

You have the threads, the fabric, the desire—but something feels missing. It’s the gap between the stitches you know and the art you want to create. This isn’t about learning a hundred new techniques, but about rethinking the ones you already have with greater intention.
Consider this your guide to closing that gap. We’ll move beyond simple patterns and explore how texture, composition, and material choice can transform your work. It’s about making your embroidery feel less like a hobby and more like an extension of your unique voice.
Together, we’ll look at how to blend thread with fabric in ways that feel both modern and timeless. You have everything you need to begin right now. Let’s make something that feels truly, deeply yours.
1. Create Architectural Depth with Sheer Overlays

Instead of stitching on an opaque canvas, choose a sheer material like organza or fine mesh to create dramatic, large-scale panels.
This technique allows your stitches to interact with light and shadow, casting secondary patterns on the wall behind them and adding architectural dimension.
Use a single, high-contrast thread color—like bright white on dark gray—to make your lines feel clean, bold, and graphic.
The key is maintaining perfect tension to prevent puckering. Use a stabilizer that you can later trim or wash away for a crisp, professional finish on your large-scale embroidery tapestries.
2. Weave with Roving for Organic Texture

Move beyond thin floss and embrace the soft, sculptural quality of wool roving or chunky yarn.
Use a simple circular loom—or even a sturdy embroidery hoop warped with cotton string—as your base.
By varying the tension and thickness of your weave, you can create undulating textures and organic color blocks that feel incredibly tactile.
This approach transforms a simple weaving project into stunning embroidered wall hangings with modern, cozy appeal.
3. Sculpt with Thread Using Free-Standing Lace
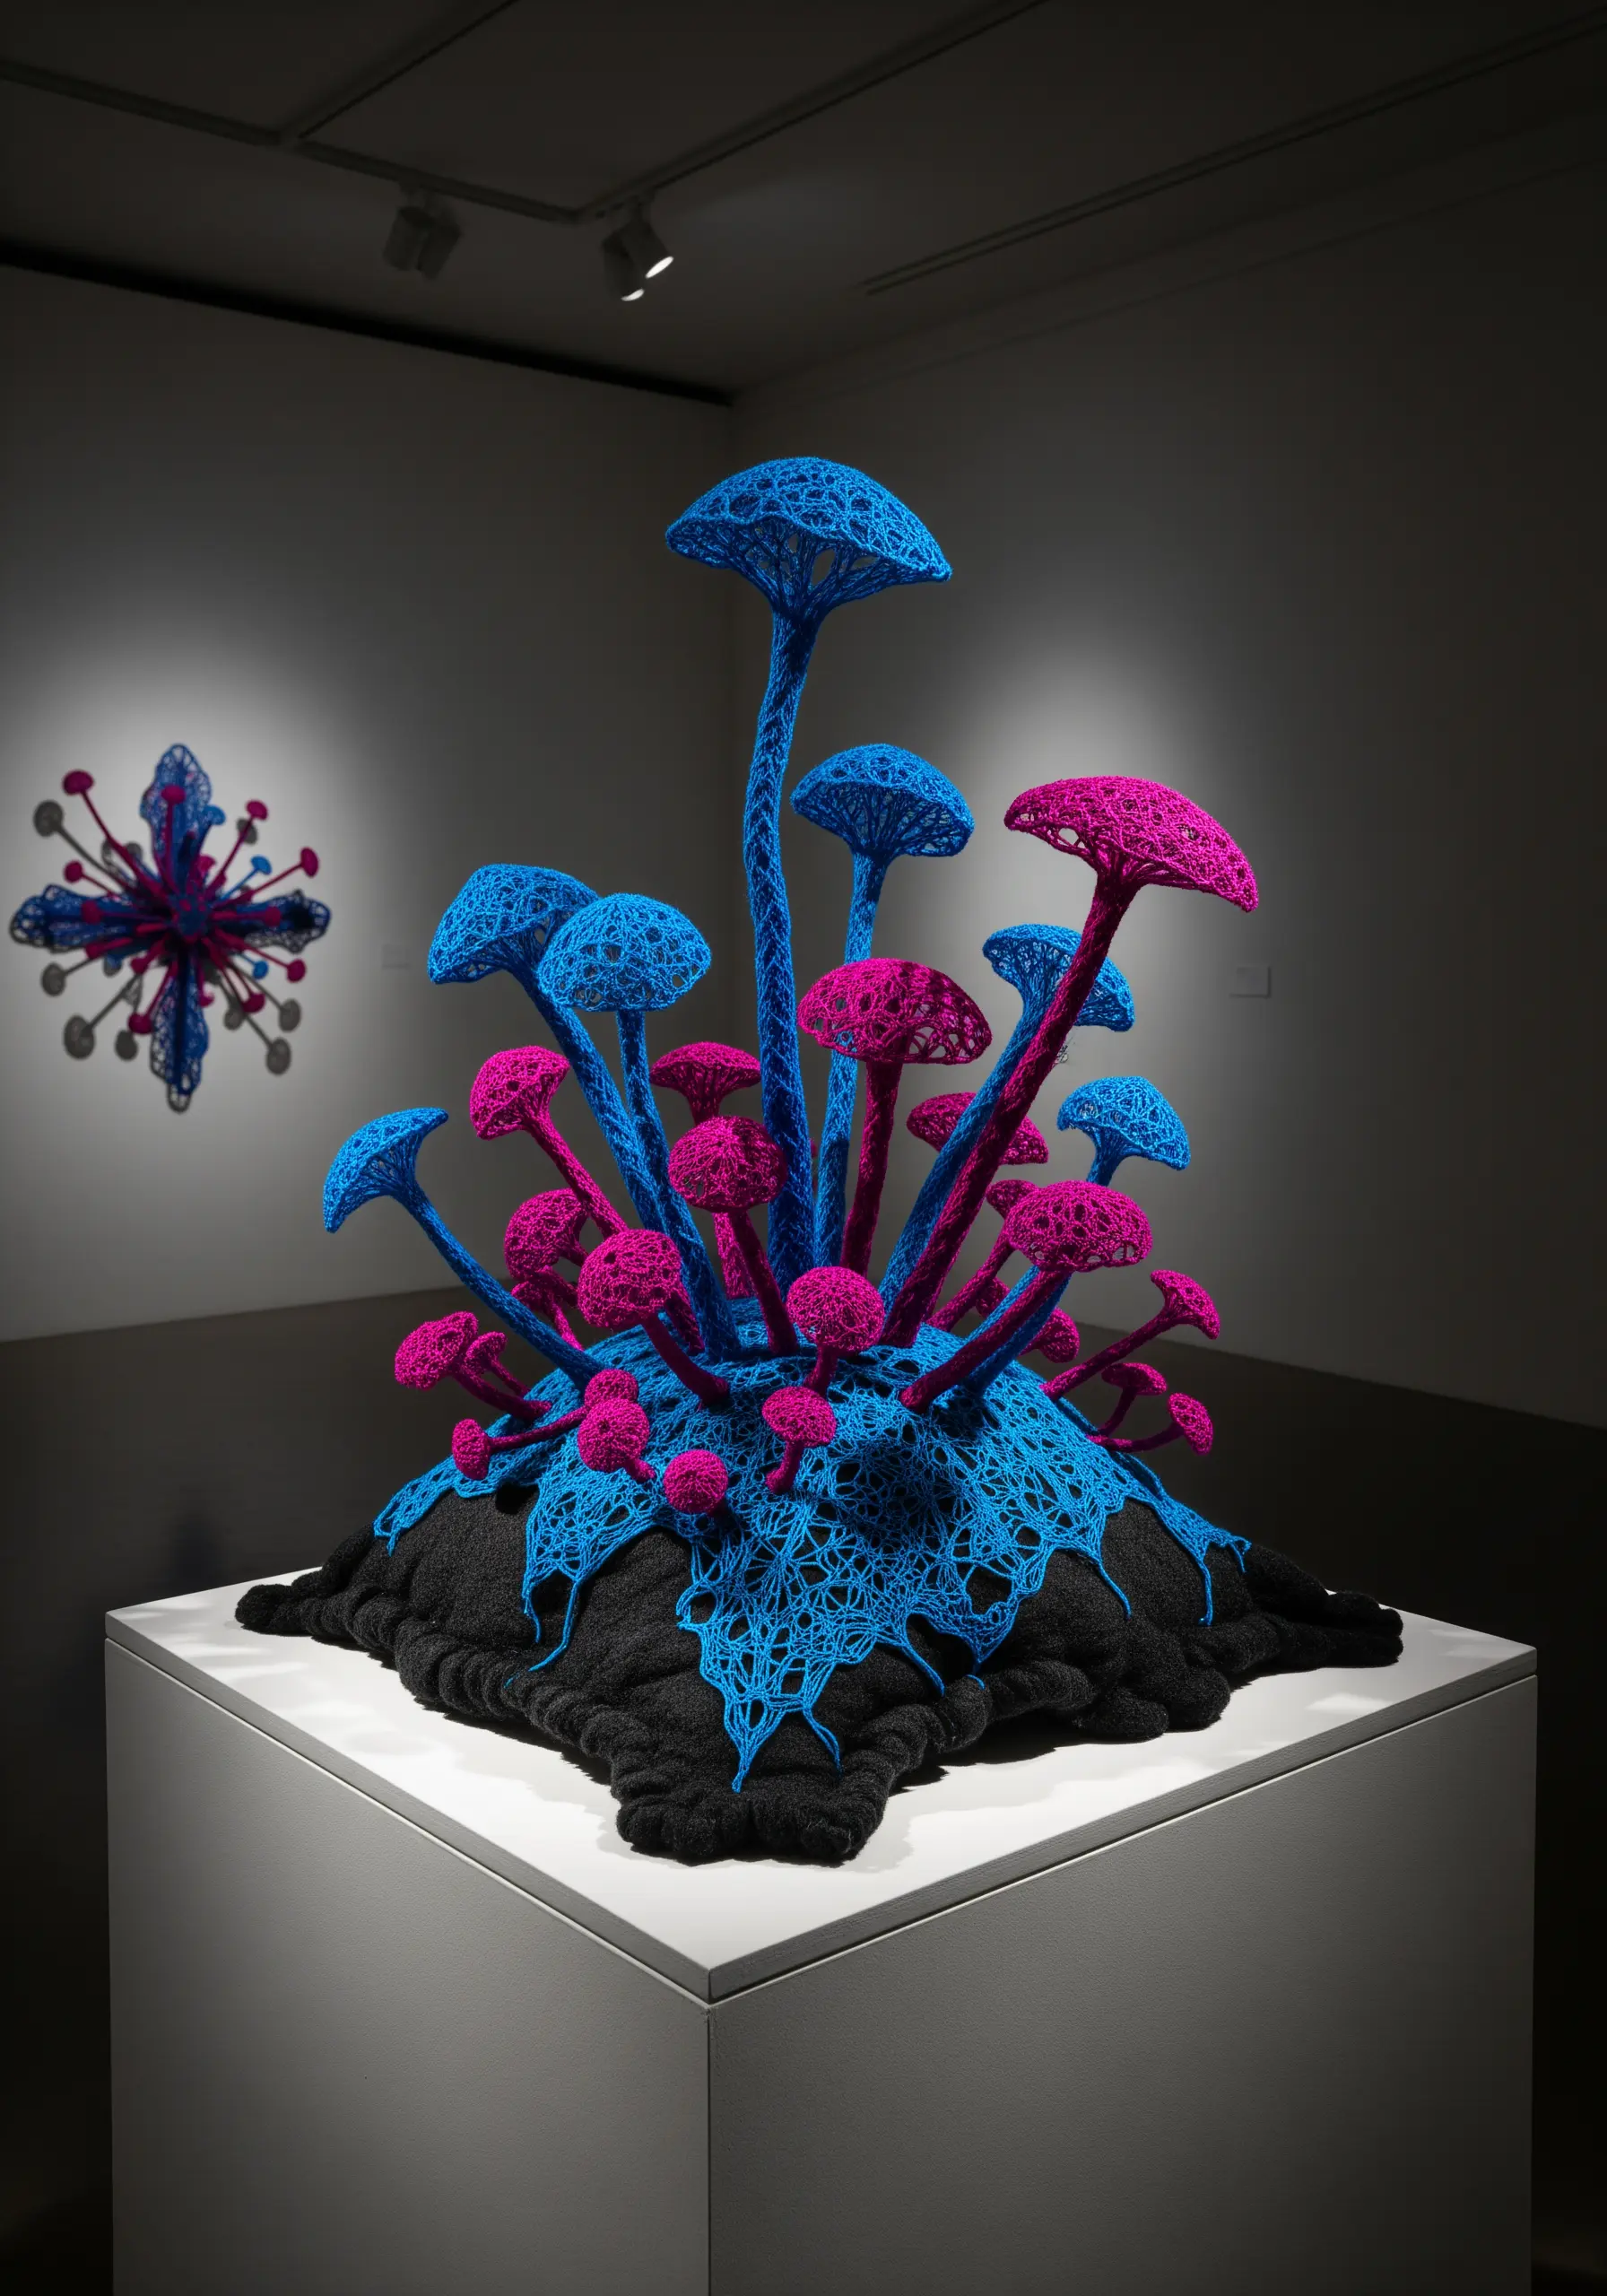
Build three-dimensional objects by stitching directly onto a water-soluble stabilizer.
Create a dense, cross-hatched stitch pattern (either by hand or machine) to form a stable fabric made entirely of thread.
Once your design is complete, dissolve the stabilizer in water, leaving behind a delicate but firm lace-like structure that holds its shape.
This technique is perfect for creating intricate sculptures, jewelry, or botanical forms that seem to defy gravity.
4. Modernize Tradition with Patchwork and Sashiko
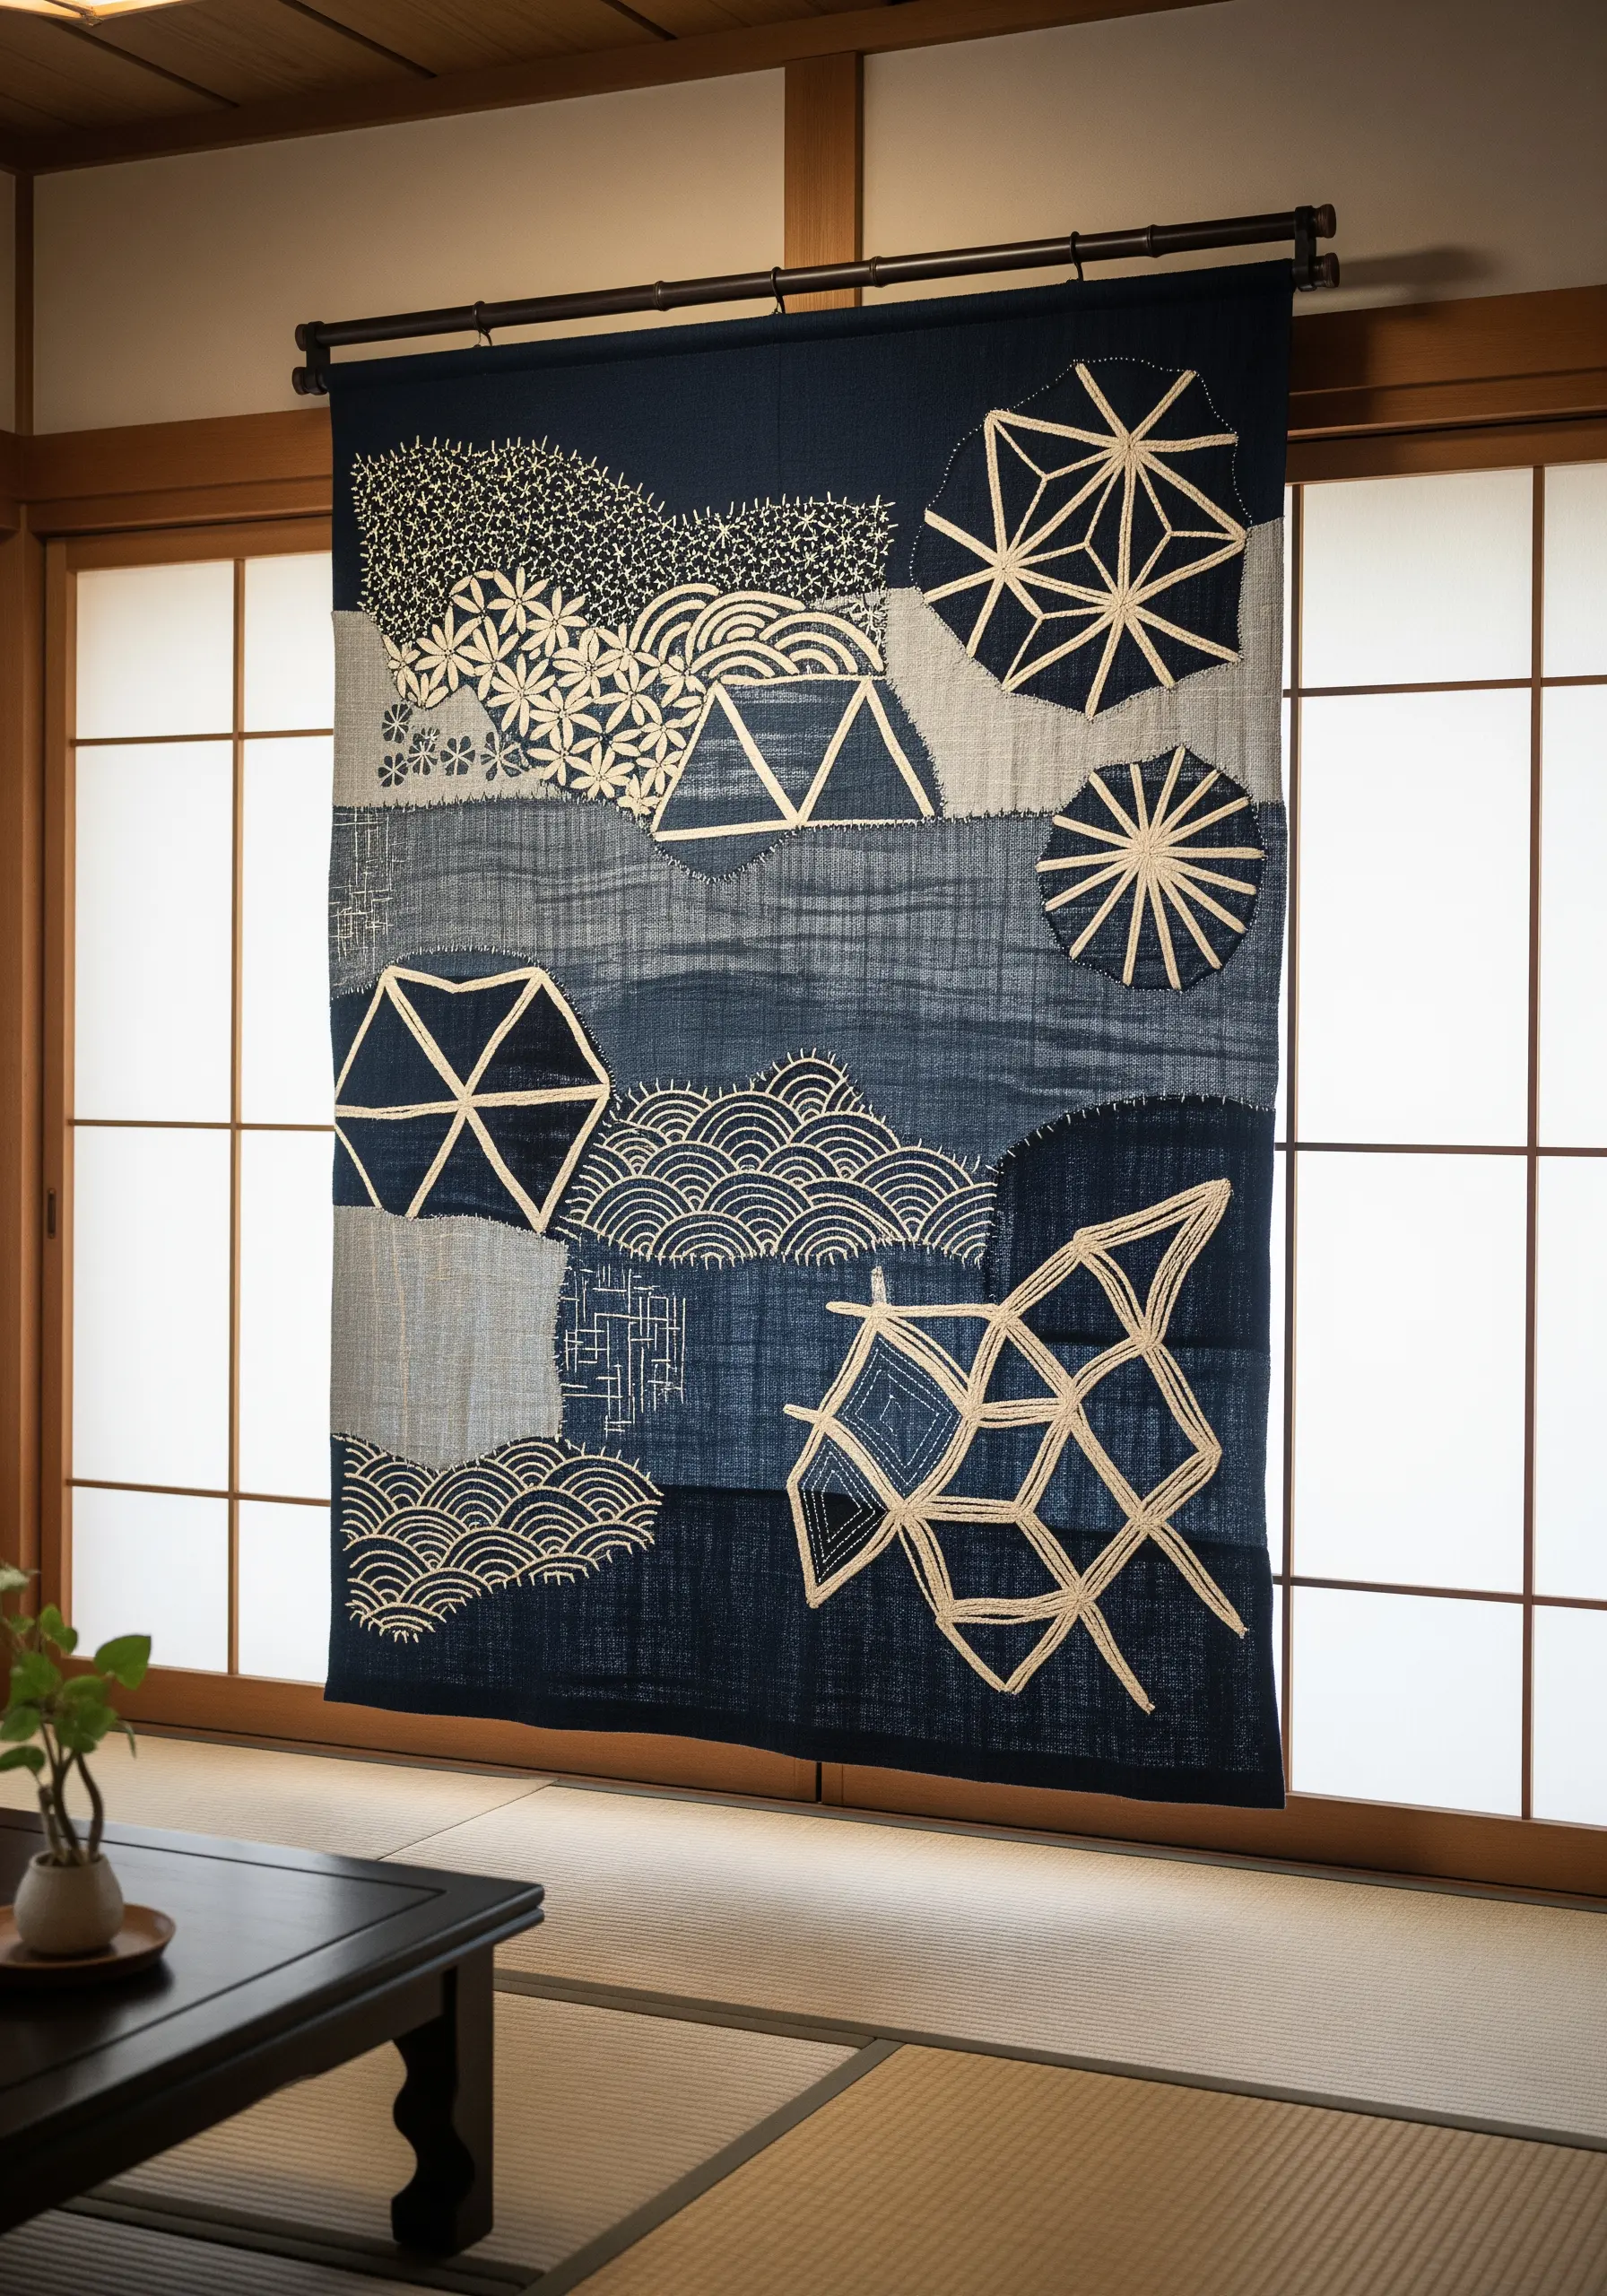
Combine the principles of Japanese Boro (mending with patchwork) and Sashiko (decorative running stitches) for a piece rich in history and texture.
Start by creating a collage of fabrics, using different weights and shades of denim or linen for depth.
Then, unify the composition with geometric Sashiko-style stitching in a contrasting cream or white thread.
The result is not just a decorative panel, but a story told through layers of cloth and deliberate, mindful stitches.
5. Master Iridescence with Thread Painting
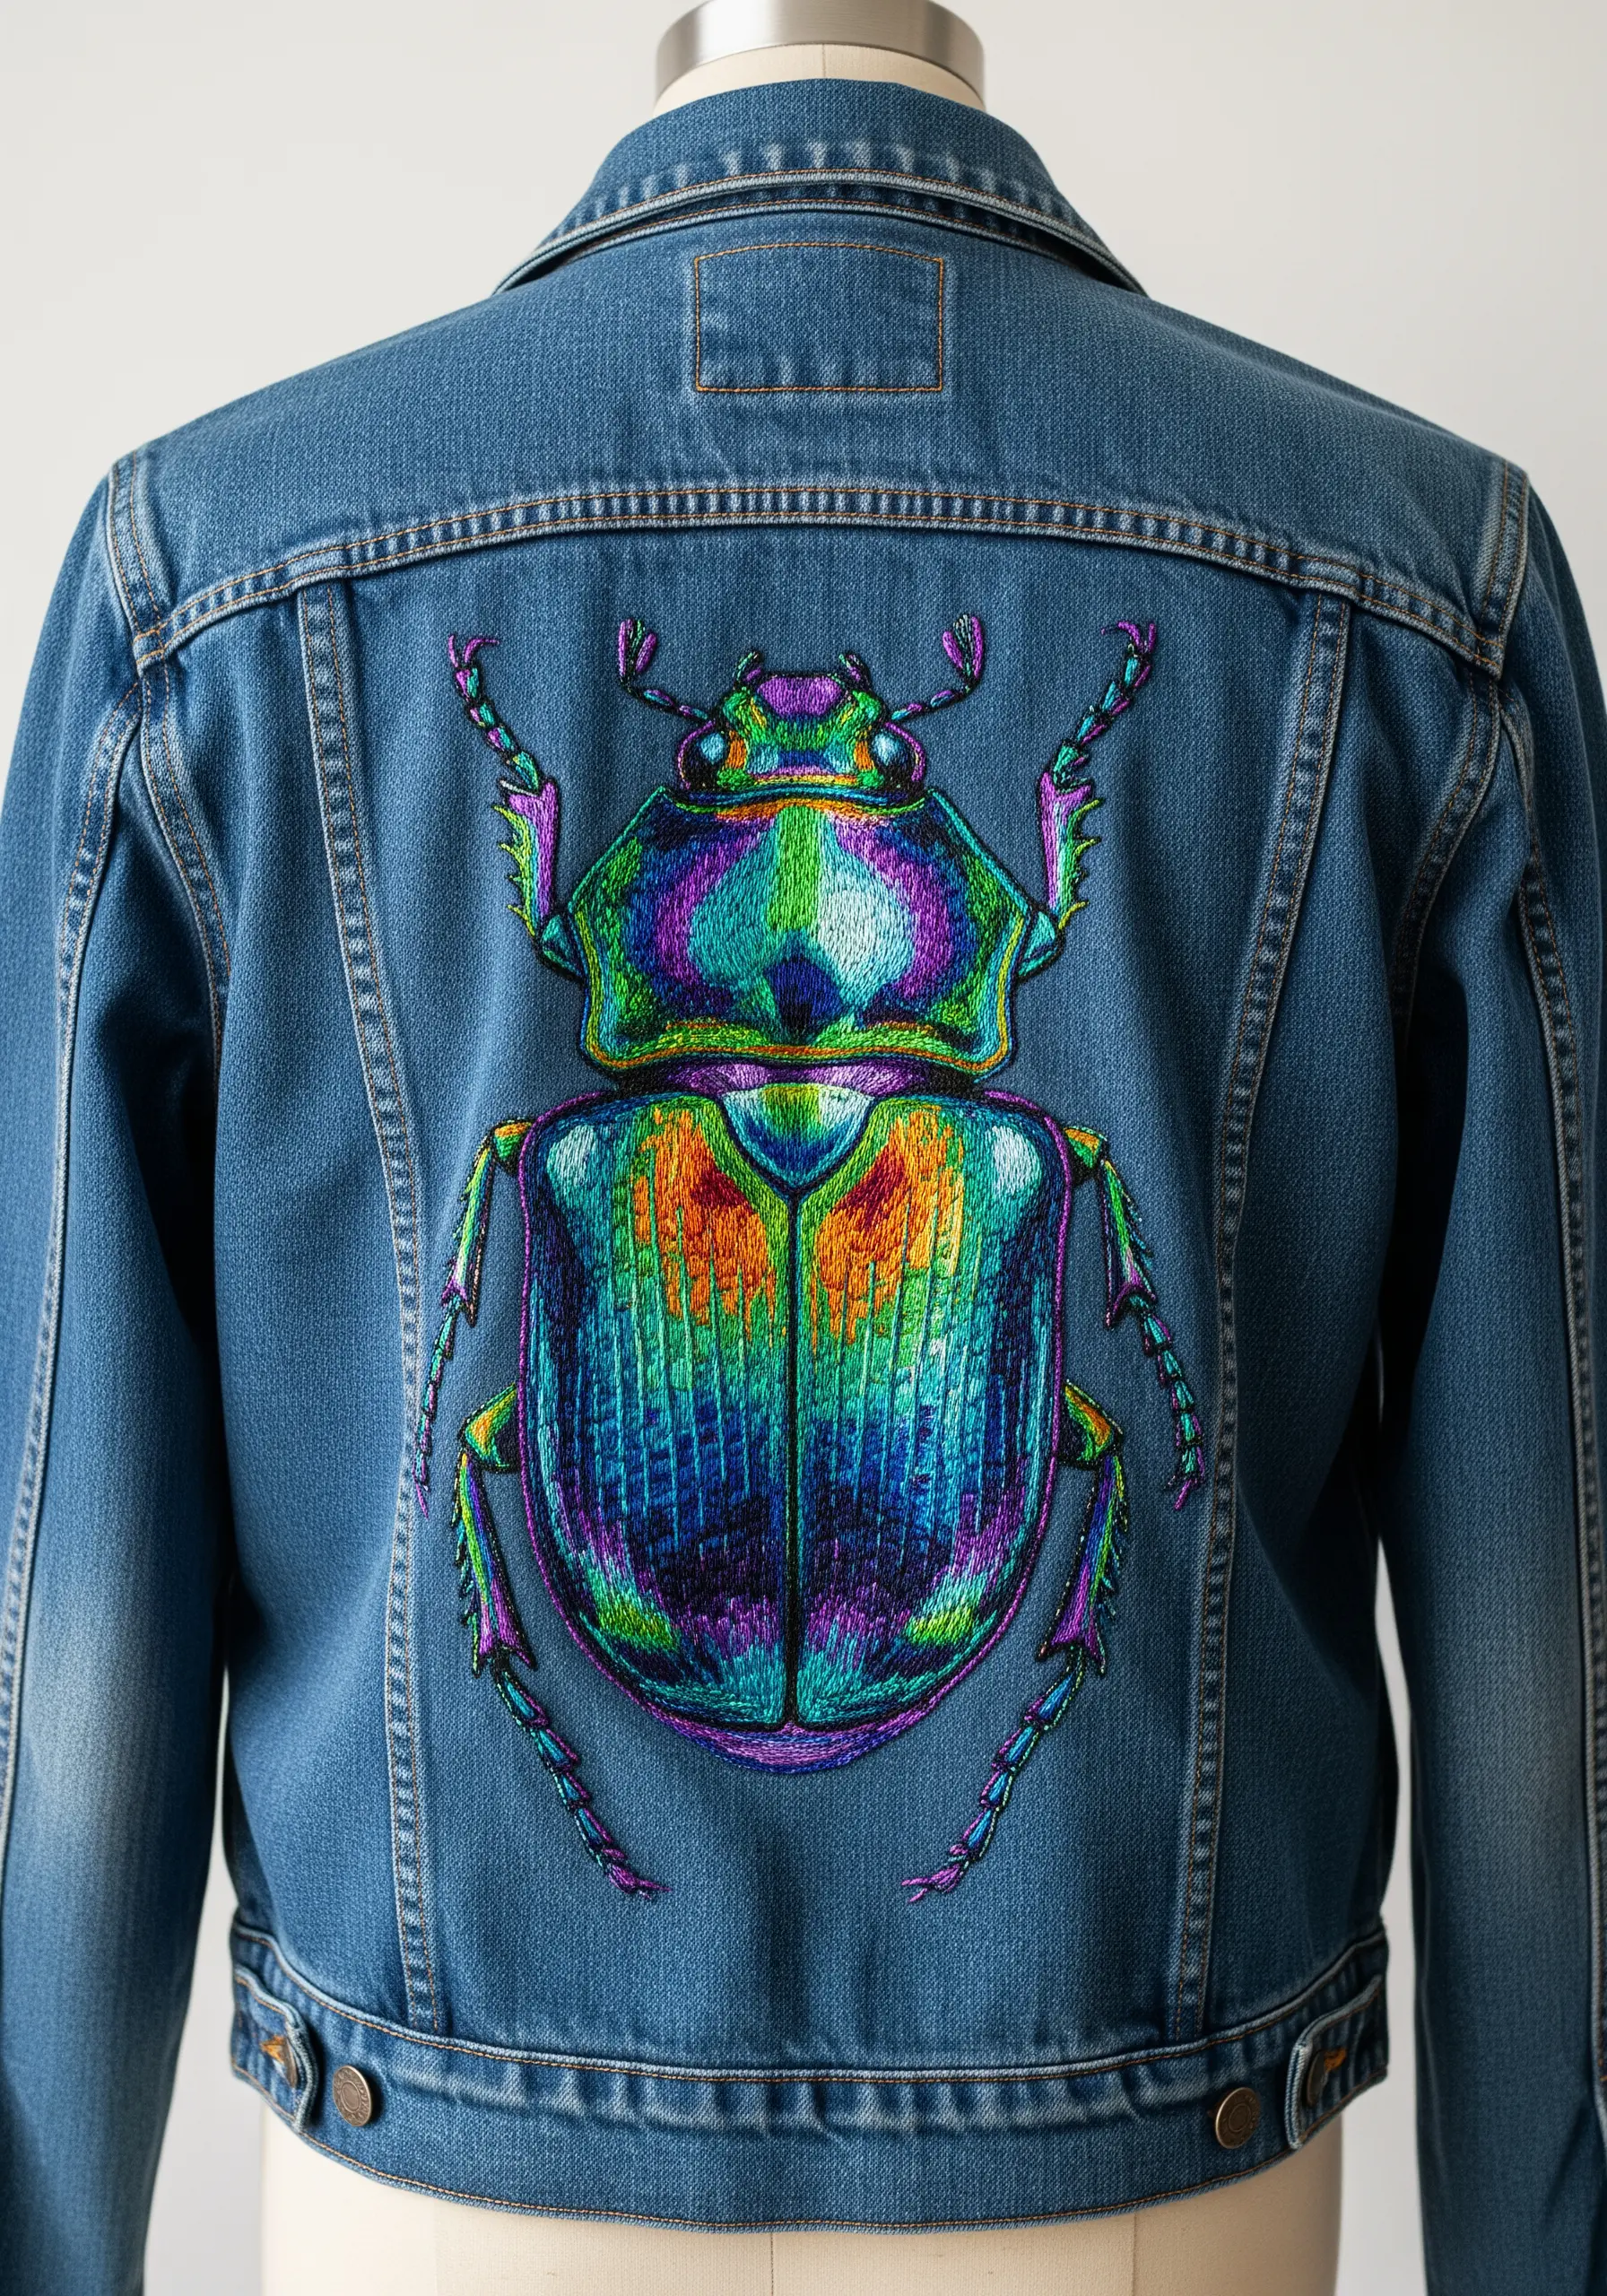
To capture the shimmering, multi-tonal effect of a beetle’s shell, use the long-and-short stitch technique known as thread painting.
Select a palette of 5-7 closely related colors, plus a few unexpected brights (like turquoise or magenta) to act as highlights.
Blend them seamlessly by splitting your floss into single strands and staggering your stitches, creating a gradient that mimics light hitting a reflective surface.
This turns a simple embroidered patch into a piece of vintage-inspired denim jacket embroidery that feels alive.
6. Transform a Room with Architectural String Art
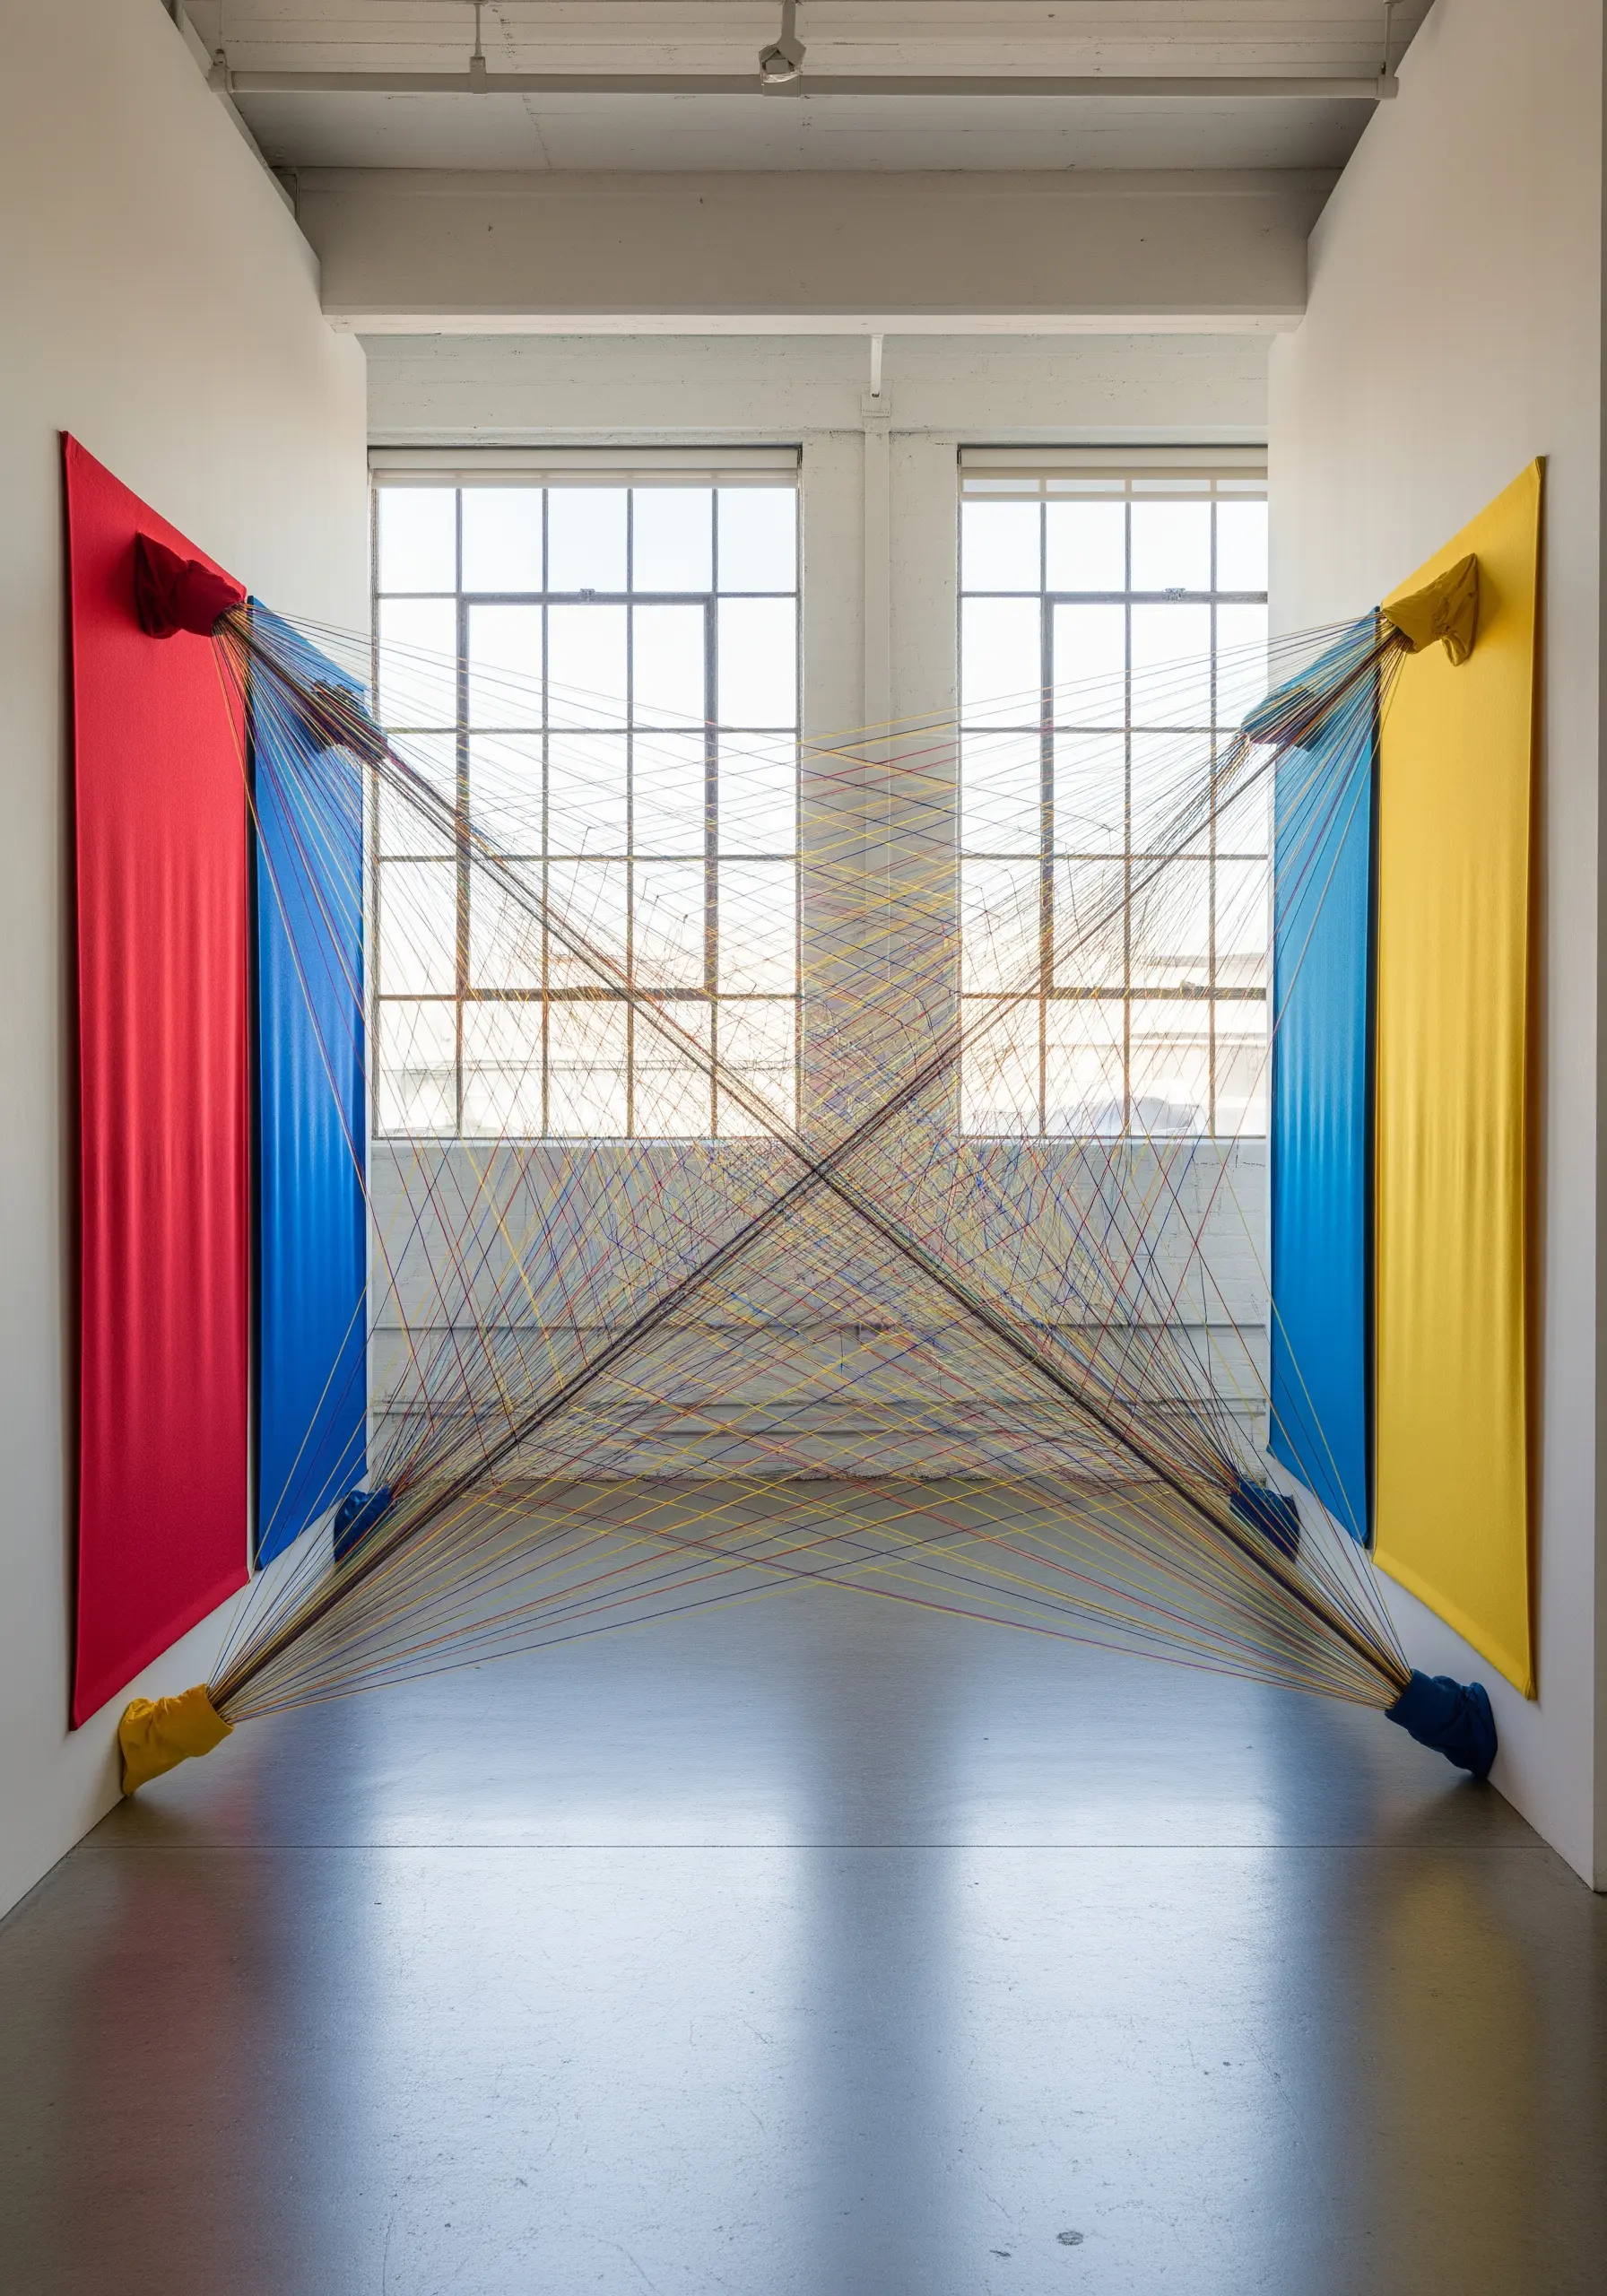
Take embroidery off the hoop and use an entire room as your canvas.
This technique, known as a thread or string installation, uses anchor points on opposing walls, floors, or ceilings to create geometric forms with stretched thread.
Plan your composition carefully, mapping out anchor points to create intersecting lines, curves, and planes.
The result is an immersive experience where thread redefines the architecture of the space, turning simple lines into a powerful statement.
7. Integrate Natural Elements with Subtle Stitching
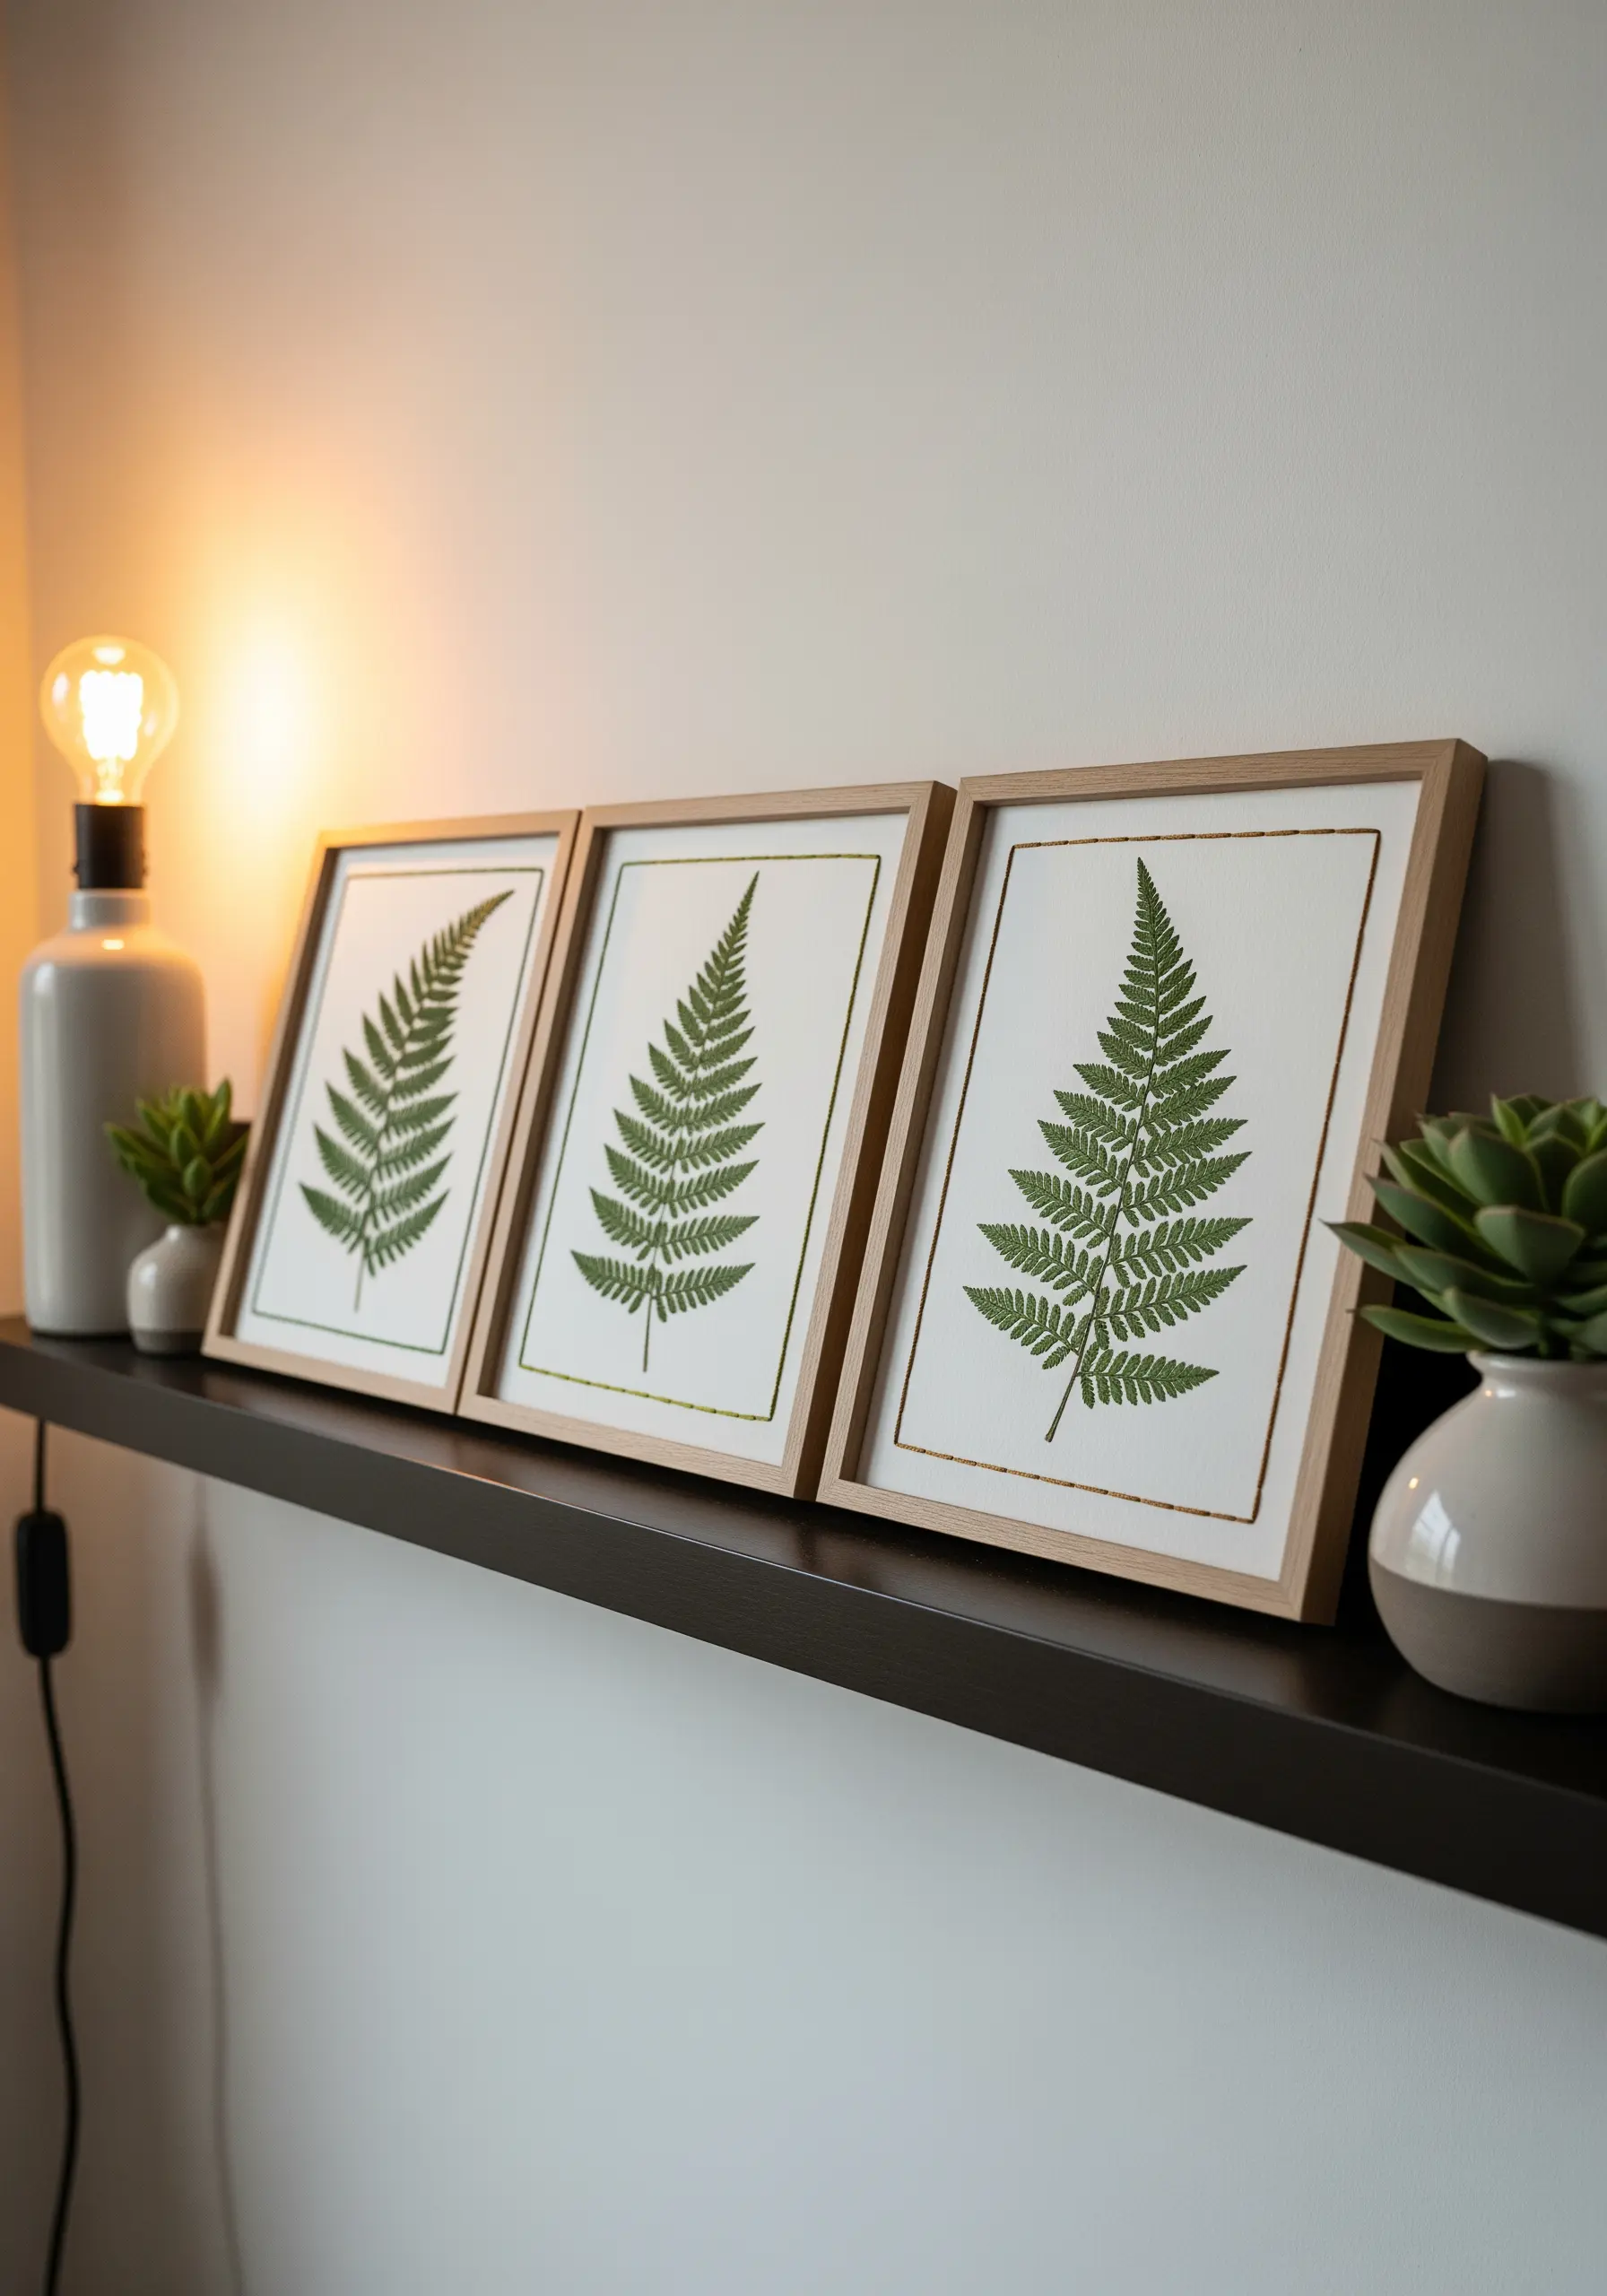
Elevate pressed botanicals by combining them with embroidery in a single composition.
Securely mount a pressed leaf or flower onto high-quality paper or fabric, then use a single strand of thread to echo its shape, add a delicate outline, or extend its stem.
The key is subtlety; the embroidery should complement the natural form, not overpower it.
This mixed-media approach creates inspiring pressed flower art projects that feel both organic and refined, perfect for a modern gallery wall.
8. Create Tension with Mixed-Material String Art
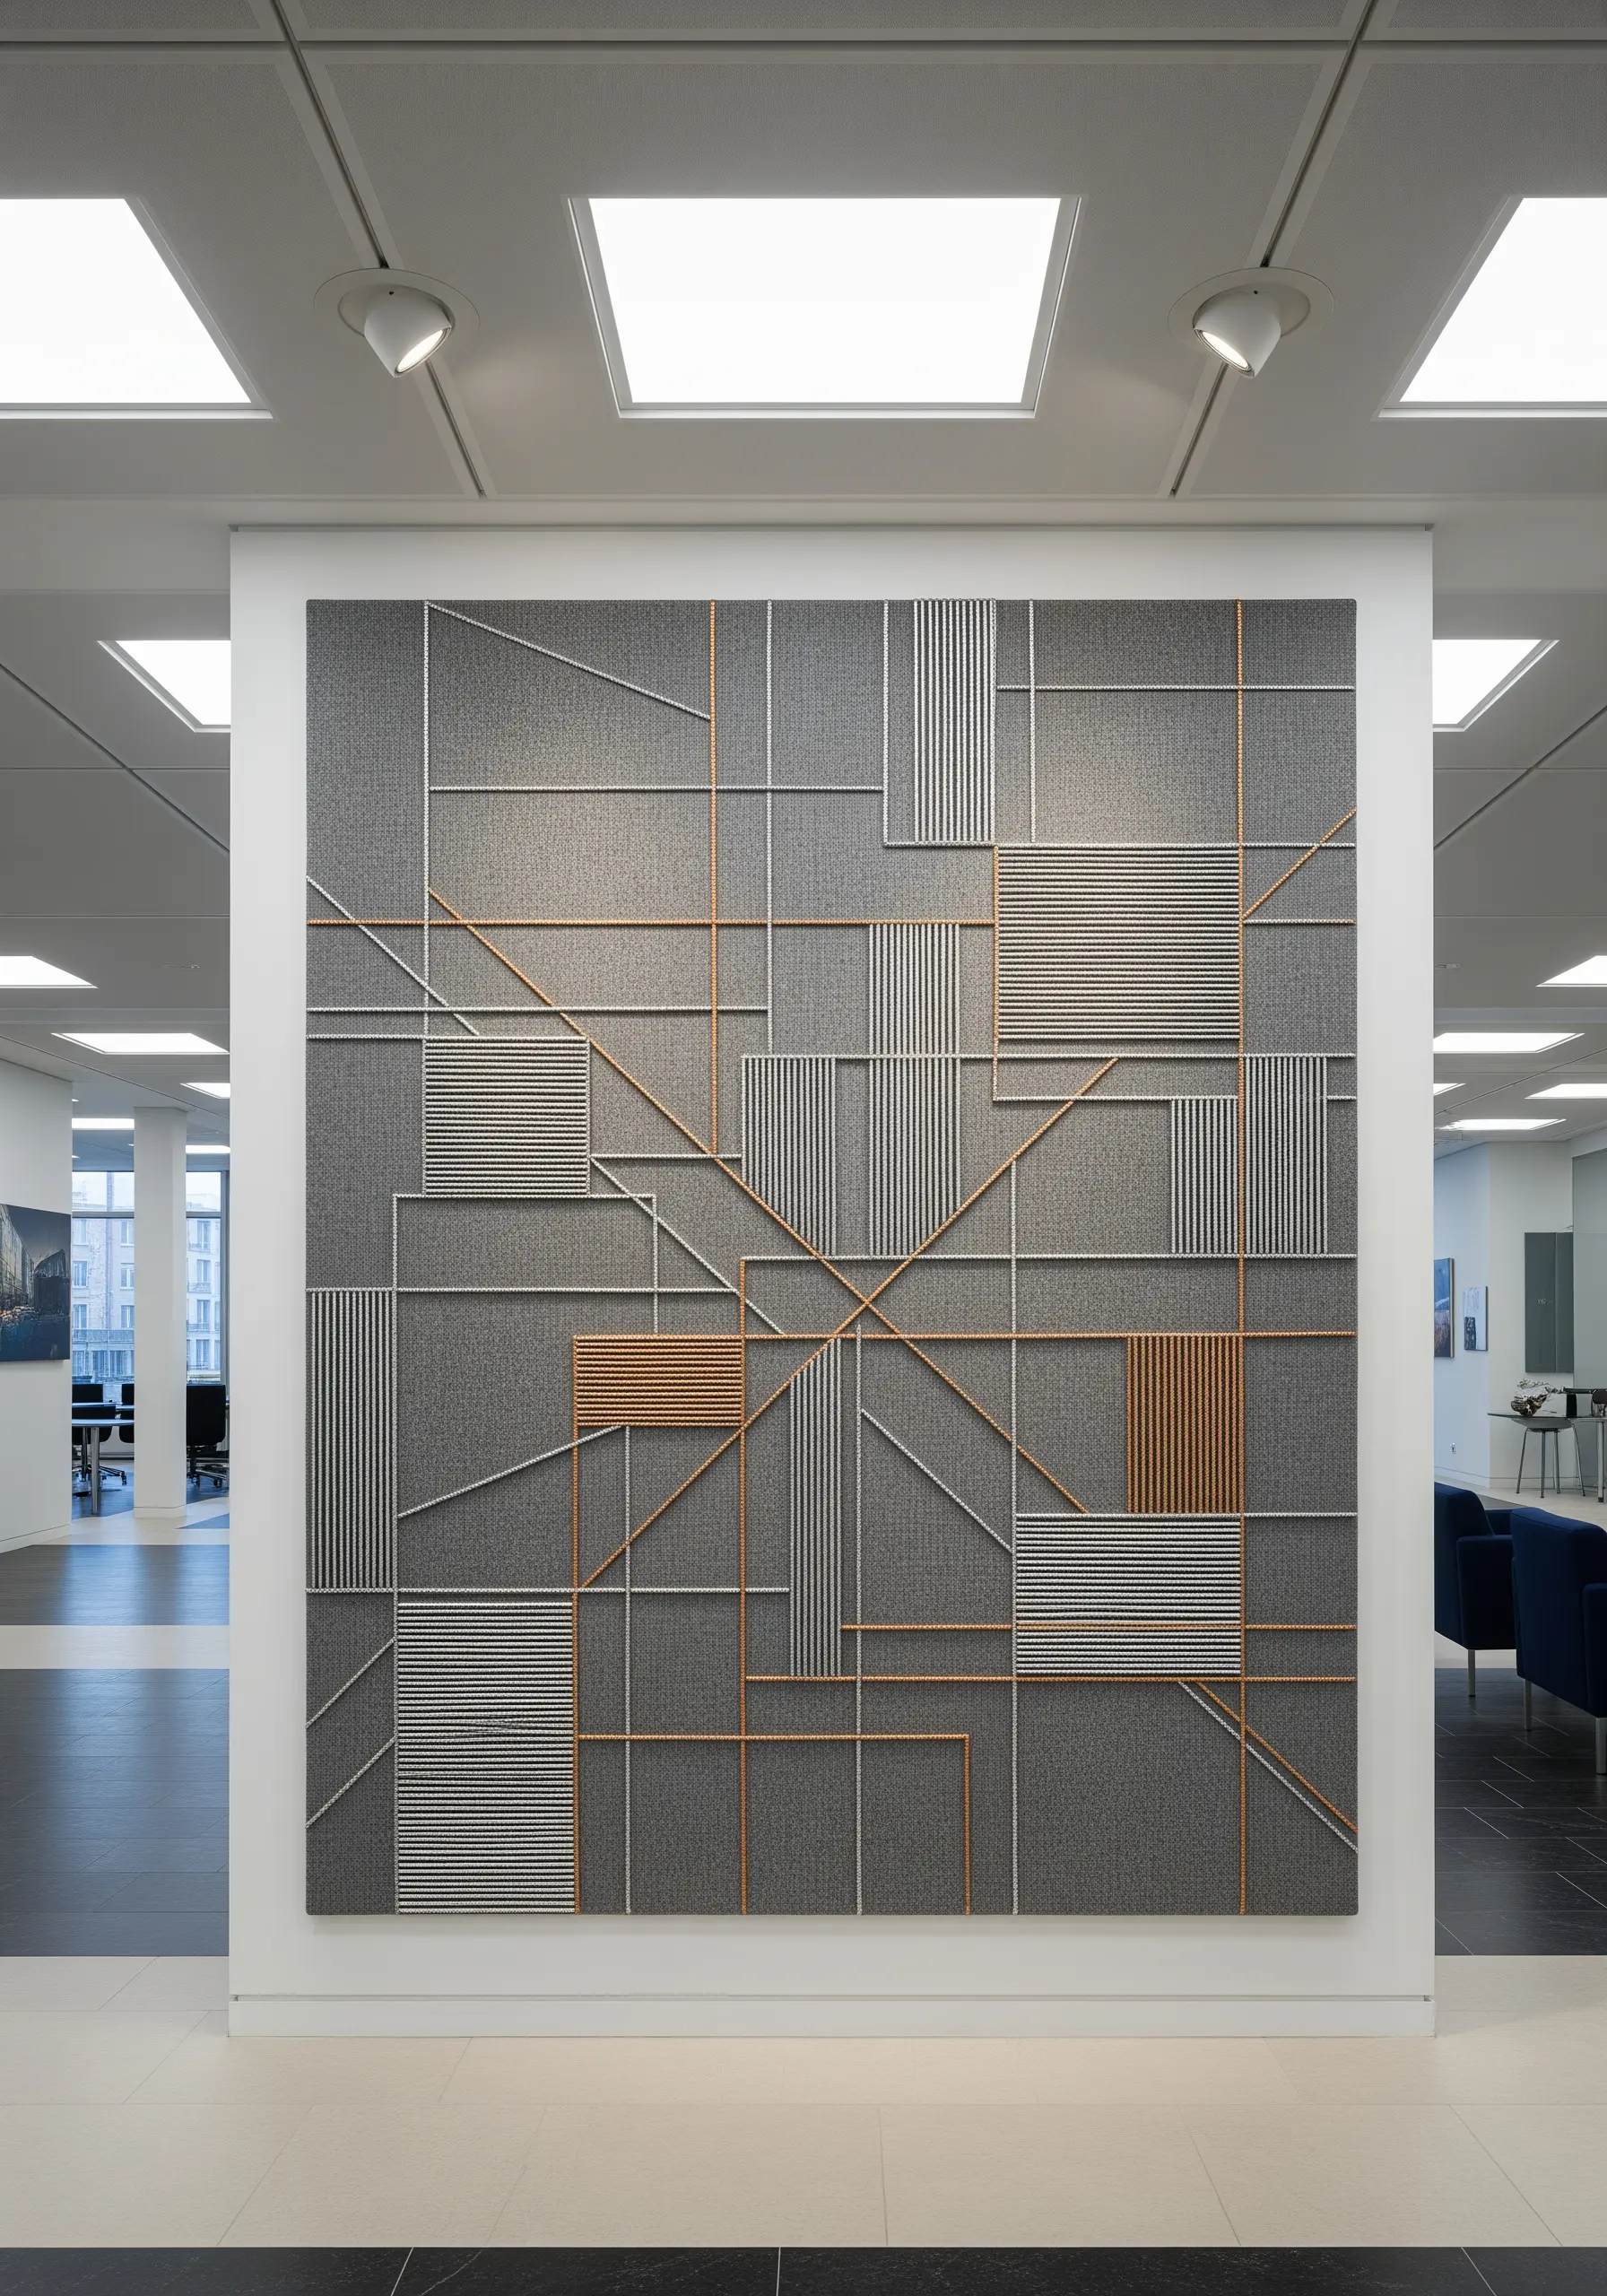
Combine hard and soft materials to create a sophisticated, high-texture wall panel.
Use a base of acoustic felt or textured linen, then add raised elements like wooden dowels or metal bars to serve as anchor points.
Stretch thread between these points to create grids, lines, and geometric shapes that add a layer of graphic precision over the soft background.
This technique turns a simple string art concept into a piece of abstract framed embroidery with compelling material contrast.
9. Build Narrative with Stitched Collage

Use thread as a way to unify disparate elements in a mixed-media collage.
Layer vintage paper, fabric scraps, dried botanicals, and paint onto a canvas, then use expressive, free-form stitching to connect and secure the pieces.
Don’t hide your knots or loose ends; let the chaotic, unrefined nature of the thread become part of the artwork’s texture and story.
This is a powerful way to experiment with fabric collage embroidery ideas that feel deeply personal and expressive.
10. Make a Statement with Sculptural Yarn
Amplify the impact of a simple line by using oversized, sculptural yarn.
Instead of stitching through the fabric, couch thick yarn or felted wool rope onto the surface using a thinner, matching thread.
This allows you to create bold, three-dimensional shapes that pop against a minimal background.
Mount the finished piece in an oversized hoop or frame to give your tactile, abstract shapes the presence of a modern sculpture.
11. Define Shapes with Negative Space

Instead of embroidering the subject itself, stitch the background to reveal your motif in negative space.
Choose a dense, textural fill stitch, like a geometric laidwork or tightly packed French knots, to create a rich, tactile background.
By leaving the central shape unstitched, you create a powerful silhouette that draws the eye and highlights the form in a unique way.
Using a high-contrast palette, like gold on black, makes this technique especially dramatic and elegant.
12. Enhance Dyed Fabrics with Contrasting Stitches

Use a dyed or patterned fabric as an active part of your design, not just a passive background.
After creating a pattern with a technique like Shibori tie-dye, analyze the lines and shapes that emerge.
Then, add a layer of embroidery that either follows the dyed lines to accentuate them or cuts across them to create a contrasting geometric grid.
Choose a bold, complementary thread color—like coral on indigo—to make your stitches stand out as an intentional, graphic overlay.
13. Carve Landscapes with Sculptural Quilting

Go beyond flat quilting by using thread to sculpt three-dimensional, topographical forms.
Layer batting and fabric, then use dense free-motion quilting to compress certain areas and allow others to puff up, creating realistic contours of mountains and valleys.
Incorporate different thread colors and weights to represent rivers, elevation lines, and geological textures.
This advanced technique, known as trapunto or sculptural quilting, transforms a flat textile into a tactile, touchable map.
14. Embroider on Three-Dimensional Surfaces
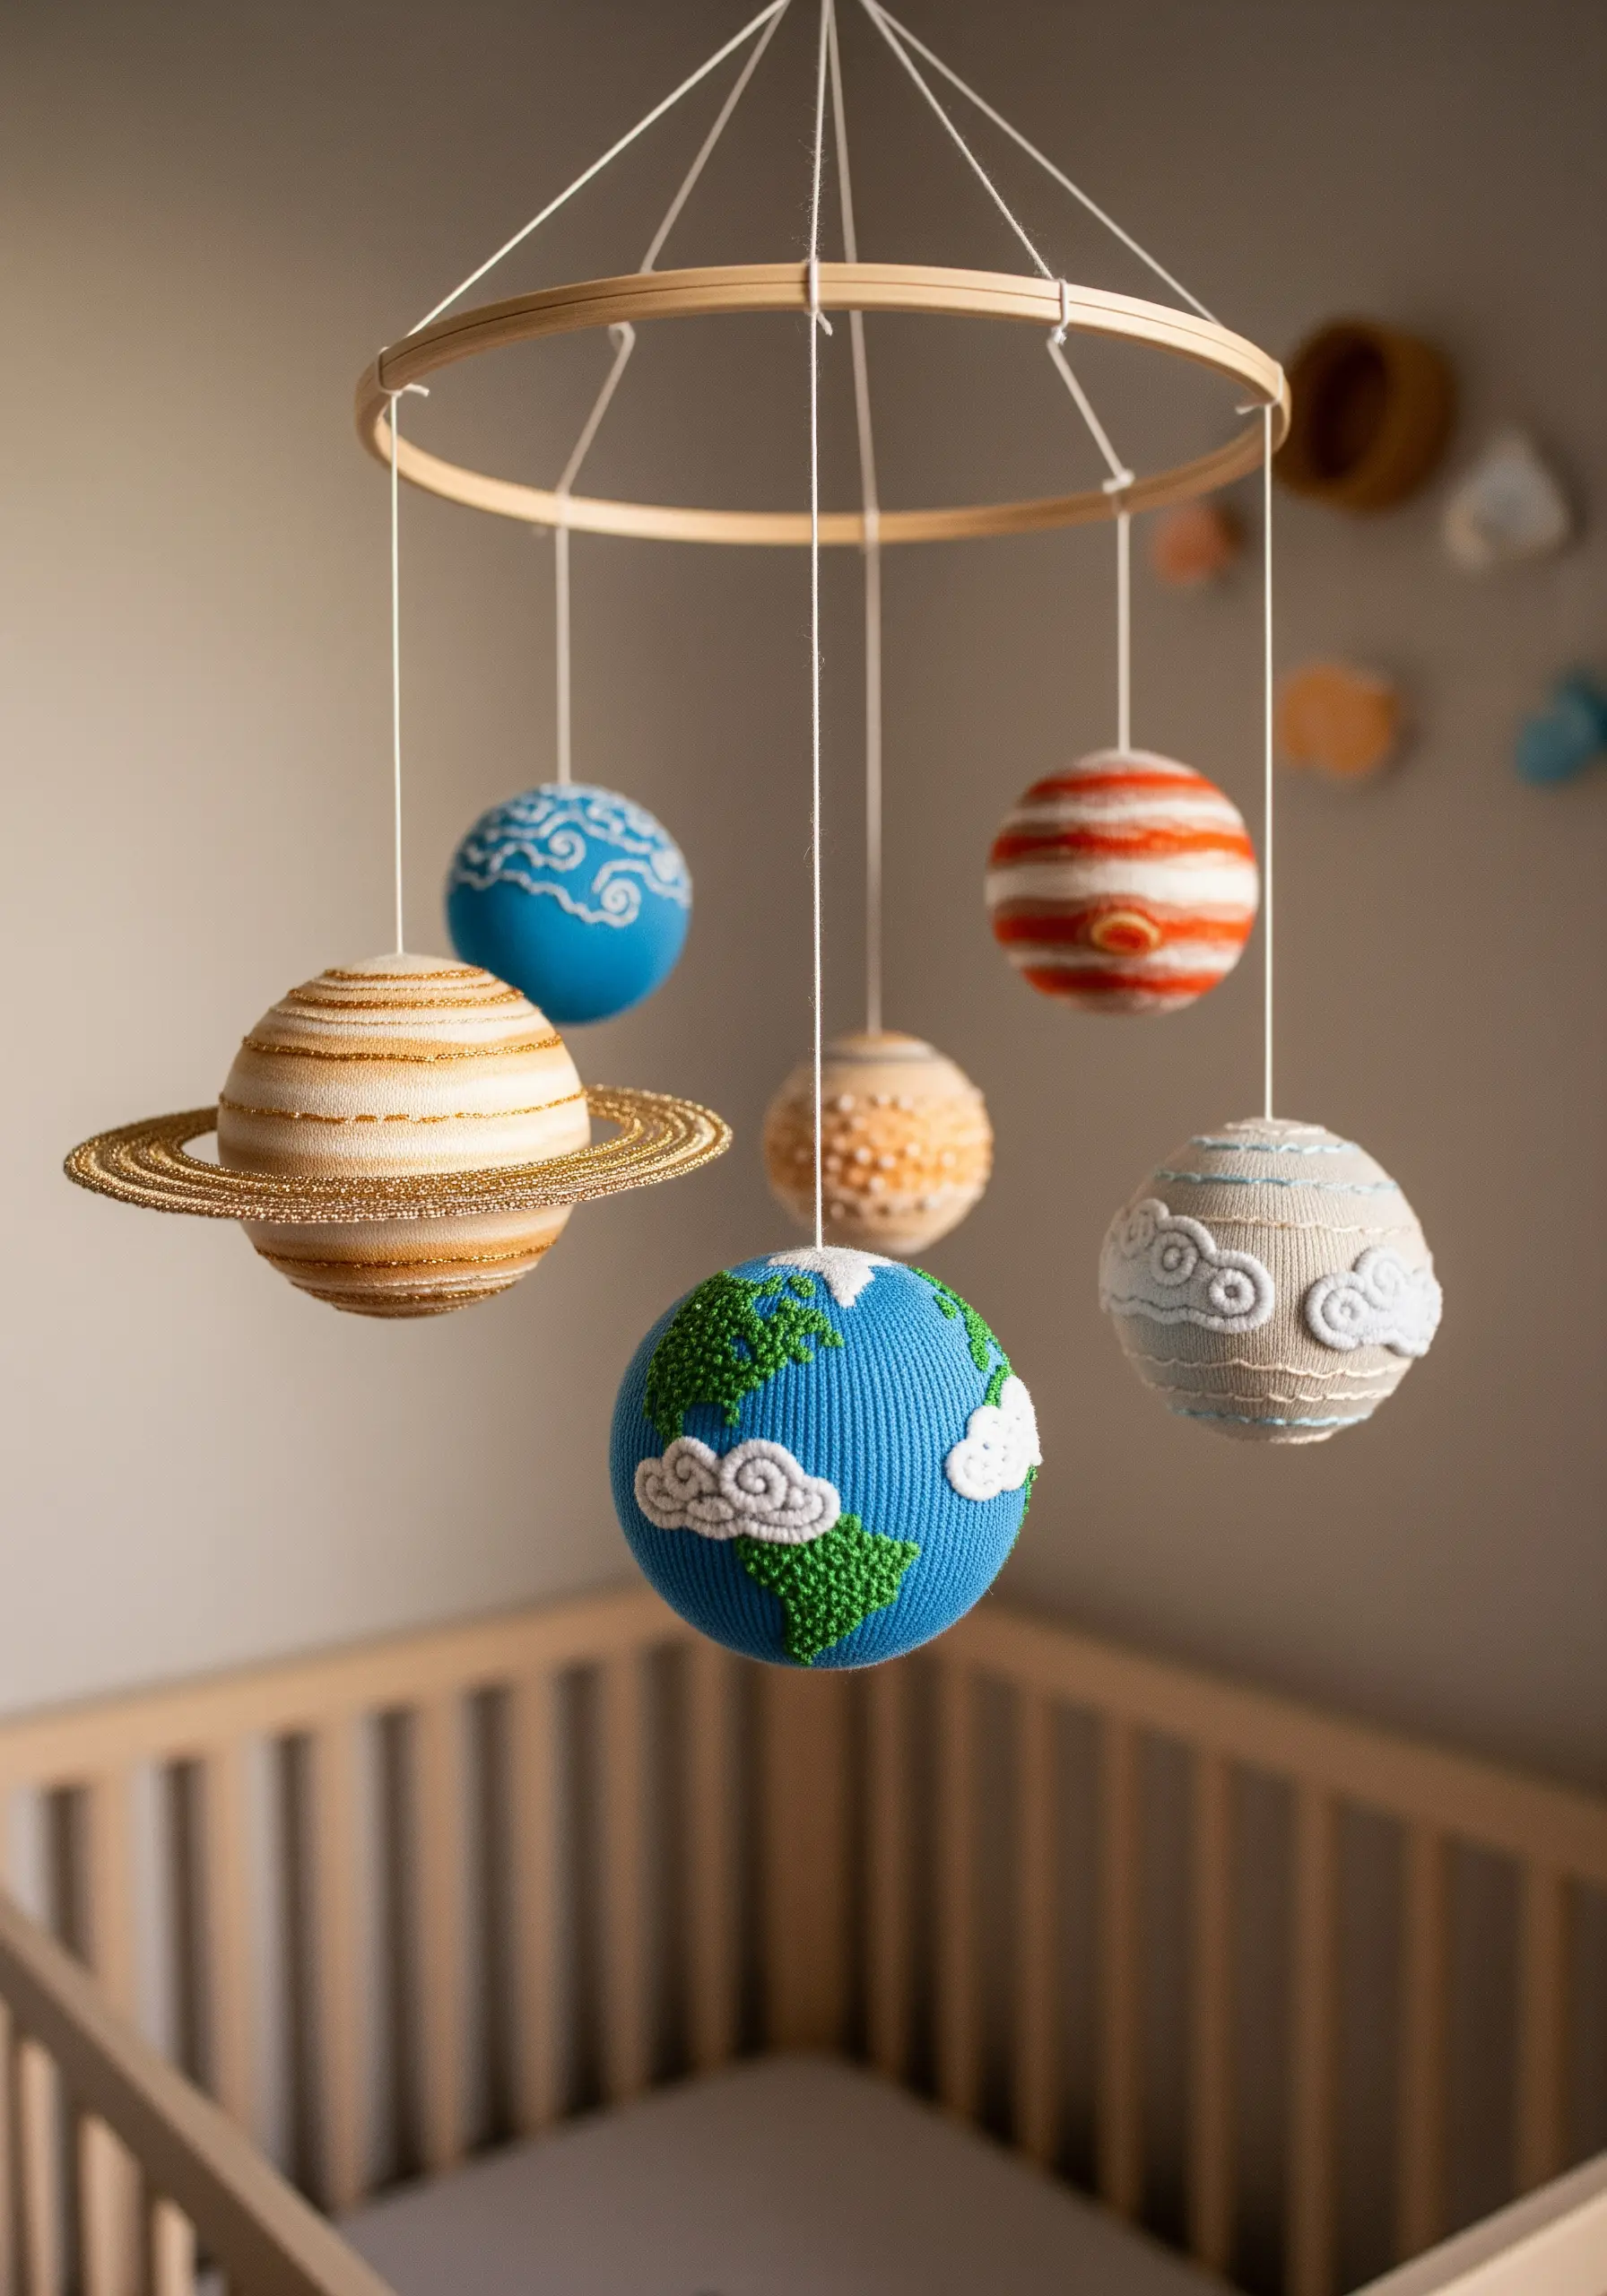
Take your embroidery off the hoop and apply it to sculptural forms.
Use styrofoam spheres or other lightweight shapes as a base, wrapping them tightly with fabric or yarn.
Then, use simple stitches like French knots, satin stitch, and backstitch to add details like clouds, continents, or planetary rings.
This technique allows you to create tactile, handmade mini decor pieces like mobiles and ornaments that are engaging from every angle.
15. Illuminate Your Stitches with a Lightbox
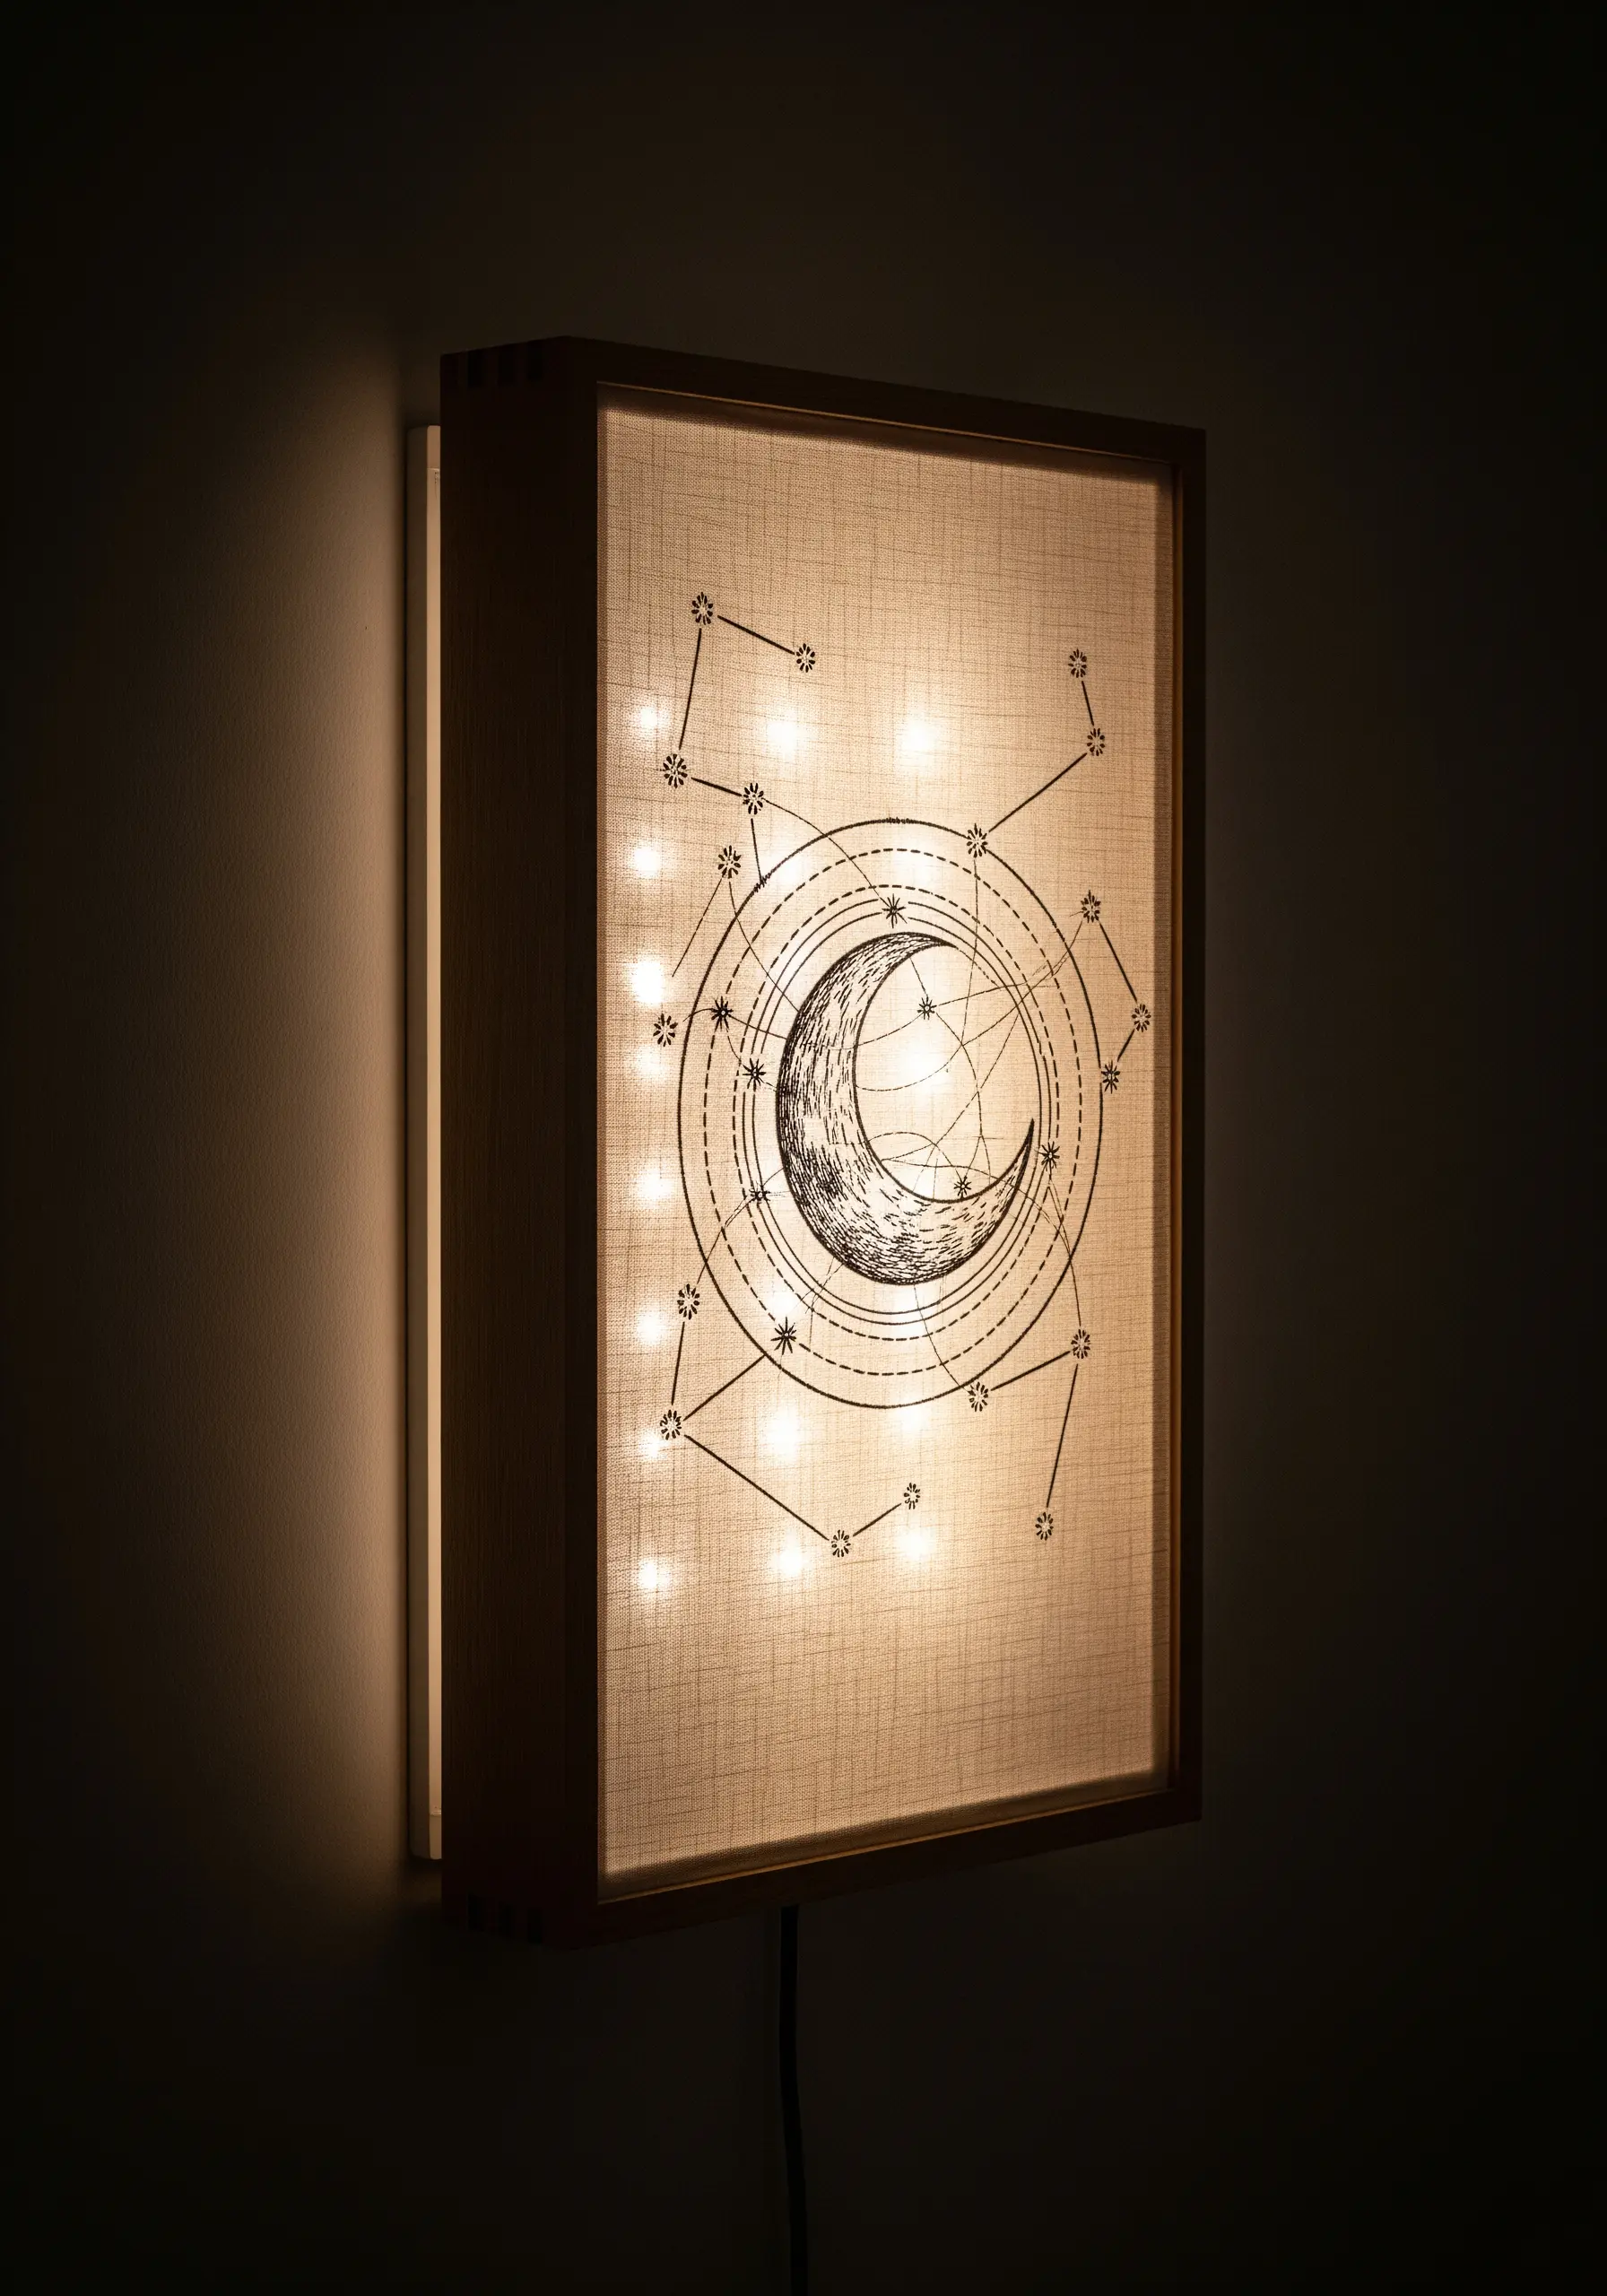
Combine embroidery with light to turn your work into a functional art piece.
Stitch your design onto a semi-translucent fabric like linen or cotton muslin, which will diffuse light beautifully.
Then, build a simple shadow box frame with a shallow depth to house a string of LED fairy lights behind your fabric.
When lit from behind, your stitched lines and the fabric’s texture are transformed, creating a magical, glowing effect perfect for celestial micro-embroidery ideas.
16. Create Embellishments from Fabric and Thread

Use your fabric scraps and leftover threads to create unique, three-dimensional embellishments.
Make simple yo-yos (gathered fabric circles) or wrap small beads with patterned fabric for textural dots.
Combine these with handmade tassels created by wrapping embroidery floss around a piece of cardstock.
Arrange these handmade elements on a neutral fabric background to create a dense, tactile composition that is rich with pattern and form.
17. Add Custom Details to Knitwear

Embroidering on a stretchy knit requires a different approach than working on woven fabric.
Instead of traditional stitches that can pull or pucker the material, use the duplicate stitch. This stitch traces the path of the existing knit stitches, creating a design that stretches and moves with the garment.
For outlines or linear details, a simple chain stitch also works well as it has natural flexibility.
Choose a yarn or floss of a similar weight to the sweater’s yarn for a seamless, integrated look.
18. Selectively Embroider Photographic Prints

Combine the precision of photography with the handmade touch of embroidery.
Create a photographic print on fabric using a technique like cyanotype (sun printing) or by printing directly onto specially treated fabric sheets.
Instead of stitching the entire design, choose one or two elements to highlight with thread.
This selective color-pop technique draws the viewer’s eye and adds a surprising layer of texture and dimension to the flat image, creating beautiful DIY mixed-media embroidery projects.
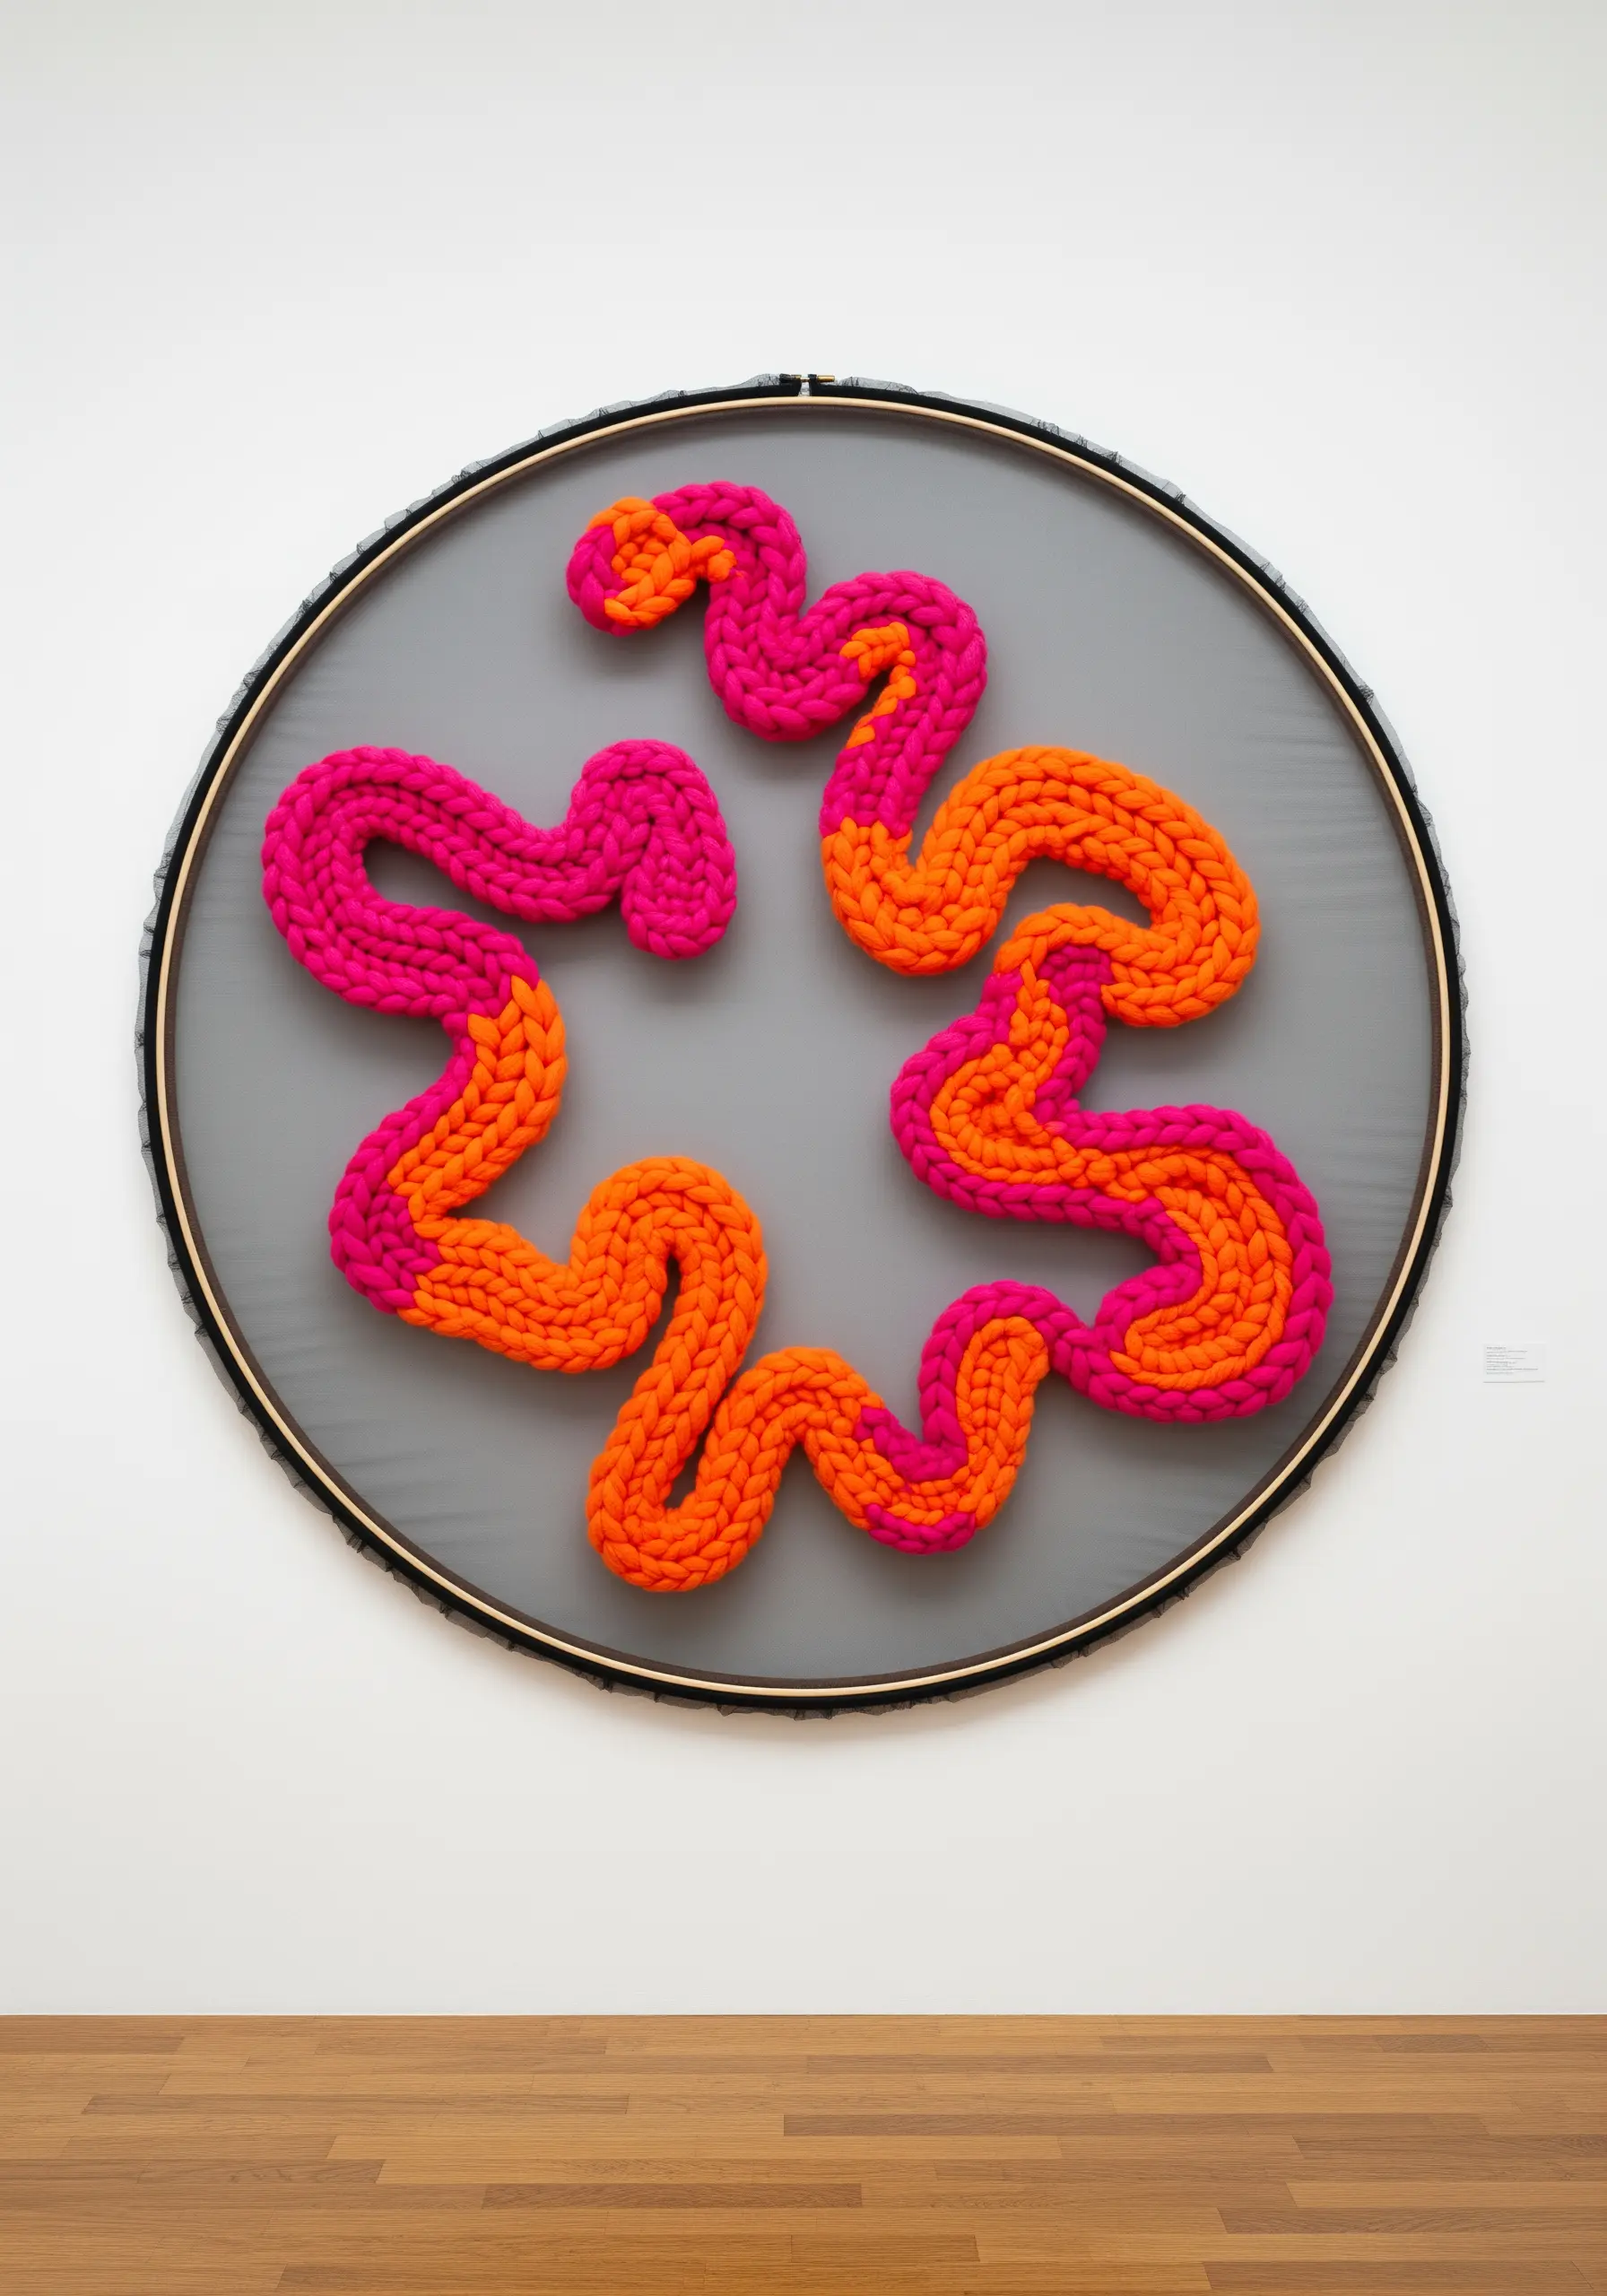
19. Coil and Couch for Sculptural Spirals
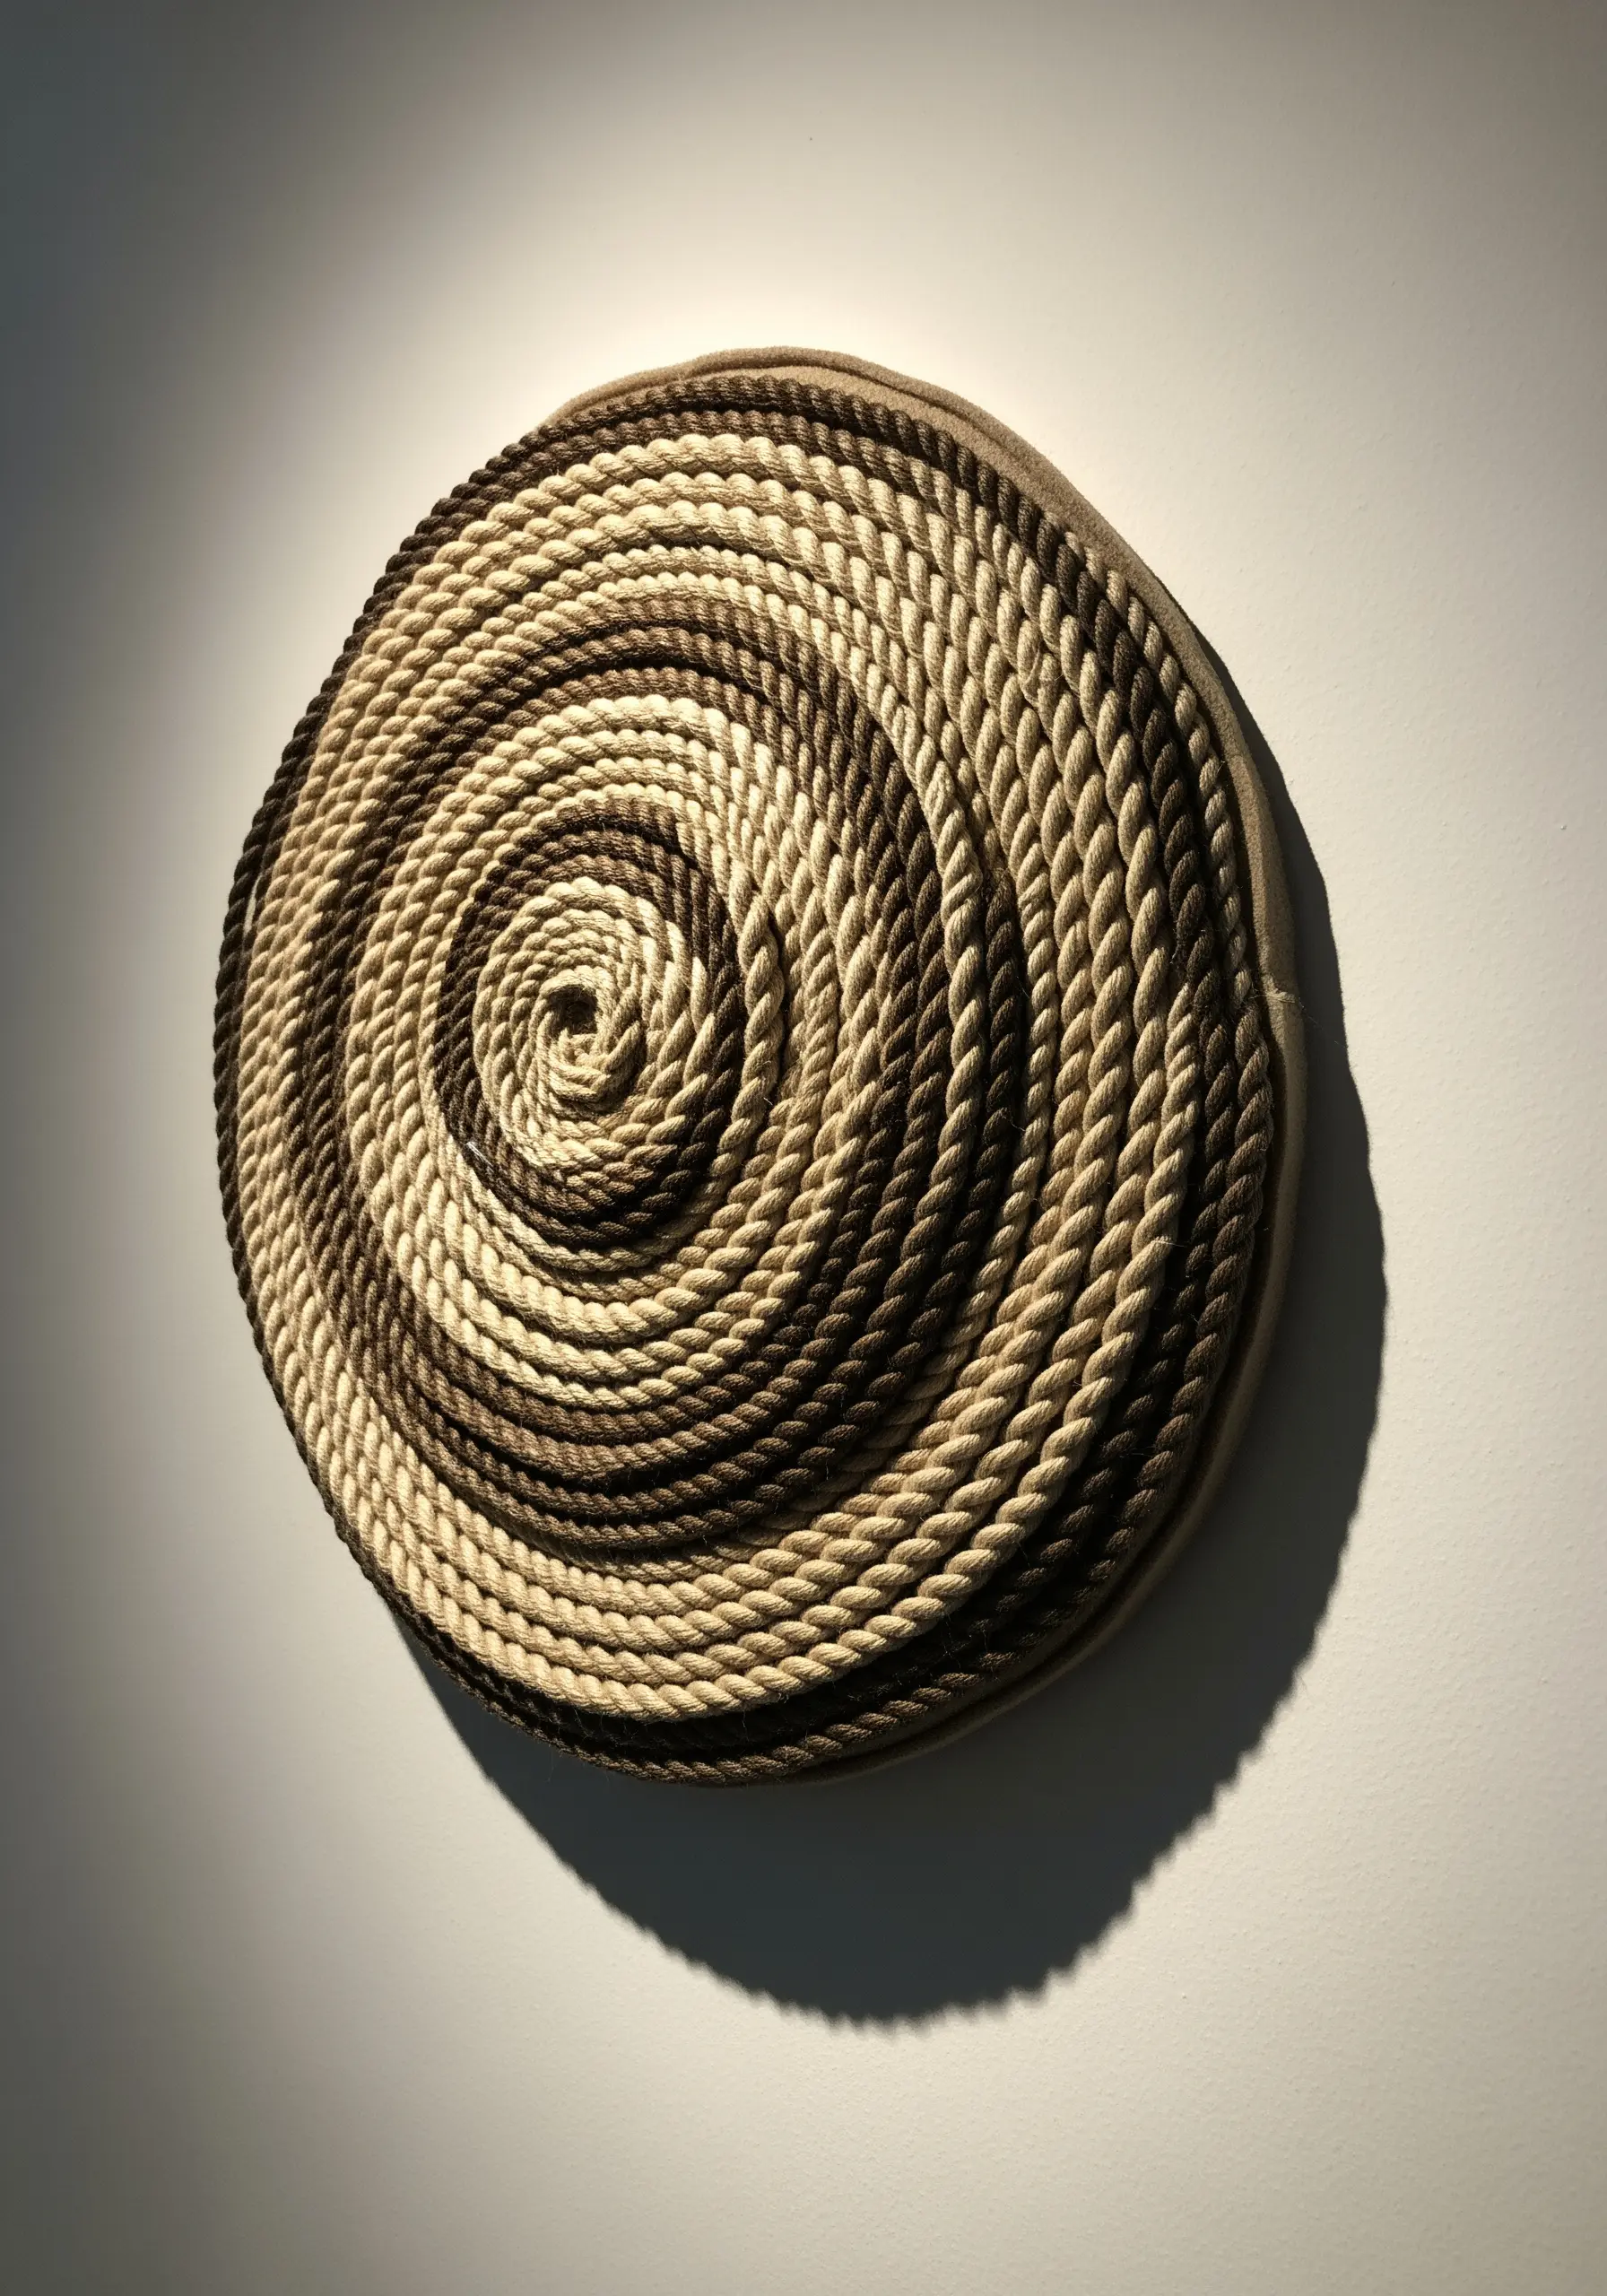
Create a dense, sculptural piece by coiling thick rope or cord and stitching it to a sturdy fabric base.
Start coiling from the center, using a strong, matching thread to couch the rope down with small, invisible stitches on the back of the work.
By introducing different colors of rope, you can create concentric circles, spirals, and organic patterns.
This method builds a heavy, tactile piece of wall art with a hypnotic sense of rhythm and depth, perfect for handmade embroidery touches that make every room feel natural.
20. Design Interactive Textile Walls

Turn your embroidery into a functional, collaborative experience.
Use a sturdy base material like industrial felt and create a grid with bold running stitches.
Add embroidered pockets, appliquéd shapes with snaps or velcro, and stitched labels to create an interactive board for organization, learning, or play.
The beauty of this approach lies in its utility; it’s a piece of art that invites touch and participation, blending craft with everyday function.
21. Translate Digital Glitches into Thread
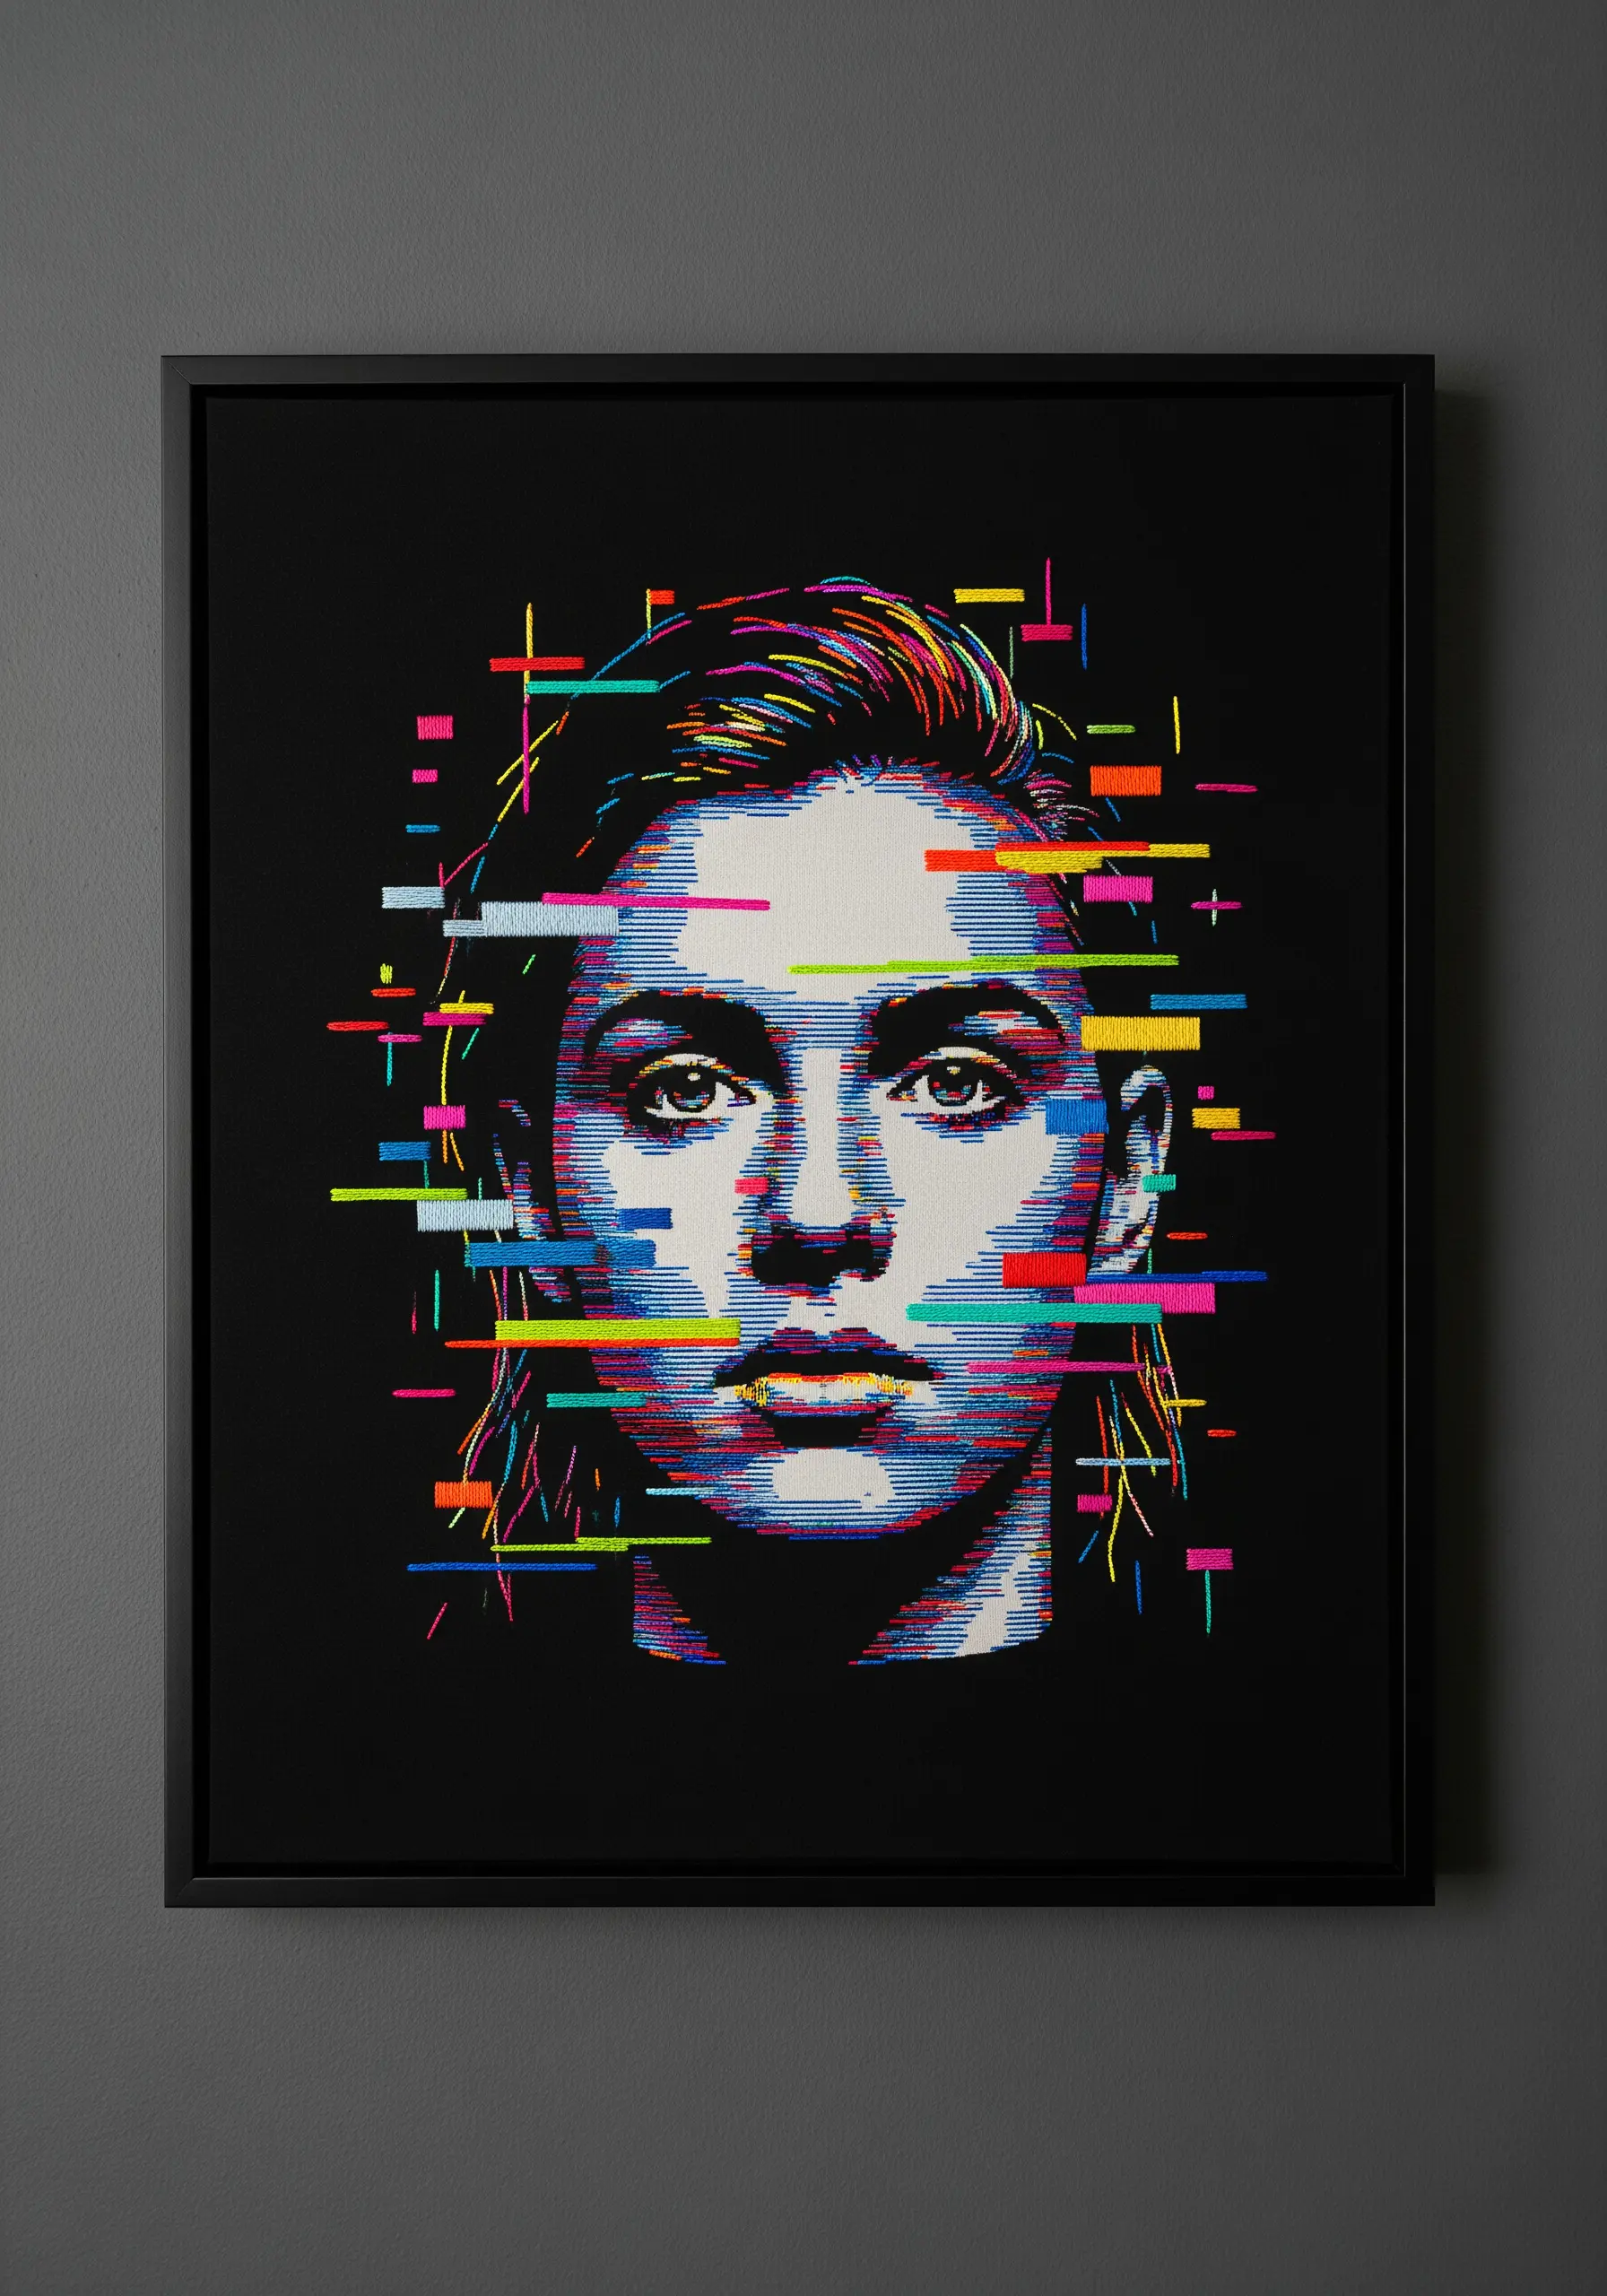
Capture the aesthetic of digital distortion using structured and chaotic stitches.
Create a portrait or image using dense, parallel satin stitches to mimic the pixels of a low-resolution screen.
Then, intentionally interrupt this order with blocks of contrasting color, elongated stitches, and loose threads to create a “glitch” effect.
This technique blends the precision of digital art with the texture of hand embroidery, resulting in a compelling, contemporary portrait.
22. Layer Fabric for Minimalist Landscapes

Suggest rolling hills and distant horizons by layering cut pieces of fabric.
Choose a palette of solid colors and arrange them to create a simple, abstract landscape. Secure the layers with fabric glue or fusible webbing.
Then, add minimalist details—like a winding road or fluffy clouds—with a simple running stitch or backstitch.
This fabric appliqué technique is a fast and effective way to create oversized hoop wall displays with a clean, graphic feel.
23. Achieve Fluidity with a Single-Line Stitch
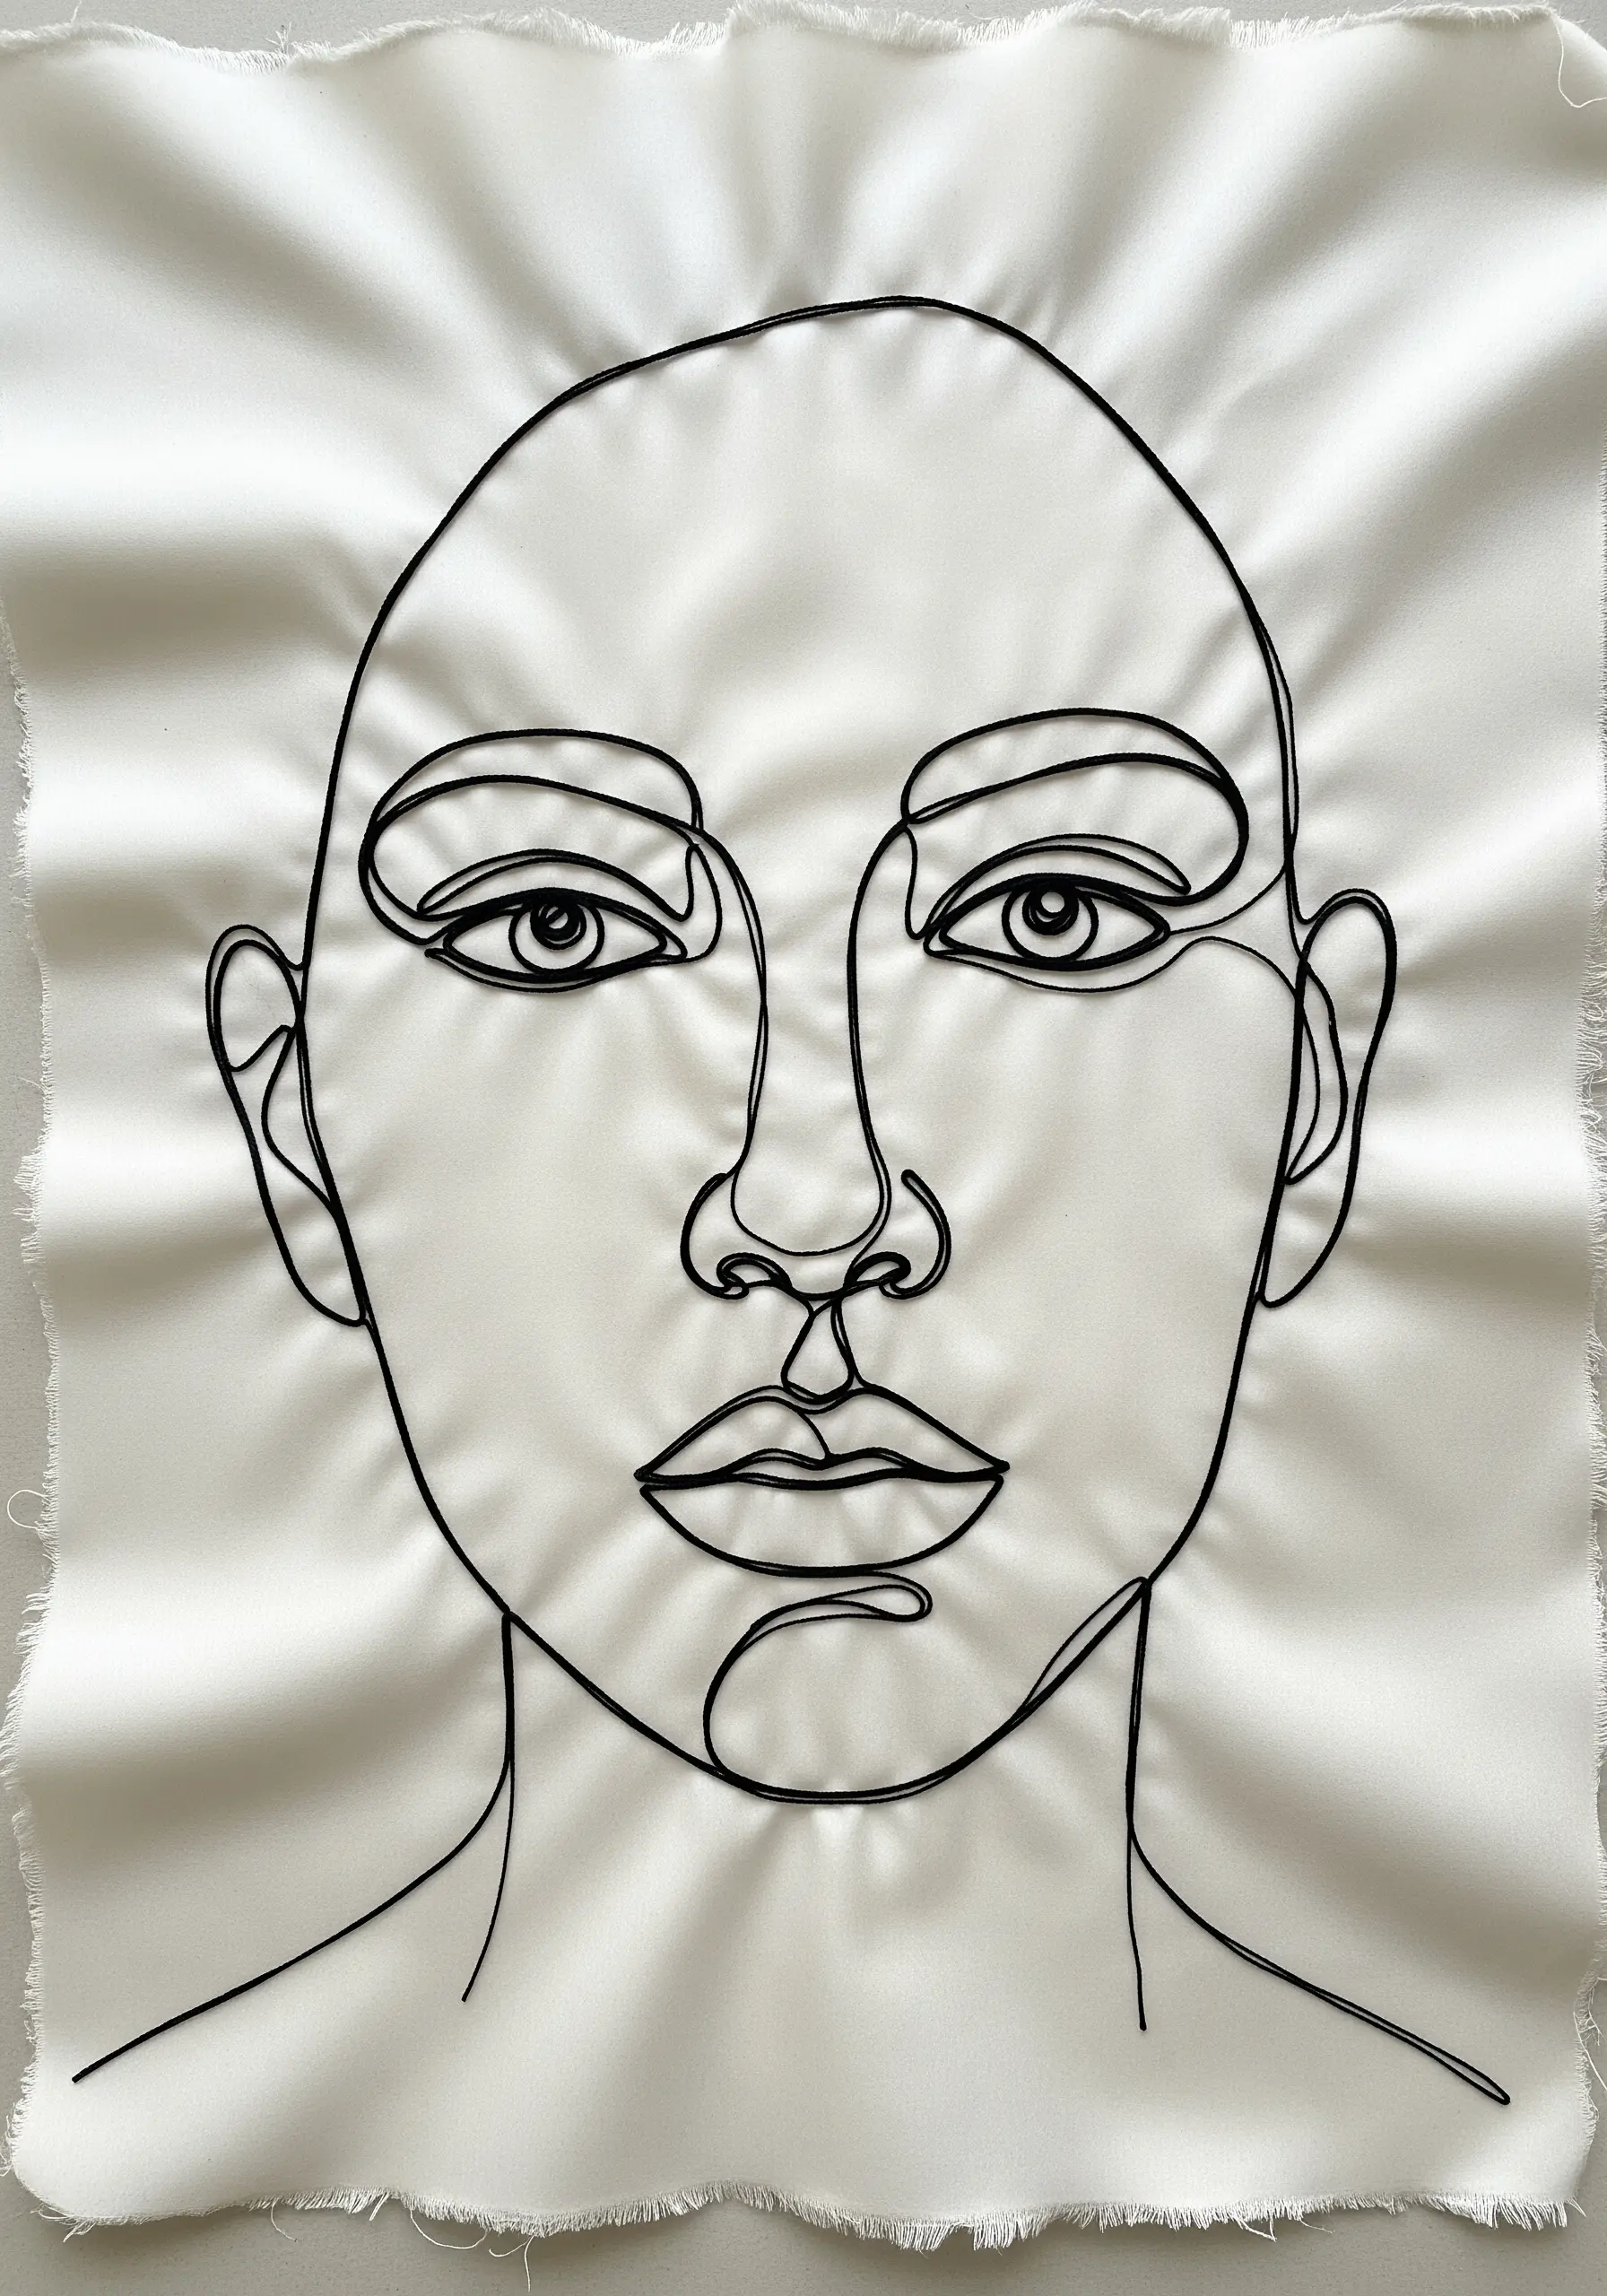
Recreate the elegance of a continuous line drawing using thread.
To achieve a smooth, unbroken line, use the couching technique: lay down a thicker cord or yarn on your fabric and tack it in place with small, perpendicular stitches in a thinner, matching thread.
This method allows you to create sharp curves and fluid shapes without the jagged edges that can sometimes result from a standard backstitch.
It’s perfect for single-line face profiles on smooth fabrics like silk or satin, where precision is key.
24. Go Big with Punch Needle or Rug Hooking

For large-scale, high-texture art, switch from a standard needle to a punch needle or rug hook.
These tools allow you to work with thick yarn and fill large areas quickly, creating dense loops of color and texture.
Map out your design on a stretched piece of monk’s cloth or linen, then work in color blocks to build your composition.
This technique is ideal for creating statement wall hangings or even custom rugs that are incredibly tactile and visually impactful.
25. Weave Stories with Memory Quilting

Combine traditional quilting with embroidery to create a deeply personal narrative piece.
Use fabric scraps that hold meaning—old shirts, dresses, or tablecloths—to construct your quilt blocks.
Then, dedicate certain blocks to hand-embroidered text, dates, or simple line drawings that tell a story or capture a memory.
This transforms a simple blanket into a family heirloom, where every patch and stitch has a purpose.
26. Create Ethereal Art by Beading on Tulle

Use tulle or fine mesh as your base fabric to make beads and sequins appear as if they are floating in mid-air.
The transparent nature of the fabric disappears from a distance, putting all the focus on your intricate beadwork.
Use a fine beading needle and a strong but delicate thread, like a nylon monofilament, to secure your embellishments without adding visual weight.
This technique is perfect for creating delicate, constellation-like designs or jewelry that feels incredibly light and ethereal.
27. Embrace Chaos with Abstract Thread Scribbling

Create dynamic, abstract texture by layering thread in a free-form, scribbled manner.
You can achieve this with a free-motion embroidery machine foot, or by hand using couching to tack down tangled loops of thread.
Work in layers with different colors to build up depth and complexity.
Small knots or seed stitches can be added to anchor the threads and provide pops of contrasting color, turning chaos into a controlled, textural composition.
28. Design Functional Textiles for Architectural Spaces

Think beyond the frame and consider how textiles can become an integral part of a room’s architecture.
Design a repeating pattern that can be translated into a custom-woven or machine-embroidered fabric for a specific purpose, like a stair runner, upholstery, or curtains.
Focus on scale, repetition, and durability to ensure the design not only looks beautiful but also functions perfectly within the space.
This approach elevates embroidery from a decorative accent to a foundational element of interior design.
29. Construct a 3D Diorama with Fiber

Build a miniature world by combining embroidery with sculptural fiber art techniques.
Create armatures for trees and plants using wire, then wrap them tightly with embroidery floss or yarn to add color and texture.
Use needle felting or French knots for mossy ground cover and simple backstitches on a fabric backdrop to create a sense of depth.
This detailed, mixed-craft approach allows you to build an immersive, three-dimensional scene entirely from fiber.
30. Explore Deconstructed Weaving and Braiding

Use the fabric itself as your primary material for embellishment.
Start with a loosely woven base like burlap or jute. Carefully pull threads from the edges and use them to create braids, tassels, or new woven patterns on the surface.
This deconstructed approach creates a seamless, organic piece where the decoration is born from the foundation fabric.
Introduce a single contrasting thread color to add a minimal, graphic element to the otherwise monochromatic texture.


