

You have the threads, the fabric, and the desire to create something beautiful for your walls. But perhaps you feel limited by the hoop, unsure how to translate your skills into something with more presence and scale. It’s time to think beyond the frame.
Fiber art isn’t just about small, delicate stitches; it’s about texture, dimension, color, and form. It’s about transforming a simple thread or piece of yarn into a statement that can define an entire room. The techniques you already know are the foundation for creating works that are not just decorative, but truly architectural.
Here, we’ll explore how to push the boundaries of traditional embroidery and fiber crafts. You’ll learn how to think sculpturally, compose with confidence, and use color and texture to create installations that feel alive. Forget the rules that keep your art small—your walls are waiting.
1. Weaving with Intentional Texture Gradients

To create a piece with this much depth, combine structured macrame with freeform weaving.
Start with a macrame header to provide a stable foundation, then transition into woven sections using thick wool roving for soft, cloud-like textures.
Vary the thickness of your yarn to build undulating waves of visual weight, creating a landscape effect.
Introduce a single, warm pop of color, like this coral, to serve as a focal point against the cooler blues and greens—it draws the eye without disrupting the calm palette.
Finish with a combination of clean fringe and chunky knots to balance polished lines with organic, tactile energy.
2. Master Bold Color Blocking with Tufting
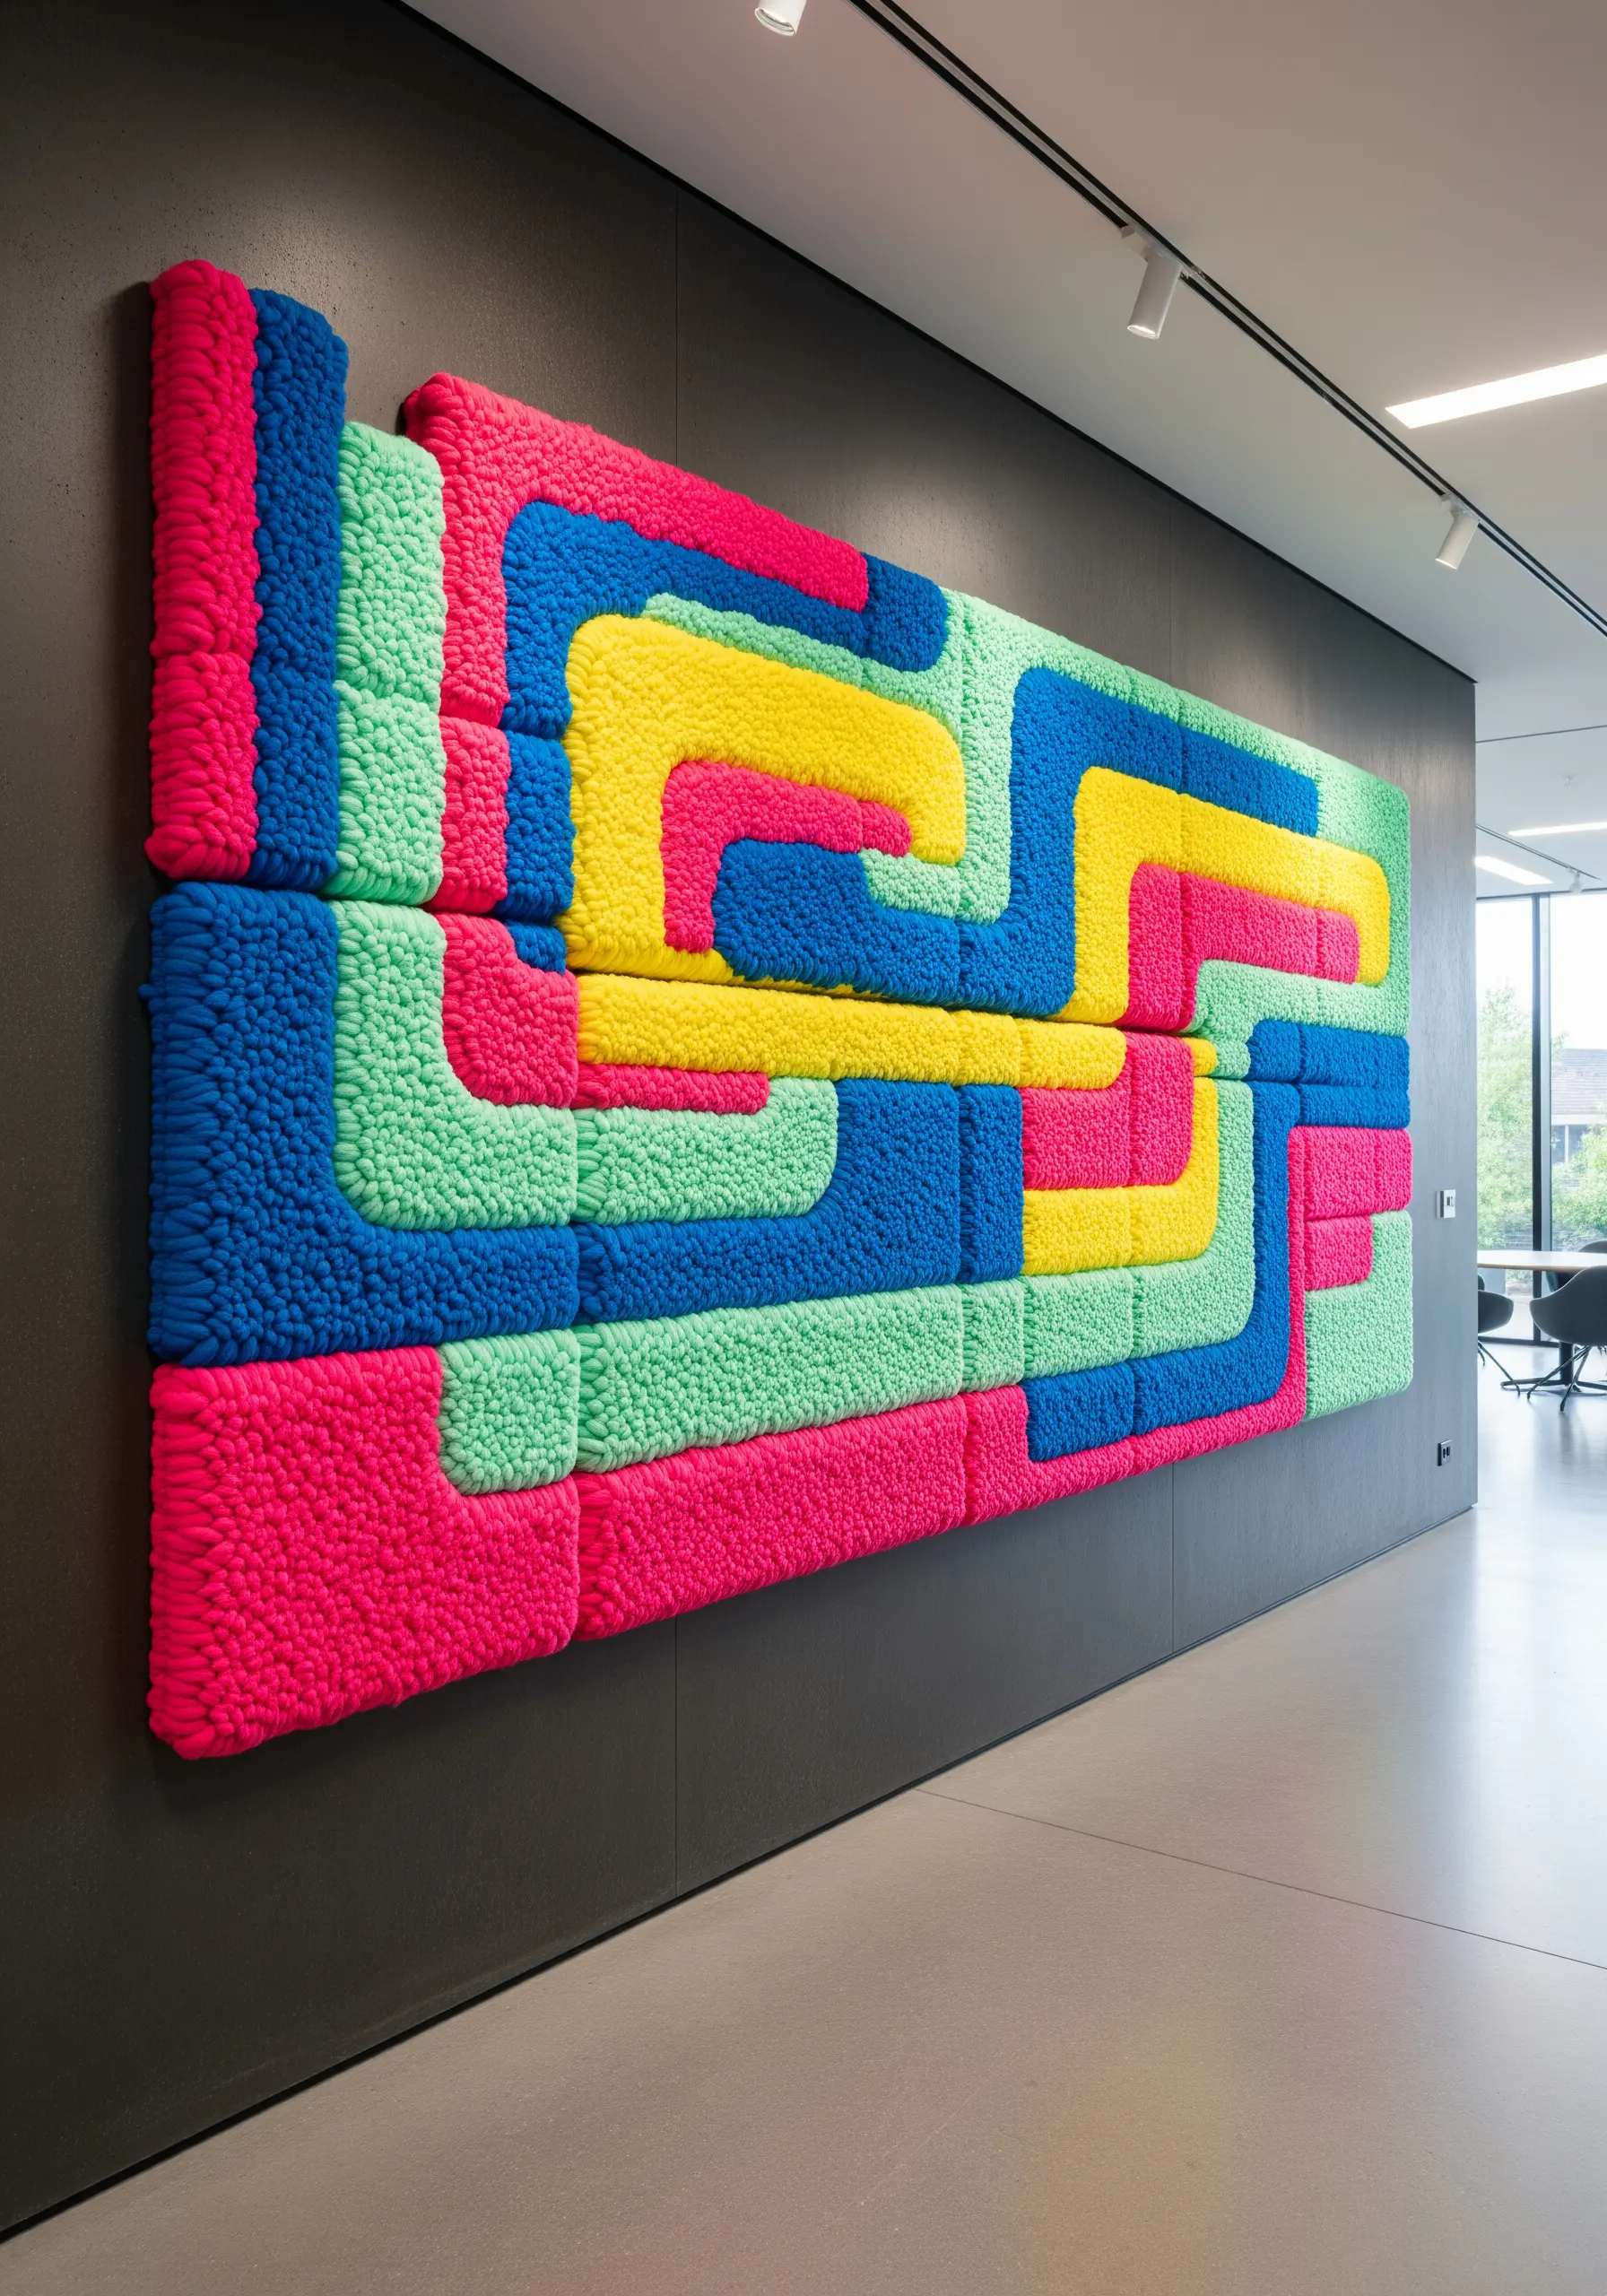
To achieve this clean, graphic look, precision in your design transfer is key.
Use a projector or carbon paper to map your geometric shapes onto the tufting cloth before you begin.
With a tufting gun, work in dense, uniform loops to create a plush, carpet-like surface where each color block feels solid and intentional.
The success of this style hinges on a high-contrast palette; pairing primary or neon colors makes the clean lines of the design pop dramatically.
Build the piece on a sturdy wooden frame to give it a raised, sculptural quality that makes it stand out from the wall.
3. Needle Felting a Painterly Landscape

You can achieve soft, atmospheric gradients by needle felting thin layers of wool roving directly onto a felt base.
Instead of creating hard lines, gently blend your colors by pulling and teasing the fibers together before felting them in place with your needle.
Use darker shades like navy and deep purple for foreground elements to build a sense of depth, then introduce lighter, warmer tones for distant mountains and the sky.
To create the sun’s glow, use mere wisps of bright yellow and white, lightly felting them so they appear translucent and ethereal.
This technique allows you to essentially paint with wool, achieving a softness that thread alone cannot replicate.
4. Designing a Cohesive Woven Triptych
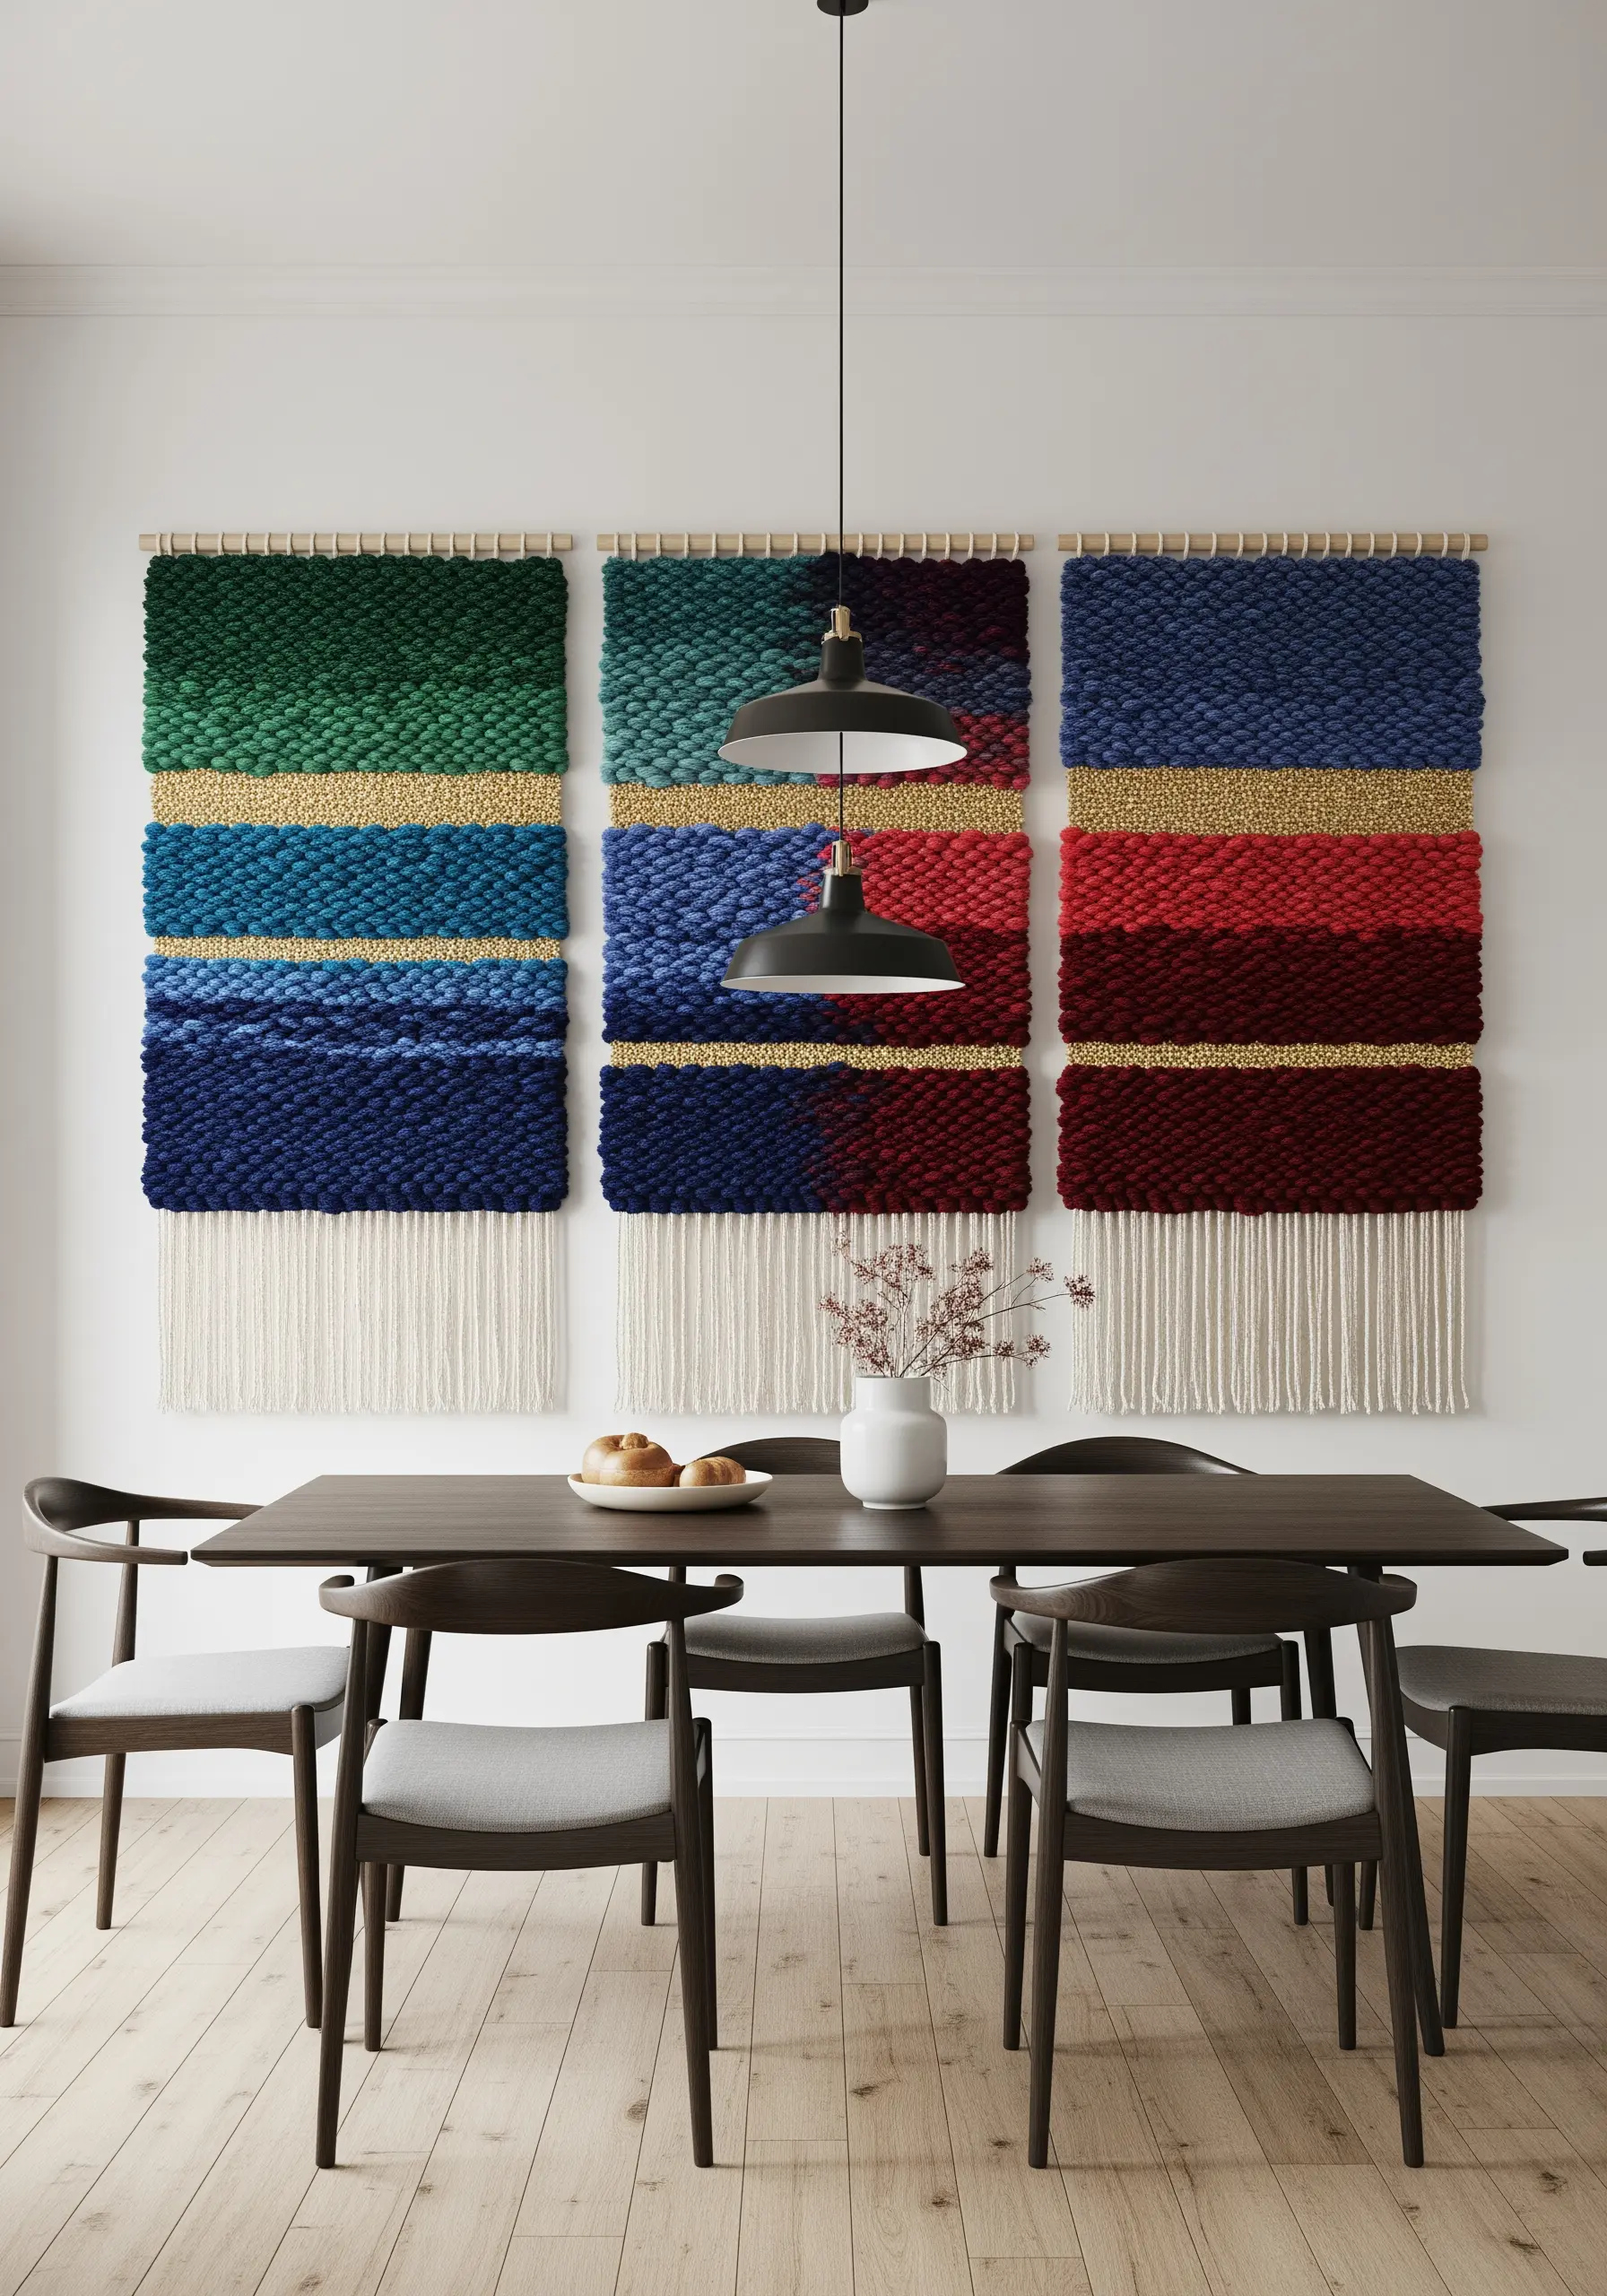
To create a unified multi-panel installation, establish a consistent color palette but vary the composition within each piece to maintain interest.
Introduce a metallic or high-sheen yarn, like a stripe of gold Lurex, to act as a common visual thread that ties the separate panels together.
Use chunky soumak weaving or thick Rya knots to build bold, textural bands of color that give the work a substantial, tactile quality.
By keeping the fringe at the bottom uniform in color and length, you establish a clean, grounding line that makes the entire triptych feel intentional and balanced.
5. Crafting Sculptural Fiber Chandeliers

Take your fiber art off the wall and into the third dimension by creating suspended forms that interact with the space.
Use a sturdy wire frame—like a lampshade ring or a repurposed wire basket—as a structural base.
Build upon the frame using crochet or macrame techniques, incorporating bands of bright, contrasting colors to define the shape and add visual energy.
For the fringe, move beyond simple yarn and use strips of upcycled fabric, which adds wonderful volume, pattern, and a playful texture that catches the light.
6. Creating a Serene Punch Needle Mural

For a wall-sized installation, stretch your monk’s cloth or primary tufting fabric over a large wooden frame that you can temporarily secure to the wall.
Draw your flowing, organic wave pattern directly onto the fabric with a marker.
Use a consistent loop height with your punch needle to ensure a uniform, plush texture across the entire surface.
The aesthetic success here lies in the analog color palette—choose soft, muted pastels that blend harmoniously to create a calming, immersive environment rather than a jarring focal point.
7. Weaving Light with Fiber Optics
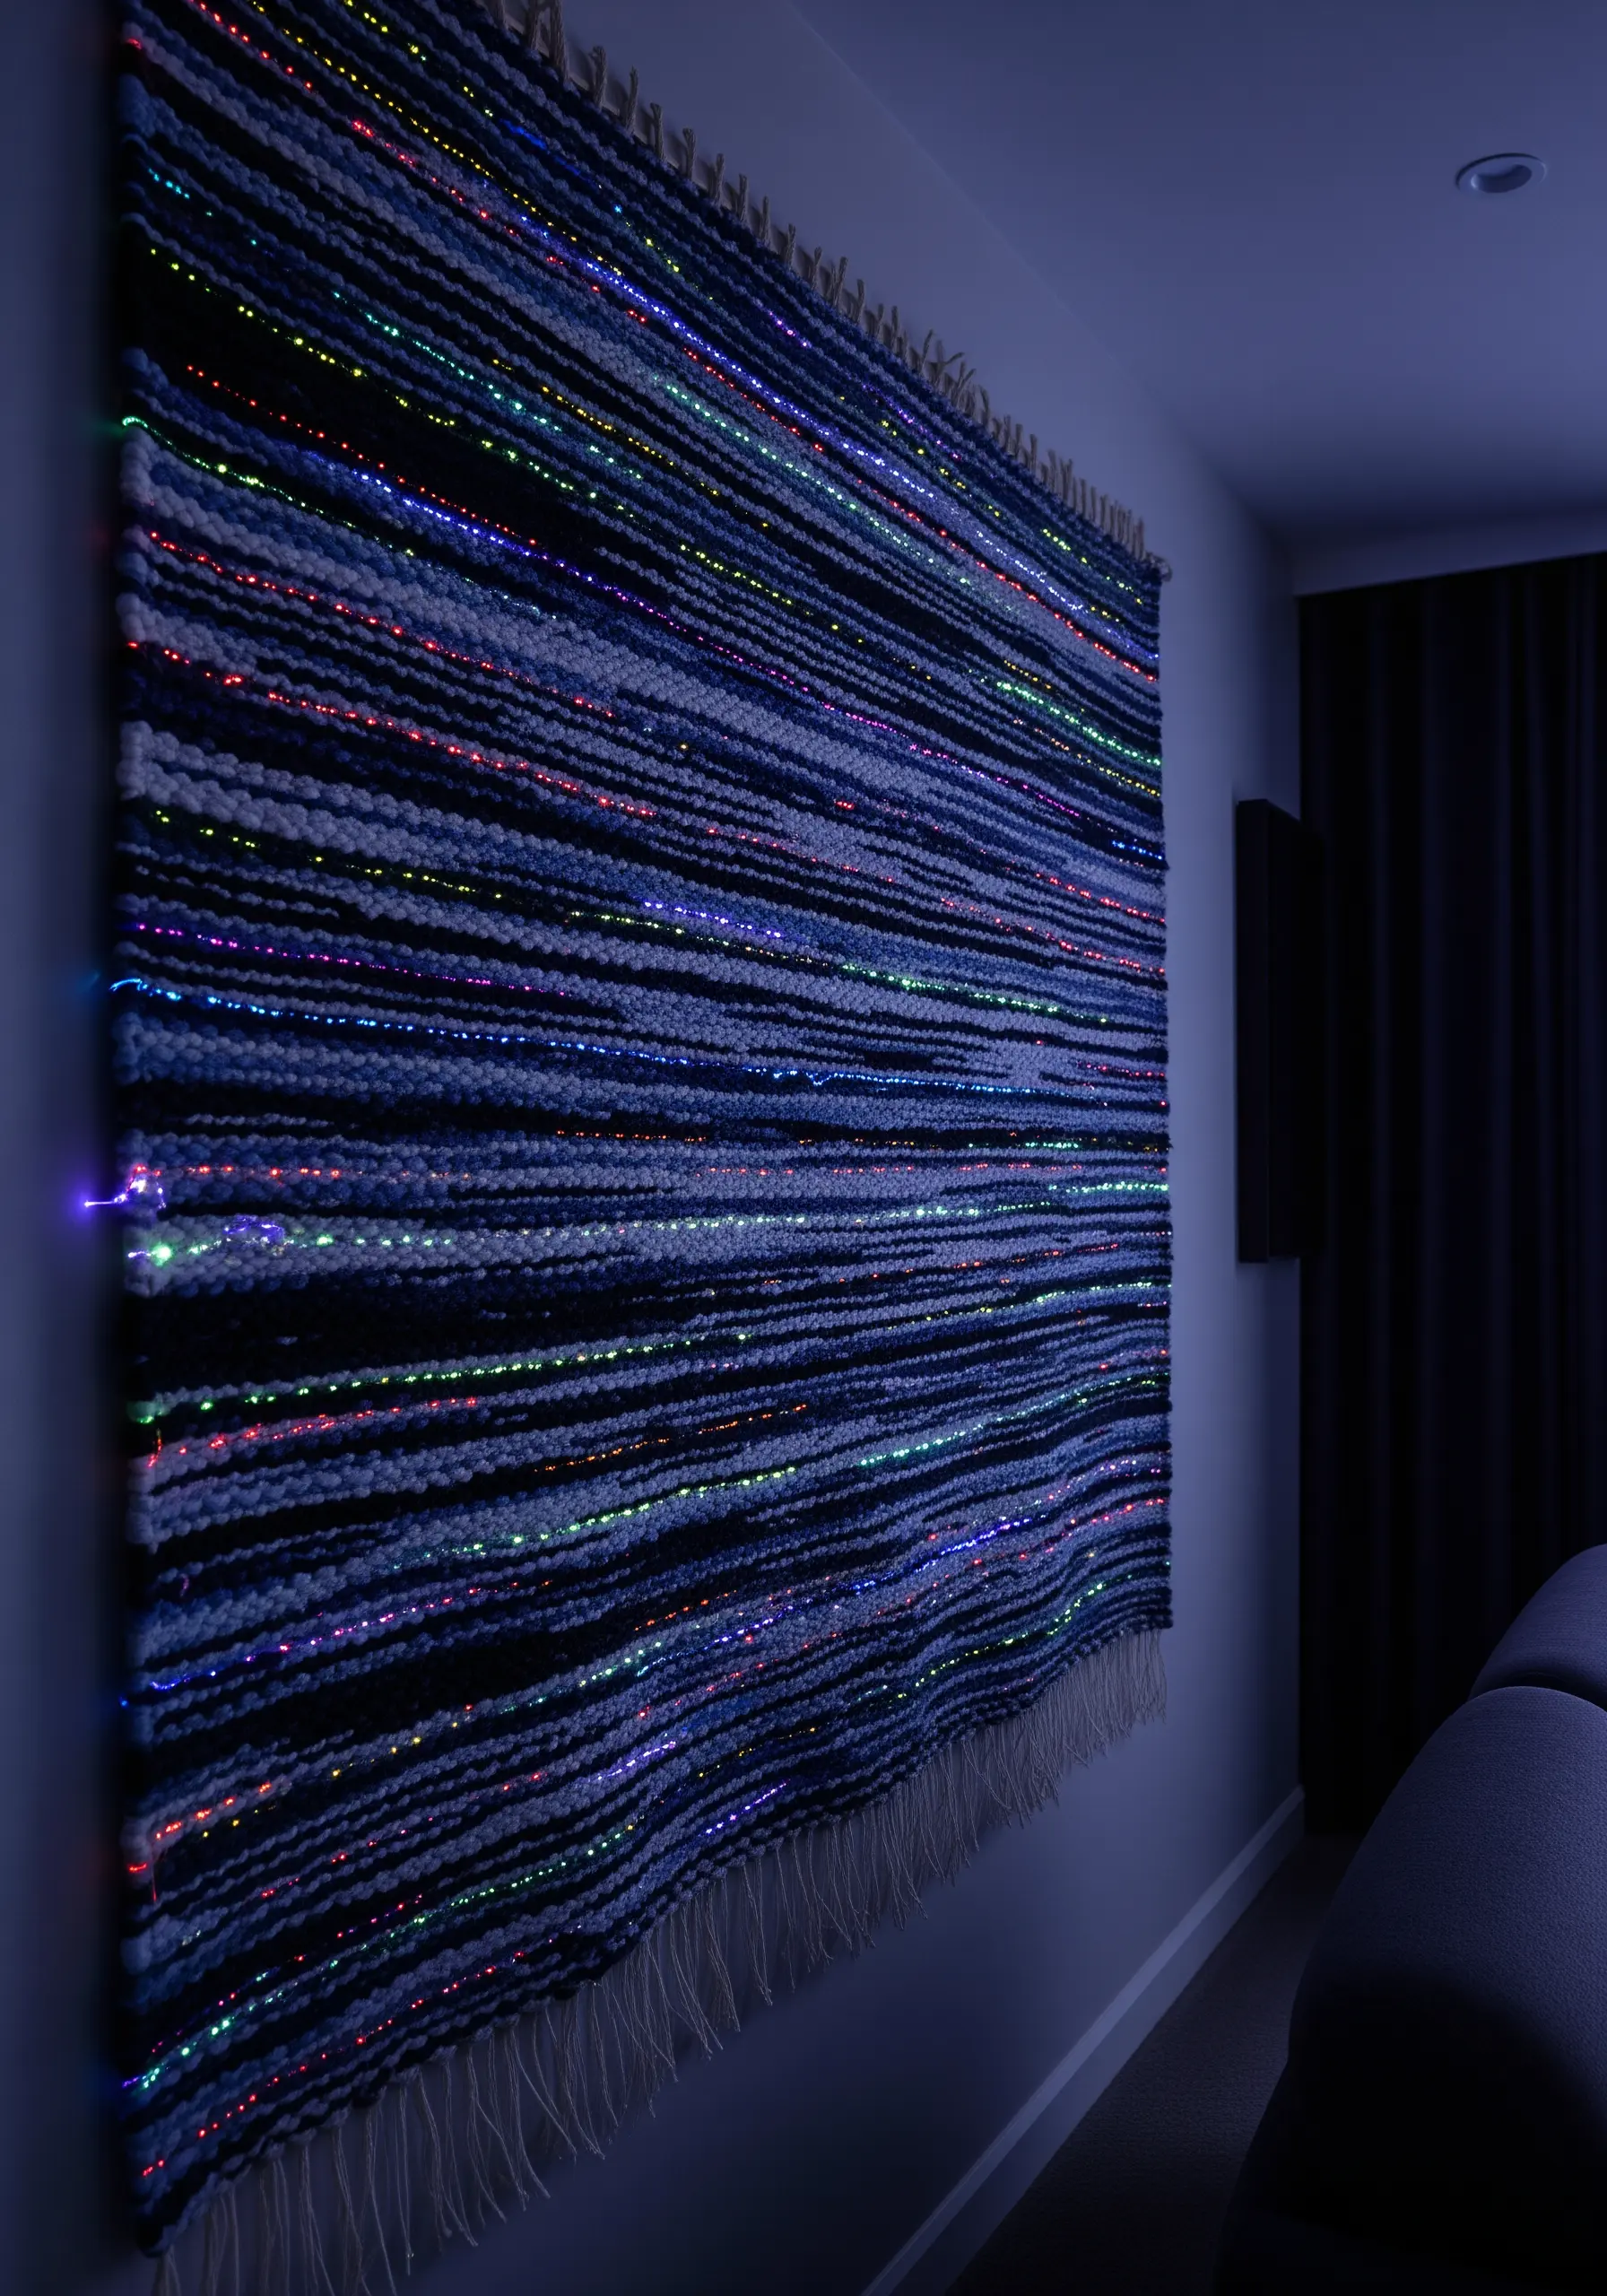
Elevate a simple woven piece by incorporating technology for a dynamic effect.
During the weaving process on your loom, treat fiber optic strands just as you would a warp or weft thread.
Weave them alongside traditional yarns, allowing the ends to poke through the front or trail from the bottom of the piece.
Choose dark, moody yarns like navy, charcoal, and black to create a night-sky effect, which makes the points of light appear brighter and more dramatic when connected to a light source.
8. Functional Macrame: Integrating Living Greenery
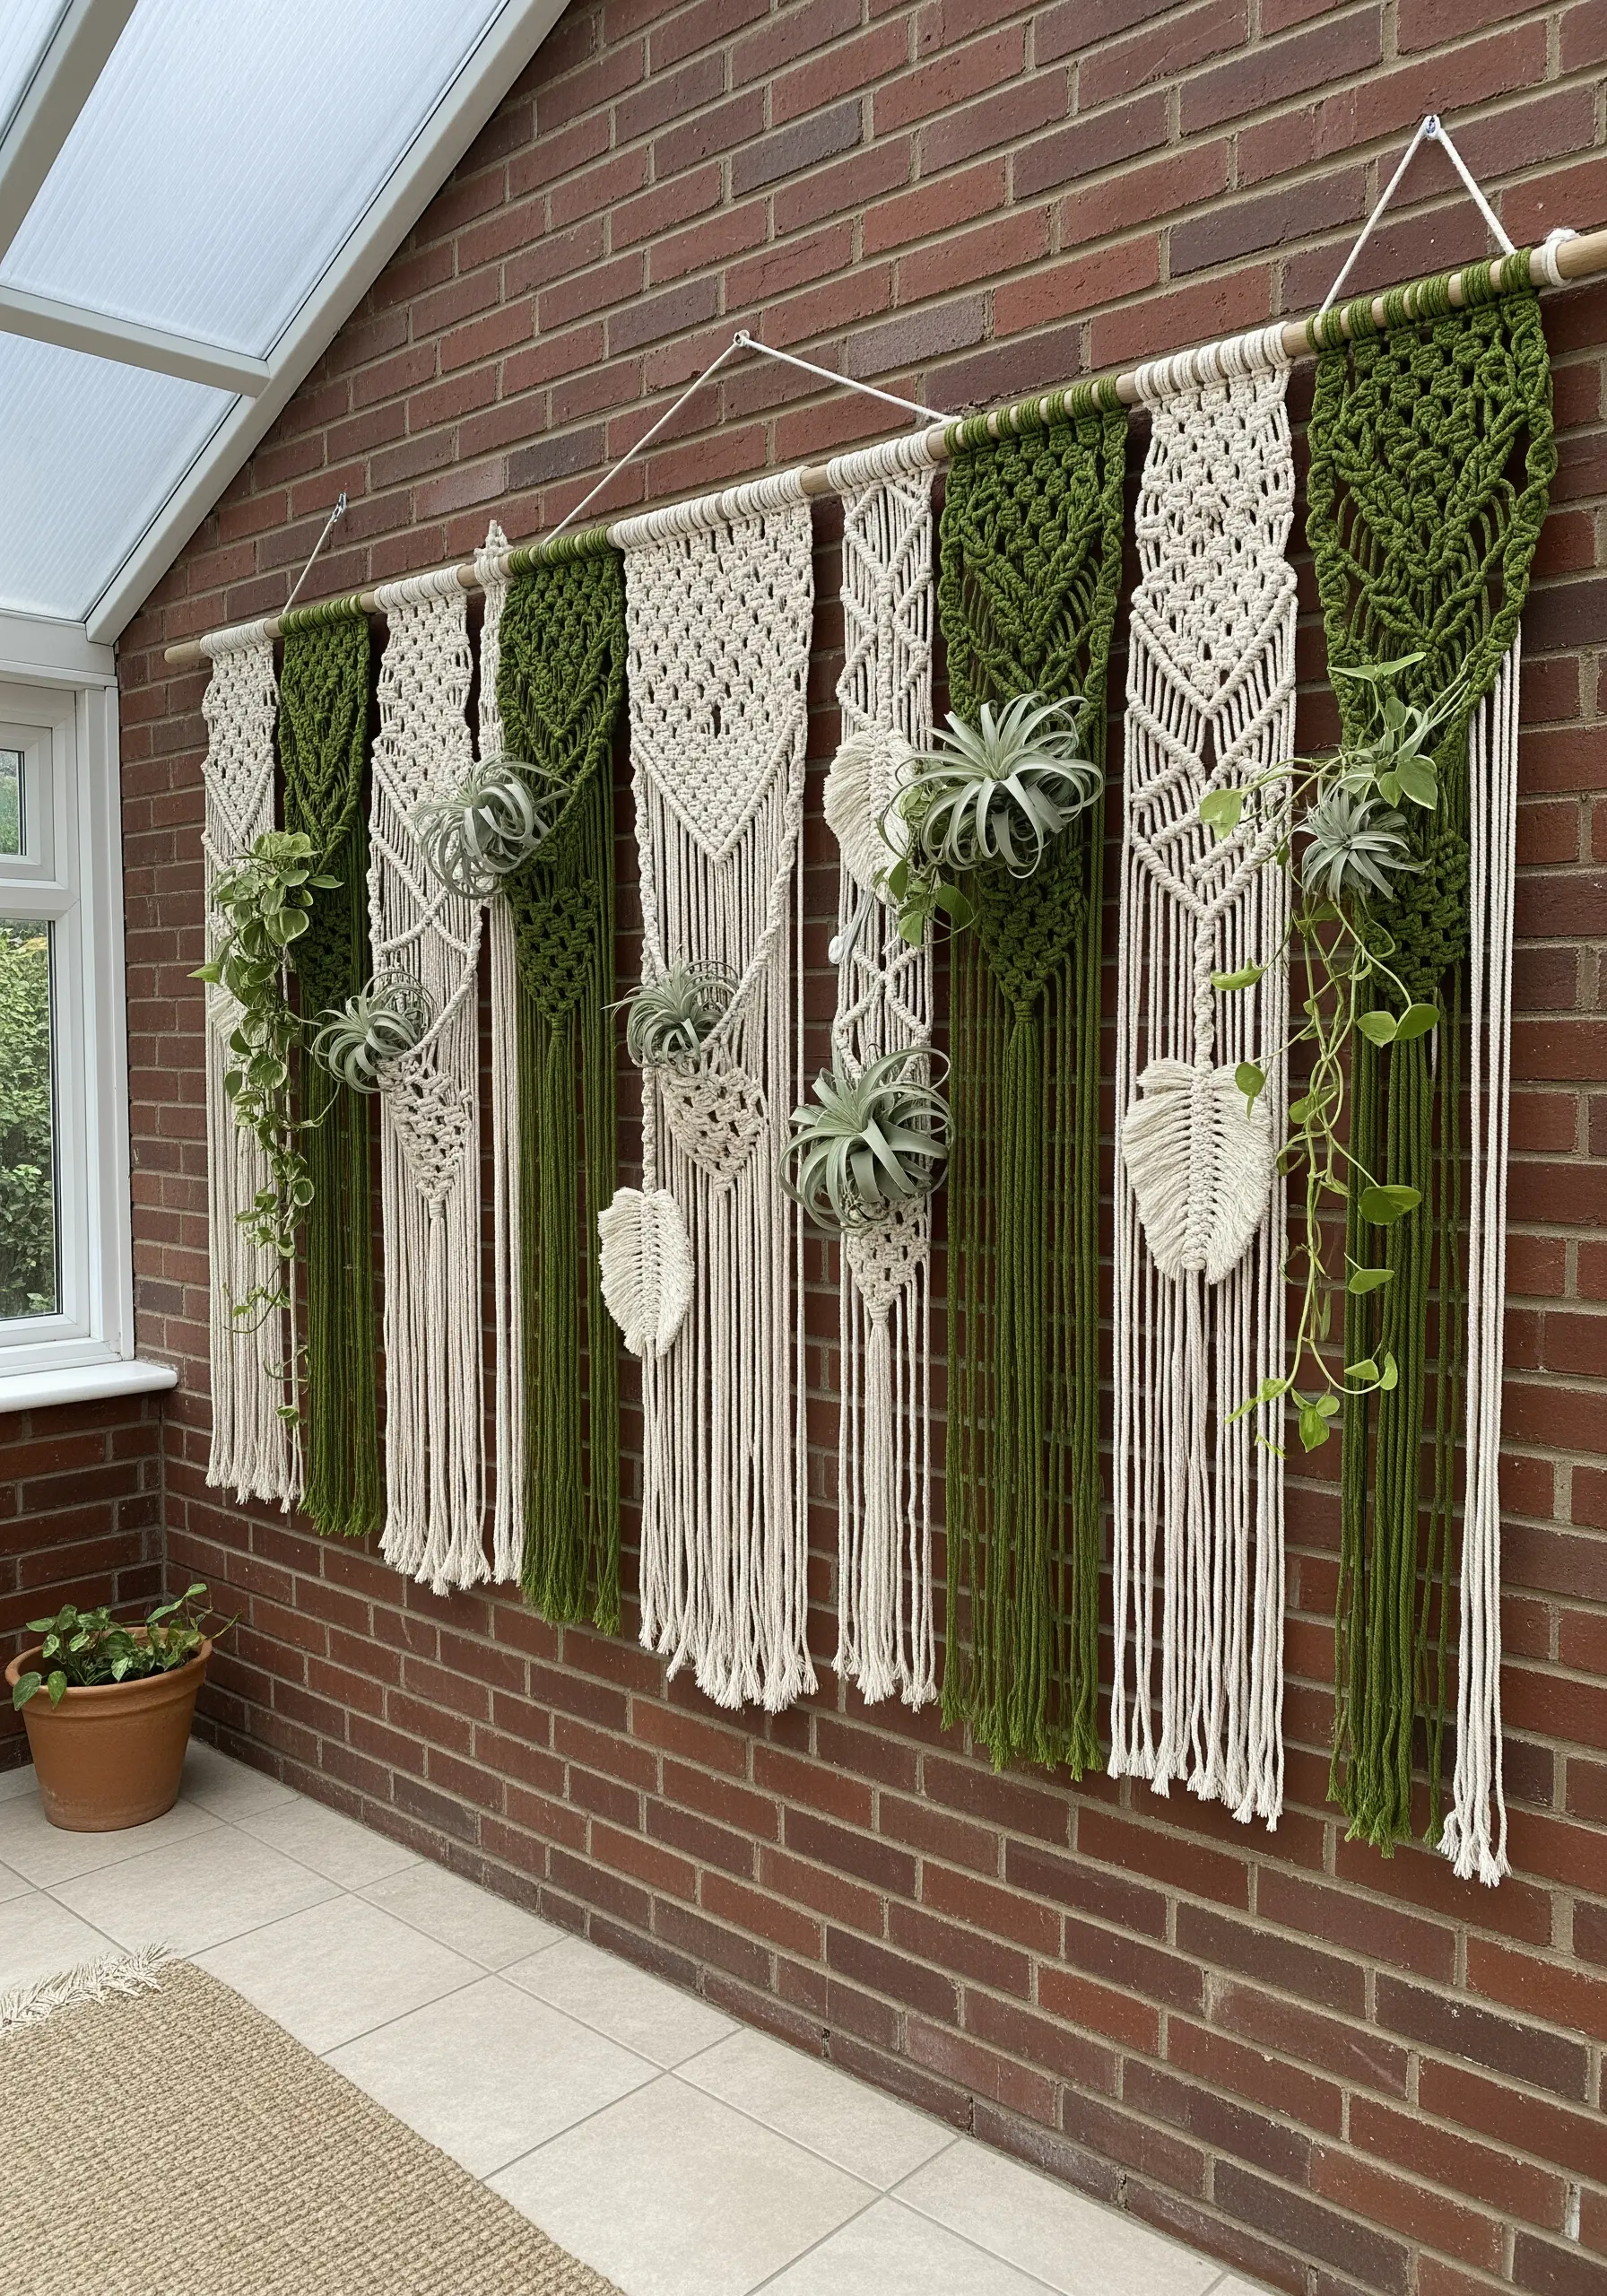
Combine your fiber art with biophilic design by incorporating pockets or holders directly into your macrame patterns.
Use rows of square knots to build a sturdy, flat panel, then create dimensional pouches using a series of half-hitch knots worked around a small form (like a can or jar) to get the shape.
Alternating between two colors creates visual interest and makes the functional elements stand out as intentional design features.
This is perfect for holding air plants (Tillandsia), which require no soil and are light enough for a textile hanger.
9. Abstract Sculpture from Upcycled Textiles

Give old clothing a new life by deconstructing it for a sculptural wall hanging.
Cut discarded denim, t-shirts, and patterned fabrics into long, continuous strips.
Braid these strips into thick, sturdy ropes of varying textures and colors, then twist, coil, and knot these braids together, securing them with hidden stitches to build a dynamic, three-dimensional form.
The beauty of this technique lies in the unexpected interplay of familiar textures, creating a piece rich with history and tactile appeal.
10. Architectural Tufting: Framing a Space with Fiber

Turn a simple doorway into a dramatic art piece by building a custom tufted frame.
Create a wooden base in the shape of the archway, then stretch your tufting cloth tightly over this form.
Using a tufting gun, fill in a vibrant, saturated rainbow gradient, packing the yarn densely to create a plush, solid texture that completely hides the backing fabric.
This technique transforms a transitional space, adding softness, color, and a sense of playful wonder directly into the architecture of your home.
11. Composing with Wrapped and Coiled Fibers
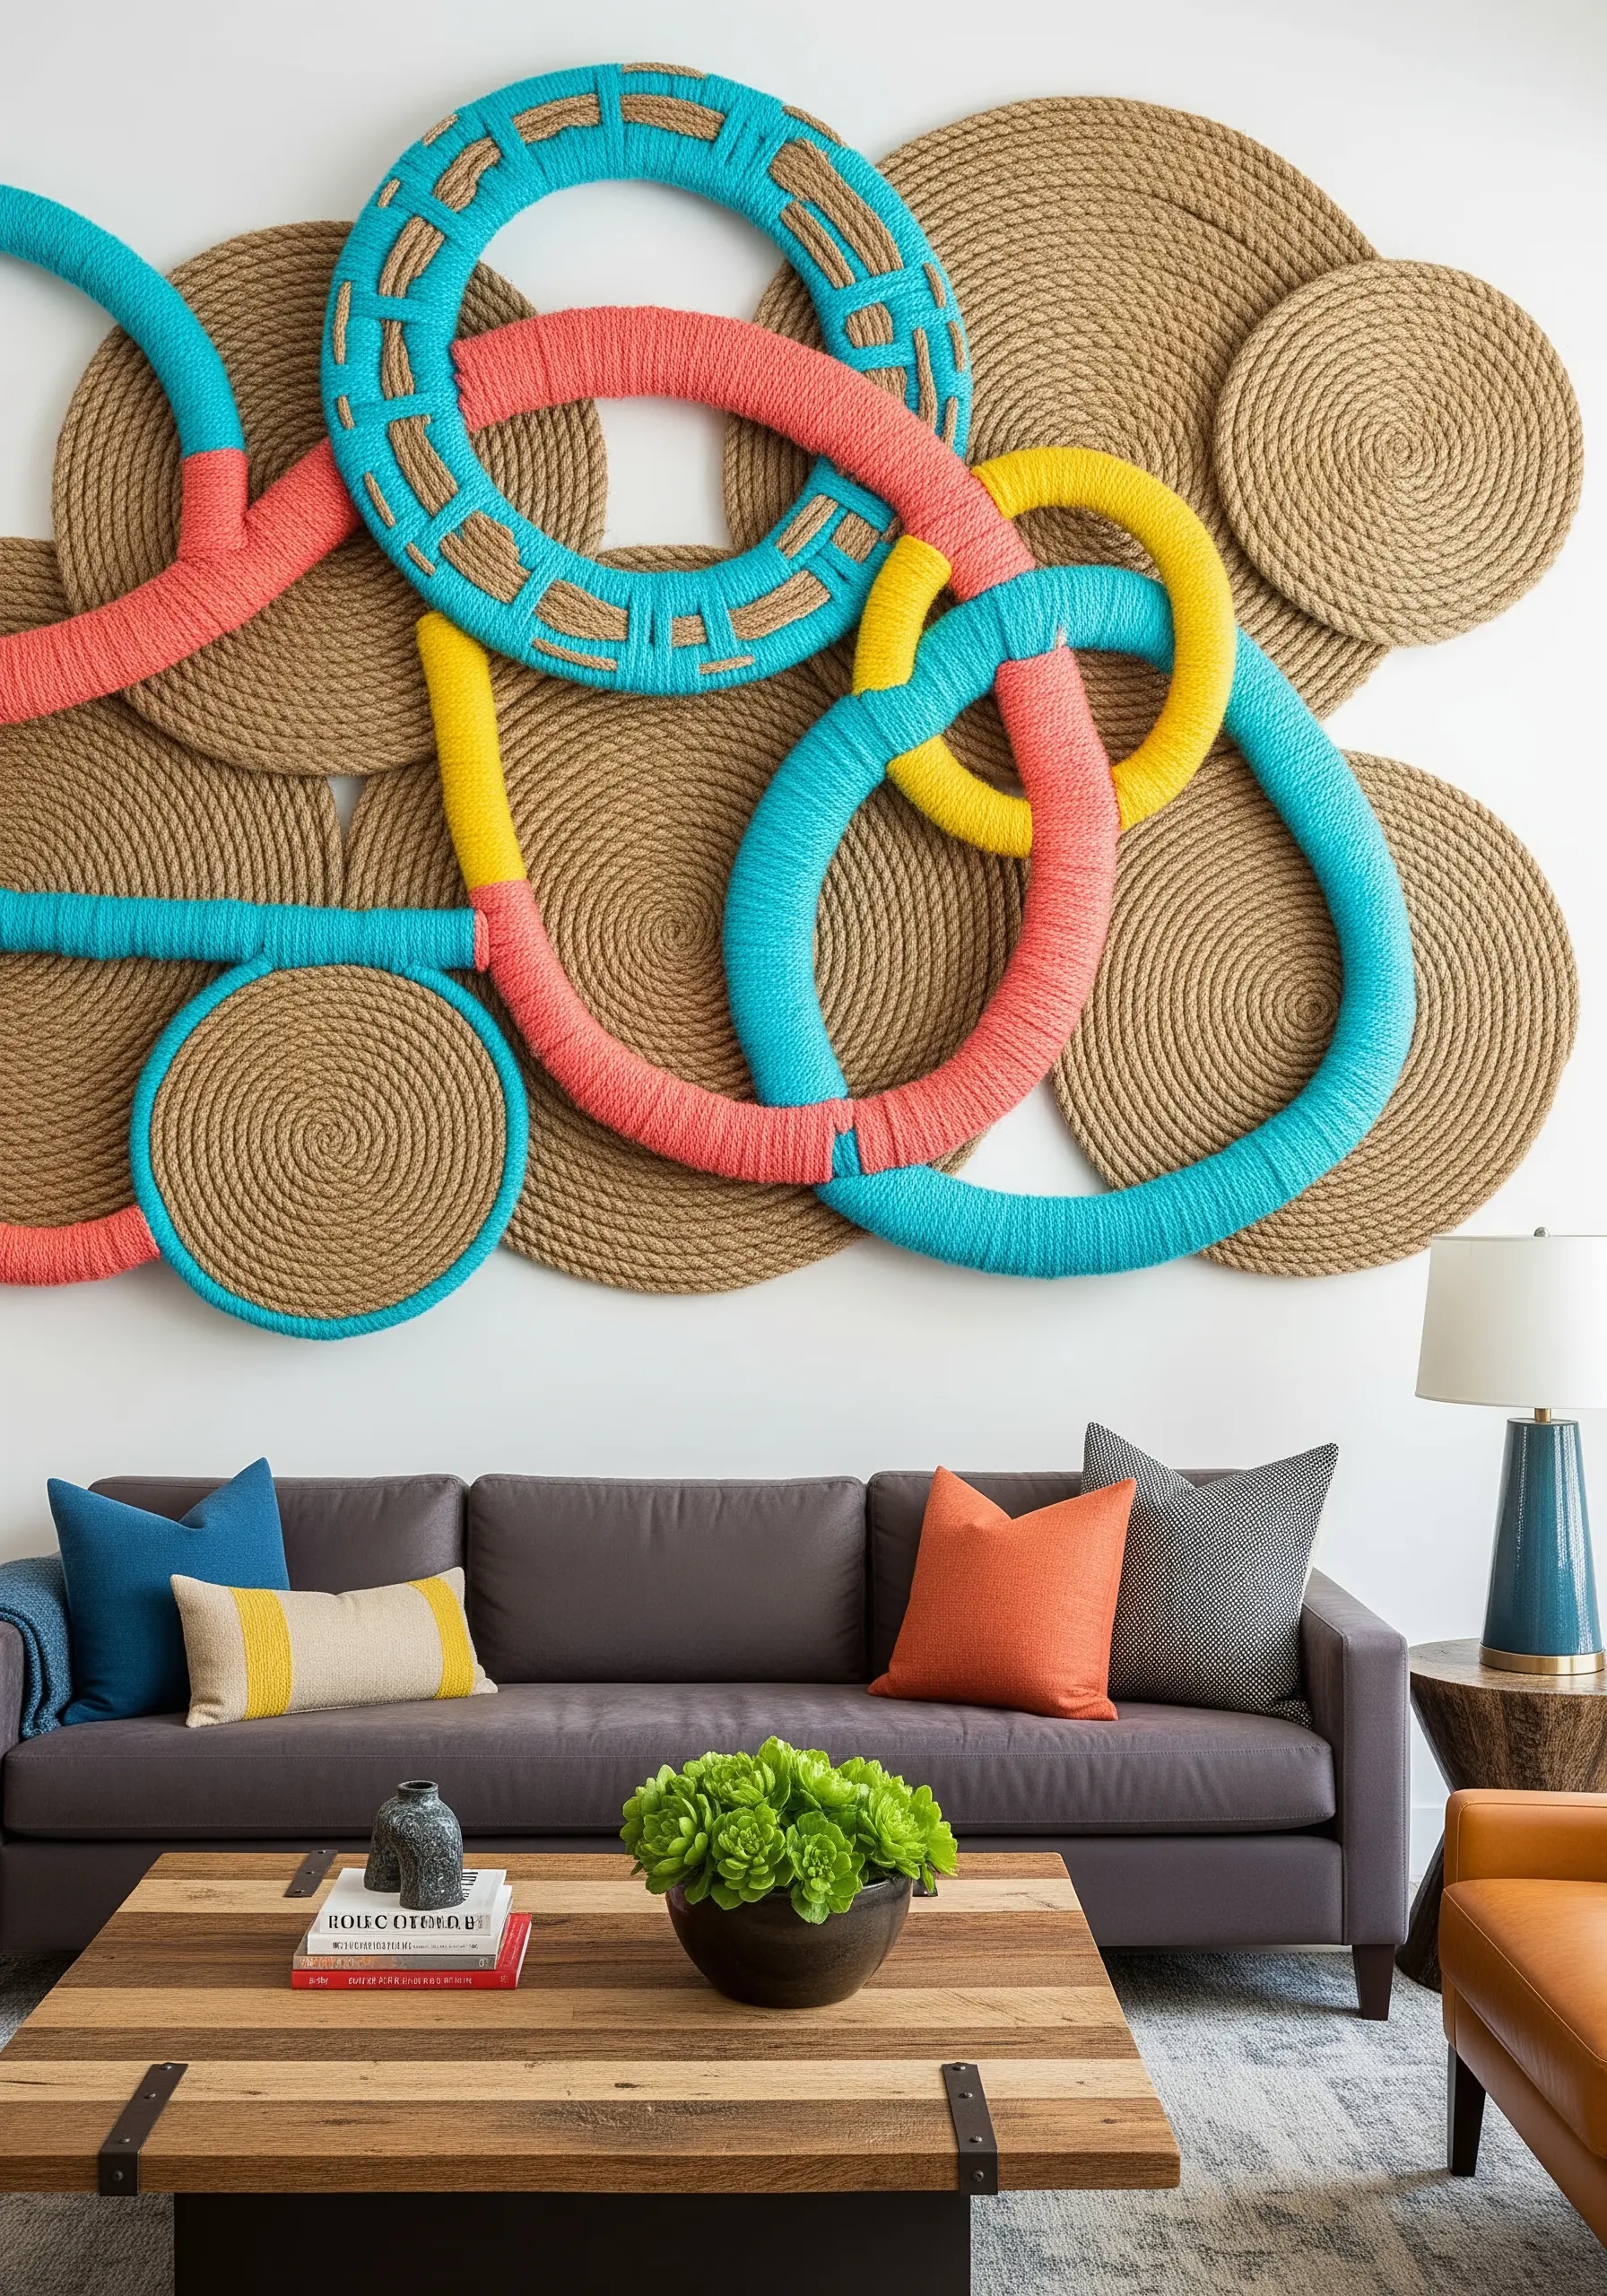
You can create a large-scale, graphic installation using simple, accessible materials.
Create the neutral elements by coiling thick jute rope into flat, disc-like shapes of various sizes, securing them with a hot glue gun on the back.
For the colorful rings, tightly wrap foam wreath forms or pool noodles with bright yarn.
Arrange these different elements on the wall before mounting them, playing with overlap and spacing to create a composition that is both balanced and dynamic.
This approach allows you to fill a large wall with impactful art without requiring complex weaving or knotting skills.
12. Displaying Chunky Knits as Statement Art
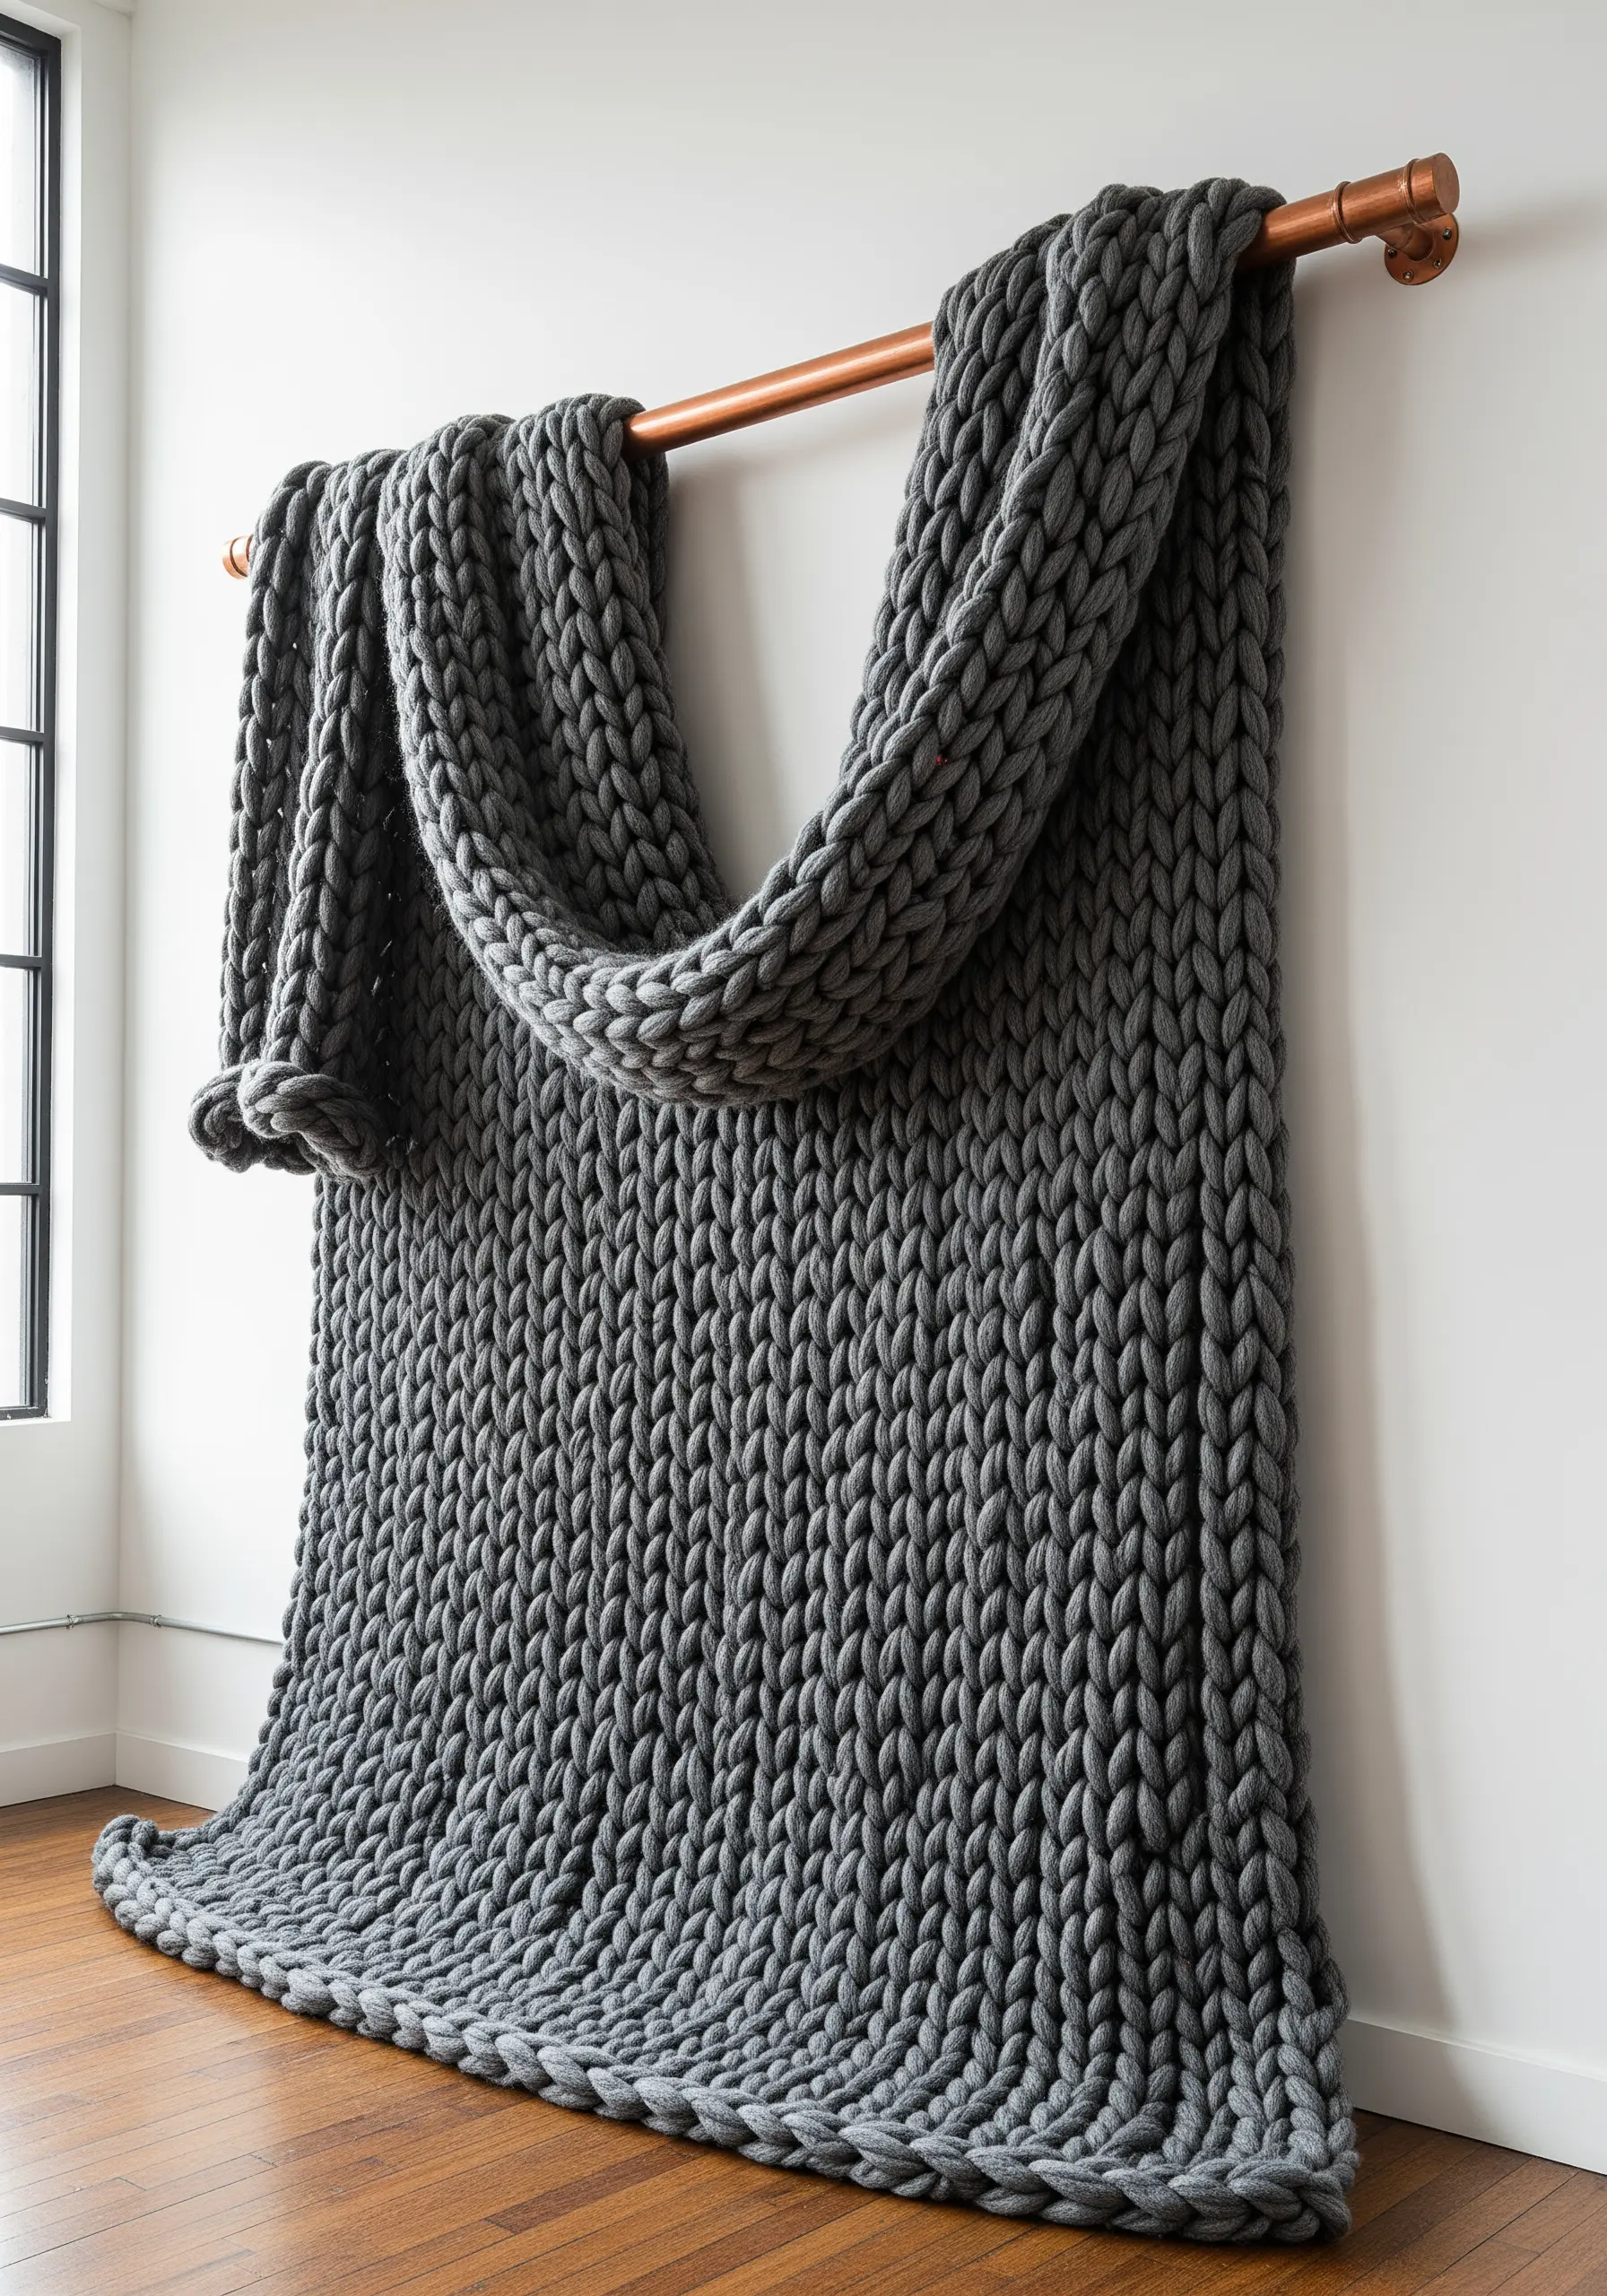
Elevate a beautiful hand-knit piece by presenting it as intentional decor rather than just a functional object.
Instead of folding it on a couch, drape a super-chunky blanket over a metallic rod, like copper or brass, mounted to the wall.
The striking contrast between the soft, oversized knit stitches and the sleek, industrial hardware creates a sophisticated textural statement.
This method highlights the craftsmanship of the knit and turns a cozy blanket into a piece of minimalist, tactile wall art.
13. Creating Ethereal Light with Fabric Gradients
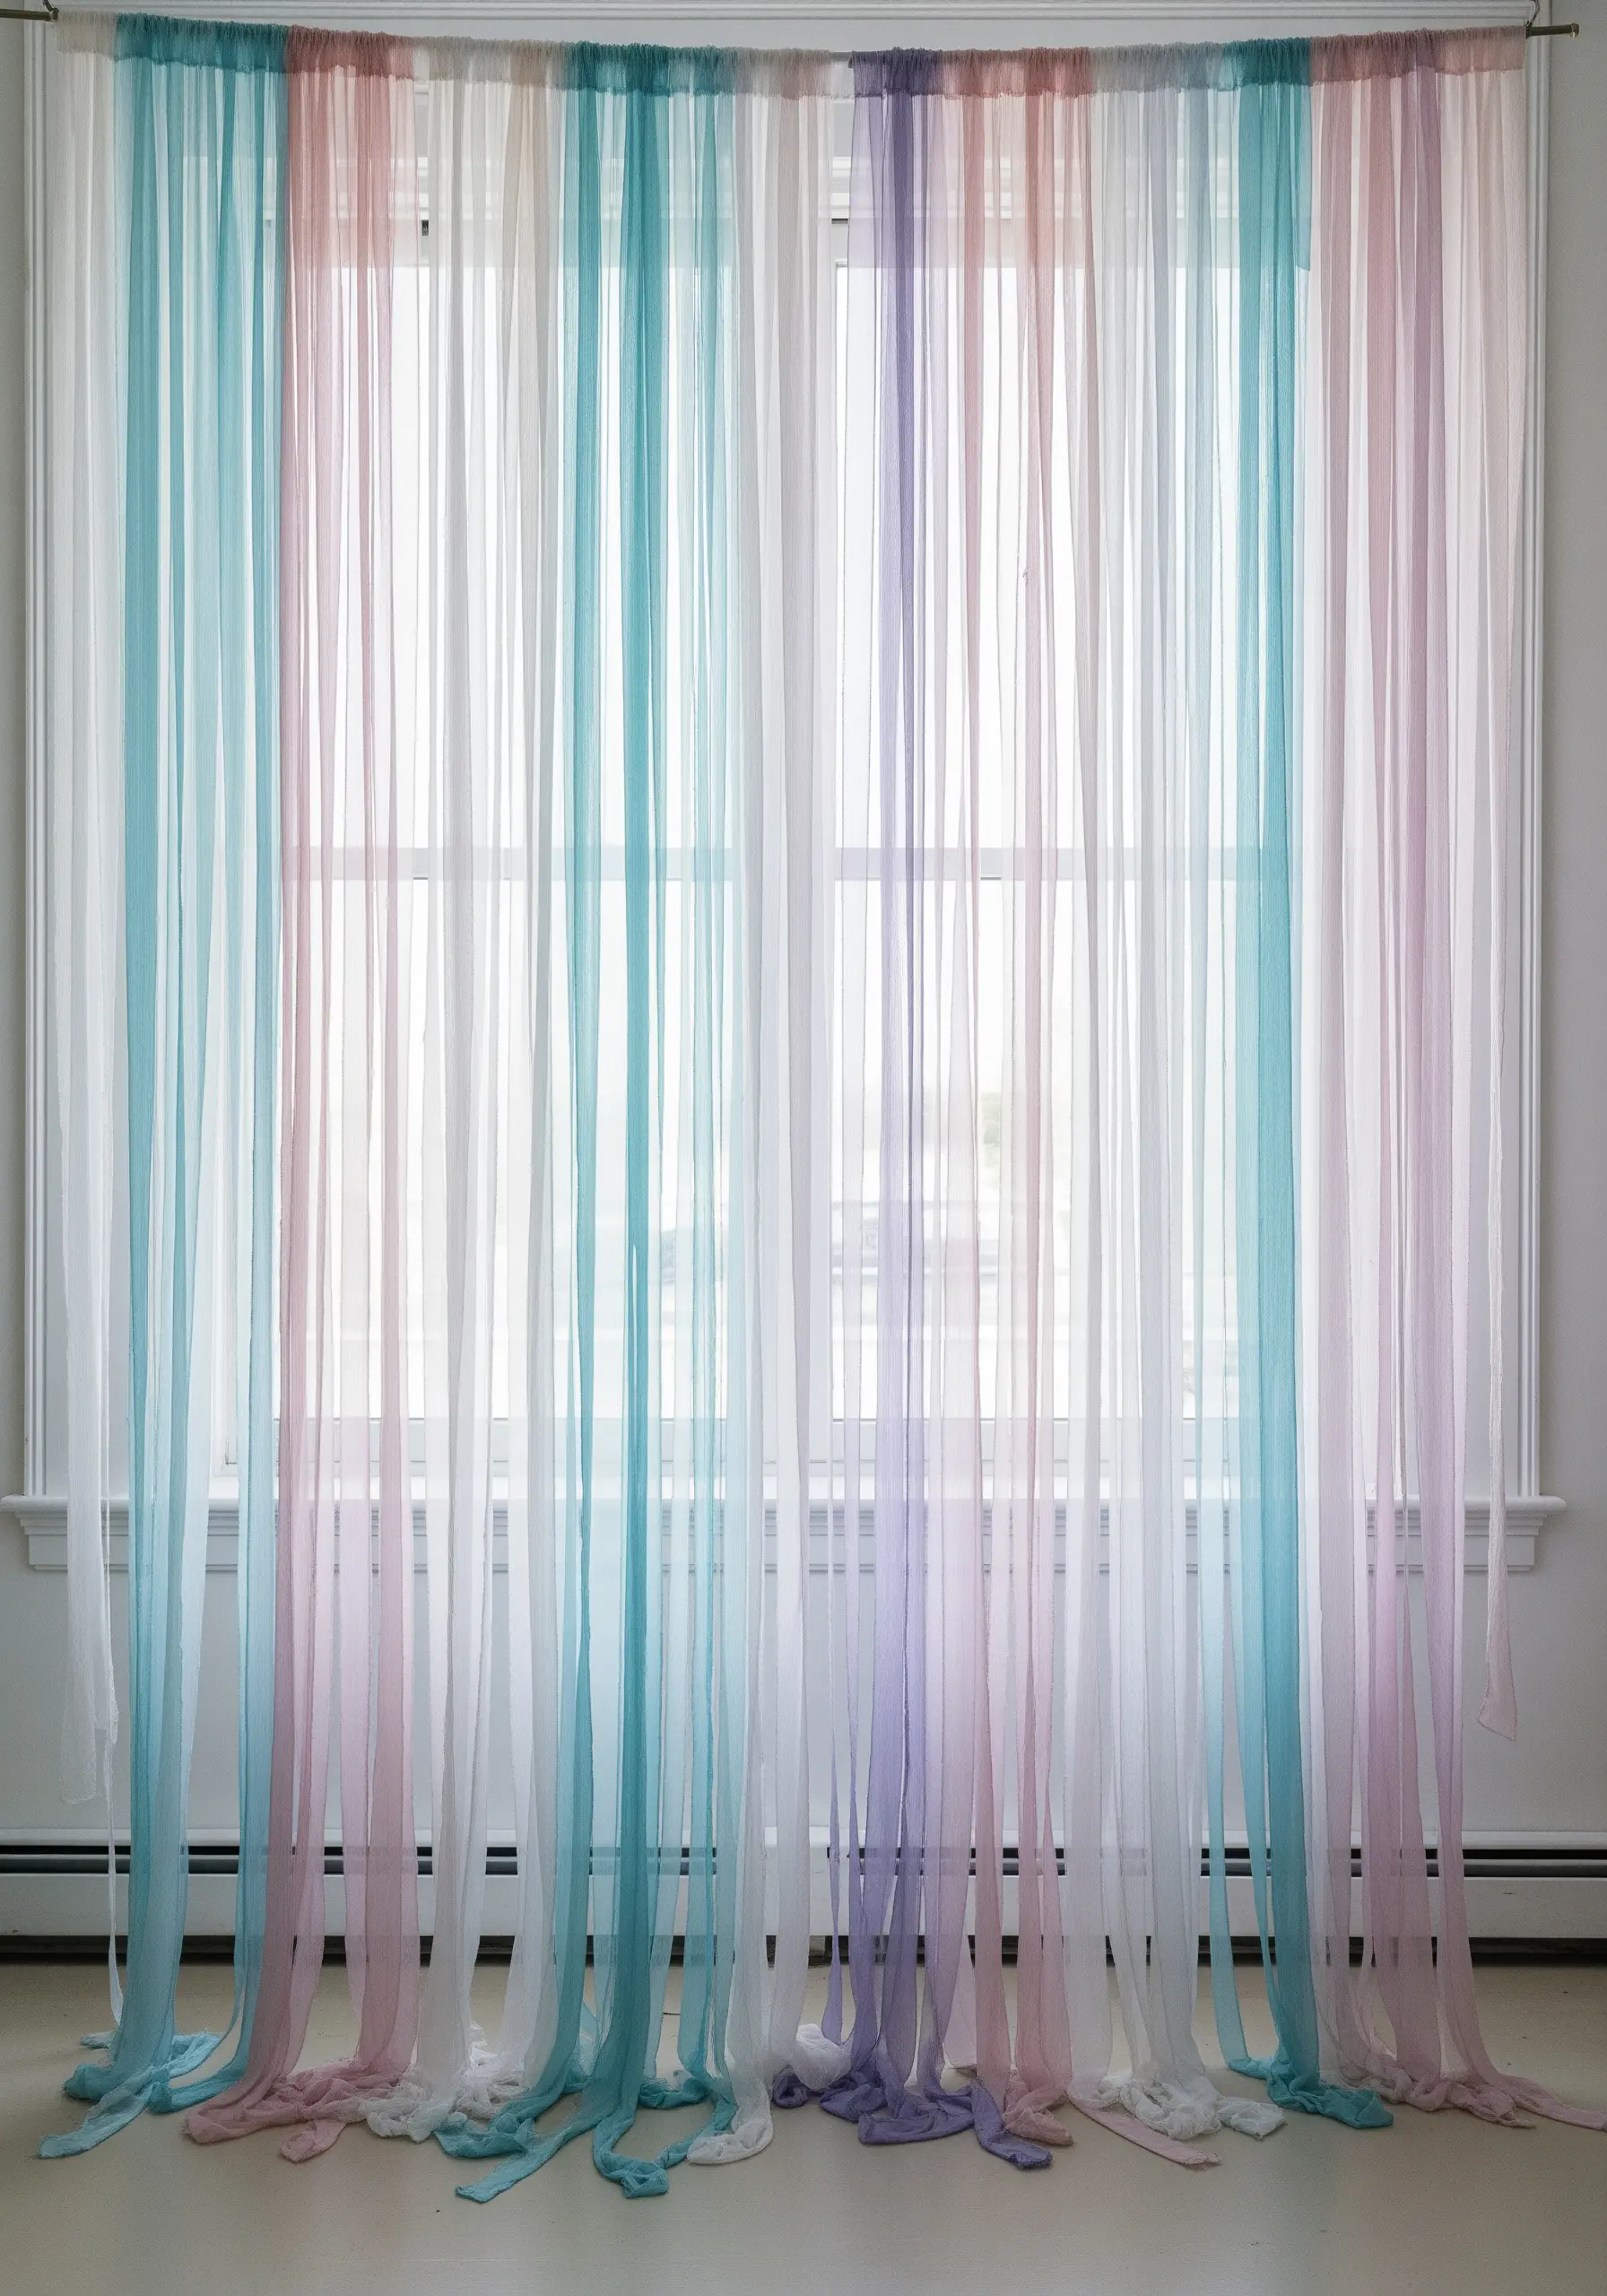
Reimagine your window treatments as a delicate fiber art installation.
Instead of a single curtain, hang individual strips of sheer, lightweight fabric like organza or silk chiffon from a standard curtain rod.
Choose a soft, harmonious color palette and arrange the strips to create a subtle, flowing gradient effect.
The fabric will catch the breeze and filter daylight, casting soft, colorful shadows that shift and change throughout the day, adding movement and ethereal beauty to the room.
14. Geometric String Art that Glows

Create an electrifying visual by combining geometric precision with UV-reactive materials.
Start with a black-painted board and map out a grid of small nails or pins.
Use neon-colored embroidery floss or string that is specifically designed to be blacklight-reactive.
Stretch the strings between the pins in precise, overlapping geometric patterns—the tension is what creates the clean lines.
Under a UV light, the threads ignite with color against the dark background, revealing layers of hidden depth and creating a mesmerizing effect.
15. Weaving with Natural and Found Objects

Add unparalleled texture and realism to your landscape weavings by incorporating elements directly from nature.
As you weave, create small pockets or use techniques like soumak wrapping to secure pieces of dried moss, bark, or small twigs into the fabric.
Use a palette of earthy greens and browns in a variety of yarn textures—from smooth cotton to fuzzy wool—to mimic the complexity of the forest floor.
This mixed-media approach transforms your weaving from a representation of nature into a tangible piece of it.
16. Building a Gradient with Modular Felt

Create a stunning, large-scale gradient effect using simple, modular shapes, which is far easier than dyeing or weaving a gradient.
Cut thick craft felt into identical geometric forms, like hexagons or triangles.
Plan your color transition on the floor first, arranging the pieces to ensure a smooth flow before mounting them to the wall with removable adhesive tabs.
By slightly overlapping the shapes and varying their angle, you can create a sense of movement and depth that makes the wall feel alive.
17. Crocheting a Hyperbolic Coral Reef
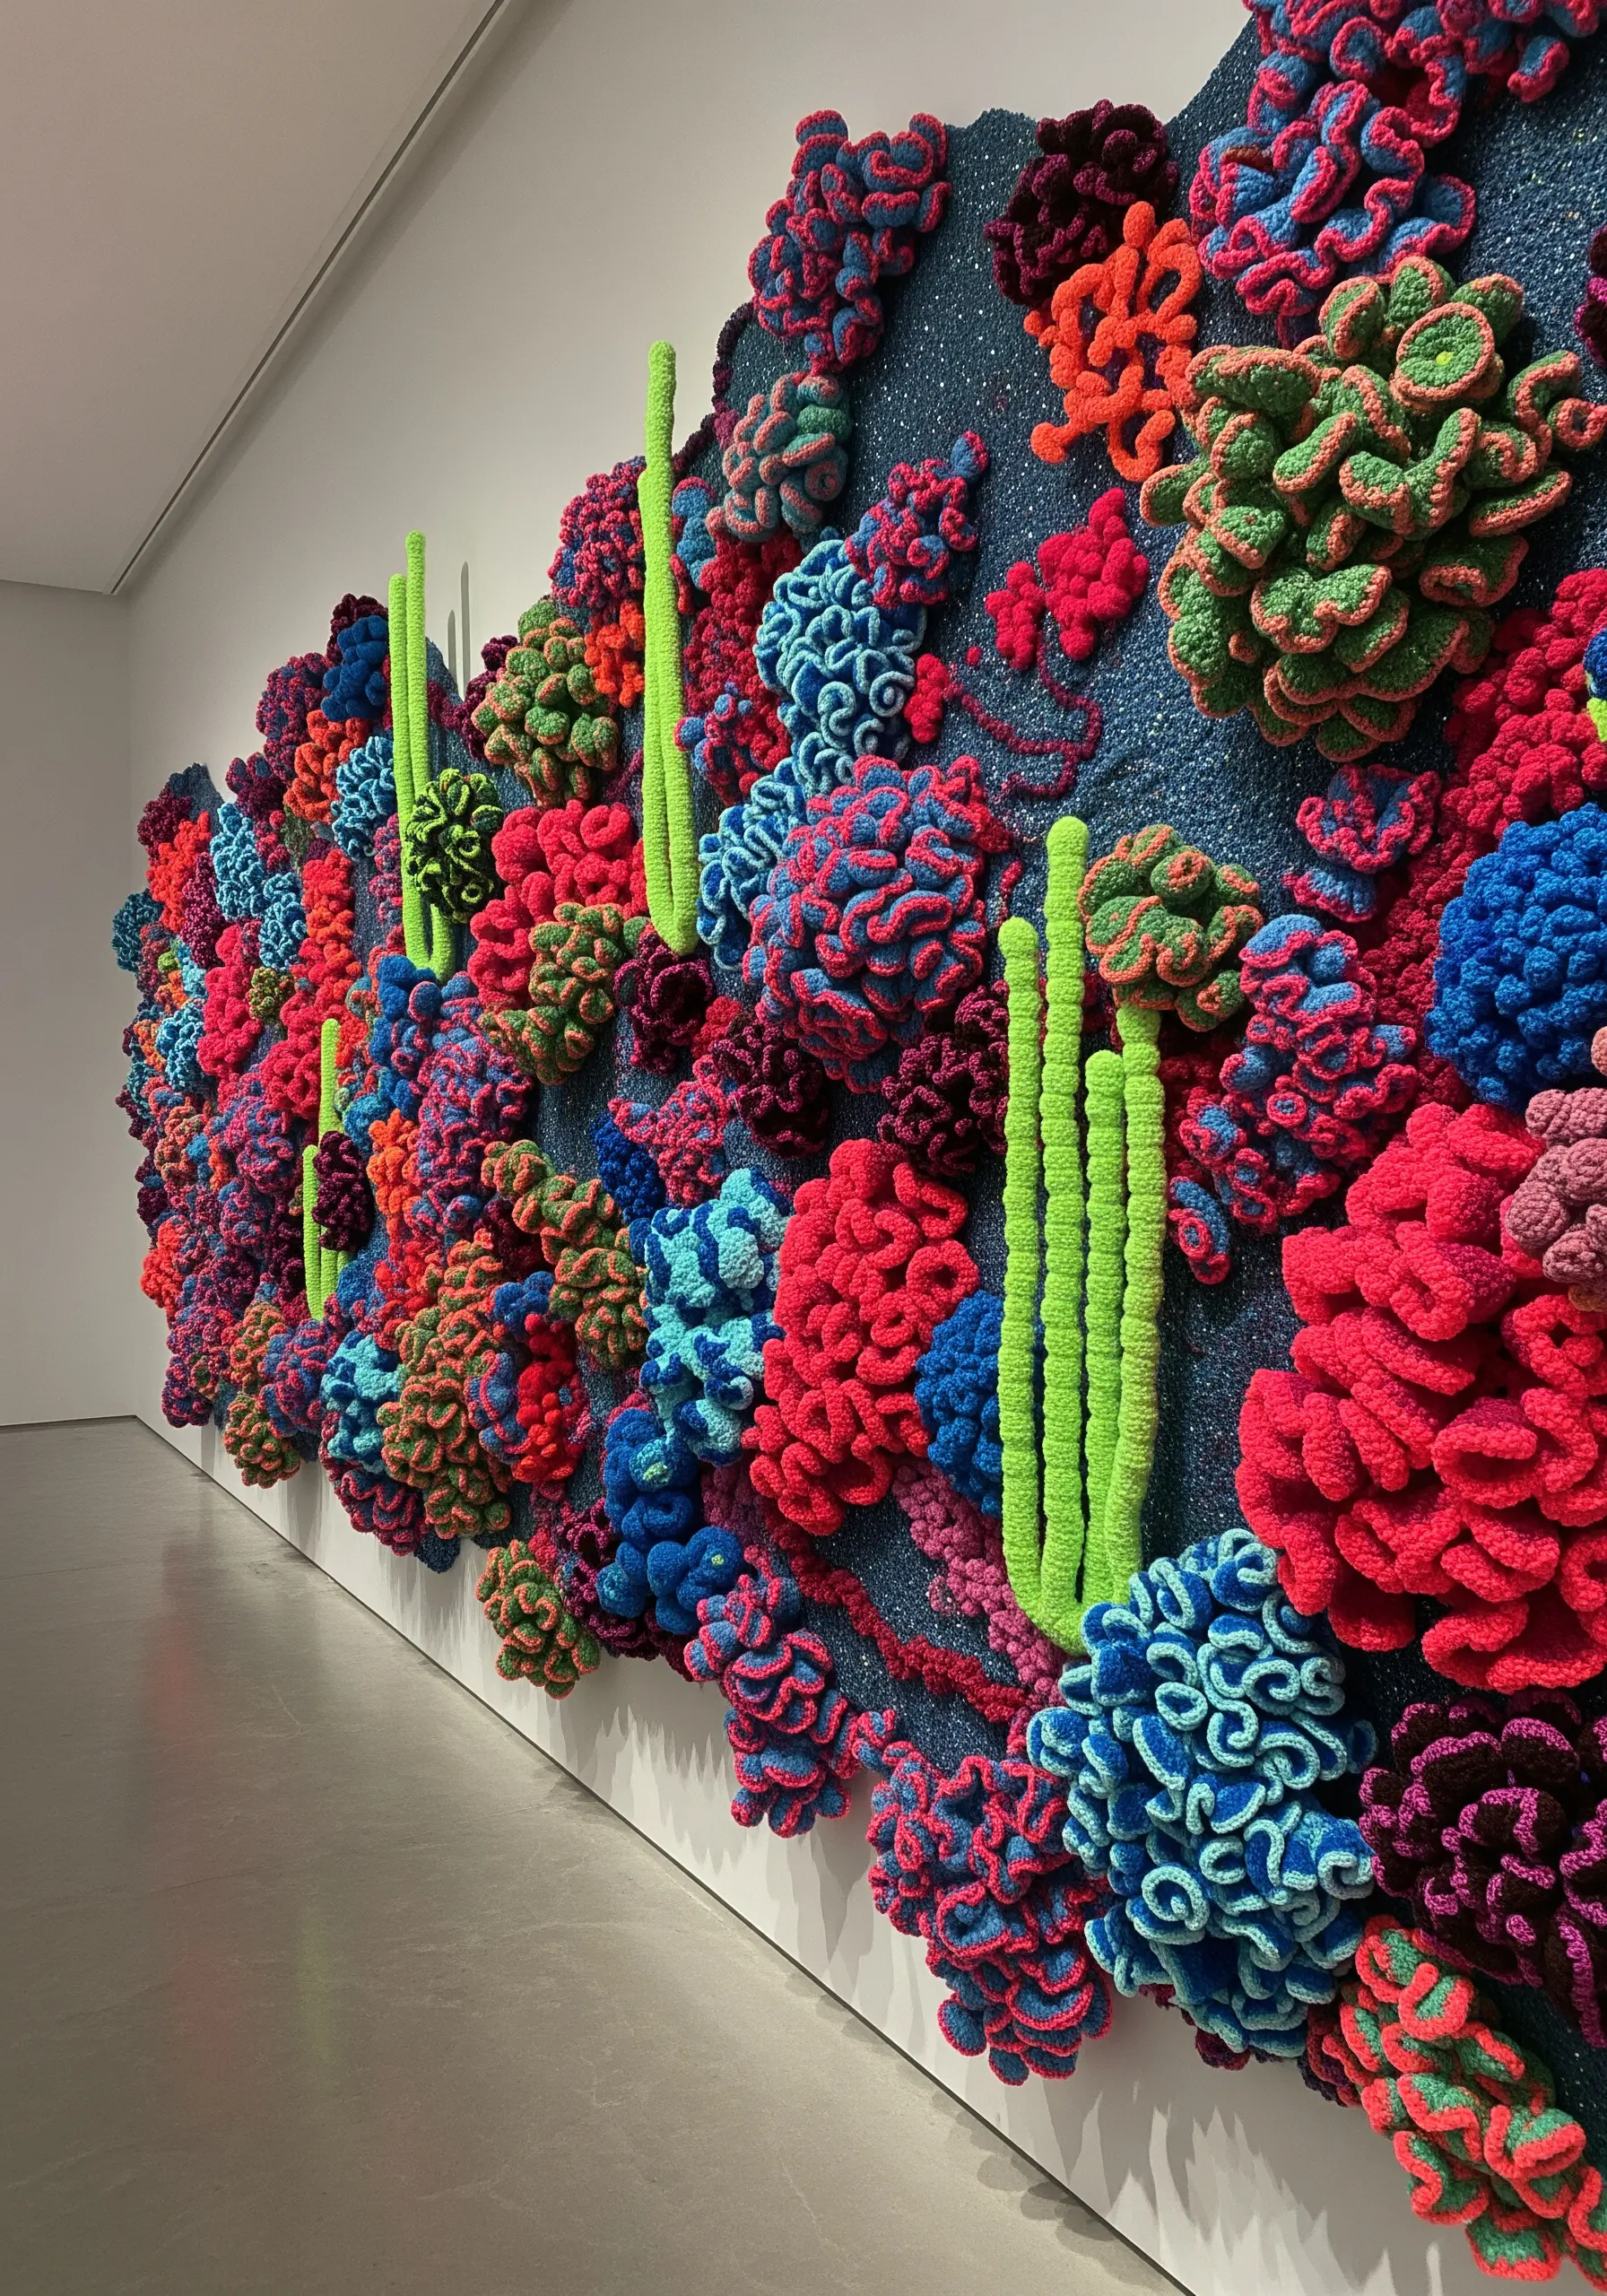
You can capture the organic, fractal forms of a coral reef by using hyperbolic crochet.
This mathematical technique simply involves increasing your stitches rapidly in each row (for example, crocheting two stitches into every one from the row below).
This forces the fabric to curl and ruffle naturally into complex, brain-like shapes without any special shaping.
Use a variety of yarn textures and vibrant, saturated colors to mimic the biodiversity of a reef, then stitch the individual forms onto a fabric-covered canvas to build a dense, layered, and tactile underwater world.
18. Designing an Ombré Fabric Installation

Make a monumental statement by working with fabric at an architectural scale.
Source or dye fabric in a wide gradient of a single color family, from the lightest tint to the darkest shade.
Rip or cut the fabric into long, uniform strips to create a cohesive look.
The key to this dramatic effect is meticulously arranging the strips from lightest to darkest before tying them to a suspended grid or mesh panel.
Letting the fabric pool on the floor enhances the sense of a cascading waterfall, creating an immersive experience that transforms the space.
19. Weaving on an Unconventional Loom
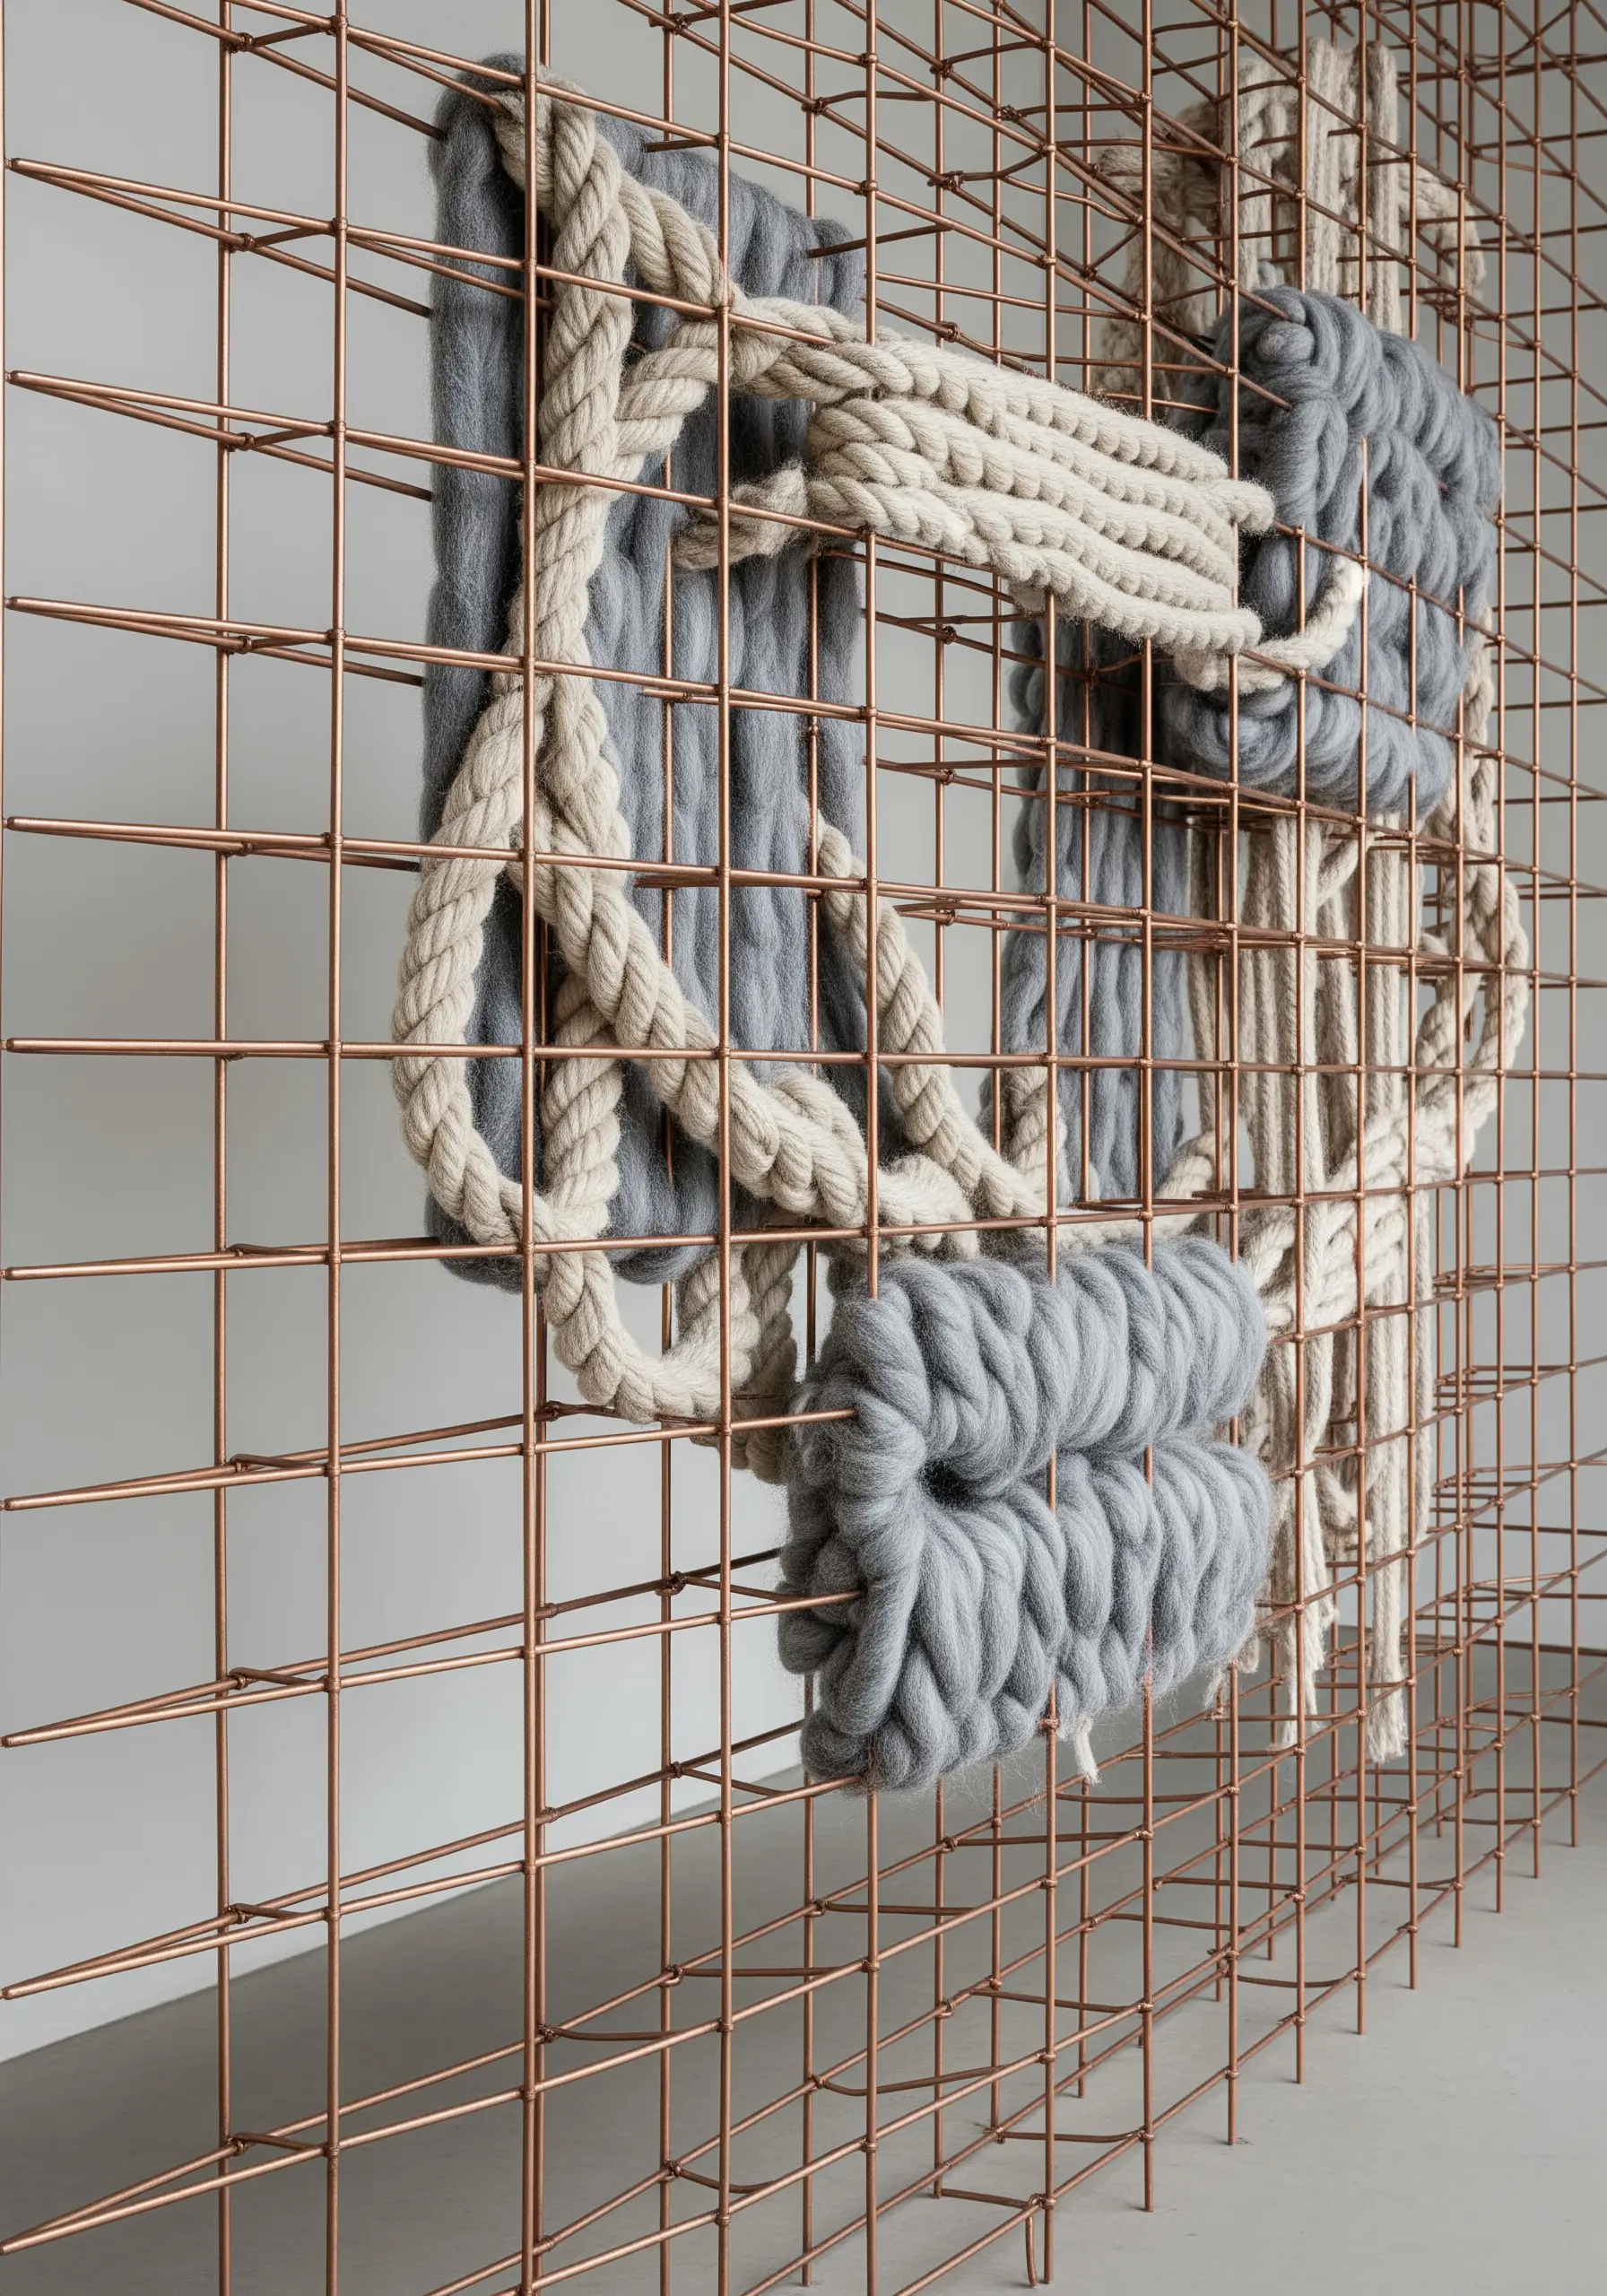
Break free from traditional looms by using industrial materials as your framework.
A simple metal grid, like copper or steel mesh, can serve as a giant, rigid canvas for your weaving.
Weave thick, soft materials like felted wool roving or marine rope through the grid, playing with tension and drape.
The contrast between the hard, geometric structure and the soft, pliable fibers creates a powerful visual tension.
This makes for one of the most effective fiber art installations that are perfect for small apartments because it has a huge impact without taking up floor space.
20. The Meditative Macrame Mandala
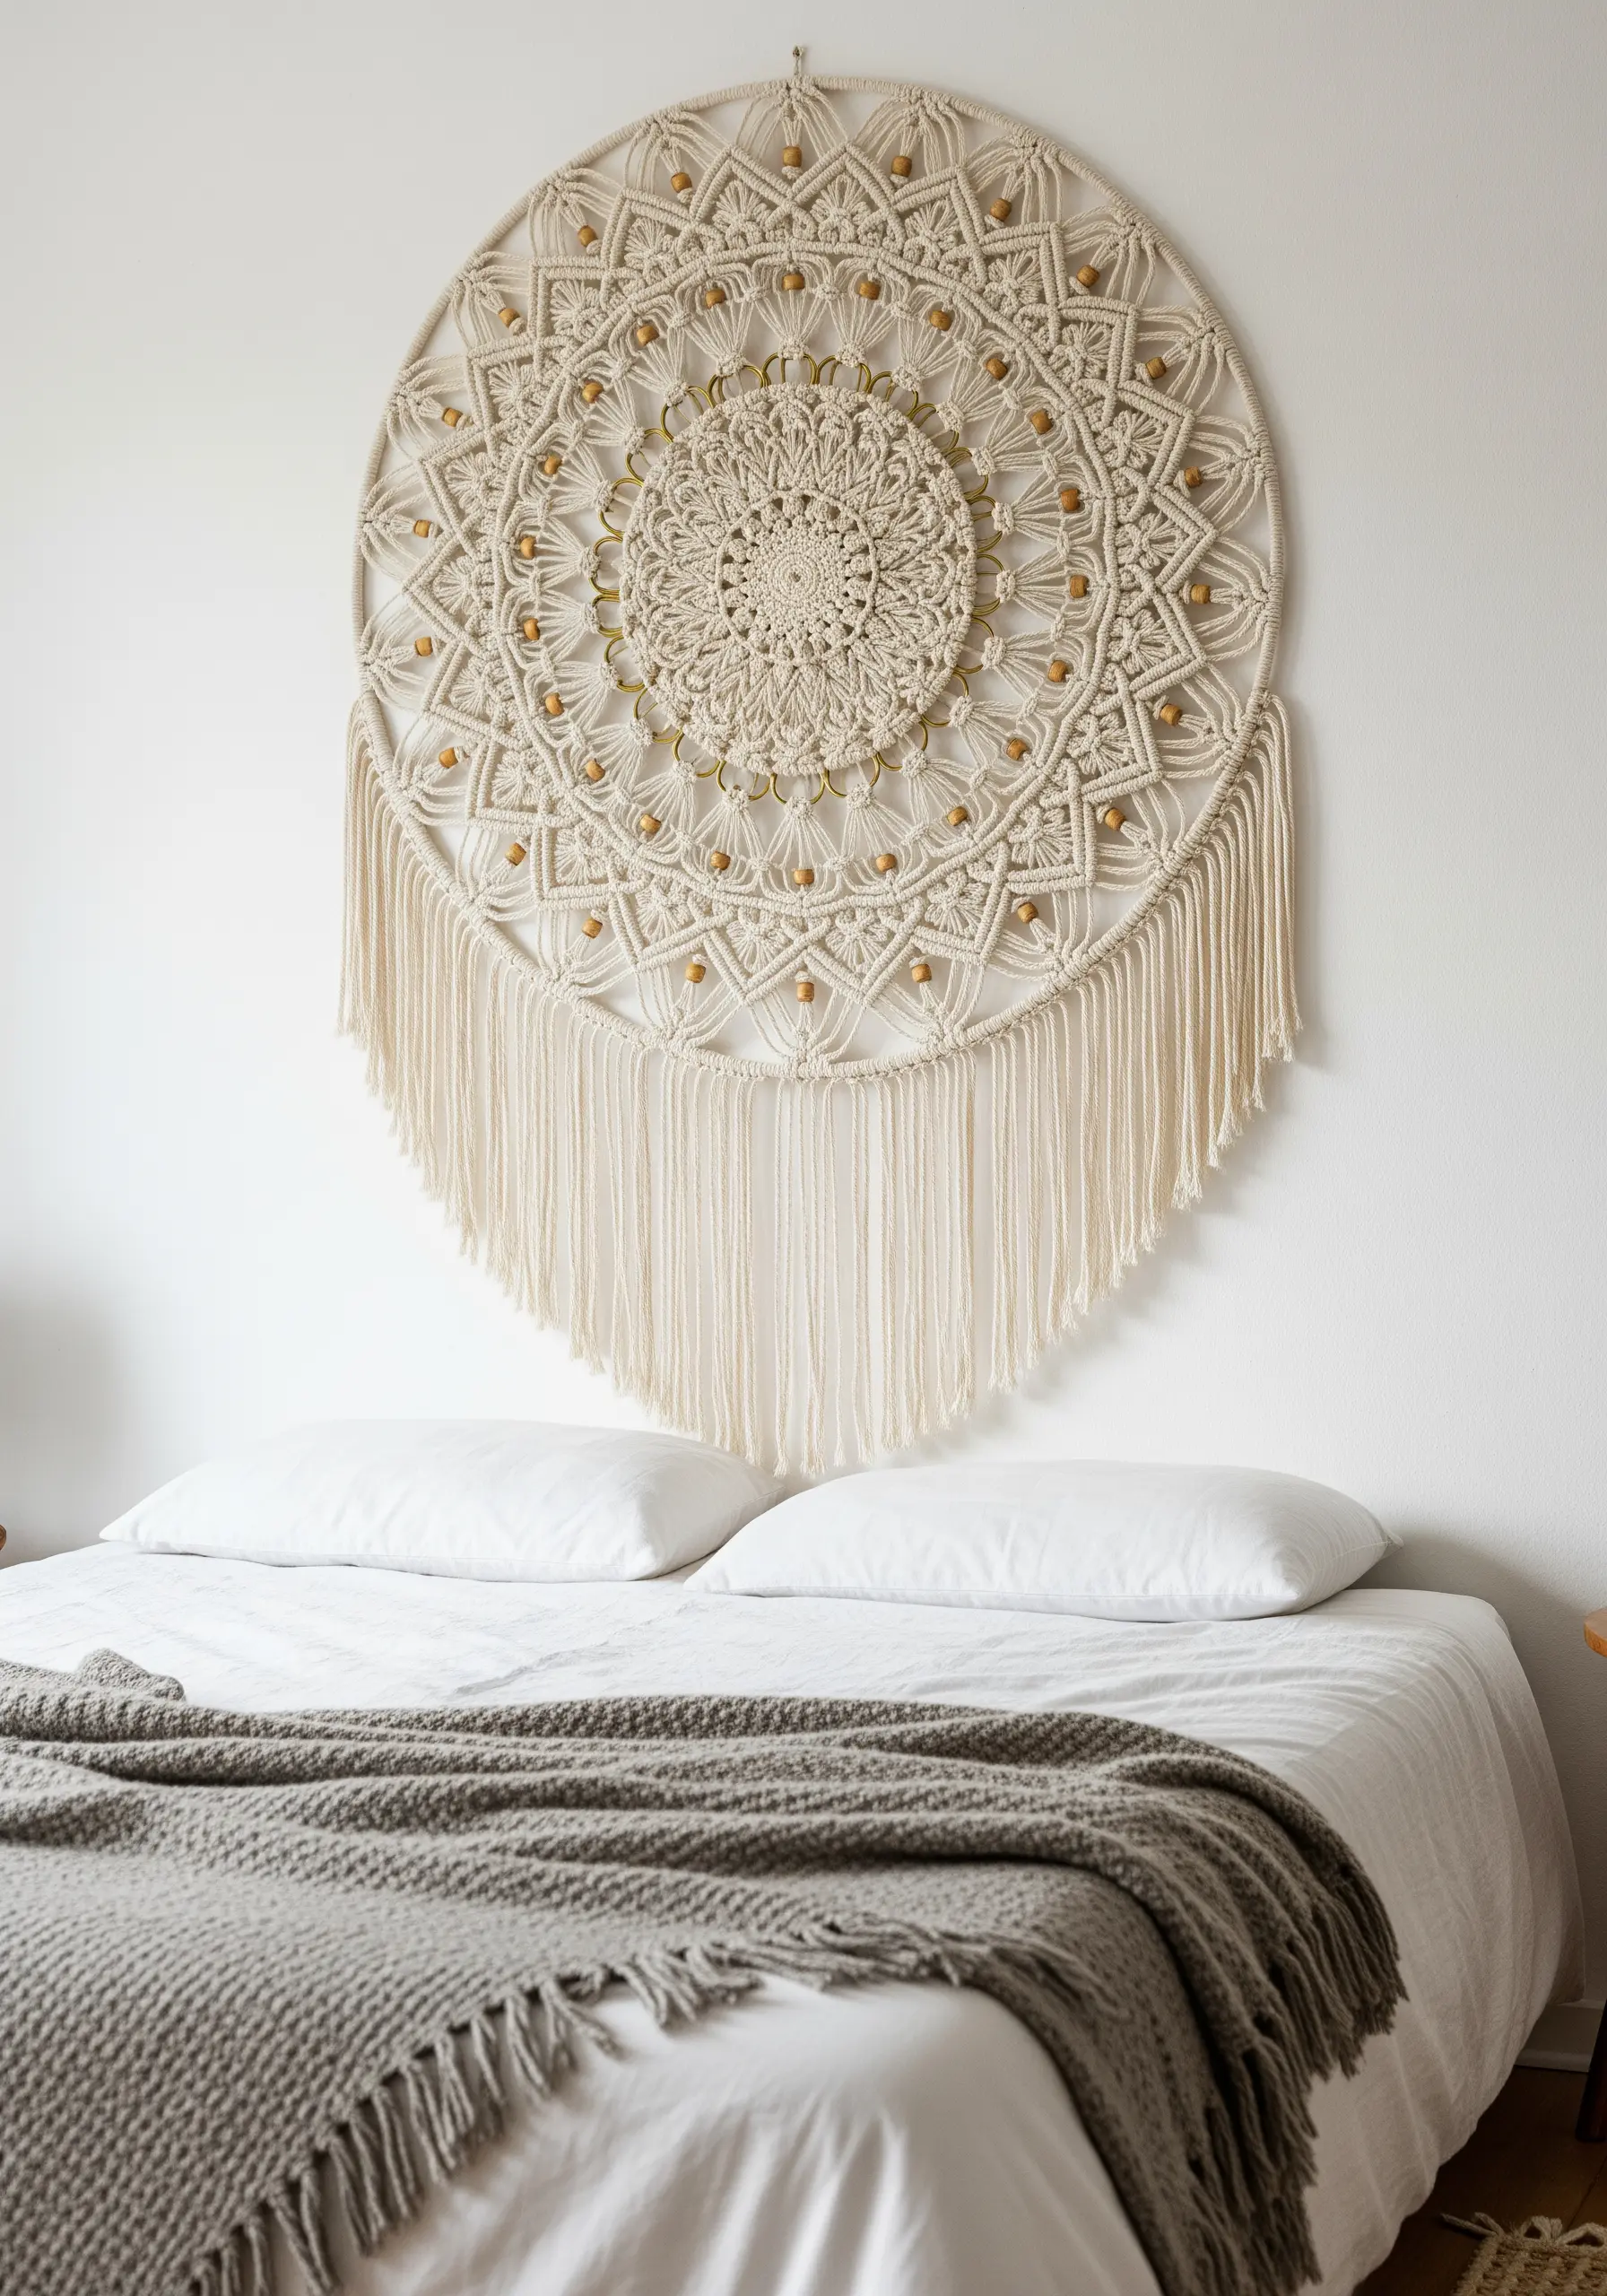
Create a serene focal point for a bedroom or quiet space by building a macrame mandala.
Start with a metal or wooden hoop as your center and work outwards in symmetrical, repeating rounds.
Incorporate a variety of knots—like square knots for structure and double half-hitches for crisp lines—to create intricate, geometric patterns.
Weave in wooden beads at regular intervals to add a natural, grounding element that enhances the repetition.
This piece embodies the principles found in modern mandala stitch patterns for calm, mindful aesthetic daily crafting, creating a serene focal point.
21. Achieving a “Paint Drip” Effect in Weaving

You can mimic the fluid, spontaneous look of abstract expressionist painting within the structured grid of a weaving.
To create this effect, use tapestry weaving techniques where you don’t carry the weft thread from edge to edge.
Instead, work in small, irregular color blocks, allowing the shapes to “drip” down the warp threads organically.
Using high-contrast colors like red and blue against a neutral background makes the shapes pop.
The key is to embrace imperfection and asymmetry, building the composition on the loom to capture a sense of energetic movement.
22. The Simplicity of a Yarn Gradient Wall
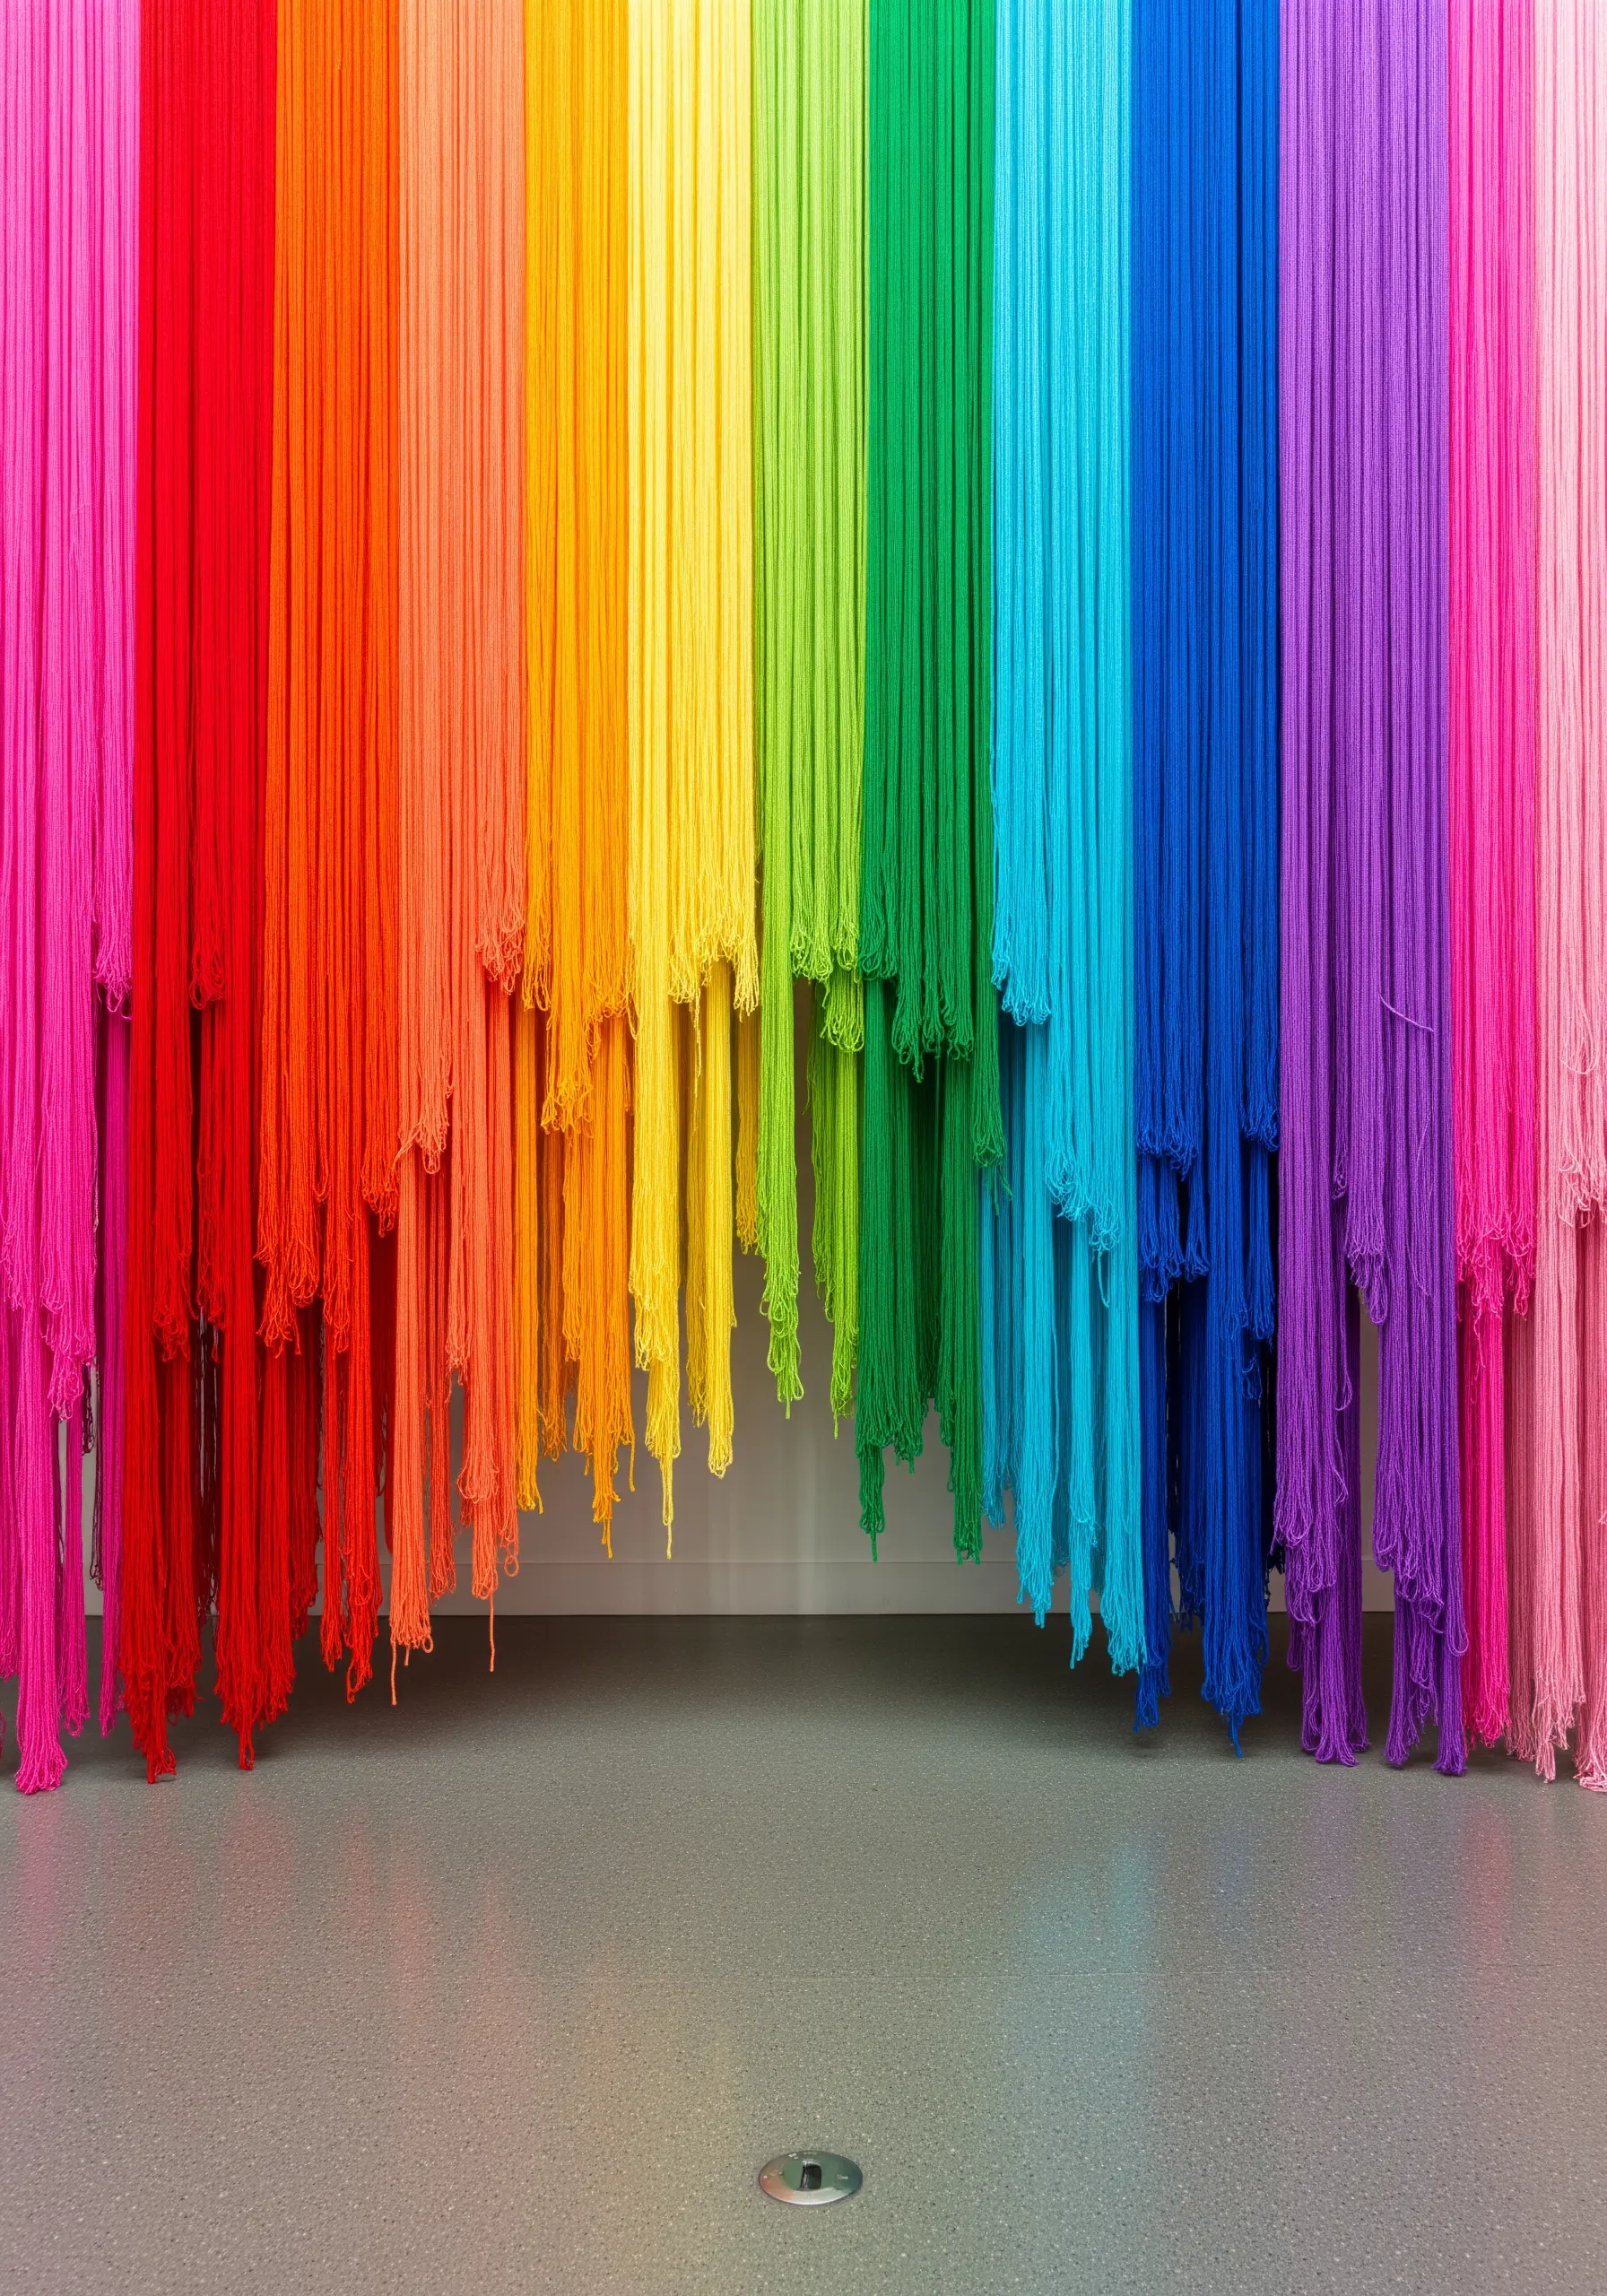
Create a high-impact installation with the simplest of materials, proving that execution is everything.
The power of this piece comes from precise color curation and flawless installation.
Source yarn in every shade of the rainbow, ensuring a smooth, seamless transition between hues.
Cut each strand to the exact same length and hang them from a discreet ceiling track or rod, packed tightly together.
The effect is a pure, uninterrupted curtain of color that transforms a simple wall into a vibrant, immersive spectrum.


