

Adding a personal, handmade touch to a child’s wardrobe transforms everyday pieces into cherished keepsakes. Daisies and buttercups, with their simple charm and cheerful energy, are the perfect motifs to begin with—they feel both timeless and full of youthful spirit.
But making embroidery that not only looks beautiful but also withstands the adventures of childhood requires more than just a pattern. It’s about choosing the right stitch for the fabric, understanding how thread weight creates texture, and placing your design thoughtfully to complement the garment’s shape and movement.
Here, you’ll discover how to make your florals pop on sturdy denim, how to keep them delicate on soft knits, and how to create compositions that feel alive and intentional. Let these ideas inspire you to pick up a needle and thread, and turn simple clothing into a canvas for your own whimsical, handcrafted stories.
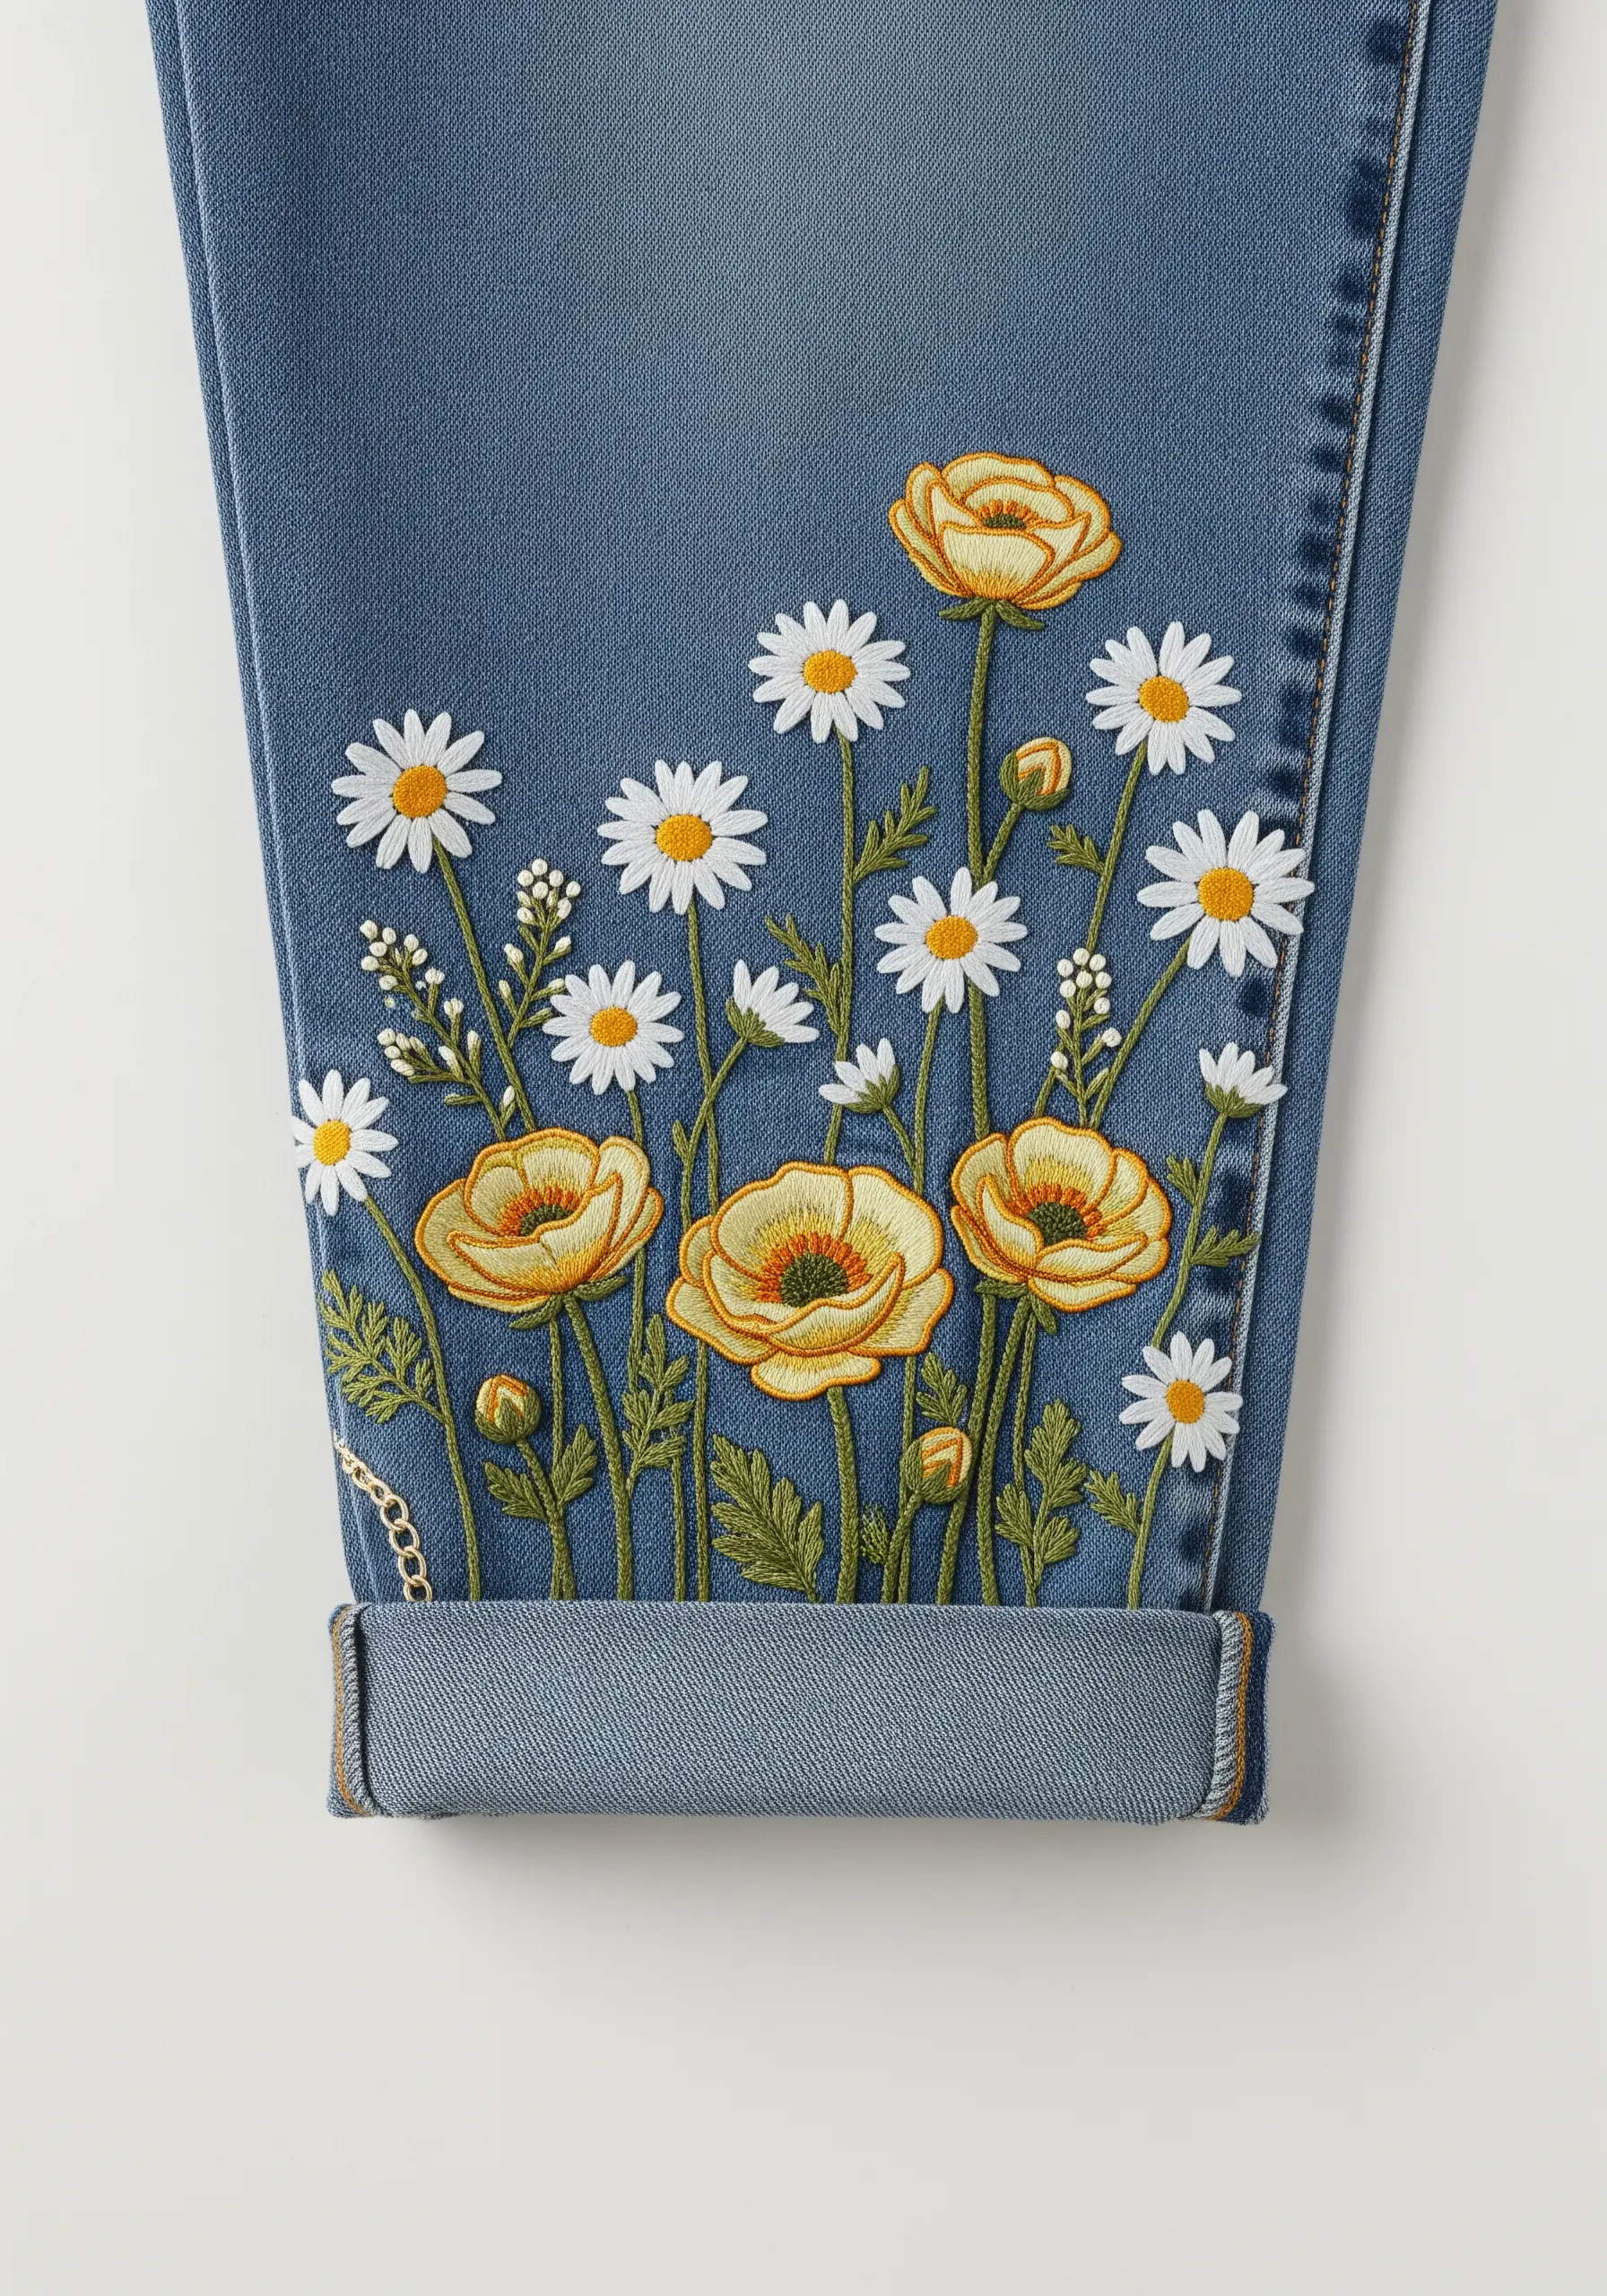
1. Dimensional Sleeve Garden
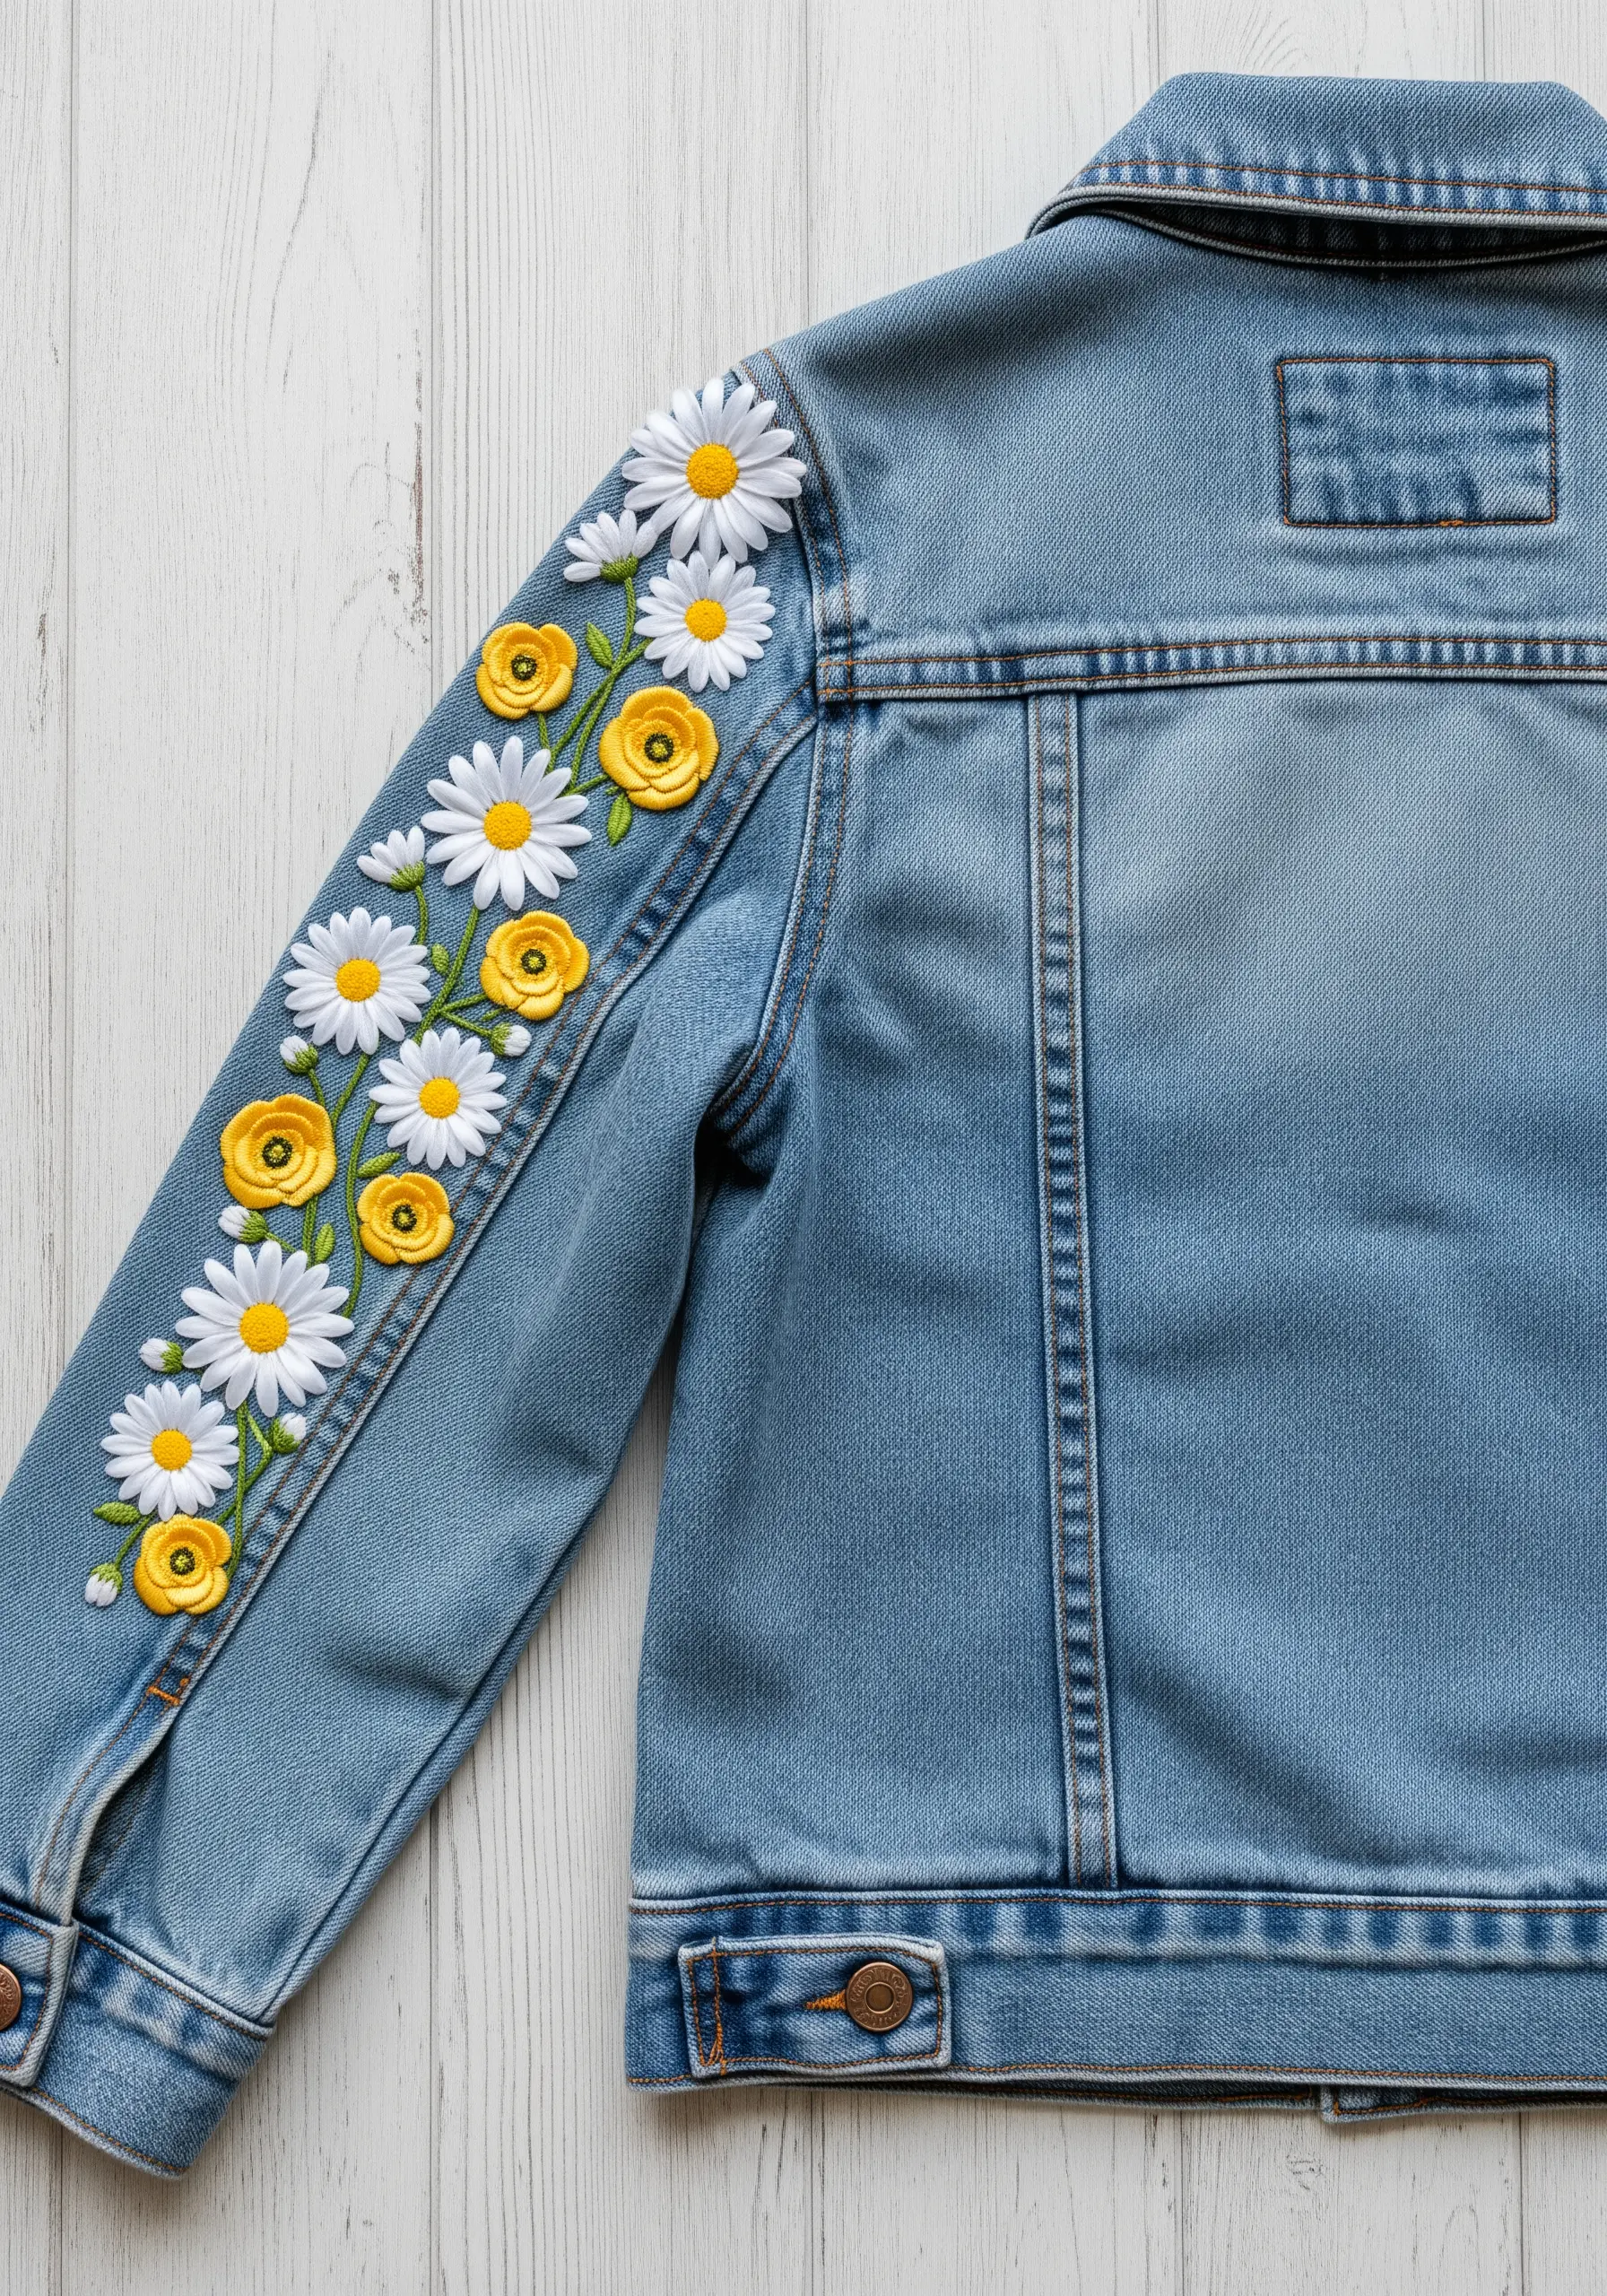
Create a stunning 3D effect on denim by using a cast-on stitch for the yellow buttercups, which lifts them off the fabric surface.
For the daisy petals, stitch detached chain stitches with all six strands of floss to give them a puffy, cloud-like volume that invites touch.
Always use a medium-weight cut-away stabilizer on the inside of the jacket to support the stitches during wear and washing, preventing puckering on the heavy denim.
This technique turns a simple sleeve into a focal point, creating a trail of blossoms that looks professionally finished and durable.
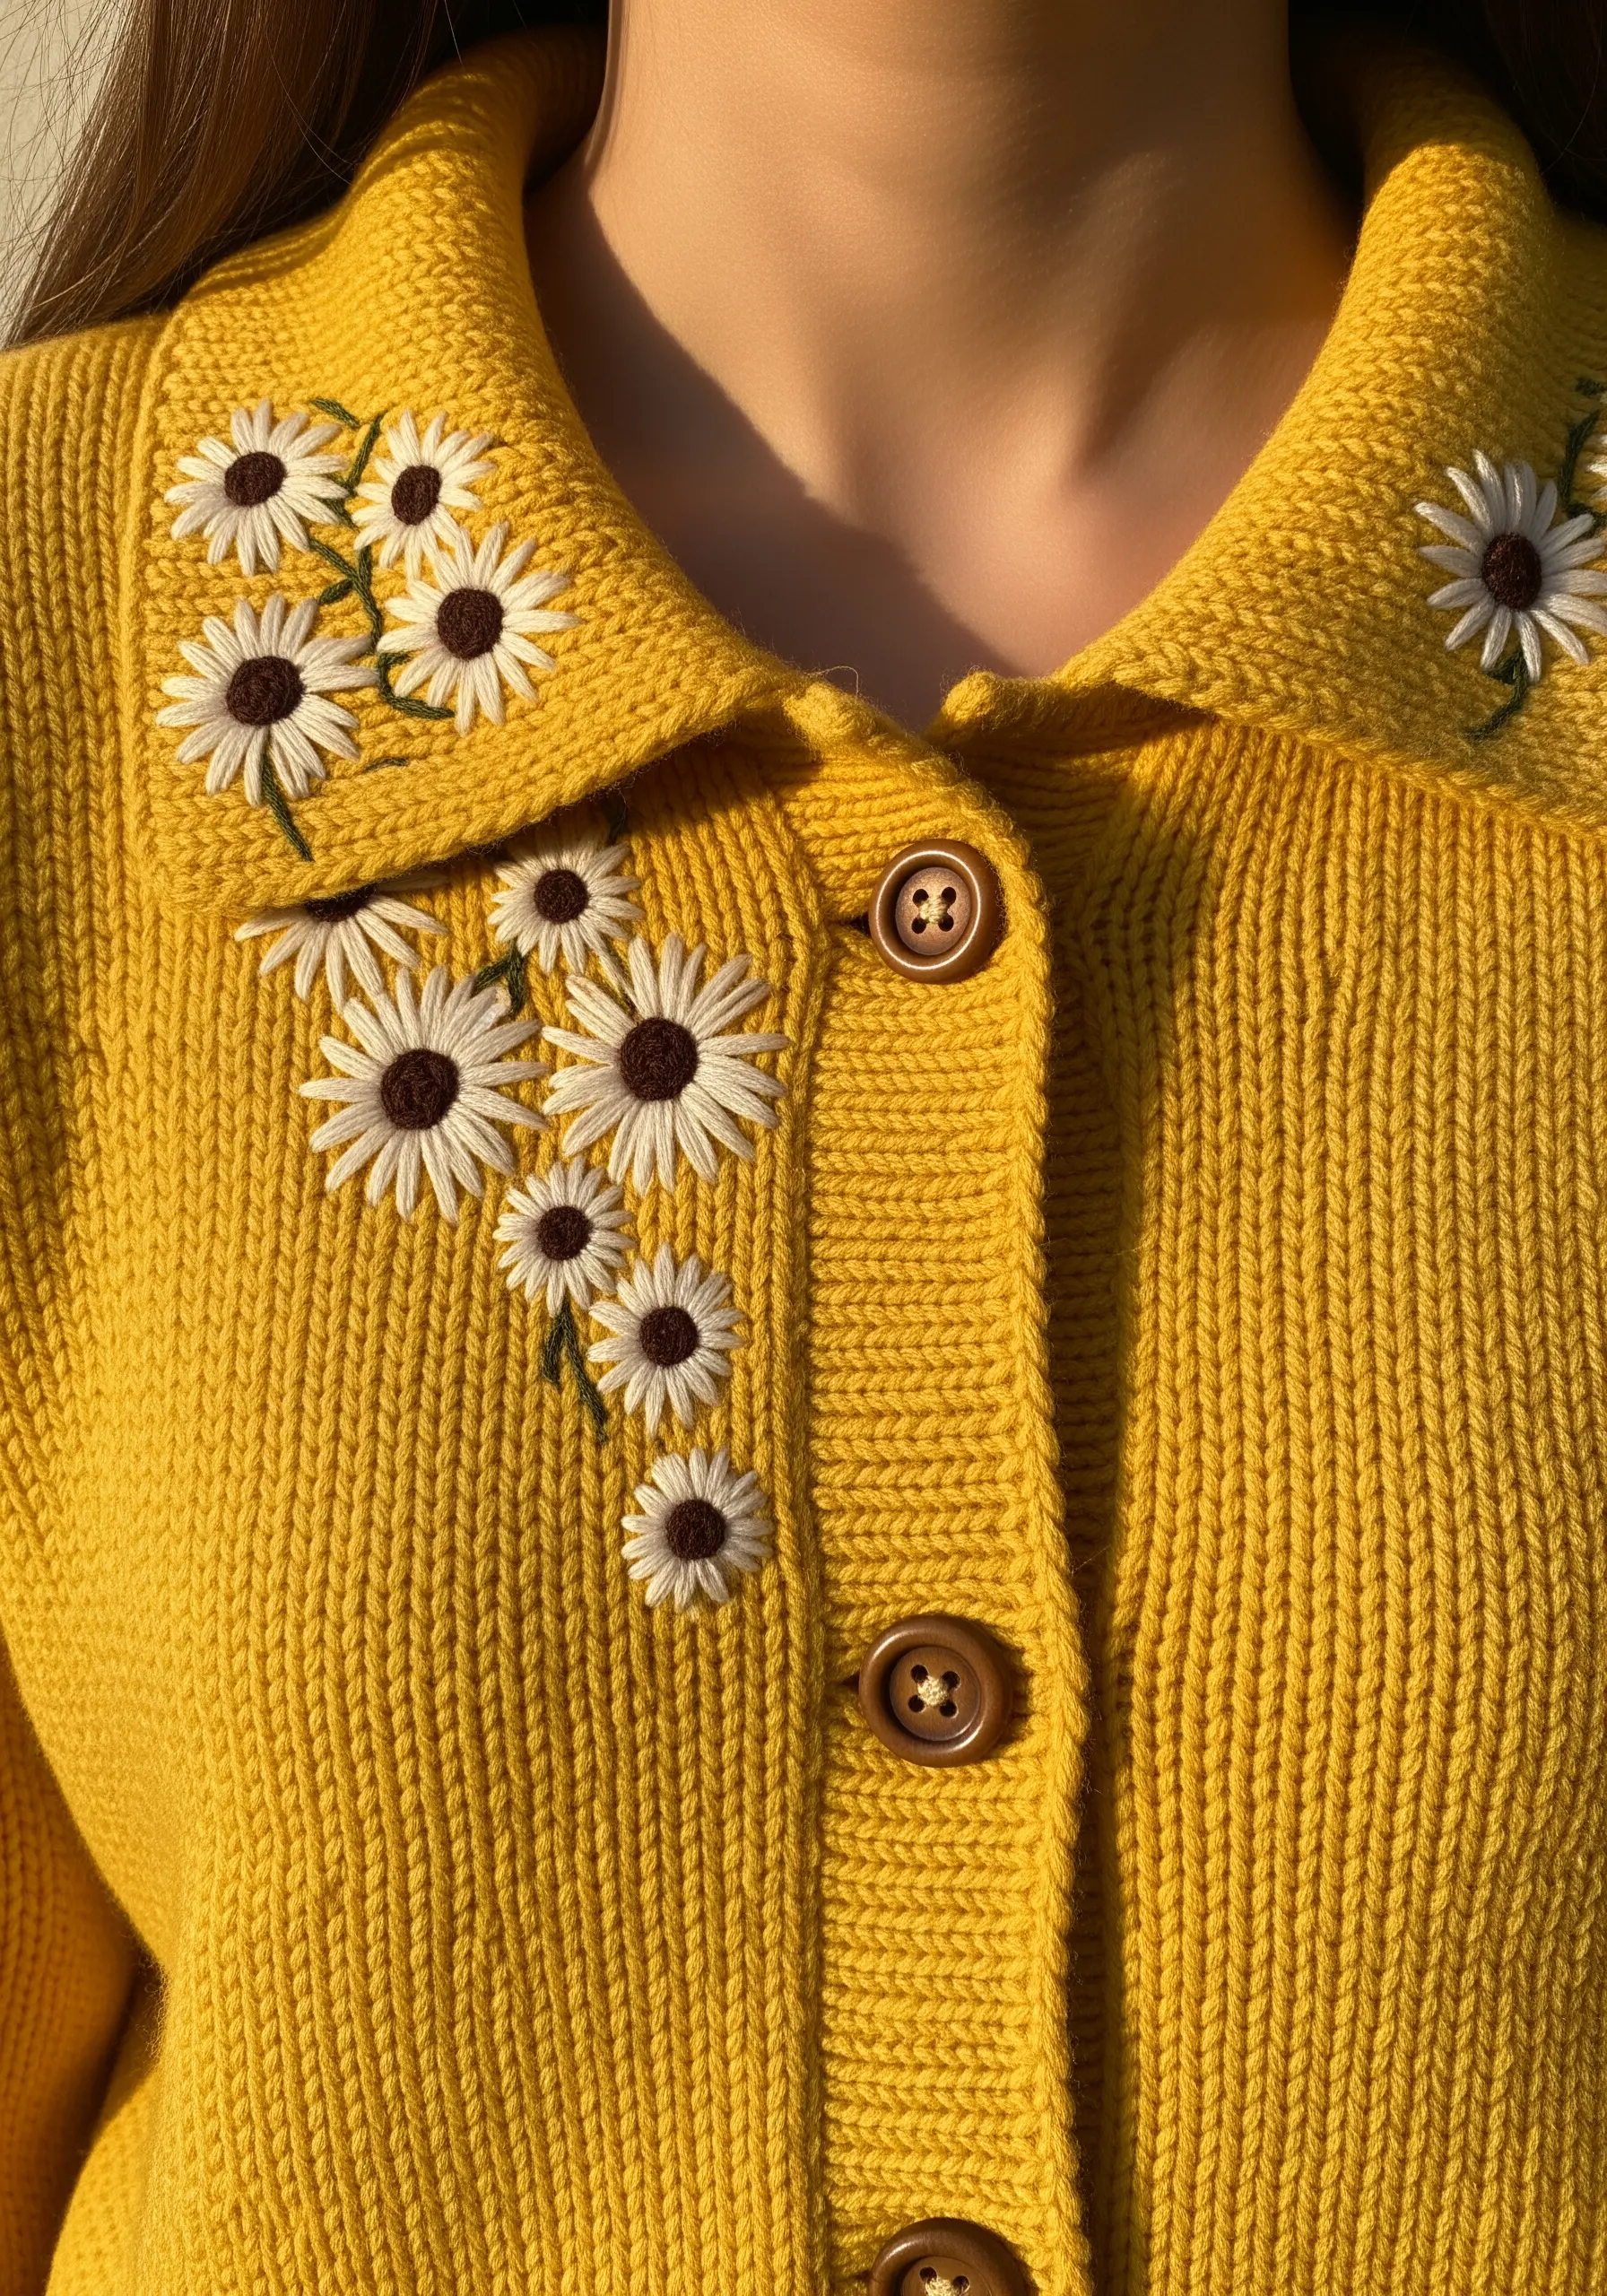
2. The Airy Neckline Wreath

When embroidering on stretchy knits like a t-shirt, a lightweight iron-on stabilizer is non-negotiable; it prevents the fabric from warping and keeps your stitches even.
Use only two or three strands of floss for a design this delicate.
This lighter touch ensures the embroidery remains flexible and doesn’t weigh down the soft drape of the fabric around the collar.
Vary the direction of your satin stitches on the buttercup petals to catch the light differently, adding subtle dimension to these meadow bloom stitch projects.
3. A Playful Scattered Meadow

Achieve an intentionally random look on a denim bib by scattering simple mini embroidery patterns of individual flowers.
Vary the height and angle of each stem using a simple backstitch, which gives the composition a natural, breezy feel.
For the buttercups, a few straight stitches forming a cup shape is all you need, while the daisies can be made with five simple detached chain stitches.
This approach is perfect for beginners and adds a custom touch without overwhelming the garment.
4. The Rich Garden Hemline

To create a dense, layered floral border, always stitch the elements in the background first.
Embroider the green foliage and stems using a fishbone stitch for leaves, then add the daisies and buttercups on top to create a sense of depth.
For the buttercups, switch from satin stitch to a long-and-short stitch to create gentle color gradients, making the petals look more realistic and less flat.
This technique works beautifully on structured fabrics like linen or canvas, as they can support the weight of a dense design without sagging.
5. Crisp Canvas Sneaker Florals

Embroidering on canvas shoes requires a sharp, strong needle and a thimble to protect your fingers.
Keep the designs clean and graphic to complement the shoe’s structure. A simple lazy daisy stitch for petals and a series of French knots for the center is effective and quick.
Use a water-soluble stabilizer on the shoe’s surface to draw your pattern, as it will wash away cleanly without leaving marks on the bright white canvas.
Focus the embroidery on the tongue and toe cap for maximum visibility and to avoid friction spots inside the shoe.
6. Collar Accents on Chunky Knits
When stitching on a ribbed or chunky knit, use yarn or tapestry wool instead of standard floss to match the texture of the garment.
Anchor your stitches in the valleys of the knit pattern to keep them secure and prevent them from getting lost in the fabric’s texture.
Use a blunt-tipped tapestry needle to avoid splitting the sweater’s yarn.
A cluster of simple detached chain stitch daisies on the collar draws the eye upward and adds a charming, retro feel to a cardigan.
7. The Painterly Bouquet Backpack
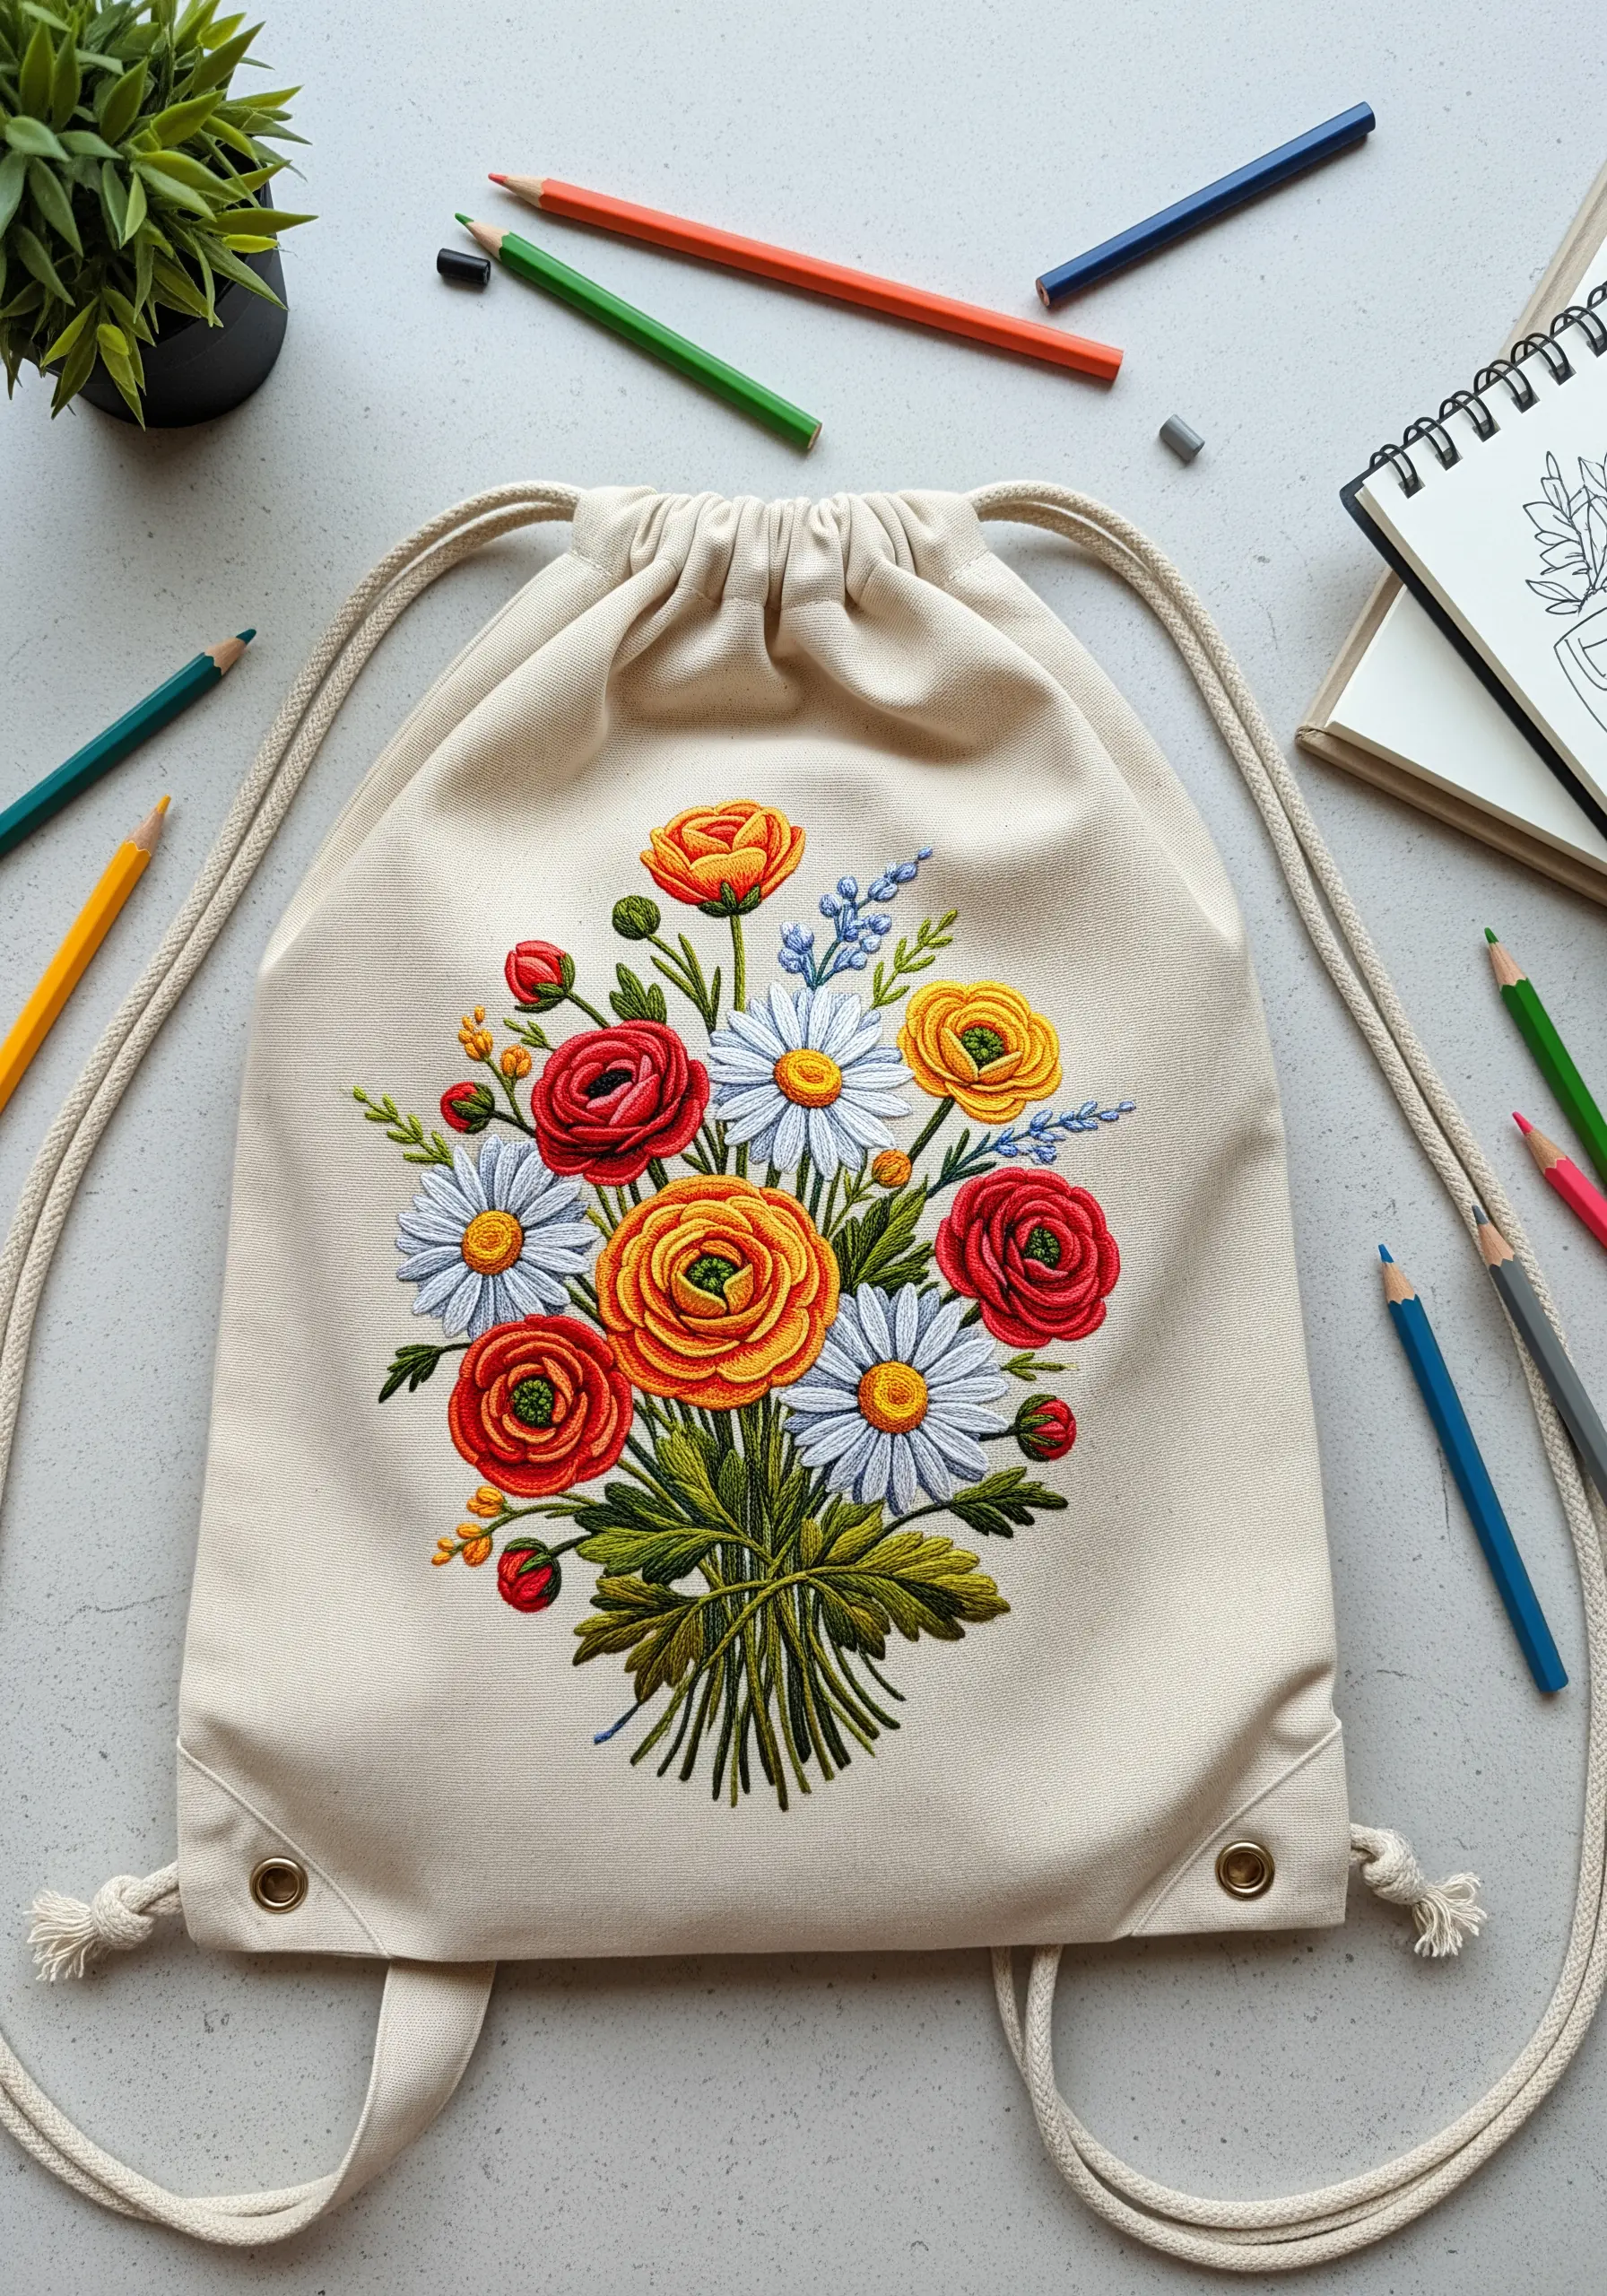
To achieve a rich, painterly effect on a canvas drawstring bag, use a thread painting technique with long-and-short stitches.
Blend multiple shades of yellow, orange, and red within a single buttercup to create realistic depth and highlights.
Use a full six strands of floss for the main flowers to make them the heroes of the bouquet, then switch to just two strands for the filler foliage and smaller buds.
This contrast in thread weight creates a clear visual hierarchy and makes the entire composition feel more dynamic and professional.
8. Symmetrical Button-Placket Borders

Create an elegant, structured look on a denim shirt by stitching symmetrical floral vines along the button placket.
Use a water-soluble marking pen and a ruler to ensure your meandering vine is perfectly mirrored on both sides for a polished, high-end finish.
Keep the motifs small and delicate, using just two strands of floss, so the design enhances the shirt’s structure rather than overwhelming it.
This is one of those subtle embroidery touches that elevates a classic garment instantly.
9. Textural Woven Hat Band

Embroidering on a straw hat requires a different approach; instead of piercing the straw, weave your stitches through the existing structure where possible.
Use a thicker thread, like pearl cotton or even fine yarn, to create bold, dimensional flowers that stand up to the hat’s texture.
Woven wheel stitches are perfect for the buttercups, and bullion knots can create wonderfully textured daisy centers.
Secure your threads on the inside with a dab of fabric glue for extra durability against sun and wear.
10. Pocket-Sized Buttercup Bouquets

Transform the back pockets of denim shorts into miniature art canvases.
To avoid stitching the pocket shut, either use a small hoop that fits inside the pocket or carefully work by hand without a hoop.
Fill the entire pocket area with a dense cluster of buttercups, layering petals with long-and-short stitch to create a lush, overflowing look.
Use at least three shades of yellow per flower to build depth and make the bouquet feel vibrant and alive, even on a small scale.
11. The Minimalist Pocket Sprig

For a touch of understated elegance on a crisp dress shirt, a single sprig of buttercups emerging from the pocket is a perfect choice.
Position the design so the stems seem to grow from inside the pocket, which adds a clever, whimsical detail.
Use a fine, single strand of floss for this to achieve a delicate, illustration-like quality.
This minimalist approach is ideal for finer fabrics like poplin, as it won’t cause any pulling or puckering.
12. A Gentle, Curving Hem Vine
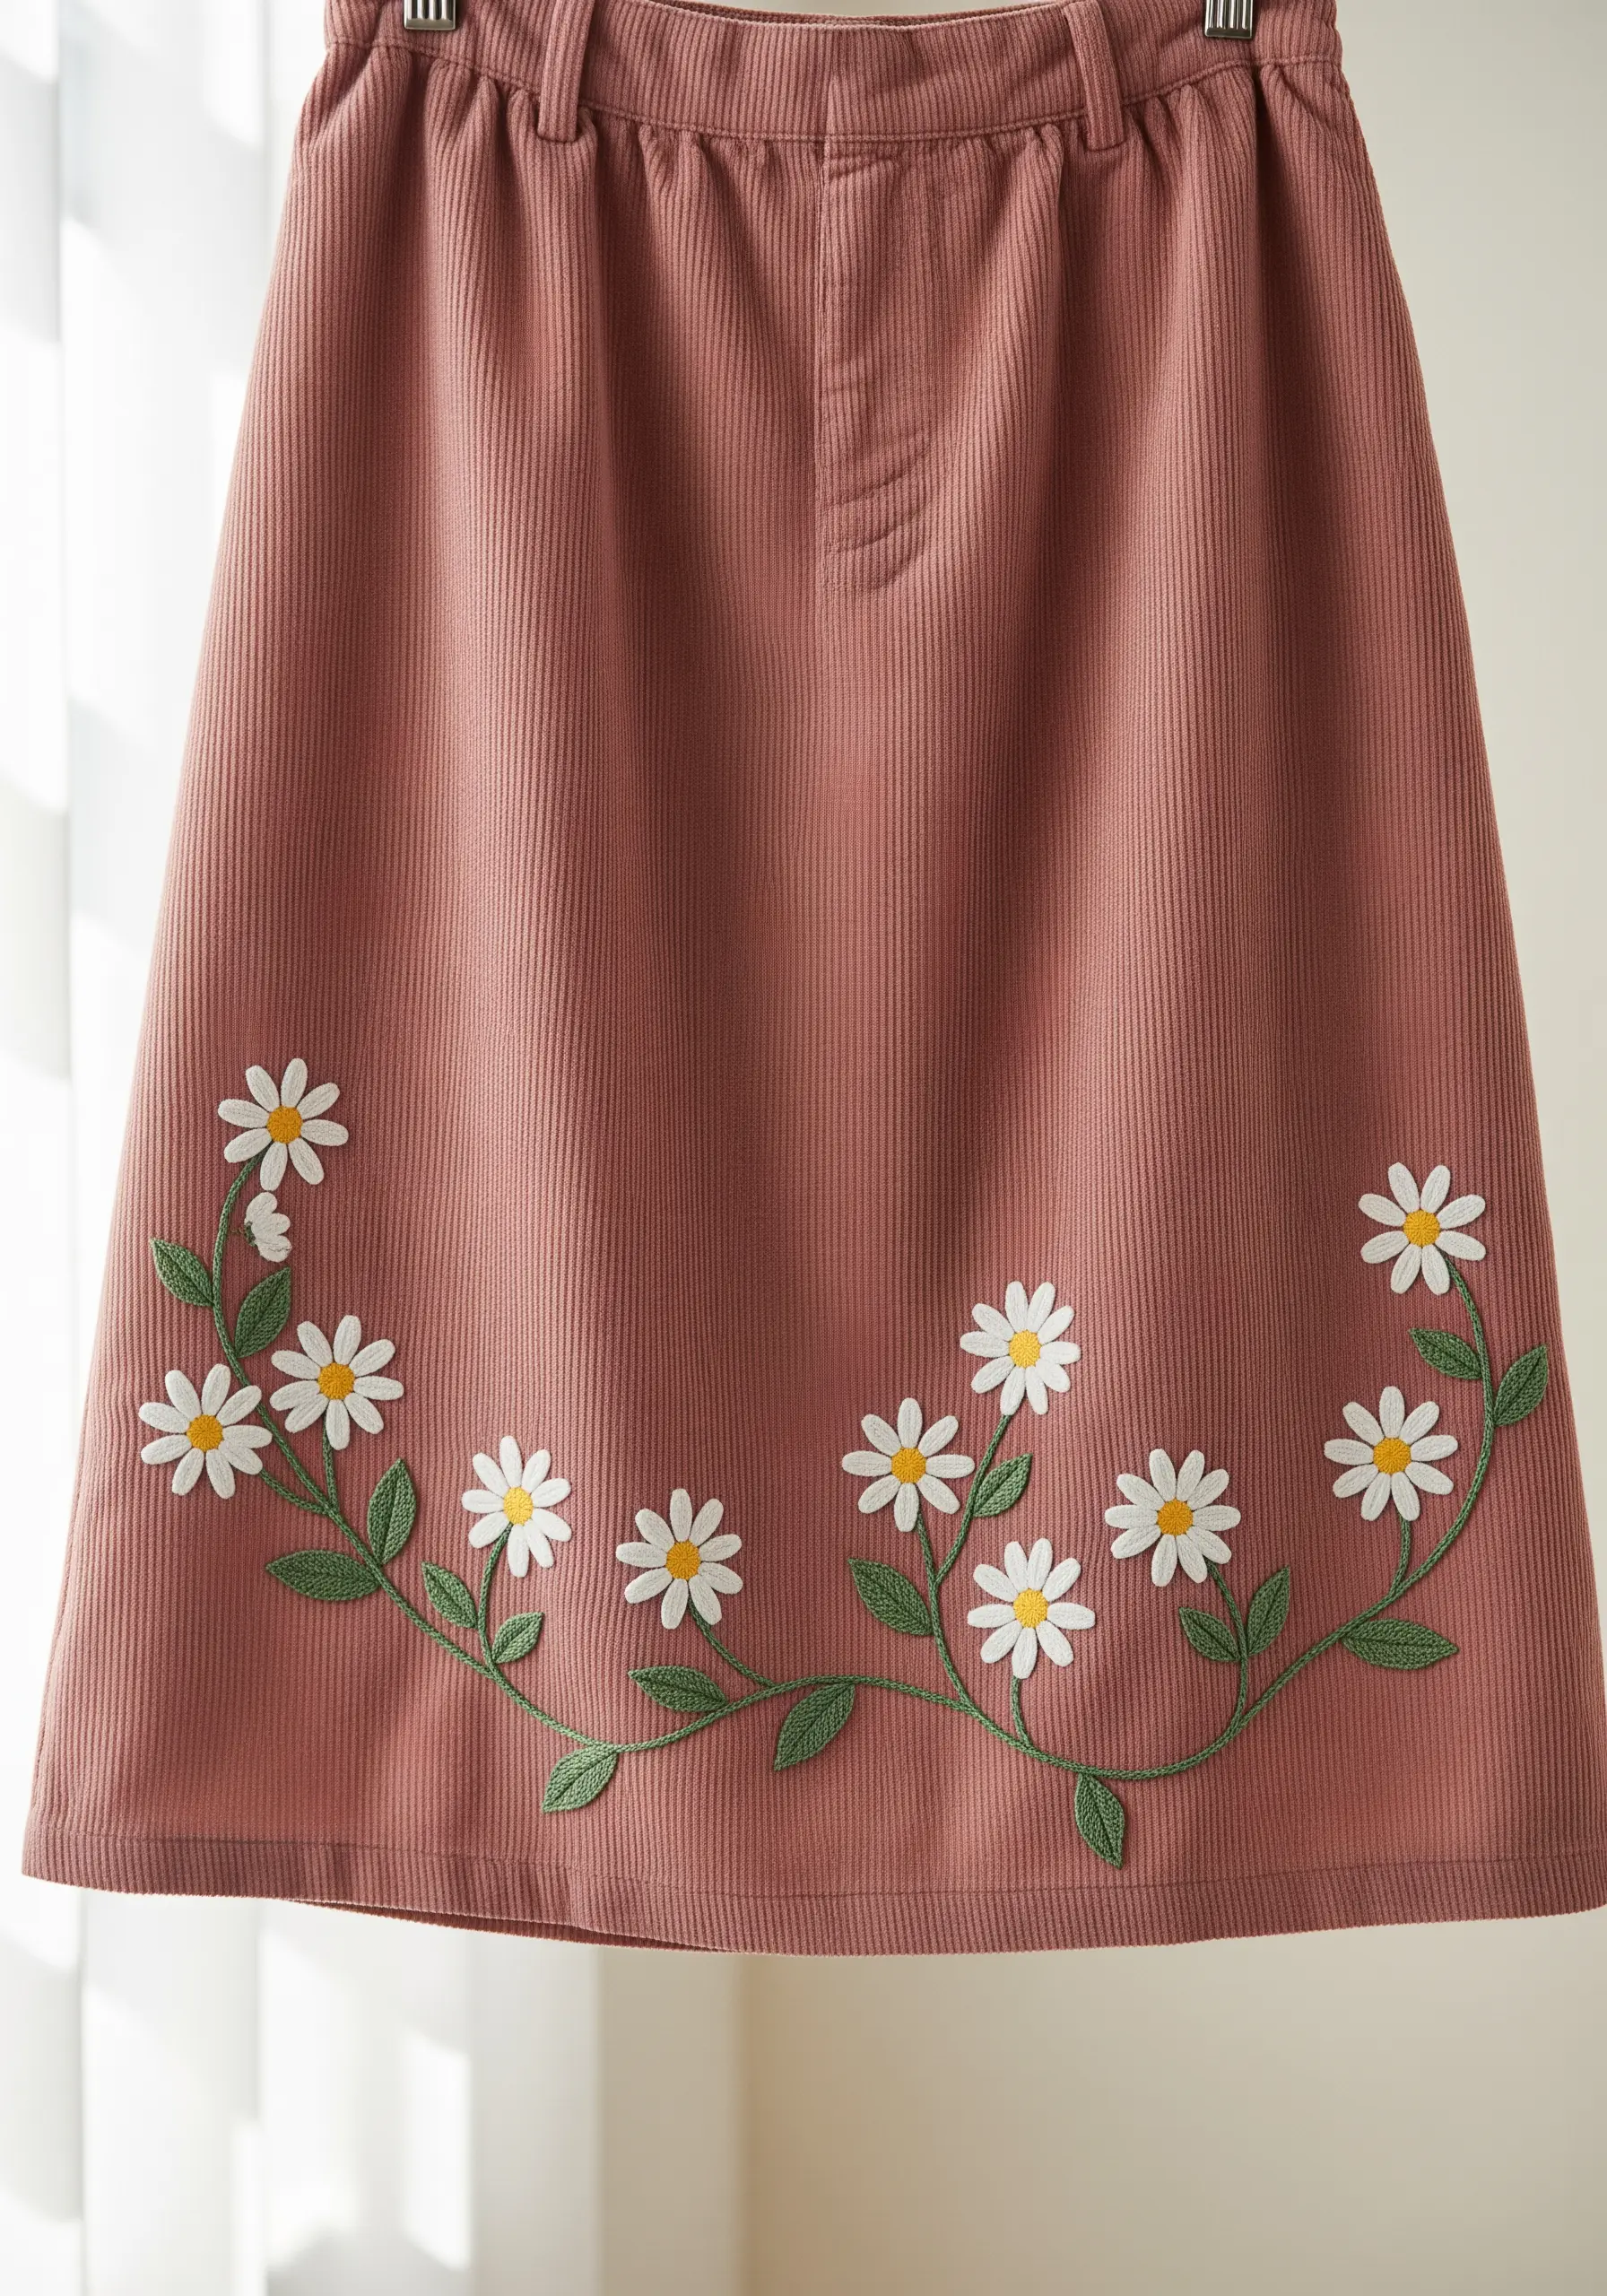
On a textured fabric like corduroy, choose simple, bold stitches that won’t get lost in the fabric’s ridges.
A clean satin stitch for the daisy petals provides a smooth contrast to the corduroy’s texture, making the flowers pop.
Create a graceful, flowing vine along the hemline using a heavier stem stitch with 4-5 strands of floss so it stands out.
The gentle curve of the design softens the straight lines of the skirt, creating a beautiful and balanced composition.
13. The Leg-Climbing Buttercup Vine
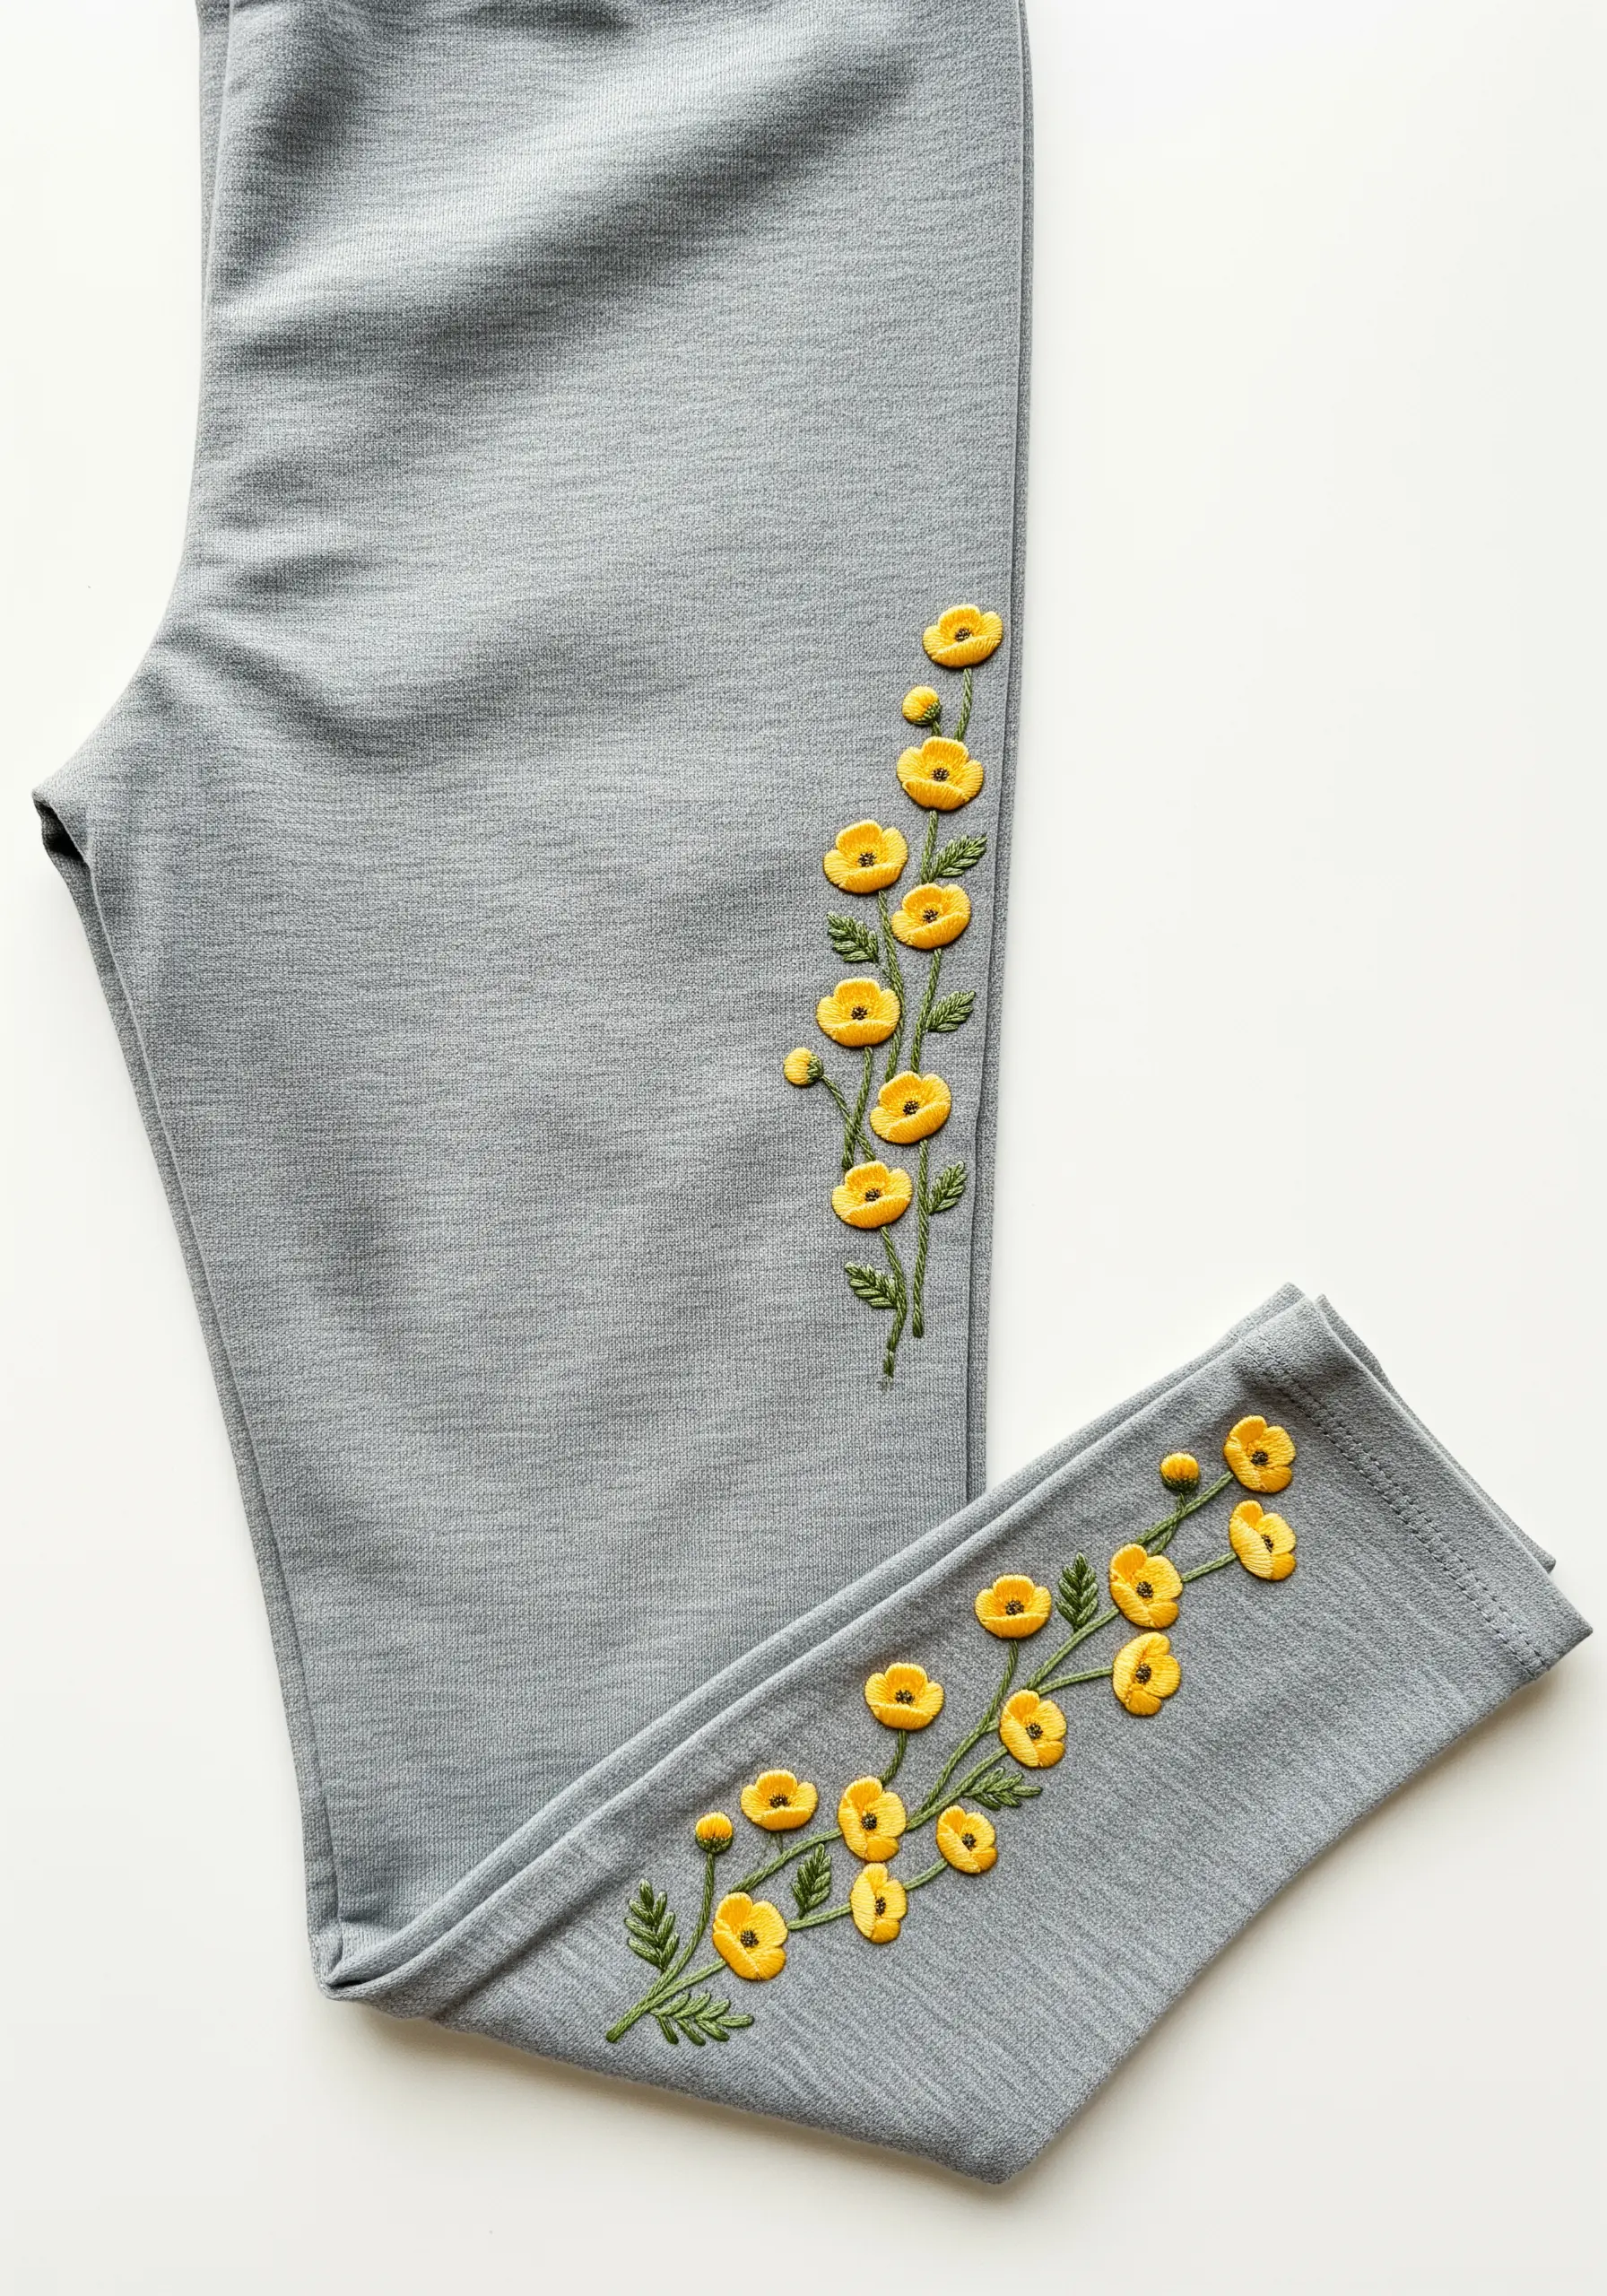
When embroidering on stretchy leggings, it’s crucial to use a stabilizer and to slightly stretch the fabric in the hoop.
This ensures the design won’t distort or break threads when the garment is worn.
Choose stitches that have some natural give, like the chain stitch or backstitch, for the stems of your climbing vine.
Placing a single, elegant vine up the side of the leg creates a flattering vertical line and adds a bespoke touch to a basic piece.
14. Bold Daisy Cuff Bands
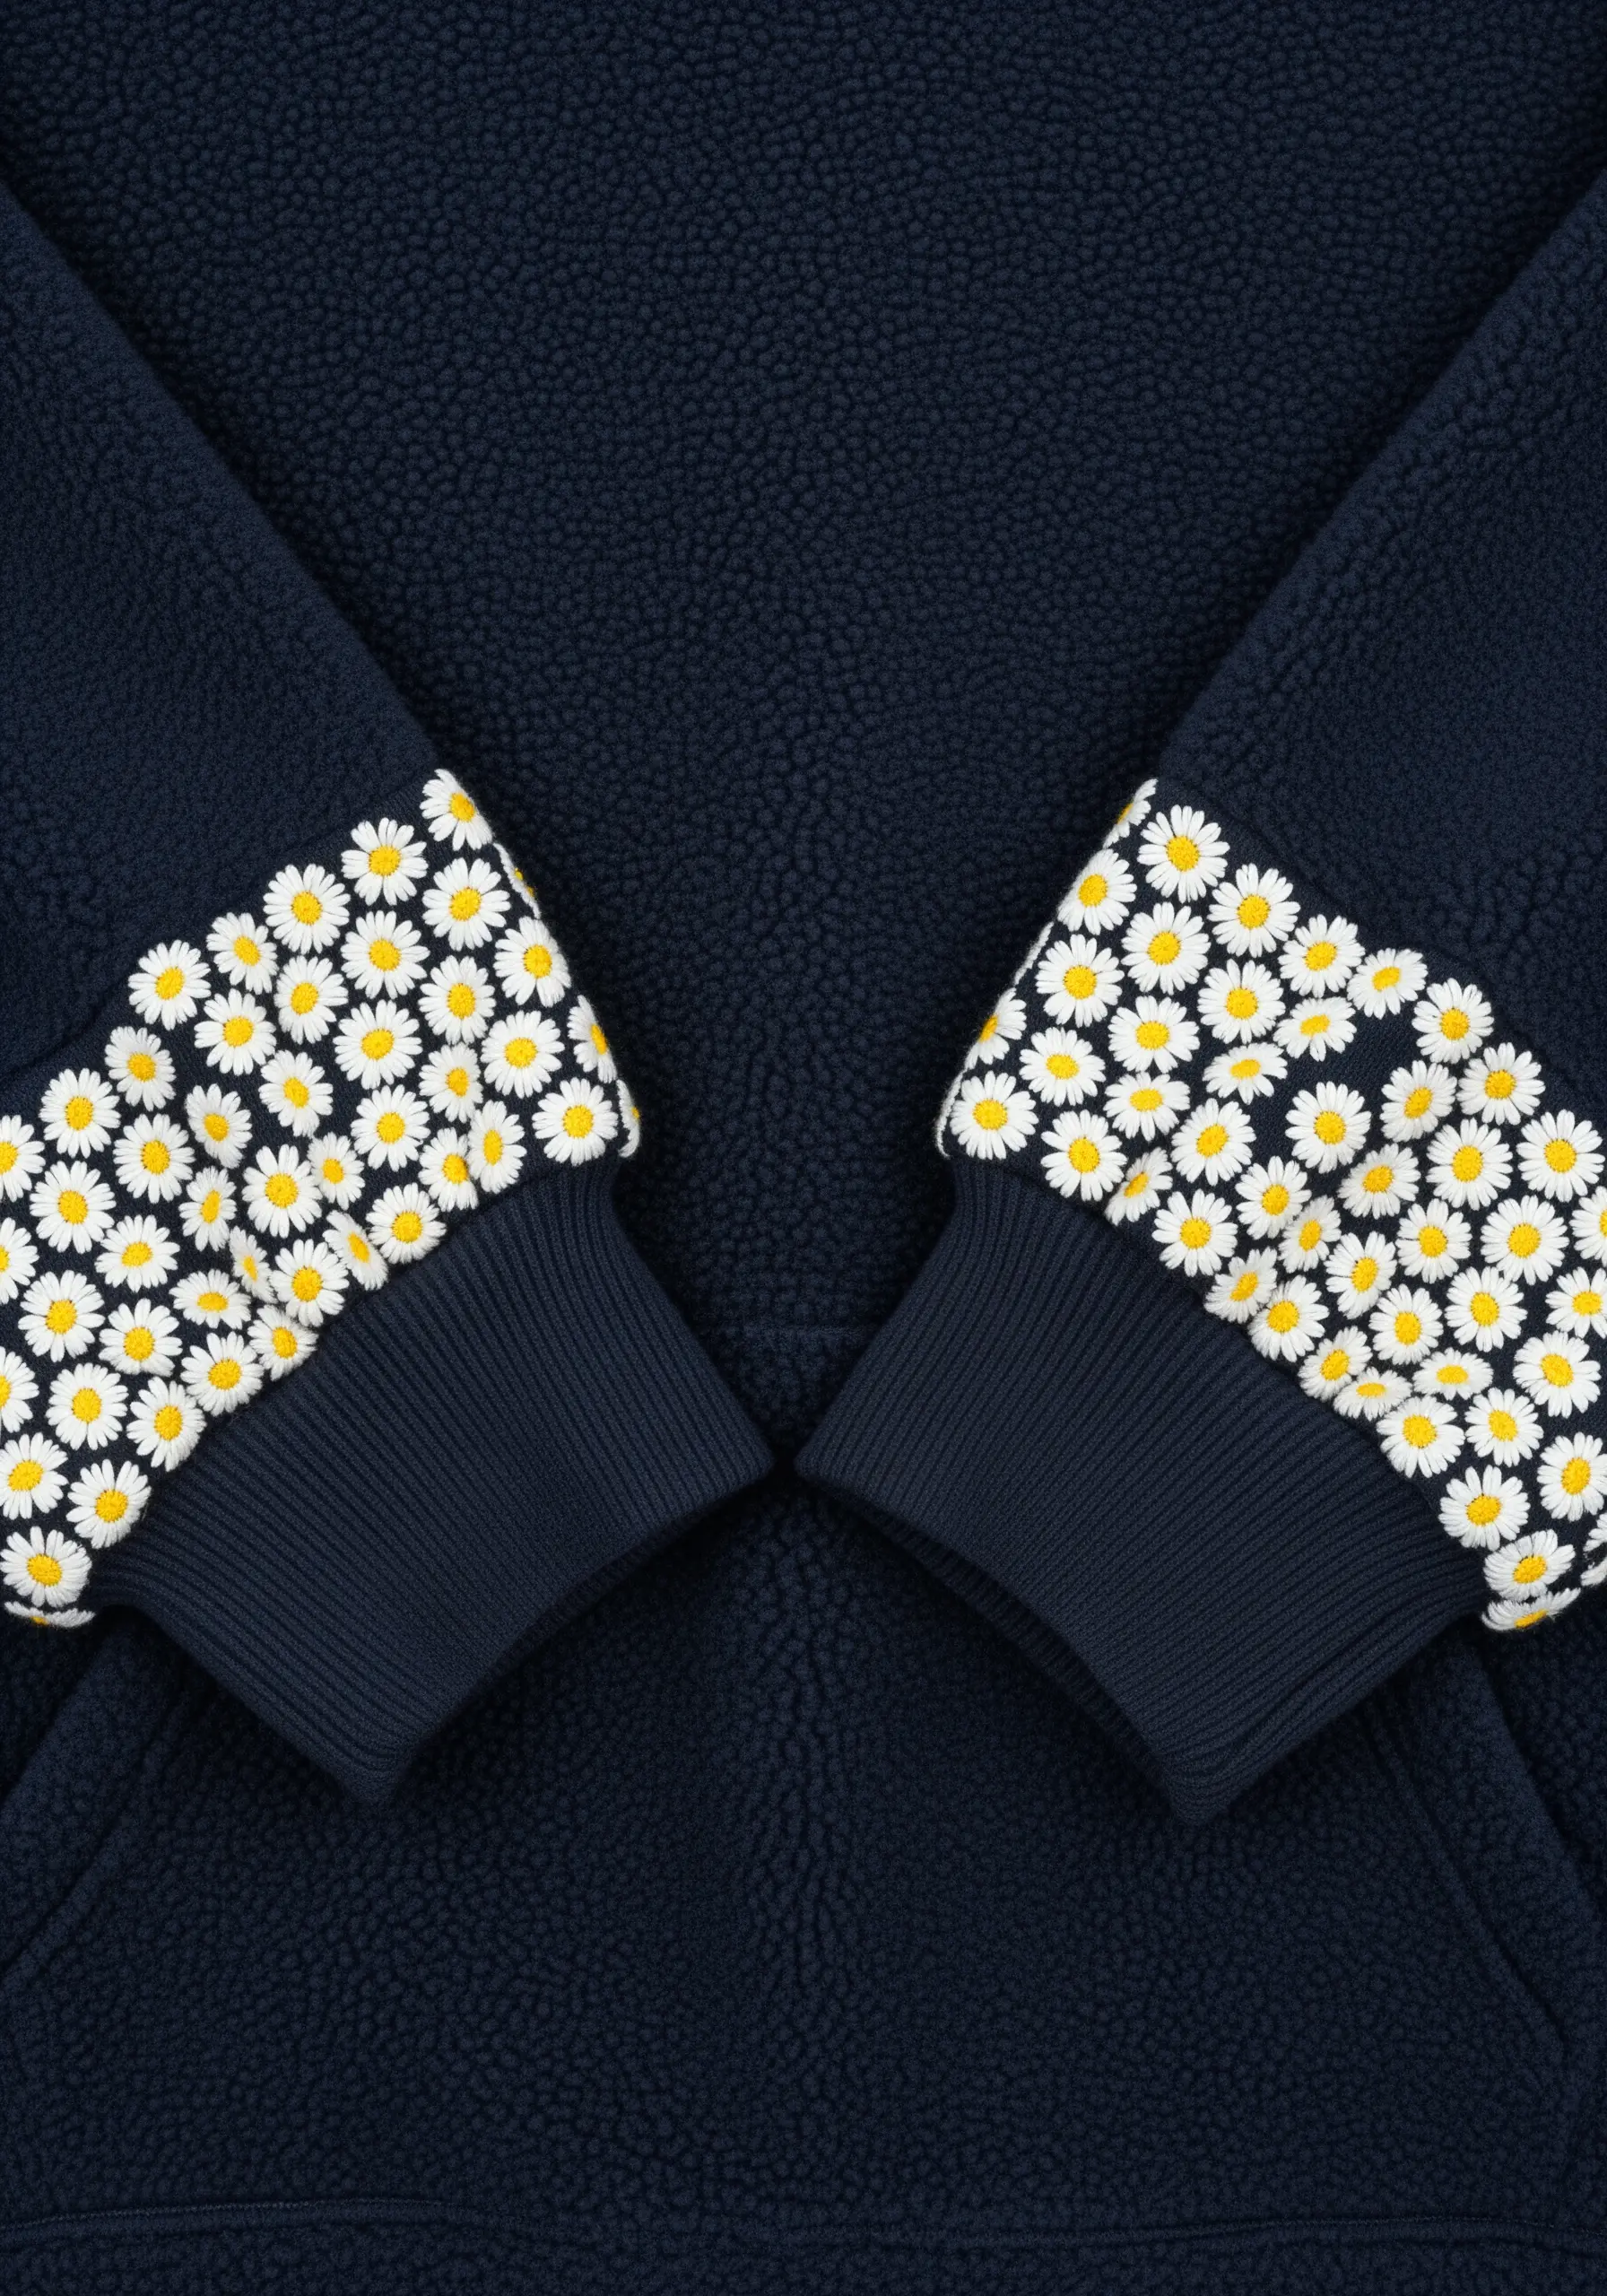
Create a high-impact design on fleece or sherpa by using the fabric’s texture to your advantage.
Work a dense band of simple satin-stitched daisies around the cuffs, using a high-contrast color palette like white and yellow on navy blue for a bold, graphic statement.
Use a full six strands of embroidery floss or even pearl cotton to ensure the stitches are substantial enough to sit on top of the plush fabric, not sink into it.
A water-soluble stabilizer on top will help you make clean, precise stitches on the fluffy surface.
15. Single-Bloom Bow Accents
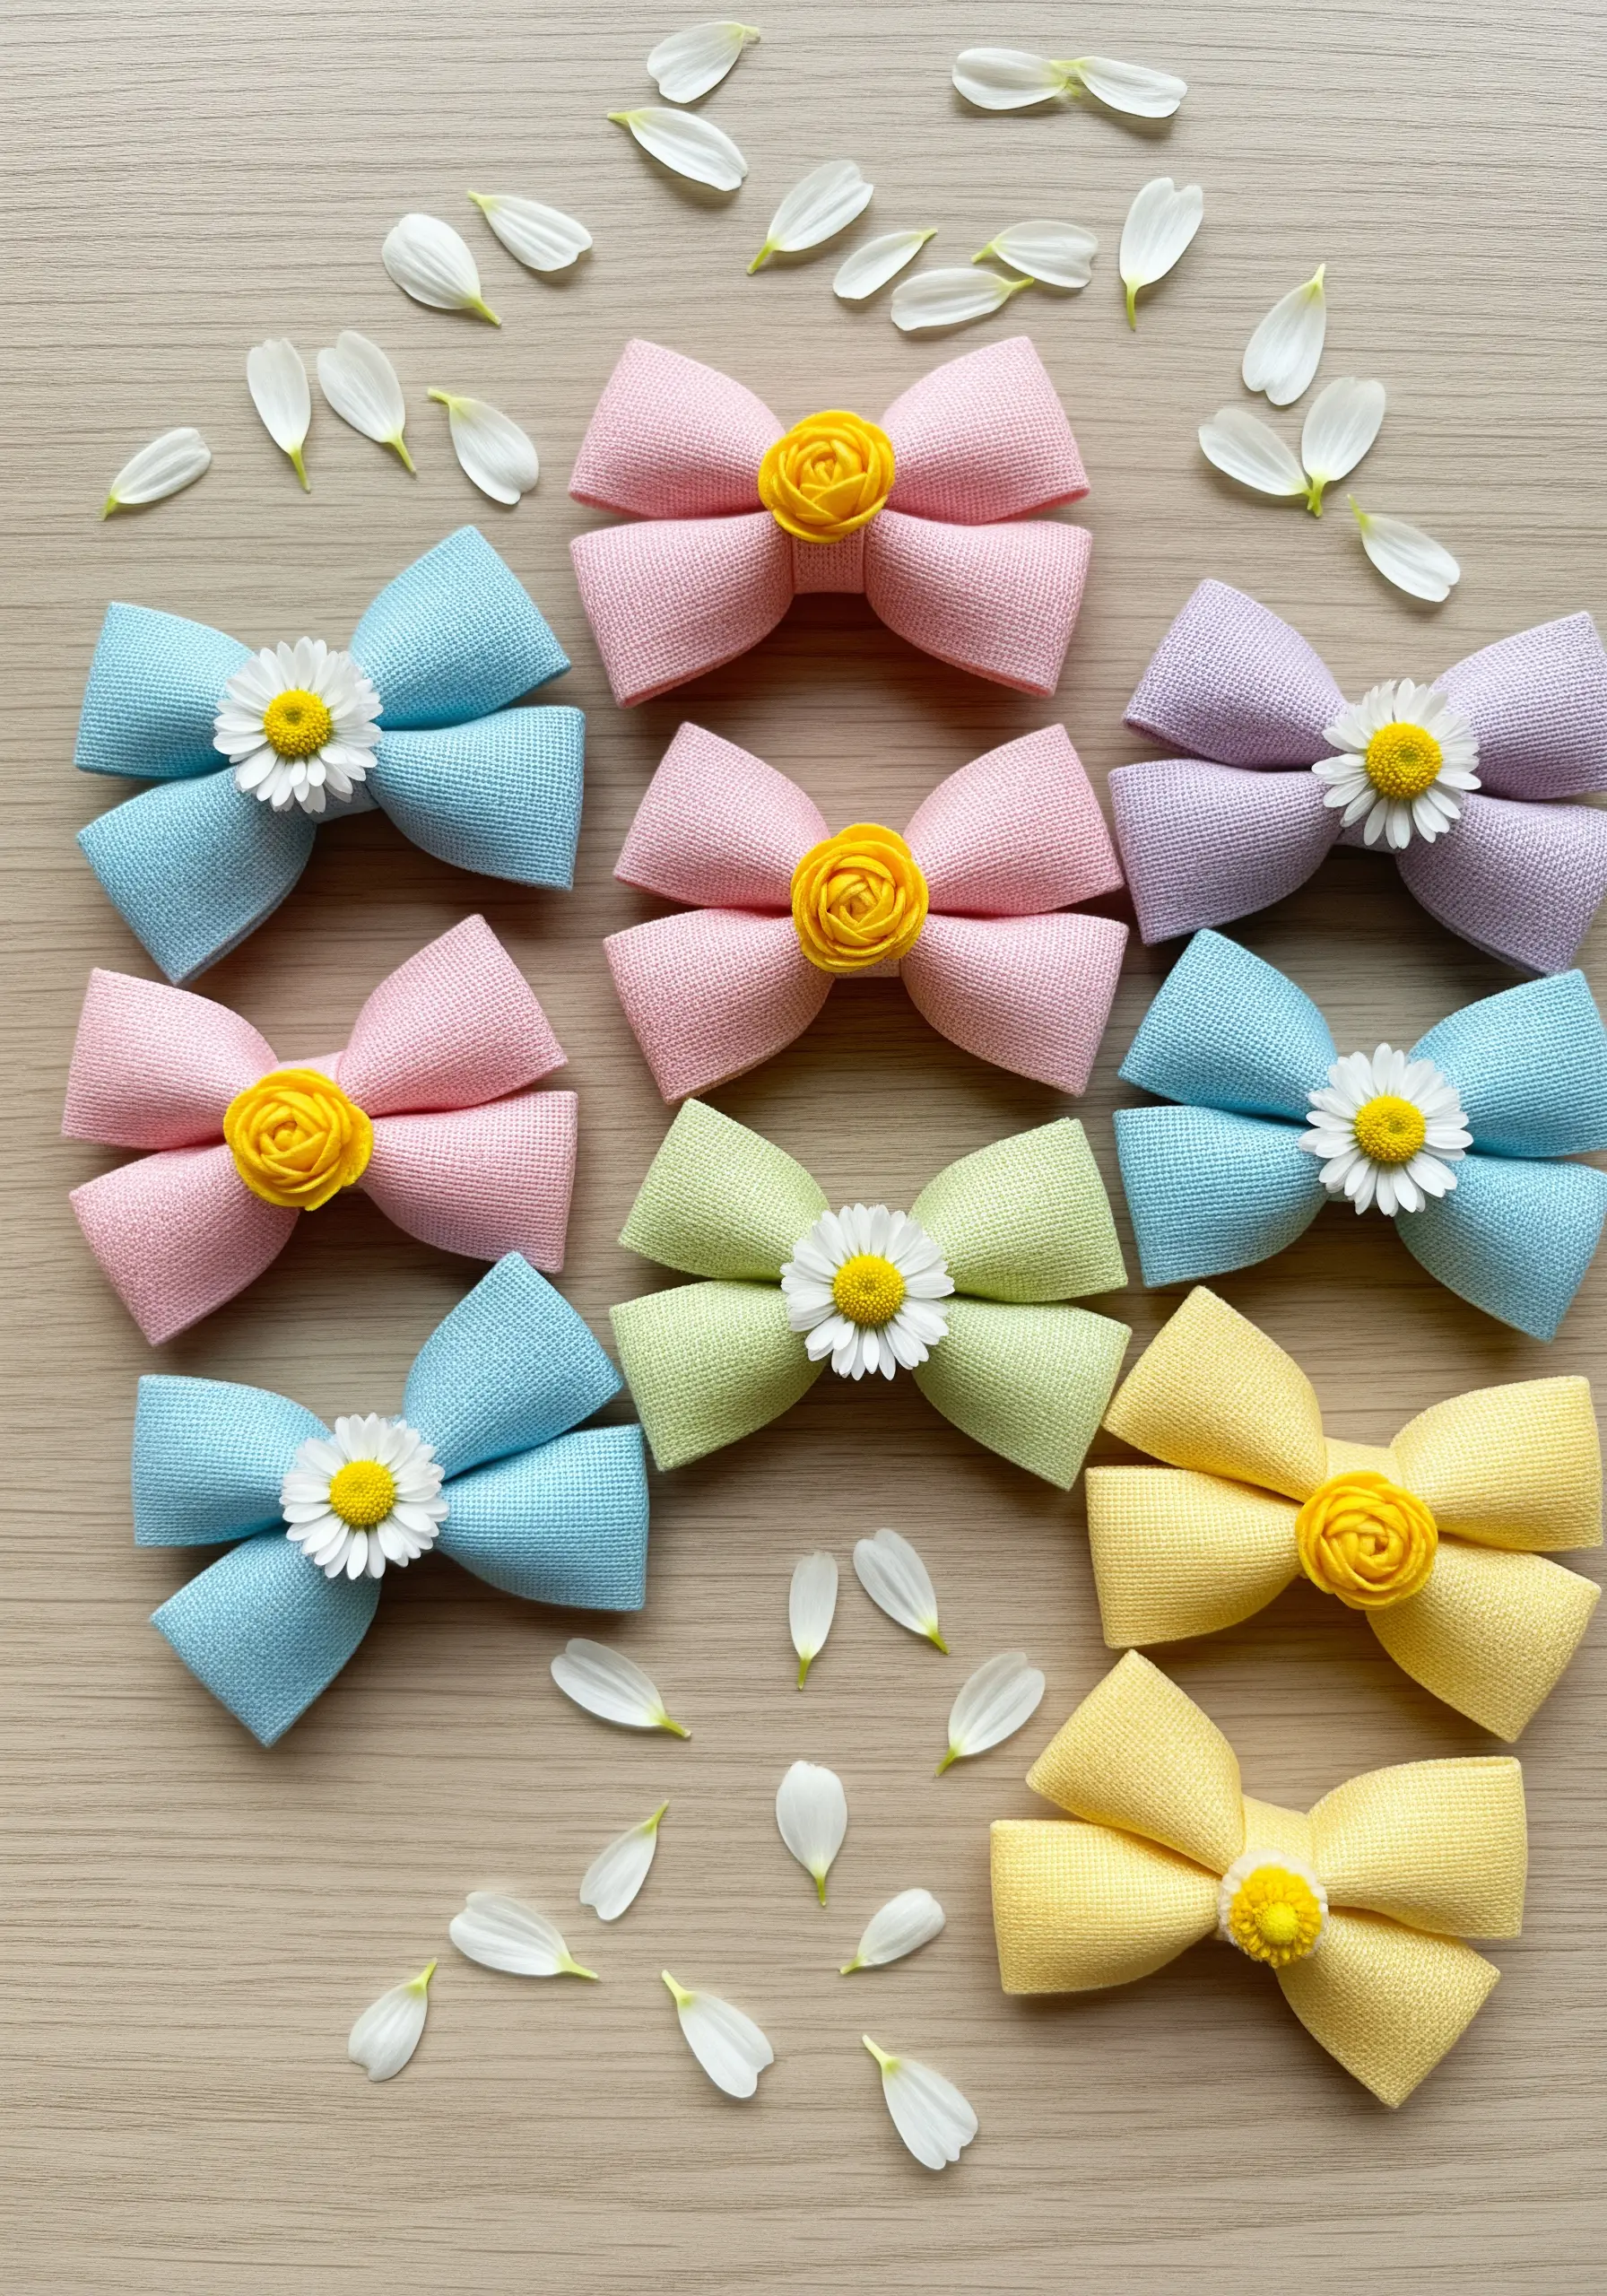
Elevate simple hair bows by adding a single, perfectly stitched flower as a central embellishment.
For the buttercups, a woven wheel stitch creates a beautiful, rose-like texture that becomes the focal point.
For the daisies, use detached chain stitches for the petals and add a cluster of French knots in the center for a classic look.
Stitch the flower directly onto the bow’s knot to create an integrated, high-quality finish that looks more thoughtful than a simple glued-on piece.
16. The Sweet Gingham Collar
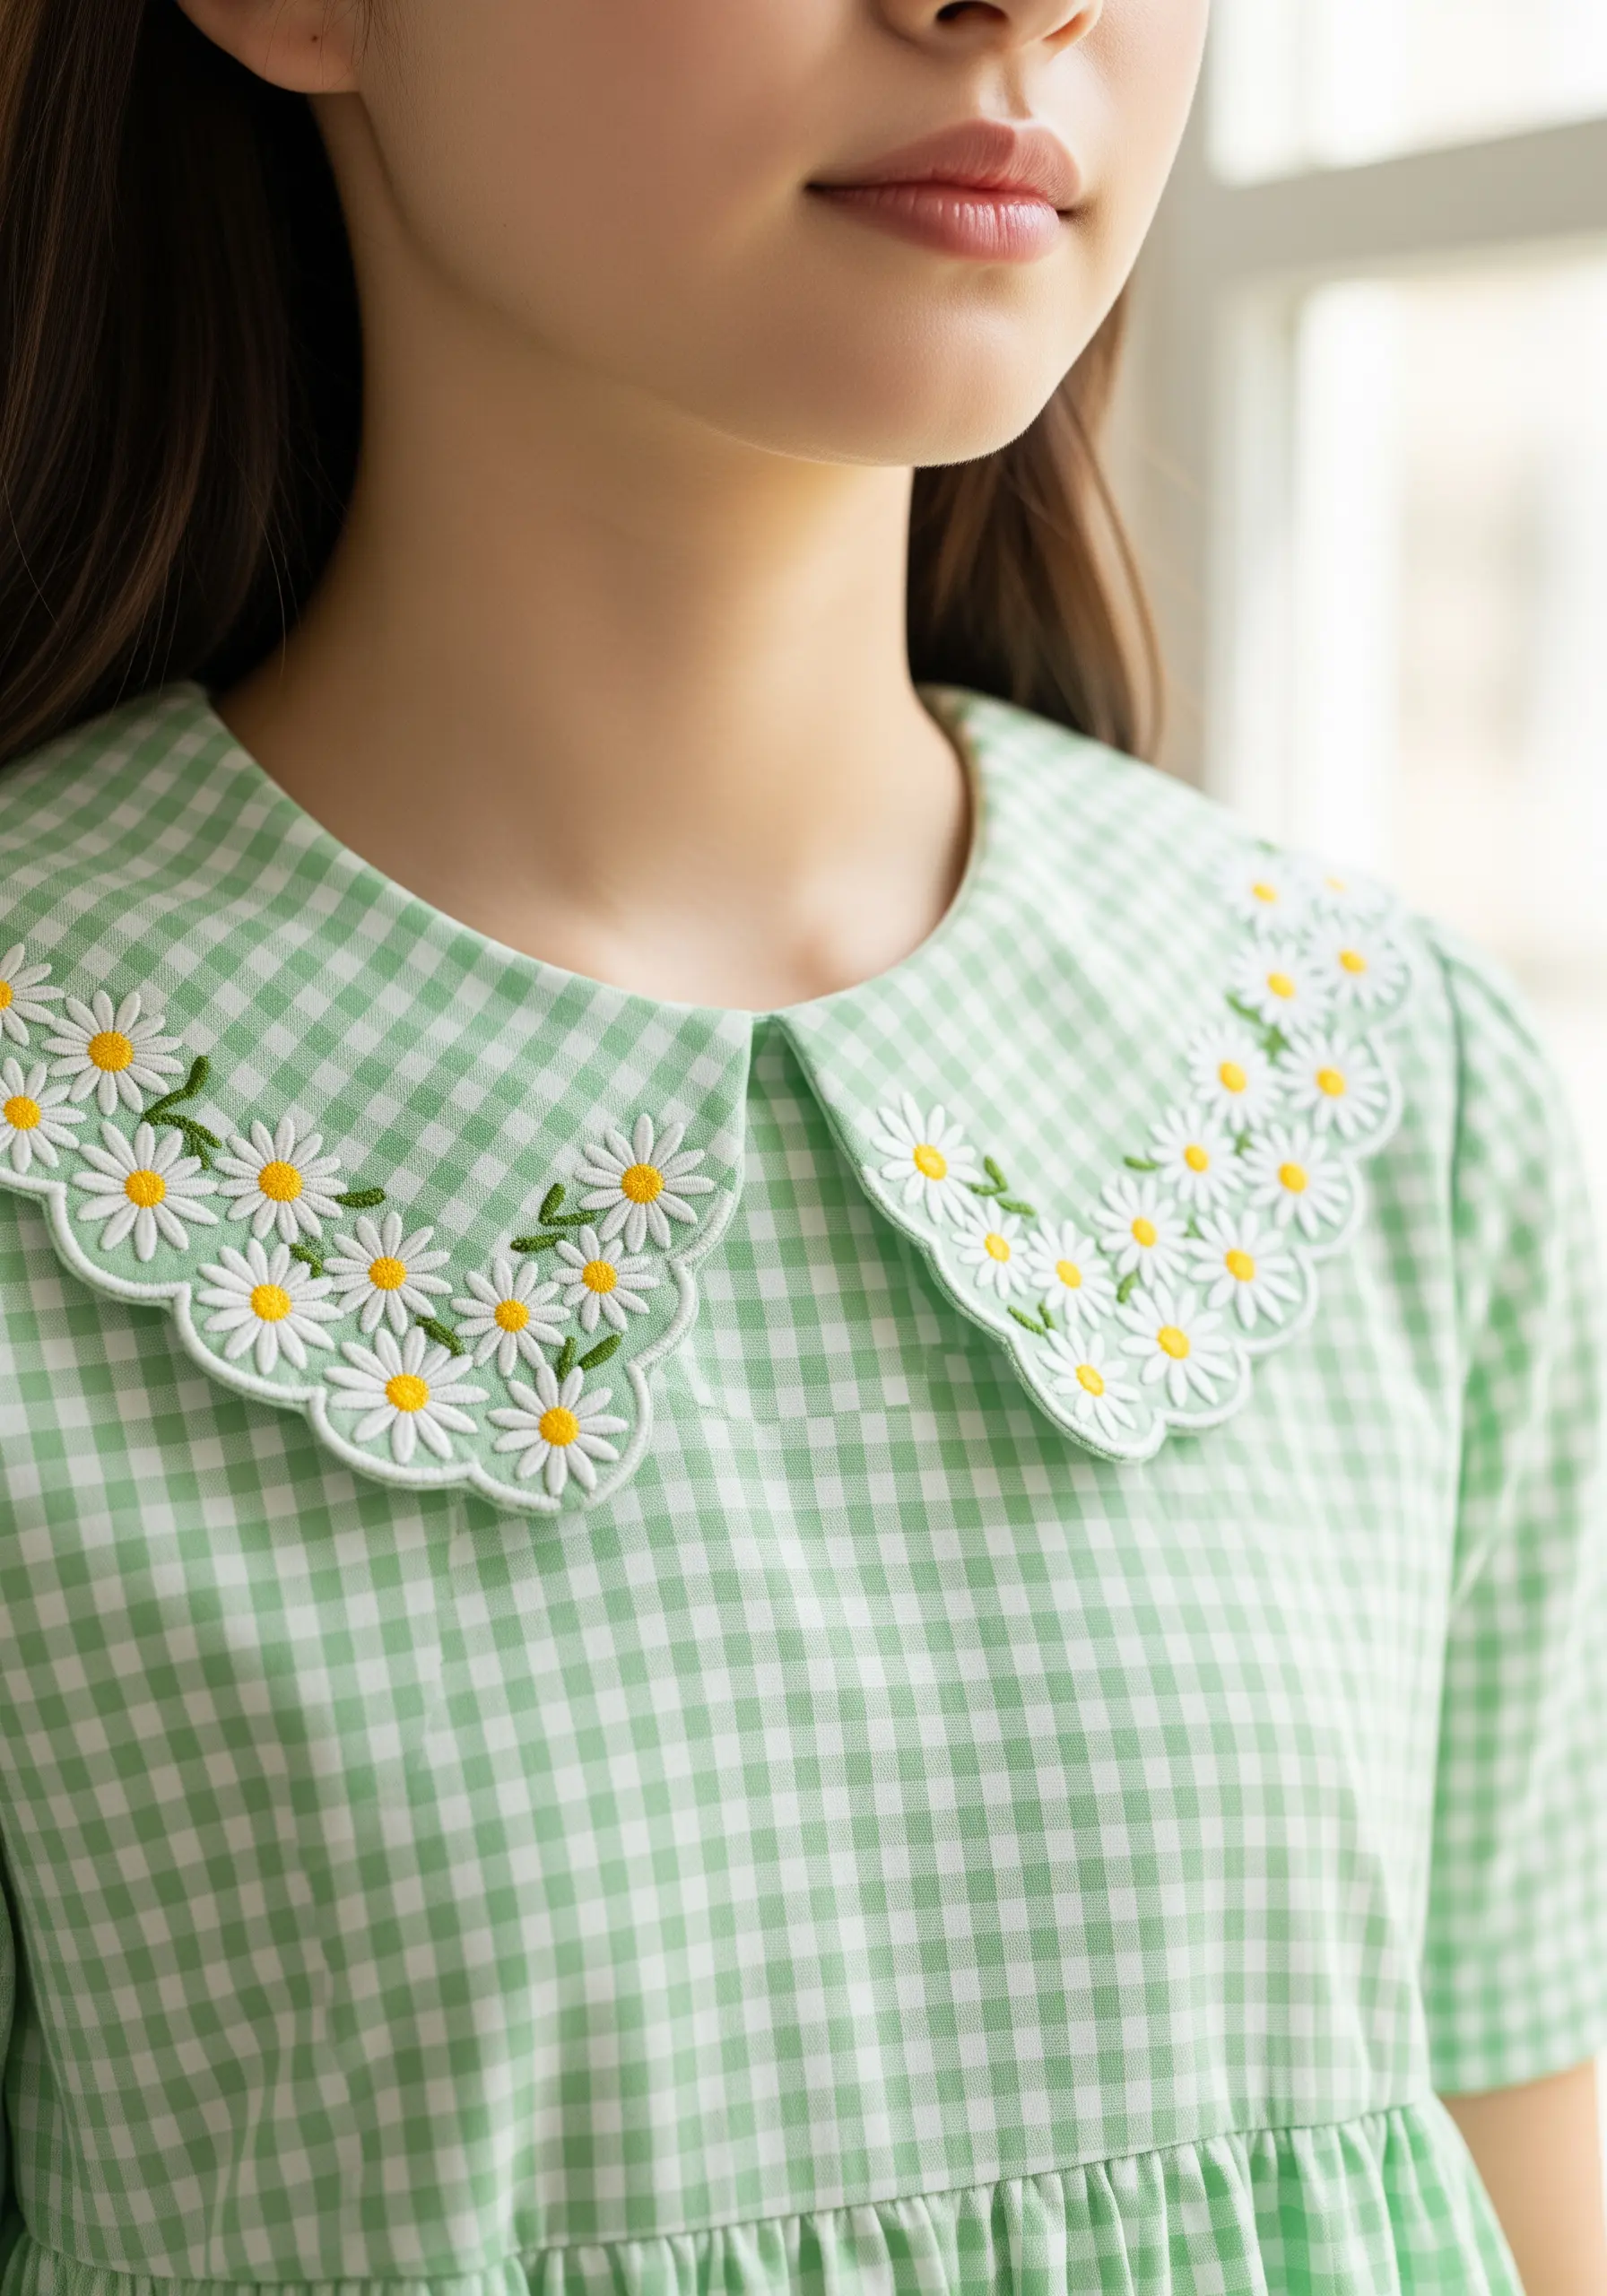
Embroidering on gingham offers a built-in grid, which you can use to guide your stitch placement for perfect symmetry and spacing.
Stitch a garland of daisies along the scalloped edge of a Peter Pan collar for a timeless, charming effect.
Use a padded satin stitch for the petals—by adding a base layer of small straight stitches first—to give them a raised profile that stands out against the patterned fabric.
This technique adds a touch of luxury and dimension to a classic dress style.
17. Rolled Cuff Wildflower Garden
Turn the rolled cuff of a pair of jeans into a surprise garden.
Create a dense, meadow-like scene by layering daisies, buttercups, and delicate filler flowers like forget-me-nots made with tiny French knots.
Use floral thread painting techniques on the buttercup petals, blending two or three shades of yellow and gold to give them a sun-kissed, realistic appearance.
The contrast between the rugged denim and the delicate, detailed embroidery is what makes this placement so visually effective.
18. Minimalist Sweater Vest Sprig
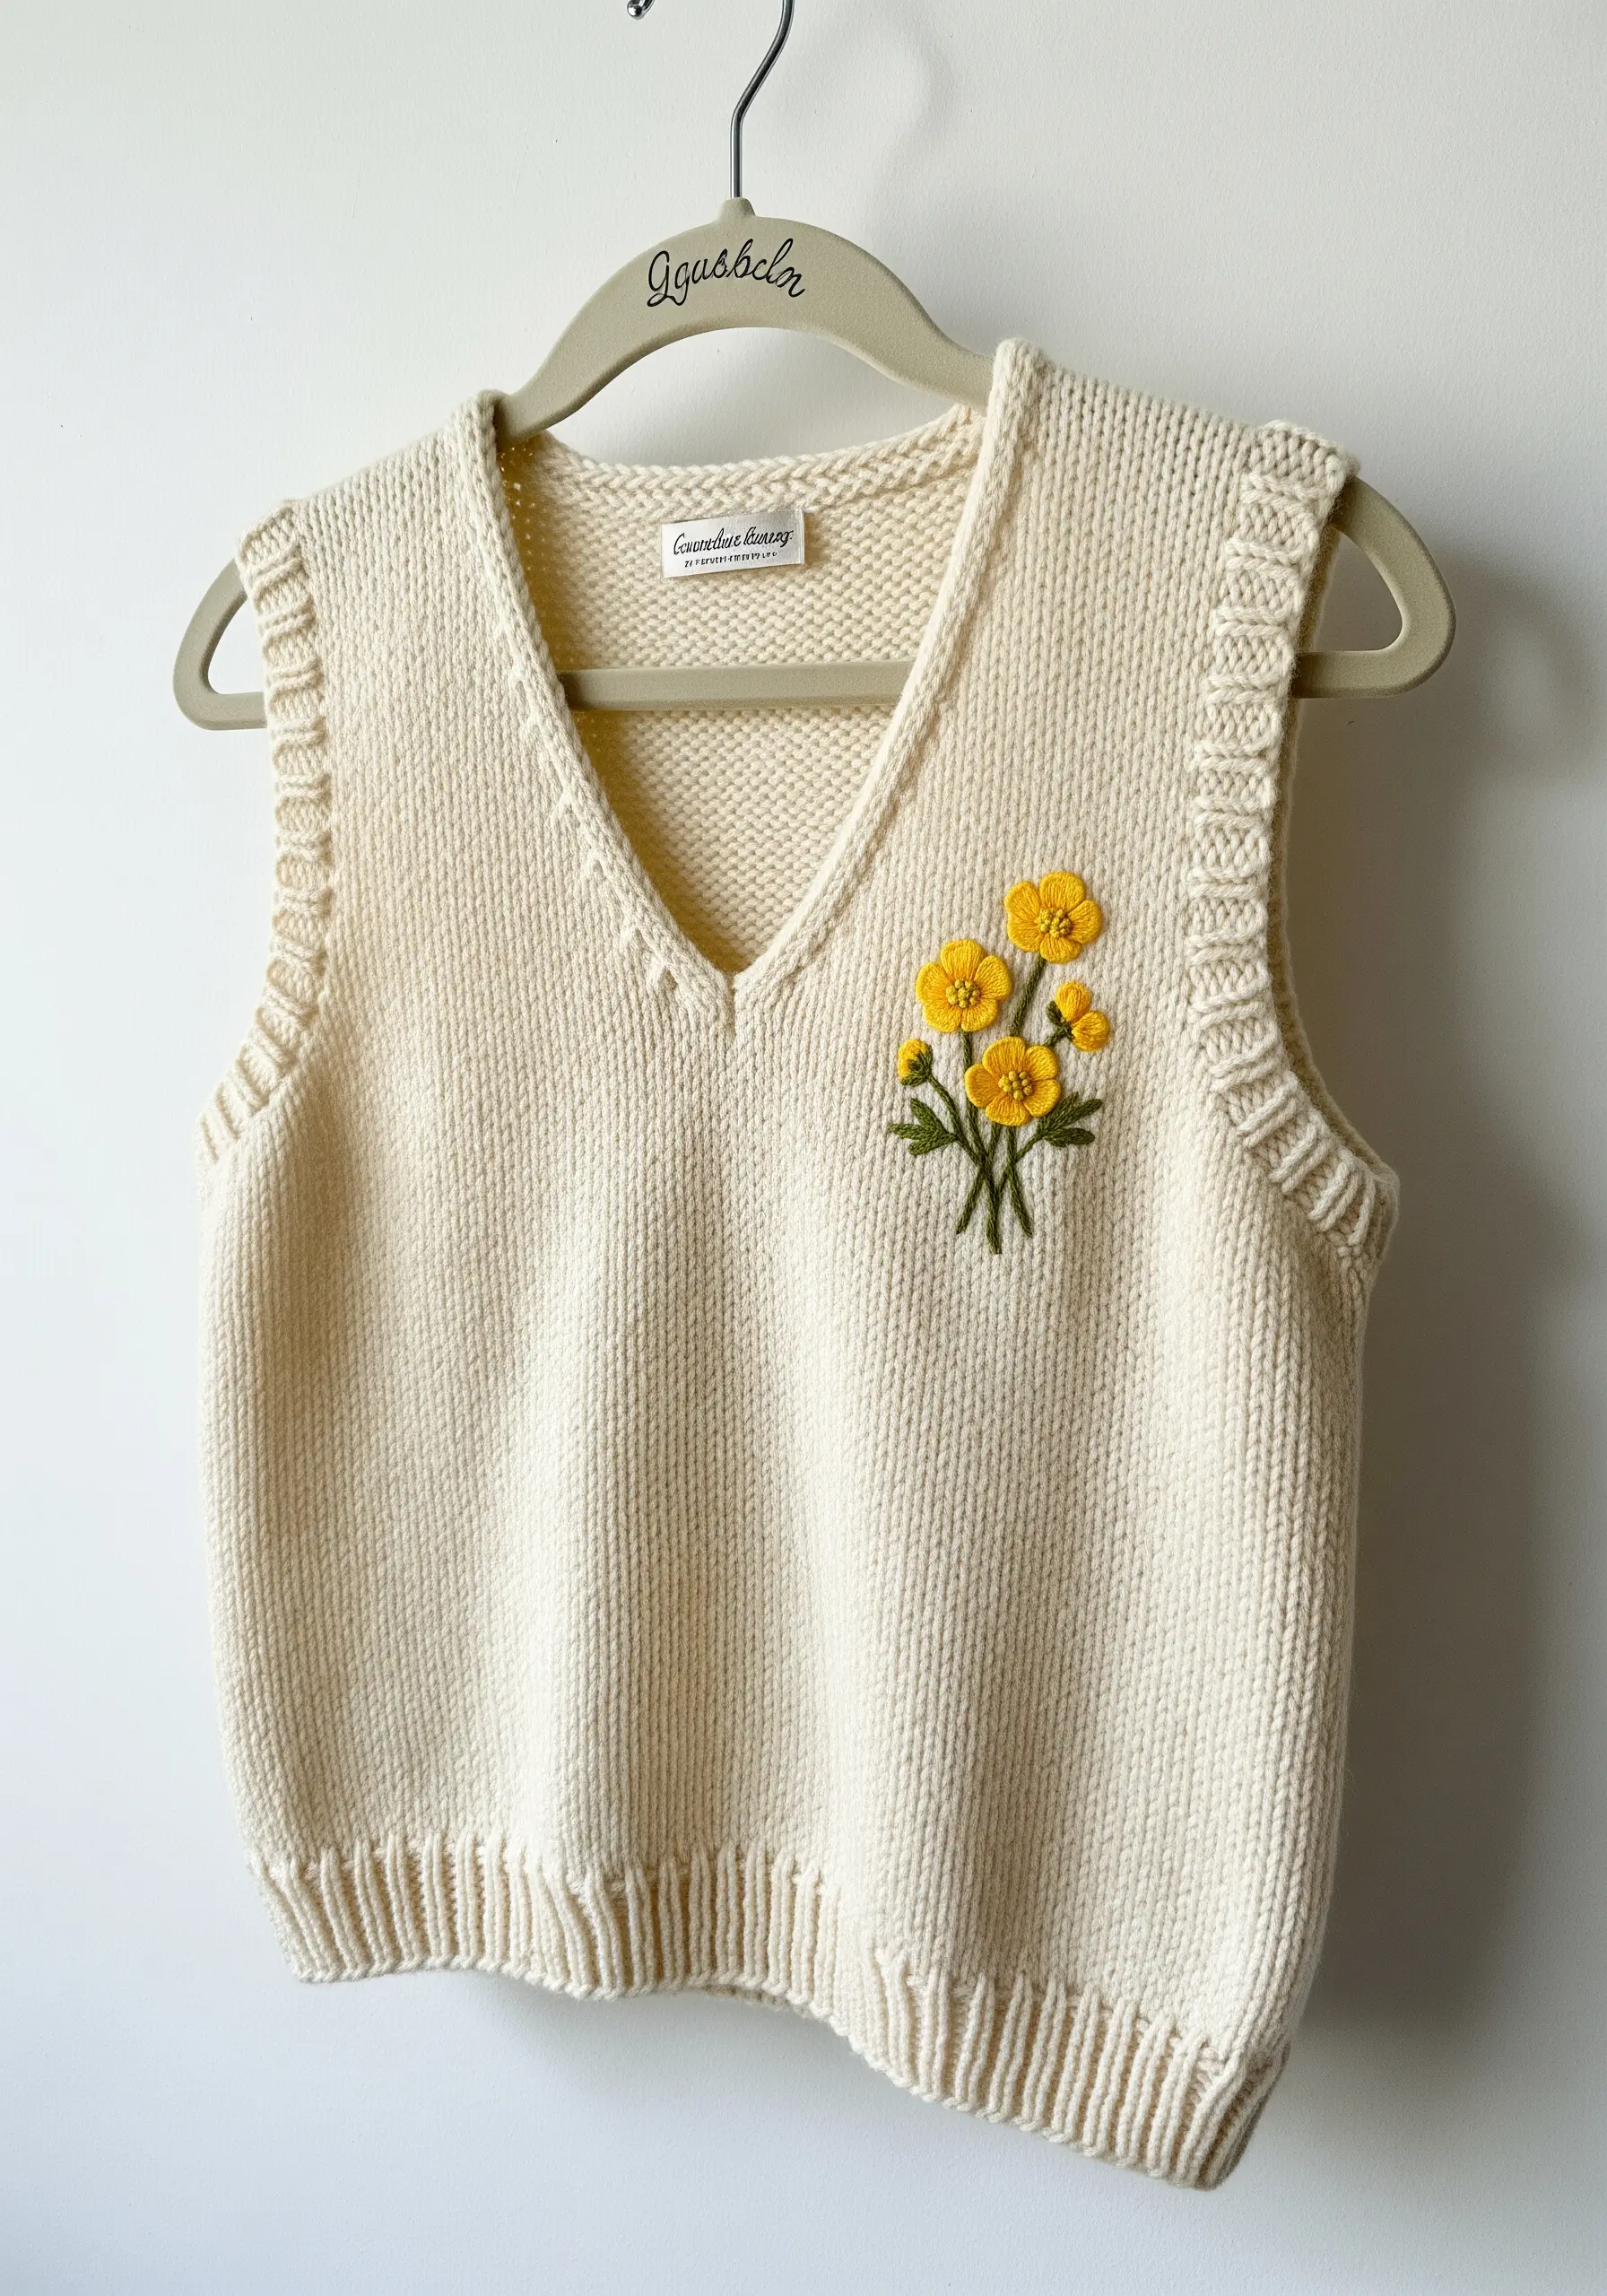
For a subtle, modern take on floral embroidery, place a small, asymmetrical sprig of buttercups on the chest of a knit vest.
Use a waste canvas to provide a temporary grid for even stitching on the knit fabric; you can pull the threads out one by one when you’re finished.
Keep the color palette simple and the stitches clean—a few lazy daisy stitches for petals and a delicate stem stitch are all you need.
This restrained approach feels both personal and effortlessly stylish, perfect for minimalist embroidery ideas.
19. The Asymmetrical Floral Cascade
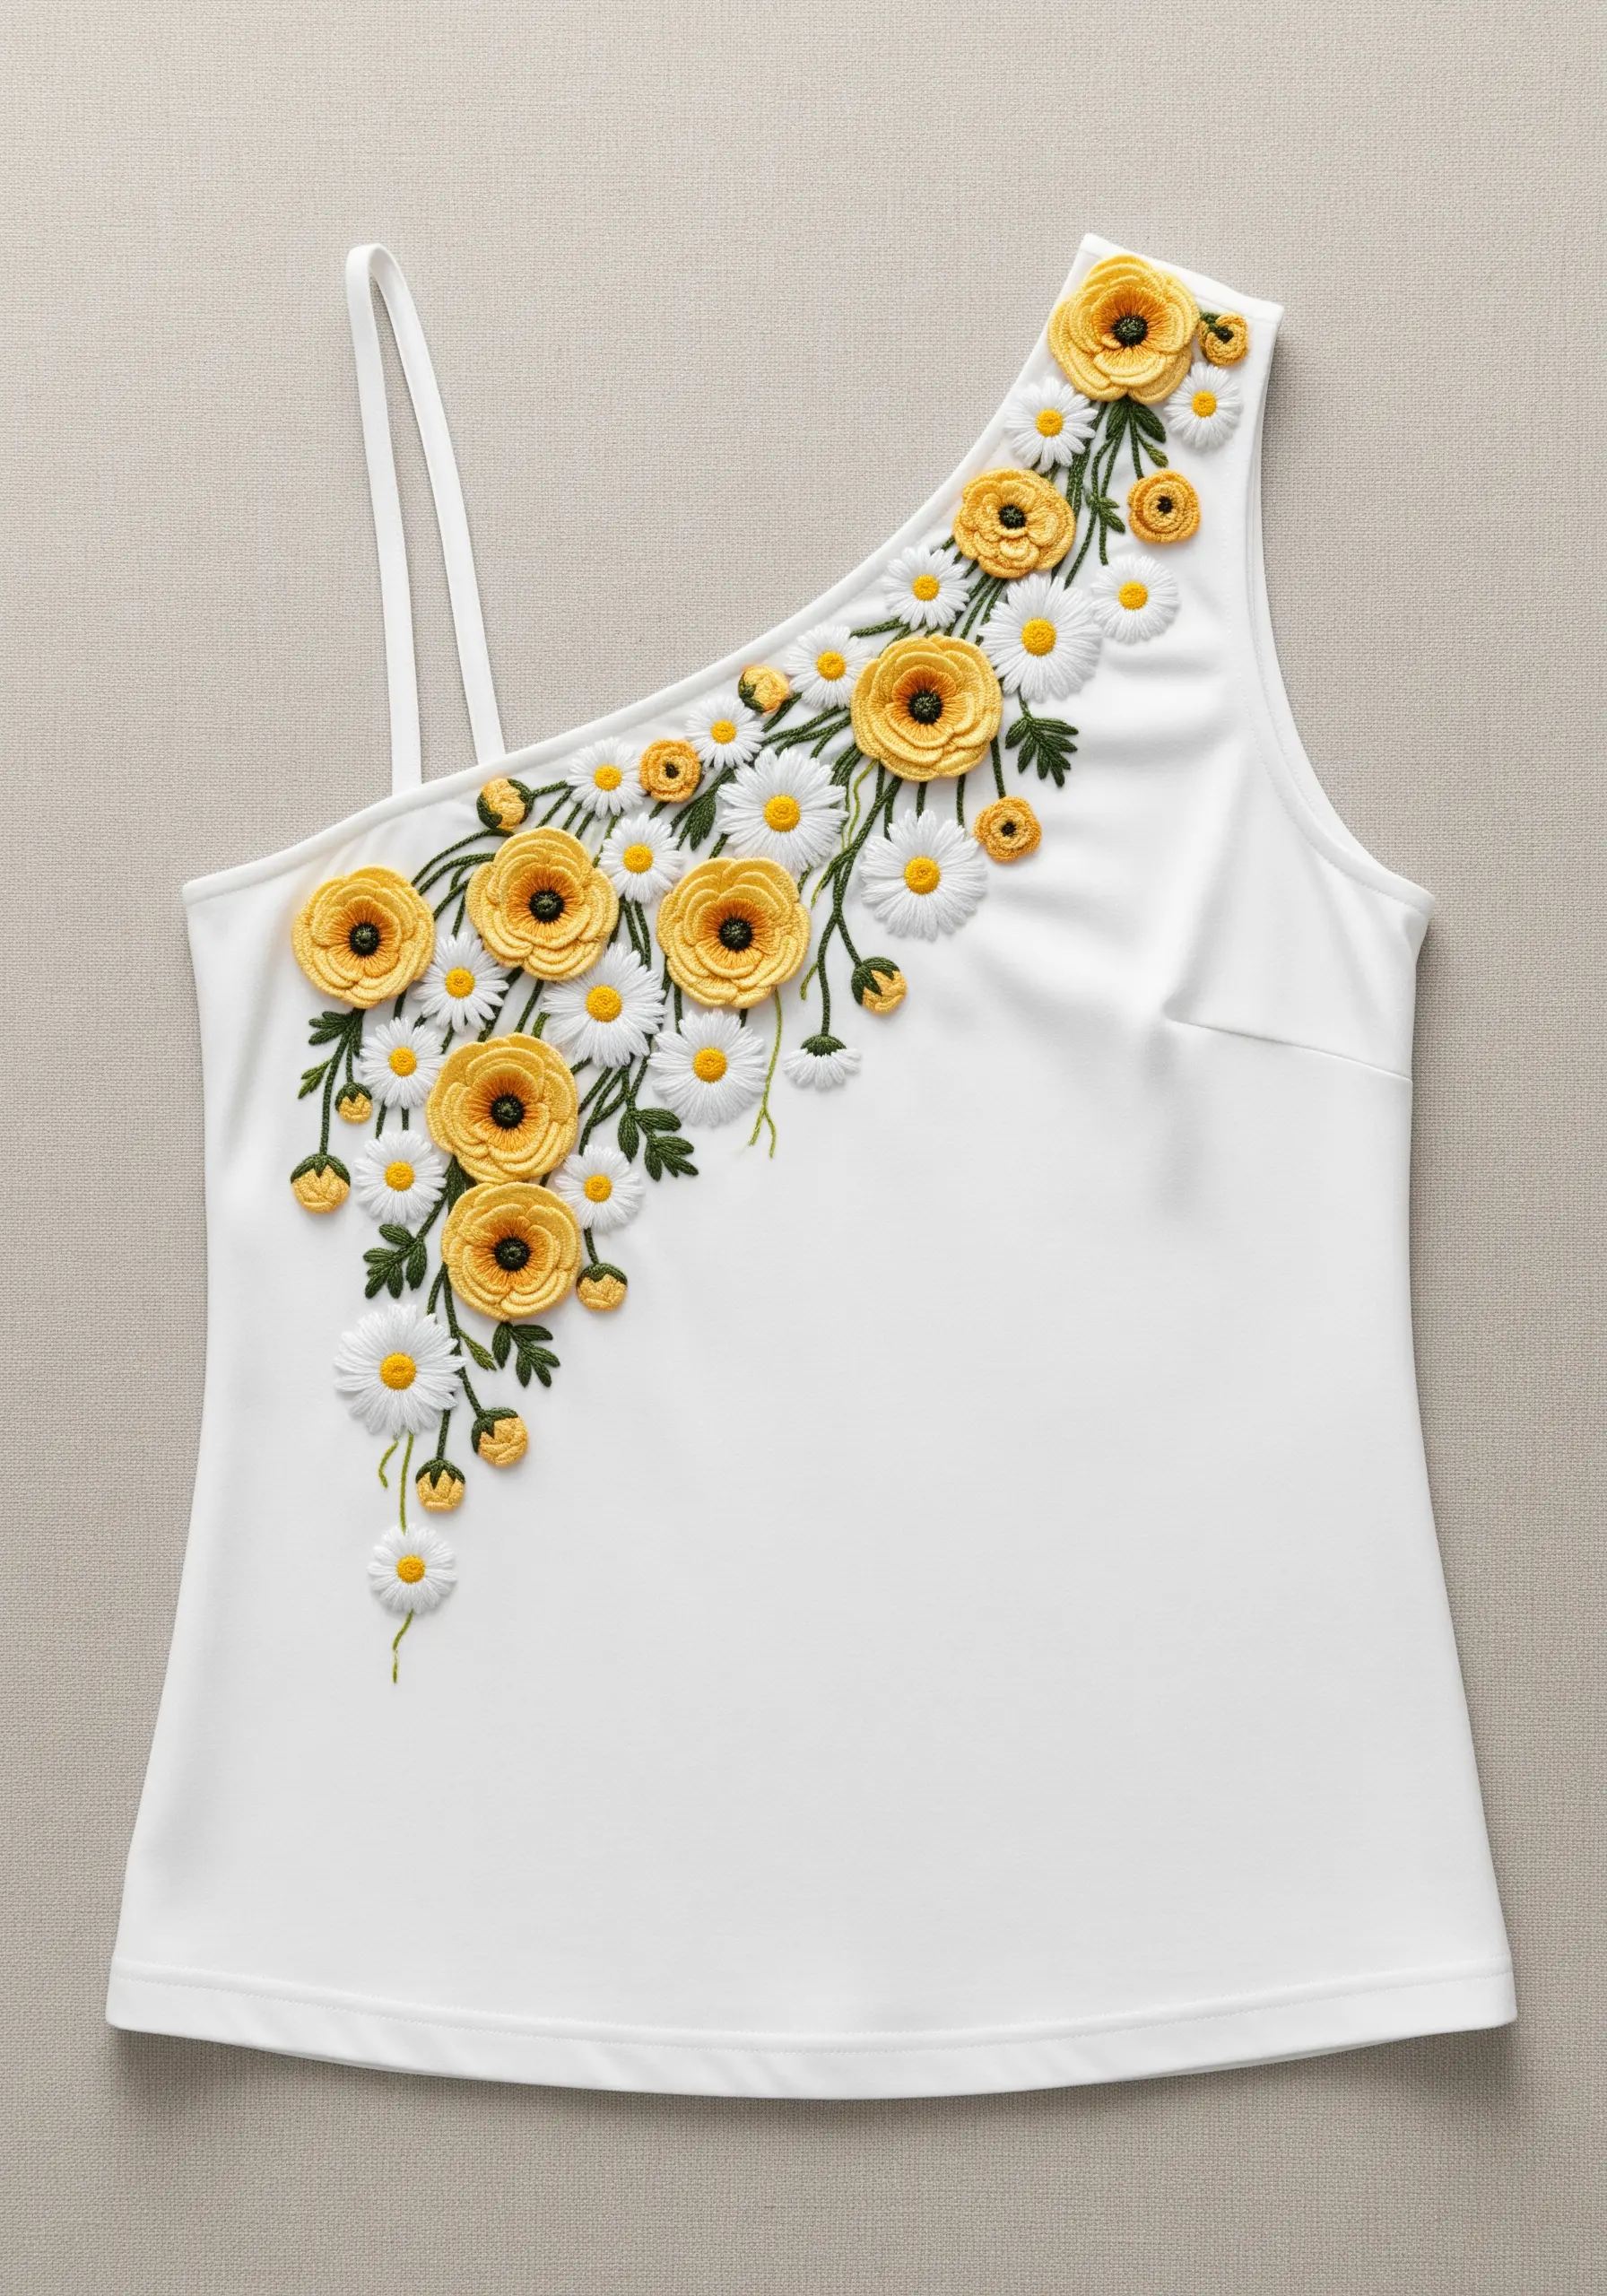
Create a dynamic, flowing design by arranging your embroidery in a cascade down an asymmetrical neckline.
Combine flat stitches like satin stitch for the daisies with highly dimensional stitches like woven picot or cast-on bullion knots for the buttercups.
This mix of textures creates incredible visual interest and a luxurious, couture feel.
Vary the size of the flowers, with larger blooms at the shoulder tapering down to smaller buds, to enhance the sense of movement and flow.
20. The Playful Daisy Scatter

Achieve a fun, carefree look on a denim skirt by scattering individual daisy motifs across the fabric as if they were tossed like confetti.
Instead of stitching directly, consider creating embroidered patches on felt or stabilizer, trimming them neatly, and then appliqueing them onto the skirt.
This method allows for perfect placement and gives the daisies a raised, sticker-like effect that’s playful and modern.
It also makes the project more manageable, as you can create the daisies one by one without a large hoop.
21. Bold Buttercups on a Canvas Tote

Make a statement on a canvas tote bag by choosing one type of flower and letting it shine.
Fill the space with a generous bouquet of buttercups, using a rich, golden yellow thread that contrasts beautifully with the neutral canvas.
Outline each petal with a darker gold split stitch before filling with a directional satin stitch. This small step adds definition and makes each flower pop.
These floral embroidery ideas are perfect for turning a practical item into a piece of wearable art.
22. The Refined Trouser Stripe

Add an unexpected touch of detail to tailored trousers with a clean, vertical line of daisies down the side seam.
This placement mimics a classic tuxedo stripe but with a whimsical, handcrafted twist.
Ensure your spacing is perfectly even by using a fabric marker and a ruler to mark the center point for each daisy before you begin stitching.
The key to this look is precision; perfectly uniform stitches and spacing will make it feel intentional and high-end.
23. The Gentle Terrycloth Border

Stitching on absorbent terrycloth, like a bib, requires a water-soluble topping stabilizer.
This plastic-like film sits on top of the fabric, preventing your stitches from sinking into the plush loops and ensuring a crisp, clean finish.
Choose simple, bold shapes and stitches like satin stitch and French knots that will stand out against the highly textured background.
A simple meadow border at the bottom adds a sweet, personal touch to a practical baby item, making it a perfect gift.
24. A Pocket Full of Buttercups
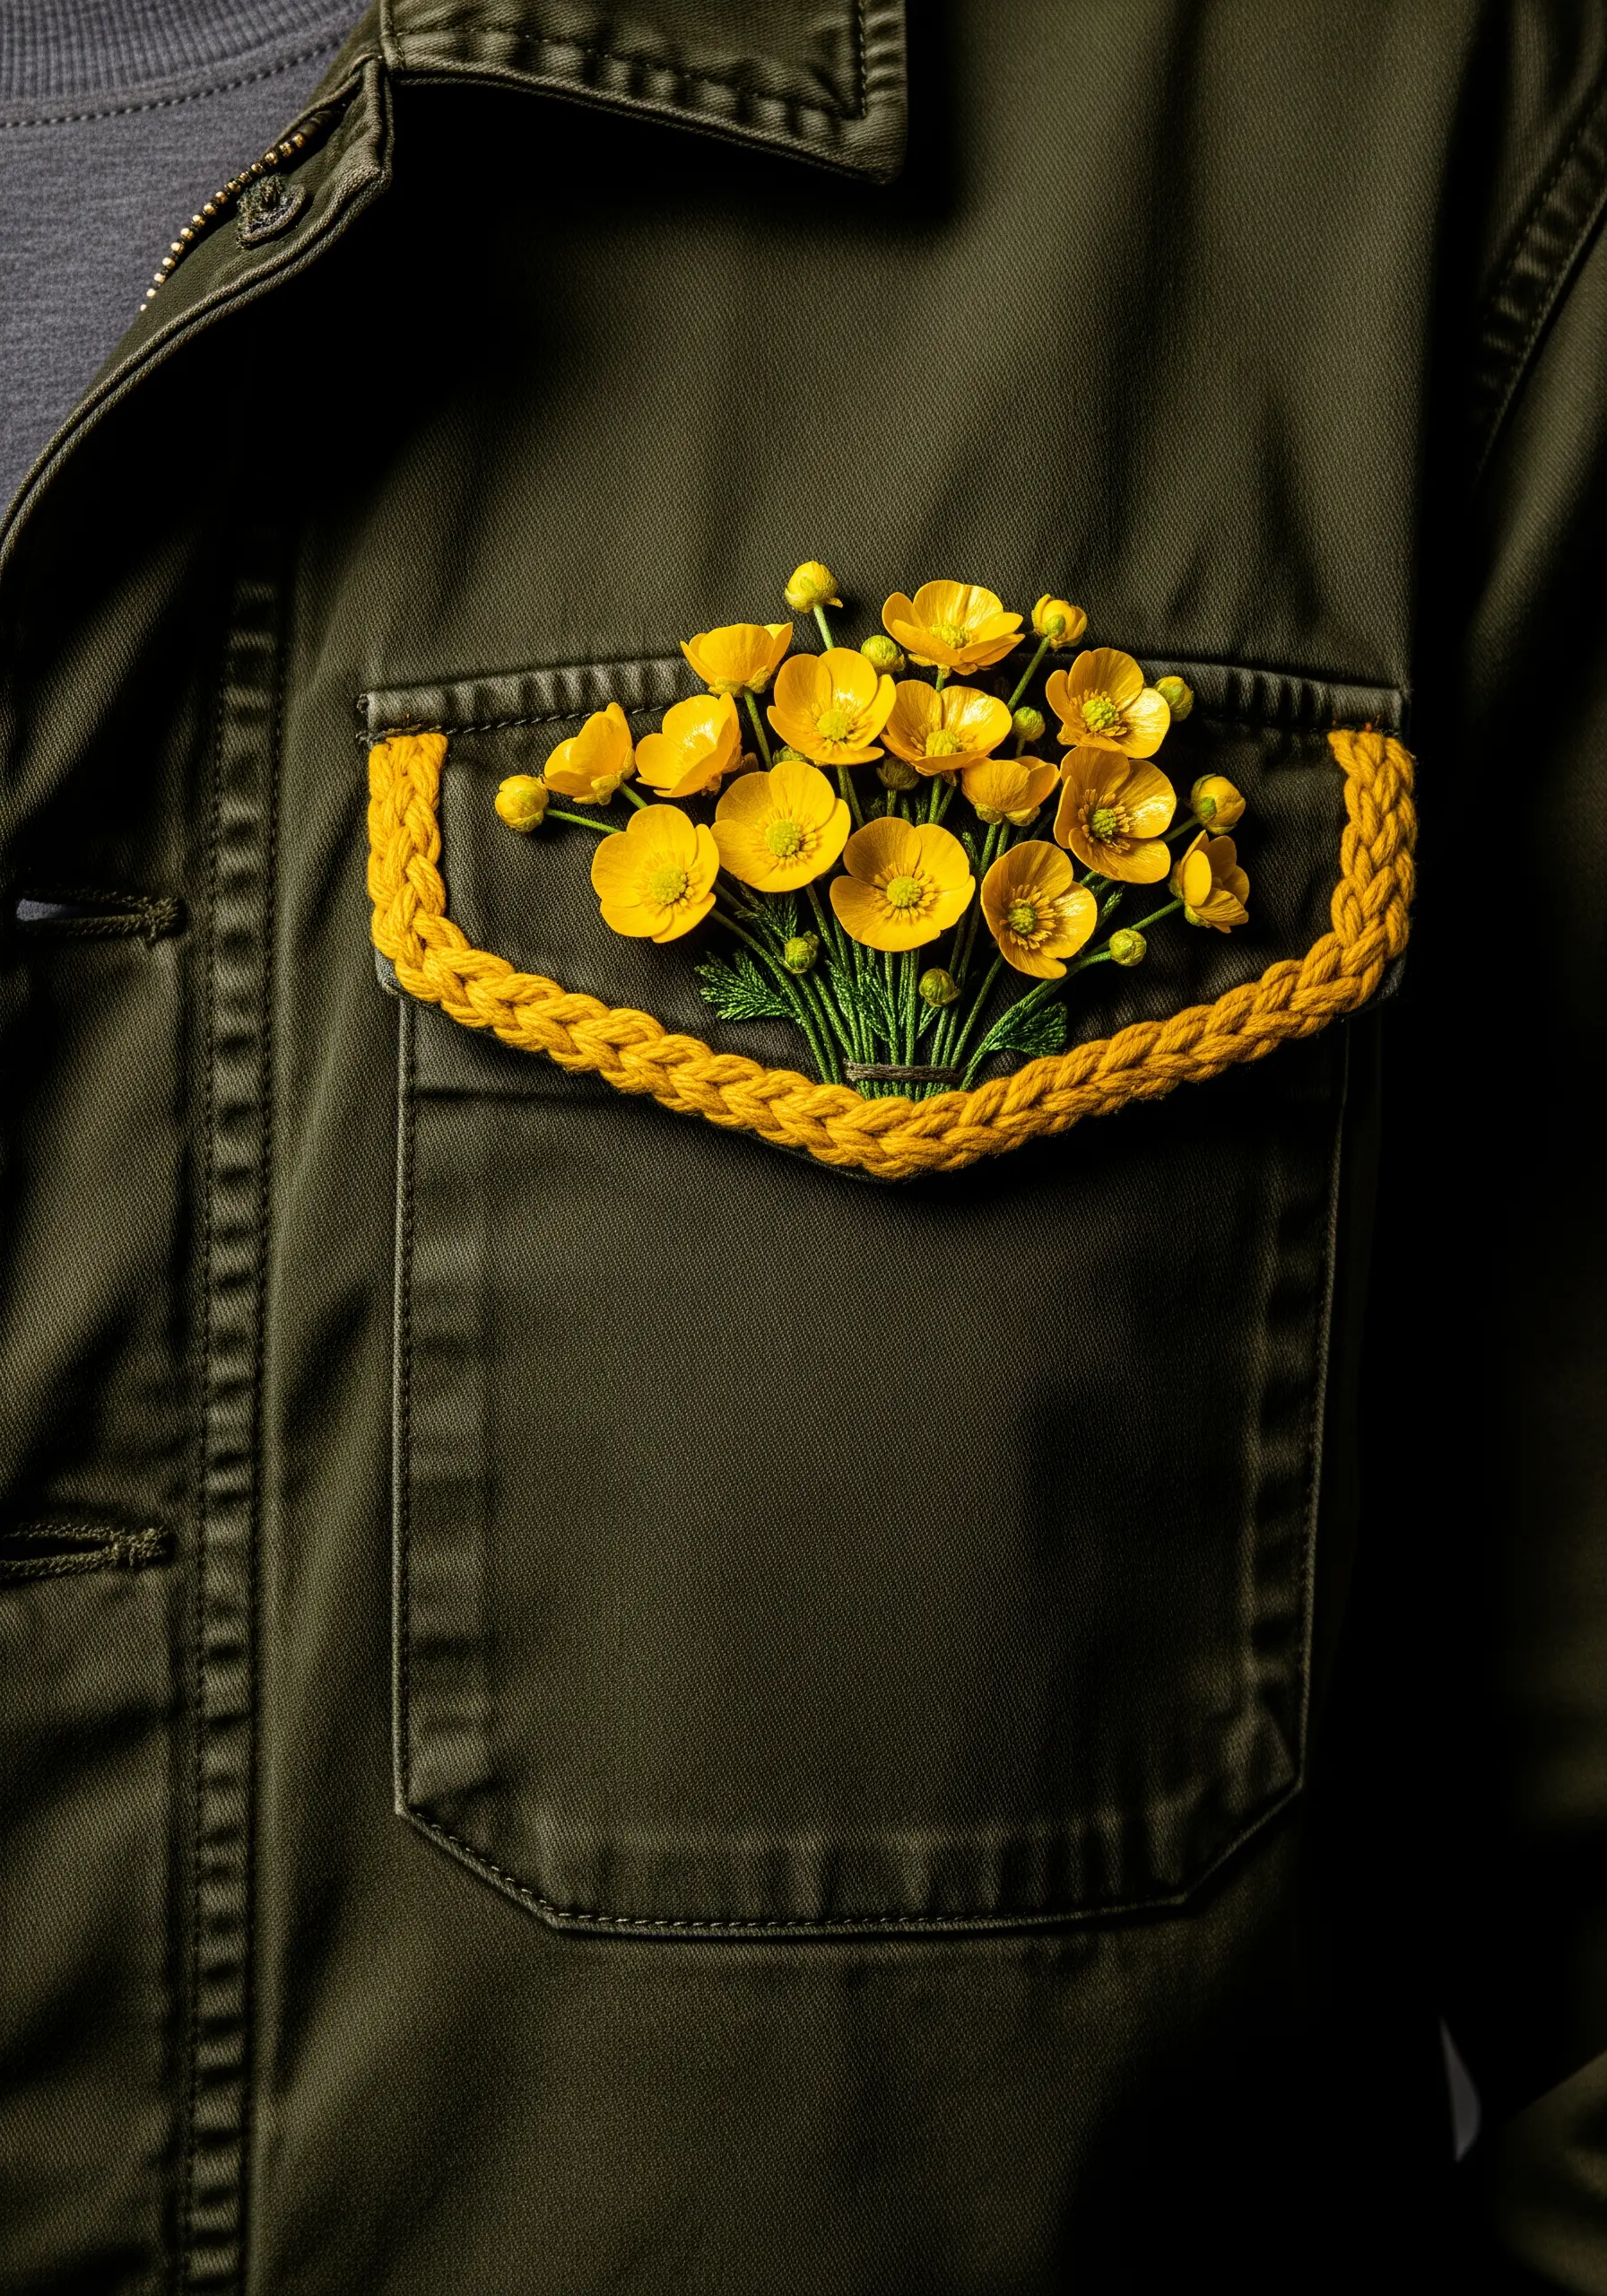
Create a surprising and dimensional effect by filling a pocket with a bouquet of 3D buttercups stitched separately and then attached.
Craft the flowers using stumpwork techniques with wire-edged petals or by using layered cast-on stitches on a felt base.
Arrange and stitch the completed bouquet inside the pocket, allowing some blooms to spill over the edge for a lush, abundant feel.
Frame the pocket with a braided stitch to add even more texture and define the space, turning it into a miniature vessel for your floral art.
25. The Elegant Side-Swept Vine
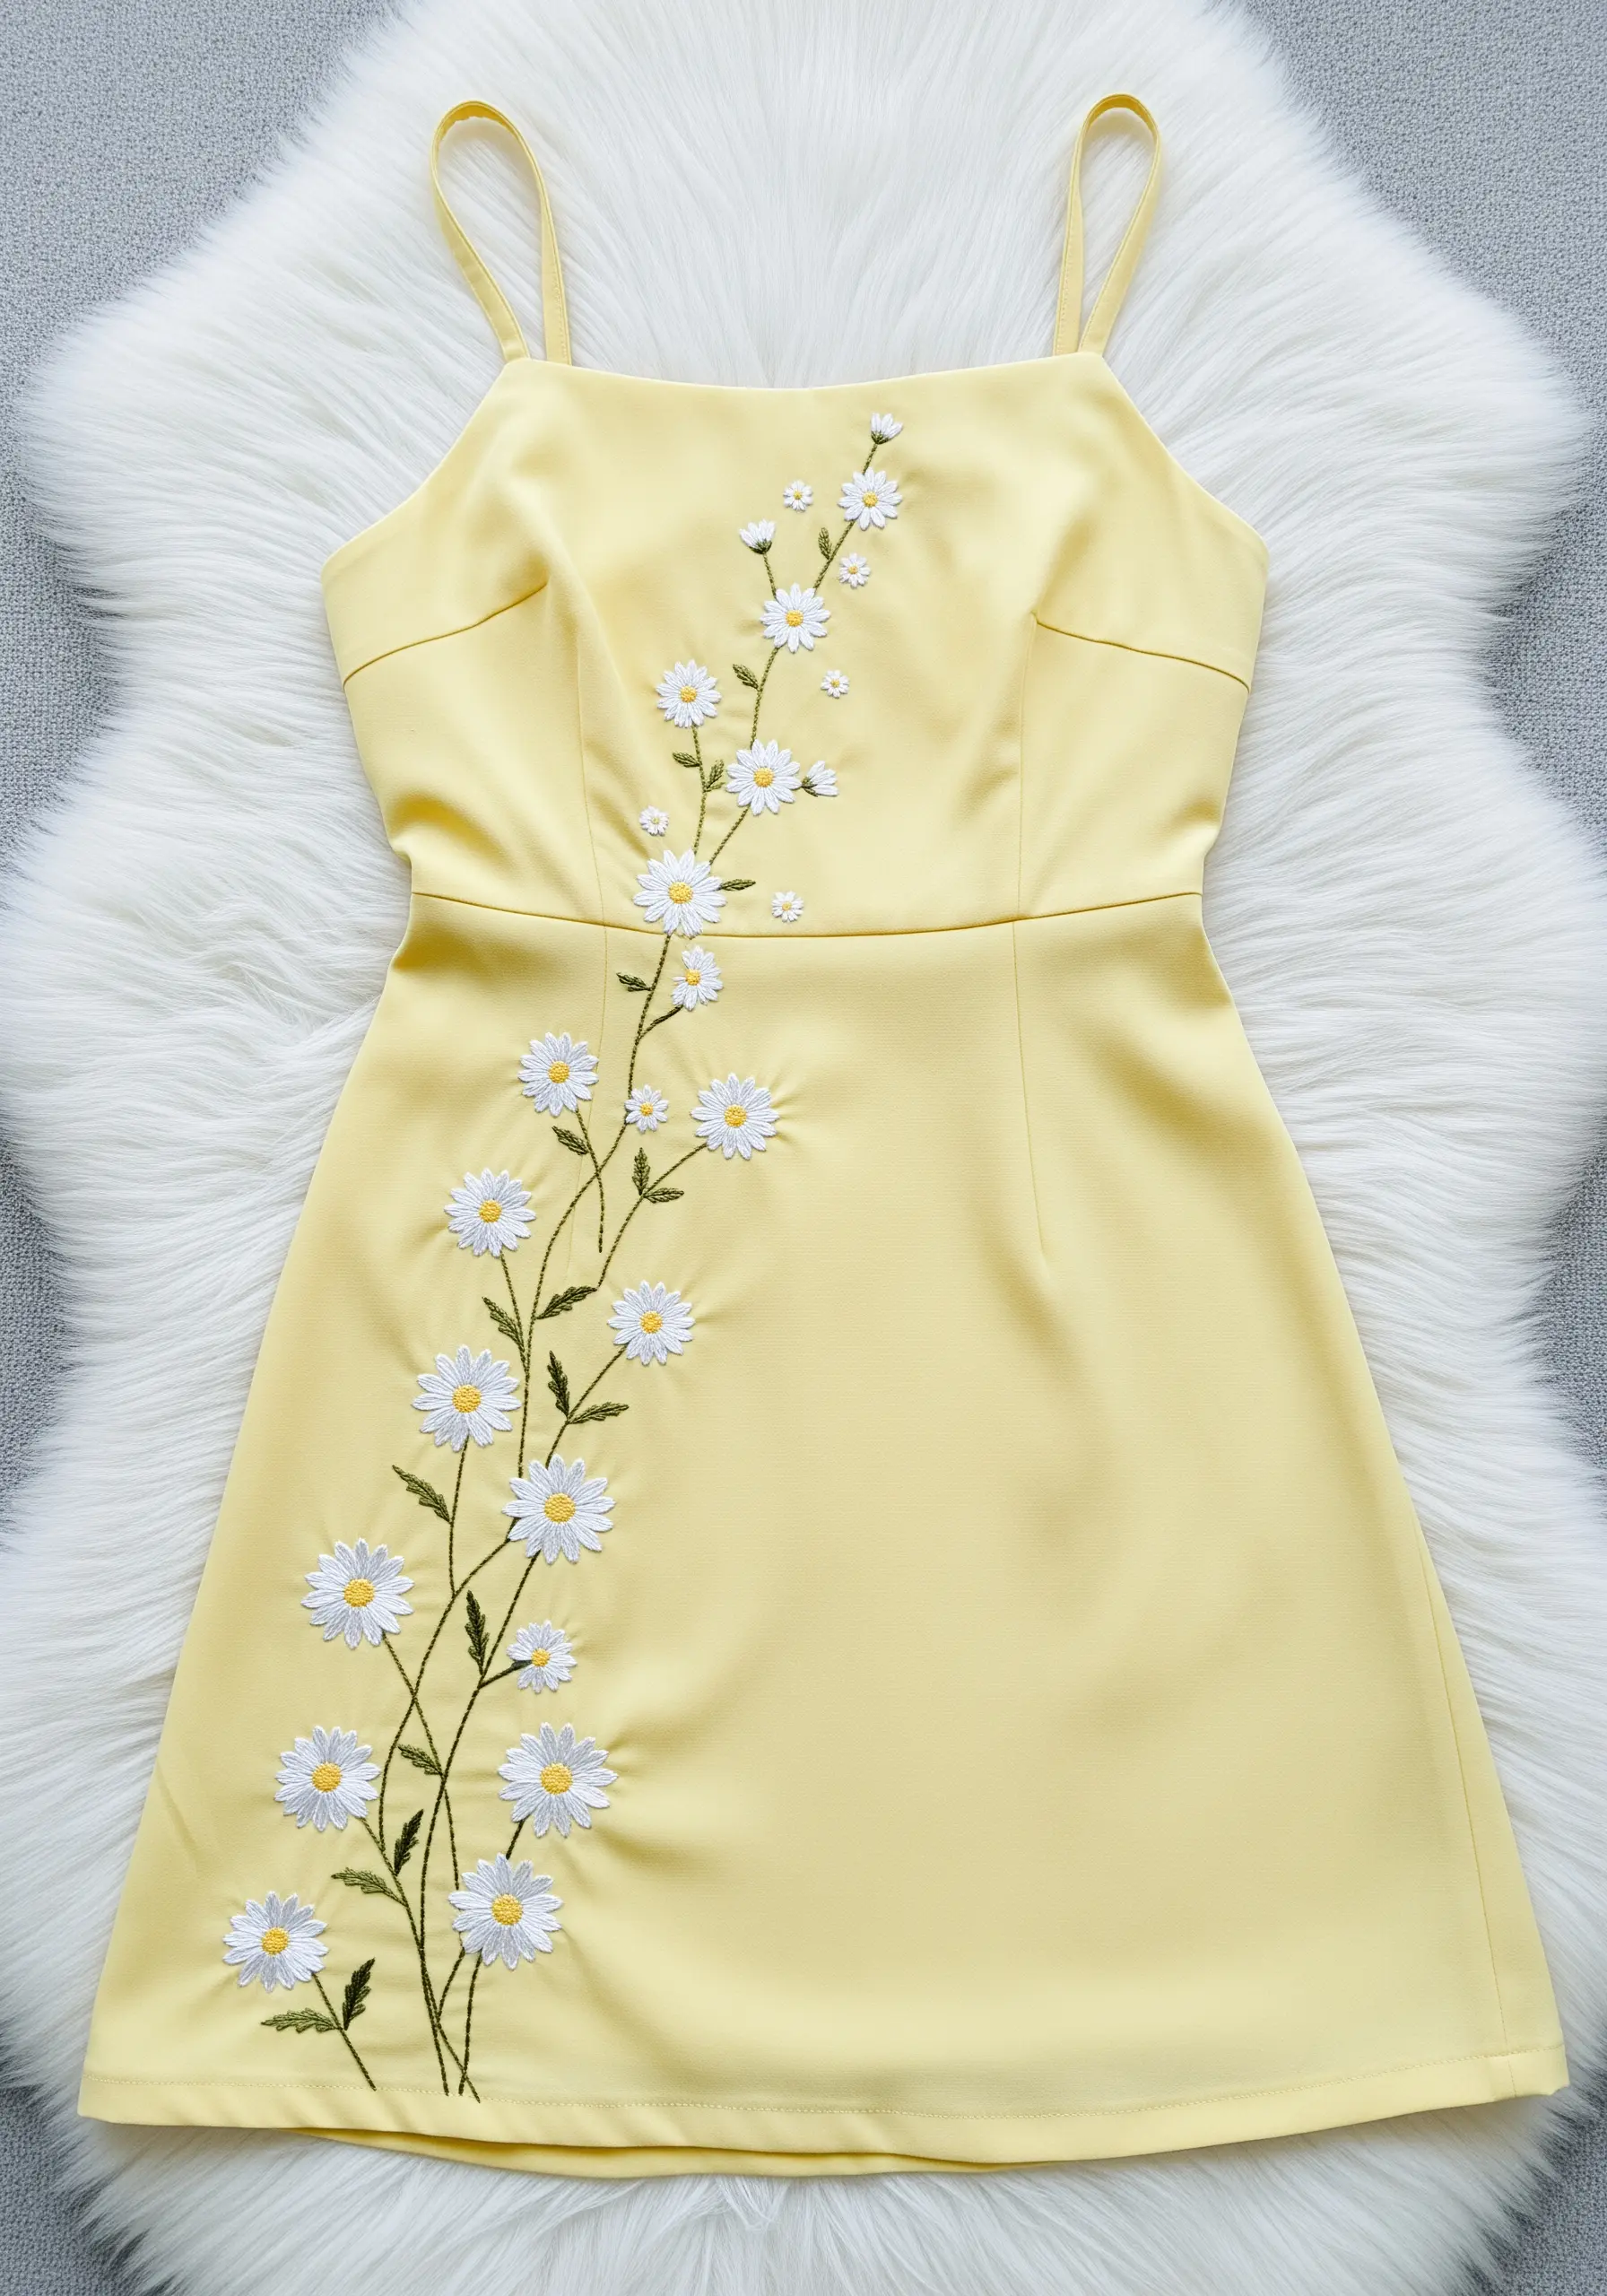
For a sophisticated design on a simple dress, stitch a single vine that sweeps gracefully up the side of the garment.
This asymmetrical placement is incredibly flattering, as it draws the eye vertically and creates a sense of elegant movement.
Use a delicate, flowing stem stitch for the vine and vary the size of the daisies, placing smaller ones at the top and bottom to create a natural taper.
On a solid-colored fabric, this single, beautifully executed element becomes the star, proving that sometimes less is truly more.


