

Have you ever finished an embroidery project and felt that something was missing? That a stitch was just a stitch, and the fabric was just fabric? You’re on the edge of a breakthrough, and all it takes is a small shift in perspective.
True artistry in embroidery isn’t about mastering hundreds of complex stitches. It’s about learning to see the thread as a sculptural line, the fabric as a canvas, and texture as a form of expression. It’s in the deliberate choice of a thicker thread for emphasis, the subtle gradient that gives a petal life, or the unexpected combination of beads and floss.
These ideas are your invitation to stitch with more intention. They are practical techniques designed to elevate your work instantly, helping you transform plain surfaces into pieces that feel polished, personal, and deeply satisfying to create. Let’s begin.
1. Add 3D Texture with Organza and Knots
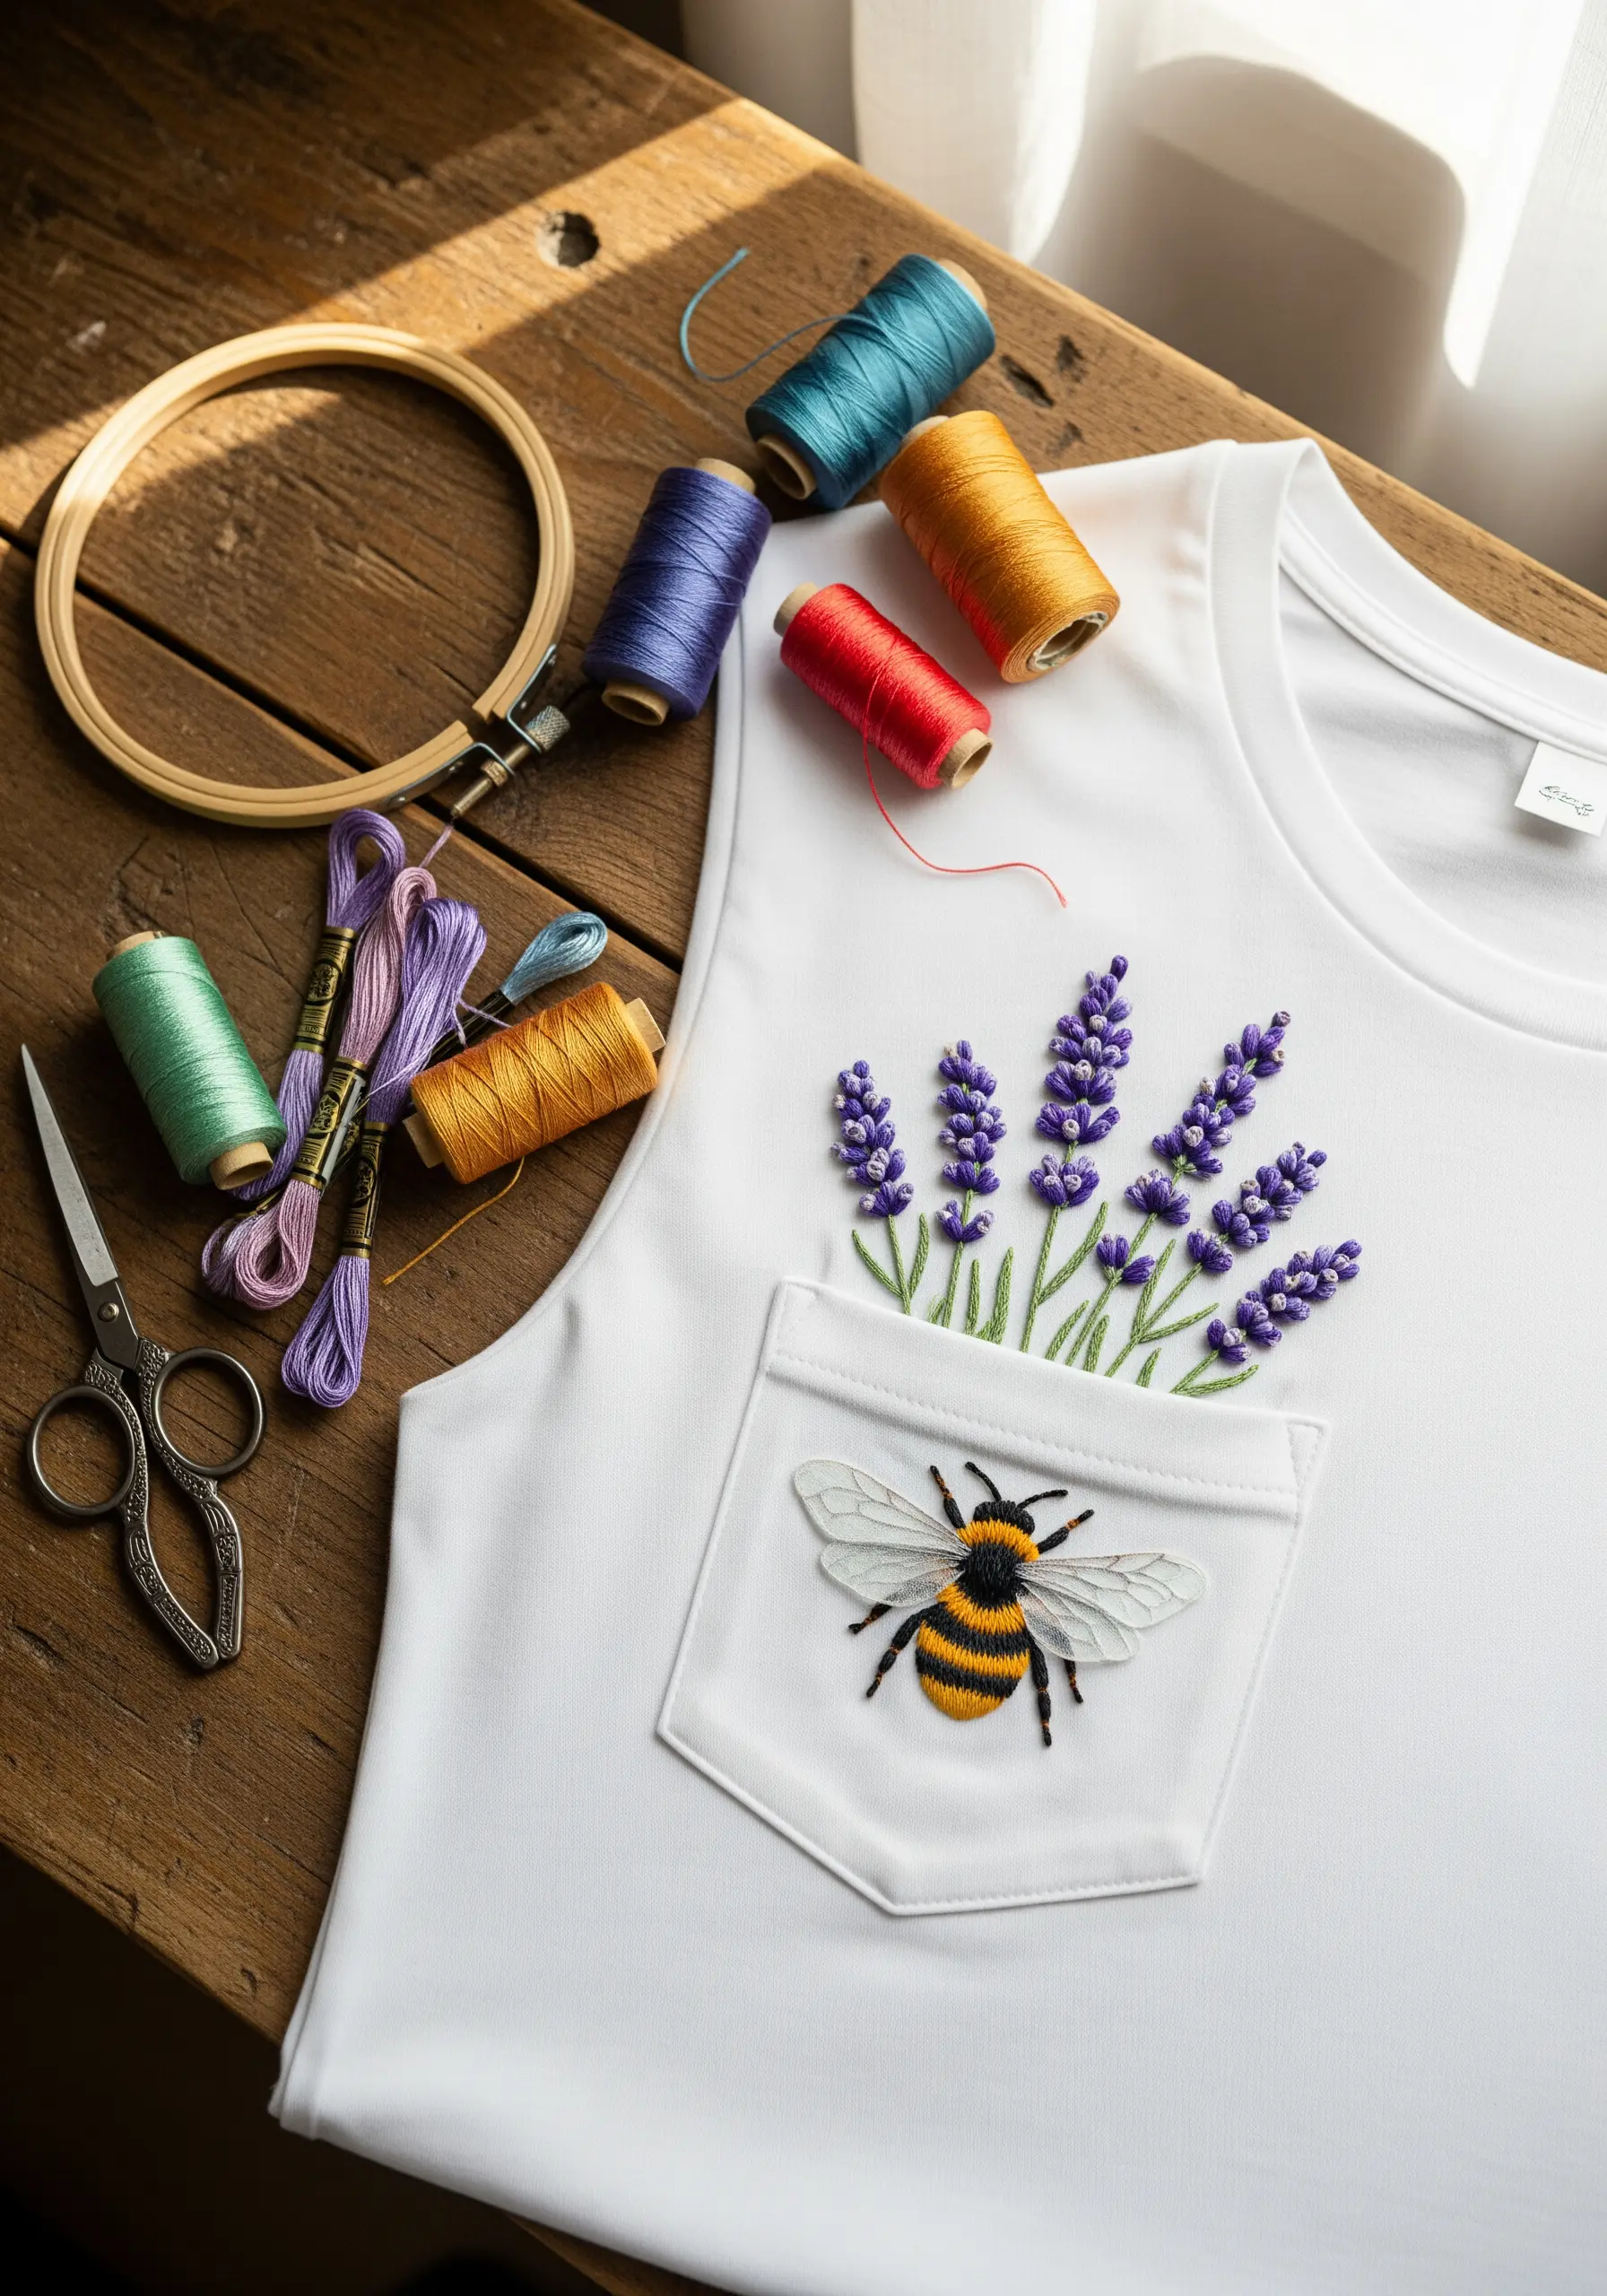
Combine different textures within a single motif to create lifelike depth.
For lavender, use densely packed French knots in varying shades of purple to mimic the clustered florets.
For the bee, use a padded satin stitch for a raised, fuzzy body and a single layer of sheer organza, outlined with a delicate backstitch, for translucent wings.
This contrast between plush knots and ethereal fabric makes the composition dynamic and tactile.
2. Master High-Contrast Celestial Designs
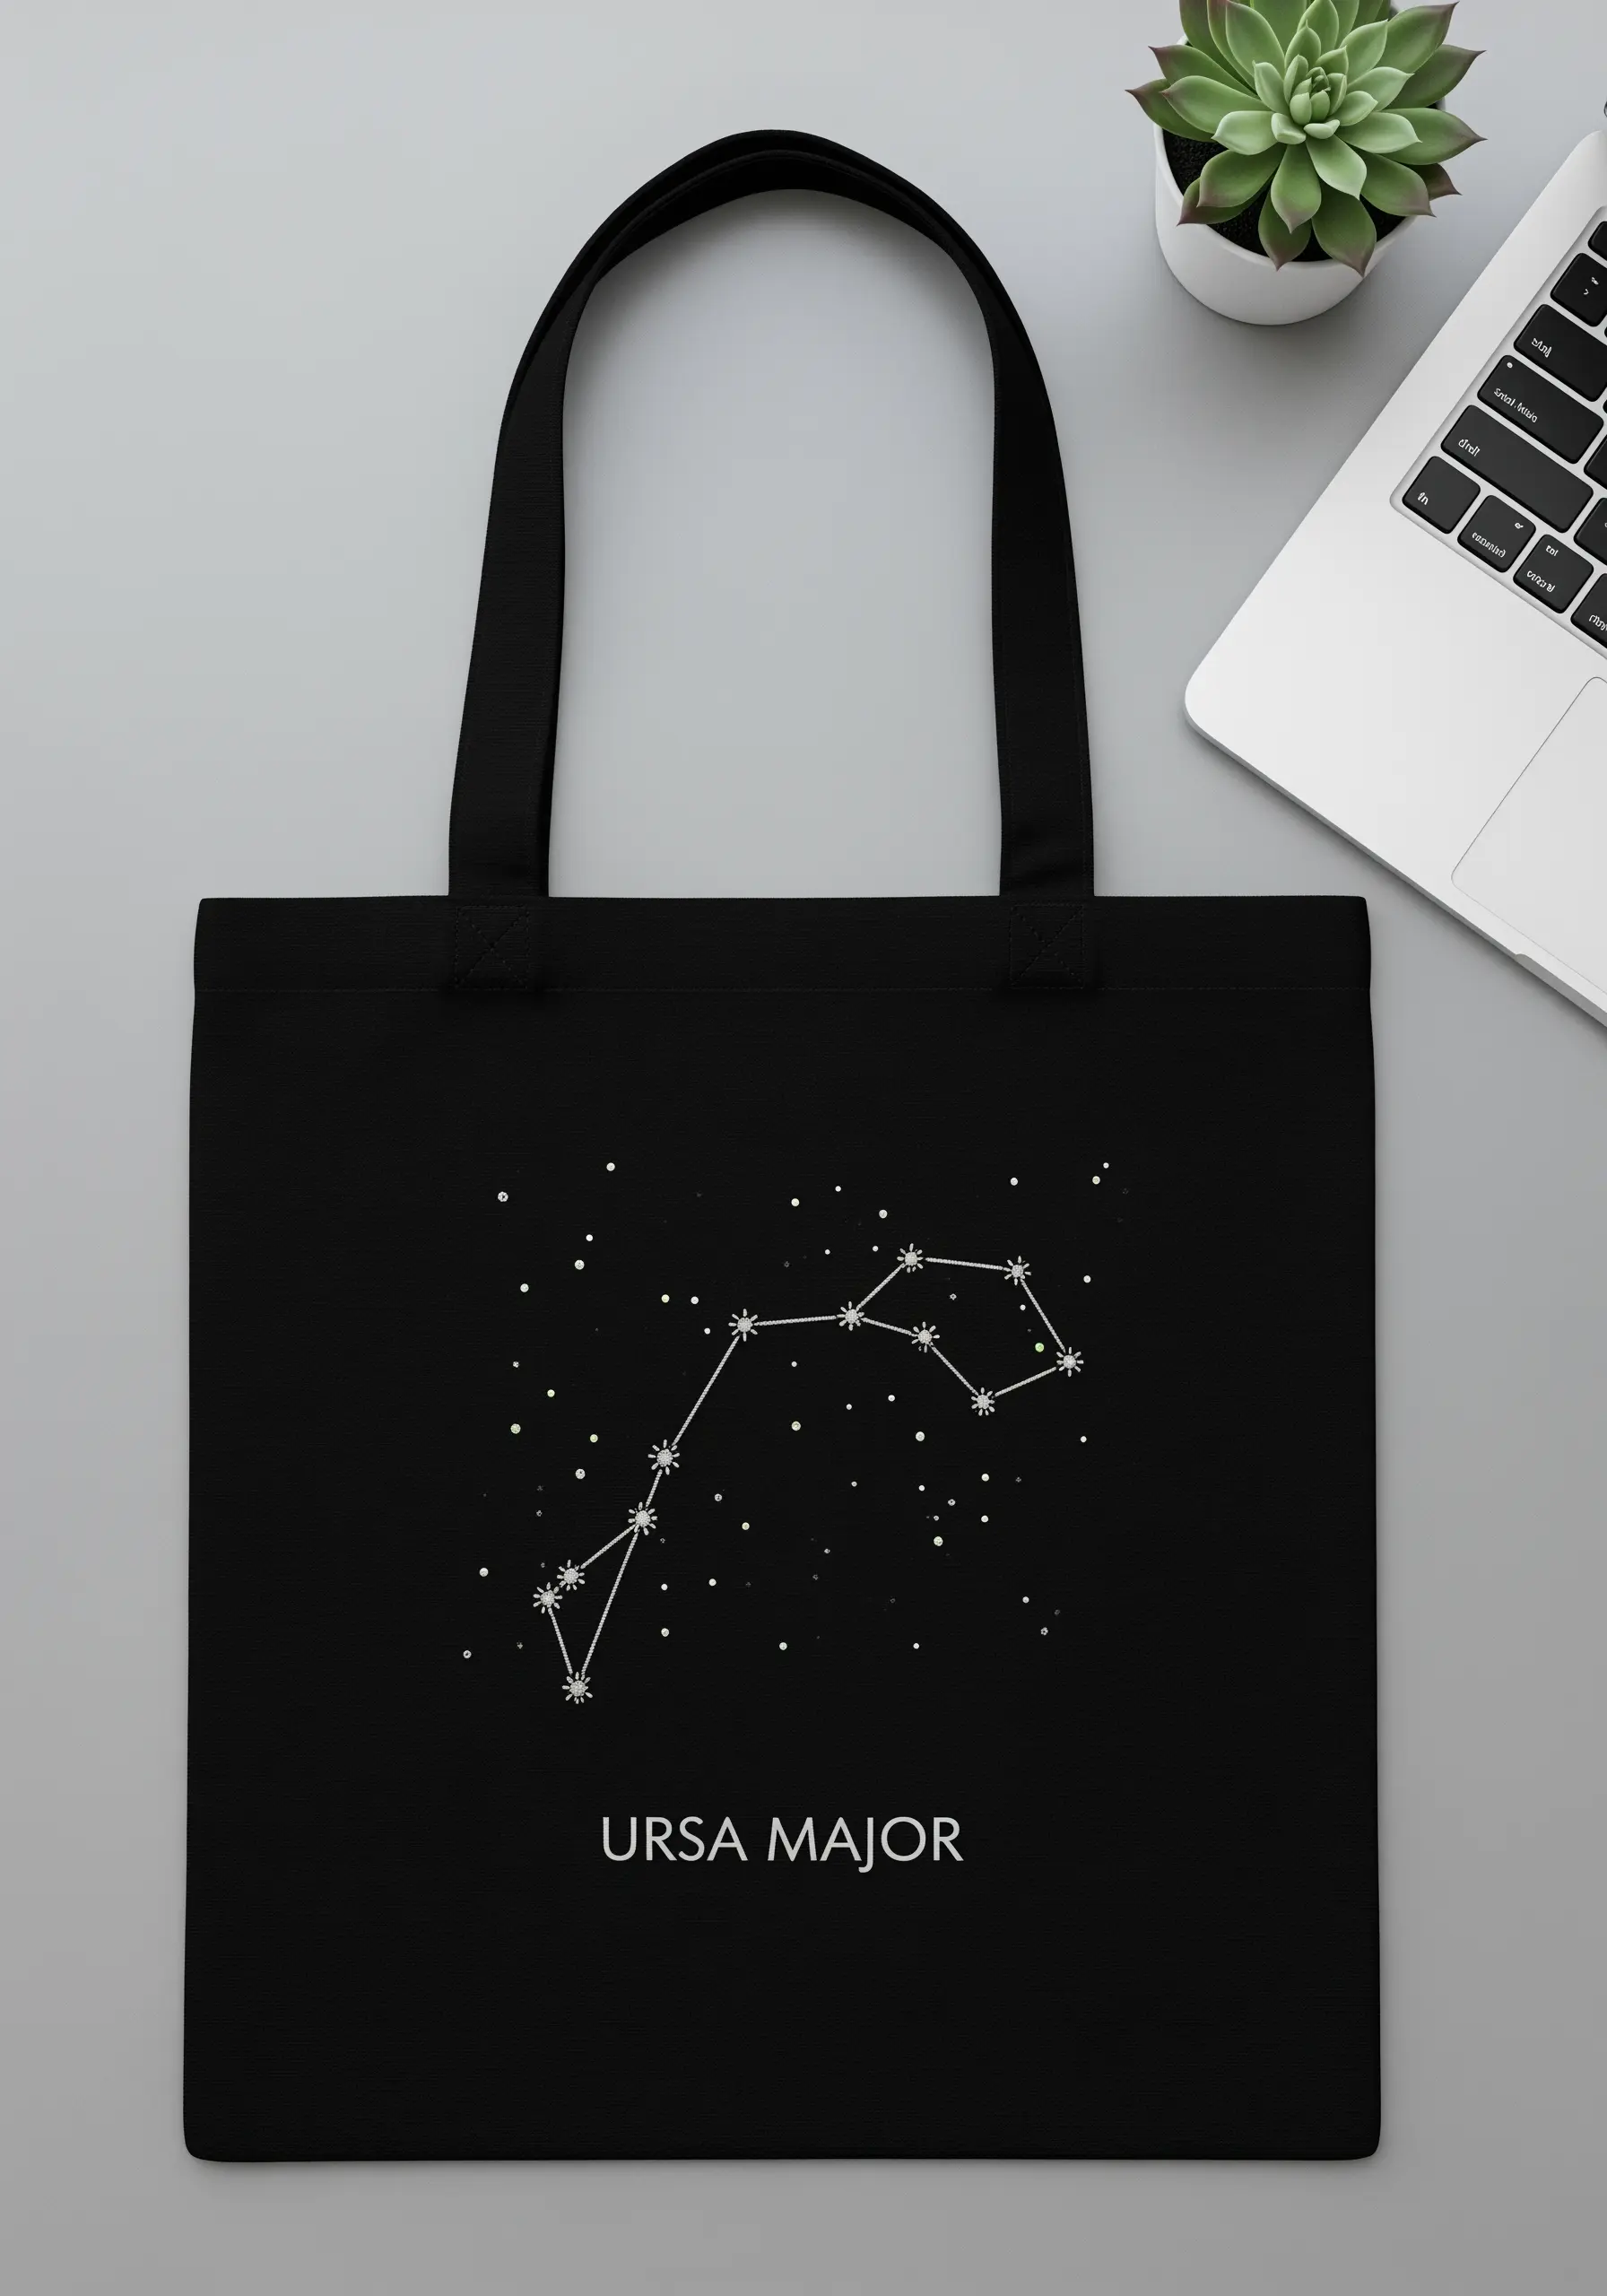
Make simple line work feel bold and graphic by stitching with white or metallic thread on black canvas.
For constellation lines, use a crisp backstitch with two strands of floss to ensure visibility.
Render the stars with small star stitches or single French knots to create points of light that stand out against the dark fabric.
This minimalist approach turns a simple tote into a piece of wearable graphic art.
3. Embrace Visible Mending with Sashiko
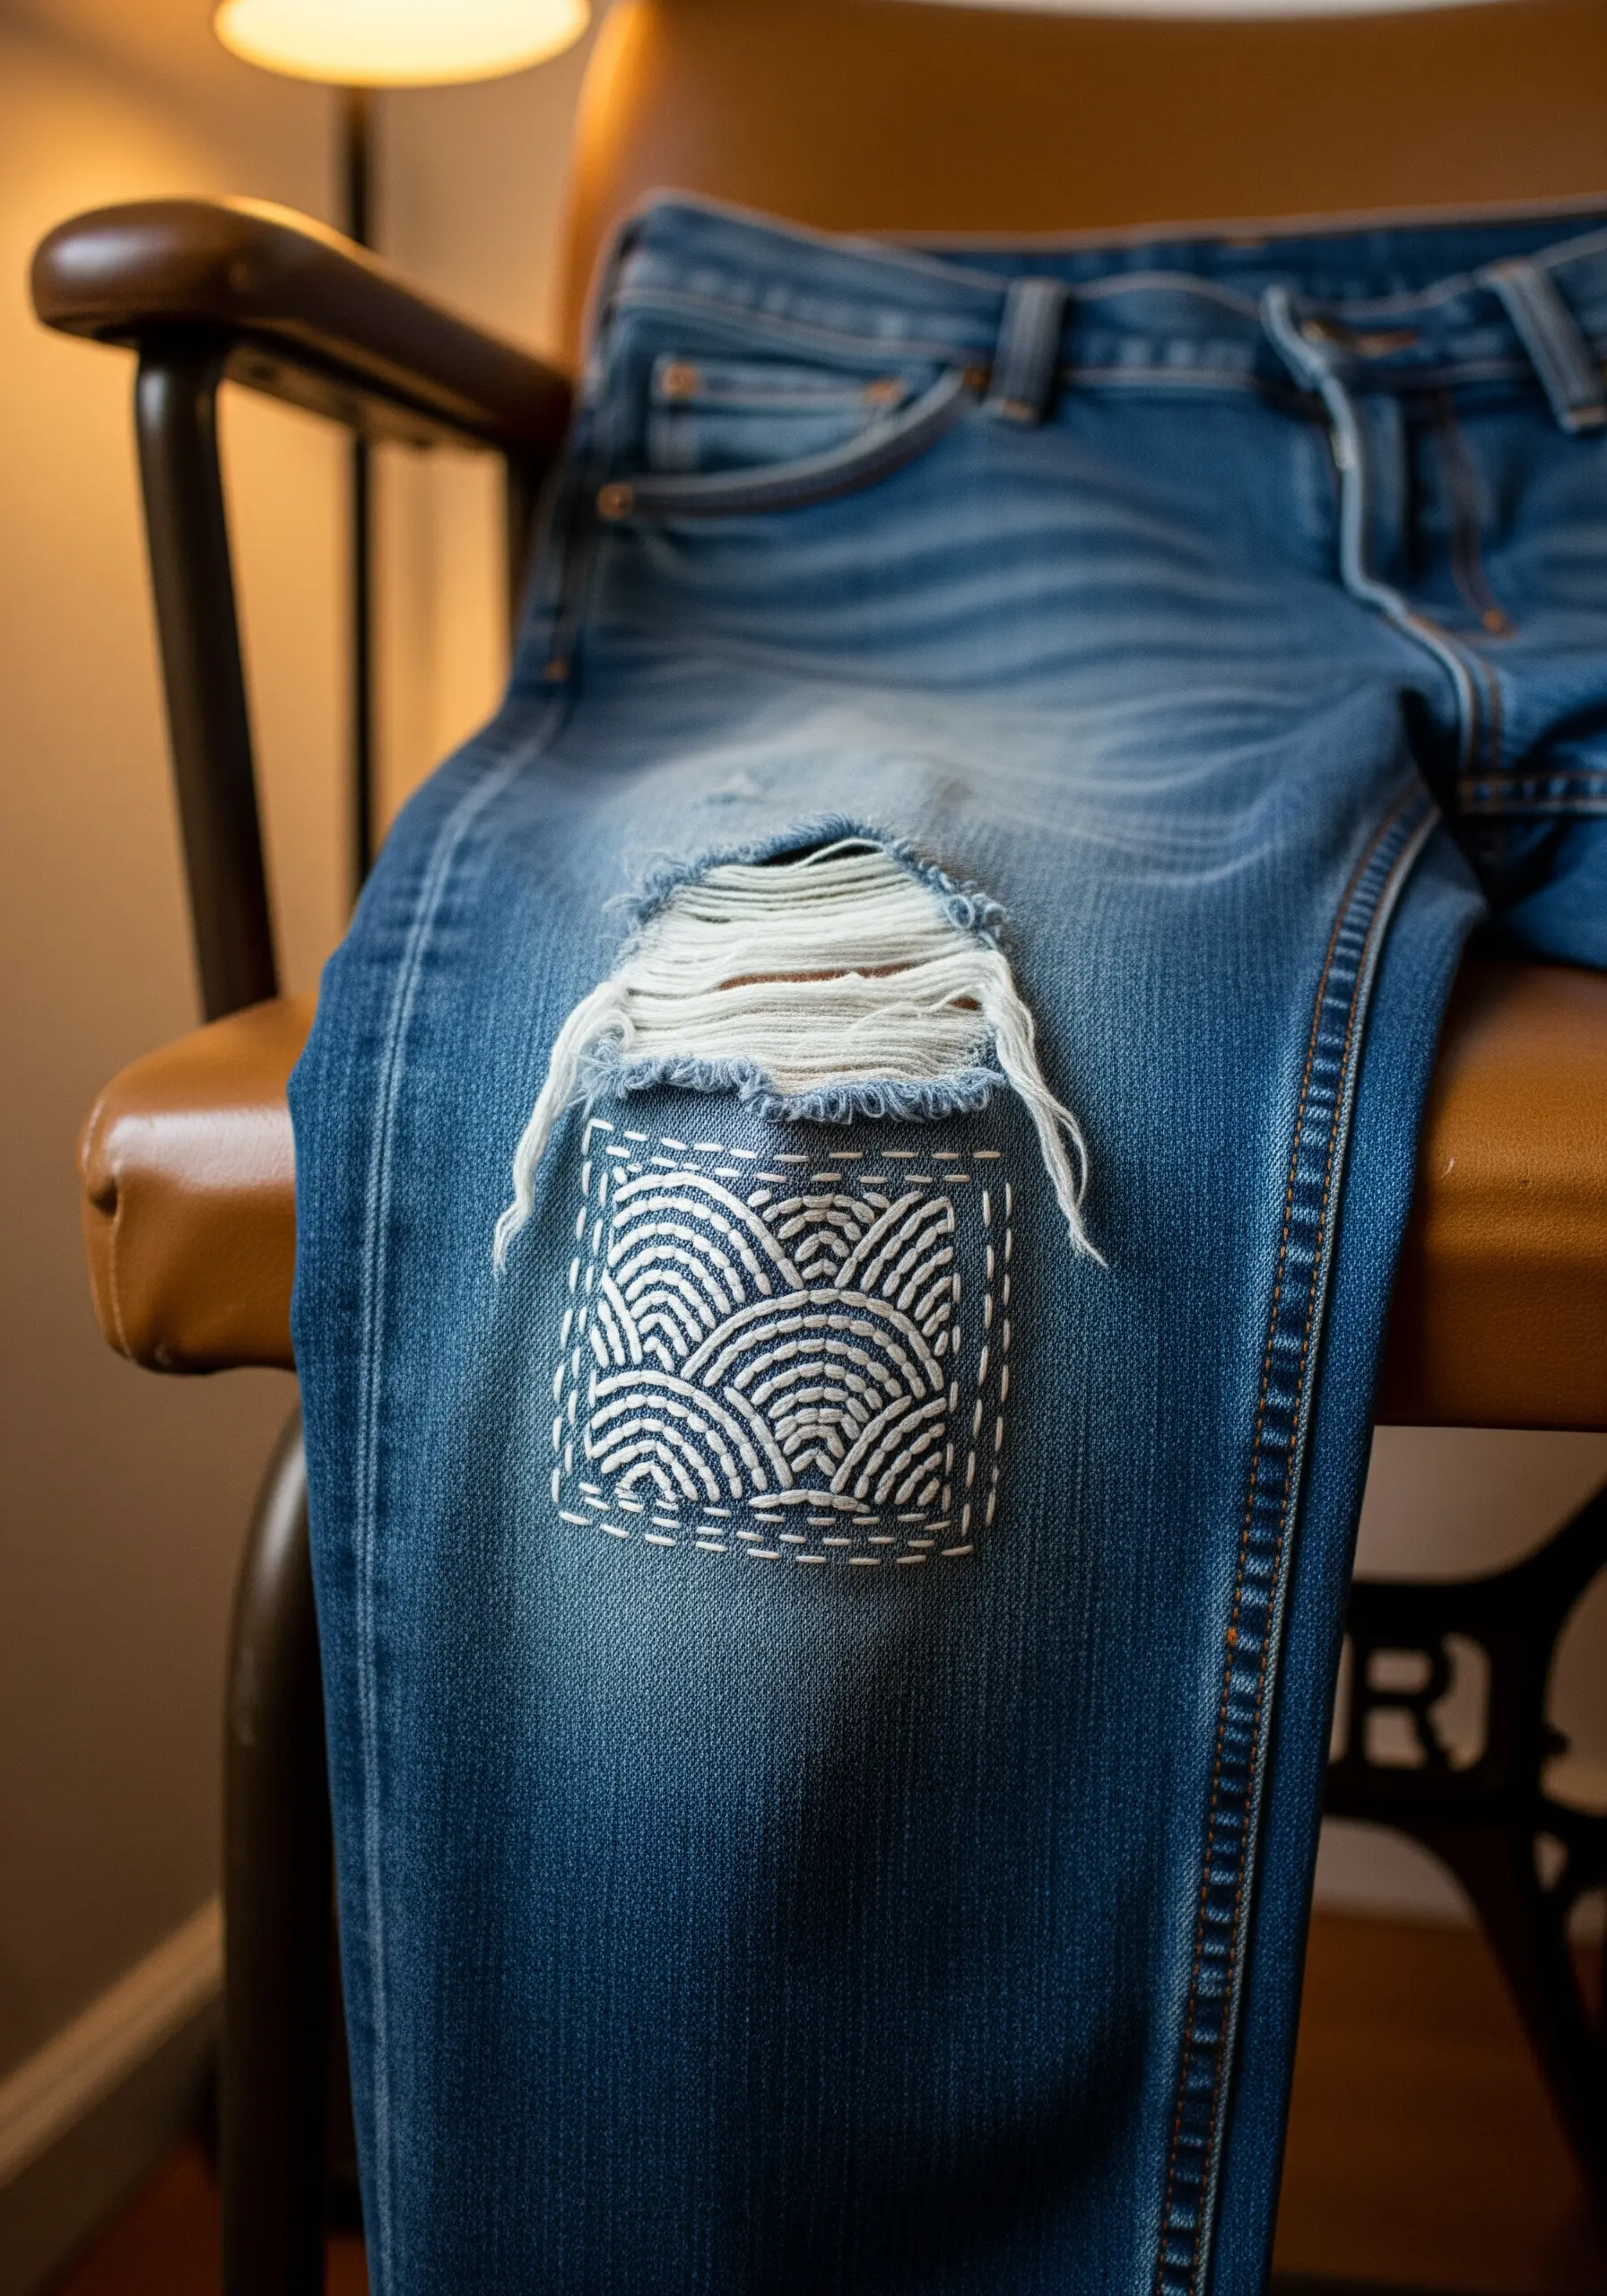
Transform a tear in your denim into a decorative feature using the Japanese art of Sashiko.
Instead of hiding the repair, accentuate it with a contrasting patch and a bold geometric pattern stitched in thick, white cotton thread.
Use a simple, repetitive running stitch to create traditional patterns like Seigaiha (waves), which adds both strength and beauty to the mend.
This technique celebrates imperfection and makes your clothing uniquely yours.
4. Create Sculptural Florals with Silk Ribbon
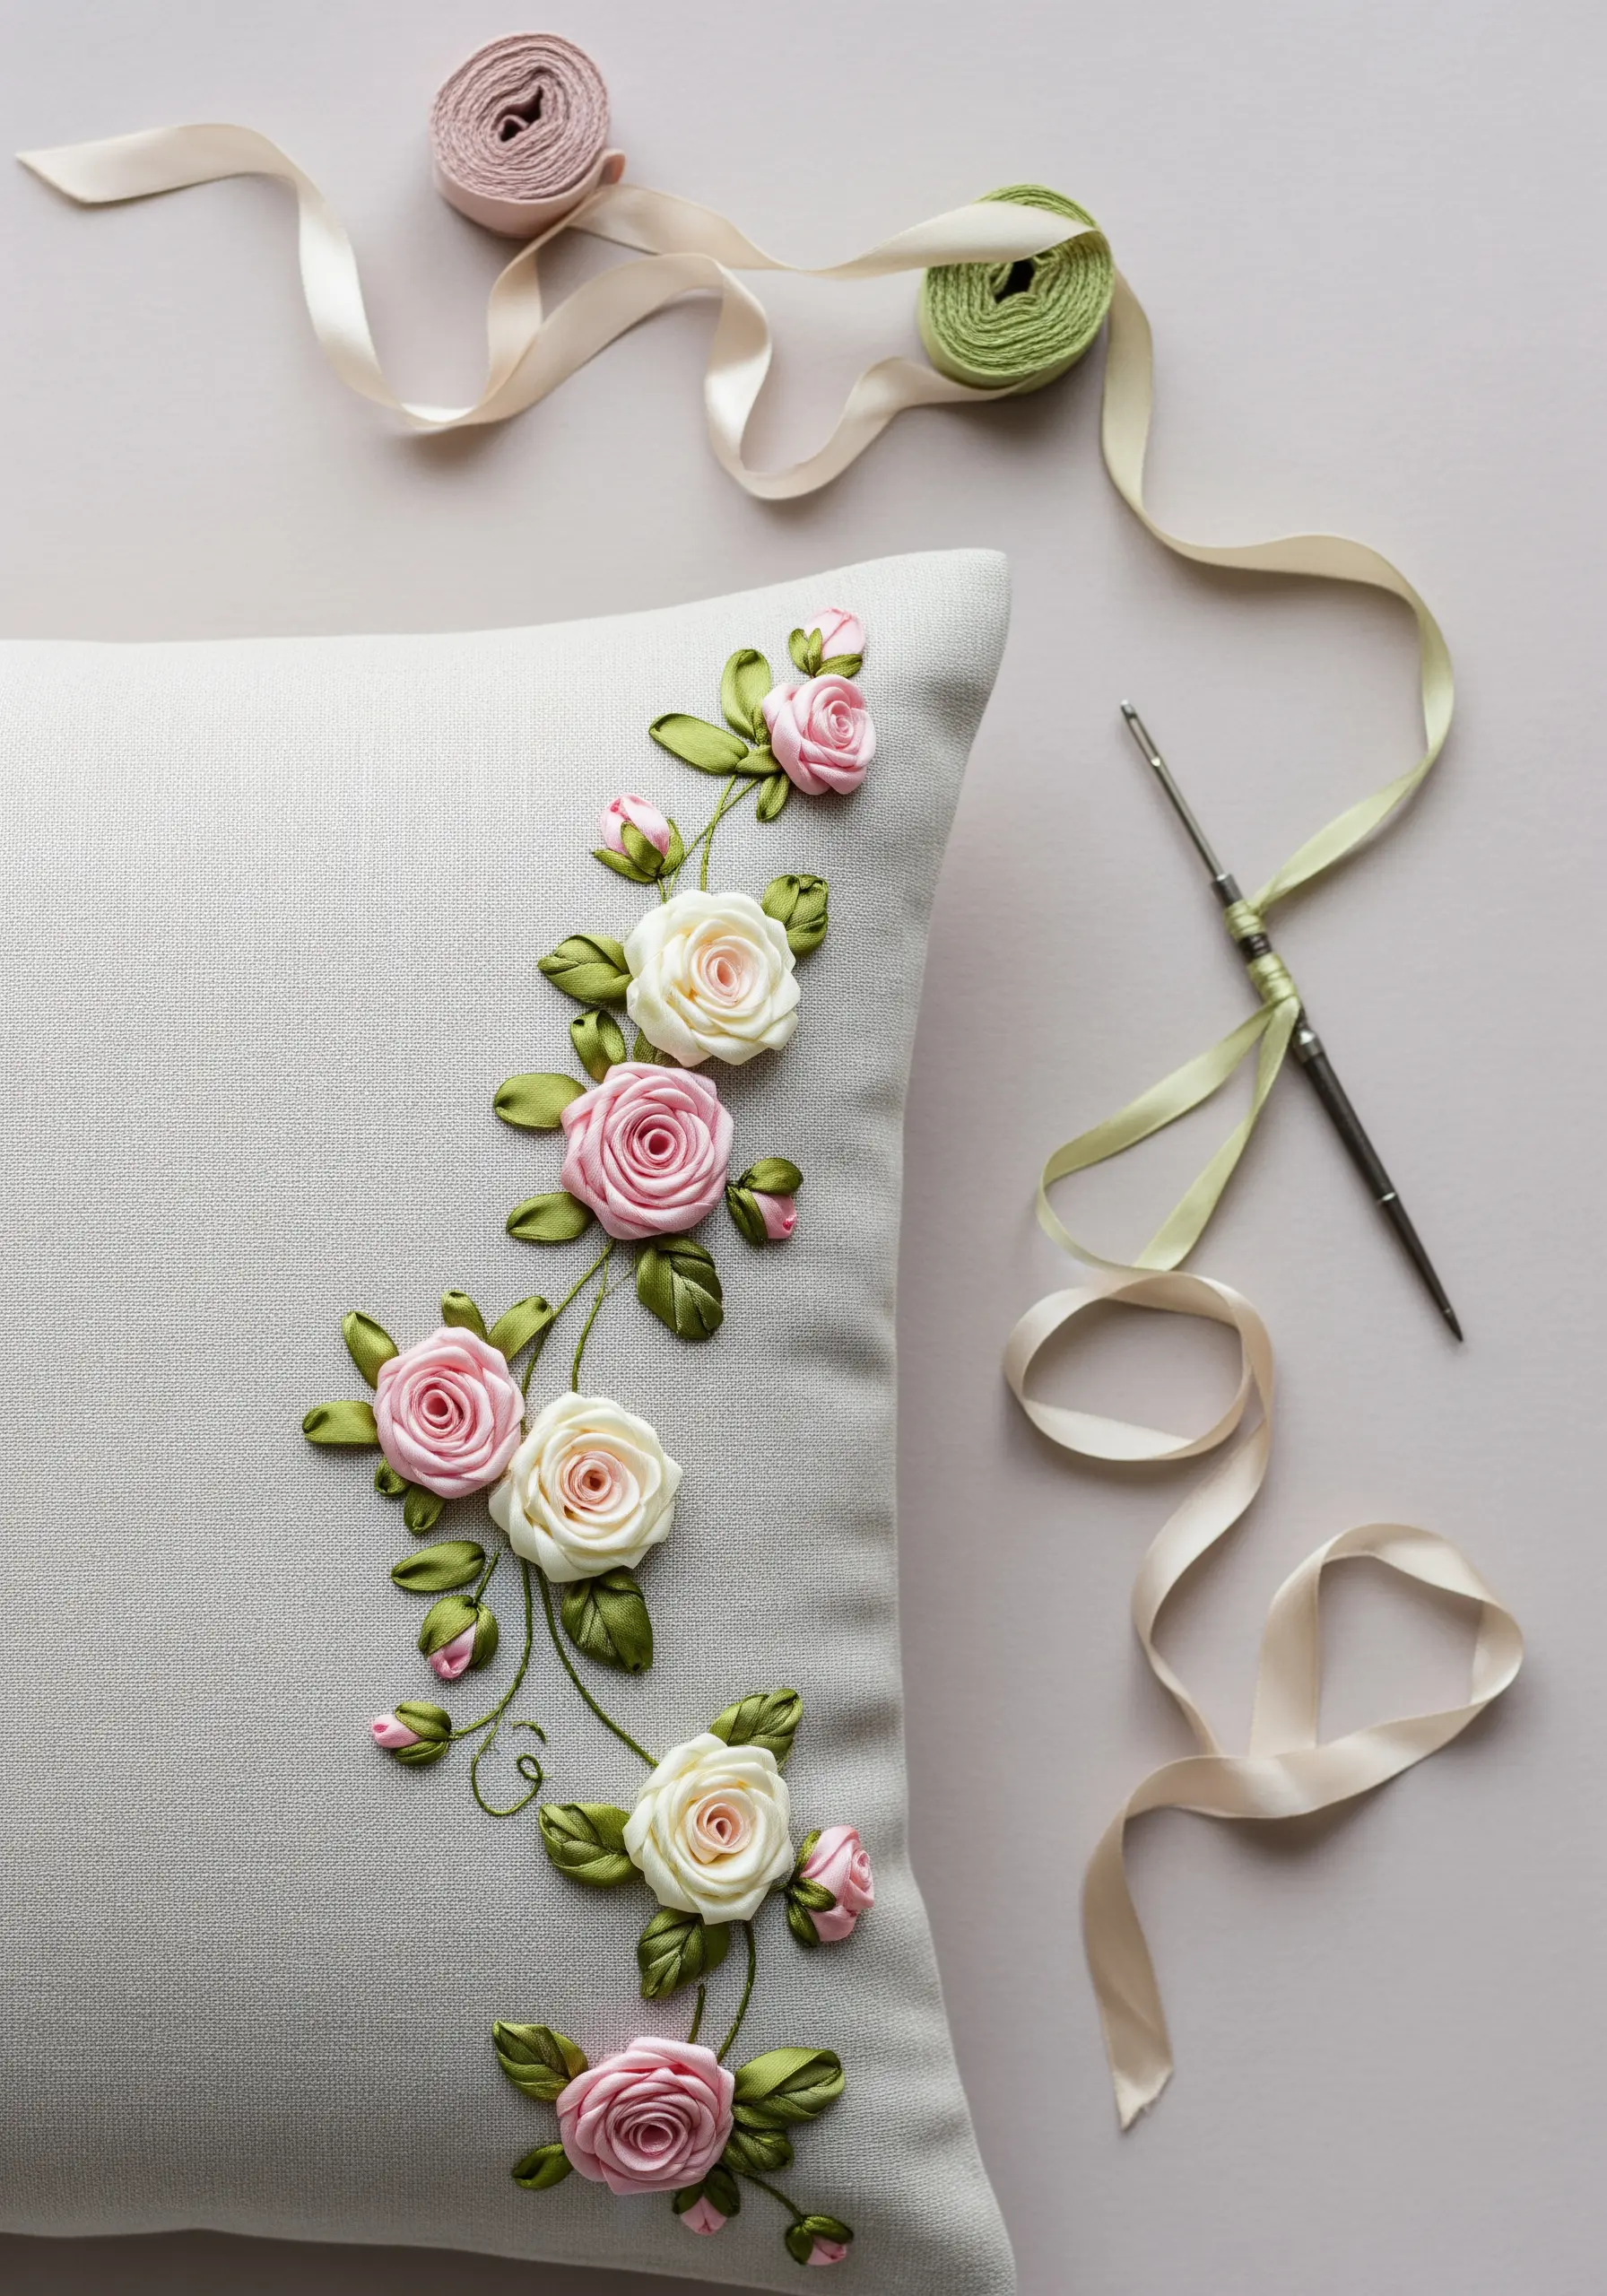
Move beyond floss to achieve realistic, three-dimensional petals with silk ribbon embroidery.
Use a woven wheel stitch (also called a spider web rose) as your base, weaving the ribbon over and under thread spokes to build a lush, raised rose.
For leaves, a single, twisted ribbon stitch creates the perfect shape and sheen.
This technique is surprisingly fast and adds a touch of vintage elegance to pillows and apparel.
5. Add Luxe Detail with Bead Embroidery
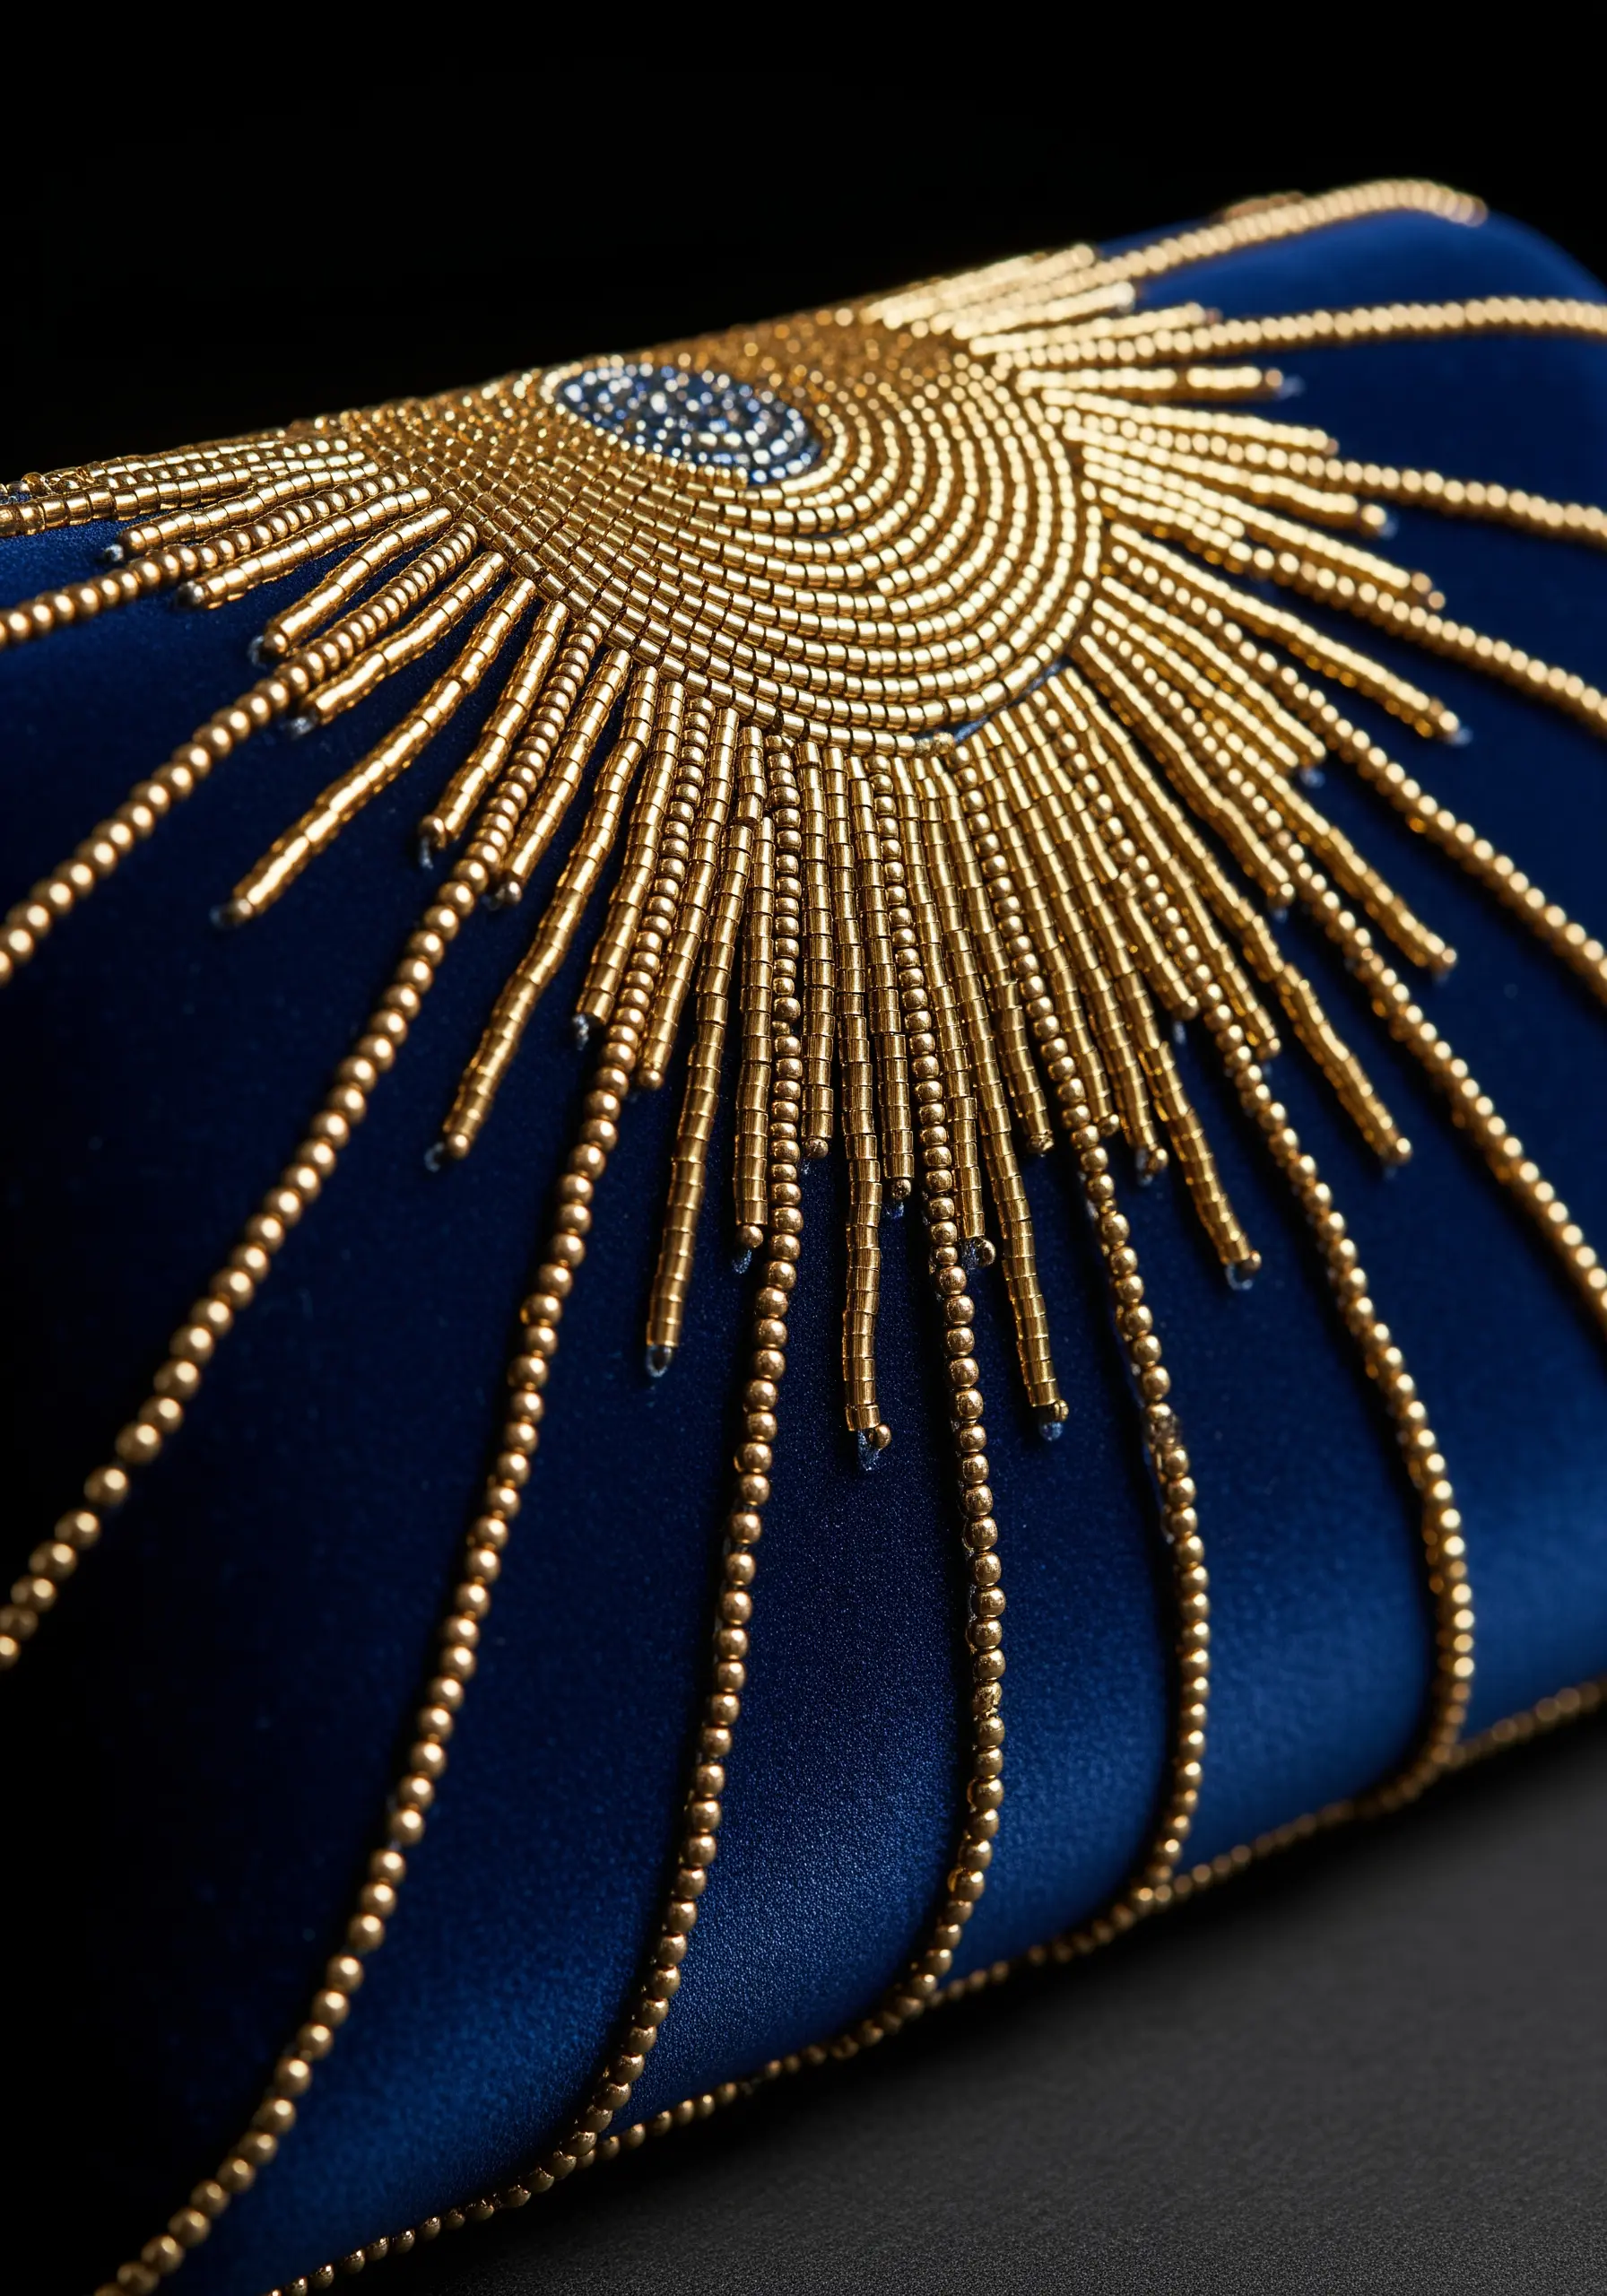
Elevate textiles like velvet or silk with the shimmer and weight of bead embroidery.
Create precise, radiating lines by couching long strands of seed beads or using a backstitch to apply bugle beads one by one.
The combination of rich velvet and metallic beads creates a powerful tactile and visual contrast, perfect for opulent home décor.
Sketch your design with a chalk pencil first to ensure perfect symmetry.
6. Paint with Thread for Abstract Shapes
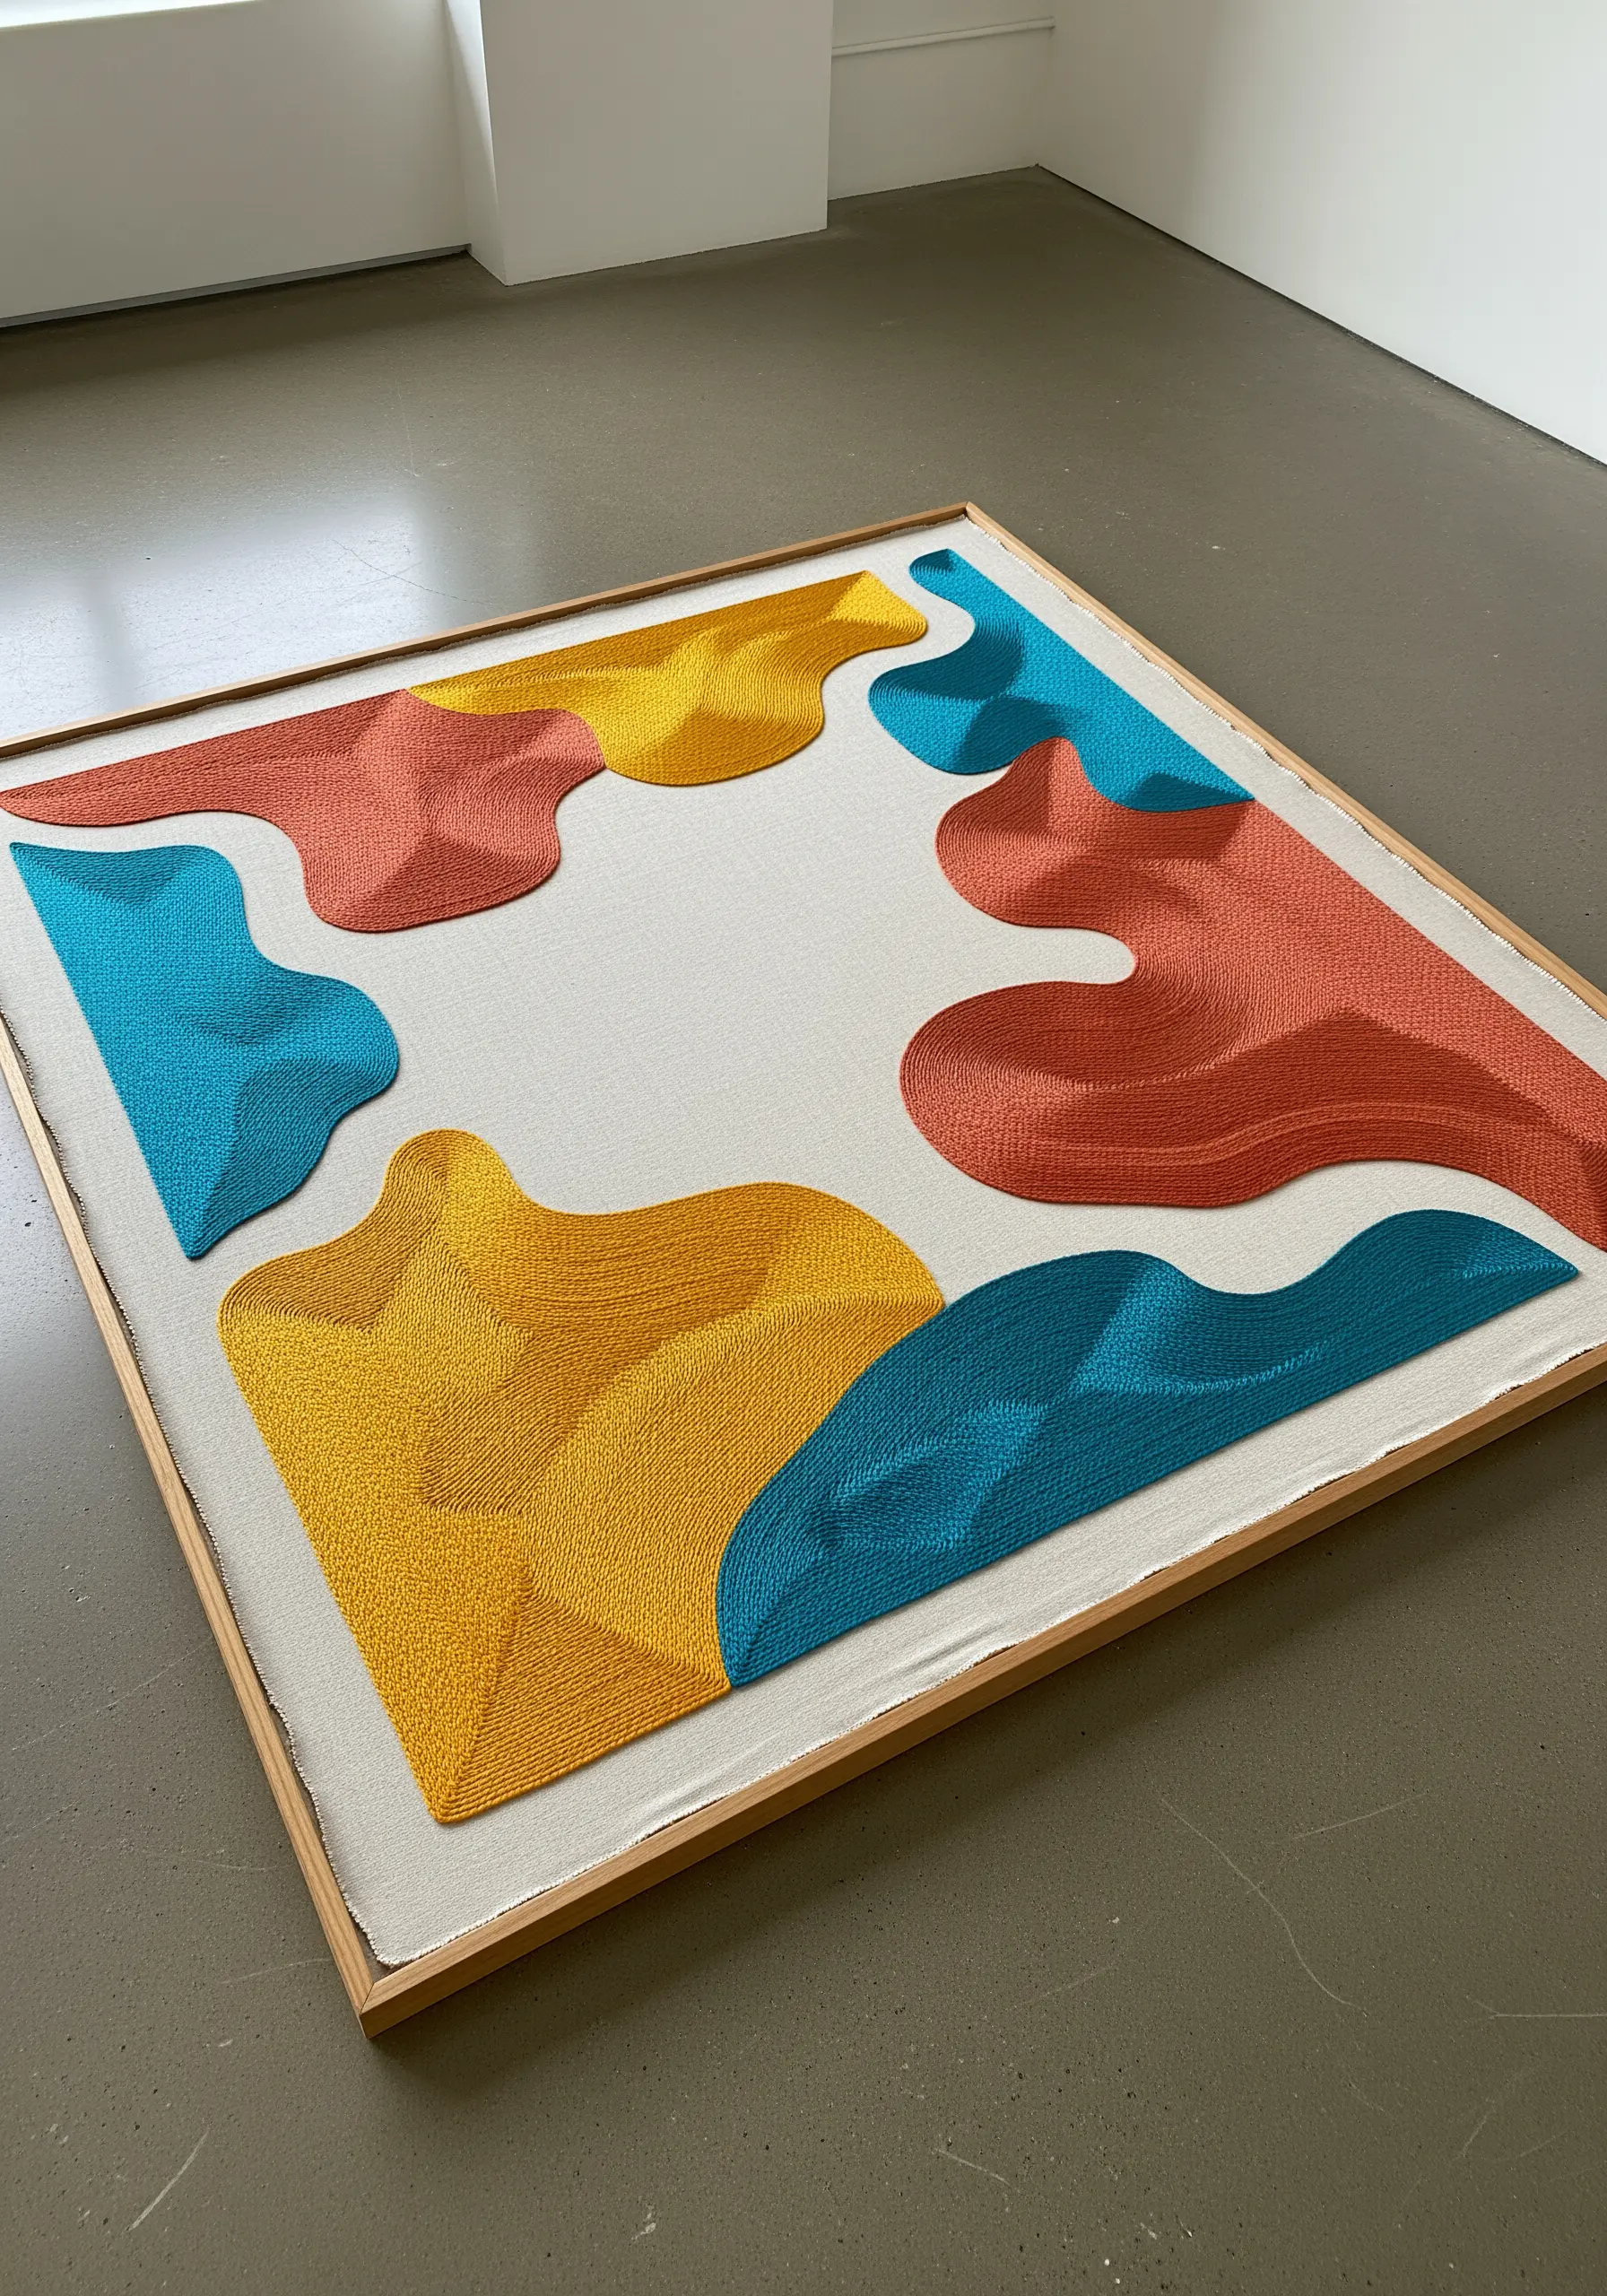
Fill large areas with solid color using a technique called thread painting to create a smooth, seamless surface.
Use long-and-short stitch, varying the stitch direction to follow the contours of your abstract shapes.
This directional stitching creates subtle shifts in light and shadow, giving the flat color blocks a sense of dimension and movement.
It transforms simple shapes into a sophisticated, gallery-worthy fiber art installation.
7. Refine Your Linens with Botanical Line Art
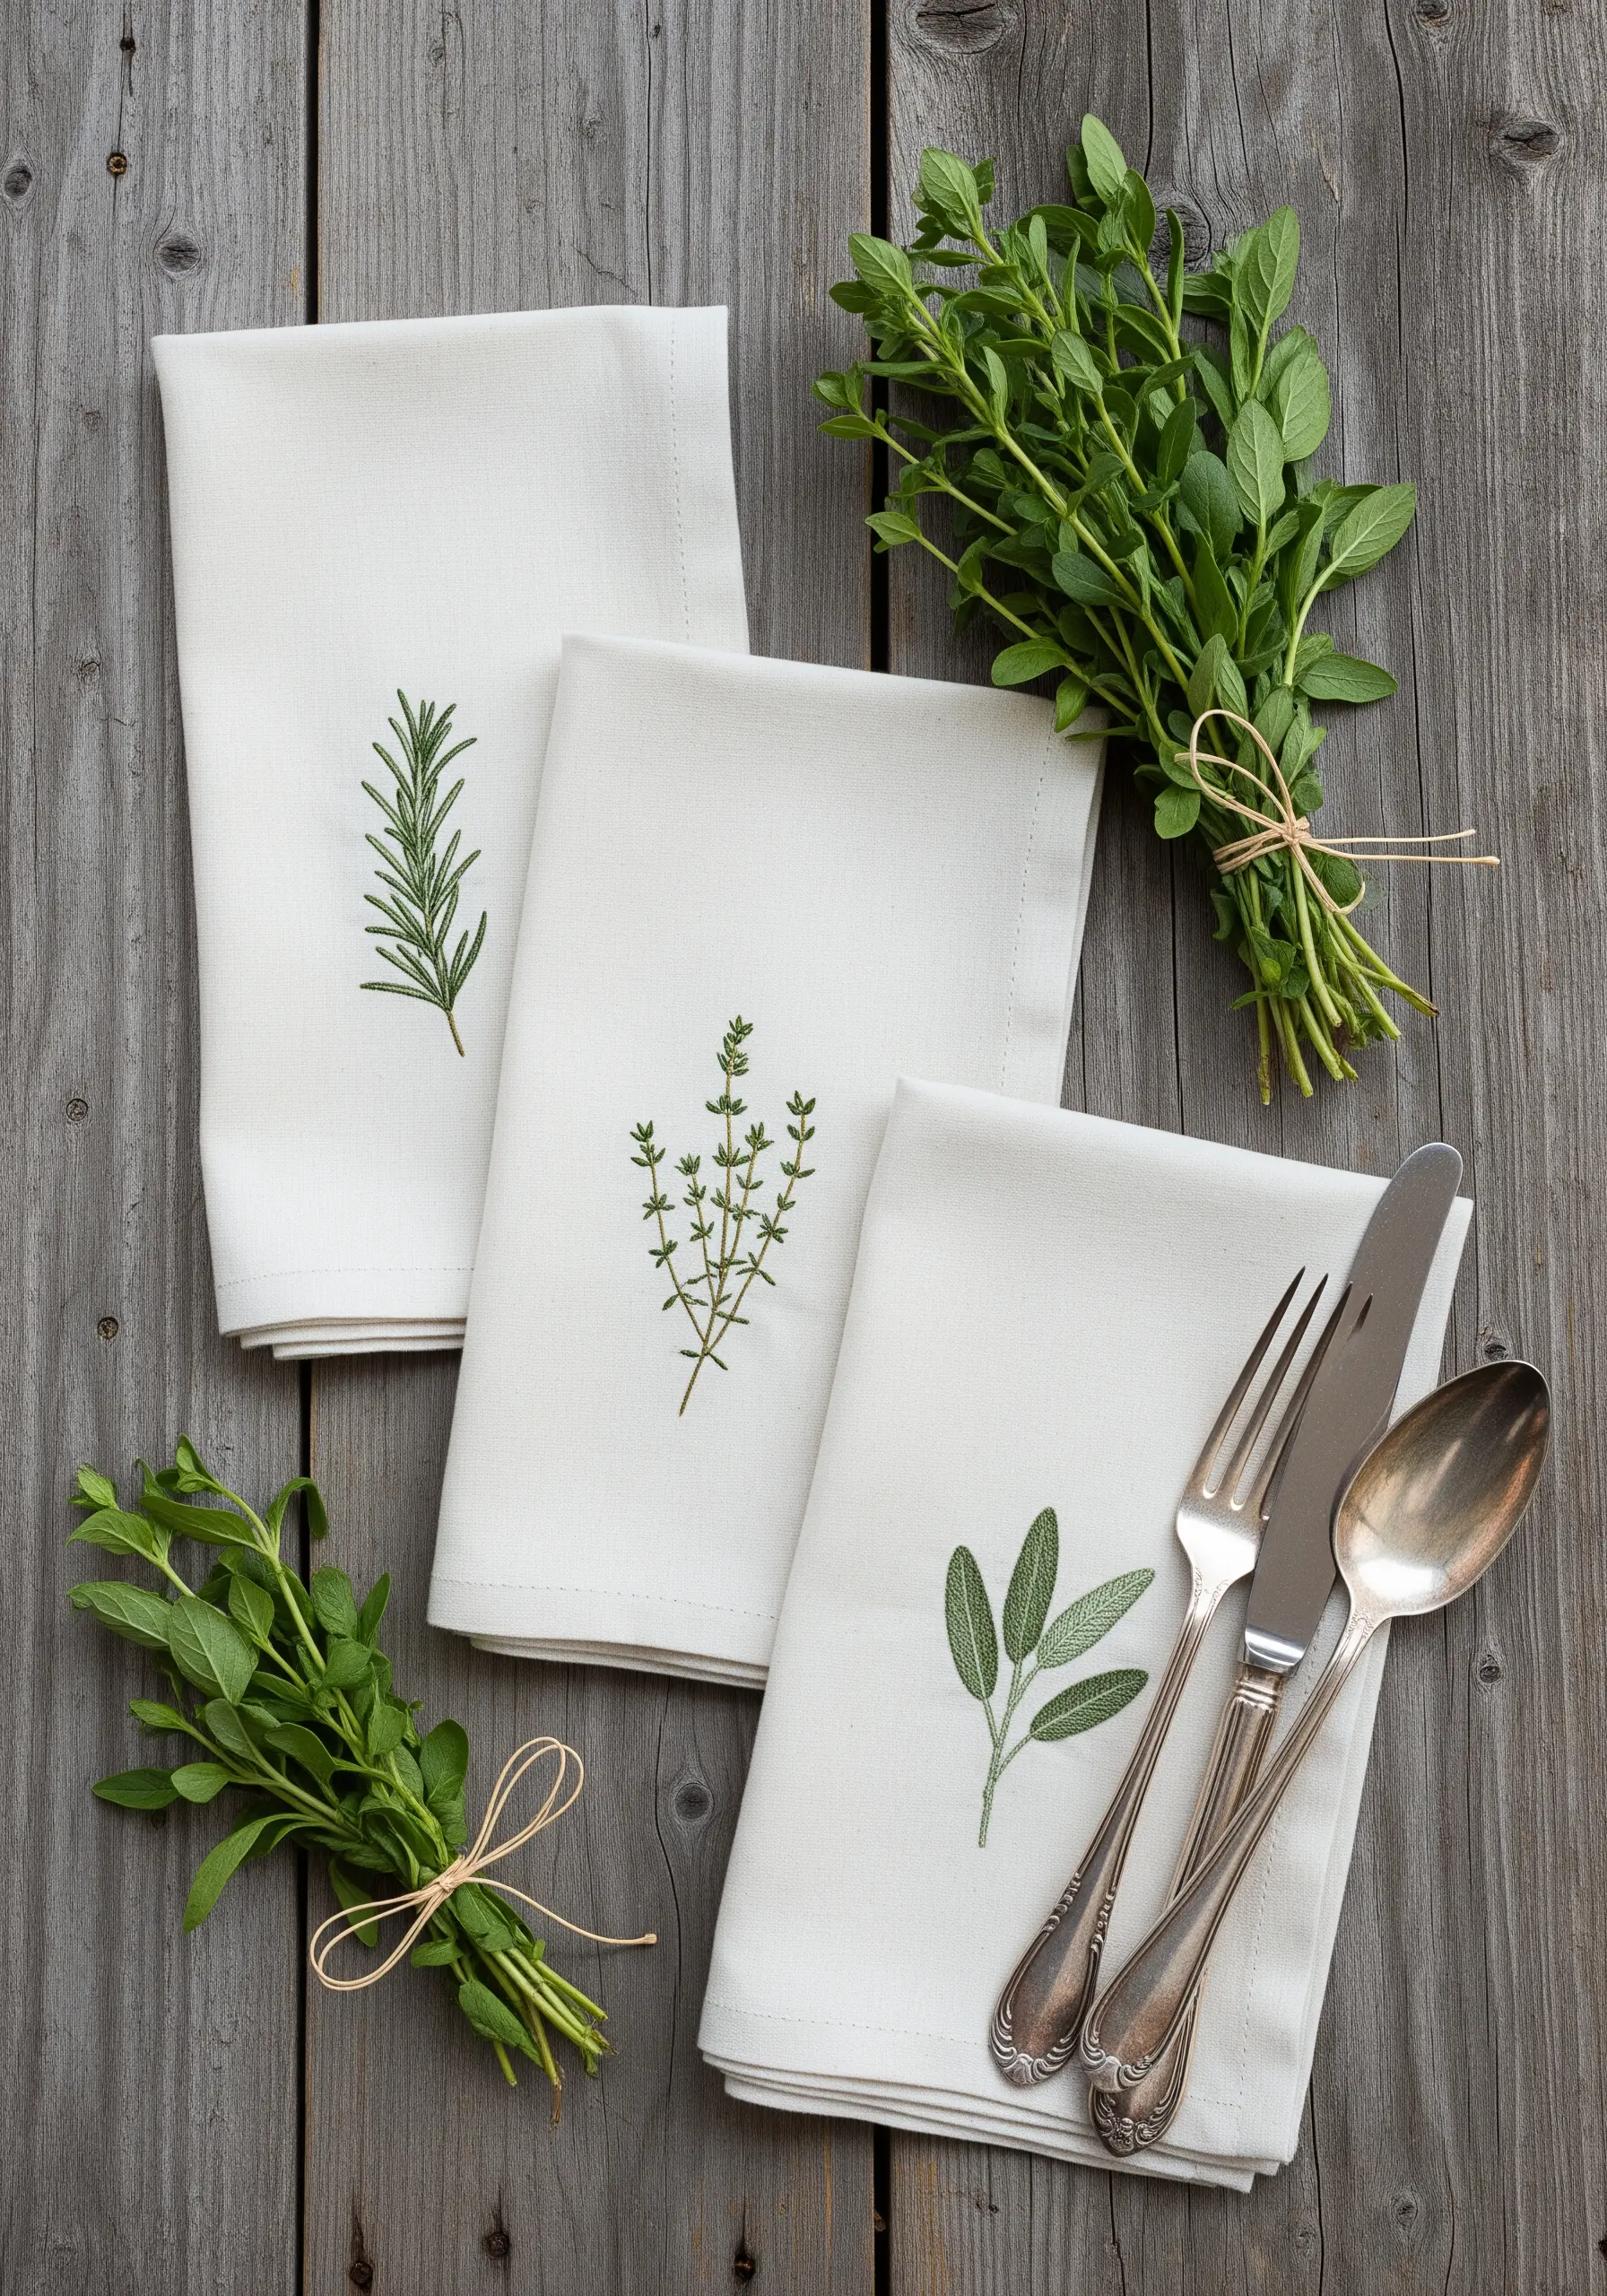
Add a touch of understated elegance to kitchen towels or napkins with delicate herb motifs.
Use just one or two strands of green floss and stick to simple outline stitches like the stem stitch or split stitch.
This creates fine, illustrative lines that feel sophisticated and clean, transforming everyday linens into something special.
These botanical line art embroidery patterns work beautifully on almost any fabric.
8. Frame a Garment with a Statement Collar
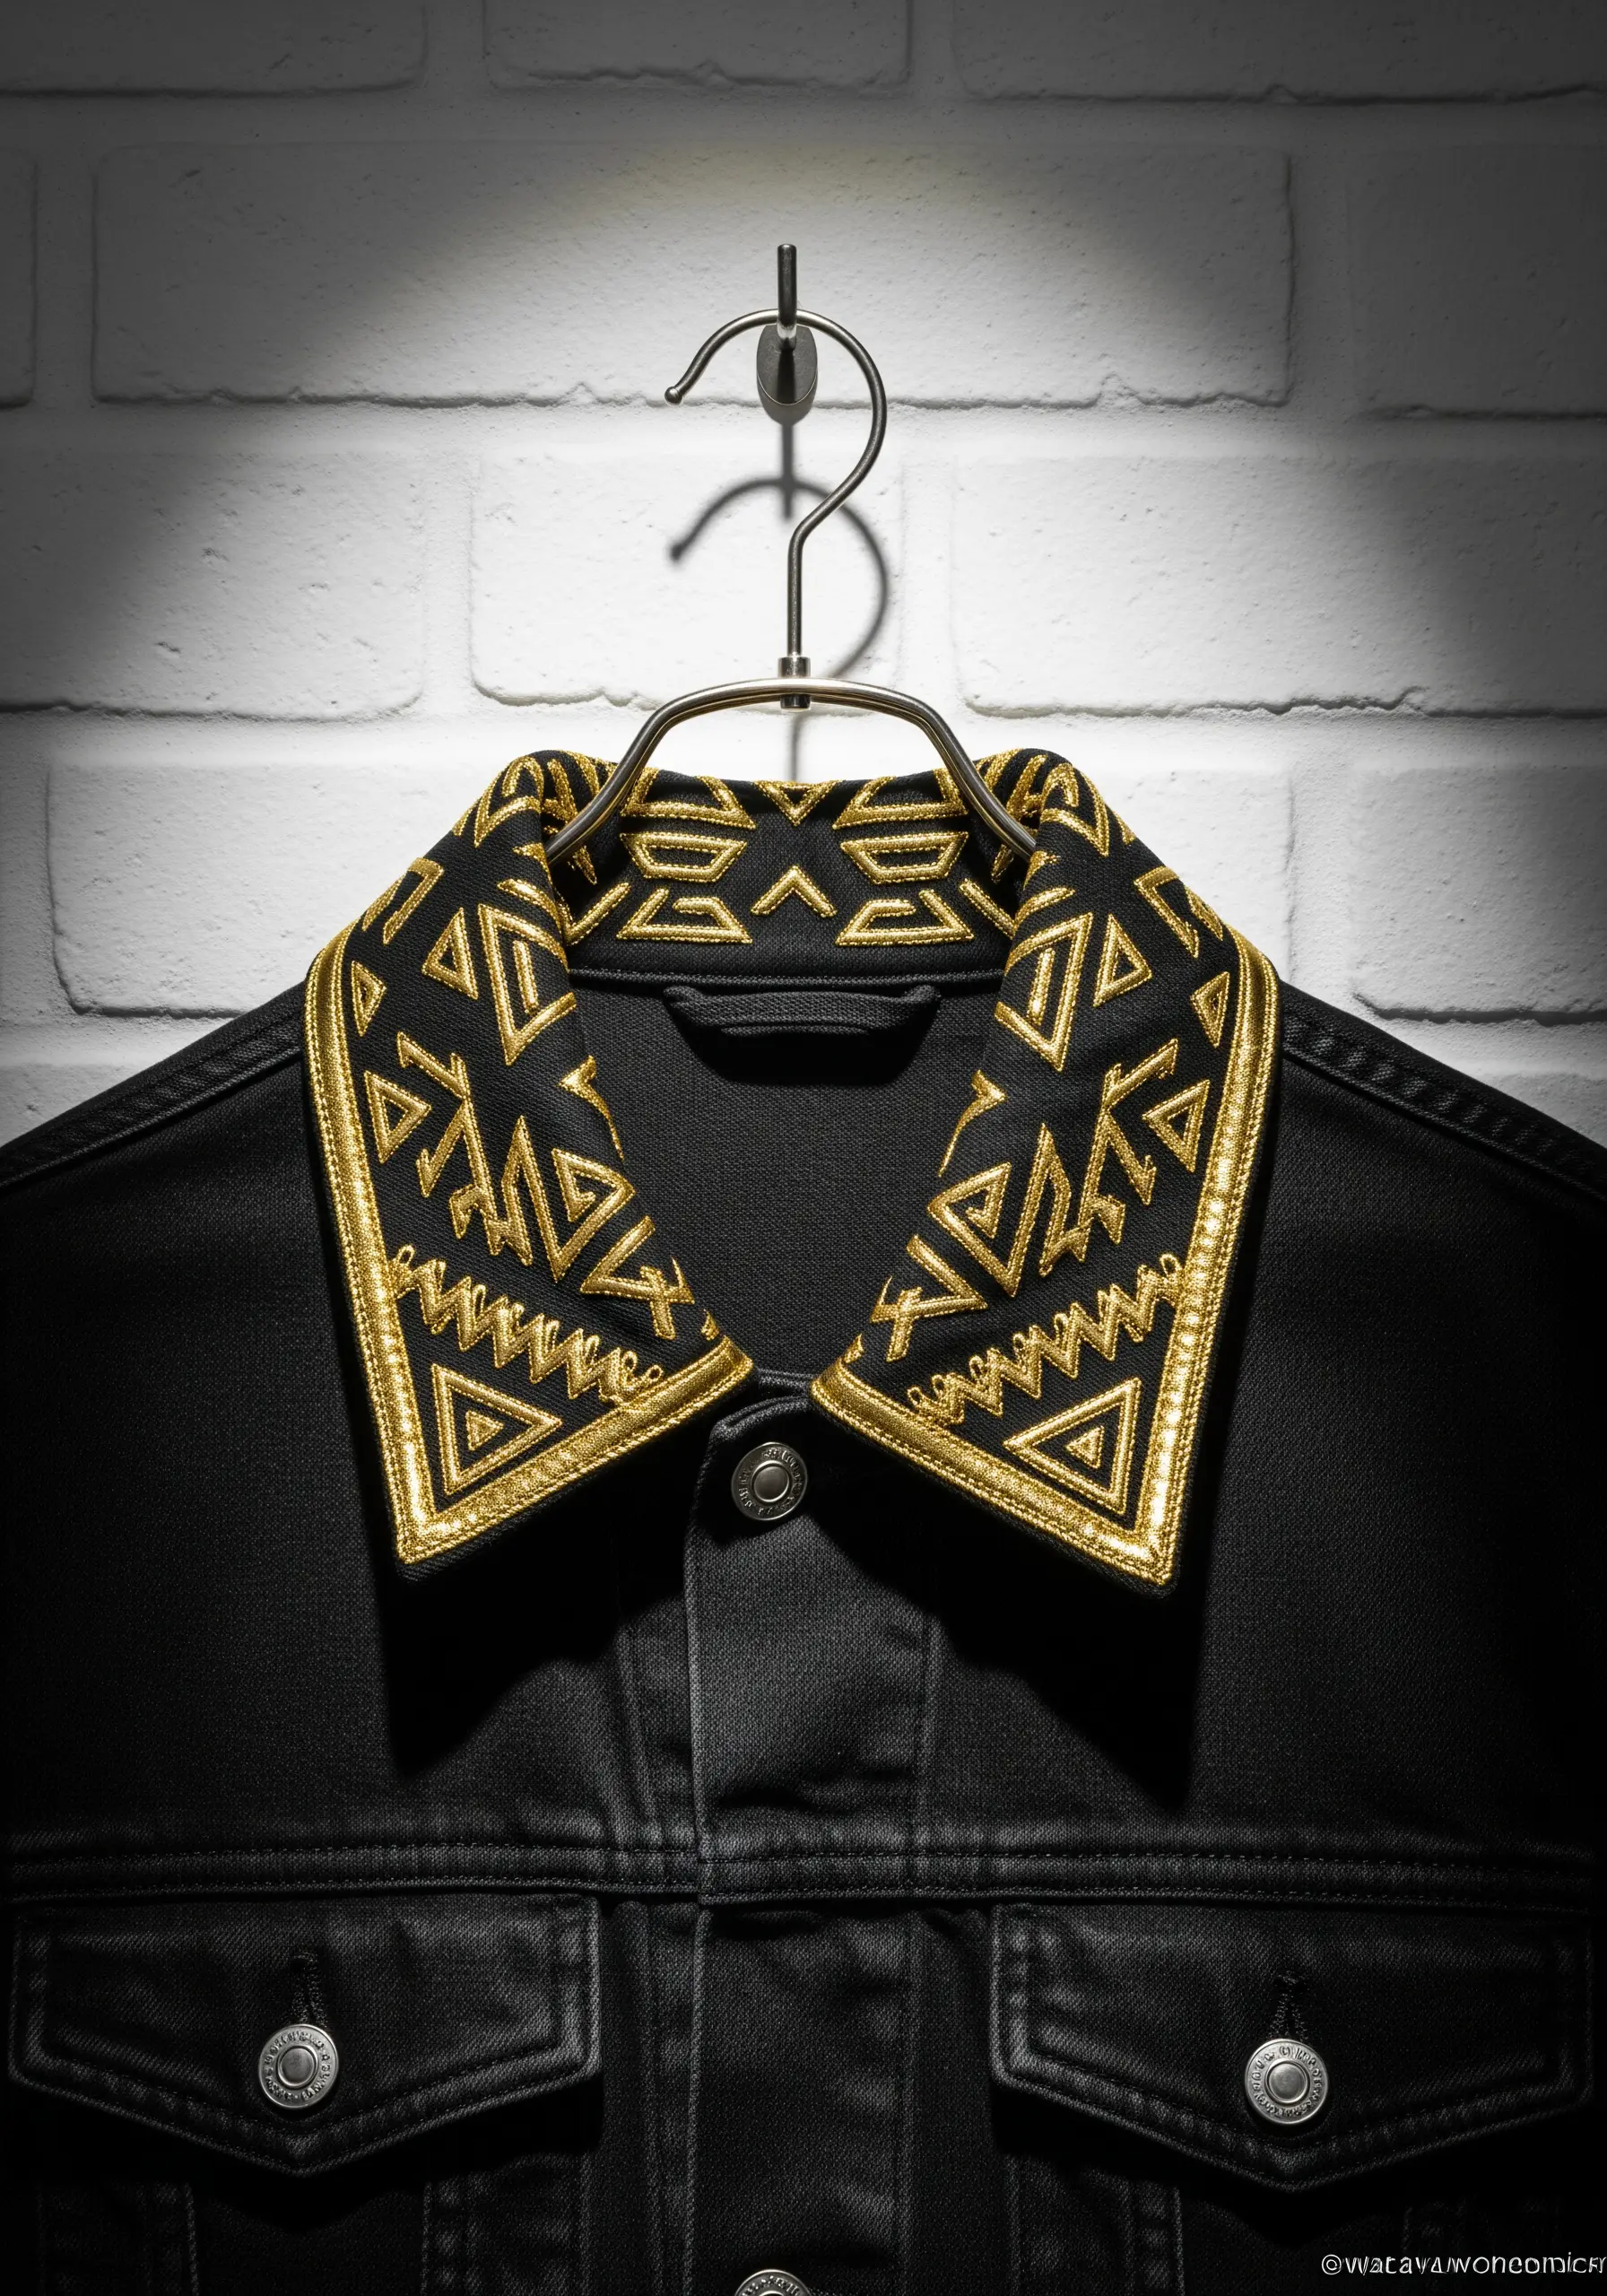
Turn a plain jacket collar into a high-fashion focal point with dense, geometric embroidery.
Use a high-sheen metallic thread and fill your design with a smooth satin stitch for a bold, armor-like effect.
Always use a stabilizer on the back of the collar fabric to prevent puckering and ensure your stitches remain flat and crisp, even on heavy denim.
This technique frames the face and adds a custom, couture feel to any jacket.
9. Build Graphic Scenes with Layered Felt
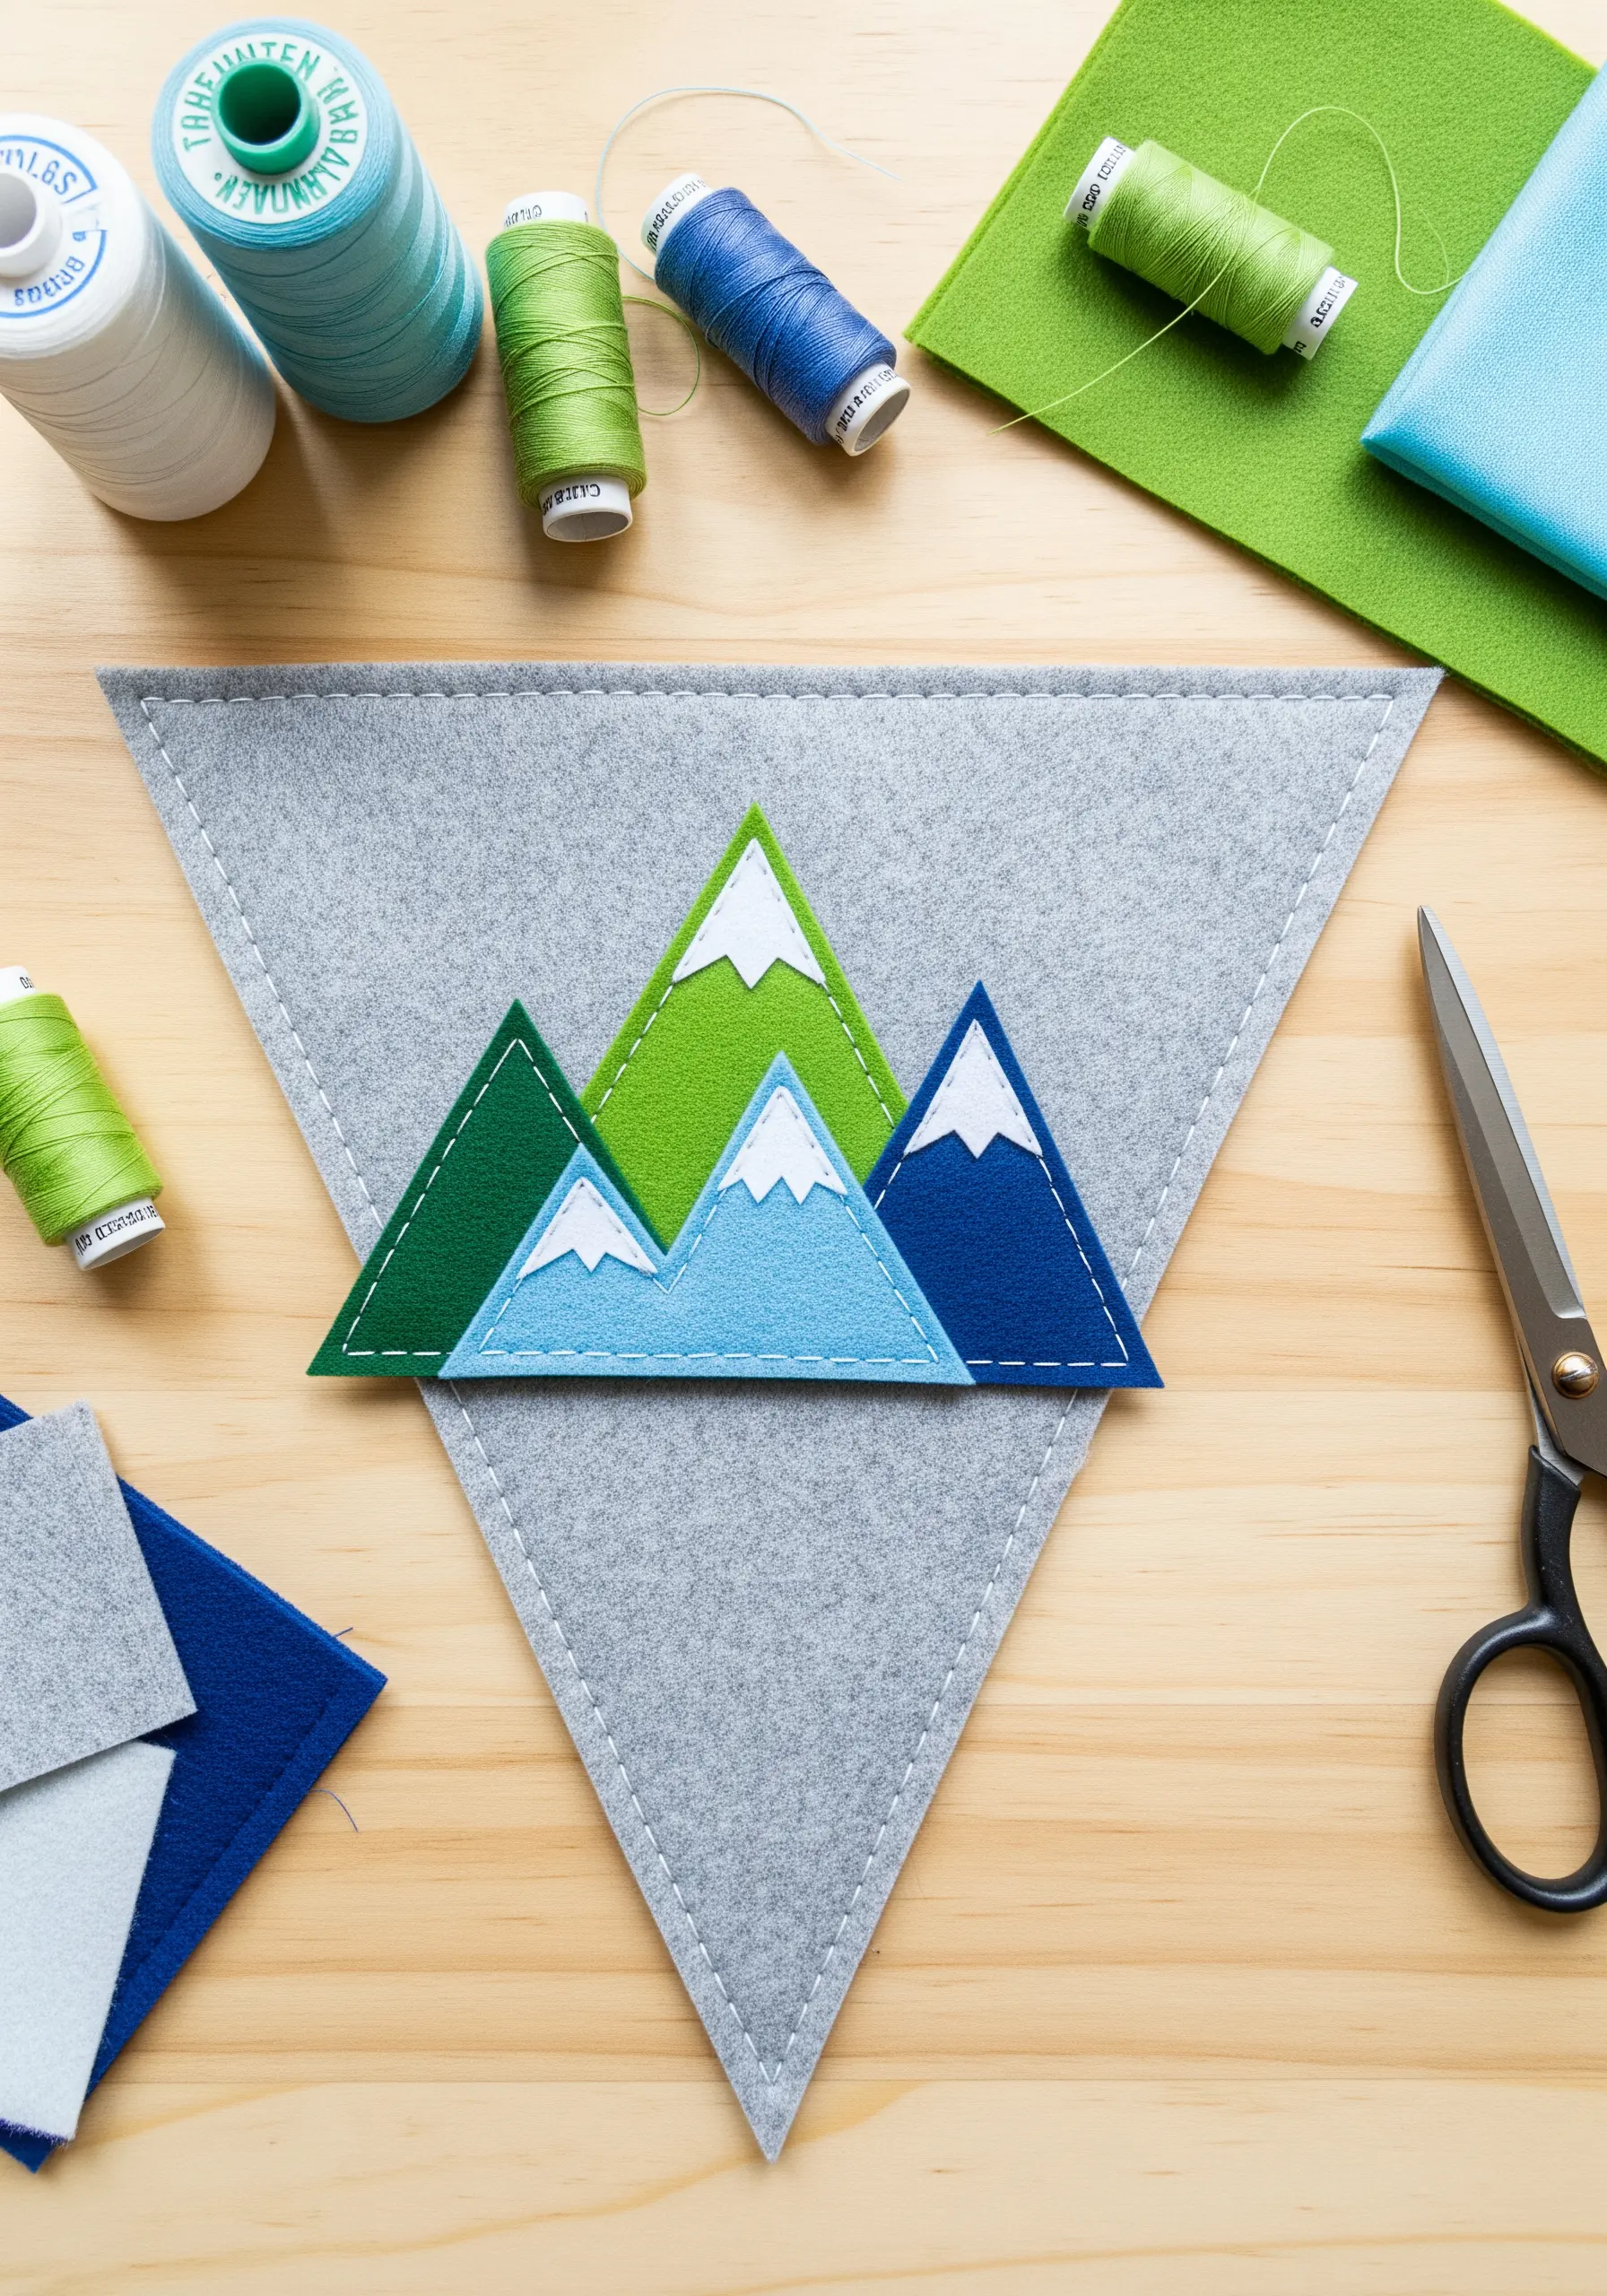
Create depth and dimension with minimal stitching by using layered felt appliqué.
Cut your shapes from different colors of felt and arrange them to build a scene, like these overlapping mountains.
Secure each piece with a simple running stitch or blanket stitch around the edge using a matching thread for a clean, almost invisible finish.
This is a quick and effective way to make pennants, nursery décor, or patches.
10. Weave a Landscape with Chunky Yarn
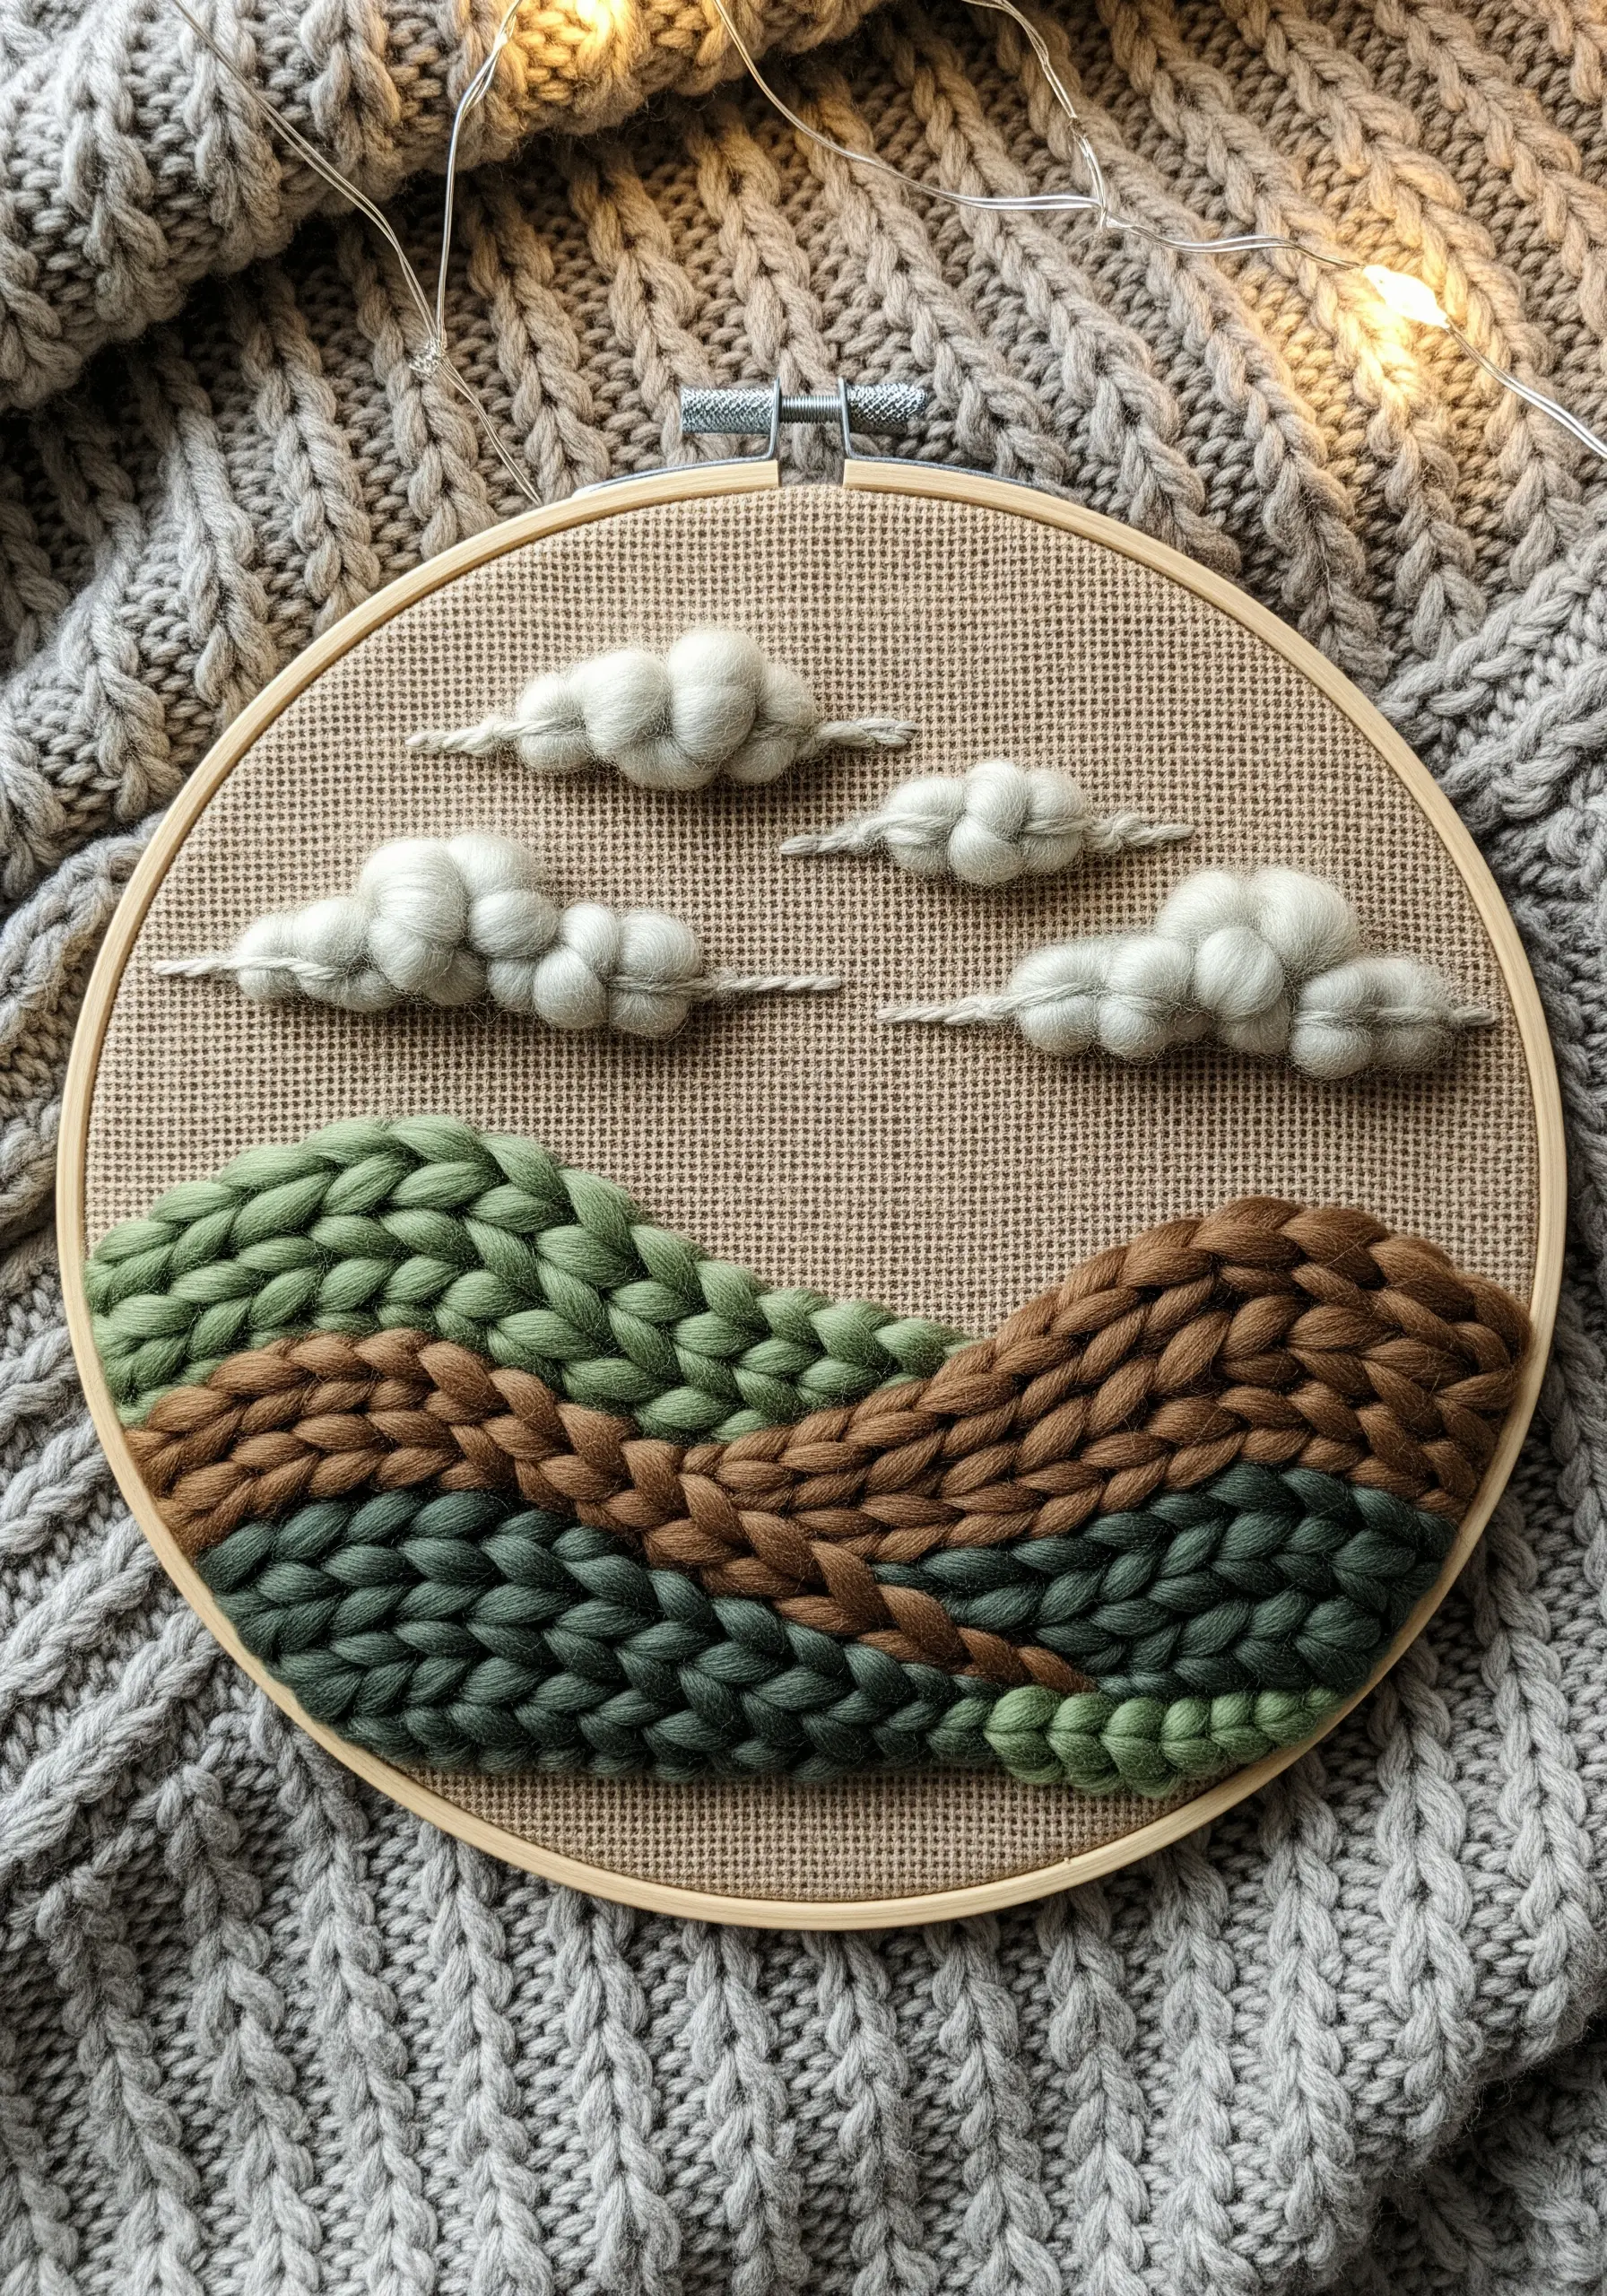
Go beyond thread and use thick yarn to create a highly tactile, woven landscape within an embroidery hoop.
Use a punch needle or a large darning needle to weave rows of chunky yarn directly onto a loose-weave fabric like burlap.
Varying the texture and color of the yarn creates the impression of rolling hills and fields.
The final piece is a soft, sculptural hoop art that begs to be touched.
11. Define Shapes with Negative Space

Create a powerful silhouette by filling the background instead of the main subject.
Leave the central motif—in this case, a deer—as plain, unstitched fabric.
Then, fill the surrounding area with thousands of tiny, randomly oriented seed stitches in a contrasting color.
This stippling effect makes the empty space of the silhouette the true focal point, creating a dramatic and atmospheric piece of art.
12. Combine Watercolor Washes with Stitched Lines
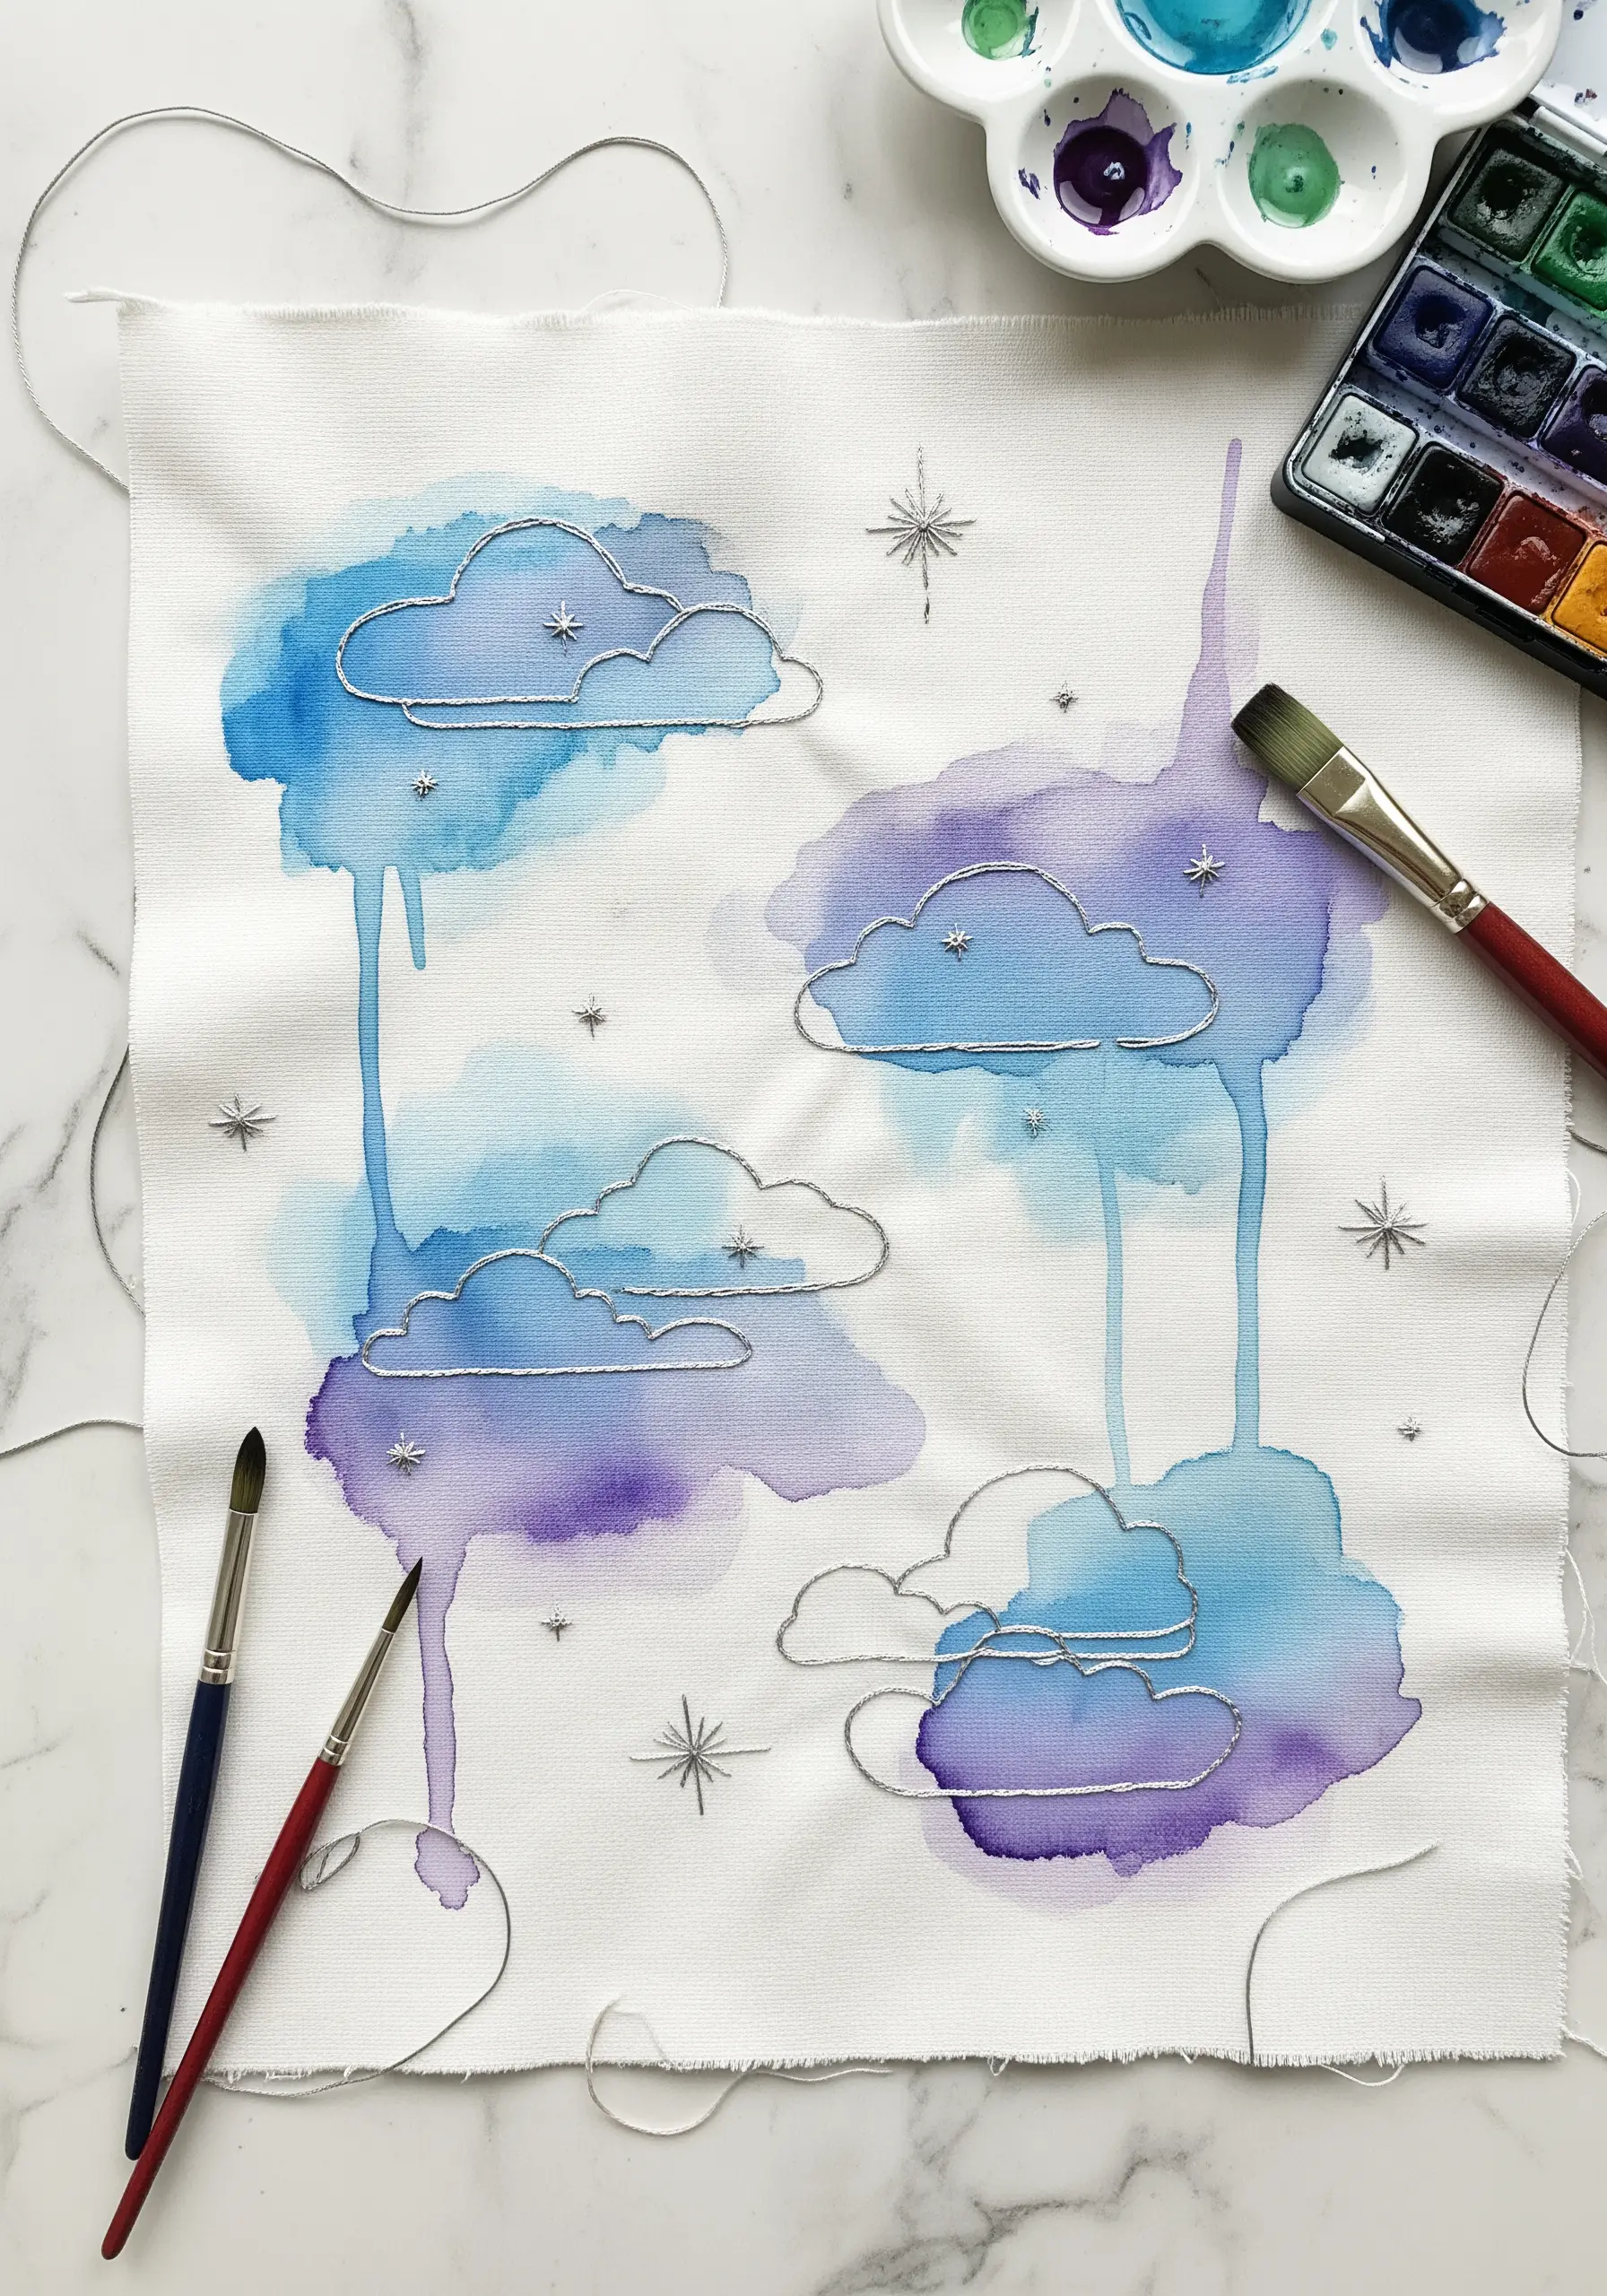
Add a layer of soft, dreamy color to your work by painting your fabric before you stitch.
Apply watercolor paint directly to your fabric, allowing colors to bleed and blend for an organic effect.
Once the paint is completely dry, add fine embroidered details with a metallic or contrasting thread.
Use a simple backstitch to outline shapes, which gives definition to the soft painted background and makes the stitched details pop.
13. Craft Bold, 3D Chenille Lettering
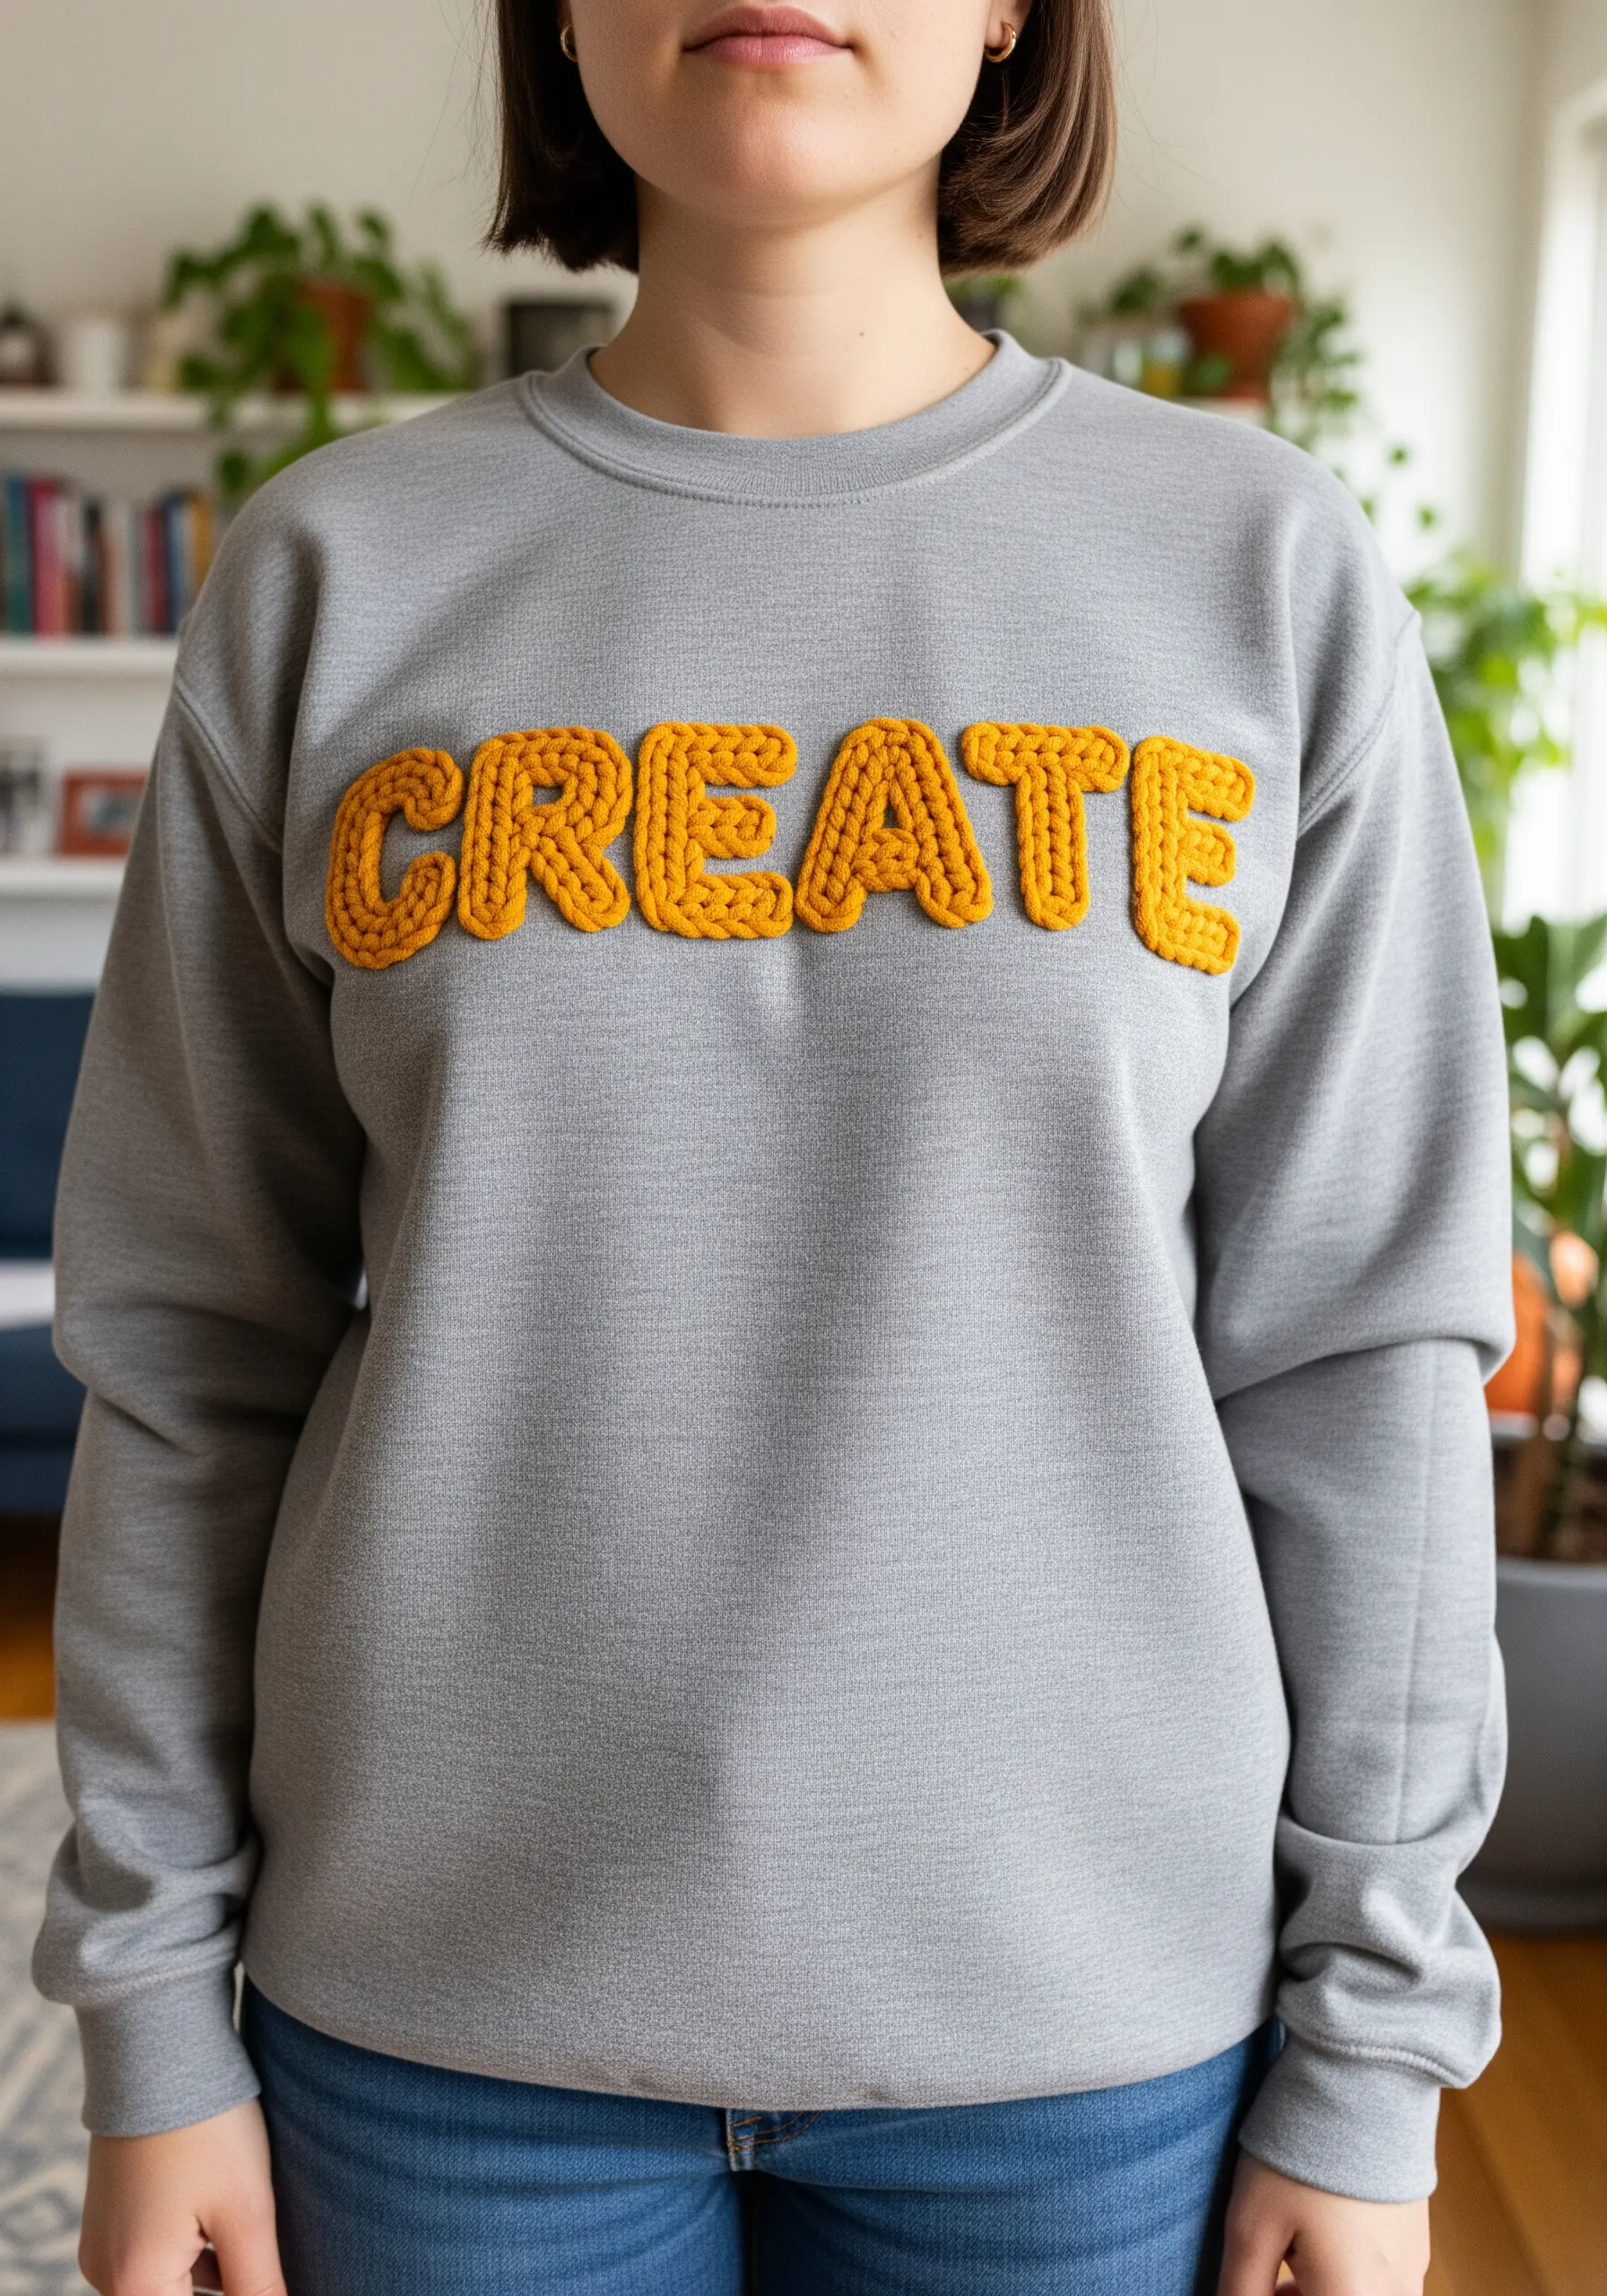
Mimic the classic texture of a varsity jacket by creating your own dimensional chenille-style letters.
Outline your letters with a split stitch, then fill the shape with a dense, chunky chain stitch using a thicker thread like pearl cotton or yarn.
The looped texture of the chain stitch creates a raised, tactile effect that makes your message stand out on any sweatshirt or jacket.
This technique adds a playful, retro vibe to casual wear.
14. Add a Subtle Border to Sheer Curtains
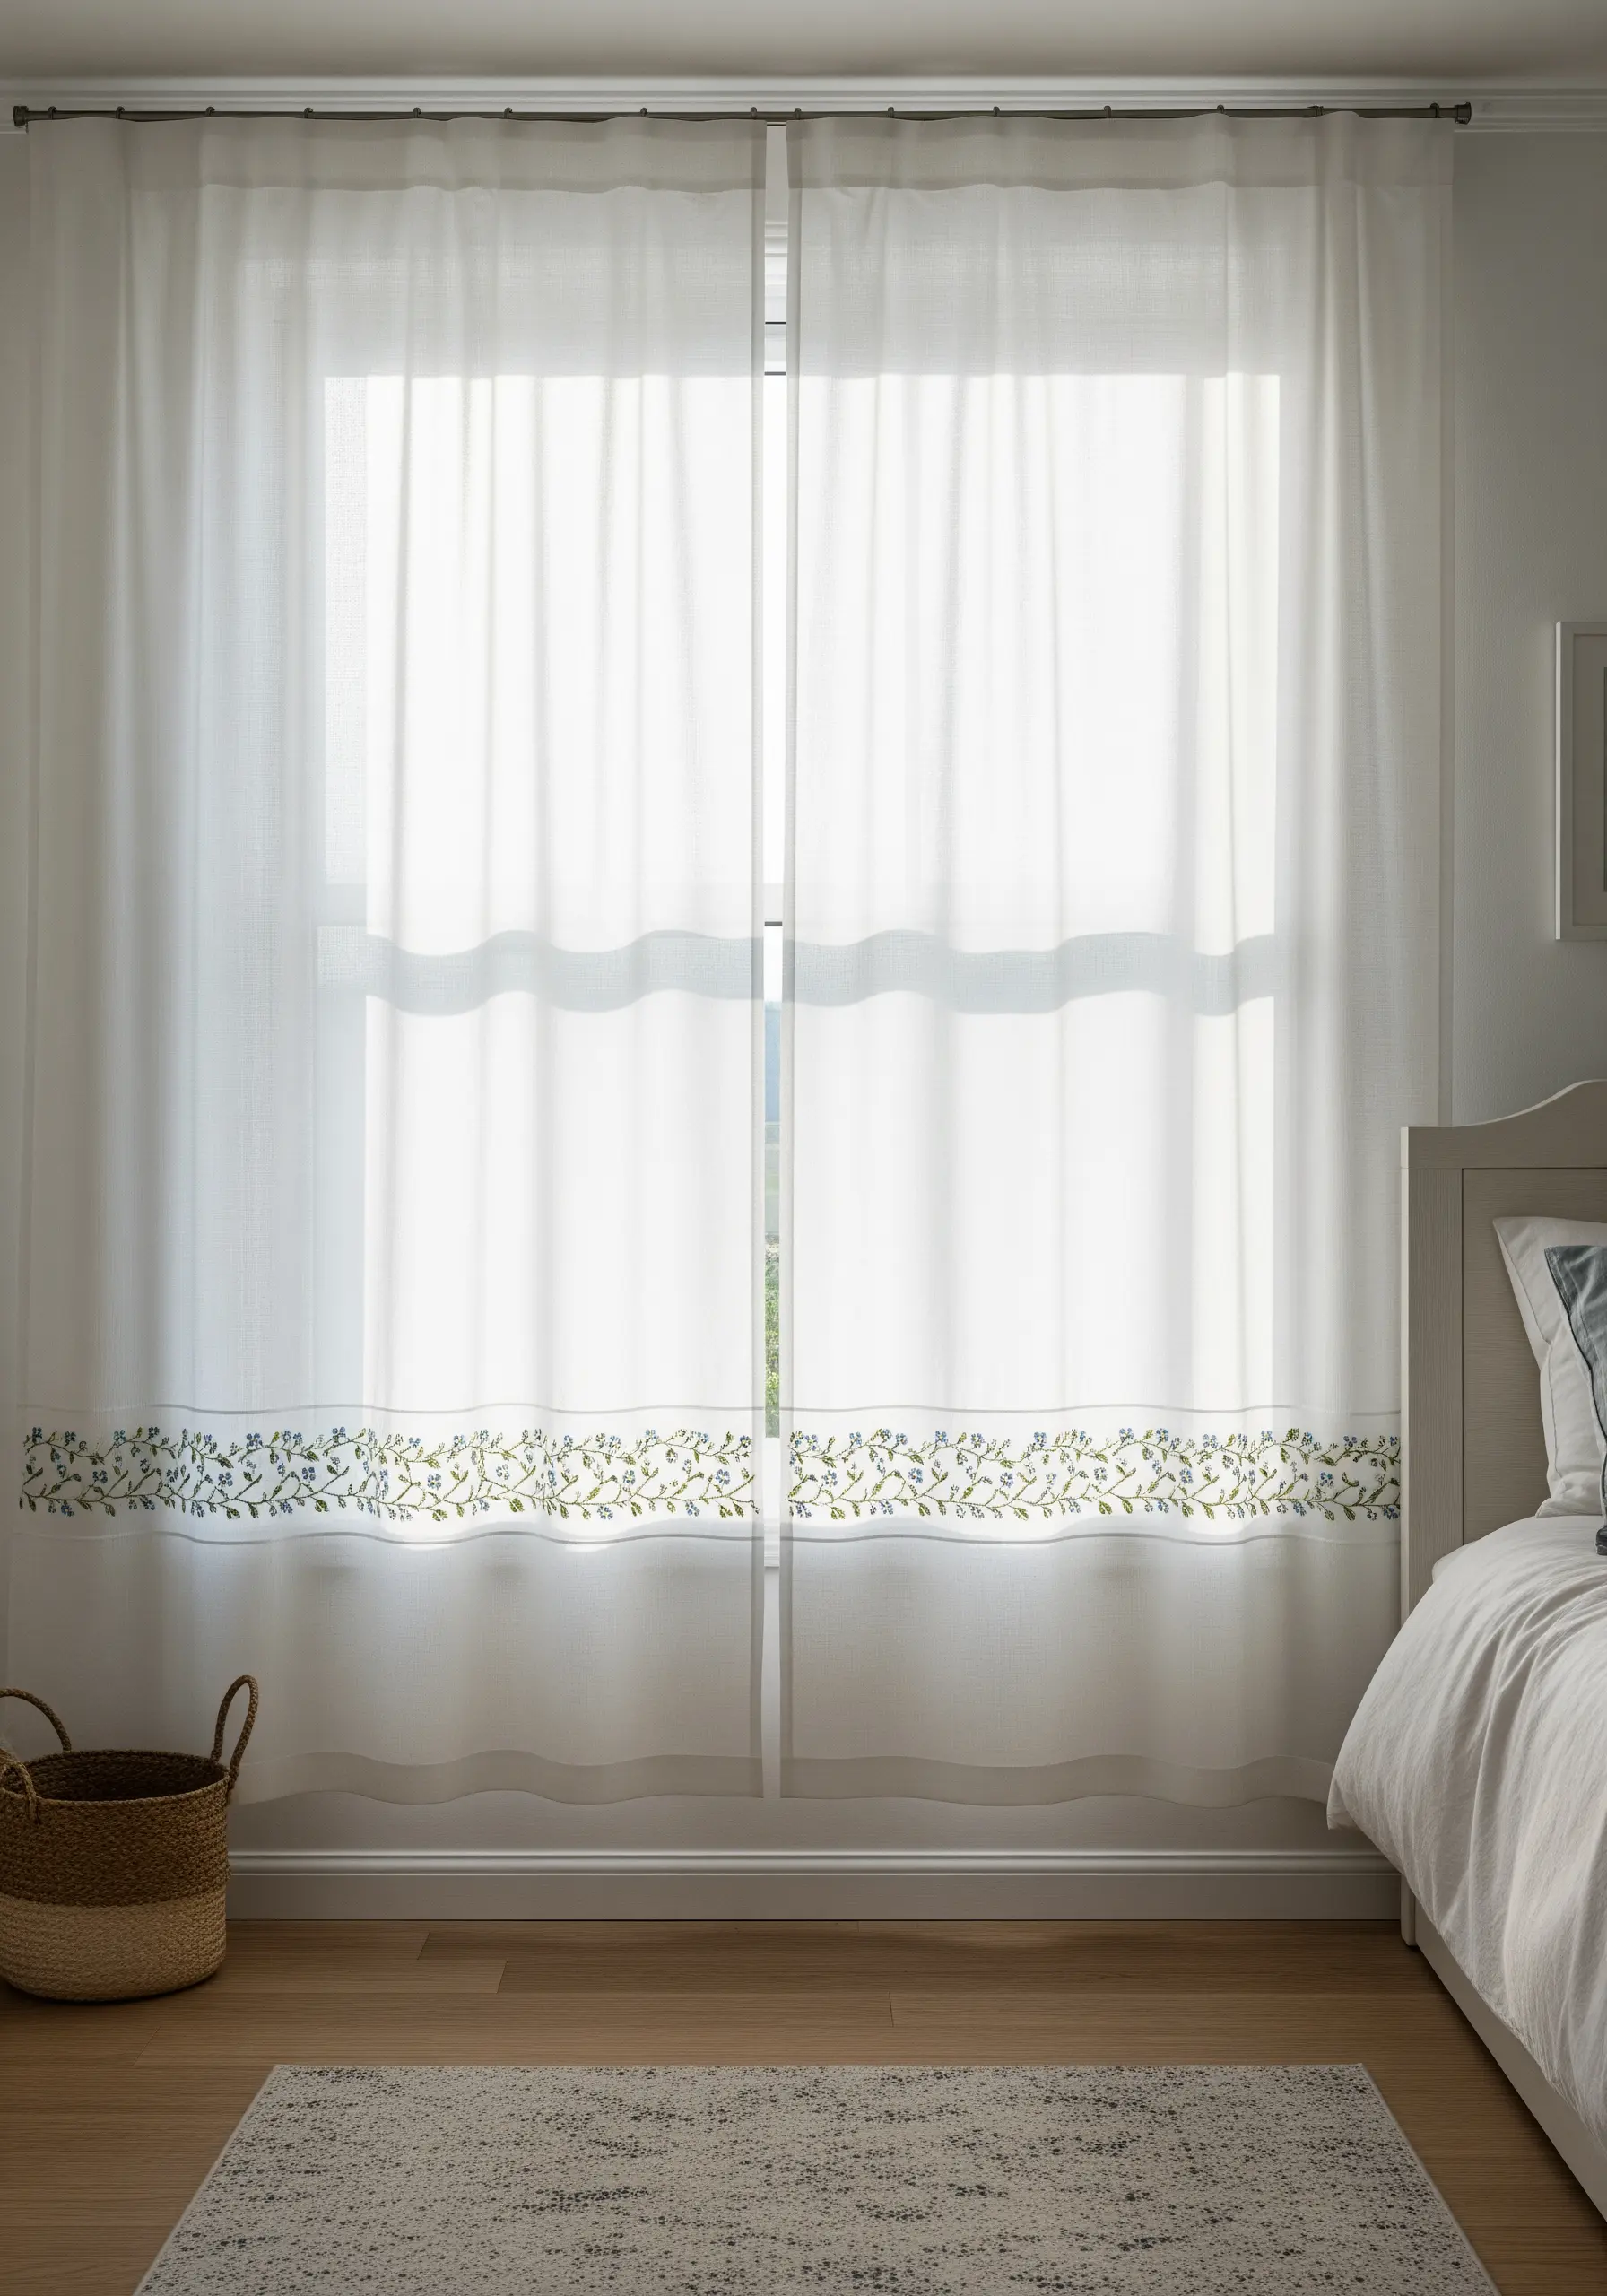
Elevate plain, lightweight curtains with a delicate embroidered border that feels custom-made.
Stitch a continuous, trailing botanical design along the bottom edge using simple stitches like lazy daisy for petals and stem stitch for vines.
Always use a lightweight, wash-away stabilizer when working on sheer fabric to prevent distortion and puckering.
The result is a soft, light-filtering detail that adds a touch of nature-inspired calm to your room.
15. Stitch a Portrait with Photorealistic Detail
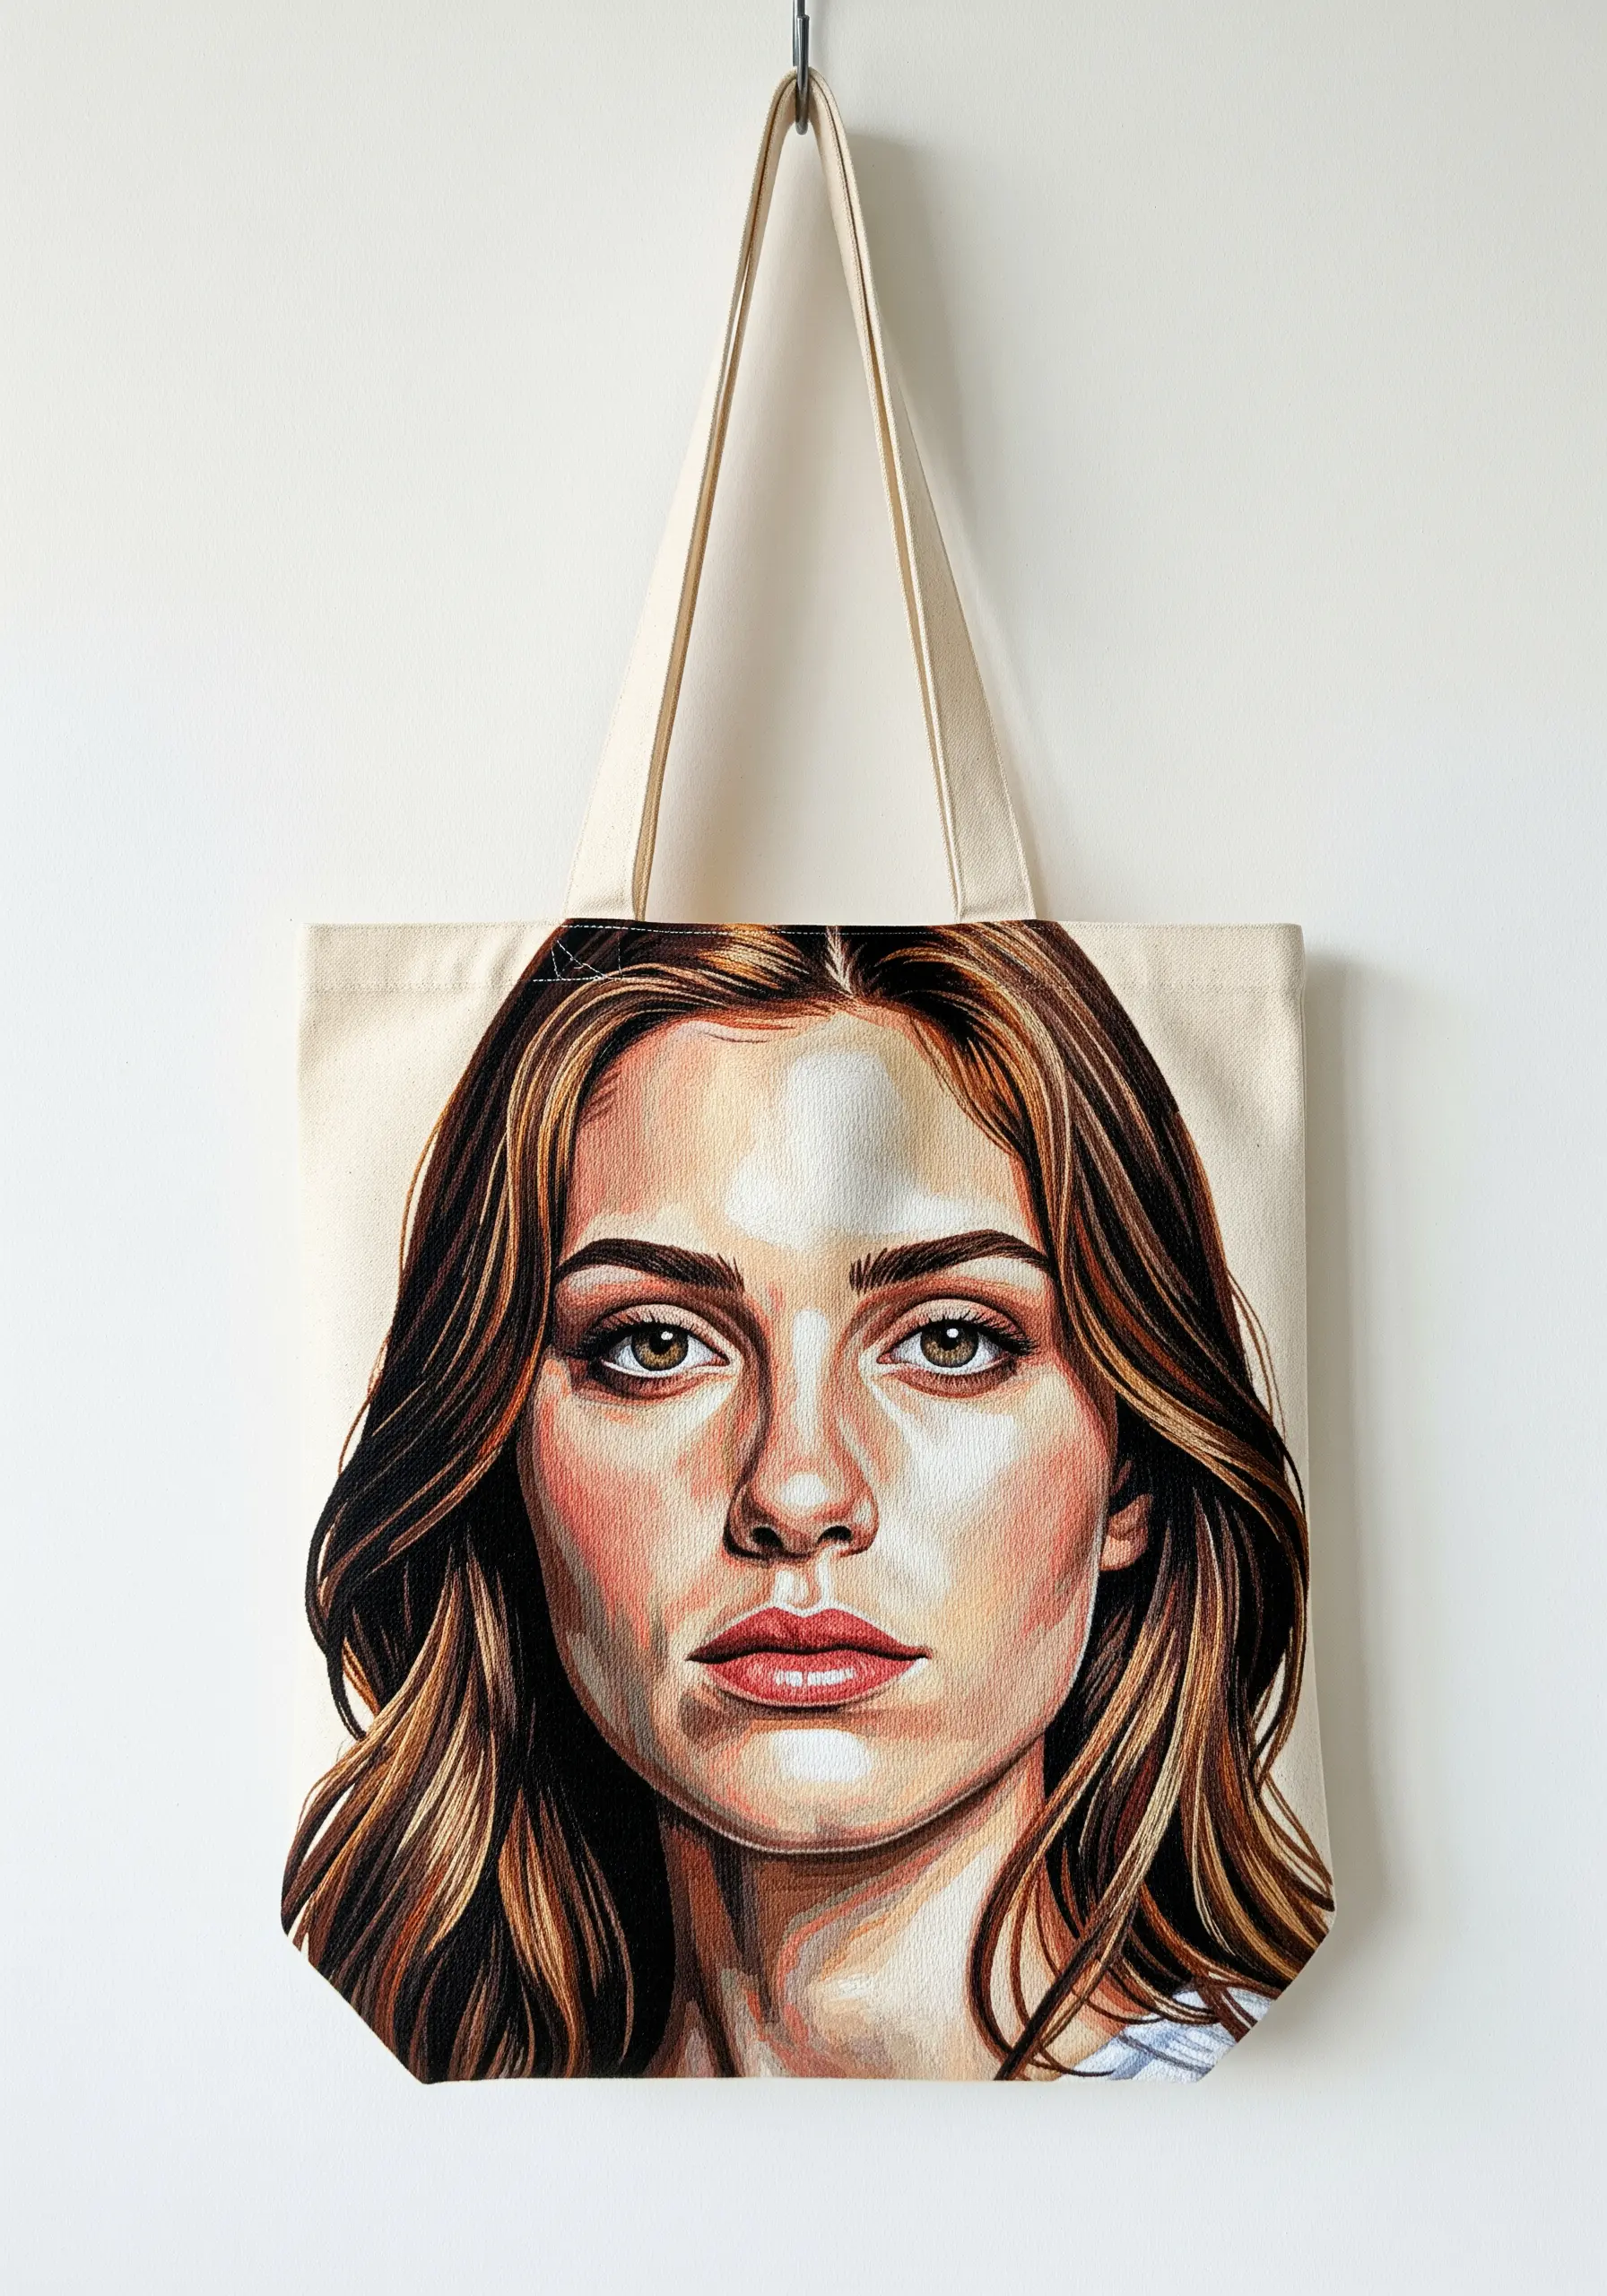
Achieve the depth and nuance of a painting by using the thread painting technique for portraits.
Use a single strand of embroidery floss and blend dozens of colors to create realistic skin tones, shadows, and highlights.
Directional long-and-short stitches are key; follow the natural contours of the face and the flow of the hair to create movement and realism.
This advanced technique transforms a simple tote bag into a breathtaking piece of wearable art.
16. Fill a Motif with Pointillist Beads
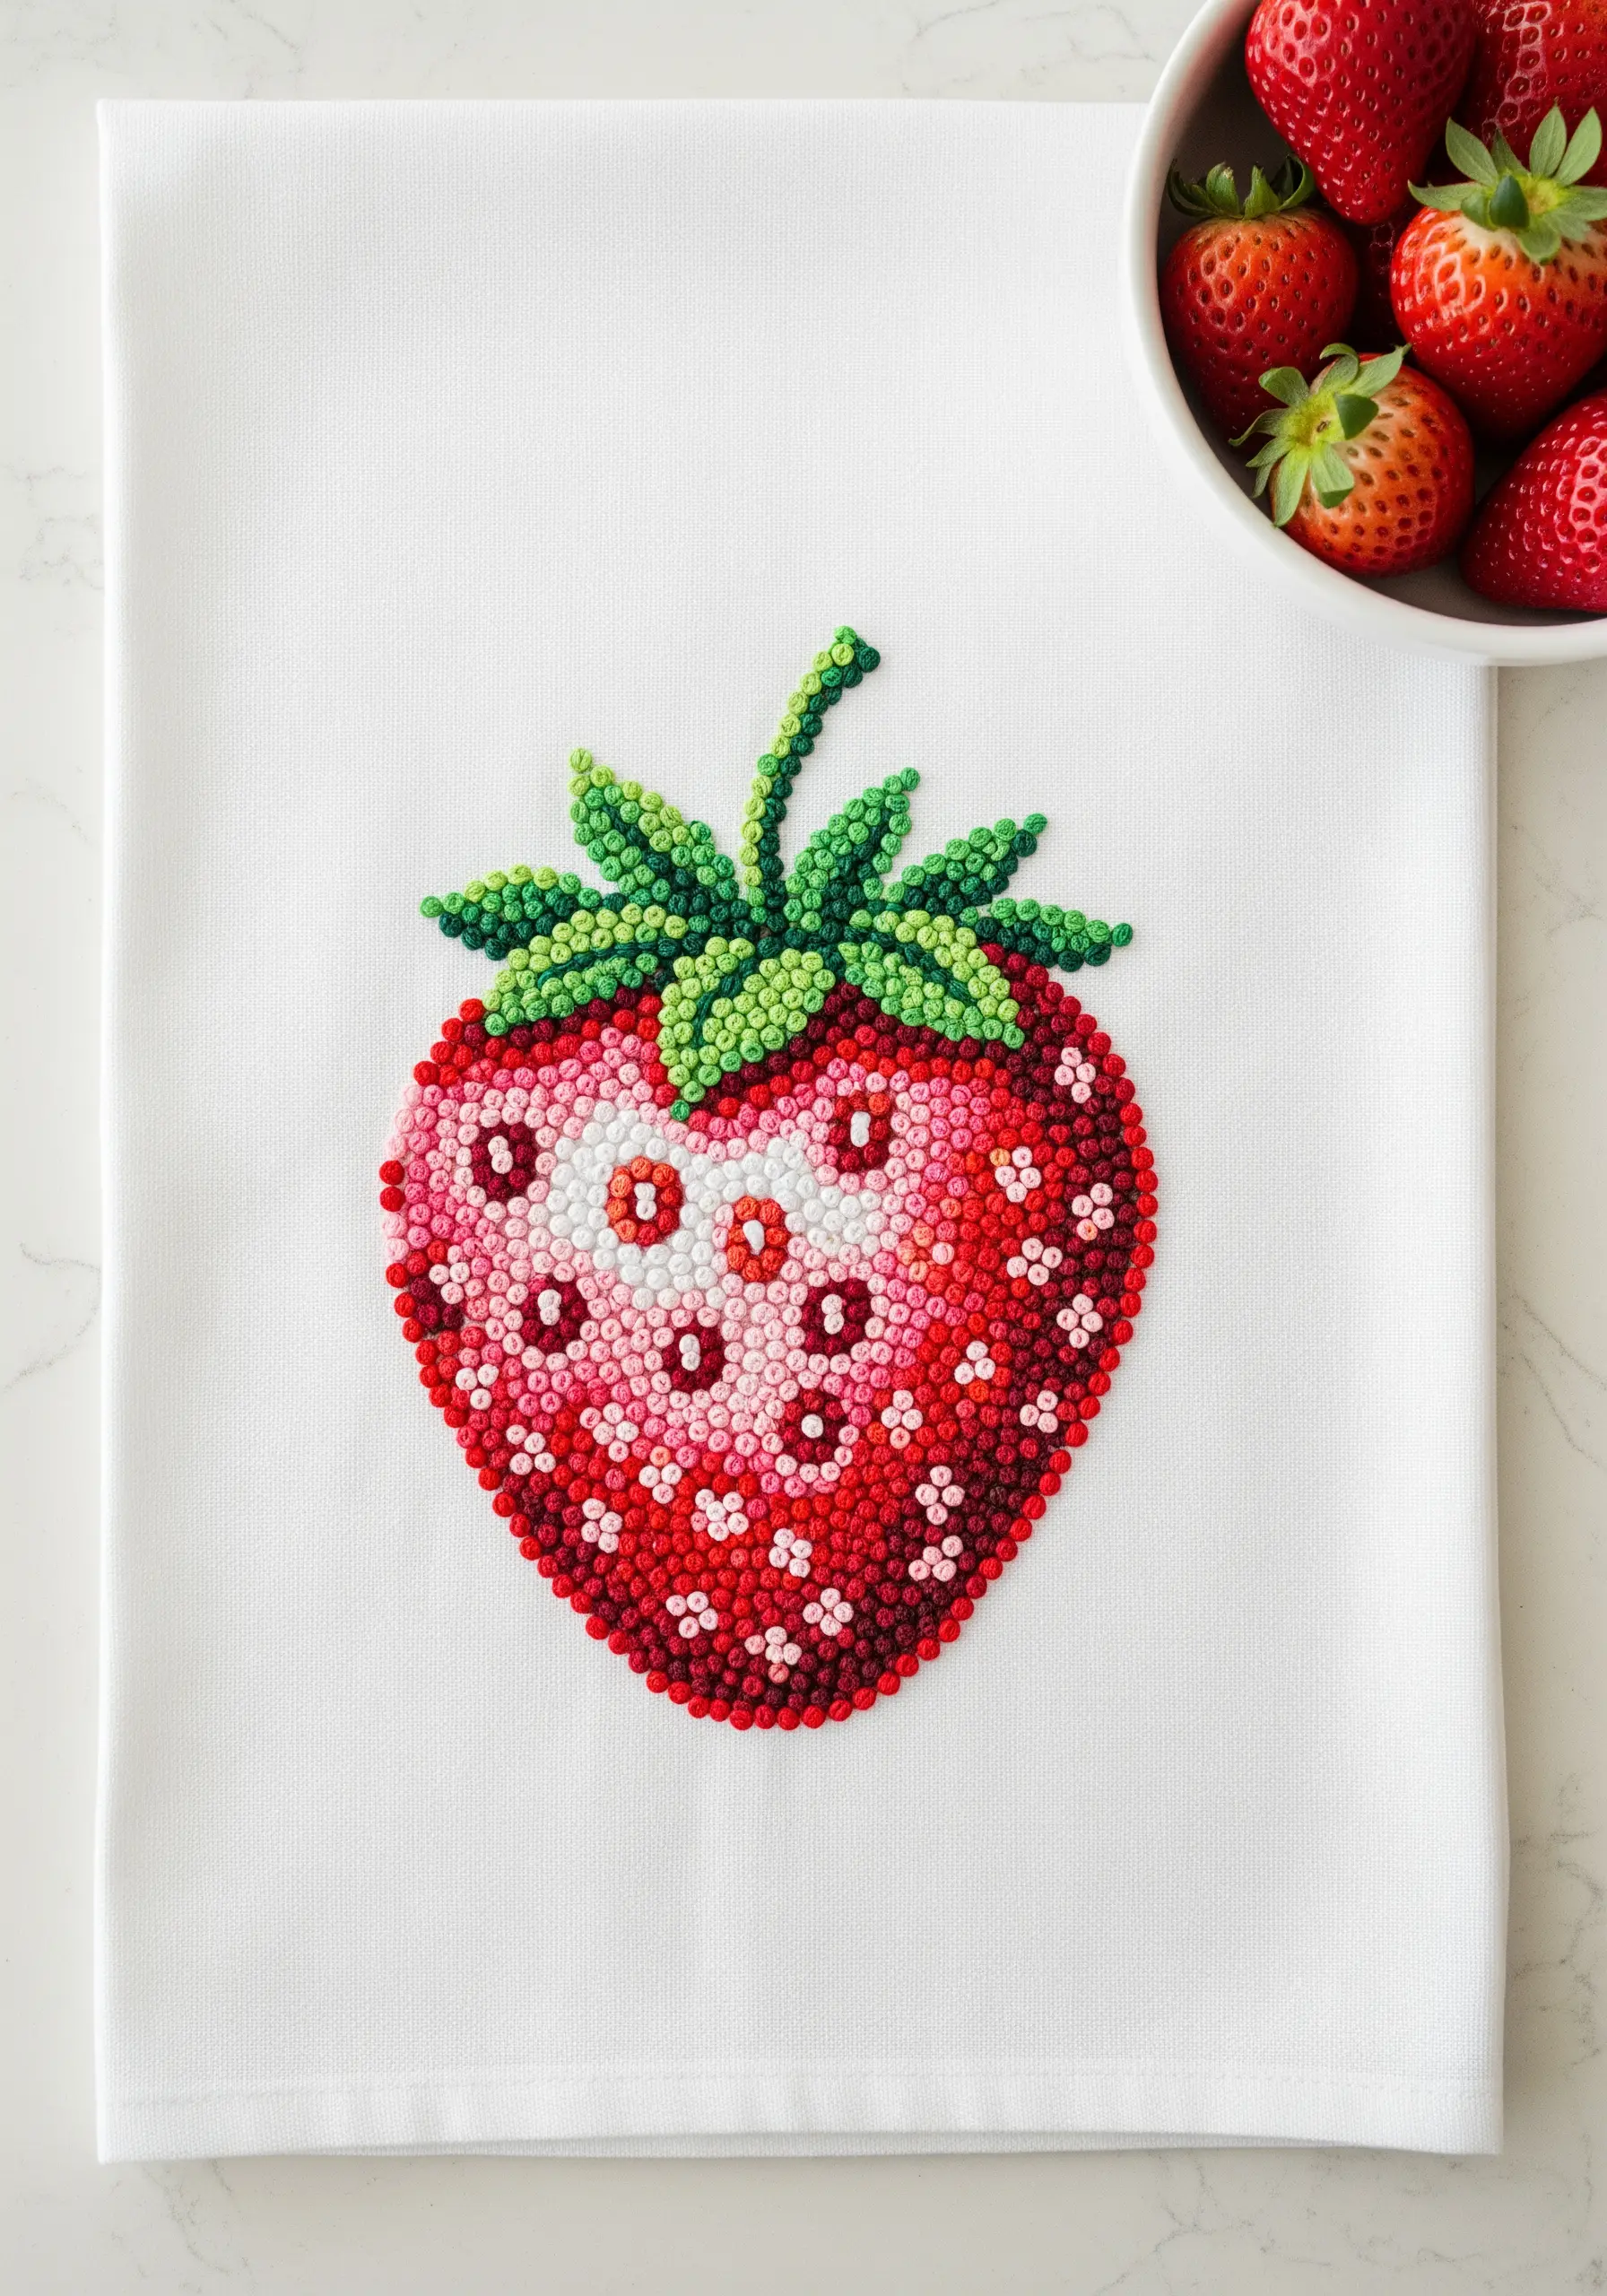
Instead of traditional fill stitches, use colorful seed beads to create a sparkling, mosaic-like effect.
Map out your color zones and fill each area by attaching beads one by one with a matching thread, using a simple backstitch.
The light-reflecting quality of the beads gives the motif a vibrant, dimensional look that floss alone cannot achieve.
This is perfect for adding a playful, tactile pop to kitchen linens or accessories.
17. Design a Minimalist, Typographic Bookmark
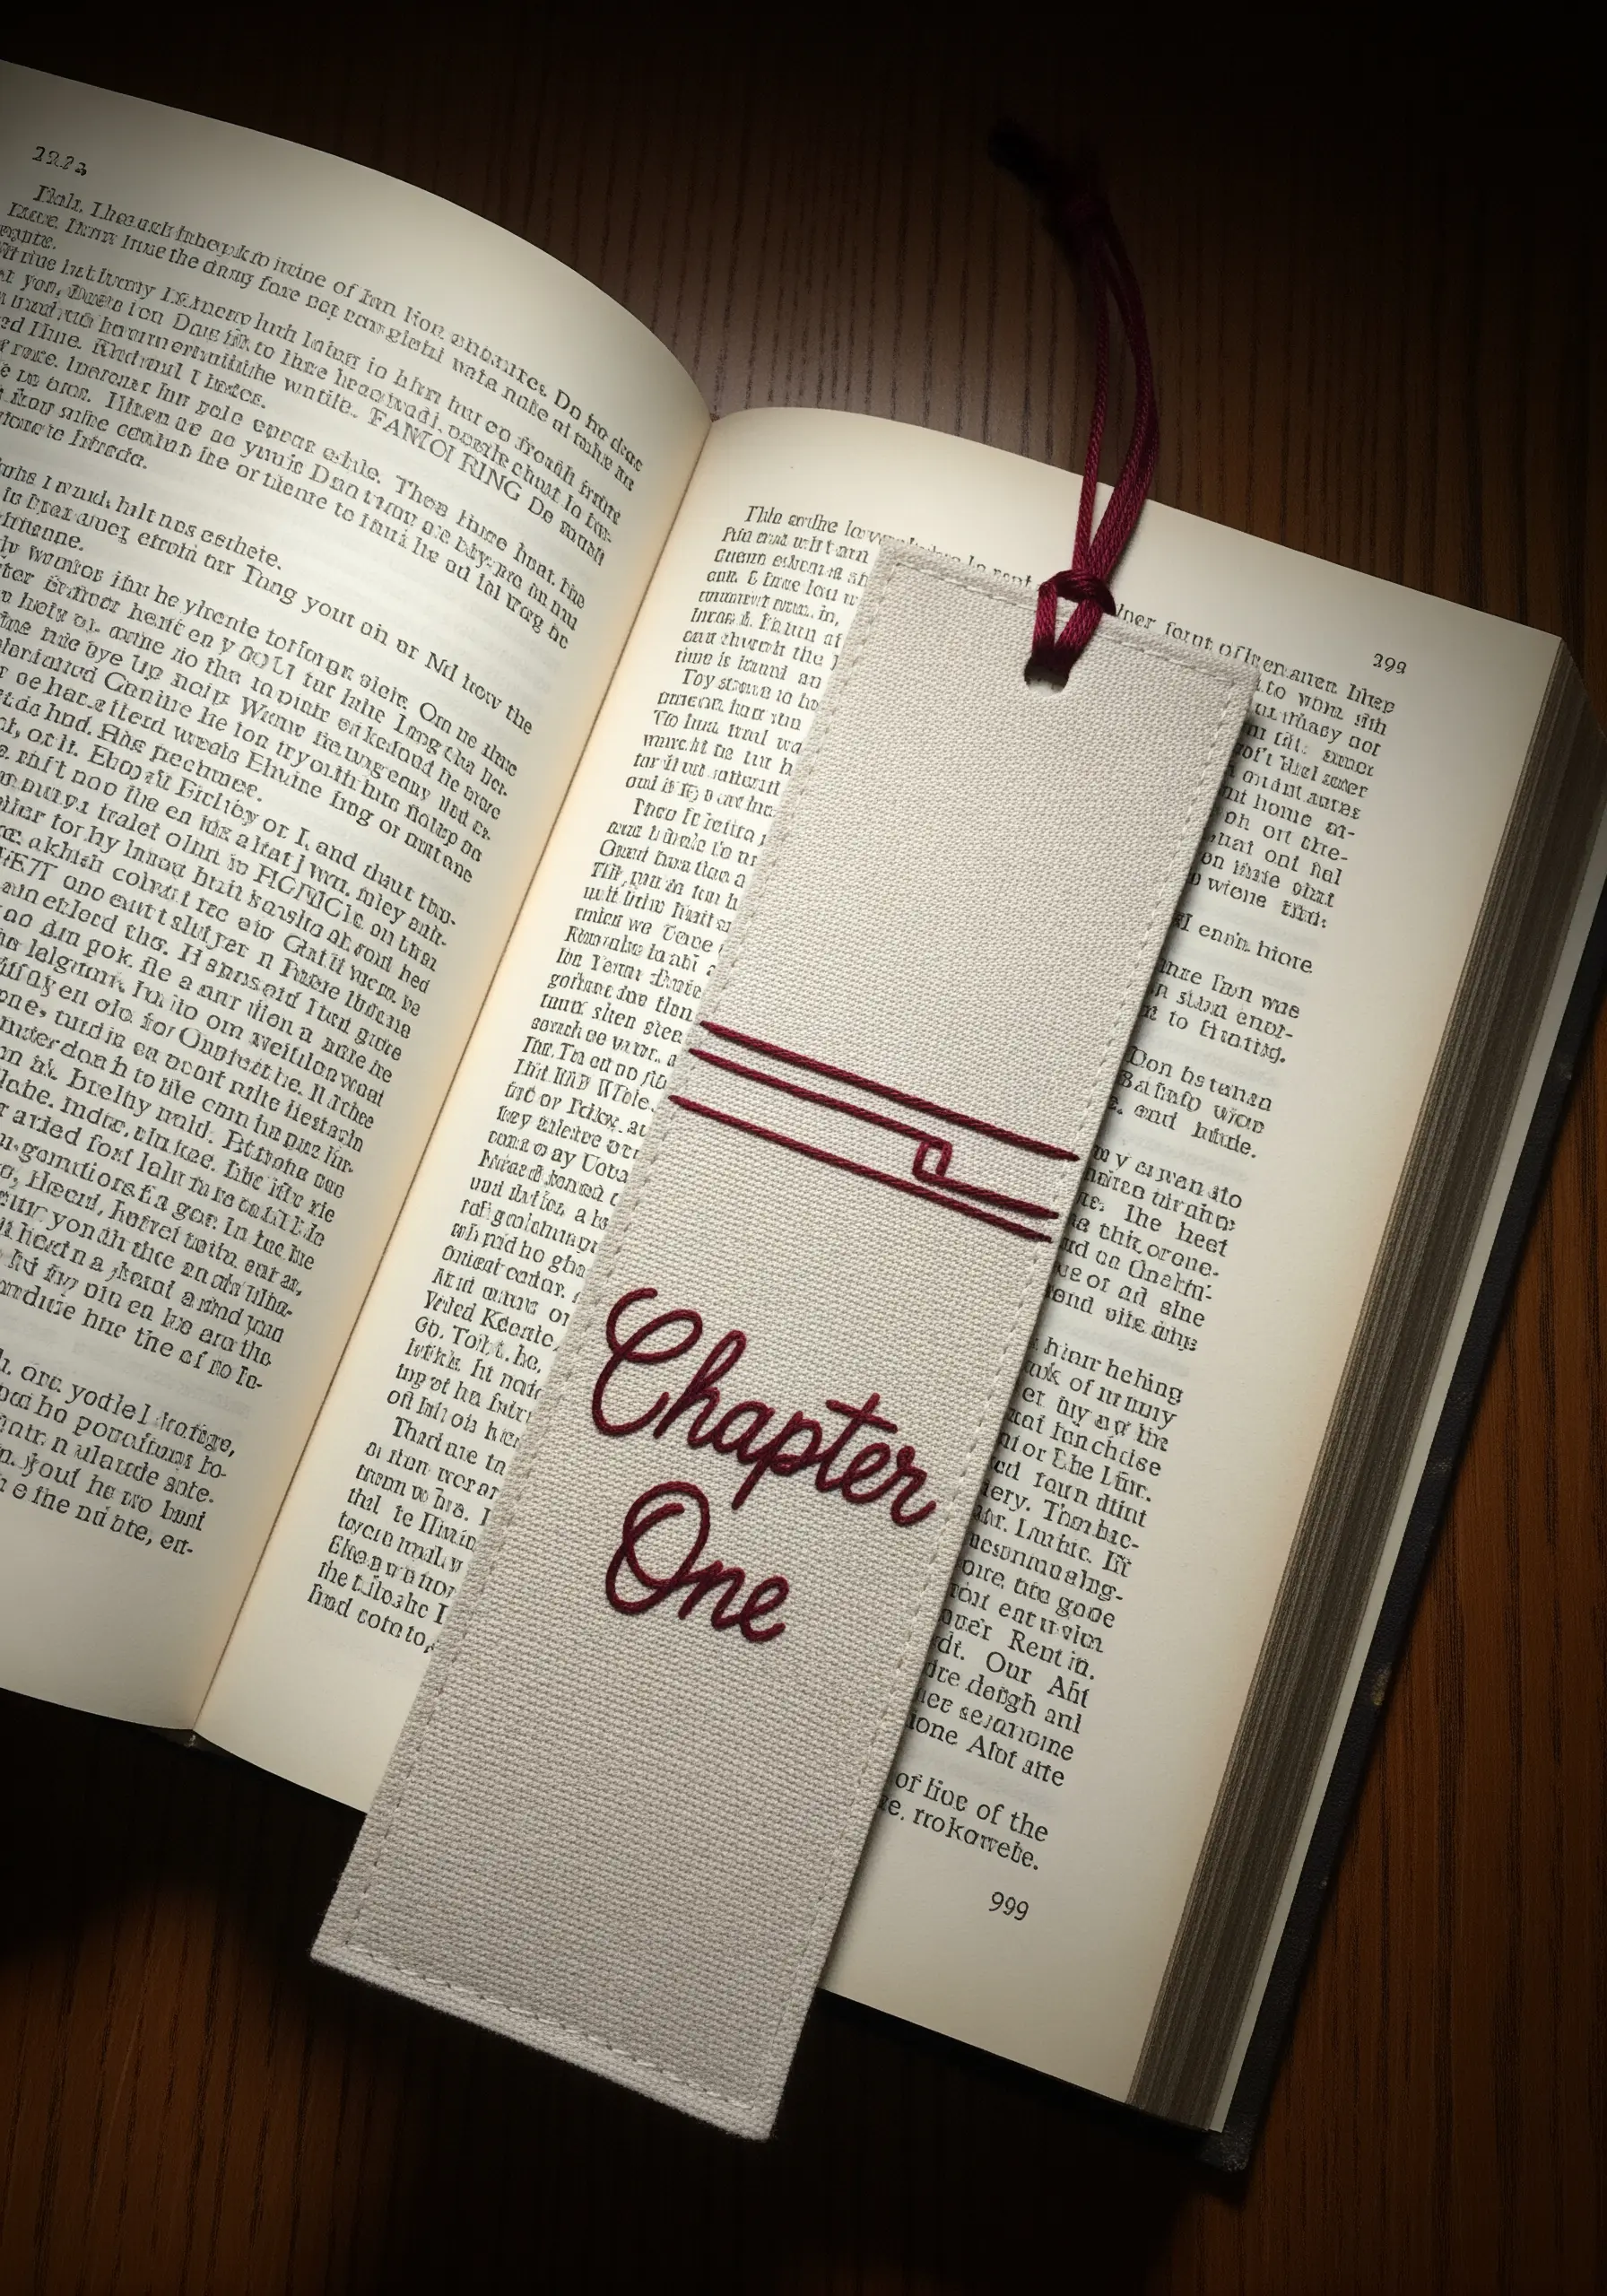
Create a functional and stylish bookmark by focusing on clean lines and elegant typography.
Use a crisp satin stitch for the lettering to ensure it is bold and readable.
Add simple, geometric line work with a contrasting backstitch for a modern, graphic touch.
Finish the bookmark by backing it with felt or another piece of fabric for durability and a professional feel, turning it into one of those perfect handmade embroidery projects.
18. Scatter a Delicate Motif for Subtle Luxury
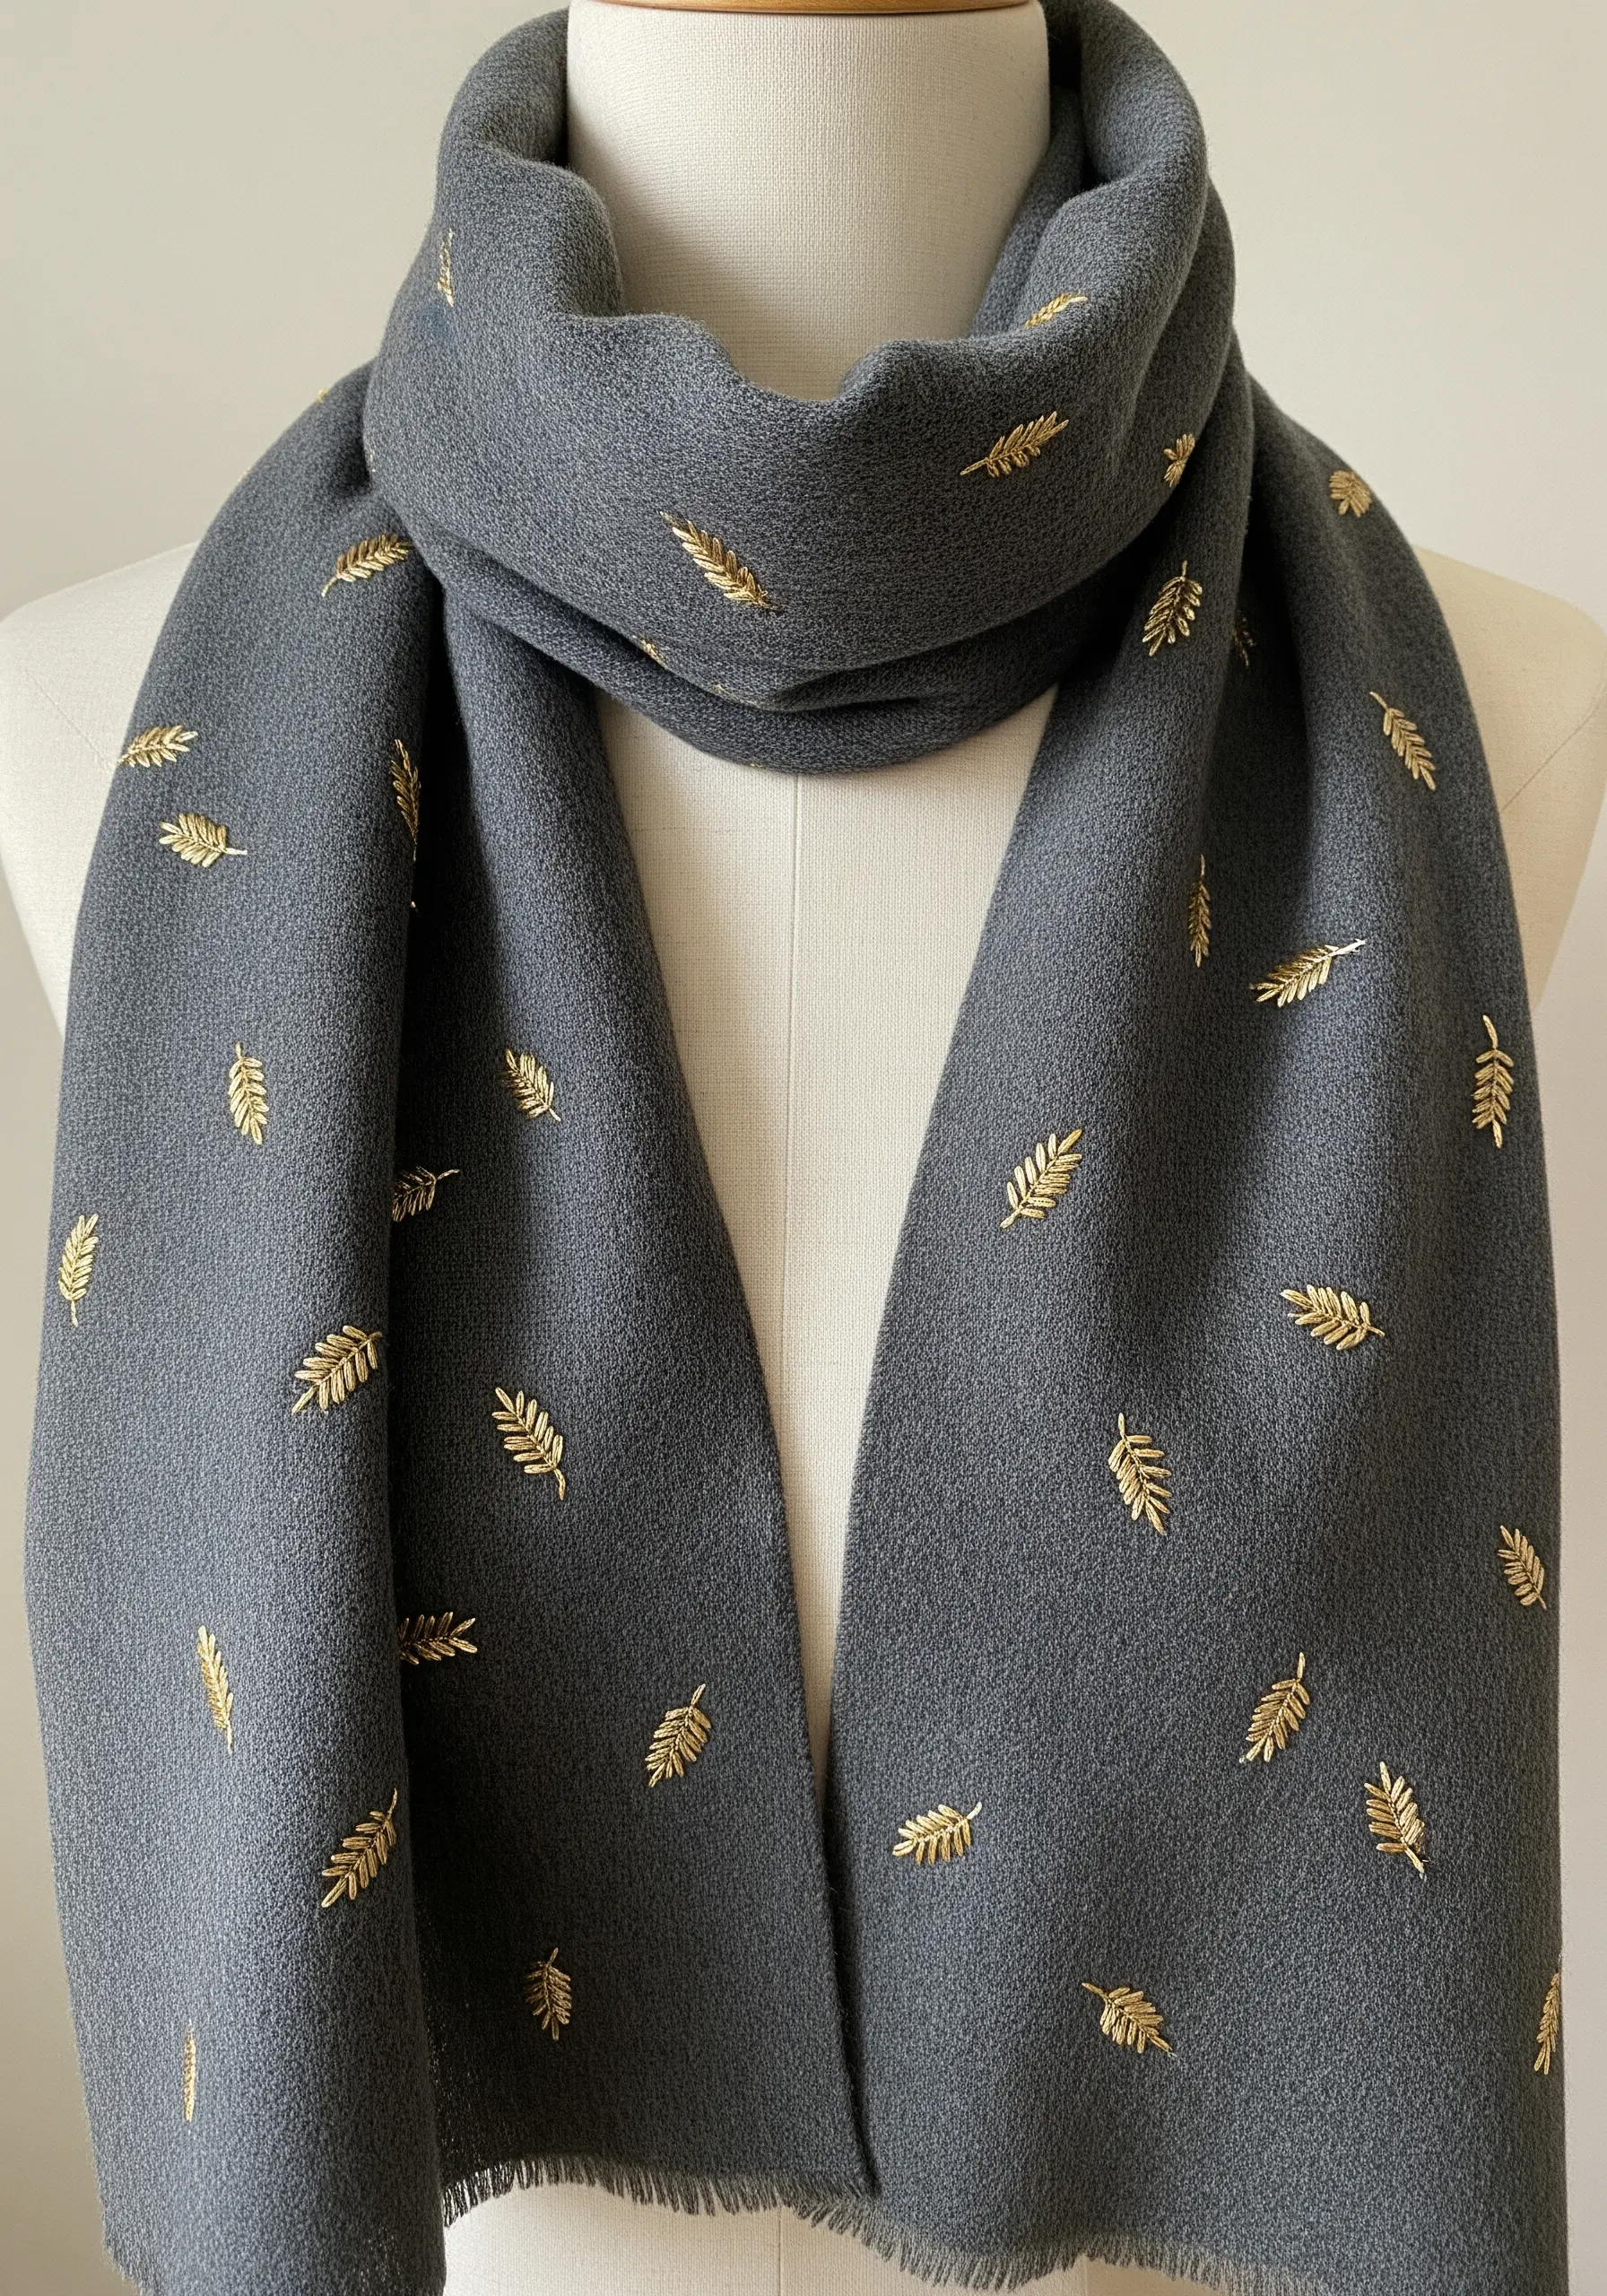
Embellish a large piece of fabric, like a scarf, with a scattered pattern of small, elegant motifs.
Use a lustrous metallic thread to stitch tiny leaves or stars, placing them in a random, organic pattern.
The key is restraint; the negative space between the motifs is just as important as the stitches themselves.
This technique adds a touch of shimmer and sophistication without overwhelming the base fabric.
19. Maximize Color Vibrancy on a Dark Canvas
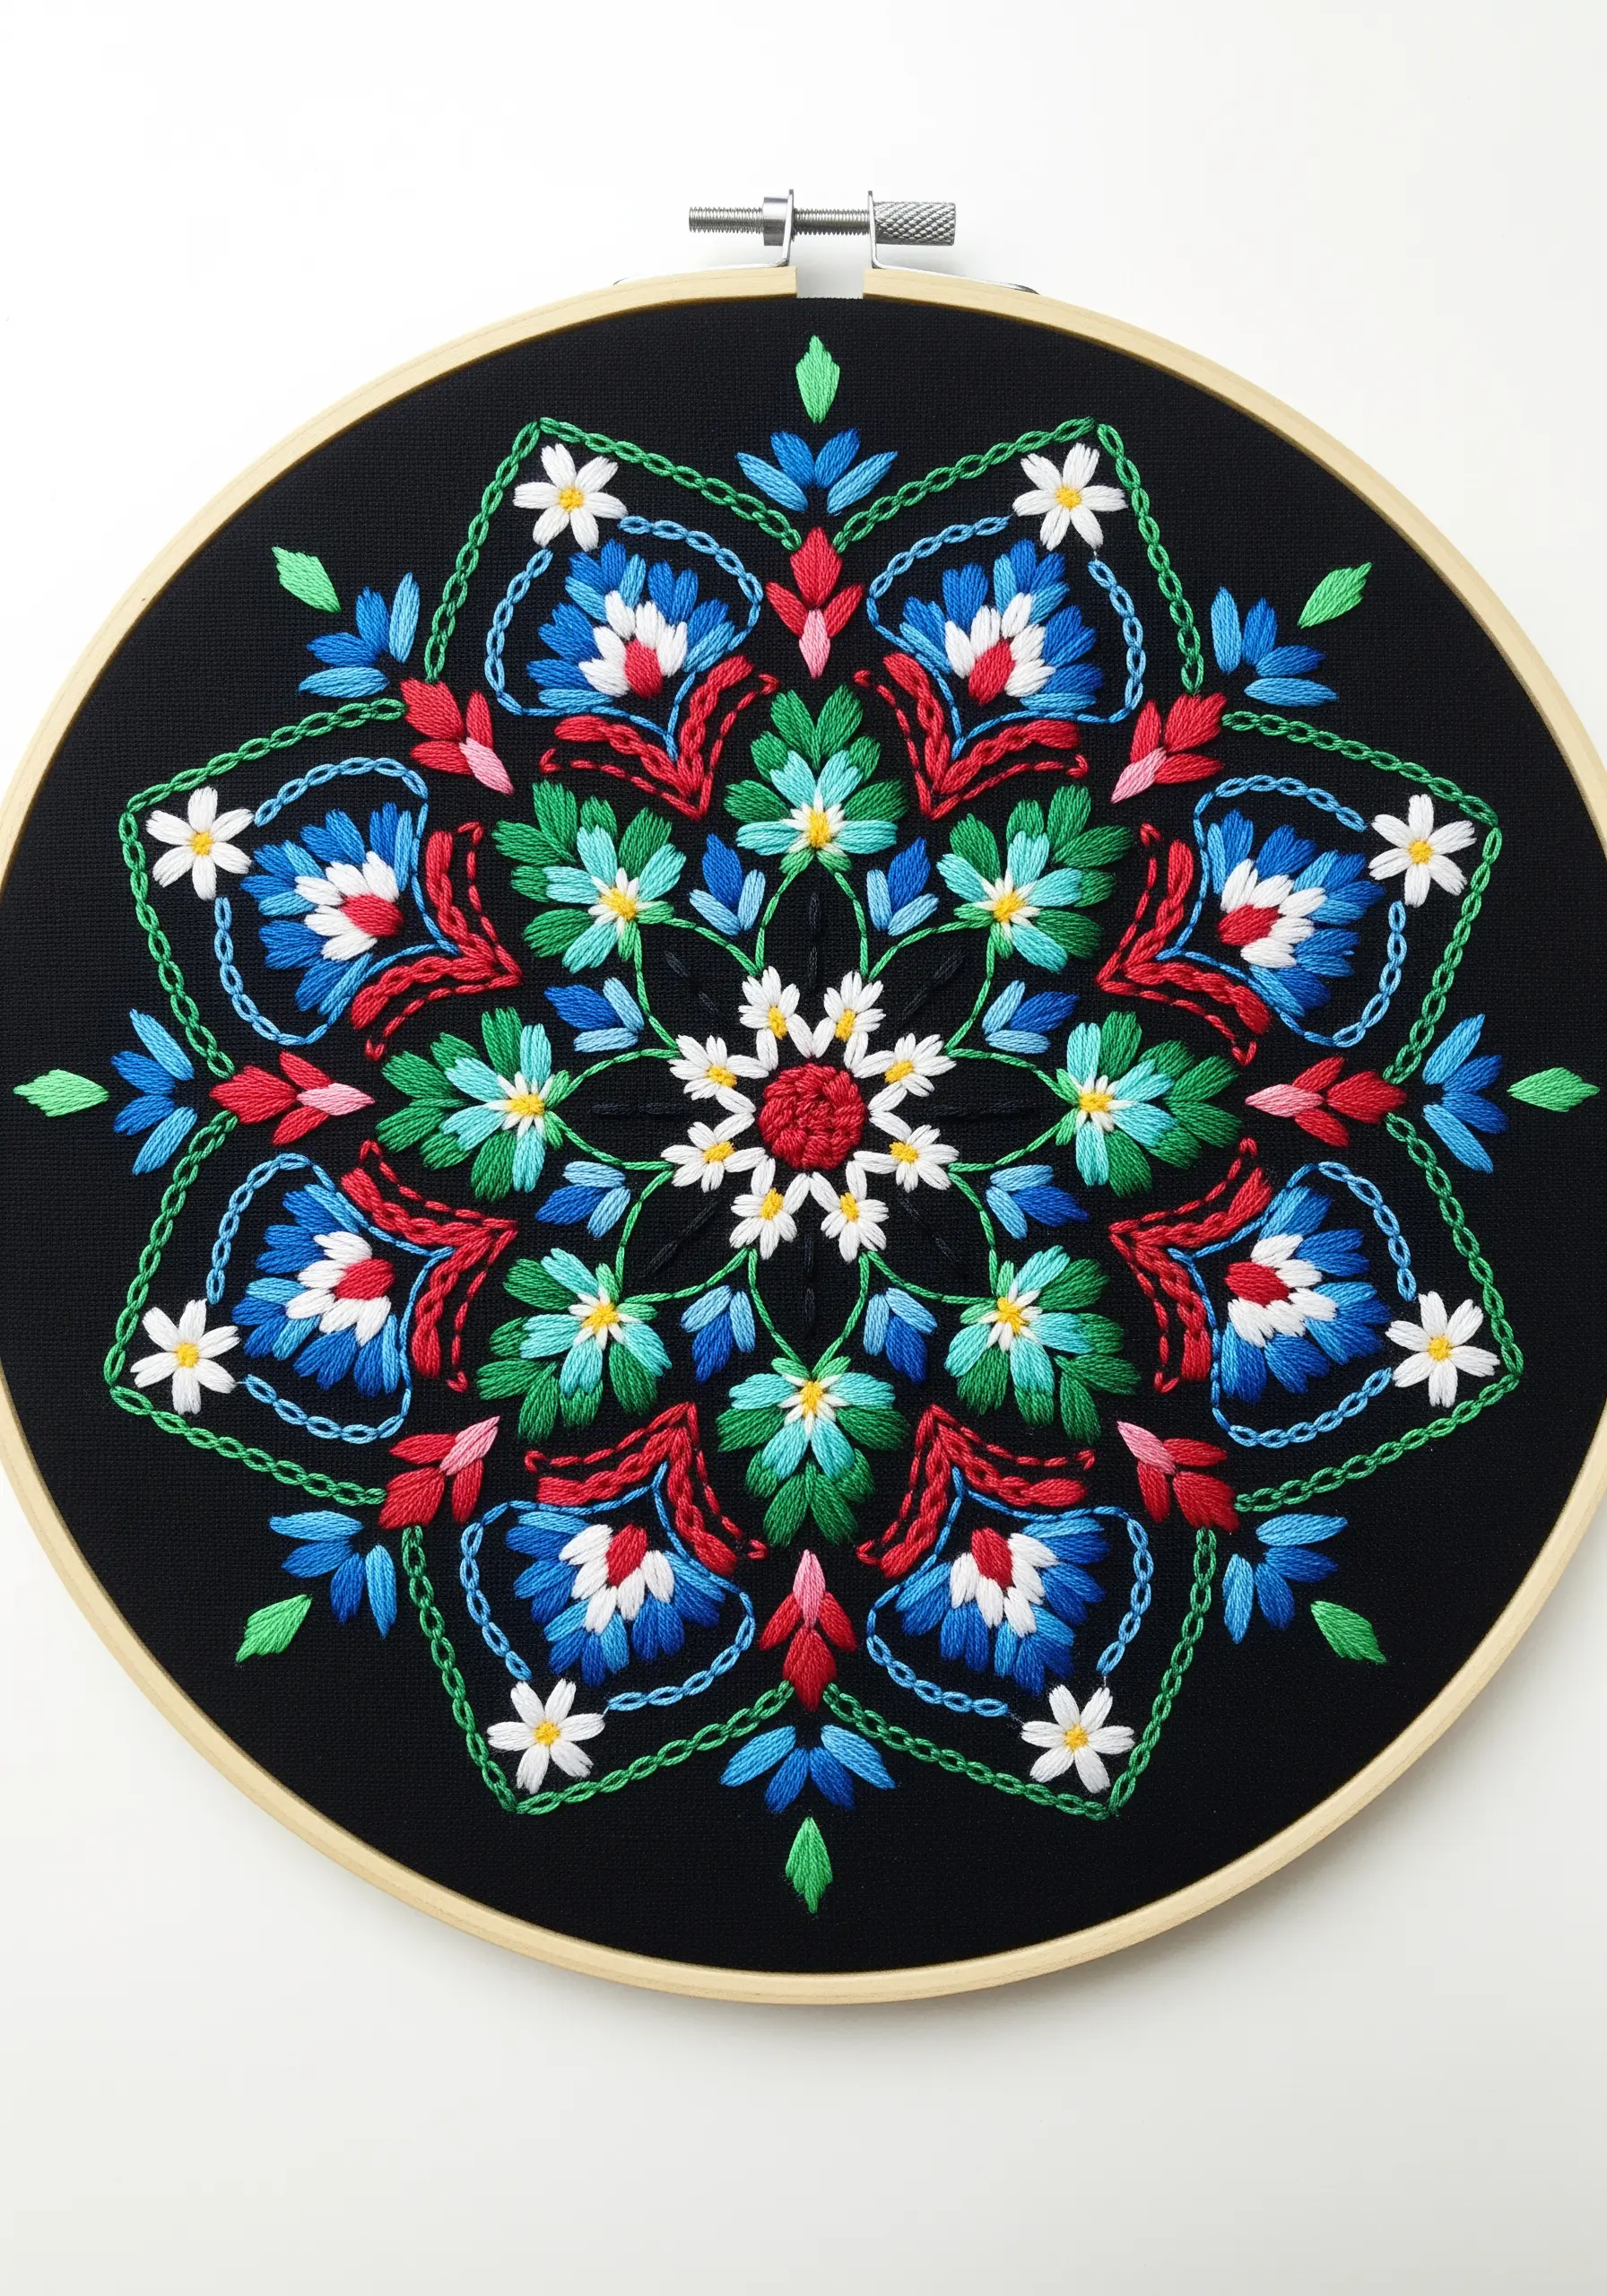
Make your thread colors appear richer and more saturated by stitching on black or dark-colored fabric.
The high contrast eliminates any visual competition, allowing bright blues, reds, and greens to pop with intensity.
For an embroidered mandala, combine various stitches—satin stitch for bold fills, lazy daisy for petals, and French knots for centers—to create a feast of color and texture.
20. Replicate Fur Texture with Directional Stitching
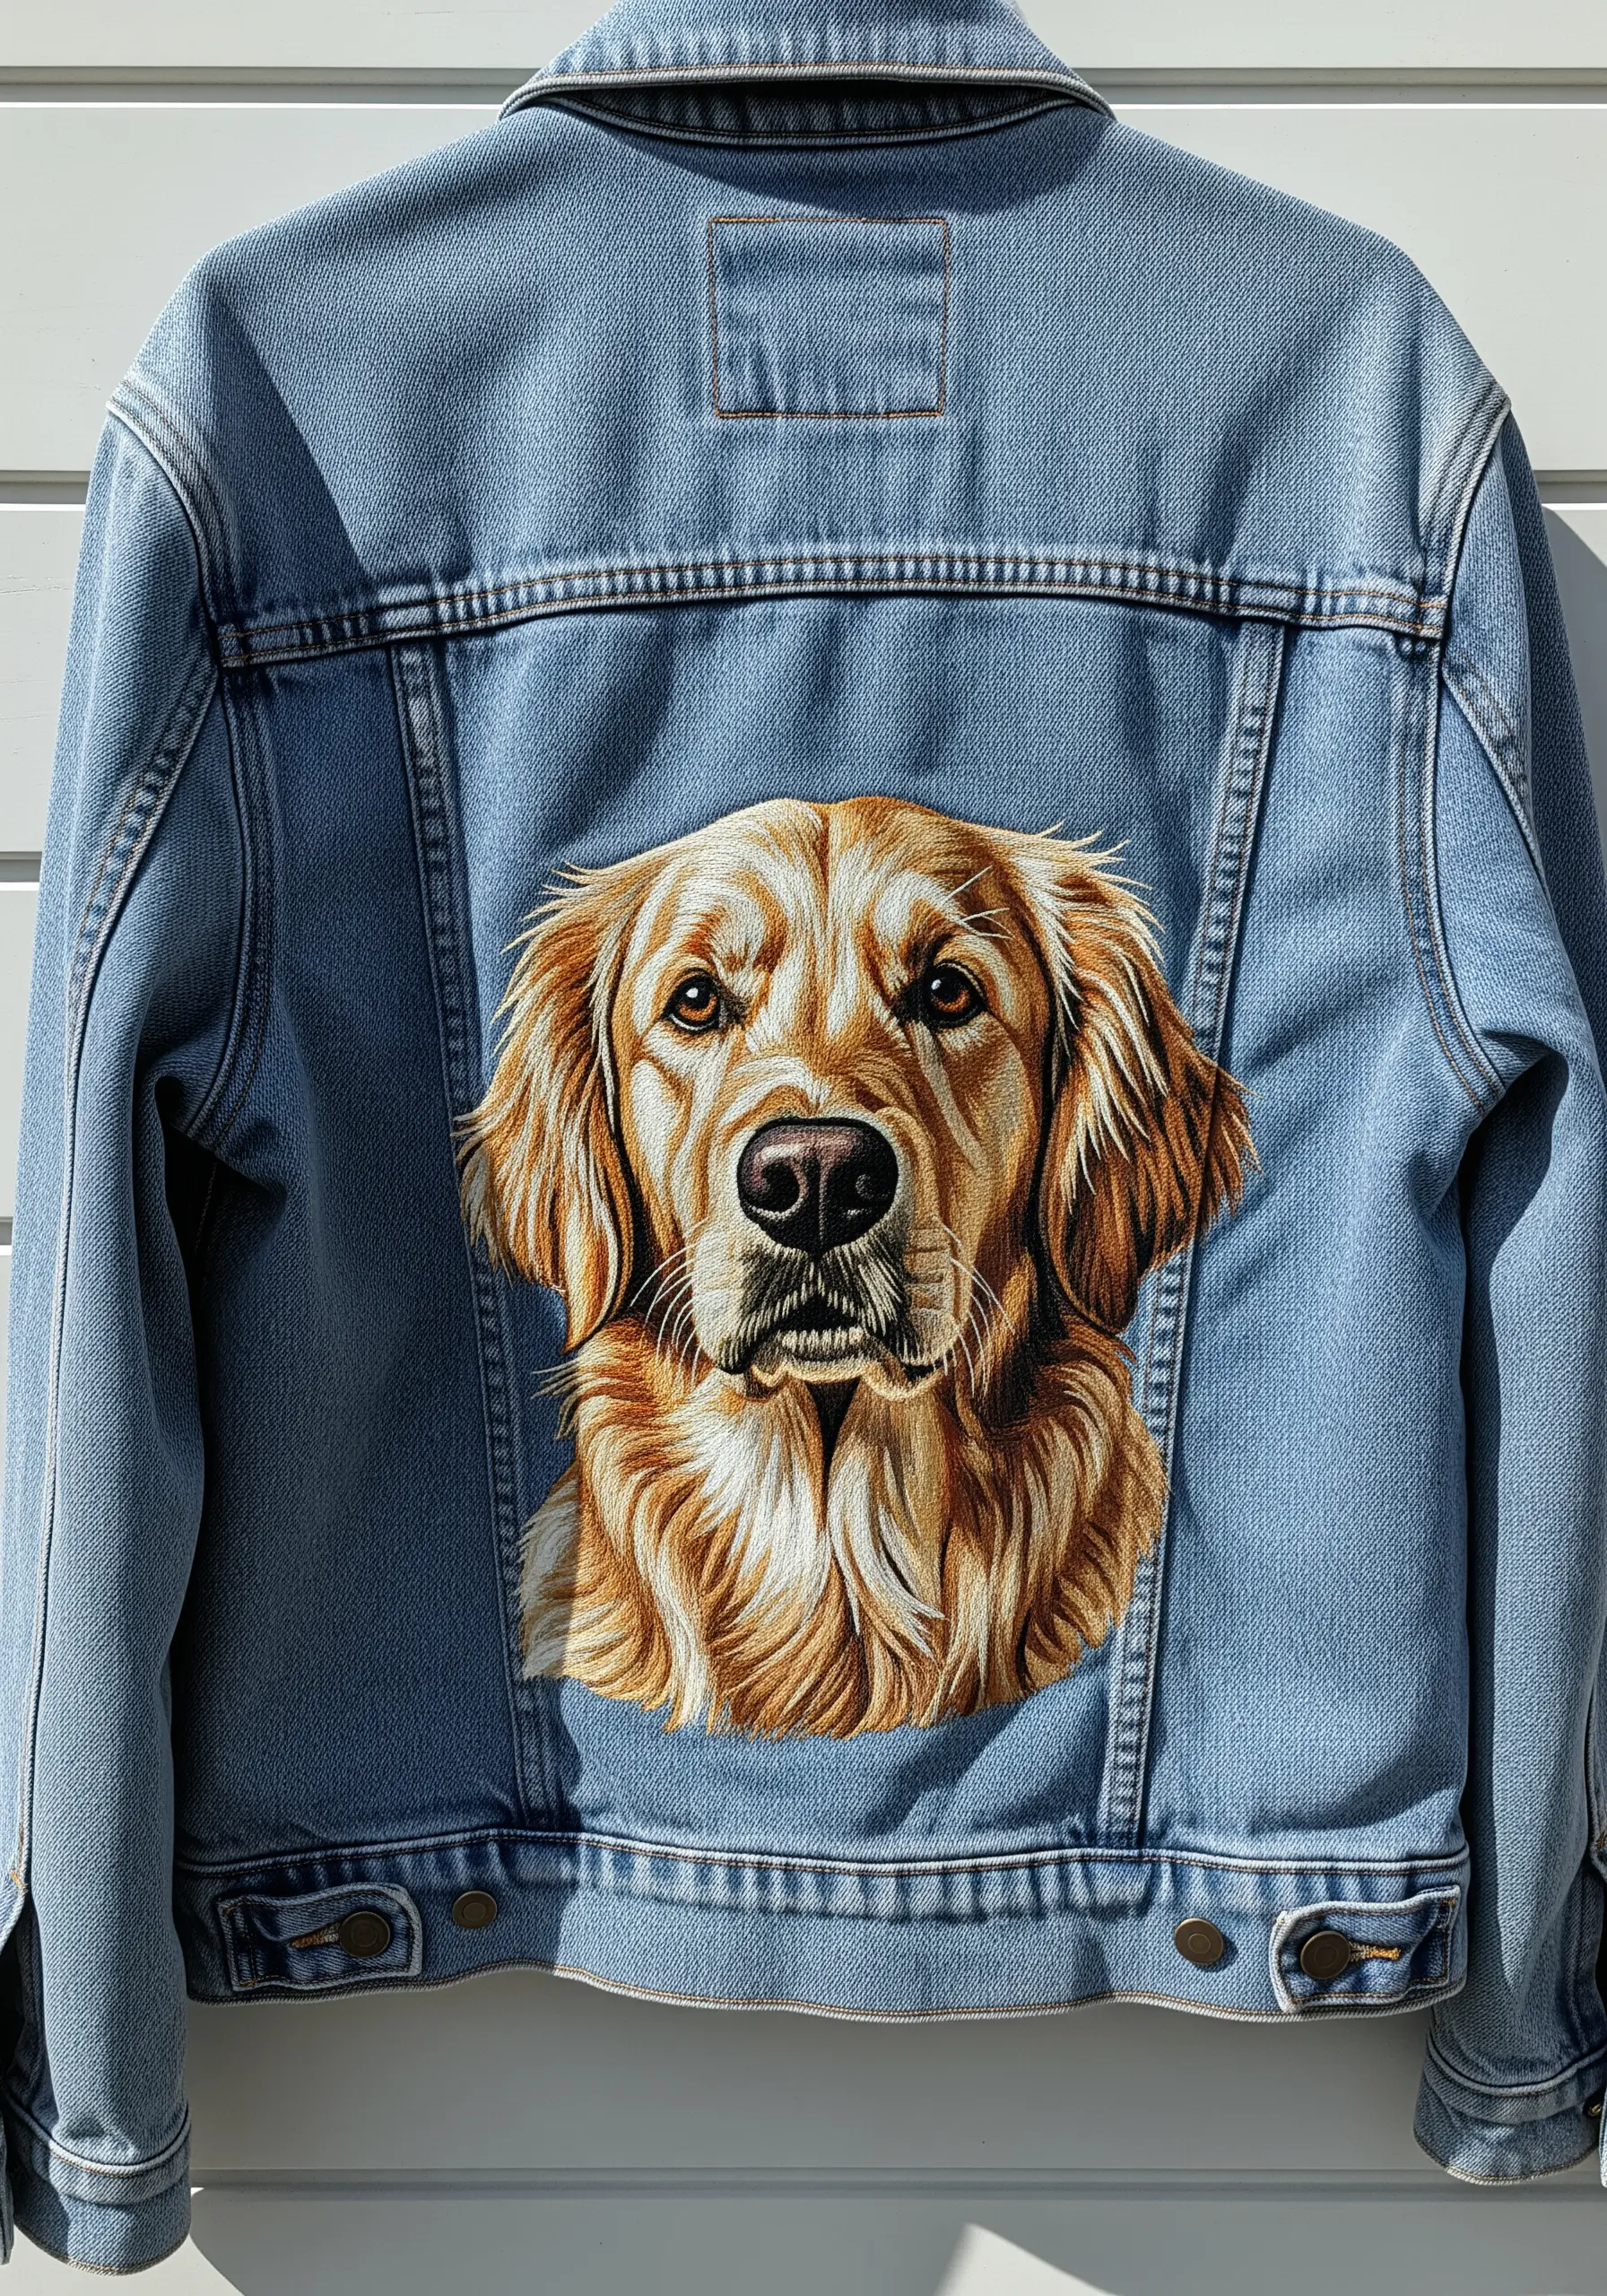
Capture the essence of an animal’s coat by paying close attention to stitch direction in your thread painting.
Use single strands of floss in multiple shades and lay your long-and-short stitches in the direction that the fur naturally grows.
Layer lighter colors on top of darker ones to create highlights and depth, giving the final portrait a realistic, touchable quality.
This technique is essential for bringing pet portraits to life on statement pieces like denim jackets.
21. Weave a Modernist Mending Patch

Move beyond traditional darning with a woven patch that’s both functional and graphically striking.
Place a fabric patch behind the hole, then create a warp by stitching long, parallel foundation threads over the gap.
Using a contrasting, colorful yarn, weave a weft thread over and under the warp threads to create a sturdy, colorful woven square.
The result is a bold, abstract repair that adds character to any knit garment.
22. Create a Celestial Scene with Sequins and Beads
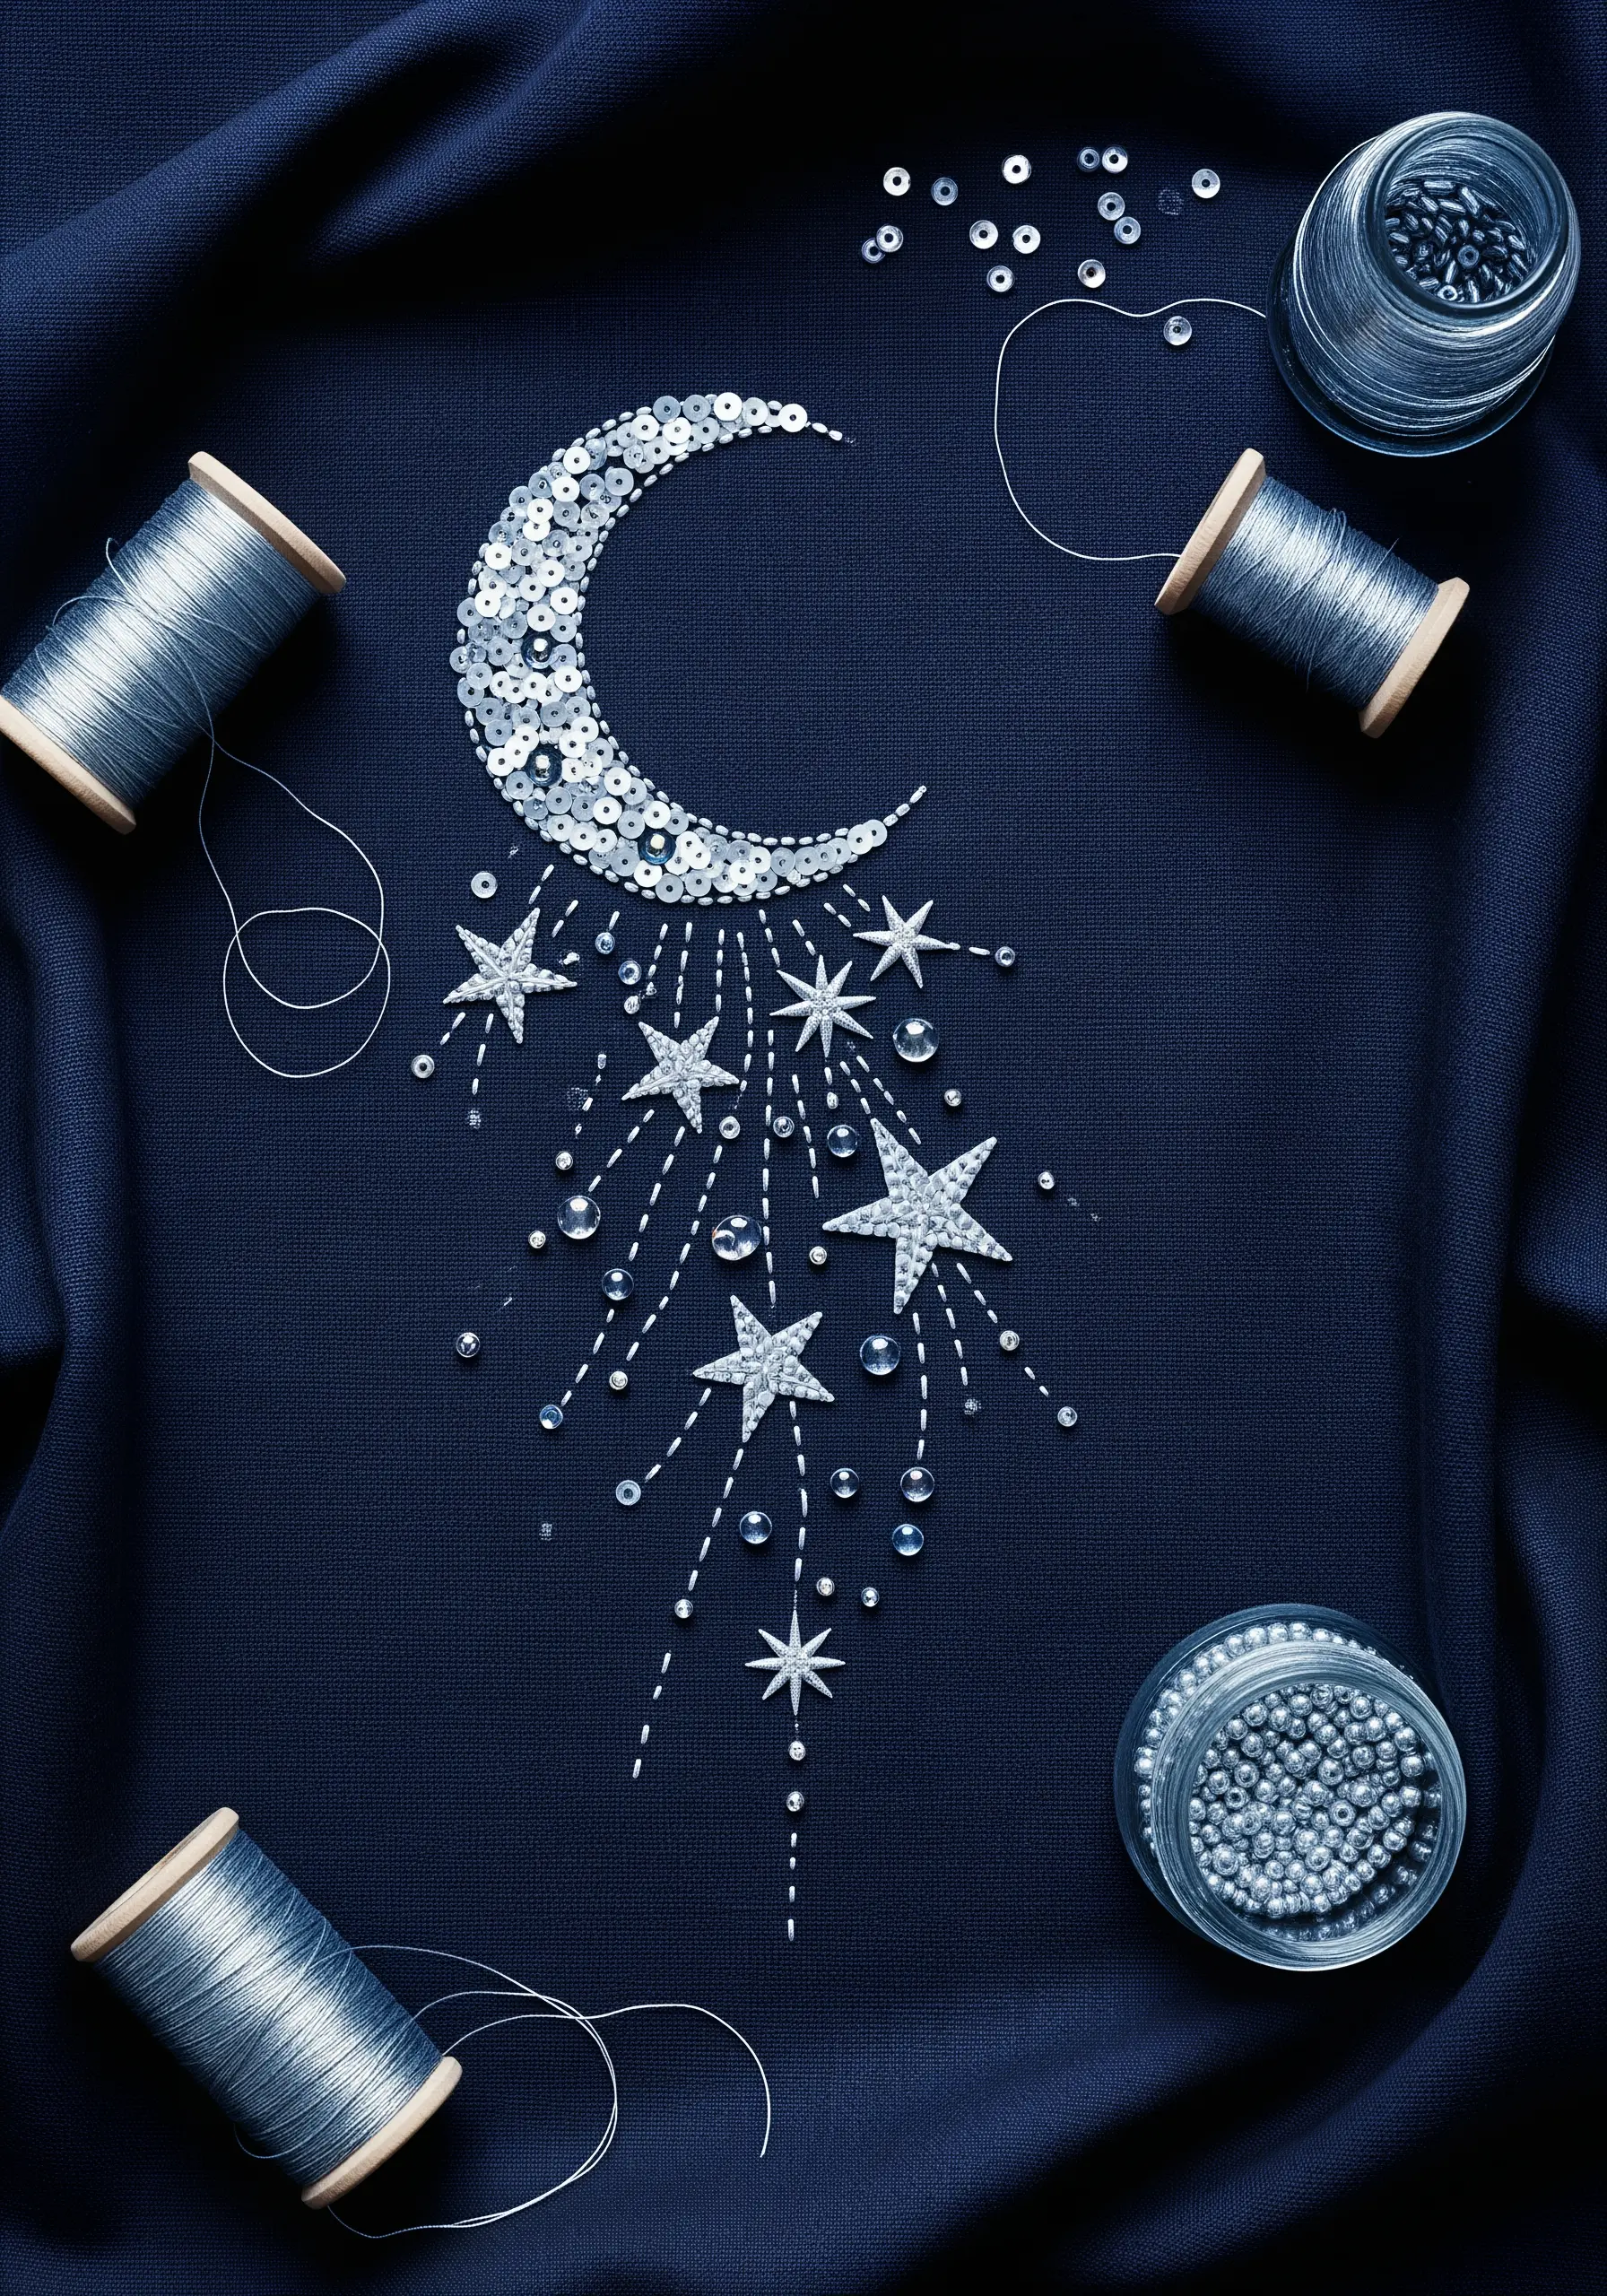
Combine sequins, beads, and metallic thread to craft a shimmering, multi-dimensional celestial design.
Fill a crescent moon shape with overlapping silver sequins, securing each one with a tiny seed bead for a polished look.
Use straight stitches with silver thread and bugle beads to create shooting stars and starbursts, adding a sense of movement and magic.
This technique works best on dark fabric to enhance the sparkle.
23. Embellish a Hemline with Architectural Line Art
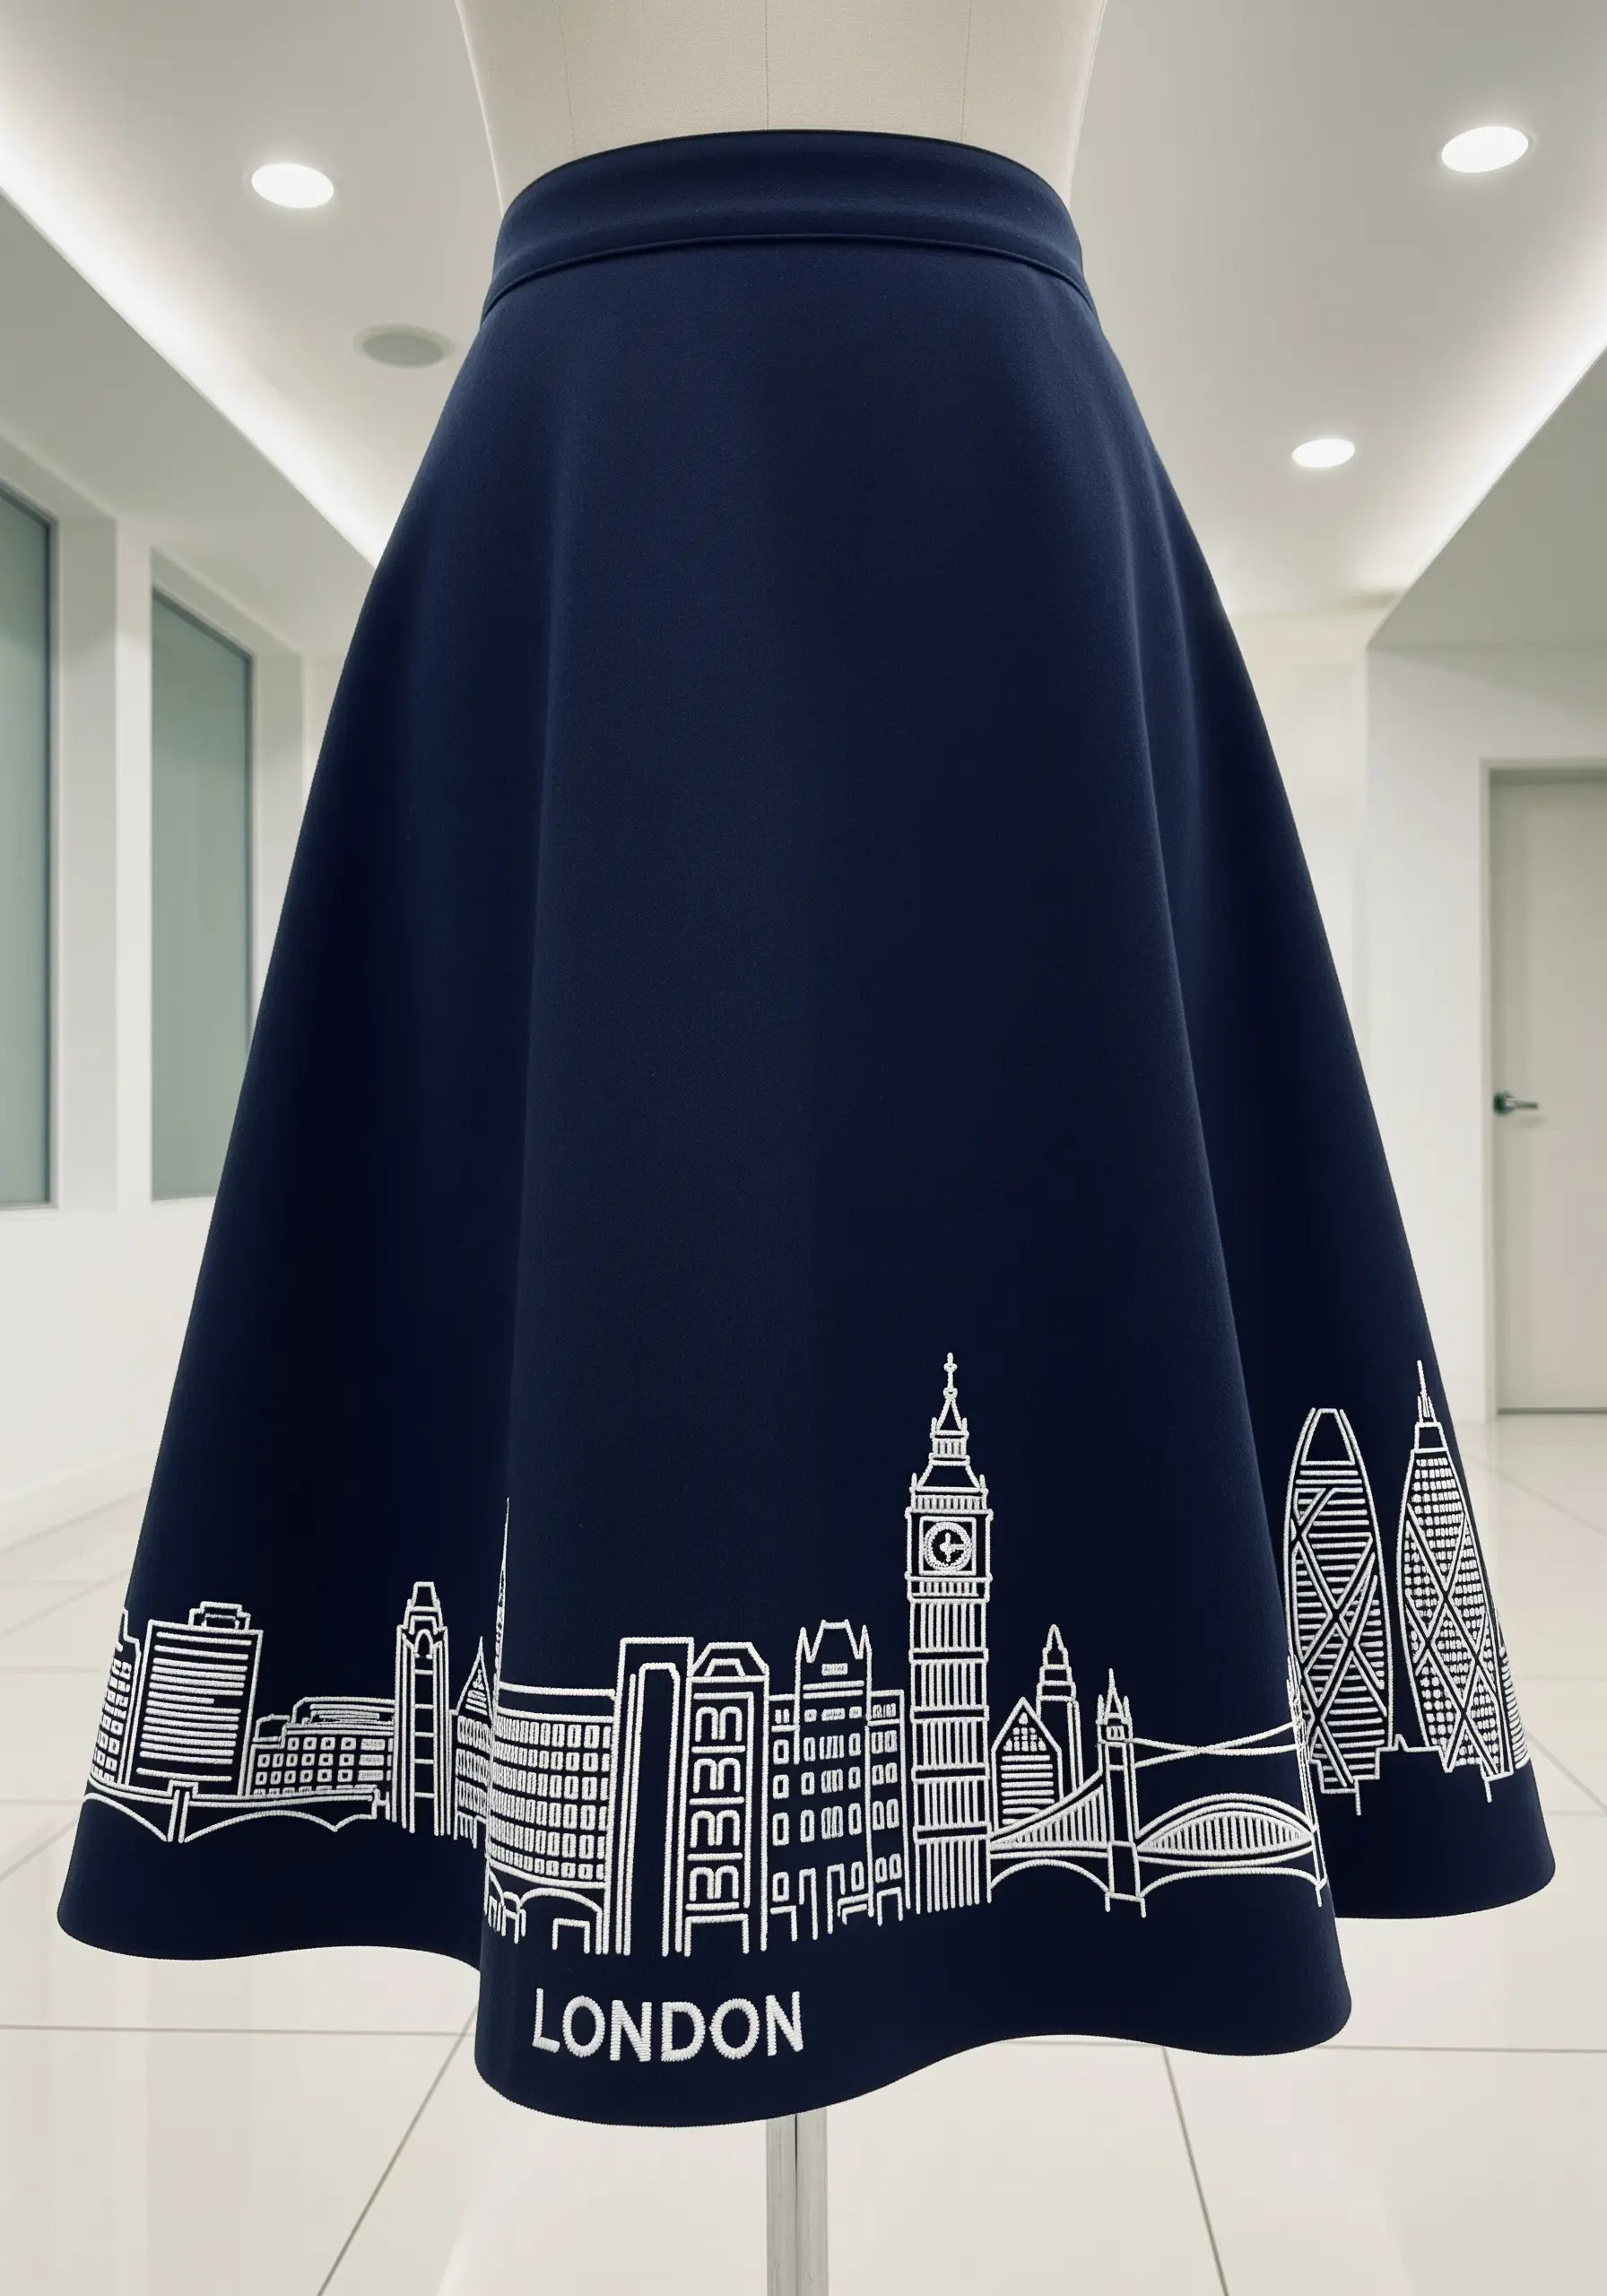
Transform a simple skirt into a piece of wearable art with a minimalist, architectural design along the hem.
Use a clean backstitch or stem stitch in a high-contrast color, like white on navy, to trace the iconic skyline of a city.
The simplicity of line art allows the silhouette of the garment to shine while adding a personal, sophisticated touch.
Ensure your stitches are even and consistent for a sharp, professional finish.
24. Build Abstract Florals with Knotted Stitches
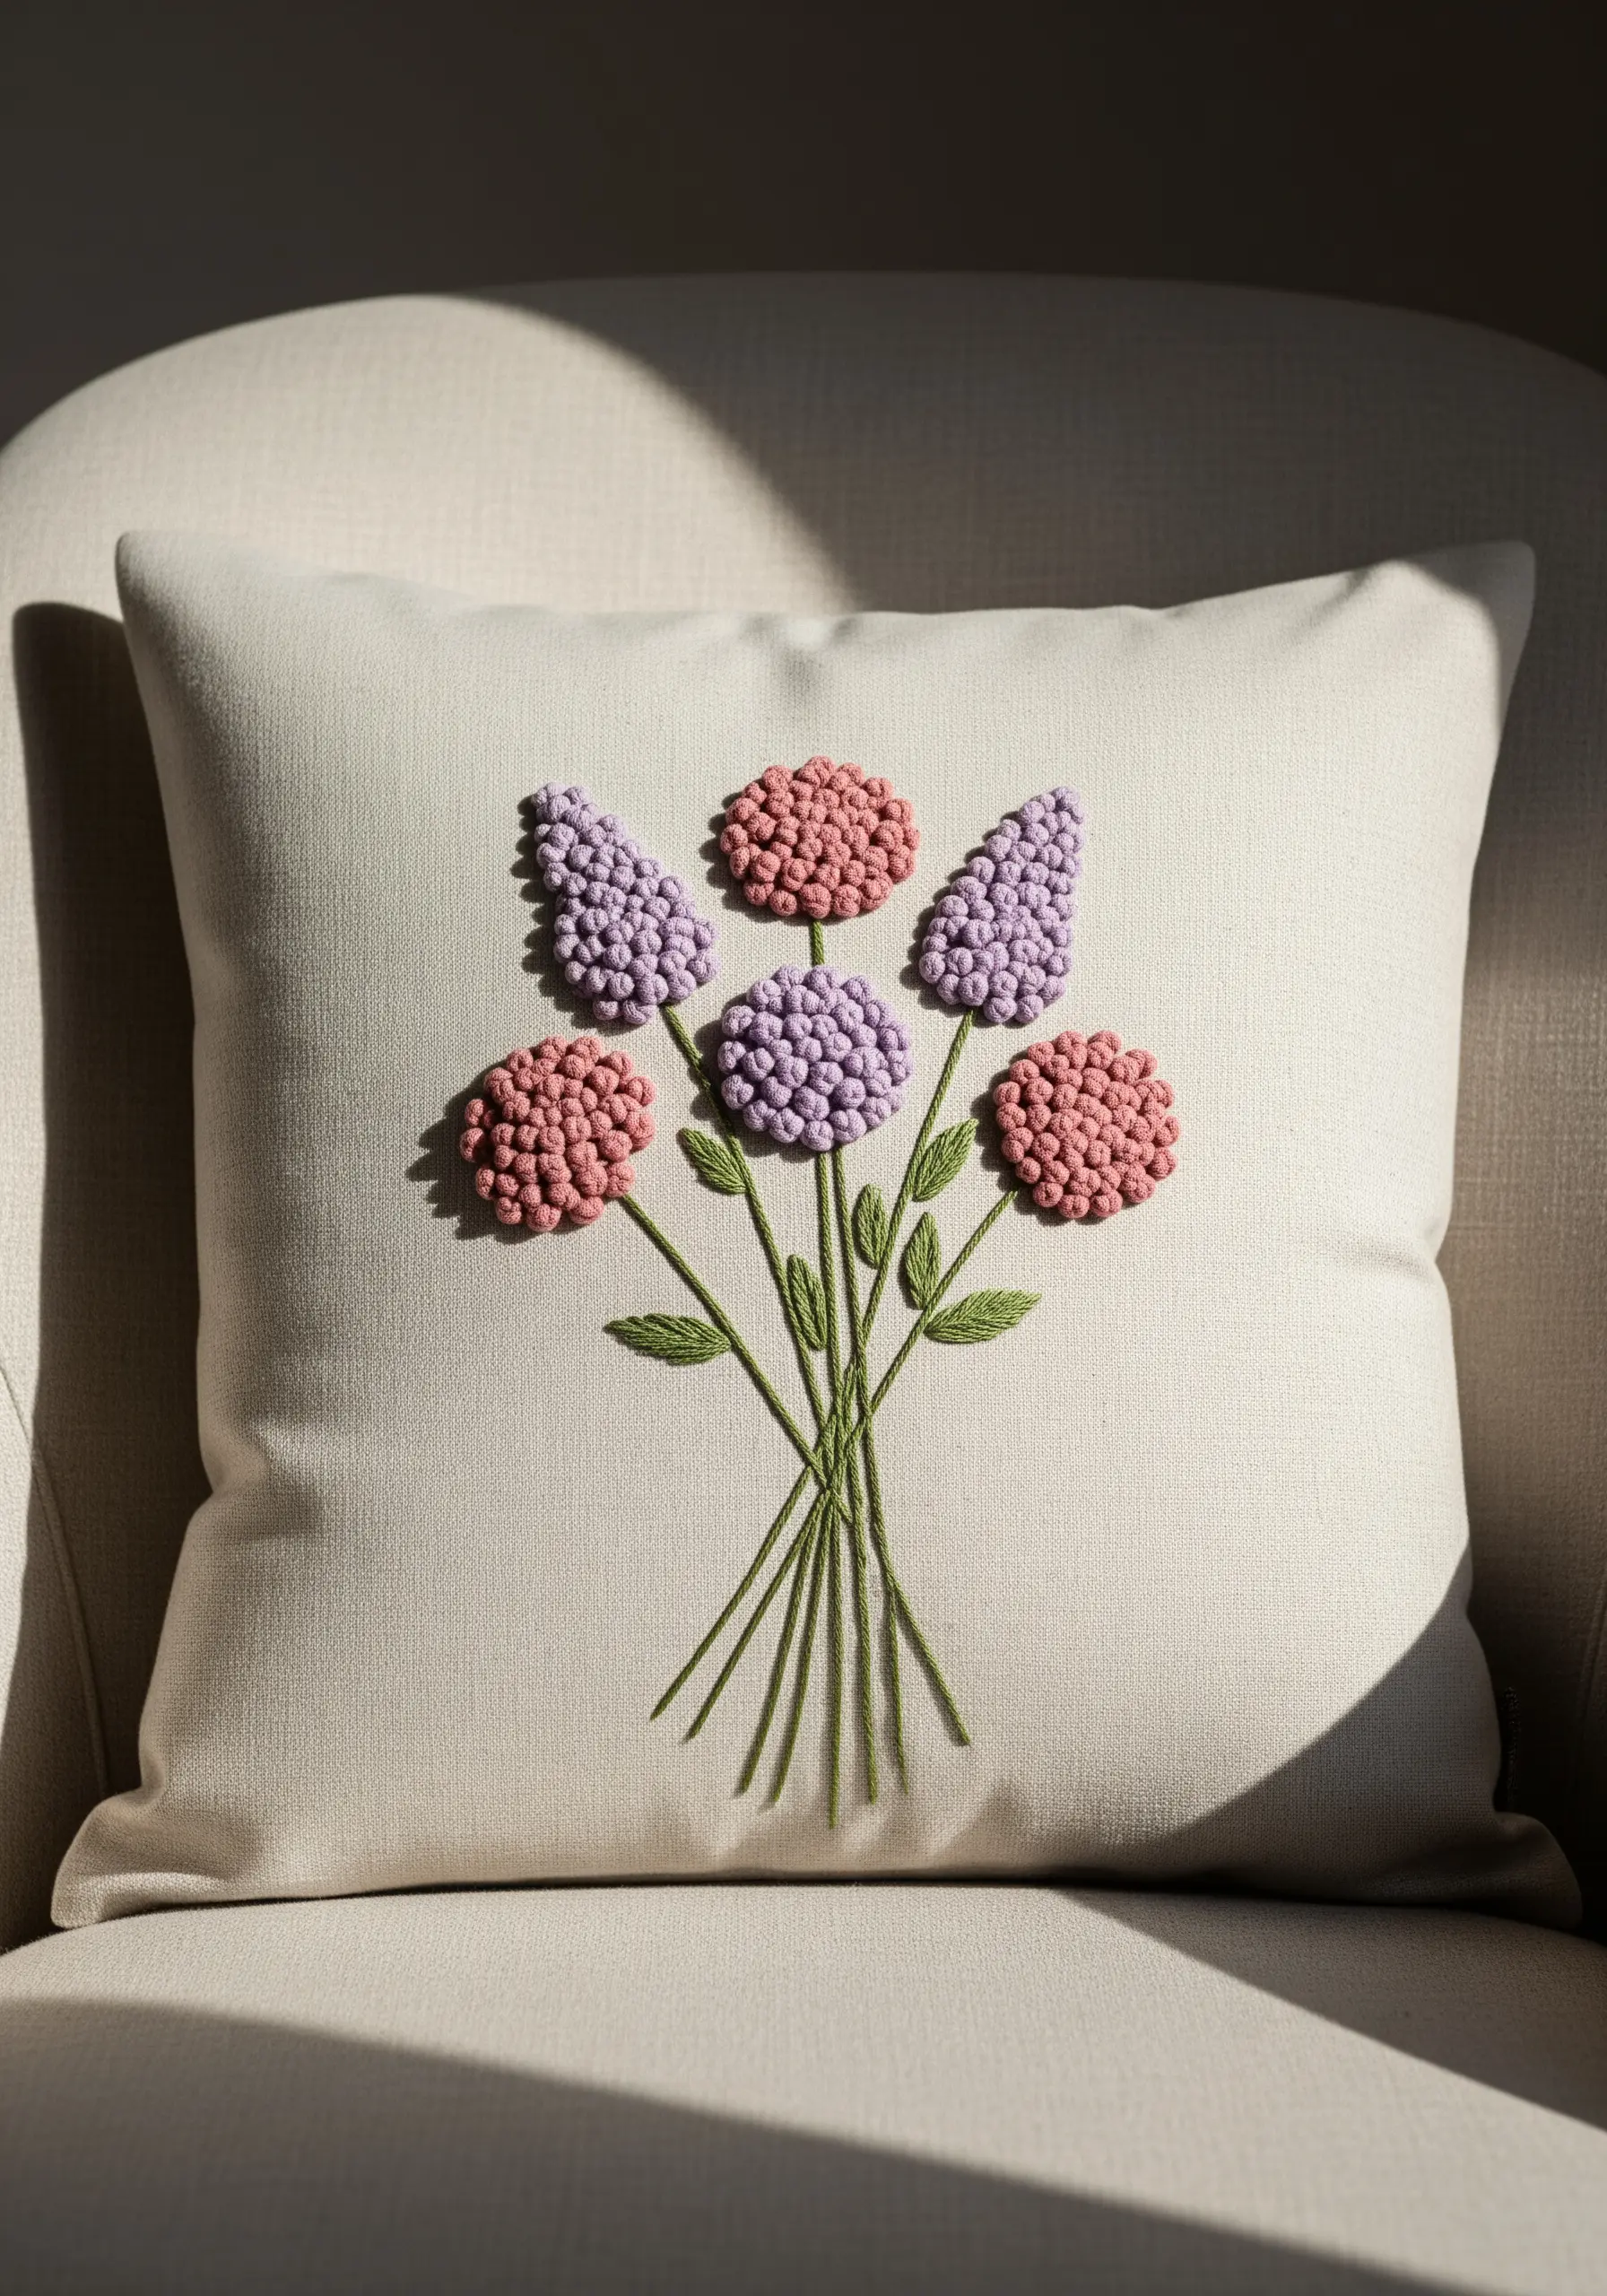
Create highly textured, abstract floral shapes by focusing on knotted stitches rather than traditional petals.
Use French knots or colonial knots, packed tightly together, to form the flower heads. Varying the number of wraps around the needle will change the size of the knot, adding dimension.
This technique produces a delightful, bobble-like texture that makes for stunning embroidery pillow ideas and tactile art.
25. Design a Gradient Pattern with Variegated Thread

Achieve beautiful, subtle color transitions effortlessly by using variegated embroidery floss.
Stitch a simple, repeating motif, like these leaves, using a fishbone or satin stitch.
The thread will naturally change color as you work, creating a soft gradient effect across the entire piece without you having to switch floss.
This is an excellent way to add visual interest to nature-themed embroidery samplers and patterns.
26. Personalize Tech with a Cross-Stitch Case
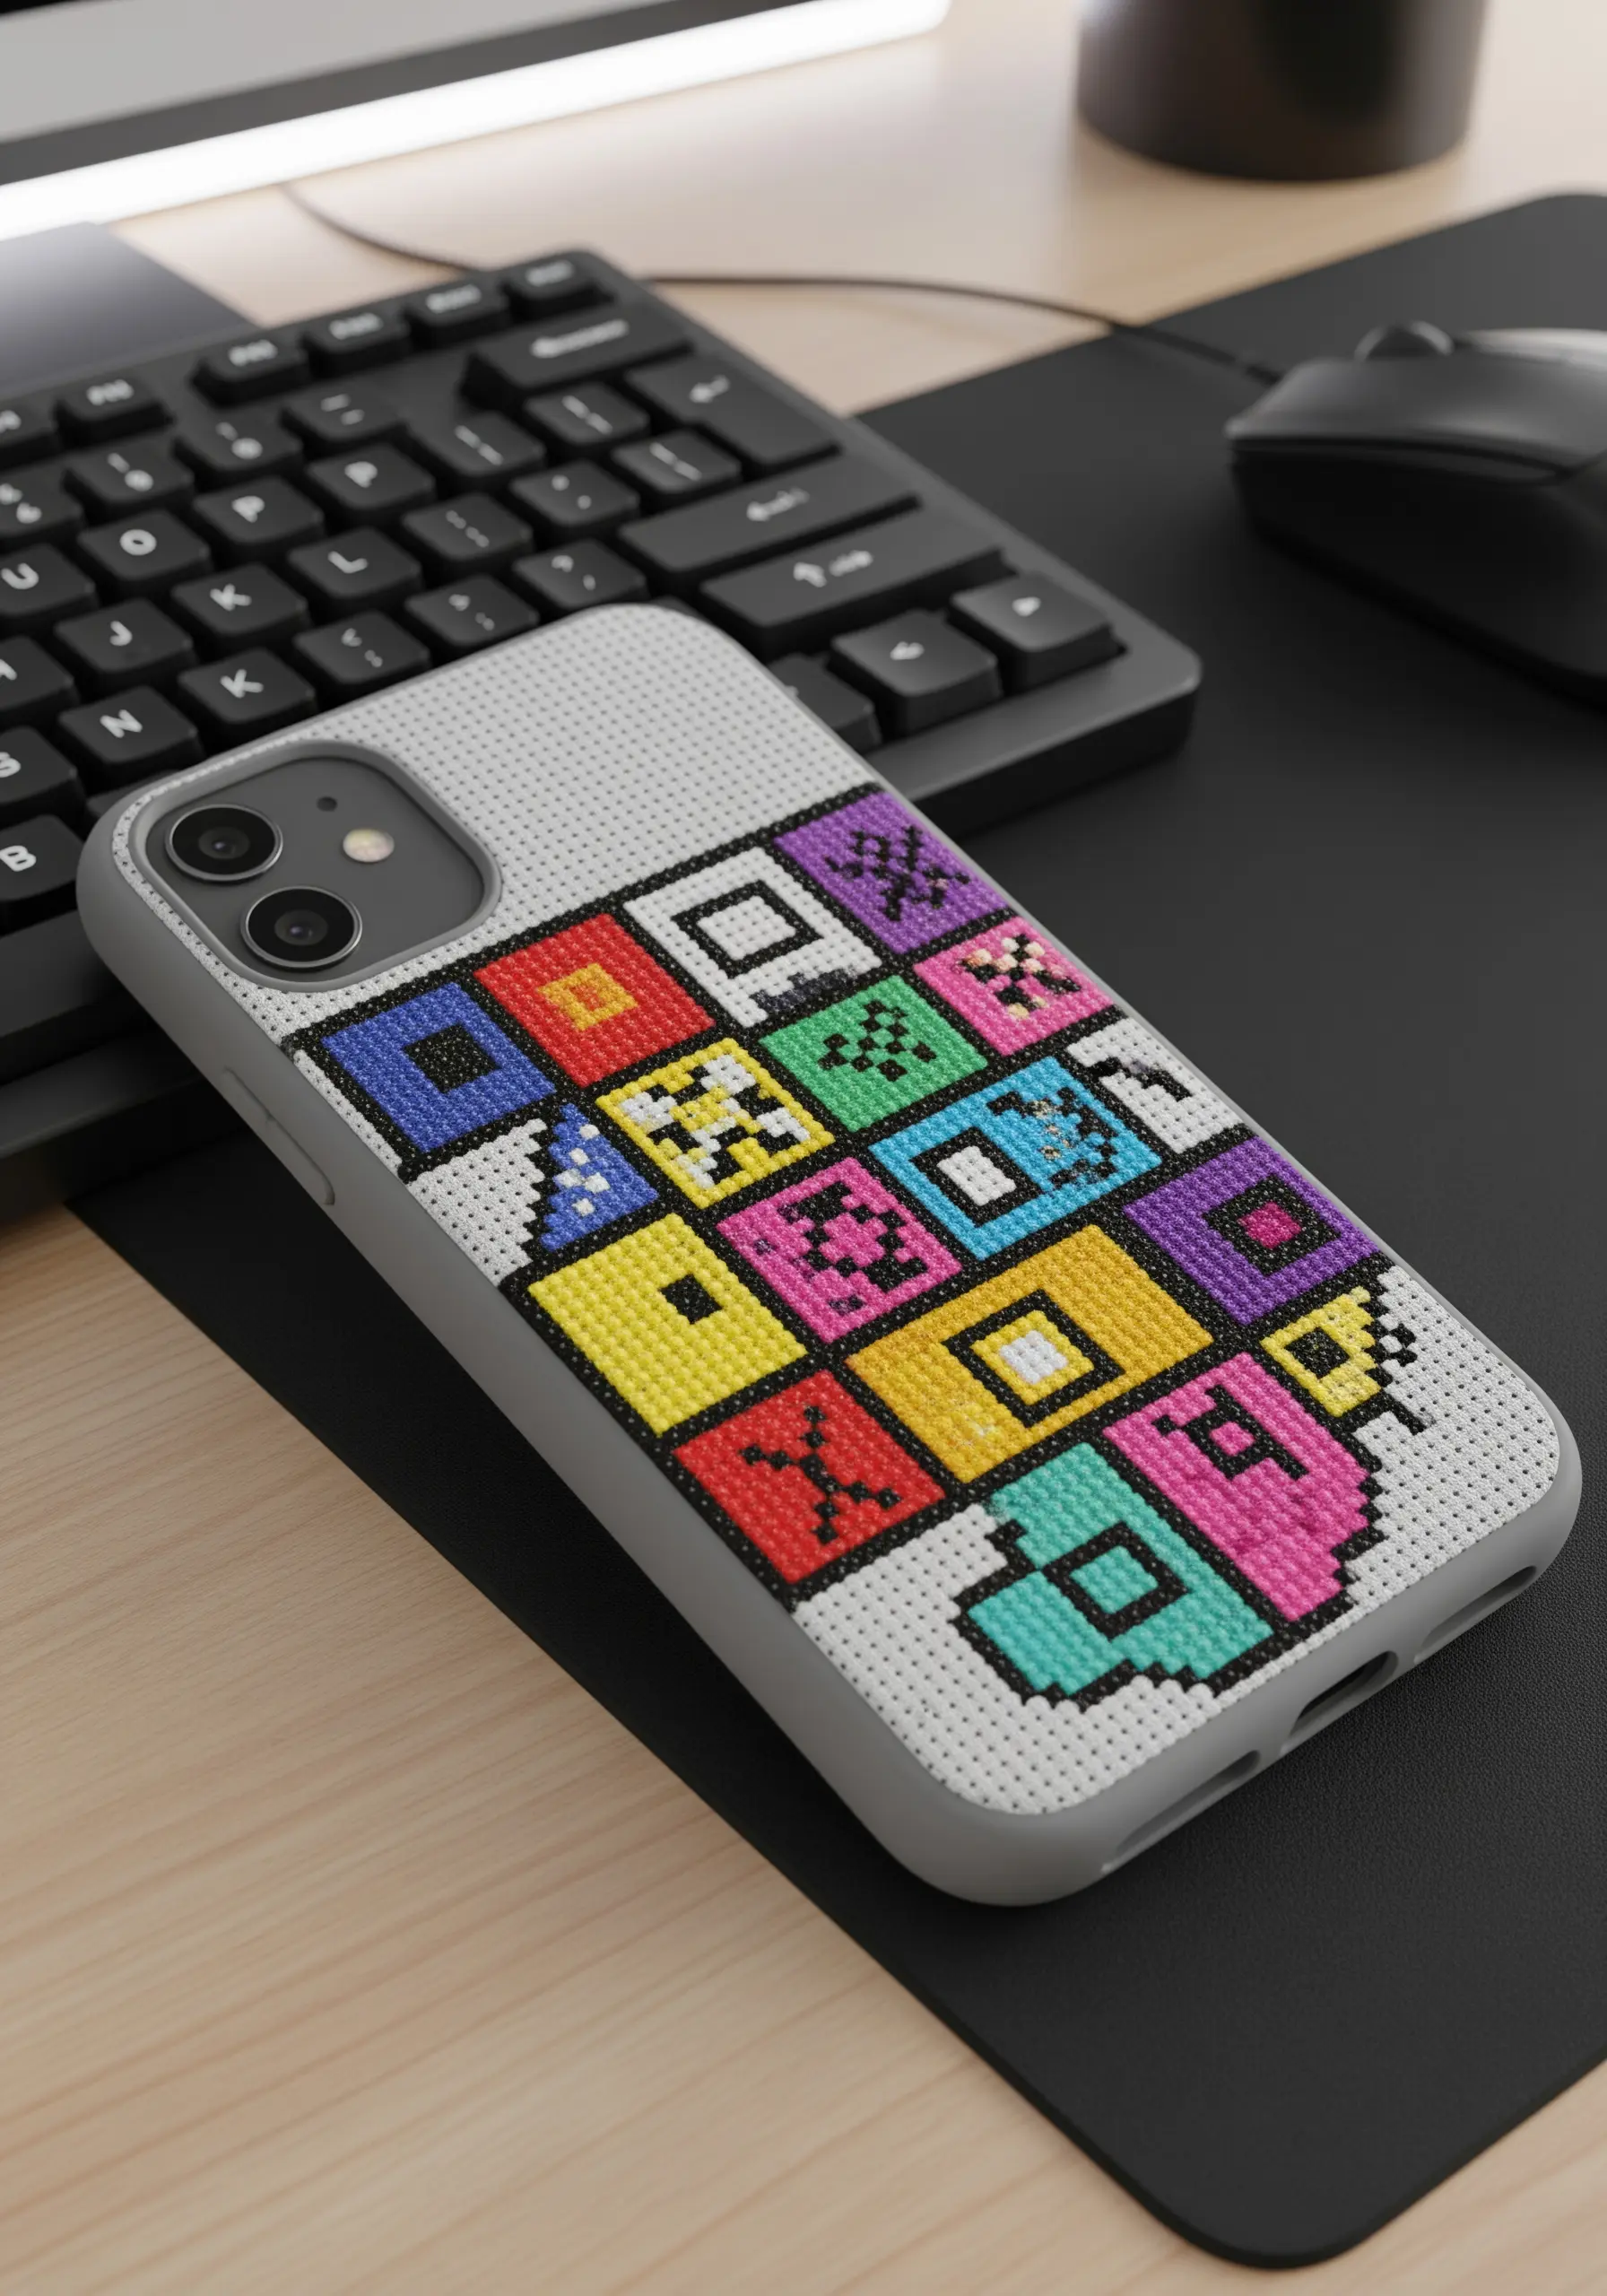
Take your embroidery off the fabric and onto your everyday accessories with a specialized cross-stitch phone case.
These cases have a perforated surface that acts just like Aida cloth, allowing you to create any pixel-based design with standard floss.
It’s a modern and unexpected way to display your craft and make your tech uniquely yours.
You can adapt any small cross-stitch pattern or create your own abstract design.
27. Add Stitched Highlights to a Photograph
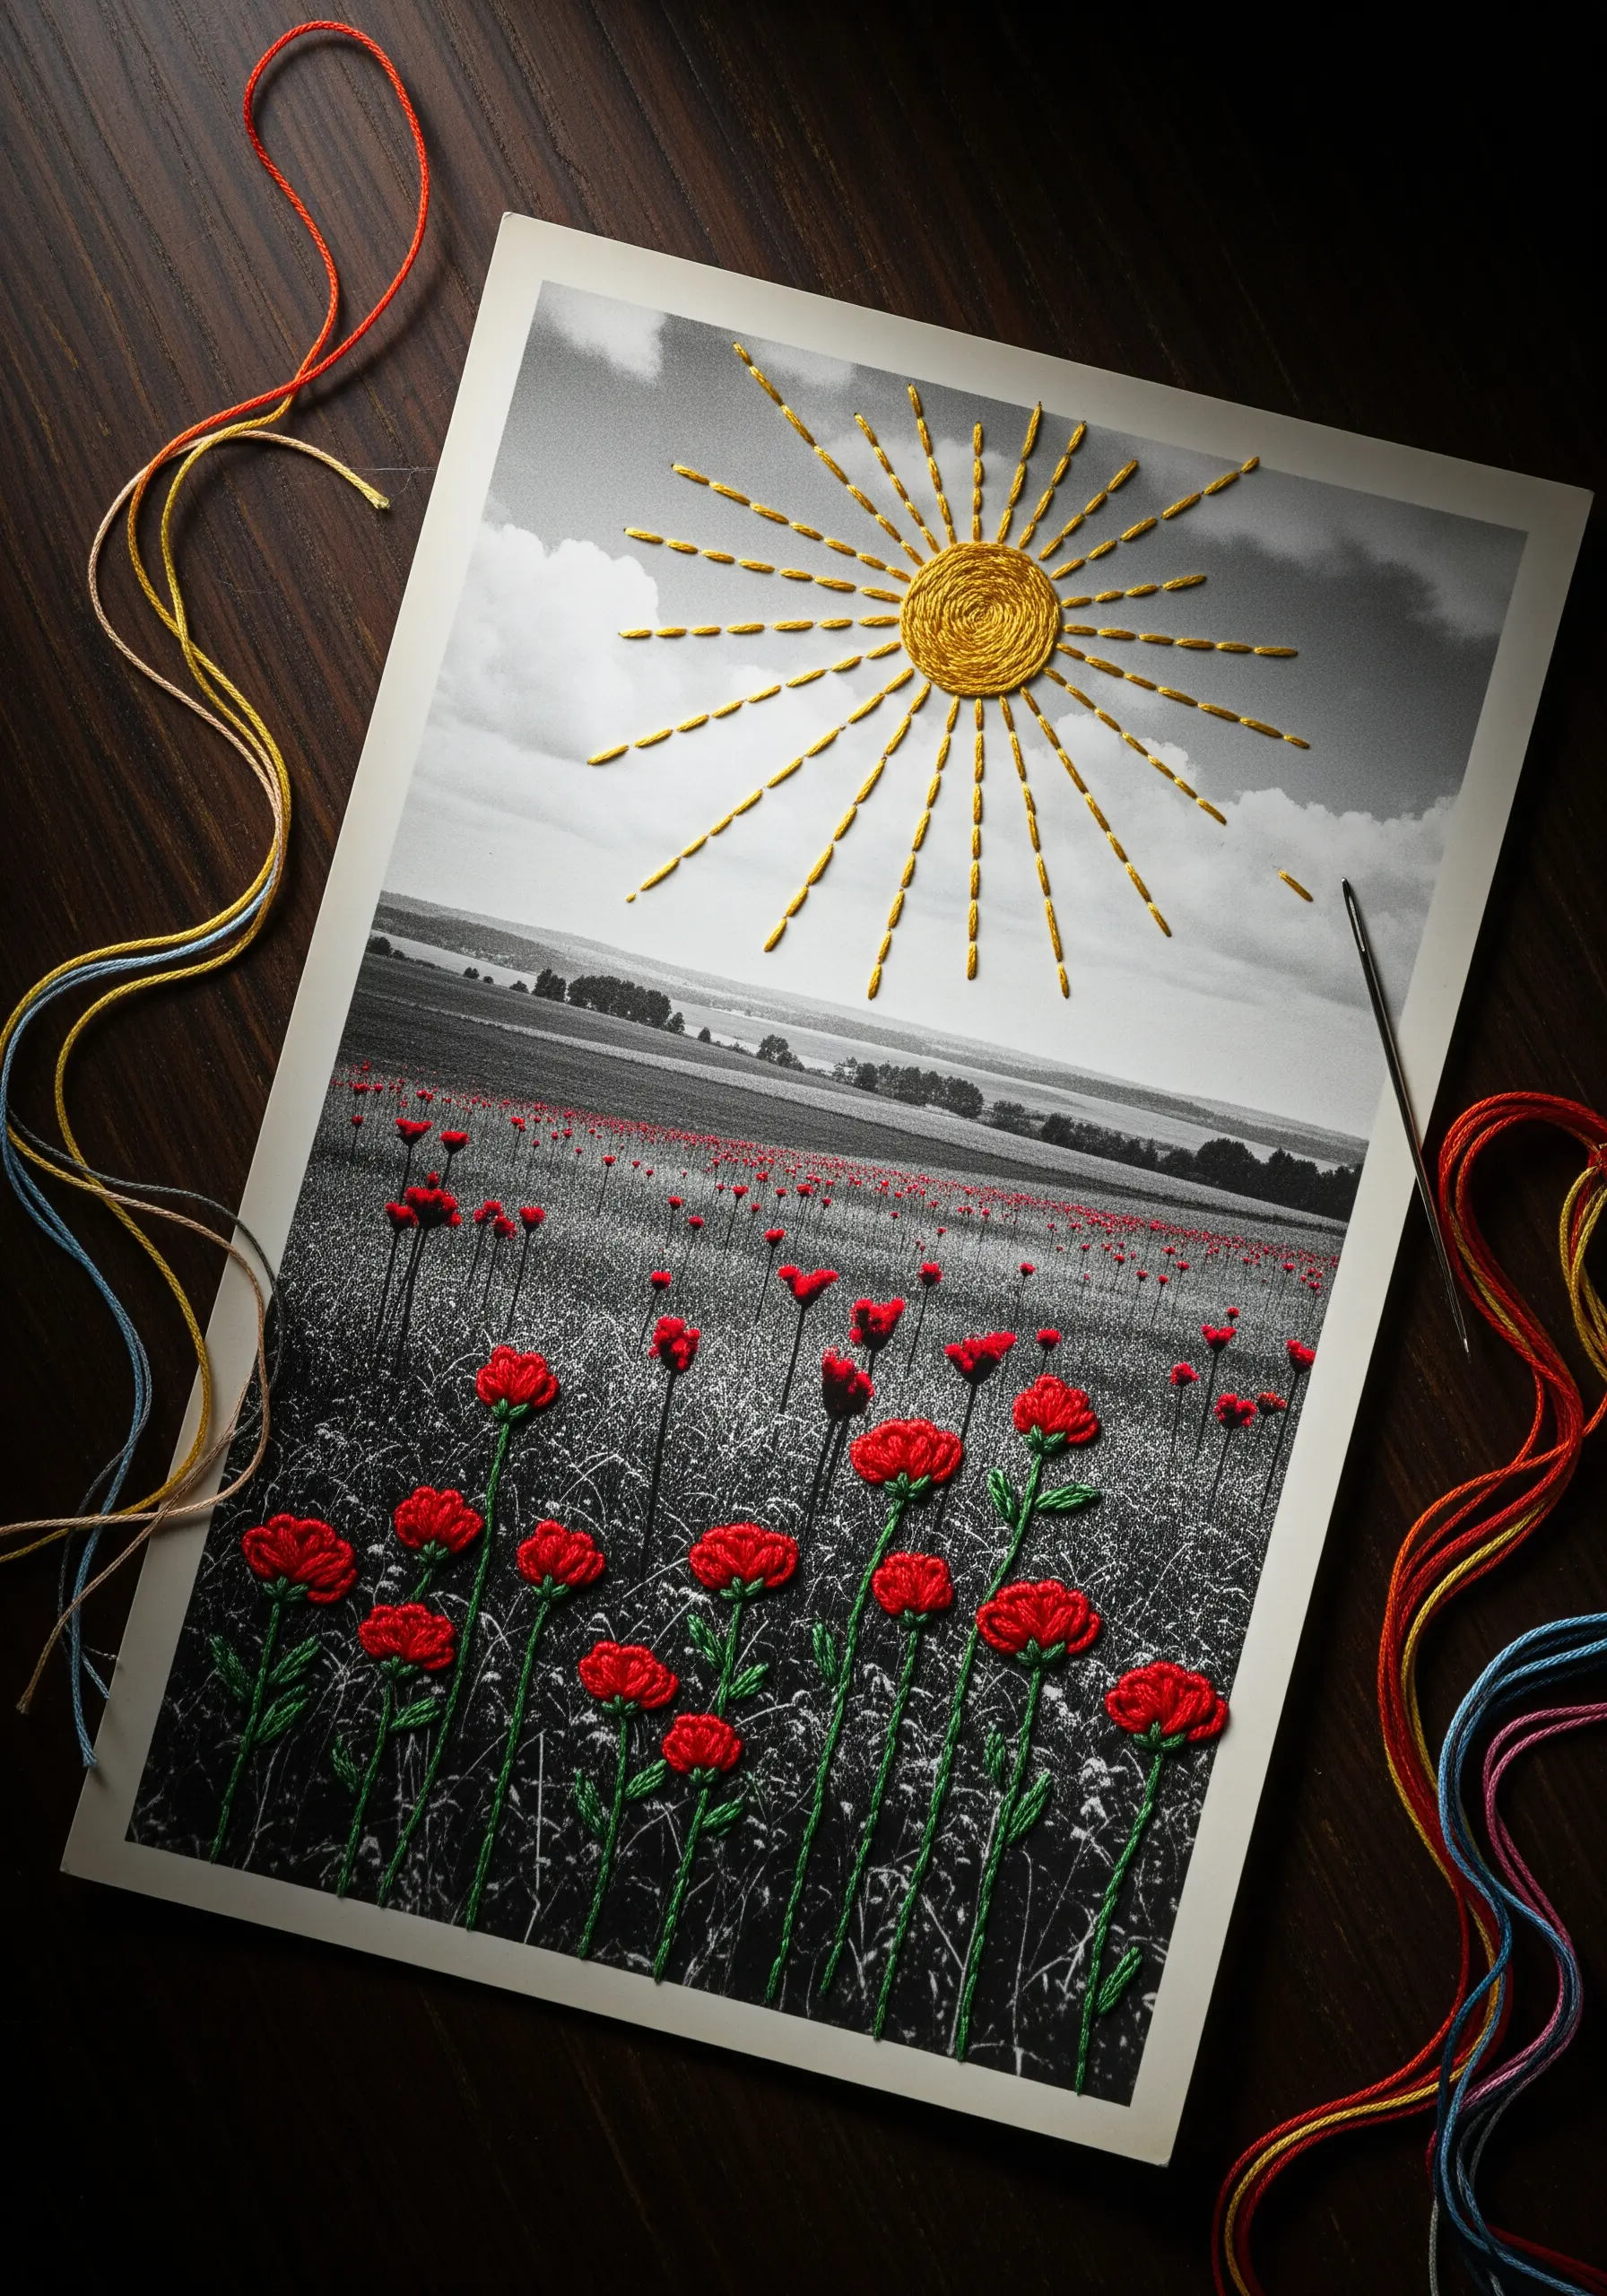
Create a unique piece of mixed-media art by embroidering directly onto a printed photograph.
Choose a photo with strong compositional elements, especially a black and white image, and print it on matte paper or printable fabric.
Use a needle to carefully pierce the paper and add selective color with embroidery floss. Highlighting a sun or flowers with vibrant thread creates a stunning focal point and a beautiful creative collage.
28. Create a Fluffy Texture with Turkey Work
Craft a lush, high-pile surface using the turkey work stitch, a technique that creates loops on the front of your fabric.
You can leave the loops intact for a looped, rug-like texture or snip them open and trim them for a soft, fluffy finish similar to a pom-pom.
This stitch is perfect for creating textured patches, adding a fuzzy element to animal embroideries, or making abstract, tactile art.
29. Master the Classic Padded Monogram
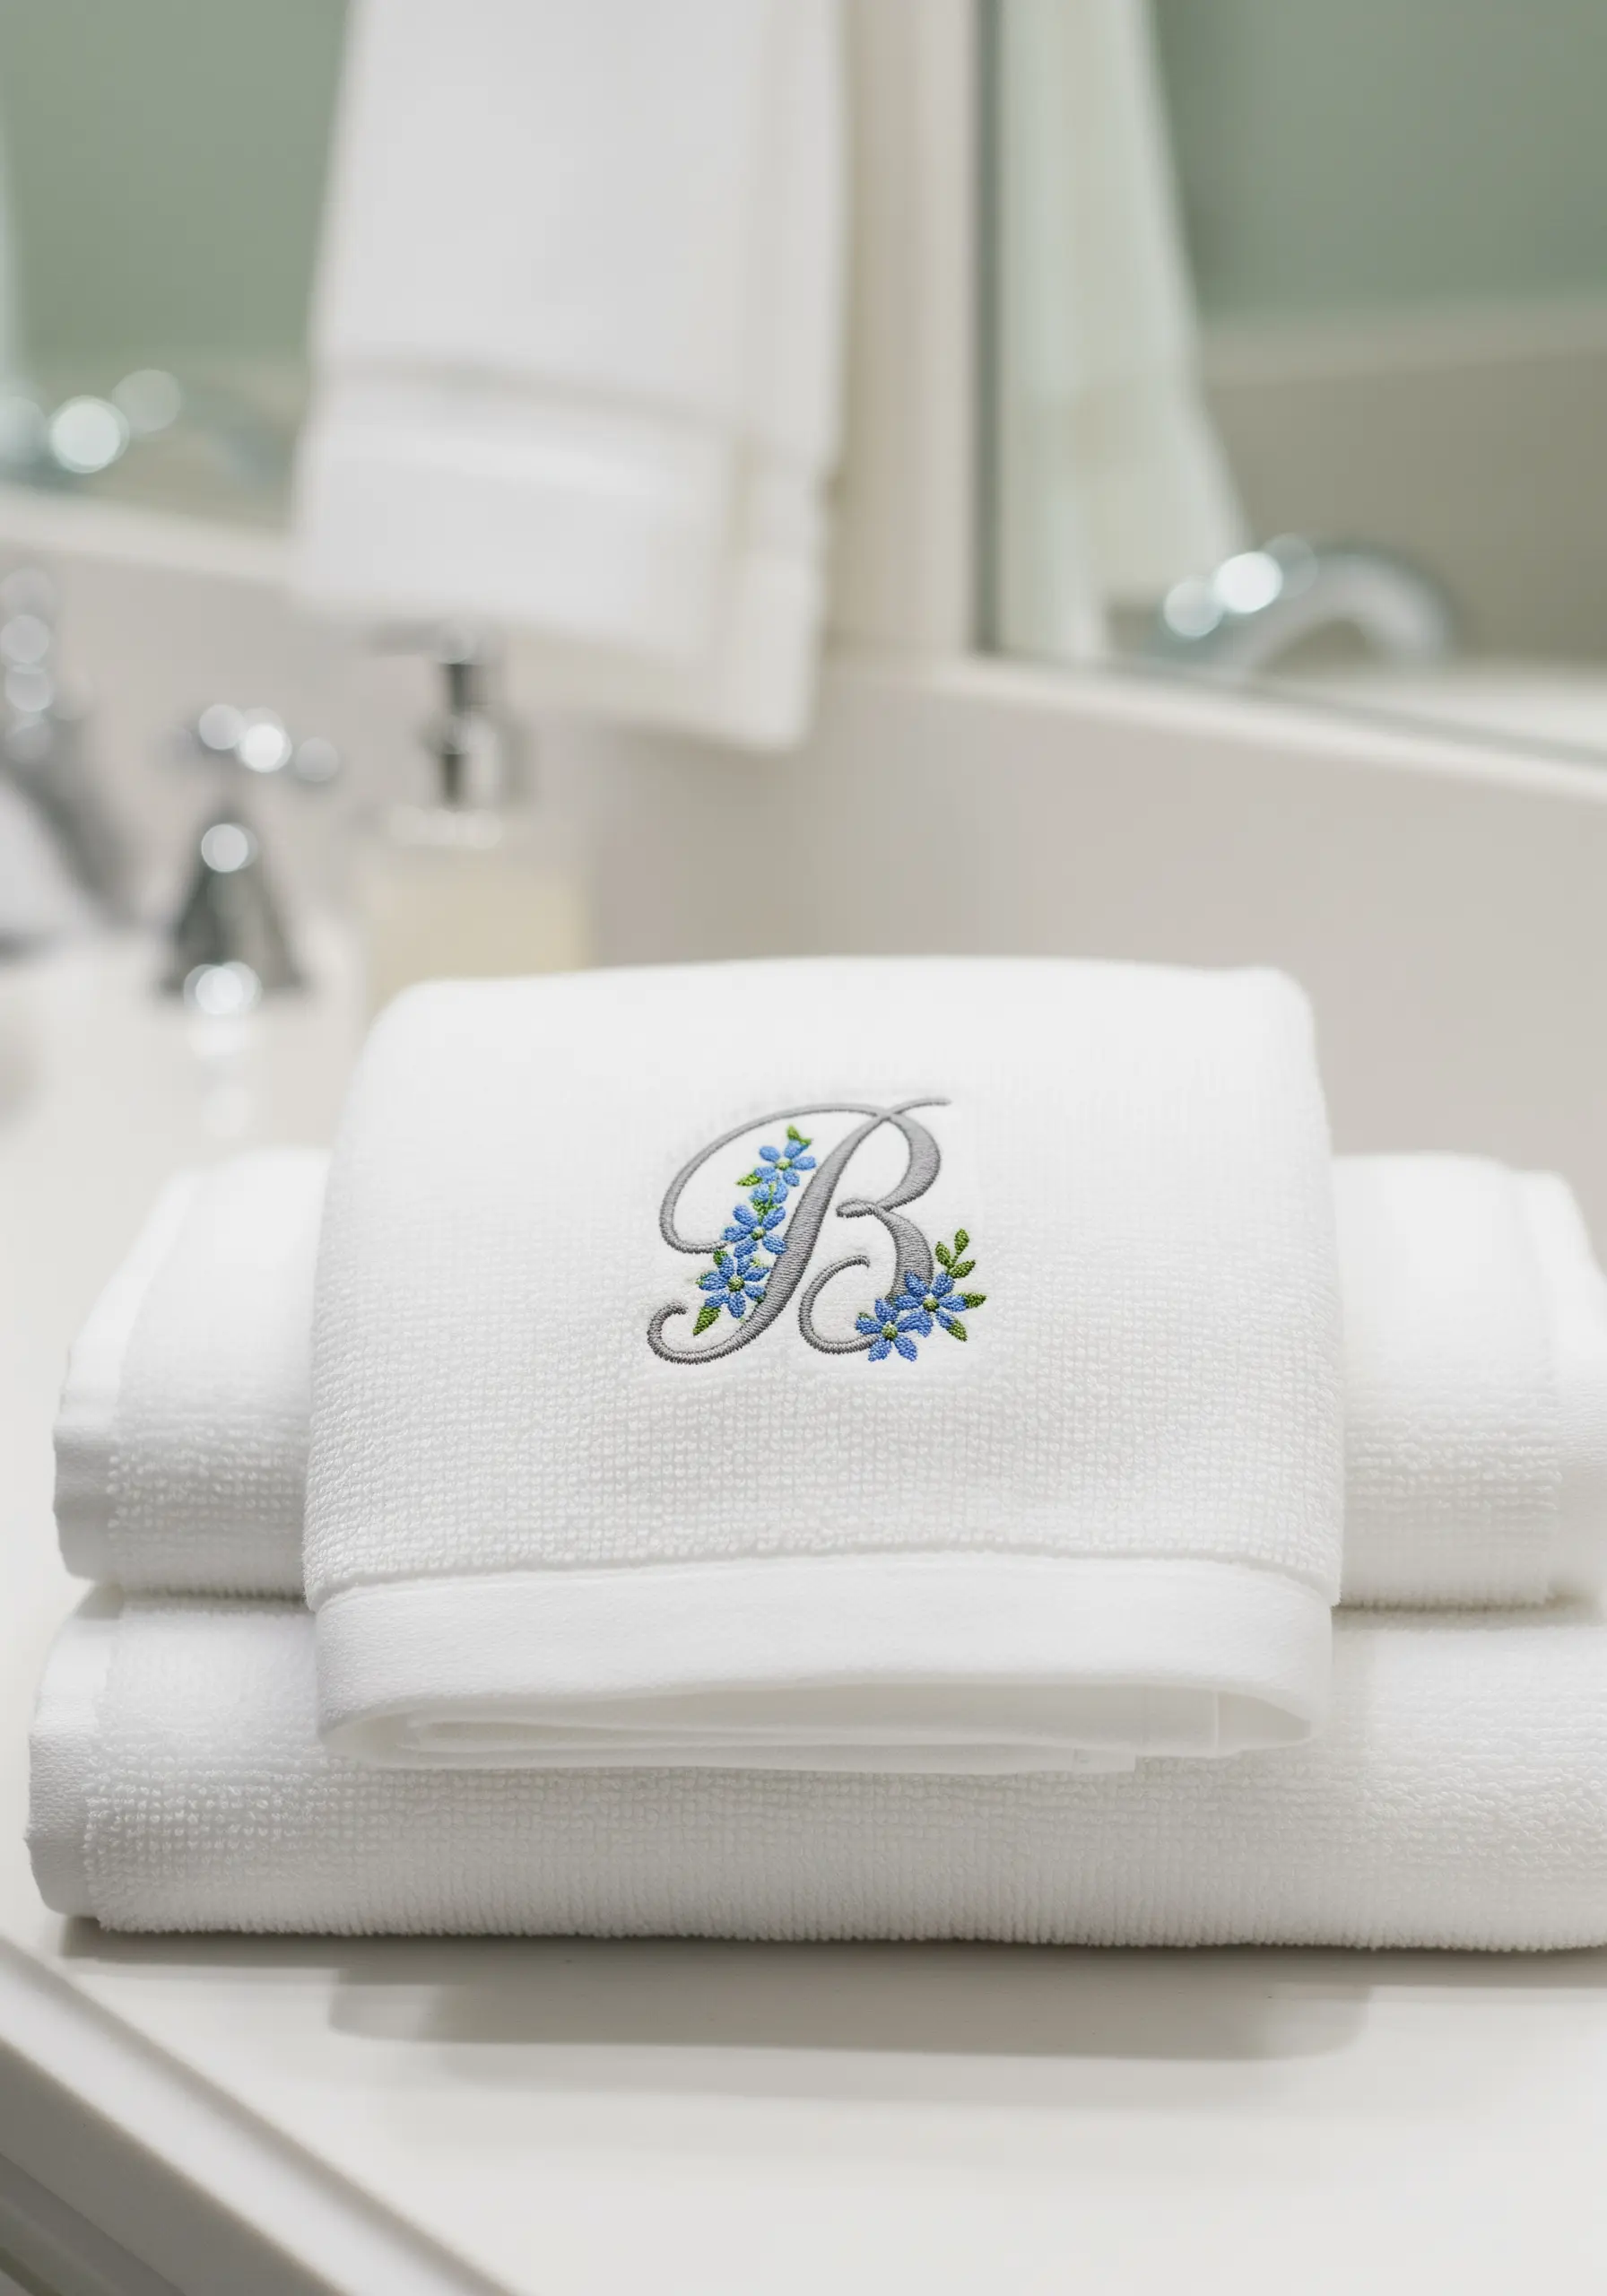
Give a monogram a luxurious, raised appearance by using a padded satin stitch.
First, create a foundation for your letter using small running stitches or a split stitch to fill the shape.
Then, work your final satin stitches over this padding. The extra height makes the monogram look exceptionally polished and professional, especially on plush fabrics like terrycloth towels.
Use a water-soluble stabilizer on top to keep your stitches from sinking into the fabric’s pile.
30. Stitch a Botanical Chart for Functional Art
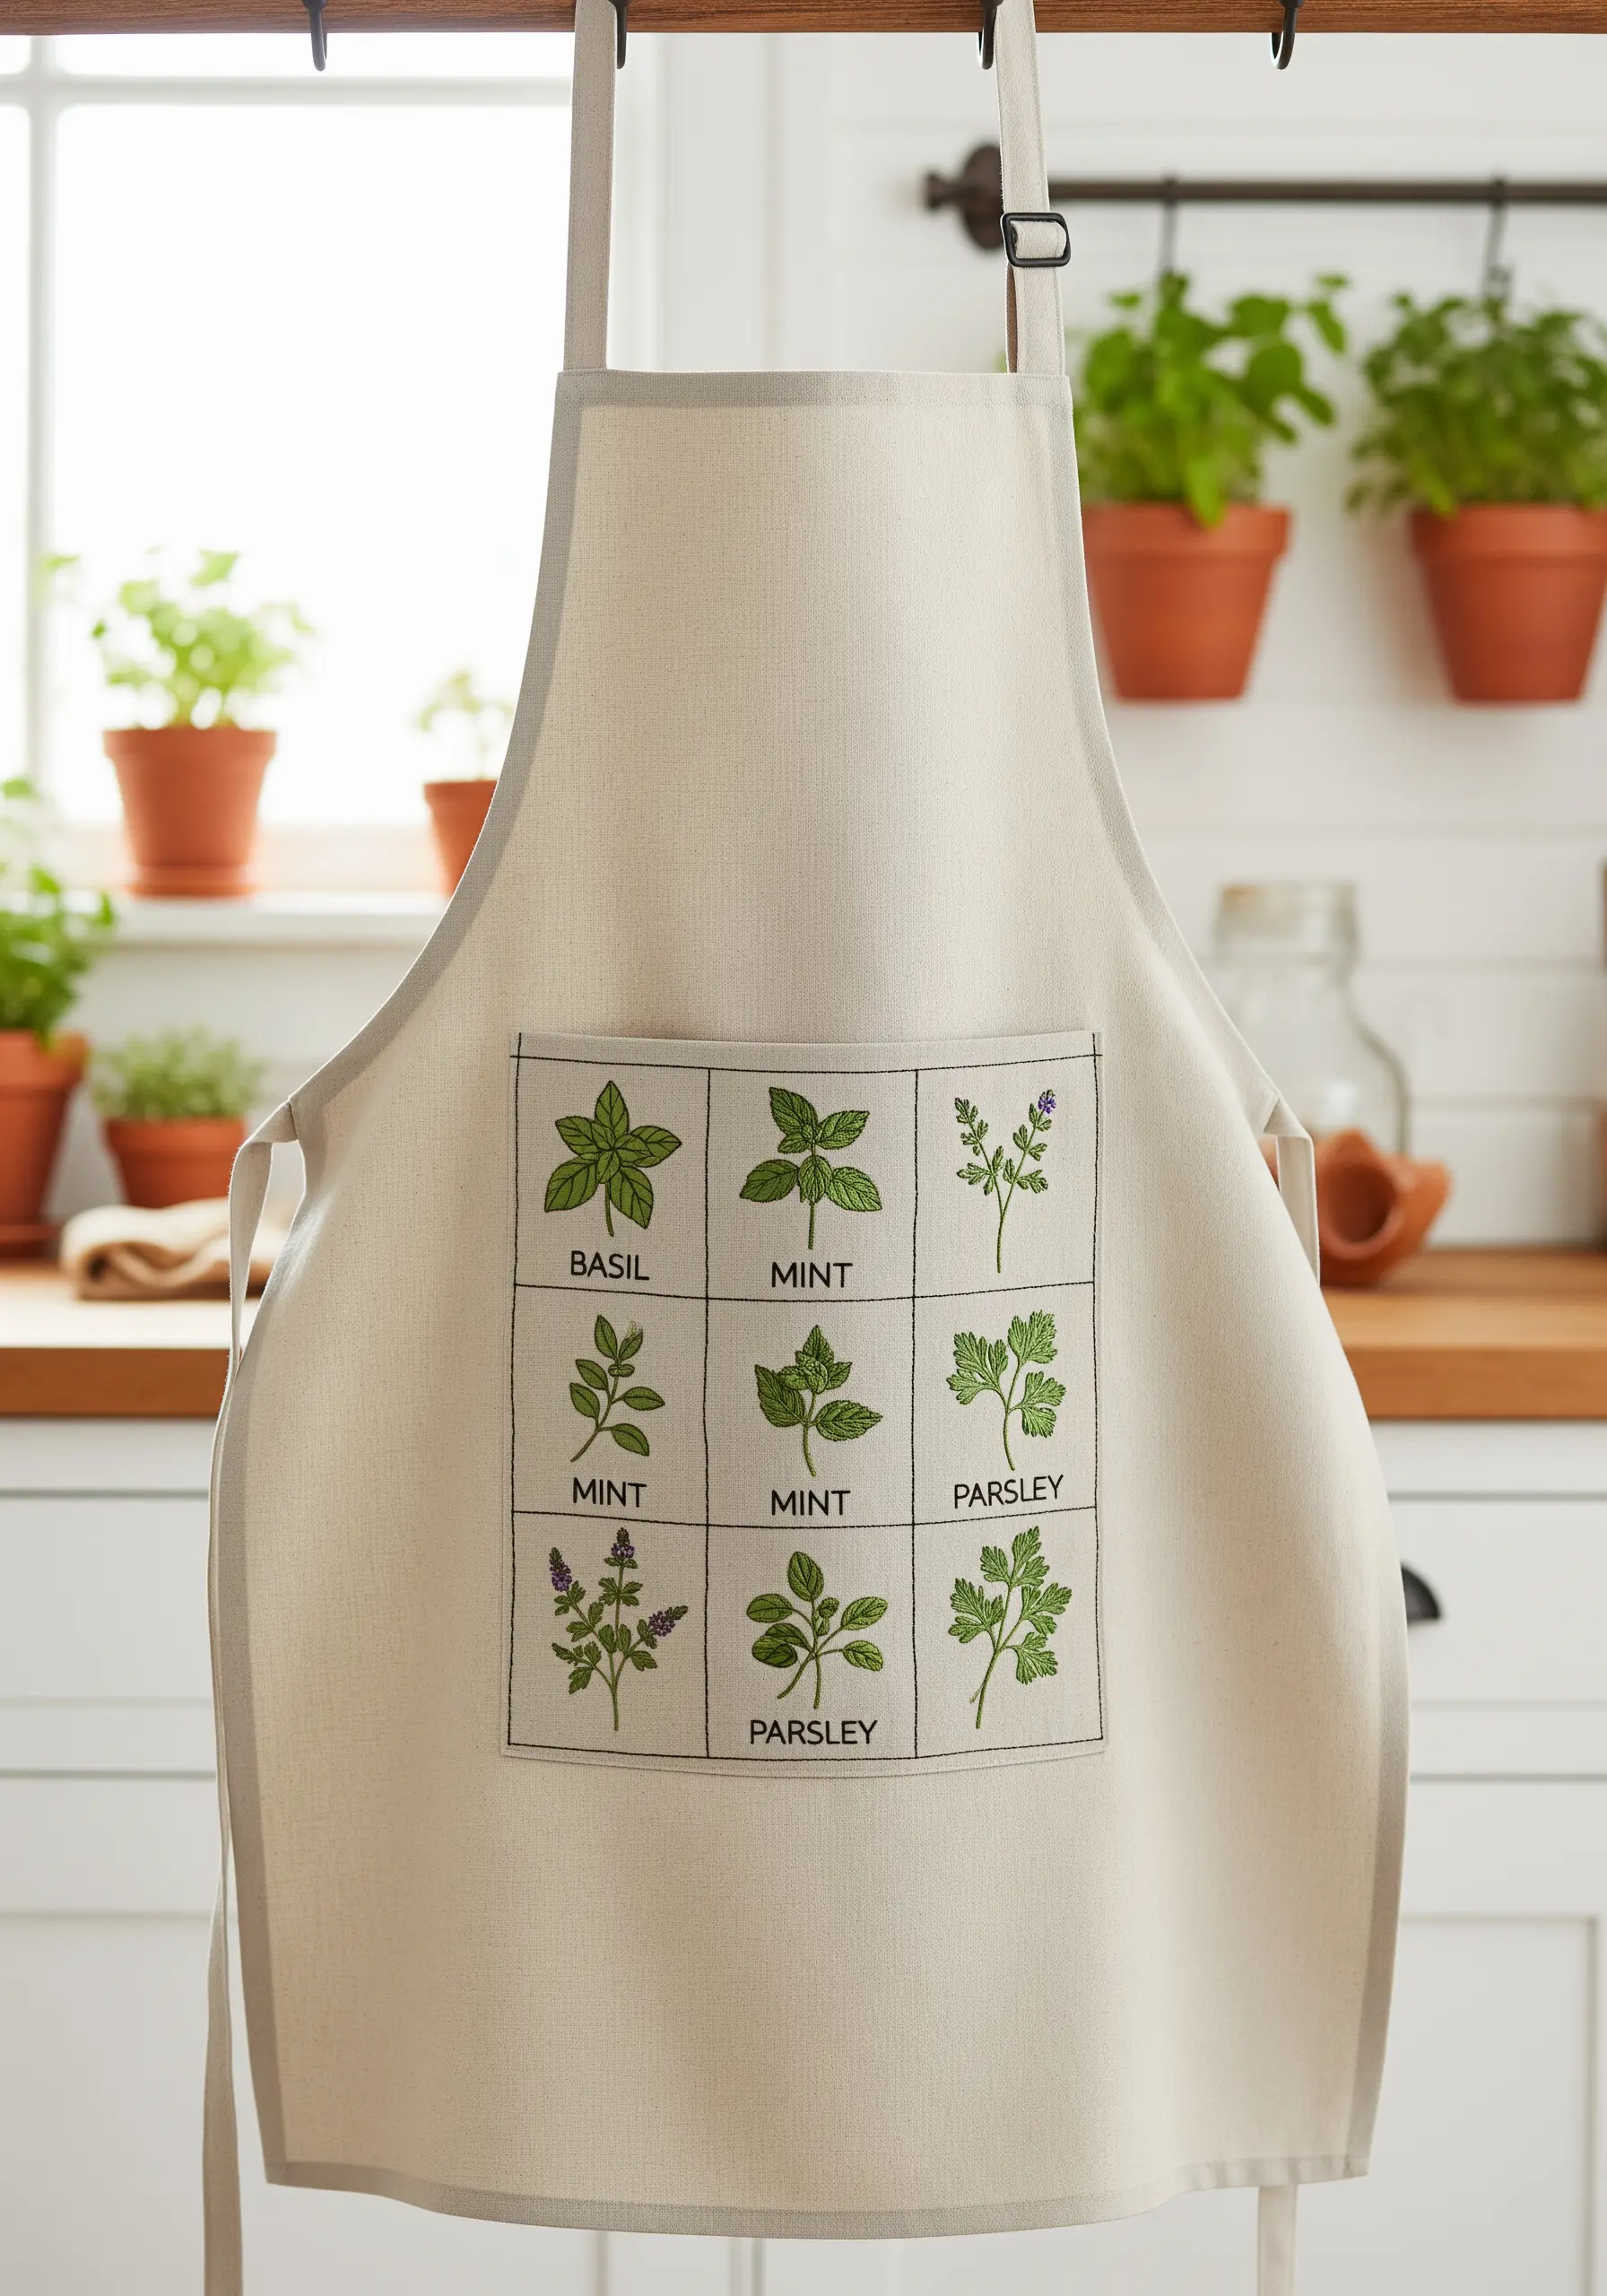
Combine your love for embroidery and nature by creating a functional, grid-style design on an apron or kitchen towel.
Use simple backstitch for the grid lines and lettering, keeping them clean and legible.
Fill in each plant with basic stitches like satin stitch and stem stitch. The organized layout of these hand-embroidery leaf patterns turns a practical item into a charming piece of kitchen décor.
31. Illuminate Your Stitches on a Lampshade

Transform a plain lampshade into a statement piece with an elegant, geometric pattern.
Use a high-sheen gold or metallic thread to stitch a repeating Art Deco fan design.
When the lamp is turned on, the light will filter through the thread, illuminating the pattern and creating a warm, ambient glow.
You can stitch on a fabric panel before it’s assembled or carefully work on an existing shade for a stunning home décor upgrade.
32. Customize Canvas Shoes with Tiny Motifs
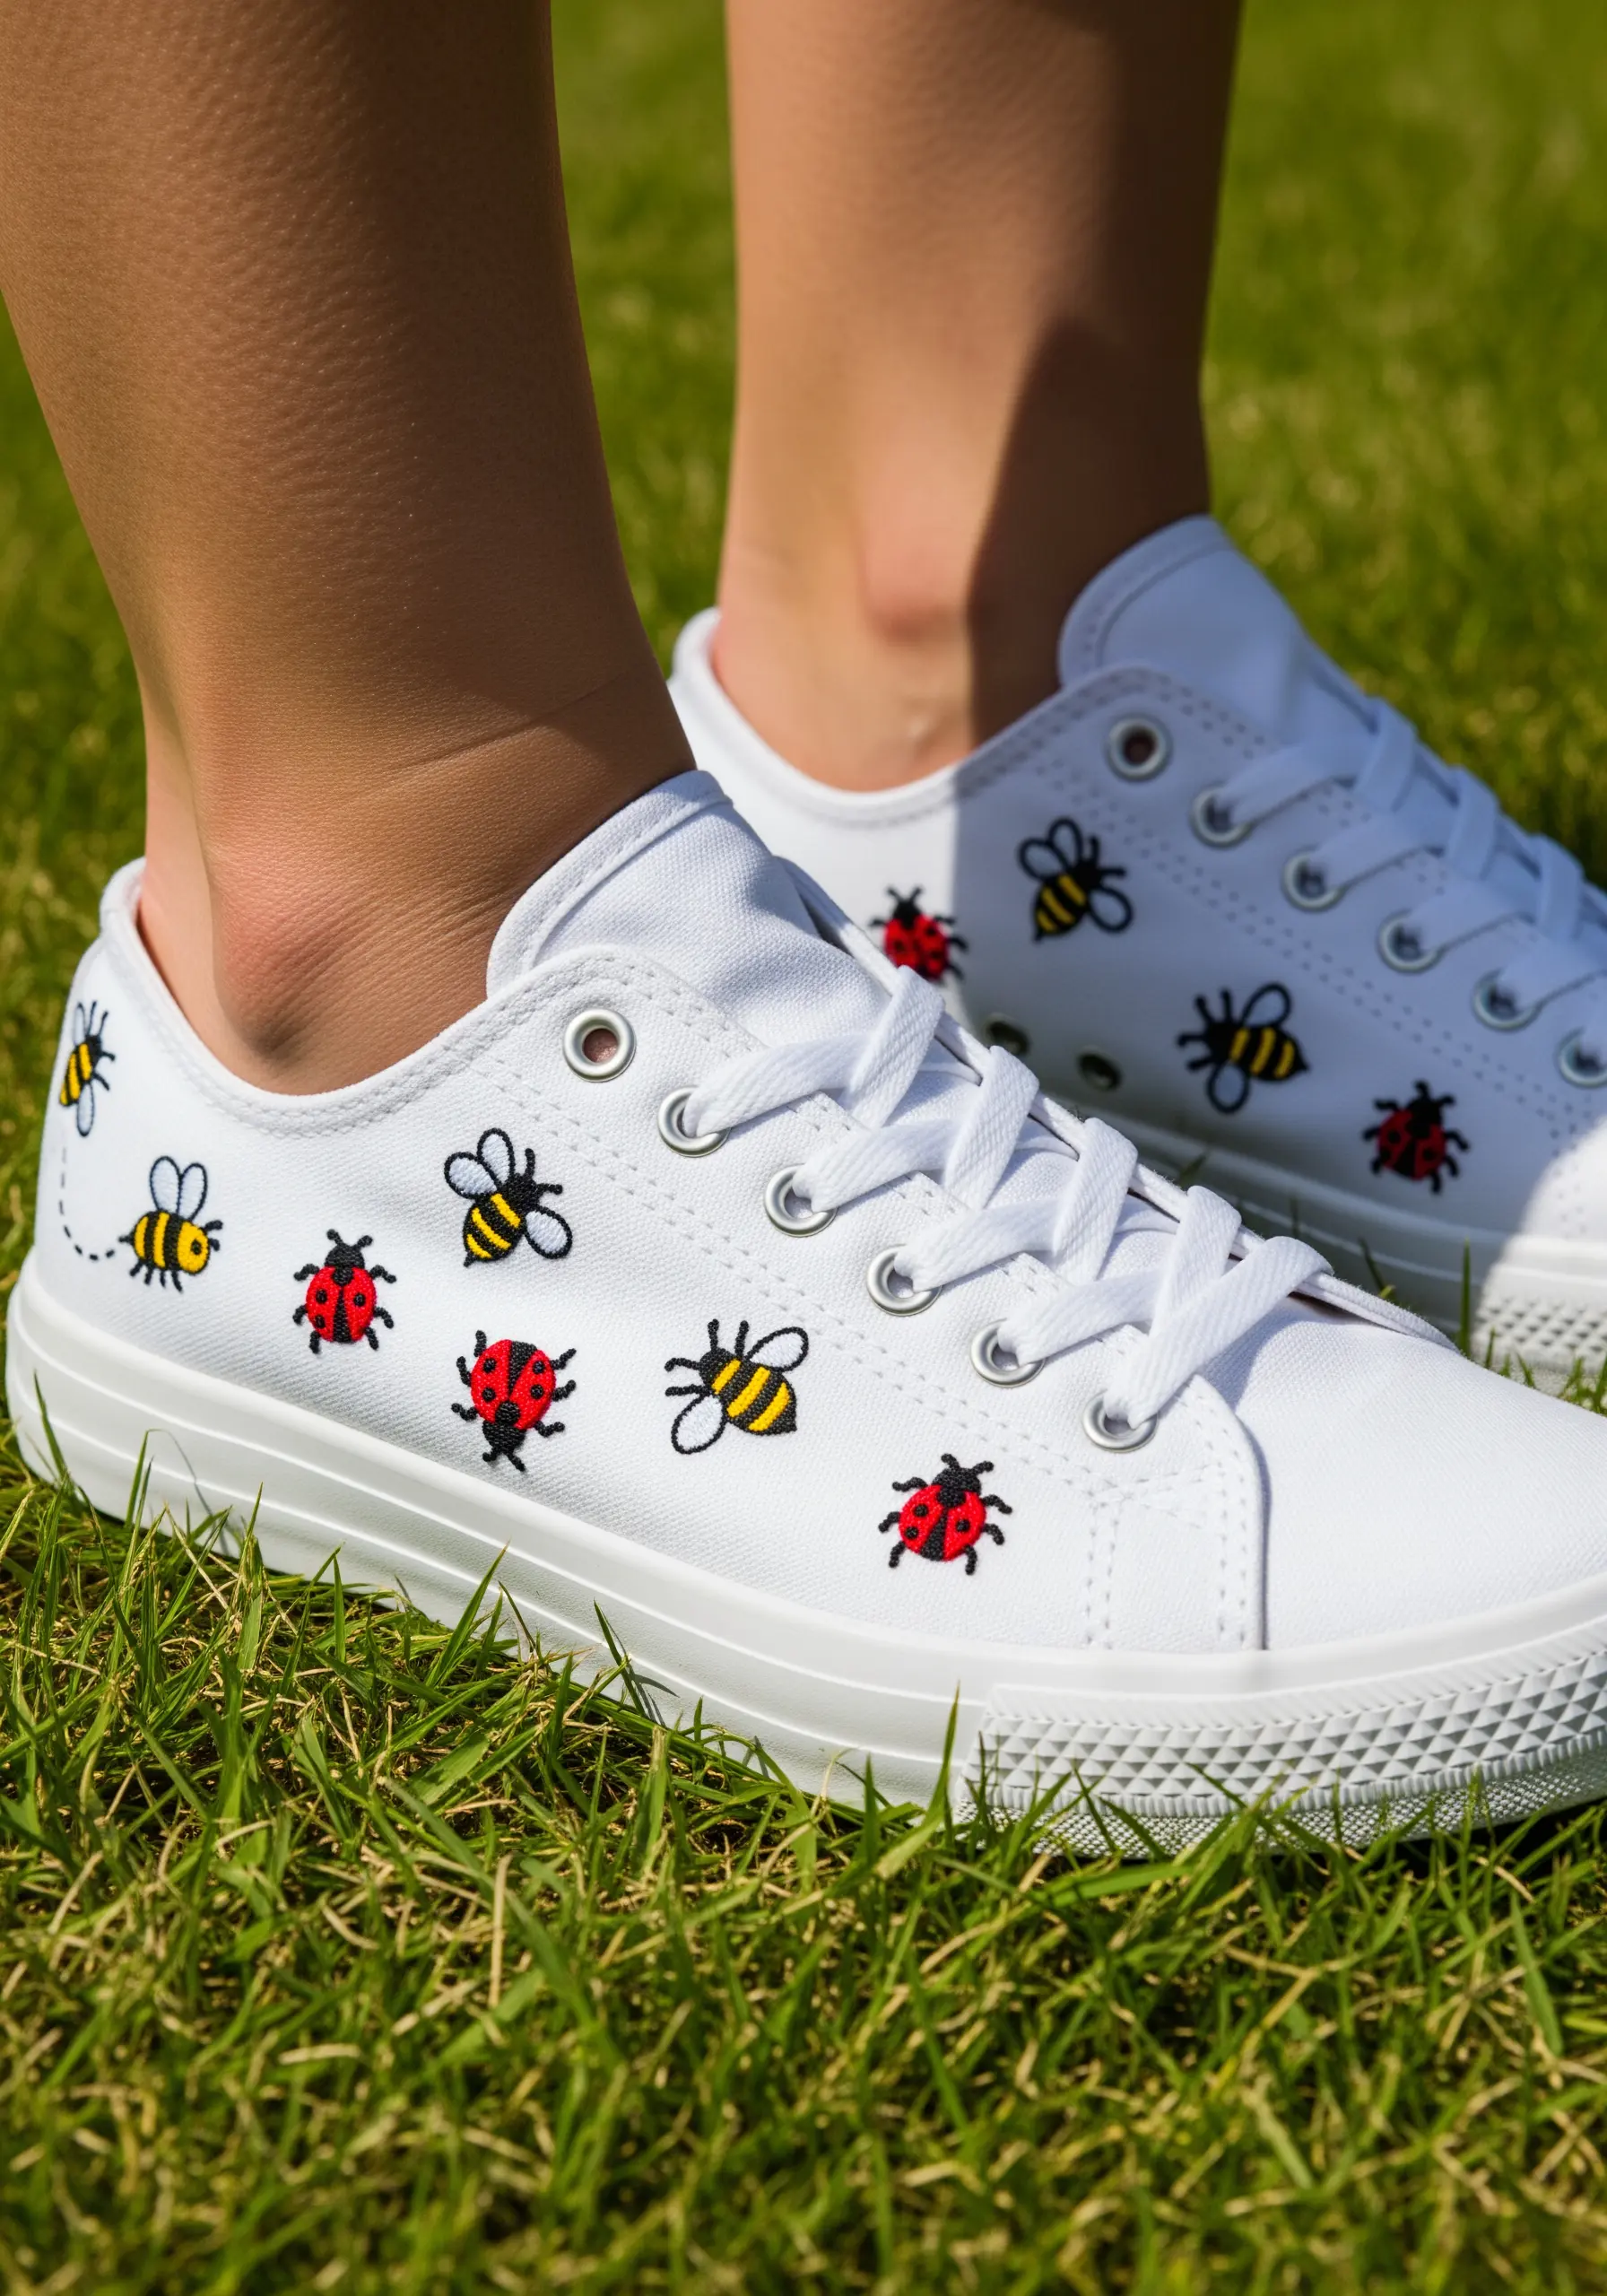
Give plain canvas sneakers a playful, personalized touch with a scattering of tiny embroidered motifs.
Use just two or three strands of floss to keep the designs small and delicate. Simple shapes like bees and ladybugs are perfect for this.
A smaller, sharp needle will make it easier to pierce the tough canvas fabric. These tiny embroidery patterns are a quick way to make your accessories one-of-a-kind.
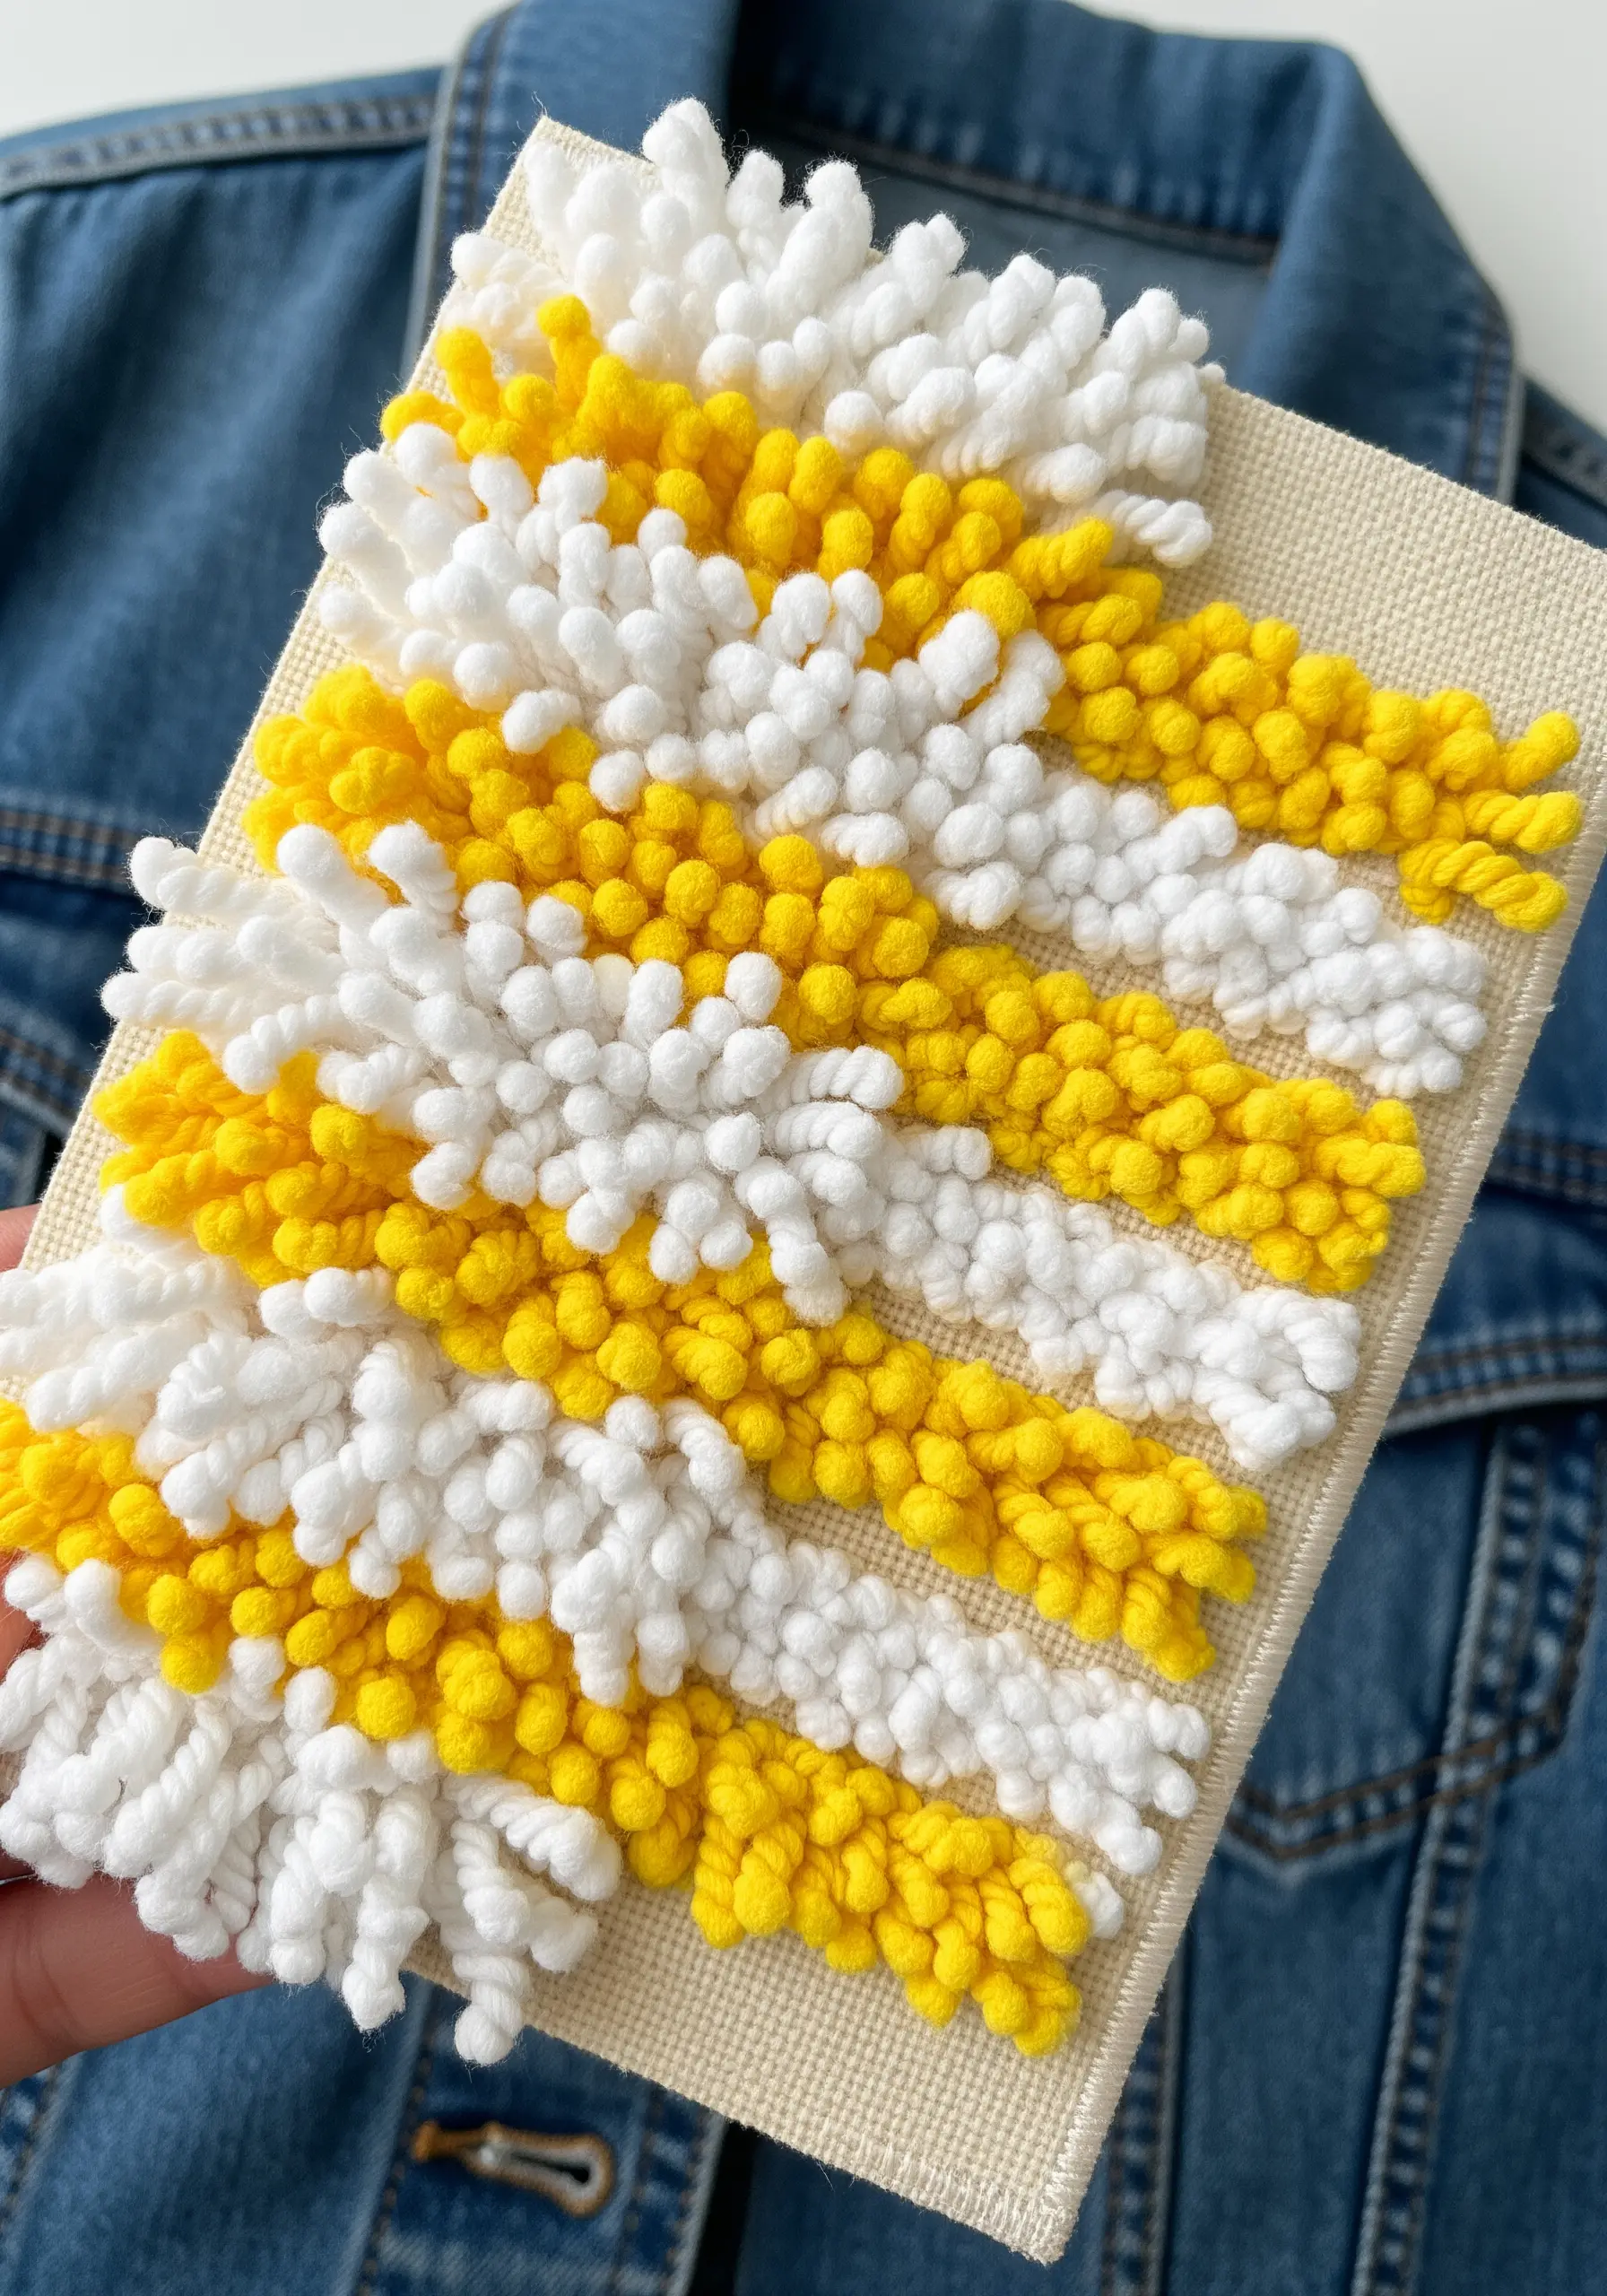
33. Sculpt an Abstract Field of French Knots
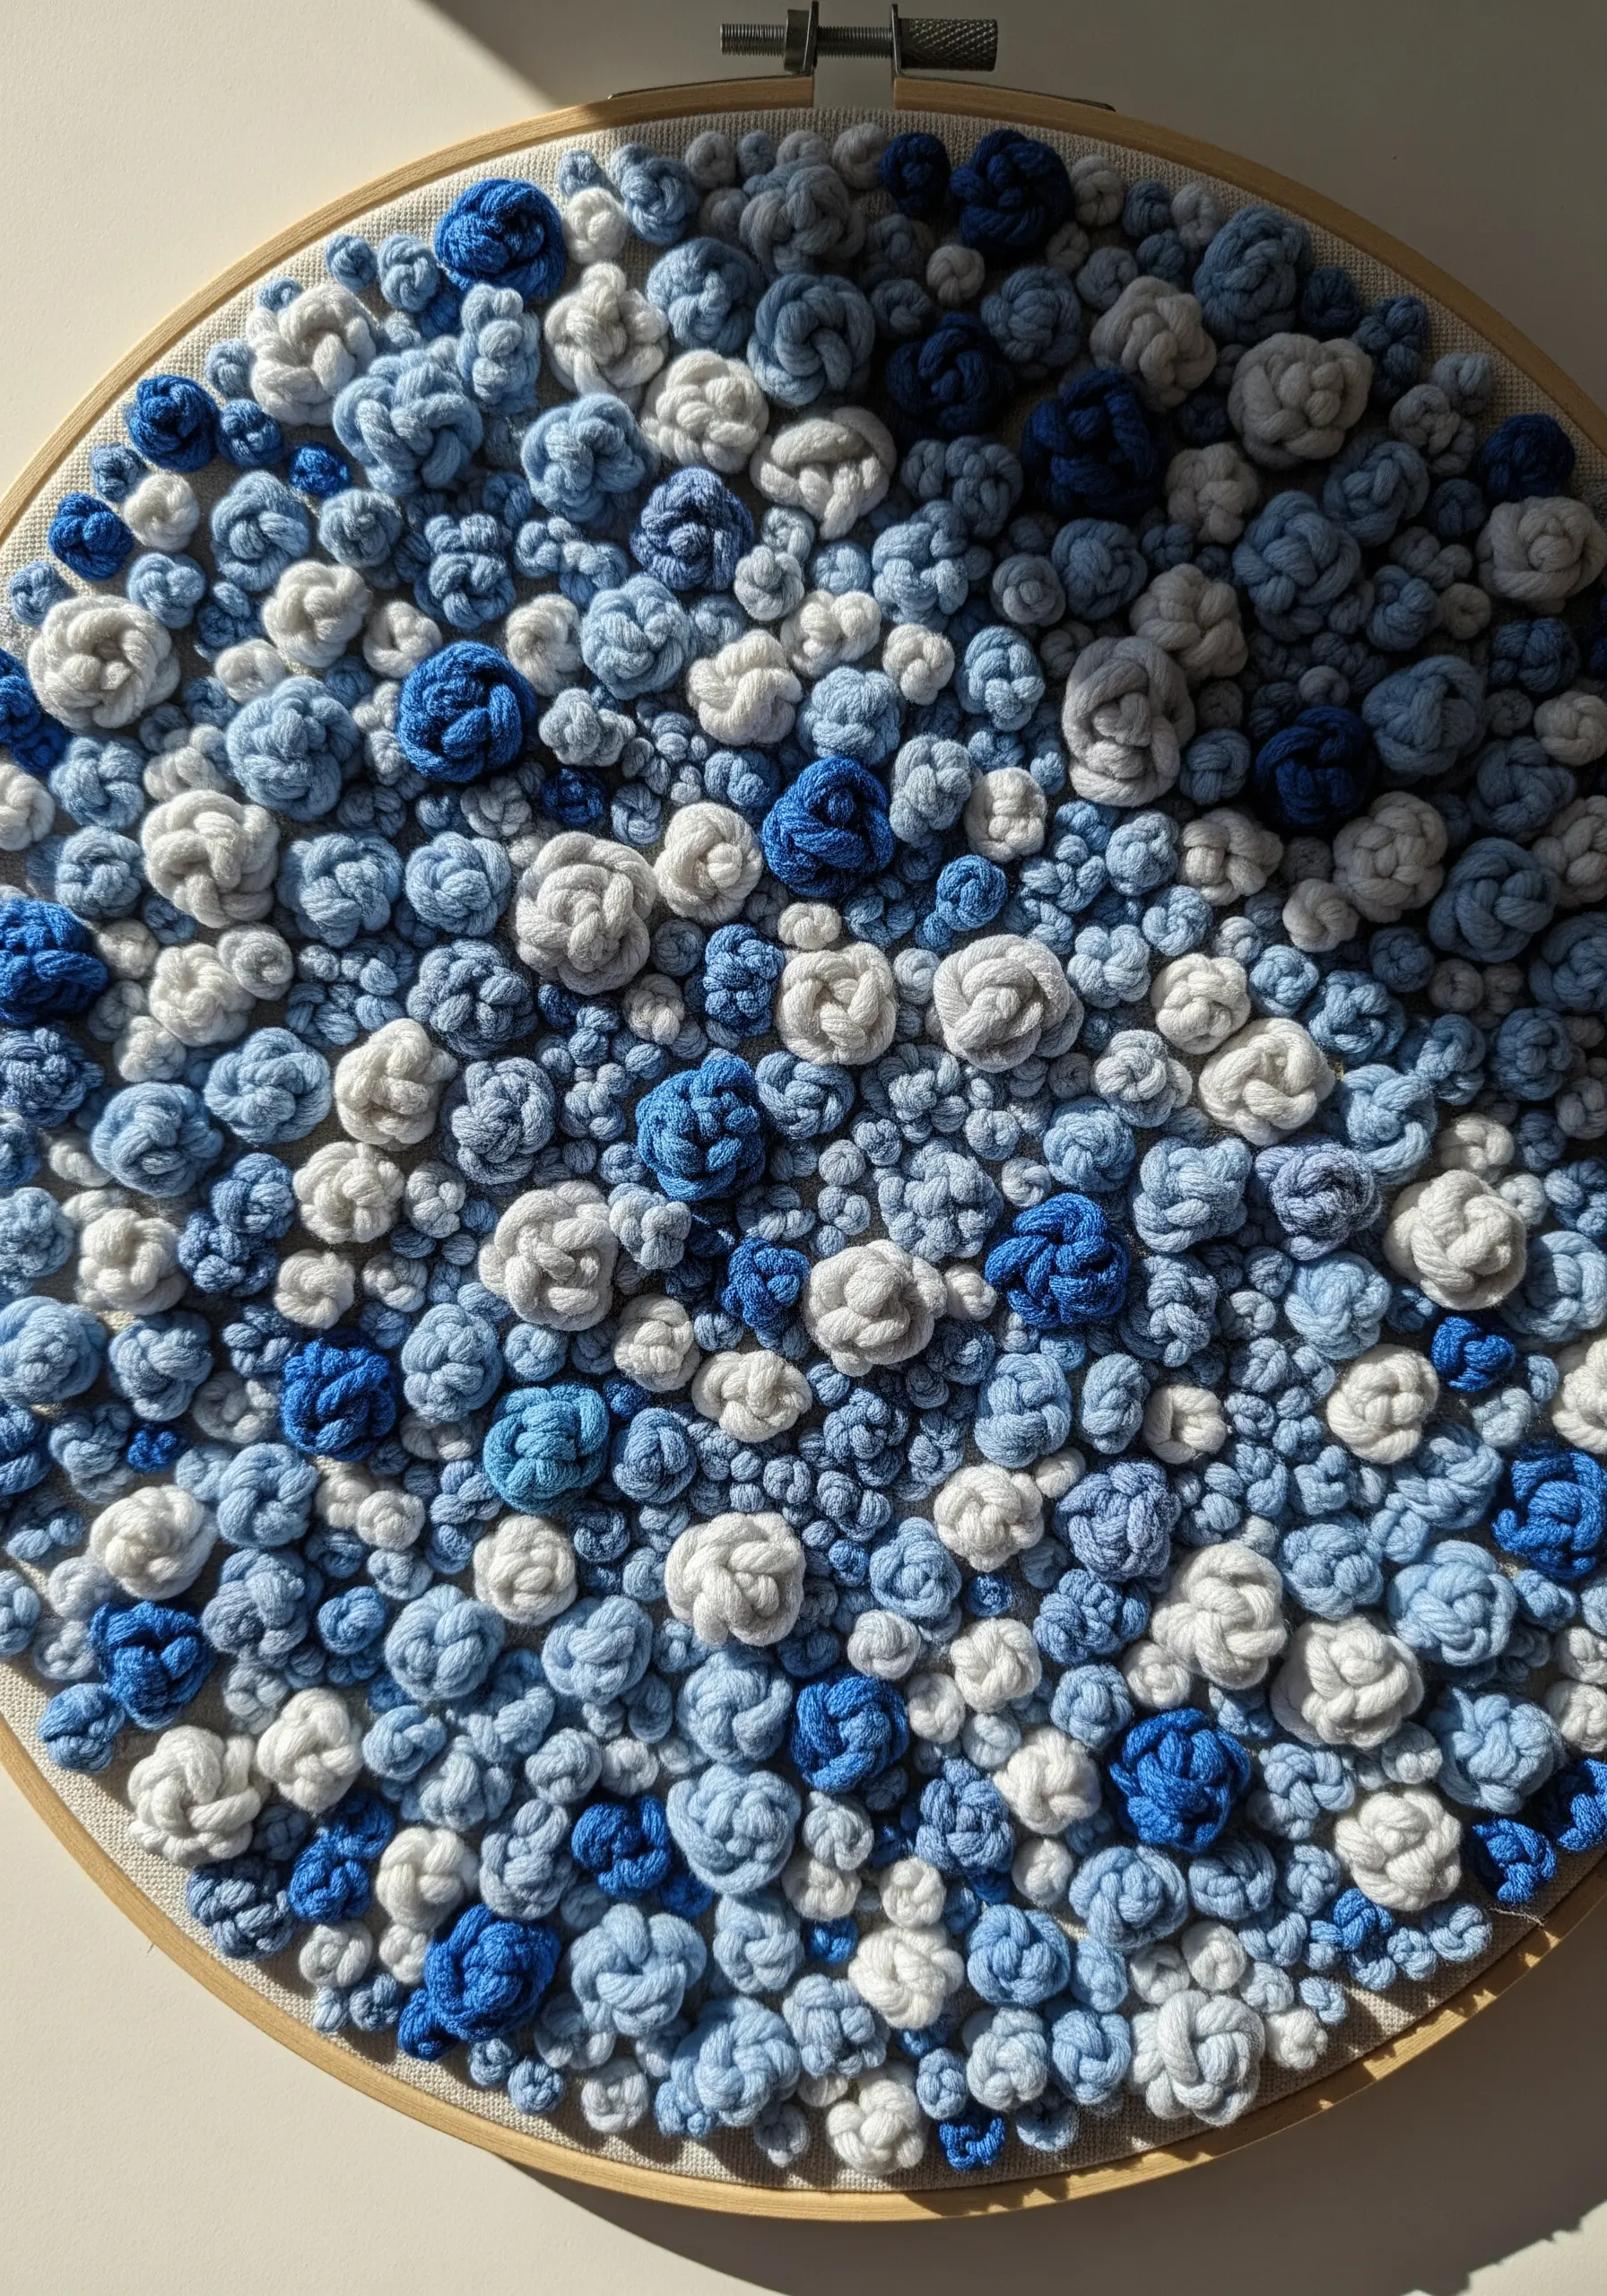
Explore texture and color by creating a dense, sculptural surface composed entirely of French knots.
Use various shades of a single color family and different weights of thread to create depth and variation.
Vary the number of times you wrap the thread around the needle to create knots of different sizes, mimicking a field of flowers or a coral reef.
This meditative technique results in a stunning, highly tactile piece of abstract texture-rich thread art.
34. Tell a Story with a Stitched Map
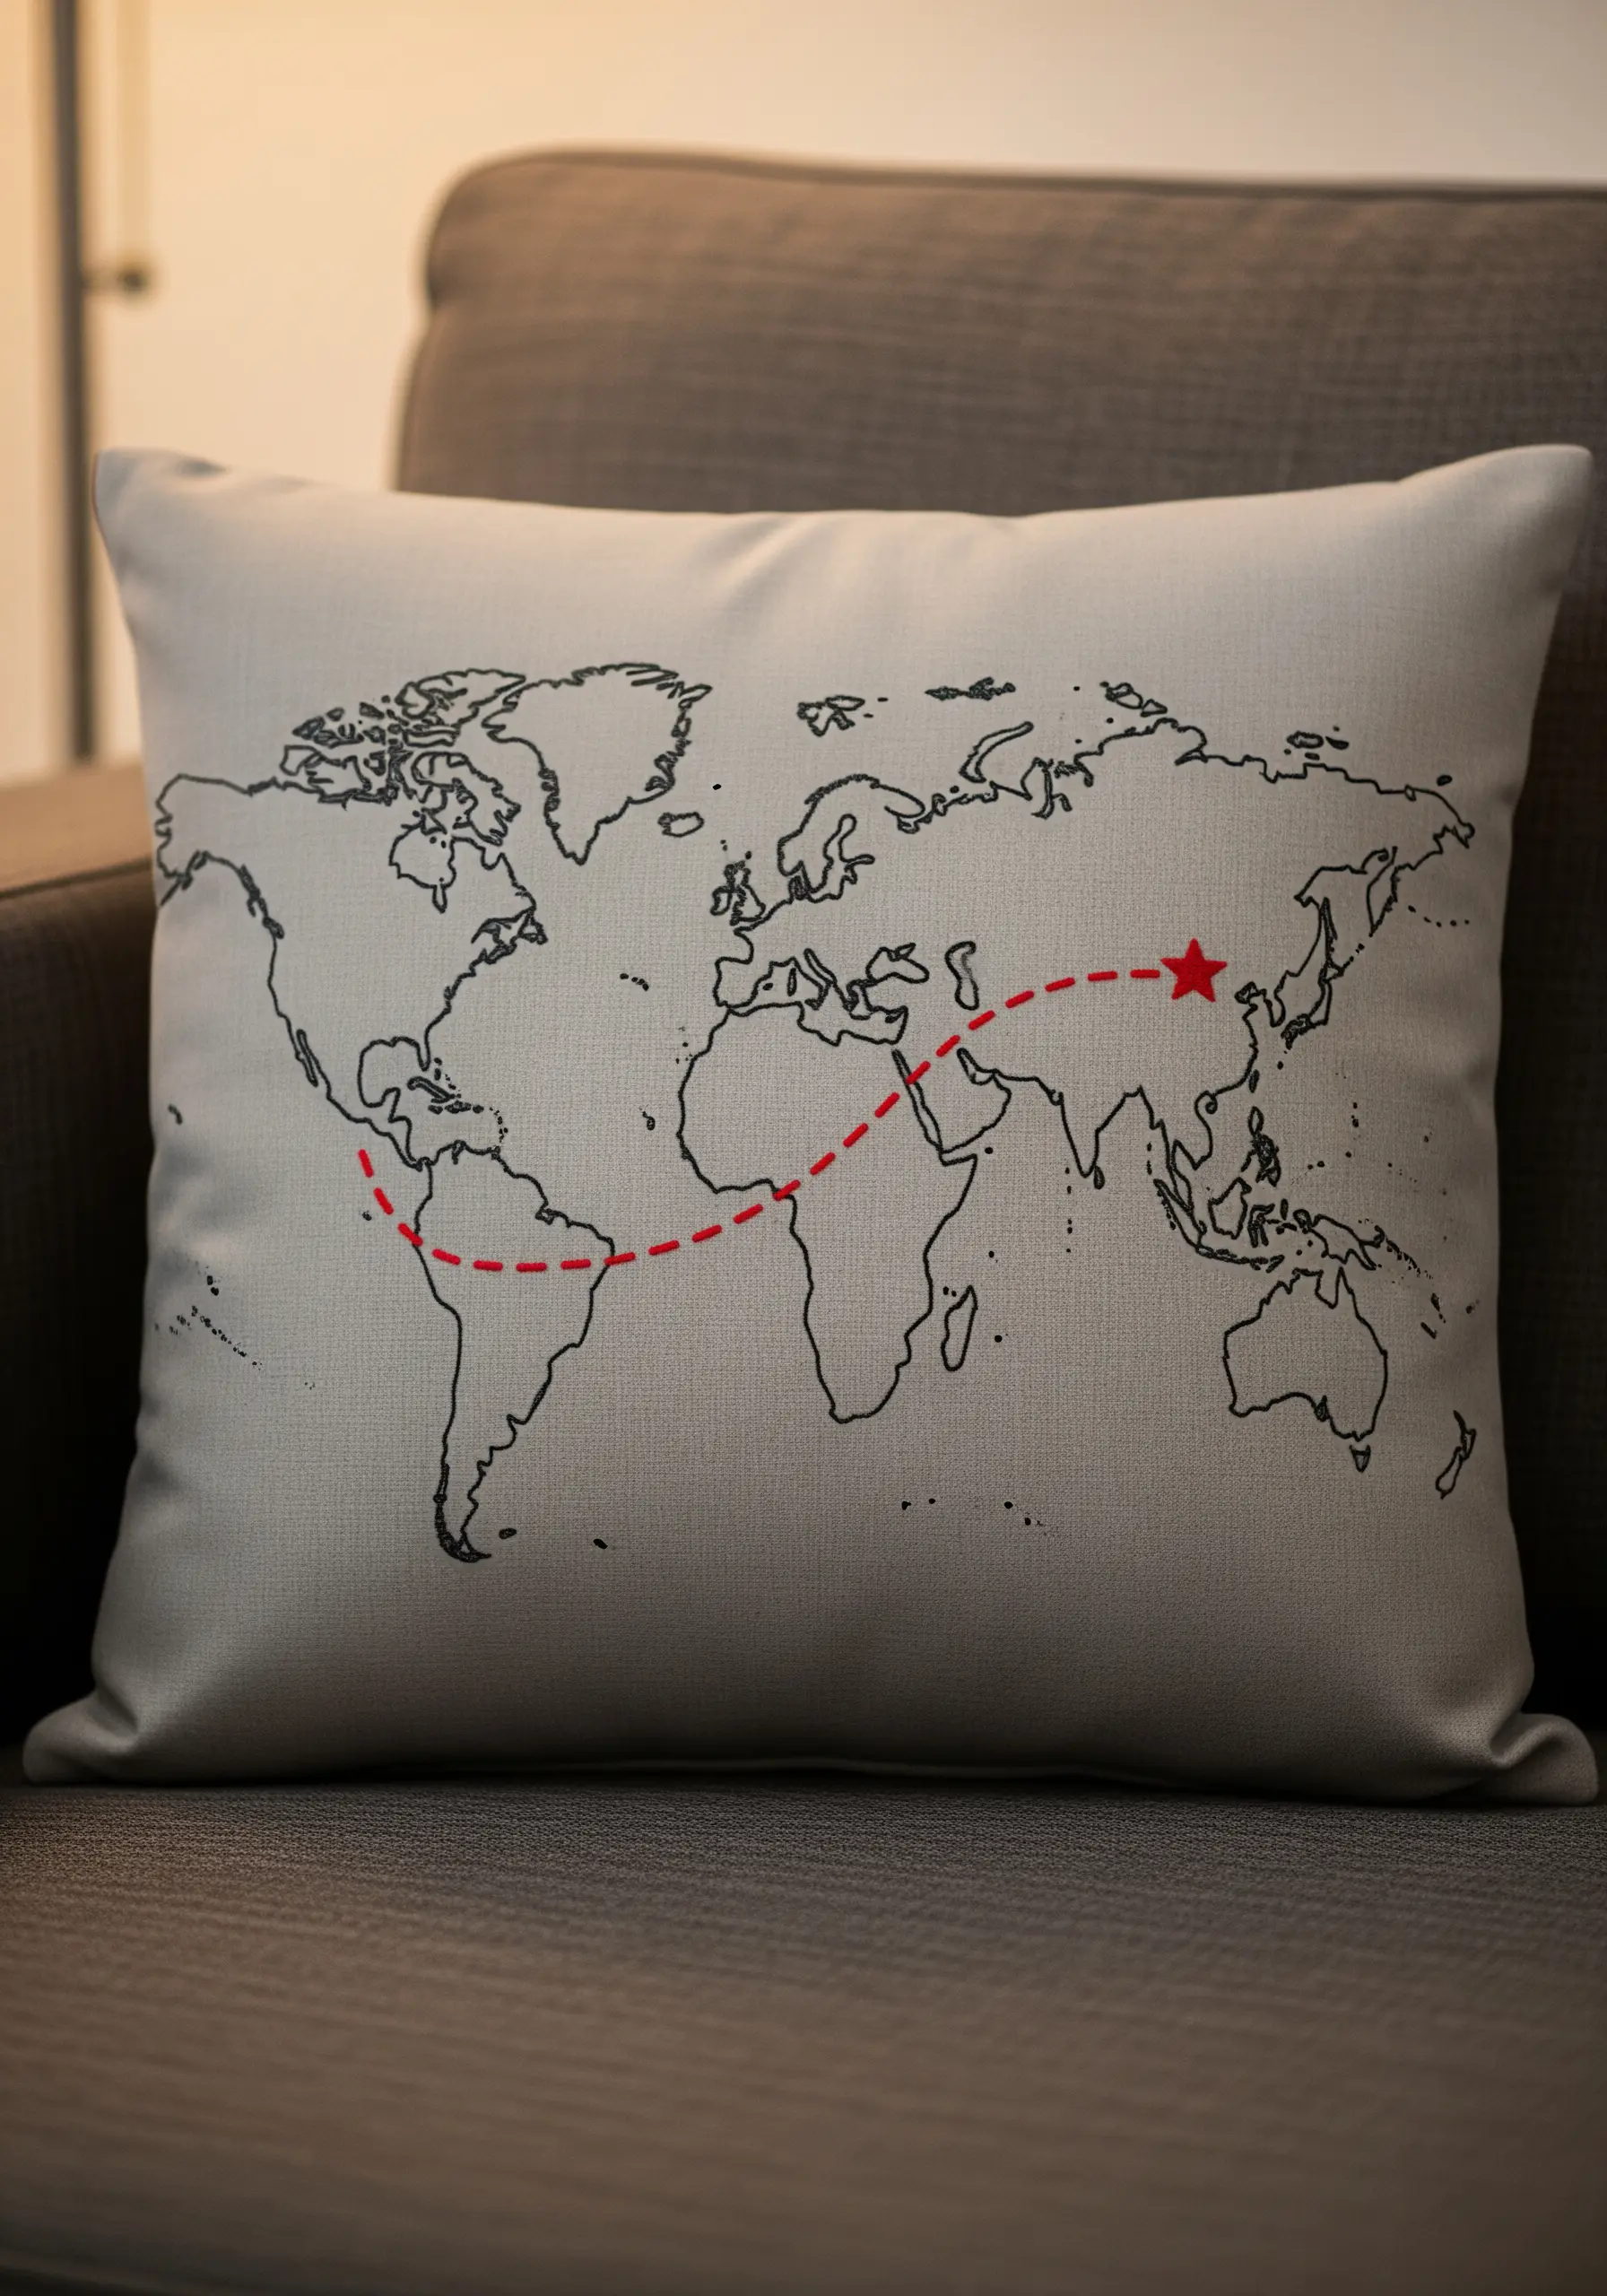
Turn a pillow or wall hanging into a personal keepsake by embroidering a map that tells a story.
Outline the continents with a simple backstitch, then use a contrasting color—like red running stitch—to trace a meaningful journey or connect two special places.
Add a small star stitch or French knot to mark a significant location, making it a unique piece of décor that holds personal history.
35. Create a Large-Scale Appliqué Wall Hanging
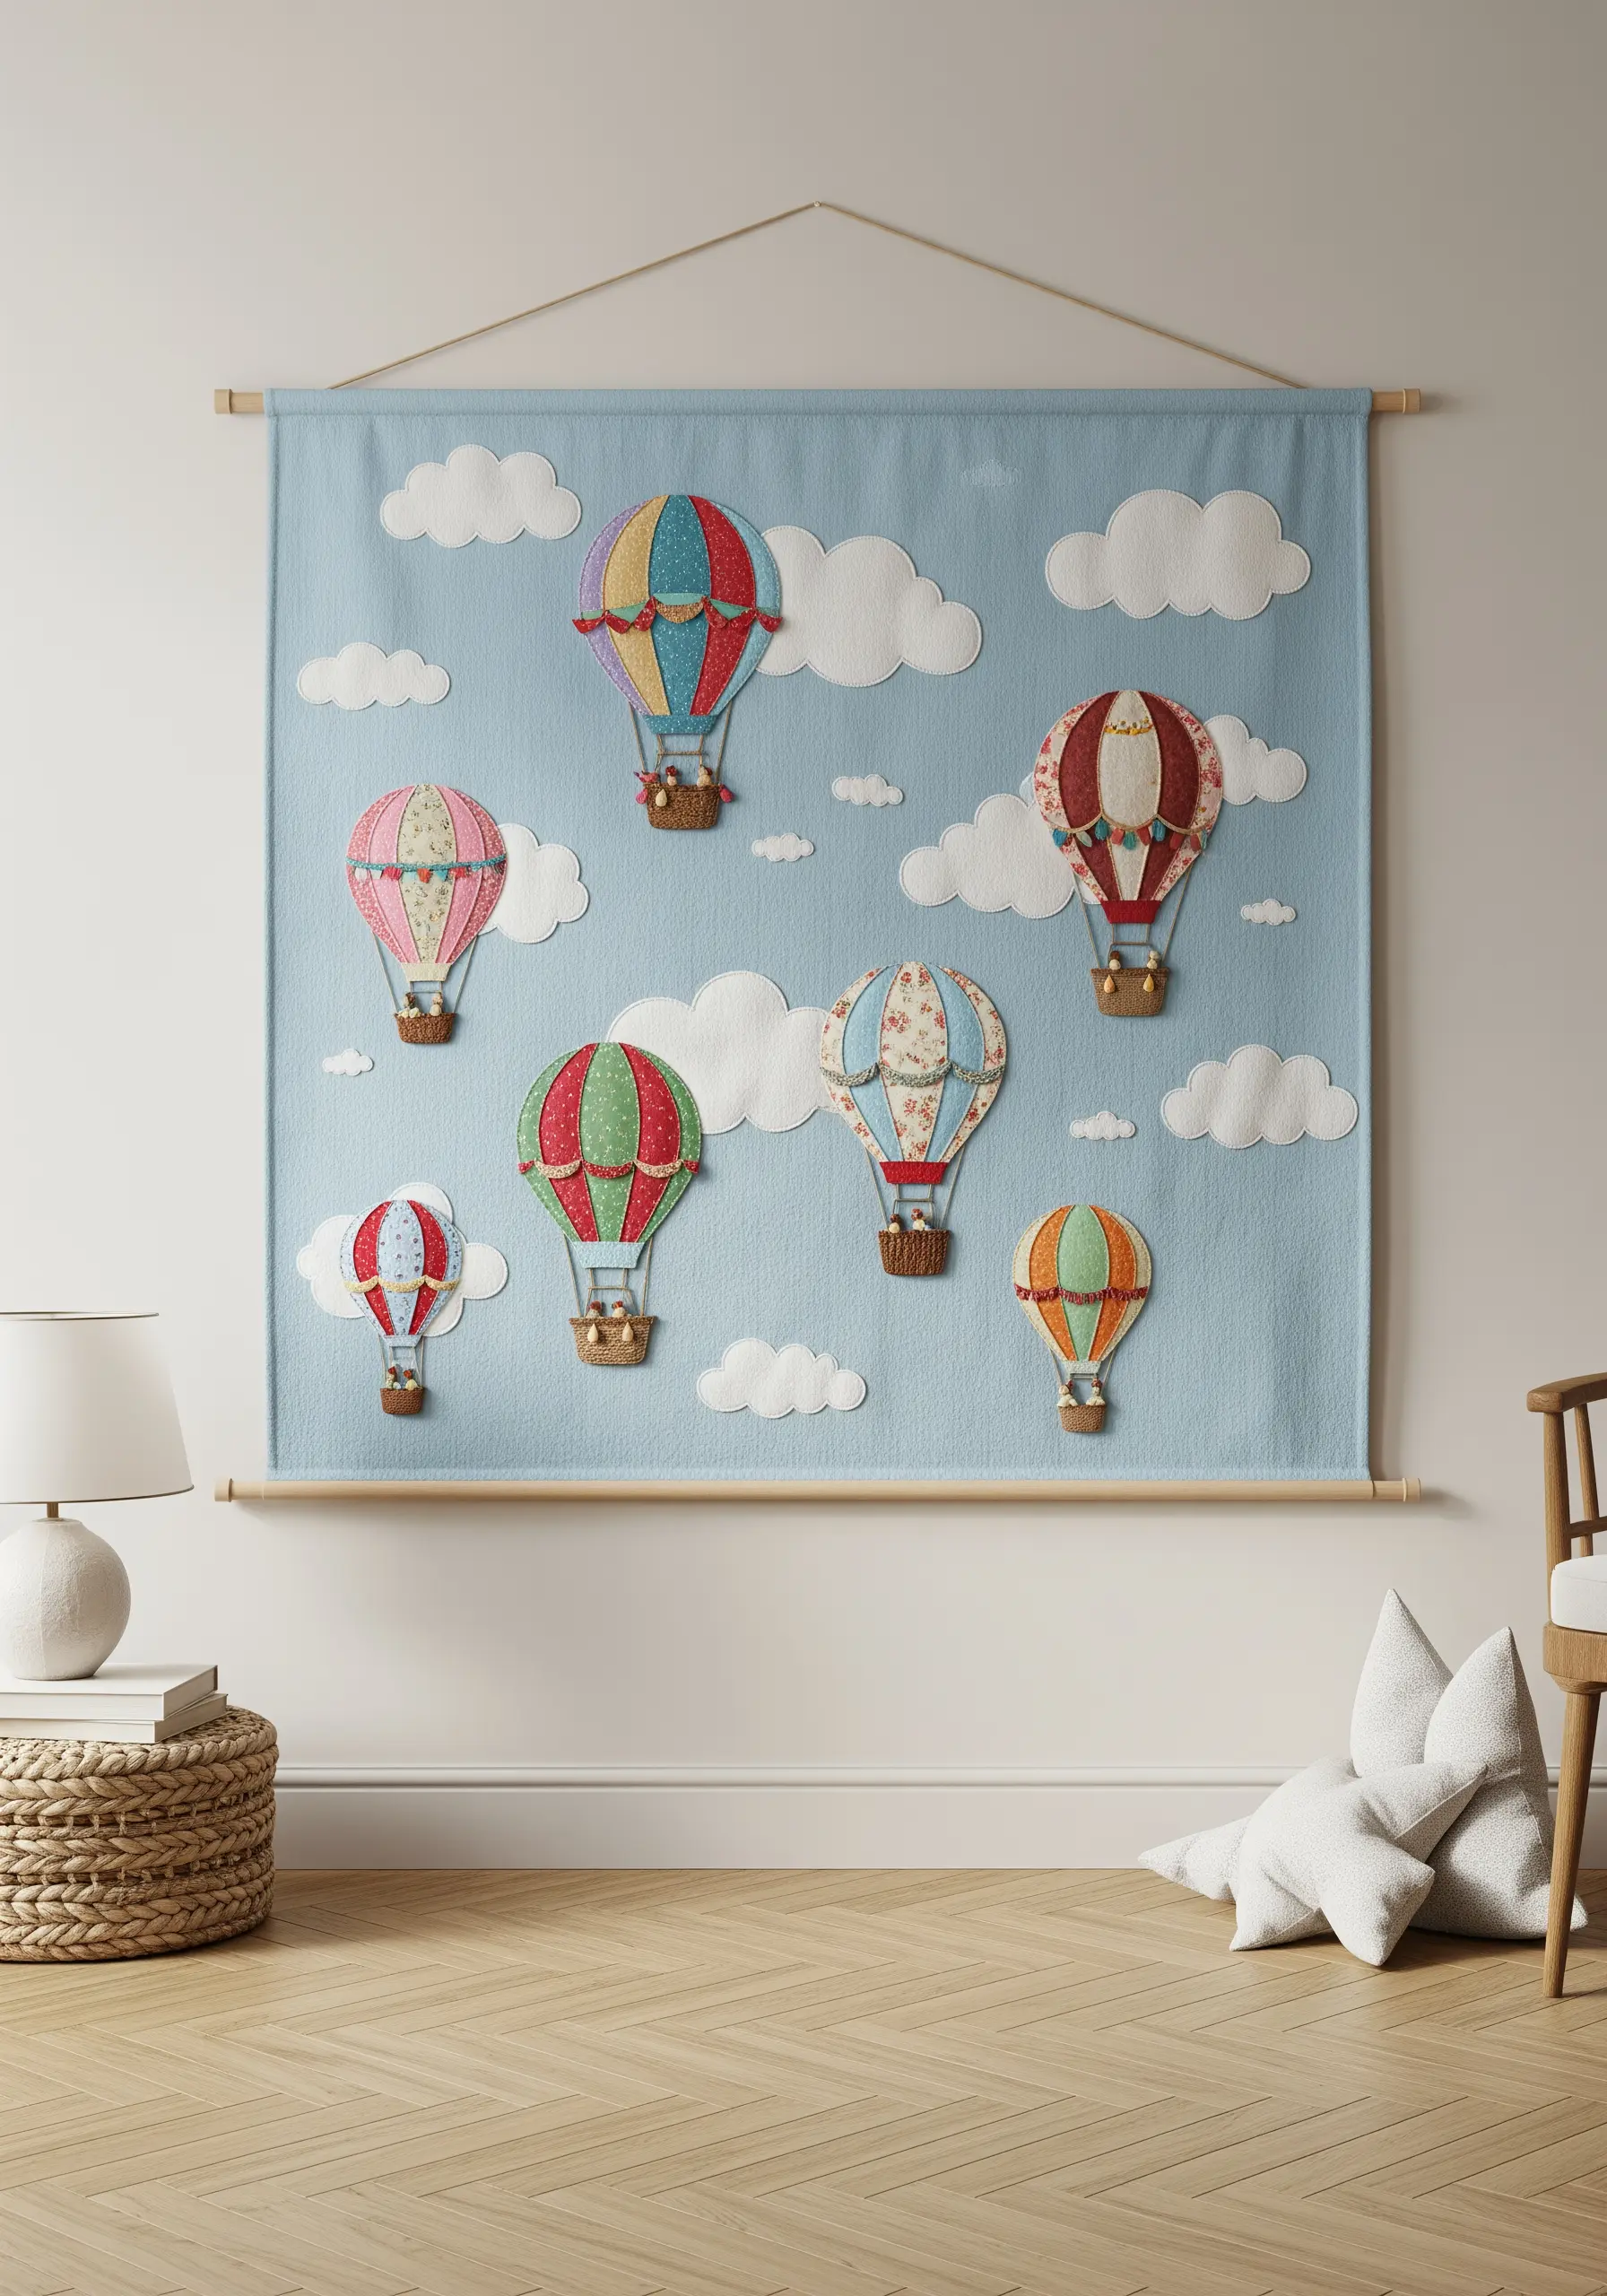
Combine appliqué and embroidery to create a charming, large-scale piece of nursery or playroom décor.
Cut your main shapes, like these hot air balloons, from patterned fabrics and secure them to your background fabric with a decorative blanket stitch.
Add smaller, embroidered details like baskets, ropes, and clouds to bring the scene to life.
This mixed-media approach allows you to create impactful embroidered nursery decor much faster than stitching the entire design.


