

Your kitchen is more than just a place to cook; it’s the heart of your home, especially in a compact urban space. Every object can, and should, bring you a little bit of joy. An embroidered kitchen towel is a small canvas, but it’s the perfect place to practice your craft and infuse your space with personality.
Elevating your embroidery isn’t about learning dozens of complex stitches. It’s about making intentional choices: using a whipped backstitch to create a perfectly smooth line, choosing three shades of green instead of one to give a leaf dimension, or adding a fabric border to frame your work with professional polish.
Think of these towels not as precious objects, but as a low-pressure sketchbook for your thread. Here, you can try a new technique, play with a bold color palette, or perfect a stitch you’ve been wanting to master. Let’s turn a simple, functional item into a small, daily work of art.
1. Achieve a Realistic Botanical Sheen
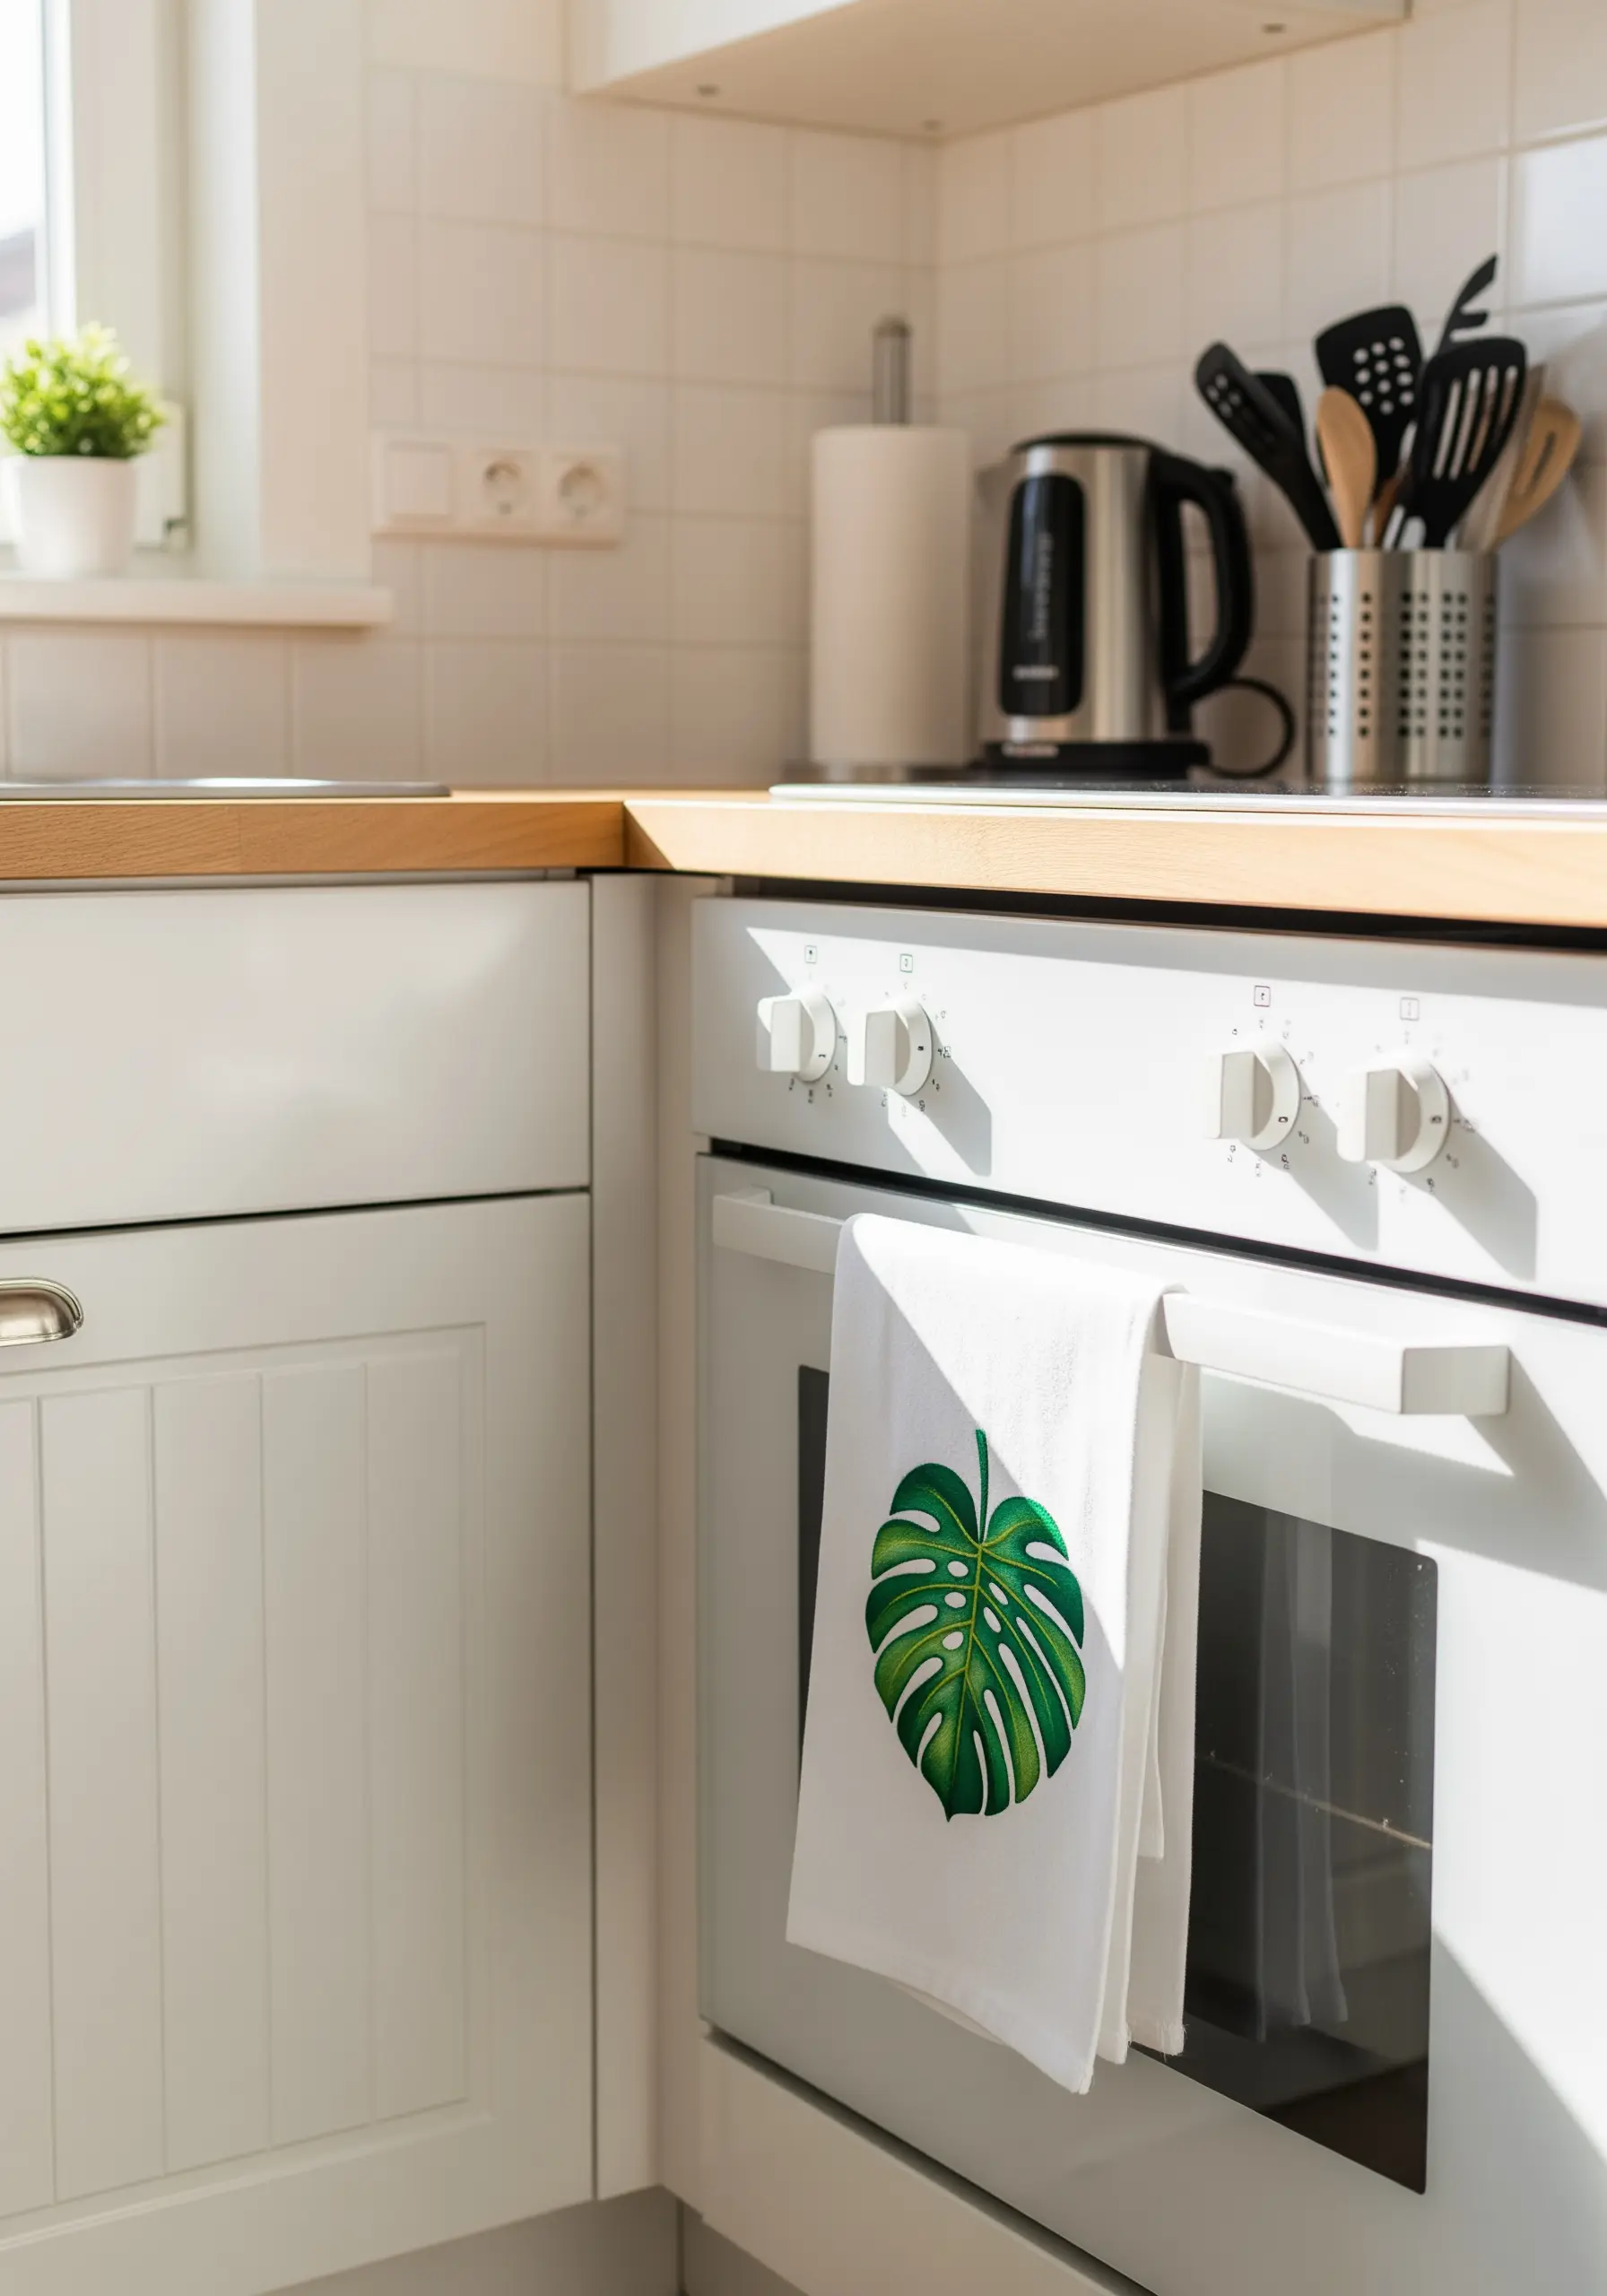
To make a single leaf feel vibrant and dimensional, focus entirely on the direction of your satin stitch.
Think of the leaf’s veins as your guide. Angle your stitches outward from a central line, mimicking how a real leaf reflects light.
Use at least three shades of green floss, blending them with a long-and-short stitch to create subtle gradients that suggest highlights and shadows.
This technique turns a simple motif into a piece of art that catches the eye from across the room.
2. Master Crisp Lettering on Textured Fabric

Stitching on waffle-weave towels can be tricky, as the texture can distort your letters.
Always use a tear-away or wash-away stabilizer on the back. This creates a smooth, stable surface for your needle, preventing the thread from sinking into the fabric’s grid.
For the bold outlines, use a three-strand backstitch. Then, fill the shapes with a dense satin stitch, ensuring your needle always lands just outside the outline for a clean, raised edge.
3. Embrace Graphic Simplicity with Line Work

This minimalist design proves that you don’t need complex fills to make a statement. The key is perfect, consistent line work.
Use a stem stitch or a split stitch with three strands of black floss for a bold, graphic line that stands out against a neutral linen towel.
Keep your stitch length uniform throughout the pattern. This consistency is what gives the design its clean, modern, and intentional feel, turning a simple tree into a sophisticated motif.
4. Create Bold Celestial Lines with Couching
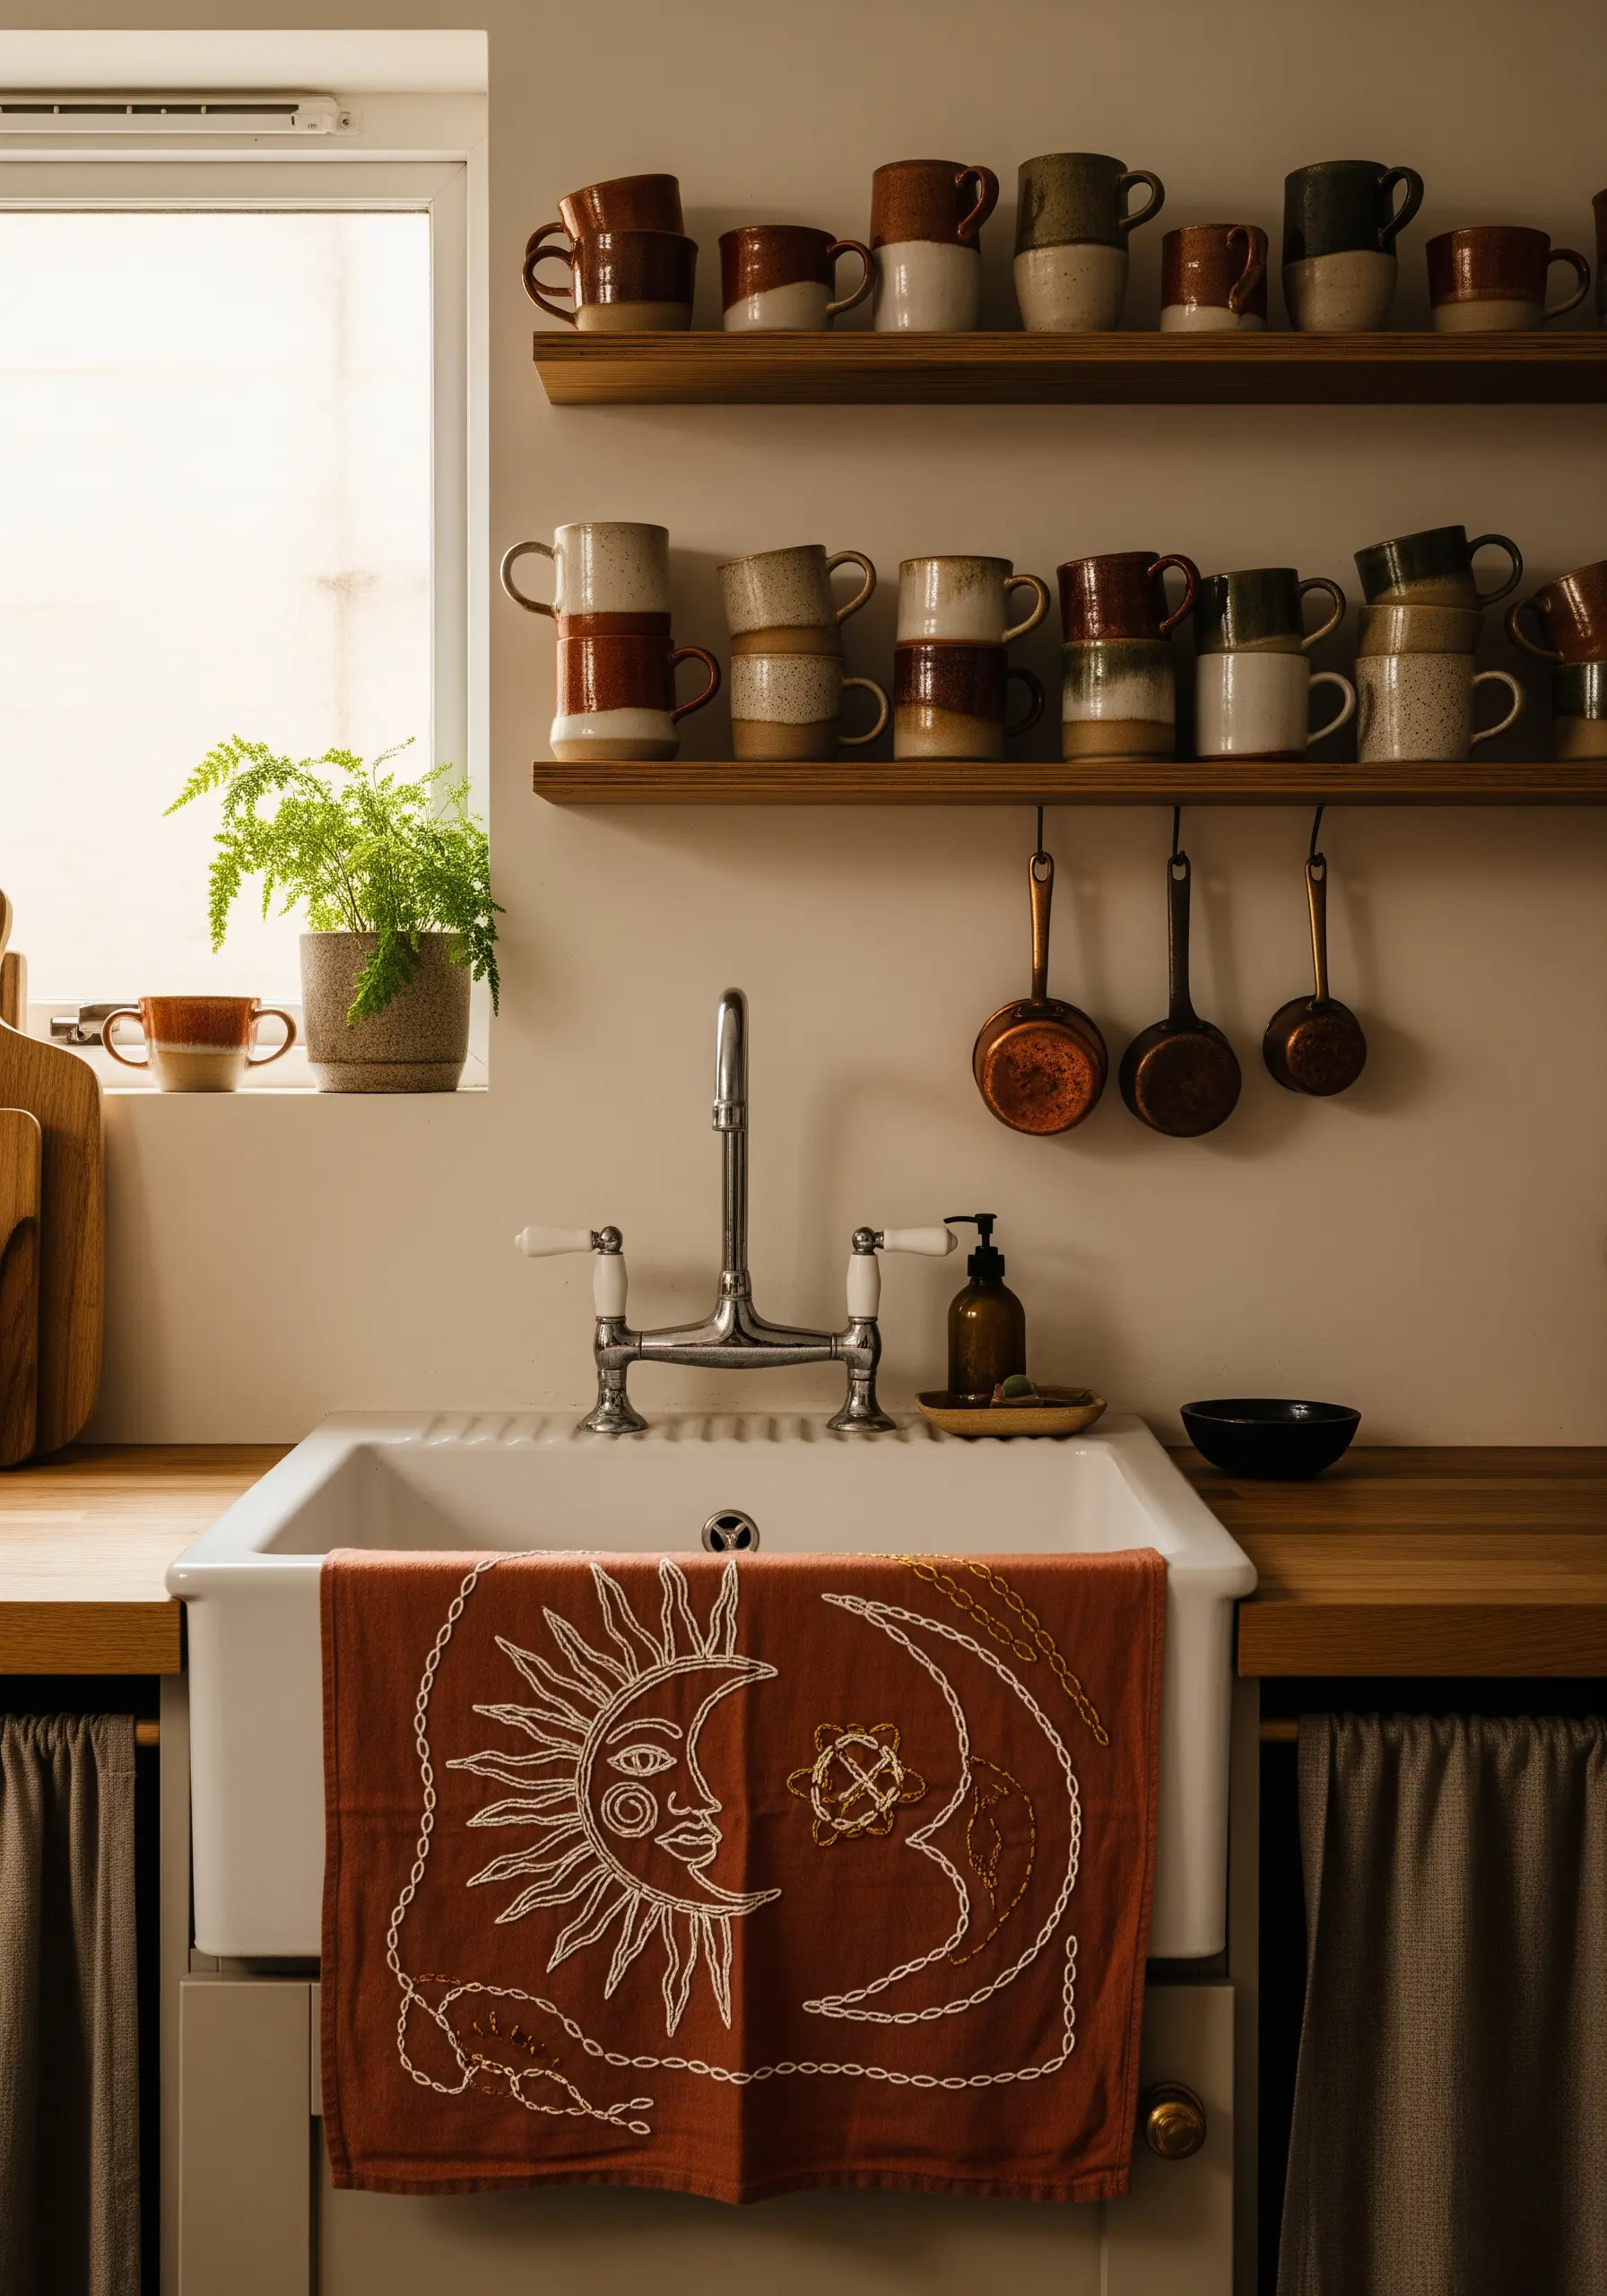
For thick, expressive outlines like these, traditional stitches can look bulky and uneven, especially on curves.
Instead, try couching. Lay down a thick thread, like a pearl cotton or multiple strands of floss, along your design line.
Then, use a single, contrasting strand to tack it down with small, perpendicular stitches. This method gives you perfectly smooth curves and a raised, tactile quality that feels both rustic and refined.
5. Section Your Satin Stitch for a Flawless Fill

Filling large areas with satin stitch can result in loose, snag-prone threads. The solution is to break the shape into smaller, manageable sections.
For this lemon slice, treat each segment as its own shape. Angle your stitches toward the center point to create a realistic, fanned-out effect.
This not only keeps your stitches tight and durable but also adds a subtle texture that mimics the real fruit’s structure, elevating the entire design.
6. Stitch Expressive Steam with Gradient Threads

To give motion and warmth to an element like steam, avoid a solid outline. Instead, use a gradient of color and a light touch.
Start with a dark gold or light orange at the base of the steam swirls, using a two-strand backstitch.
As you move upward, switch to a lighter gold and then to an off-white, reducing to a single strand. This subtle shift in color and weight makes the steam appear to rise and dissipate naturally.
7. Capture Delicate Herbs with Varied Stitches
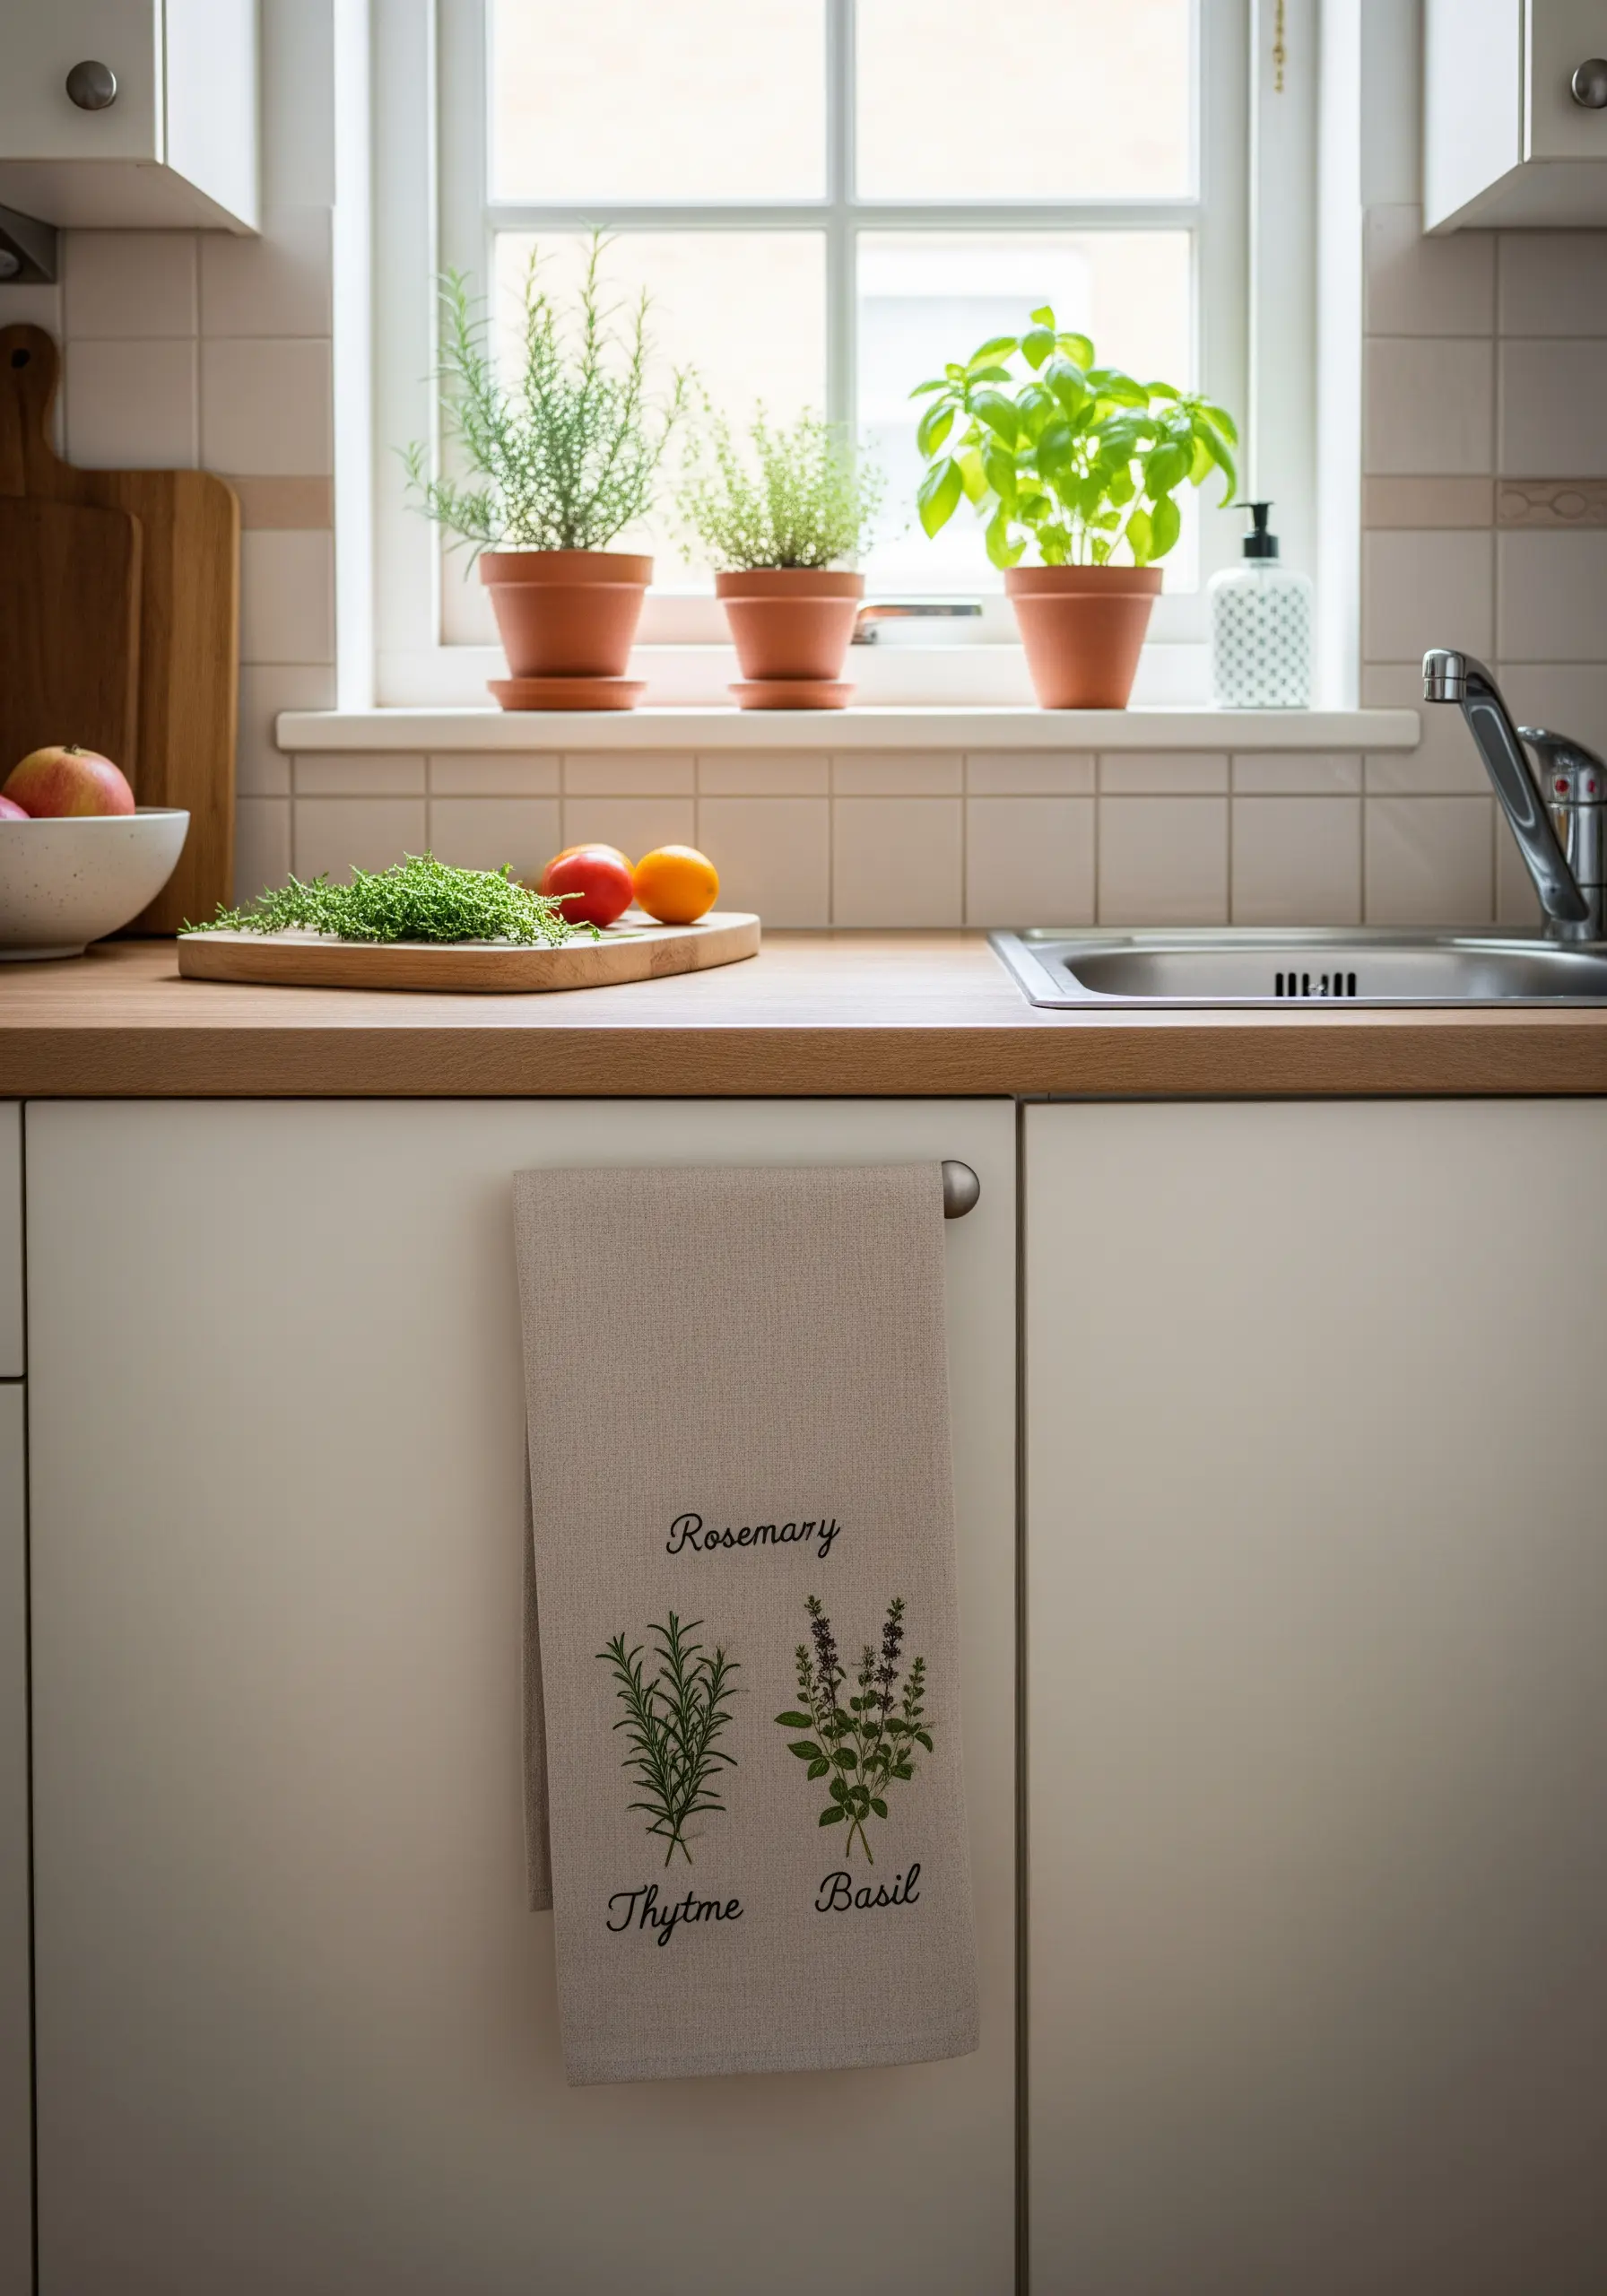
To give each herb its own personality, assign a different stitch or texture to its leaves.
Use a simple straight stitch for rosemary needles, tiny lazy daisy stitches for thyme leaves, and small, detached chain stitches for the fuller basil leaves.
For the lettering, a neat, single-strand backstitch ensures readability without overpowering the delicate botanical illustrations. This approach turns a simple towel into a charming herbal plant embroidery guide.
8. Use Appliqué for Clean, Modern Color Blocking

For a design inspired by modern art, filling large color blocks with thread is impractical and can cause the fabric to pucker.
Instead, use fabric appliqué. Cut your colored fabric shapes precisely and fuse them to the towel with a lightweight, iron-on adhesive.
Secure the edges with a dense, crisp satin stitch in black thread. This technique provides perfectly flat color and sharp lines, creating a bold, gallery-worthy piece for your kitchen.
9. Add Dimension with Long-and-Short Stitch Shading

To make these root vegetables look like they were pulled straight from the garden, thread painting is essential.
Use a long-and-short stitch to blend multiple shades, creating smooth color transitions that suggest roundness and depth.
For the beet, blend deep purple into magenta and pink. For the carrot, transition from dark orange to a pale yellow highlight. This thoughtful shading is what breathes life into a simple subject.
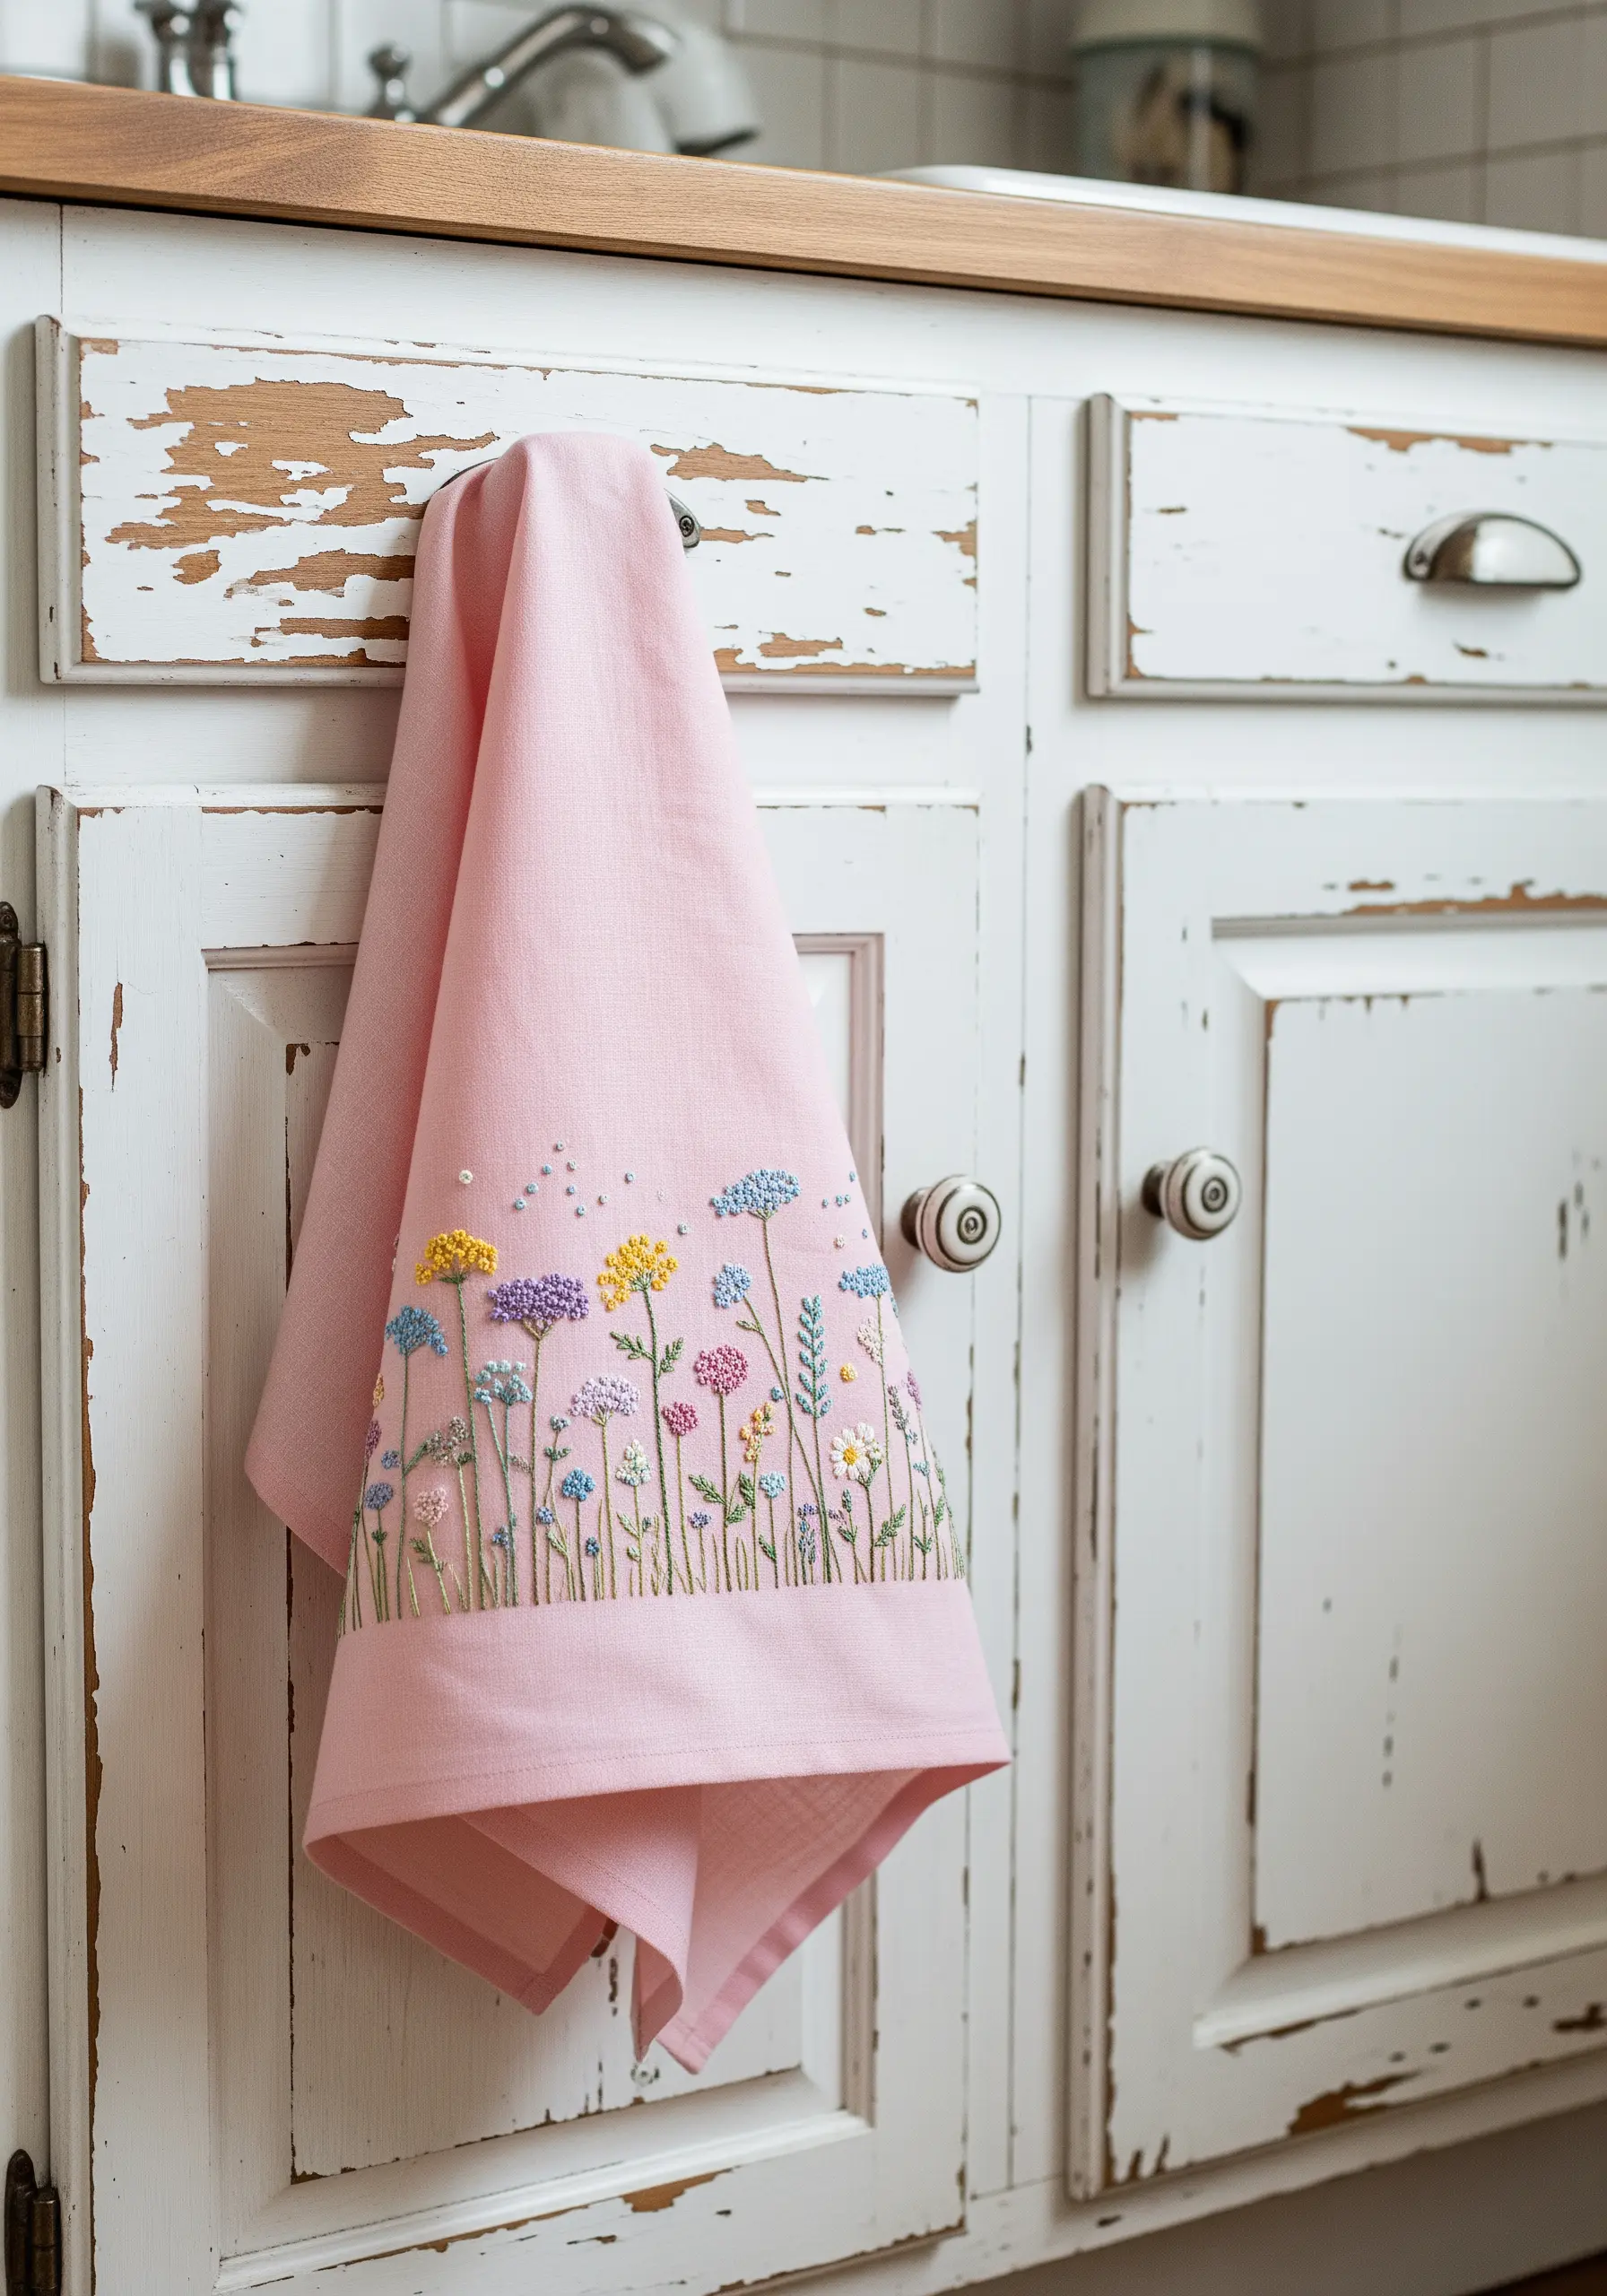
10. Elevate a Motif with Strategic Negative Space

Sometimes, the most impactful design is the simplest. This single seashell shows the power of careful placement and negative space.
Place a small, elegant motif in a corner or along the bottom edge rather than centering it. This feels more sophisticated and intentional.
Use a whipped backstitch in a contrasting color to create a smooth, raised line that defines the shape without overwhelming it. This is a hallmark of minimal embroidery designs that feel effortlessly stylish.
11. Create a Playful Vibe with Bold Outlines
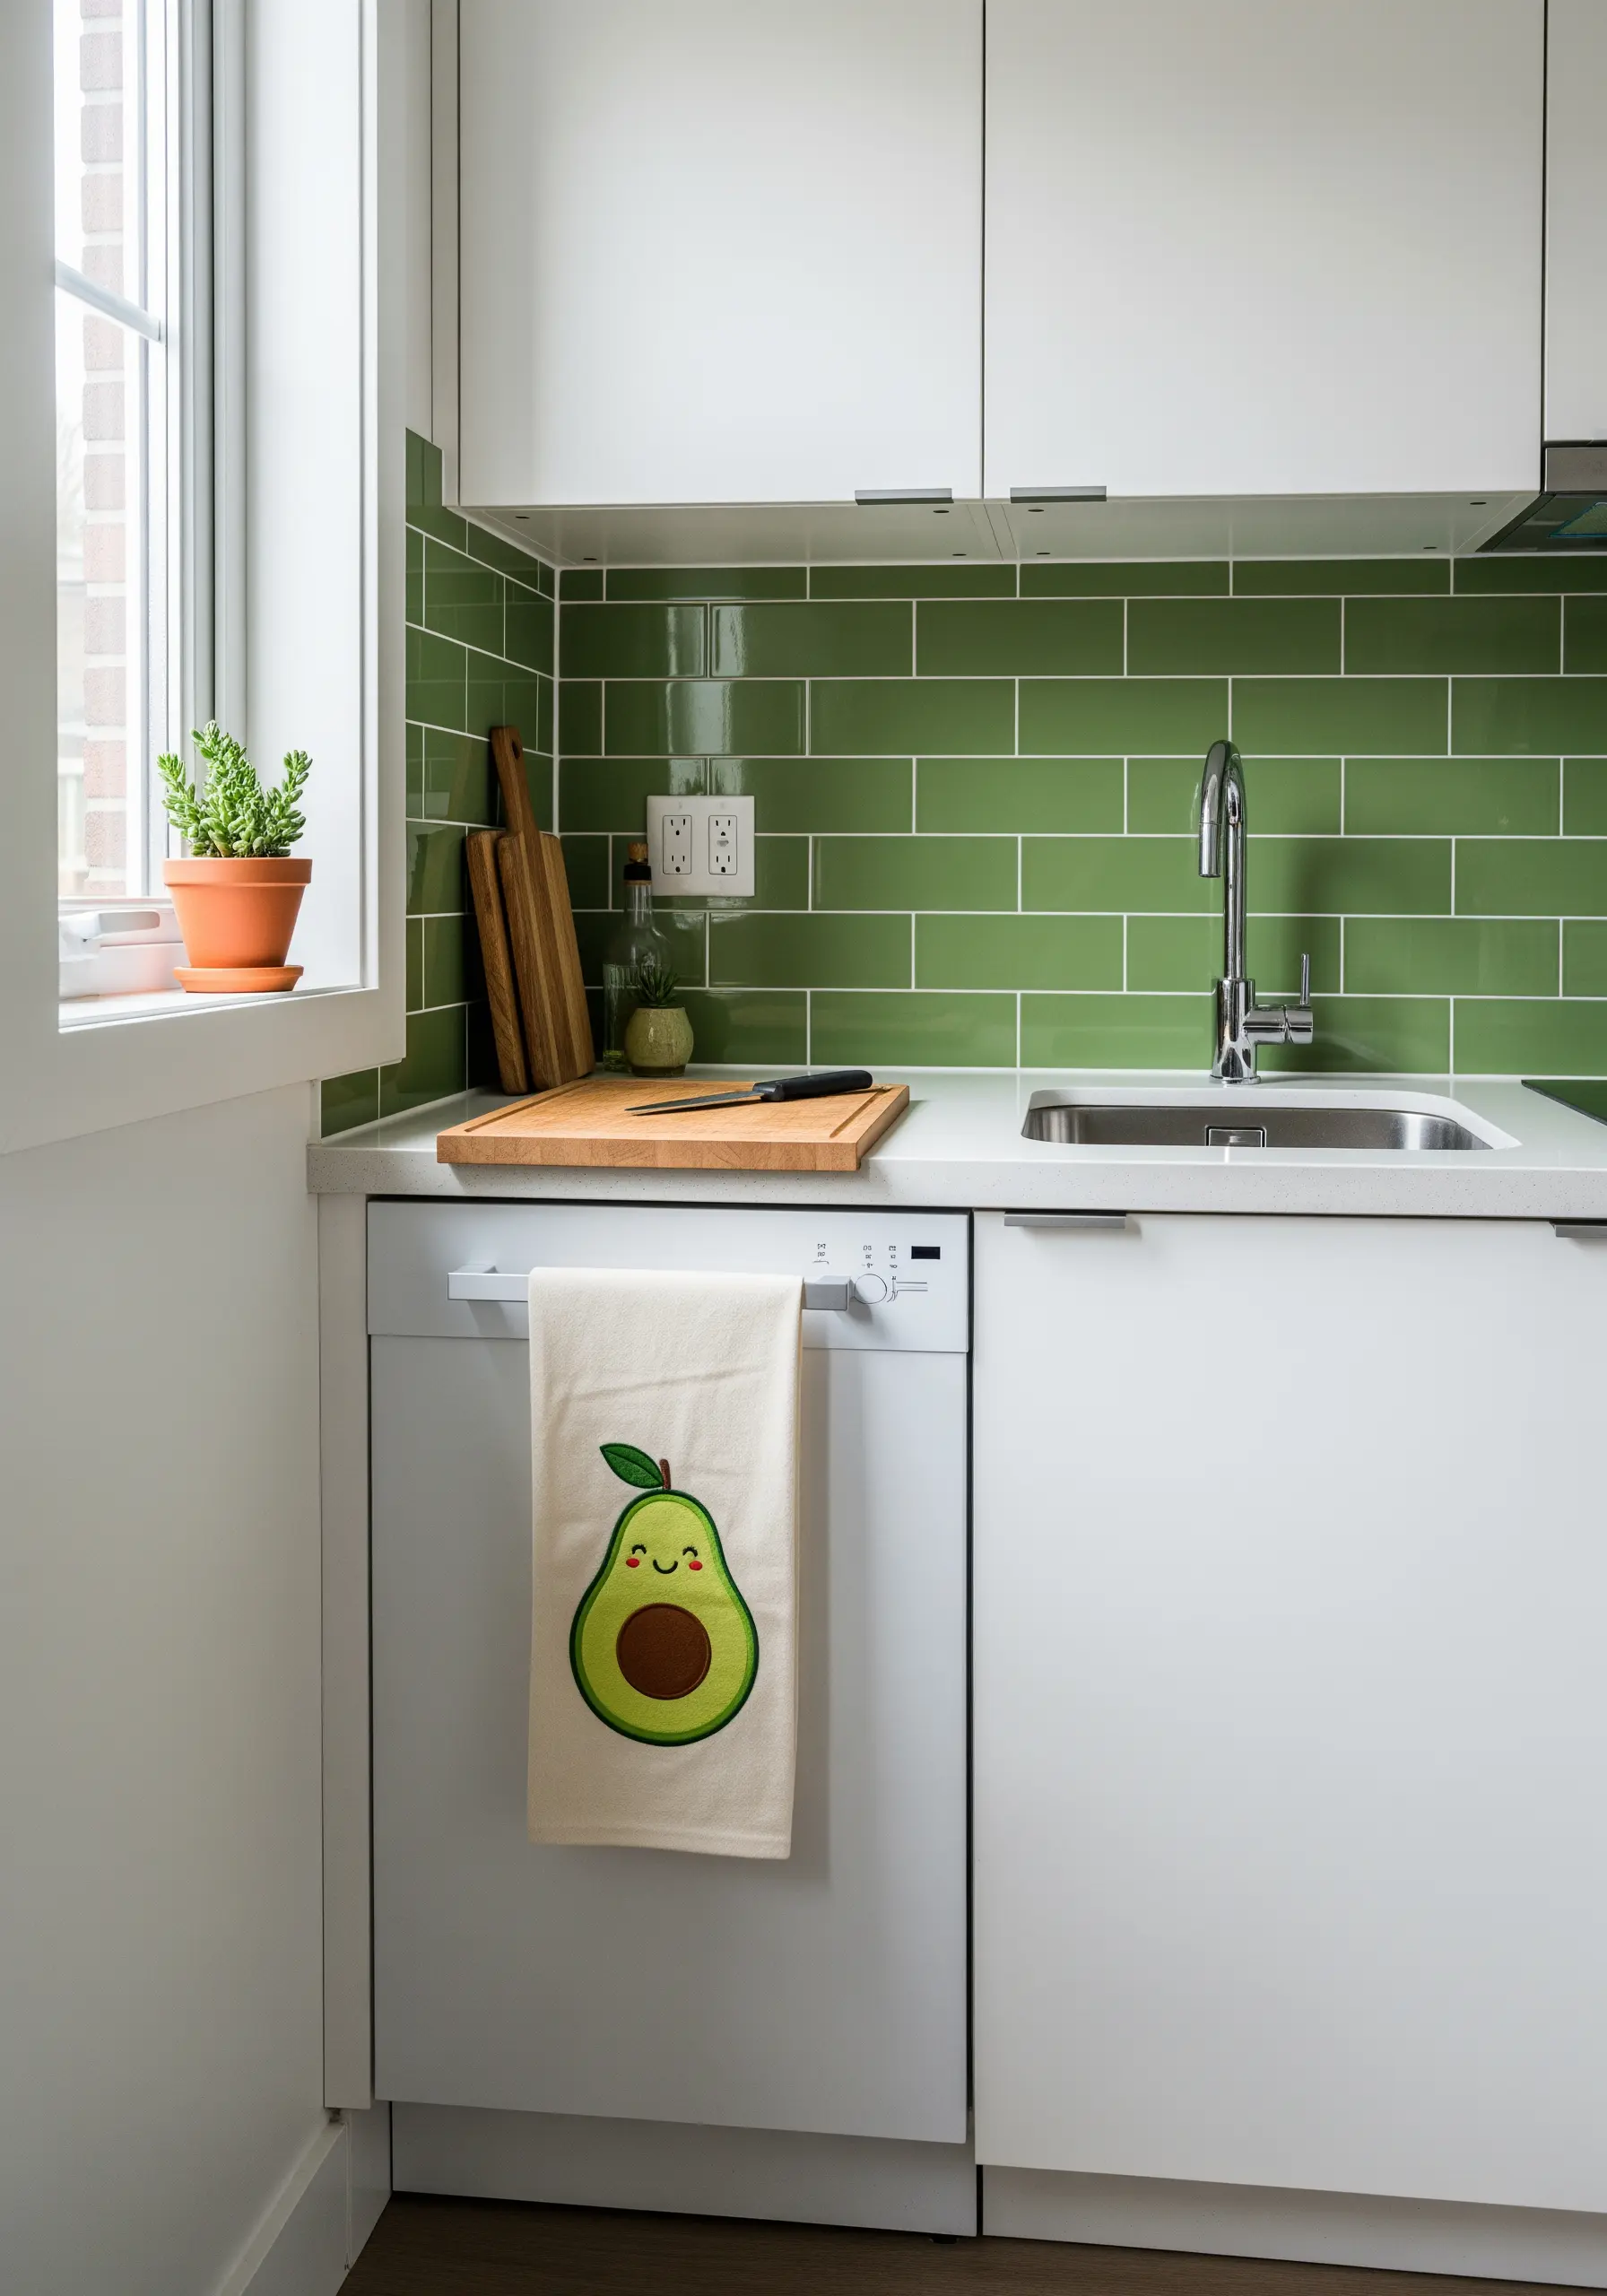
To achieve this cheerful, cartoon-inspired look, the outline is just as important as the fill.
First, complete the satin stitch fill for each colored section, making sure your stitches are smooth and even.
Then, come back with a thick, three-strand backstitch in a dark color around the entire design and its details. This final outline cleans up any uneven edges from the satin stitch and makes the entire motif pop, giving it a clean, graphic finish.
12. Stitch with Metallics for an Art Deco Glow

Metallic thread can elevate a simple design, but it requires a bit of technique to prevent frustration.
Work with shorter lengths of thread (no more than 12 inches) to minimize twisting and fraying. A thread conditioner or beeswax can also make it glide more smoothly.
Use a needle with a larger eye to reduce friction. The stunning, light-catching result of this Art Deco pattern is well worth the extra care and gives your kitchen a touch of unexpected glamour.
13. Build Realistic Texture in Botanical Studies
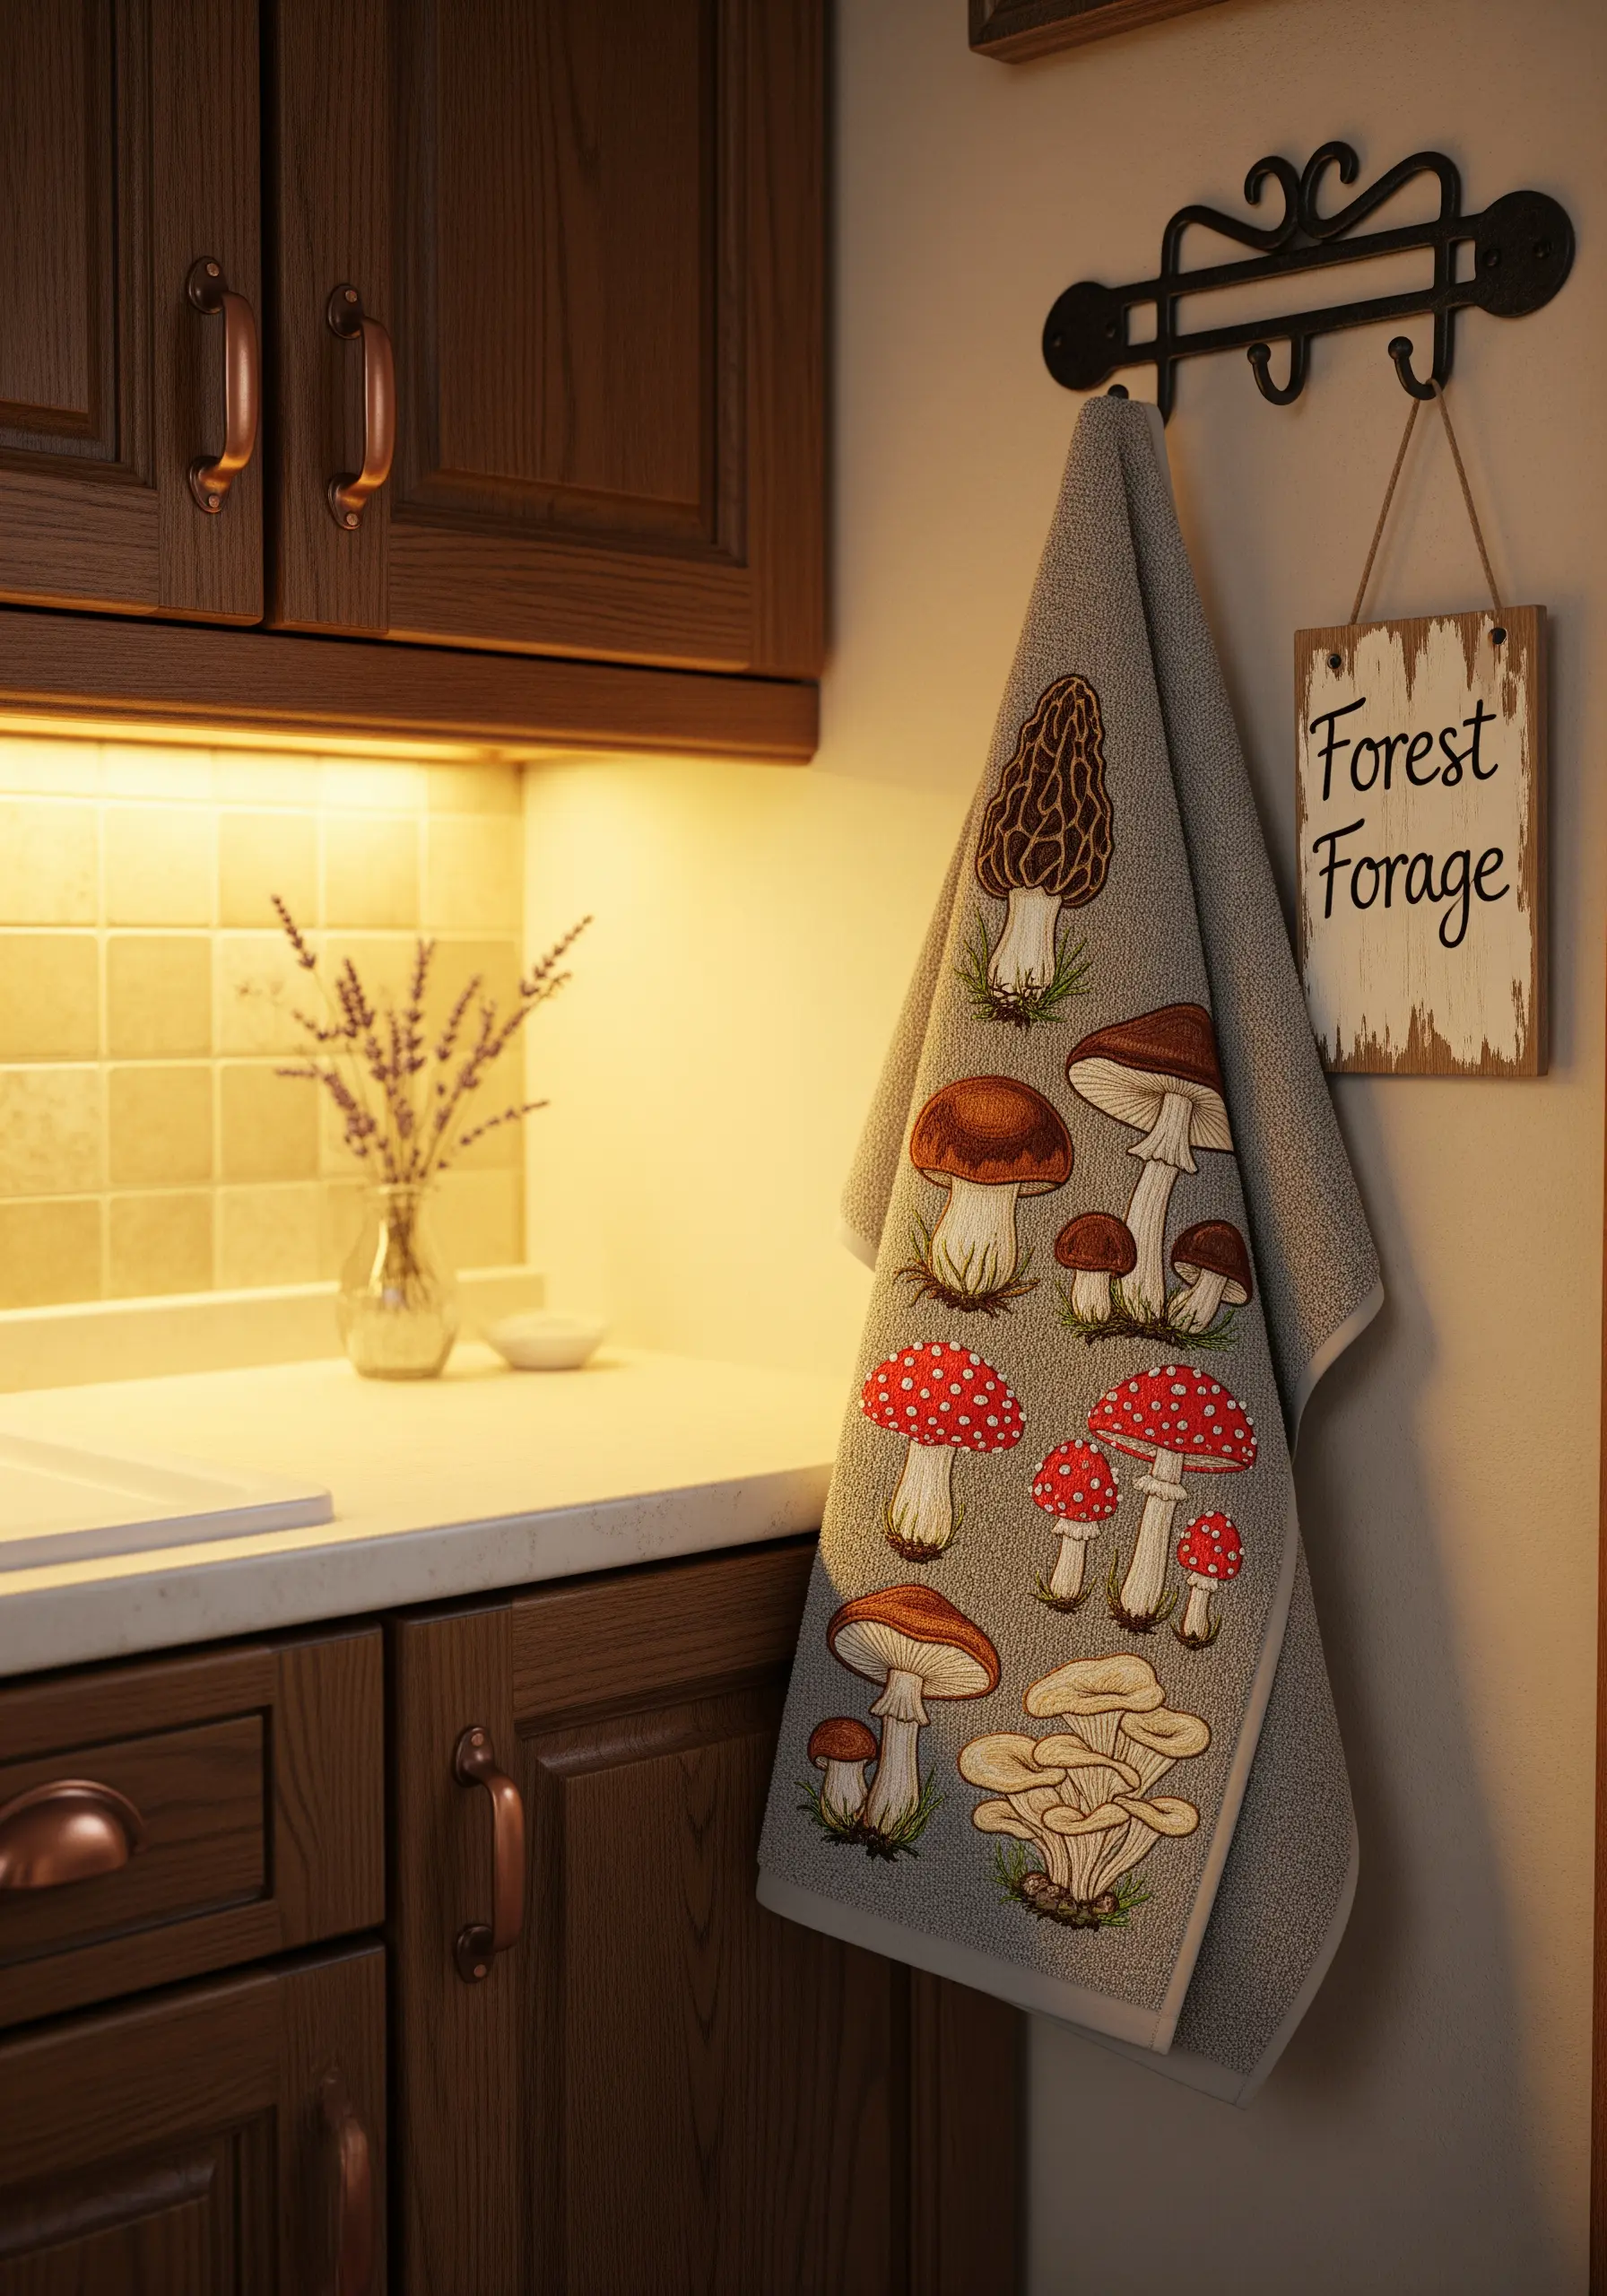
To create a collection of forest mushrooms that feels like a page from a naturalist’s notebook, focus on texture.
Use long-and-short stitch for the smooth caps, blending shades to create a rounded effect. For the gills underneath, use tightly packed vertical straight stitches.
Introduce a few French knots or even a bit of Turkey work at the base of the stems to suggest moss and soil, grounding your composition in realism.
14. Perfect the Single-Line Stitch

The beauty of a continuous line drawing is its fluid, unbroken feel. To replicate this in thread, your stitch choice is crucial.
Use a whipped backstitch or a stem stitch. Both stitches cover the joins between them, creating a single, solid line with no visible gaps.
Use two or three strands of floss for a line with enough presence to stand on its own. This technique transforms a simple sketch into a piece of one-line embroidery wall art for your kitchen.
15. Create Fuzzy Texture with Directional Stitches

To give the bee’s body a soft, fuzzy appearance, avoid a flat satin stitch. Instead, use a series of short, angled straight stitches.
For the yellow stripes, angle your stitches outward from the center, slightly overlapping them to mimic the texture of fine hairs.
For a truly advanced touch, stitch the wings separately on a piece of sheer organza, cut them out carefully, and tack them onto the towel for a delicate, three-dimensional effect.
16. Make Colors Vibrate with High Contrast
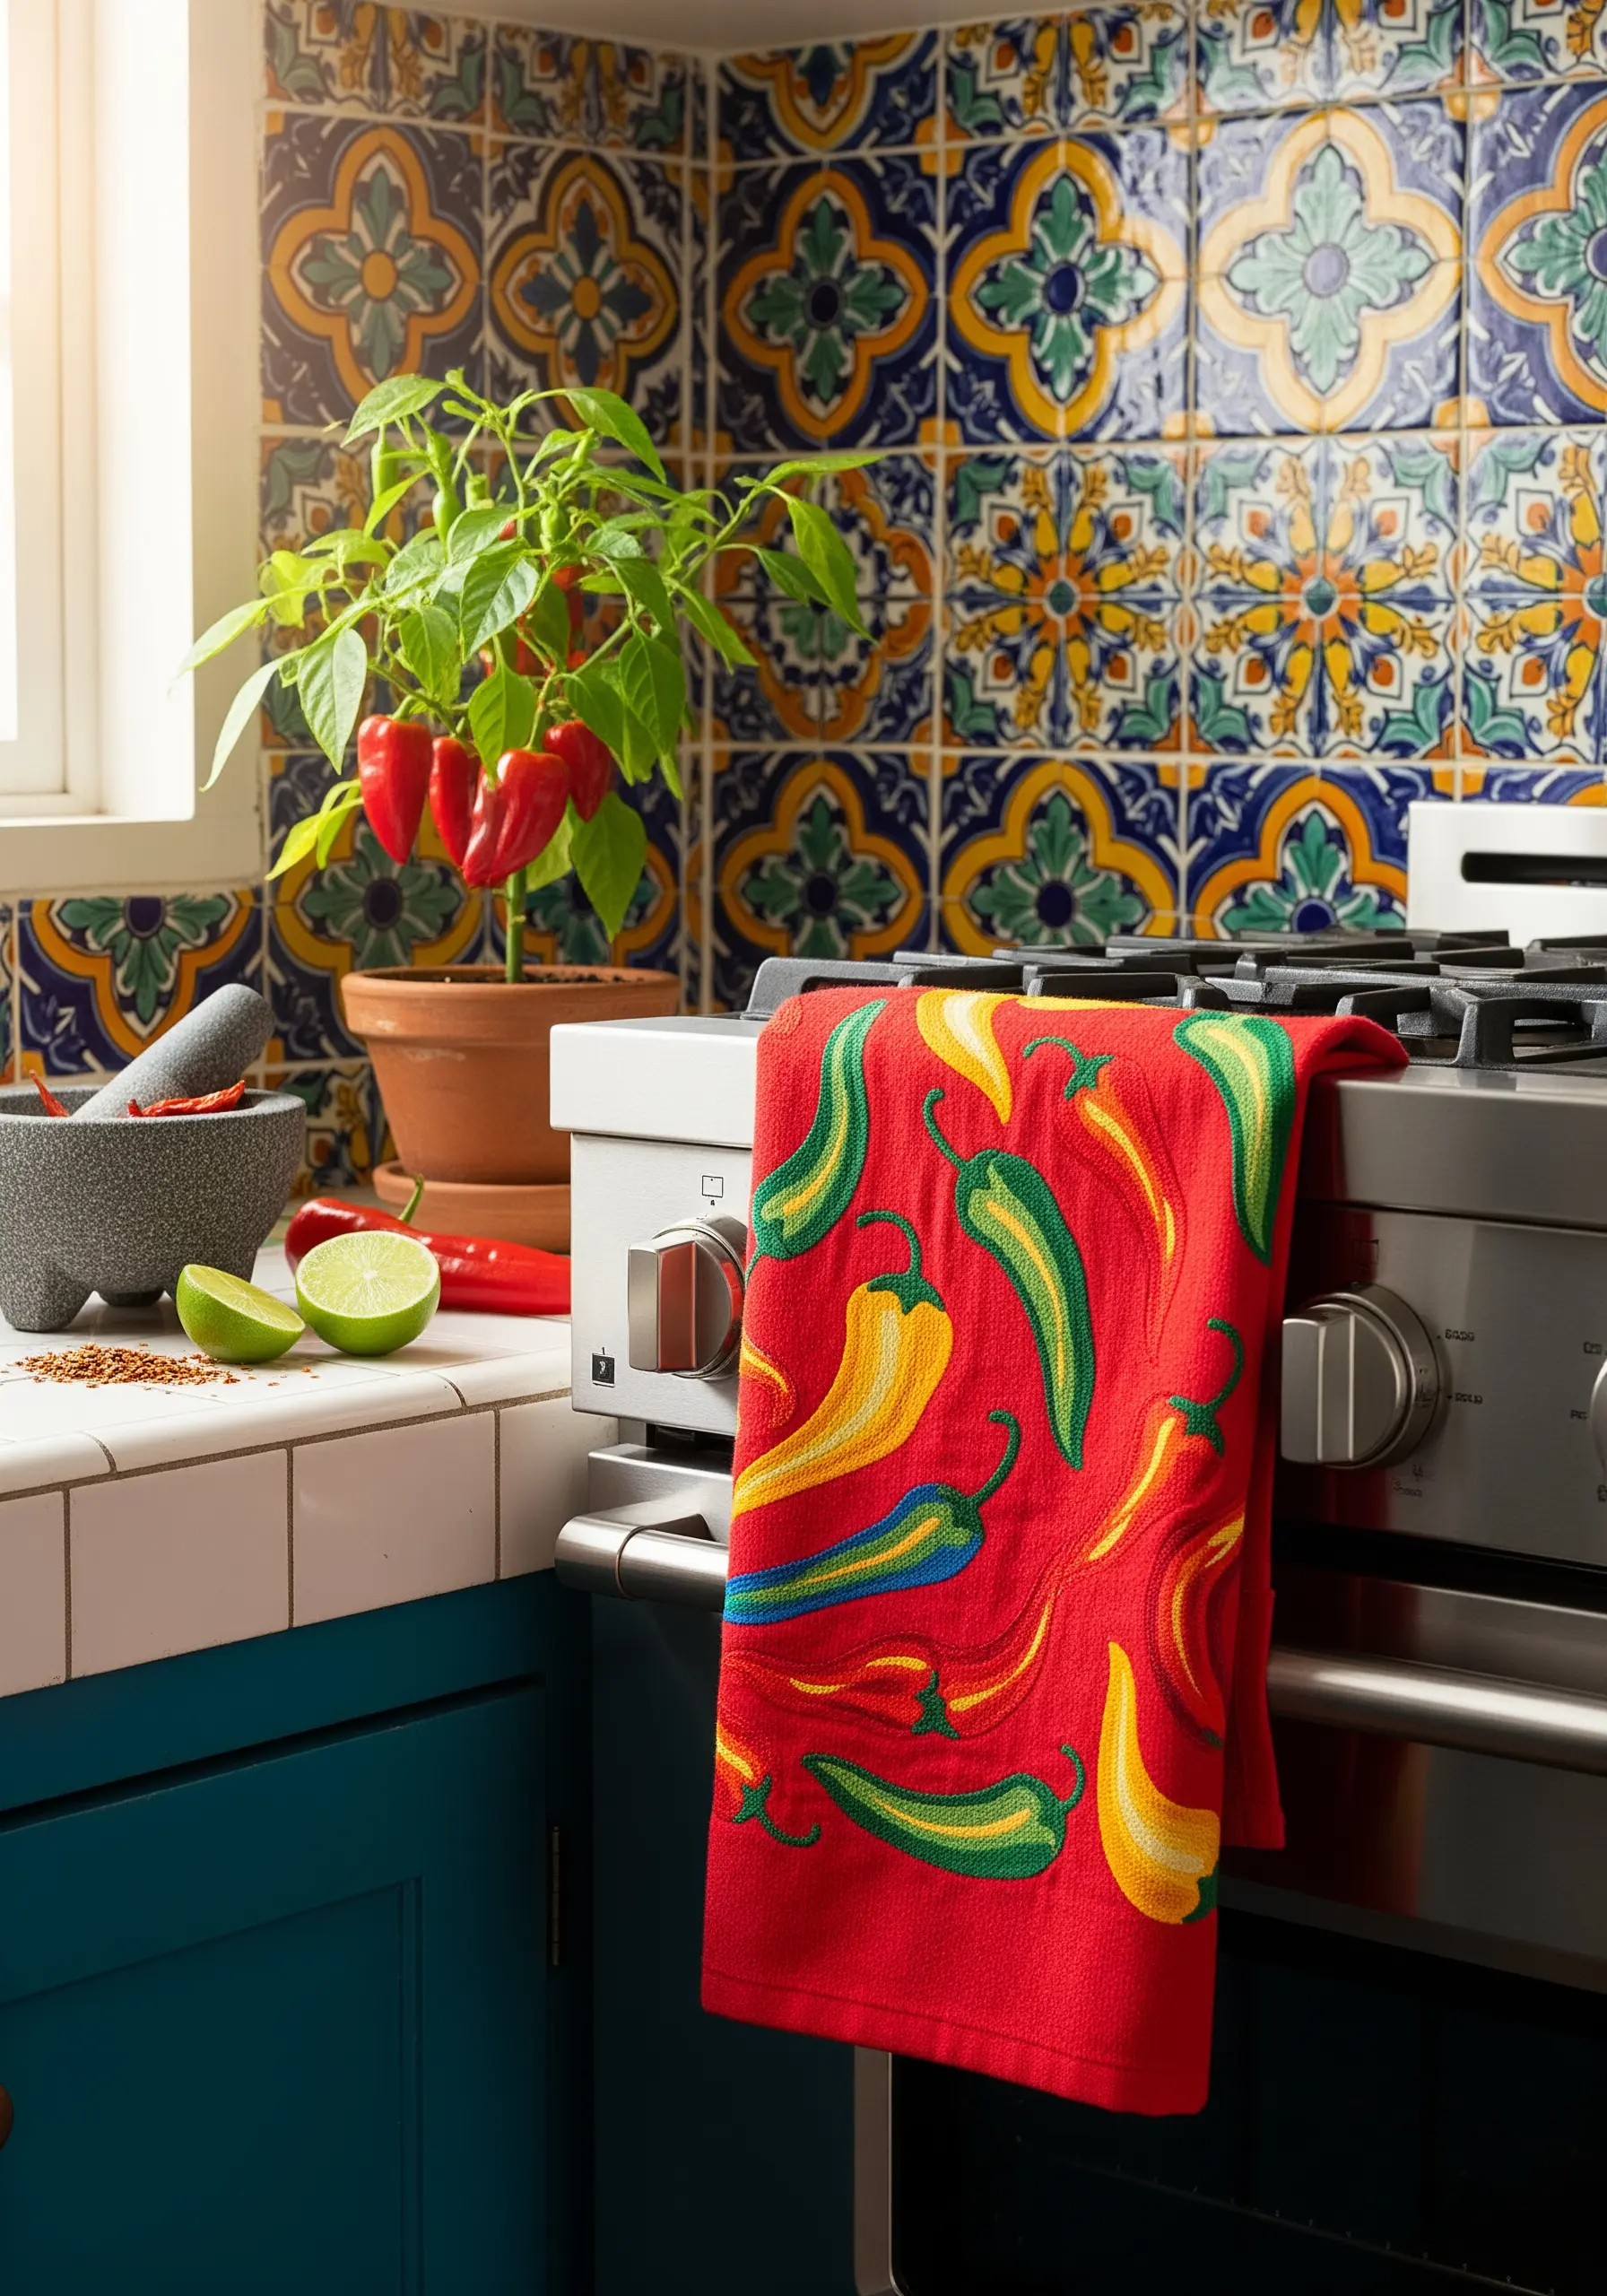
This design’s energy comes from the interplay between the bright towel and the vibrant peppers. You can amplify this effect with your thread choices.
When stitching the peppers, don’t just fill them with a single color. Add a sliver of a much darker shade on one side for a shadow, and a single-strand highlight of pure white on the other.
This small detail of light and shadow makes the colors feel richer and gives the simple shapes a dynamic, three-dimensional quality.
17. Combine Embroidery with Appliqué Borders
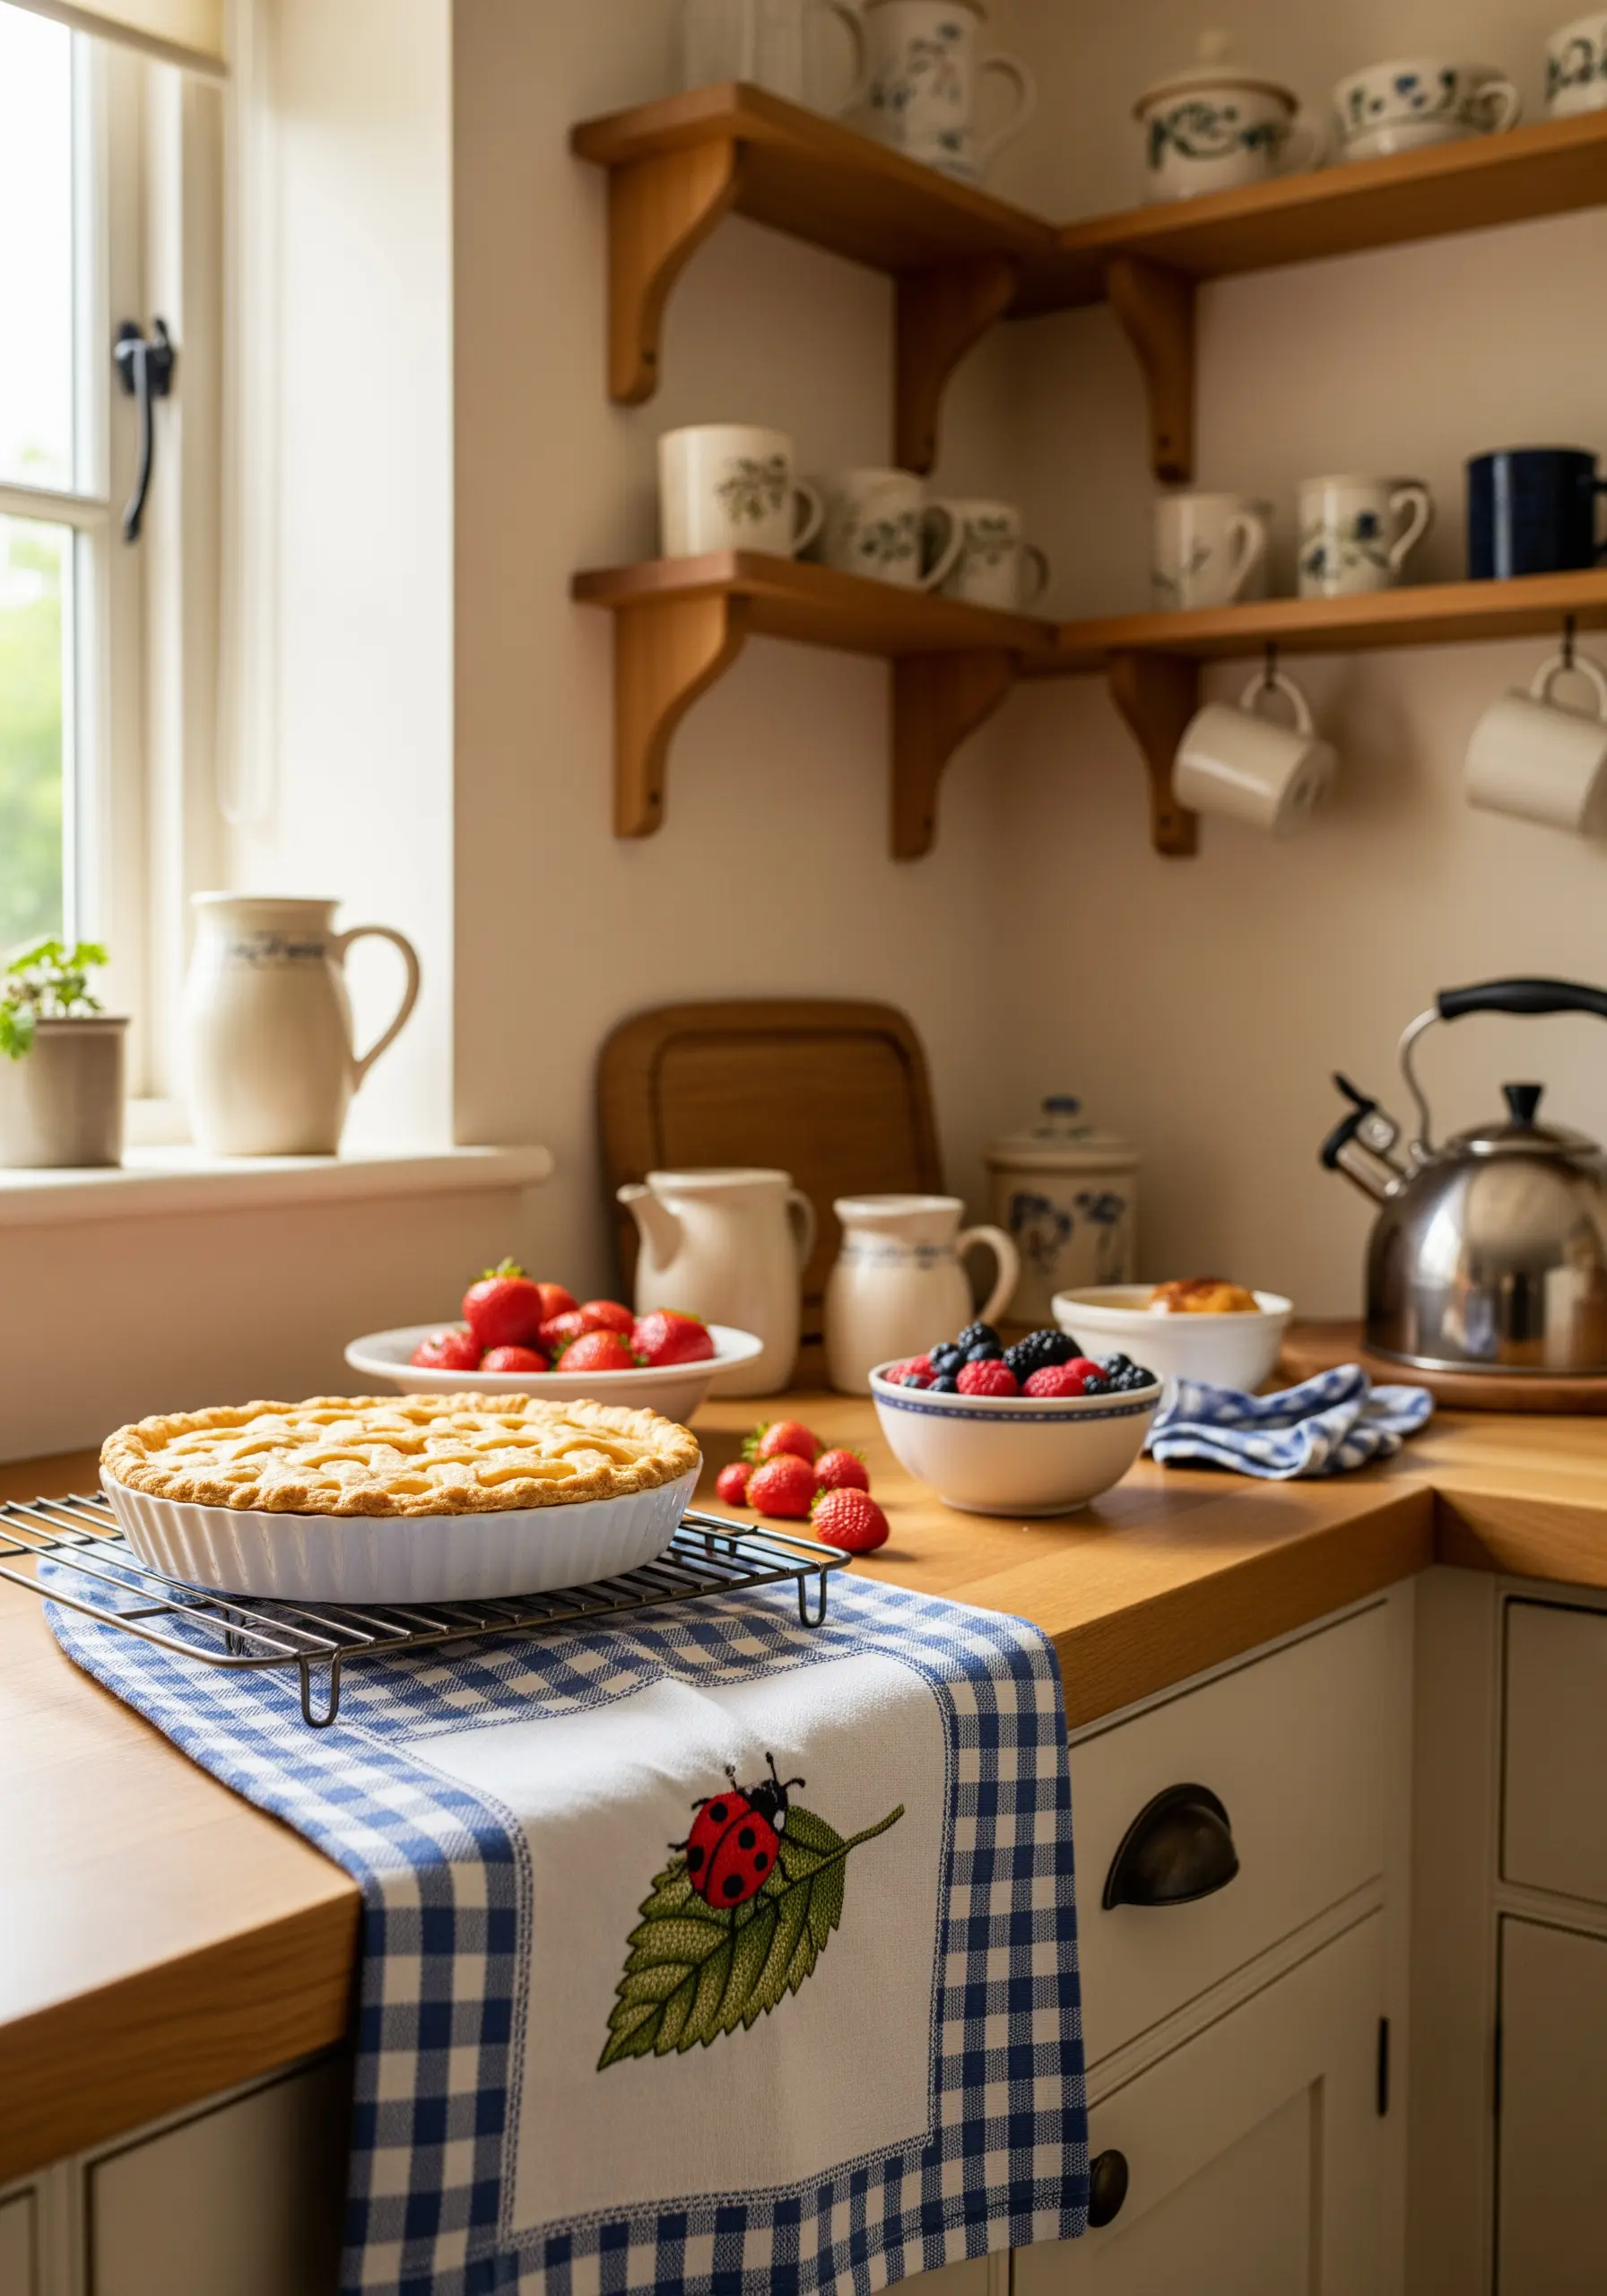
A simple way to frame your embroidery and add a touch of cottage charm is to incorporate a fabric border.
Cut a strip of gingham fabric and press the edges under. Topstitch it neatly onto the towel before you begin your embroidery.
Stitching your motif—like this simple ladybug on a leaf—so that it slightly overlaps the fabric border makes the two elements feel cohesive and fully integrated.
18. Add a Secret Glow to Your Stitching

For a design that holds a delightful surprise, stitch your constellation with glow-in-the-dark embroidery floss.
Use a single strand for the fine connecting lines to keep them delicate. For the stars, use French knots of varying sizes—wrap the thread once for small stars and two or three times for brighter ones.
The result is a sophisticated astronomical chart by day and a magical, glowing map by night.
19. Replicate Food Textures with Smart Stitch Choices
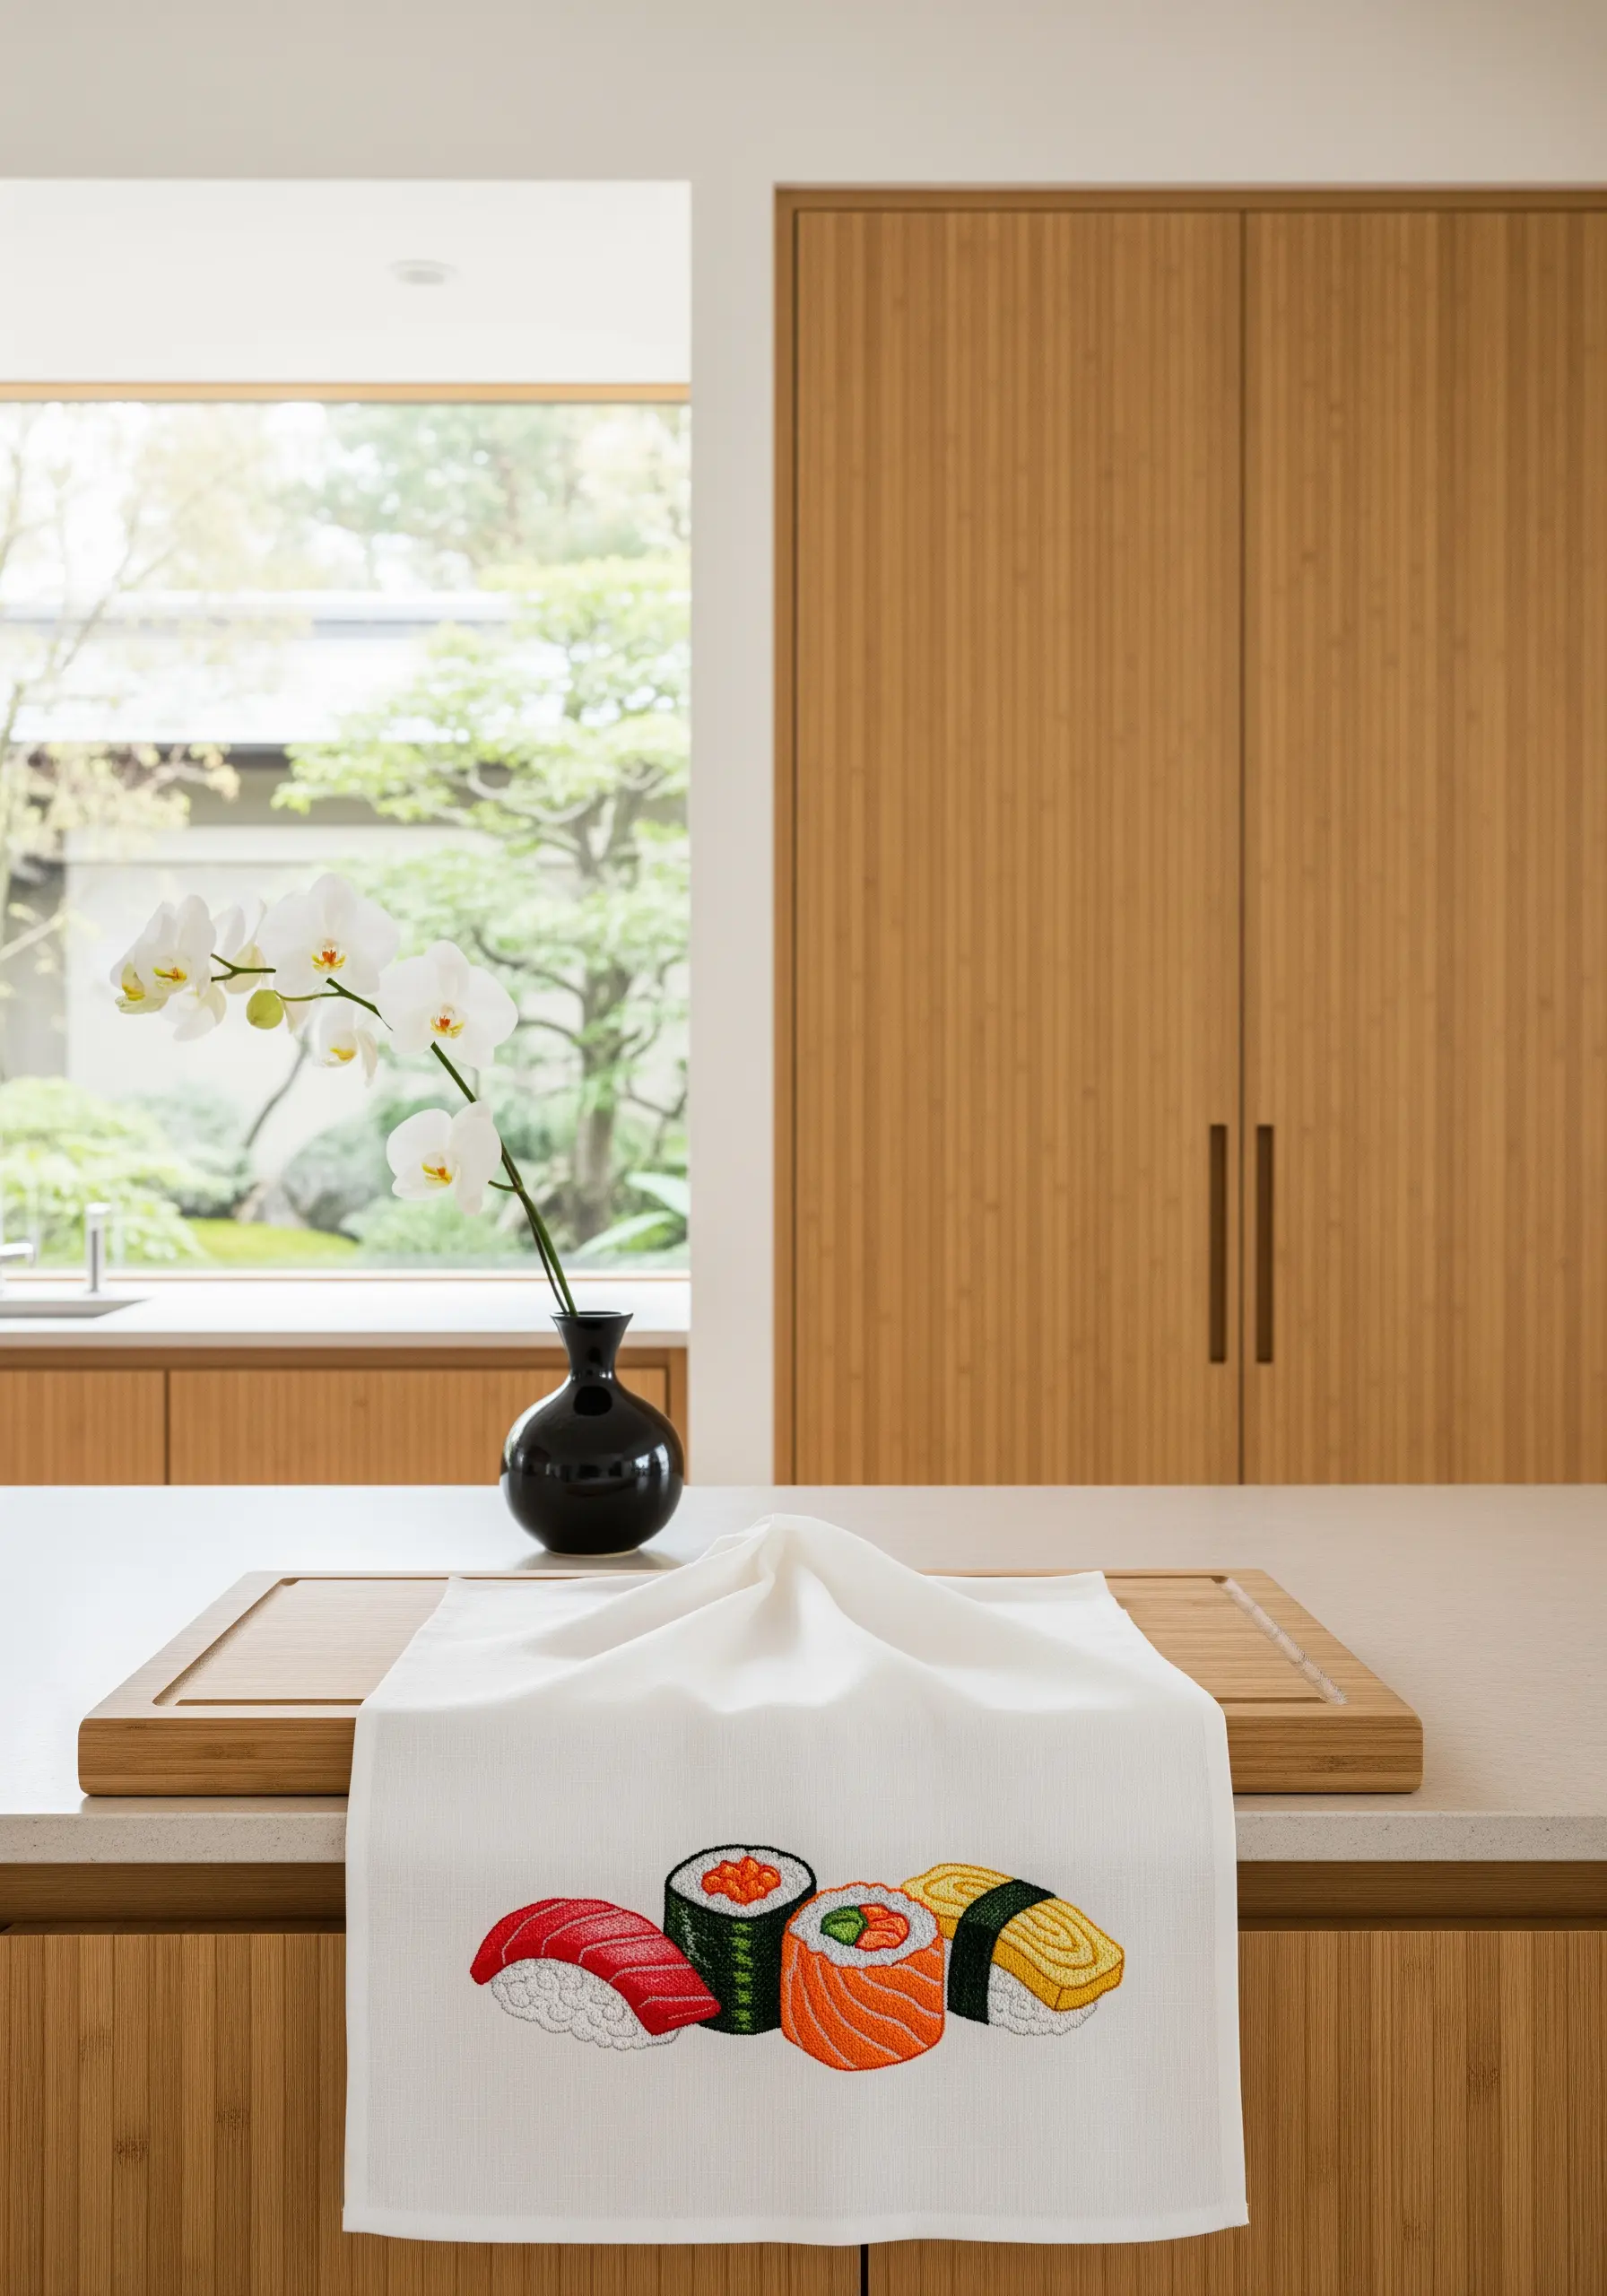
To make embroidered food look appetizing, think about its real-life texture. For this sushi set, each piece requires a different approach.
Use tiny orange French knots clustered together for the ikura (roe). For the salmon, blend pink and orange with long-and-short stitches, adding white straight stitches for the stripes of fat.
A grid of straight stitches, or a brick stitch, perfectly replicates the texture of the tamago (egg). This attention to detail makes the design both clever and convincing.
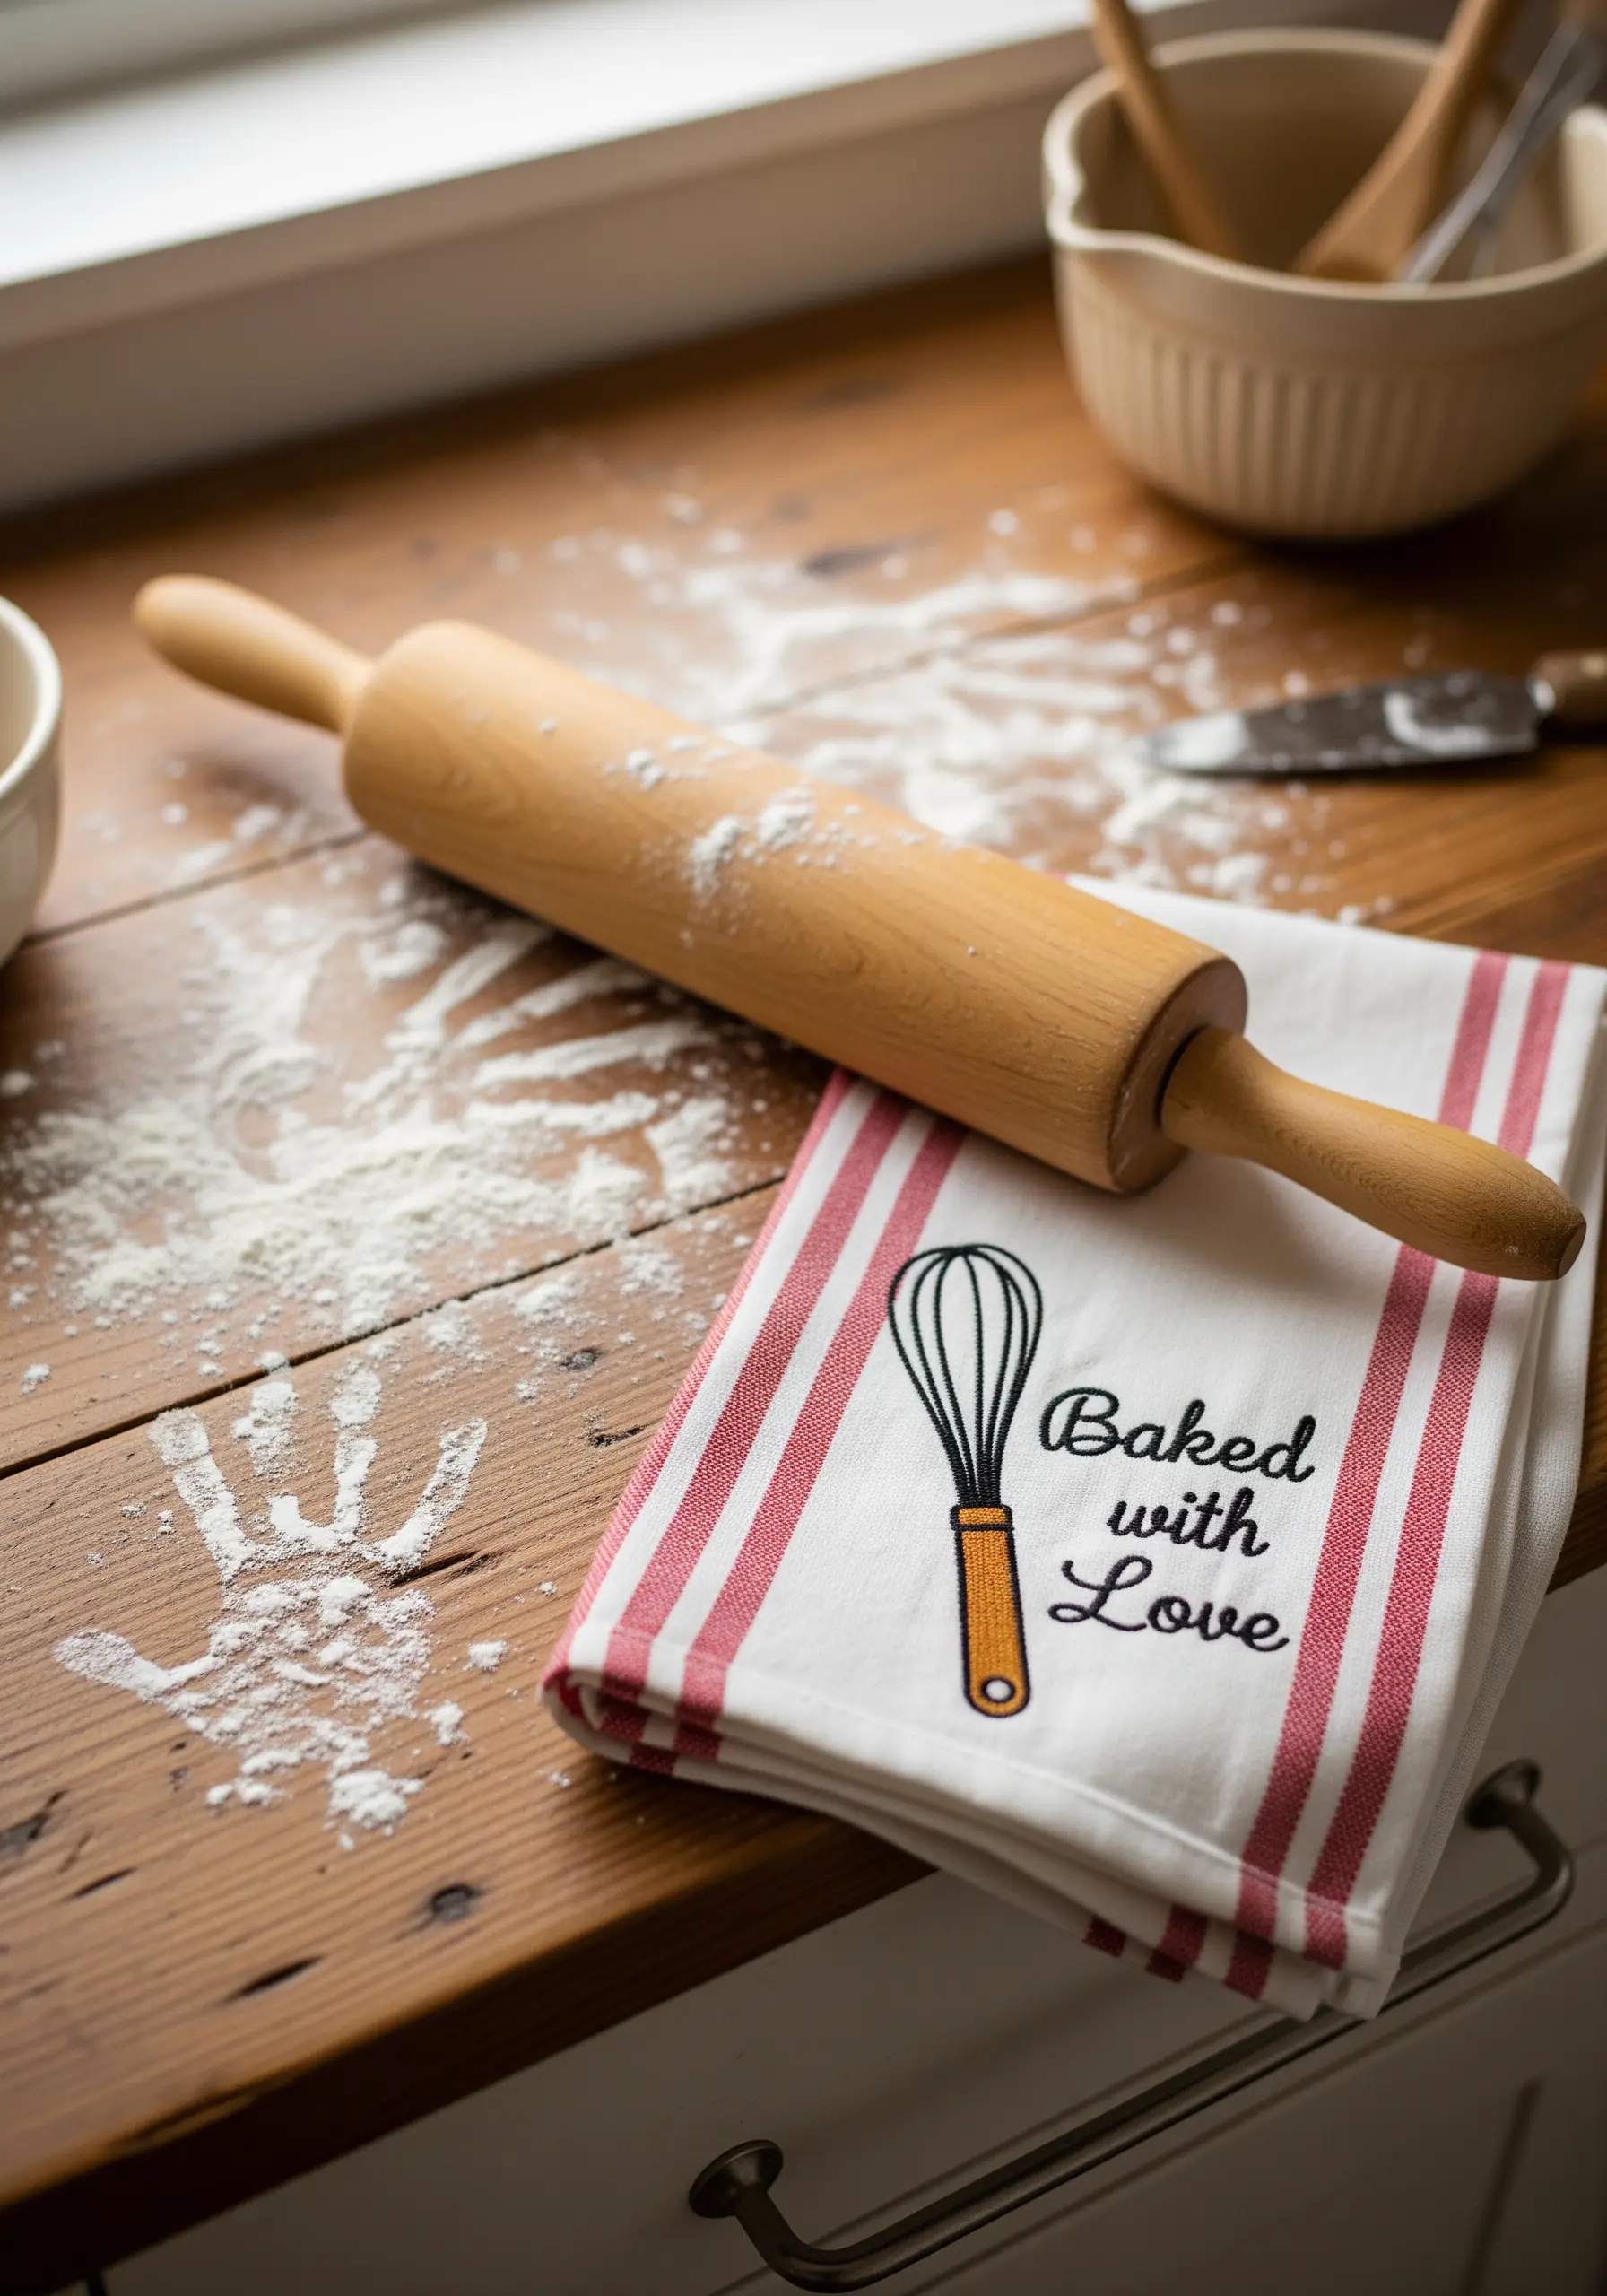
20. Give Lettering a Soft, Approachable Feel

For a heartfelt quote, a hard, graphic font can feel out of place. Soften your lettering with a simple but effective technique.
Instead of a standard backstitch, use a stem stitch. The slightly overlapping nature of the stitch gives the lines a rounded, rope-like quality that feels gentler and more organic.
For the tiny heart, use a padded satin stitch—a few underlying straight stitches—to give it a subtle, charming puffiness.
21. Create a Wildflower Meadow with a Stitch Sampler
A field of wildflowers is the perfect opportunity to play with a variety of simple stitches to create depth and texture.
Use lazy daisy stitches for petals, French knots for flower centers and buds, and straight stitches for grass and stems.
Vary the height, color, and thread count (using one strand for distant flowers and three for closer ones) to build a layered, natural-looking scene. This approach turns your towel into a beautiful wild garden.
22. Explore Negative Space with Tonal Stitching
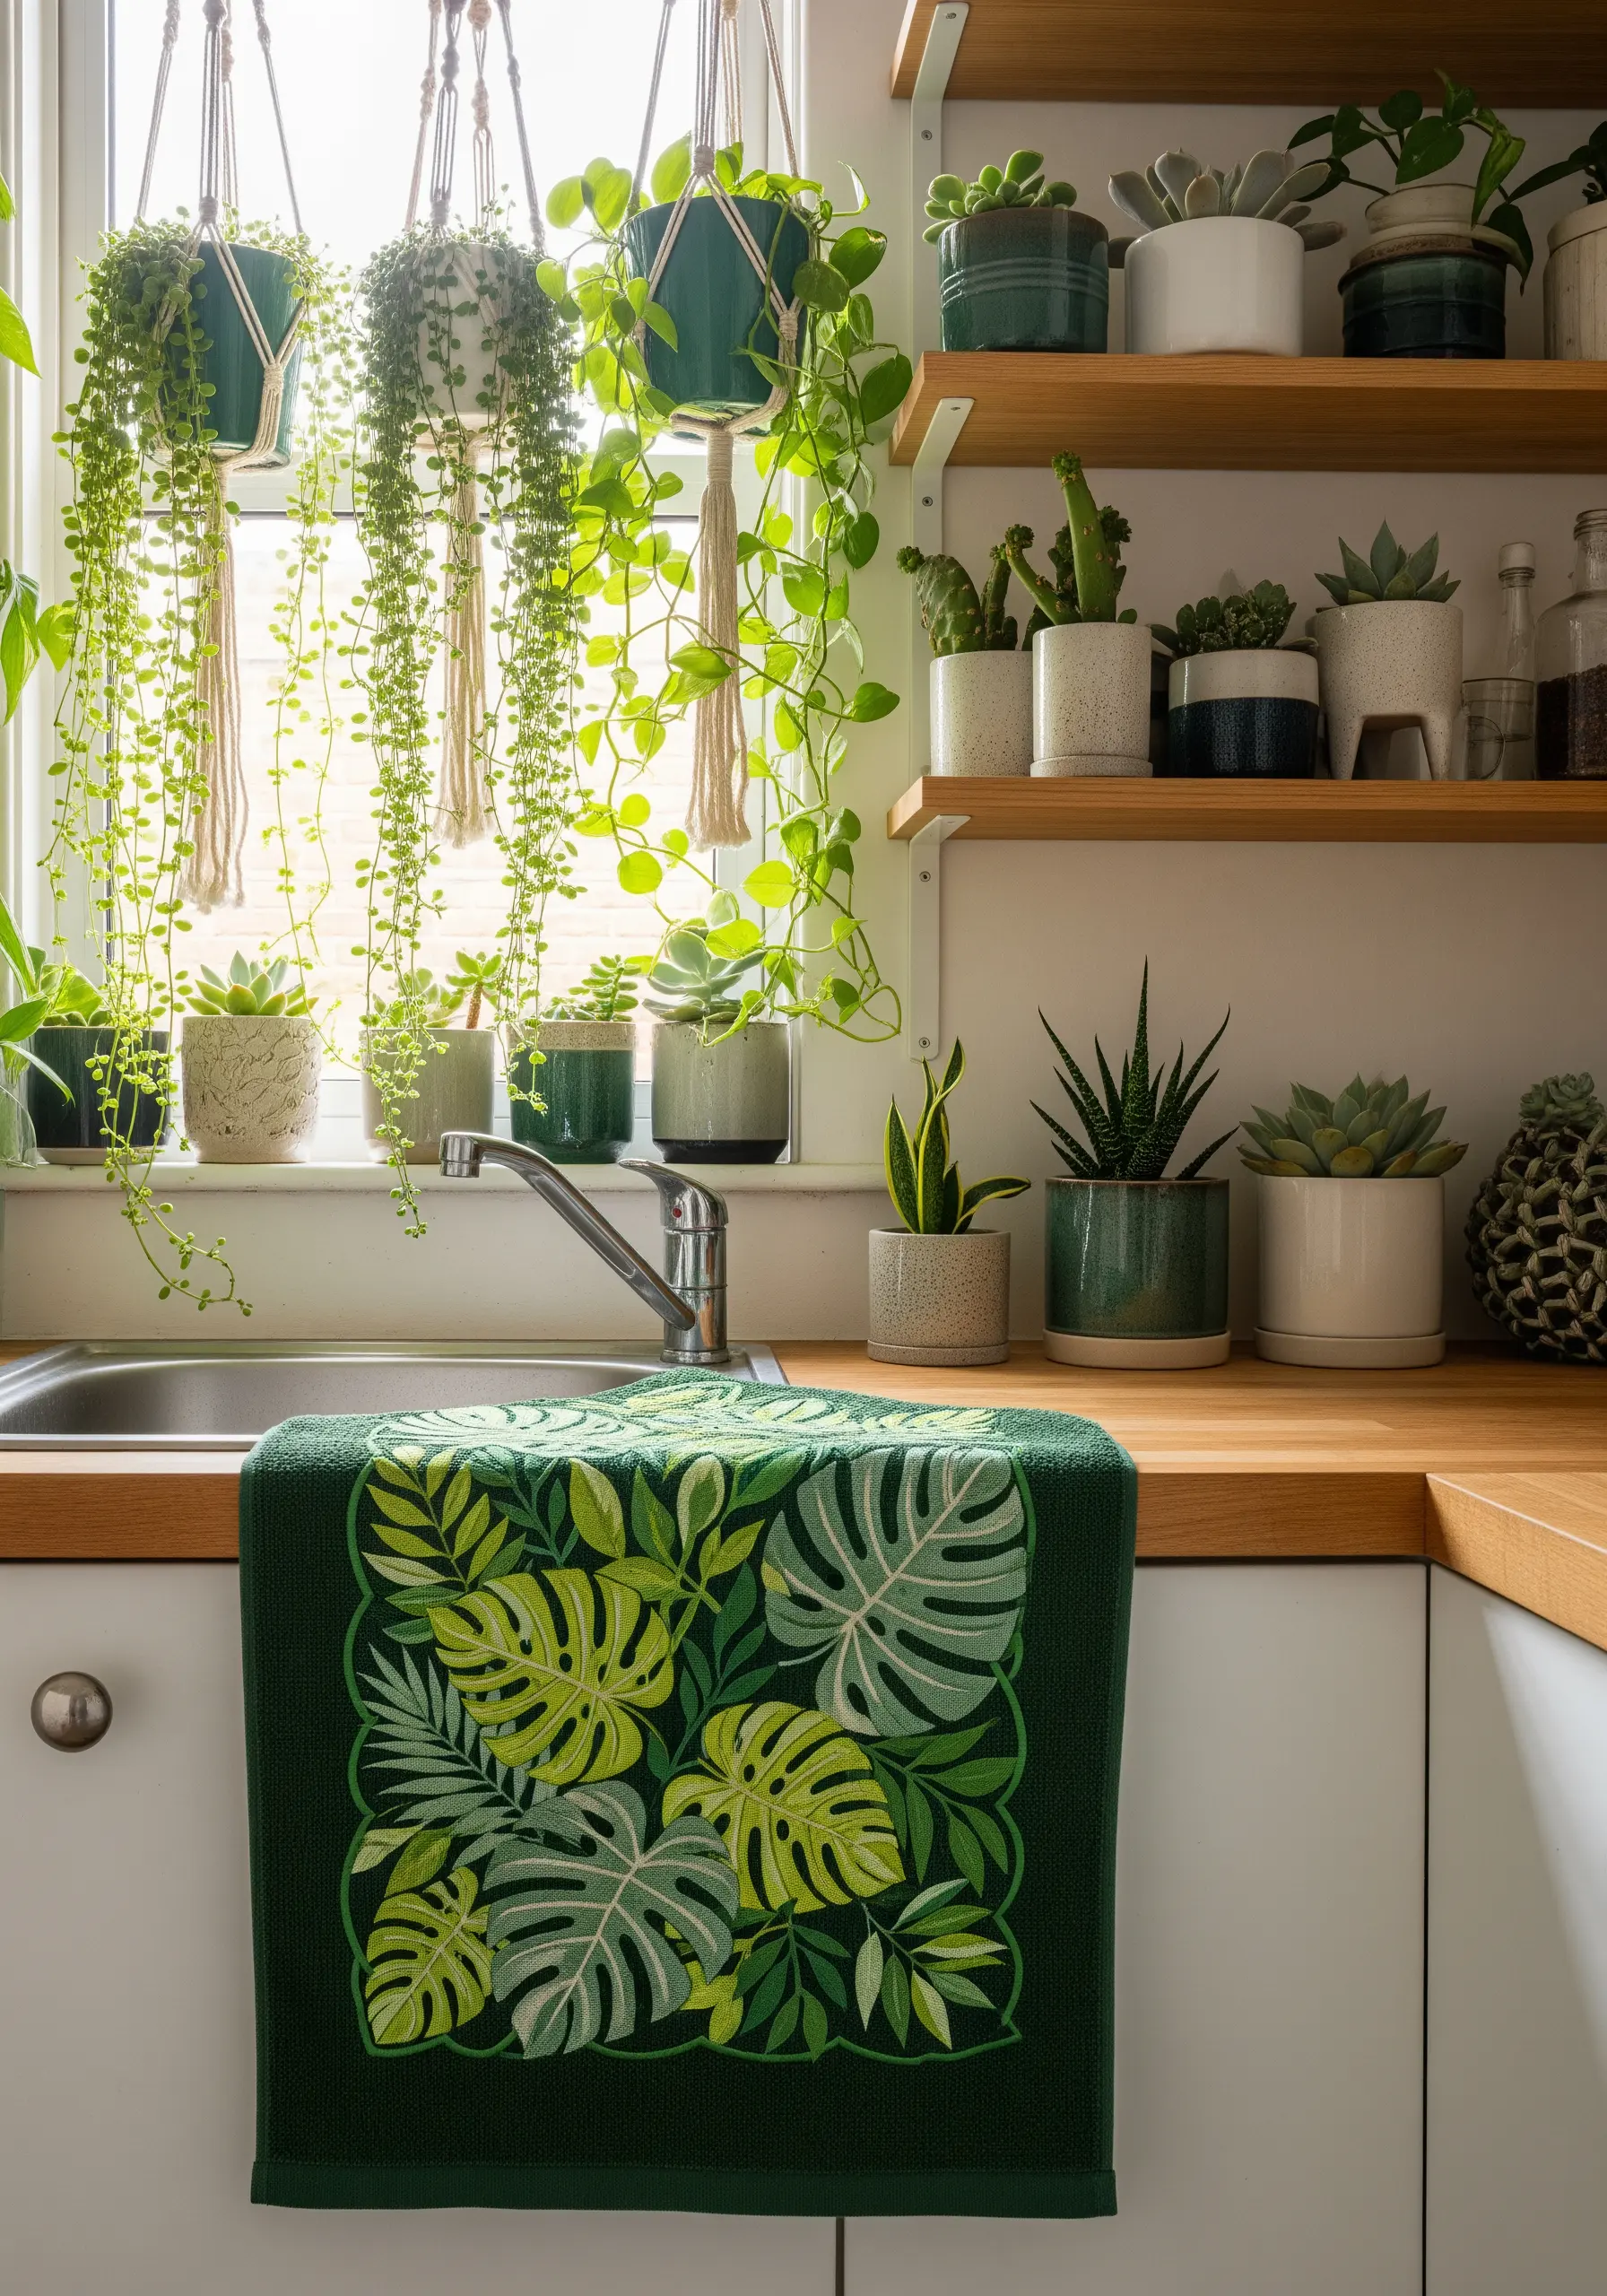
Instead of filling in the leaves, let the fabric do the work. This sophisticated design is created by stitching the background.
Trace your leaf pattern onto the towel. Then, fill the entire area *around* the leaves with dense straight stitches or seed stitches, using a thread that’s a few shades lighter or darker than your fabric.
The result is a subtle, textured design where the leaves emerge from the background, creating a chic, tone-on-tone effect.
23. Create Visual Interest by Pairing Fonts
Combining two different lettering styles adds instant personality to any embroidered quote.
For a clean, modern look, pair a simple print with an elegant script. Stitch the print letters using a basic backstitch for clarity and structure.
For the script font, use a whipped backstitch or stem stitch to create a smoother, more fluid line that mimics handwriting. This simple pairing makes your text feel dynamic and thoughtfully designed.
24. Capture Shaggy Fur with the Turkey Work Stitch
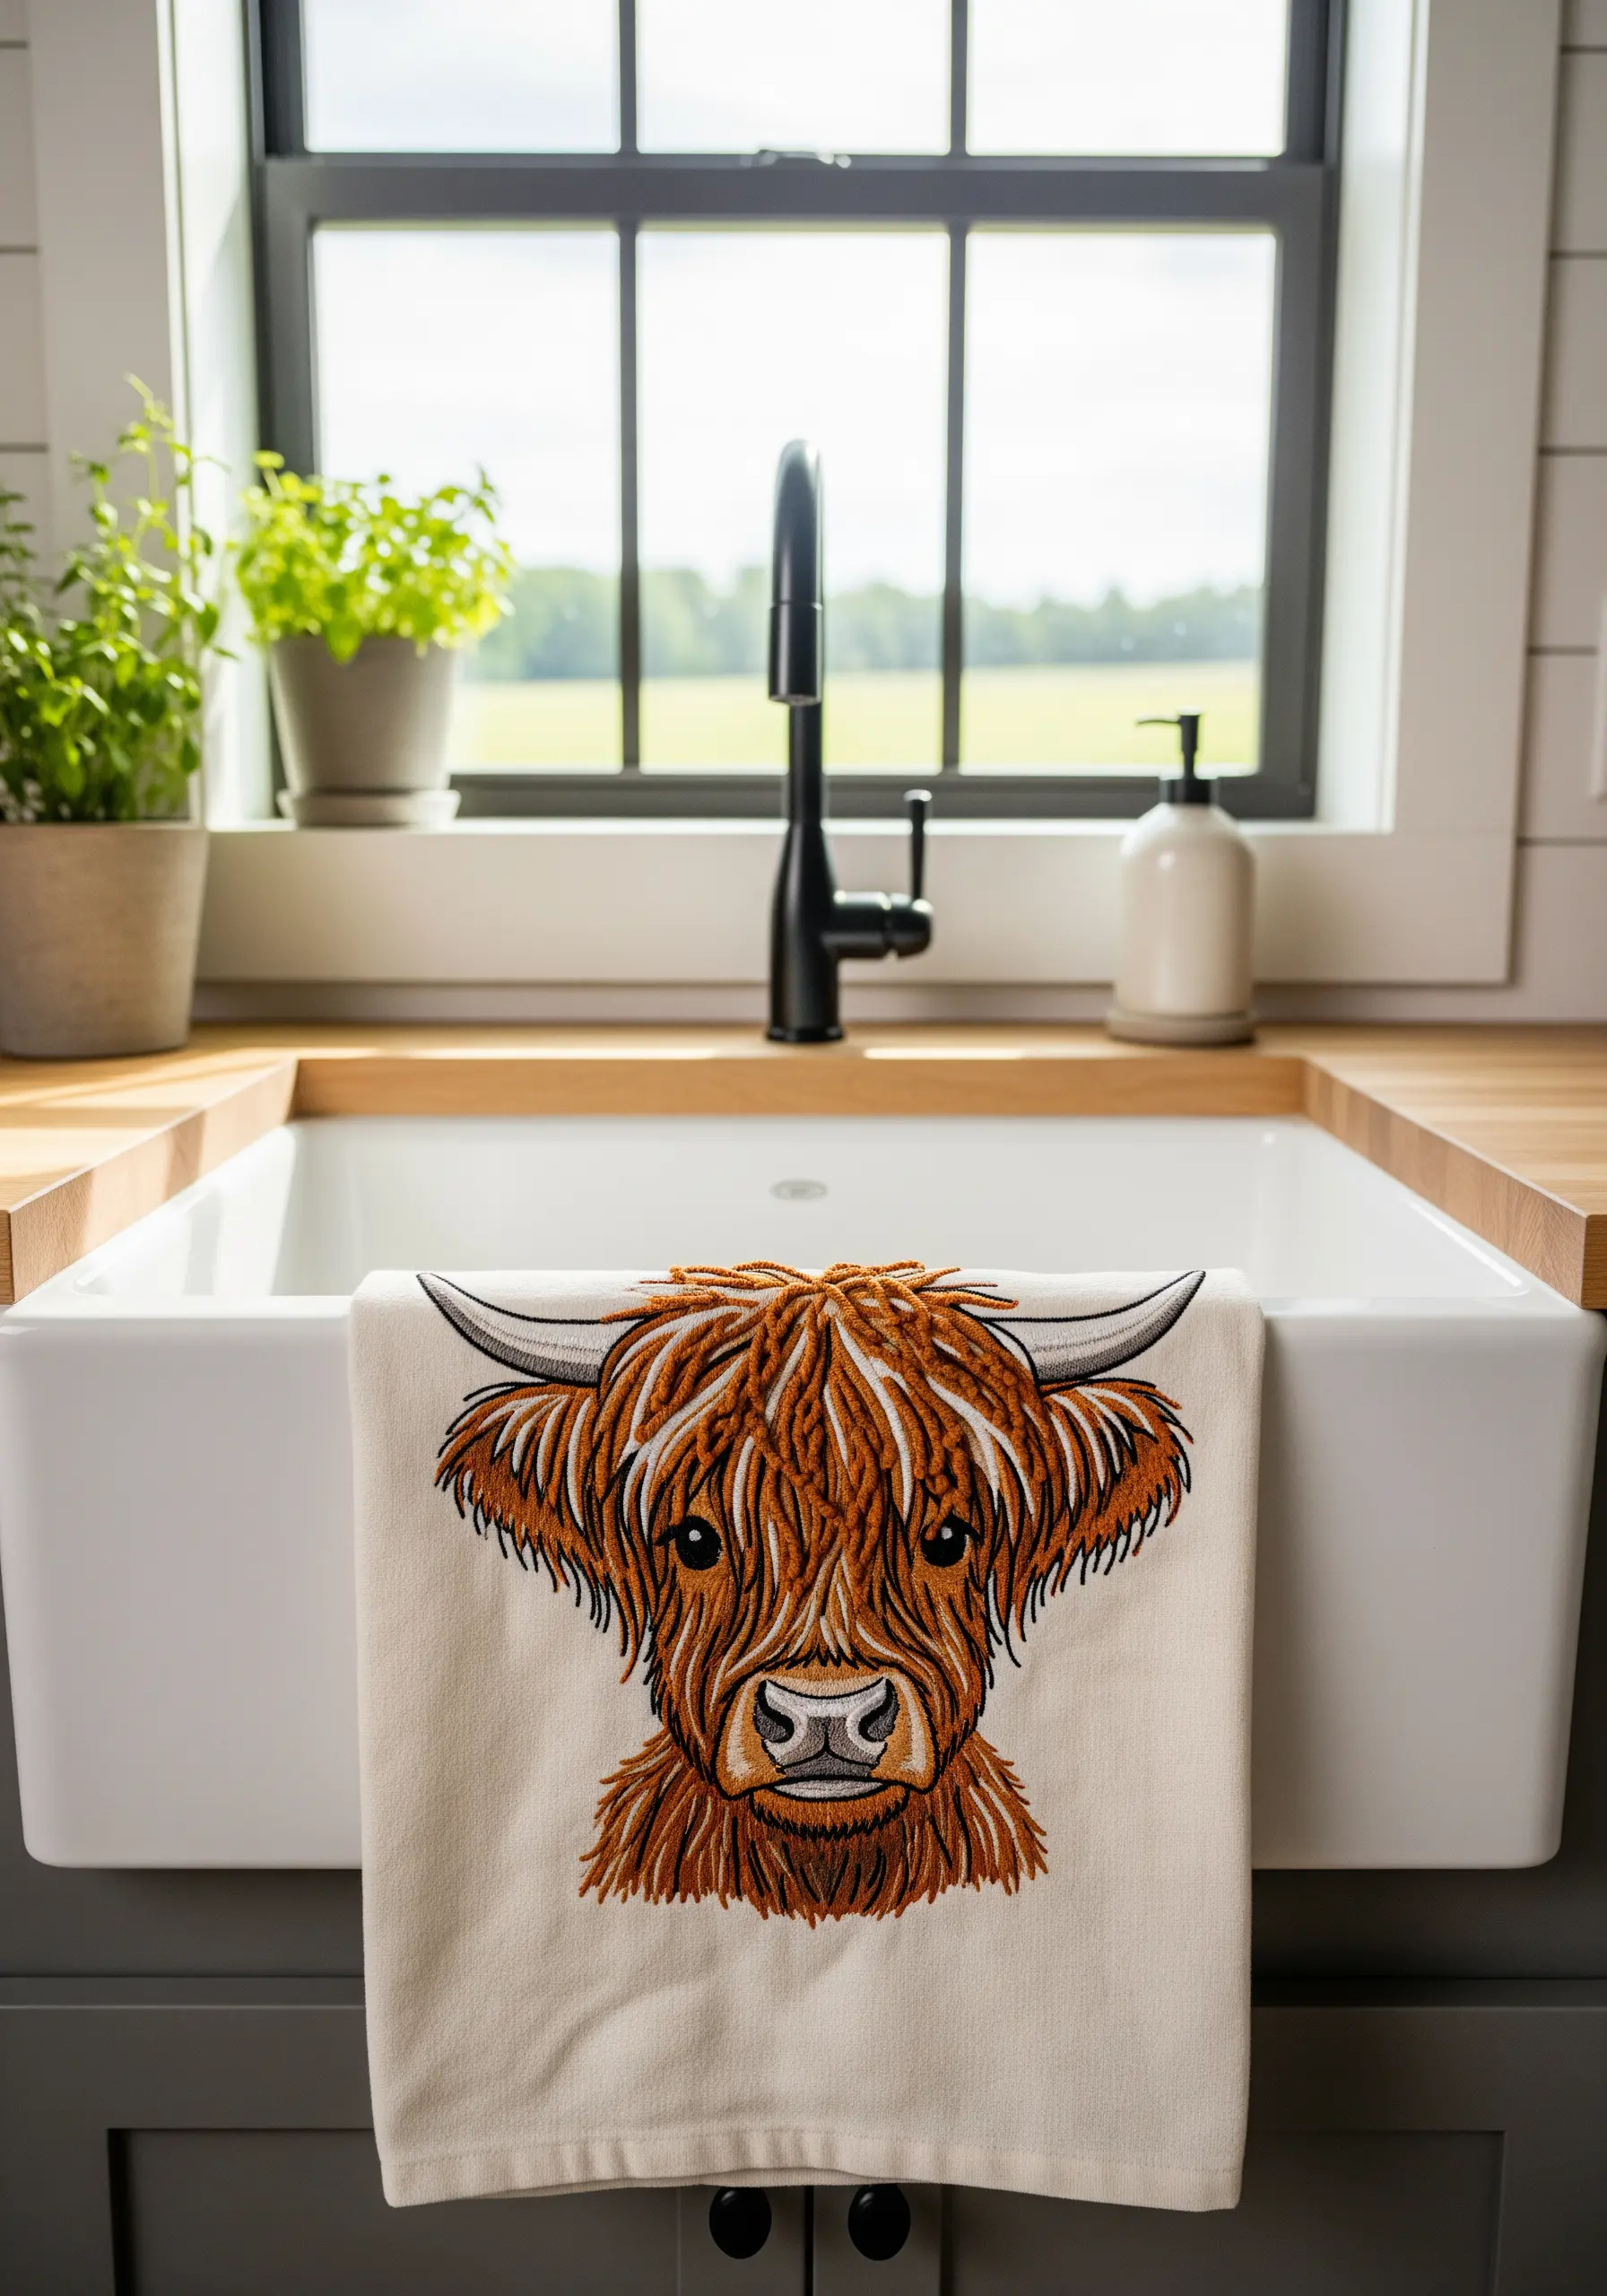
To achieve the wonderfully shaggy coat of a Highland cow, you need a stitch that creates loops you can trim.
The Turkey work stitch is perfect for this. You create a series of loops that are anchored at the base. Once an area is filled, you can snip the tops of the loops and fluff them up to create a plush, fur-like texture.
Use a blend of brown, orange, and tan threads to give the fur realistic depth and color variation.
25. Translate Tilework into Thread
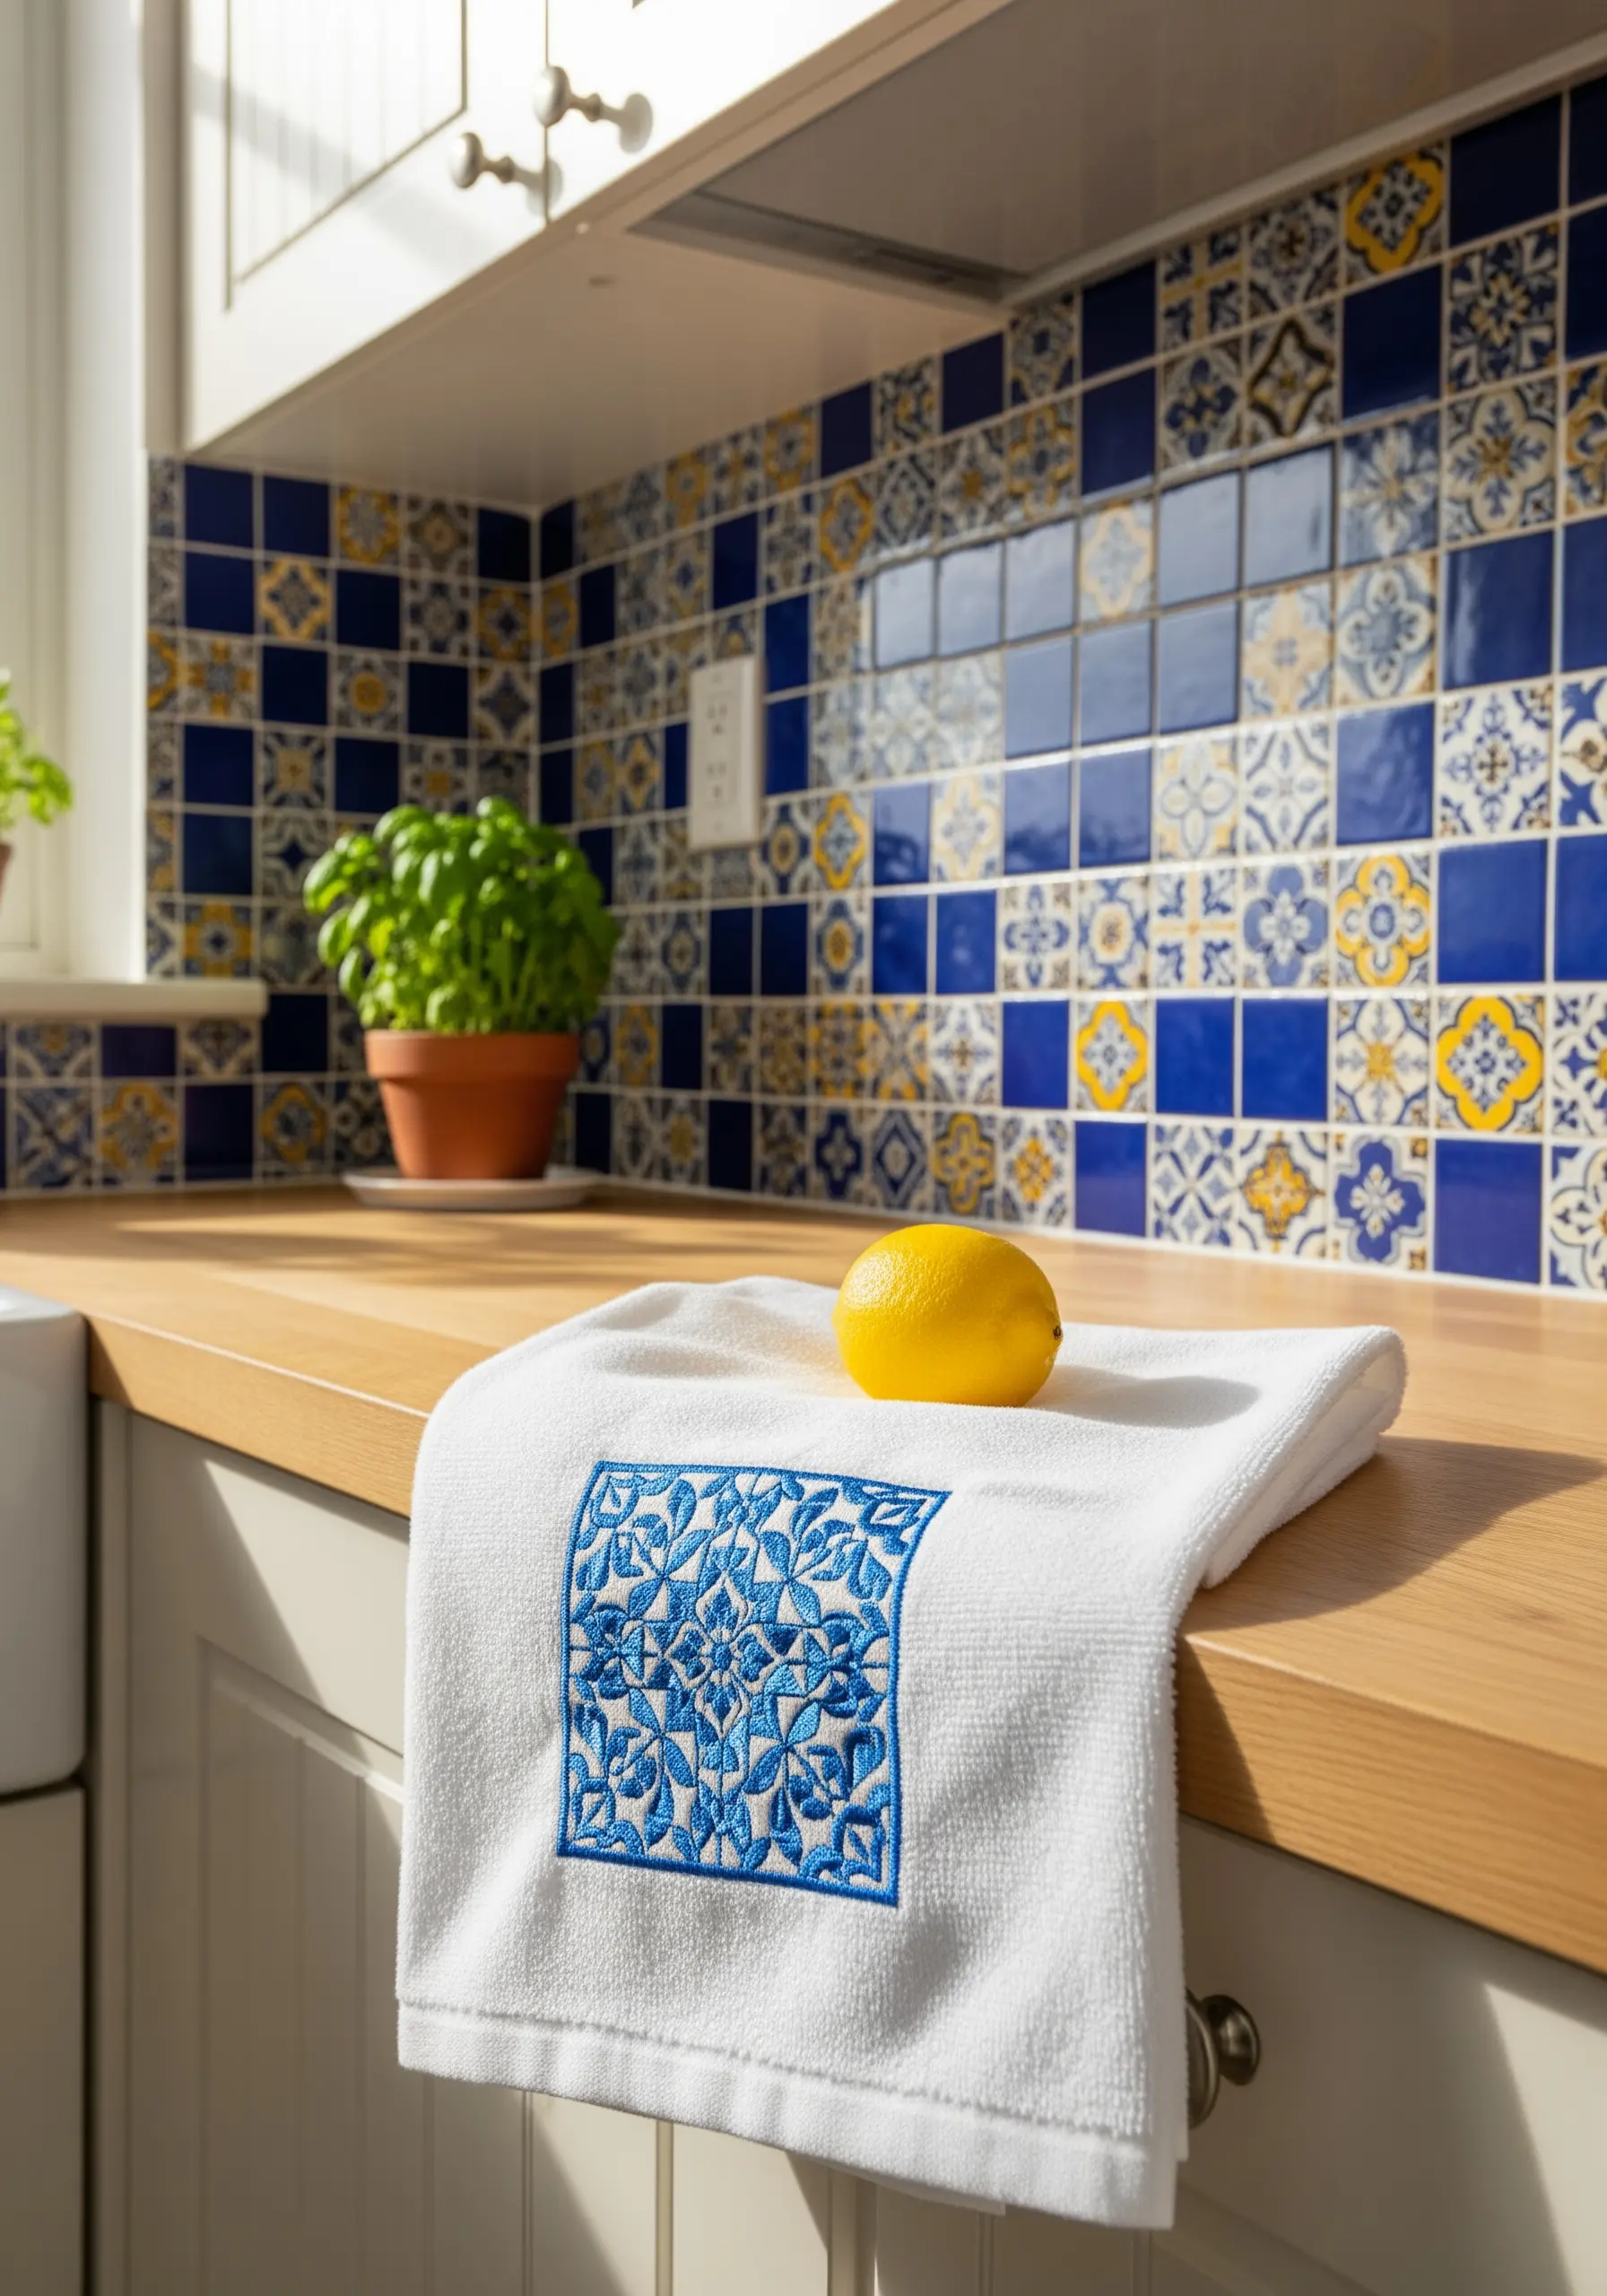
Replicating the intricate look of Portuguese Azulejo tiles on fabric requires a focus on dense, smooth fills.
Because this design is so stitch-heavy, it’s crucial to use a stabilizer on your towel—especially if it’s terry cloth—to prevent distortion.
Outline each shape with a dark blue backstitch, then fill with satin stitches in lighter shades of blue. Keeping your satin stitches short and tightly packed is the key to achieving that smooth, ceramic-like finish.
26. Design with Raw-Edge Appliqué for a Modern Look

For a bold, graphic design like this, you can embrace a more deconstructed, modern appliqué technique.
Instead of turning the edges under or covering them with satin stitch, leave them raw. Simply fuse your fabric shapes onto the towel with an iron-on adhesive.
Then, use a simple running stitch in a matching or contrasting thread about an eighth of an inch from the edge. This secures the shape while creating a clean, architectural, and slightly rustic finish. It’s a key technique in many fabric collage embroidery ideas.
27. Use Directional Satin Stitch for Simple Shading

Even a simple motif like a carrot can be given beautiful dimension through the thoughtful direction of your satin stitch.
Instead of stitching straight across, angle your stitches slightly inward, following the natural curve of the carrot. This subtle change instantly creates a sense of roundness.
Use two or three similar shades of orange, filling sections with different tones to create highlights and shadows without complex blending.
28. Capture Detail with a Fine-Line Backstitch

When embroidering a detailed skyline, the goal is recognition, not realism. A clean, simple outline is most effective.
Use a single strand of embroidery floss in a contrasting color. A single strand is fine enough to capture architectural details without becoming messy or cluttered.
A tiny, neat backstitch is the perfect choice, creating a crisp, continuous line that looks like a pen-and-ink drawing on fabric.
29. Create Shading with Cross-Hatching
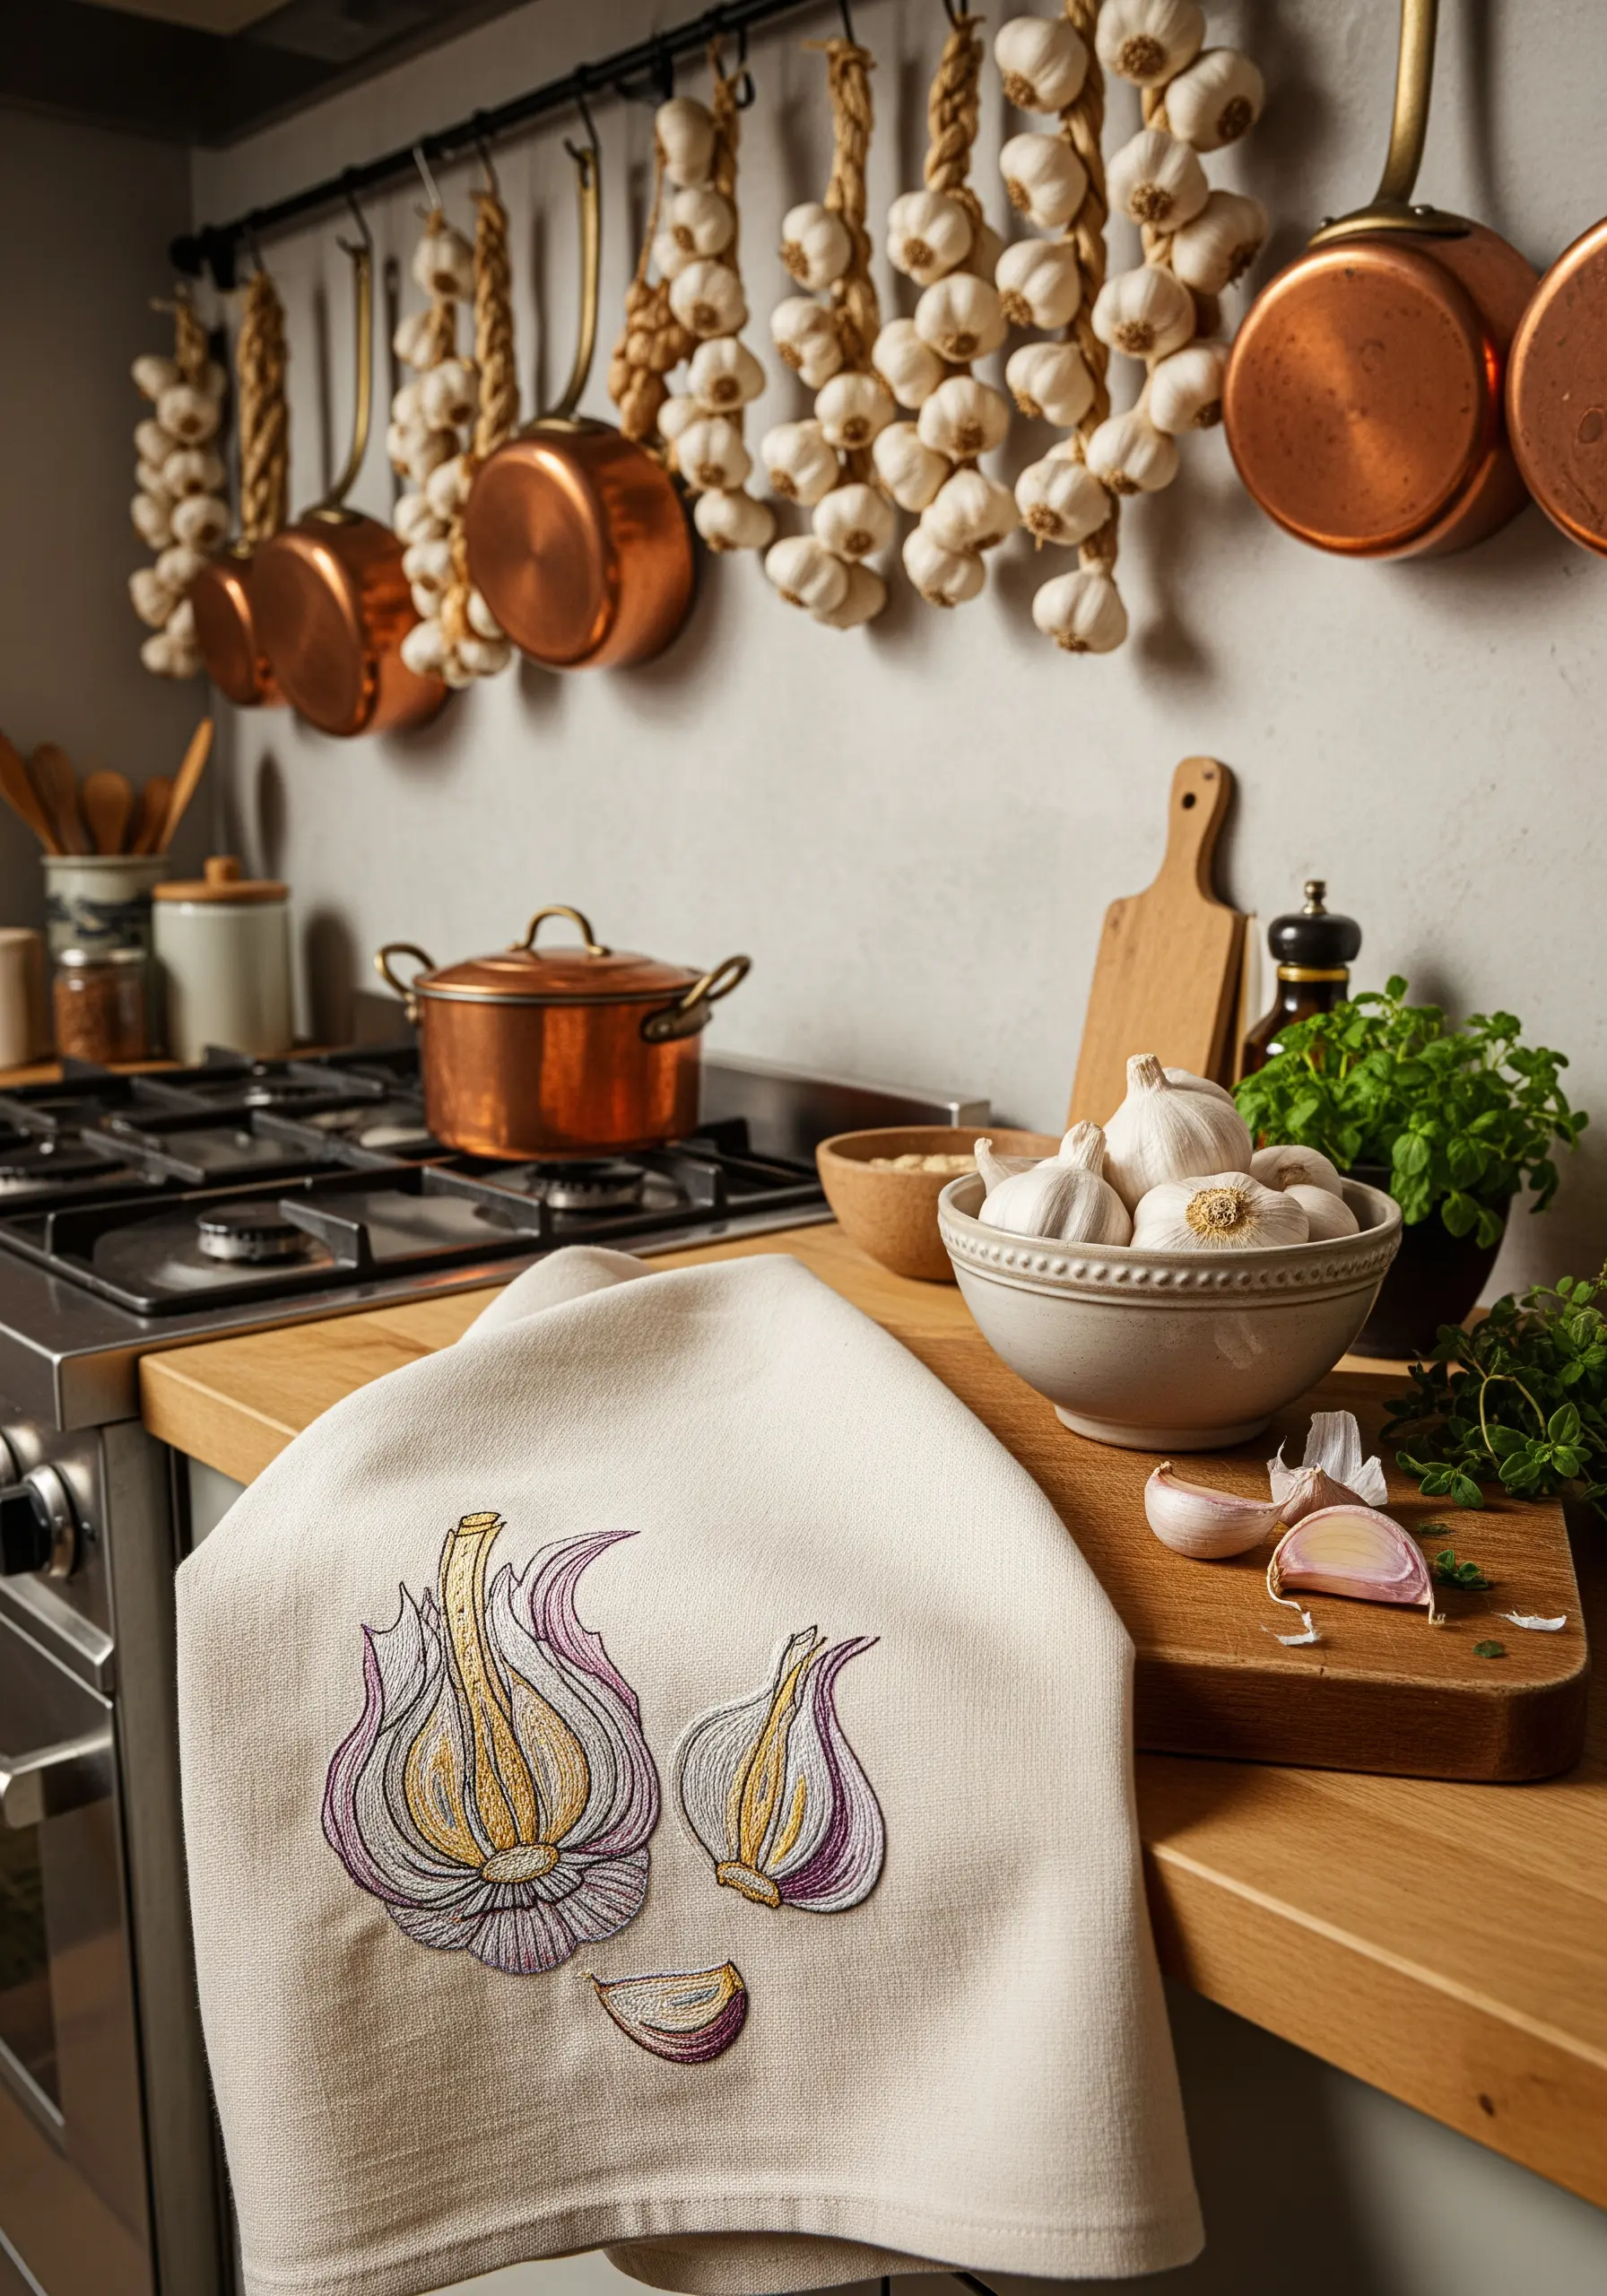
To give these garlic bulbs a papery, translucent texture, mimic the style of a botanical sketch by using cross-hatching.
Fill the main shapes with a light satin stitch. Then, come back with a single strand of a darker color (like purple or grey) and add layers of spaced-out straight stitches, first in one direction and then across them in another.
This technique builds up tone and texture beautifully, giving the design an artistic, hand-drawn quality.
30. Combine Felt Appliqué for Playful Dimension

For a fun, fast, and wonderfully tactile design, combine embroidery with simple felt appliqué.
Cut the egg white and yolk shapes from felt and secure them to your towel with a few small stitches or fabric glue.
Then, add the personality with embroidery. A simple backstitch for the smiles and French knots for the rosy cheeks are all you need. This mixed-media approach is perfect for creating fun fabric crafts with lots of character.


