

You have the threads, the fabric, the desire to create something beautiful. But perhaps you feel a gap between the vision in your mind and the final stitches in the hoop. It’s a quiet frustration many of us feel—the sense that your work could be more refined, more expressive, more you.
Let’s shift that feeling, not with more complexity, but with more intention. The difference between good embroidery and stunning embroidery often lies in a few small, thoughtful adjustments: the way you layer a color, the stitch you choose for an outline, or the texture you create with a simple knot.
These ideas are your invitation to explore that next level. They are tiny projects, yes, but they are built on powerful techniques that will sharpen your eye and steady your hand. You’ll discover that creating something that looks intricate and polished is not about difficulty—it’s about clarity.
1. Create Botanical Depth with Color Layering

To give your embroidered ferns and leaves a realistic, three-dimensional quality, work with a palette of three to four shades of the same color—from dark to light.
Use a fishbone stitch, alternating the shades as you work your way down each frond.
Place the darkest shade at the base and center, gradually introducing lighter shades toward the tips.
This technique mimics how light naturally hits foliage, creating depth and movement without requiring any complex new stitches. The result is lush, textured, and looks far more advanced than it is.
2. Build Dimension with Felt Appliqué Brooches

You can create charming, layered characters without intricate embroidery by using felt appliqué.
Cut your main shapes from different colors of felt and layer them to build the form—like the white face on the fox or the grey mask on the badger.
Use a simple blanket stitch around the edges with a contrasting thread to secure the pieces and create a clean, professional finish.
For tiny details like eyes or whiskers, a few well-placed seed stitches or French knots are all you need to bring your creation to life.
3. Craft a Landscape with Fabric Collage
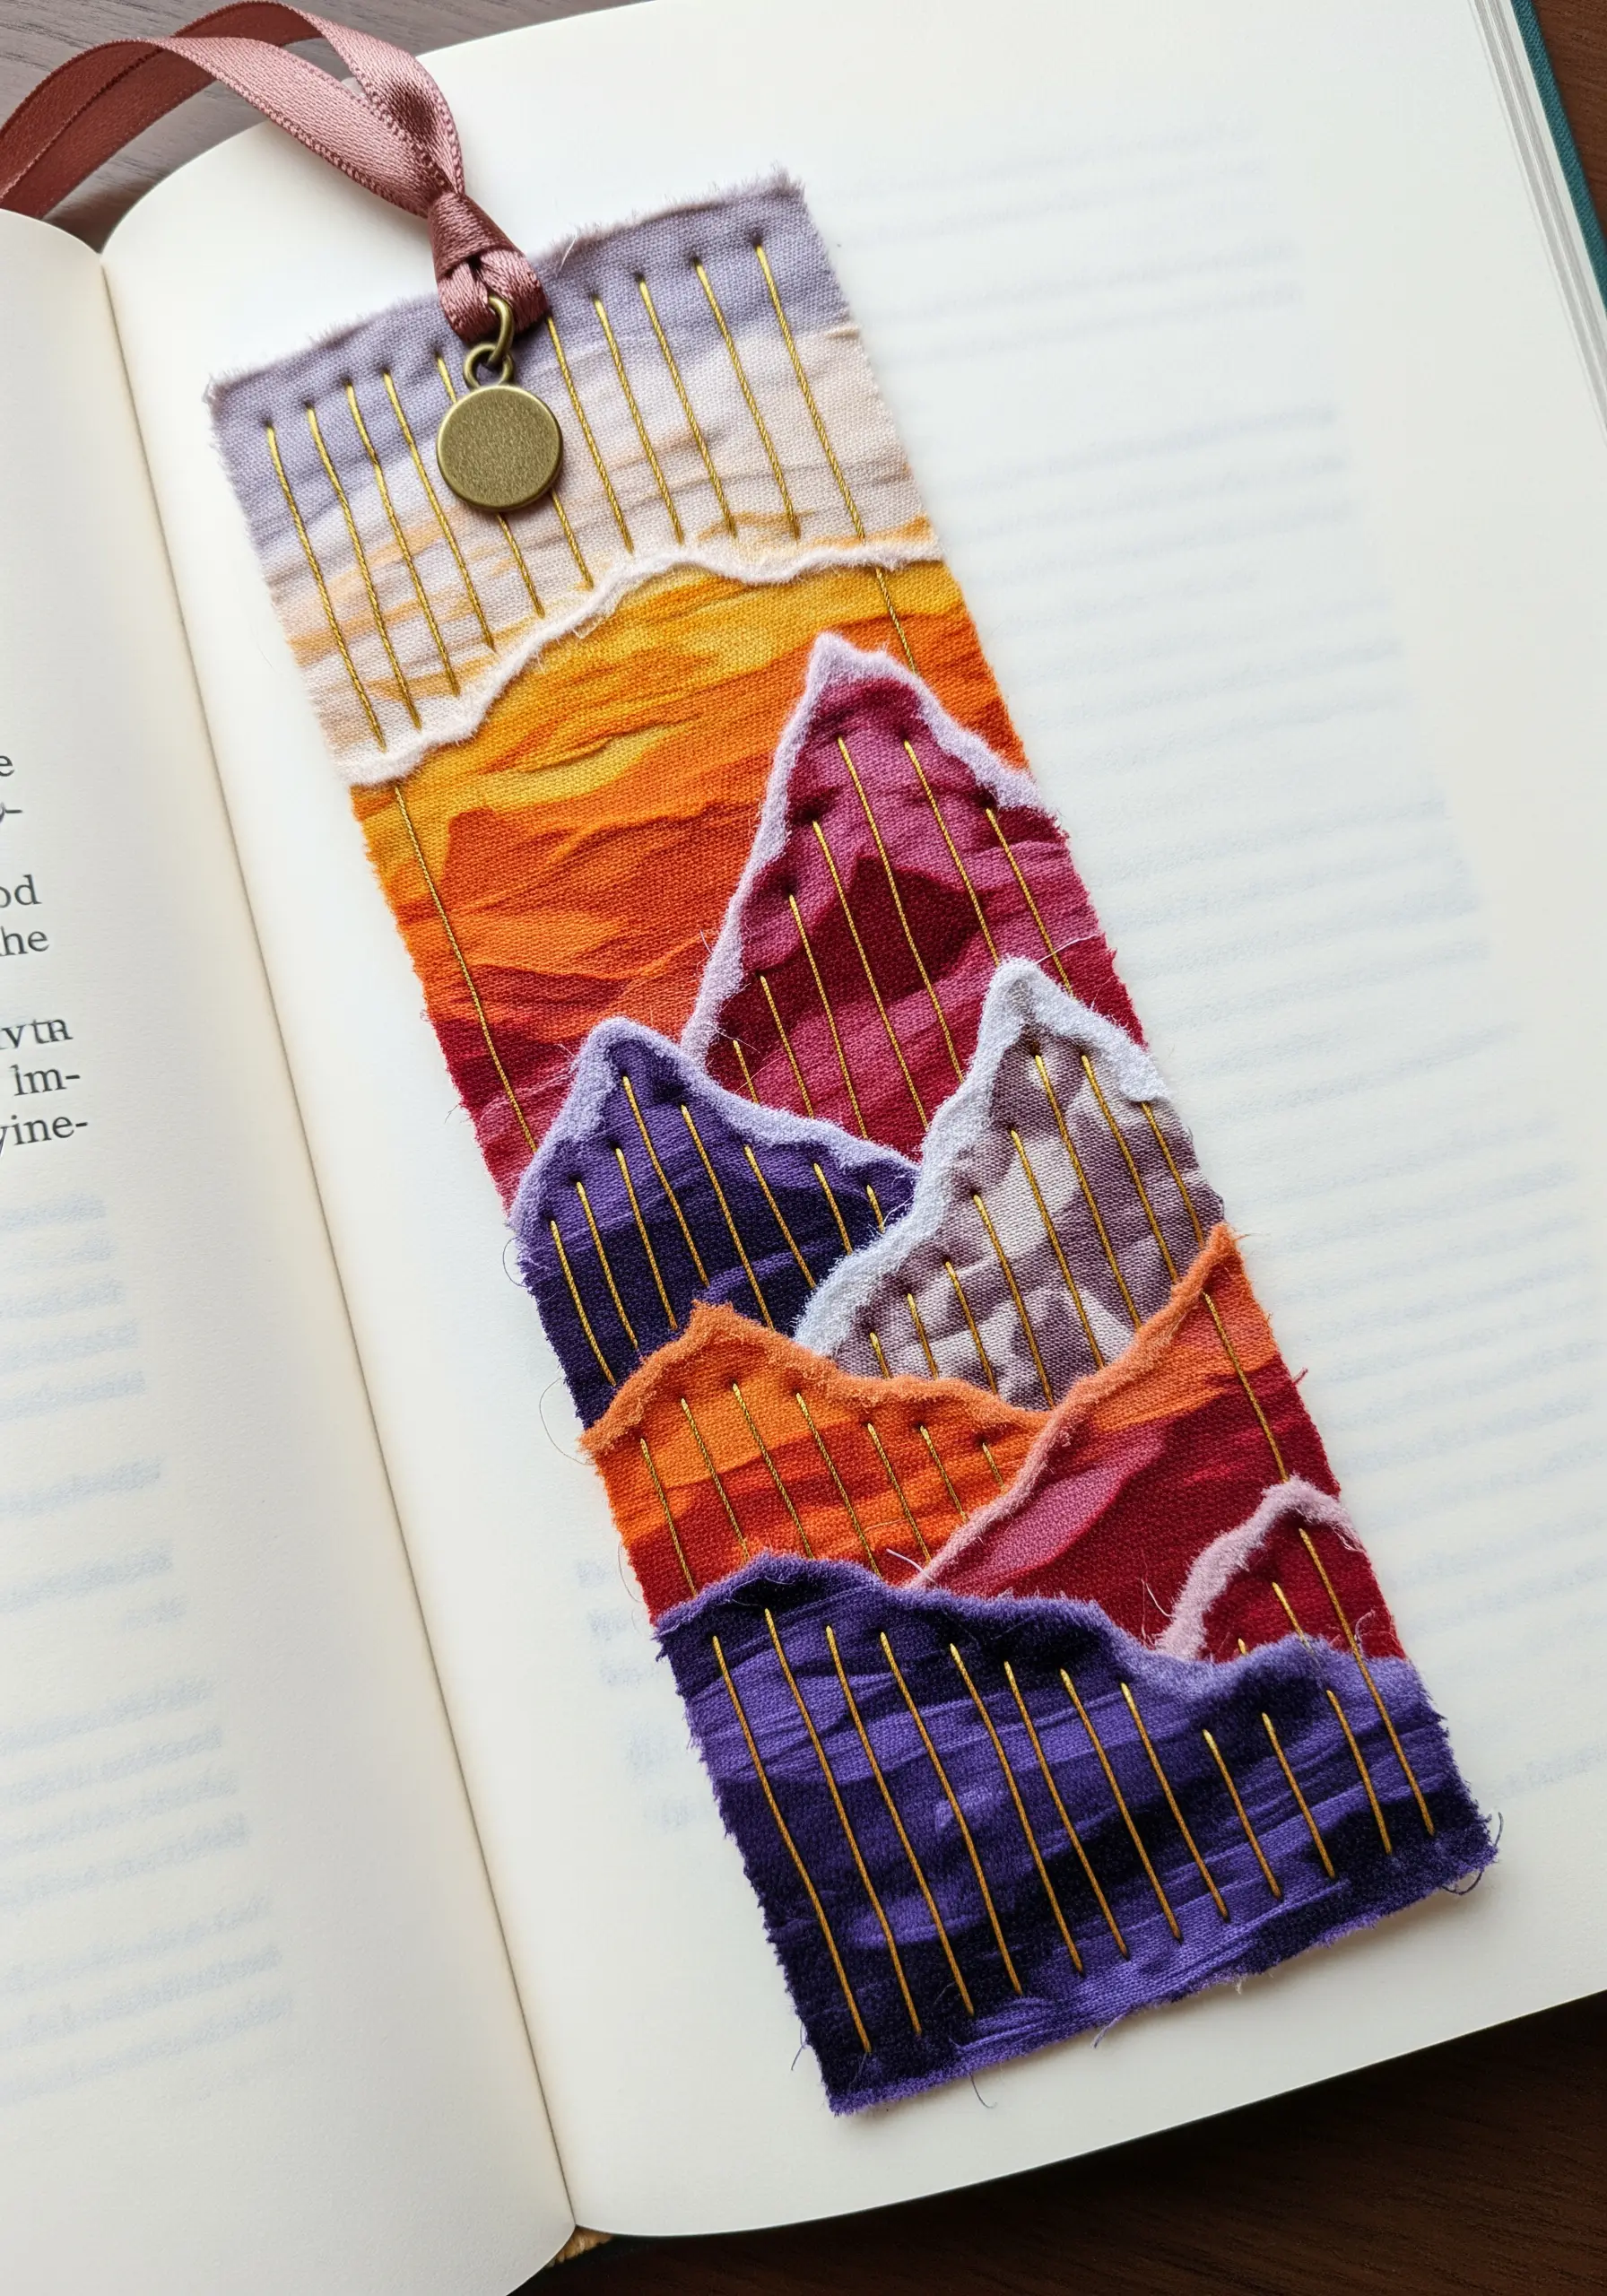
Turn tiny fabric scraps into an atmospheric landscape bookmark.
Start by tearing small pieces of fabric—the frayed edges add beautiful, organic texture—and arrange them to form mountains and a sky.
Once you’re happy with the composition, lay them on a backing fabric and secure them with simple, straight vertical stitches in a contrasting metallic thread.
This technique, known as couching, not only holds the pieces but also adds a graphic element that suggests rain or sunbeams, unifying the entire design.
4. Design a Wildflower Meadow on Felt

A simple project like a needle case becomes a masterpiece when you combine a variety of basic stitches to create a rich, textured garden.
Use lazy daisy stitches for petals, French knots for flower centers, and satin stitch for small buds. Vary the height and color of each flower to create a sense of depth and wildness.
Working on a sturdy fabric like felt provides a stable base, making it easy to keep your stitches neat and even. This is an excellent way to practice new stitches with style.
5. Add Celestial Sparkle with Beading

Transform a simple fabric shape into a luminous ornament with beads and sequins.
Start with a padded fabric base—a bit of stuffing adds a luxurious, 3D feel. Use a fine beading needle and thread that matches your fabric.
Outline the shape with a row of tiny seed beads for a crisp, defined edge. Then, fill the interior with a constellation of sequins and scattered beads to catch the light from every angle.
This is less about complex stitching and more about thoughtful placement and texture.
6. Master the Perfect Fill for Iron-On Patches
The secret to smooth, professional-looking embroidered patches is preparing your outline first.
Before you begin the satin stitch fill, trace the entire outline of your shape with a split stitch. This creates a slightly raised, stable border for your satin stitches to rest against.
When you fill the shape, bring your needle up just outside the split-stitch line and down on the other side. This ensures a clean, sharp edge and prevents the fabric from puckering, giving your patches that coveted store-bought finish.
7. Achieve Painterly Blending with Long-and-Short Stitch

To create the soft, realistic color gradients on a moth’s wings, the long-and-short stitch is your best friend. It allows you to blend colors seamlessly without creating harsh lines.
Start with your first color, making a row of alternating long and short stitches. Then, bring your second color up through the fabric and stitch back into the first color layer, tucking your new stitches between the old ones.
This technique makes your embroidery look like watercolor paintings on fabric, transforming your thread into paint.
8. Create Geometric Precision with Bugle Beads

For sharp, graphic patterns that shine, combine felt appliqué with bugle beads.
Cut your felt into precise shapes, like these triangular book corners. Use a pencil and ruler to lightly draw your geometric design directly onto the felt.
Then, stitch down long bugle beads along the lines you drew. Their length allows you to create clean, straight lines much faster than with individual seed beads. A simple backstitch around the edges of the felt provides a tidy finish.
9. Sculpt a Succulent Garden from Felt
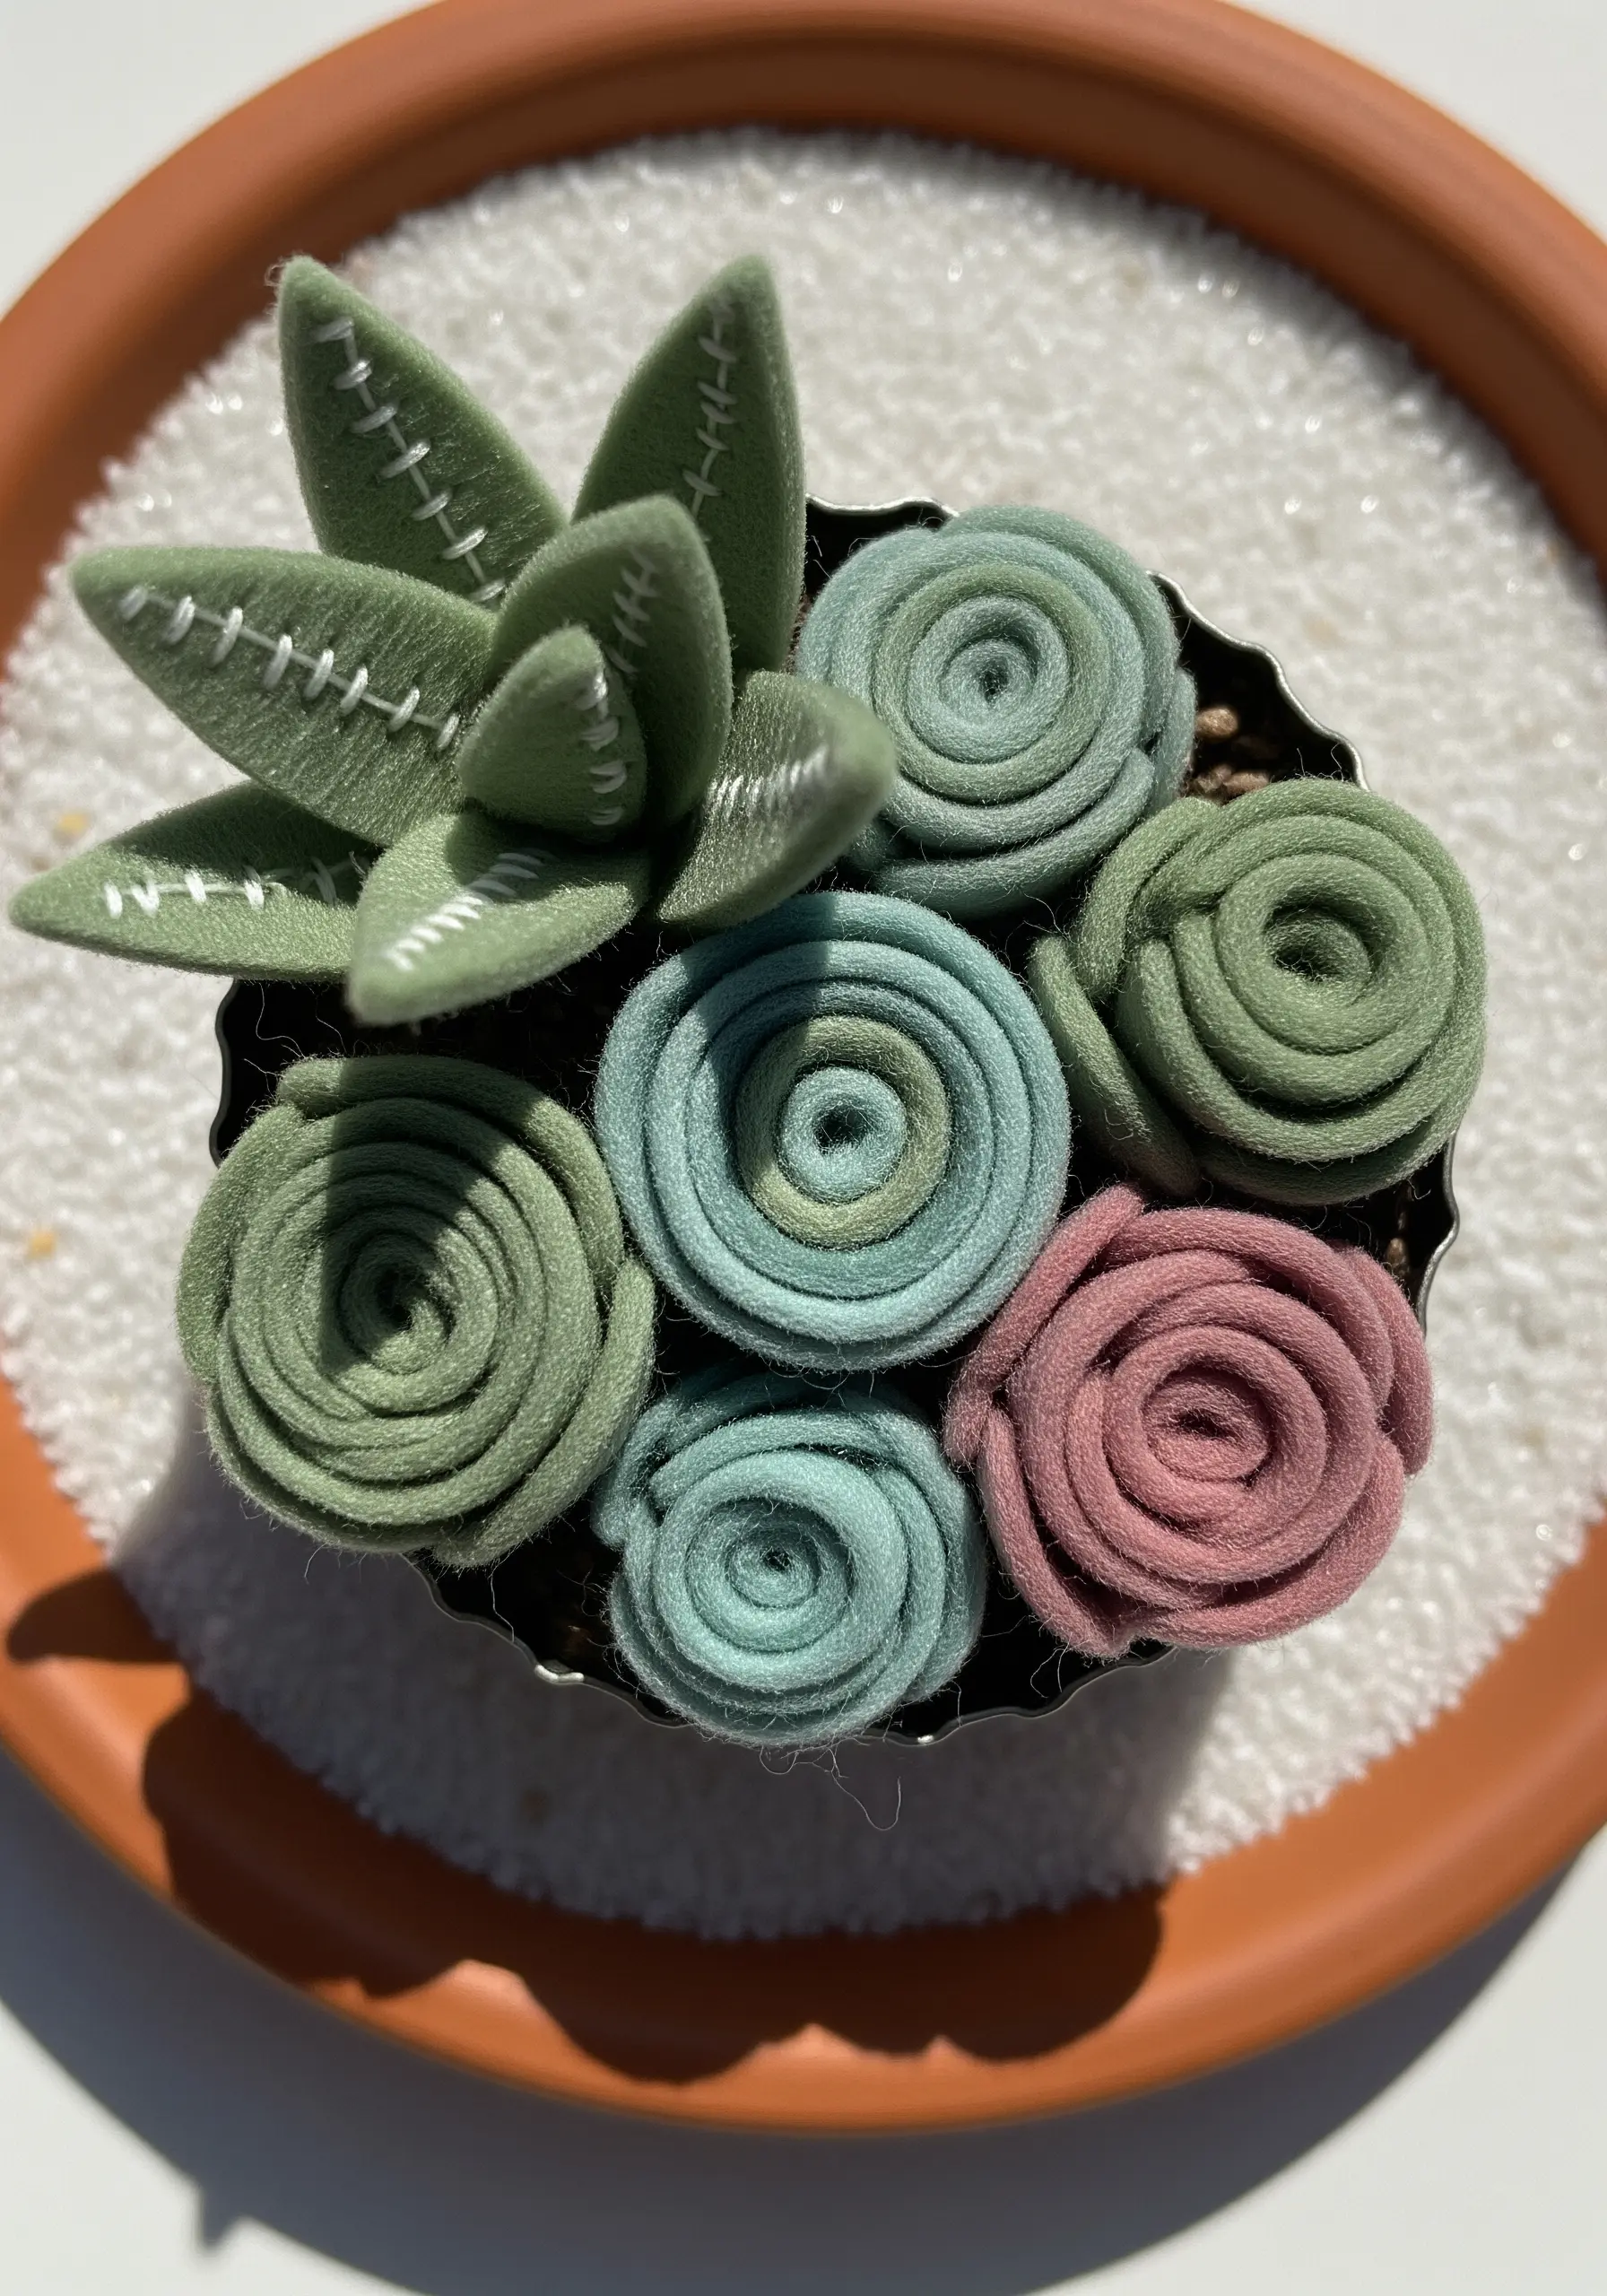
You can create a lifelike plant that never needs watering by simply rolling and shaping felt.
For the rosettes, cut long strips of felt and roll them tightly, securing the base with a few stitches or a dot of hot glue. For the pointed leaves, cut individual leaf shapes, fold them at the base to create a crease, and stitch them together.
A simple running stitch in a contrasting color adds a decorative, hand-stitched detail that highlights the form without requiring any complex embroidery skills.
10. Paint with Thread Using French Knots

Give your monograms a stunning, textured gradient effect by filling the letter with French knots.
Think of it as pointillism with thread. Start at the bottom with your darkest shade, packing the knots closely together. As you move up, gradually introduce lighter shades, mixing them at the transition points to create a smooth blend.
The key is consistency in the size and tightness of your knots. This technique is perfect for tiny pendants and projects that make tiny jewelry pieces pop.
11. Mimic Natural Textures with Thread and Beads

To recreate the captivating look of a geode slice, combine concentric satin stitches with a beaded center.
First, stitch rings of satin stitch in graduating shades of your chosen color, moving from dark to light. Keep the stitches perpendicular to the edge of each ring for a clean look.
For the crystal-filled center, use a mix of seed beads in coordinating colors. Secure them with small, scattered stitches, packing them tightly to create a dense, sparkling texture that contrasts beautifully with the smooth floss.
12. Stitch the Stars with Minimalist Detail
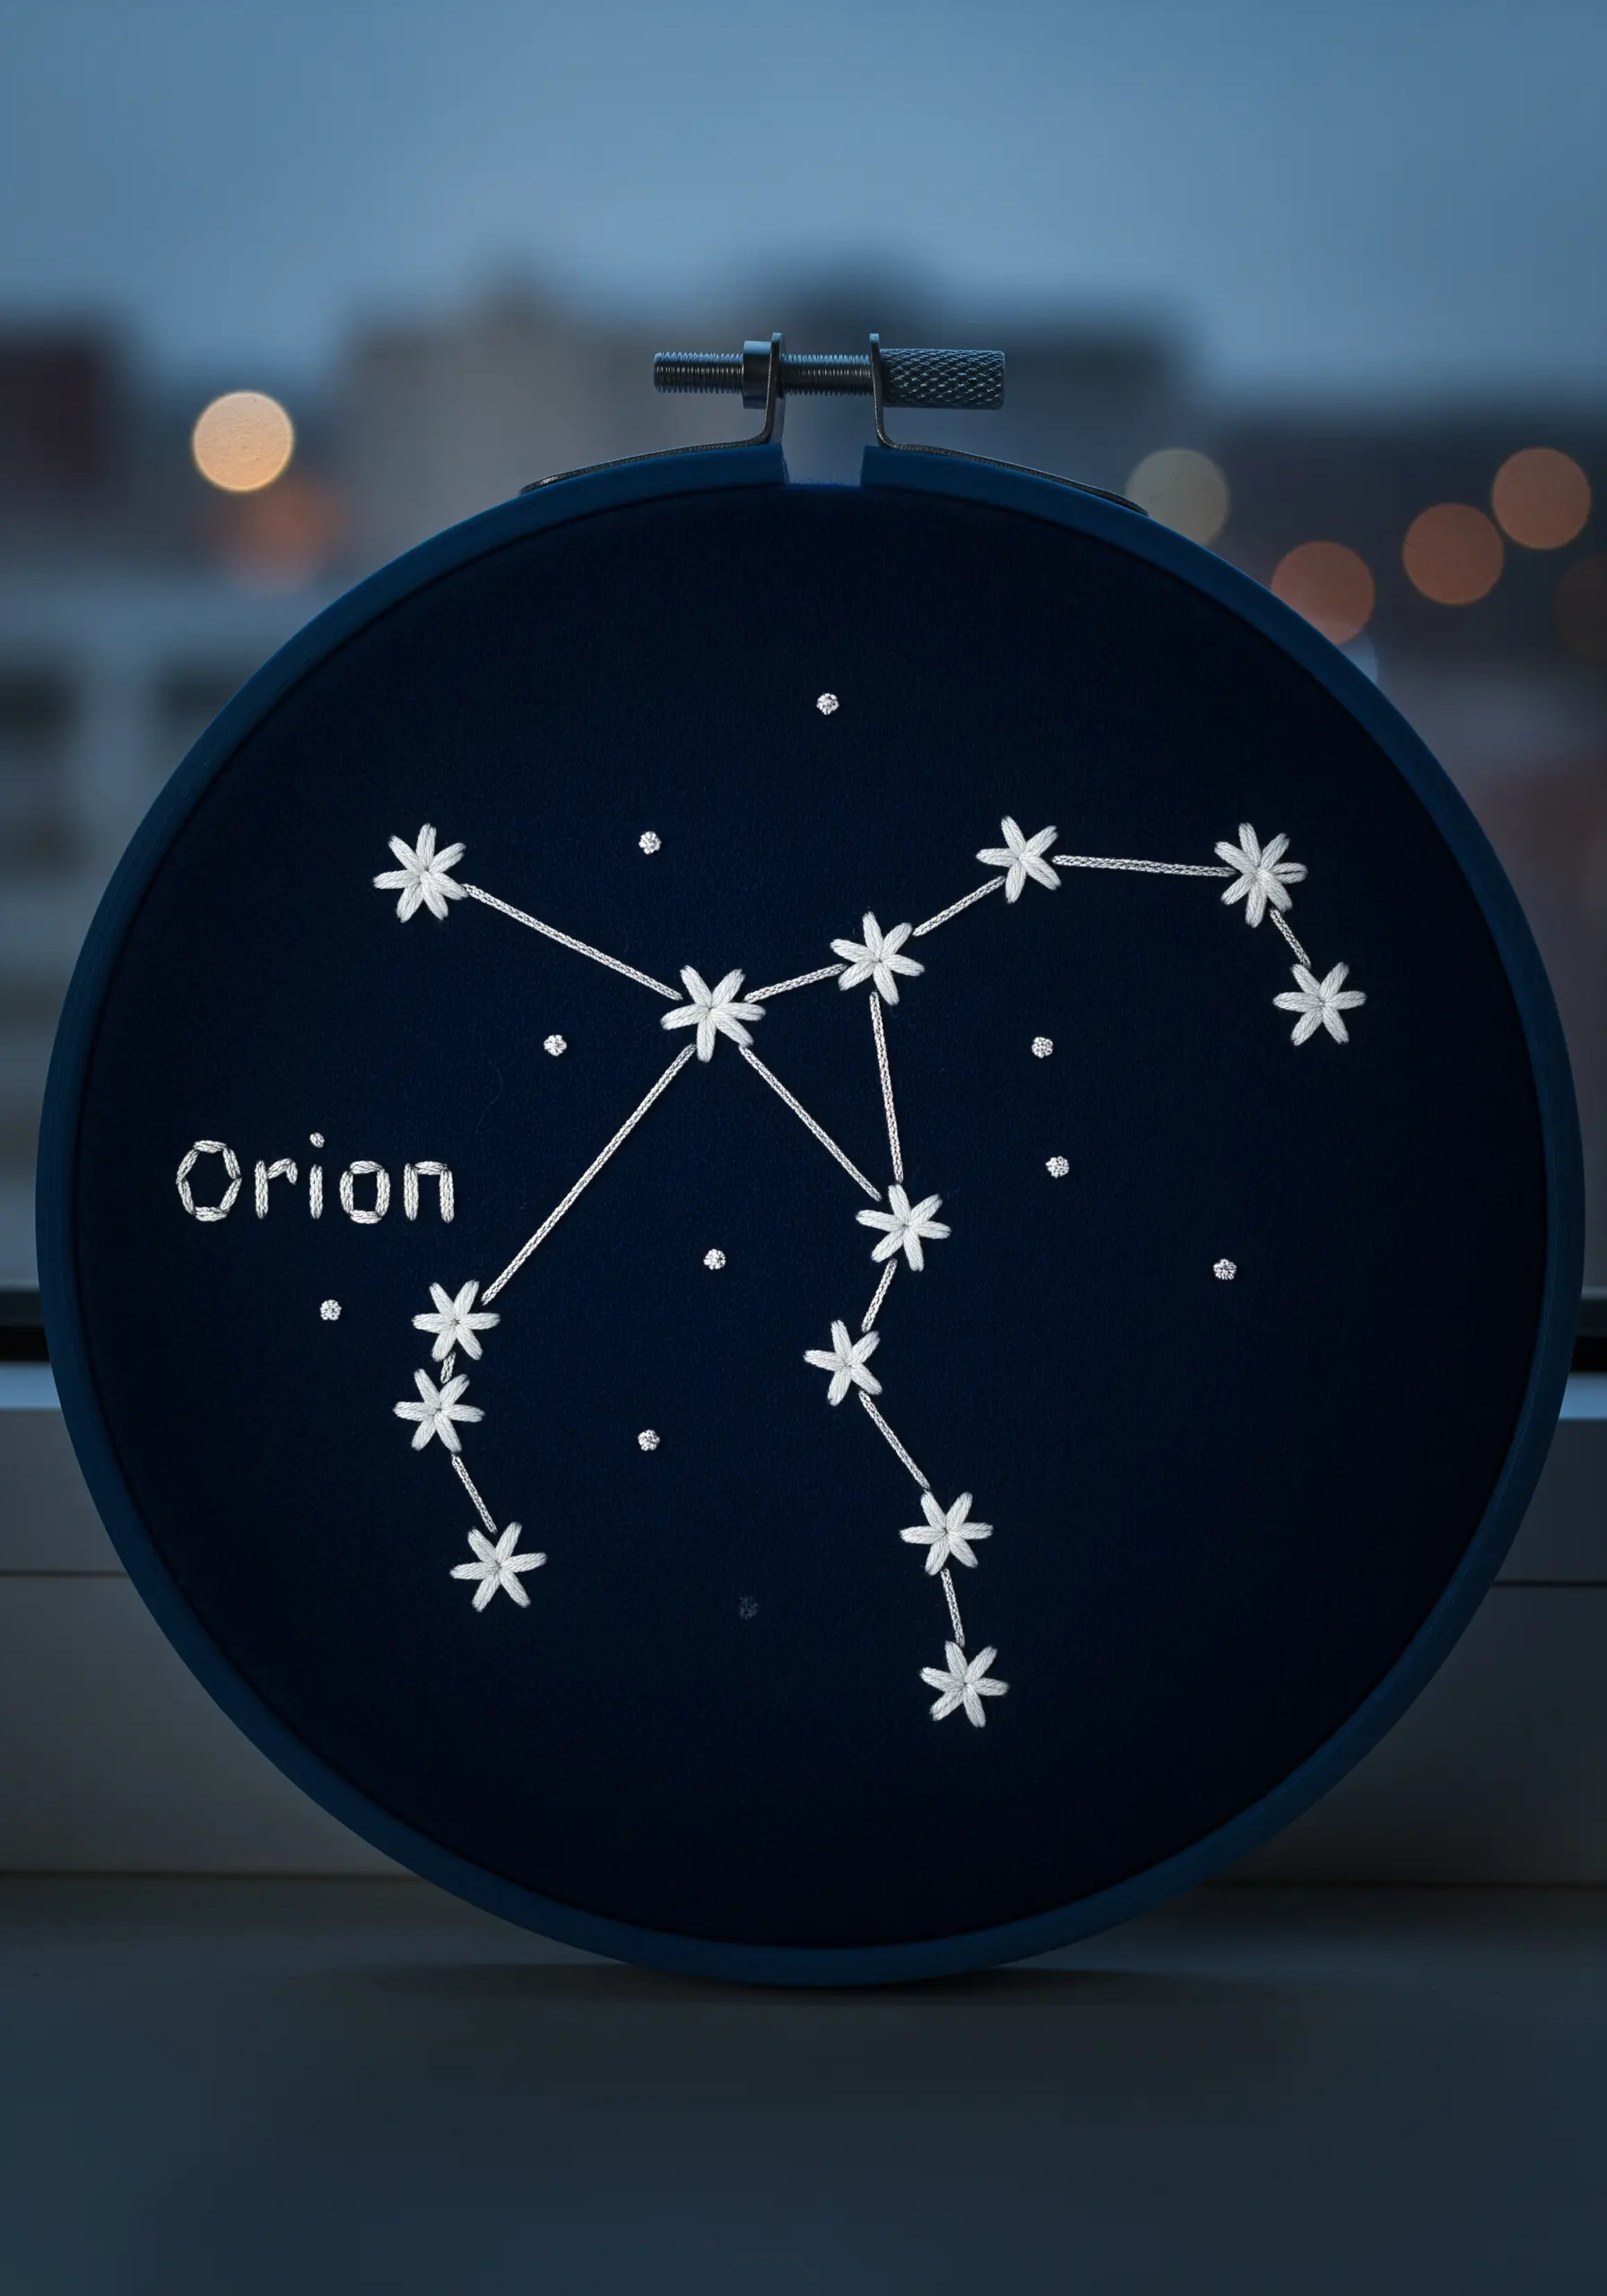
You don’t need complex stitches to map the night sky. The elegance of a constellation piece comes from its precision and contrast.
Choose a dark, tightly woven fabric like navy cotton or linen. Use a bright white or metallic silver thread to stand out.
Use a simple backstitch for the connecting lines, focusing on keeping your stitch length consistent. For the stars, a small star stitch or a single, detached chain stitch (lazy daisy) creates a perfect celestial point. The negative space is just as important as the stitches, so embrace the quiet simplicity.
13. Explore Tiny Tapestries with Pin Loom Weaving

If you love working with fiber, a pin loom is a wonderfully simple way to create small, woven squares without the complexity of a large loom.
You simply wrap the yarn around the pins in a specific sequence and then use a needle to weave the final strands through, locking everything in place.
Using a variegated or multicolored yarn does all the design work for you, creating beautiful, intricate-looking patterns with zero effort. These tiny tapestries are perfect for coasters, patches, or piecing together into a larger project.
14. Construct Sweet Macaron Pincushions

This adorable project is more about simple construction than embroidery. The magic is in creating the classic macaron shape.
Cut two circles of felt for the shells. For each circle, use a running stitch around the edge and pull to gather it around a small foam or stuffing form.
To create the signature ‘feet’ of the macaron, use a contrasting thread to make a series of small, vertical stitches around the side of each shell before you stitch the two halves together. It’s a tiny detail that makes all the difference.
15. Paint a Micro-Landscape on a Thimble

Micro-embroidery is the art of building a scene with tiny, deliberate stitches. The key is to use only one or two strands of floss.
Cover a thimble with a small piece of felt or linen. Use seed stitches (tiny, scattered straight stitches) to create texture for the ground and sky.
Define larger shapes like mountains with a simple backstitch outline, then fill them with more seed stitches. A few well-placed French knots become instant flowers. The result is a breathtakingly detailed scene in a minuscule space.
16. Finish Felt Creations with a Decorative Blanket Stitch

A simple felt ornament can look incredibly polished and professional with one simple technique: a neat, even blanket stitch.
This stitch not only joins your felt pieces together but also creates a beautiful, decorative border. Use a contrasting color of thread to make the stitch pop.
The key to a perfect blanket stitch is consistency in spacing and depth. Mark your stitch points with a fabric pen beforehand if you need a guide. This simple finish elevates any felt project and is a great way to make thoughtful DIY gifts fast.
17. Try Elegant Embroidery on Paper Cards
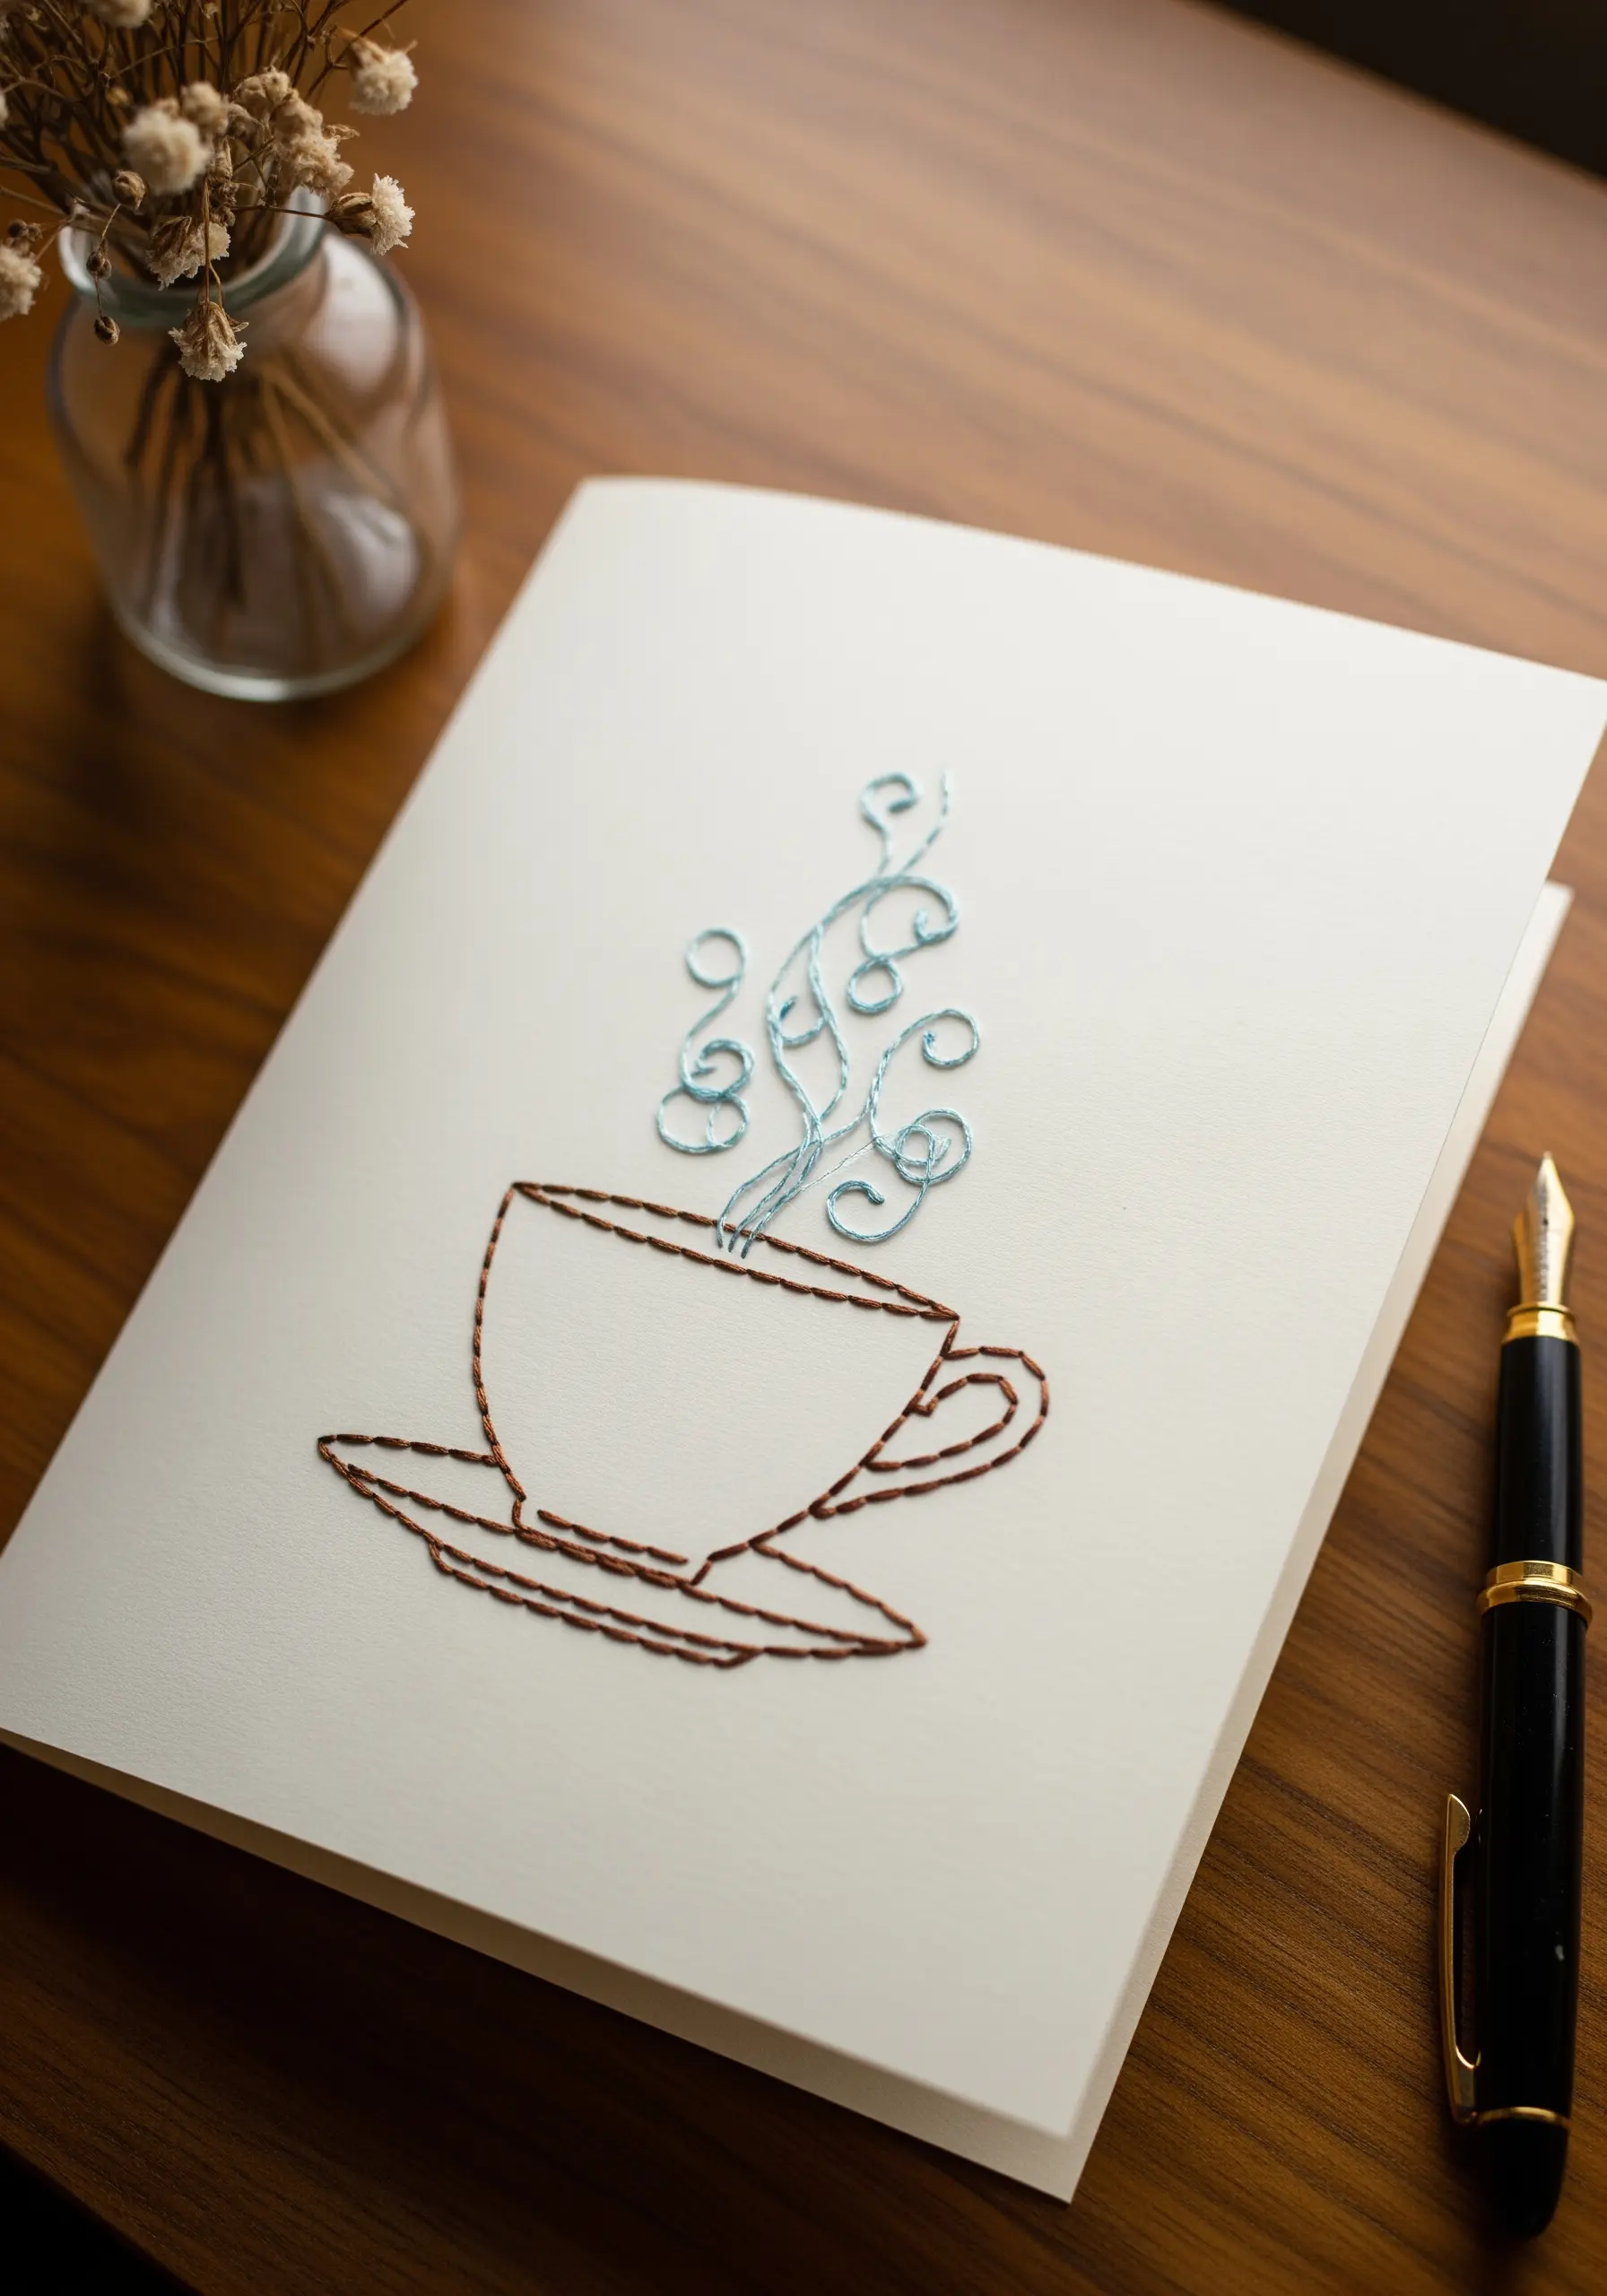
Stitching on paper creates a uniquely clean and graphic effect that’s perfect for greeting cards.
Choose a sturdy cardstock and transfer your design lightly with a pencil. Before you start stitching, use your needle to pre-pierce holes along the design lines. This prevents the paper from tearing as you pull the thread through.
Simple outline stitches like backstitch or stem stitch work best. You don’t need complex fills; the texture of the thread against the smooth paper is the star of the show.
18. Create Lifelike 3D Forms with Stumpwork
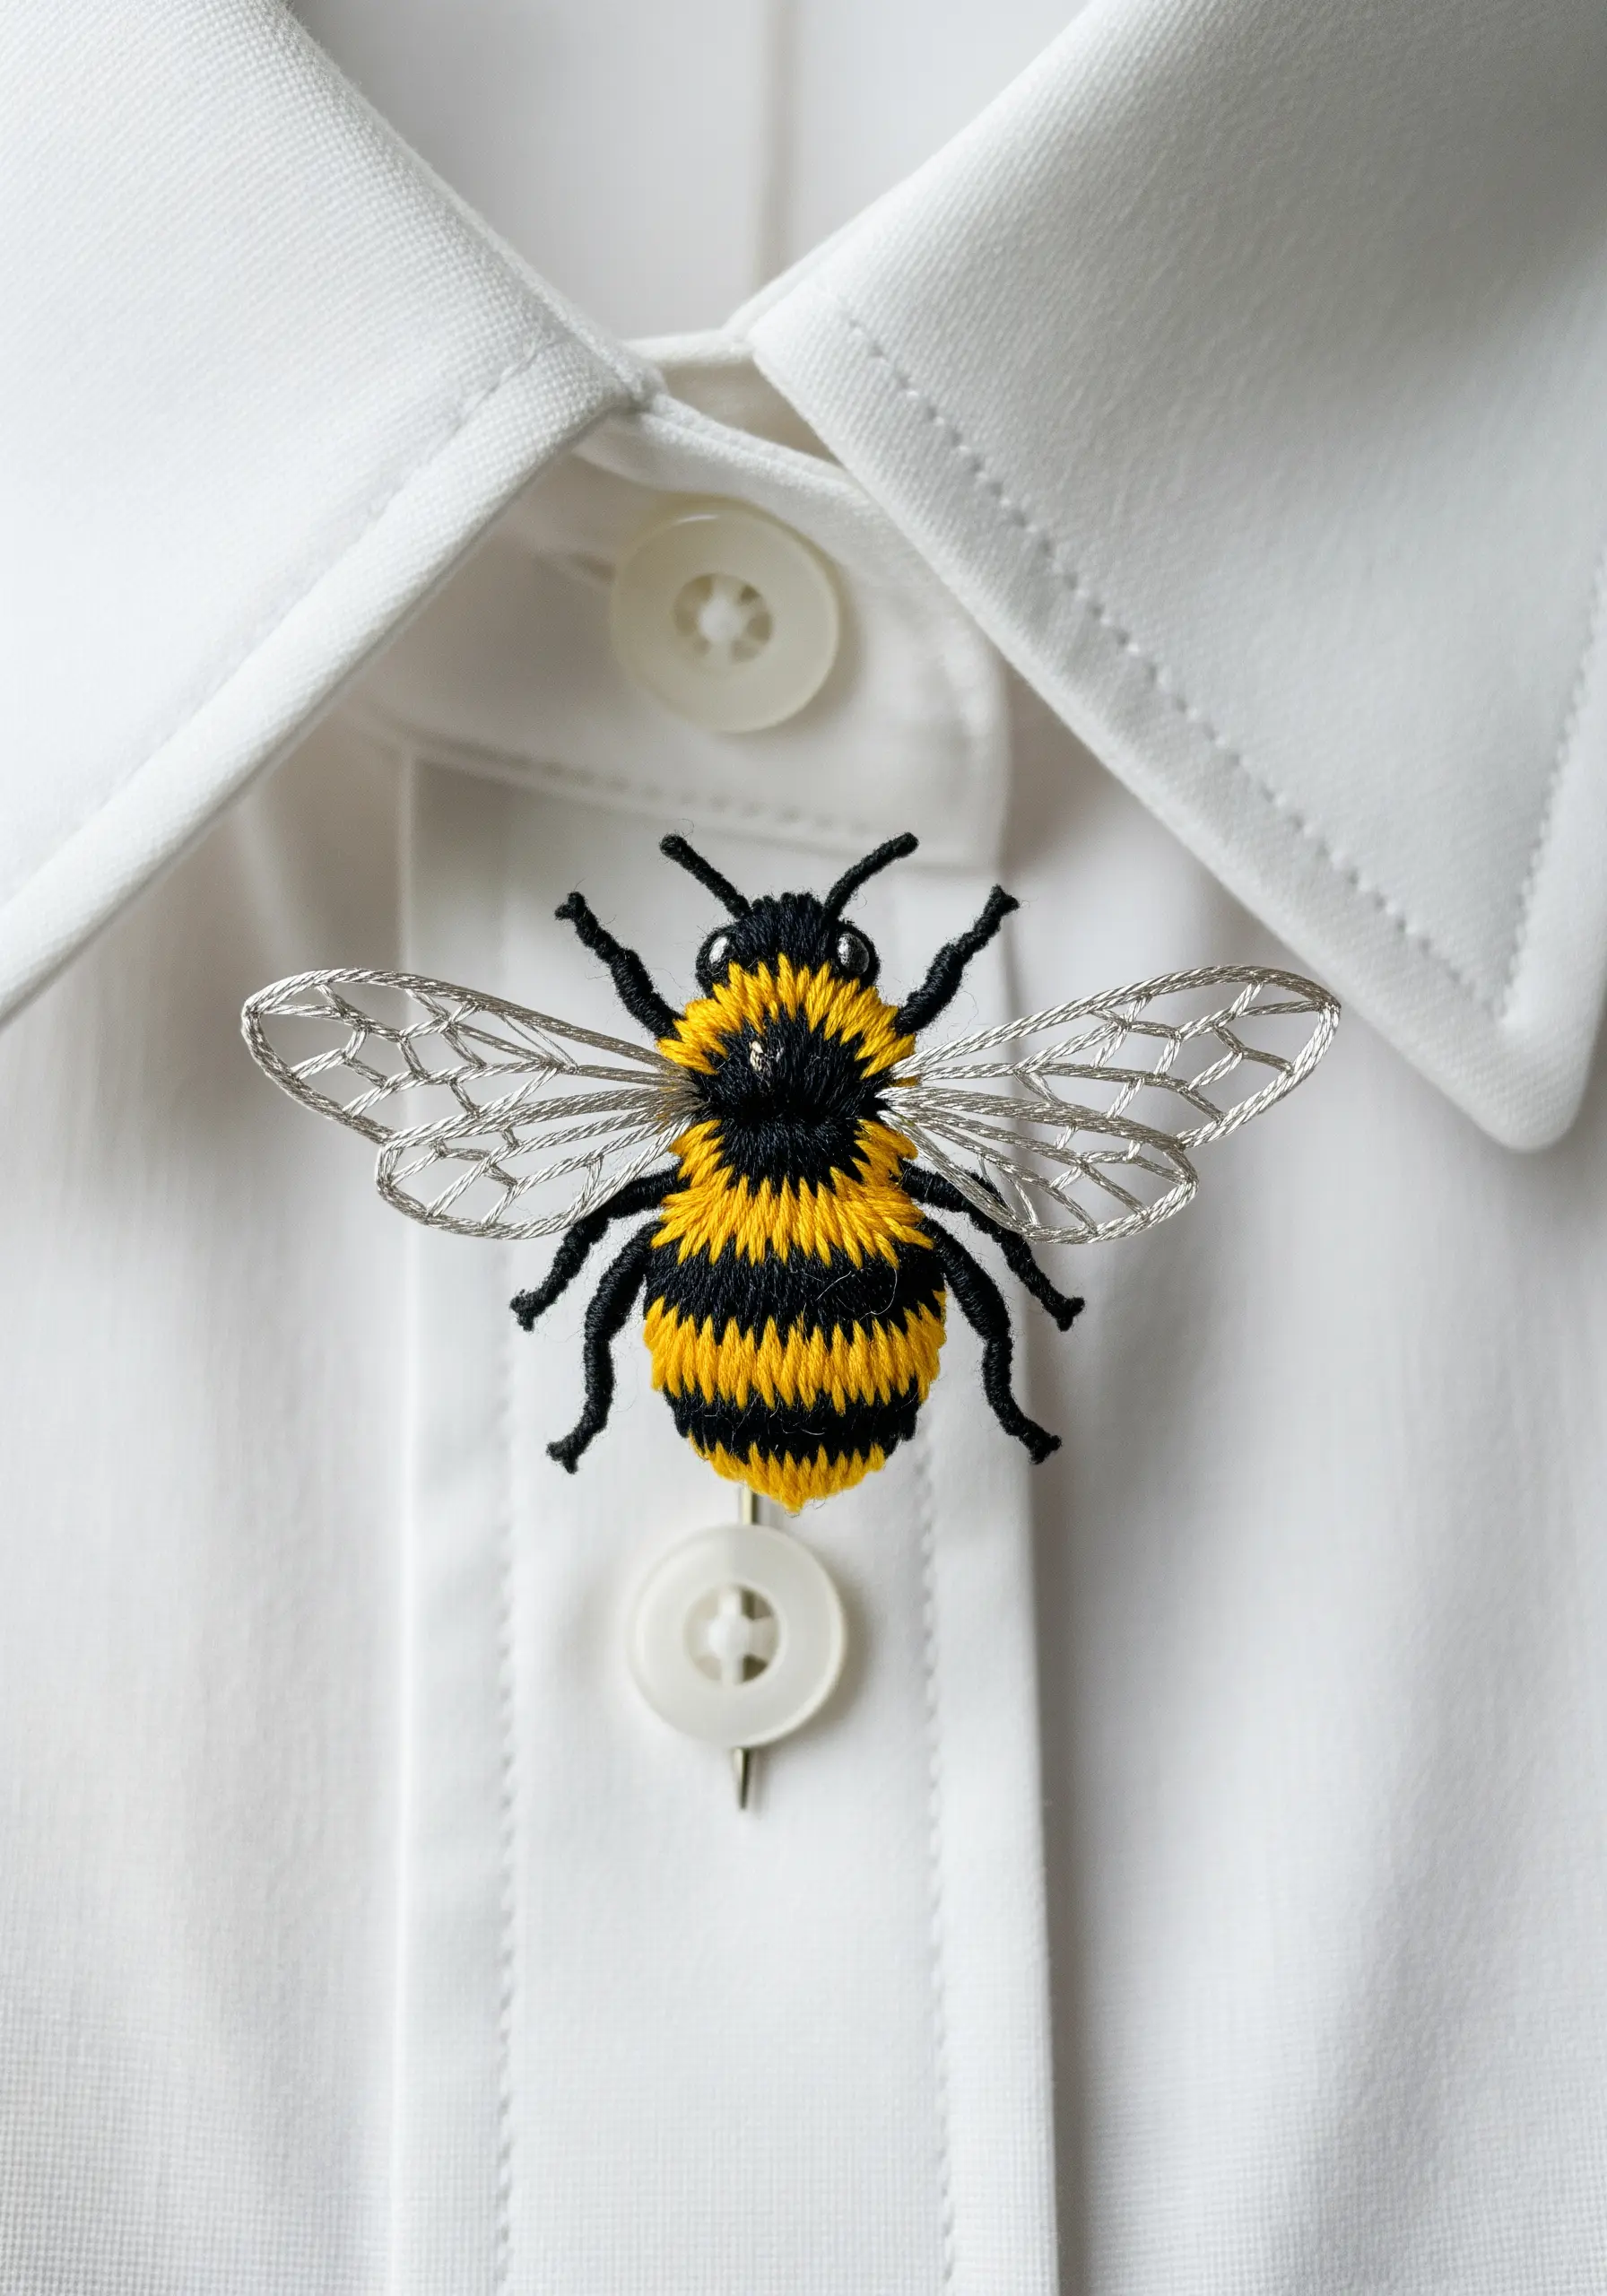
Stumpwork, or raised embroidery, is easier than it looks. You can create a 3D bee by working different parts separately.
For the fuzzy body, create a small pad of felt or satin stitches, then work your final stitches over it. This technique, called padding, gives it a rounded, realistic shape.
The wings are created off the hoop. Outline a wing shape on spare fabric with fine wire, then cover the wire and fill the shape with a buttonhole stitch. Cut it out and attach it to the body for wings that truly stand out.
19. Design a Simple and Fragrant Lavender Sachet

For a project that is both beautiful and functional, embroider a simple botanical design onto a linen sachet.
Use a deep purple thread and satin stitch for the lavender buds, keeping your stitches small and angled slightly outward from the stem. For the chamomile, a few white lazy daisy stitches around a yellow French knot are all you need.
Group the stems together with a simple stem stitch to create a natural-looking bouquet. The simplicity of the embroidery on the textured linen fabric is what makes this design so elegant.
20. Craft Custom Accessories with Fabric-Covered Buttons

This is one of the fastest ways to turn tiny, precious fabric scraps into something useful and beautiful.
You’ll need a button-covering kit, which comes with the metal shells and a tool for assembly. The key to a professional look is ‘fussy cutting’—carefully cutting your fabric to perfectly center a flower or motif on the button.
Once covered, you can glue them onto hair ties, bobby pins, or earring posts to create a whole set of coordinated accessories in minutes.
21. Shape a Whimsical Felt Toadstool

Create a charming woodland mushroom with just a few pieces of felt and some basic hand-sewing stitches.
For the red cap, cut a circle of felt, gather the edge with a running stitch, and stuff it lightly to create a domed shape. The spots are simple white cross stitches, which add a lovely handmade texture.
The stem can be a small piece of dowel wrapped in off-white felt or a tightly rolled piece of felt itself. This project is all about form and assembly, proving that you can create delightful 3D objects with very little complexity.
22. Frame Your Work with a Decorative Border Stitch
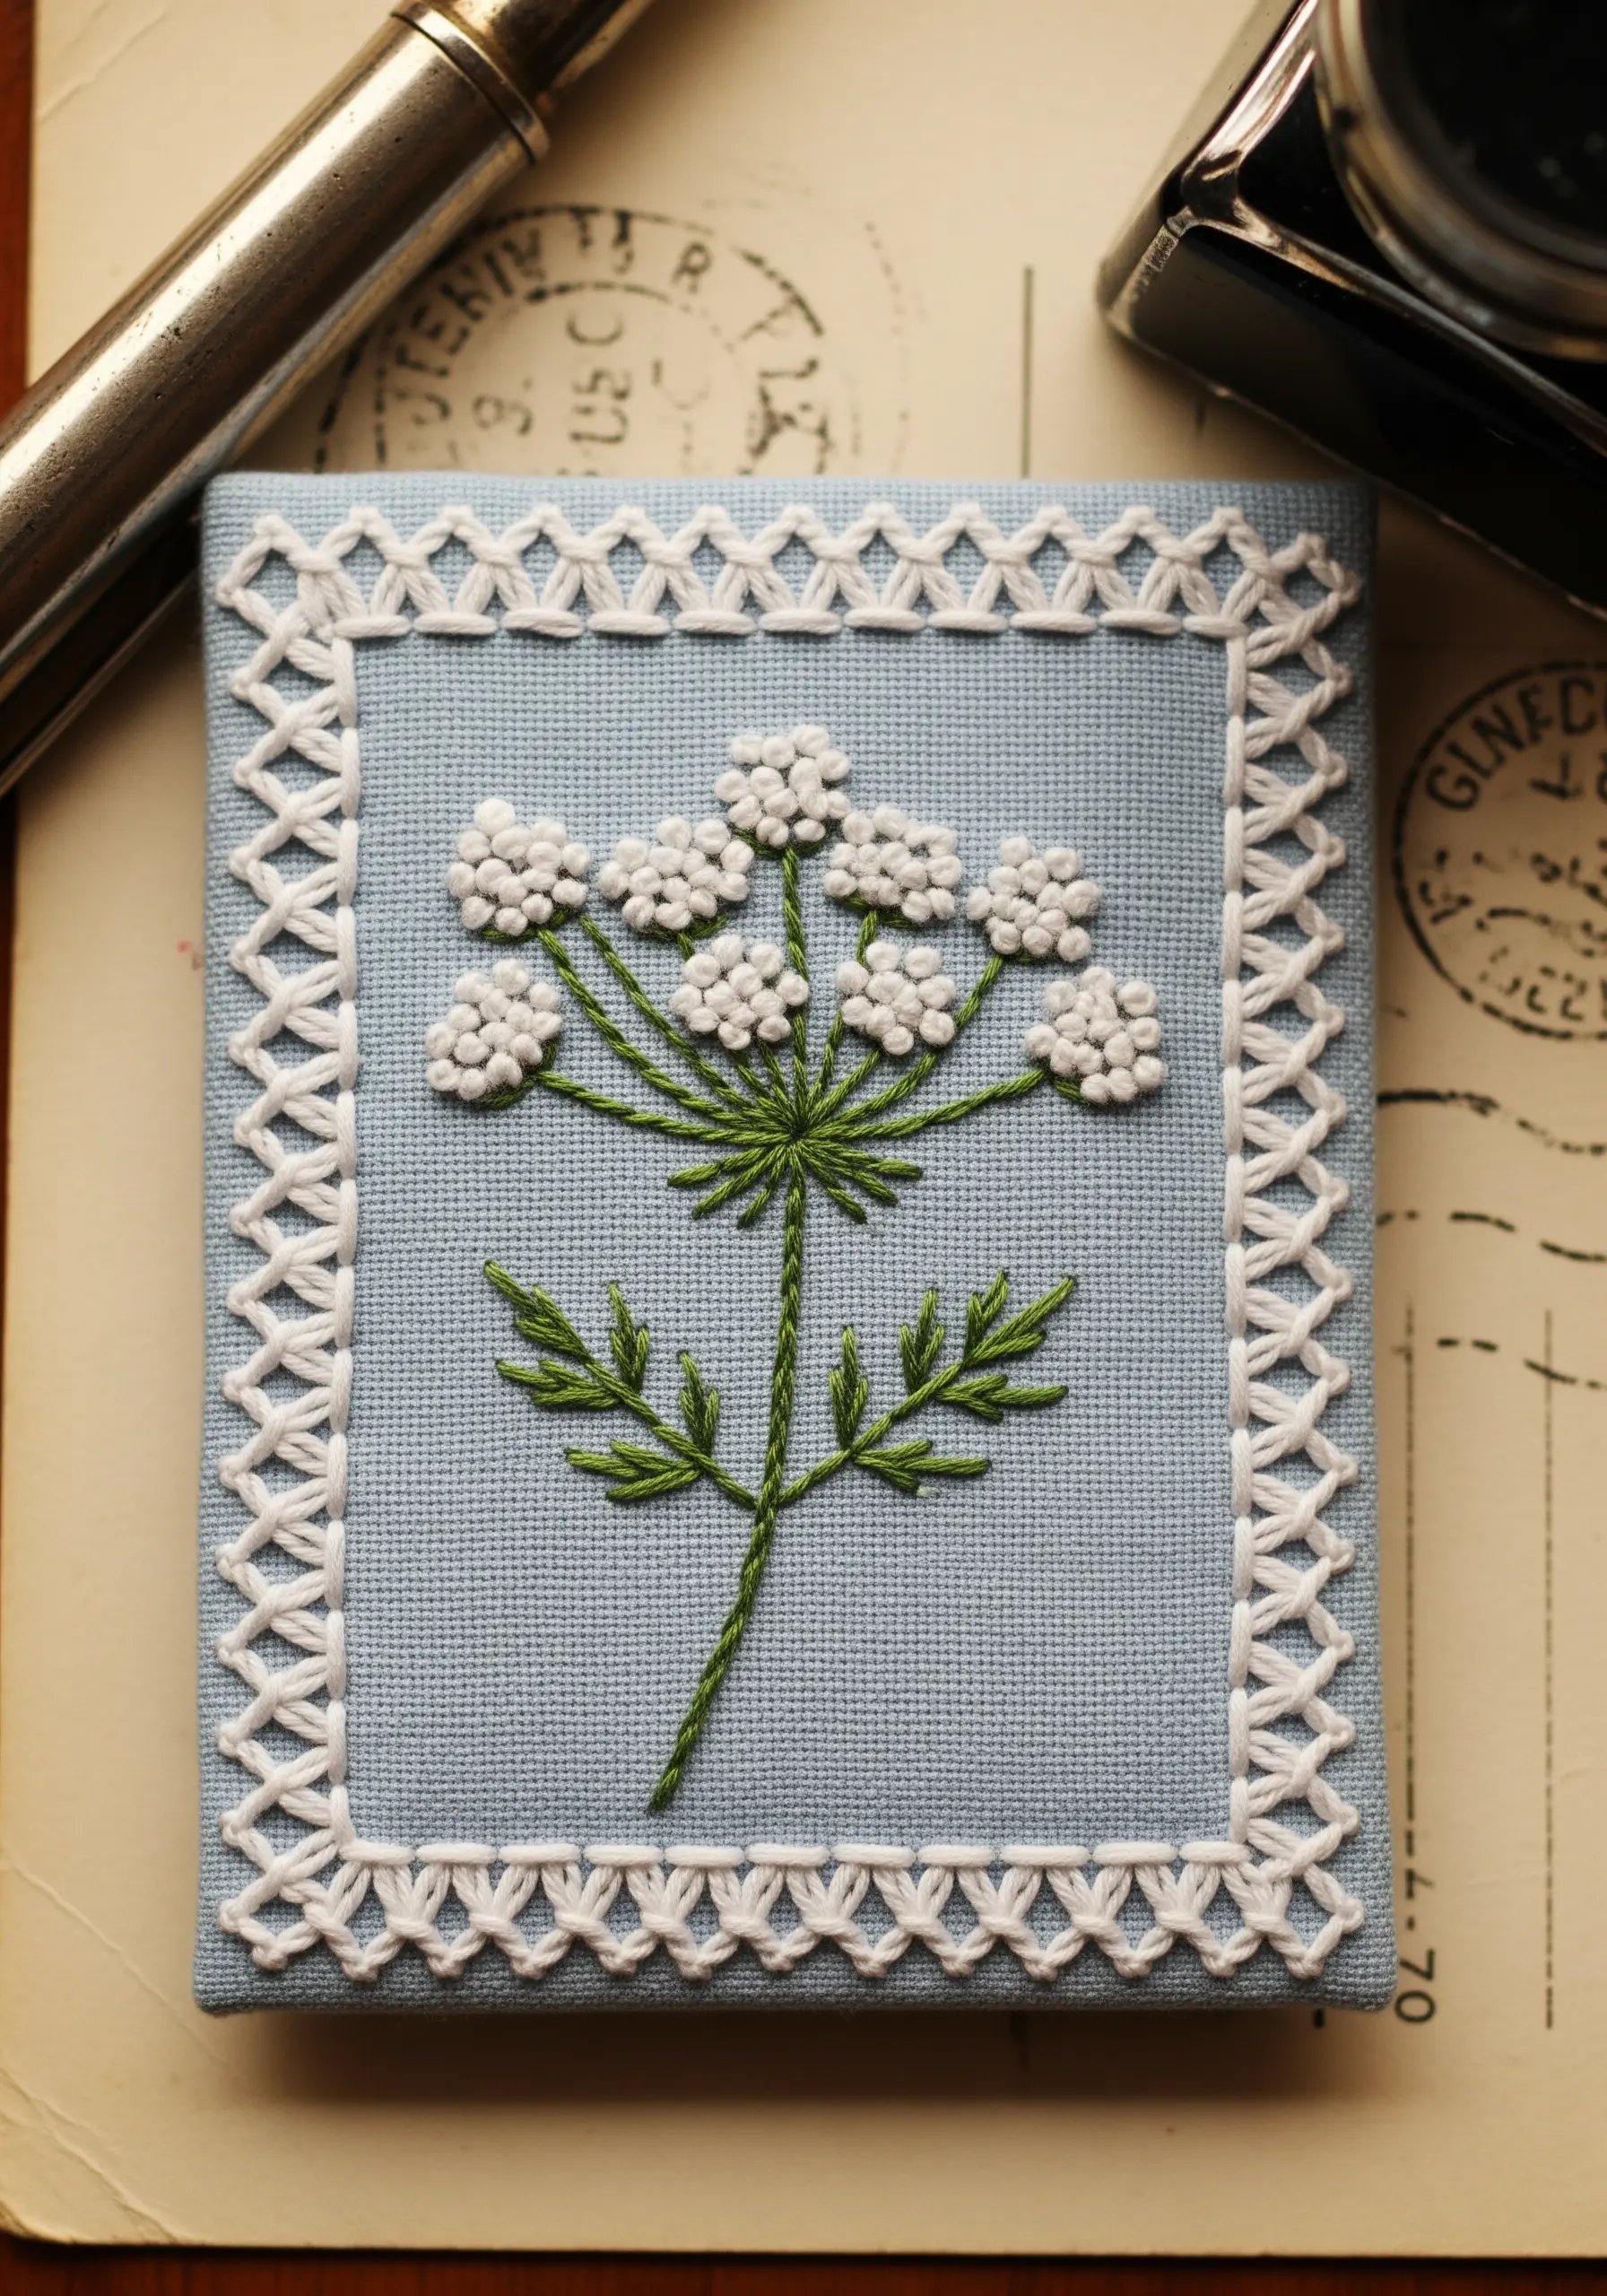
Elevate any small embroidery project by adding a beautifully stitched frame. A decorative border makes the piece feel finished and intentional.
The border shown here is a variation of a crossed blanket stitch, but a herringbone stitch or even a simple chain stitch would also work beautifully.
Use a contrasting thread, like this bright white against the blue fabric, to make the border a key design element. It’s a simple addition that adds a significant amount of polish and charm to your finished piece.
23. Create a Serene Paperweight from a Fabric Scrap
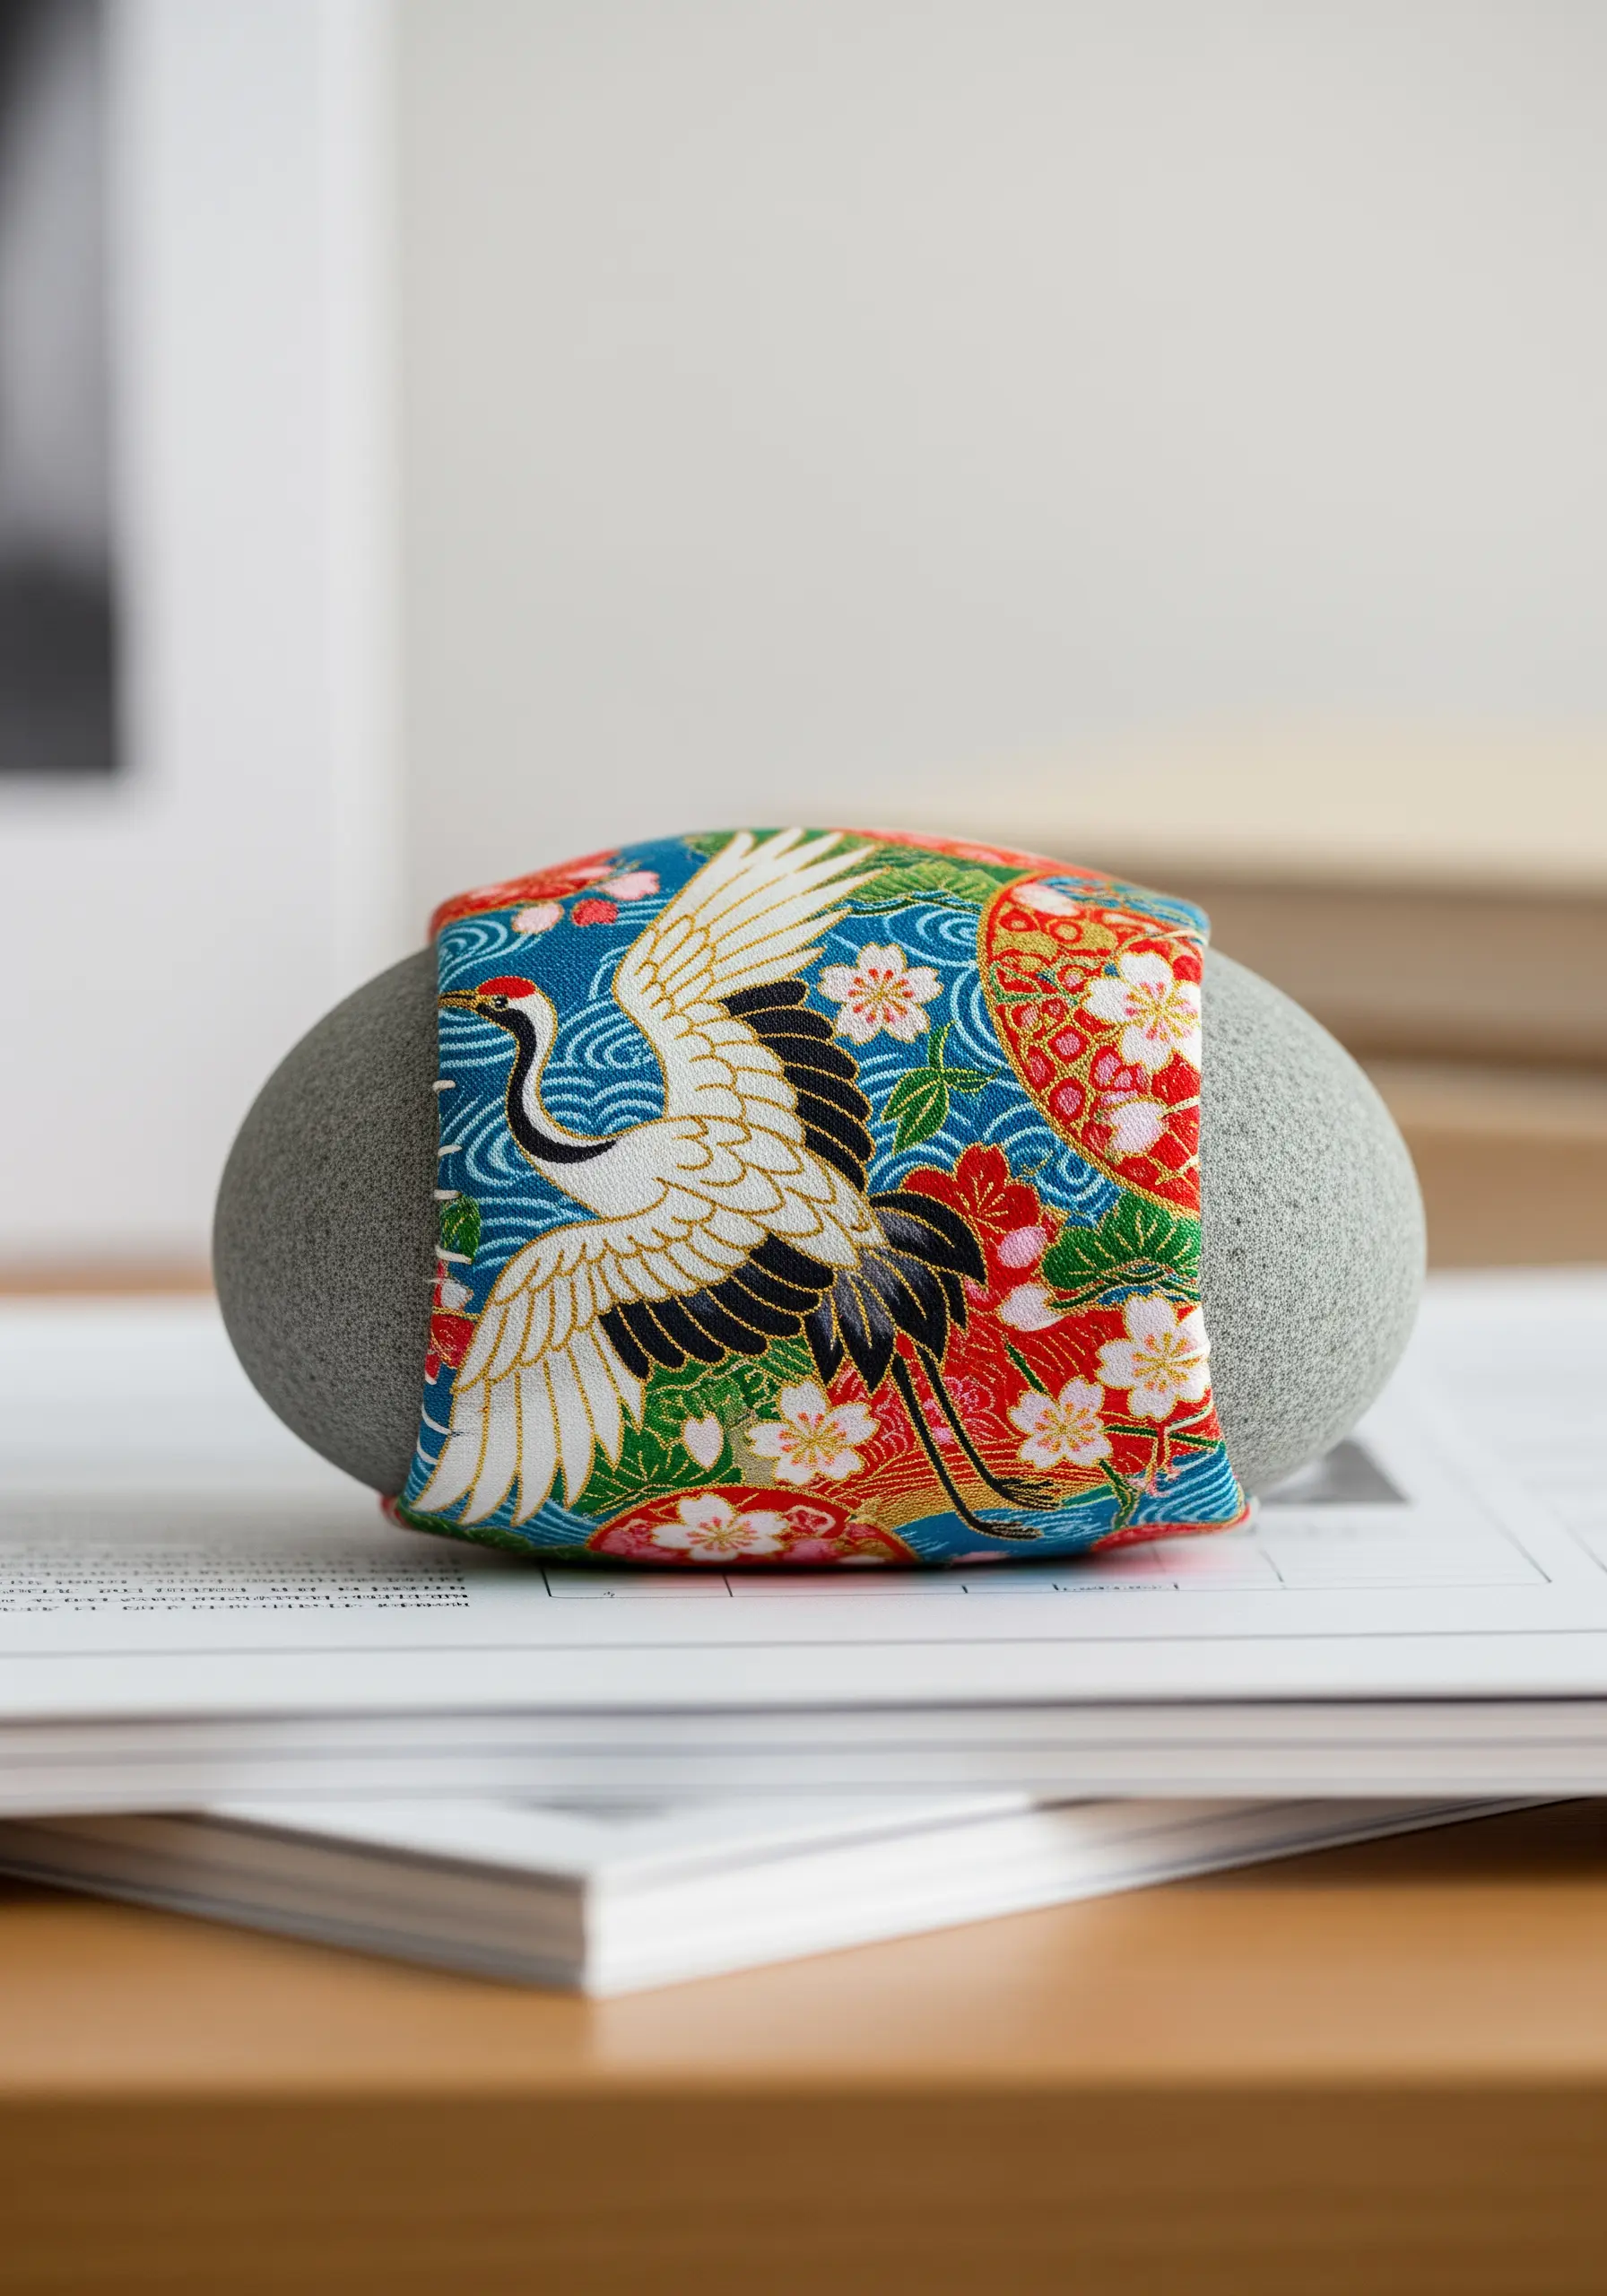
This craft is a beautiful exercise in simplicity, where the chosen fabric does all the aesthetic work.
Select a fabric with a stunning print that tells a story, like this Japanese crane design. You’ll only need a small rectangle.
Fold the fabric into a small pouch, sew the seams neatly, and fill it with rice, sand, or small pebbles to give it a satisfying weight. This is a meditative, five-minute project that turns a beautiful textile into a functional object of art for your desk.
24. Explore Miniature Quilting with Paper Piecing
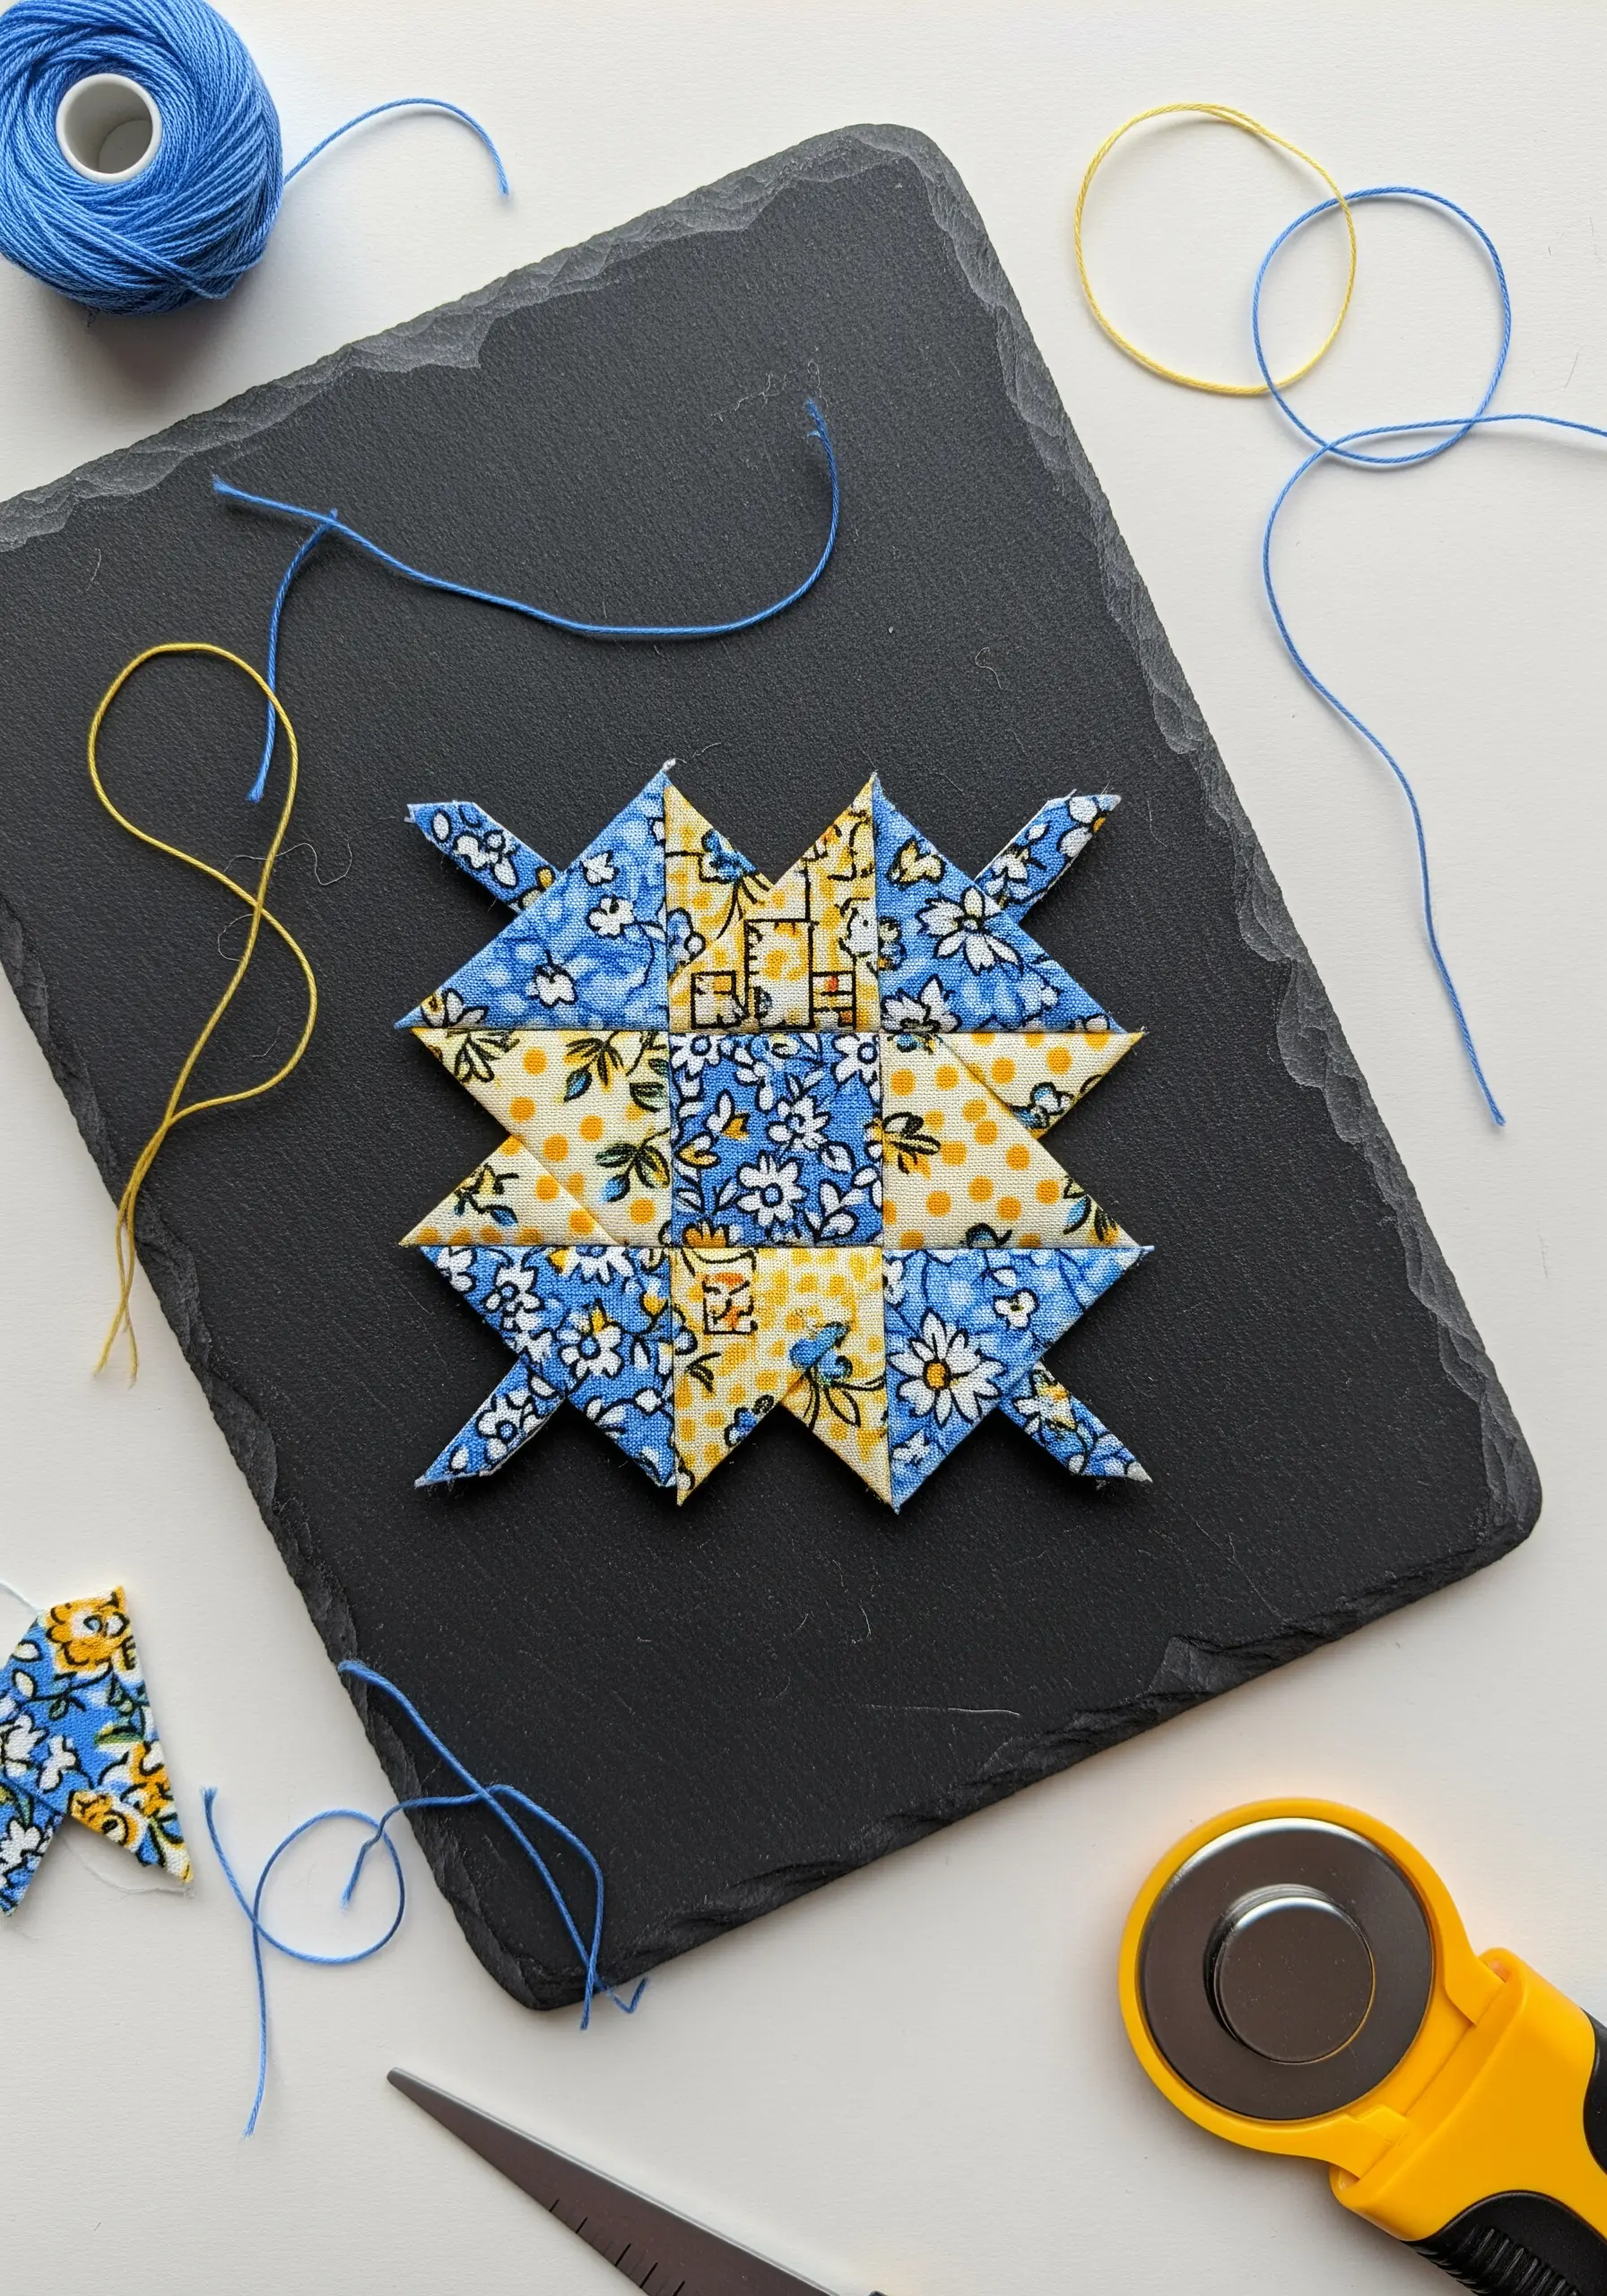
You can create perfectly sharp geometric shapes, like this star block, using a technique called English Paper Piecing.
Instead of struggling with tiny, stretchy seams, you wrap your fabric around pre-cut paper templates and baste it in place. This gives you crisp, stable edges.
Then, you simply place the pieces right-sides-together and join them with a tiny, almost invisible whipstitch. Once the shape is complete, you remove the paper templates, leaving you with a perfectly precise patchwork block.
25. Weave Texture into Your Embroidery Hoop

Introduce a new dimension to your hoop art by incorporating woven stitches. This technique creates incredible texture that begs to be touched.
First, create a ‘warp’ by making a grid of long, parallel vertical and horizontal stitches. Then, using a tapestry needle and a thicker yarn, weave your ‘weft’ thread over and under the warp threads.
Experiment with different weaving patterns and yarn thicknesses to create a sampler of textures. It’s a fantastic way to create with only thread texture and color, all within the simple frame of an embroidery hoop.
26. Personalize Your Workspace with Fabric-Wrapped Clips
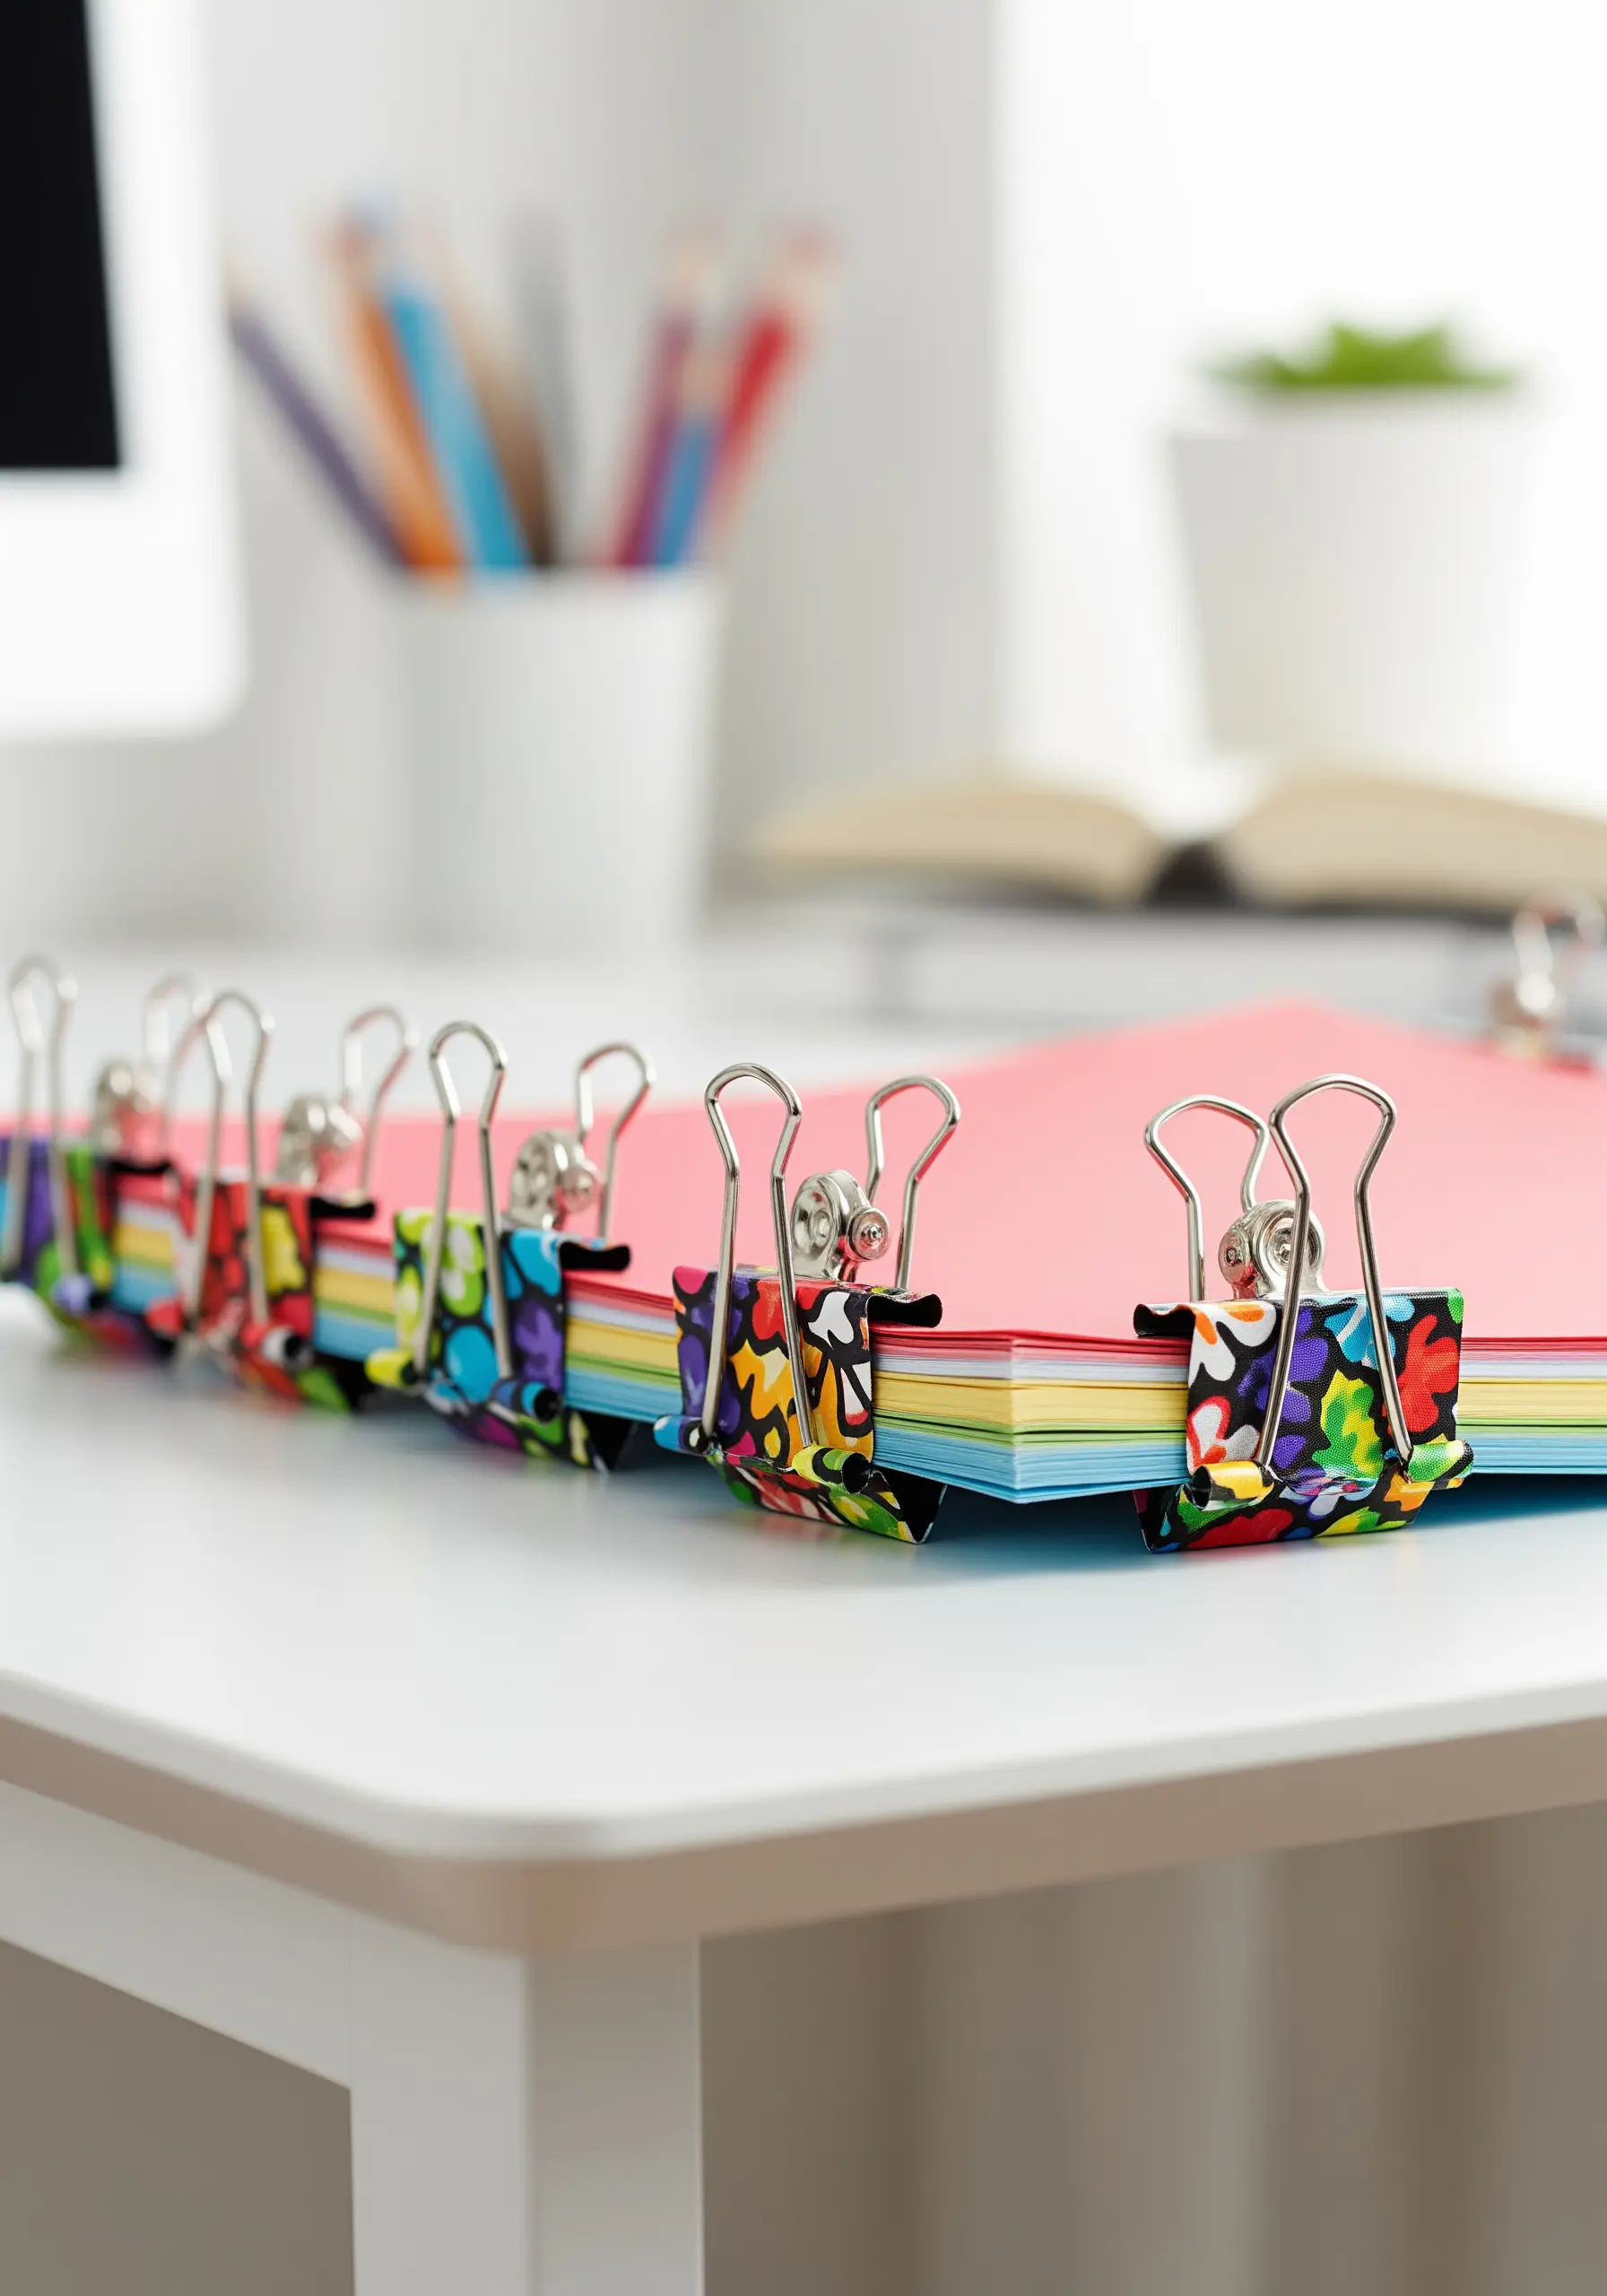
This no-sew project is a quick and satisfying way to bring a splash of color and personality to ordinary office supplies.
All you need are standard binder clips, small scraps of your favorite fabric, and a strong craft glue or Mod Podge.
Cut a piece of fabric to the size of the clip’s surface, apply a thin layer of glue, and smooth the fabric on, wrapping it tightly around the edges. It’s a simple way to make your workspace feel more creative and uniquely yours.
27. Stitch a Modern Heirloom with a Silhouette Portrait

A stitched silhouette offers a timeless, elegant aesthetic that relies on texture and shape rather than color.
The key to a successful silhouette is a dense, uniform fill stitch. A split stitch, worked in tight, concentric rows, is an excellent choice as it creates a smooth, almost woven texture.
Trace your silhouette onto the fabric, then begin stitching from the outside edge and work your way in. Using a single color of thread places all the focus on the clean lines and the subtle play of light on the stitches, creating a classic piece with a modern, handmade feel.


