
If you’re ready to move beyond simple outlines and flat satin stitches, this is where your floral embroidery transforms into art. The secret to realism isn’t about learning dozens of complex stitches—it’s about learning to see like a painter, but with a needle and thread.
We will explore how to blend colors so seamlessly they look like watercolor, how to use stitch direction to sculpt a petal’s curve, and how to add that final, dew-kissed shimmer that brings your work to life. Each technique is a small adjustment that yields a dramatic, professional-looking result.
Forget feeling intimidated by hyper-realism. Think of it as a series of quiet, thoughtful decisions—choosing one more shade of pink, changing the angle of a stitch, or adding a single, light-catching bead. You have the skill; now it’s time to refine your eye and let your threads do the talking.
1. Sculpting Rose Petals with Tonal Reds

To create the deep, velvety texture of a rose, rely on at least five shades of a single color, moving from a dark garnet for the shadows to a bright crimson for the highlights.
Use a single strand of six-strand floss for maximum blending control, directing your long-and-short stitches to follow the natural curve of each petal.
For the dew-kissed effect, secure tiny, clear seed beads with a single, taut stitch, mimicking how light refracts on a water droplet.
Introduce a single strand of a whisper-thin metallic silver thread into your highlight areas; this will catch the light and create an illusion of moisture without overwhelming the matte finish of the cotton floss.
2. Achieving Painterly Blends in Peony Petals

The key to a soft, voluminous peony is the seamless gradient you achieve with needle painting, specifically the long-and-short stitch.
Work in sections, petal by petal, blending a soft pink into a buttery cream by staggering your stitch lengths and directions.
Always use a single strand of thread to ensure your colors melt into one another, avoiding the harsh lines that can occur with thicker thread.
Stitching on a dark, high-contrast fabric like charcoal gray linen makes these pale, delicate colors appear more luminous and defined.
3. Defining Ruffled Edges with Metallic Couching

After thread-painting the body of an iris petal, give it structure and a hint of magic by outlining it with a fine metallic thread.
Instead of trying to stitch with the metallic floss directly, use the couching technique: lay the metallic thread along the edge and tack it down with tiny, perpendicular stitches of a matching purple thread.
This method prevents the notoriously difficult metallic thread from snagging while creating a perfectly sharp, shimmering edge that defines the petal’s unique shape.
For the fuzzy yellow ‘beard,’ use turkey work or tightly packed French knots to build up a convincing, touchable texture.
4. Shading White Lilies for Hyper-Realism

Embroidering white florals convincingly is not about using pure white thread, but about mastering the art of shadow and subtle color.
Use an off-white or pale silver as your main petal color, then work in shadows with single strands of light gray, pale lavender, or even a hint of mint green near the stem.
This creates dimension and prevents the flower from looking flat or washed out against the fabric.
Add tiny magenta seed stitches or French knots to replicate the lily’s delicate freckles, providing a crucial pop of color that makes the white feel brighter.
5. Capturing Sunlight with Directional Satin Stitch

For flowers with large, smooth petals like this California poppy, directional satin stitch is your most powerful tool for showing how light hits the surface.
Vary the angle of your stitches to follow the petal’s form—straight in the center, curving outward toward the edges. This simple shift in direction creates the illusion of folds and highlights.
Blend a golden yellow into the vibrant orange to suggest where the sun is strongest, giving the bloom a warm, backlit glow.
The delicate, airy foliage can be rendered with simple straight stitches or fly stitches using a single strand of green floss.
6. Creating a ‘Wet Look’ with White Highlights

To make petals look genuinely wet, you need to think like a painter and add speculative highlights where light would hit a water droplet.
After filling the petals with shades of pink, use a single strand of pure white floss to add very fine, short straight stitches along the veins and edges.
These tiny white stitches, placed next to darker areas, trick the eye into seeing a glossy, reflective surface, enhancing the effect of the beaded ‘water’ drops.
This technique works best on dark fabric, where the contrast allows the white highlights to pop with intensity.
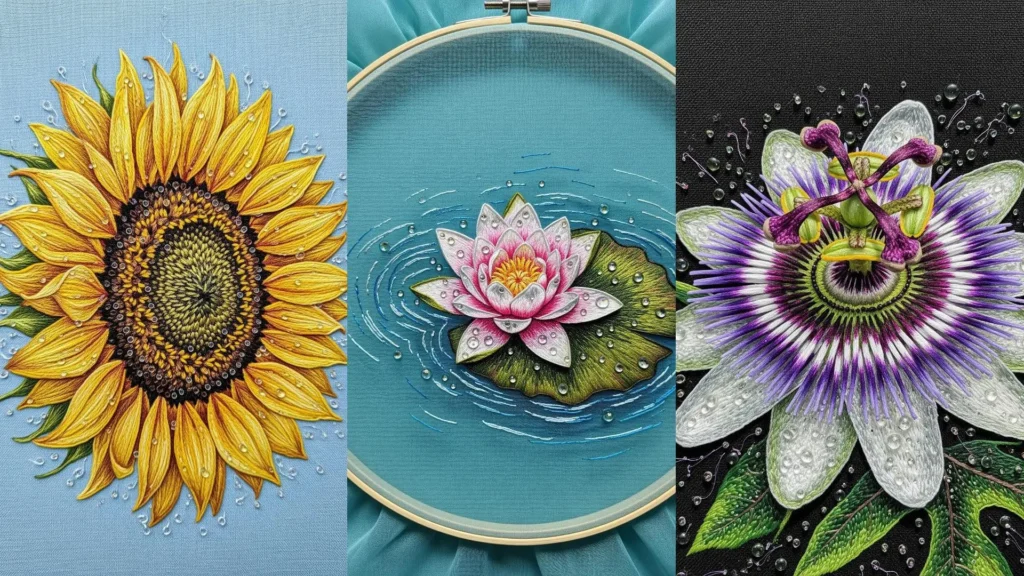
7. Building Dense Texture in a Sunflower Center

The heart of a realistic sunflower lies in its complex, seed-packed center. Recreate this texture by layering different types of knots and stitches.
Start with a base of satin stitch in dark brown, then layer hundreds of French knots on top, varying the color from dark brown to amber and gold.
Make the knots in the very center smaller and tighter, gradually increasing their size as you work outward to mimic the pattern of seeding.
This dense, three-dimensional center provides a beautiful textural contrast to the smooth, thread-painted petals of the sunflower.
8. Stitching Hydrangeas with Soft Color Blocking

To prevent a dense cluster of flowers like hydrangeas from looking like a single, undefined mass, treat each tiny floret as its own miniature painting.
For each four-petaled floret, use a slightly different combination of blues and purples, filling them with a simple satin stitch aimed toward the center.
This subtle variation in color from one floret to the next creates depth and separates the blooms, making the entire cluster look more natural and less uniform.
A tiny yellow French knot in the center of each floret provides a focal point and unifies the entire composition.
9. Using Velvet as a Dramatic Floral Backdrop

Stitching on a fabric with its own luxurious texture, like velvet, instantly elevates your embroidery and adds a unique depth.
The deep pile of the velvet absorbs light, making your thread colors appear incredibly rich and saturated, especially for a dramatic composition like this orchid.
Use a stabilizer on the back to prevent the fabric from stretching, and pull your stitches just taut enough to lie flat without sinking into the pile.
The contrast between the smooth, silky thread and the plush velvet creates a powerful tactile and visual experience that plain cotton or linen cannot replicate.
10. Crafting Delicate Lavender with Knots and Straight Stitches

To capture the airy, slightly fuzzy texture of lavender, move beyond basic stitches and embrace a mixed-stitch approach.
Use bullion knots or multi-wrap French knots for the individual purple florets, which gives them a beautiful, raised texture that mimics the real bloom.
Place these knots in small clusters along the stem, interspersing them with tiny straight stitches in a lighter lilac to suggest buds that are just beginning to open.
The scattered, wispy single stitches around the main stem add a sense of movement and delicacy, as if capturing a moment in a gentle breeze.
11. Achieving a Petal’s Sheen with Thread Direction

For petals with a subtle, pearlescent quality like a magnolia, the direction of your stitches is everything. It dictates how light reflects off the thread.
Use long, straight stitches that radiate from the base of the petal to the tip, following its gentle curve. This continuous flow of thread creates a smooth, satin-like surface.
Blend shades of grey, cream, and silver to create soft shadows and highlights that define the petal’s form without harsh outlines.
The dense, golden center, created with French knots and straight stitches, provides a warm, textural contrast to the cool, smooth petals.
12. Creating Luminous Edges on Tulip Petals

To capture the way light often seems to pass through the delicate edge of a tulip petal, use a lighter, contrasting color for the final outline.
After filling the body of the petal with rich reds and pinks, use a single strand of pale yellow or gold to stitch a fine border of split stitch right along the edge.
This technique creates a ‘halo’ effect, suggesting translucency and giving the flower a vibrant, backlit appearance.
It’s a simple adjustment that adds a tremendous amount of realism and stops the flower from blending into the background.
13. Mapping Color Zones for Complex Flowers

For radially symmetrical flowers like dahlias, lightly sketch out the color zones on your fabric before you begin stitching.
Divide the petals into sections: the dark, shadowy center, the vibrant mid-tones, and the lighter, sun-bleached tips.
Fill each small petal with short satin stitches, carefully blending the colors where the zones meet. This methodical approach keeps the complex pattern from becoming chaotic.
Outlining each tiny petal with a single strand of a slightly darker shade helps define its shape and makes the overall flower look crisp and intricate.
14. Creating Atmosphere with Negative Space

The elegance of this cherry blossom branch comes not just from the stitches, but from the empty space around them. Don’t feel the need to fill every inch of your fabric.
Allow the branches to trail off naturally and scatter a few loose petals and buds around the main composition. This creates a sense of movement and lightness.
Using a textured or patterned fabric, like this bamboo-effect cotton, adds interest to the negative space without competing with your embroidery.
This composition feels more like a delicate watercolor painting, making it a perfect example of how minimalist embroidery decor ideas can create a calm, modern aesthetic.
15. Building a Fuzzy Texture for Forget-Me-Nots

To give tiny flowers like forget-me-nots a soft, almost fuzzy texture, stitch them on a fabric with a bit of loft, like wool felt or flannel.
Use a slightly looser tension on your satin stitches, allowing the thread to sit more on the surface rather than pulling tight against the fabric.
After stitching, you can gently brush the petals with a stiff, clean brush (like a suede brush) to slightly raise the fibers of the floss and the fabric, enhancing that soft-focus effect.
The high contrast of the sharp, bright yellow French knot centers makes the soft blue petals appear even more delicate.
16. Capturing Iridescence in Pansy Petals

Pansies are known for their velvety, almost iridescent quality, which you can replicate by blending unexpected colors.
Don’t just stick to purples and yellows. Look closer and you’ll see hints of black, deep magenta, and even blue. Use single strands of these colors to blend them seamlessly.
Lay your long-and-short stitches in the direction of the dark ‘veins’ radiating from the center. This enhances the realism and guides the viewer’s eye.
A single, well-placed bead or a cluster of French knots in a contrasting color (like the pale green here) makes for a perfect, light-catching center.
17. Stitching Water Ripples for Context

Placing a flower in its natural environment instantly tells a story. For a water lily, this means creating the illusion of water.
Use simple, concentric ovals of running stitch or backstitch around the flower, using two or three shades of blue and white.
Vary the length of your stitches and the space between them to create a more organic, shimmering effect. The white stitches, in particular, suggest light reflecting on the surface.
This simple background technique transforms the piece from a straightforward floral portrait into a complete, atmospheric scene, making it a beautiful piece of DIY framed embroidery art.
18. Constructing Complex Flowers in Layers

For an intricate flower like a passionflower, don’t try to stitch everything at once. Build it up in structural layers, from back to front.
First, stitch the large white base petals. Next, add the ring of fine purple and white straight stitches (the corona filaments). Then, build the central structure (the stamens and pistils) using satin stitch, French knots, and wrapped stitches.
This layered approach ensures that each delicate component sits correctly on top of the last, creating a true-to-life three-dimensional effect.
It’s a methodical process that turns a potentially overwhelming subject into a manageable and rewarding project.
19. Replicating Queen Anne’s Lace with French Knots

The key to capturing the delicate, lace-like structure of Queen Anne’s Lace is to focus on clusters of tiny stitches.
Create the main stems with a fine whipped backstitch. For the individual umbels (the flower clusters), use a foundation of thin, radiating straight stitches.
At the tip of each of these tiny stems, place a single, small white French knot. For some, use a detached chain stitch to represent a floret that hasn’t fully opened.
The variation between the knots and loops, all in crisp white against a muted green background, perfectly captures the flower’s airy, intricate form.
20. Blending a Rainbow Gradient on a Single Petal

The bird of paradise offers a stunning opportunity to practice dramatic color blending within a single, defined shape.
Instead of blending colors softly across an entire flower, you’ll blend them sharply along the length of a petal or stem.
Use single strands of floss and lay your long-and-short stitches side-by-side, creating a smooth, seamless transition from one hue to the next—like the rainbow effect on the stem.
To keep the edges between the vibrant orange and the electric blue perfectly crisp, outline each section with a split stitch before you begin filling it in.
21. Creating Soft Folds in Calla Lily Petals

The elegance of a calla lily comes from its sculptural, unfurling shape. You can recreate this by carefully directing your stitches to create light and shadow.
Use a single strand of thread and long, slightly curved stitches that follow the direction of the petal’s wrap. Don’t stitch straight across.
Introduce a pale yellow or chartreuse green near the base and a soft gray along the outer edge where a shadow would naturally fall. This tonal shift is what creates the illusion of a gentle fold.
The tightly packed French knots of the golden spadix provide a necessary point of texture and saturated color against the smooth, subtle petal.
22. Adding a Watercolor Background Effect

To give your embroidery a soft, atmospheric backdrop, consider adding a hint of color to the fabric before you even start stitching.
You can use fabric paints, watercolor paints (if the piece won’t be washed), or even watered-down acrylics to create a gentle wash of color behind your design.
Apply the color sparingly and let it dry completely before stretching the fabric in the hoop. This painted background enhances the stitched elements and adds a layer of artistic depth.
Here, a soft purple wash makes the bluebell flowers feel more cohesive and integrated into the scene, turning your hoop into a complete piece of abstract floral embroidery.
23. Crafting Weightless Dandelion Seeds

To capture the feeling of dandelion seeds floating on the wind, you must focus on creating a sense of lightness and transparency.
Use a single strand of white thread for the pappus (the parachute-like fibers). Create them with a series of straight stitches radiating from a central point, but don’t make them perfectly uniform.
For the seed itself (the achene), use a single, darker satin stitch. The key is the space between the elements—allow the dark background fabric to show through.
This masterful use of negative space is what gives the piece its delicate, ephemeral quality, making it feel like the seeds could float away at any moment.


