
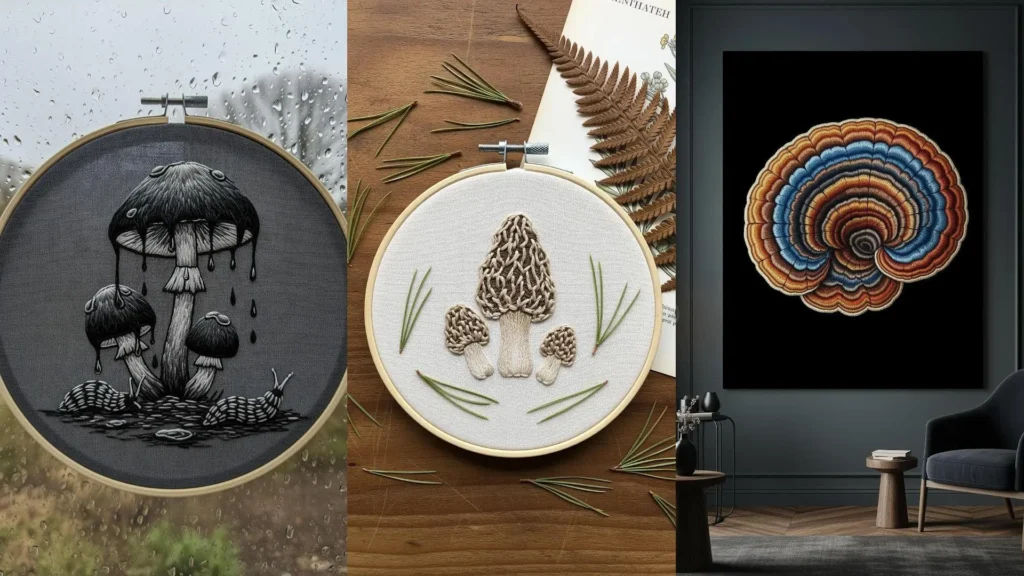
Have you ever stopped on a walk to look closely at the forest floor? It’s a world of immense detail—the velvety texture of moss, the intricate gills of a mushroom, the fractal patterns of lichen on a fallen branch. It’s a place of quiet, complex beauty. Your embroidery can capture that same feeling.
Instead of just stitching a shape, I want you to think about stitching a texture, a shadow, a feeling. How can you make that mushroom cap look rounded and glossy? How can you make that moss feel so real someone wants to touch it? It’s not about using a hundred different fancy stitches, but about using simple stitches with intention.
In these ideas, you’ll discover how a change in thread direction can create form, how layering colors can build depth, and how combining textures can make your work come alive. Let the quiet artistry of the forest floor guide your needle and transform your next project into something truly special.
1. Create Depth with High-Contrast Fabric
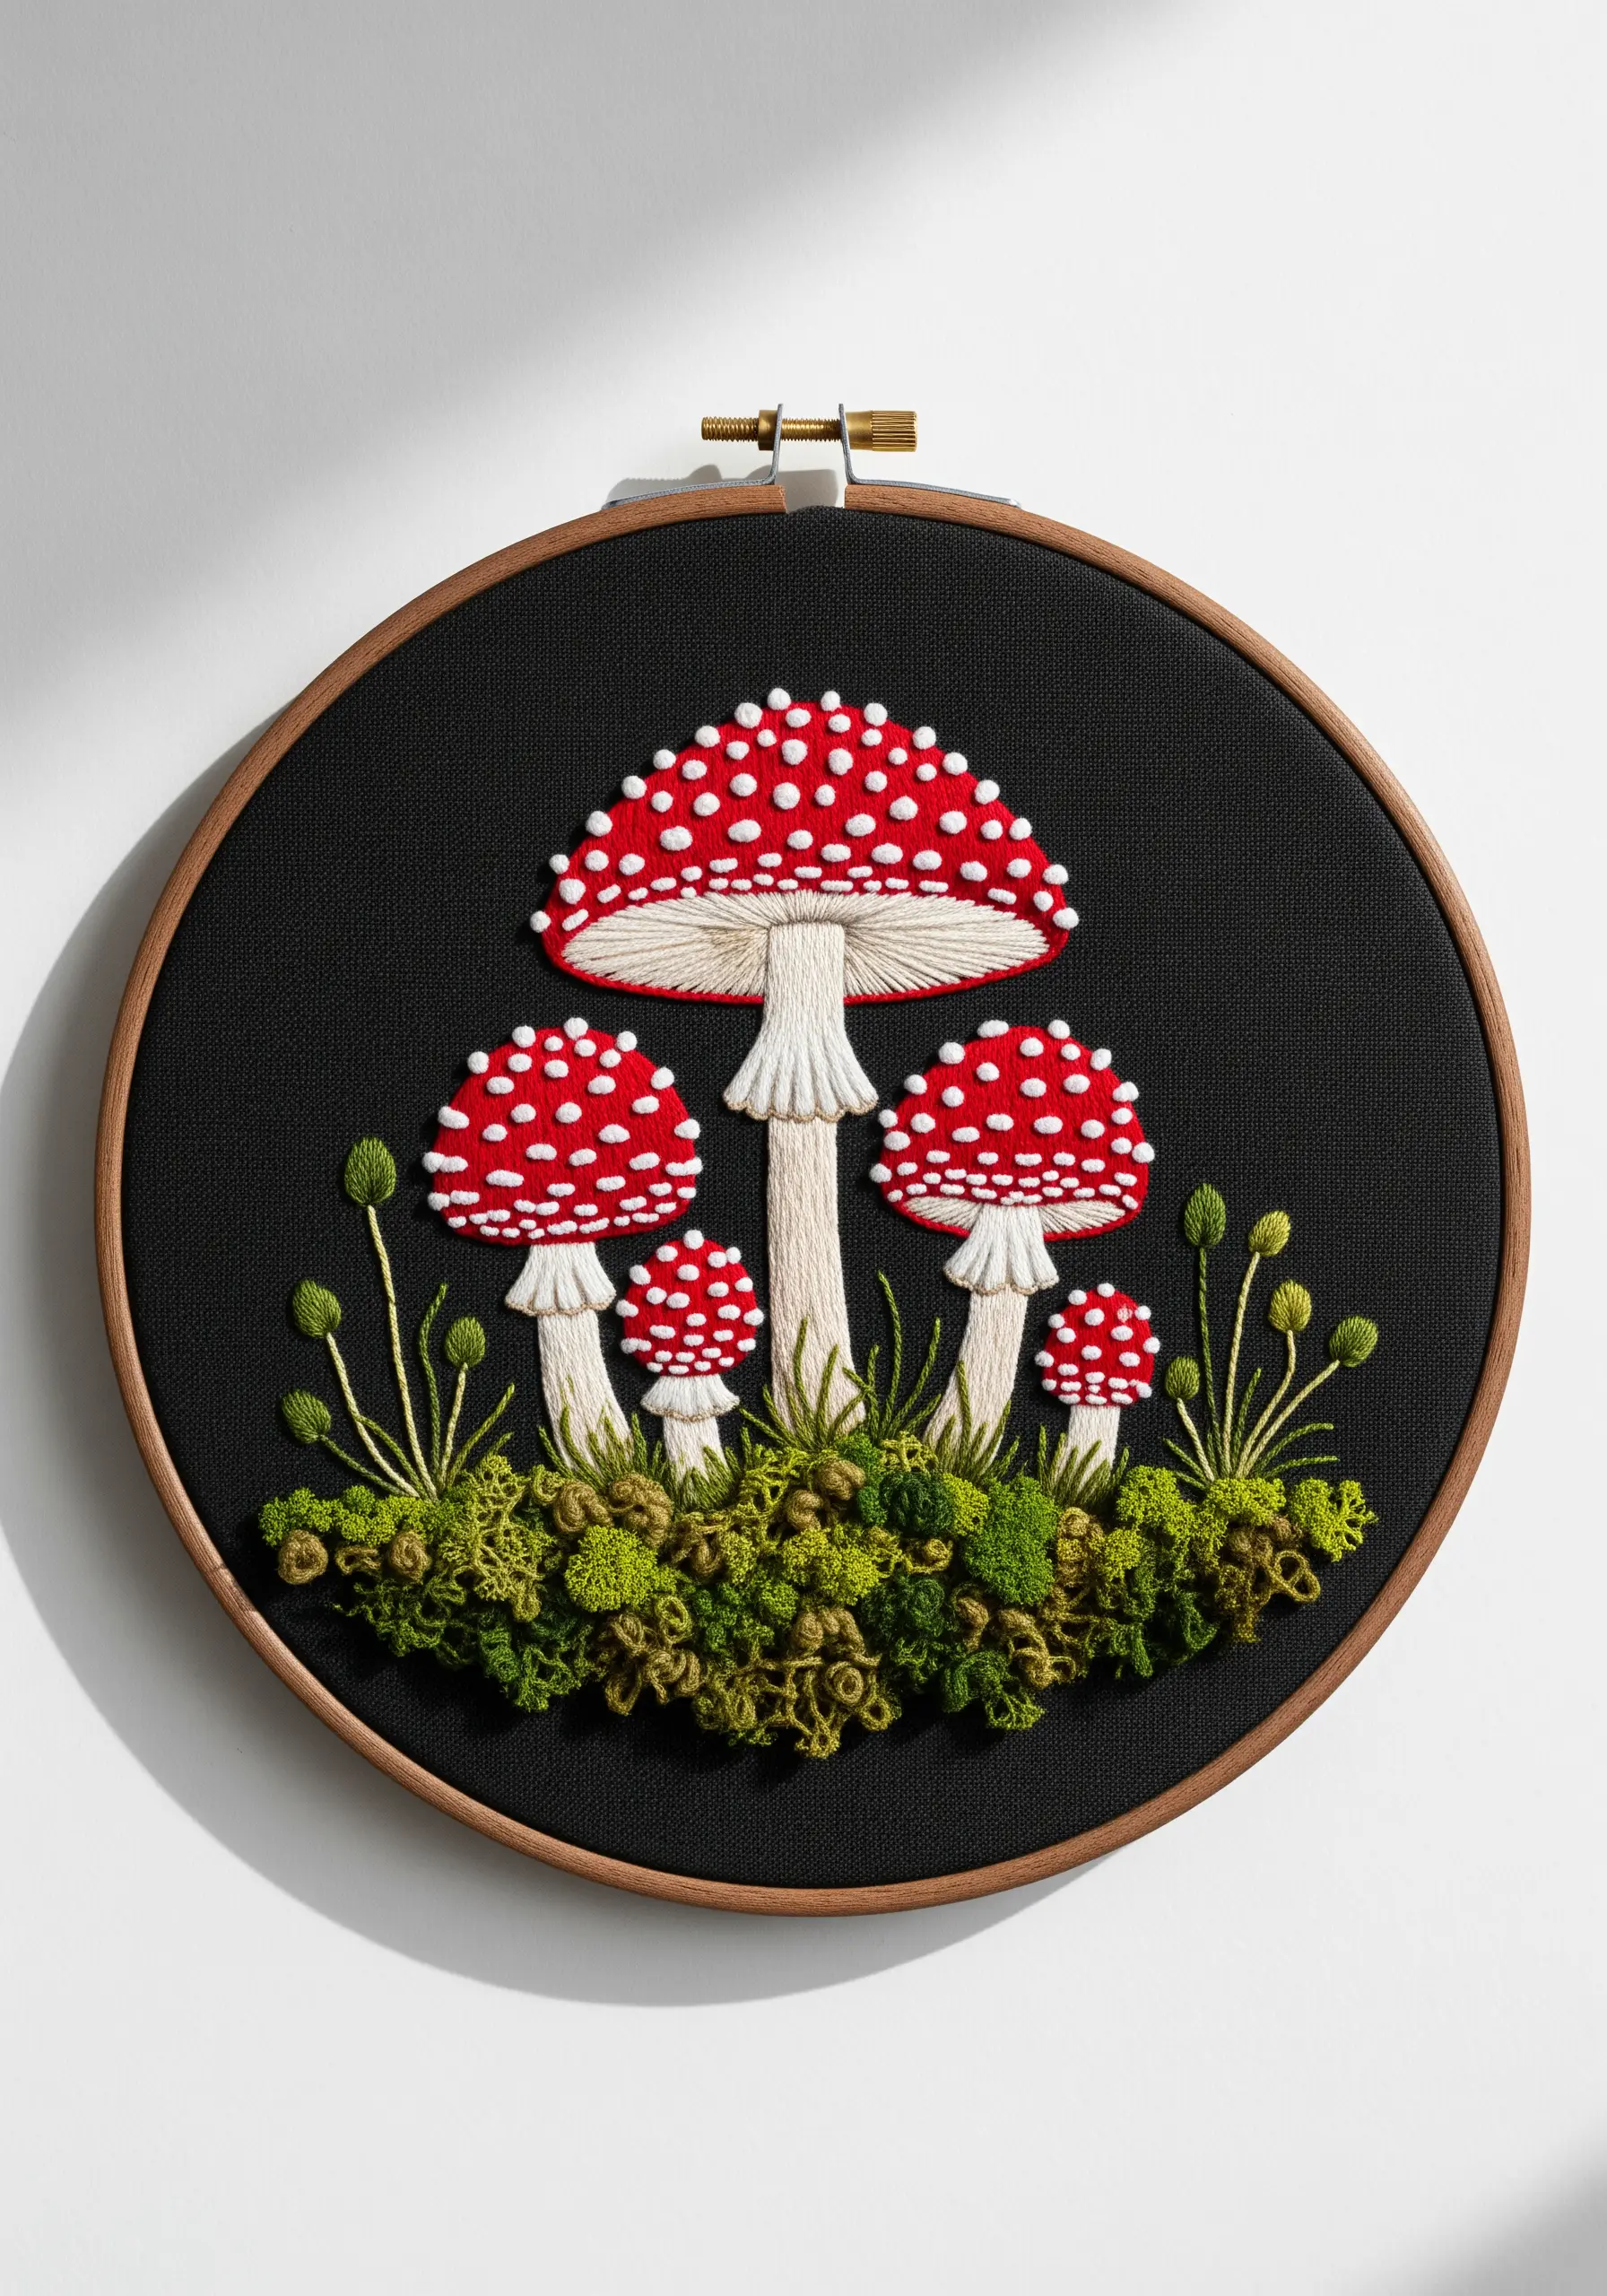
Stitch your fly agaric mushrooms on black or dark charcoal fabric to make your colors intensely vibrant.
Use a crisp white thread for the stems and a brilliant red for the caps; the dark background absorbs light, forcing the thread colors to stand out dramatically.
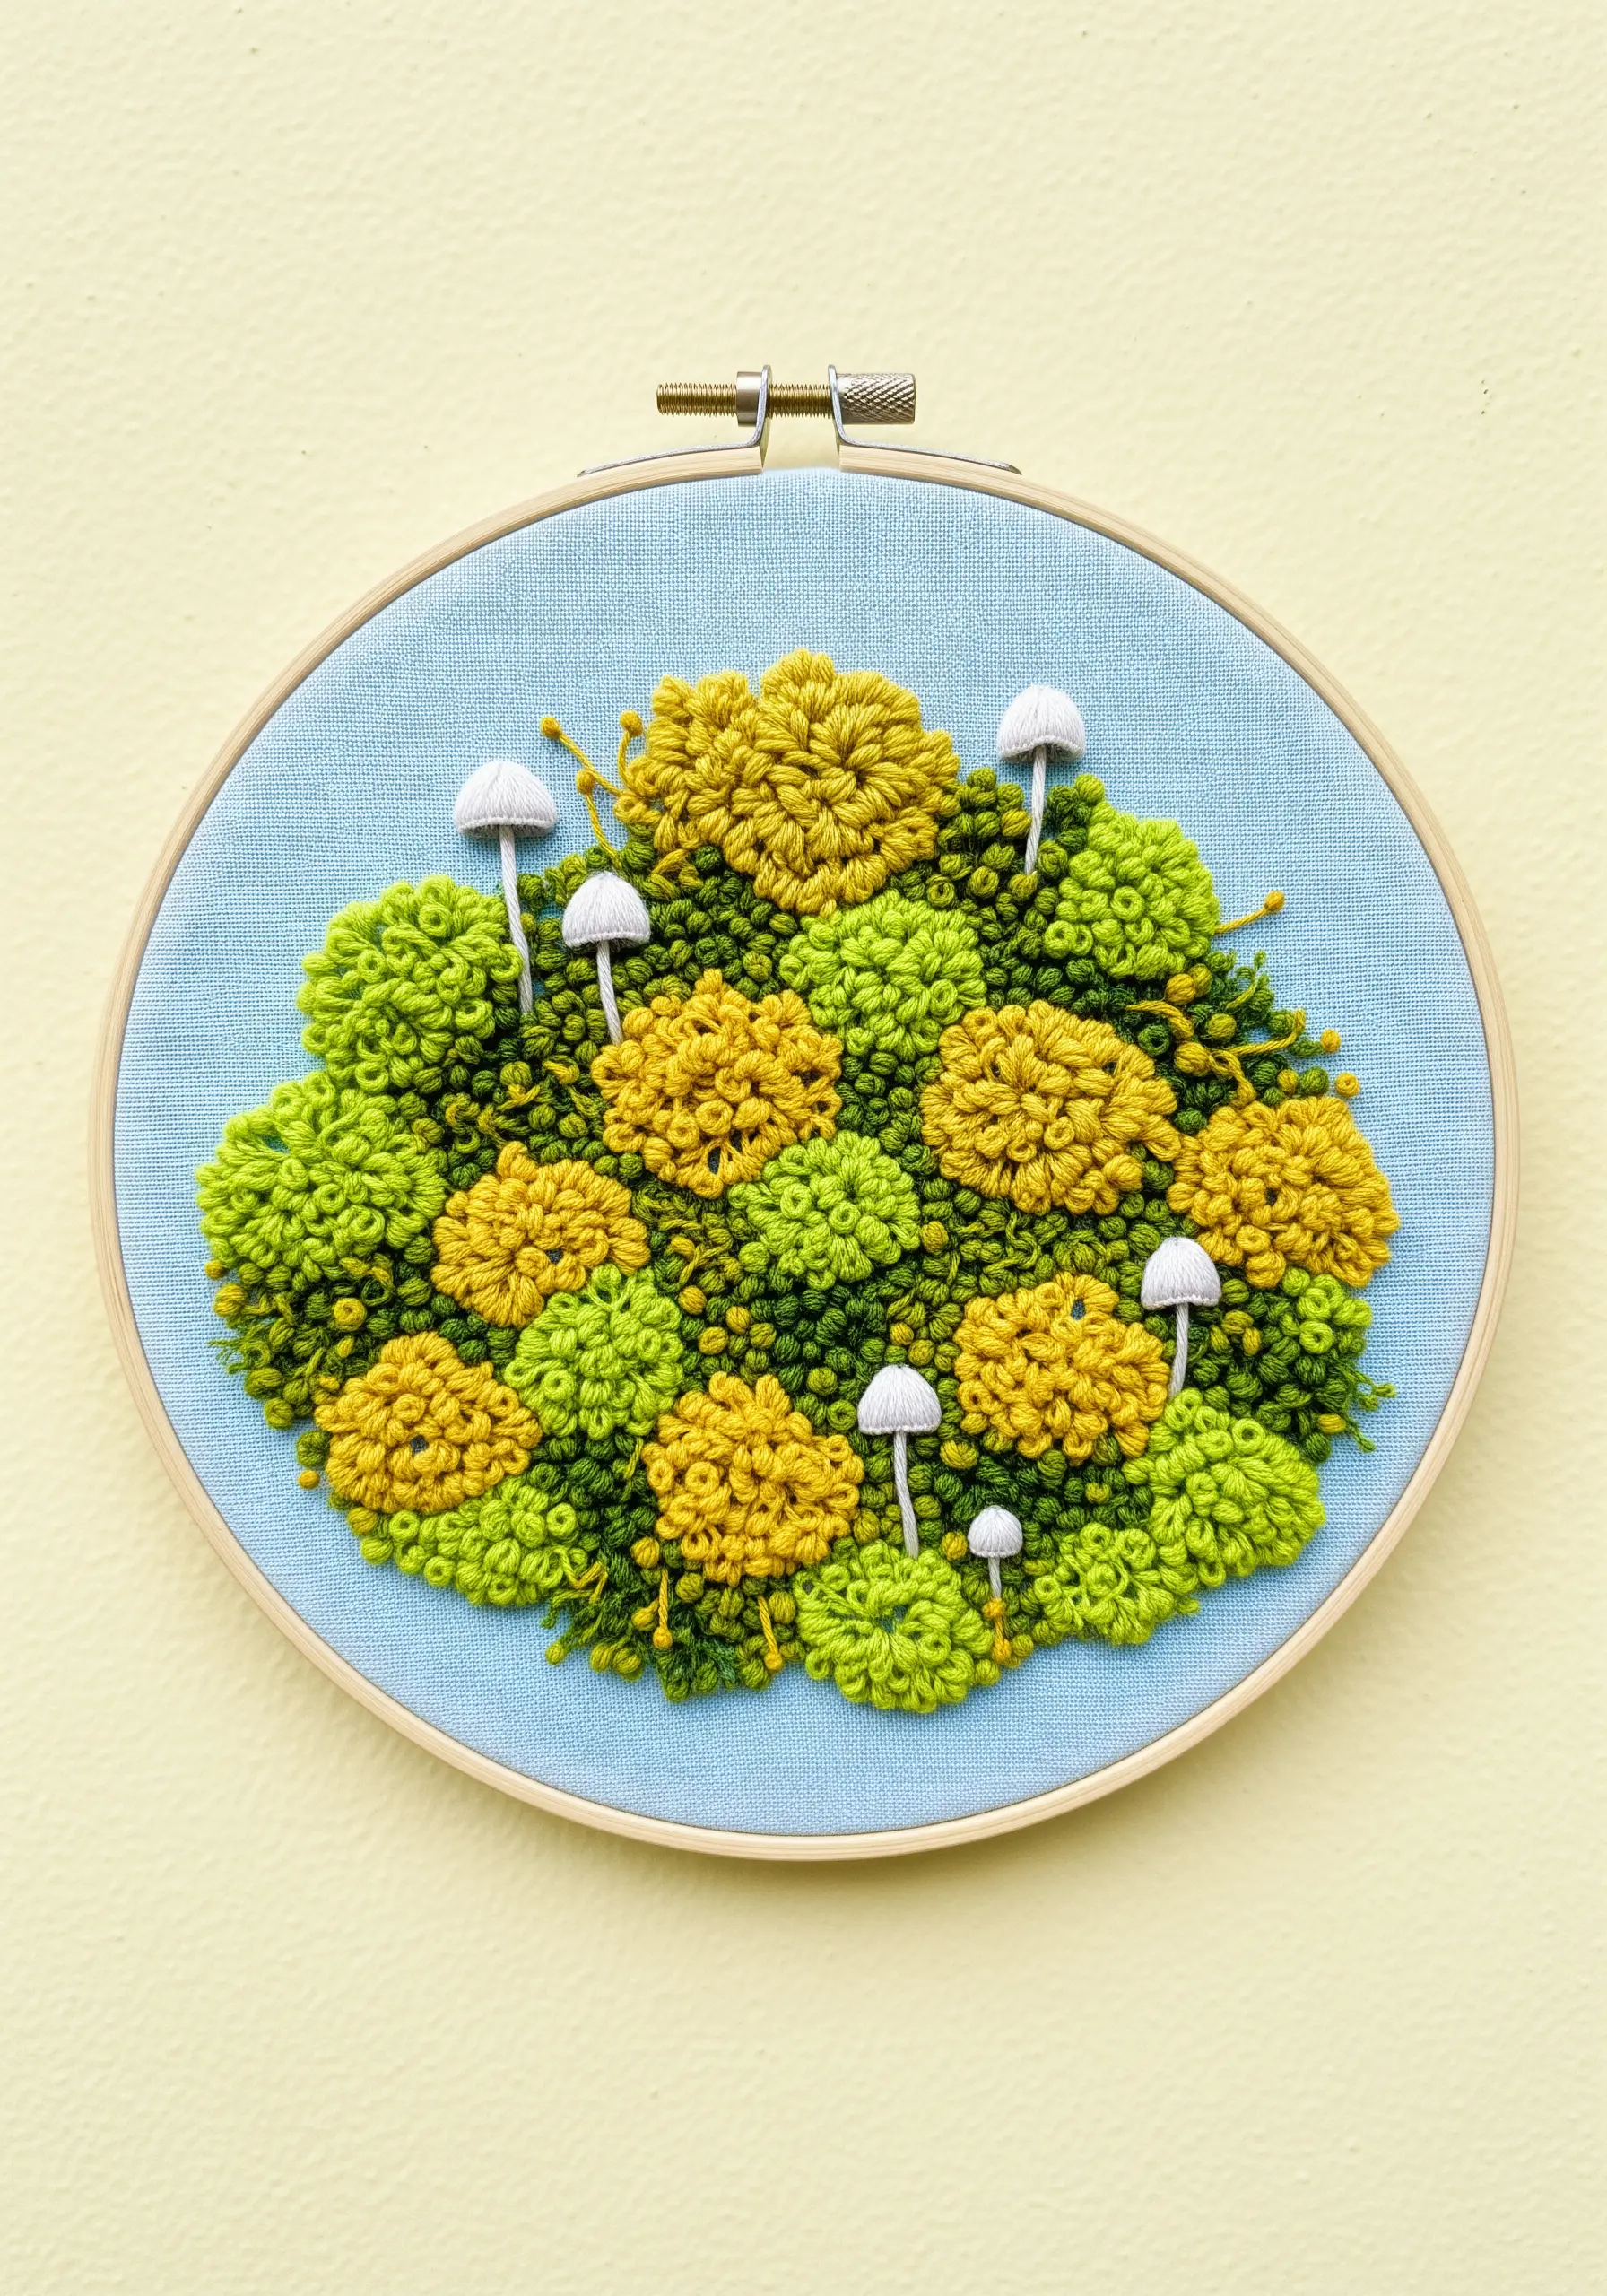
For the moss, layer French knots using two or three shades of olive green to create a lush, three-dimensional forest floor that feels touchable.
The white dots on the cap should be stitched last, using raised French knots to give them a distinct, bumpy texture that contrasts with the smooth satin stitch of the cap.
2. Master Morel Texture with Stem Stitch
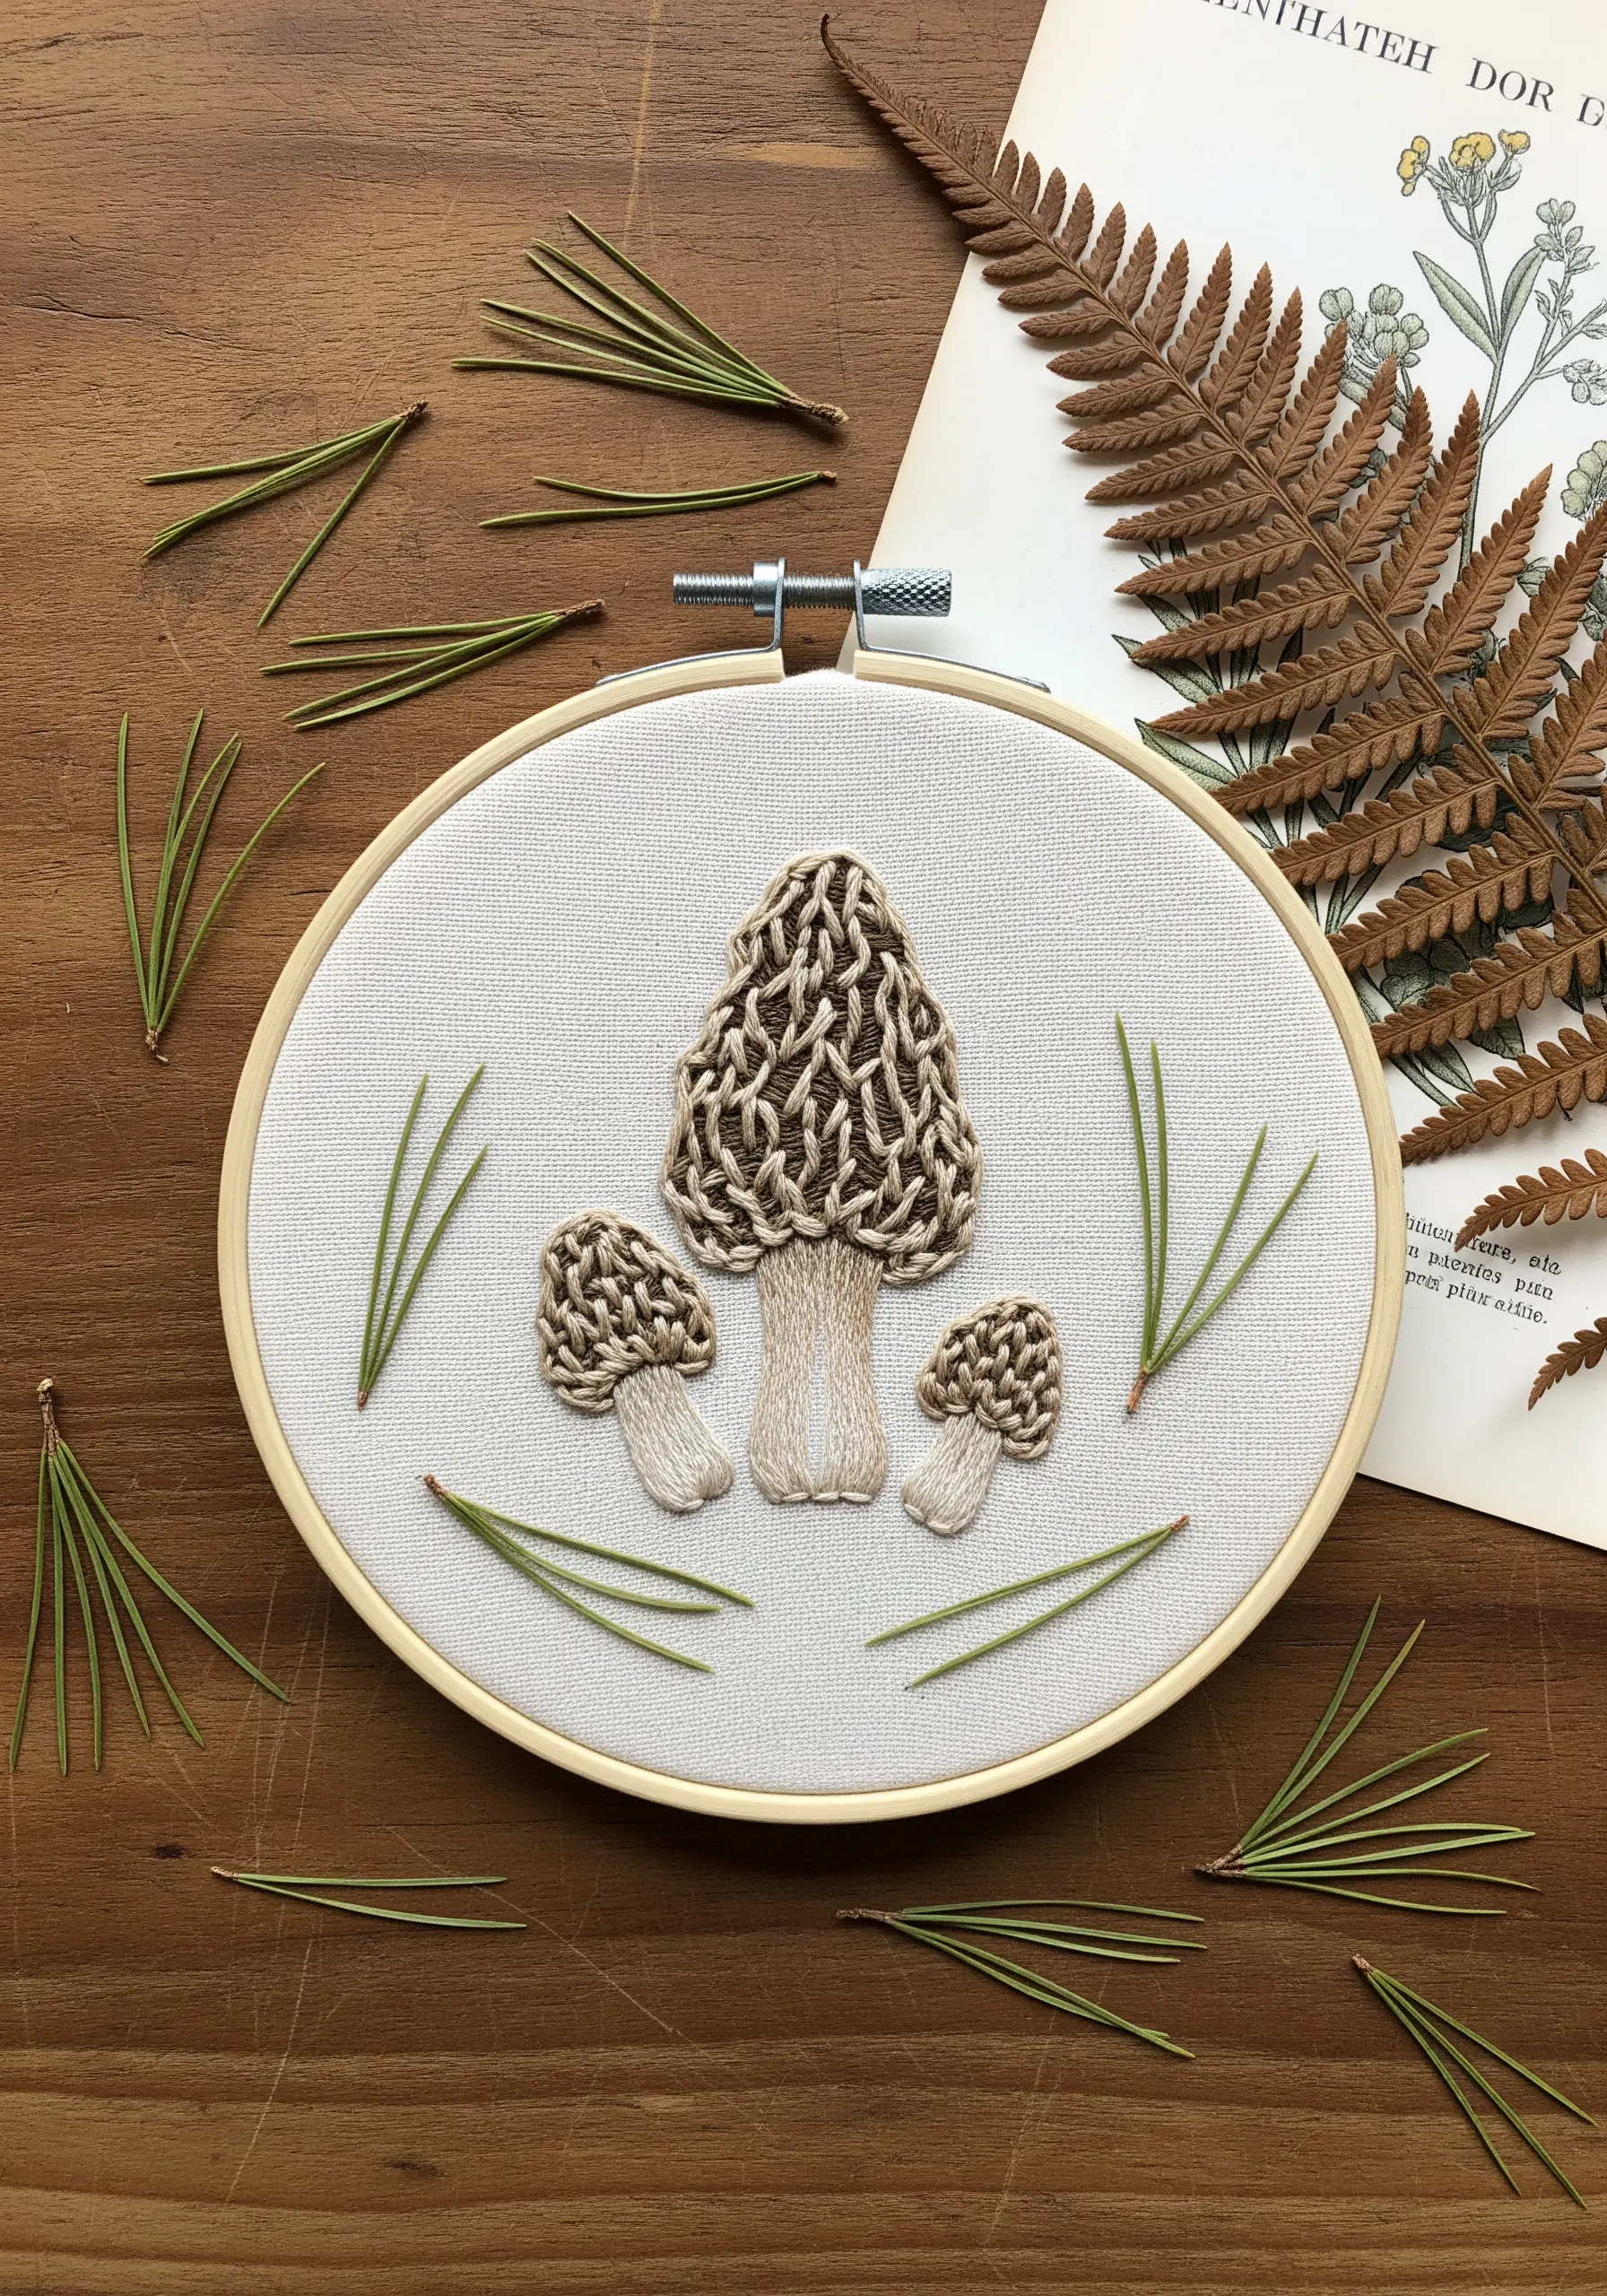
Recreate the unique, pitted texture of a morel mushroom by using a stem stitch or whipped backstitch for the ridges.
Work the stitches in a meandering, organic pattern, outlining the hollows first before filling the interior spaces with a lighter shade of beige or cream thread.
Use a single strand of floss for this delicate work; it allows for greater detail and prevents the texture from becoming bulky or undefined.
This technique turns a simple shape into a complex and realistic study of natural textures.
3. Stitch a Bioluminescent Glow
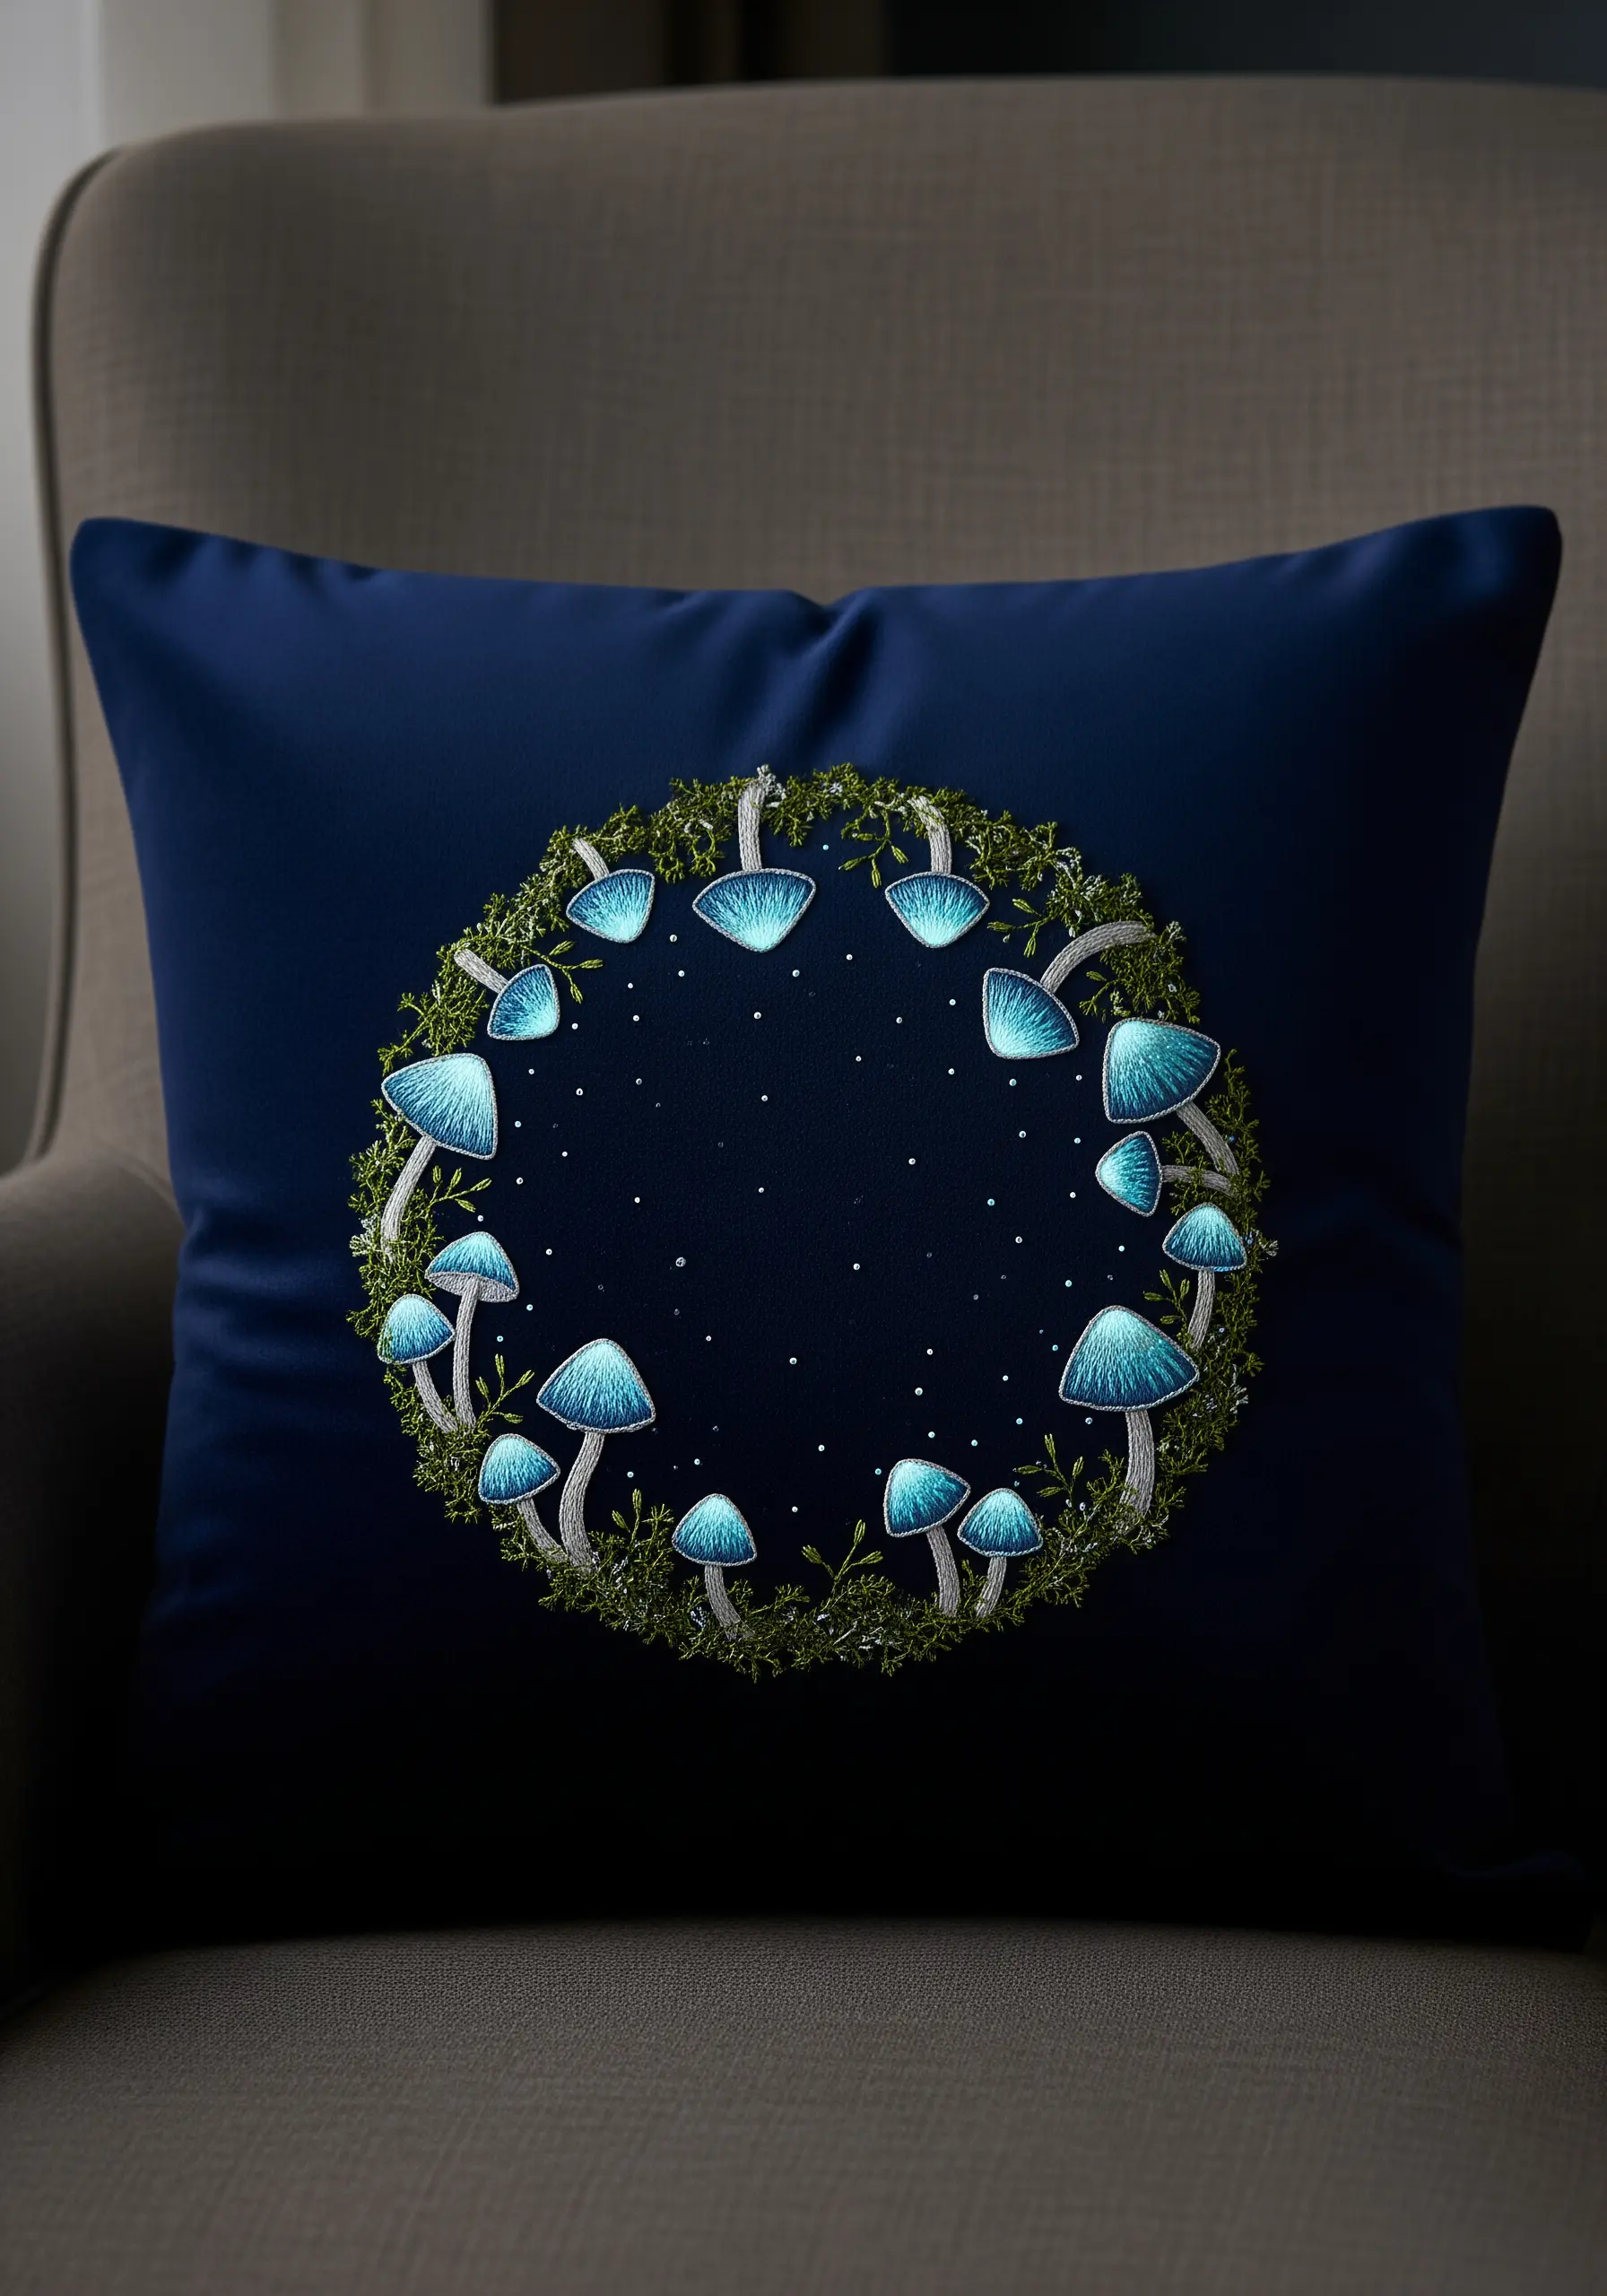
Evoke the magic of bioluminescent fungi by stitching with pale blues, silvers, and even a glow-in-the-dark thread on a navy or black cushion cover.
Use long-and-short stitch on the mushroom caps, blending from a vibrant aqua at the edge to a soft white in the center to create a radiant effect.
Scatter tiny seed stitches or French knots in white or silver metallic thread to represent a starry night sky, integrating the motif into its background.
This is one of those embroidered pillow covers that transforms a simple object into a piece of enchanting art.
4. Layer Satin Stitch for Bracket Fungi
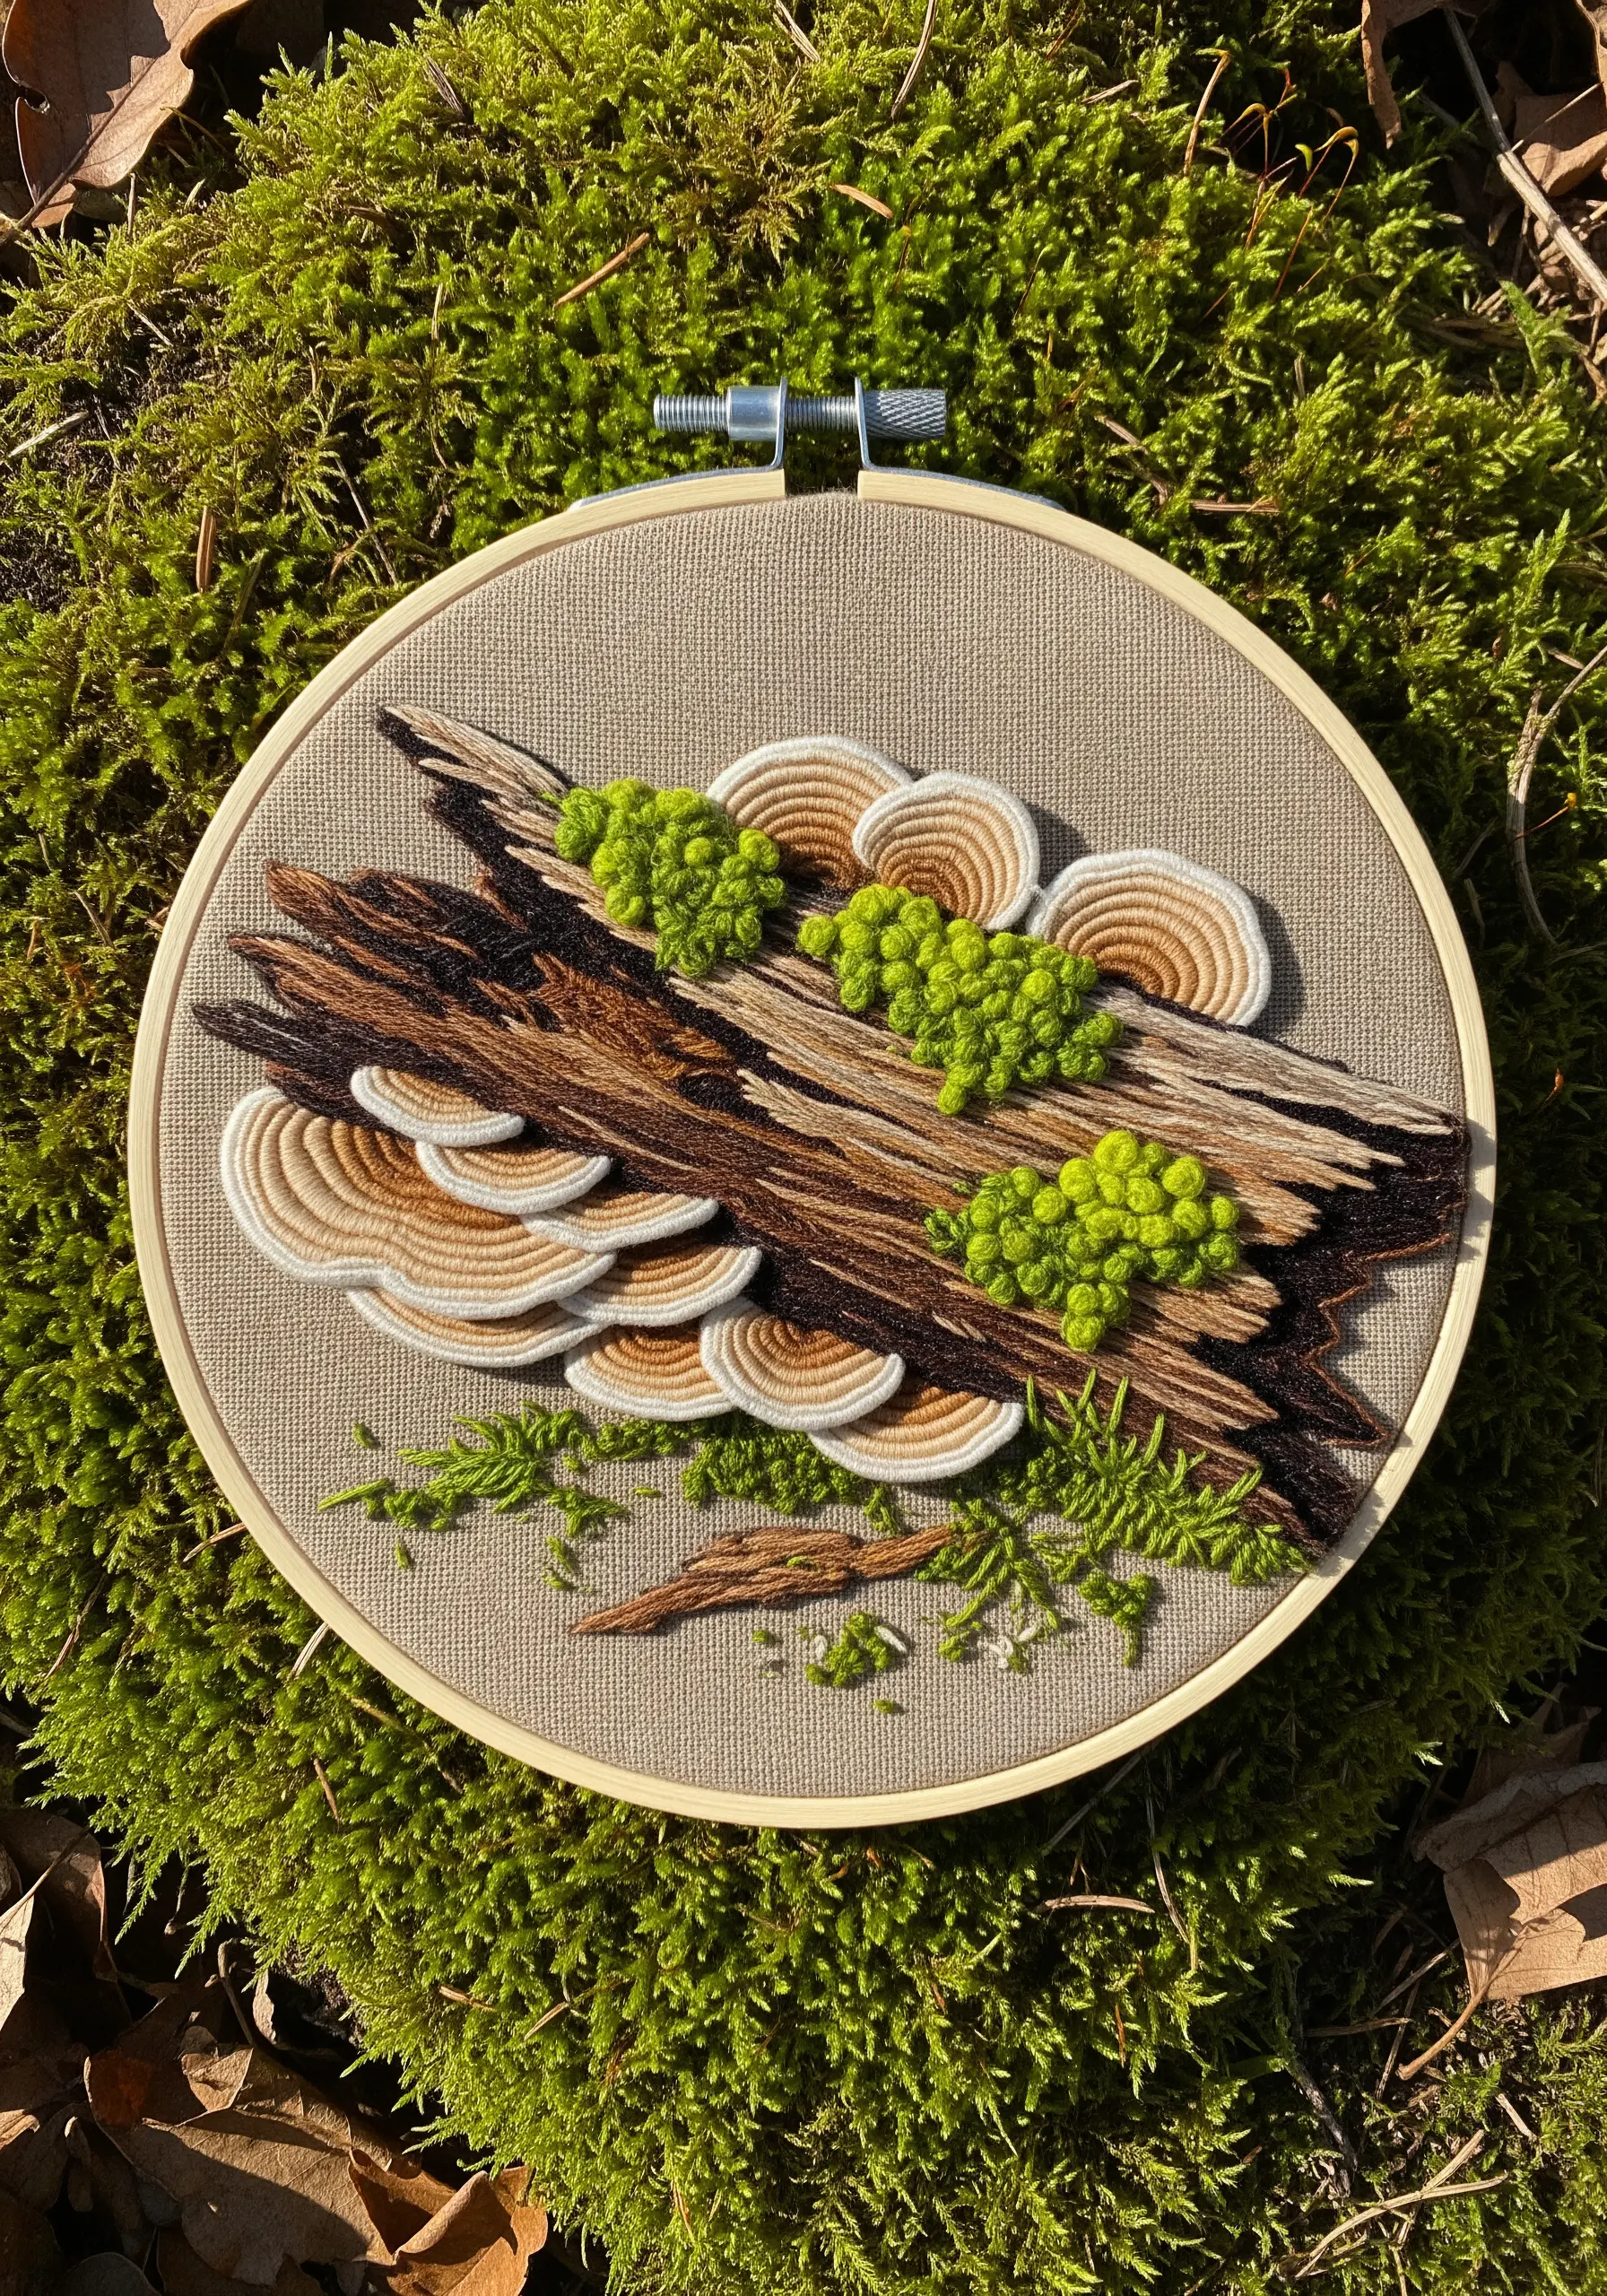
Capture the graceful, concentric rings of turkey tail mushrooms by layering rows of satin stitch in graduating earth tones.
Start with the darkest color at the base where the mushroom meets the wood, then work outwards with progressively lighter shades of brown, beige, and cream.
To create the log, use long, irregular straight stitches in dark brown and black to mimic the texture of rough bark.
Contrast these smooth, flat stitches with bumpy French knots in a vibrant chartreuse green for moss, adding a pop of color and tactile interest.
5. Explore Abstract Color Blocking
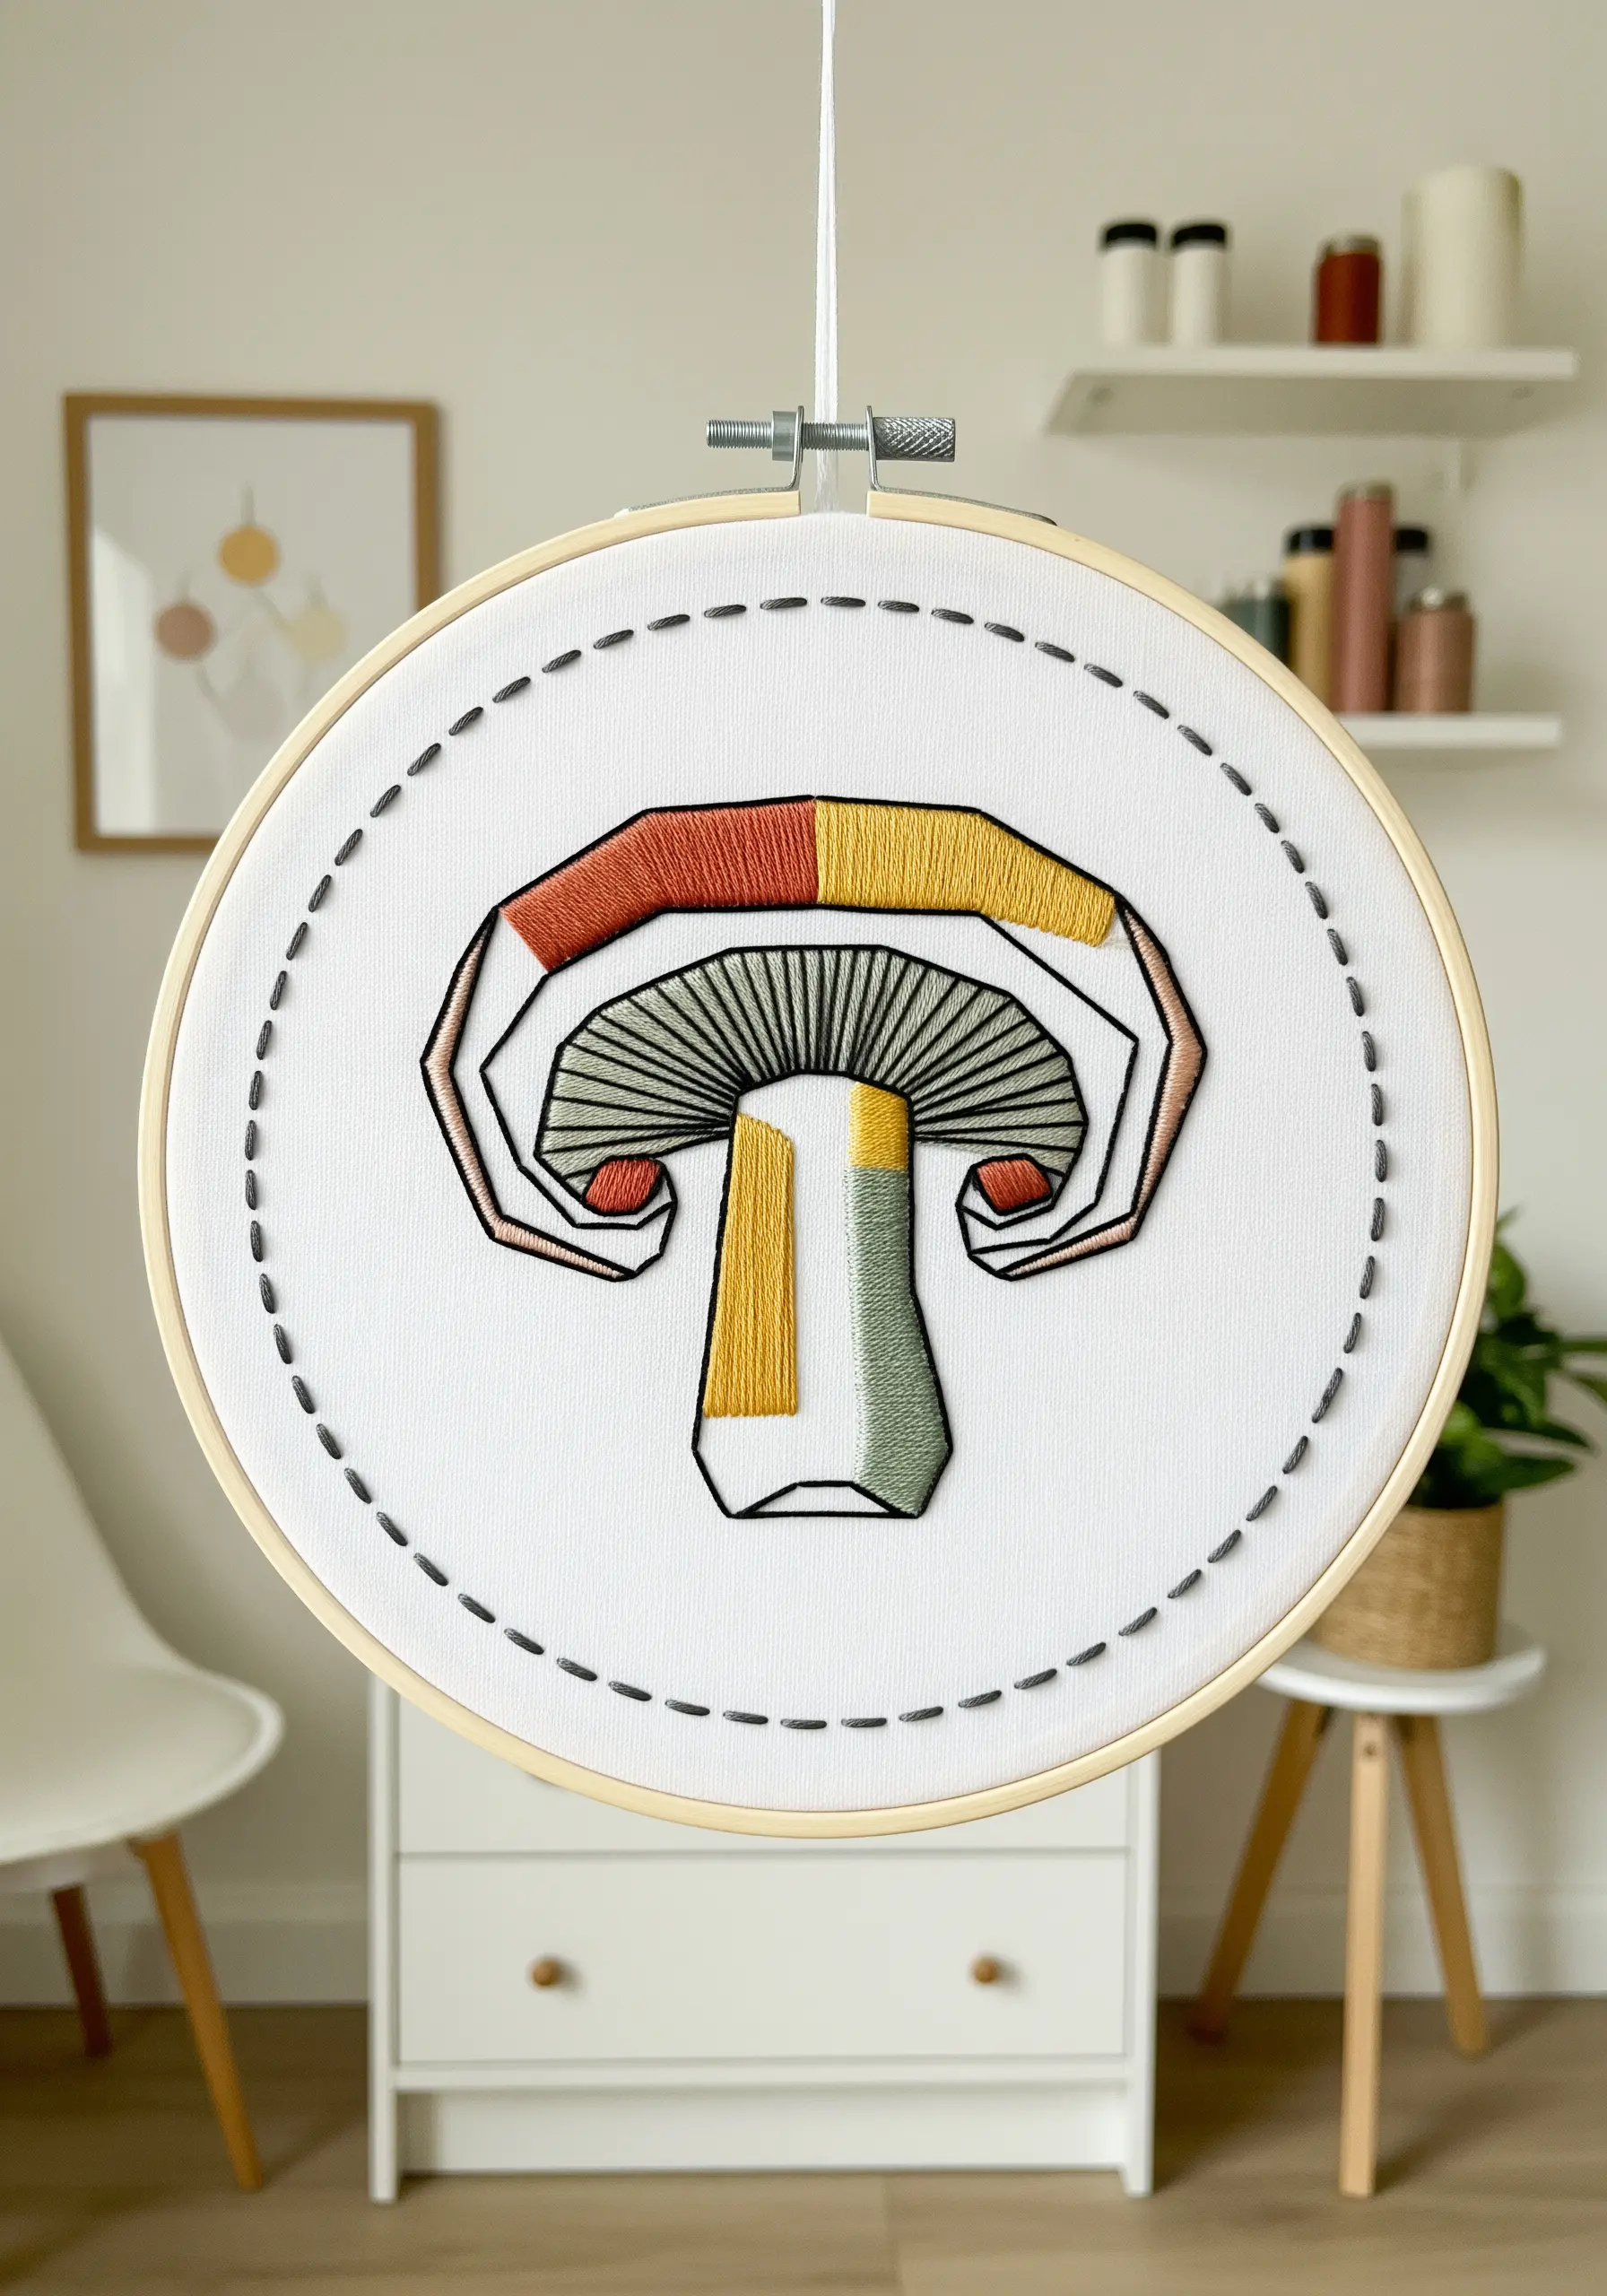
Deconstruct a mushroom into a modern, geometric motif by using color blocking and bold outlines.
Define the primary shapes with a sharp, two-strand backstitch in a dark, contrasting color like charcoal grey.
Fill each segment with flawless satin stitch, choosing an unexpected palette of muted terracotta, gold, and sage green.
The key to this style is precision; ensure your satin stitches are perfectly parallel and your outlines are crisp to achieve that clean, graphic look.
This technique turns a botanical subject into a piece of minimalist stitched art.
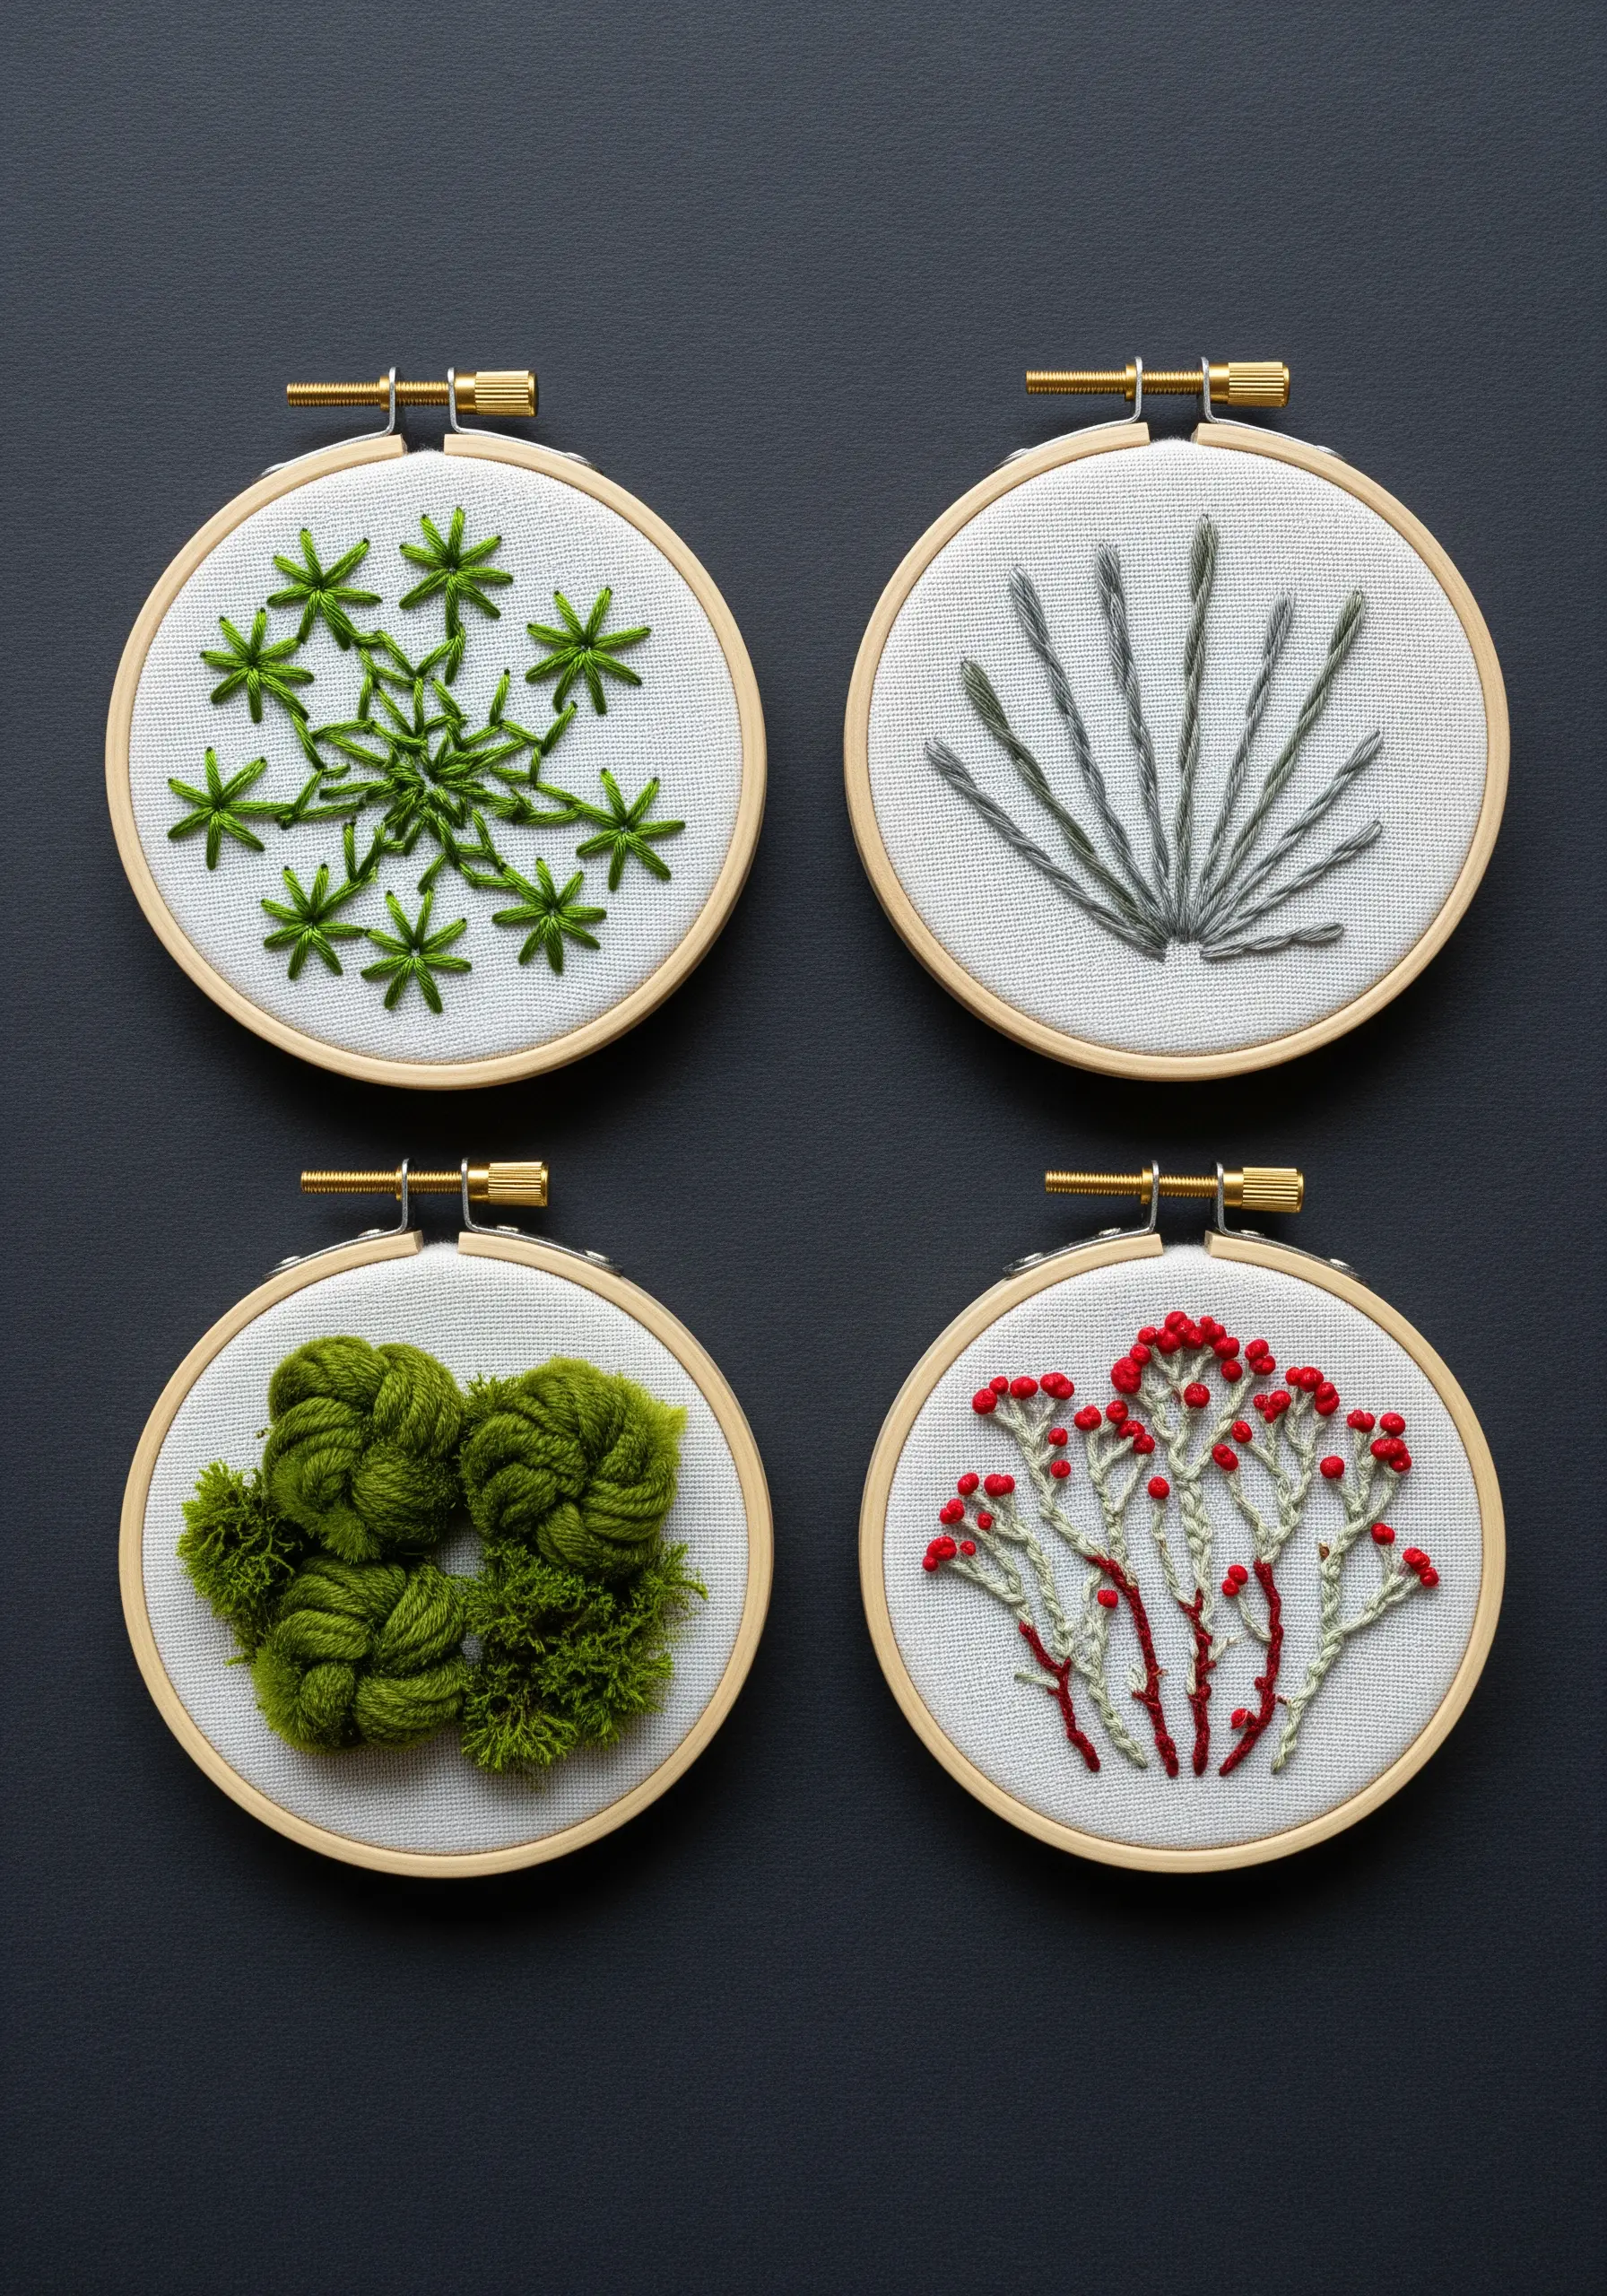
6. Add Delicate Spores with French Knots
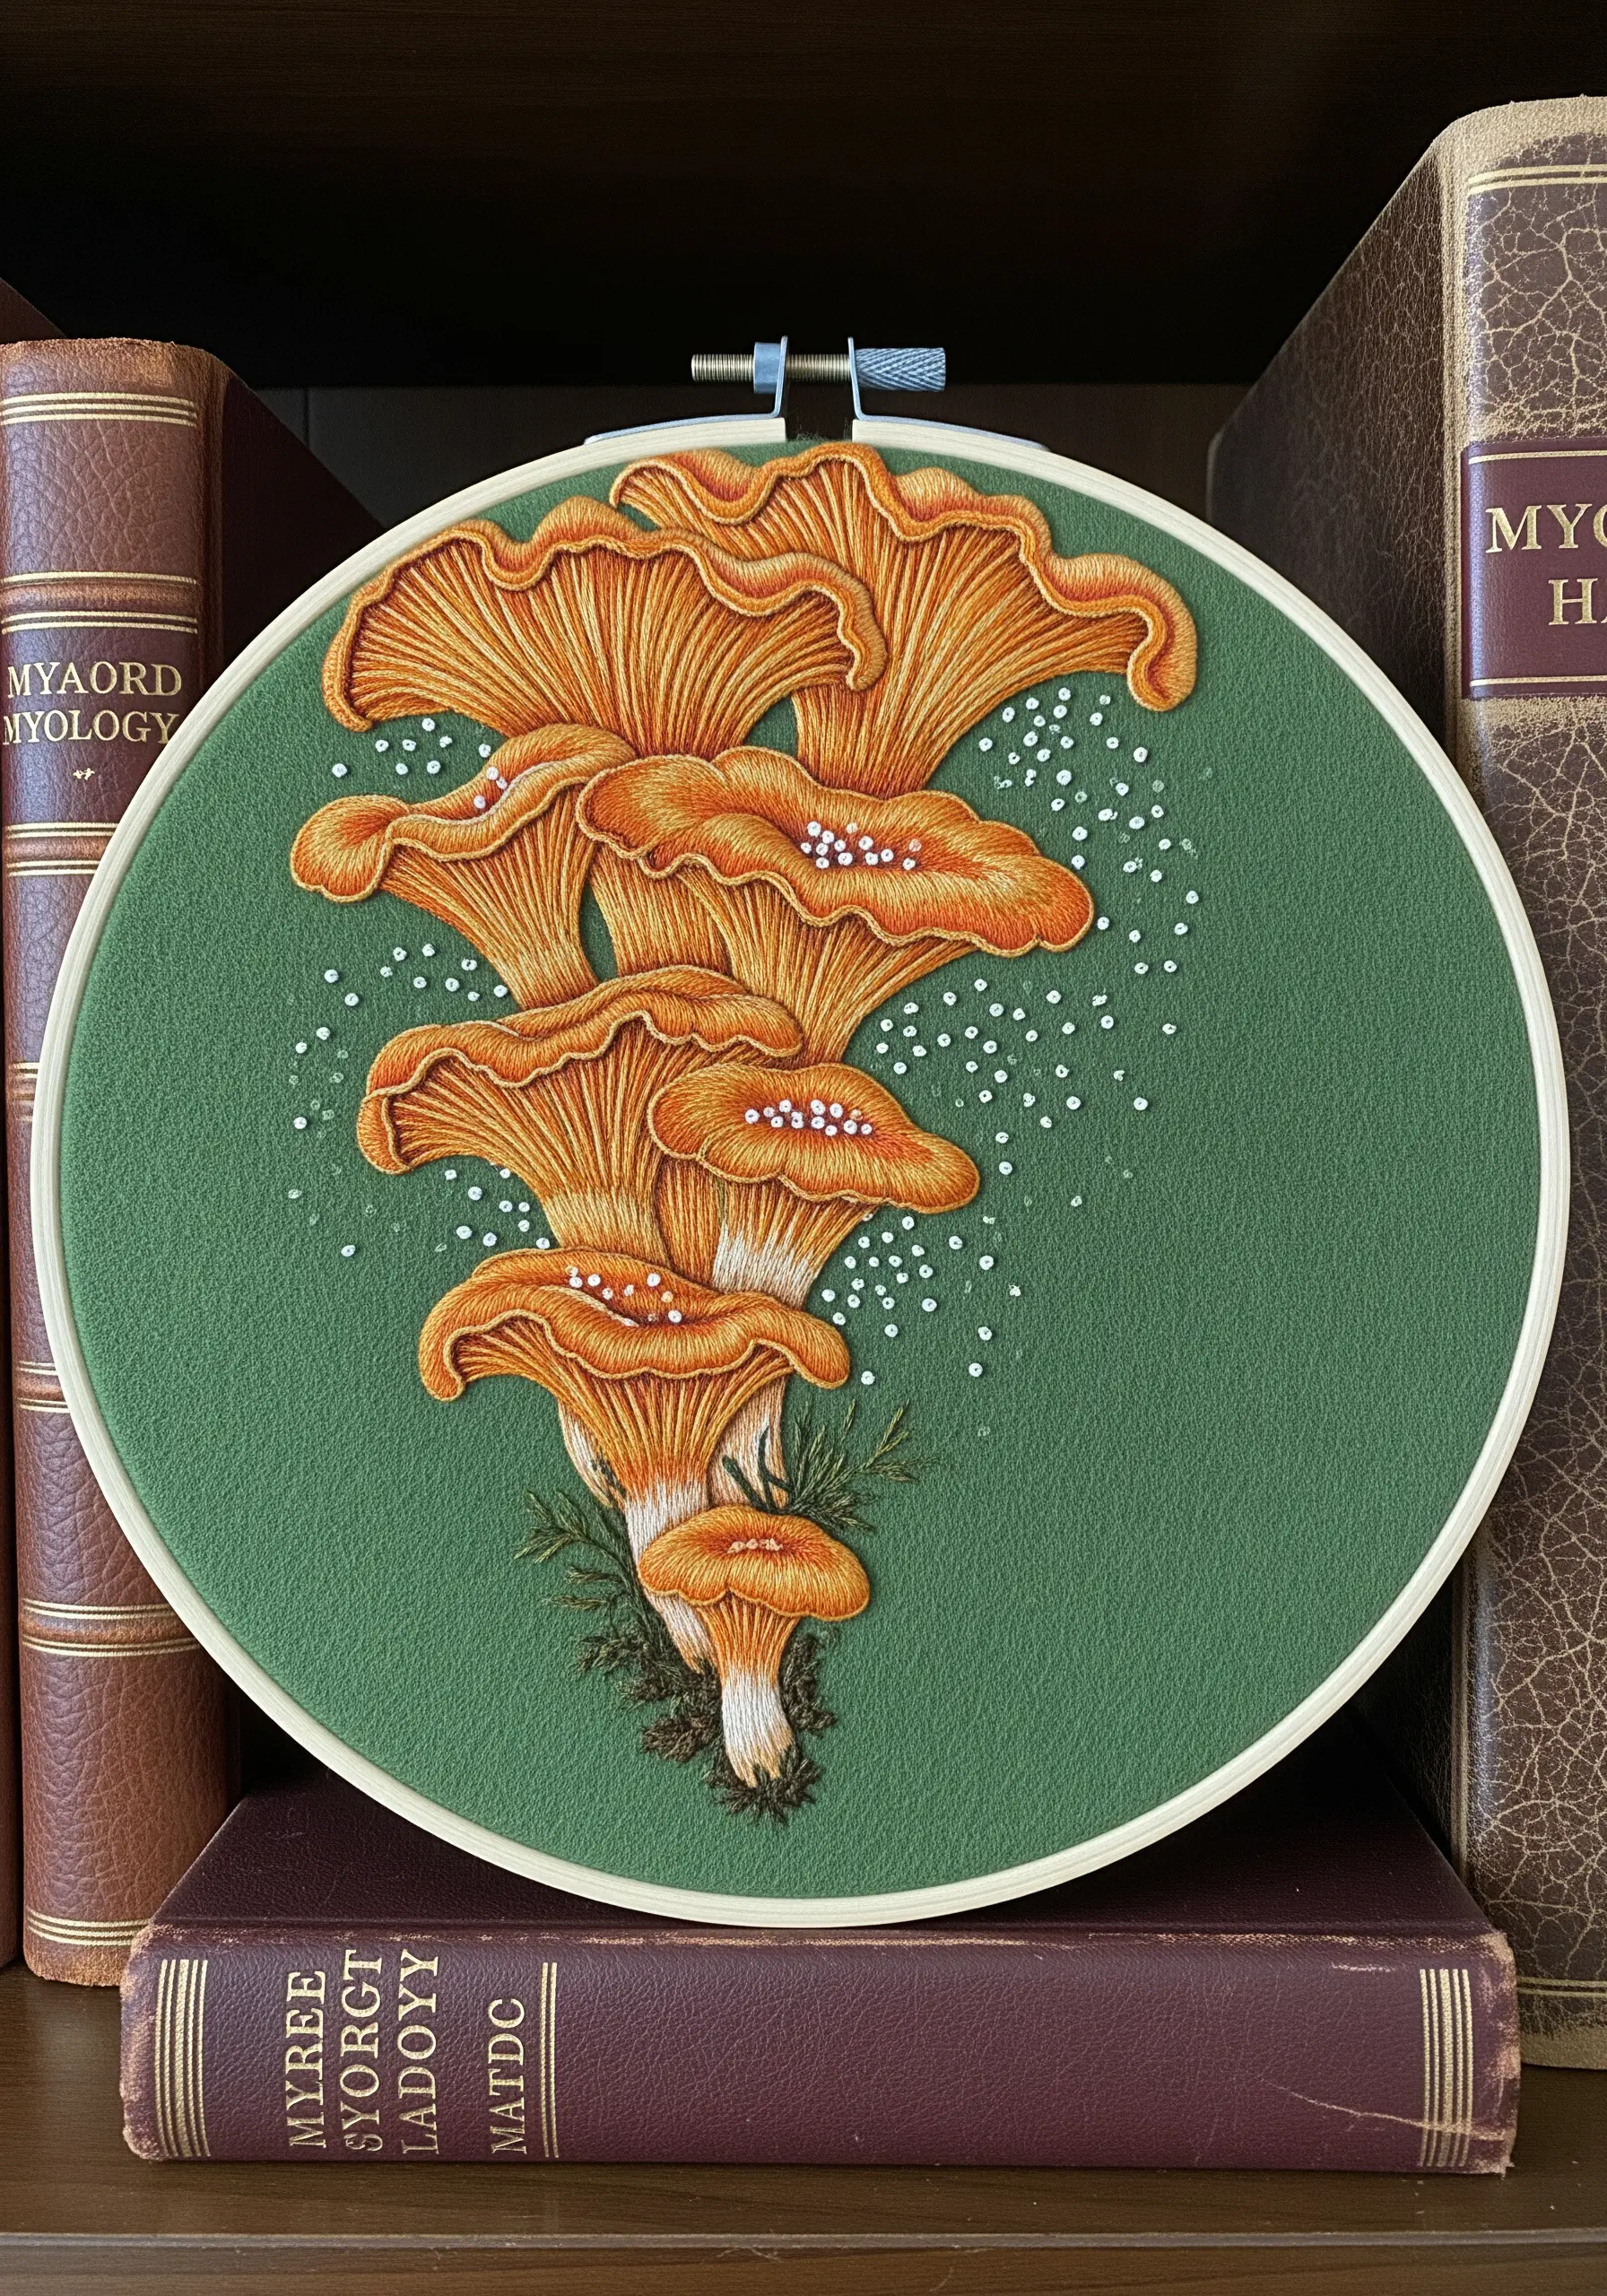
Give your chanterelle mushrooms a touch of realism by scattering tiny white French knots or seed beads over the caps to represent spores.
Use a directional long-and-short stitch for the ruffled caps, ensuring your stitches follow the outward curve to create a sense of movement and volume.
Stitching these vibrant orange fungi on a muted sage or olive green fabric creates a sophisticated, complementary color harmony that feels natural and earthy.
Just a few strategically placed knots add a layer of detail that elevates the entire piece from a simple depiction to a delicate botanical study.
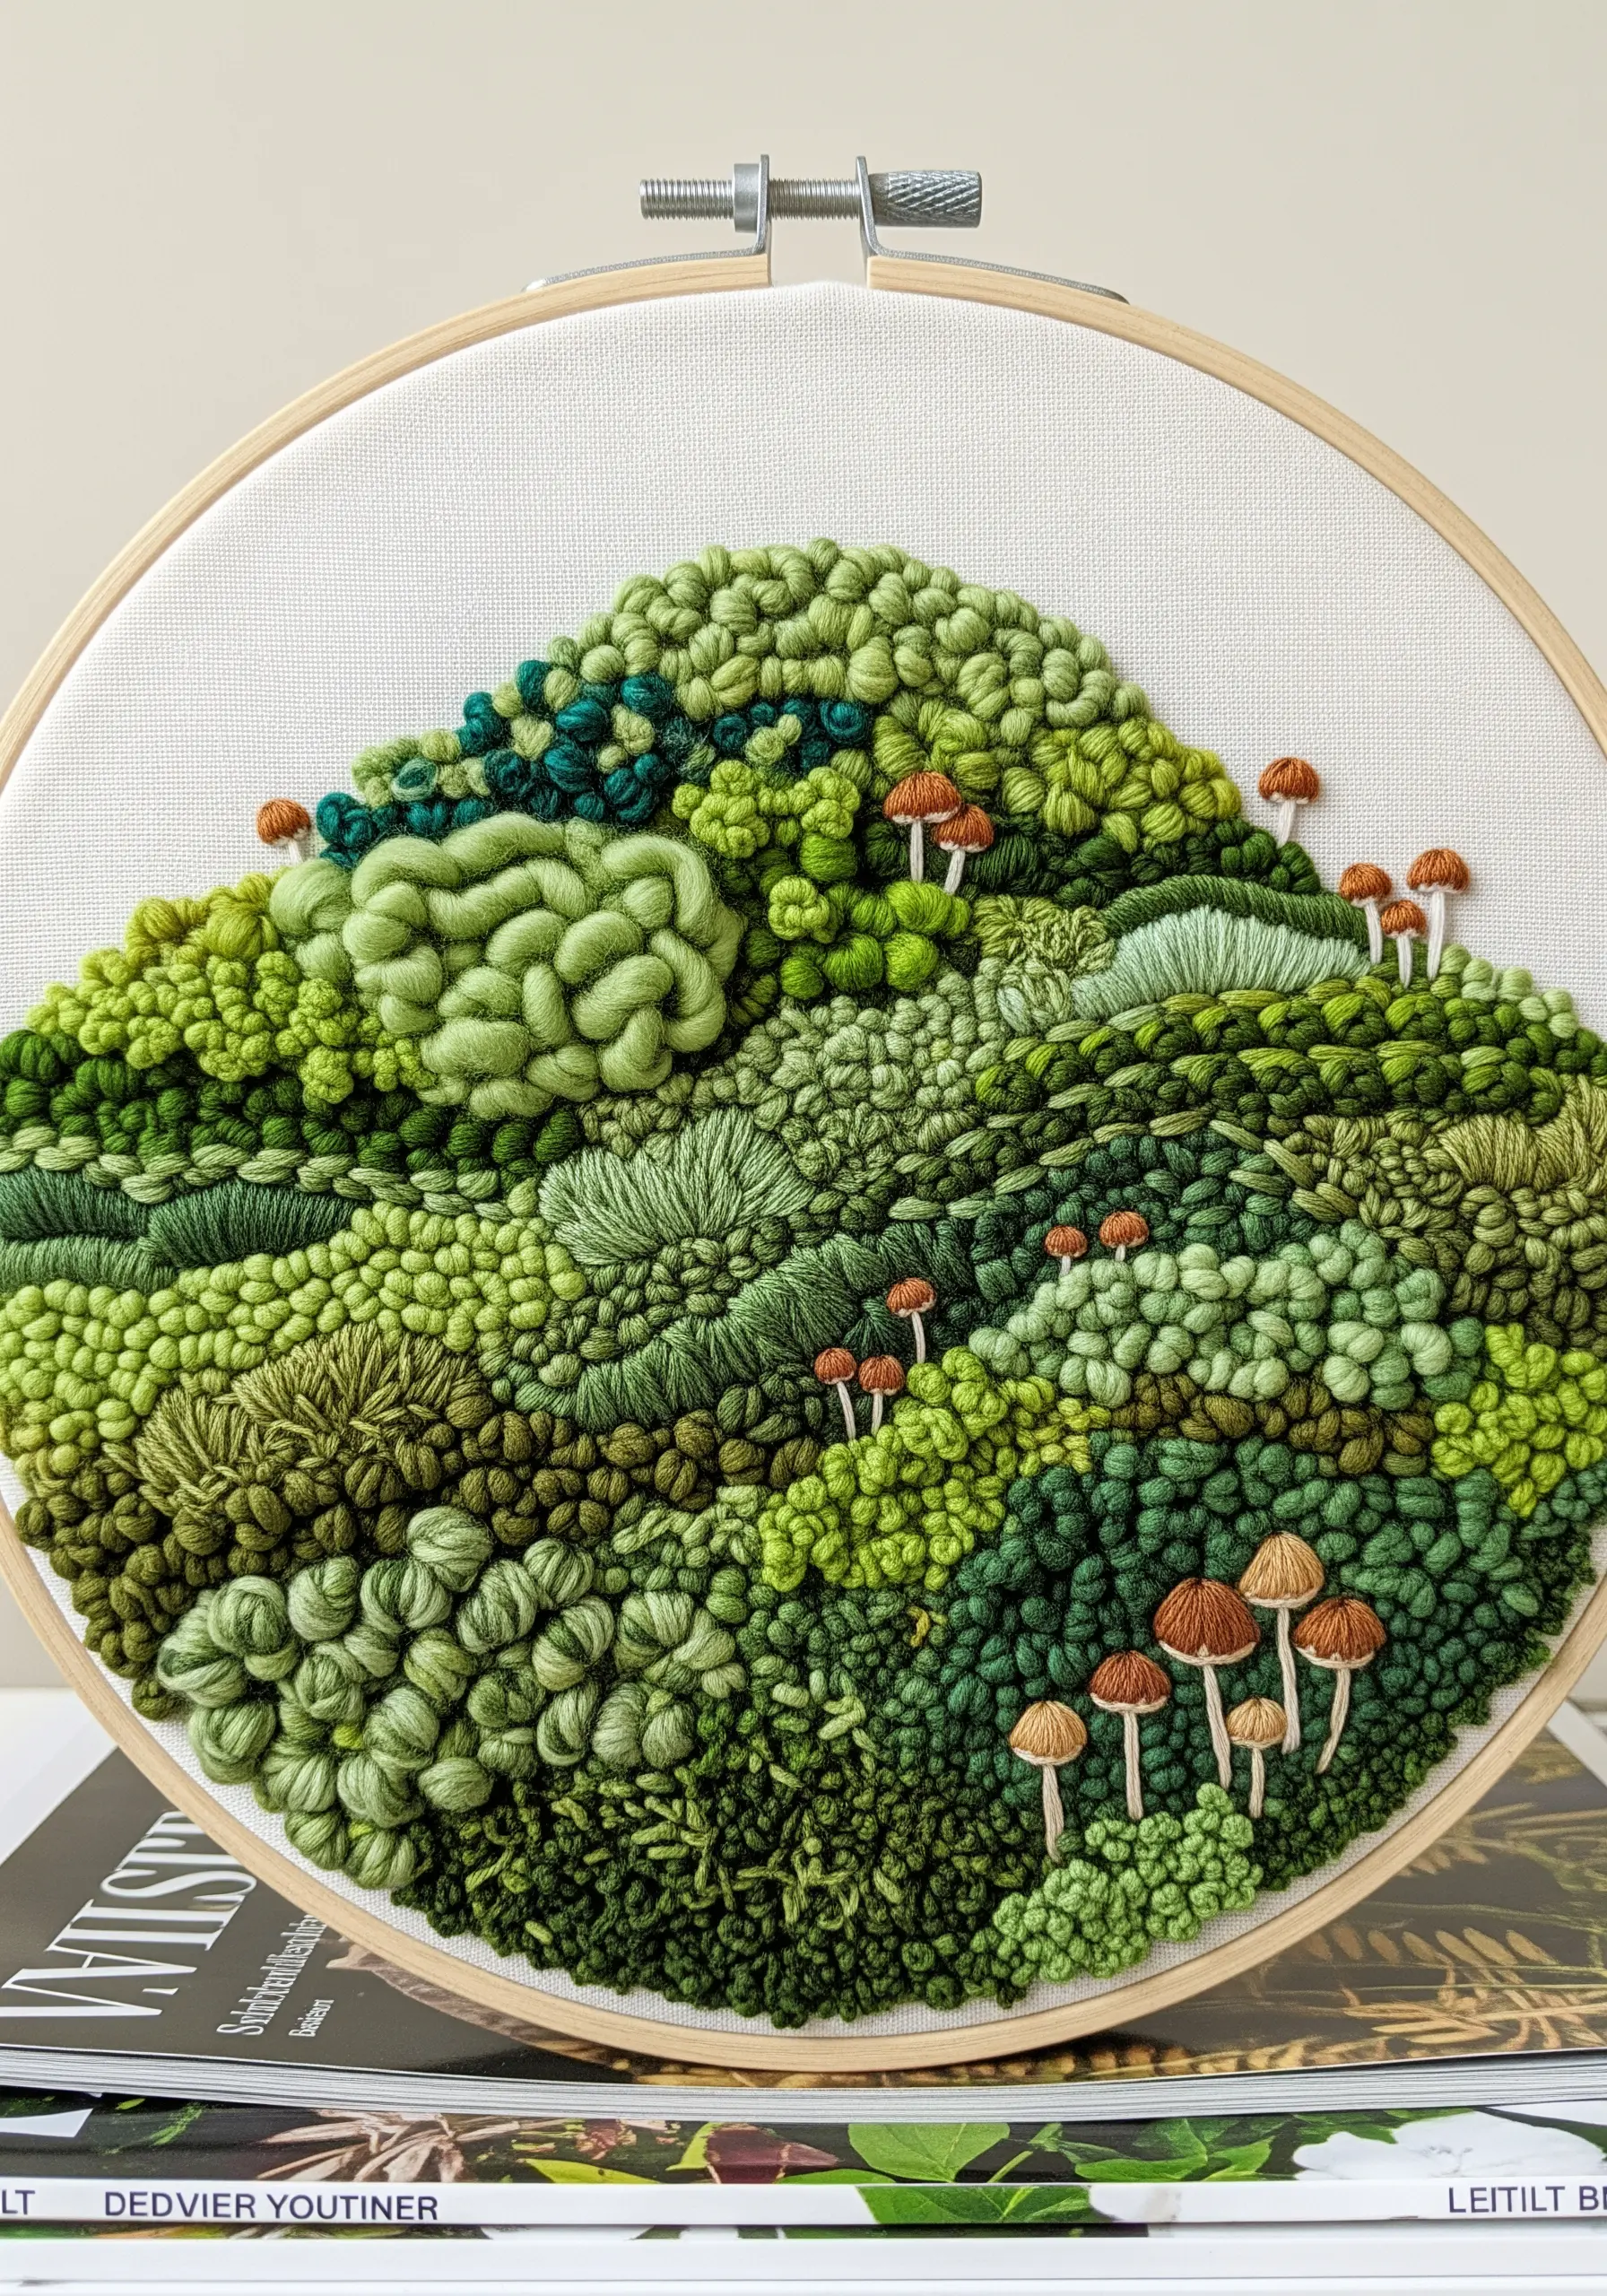
7. Weave a Dense Mossy Tapestry
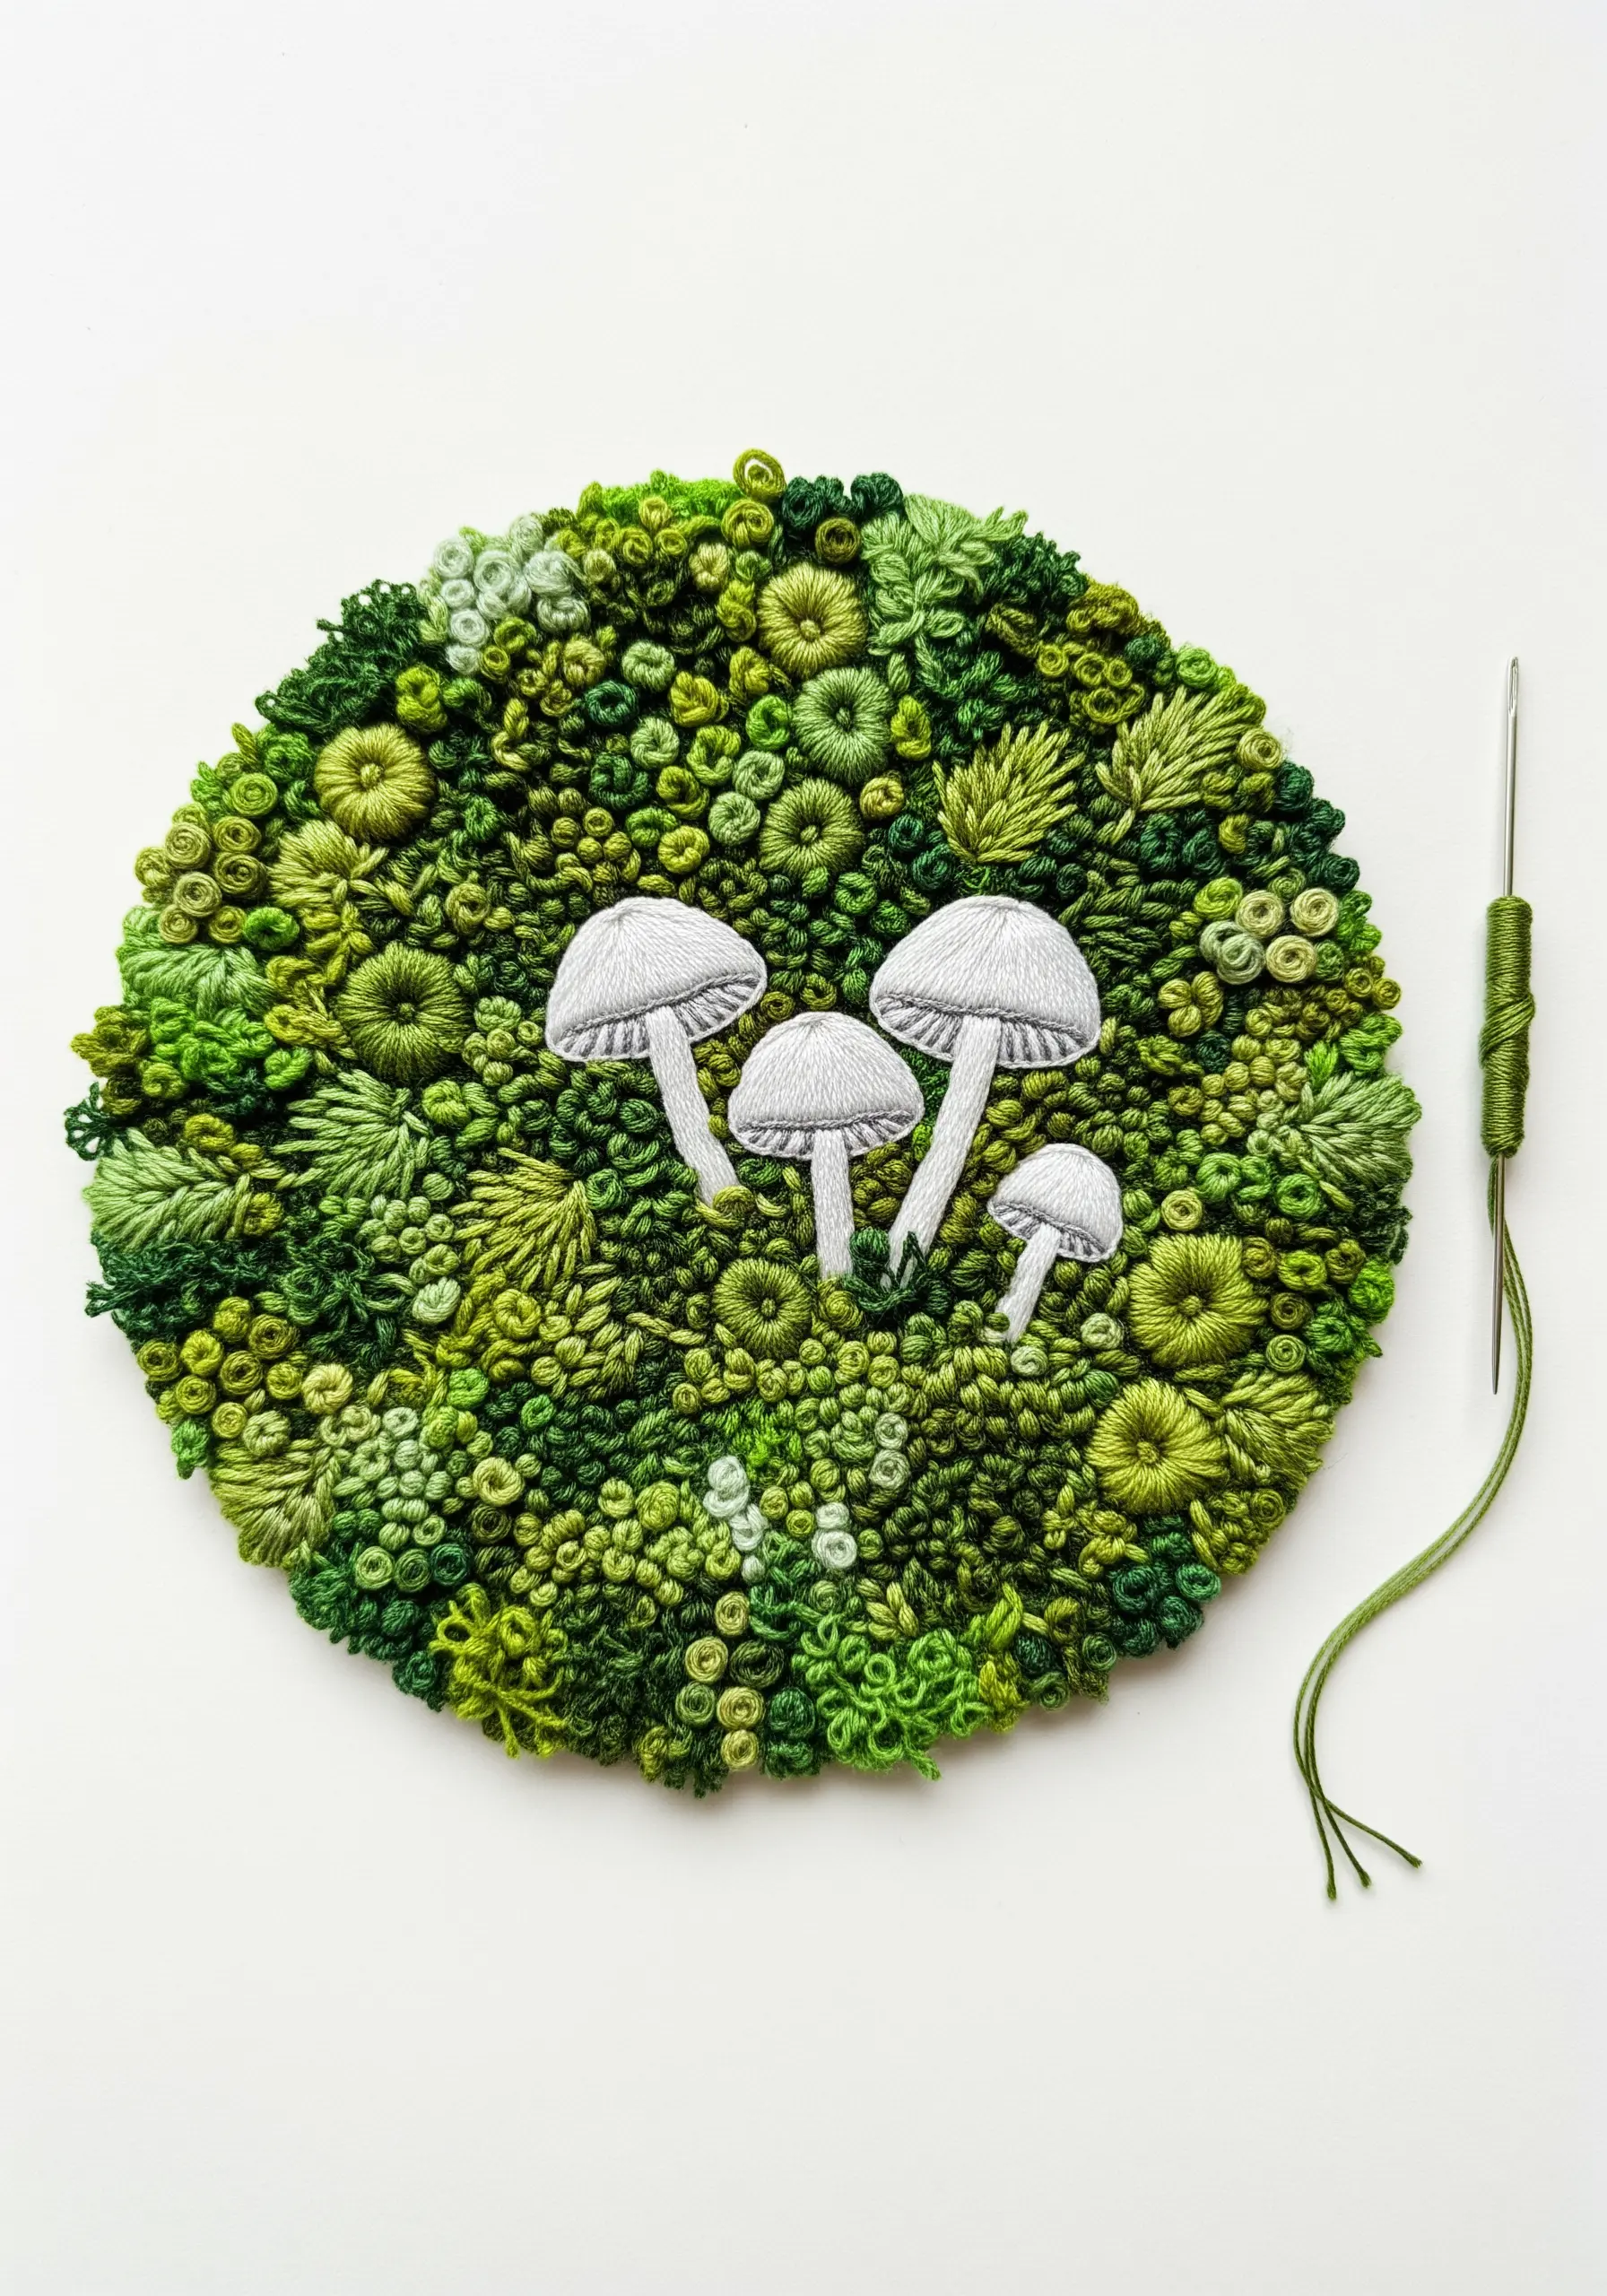
Create an immersive, tactile forest floor by filling the entire background with a variety of textural stitches.
Combine French knots, bullion knots, woven wheel stitches, and tufted needle weaving in a dozen different shades of green to build a rich, mossy landscape.
Vary the size of your knots and the number of strands you use to create organic clusters and mounds.
Stitch your main subject—like these simple white mushrooms—with a smooth satin stitch. The contrast between the complex, bumpy background and the clean subject makes the mushrooms pop.
8. Paint with Thread in Monochrome
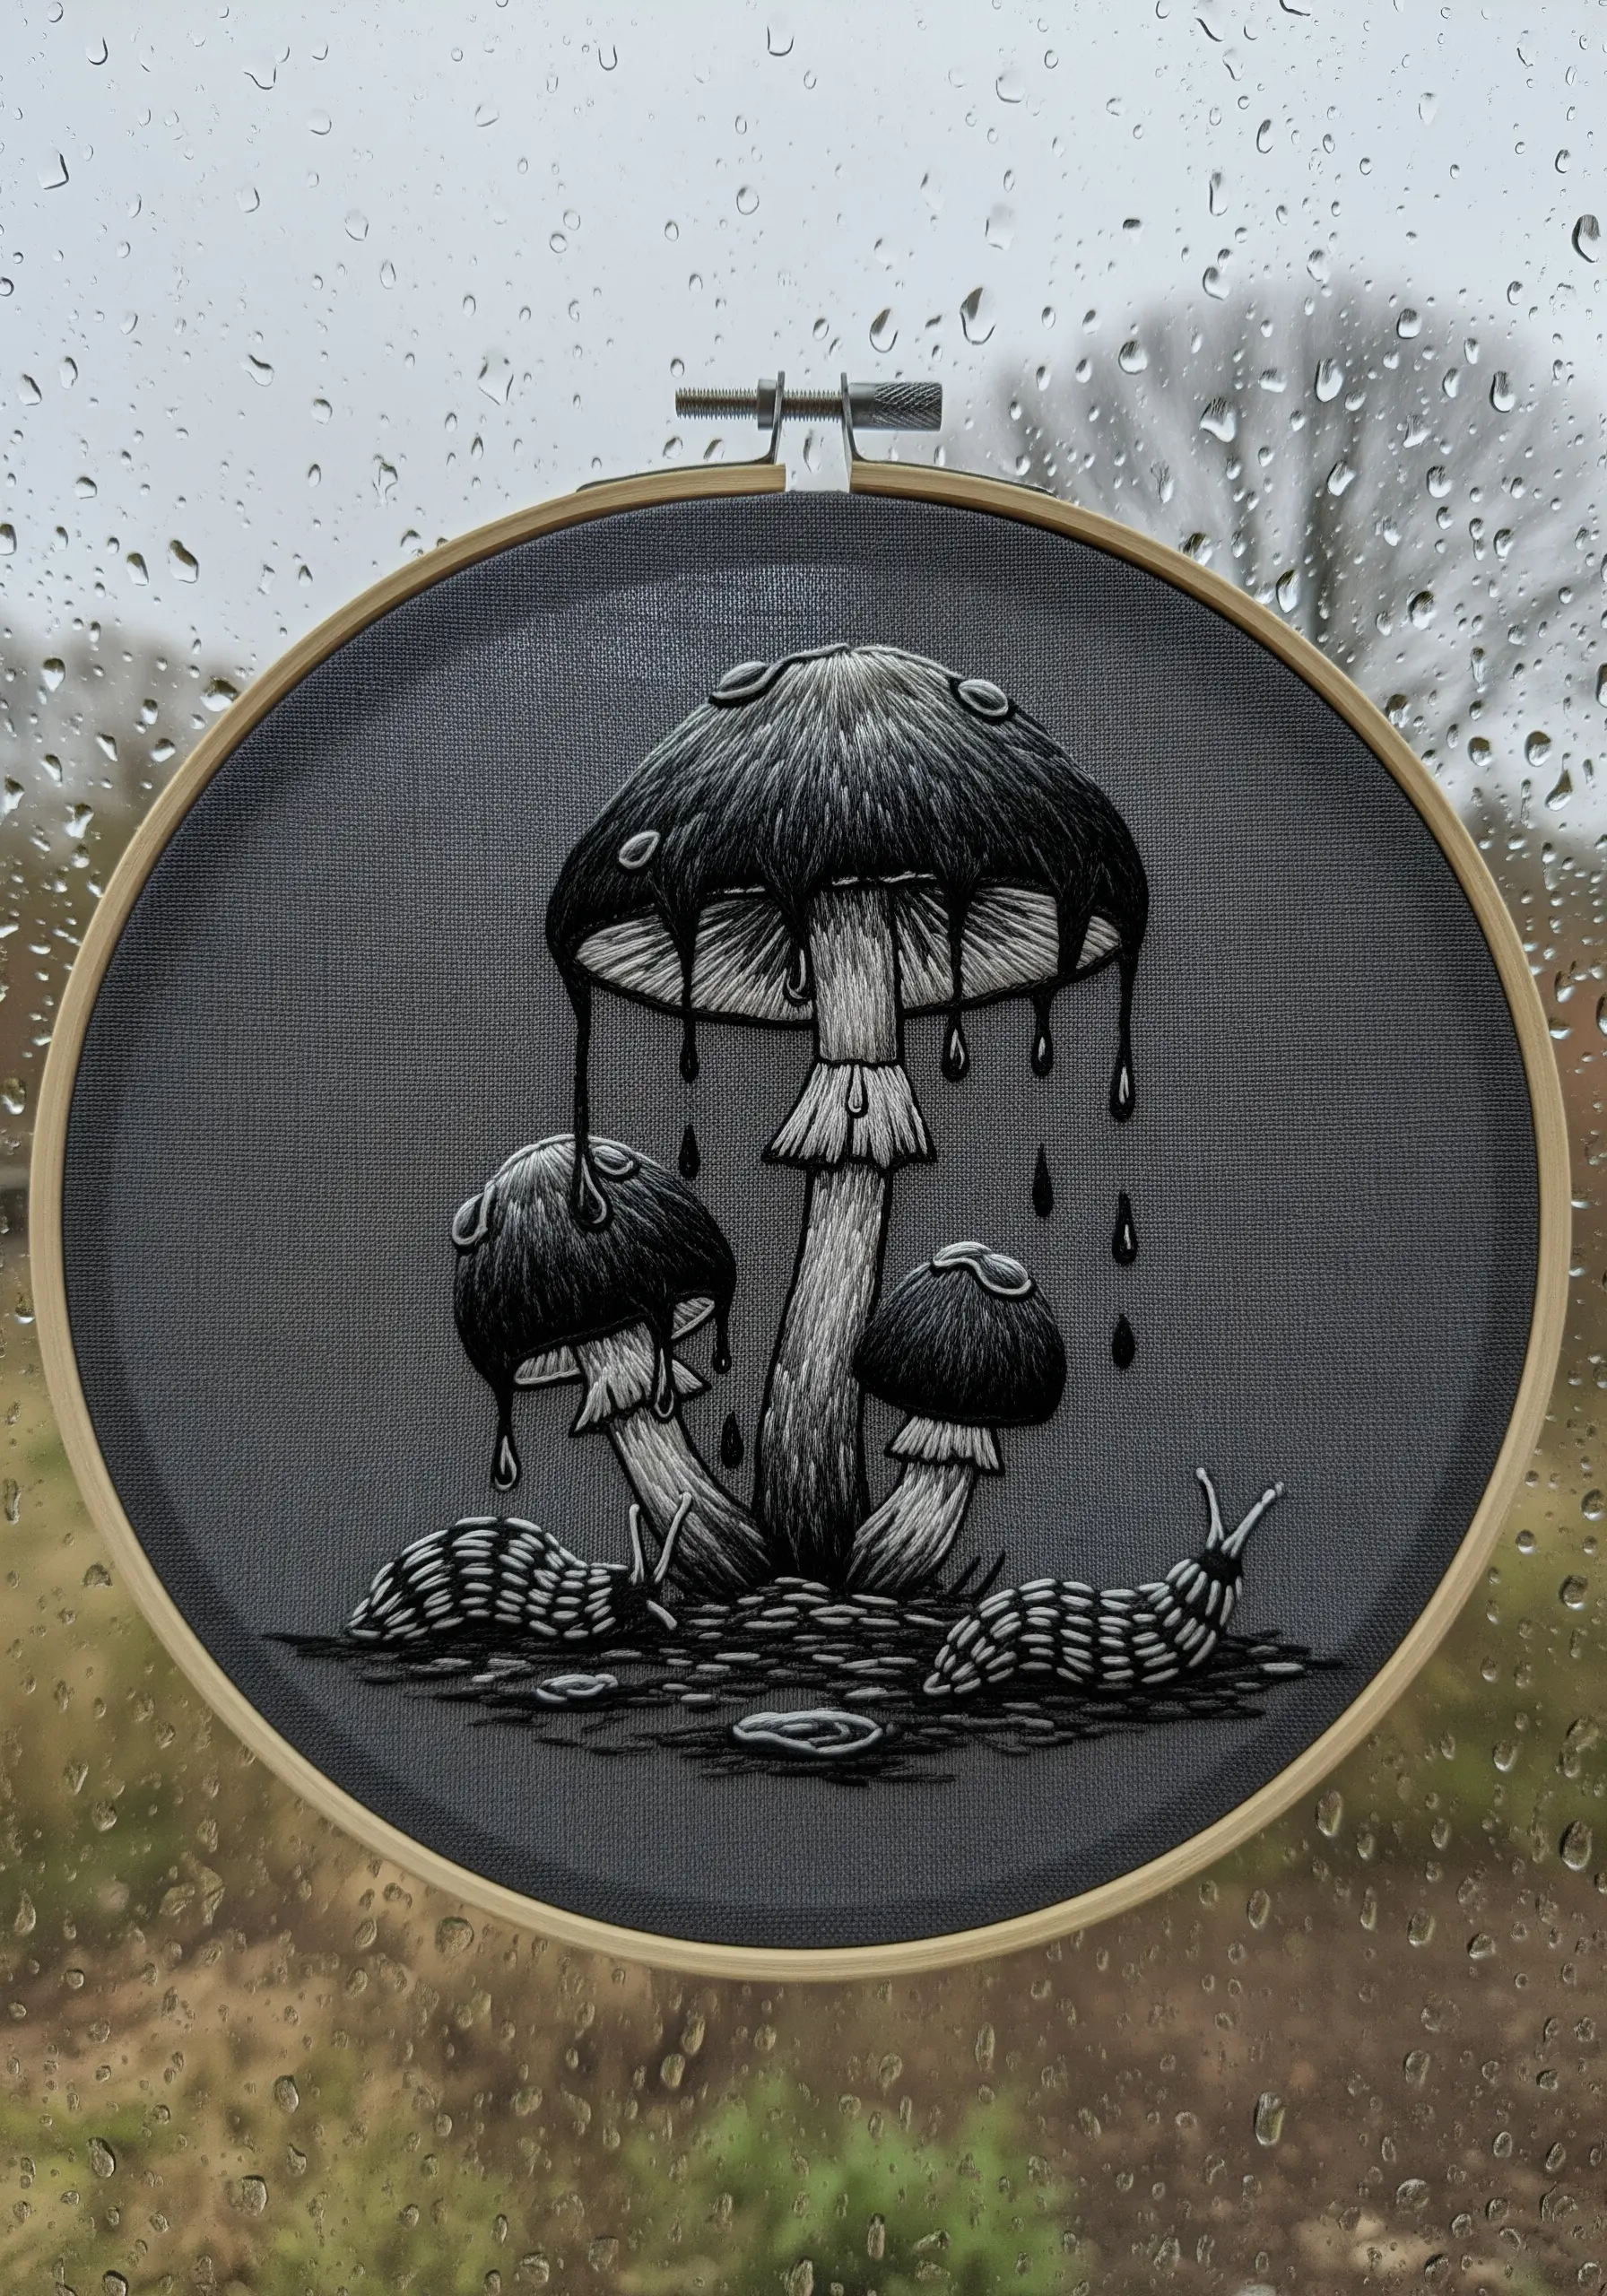
Challenge yourself with a monochrome palette to focus purely on light, shadow, and texture.
Use four to five shades of grey and black thread to “paint” your mushrooms, applying long-and-short stitch to create smooth gradients and define form.
Create the illusion of inky drips by using single, long straight stitches that trail down from the mushroom caps.
This technique forces you to see your subject in terms of value rather than color, dramatically improving your shading skills and creating a moody, atmospheric piece.
9. Elevate Your Hoop Art with Beading
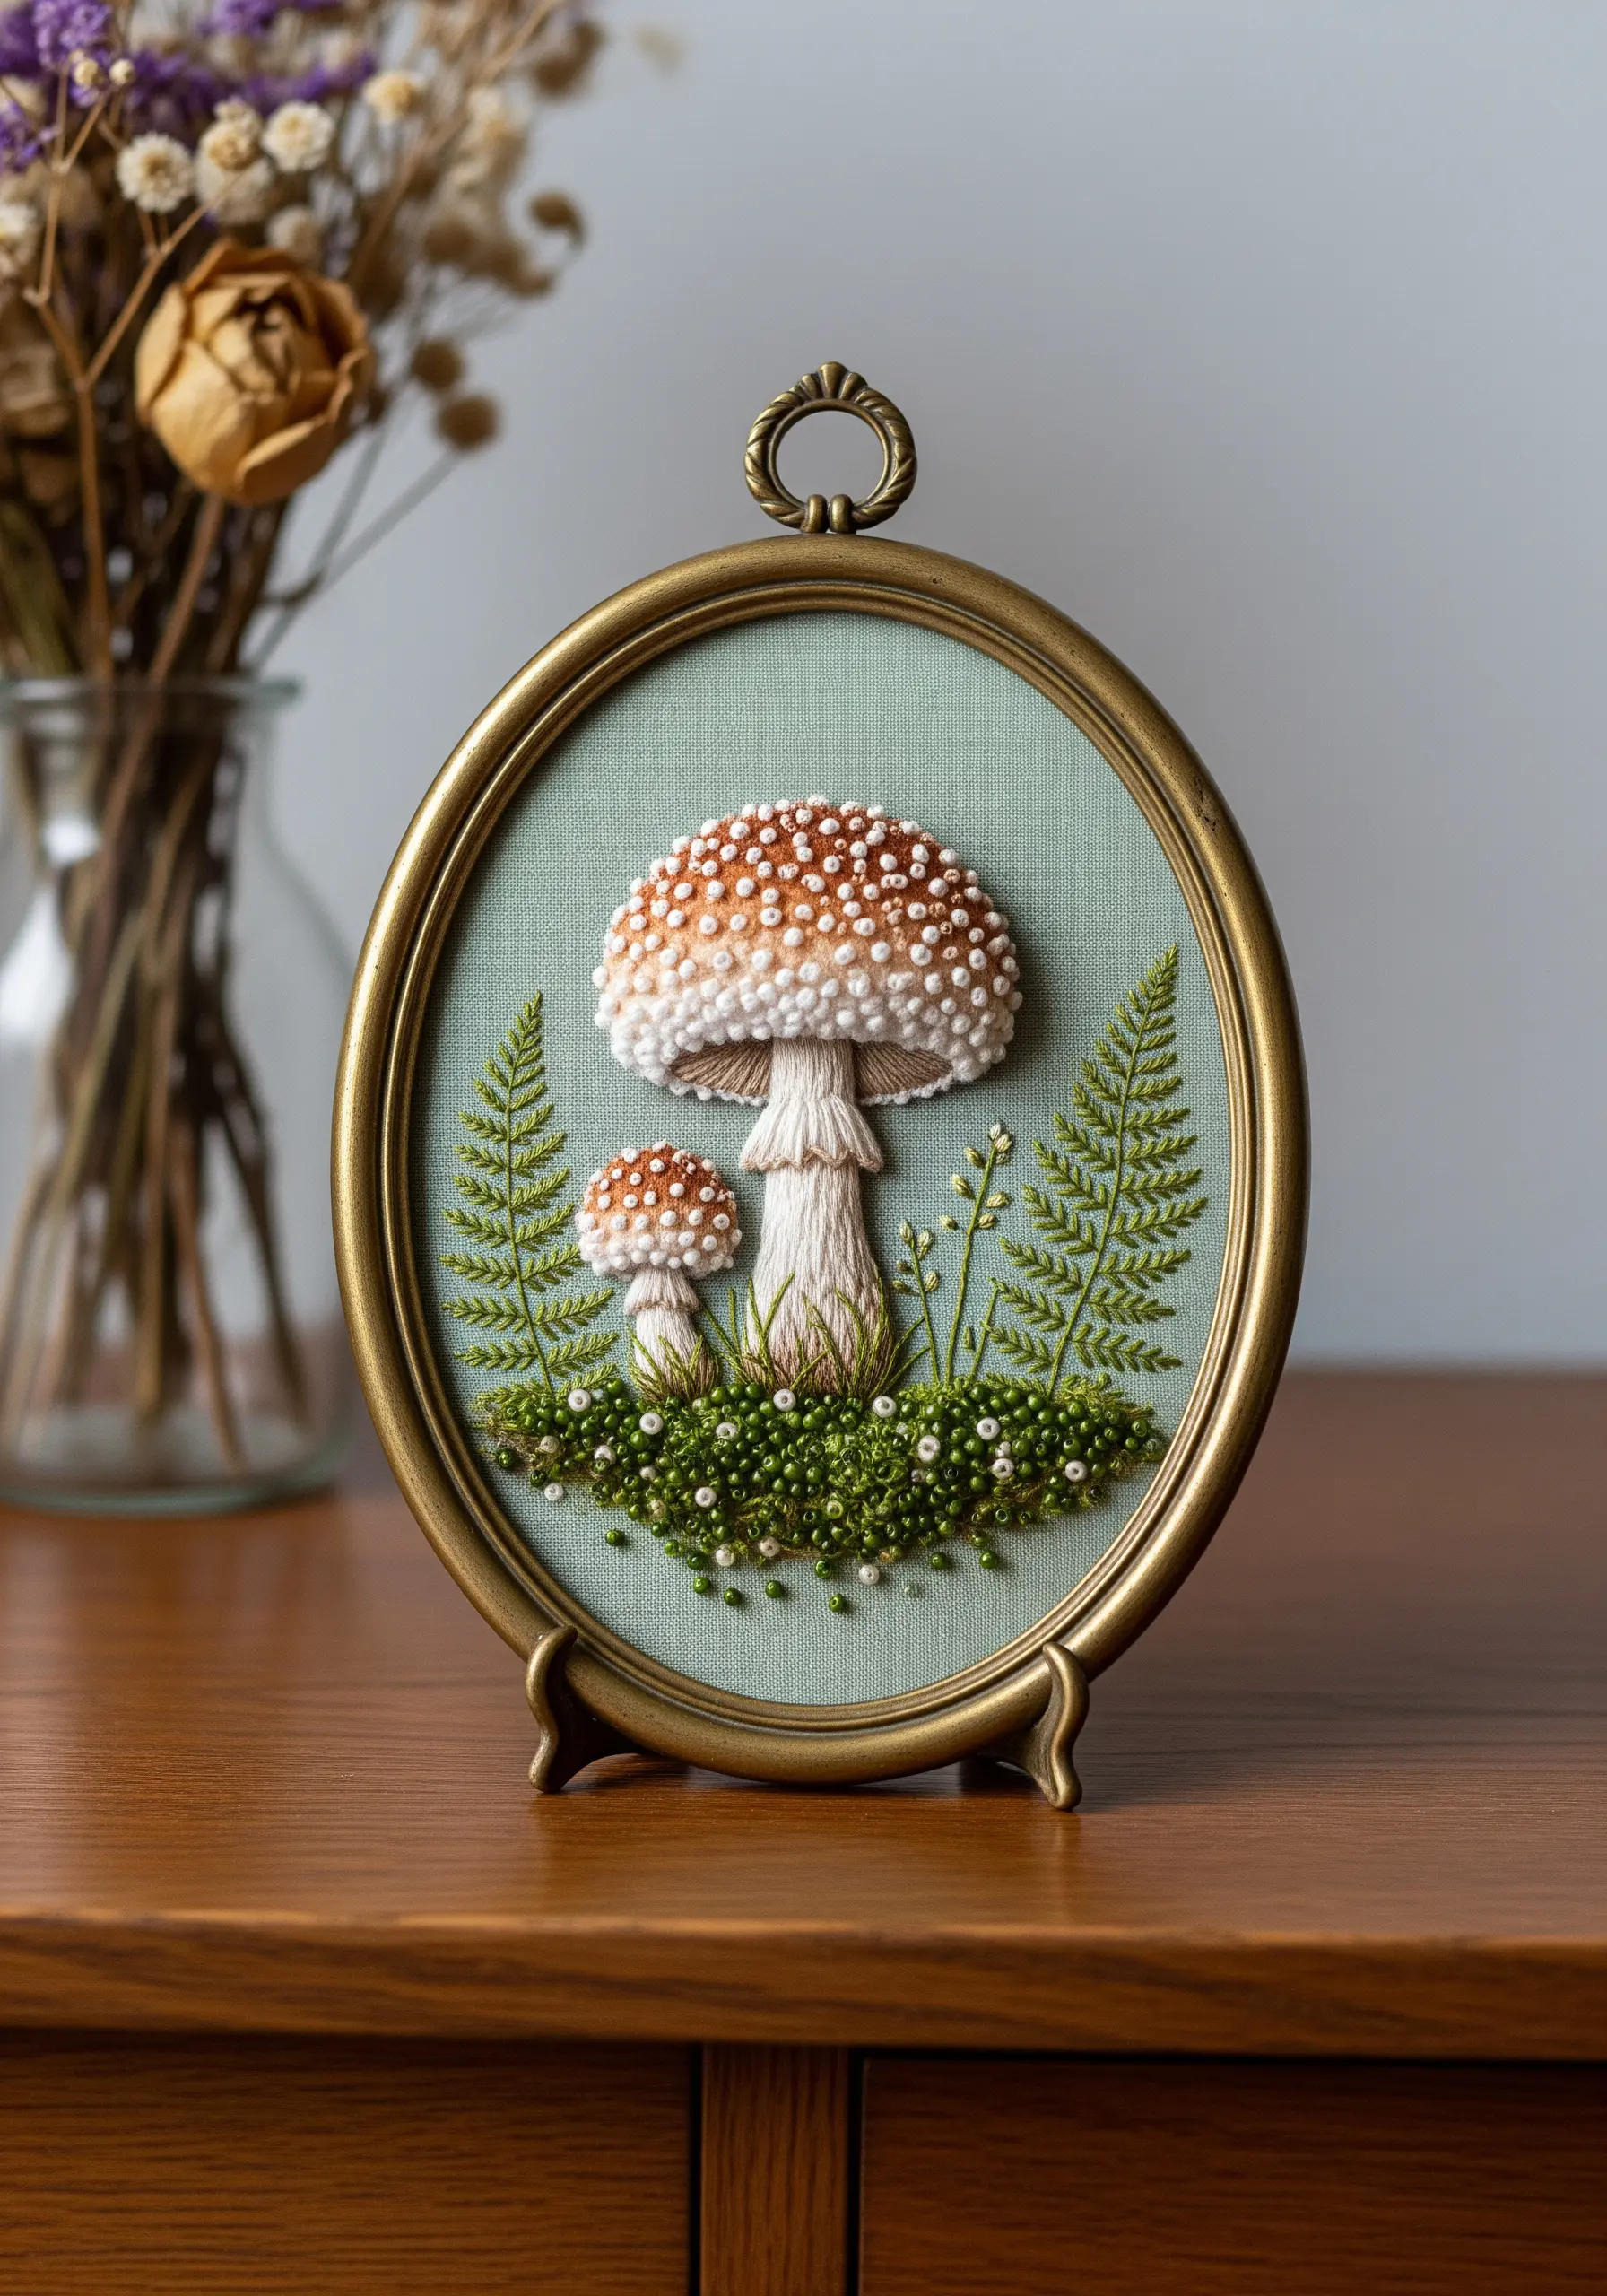
Integrate tiny seed beads into your forest floor design to add a subtle glimmer and a new dimension of texture.
Use beads for the dots on a fly agaric cap, or scatter them amongst French knot moss to mimic dewdrops.
Stitch delicate ferns using the fern stitch or fly stitch, keeping them light and airy to contrast with the more solid shapes of the mushrooms.
Finishing your piece in an ornate, vintage-style frame instead of a standard hoop instantly turns it into a precious object.
10. Design a Botanical Specimen Chart
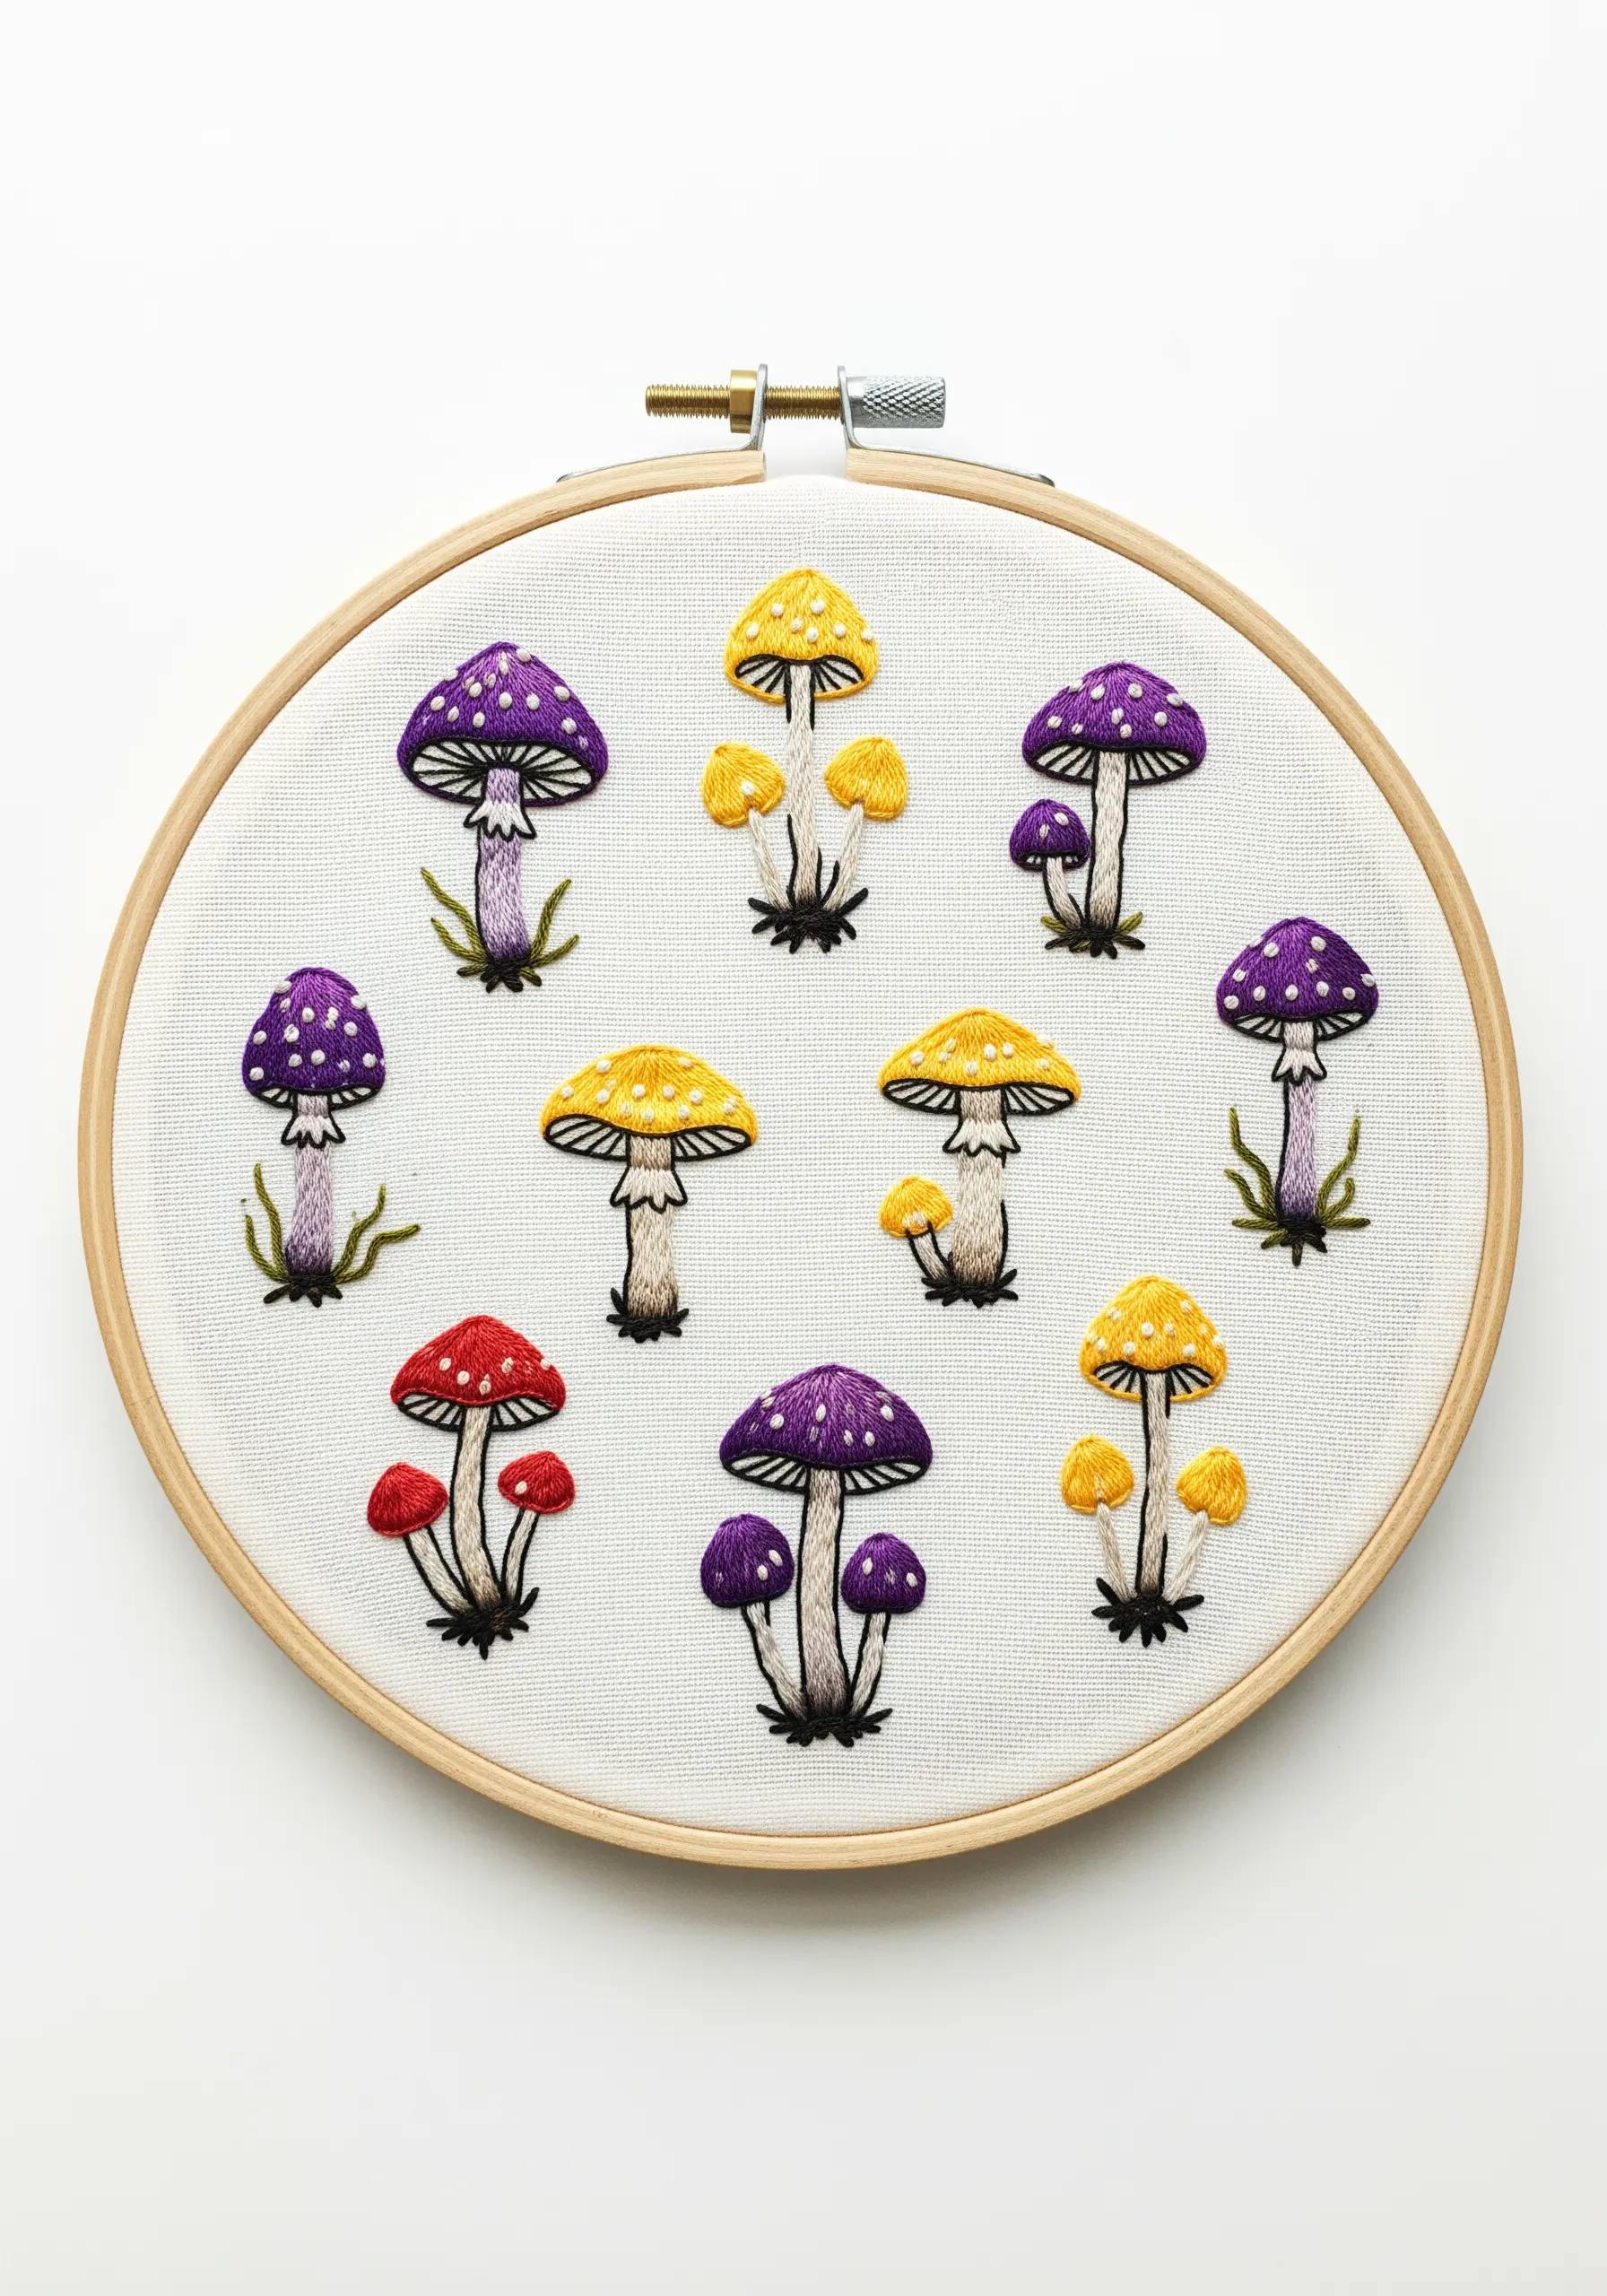
Arrange a collection of small mushroom motifs in a grid-like pattern to create a charming botanical specimen chart.
Choose a limited, harmonious color palette—like purples, yellows, and reds—to ensure the overall design feels cohesive, not chaotic.
Keep each mushroom small and simple, focusing on capturing its essential shape and color with basic satin and stem stitches.
This is a wonderful way to practice consistency and composition, turning simple mini embroidery patterns into a sophisticated piece of wall art.
11. Experiment with 3D Turkey Work Moss
For a truly three-dimensional moss effect, use the Turkey work stitch (also known as the Ghiordes knot).
Create loops with your thread, securing each one with a tiny locking stitch, then trim the loops to your desired height to create a plush, velvety pile.
Use variegated green thread or switch colors often to give your moss a more natural, varied appearance.
Stitching on a stretched canvas instead of a hoop provides a rigid surface, which makes this raised stitching technique easier to execute and gives you a ready-to-hang art piece.
12. Capture Raindrops with Crystal Beads
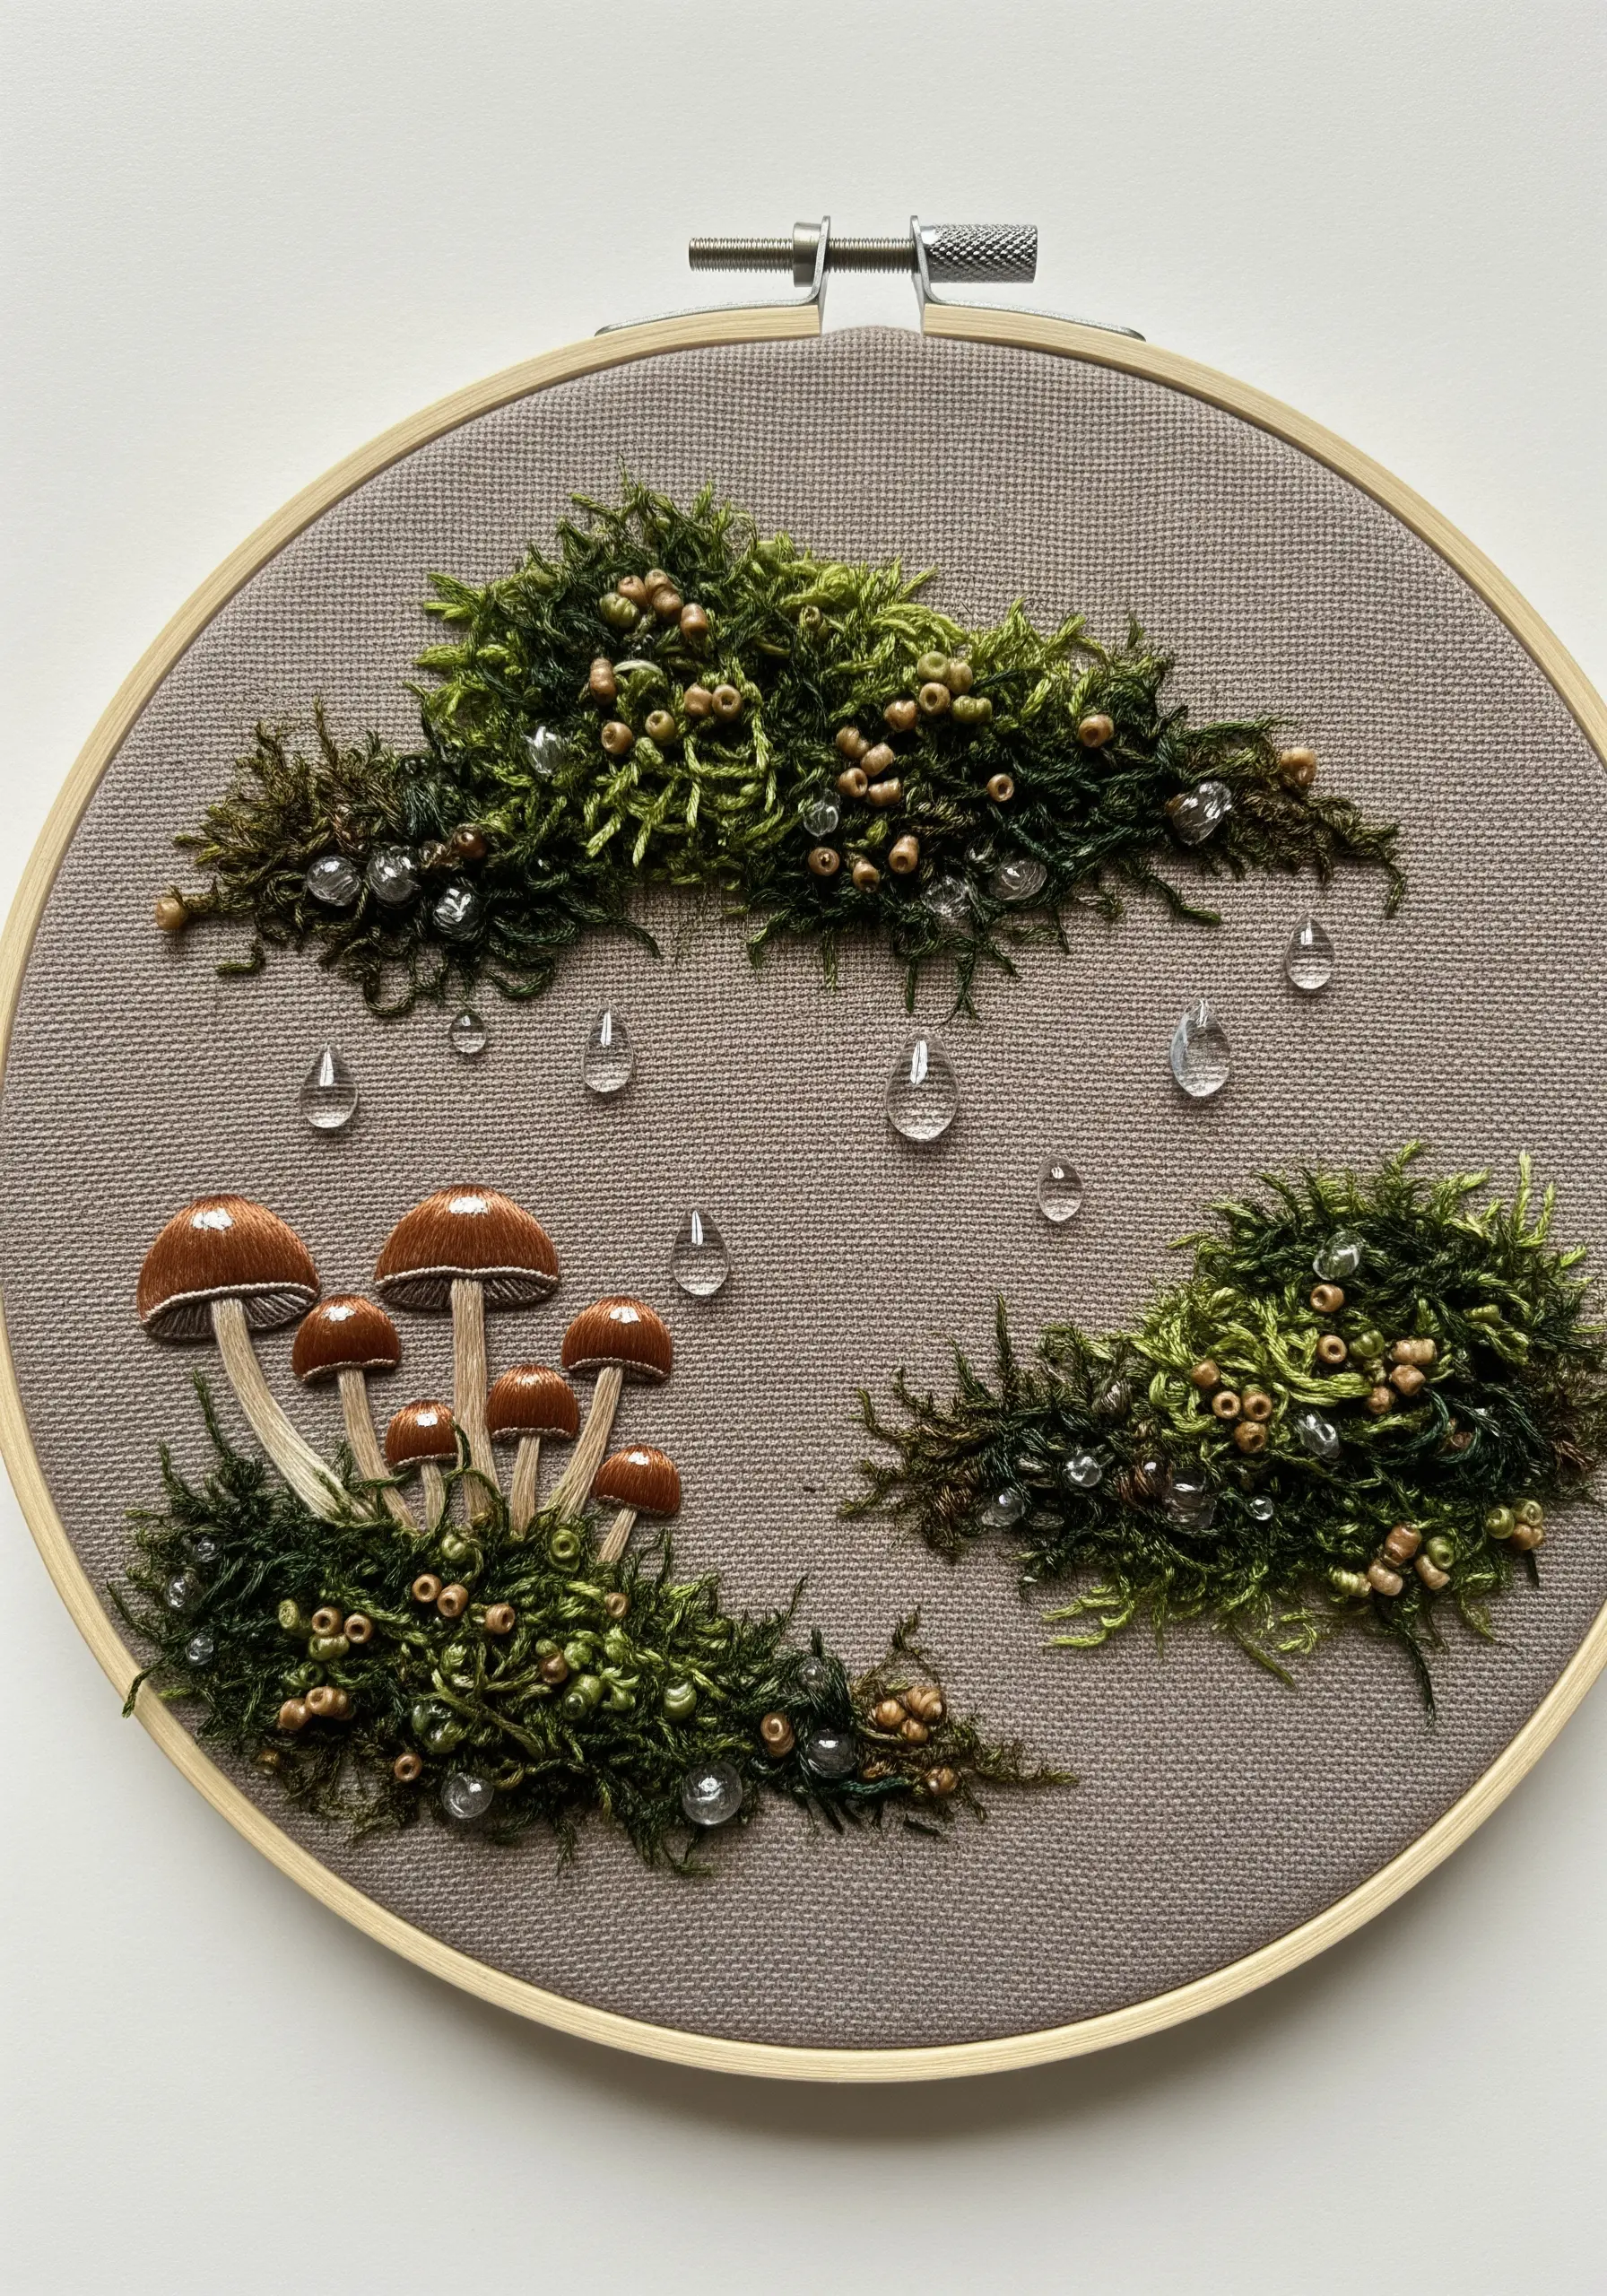
Incorporate transparent, teardrop-shaped crystal beads to create the stunningly realistic effect of raindrops.
Stitch them securely over your mossy textures, allowing them to hang slightly to mimic the pull of gravity.
Build your mossy mounds with a mix of French knots and straight stitches, adding tiny brown or wooden beads to suggest soil and spores within the greenery.
This mixed-media embroidery approach transforms your hoop into a multisensory scene, capturing a fleeting moment in nature.
13. Stitch a Soft Lichen Border

Create a delicate, spongy texture reminiscent of lichen or reindeer moss using dense clusters of bullion knots or a modified, loose French knot.
Work in a soft, unexpected color palette like pale pink, yellow, and spring green for a modern, almost abstract interpretation of forest flora.
Alternate the mossy textures with airy fern stitch or fly stitch fronds to create a balanced composition that feels both grounded and light.
This design works beautifully as a delicate border, leaving the center of the hoop open for a monogram or quote.
14. Embrace an Autumnal Color Palette
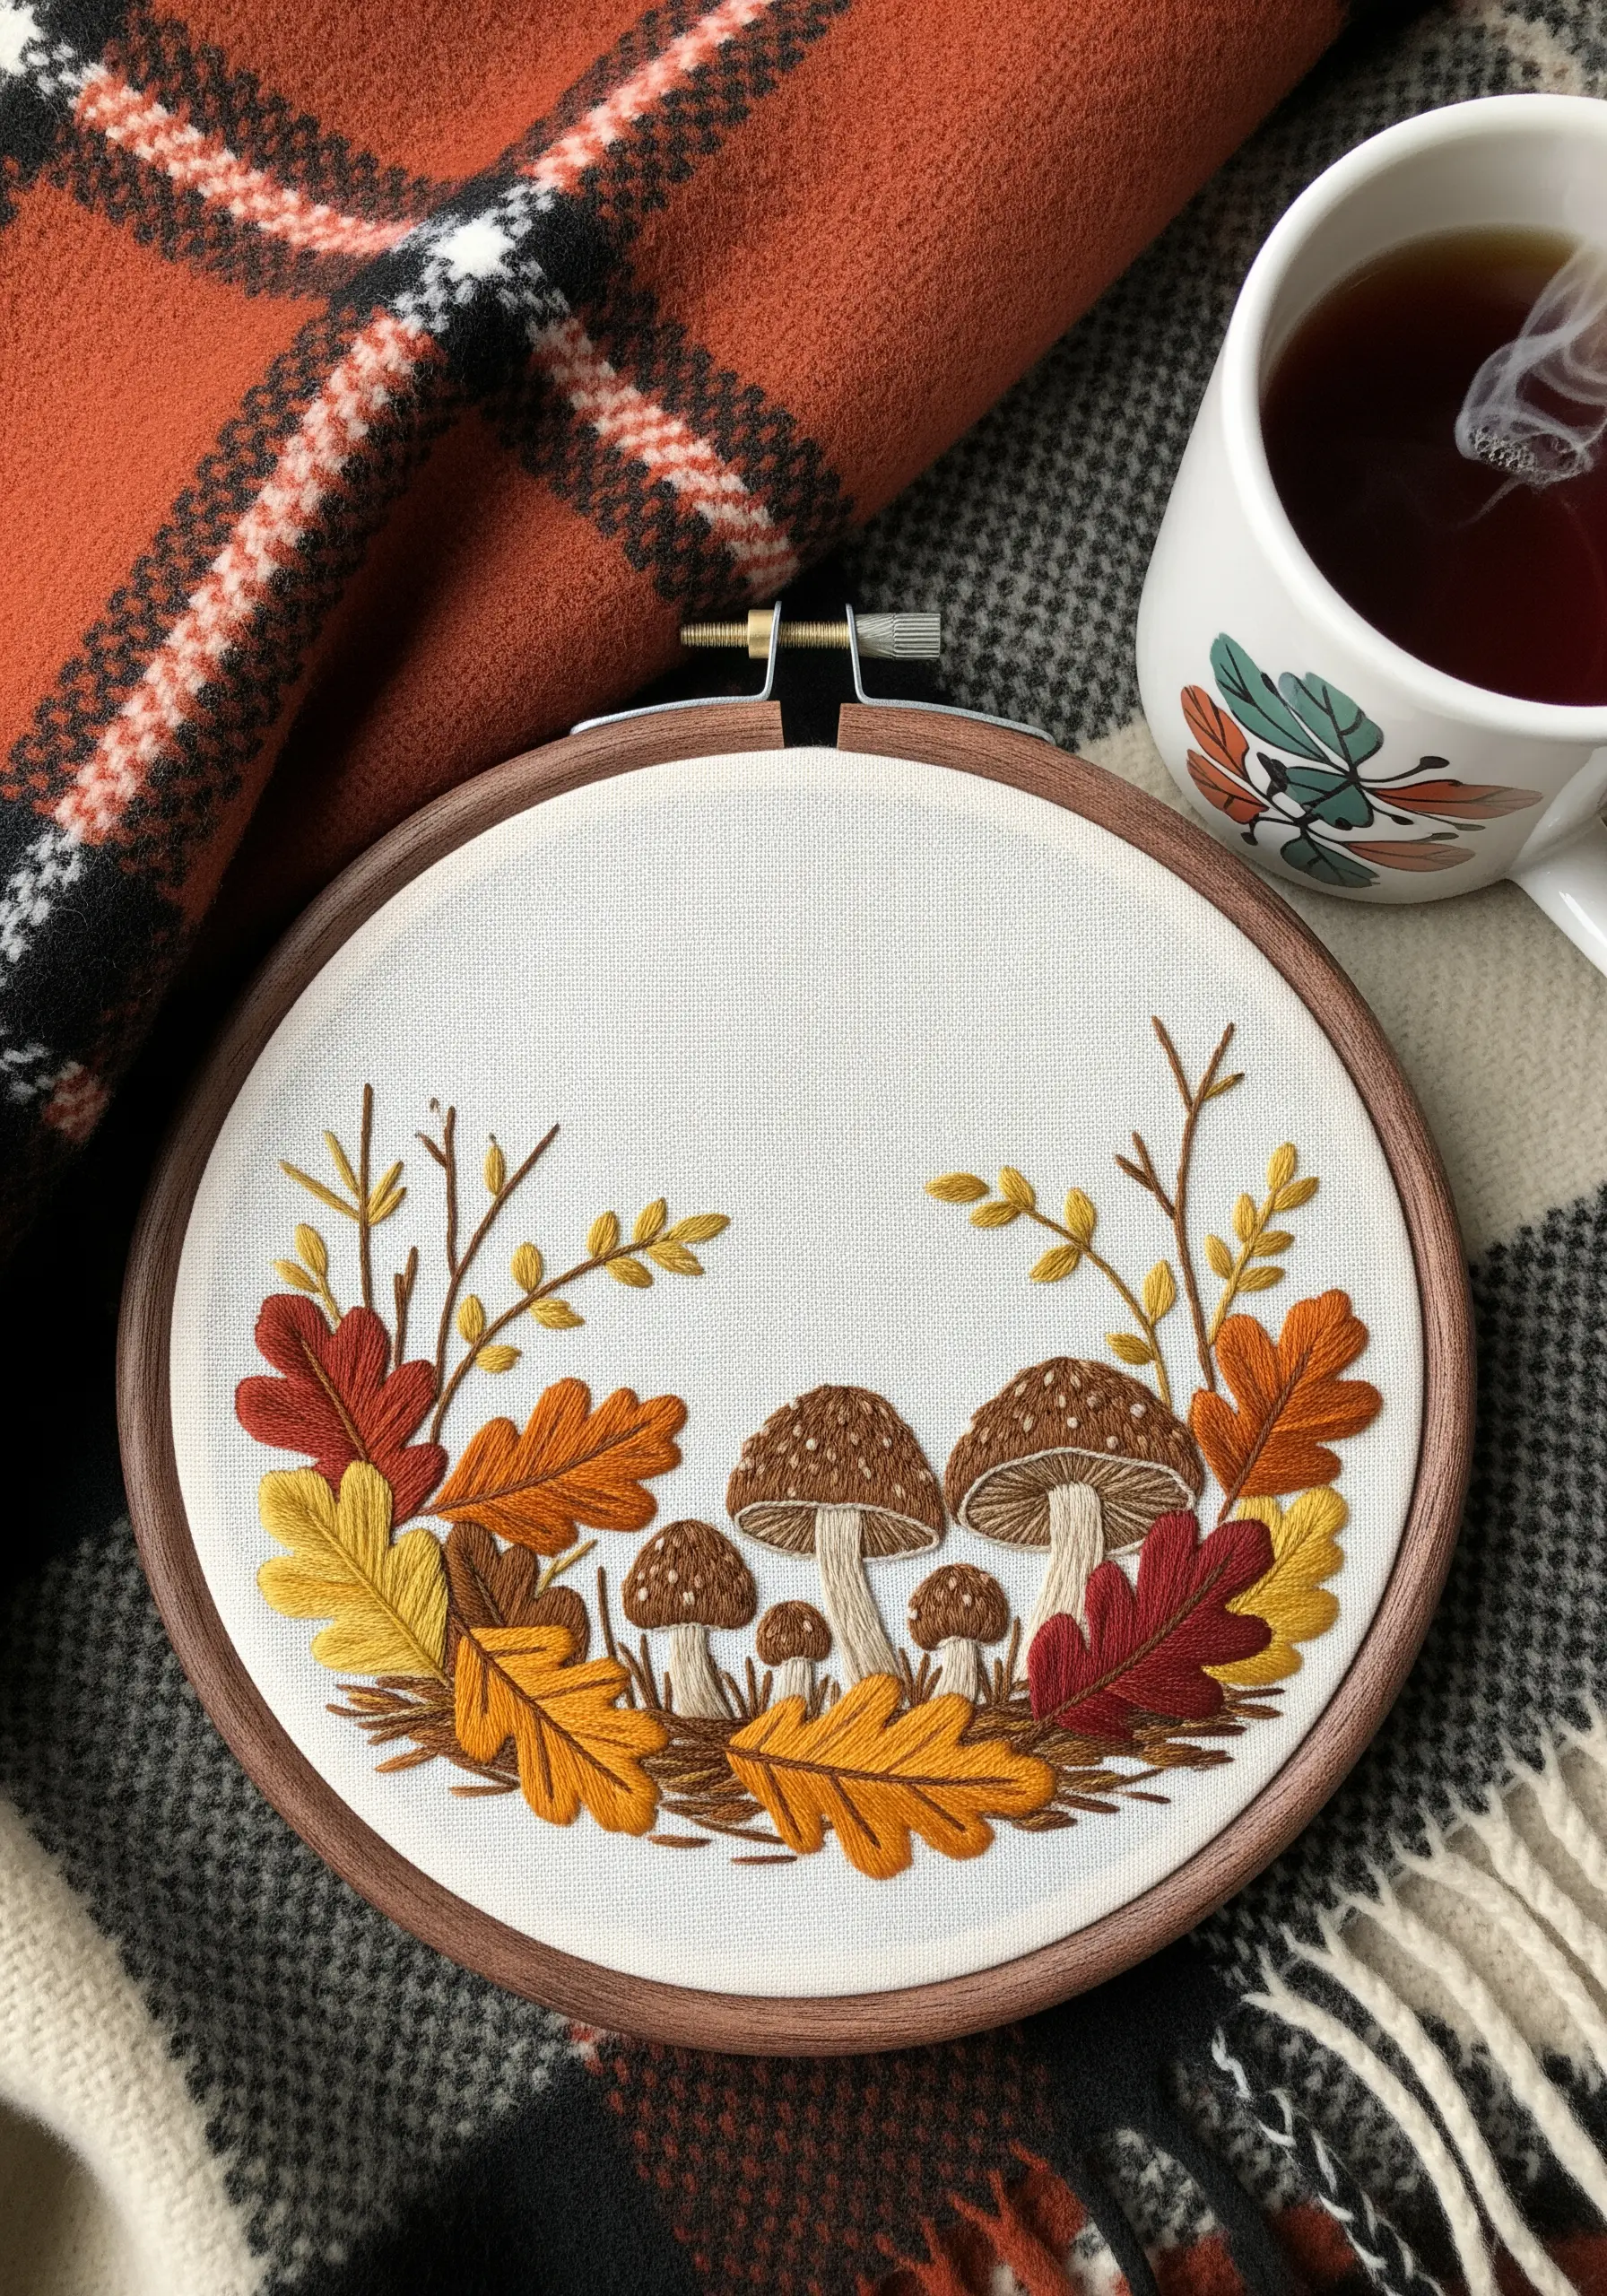
Capture the cozy feeling of autumn by building your design around a warm, rich color palette.
Use deep reds, burnt oranges, and golden yellows for fallen leaves, blending the colors within each leaf using long-and-short stitch.
Choose mushroom colors that complement this scheme, such as earthy browns and muted creams.
Arrange the leaves in overlapping layers to create a sense of depth, making it appear as if the mushrooms are nestled right into a pile of crisp autumn foliage.
15. Add Magic with Glow-in-the-Dark Thread
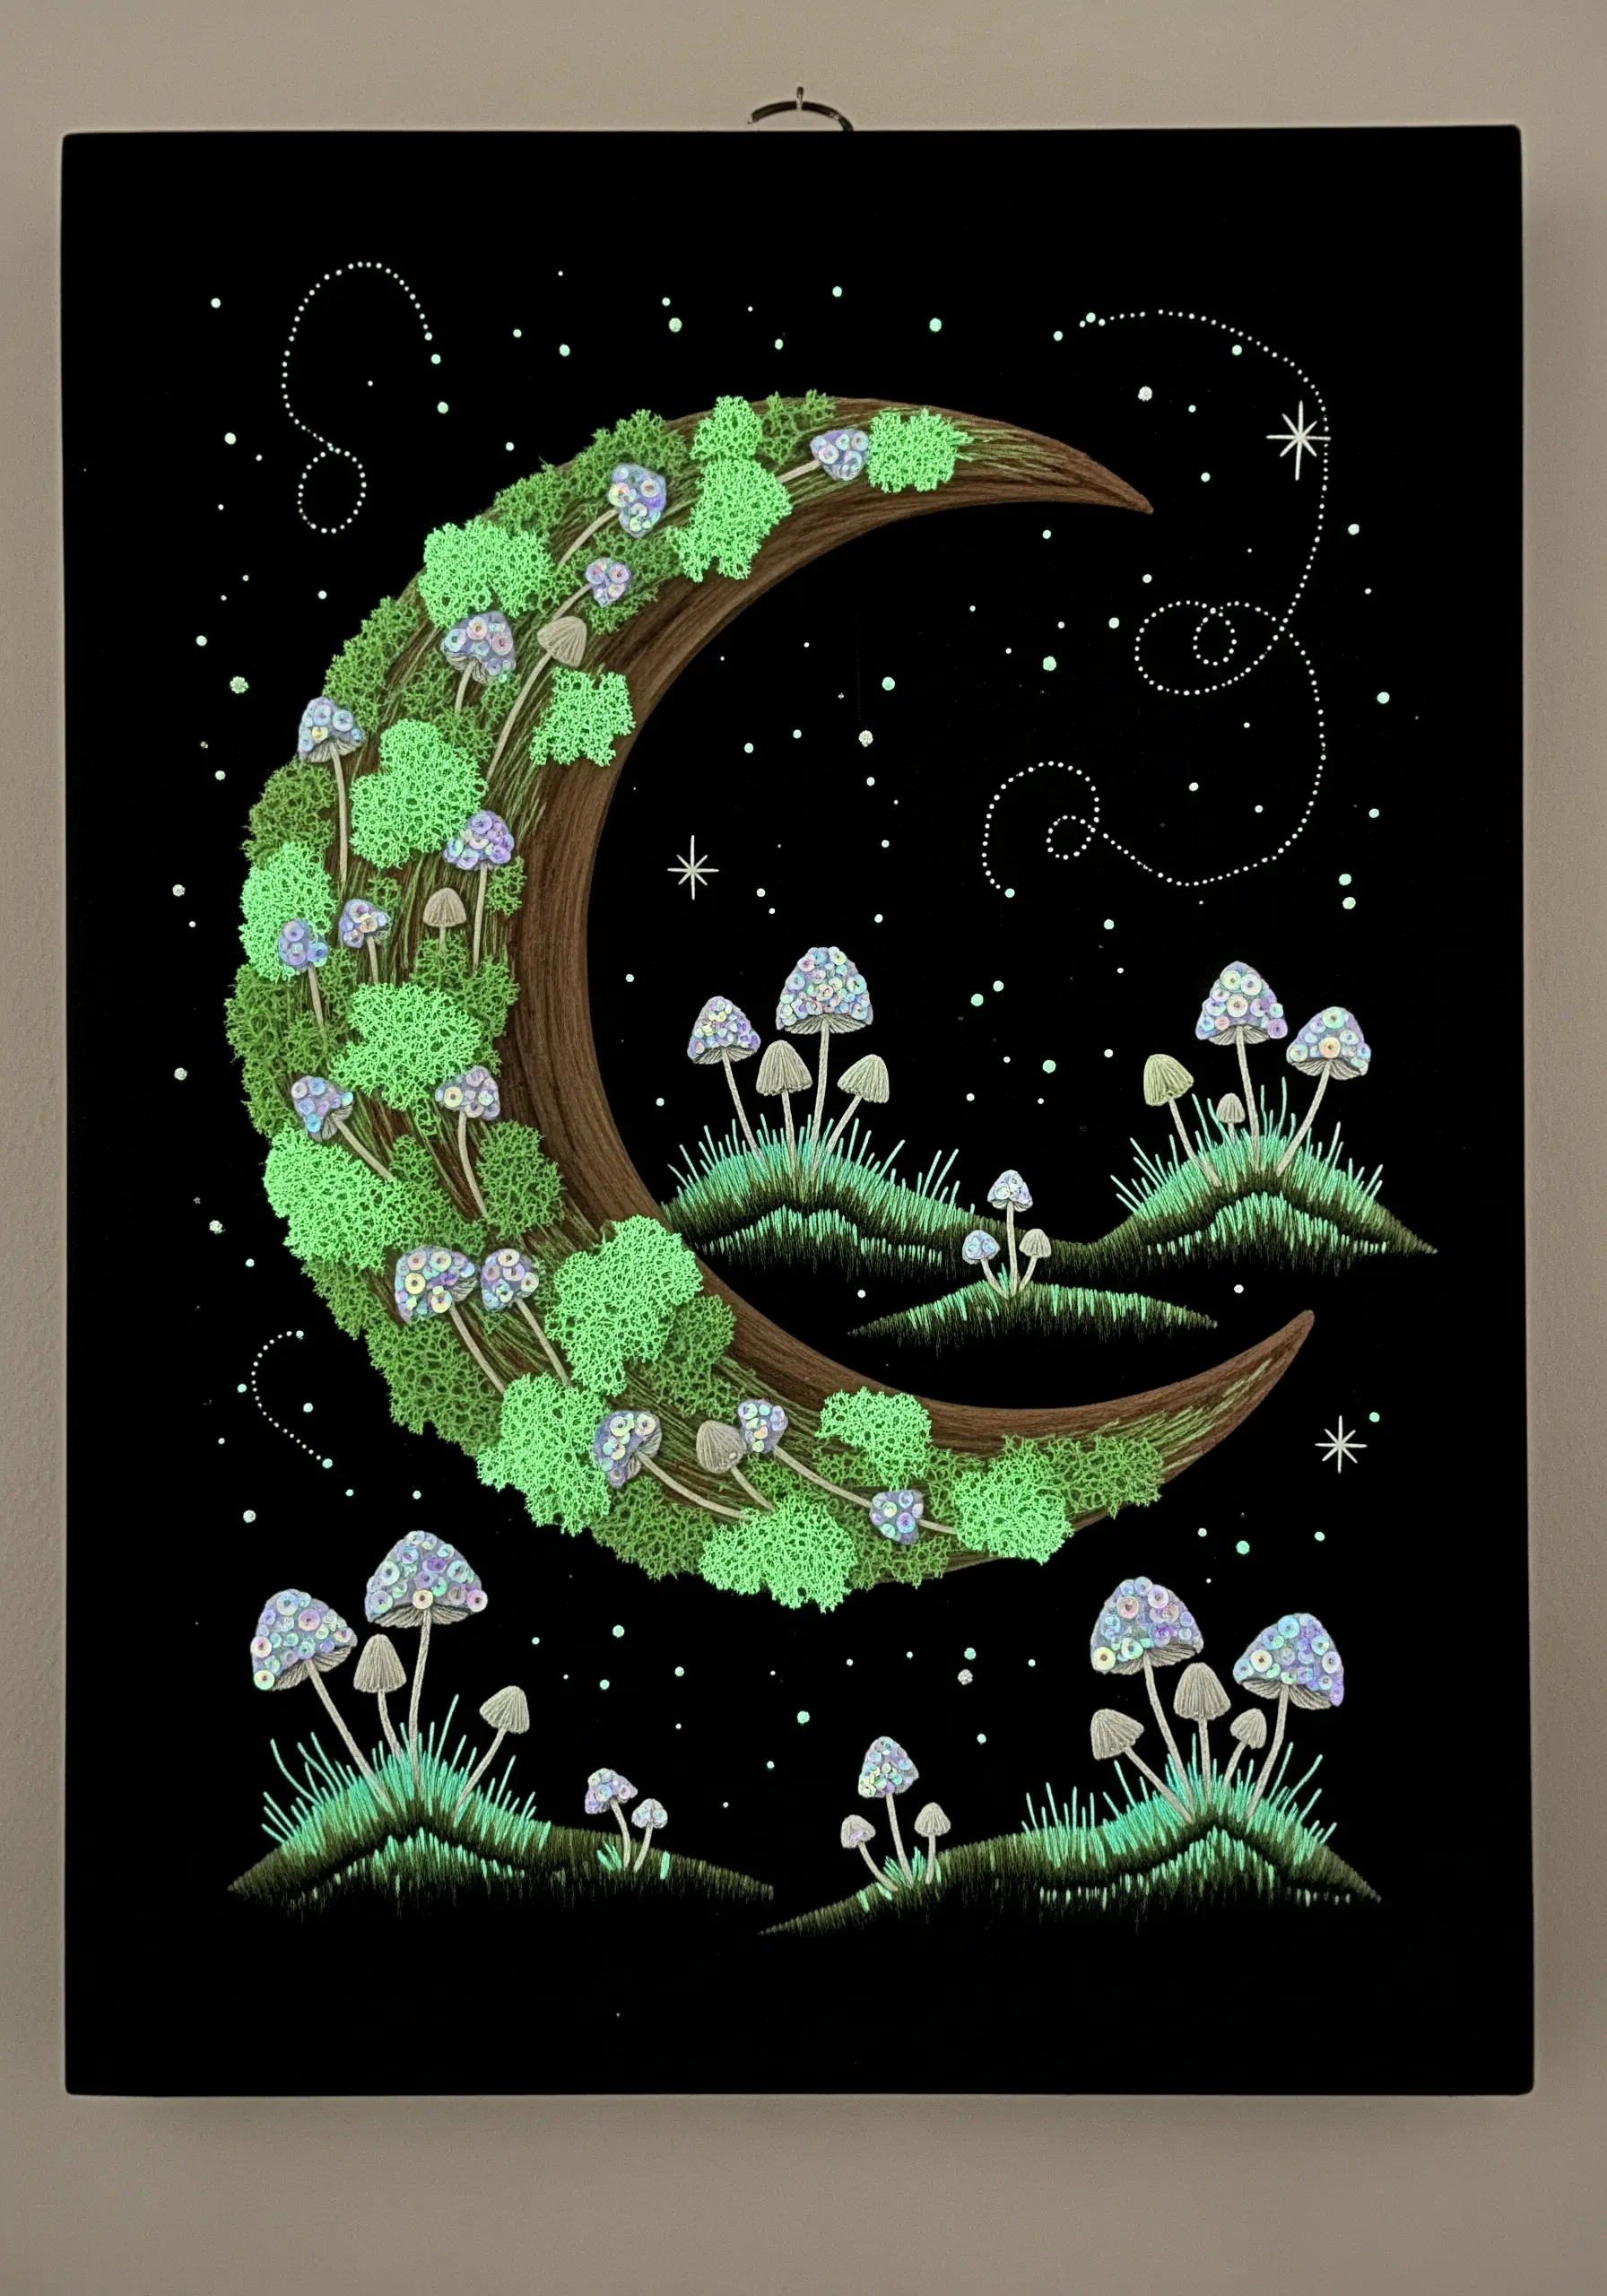
Create a piece with a secret second life by strategically using glow-in-the-dark embroidery floss.
Use it for the moss, the stars, or the spots on fantastical mushrooms to create a design that transforms in the dark.
During the day, the thread will appear as a soft white or pale green, but at night it will reveal a magical, luminous scene.
This is a particularly wonderful technique for art in a bedroom or nursery, adding an element of surprise and wonder.
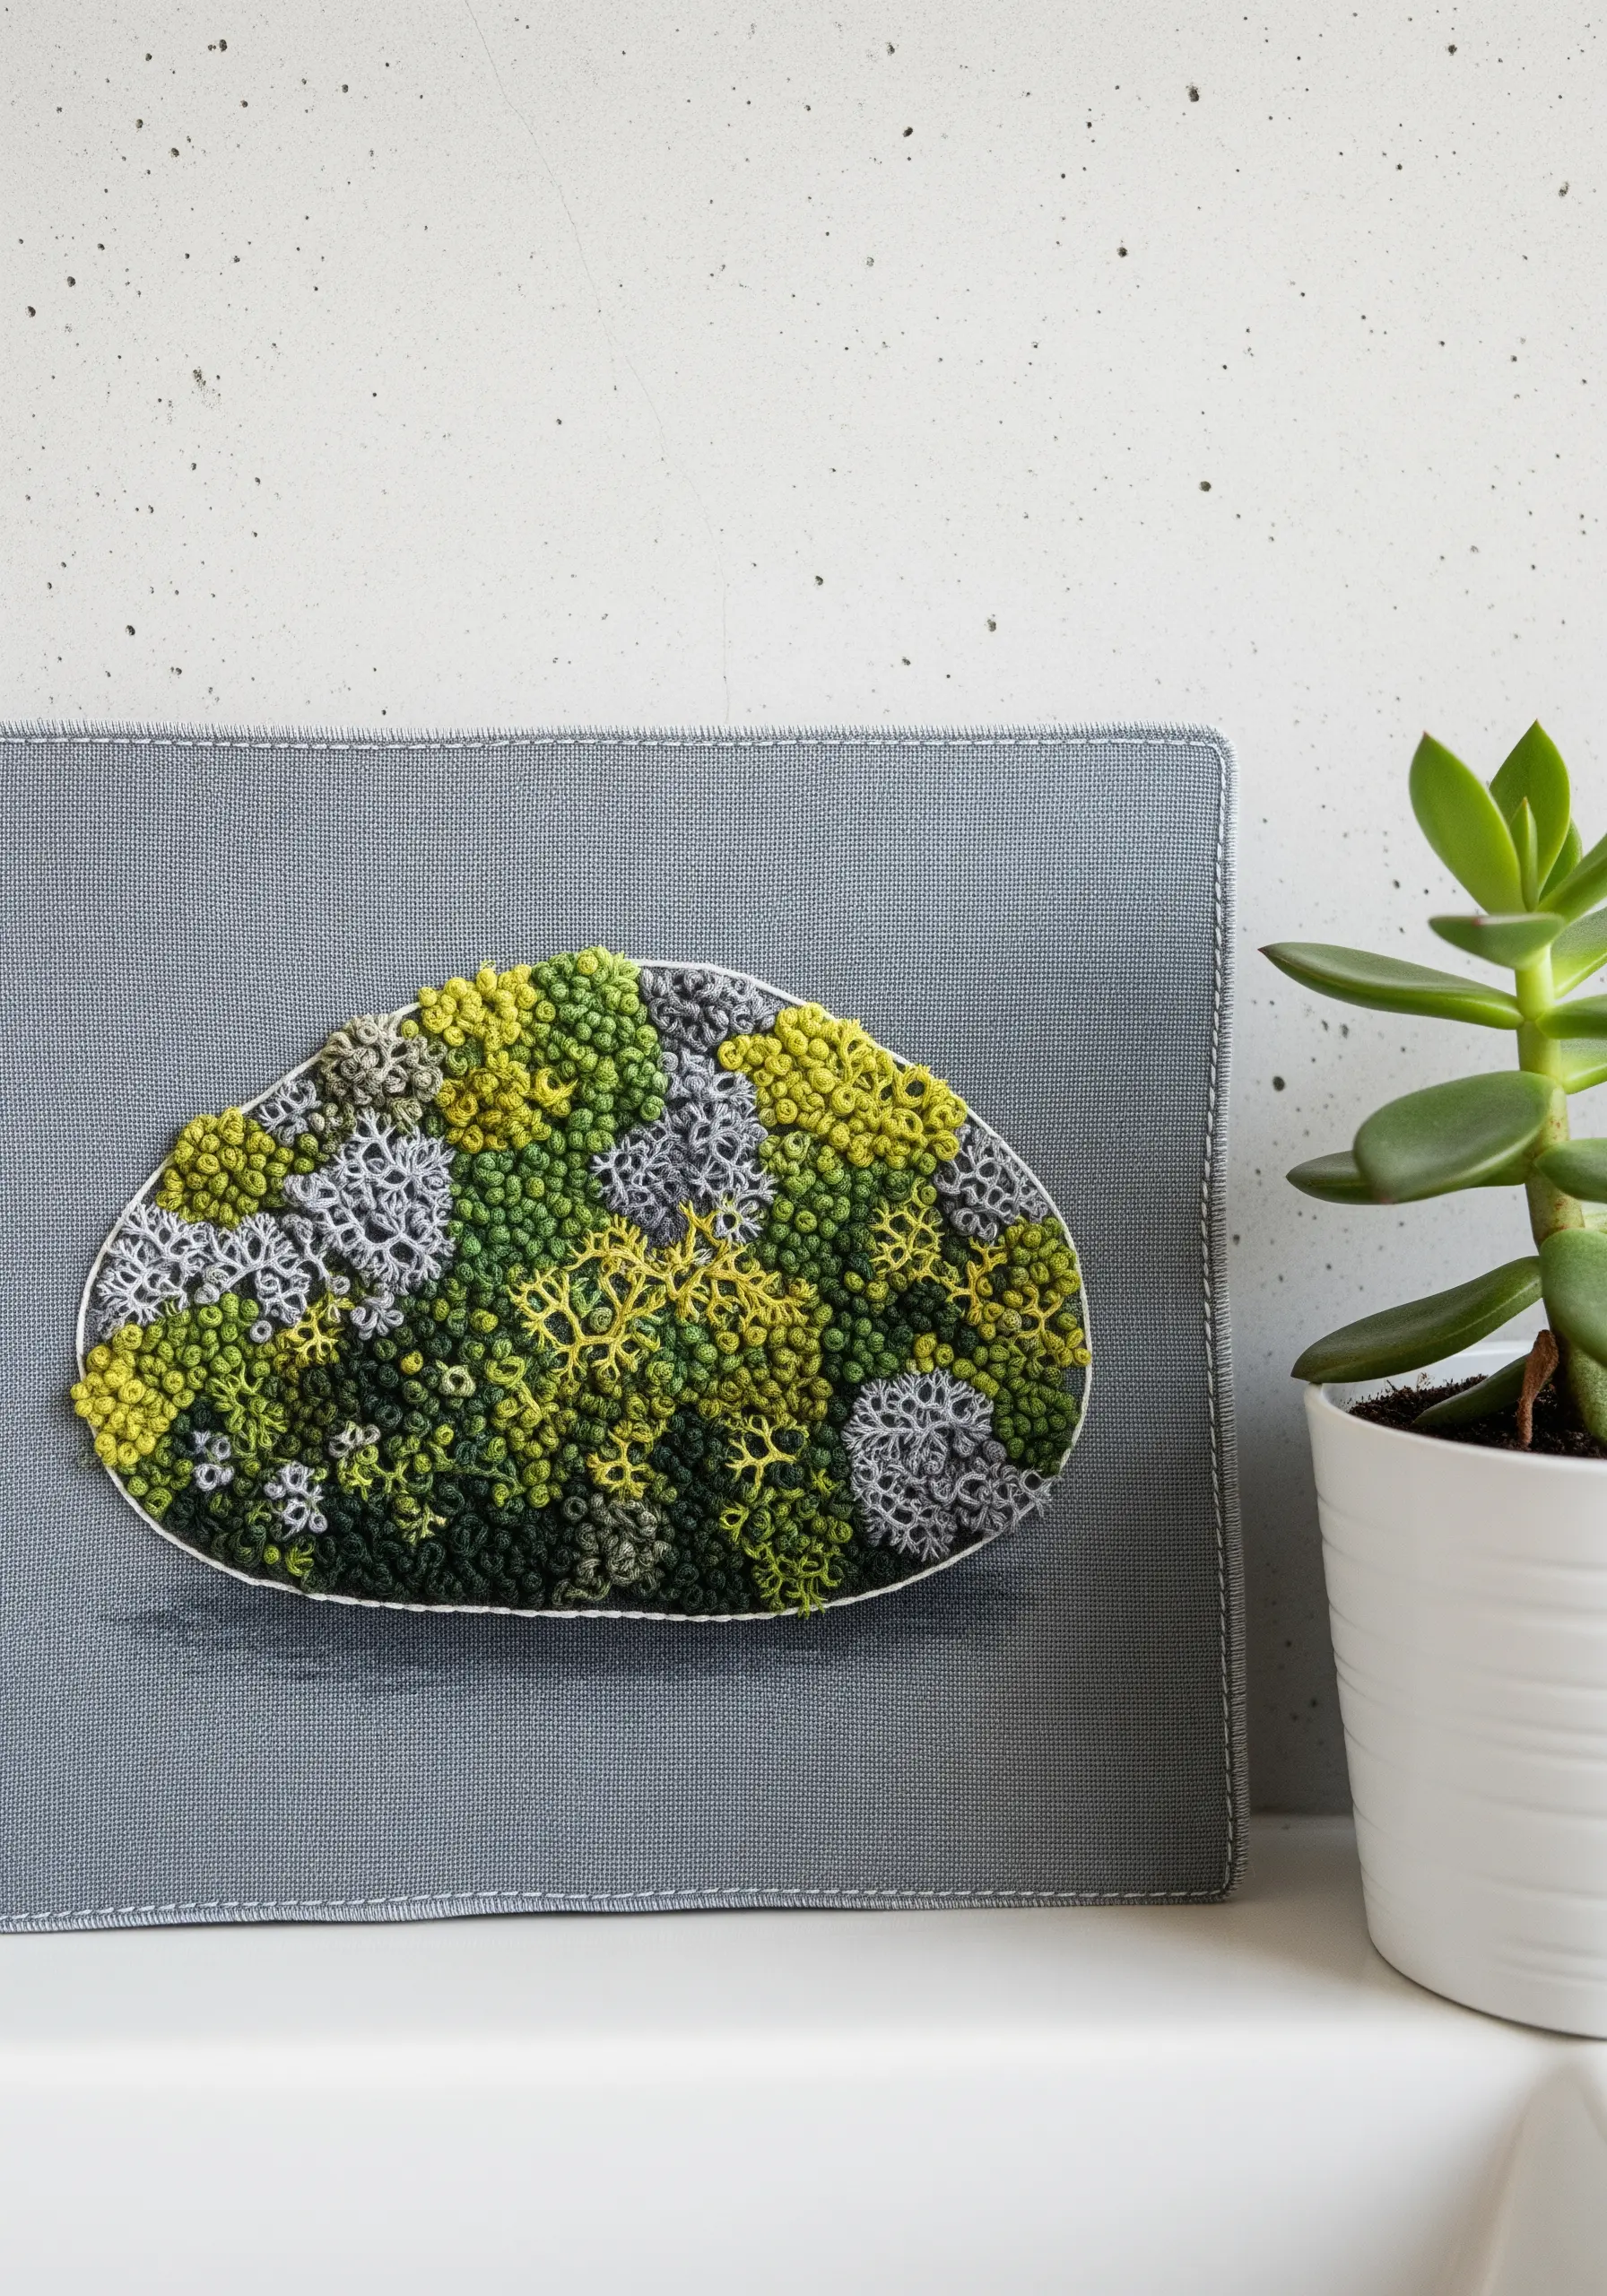
16. Explore Lichen Forms on Felt
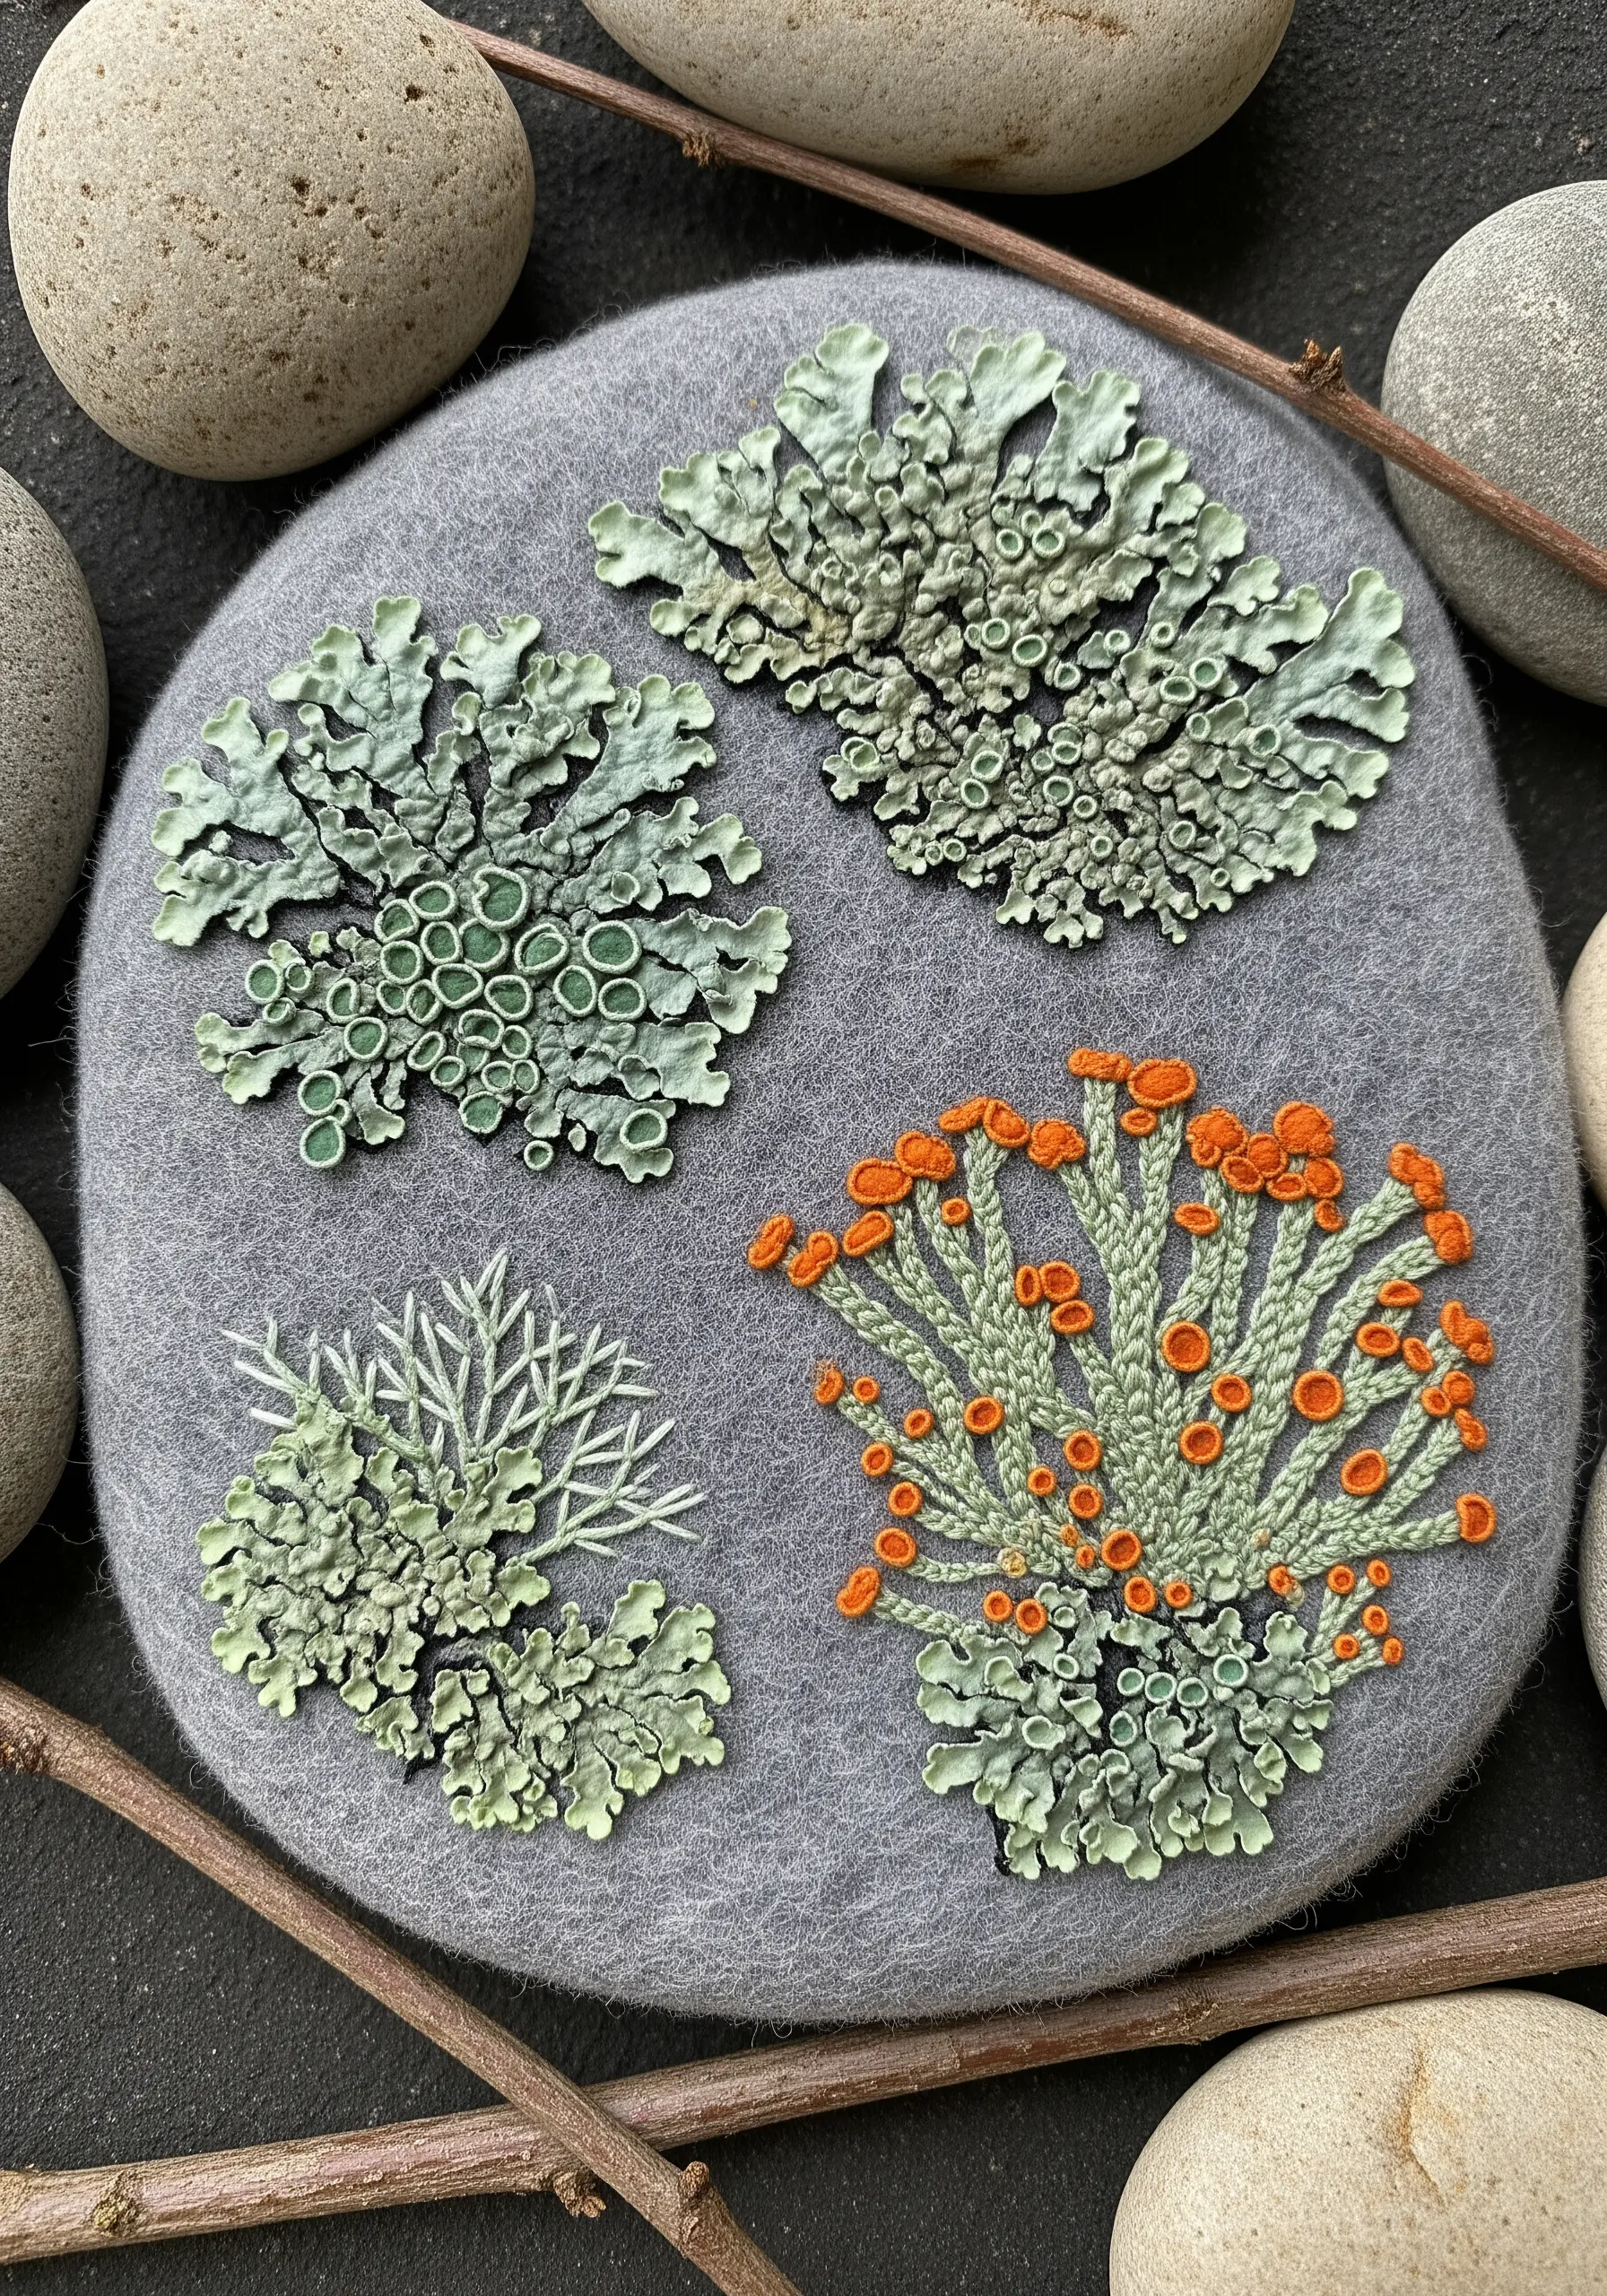
Use a piece of wool felt as your base fabric for a rich, textural effect. Its dense, stable nature is perfect for supporting heavy stitchwork without puckering.
Create the ruffled, leafy forms of lichen by stitching overlapping detached chain stitches (lazy daisies) around a central point.
For granular lichen varieties, use tight clusters of French knots in variegated greens and greys.
The matte, soft finish of the felt provides a beautiful contrast to the slight sheen of the embroidery floss, making the stitched textures even more prominent.
17. Design a Symmetrical Nursery Wreath
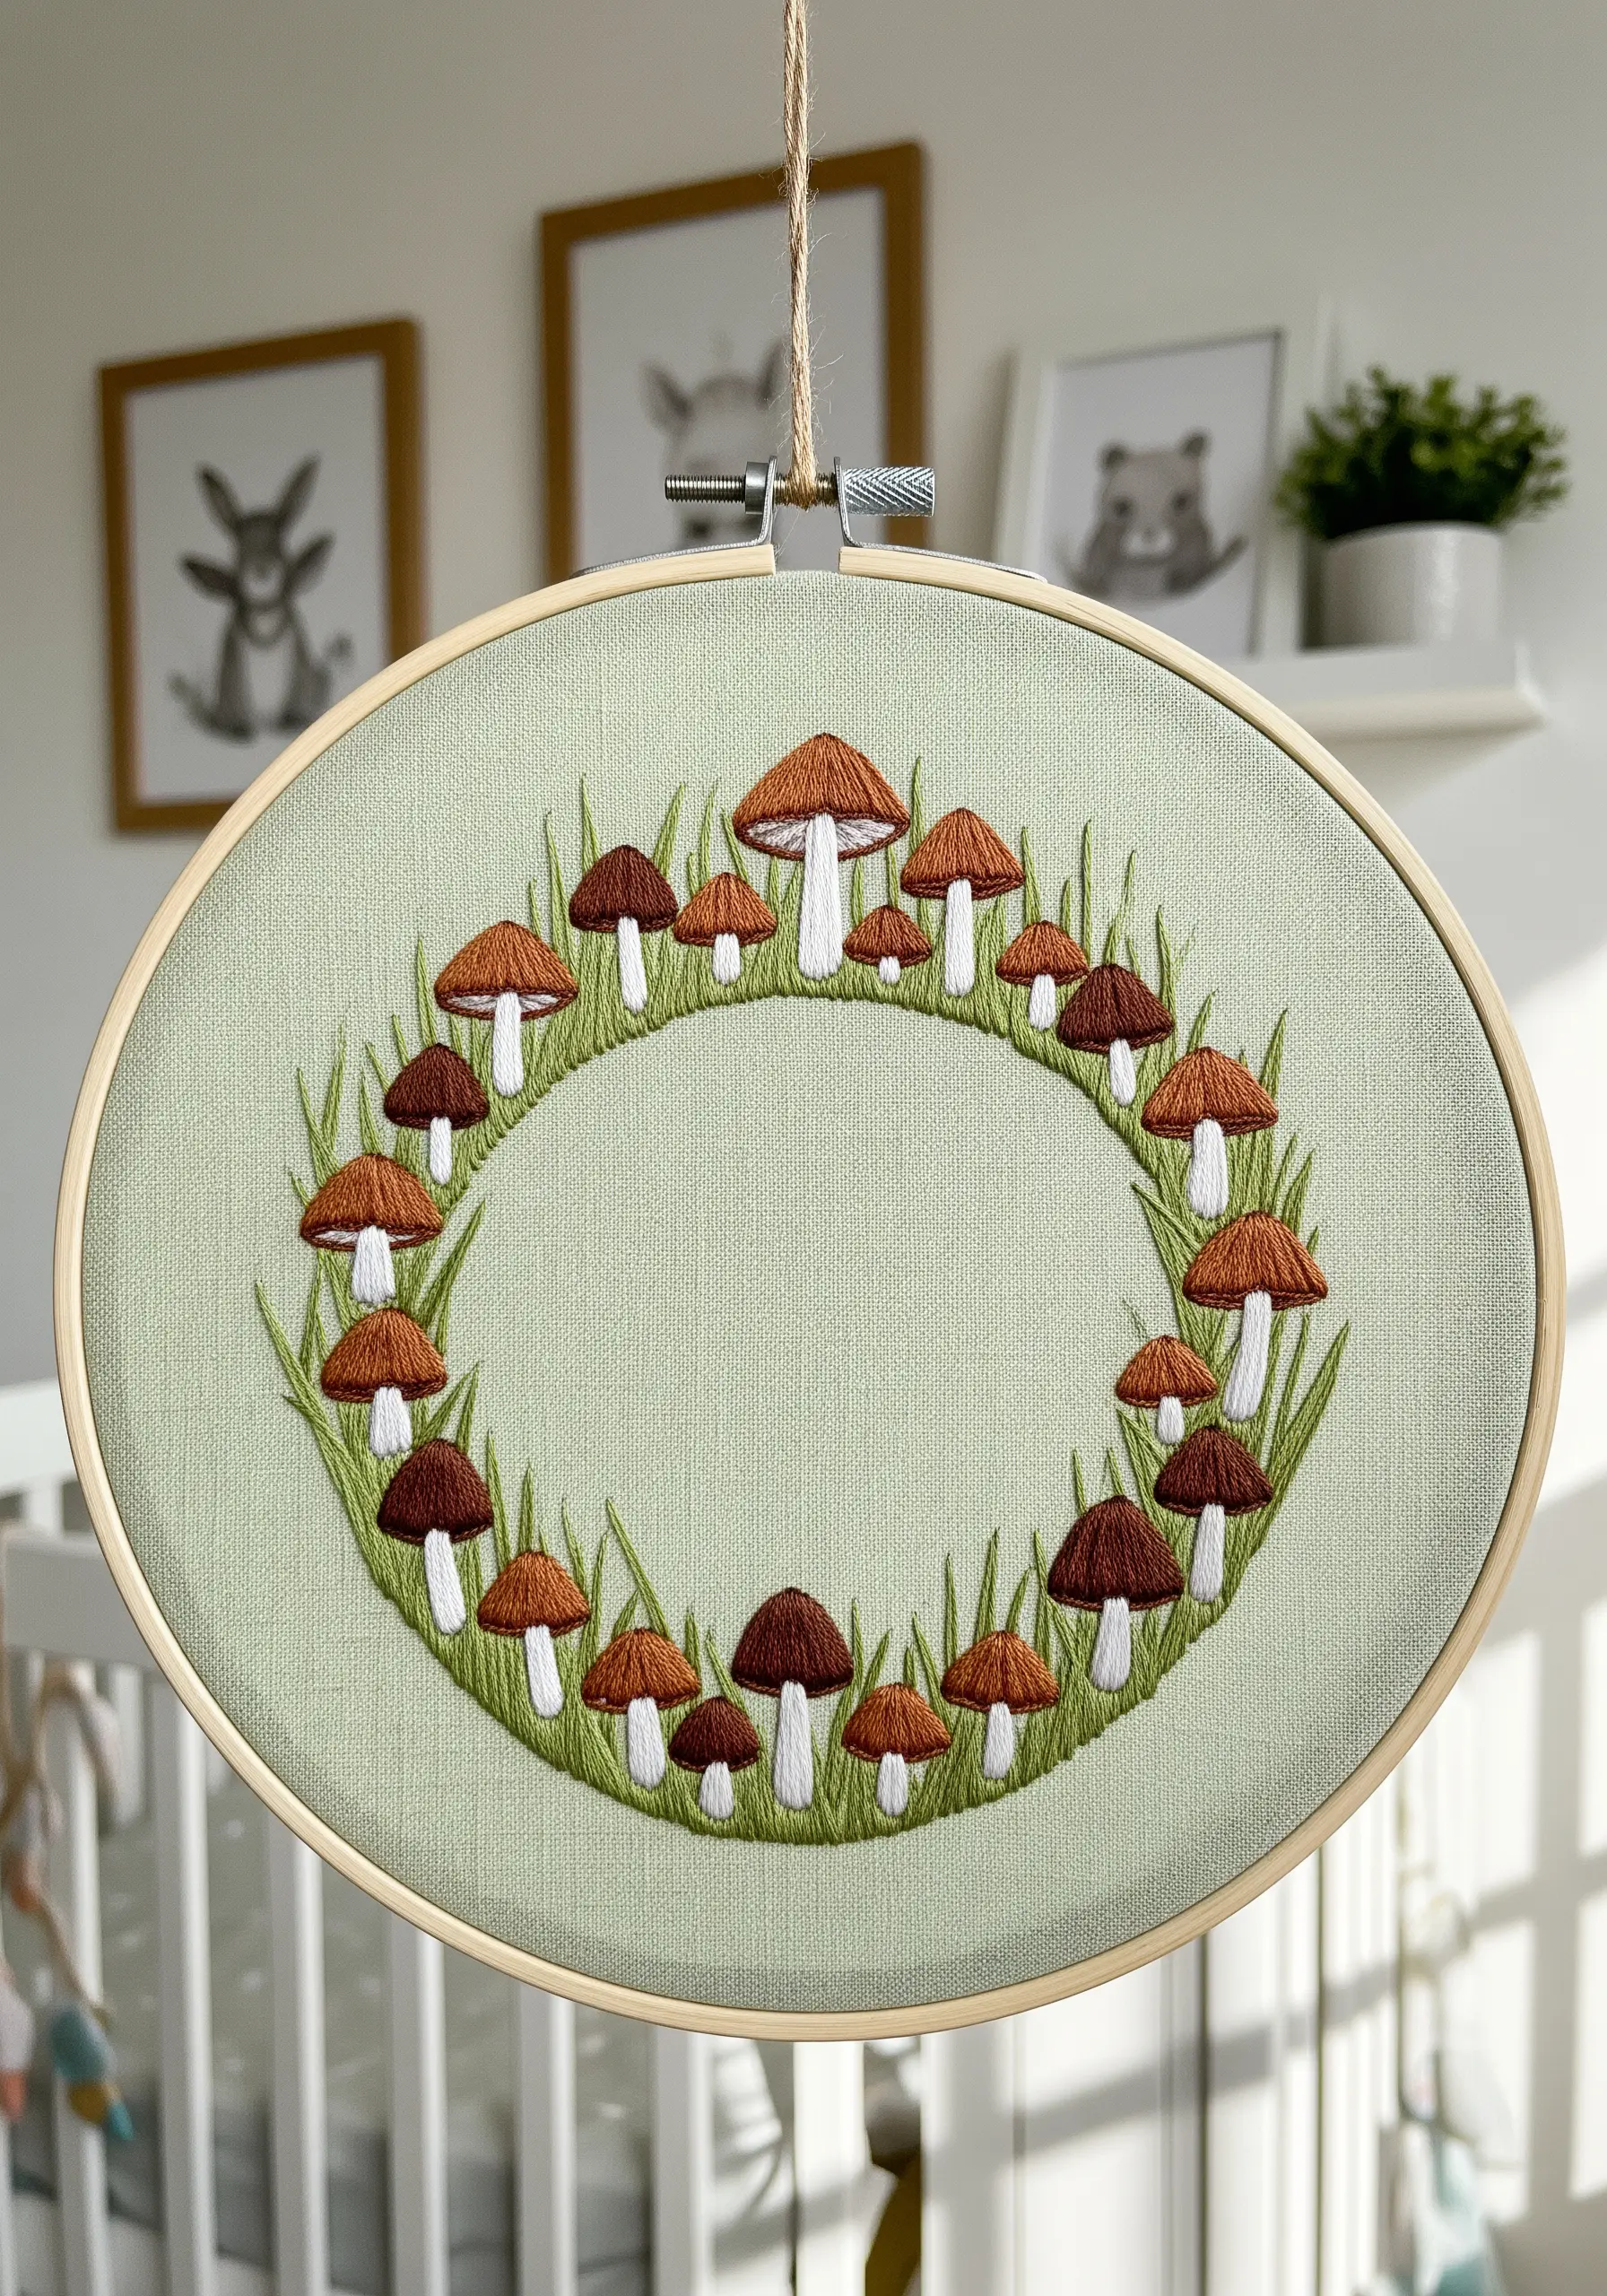
Create a sweet and calming piece for a nursery by arranging mushrooms in a simple, symmetrical wreath.
Use basic, satisfying stitches like satin stitch for the caps and backstitch for the stems, making it a perfect project for mindful, relaxing stitching.
A soft color palette of sage green, gentle brown, and clean white enhances the serene feeling.
The circular composition provides a sense of enclosure and peace, making these adorable forest animal embroidery ideas perfect for a child’s room.
18. Illustrate a Mycelial Network
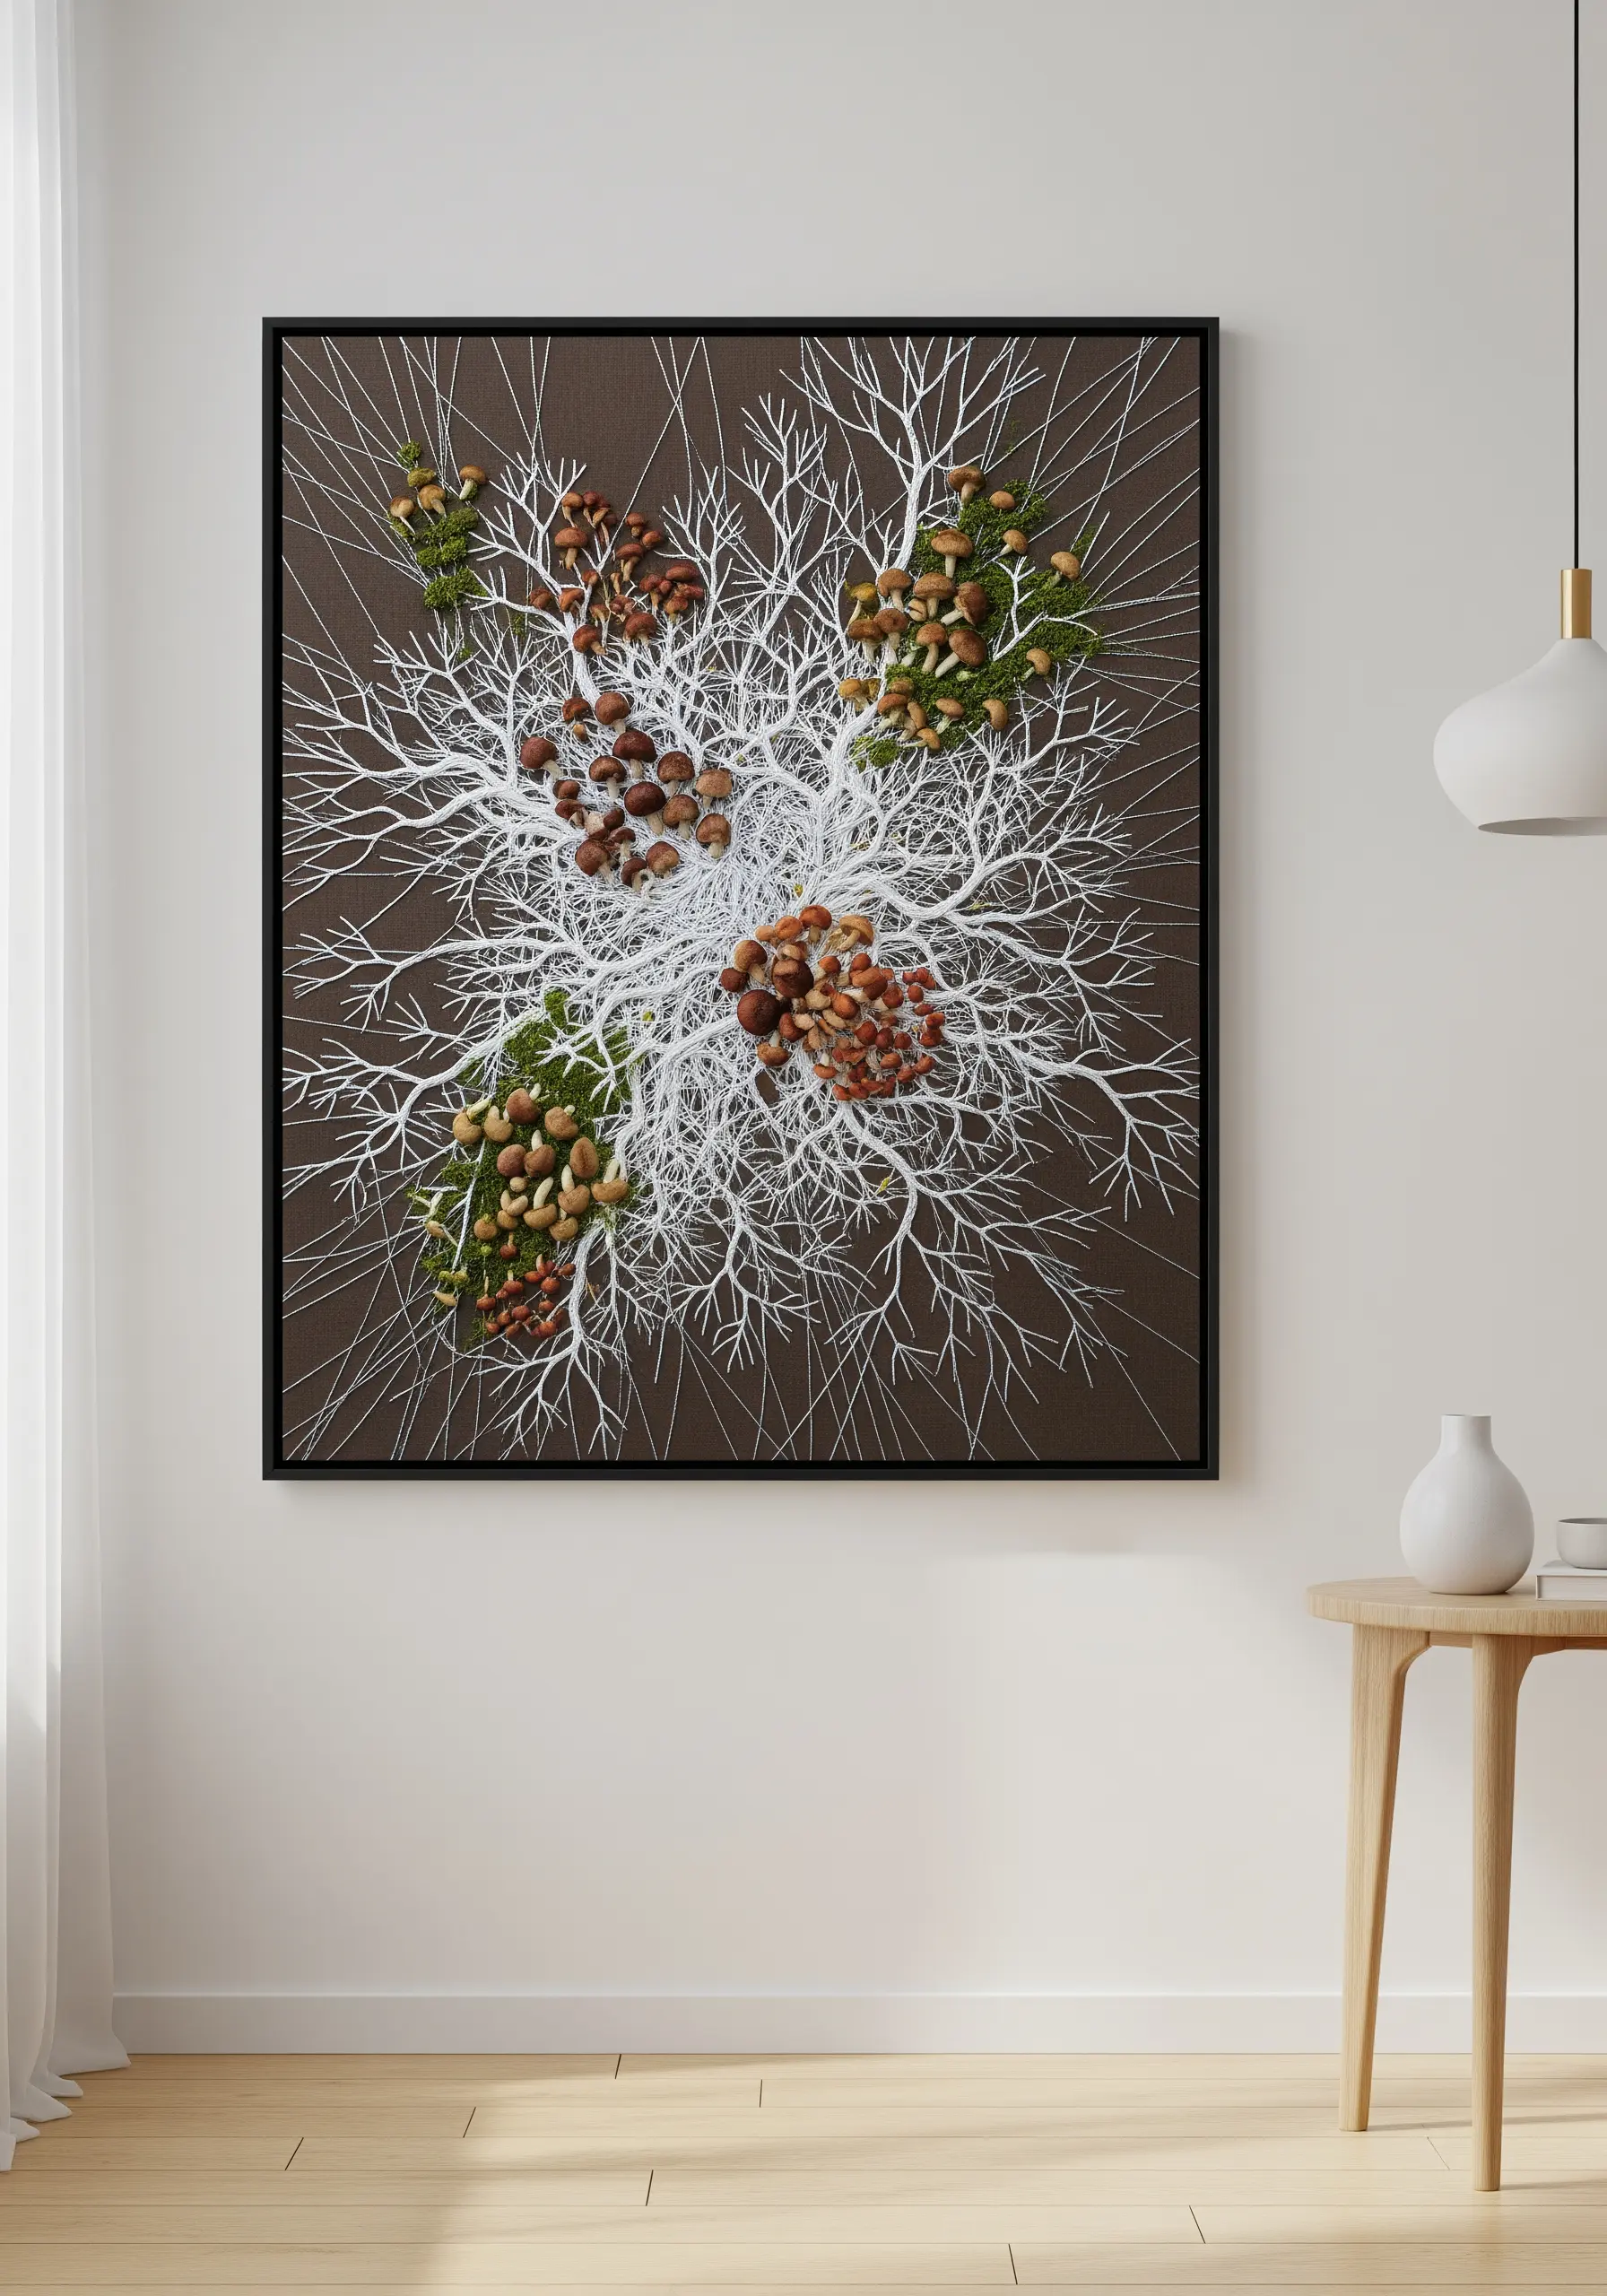
Go beyond the mushroom and stitch the intricate beauty of the mycelial network beneath.
On a dark, earthy brown fabric, use a fine, single strand of white or off-white thread to create the branching, root-like structures with a simple backstitch or split stitch.
Add small clusters of mushrooms on top of the network, as if they are fruiting directly from your stitched creation.
This conceptual approach tells a deeper story about the interconnectedness of the forest ecosystem, turning your embroidery into a piece of biological art.
19. Create a Bold Tote Bag Patch
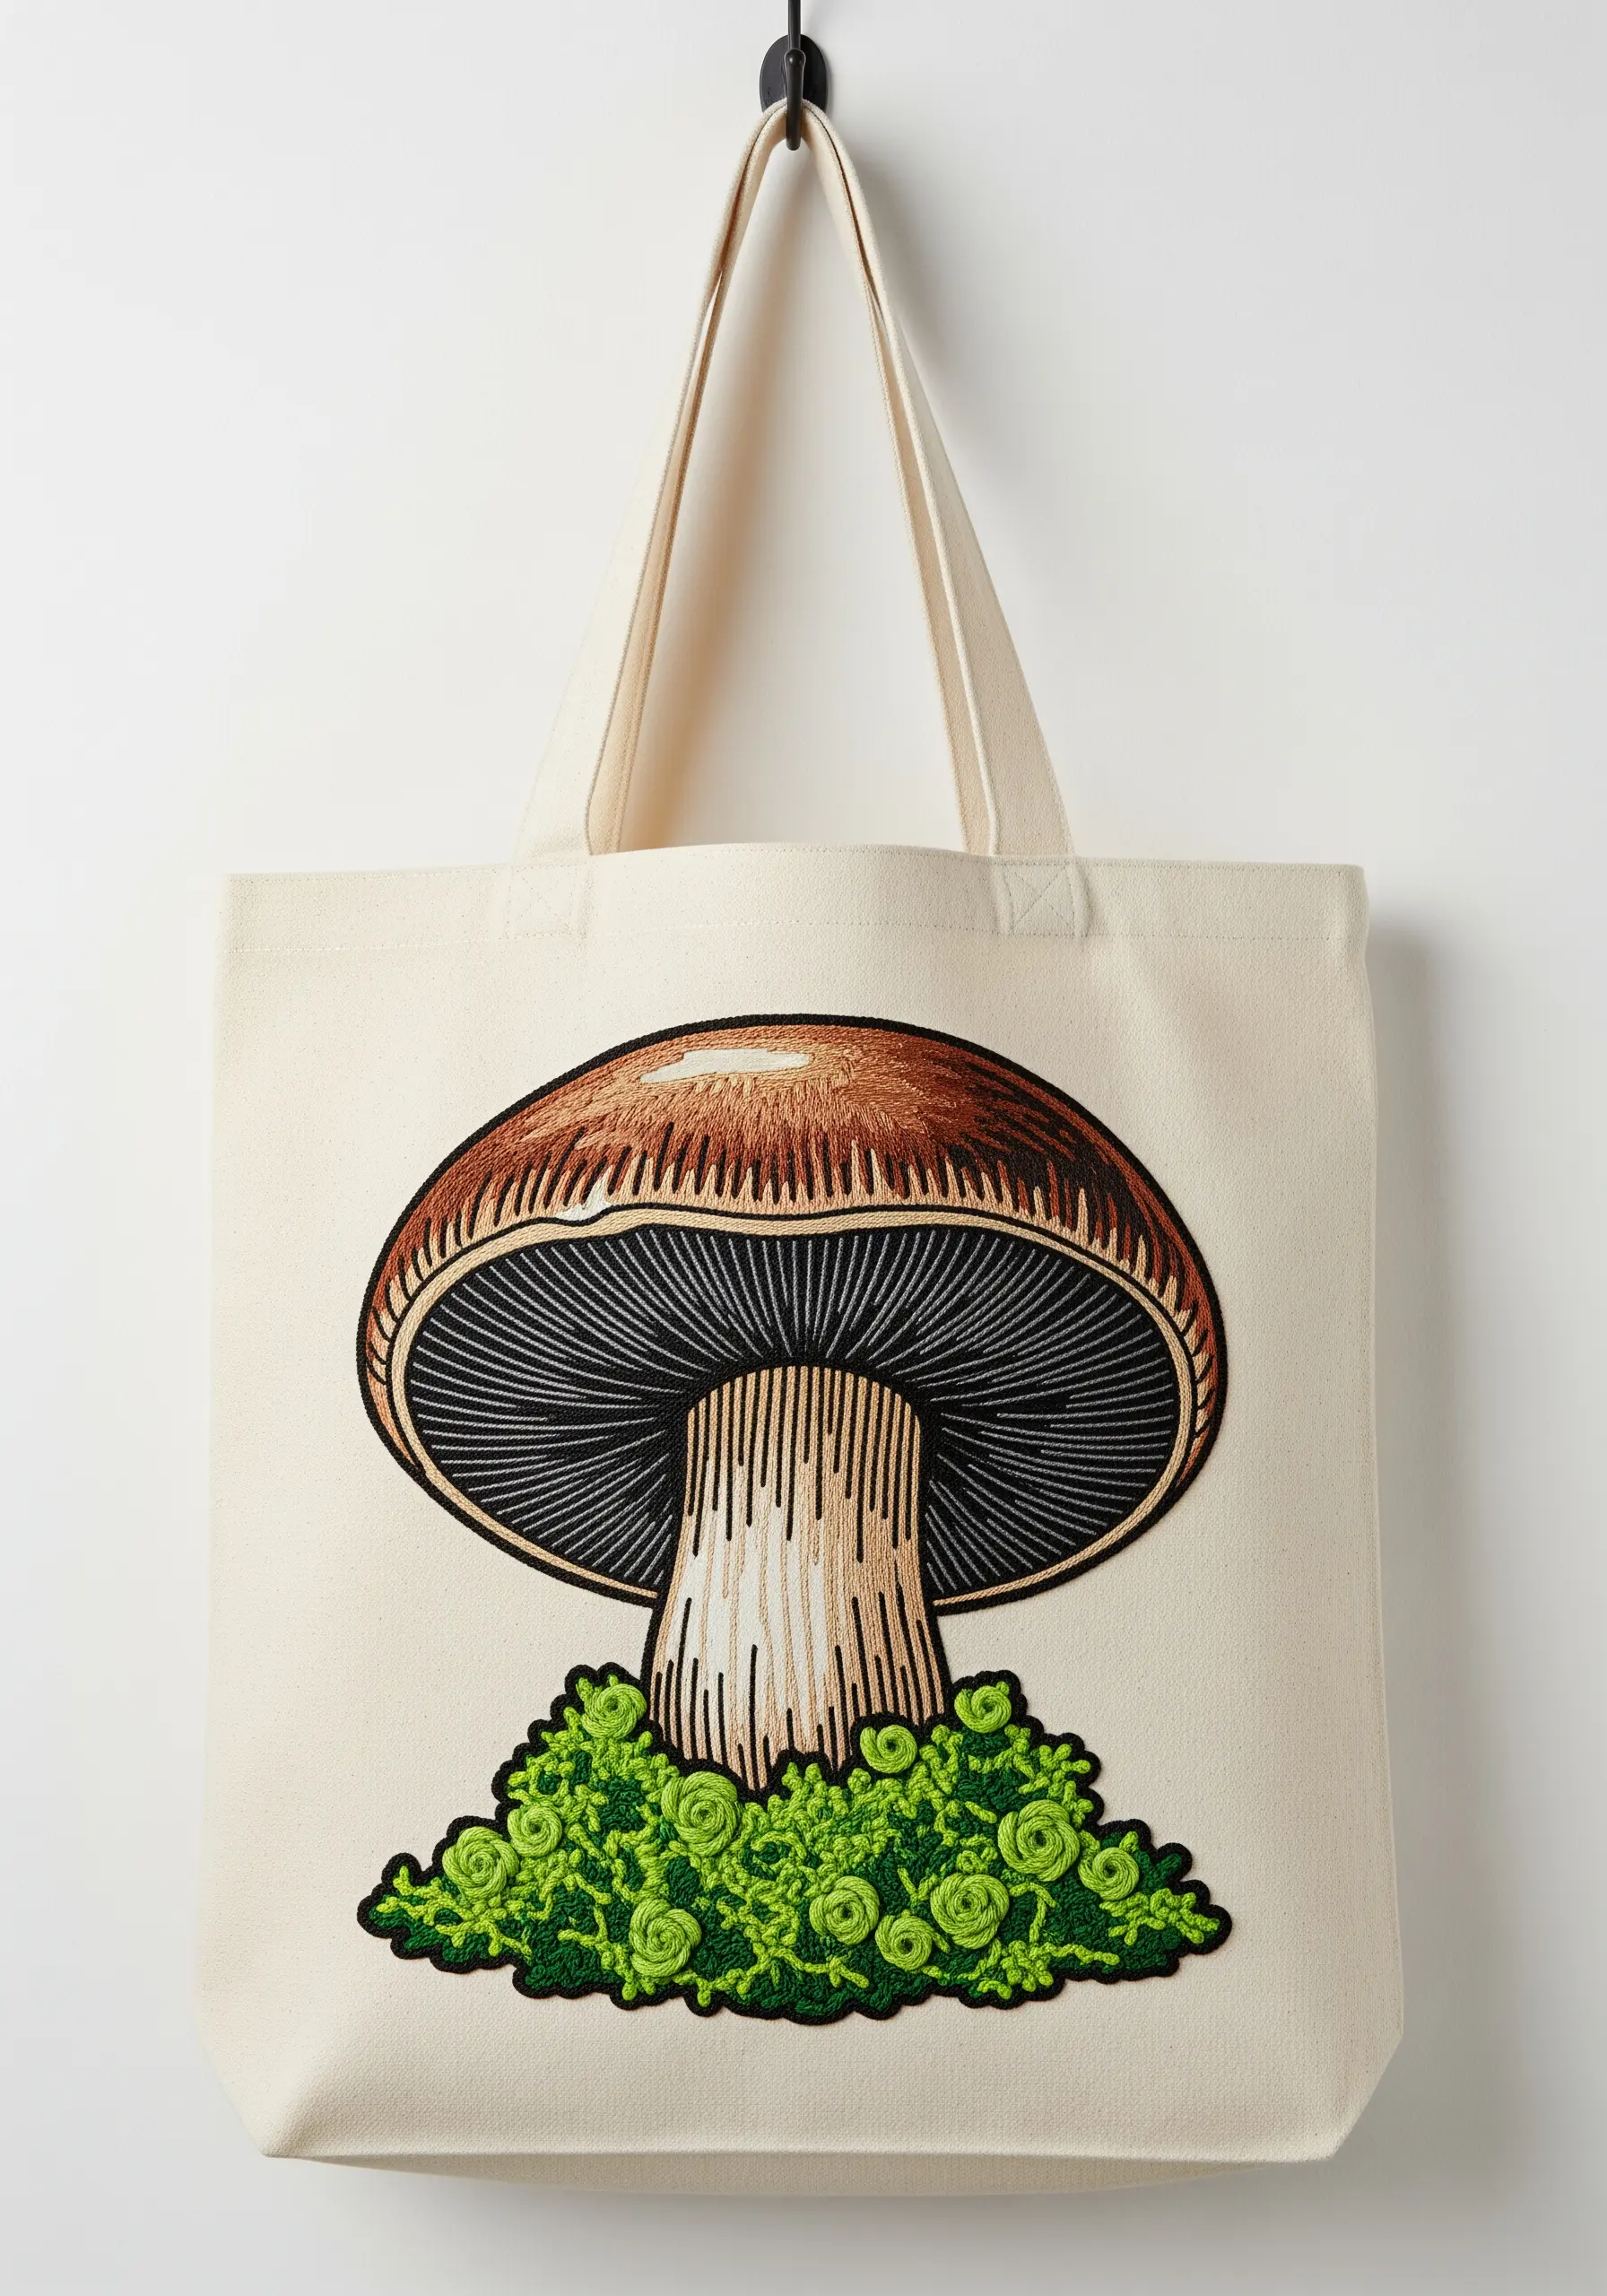
Instead of stitching directly onto a canvas tote, create a durable, professional-looking patch.
Stitch your design onto a separate piece of sturdy fabric, like cotton drill, using a tear-away stabilizer for support.
Once complete, outline the entire design with a thick, bold satin stitch border. Carefully trim the excess fabric around the border.
Finally, either iron on the patch with fusible backing or stitch it securely onto your bag. This method prevents puckering and ensures your design stands out crisply.
20. Stitch on Sheer Fabric for a Winter Scene

Create a magical, ethereal effect by stitching your winter scene on a sheer fabric like organza or tulle.
You’ll need to use a water-soluble stabilizer (like Sulky Solvy) on top or behind your fabric to support your stitches, which you’ll rinse away upon completion.
Use scattered white seed beads or tiny French knots to create a delicate, sparkling snow effect that seems to float in mid-air.
The transparency allows the world behind the hoop to become part of the artwork, adding a unique, interactive quality to your piece.
21. Achieve Realistic Blending with Thread Painting

Give your mushrooms a realistic, painted look by using the long-and-short stitch technique, also known as needle painting.
Select at least three or four shades of a single color, from dark to light. Fill the mushroom cap with interlocking rows of straight stitches, blending the shades together seamlessly.
Use a single strand of floss for the most subtle and smooth gradients. This technique requires patience but rewards you with stunningly lifelike results.
It’s the perfect way to turn simple lines into art that looks almost painted.
22. Build a Whimsical Mushroom House
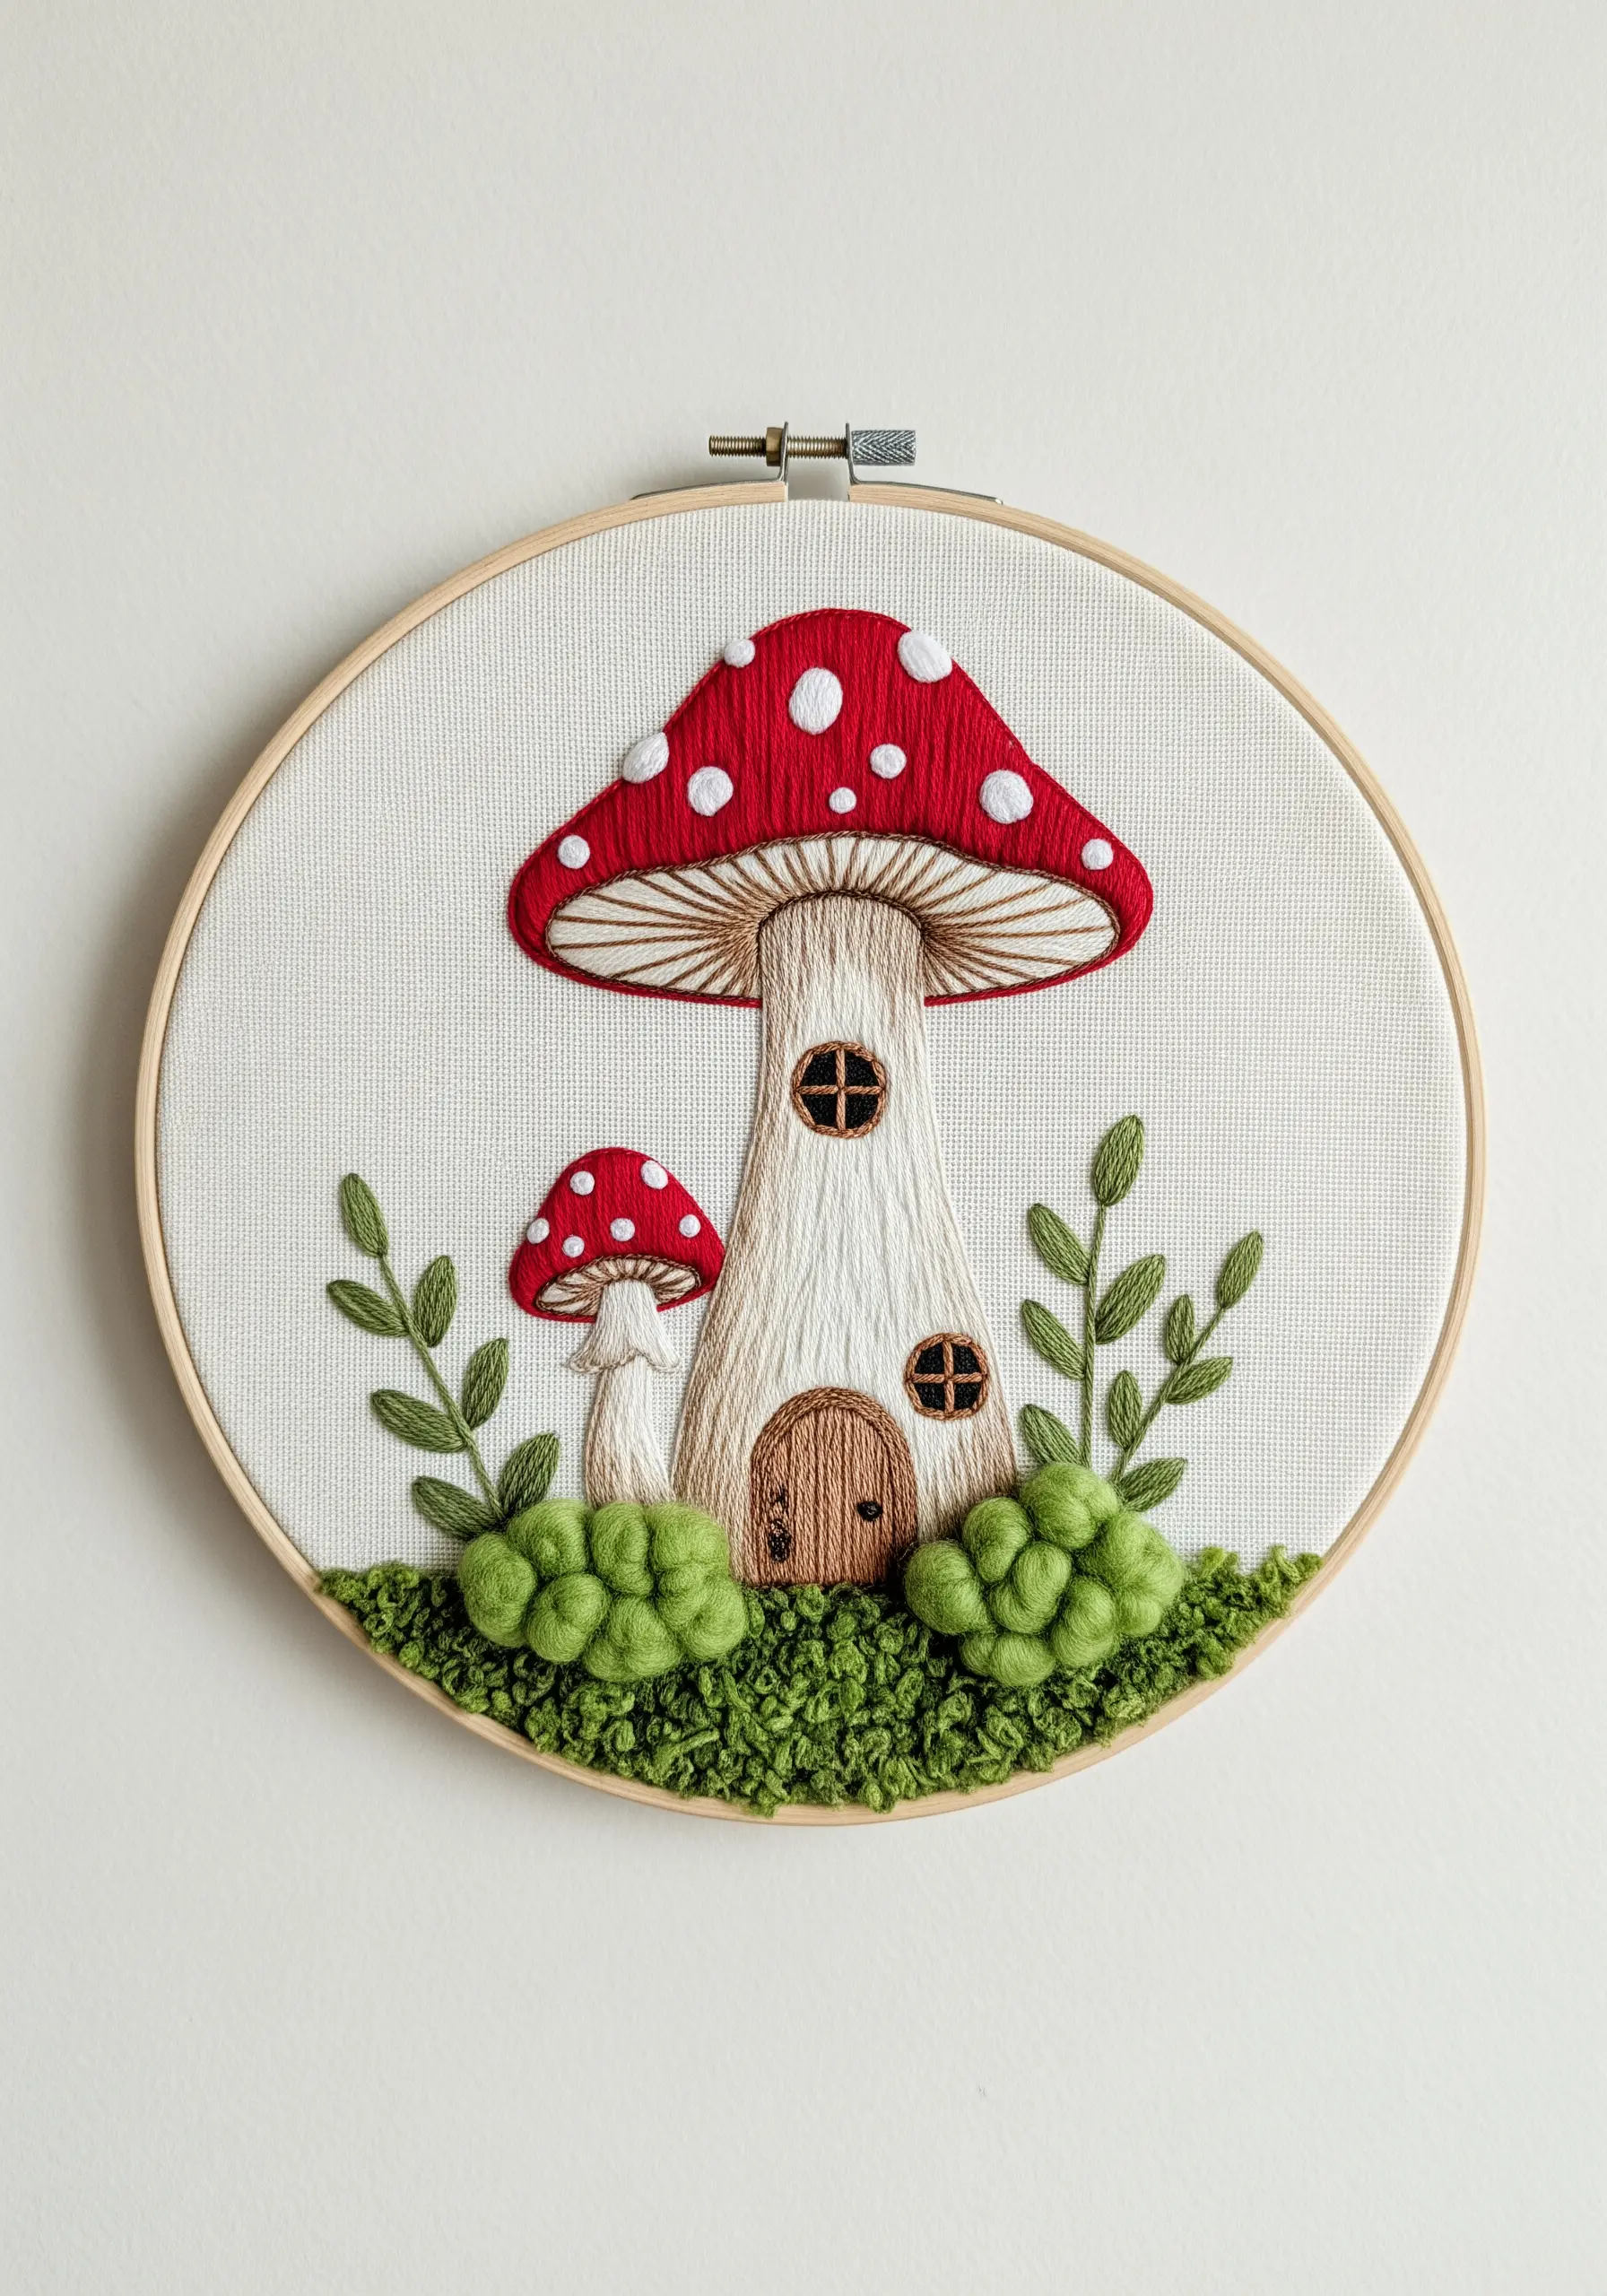
Add a touch of fairytale charm to your work by transforming a mushroom into a tiny woodland home.
Use satin stitch for the main structure, then add details like a door and windows with a contrasting dark thread and simple backstitch.
Create plush, round bushes on either side of the door using bullion knots or clusters of French knots for a soft, inviting texture.
This imaginative twist is perfect for nursery decor or for anyone who loves to add a bit of storytelling to their stitching.
23. Create Shaggy Texture with Cut Loops

Capture the unique texture of shaggy mane mushrooms by using a looped stitch like the Turkey work stitch.
Instead of leaving the loops, carefully snip them open and fluff the threads with your needle to create a soft, frayed texture.
Work in rows from the bottom of the cap upwards, overlapping them slightly, just as the scales on the real mushroom would.
Using a mix of off-white, grey, and light brown threads will give the texture a more realistic, dimensional appearance.
24. Map a Landscape with Stitch Variation
Instead of a single texture, think of your hoop as a topographical map of the forest floor.
Use different stitches to represent different types of growth: dense French knots for cushion moss, raised bullion knots for trailing moss, and woven spider wheels for lichen rosettes.
Varying your thread thickness—from a single strand to all six—will also create more contrast and depth.
This nature texture embroidery approach results in a rich, tactile piece that invites the viewer to look closer and explore the landscape you’ve created.
25. Adapt Designs for Textured Fabrics
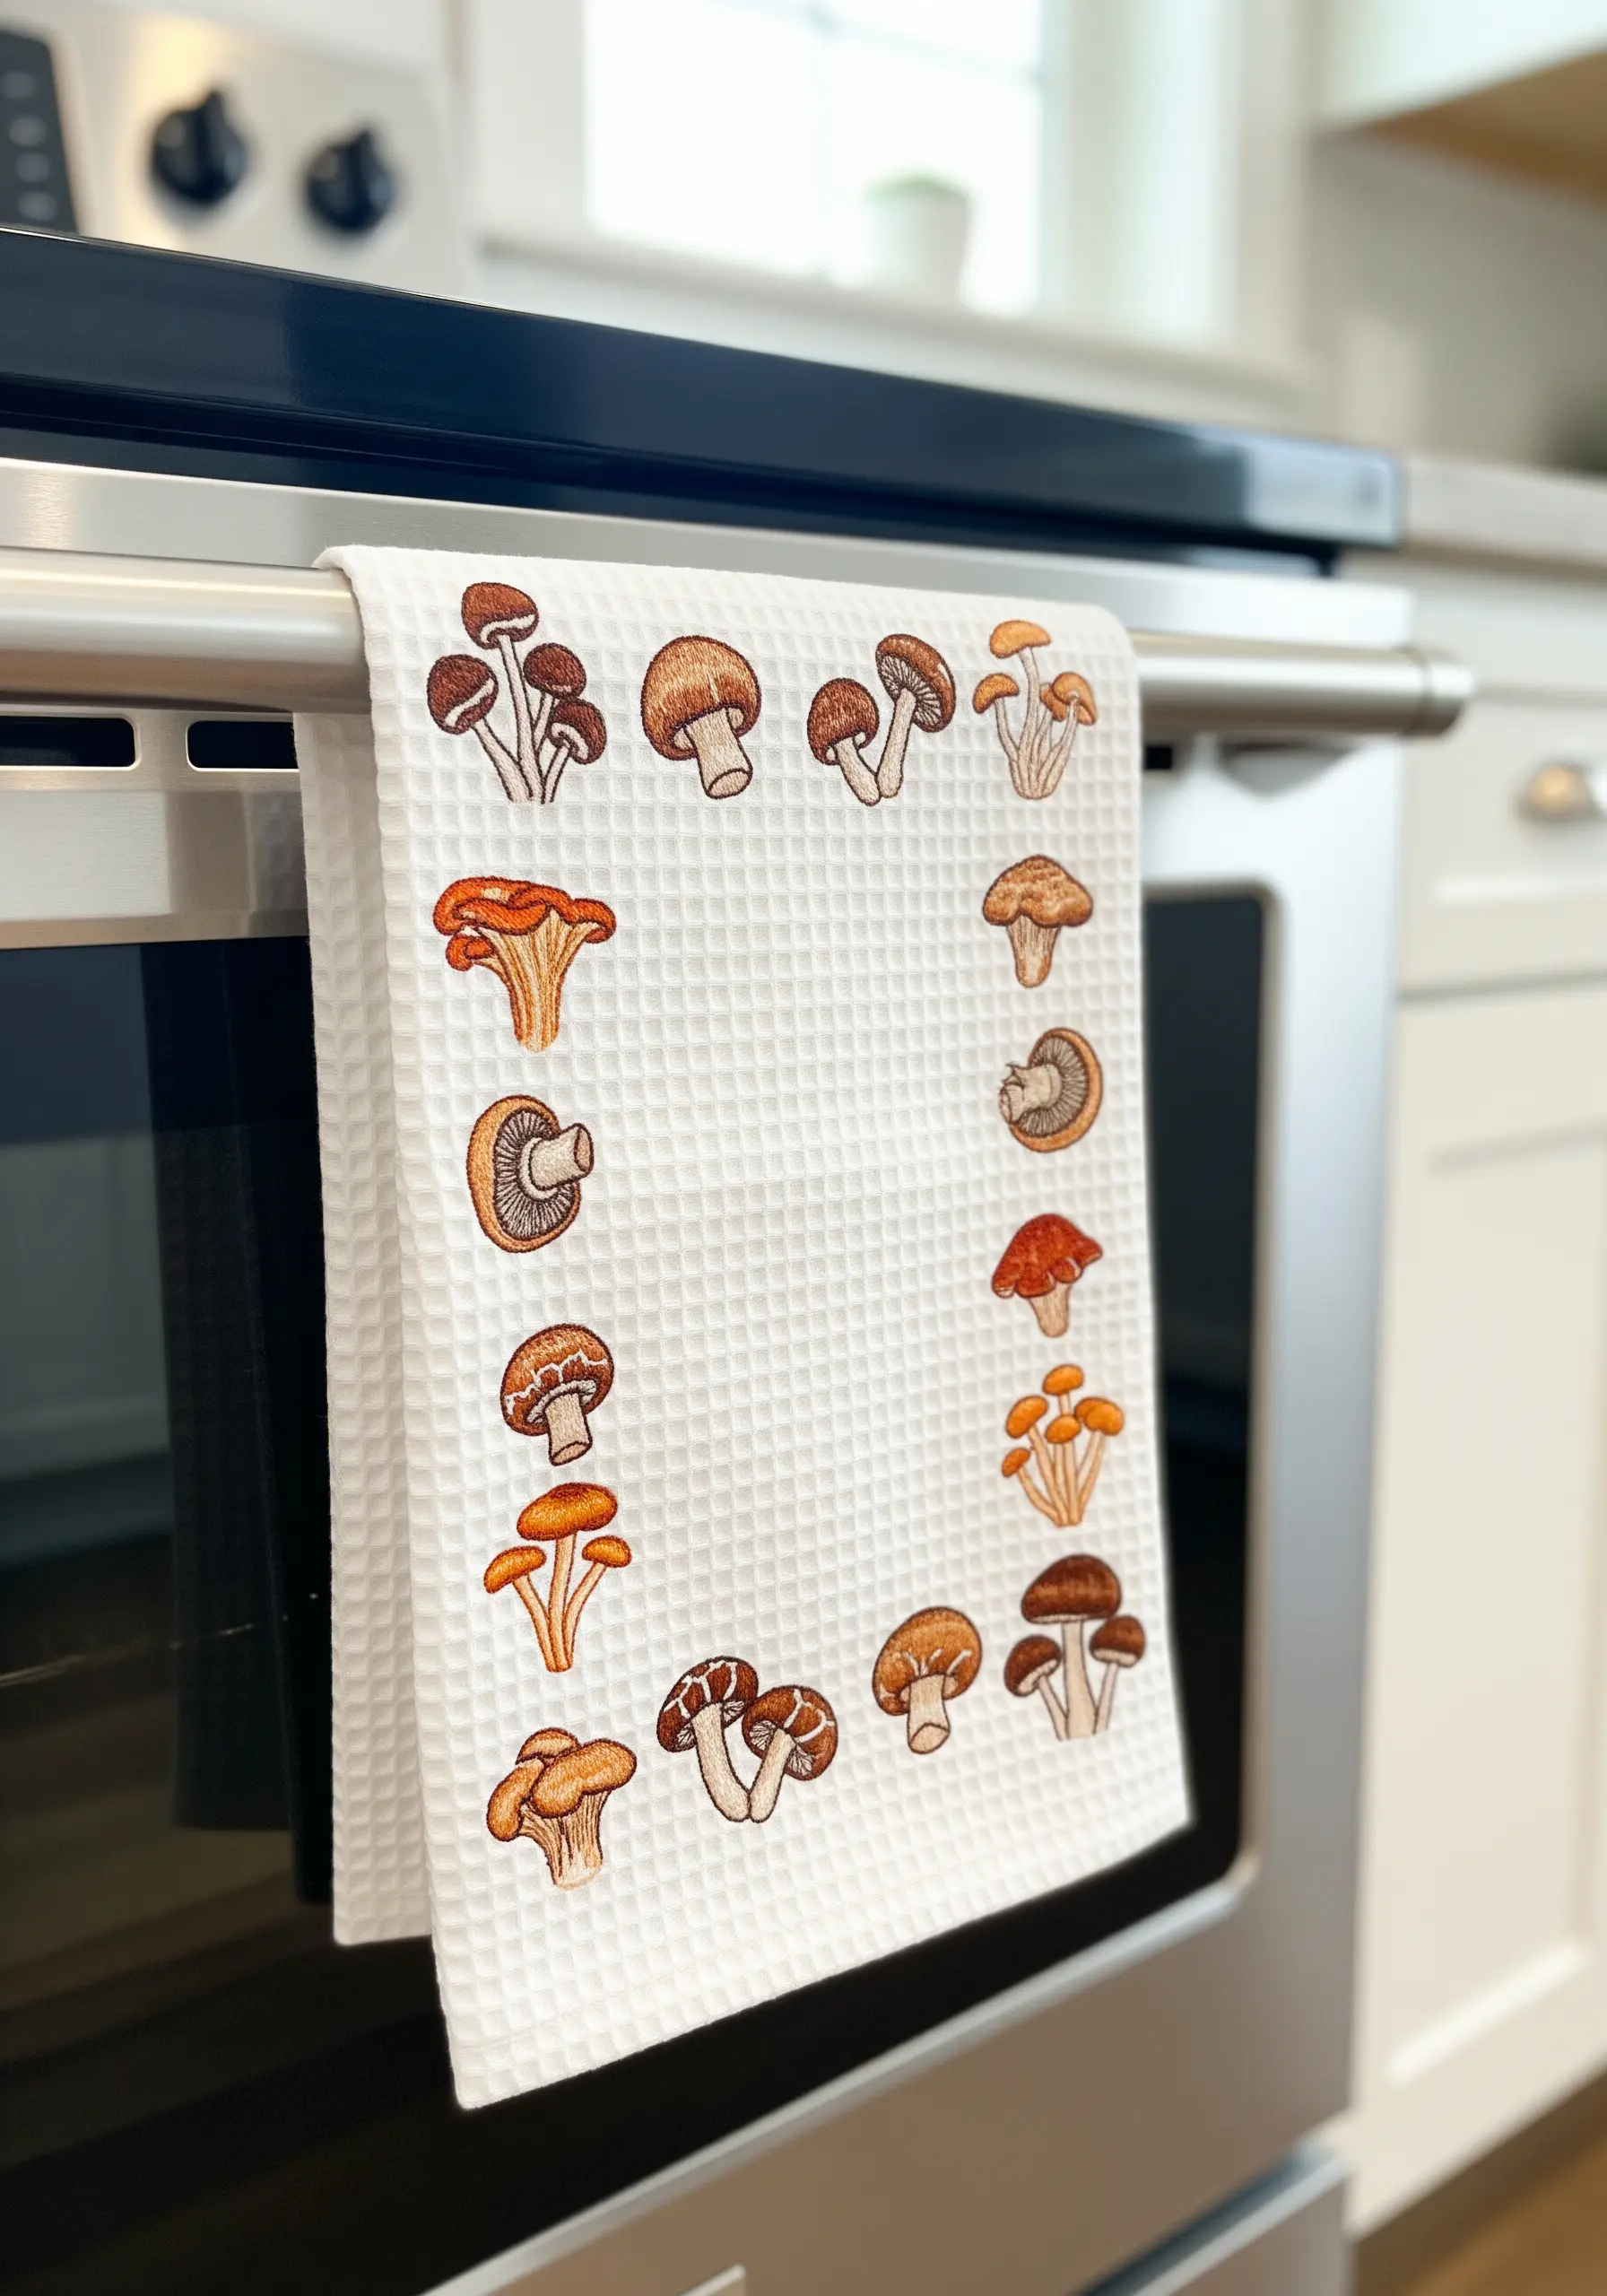
When stitching on a fabric with a prominent weave, like a waffle-weave kitchen towel, simplify your designs.
Opt for clean outlines using a backstitch or stem stitch, and fill small areas with satin stitch.
Always use a stabilizer on the back of the fabric; this prevents the stitches from sinking into the weave and keeps your lines smooth and even.
Arranging small, simple motifs in a repeating pattern or border is an effective way to decorate functional items beautifully.
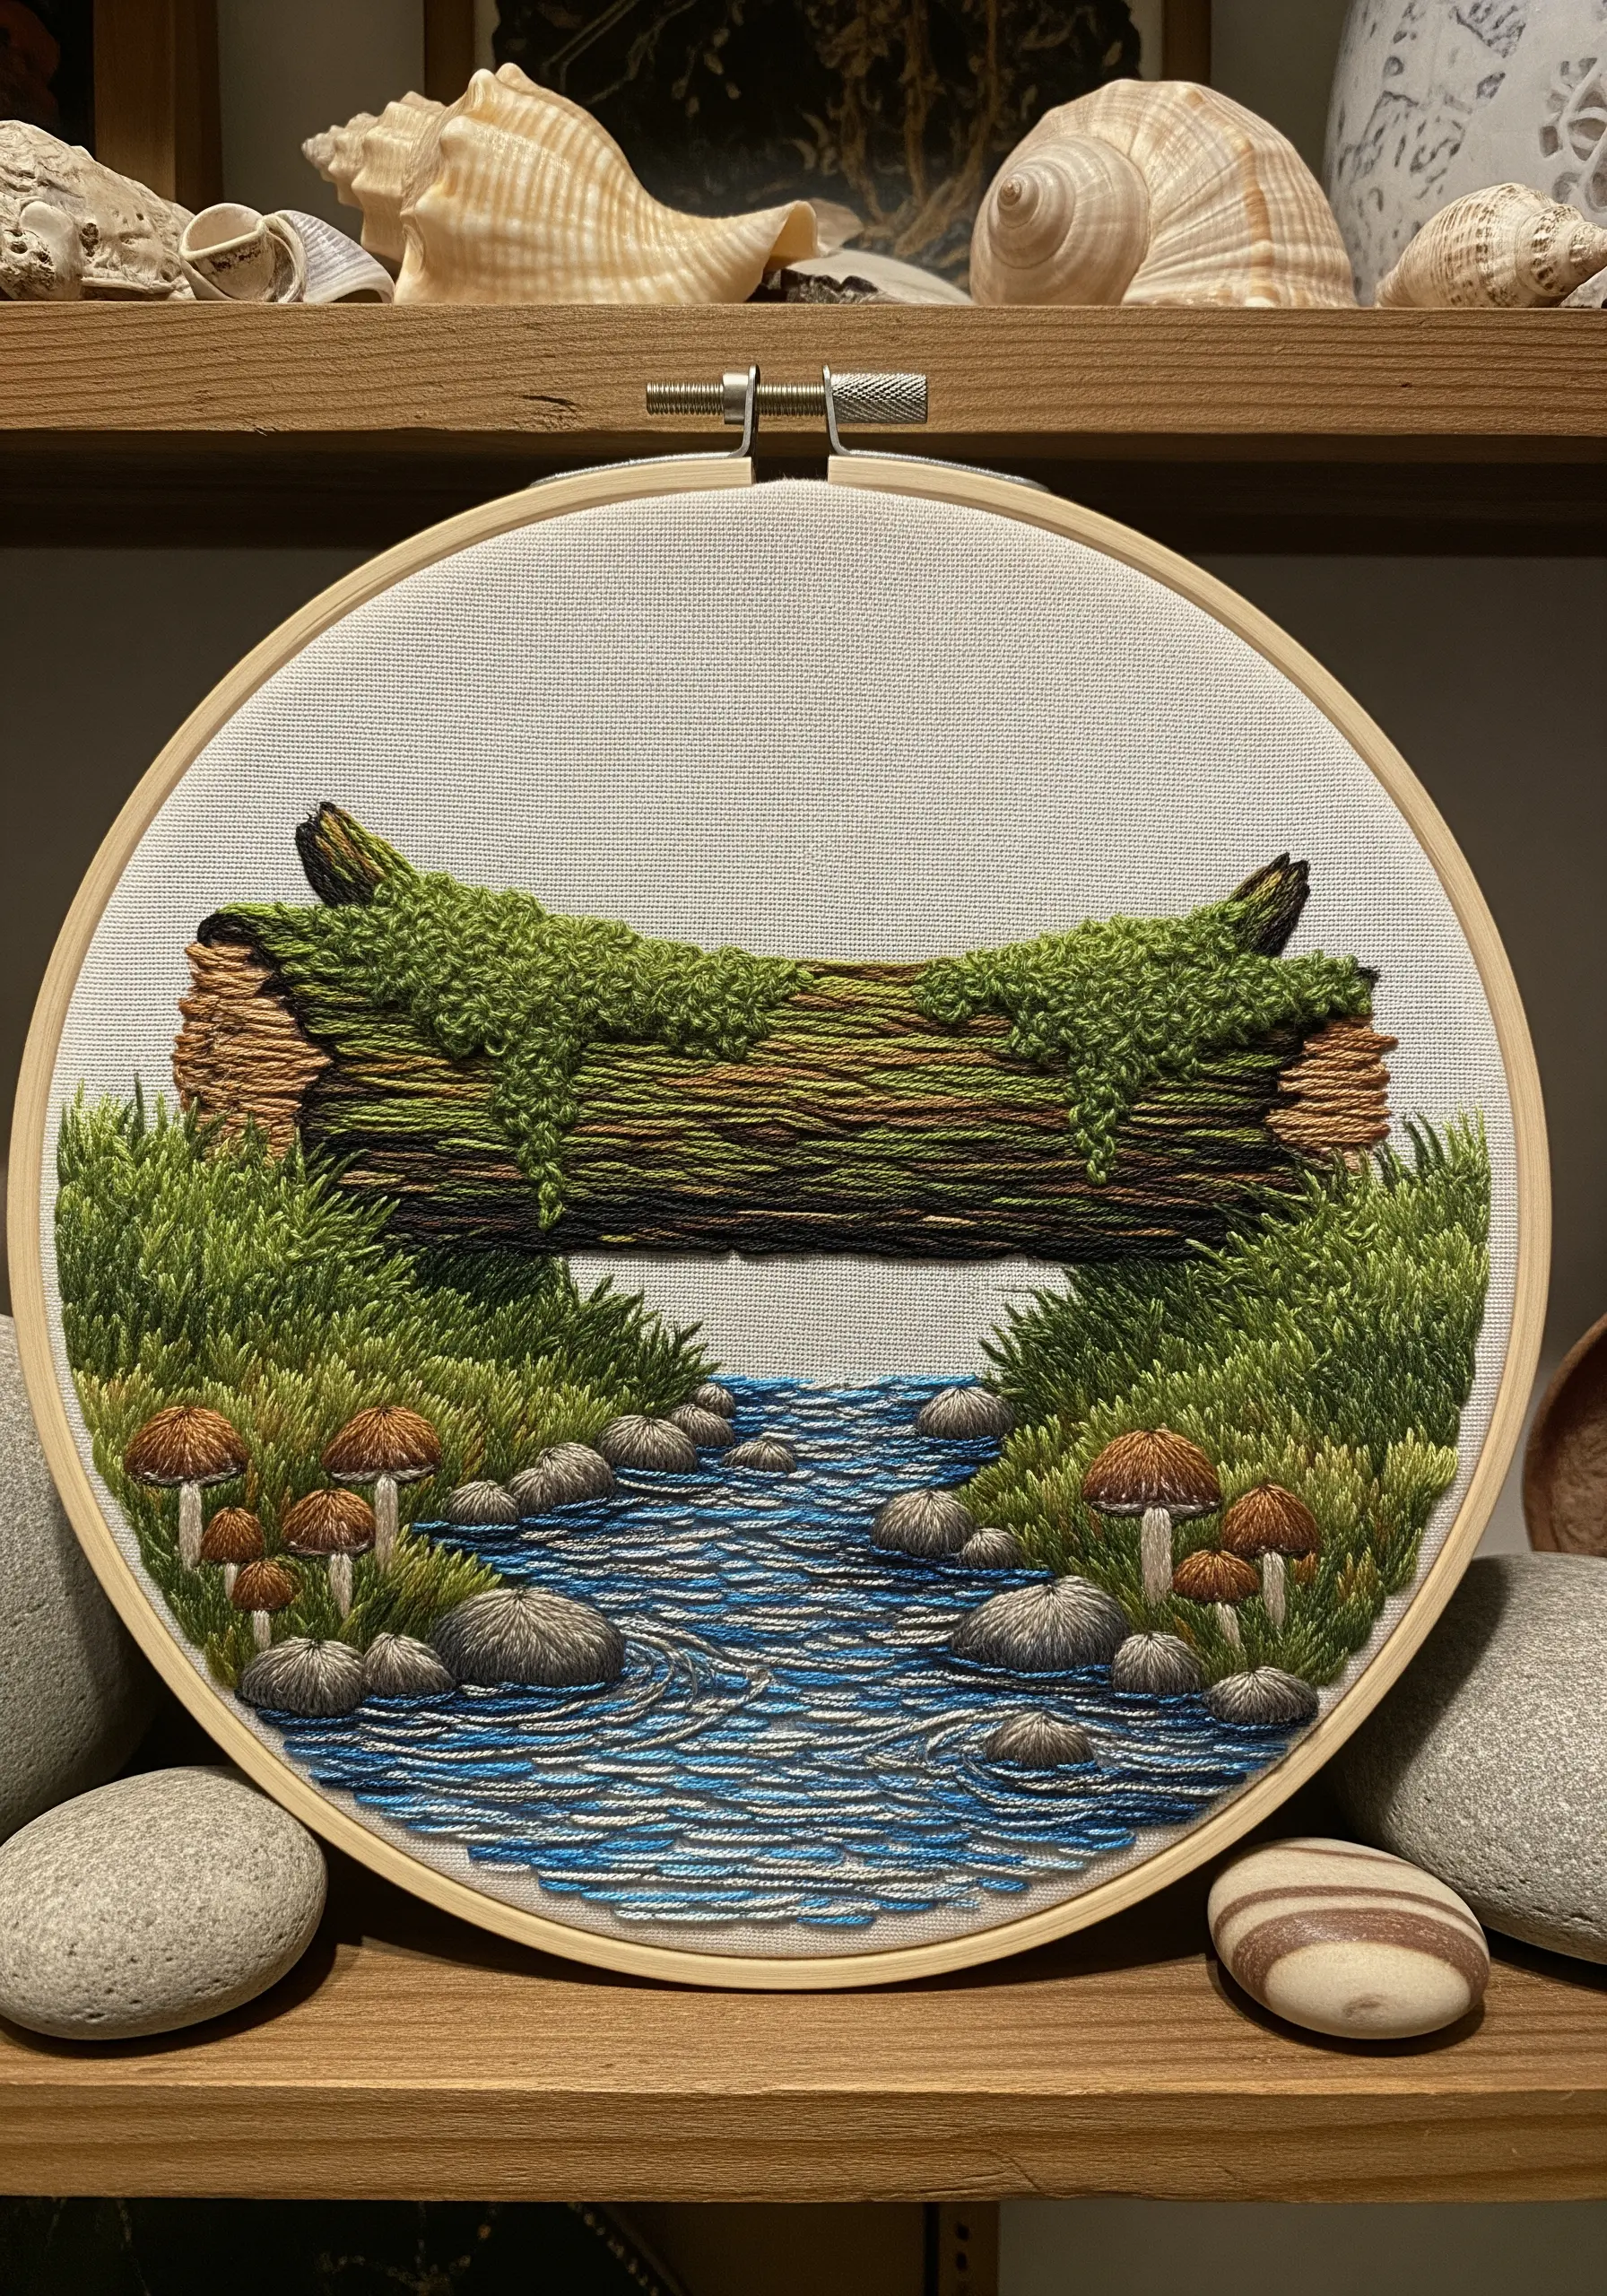
26. Stitch a Pine Needle Forest Floor
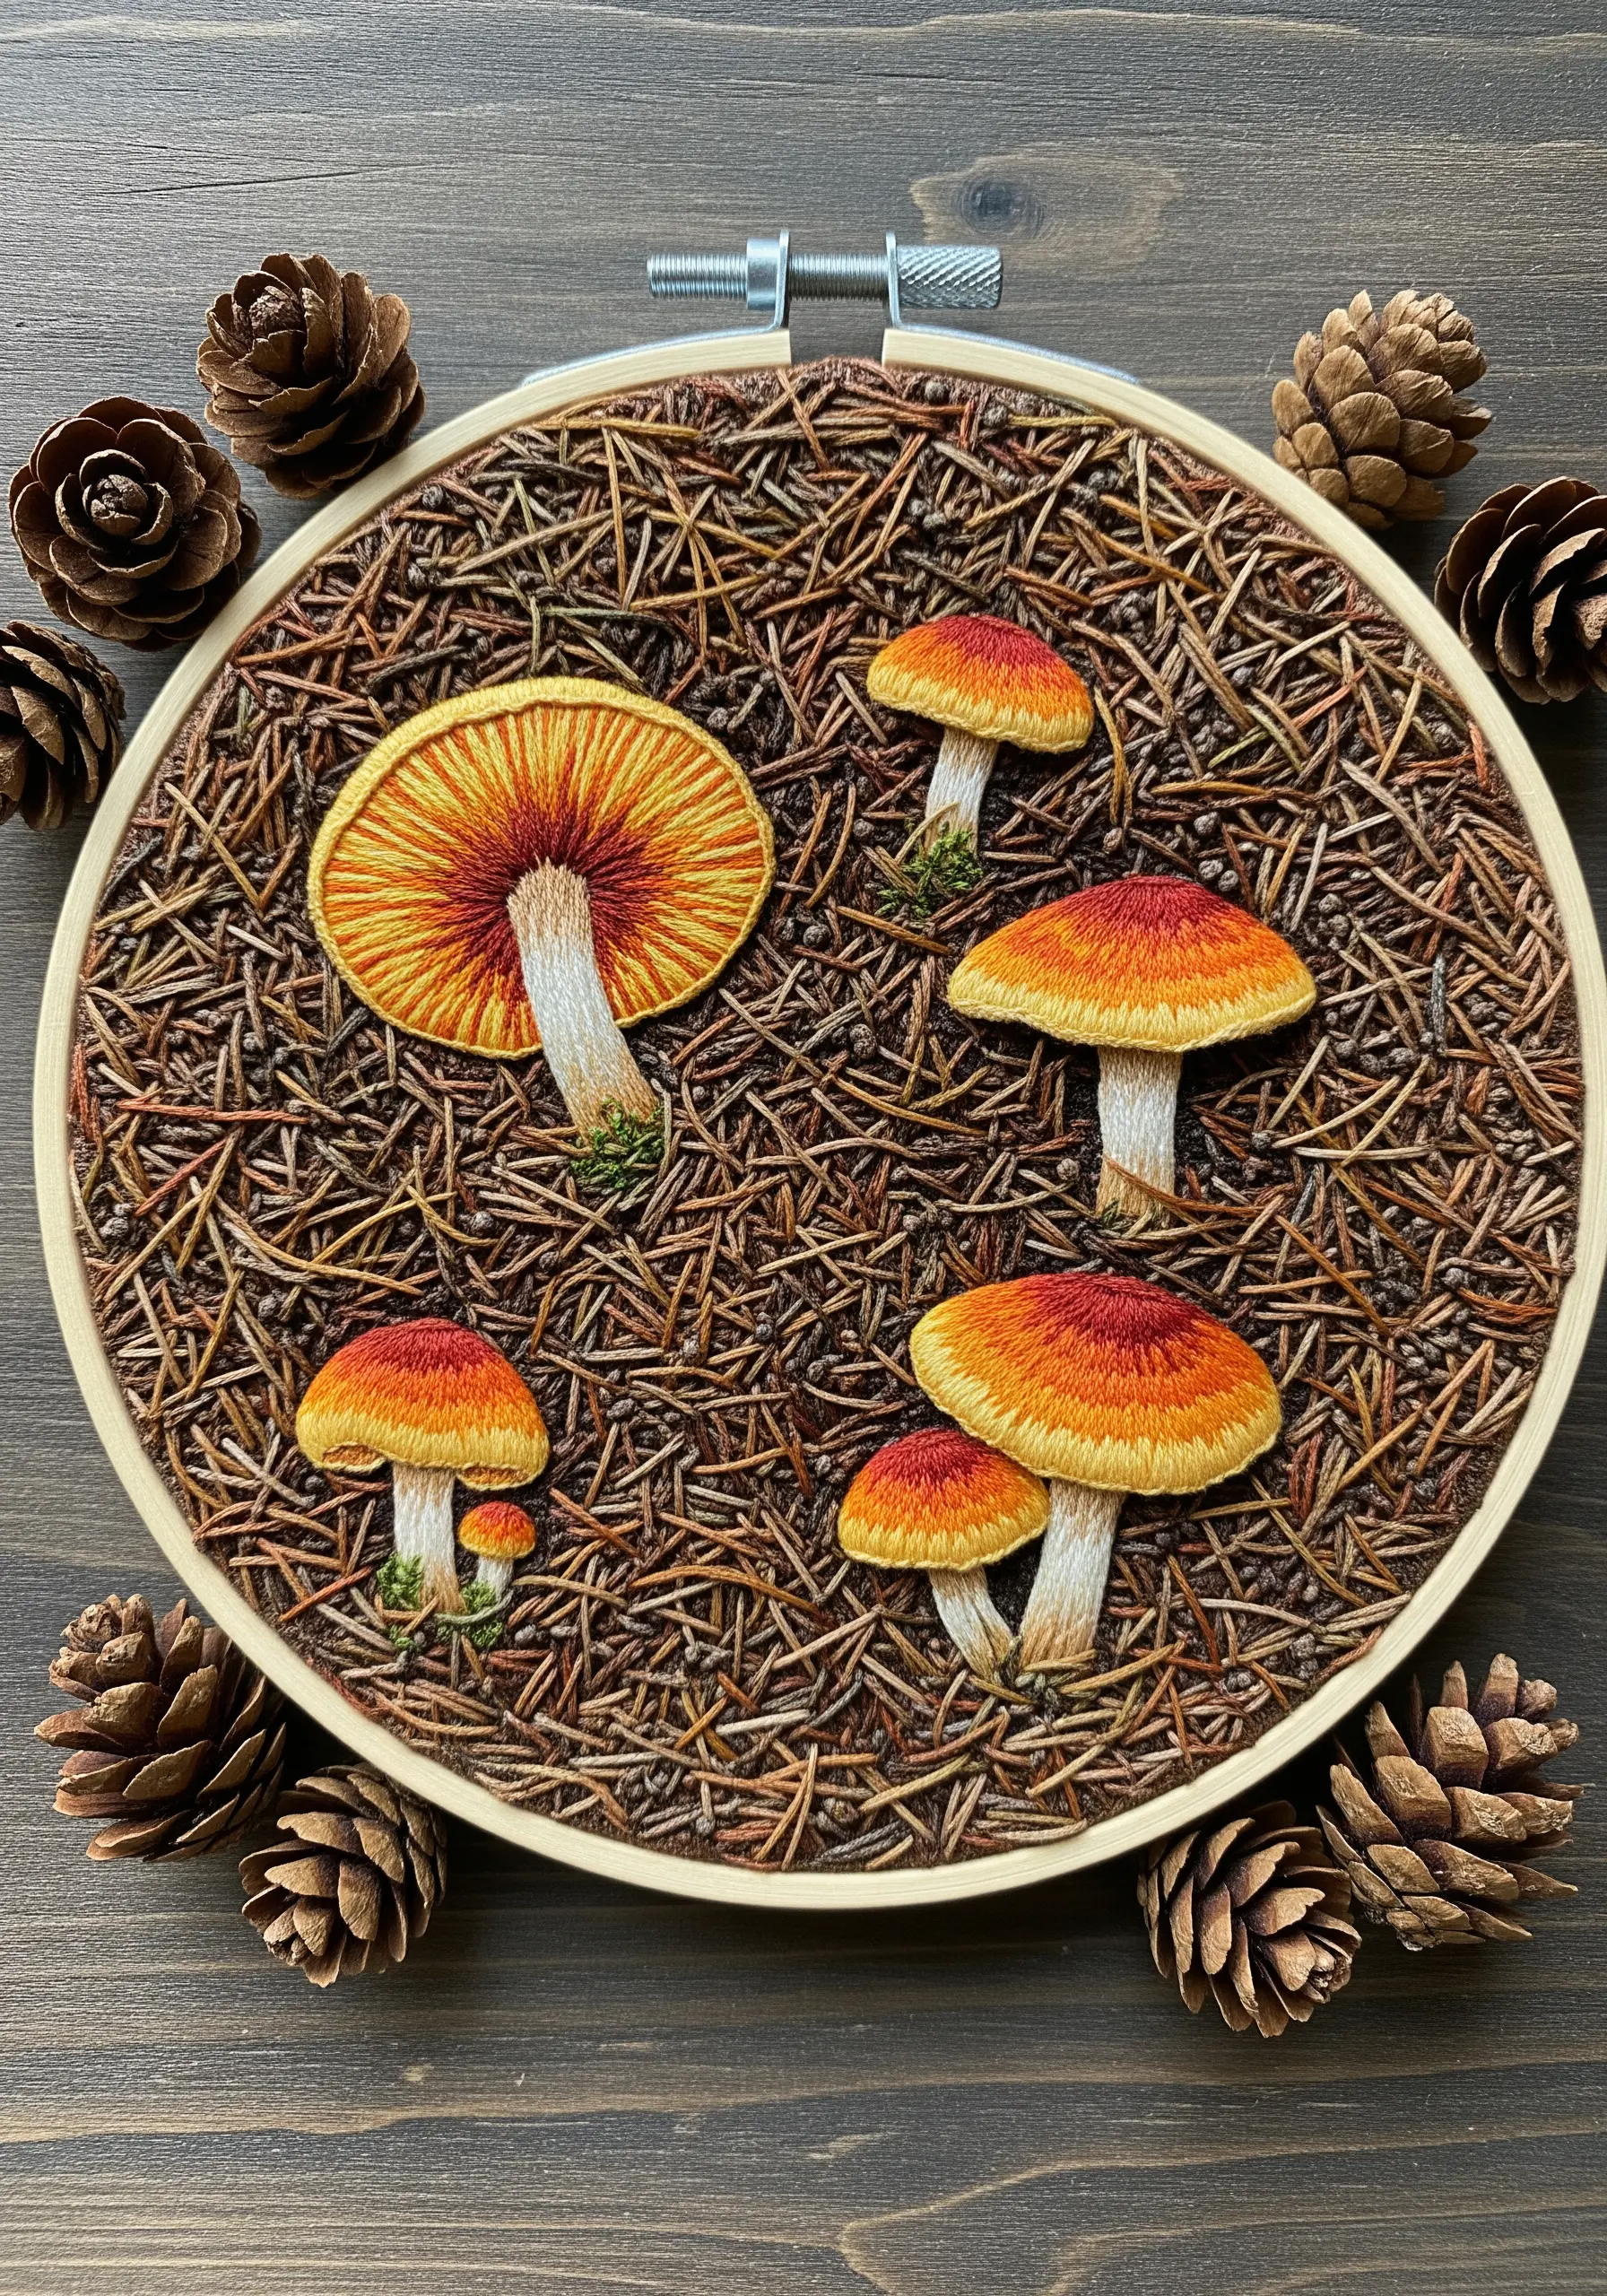
Create the illusion of a dense bed of pine needles by filling your background with a thick layer of overlapping straight stitches.
Use several shades of brown, tan, and reddish-brown thread, laying your stitches in varied directions to create a random, natural look.
Once the background is complete, stitch your mushrooms on top. This layering technique makes it appear as though they are genuinely sprouting from the forest floor.
The contrast between the chaotic, linear background and the solid, smooth mushrooms is visually striking.
27. Scale Up with Bolder Thread Choices
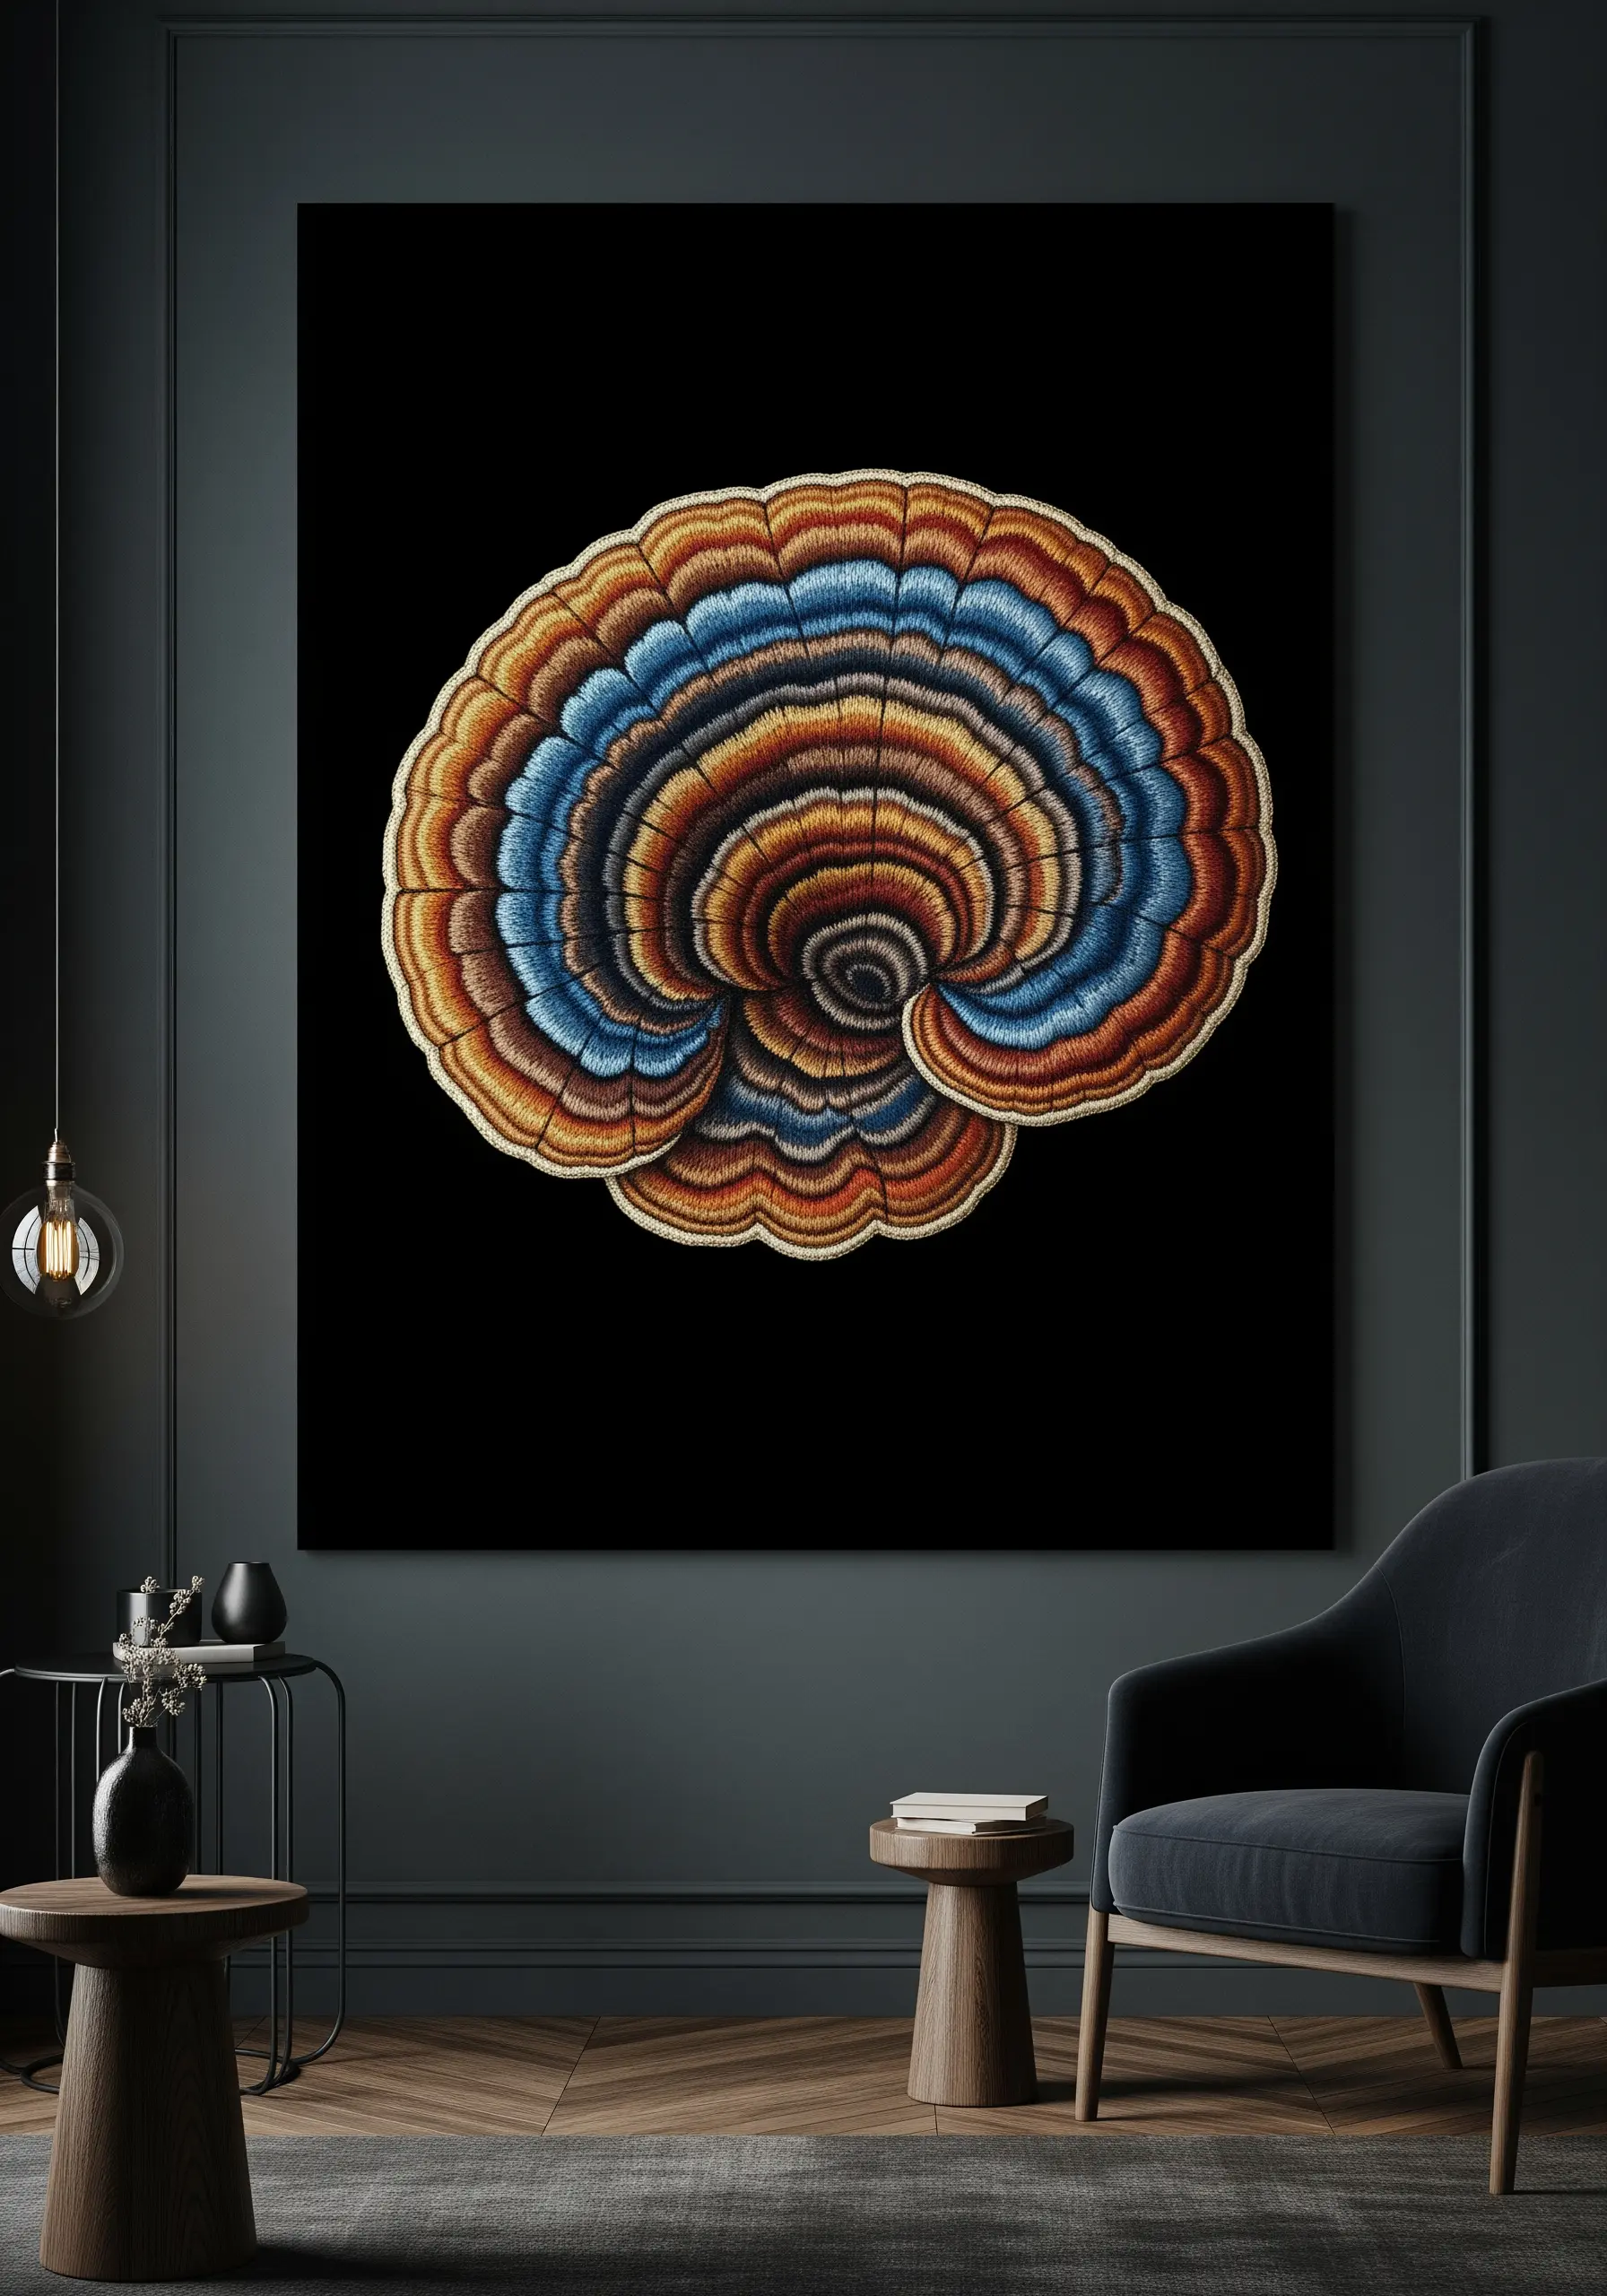
For a large-scale, statement piece of wall art, switch from standard six-strand floss to a thicker thread.
Use pearl cotton or even fine tapestry wool to fill large areas more quickly and create a bolder texture.
Continue to use long-and-short stitch for blending, but allow your stitches to be longer and more expressive.
Working big allows you to explore dramatic color combinations, like the vibrant blues and oranges in this bracket fungus, creating a powerful focal point for a room.
28. Play with Scale for Delicate Compositions
Create a charming and delicate scene by contrasting large areas of texture with tiny, simple motifs.
Build up fluffy mounds of moss using dense French and colonial knots in shades of yellow and green.
Then, add minuscule white mushrooms. Form the cap with a single, tiny detached chain stitch and the stem with a single straight stitch.
This dramatic difference in scale draws the eye and highlights the intricate detail in your work, making the tiny mushrooms feel precious.
29. Create a Moss & Lichen Stitch Sampler
Dedicate a few small hoops to creating a sampler of forest floor textures. It’s a fantastic way to practice and build your stitch vocabulary.
In one hoop, practice tufted moss with Turkey work. In another, try creating lichen with radial straight stitches or bullion knots.
Experiment with different threads, colors, and densities to see what effects you can create.
This focused practice will give you the confidence to incorporate these organic-inspired embroidery textures into your larger compositions.
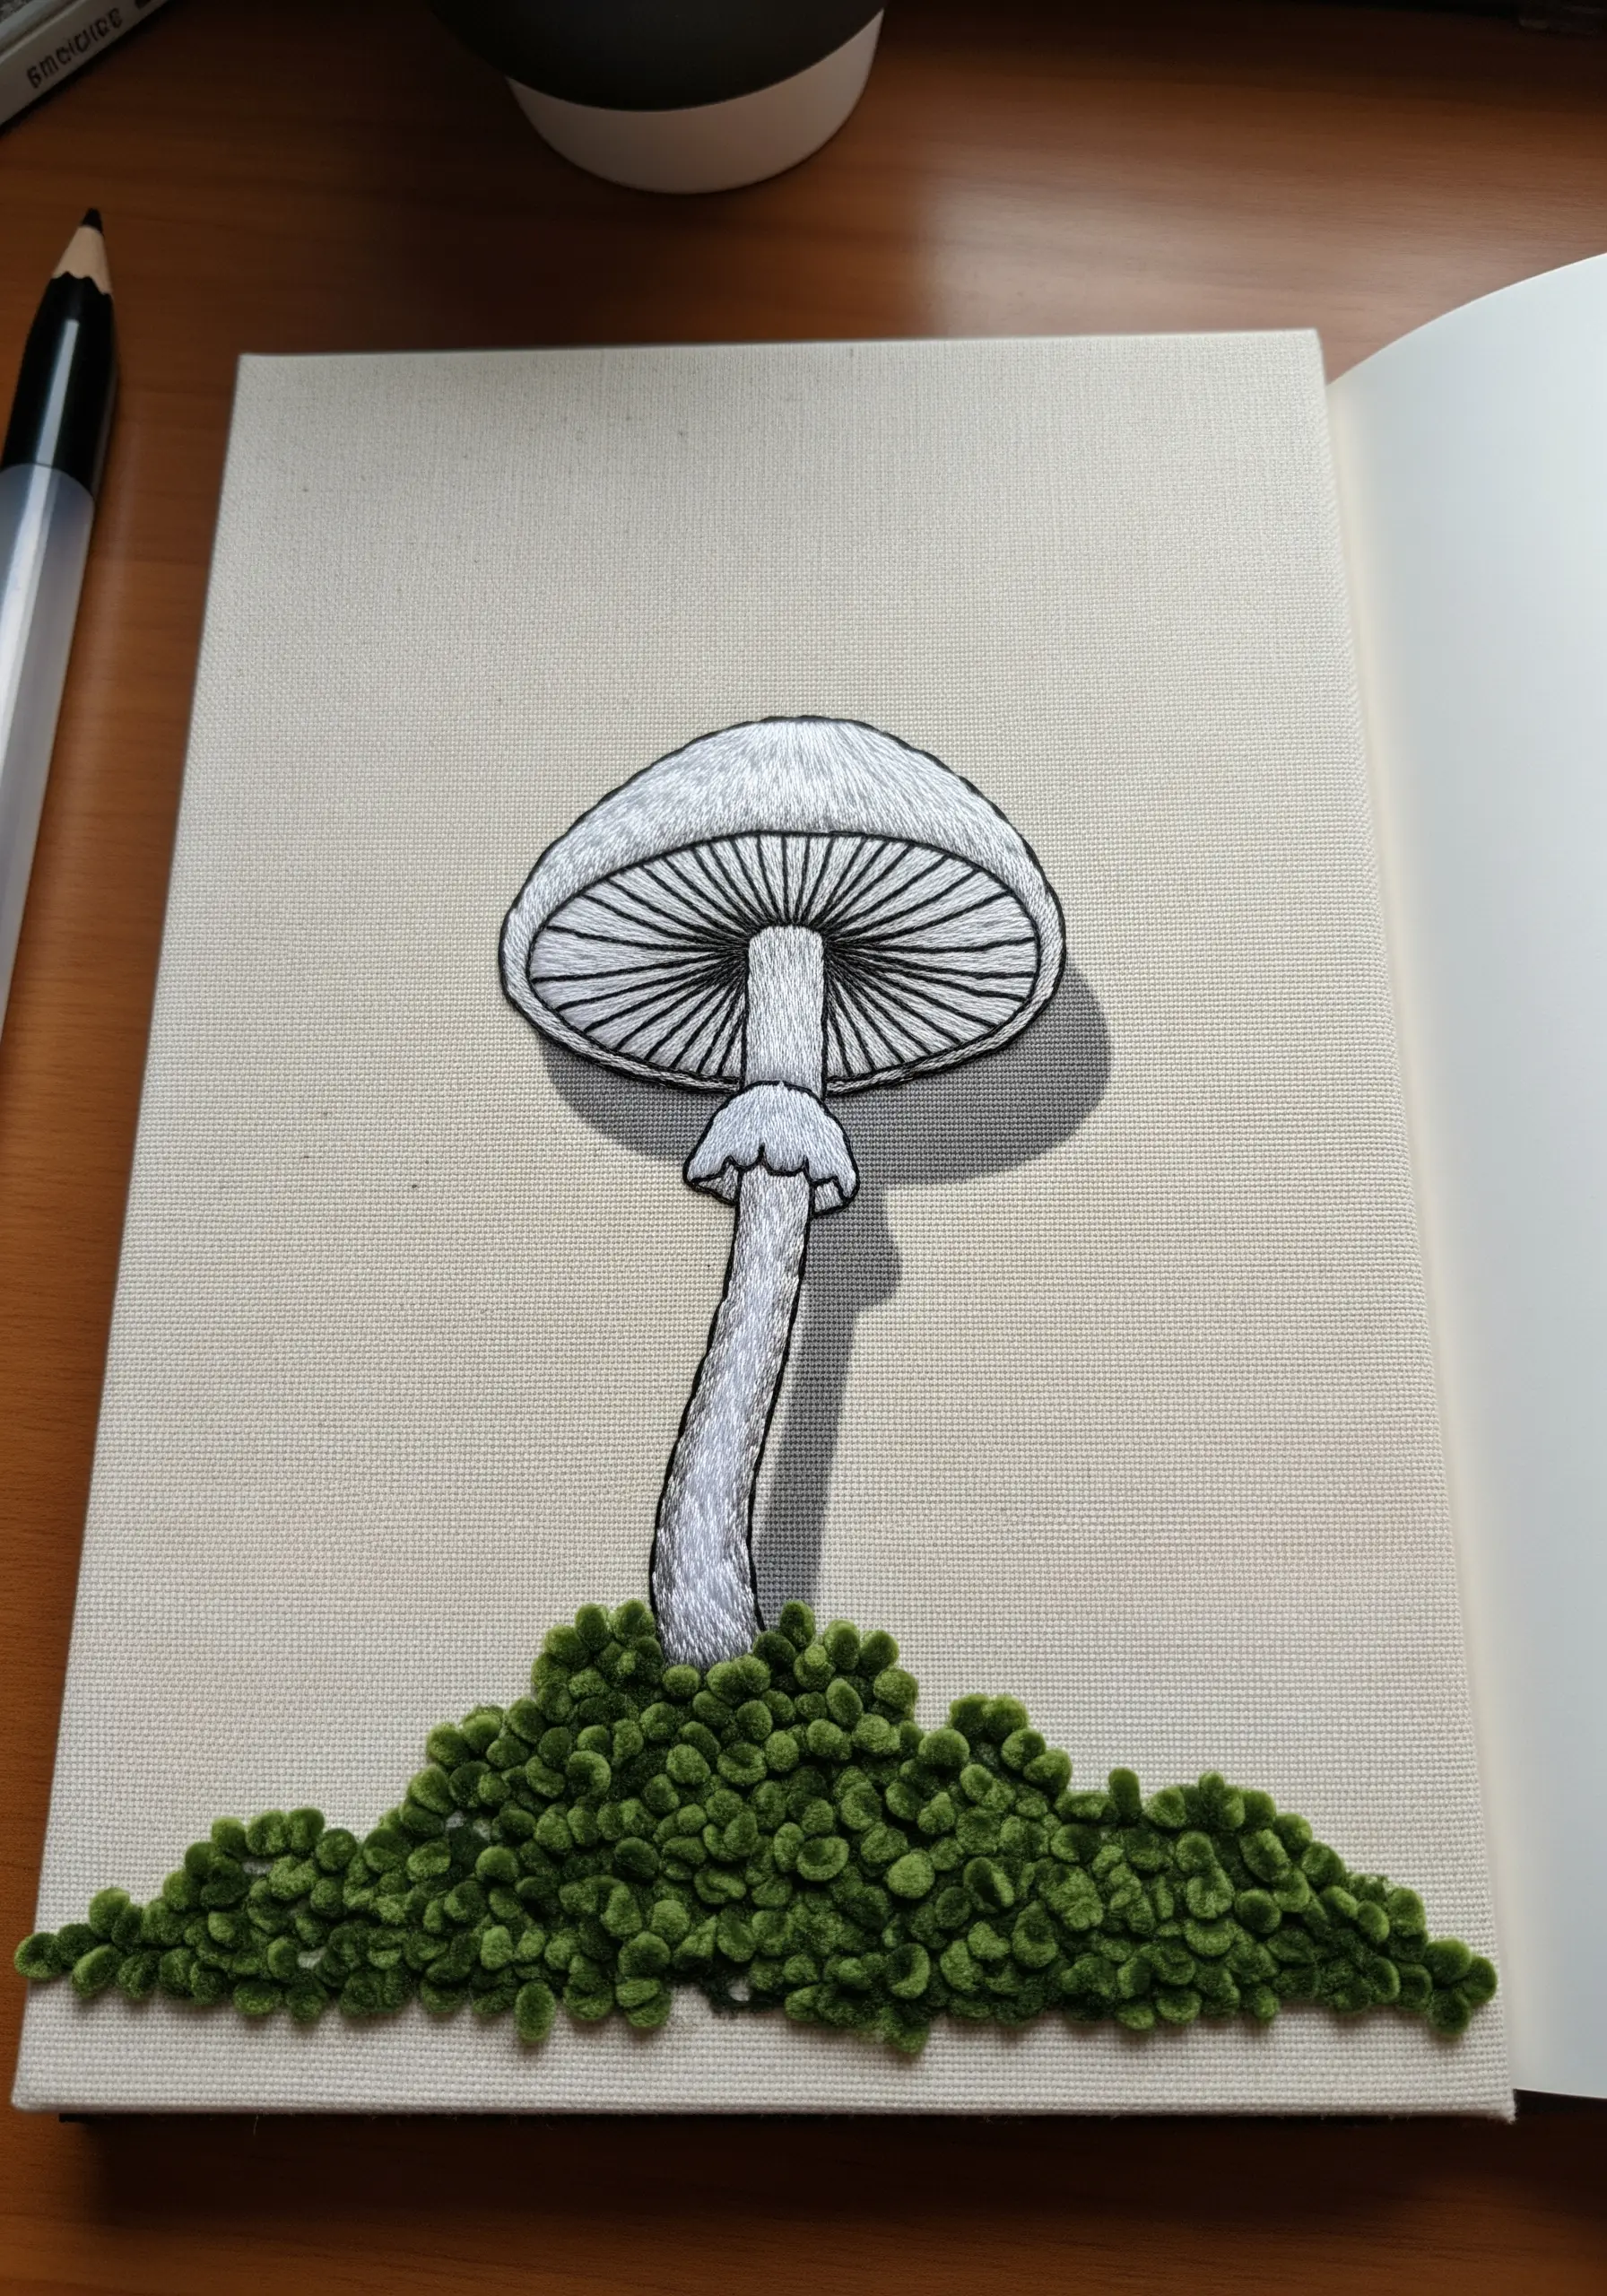
30. Mount Your Work on Canvas for a Frameless Finish
For a clean, modern display that doesn’t require a traditional frame, mount your finished embroidery on a stretched canvas or canvas board.
Ensure your fabric is ironed and larger than your board. Stretch it tightly and evenly, securing it on the back with staples or strong archival glue.
This method allows the textural quality of your stitching—like these dense lichen forms made of French knots and bullion stitches—to take center stage.
It’s a professional finishing technique that makes your handmade mini decor pieces look gallery-ready.
31. Abstract the Form with Radial Stitches
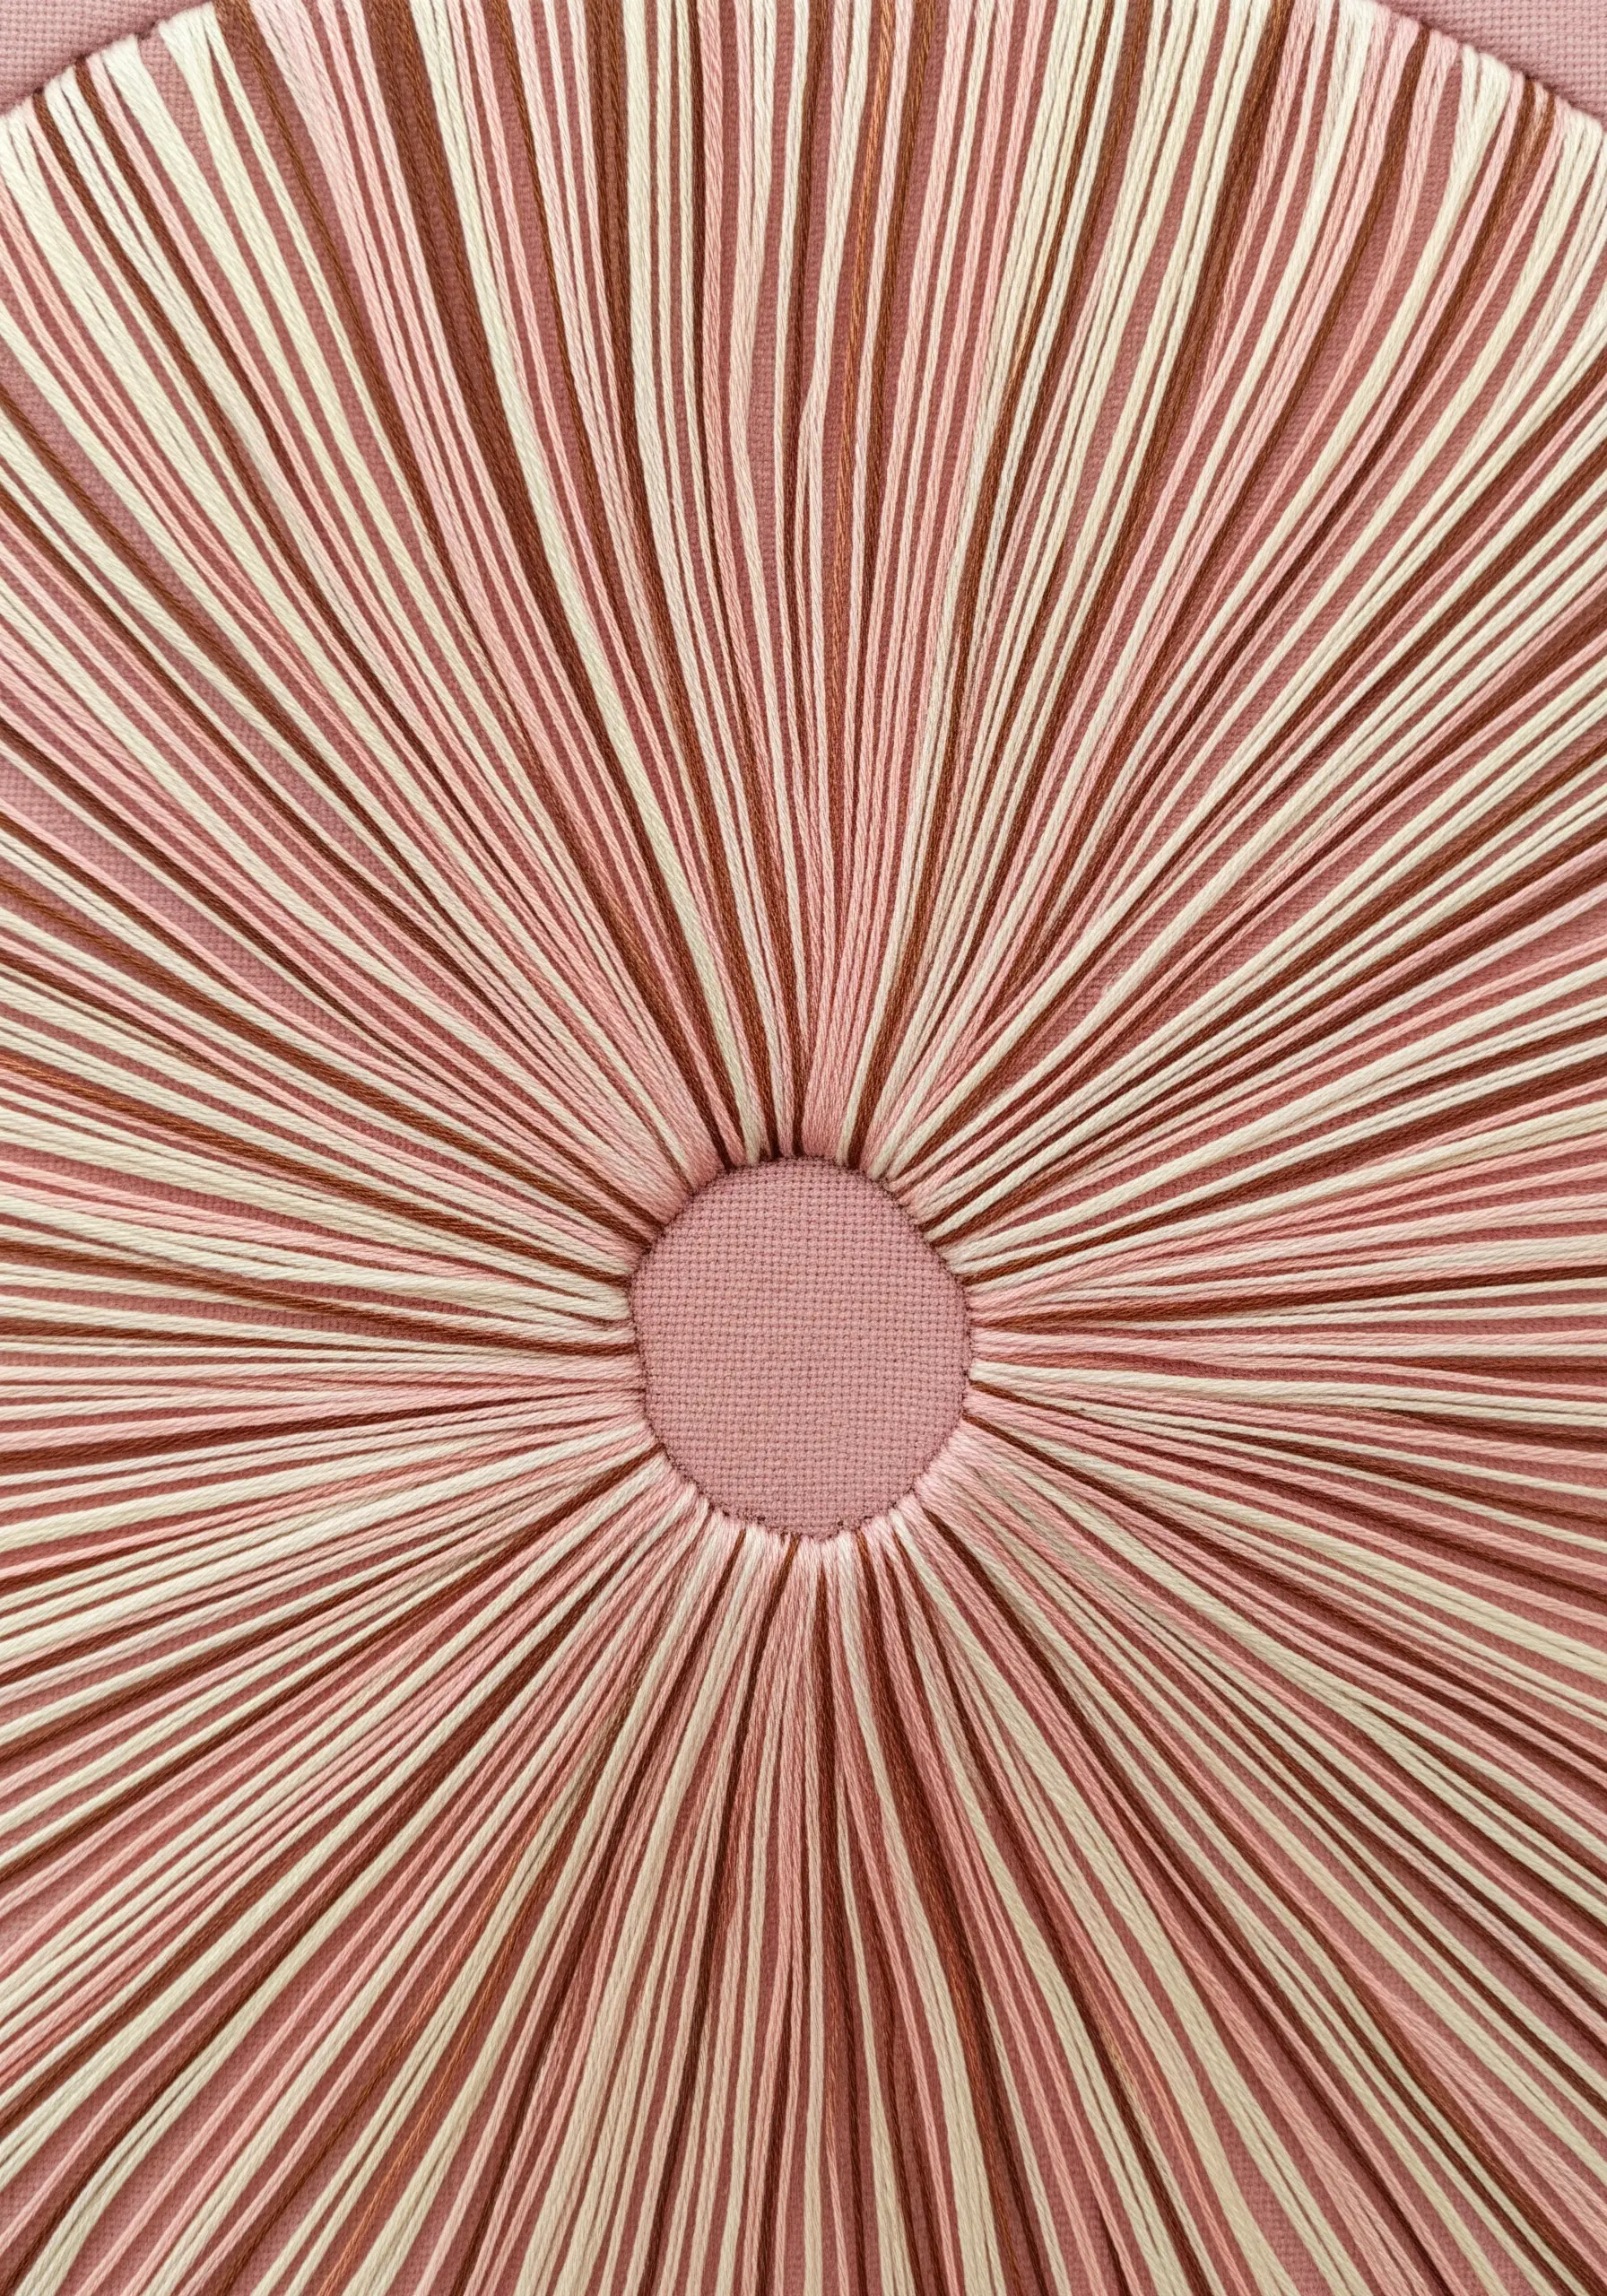
Zoom in on a single element, like the gills of a mushroom, and transform it into a piece of abstract art.
Create a perfect circle in the center, then work long, straight stitches radiating outwards to the edge of your design area.
Use multiple strands of floss in closely related colors—like pale pink, cream, and tan—to create a subtle, striped effect that emphasizes the pattern.
This exercise in precision and color theory results in a stunning, minimalist piece that captures the essence of the mushroom’s structure.
32. Paint a Waterscape with Thread
Depict moving water by filling the area with horizontal rows of stem stitch, split stitch, or even just wavy backstitch.
Use three to four shades of blue, from dark to light, and alternate them randomly to create the impression of light reflecting on the surface.
Add a few stitches of white or metallic silver to represent glints of sunlight.
The contrast between the horizontal, flowing stitches of the water and the vertical, grassy stitches on the bank creates a dynamic and believable landscape.
33. Create a Surprising Visual Hybrid
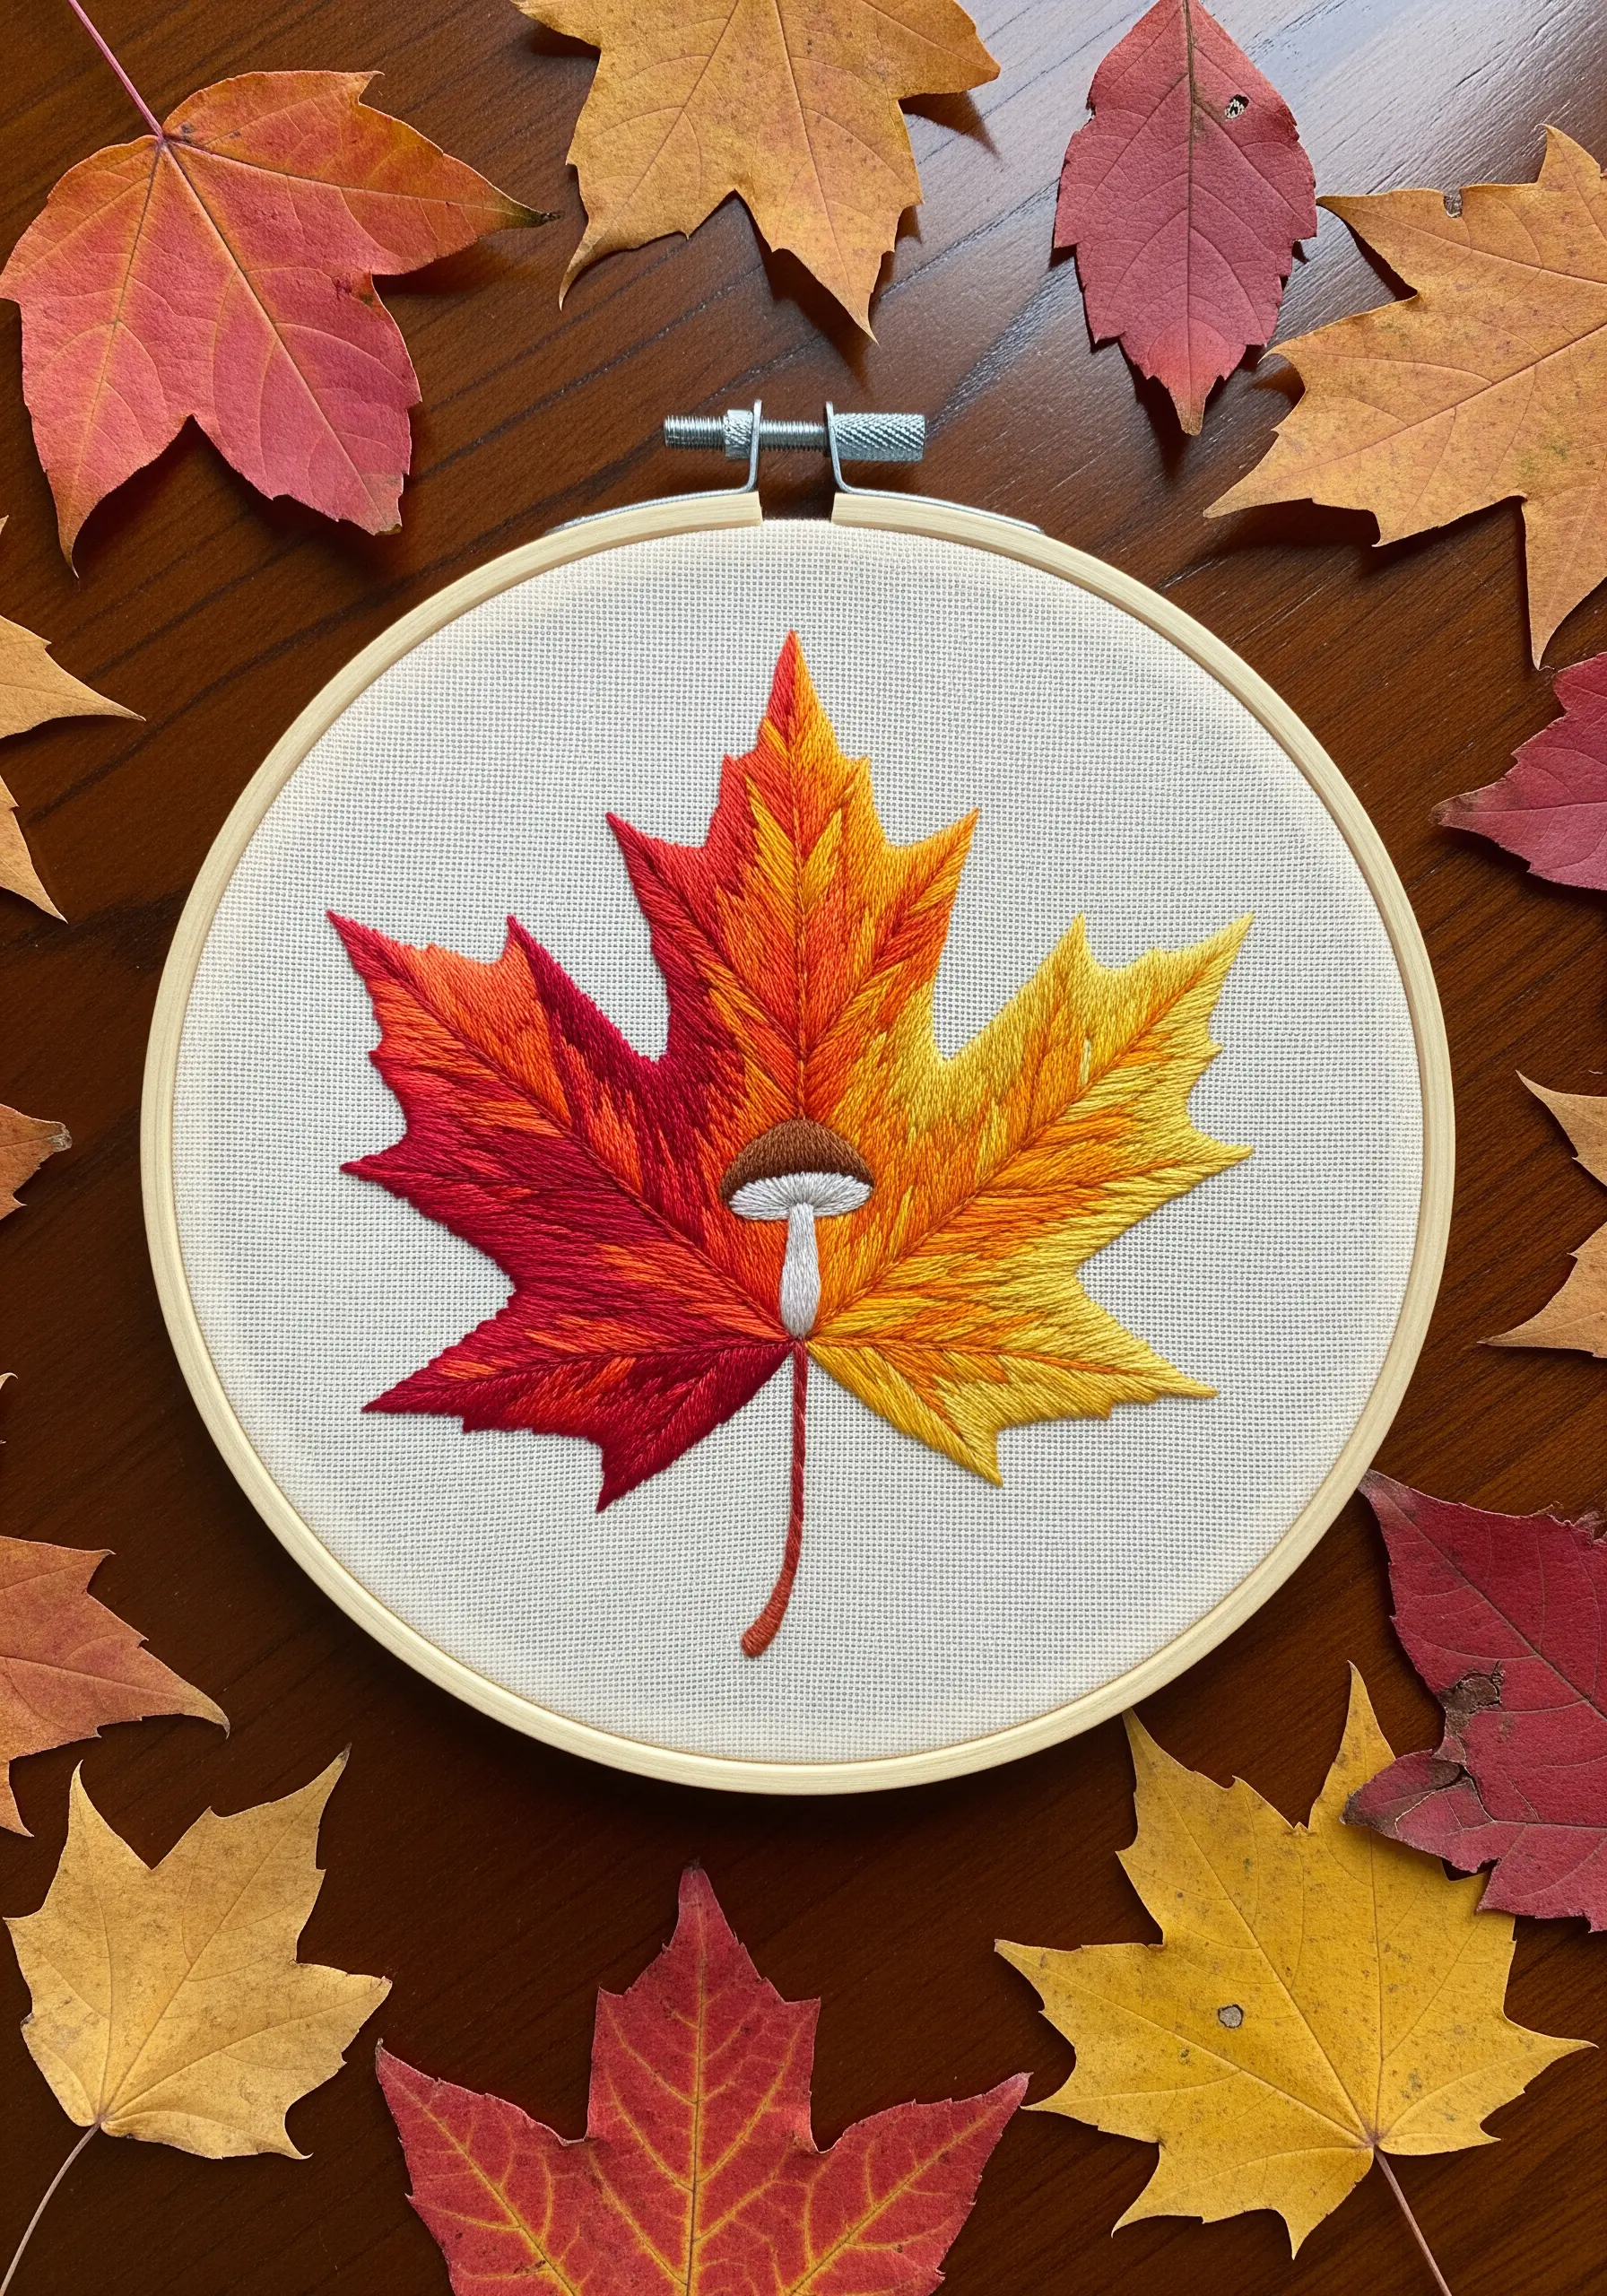
Combine two distinct botanical elements into one surprising and creative composition.
Here, the iconic shape of a maple leaf becomes the canvas for a mushroom stem, creating a clever visual pun.
Focus your technical skill on the most complex part of the design—in this case, the beautiful thread-painted gradient of the leaf, which transitions seamlessly from deep red to bright yellow.
This playful approach to design challenges the viewer to look twice and adds a layer of wit to your work.
34. See the Magic in a Simple Line Drawing
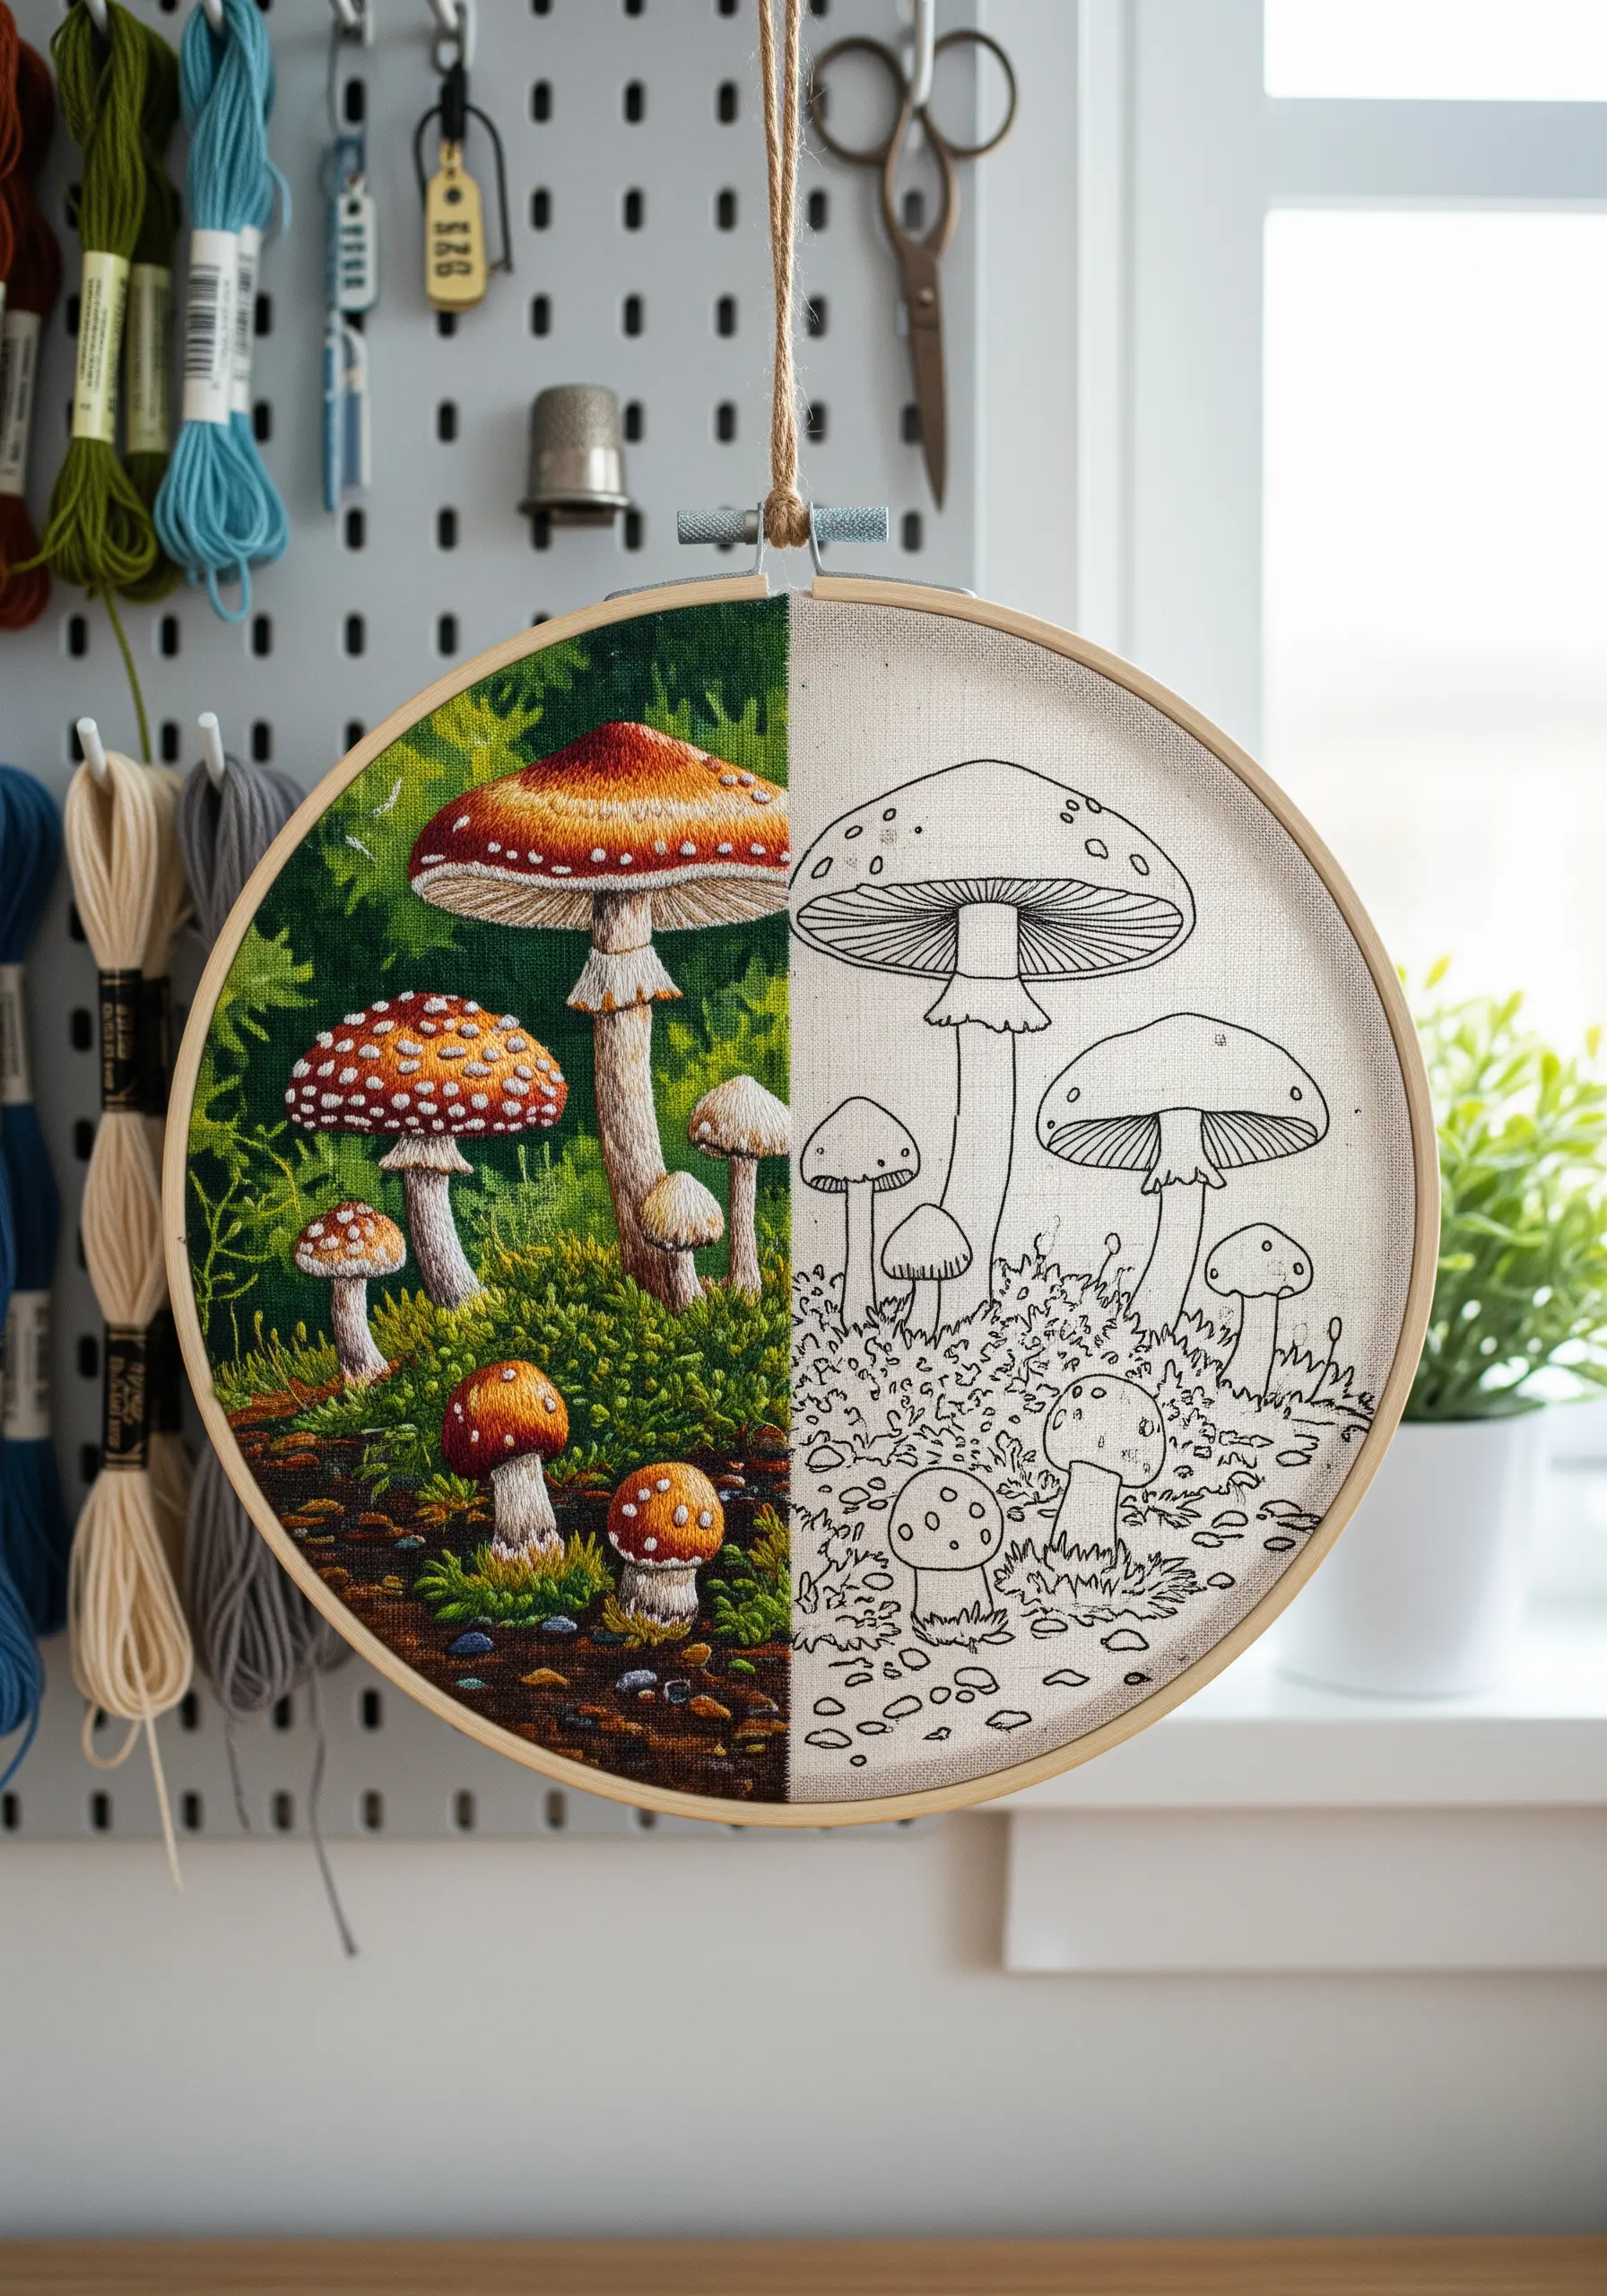
Appreciate the journey from a simple outline to a fully rendered piece. This split-view concept is a powerful reminder of how color, shading, and texture bring a design to life.
Use a fine-tipped, permanent fabric pen for your initial drawing to ensure clean, crisp lines.
Then, methodically fill the shapes with long-and-short stitch, focusing on how you can use thread to create shadow and light where none existed before.
It’s a fantastic way to build confidence, proving that even the most complex-looking embroidery starts with a simple sketch.
35. Frame Your Scene in a Stitched Terrarium
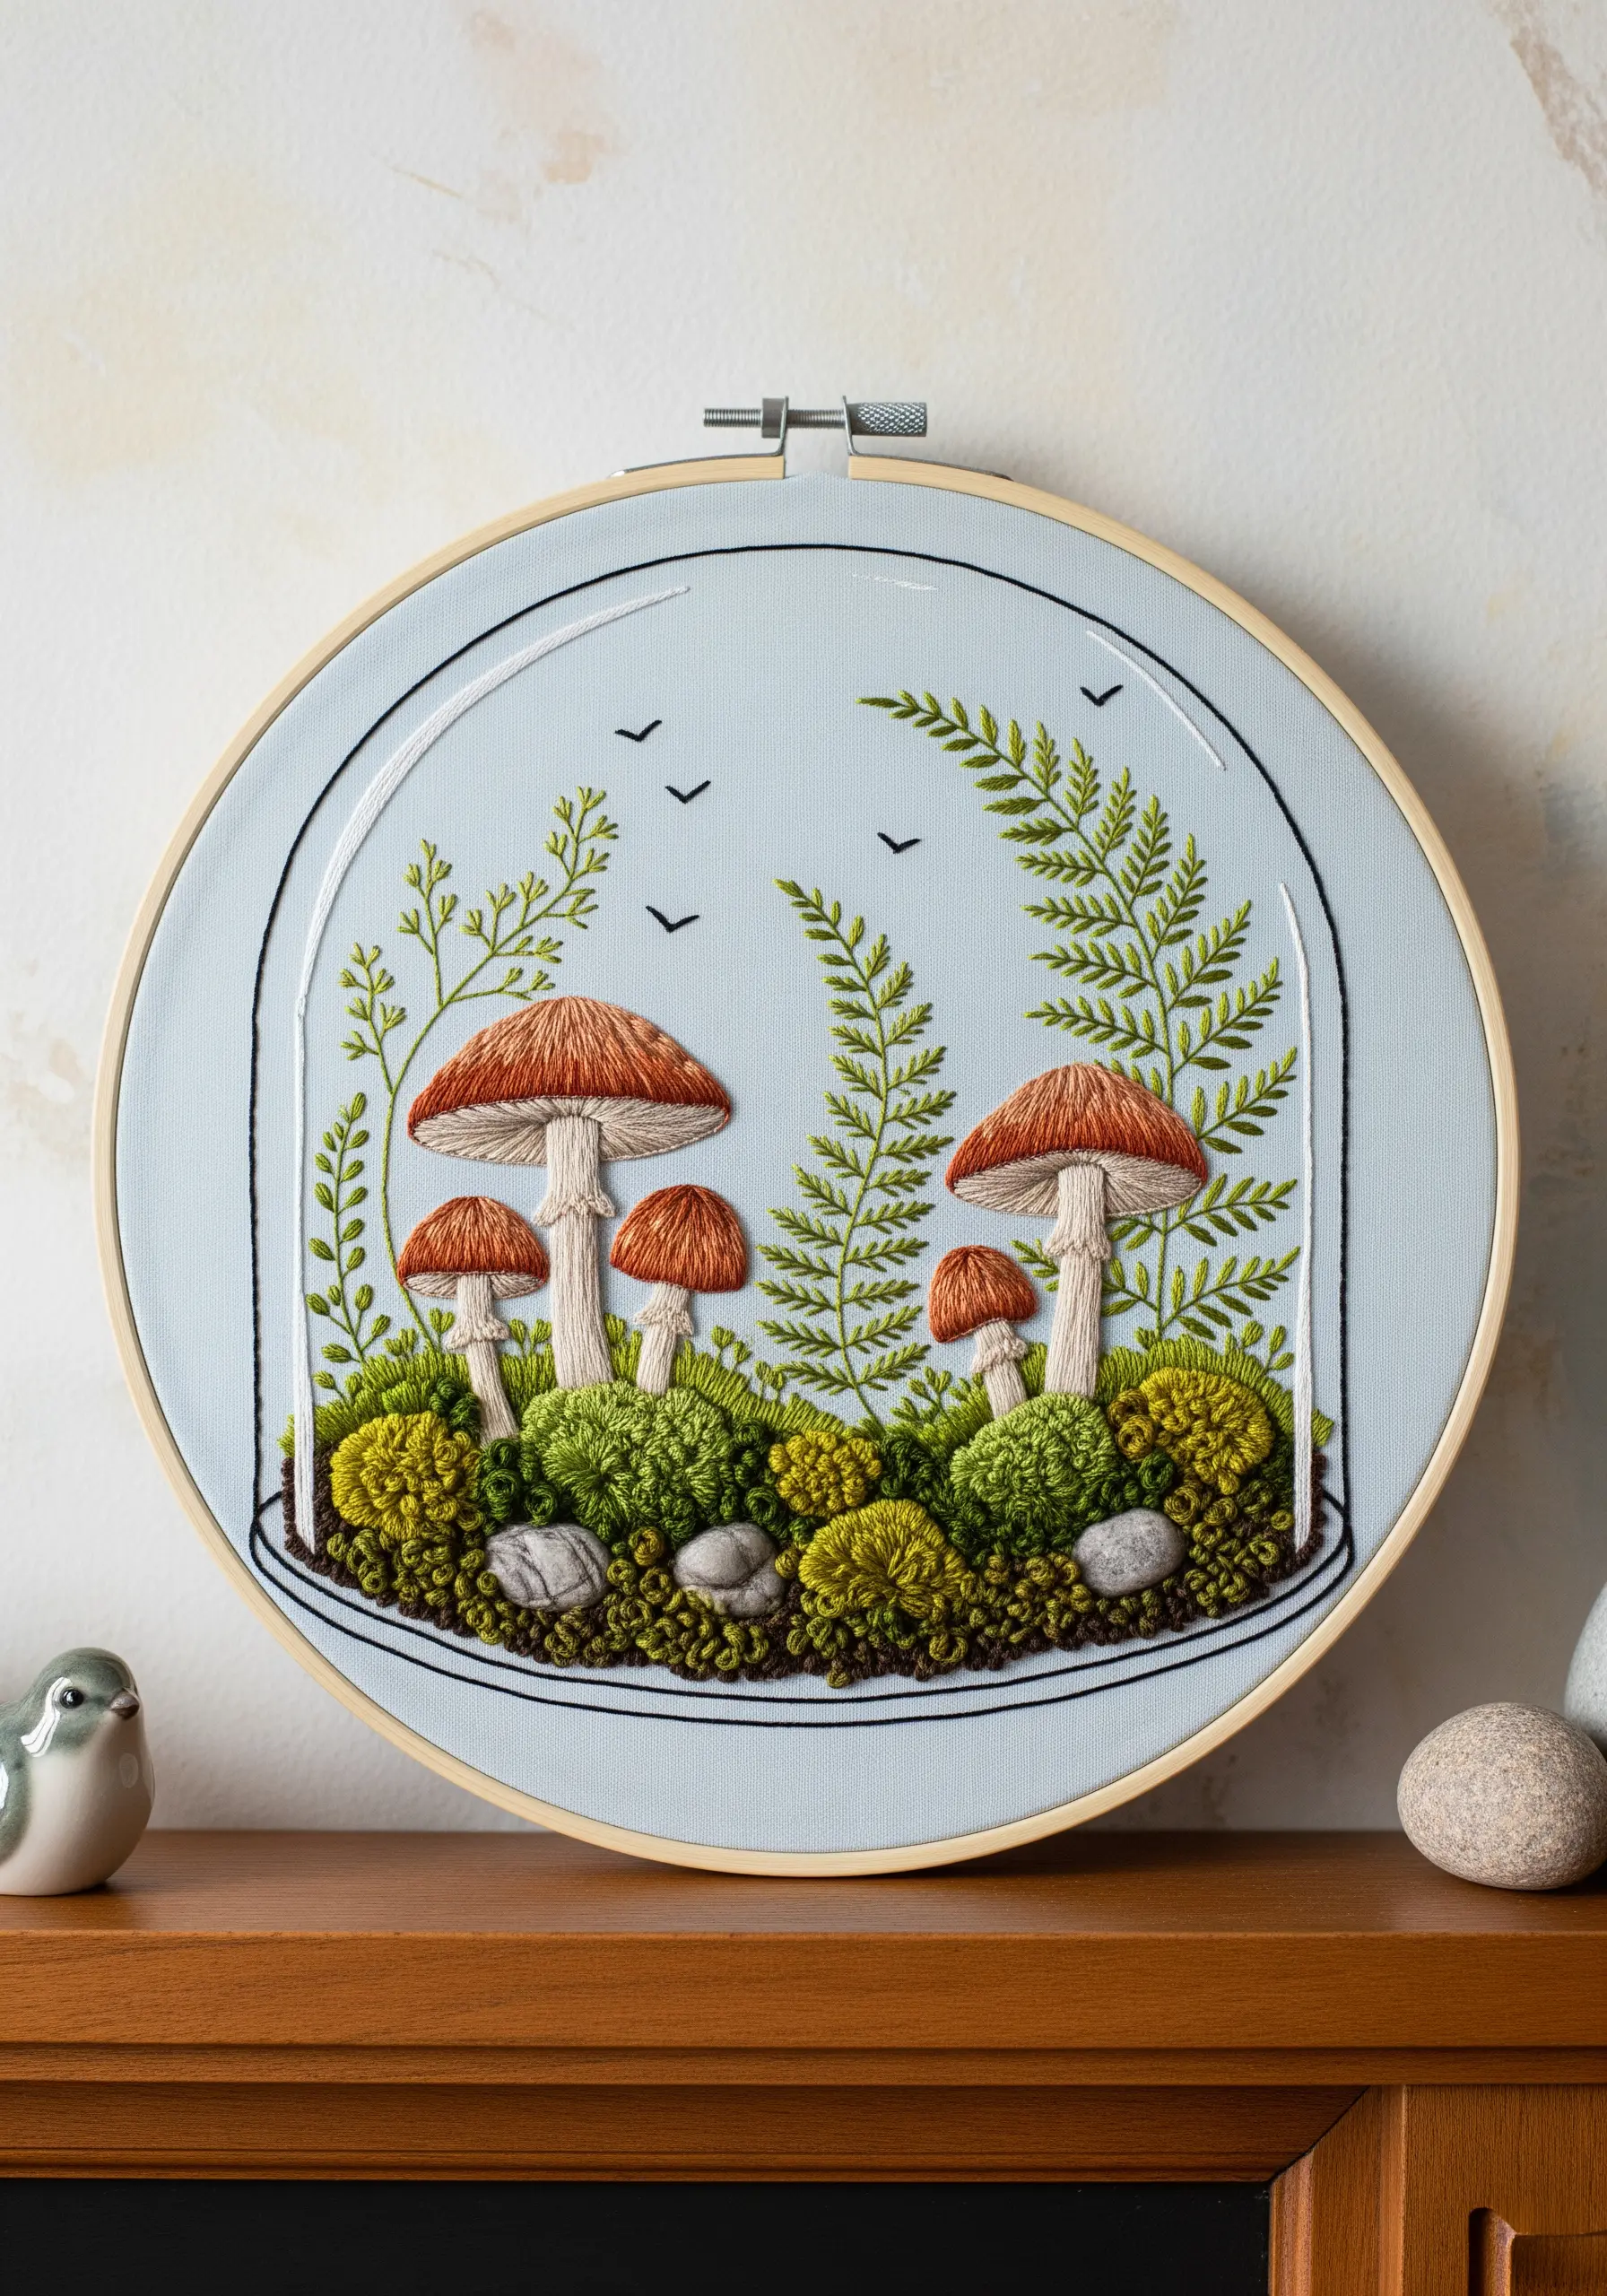
Create a self-contained world by framing your botanical scene within the stitched outline of a glass cloche or terrarium.
Use a thin, clean backstitch in black, grey, or white to create the glass shape. This simple border adds a narrative element, turning your hoop into a miniature ecosystem.
Add a few tiny V-shaped stitches (fly stitches) to represent birds flying outside the glass, further enhancing the sense of a world-within-a-world.
This is a charming way to display delicate botanical textile art.
36. Weave a Story with Whimsical Pairings
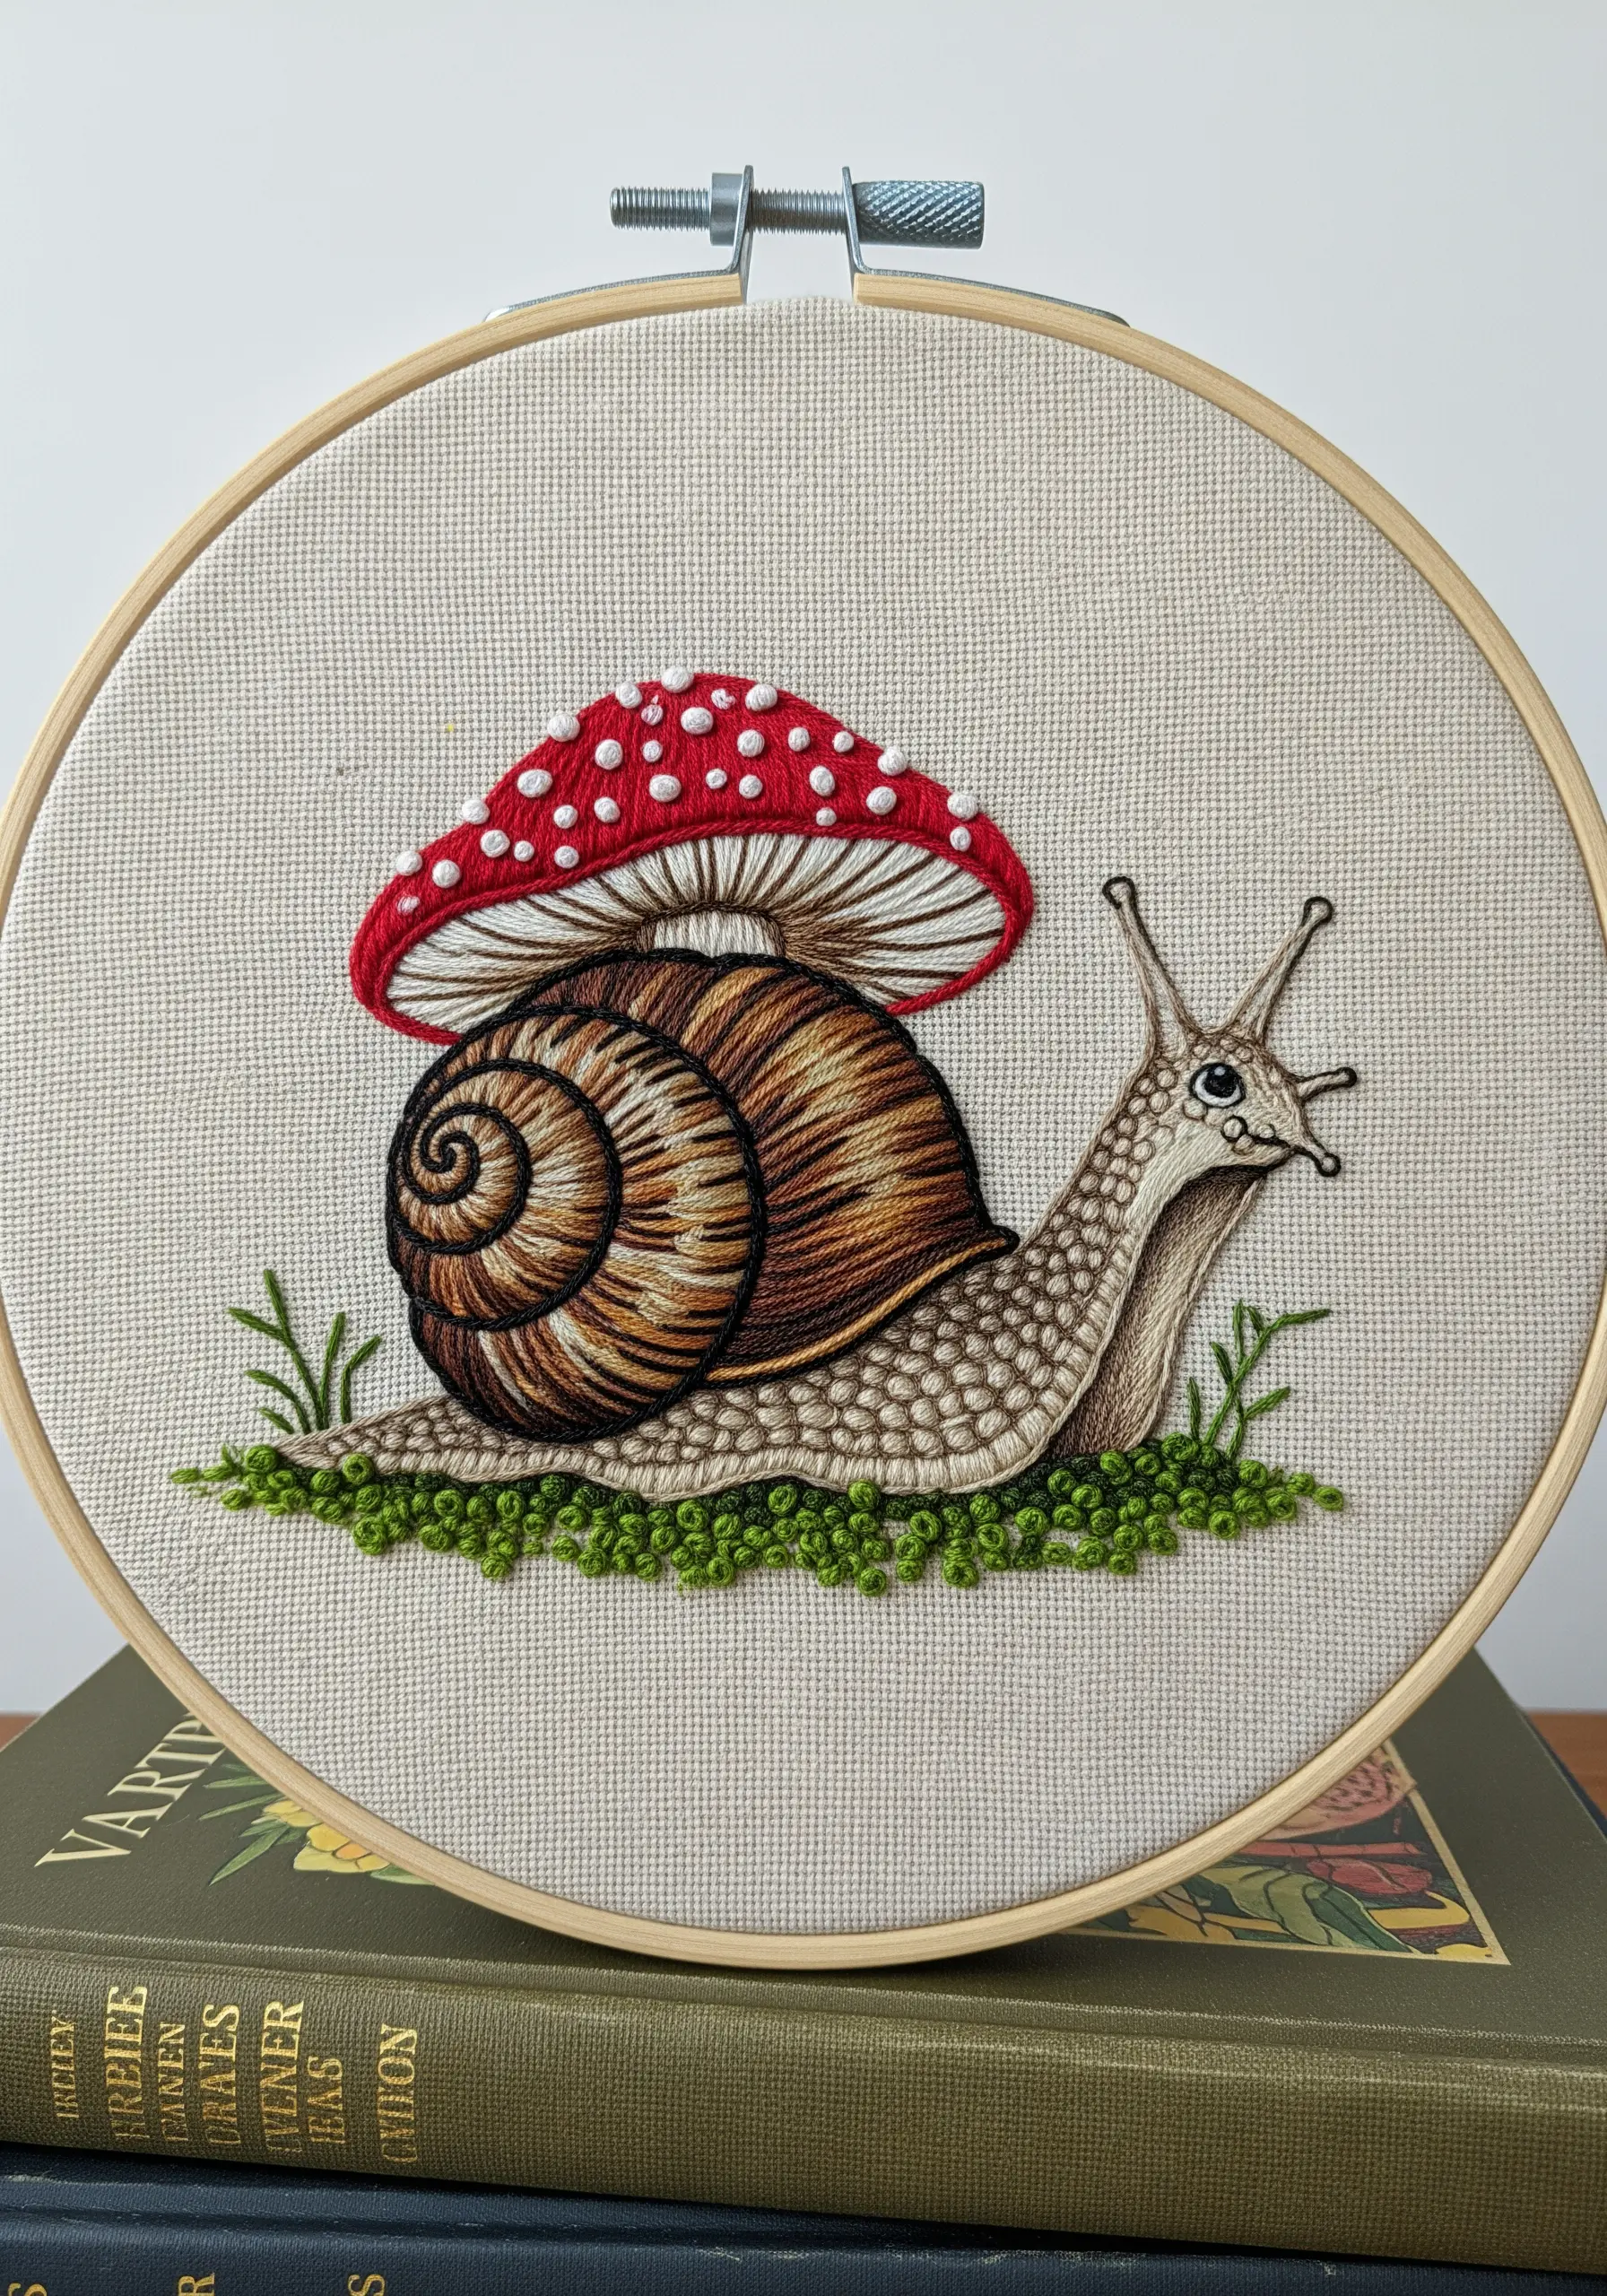
Combine a creature with a botanical element to create a whimsical, narrative-driven piece.
Here, a fly agaric becomes a snail’s shell, instantly sparking a story in the viewer’s mind.
Pay close attention to the different textures: the smooth, curved satin stitch of the mushroom cap contrasts with the intricate spiral of the shell (achieved with directional backstitch) and the soft, dotted texture of the snail’s body (made with tiny seed stitches).
This thoughtful use of stitch and composition elevates your work from a simple depiction to a piece of charming illustration.


