

Glitter thread holds so much promise, yet it can feel intimidating. You worry it might look cheap, or that the thread itself will be a nightmare to work with. But what if you could use that sparkle to create something that feels intentional, luxurious, and uniquely yours?
The secret isn’t in complex patterns, but in precise technique. It’s about pairing that shimmer with the right stitch to create texture, the right fabric to create contrast, and the right amount of space to let the design breathe. A few well-placed stitches can transform a simple black dress into a statement piece for a night out.
Consider this your guide to mastering that magic. These ideas are more than just pretty pictures; they are starting points. Notice how a change in stitch direction can alter the way light hits the thread, or how a simple bead can elevate an entire motif. Let’s stitch something that truly shines.
1. High-Contrast Celestial Bodice
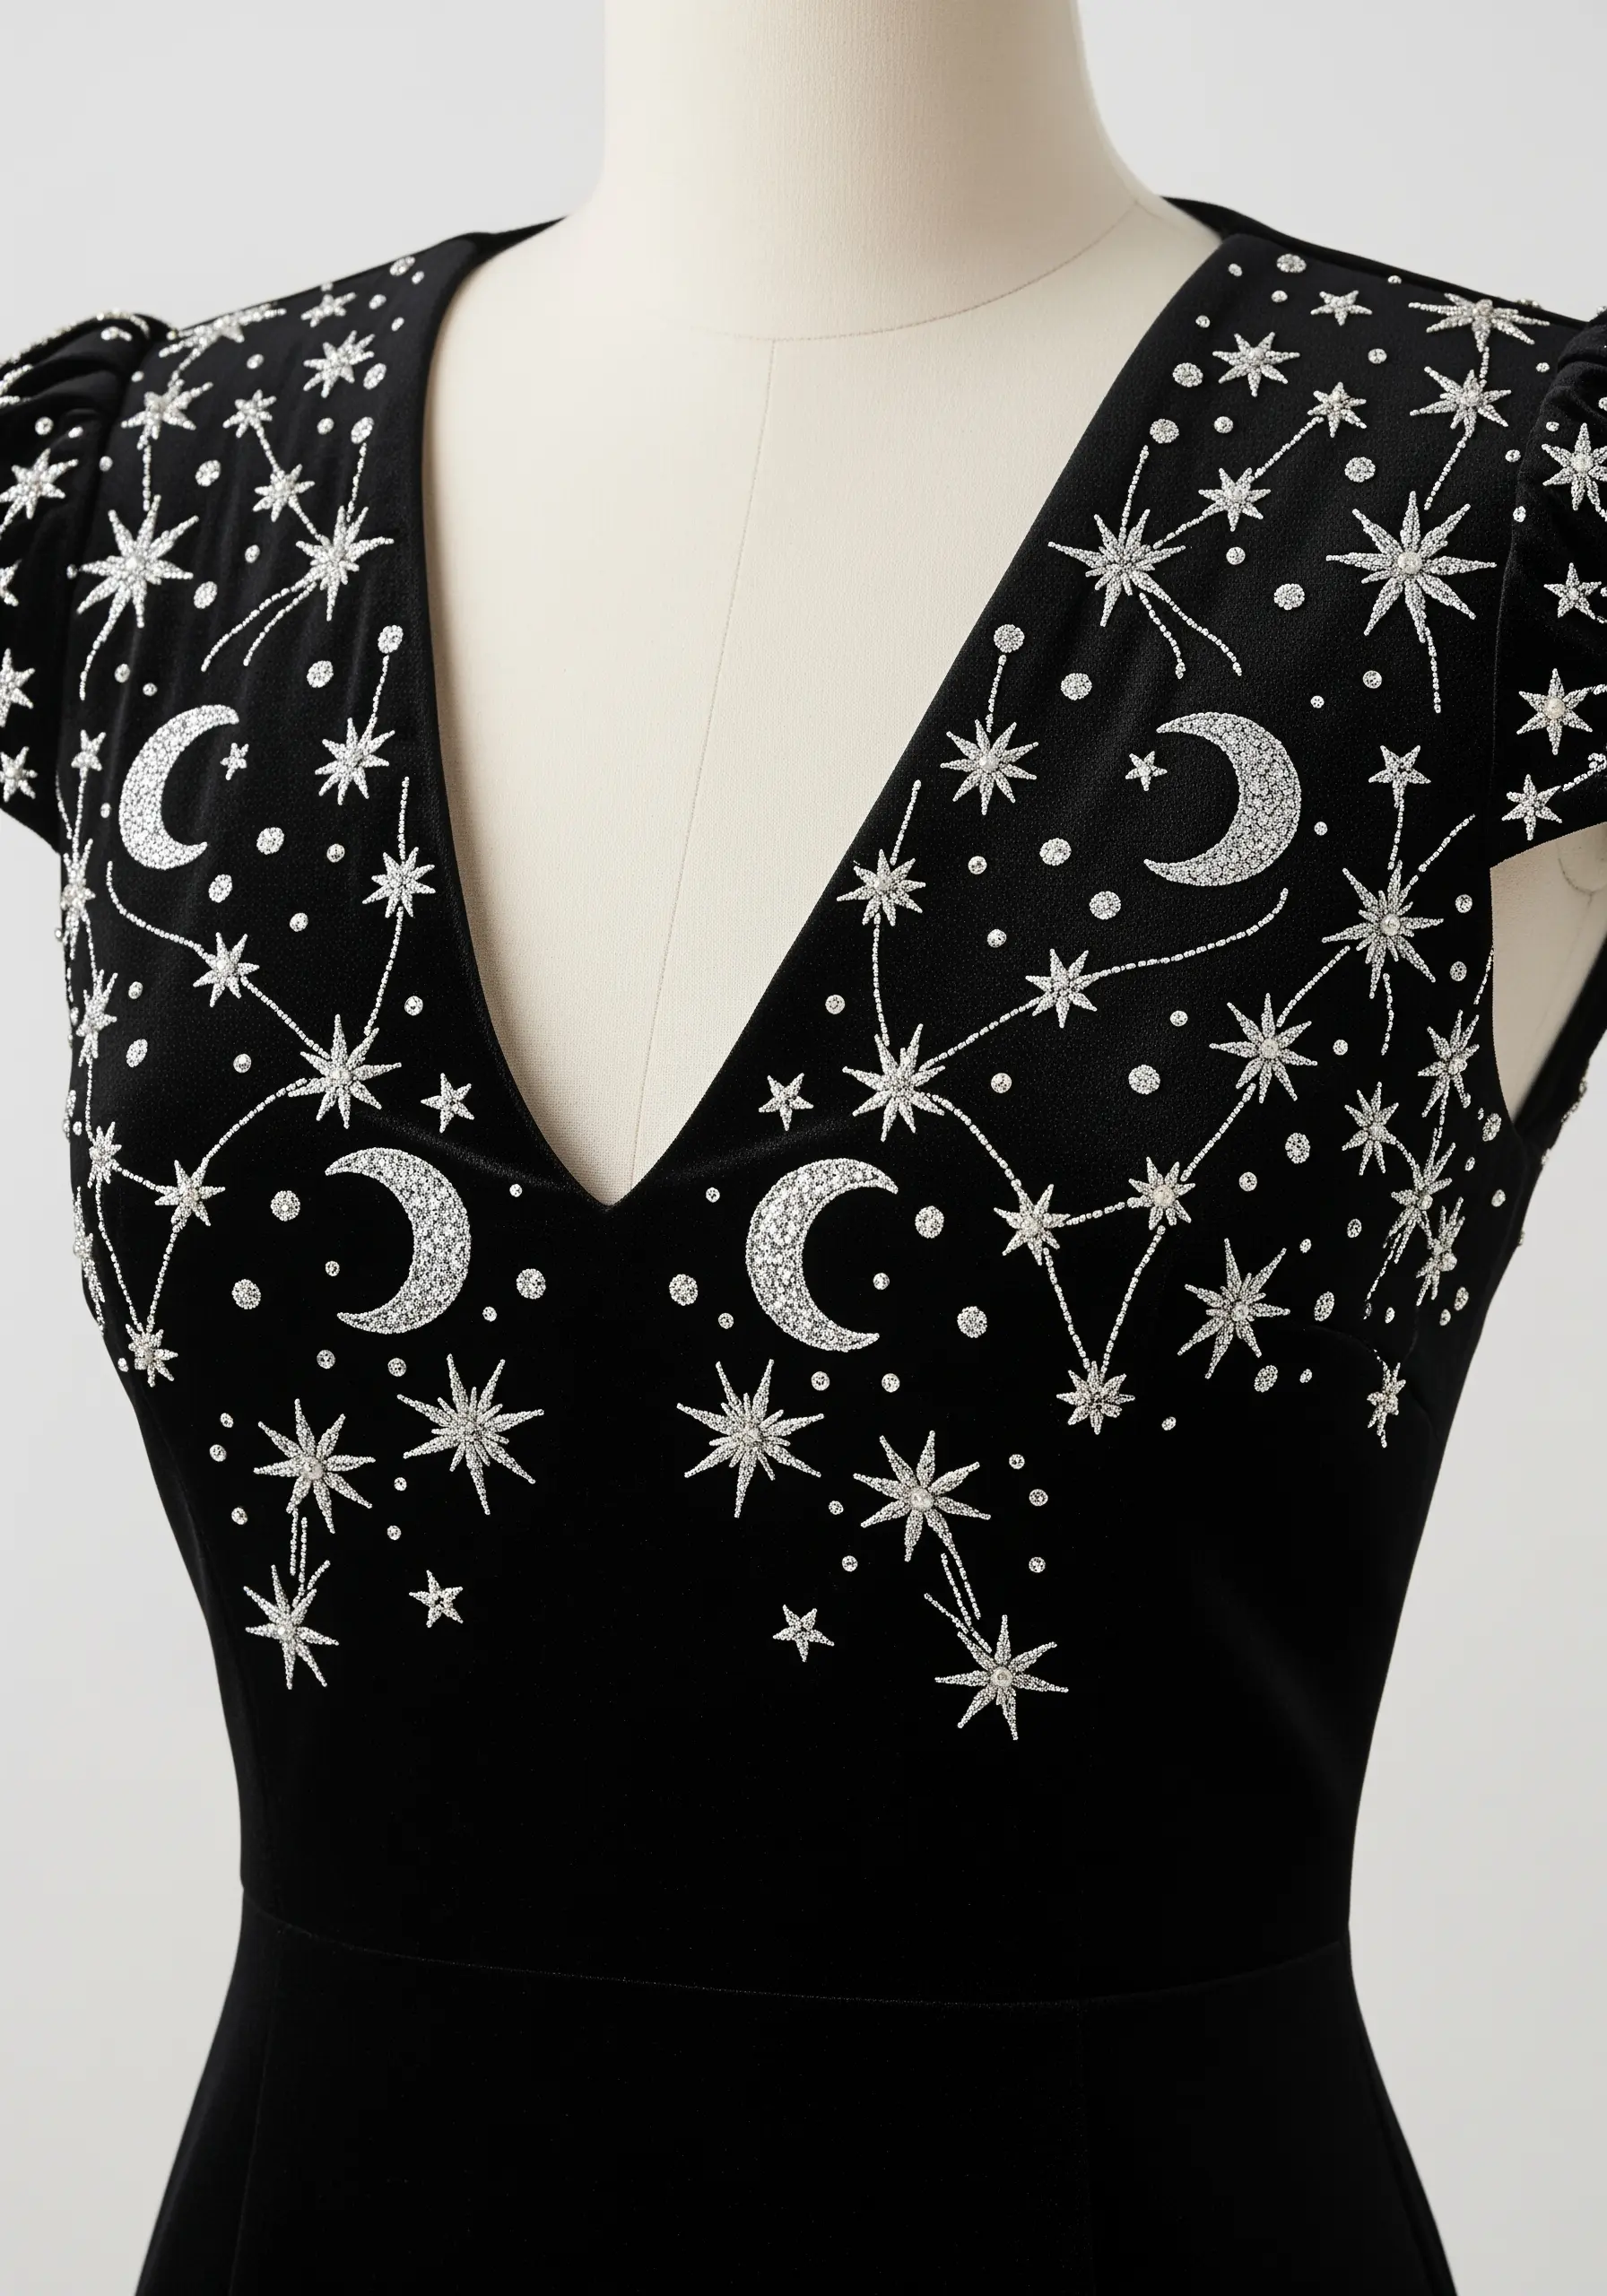
To make glitter thread pop against dark fabric, focus on stitch density and texture variation.
Use a dense, multi-directional satin stitch for the crescent moons, allowing the silver glitter thread to create a solid, light-catching surface.
For the surrounding stars, switch to single straight stitches and tiny French knots. This contrast between solid fills and delicate points creates a dynamic, visually balanced composition.
Stitching on a fabric with a matte finish, like crepe or cotton sateen, prevents any competing sheen and makes your metallic work the star.
2. Art Deco Radiance on Satin
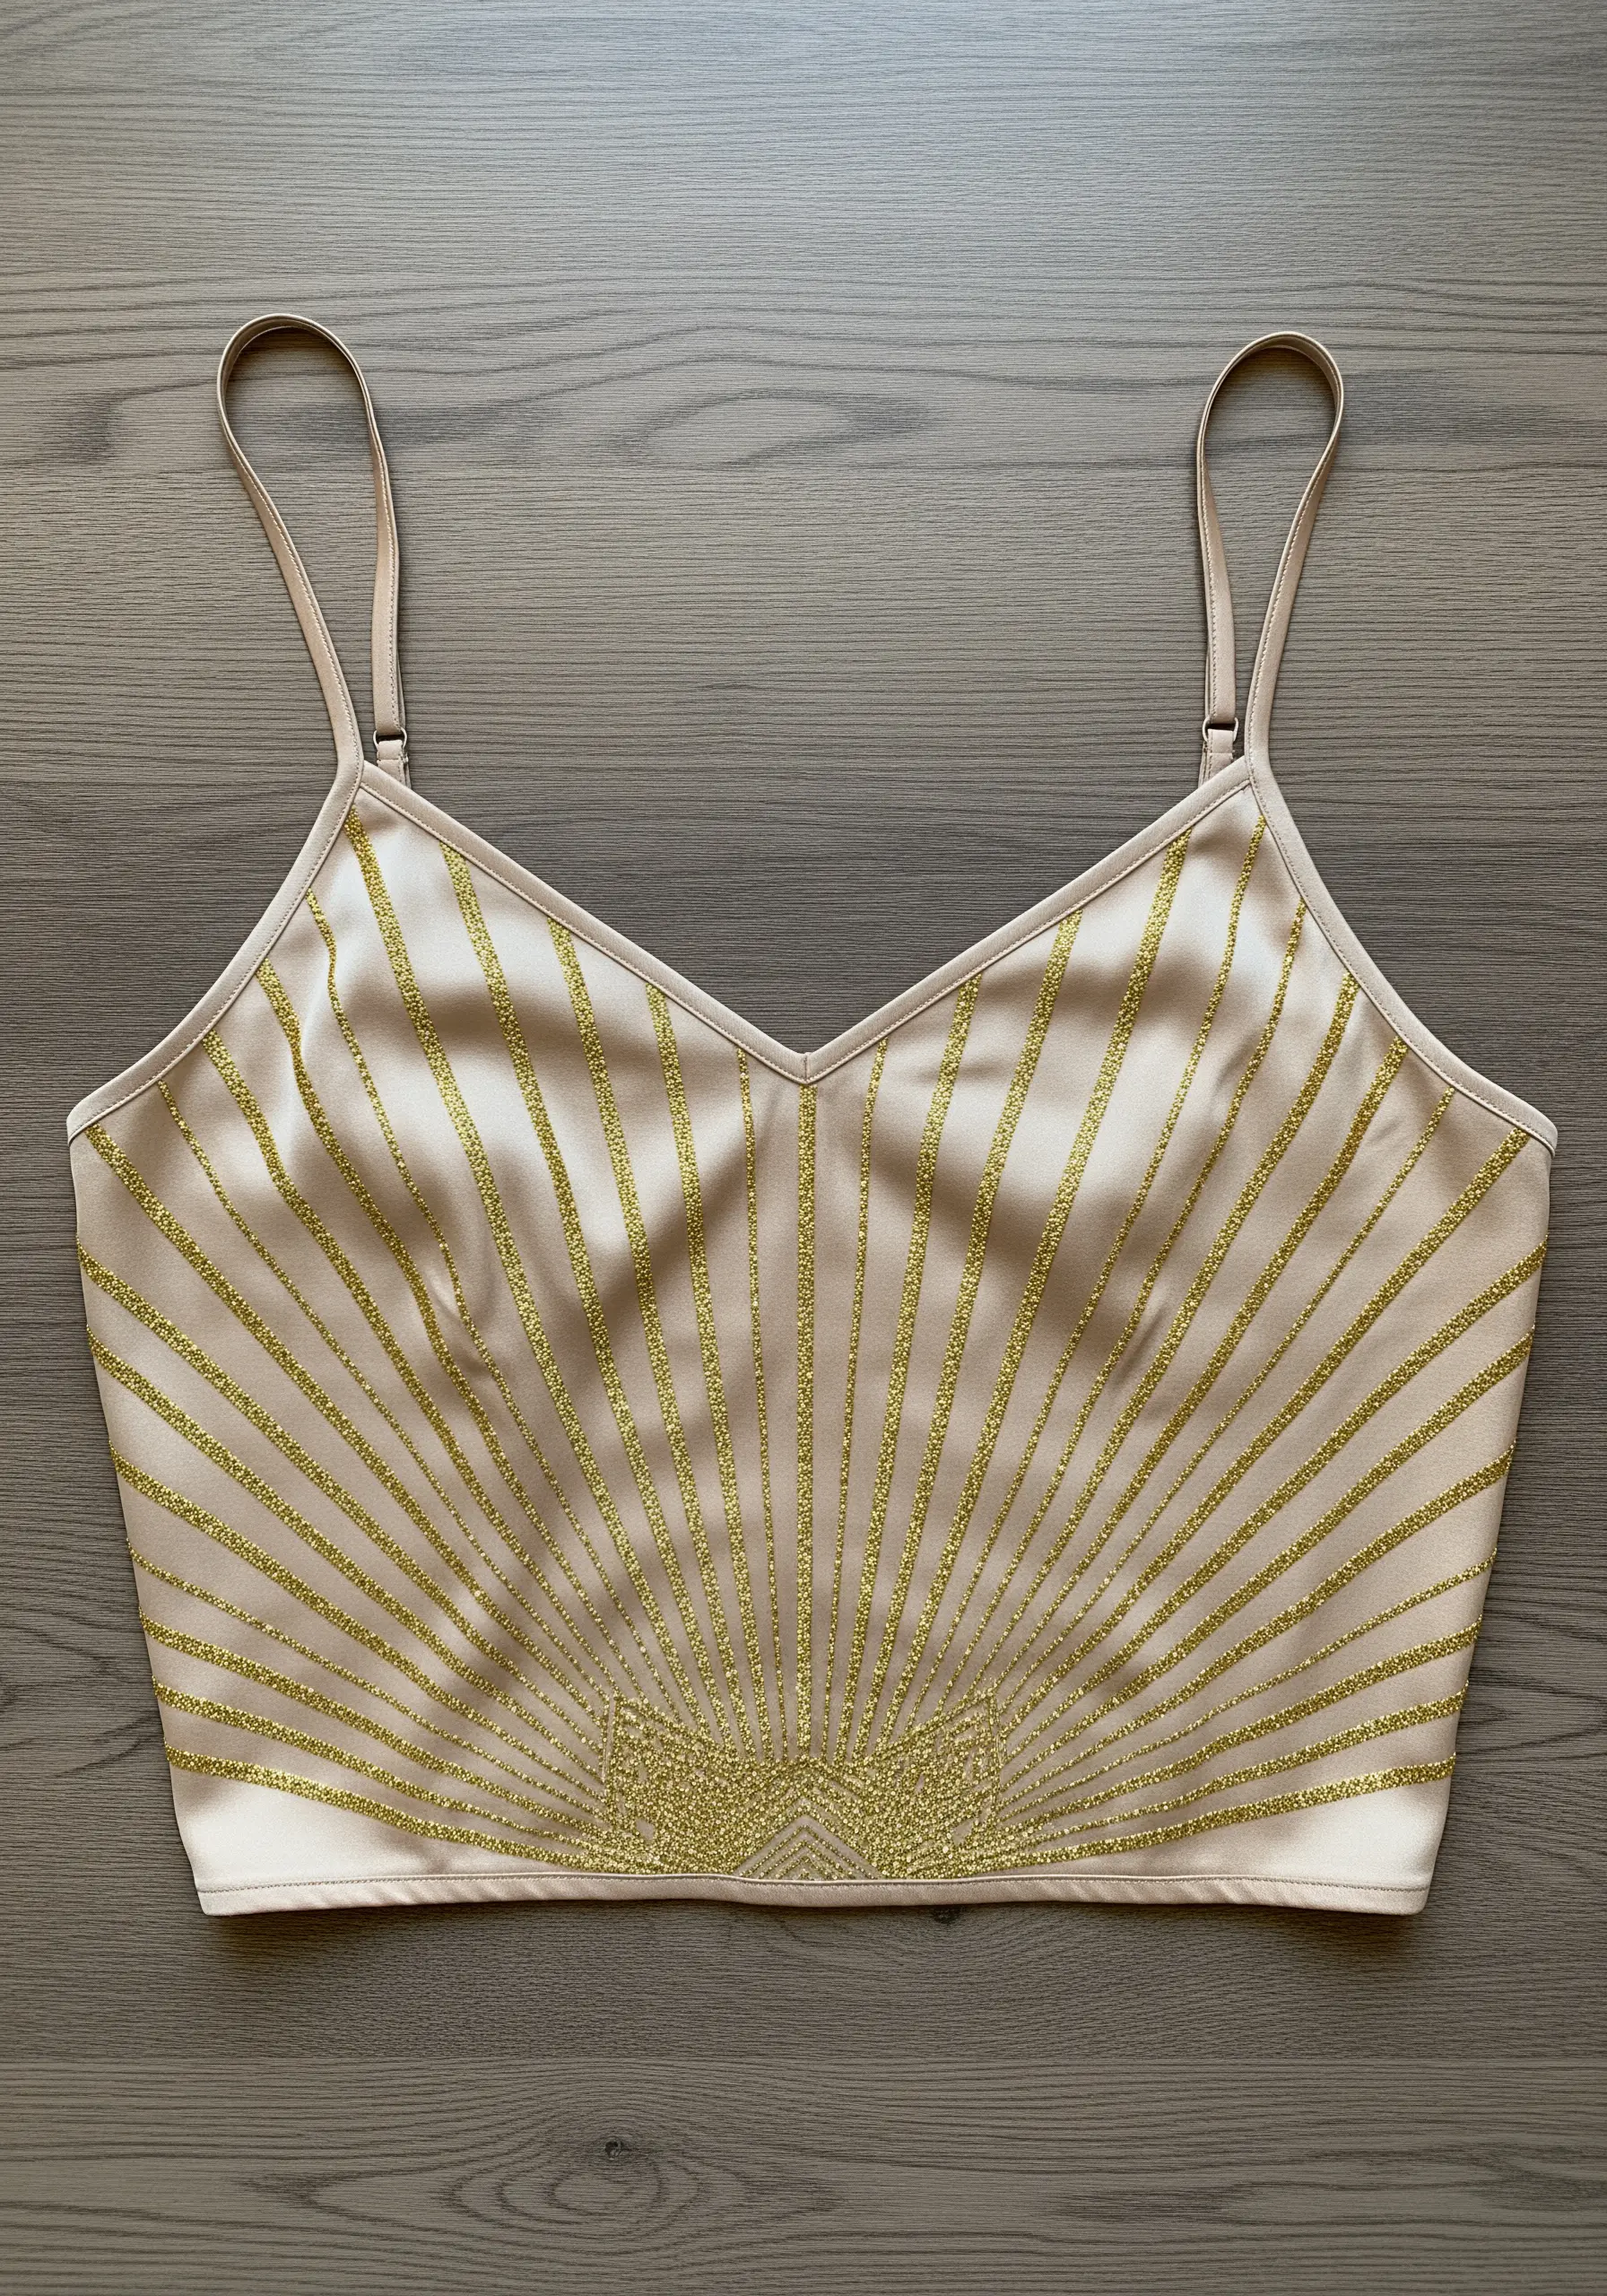
Achieving clean, sharp lines with glitter thread on a slippery fabric like satin requires a stabilizer.
Adhere a tear-away stabilizer to the back of your fabric before stitching to prevent puckering and keep your lines straight.
Use a simple backstitch for the radiating lines, ensuring even tension for a smooth finish.
For the central motif, a dense seed stitch fill provides a beautiful textural contrast to the sleek lines, creating a focal point that glimmers.
3. Dimensional Florals on Sheer Tulle
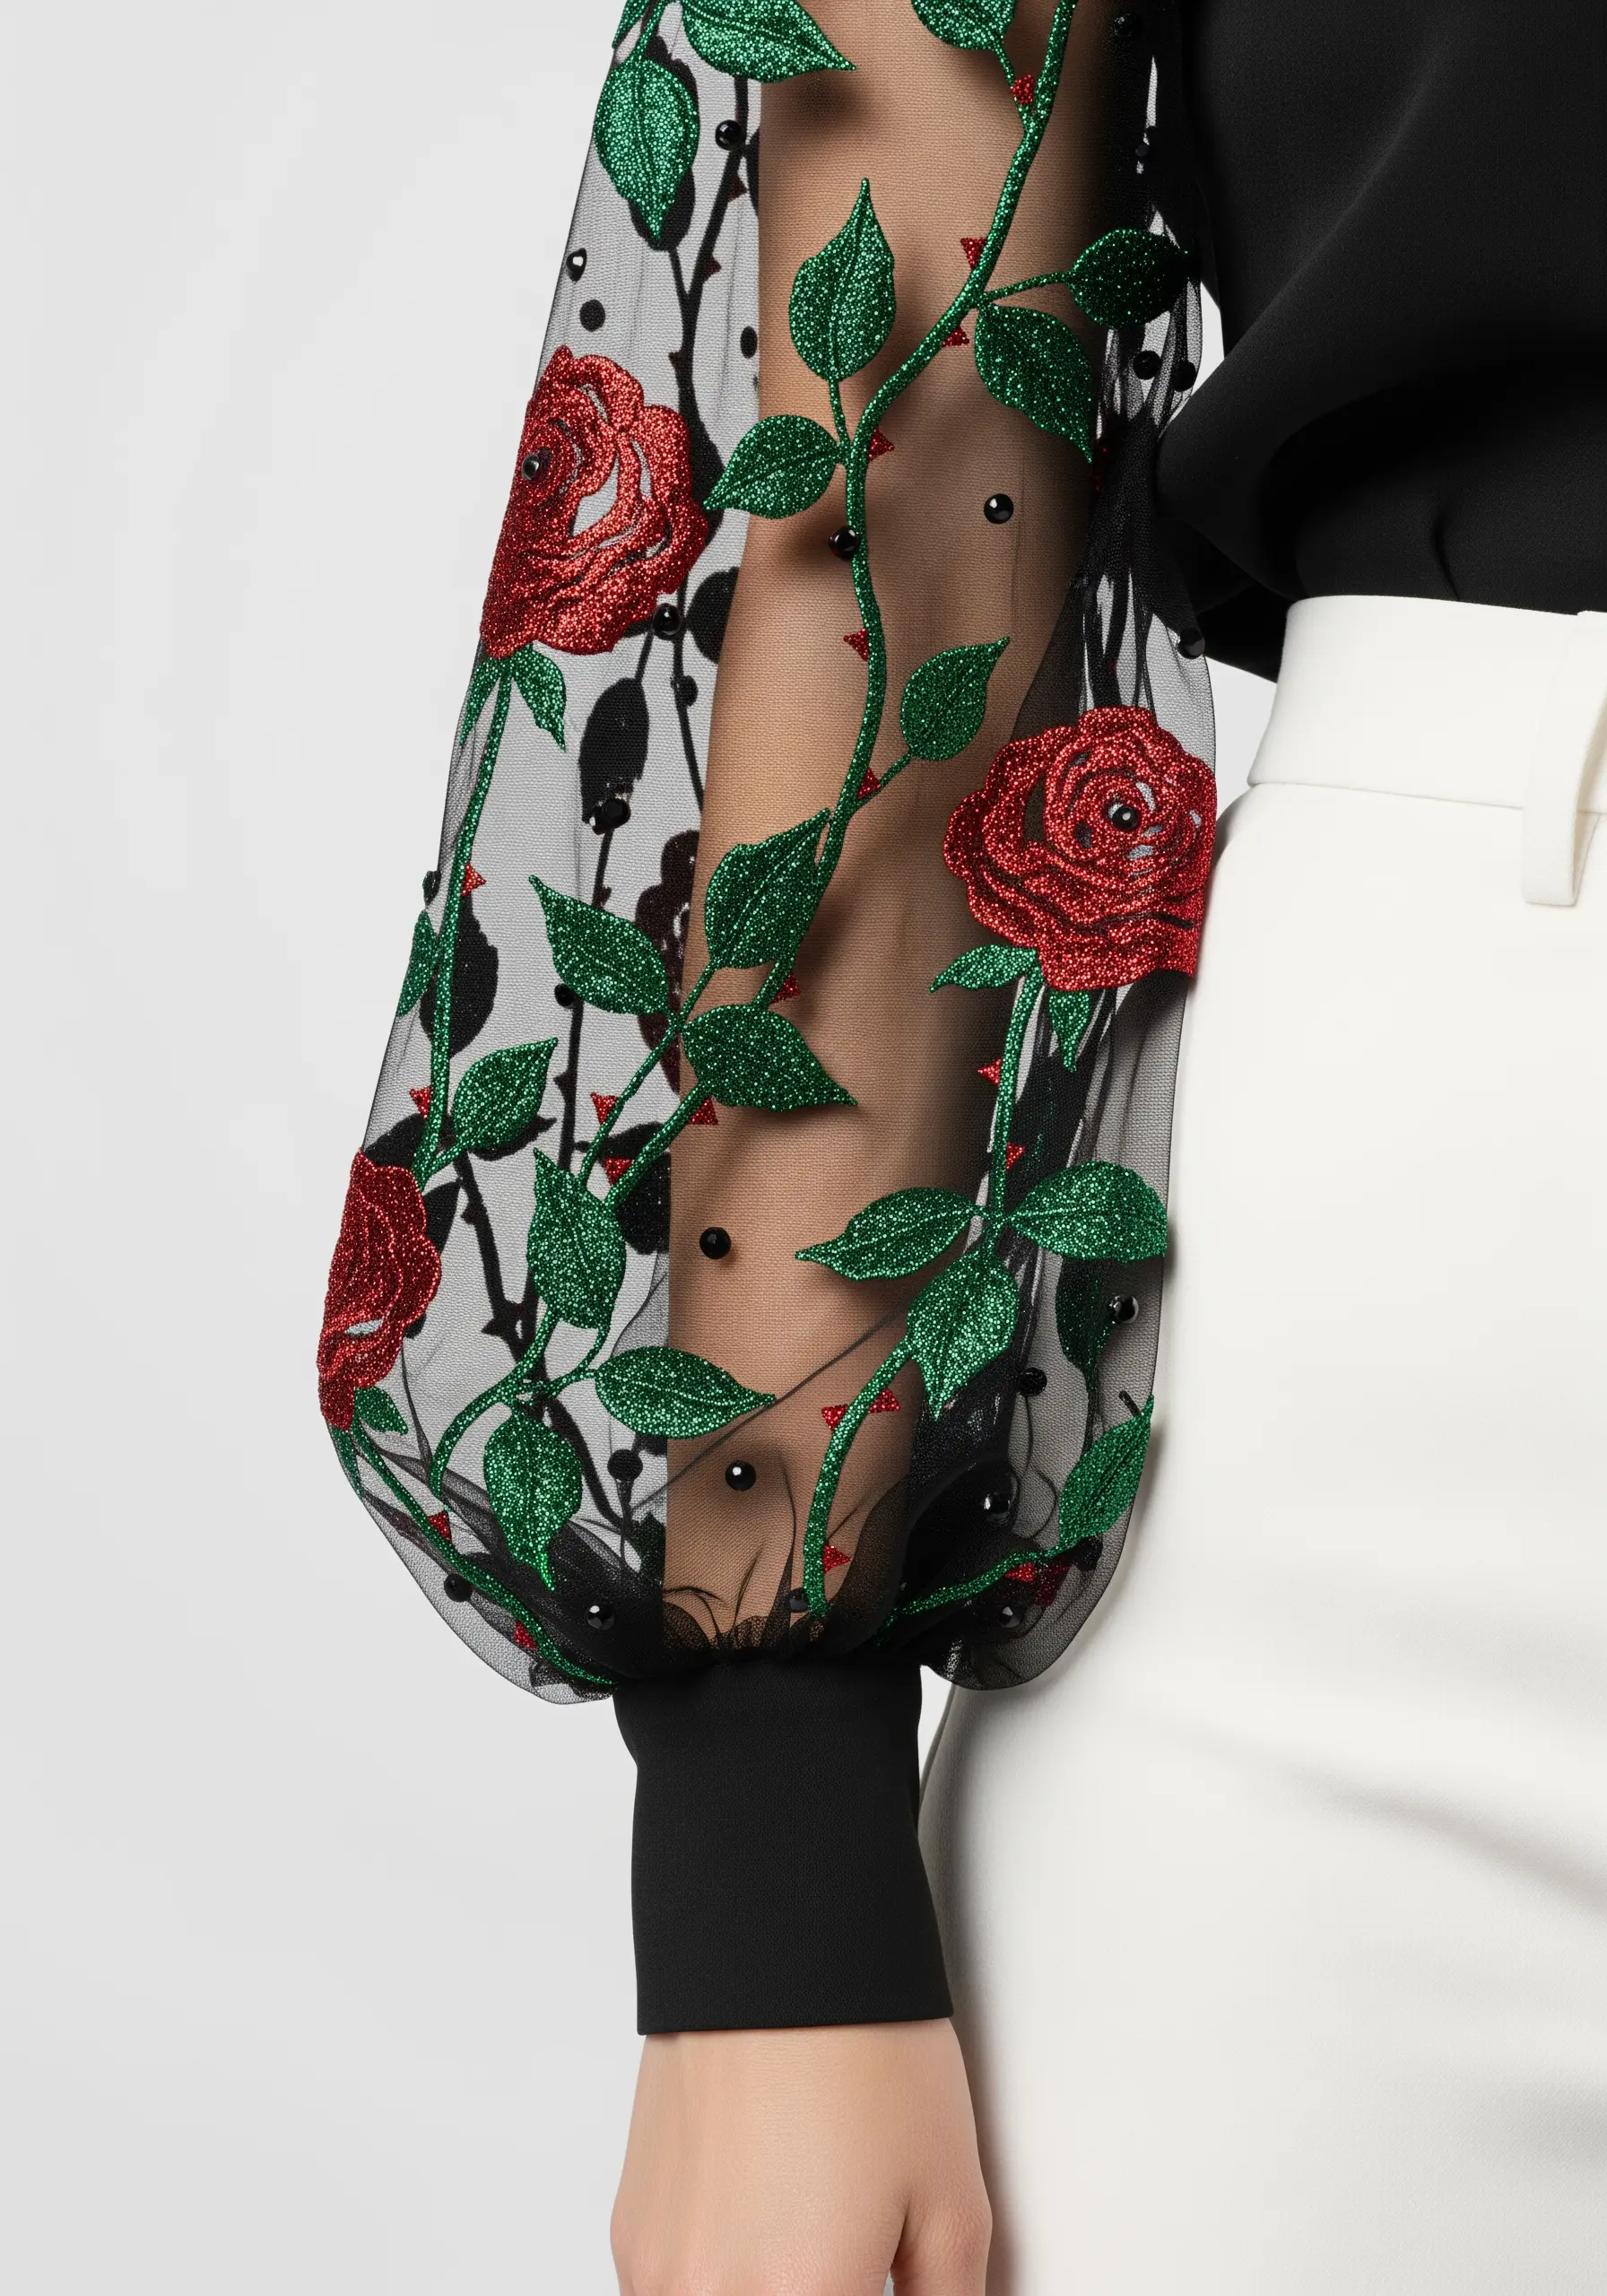
When embroidering on sheer fabrics like tulle or organza, a water-soluble stabilizer is your best friend.
It provides the support needed for dense stitching and dissolves completely, leaving your design flawlessly suspended.
Use a vibrant red glitter thread in a satin stitch for the rose petals to ensure they are opaque and bold against the transparent background.
For the vines, try a whipped backstitch with green glitter thread to create a raised, cord-like texture that adds elegant dimension.
4. Abstract Glitter Thread Painting
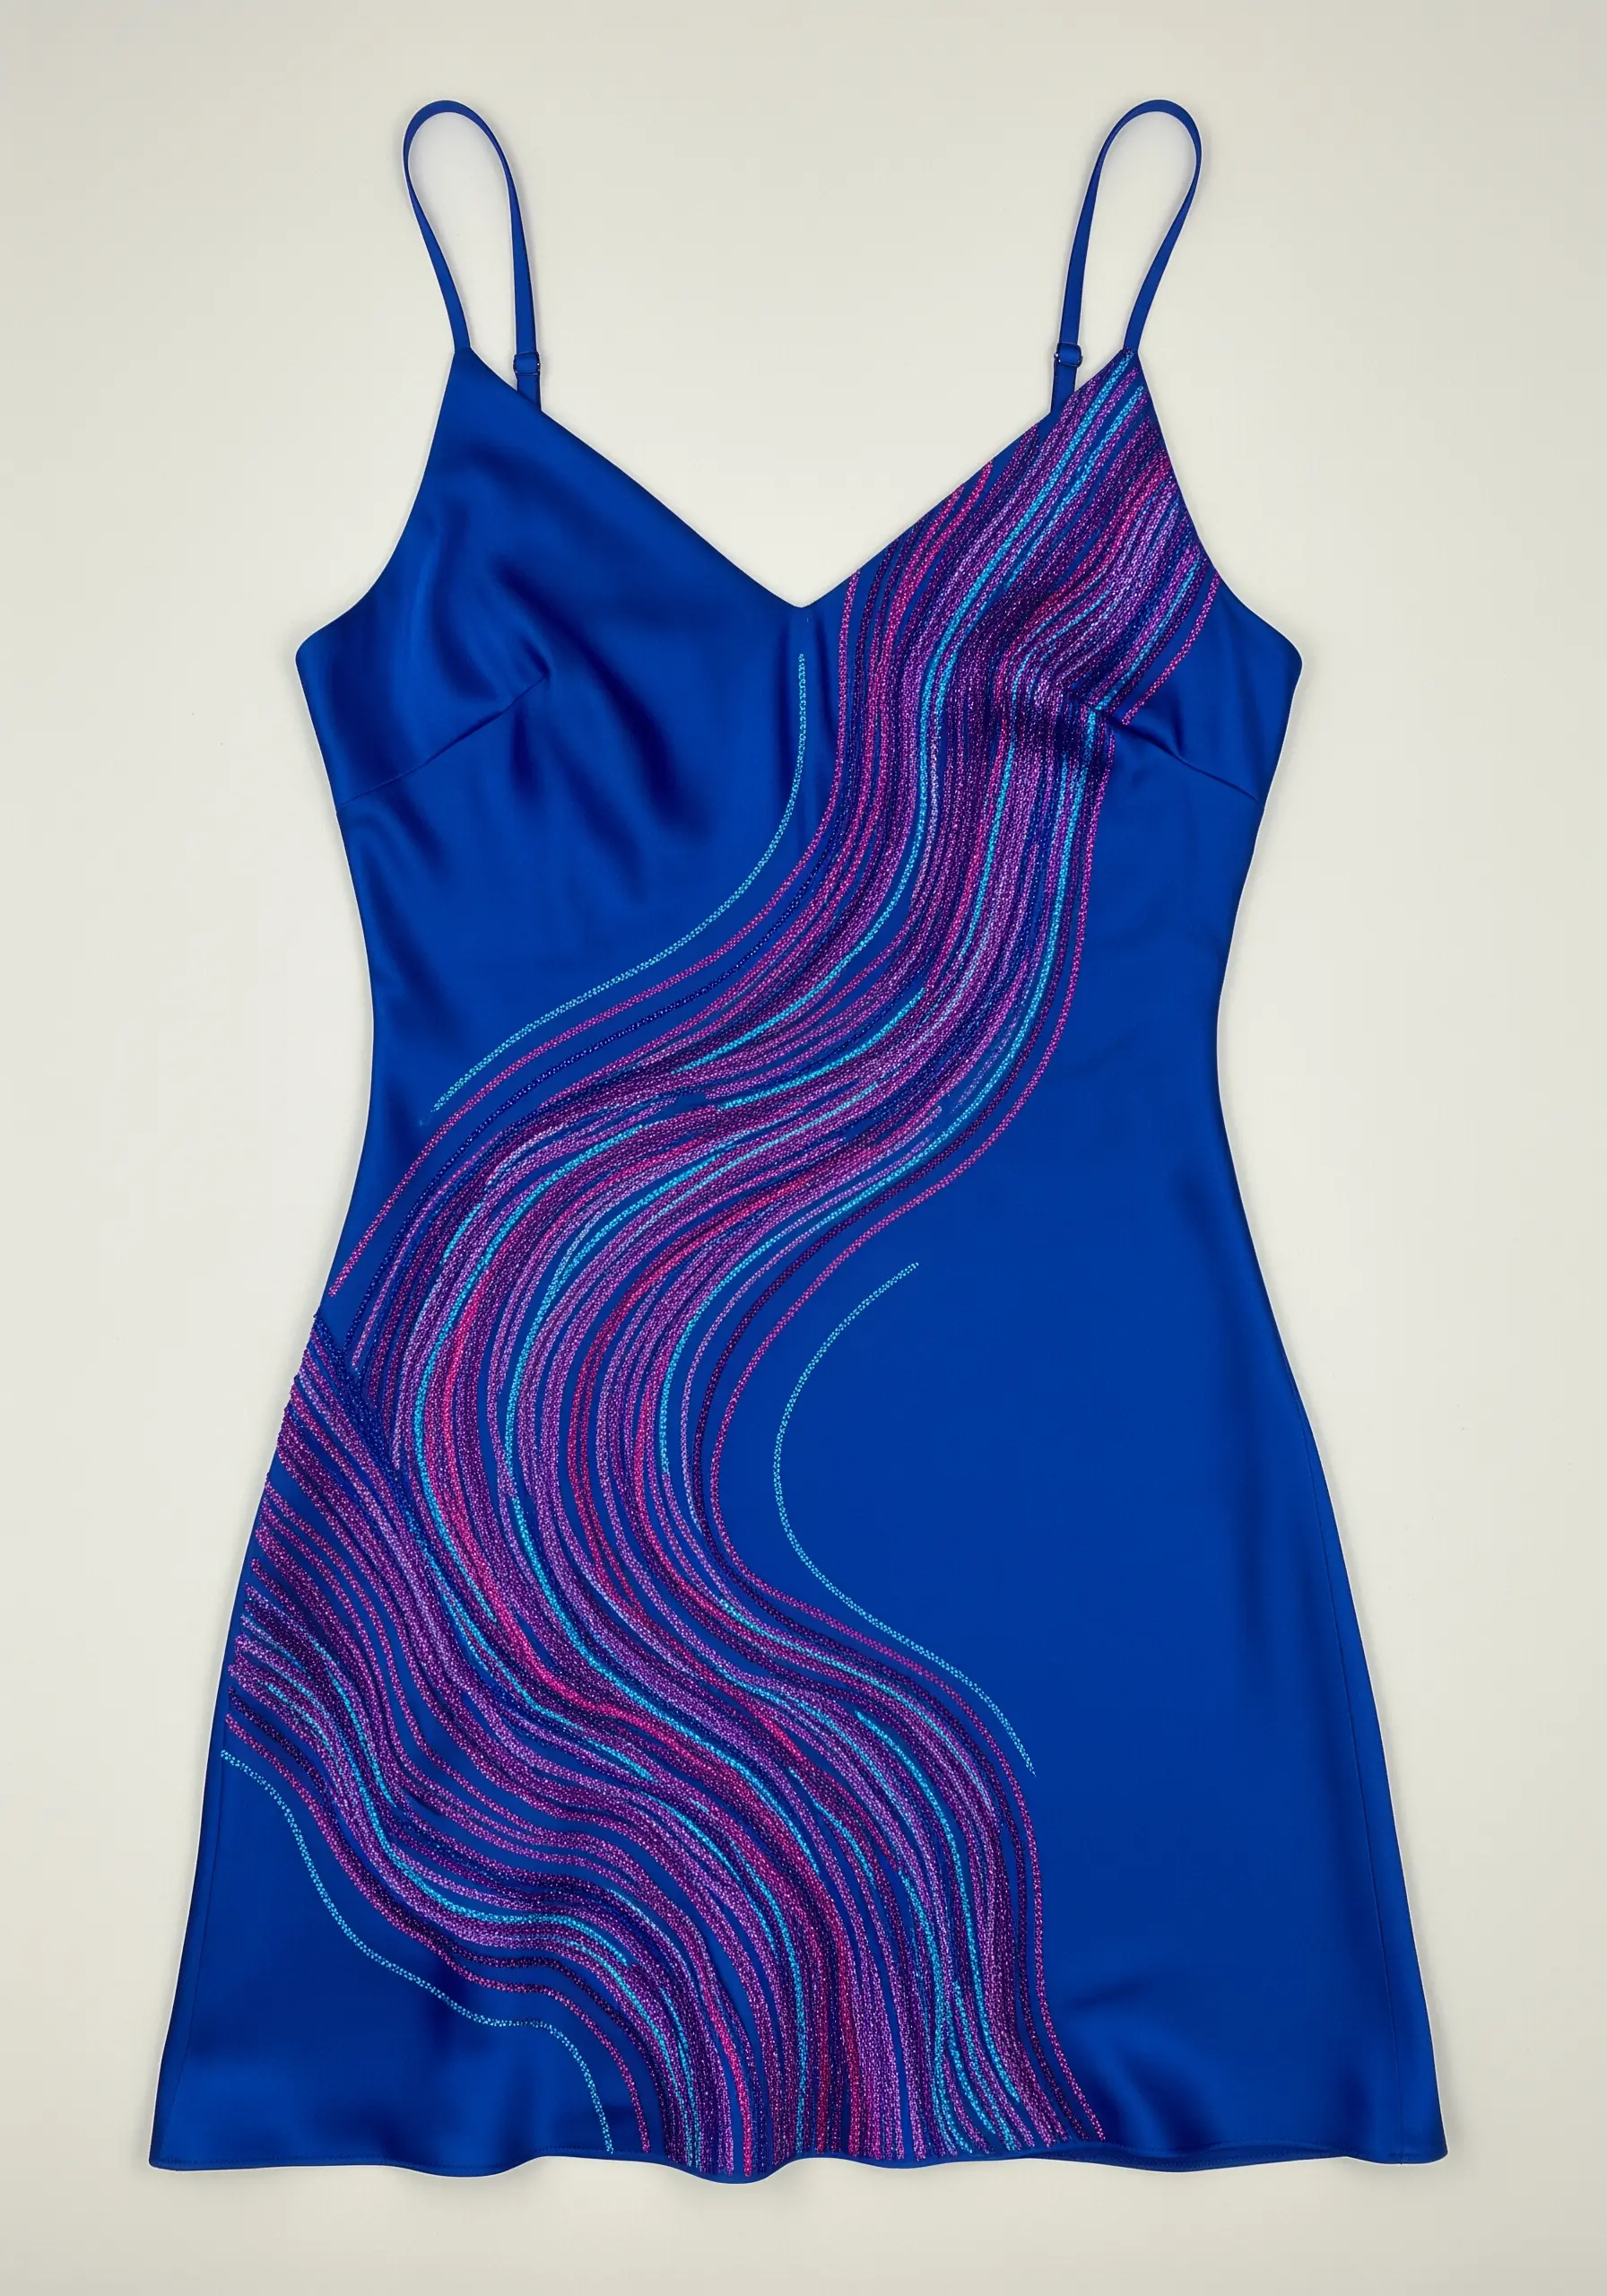
Create a sense of movement by using multiple colors of glitter thread and long, flowing stitches.
Work with single strands of thread in analogous colors—like pink, purple, and cyan—and use a simple running stitch or backstitch.
Allow your lines to gently curve and overlap, which builds depth and blends the colors organically.
This free-form technique is perfect for embellishing slip dresses, as the fluid stitches complement the drape of fabrics like silk or satin.
5. Structured Egyptian Revival Collar

Build a statement collar by combining glitter thread with beads and sequins for unmatched texture.
Start with a stiff base fabric like felt. Outline each geometric shape with a couched gold glitter thread to create crisp, defined borders.
Fill the sections with dense turquoise seed beads and use a single, complementary bead to anchor each flat sequin, adding another layer of sparkle.
This mixed-media approach turns simple embroidery into wearable art that feels weighty and luxurious.
6. Serpentine Satin Stitch on Jersey

When embroidering on stretchy knit fabric, an iron-on cut-away stabilizer is essential to prevent the design from warping.
Use a split stitch to create a sharp outline for the snake, which provides a stable foundation for your fill stitches.
Fill the scales with a satin stitch using a high-shine green glitter thread, alternating the stitch direction slightly to mimic the texture of scales.
The gold glitter thread border, worked in a clean backstitch, adds a final touch of polished definition.
7. Ethereal Constellations on Tulle

Create a delicate, floating effect by stitching celestial motifs onto a fine tulle overlay.
Use a water-soluble stabilizer to support your stitches, then dissolve it away for a clean finish.
Vary your stitches: use radiating straight stitches for starbursts, tiny satin stitches for shooting stars, and strategically placed bugle beads or sequins for extra shimmer.
Keeping the thread color consistent—like this shimmering white-silver—creates a cohesive and sophisticated design that feels truly magical.
8. Peacock Feather with Sequined Eye
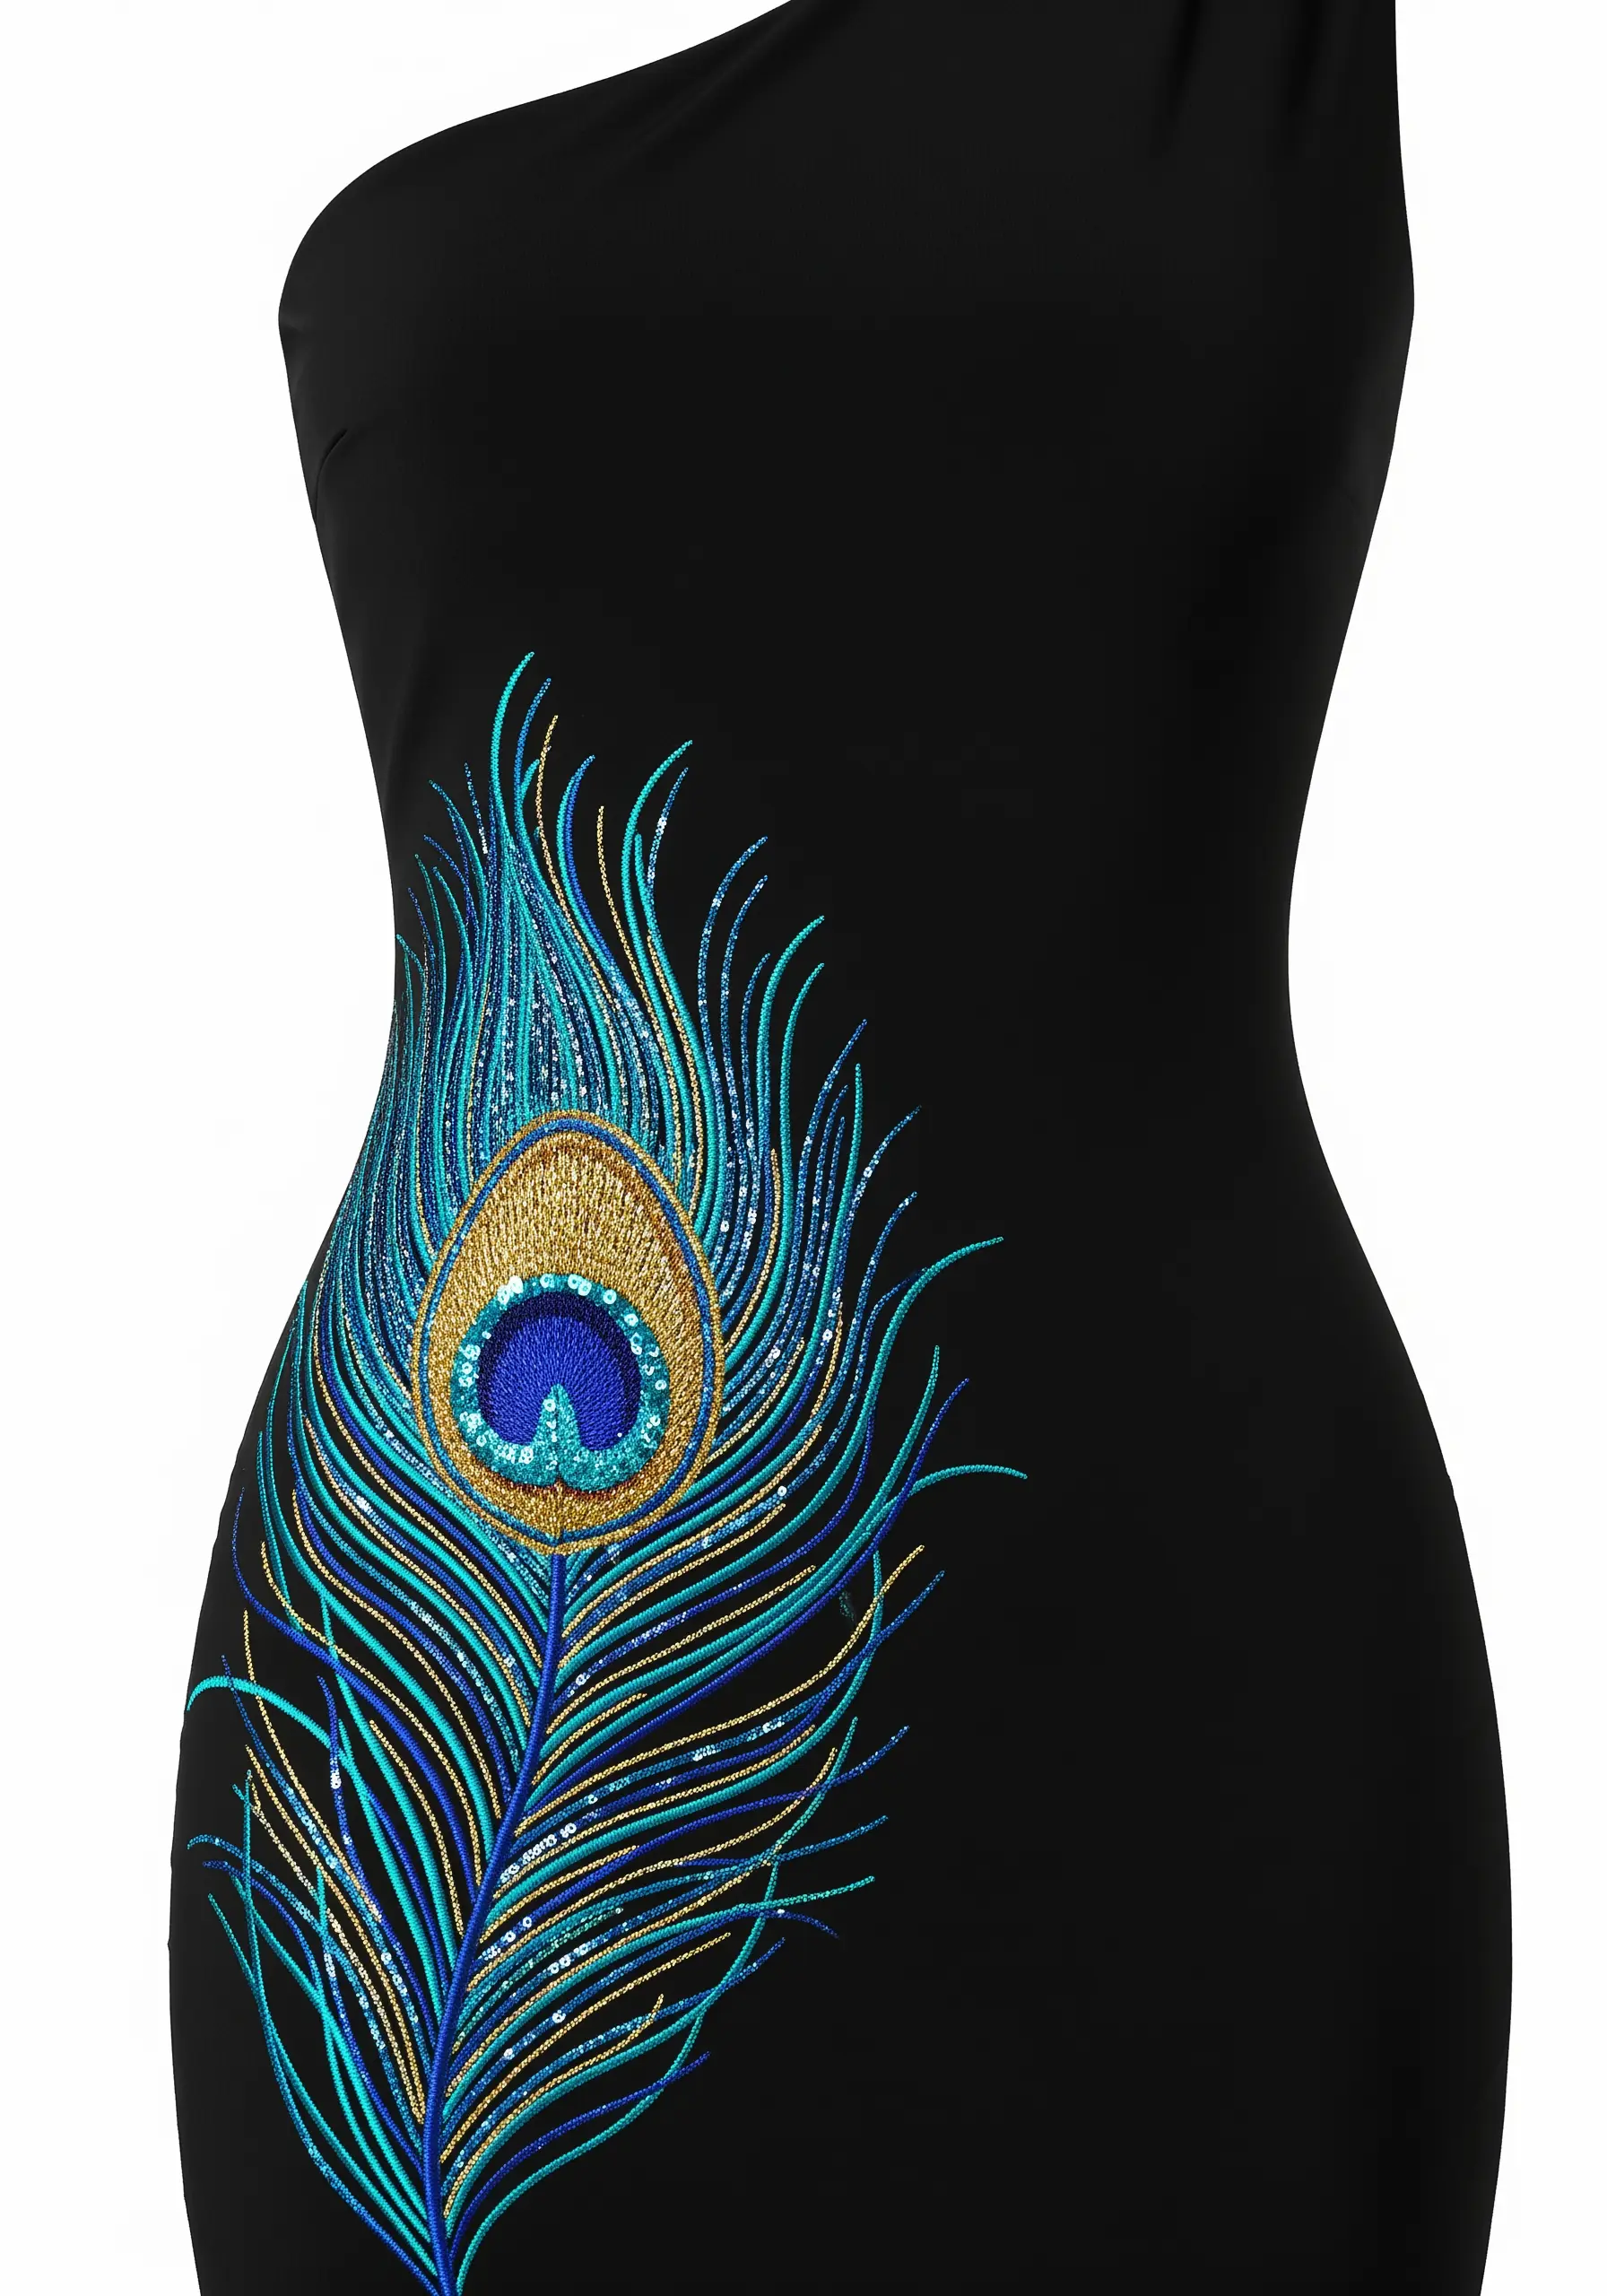
For a design with this much detail, stitch direction is everything.
Use long, single straight stitches for the feather barbs, angling them outwards from the central shaft to create natural movement.
Introduce multiple shades of blue, turquoise, and gold glitter thread to build depth.
For the feather’s eye, fill the center with dense blue satin stitch and surround it with a ring of iridescent sequins to create a brilliant, captivating focal point.
9. Baroque Scrollwork on Crisp Cotton
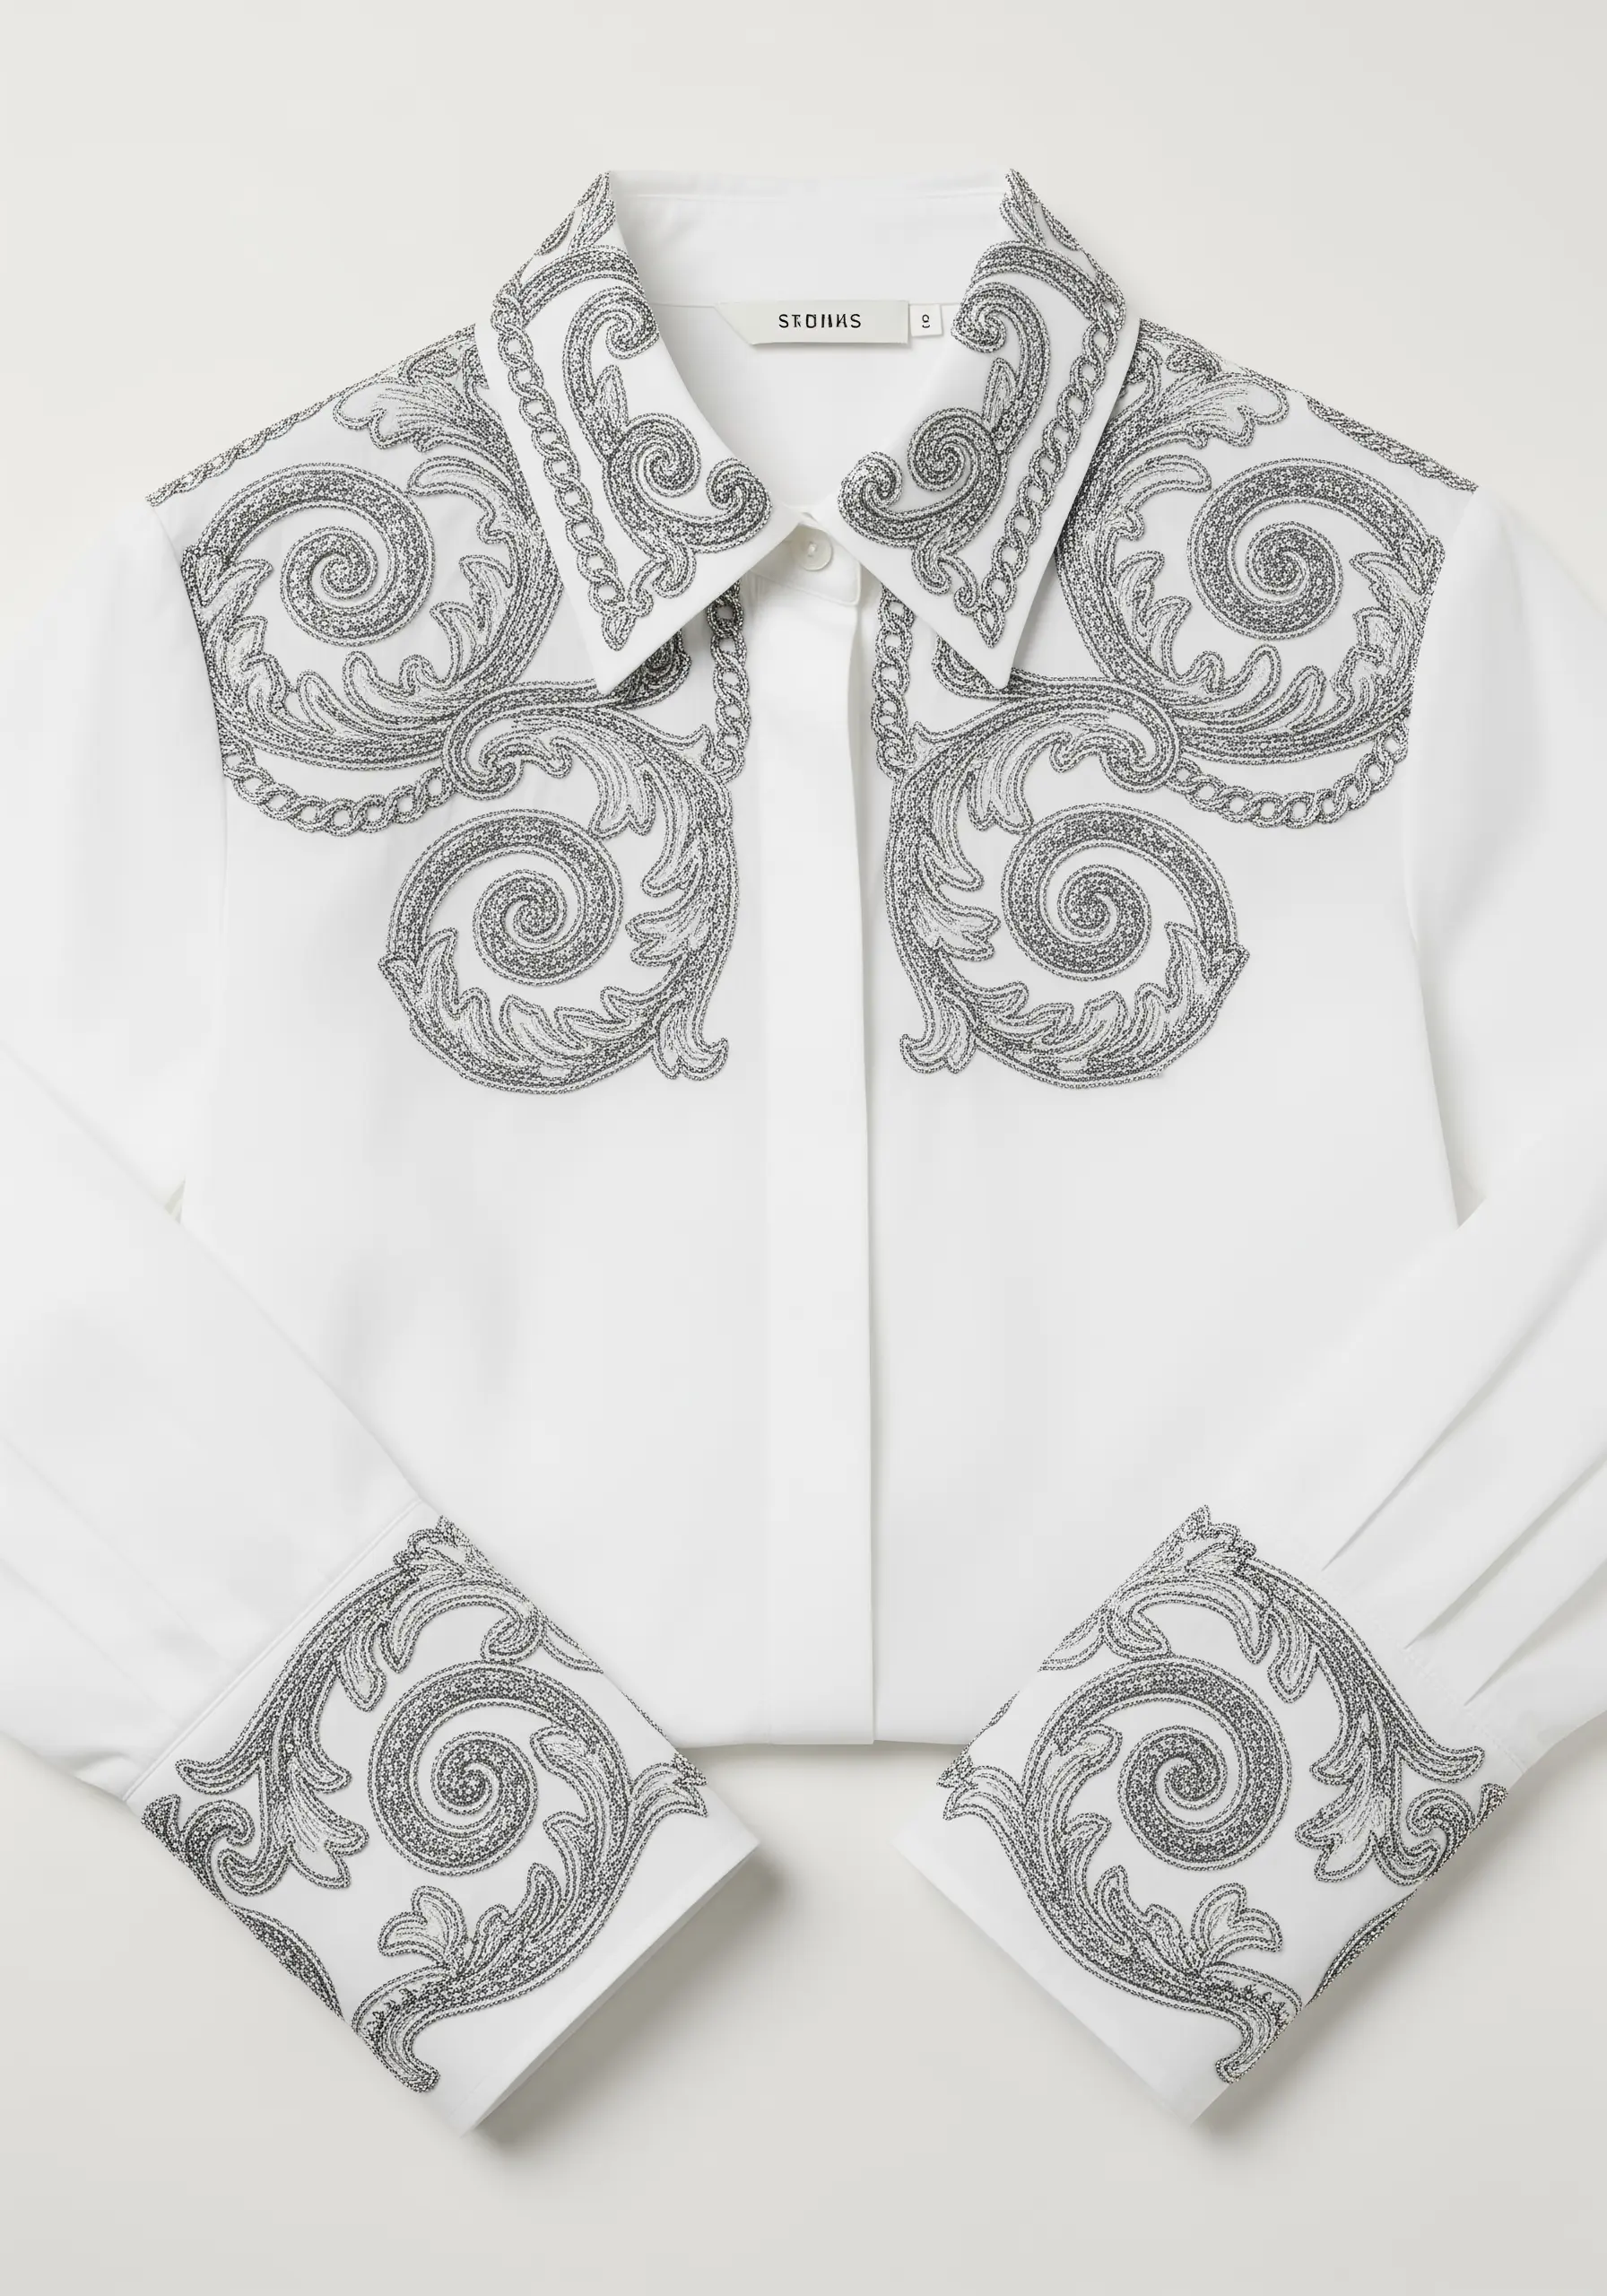
Achieve a heavily textured, almost metallic look by filling your design with a dense seed stitch using silver glitter thread.
This fill technique is more forgiving than satin stitch and creates a unique, granular sparkle that catches the light from all angles.
Define the edges of the baroque swirls with a single, clean line of backstitch using the same thread.
The contrast between the crisp white shirt and the intricate, shimmering scrollwork creates a look of effortless luxury.
10. Cascading Glitter Rain Effect

Create an elegant gradient effect by varying the density of your stitches.
Start at the neckline with tightly packed vertical straight stitches using gold glitter thread, placing them close together for a solid band of sparkle.
As you move down the bodice, gradually increase the space between your stitches, letting them become sparser.
Finally, transition to randomly placed single seed stitches or French knots to mimic the final droplets of a shimmering shower.
11. Architectural Outlines in Silver Thread
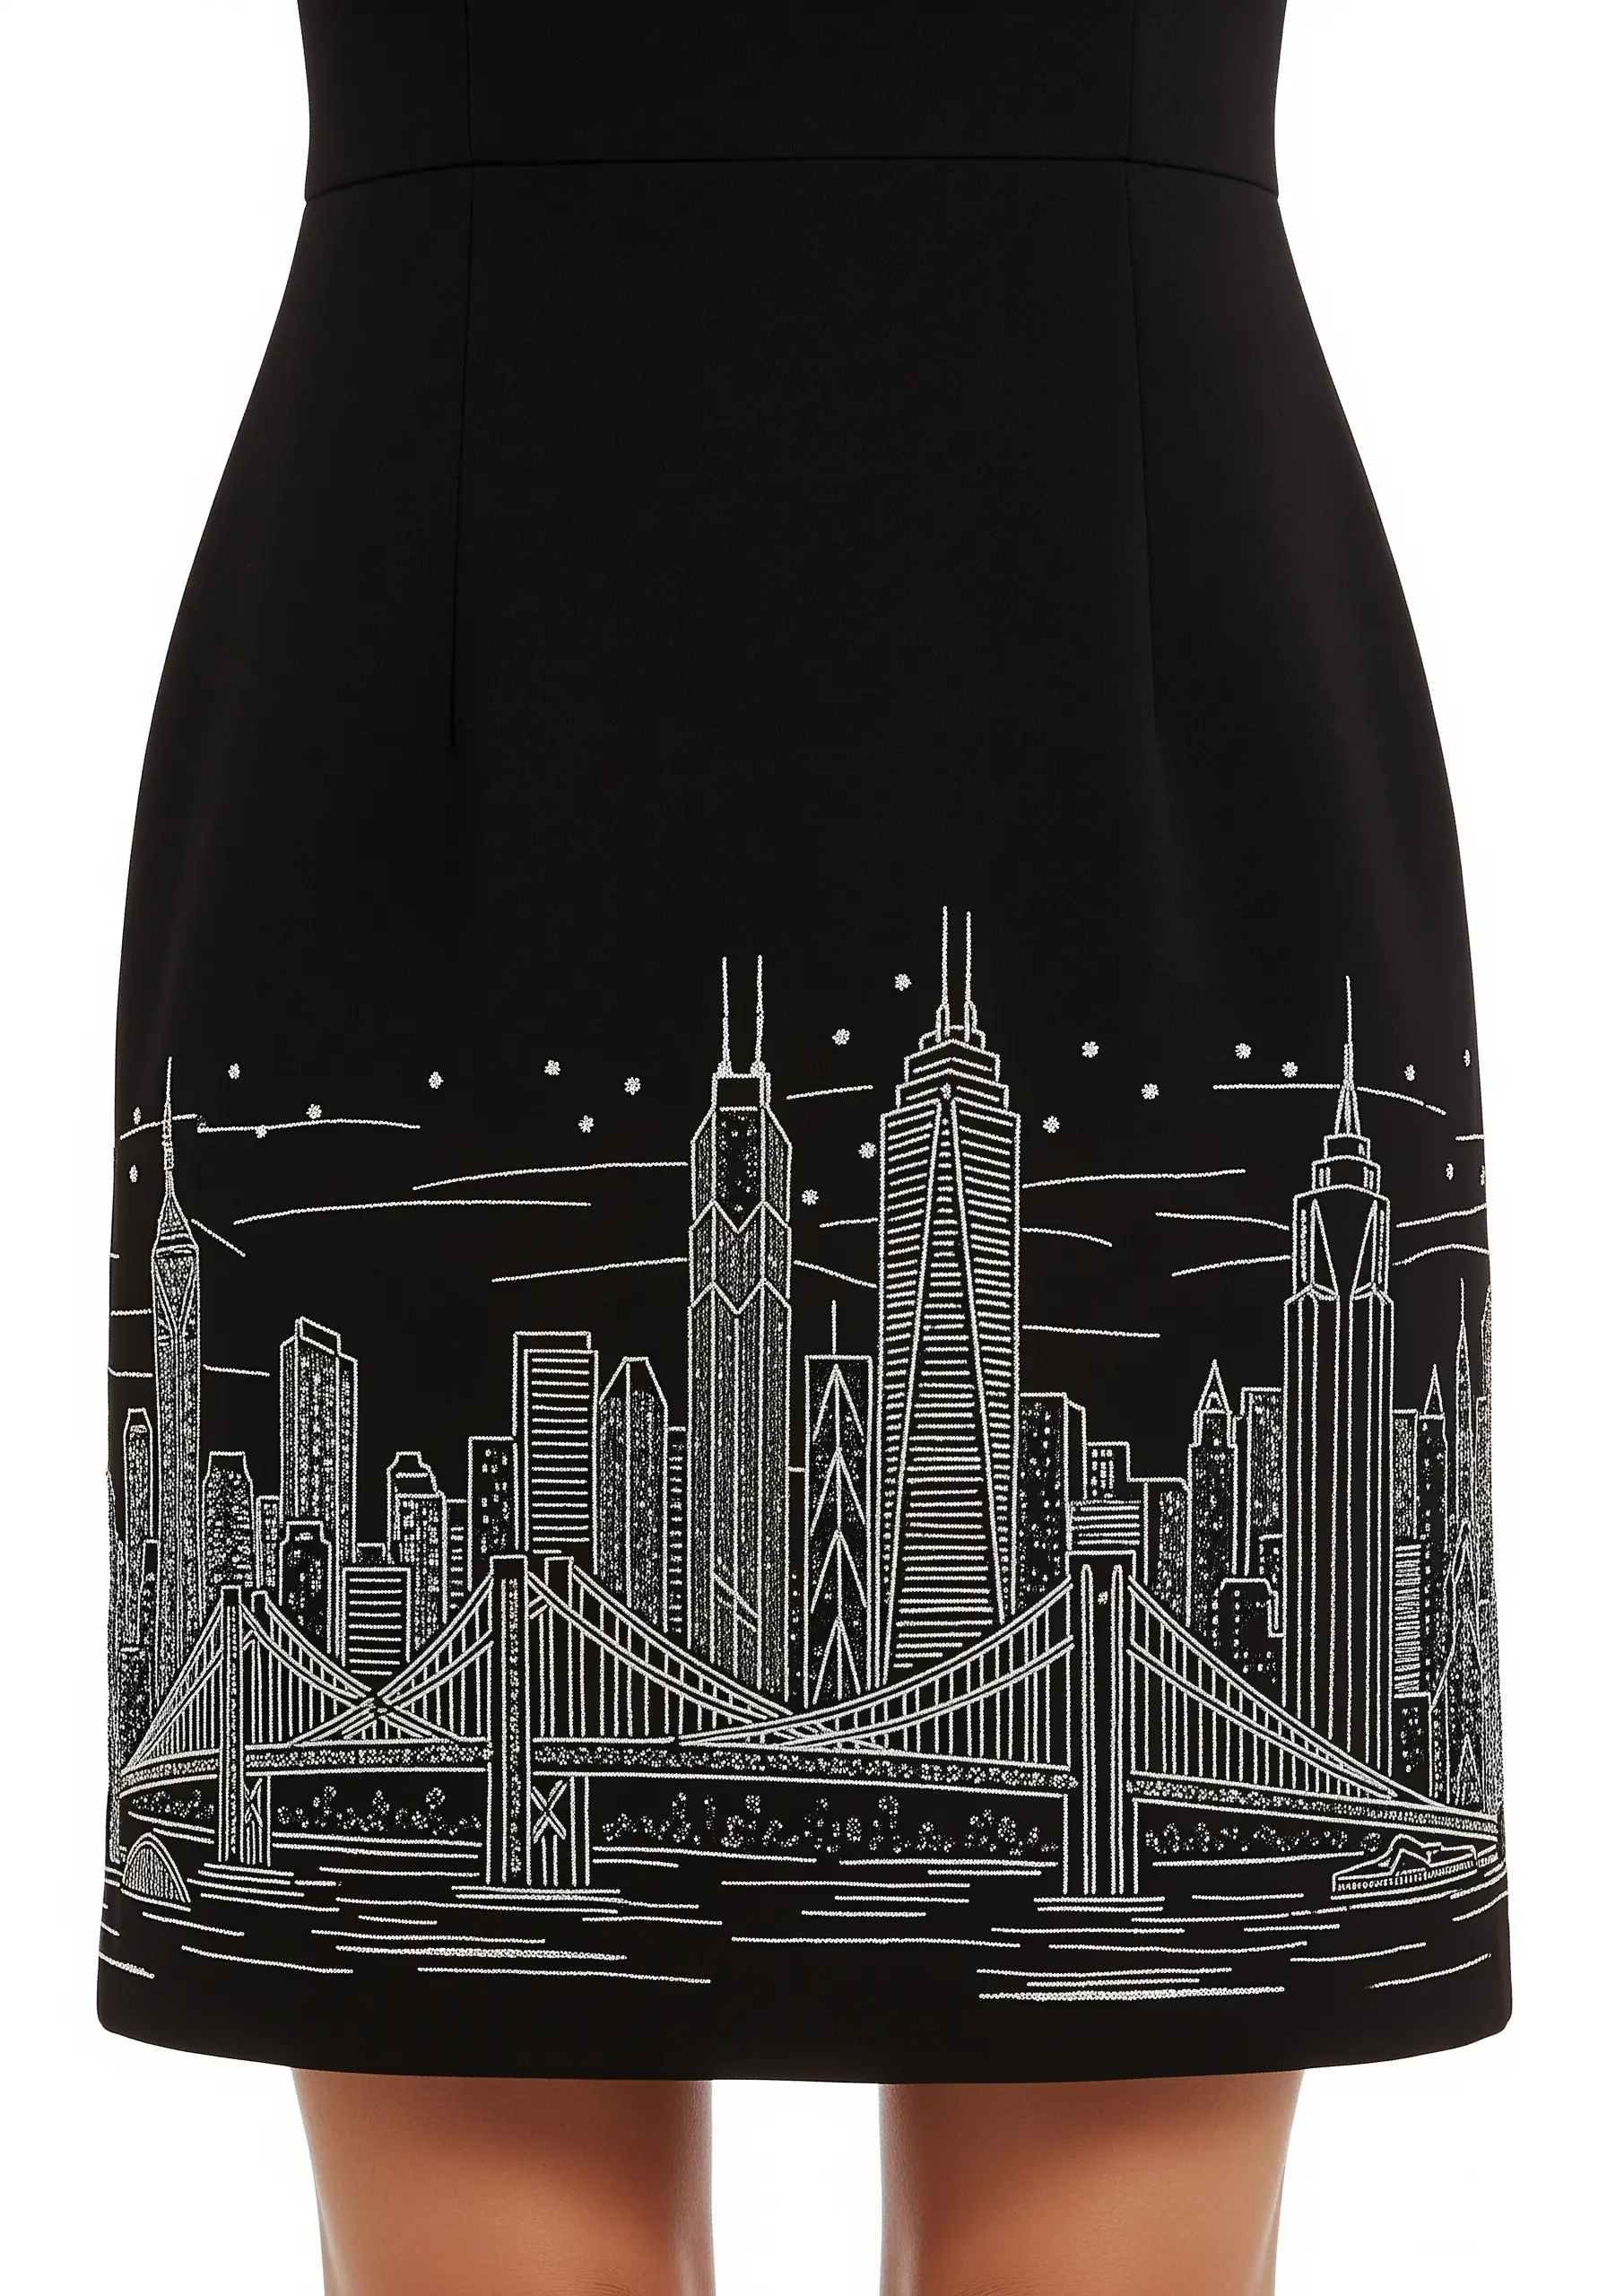
Recreate a city skyline with clean, graphic lines using a simple backstitch or stem stitch.
Choose a fine-gauge silver glitter thread that won’t overwhelm the intricate details of the architecture.
For the windows and highlights, use tiny, scattered seed stitches or French knots to add a subtle sparkle that suggests city lights without cluttering the design.
This minimalist approach works best on a solid, dark fabric that provides a high-contrast canvas for your line art.
12. Bold Tiger Stripes on Faux Leather

Stitching on faux leather requires a specific needle—a leather or microtex needle will pierce the material cleanly without tearing it.
Use a dense, slightly padded satin stitch to fill in the tiger stripes. The slight padding underneath gives the glitter thread a raised, 3D effect that stands out.
Choose a high-sparkle, chunky glitter thread in orange and black to create a bold, graphic contrast that feels both fierce and glamorous.
Remember to lengthen your stitch slightly, as too many perforations can weaken the material.
13. Celestial Map All-Over Pattern
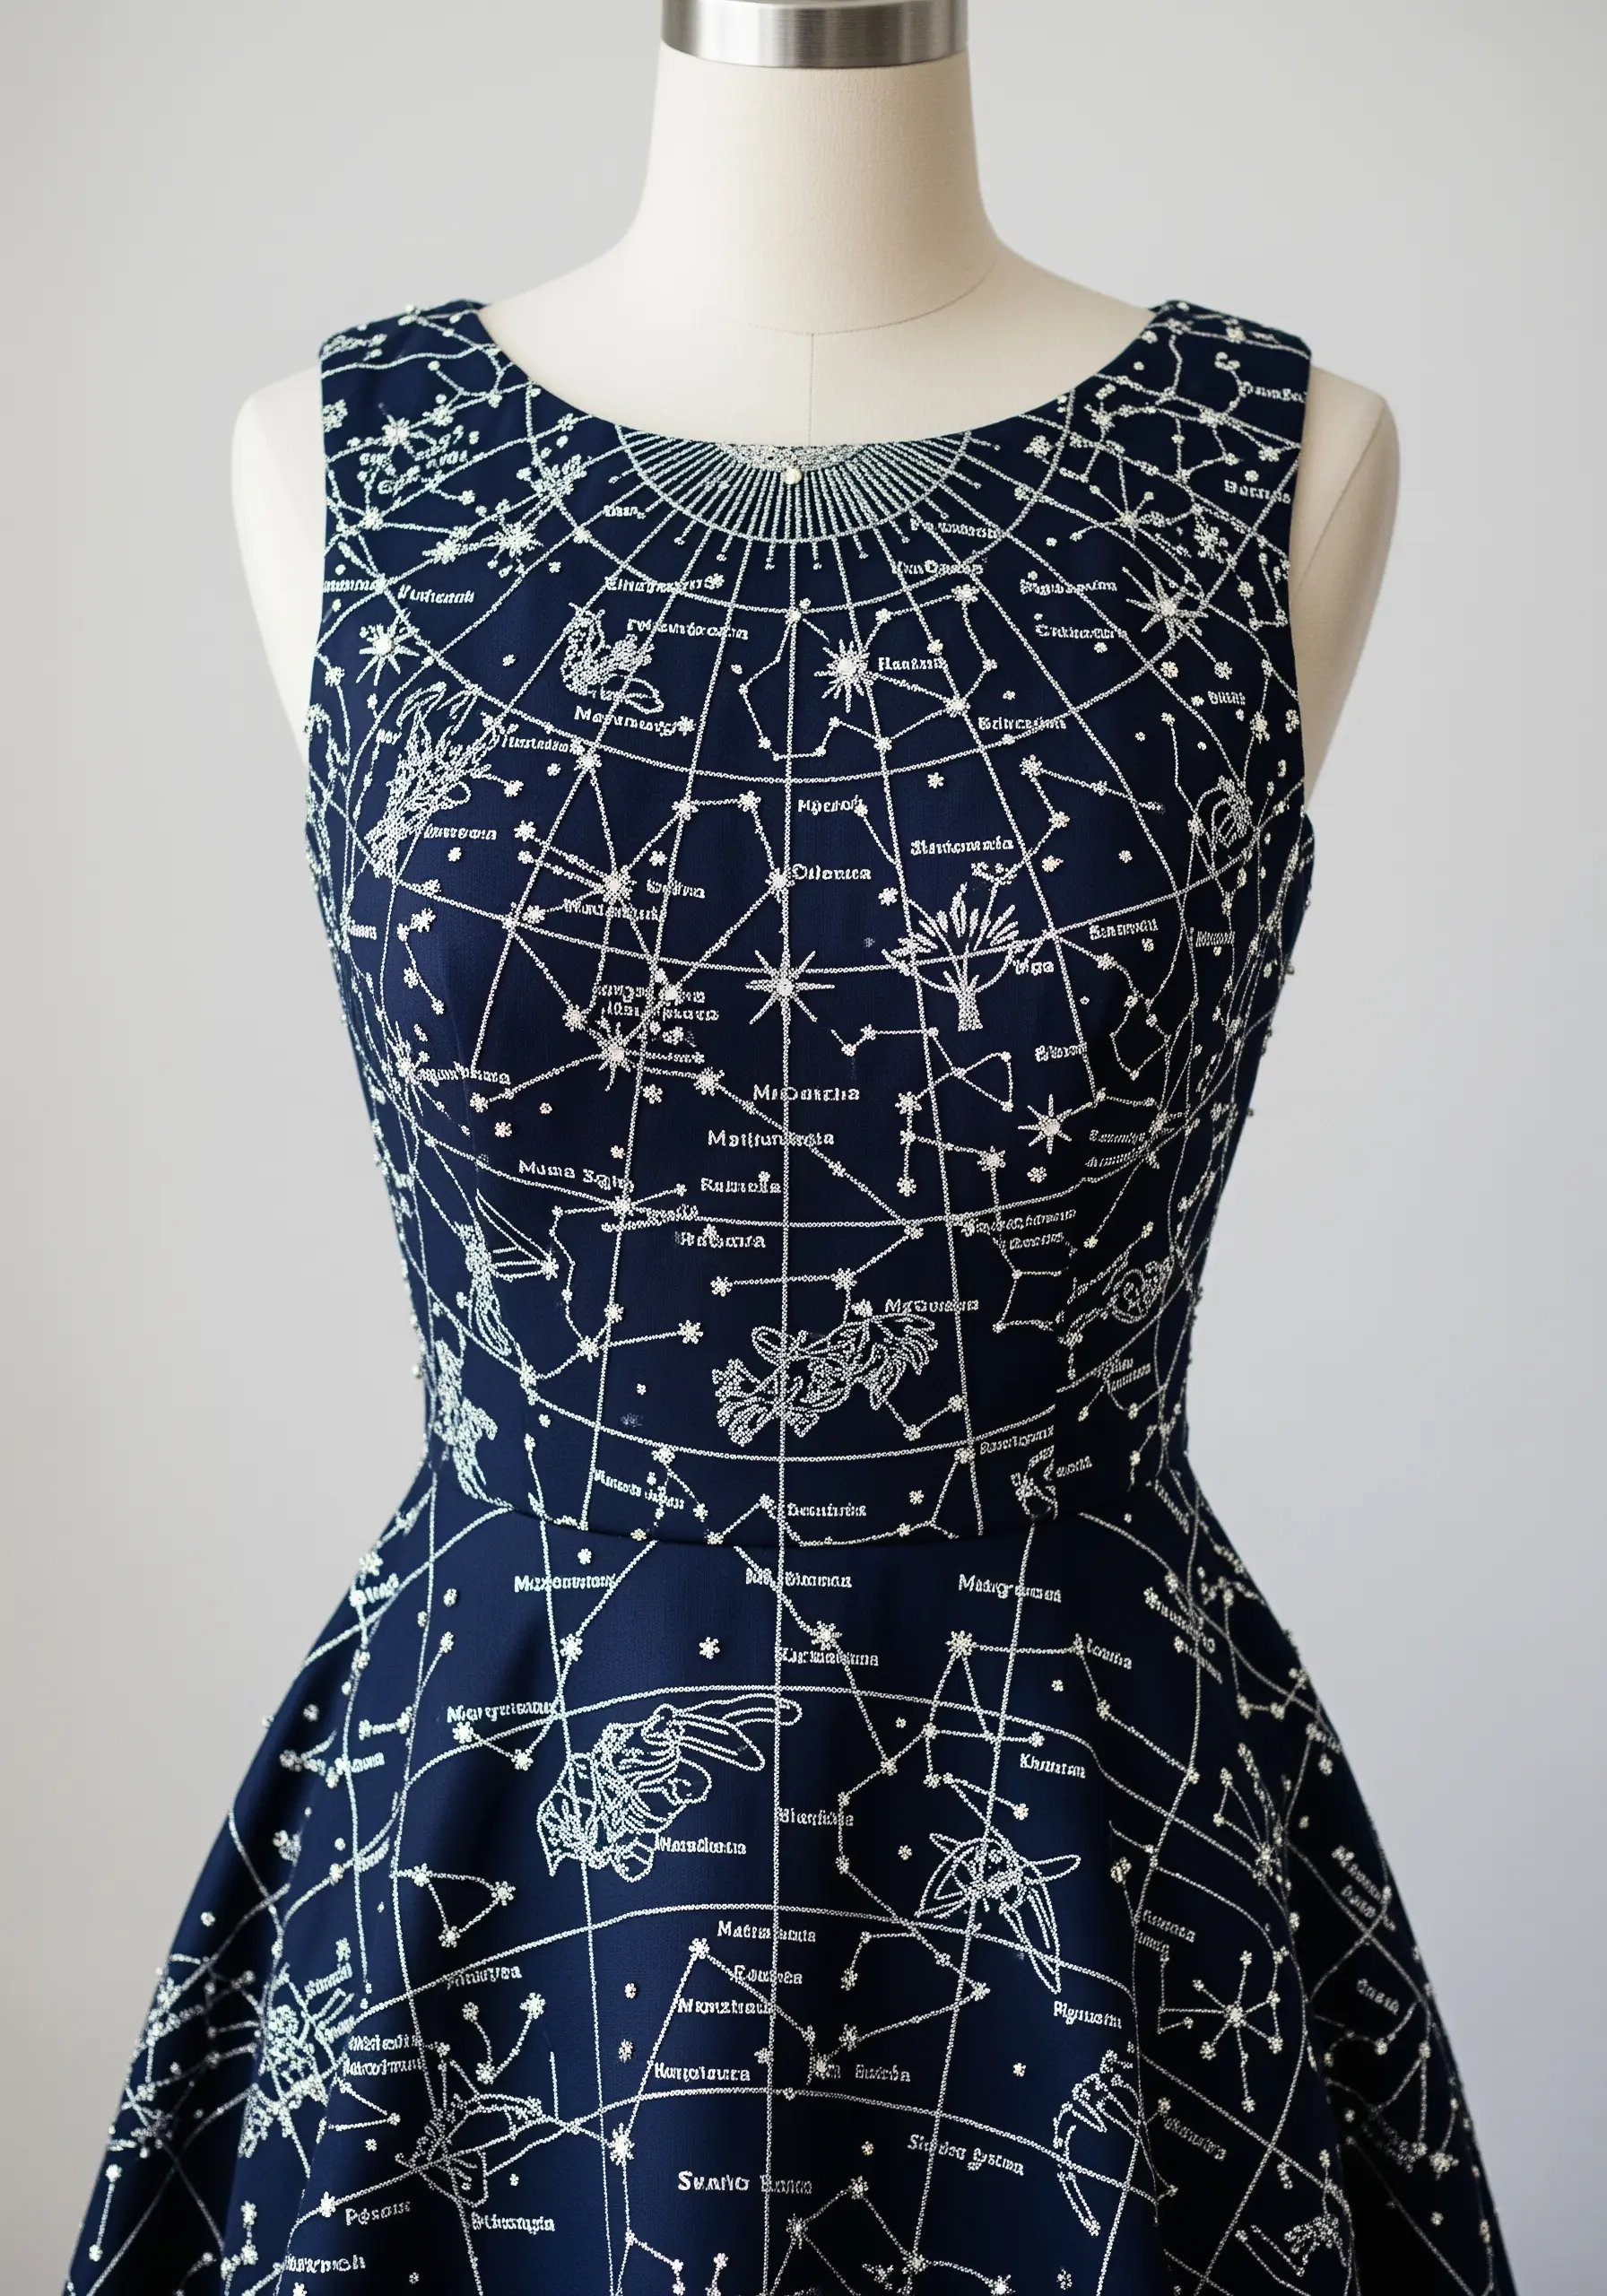
When tackling an all-over pattern, consistency is key to a professional finish.
Use a single, simple stitch—like a backstitch—for all the connecting lines to create a uniform, map-like feel.
For the constellation motifs, switch to radiating straight stitches or small satin-stitched shapes to make them stand out as focal points.
Using a light, silvery-blue glitter thread on a dark navy fabric creates a sophisticated, tonal palette that looks like a vintage star chart.
14. Molten Gold Drip Effect
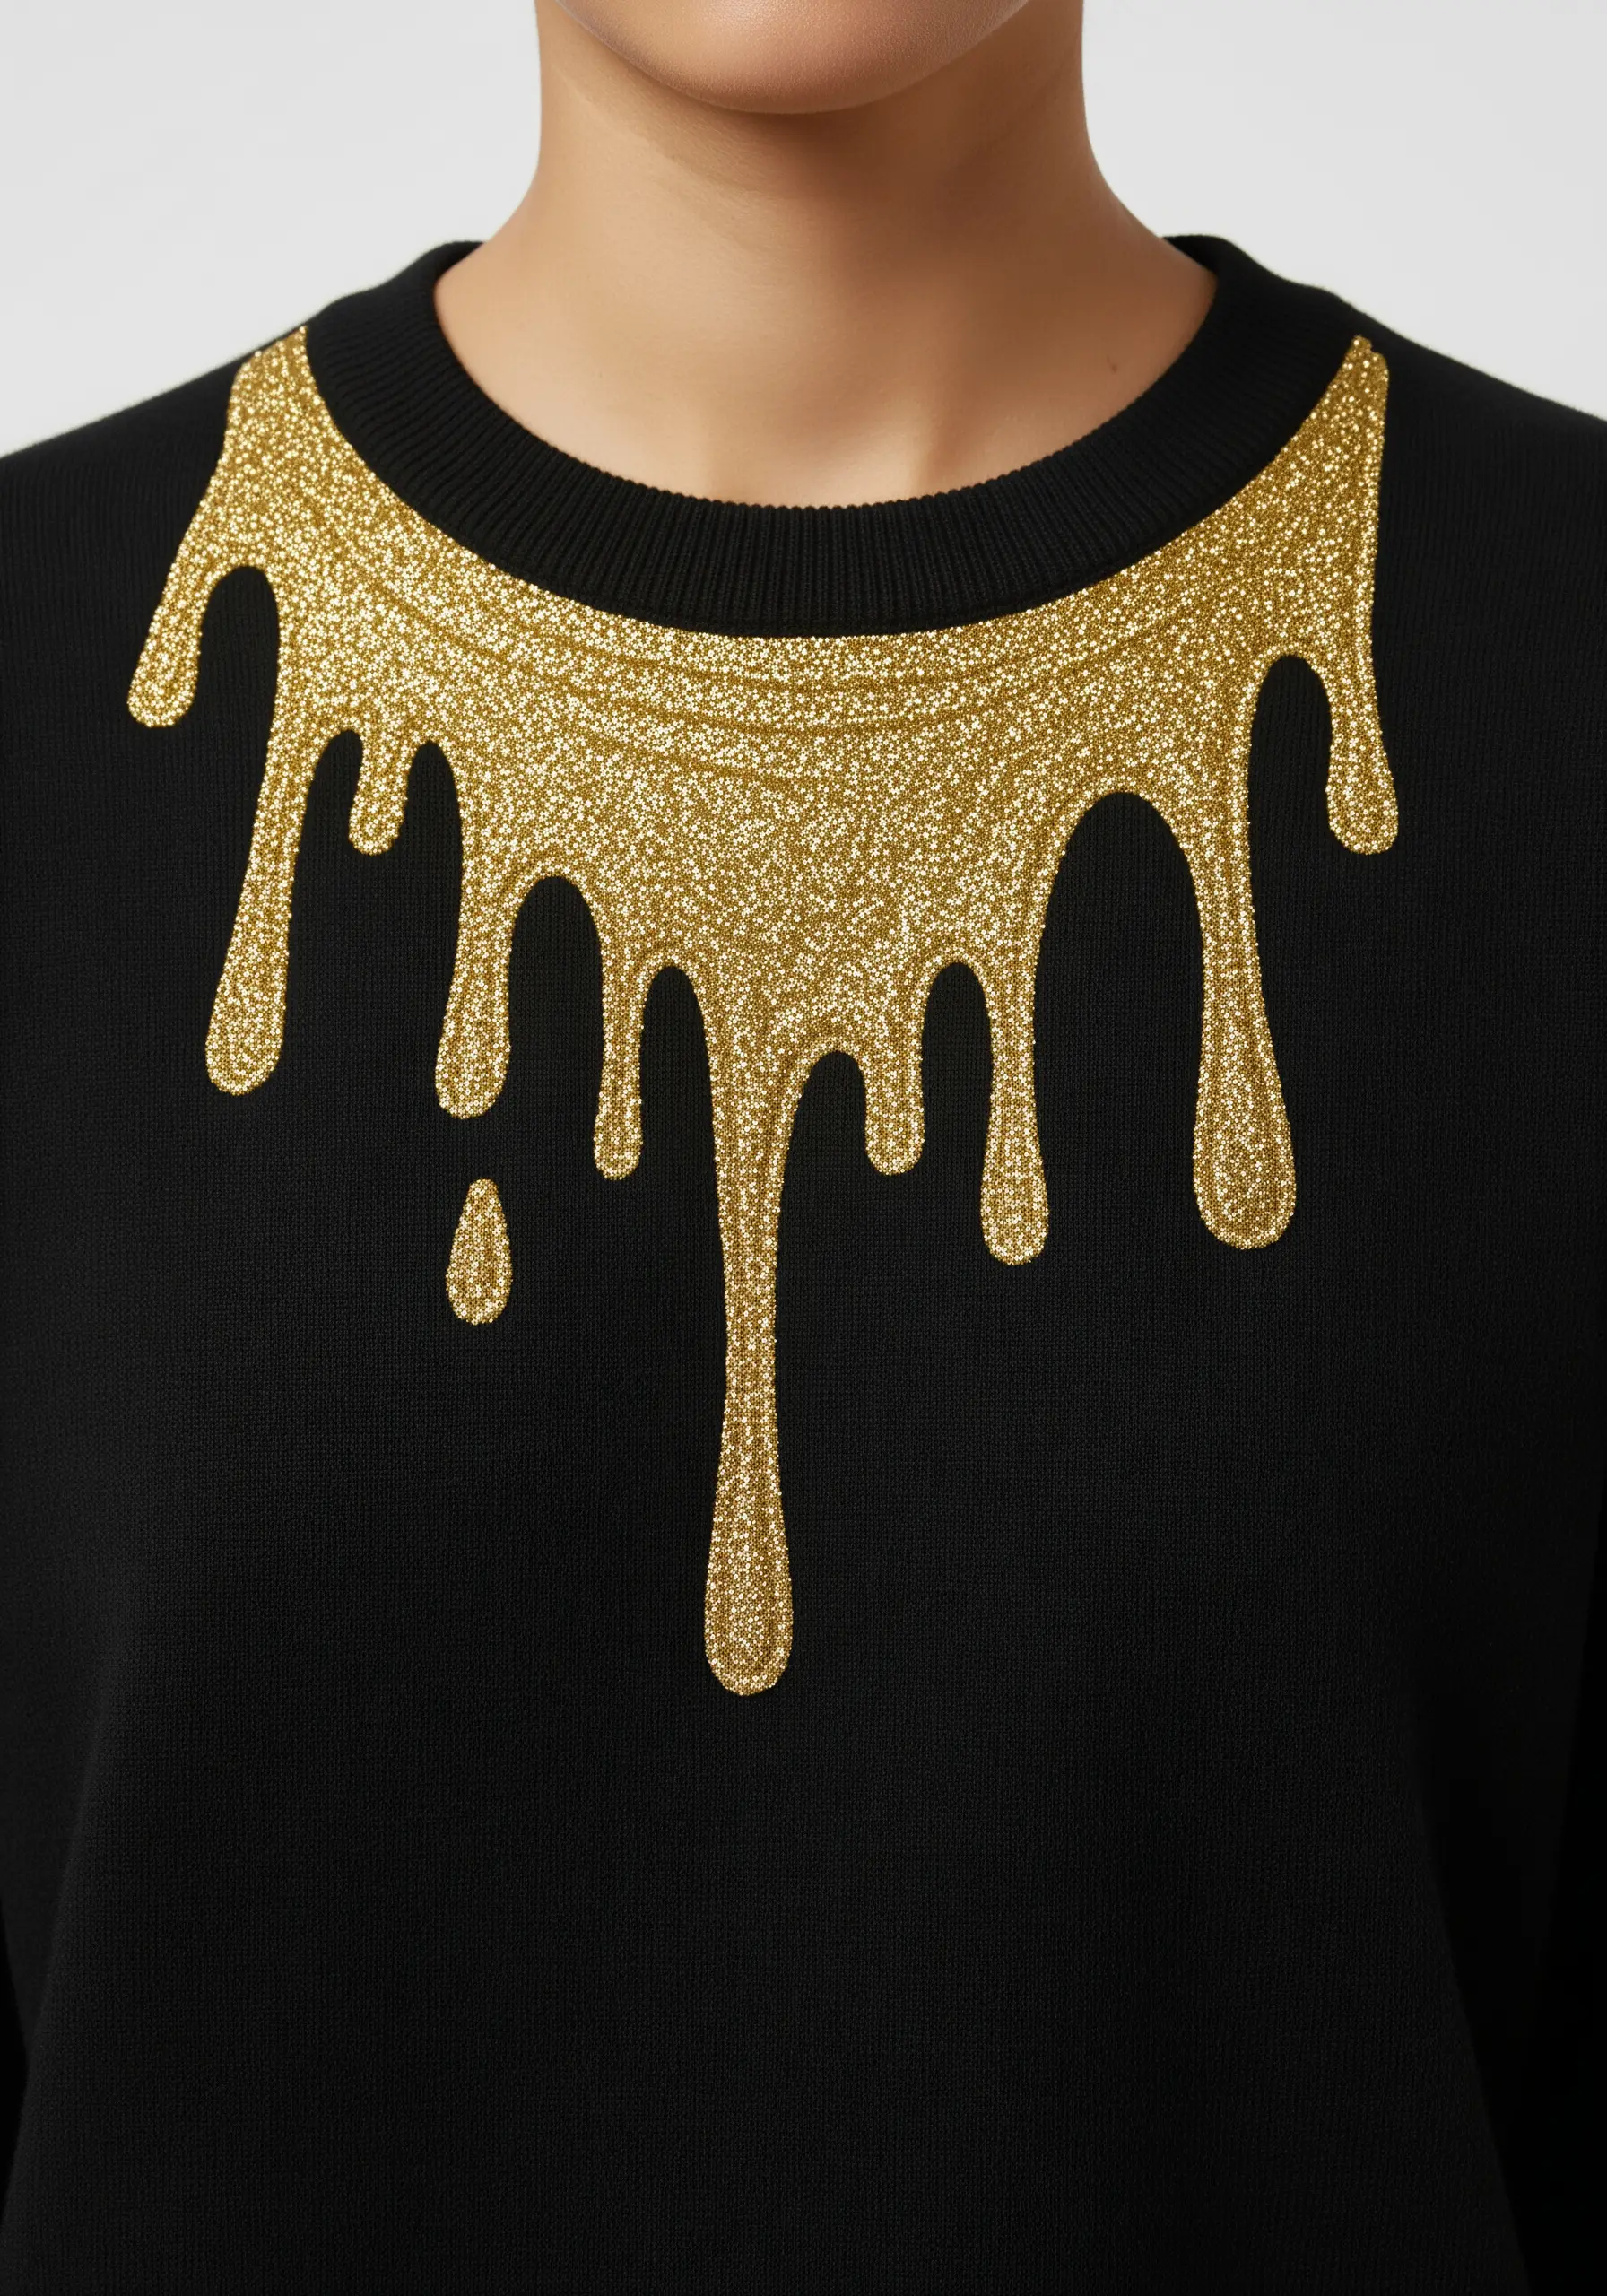
To create this fluid, dripping look, you need a fill stitch that is dense and smooth.
A tight, machine-embroidered tatami fill or a meticulously worked hand satin stitch is perfect for achieving that solid, liquid-gold appearance.
Trace your drip pattern with a disappearing ink pen, ensuring the curves are organic and varied in length for a natural feel.
Using a high-quality, densely packed gold glitter thread on a matte black knit base makes the design feel incredibly luxe and dimensional.
15. Elegant Iris with Thread Painting
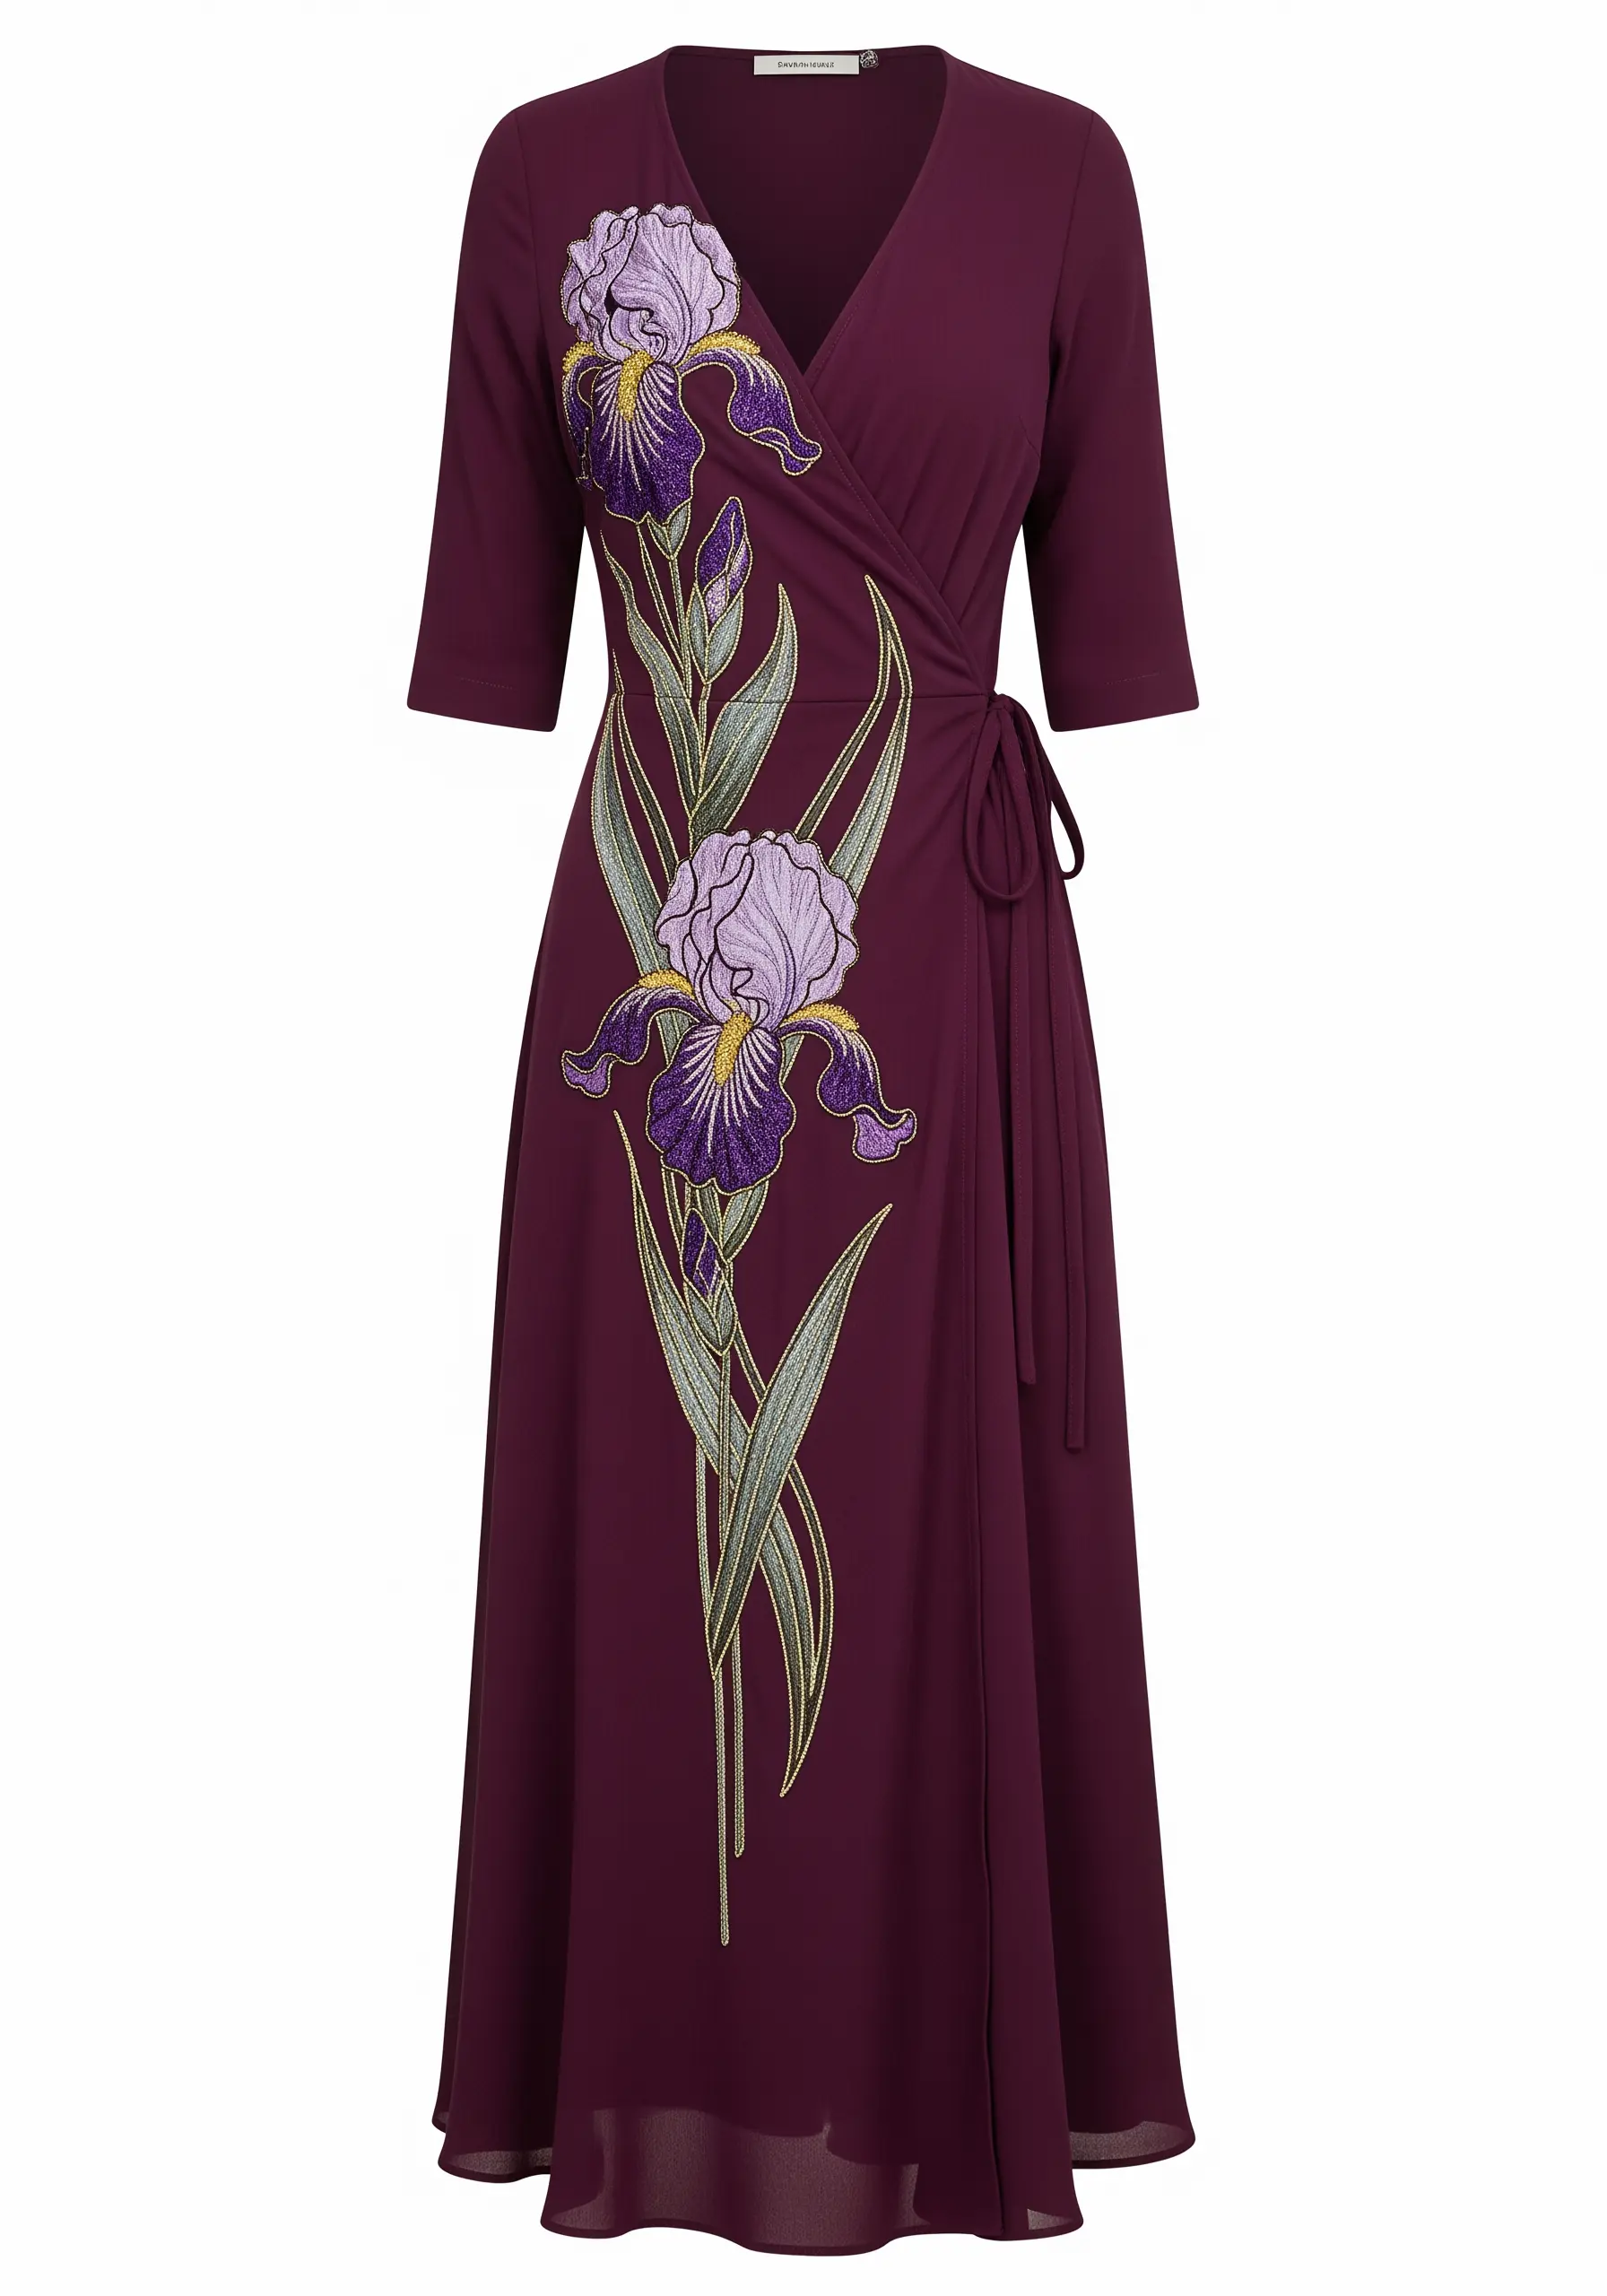
Achieve painterly depth in your florals by blending different shades of glitter thread.
Use a long-and-short stitch to fill the iris petals, subtly transitioning from a deep violet to a lighter lavender glitter thread.
This technique eliminates hard lines between colors and creates a soft, realistic gradient.
For the leaves, use a fishbone stitch to create a central vein and add natural dimension, combining a sage green with a silver glitter thread for highlights.
16. Delicate Spiderweb with Dewdrops

For a design this delicate, a single strand of fine metallic or glitter thread is all you need.
Use a simple backstitch for the main threads of the web, radiating from the neckline for a flattering effect.
Create the concentric circles with a gently curved running stitch.
Instead of stitching dewdrops, sew on tiny, high-quality crystals or clear beads at the intersections. This mixed-media embroidery approach adds a touch of three-dimensional sparkle that catches the light beautifully.
17. Cherry Blossoms with Gradient Petals

Give your cherry blossoms a delicate, realistic look by combining three different threads.
Outline the branches with a couched brown glitter thread for a textured, bark-like finish.
For the petals, use a satin stitch with a simple white thread for the main fill.
Finally, add a touch of deep pink or red glitter thread to the center of each flower with just a few straight stitches, creating a subtle gradient that draws the eye.
18. Liquid Metal Appliqué
This bold look is achieved by combining appliqué with embroidery for a high-impact, graphic effect.
Cut your abstract shapes from a metallic silver lamé or faux leather fabric.
Use a temporary fabric adhesive to place them securely before stitching.
Finally, outline each shape with a tight, dense satin stitch in a matching silver glitter thread. This technique secures the appliqué and creates a clean, raised border that makes the design pop.
19. Celestial Velvet with Contrasting Textures

When embroidering on velvet, its plush pile requires you to use a water-soluble topper.
This thin film sits on top of the fabric, preventing your stitches from sinking in and getting lost.
For the sun, a dense satin stitch with gold glitter thread creates a solid, reflective surface.
For the moon, use silver glitter thread combined with tiny seed beads or French knots. This adds a different kind of sparkle and enhances the minimal celestial embroidery aesthetic with texture.
20. Layered Botanical Appliqué
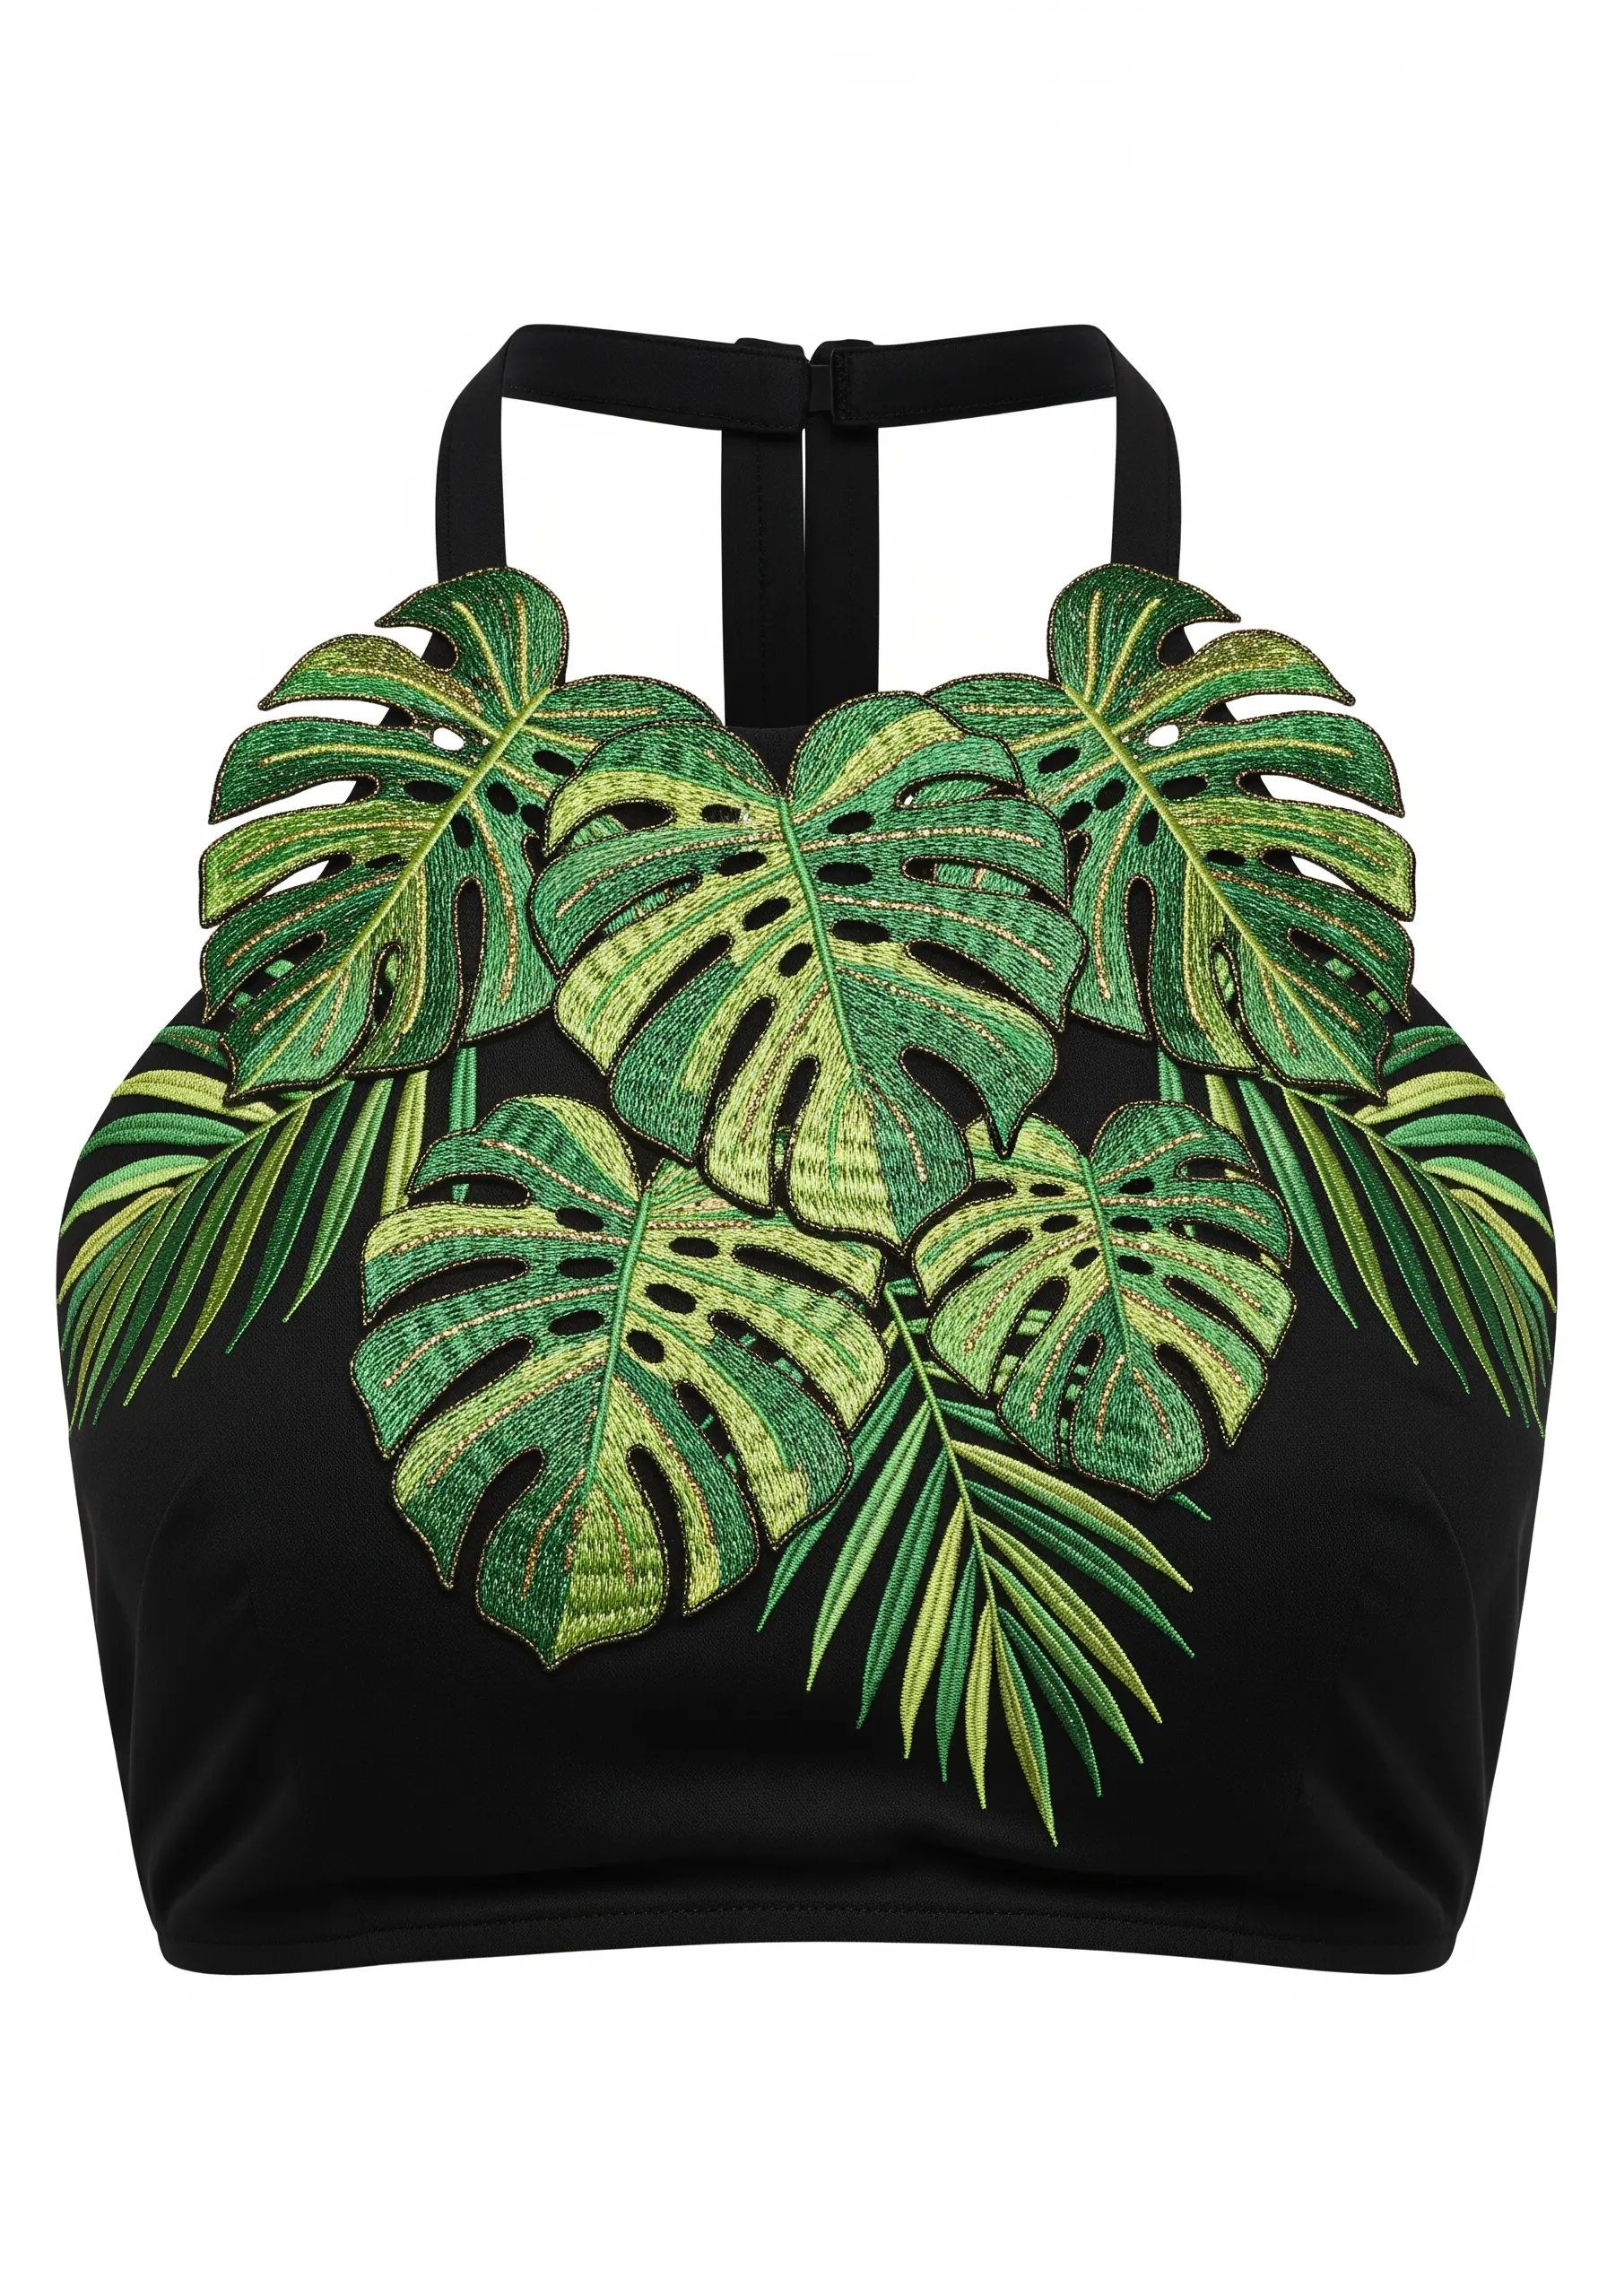
Create stunning, dimensional leaves by layering appliqué with glitter thread embroidery.
First, cut your monstera leaf shapes from a stable cotton fabric and use a light adhesive to position them on your top.
Edge each leaf with a tight satin stitch in a dark green glitter thread to secure it and provide a clean border.
Add the veins and variegation by stitching directly onto the appliqué pieces with various shades of green and gold glitter thread. This layering adds incredible depth and a professional finish.
21. Explosive Stitches on a Sequin Base

Embroidering on a pre-sequined fabric can create an incredible layering of sparkle.
Use a strong, sharp needle (like a topstitch needle) that can handle the dense material.
Create firework bursts with simple radiating straight stitches in various colors of glitter thread—gold, silver, red, and blue.
For the smaller starbursts, use a cluster of French knots in a single color. This technique adds texture on top of texture for a truly dazzling result.
22. The Great Wave in Glitter Thread

Capture the movement of Hokusai’s wave by focusing on stitch direction and color blocking.
Use a satin stitch or a tight long-and-short stitch to fill each section of the wave, ensuring your stitches follow the curve of the water.
Block out the colors using different shades of blue, aqua, and white glitter thread to create clear, graphic separation.
The white glitter thread for the sea foam should be stitched last, overlapping the blue sections slightly to create a sense of crashing spray.
23. Phoenix Wings with an Ombré Effect
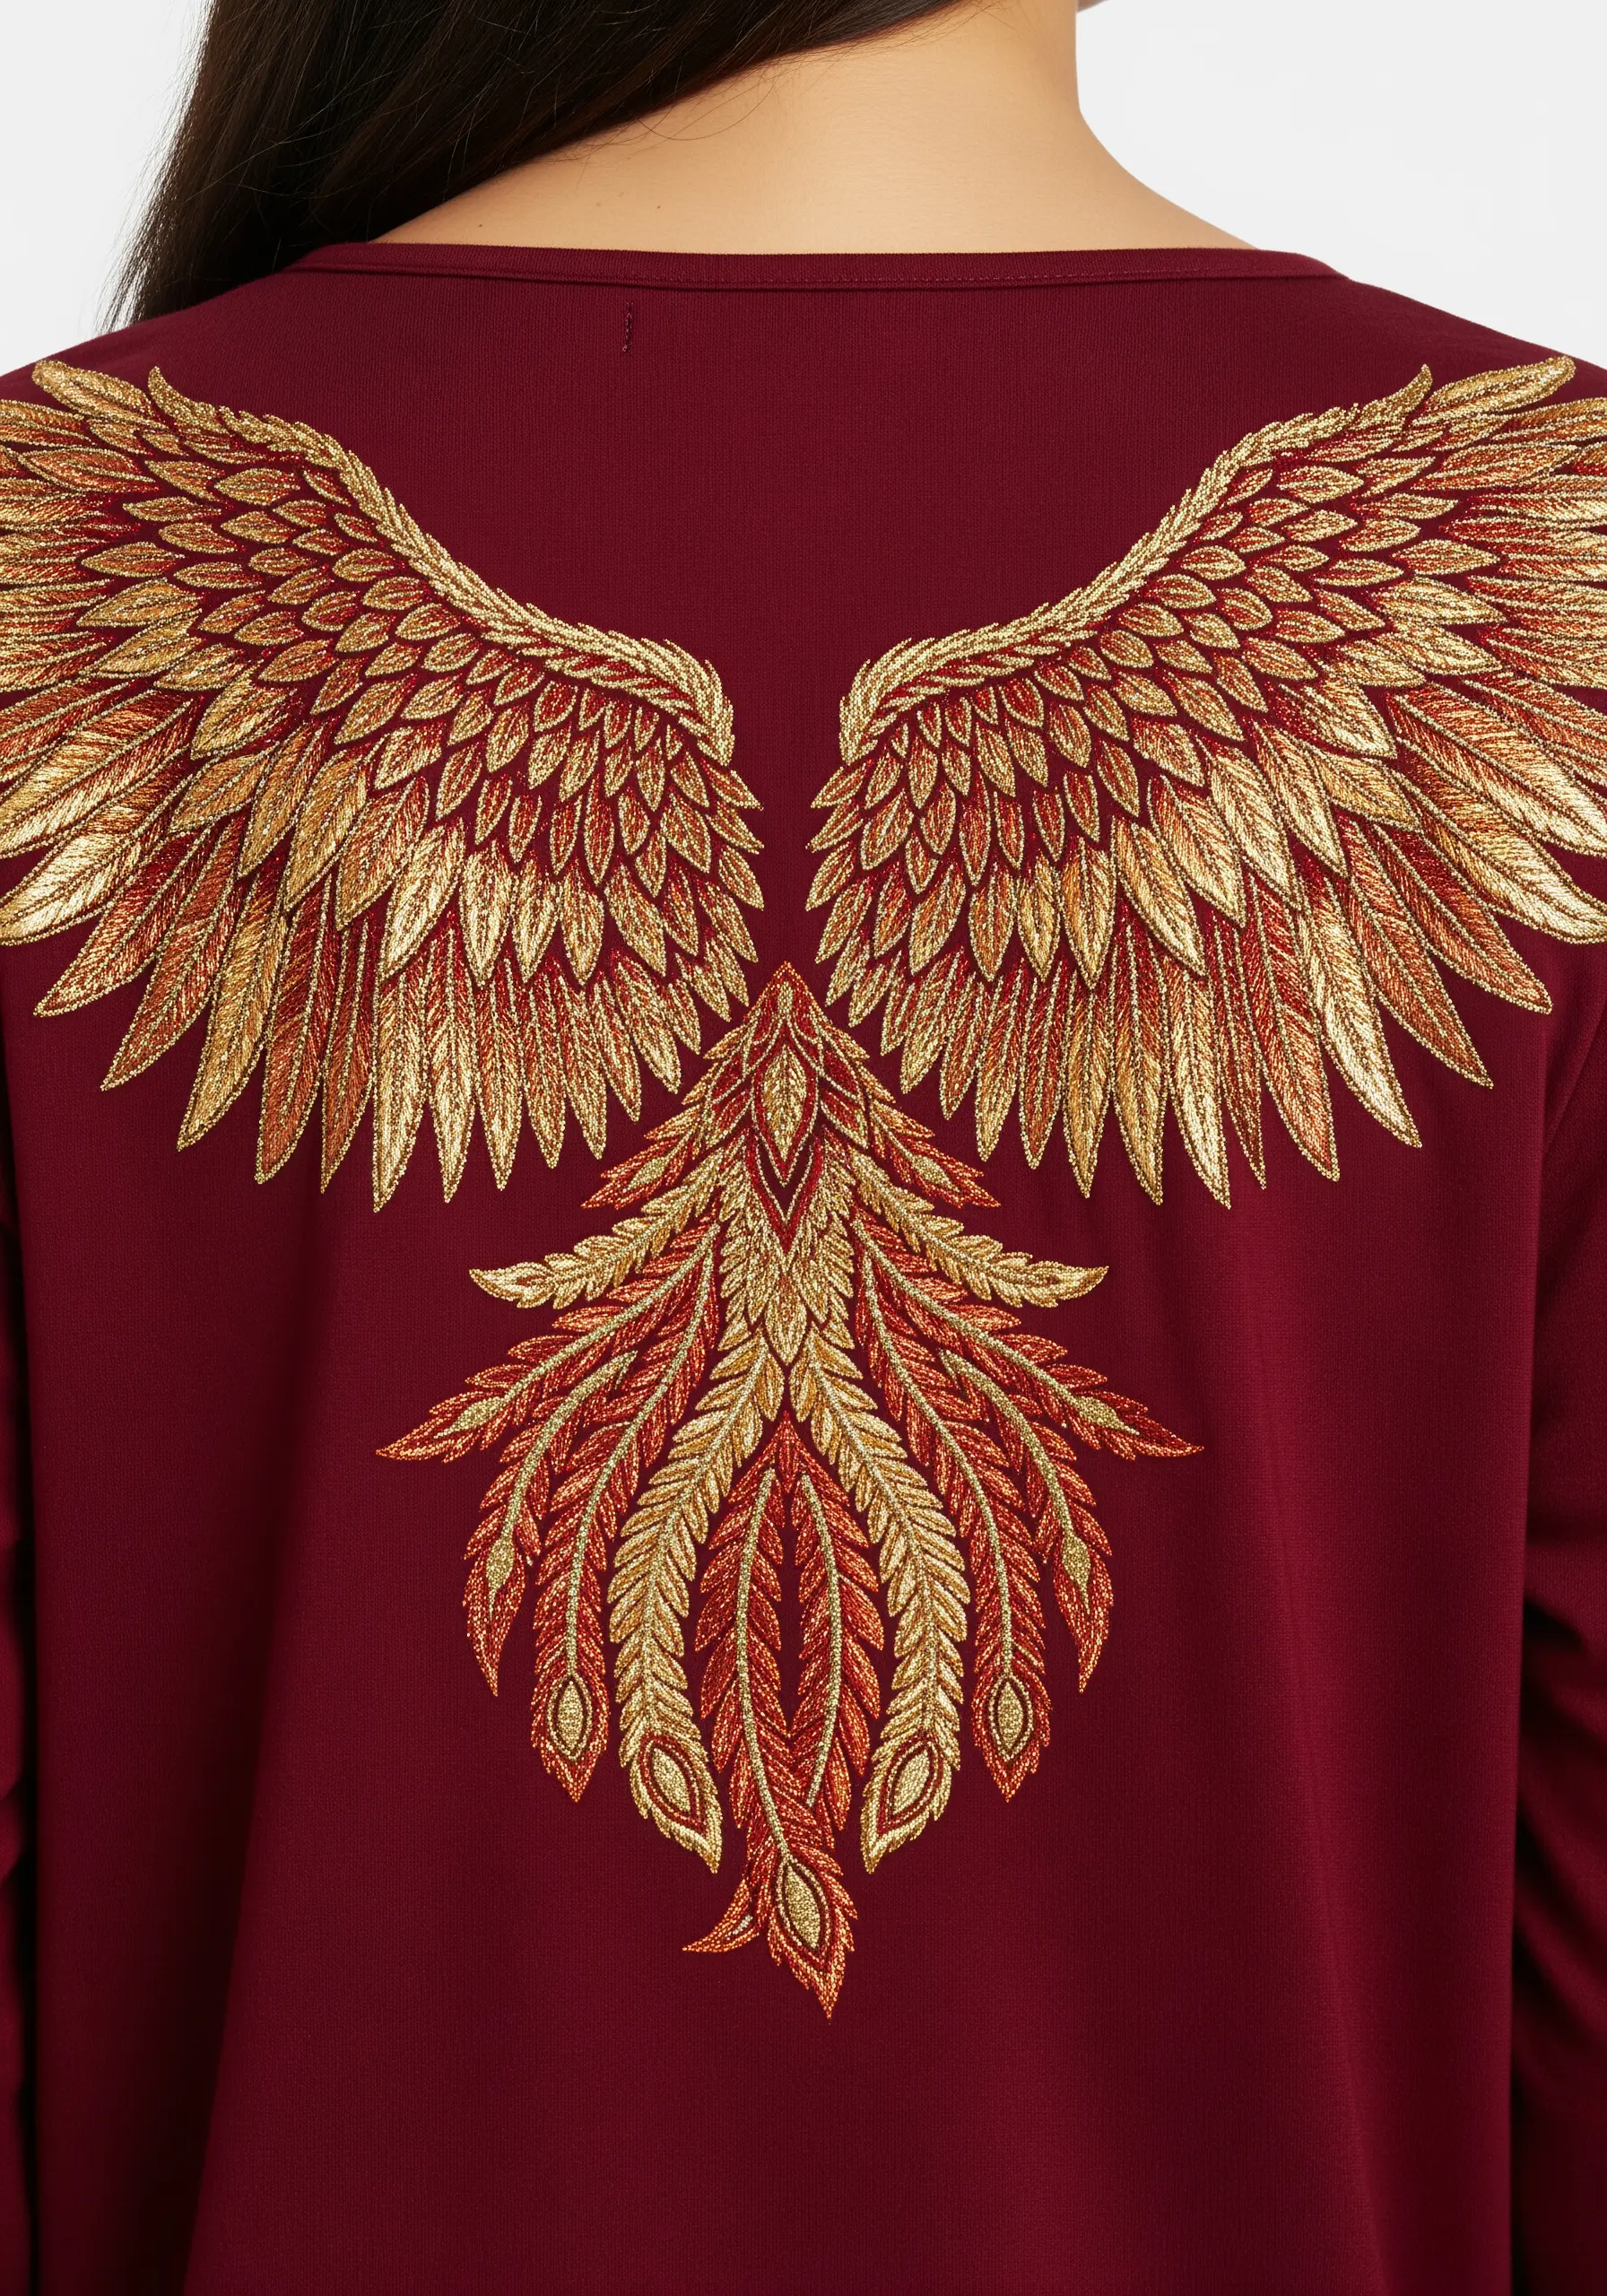
Create a fiery ombré effect in these majestic wings by carefully blending your glitter threads.
Use a long-and-short stitch, starting with a deep red or copper glitter thread at the bottom of the feathers.
Gradually introduce a gold glitter thread, overlapping your stitches to create a seamless transition from one color to the next.
This thread painting technique gives the wings a sense of depth, warmth, and magical radiance.
24. Bejeweled Mandala on Jersey

Elevate a classic mandala design by incorporating beads and pearls alongside your glitter thread.
Embroider the intricate lines of the mandala using silver, gold, and lavender glitter threads in a simple backstitch or stem stitch.
At key intersections and along the outer edges, strategically sew on small faux pearls and silver beads.
This combination adds not just sparkle but also a three-dimensional, tactile quality that makes the design feel incredibly rich and ornate. Remember to use a stabilizer on this stretchy fabric!
25. Geometric Rose Gold Accents

For a modern, graphic look, pair a trendy metallic like rose gold with a neutral base fabric.
Use a crisp backstitch for the geometric outlines to keep the lines sharp and clean.
For the filled-in triangles, you can use a dense satin stitch, but a seed stitch fill will offer a more textured, contemporary sparkle.
This contrast between clean lines and textured fills creates a design that feels both architectural and effortlessly chic.
26. Iridescent Dragonfly Wings

To mimic the delicate, iridescent quality of dragonfly wings, you’ll need a sheer, glitter-infused appliqué fabric.
Cut the wing shapes from iridescent organza and tack them onto your garment.
Outline the wings and stitch the veins using a fine, dark blue glitter thread and a simple backstitch.
For the body, use a chunkier, more textured glitter thread or chenille in turquoise and black to create a fuzzy, dimensional look that contrasts beautifully with the ethereal wings.
27. Ornate Keyhole and Pearl Embellishment
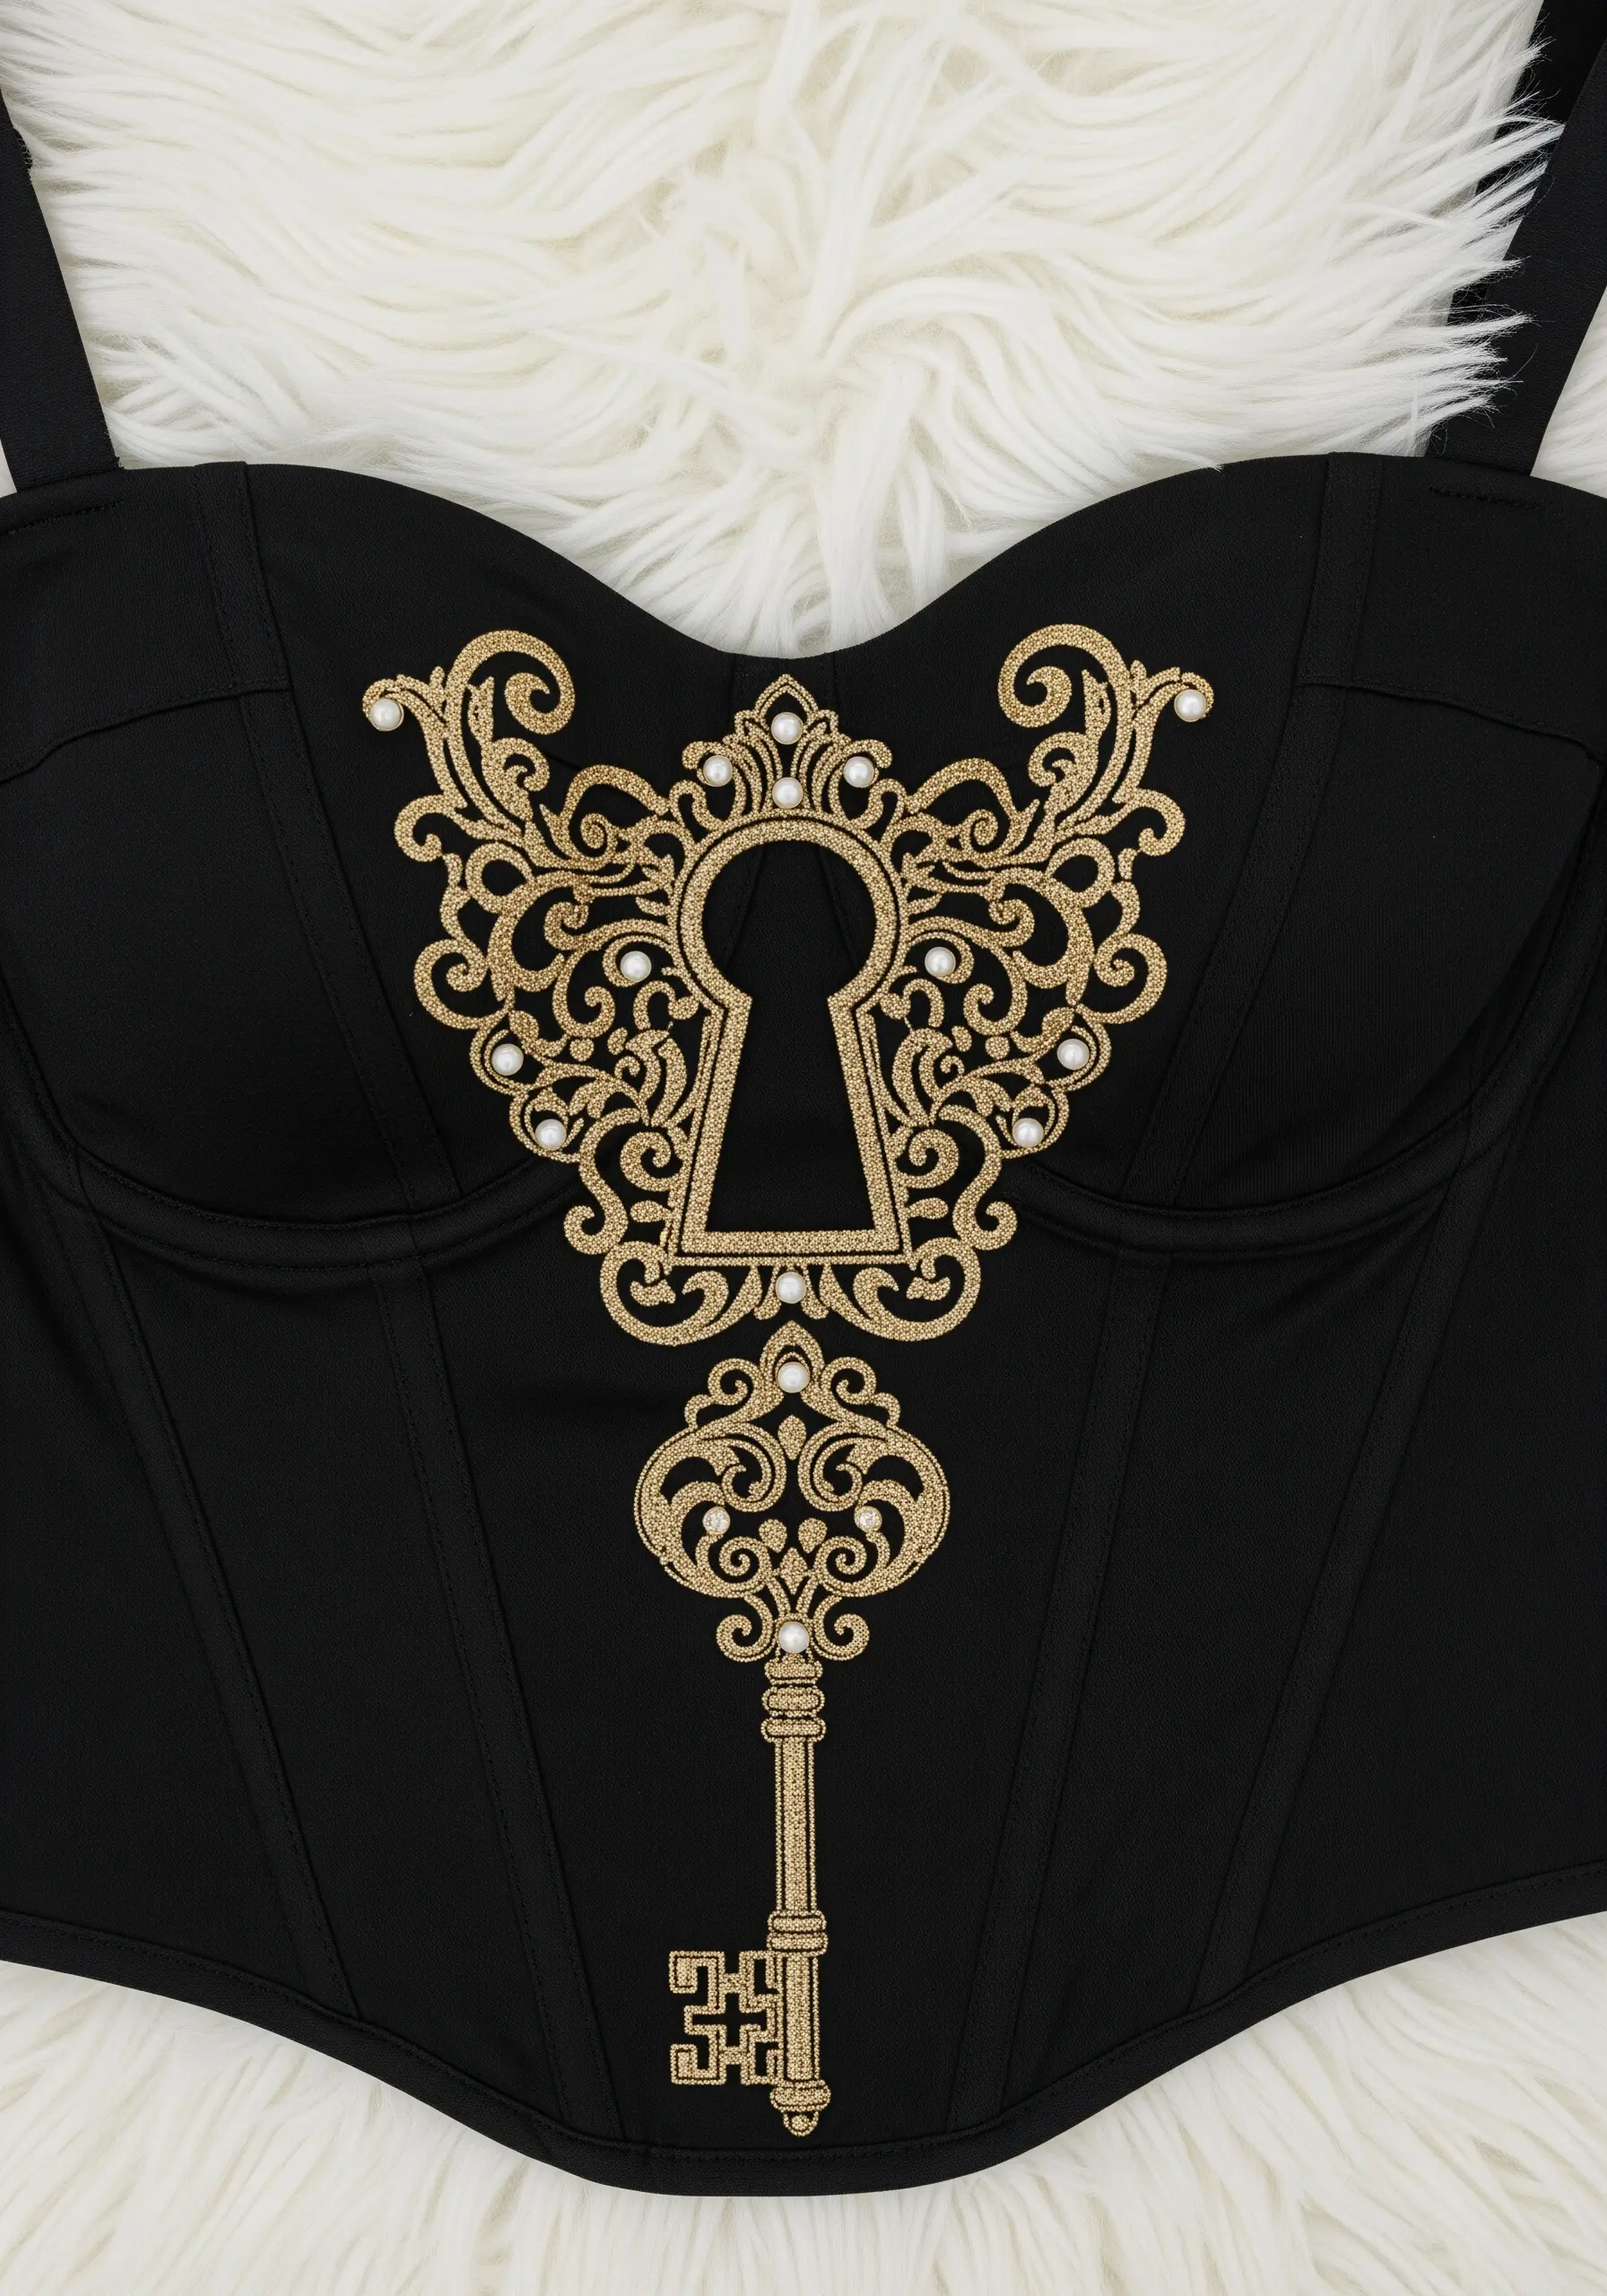
Create an elegant, antique feel by pairing gold glitter thread with classic pearls.
Use a raised satin stitch for the main scrollwork of the key and keyhole to give it dimension and a heavy, metallic feel.
Outline the entire design with a single row of couched thread for a sharp, clean finish.
Finally, sew small faux pearls into the loops of the scrollwork. This adds a soft, classic counterpoint to the sharp sparkle of the gold thread.
28. Scattered Musical Notes

For a playful, scattered pattern, the key is to vary the orientation and size of your motifs.
Use a simple satin stitch to fill in the musical notes with a bright silver glitter thread.
To ensure the glitter texture is consistent and smooth, keep all your satin stitches running in the same direction—either horizontally or vertically.
This simple fill technique makes the notes pop against the dark fabric, creating a fun and eye-catching design that doesn’t require complex stitches.
29. Glittering Solar System on Mesh
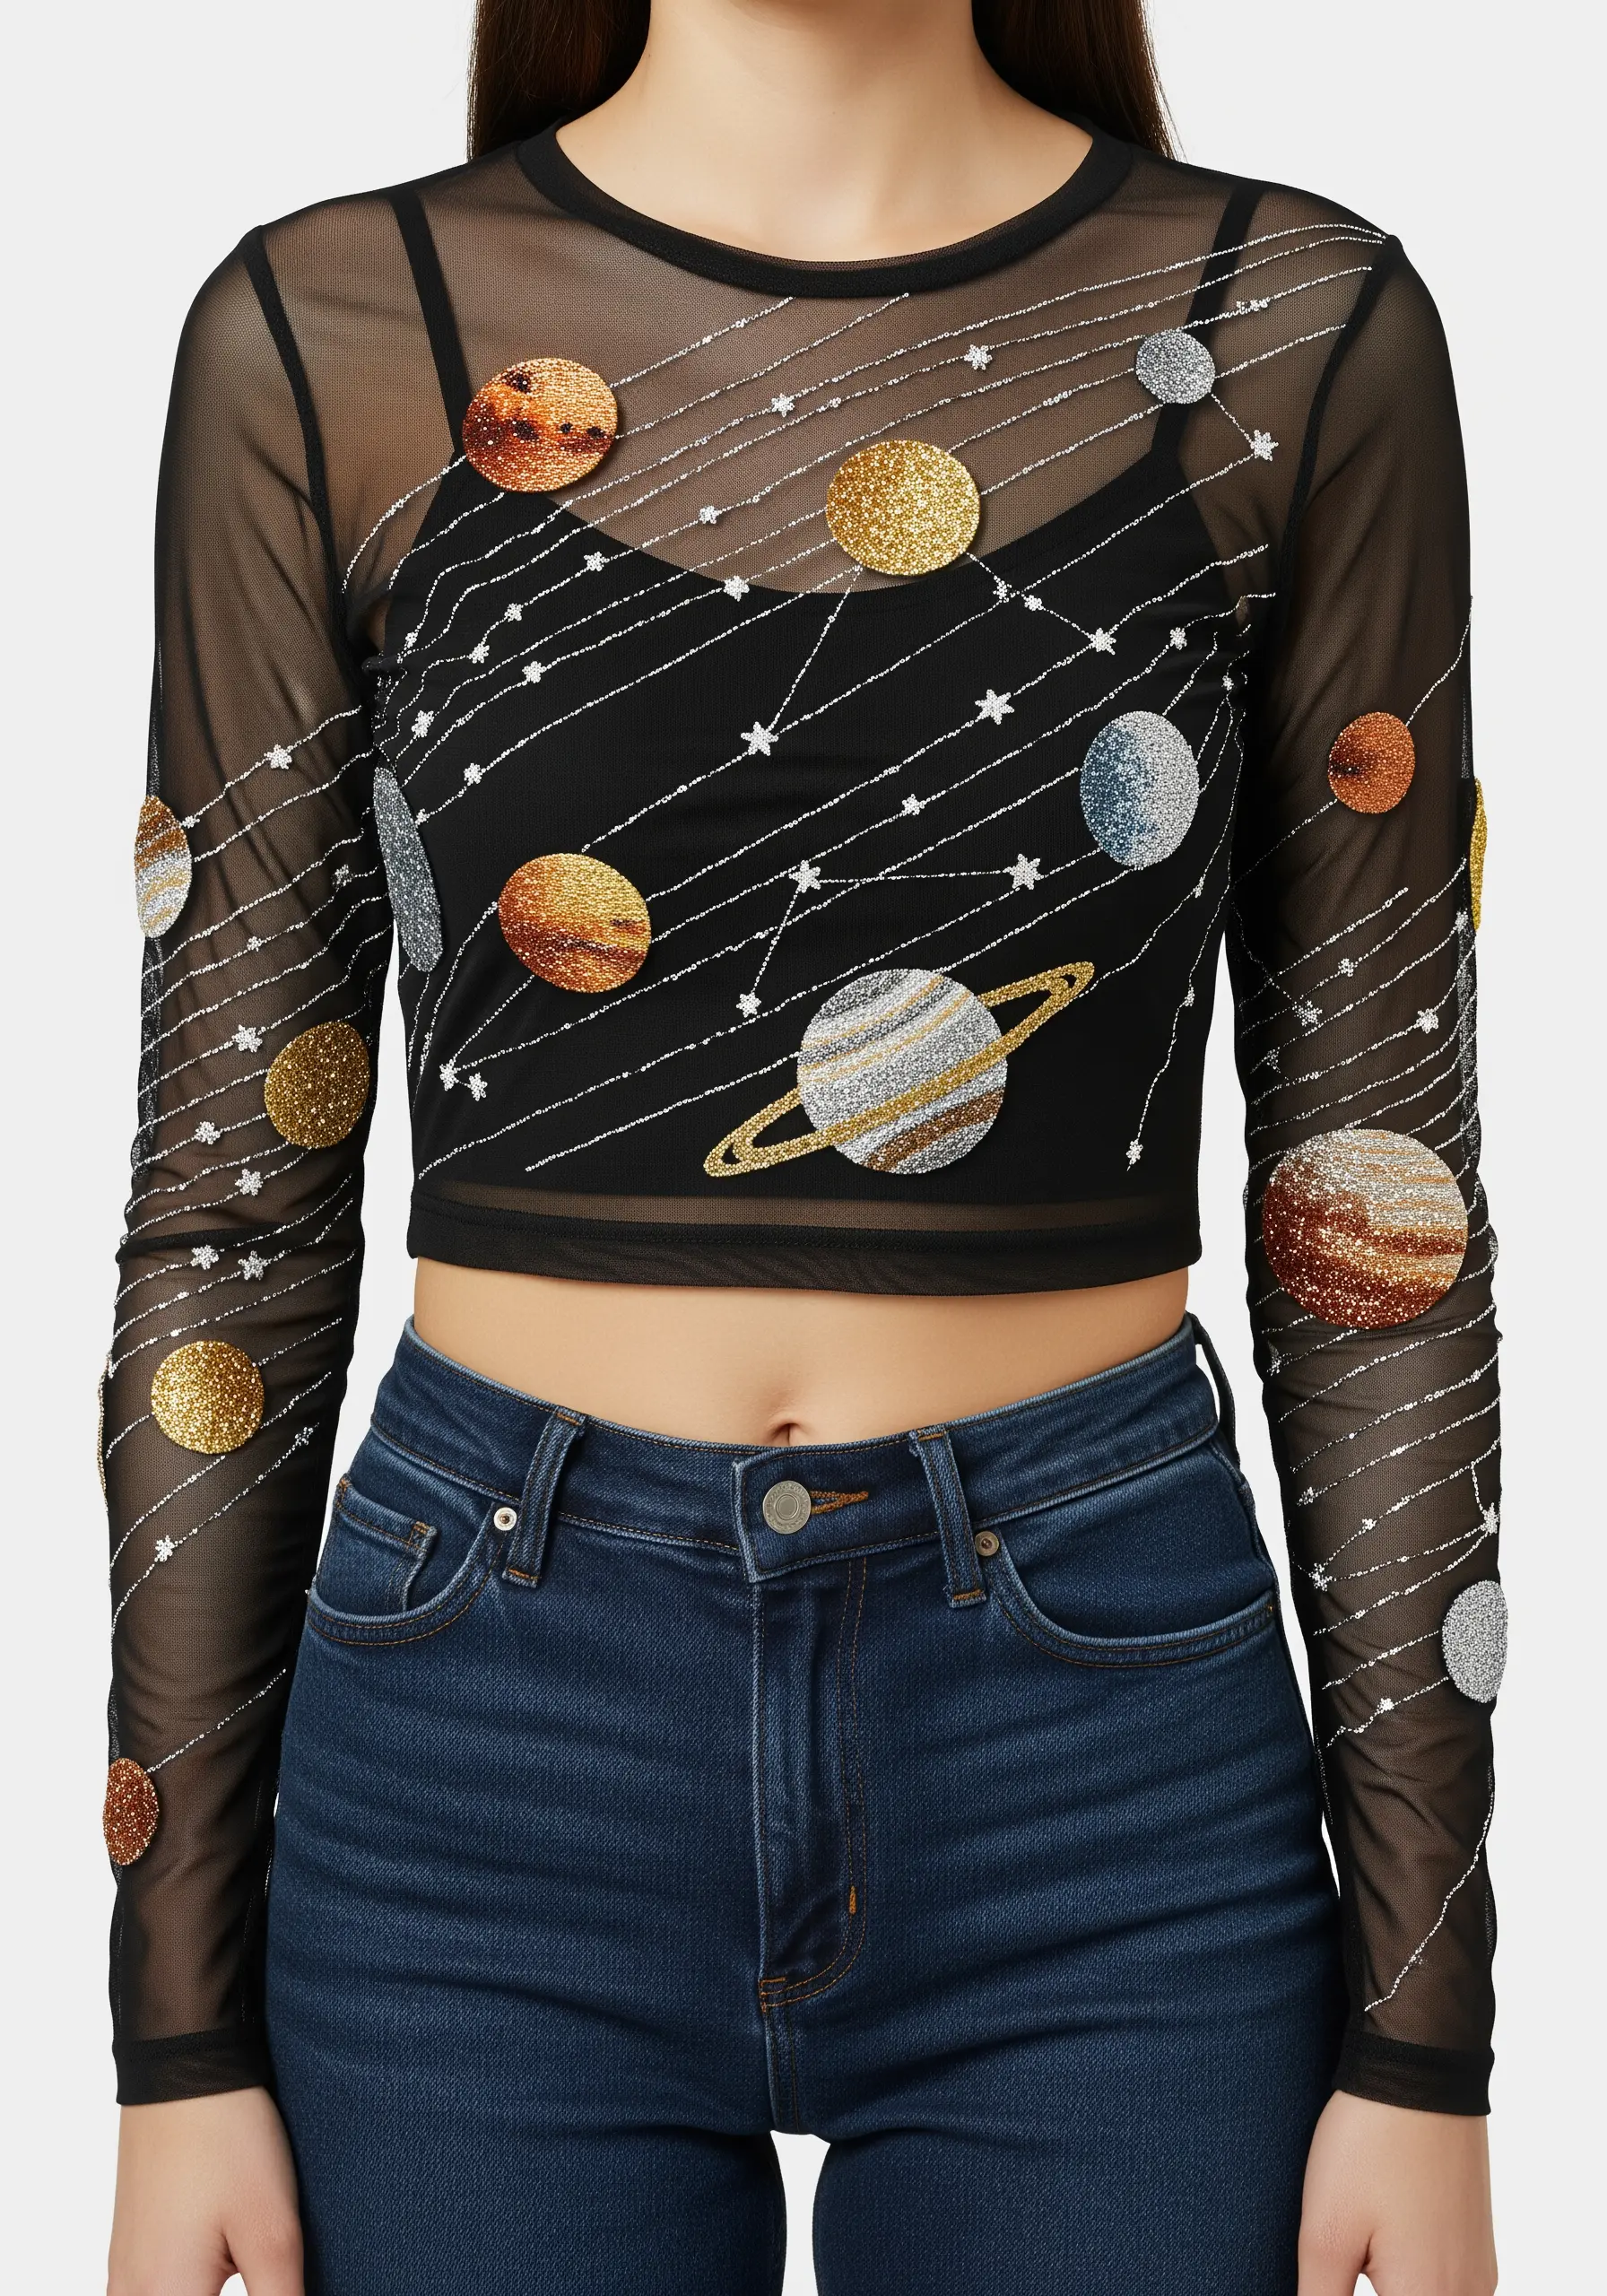
Layering embroidery on sheer mesh creates a stunning, multi-dimensional effect.
Again, a water-soluble stabilizer is crucial here for support.
For the planets, use a dense, machine-embroidered fill stitch with variegated glitter threads to mimic their surfaces.
Use a simple, fine silver glitter thread for the orbital paths and stars, stitched with a running stitch. This contrast in thread weight makes the planets feel solid and prominent while the paths remain delicate and cosmic.


