

There’s a quiet magic in translating the night sky into thread, turning a simple piece of fabric into a window to the cosmos. But how do you move beyond basic star shapes and create something that feels both personal and polished? This is where intention comes in.
Forget trying to replicate a photograph. Instead, I want you to think like a mapmaker of dreams. Your needle becomes the pen, your thread the ink. We’ll explore how the weight of a thread can change a star from a distant glimmer to a bold statement, and how a simple change in stitch direction can create the illusion of moonlight on a cratered surface.
These ideas are more than just patterns; they are starting points. They are invitations to embrace negative space, to play with texture, and to build a celestial world that is entirely your own. Your next hoop can be a calm, meditative piece that brings a sense of wonder to your walls.
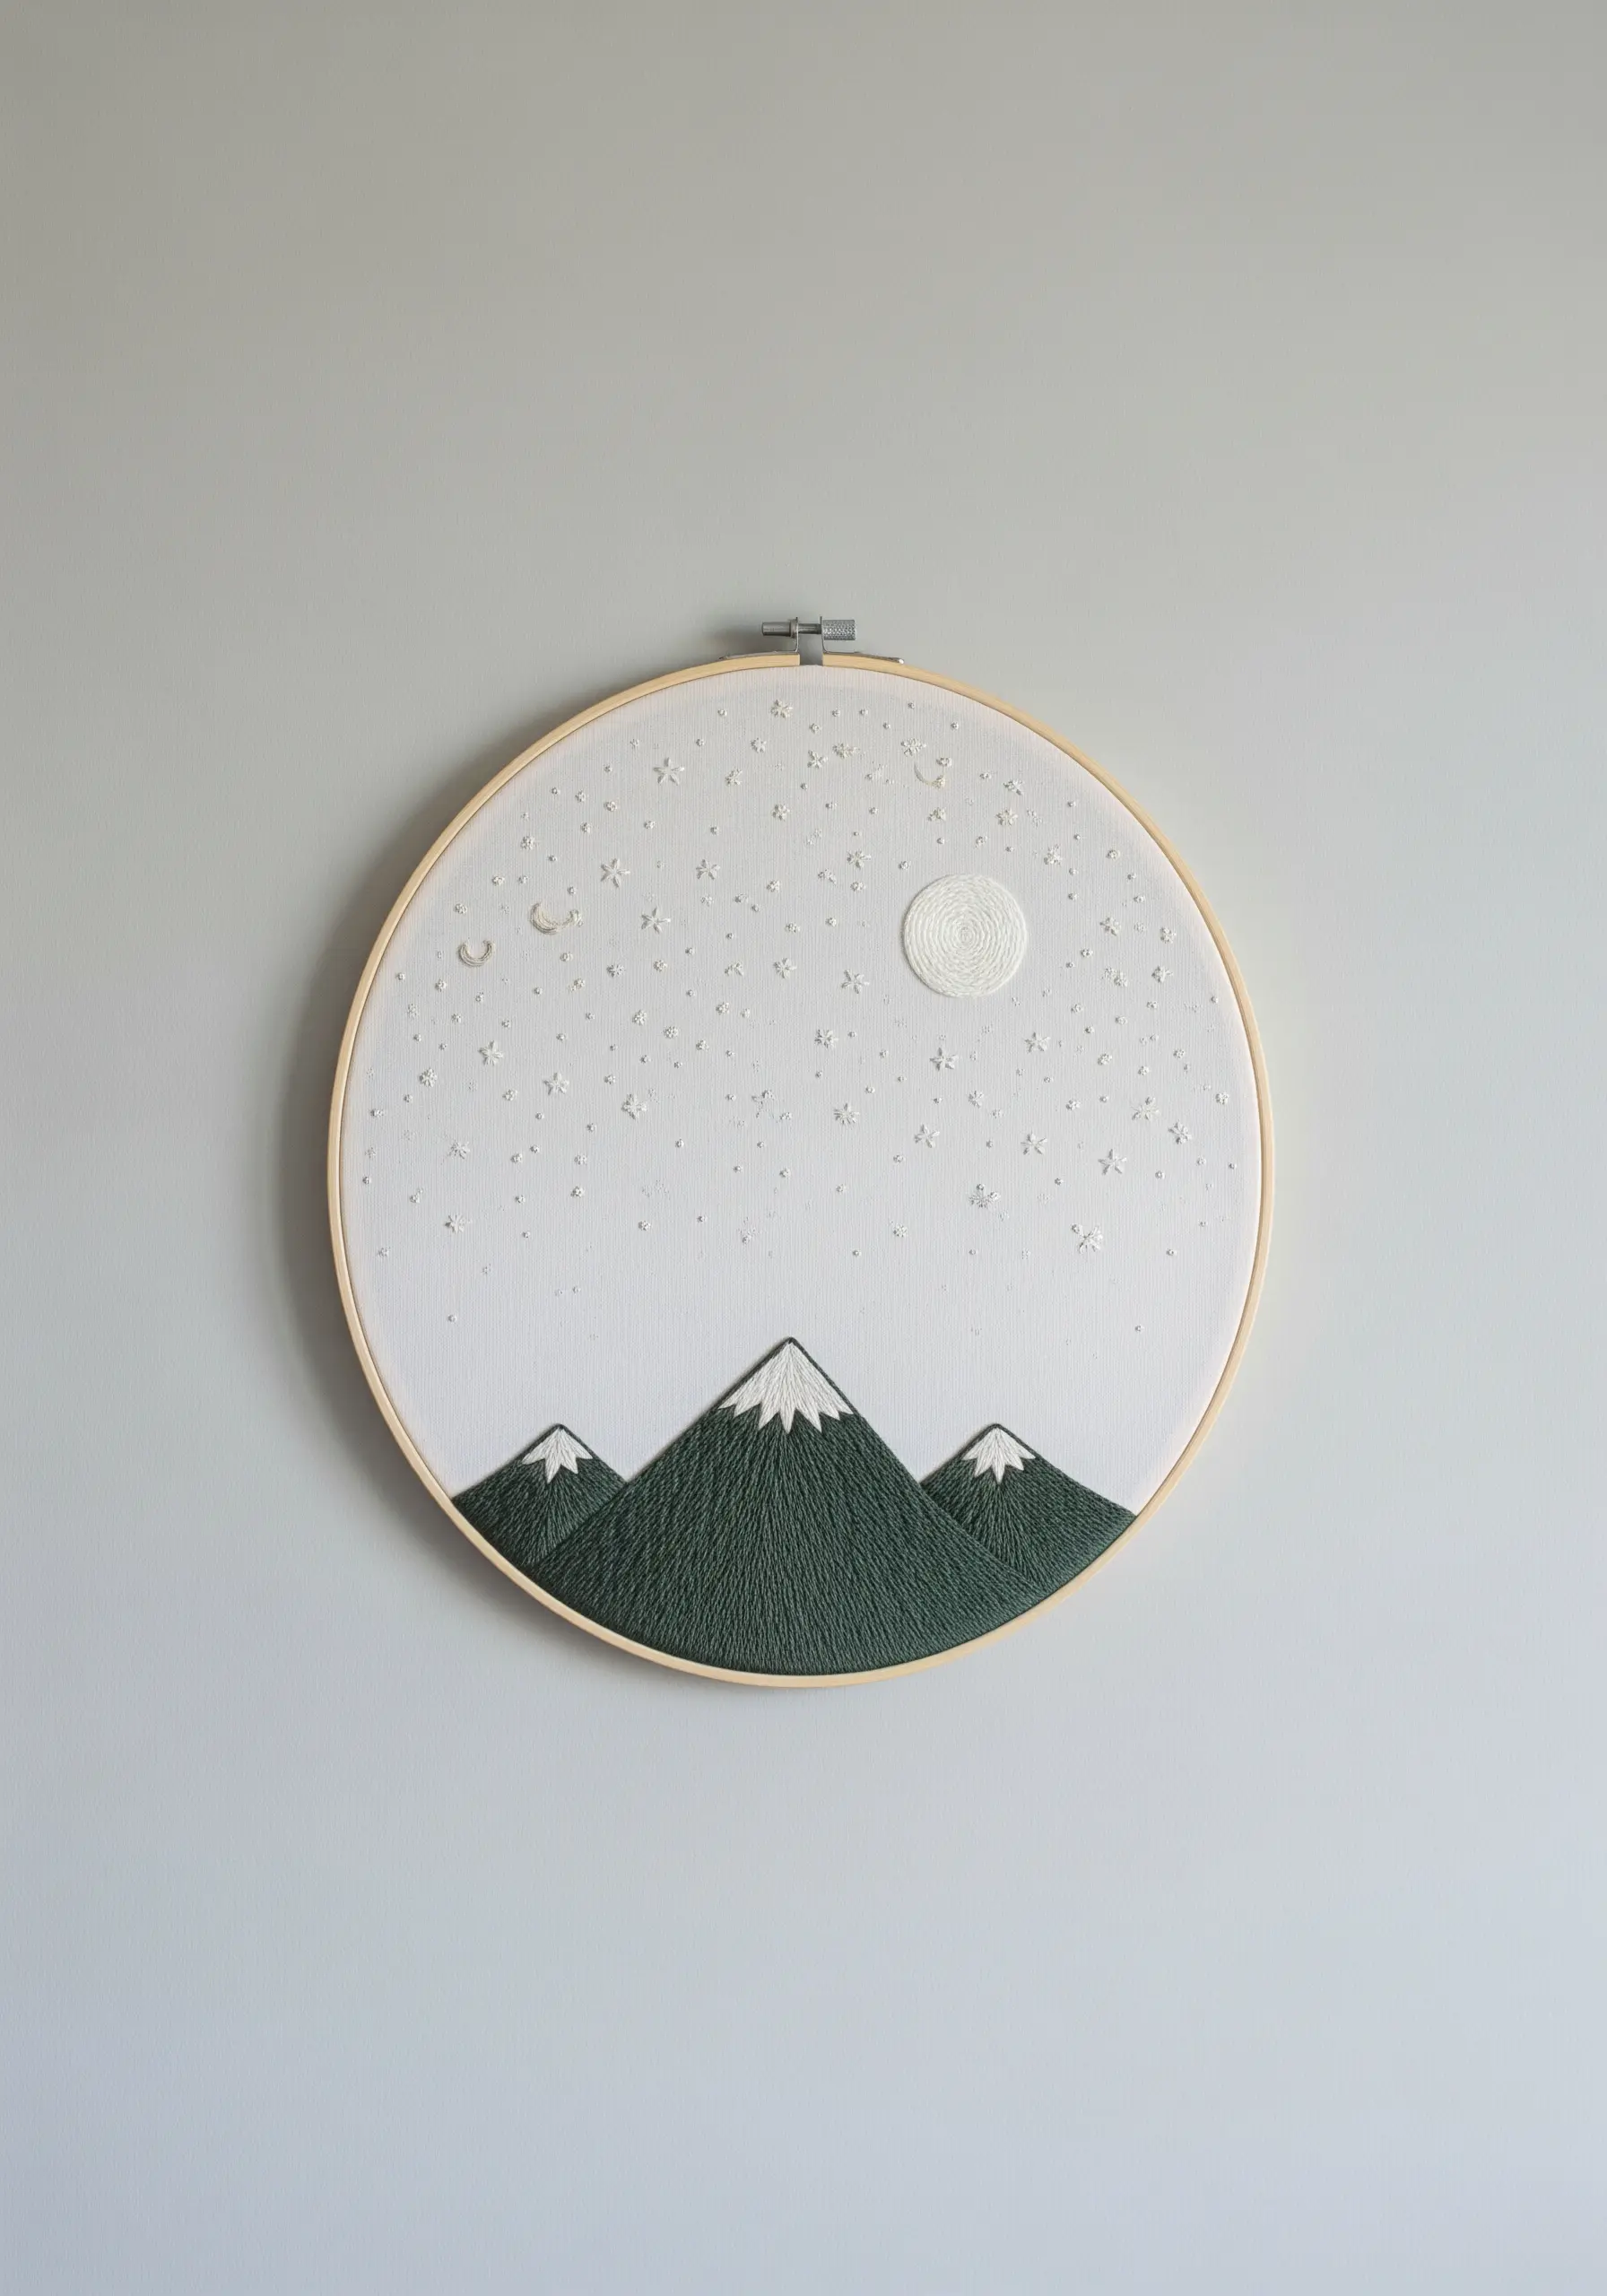
1. Render a Constellation with Architectural Precision
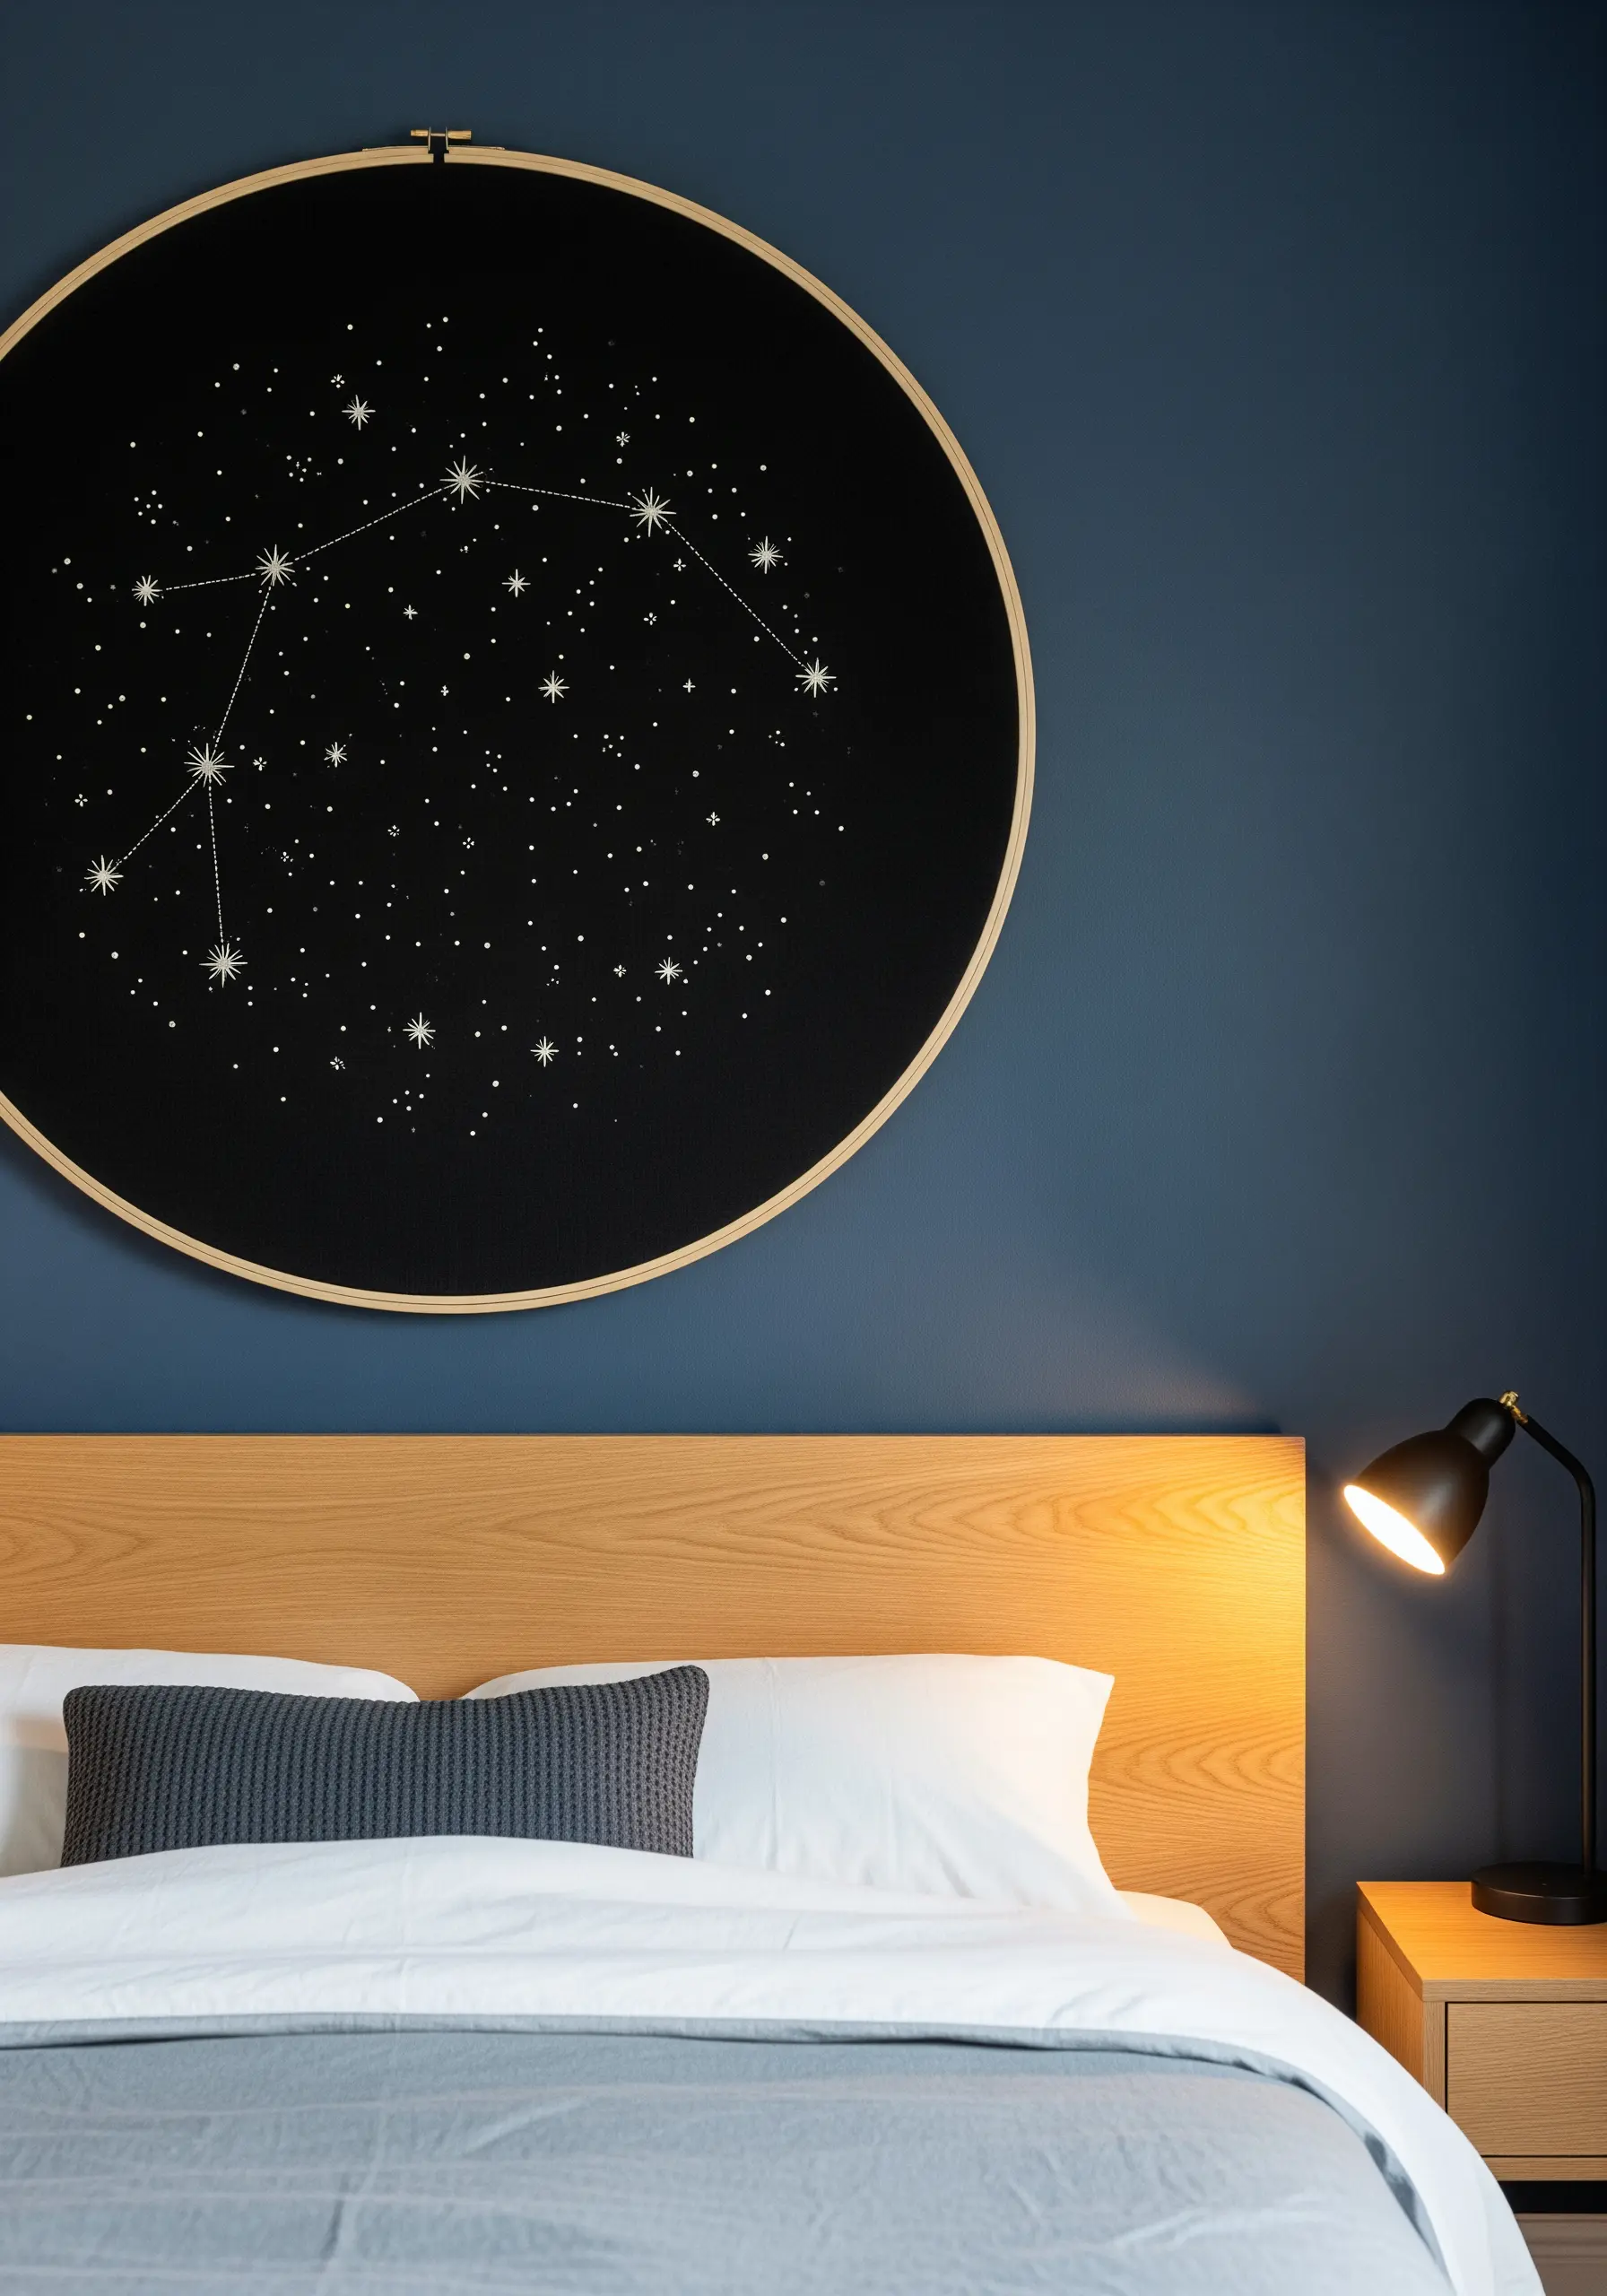
To create a large, dramatic constellation, choose a high-contrast palette like bright white thread on black cotton canvas.
Use a single strand of floss for the connecting lines to keep them sharp and delicate, mimicking the faint paths between stars.
For the stars themselves, vary the size of your French knots by using one, two, or three wraps around the needle—this simple adjustment creates a realistic sense of depth and distance.
This technique transforms a simple star chart into an elegant piece of oversized art, perfect for grounding the space above a headboard.
2. Capture Lunar Texture in a Triptych
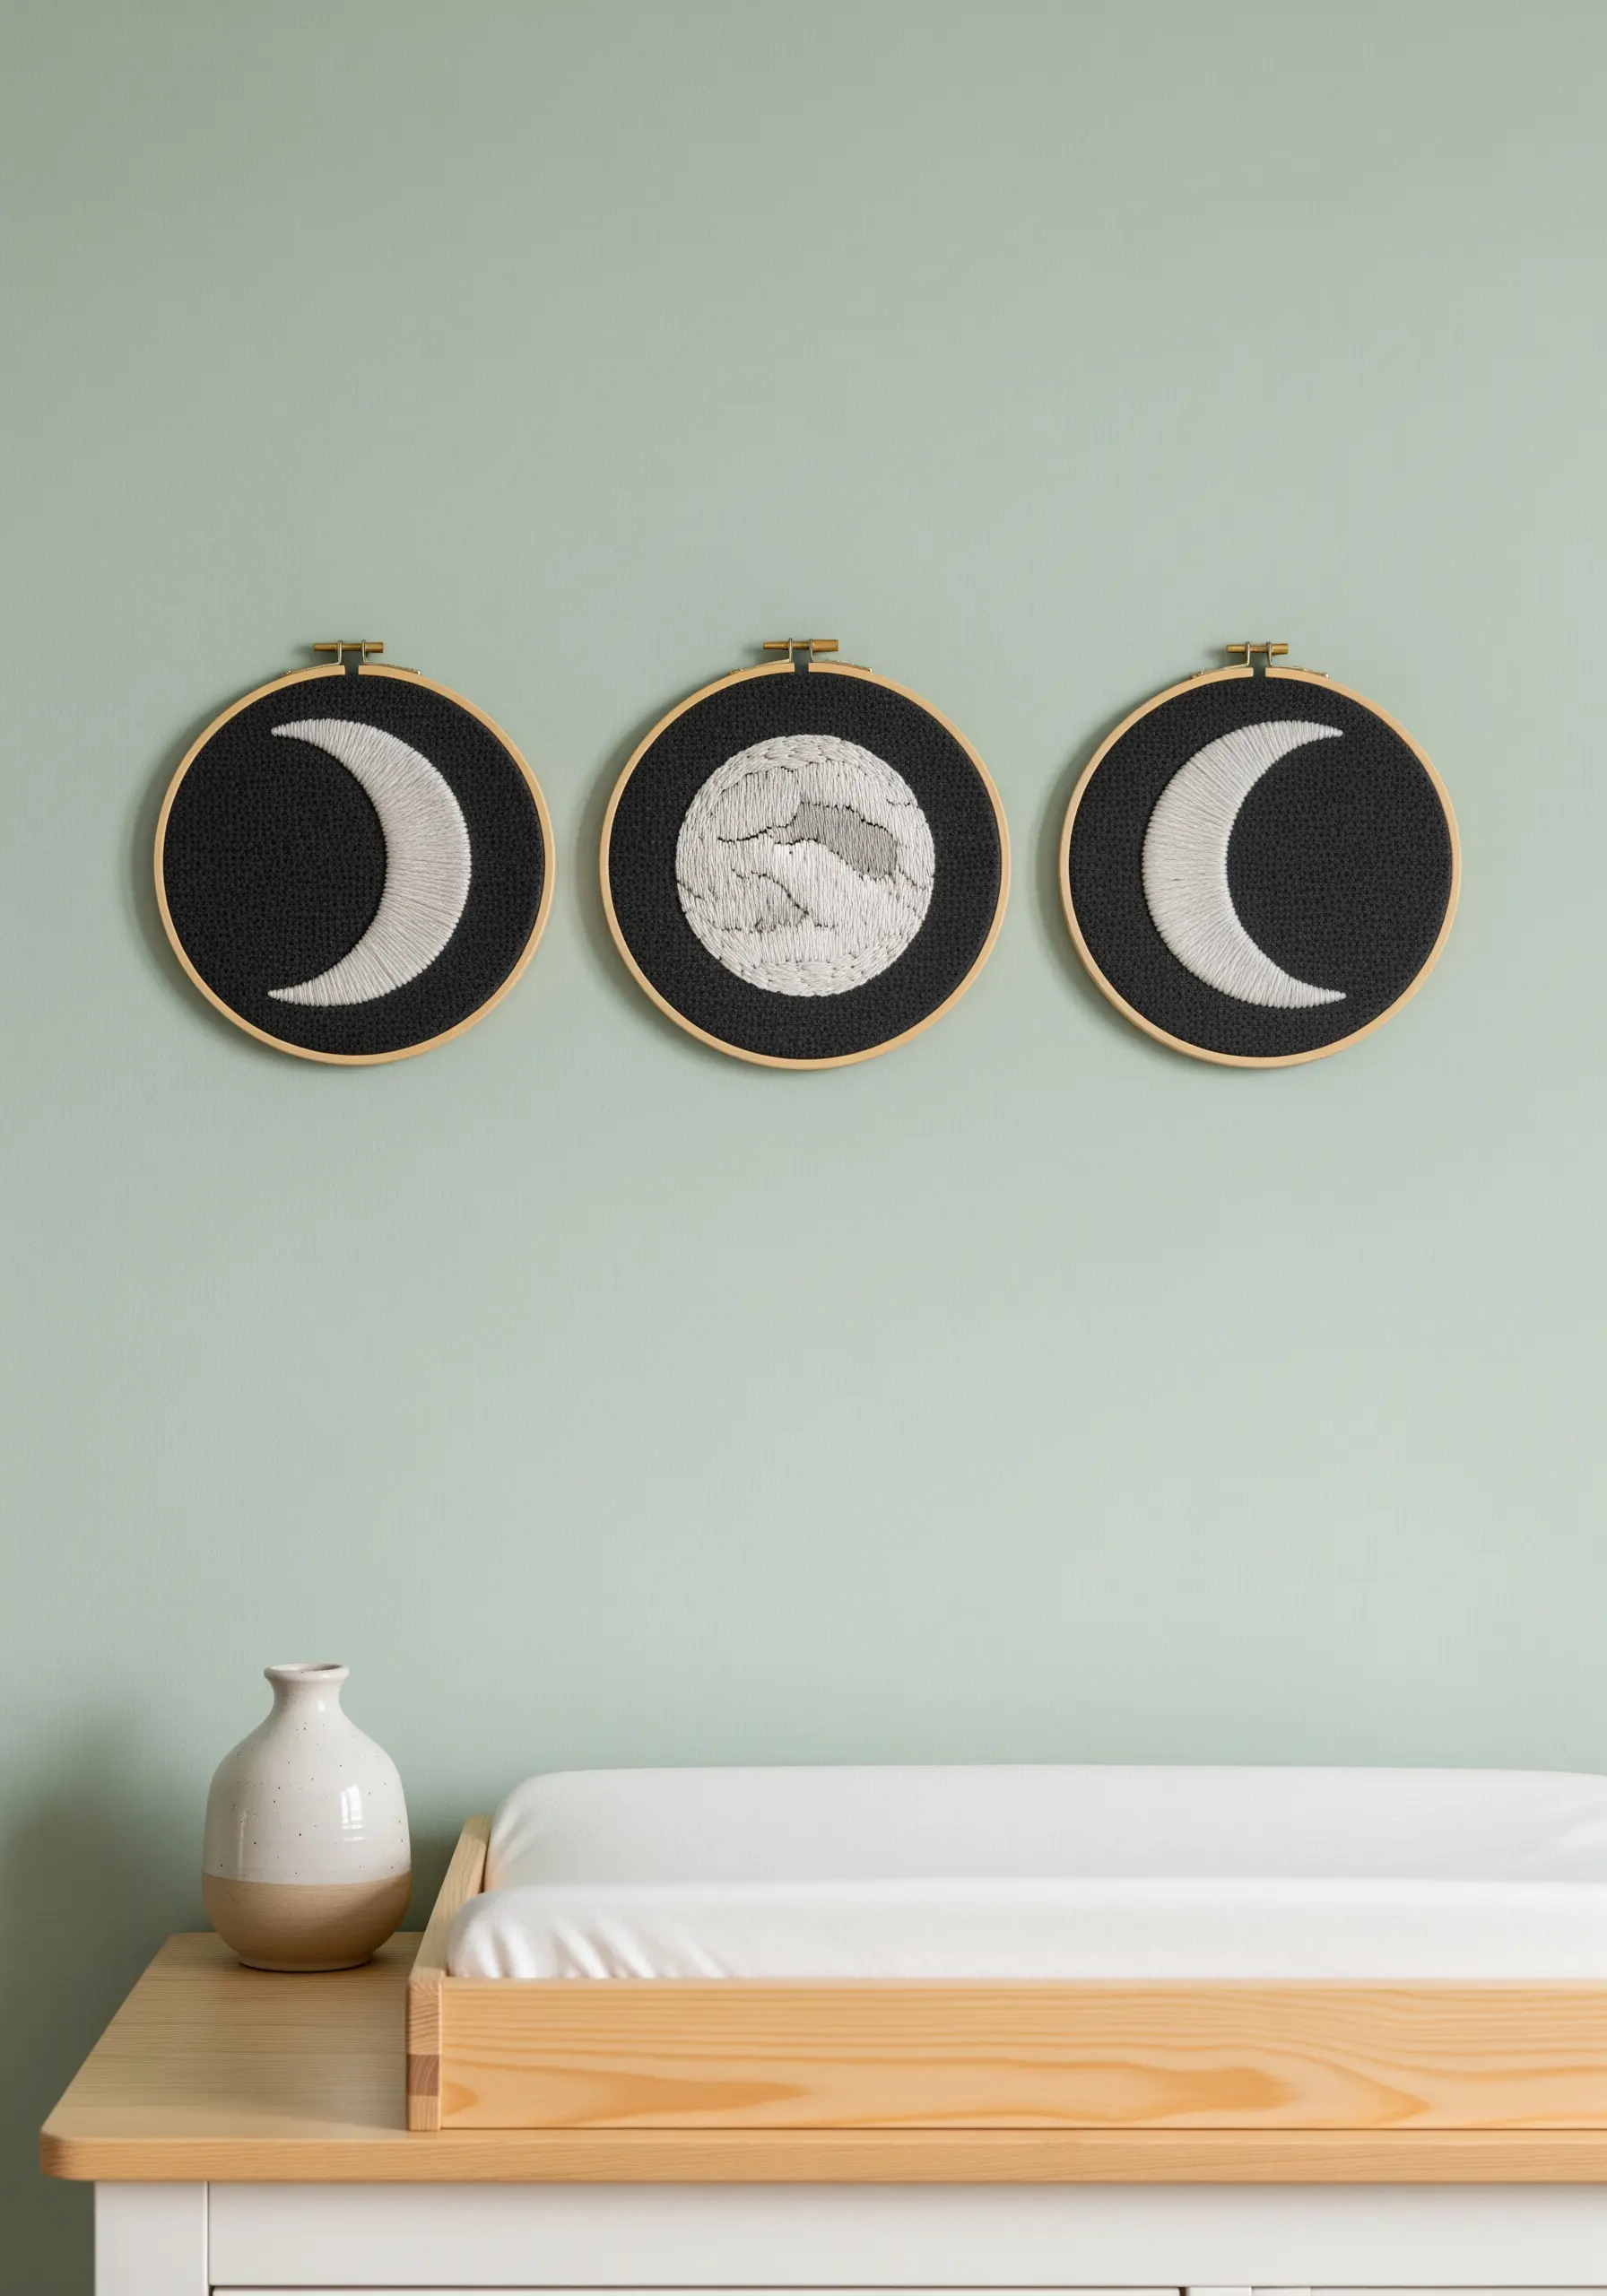
Instead of a simple satin stitch, capture the moon’s cratered texture using a dense, slightly chaotic long-and-short stitch.
Work in a spiral pattern from the outside in, layering shades of white, cream, and pale grey to give the surface a three-dimensional feel.
For a cohesive trio, keep the scale and fabric consistent across all three hoops.
The contrast between the smooth crescent moons and the textured full moon creates a dynamic narrative of the lunar cycle, elevated by your stitchwork.
These negative space embroidery techniques allow the dark fabric to define the shapes with graphic power.
3. Curate a Cohesive Celestial Gallery Wall
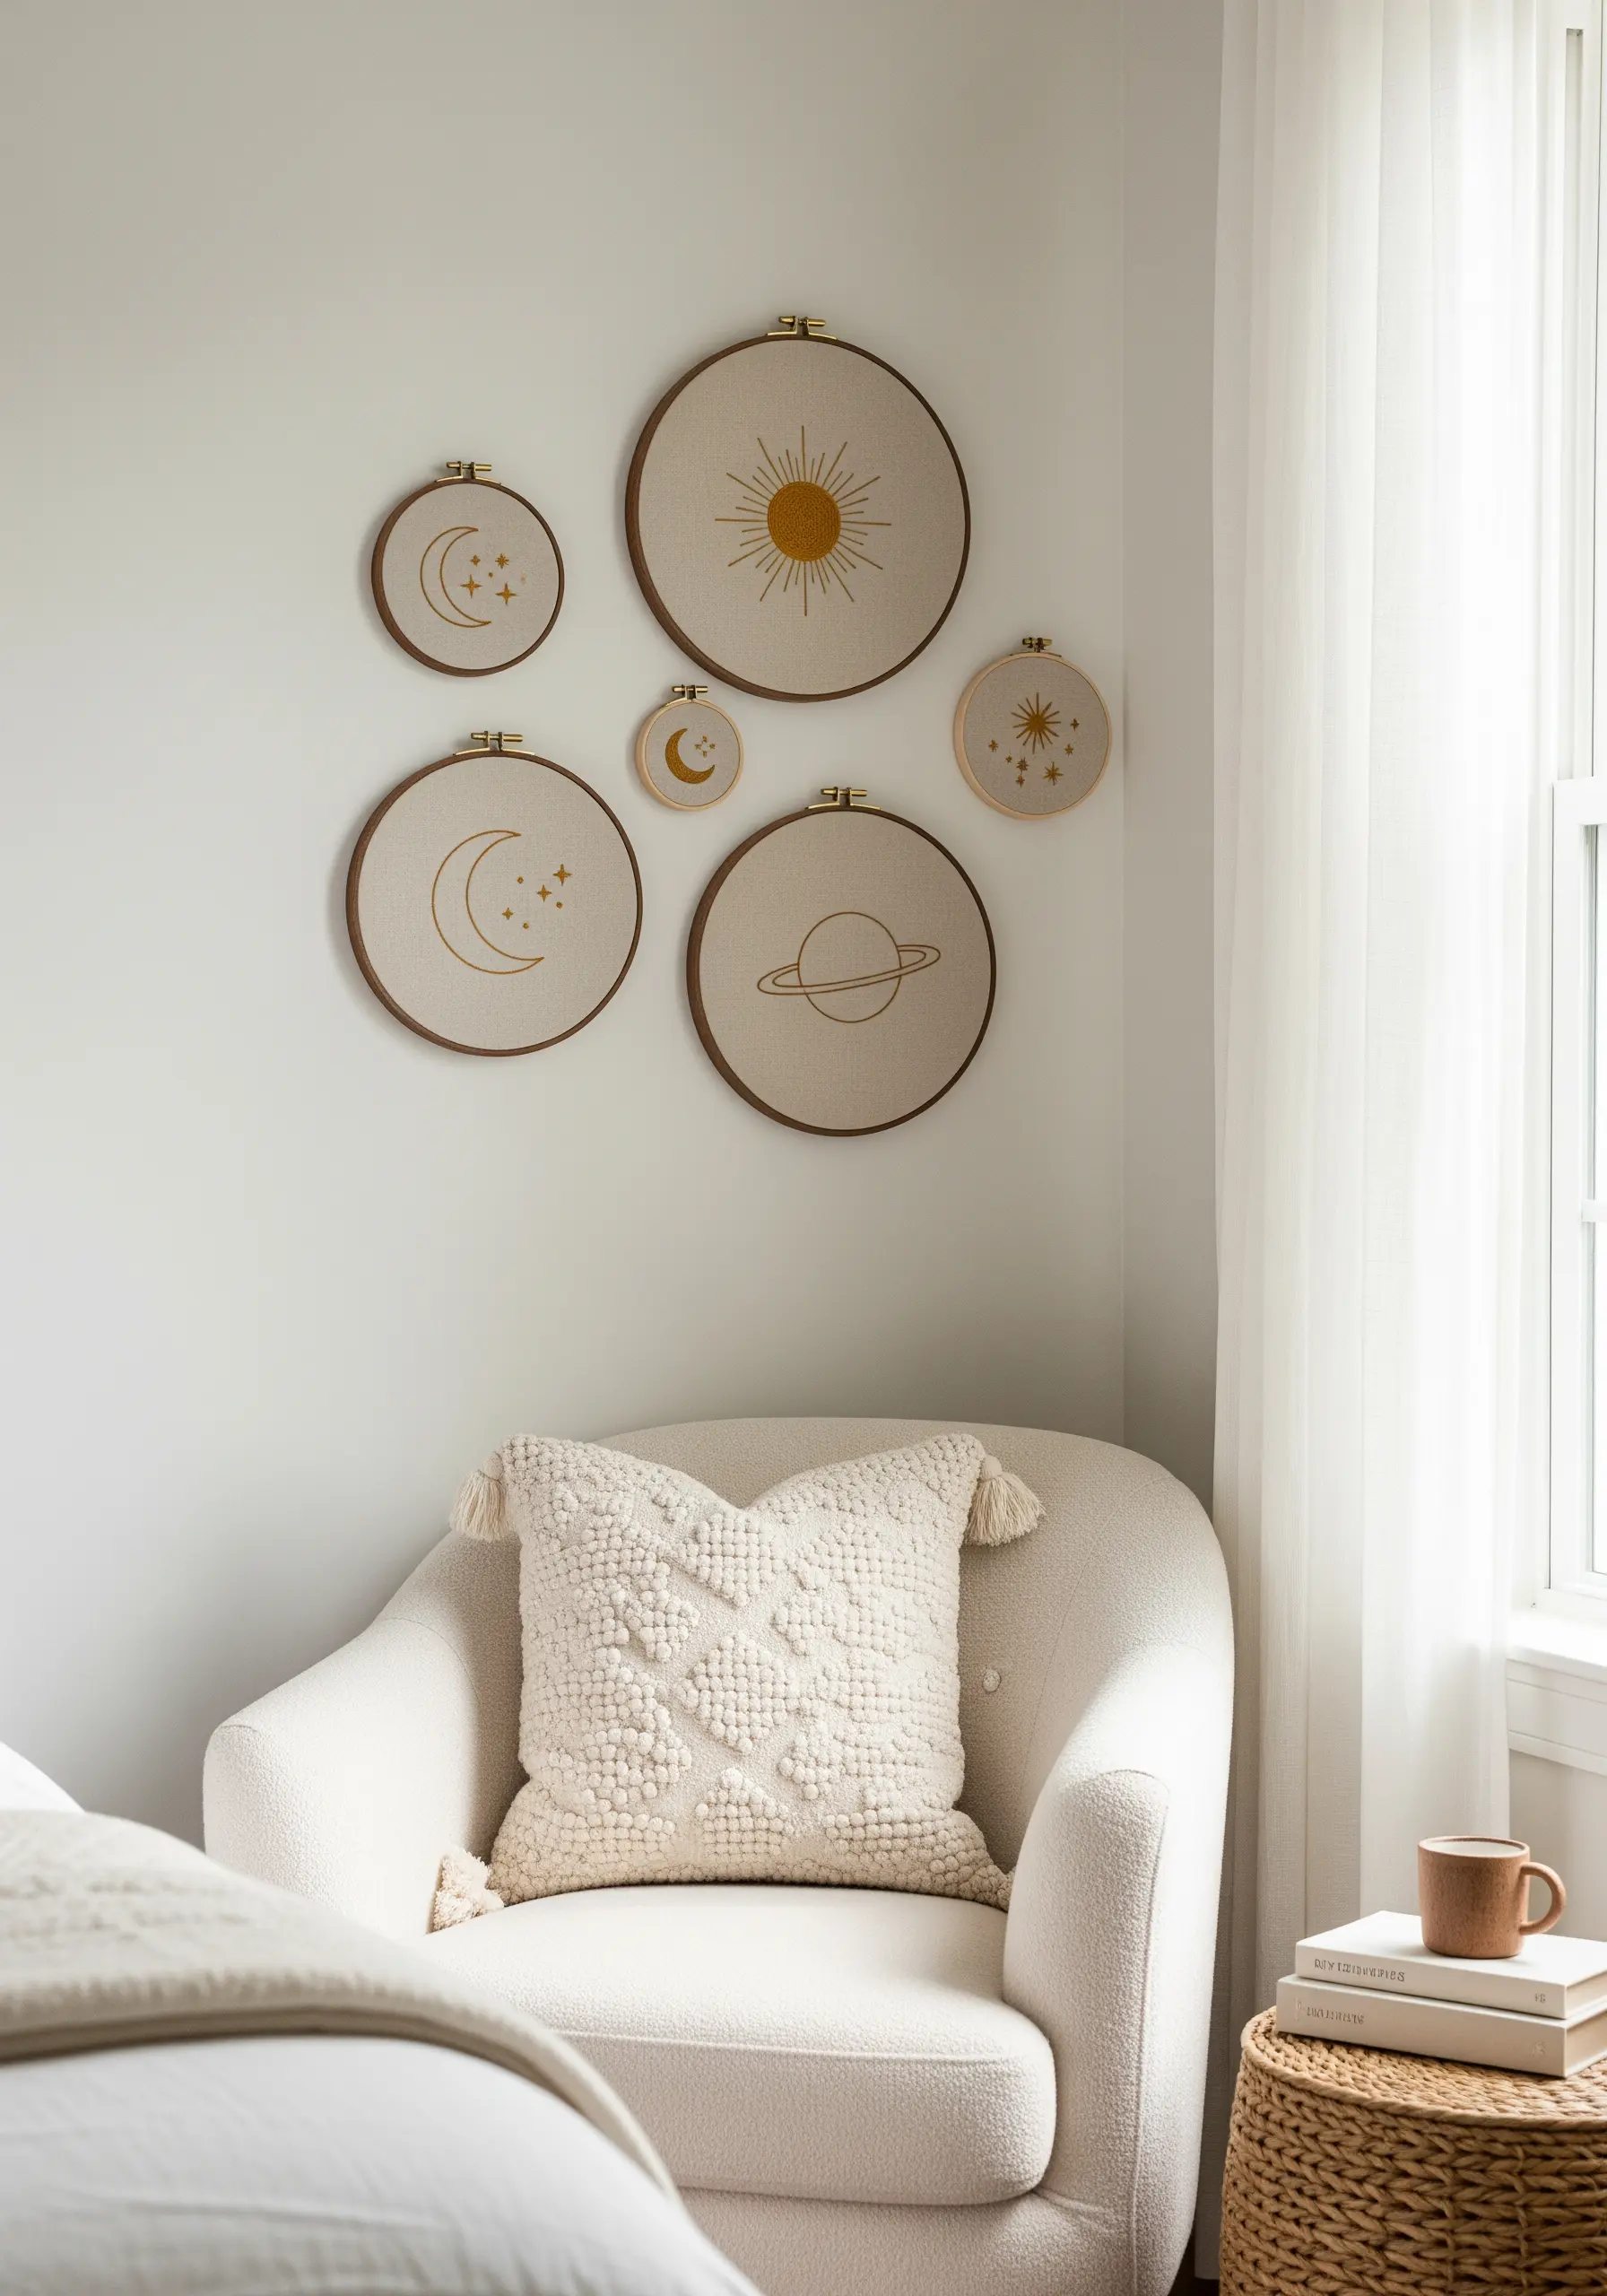
To unify a collection of celestial motifs, stitch them all in the same color thread on the same type of neutral linen fabric.
Varying the hoop sizes adds visual interest and allows you to create a balanced, asymmetrical layout that feels organic and thoughtfully curated.
Stick to simple backstitch or stem stitch to keep the designs clean and graphic, ensuring the collection feels like a unified set rather than a random assortment.
By arranging them in a gentle cluster, you can turn a blank corner into a sophisticated focal point with thoughtfully planned hooped wall collage layouts.
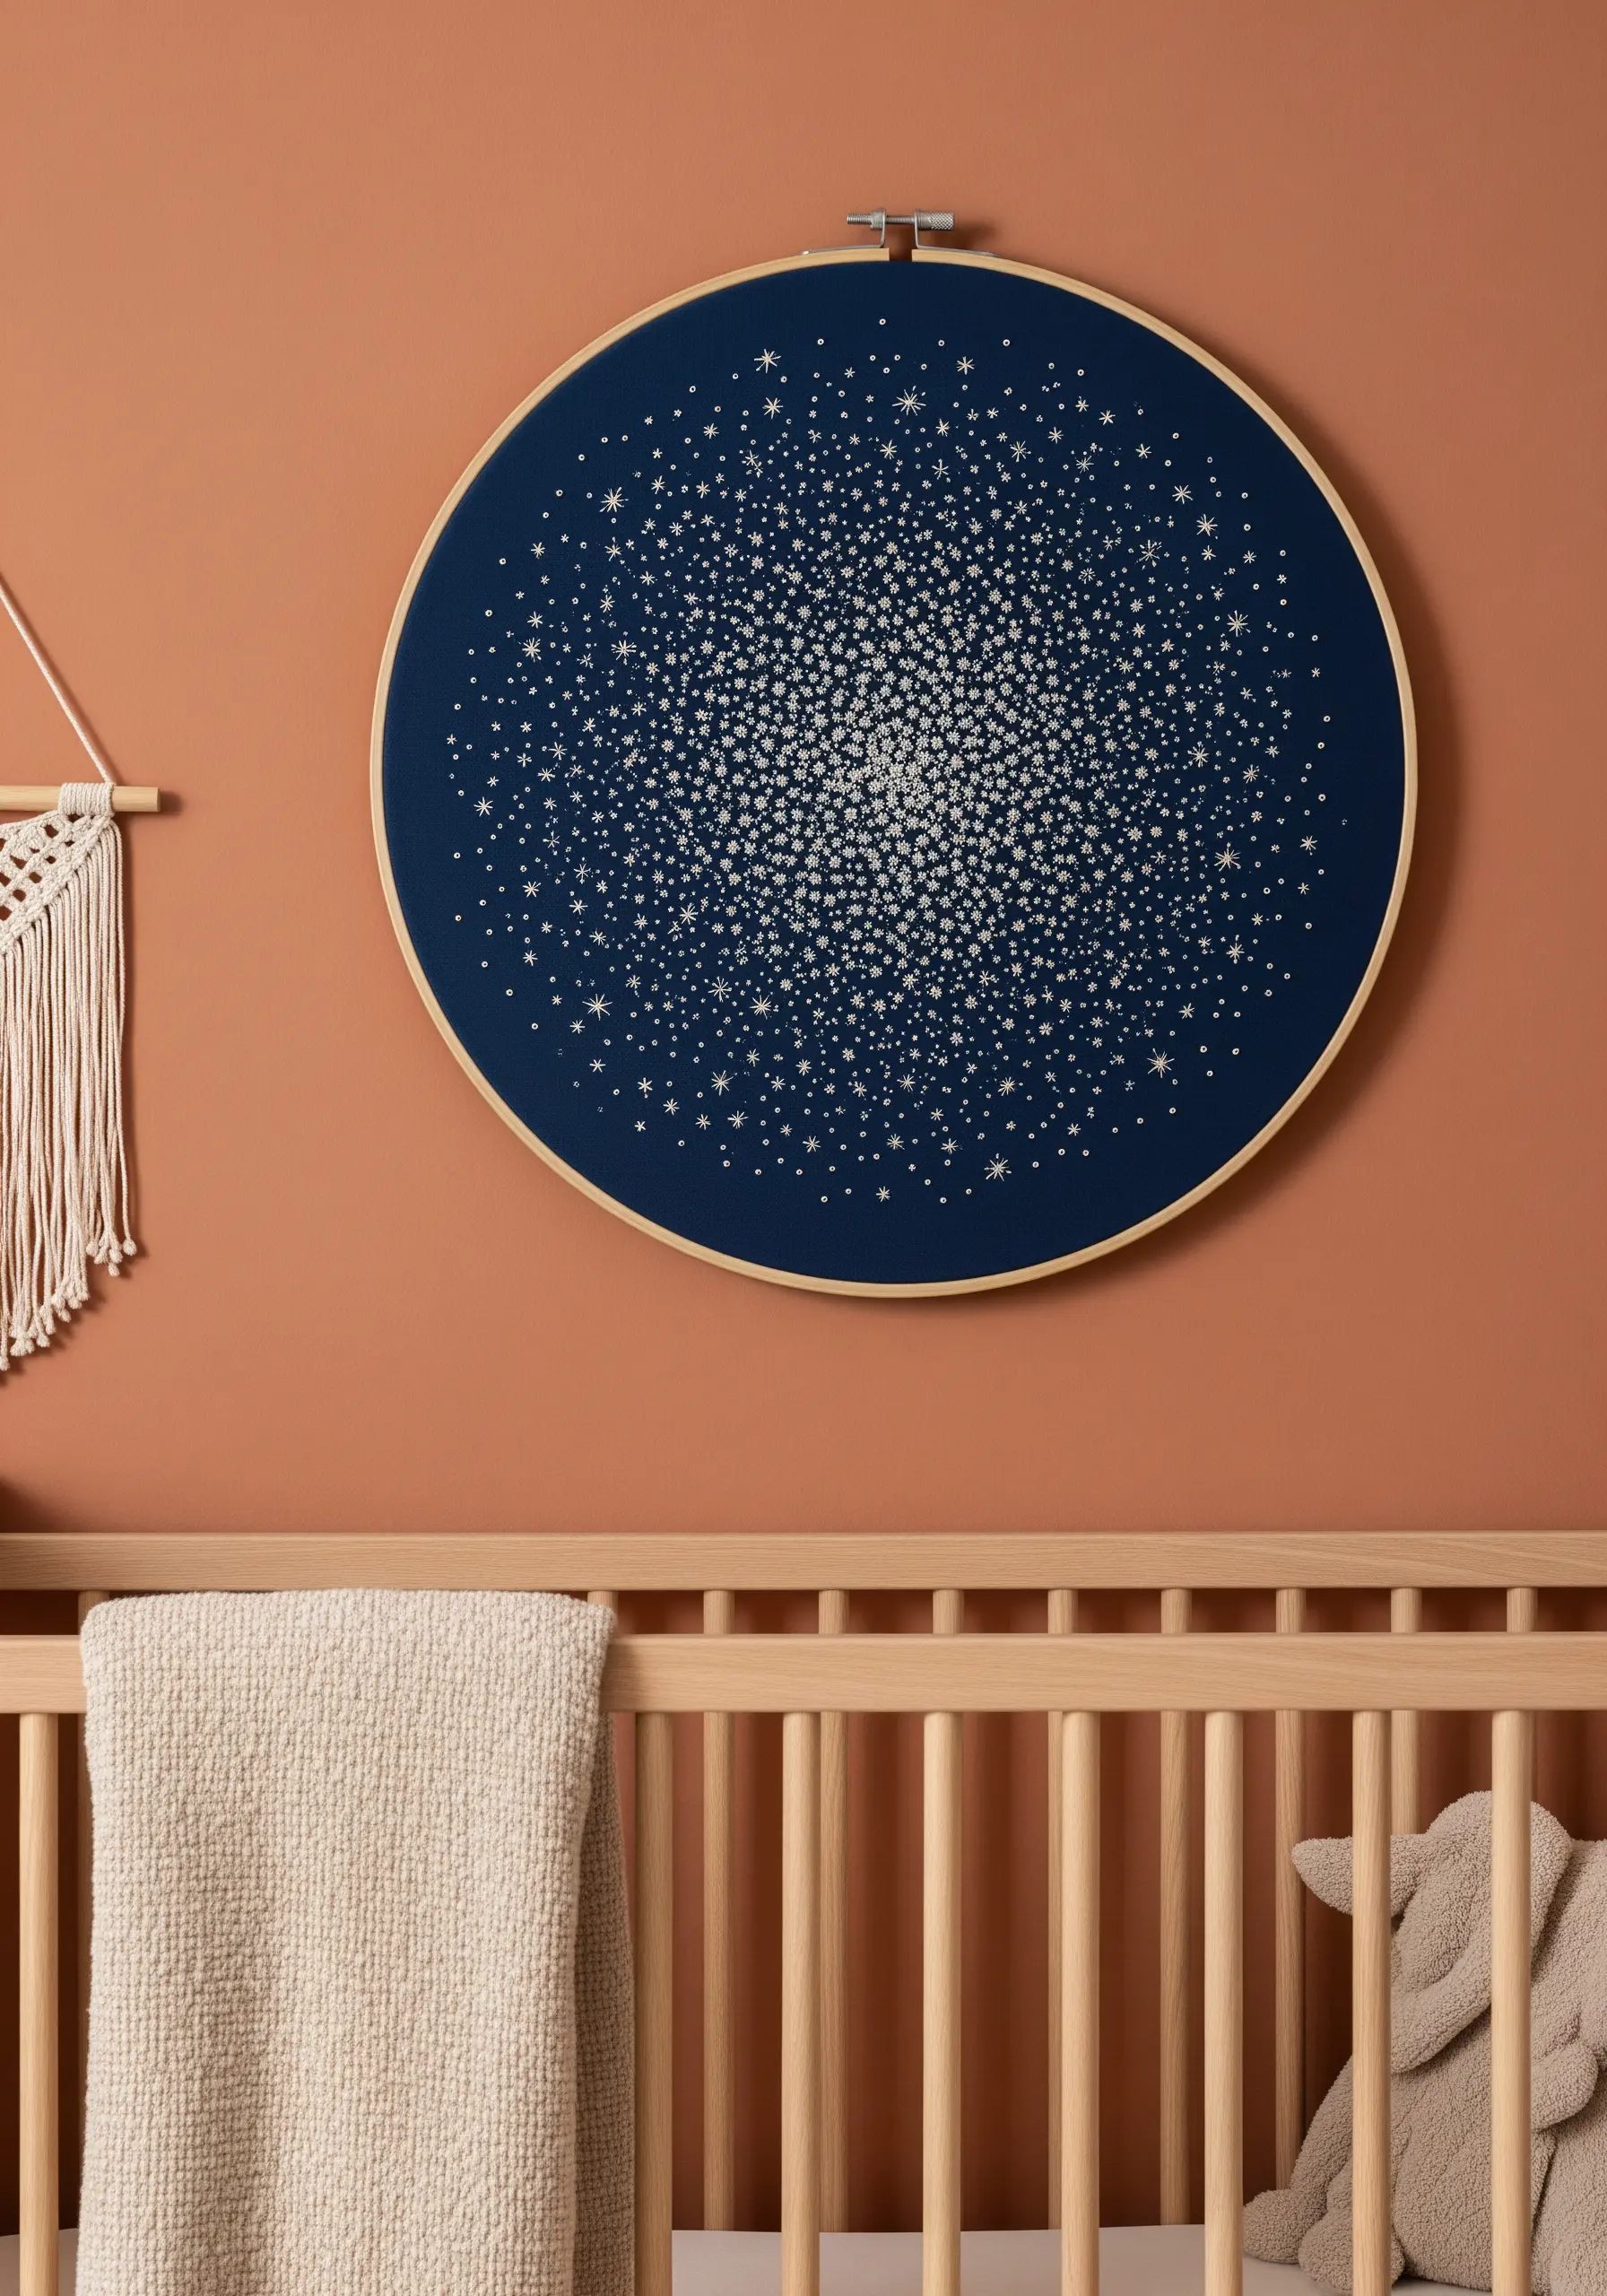
4. Stitch a Panoramic Milky Way with Thread Pointillism
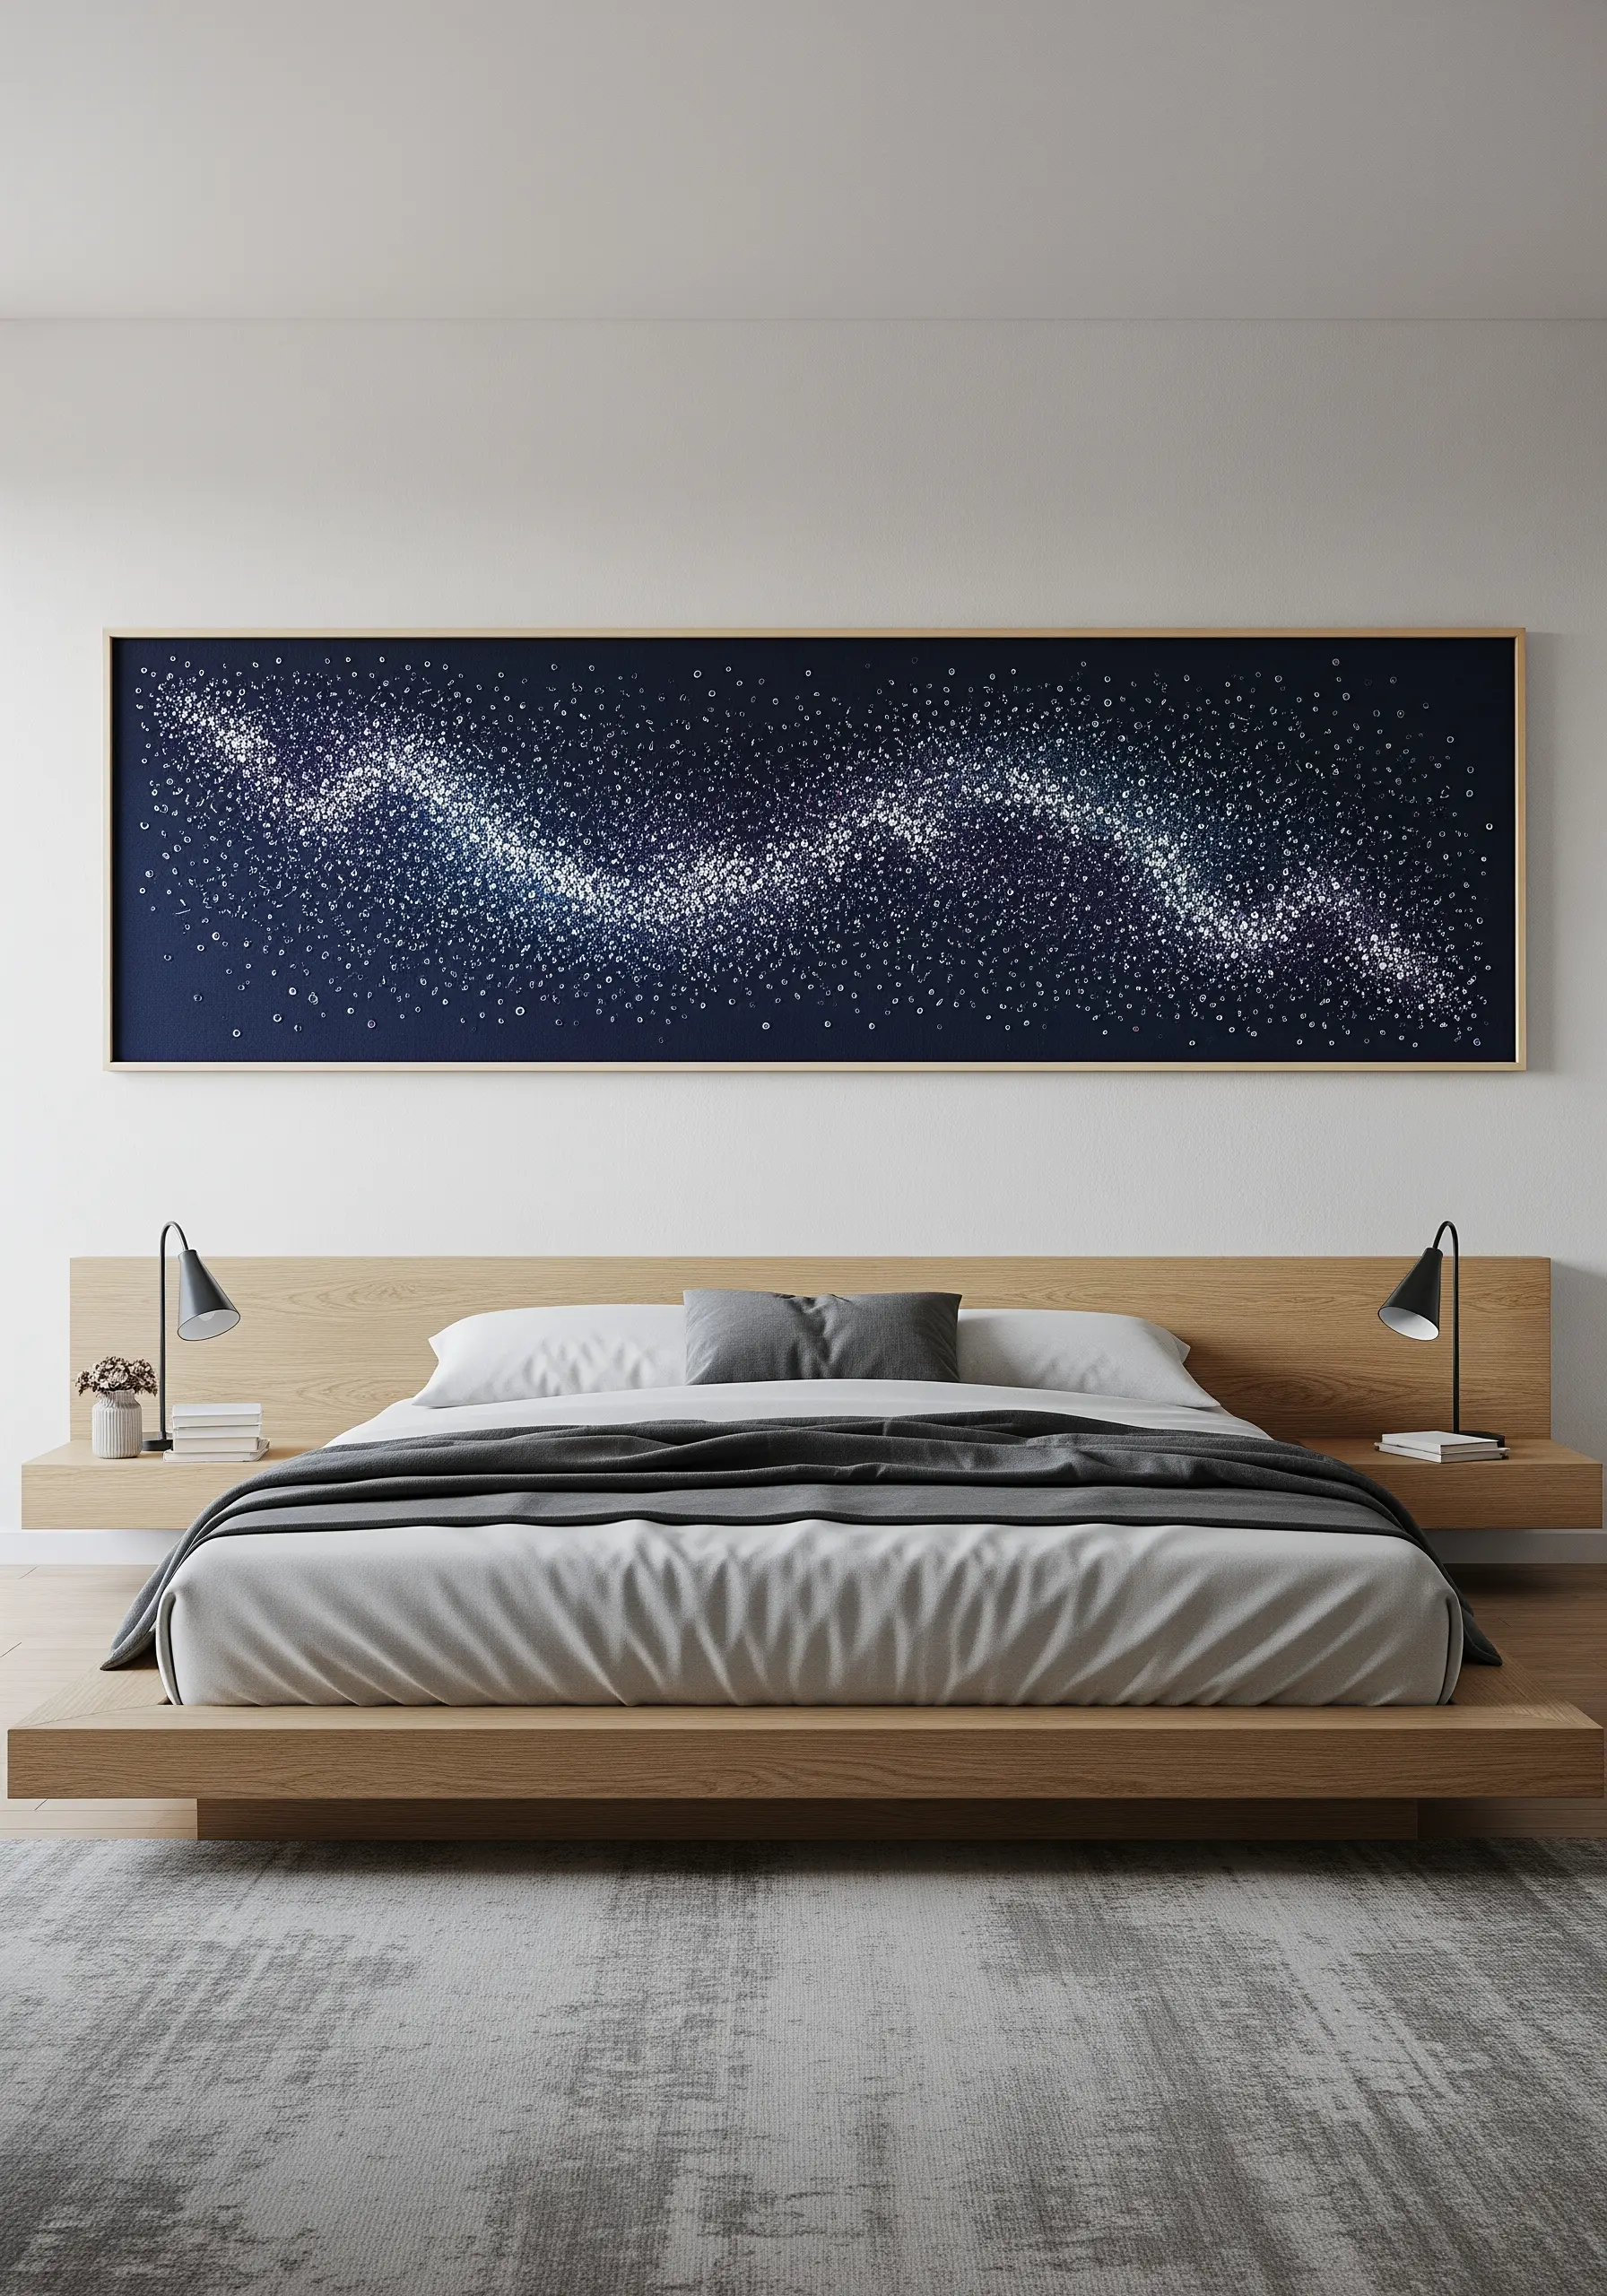
For a breathtaking panoramic piece, think in terms of texture and density, not perfect lines.
Fill the canvas with thousands of tiny seed stitches and French knots, clustering them tightly in the center and scattering them toward the edges to create the illusion of the Milky Way’s dense core.
Incorporate silver metallic, pale blue, and lavender threads among the white to give the galaxy a shimmering, multi-tonal depth that catches the light.
This patient, meditative technique produces a result that feels vast and atmospheric, transforming your bedroom into a serene observatory.
5. Blend Celestial Calm with Grounded Landscapes
Create a serene composition by combining two distinct textures: the smooth fill of a mountain range with the delicate scatter of a starry sky.
Use a vertical satin stitch for the mountains to give them a solid, grounded presence, and use a single strand of white floss for tiny, spaced-out French knots to represent the stars.
Stitching a white-on-white sky creates a subtle, low-contrast effect that feels incredibly peaceful and sophisticated.
This approach allows you to create beautiful, relaxing nature scene embroidery hoops that invite a sense of quiet wonder.
6. Create a Sunburst with Geometric Precision
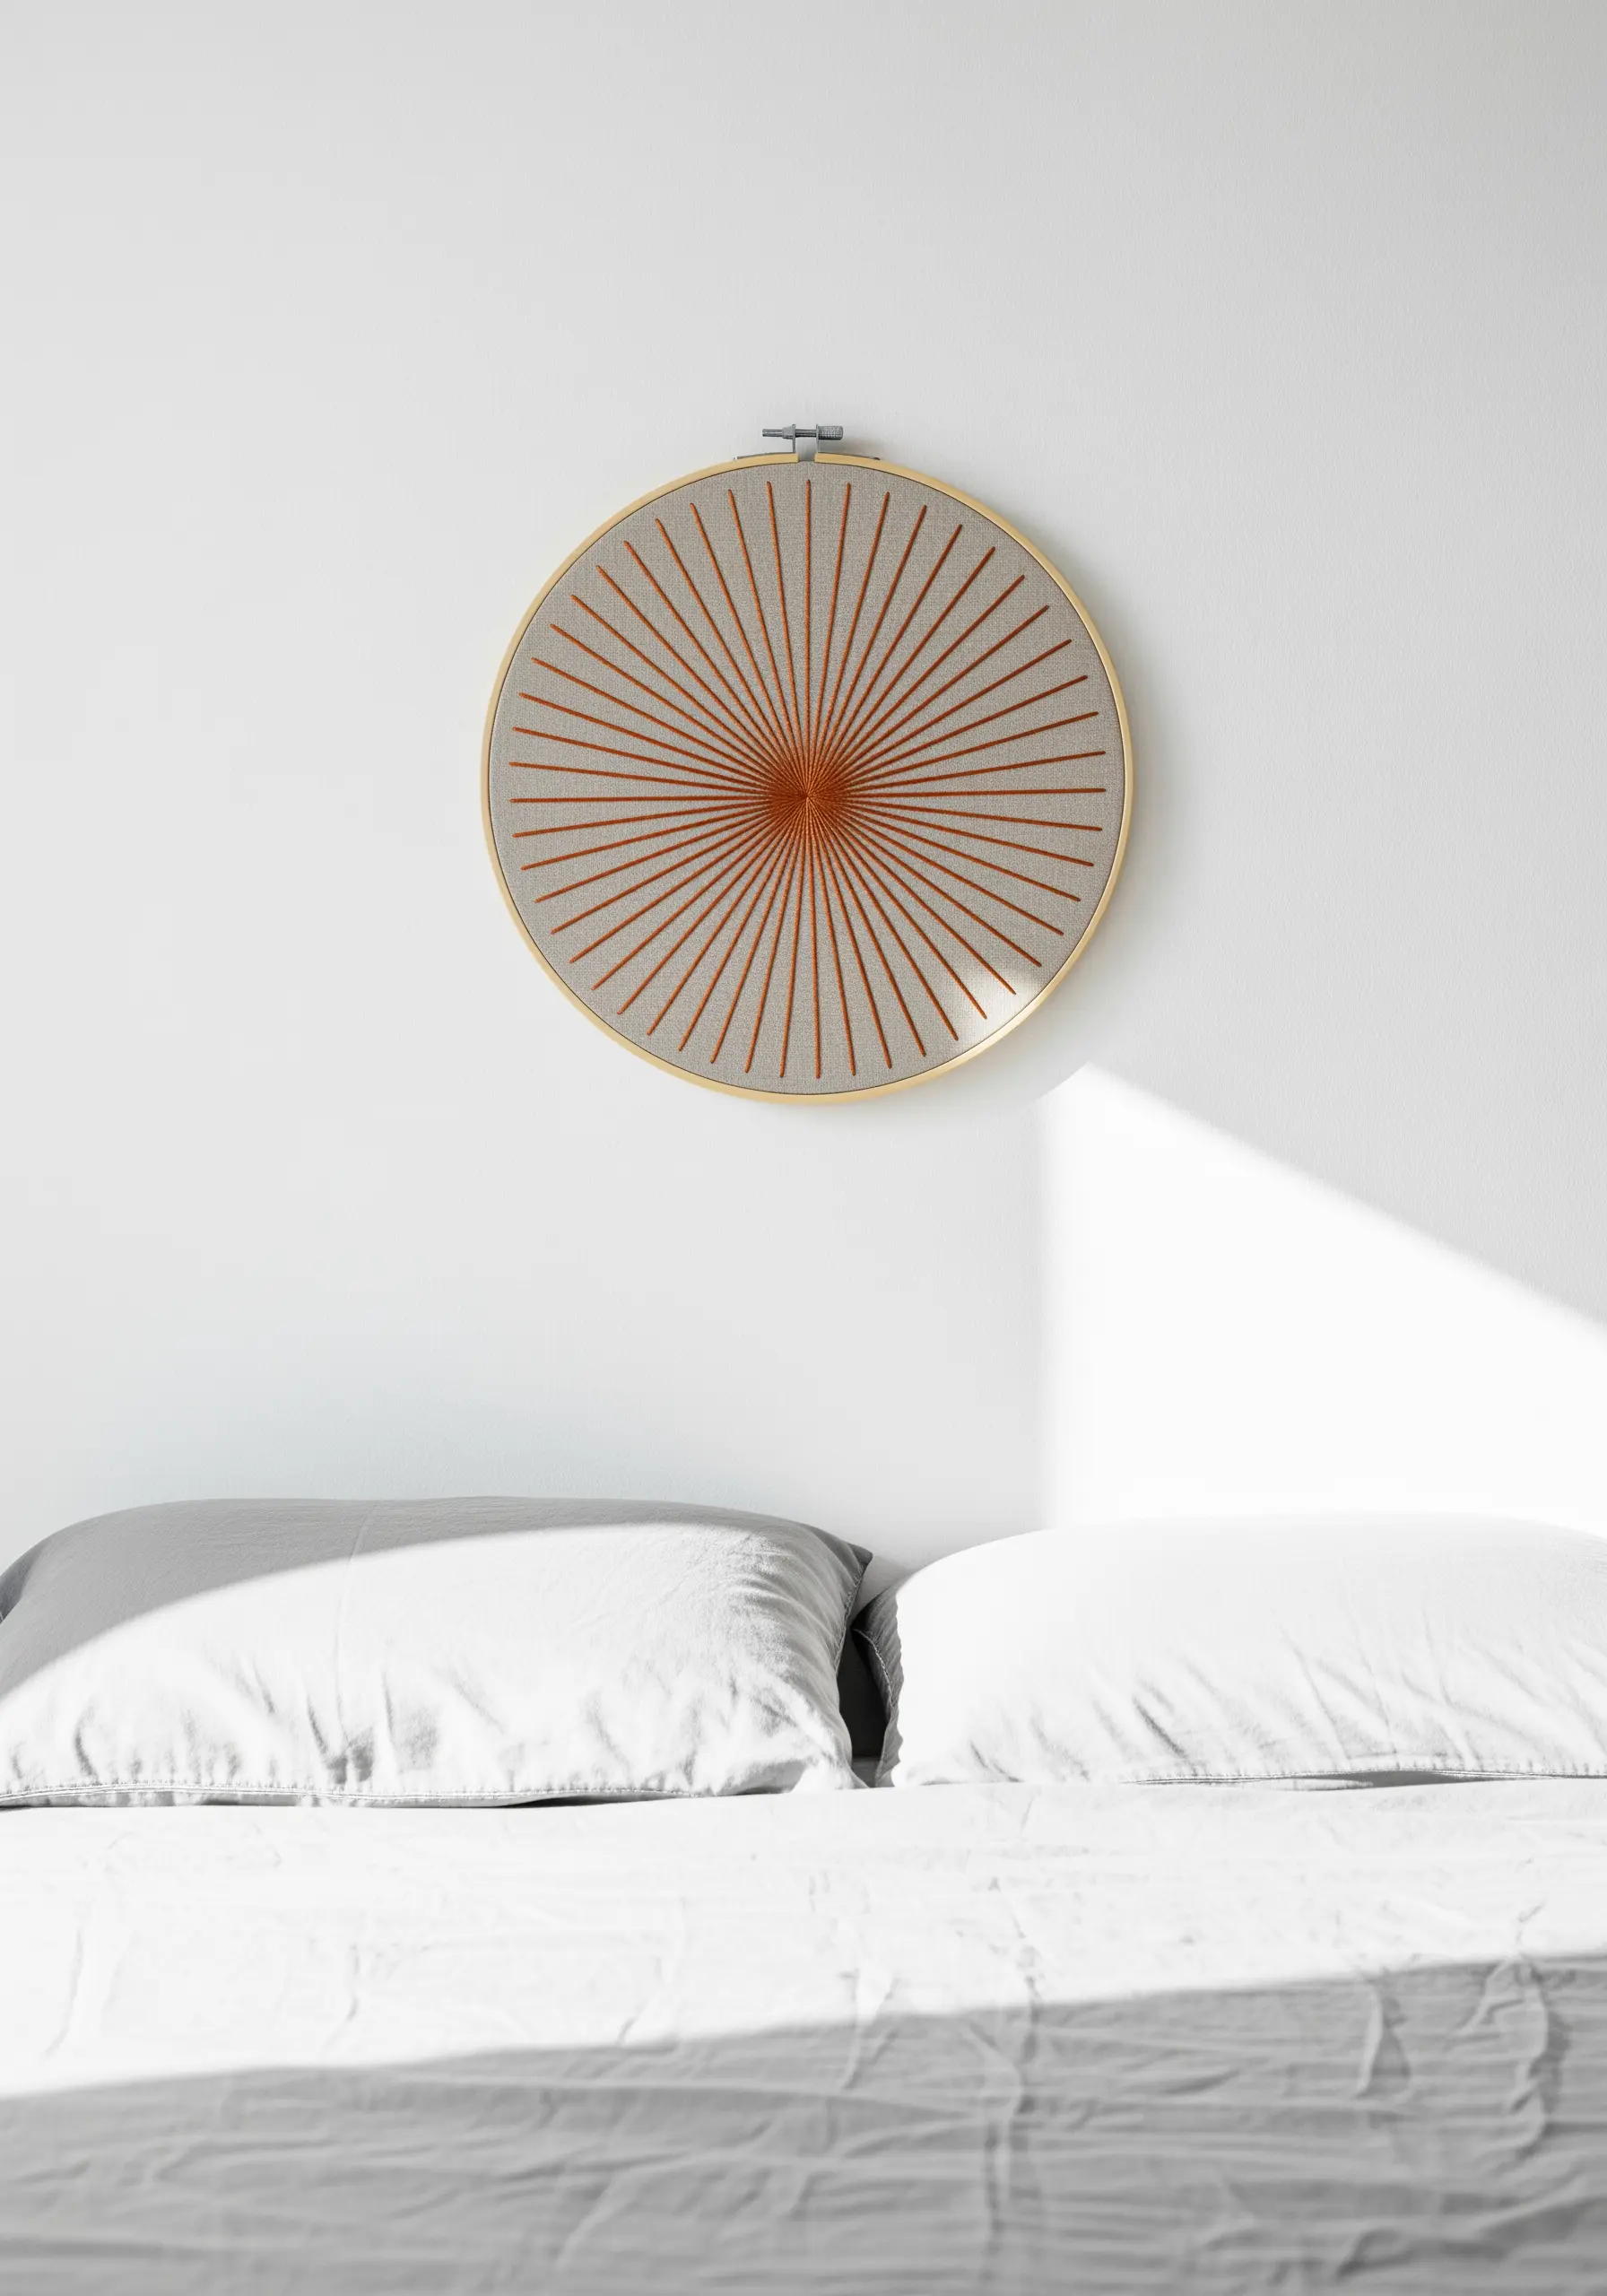
The power of this design lies in its perfect symmetry. Before you stitch, use a fabric pen and a protractor to mark the center point and evenly spaced lines radiating outward.
Use a thick, six-strand floss for the straight stitches to give them weight and presence against the neutral fabric.
A warm, earthy tone like terracotta or ochre makes the geometric shape feel organic and sun-like.
This piece demonstrates how clean line art geometry-based stitches can create a powerful and modern statement with minimal effort.
7. Embrace Graphic Power with Negative Space
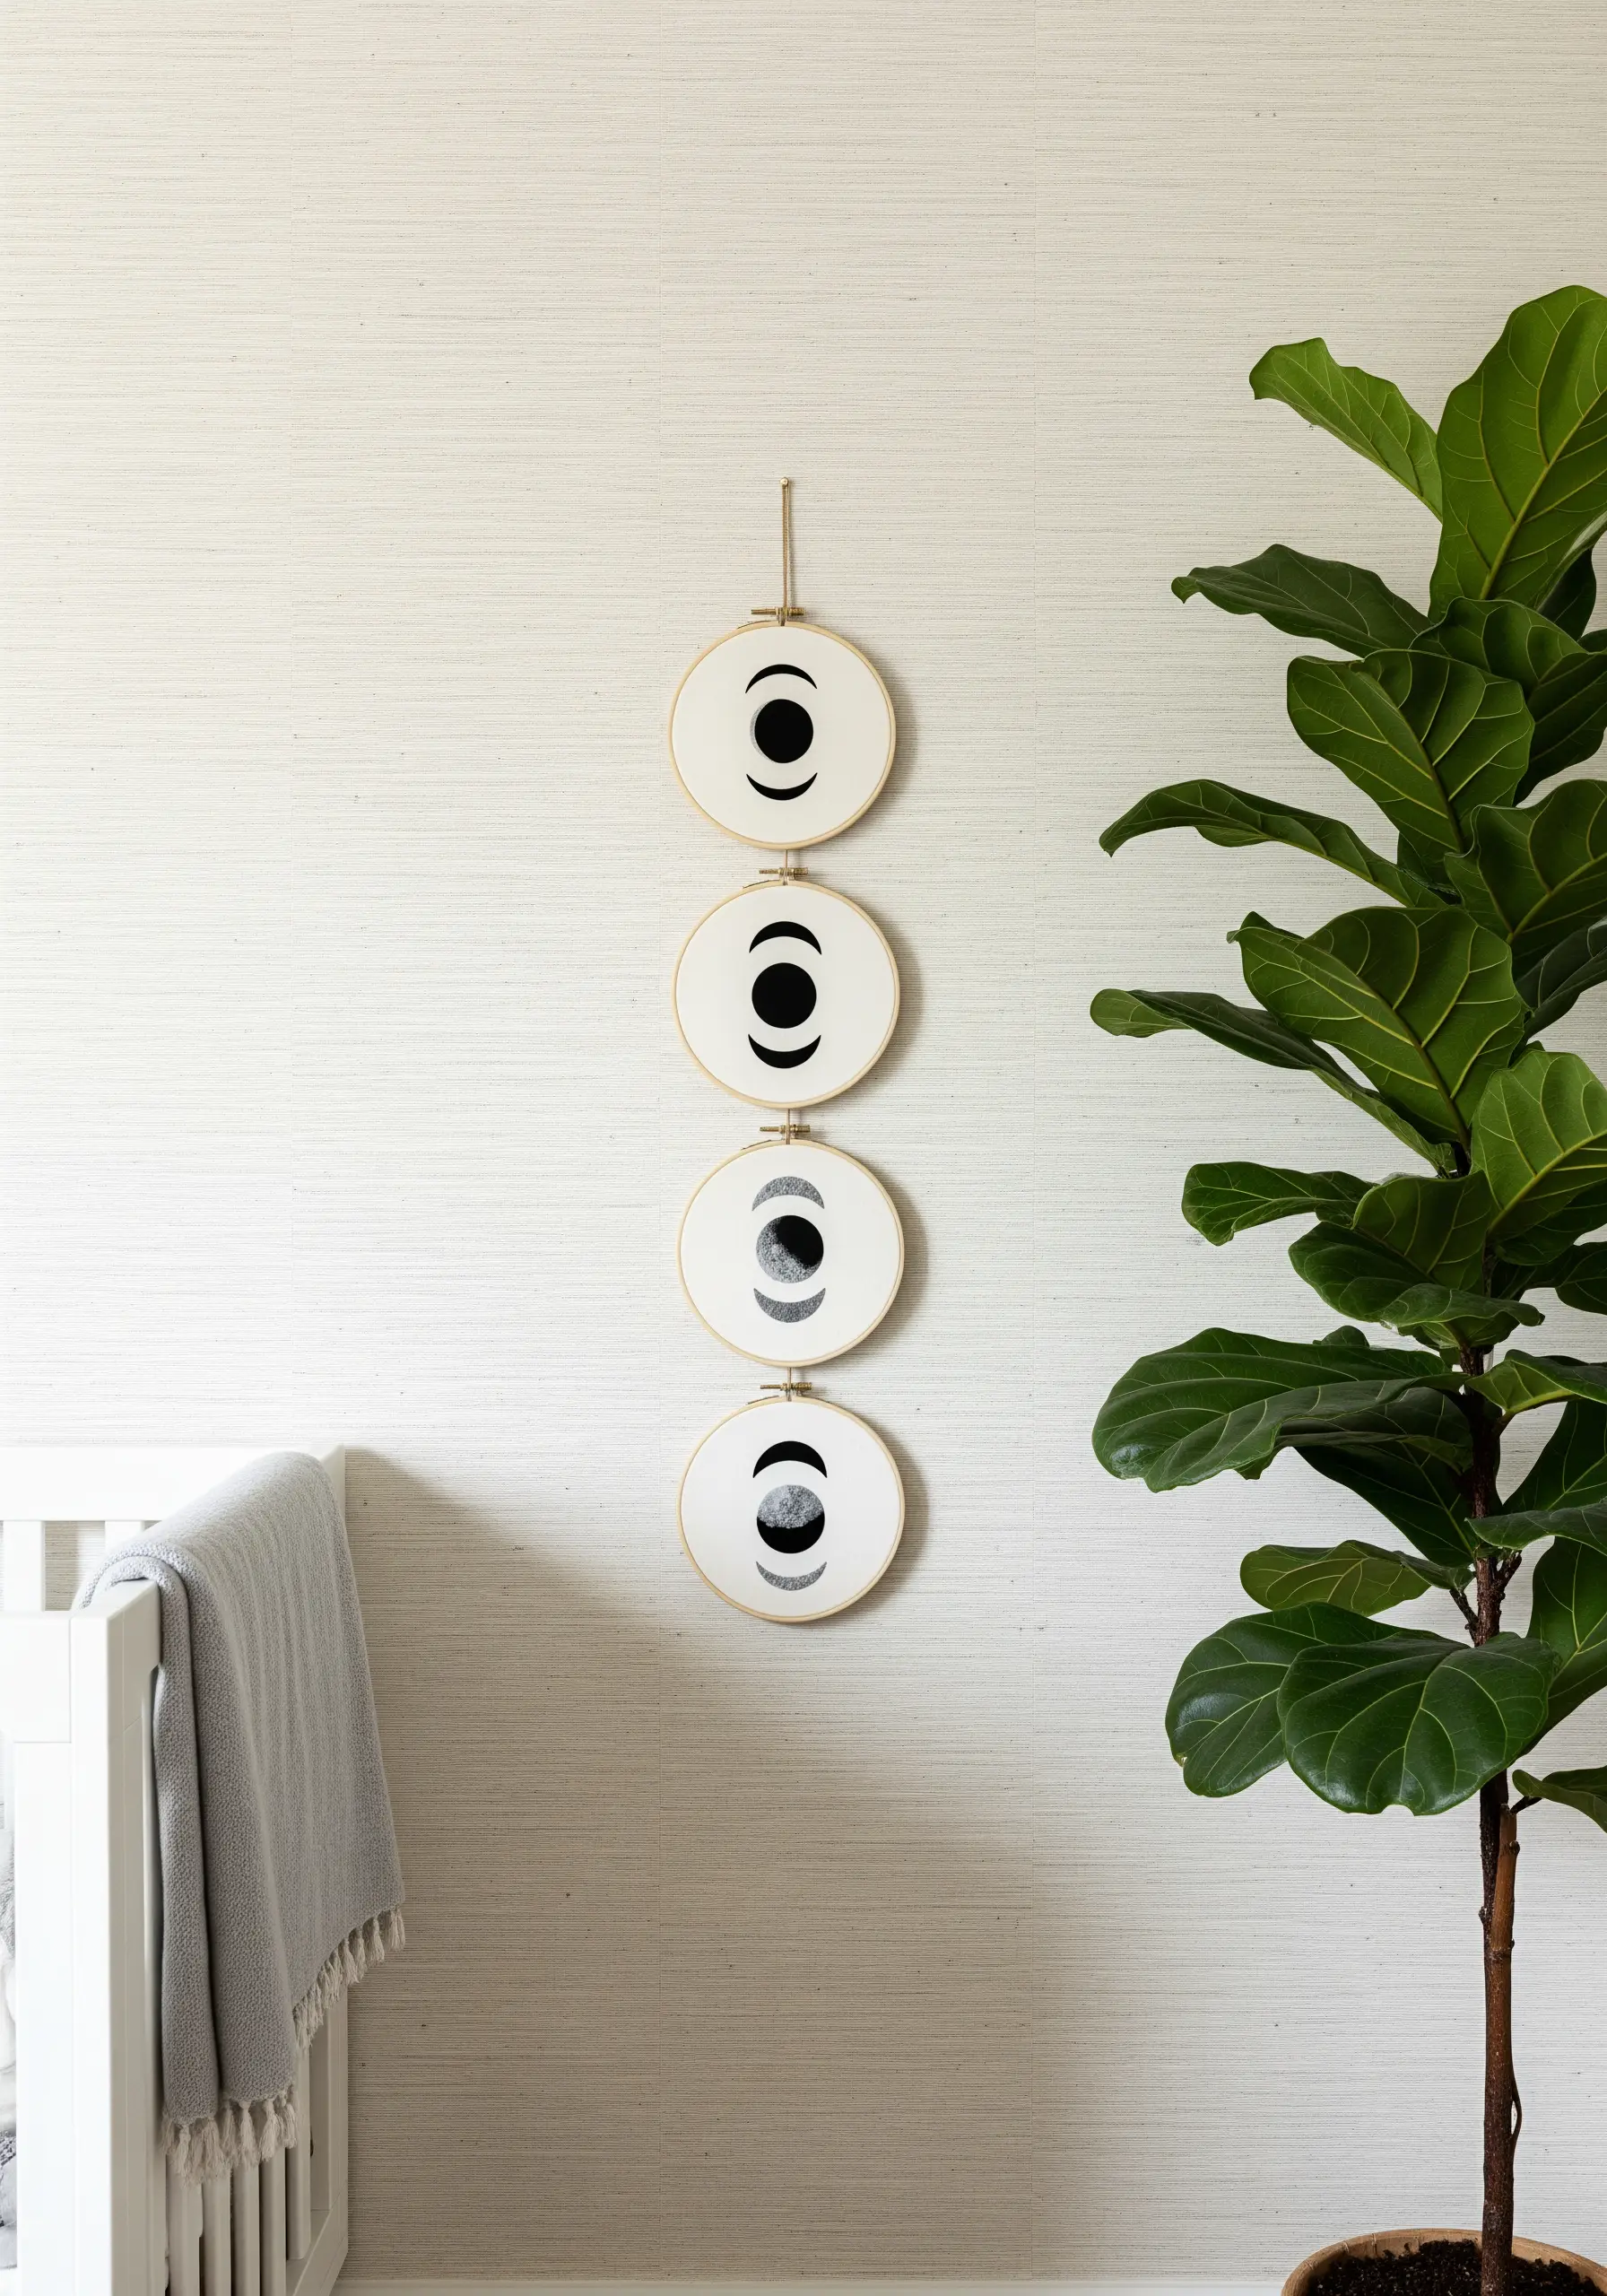
This design’s impact comes from what you *don’t* stitch. By filling in the background, you allow the un-stitched fabric to form the primary shapes of the moon phases.
Use a crisp backstitch to outline the circles first, ensuring clean edges before filling the surrounding space with a dense satin stitch.
Staging these hoops vertically creates a strong graphic line, drawing the eye upward and making it an excellent choice for a narrow wall space in a nursery.
8. Add a Touch of Luxe with Metallic Thread

To elevate a simple celestial design, switch from cotton floss to a gold metallic thread. Work on a rich, dark fabric like navy velvet or linen to make the shimmer truly stand out.
Pro tip: Use shorter lengths of metallic thread (no more than 12 inches) and a thread conditioner to prevent tangling and fraying.
Combine a clean satin stitch for the moon with delicate seed stitches for the star trail to create a dynamic sense of movement and sparkle.
The result is a piece of contemporary metallic thread designs that feels less like a craft project and more like a piece of jewelry for your wall.
9. Sculpt a Hyper-Realistic Moon with Textural Stitches
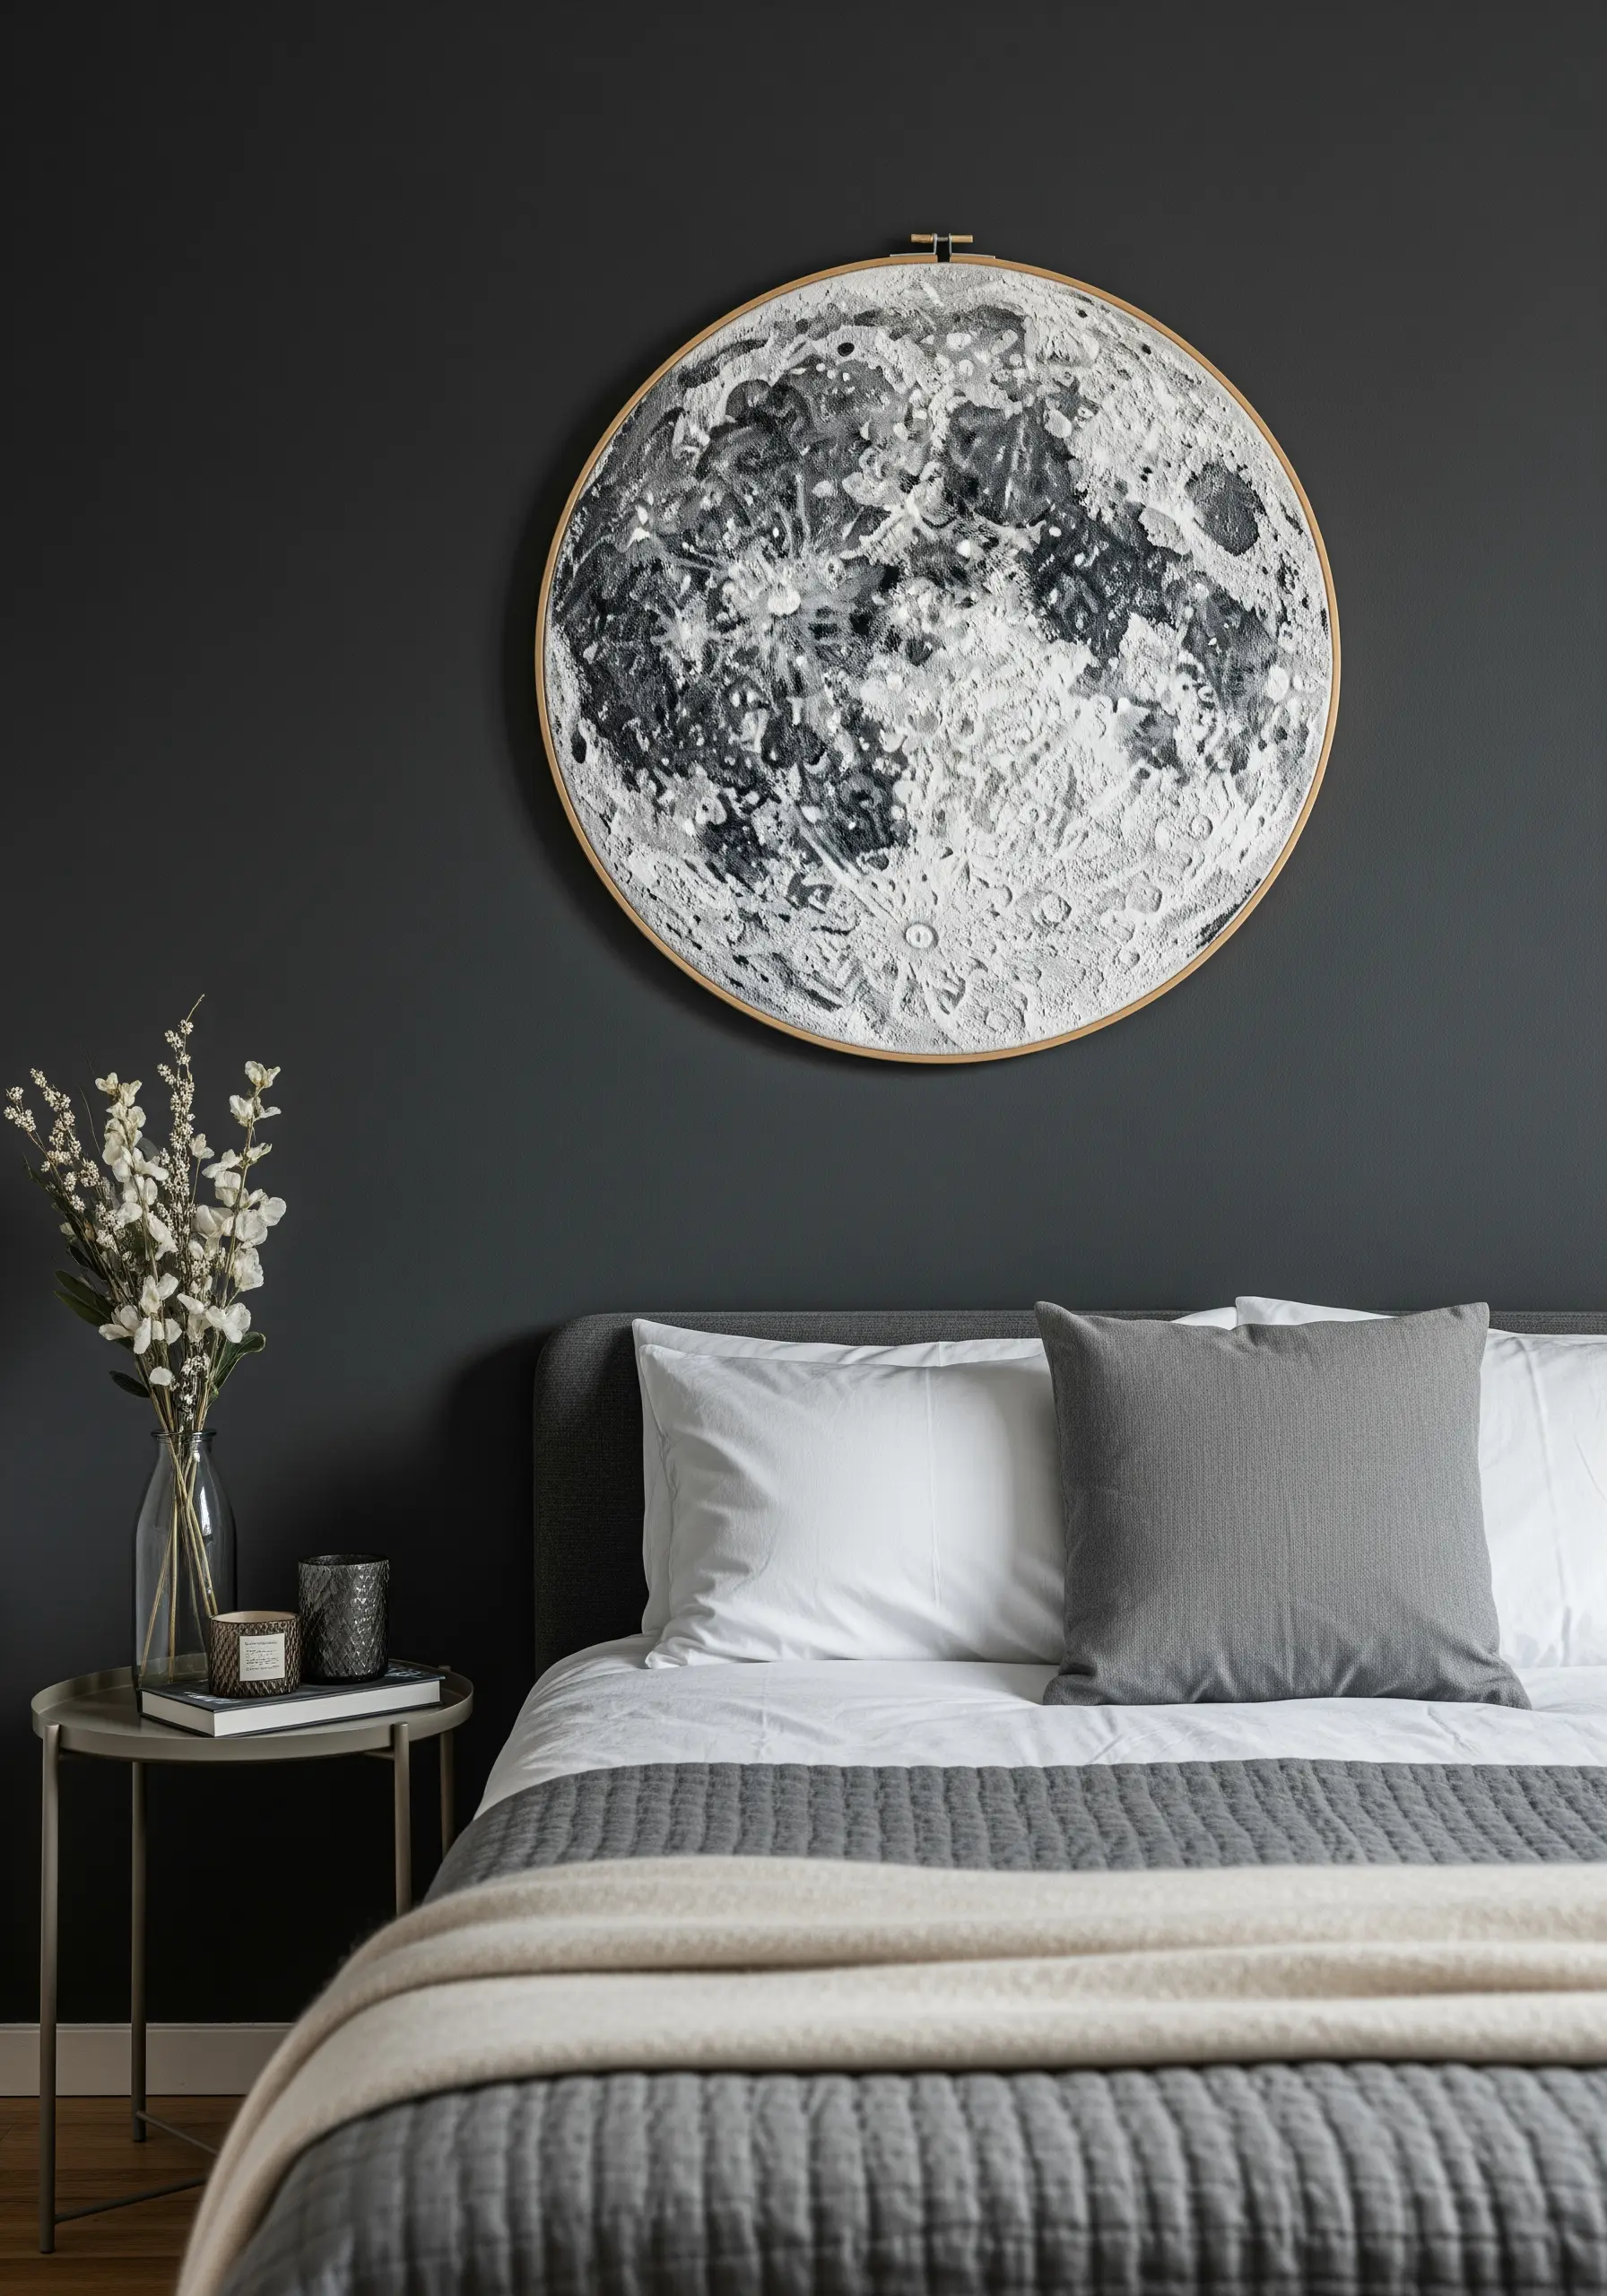
To achieve a photorealistic lunar surface, you need to think like a sculptor. This isn’t about flat color, but about creating light and shadow with thread.
Use a dense combination of French knots, bullion knots, and layered satin stitches in shades of grey, white, and silver.
Vary the stitch direction and density to mimic the moon’s craters and plains. This controlled chaos is what gives the piece its incredible depth.
These statement textured embroidery techniques turn the fabric into a canvas for a truly impressive, touchable work of art.
10. Craft a Dreamy, Three-Dimensional Nursery Mobile
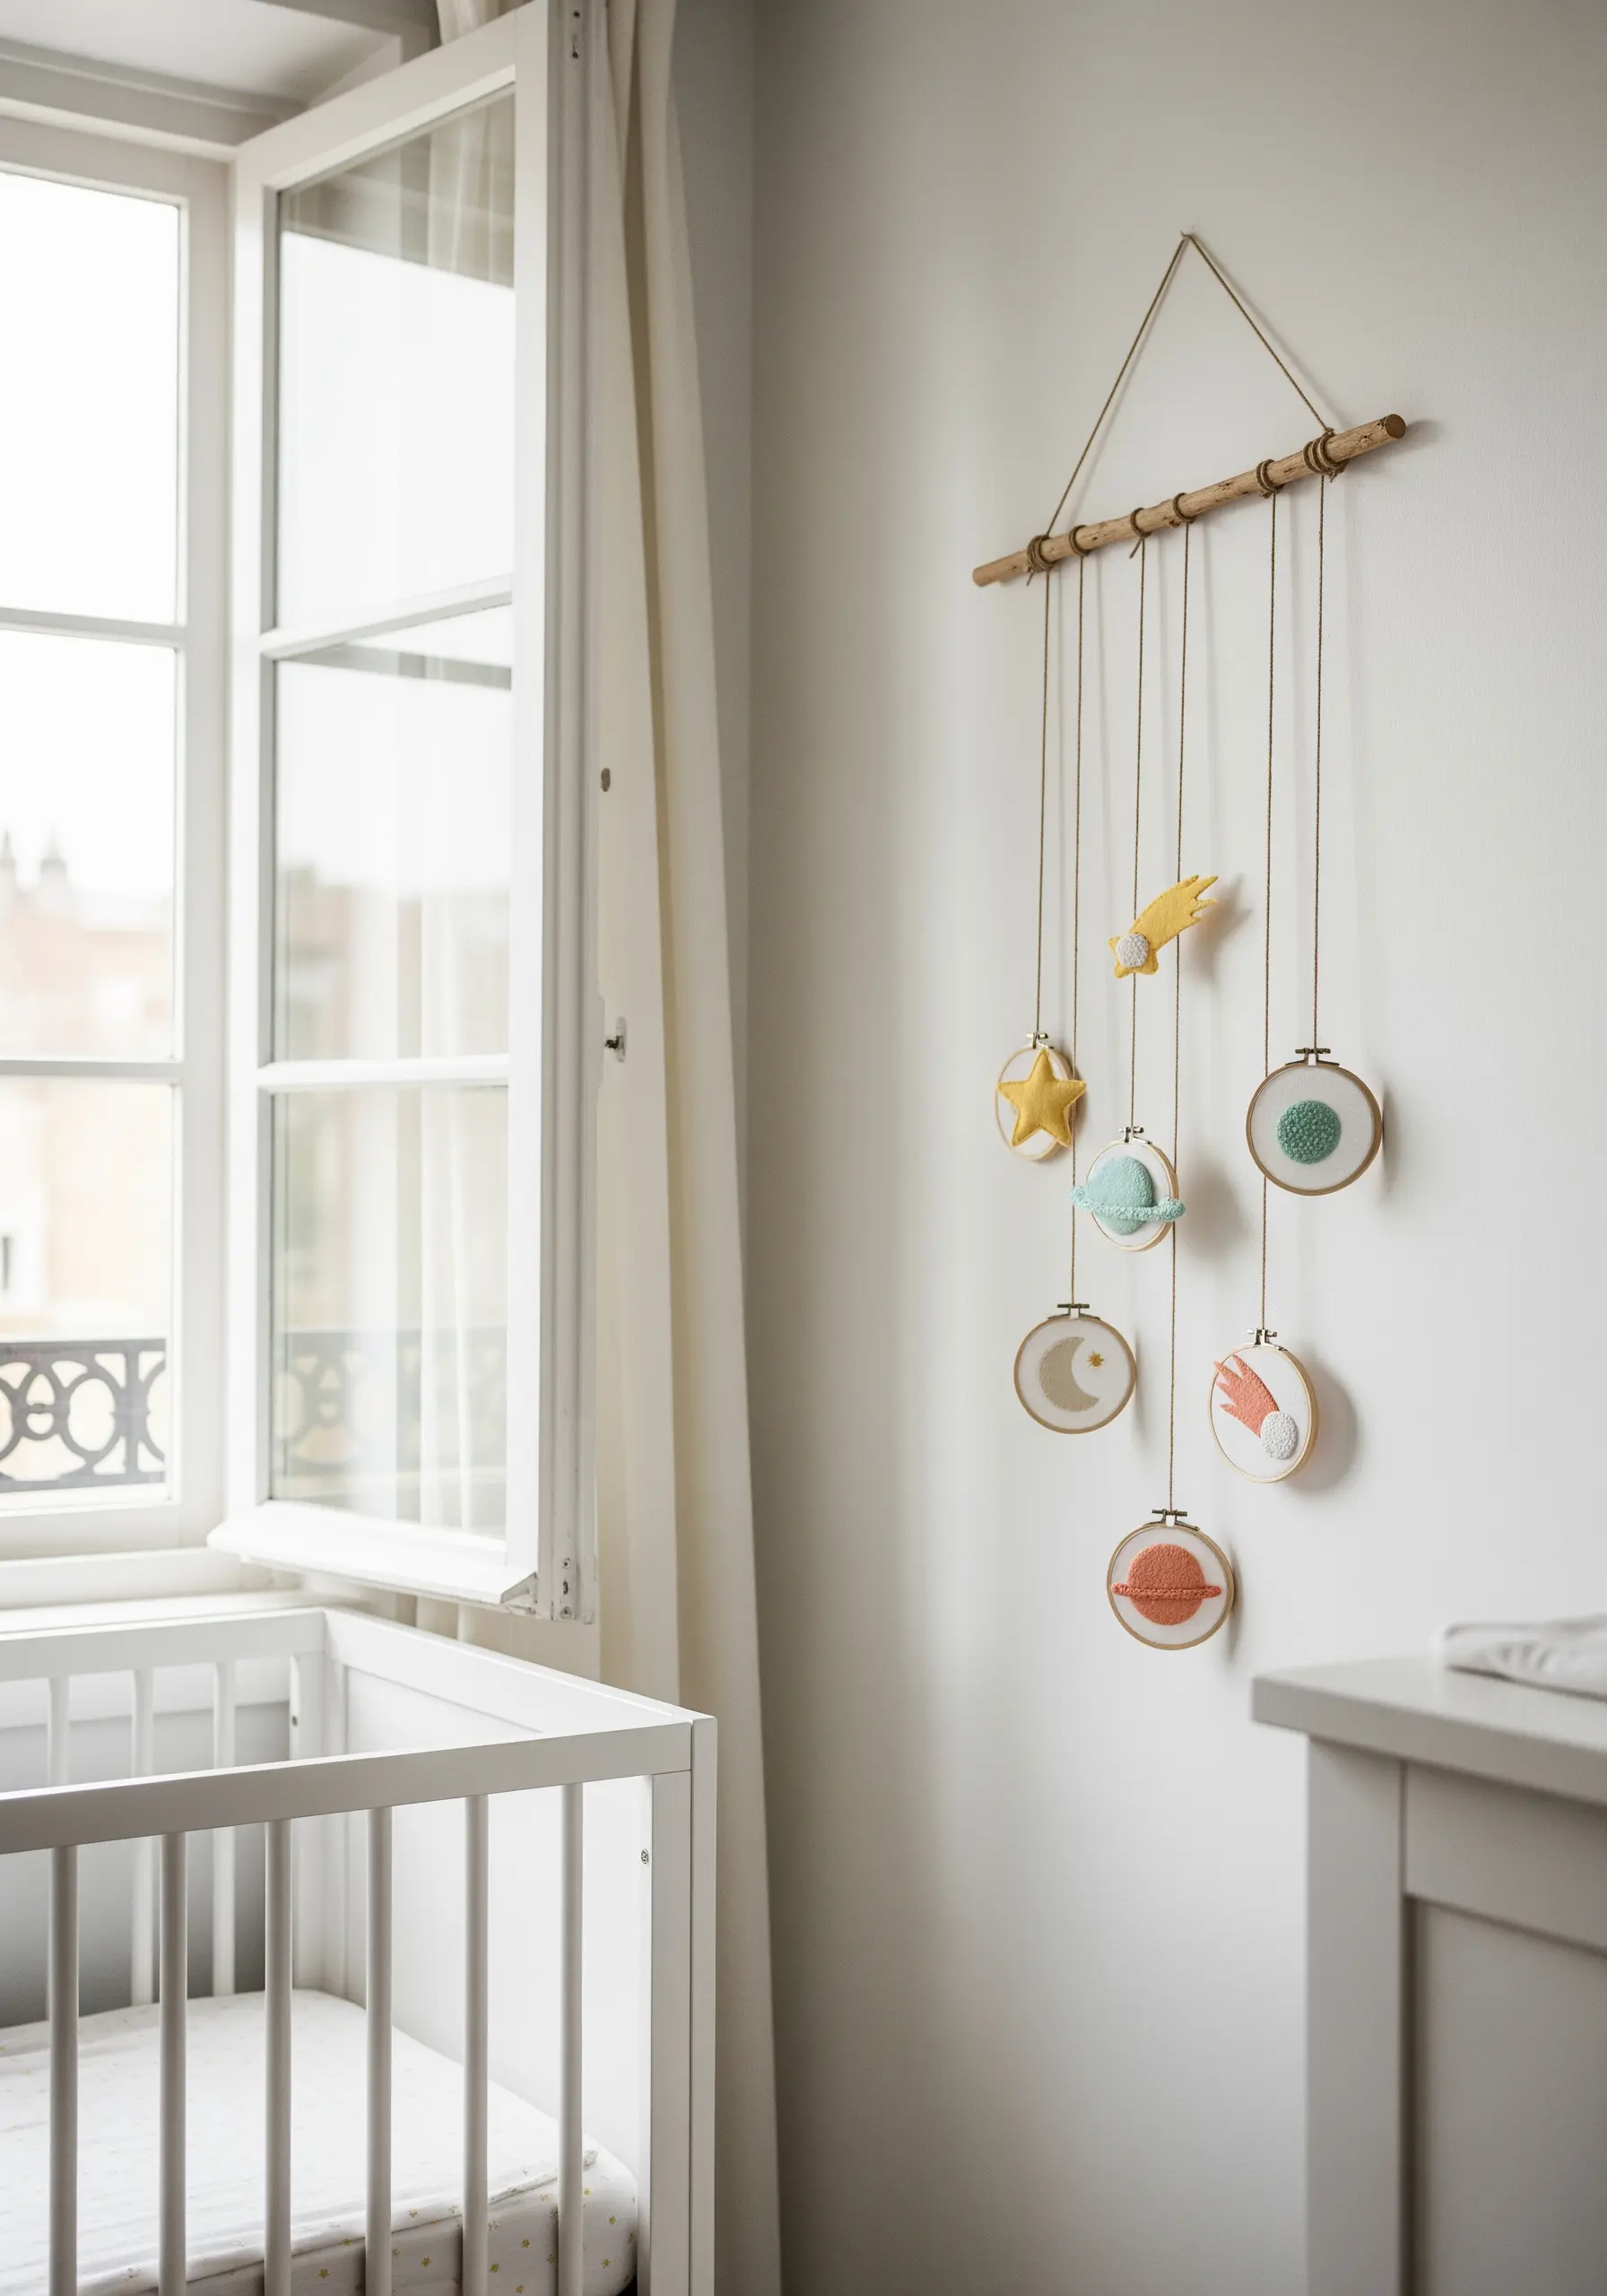
Take your embroidery off the wall by creating small, stuffed celestial shapes for a mobile.
Stitch your designs onto two pieces of felt, cut them out leaving a small seam allowance, and then whip stitch them together, adding a bit of stuffing before you close the final seam.
Use soft pastel threads and simple satin stitches to keep the look gentle and sweet, perfect for a nursery.
This approach transforms simple hoops into interactive, floating sculptures, creating gentle nursery stitch art wall ideas that move with the slightest breeze.
11. Convey Motion with Directional Stitching
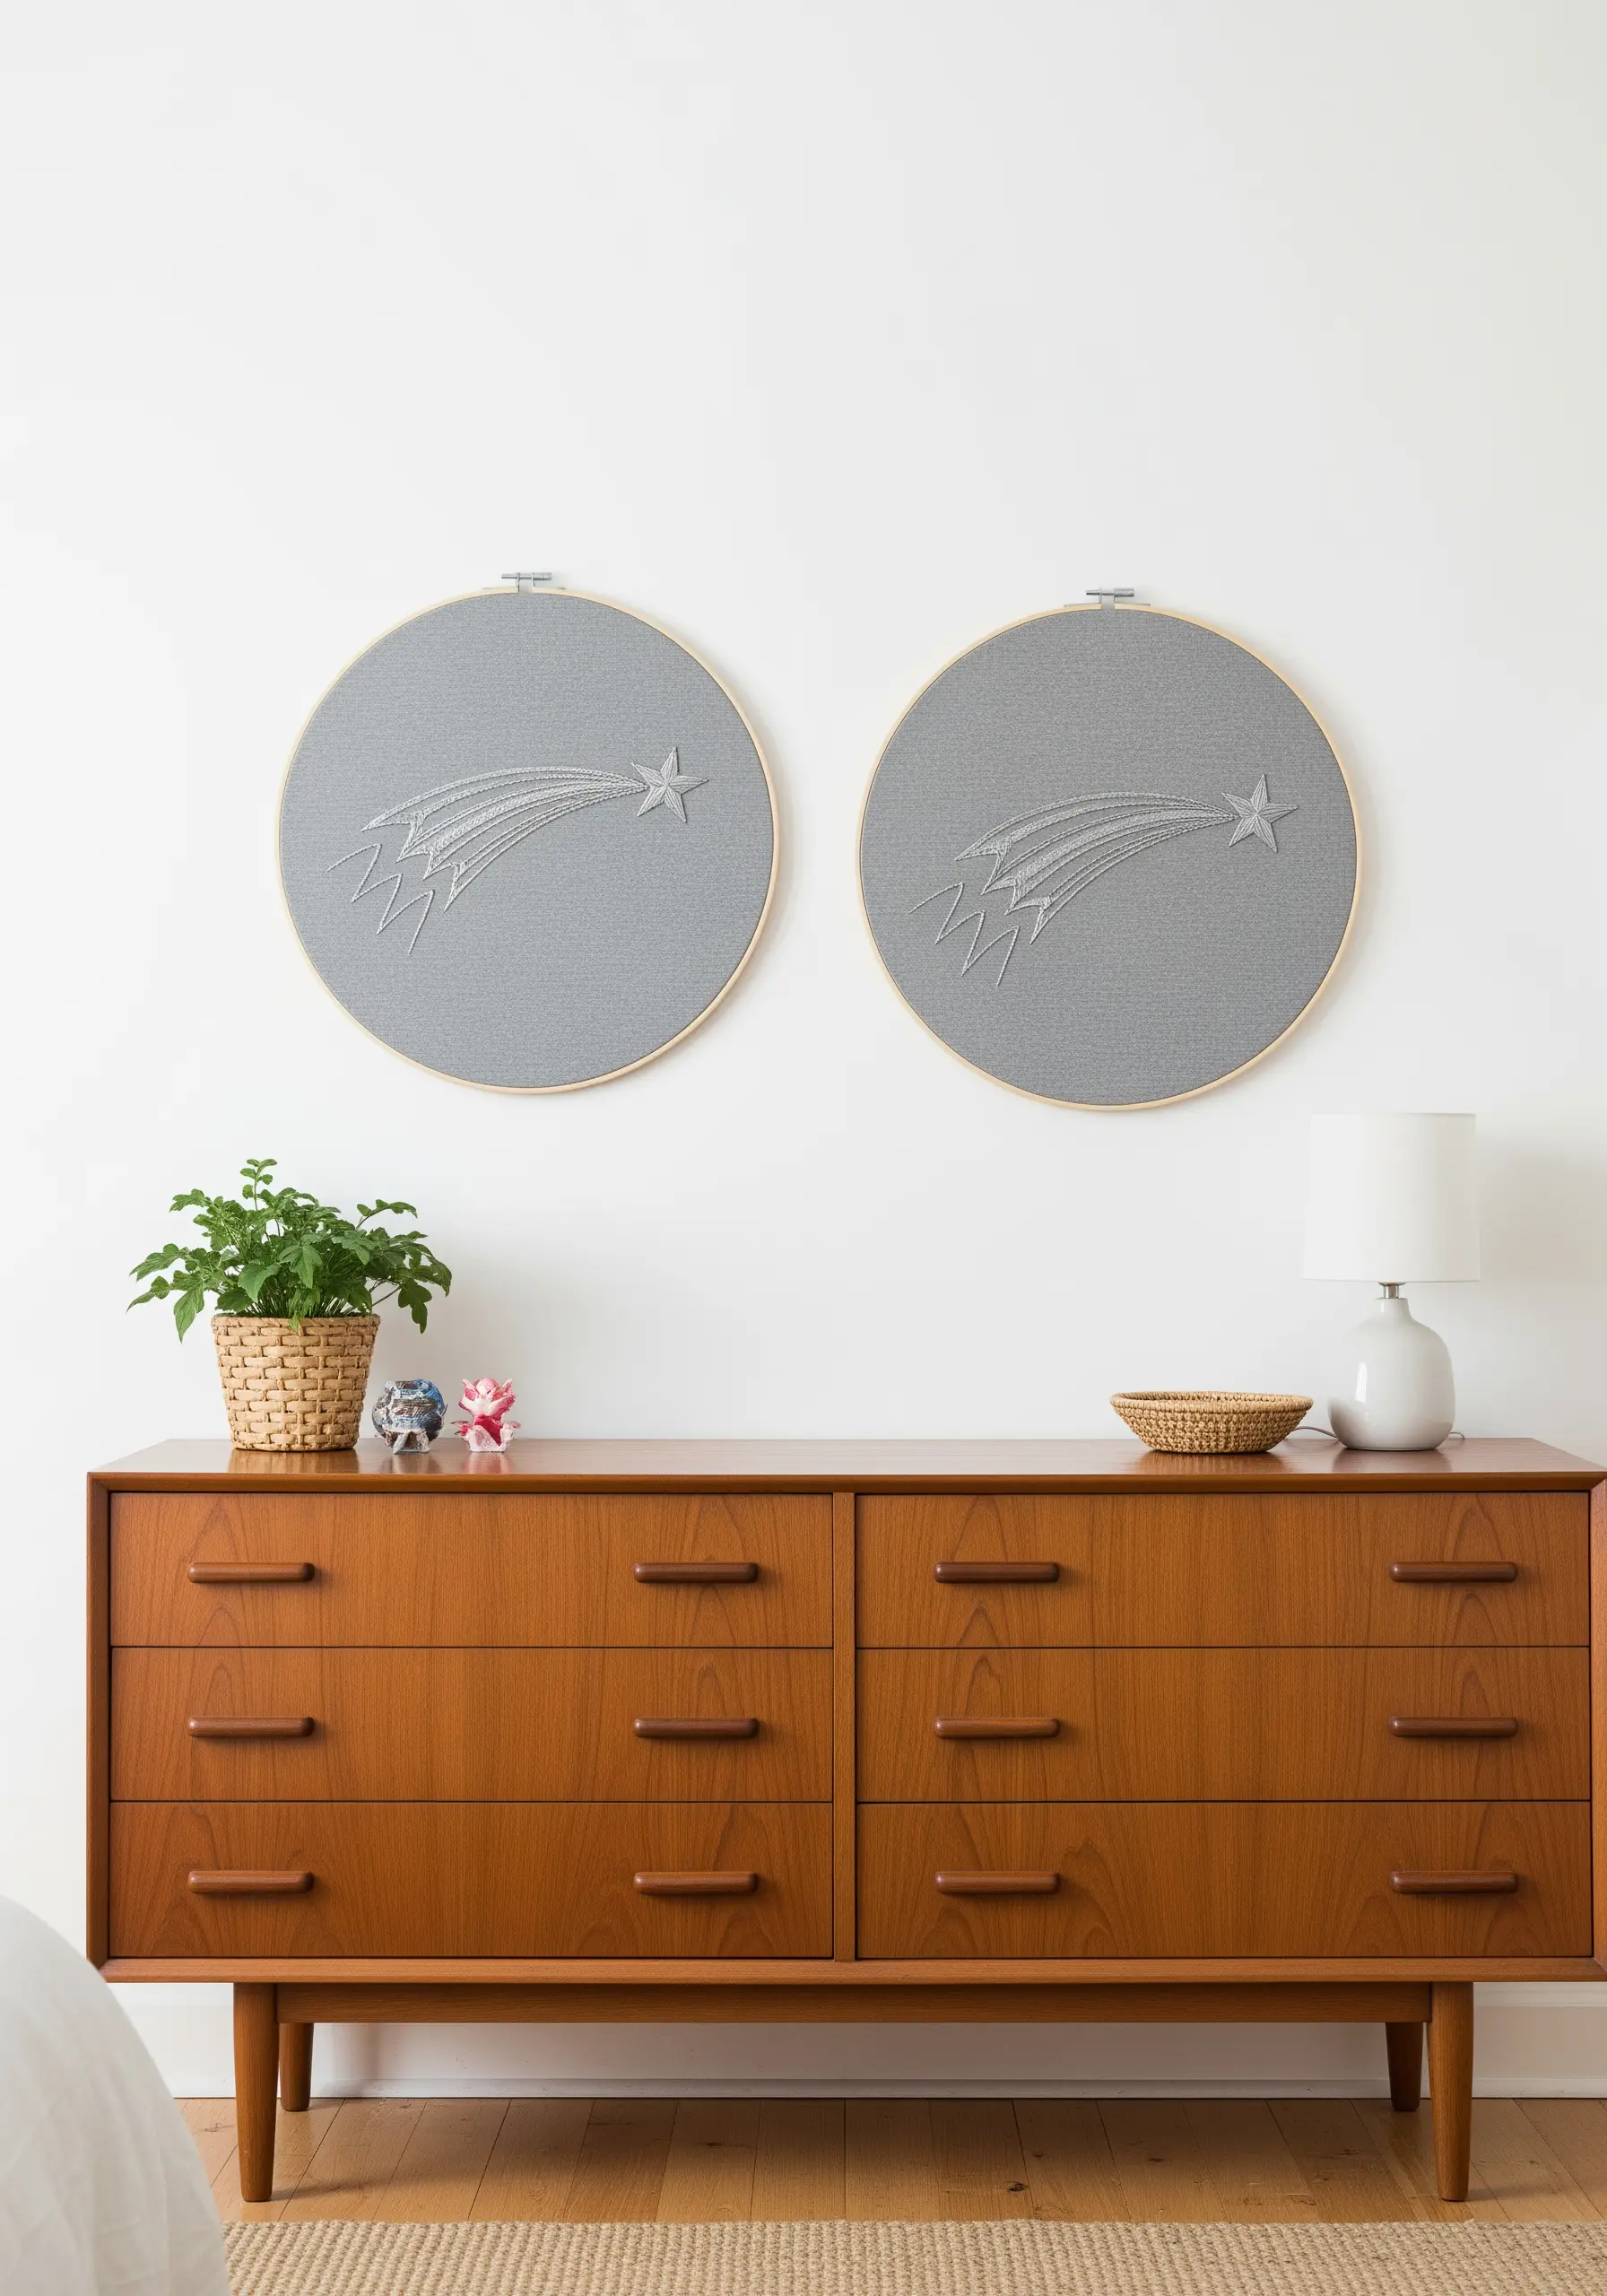
To make a shooting star feel dynamic, the direction of your stitches is everything.
Use a clean satin stitch for the star itself, then create the tail with long, flowing straight stitches of varying lengths.
Angle the stitches slightly outward from the central path to create a sense of explosive movement and energy.
Stitching the same motif as a diptych enhances this effect, creating a synchronized cosmic event across your wall.
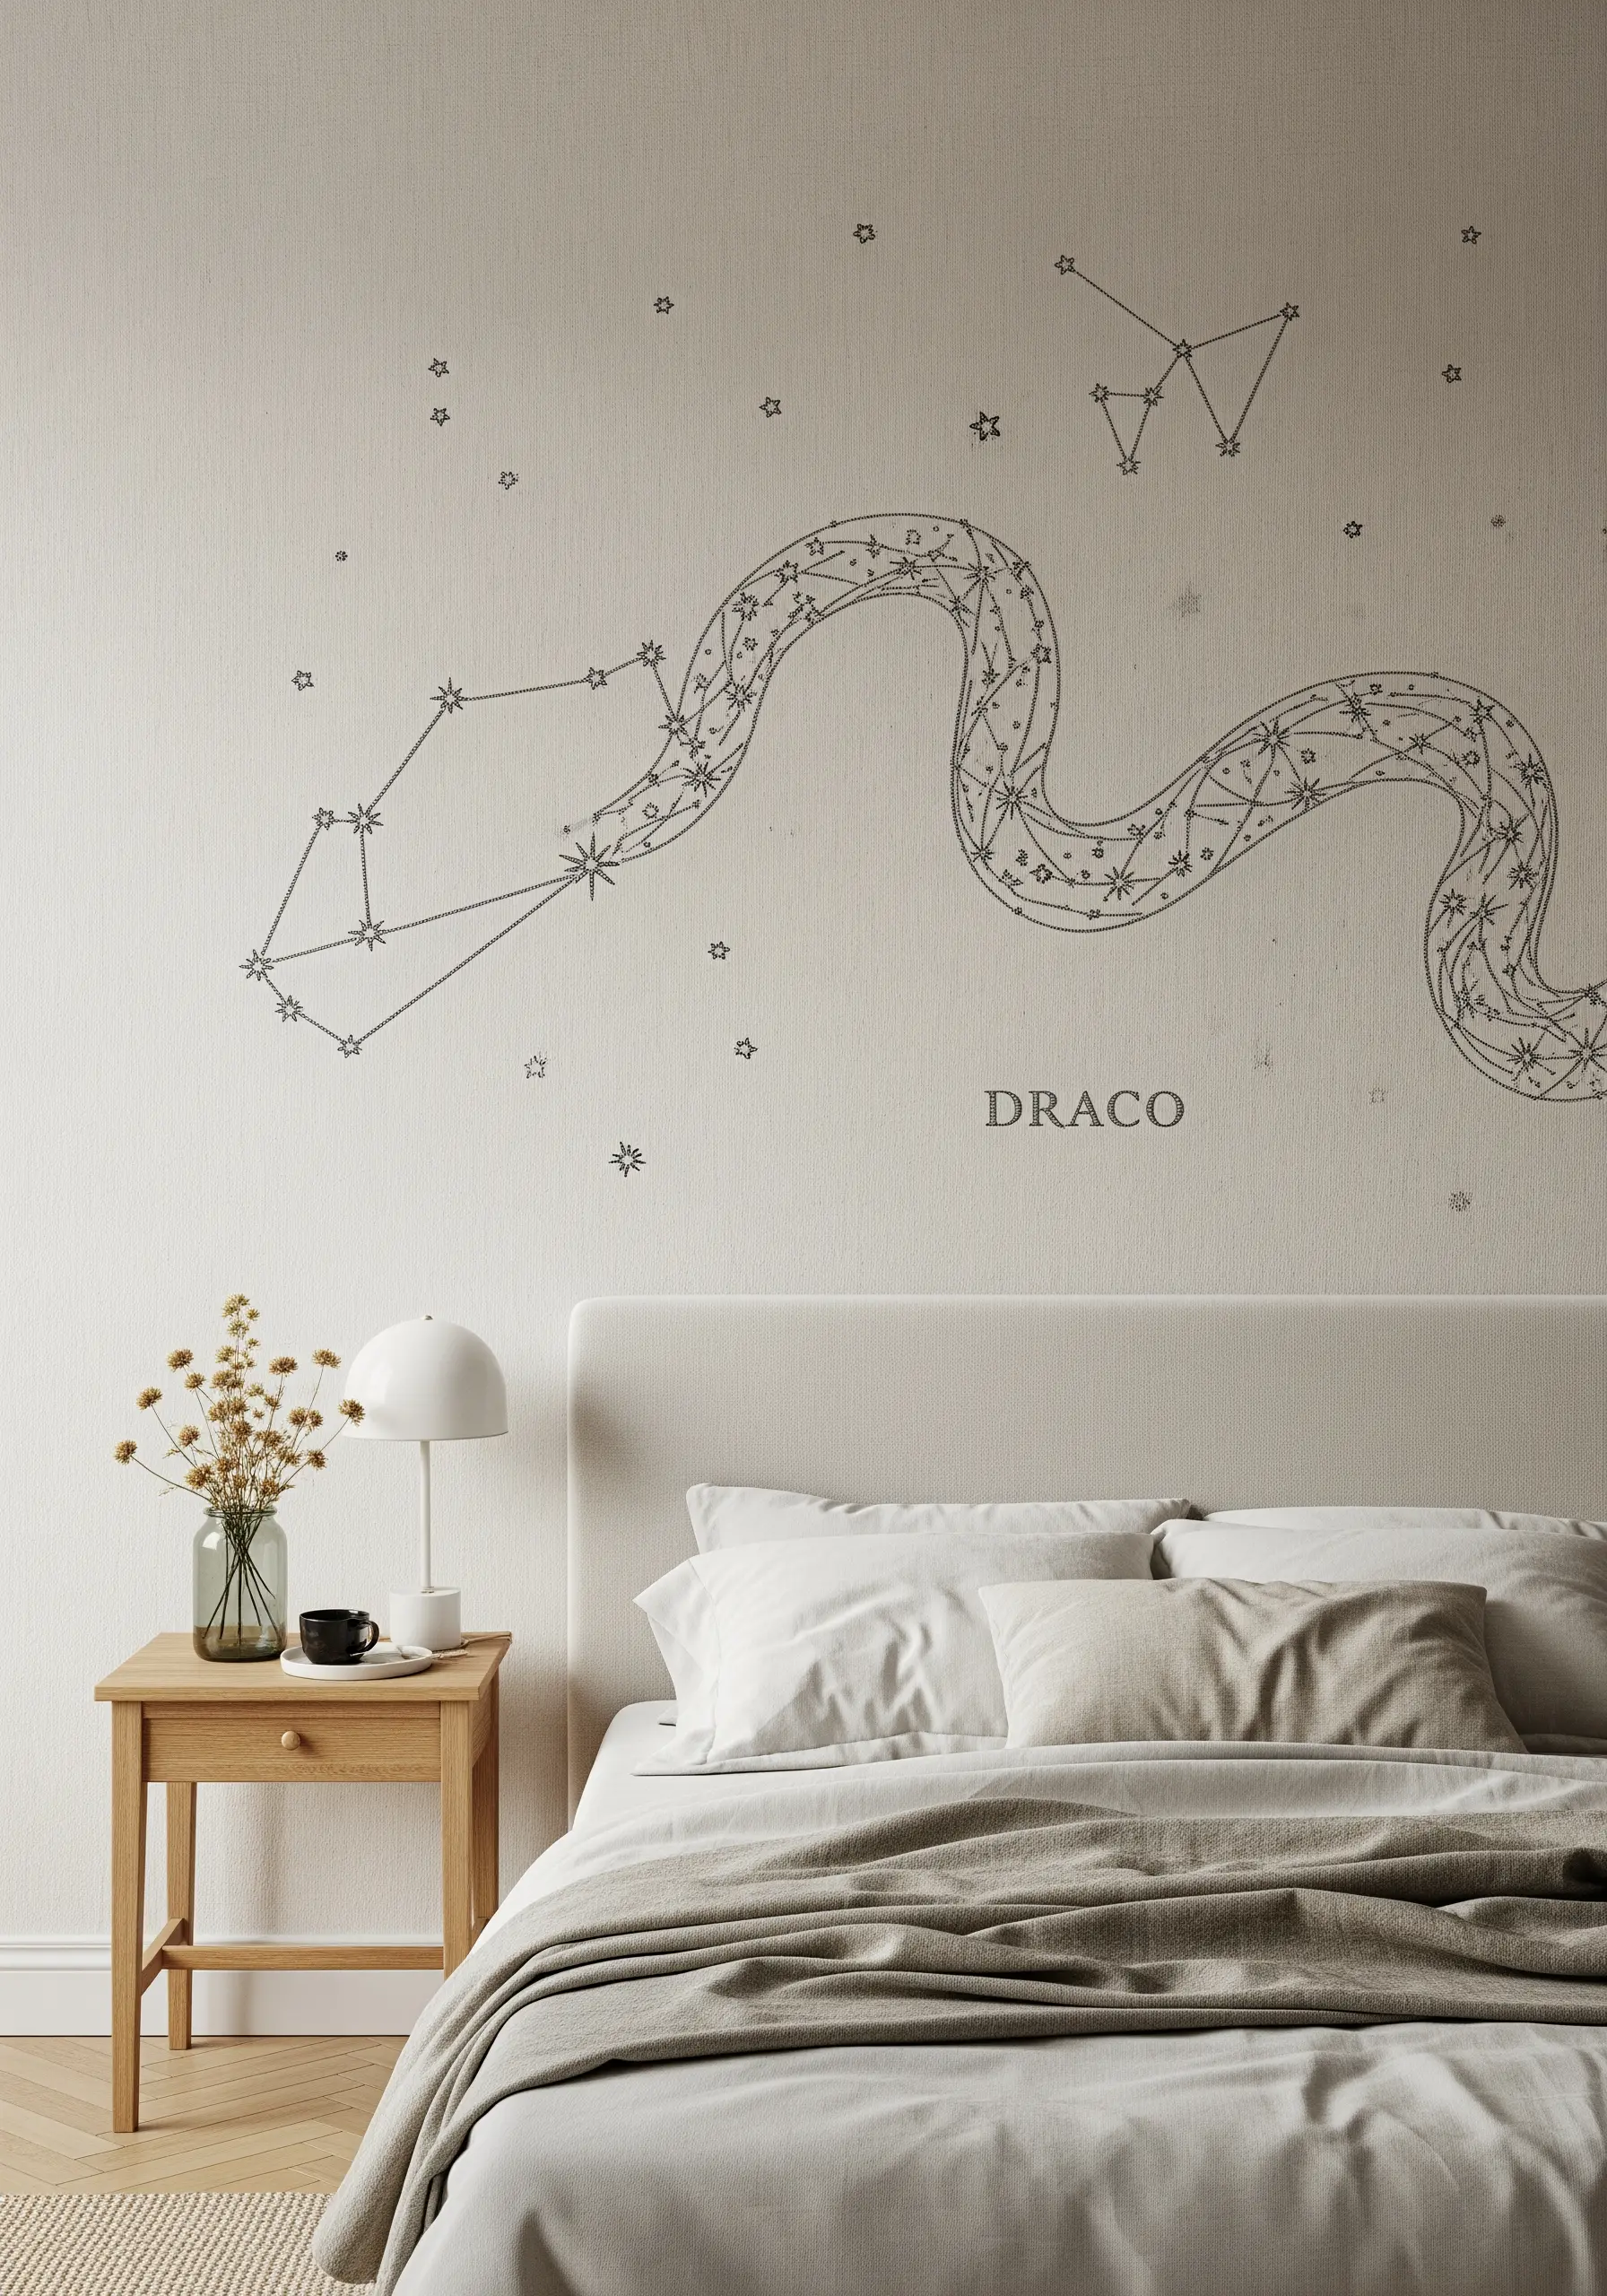
12. Map the Cosmos with Technical Line Work
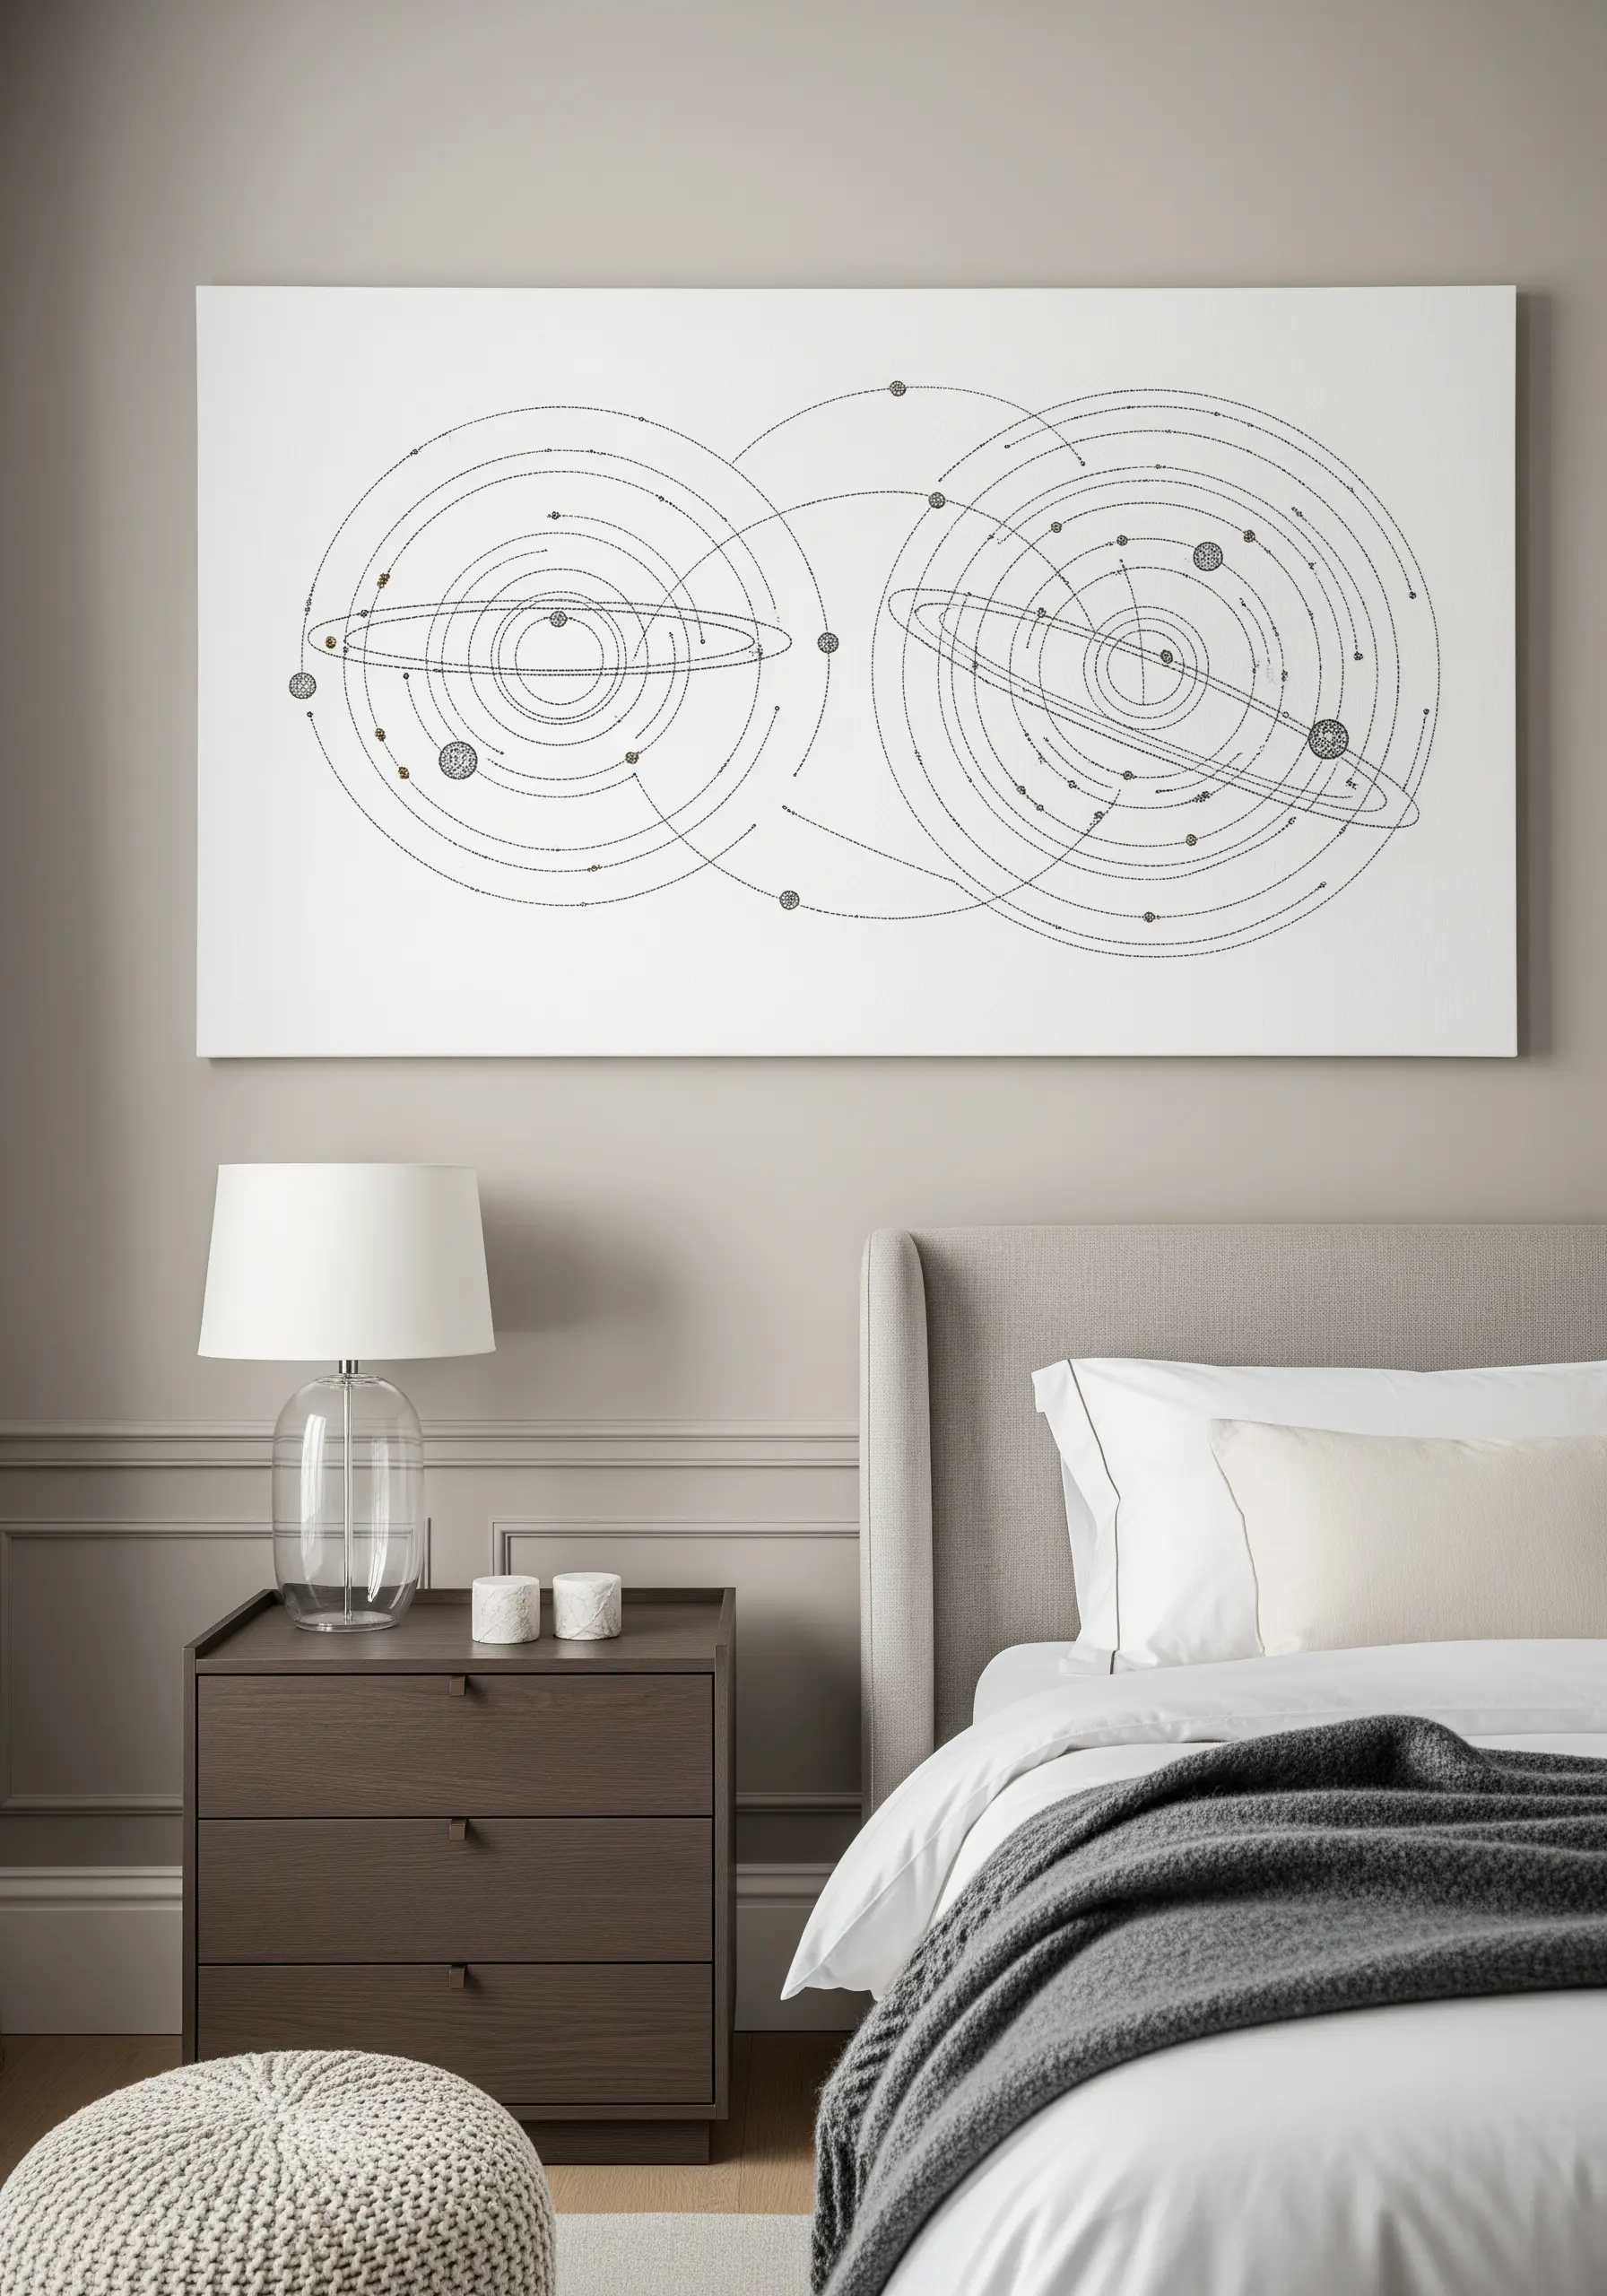
Channel the aesthetic of an antique astronomical chart by focusing on precise, delicate line work.
Use a single strand of black or dark grey thread on a crisp white canvas for a clean, architectural look.
A simple running stitch or backstitch is perfect for tracing orbital paths, while tiny satin stitches or French knots can represent planets and stars.
The key here is accuracy and restraint; transfer your design meticulously with a fine-tipped pen to ensure every line is perfectly placed.
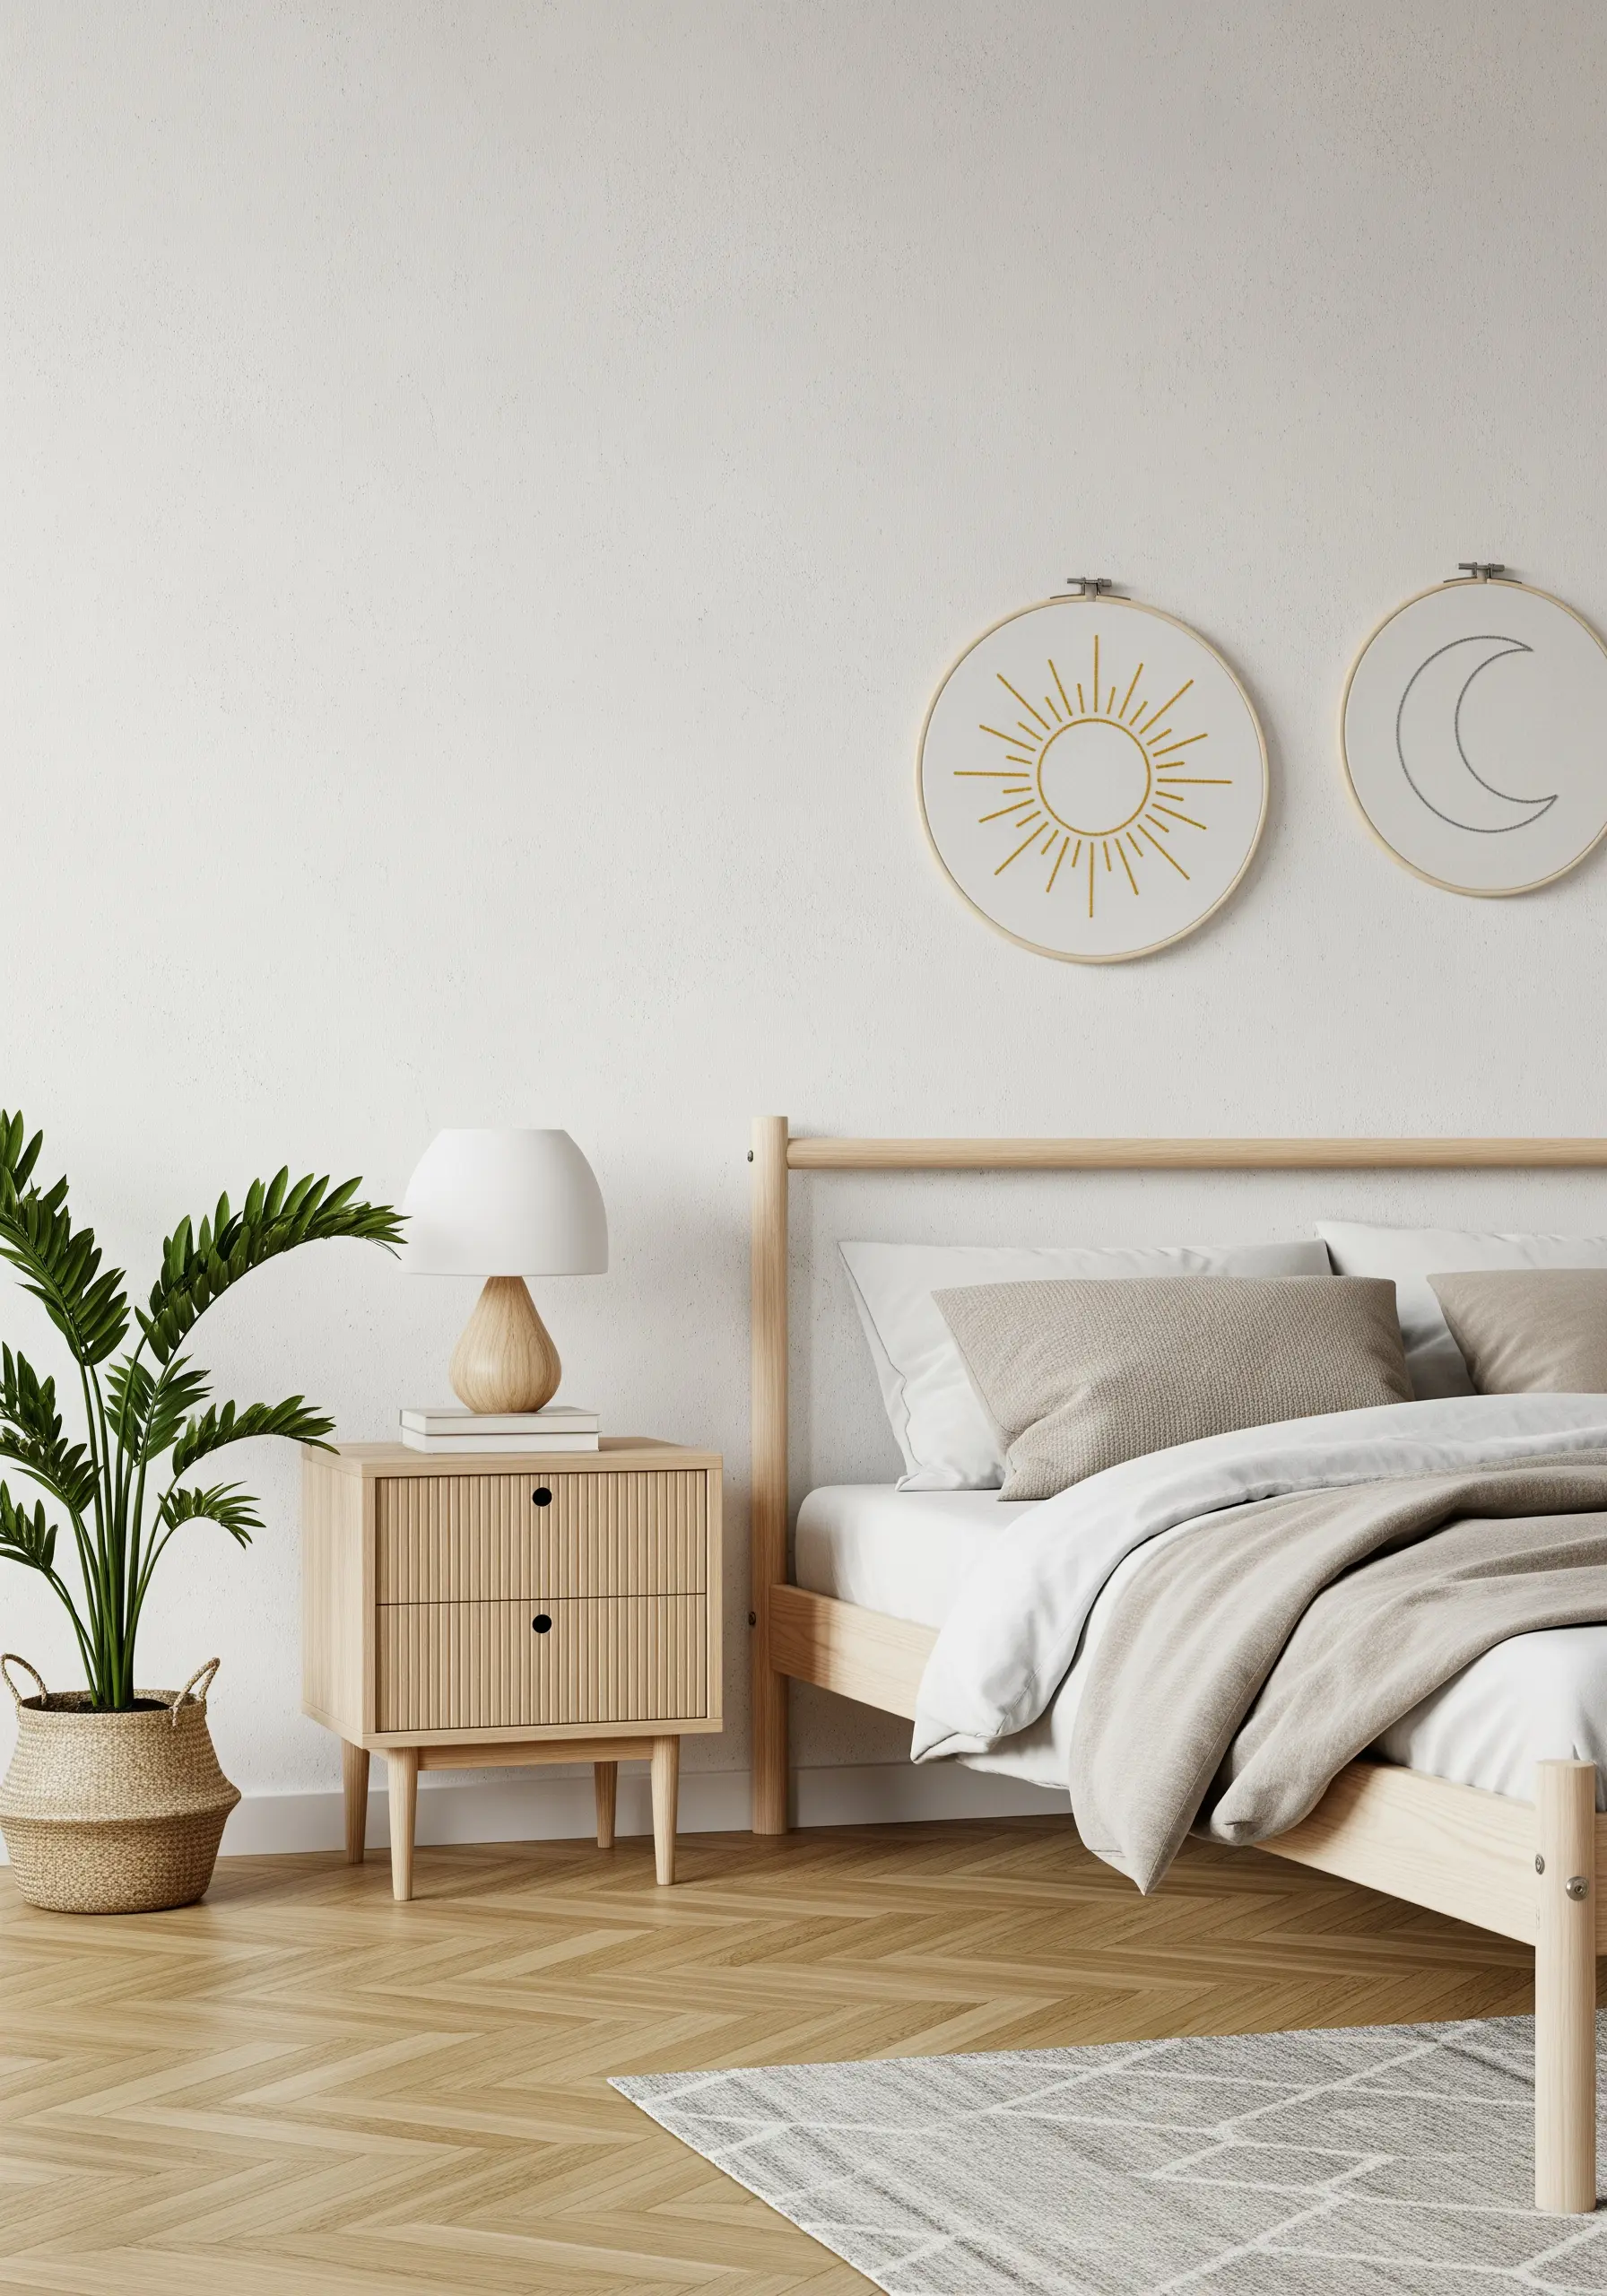
13. Personalize the Night Sky with a Zodiac Hoop
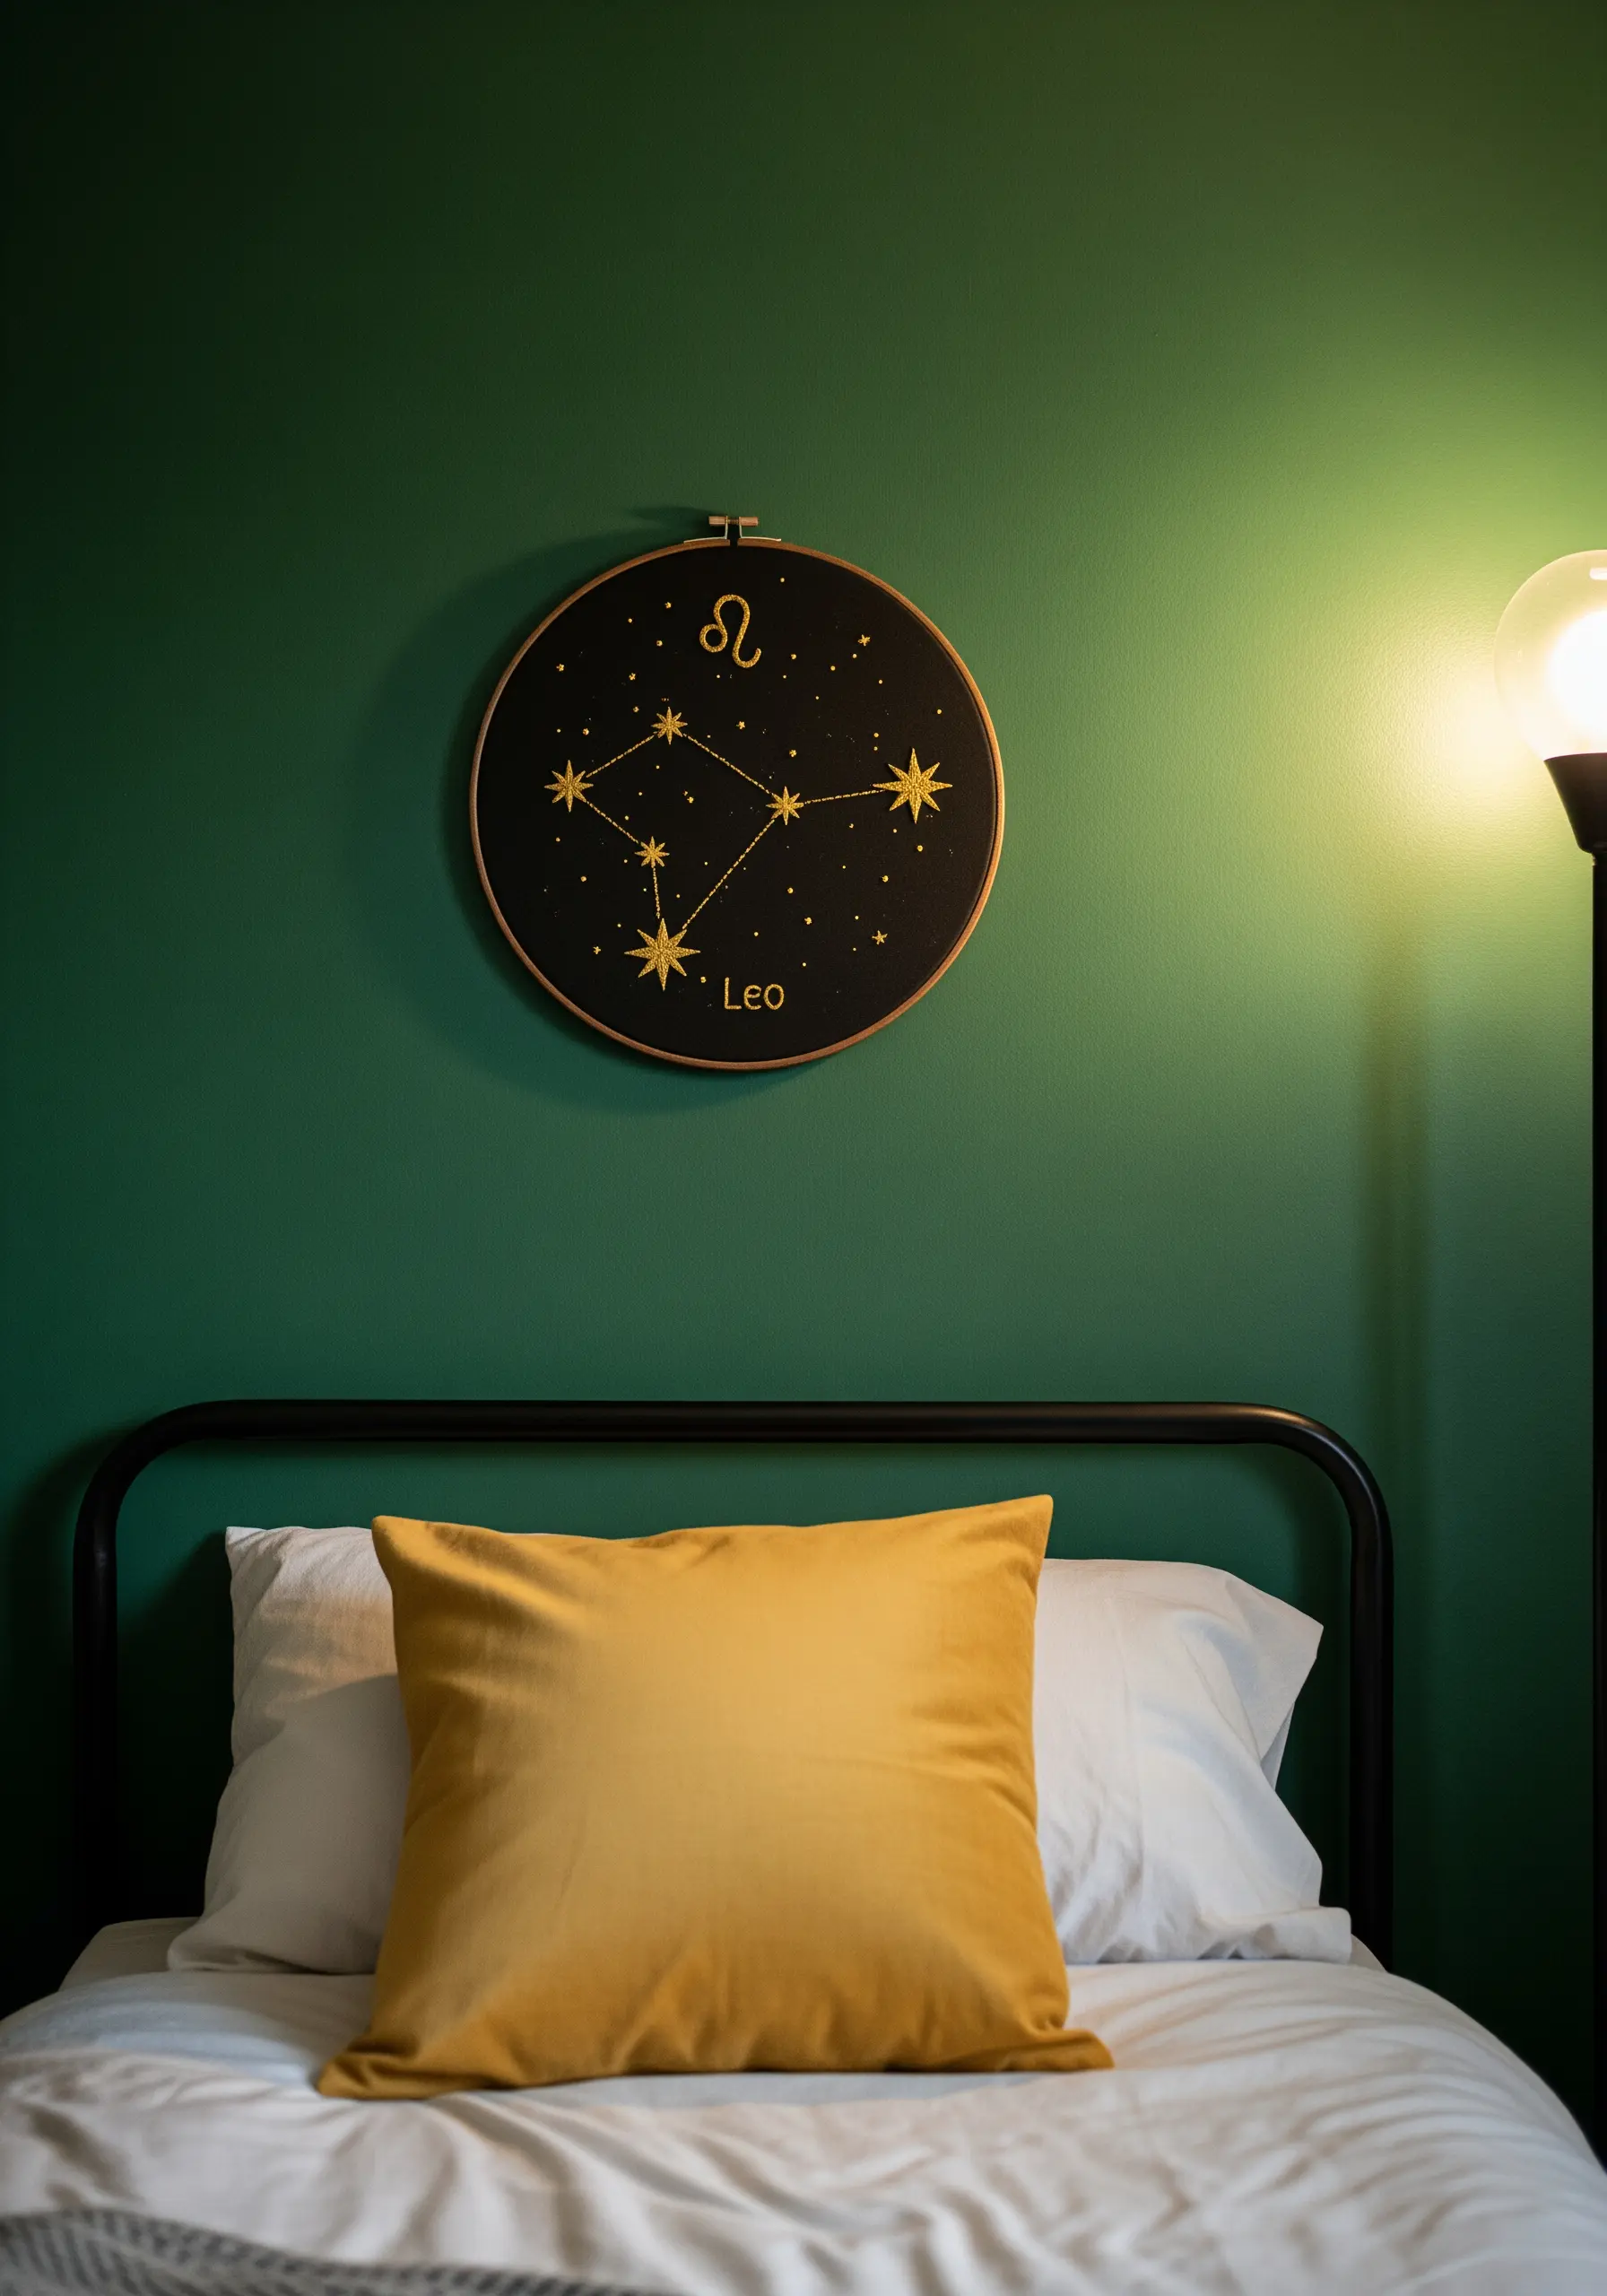
Create a deeply personal piece of art by stitching a zodiac constellation. The combination of typography and celestial map is timeless.
Use a bold, shimmering gold thread for maximum impact against a dark, moody background color like hunter green or charcoal grey.
Stitch the stars with a star stitch or a filled-in satin stitch to make them pop, and use a simple backstitch for the connecting lines and lettering.
This is a perfect project for a meaningful gift or for adding a touch of personal identity to your own space.
14. Connect Your Hoops to Form a Larger Constellation
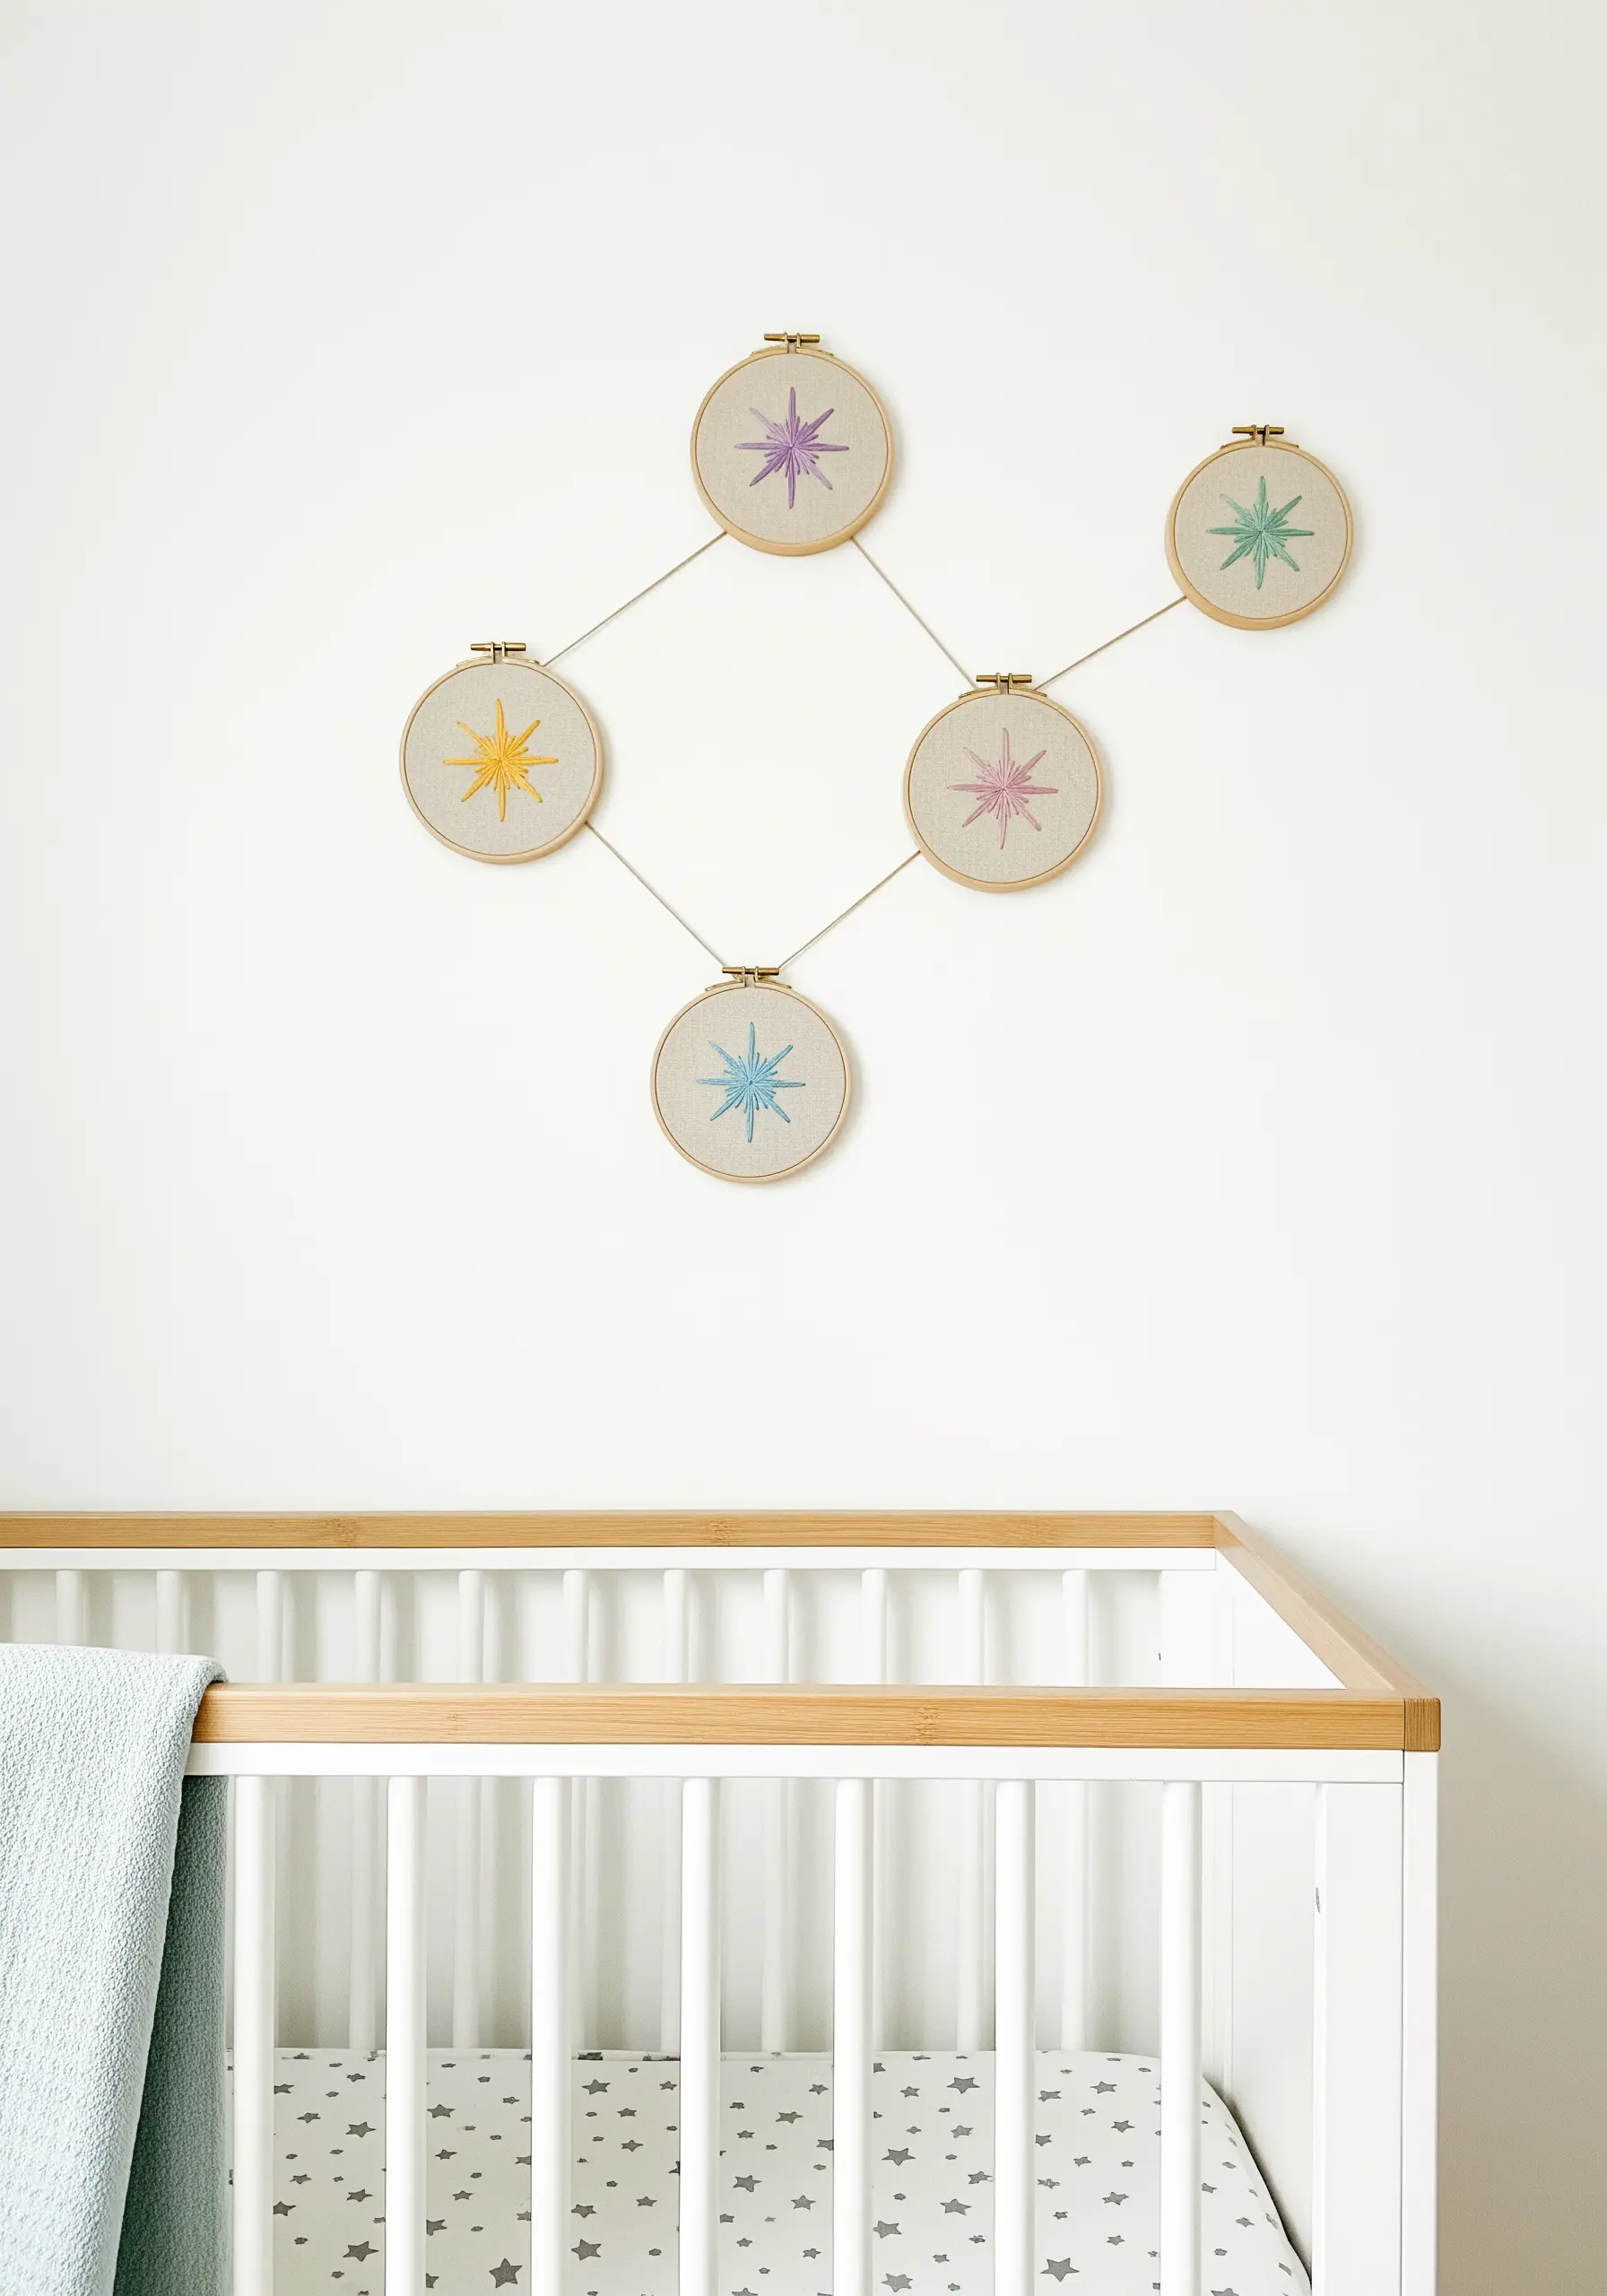
Elevate a simple gallery wall by physically connecting the hoops with thread, transforming individual pieces into one large, interconnected design.
Plan your layout on the wall first, marking where each hoop and connecting line will go.
Stitch your starbursts within each hoop, then use a sturdy neutral thread and small, clear wall hooks or pins to stretch the lines between them.
This innovative display technique turns your embroidery into a dynamic wall installation that feels both playful and intentional.
15. Paint a Nebula with Variegated Threads
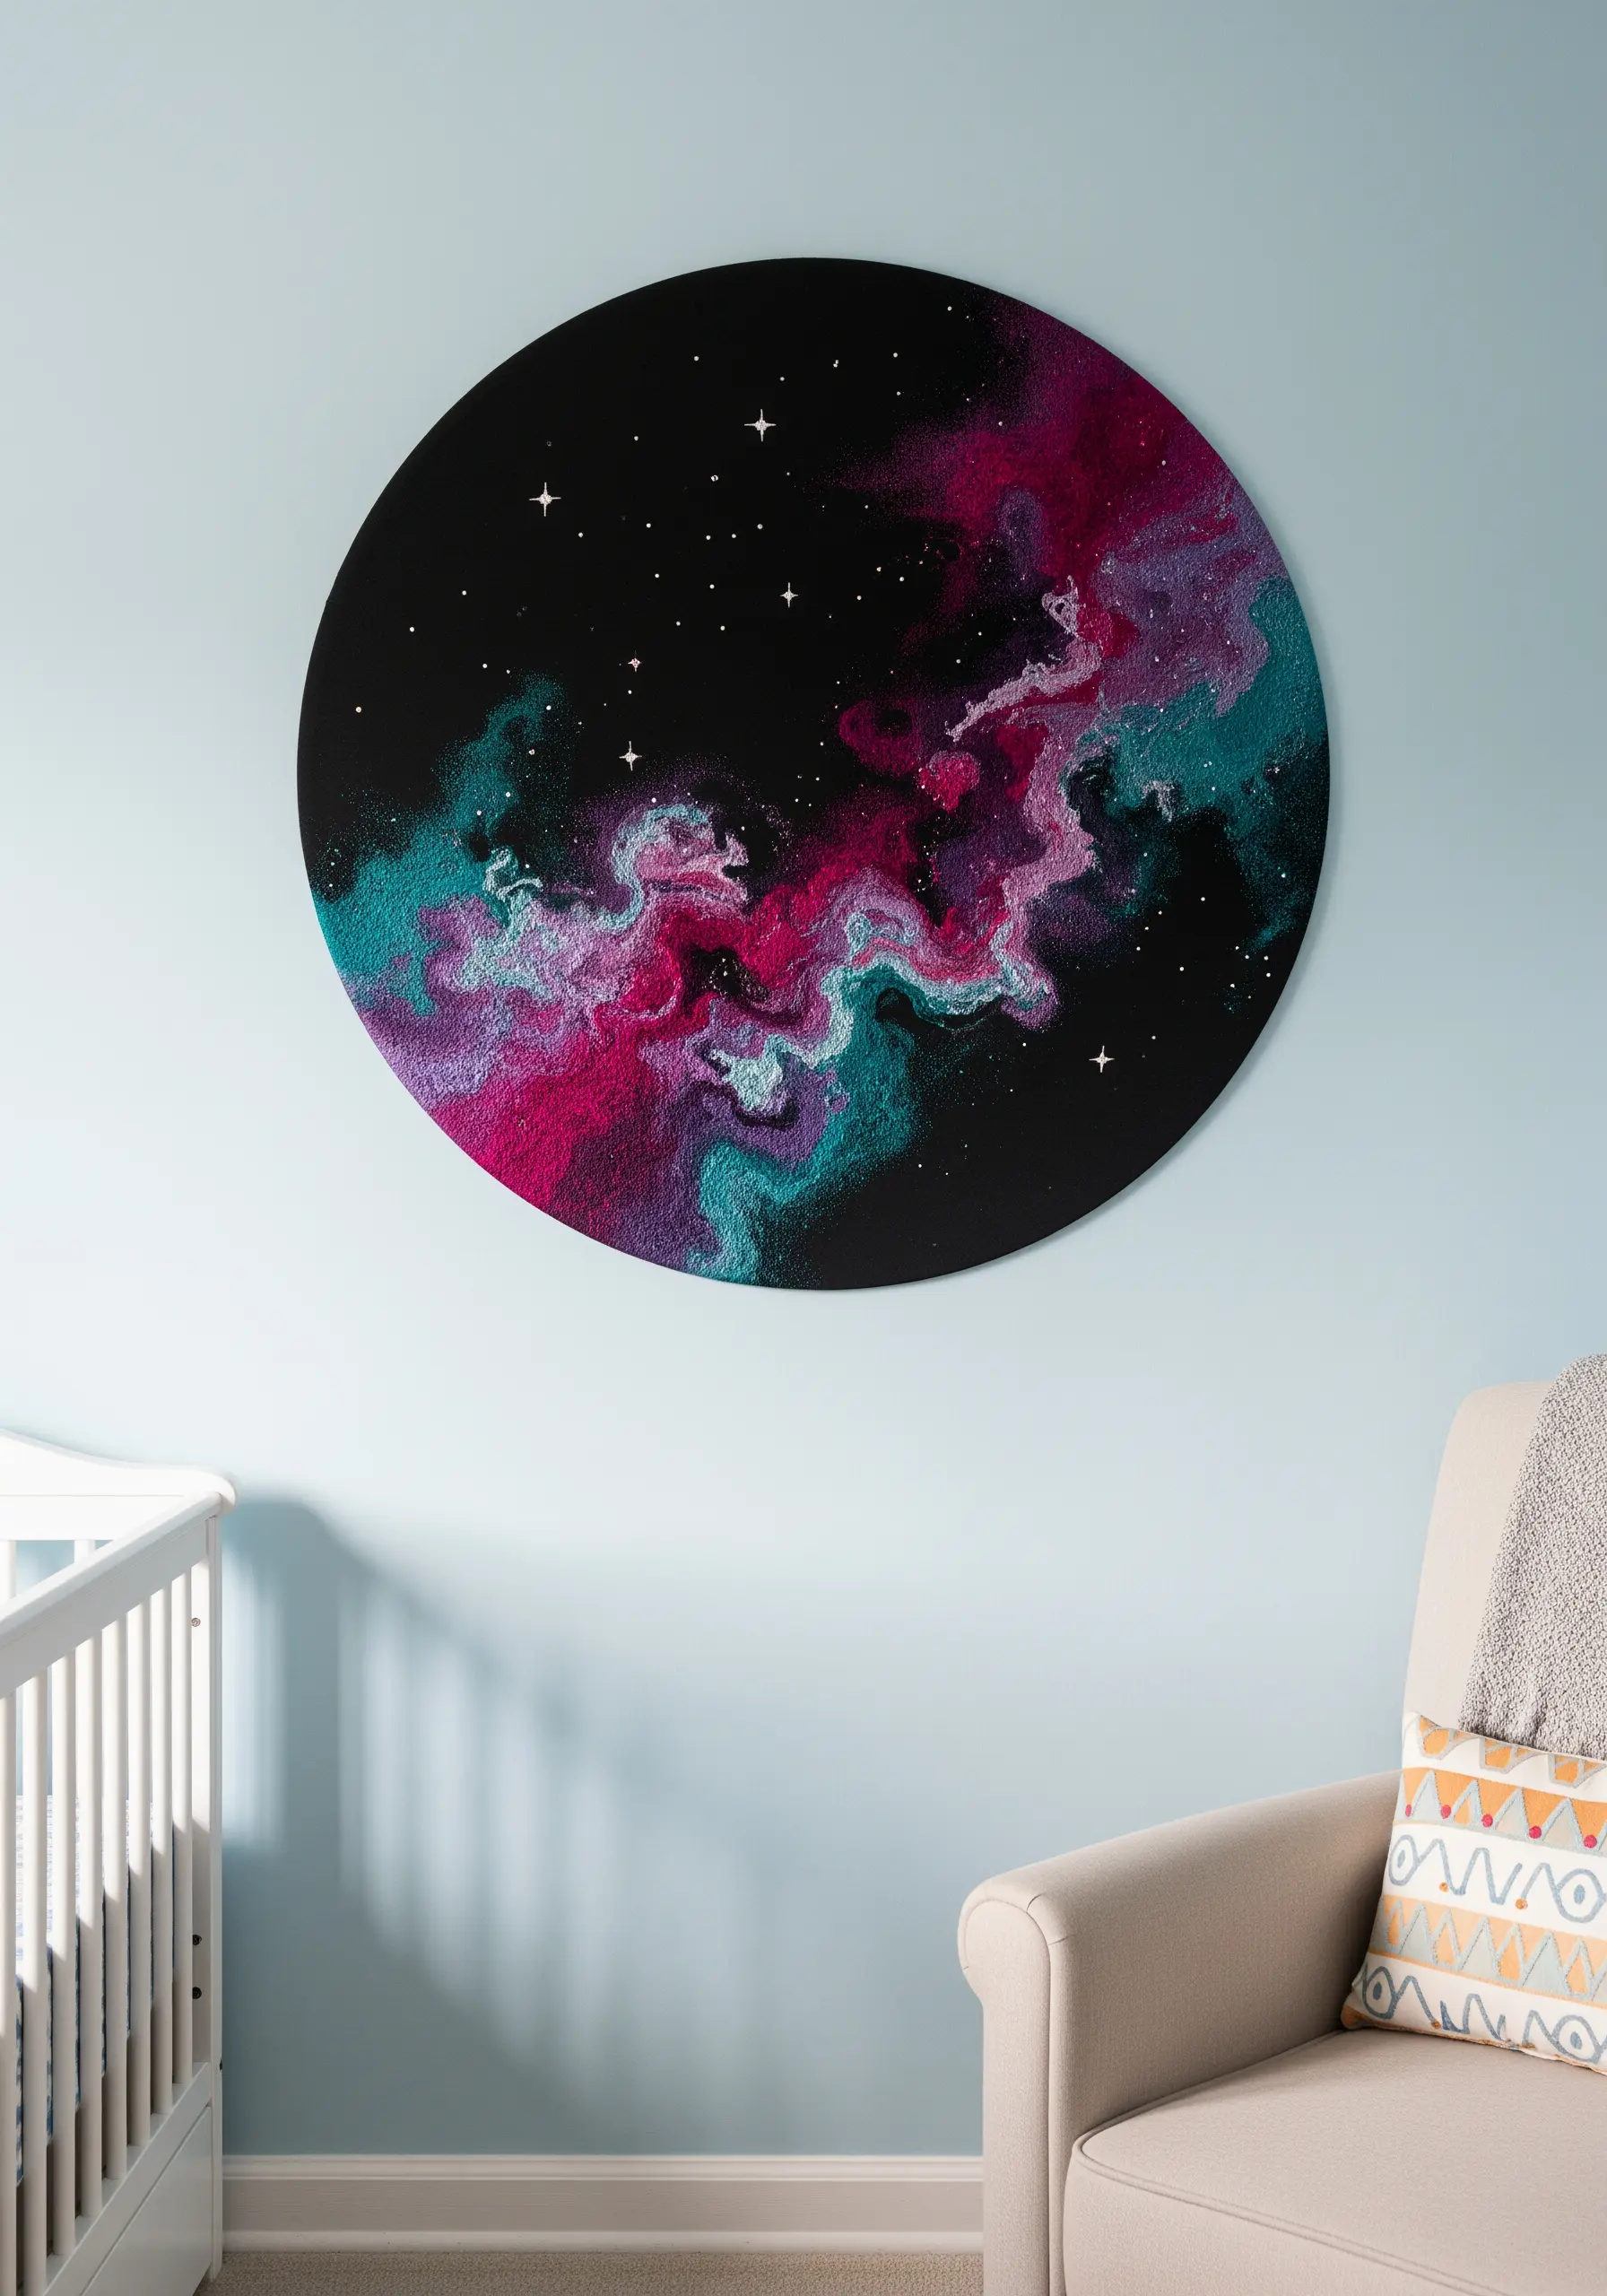
To capture the swirling, ethereal quality of a nebula, let go of precise stitches and embrace a more painterly approach.
Use variegated floss in cosmic colors like magenta, teal, and violet, and fill the space with dense, random seed stitches.
There’s no need to follow a pattern; simply allow the colors to blend and flow organically as you stitch.
Add a sprinkle of silver metallic French knots to represent distant stars within the cosmic cloud. This is a perfect application of abstract thread sculpting tricks.
16. Master Elegance with Minimalist Line Art
Sometimes, the most powerful statement is the simplest. This design relies on the clean confidence of a single, unbroken line.
Choose a smooth, high-quality fabric where the thread can glide effortlessly. A simple backstitch or stem stitch using just two strands of floss is all you need.
The negative space around the motifs is just as important as the stitched lines, creating a sense of balance and calm.
These minimal line drawing embroidery ideas are perfect for creating a serene, modern aesthetic in a bedroom.
17. Scale Up a Constellation for a Full-Wall Mural
For a truly immersive celestial experience, take your embroidery directly onto the wall. This can be done on a large, stretched piece of fabric or even directly on a painted canvas.
Use a projector to transfer your design to ensure the scale and proportions are correct.
Opt for thicker materials like yarn or tapestry wool so the design is visible and impactful from across the room.
A mix of stitched lines and appliqué star shapes can add texture and dimension to your large-scale cosmic map.
18. Create Planetary Dimension with Color Blending
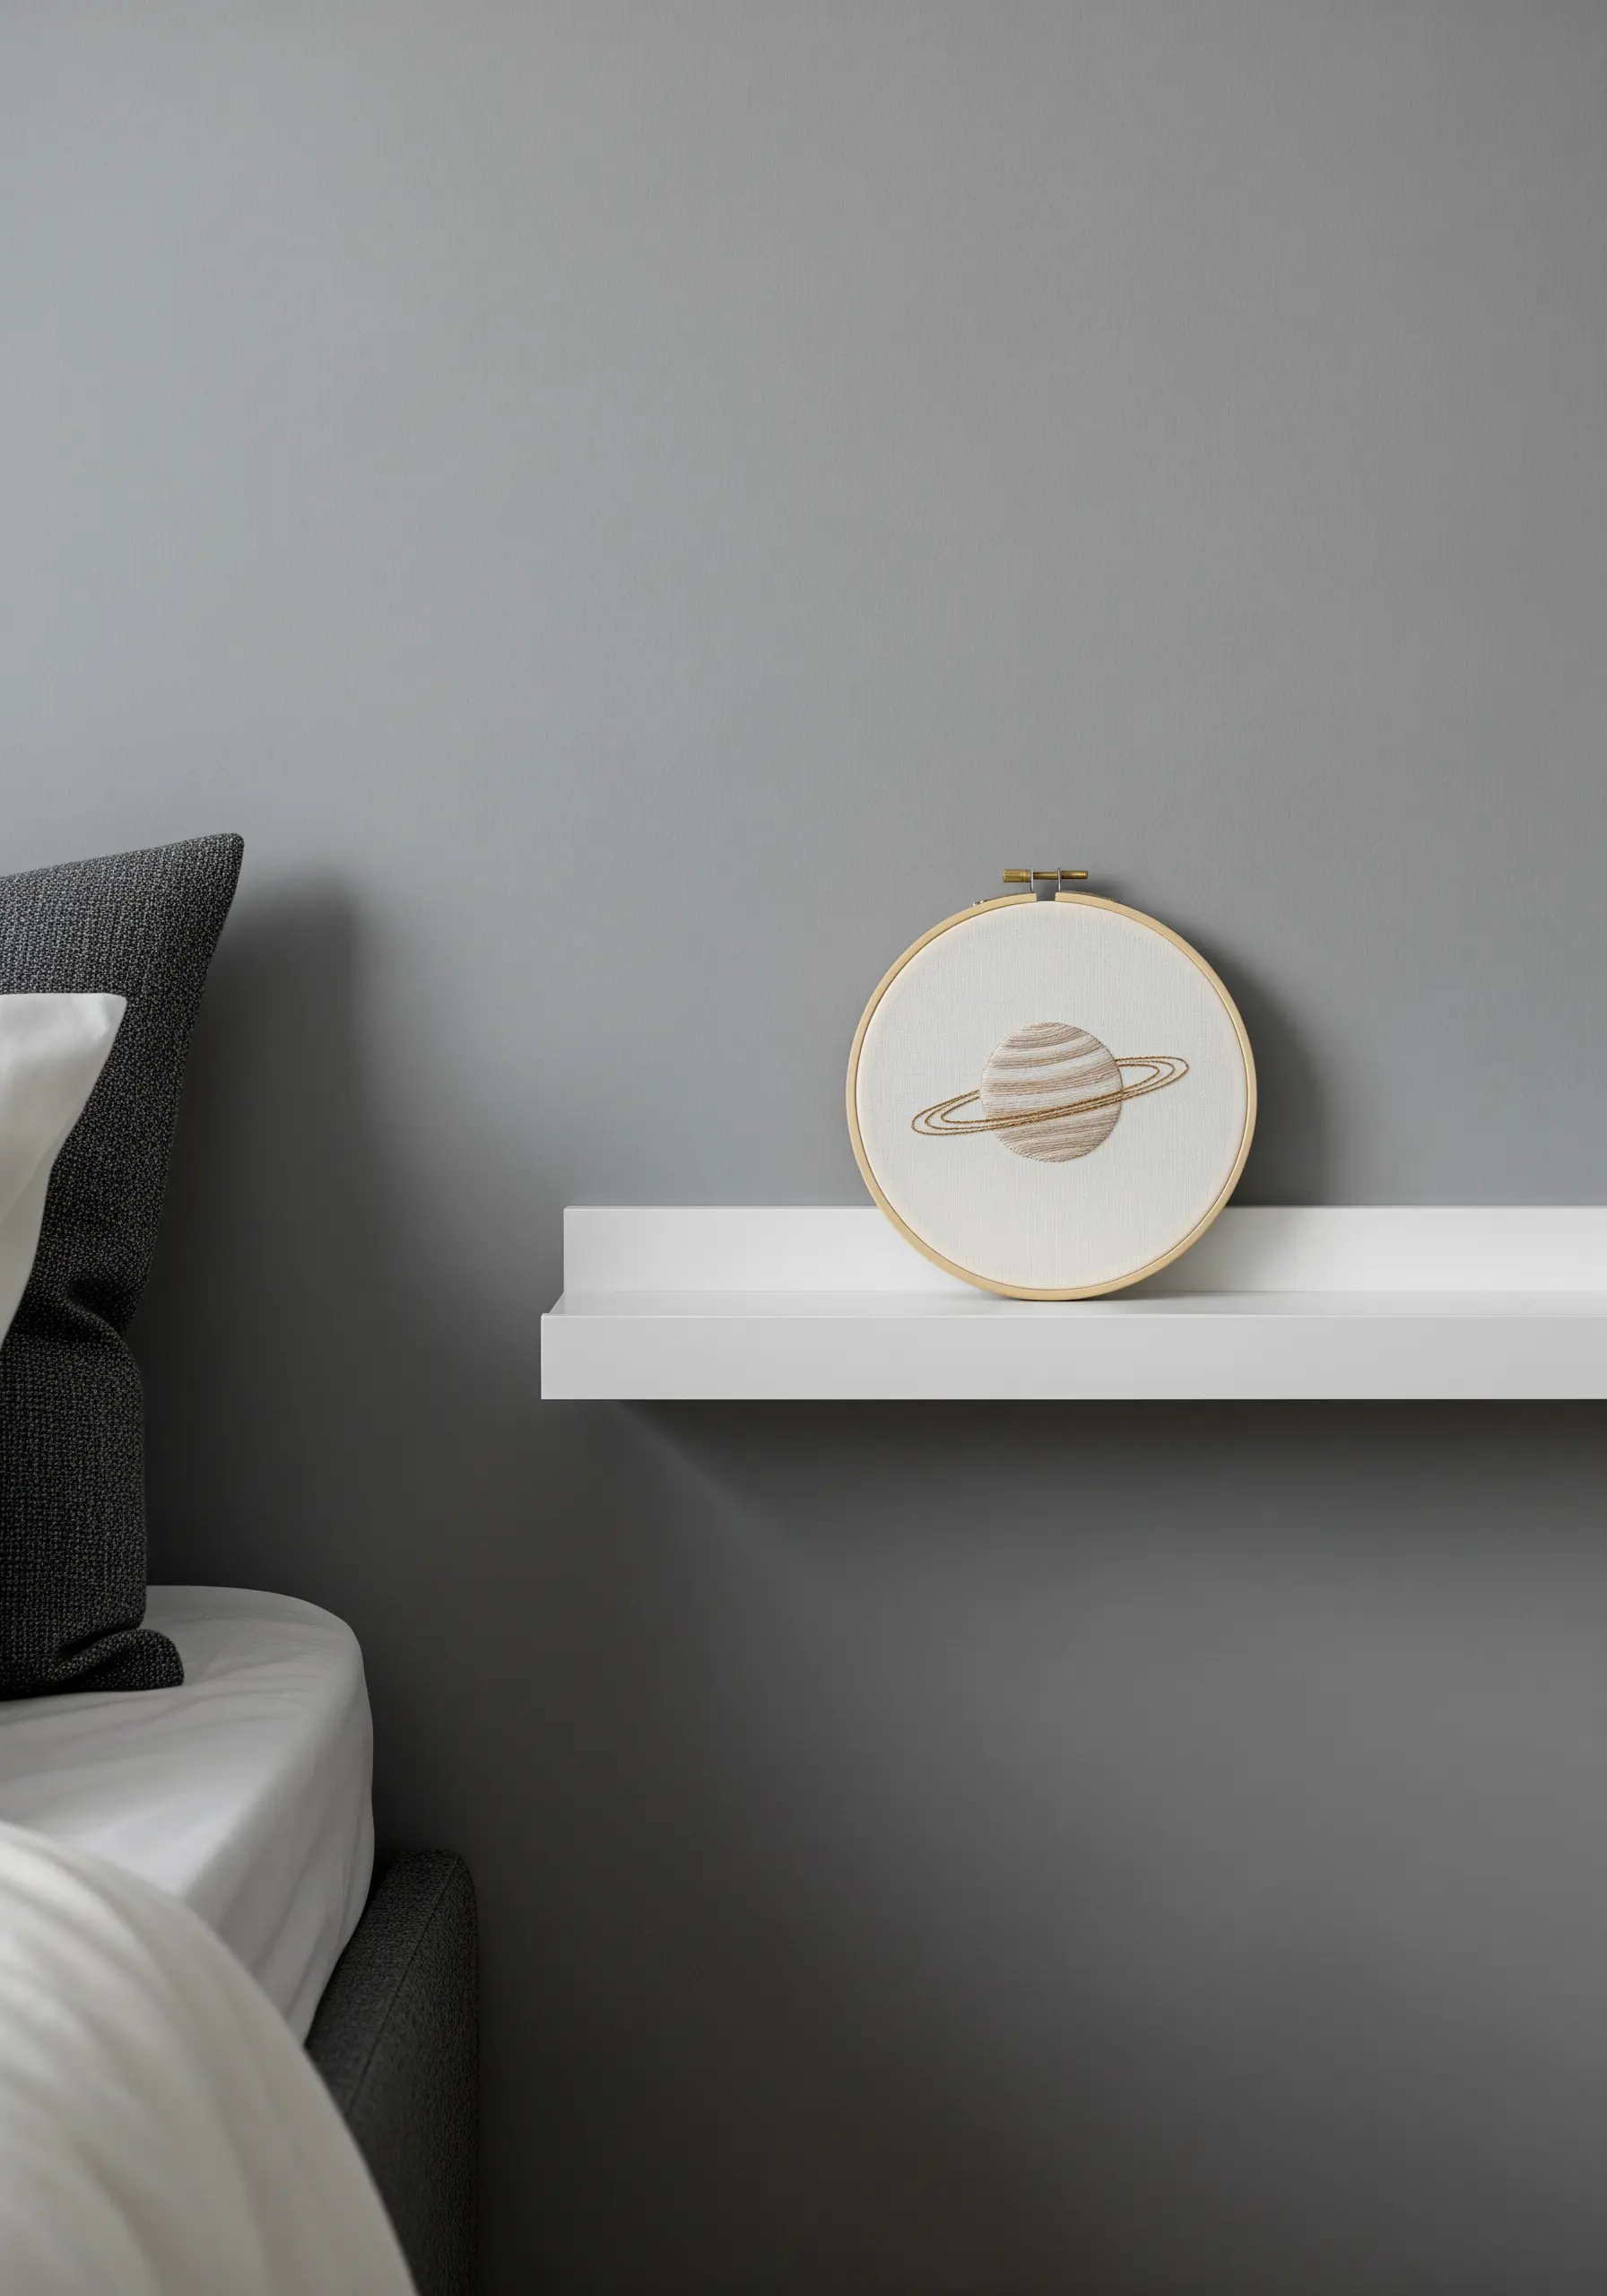
To make a planet like Saturn feel spherical, you need to master subtle color gradients.
Use a long-and-short stitch and work in curved rows that follow the planet’s shape. Blend 3-4 closely related shades—like cream, beige, and taupe—to create a smooth transition from light to shadow.
A single strand of gold metallic thread for the rings adds a delicate, elegant highlight that completes the design.
This thoughtful use of color is what separates a flat circle from a convincing three-dimensional planet.
19. Design a Star Cluster with Controlled Density
The key to a believable star cluster is creating a bright, dense core that gradually fades into the surrounding space.
Fill the center of your design with a tight concentration of French knots and star stitches, overlapping them slightly.
As you move outward, begin to space your stitches further and further apart, using smaller knots (fewer wraps) and single seed stitches at the very edges.
This technique creates a brilliant focal point that naturally draws the eye, making your hoop feel like a glimpse through a telescope.
20. Combine Watercolor Painting and Stitching
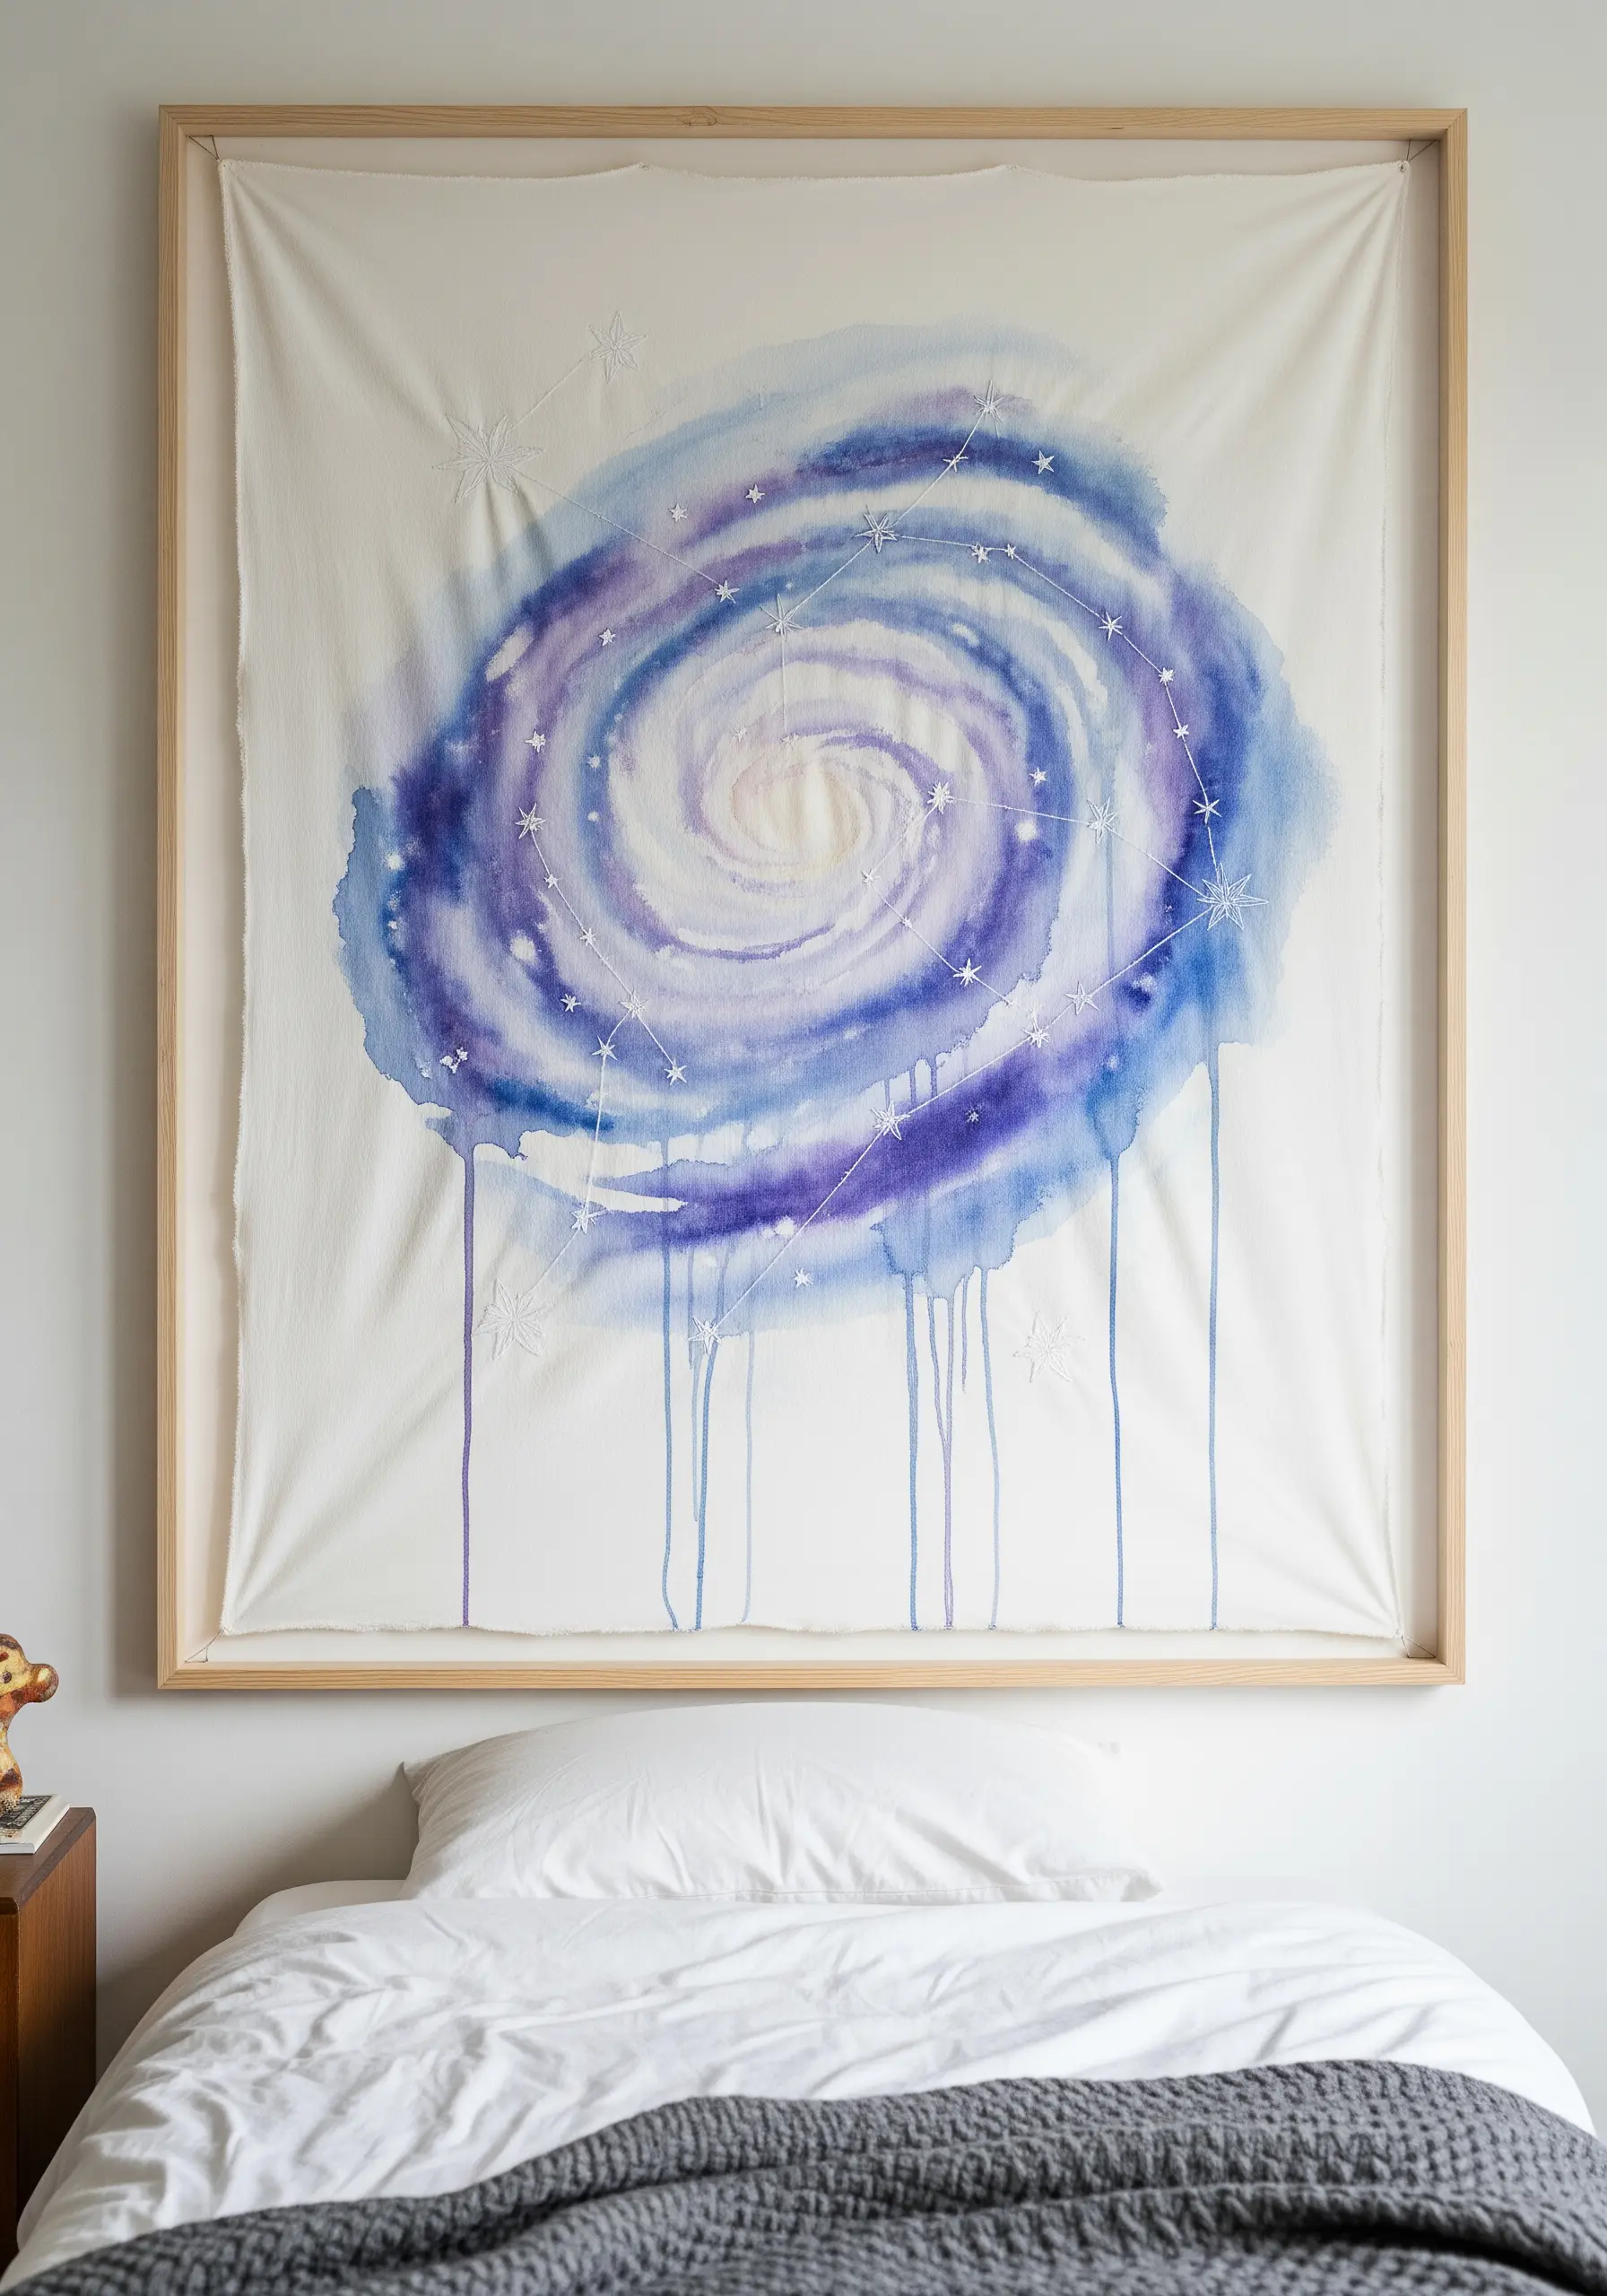
For a soft, dreamy galaxy, merge the fluidity of watercolor with the precision of embroidery. This is one of the most expressive mixed media embroidery wall art techniques.
Lightly wet your fabric and apply watercolor paints, allowing the colors to bleed and blend naturally. Let it dry completely before hooping.
Once the painted background is ready, use a bright white or silver thread to stitch tiny stars and constellation lines directly over the colors.
The embroidery adds a layer of sharp detail and texture that beautifully contrasts with the soft, diffused paint.
21. Capture the Northern Lights with Thread Painting
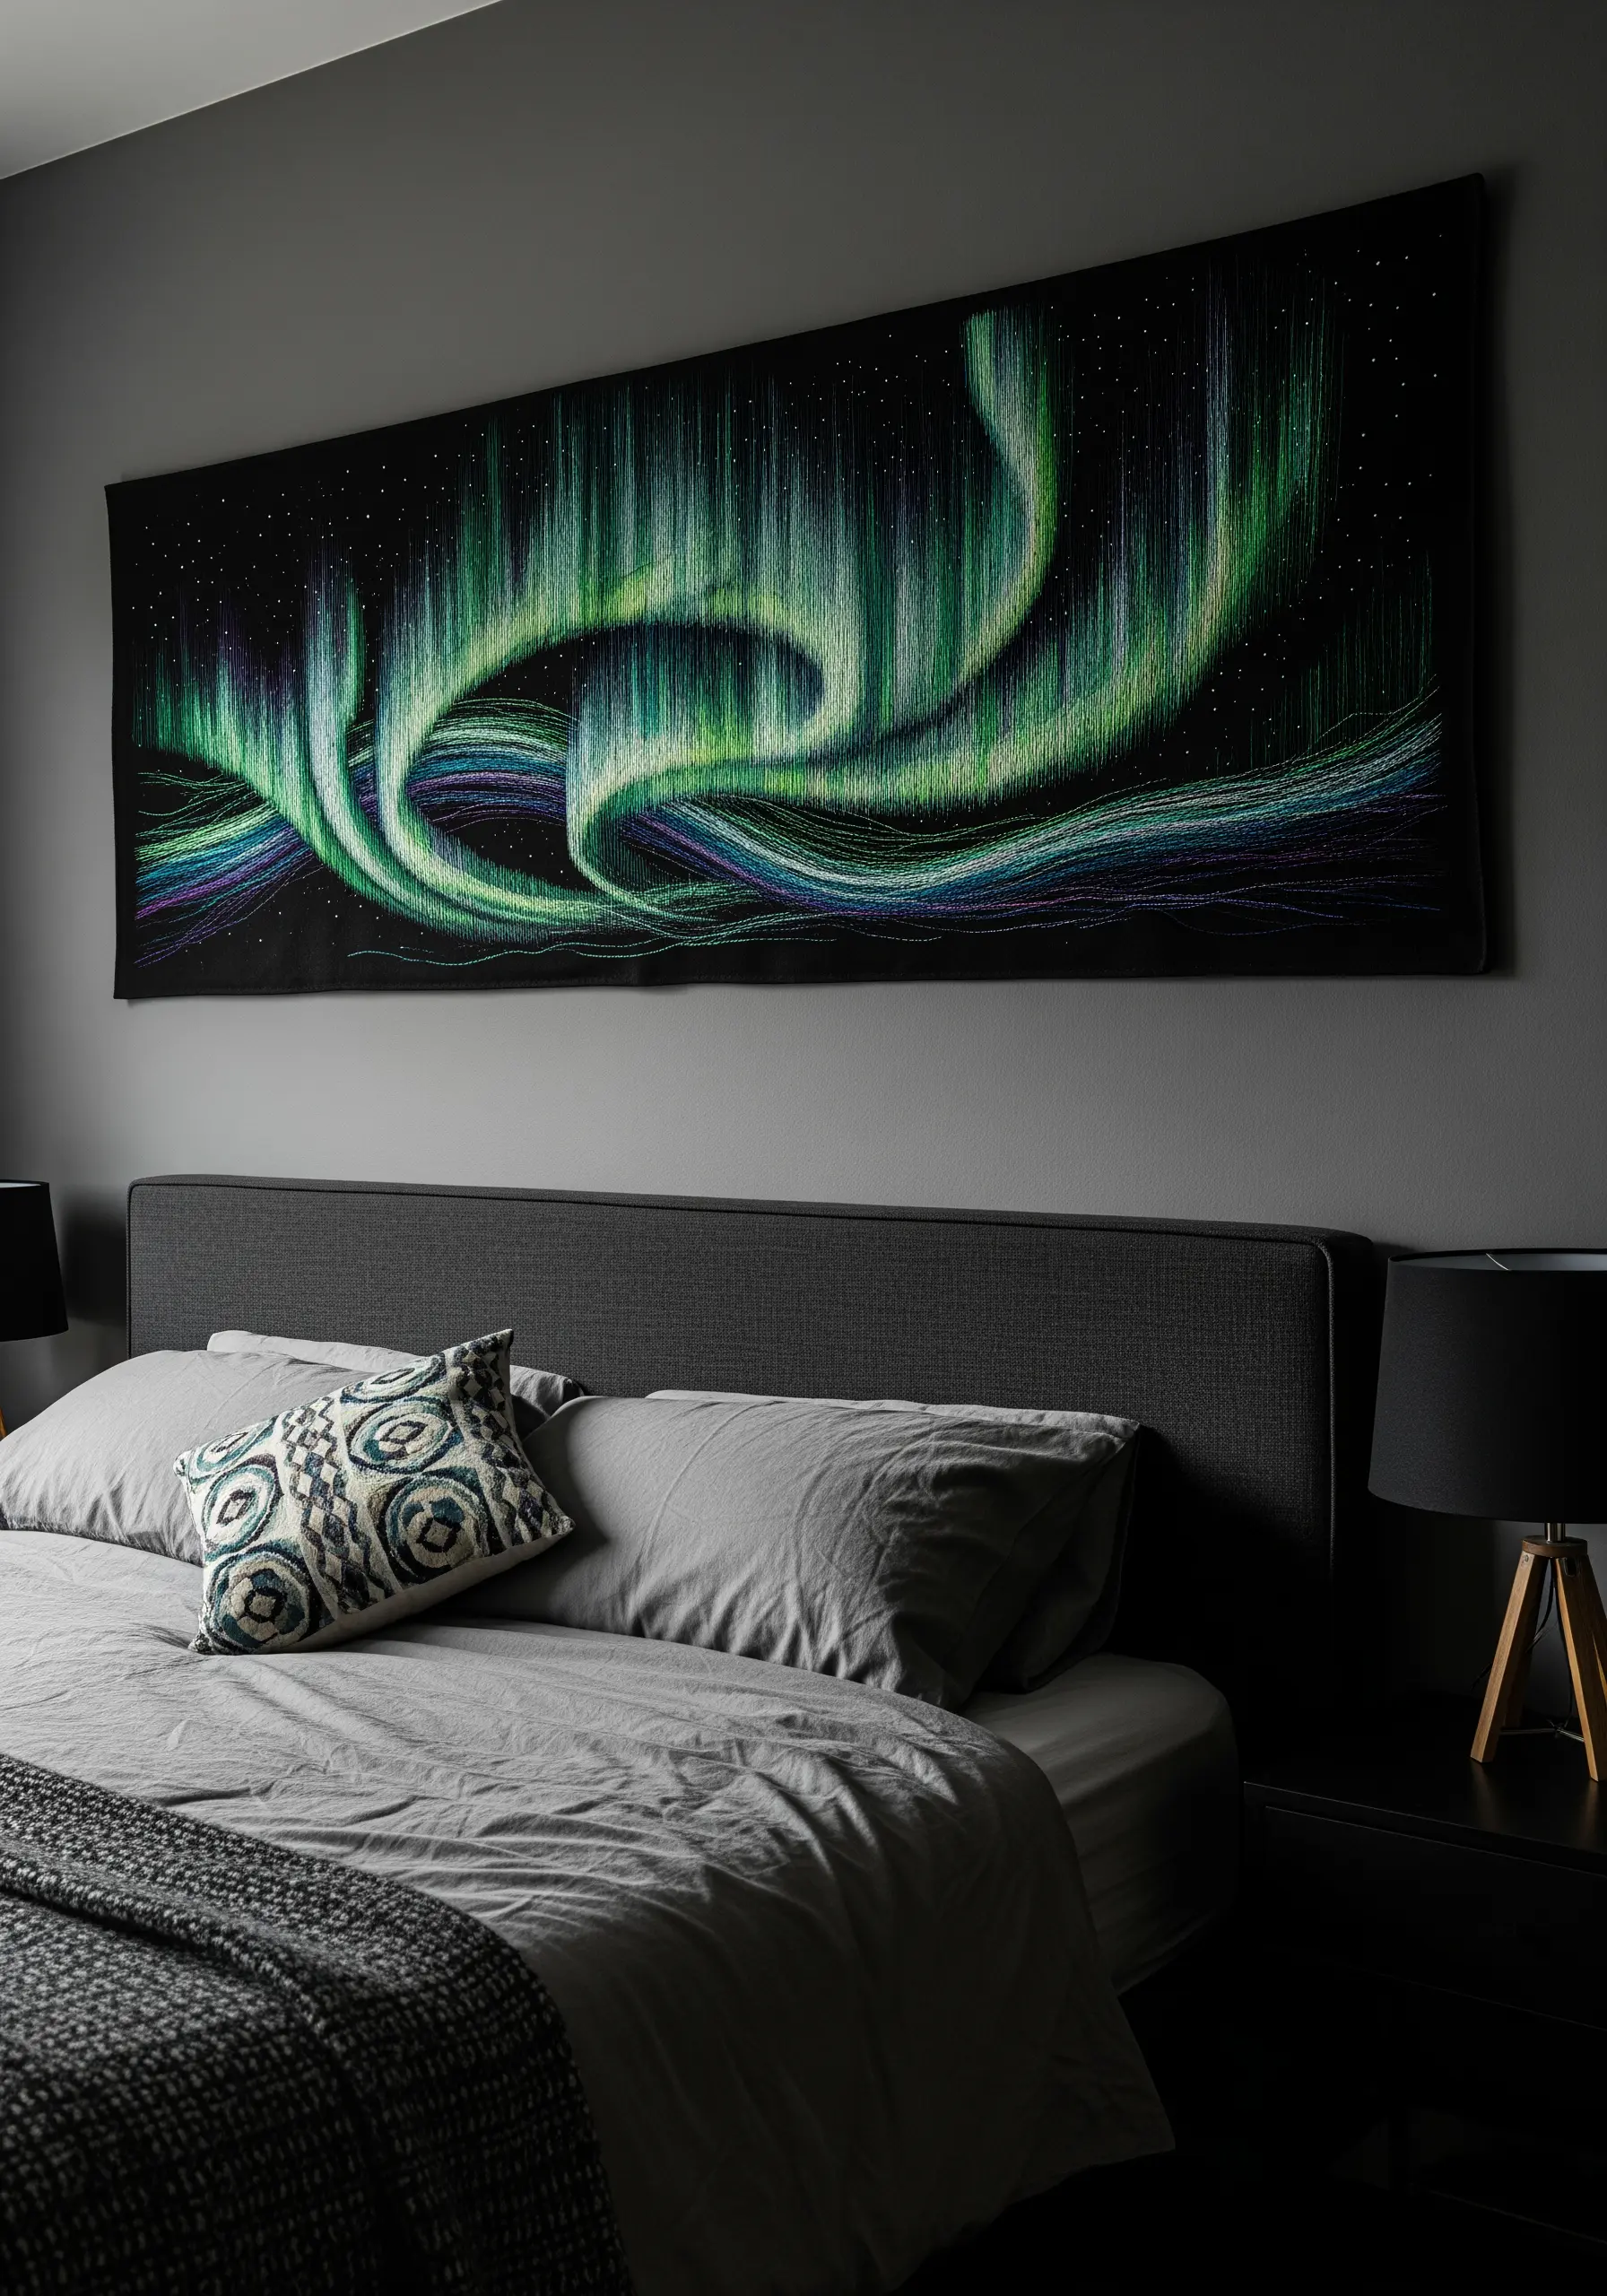
Recreate the flowing movement of the aurora borealis using vertical thread painting. This technique creates stunning modern thread illusion techniques.
Use a palette of bright greens, teals, and blues, blending them together with long, vertical satin stitches of varying lengths.
Layer your colors to create a sense of shimmering, transparent light curtains against a dark fabric background.
A scattering of French knots for stars will complete the scene, turning a flat piece of fabric into a dynamic light show.
22. Stitch a Symmetrical Celestial Mandala
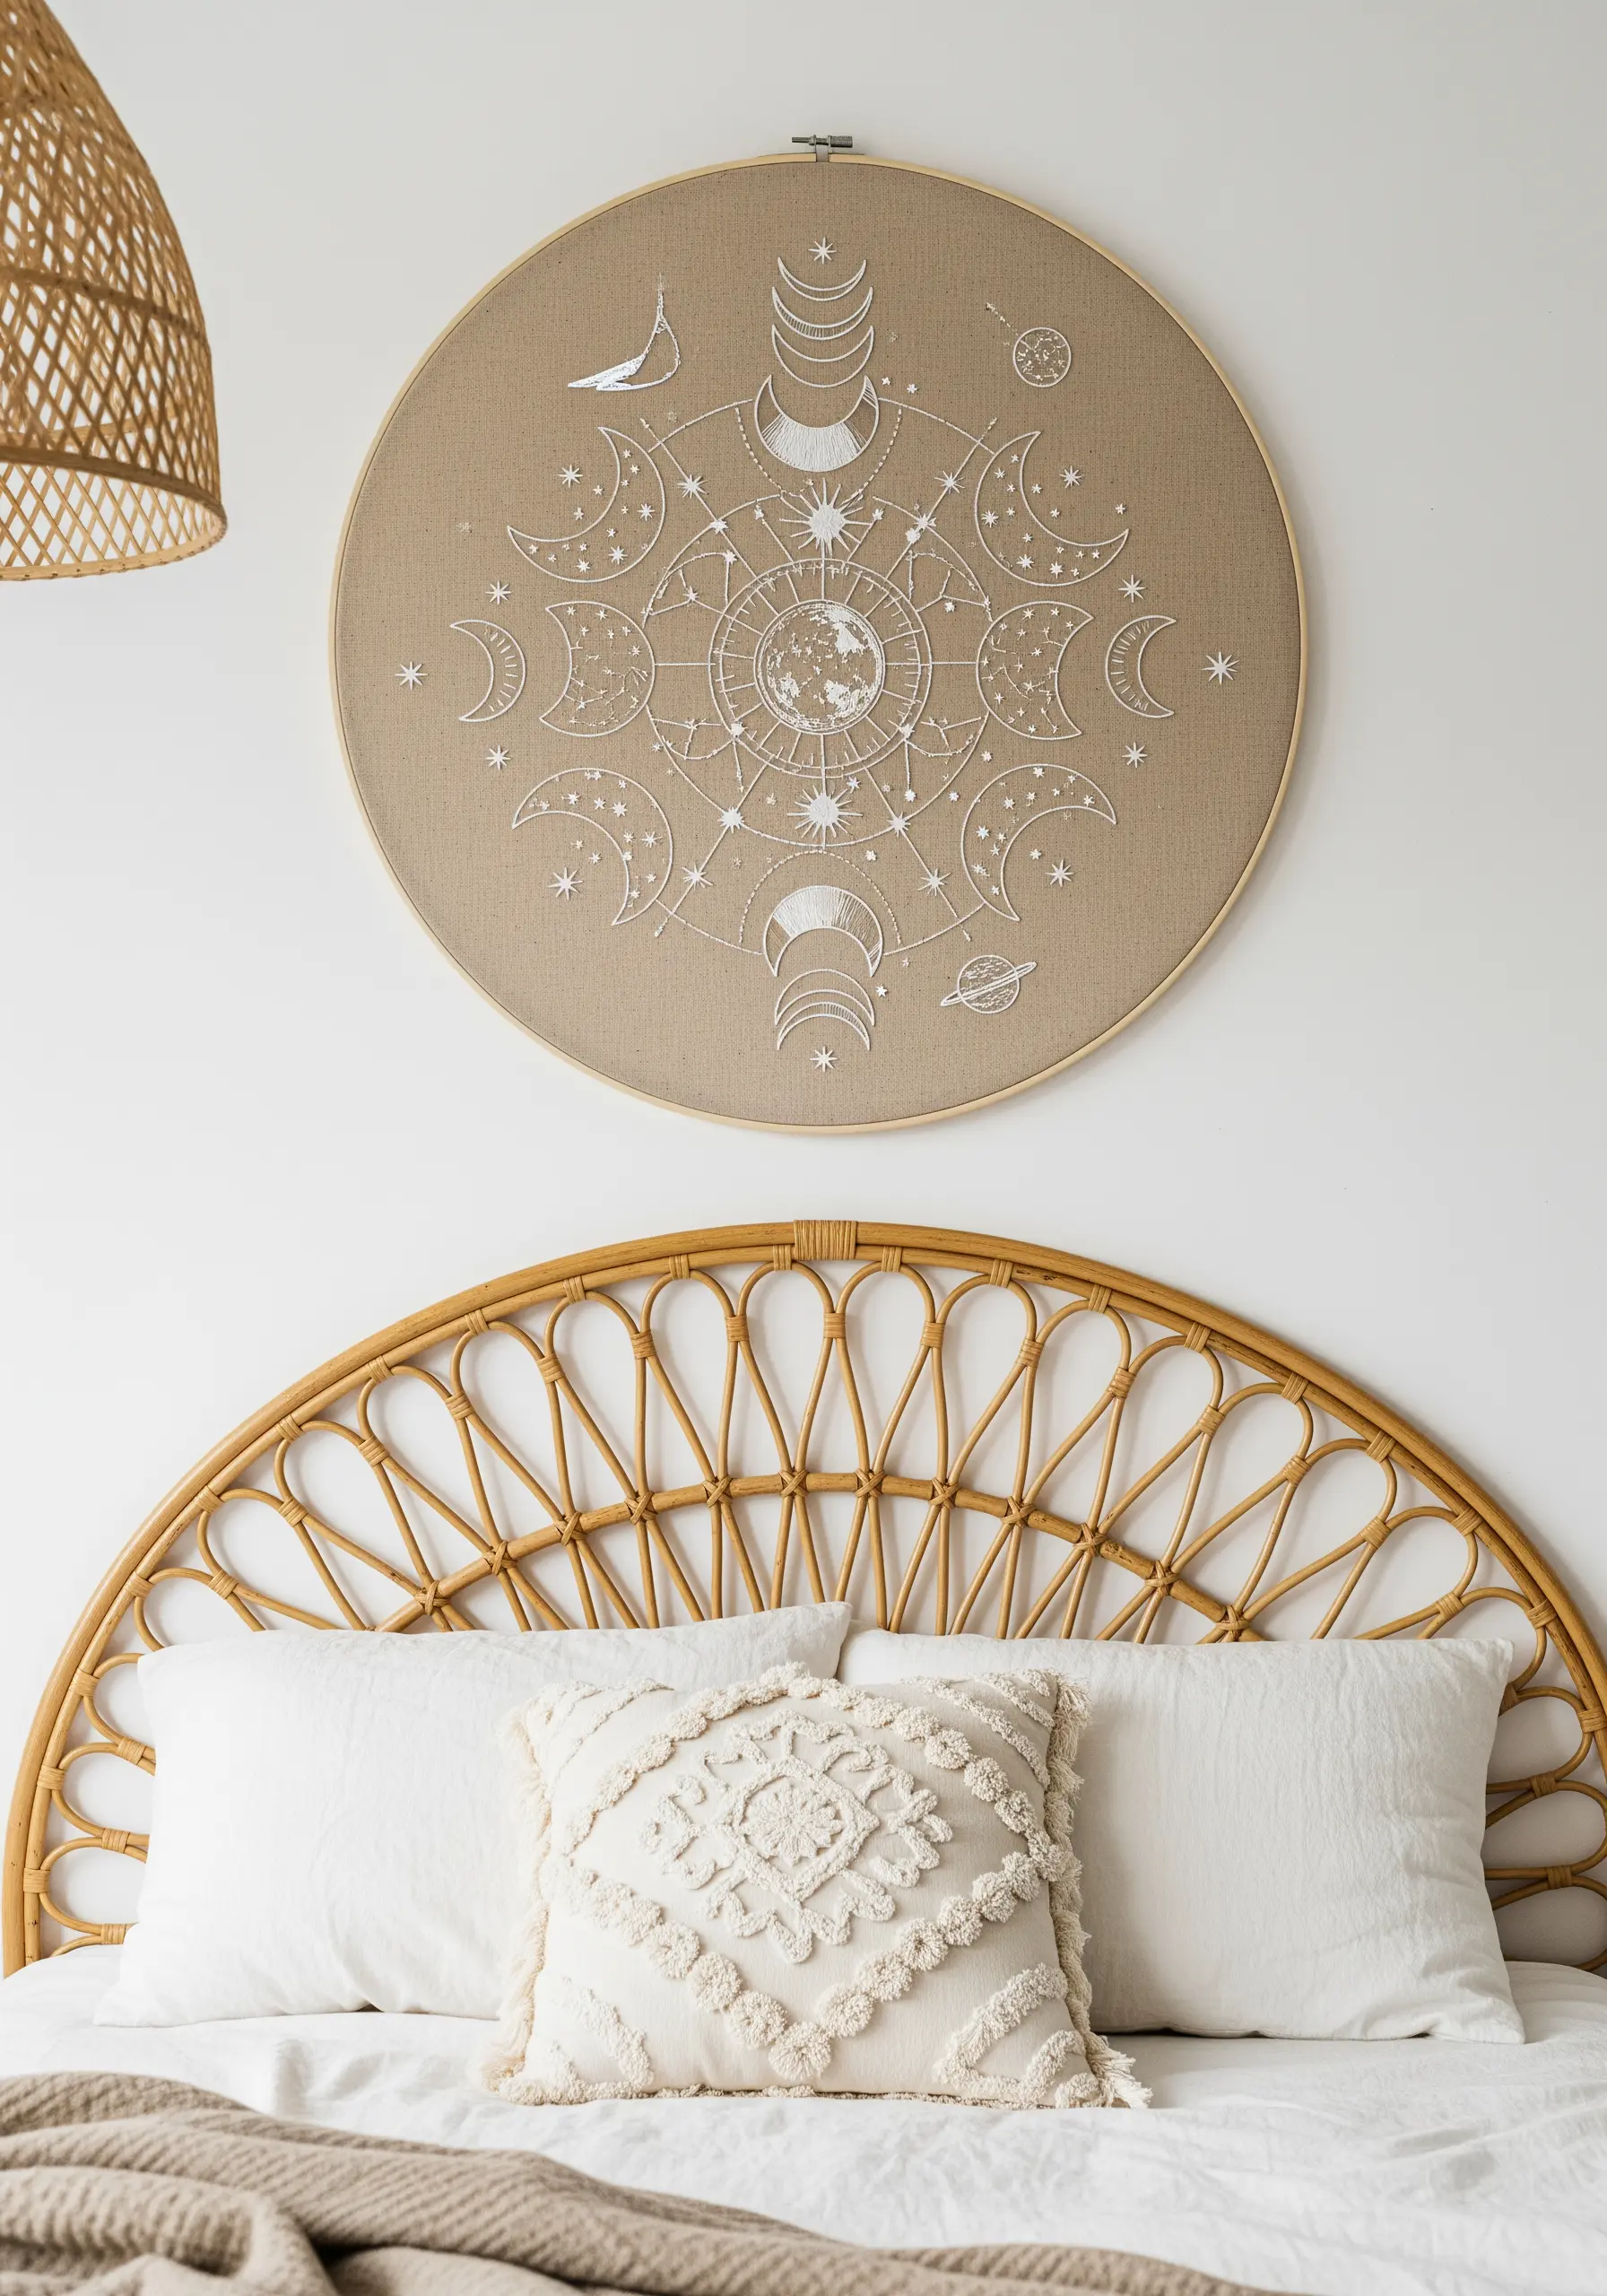
A celestial mandala combines the meditative practice of stitching with cosmic symbolism for a piece that is both beautiful and meaningful.
To ensure perfect symmetry, draw your guidelines onto the fabric with a water-soluble marker before you begin.
Use a single color of thread, like crisp white on natural linen, to emphasize the intricate line work and sacred geometry of the design.
These modern mandala stitch patterns are perfect for creating a central, calming focal point above a bed.
23. Create a Gentle Nursery Scene with Appliqué
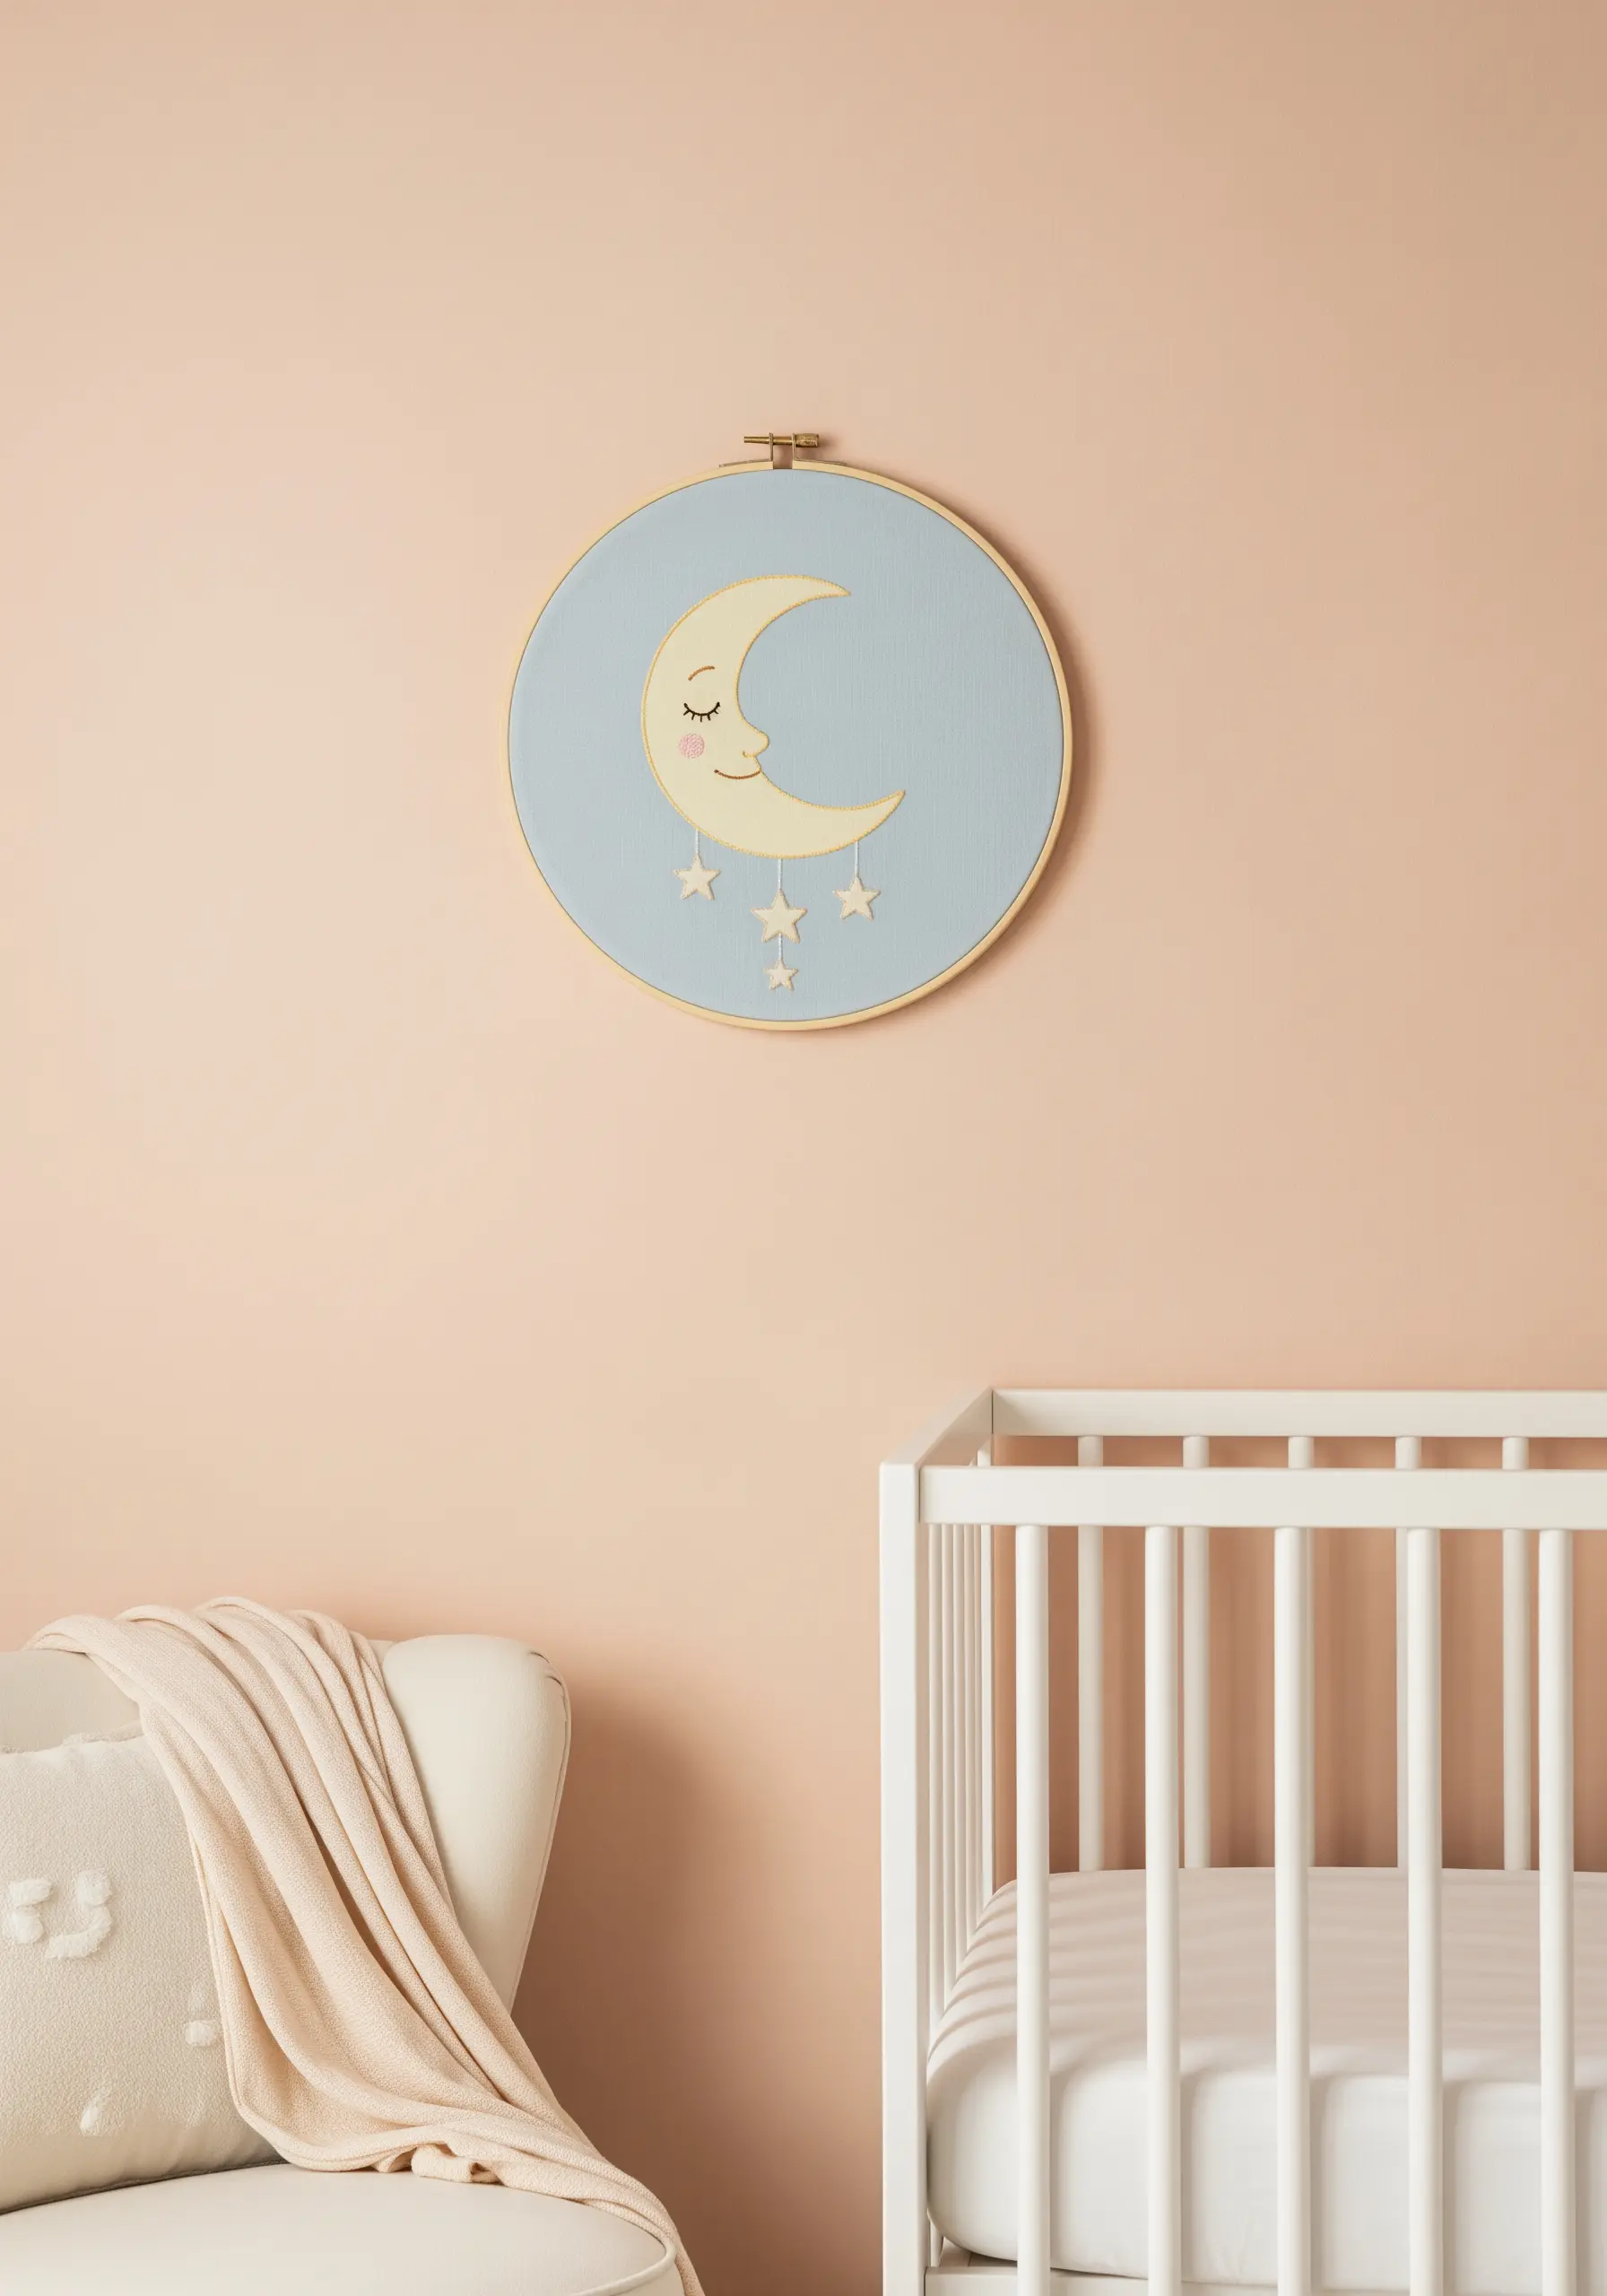
For a soft, tactile design perfect for a nursery, combine simple embroidery with felt appliqué.
Cut the main moon shape from a soft yellow felt and attach it to your background fabric with a neat whip stitch around the edge.
Embroider the gentle facial features directly onto the felt, and add small, dangling star charms for a touch of playful movement.
This layering technique adds a gentle three-dimensional quality that is both visually and texturally appealing for a child’s space.


