
Have you ever finished a piece and felt that something was missing? That a small shift in technique or materials could have taken it from ‘handmade’ to ‘hand-crafted’?
The difference is often in the details—the choice of stitch that creates the perfect texture, the right thread weight for a crisp line, or the confidence to combine fabric, thread, and beads in a way that feels both personal and polished.
Here, you won’t find vague suggestions. Instead, you’ll discover specific, thoughtful adjustments you can make right now. Think of these ideas not just as projects to copy, but as techniques to absorb and apply to your own work, turning simple gifts into stunning pieces of decor that truly resonate.
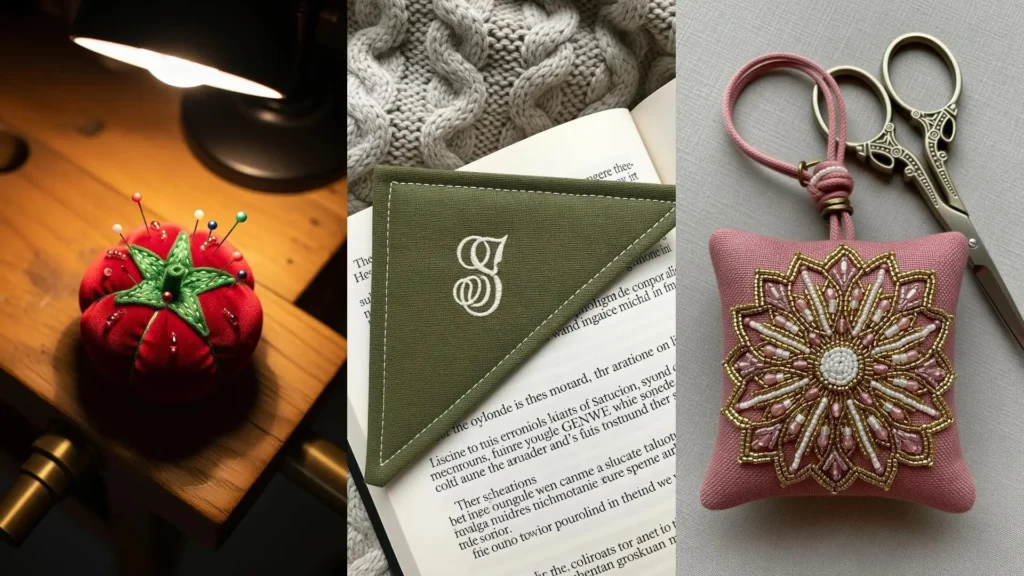
1. Elevate the Humble Pincushion
Transform a simple sewing tool into a piece of art by focusing on texture and dimension.
Use a rich, plush velvet for the body to create a luxurious feel that also holds pins securely.
For the leaves, execute a dense satin stitch with a slight sheen thread, ensuring your stitches are angled from the center outwards to mimic natural veins.
Add a scattering of tiny seed beads across the tomato’s body to catch the light, turning a purely functional item into a decorative object for a craft space.
2. Master Realistic Fur with Thread Painting
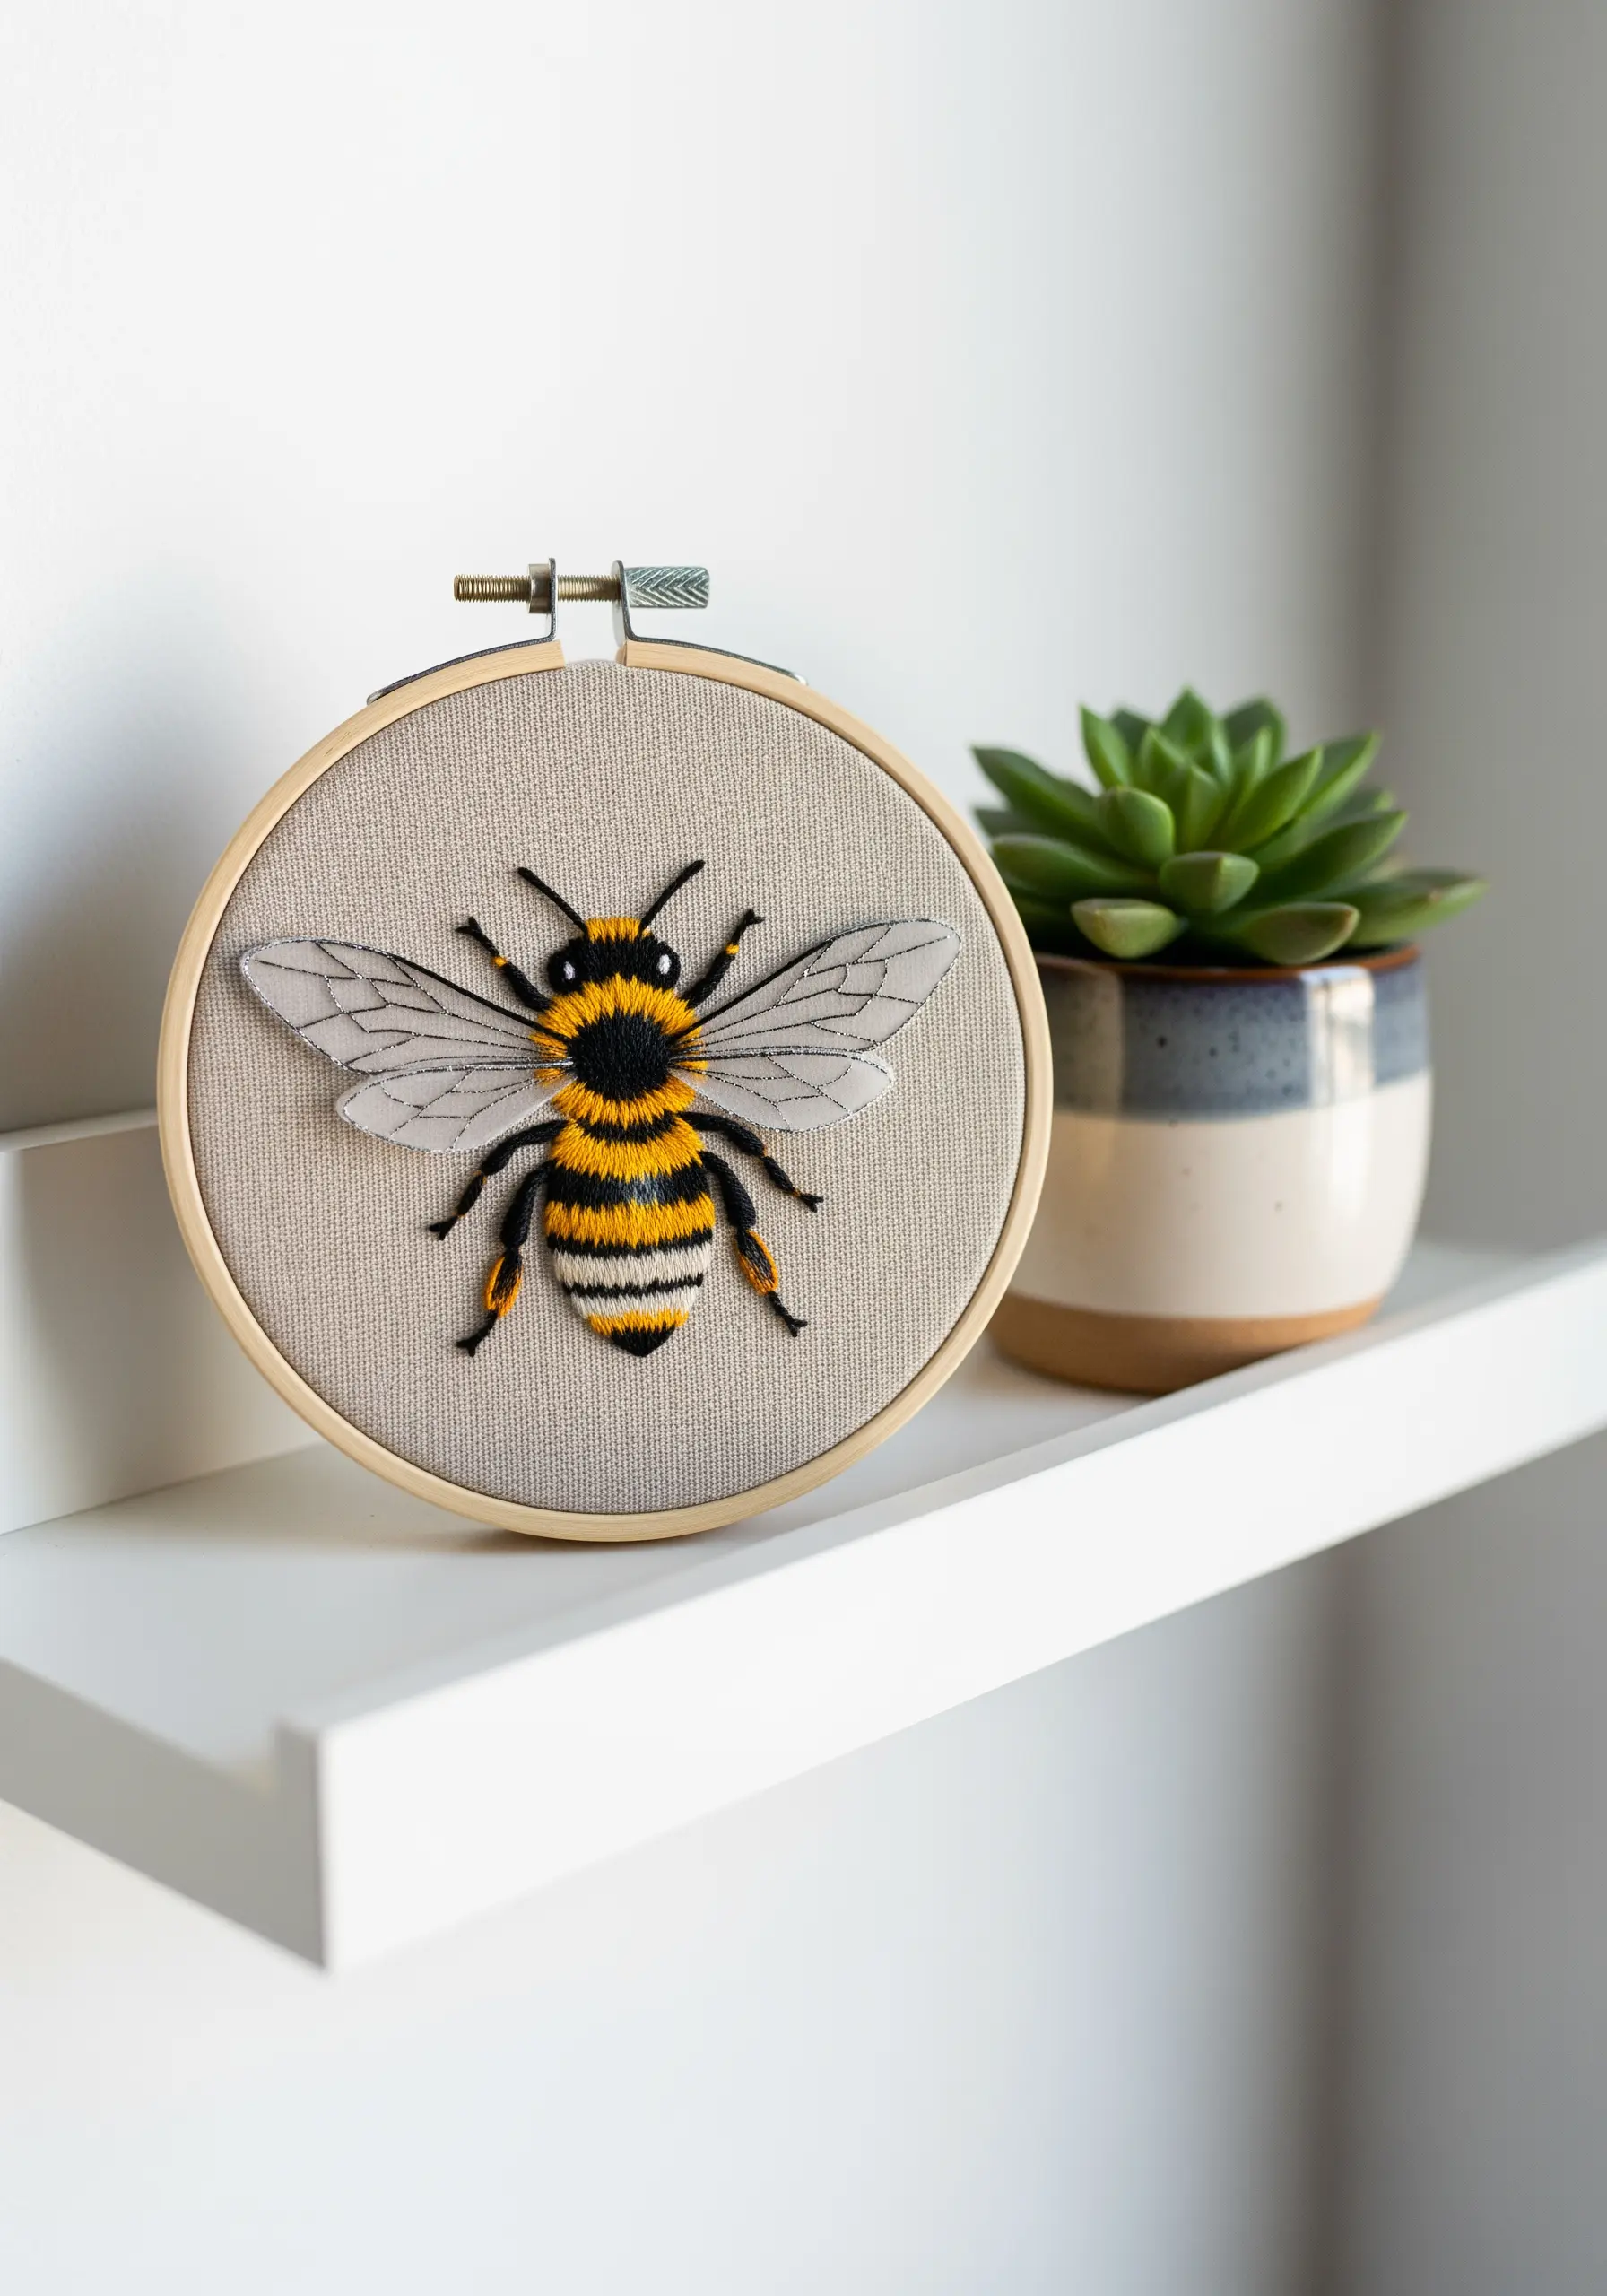
To achieve the fluffy texture of a bee’s body, move beyond flat satin stitch and embrace thread painting with a long-and-short stitch.
Use a single strand of floss and blend shades of yellow, ochre, and black, staggering your stitches to create a soft, realistic gradient.
For the wings, stitch the veins onto a layer of sheer organza, then cut them out and attach them to the body for a delicate, 3D effect.
This layering of techniques is what gives the final piece its lifelike quality and visual depth.
3. Add Art Deco Glamour with Metallics and Beads

Stitching on silk or satin requires care, but the result is unparalleled elegance. Always use a fine, sharp needle to avoid snagging the fabric.
To control slippery metallic threads, use the couching technique: lay the metallic thread on the surface and tack it down with a second, finer thread in a matching color.
This method ensures your lines are perfectly smooth and prevents the metallic fibers from snagging or pulling.
Place single seed beads at the intersections of your stitched lines to create focal points that add a subtle, refined sparkle.
4. Create Dimensional Foliage with Ribbon Stitch
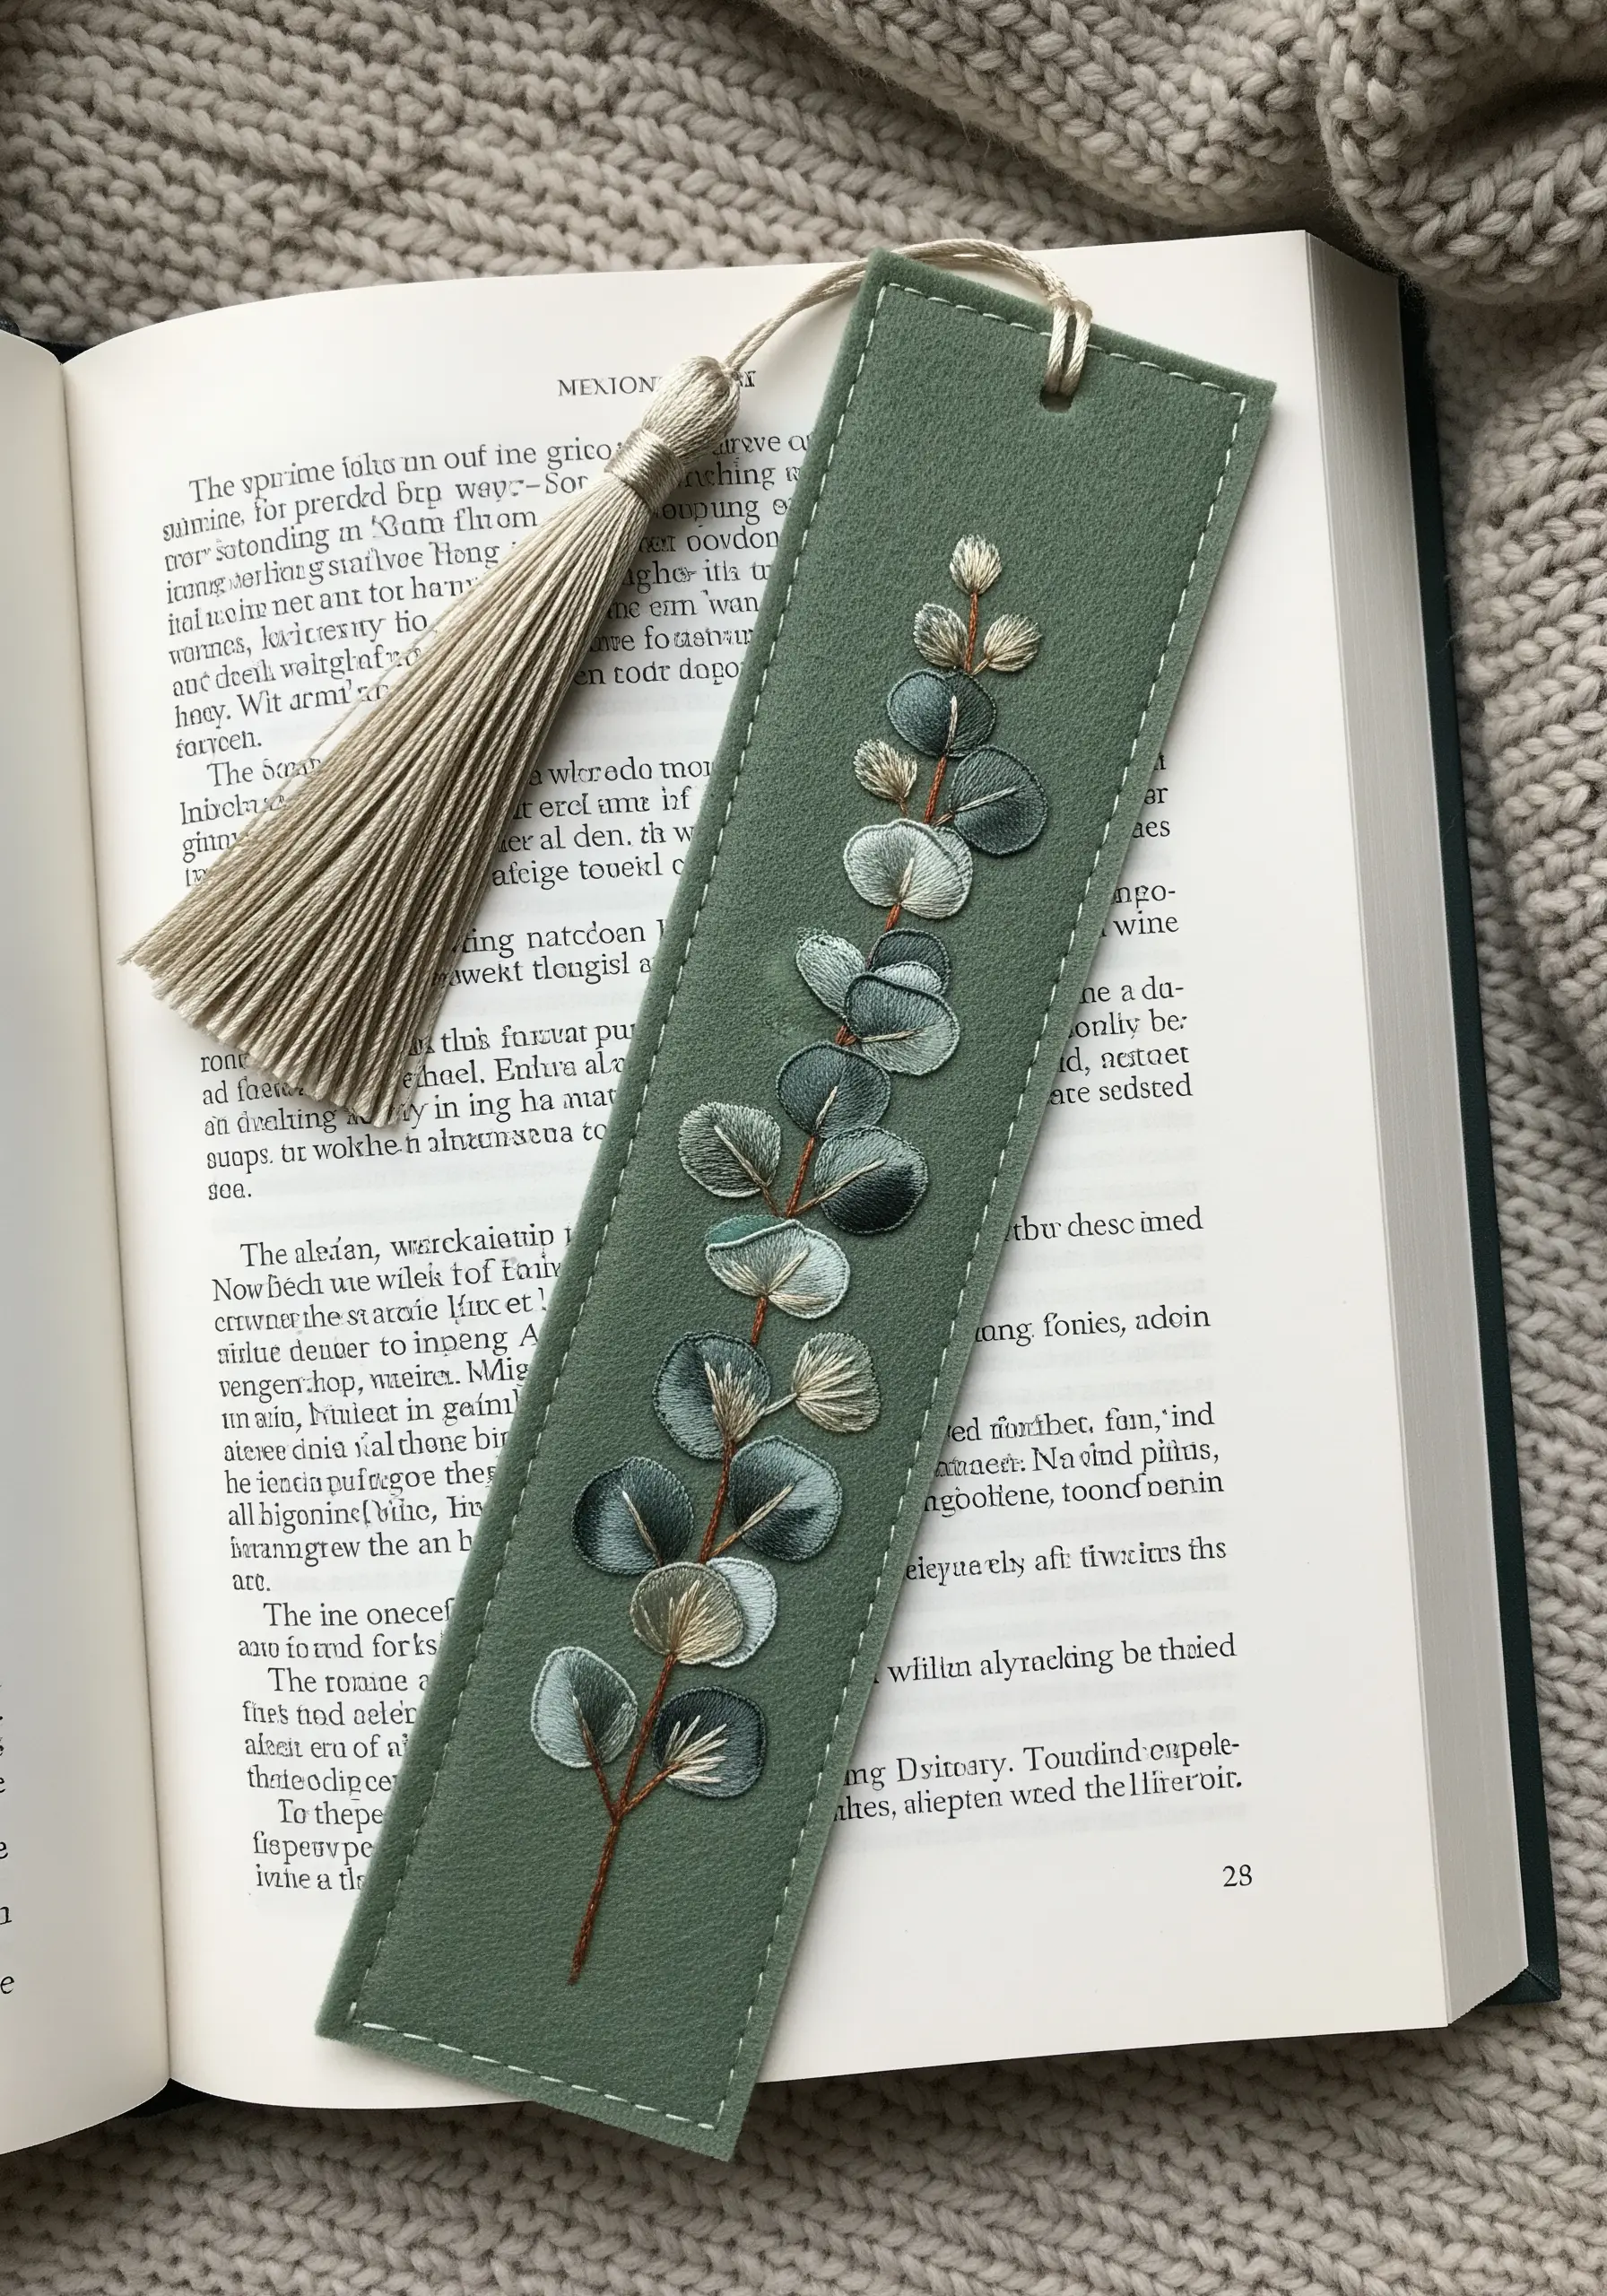
For the soft, rounded leaves of eucalyptus, silk ribbon is more effective than thread.
Use a simple ribbon stitch, allowing the ribbon to twist slightly as you pull it through the fabric—this creates natural-looking folds and highlights.
Work on a sturdy base like felt or faux leather, which provides enough structure for the ribbon without needing a hoop.
Alternate the direction and tension of your stitches to create a sense of movement and depth in the foliage.
5. Weave Celestial Details into Fiber Art
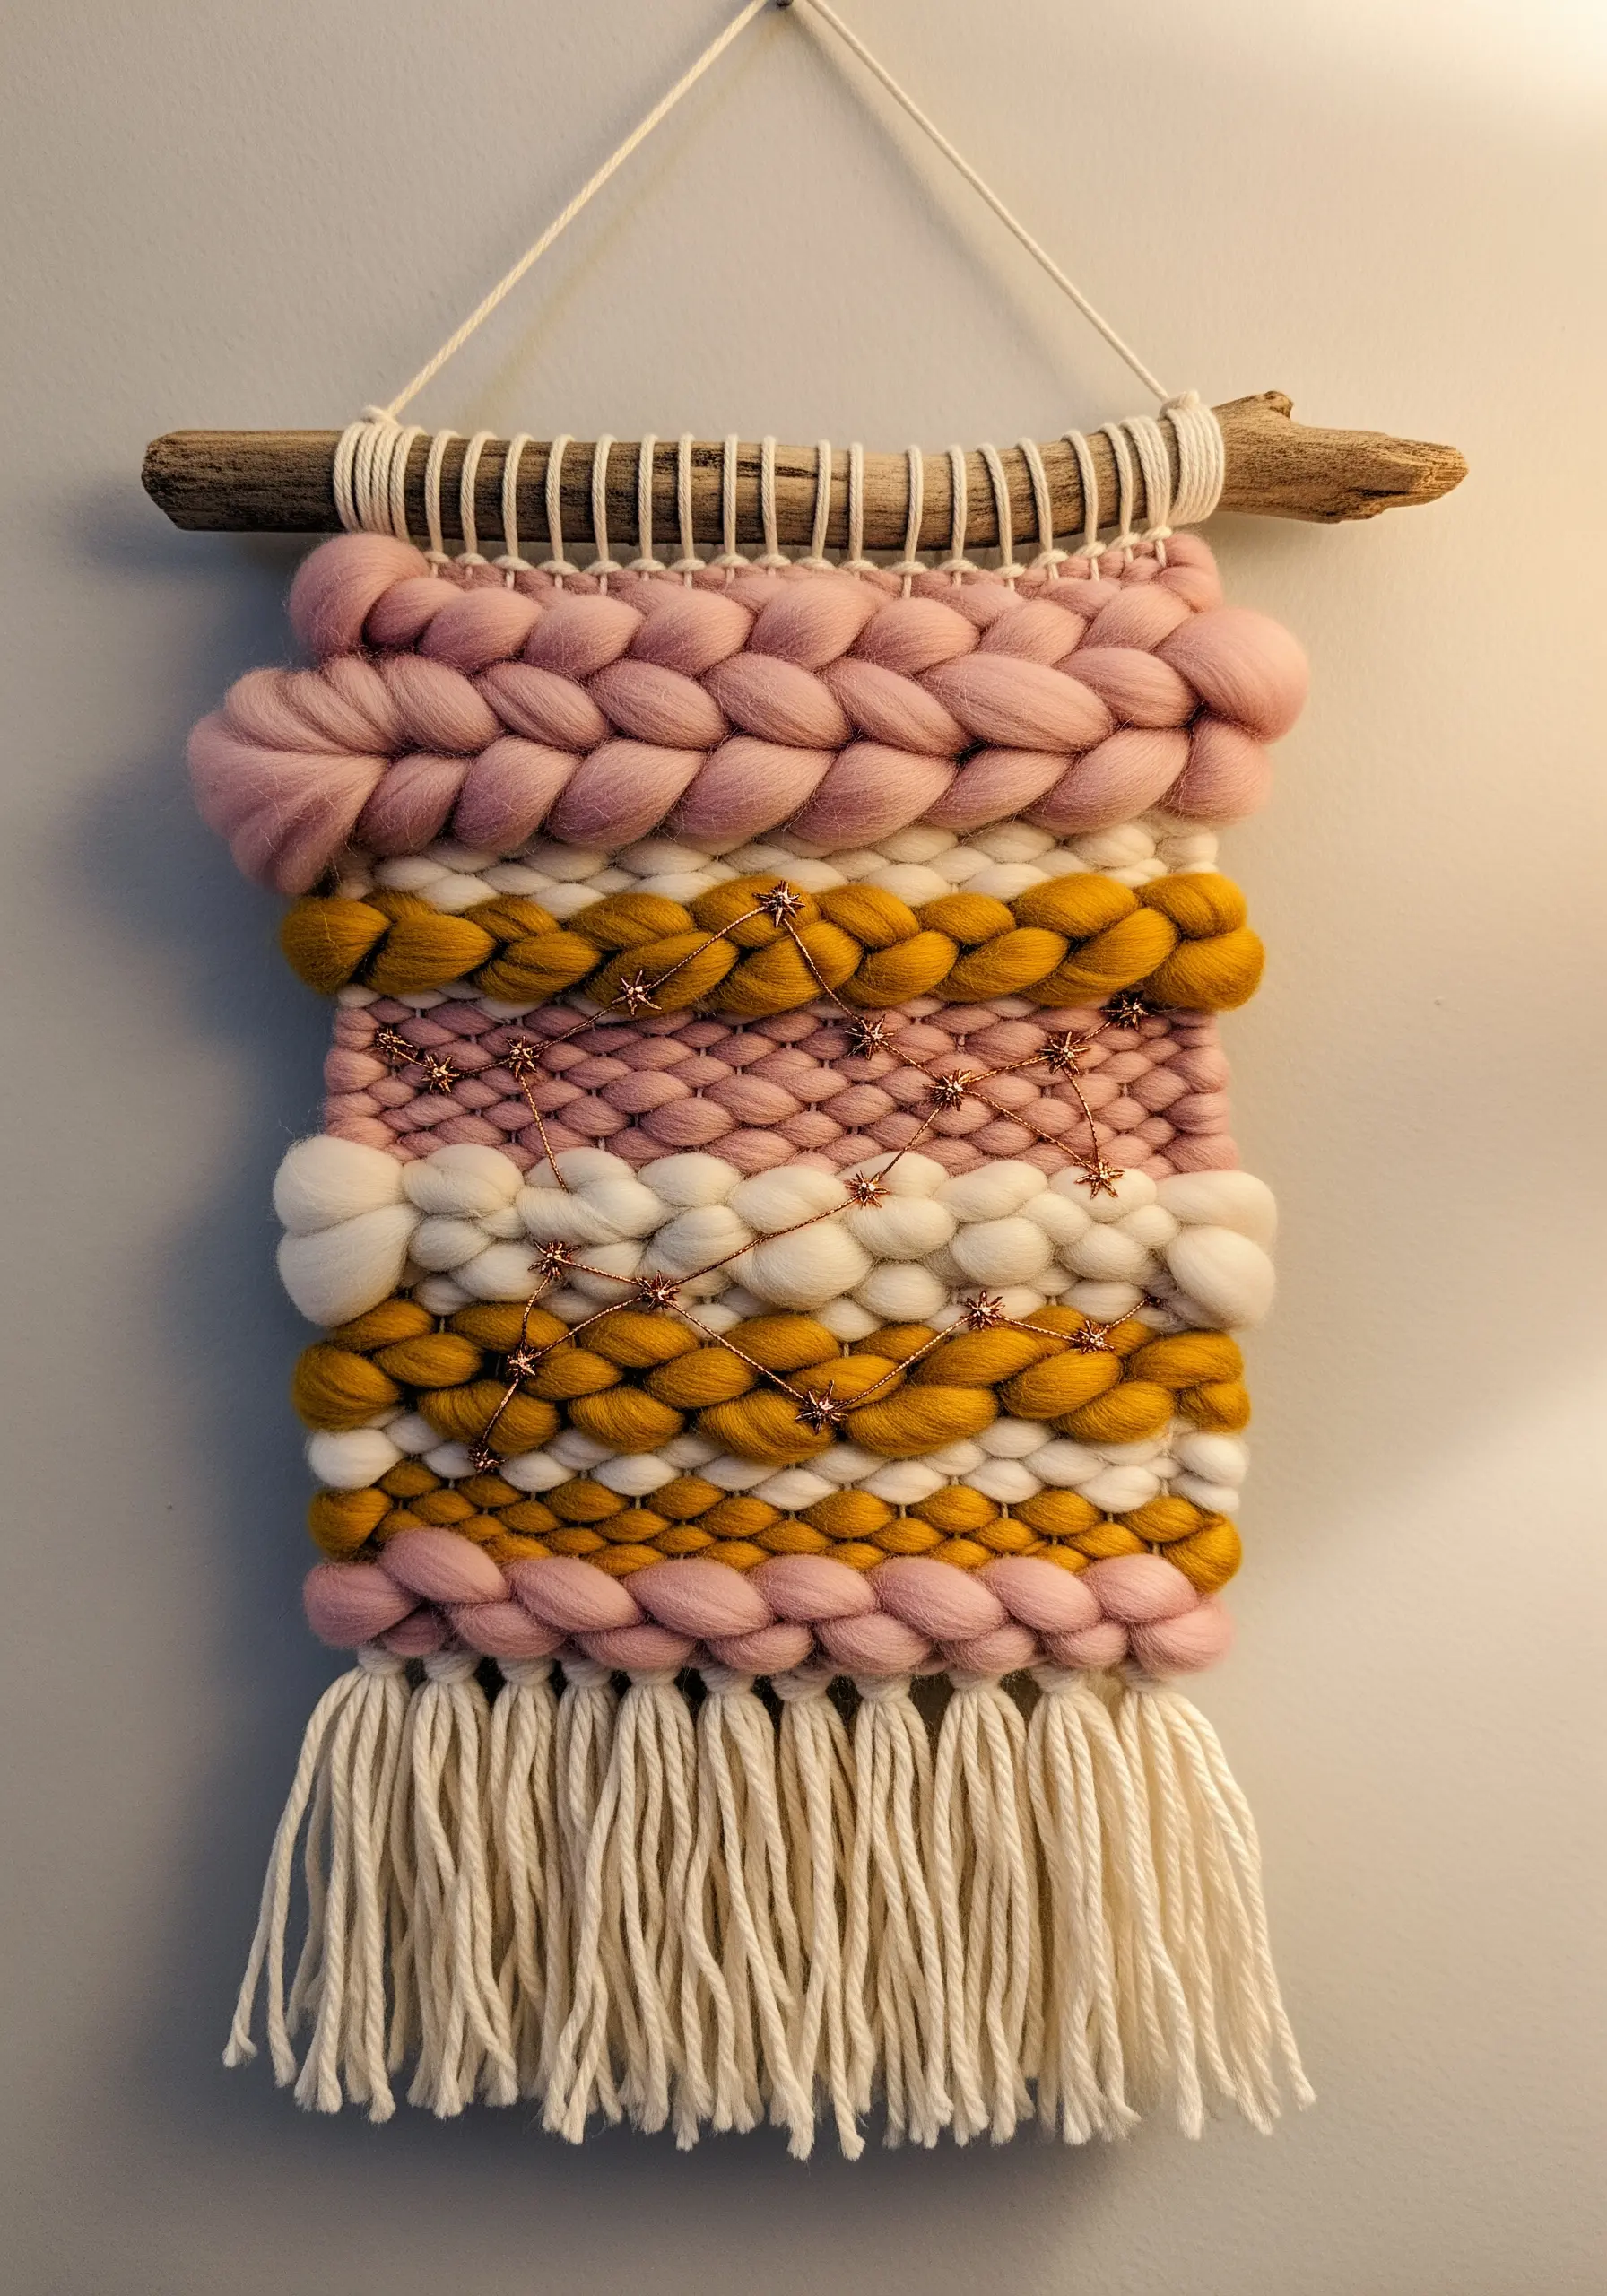
Bridge the gap between weaving and embroidery by adding stitched details directly onto your finished woven piece.
After weaving your base with chunky wool roving and yarn, use a sharp needle and metallic copper thread to stitch constellations over the top.
A simple backstitch is all you need to create delicate, graphic lines that contrast beautifully with the soft, thick texture of the weaving.
This technique turns a beautiful yarn wall art piece into a personalized story.
6. Stitch Sharp, Minimalist Line Art on Felt

Felt is an ideal canvas for modern line art because its non-fraying edges allow for clean, unhemmed shapes.
To achieve crisp geometric lines, use a backstitch with only two or three strands of floss. This prevents the lines from looking bulky or fuzzy.
For a functional item like a coaster, secure your thread ends meticulously by weaving them under existing stitches on the back, then add a dab of clear fabric glue for durability.
A simple running stitch border adds a handmade, polished finish to the final piece.
7. Craft a Delicate Cherry Blossom Valet Tray
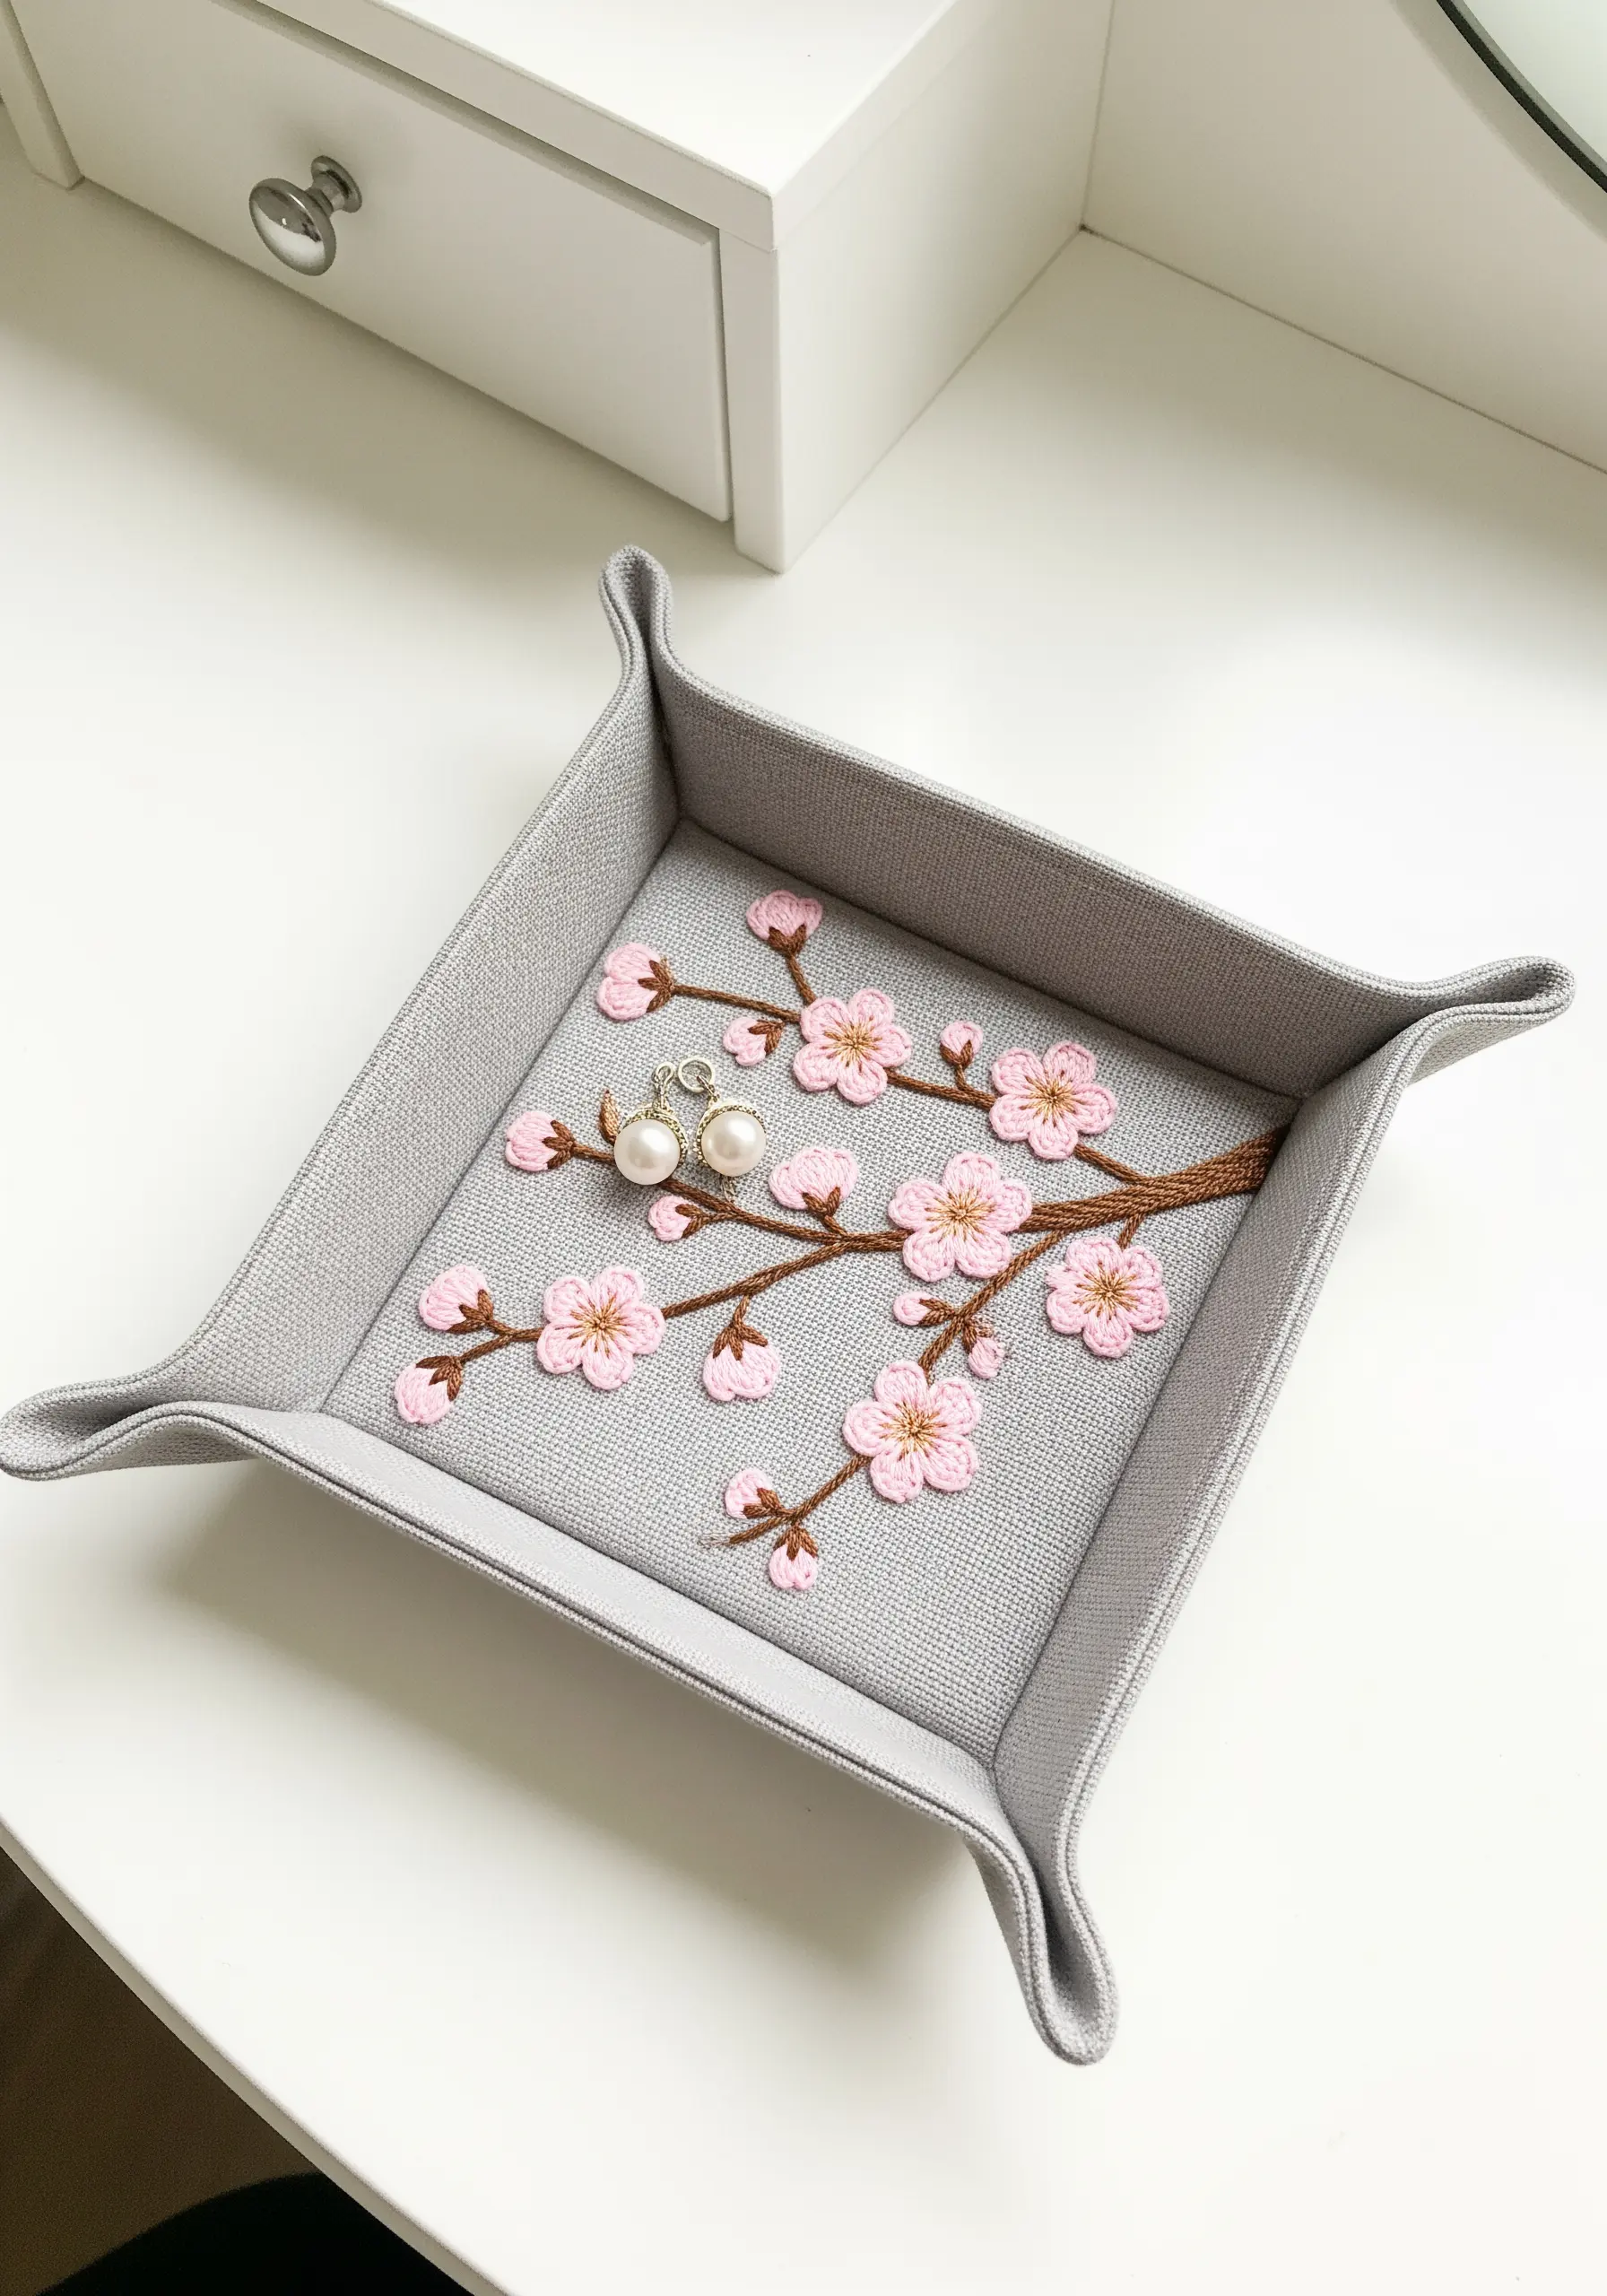
For a valet tray that gets daily use, durability is key. Use a tightly woven linen or canvas that can withstand wear.
The cherry blossom petals are created with a satin stitch, but the secret to their puffiness is a padded satin stitch.
First, lay down a few straight stitches within the shape as a foundation, then cover them with your final satin stitches. This raises the surface for a subtle 3D effect.
Use a darker brown thread and stem stitch for the branches to create a solid, grounding element in the composition.
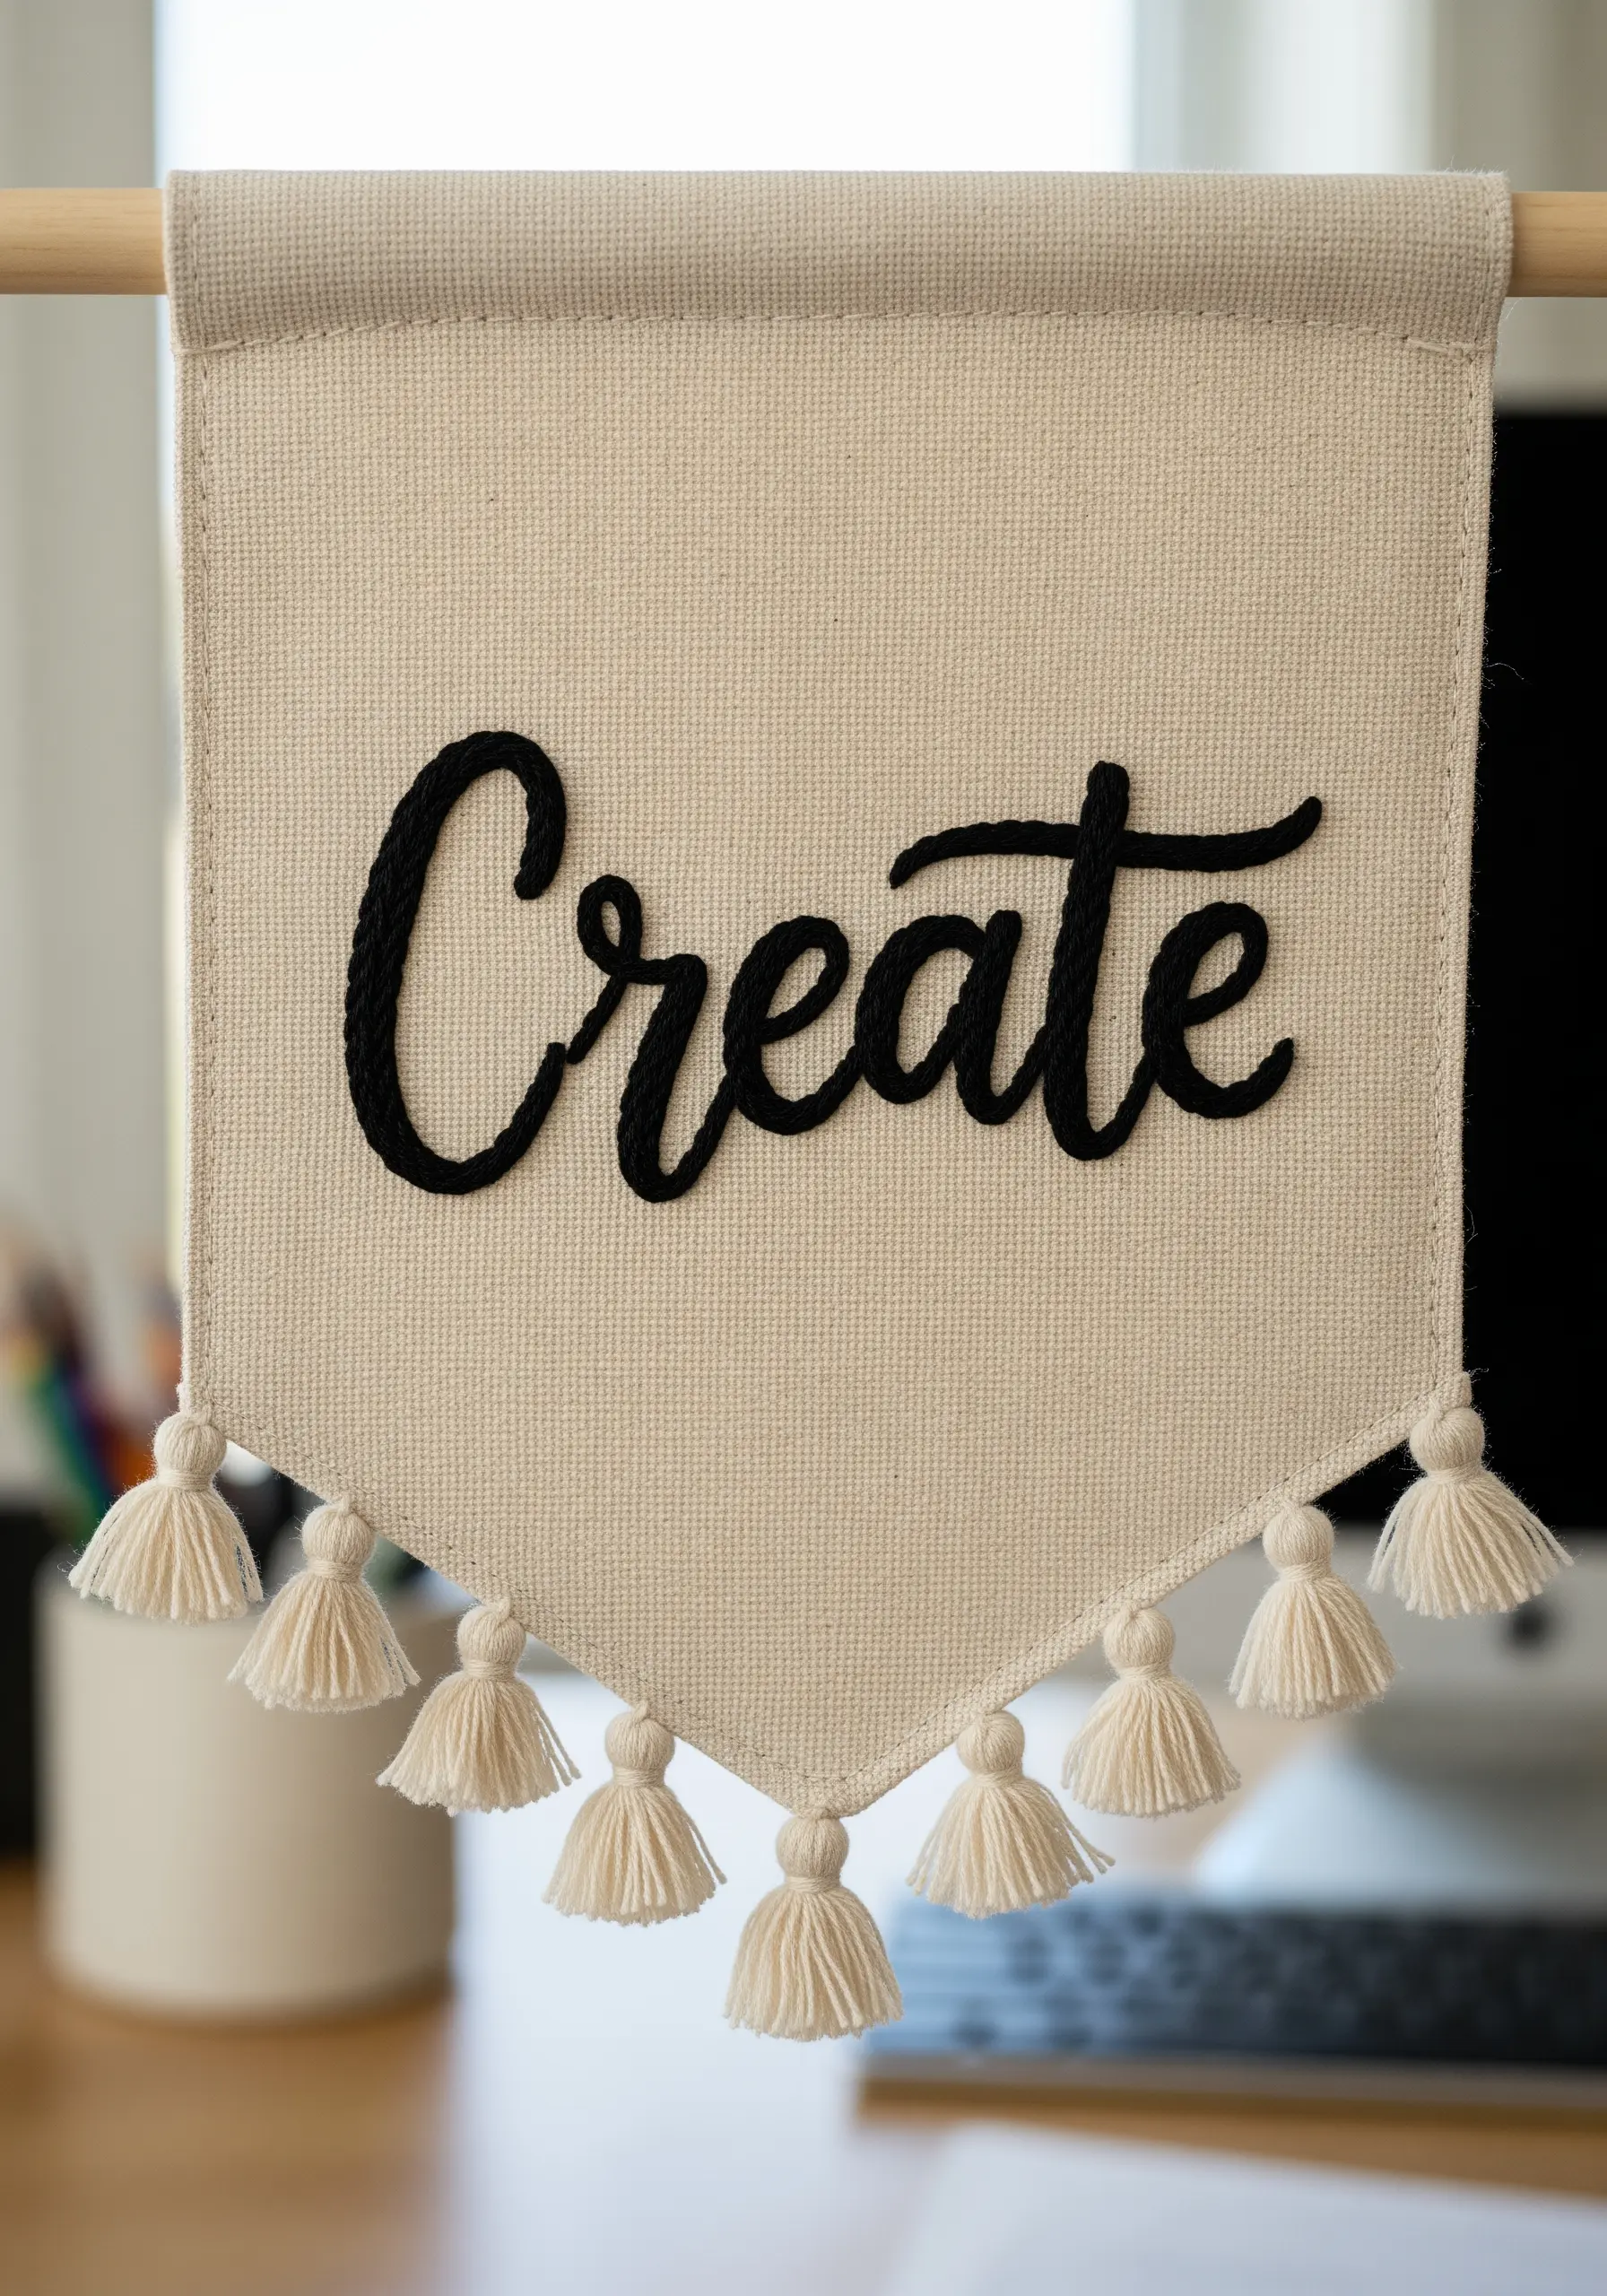
8. Design Bold Banners with Couched Yarn
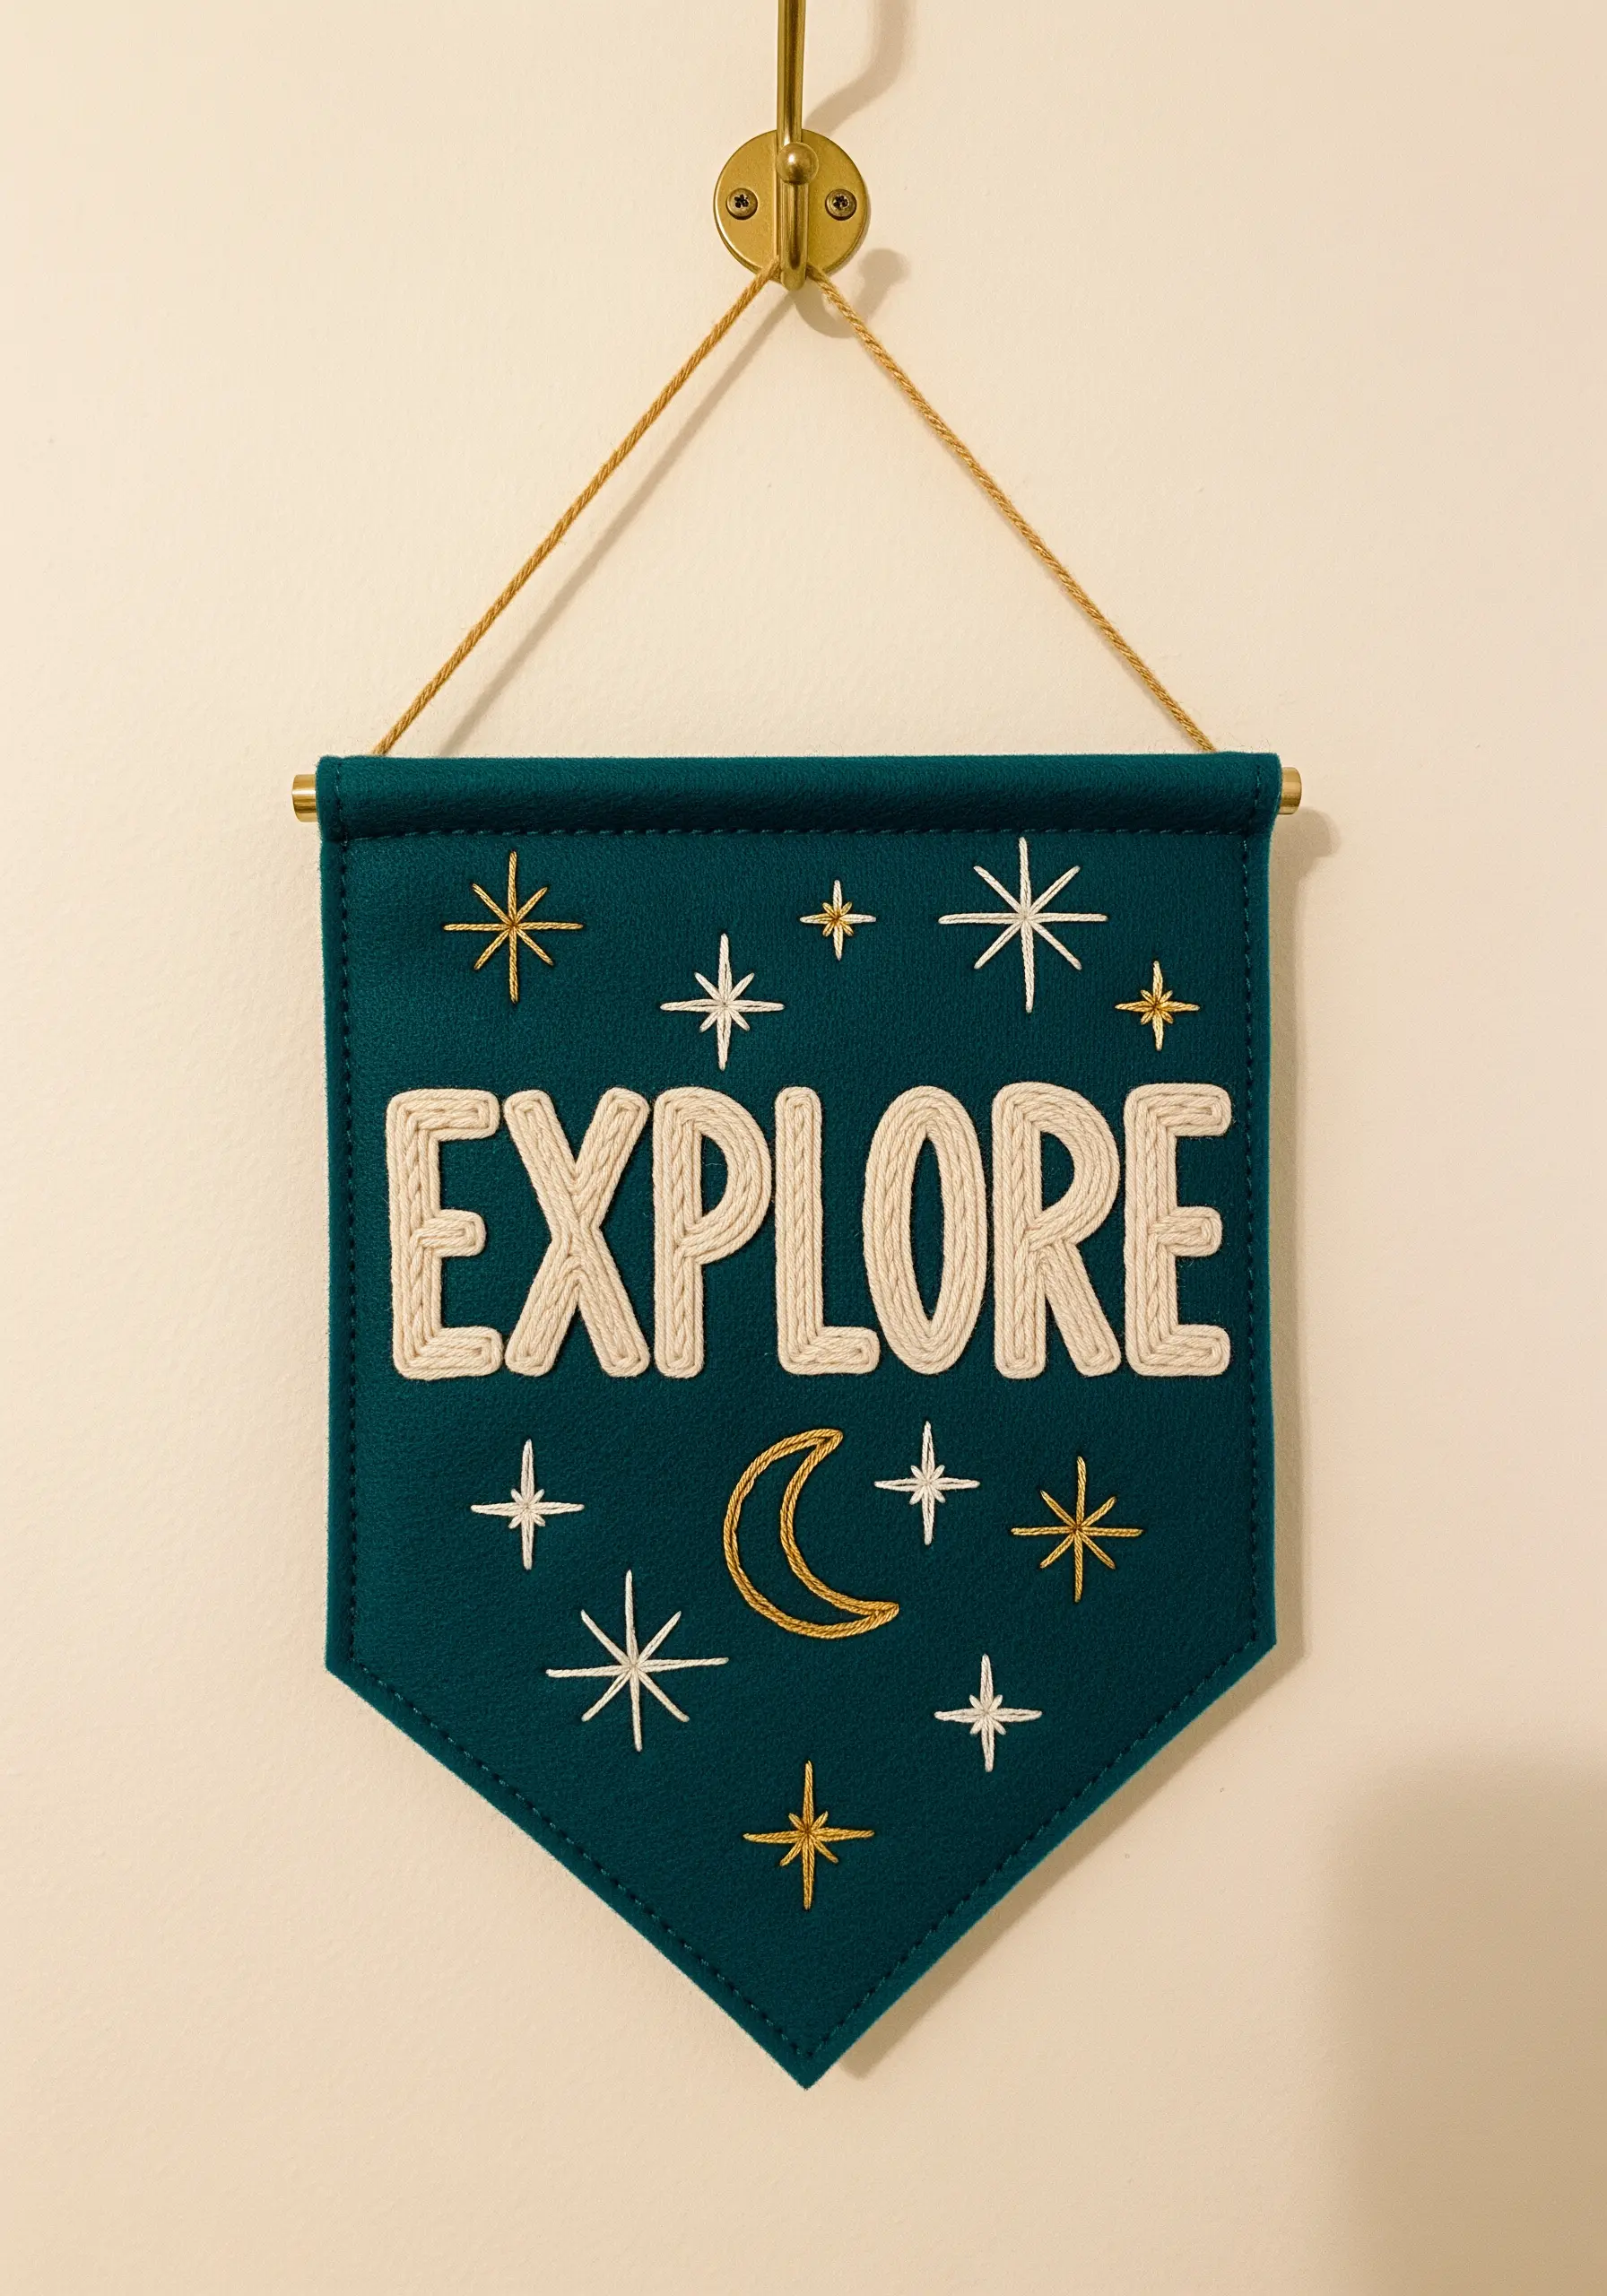
To make typography the hero of your design, swap fine floss for thick yarn. This instantly adds texture and graphic impact.
Instead of trying to pull the yarn through the fabric, use the couching technique. Lay the yarn along your design line and use a regular six-strand floss in a matching color to stitch it down every quarter-inch.
Contrast the bold yarn with delicate starbursts stitched in a fine metallic thread. This play on scale and texture is what makes the final banner feel dynamic and modern.
9. Pack Detail into a Miniature Keychain
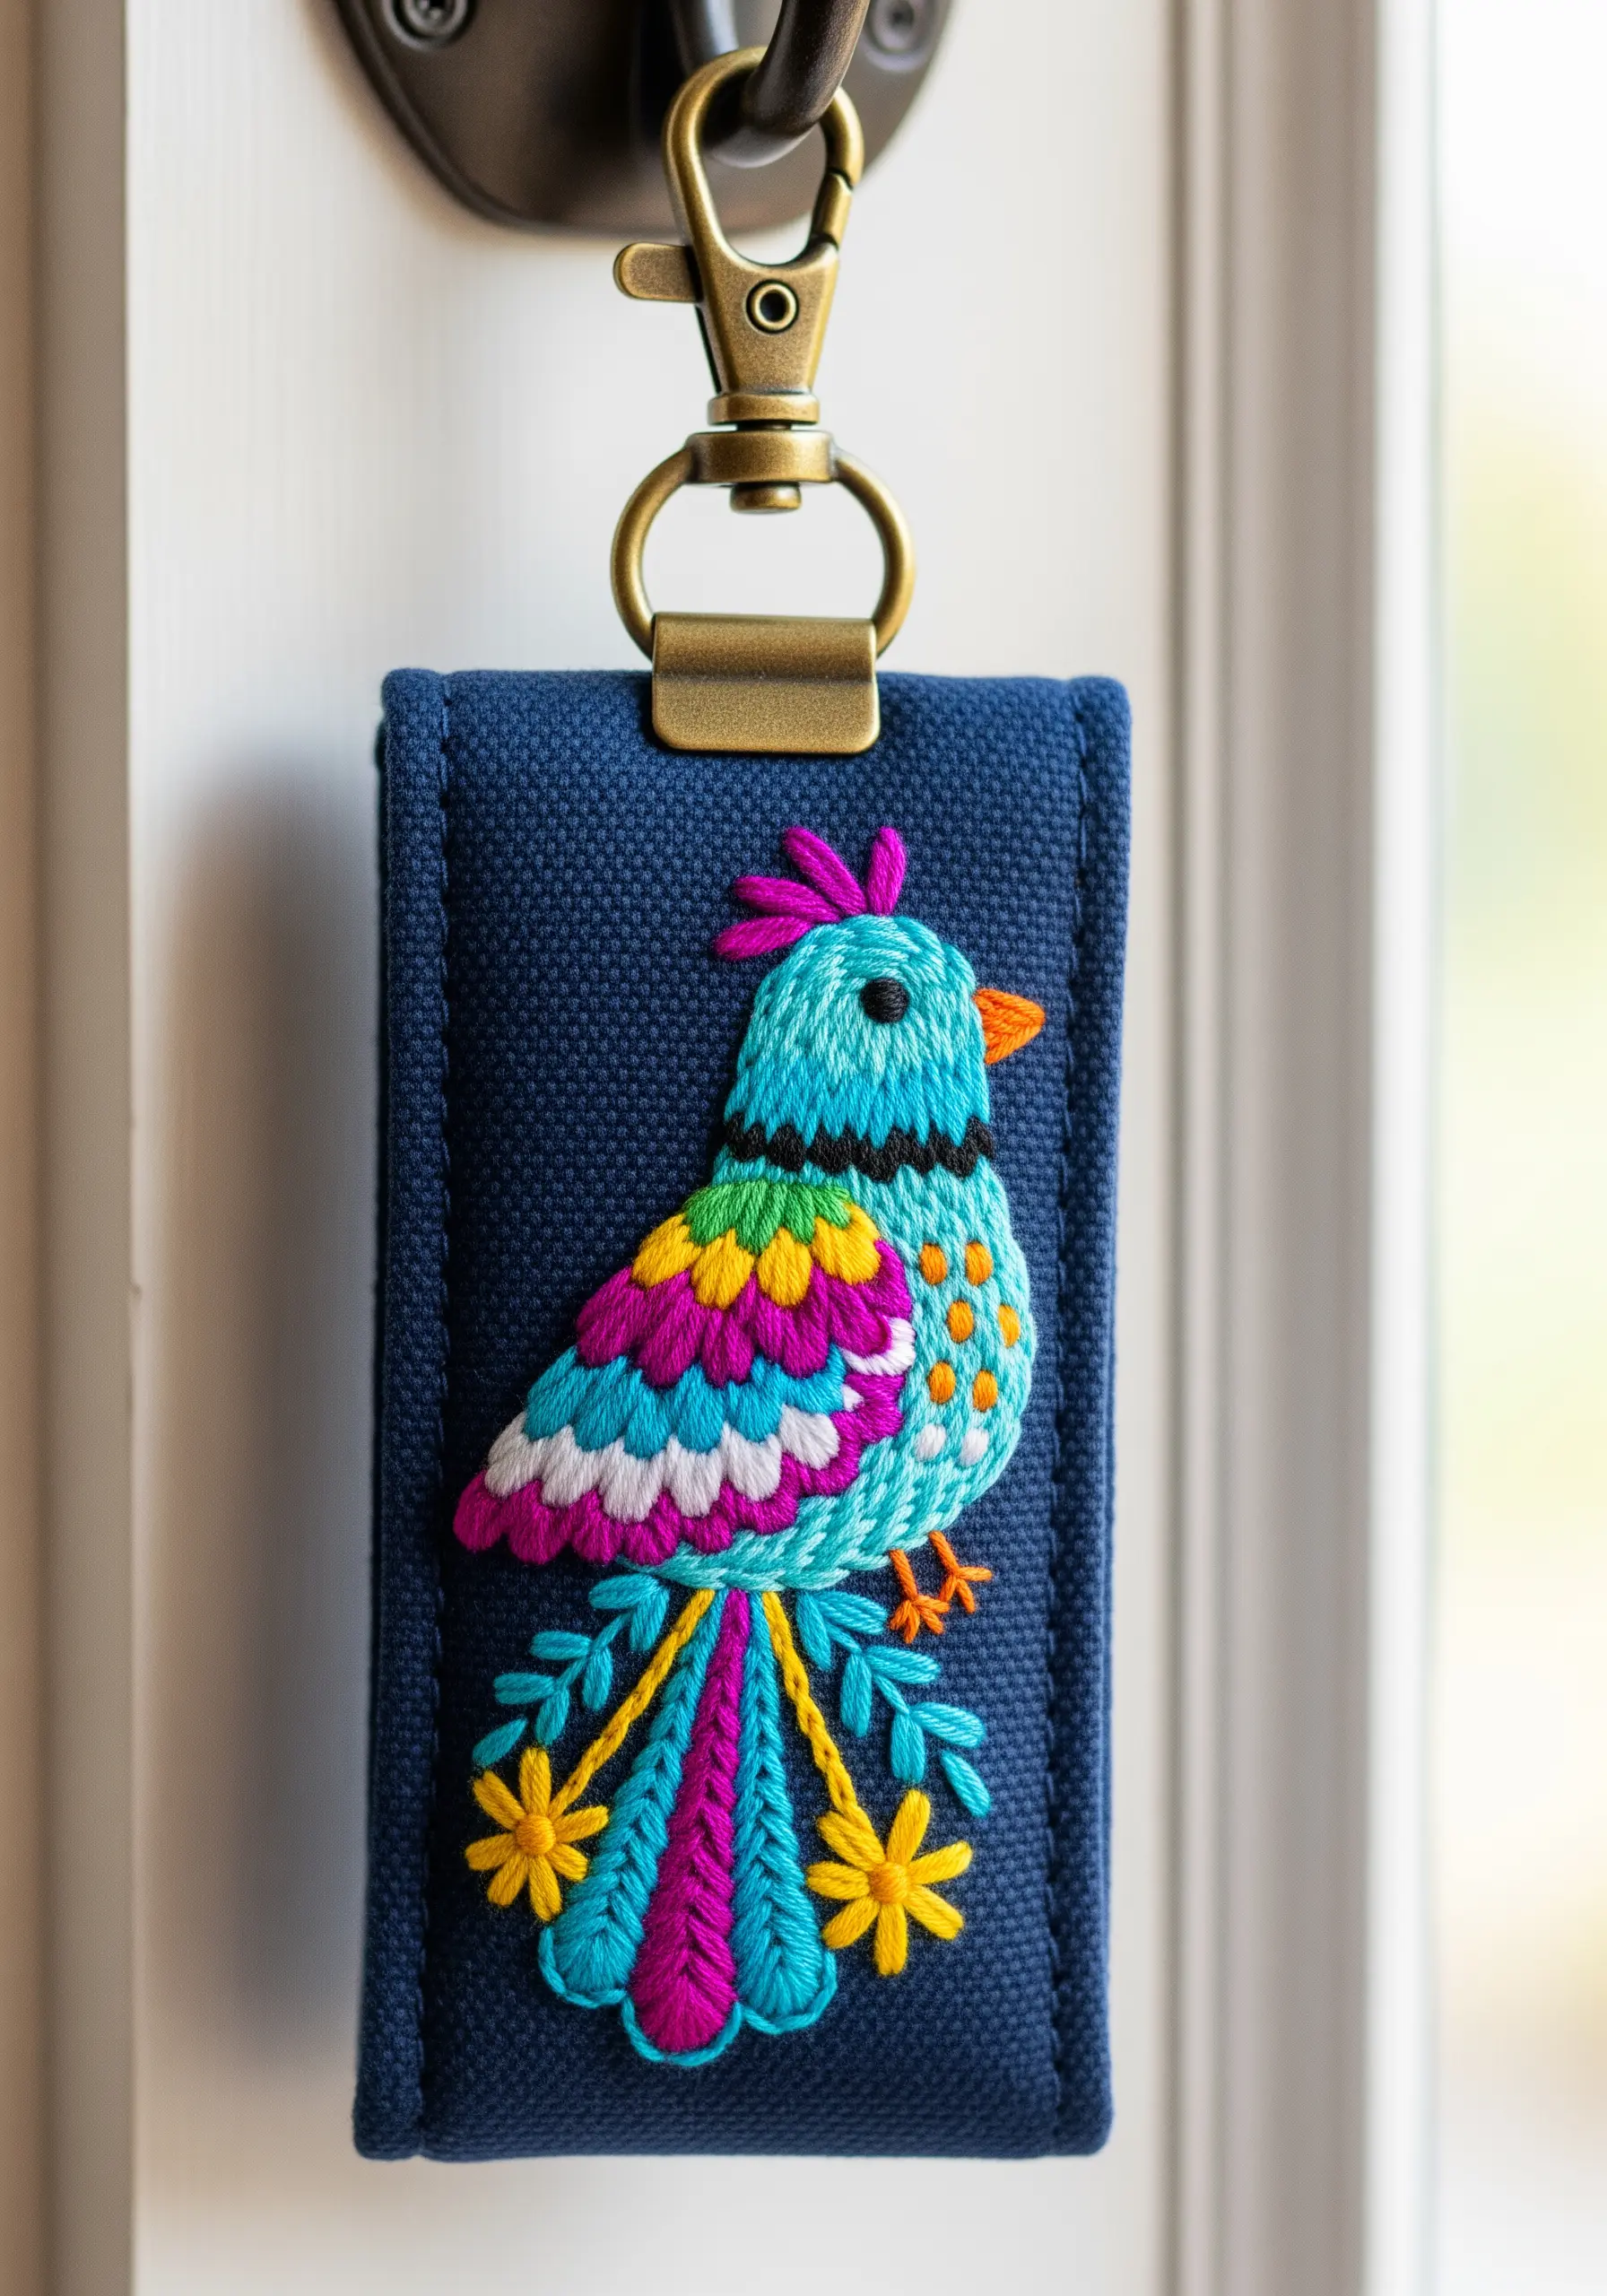
Working on a small scale requires precise stitch direction. To create the illusion of feathers on this tiny bird, angle your satin stitches to follow the bird’s contours.
Use short satin stitches for the wings and a slightly longer satin stitch for the tail feathers to create a subtle shift in texture.
Don’t be afraid to use bold, contrasting colors. On a small canvas, vibrant hues create energy and ensure the details don’t get lost.
Finish by adding a few French knots for extra texture on the body—it’s a perfect way to add detail in a tight space.
10. Add Subtle Definition with ‘Quilt-broidery’
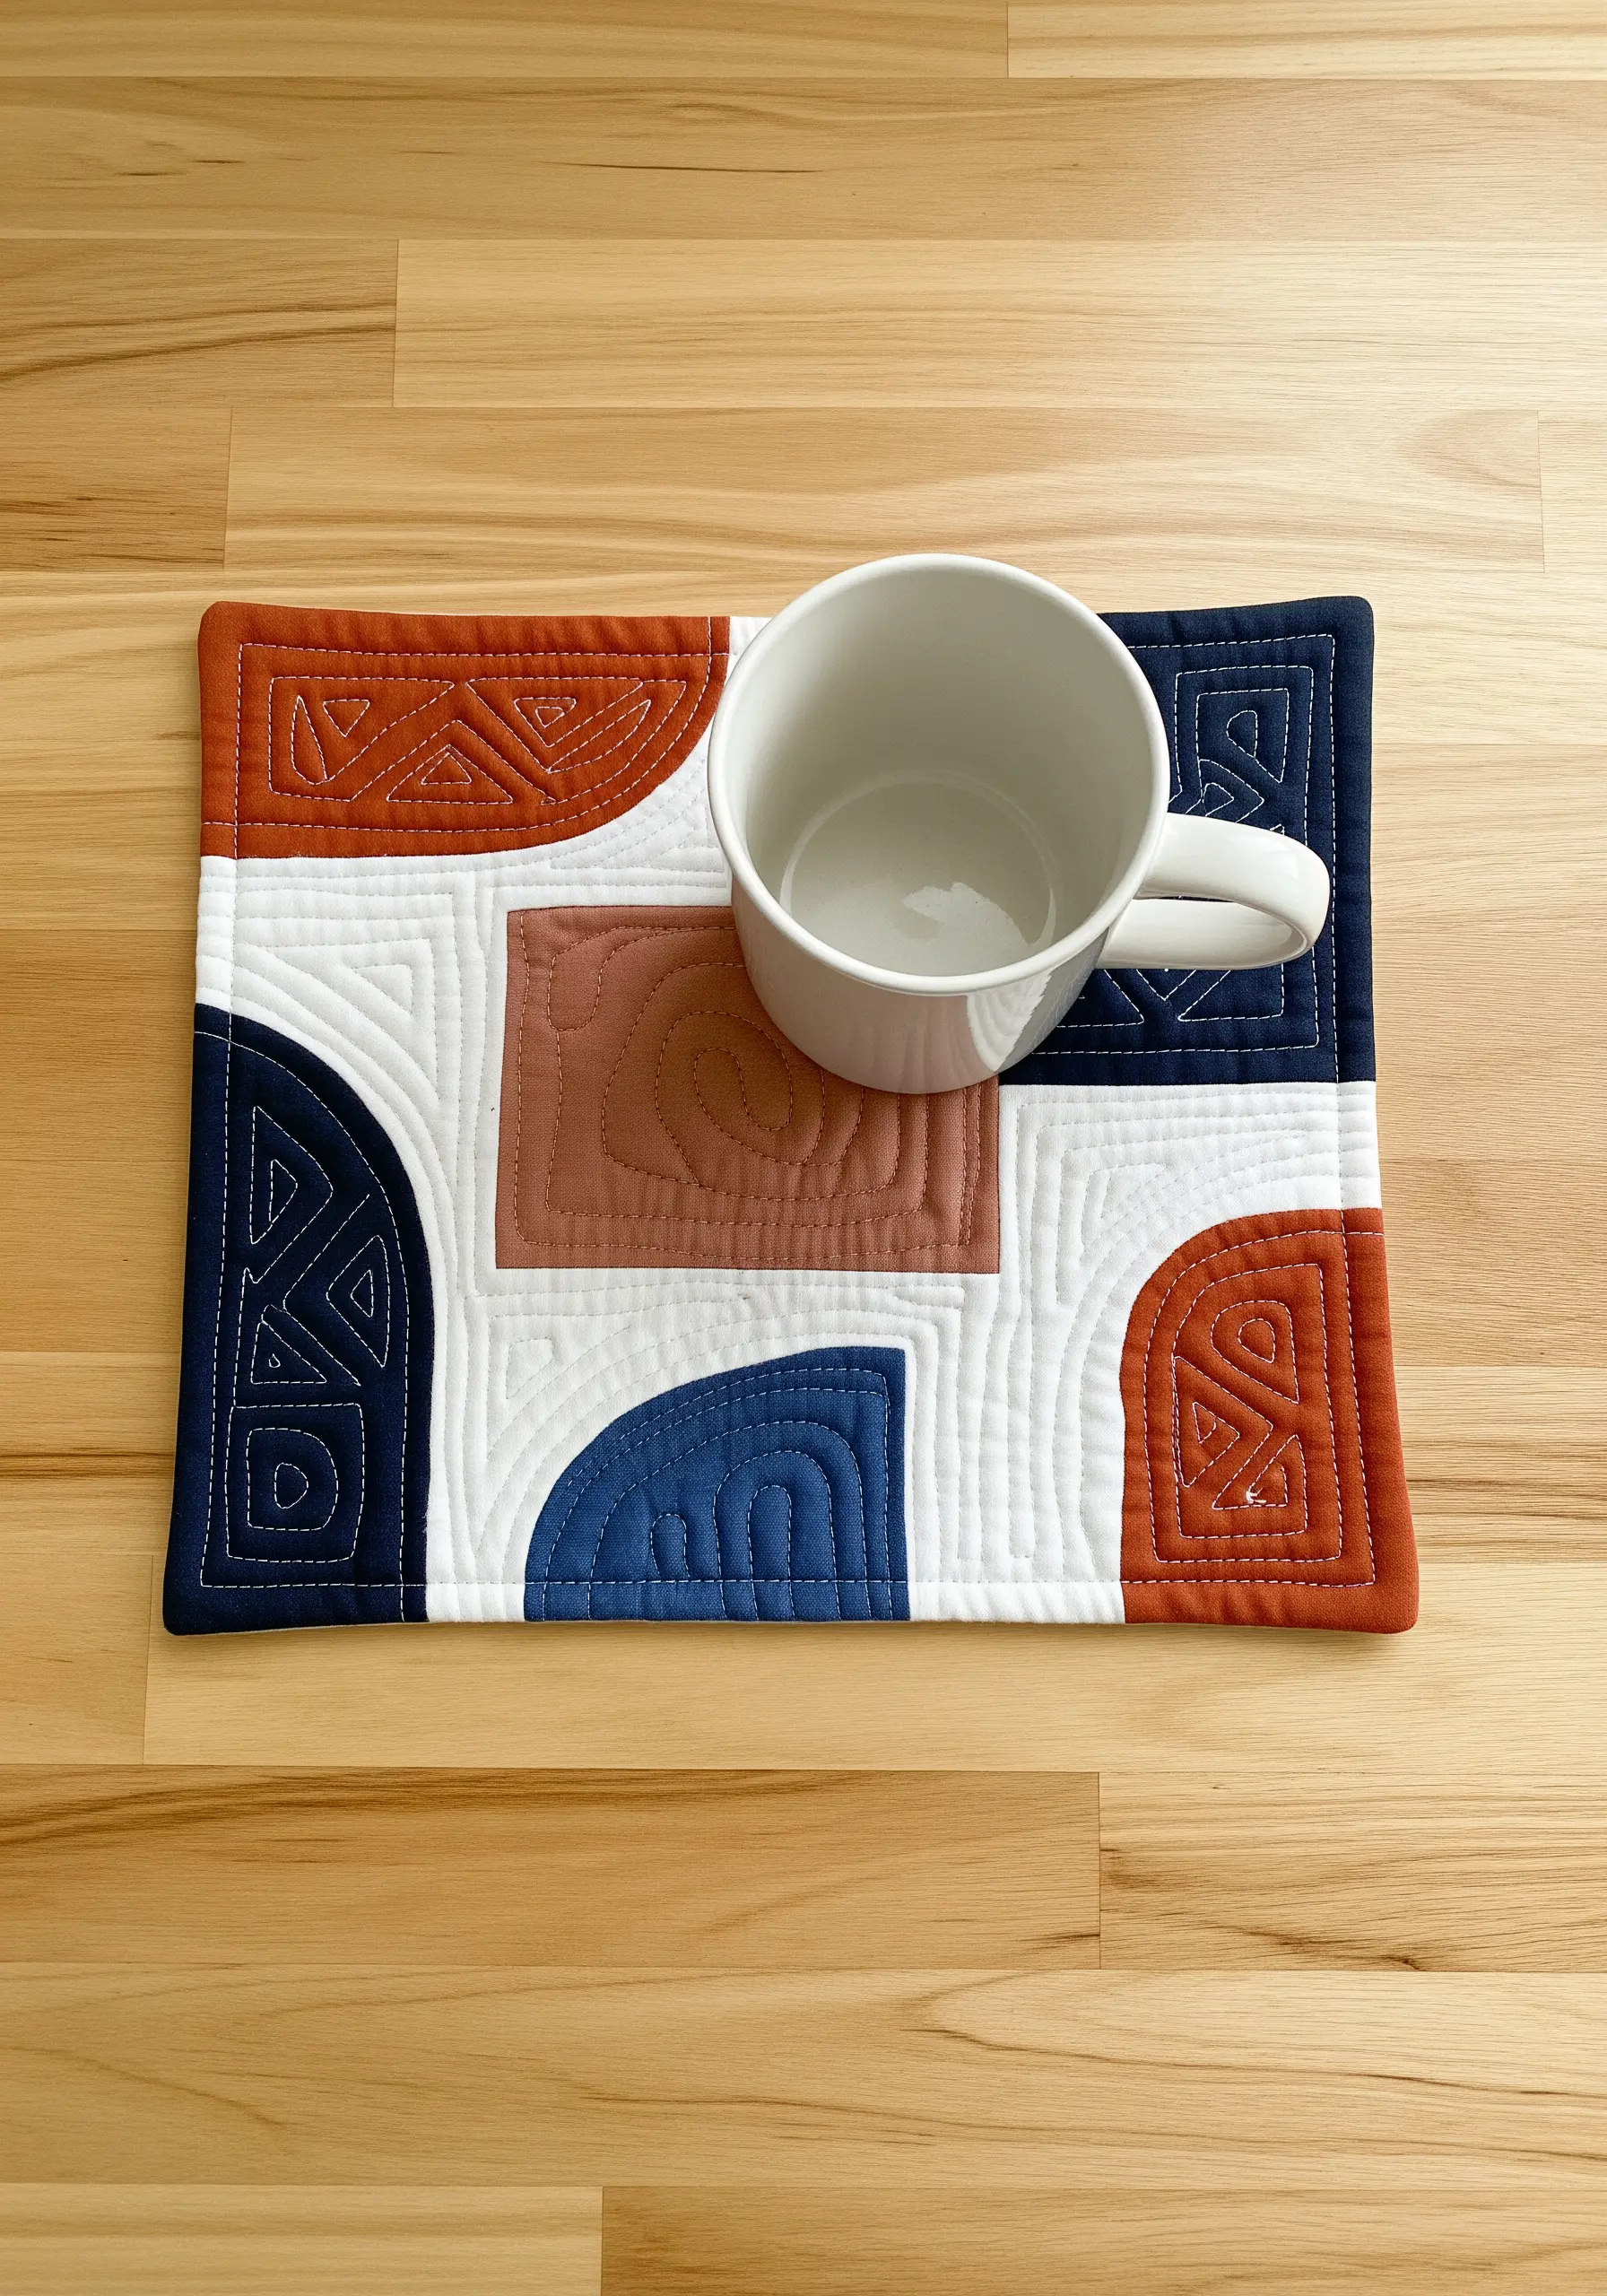
Elevate a simple quilted placemat or mug rug by adding hand embroidery after the machine quilting is complete.
Choose a thread color that complements your fabric palette—here, a simple white running stitch traces the machine-quilted lines, adding a layer of handmade texture.
This technique, sometimes called ‘big stitch quilting,’ adds visual interest without requiring complex embroidery skills. It highlights the geometric shapes of the patchwork and gives the piece a soft, tactile quality.
It’s a mindful way to add a personal touch to any quilted project.
11. Build a Forest Floor with French Knots
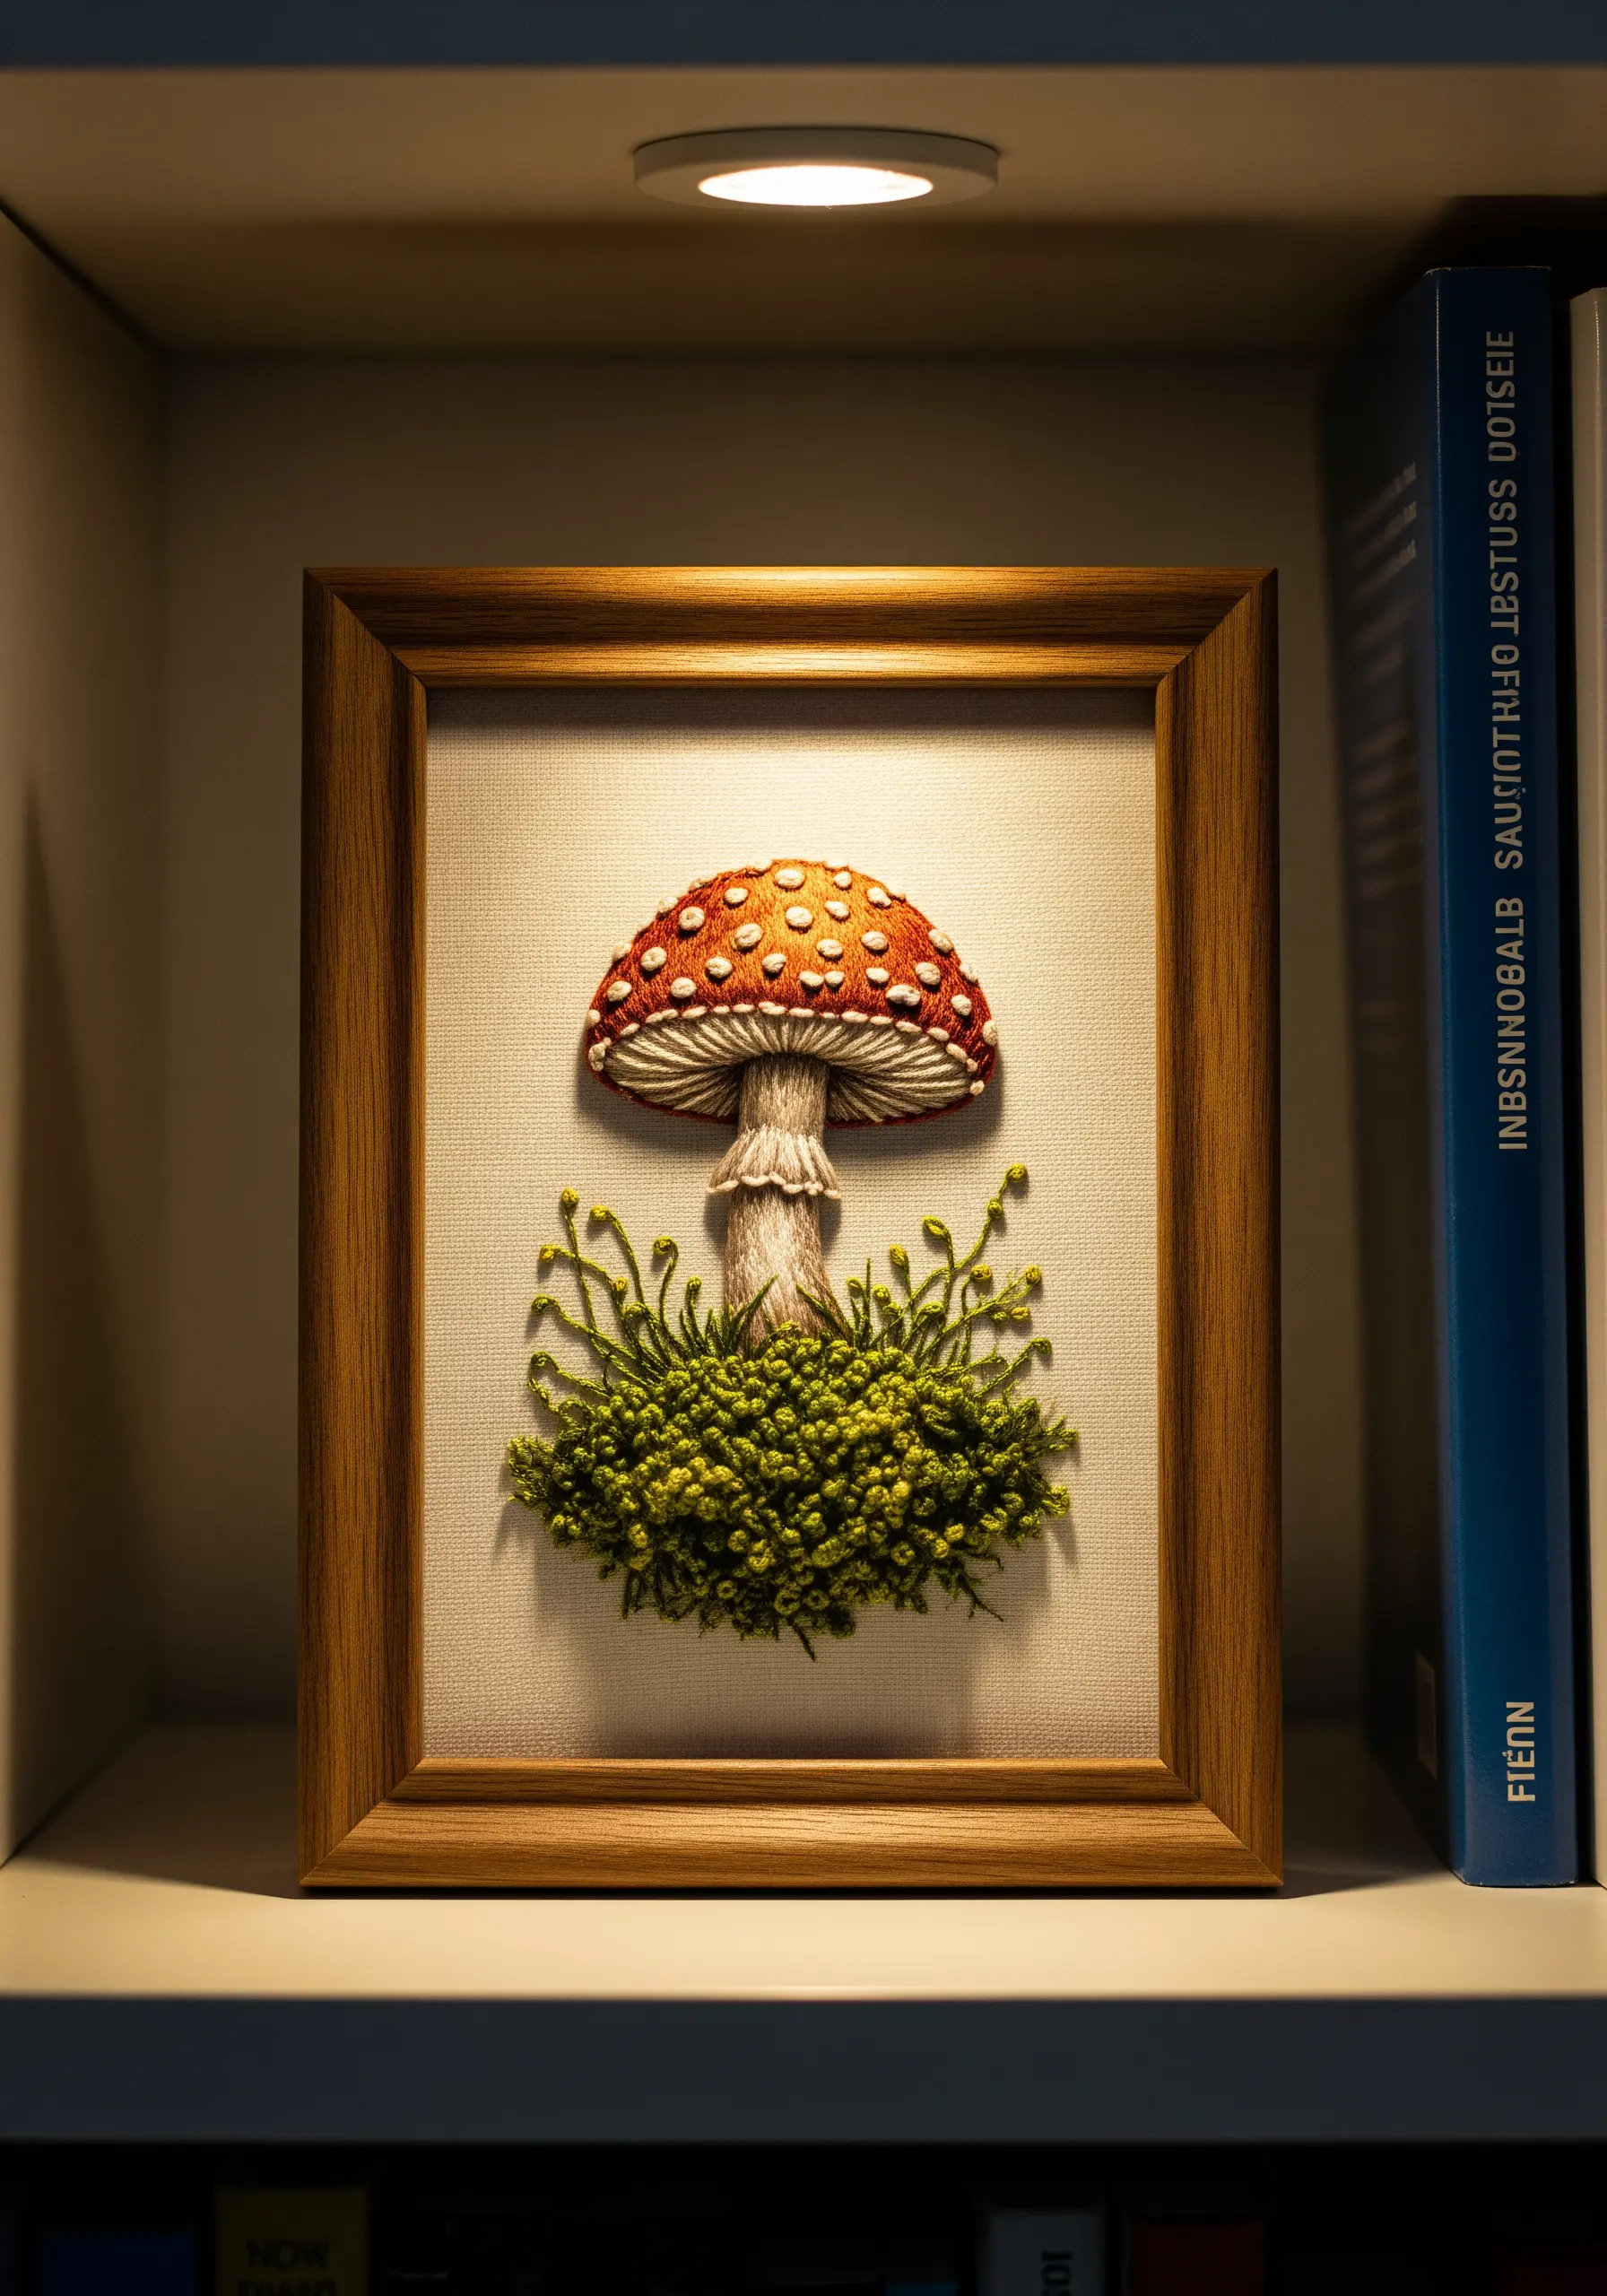
To create a lush, mossy texture, rely entirely on French knots. The key to a realistic look is variation.
Use at least three or four shades of green and chartreuse thread, and vary the number of times you wrap the thread around the needle (once for small knots, twice for larger ones).
Cluster the knots tightly together, allowing them to overlap to build up a dense, three-dimensional base.
For the mushroom cap, use a brick stitch to stagger your stitches, which creates a smooth, curved surface without the rigid lines of a traditional satin stitch.
12. Construct Ethereal Wings with Appliqué

This dragonfly is a masterclass in mixed-media embroidery, perfect for embellishing a gift box.
Create the body with padded satin stitch over a few strands of felt or extra thread to give it a raised, sculptural form. Use tiny seed beads for the eyes.
The wings are the focal point: stitch them on iridescent organza or a similar sheer fabric, then carefully cut them out and appliqué them to the base fabric just under the body.
This method gives them a translucent, floating quality that thread alone cannot achieve.
13. Embroider on Velvet for Luxe Table Linens

Velvet’s deep pile can be tricky, but it creates an incredibly luxurious backdrop for embroidery. Always use a tear-away stabilizer on the back to prevent the fabric from stretching.
A simple design stitched in a high-contrast metallic thread, like this gold vine on jewel-toned velvet, looks effortlessly opulent.
Use a stem stitch for the vine—its twisted, rope-like texture sits beautifully on top of the velvet’s pile without sinking in.
These napkin rings are a fast project that adds a significant touch of handmade elegance to any dinner party.
14. Design a Wildflower Bouquet for a Wall Pouch
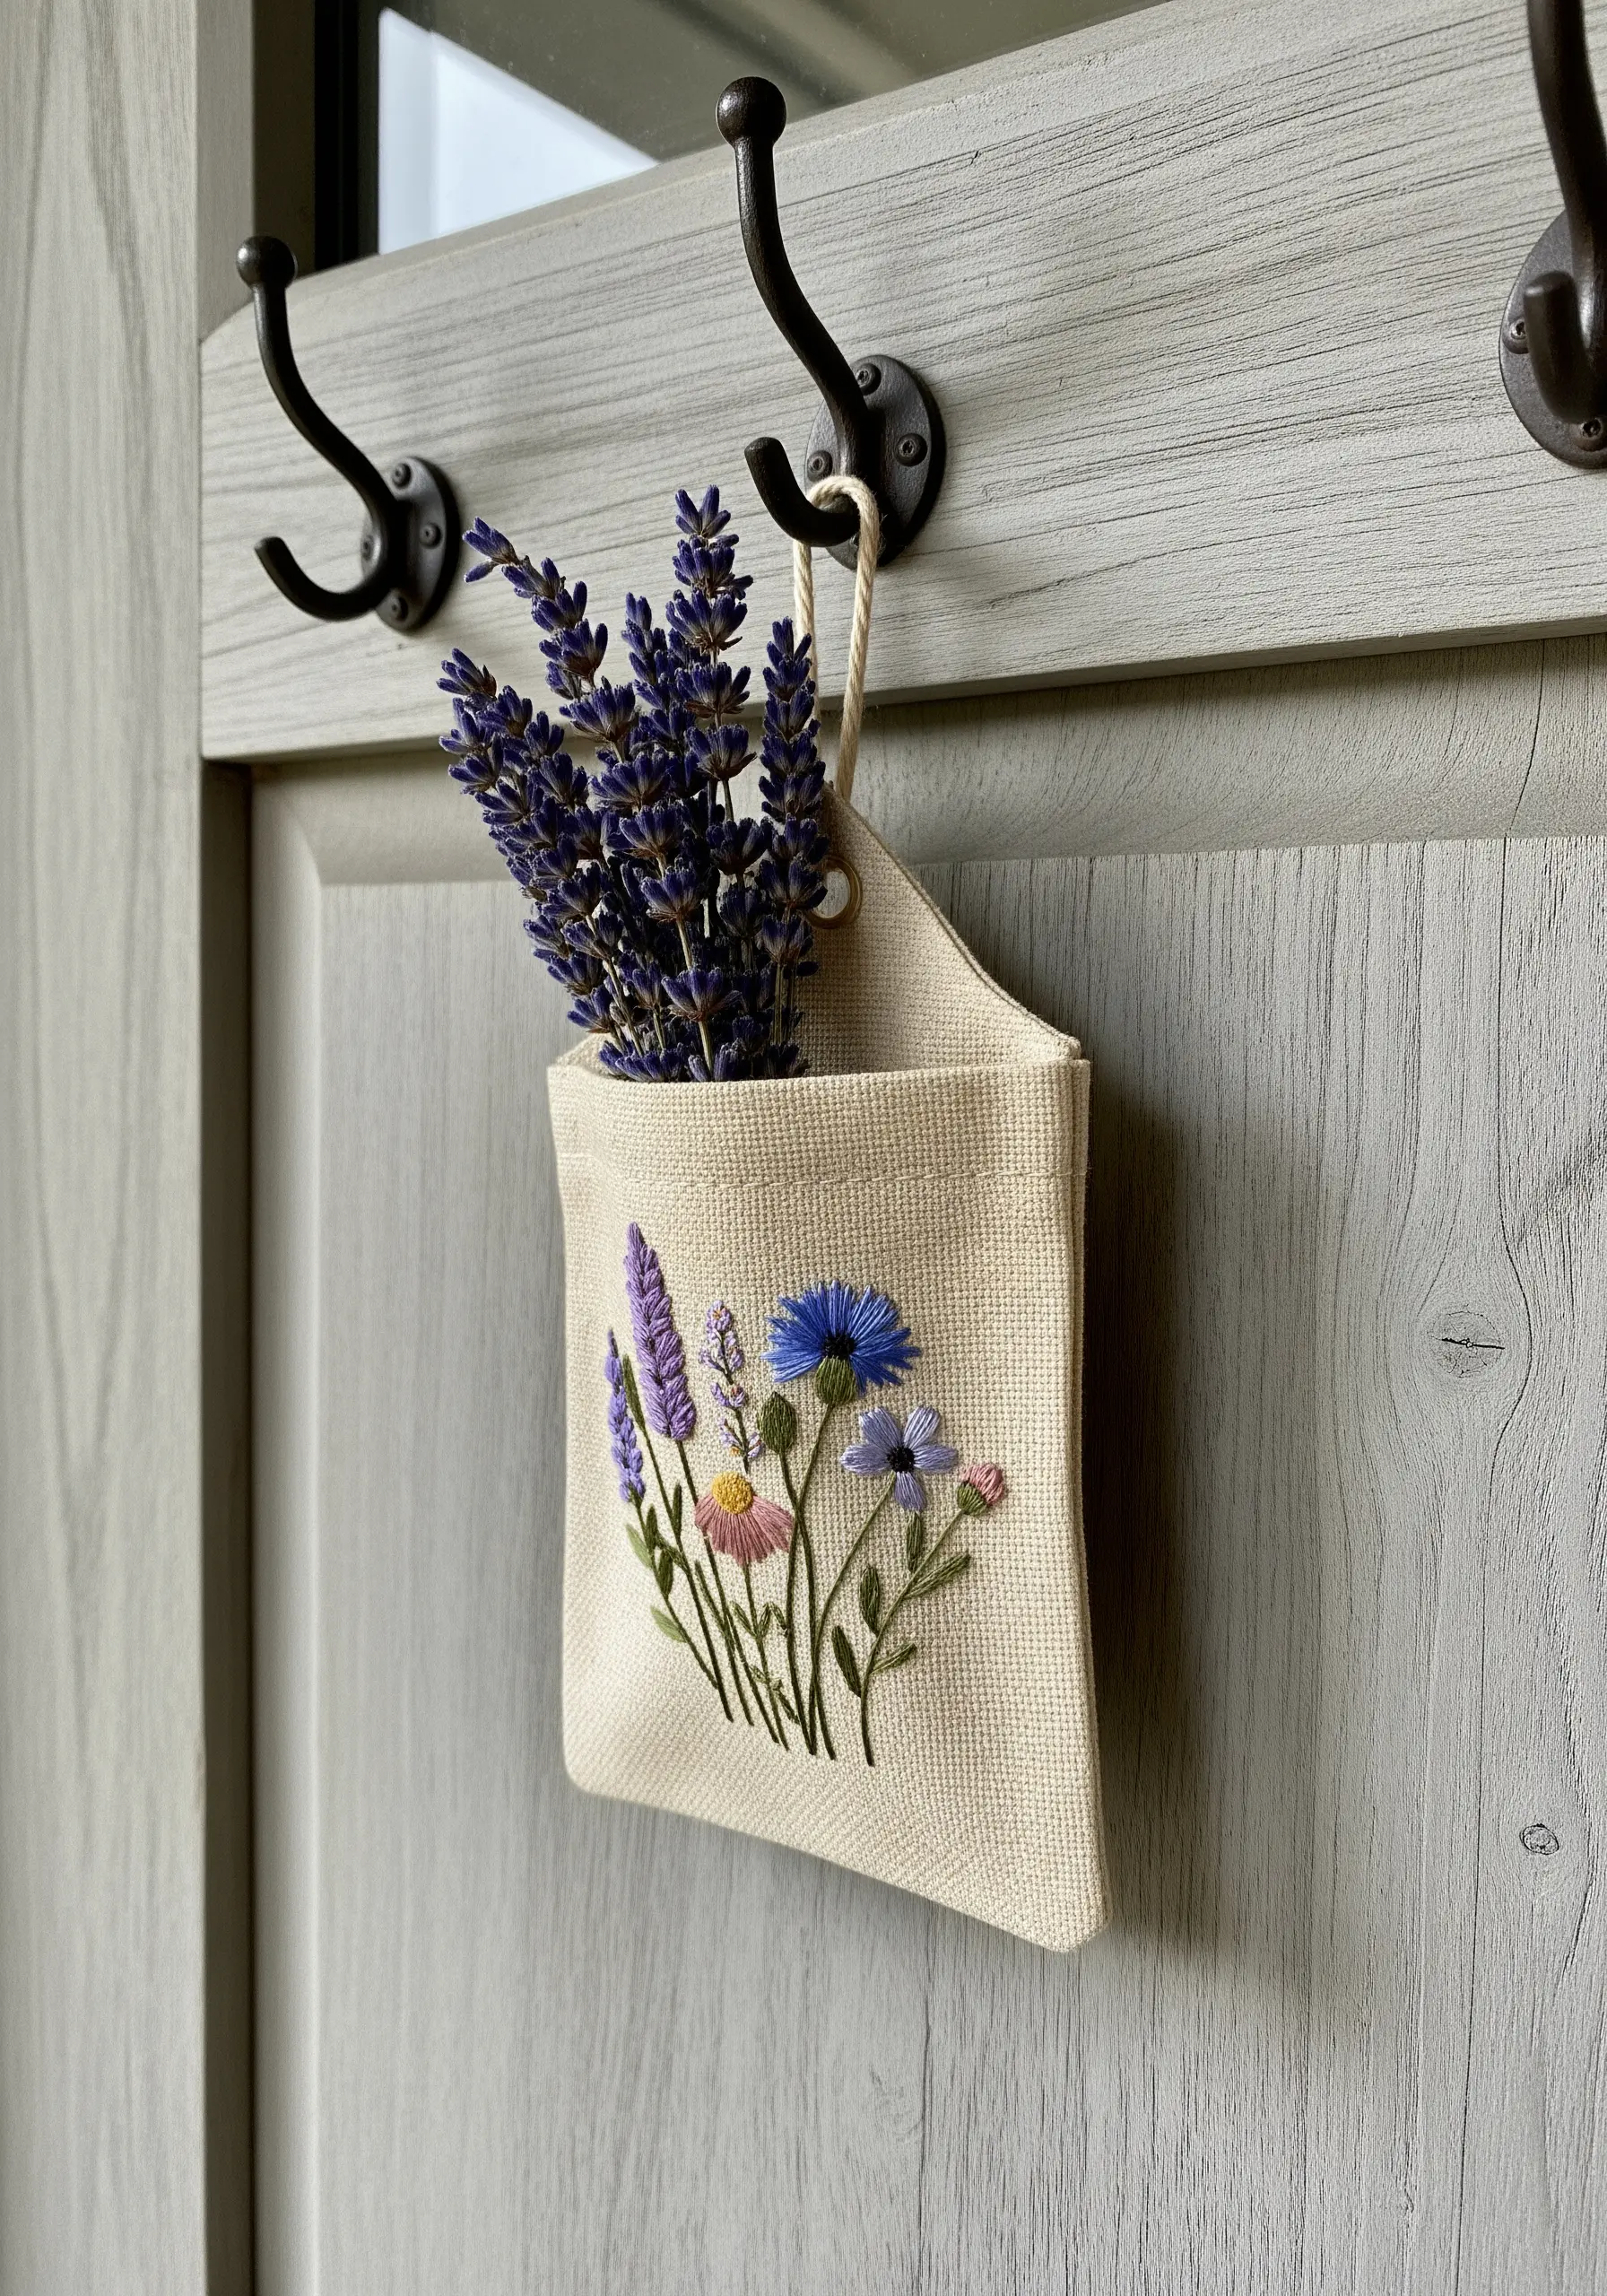
Create a dynamic wildflower arrangement by assigning a different stitch to each type of flower, which gives every bloom its own unique character.
Use long, straight stitches for lavender, lazy daisy stitches for small pink petals, and woven wheel stitches for the larger cornflowers.
This mix of textures makes the composition feel more organic and interesting than if it were all done in one stitch style.
These small floral embroidery inspirations are perfect for functional items like this hanging pouch, bringing beauty to everyday storage.
15. Craft a Celestial Nightscape with Beads
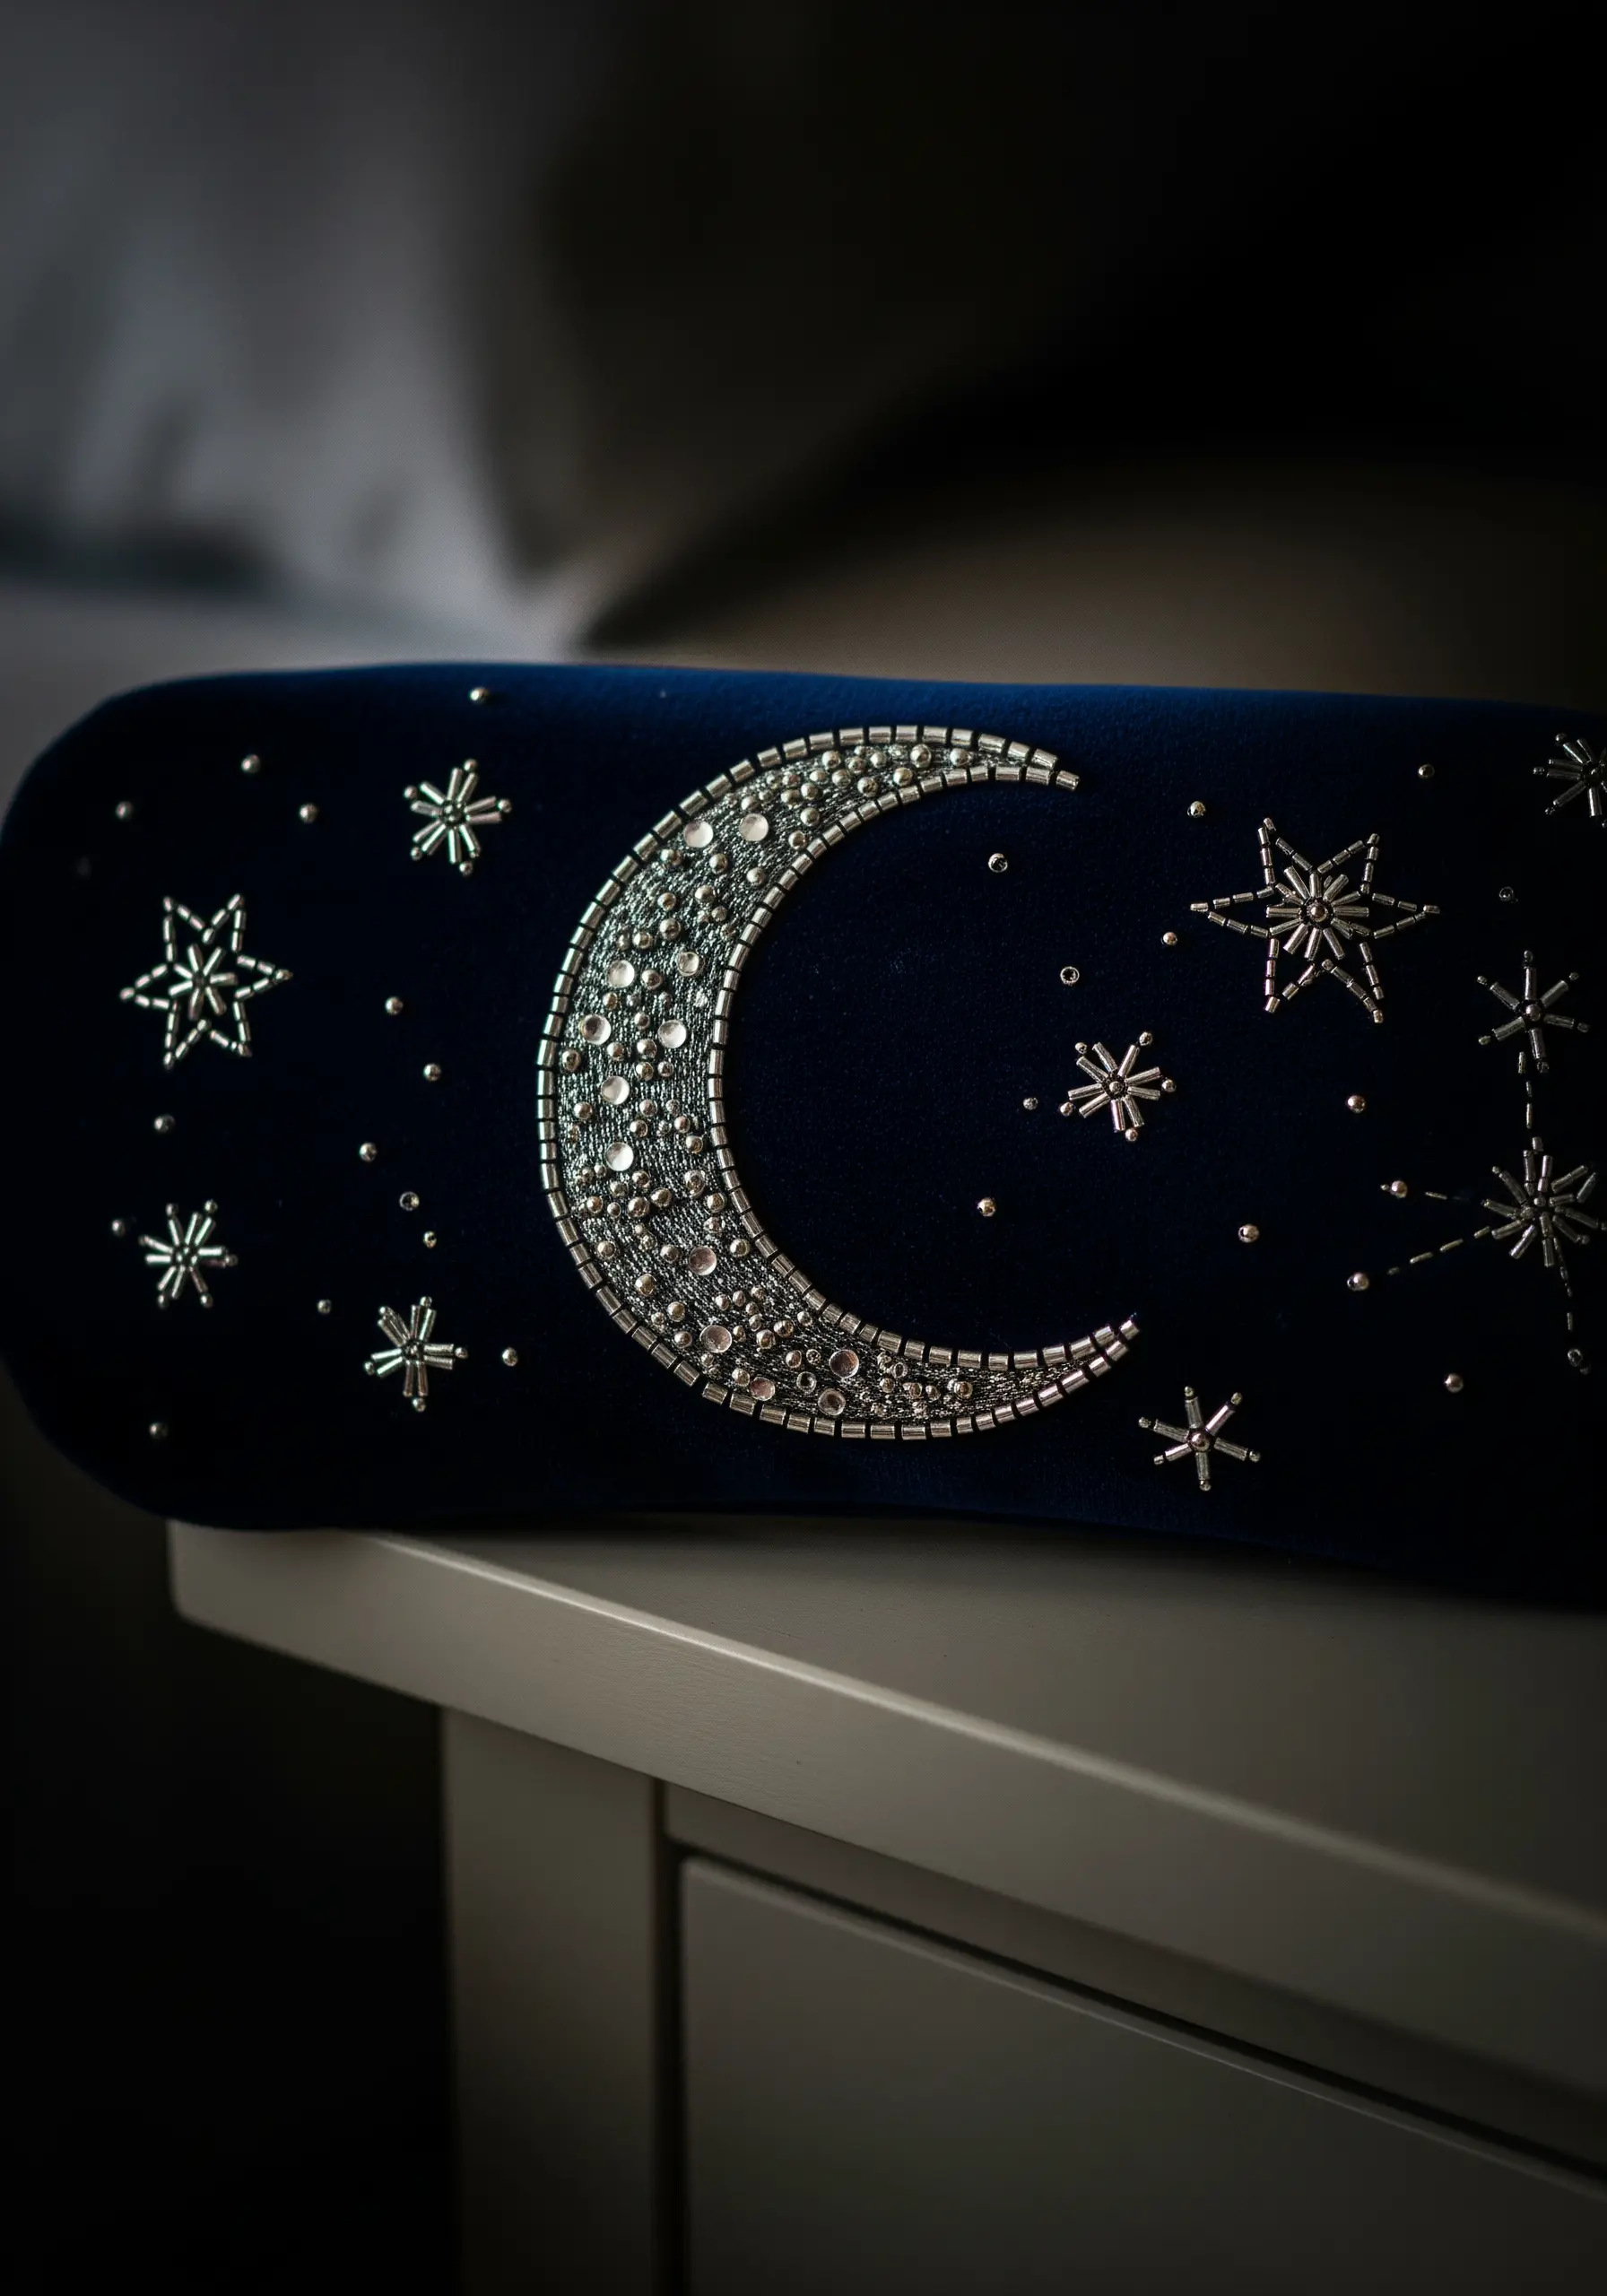
Transform a simple sleep mask into a dreamy accessory by using beads to create a shimmering moon.
Fill the crescent moon shape with a dense field of silver and clear seed beads, stitching them on randomly rather than in neat rows to create a textured, light-catching surface.
For the stars, stitch silver bugle beads in starburst patterns. The long, thin shape of the beads creates sharp, graphic lines that contrast beautifully with the soft velvet and the dense texture of the moon.
This project showcases how beads can be used to ‘paint’ with light and texture.
16. Perfect a Clean Monogram with a Split Stitch Base
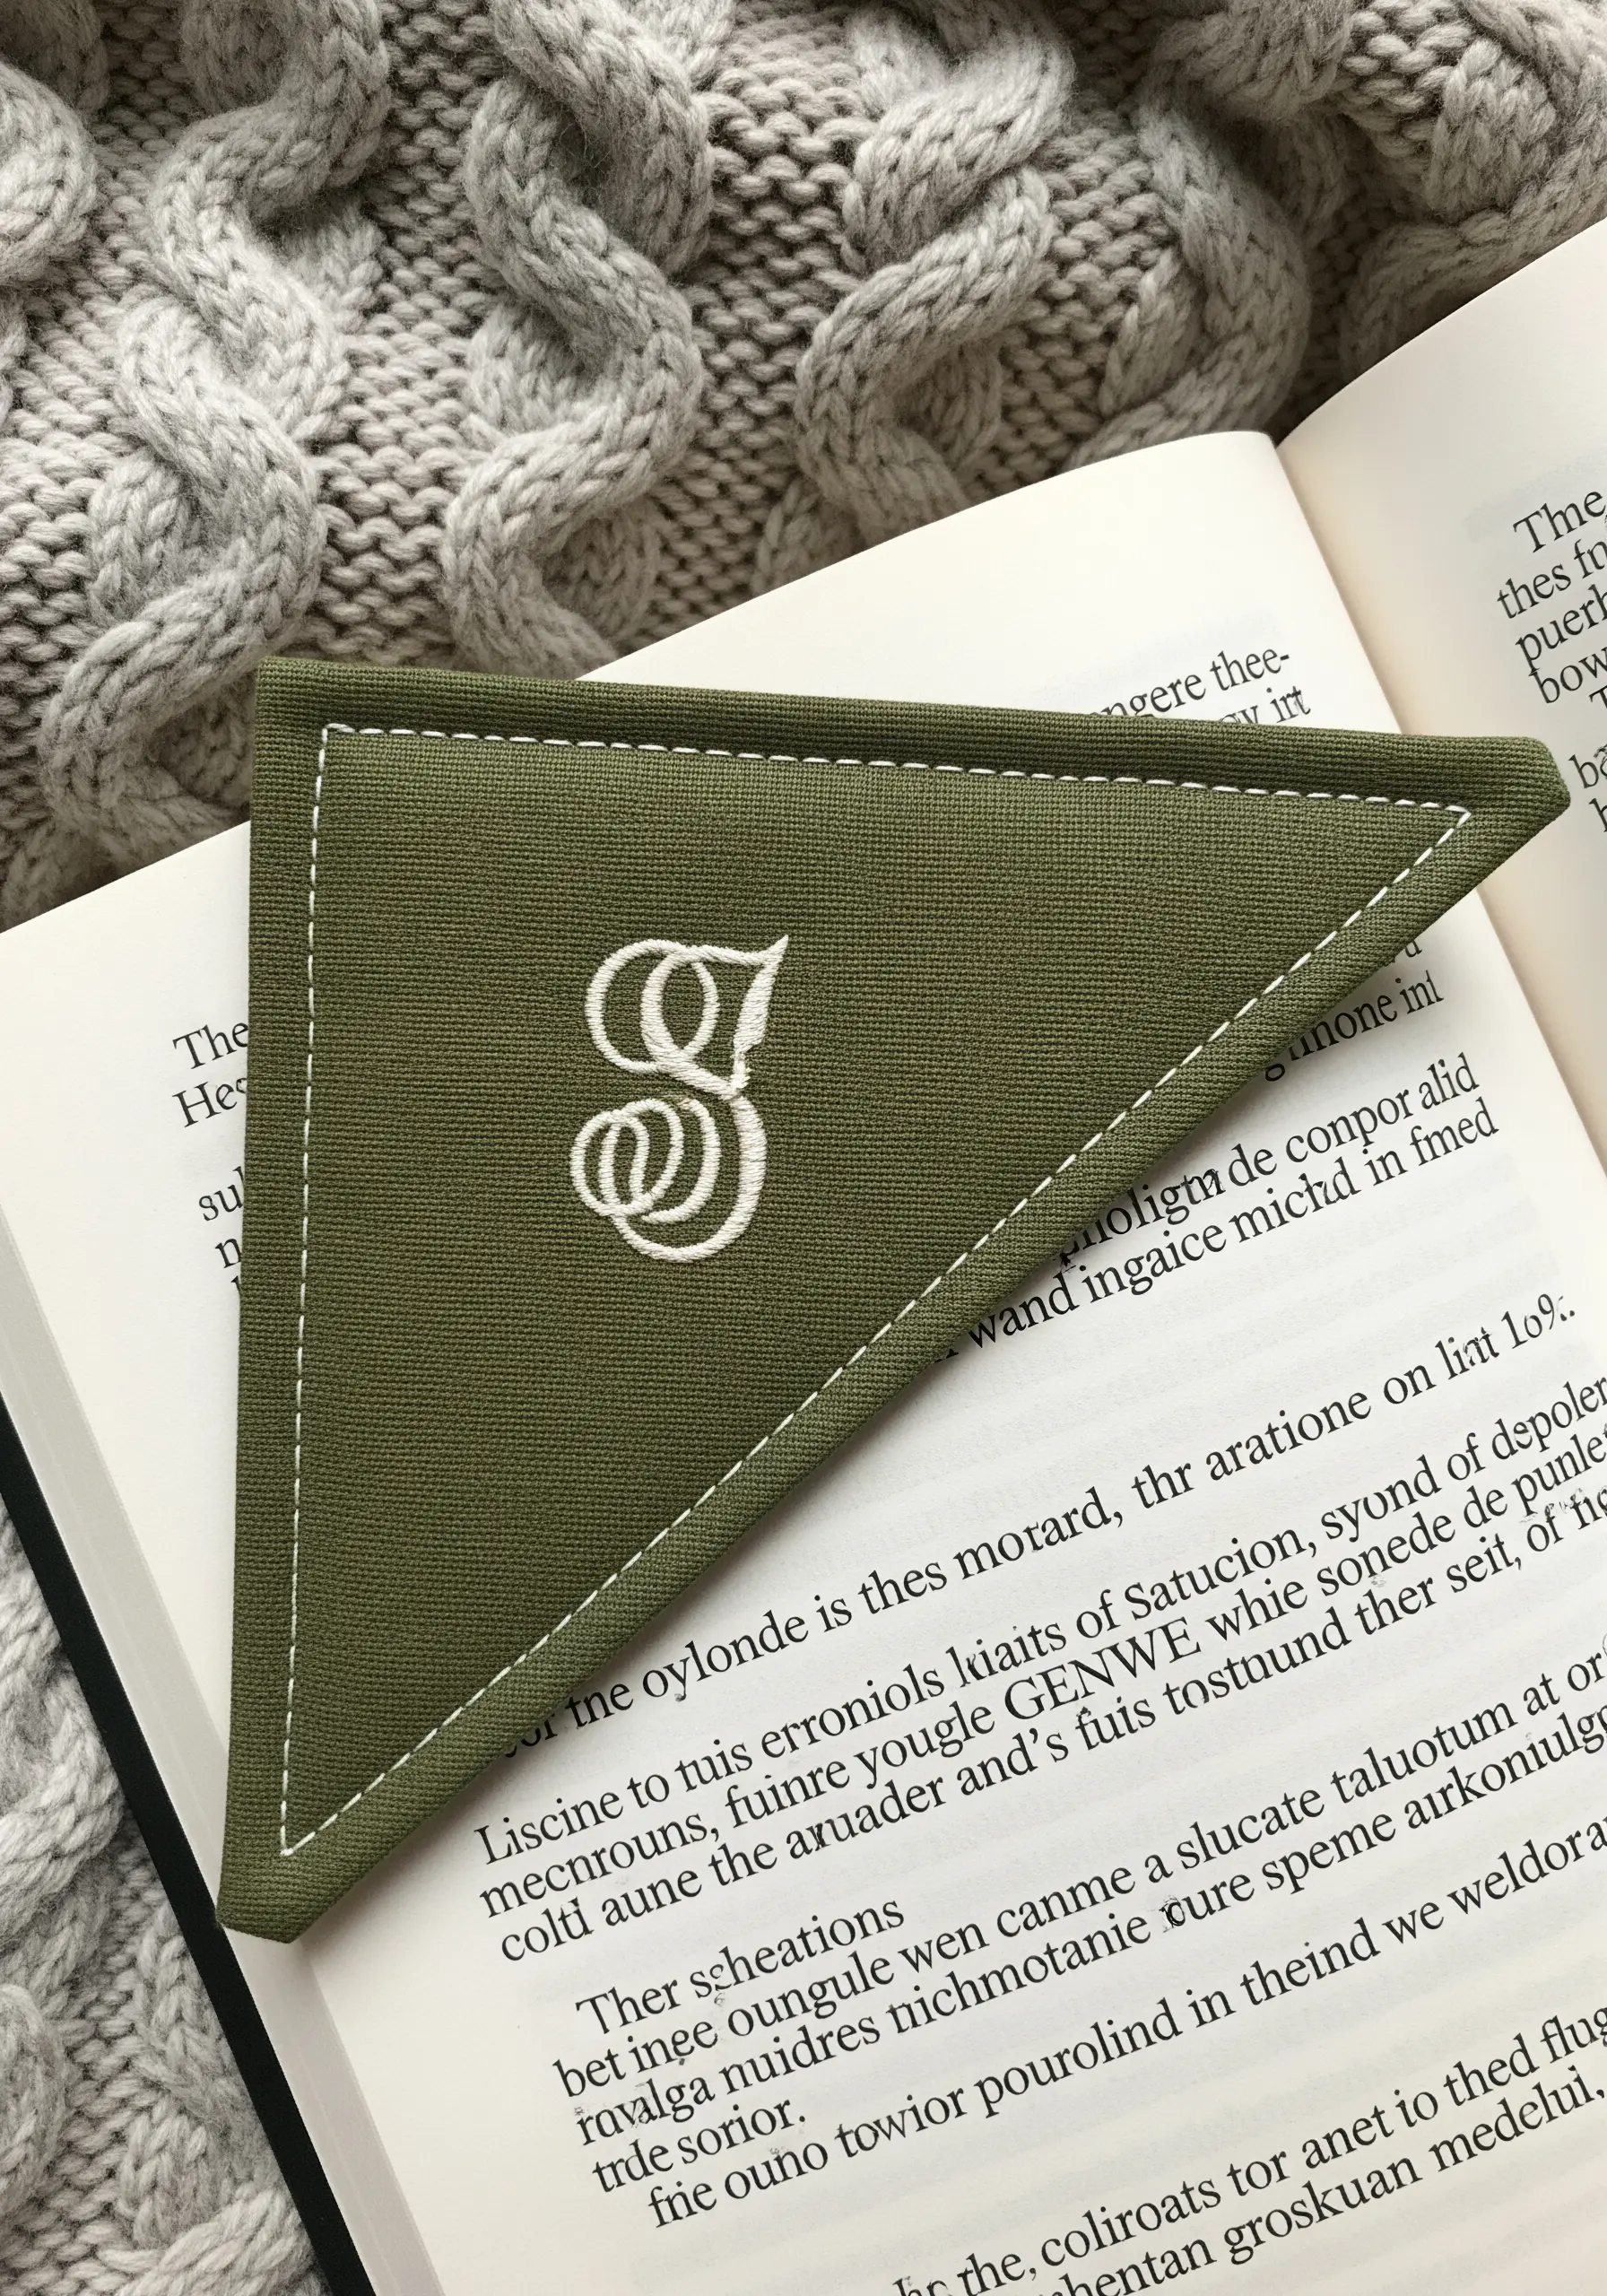
The secret to a perfectly smooth, raised satin stitch for monograms is the preparation. Before you stitch a single satin stitch, outline the entire letter with a split stitch.
This split stitch border creates a firm, raised edge for your satin stitches to rest against, preventing them from slipping and ensuring a crisp, clean outline.
When filling the shape, keep your satin stitches perpendicular to the letter’s form. This creates a uniform surface with a beautiful sheen.
A simple running stitch around the edge gives this corner bookmark a professional finish.
17. Create ‘Floating’ Portraits on Tulle
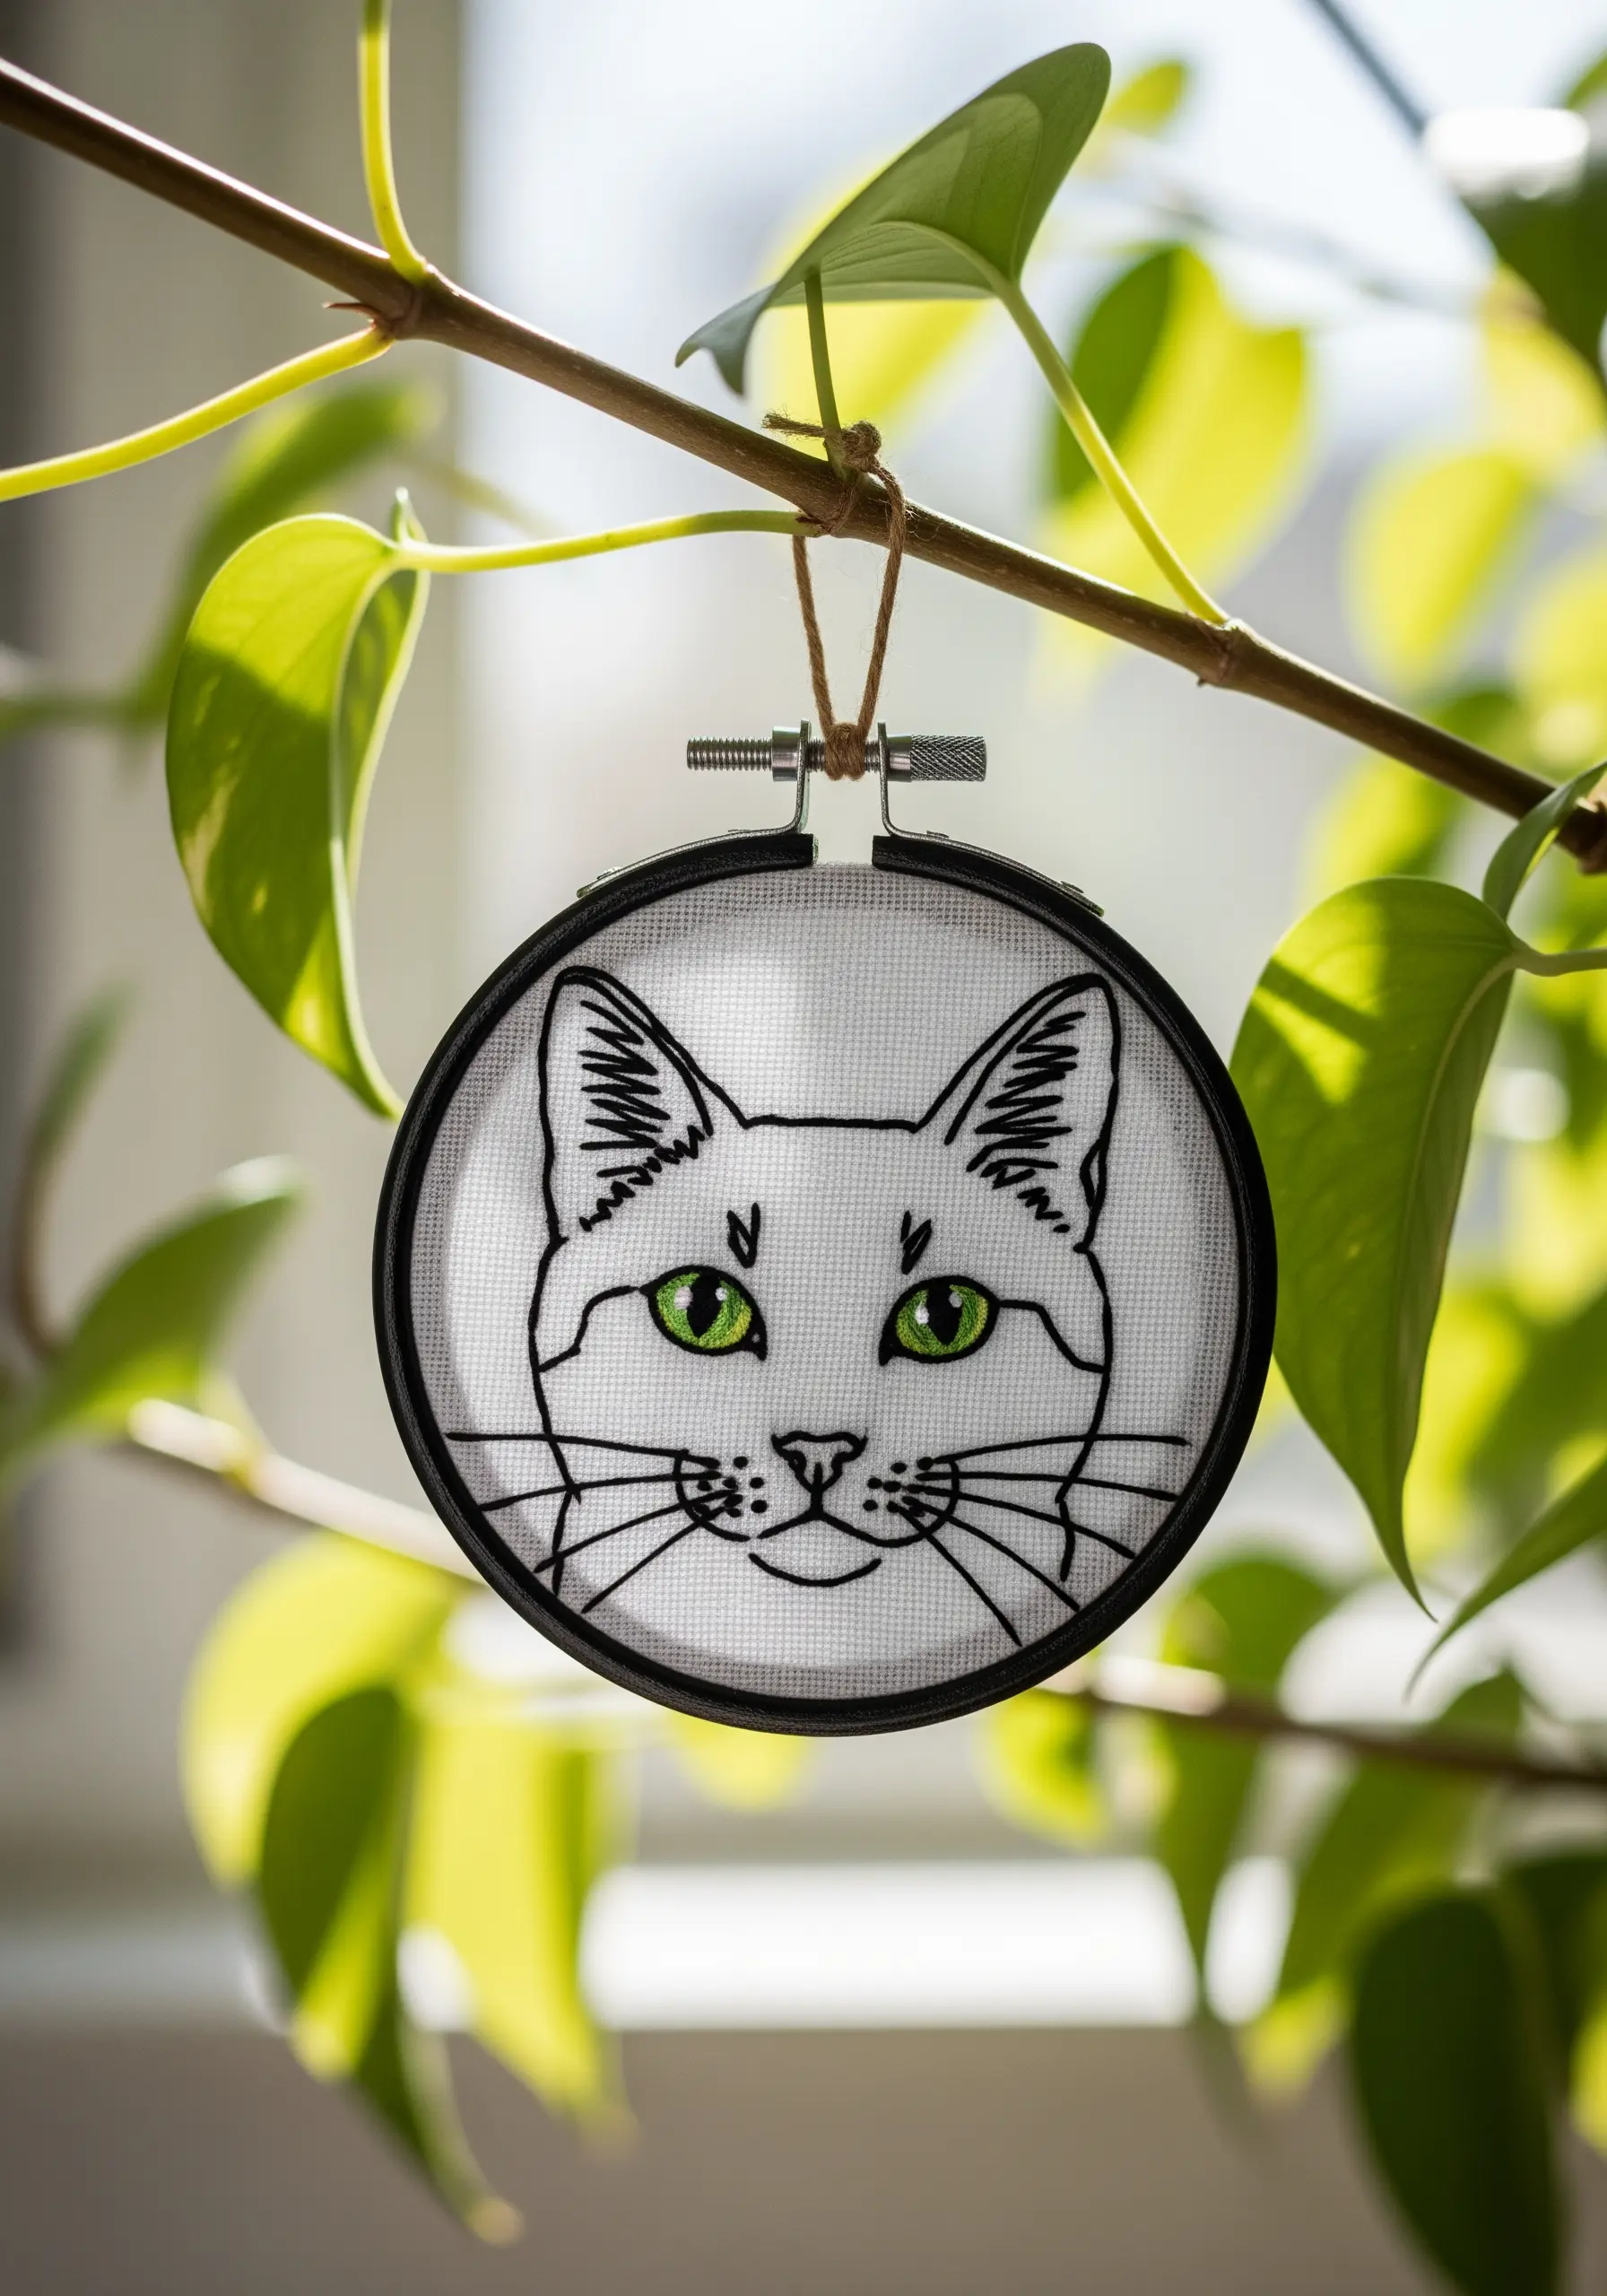
Stitching on a sheer fabric like tulle or organza creates a stunning illusion where the embroidery appears to float in the hoop.
Use a simple backstitch with three strands of floss to create a bold, graphic line that stands out against the transparent background.
To add a pop of color that feels just as weightless, fill the eyes with satin stitch, but use only two strands of thread to keep it from becoming too heavy for the delicate fabric.
These make incredible ornaments or suncatchers, as the light can pass through the fabric.
18. Add a Pop of Color to Leather with Blanket Stitch
You can embroider on leather or faux leather without any special equipment—just be sure to use a sharp leather needle that can pierce the material cleanly.
Instead of stitching a design *on* the surface, use the edges as your canvas. A decorative blanket stitch or cross stitch with thick, vibrant pearl cotton adds a bold, graphic finish.
This technique is not only decorative but also functional, as it can be used to join two pieces of leather together.
The contrast between the rustic leather and the bright, modern thread colors makes for a striking gift.
19. Design a Beaded Mandala Sachet
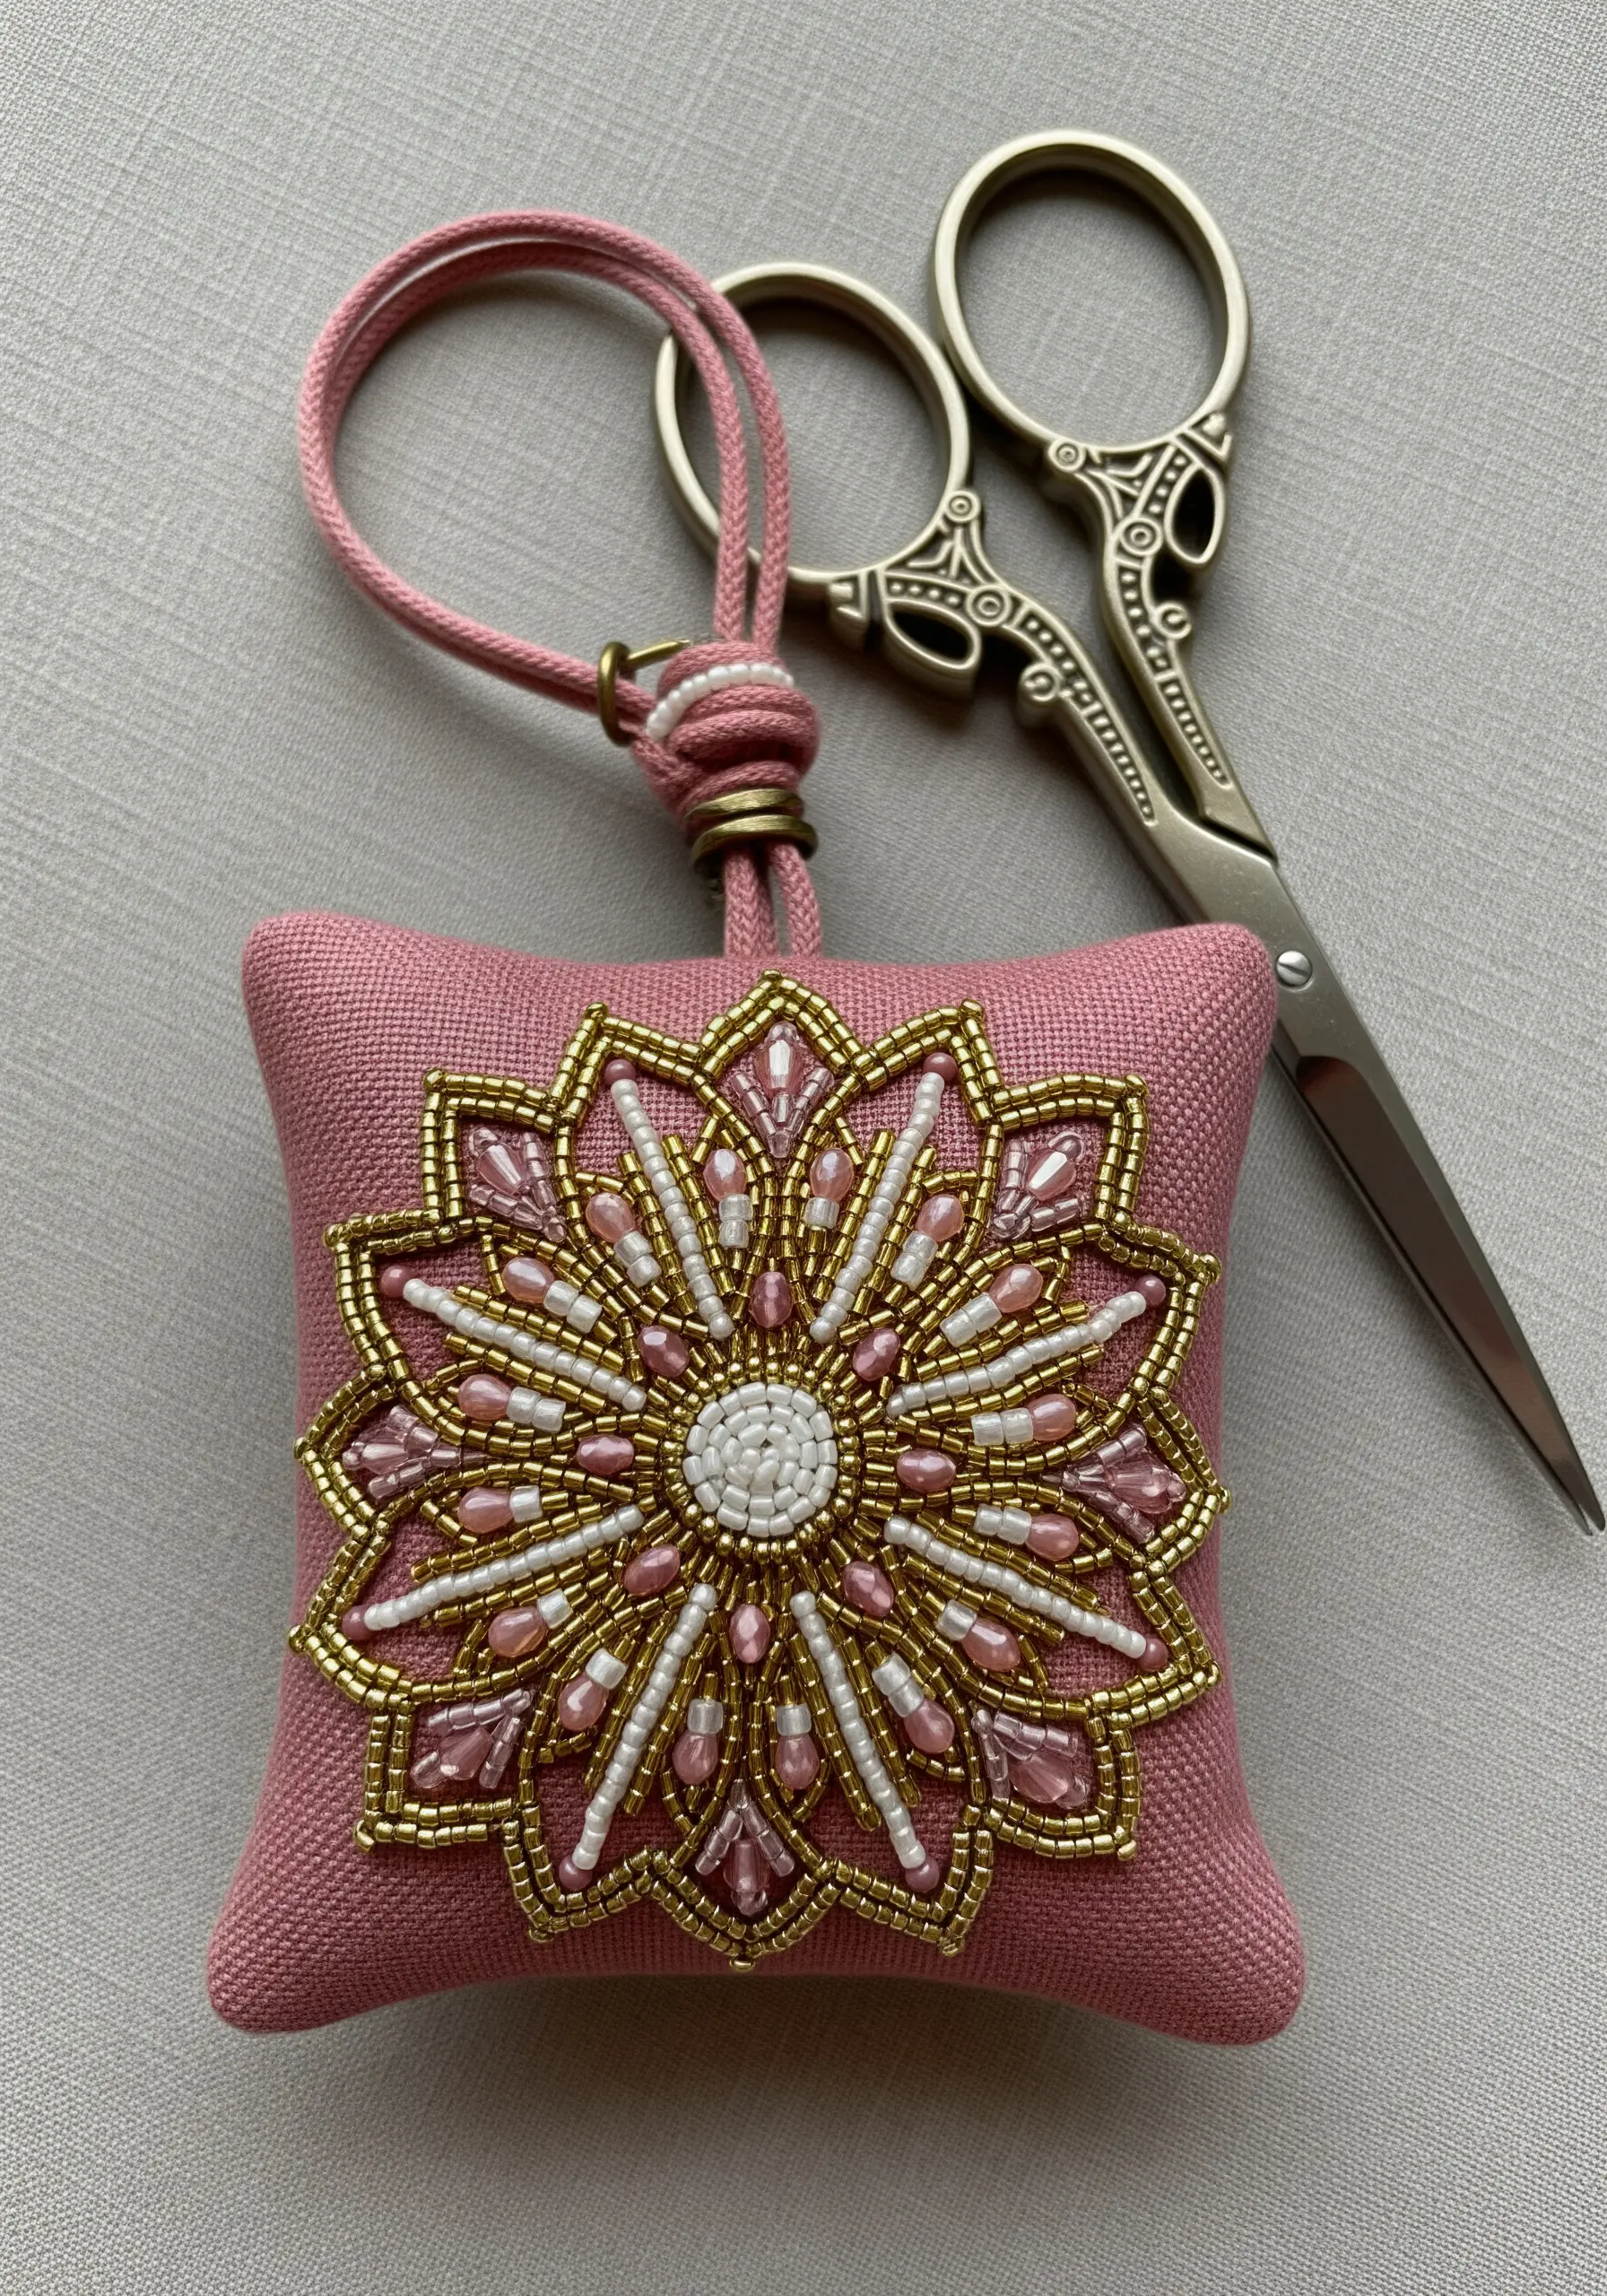
Think of this project as painting with beads rather than thread. It’s a perfect way to create a detailed, high-impact design that feels incredibly luxe.
Start by stitching the outline of your mandala with a metallic thread using a couching stitch. This creates a defined frame for your beadwork.
Fill in each section with different colored seed beads, using a strong beading thread and tacking down two or three beads at a time for a secure finish.
The combination of metallic outlines and shimmering beads creates a piece that is both a visual and tactile delight.
20. Achieve 3D Lettering with Yarn and Canvas
For bold, script-style lettering that pops, use a dimensional technique on a sturdy canvas banner.
This isn’t stitched *through* the fabric, but rather stitched *onto* it. Create your letter shapes using a thick, felted yarn, and then use a matching sewing thread to tack it down discreetly to the canvas.
This appliqué method creates a soft, sculptural effect that is much faster than filling the letters with satin stitch.
Adding simple yarn tassels at the bottom ties the whole piece together and reinforces the cozy, handmade aesthetic.
21. Embellish Appliqué with Simple Stitches
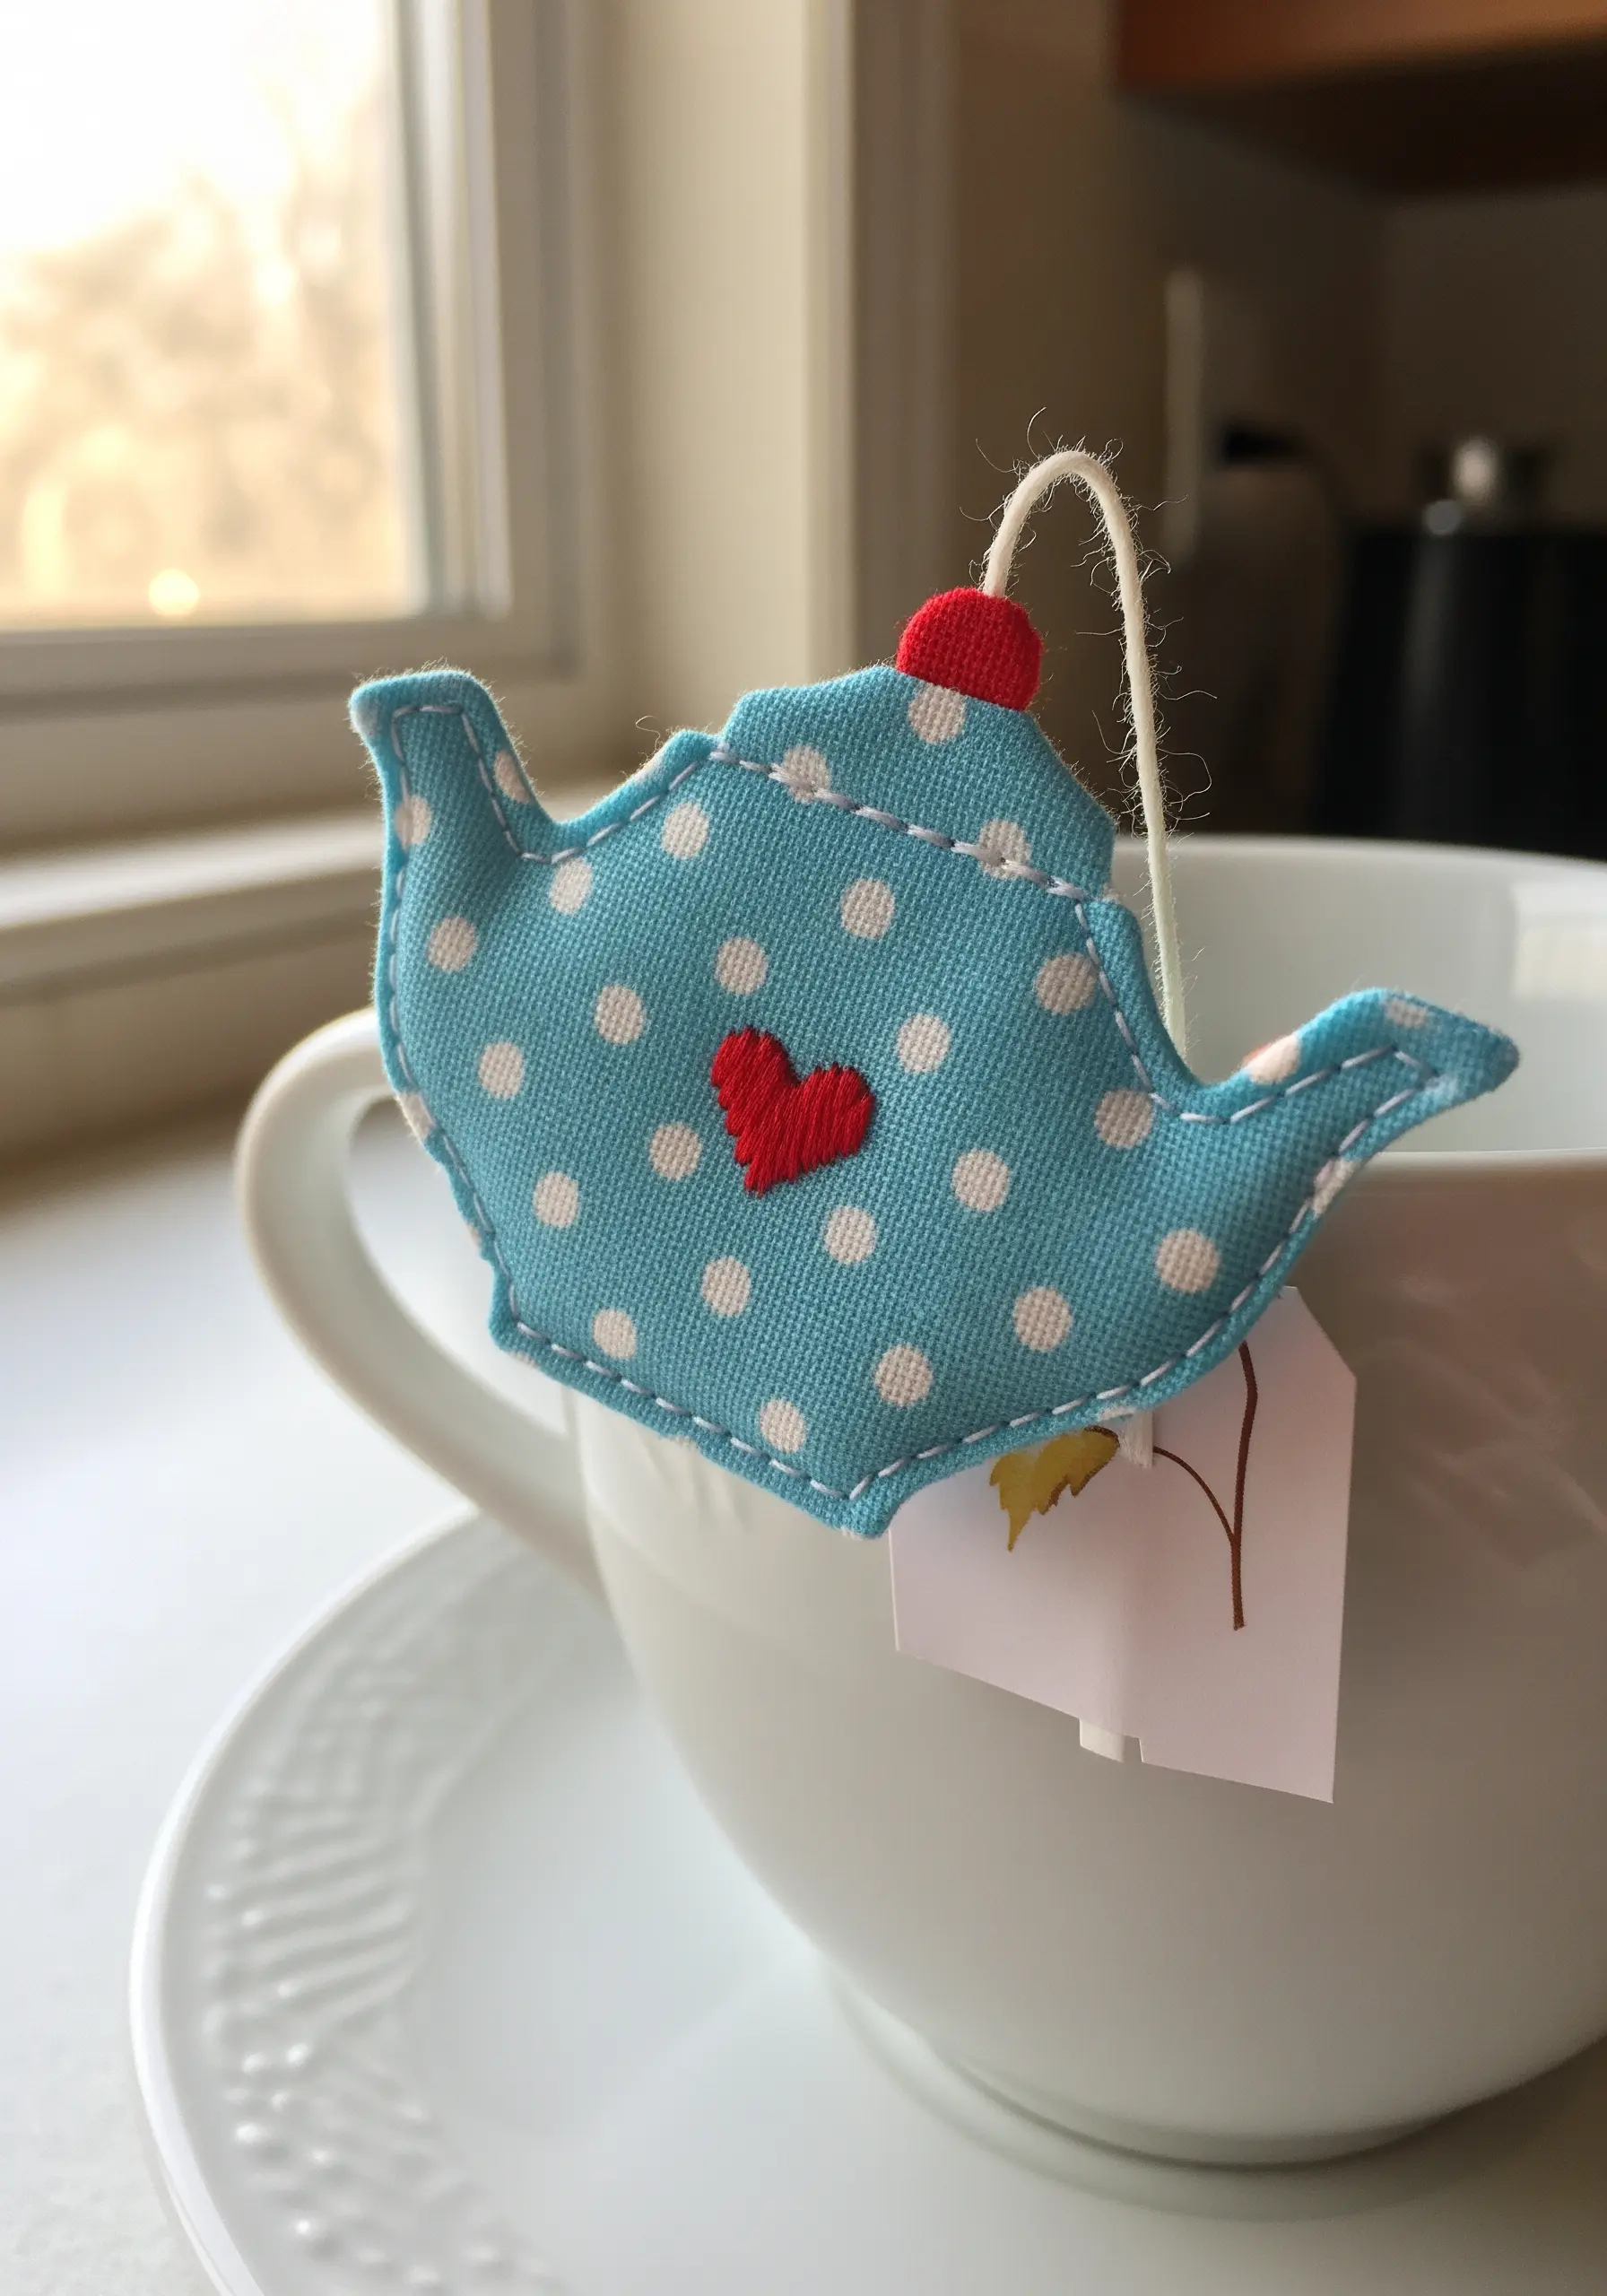
Combine the speed of appliqué with the charm of embroidery for a quick and delightful project, like this tea bag holder.
First, cut your main shape from a fun, patterned fabric. Use an iron-on adhesive like HeatnBond to secure it to a felt backing.
Then, add a small, contrasting appliqué detail, like the red heart, and secure its edges with a few simple straight stitches.
A simple running stitch around the main shape’s edge adds a decorative finish and extra durability. It’s a perfect project for using up beloved fabric scraps.
22. Create a Painterly Leaf Patch
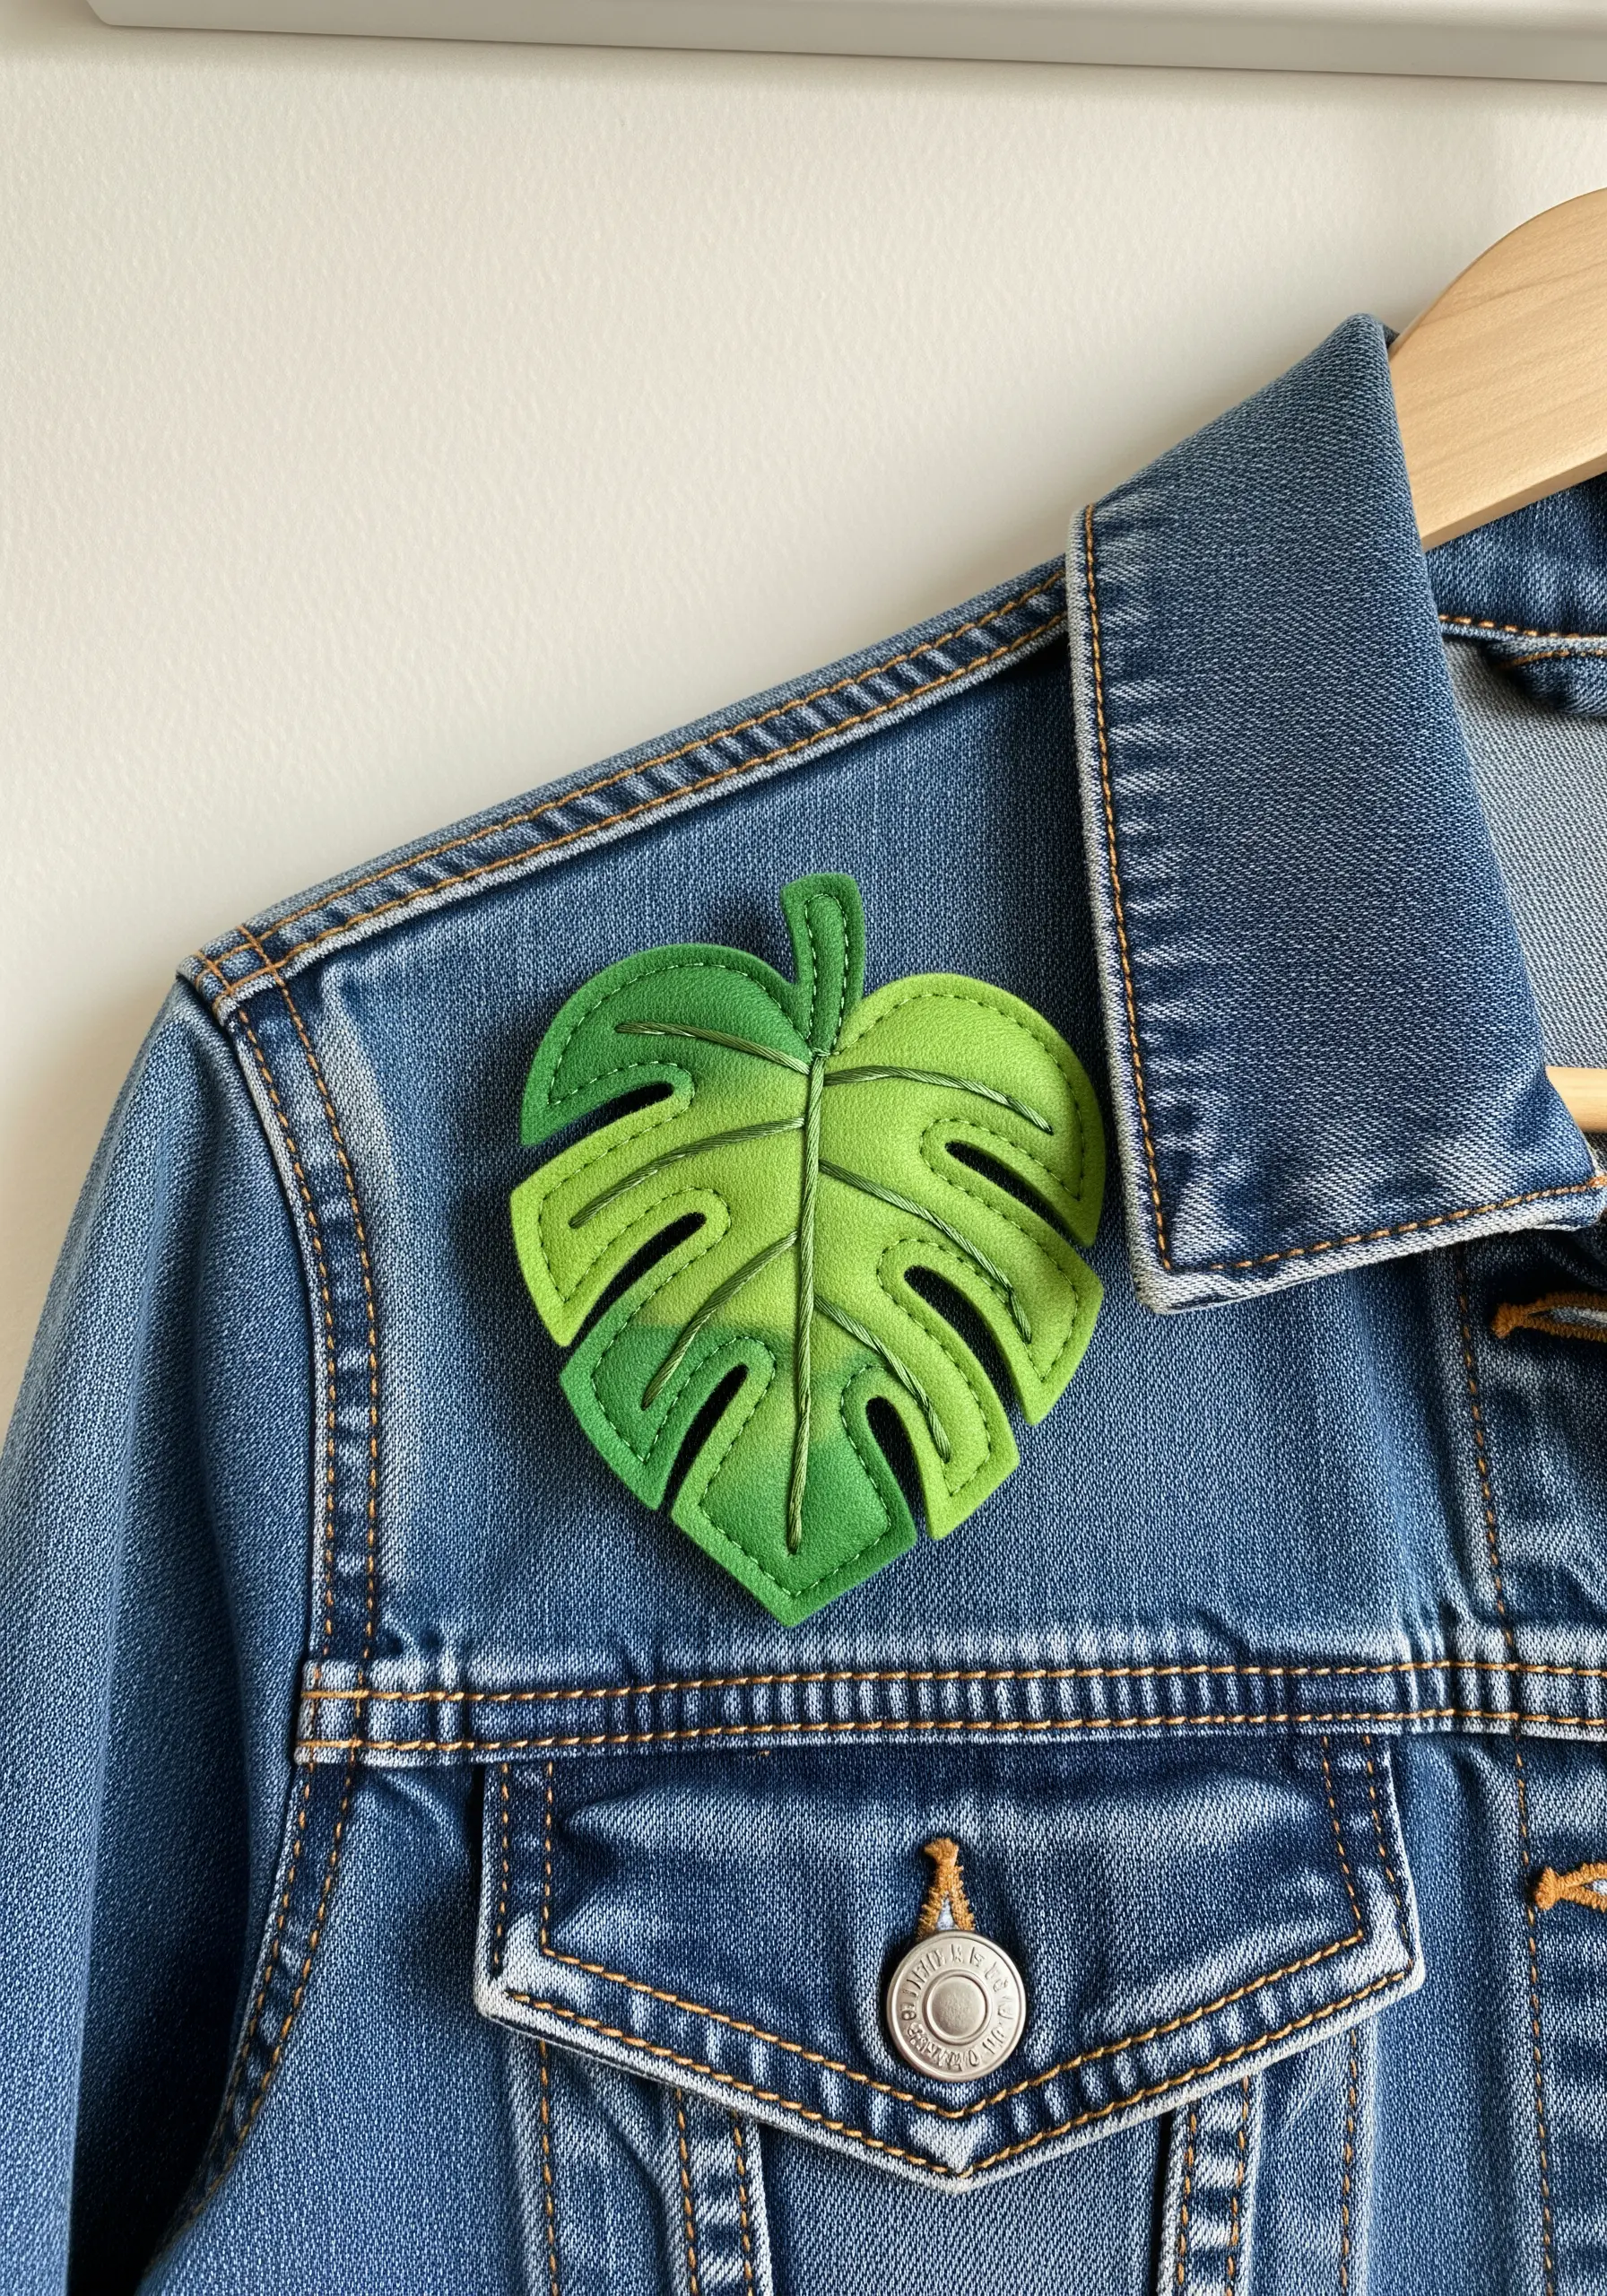
Give your embroidered patches a unique, artistic look by pre-painting your fabric base.
Before stitching, use fabric paints or watercolor paints on a piece of white felt to create a soft green gradient. Let it dry completely.
Then, stitch the veins and outlines of the Monstera leaf over the painted background. The color behind the stitches adds depth and a painterly quality that thread alone can’t replicate.
Once finished, cut out the shape, and you have a unique botanical patch ready to adorn a jacket or bag.
23. Map Your Travels on a Leather Tag
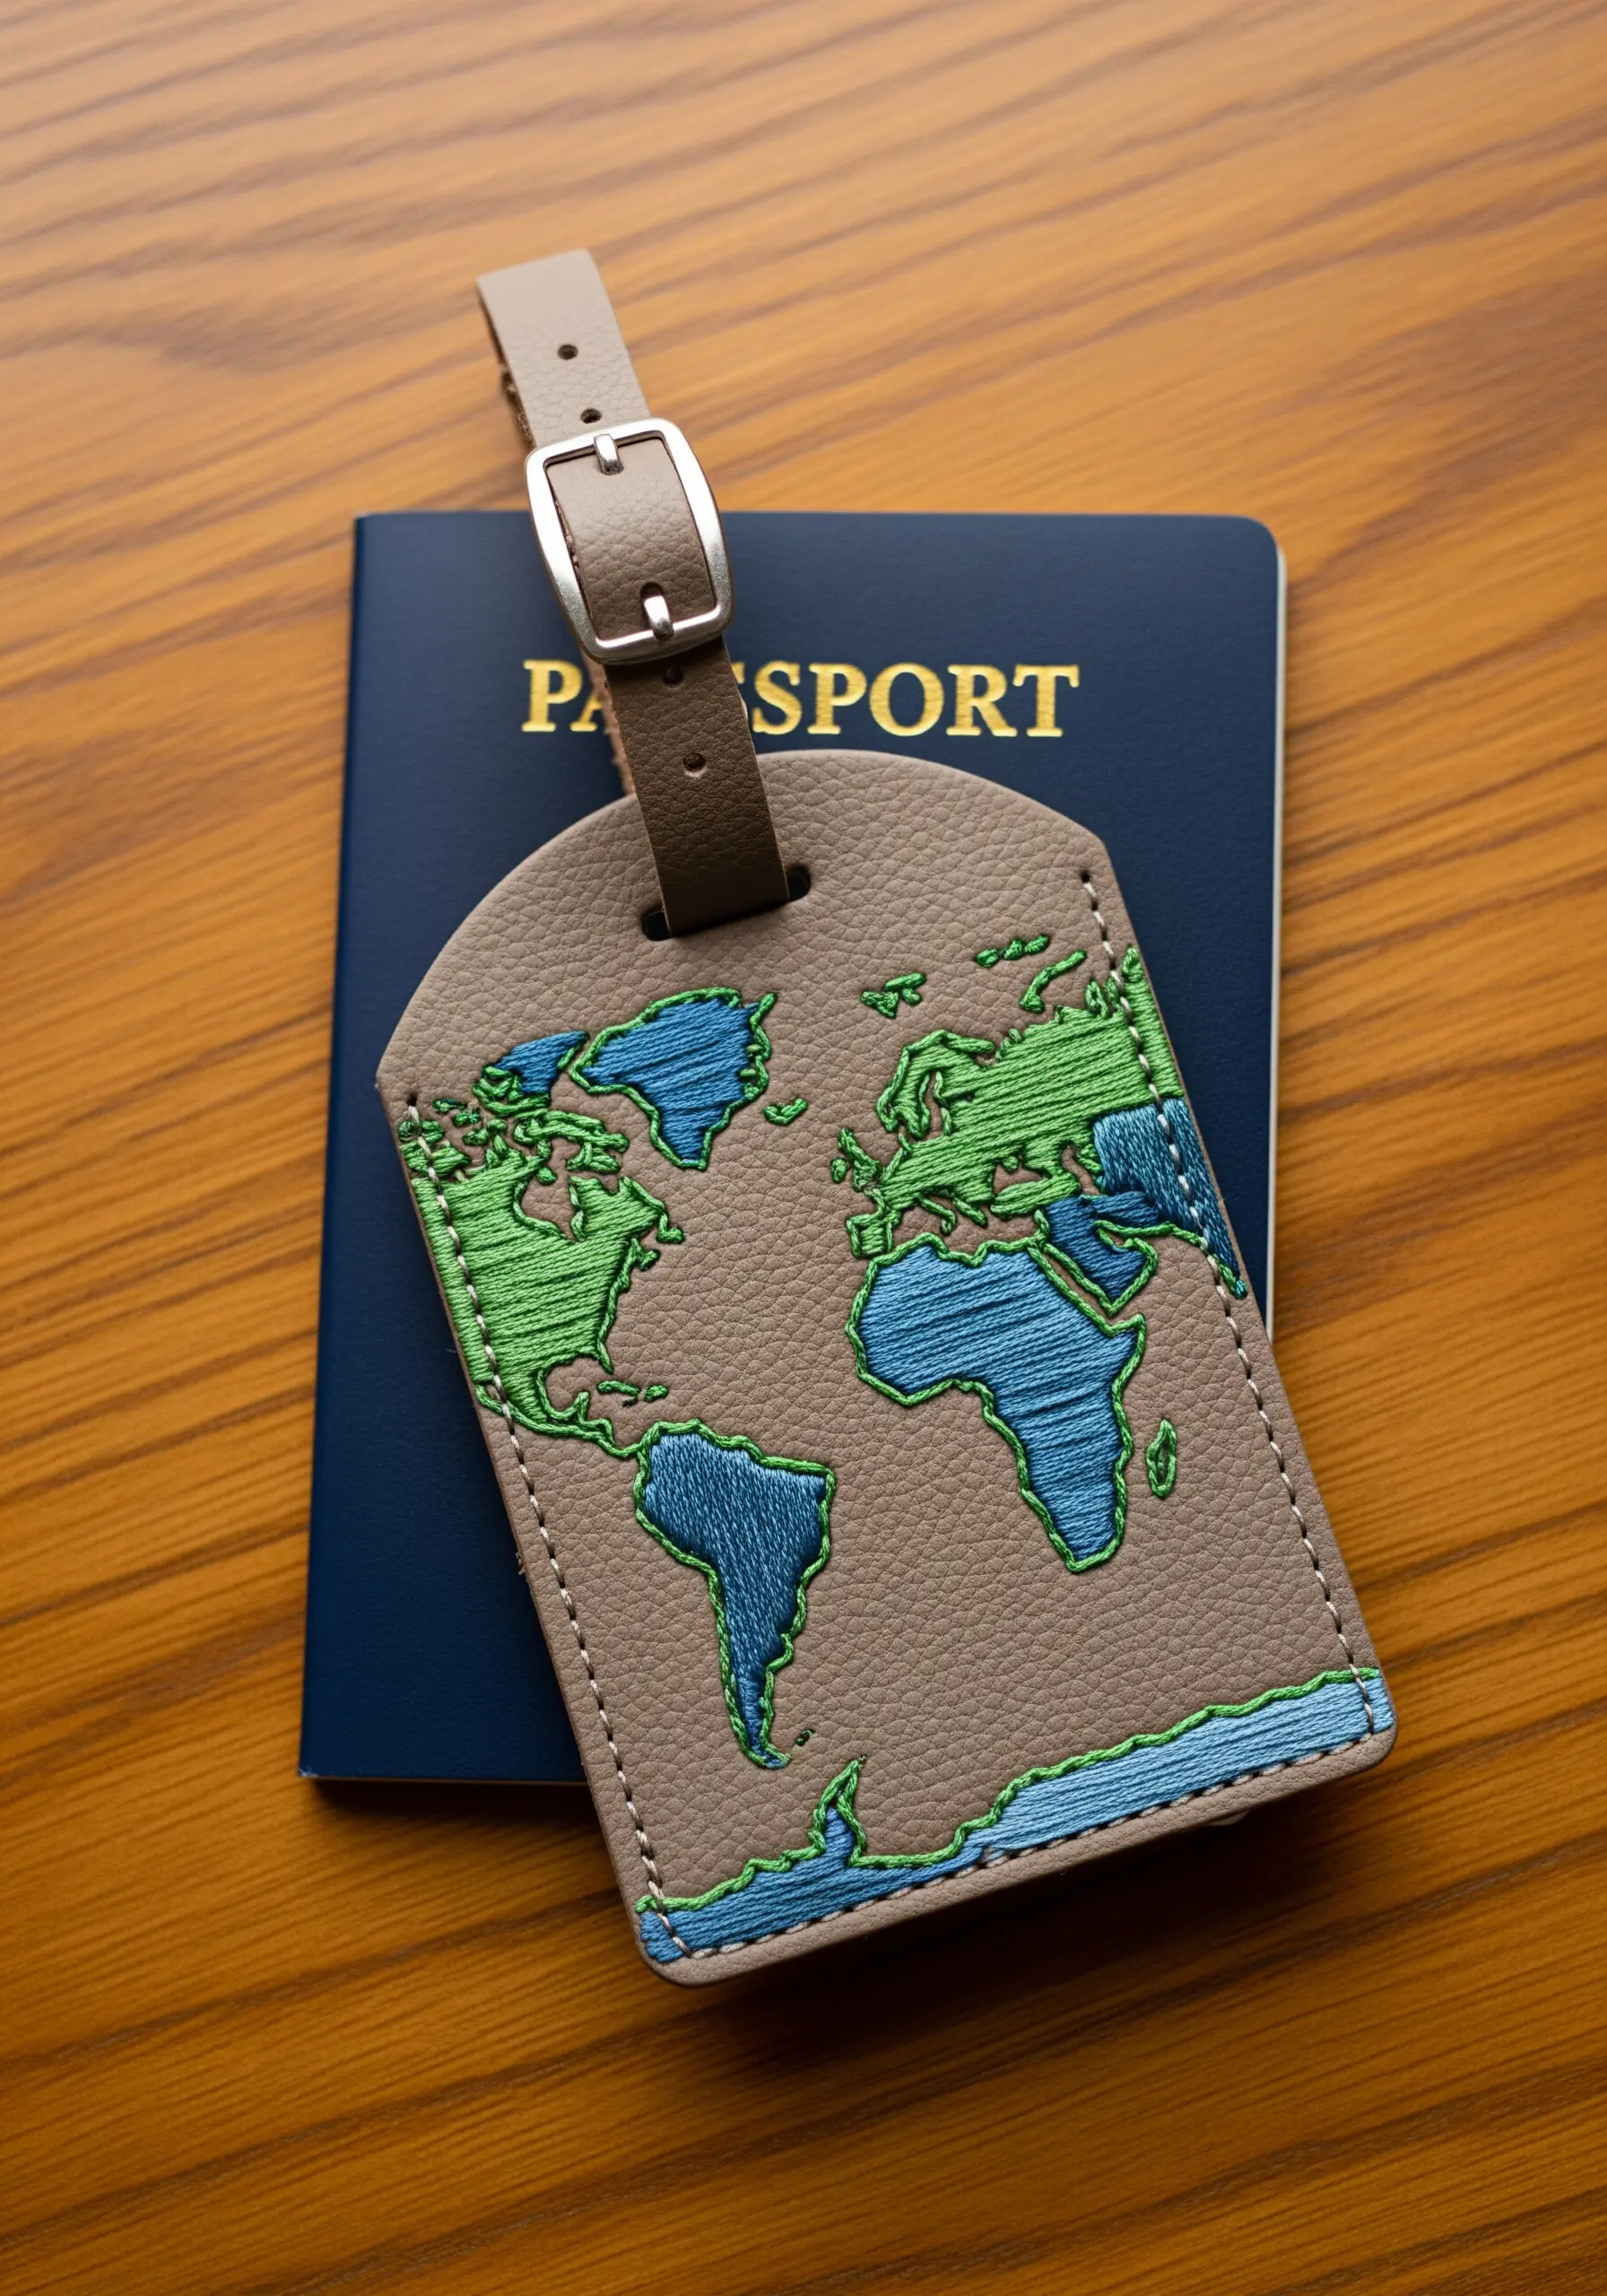
A personalized luggage tag makes a thoughtful gift for any traveler. Faux leather provides a sturdy and elegant base for embroidery.
To create the continents, use a long-and-short stitch to fill the shapes. This allows you to blend shades of green and blue for a more dynamic, topographic feel.
Use a simple backstitch for the outlines to ensure the shapes are clearly defined against the neutral background.
Remember to use a leather needle to make piercing the material easier and to prevent your thread from shredding.
24. Sculpt a Cactus with Thread Wrapping
This charming cactus isn’t stitched in a hoop—it’s a three-dimensional sculpture created with thread.
Start with a core form made from wire and padding. Then, carefully and tightly wrap the entire form with green embroidery floss or pearl cotton.
The texture comes from the uniform direction of the wrapping. For the spines, use a single strand of white or cream thread to make tiny straight stitches directly into the wrapped surface.
Finish with a vibrant woven wheel stitch on top for a blooming flower. This technique is a fantastic way to think about thread beyond the hoop.
25. Add a Sweet Touch to Jar Toppers
Elevate a homemade gift of jam or preserves with a simple embroidered detail. Stitching on gingham can be tricky due to the pattern.
To solve this, use waste canvas. Baste a small piece of waste canvas onto the center of your fabric circle. The grid provides a perfect guide for a neat satin stitch or cross-stitch design.
After you’ve finished stitching your strawberry, simply wet the fabric and pull out the waste canvas threads one by one, leaving a perfect design behind.
It’s a simple trick for flawless stitching on any patterned fabric.
26. Stitch a Clean Outline on Microfiber
A personalized glasses cleaning cloth is a wonderfully practical handmade gift. The key to stitching on this slippery, synthetic fabric is stabilization.
Always use a sheet of tear-away stabilizer on the back of the cloth while you stitch. This will prevent the fabric from puckering and keep your lines clean.
A simple backstitch using three strands of floss is perfect for creating a clear, graphic outline that won’t feel bulky or interfere with the cloth’s function.
Once finished, gently tear away the stabilizer for a professional result.
27. Craft Mini Hoop Wine Charms
These tiny embroidery hoops make for quick, charming, and endlessly customizable wine glass charms.
Use aida cloth or an evenweave linen, as the grid makes it easy to center your tiny designs. Stitch simple, graphic motifs like stars, leaves, or swirls.
Using a single high-contrast color, like silver metallic thread on a dark background, creates a sophisticated and festive look.
These small embroidery projects are perfect for using up scrap fabric and threads, and a set of four or six makes an excellent hostess gift.


