

When you sit down with a needle and thread, you’re not just making something—you’re composing. You’re making choices about line, color, and texture. But it can be frustrating when the polished, intentional piece you see in your mind doesn’t quite translate to the fabric in your hoop.
The secret to elevating your work isn’t about learning dozens of complex stitches. It’s about understanding how small, deliberate adjustments can have a powerful artistic impact. It’s choosing a split stitch for its clean, graphic line, or using all six strands of floss to give a simple shape a bold, satisfying presence.
Think of these ideas not as rules, but as invitations. They are techniques and concepts designed to help you stitch with more confidence and intention. See them as a starting point to explore your own style and create work that feels not just handmade, but truly artful.
1. The Continuous Line Portrait
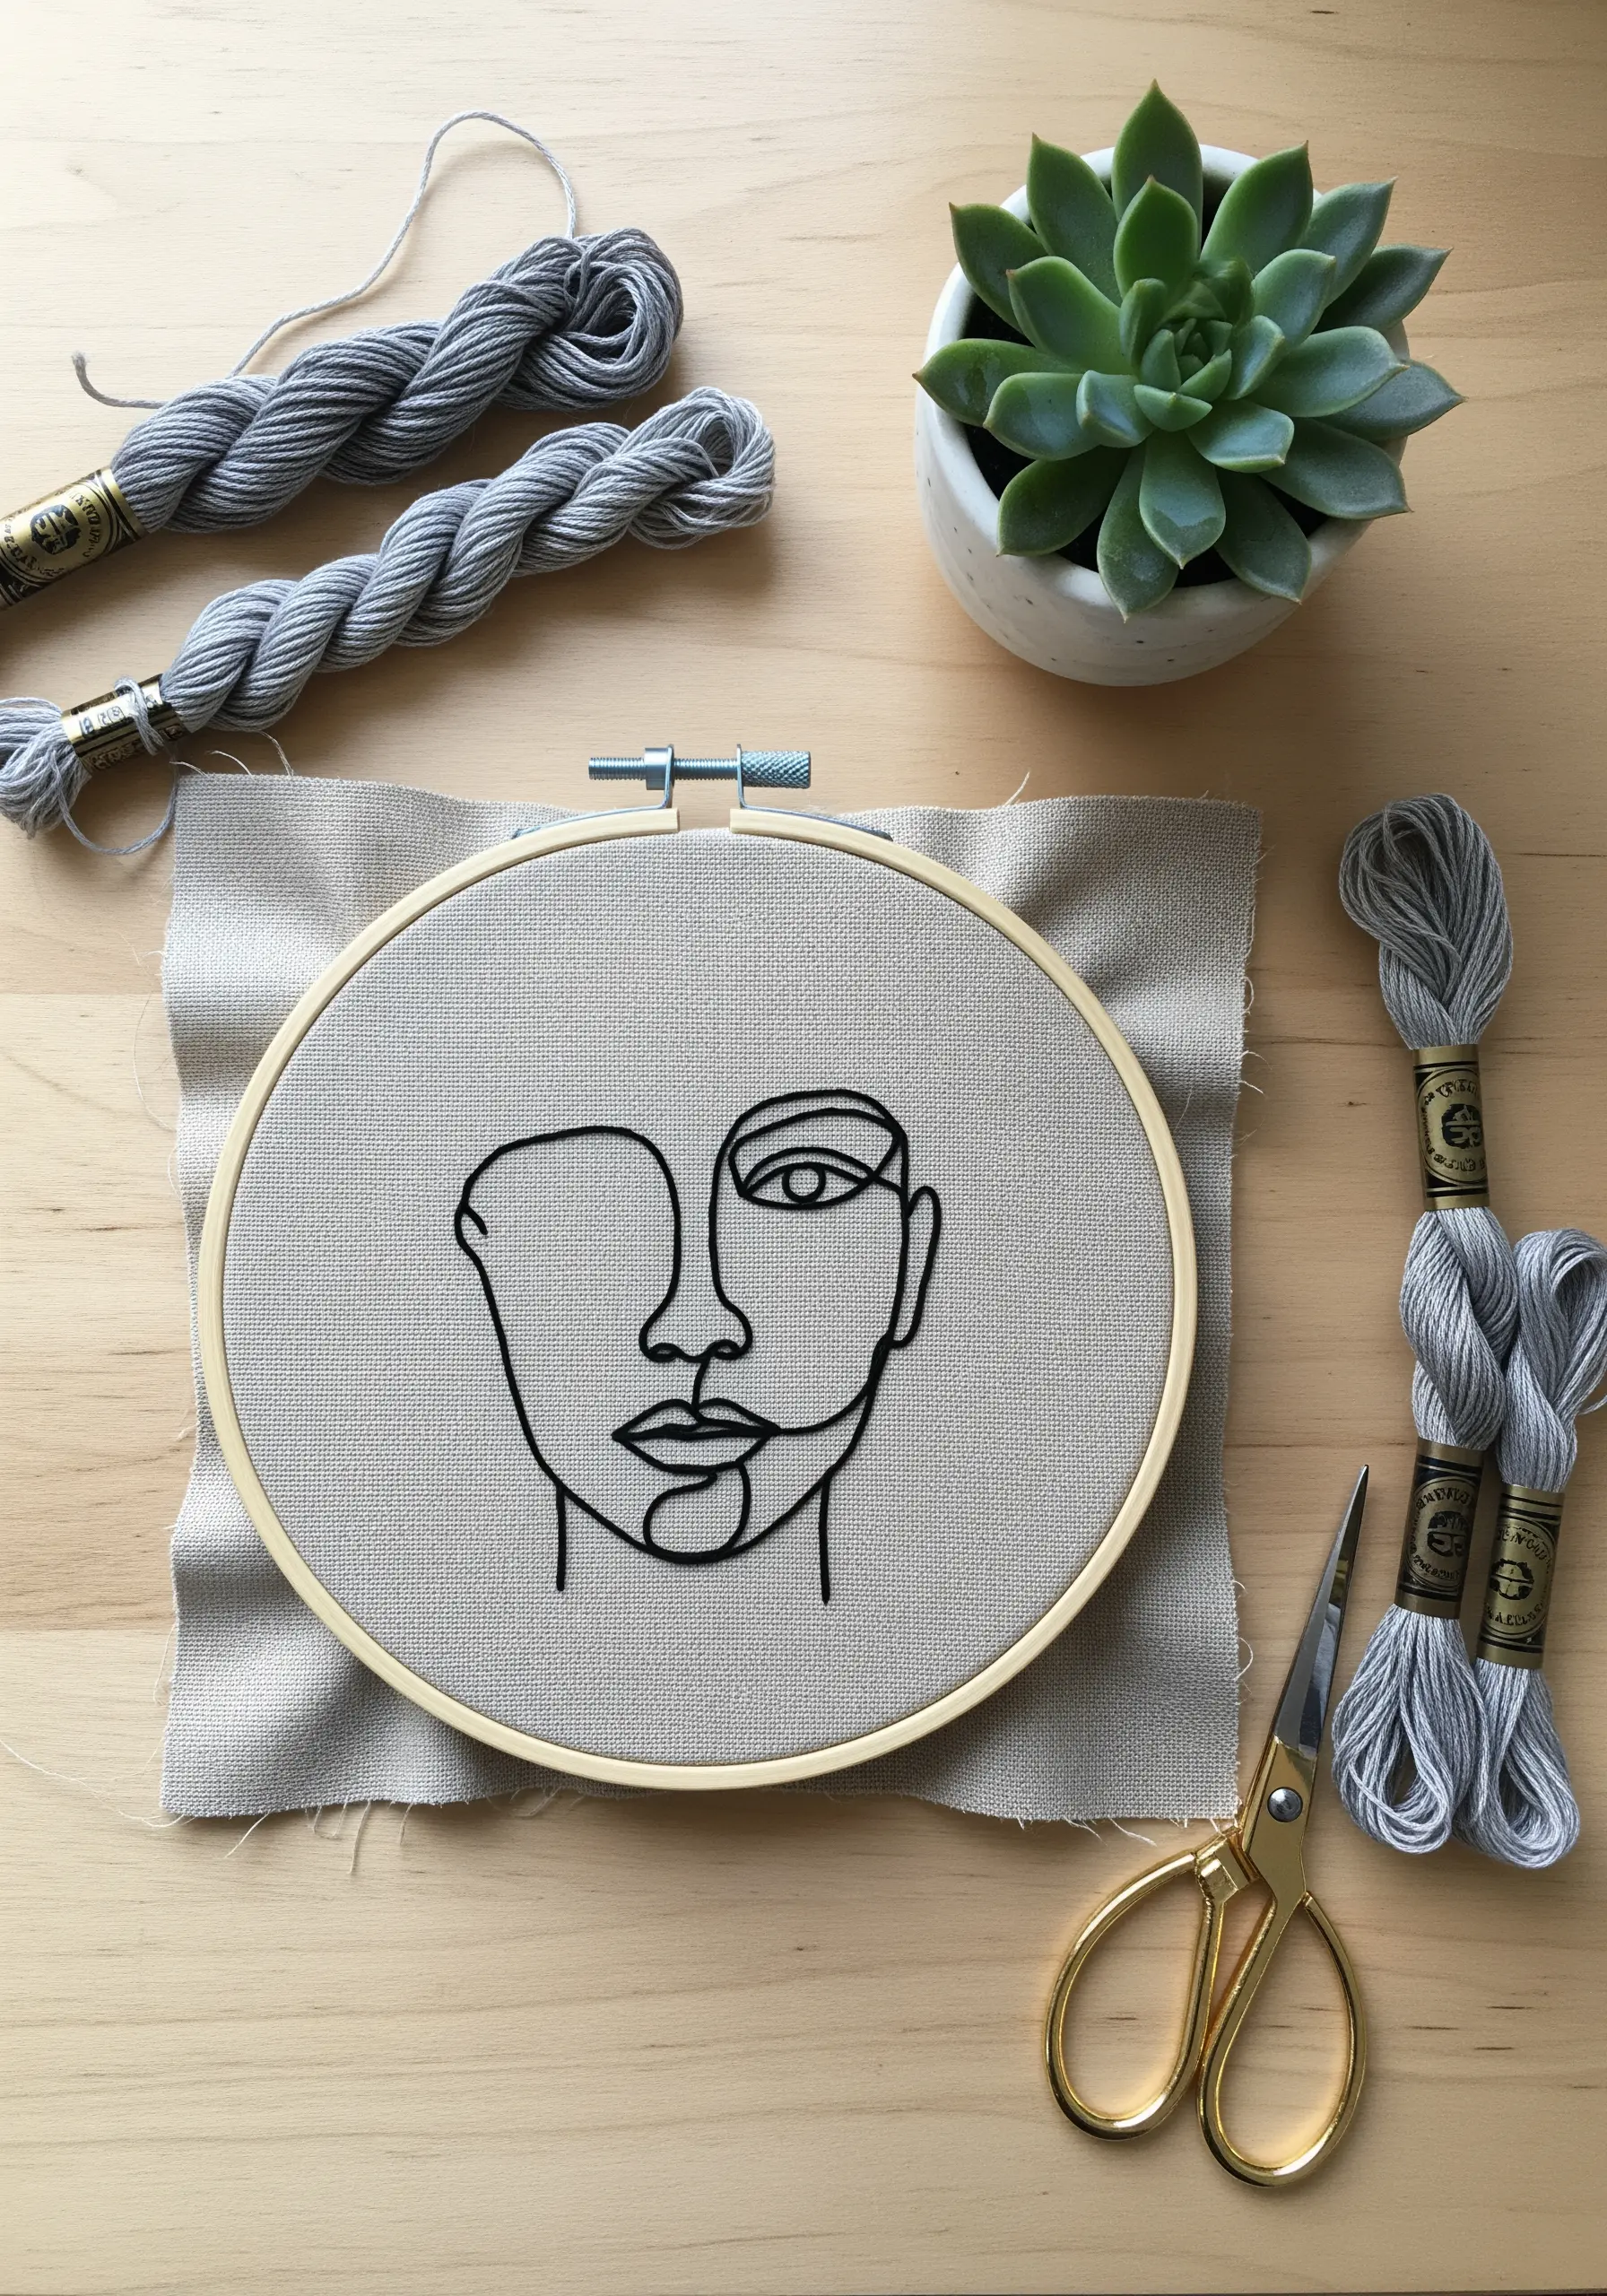
To achieve this fluid, ink-like quality, trace your design onto the fabric and use a whipped backstitch with four to six strands of floss.
First, create a standard backstitch outline.
Then, using a second threaded needle, slide it under each backstitch without piercing the fabric, “whipping” the original line into a smooth, raised curve.
This technique eliminates the segmented look of a basic backstitch, which is crucial for Continuous Line Portrait designs that rely on a single, unbroken stroke.
The added thickness gives your work a graphic presence that feels both modern and intentional.
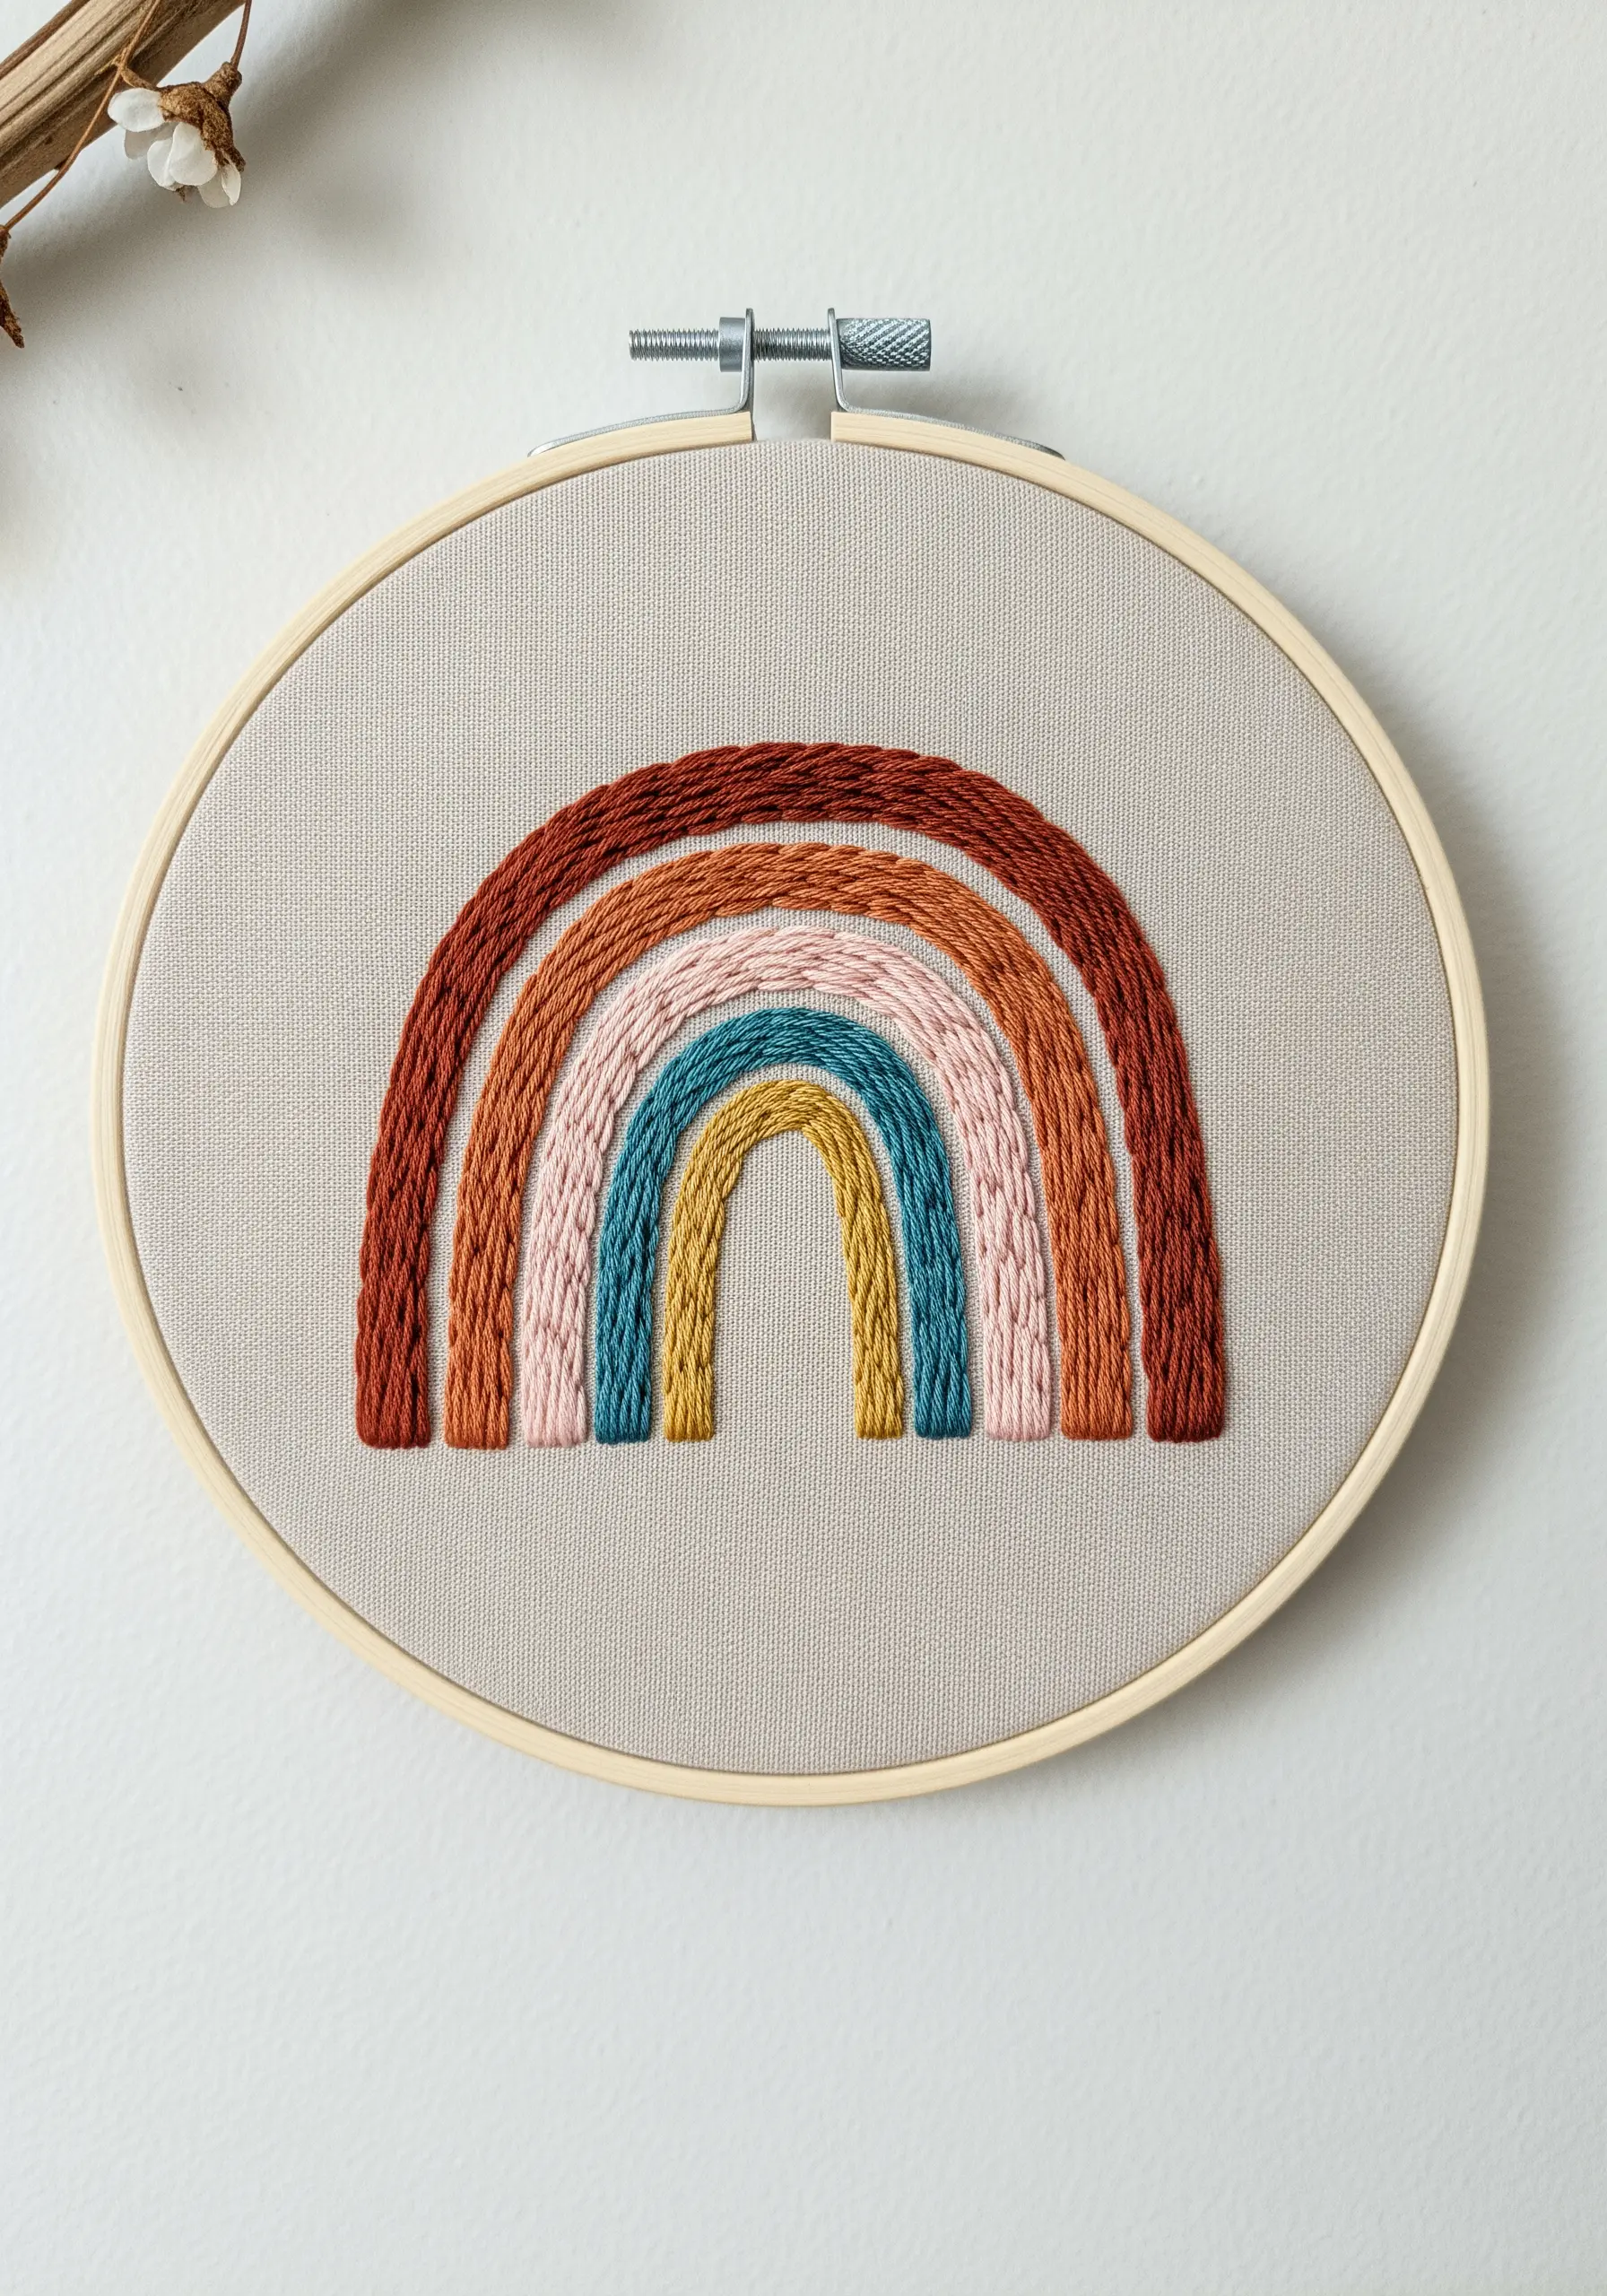
2. Architectural Arcs with Couching
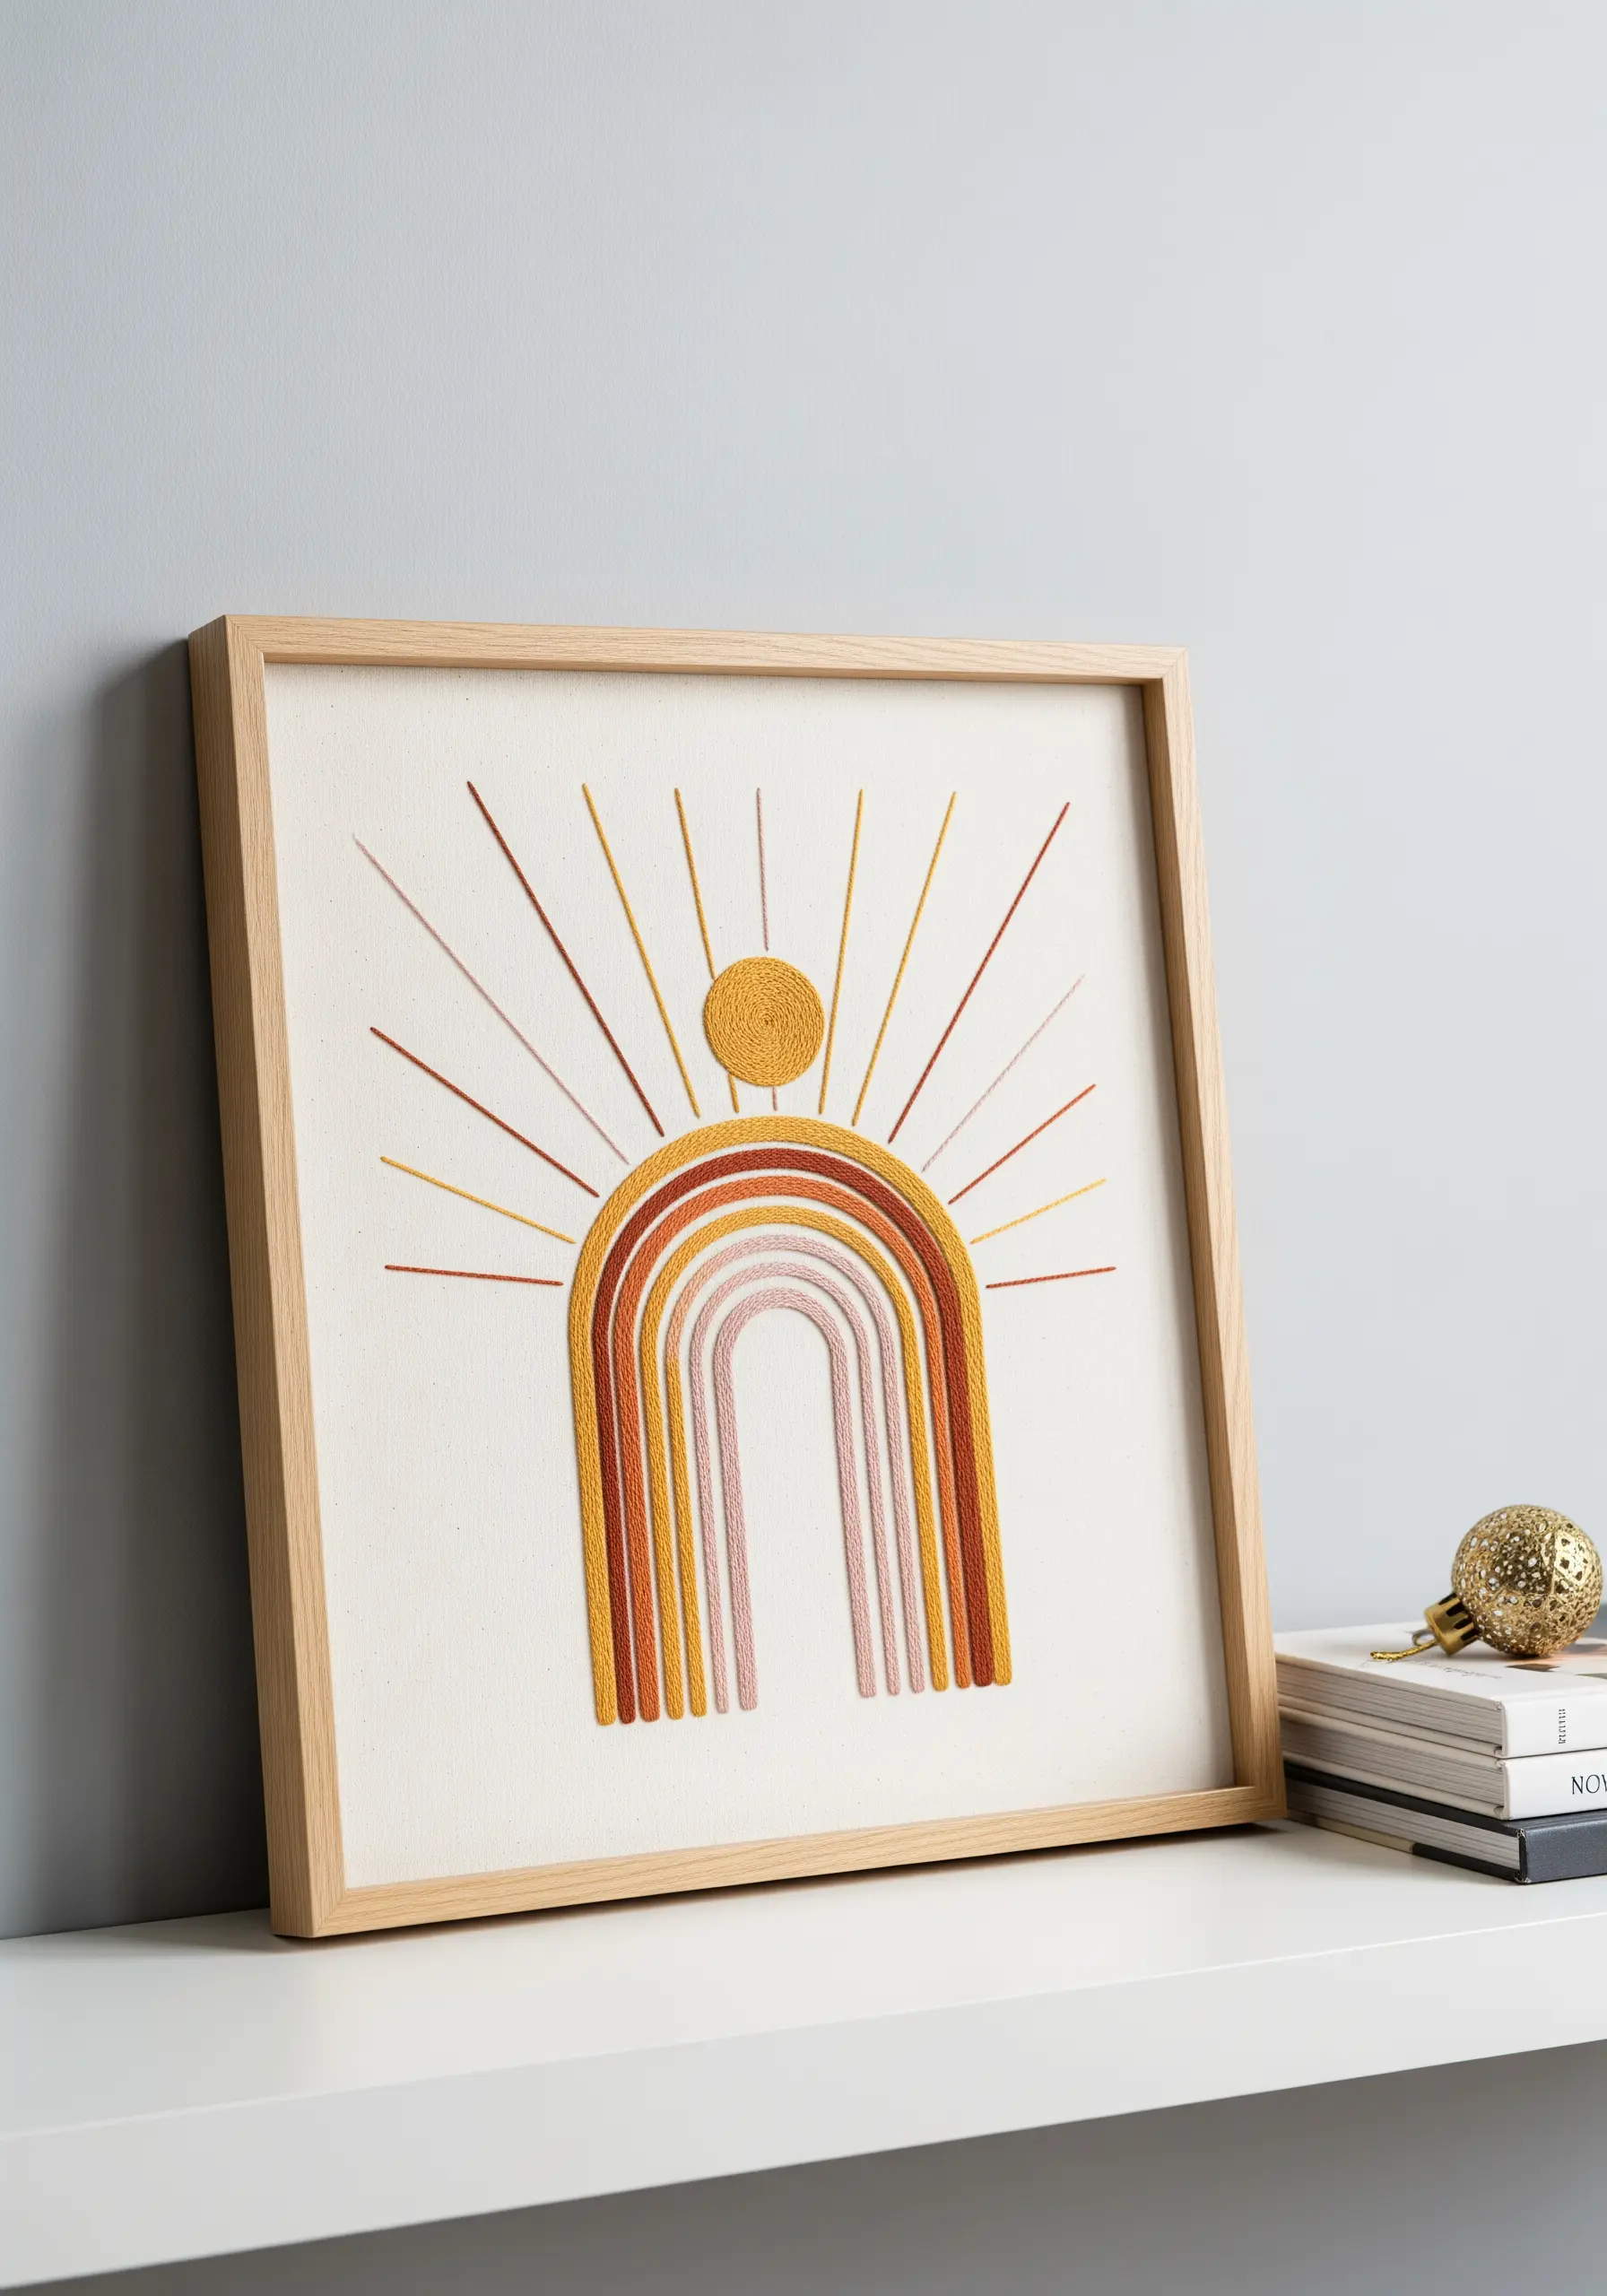
For these bold, clean rainbow arches, traditional satin stitch can be difficult to keep perfectly even over long curves.
Instead, use couching.
Lay down a thick material—like multiple strands of floss, pearl cotton, or even fine yarn—along your design line.
Then, use a single, contrasting or matching thread to tack it down with tiny perpendicular stitches.
This method gives you perfectly uniform, raised lines with a beautiful texture, ideal for architectural shapes and minimalist sun rays.
It’s a faster and cleaner alternative for creating impactful, framed embroidery pieces.
3. Sculptural Texture with French Knots

While this look is often achieved with punch needle, you can create a similar high-pile effect with densely packed French knots.
Use all six strands of embroidery floss to make your knots as plump as possible.
The key to a uniform, plush finish is consistency in how many times you wrap the thread around your needle (once or twice is standard) and placing the knots so close together that no fabric shows through.
This technique transforms simple geometric shapes into a rich, tactile surface.
4. Celestial Mapping with Metallic Thread
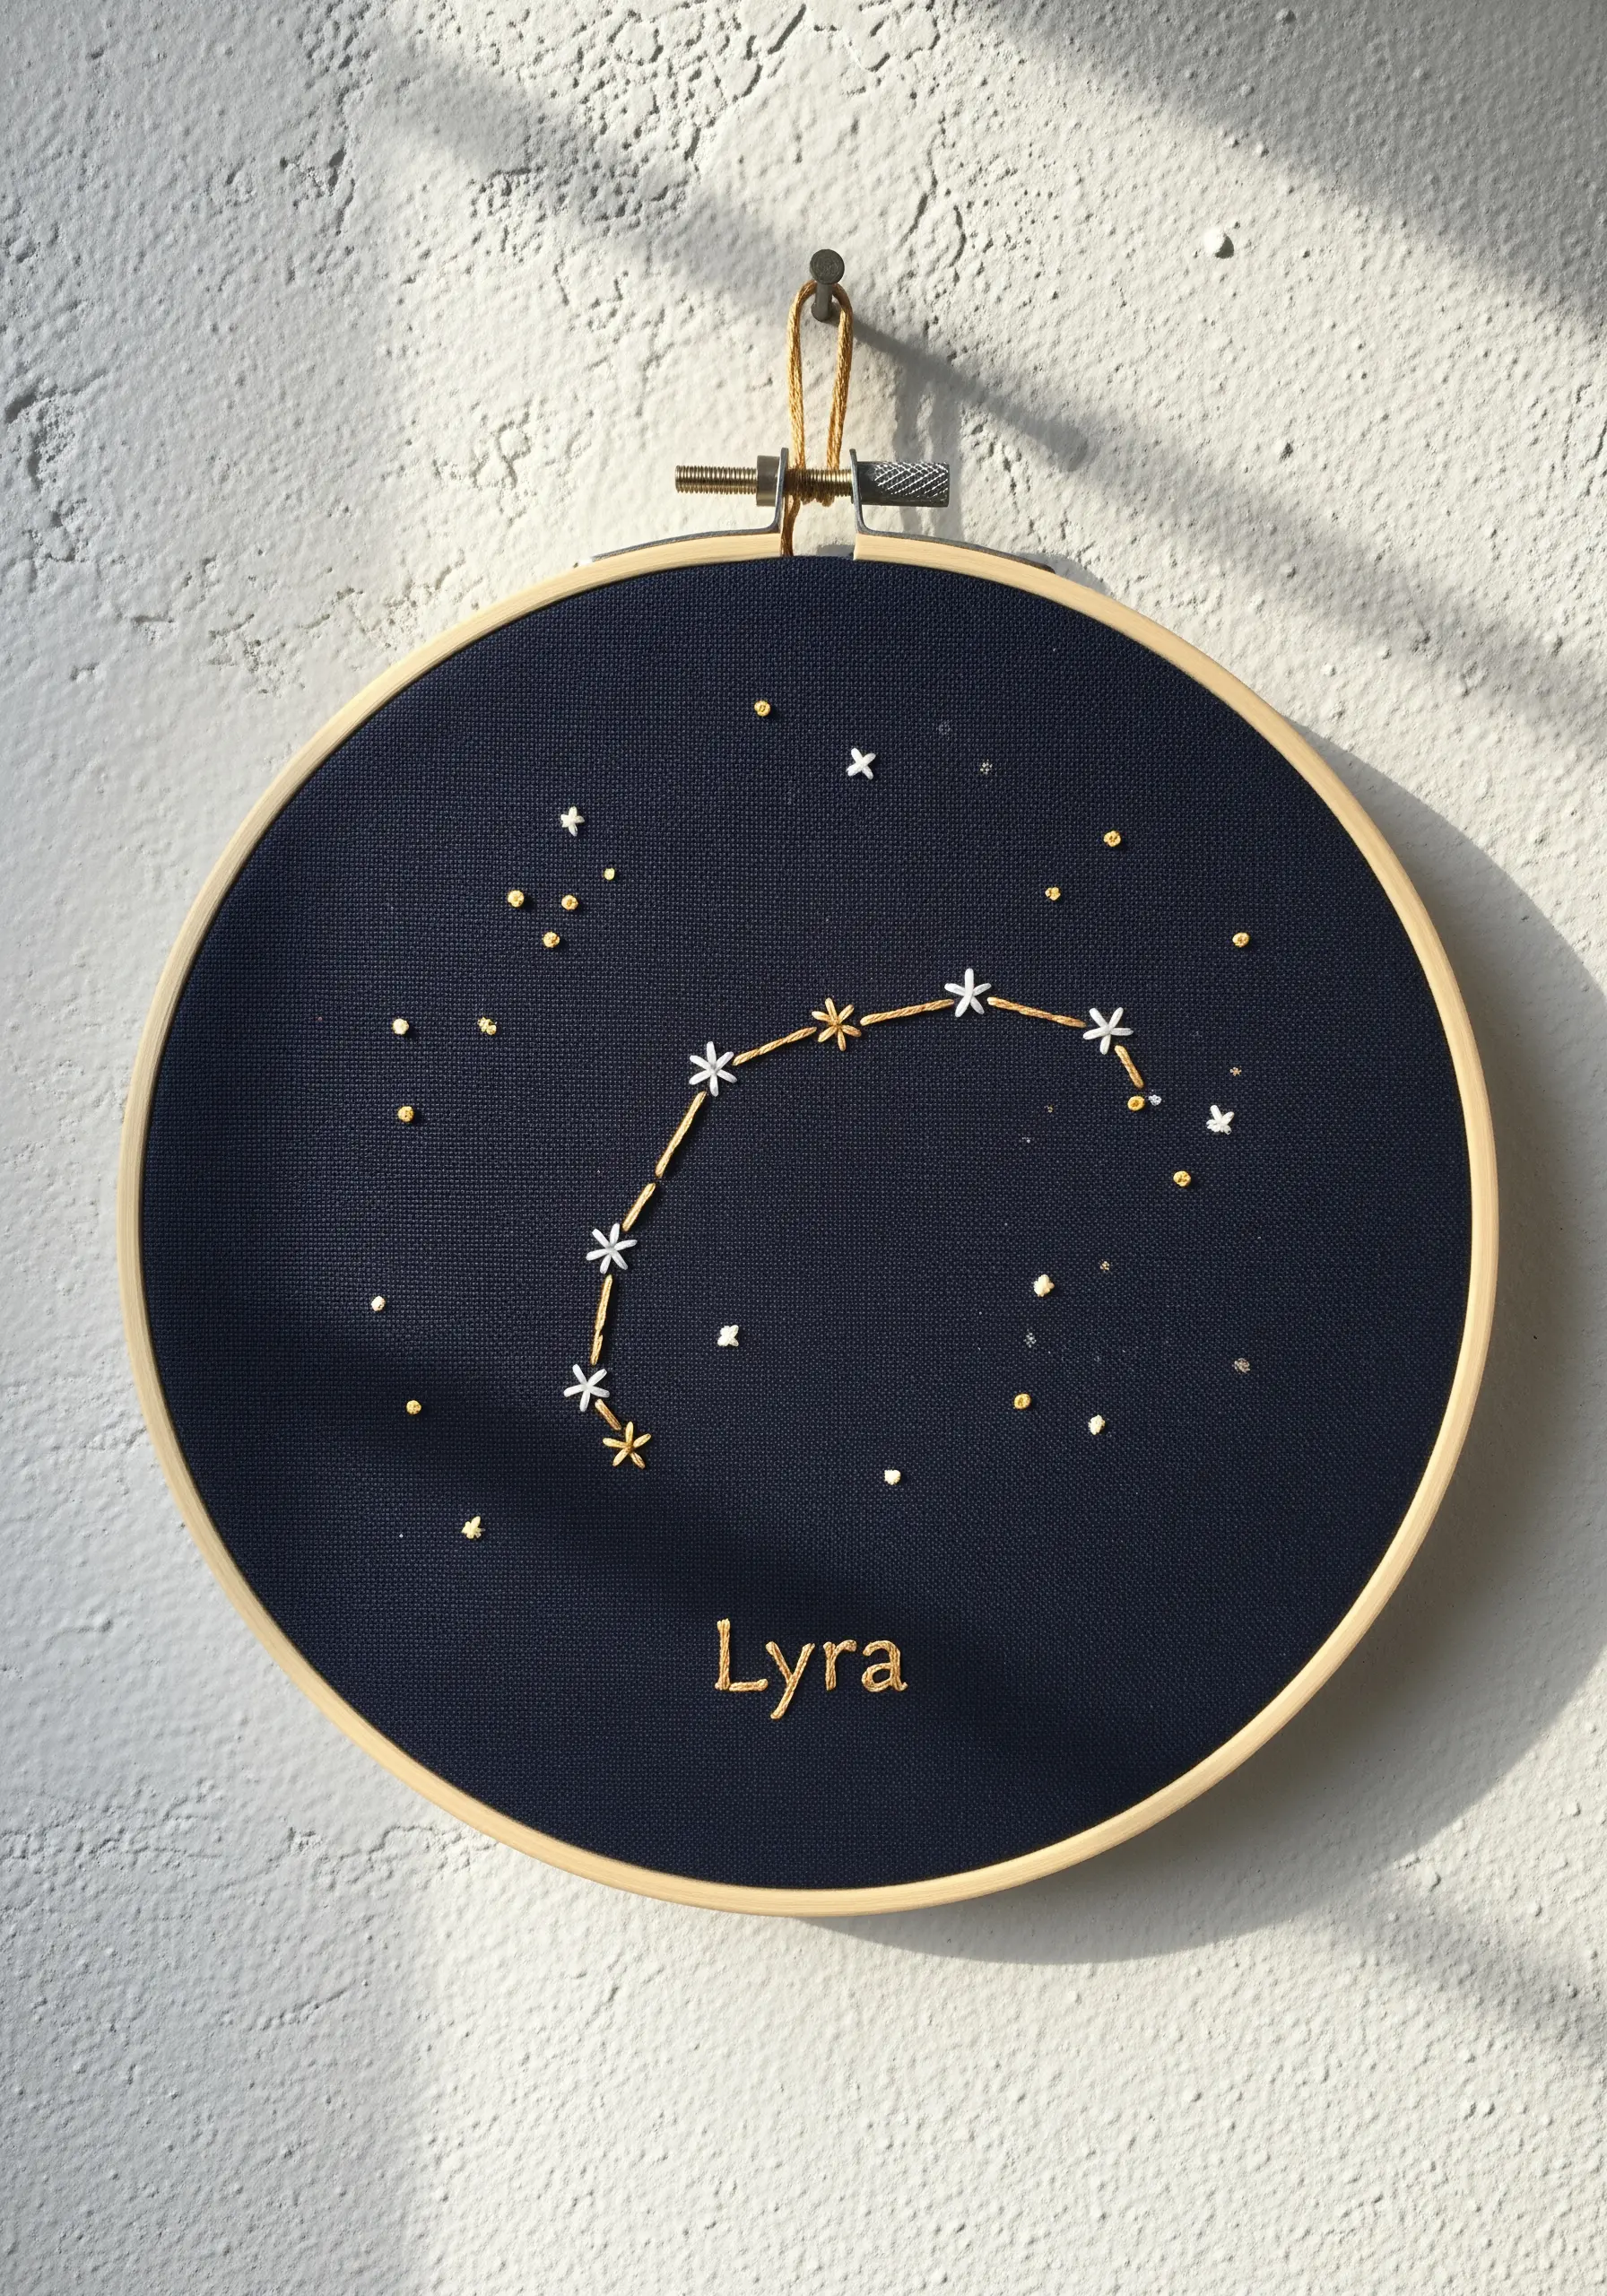
Stitching on dark fabric offers dramatic contrast, especially when using metallic or high-sheen threads for Celestial Mapping.
For the delicate constellation lines, use a single strand in a simple backstitch.
Create the stars with a star stitch or tiny detached chain stitches to give them dimension.
For an extra sparkle, scatter a few tiny French knots using a gold metallic thread—this mimics distant stars and adds a layer of texture.
To transfer your pattern accurately onto dark fabric, use a white water-soluble transfer pen or stabilizer paper.
5. The Modern Botanical Outline
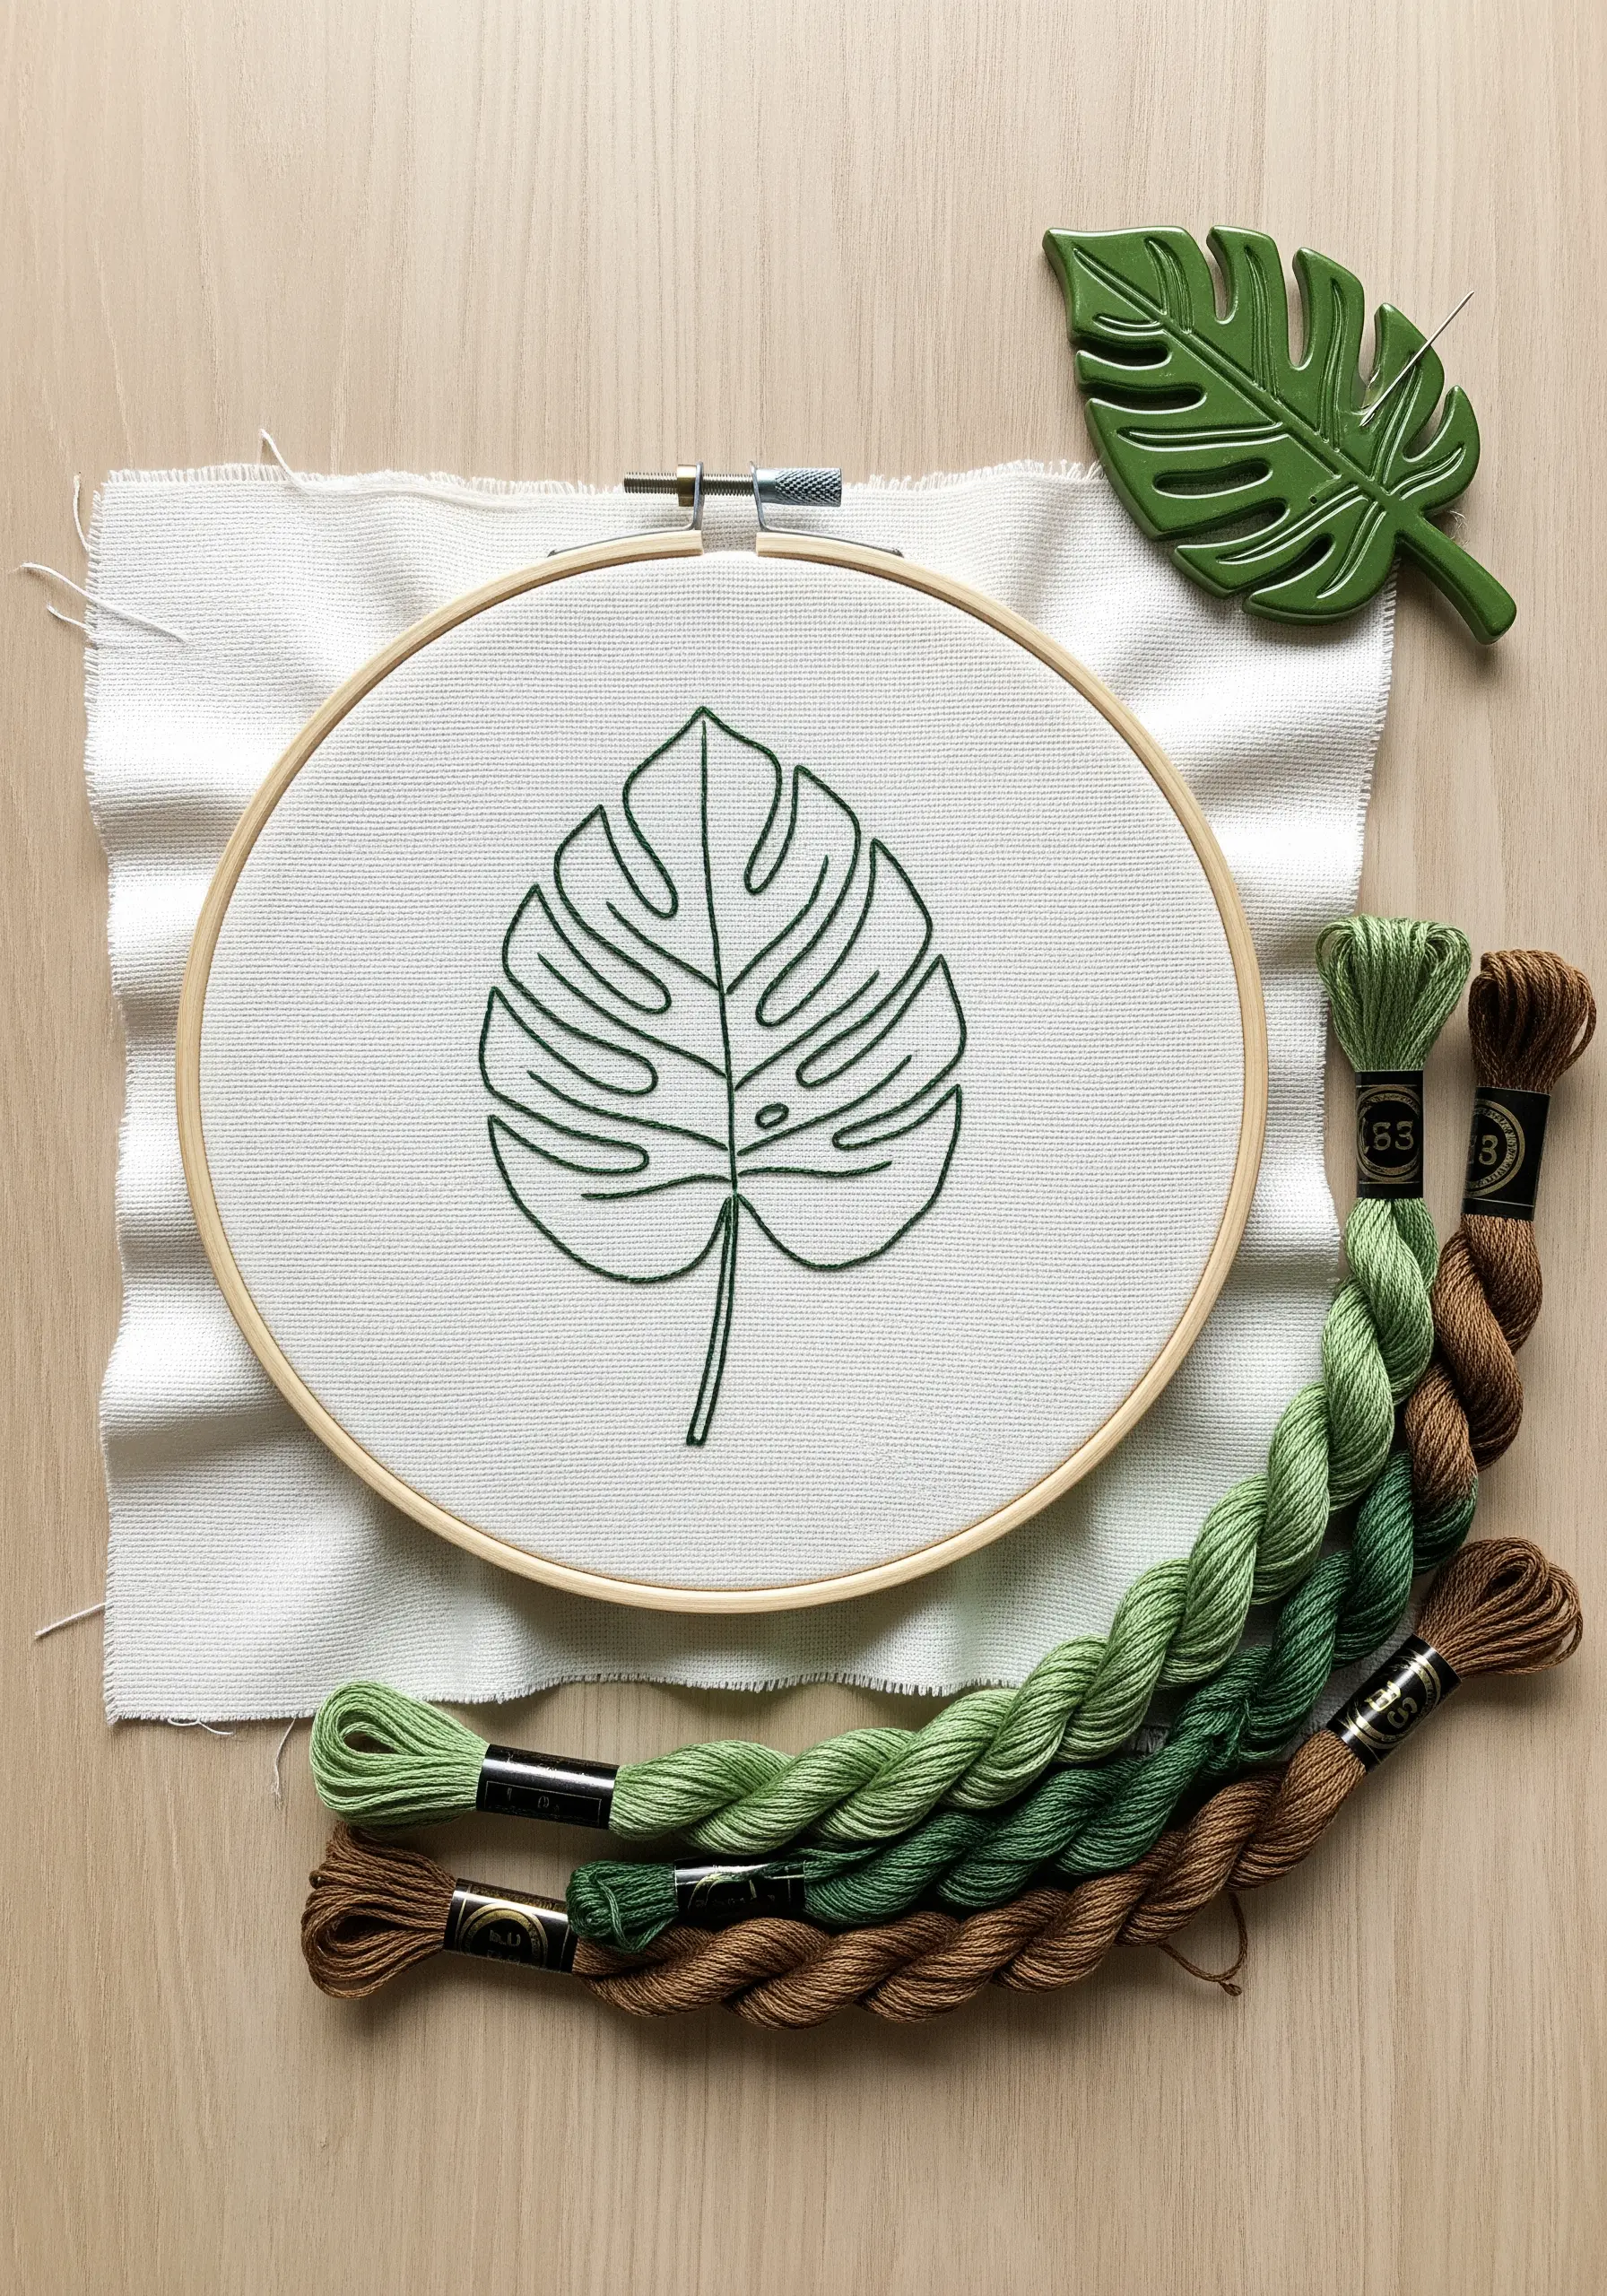
For a clean and graphic Modern Botanical Outline, your stitch choice is paramount.
A split stitch, worked with three strands of floss, will give you a smooth, solid line that mimics the quality of an ink drawing.
To create sharp corners and defined points on leaves like the monstera, always end one stitch precisely at the apex before beginning the next stitch in the new direction.
This prevents the rounded, soft corners that can make line art lose its crispness.
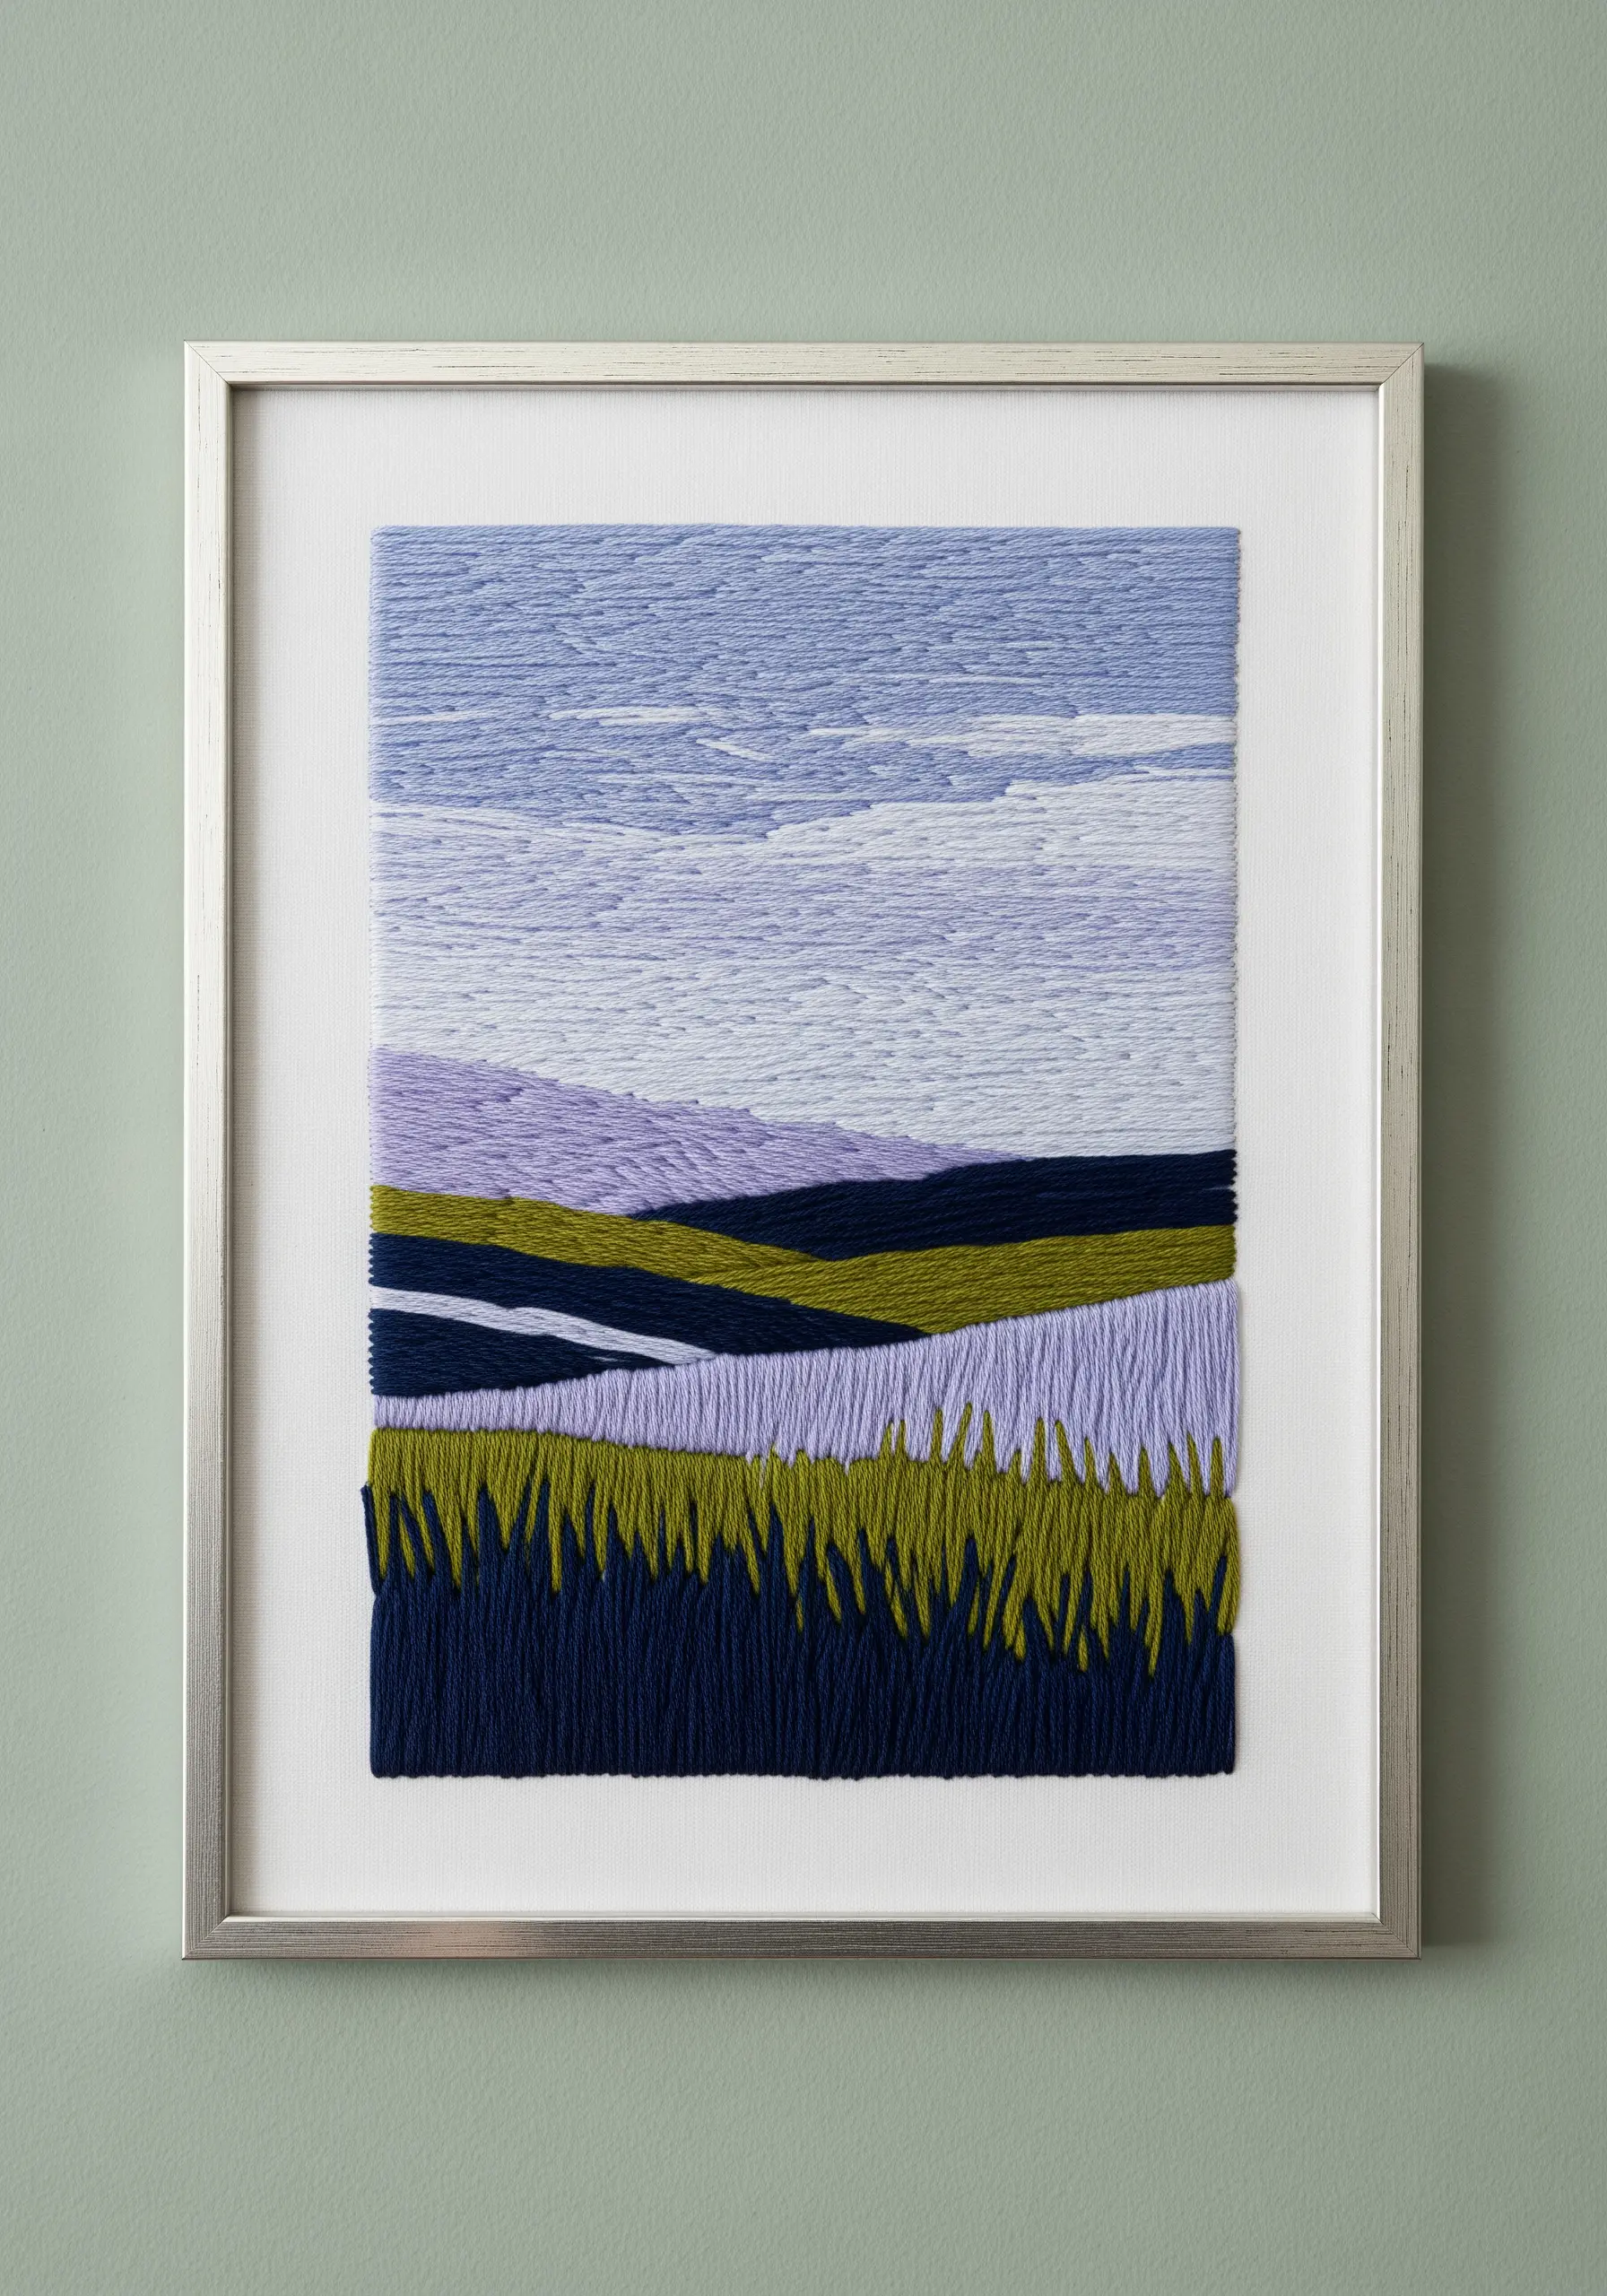
6. Painterly Landscapes with Thread Layers
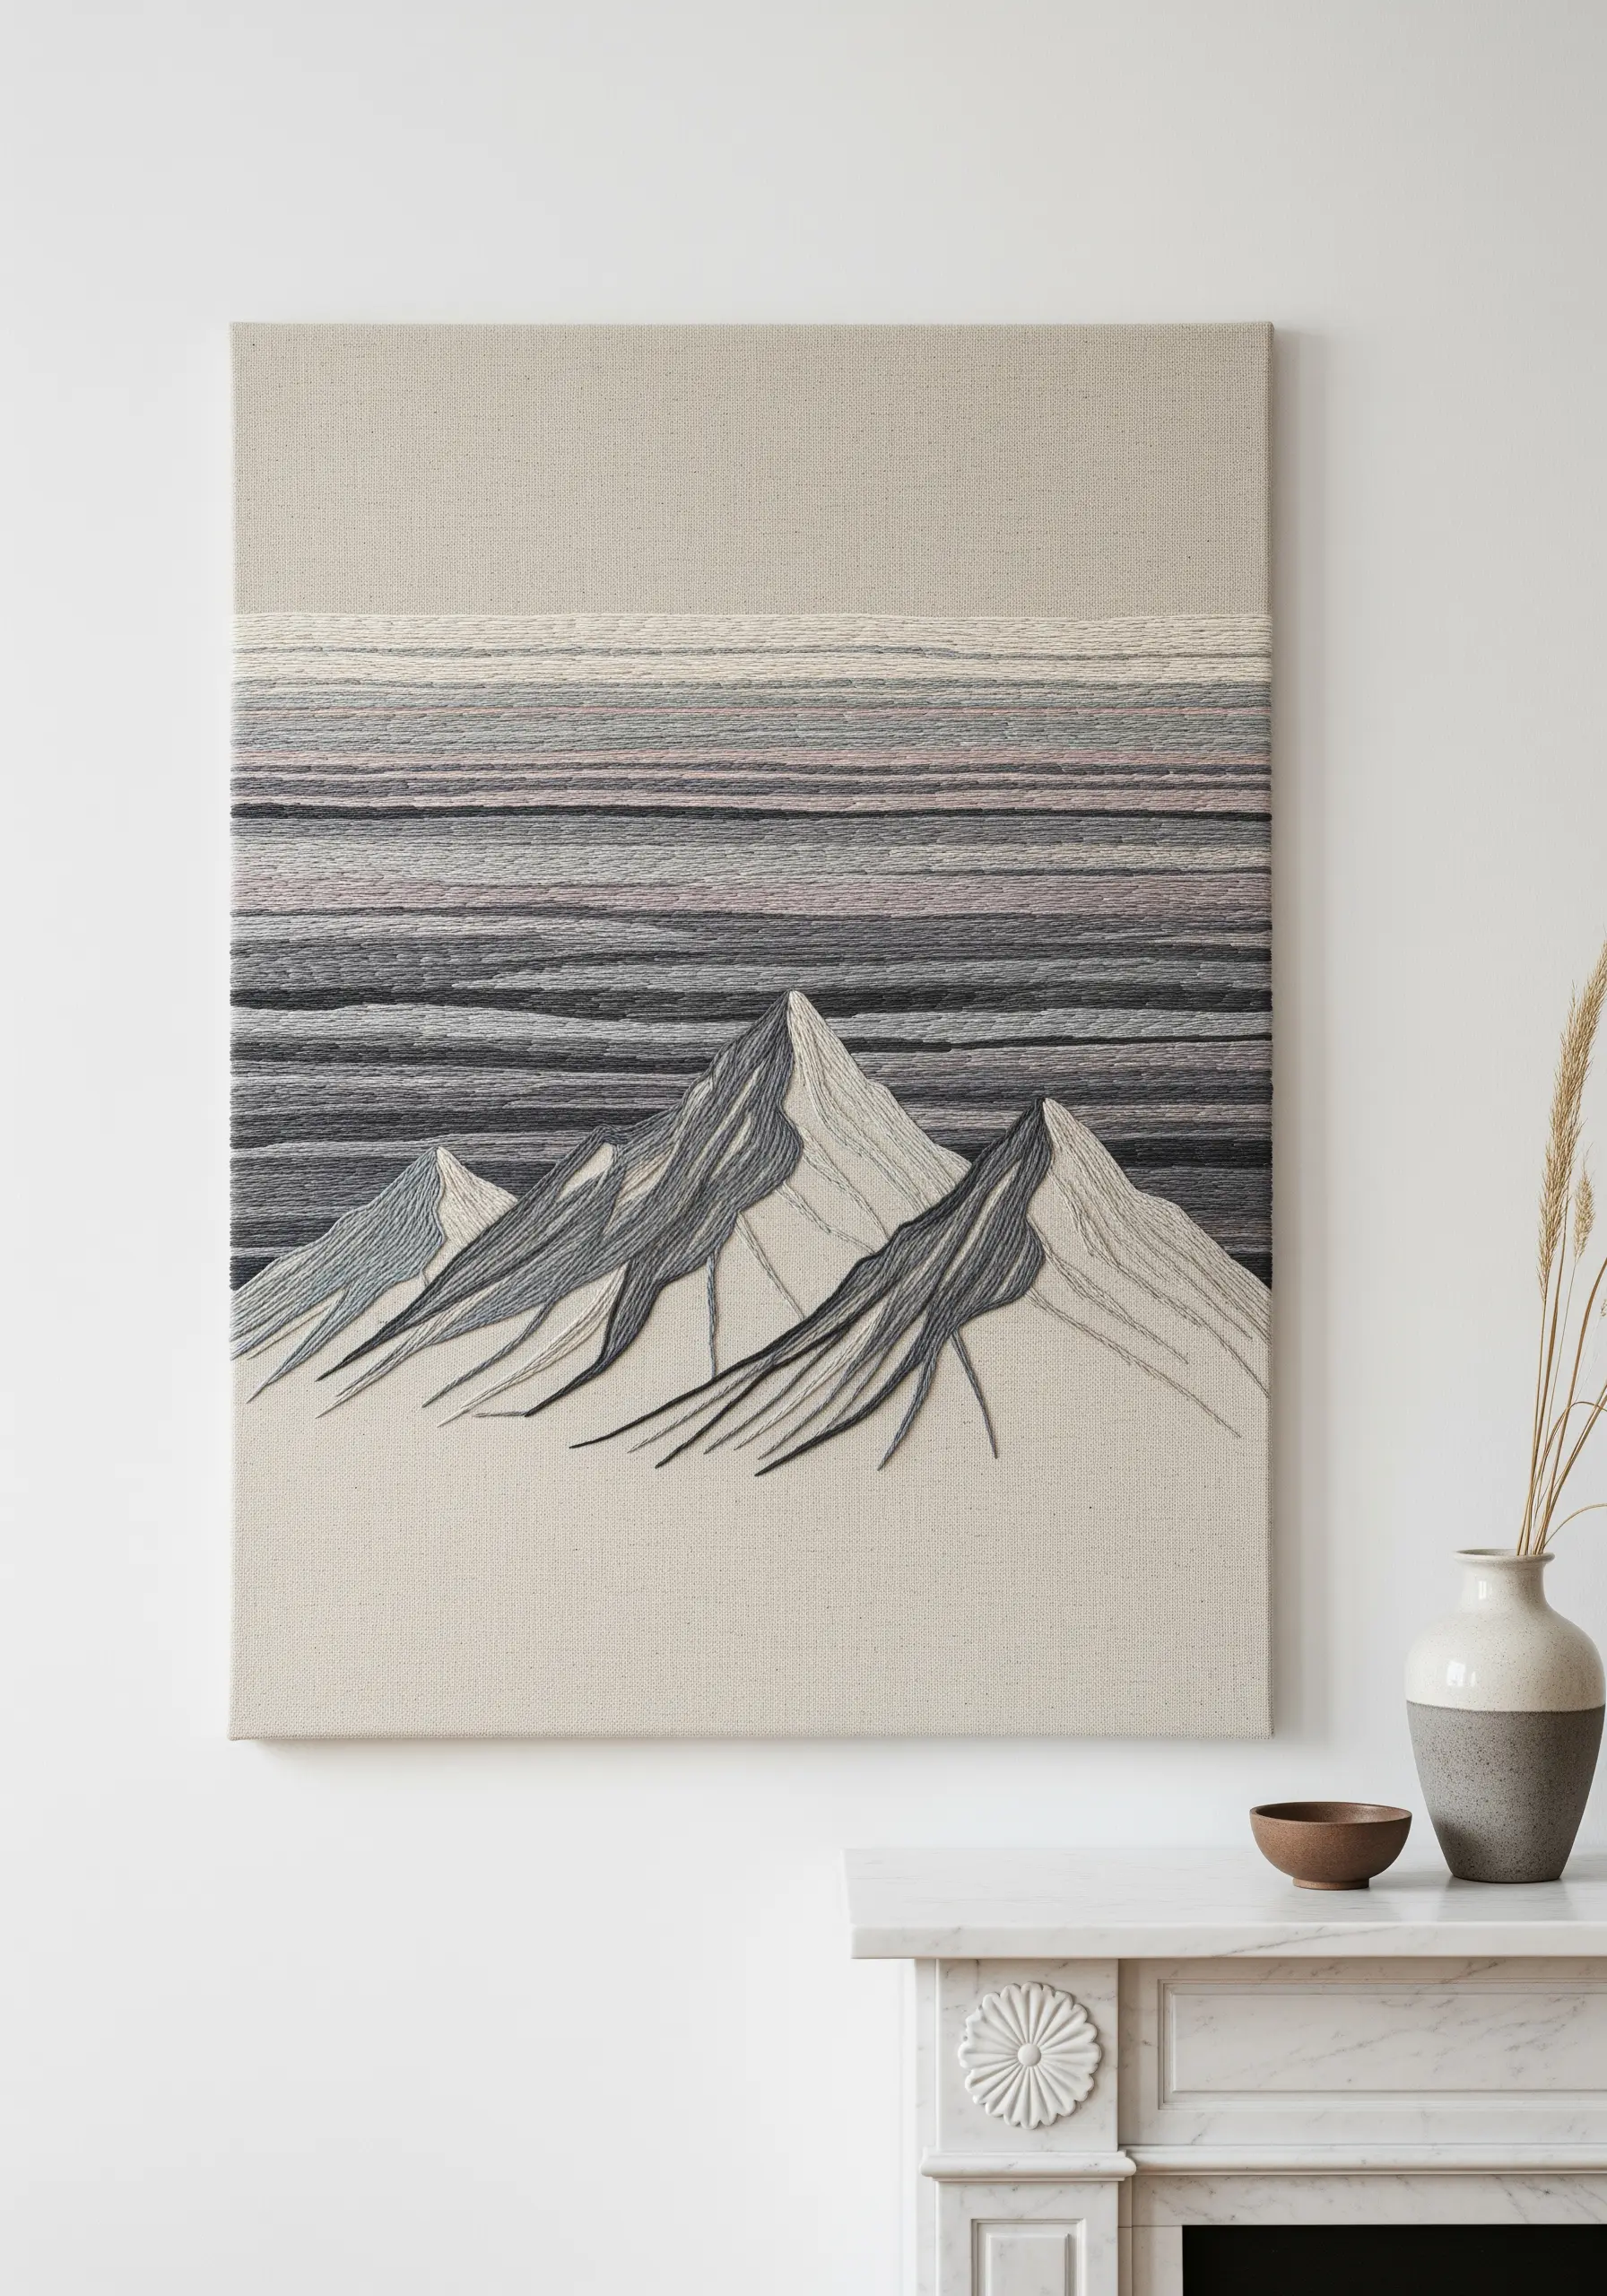
Create atmospheric, Painterly Landscapes by thinking of your thread like paint.
Work in horizontal bands, using long and short stitches to blend colors and create soft, textural layers.
Use a limited palette of muted tones, but vary the number of strands you use—four to five for the foreground mountains, and two to three for the distant sky—to create a sense of atmospheric depth.
Allow your stitches to overlap slightly to create a seamless, woven appearance rather than hard lines.
7. Calligraphy in Thread
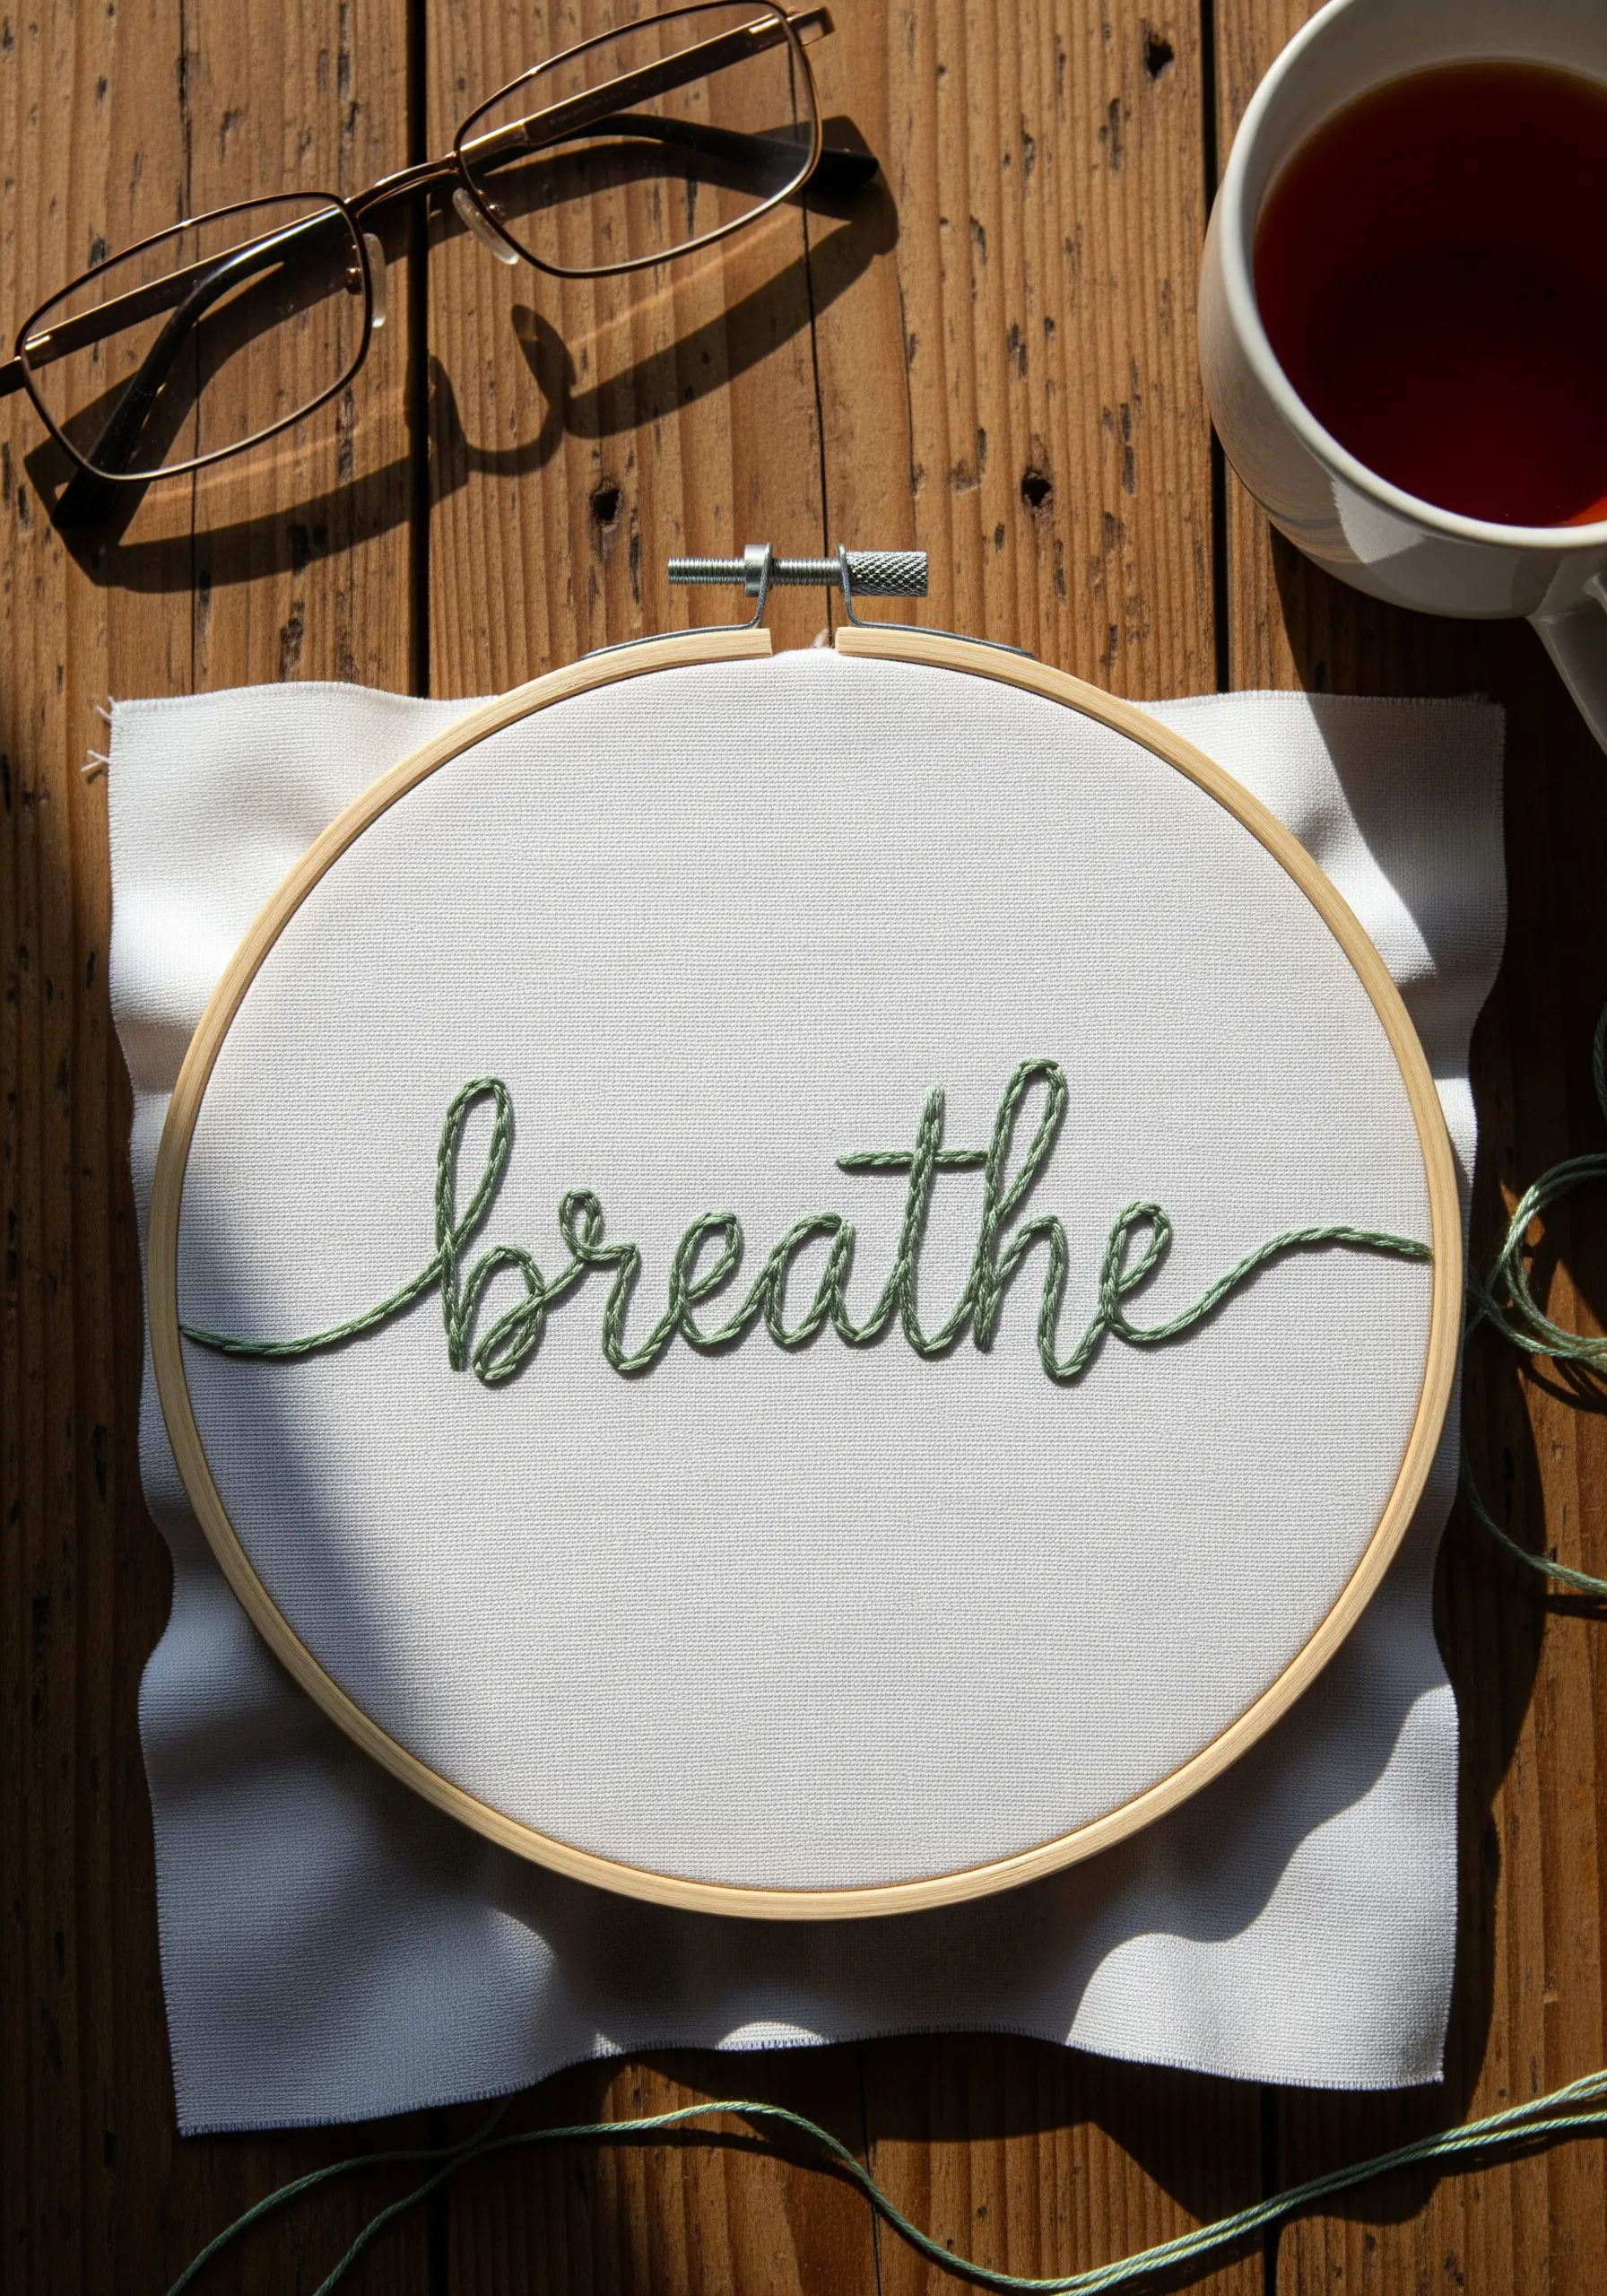
To translate the elegant flow of handwriting into embroidery, a stem stitch is your best tool.
The secret to smooth curves in your Calligraphy in Thread is maintaining an absolutely consistent stitch length and angle.
Use three or four strands of floss for a line with presence.
For the thicker downstrokes found in calligraphy, you can go over the line a second time with another row of stem stitch right beside the first, effectively doubling its weight and creating that authentic thick-and-thin rhythm.
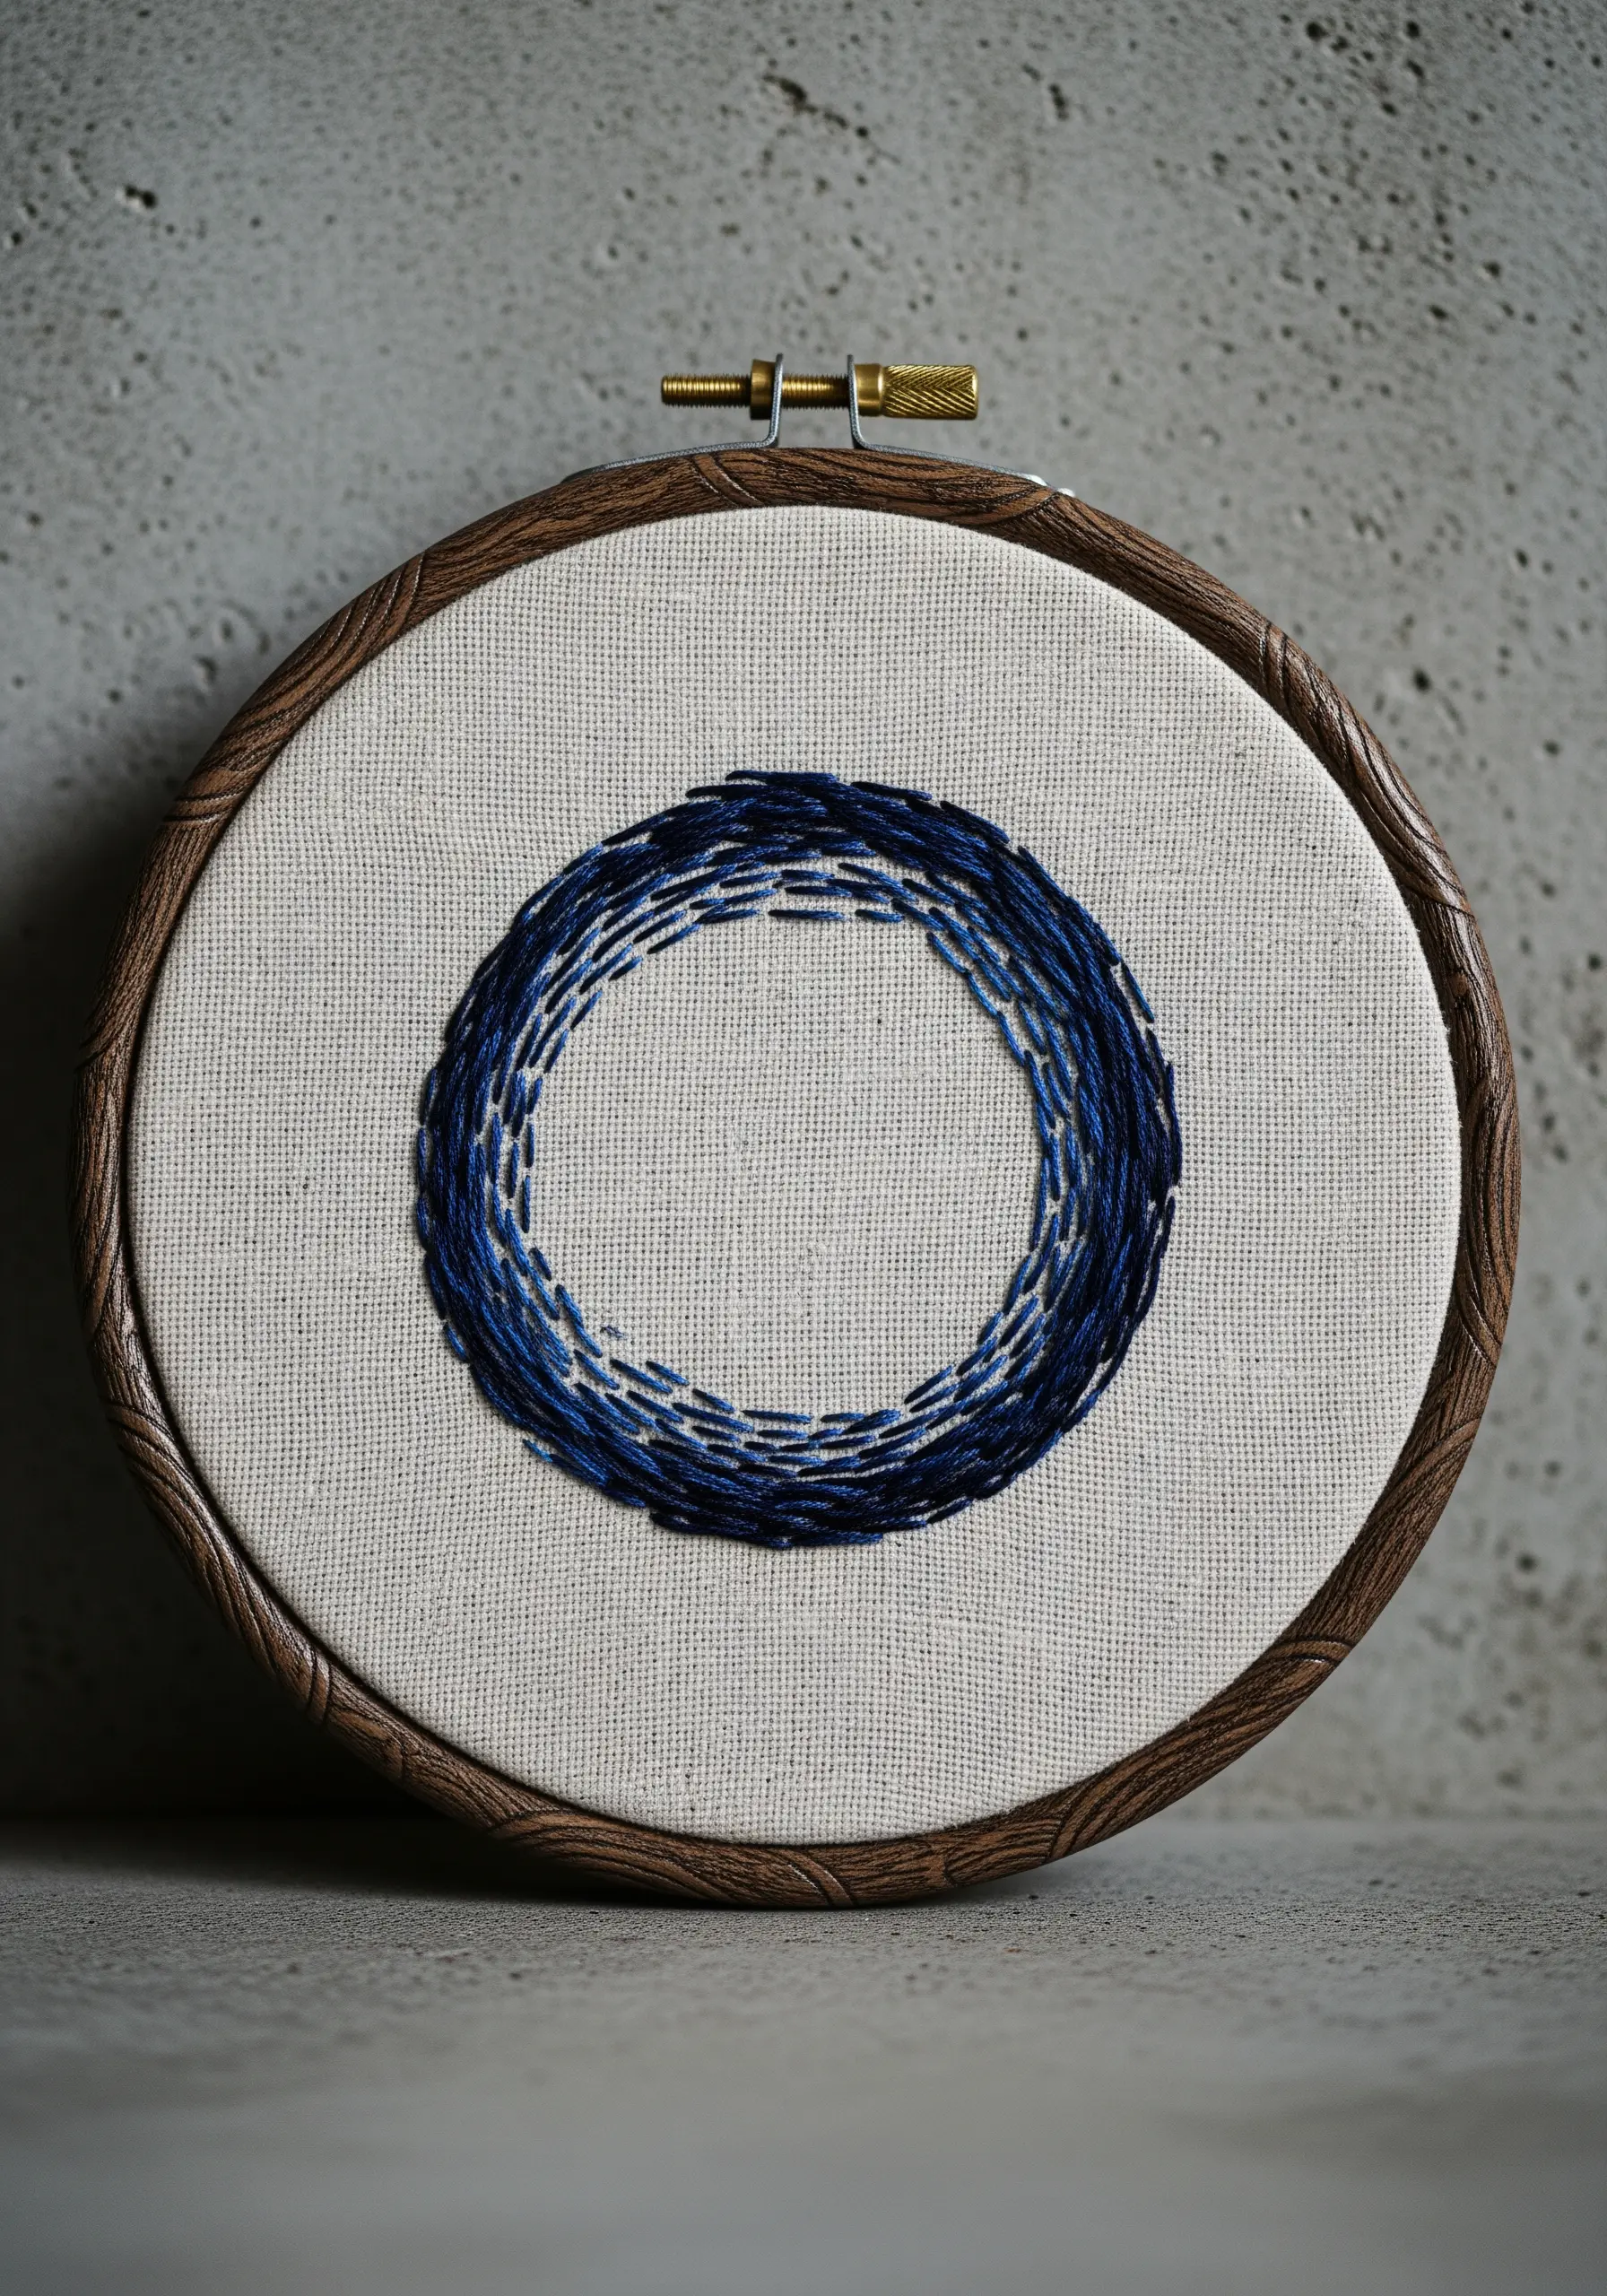
8. High-Relief Woven Circles
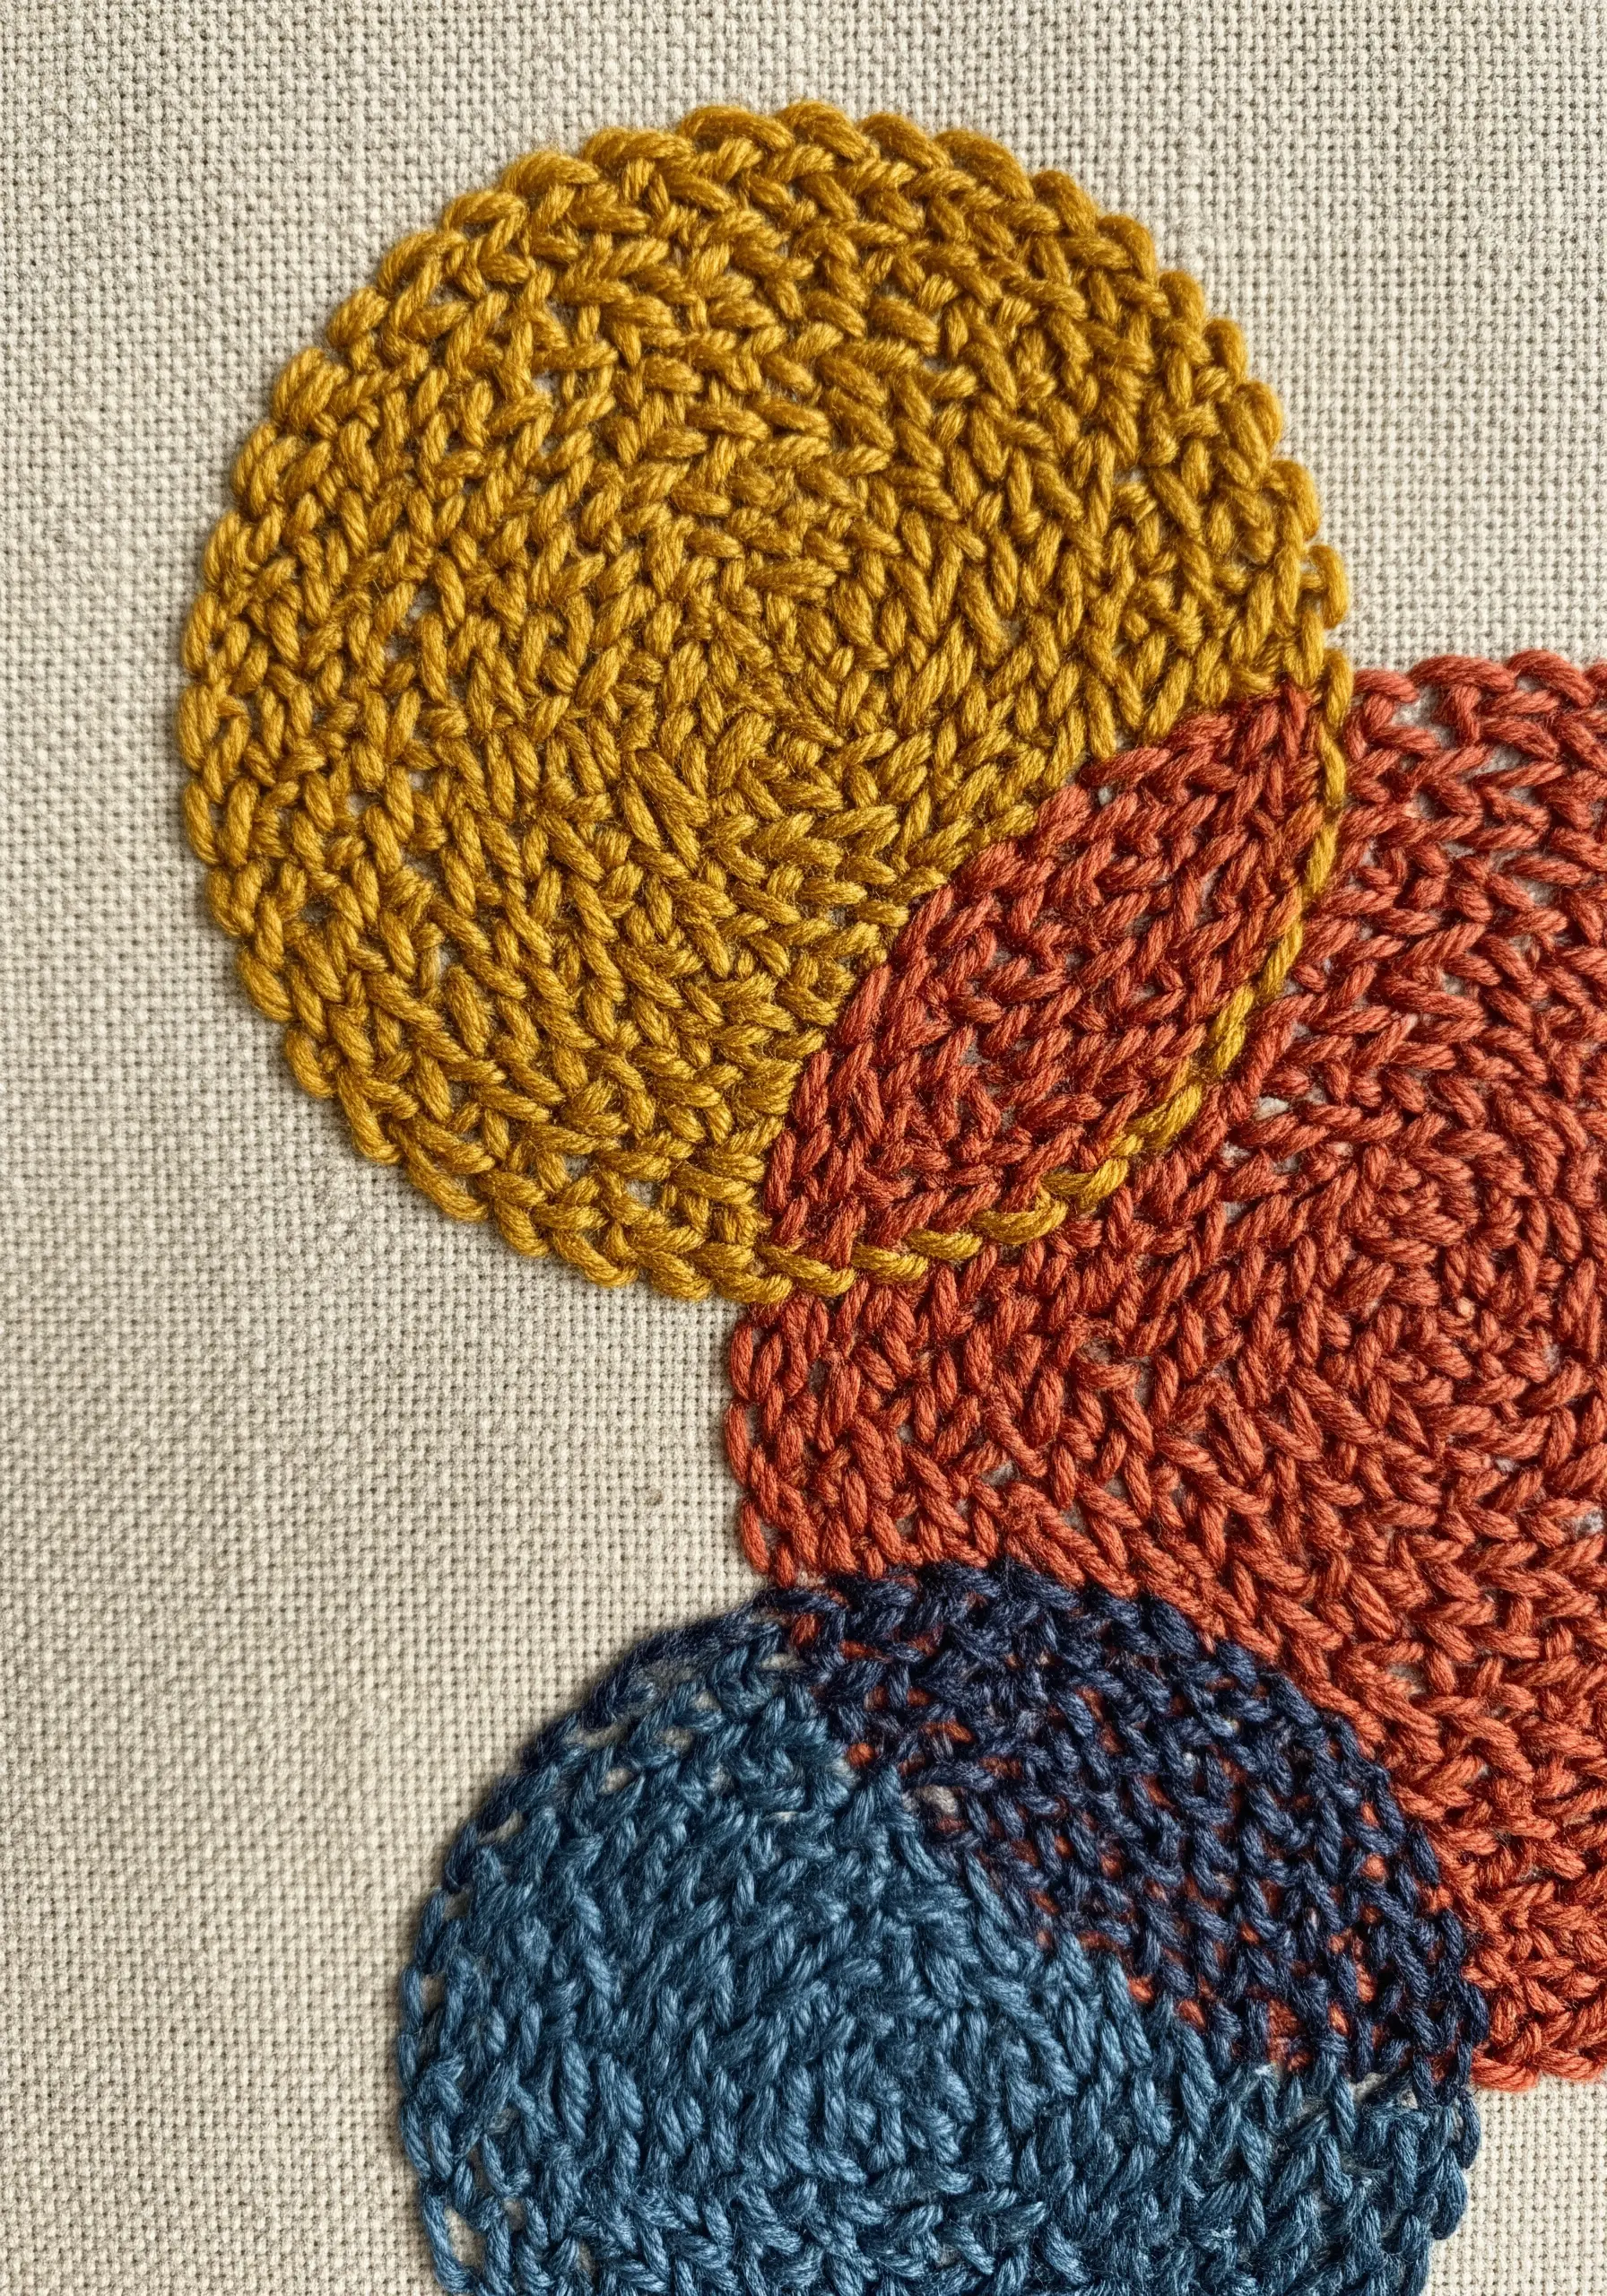
For designs that demand high texture, move beyond flat stitches.
Create these raised, woven circles with a woven wheel stitch (or spider web stitch).
Start by creating a foundation of straight stitches, like spokes on a wheel (always use an odd number).
Then, weave your working thread over and under these spokes, spiraling out from the center.
Do not pierce the fabric as you weave; your needle only passes through the foundation stitches.
This builds a dimensional, tactile shape that rises beautifully from the fabric surface.
9. Architectural Precision in a Single Thread
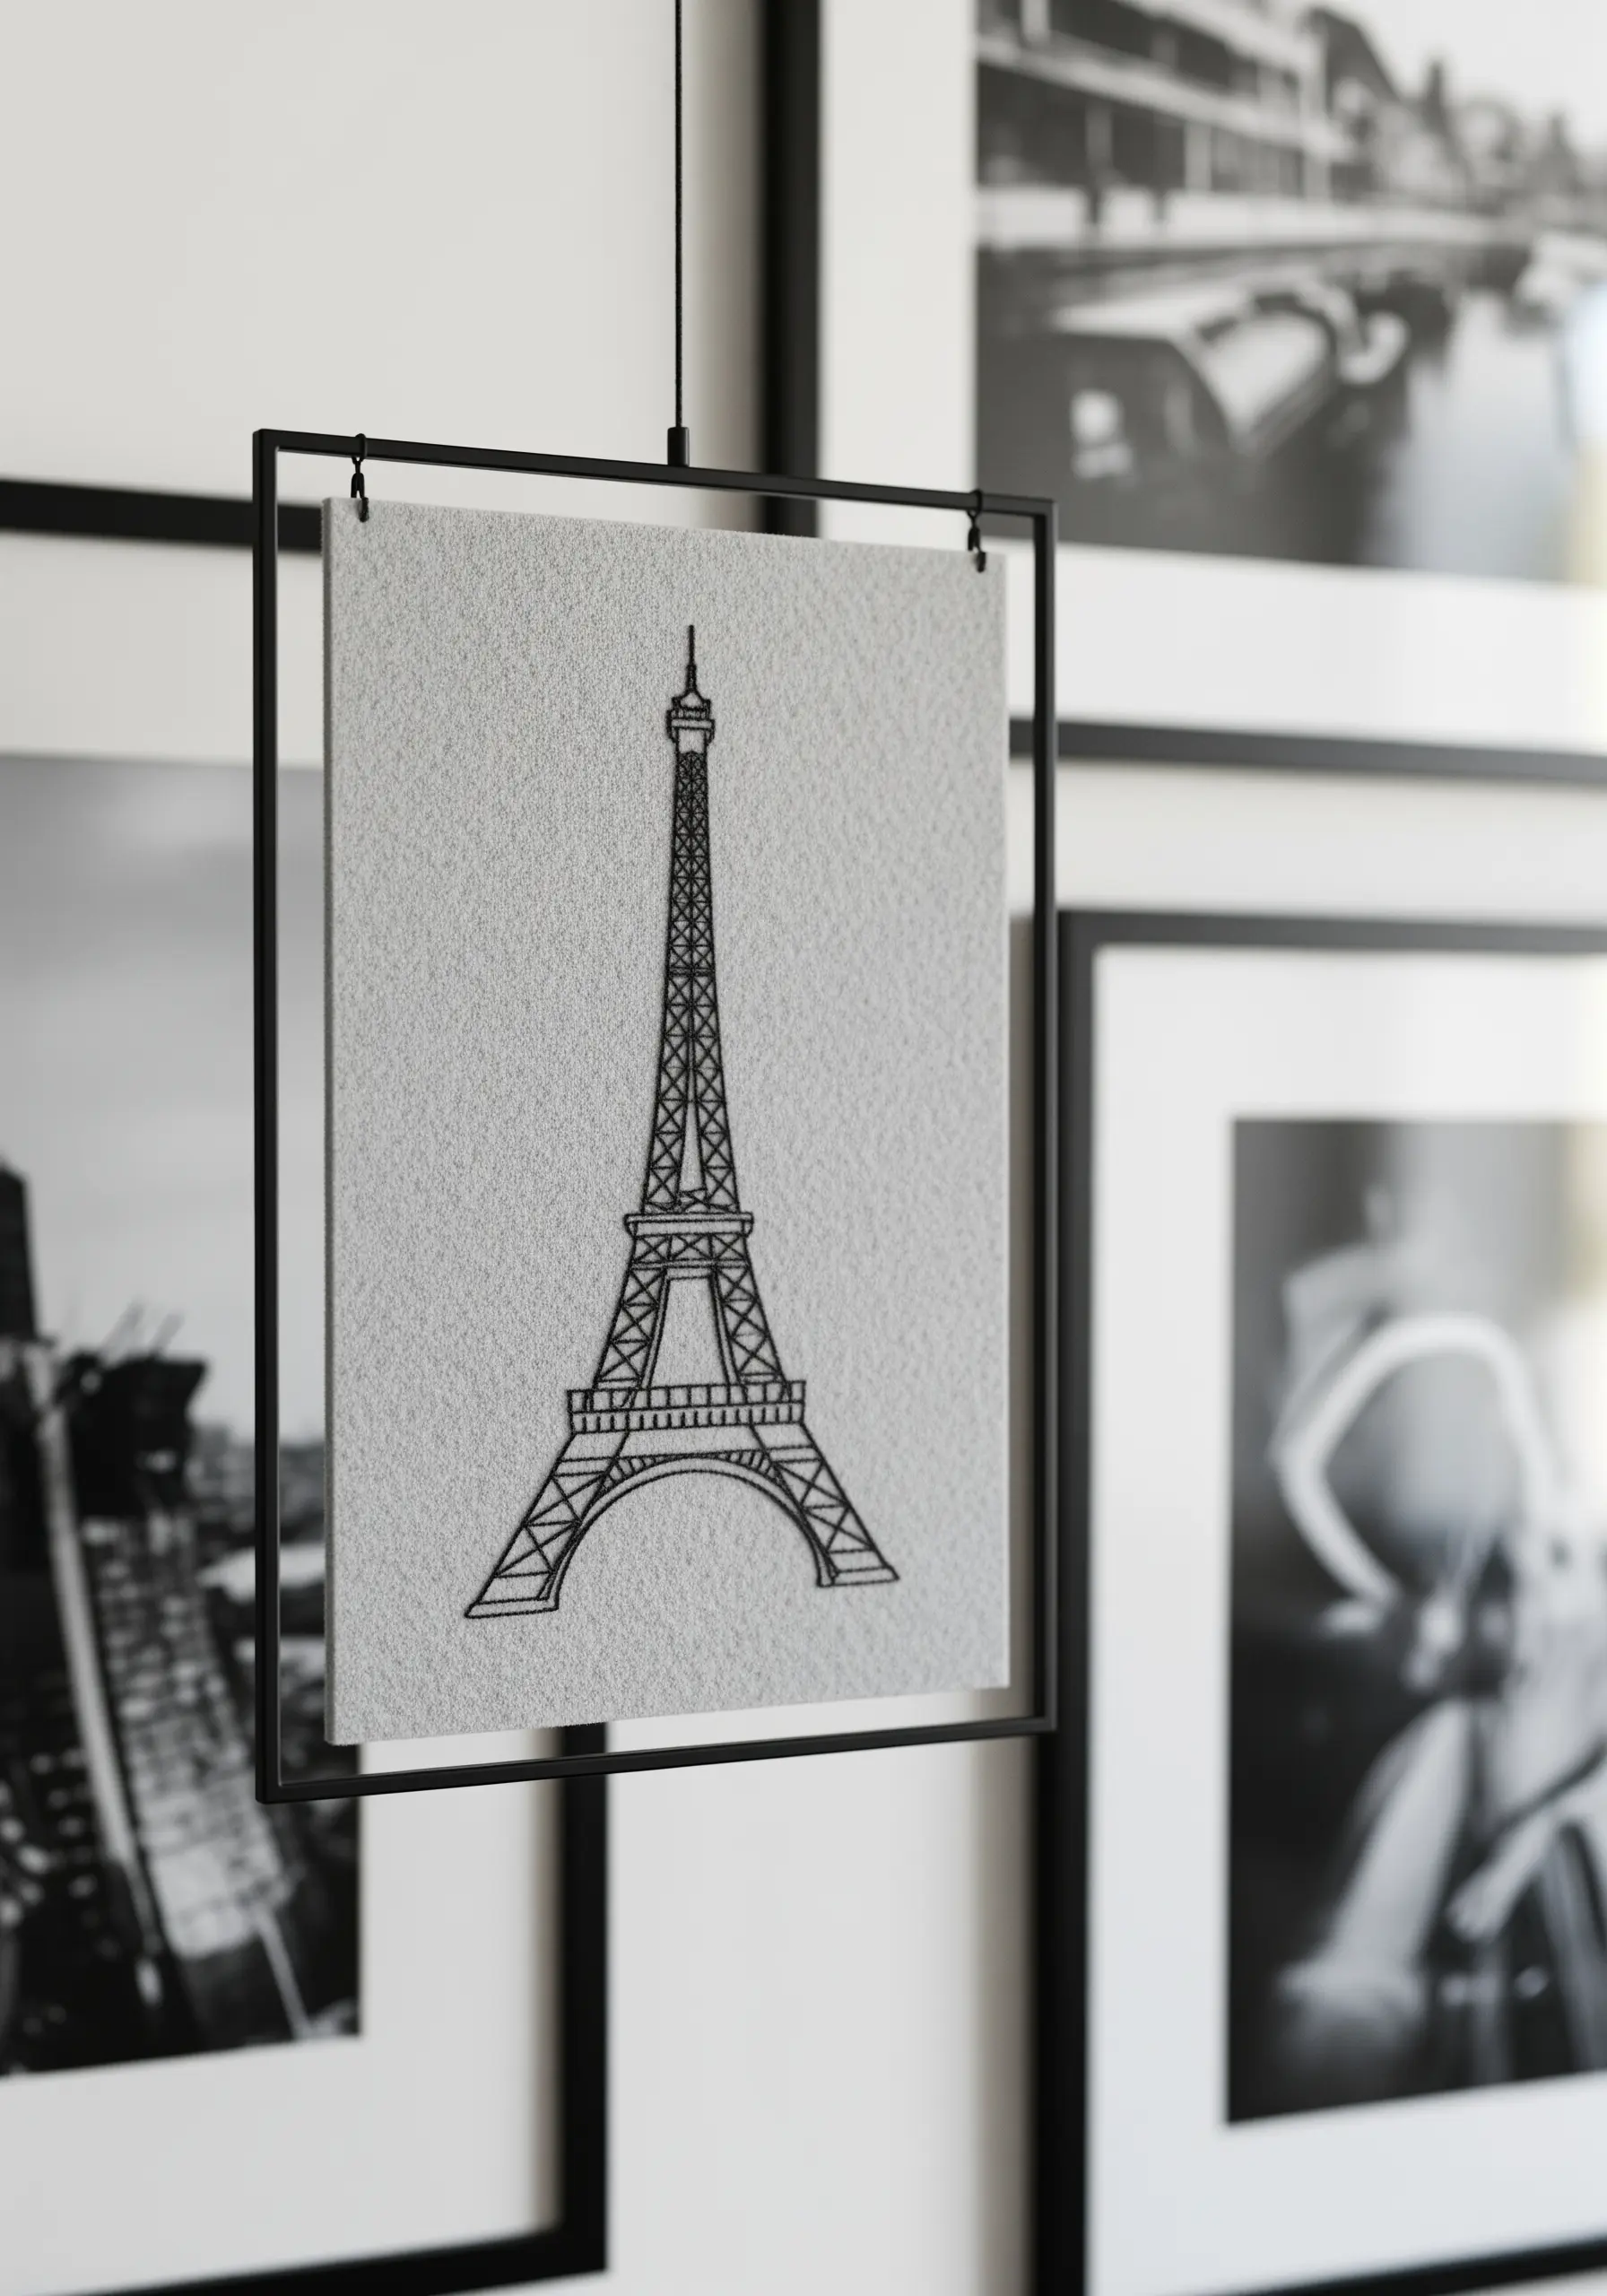
Achieving delicate Architectural Precision requires restraint and the right materials.
Use only a single strand of black embroidery floss to keep your lines as fine as a technical pen drawing.
A backstitch is perfect for this.
Work on a high-count, even-weave fabric like linen, which provides a stable grid for your stitches.
Using a smaller needle (size 9 or 10) will ensure that you pierce the fabric cleanly, preventing noticeable holes and keeping your line work crisp and professional.
10. High-Contrast Celestial Motifs

To make your metallic threads truly shine in High-Contrast Celestial Motifs, give them a foundation.
Before you begin with your metallic floss, first stitch the shape using a base layer of regular floss in a similar color (e.g., light grey for silver, beige for gold).
Use a split stitch for this underlayer.
Then, stitch directly over it with your metallic thread.
This technique, called padding, raises the metallic stitches slightly off the fabric, allowing them to catch more light and appear much brighter and more solid.
11. The Textured Rainbow Arch
This bold, rope-like Textured Rainbow Arch is achieved with a heavy whipped chain stitch.
First, create a basic chain stitch using all six strands of your embroidery floss.
To give it that rounded, solid appearance, take another six-strand length of the same color and whip the chain stitch—that is, slide your needle under each link of the chain without piercing the fabric.
This doubles the stitch’s volume and smooths its texture, resulting in satisfyingly chunky, graphic lines.
12. Geometric Abstraction with Crisp Lines

The key to successful Geometric Abstraction is flawless linework.
Use a ruler and a removable fabric marker to draw your design perfectly before you begin.
Use a simple backstitch with two or three strands of high-contrast thread.
At every corner or intersection of lines, ensure a stitch either begins or ends at that exact point.
This technique of anchoring your stitches at each vertex is what prevents wobbly lines or rounded corners, keeping your geometric forms sharp and intentional.
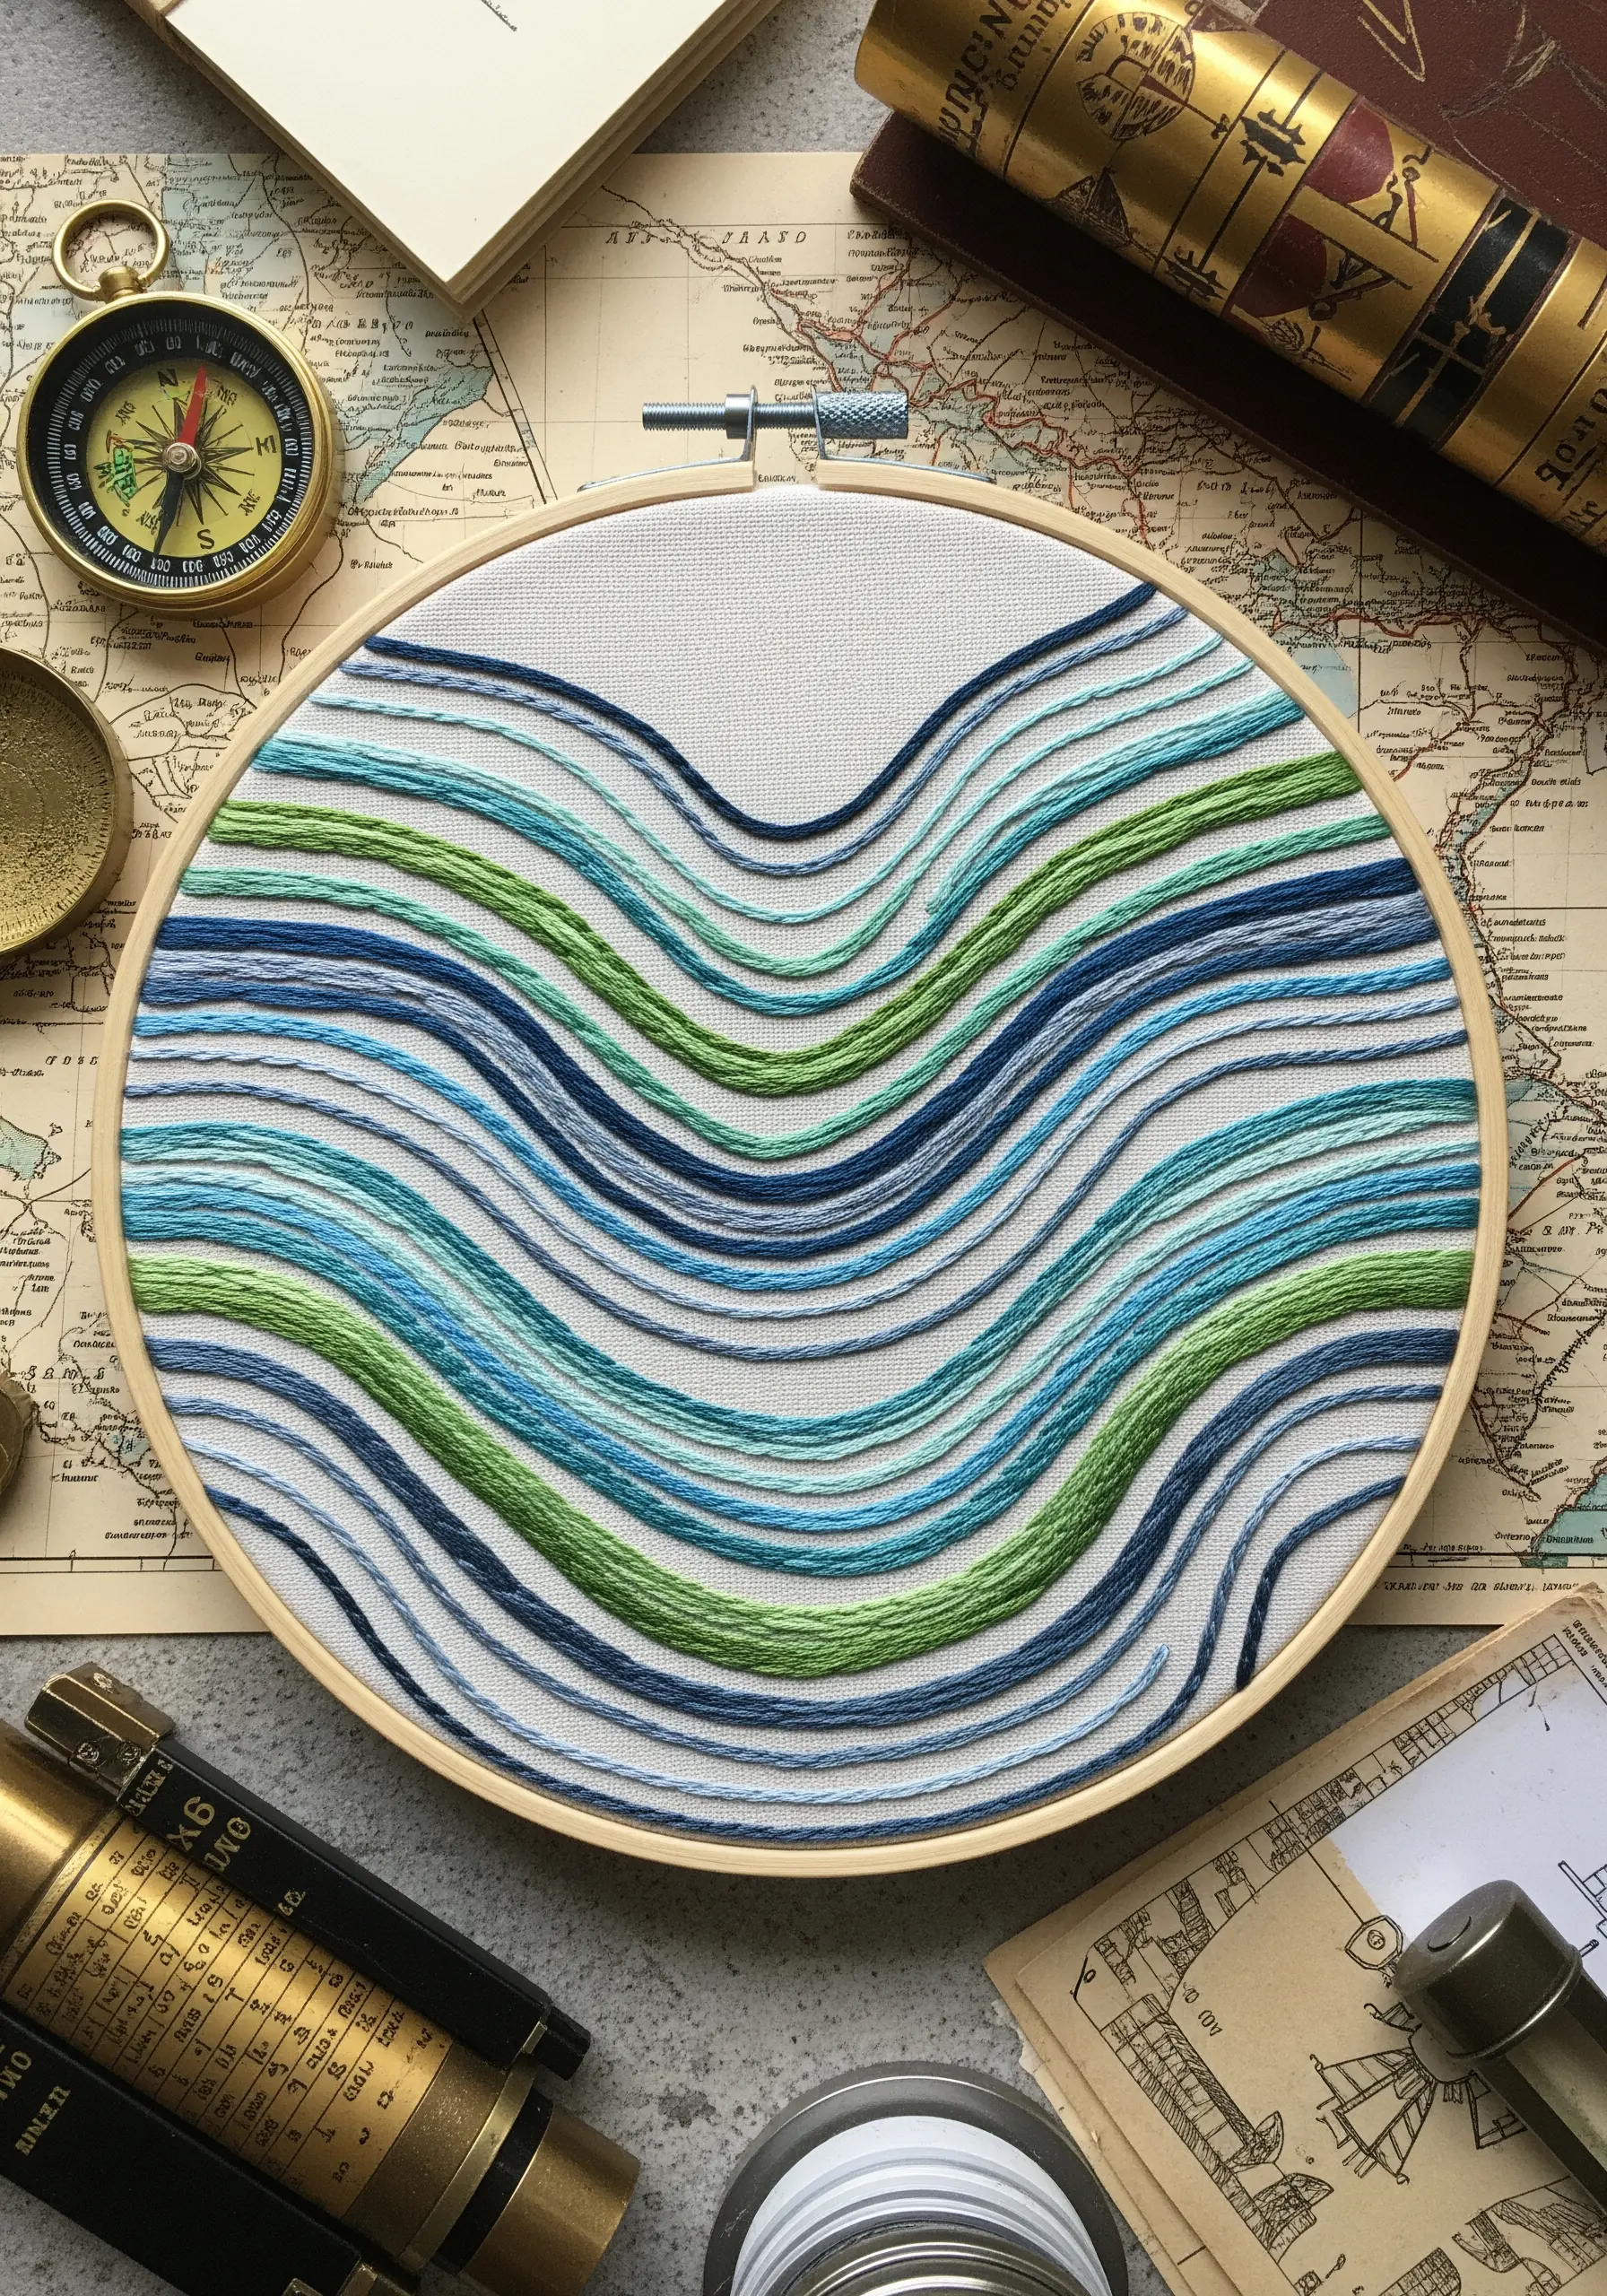
13. Capturing Motion with Varied Line Weight
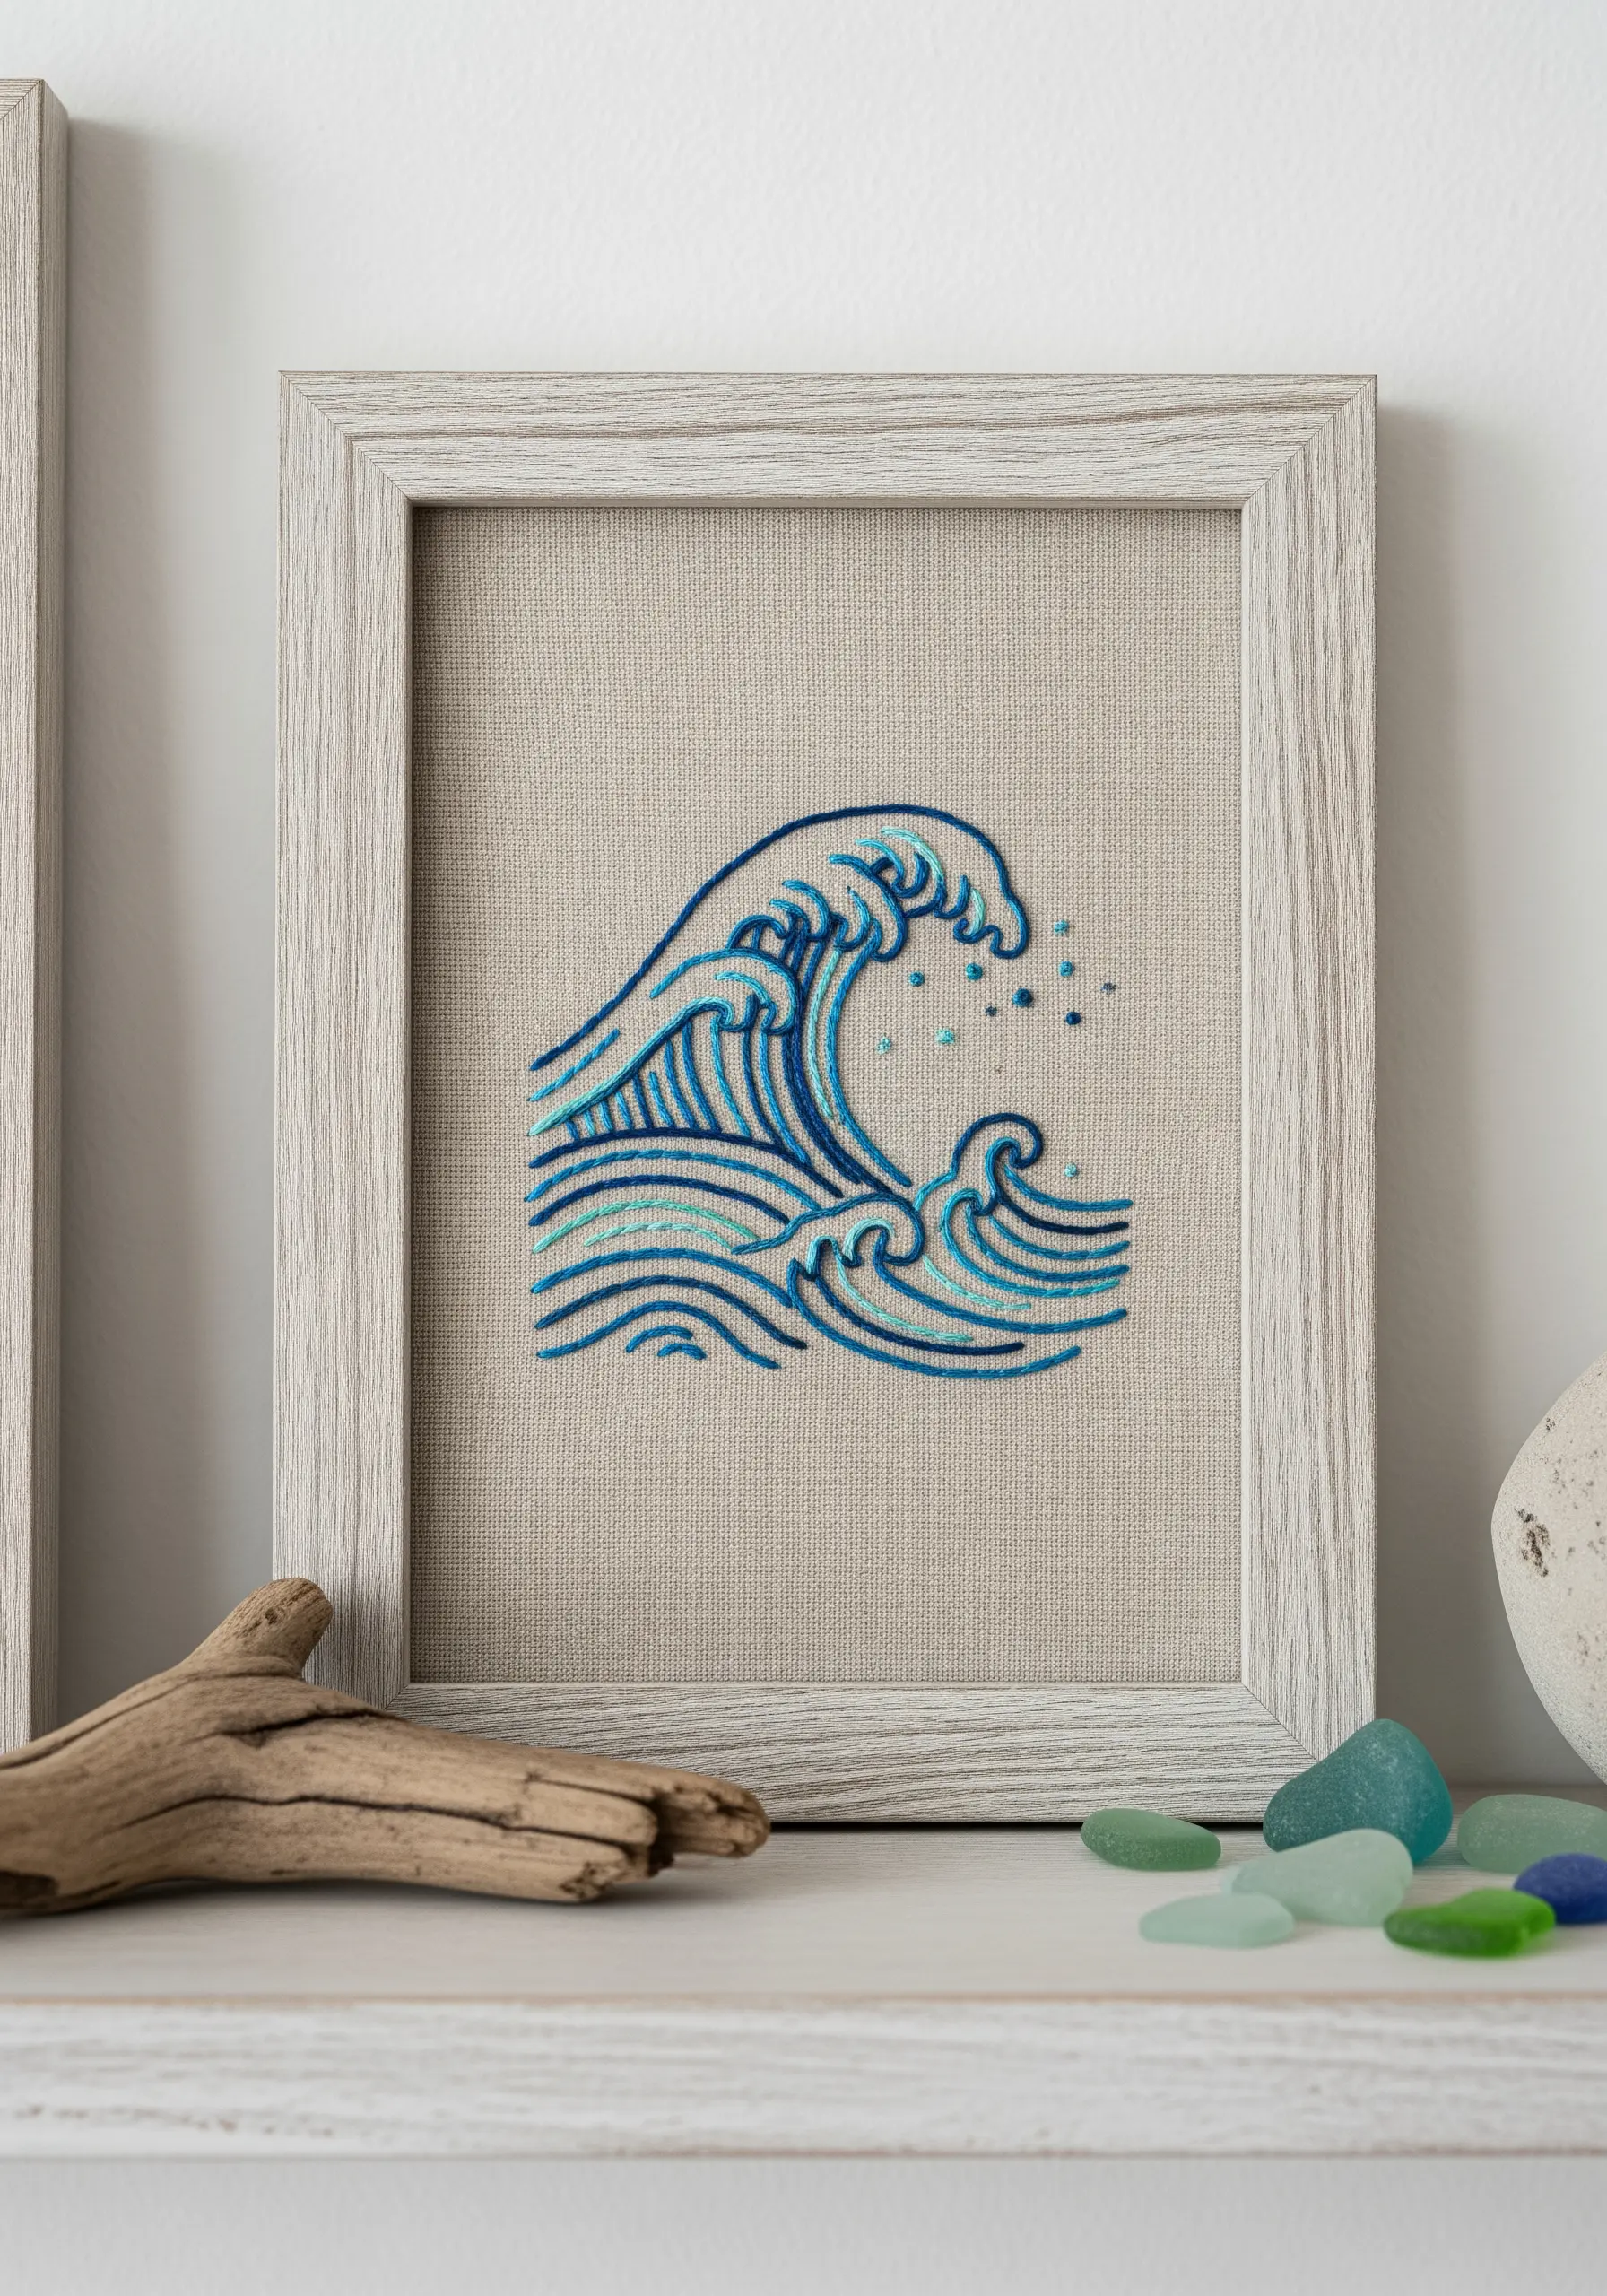
To infuse a static image like this stylized ocean wave with energy and movement, play with the weight of your lines.
You can achieve this by varying the number of floss strands you use for different elements.
Use three or four strands for the main, powerful outlines of the wave. Drop down to two strands for the secondary inner curves and details.
Finally, use a single strand for the lightest elements, like the sea spray, which can be rendered with tiny, scattered straight stitches or French knots.
14. The Playful Scatter Pattern
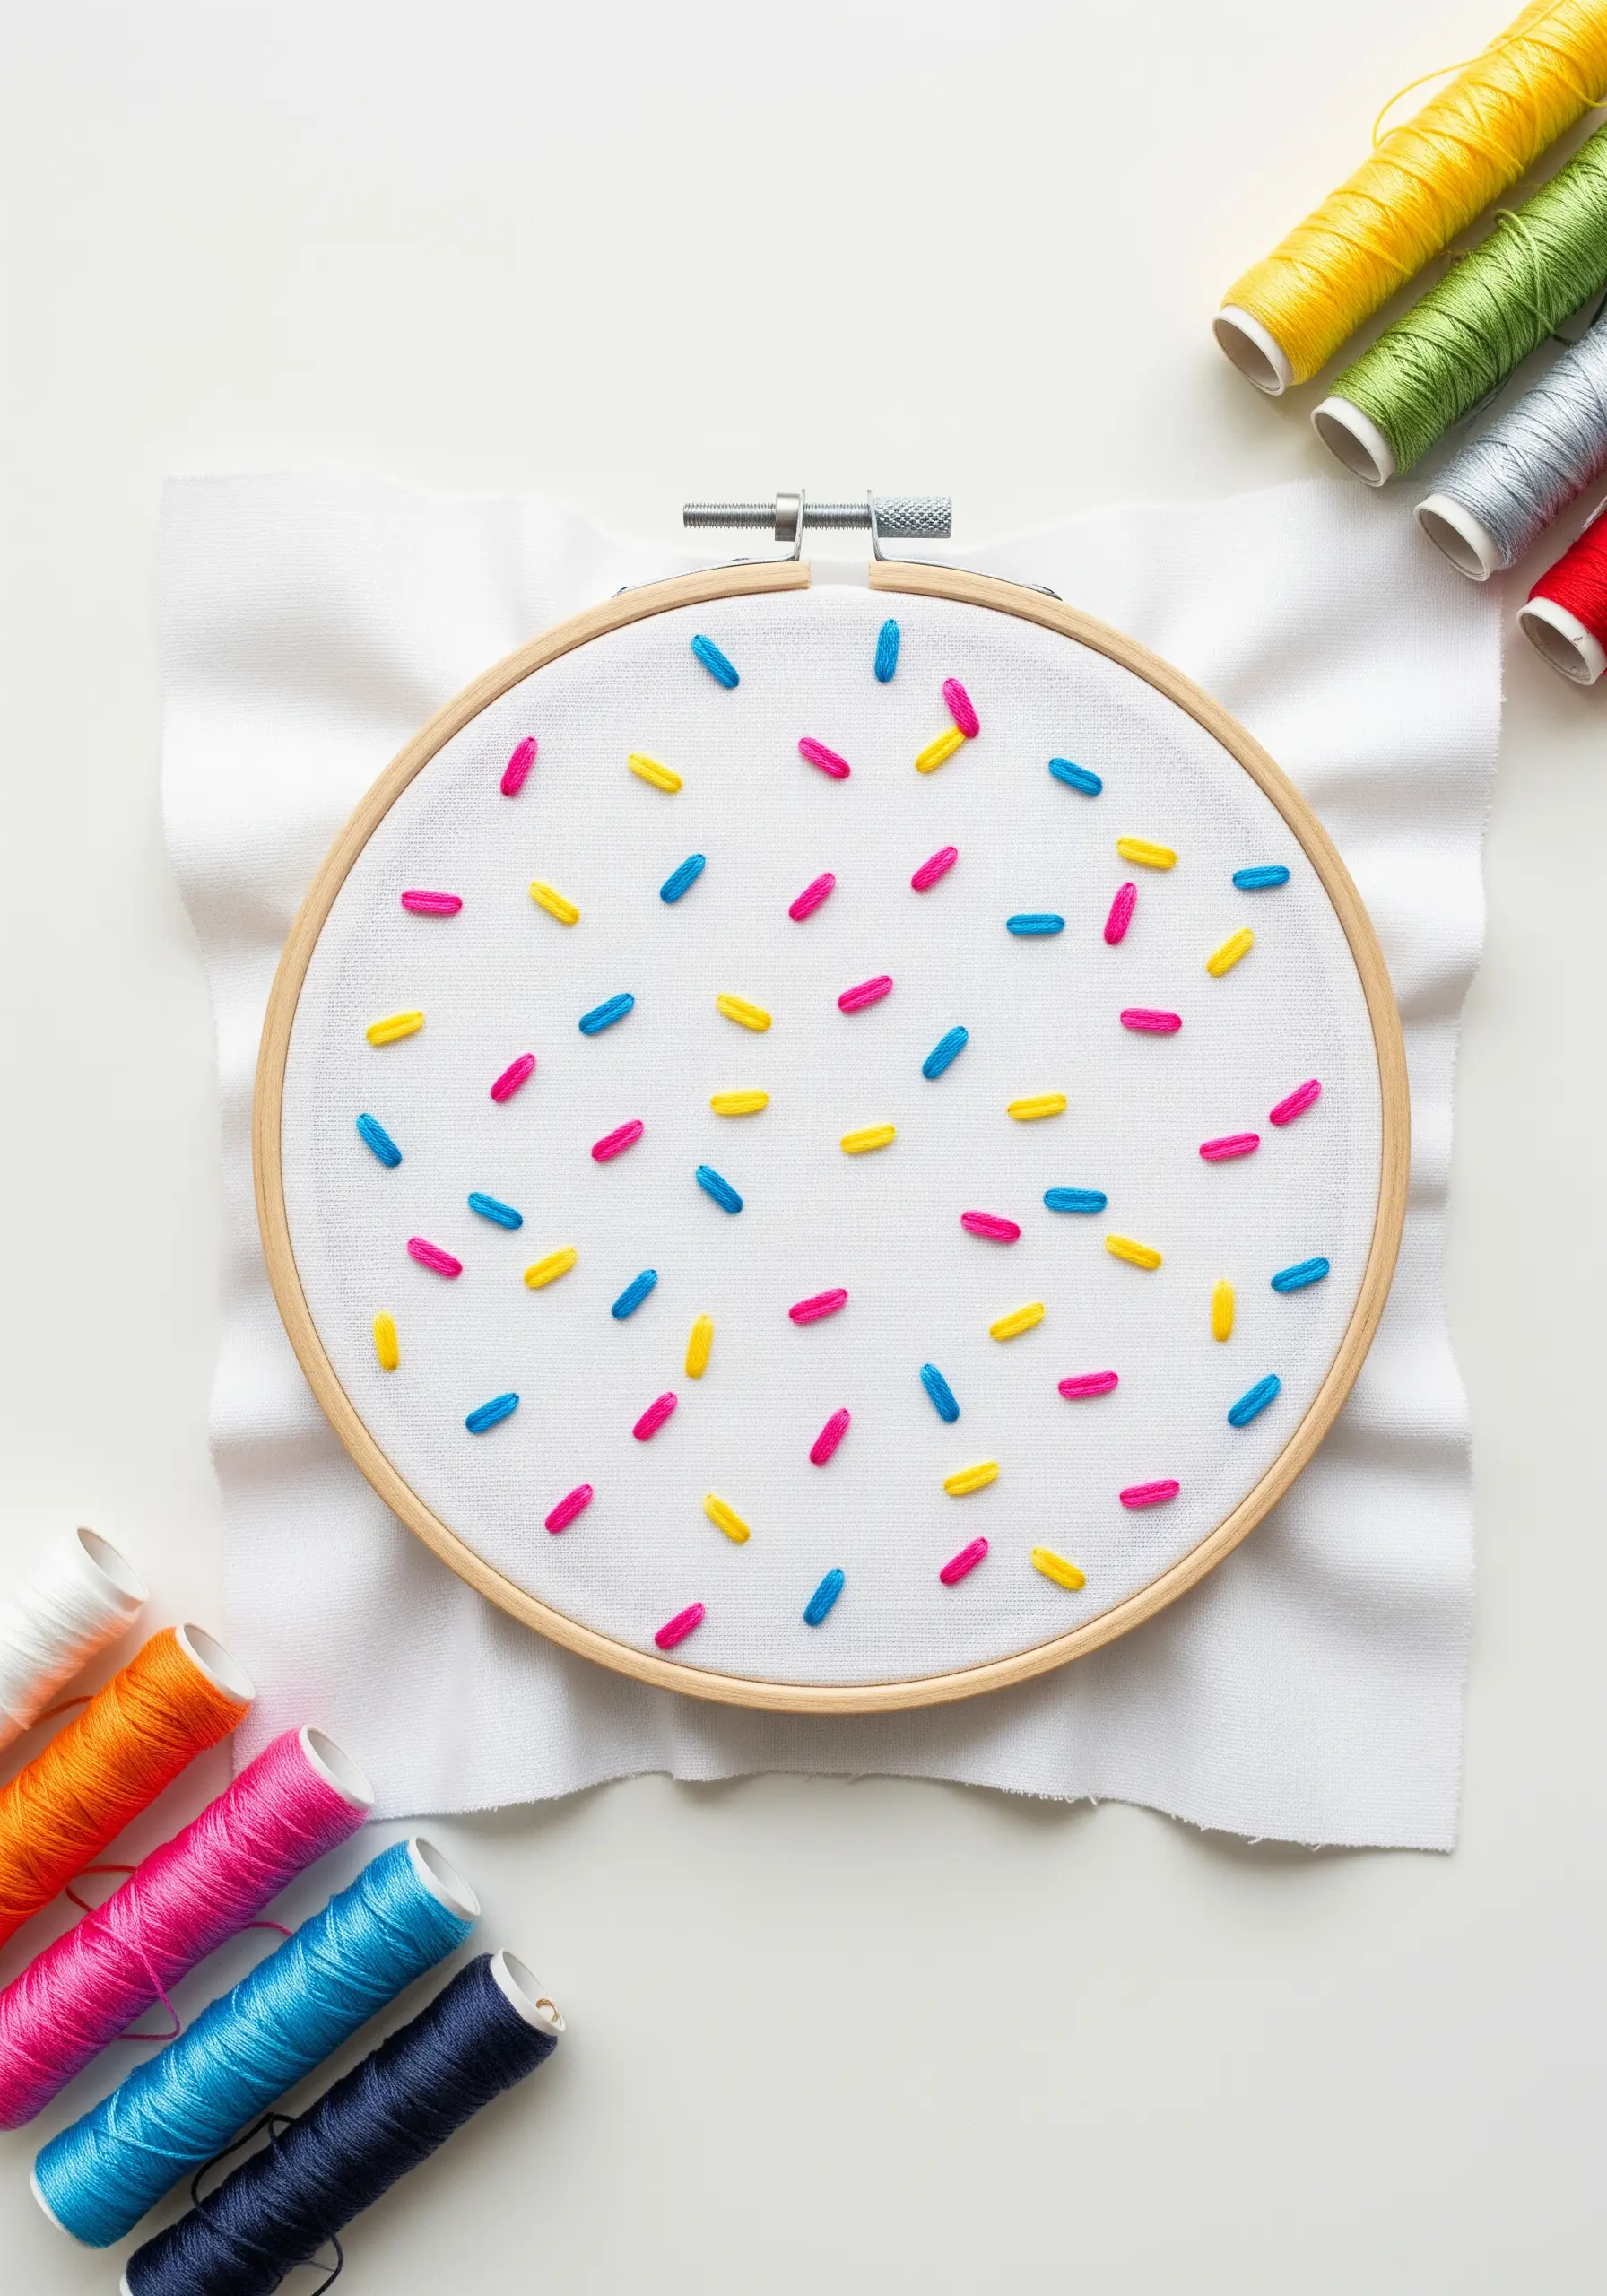
This joyful Playful Scatter Pattern relies on perfectly executed short satin stitches to create the look of candy sprinkles.
Use four to five strands of floss to give each sprinkle a plump, raised look.
To keep the ends of each sprinkle neat and rounded, ensure your needle enters and exits the fabric just outside your drawn line, not on it.
Stagger the direction and spacing of the sprinkles randomly across the fabric for a natural, spontaneous effect, but keep the length of each stitch consistent for a polished finish.
15. The Floating Wreath on Sheer Fabric

Stitching on a sheer fabric like organza or tulle creates an ethereal, floating effect that is impossible to achieve on opaque cloth.
The trick is to use a stabilizer.
Hoop your sheer fabric with a layer of water-soluble stabilizer on top. Stitch your design through both layers—the stabilizer will prevent the delicate fabric from puckering and stretching.
When you are finished, simply trim the excess stabilizer and soak the piece in water. The stabilizer will dissolve, leaving only your beautiful embroidery suspended in mid-air.
16. Sculptural Lines with Yarn Couching

When you want a line with serious impact, switch from embroidery floss to yarn.
This bold, sculptural line is created through couching.
Simply lay the yarn along your design line on the fabric. Then, using a regular needle and a single strand of matching embroidery floss, make small, evenly spaced tacking stitches over the yarn to secure it in place.
This technique allows you to create thick, graphic outlines that would be impossible with traditional stitches, adding a dramatic, three-dimensional quality to your work.
17. The Geometric Satin Stitch Animal
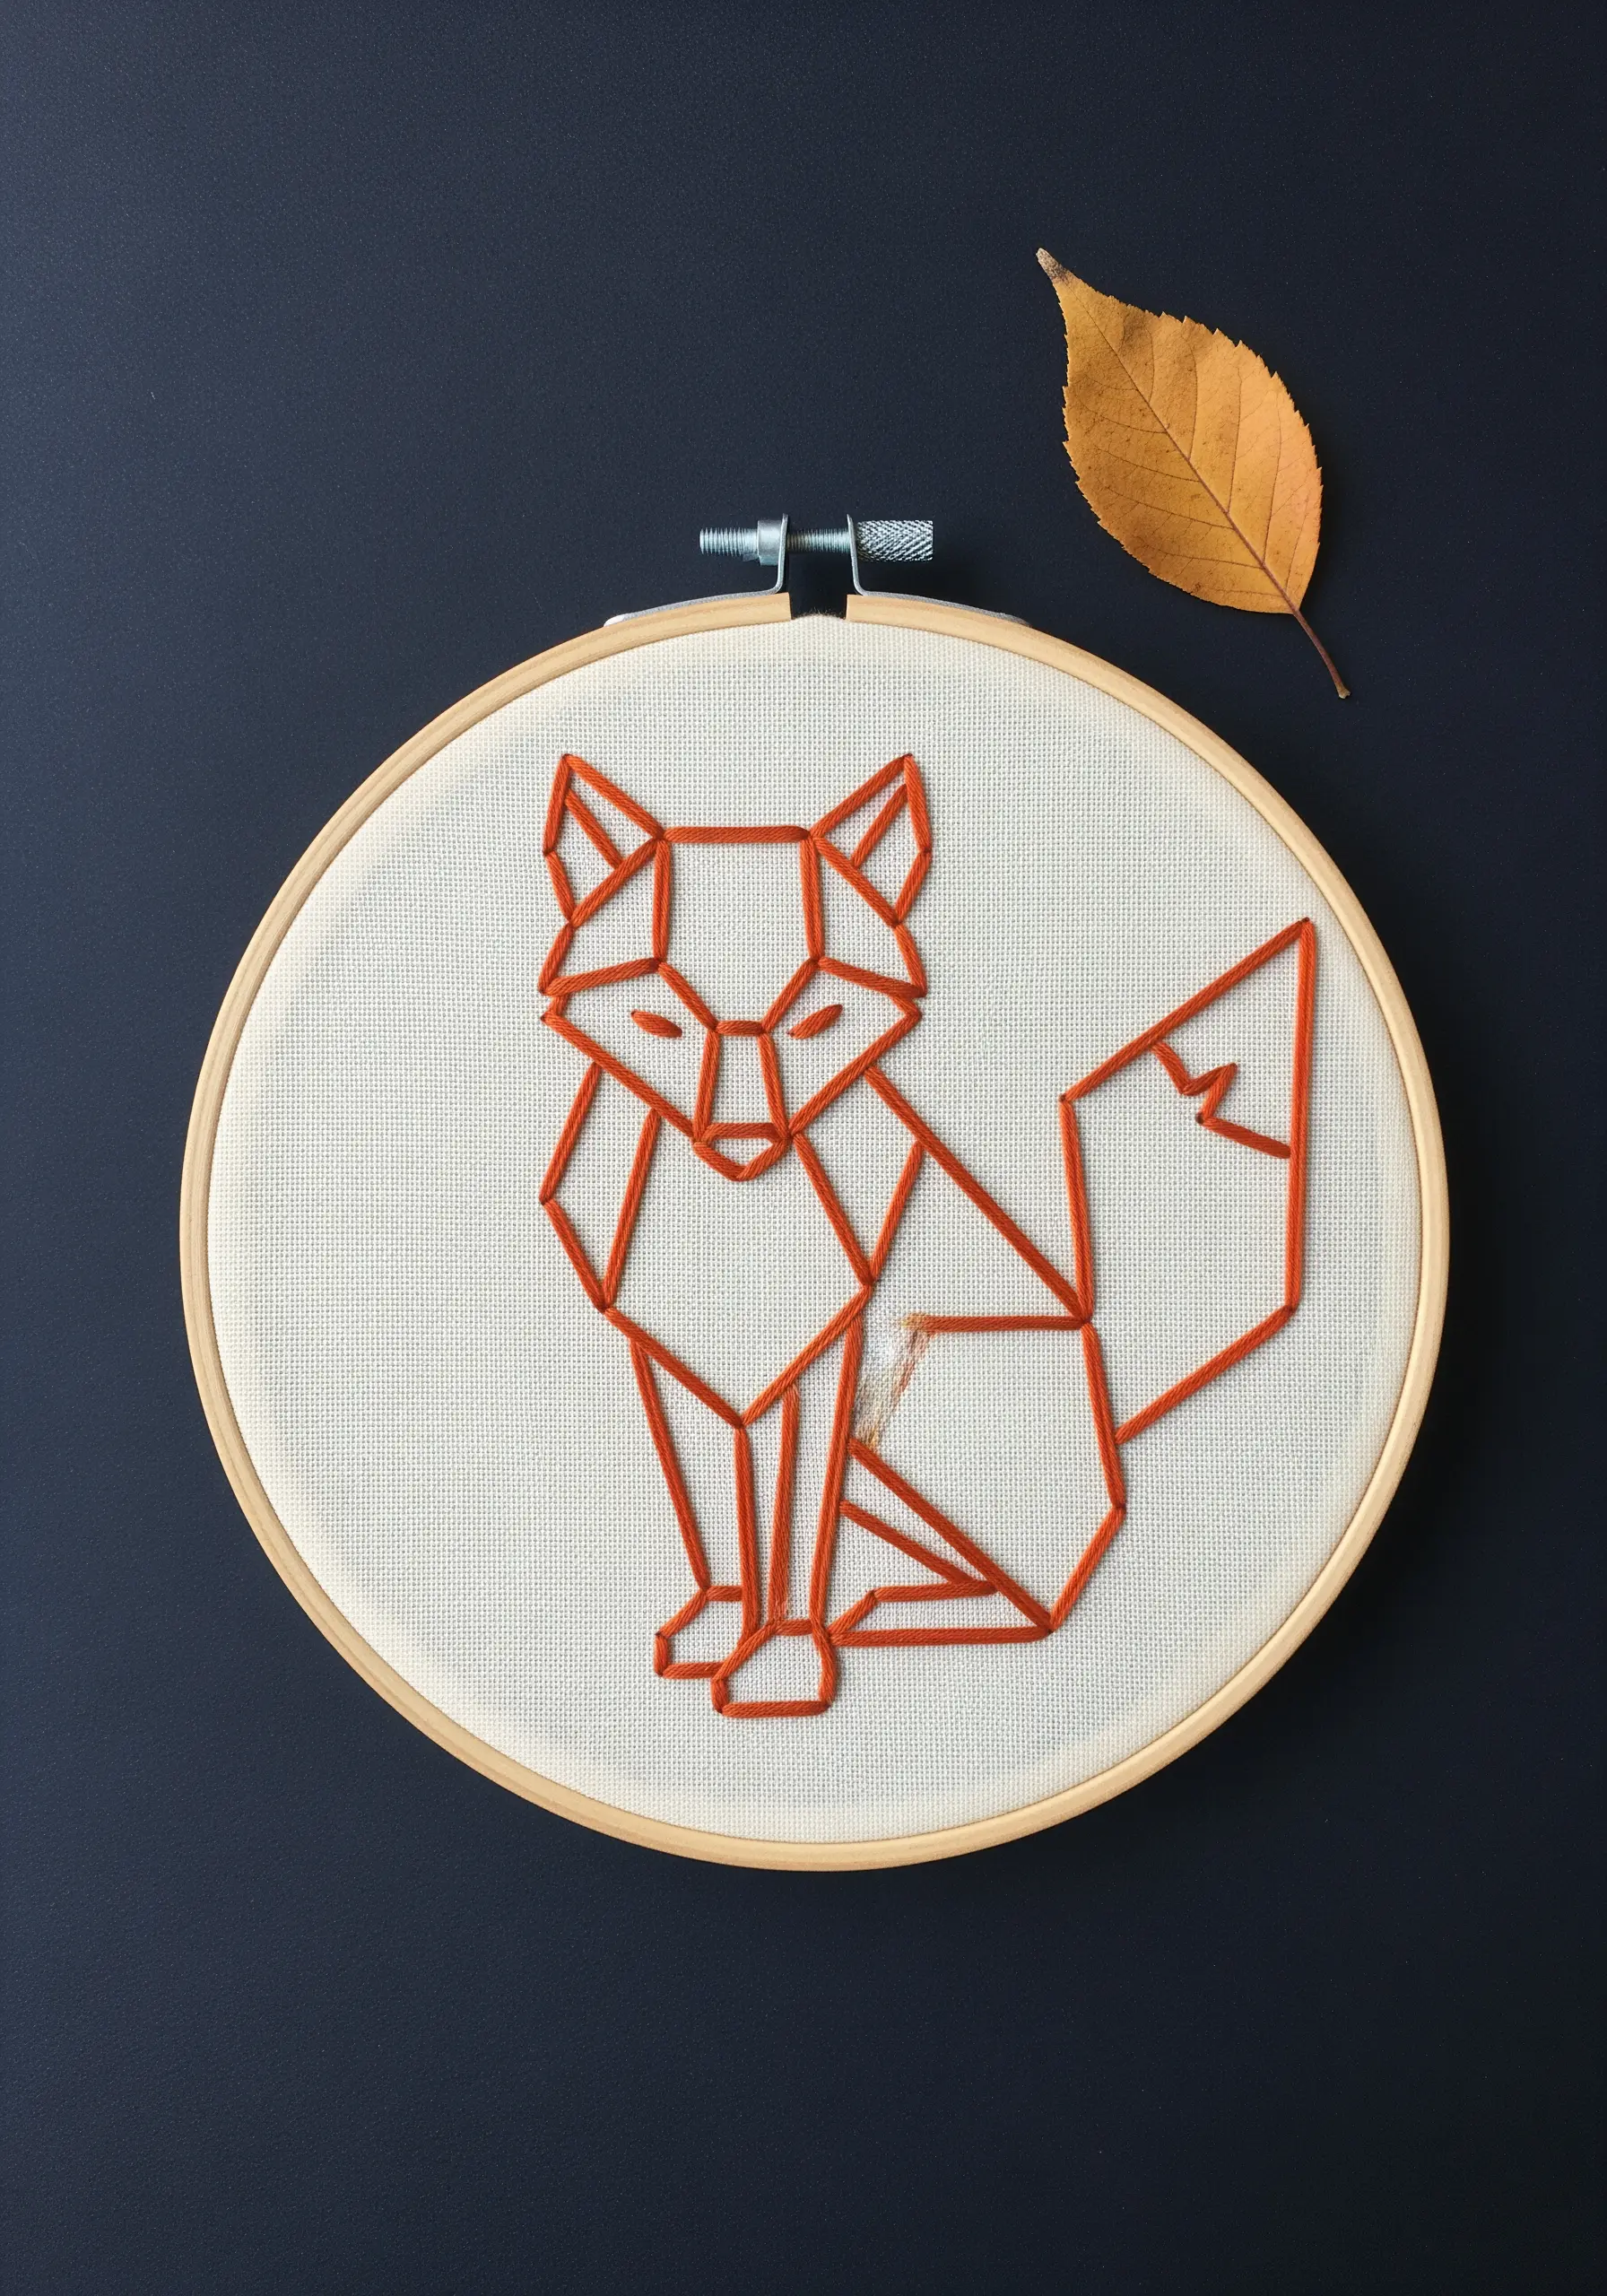
The sharp, clean look of this Geometric Satin Stitch Animal depends entirely on its crisp edges.
To achieve this, always outline each separate polygon of your design with a split stitch or backstitch first.
This outline acts as a containing wall for your satin stitches.
When you fill in the shape, bring your needle up on the outside of the outline and down on the inside. This ensures your satin stitch tucks neatly under the border, creating a perfectly defined edge with no fuzzy gaps.
18. Abstract Landscape with Color Blocking
To create an Abstract Landscape, focus on creating distinct fields of color and texture with long and short stitch.
Work one color block at a time, angling your stitches to suggest the slope of a hill or the flatness of a field.
Where two colors meet, instead of creating a hard line, allow the stitches from each block to interlock slightly.
This creates a soft, woven transition that feels more painterly and organic, blending the colors just enough to unify the composition while maintaining the blocky, graphic style.
19. Elevated Lettering on Felt

Using wool felt as your base fabric provides a unique opportunity for Elevated Lettering on Felt.
Because felt is a matted fiber rather than a woven one, you are free from the constraints of a grid. Your needle can pierce the surface anywhere, which makes creating smooth, perfect curves in script lettering much easier.
Use a high-contrast thread (like white on grey) and a slightly thicker stitch, like a whipped backstitch or stem stitch with four strands, to make your message stand out against the soft, matte texture of the felt.
20. The Woven Color Gradient
To stitch a seamless gradient, the magic is in the transition between color bands.
This texture is created with a dense brick stitch or seed stitch.
Stitch one full row of your first color. When you start the next row with your second color, allow a few stitches to dip down into the row above.
Likewise, bring a few stitches from the first color up into the second row.
This subtle mixing at the boundary line fools the eye and creates a beautifully smooth and gradual shift from one hue to the next.
21. The Cohesive Motif Collection
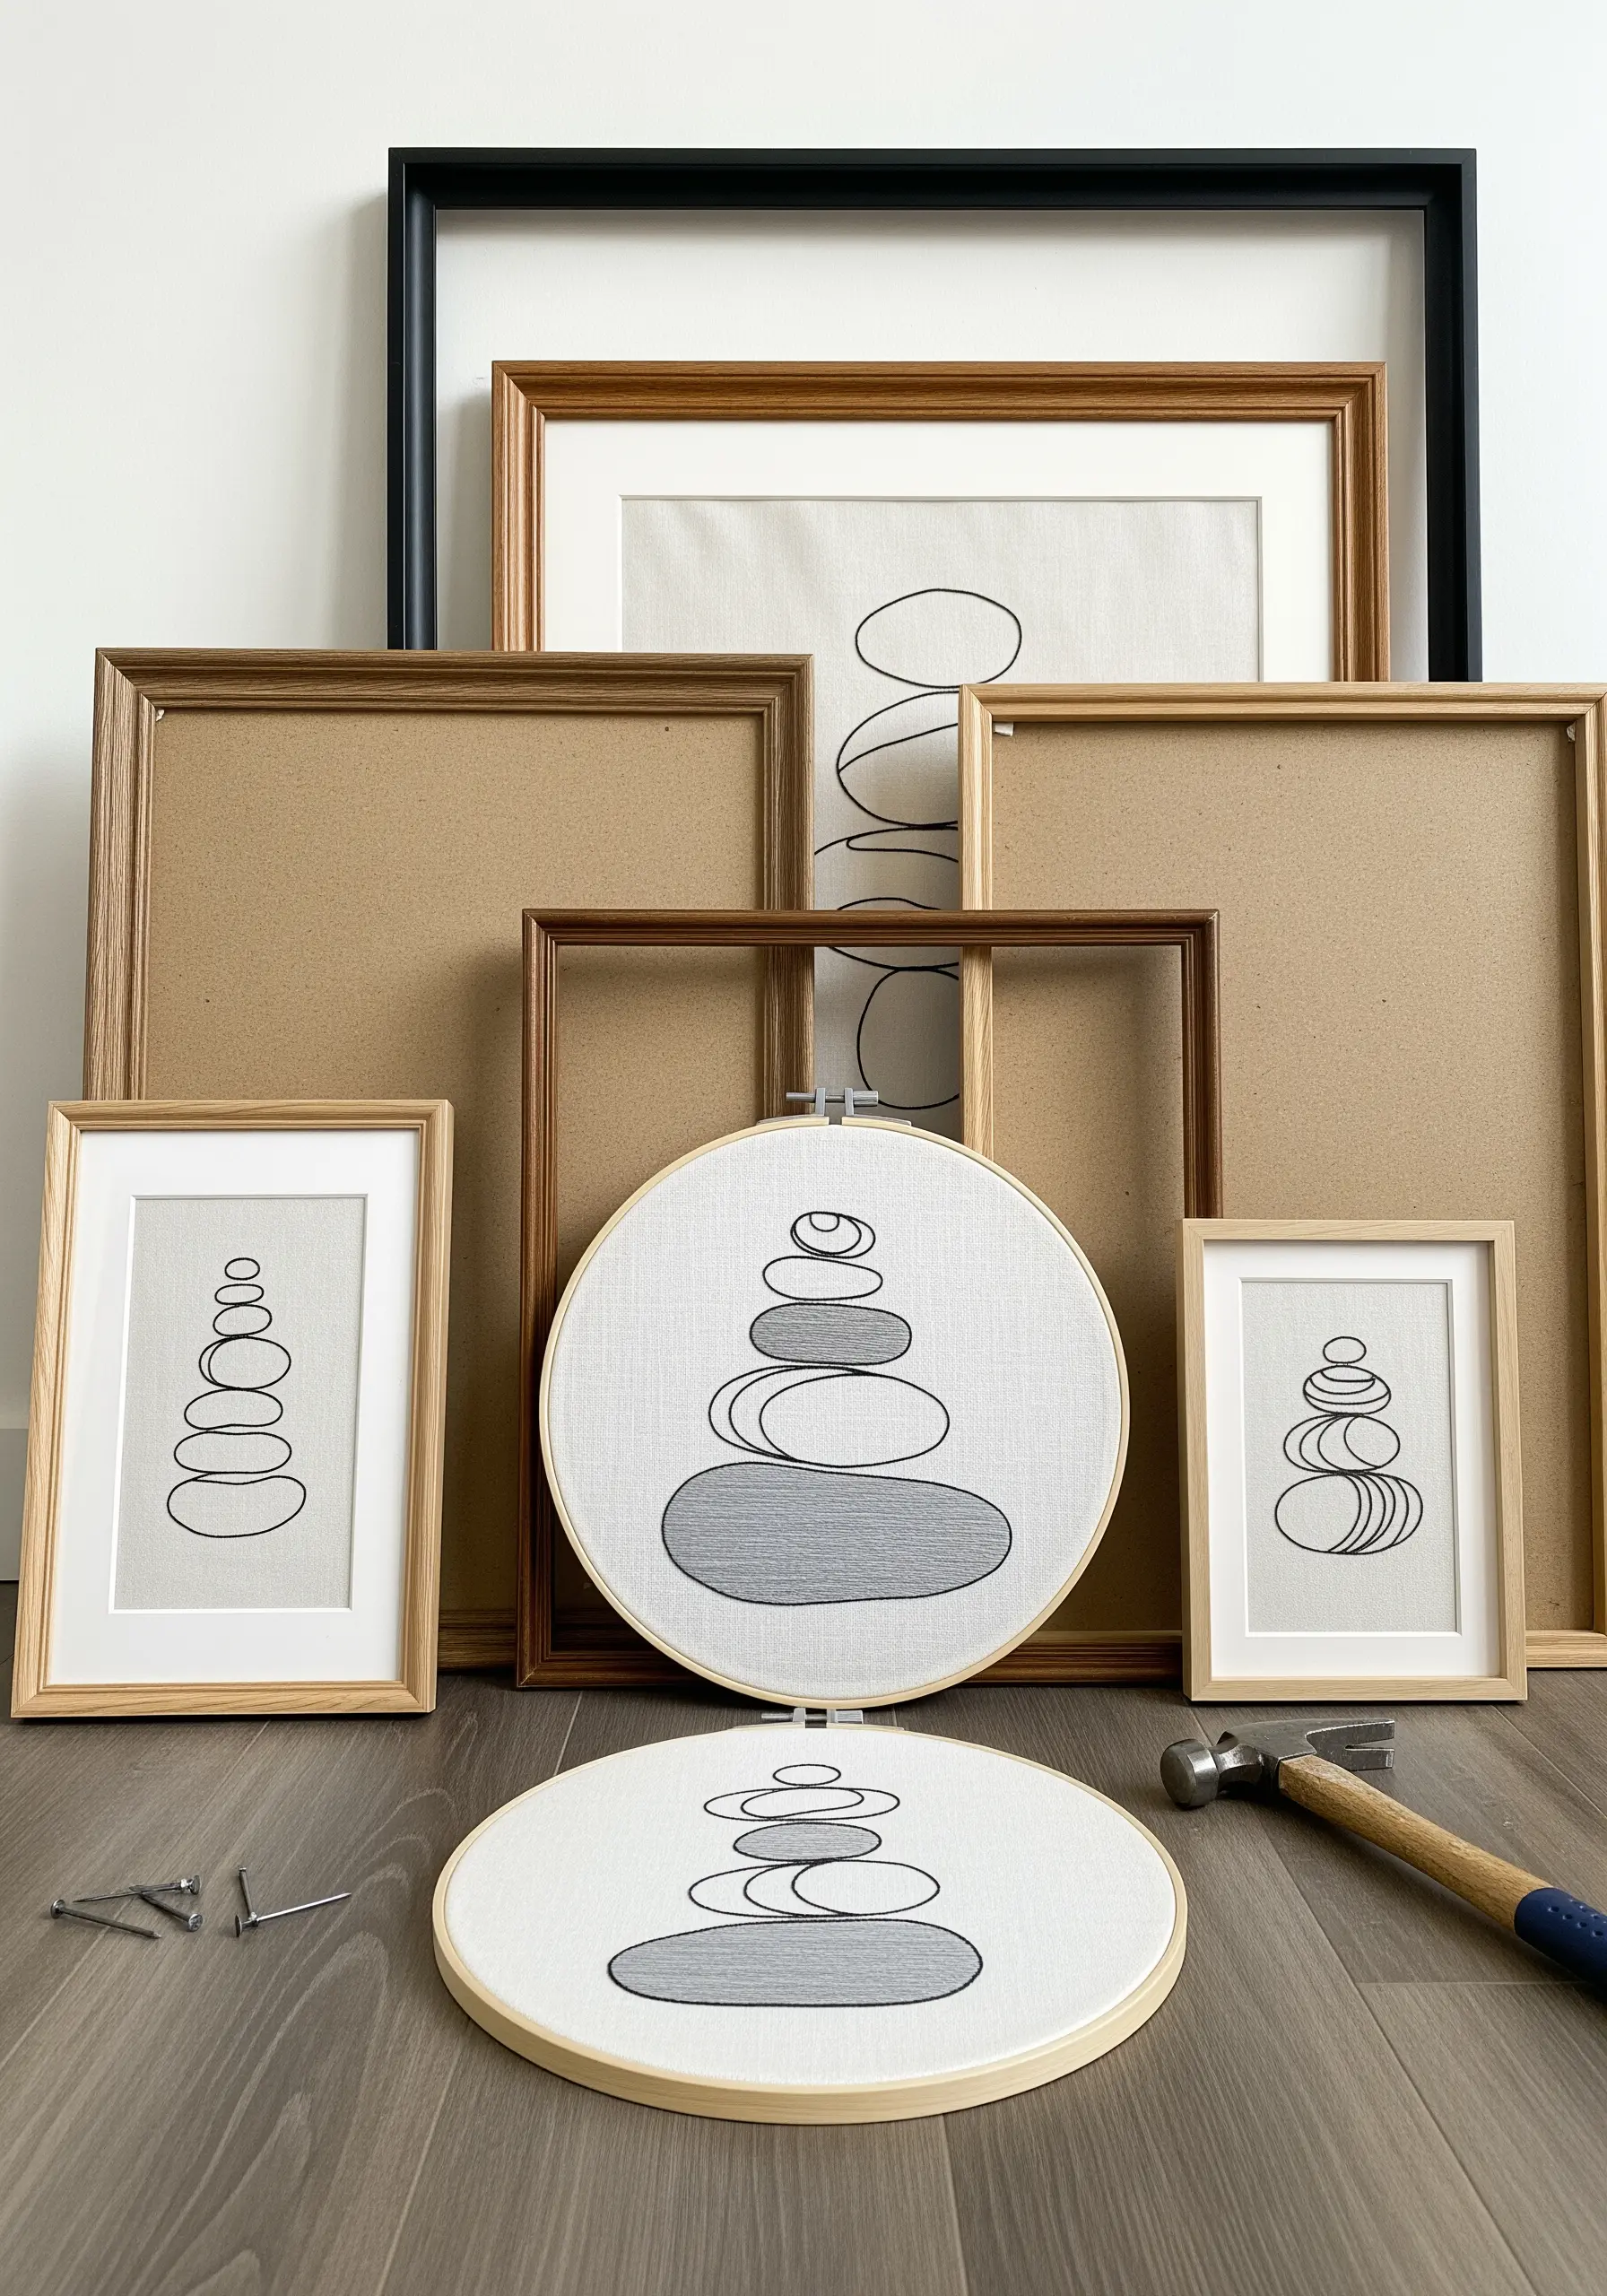
Transform simple individual hoops into a sophisticated art installation by creating a cohesive gallery wall.
Choose one simple motif, like these stacked stones, and repeat it across multiple pieces.
Vary the scale, orientation, and framing—some in hoops, some in traditional frames—but maintain a strict, consistent color palette (e.g., black, white, and a single neutral fabric).
This repetition and restraint are what unify the collection and give it the intentional, curated feel of a gallery display.
22. Metallic Line Art with a Sculptural Feel

For lines that look as if they’re drawn with polished wire, you can couch a thin, malleable craft wire directly onto your fabric.
Shape the wire to your design, lay it on the fabric, and use a single strand of matching sewing thread to tack it down with tiny, almost invisible stitches.
Alternatively, for a similar but more flexible result, use a stiff metallic cord like Kreinik Japan Thread and apply it with a couching stitch.
Both methods give your line art a raised, metallic, and distinctly sculptural quality.
23. The Beauty of Negative Space

The elegance of this Minimalist branch design comes from what is not stitched.
By keeping the motif simple and placing it off-center, you allow the un-stitched fabric, or negative space, to become an active part of the composition.
Use a simple satin stitch for the branch and perfectly executed French knots for the berries.
The key to a perfect French knot is to hold the working thread taut as you wrap the needle and as you push it back through the fabric very close to, but not in, the original entry hole.
24. Pattern Inlay with Contrasting Stitches
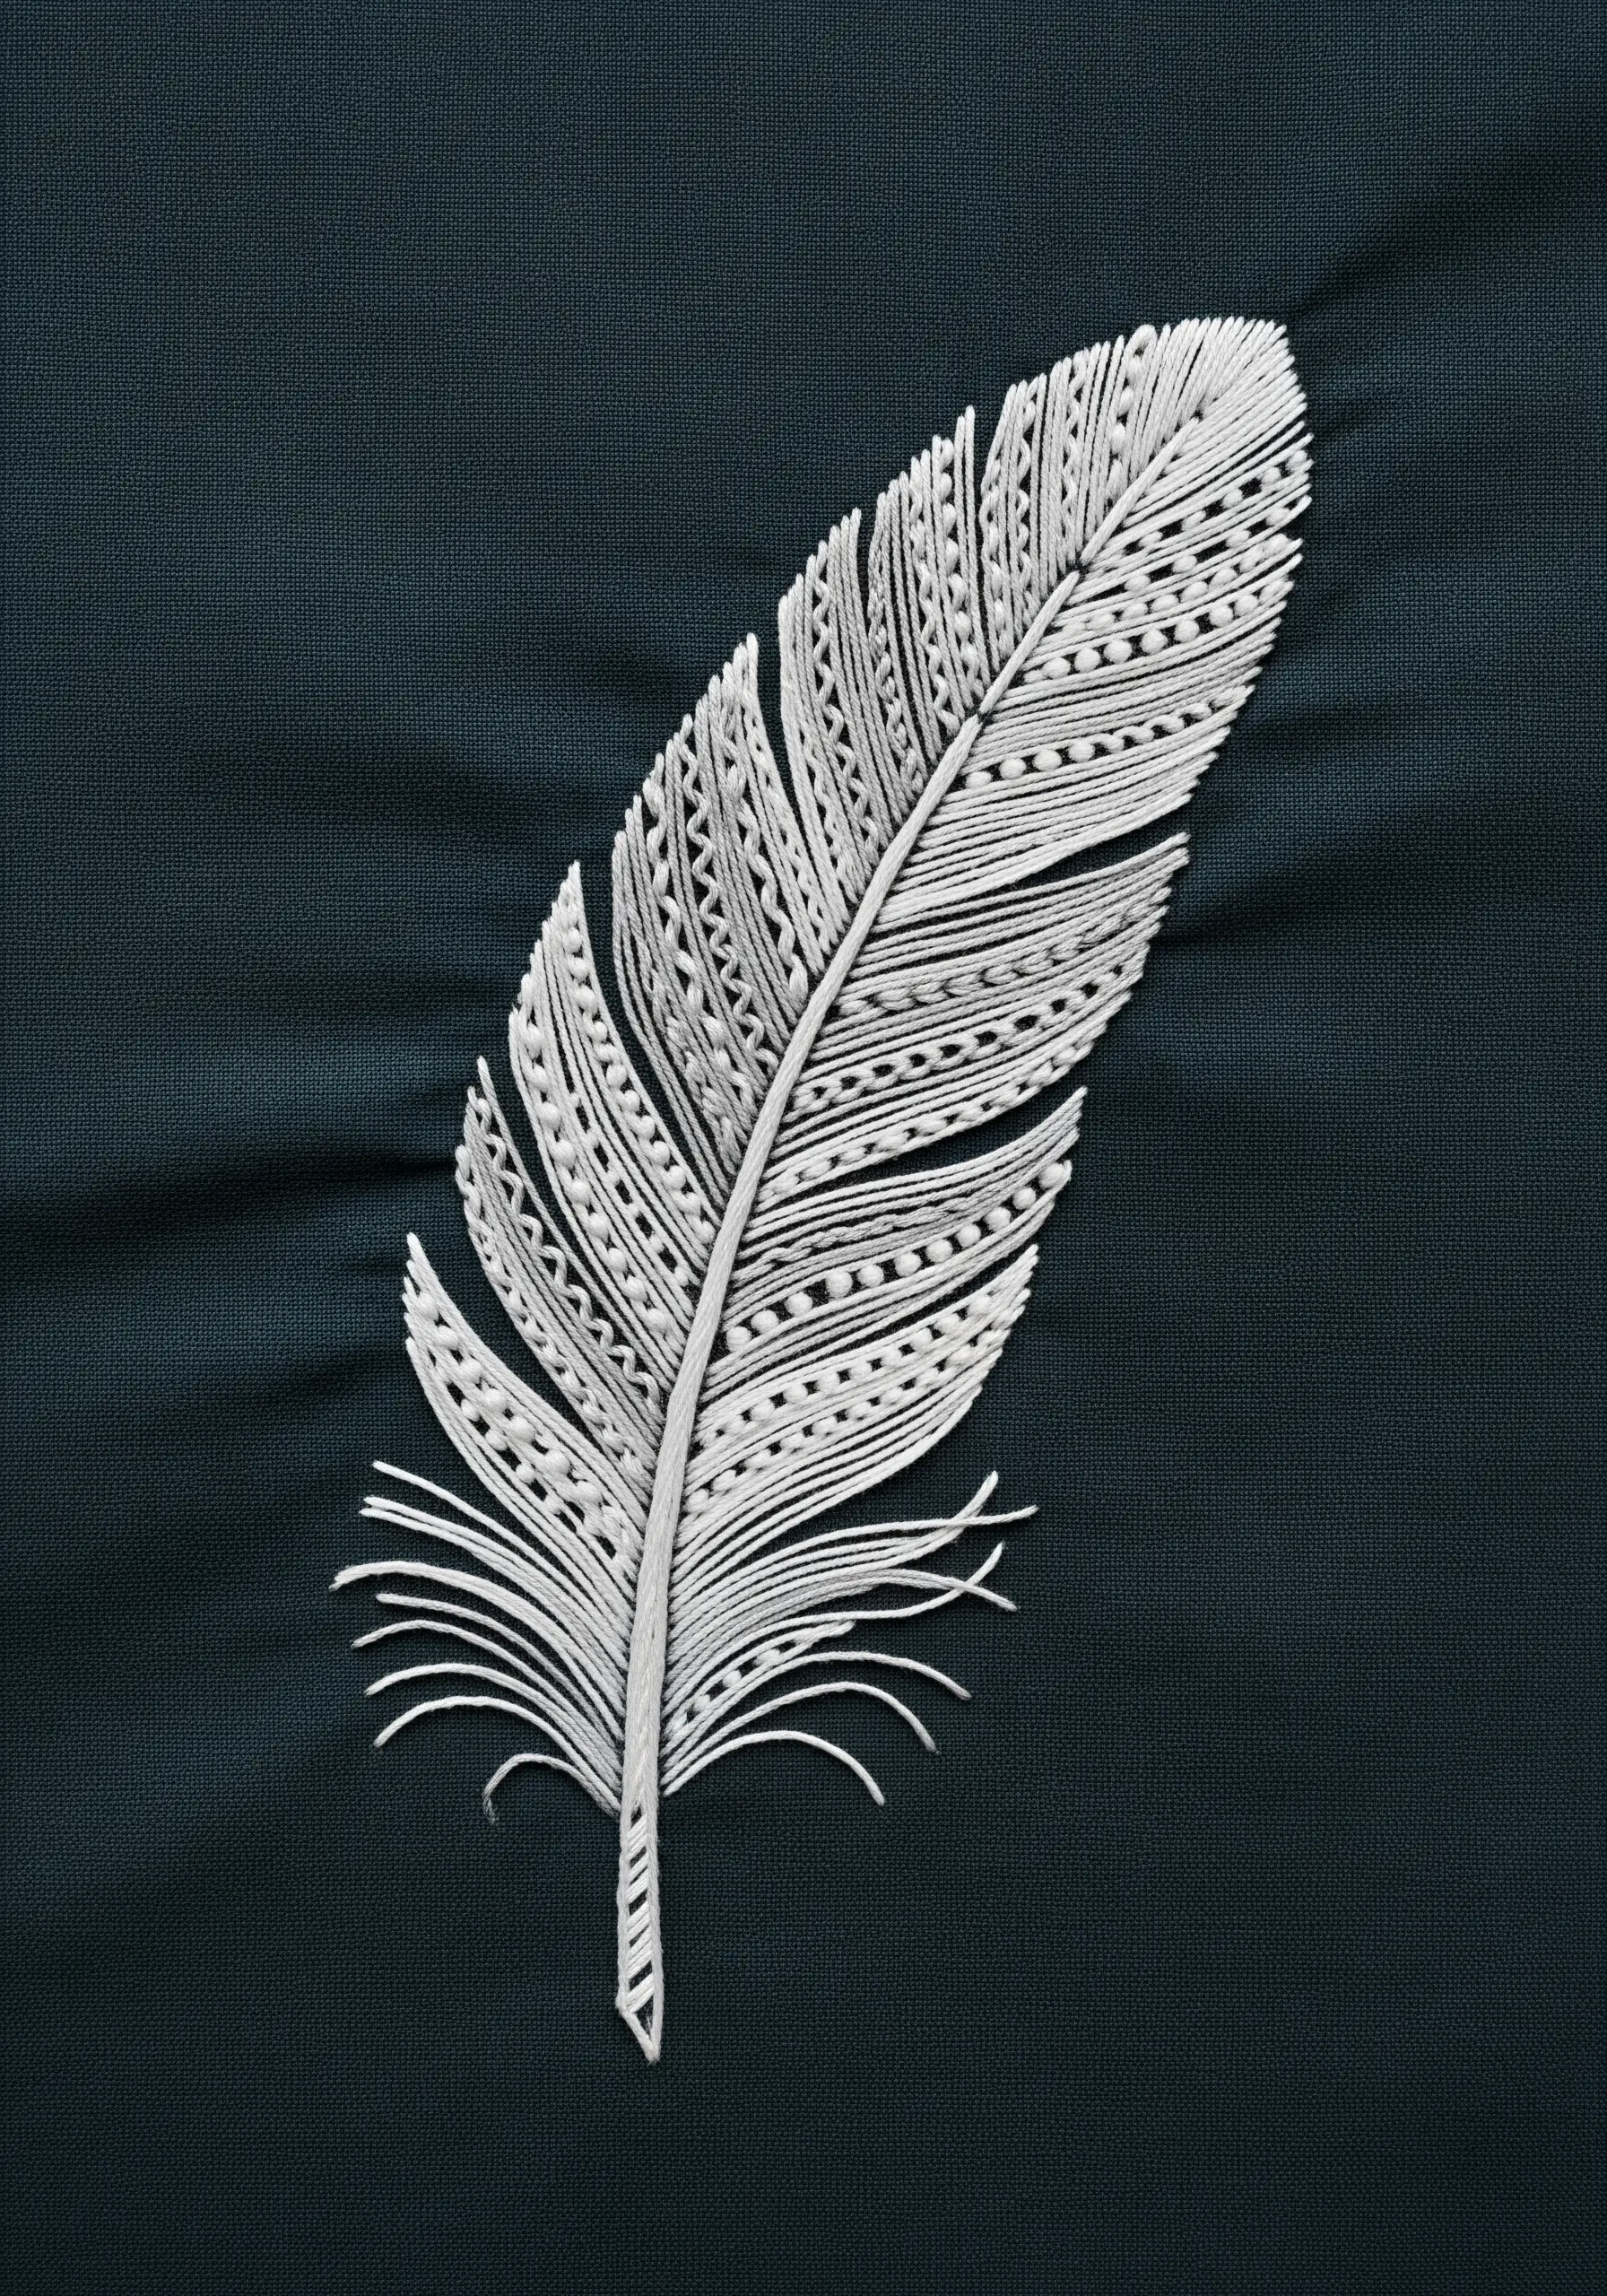
You can create incredibly intricate patterns within a single shape by treating it like a mosaic.
First, fill the larger sections of the feather with a smooth satin stitch. Then, approach the remaining empty spaces as opportunities for texture.
Fill these channels with contrasting stitches: a row of tiny seed stitches, a series of small V-shapes using fly stitch, or parallel bars of straight stitches.
This technique of layering different stitch patterns within one outline creates stunning depth and detail.
25. The Curated Hoop Collection

Elevate a grouping of small hoops by presenting them as a single, unified piece of art.
Mounting your finished hoops onto a fabric-covered board and placing them inside a large shadow box frame transforms them from individual projects into a Curated Hoop Collection.
This thoughtful presentation provides context and cohesion, making the simple motifs feel more intentional and gallery-ready.
Choose a background fabric for the frame that provides quiet contrast and complements your interior decor.
26. Organic Flow with Variegated Thread
For these beautiful, organic waves of color, let variegated thread do the work for you.
Variegated floss contains several shades or colors along a single strand.
As you stitch with it, the colors will change on their own, creating subtle, natural shifts in hue without the need to switch threads constantly.
Use a simple stem stitch or whipped backstitch to create the flowing lines, and the thread itself will provide the beautiful, gradient-like effect that gives the piece its sense of movement.
27. Creating Movement with Stitch Density
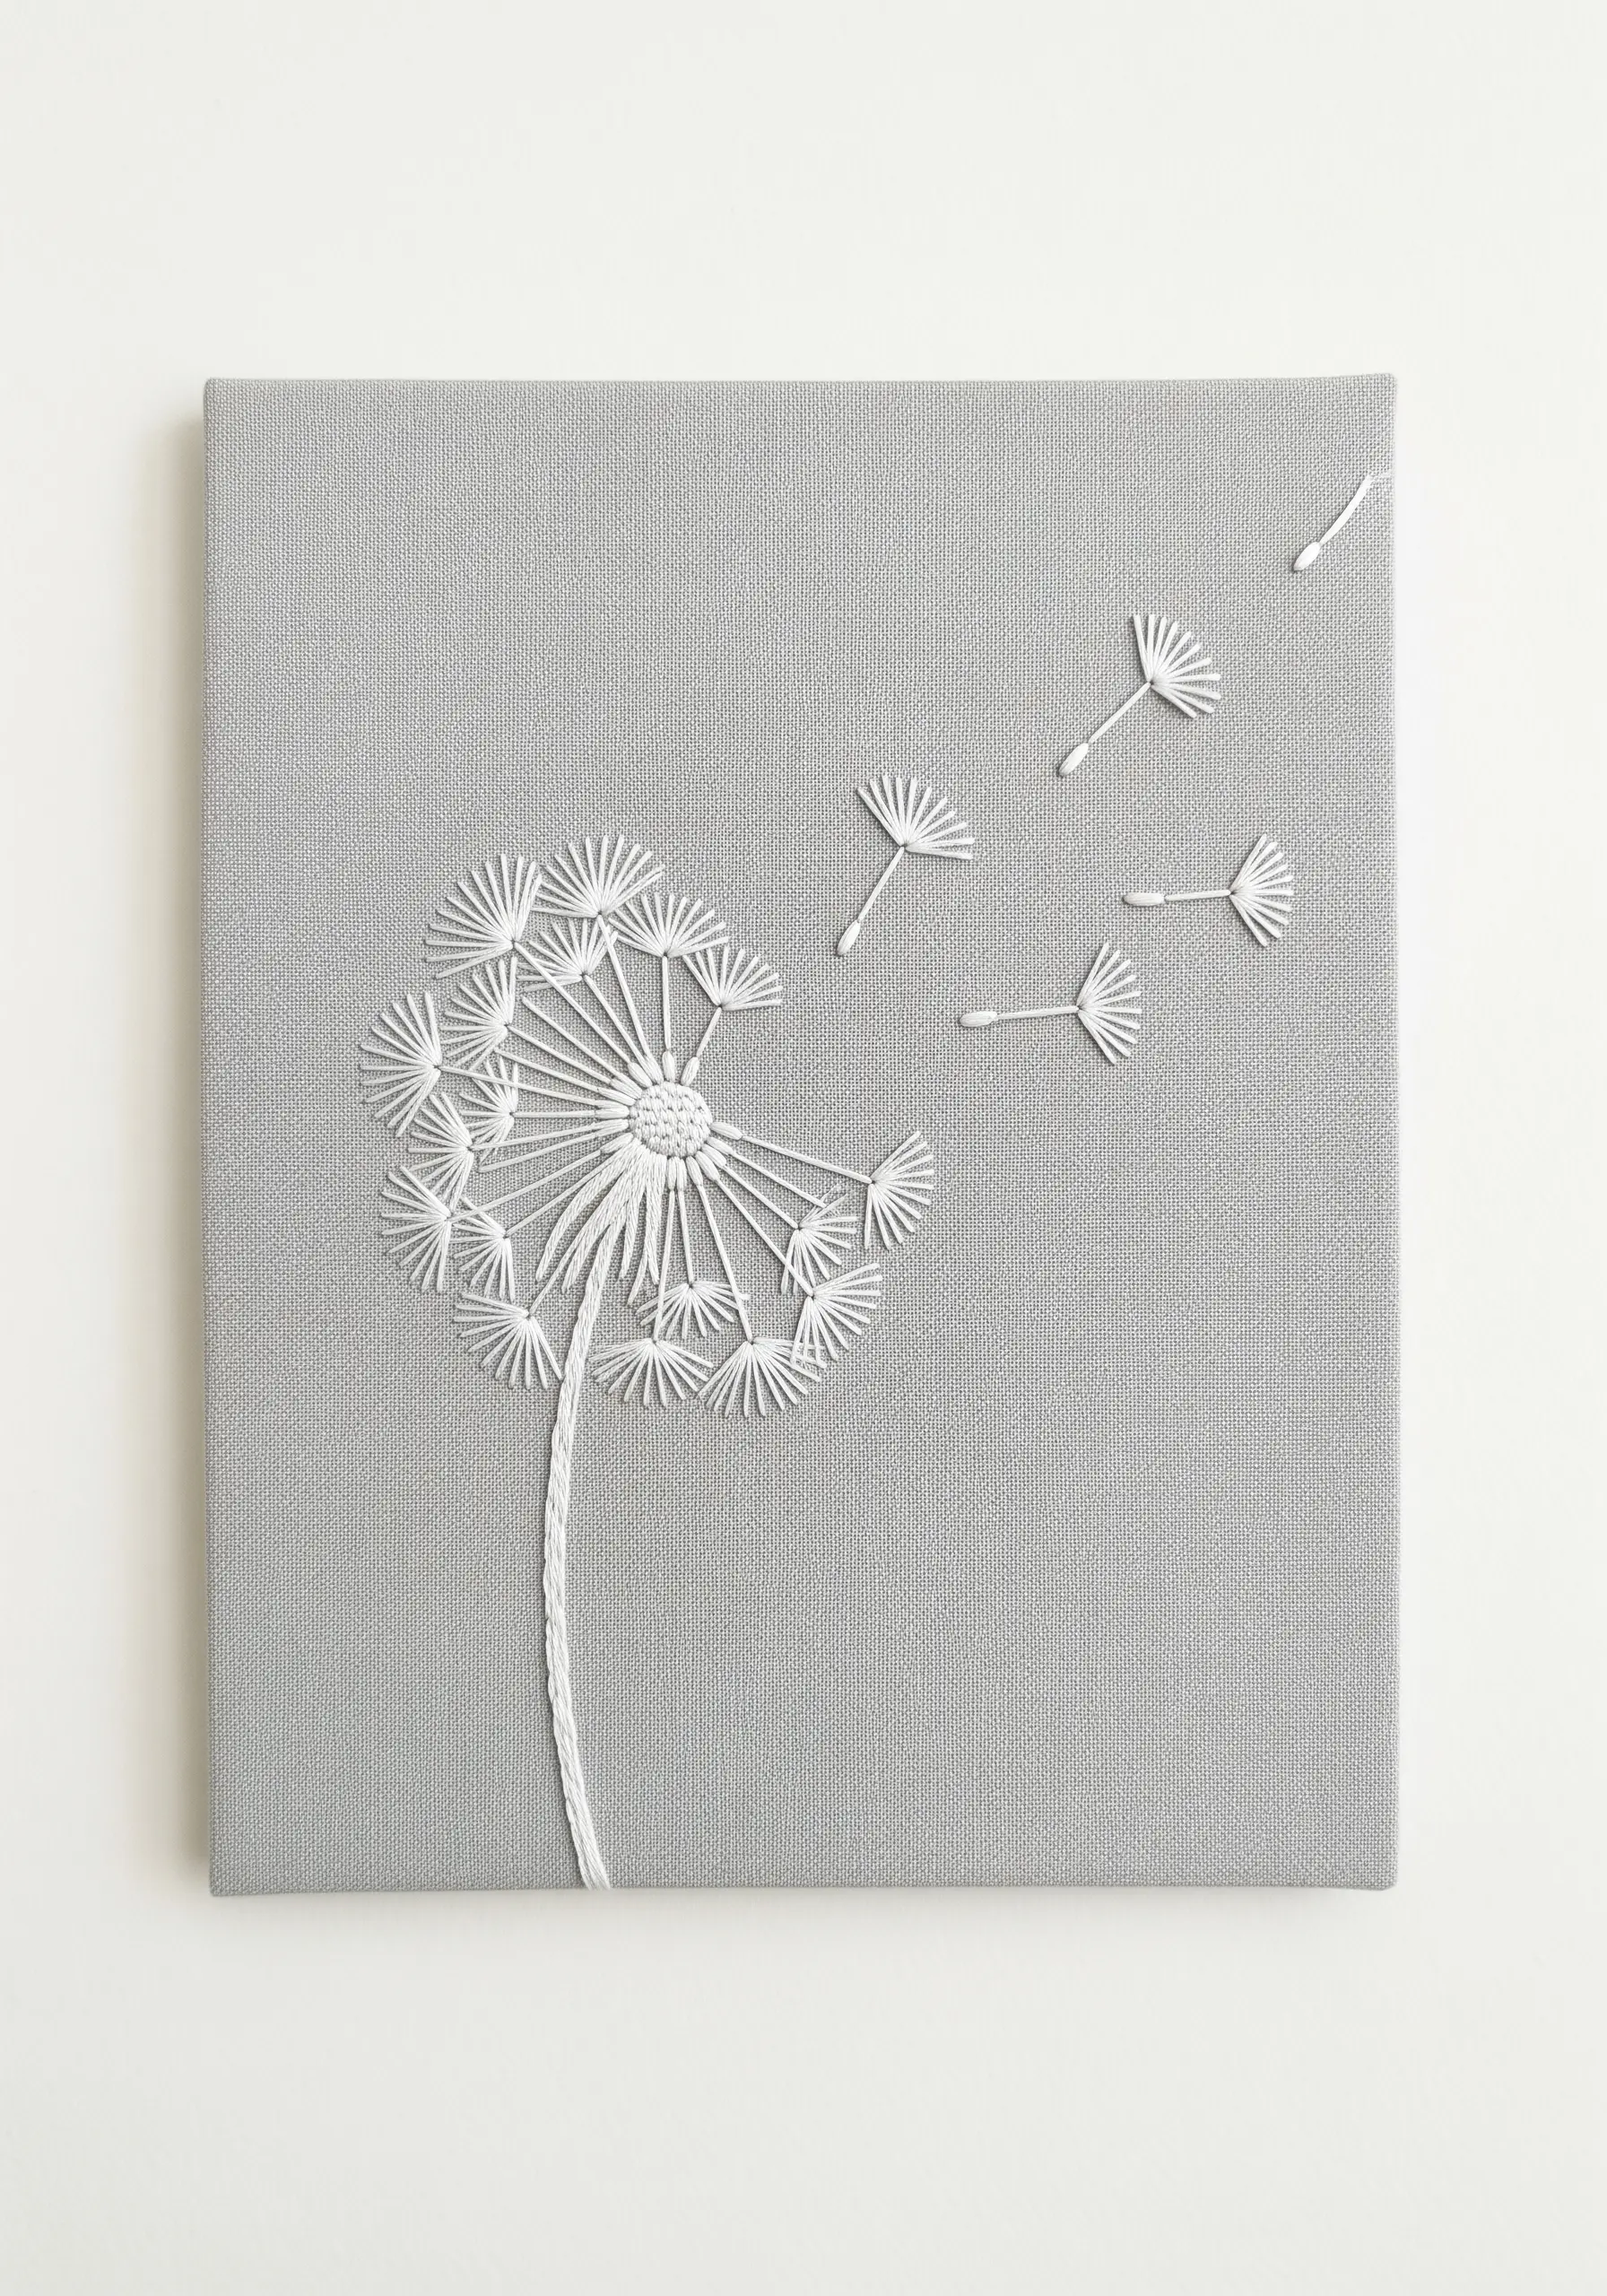
The success of this dandelion piece isn’t just in the stitches themselves, but in their placement.
Use detached chain stitches for the parachute-like tops of the seeds and simple straight stitches for their stems.
The detail that creates a powerful illusion of movement is the spacing.
Keep the stitches dense and tightly packed at the dandelion’s core. As the seeds break away and float off, increase the space between them and vary their angles. This progressive loosening of the pattern makes the seeds feel light and airborne.
28. The Abstract Stitch-Painted Circle
Create this energetic, expressive texture by layering short straight stitches like brushstrokes.
There is no rigid pattern here. Start with a base layer of your darkest color, placing stitches in multiple directions within the circle’s outline.
Then, layer on your mid-tones and highlights, allowing the stitches to overlap and intermingle.
This technique, often called thread painting, is less about precision and more about building up color and texture to create a piece that feels dynamic, abstract, and full of energy.


