Perhaps you’ve mastered the satin stitch and your French knots are perfect, but you feel a creative plateau. You’re looking for that next step—a way to make your embroidery feel less like a hobby and more like an art form, one that is deeply and uniquely yours.
The secret isn’t always in learning a more complex stitch. Often, it’s in the quiet conversation between thread and an unexpected surface. It’s in the texture of paper, the translucence of a pressed leaf, or the dimensional pop of a stitch on a painted canvas.
Here, we’ll explore how to blend embroidery with other materials not just as a craft, but as a deeply relaxing practice. These ideas are designed to help you slow down, notice the details, and create pieces that are not only beautiful to look at but profoundly satisfying to make.
1. Unify Watercolor Washes with 3D Stitches

Begin by applying loose watercolor washes onto thick, cold-press paper or a tightly woven cotton fabric.
Once dry, mount your piece in a hoop and use dimensional stitches like woven wheel roses or bullion knots to selectively highlight parts of your line drawing.
This technique works because the flat, fluid background makes the textured, sculptural stitches pop, creating a beautiful contrast in both medium and dimension.
Choose silk or satin threads for the stitches to add a subtle sheen that mimics the wetness of paint, further integrating the two mediums.
2. Add Metallic Relief to Decoupage Surfaces

Elevate a simple decoupage project by adding a stitched focal point directly onto the papered surface.
First, pierce your design’s outline with a fine awl or a thick needle to prevent tearing the paper.
Use a high-sheen metallic thread and a couching stitch to lay down thick, cord-like outlines that sit on top of the surface, creating a raised, almost jewelry-like effect.
This method adds luxurious texture and transforms a flat collage into a tactile object with perceived weight and history.
3. Map Your Landscape with Fabric and Flora

Combine fabric appliqué, pressed botanicals, and minimal stitching to create a large-scale landscape piece.
Layer torn or cut strips of textured fabrics like linen or felt to build an abstract, stratified background representing earth and sky.
Secure pressed ferns or flowers using tiny, almost invisible couching stitches with a single strand of matching thread.
Finally, add fine backstitched lines to suggest topographic contours, unifying the fabric and botanicals into a cohesive, organic design.
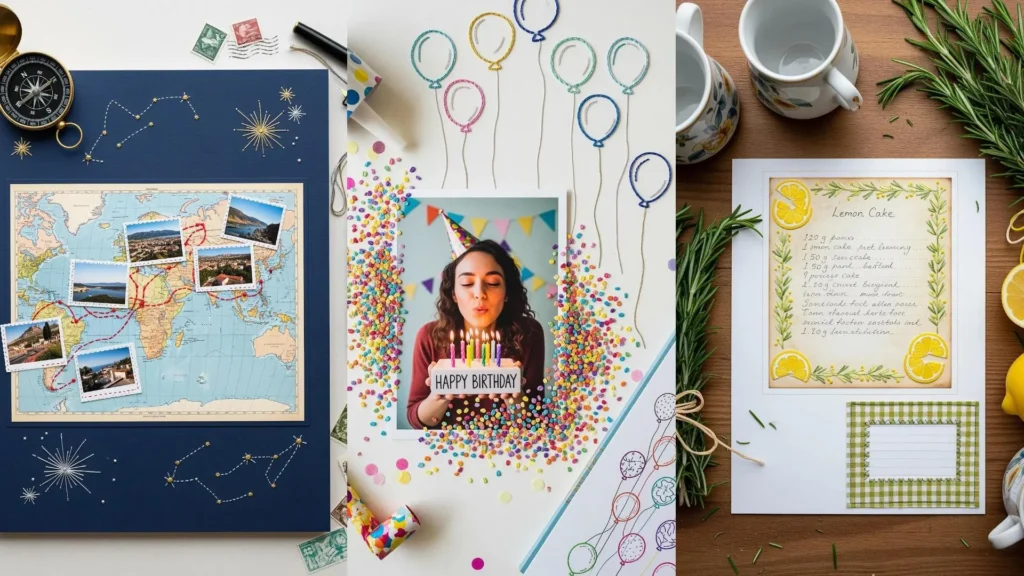
4. Illuminate Paper Collages with a Stitched Sun

Give your paper art a focal point of light and texture by adding a single, bold embroidered element.
Use a woven wheel stitch (or spider web stitch) with six-strand floss to create a dense, circular sun that radiates warmth.
The texture of the thread against the flat, torn paper of the mountains creates an immediate and satisfying contrast.
This is a quick, high-impact way to introduce embroidery to your card-making or scrapbooking, turning a simple craft into a personalized keepsake.
5. Give Photographic Prints Stitched Wings

Transform a simple black-and-white photograph or print by adding vibrant, densely stitched embellishments.
Mount the print onto a sturdy canvas or thick cardstock, then use a needle to pierce the outline of the area you intend to stitch.
Fill the shape with a tight satin stitch or long-and-short stitch using variegated thread for an effortless gradient effect.
The contrast between the flat, grayscale image and the raised, intensely colored embroidery creates a surreal and captivating piece of abstract mixed-media embroidery.
6. Craft Narrative Bookmarks with Thread and Paper

Create a collection of unique bookmarks by combining different mixed-media techniques on a small scale.
Embroider constellations onto watercolor-painted cardstock using metallic thread for a touch of magic.
Use simple running stitches on fabric scraps for a rustic, visible mending aesthetic.
For a botanical touch, sandwich a single pressed flower between two layers of vellum and stitch the edges to seal it.
These tiny canvases are perfect for experimenting without the commitment of a large project.
7. Animate Stamped Designs with Variegated Thread

Breathe life into simple rubber-stamped outlines by filling them with a pop of color and texture.
Use a waterproof ink pad on thick cardstock tags to create your clean, linear designs.
Instead of meticulously changing colors, use a single variegated six-strand floss to fill in the shapes with a few straight stitches.
The thread does the color-blending work for you, resulting in a dynamic, painterly effect with minimal effort—perfect for creating a set of beautiful, handmade embroidery projects to give as thoughtful birthday gifts.
8. Sculpt Bold Shapes with Rope on Handmade Paper

Explore bold, graphic design by couching thick cotton rope onto heavily textured handmade paper.
The soft, pliable rope creates clean, high-relief lines that stand out against the raw, fibrous surface of the paper.
Use a sturdy, large-eyed needle and a matching or contrasting thread to tack the rope down with small, evenly spaced stitches.
This technique shifts the focus from intricate stitching to form and texture, making it a meditative process perfect for creating calming embroidery decor ideas.
9. Frame Ethereal Watercolors with Wire

Construct a delicate sculpture by using wire as both a frame and a drawing tool for translucent paper.
Shape thin, malleable wire into your desired form—like a sailboat—then stretch and glue a lightweight paper, like rice paper or vellum, across the sections.
Once dry, use watercolors to add soft washes of color, letting the pigment bleed and pool for an organic feel.
The wire acts as a minimalist line drawing, giving structure to the fragile, light-filled paper sails, creating stunning coastal theme tiny embroidery art.
10. Weave Memories into Your Nature Journal

Integrate found objects from nature directly onto your journal pages using simple weaving and stitching techniques.
Secure a pressed leaf to the page and use a needle to pierce a small rectangular frame through it and the paper below.
Use this frame as a loom, wrapping metallic or cotton threads back and forth to create a woven patch that physically binds the memory to the page.
Finish by adding a decorative blanket stitch around a photograph to create a cohesive, multi-layered journal spread.
11. Puncture Papier-Mâché with Graphic Stitches

Add an unexpected touch of softness and color to hard papier-mâché forms with bold, simple stitches.
After your papier-mâché bowl is dry and painted, use a small drill bit or a sturdy awl to carefully pierce holes for your design.
Thread a large-eyed needle with thick yarn or embroidery floss and use a star stitch or simple straight stitches to create graphic, starburst motifs.
The contrast between the rigid, paper-covered surface and the soft, vibrant thread creates a playful and modern folk-art aesthetic.
12. Fill a Silhouette with Dense Thread Painting

Create a stunning piece of art by using a simple silhouette as a container for intricate, freeform embroidery.
Start with a collage background of maps or old book pages to add subtle depth and history.
Lightly trace your silhouette onto fabric and fill it completely with a riot of color and texture, using stitches like French knots, satin stitch, and woven wheels.
Outline the final shape with a clean, thick line of whipped backstitch to give it a crisp, defined edge that contains the beautiful chaos within.
13. Add Subtle Structure to Paper-Cut Feathers

Enhance the delicate nature of paper-cut art with a single, structural line of thread.
Instead of embroidering a full design, use a simple running stitch or backstitch down the center of a paper feather to represent the rachis (shaft).
This minimal intervention adds a hint of textile softness and dimension without overwhelming the intricate paper cuts.
It’s a perfect example of how one simple stitched line can provide structure and a focal point, turning paper cutouts into more refined objects.
14. String Together an Autumn Garland with a Simple Stitch

Assemble a quick and festive garland by using thread to both embellish and connect paper elements.
Use die-cut paper leaves in warm autumnal colors as your base.
With your sewing machine, or by hand, use a simple straight stitch or running stitch down the center of each leaf, leaving a long tail of thread between each one to form the garland’s string.
The stitched line adds a lovely vein-like detail while simultaneously being the functional element that holds your decor together.
15. Suspend Painted Moons with Delicate Thread

Craft a serene and weightless mobile by combining watercolor paper, subtle color washes, and fine metallic thread.
Cut geometric shapes from heavy watercolor paper and apply a wet-on-wet technique with blues and greens for a dreamy, atmospheric effect.
Once dry, pierce the shapes to add spare, elegant lines of gold thread or a few tiny seed beads for a hint of sparkle.
The magic is in the balance and restraint; the thread isn’t the star but the quiet connector that lets the ethereal paper shapes float.
16. Embroider Tiny Moments on Handmade Paper Tags

Explore the joy of miniature embroidery by creating tiny floral motifs on textured, handmade paper.
Use just one or two strands of floss to keep the stitches delicate and prevent tearing the paper.
A simple lazy daisy for a petal, a French knot for a flower center, and a straight stitch for a stem are all you need.
These easy small embroidery patterns can be used as unique tea tags, gift tags, or place cards, offering a personal, handmade touch.
17. Add a Padded Appliqué to a Decoupage Box

Combine the dimensionality of stumpwork with the layered texture of decoupage for a truly unique decorative box.
First, create your embroidered element—like a hot air balloon—on a separate piece of fabric, using padded satin stitch to give it a raised, 3D quality.
Carefully cut out the embroidered shape, leaving a small fabric border, and glue it securely onto the lid of your finished decoupage box.
The raised appliqué becomes a tactile focal point, inviting touch and transforming the box into a multi-sensory art piece.
18. Compose Framed Studies of Texture and Line

Create a gallery wall of small, abstract artworks by exploring the interplay of paper, thread, and simple mark-making.
In each frame, focus on a single technique: weave strips of paper, layer torn collage elements, or add rows of running stitches to crumpled paper.
Use a limited, neutral color palette to unify the collection, allowing the textures to be the main focus.
This exercise encourages you to see thread not just as a decorative tool but as a way to create lines, patterns, and textures, just like a pencil or charcoal.
19. Plot a Personal Journey with 3D Embroidered Pins

Turn a map into a personal story by creating tiny, dimensional embroidered pins to mark significant locations.
Stitch miniature buildings, trees, or symbols onto small squares of felt or canvas, using French knots and satin stitch for texture and density.
Wrap the finished embroideries around small, padded buttons or cardboard squares and secure them on the back.
Pin them to a map and connect them with a simple red backstitch to visualize a favorite walk, a memorable trip, or the story of your life.
20. Illuminate a Lampshade with Stitched Skeletons

Combine pressed botanicals and simple embroidery to create a lampshade that comes alive when lit.
Use skeleton leaves (which have had their fleshy part removed) for their intricate, vein-like patterns.
Carefully arrange and attach them to a translucent parchment lampshade, then use a running stitch or blanket stitch to frame each leaf or floral element.
When the lamp is turned on, the light shines through the delicate leaves, highlighting both their natural structure and your hand-stitched details.
21. Weave Geometric Light with Thread and Vellum

Create a stunning, stained-glass effect on a window using layers of colored tissue paper and thread.
Arrange and overlap squares of tissue paper or vellum on a piece of clear contact paper to build your composition.
Use the contact paper as your ‘fabric’ and stitch geometric patterns directly through the layers with dark embroidery floss.
When hung in a window, the light filters through the colored paper, illuminating your thread work and casting colorful shadows, much like retro string art patterns.
22. Achieve Precision with Paper Mandala Embroidery

Explore the meditative art of paper embroidery, where precision and pattern take center stage.
Print or draw your mandala design on cardstock and use a piercing tool to create evenly spaced holes along all the lines.
Using a single strand of thread, follow a methodical stitching pattern to connect the holes, building up layers of straight lines that create intricate, geometric curves.
The process is incredibly calming, as it relies on rhythm and repetition to transform a simple drawing into one of these stunning embroidered mandala wall art designs for mindful stitching.
23. Sculpt Ocean Waves with High-Texture Threadwork

Build a dynamic, sculptural seascape on a journal cover or canvas using a variety of threads and stitches.
Lay down a base of long, straight stitches with variegated blue floss to create the undulating movement of water.
Then, build up the crests of the waves using dense clusters of French knots and tightly wrapped coils (bullion knots) in white and off-white threads.
This layering of different textures and thread weights is what creates the illusion of foam and spray, turning a flat surface into a tactile, moving ocean.
24. Create Ethereal Layers with Stitched Vellum

Achieve a soft, dreamlike quality in your collage work by stitching onto translucent vellum or rice paper.
Embroider your motifs—like these simple birds—onto the vellum using a fine needle and a delicate backstitch.
Gently tear the edges of the vellum to create a soft, cloud-like border.
Layer the stitched vellum over a vintage postcard or botanical illustration; the transparency allows the background to show through, creating a piece with beautiful depth and a sense of gentle nostalgia.
25. Curate a Sampler of Tactile Exploration

Design a sampler that isn’t about perfecting stitches, but about exploring how thread interacts with different surfaces.
Divide a large piece of handmade paper into a grid and dedicate each square to a different material: corrugated cardboard, crumpled tissue paper, torn canvas, or bubble wrap.
In each square, experiment with a few simple marks—running stitches, wrapped yarn, French knots—and observe how the texture of the material changes the look and feel of the stitch.
This is a wonderfully freeing exercise in material curiosity and one of the best embroidery projects inspired by textures you could try.