

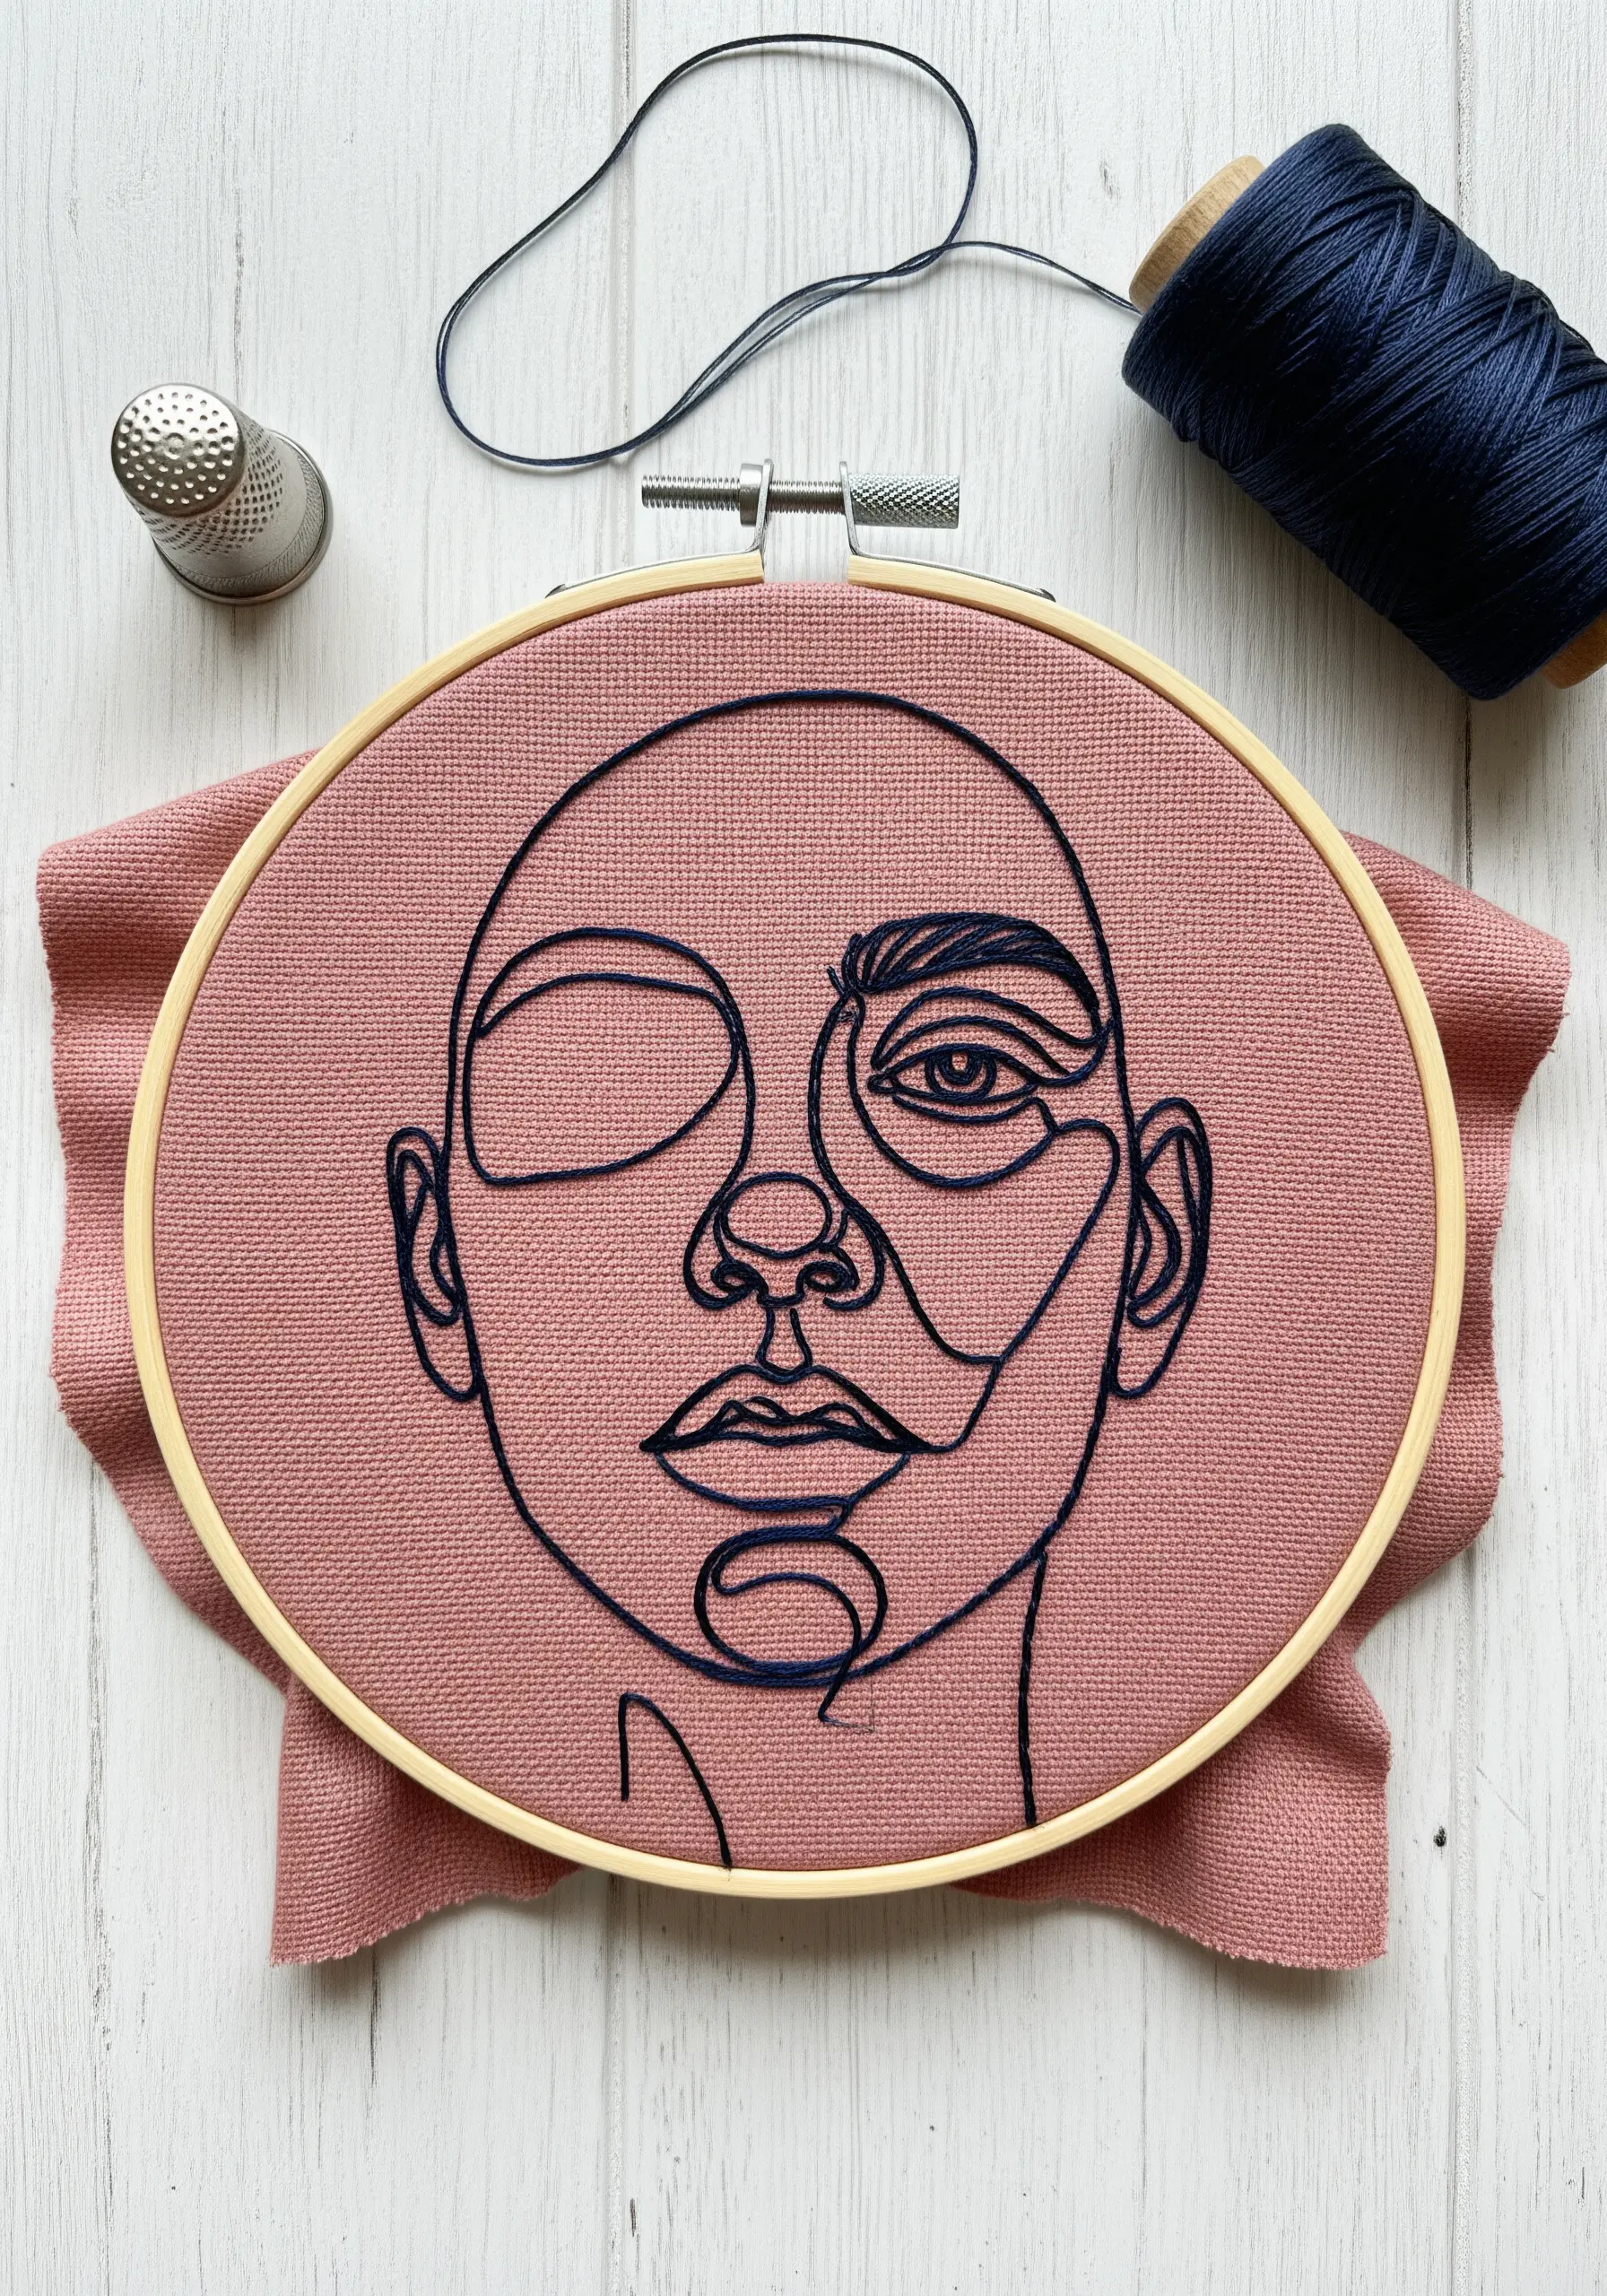
If you’ve ever felt that your embroidery could be more expressive or modern, I want you to take a breath and look at the simple power of a single line. Forget complex stitches and dozens of colors for a moment. The path to truly elegant work is often through thoughtful simplicity.
Line-art faces are more than just a quick project; they are a meditative practice in form and expression. Each one is an opportunity to perfect the curve of a stitch, to understand the relationship between thread and fabric, and to see how much emotion can be conveyed with just one continuous contour.
These projects are designed to be completed in an afternoon, but their impact is lasting. They will build your confidence, refine your technique, and leave you with a piece of minimalist art that feels both personal and incredibly sophisticated. Let’s begin.
1. Master the Bold, Continuous Line
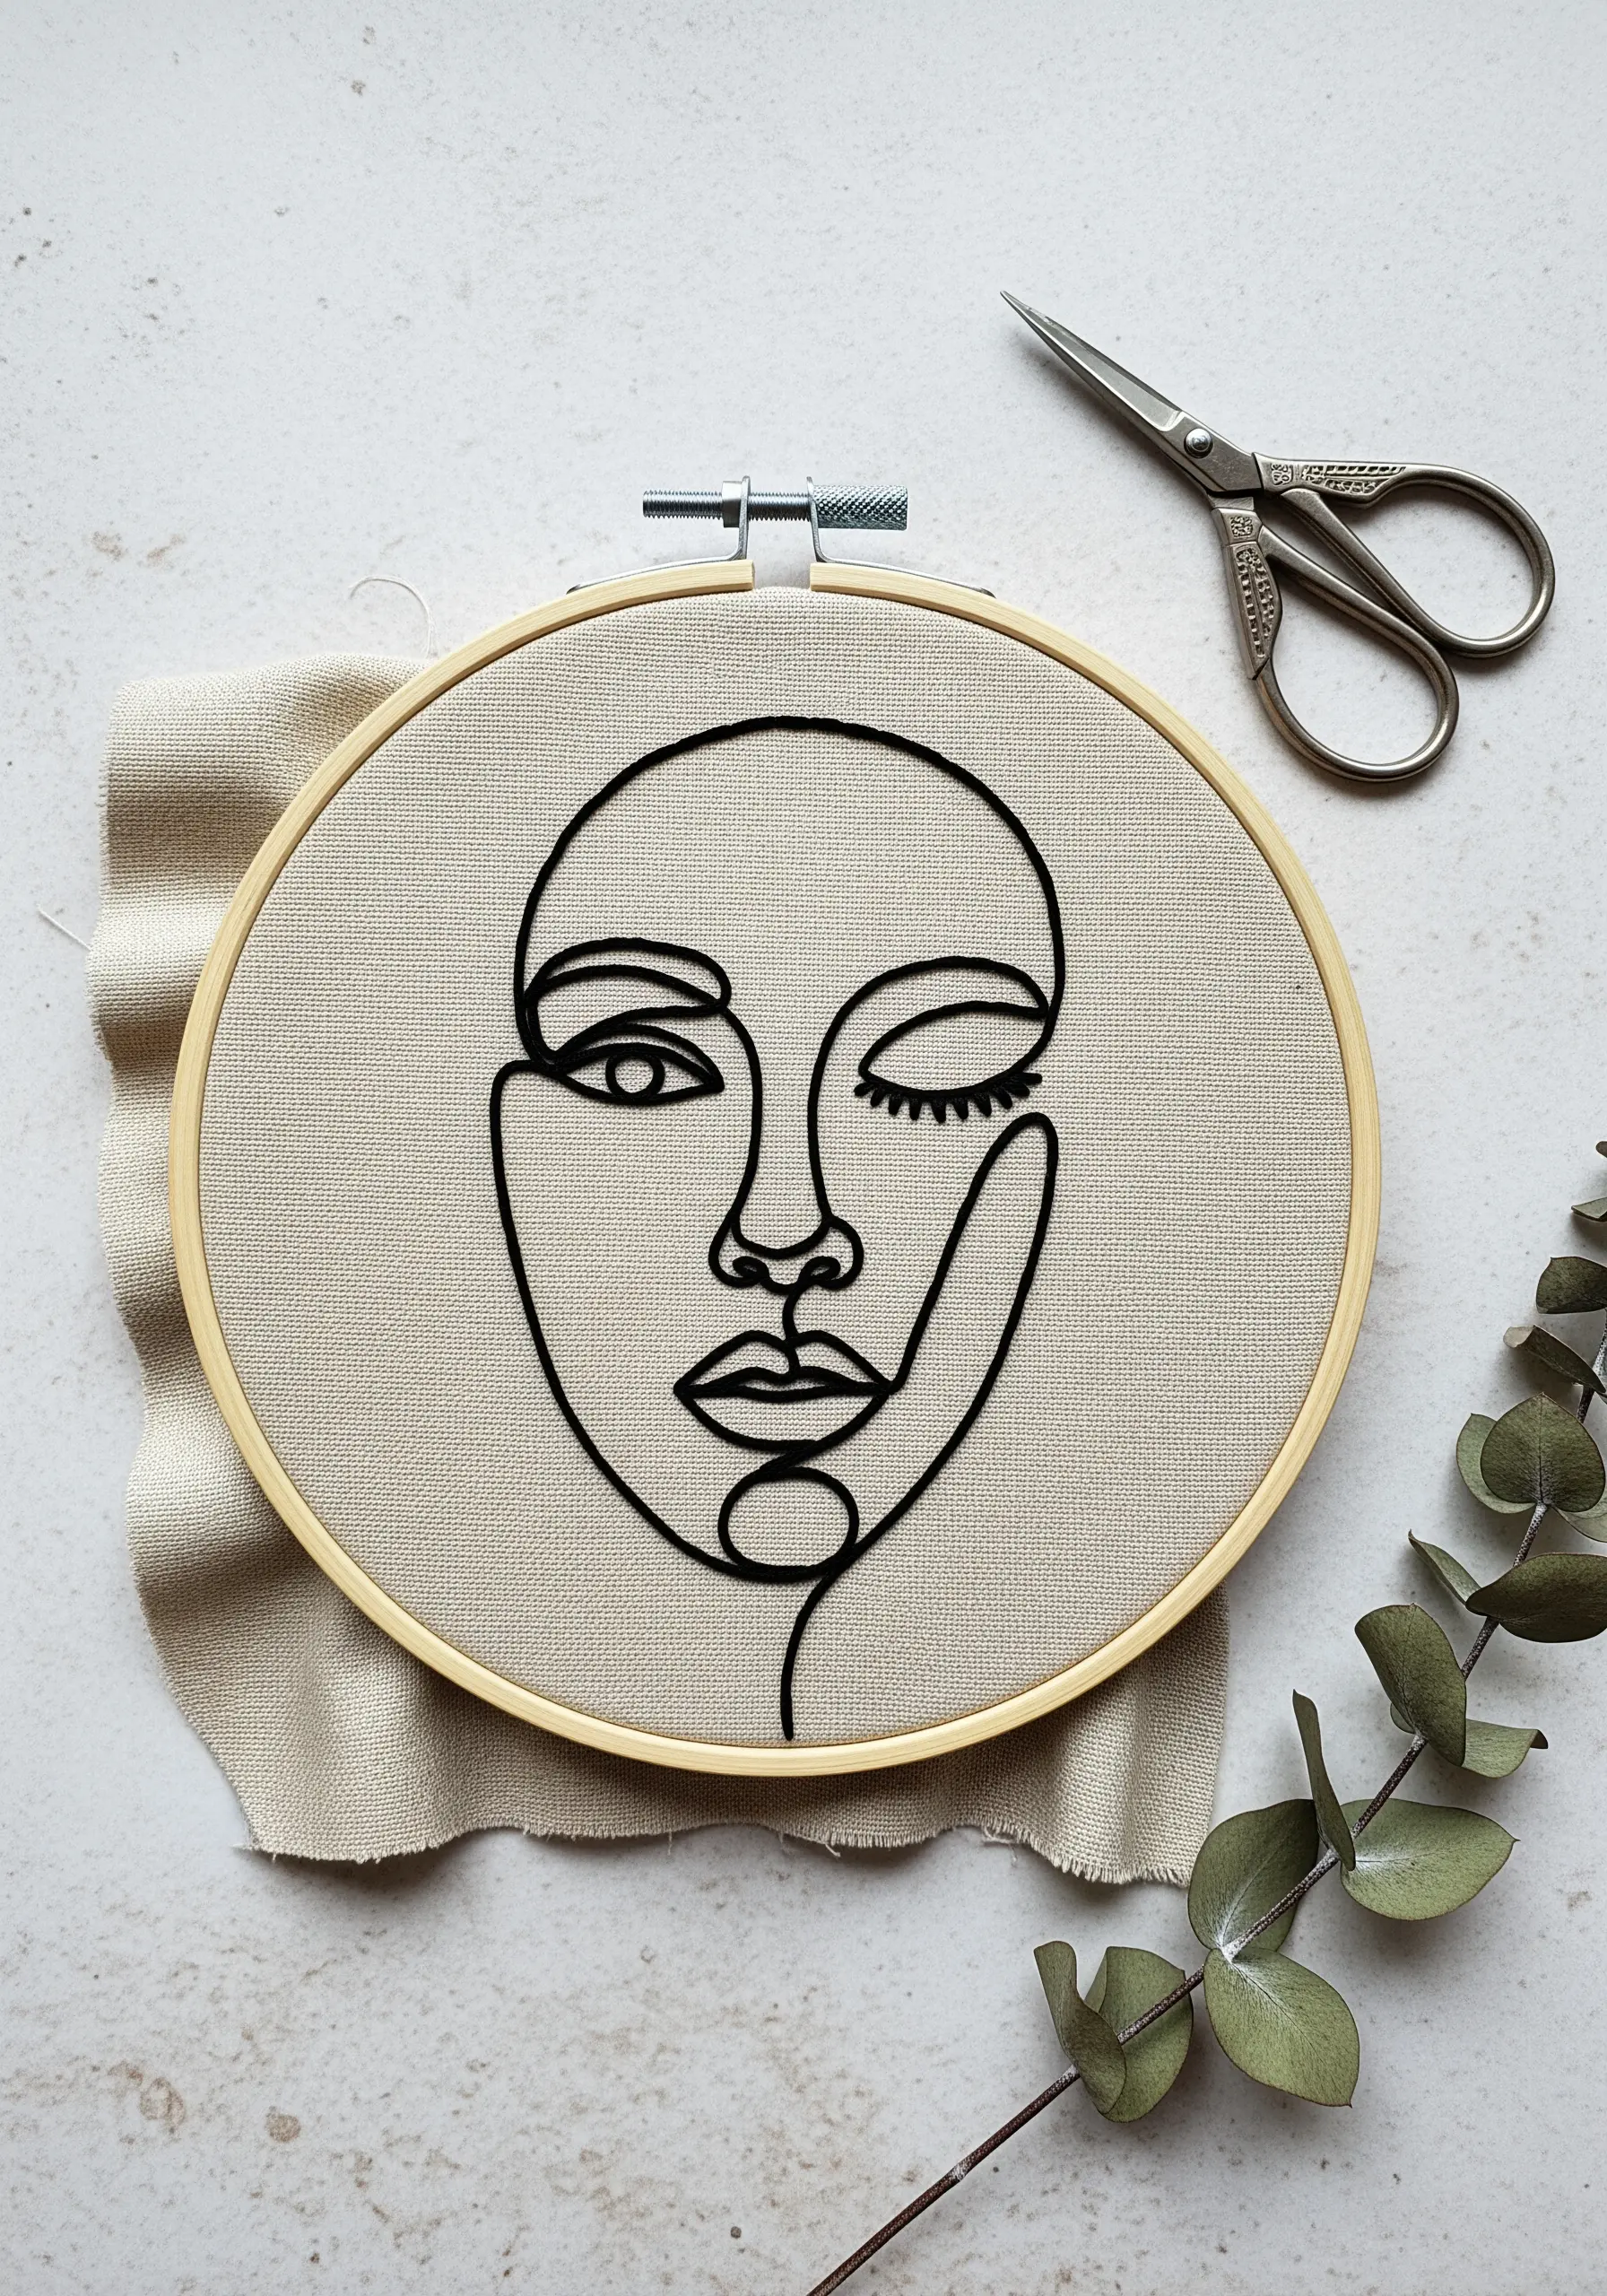
To achieve this strong, graphic look, use all six strands of your embroidery floss.
Instead of a standard backstitch, which can appear broken on curves, try a whipped backstitch or a stem stitch.
This technique smooths out the line, creating a fluid, ink-like quality that gives the portrait its modern, effortless feel.
Maintain even tension on your fabric to prevent any puckering and ensure your lines remain crisp.
2. Sculpt with Directional Fill Stitches
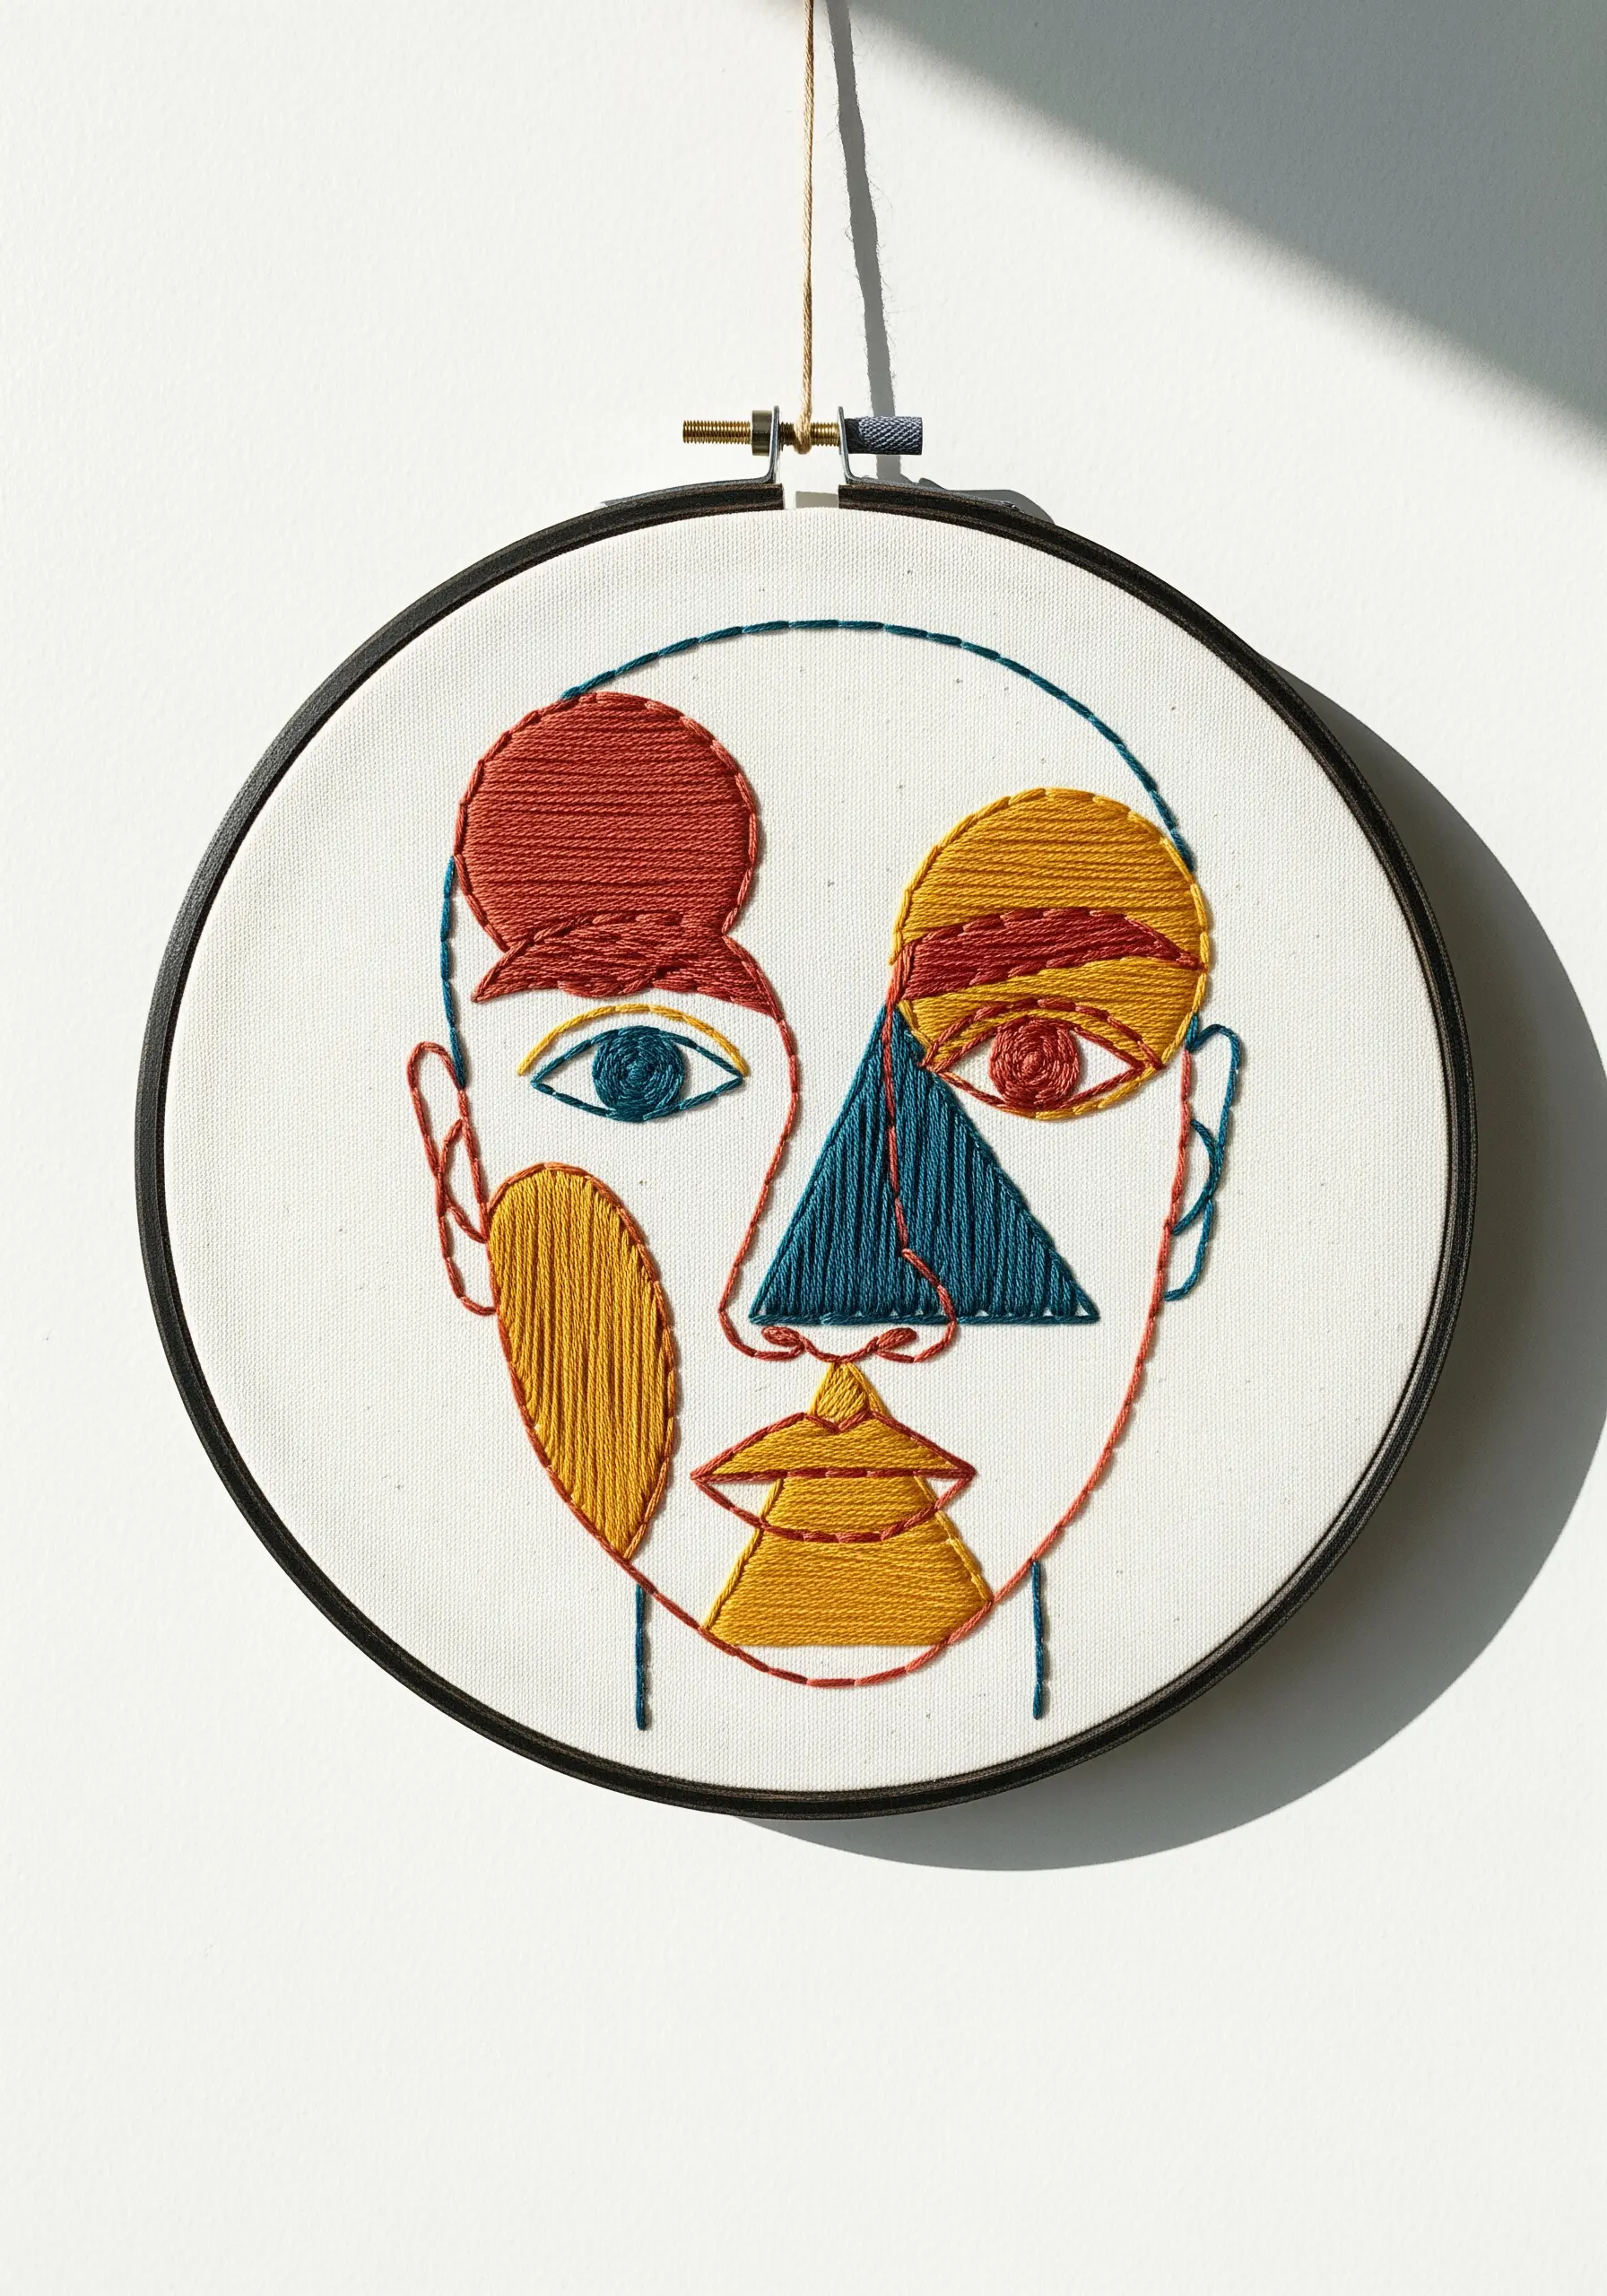
Give abstract shapes dimension by controlling the direction of your fill stitches.
Instead of stitching horizontally or vertically, angle your satin stitches to follow the intended contour of each colored block.
For an even cleaner edge, outline each shape with one row of split stitch before filling it in; this creates a subtle, raised border that contains the satin stitch perfectly.
This method transforms flat color blocks into dynamic, sculptural elements.
3. Balance Line Art with a Single Detailed Motif

Create a sophisticated focal point by pairing a simple line-art face with one element of intricate detail.
Use a thinner thread (2-3 strands) for the face to keep it light and ethereal, then switch to a thicker thread or a more textured stitch—like fishbone or woven wheel—for the botanical element.
This contrast in weight and texture draws the eye and tells a story, proving that well-executed minimal embroidery designs are all about thoughtful balance.
4. Create Intimacy with High-Contrast Contours

Stitching with white thread on black fabric delivers immediate drama and sophistication.
To keep your lines pristine, choose a high-quality, tightly twisted cotton thread that won’t fray or attract lint from the dark background.
A stem stitch works beautifully here, creating a smooth, rope-like line that stands out boldly against the fabric.
This technique is perfect for creating impactful romantic couple line art embroidery patterns with a modern edge.
5. Vary Your Line Weight for Visual Depth
Introduce subtle complexity by varying the thickness of your lines within a single-color design.
Use 4-6 strands of floss for the main outline of the face, then switch to just 1-2 strands for finer details like the inner eye or subtle contours.
This technique mimics the pressure of a pen on paper, adding an artistic, hand-drawn quality and a sense of depth without adding color.
It’s an effective way to create visual interest on high-contrast walls.
6. Frame a Portrait with Geometric Overlays

Add a layer of modern structure by superimposing geometric shapes over a classic line-art face.
Stitch the portrait first, then layer the squares or lines on top, using a complementary color palette to create harmony.
Use a simple backstitch for all lines to maintain a clean, architectural look.
This compositional technique adds an analytical, almost cubist feel to the design, making it a standout piece among other geometric patterns.
7. Suggest Movement with Flowing Split Stitches
When stitching elements like hair, use long, directional split stitches to create a sense of flow and movement.
Instead of filling the area with satin stitch, lay down parallel lines of split stitch that follow the natural wave of the hair.
This approach not only adds texture but also allows you to create depth and highlights with just a single color of thread, giving the piece a serene, elegant finish.
8. Build Bold Texture with Raised Chain Stitch

For a highly tactile and bold look, fill in sections of your portrait with rows of detached chain stitch or a heavy woven stitch.
This technique creates a thick, almost knitted texture that stands off the fabric, adding a powerful sculptural effect.
Combine this with sharp, clean outlines in a simple backstitch to balance the heavy texture with refined detail, like for the lips and eyes.
The contrast between the flat outlines and the dimensional fill makes the entire piece pop.
9. Add a Touch of Light with Metallic Thread

Elevate a simple line drawing by incorporating a hint of metallic thread.
Stitch the entire portrait in a classic cotton floss, then go back and add small, sparkling accents—like the stars or highlights on the eyelashes—with a single strand of silver or gold.
Using a thread conditioner or a shorter length of thread can make stitching with metallics easier.
This subtle touch of shimmer catches the light beautifully, making your piece feel magical without being overwhelming. It’s a great introduction to using metallic thread.
10. Create Playful Dimension with a Woven Wheel

Transform a simple shape into a dimensional focal point using a woven wheel stitch, also known as a spider wheel.
This stitch creates a raised, circular element that is perfect for adding texture and a pop of fun to minimalist designs.
Use it for a stylized eye or a rosy cheek to introduce an element of handmade charm.
It’s a fast, satisfying stitch that adds instant character and makes for delightful playful hoop art.
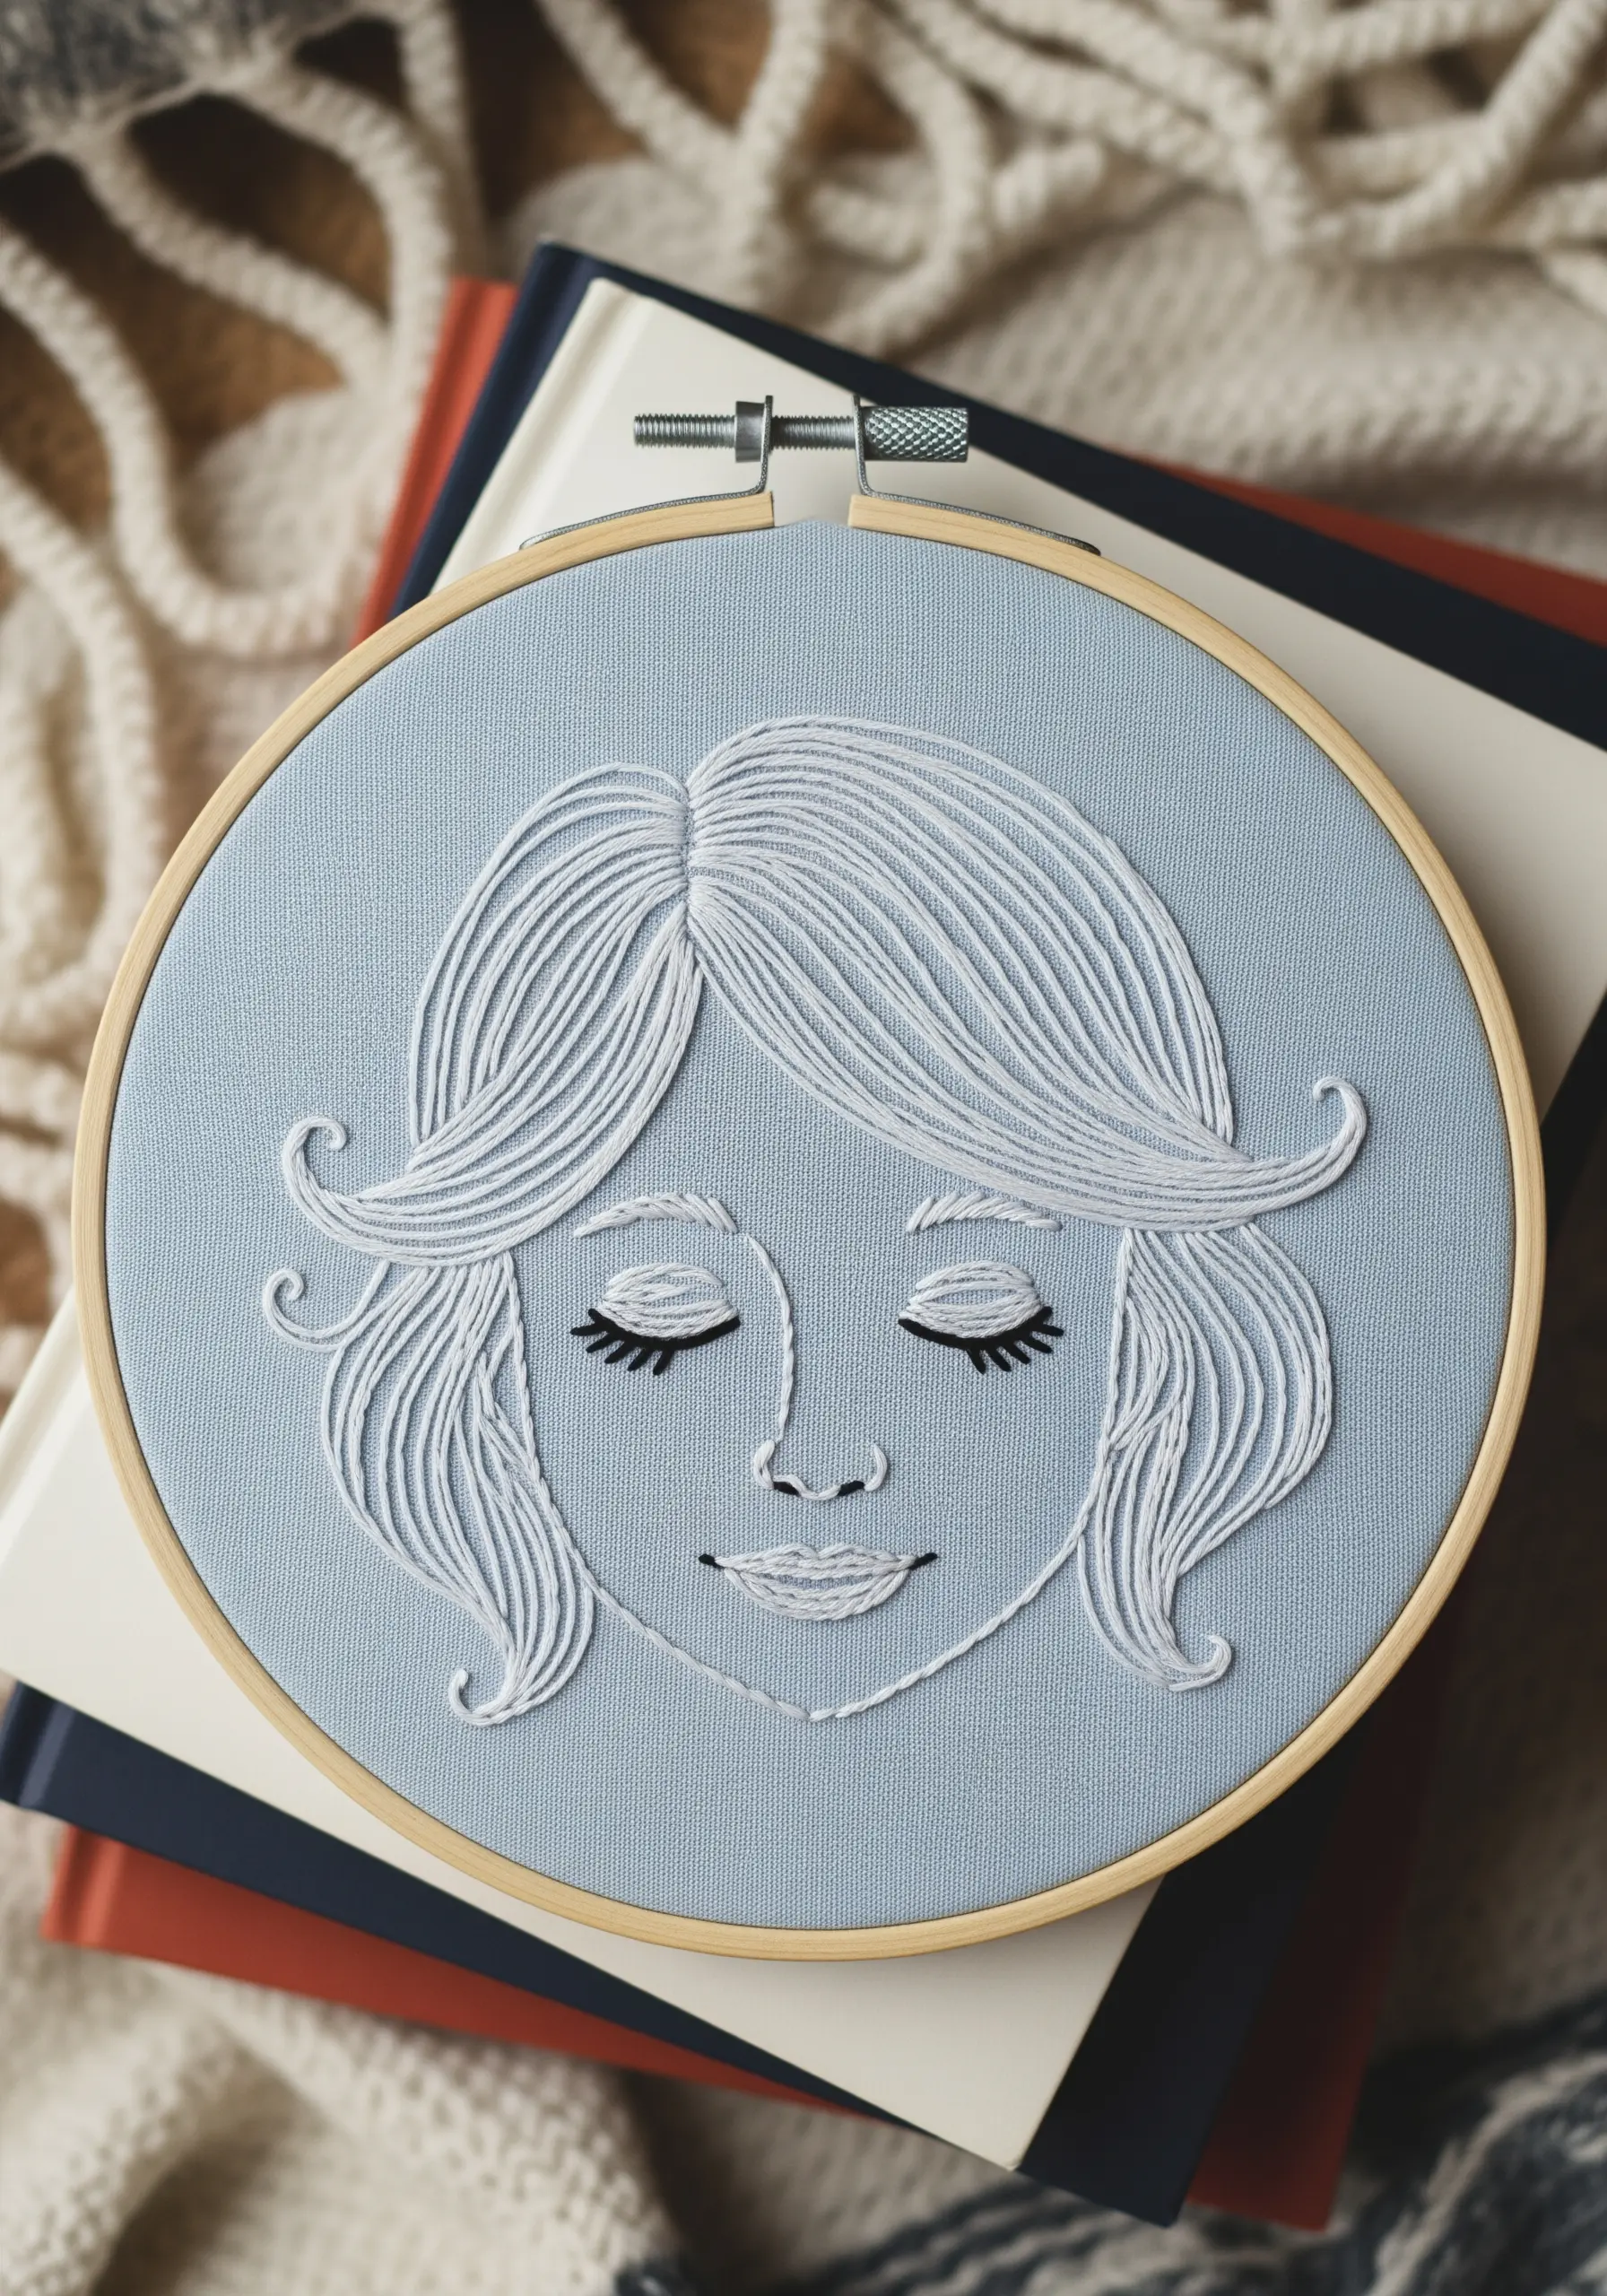
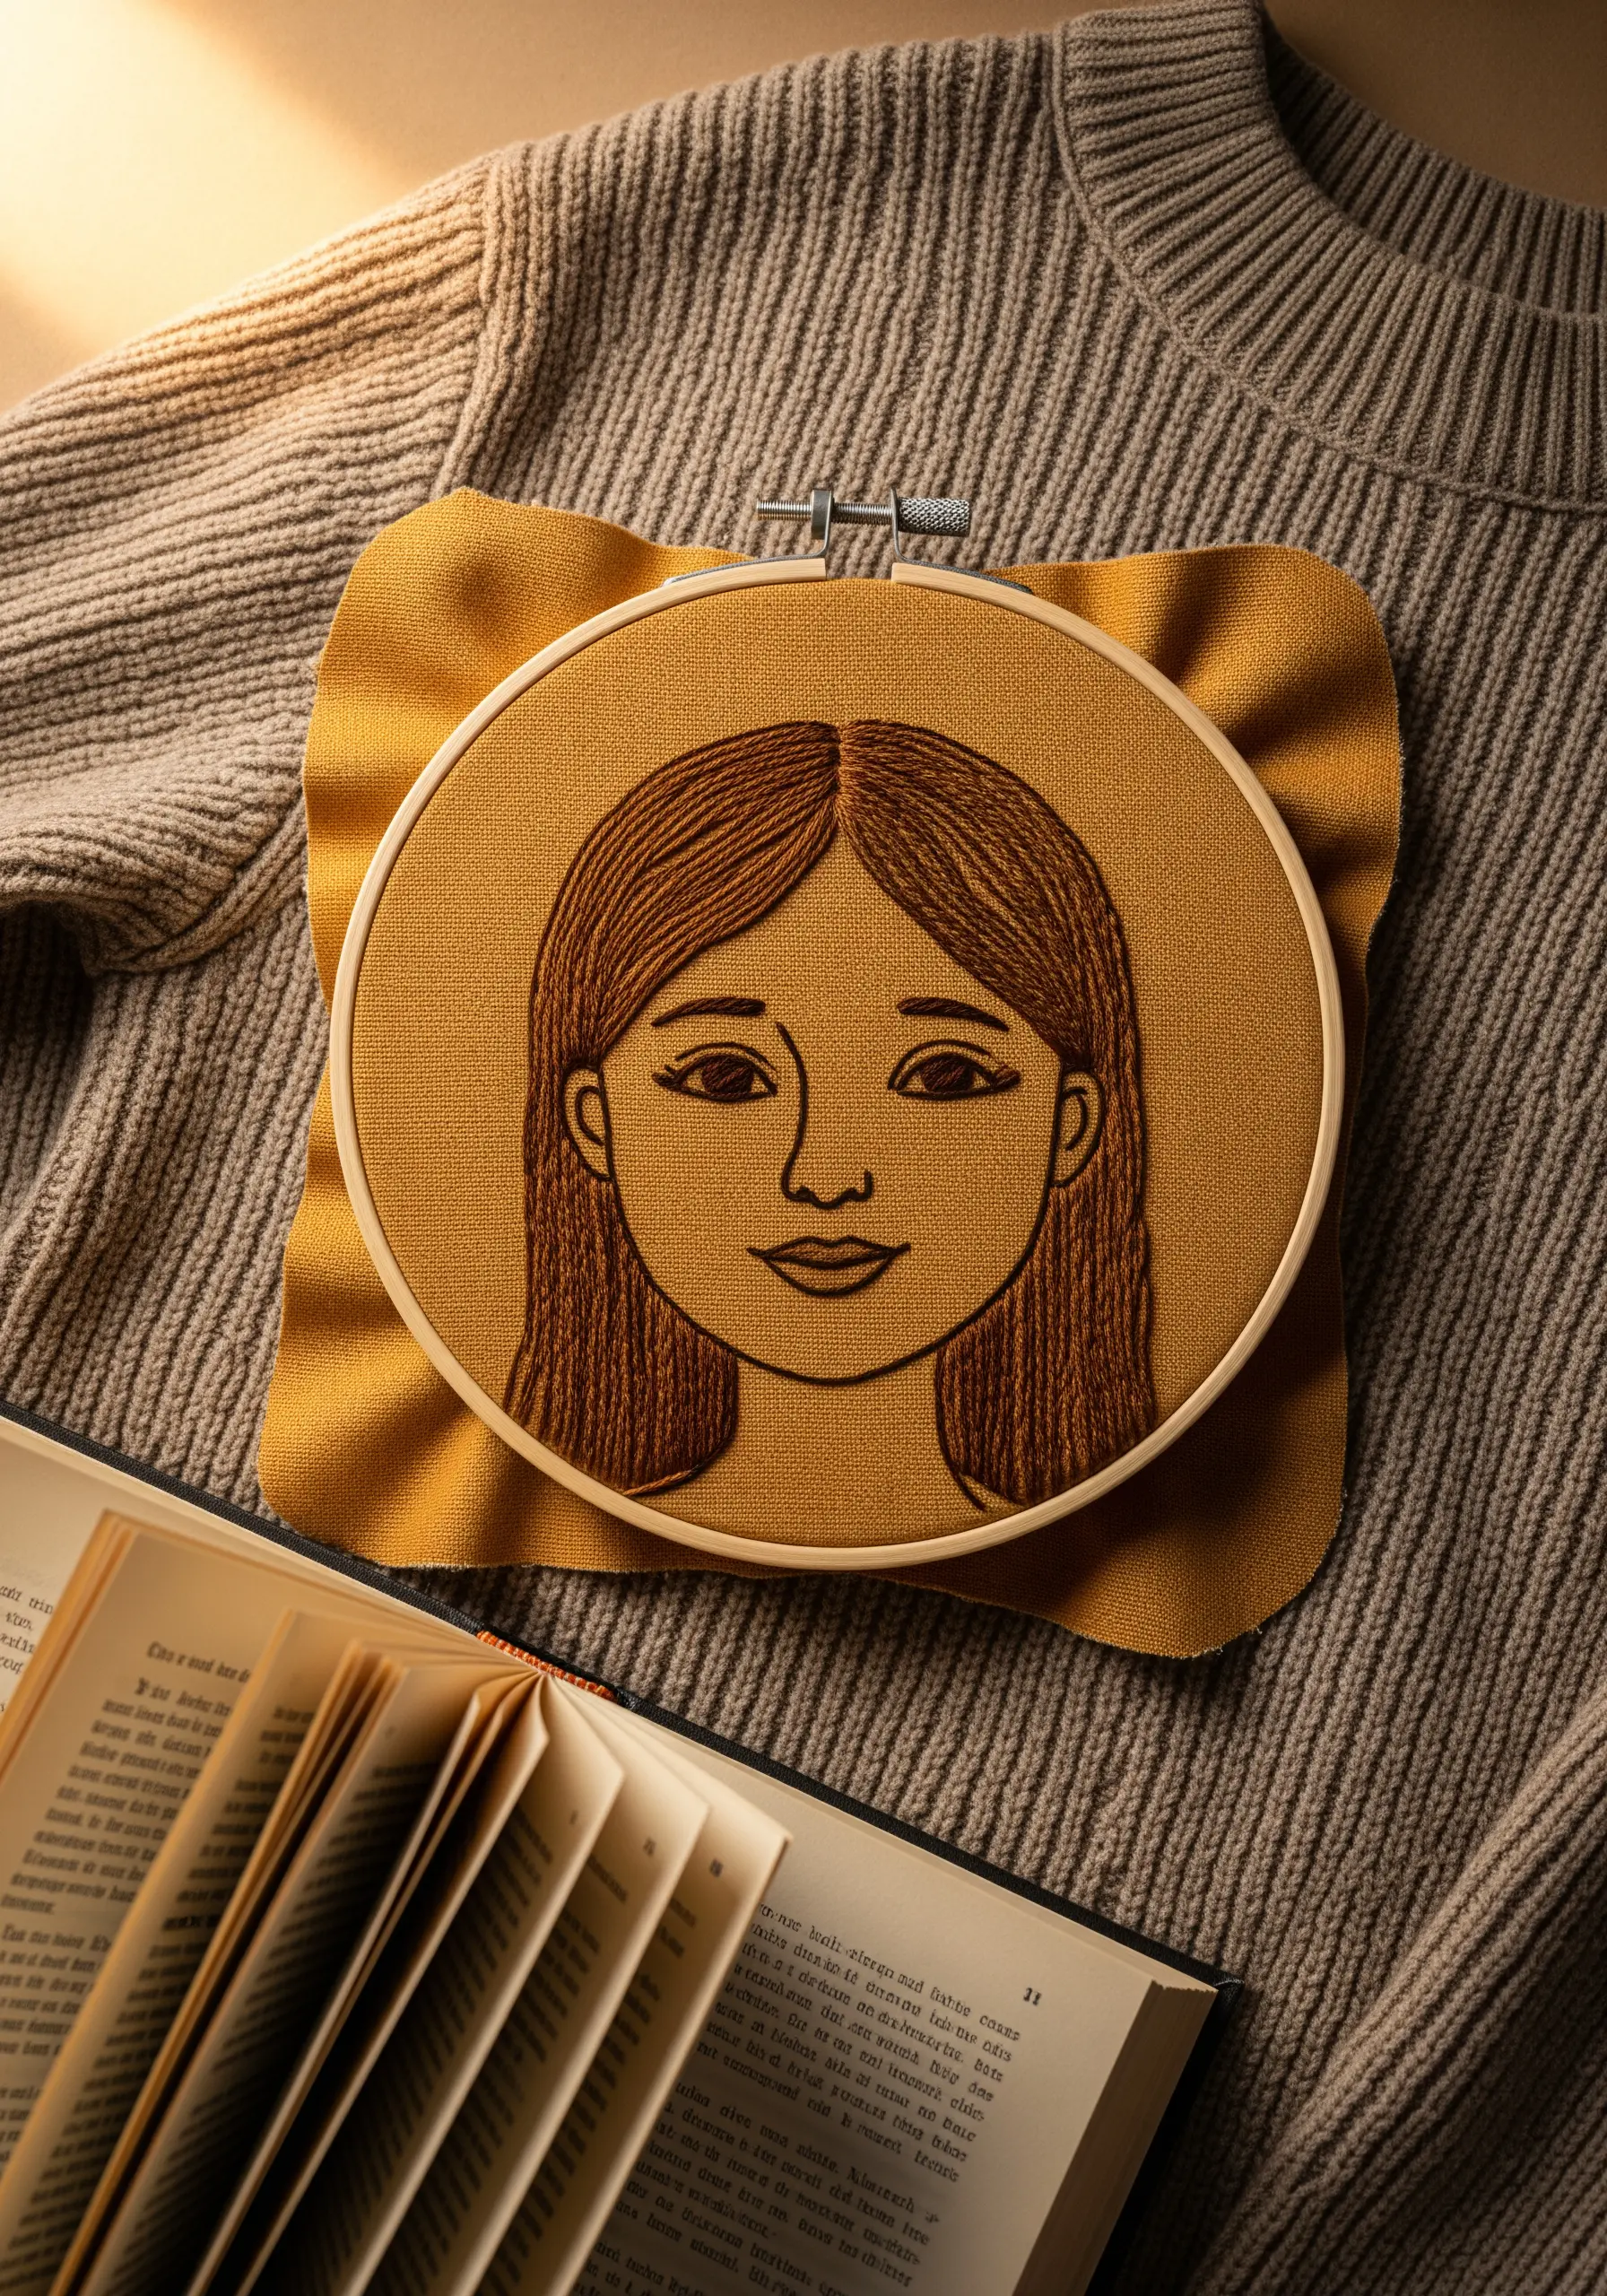
11. Blend Colors in Hair for a Painterly Effect
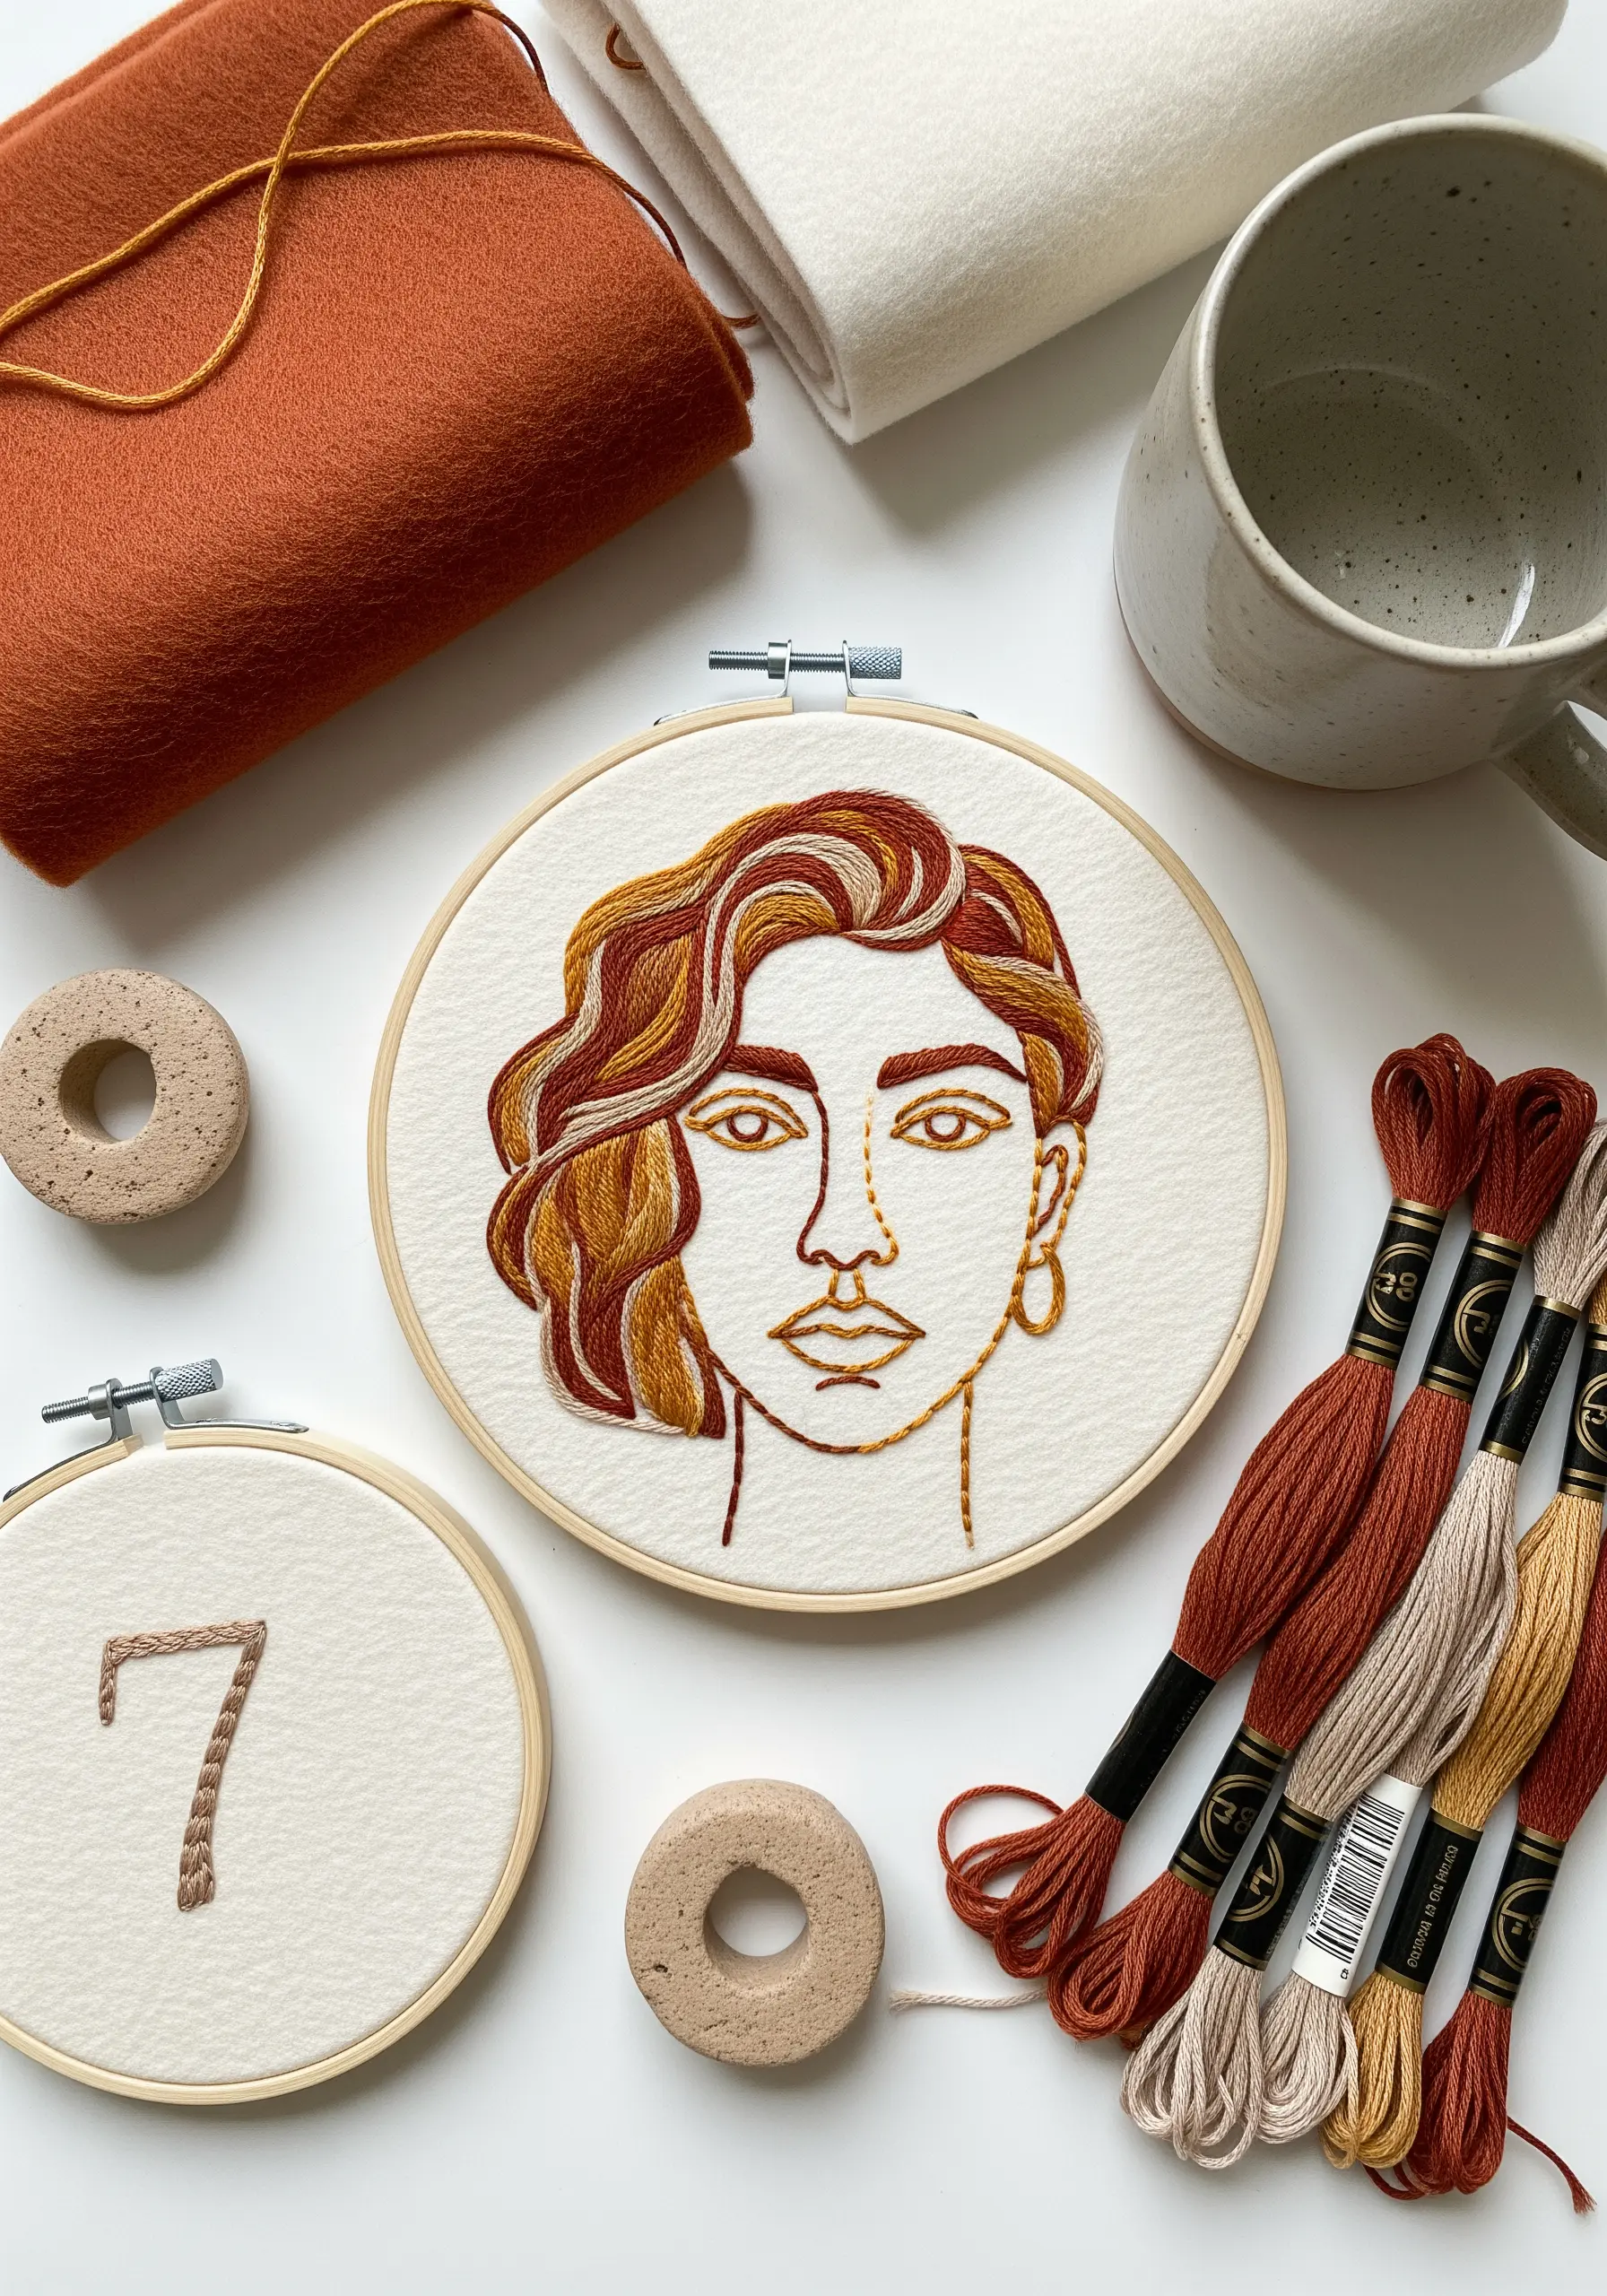
Achieve a soft, painterly look by blending multiple thread colors within the hair.
Use the long-and-short stitch, threading your needle with one strand from two different colors at the same time.
This technique creates a subtle, variegated effect that adds incredible depth and realism to your portrait.
It’s a simple form of color blending that makes your work look far more complex than it actually is.
12. Stitch a Cascade of Ocean-Inspired Waves

Capture the movement of water by filling the hair with layered, directional stitches in shades of blue and teal.
Use a split stitch and vary the length and curve of each line to mimic the flow of waves.
Overlap the colors slightly to create a sense of depth and turbulence.
Adding French knots as bubbles provides a final, charming touch to this beautiful, ocean-inspired design.
13. Weave Botanicals into a Portrait Silhouette

Combine portraiture and florals in a unique composition by using a silhouette as a vessel for a bouquet.
Stitch the outline of the face with a simple backstitch, then fill the space with your favorite floral stitches—lazy daisies for petals, French knots for centers, and stem stitch for stalks.
This imaginative approach transforms two classic embroidery subjects into one cohesive piece of botanical stitch art.
14. Explore Duality with Negative Space
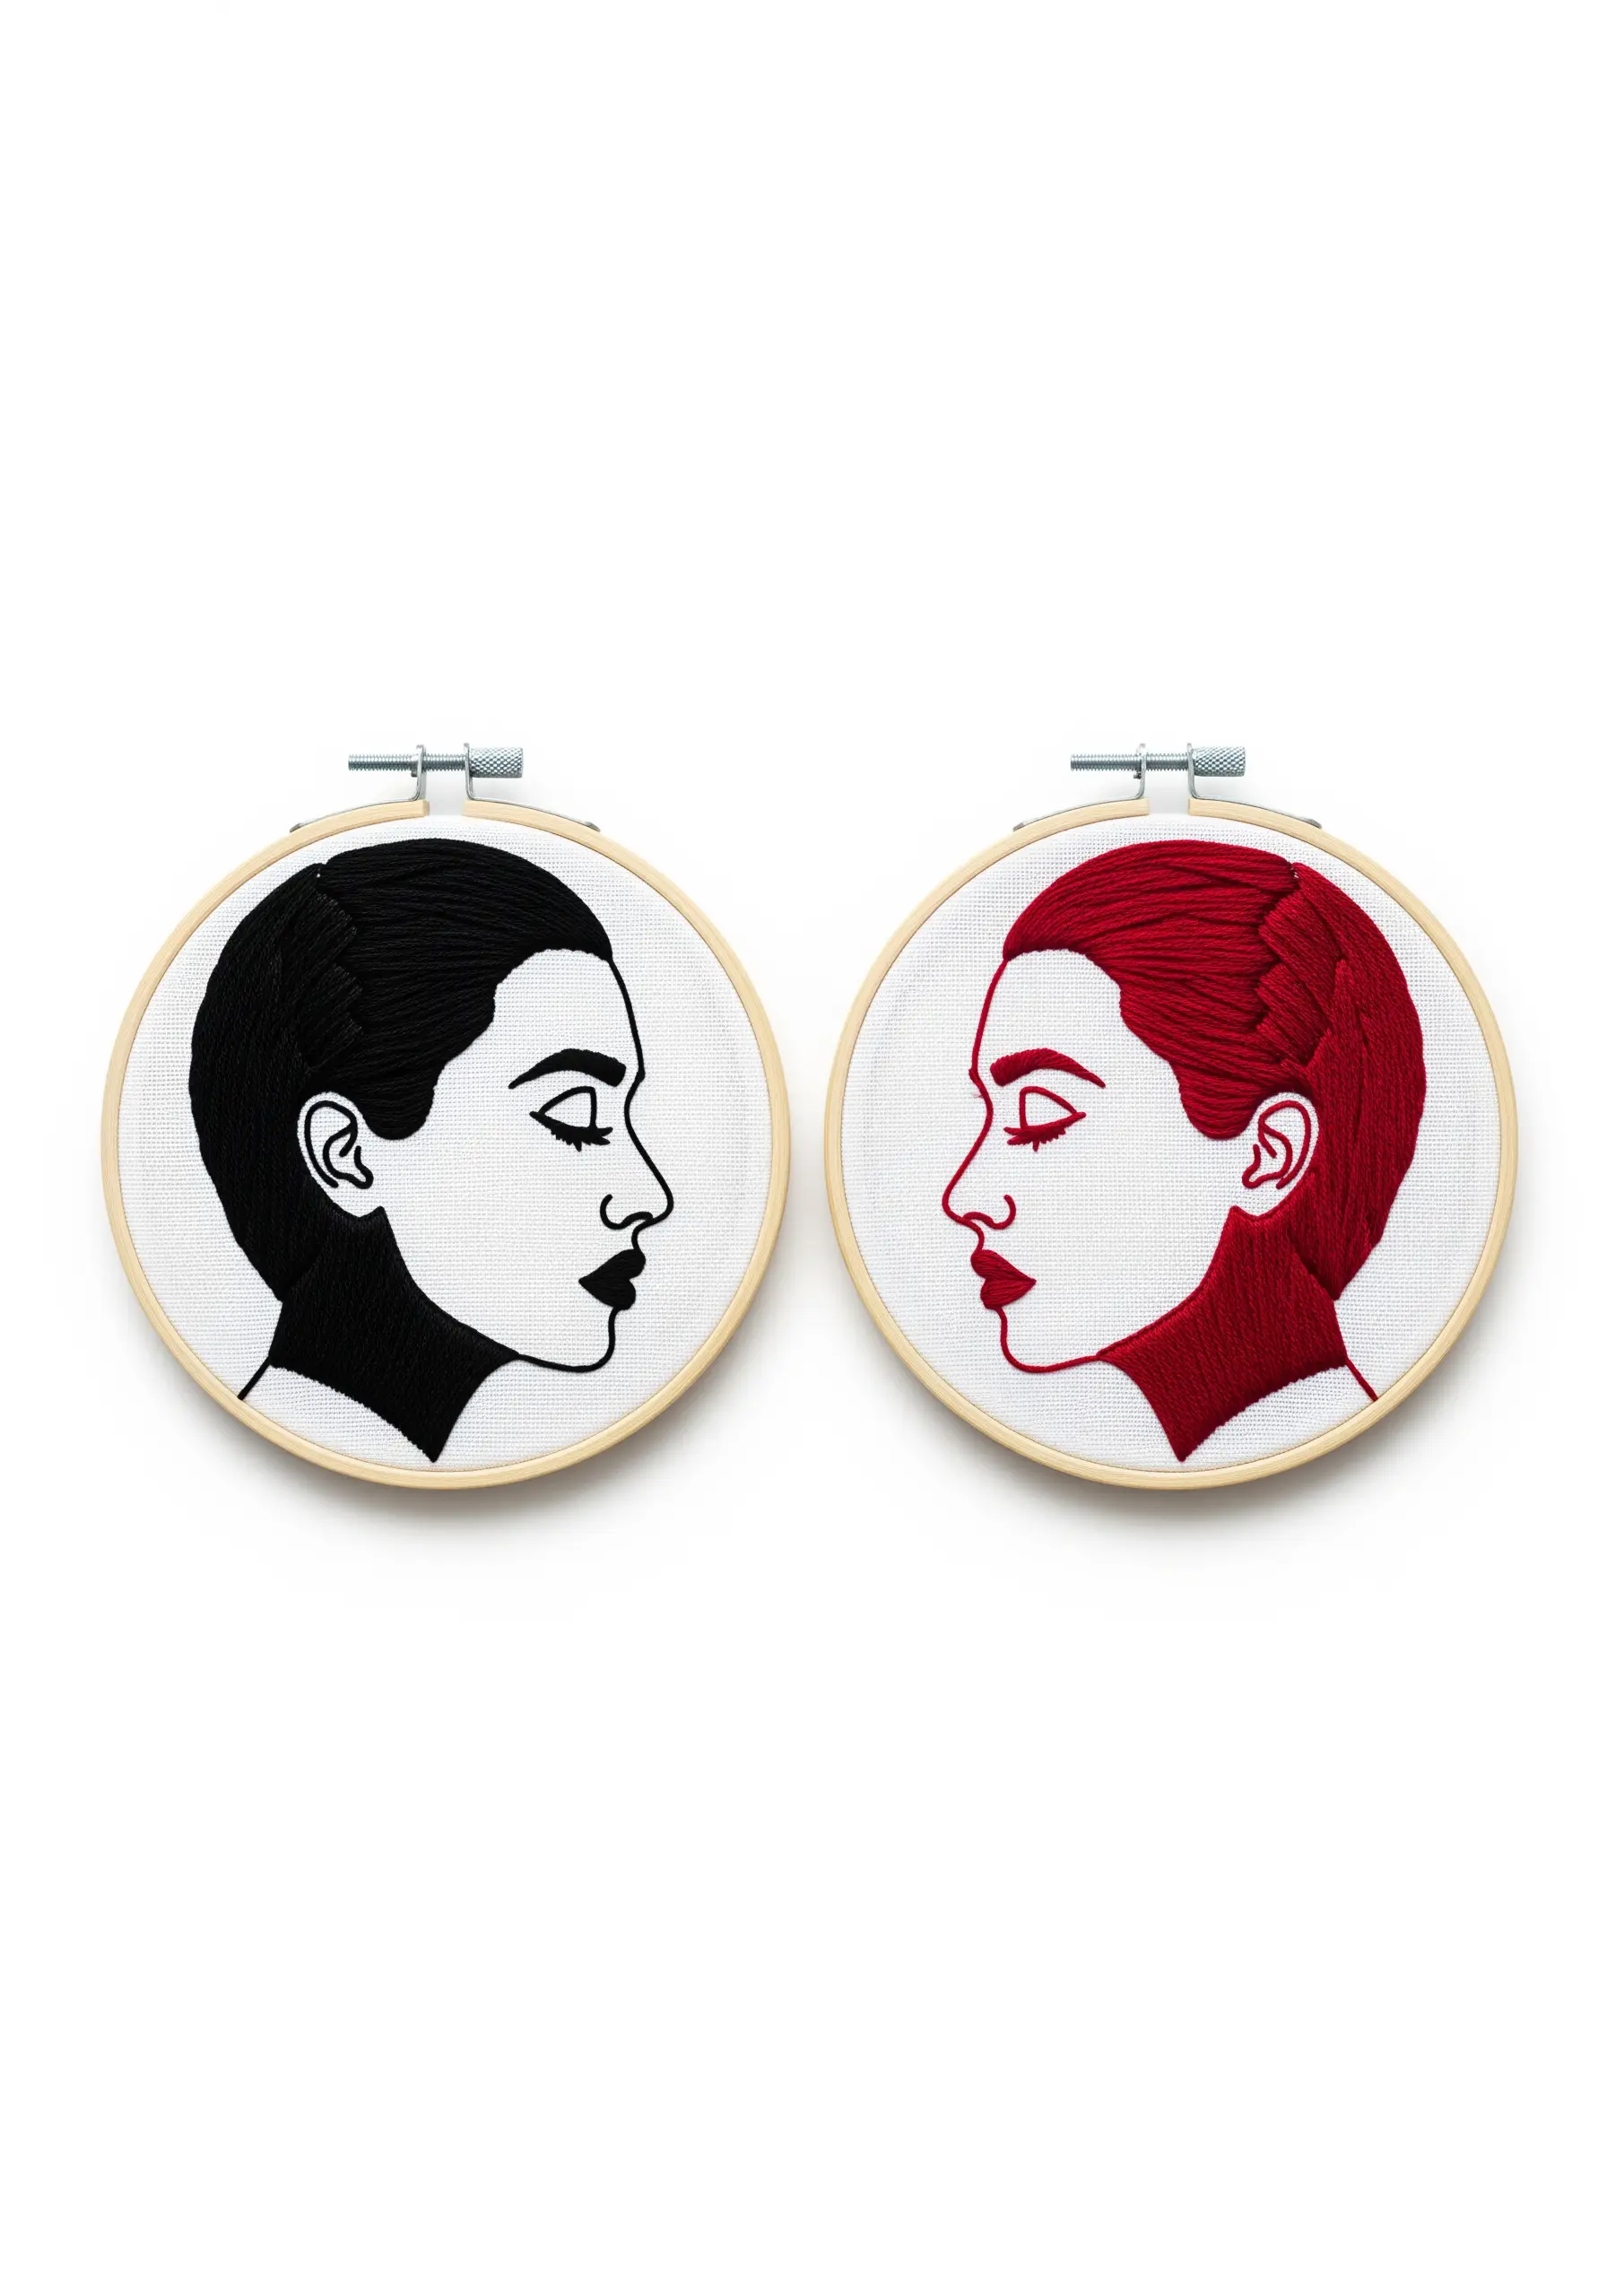
Create a powerful diptych by stitching the same portrait twice, using color and negative space as mirror images.
On one hoop, fill the portrait with dense satin stitch and leave the background blank.
On the second, reverse it: stitch the background, leaving the portrait as untouched fabric.
This exercise in positive and negative space results in a striking, gallery-worthy pair that explores themes of identity and perception.
15. Create Softness with Earth-Toned Threads

Move beyond classic black and embrace the warmth of earthy browns and taupes for your line art.
These softer tones create a more gentle, subtle effect, especially on unbleached cotton or linen fabric.
Using a variegated brown thread can add even more dimension, giving the lines a natural, almost wood-grain appearance.
This is a simple switch that deepens the aesthetic of your work by exploring neutral colors in embroidery.
16. Fill with Texture Using Dispersed Seed Stitches
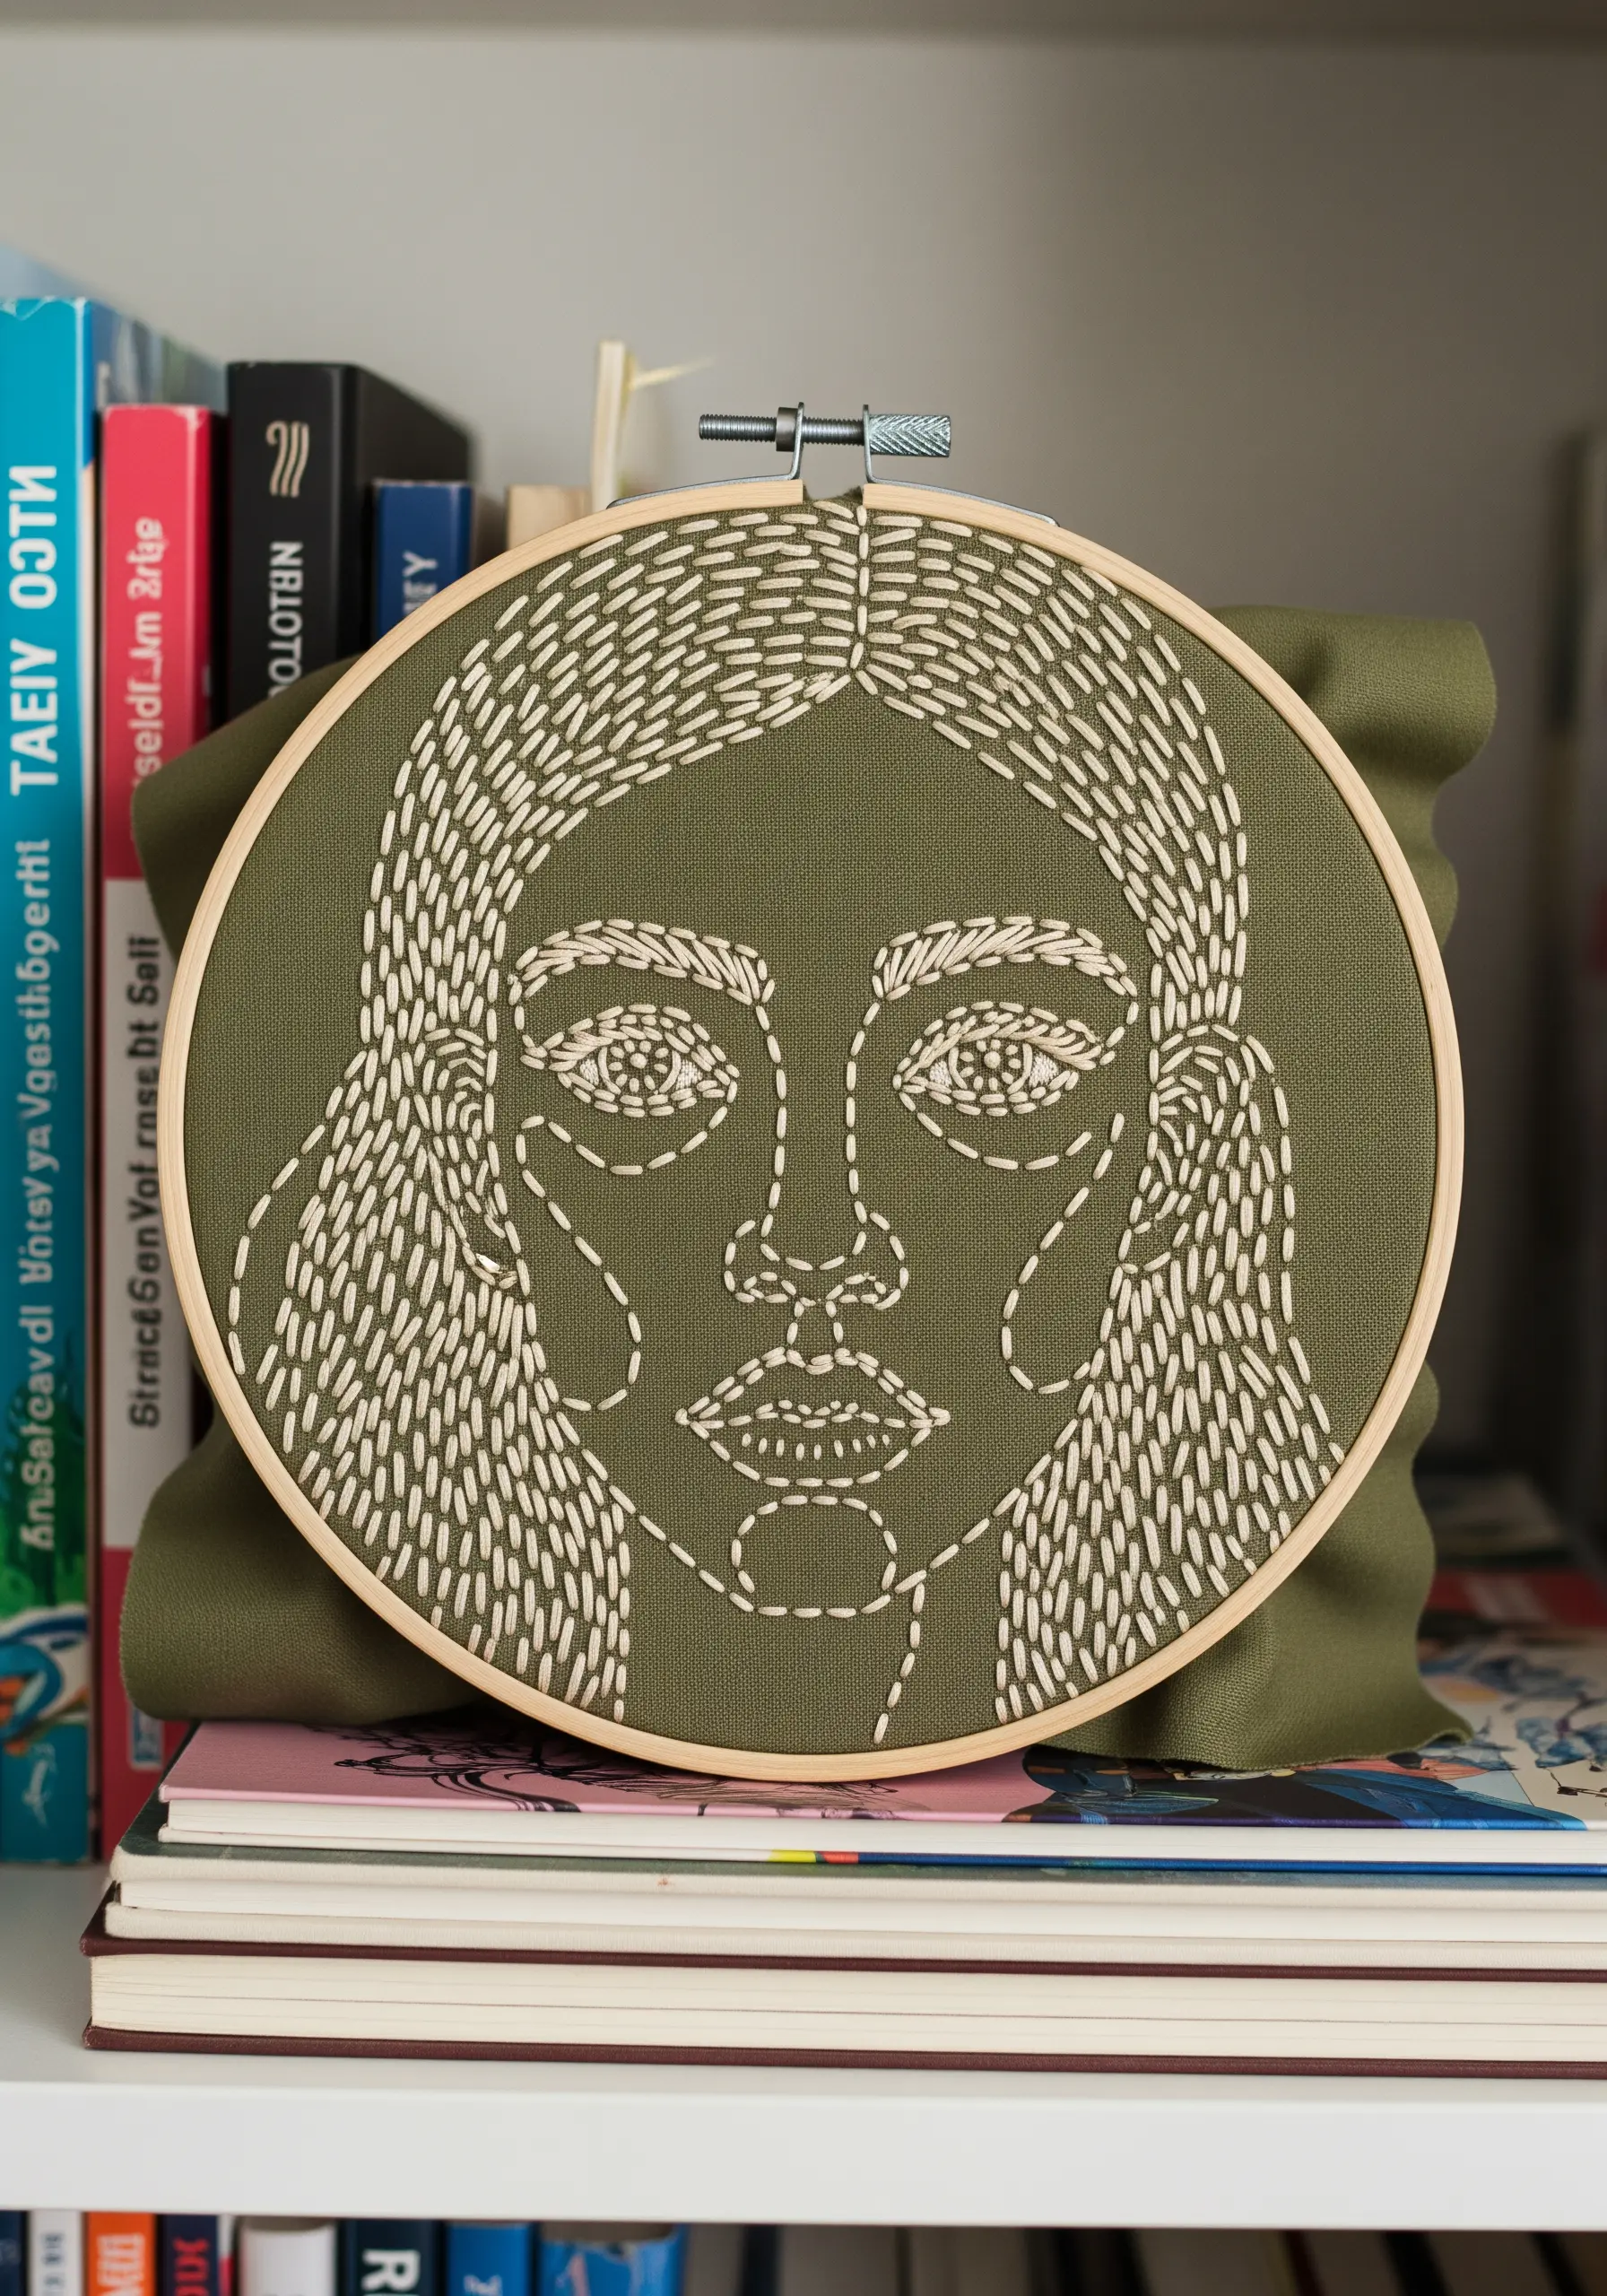
Instead of a solid fill, create a light, airy texture with scattered seed stitches.
After outlining your portrait, fill in areas like the hair and facial planes with small, straight stitches oriented in various directions.
Vary the density of the stitches—placing them closer together for shadows and farther apart for highlights—to create subtle shading.
This technique adds a beautiful organic texture without the time commitment of a full satin stitch.
17. Stitch a Simple Portrait for Apparel
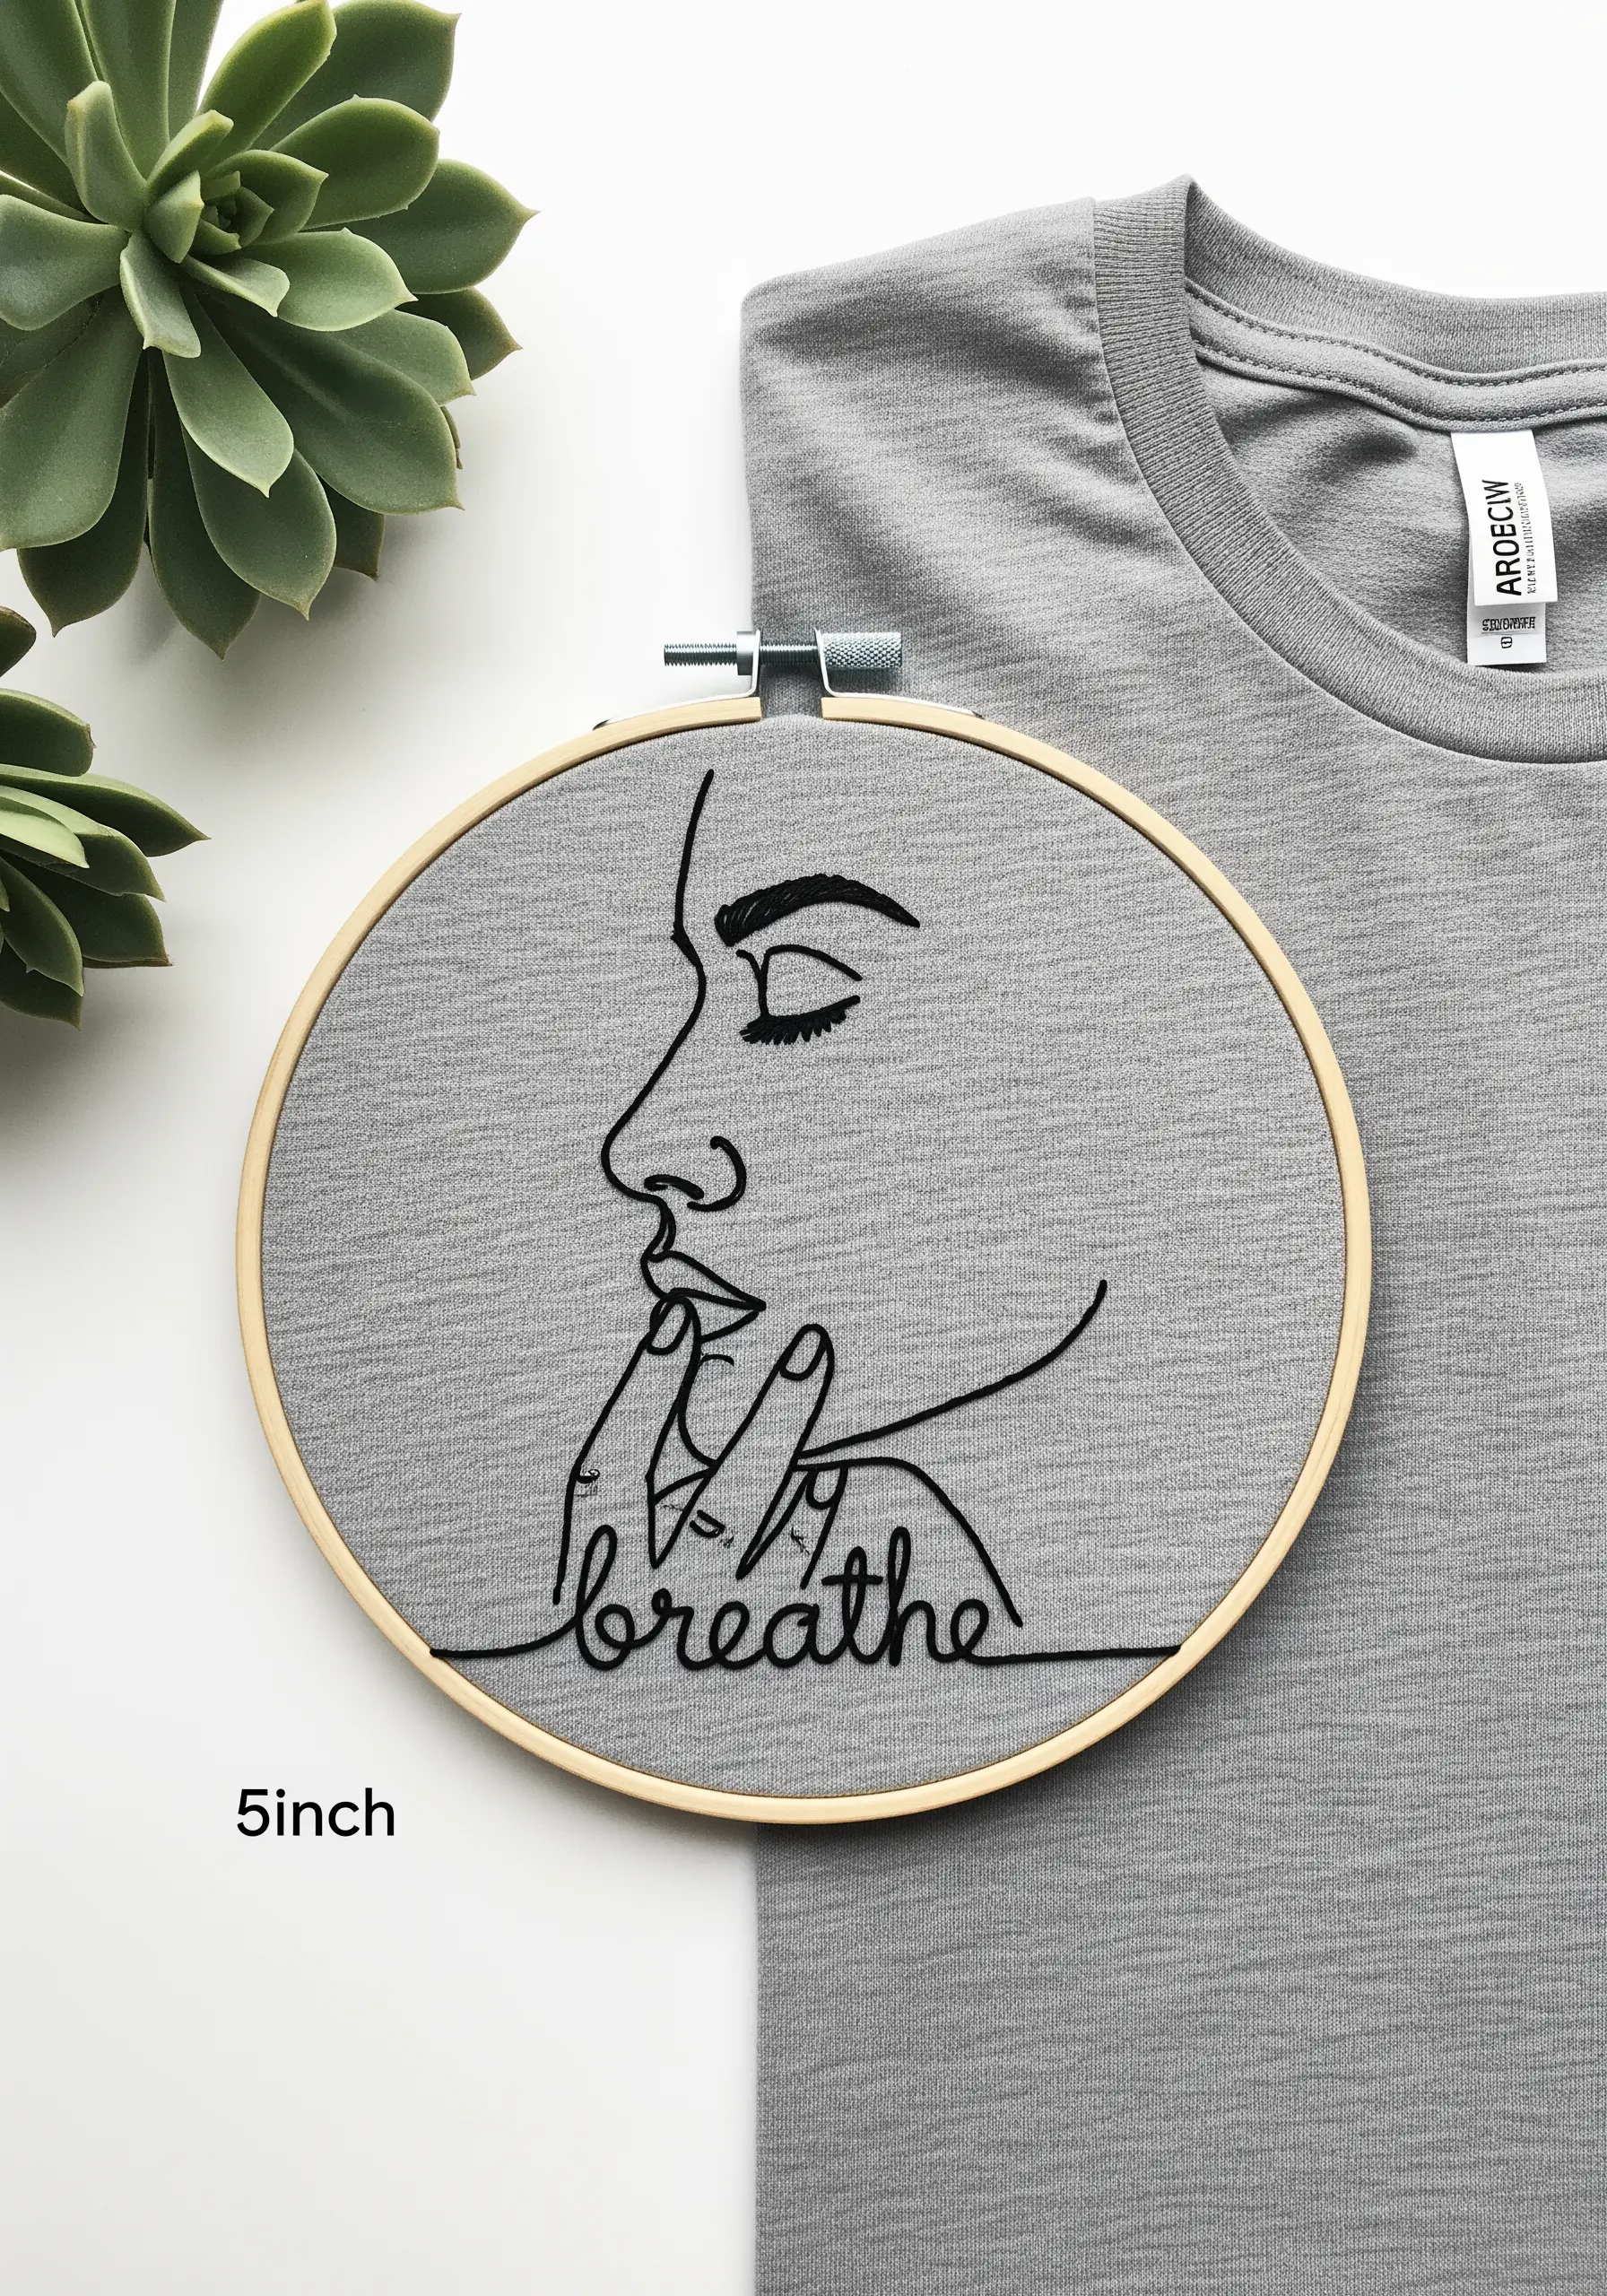
A clean, single-line design is perfect for elevating everyday clothing.
When stitching on jersey or knit fabric, always use a stabilizer on the back to prevent the fabric from stretching and your stitches from warping.
A stick-and-stitch stabilizer is ideal: you can print or draw your design on it, stitch through it, and then dissolve it in water when you’re done.
This ensures your lines are crisp and professional, making it easy to personalize denim jackets or your favorite t-shirt.
18. Integrate Text with a Continuous Line

Merge a word into your portrait by making it part of the continuous line drawing.
This technique requires careful planning to ensure the script flows naturally from the lines of the face or hand.
Use a smooth stem stitch or whipped backstitch to maintain the unbroken flow from image to text.
It transforms a simple design into one of the most meaningful personalized gifts that feel deep and intentional.
19. Add Dimension with Mixed-Media Embellishments

Take your hoop art into the third dimension by incorporating real-world objects.
After stitching your portrait, securely attach a small object like an earring, a charm, or even tiny dried flowers with a few sturdy stitches.
This unexpected element creates a delightful surprise and instantly transforms your embroidery into a unique mixed-media piece.
Ensure the object is lightweight so it doesn’t pull on the fabric.
20. Construct a Portrait with Geometric String Art
Create a futuristic, faceted portrait using a technique inspired by string art.
Instead of curved lines, build the face with a series of straight stitches stretched between anchor points.
Layering different colors of thread creates an incredible sense of depth and complexity.
This methodical approach turns the humble straight stitch into one of your most powerful tools for creating bold statement embroidery pieces.
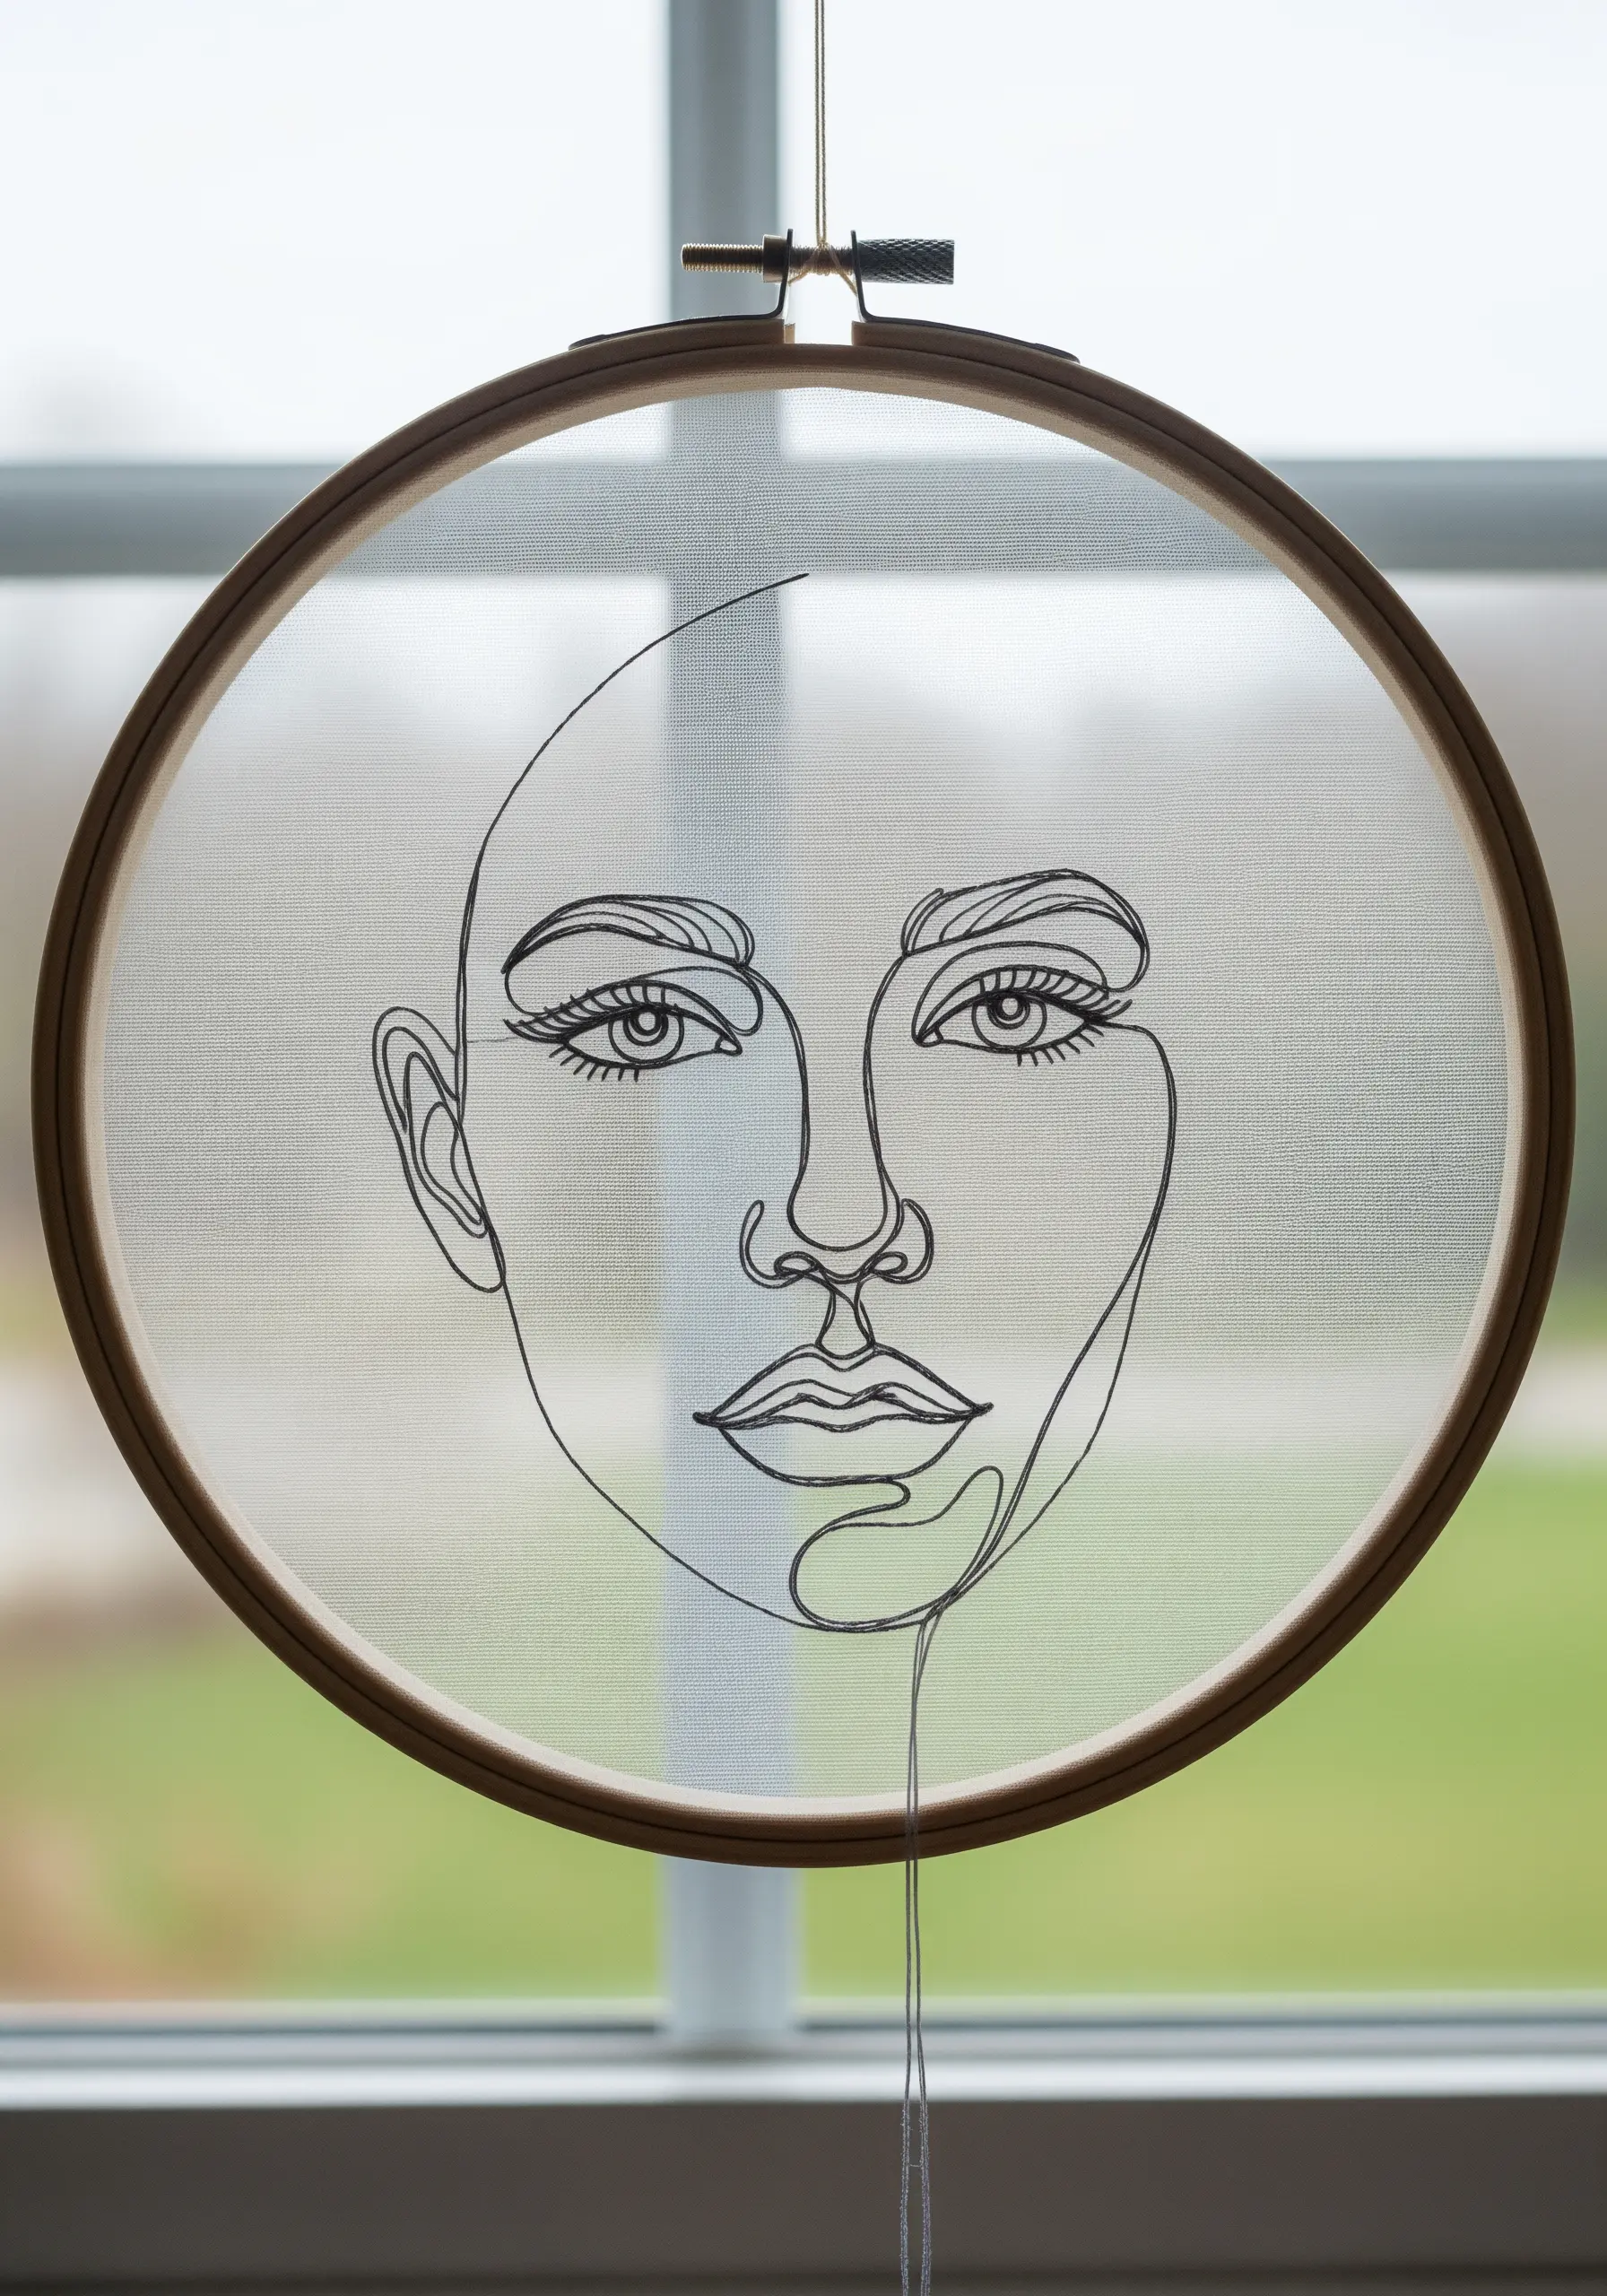
21. Create an Ethereal Look on Sheer Fabric

Stitching on sheer fabric like organza or voile creates a magical, floating effect.
Since the back of your work will be visible, this technique demands neatness.
Start and end your threads with tiny anchor stitches hidden within the design, rather than using knots.
The transparency of sheer fabrics allows you to play with light and shadow, making your line art appear suspended in mid-air when hung in a window.
22. Define a Portrait with Abstract Color-Blocking

Explore the relationship between line and color by splitting a portrait down the middle.
Keep one half as a simple black outline, and fill the other with vibrant, abstract shapes and lines.
Use a whipped chain stitch or a heavy stem stitch for the colored sections to give them a bold, raised texture that contrasts with the flat black outline.
This approach is a fantastic exercise in composition and avant-garde color-blocking.
23. Visualize Sound with Expressive Motifs
Let your portrait tell a story beyond its lines by incorporating symbolic elements.
Here, musical notes flow from the mind, stitched with the same simple backstitch as the silhouette.
This technique turns a simple portrait into a representation of an inner world—of thoughts, dreams, or creativity.
Think about what abstract shapes or symbols could represent your subject’s passion, transforming it into one of the most personal abstract embroidery motifs inspired by music or memory.


