
If you’ve ever felt that your embroidery, while beautiful, could offer something more—more depth, more texture, more presence—it’s time to think beyond the single layer of fabric.
True artistry in textiles often comes from building layers, whether through sculptural stitches, mixed materials, or clever optical effects. It’s about creating a piece that doesn’t just sit on the wall, but interacts with the space, the light, and the viewer.
Here, you’ll find techniques that invite you to fold, layer, stack, and combine materials in ways that add instant drama and sophistication. These aren’t complicated methods, but intentional shifts in approach that will fundamentally change how your work commands a room.
1. Achieve Floral Depth with Padded Stumpwork
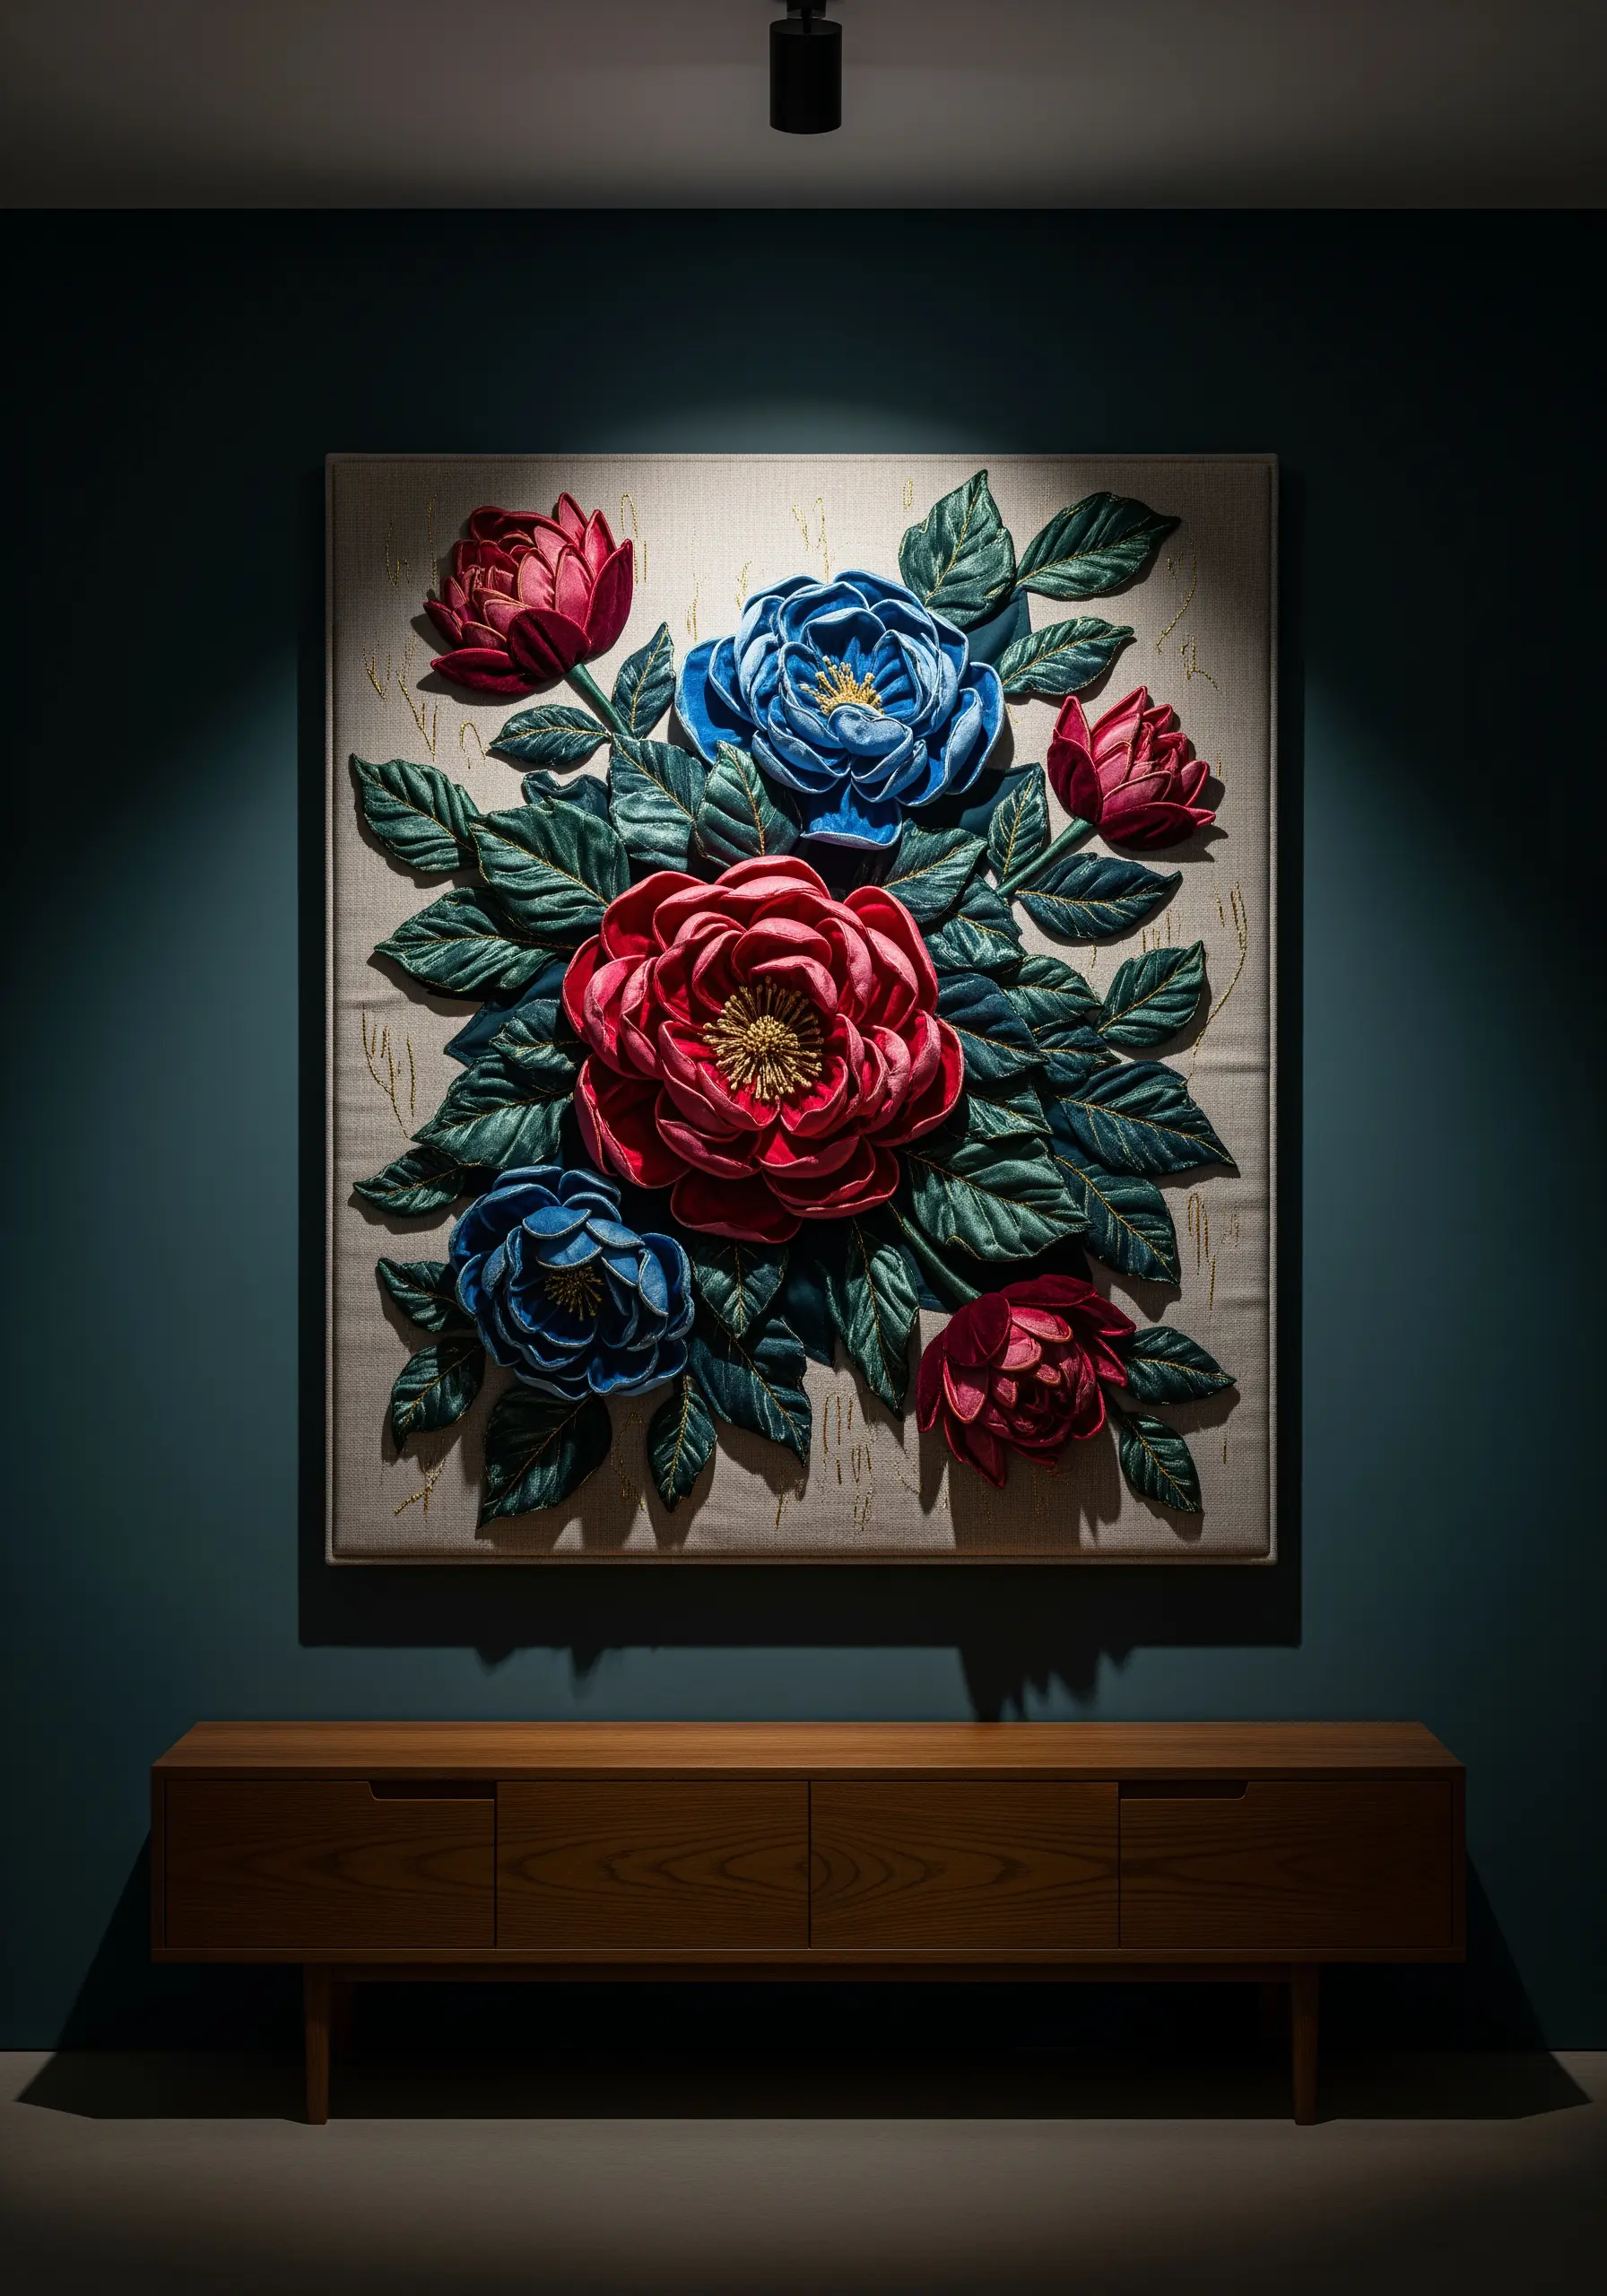
To give your florals a sculptural, three-dimensional quality, move beyond flat satin stitch and embrace padded stumpwork.
First, create a foundation by layering small, graduated pieces of felt or by building up layers of satin stitches where you want the highest point of the petal to be.
Then, cover this entire padded shape with a final, smooth layer of satin stitch, ensuring your stitches extend just beyond the padding to create a clean, rounded edge.
This technique forces light and shadow to play across the surface, making the flower feel alive and dramatically lifting it from the background fabric.
For maximum effect, use a lustrous thread like silk or rayon that catches the light beautifully on the curved surfaces.
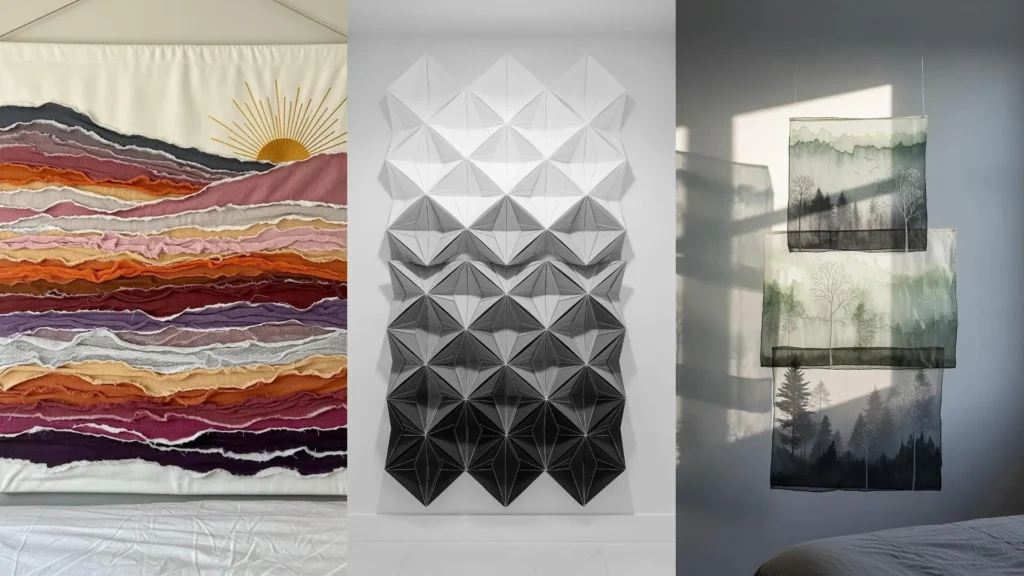
2. Create Atmospheric Haze with Sheer Fabric Layers
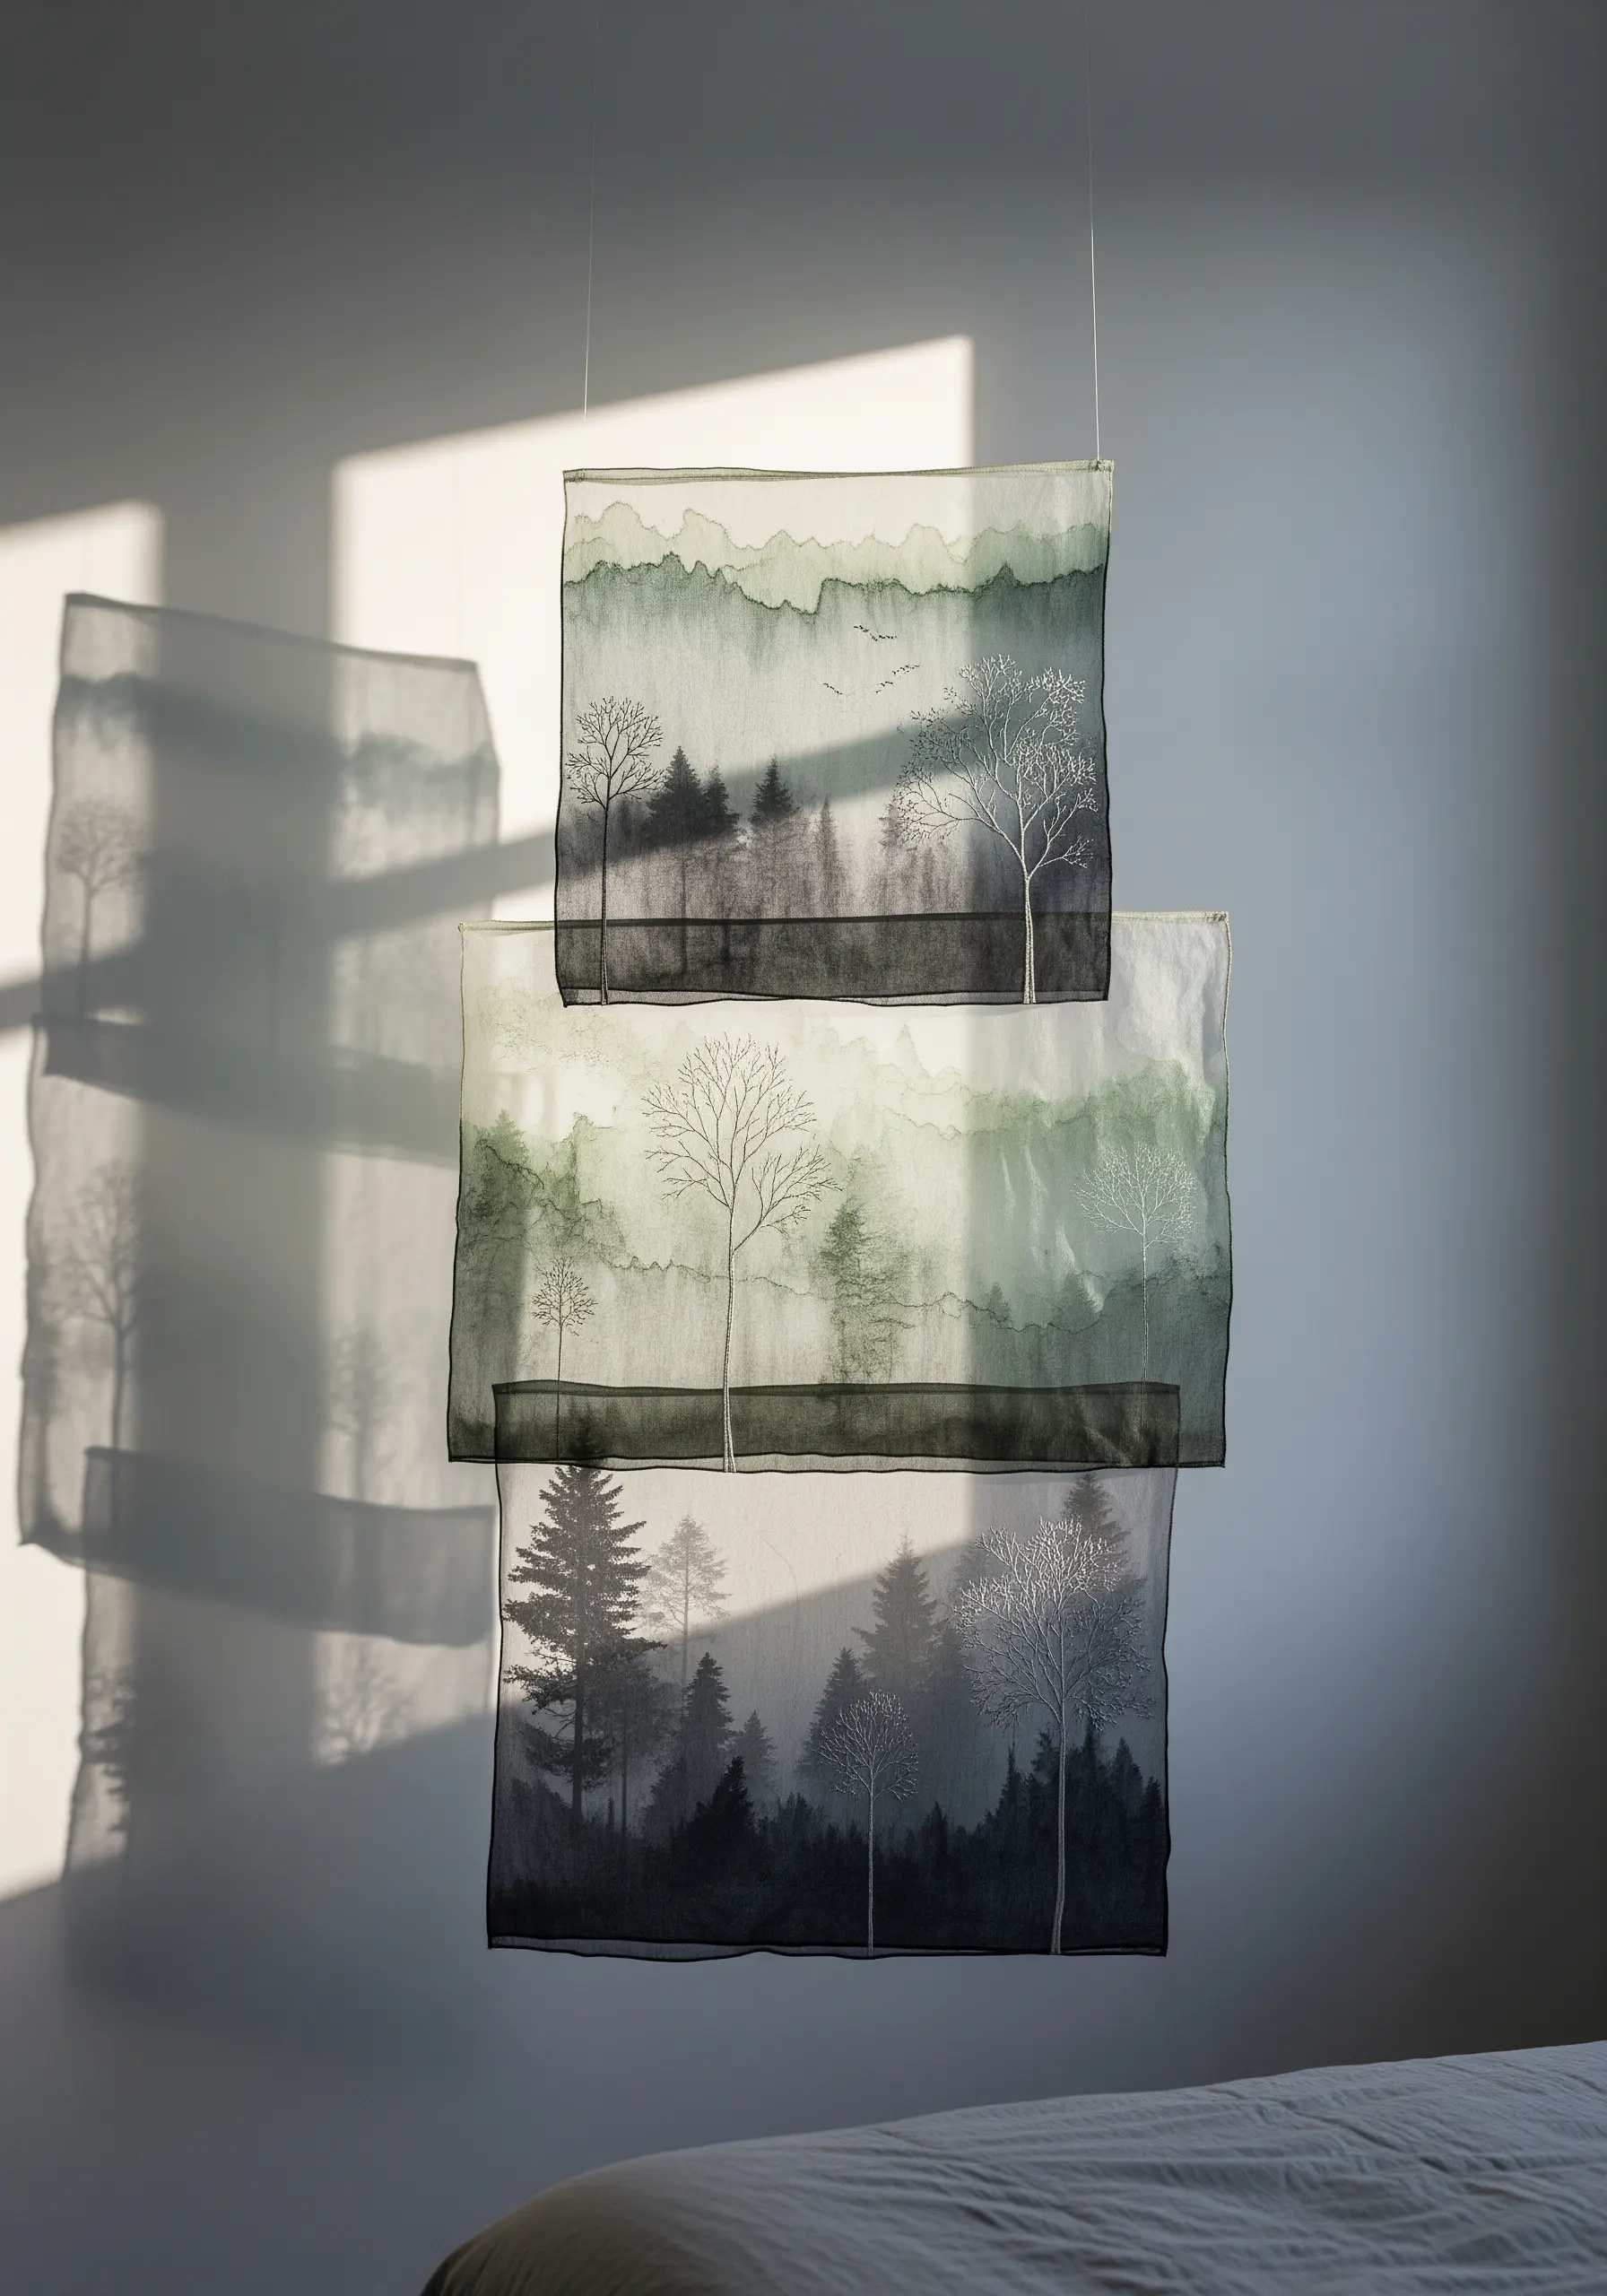
Capture the ethereal quality of a misty landscape by stitching on multiple layers of transparent fabric like silk organza or tulle.
Embroider different elements of your scene—foreground trees on one layer, distant mountains on another—using fine, single-strand thread to avoid weighing down the delicate material.
When you hang the panels one in front of the other, the overlapping images create a natural sense of atmospheric perspective and depth.
The slight movement of the fabric adds a living, breathing quality to the artwork, making the scene feel dynamic and immersive.
3. Emulate Stained Glass with Bold Outlines
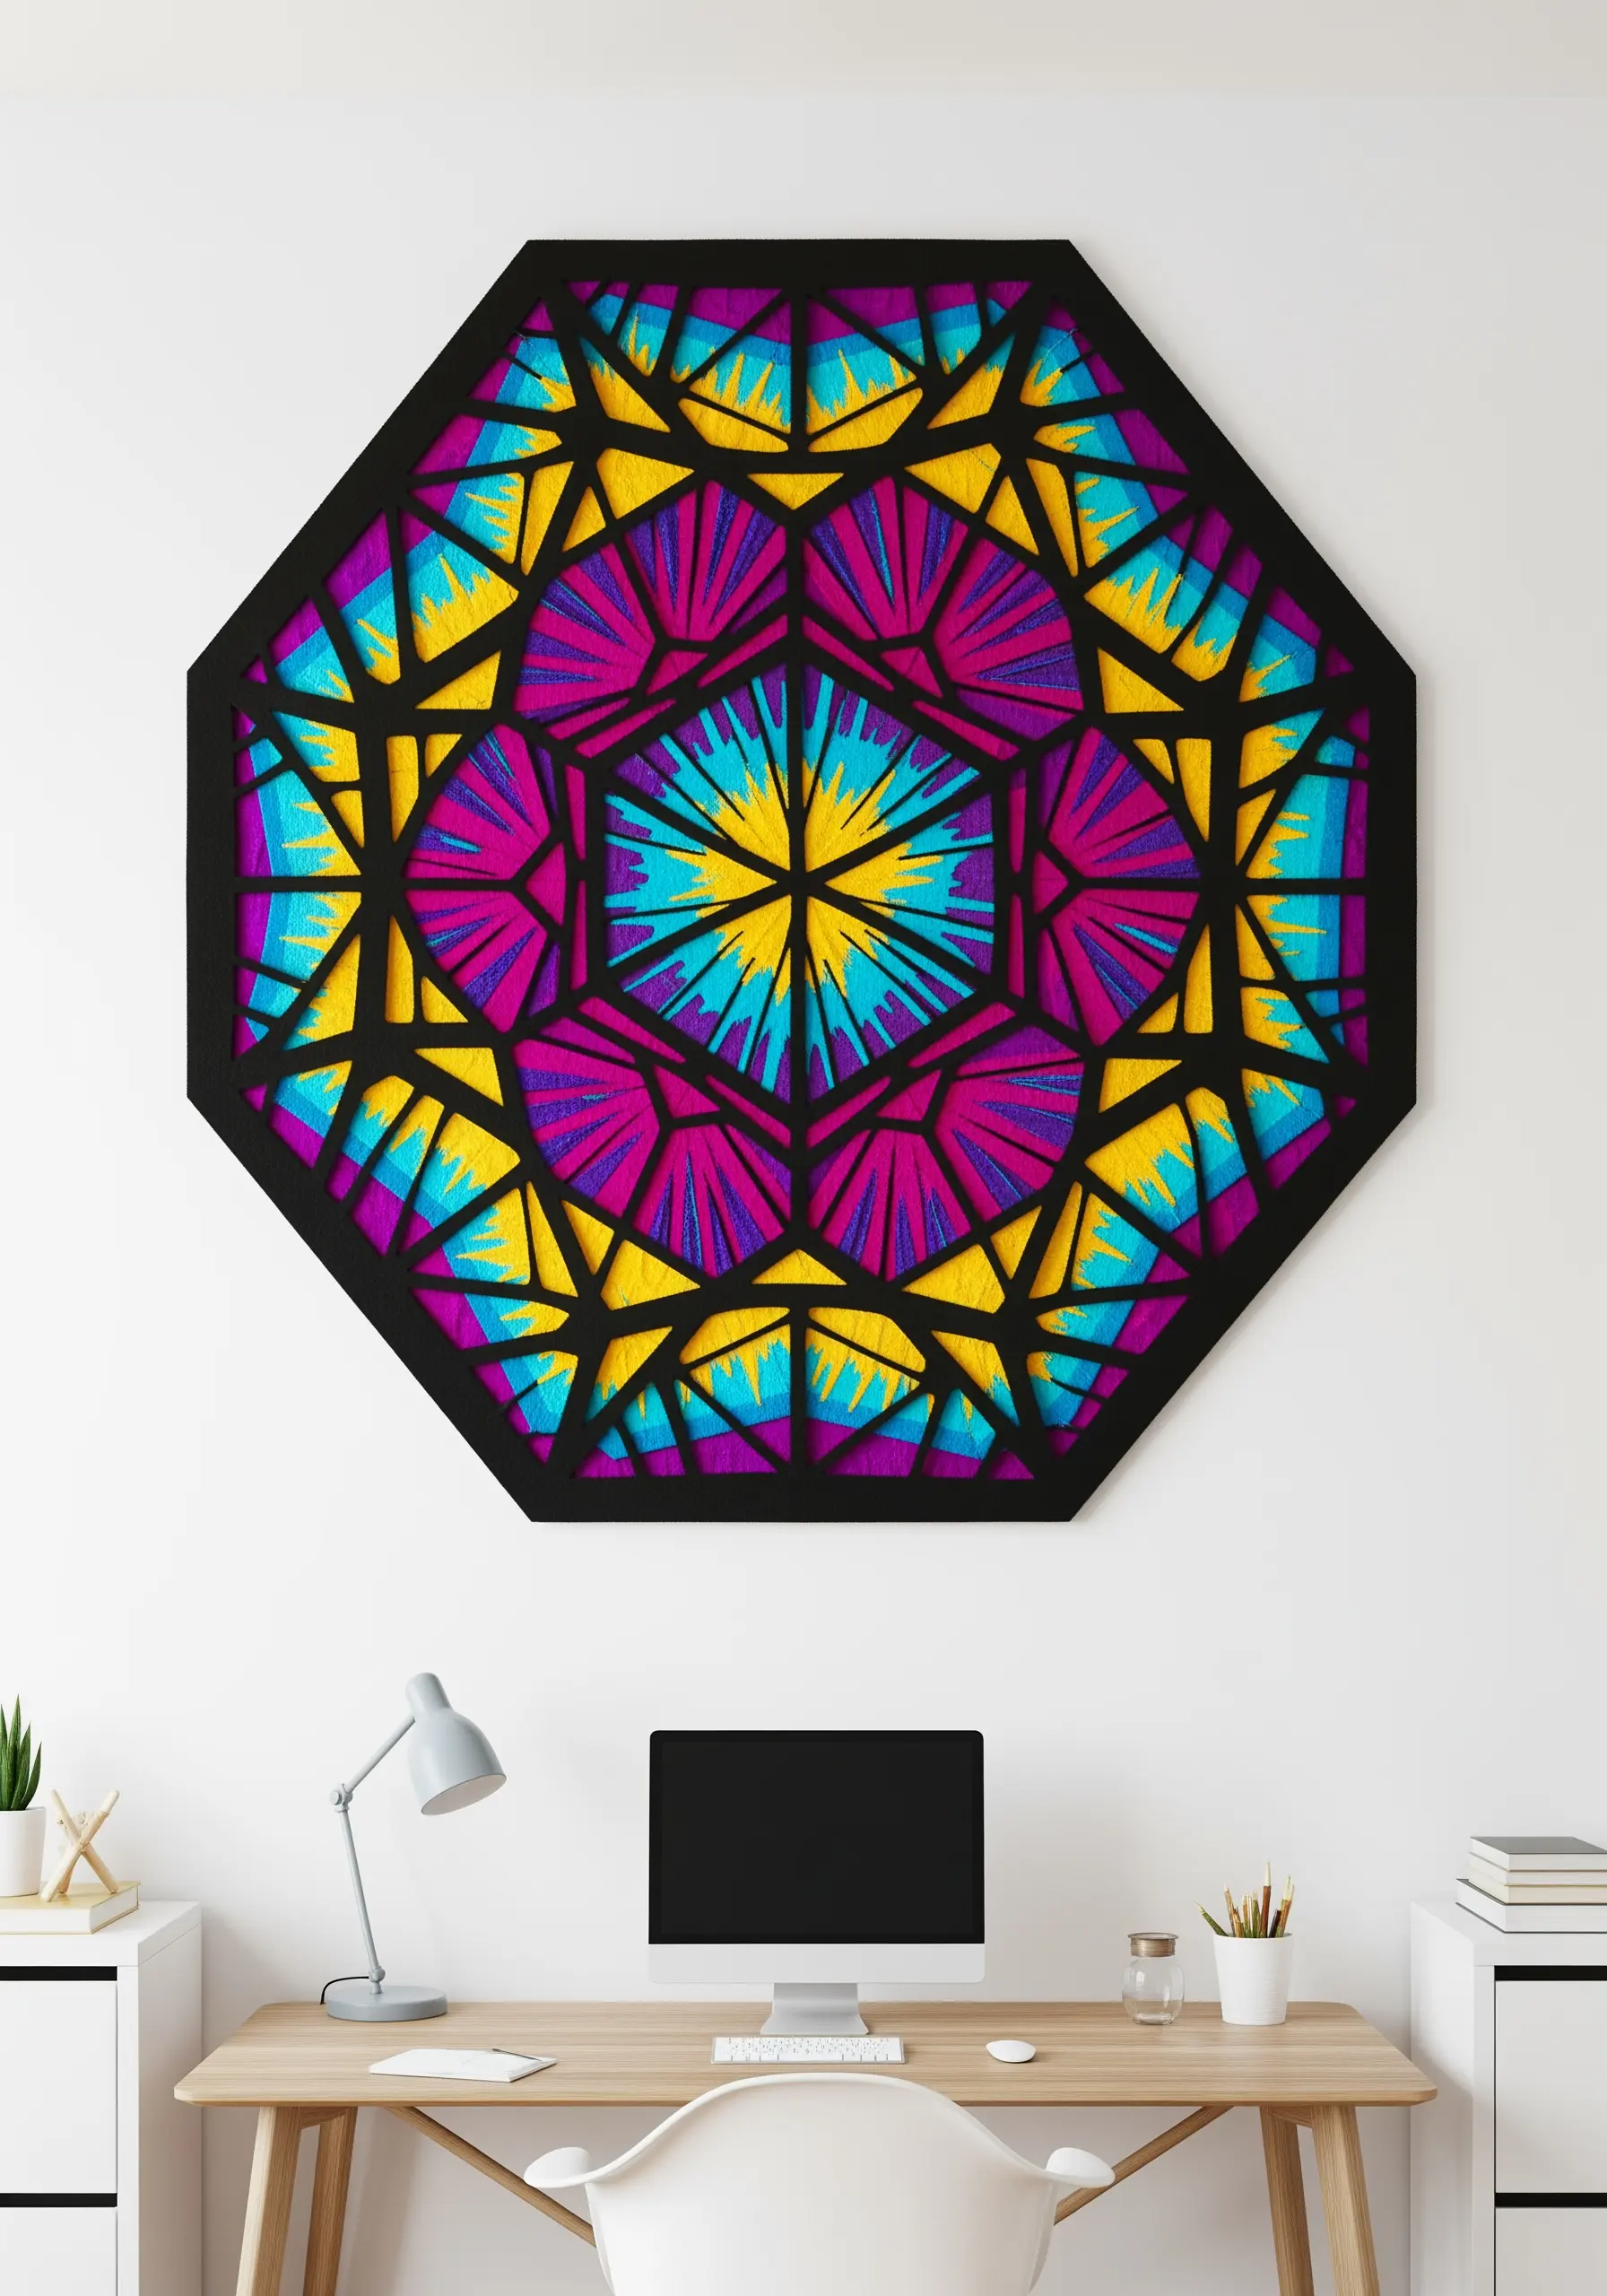
To create the vibrant, luminous effect of stained glass, the secret lies in the powerful contrast between dense color and dark, graphic lines.
Fill each segment with exceptionally tight satin stitches, using a high-sheen rayon or silk thread that reflects light intensely.
Next, define each shape with a thick, bold outline using a couched heavy black cord or multiple strands of black floss worked in a stem stitch.
This dark border contains the color, making each hue appear more saturated and radiant, perfectly mimicking the leaded lines and glowing panes of a real window.
4. Construct a Cascading Foliage Wall Hanging
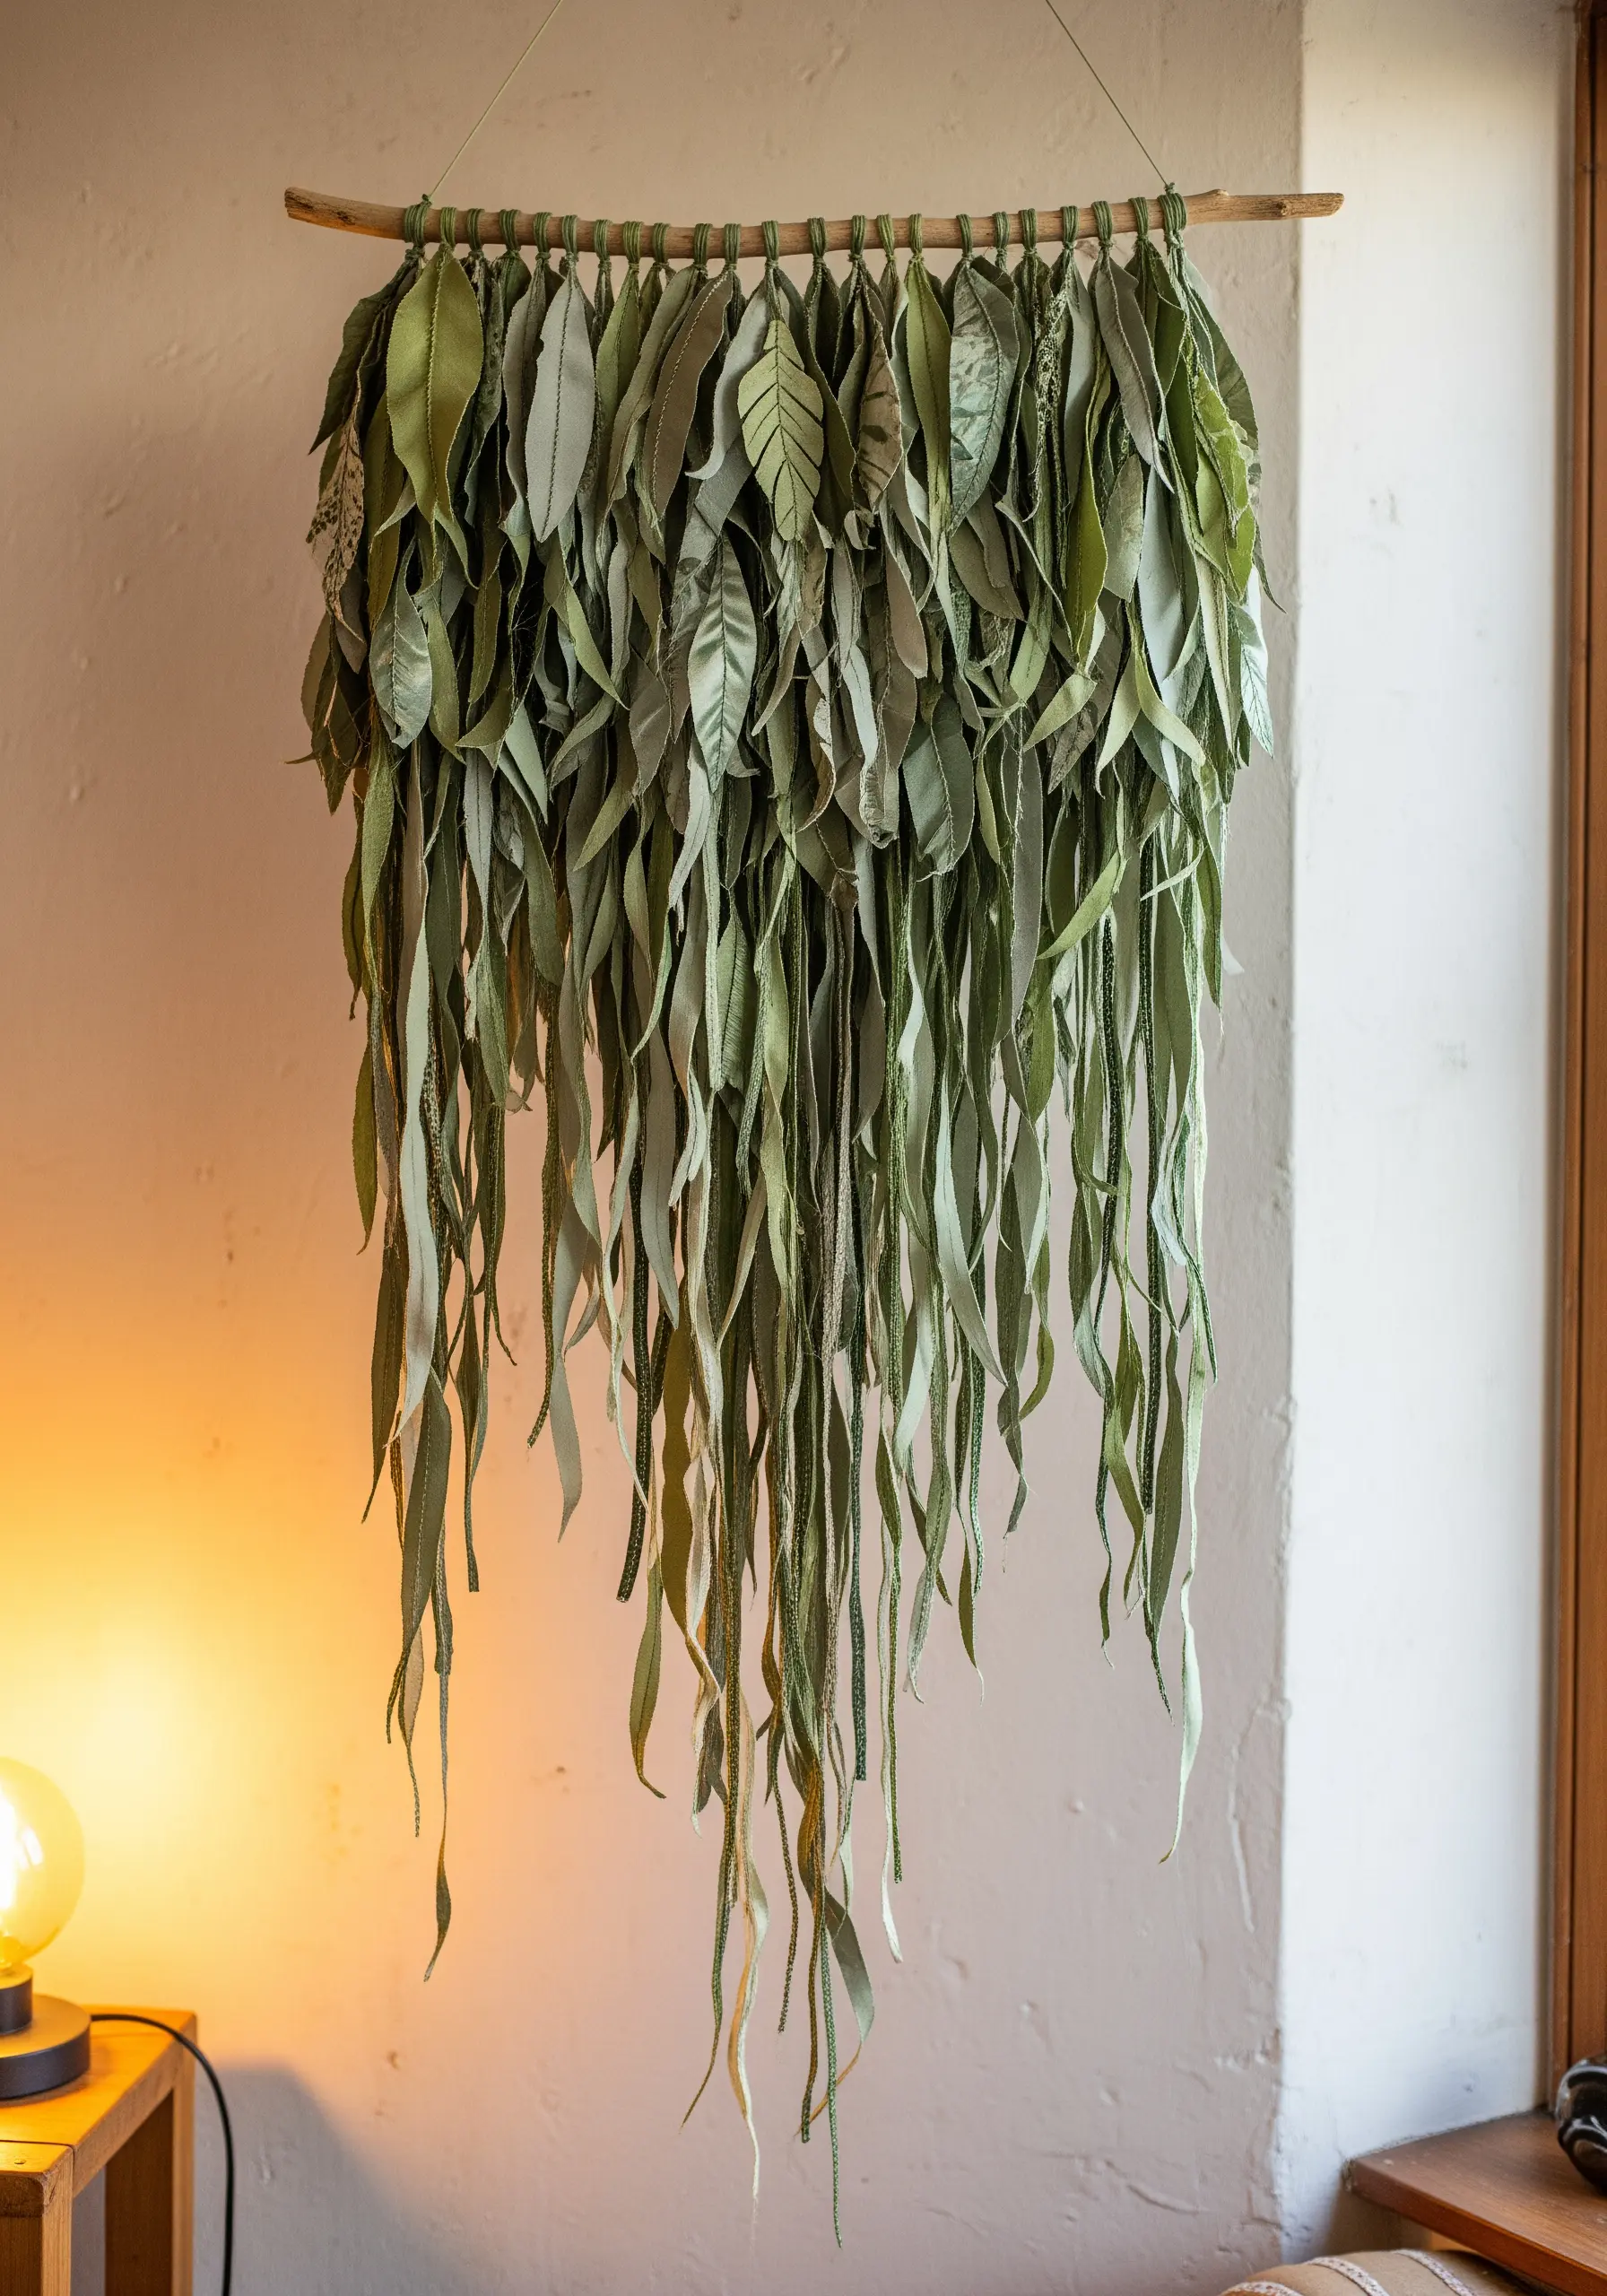
Move beyond the hoop and create a large-scale botanical installation with layered fabric leaves.
Cut individual leaf shapes from various green fabrics—felt, linen, and cotton—to create subtle variations in texture and tone.
Use a simple backstitch or stem stitch to add delicate veining to each leaf, which adds realism and structural integrity.
Finally, attach the leaves in dense, overlapping clusters to a natural branch or wooden dowel, allowing them to cascade downwards.
This technique creates a lush, organic texture that flows with movement and life, turning a flat wall into a vertical garden.
5. Build an Urban Landscape with Textured Appliqué
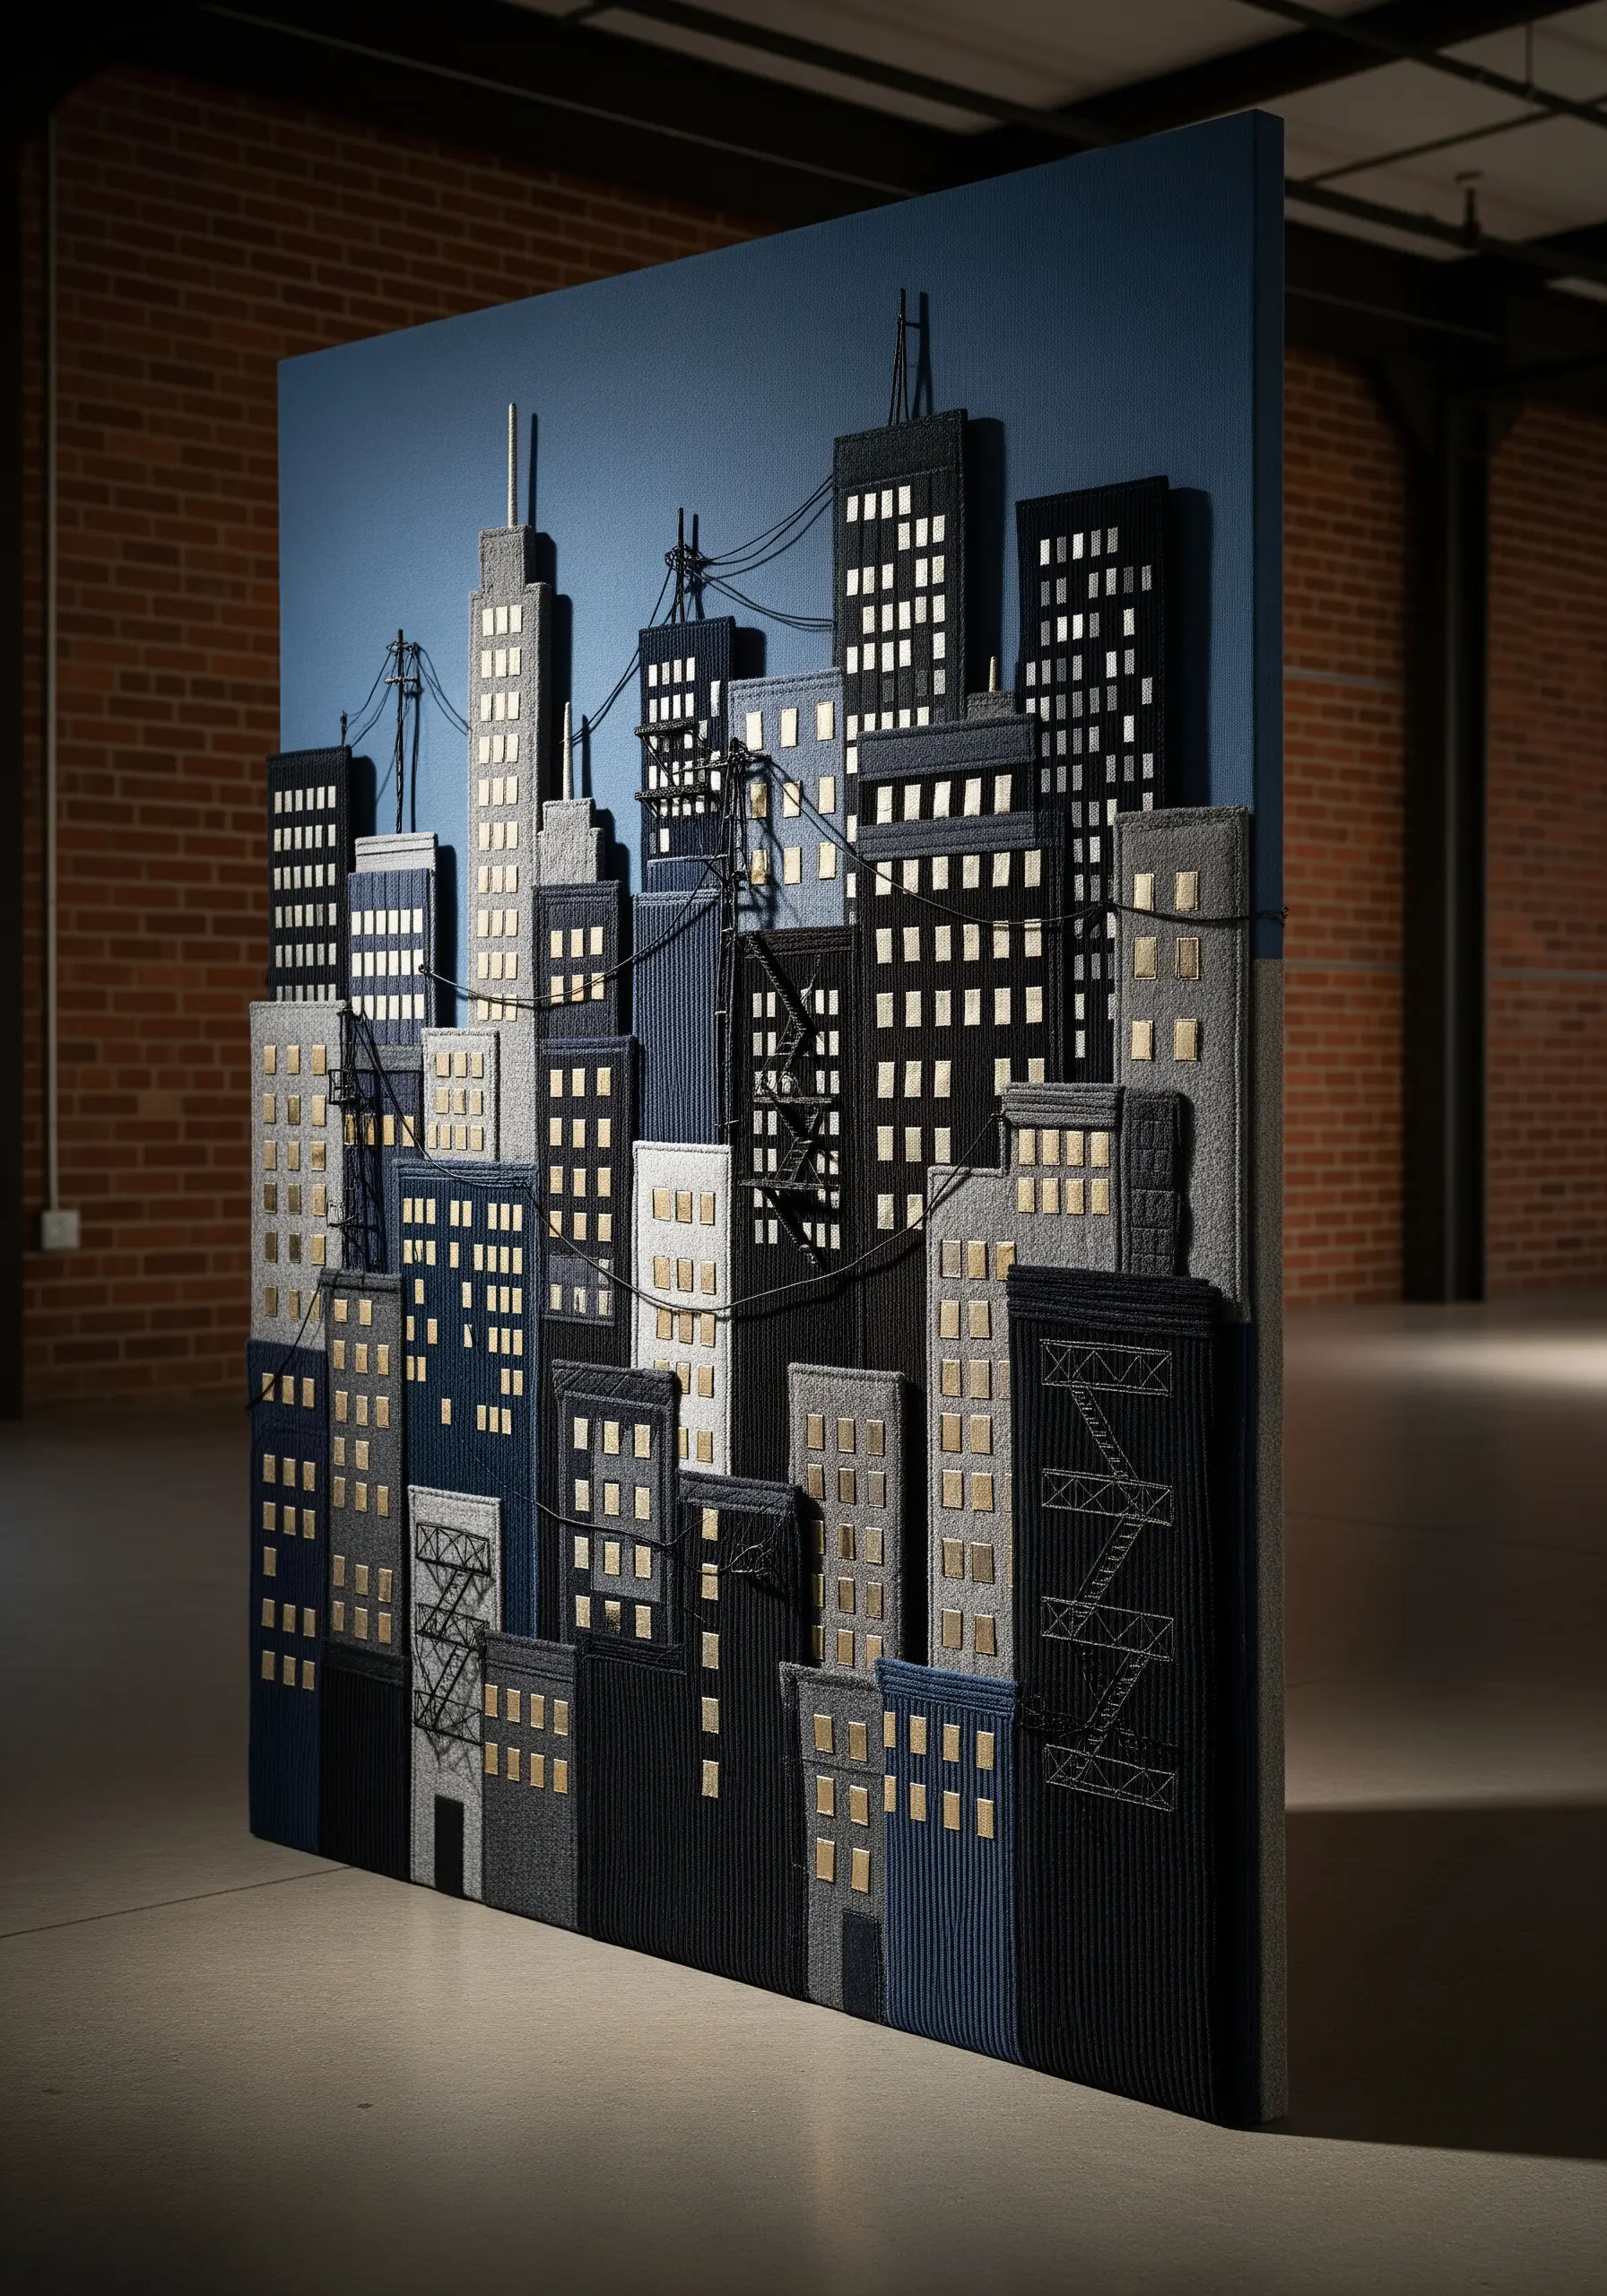
You can construct a dynamic city skyline by treating fabric swatches like architectural materials.
Cut building shapes from fabrics with different weaves and textures, like denim, corduroy, and heavy canvas, to represent various facades.
Layer these pieces to create perspective, placing darker or larger buildings in the foreground.
Use a simple running stitch to secure the appliqué, and add details like glowing windows with small rectangles of metallic fabric or satin stitches in a gold thread.
The interplay of textures and the subtle shimmer of the windows give the composition a tangible, metropolitan energy.
6. Sculpt with Threadless Folds and Stitches
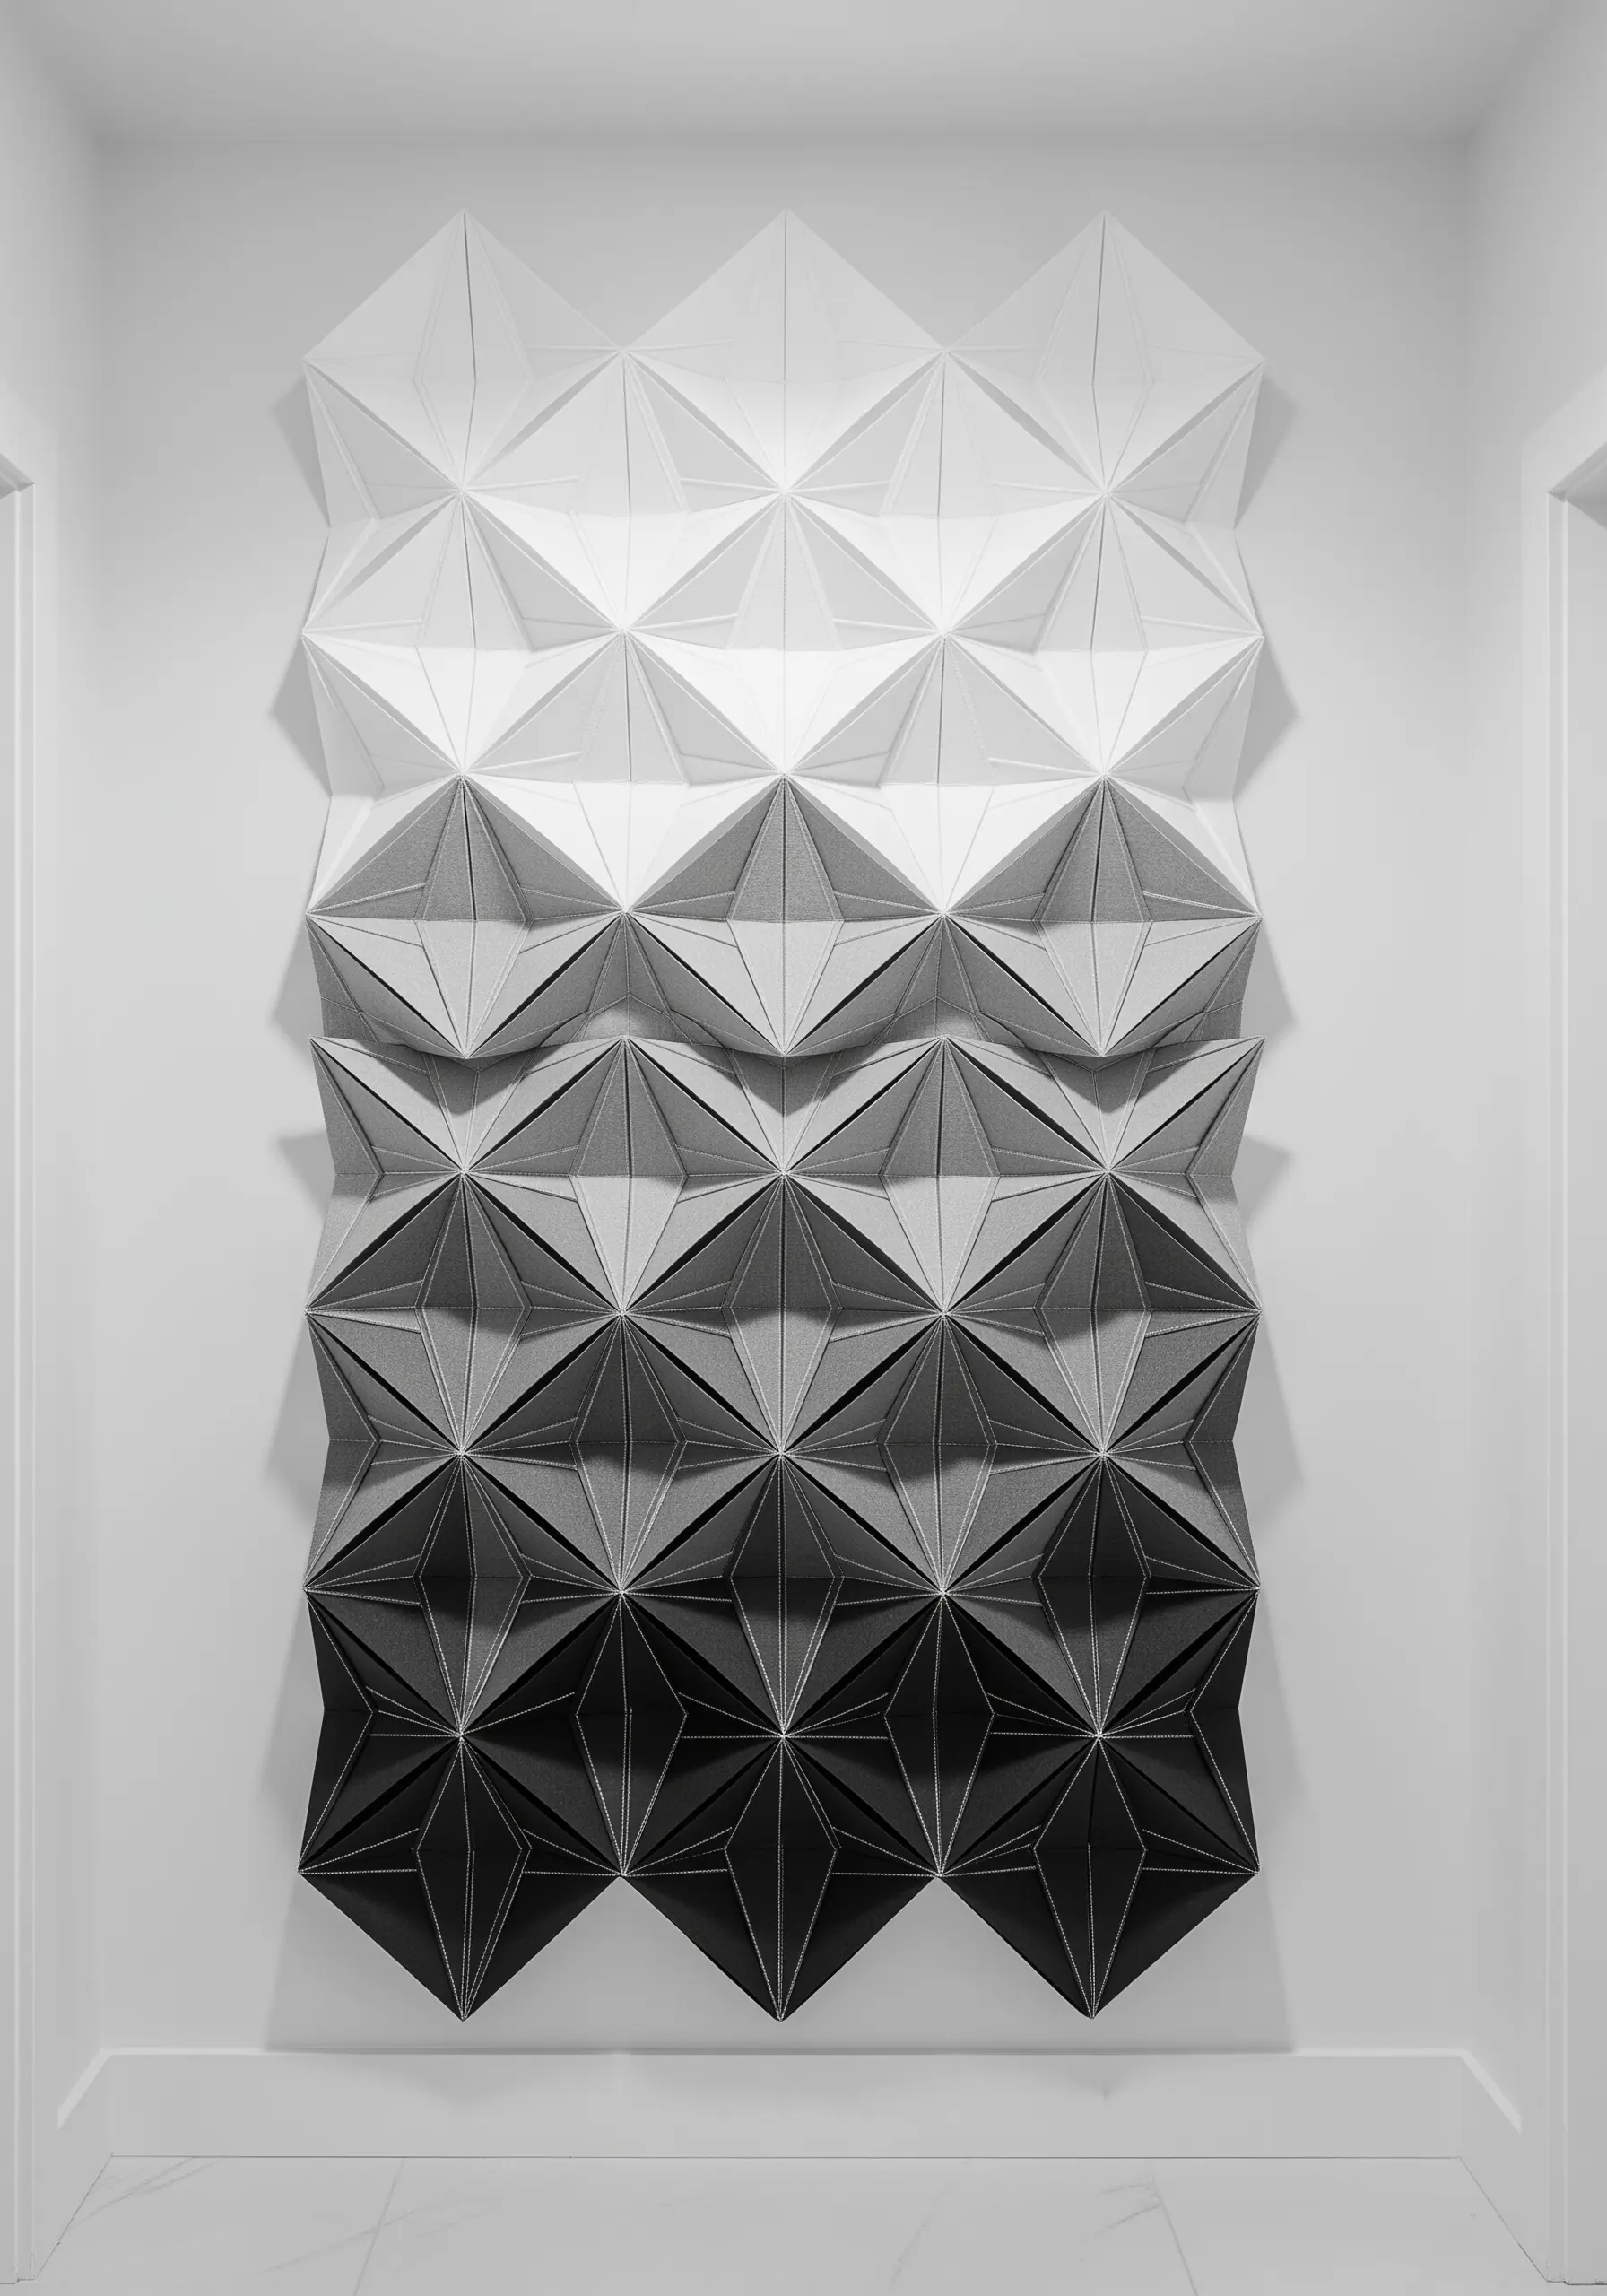
Create powerful geometric depth not with thread, but with the fabric itself.
This technique, similar to origami, involves precisely folding a single piece of stiff fabric (like canvas or heavy linen) into a repeating three-dimensional pattern.
Press each fold sharply with an iron to set the creases, then secure the intersections on the reverse side with small, invisible stitches.
The drama comes entirely from the crisp shadows cast by the geometric forms, creating a sophisticated, minimalist statement piece where texture is the true subject.
7. Stitch Topographical Contours with Layered Yarn
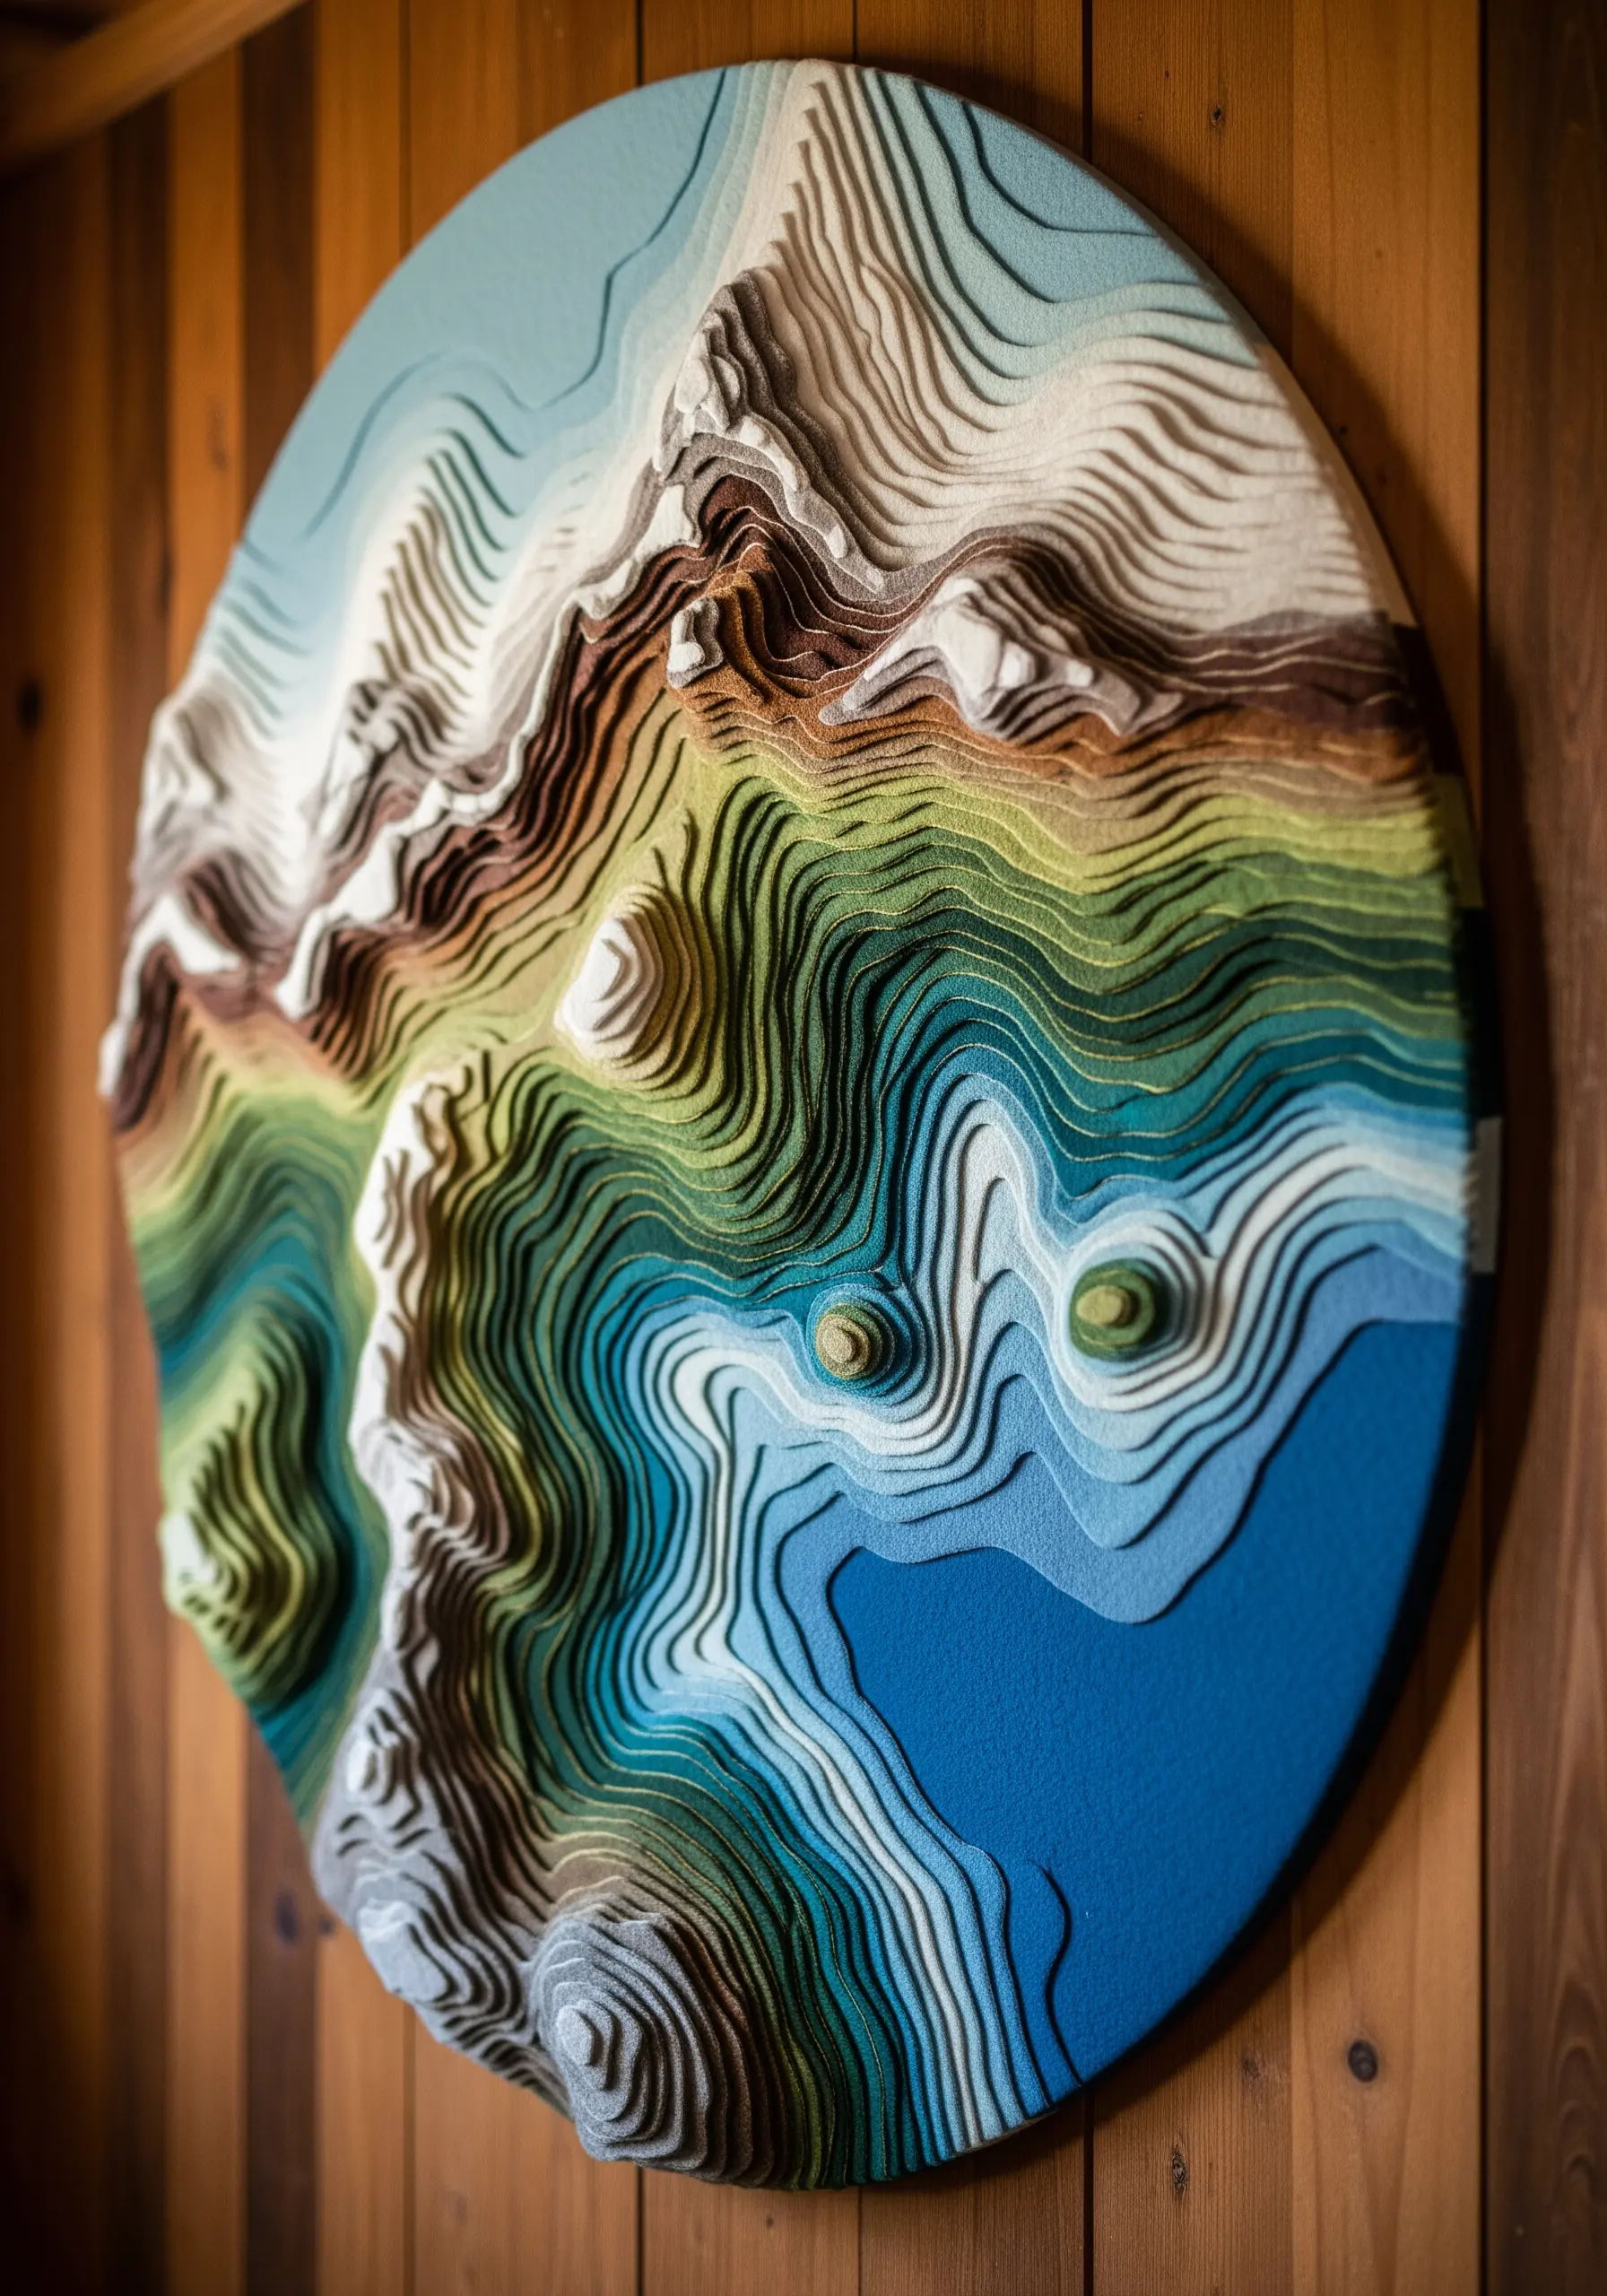
Translate the beauty of a topographical map into a tactile work of art using couching and thick yarn.
Begin by transferring the contour lines of a landscape onto your base fabric.
Lay down thick yarn or roving wool along these lines and secure it with small, perpendicular stitches (couching) in a matching or contrasting thin thread.
Build up the elevation by adding more layers of yarn in mountainous regions, creating a tangible, 3D relief of the terrain that invites touch.
This method transforms a flat map into a sculptural mountain landscape.
8. Compose Portraits with Deconstructed Fabric Collage
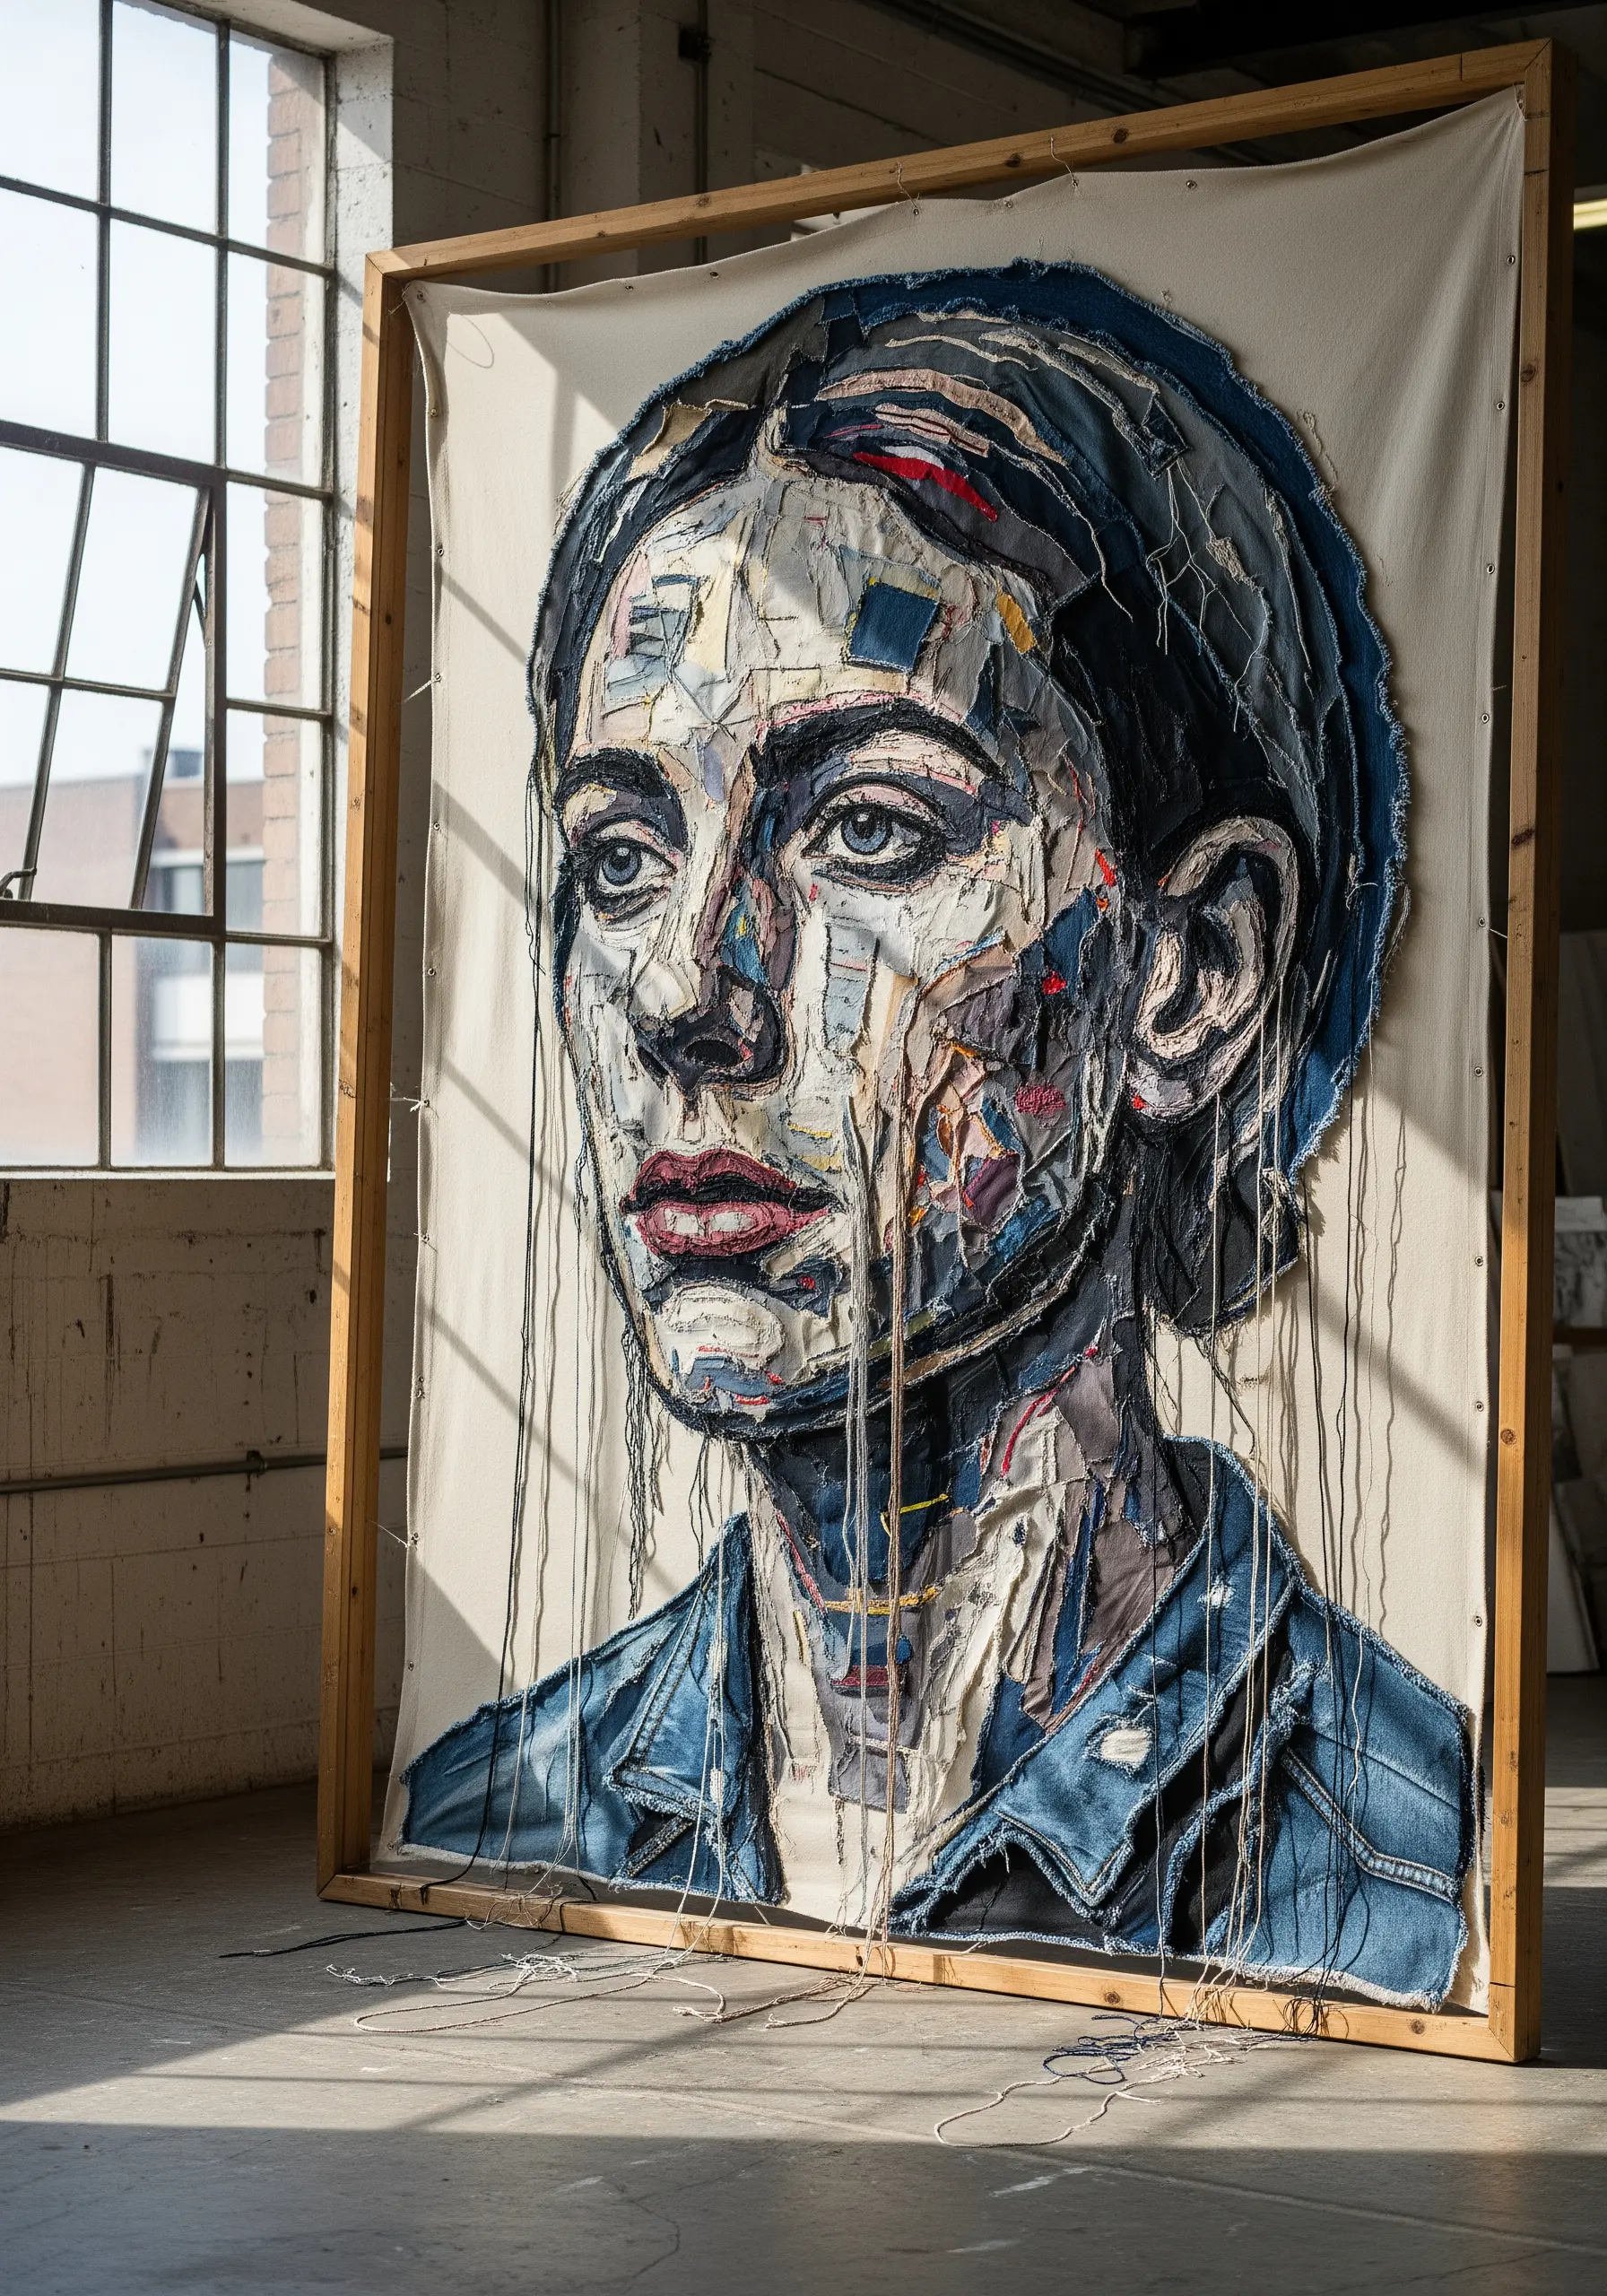
Instead of thread painting, use fabric scraps to build a portrait with raw, expressive power.
Cut or tear pieces from old clothing—especially denim, with its range of worn tones—and arrange them to form the planes and shadows of a face.
Layer the pieces, allowing frayed edges and loose threads to remain visible, as they contribute to the artwork’s texture and emotional depth.
Use minimal stitching to tack down key features, letting the collage of fabric do the expressive work.
This technique transforms textile waste into modern thread portraits with profound character.
9. Design with Light Using Shadow Embroidery
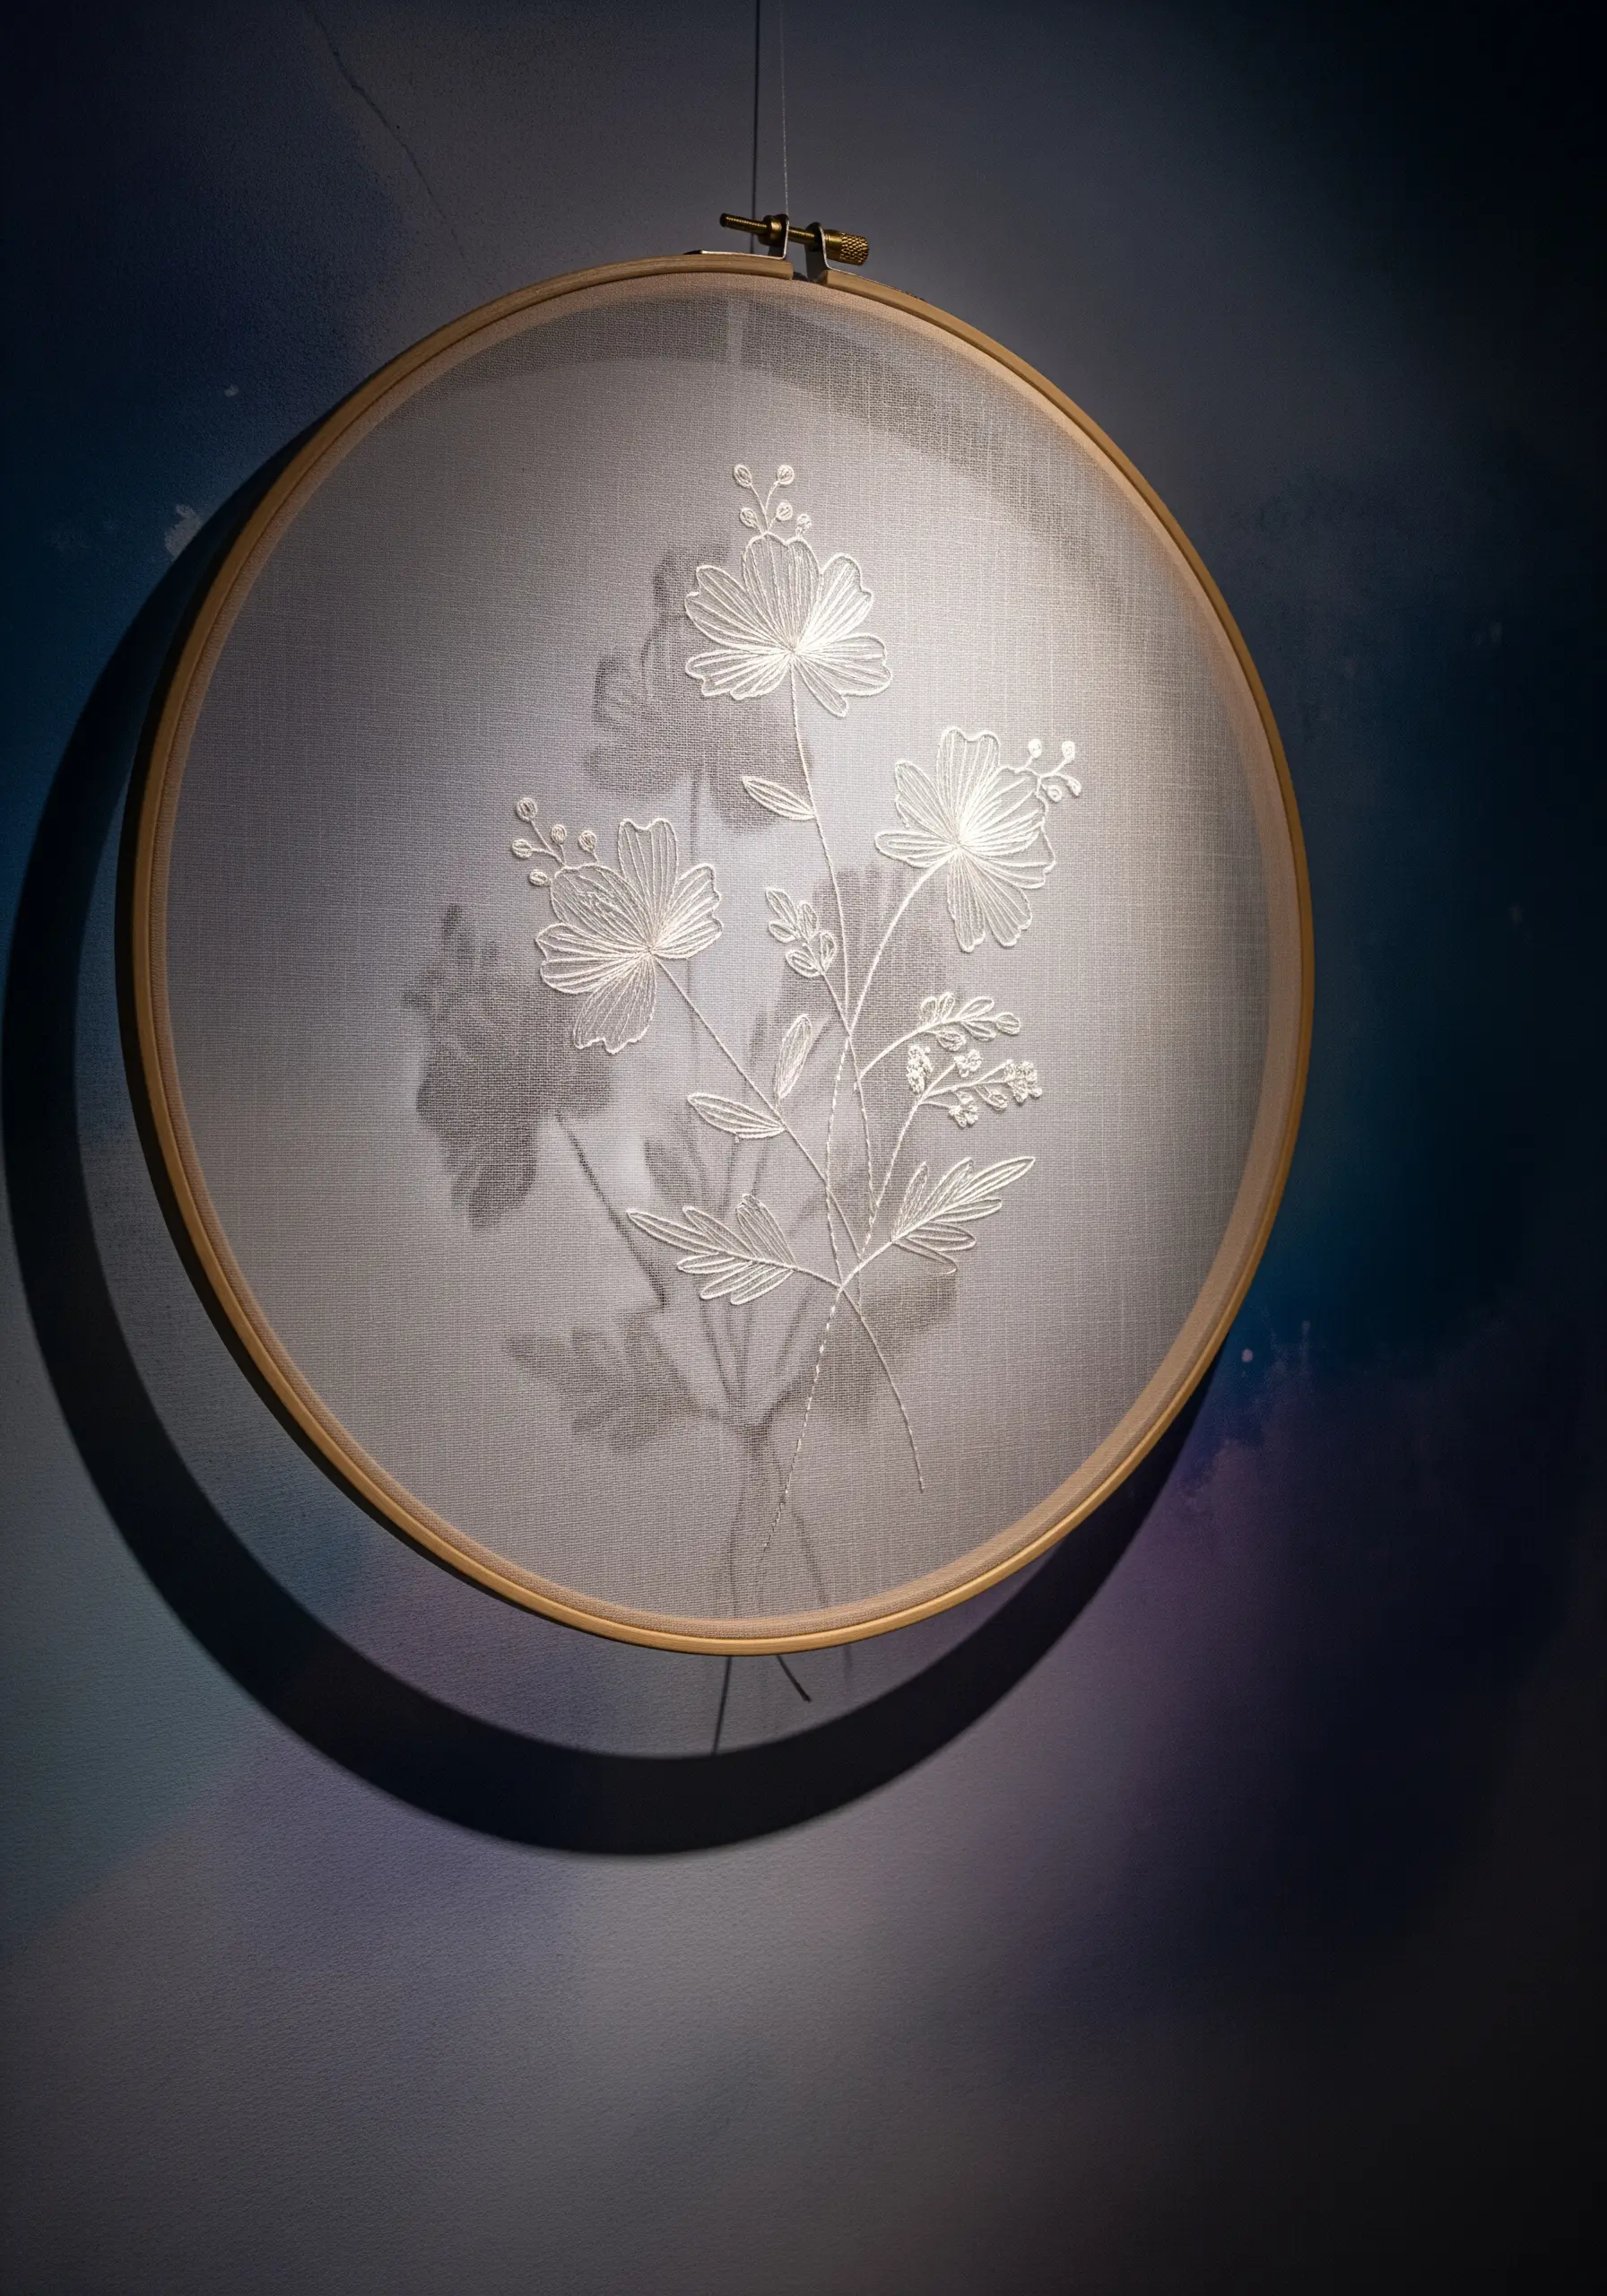
Elevate a simple line design by making its shadow a key part of the composition.
Stretch a single layer of fine, sheer tulle taut in a hoop and stitch your motif using a crisp, white thread.
When you hang the piece slightly away from a wall and light it from the side or above, the embroidery casts a delicate, secondary drawing onto the surface behind it.
This floating effect is ethereal and dynamic, creating two layers of art from one line of stitching and turning negative space into an active element.
10. Weave a Tapestry of Contrasting Textures
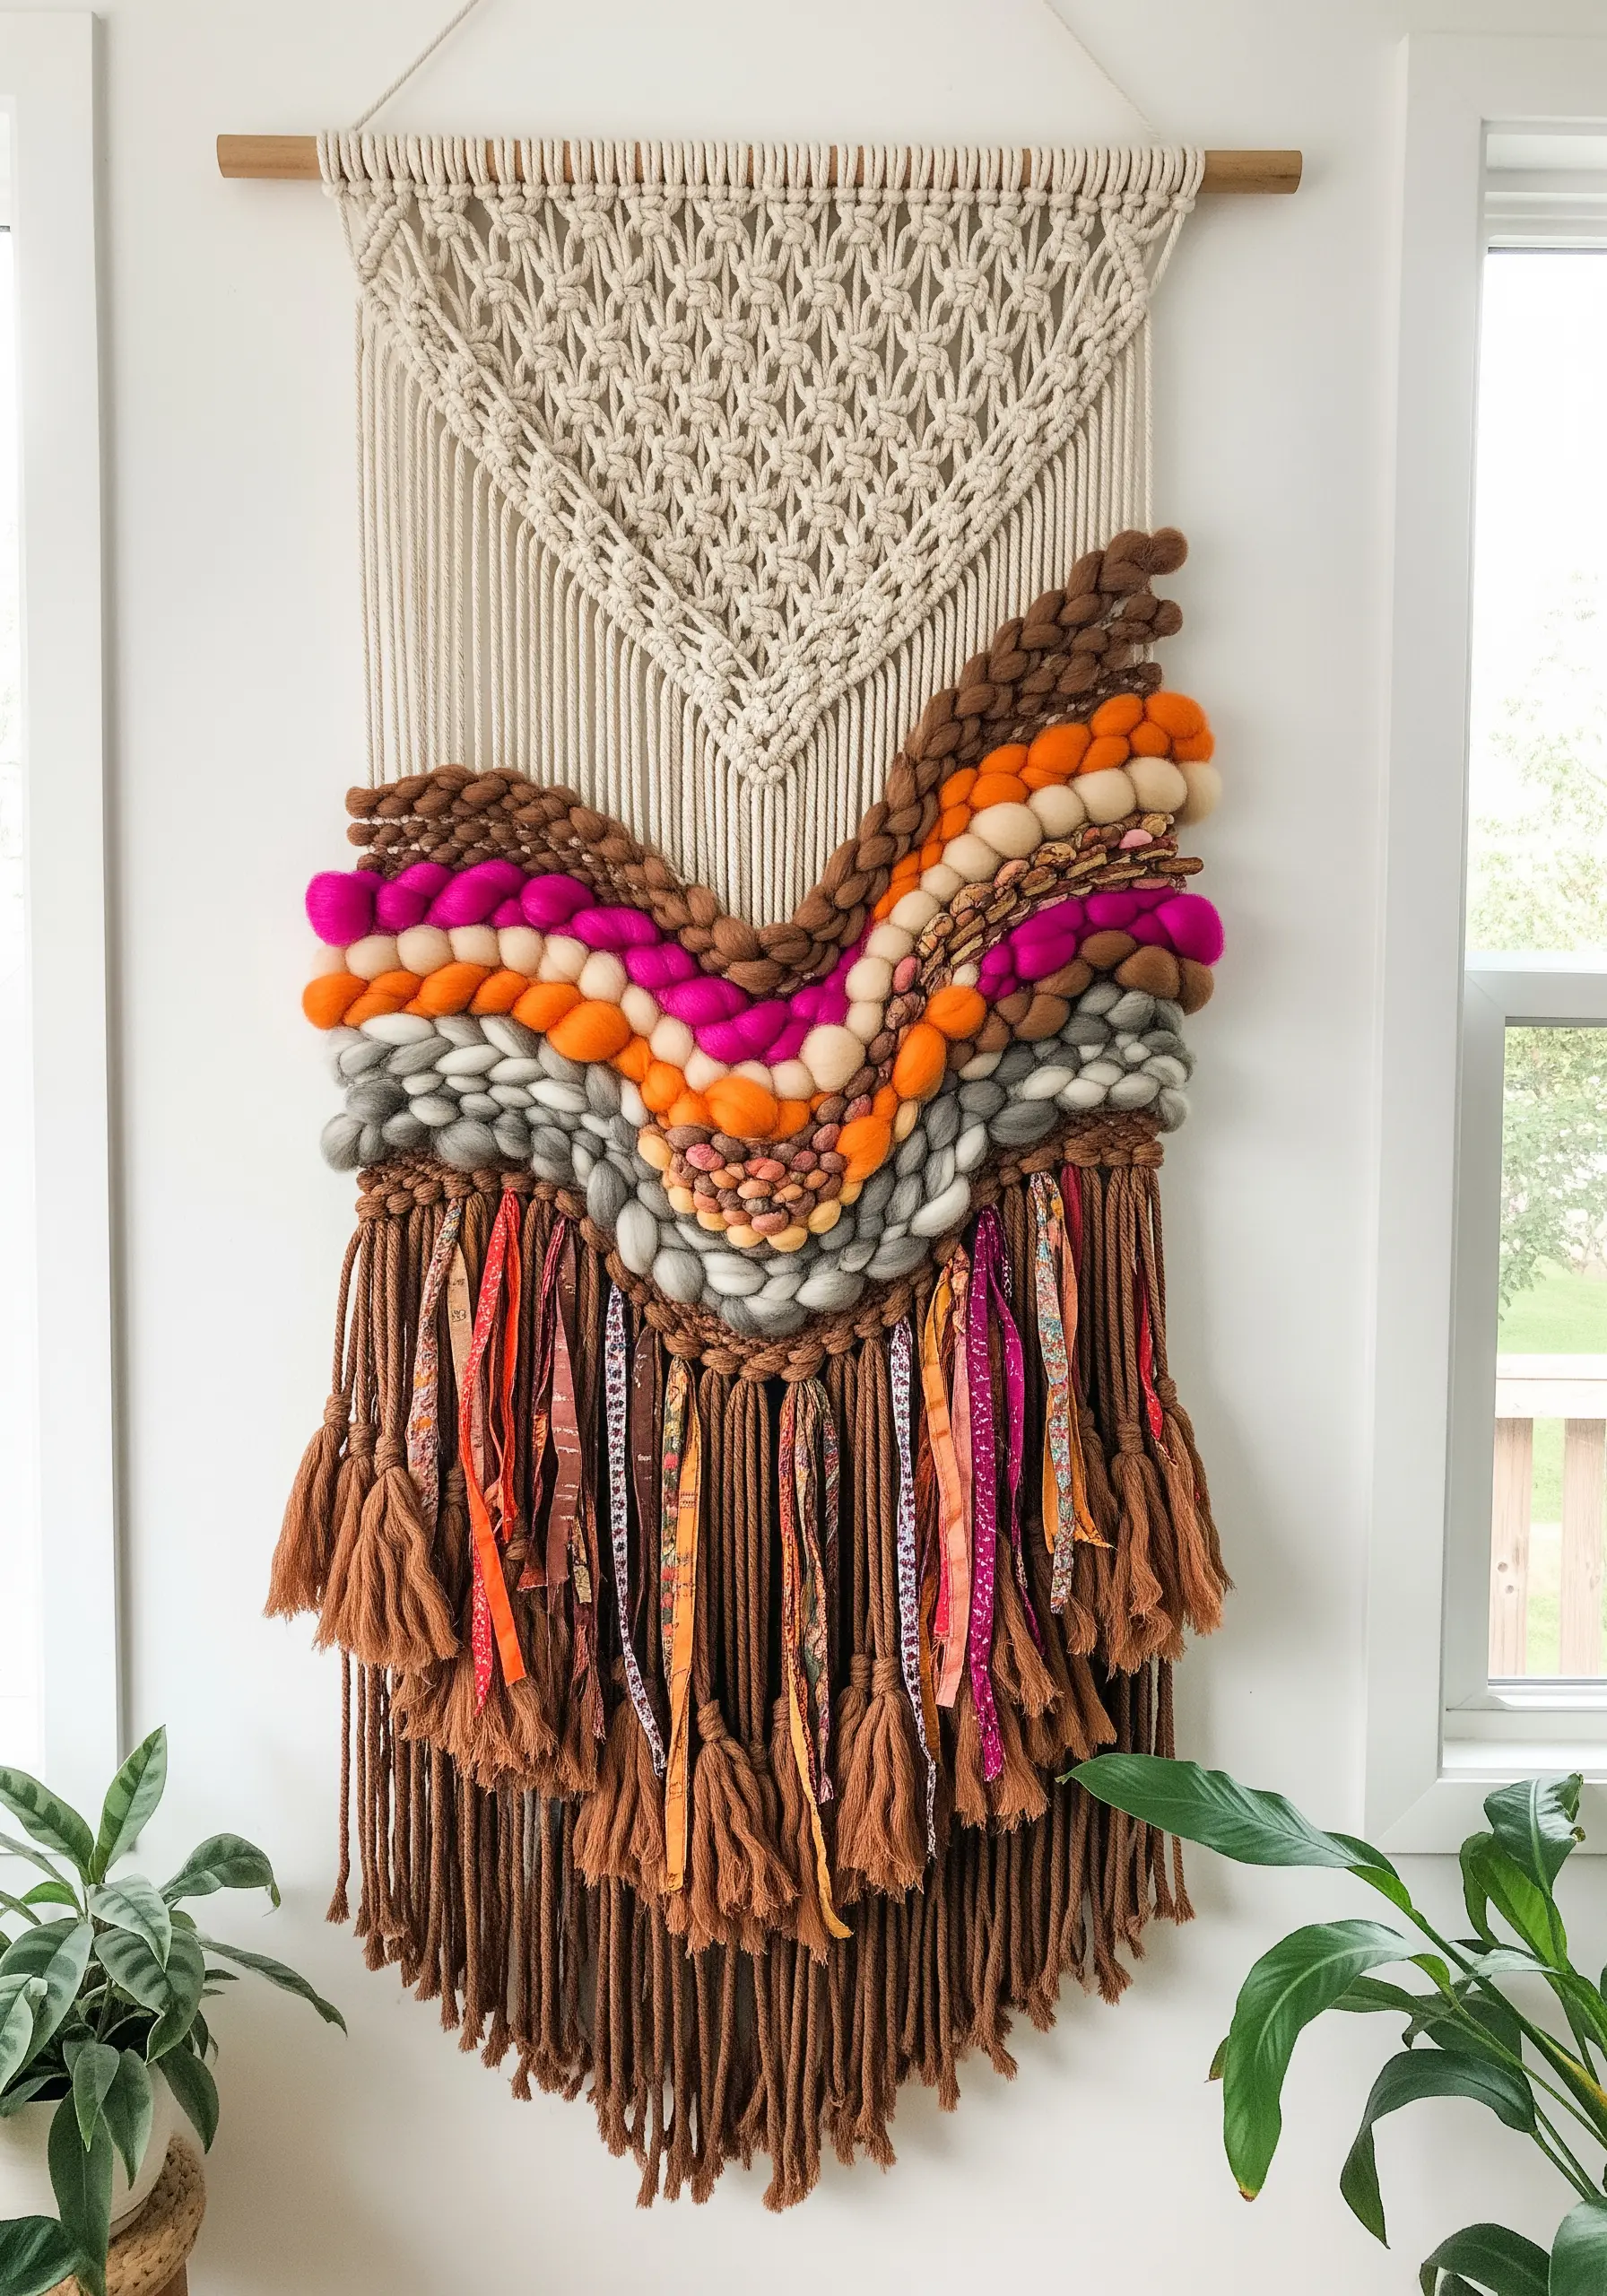
Go beyond traditional embroidery by weaving a wall hanging that celebrates radical texture.
Combine different fibers on a single loom or frame, moving from smooth macramé knots to chunky, unspun wool roving and silky ribbons.
Vary the tightness of your weave, creating densely packed sections that contrast with looser, more organic forms.
The visual and tactile richness comes from this deliberate juxtaposition of thick and thin, soft and coarse, structured and freeform.
This is a perfect way to use up leftover yarn and fabric scraps to create mixed fiber wall hangings.
11. Curate an Evolving Textile Specimen Board
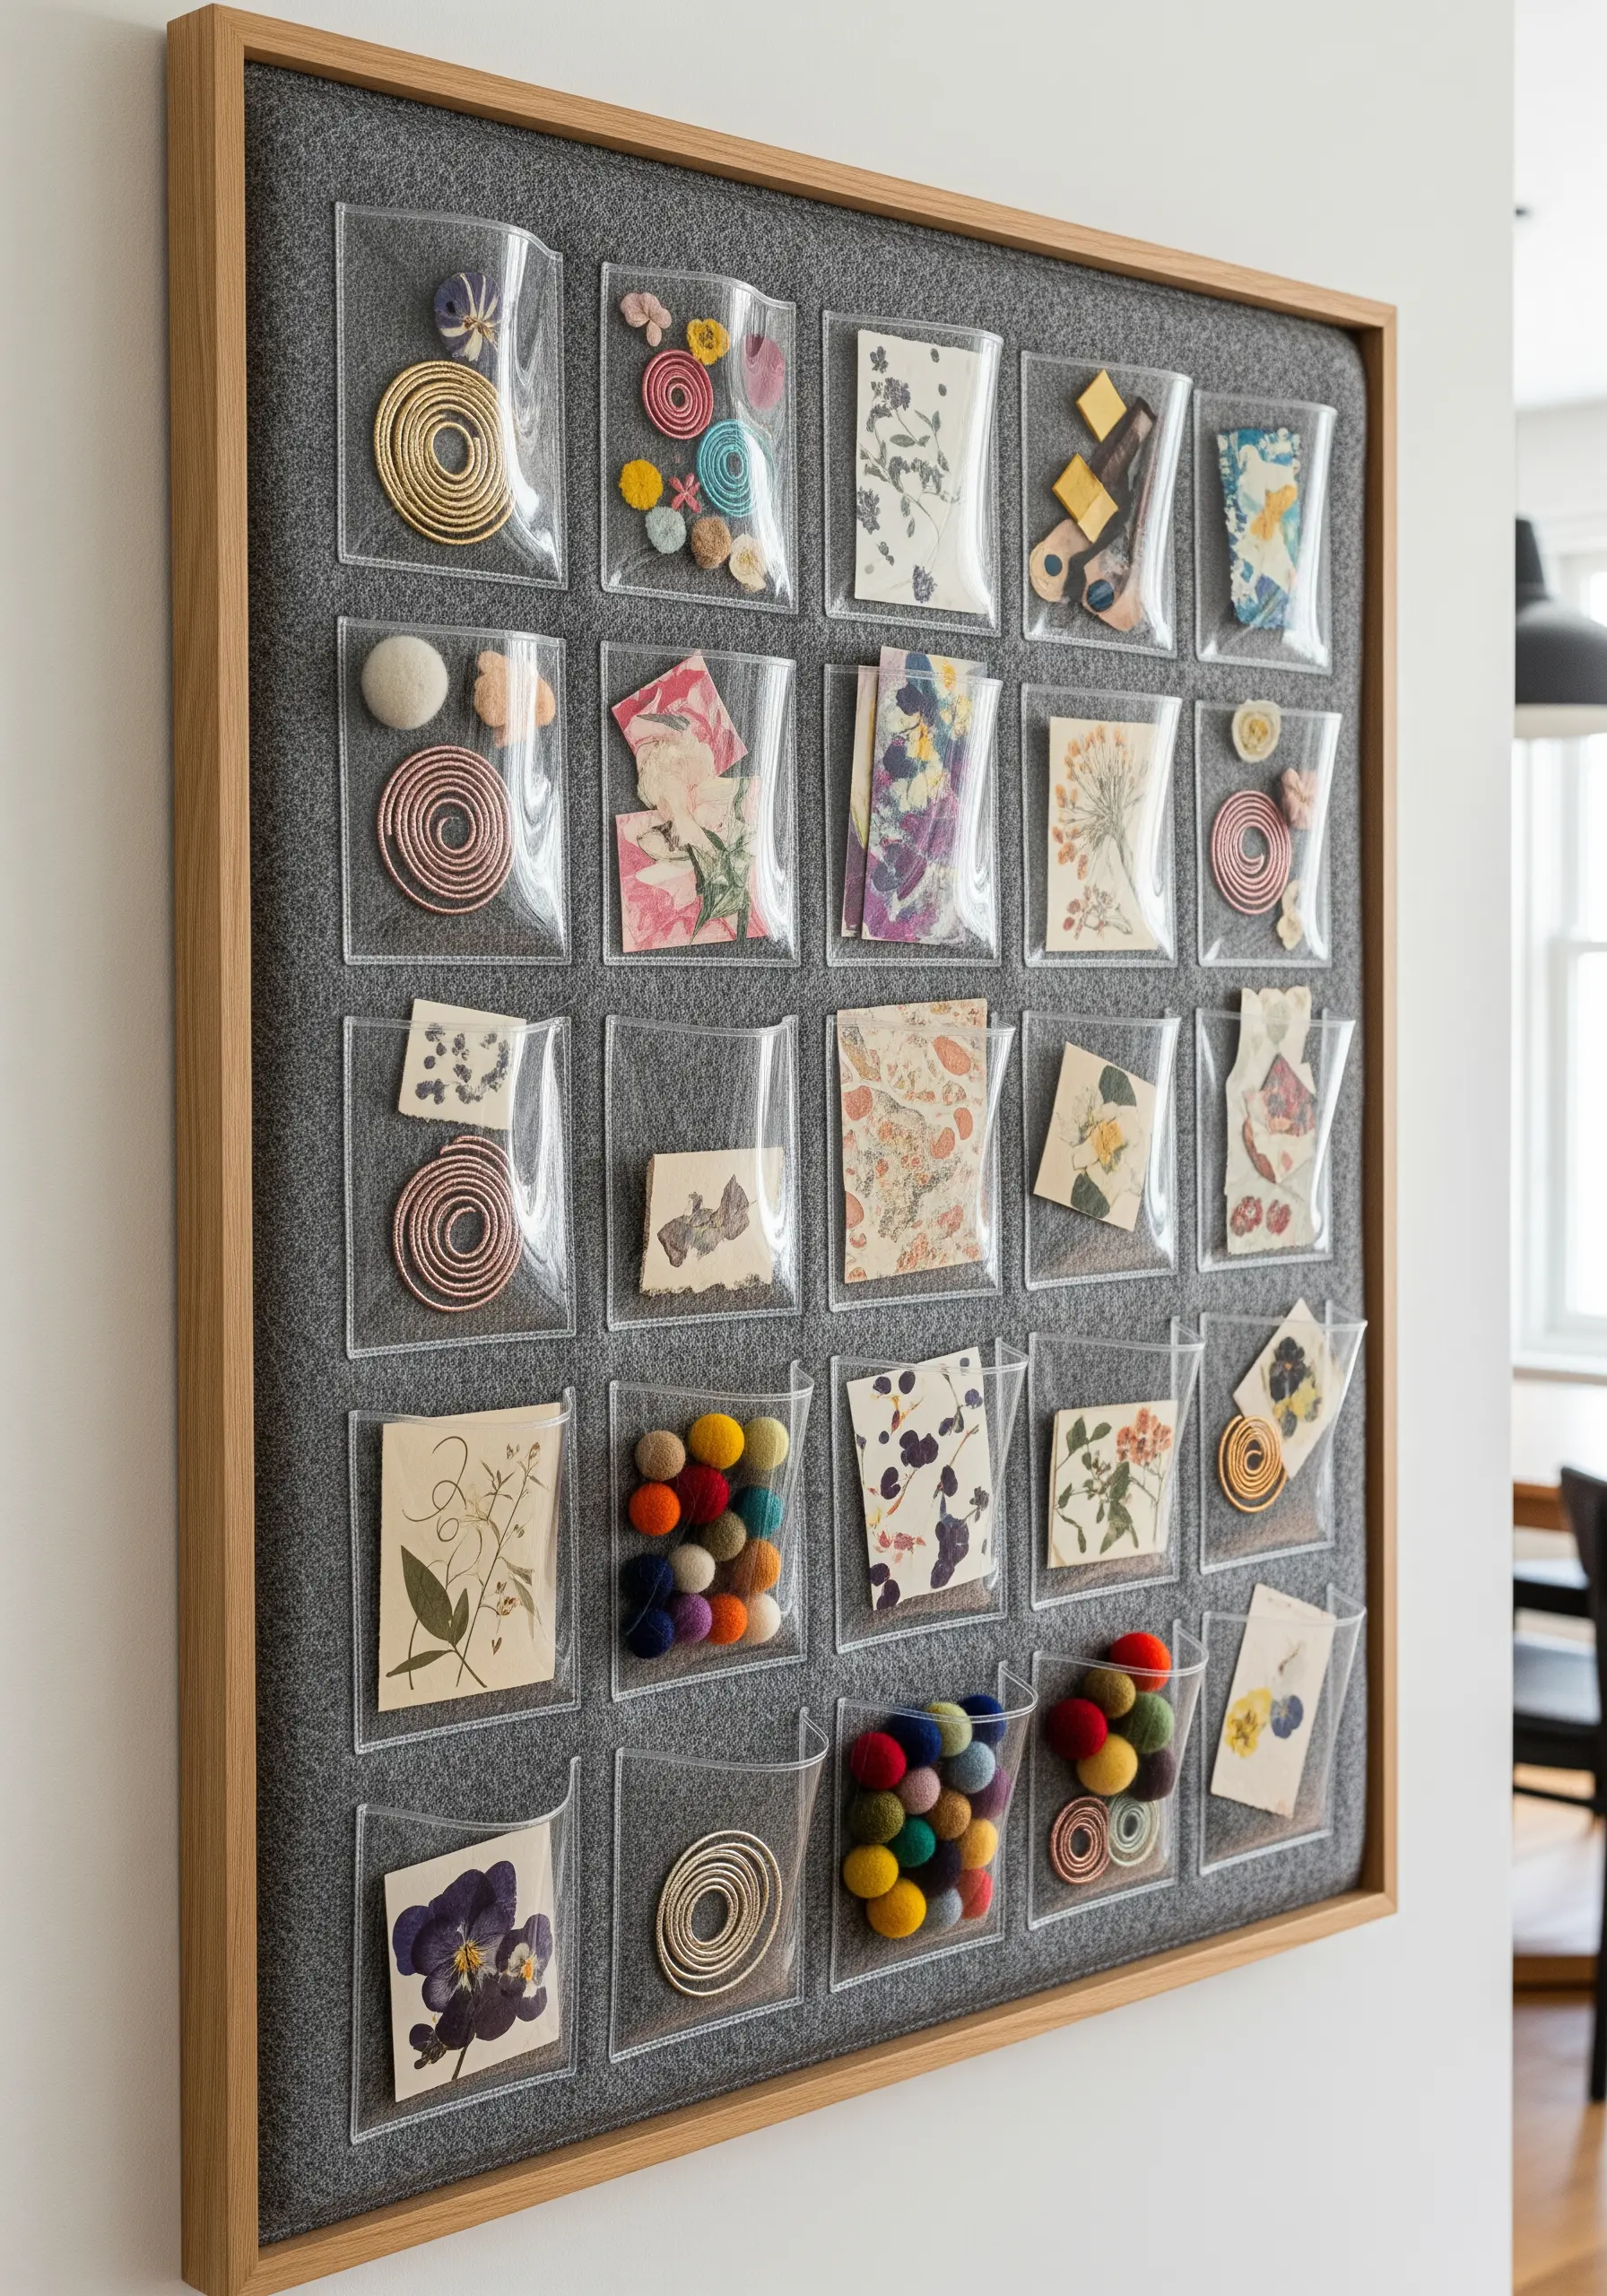
Turn your small experiments and found objects into a dynamic, layered wall display.
Cover a corkboard with a neutral felt fabric and arrange a grid of clear vinyl or acetate pockets.
Fill these pockets with textile treasures: miniature stitch samplers, pressed botanicals, coiled threads, colorful felt balls, or fragments of beautiful paper.
This approach allows you to curate and rearrange your inspirations, creating a personal and ever-changing piece of framed embroidery artworks that tells the story of your creativity.
12. Build a Soft-Sculpture Coral Garden
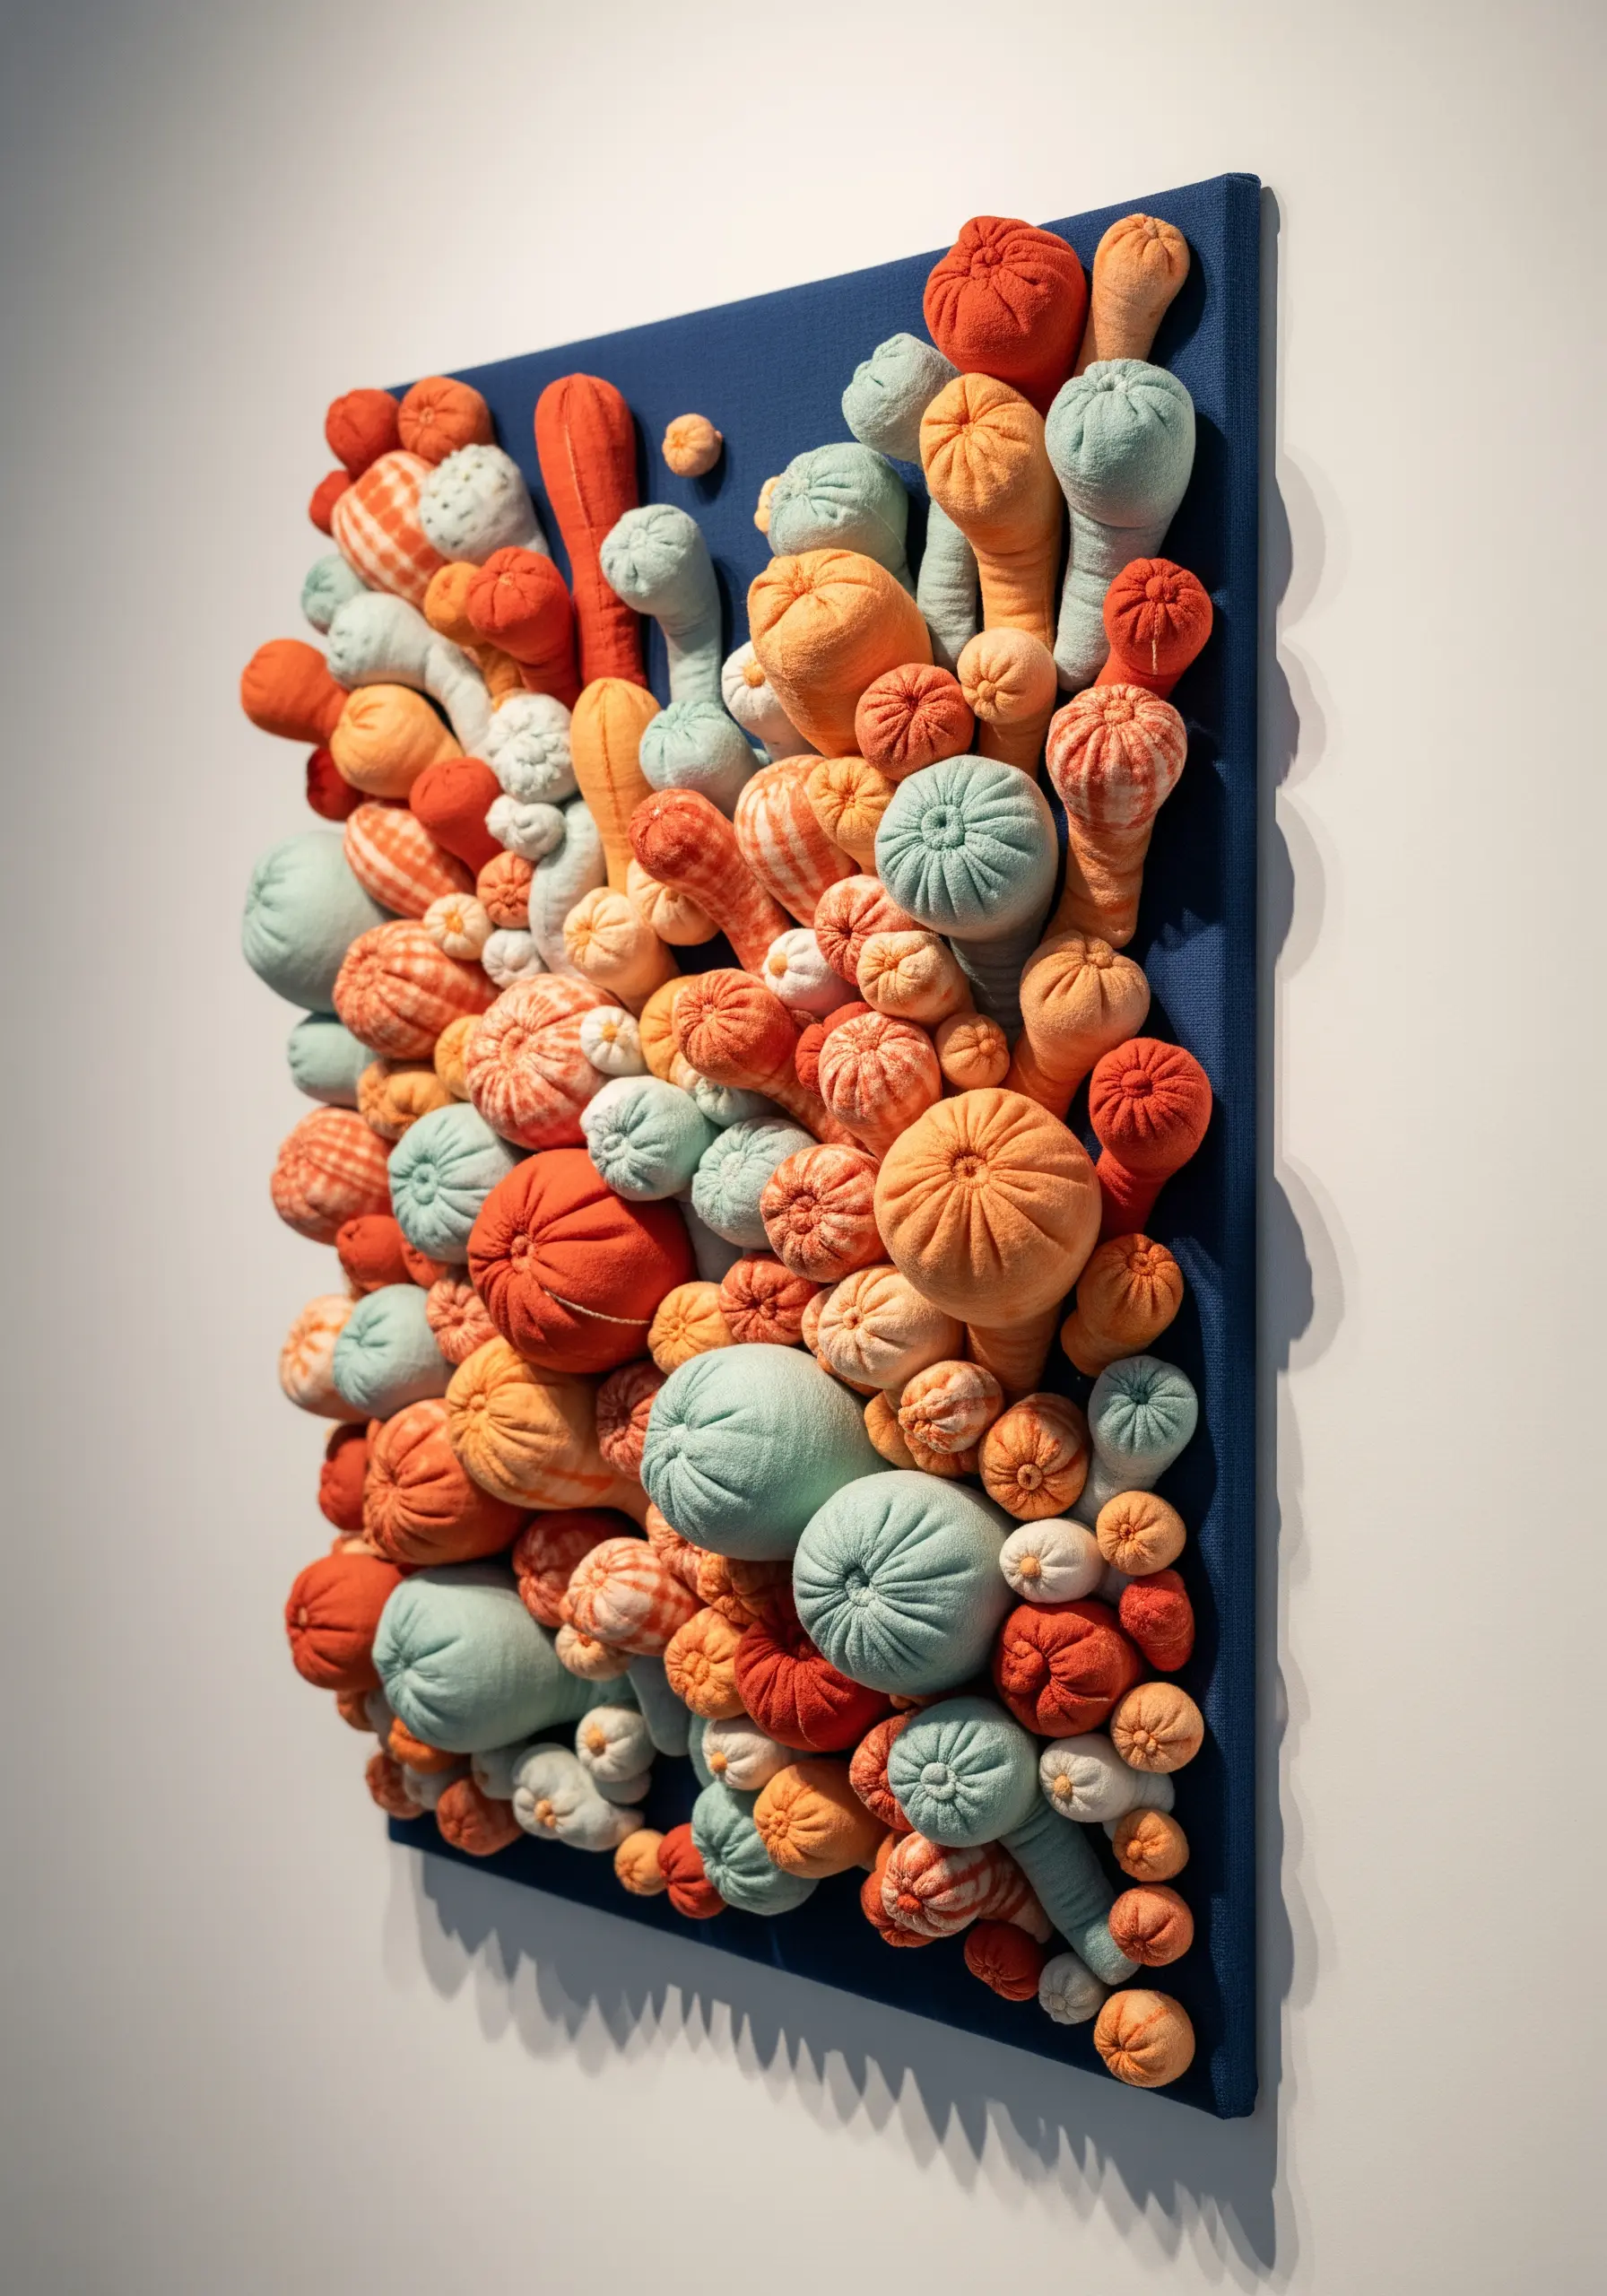
Create an organic, tactile landscape that literally grows out from the wall.
To make each element, sew small pouches from colorful, patterned fabrics, stuff them firmly with fiberfill, and stitch them closed.
Vary the shapes and sizes to mimic the diversity of a coral reef—from small, round polyps to longer, tubular forms.
Arrange and stitch these soft sculptures in a dense cluster onto a stretched canvas, creating a vibrant, playful composition that is irresistibly touchable.
13. Craft Dreamy Landscapes with Tulle and Punch Needle
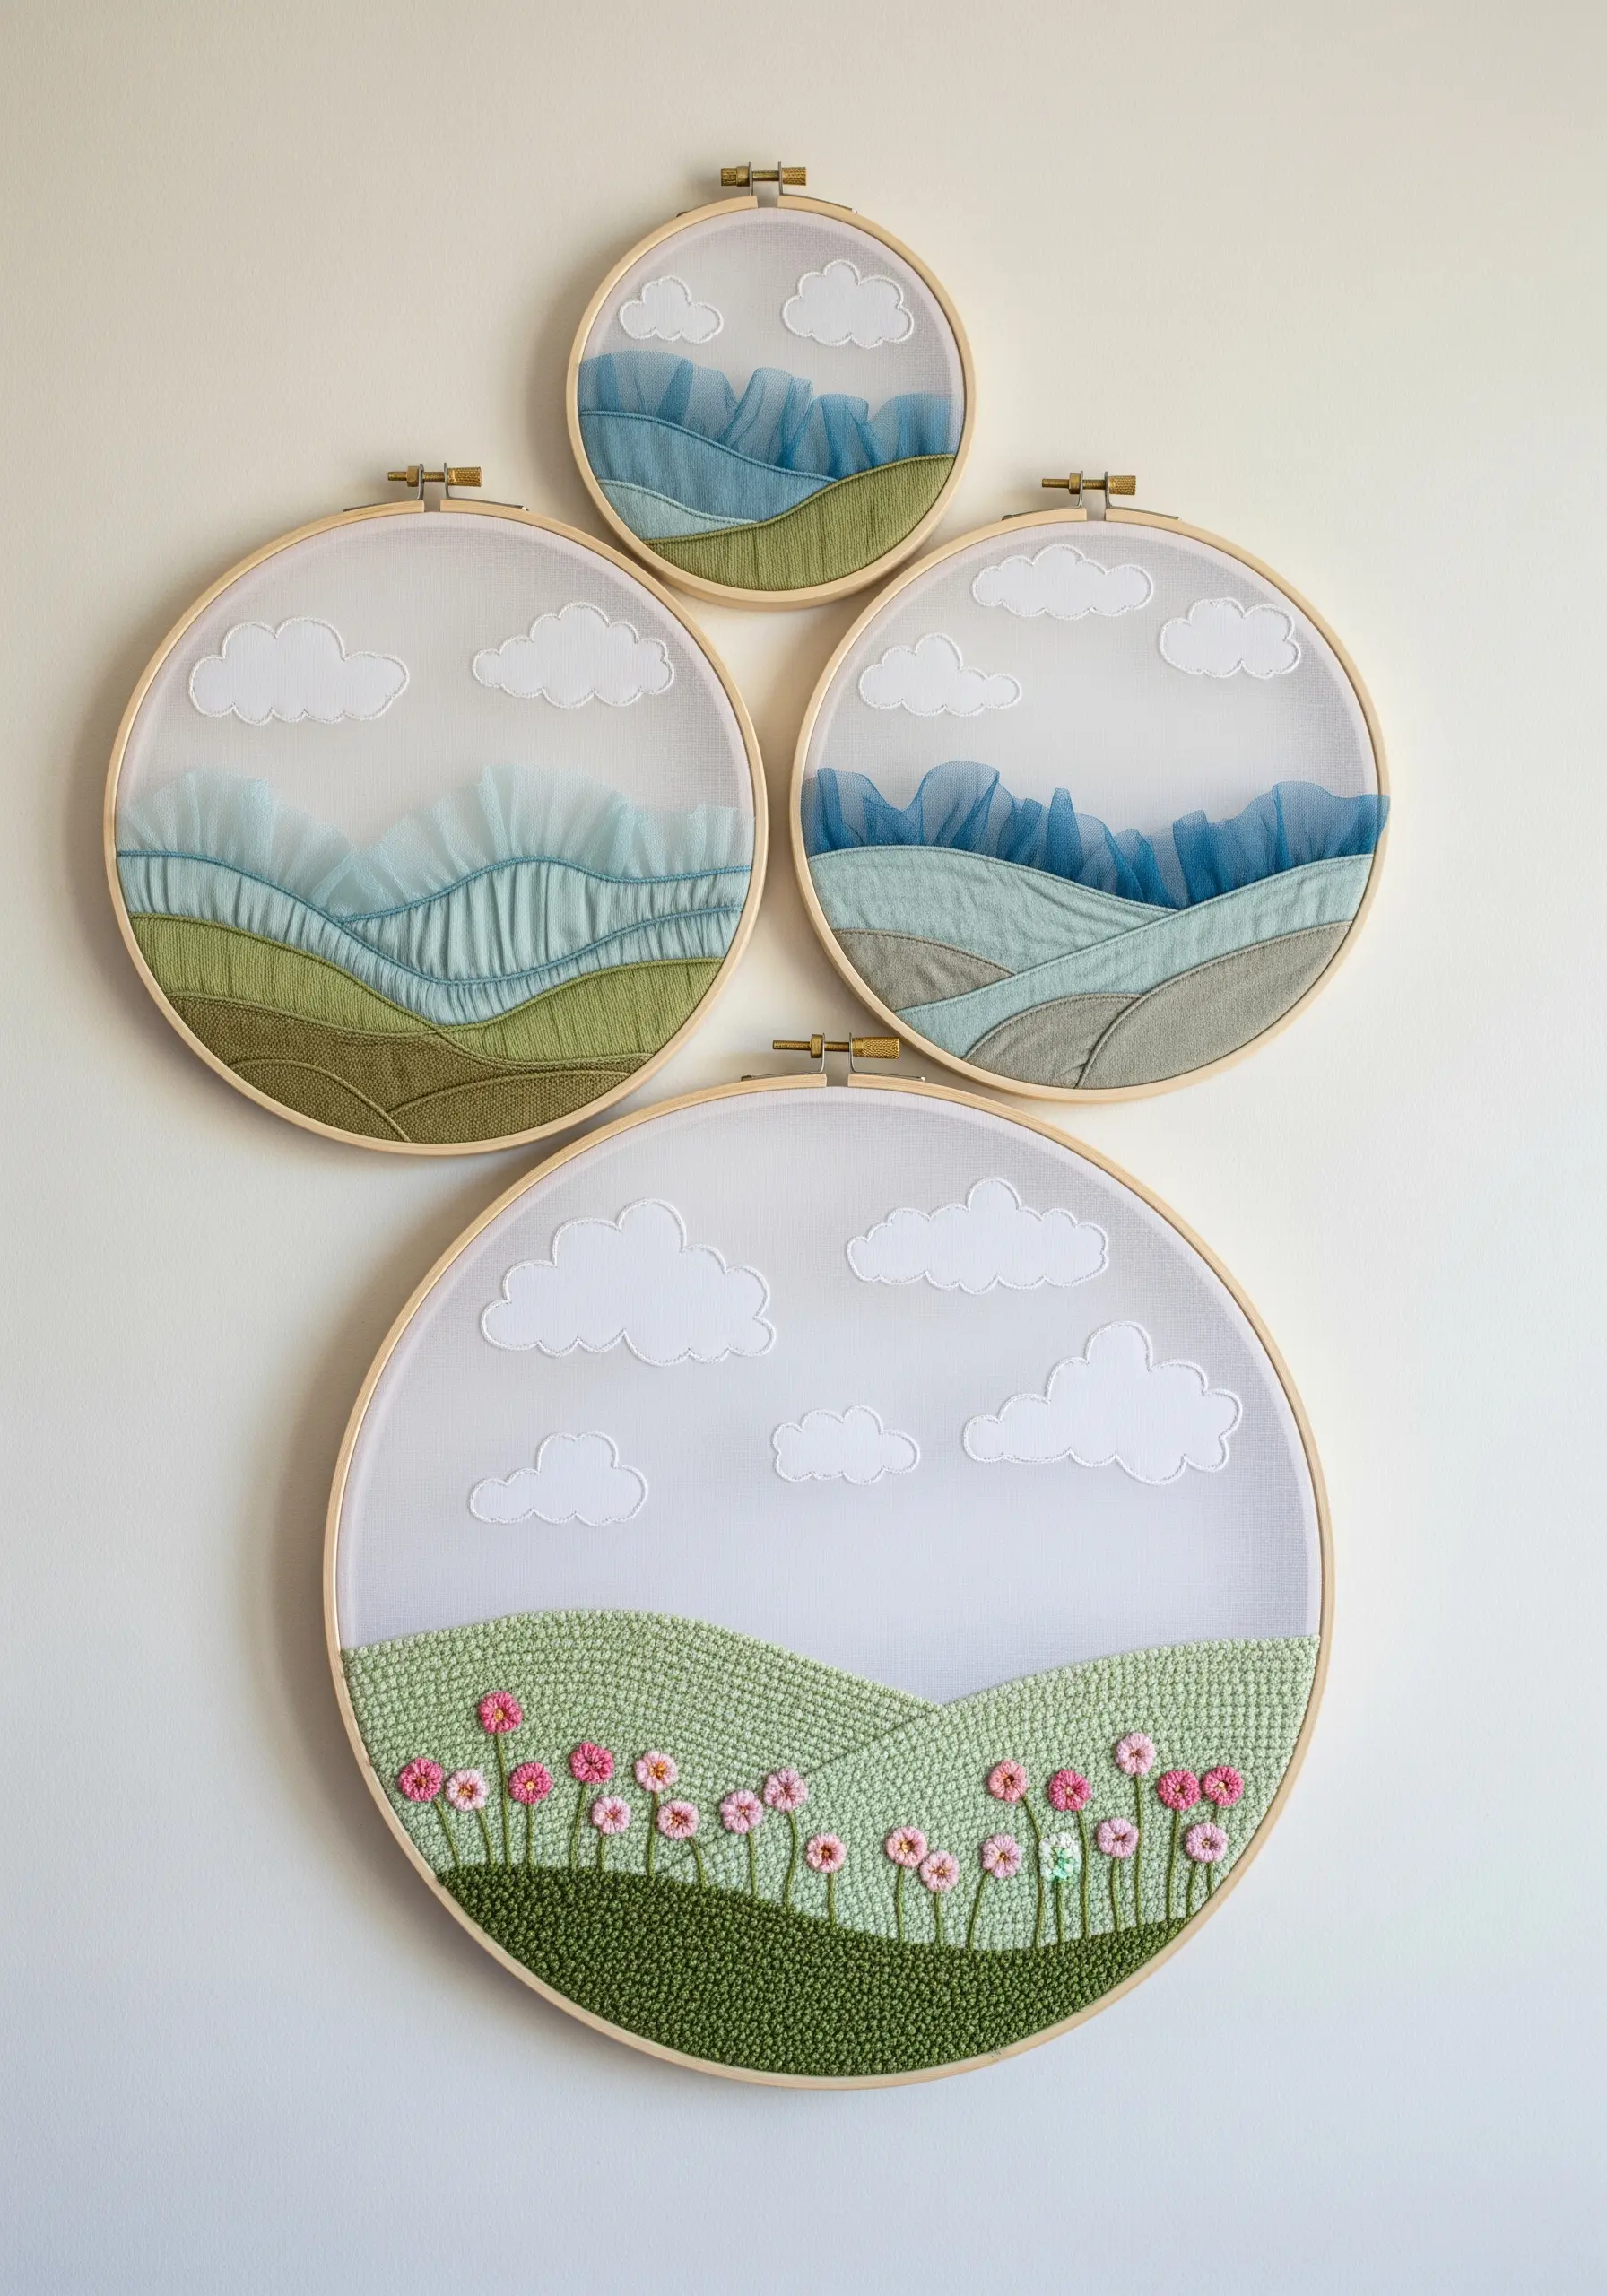
Combine the soft texture of punch needle with the ethereal quality of sheer fabrics for a multi-layered landscape.
Use punch needle to create tactile, grassy hills in the foreground, which gives a wonderful, plush texture.
For the background, layer cut pieces of colored tulle or organza to represent distant, misty mountains, securing them with a few discreet stitches.
The contrast between the dense, looped foreground and the airy, transparent background creates a charming and imaginative sense of depth.
14. Illustrate a Fabric Galaxy with Paint and Beads
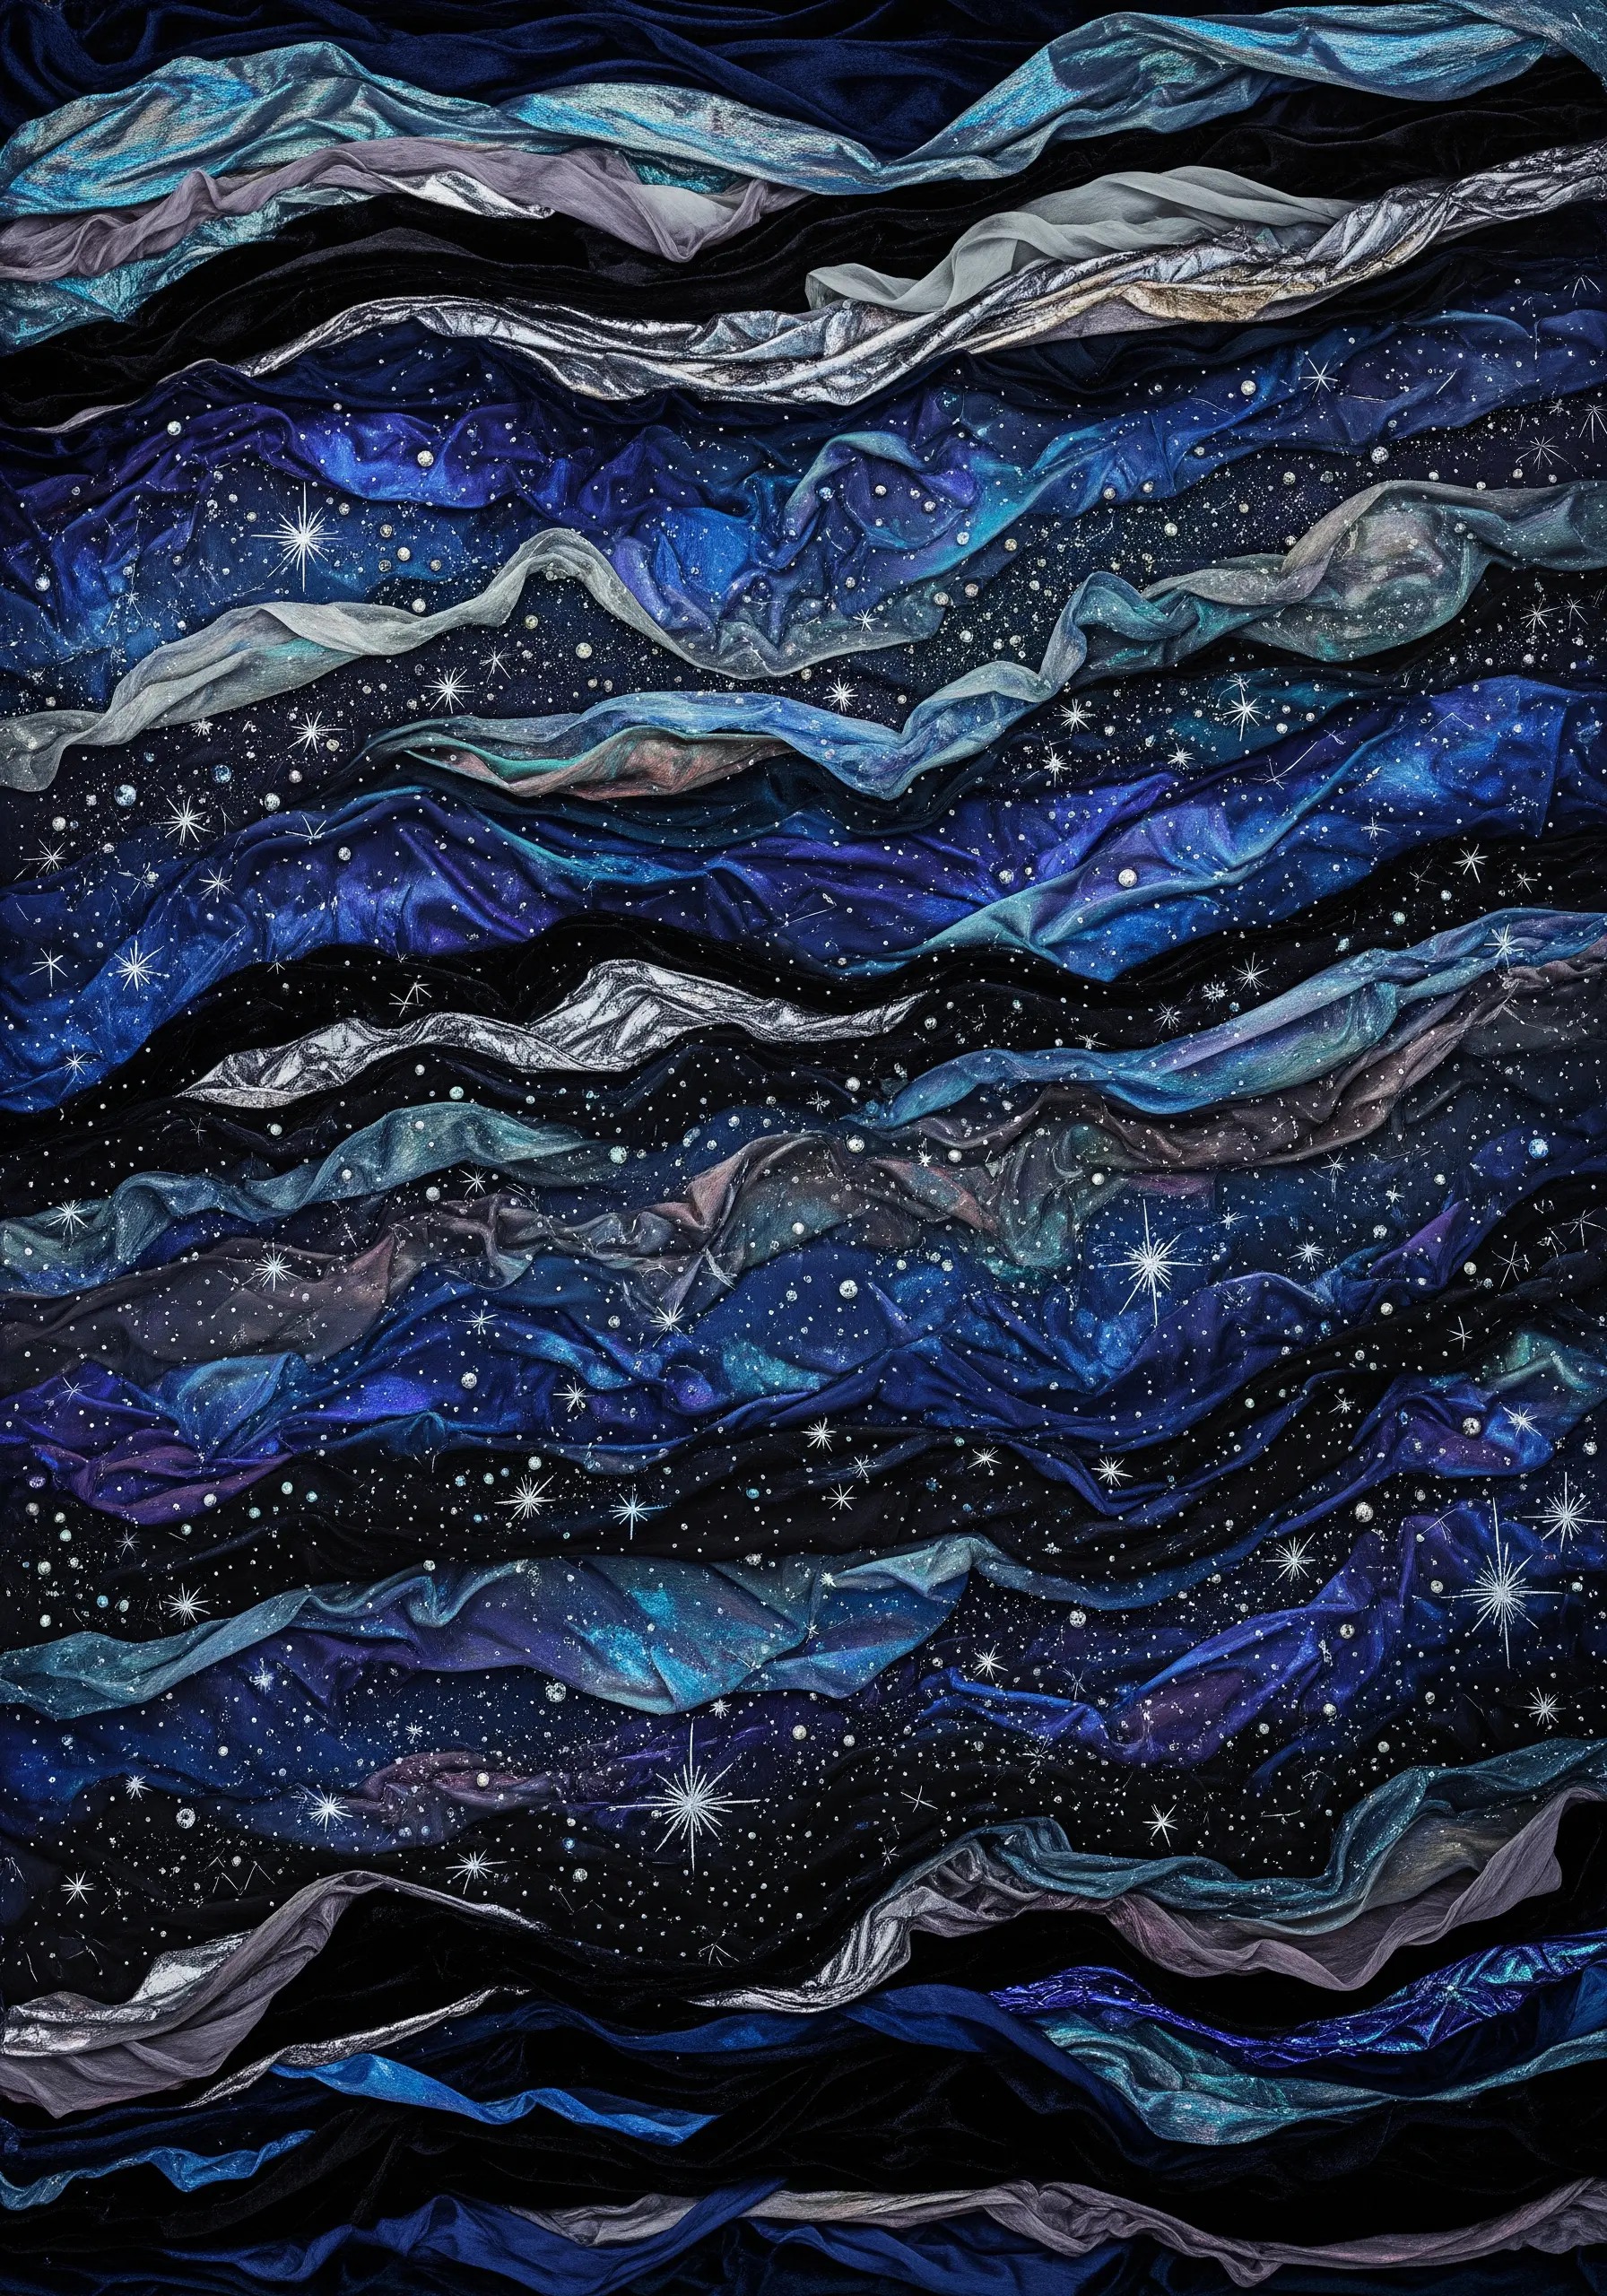
Construct a mesmerizing night sky by layering different materials and techniques.
Start by arranging and ruching strips of dark, lustrous fabrics like velvet and satin to create the flowing shapes of a nebula.
Once secured, use a fine brush and white or silver fabric paint to spatter tiny stars across the surface.
For a final layer of dimension, add strategically placed seed beads or individual French knots in metallic silver thread to represent brighter, twinkling stars.
This mixed-media technique results in a cosmos with incredible depth and sparkle.
15. Weave an Architectural Textile Screen
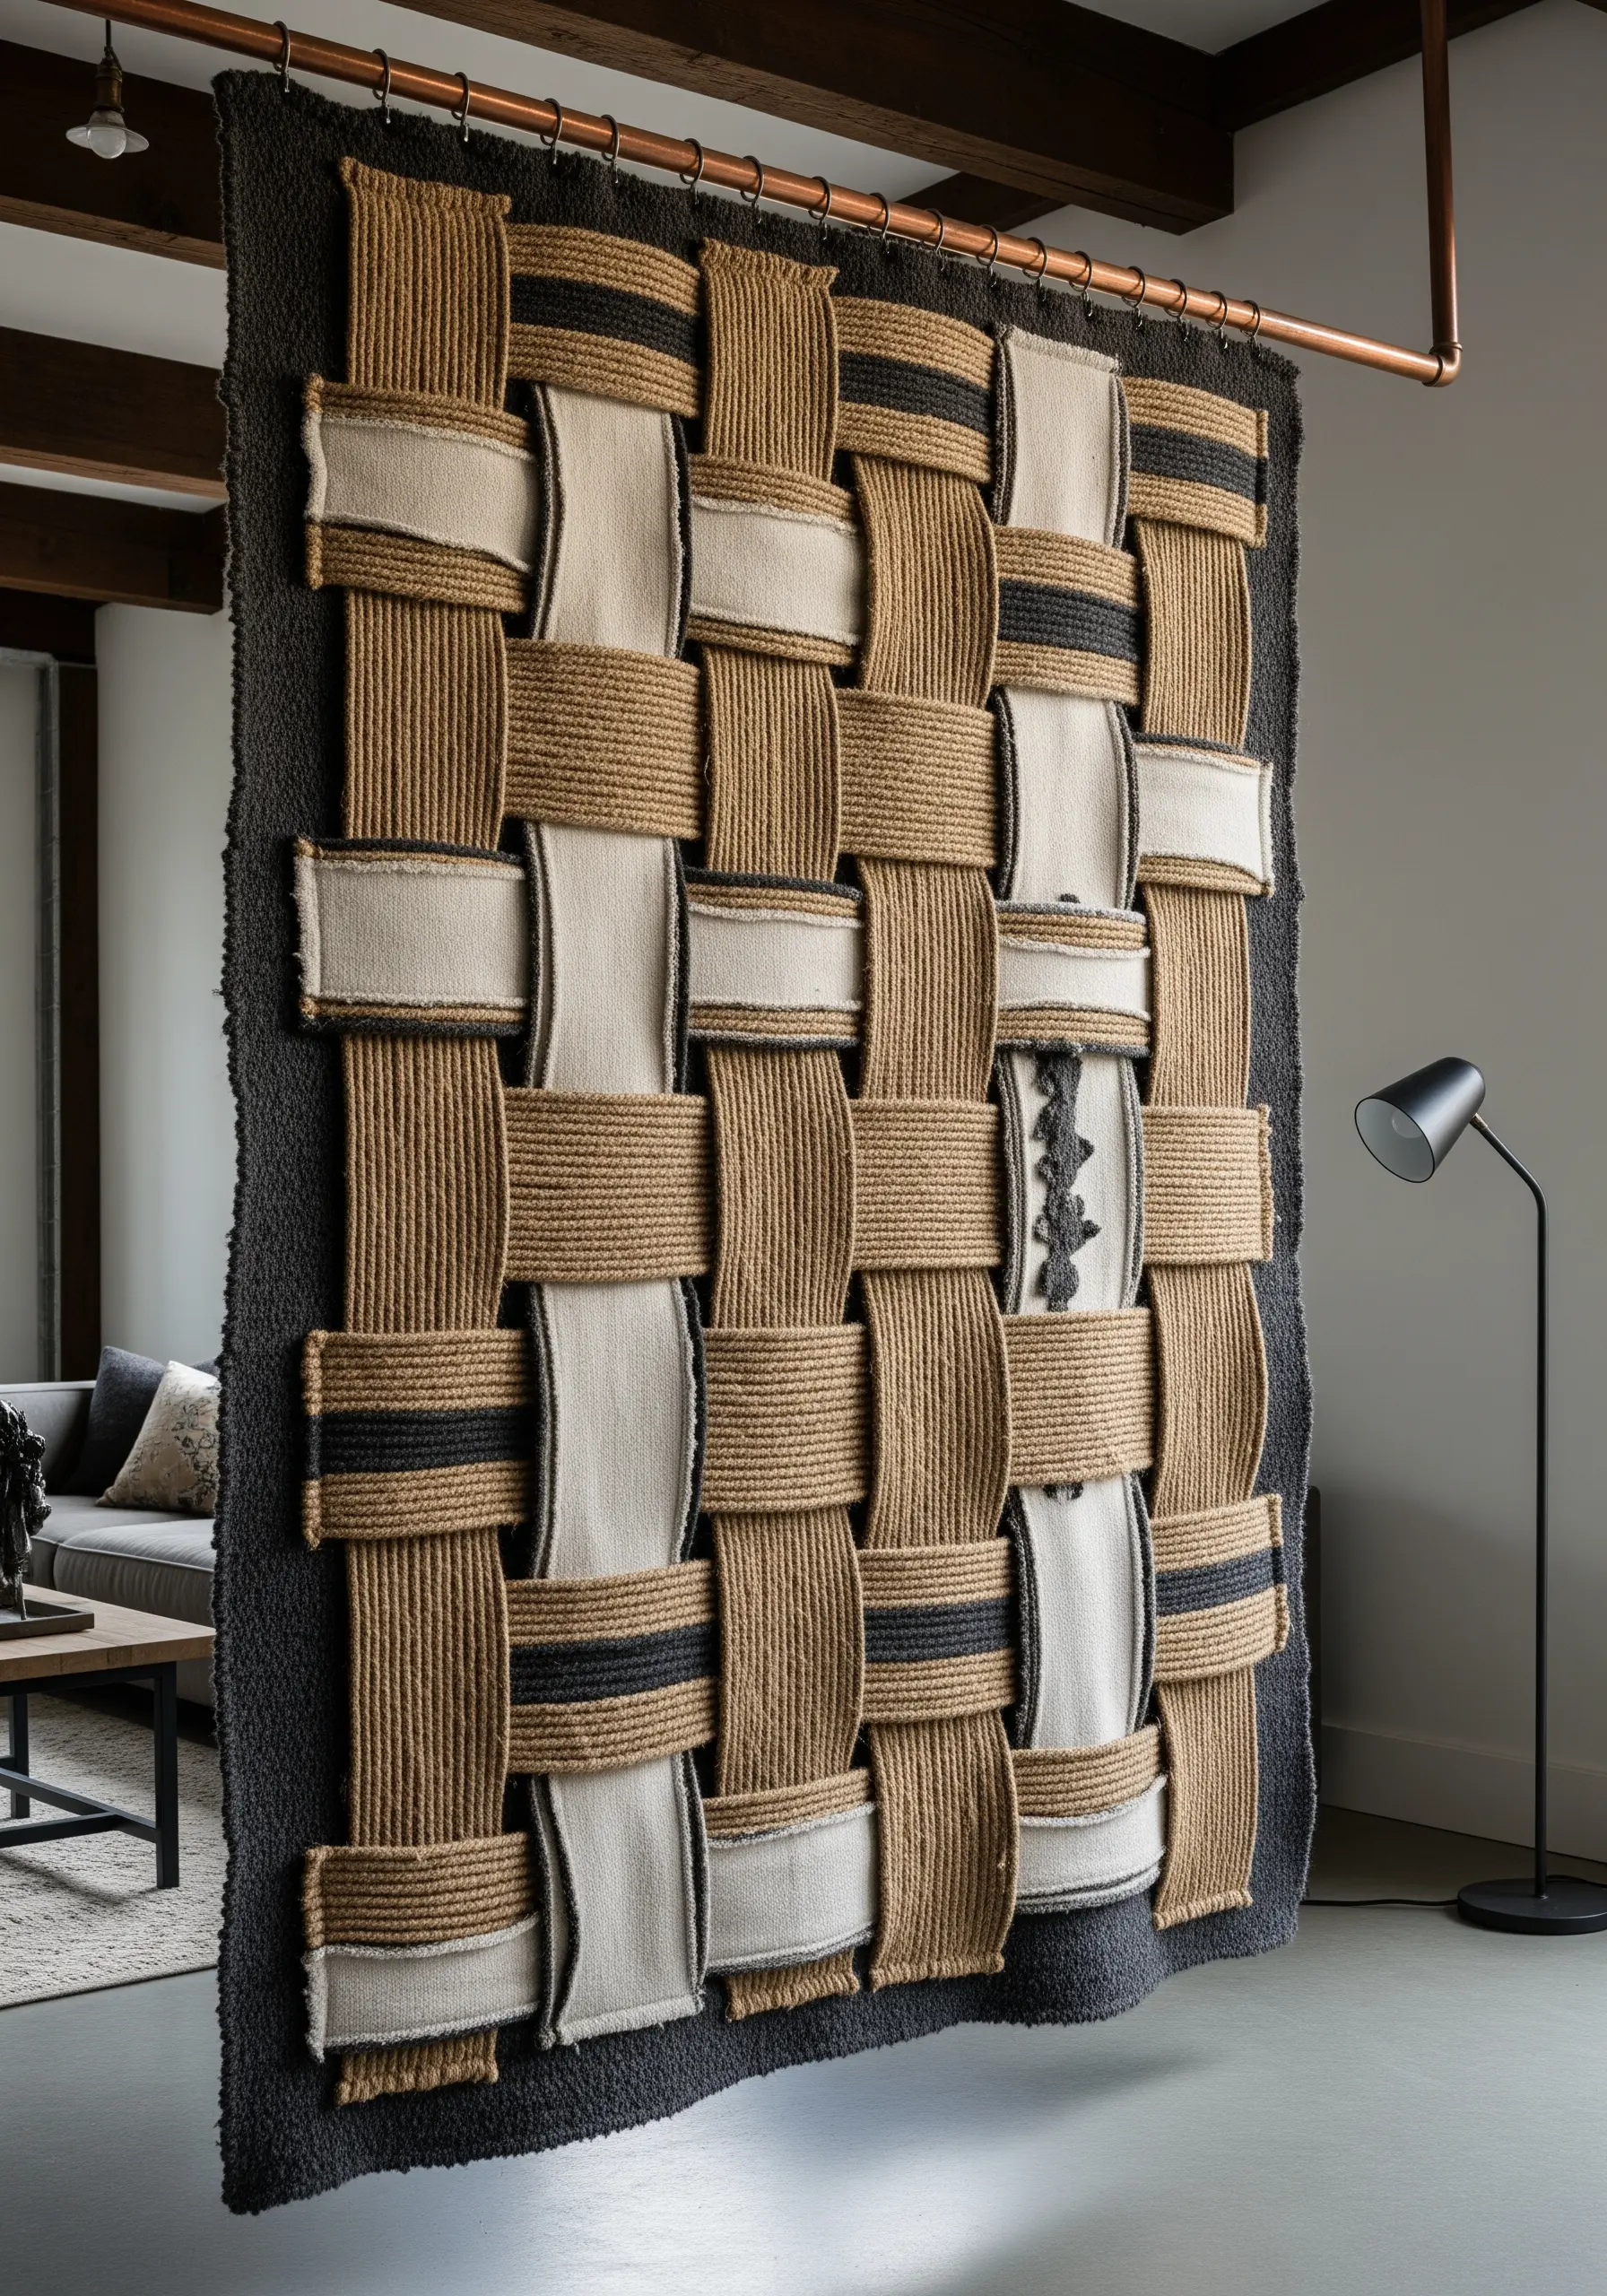
Transform your work into a functional art piece by weaving on a grand scale.
Use a large, sturdy frame as your loom and choose substantial materials like thick jute rope, heavy felt strips, and wide bands of canvas.
Create a simple, bold plaid pattern by weaving the wide strips over and under the taut rope warp.
The result is a highly textural, architectural piece that can stand on its own as a room divider or a statement wall hanging, commanding attention through its sheer scale and tactile presence.
16. Use Shibori Dyeing as a Layered Canvas

Create visual depth before you even thread your needle by starting with hand-dyed fabric.
Use the Japanese art of Shibori, which involves folding, twisting, and binding fabric before dyeing it in indigo.
This process produces intricate, layered patterns with soft, bleeding edges that suggest depth and complexity on their own.
You can hang these dyed cloths as a stunning minimalist series or use them as a dynamic, patterned background for a few simple, carefully placed stitches.
17. Sculpt a Landscape with Raw-Edge Fabric Strips
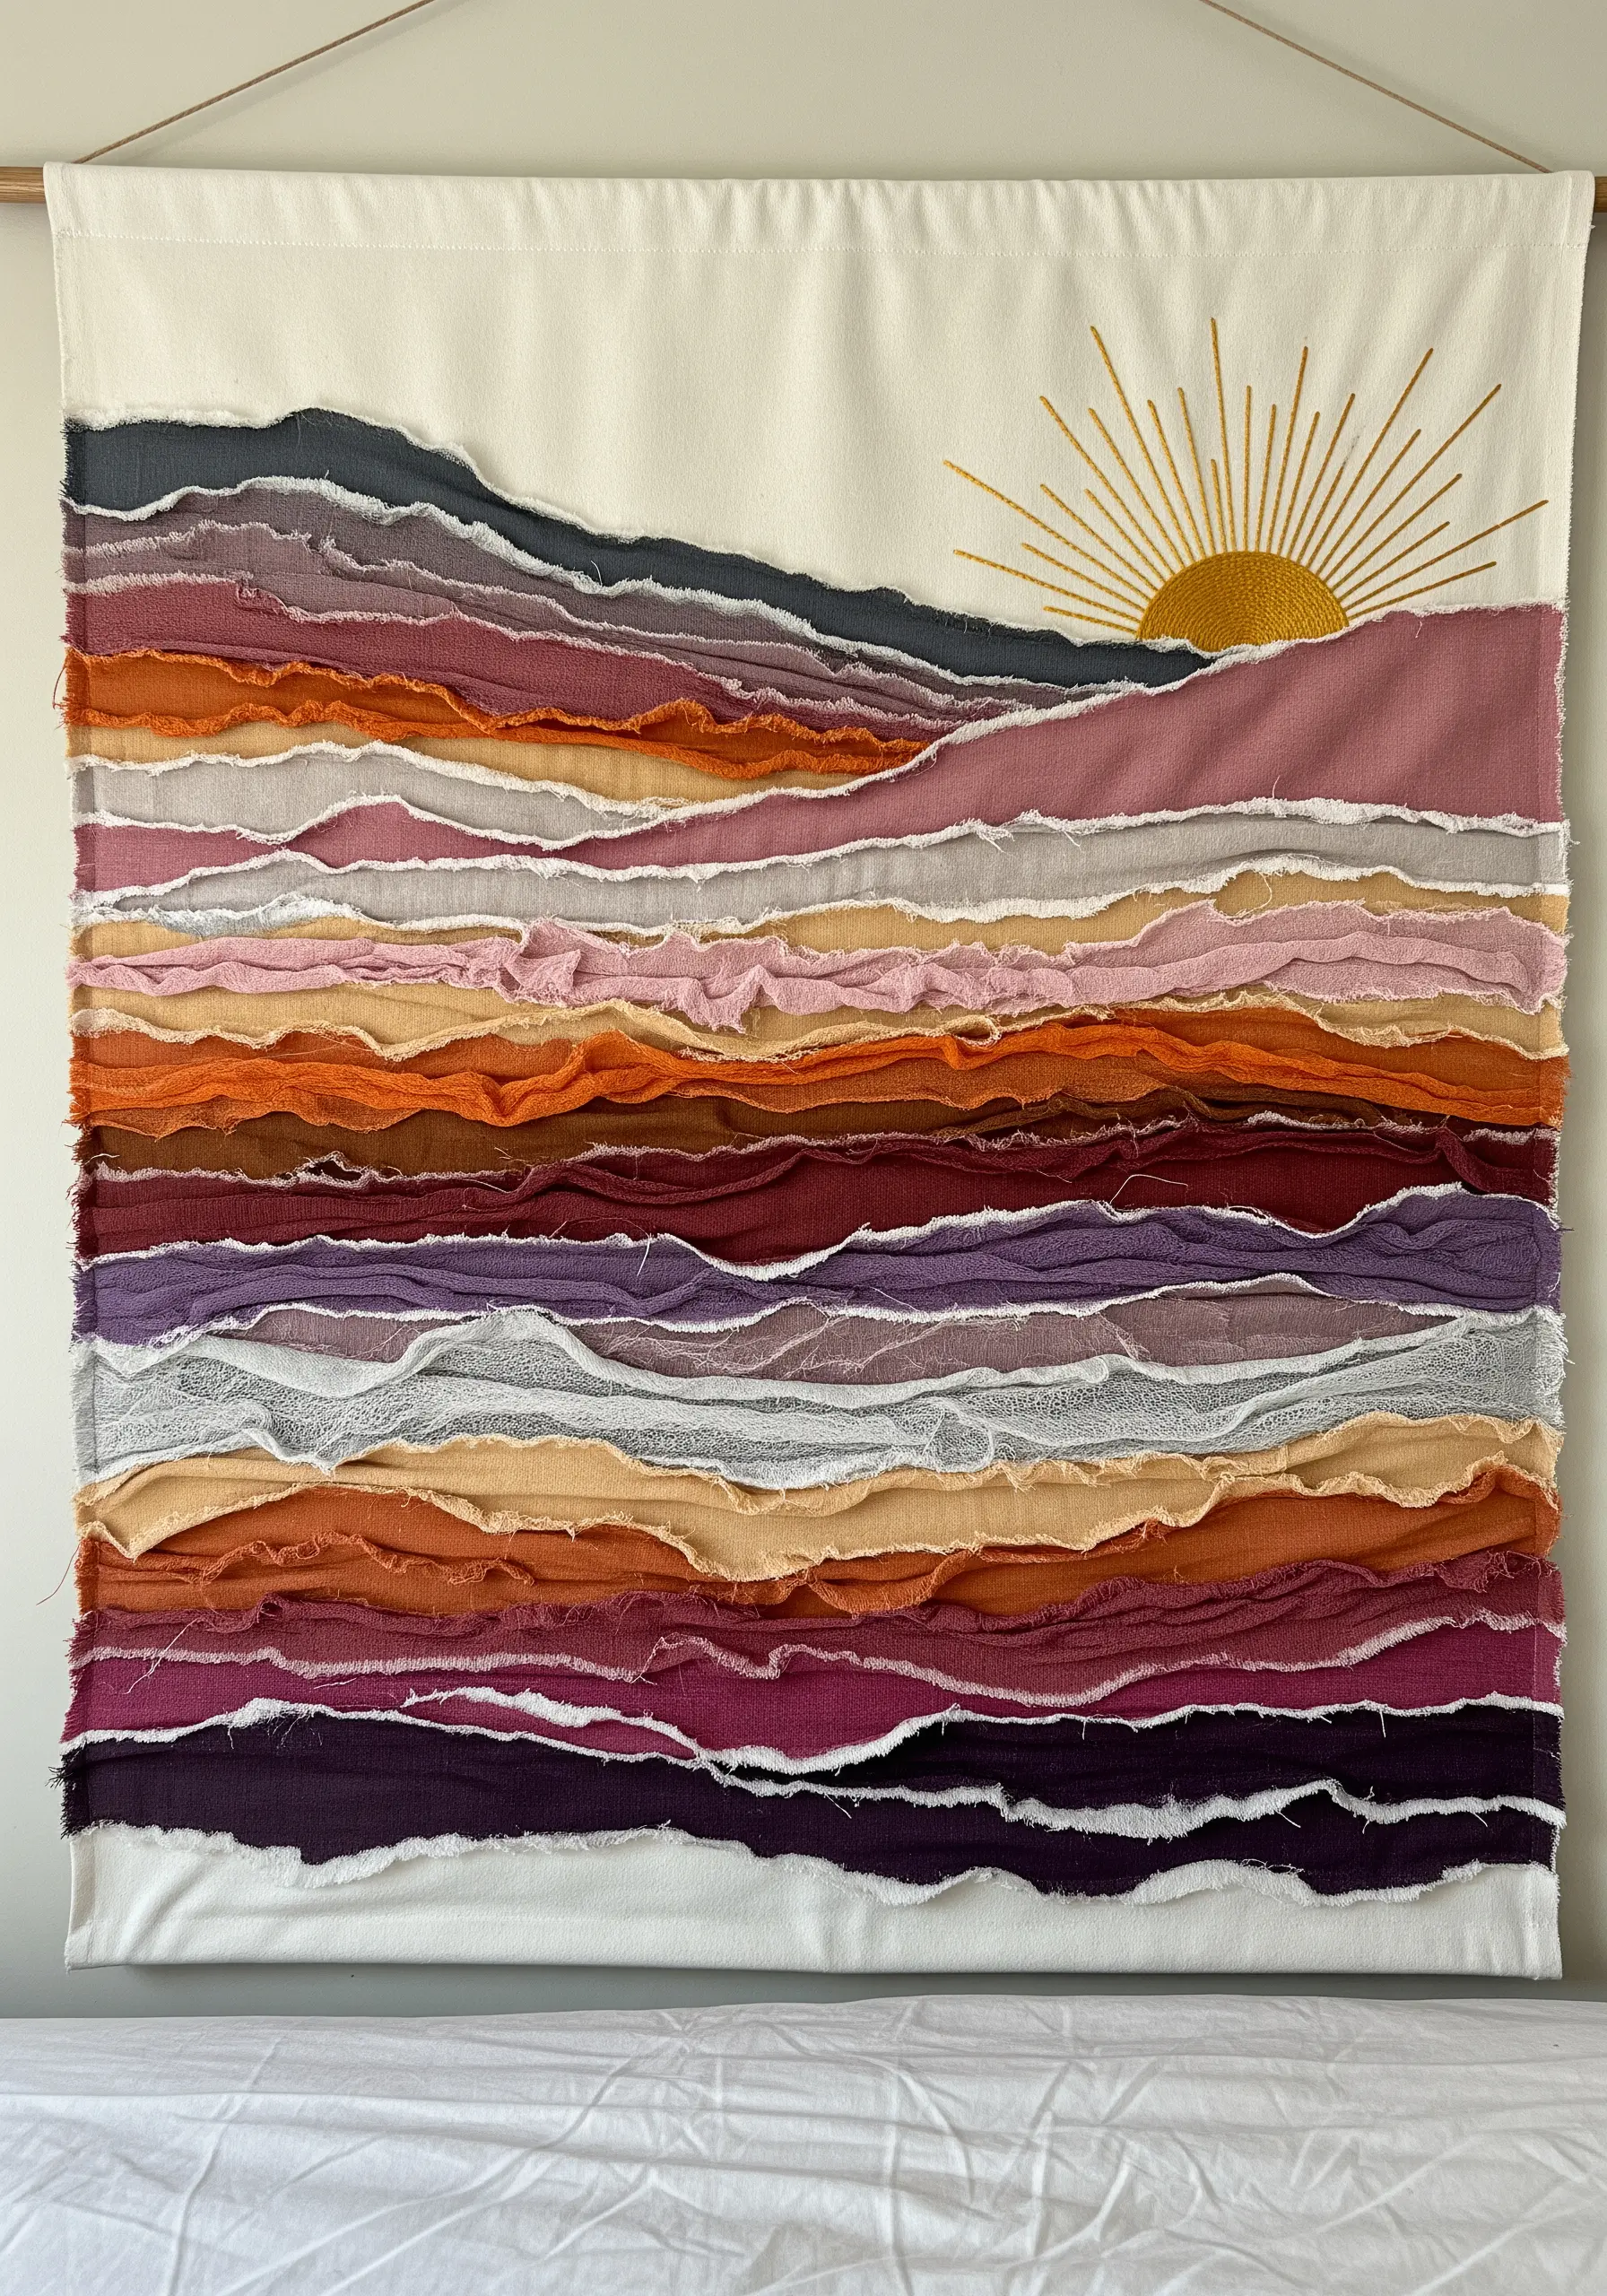
Build a richly textured landscape with a beautifully simple and forgiving appliqué technique.
Instead of cutting, tear strips of various woven fabrics—like cotton and linen—to create soft, frayed edges.
Layer these strips horizontally on a backing fabric, overlapping them to form rolling hills or a dramatic sunset.
Secure the strips with a simple running stitch, then add a single, cleanly embroidered element, like a satin-stitched sun, for a striking contrast between raw texture and refined detail.
This method is a fantastic way to create upcycled fabric wall art from your scrap bin.


