

You’ve mastered the stitches and finished countless small projects, but now you’re ready to create something with real presence—a piece of fiber art that can anchor a room.
Think of an oversized embroidery hoop not just as a tool, but as a frame. It’s an opportunity to move beyond small motifs and compose a piece of art that has the scale and impact of a painting, but with the unique texture and warmth that only thread can provide.
This collection is your guide to thinking bigger. Here, you’ll discover how to use scale, texture, and composition to your advantage, turning simple stitches into dramatic landscapes, bold abstract statements, and stunning botanical displays. It’s time to make your walls speak, one stitch at a time.
1. Master Dimensional Texture with Chunky Yarn Couching

To create this high-impact mountainscape, move beyond standard floss and embrace chunky yarn or wool roving.
Lay the yarn on your fabric in the desired shape and use a matching, thinner embroidery thread to tack it down with small, evenly spaced stitches—a technique called couching.
This method allows you to build bold, tactile shapes quickly, creating a sculptural effect that contrasts beautifully with the flat background fabric.
Choose a calm, analogous color palette of blues, grays, and creams to maintain a serene and modern aesthetic.
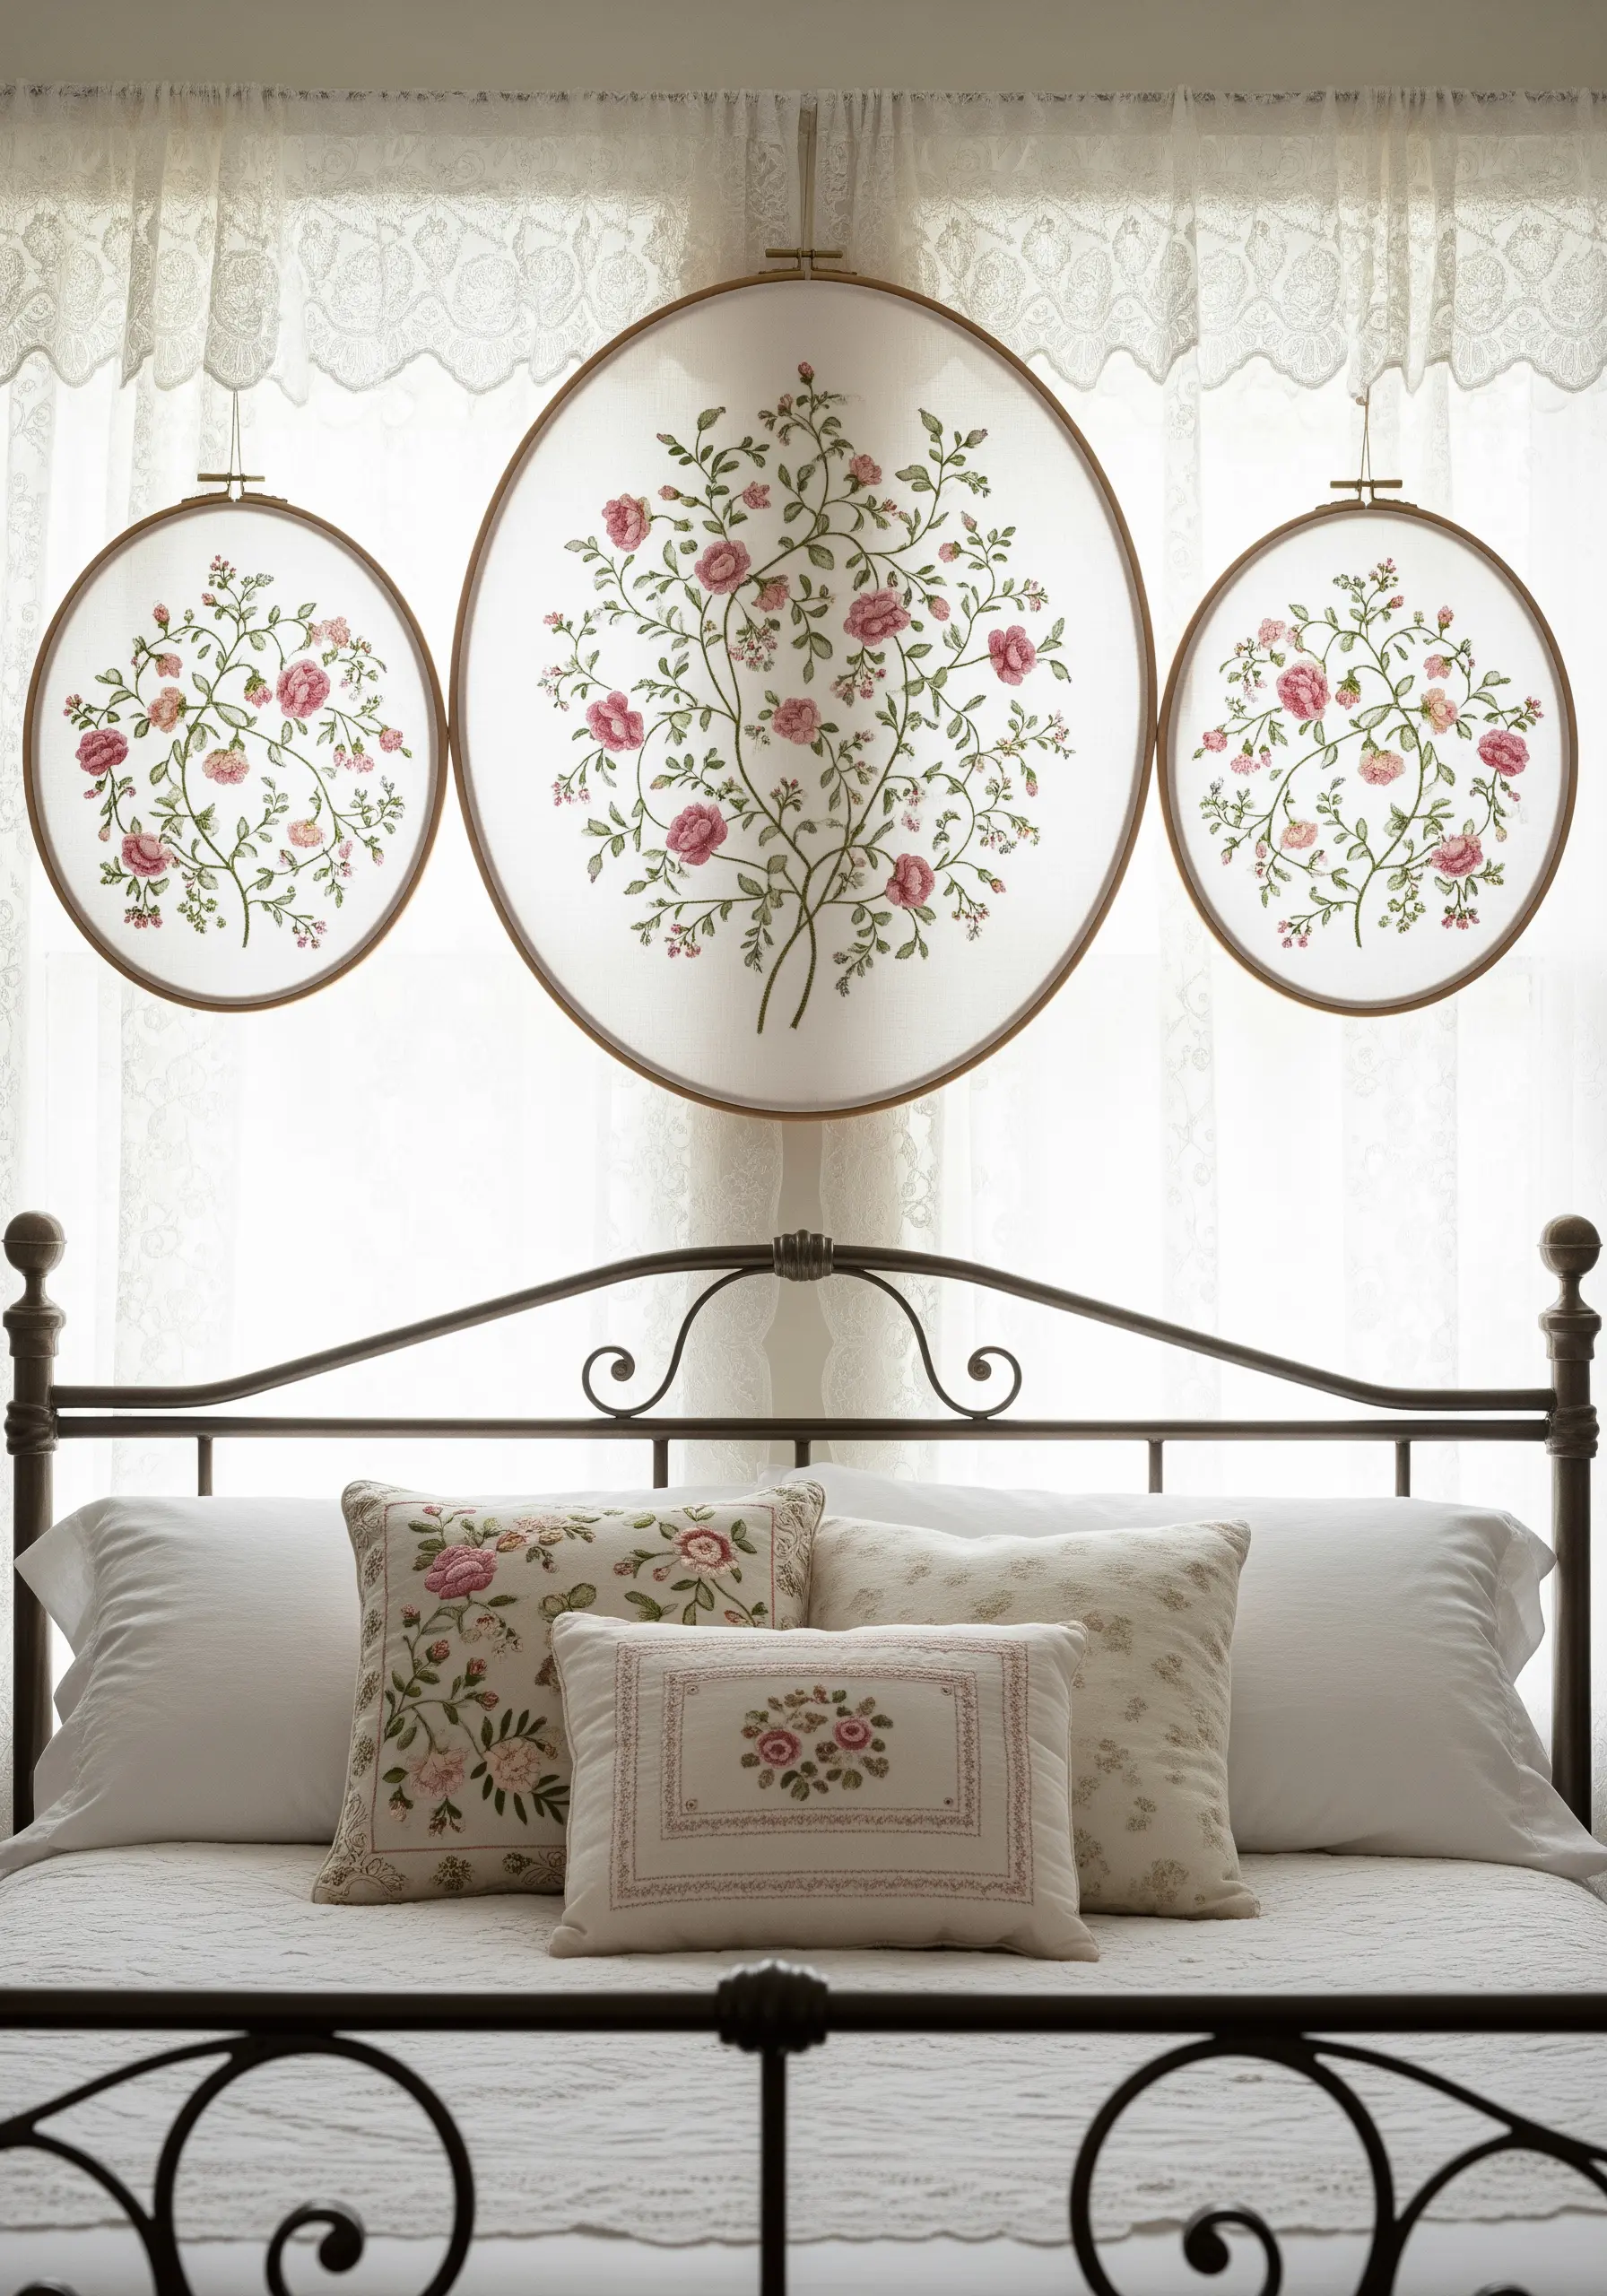
2. Create a Lush Botanical Triptych on a Dramatic Background
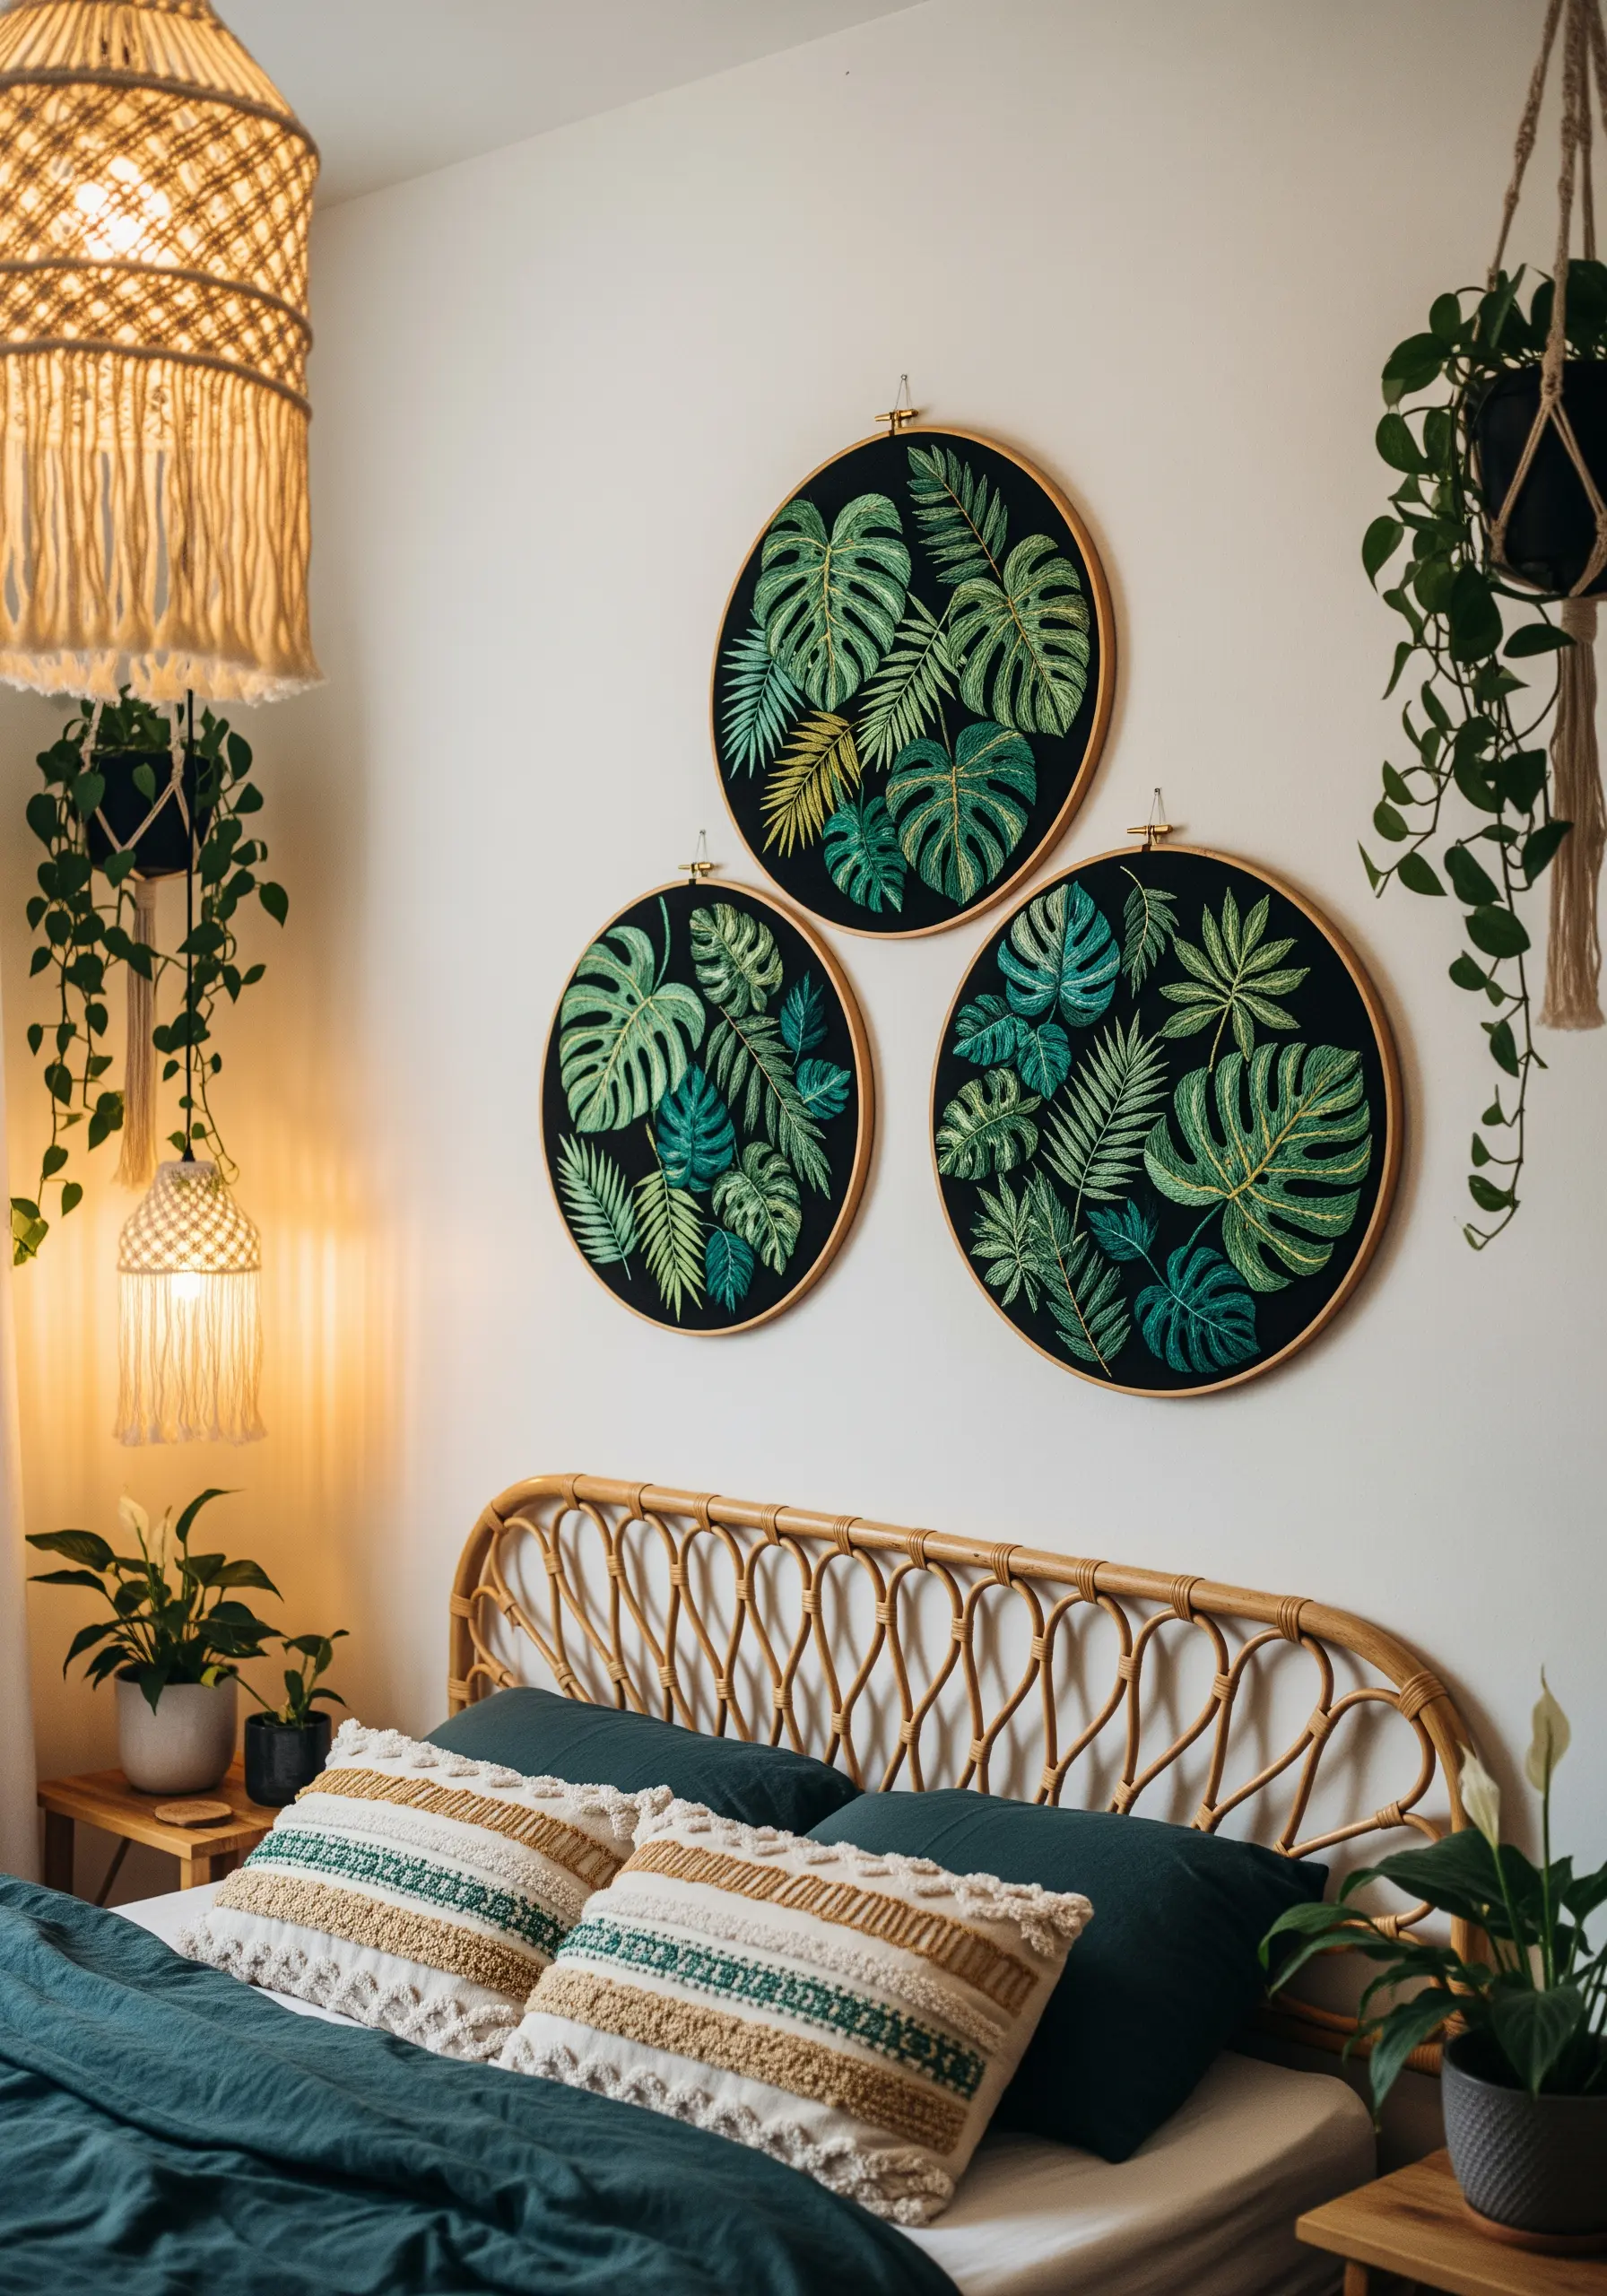
Arrange three hoops in a staggered pyramid shape to create a dynamic focal point above a headboard.
Stitching on black or dark navy linen makes the vibrant greens of the monstera leaves appear richer and more saturated.
Use a long-and-short stitch to fill the leaves, allowing you to blend multiple shades of green for realistic highlights and shadows.
Vary the leaf designs and their orientation in each hoop to give the composition a natural, non-repetitive flow.
3. Design a Mid-Century Modern Gallery Wall

Curate a collection of hoops by uniting them with a strict mid-century color palette—think mustard yellow, deep orange, olive green, and teal.
Combine geometric blocks of dense satin stitch with crisp, clean lines of backstitch to create visual tension and balance.
Vary the hoop sizes and arrange them in an organic, asymmetrical cluster to encourage the eye to move across the entire composition.
This approach transforms individual pieces into a single, cohesive work of art.
4. Achieve Ethereal Lightness with Sheer Fabric

Stitching on a sheer fabric like organza or tulle makes your embroidery appear to float in mid-air, creating a delicate, ethereal effect.
Always use a stabilizer (water-soluble or heat-away) behind the sheer fabric while stitching to prevent puckering, then remove it once you’re finished.
For the branches, a whipped backstitch provides a solid, raised line, while scattered French knots in soft pinks make perfect, minimalist blossoms.
Stacking the hoops vertically is an elegant solution for narrow walls or flanking a window.
5. Build a Vibrant 3D Floral Sculpture with Felt Appliqué

Move your art off the fabric surface by combining embroidery with dimensional felt appliqué.
Cut petal and leaf shapes from brightly colored wool-blend felt, then layer and fold them to create three-dimensional flowers.
Secure each felt piece to the background fabric with just a few anchoring stitches, adding embroidered French knots or seed stitches for the flower centers.
This technique adds incredible depth and shadow, turning your hoop into a tactile floral sculpture.
6. Craft a Serene Nursery Scene with Padded Appliqué

To give clouds and moons a soft, pillowy dimension, use a padded appliqué or trapunto technique.
Place a small layer of batting behind your appliqué fabric before stitching it down; this will raise the shape from the background, creating a gentle, 3D effect.
For the moon, use a silver metallic thread in a satin stitch to add a subtle shimmer that catches the light.
This tactile quality is perfect for creating emotional nursery decor that feels both visually soft and comforting.
7. Weave a Dynamic Ocean Wave with Mixed Fibers

Combine weaving and embroidery in a single hoop for a truly unique piece of mixed-fiber art.
First, create a warp by stringing strong thread across the hoop, then weave with various yarns, wool roving, and threads to build the wave’s form and color gradients.
Use high-texture stitches like French knots and Turkey work for the seafoam, creating a frothy effect that seems to crash out of the hoop.
Framing the hoop with found materials like driftwood adds an organic, sculptural finish.
8. Define Form with Bold, Sculptural Couching
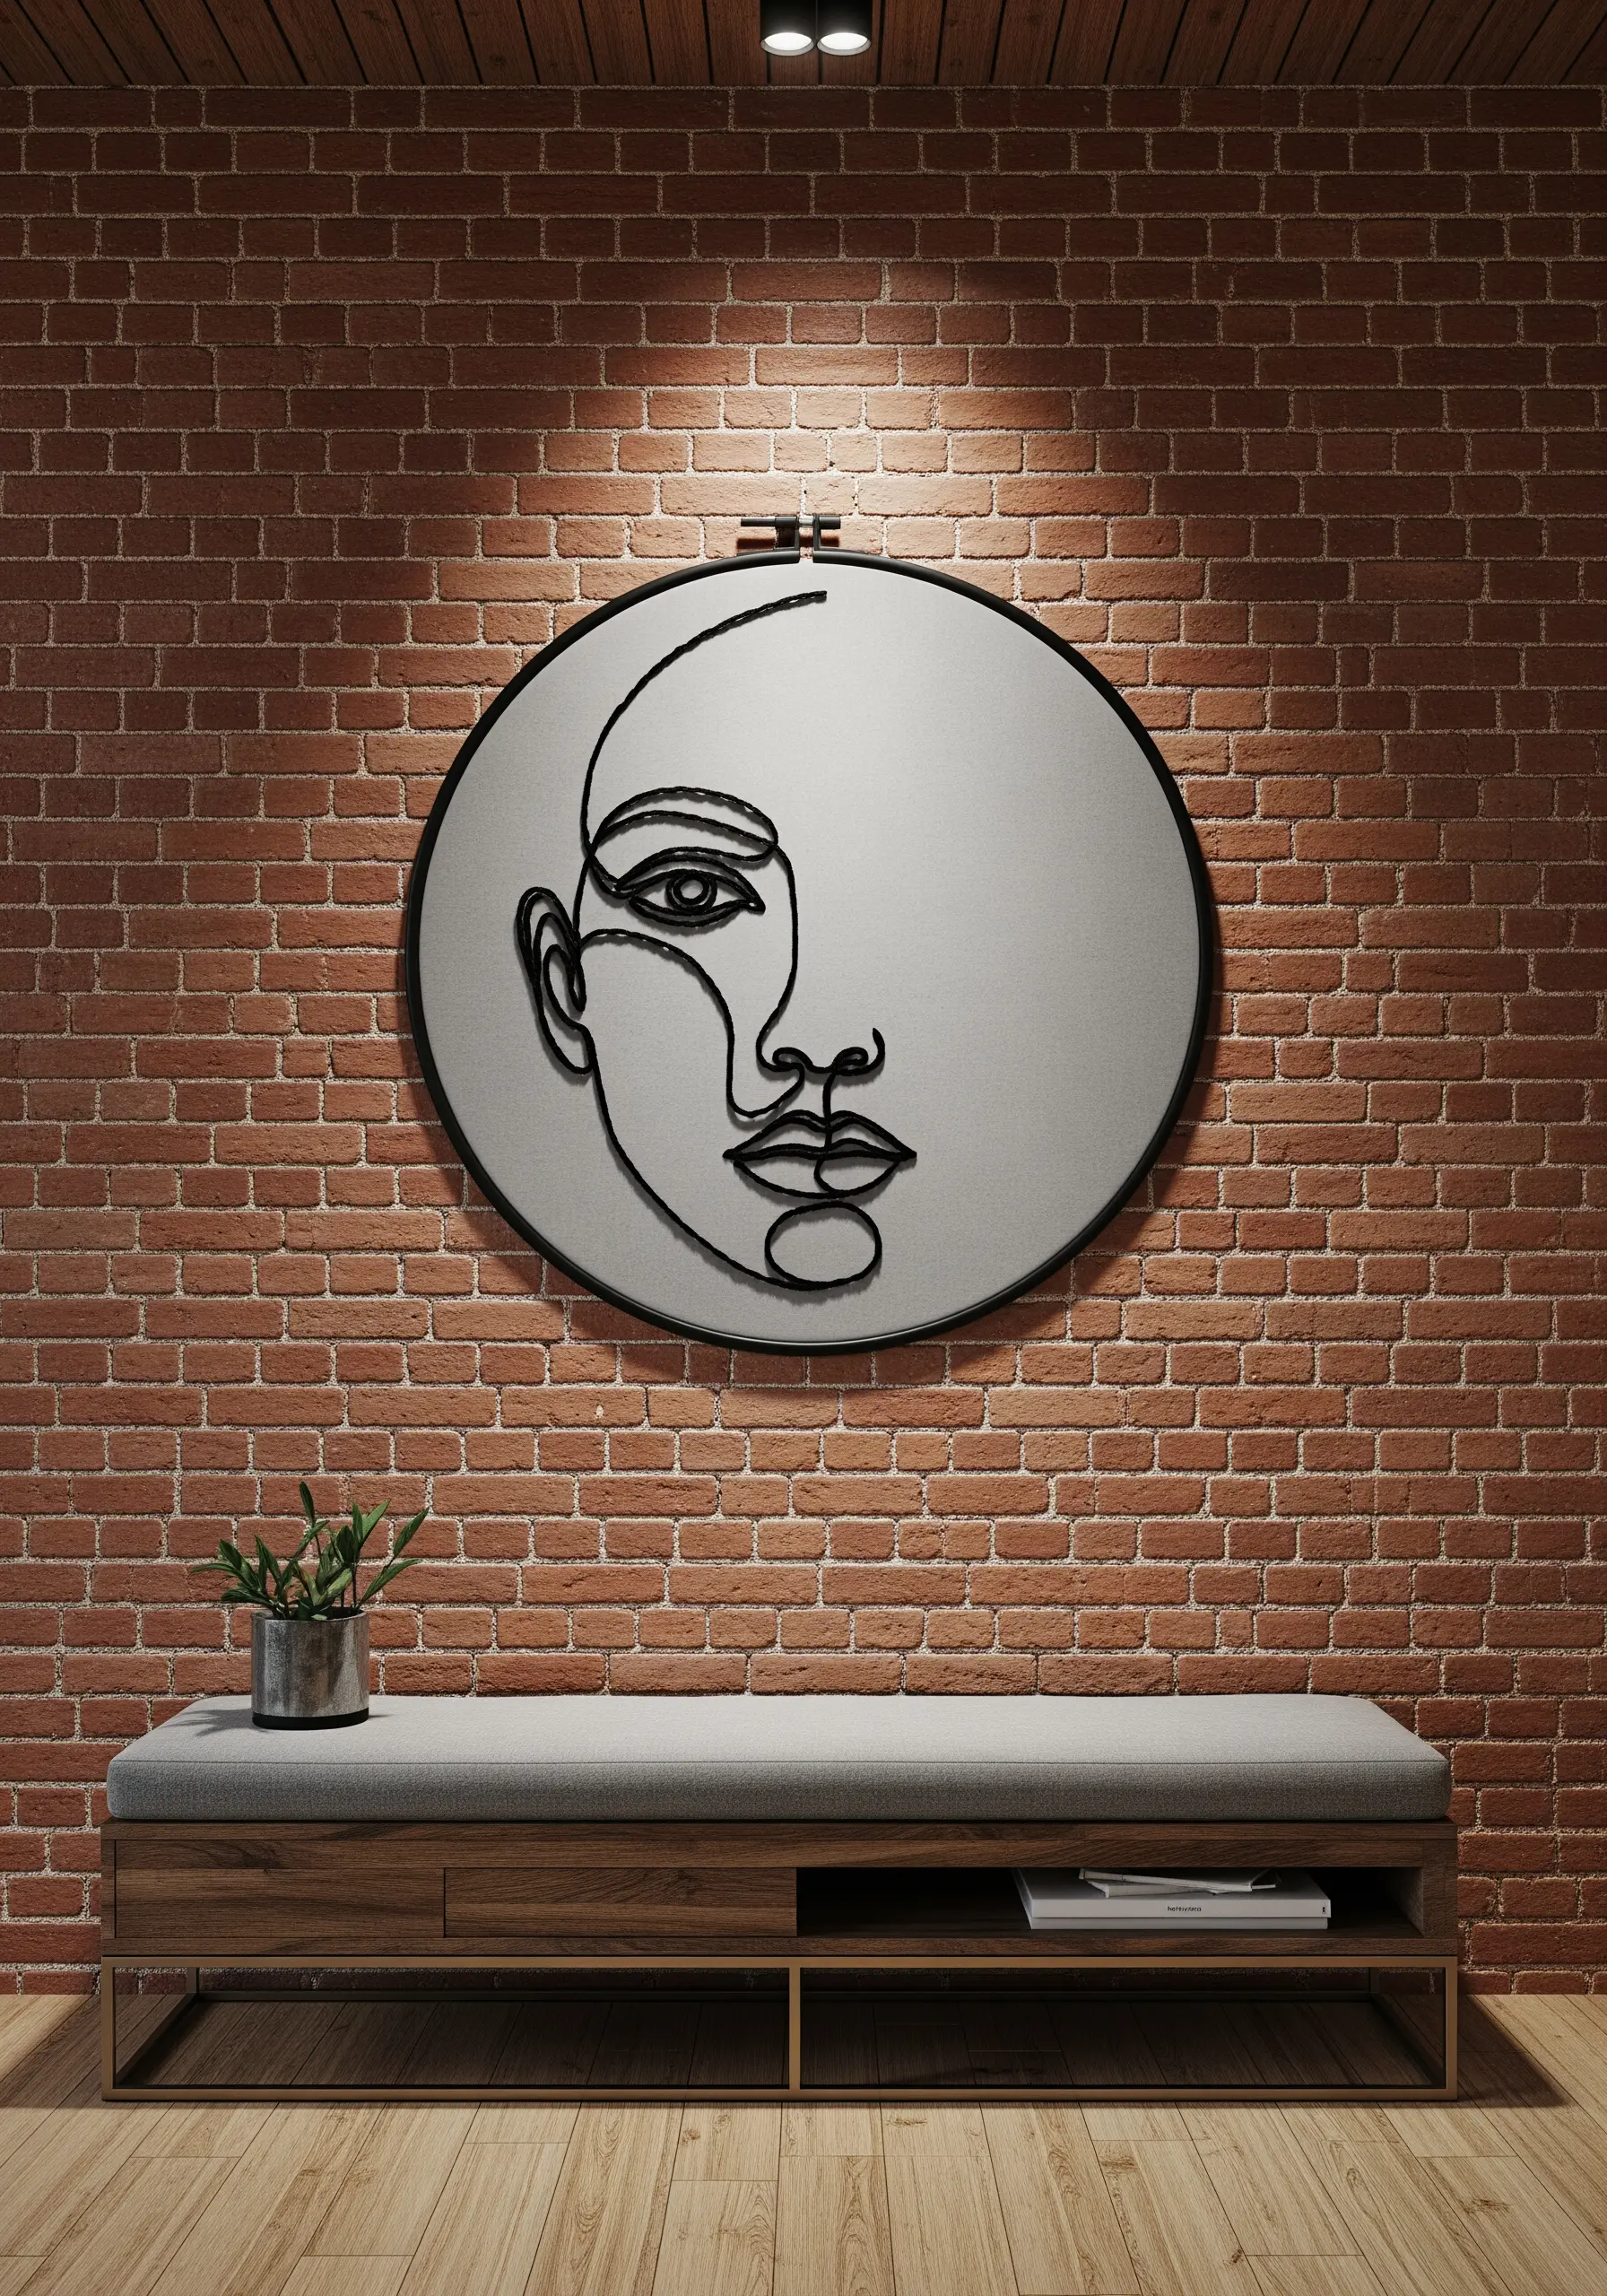
Elevate a simple line drawing into a piece of modern sculpture by using thick cord or yarn instead of floss.
Carefully couch the cord onto the fabric with a matching thin thread, ensuring your stitches are nearly invisible.
The thickness of the cord creates dramatic shadows and gives the line a tangible presence that changes with the light in the room.
This high-contrast, minimalist approach makes a powerful statement on an industrial brick or clean, modern wall.
9. Curate a Botanical Cabinet of Curiosities

Create the feel of a vintage naturalist’s collection by grouping several hoops with a single, cohesive theme.
Using the same deep olive green fabric for each piece provides a consistent backdrop that makes the detailed illustrations stand out.
For the fine lines and delicate shading required for scientific illustrations, work with just a single strand of embroidery floss and use tiny split stitches.
The varied hoop sizes and asymmetrical arrangement add visual interest while maintaining a sophisticated, curated feel.
10. Add Farmhouse Charm with a Loose, Rustic Style

To capture a relaxed, modern farmhouse aesthetic, choose a natural, loosely woven background fabric like linen or osnaburg.
Embrace a slightly imperfect, open stitching style rather than aiming for flawless precision. Use simple stitches like lazy daisy for leaves and French knots for lavender buds.
The simplicity of the wreath design, combined with the texture of the fabric, creates a piece that feels both handmade and effortlessly elegant.
It’s the perfect welcoming touch for a kitchen door or entryway.
11. Echo Your Decor with Glamorous Metallic Threads
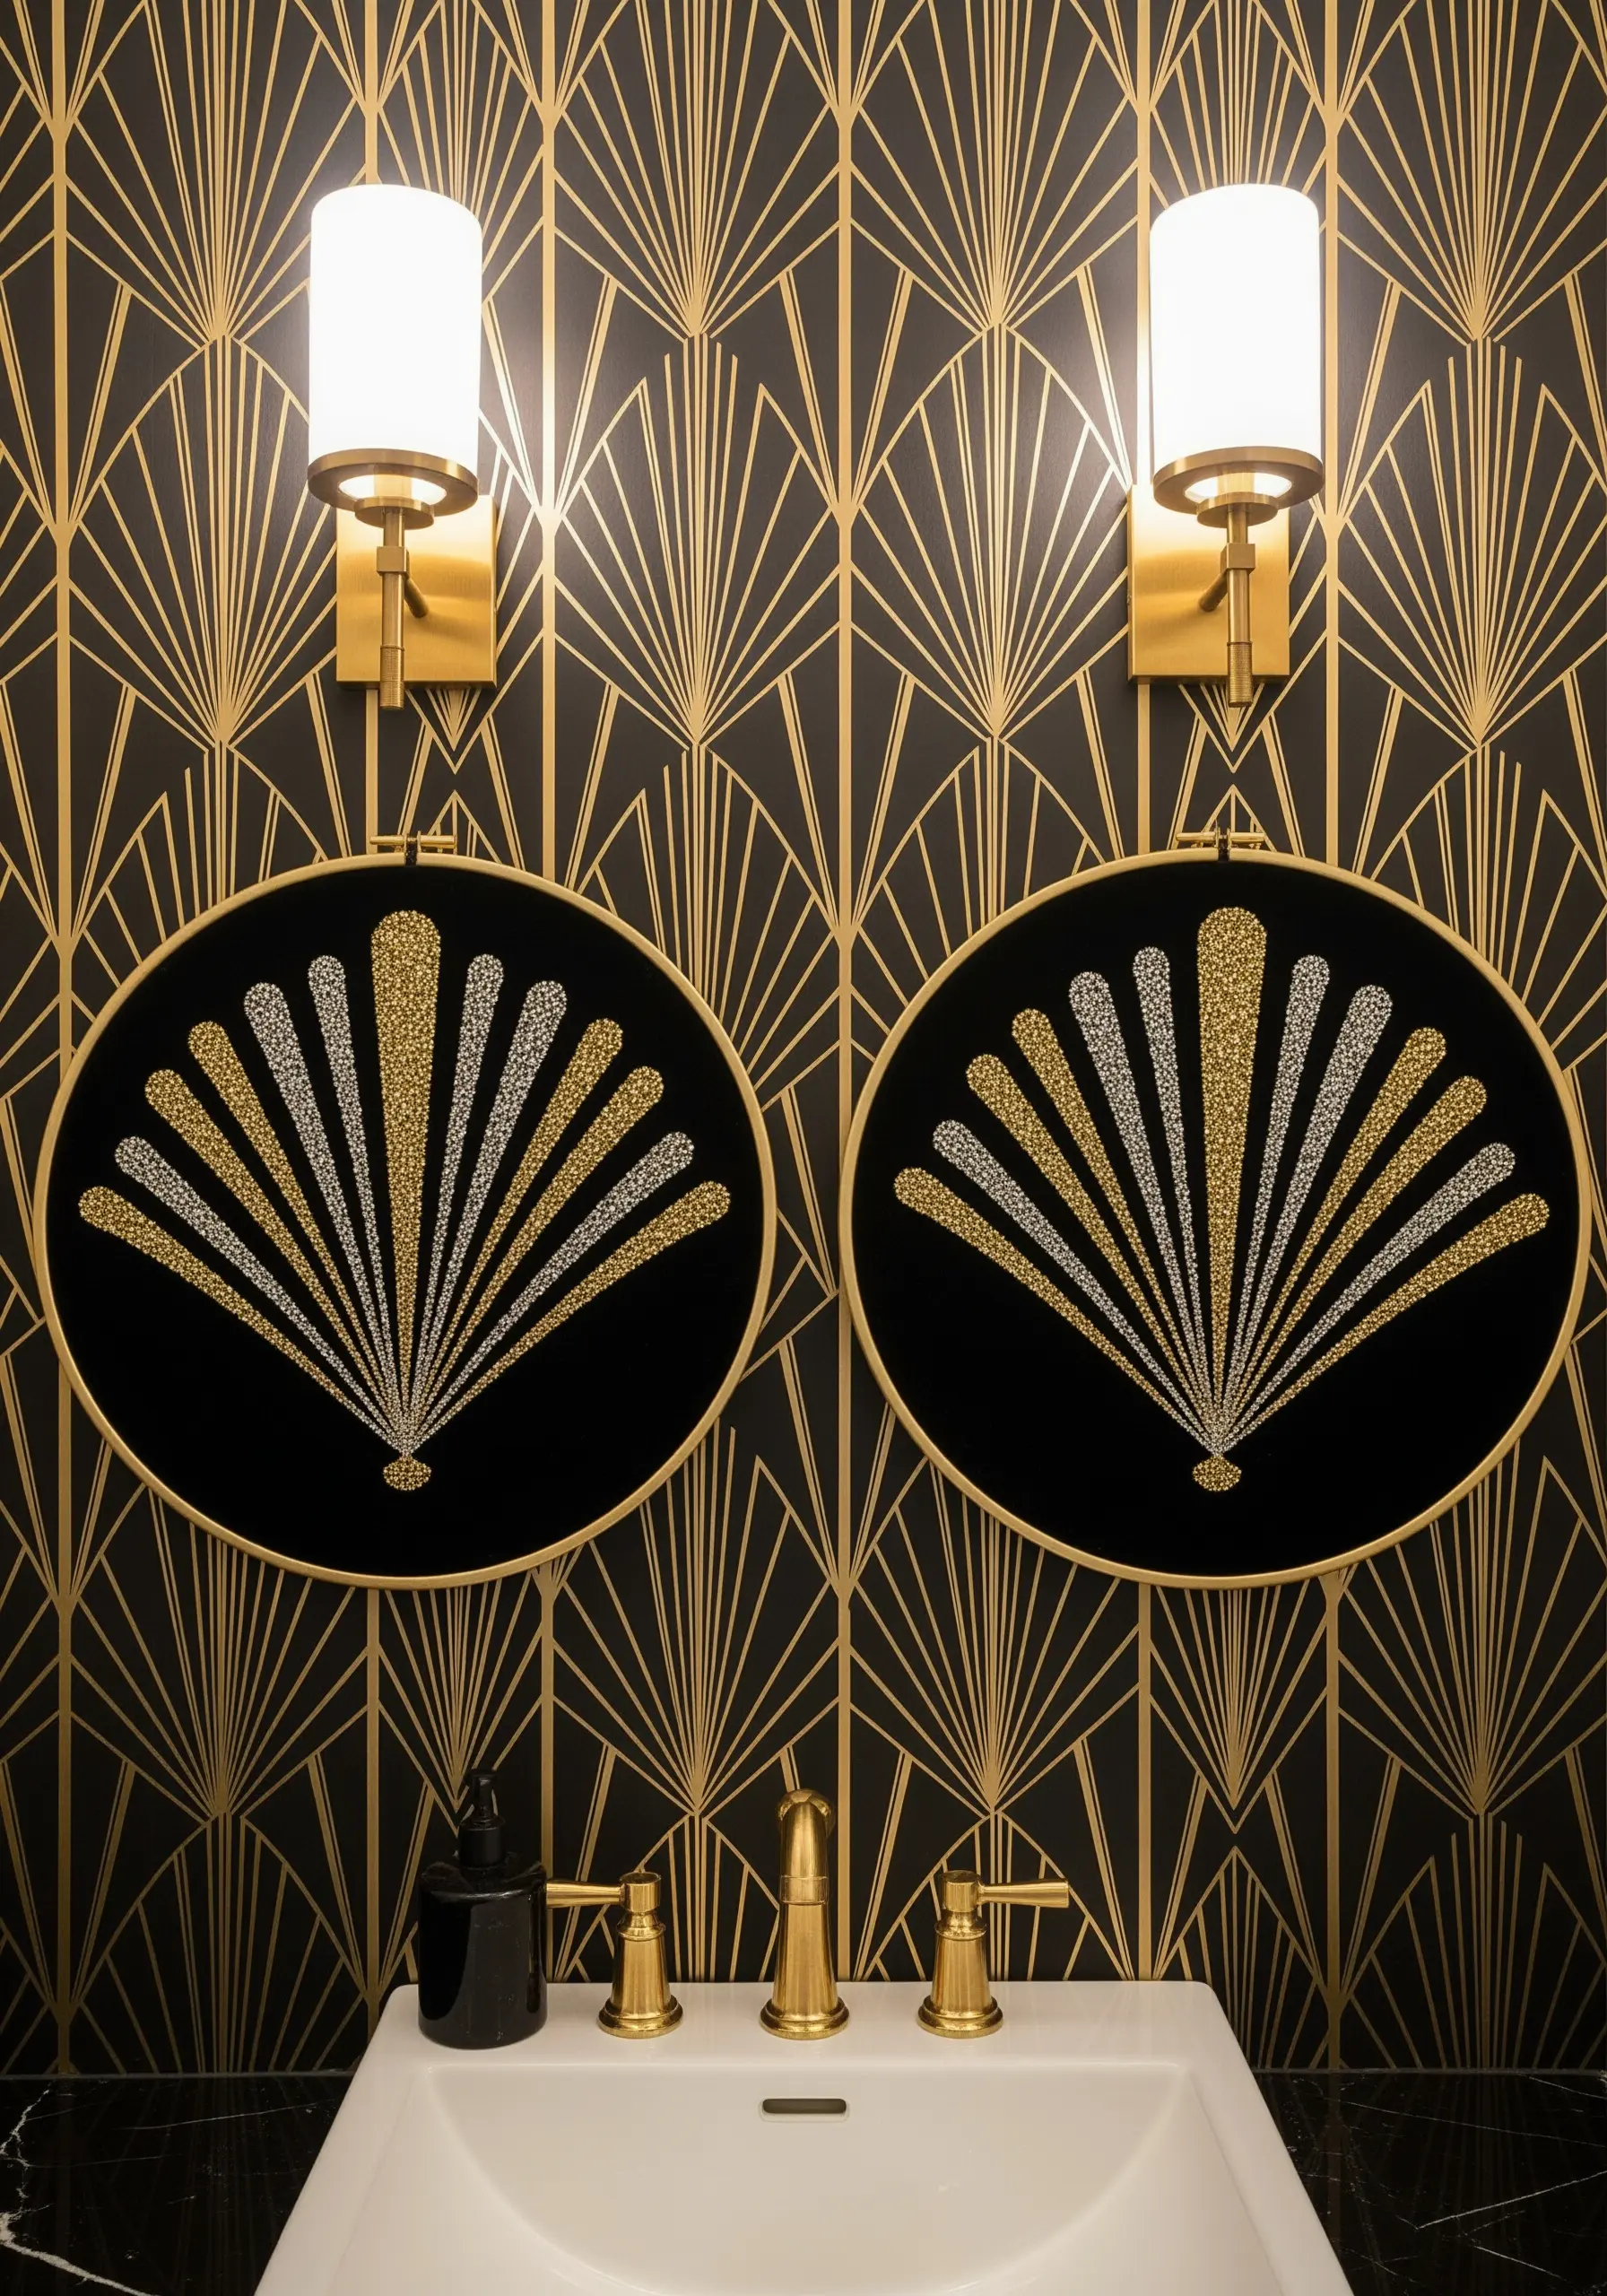
Instead of competing with a bold wallpaper, create an embroidery piece that complements it.
Isolate a single motif from the pattern—like this Art Deco fan—and recreate it in thread to create a cohesive, custom look.
Use gold and silver metallic threads to catch the light and add a touch of glamour that echoes the room’s fixtures.
For a shimmering, textured fill that is more forgiving than satin stitch, try using seed stitch.
12. Give Words Dimension with Raised Lettering

When embroidering a meaningful quote, give the words physical presence by using a raised stitch technique.
For the bold script, a whipped backstitch using all six strands of floss creates a smooth, rope-like effect that stands out from the fabric.
Alternatively, a padded satin stitch, where you first lay down a base of straight stitches before covering them, will give letters a puffy, three-dimensional quality.
Contrast the heavy text with more delicate, airy floral elements below for visual balance.
13. Design a Playful and Tactile Kids’ Room Gallery

Create a joyful gallery wall for a playroom by combining bright colors, simple shapes, and a variety of textures.
Use chunky yarn and a punch needle or couching technique to create soft, touchable surfaces that are perfect for a child’s space.
Mixing iconic shapes like animals and rainbows with simple numbers adds a subtle educational element.
The varied hoop sizes and scattered arrangement give the wall a dynamic, playful energy. This approach is a great use of cartoon-style embroidery ideas.
14. Explore Mood and Depth in a Monochromatic Palette

Challenge yourself to create a complex scene using only shades of a single color, from light to dark.
This forces you to rely on texture and stitch direction to create definition and depth between the different landscape elements.
Use dense satin stitch for the smooth, rolling hills, and contrast it with looser seed stitches for the clouds and vertical straight stitches for rain.
The result is a sophisticated, atmospheric piece that feels both modern and serene.
15. Create a Soaring Narrative with a Vertical Diptych
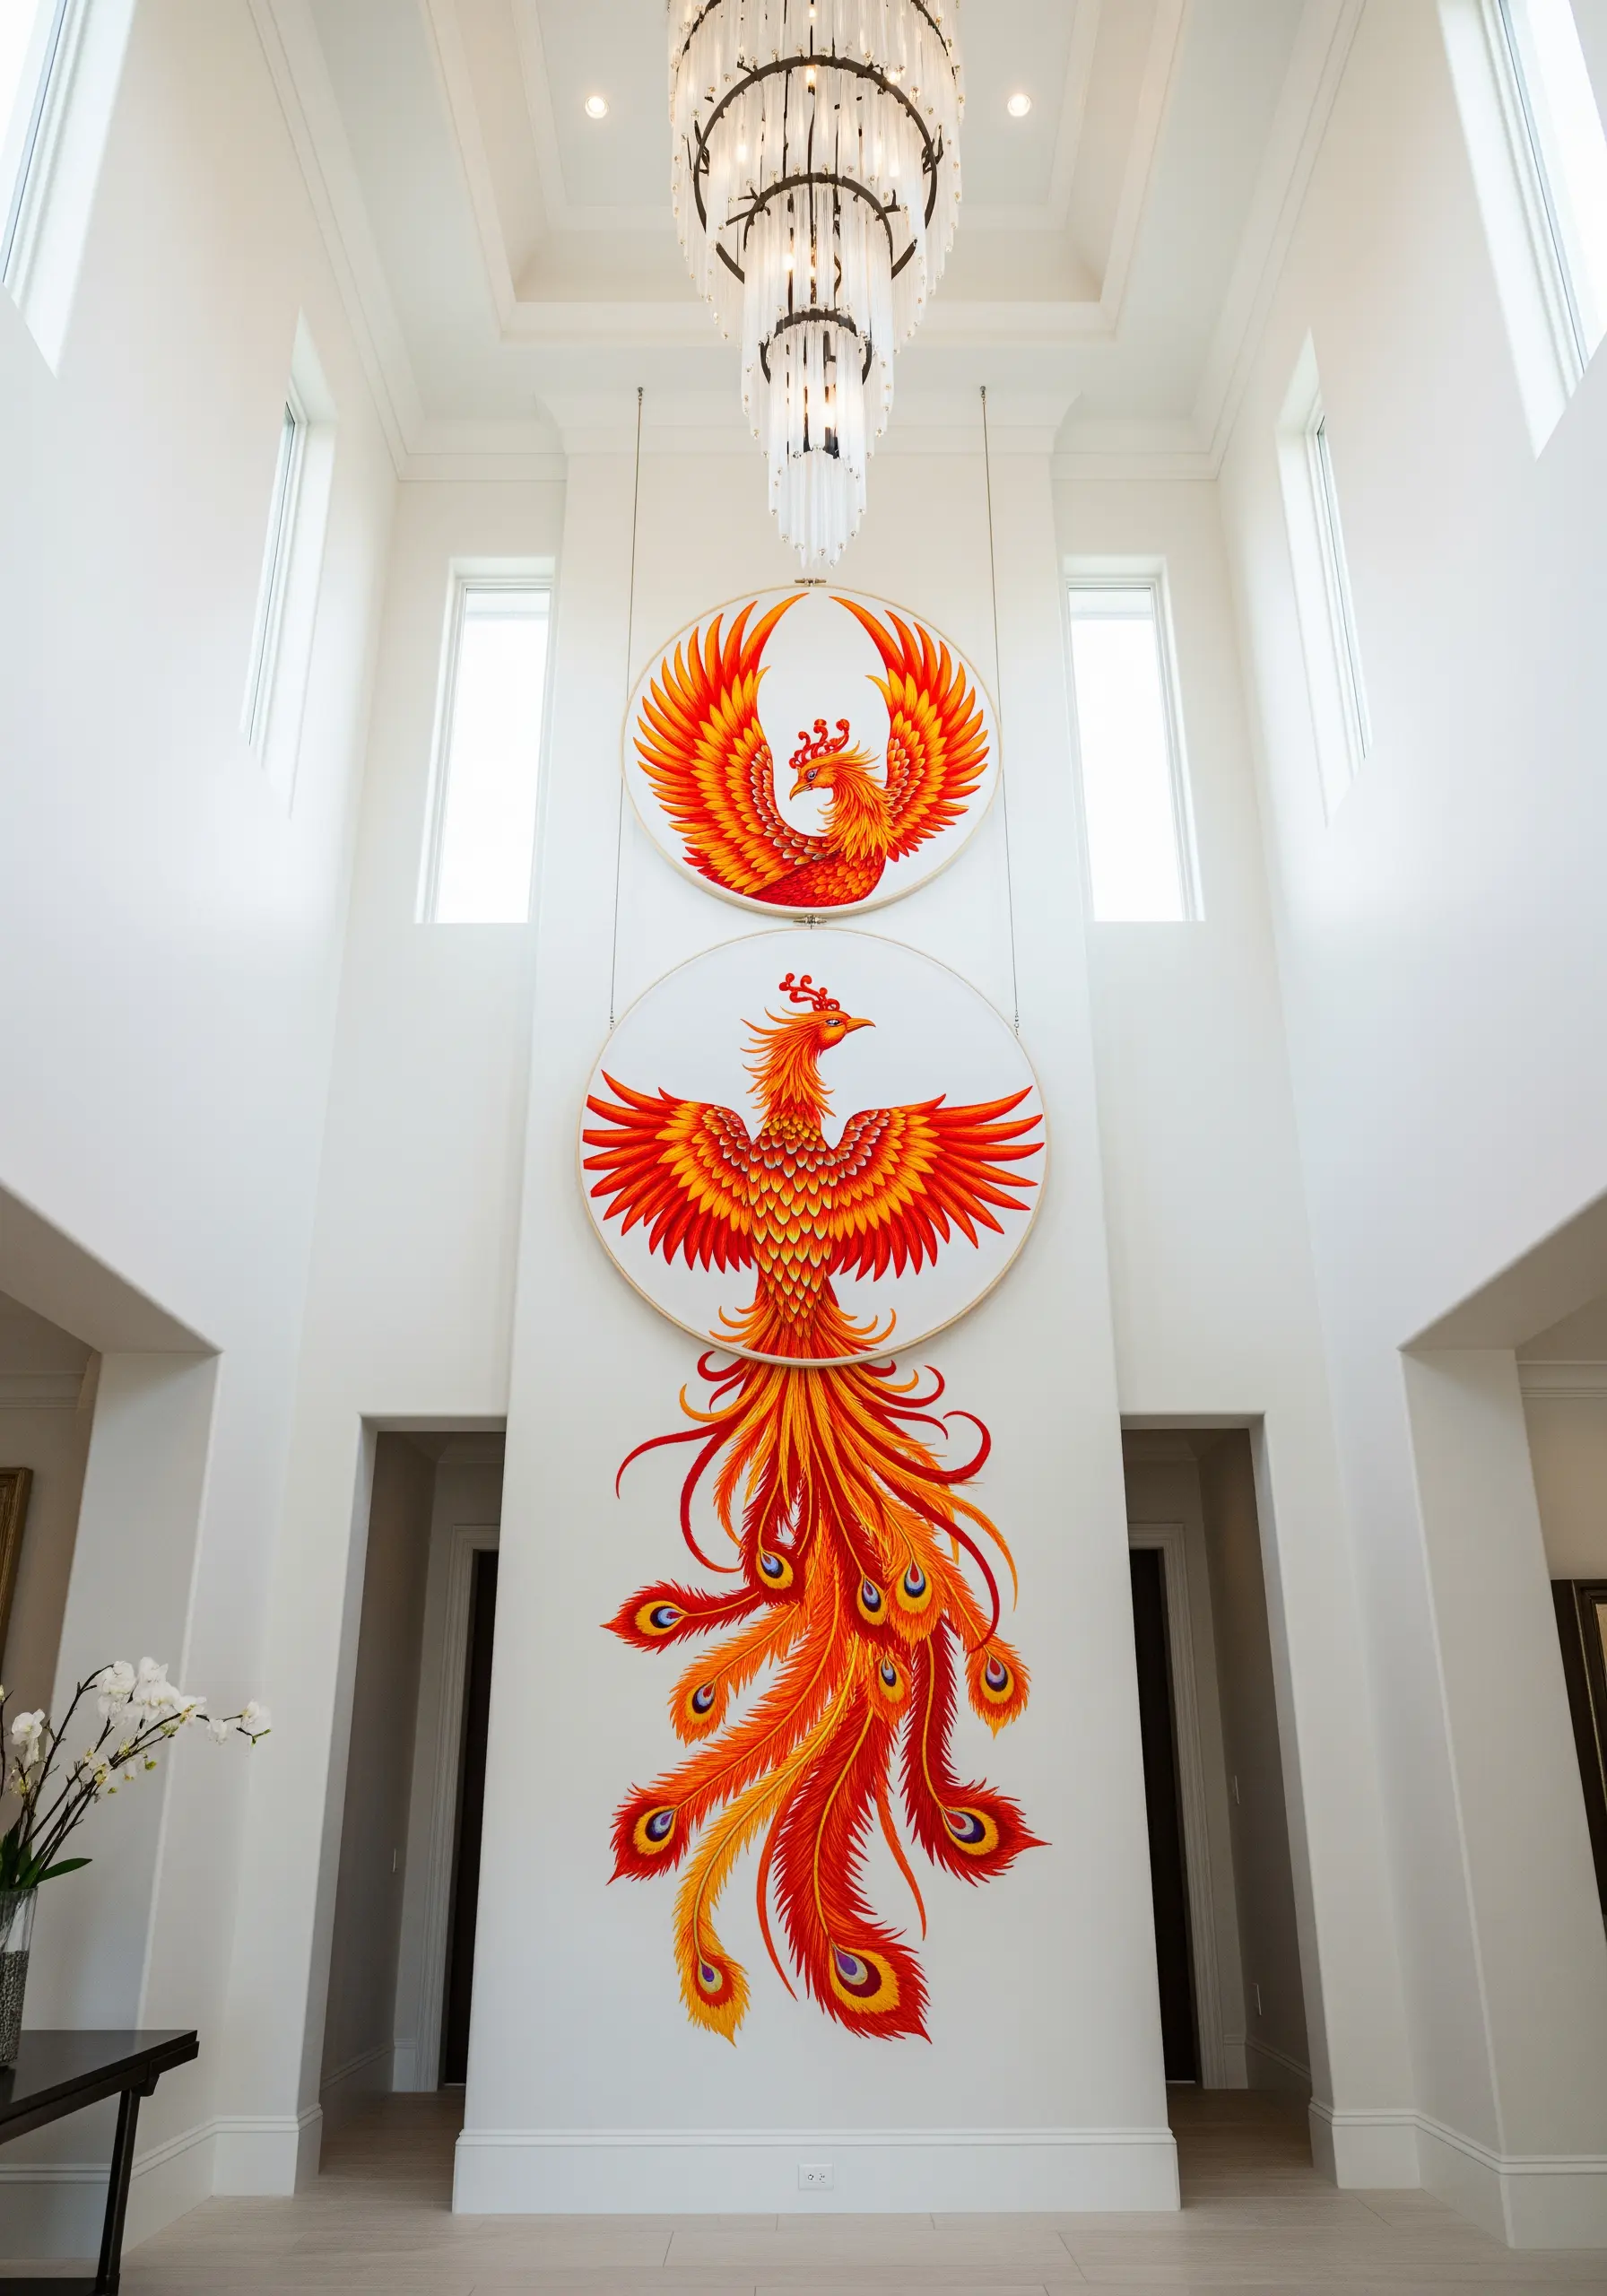
For a truly show-stopping piece in a room with high ceilings, extend your design across multiple hoops to create a single, continuous image.
This technique, known as a diptych (for two panels) or triptych (for three), turns your embroidery into a large-scale art installation.
The key to success is a perfectly transferred pattern that ensures every line flows seamlessly from the top hoop to the bottom one.
The effect is breathtaking, leading the eye upward and making the space feel even grander.
16. Paint a Desert Sunset with Blended Stitches

To capture the soft, blended colors of a sunset, the long-and-short stitch is your most powerful tool.
This technique allows you to create seamless color gradients that mimic a painter’s brushstrokes, perfect for skies and landscapes.
Stitch on a rustic, textured fabric like burlap or linen to enhance the earthy feel of the desert scene.
Vary the direction of your stitches to define different elements—horizontal for the sky and distant mountains, and vertical for the saguaro cactus in the foreground.
17. Make Your Motif Pop on a Patterned Background
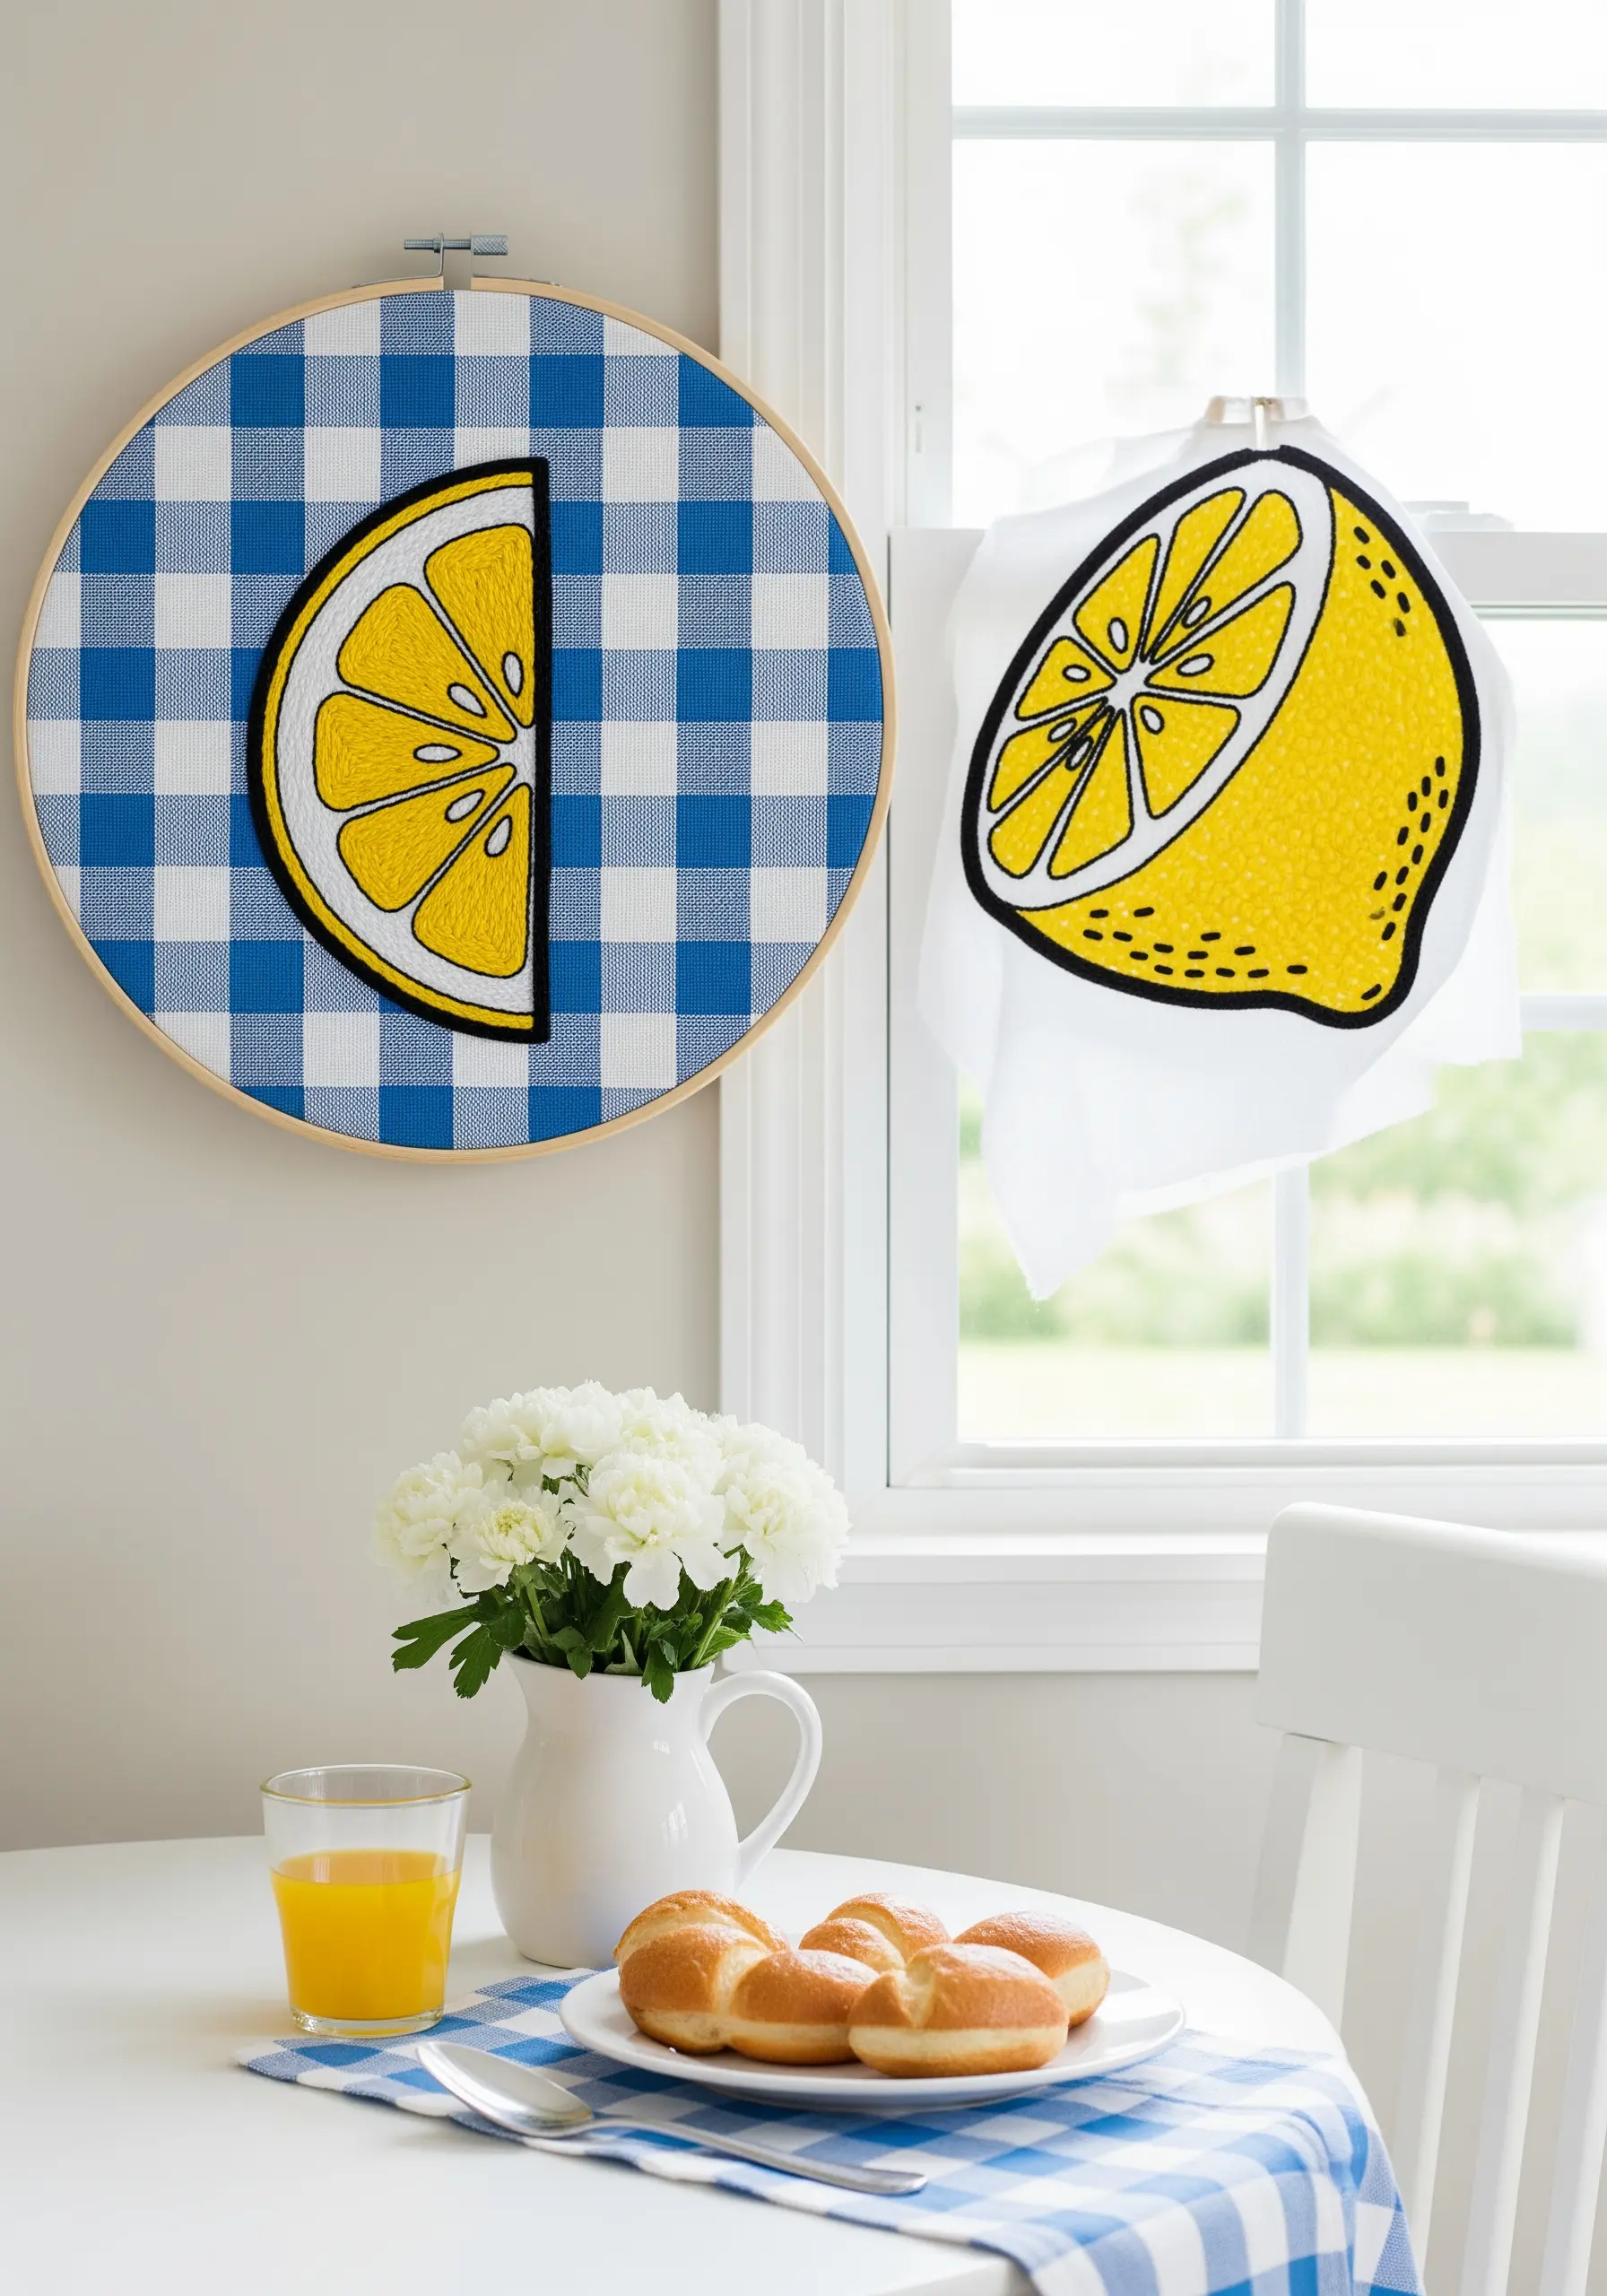
Don’t be afraid to stitch on patterned fabric; it can add an instant layer of color and personality to your work.
To ensure your embroidered motif stands out against a busy background like gingham, choose a simple, graphic design with high-contrast colors.
Outline the entire shape with a bold, thick line of black satin stitch or whipped backstitch. This creates a clean border that separates your subject from the pattern behind it.
18. Curate a Graphic Collection with High-Contrast Linework

Achieve a sophisticated, modern look by pairing detailed scientific illustrations with intricate geometric designs like embroidered mandala wall art.
Stitching with a single high-contrast color—like black thread on light fabric, or white thread on dark fabric—unifies the diverse subjects and gives the collection a graphic, cohesive feel.
This style demands precision, so use a fine split stitch or backstitch to ensure your lines are crisp and clean.
19. Create Photorealistic Texture with Directional Stitching
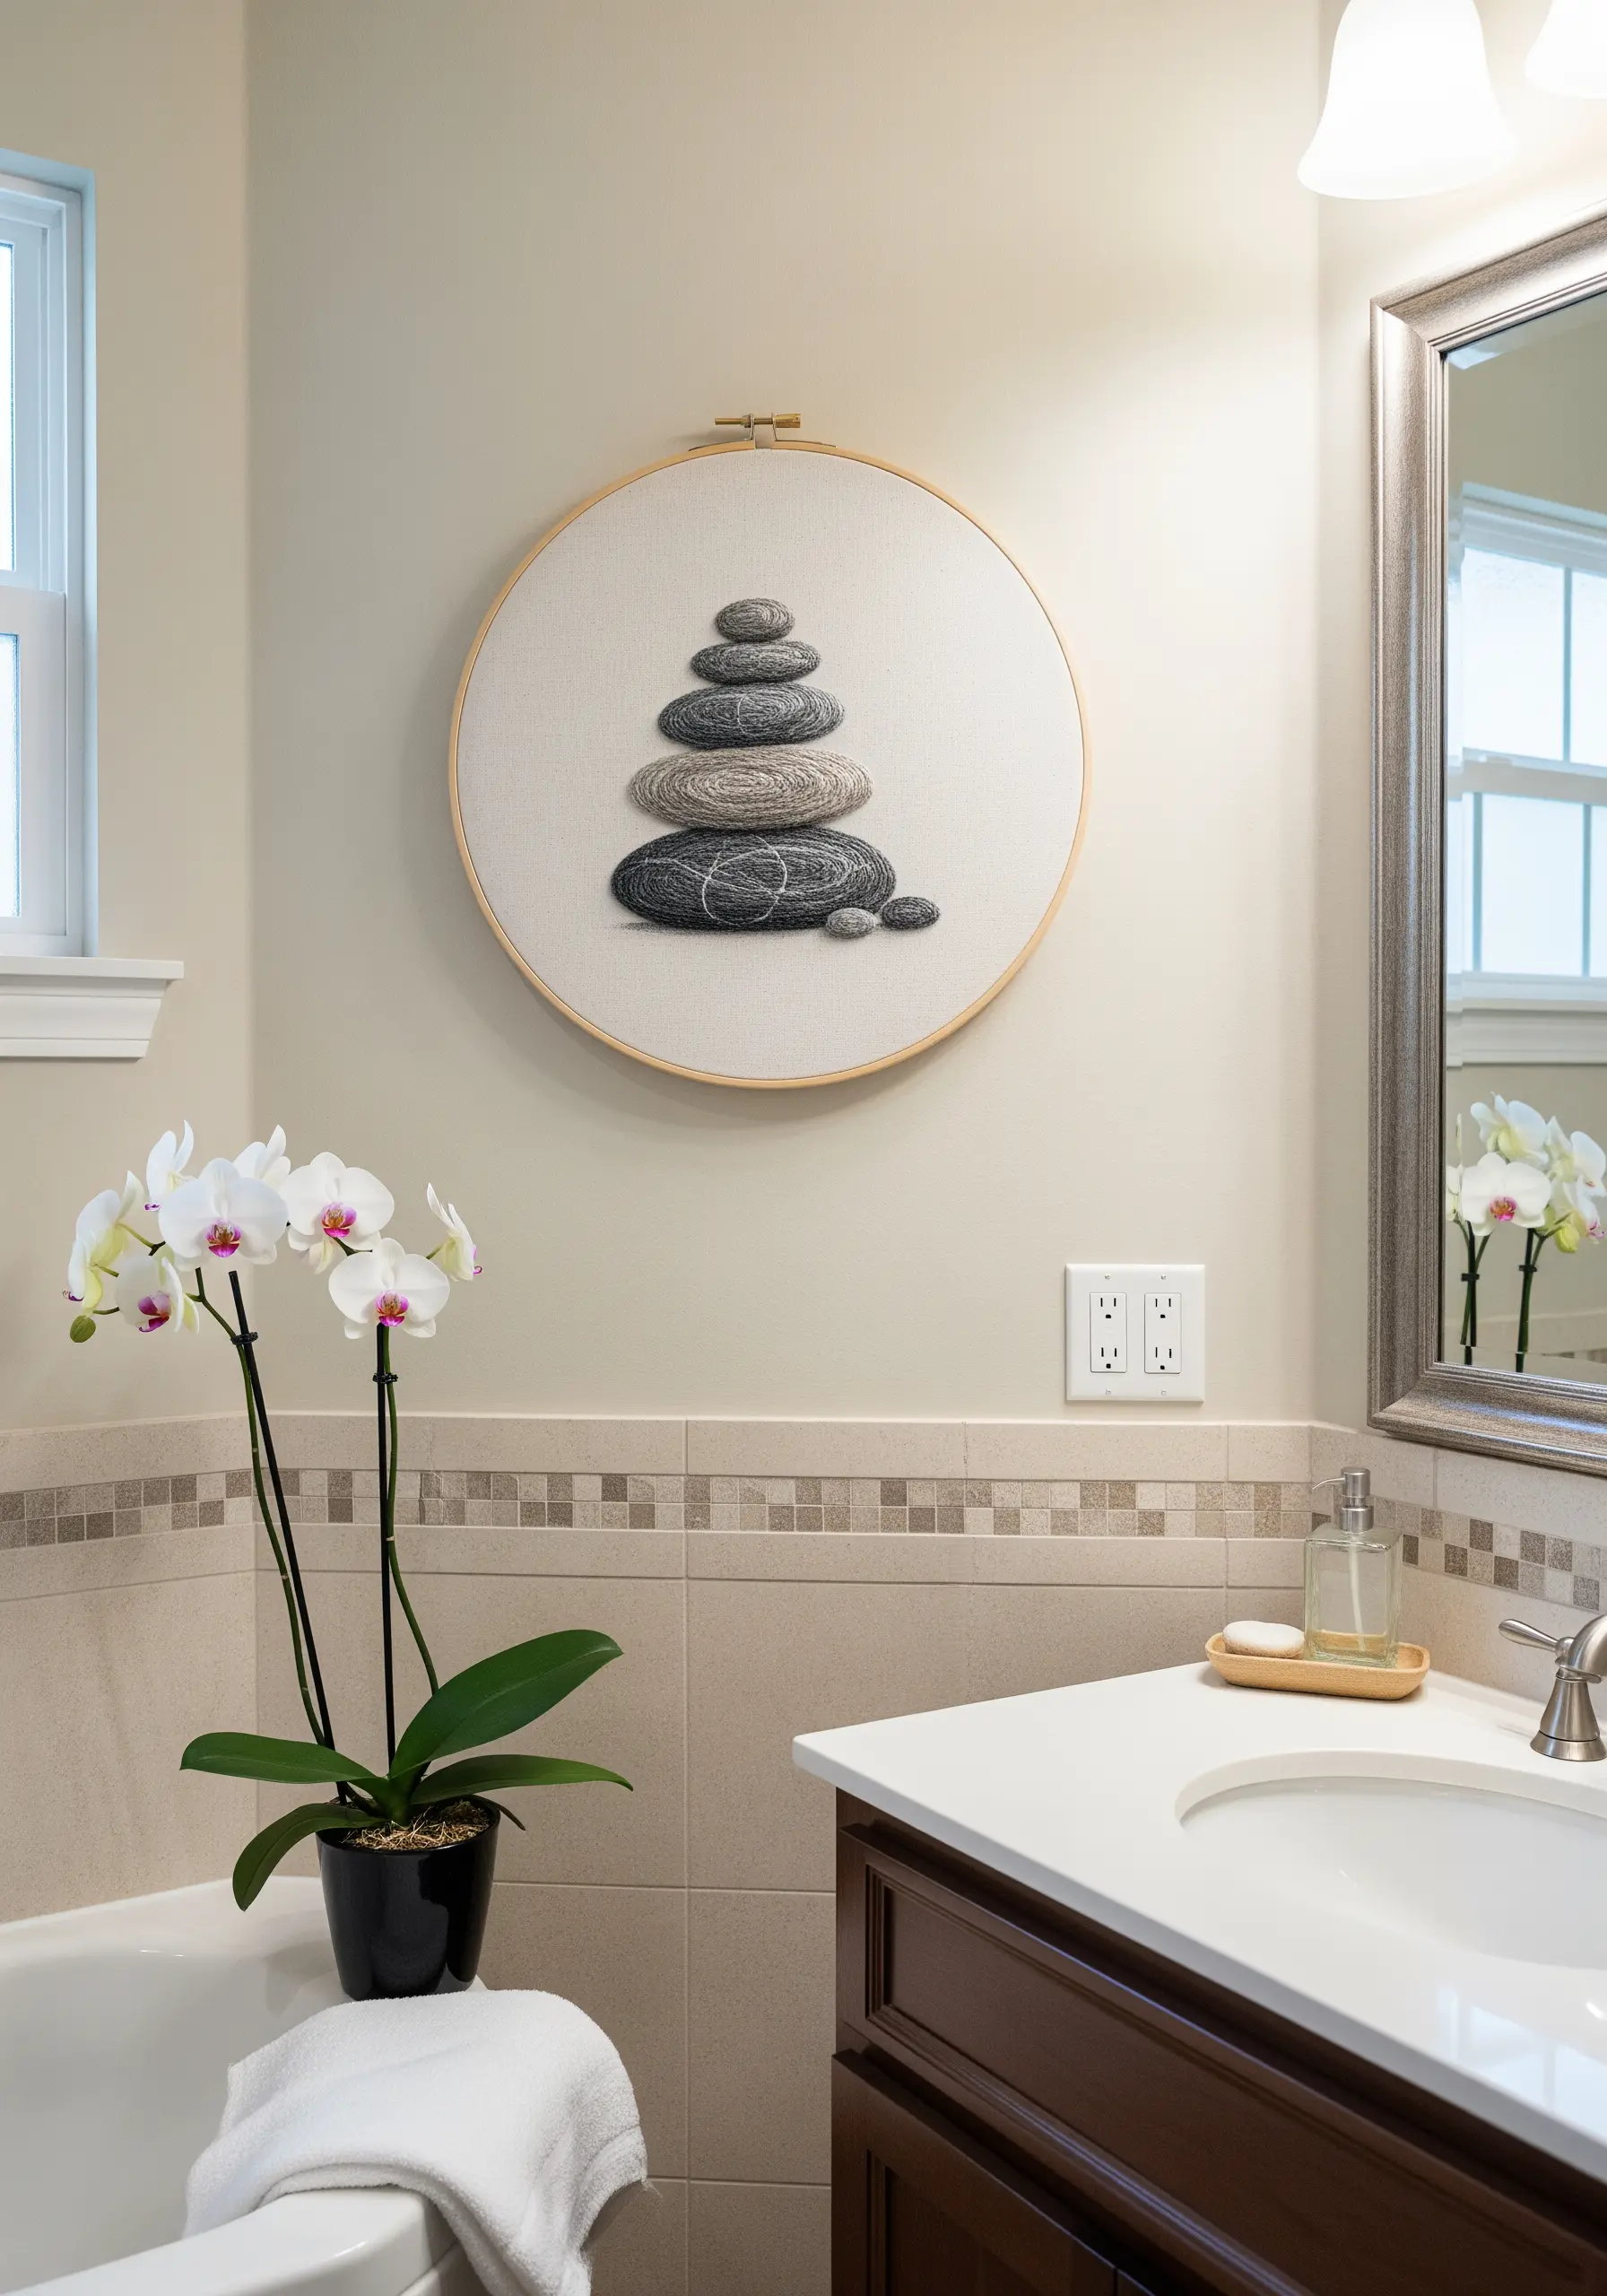
To make embroidered objects look three-dimensional, the direction of your stitches is everything.
For these stacked stones, use a long-and-short stitch, gently curving your stitches to follow the rounded form of each rock.
Blend several shades of grey, taupe, and cream within each stone to create subtle highlights and shadows, which enhances the illusion of depth and solidity.
This mindful technique transforms flat thread into a realistic, tangible texture.
20. Illustrate a Lunar Cycle Across Multiple Hoops

A series of hoops provides the perfect canvas for depicting a progression, like the phases of the moon.
To achieve the moon’s textured, cratered surface, fill the shapes with dense French knots in white and silver thread.
Alternatively, for a smoother shimmer, use silver lamé fabric as an appliqué base and add minimal stitched details on top.
Displaying the hoops in a straight line along a hallway creates a beautiful narrative flow and a powerful graphic statement.
21. Recreate Abstract Art with Geometric Precision

Pay homage to modern art masters by translating their iconic compositions into thread.
For a piece inspired by Piet Mondrian, the key is flawlessly executed satin stitch. Keep your stitches perfectly parallel and ensure the edges of each color block are razor-sharp.
Use a crisp black backstitch or stem stitch to create the defining grid lines, which will hide any minor imperfections where the colors meet.
This transforms a simple stitch into a bold, graphic art piece.
22. Integrate Patterned Fabric into Your Scene
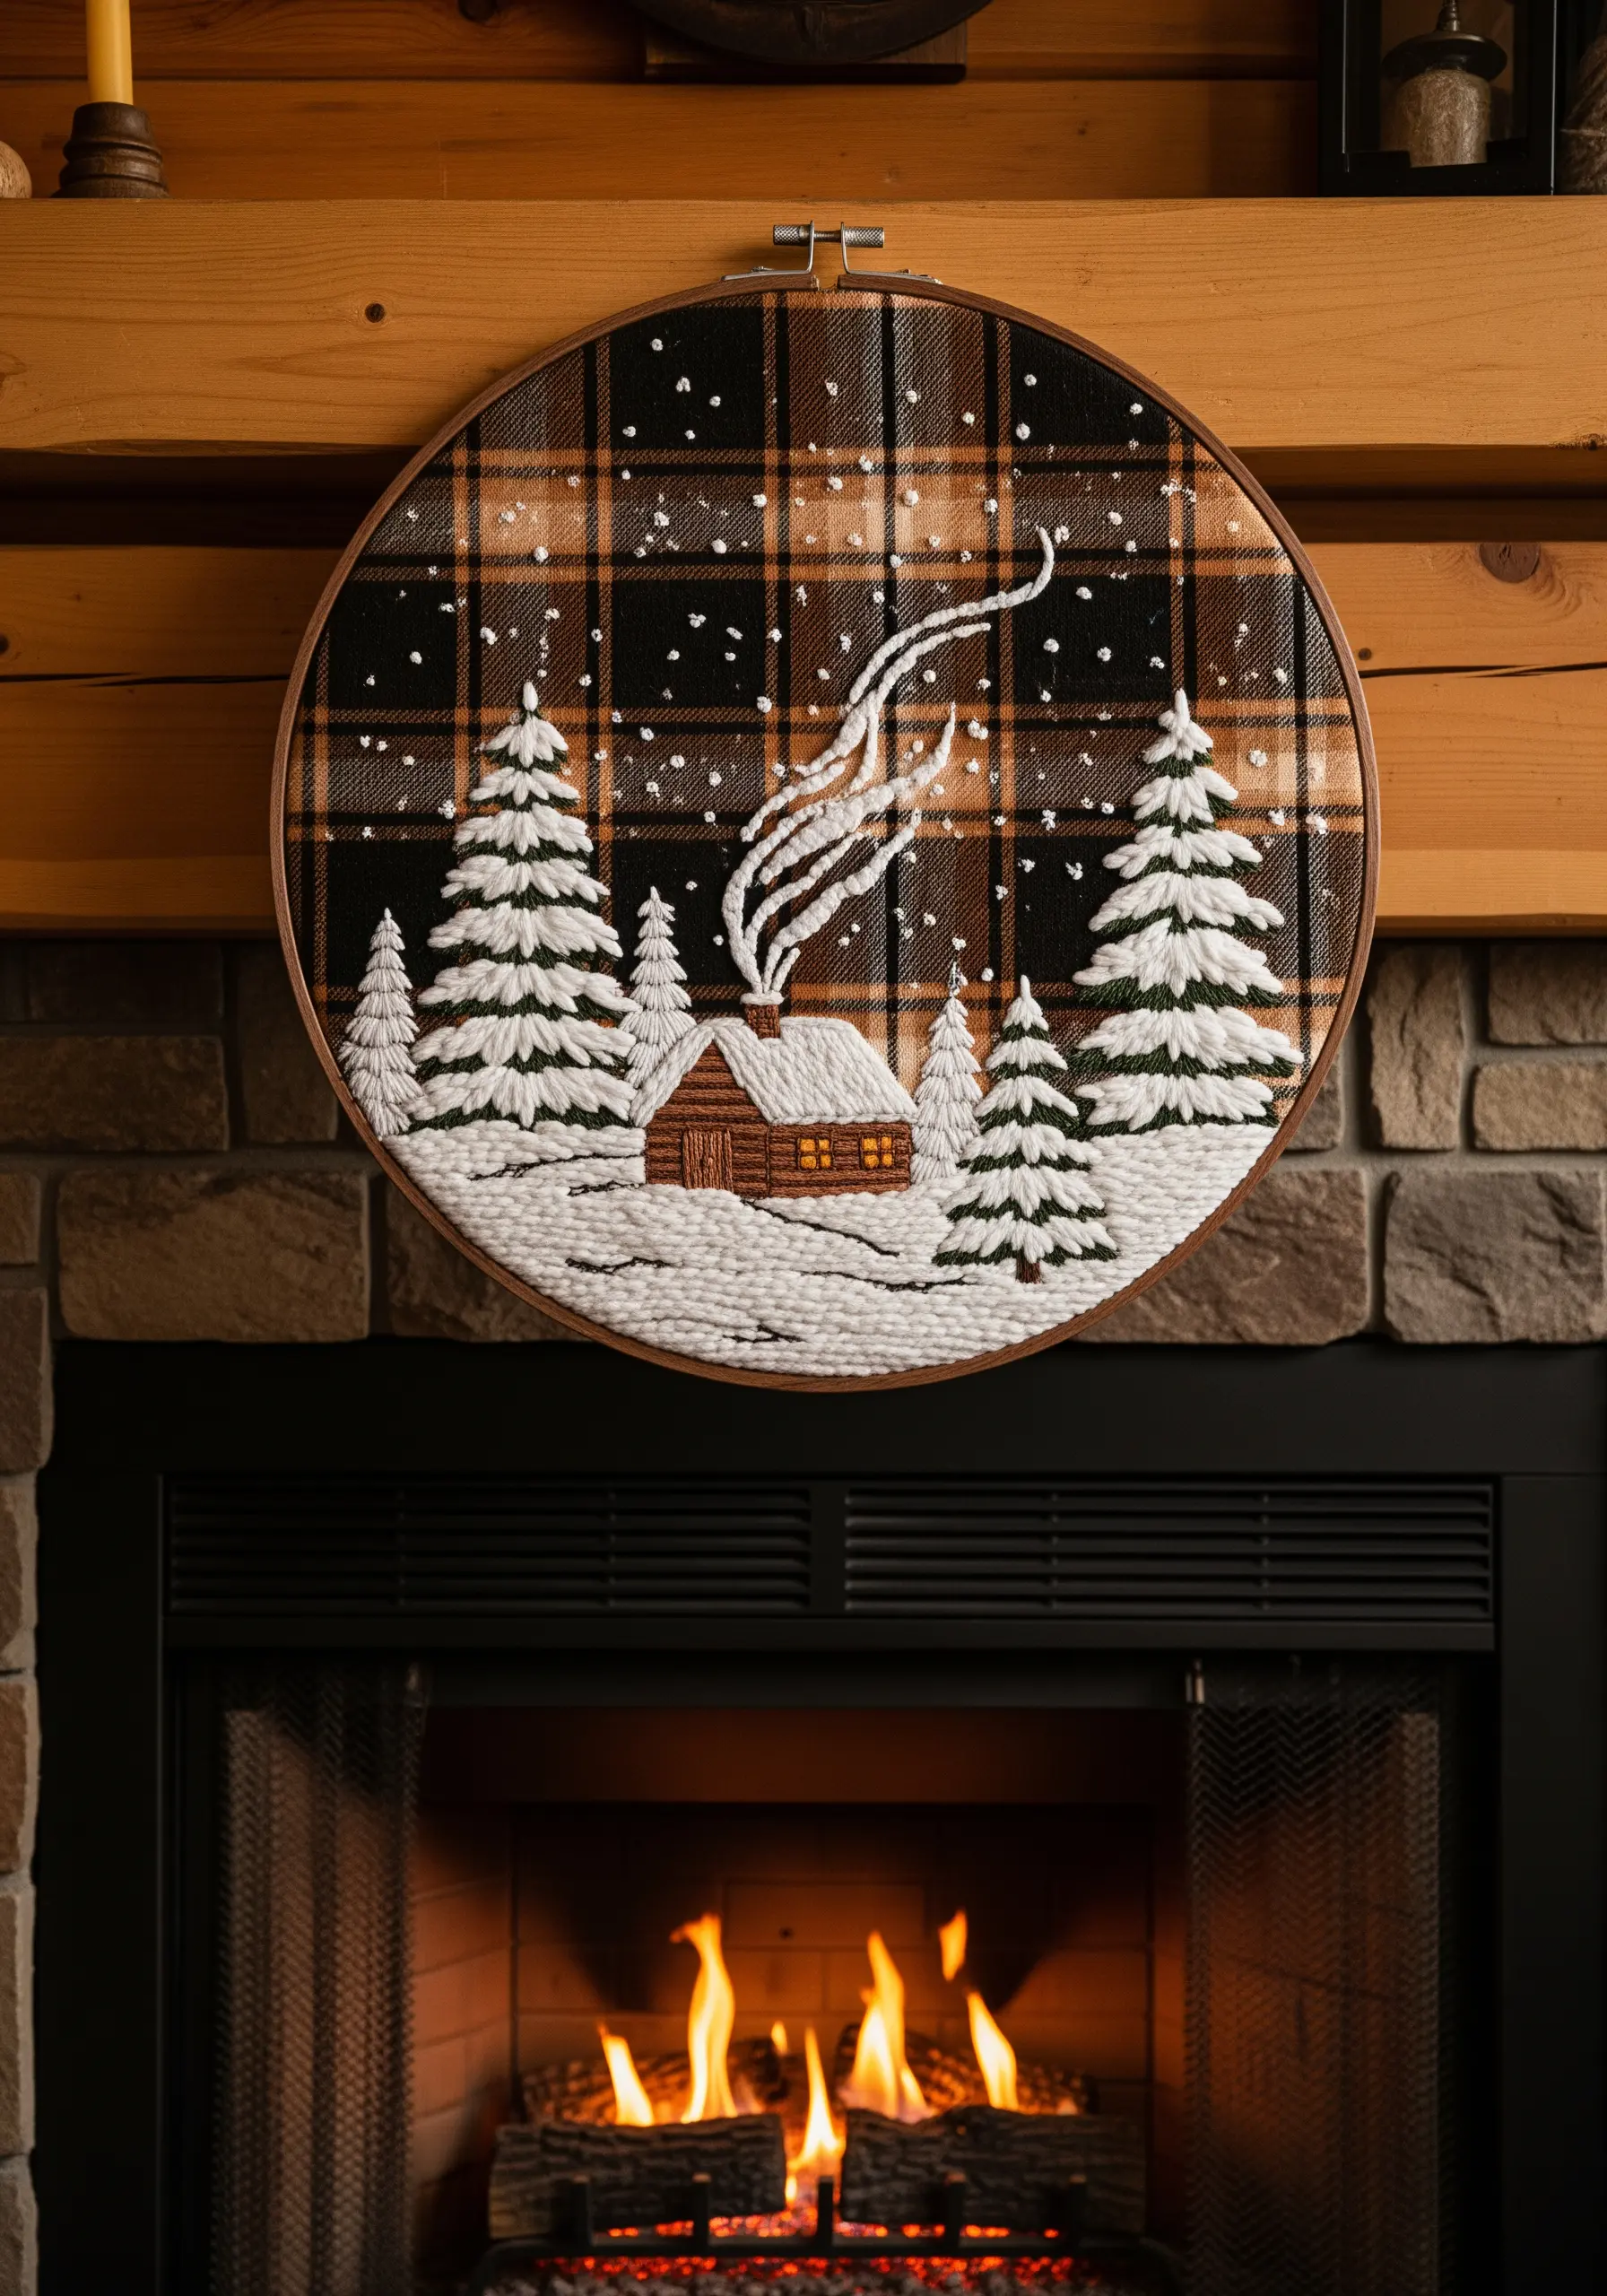
Let your background fabric do some of the storytelling. A classic plaid immediately sets a cozy, rustic mood for this winter cabin scene.
When stitching on a bold pattern, choose a simple, high-contrast color palette for your embroidery to ensure it doesn’t get lost.
Here, the bright white snow pops against the dark plaid. Use a dimensional stitch like the Turkey work for the snow on the trees to add a fluffy, tactile texture.
23. Convey Movement with Minimalist Thread Drawing
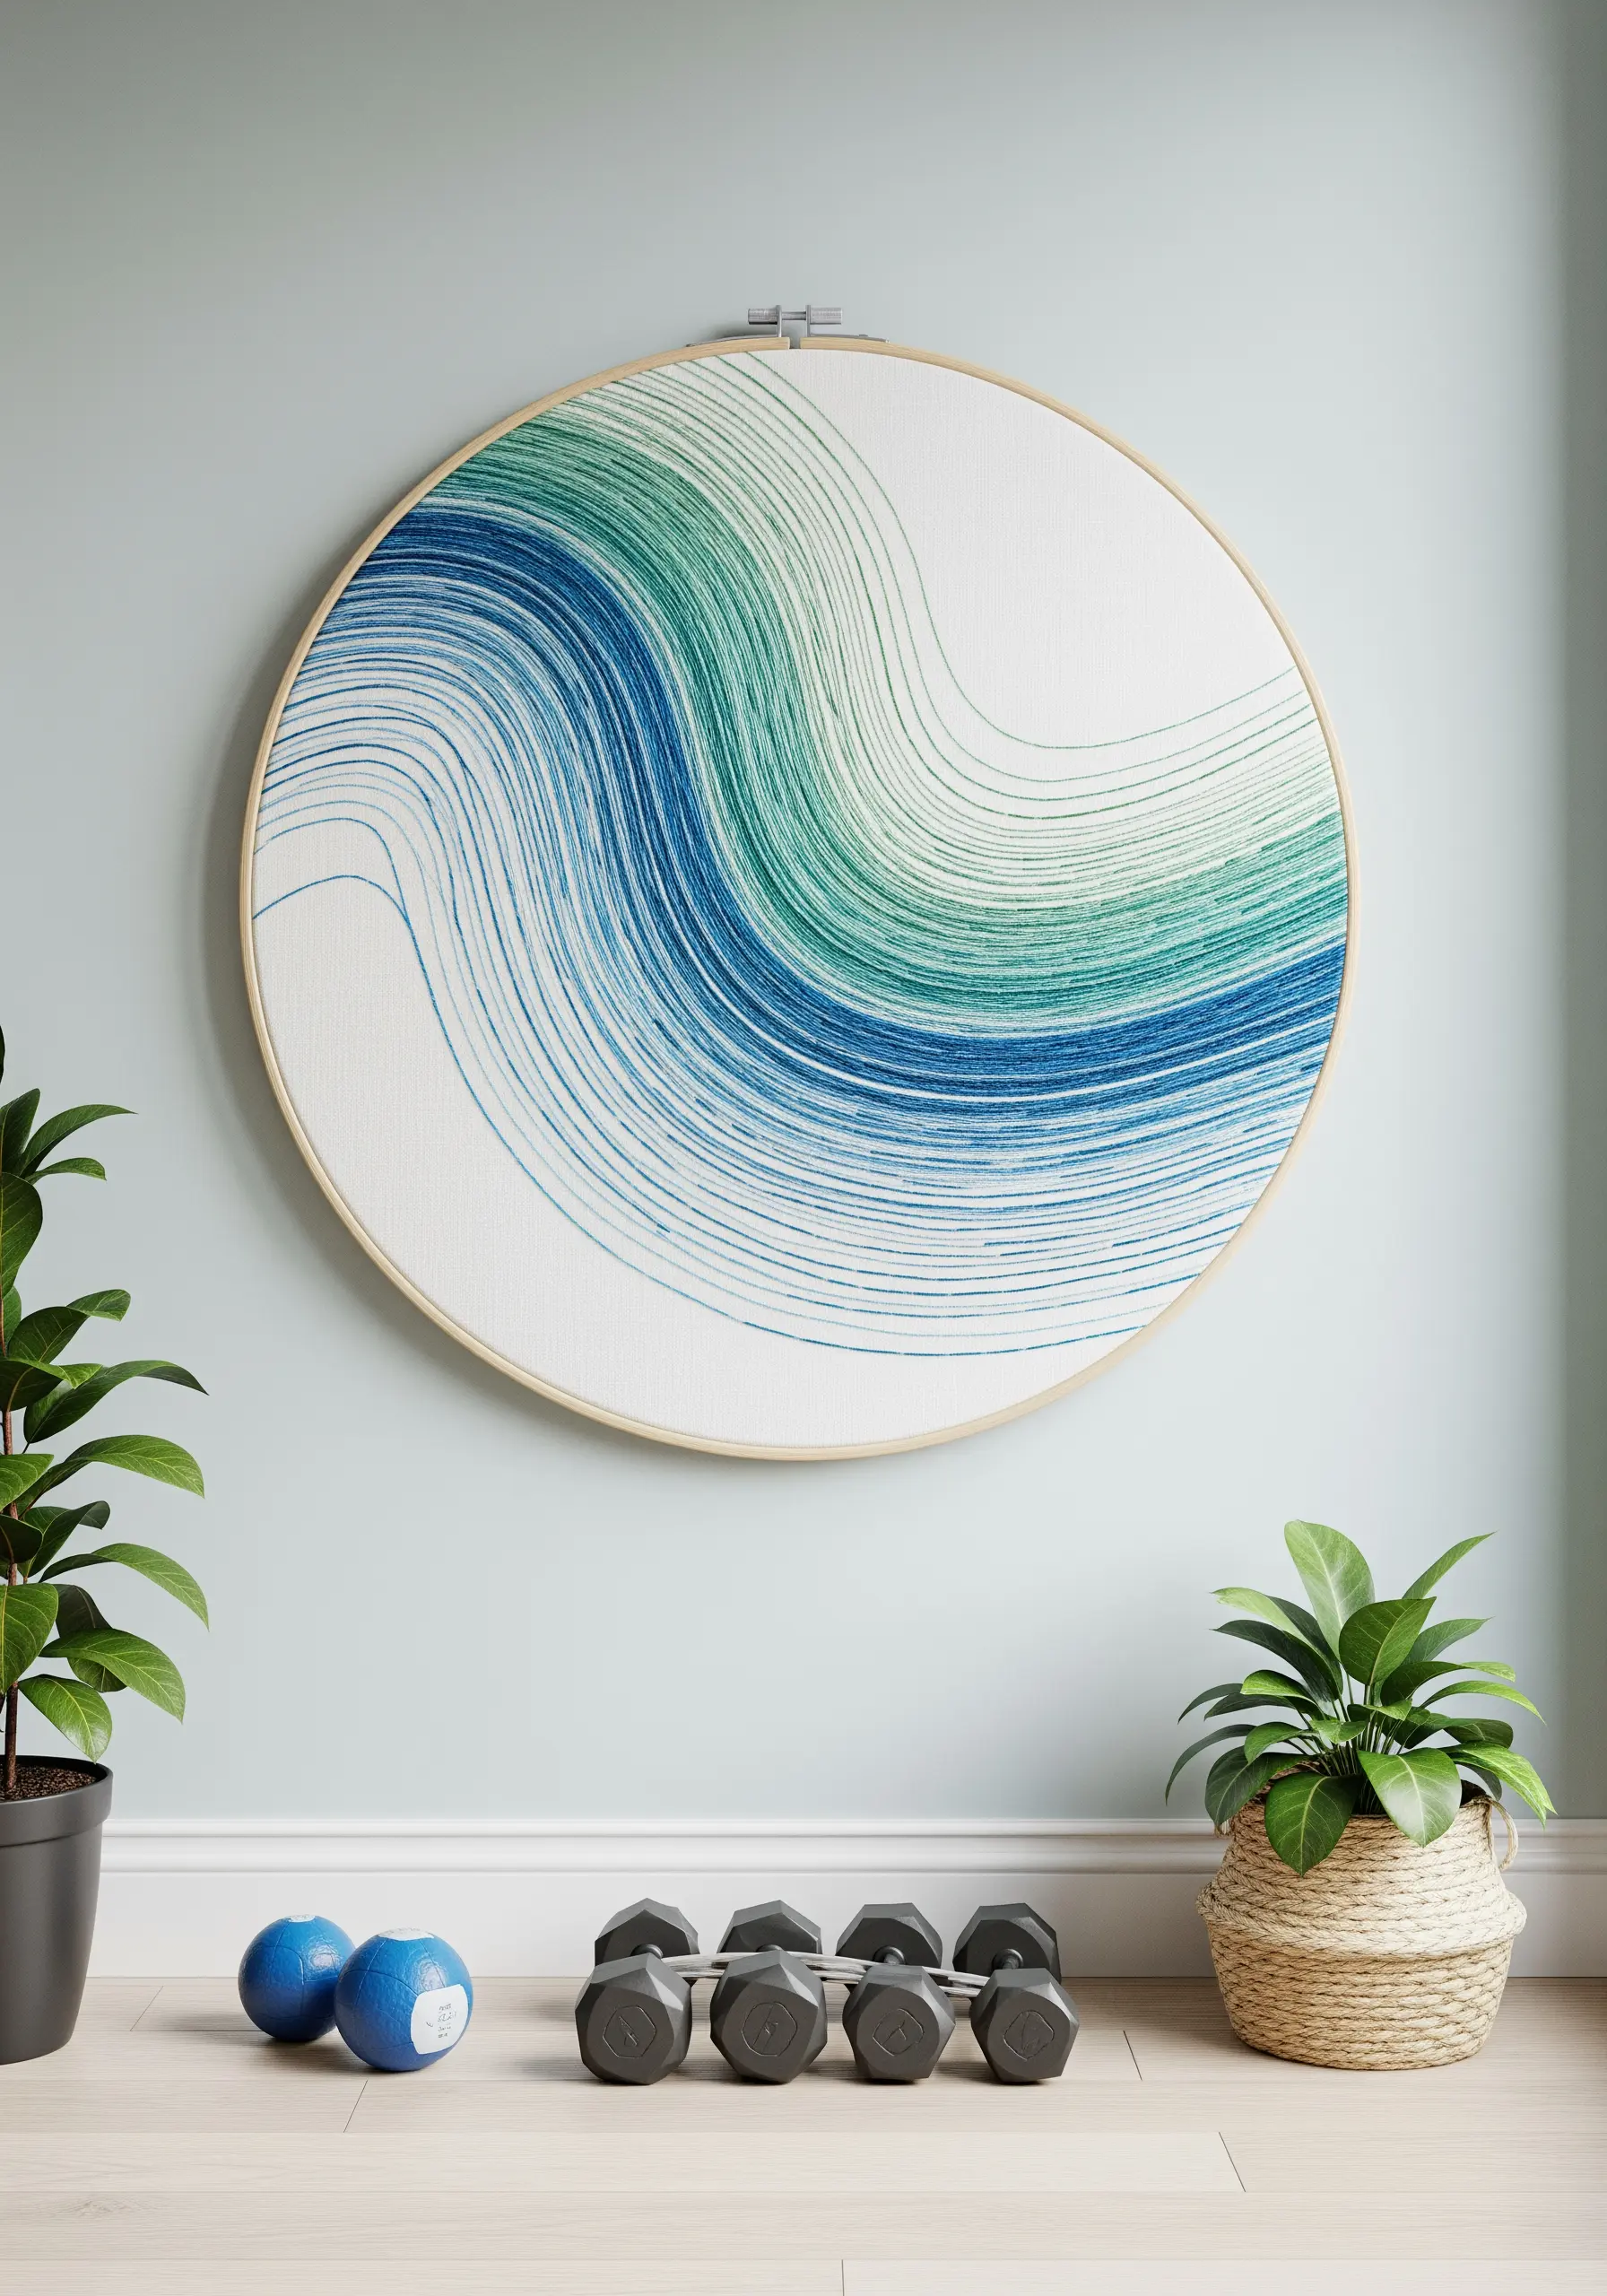
You don’t need to fill an entire hoop to make a powerful statement. This piece uses the simplest of stitches—the running stitch—to create a sense of serene, flowing energy.
Layer lines of thread in analogous colors, like these shades of blue and green, to build a gentle, organic gradient.
The negative space is just as important as the stitches themselves, giving the composition room to breathe.
This meditative approach results in a piece of contemporary, minimalist art.
24. Layer Sheer Hoops for a Dreamy, Light-Filled Display
Create a romantic, layered focal point by stitching delicate florals on sheer organza and hanging the hoops in front of a window.
The natural light will filter through the fabric, illuminating your stitches and making them appear to glow.
Arrange hoops of different sizes in a balanced composition, with the largest piece in the center, to create a harmonious display that feels like a single, cohesive installation.
This technique turns your embroidery into an interactive piece that changes throughout the day.


