

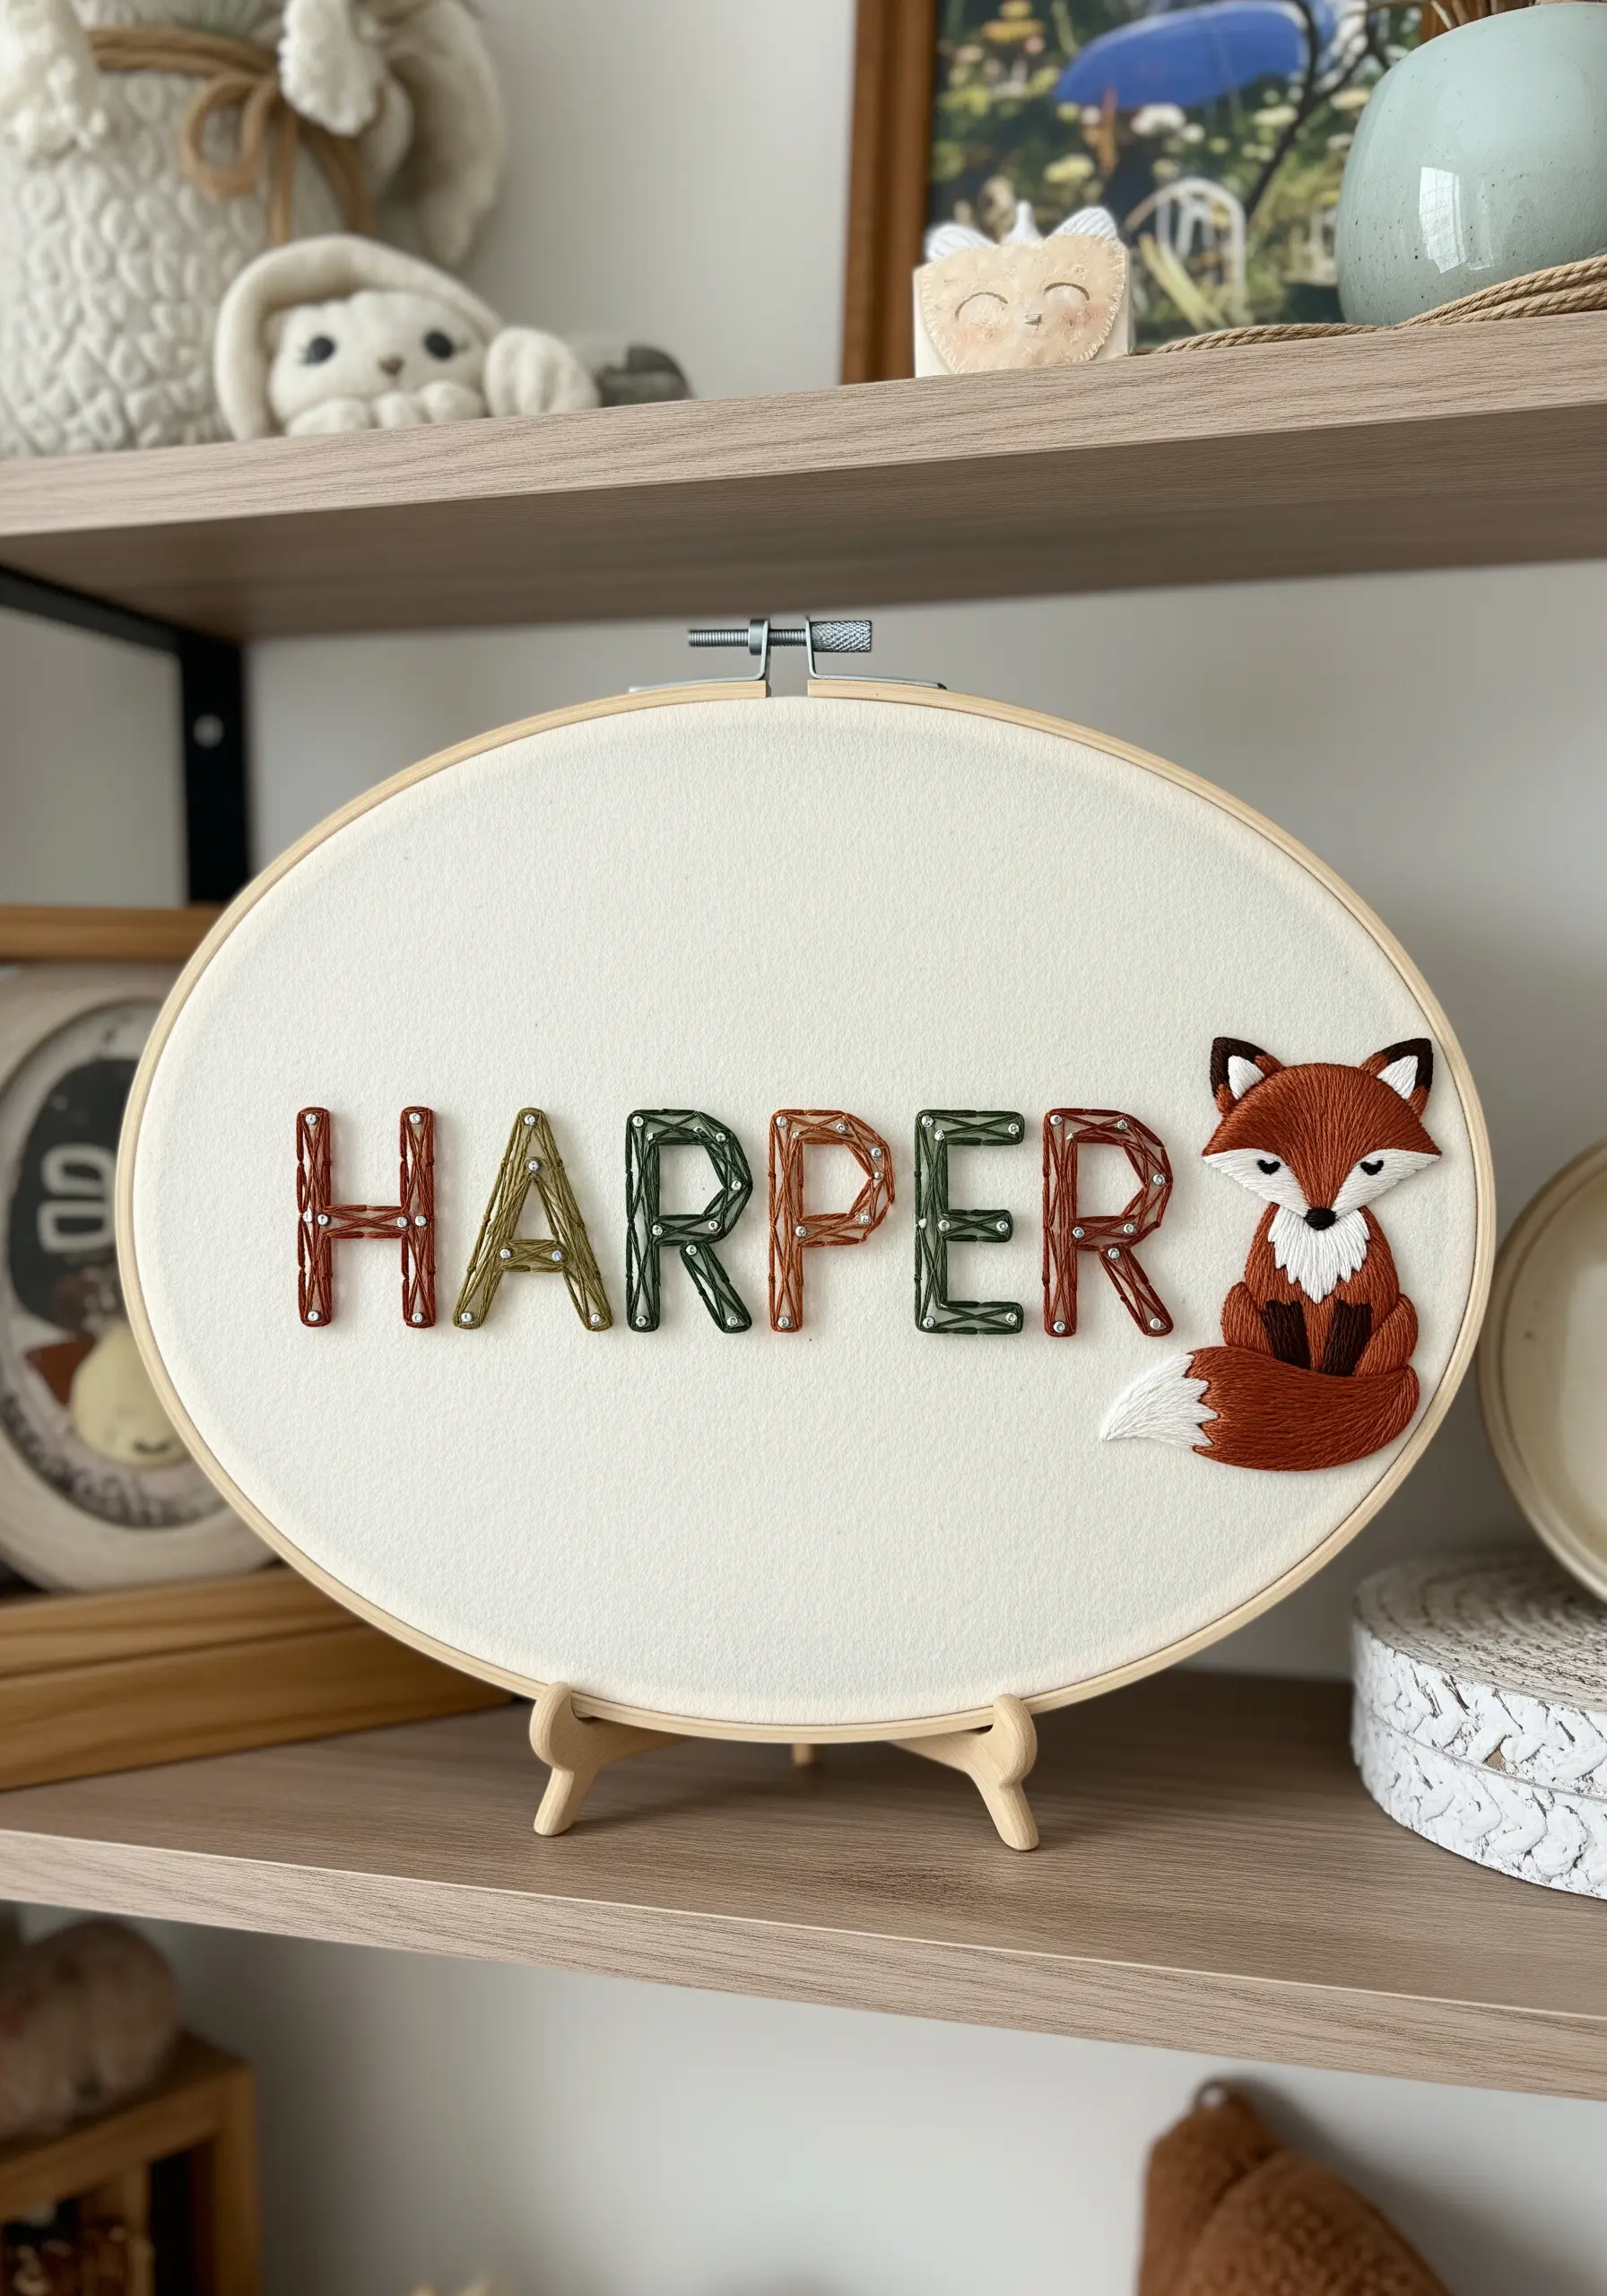
You have a gift for making things by hand, but perhaps you’re looking for a way to make your personalized pieces feel more intentional, more modern, more *you*. String art, with its clean lines and graphic presence, offers a new perspective—a way to think about thread not just as a filler of shapes, but as a structural element of design.
In this collection, I want you to see how the principles of tension, layering, and geometry from string art can be translated directly into your embroidery. You don’t need new tools, just a new approach. We’ll explore how to use a single thread to create architectural grace, how to blend colors for a seamless gradient, and how to combine stitches to build breathtaking texture.
These are more than just pretty ideas; they are techniques that will elevate your work, giving you the confidence to create gifts that are not only personal but also polished works of art. Let’s begin.
1. Layered Fills with Variegated Thread

To translate this dense, multi-tonal effect, abandon the traditional satin stitch in favor of layered straight stitches.
Use variegated embroidery floss in an earthy palette—think rust, olive, and gold—to automatically create subtle stripes within each letter.
Vary the direction of your stitches in small sections inside each letter to build texture and prevent the colors from looking too uniform.
This method adds visual weight and a rustic, handcrafted feel that a flat fill stitch cannot achieve, making it perfect for earthy embroidery projects.
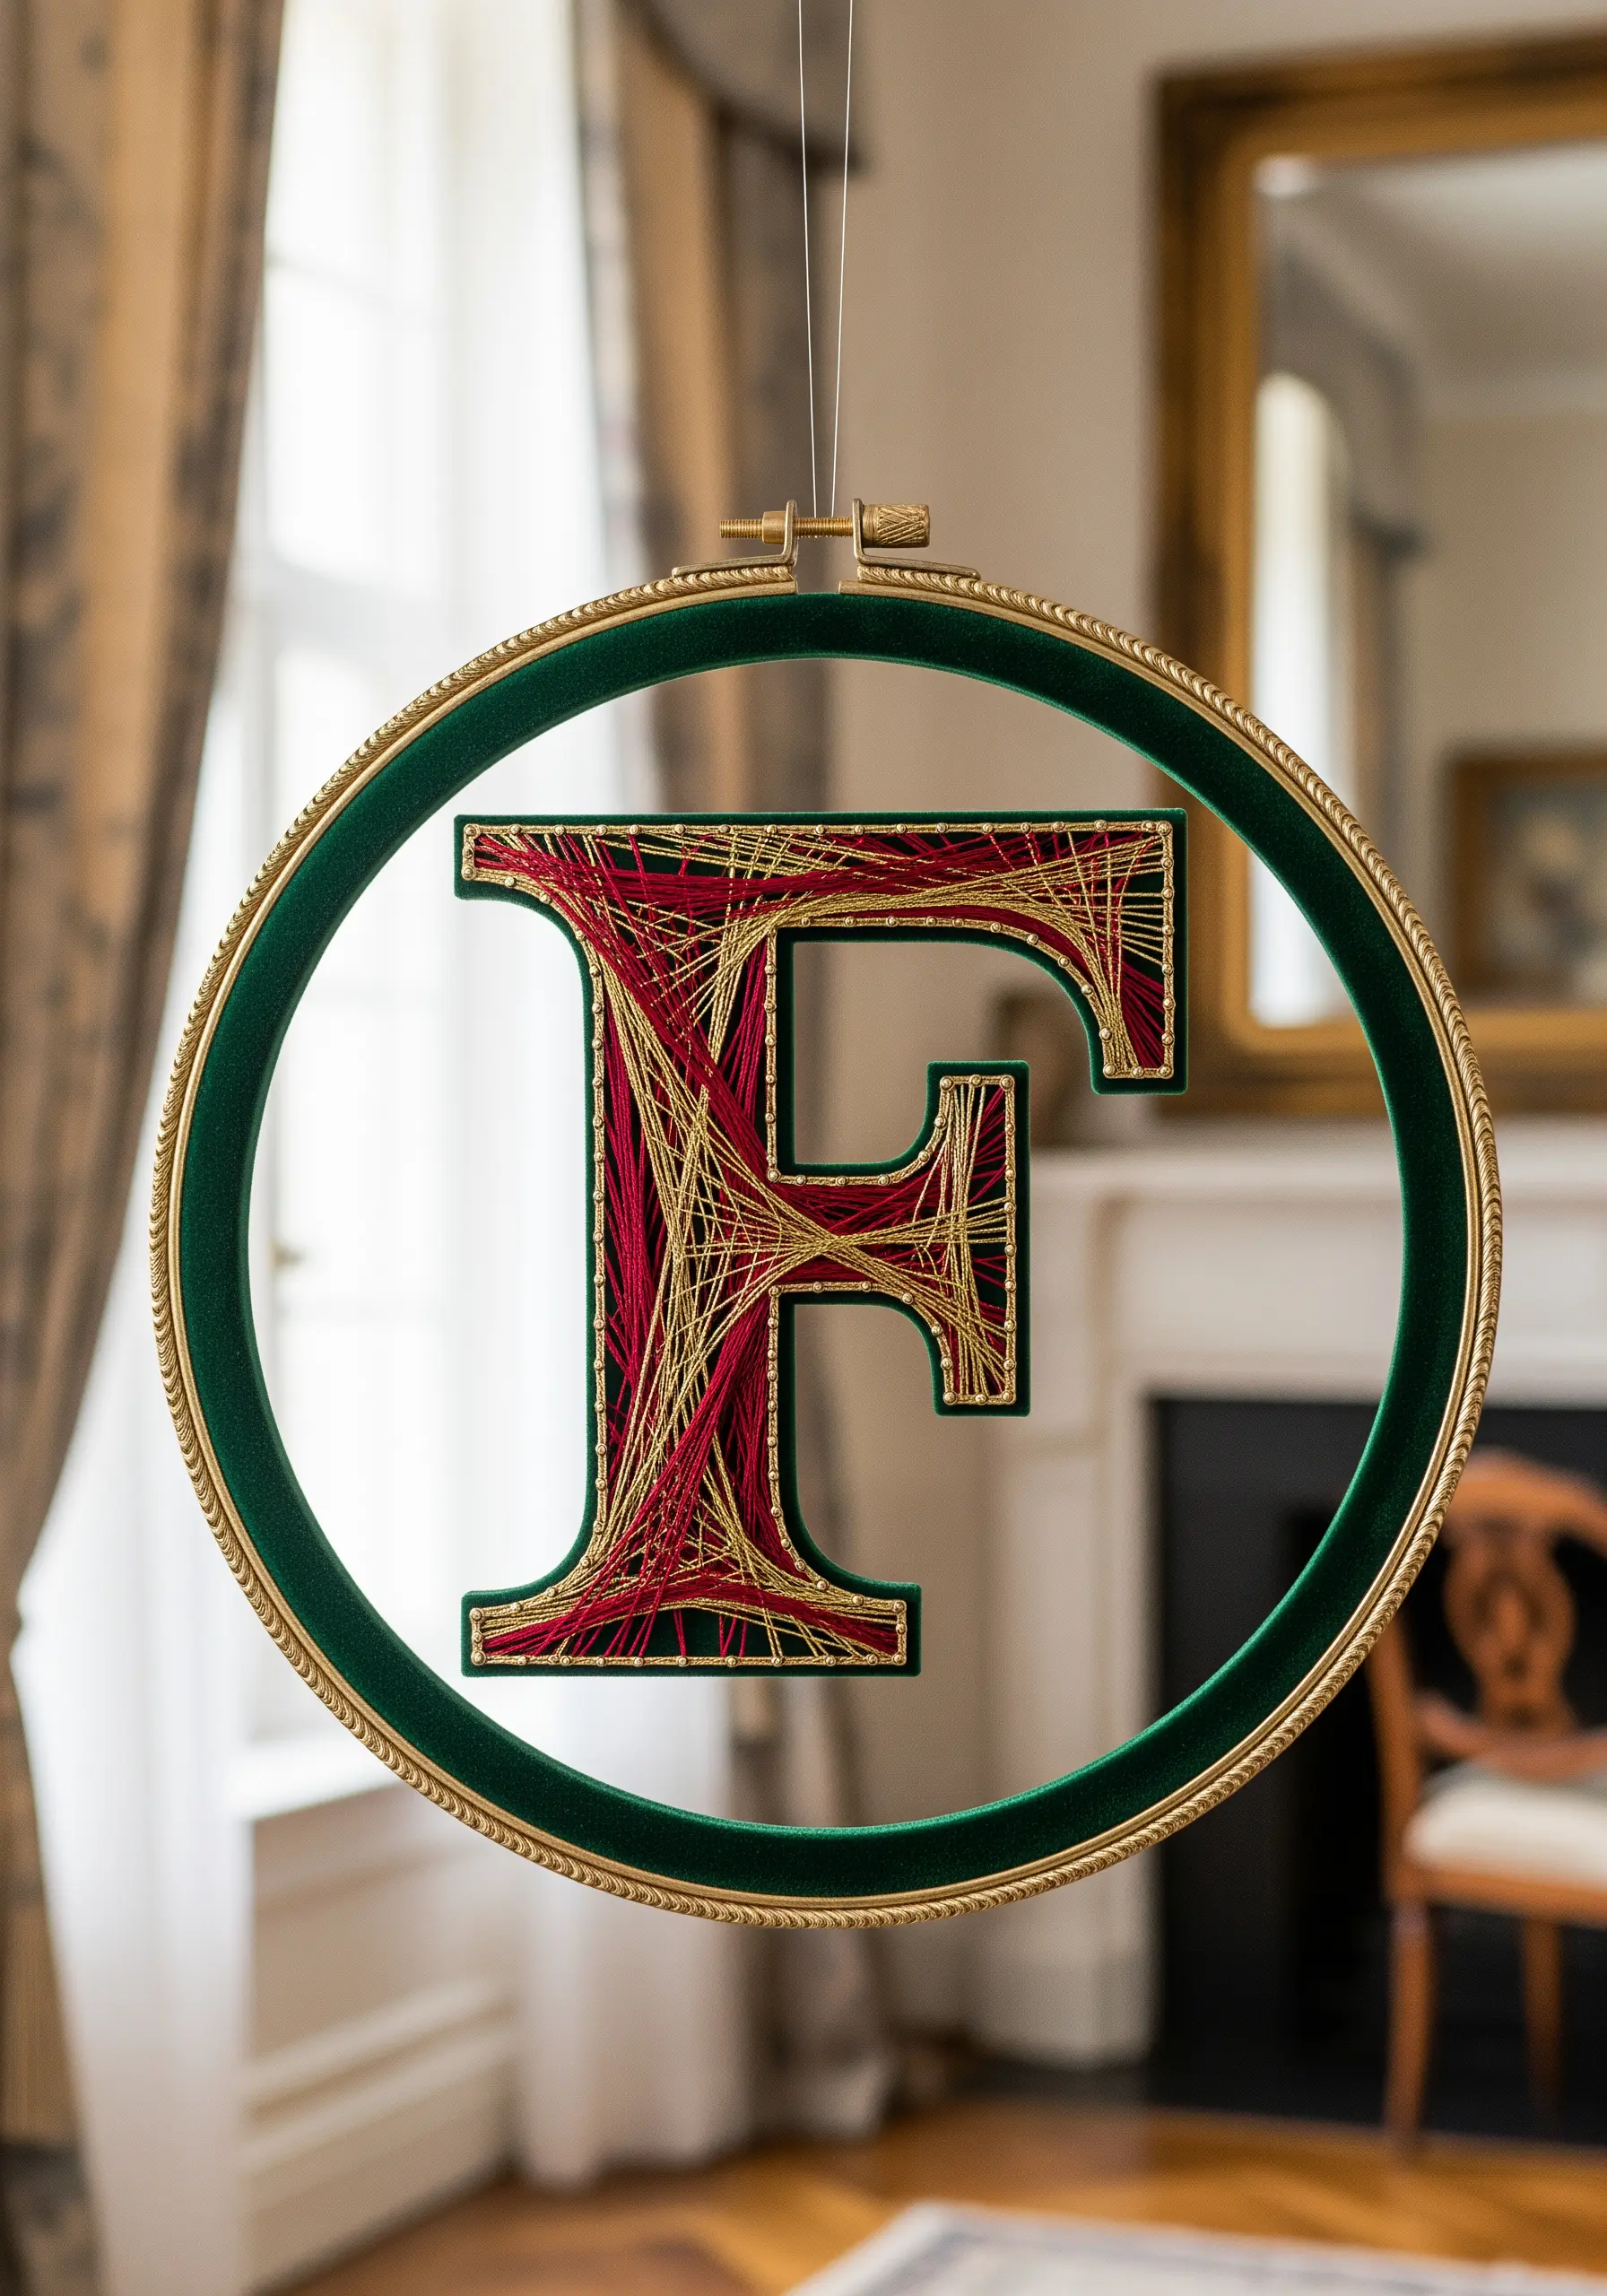
2. Geometric Tension with Metallic Thread
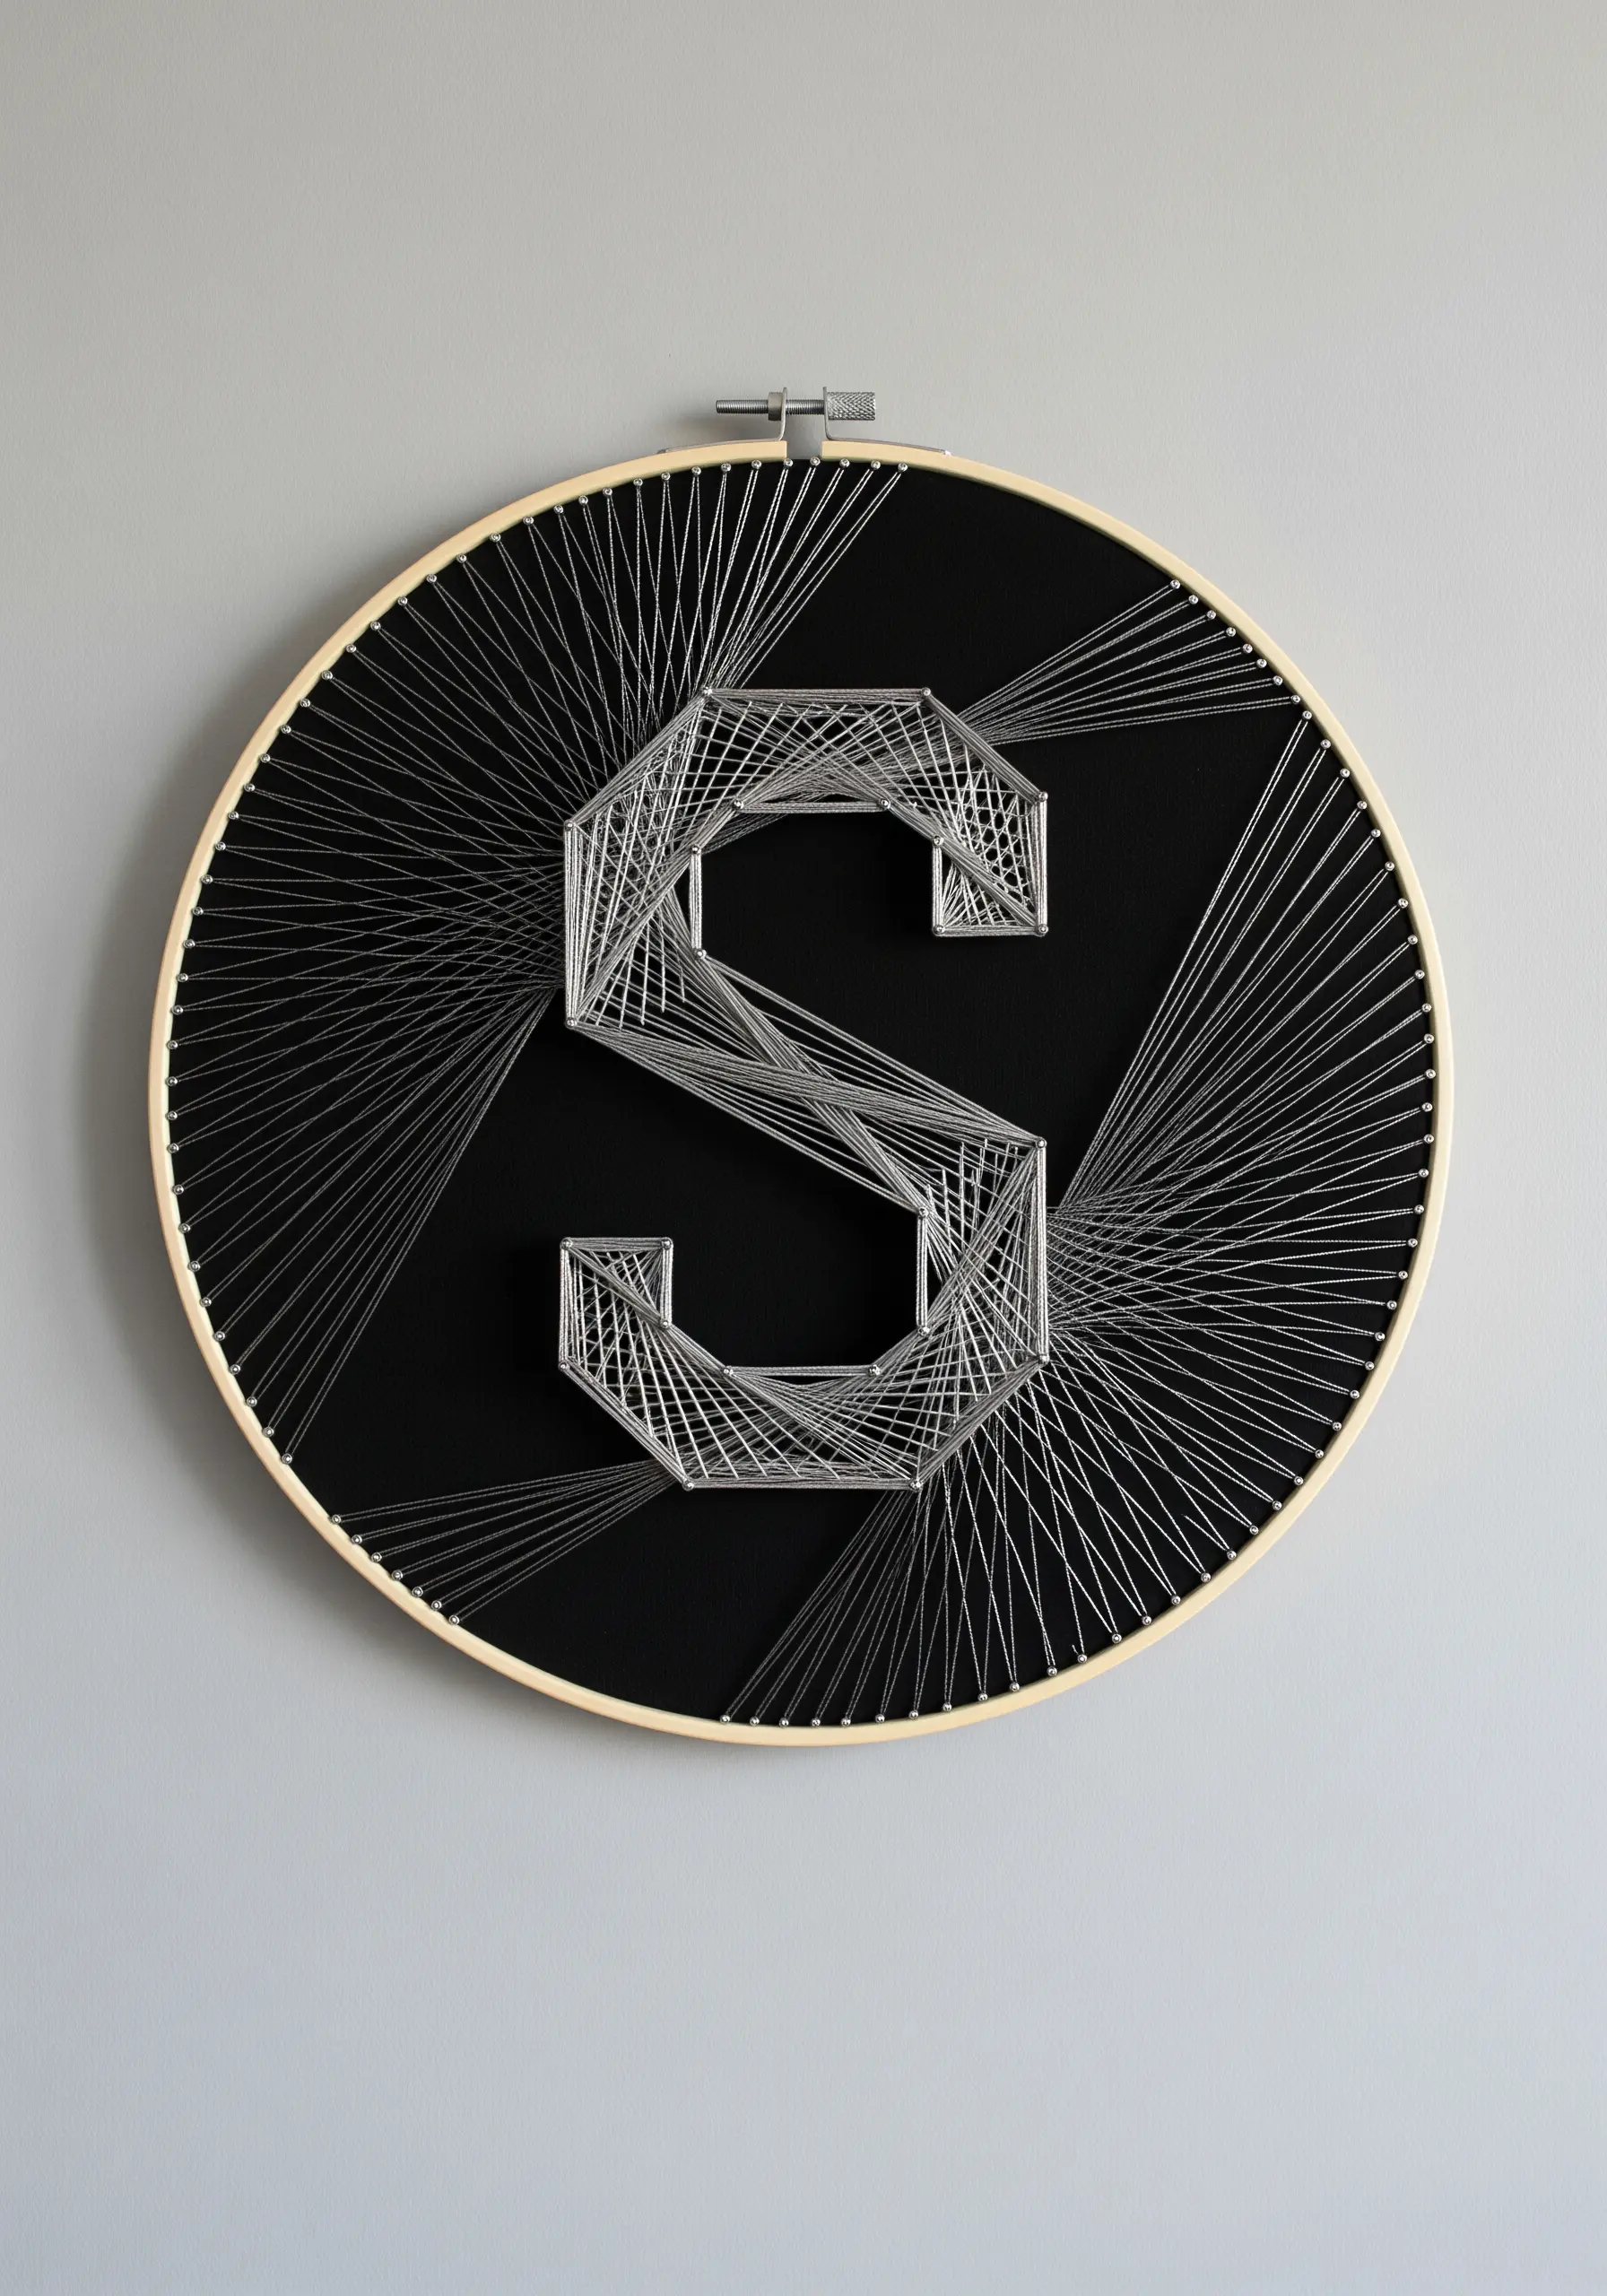
Recreate the tension of string art by using your embroidery hoop as the frame and a fine, high-sheen thread as your medium.
Instead of nails, use tiny, discreet seed stitches or French knots as anchor points around your letter’s outline and the hoop’s edge.
Pull a single, continuous thread between these points, wrapping it to build sharp, geometric lines against a dark fabric background.
This technique works best with a single strand of metallic or silk thread, as its luminosity emphasizes the clean, architectural quality of the design.
3. Seamless Rainbow Gradient Fills

Achieve this vibrant, blended rainbow not by changing thread for each letter, but by flowing the colors through the entire name.
Map out your color transitions first, dividing each letter into vertical sections for your gradient.
Use a long-and-short stitch to seamlessly blend one color into the next, ensuring your stitches follow the shape of the letter for a clean finish.
For the subtle sparkle, scatter a few silver French knots or tiny sequins randomly across the dark fabric, mimicking a starry night sky.
4. Monograms with Botanical Accents
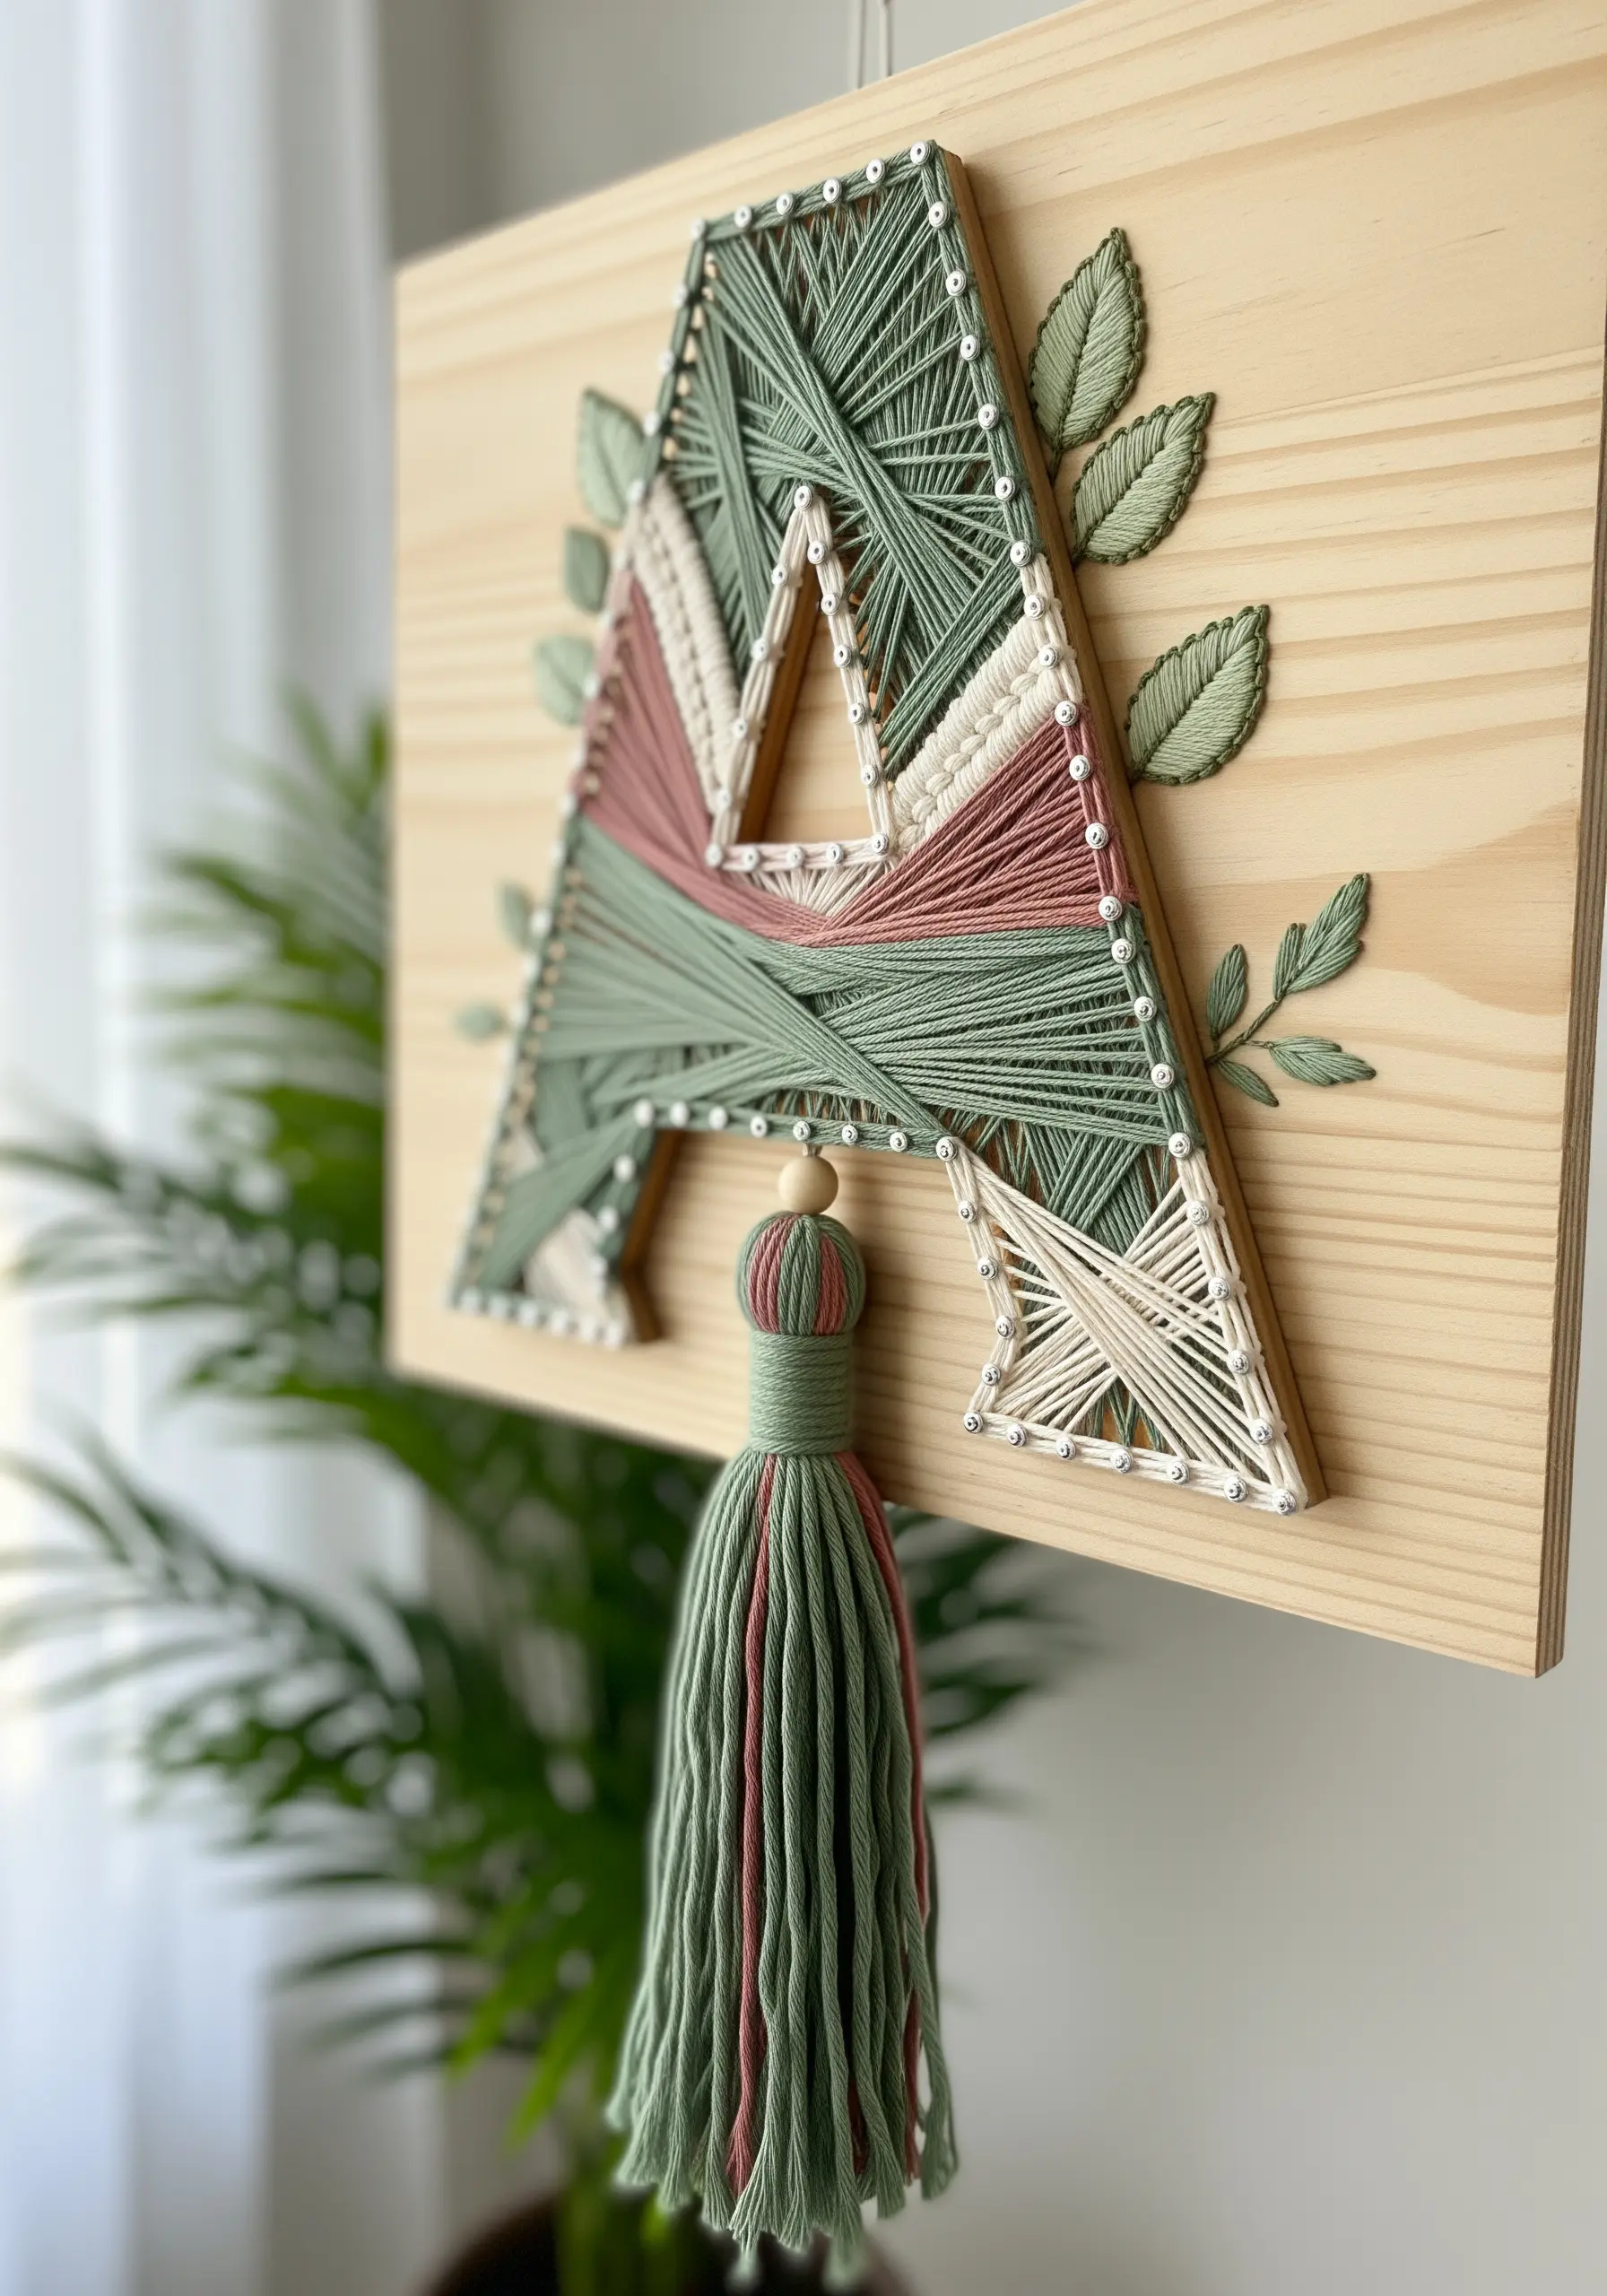
Combine clean, graphic lettering with soft, organic details for a beautifully balanced composition.
Fill the sections of your monogram with directional satin stitches, using two or three harmonious, muted colors to create visual interest.
For the leaves, use a fishbone stitch to create a defined central vein and natural texture.
Finally, create a matching tassel using leftover floss from your project; this small detail ties the entire piece together and adds a professional, decorative finish.
5. Abstract Textures for Water Effects
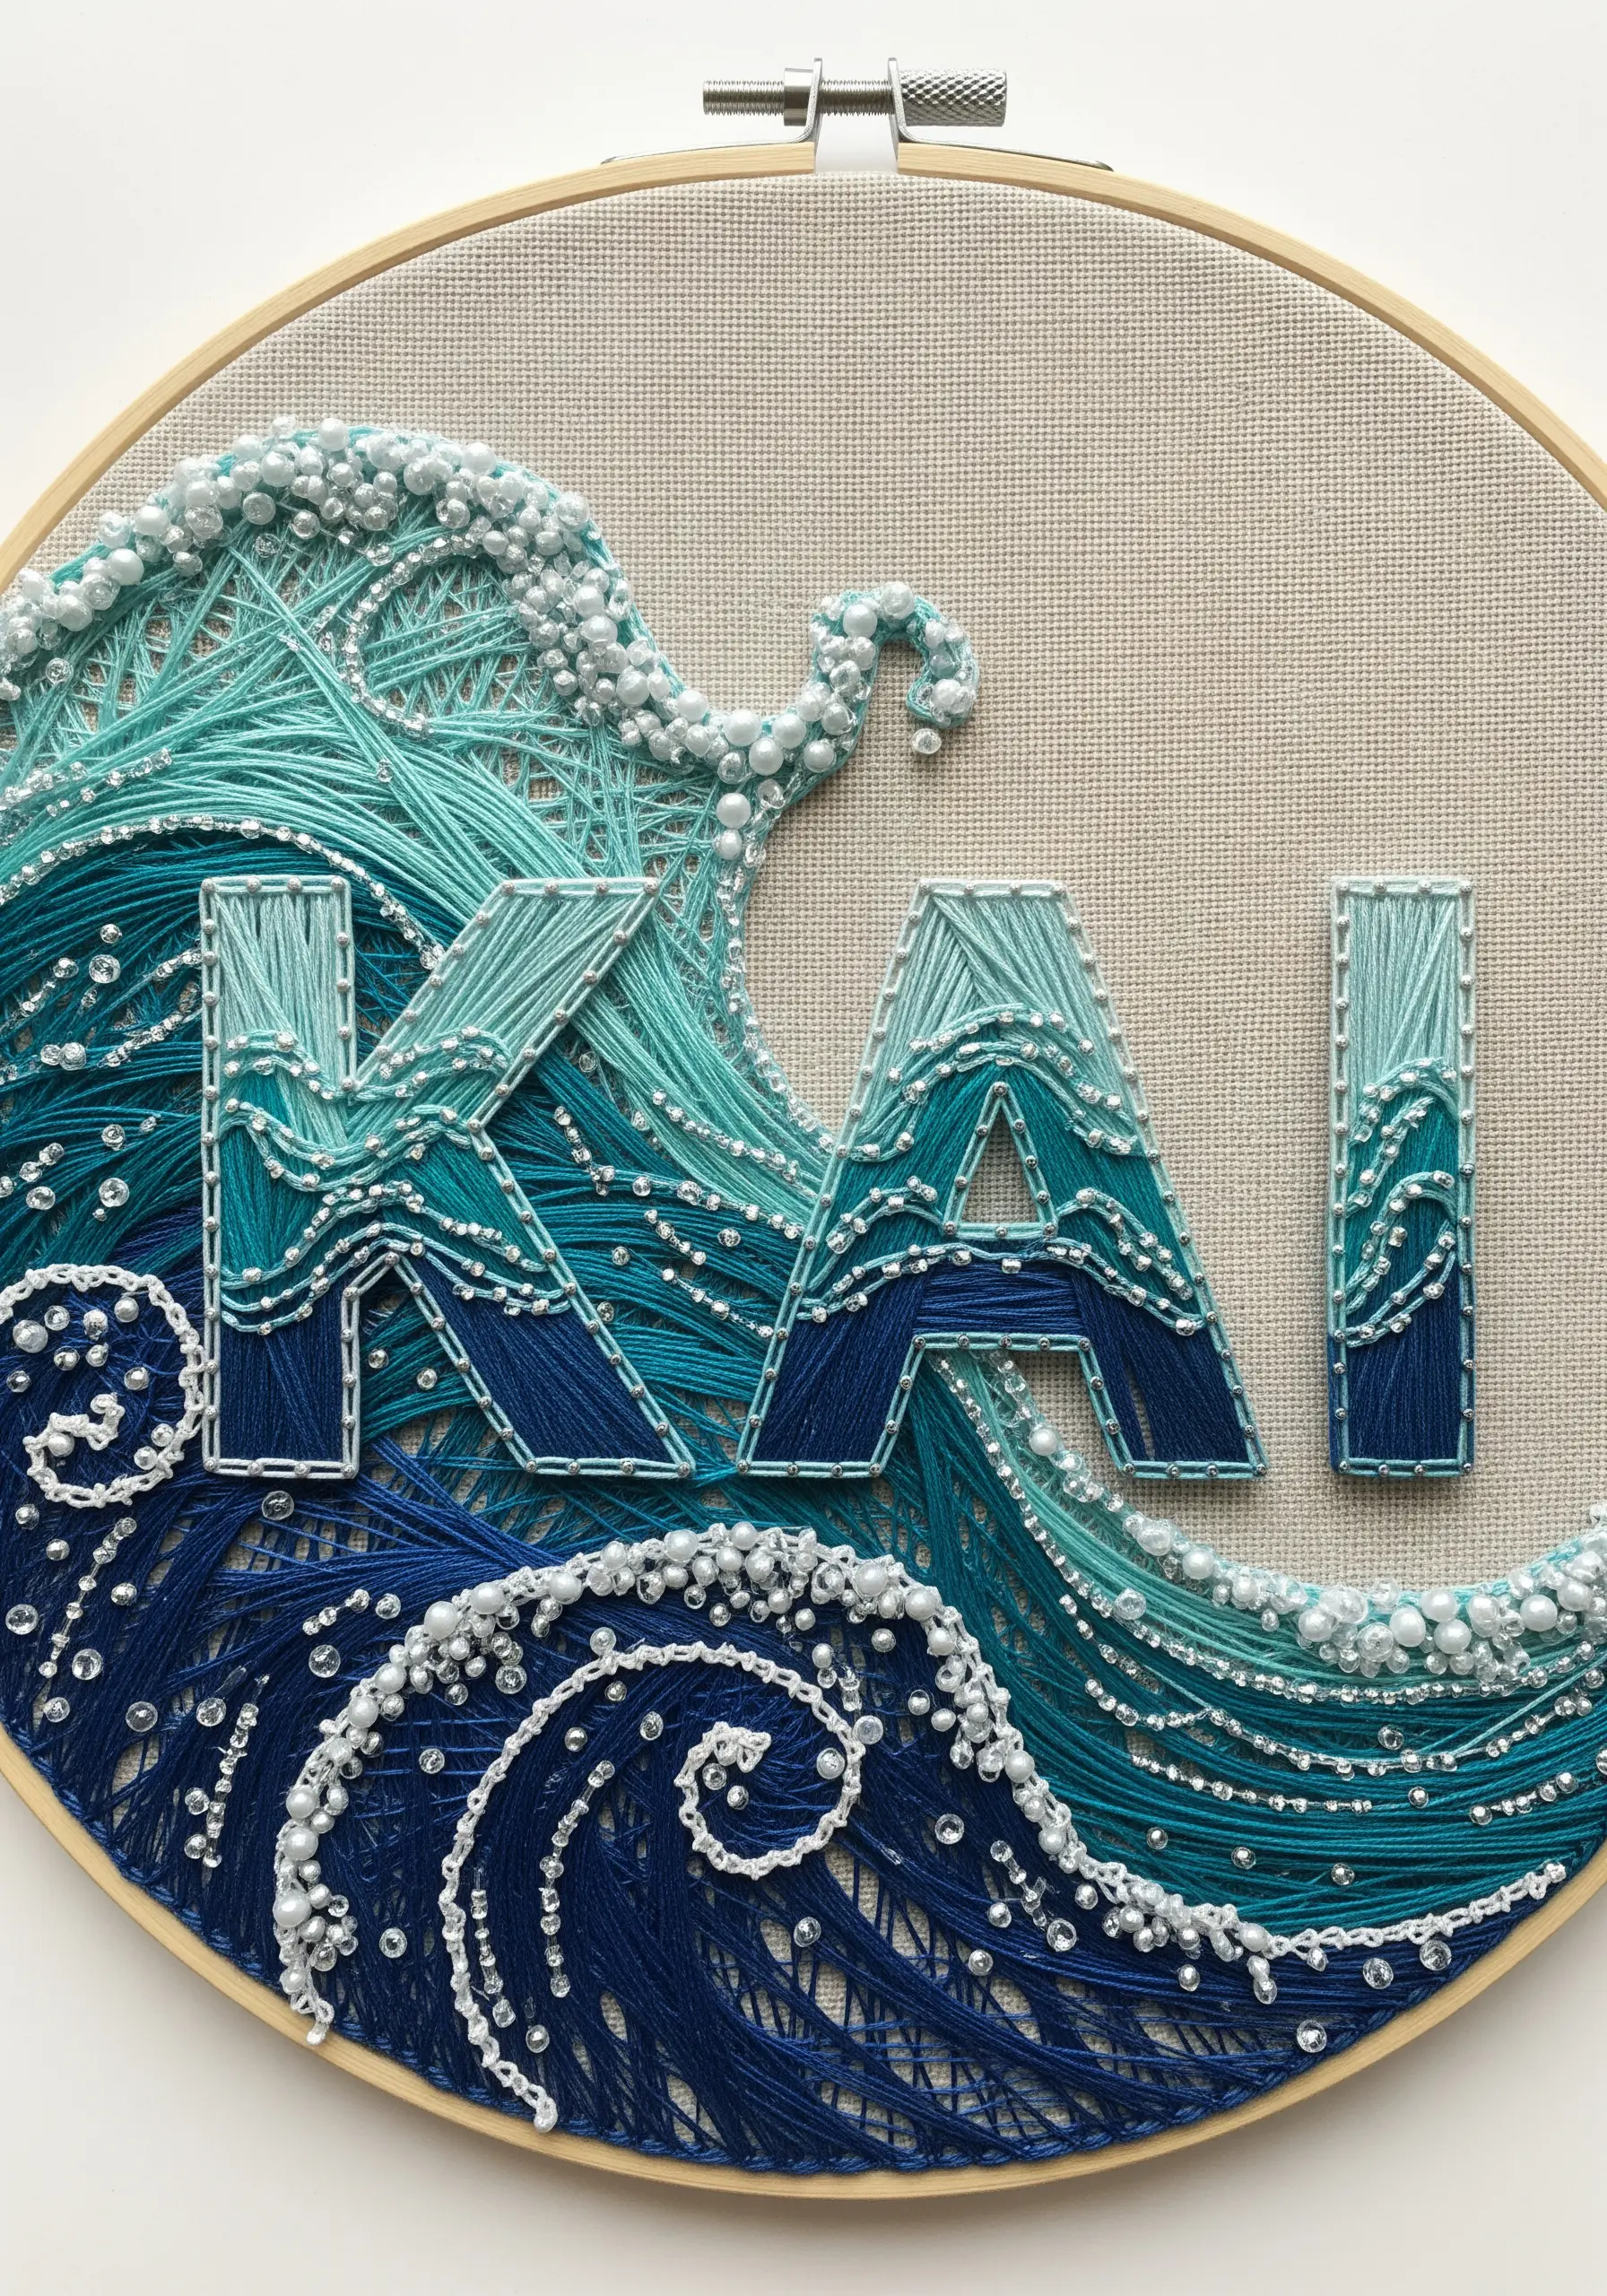
Evoke the energy of moving water by layering different threads, stitches, and beads to build dimension.
Use long, flowing straight stitches in various shades of blue and teal to form the base of the waves, varying their direction to create a sense of motion.
For the seafoam, create dense clusters of French knots using white or off-white thread, concentrating them at the crests of the waves.
Intersperse clear seed beads throughout the knots and waves; they will catch the light and create the shimmering effect of water droplets, turning your fabric into a dynamic seascape.
6. Art Deco Precision with Metallic Lines

Capture the bold geometry of Art Deco by focusing on flawless lines and high-contrast materials.
Use a high-quality metallic thread, like gold or silver, and pair it with a classic black for maximum impact.
Outline your entire design with a single, sharp backstitch before filling it with long, straight stitches pulled taut between anchor points.
Stitching on a high-count linen or cotton ensures your lines remain crisp and your background stays perfectly smooth, enhancing the luxurious, architectural feel of the piece.
7. Classic Wreaths and Gradient Monograms
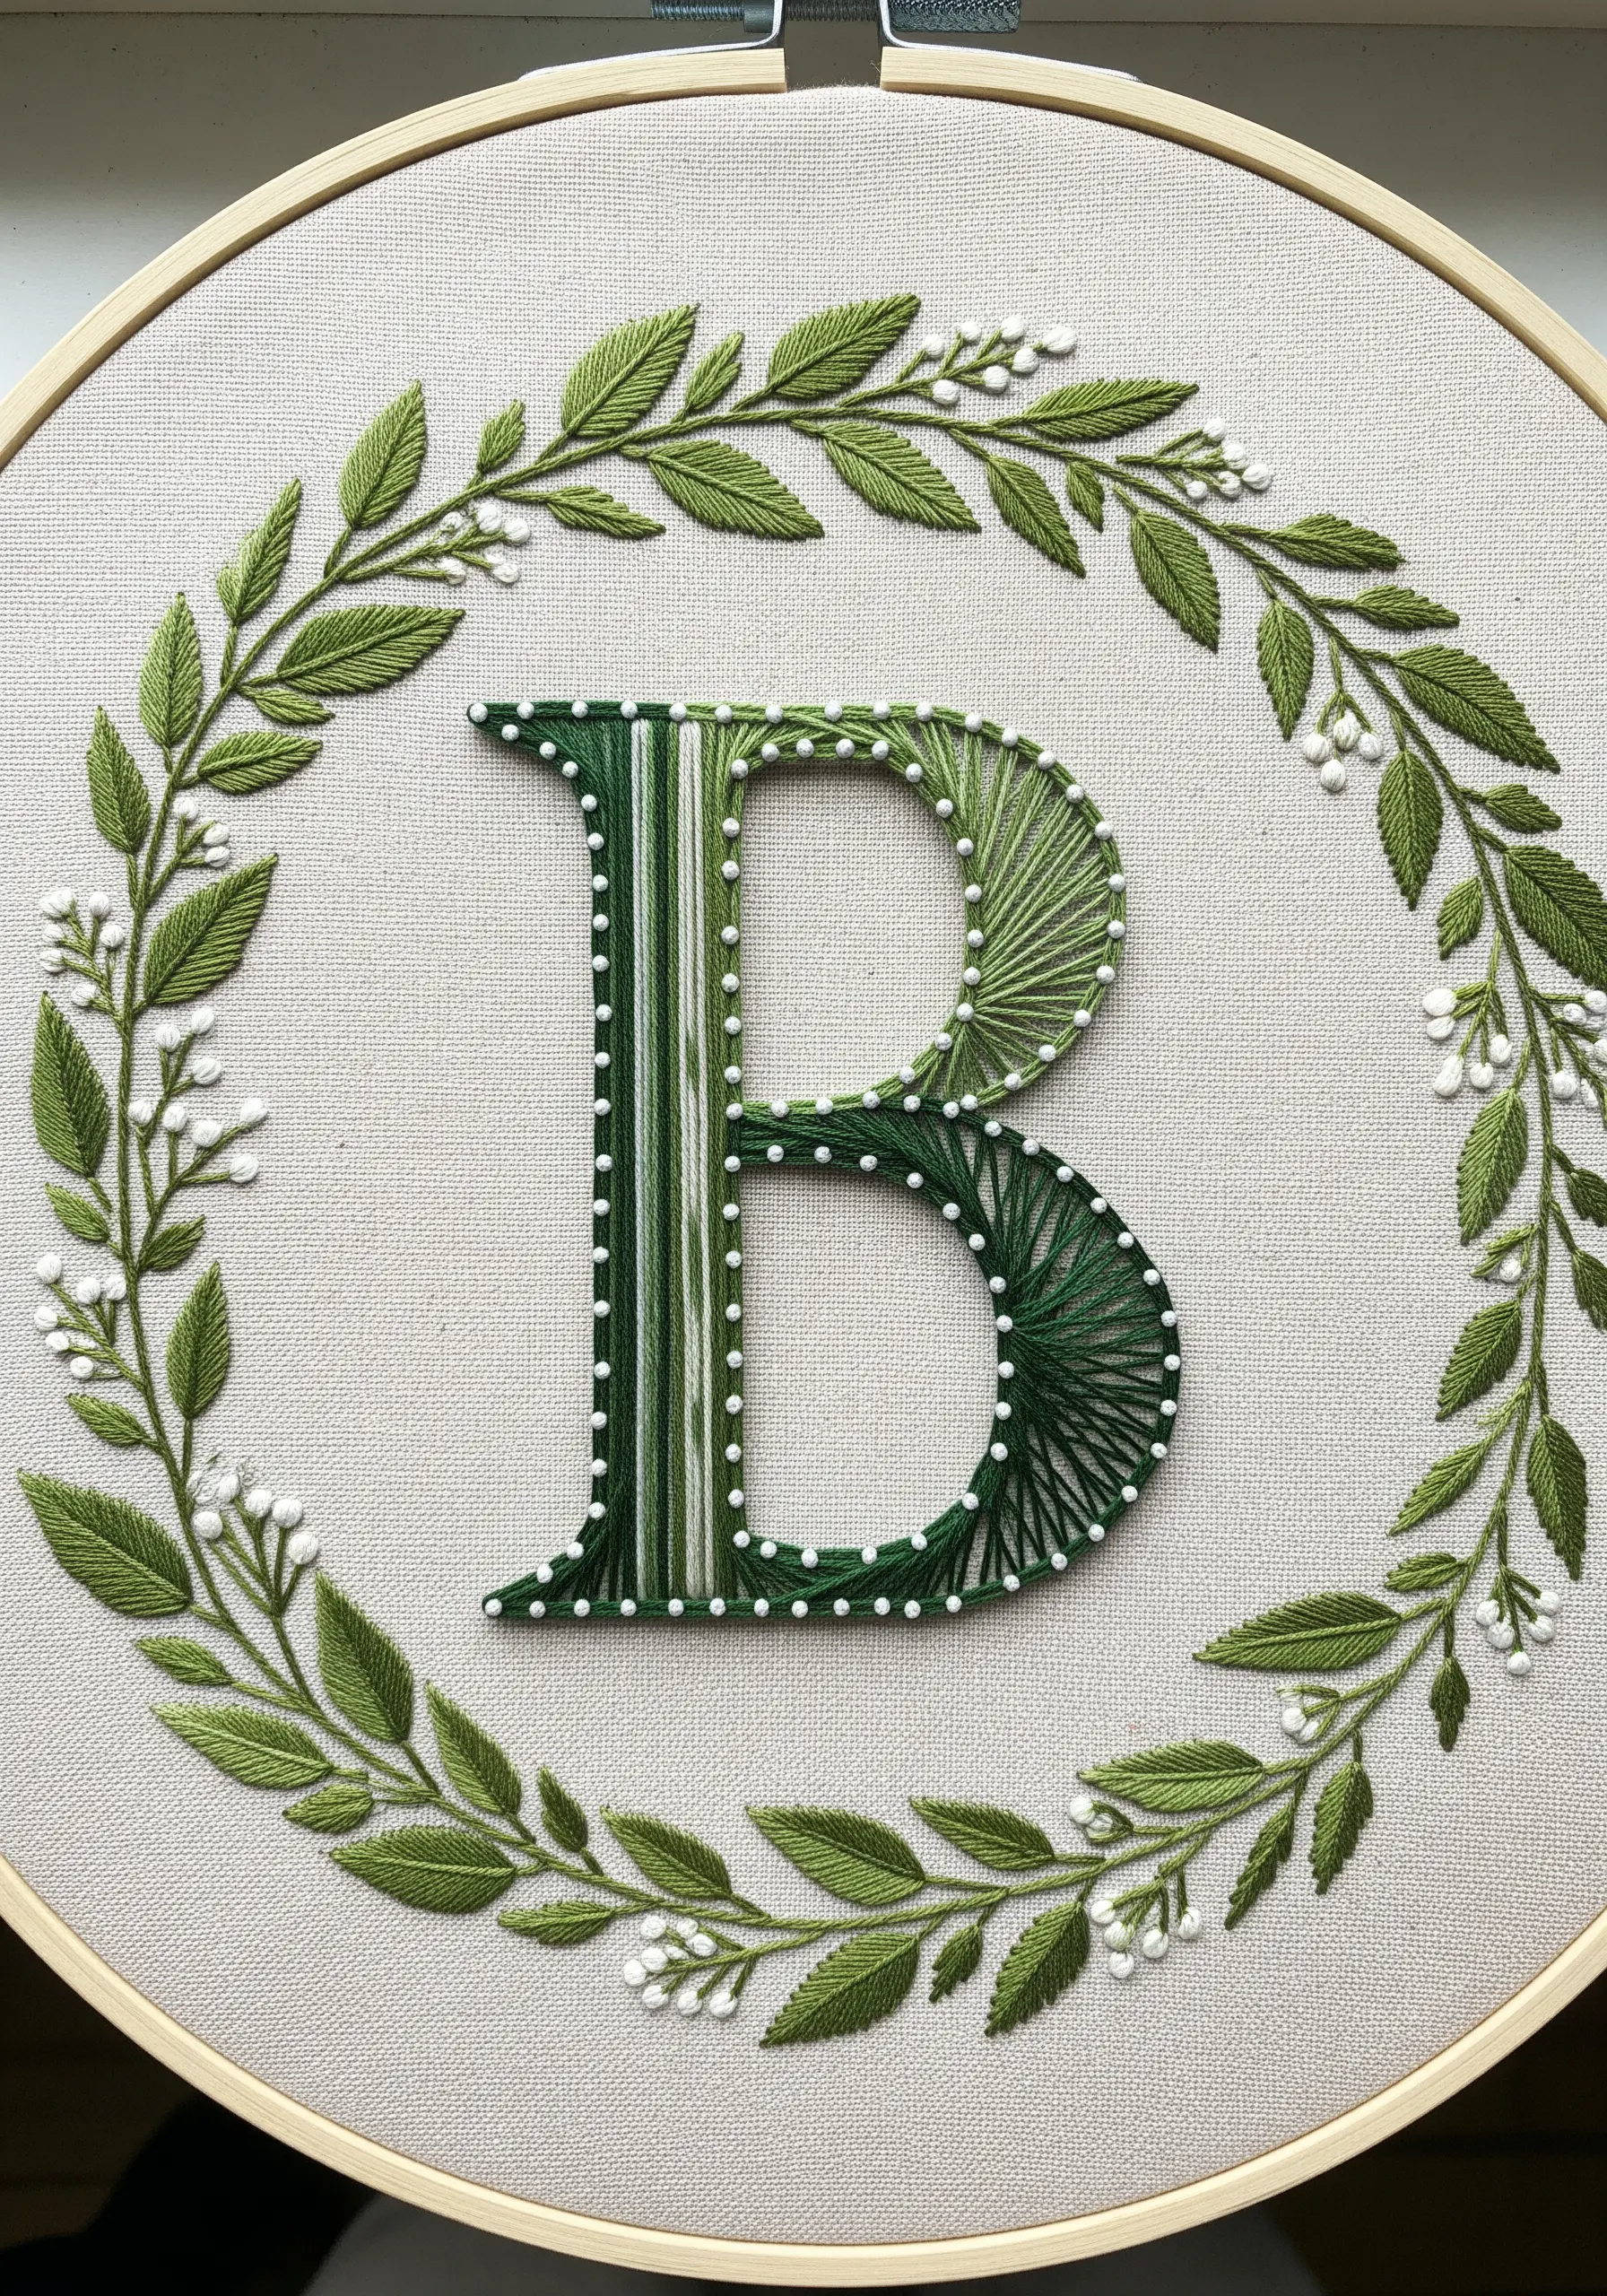
To create a monogram with a gentle gradient, use two or three shades of the same color and a long-and-short fill stitch.
For the botanical wreath, use a fishbone stitch for the leaves to give them a natural, veined appearance.
Create the small white buds with colonial knots instead of French knots—they are slightly rounder and more robust, providing a beautiful textural contrast to the flat leaves.
This combination of a smooth letter fill and textured botanicals results in a refined, timeless piece perfect for personalized embroidered gifts.
8. Celestial Lettering with Whipped Stitch
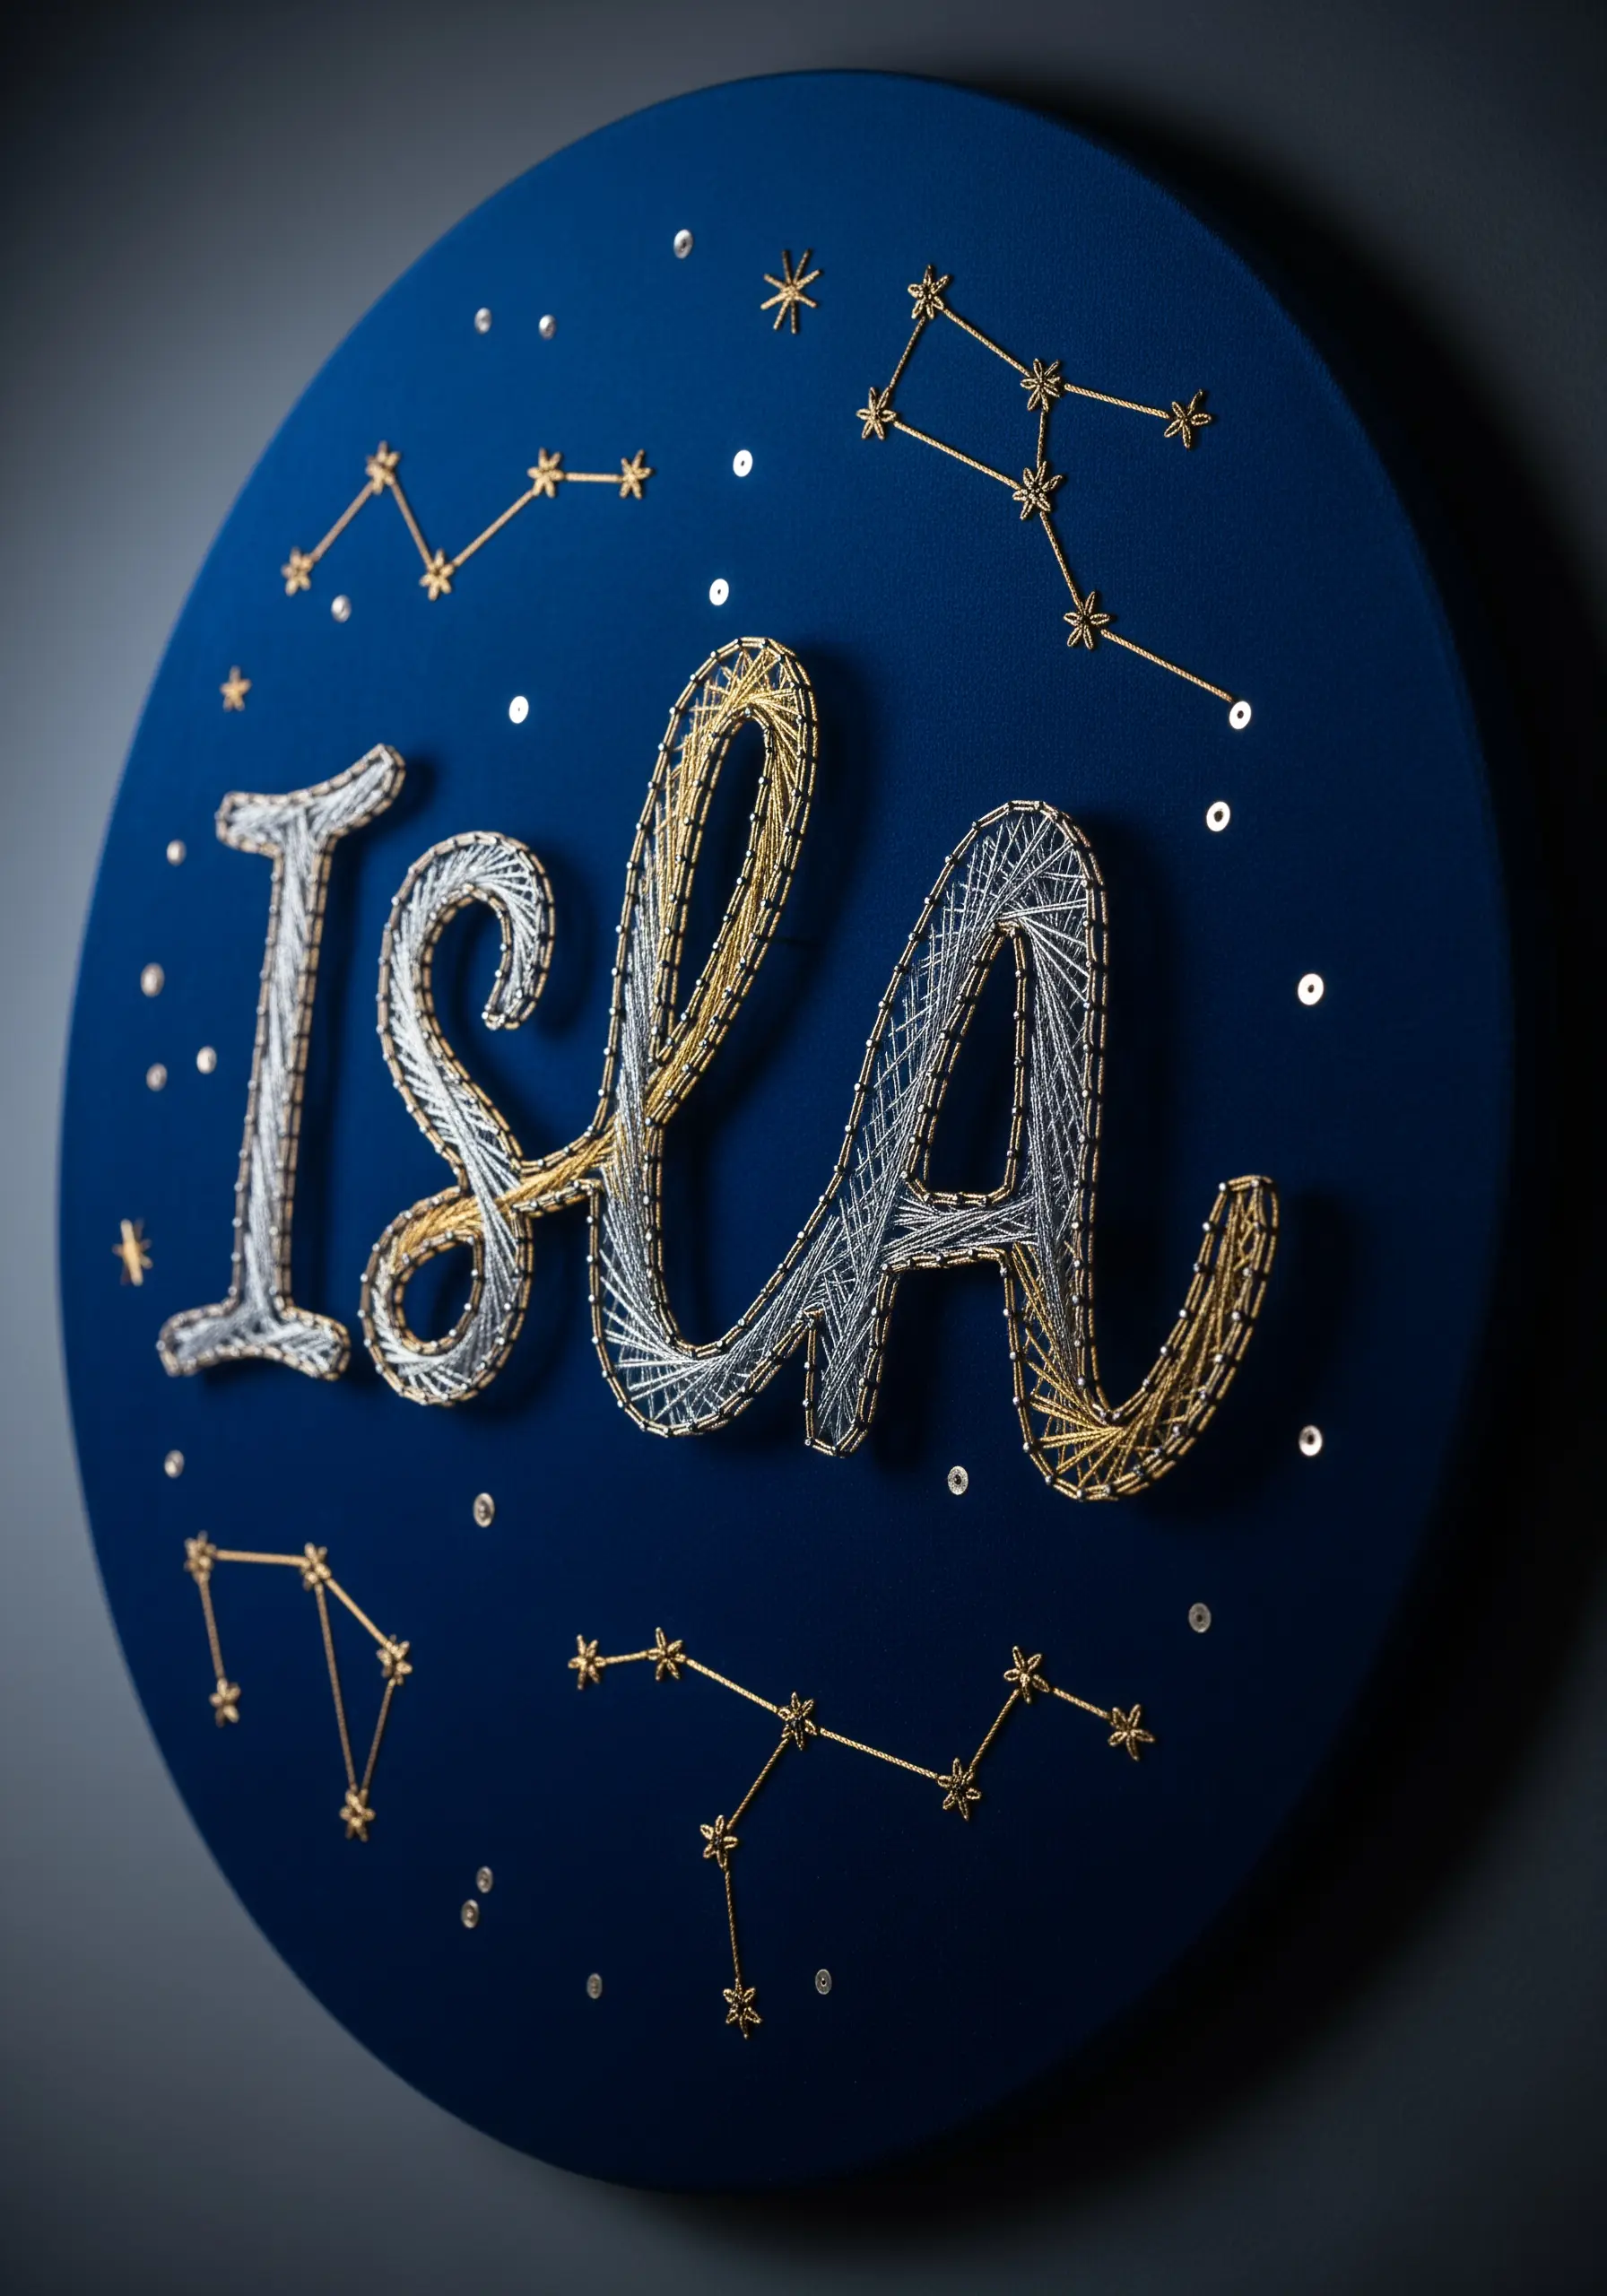
Create this elegant, shimmering script by combining two different thread textures with a whipped backstitch.
First, stitch the name using a standard backstitch with a matte white or silver thread.
Then, take a fine gold metallic thread and ‘whip’ it around the backstitches without piercing the fabric, creating a twisted, candy-cane effect.
Add tiny straight stitches and French knots for surrounding constellations, using only the gold metallic thread to tie the celestial theme together.
9. Large-Scale Fiber Art for Walls
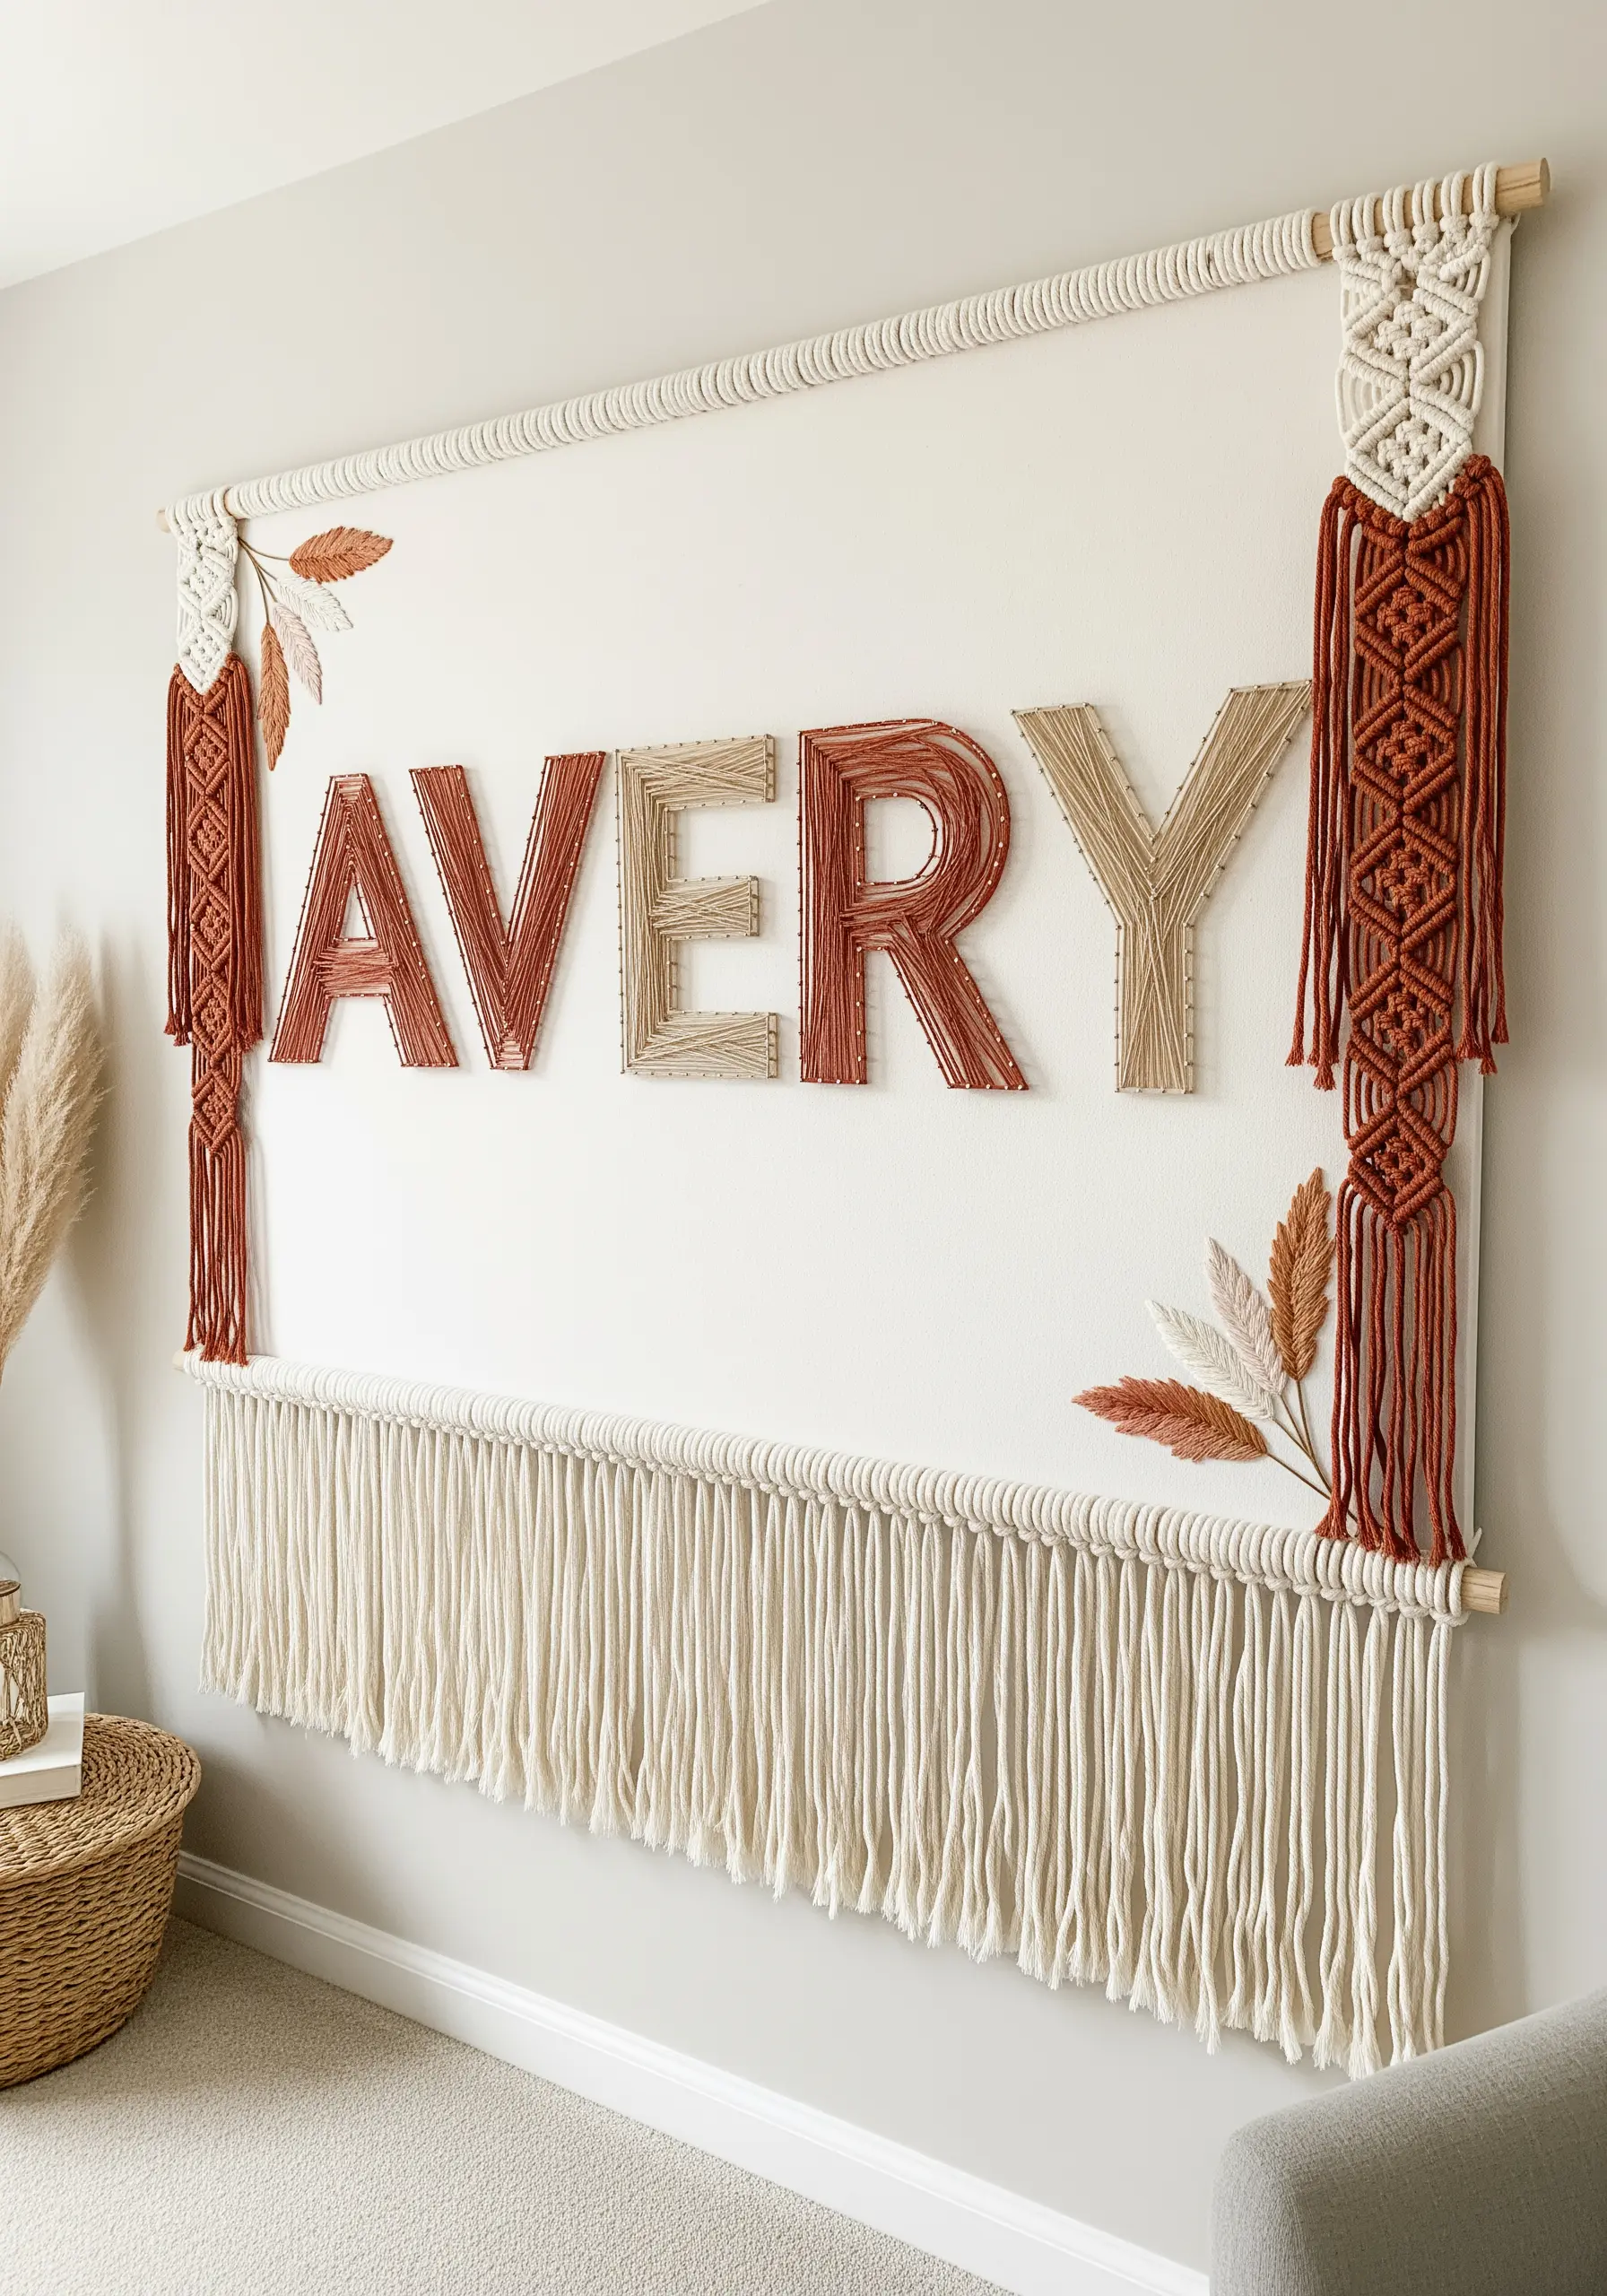
Translate small-scale embroidery to a statement wall hanging by swapping floss for yarn and hoops for dowels.
Instead of stitching through fabric, use a large canvas or linen panel as your base and couch thick yarn onto the surface to form the letters.
Integrate macrame panels on the sides and a long fringe at the bottom, using colors that complement the yarn in your lettering.
This approach blends embroidery techniques with fiber art for a truly impressive piece of yarn wall art designs.
10. Elegant Script with Pearl Accents
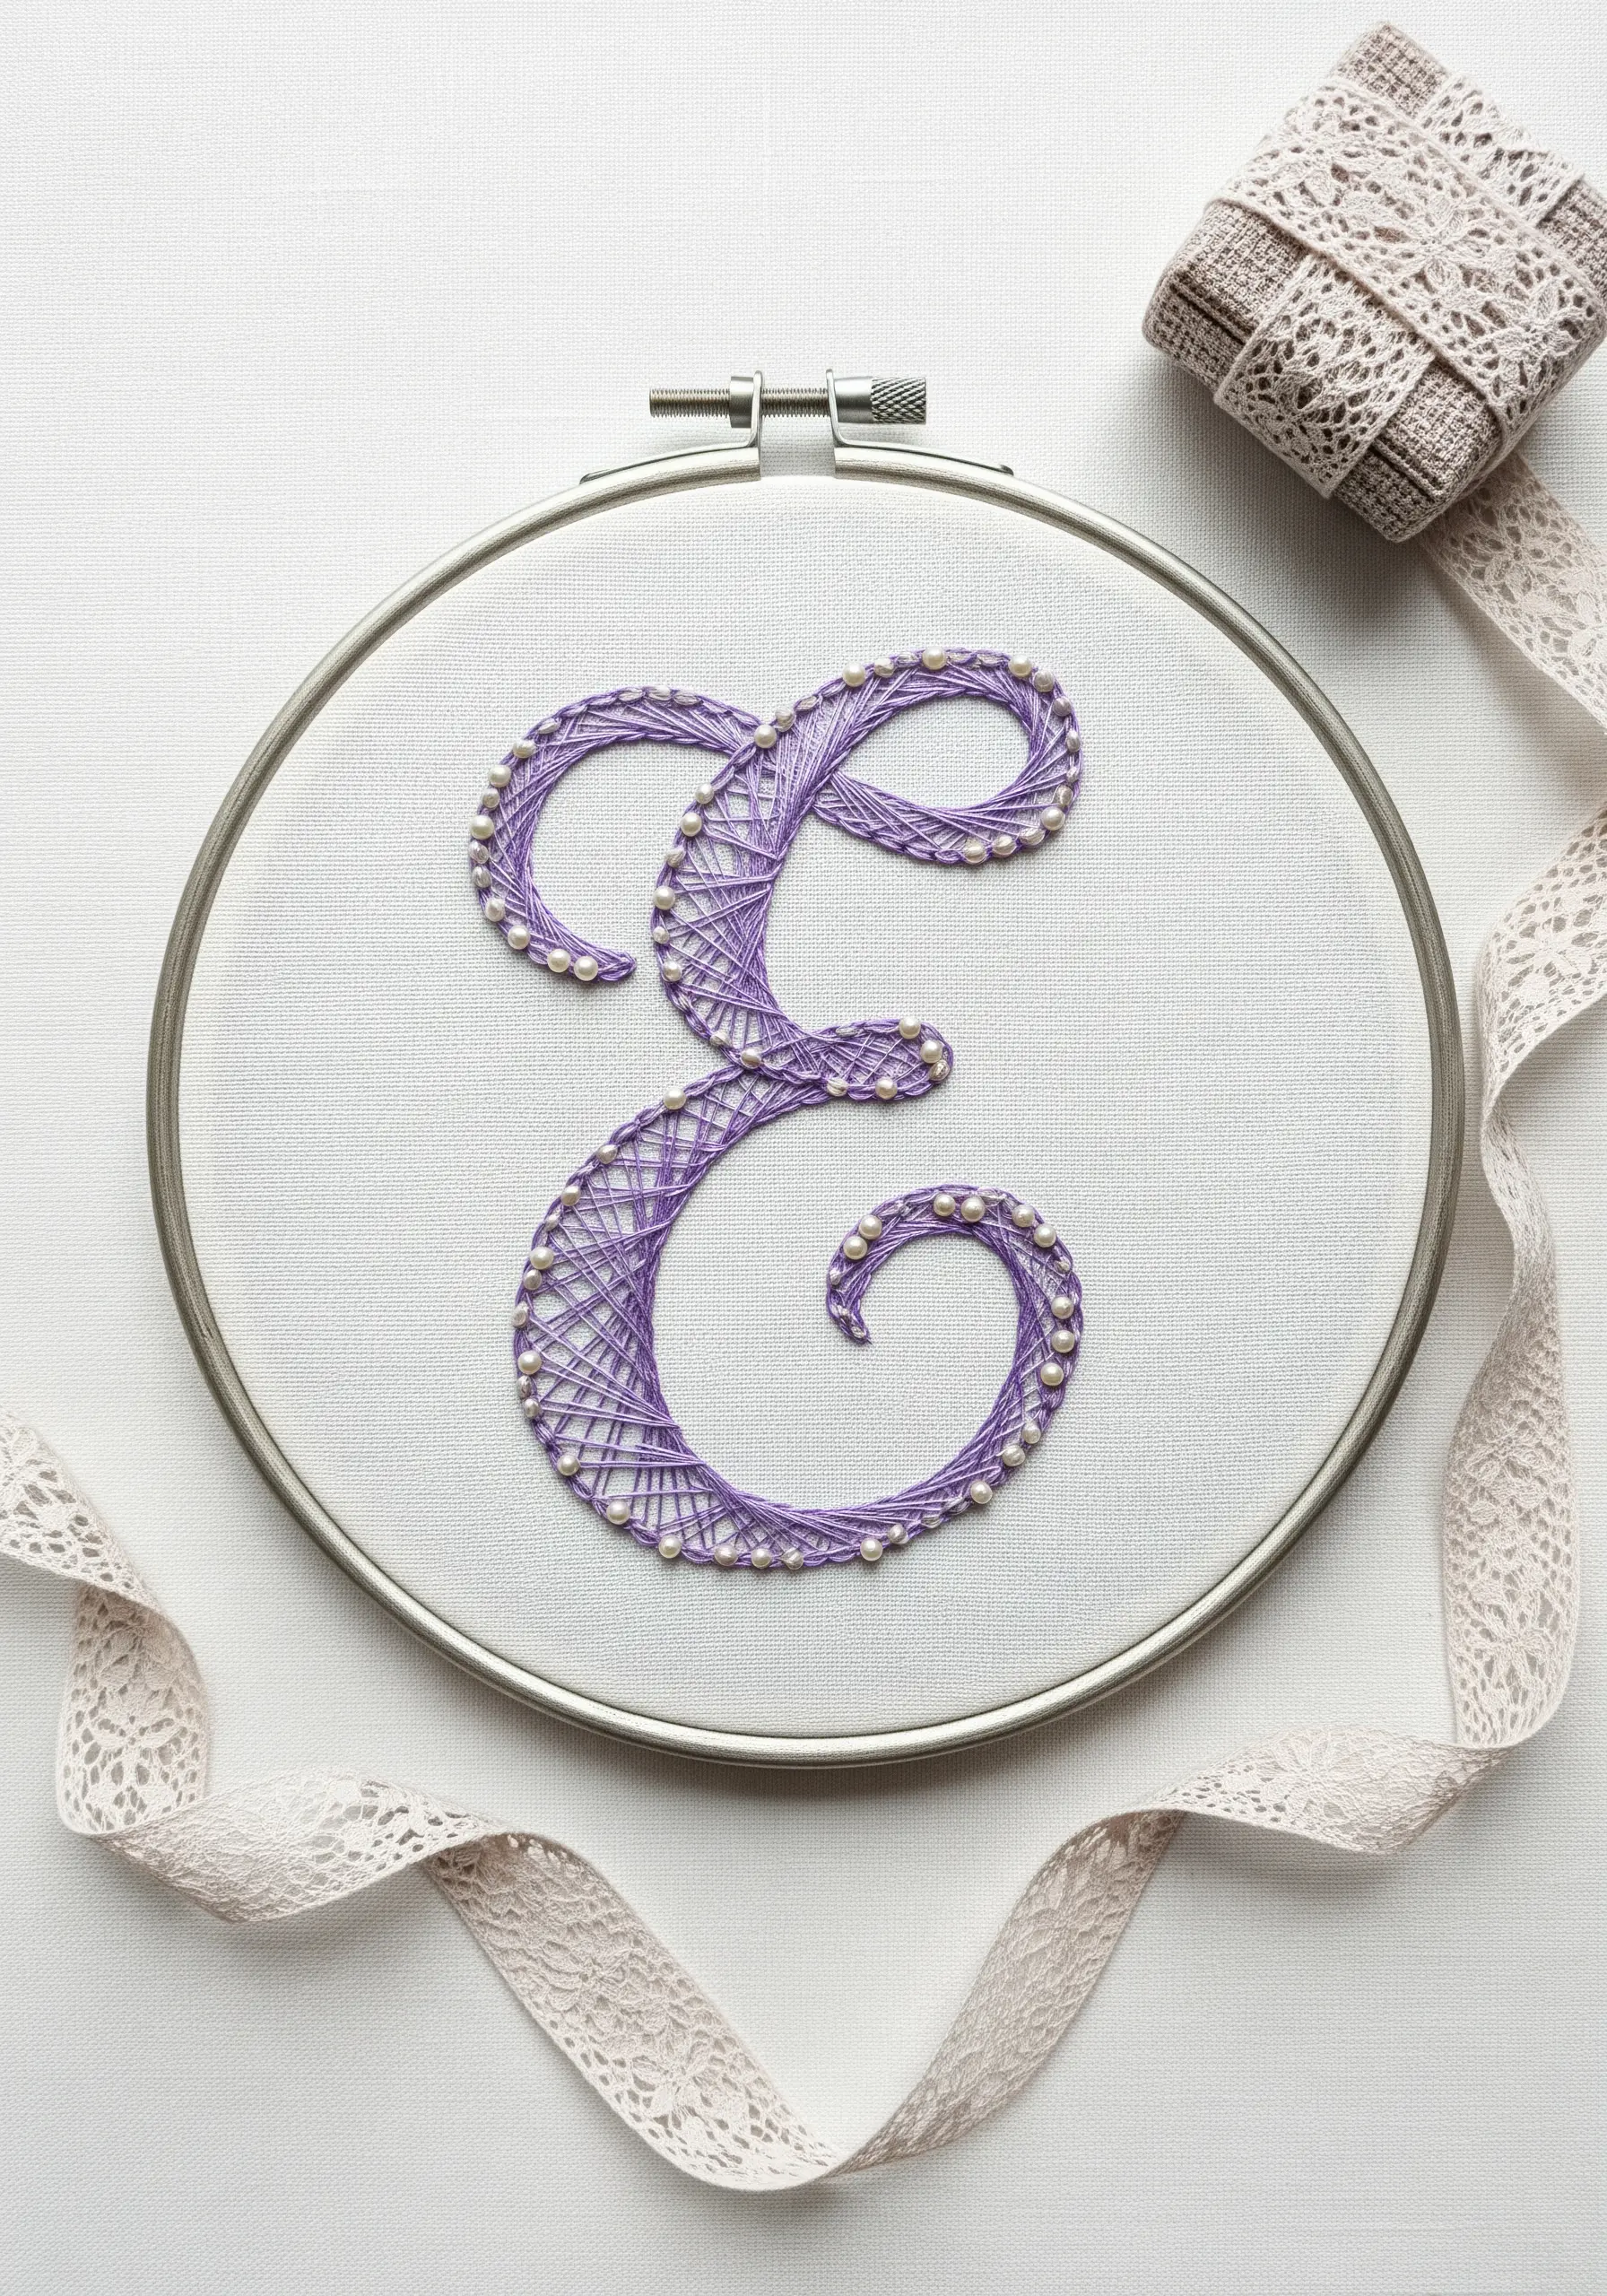
Elevate a simple monogram by incorporating beads directly into its structure, not just as decoration.
Begin by carefully stitching small seed pearls or beads along the outline of your cursive letter.
Use these pearls as the anchor points for your thread, wrapping a fine, silky floss around them to create the fill.
This technique not only adds a touch of luxury but also provides a perfectly spaced, structural guide for your stitches, ensuring a flawless and elegant curve.
11. Industrial Style on a Neutral Base
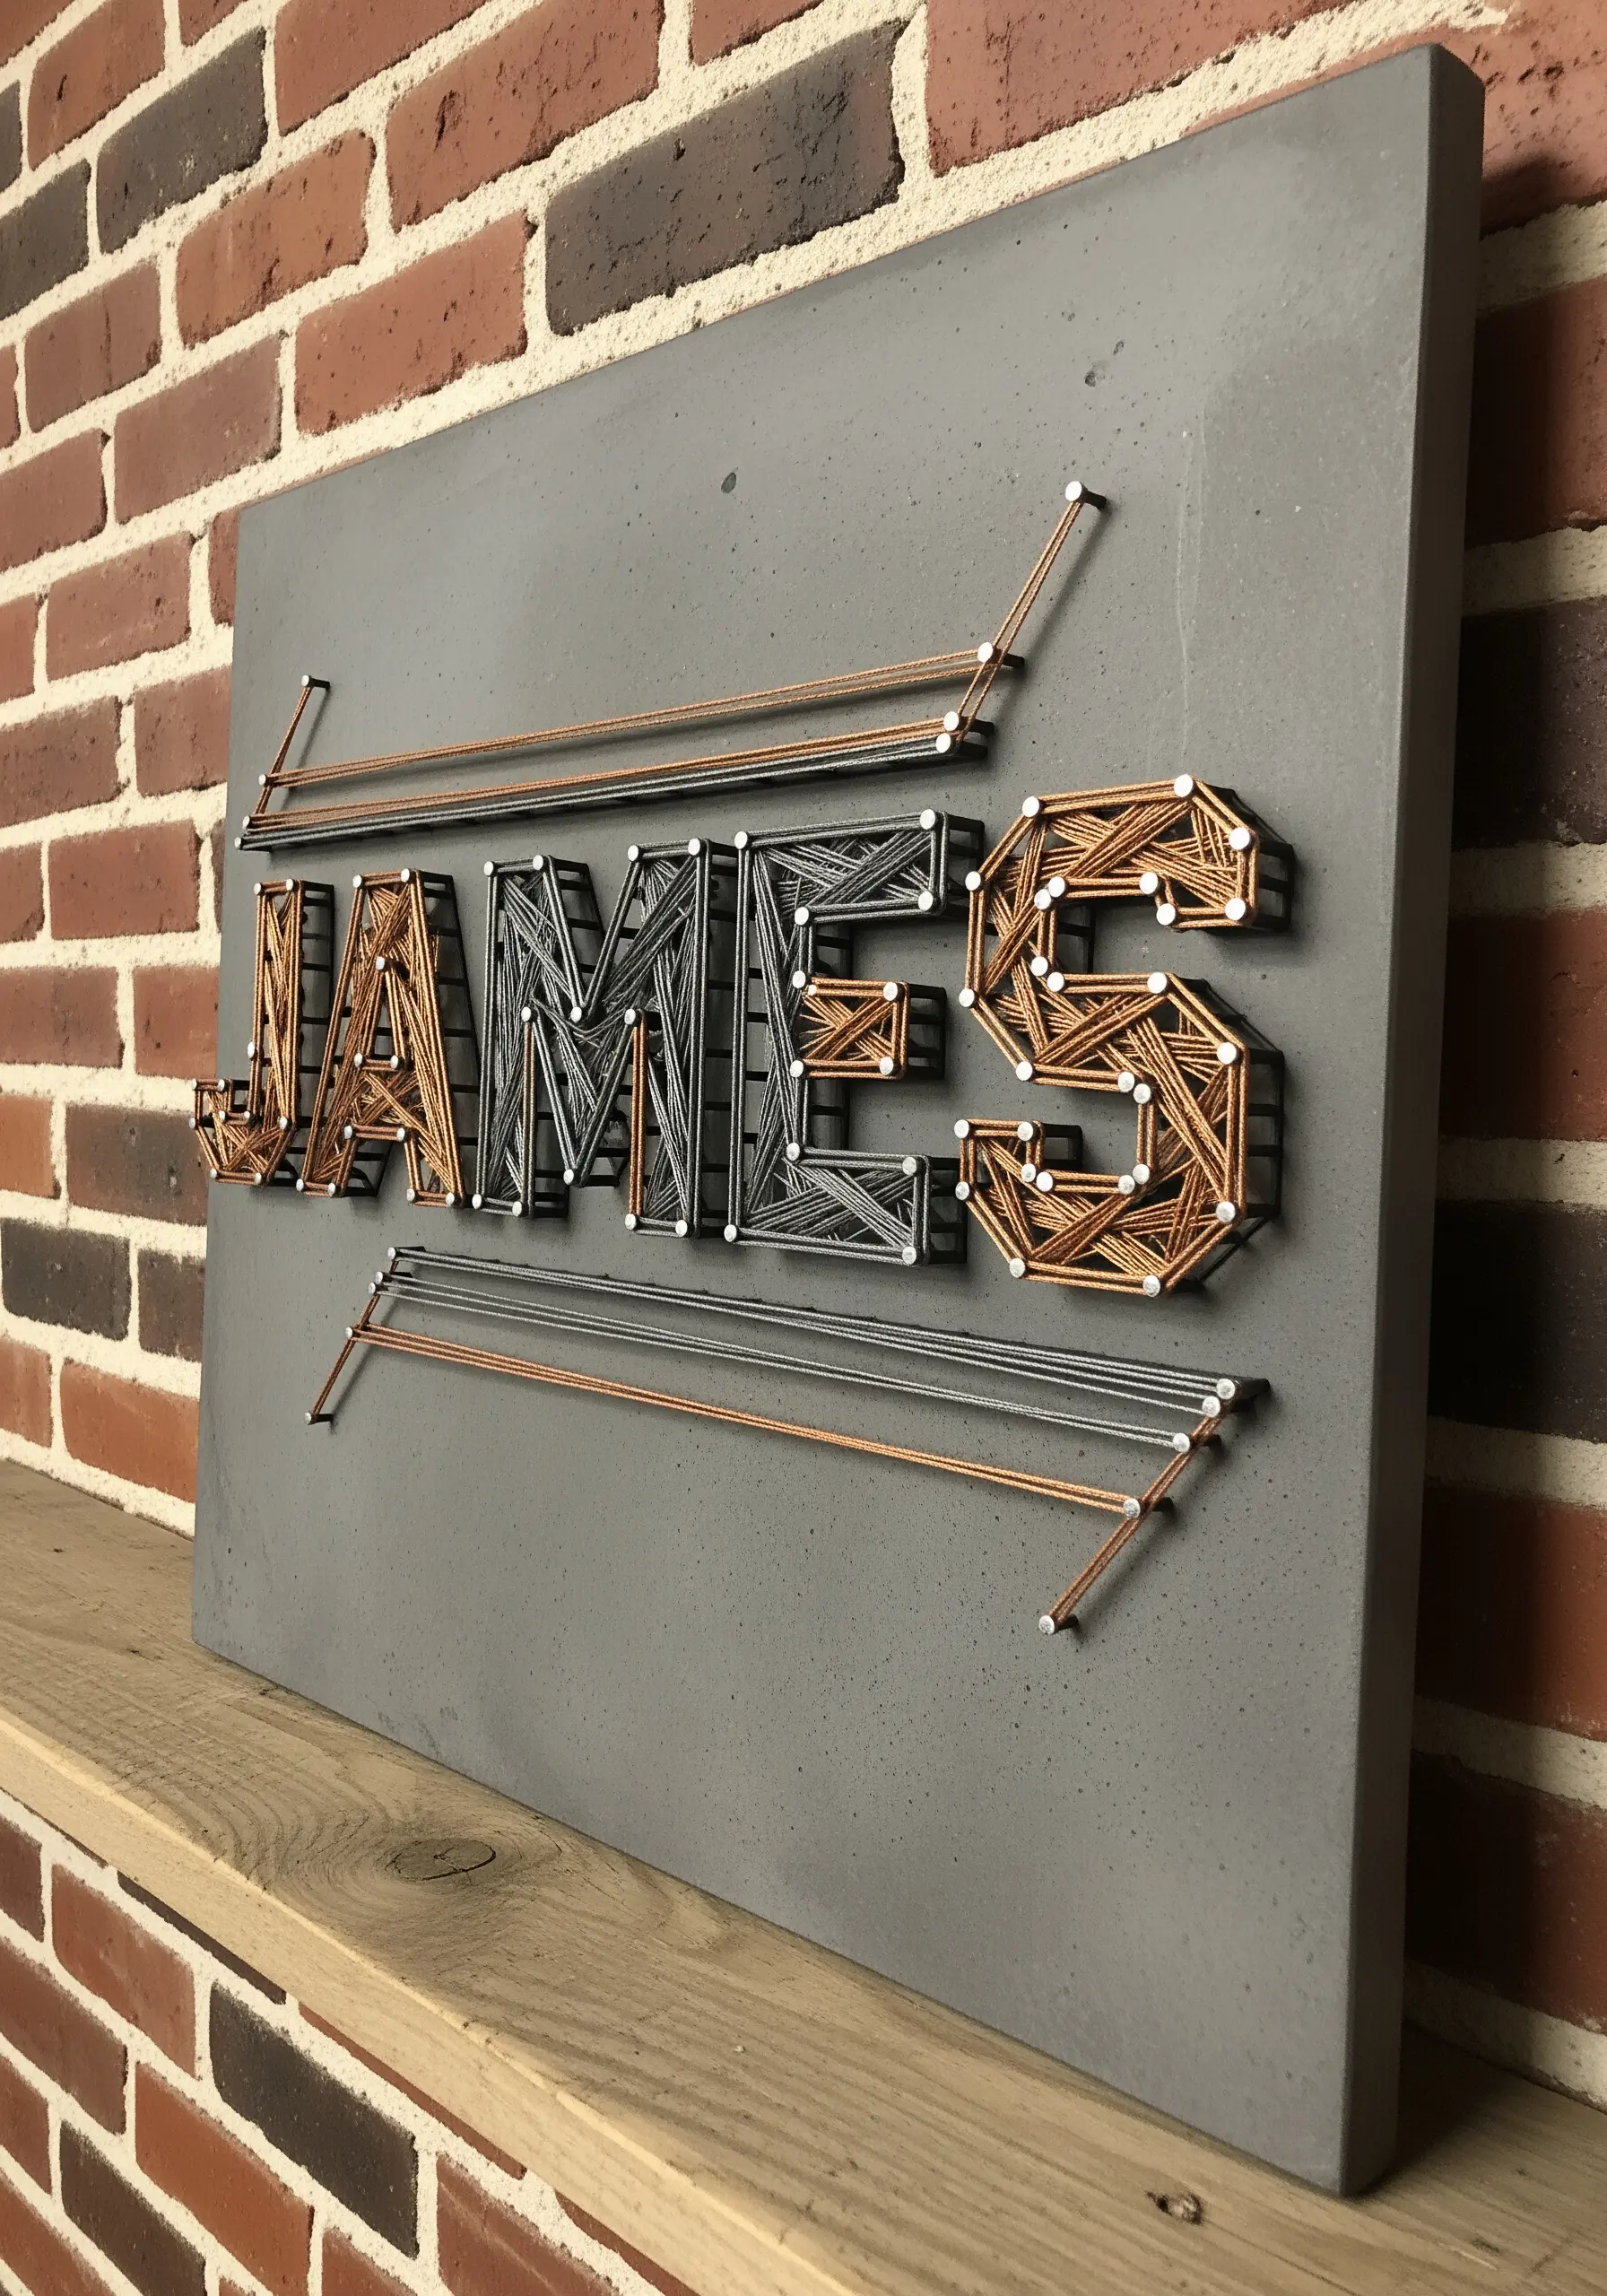
To achieve this modern, industrial aesthetic, choose a background fabric that mimics concrete, such as a high-quality gray wool felt or a tightly woven canvas.
Use a combination of dark gray and metallic copper threads to create a sophisticated, masculine color palette.
For the long, extending lines, lay your metallic thread on the surface and secure it with tiny, invisible couching stitches.
This keeps the lines perfectly straight and taut, which is essential for capturing the sharp, architectural feel of the design.
12. 3D Moss and Woodland Textures

Bring your letter to life by building up layers of textural, three-dimensional stitches.
Create the mossy fill with a dense field of French knots, or for a more advanced texture, use the turkey work stitch and trim the loops to create a velvety pile.
For the delicate ferns, use the fly stitch to form the fronds, and craft the mushrooms as separate stumpwork elements stitched onto the fabric.
This multi-stitch approach creates a tactile, miniature forest scene that invites touch and transforms the monogram into a work of organic texture embroidery.
13. Radiant Background Gradients
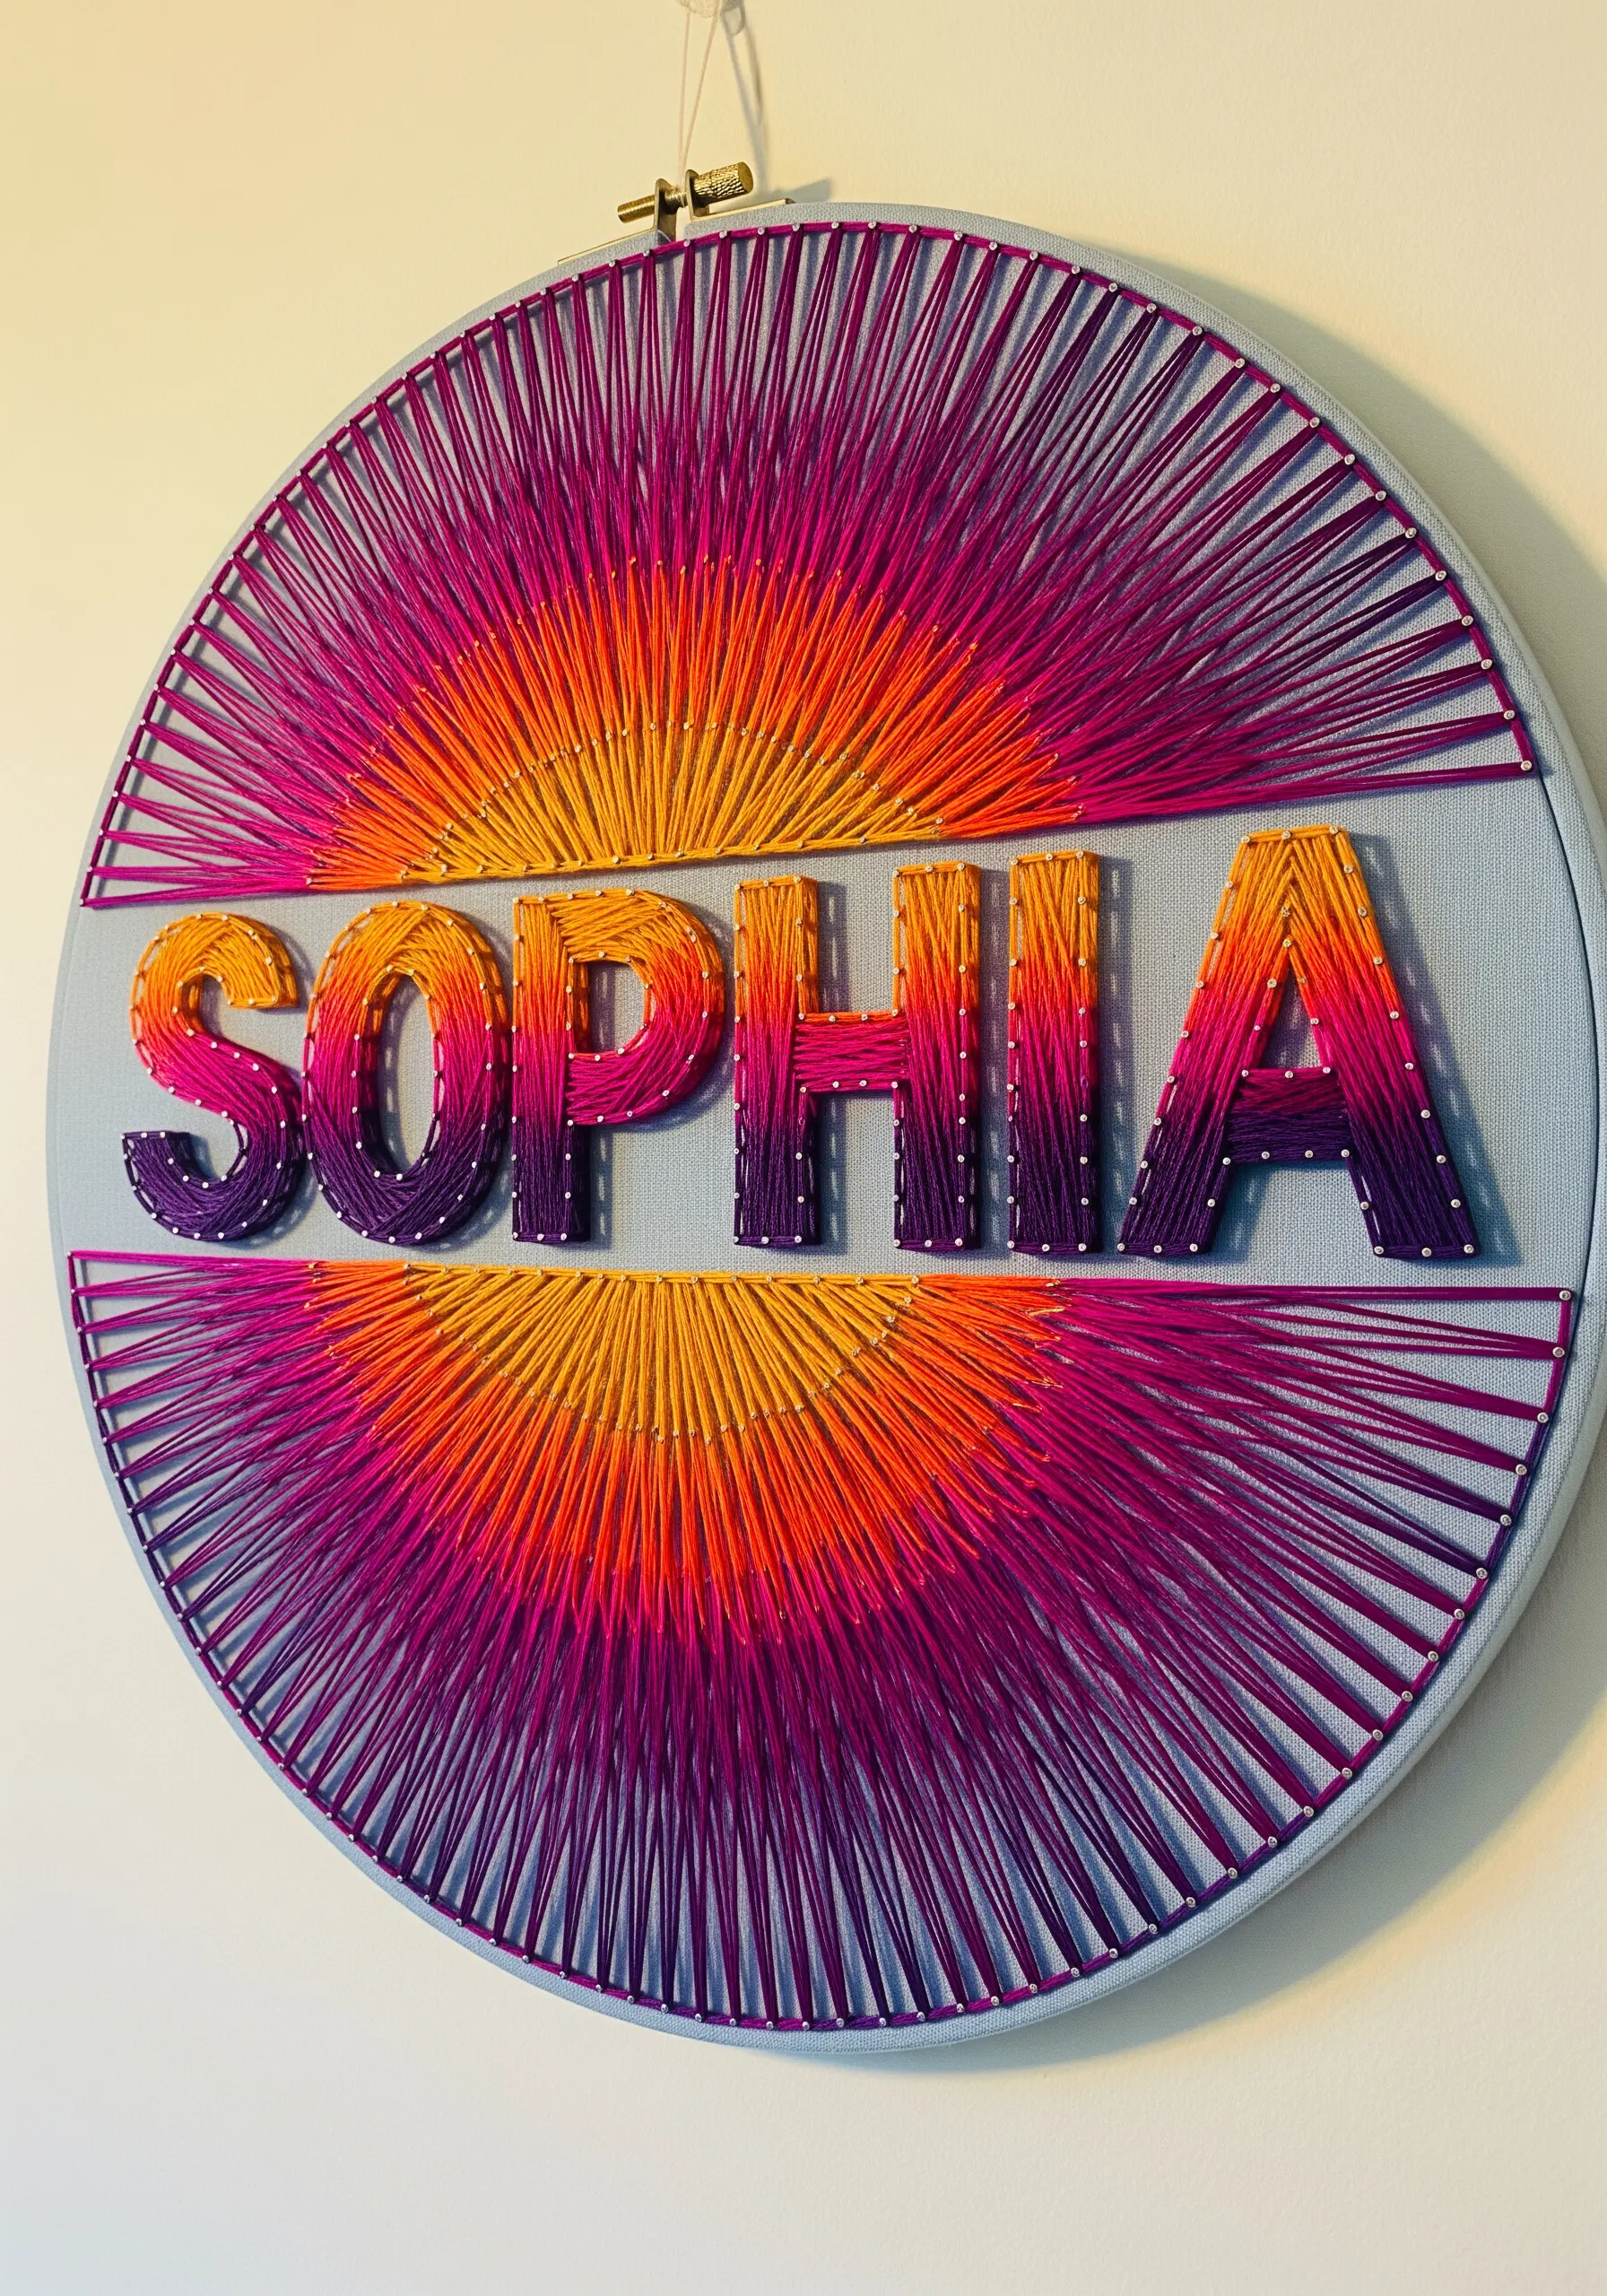
Instead of filling the letters, make the background the star of the show with a radiant sunset gradient.
Work long, straight stitches from the outer edge of the hoop toward the center, changing your thread color gradually from pink to orange to yellow.
Leave a clean, horizontal band of unstitched fabric across the middle for your lettering.
Embroider the name in a solid, contrasting color on top of this negative space. This technique creates a dramatic focal point and a clean, modern composition.
14. Vintage Patina with Fabric Dye

Create an authentic, aged appearance by treating your fabric before you even make a stitch.
Stretch your linen or cotton in the hoop, then use a paintbrush to apply cooled black tea or coffee around the edges, letting it bleed naturally toward the center.
Once dry, stitch your monogram using a muted brown or sepia thread, keeping the fill sparse with crisscrossing straight stitches.
This combination of dyeing and open stitching results in a beautiful, heirloom quality that feels both rustic and timeless.
15. Glow-in-the-Dark Galactic Scenes

Create a design with a magical secret by using glow-in-the-dark embroidery floss for the name.
During the day, it will appear as a simple white or pale green, but in the dark, it will illuminate the piece.
For the planets, use variegated thread stitched in a spiral or circular pattern to give them dimension and color depth.
Scatter a few glowing French knots for distant stars to complete the cosmic effect, making it a perfect piece for cosmic embroidery art.
16. Energetic Fills with Bold Color
Embrace a playful, chaotic energy by layering vibrant, contrasting colors.
Choose three or four bold, saturated hues—like magenta, turquoise, and yellow—and use all six strands of the floss for a chunky, textured look.
Fill the letter with dense, overlapping straight stitches, changing the color and direction randomly.
The key is to completely cover the background fabric, creating a solid block of energetic color that feels dynamic and modern, similar to modern neon-on-black thread art.
17. Delicate 3D Cherry Blossoms
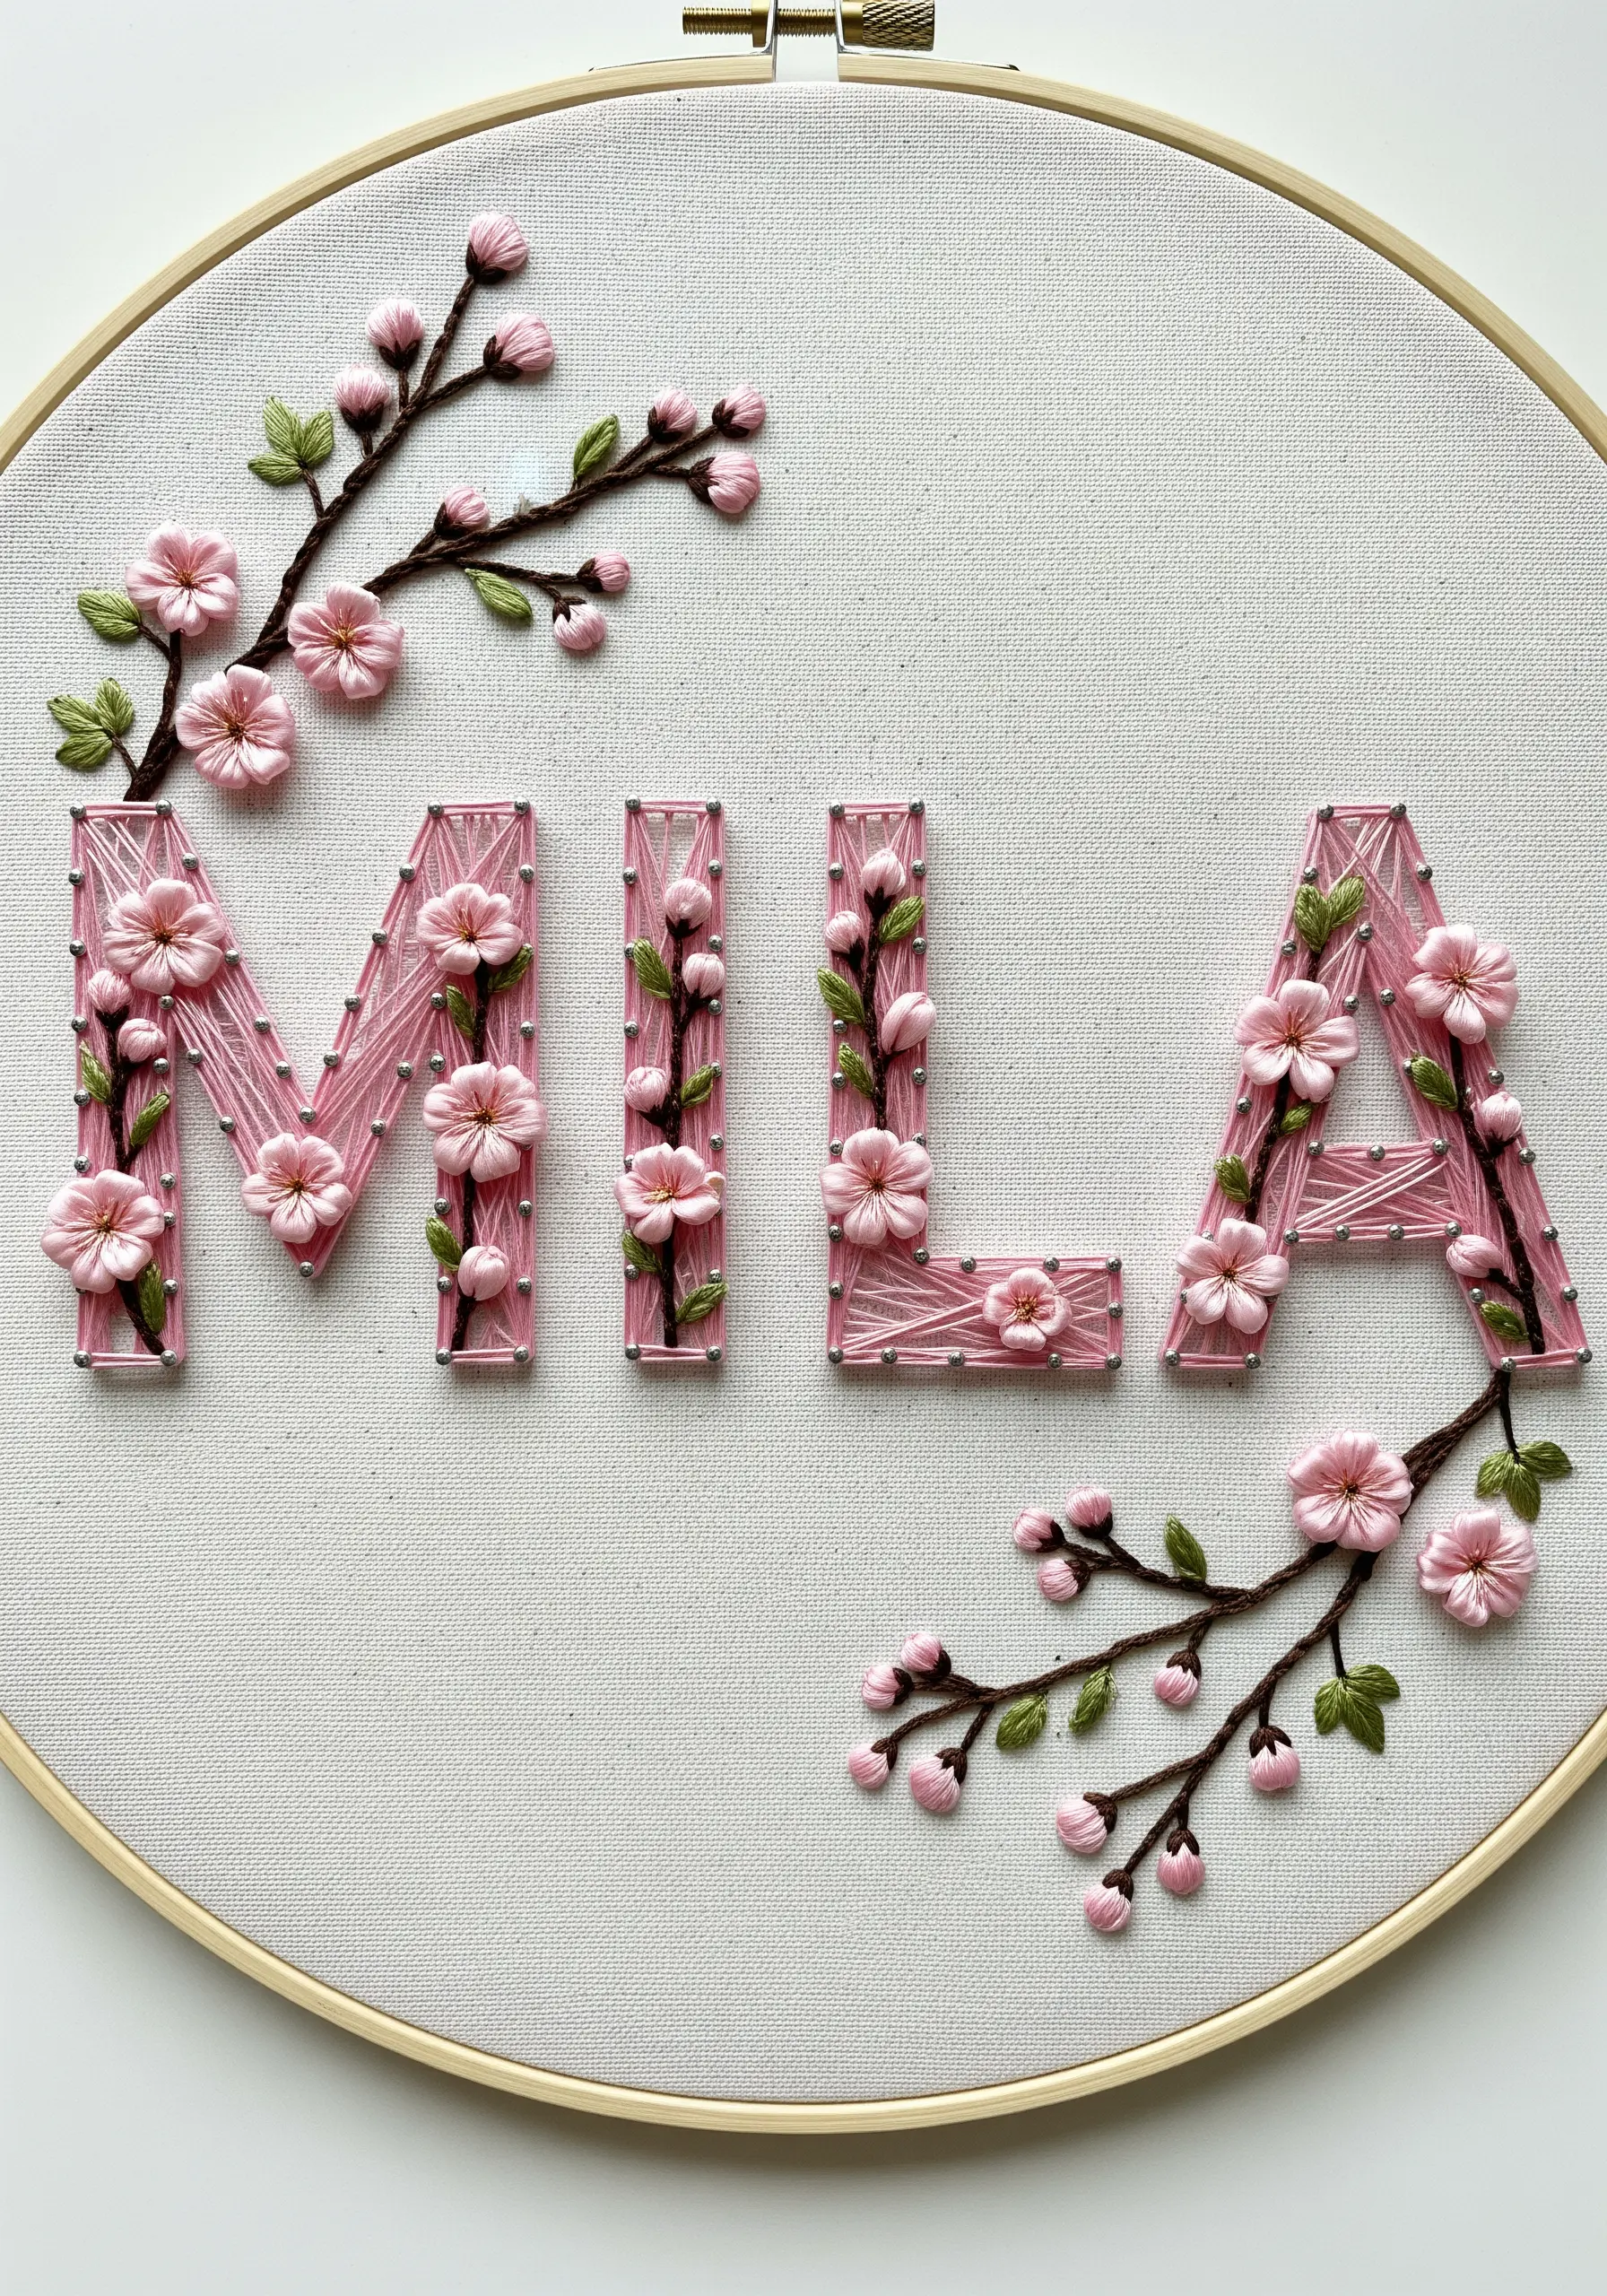
Add a soft, dimensional touch to your lettering by weaving in delicate floral elements.
First, fill the letters with a simple satin stitch in a soft pink.
Then, using a darker brown, stitch slender branches that appear to grow over and around the letters.
Create the cherry blossoms with five detached chain stitches (lazy daisies) arranged in a circle for the petals, and add a single French knot in the center to complete each flower.
18. Integrating Names into Landscapes

Make your embroidered name a natural part of a larger scene, rather than just an object placed on top of it.
Create the mountain range first, using long-and-short stitches in shades of blue and gray to build the peaks and shadows.
Embroider the name across the base of the mountains, using a crisp white or off-white thread so it appears like a snowy foreground or a low-lying cloud.
This technique creates a cohesive, illustrative piece that tells a story.
19. Gilded Outlines and Gemstone Accents
For a truly luxurious finish, frame your monogram with a bold, metallic outline.
Couch a thick metallic cord or gold thread around the edges of the letter to create a clean, raised border that immediately elevates the design.
After filling the letter with a vibrant color gradient, strategically sew on flat-backed crystals or small gemstones.
Placing them at intersections or corners draws the eye and transforms the piece into textile jewelry, a perfect use of metallic thread for modern artwork.
20. Appliqué and Thread-Painted Characters
Create charming characters next to your lettering by combining appliqué with thread painting for a storybook feel.
Cut the basic shapes of the animal from felt and apply them to your fabric.
Then, using a long-and-short stitch, cover the felt entirely with embroidery floss, blending colors to create the texture of fur and add realistic details.
This technique makes the character pop from the background, turning simple fabric collage embroidery animals into lively companions for your personalized name.
21. The Modern Stained Glass Effect

Mimic the bold look of stained glass with thick, dark outlines and vibrant, segmented color fills.
Create the black borders using a heavy chain stitch or by whipping a backstitch with a second thread—this gives it the thickness and definition of lead lines.
Fill each segment with a dense satin stitch, keeping all stitches within a single pane running in the same direction.
This consistent directionality makes the light reflect off the thread like it would from a pane of glass, creating a luminous, graphic effect.
22. Embellishing with Silk Ribbon Roses

Add instant romance and texture to your letters with the soft dimension of silk ribbon embroidery.
After stitching the letters in a simple satin stitch, use silk ribbon to create tiny woven roses (also known as spider web roses) directly on the surface.
Add small French knots and detached chain stitches with the ribbon to represent buds and leaves, clustering them in corners or along the curves of the letters.
This technique creates a lush, three-dimensional garden that blooms right on your typography.
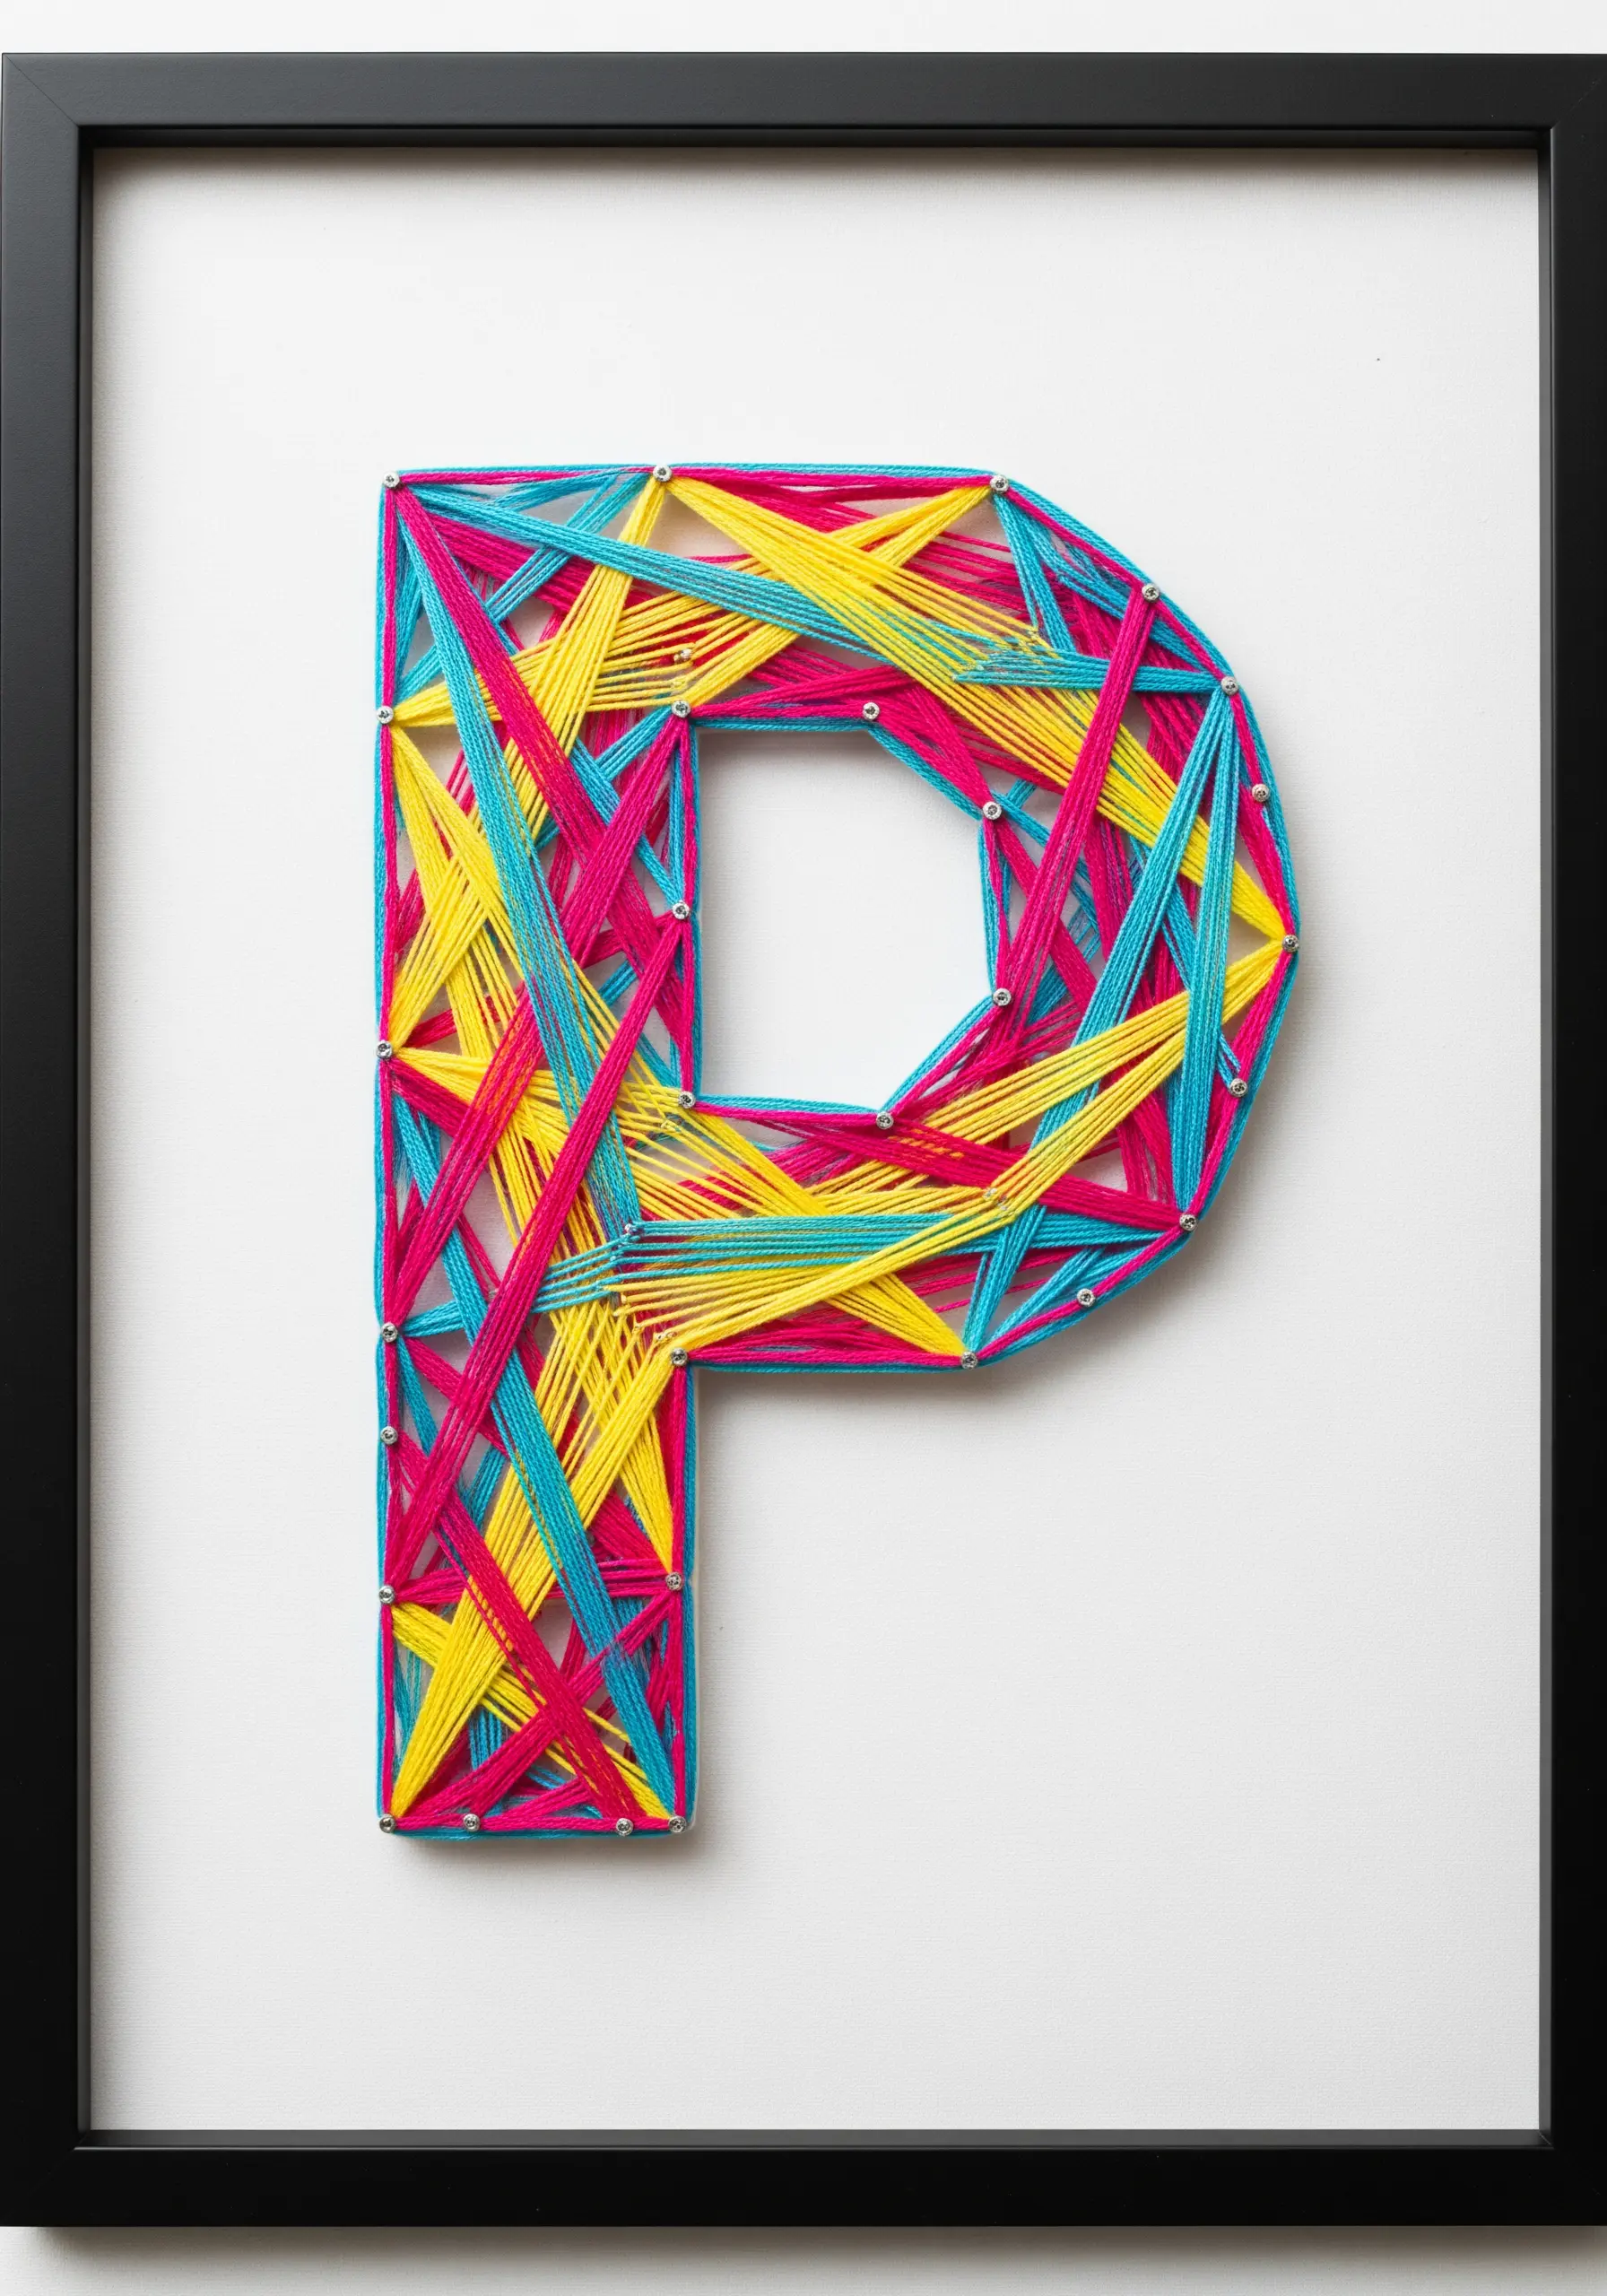
23. Dynamic Interplay of Neon Colors

Create the illusion of interwoven threads by carefully planning your stitch path and using high-contrast neon floss.
Choose a dark, non-reflective background like black cotton twill or carbon fiber fabric to make the colors pop.
Stitch all the lines of one color first. Then, for the second color, weave the thread over and under the existing stitches at crossing points without piercing the fabric.
This technique creates a true sense of depth and movement that a simple layered approach cannot replicate.
24. Graphic Industrial Lettering

Achieve a bold, industrial look by choosing textiles and colors with a utilitarian feel.
Use a thick, gray heathered felt as your background fabric for its matte texture and sturdiness.
For the lettering, create a strong outline with a black split stitch, then fill it with a vertical satin stitch for a clean, solid appearance.
The diagonal caution stripes can be made with wide blocks of satin stitch, alternating between bright yellow and black for a high-contrast, graphic impact.
25. The Floating Monogram Technique
Create a stunning ‘floating’ effect by removing the fabric entirely, leaving only your stitched creation suspended in the hoop.
You will need to stitch your entire design—including the structural outline and the inner string art fill—onto a sheet of water-soluble stabilizer.
After you finish stitching, simply wash the stabilizer away in warm water, leaving a delicate, thread-only monogram.
For a truly elegant display, wrap the embroidery hoop in velvet ribbon before mounting your finished piece inside it.
26. Mandala-Inspired Geometric Names
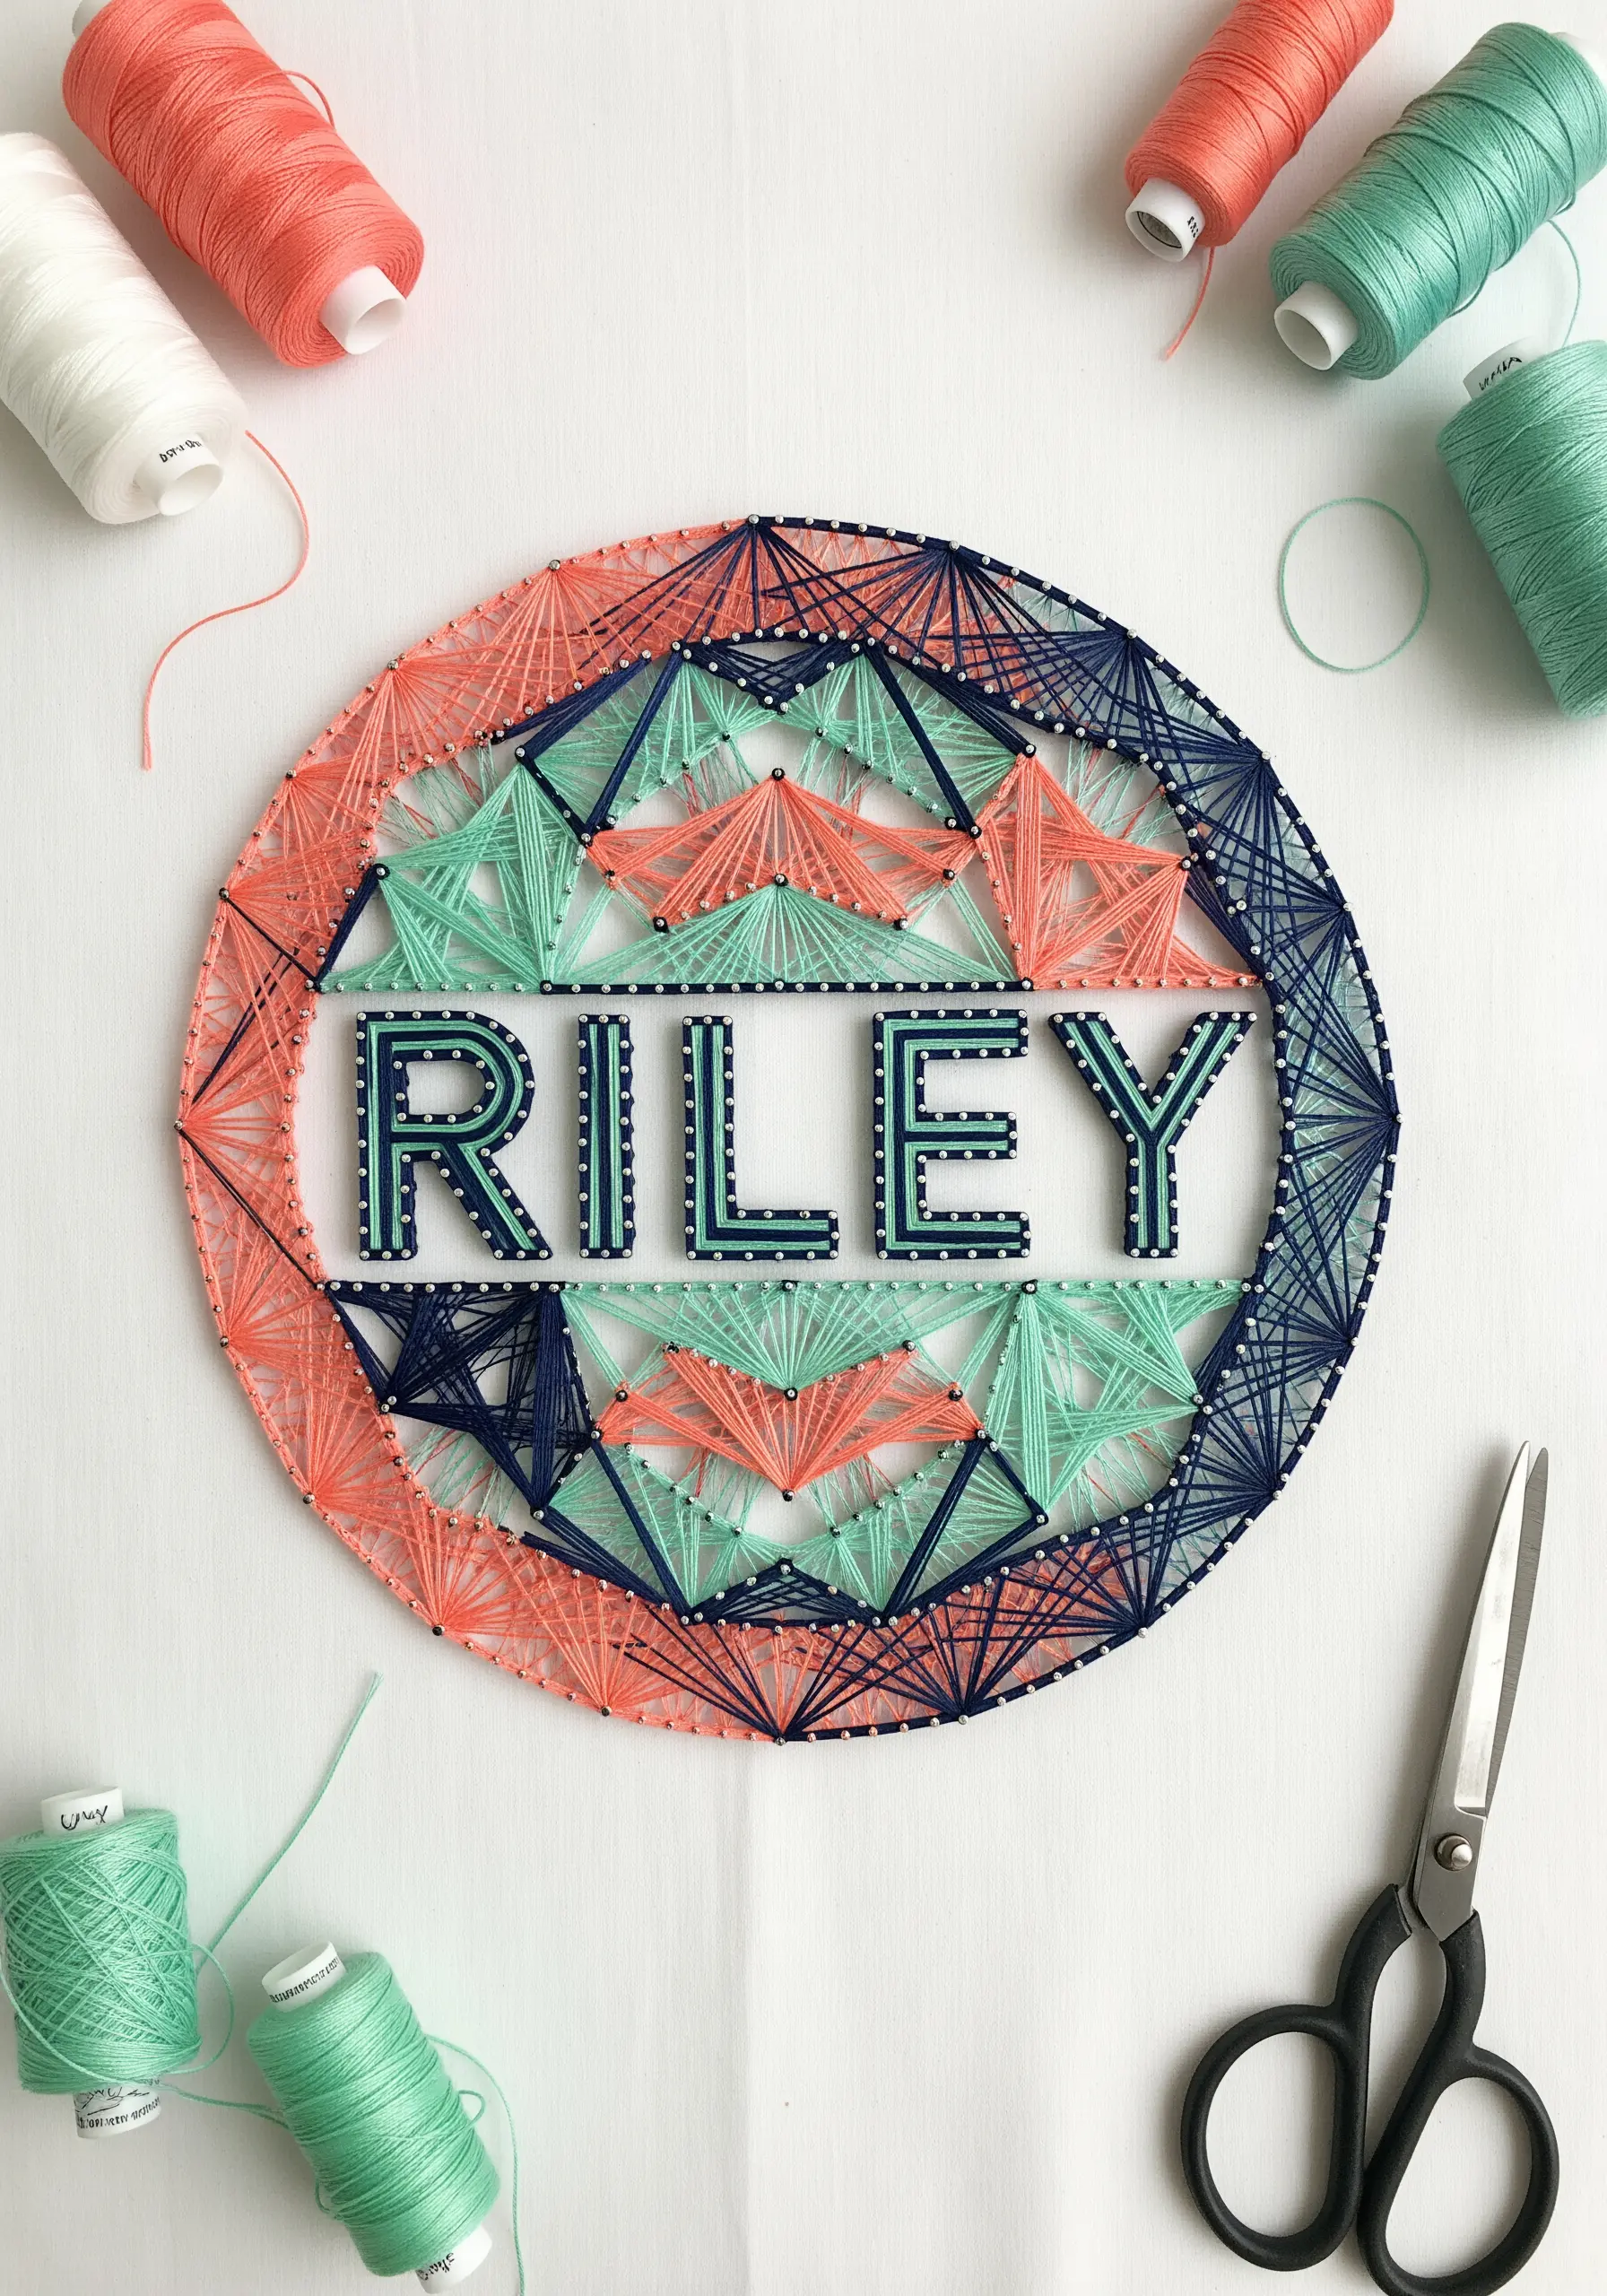
Transform a simple name into a complex, meditative piece by building a geometric mandala around it.
Embroider the name in the center, leaving it as a block of negative space or filling it with a simple stitch.
Using the letters as your base, work outwards, creating radiating patterns of straight stitches that connect to anchor points on the hoop’s edge.
Alternate thread colors in concentric rings to define the layers of your mandala, creating a design that is both personal and beautifully symbolic.


