

When you look at a piece of embroidery that feels truly alive, it’s rarely because of a complex stitch. It’s because the artist understood how to use fabric and thread to build layers, texture, and light—just like a painter uses paint.
Fabric collage embroidery isn’t about hiding your stitching; it’s about giving it a foundation. By starting with carefully chosen pieces of fabric, you create an instant base of color, pattern, and texture. This allows you to focus your stitching on what matters most: the glint in an eye, the softness of fur, or the curve of a wing.
In these examples, you’ll see how to let patterned fabric do the color-blending for you, how to use scraps to build dynamic forms, and how a simple change in stitch direction can transform a flat shape into a living creature. This is where your embroidery evolves from a craft into an art form.
1. Blend Appliqué and Thread Painting for Rich Fur
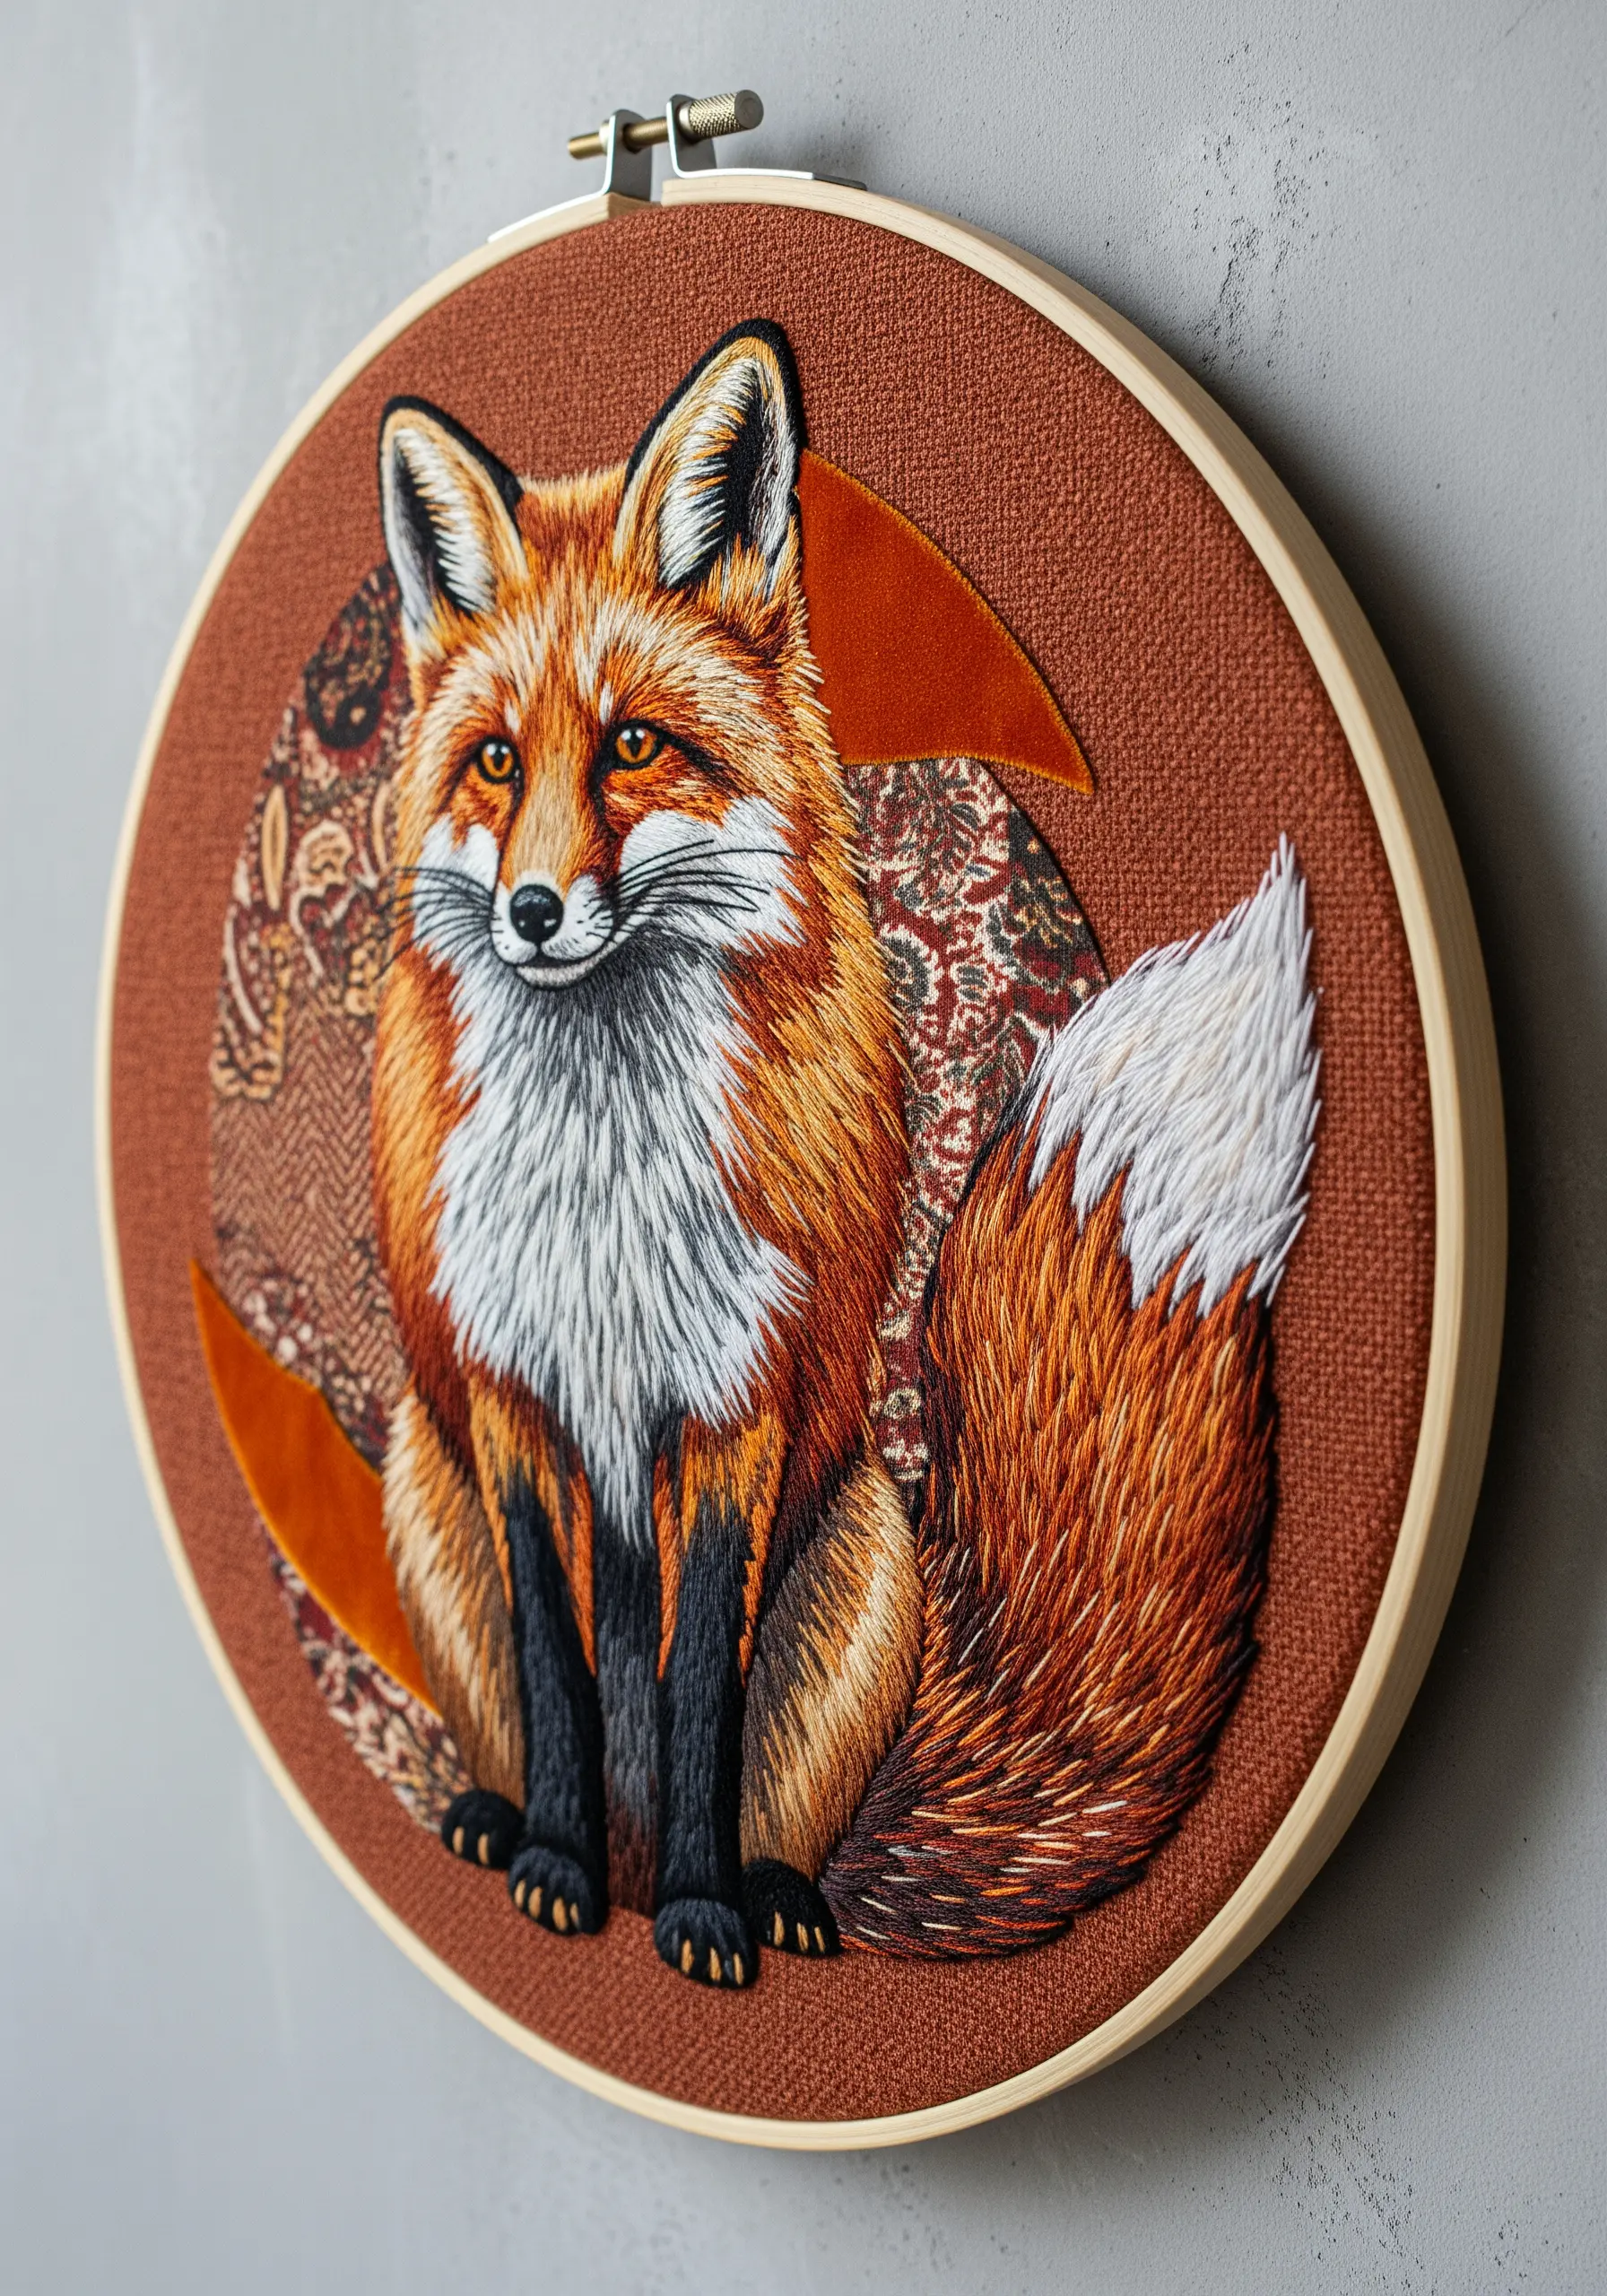
Start by cutting simple shapes from patterned or textured fabric to form the base of the animal’s body.
This technique, known as appliqué, provides instant color and depth, saving you hours of fill stitching.
Then, use long-and-short stitches to blend thread from the fabric edge outward, creating a seamless transition that looks like realistic fur.
For the chest and tail, use a single strand of floss in varying shades of white, grey, and cream to build up a soft, dense texture that contrasts with the collaged elements.
This combination gives your work both the speed of collage and the refined detail of thread painting.
2. Define Shapes with Raw-Edge Appliqué and Gold Thread
To achieve this illustrative style, cut your main subject from a single piece of fabric or paper and apply it to a contrasting background using a fusible web.
Leave the edges raw to create a delicate, slightly lifted effect that adds shadow and dimension.
Instead of dense fill stitches, use simple backstitch or running stitch to outline the details, like the feathers on the wings.
Introduce a single metallic gold thread for select outlines to add a touch of luxury and draw the eye without overwhelming the minimal composition.
This method transforms a simple drawing into a sophisticated mixed-media piece.
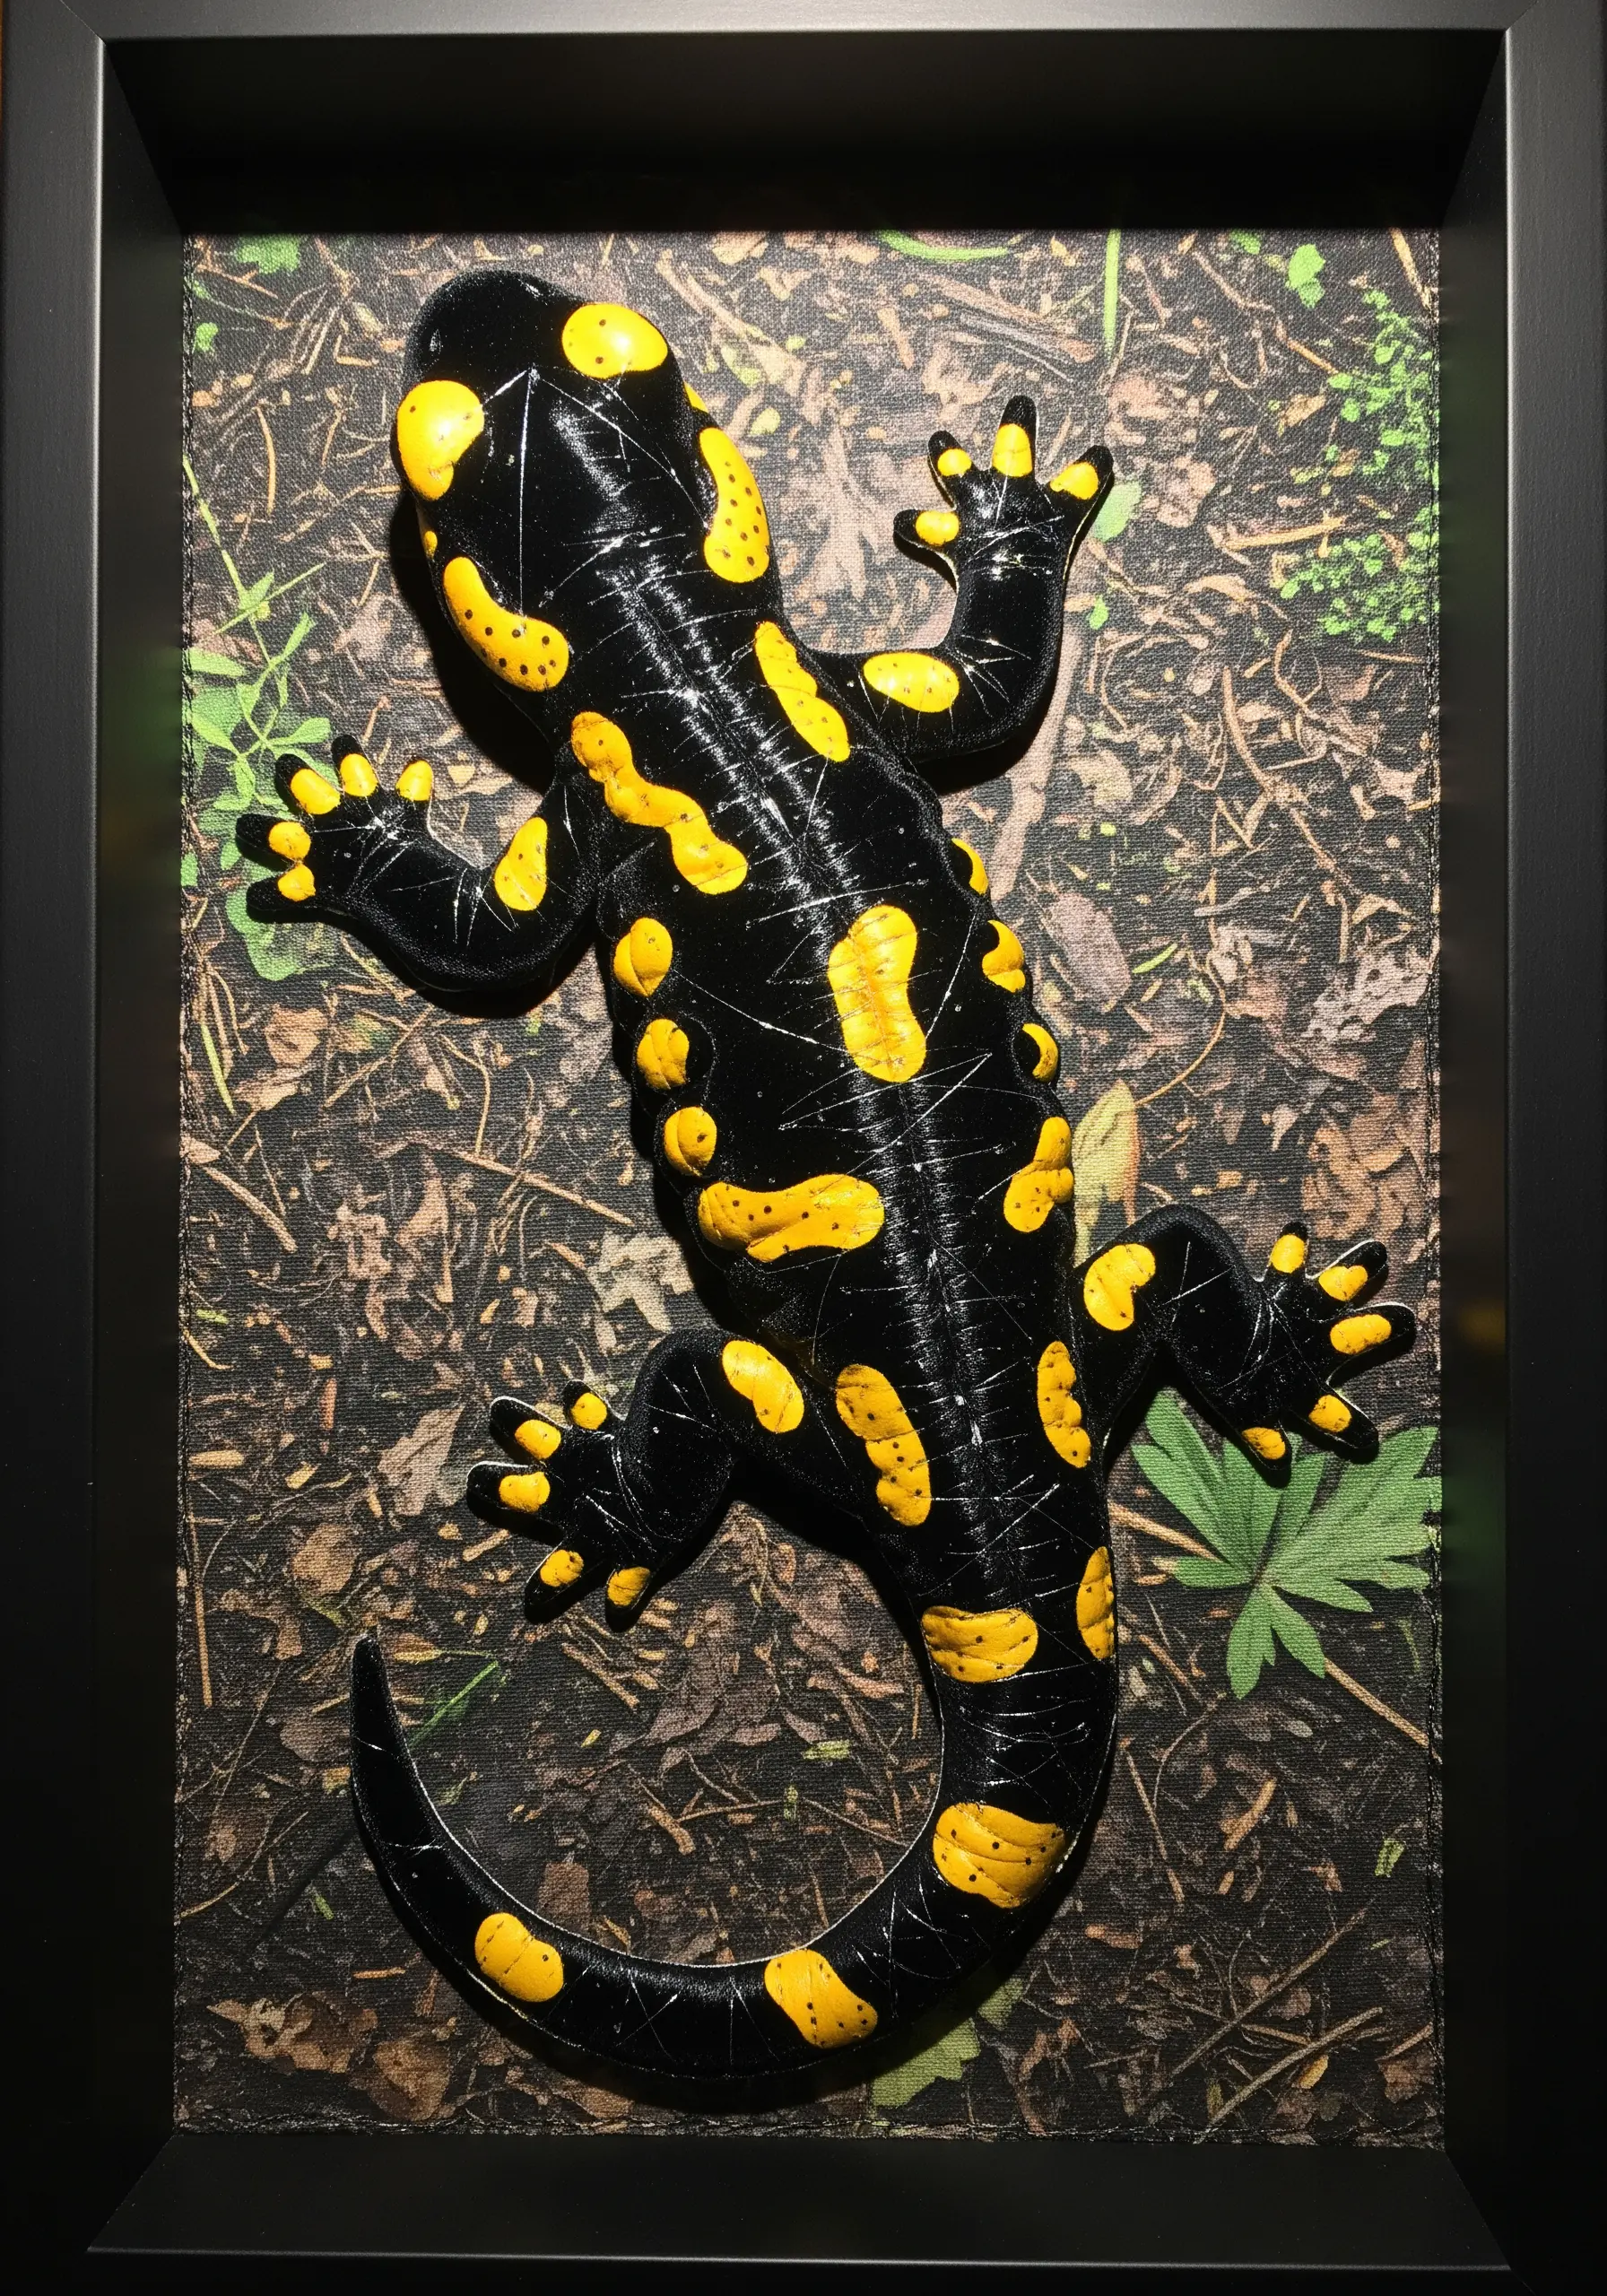
3. Create a Seascape with Denim and Scrap Fabric Collage
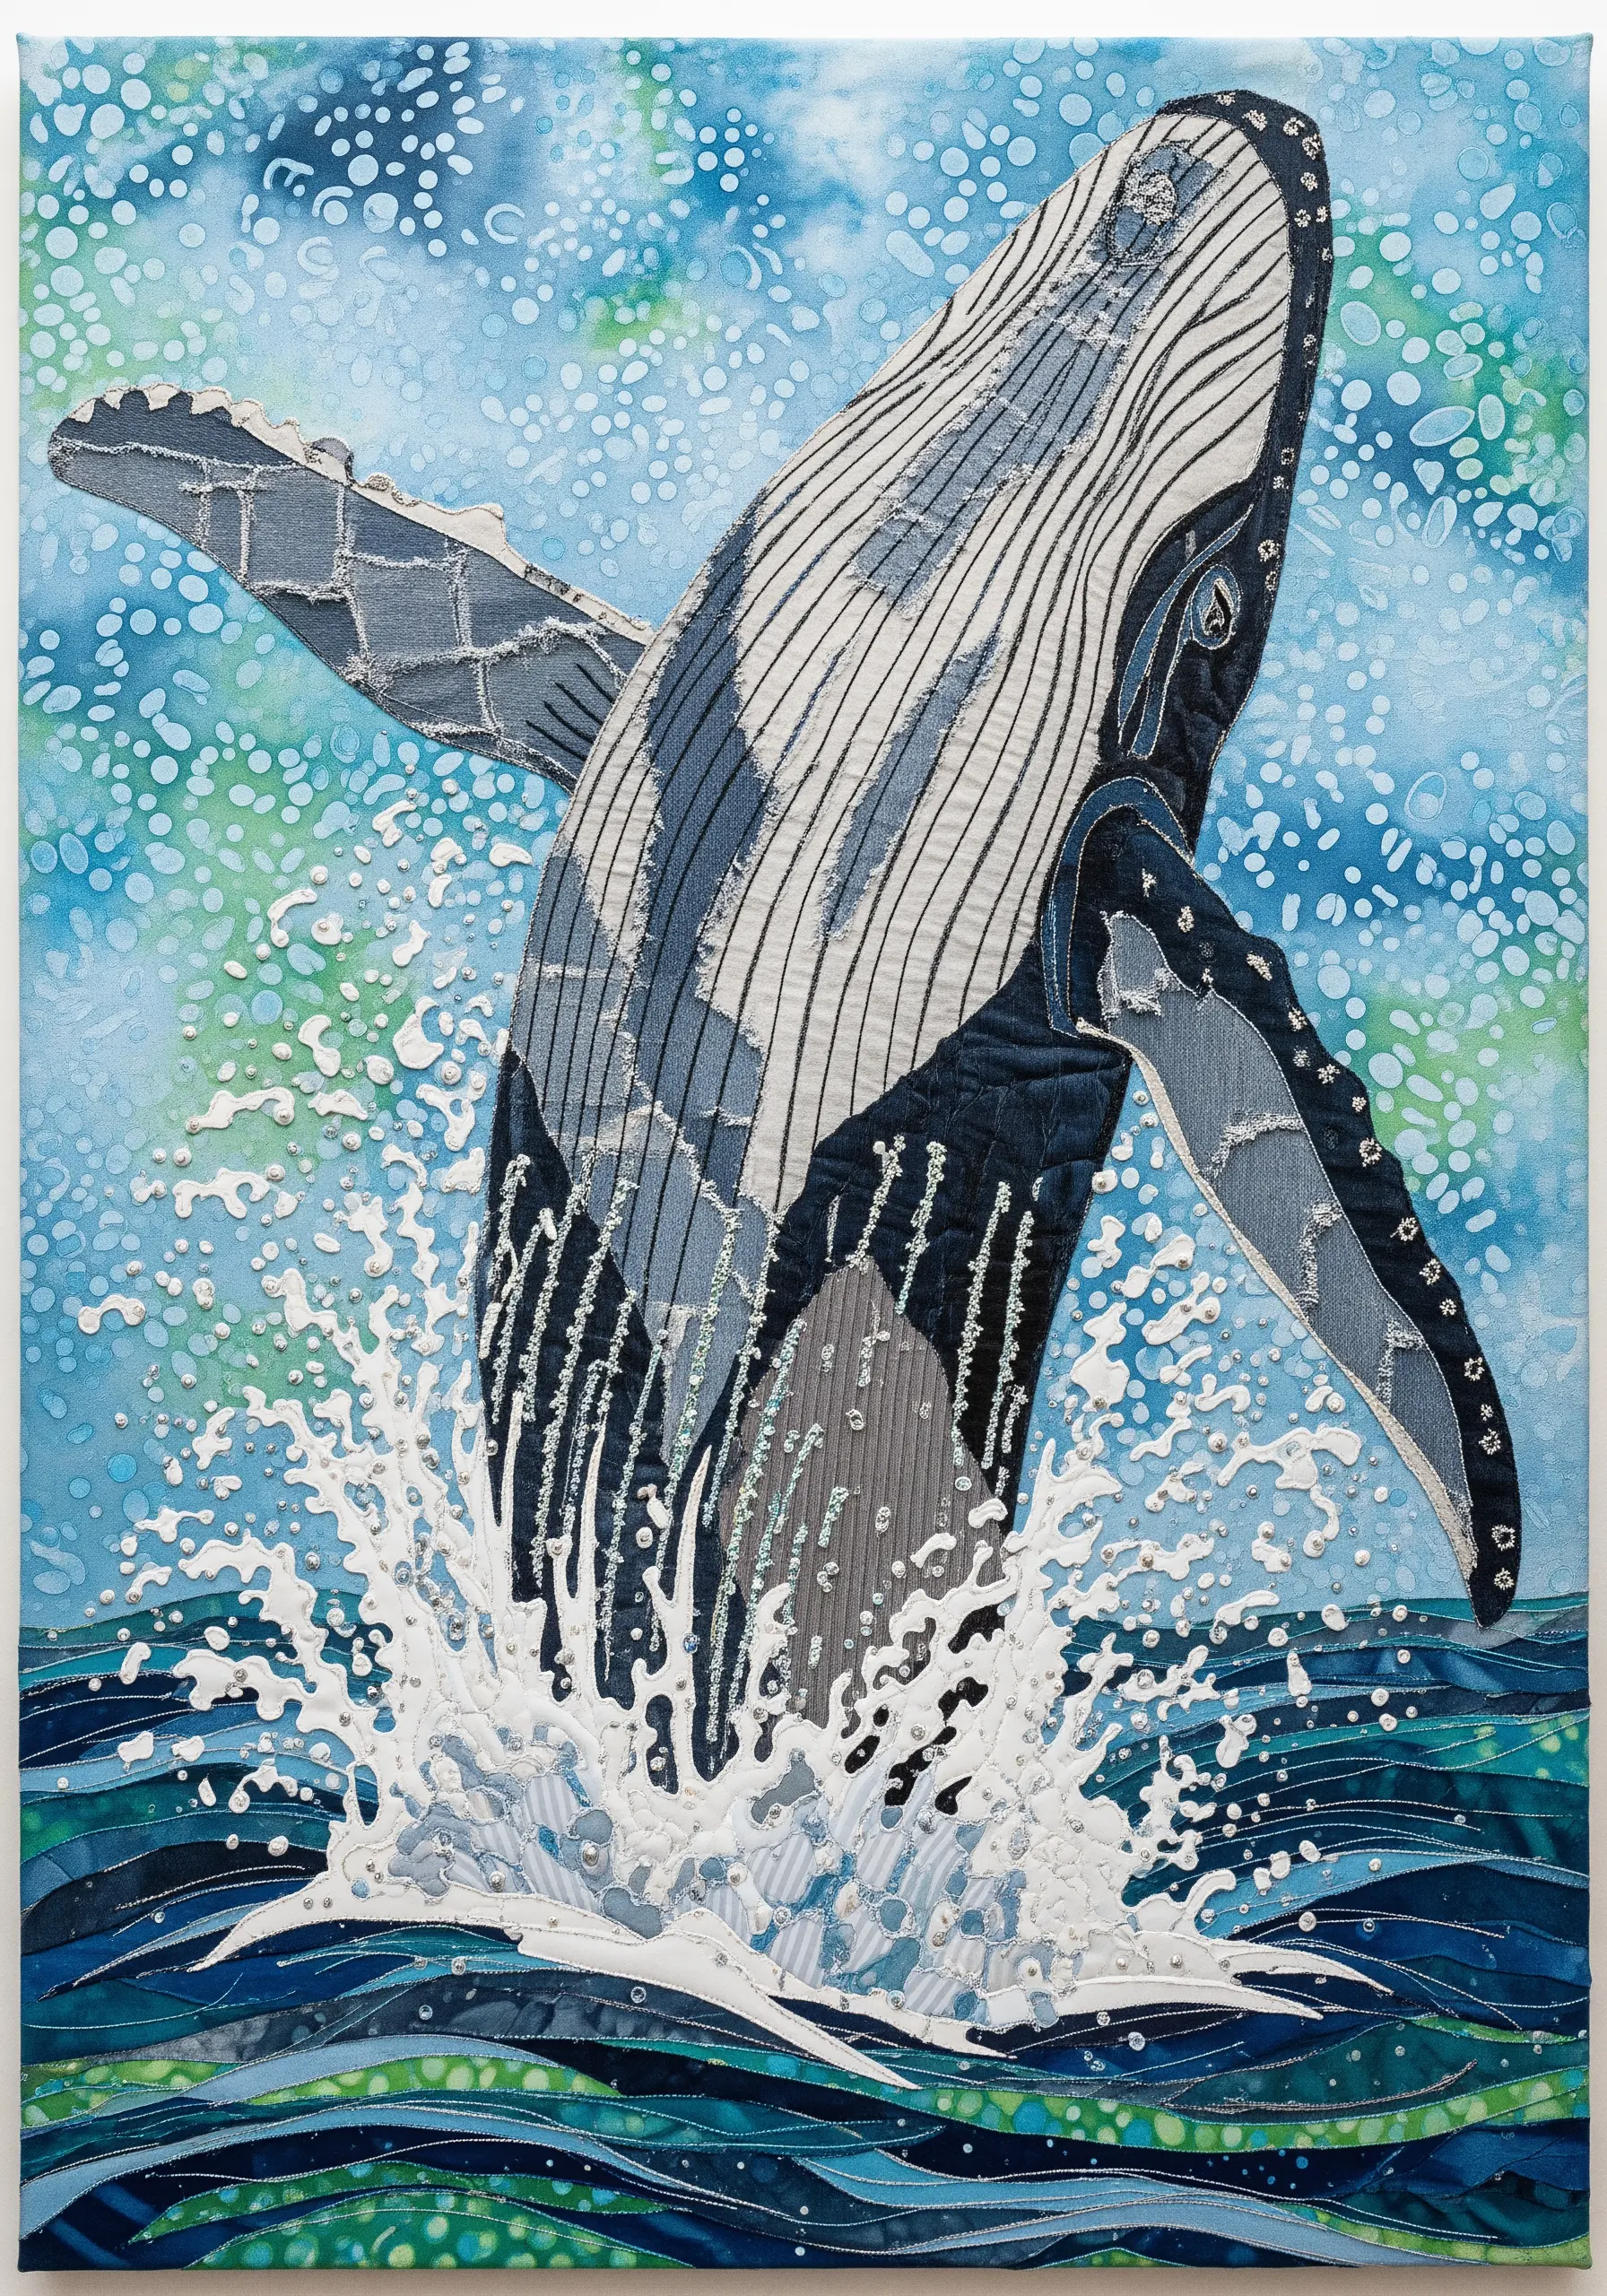
Build your animal’s form by layering various fabric scraps, especially materials with inherent texture like denim, corduroy, or linen.
Cut the pieces to follow the contours of the animal, allowing the different weaves and shades to create natural highlights and shadows.
Secure the pieces with simple running stitches or small tacking stitches rather than a full satin stitch outline; this keeps the focus on the fabrics themselves.
For the surrounding water and spray, use smaller, confetti-like fabric pieces and French knots to create a sense of energetic movement.
This is one of the most effective scrap fabric collage embroidery ideas for dynamic, textured scenes.
4. Construct 3D Feathers with Layered, Wired Fabric
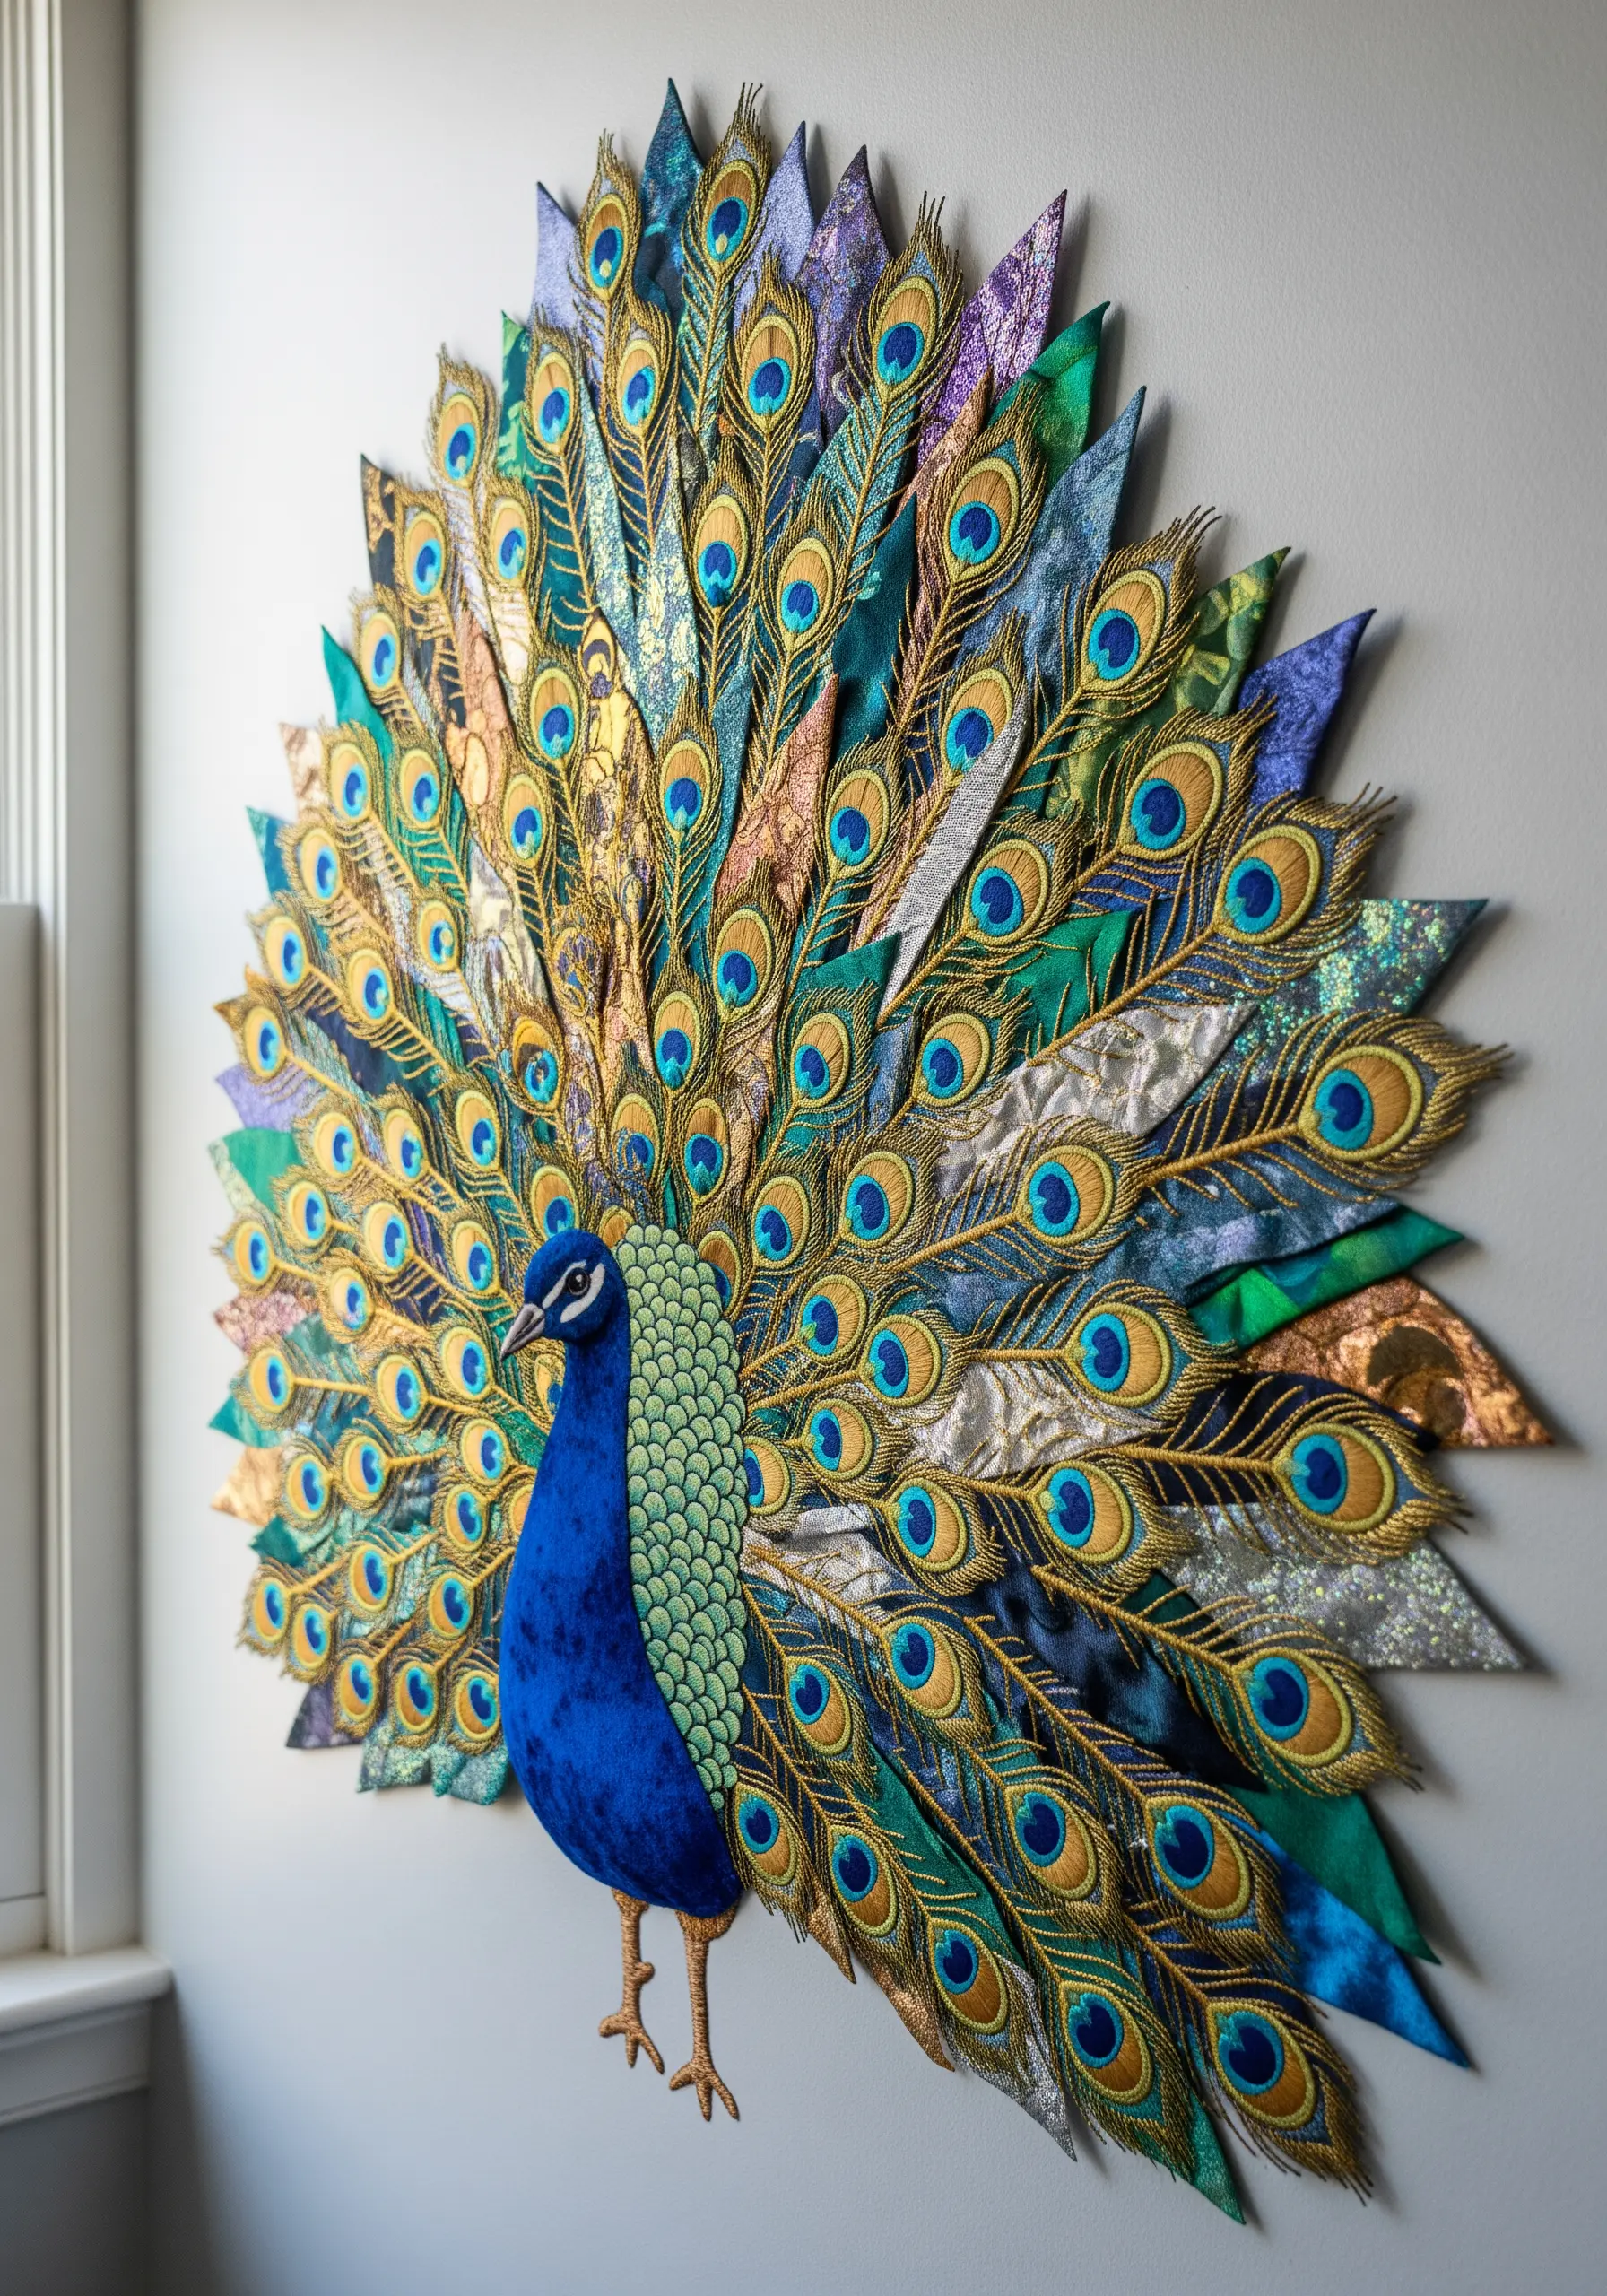
To give your bird’s tail a magnificent, three-dimensional look, create each feather as a separate component.
Cut pointed feather shapes from a variety of luxurious fabrics like satin, silk, and metallic brocade.
For extra structure, you can iron a lightweight fusible interfacing to the back of each fabric piece before cutting.
Stitch a central line down each feather to mimic the quill, then arrange and layer them onto your background fabric, stitching only the base of each one down.
This allows the tips to lift away from the surface, creating dramatic shadows and a truly statement textured embroidery piece.
5. Use a Black Canvas to Make Colors Vibrate
Stitching on a black or dark navy background is a powerful choice that makes every color appear more saturated and intense.
For an animal with bold markings like a tiger, this high-contrast base eliminates the need for outlining, as the black fabric naturally defines each shape.
Focus your effort on directional long-and-short stitches to create the flow of the fur, using just three or four shades of orange to create a smooth gradient.
A single strand of white floss for whiskers adds a final, delicate touch that stands out sharply against the dark canvas.
6. Let Batik Fabric Do the Color Work for You
Instead of meticulously blending dozens of thread colors, select a piece of batik or watercolor-dyed fabric that already contains the hues you need.
Carefully cut out the shapes for your turtle’s shell and skin, paying attention to how the pattern on the fabric aligns with your design.
Once appliquéd, all you need to do is add a bold outline stitch, like a whipped backstitch or a narrow satin stitch, to define the edges and make the design crisp.
This technique is perfect for creating complex, colorful pieces with minimal stitching effort.
7. Add Abstract Stitches to Convey Motion
After collaging your central figure with small, vibrant fabric scraps, extend the design’s energy beyond the body.
Use simple, radiating straight stitches in complementary colors to suggest the rapid movement of the hummingbird’s wings.
Vary the length and density of these stitches to create a sense of fading motion, as if the bird is darting through the air.
This abstract touch transforms a static portrait into a dynamic scene, making it one of those bird & butterfly embroidery patterns that make fabric come alive.
8. Choose Fabrics with Built-In Texture
Before you even thread your needle, think about how your fabric choice can create texture for you.
For an animal like a bear, use materials such as brown corduroy for the body to mimic the direction of coarse fur, and a softer faux suede or velvet for the chest and muzzle.
By selecting fabrics that already have a tactile quality, you can build a dimensional, lifelike creature with very minimal stitching.
A few well-placed backstitches to define claws or facial features are all you need to complete the piece.
9. Create a Scaly Surface with Dense French Knots
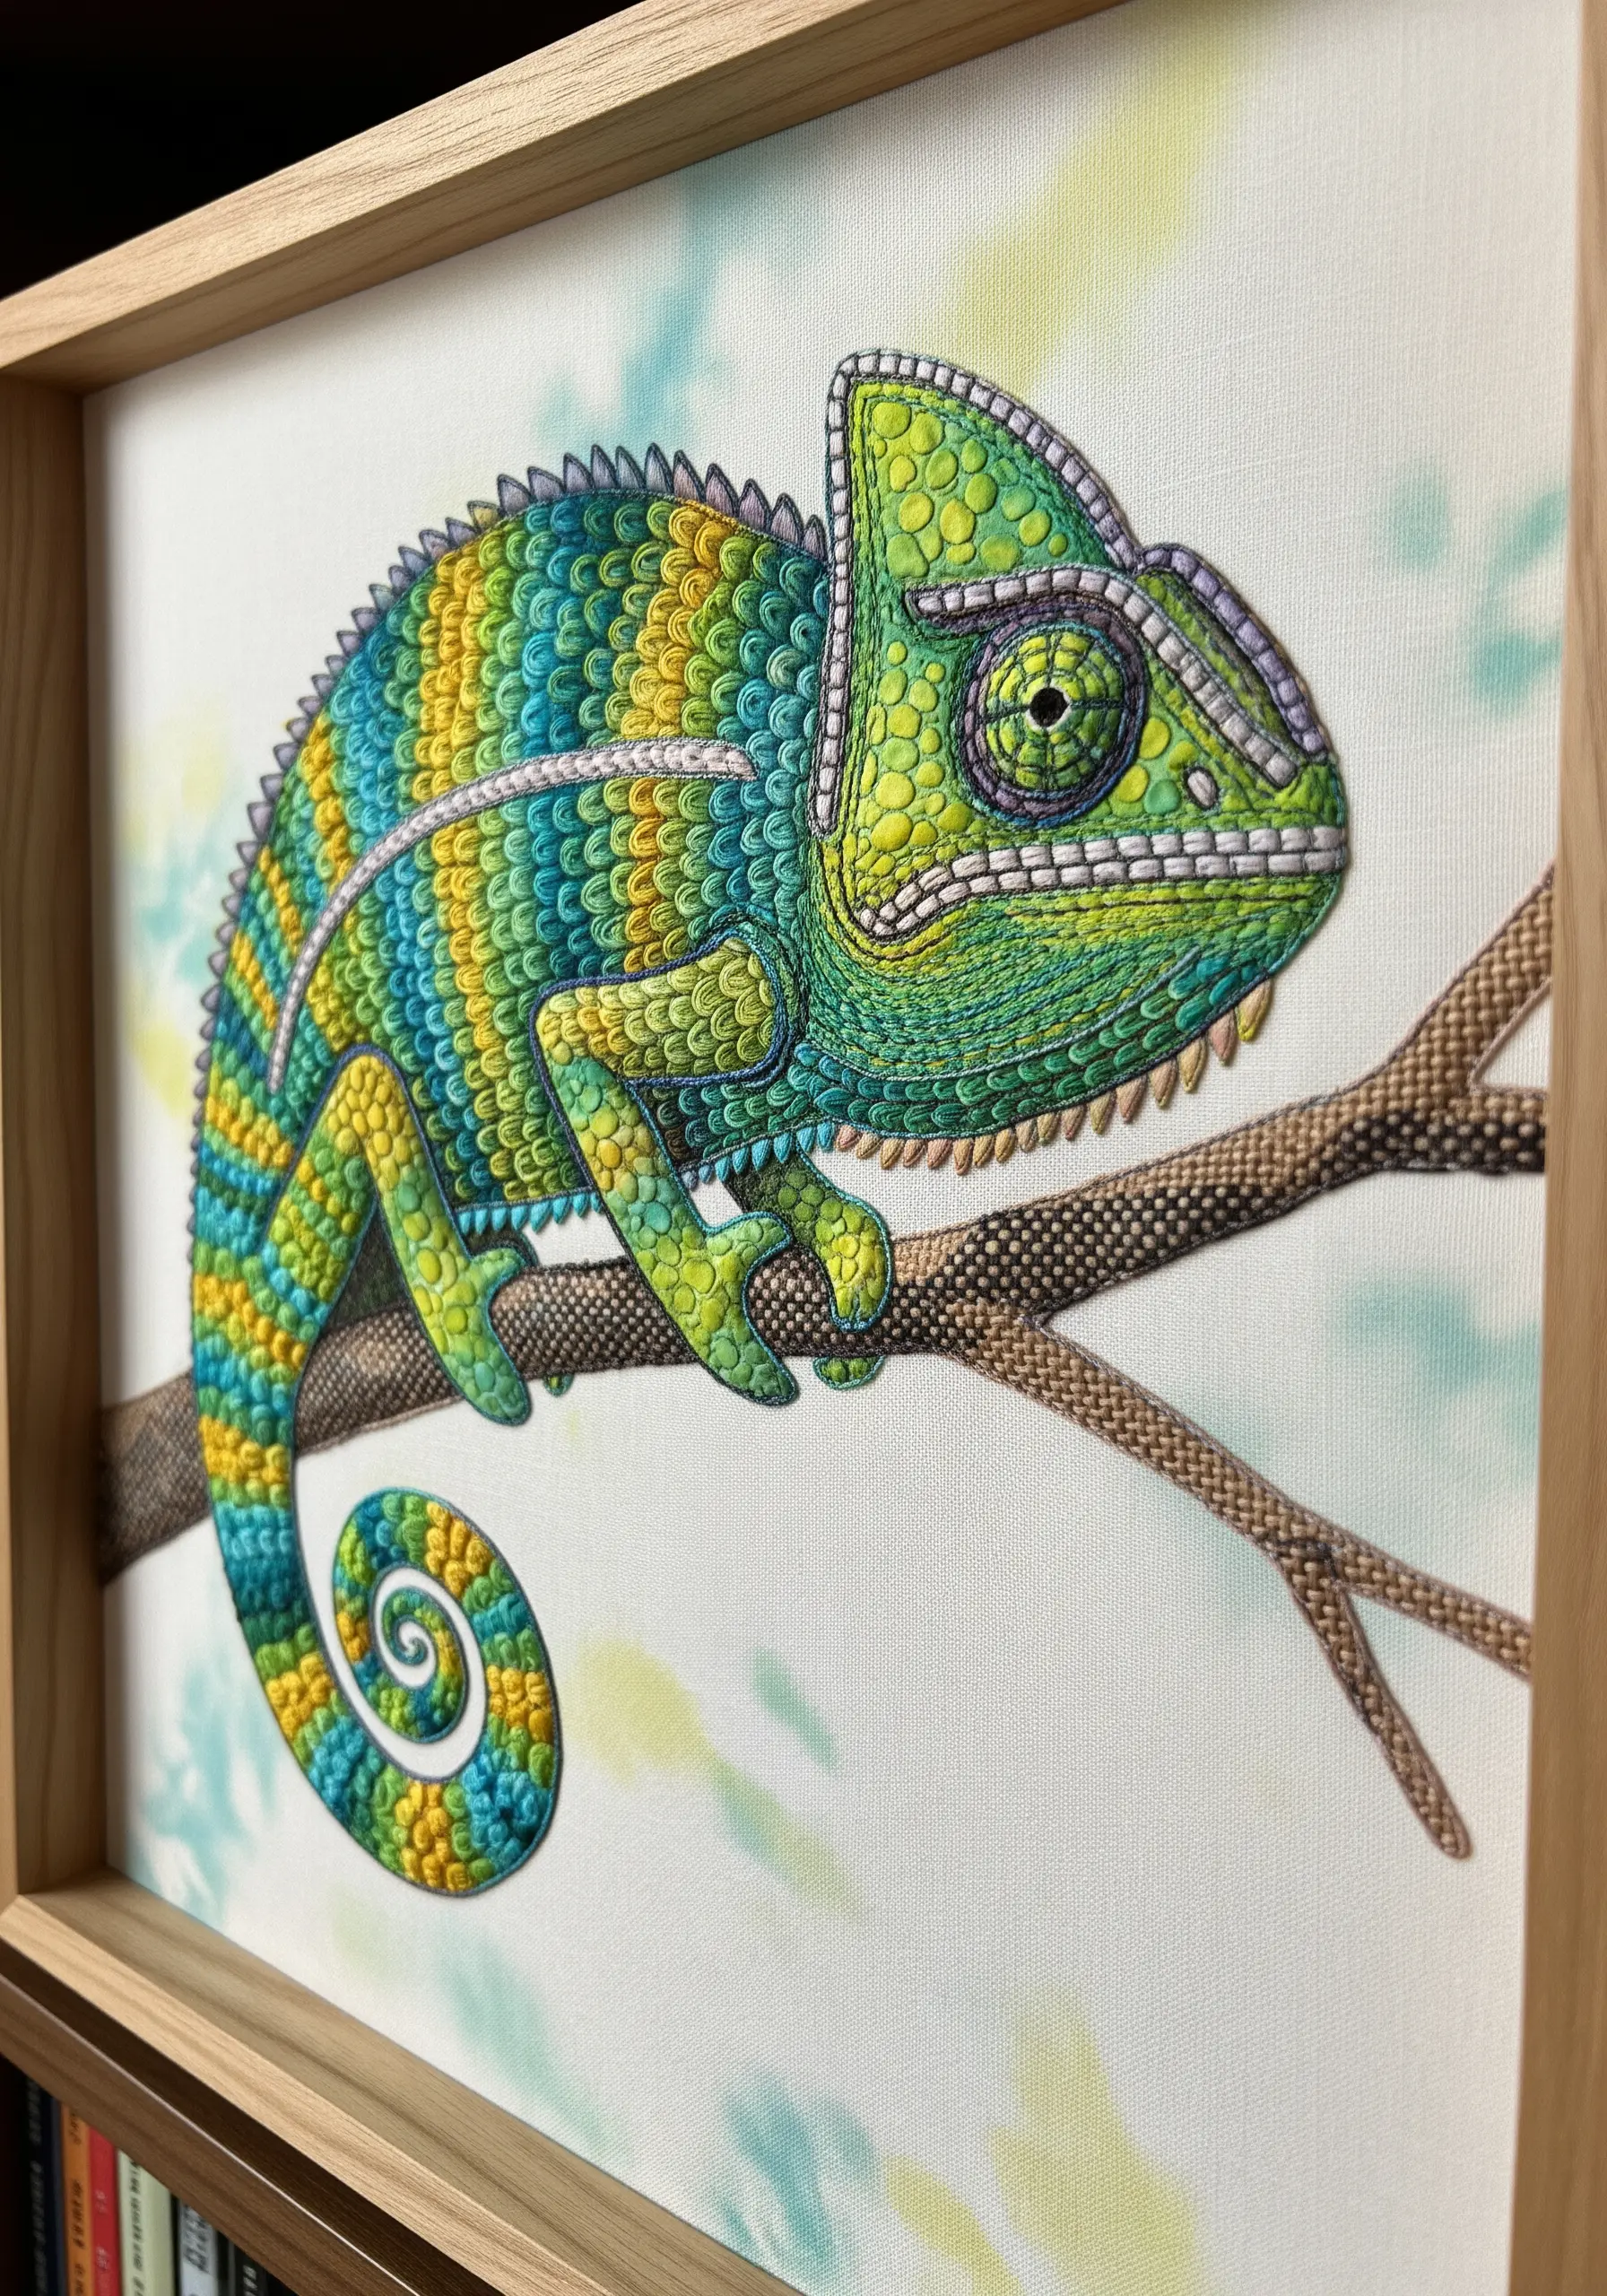
To replicate the unique, beaded texture of a chameleon’s skin, lay down a base of color with fabric appliqué or simple satin stitch.
Then, work over these areas with densely packed French knots using a range of greens, yellows, and blues.
Use a single strand of floss for tiny, tight knots and two strands for larger, more pronounced bumps.
This layering of knots over a colored ground creates an incredible, touchable texture that perfectly captures the reptile’s scaly appearance and adds life to the room.
10. Build Form with a Monochromatic Fabric Palette
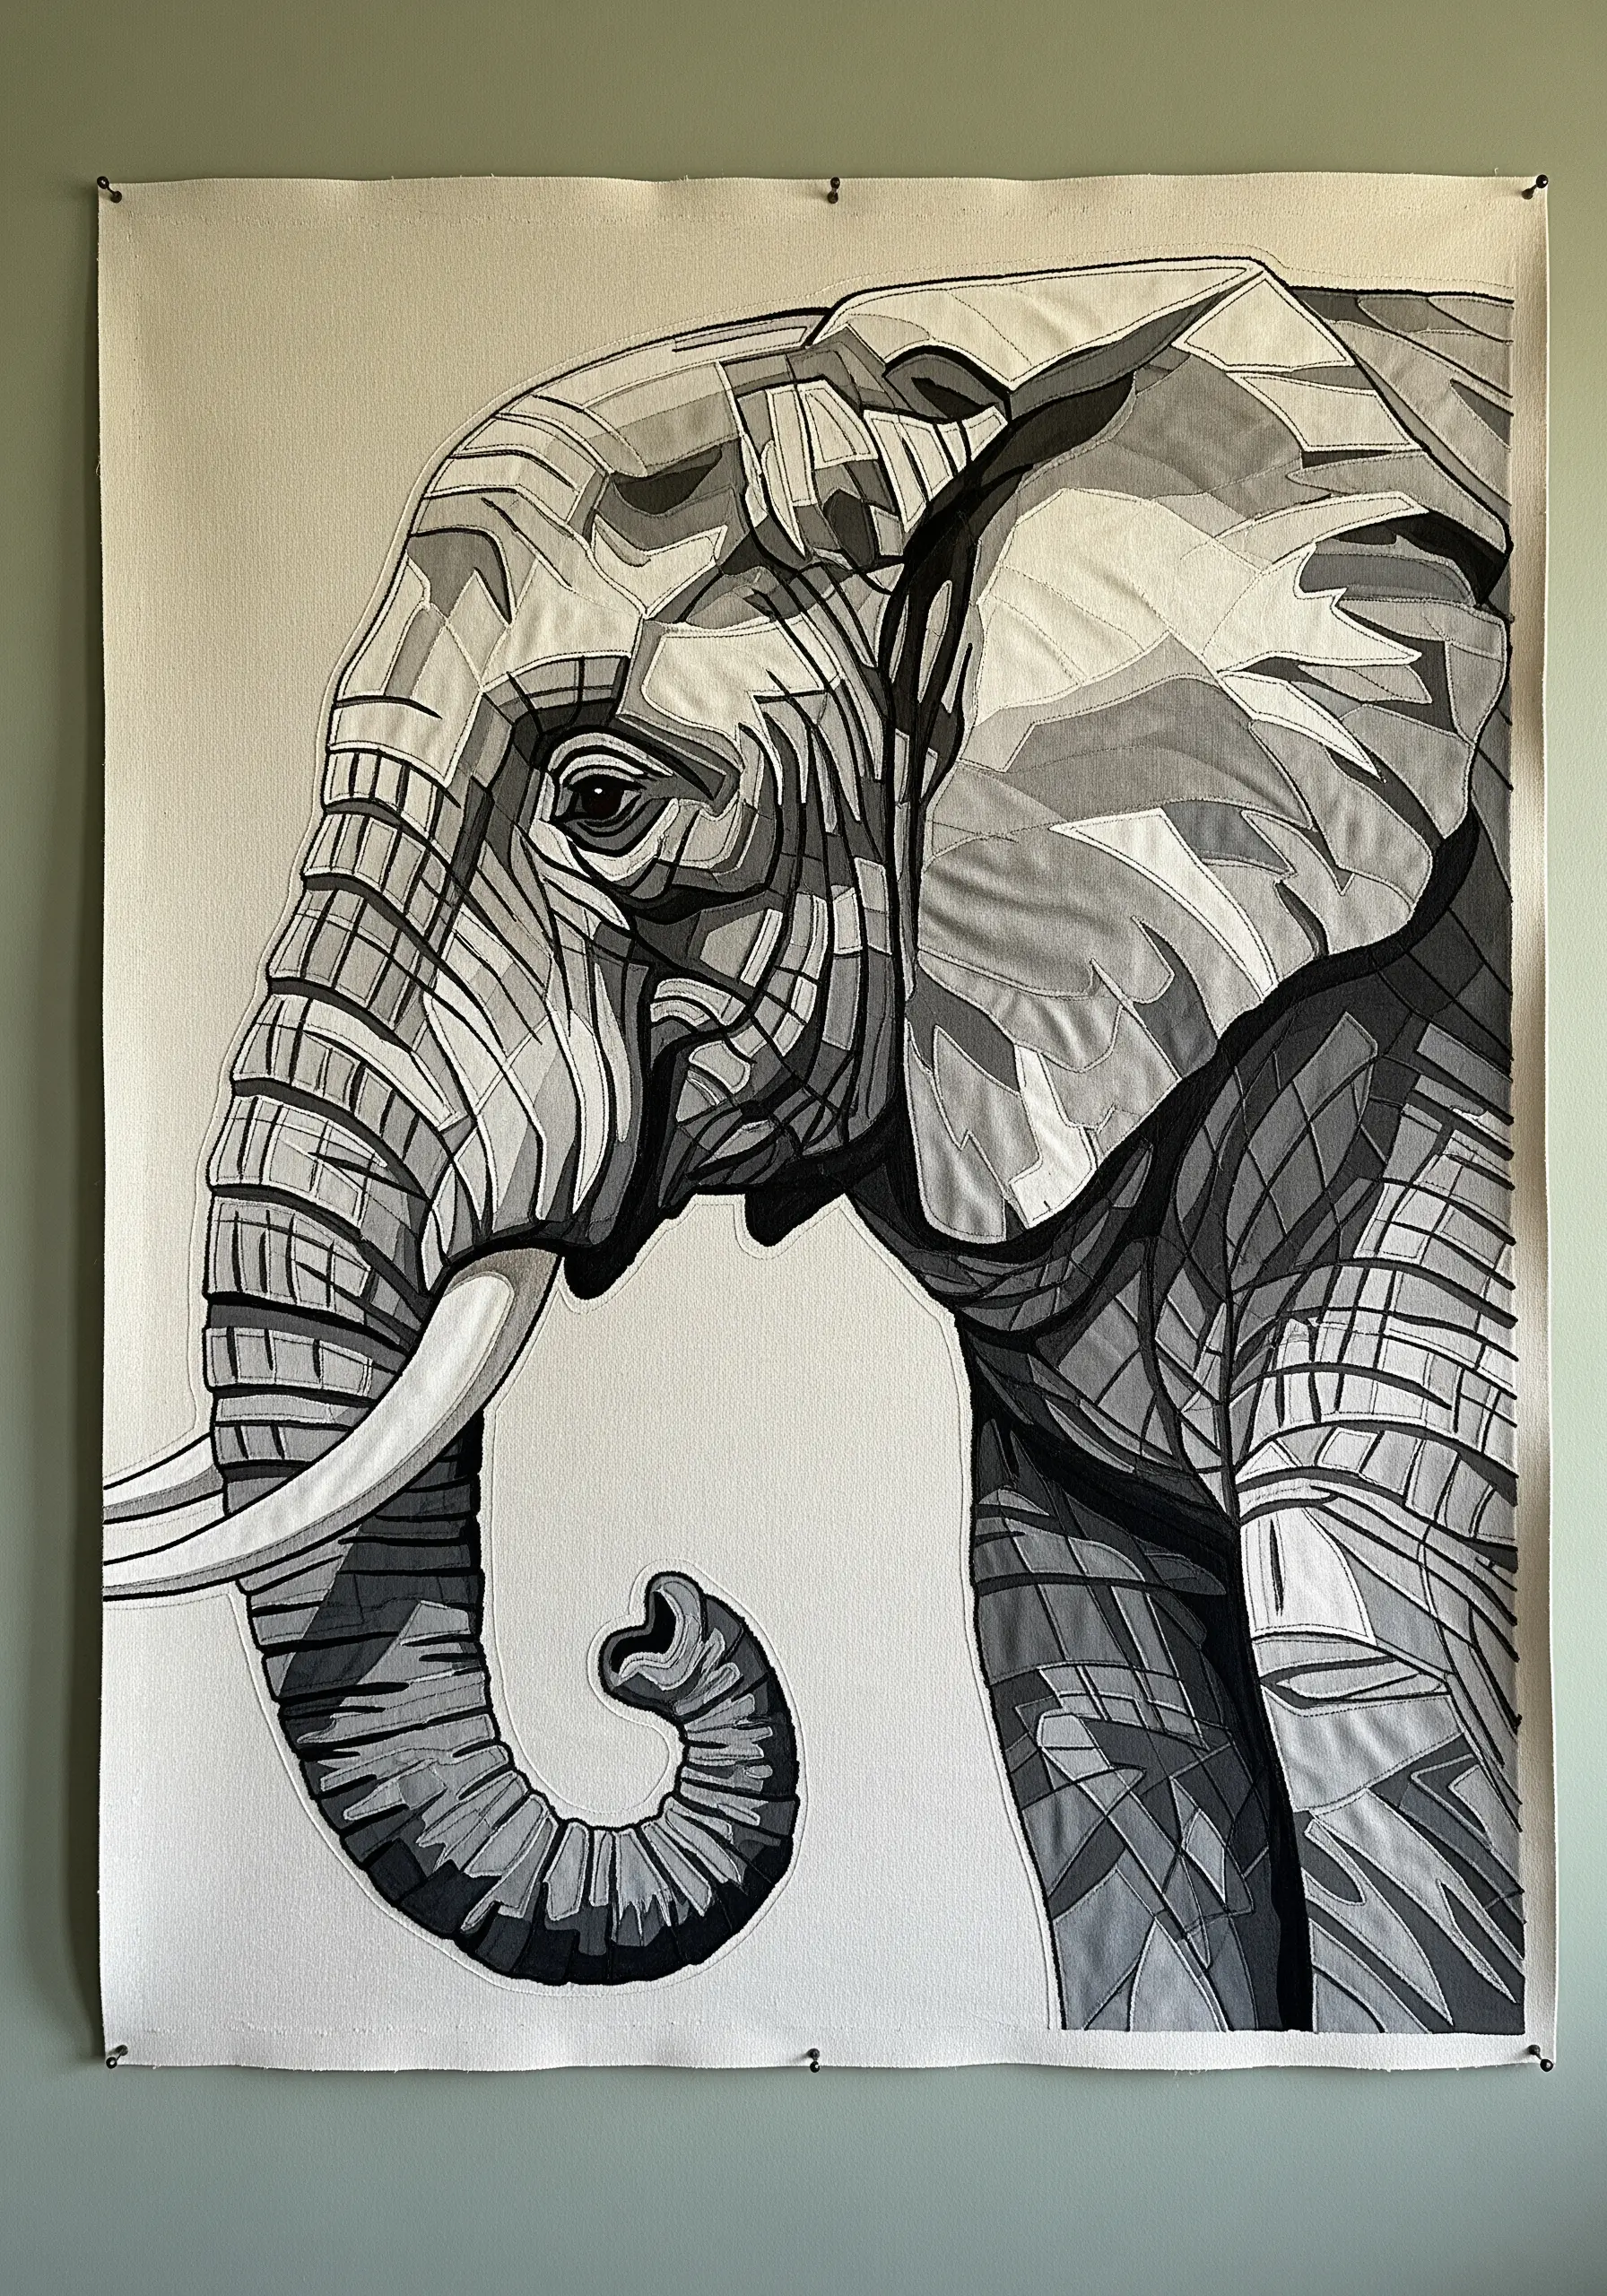
You don’t need a full spectrum of color to create a powerful portrait. Instead, focus on value by selecting fabrics in various shades of a single color, like grey.
Cut and layer pieces of light, medium, and dark grey fabric to sculpt the highlights and shadows of the elephant’s face.
Use clean, sharp lines in your appliqué to create a modern, almost geometric effect.
Add contour lines with a simple backstitch to represent wrinkles and folds, guiding the viewer’s eye and reinforcing the animal’s powerful form. This is a hallmark of monochrome embroidery wall art concepts.
11. Master Feather Direction with Thread Painting
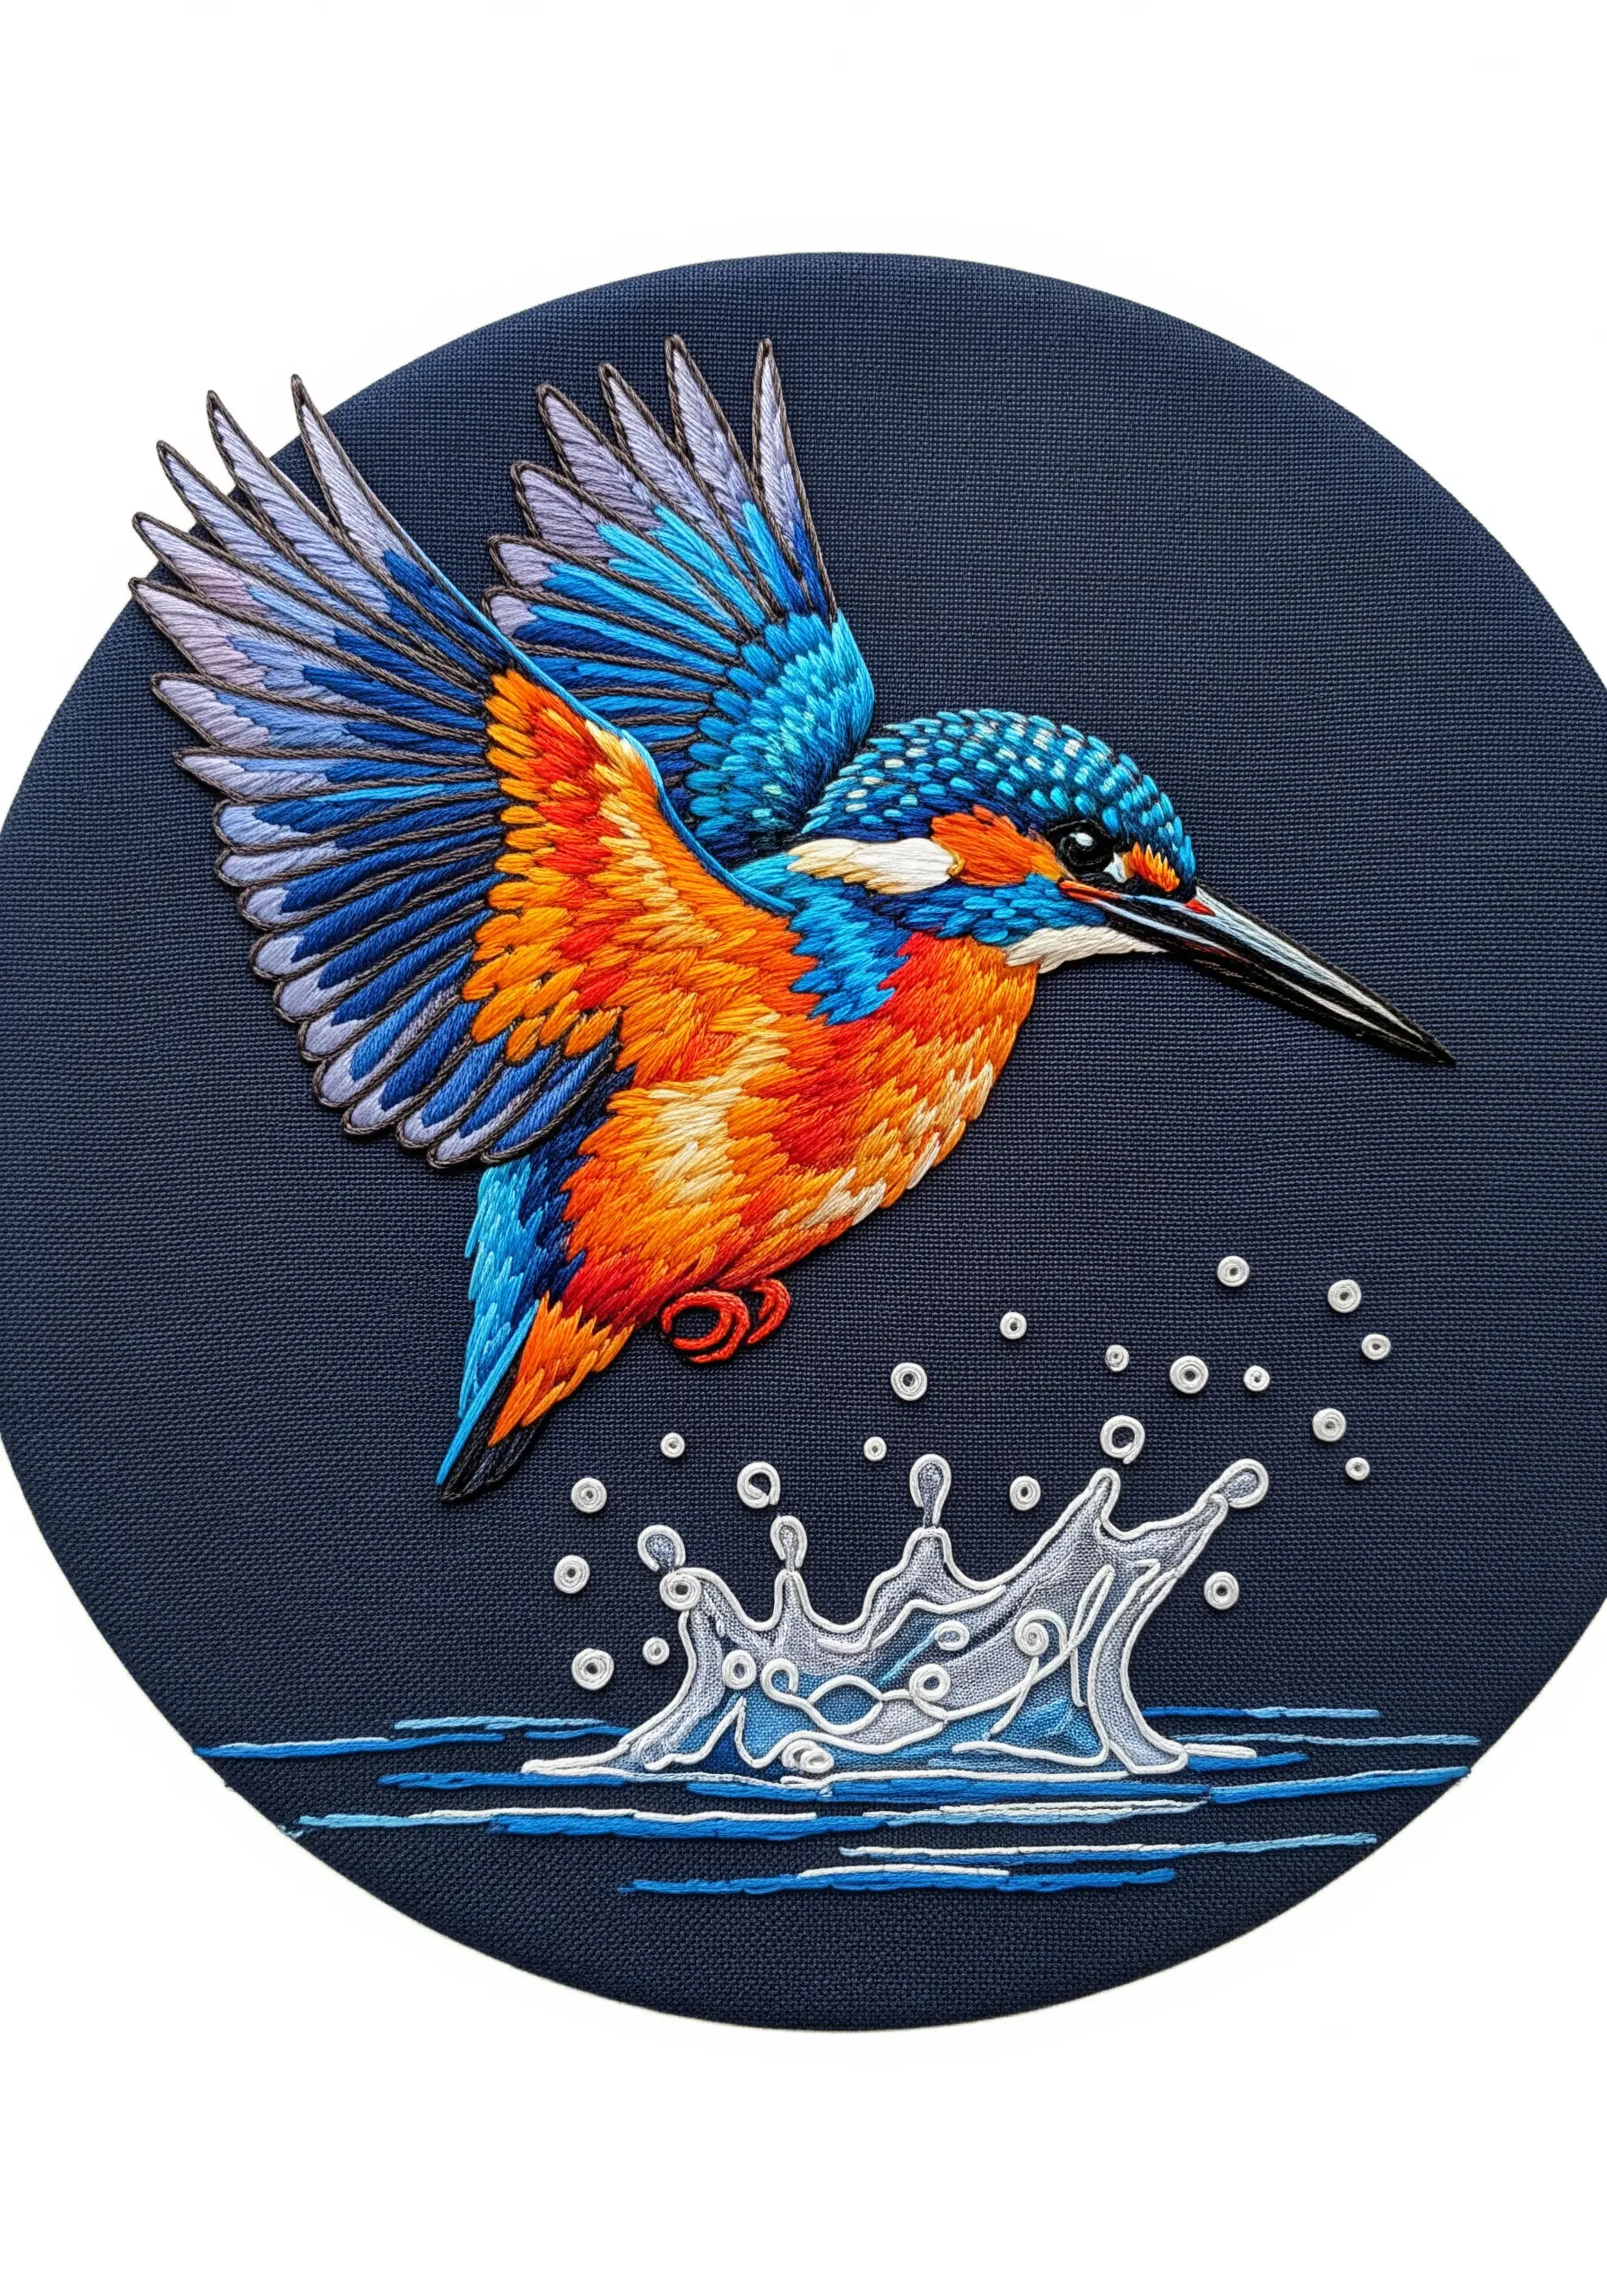
When thread painting birds, the direction of your stitches is everything. It dictates how light reflects off the ‘feathers’ and defines the creature’s shape.
For the wings, use long, straight stitches that radiate from the body. For the head and chest, use shorter, curved stitches that follow the animal’s contours.
Work in small sections, blending vibrant oranges, blues, and purples with long-and-short stitches to create a smooth, iridescent finish.
The deep navy background ensures every bright thread stands out, turning your hoop into a dramatic work of abstract thread painting.
12. Suggest Translucence with Sheer Organza Layers

To capture the ethereal quality of a jellyfish, use sheer fabrics like organza or tulle as your primary material.
Cut the shape of the bell and layer several pieces of white or iridescent organza, stitching them down with fine, almost invisible thread.
This layering creates a ghostly, translucent effect. For the tentacles, use a mix of delicate threads: fine metallic cords, single strands of silk floss, and even beaded wire.
Letting them hang freely adds movement and realism, making these fabric collage embroidery projects using sheer fabrics feel truly alive.
13. Combine Appliqué and Satin Stitch for a Clean Finish
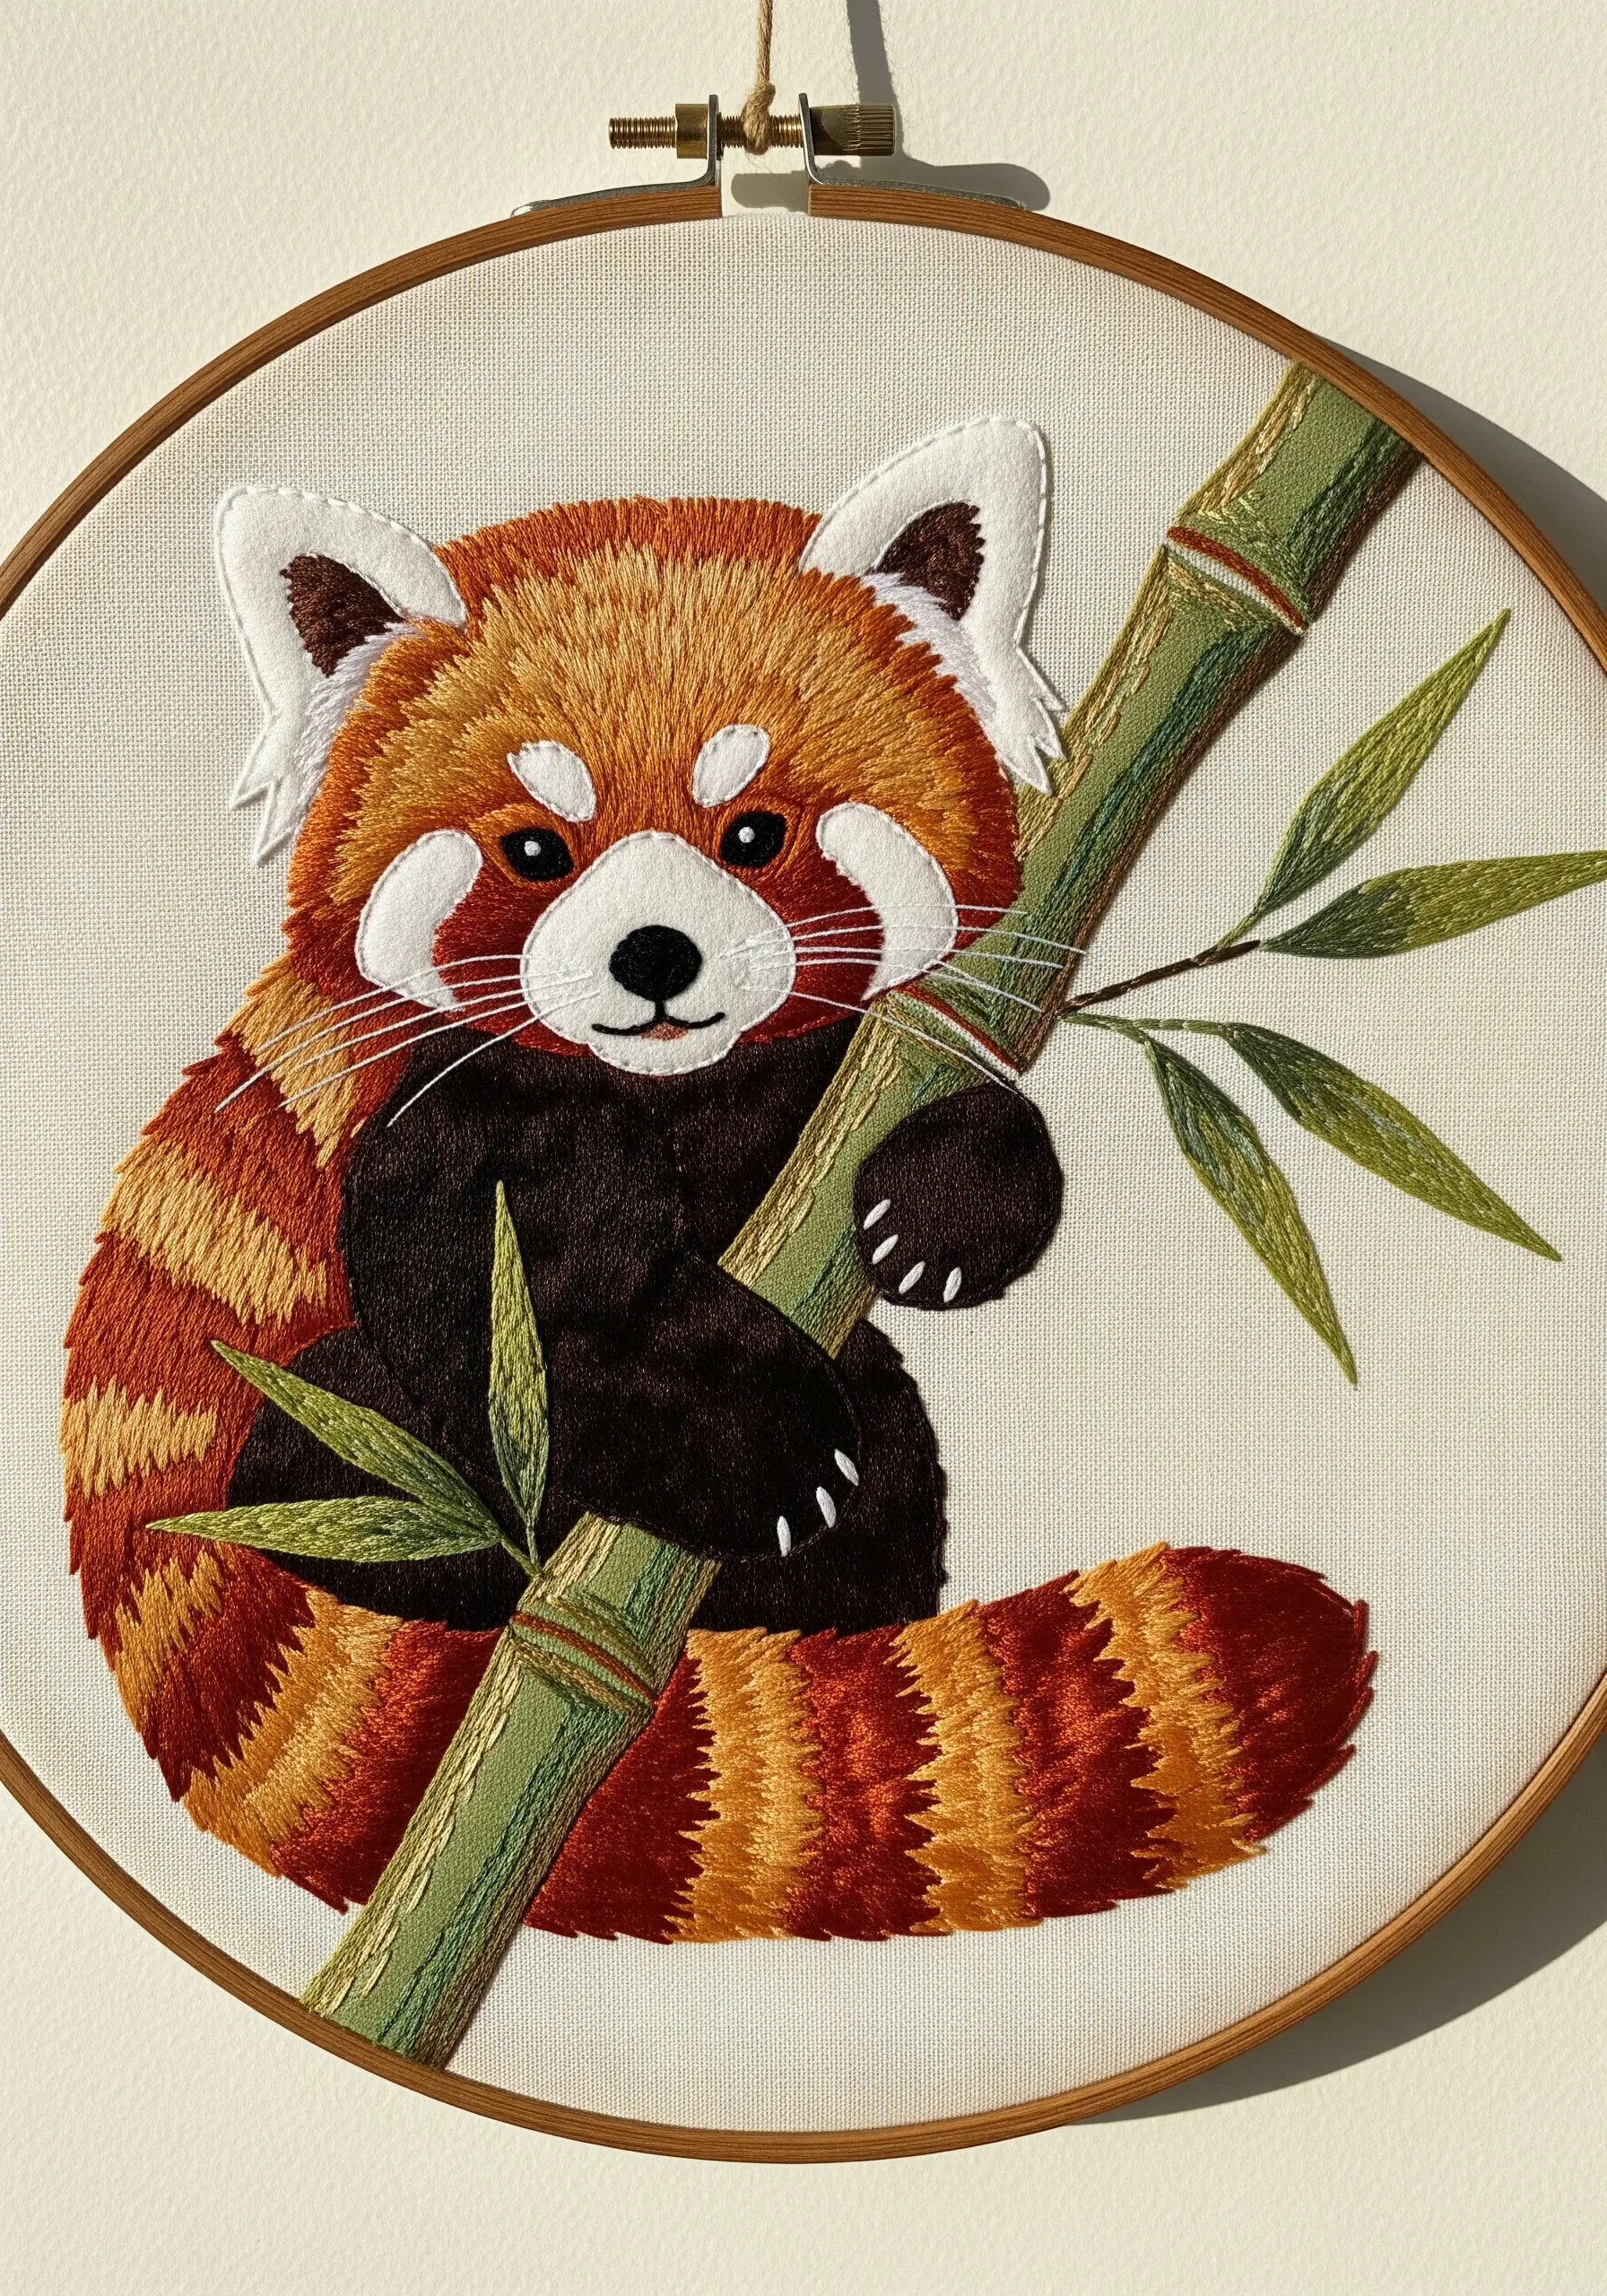
For a clean, graphic style, use felt or non-fraying cotton for your appliqué pieces.
Tack down the fabric shapes for the red panda’s body and face, then completely cover the raw edges with a dense, smooth satin stitch.
This technique creates a sharp, polished outline that looks almost like a high-quality patch.
Use long-and-short stitch for the furrier parts like the tail and cheeks to add soft texture that contrasts beautifully with the crisp outlines.
14. Enhance a Drawing with Delicate Line Work
Fabric collage doesn’t always mean covering the entire surface. Start by lightly sketching or transferring your design onto the fabric.
Use fabric paints or inks to add soft washes of color for the base tones. Then, use a single strand of dark brown or black thread to add selective detail.
Focus your stitching on key areas: the outline of the ears, the flick of fur on the cheeks, and the delicate whiskers.
This minimalist approach preserves the lightness of the drawing while adding just enough texture to make it a meaningful, personalized keepsake.
15. Layer Satin Fabric for a Glossy Feather Effect
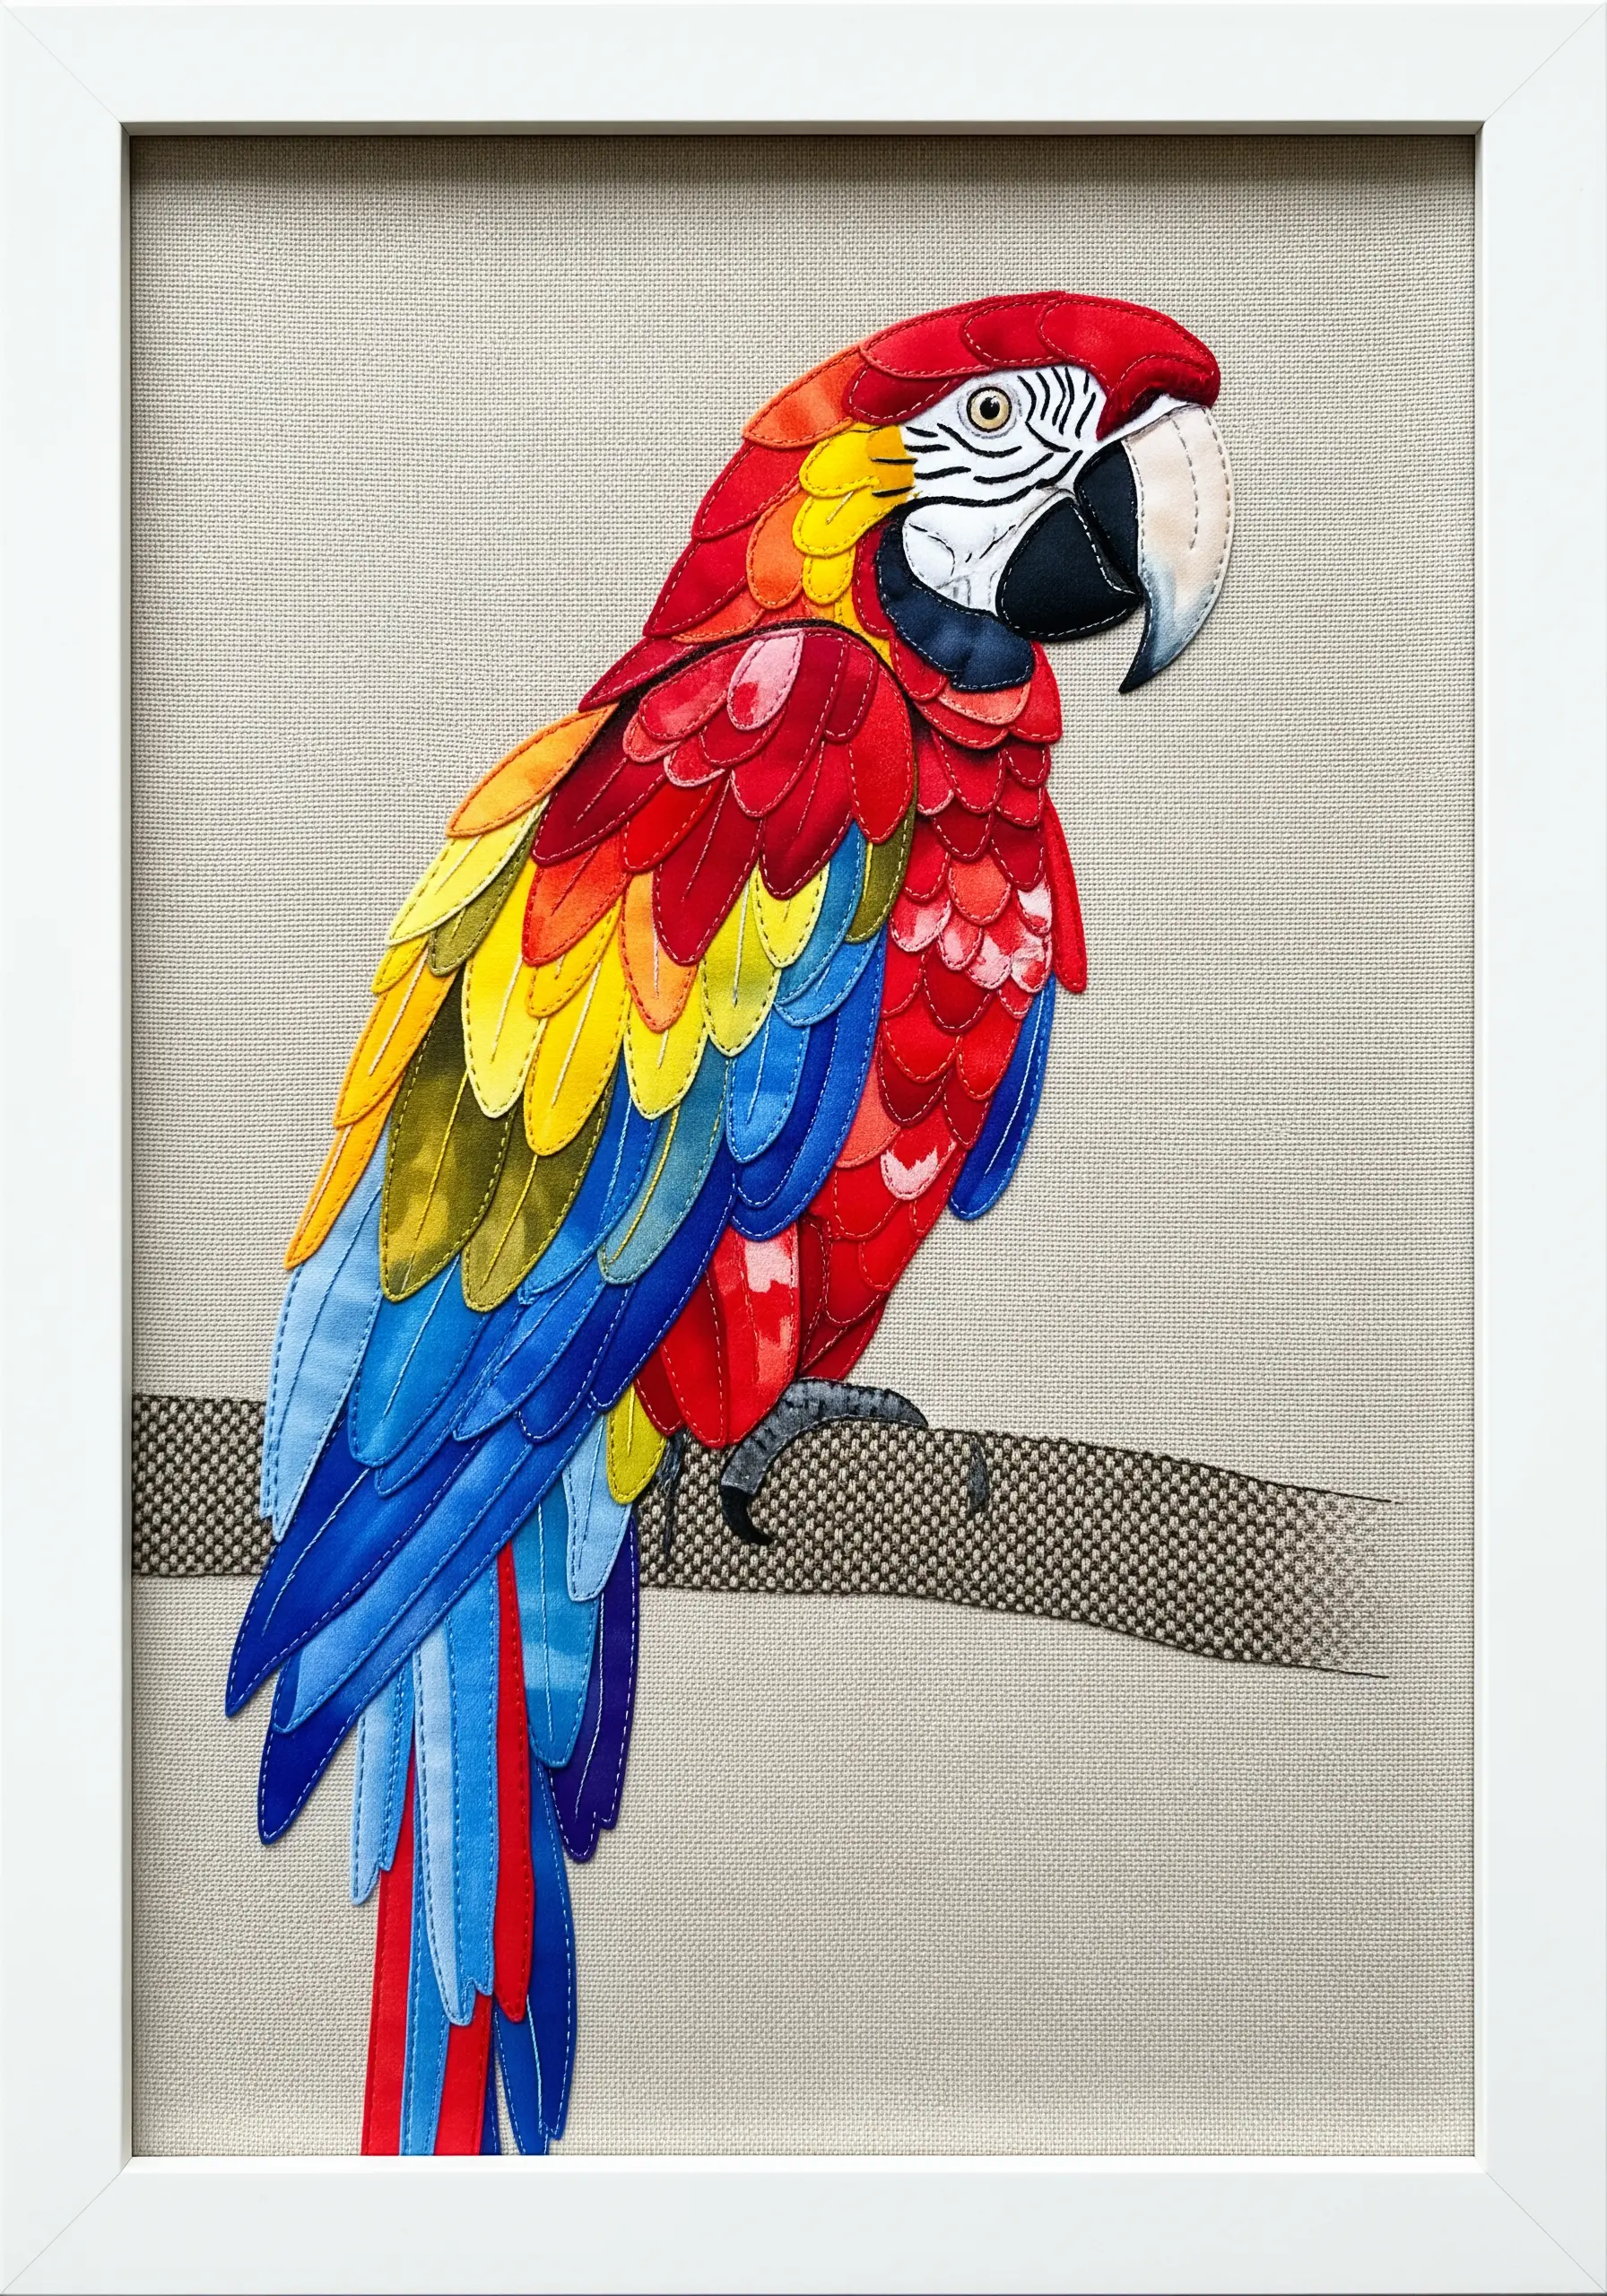
The natural sheen of satin fabric makes it the perfect choice for creating the vibrant, glossy feathers of a macaw.
Cut individual feather shapes from different colors of satin, making sure to cut on the bias to minimize fraying.
Arrange them in overlapping layers, starting from the tail and working your way up the body, just as feathers naturally grow.
A single stitch down the center of each fabric piece will secure it while allowing the edges to lift slightly, enhancing the layered, realistic look.
16. Couch Metallic Cords for Bold, Clean Outlines
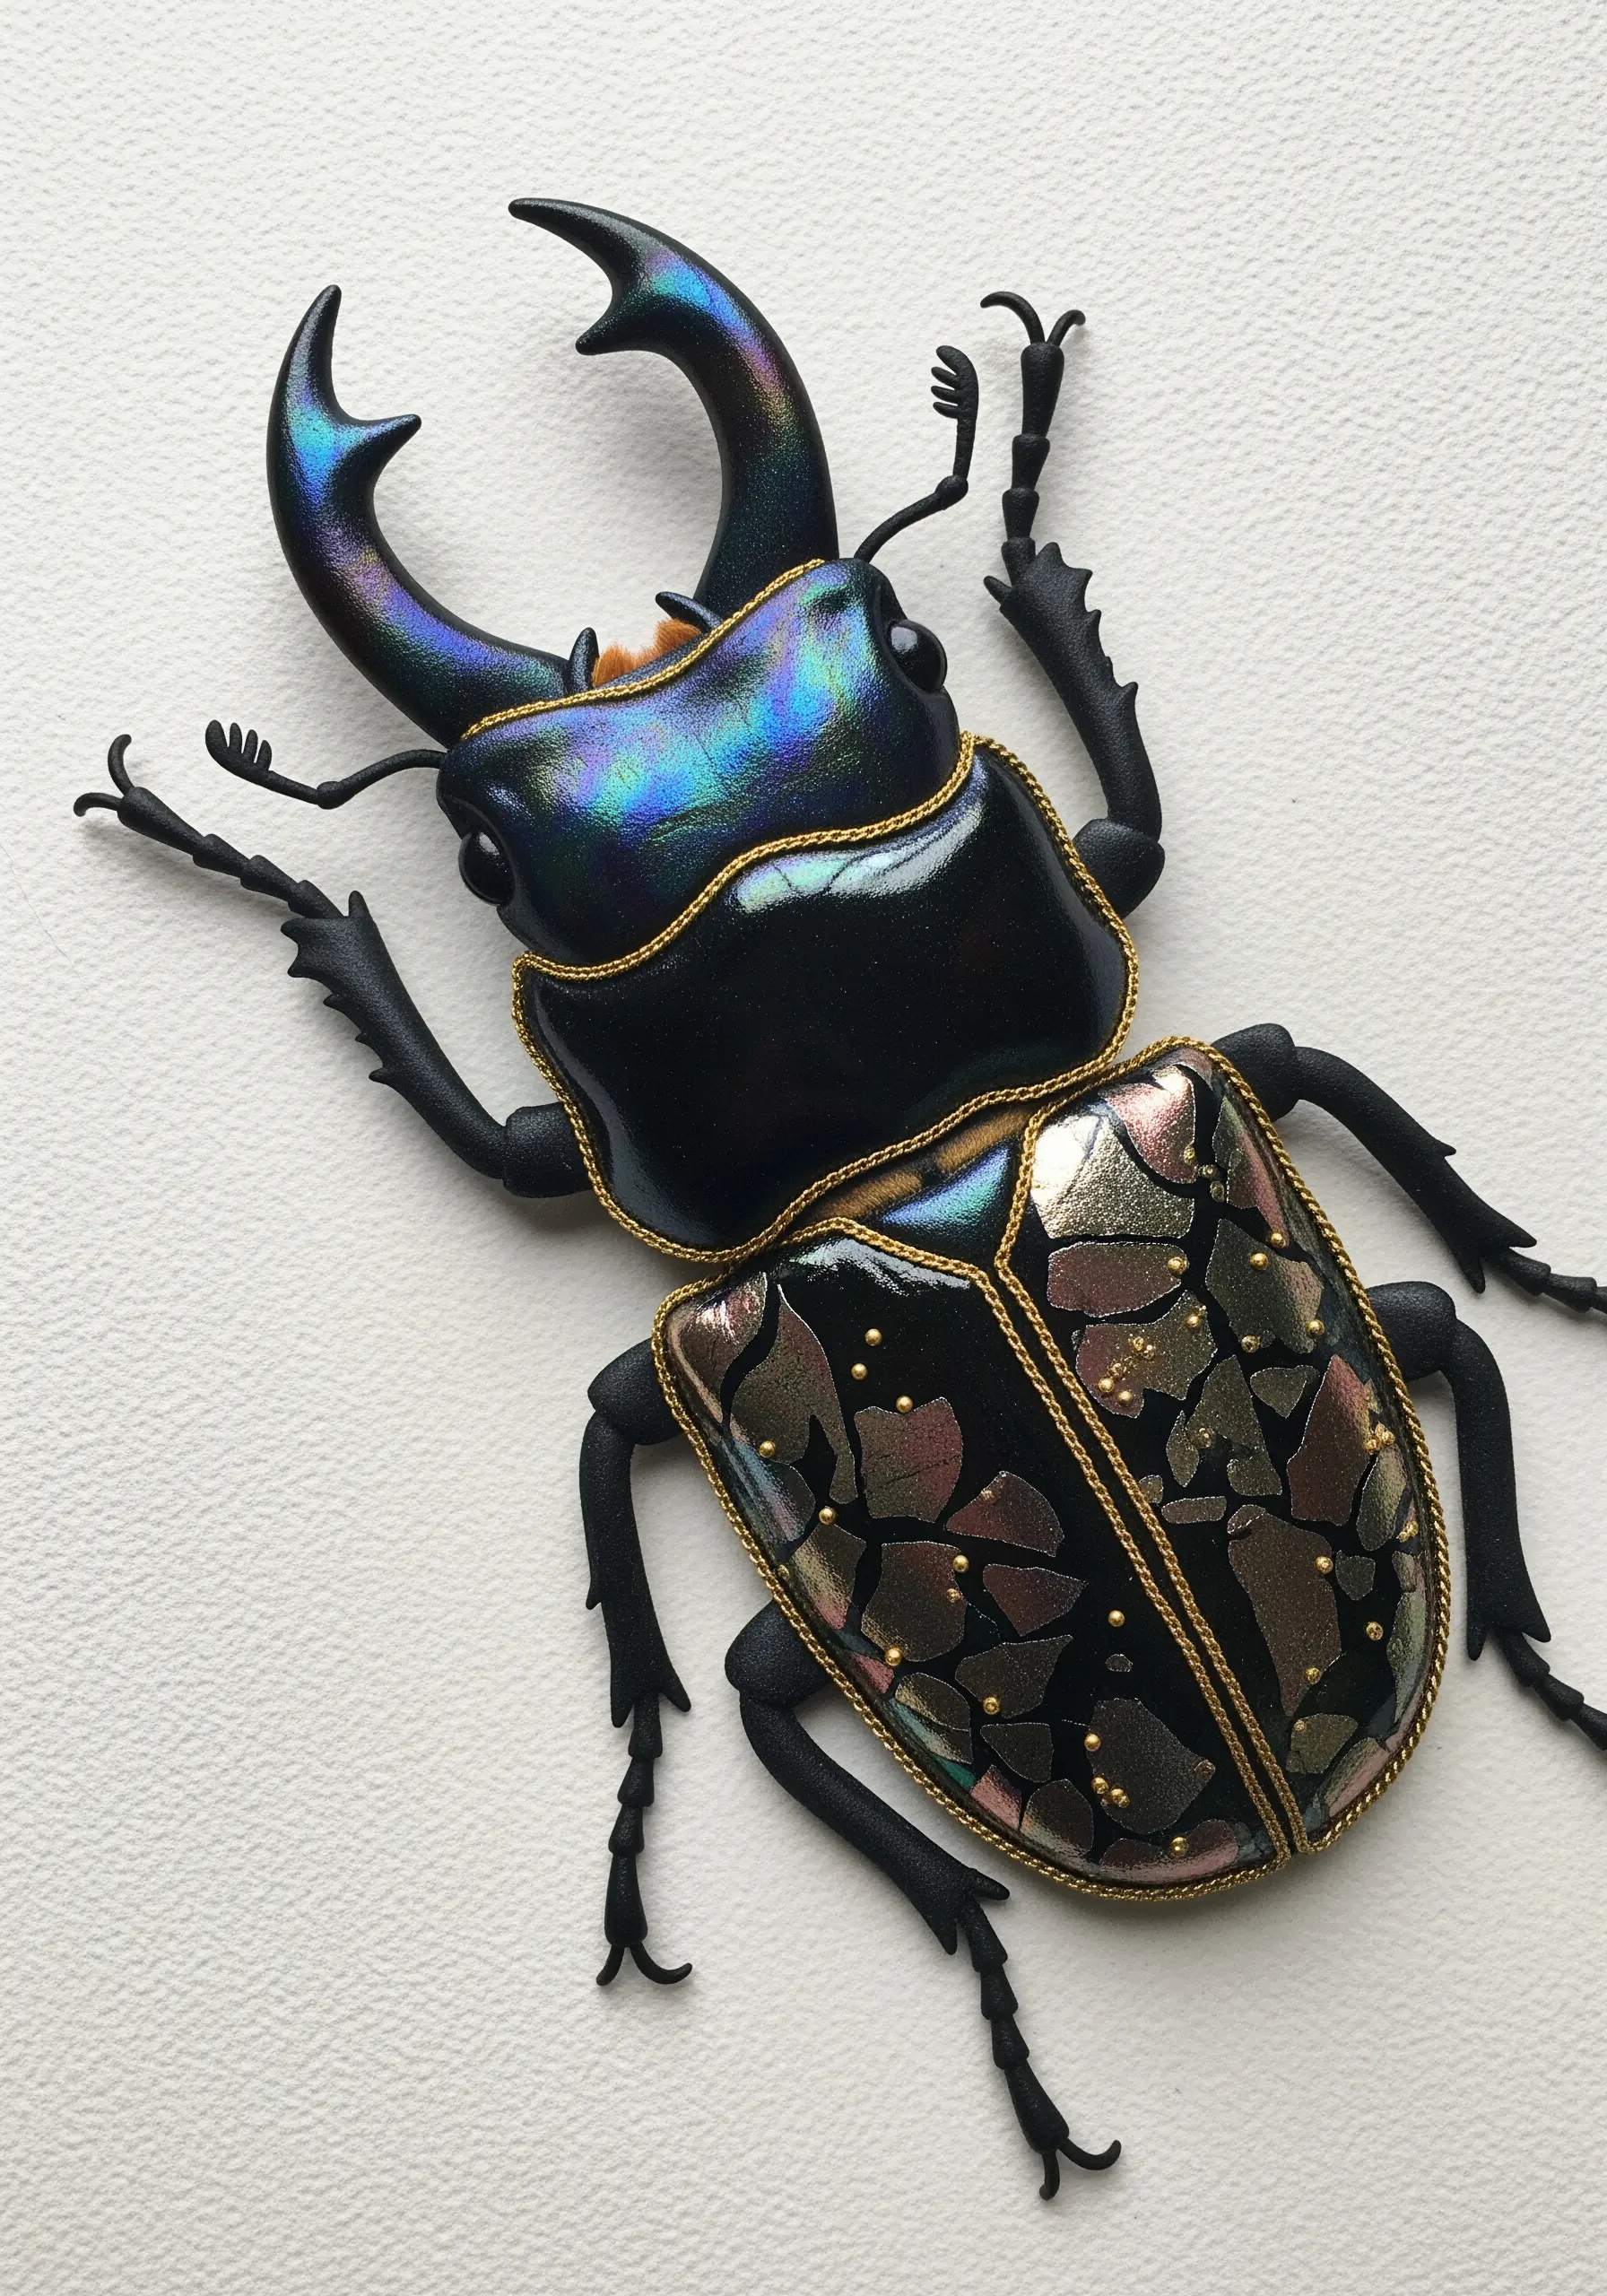
When working with non-traditional materials like iridescent faux leather, you need a technique that provides a strong, defined edge.
Couching is the perfect solution. Lay a thick metallic cord along the edge of your appliqué shape, then use a second, finer thread to tack it down with small, perpendicular stitches.
This creates a raised, decorative outline that cleanly separates the different elements of your design and adds a luxurious, jewel-like finish.
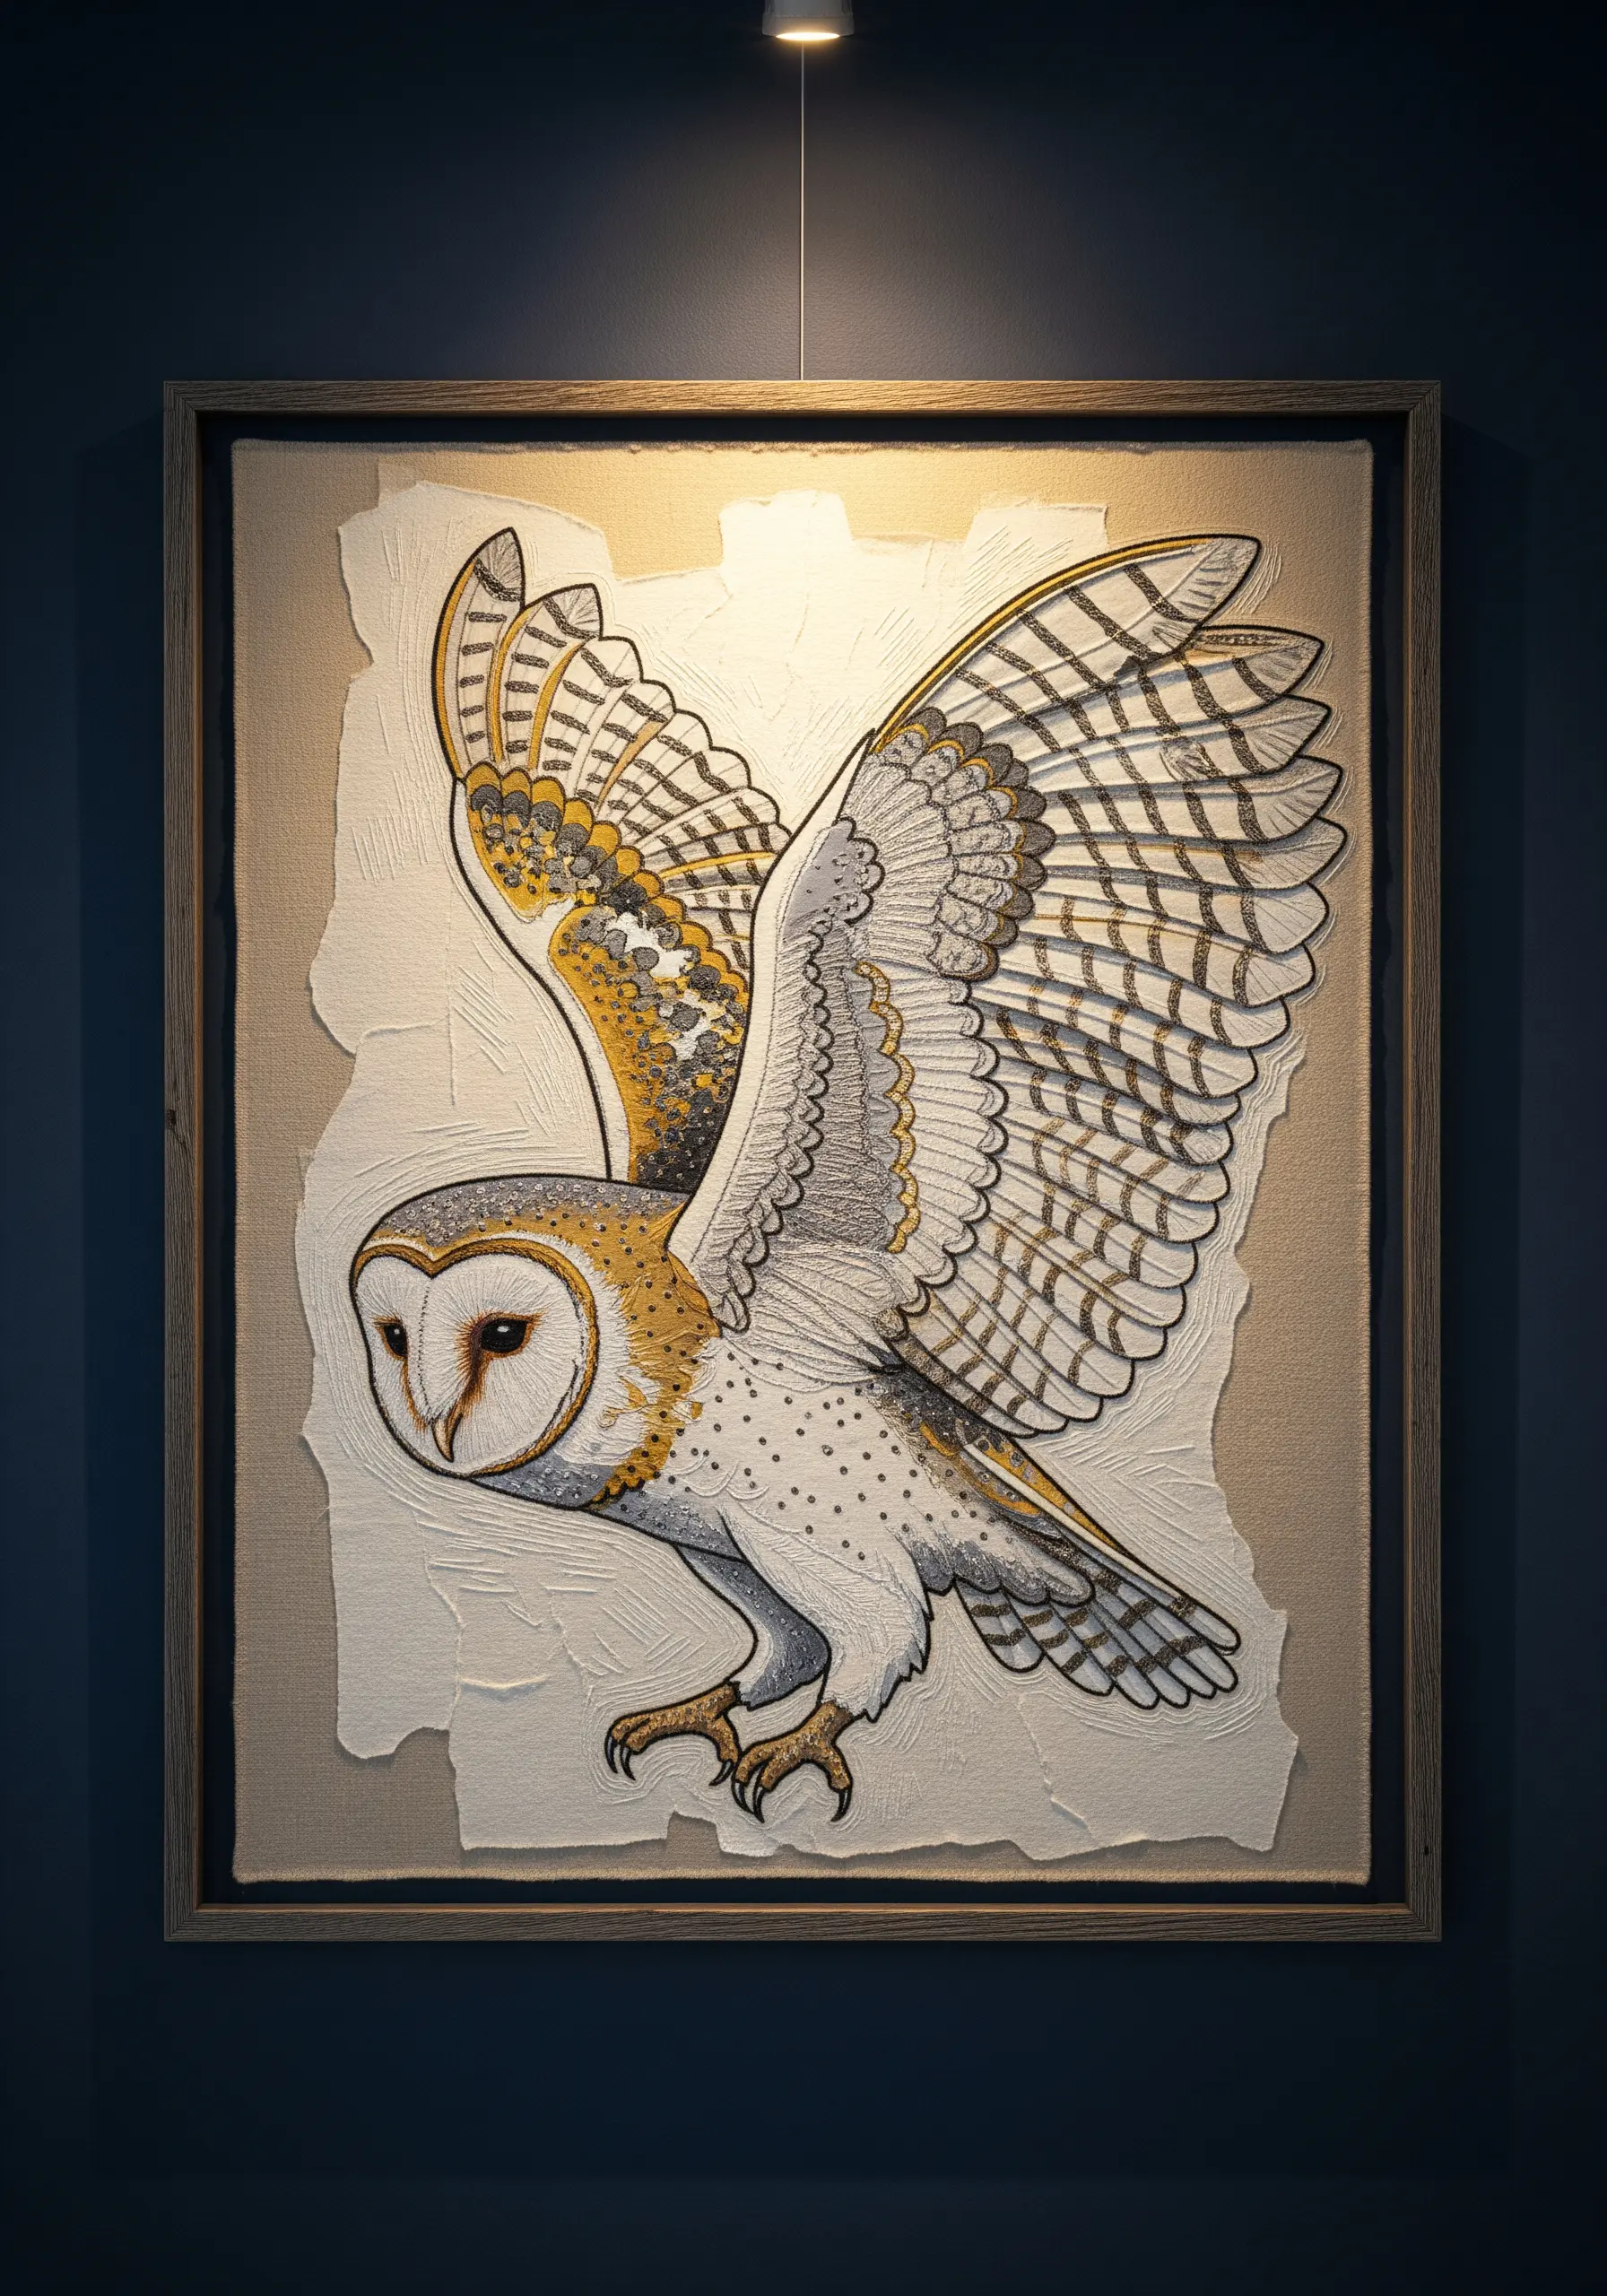
17. Create Depth with White-on-White Textures
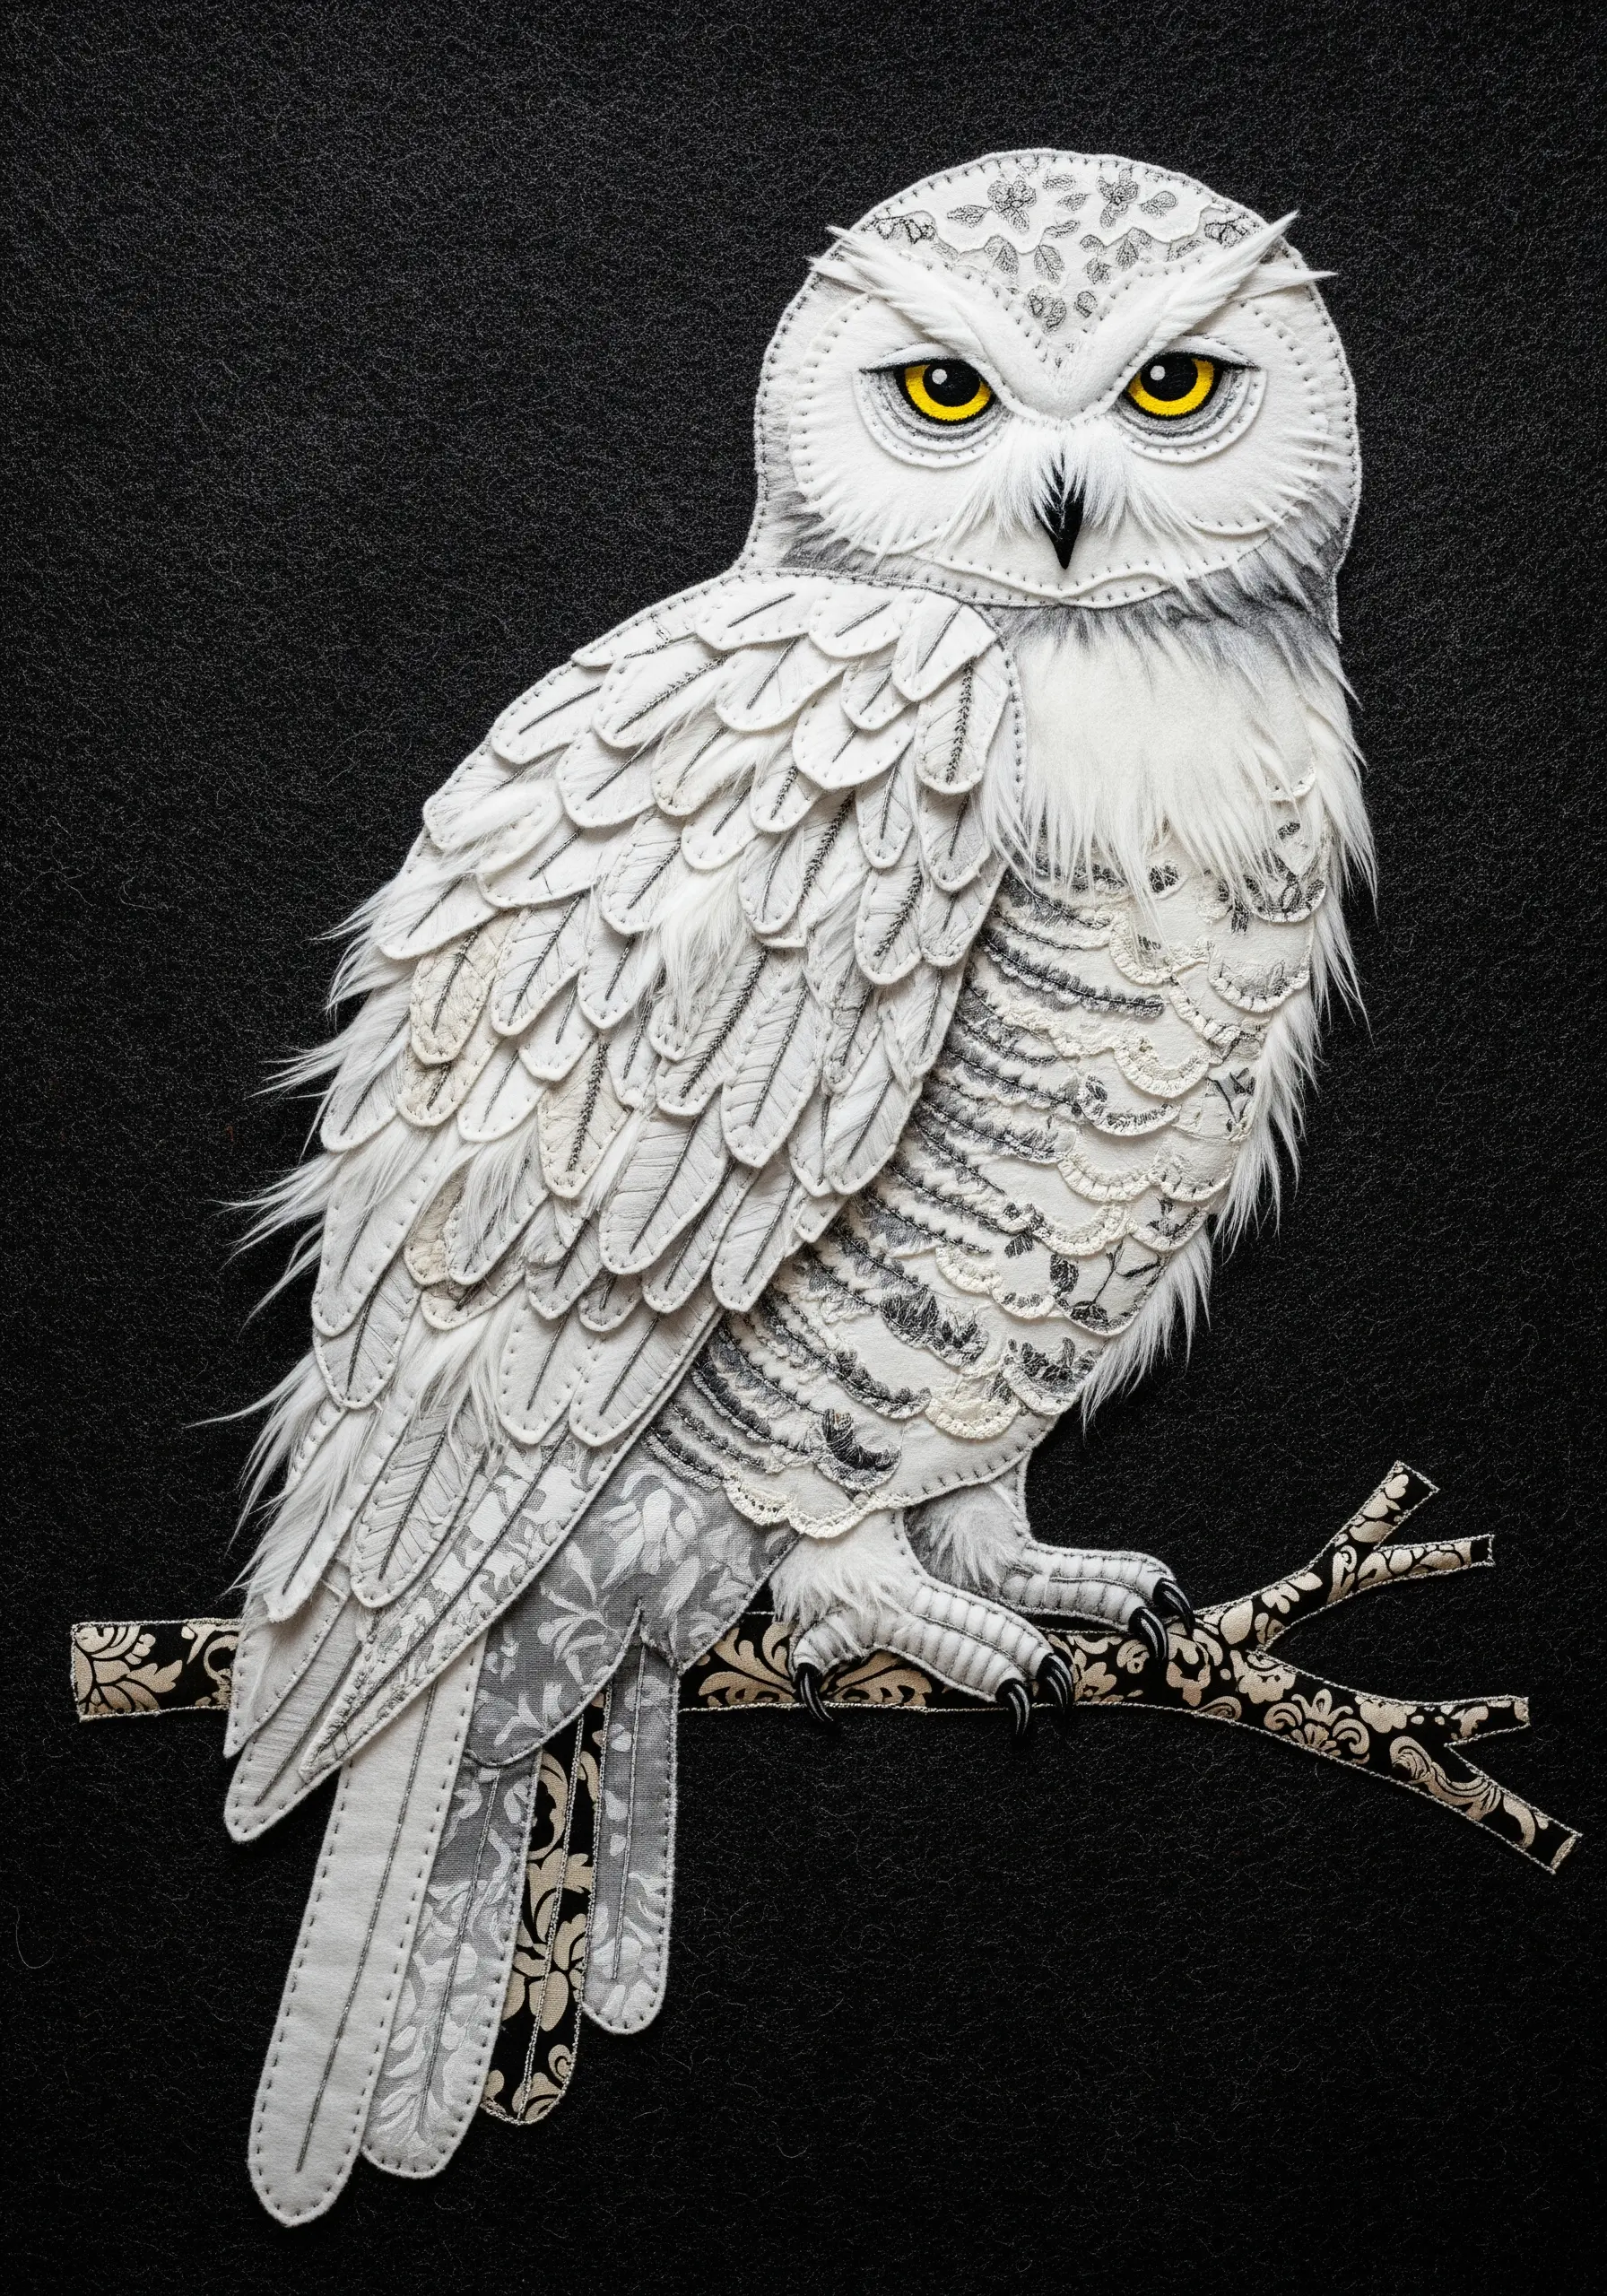
A monochrome palette challenges you to focus on texture. To create this snowy owl, gather a variety of white and pale grey fabrics: lace, damask, linen, and even thin faux fur.
Cut feather shapes and body parts, layering the different materials to build form and interest.
The subtle patterns in the lace and damask add detail without color, while the faux fur adds a soft, downy texture around the face.
This approach uses tone-on-tone embroidery techniques to create a stunningly complex piece from a simple color scheme.
18. Use Negative Space to Suggest Water and Movement
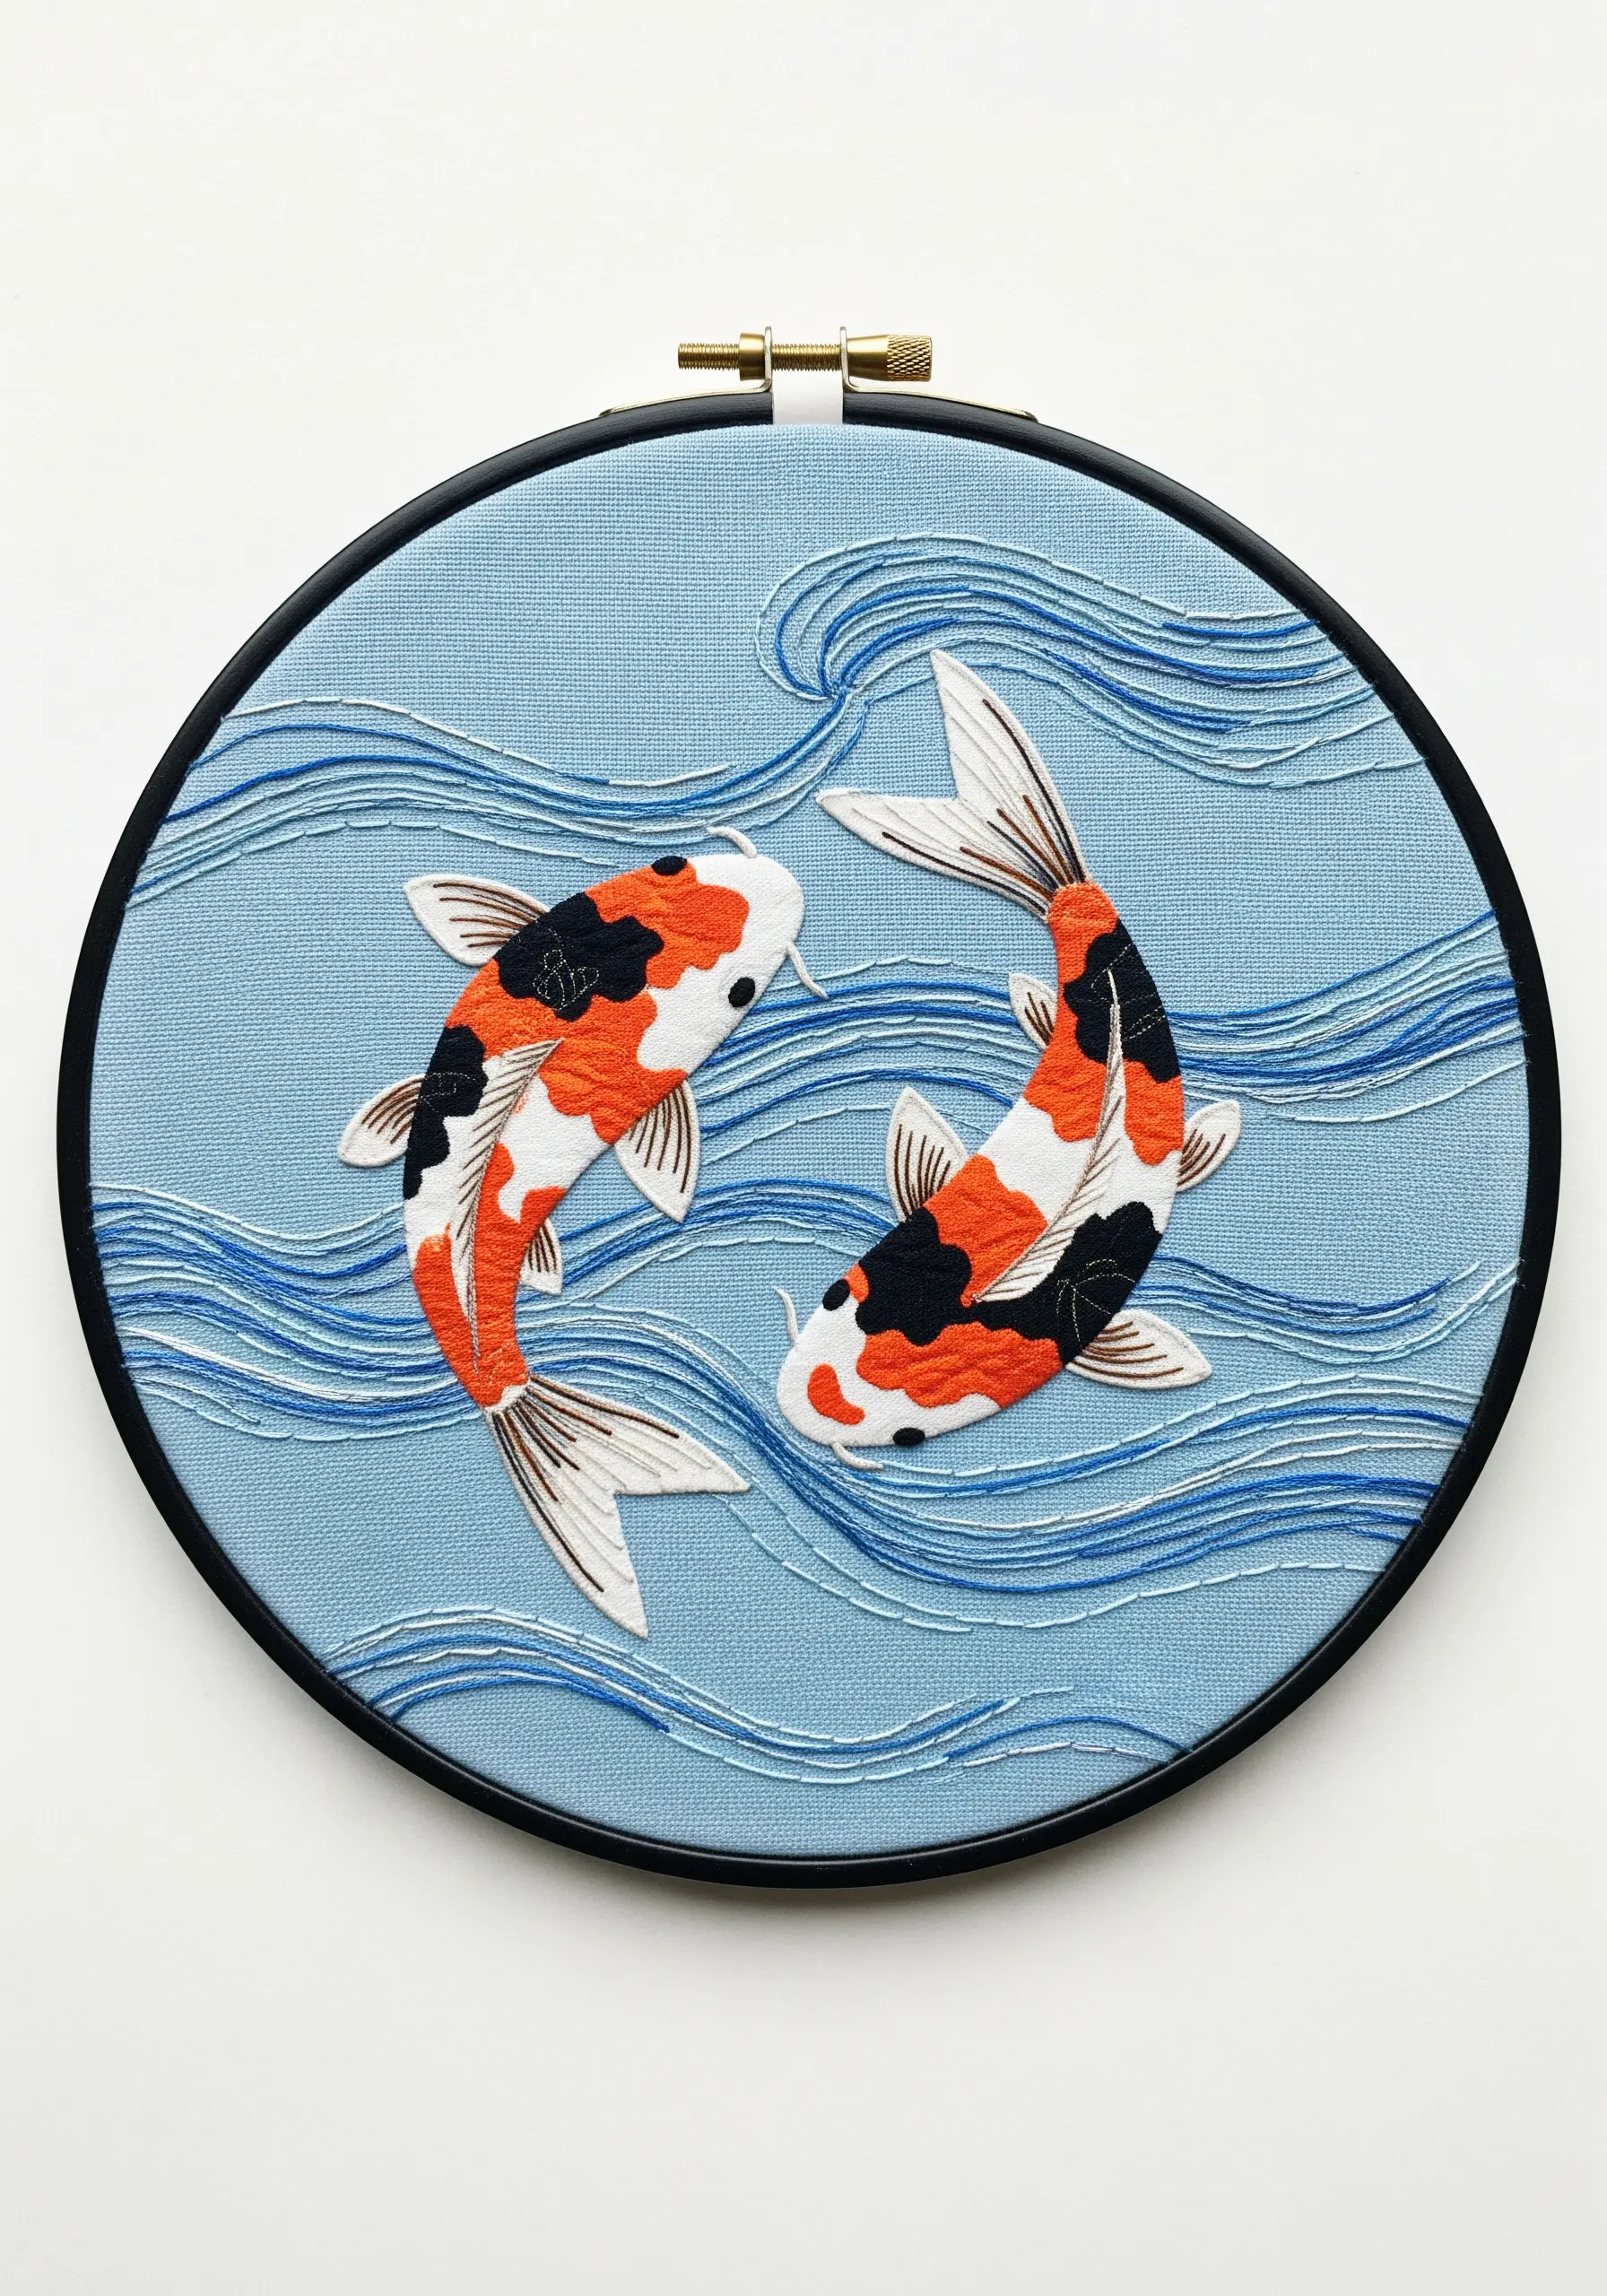
In this composition, the space around the subjects is just as important as the subjects themselves.
After creating the koi fish with fabric appliqué, use simple, wavy lines of backstitch or stem stitch to represent the water.
By spacing these lines apart, you allow the background fabric to show through, creating a sense of clarity and depth.
Vary the shades of blue thread and the curve of your lines to give the water a fluid, dynamic feel, a core principle in Japanese Zen-inspired embroidery designs.
19. Vary Stitch Length and Angle for Wild Fur
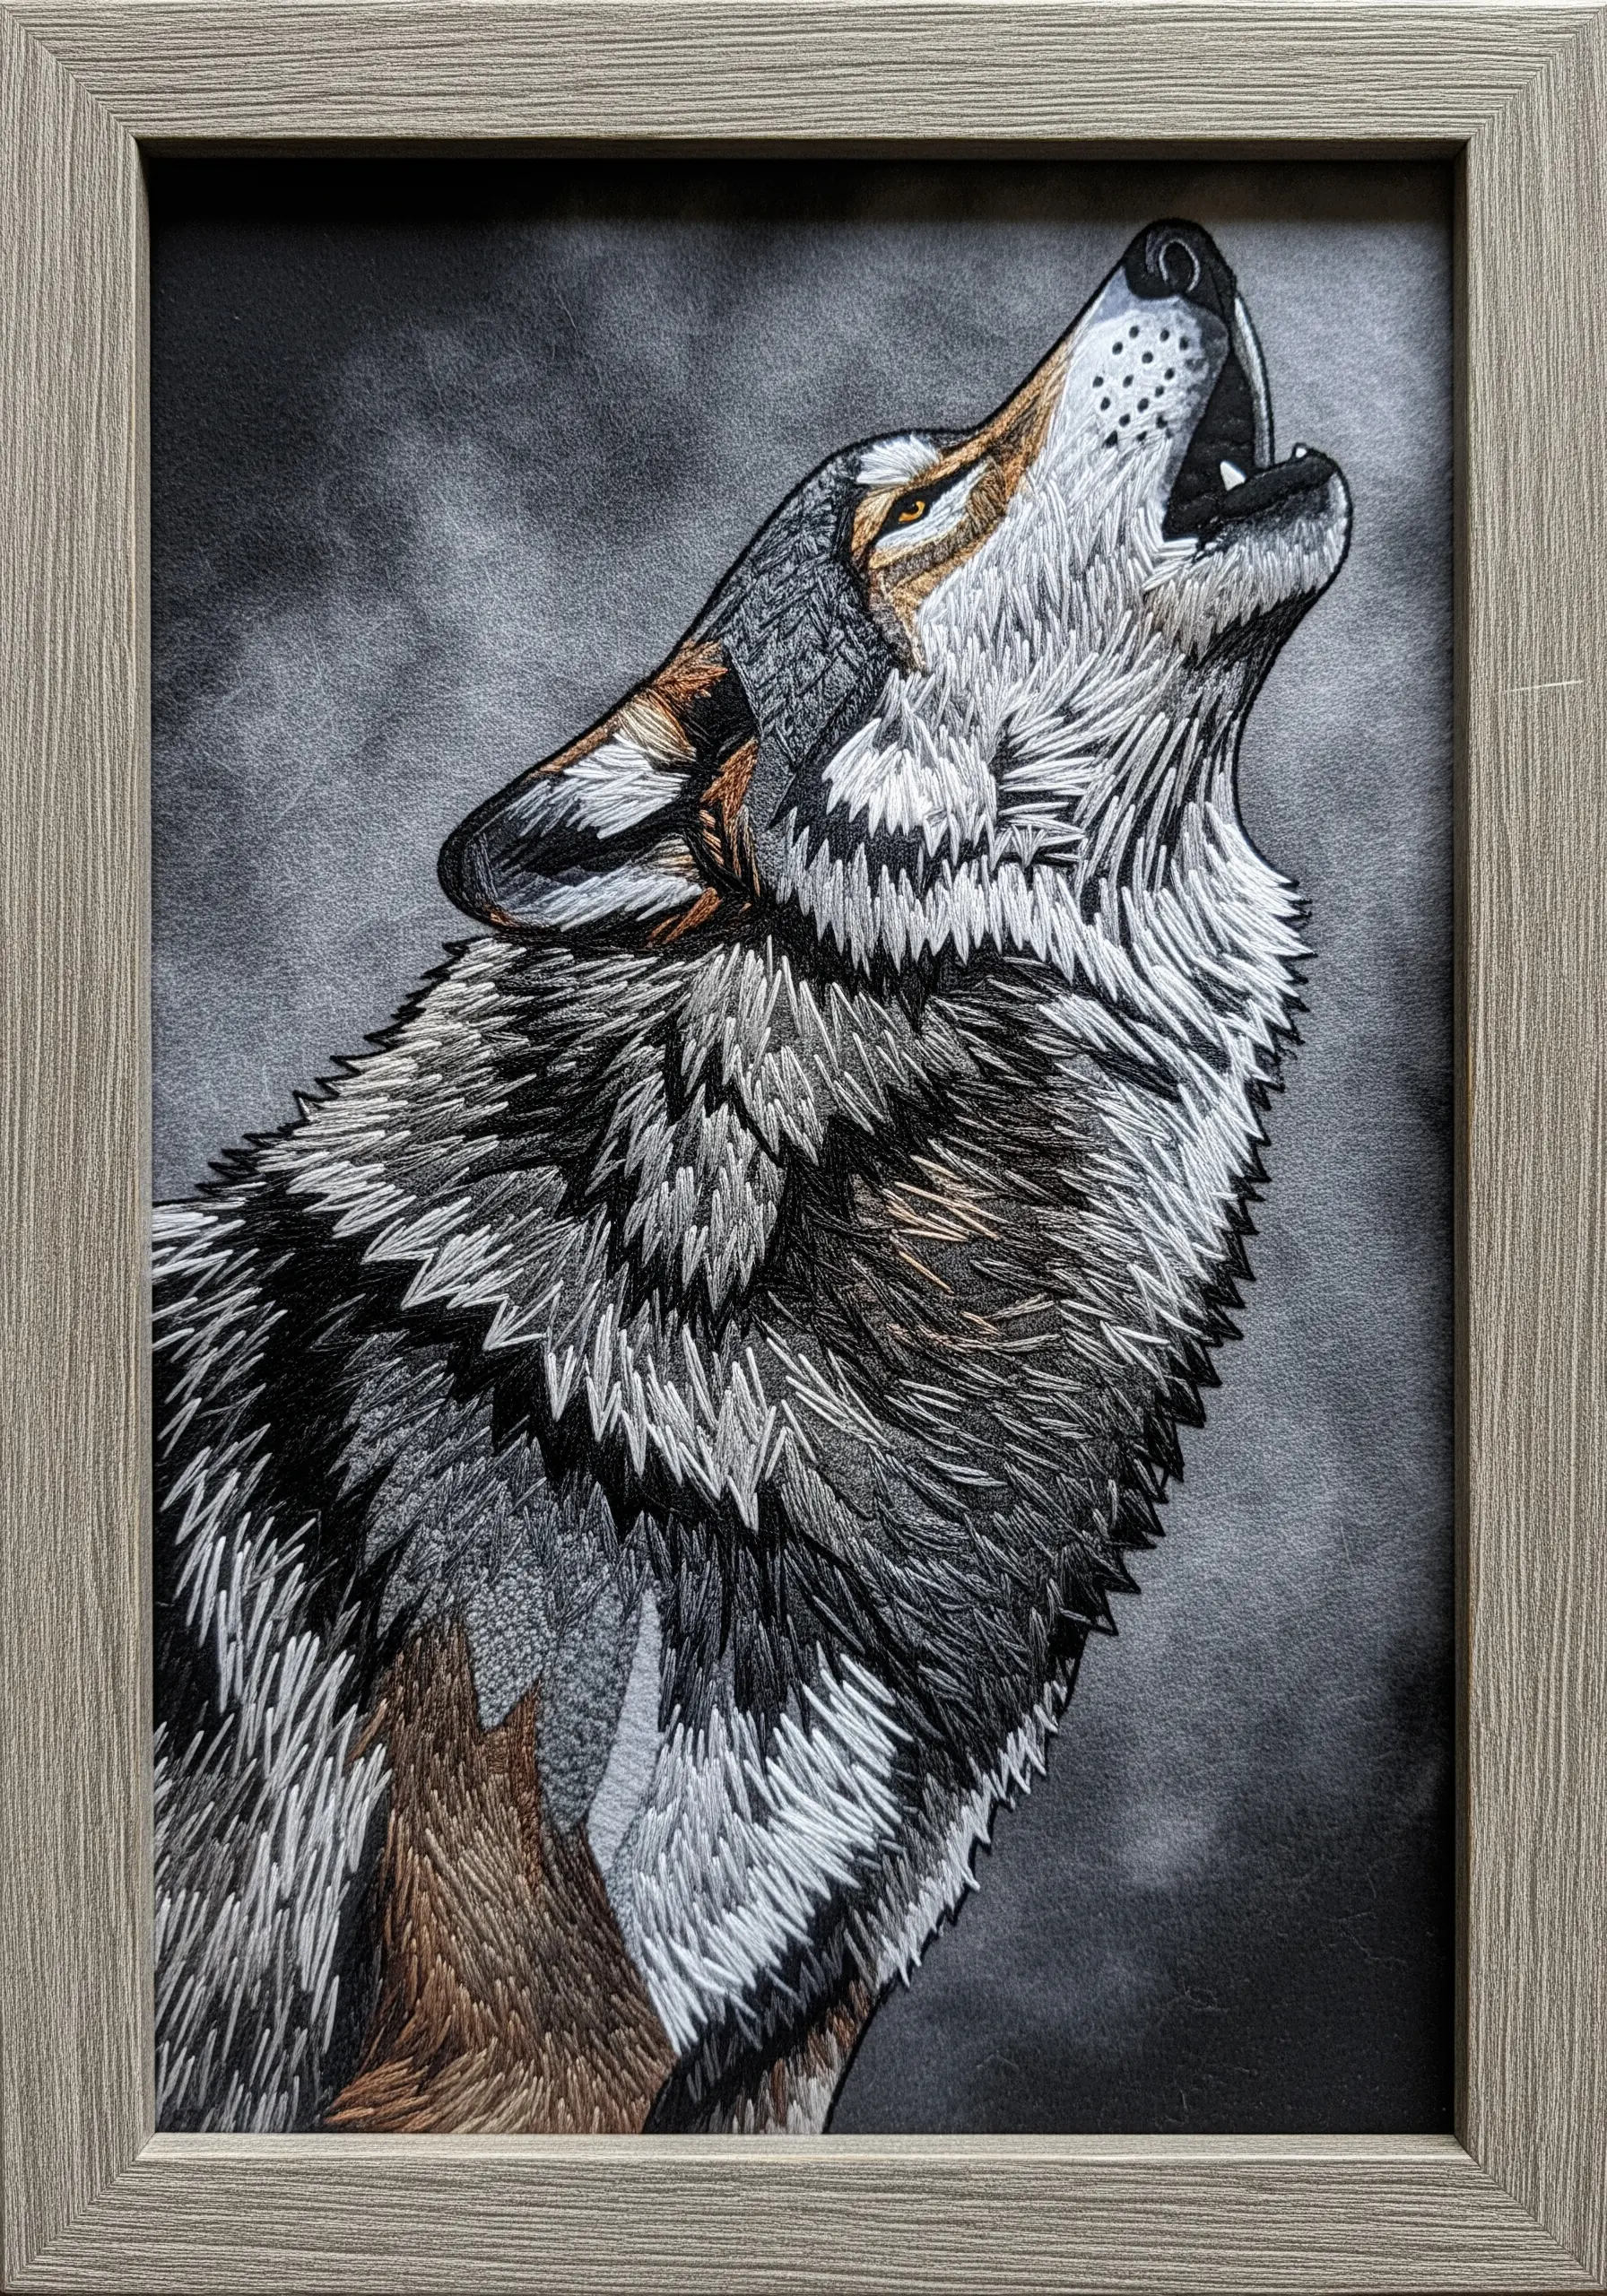
To avoid a flat, uniform look when stitching fur, you must vary your technique. For the dense undercoat of a wolf, use shorter, softer long-and-short stitches.
For the coarse guard hairs on the back and neck, switch to longer, more aggressive straight stitches laid down in jagged, overlapping layers.
Angle your stitches to follow the direction of hair growth, radiating from the snout and flowing back along the body.
This controlled chaos is the key to creating fur that looks untamed and truly wild, making it one of the most compelling realistic wolf embroidery motifs.
20. Sculpt Shaggy Hair with Turkey Work Stitches
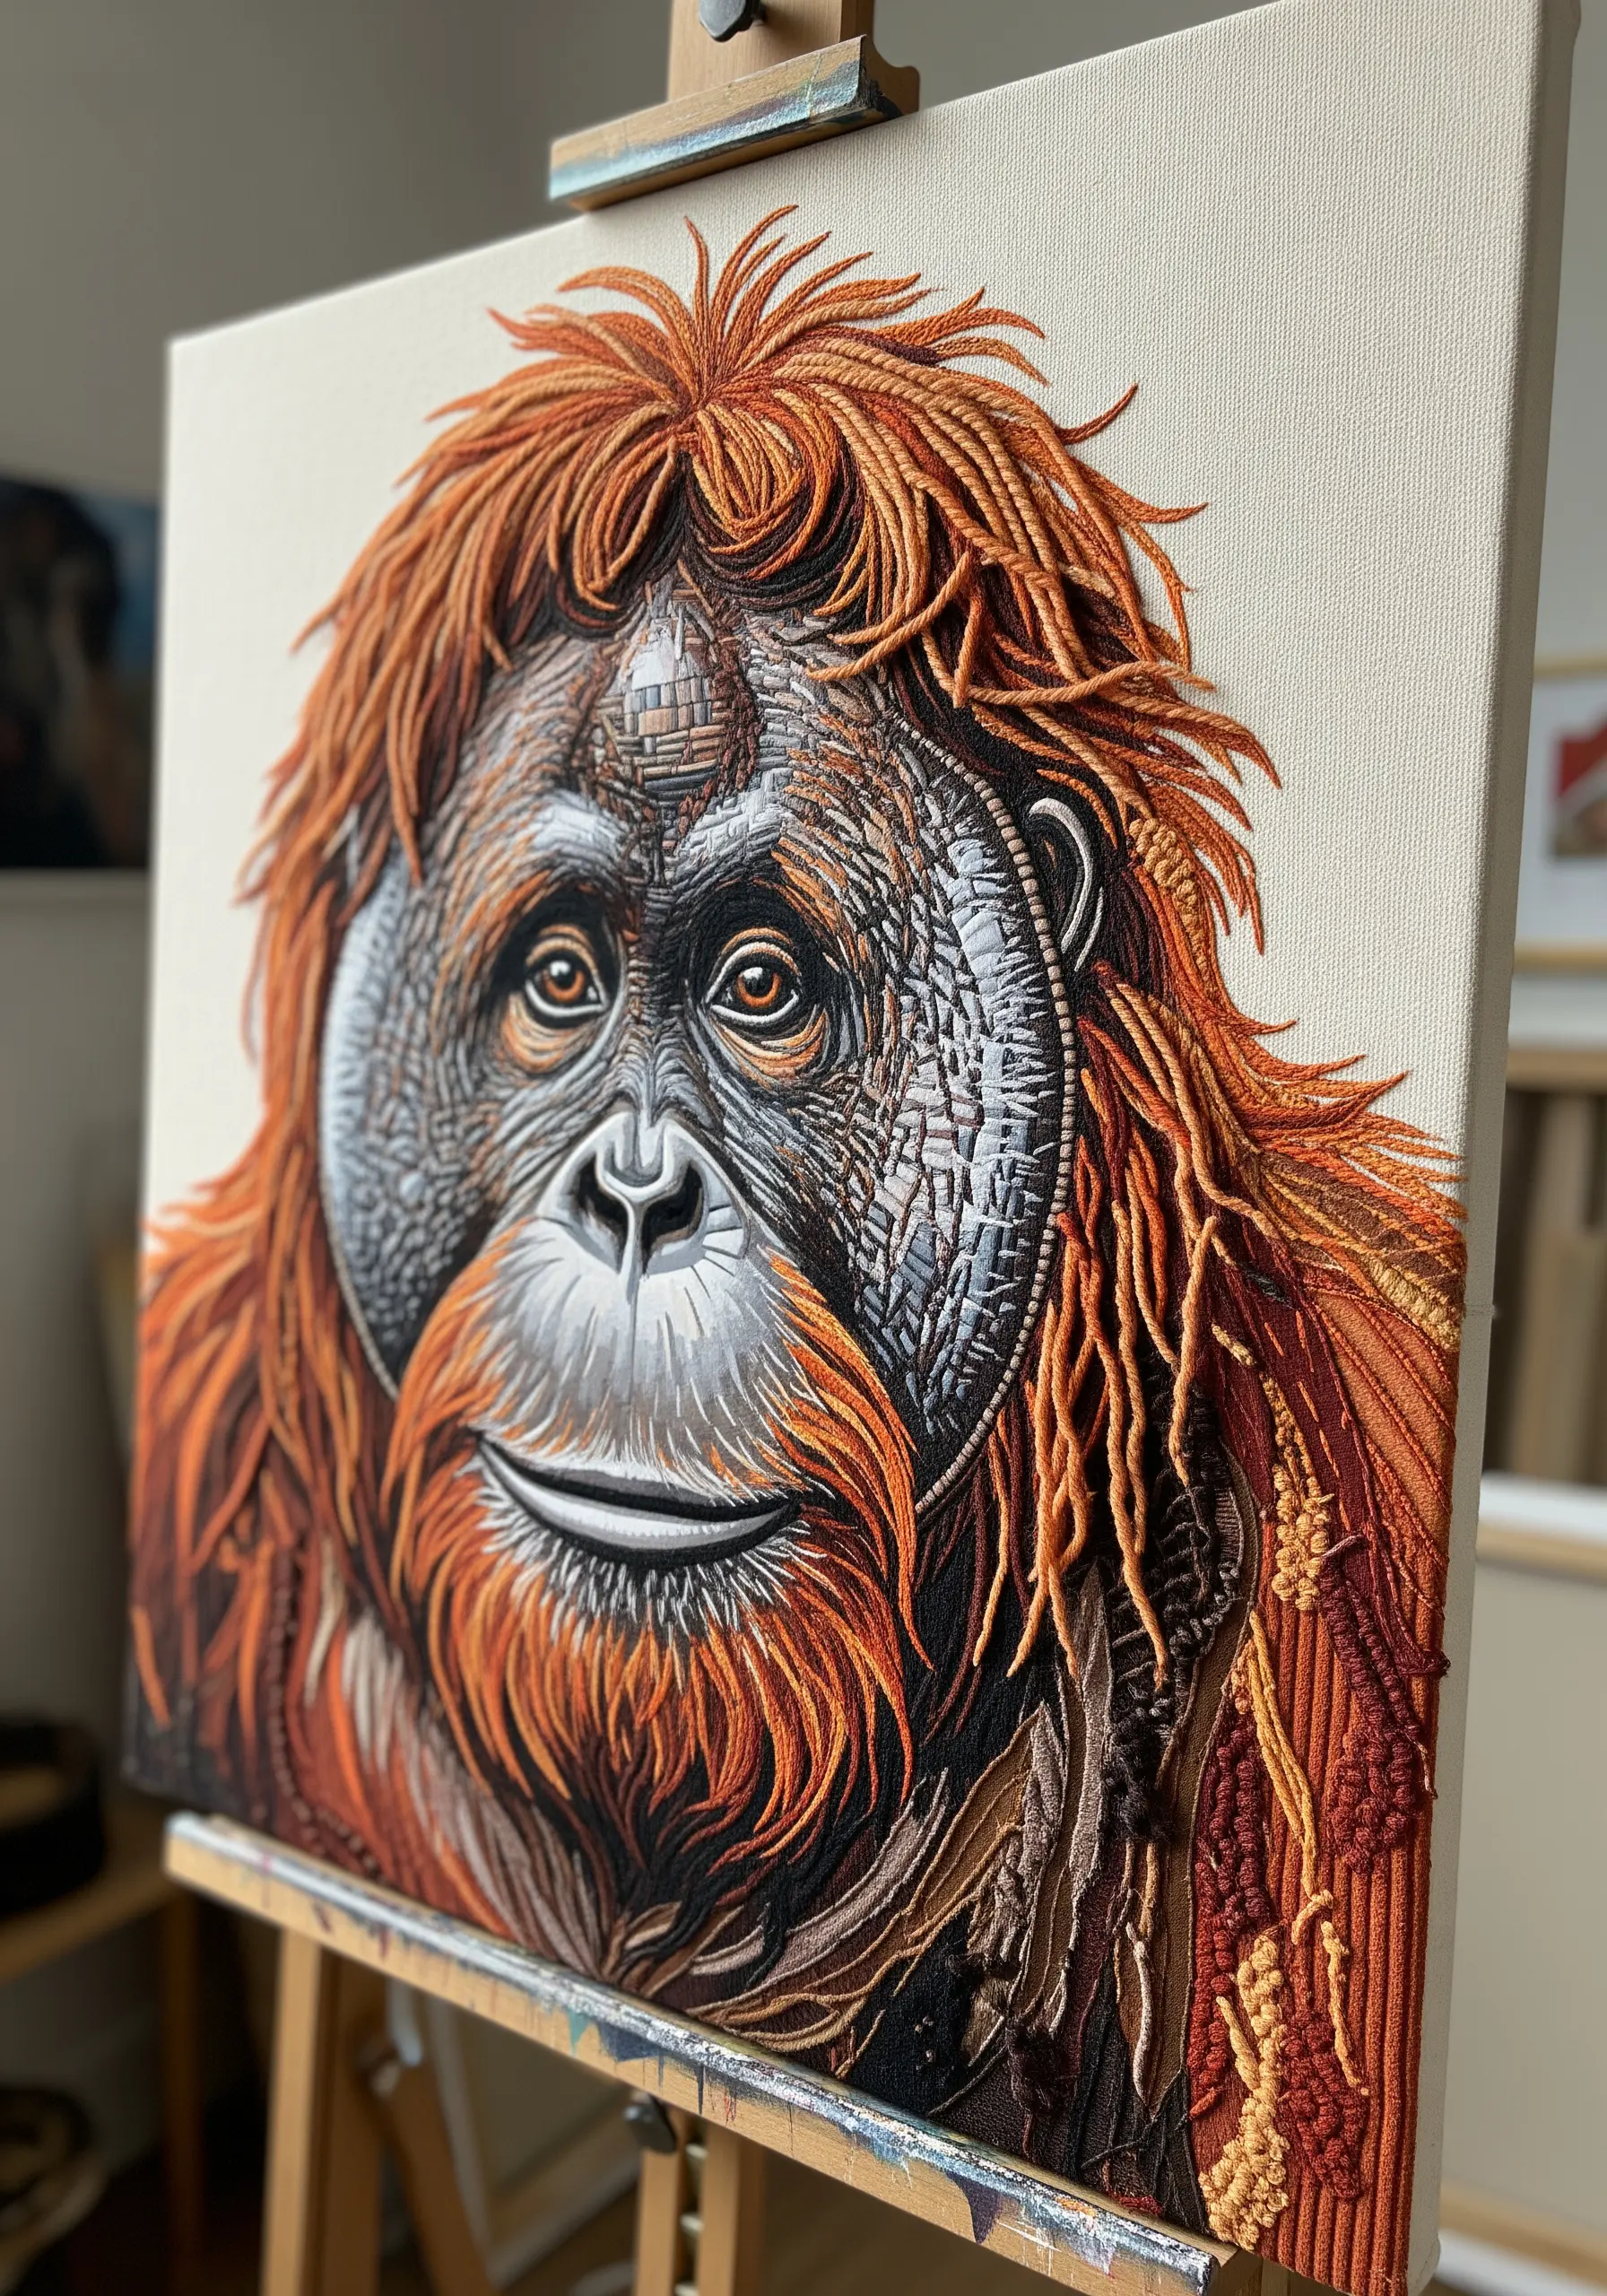
For animals with long, shaggy hair like an orangutan, the turkey work stitch is your best tool for creating incredible 3D texture.
Create loops of thread on the surface of your fabric, securing each one with a small tacking stitch.
You can leave the loops as they are for a curly effect, or snip them and fluff them up for a hair-like texture.
Combine this with padded satin stitch for the flatter areas of the face to create a piece with dramatic, sculptural depth. These are the kind of contemporary texture techniques that elevate your art.
21. Craft Delicate, Transparent Wings with Wired Organza
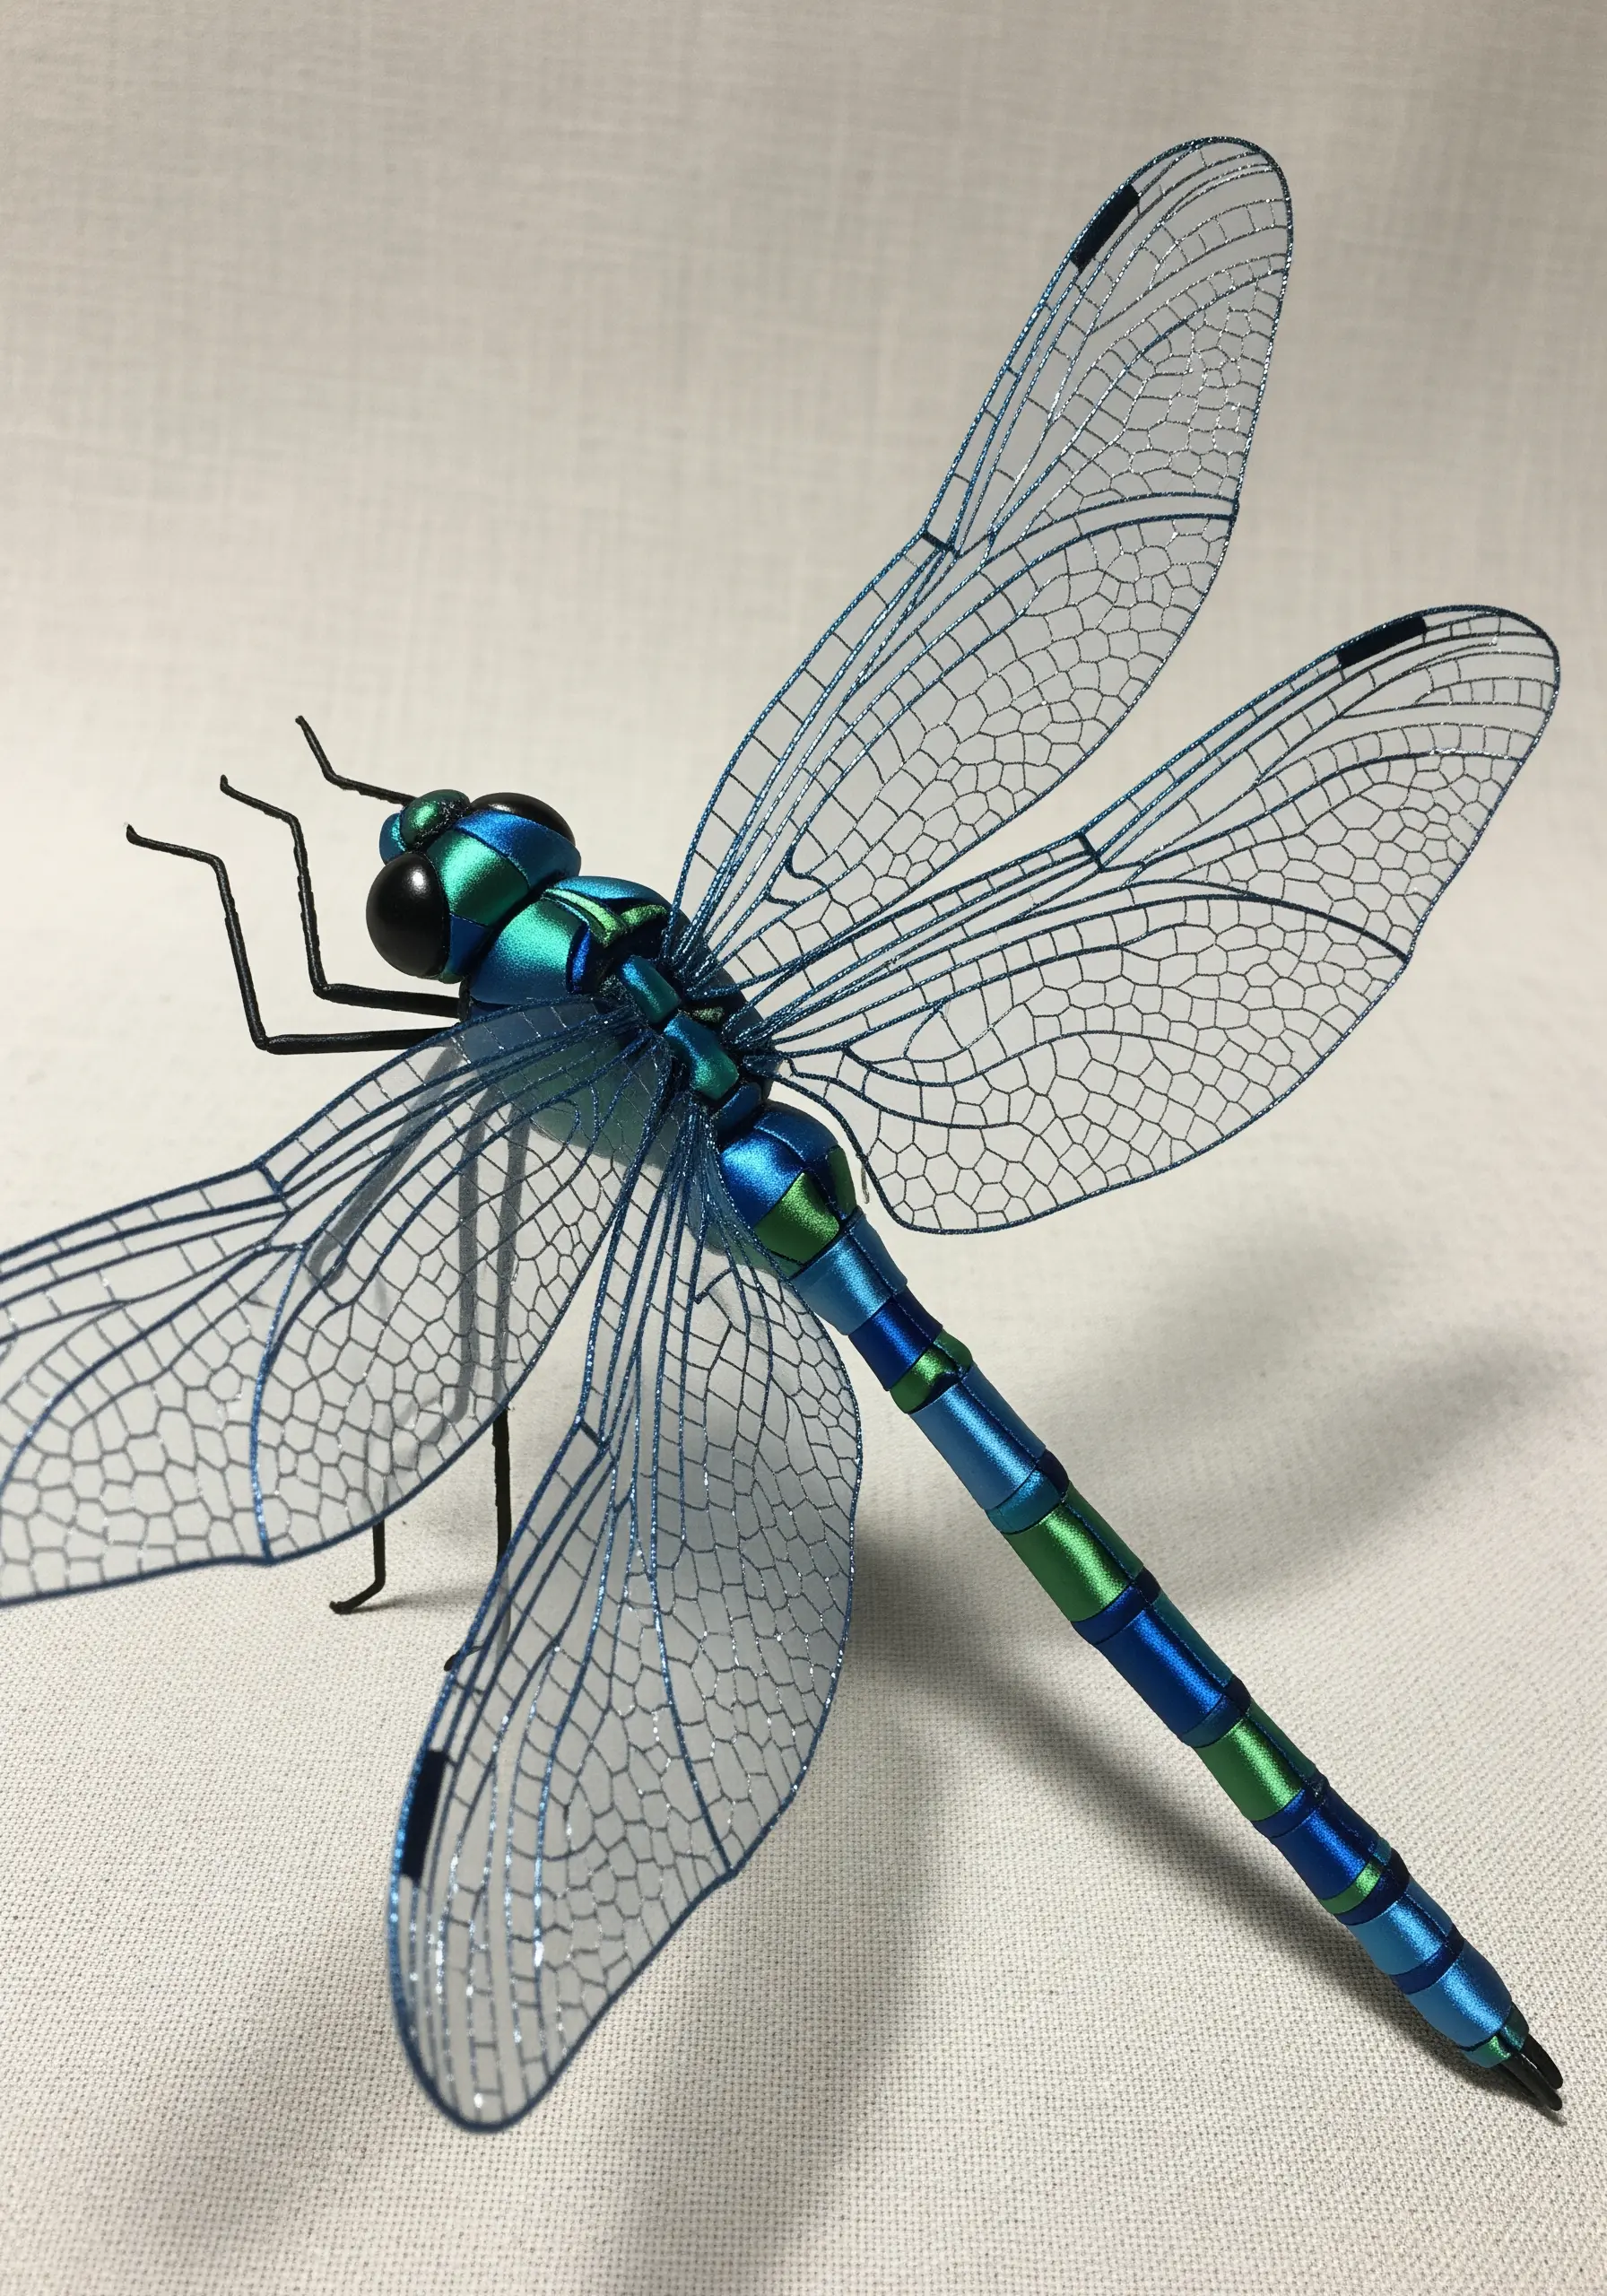
Achieve lifelike insect wings using a stumpwork technique. First, create a frame for each wing using a fine-gauge wire.
Lay a piece of sheer organza over the wire frame and stitch the vein details directly onto it, making sure your stitches wrap around the wire to secure the fabric.
Once the embroidery is complete, carefully trim away the excess organza from the outside of the wire.
You can then bend the wired wings into a realistic shape and attach them to the embroidered body, allowing them to stand freely off the background fabric.
22. Form Realistic Spines with Snipped Loops
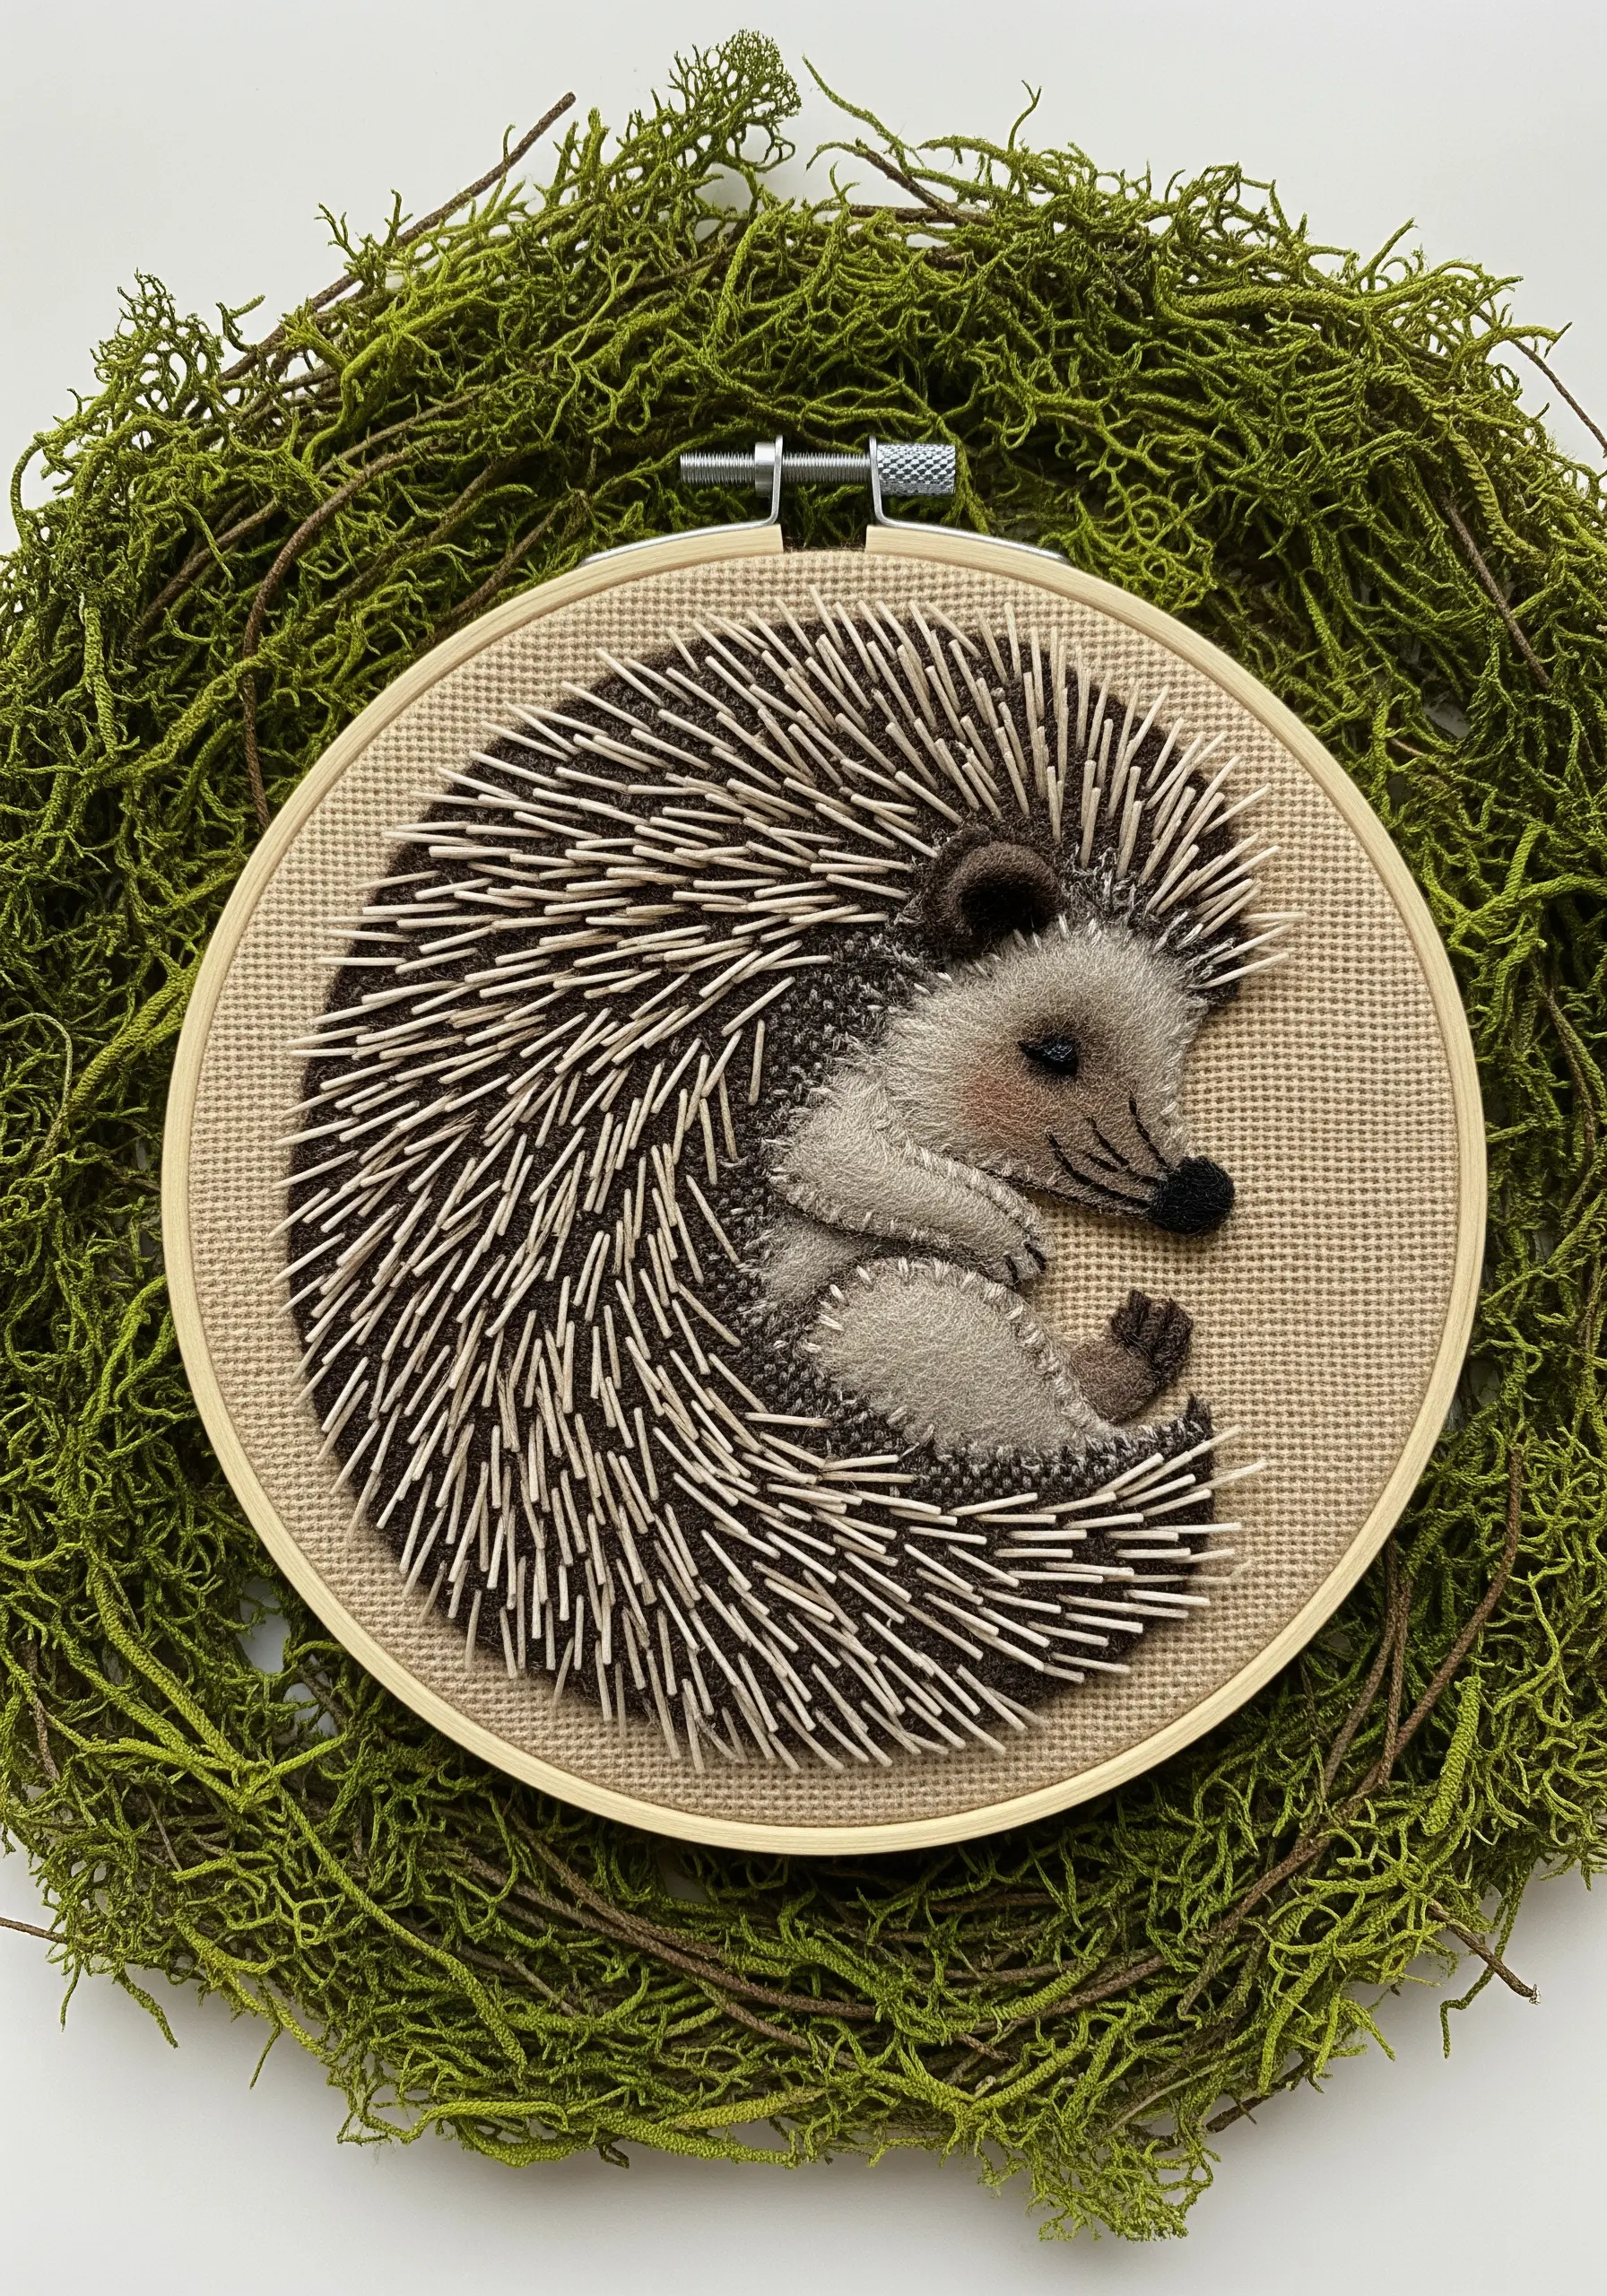
The hedgehog’s prickly coat is perfect for practicing the turkey work stitch. Start with a simple felt appliqué base for the animal’s body and face.
Working in dense rows, create hundreds of thread loops all over the body. For the signature two-toned look of the spines, use one strand of dark brown and one strand of off-white thread together in your needle.
Once all the loops are made, use a small, sharp pair of scissors to snip them open. Trim them to the desired length to create a wonderfully spiky, tactile finish.
23. Set the Scene with a Patchwork Background
Before you begin your animal appliqué, create a simple yet effective background by sewing together squares and rectangles of coordinating fabrics.
A patchwork of muted, earthy prints provides texture and a sense of place, suggesting a forest or landscape without being overly literal.
Once your background is assembled, you can apply your main subject over it. The patchwork adds a layer of complexity and visual interest that makes the entire piece feel richer and more complete.
It’s a simple way to make boho fabric collage embroidery pieces that look like they belong in a gallery.
24. Use Ribbon Stitches for Soft, Full Flower Petals
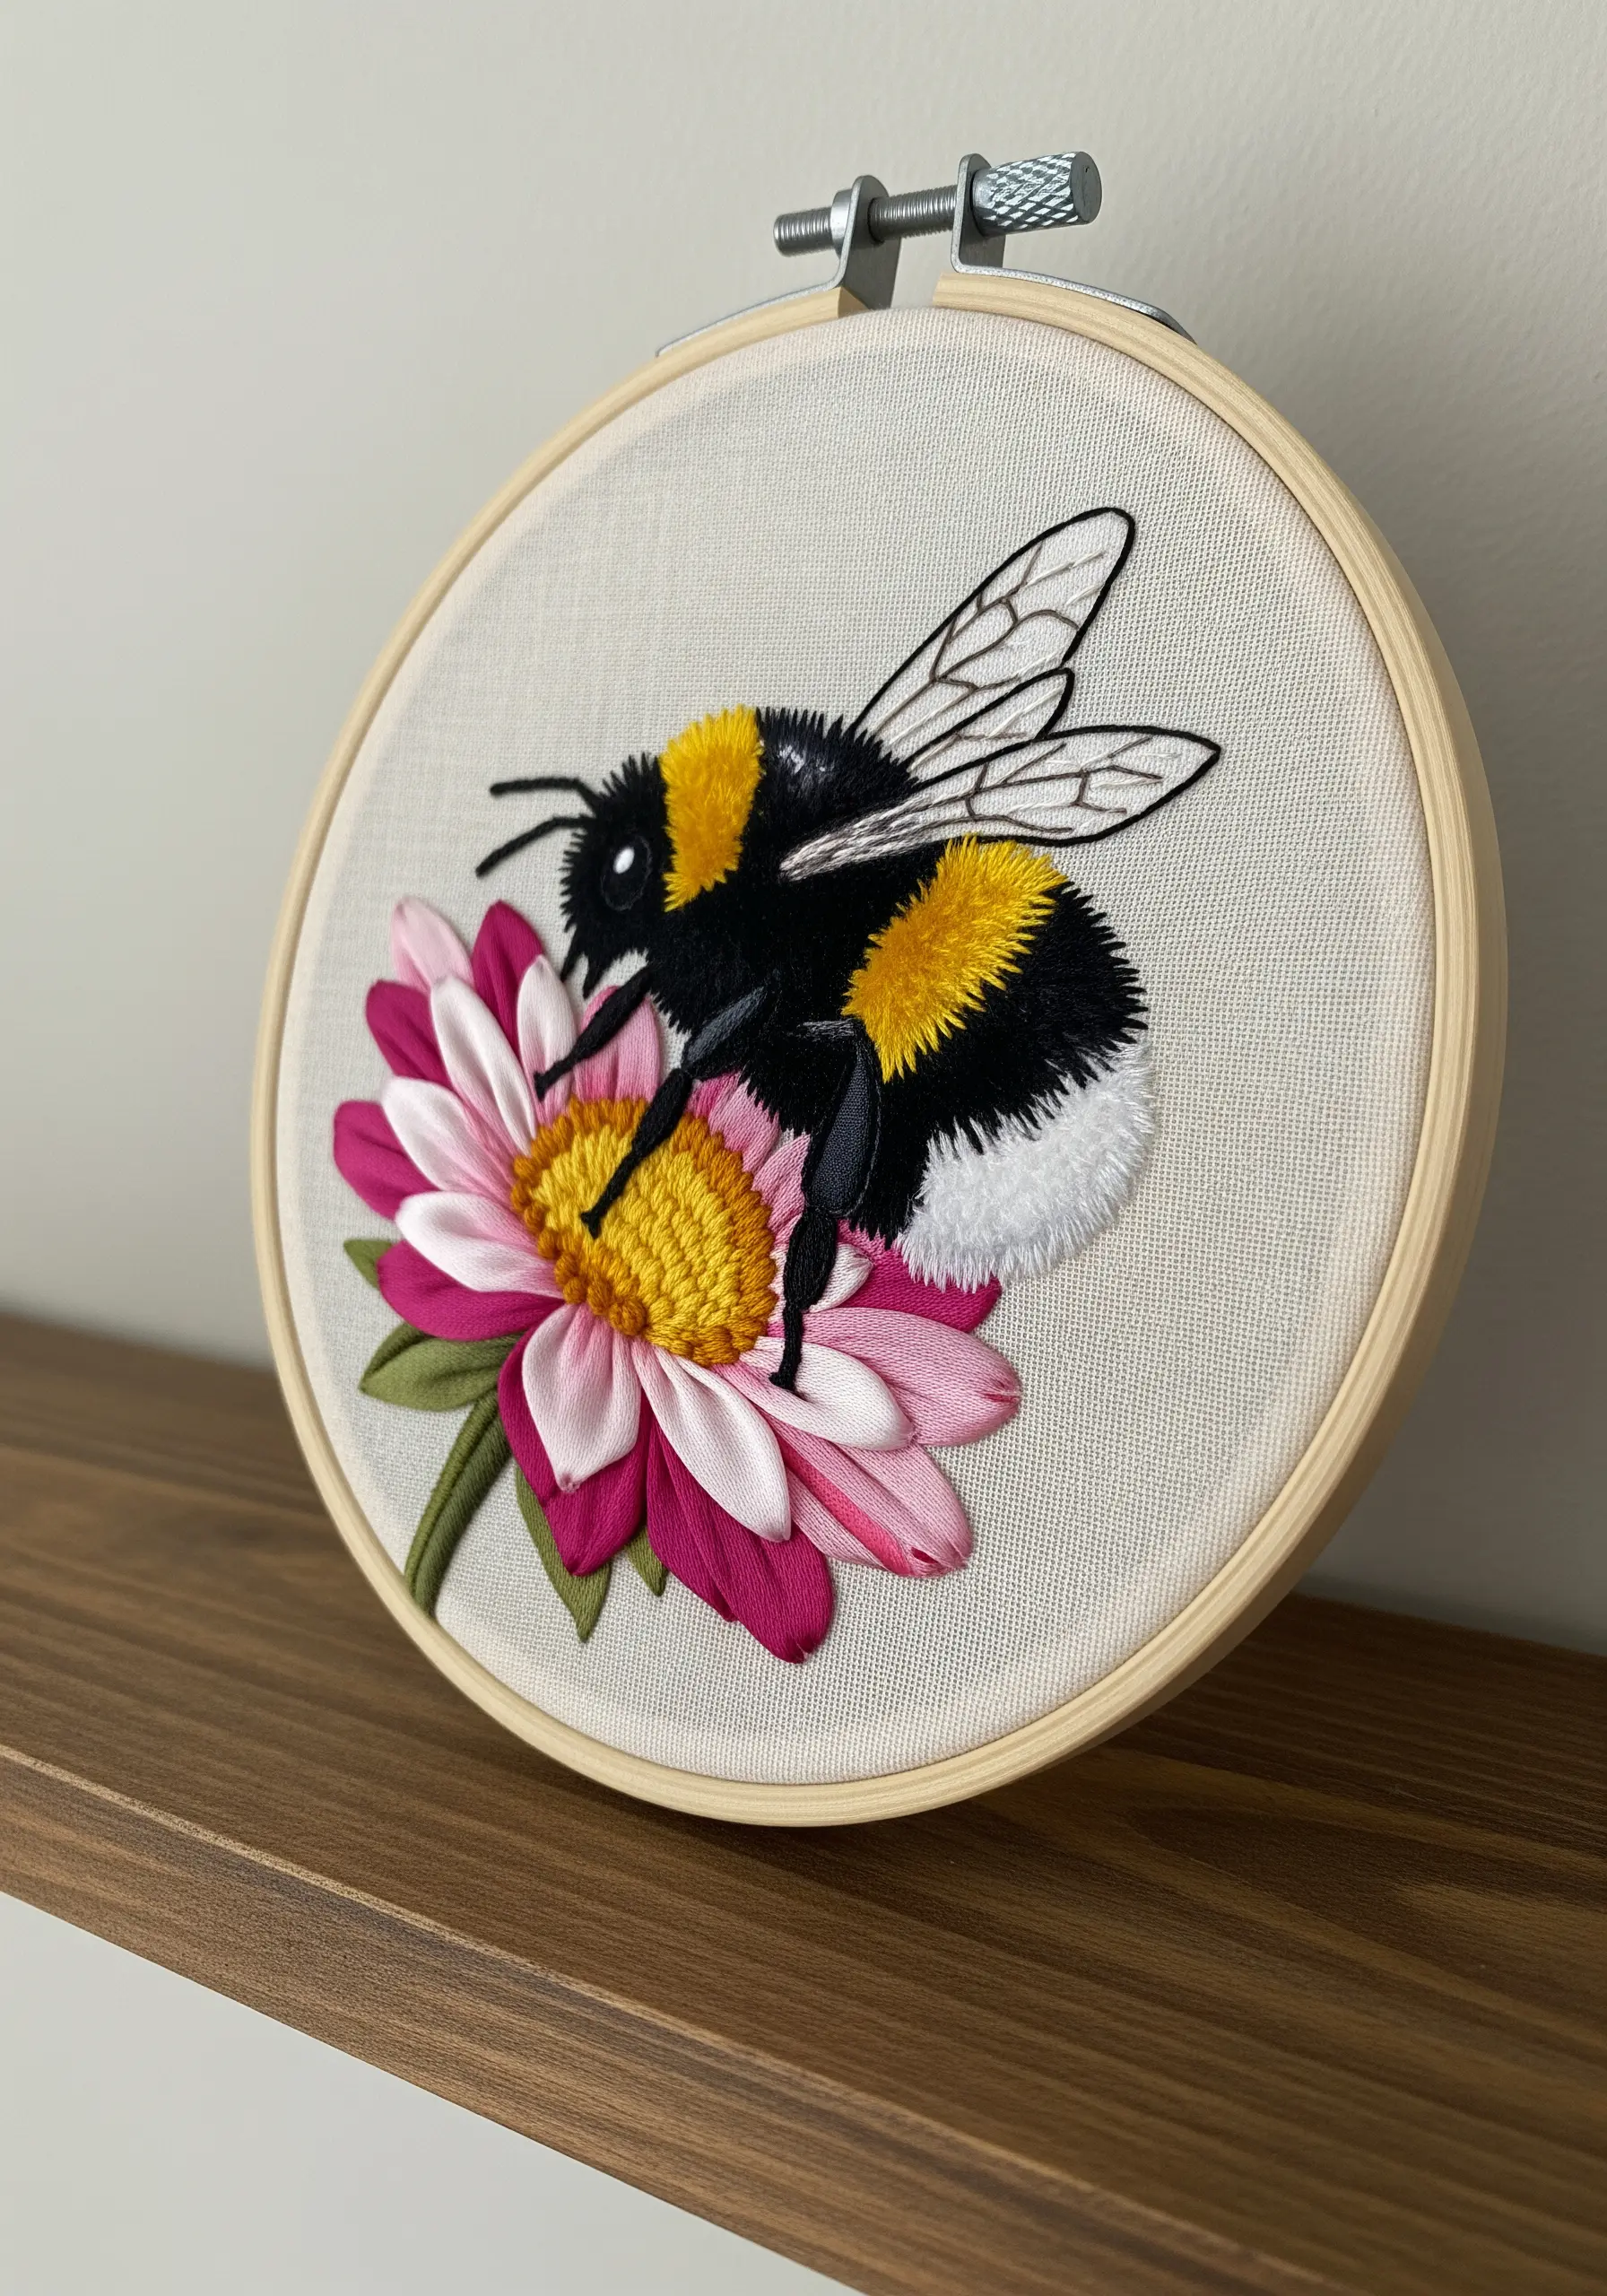
To create the lush petals of the flower, switch from floss to silk ribbon. The width of the ribbon allows you to form a full, soft petal shape with a single stitch.
Use a simple ribbon stitch or a folded ribbon stitch, pulling the ribbon through the fabric to create the form.
For the bee’s fuzzy body, revert to standard floss and use trimmed turkey work loops to create the fluffy texture.
This mix of materials—smooth ribbon for petals and fuzzy thread for the bee—creates a delightful tactile contrast.
25. Let Boucle Fabric Create a Fleece Texture Instantly
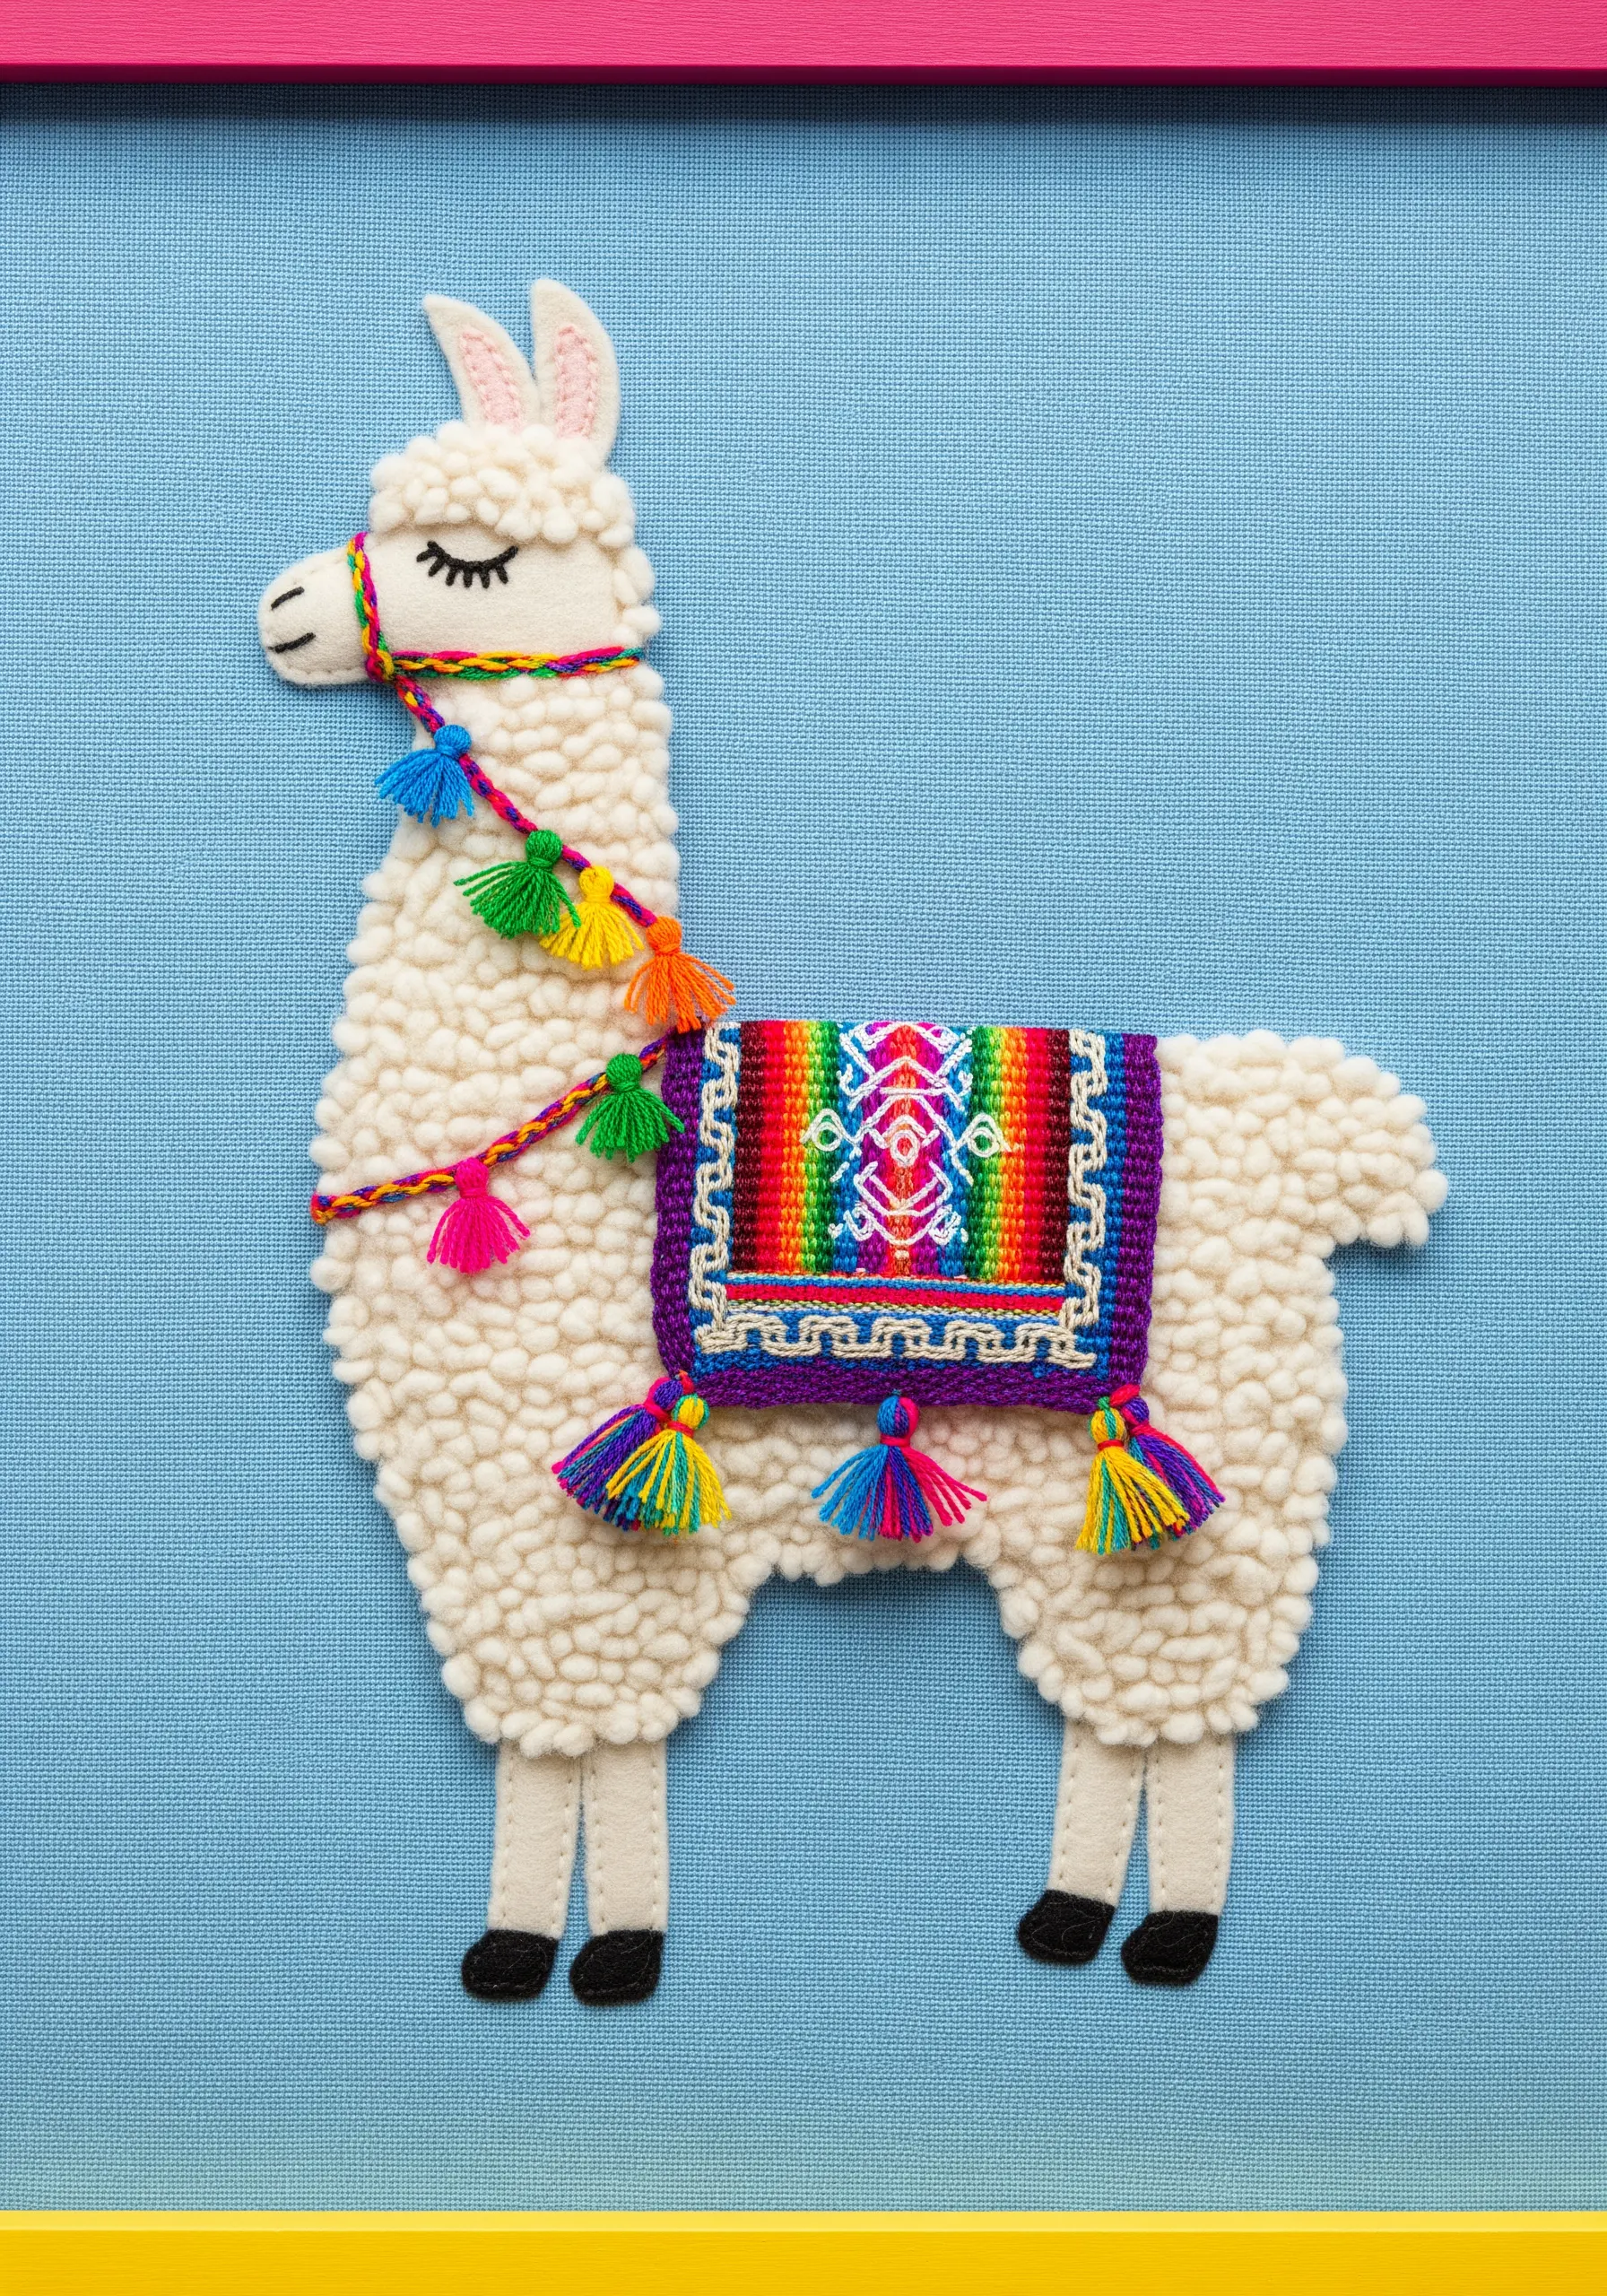
To capture the woolly texture of a llama or sheep, use a looped fabric like boucle, sherpa, or even a piece of terry cloth for your appliqué.
The fabric itself provides the fleece-like surface, saving you from having to create it with countless French knots.
Simply cut the body shape from the textured fabric and appliqué it onto your background. You can then add smaller details using felt, simple stitches, and even tiny tassels for a playful, mixed-media piece.
26. Define Batik Appliqué with Precise Outlines
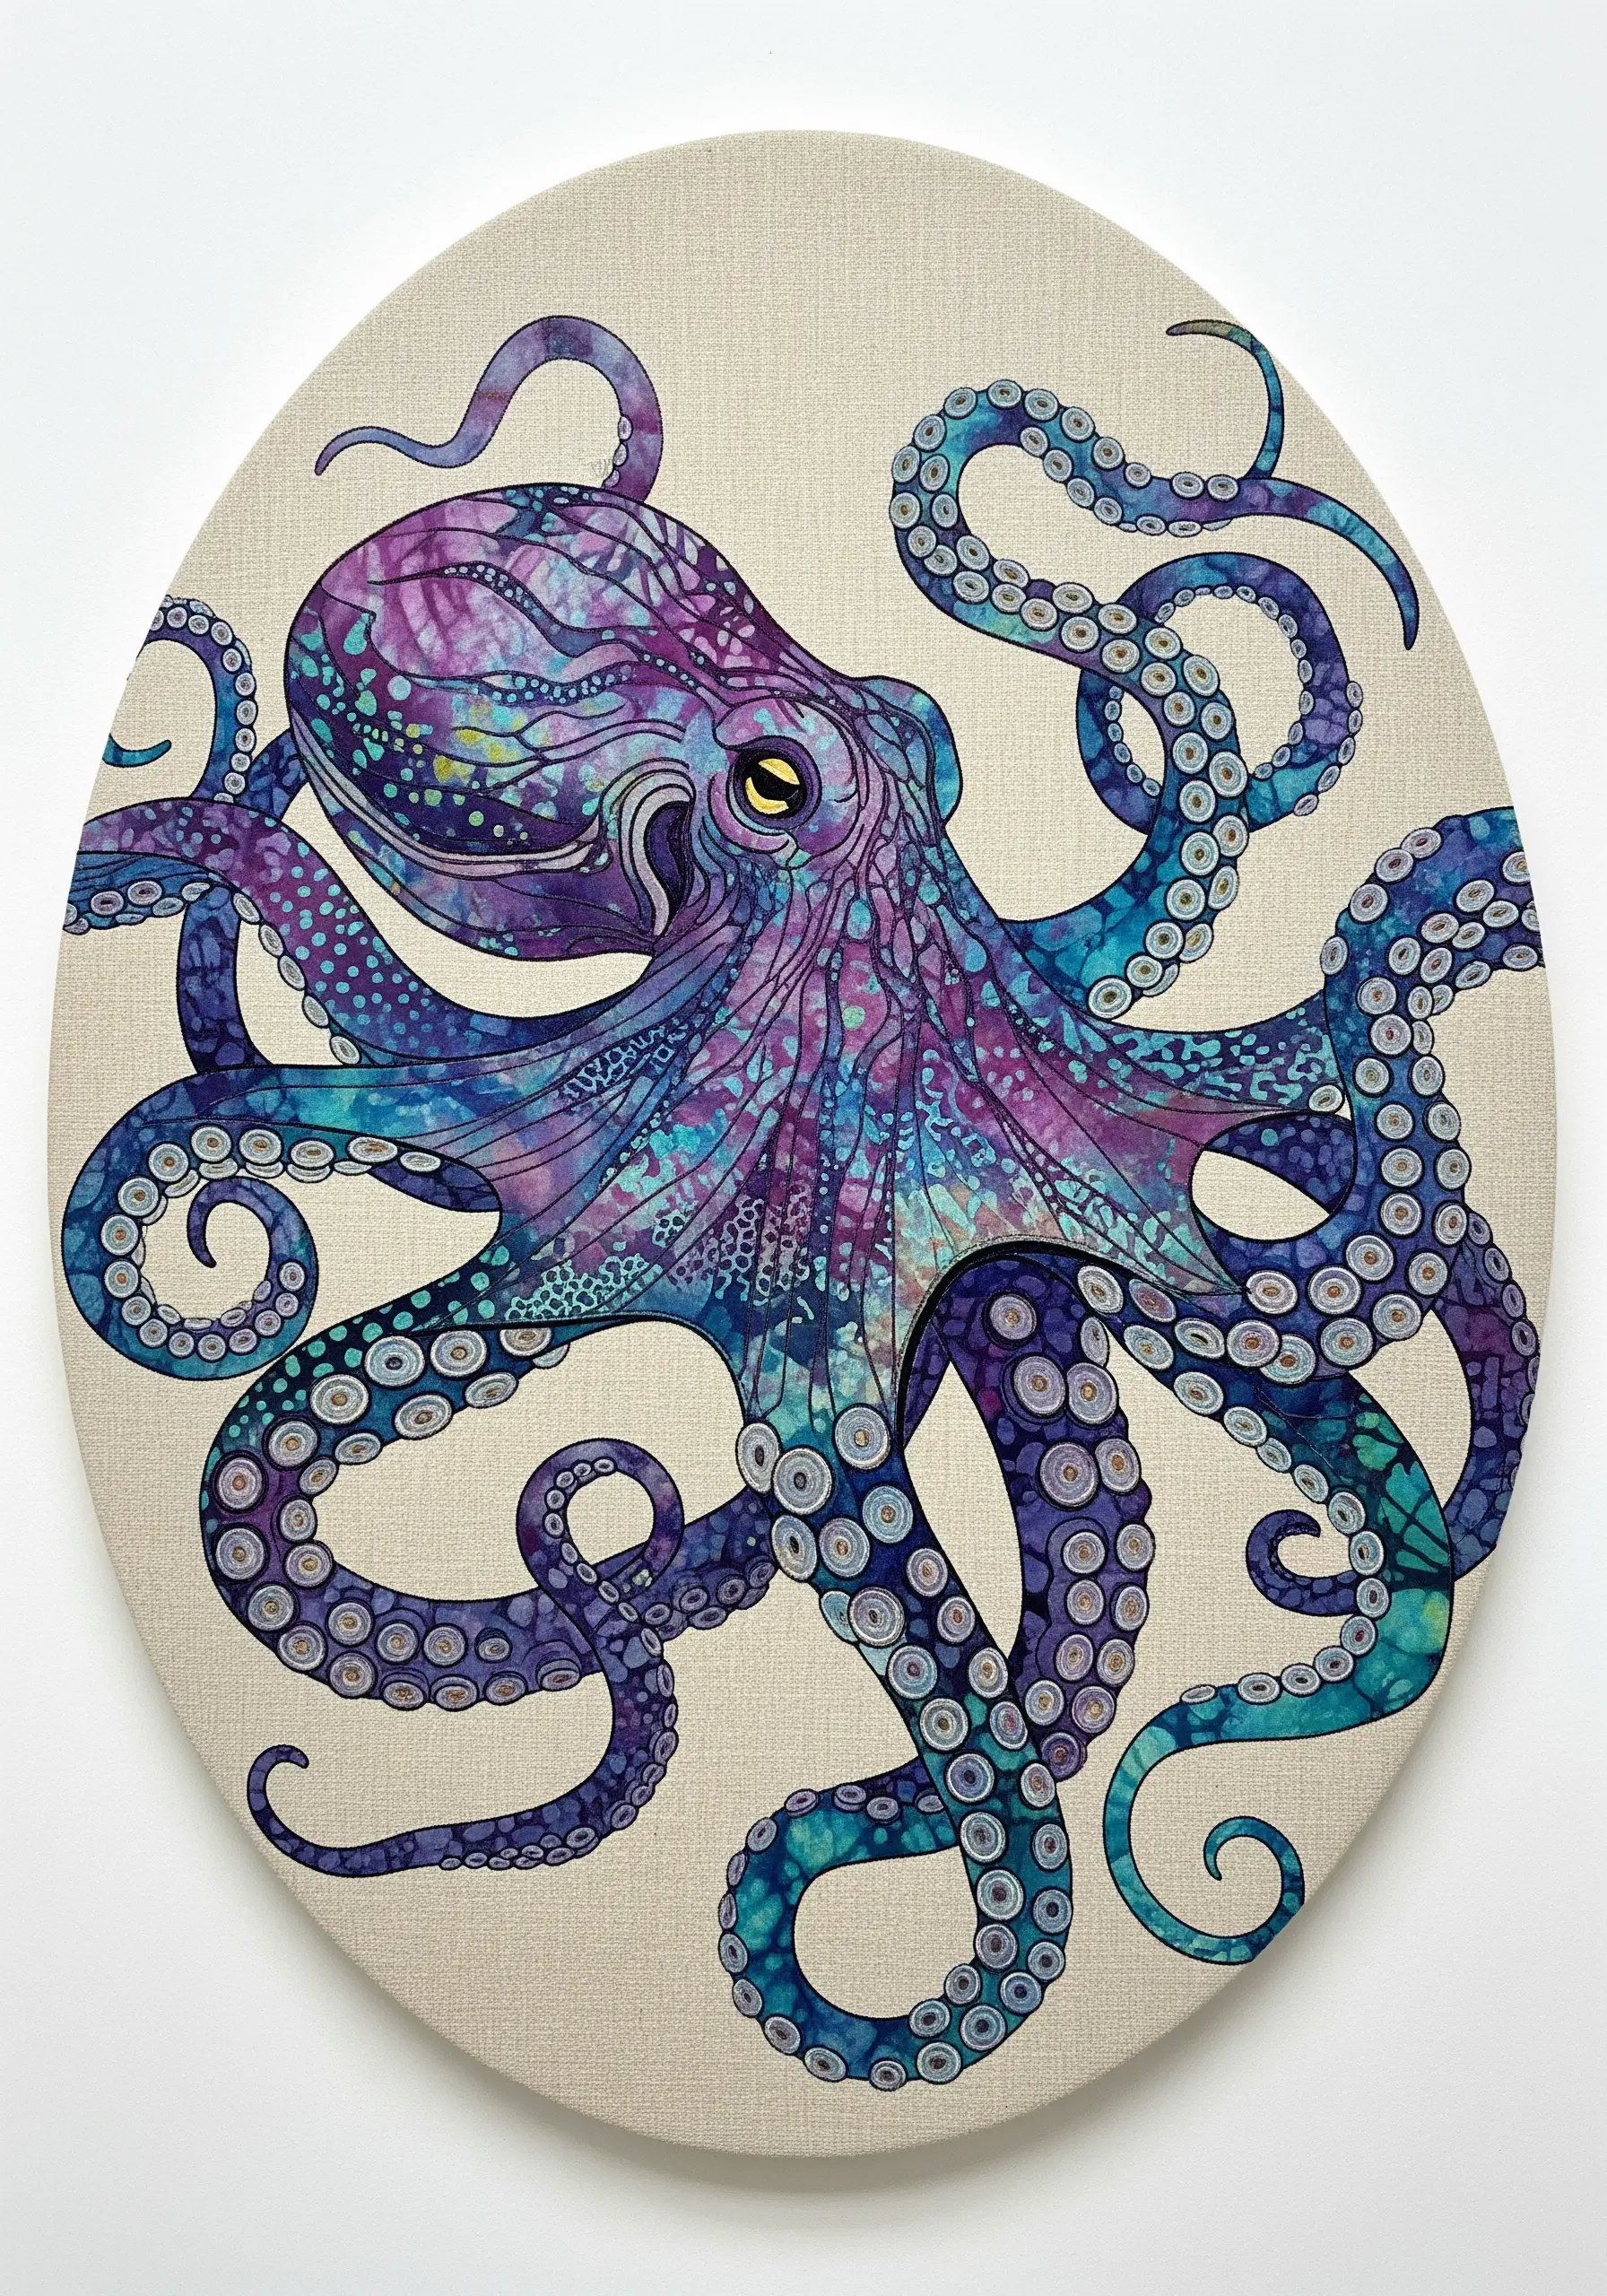
When you use a vibrant, multi-tonal fabric like this purple and blue batik, the material provides all the color variation and pattern.
Your job as the stitcher is to add clarity and definition. After applying your fabric octopus, use a single strand of black or dark grey thread to carefully outline every detail.
Use a tiny backstitch or split stitch to trace the edges of the tentacles and the individual suckers. This fine line work grounds the wild colors of the batik and makes the entire design sharp and legible.
27. Create Shaggy Fur with Long Yarn Stitches
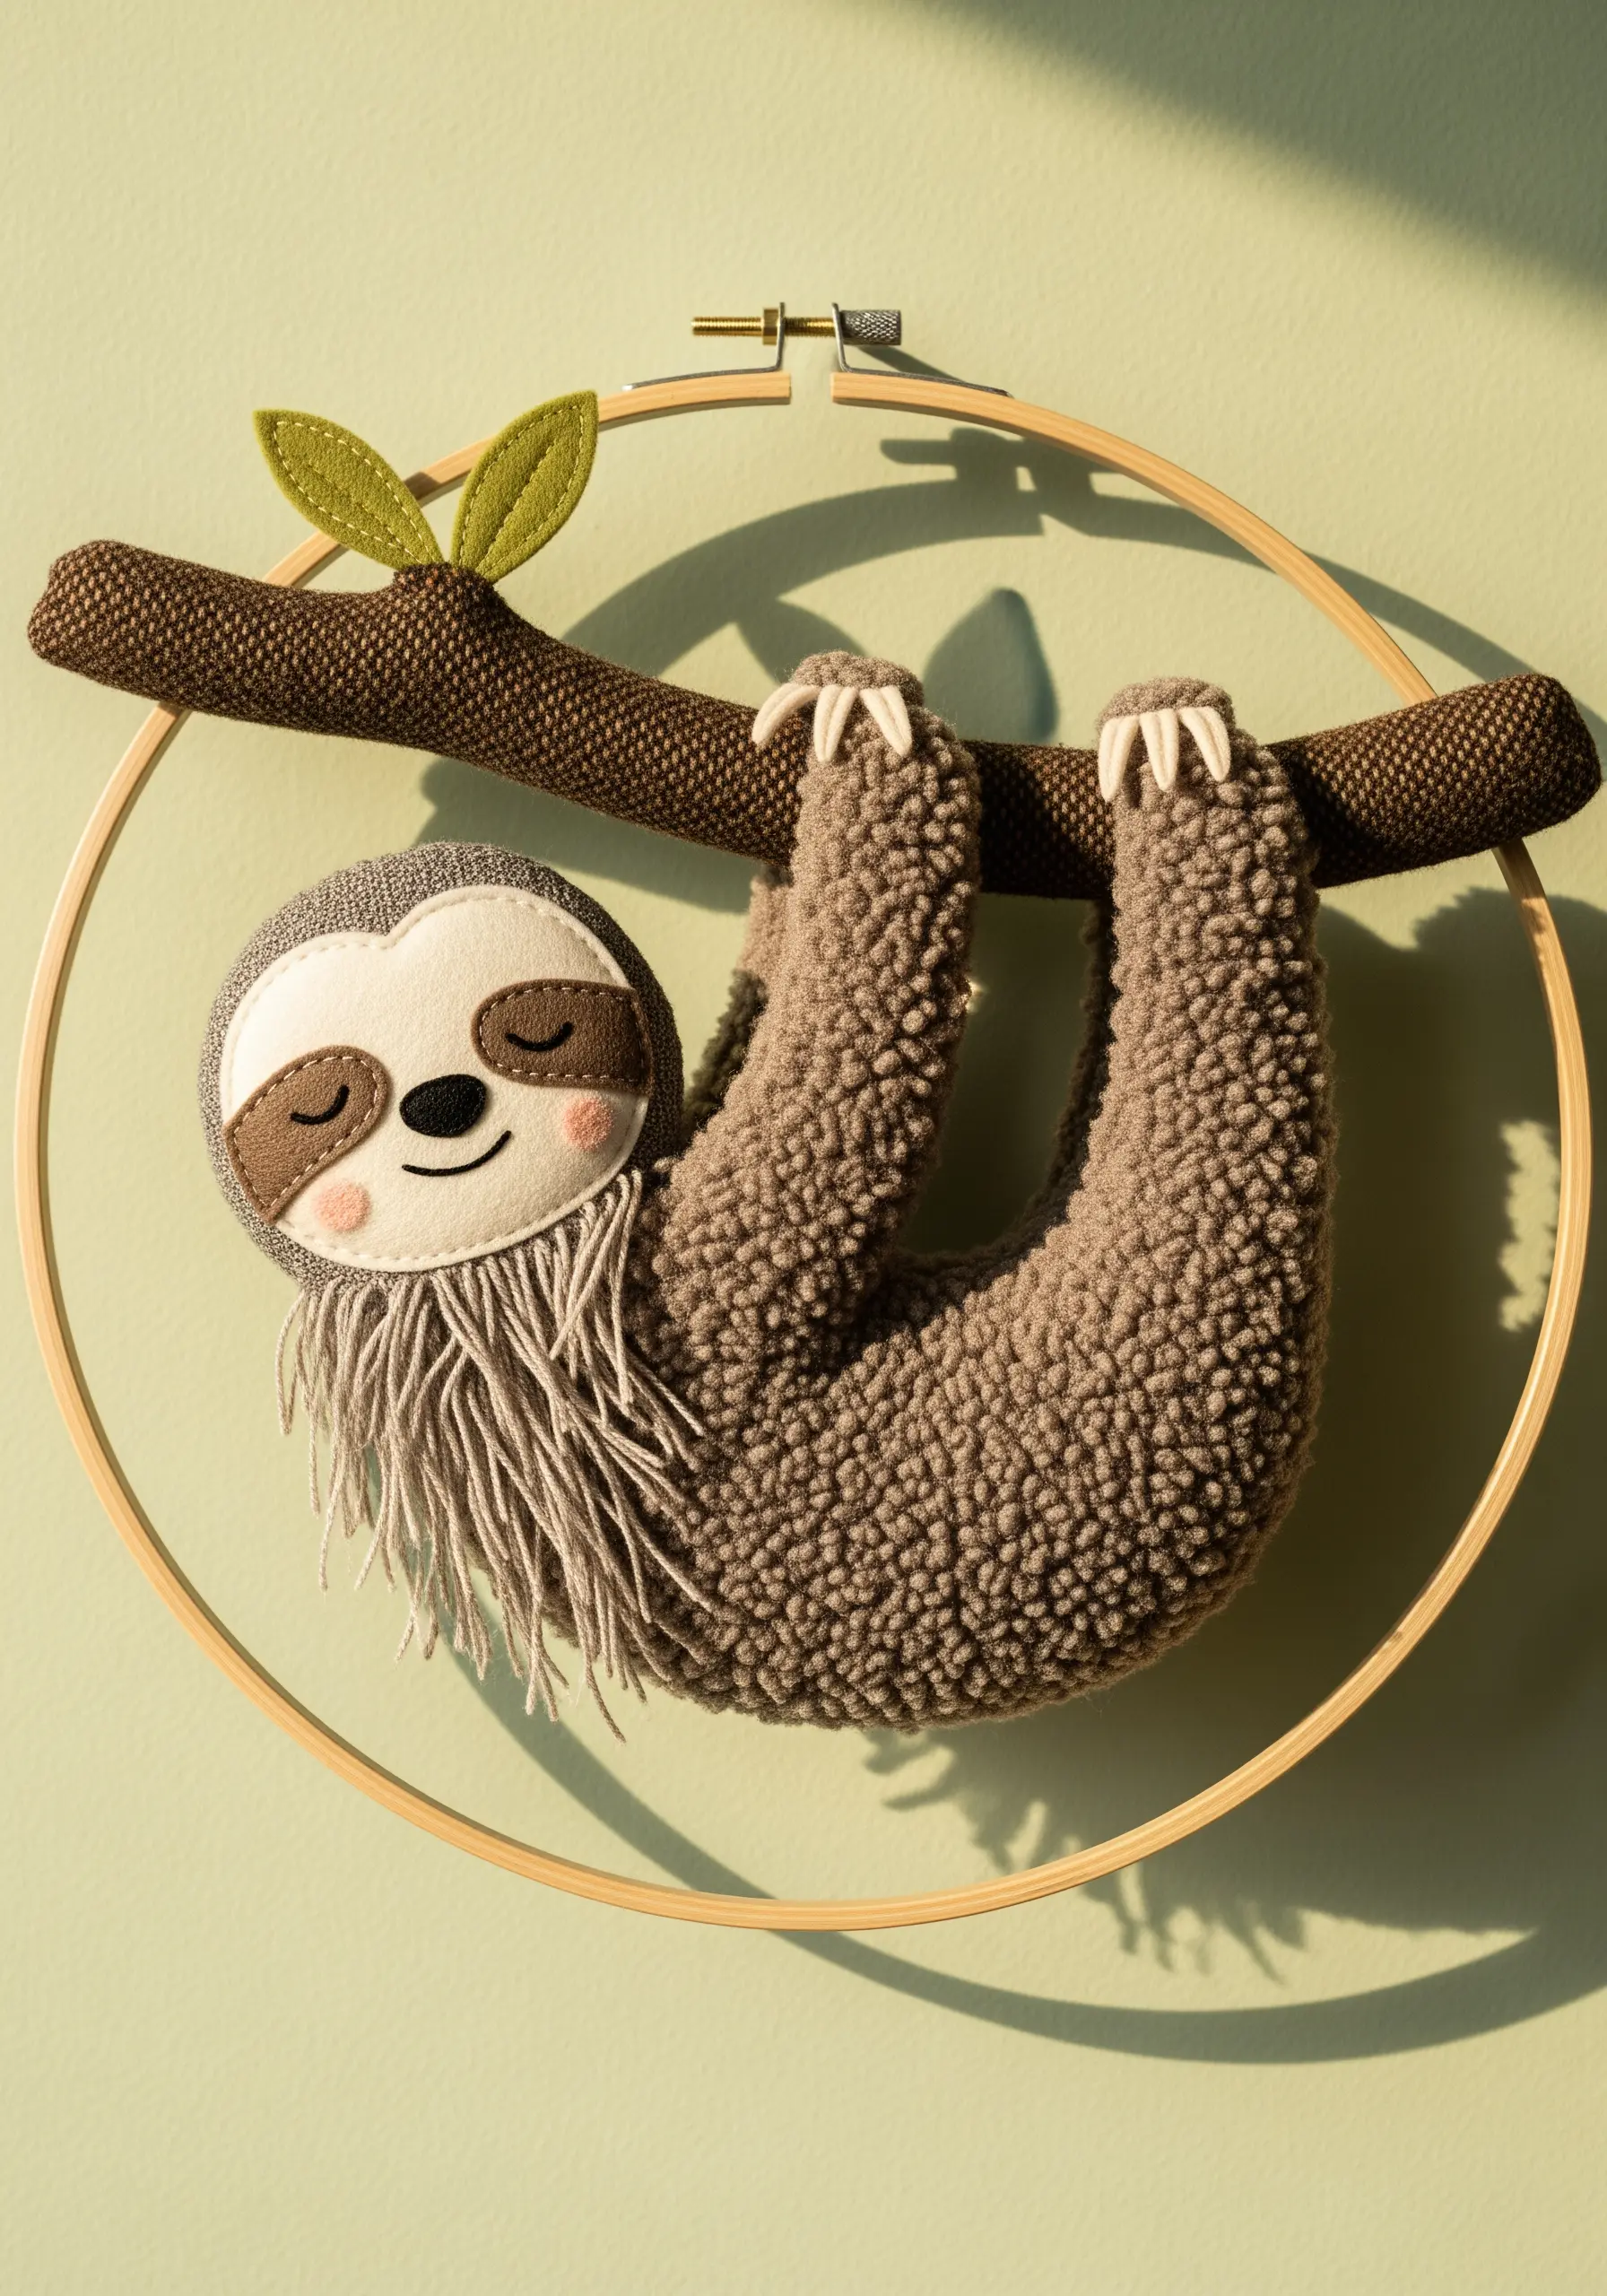
To give your sloth its characteristically shaggy look, combine a felt appliqué base with long strands of yarn.
After stitching down the felt face and body, use a large-eyed needle to bring strands of yarn up through the fabric, securing them with a small stitch at the top.
Let the long ends of the yarn hang loose, then trim and separate the plies to create a soft, flowing fringe.
This technique is a fast and effective way to add long fur or hair to your creations.
28. Capture Iridescence with Thread Painting on Satin
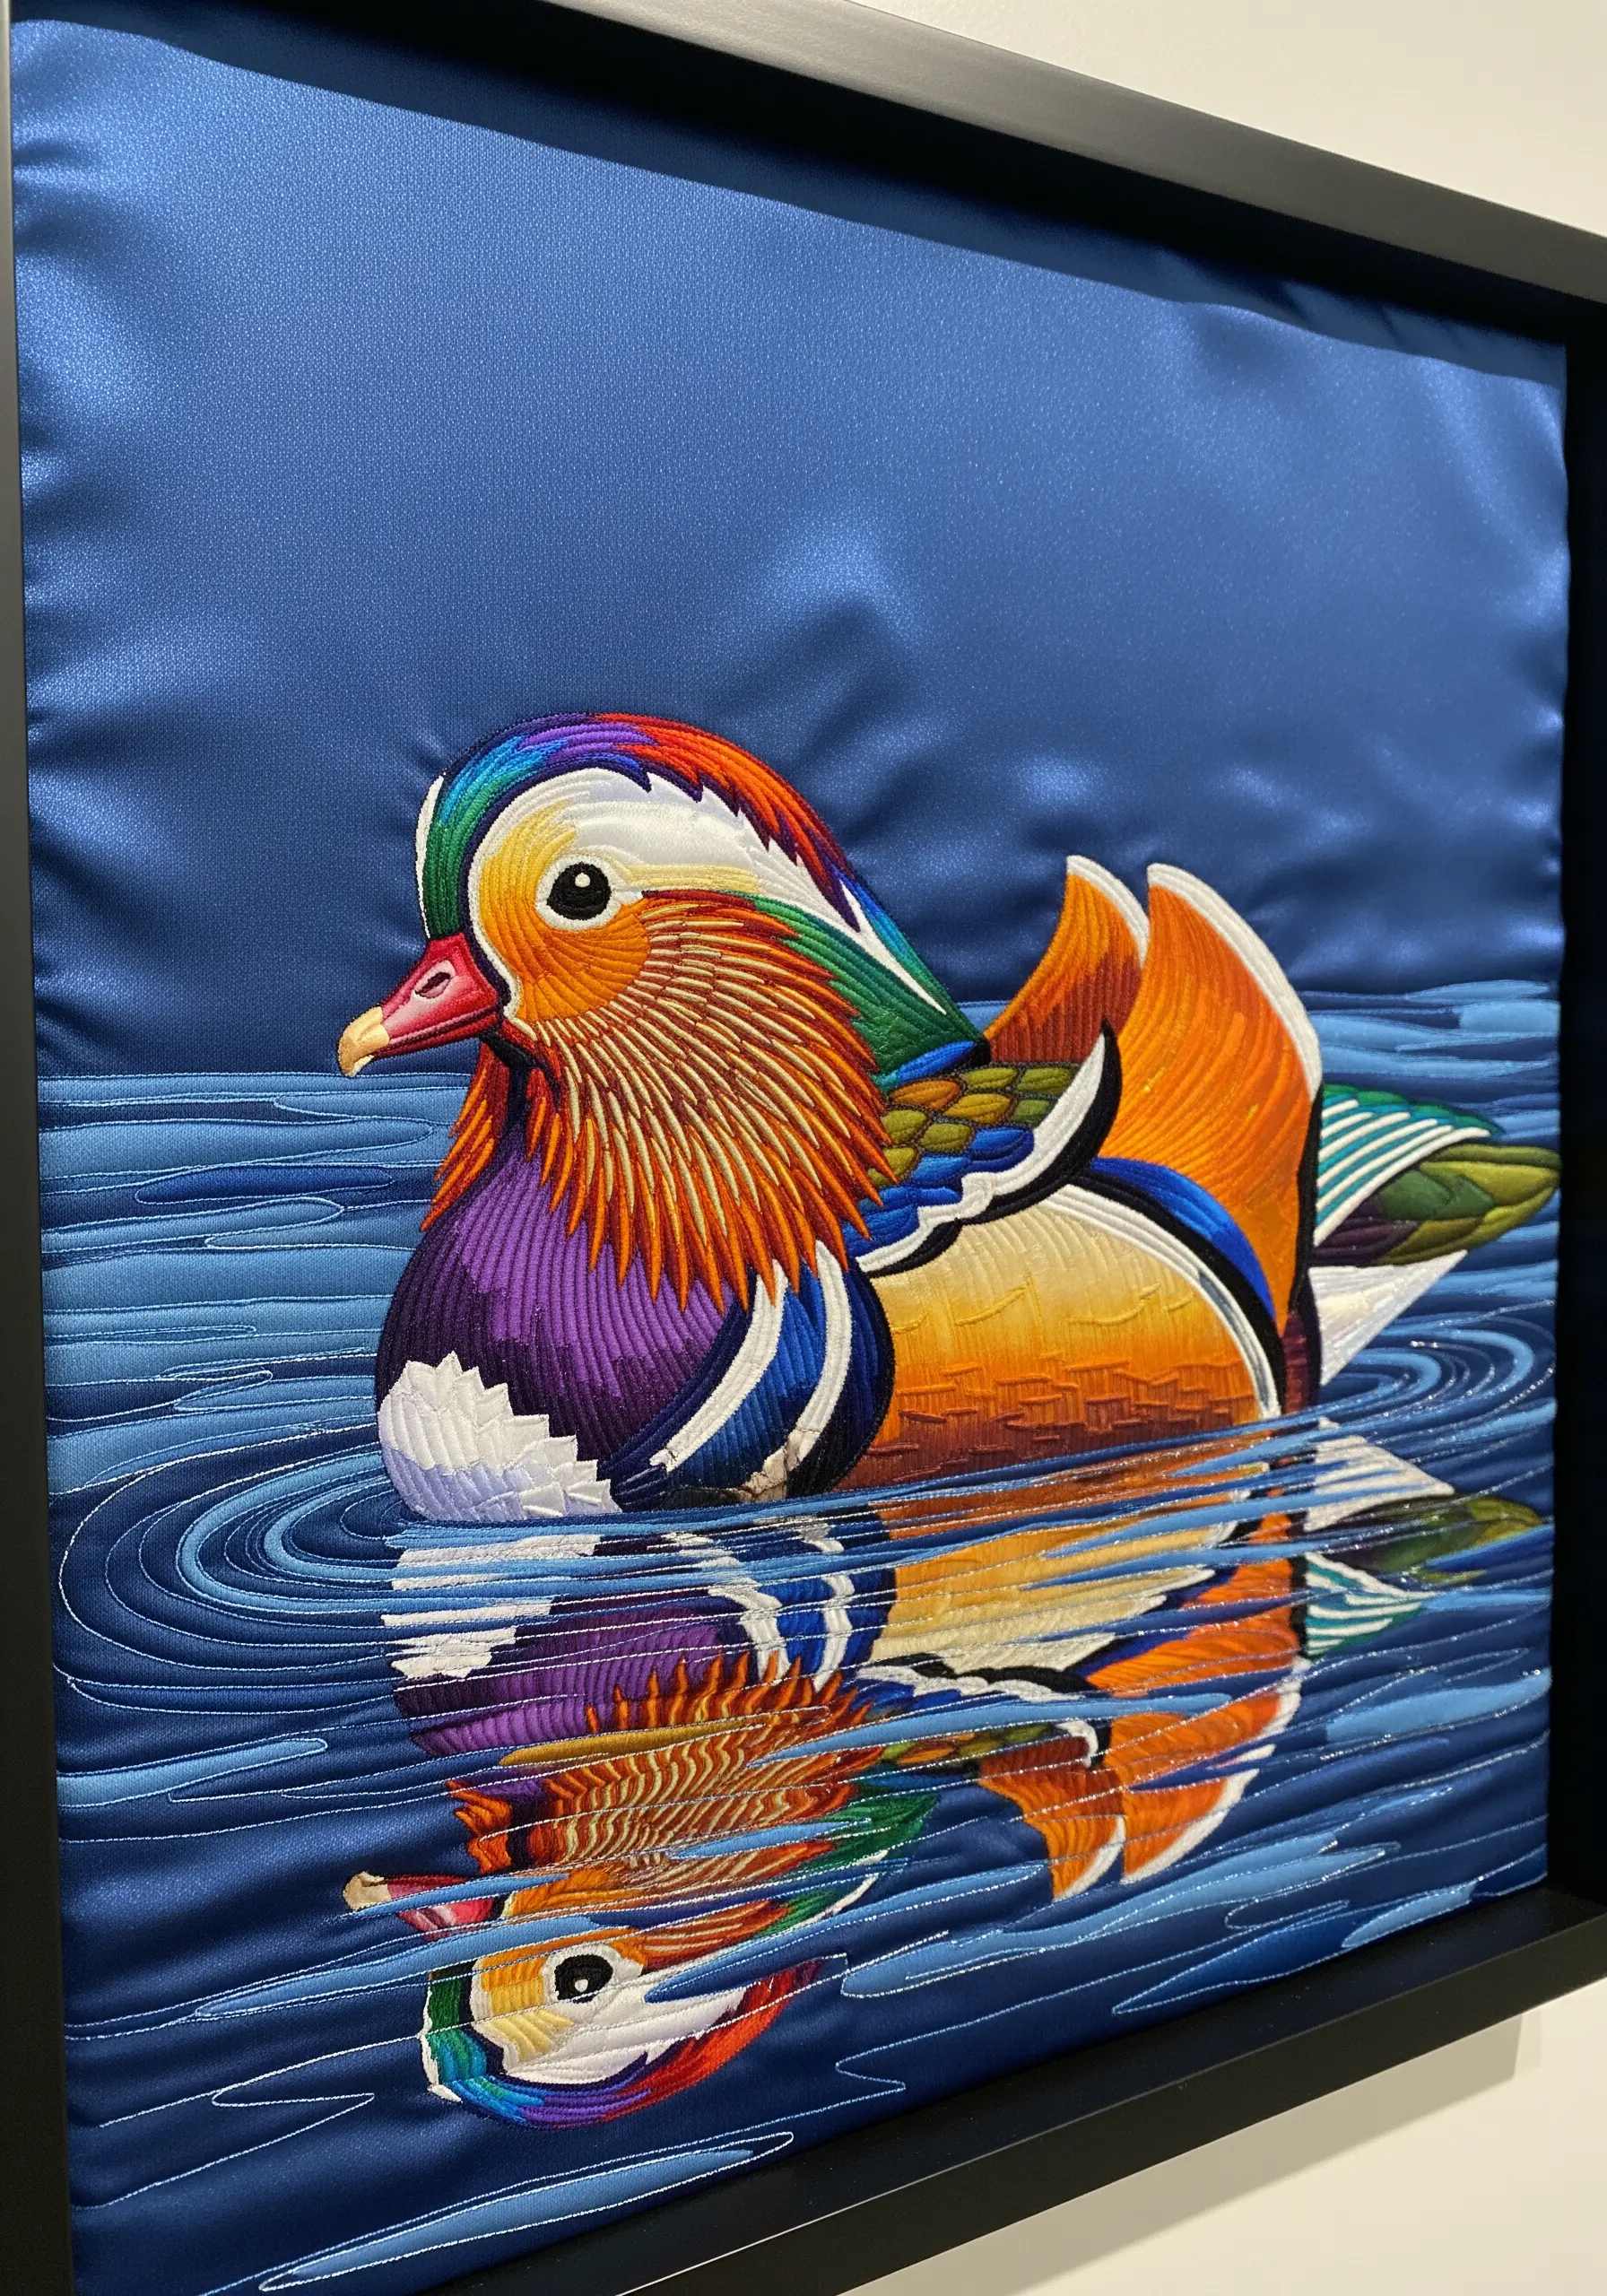
The brilliant, color-shifting feathers of a mandarin duck are a perfect subject for detailed thread painting.
To enhance the effect, work on a base fabric with a natural sheen, like royal blue satin. The reflective quality of the satin will amplify the luster of your threads.
Use single strands of silk or rayon floss, as their high sheen mimics iridescence beautifully. Blend your colors meticulously with directional long-and-short stitches to create the smooth, almost metallic finish of the bird’s plumage.
29. Mix Textural Fabrics for a Multi-Layered Coat
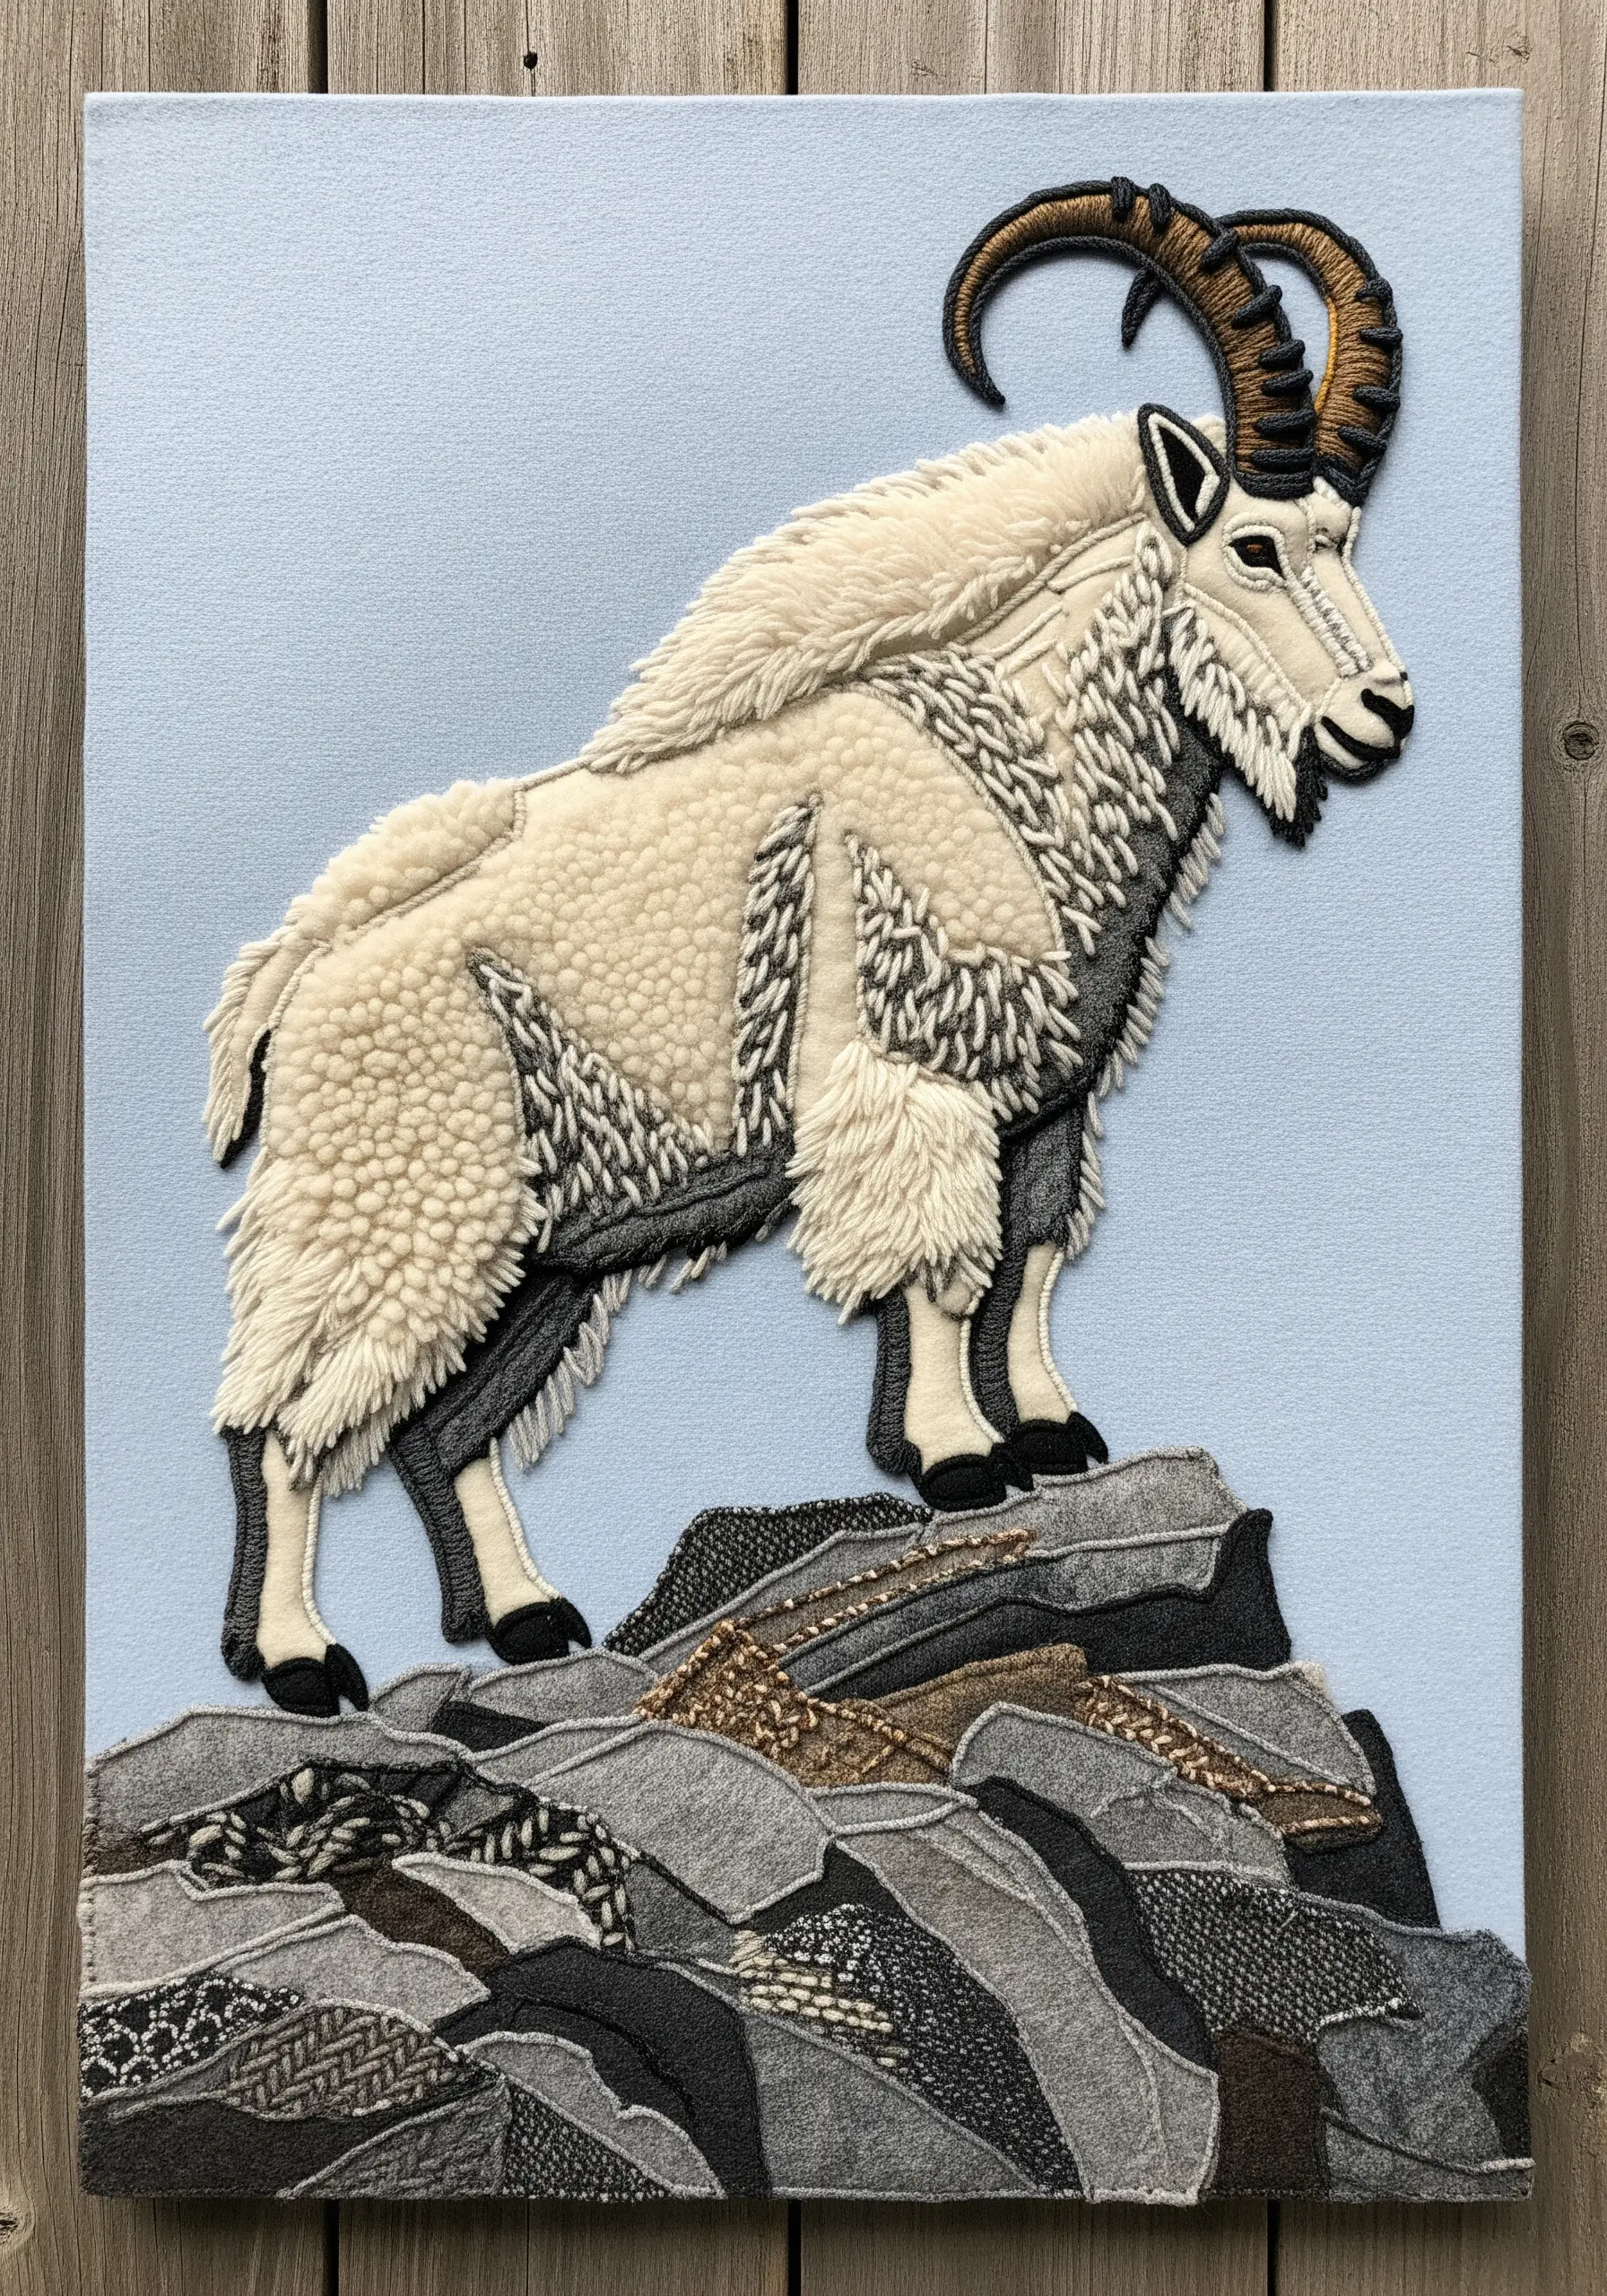
A mountain goat’s coat is a fascinating mix of textures. Recreate it by combining different specialty fabrics in a single appliqué.
Use a bumpy, off-white sherpa or boucle for the main body to represent the woolly undercoat. For the longer hair on the legs and back, use a shaggier faux fur fabric.
Use dense fill stitches or a smoother fabric for the horns and hooves to contrast with the soft body.
This fabric-first approach allows you to build a complex, tactile portrait with strategic material choices.
30. Use Padded Satin Stitch for a 3D, Glossy Effect
To make your subject physically lift off the fabric and mimic a salamander’s wet skin, use padded satin stitch.
First, create a padded base for the body and spots by stitching layers of felt or rows of running stitches in the desired shapes.
Then, work your final satin stitches over this padding. The extra height makes the stitches catch the light, creating a raised, glossy, and highly dimensional effect that feels incredibly lifelike.
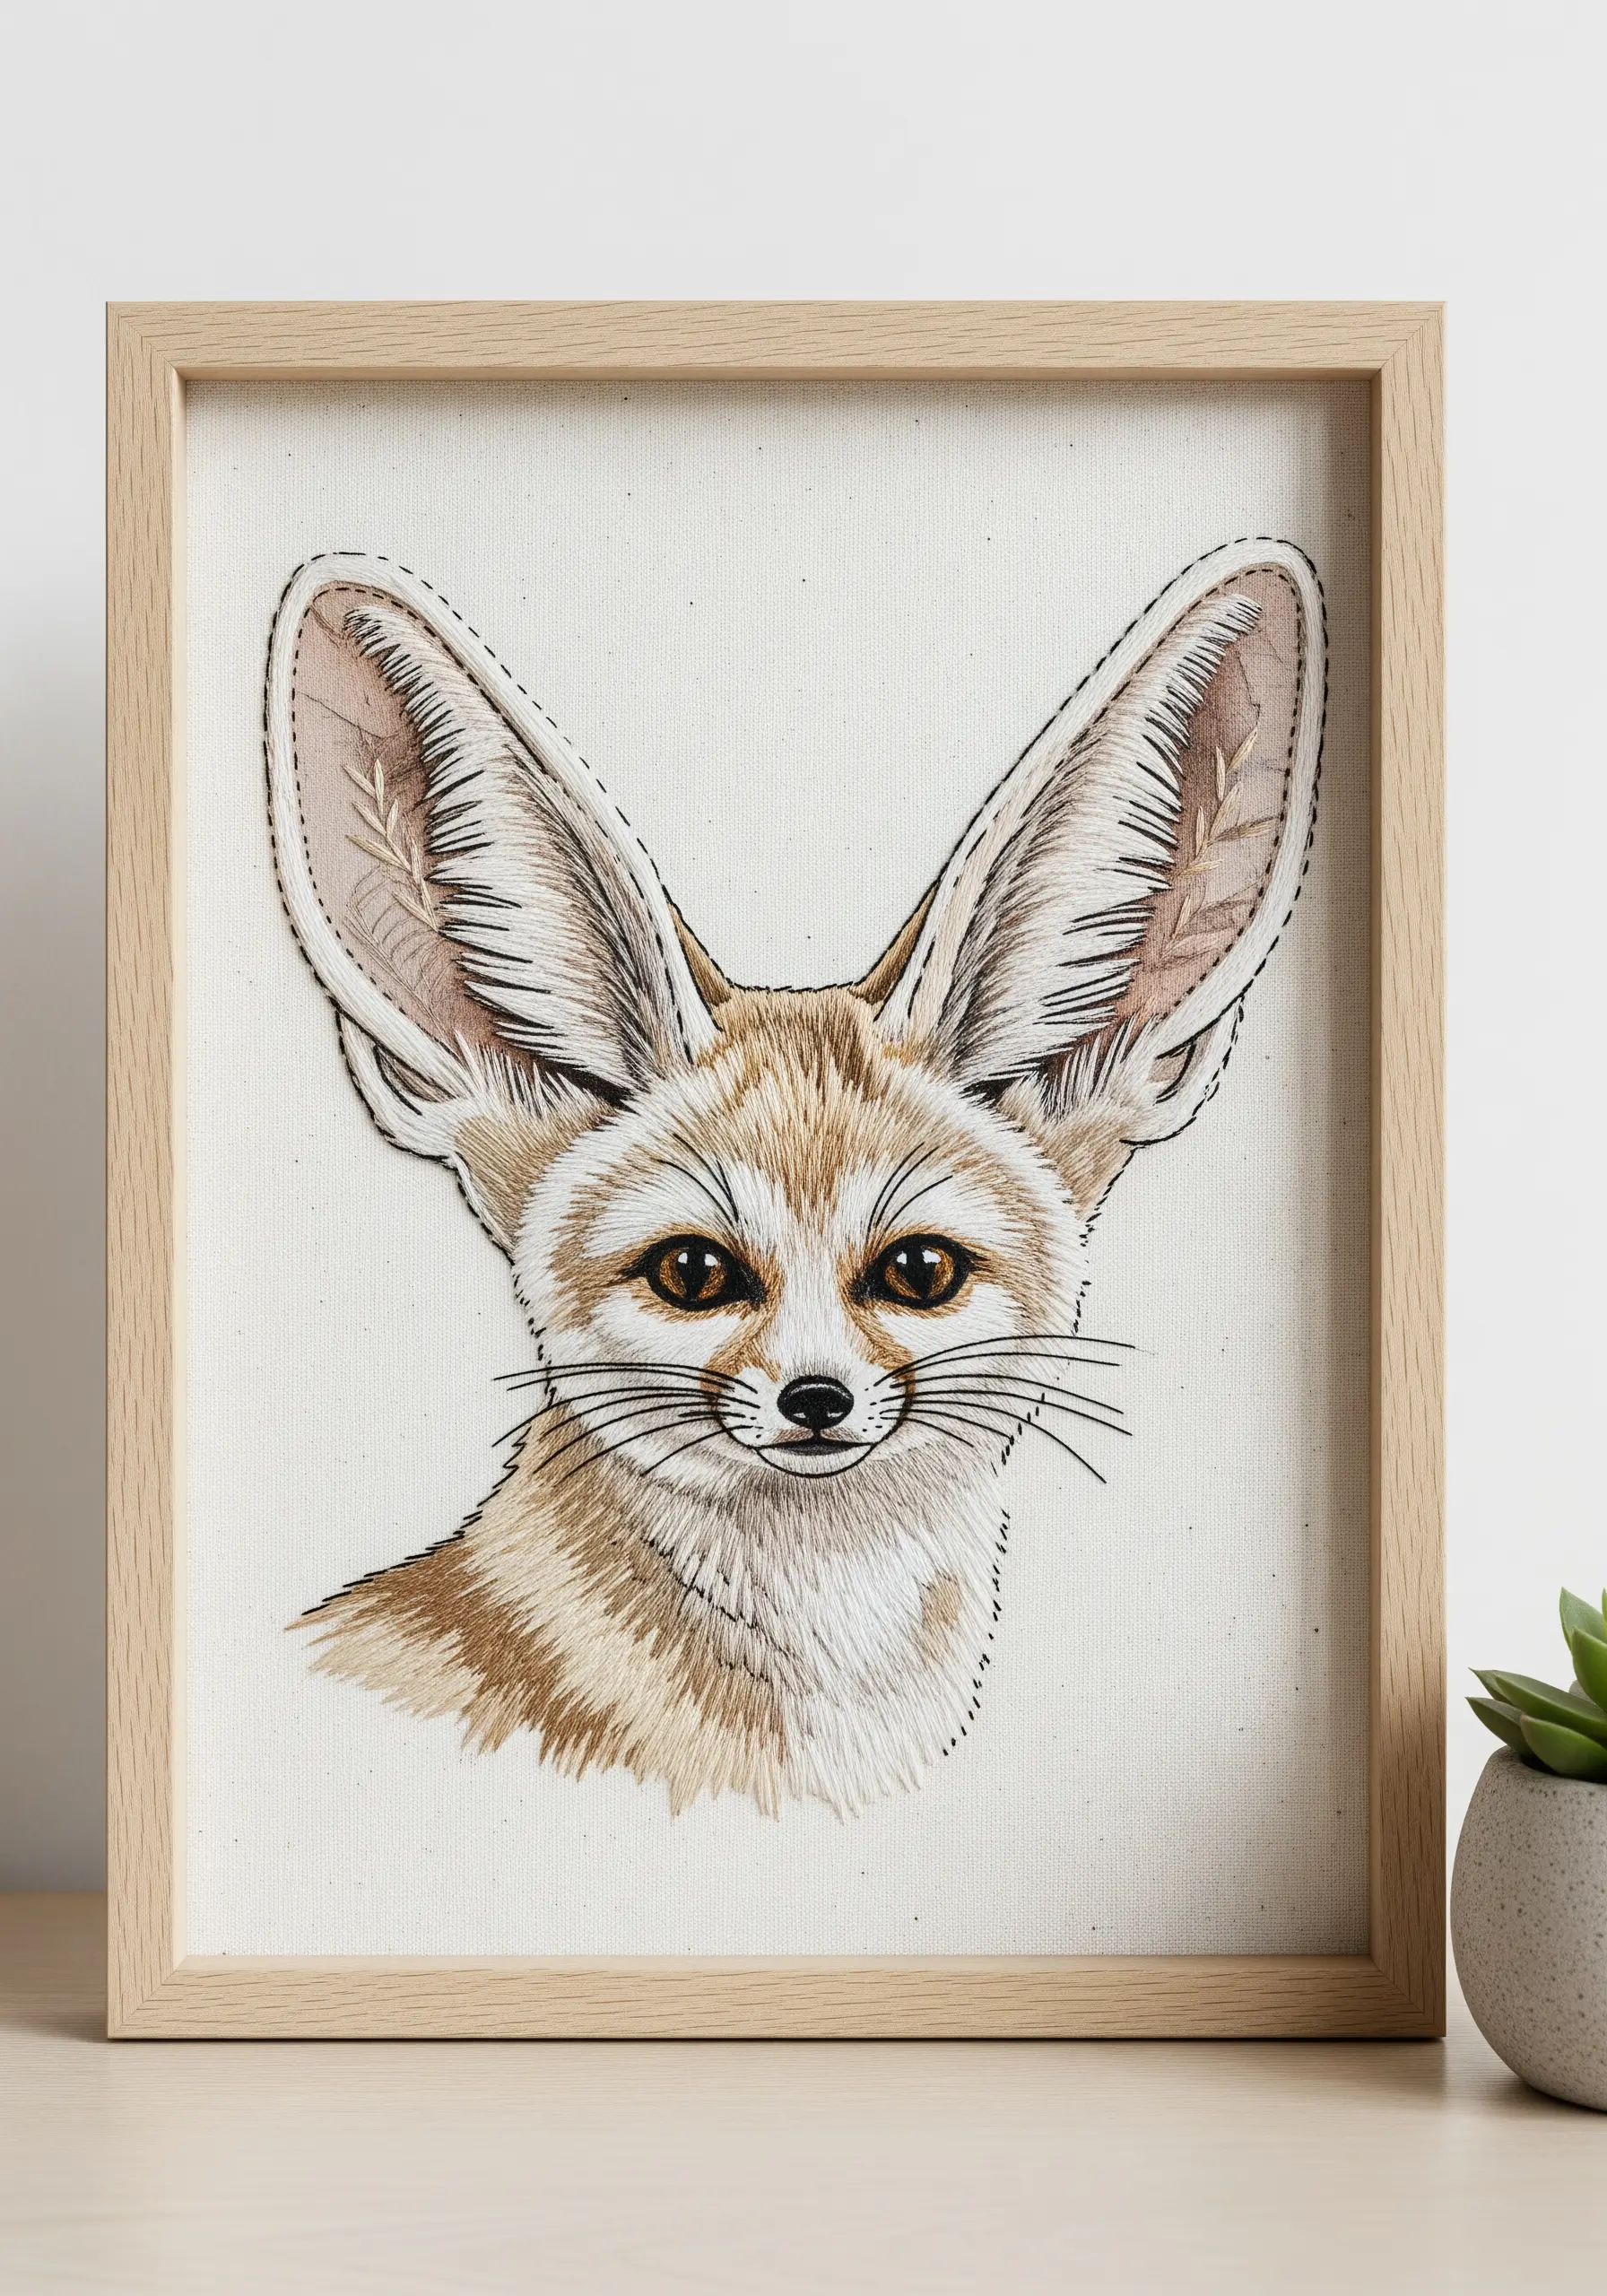
31. Build Form with a Collage of White Lace and Linen
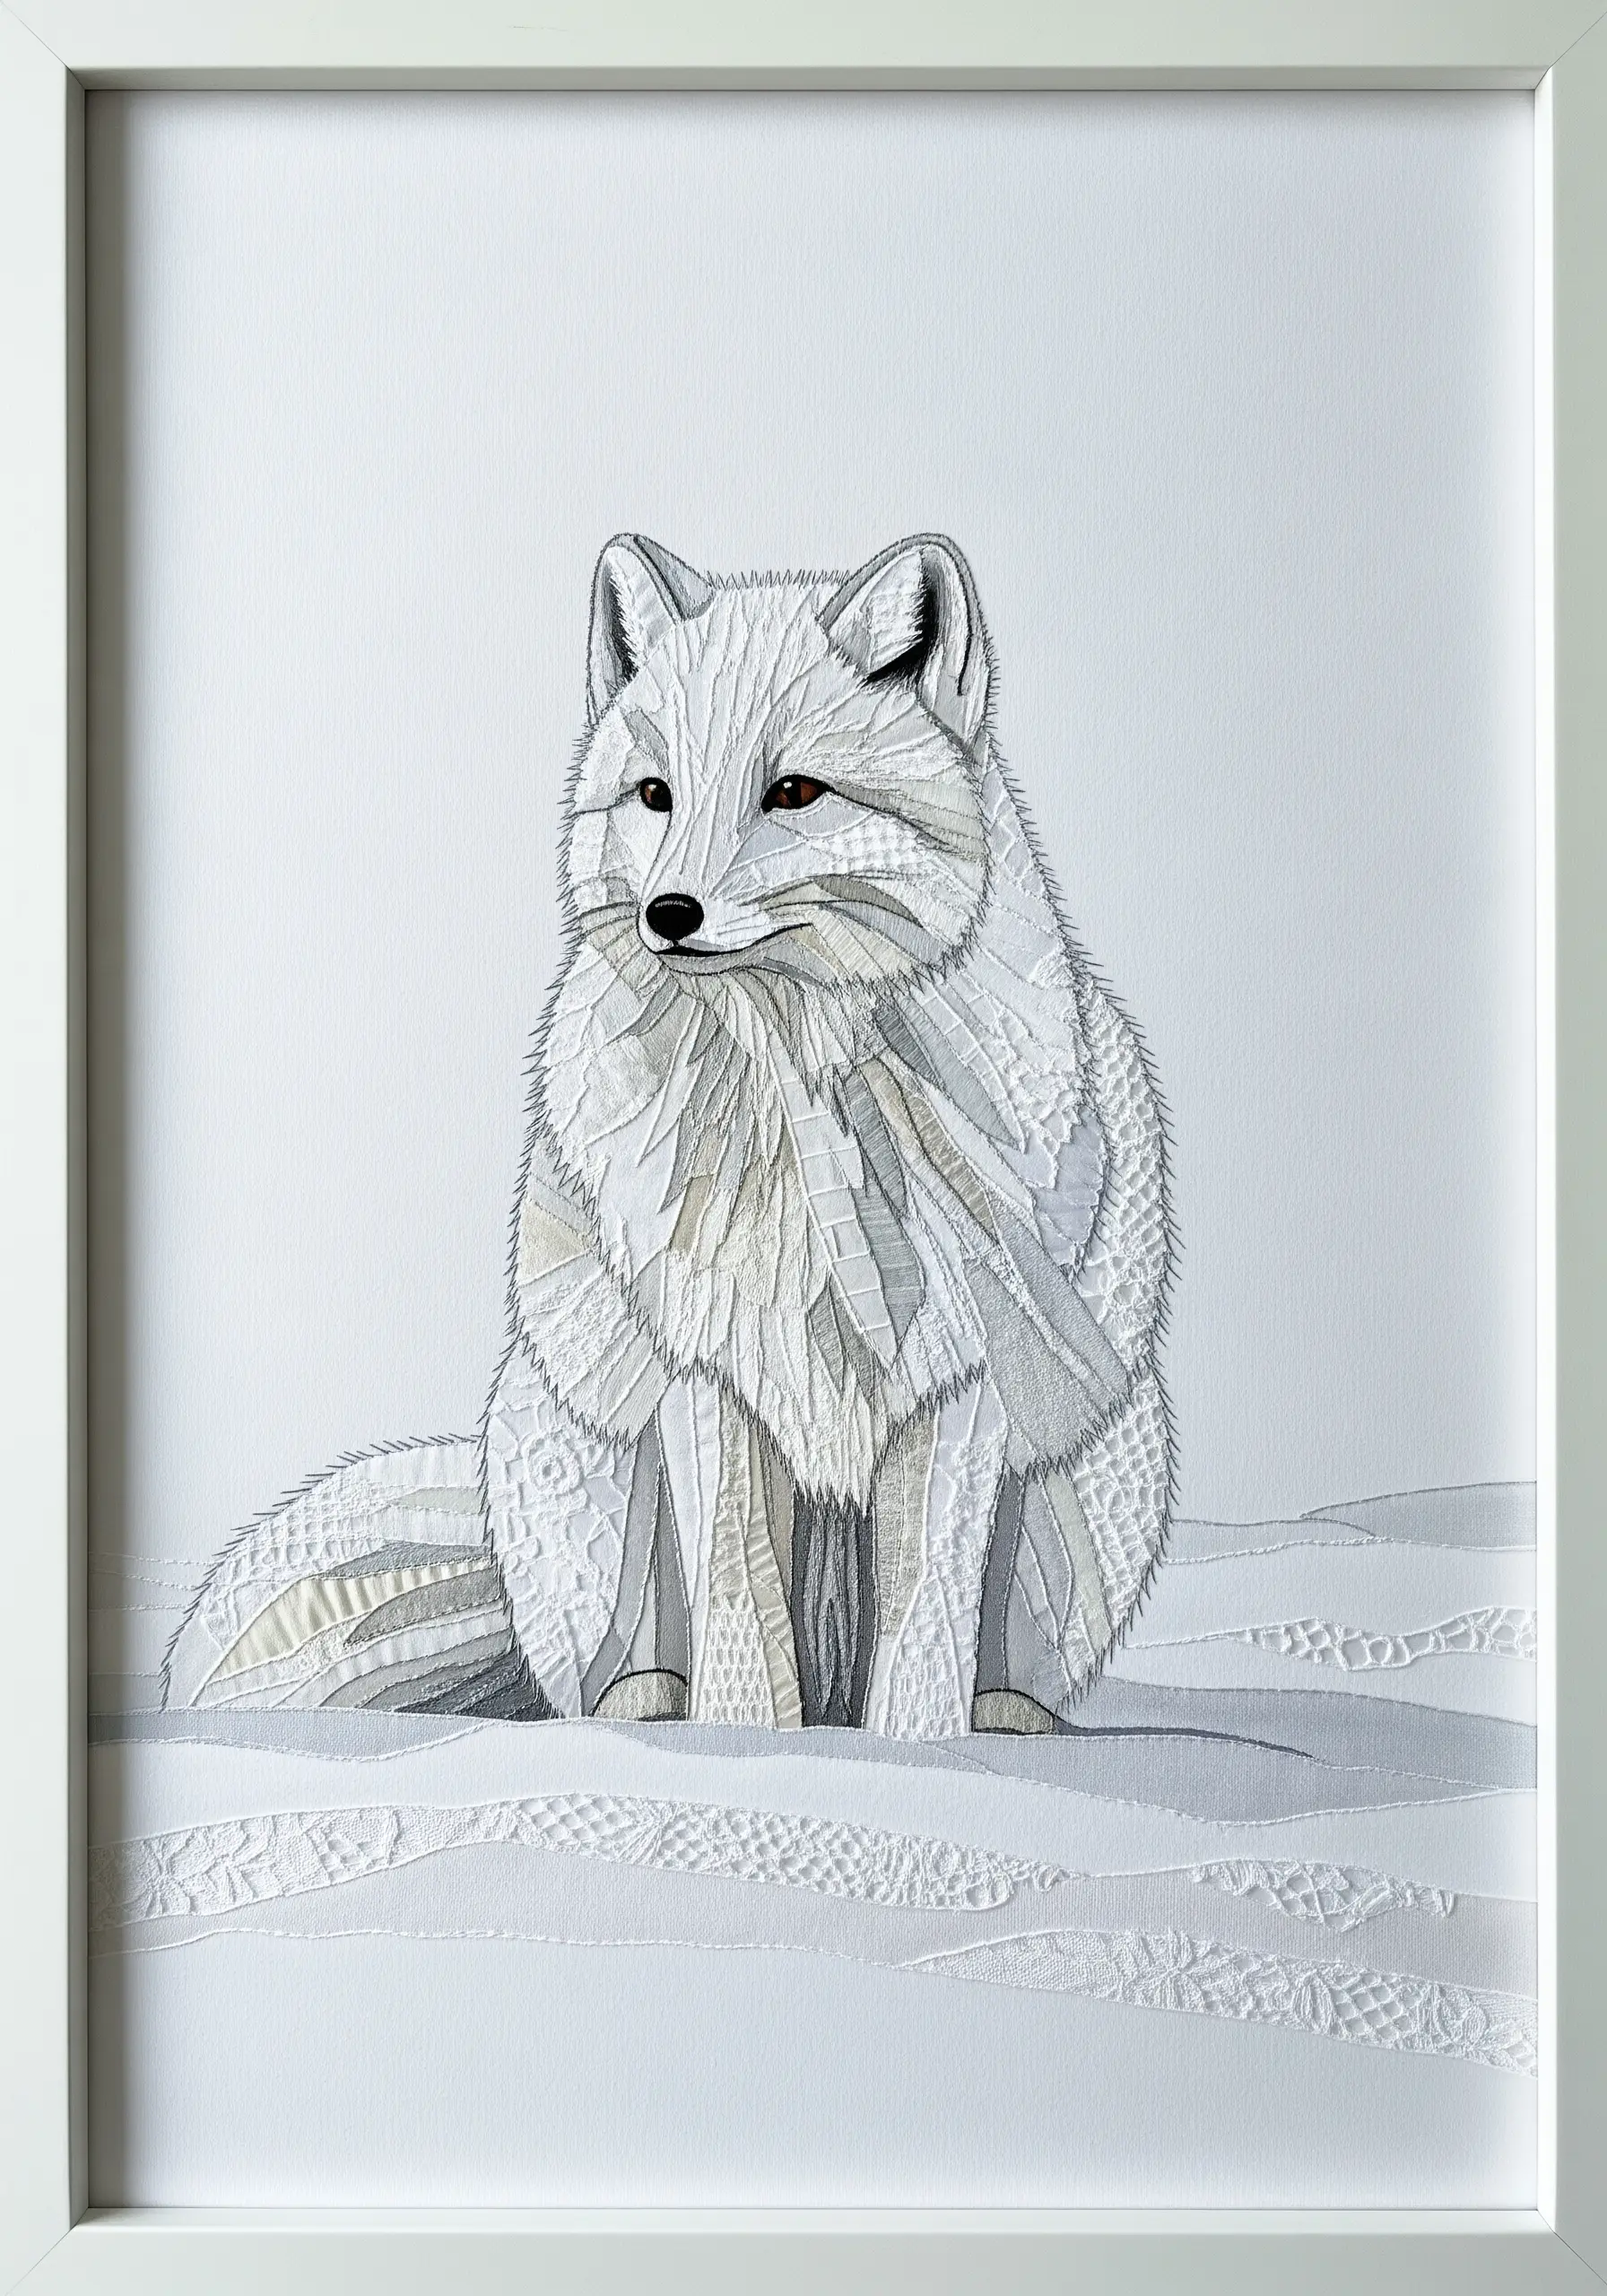
Working with an all-white palette forces you to see texture and shadow in a new way. Create the subtle form of an arctic fox by collaging with different white fabrics.
Cut small, overlapping pieces of lace, damask, linen, and eyelet fabric, arranging them to follow the direction of fur growth.
The inherent patterns and weaves of each fabric will create subtle variations in tone and shadow, building a complex form without a single colored thread. A few grey backstitches can define the eyes and nose.
32. Blend Silk Threads to Paint Flowing Fins
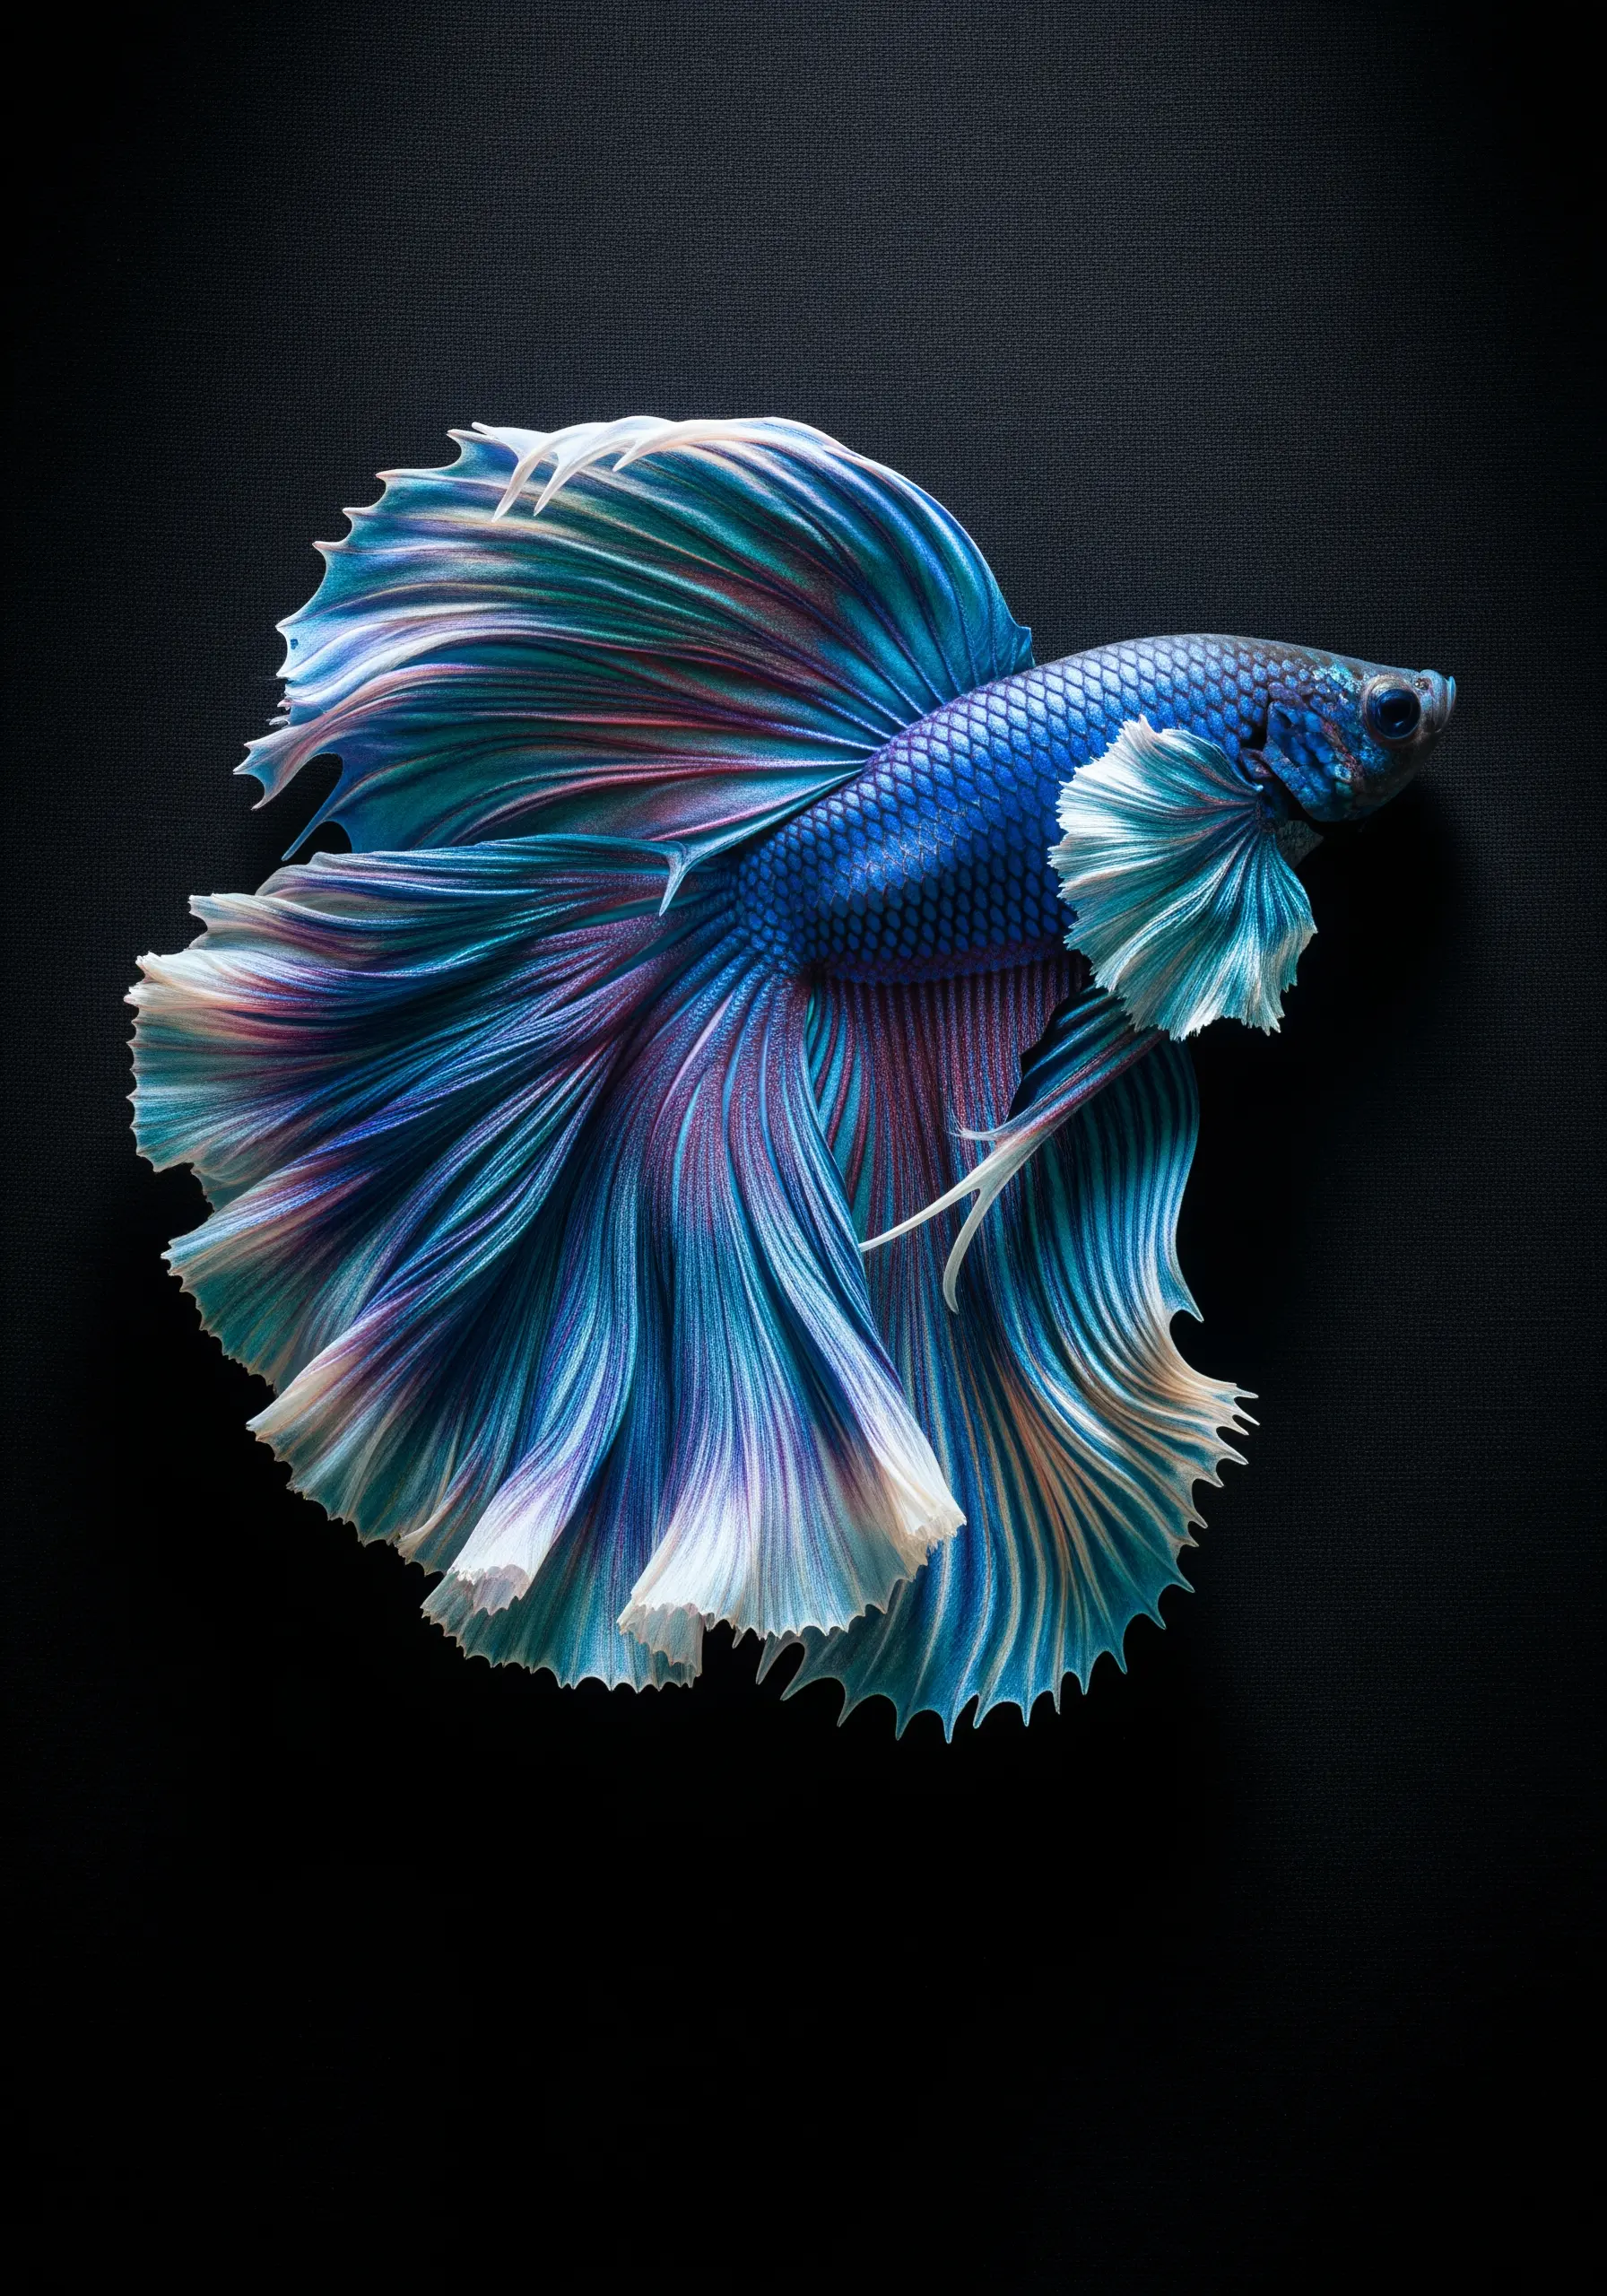
The fins of a betta fish look like watercolor paintings, and you can achieve this effect with thread.
Use single strands of silk or rayon floss, which have a fluid drape and high sheen. Instead of short, choppy stitches, lay long, flowing split stitches or satin stitches that follow the curve of the fins.
Place colors next to each other rather than trying to blend them perfectly; this allows the eye to mix the colors and creates a more vibrant, shimmering effect, much like light passing through water.
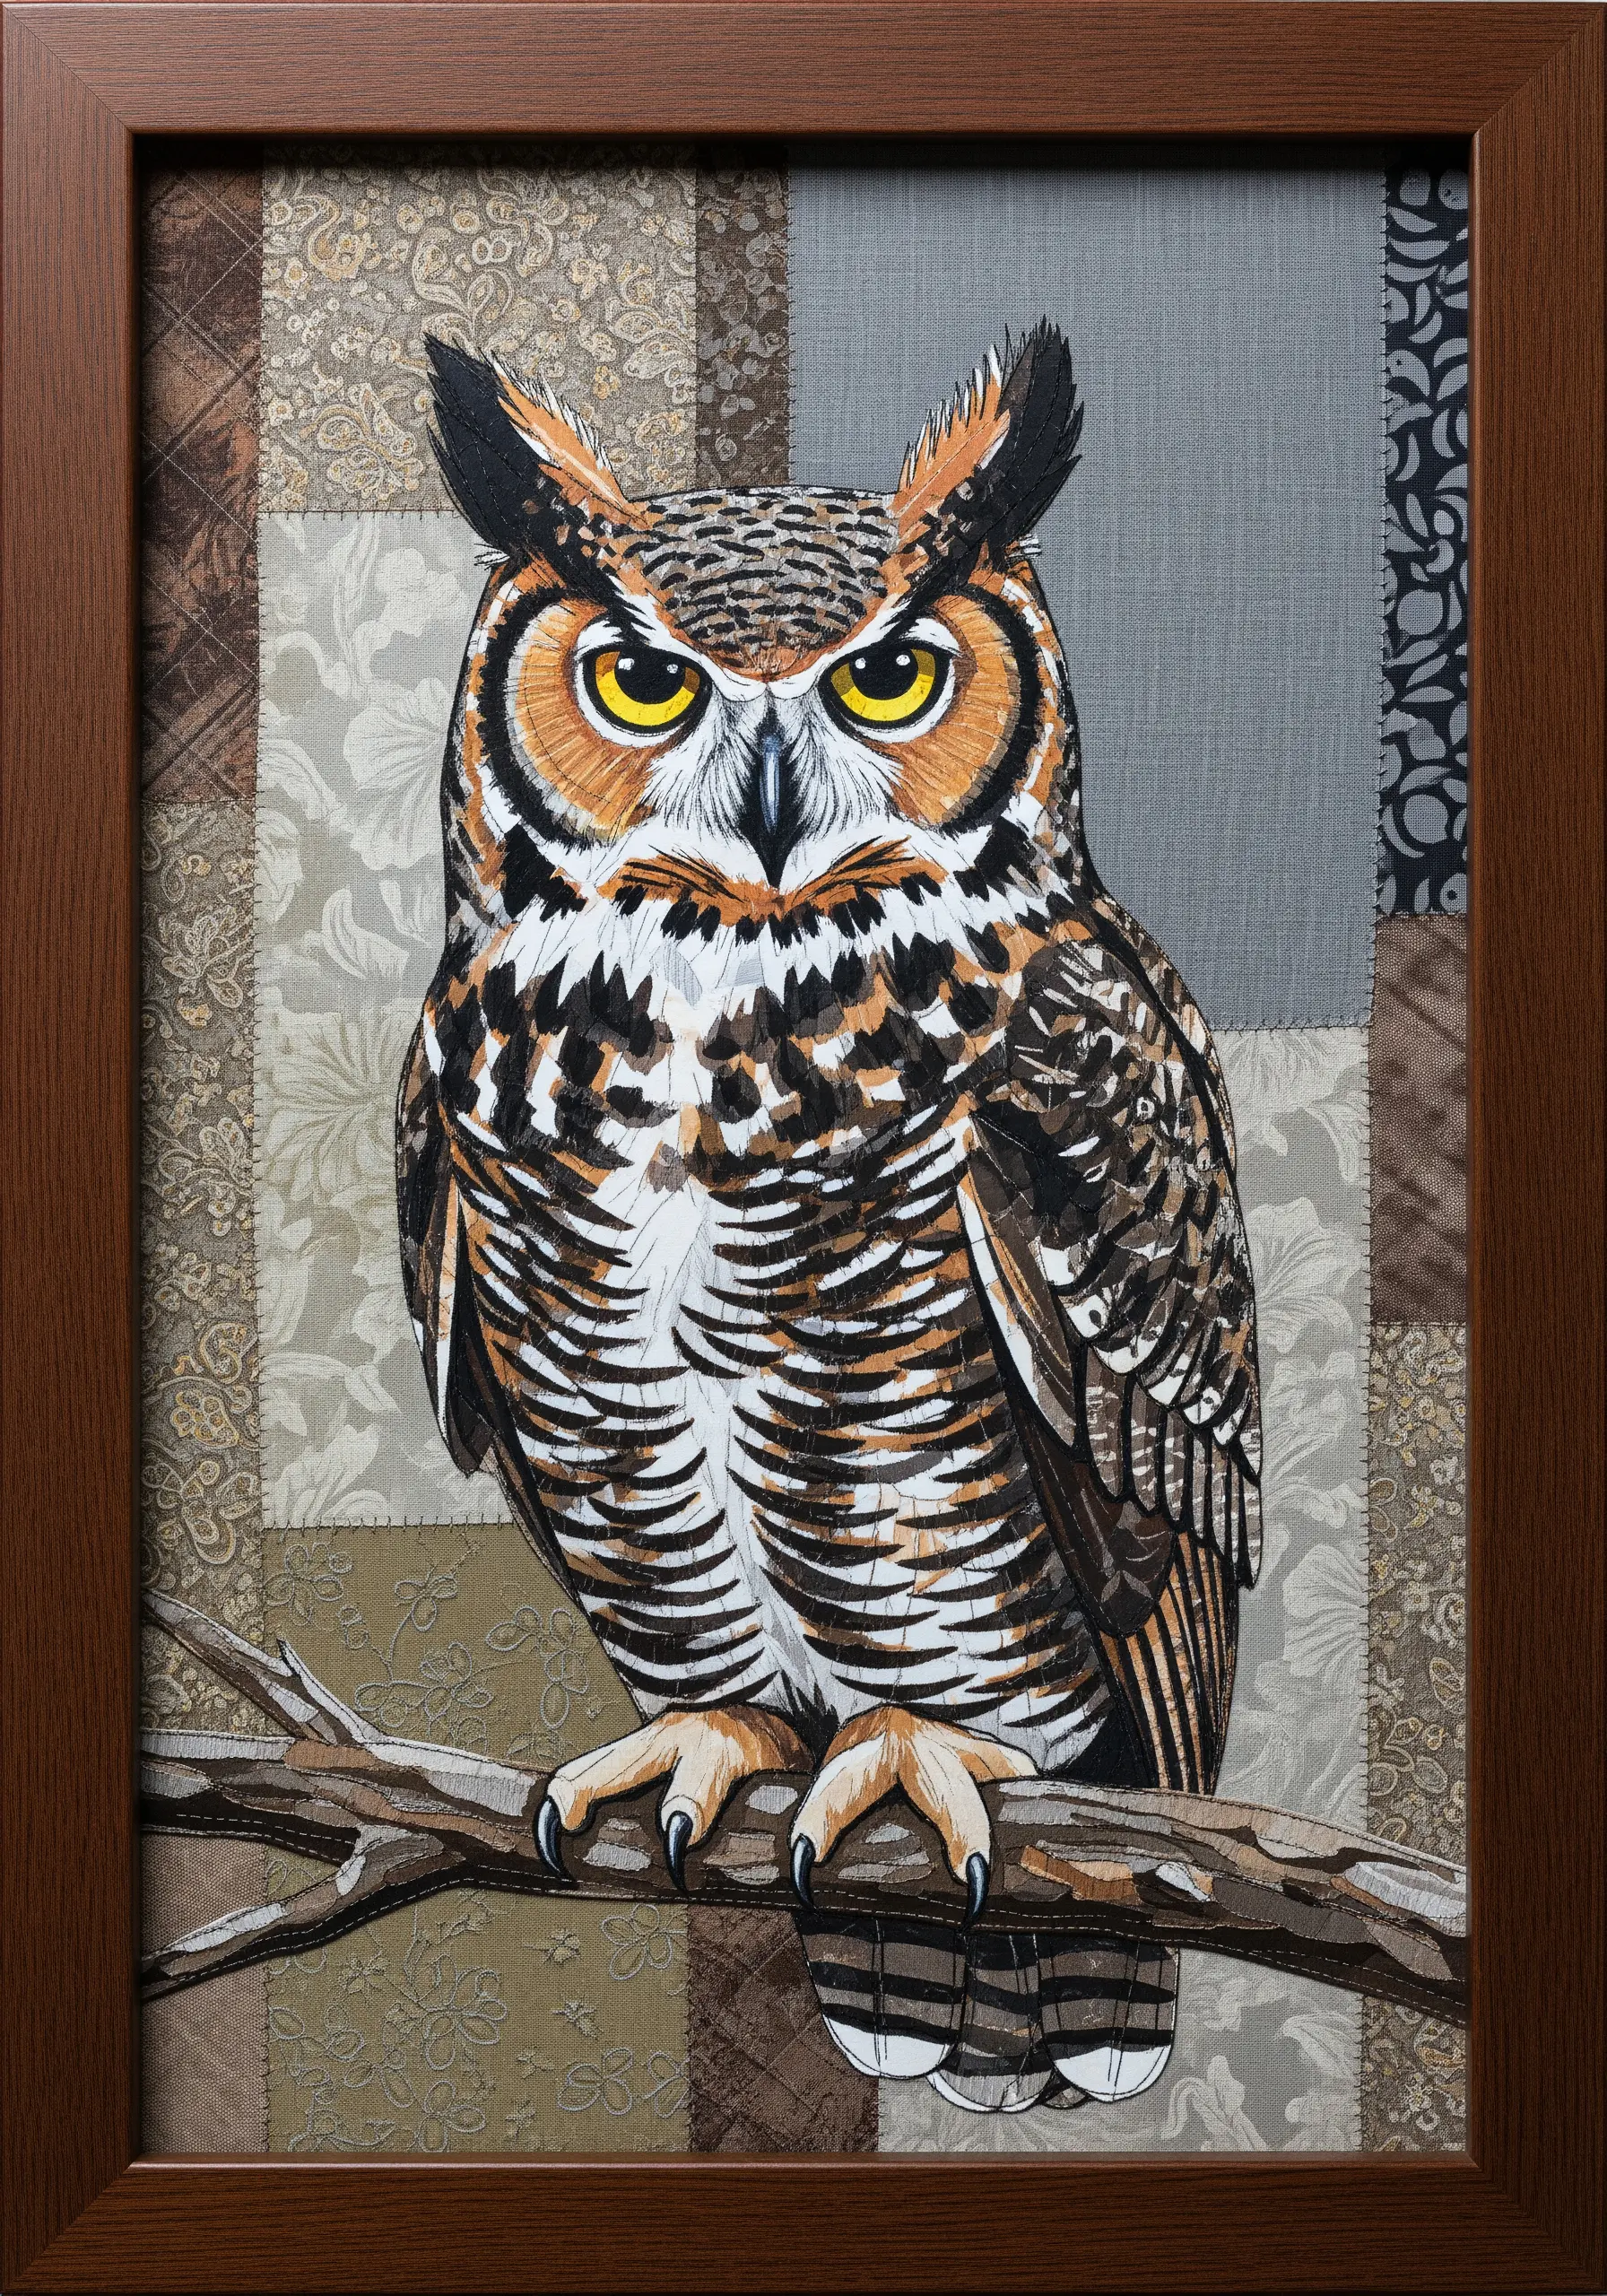
33. Create Feather Layers with Directional Satin Stitch
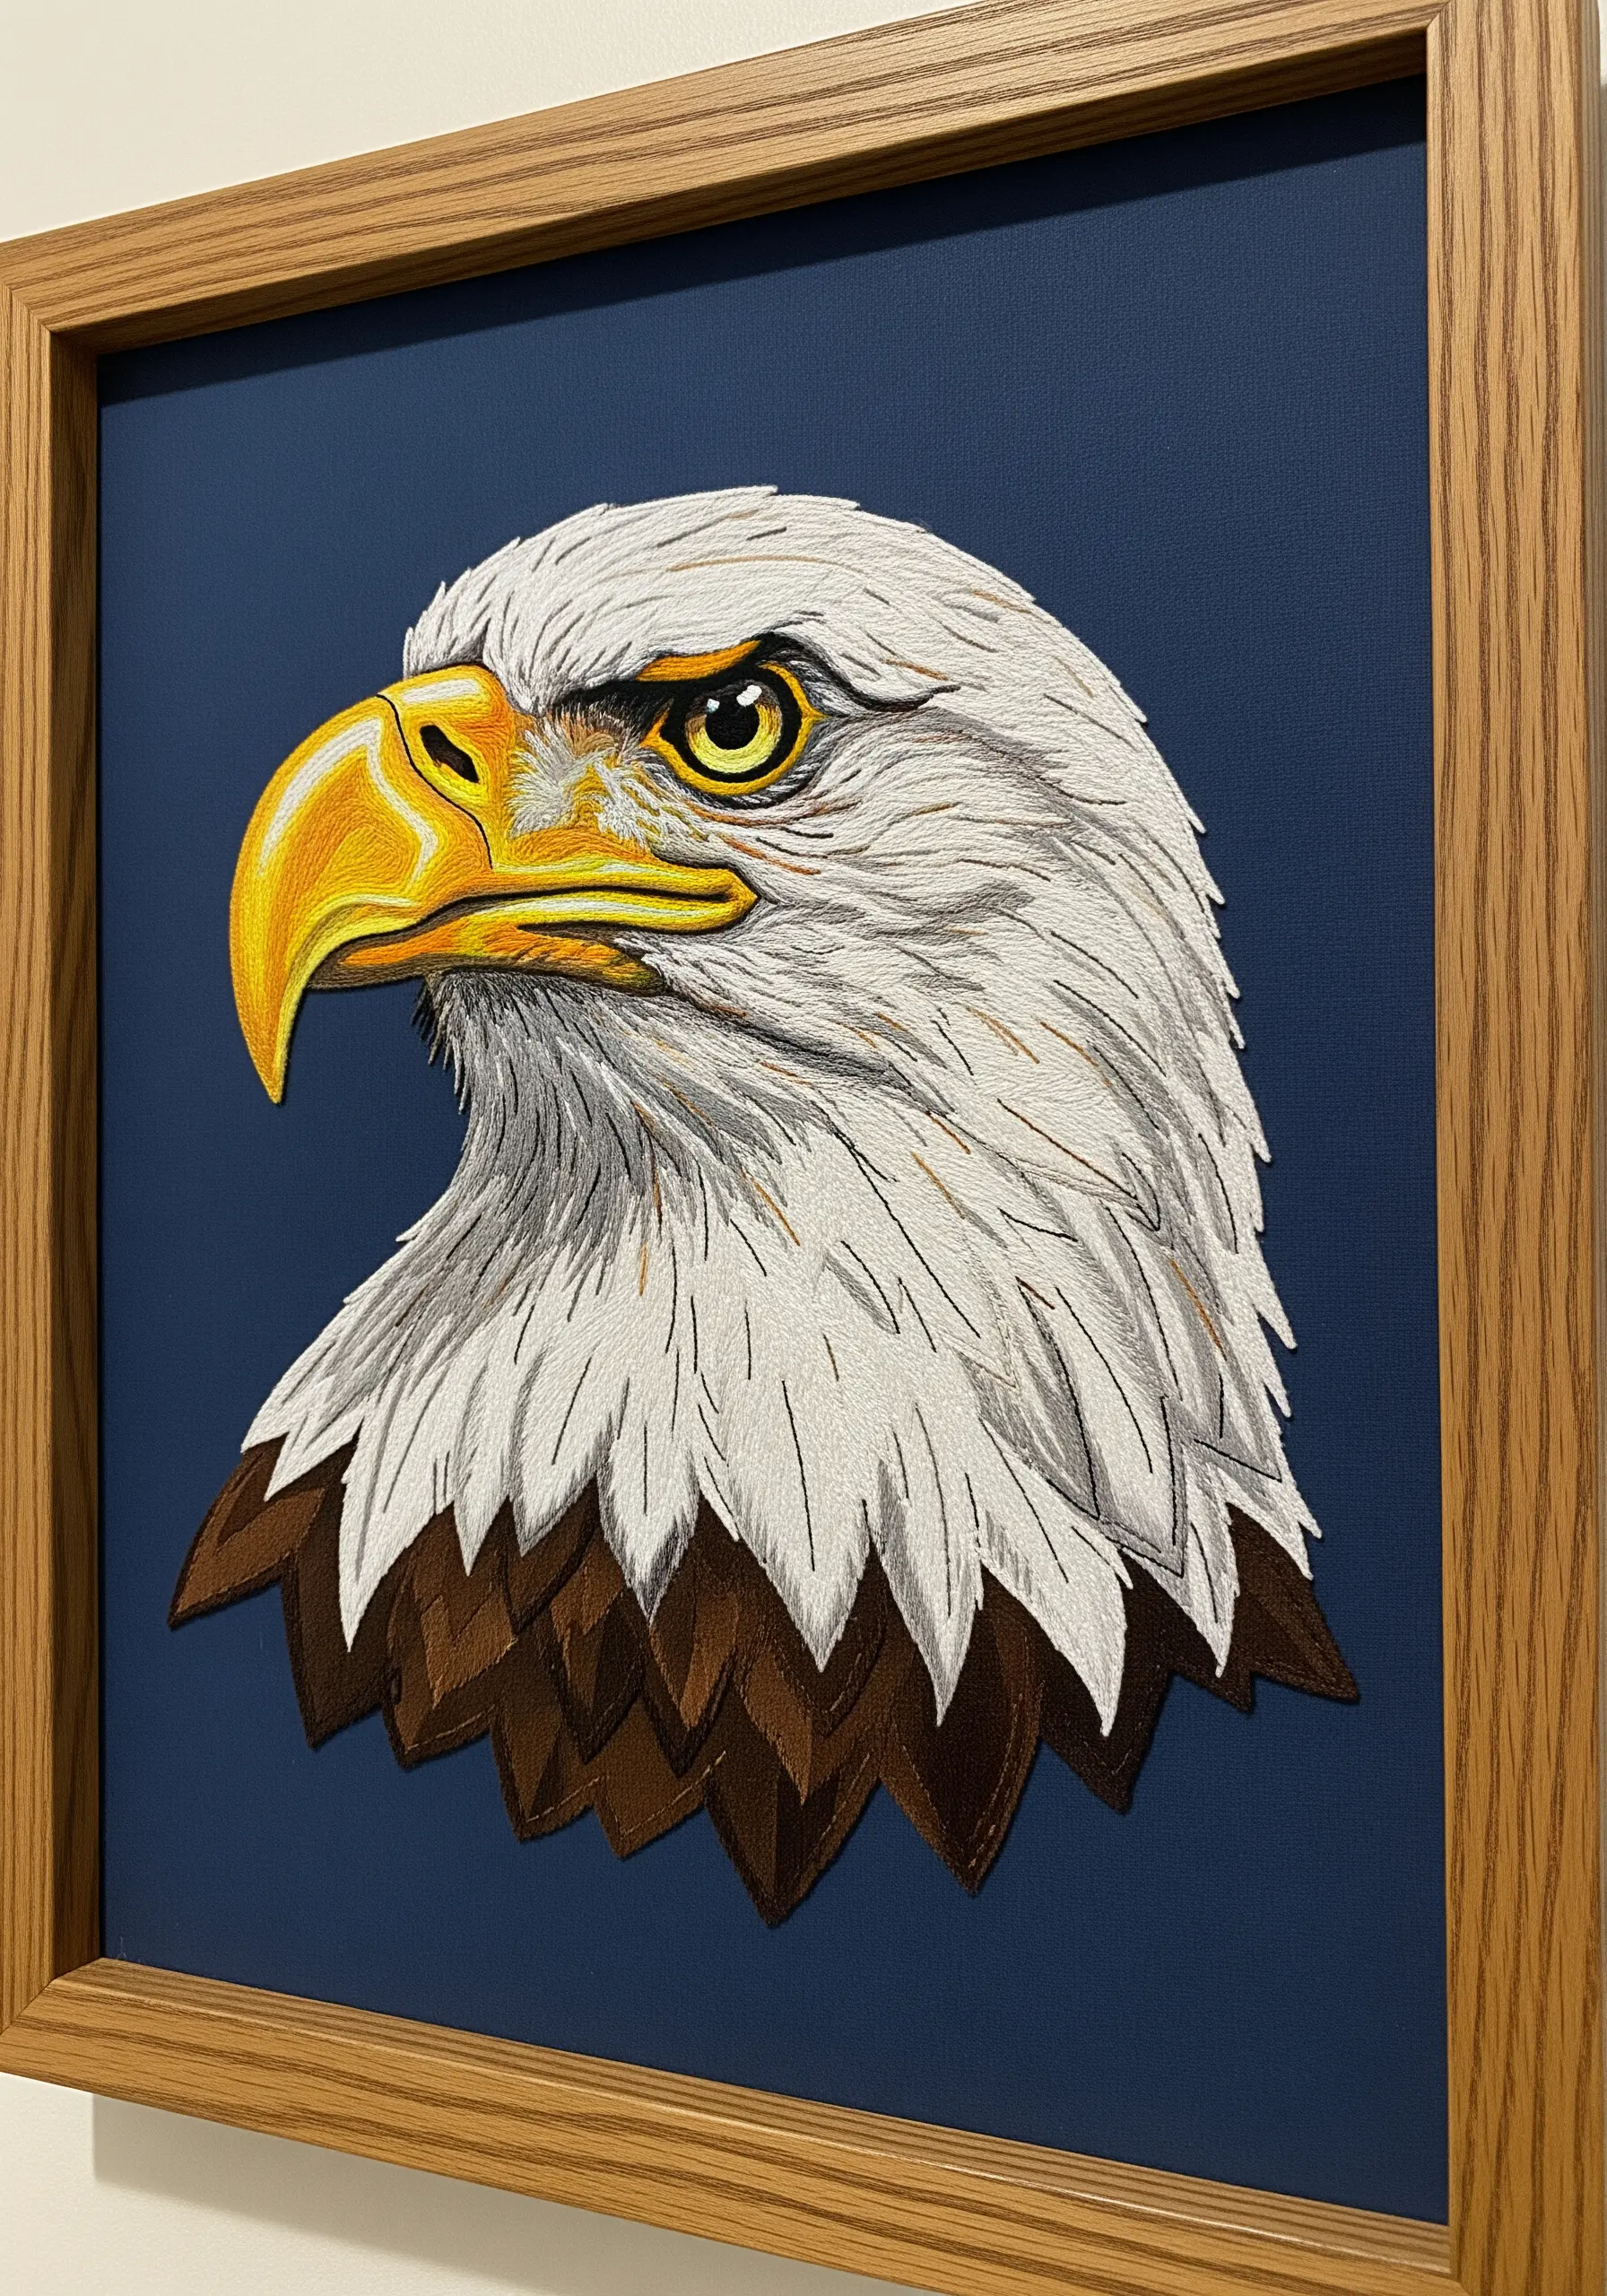
To depict the distinct feathers of a bald eagle, think in layers. For the soft white head, use very short satin stitches angled towards the beak, creating a downy texture.
For the larger brown feathers at the base of the neck, use longer, broader satin stitches shaped like an inverted ‘V’.
Physically layering these stitched feather shapes on top of one another adds dimension and realism.
This directional approach to a classic stitch is what separates a flat design from a portrait that feels alive.


