

Perhaps you’ve mastered the basic stitches, but your work still feels like it’s missing something—that touch of artistry that transforms a craft into a delicate statement. You sense there’s a way to make your florals feel less like patterns and more like memories of a sunlit garden, pressed between the pages of a book.
That refinement you’re seeking isn’t found in more complex tools or expensive threads. It’s in the subtle shift of a stitch’s direction, the choice to use one strand instead of two, or the courage to embrace negative space. It’s about learning to see the way a real petal catches the light and translating that observation into thread.
Consider this your guide to moving beyond merely stitching a flower to truly capturing its essence. Here, you’ll find 25 techniques designed to give your work the depth, texture, and vintage-inspired soul you’ve been searching for. Let’s begin.
1. Master the Art of Pansy Petal Gradients

To capture the paper-thin quality of pansy petals, transition from satin stitch to a more nuanced thread painting.
Use a single strand of floss and directional long-and-short stitches that radiate from the center, mimicking the flower’s natural veining.
This technique allows you to blend multiple shades—from deep violet to pale lavender and rich gold—without creating harsh lines, resulting in a photorealistic finish.
Overlap your stitches slightly to ensure a seamless color transition that looks effortlessly blended.
2. Create Ethereal Queen Anne’s Lace on Tulle

Stitching on a sheer fabric like tulle makes your design appear to float in mid-air, perfect for delicate botanicals.
Use a water-soluble stabilizer on top to prevent the fabric from stretching and to give your needle a temporary foundation.
For the tiny floral clusters, use a combination of detached chain stitches and tiny seed stitches instead of French knots, which can be too bulky.
This approach preserves the airy, light quality of the flower and makes the negative space a powerful part of the composition.
3. Build Realistic Lavender Texture with Bullion Knots

Give your lavender sprigs a three-dimensional, true-to-life texture by swapping flat stitches for sculpted ones.
Use stacked bullion knots or tightly packed French knots to form the individual buds, clustering them closely along the stem.
Vary the number of wraps on your bullion knots to create tapered ends on each flower spike, just as they appear in nature.
This method adds depth and shadow, making your lavender stitch ideas feel wonderfully tactile and realistic.
4. Curate a Botanical Study with Fern Variations

Transform a simple pattern into a sophisticated botanical collection by introducing subtle variations in color and density.
Embroider each fern with a slightly different shade of green—from sage to olive to deep forest—to create visual interest and depth.
Alternate between dense fishbone stitches for fuller fronds and sparse fly stitches for more delicate ones.
Arranging them on a stretched canvas instead of a hoop gives your work the formal presence of a framed scientific illustration.
5. Achieve Translucent Petals with Directional Stitching
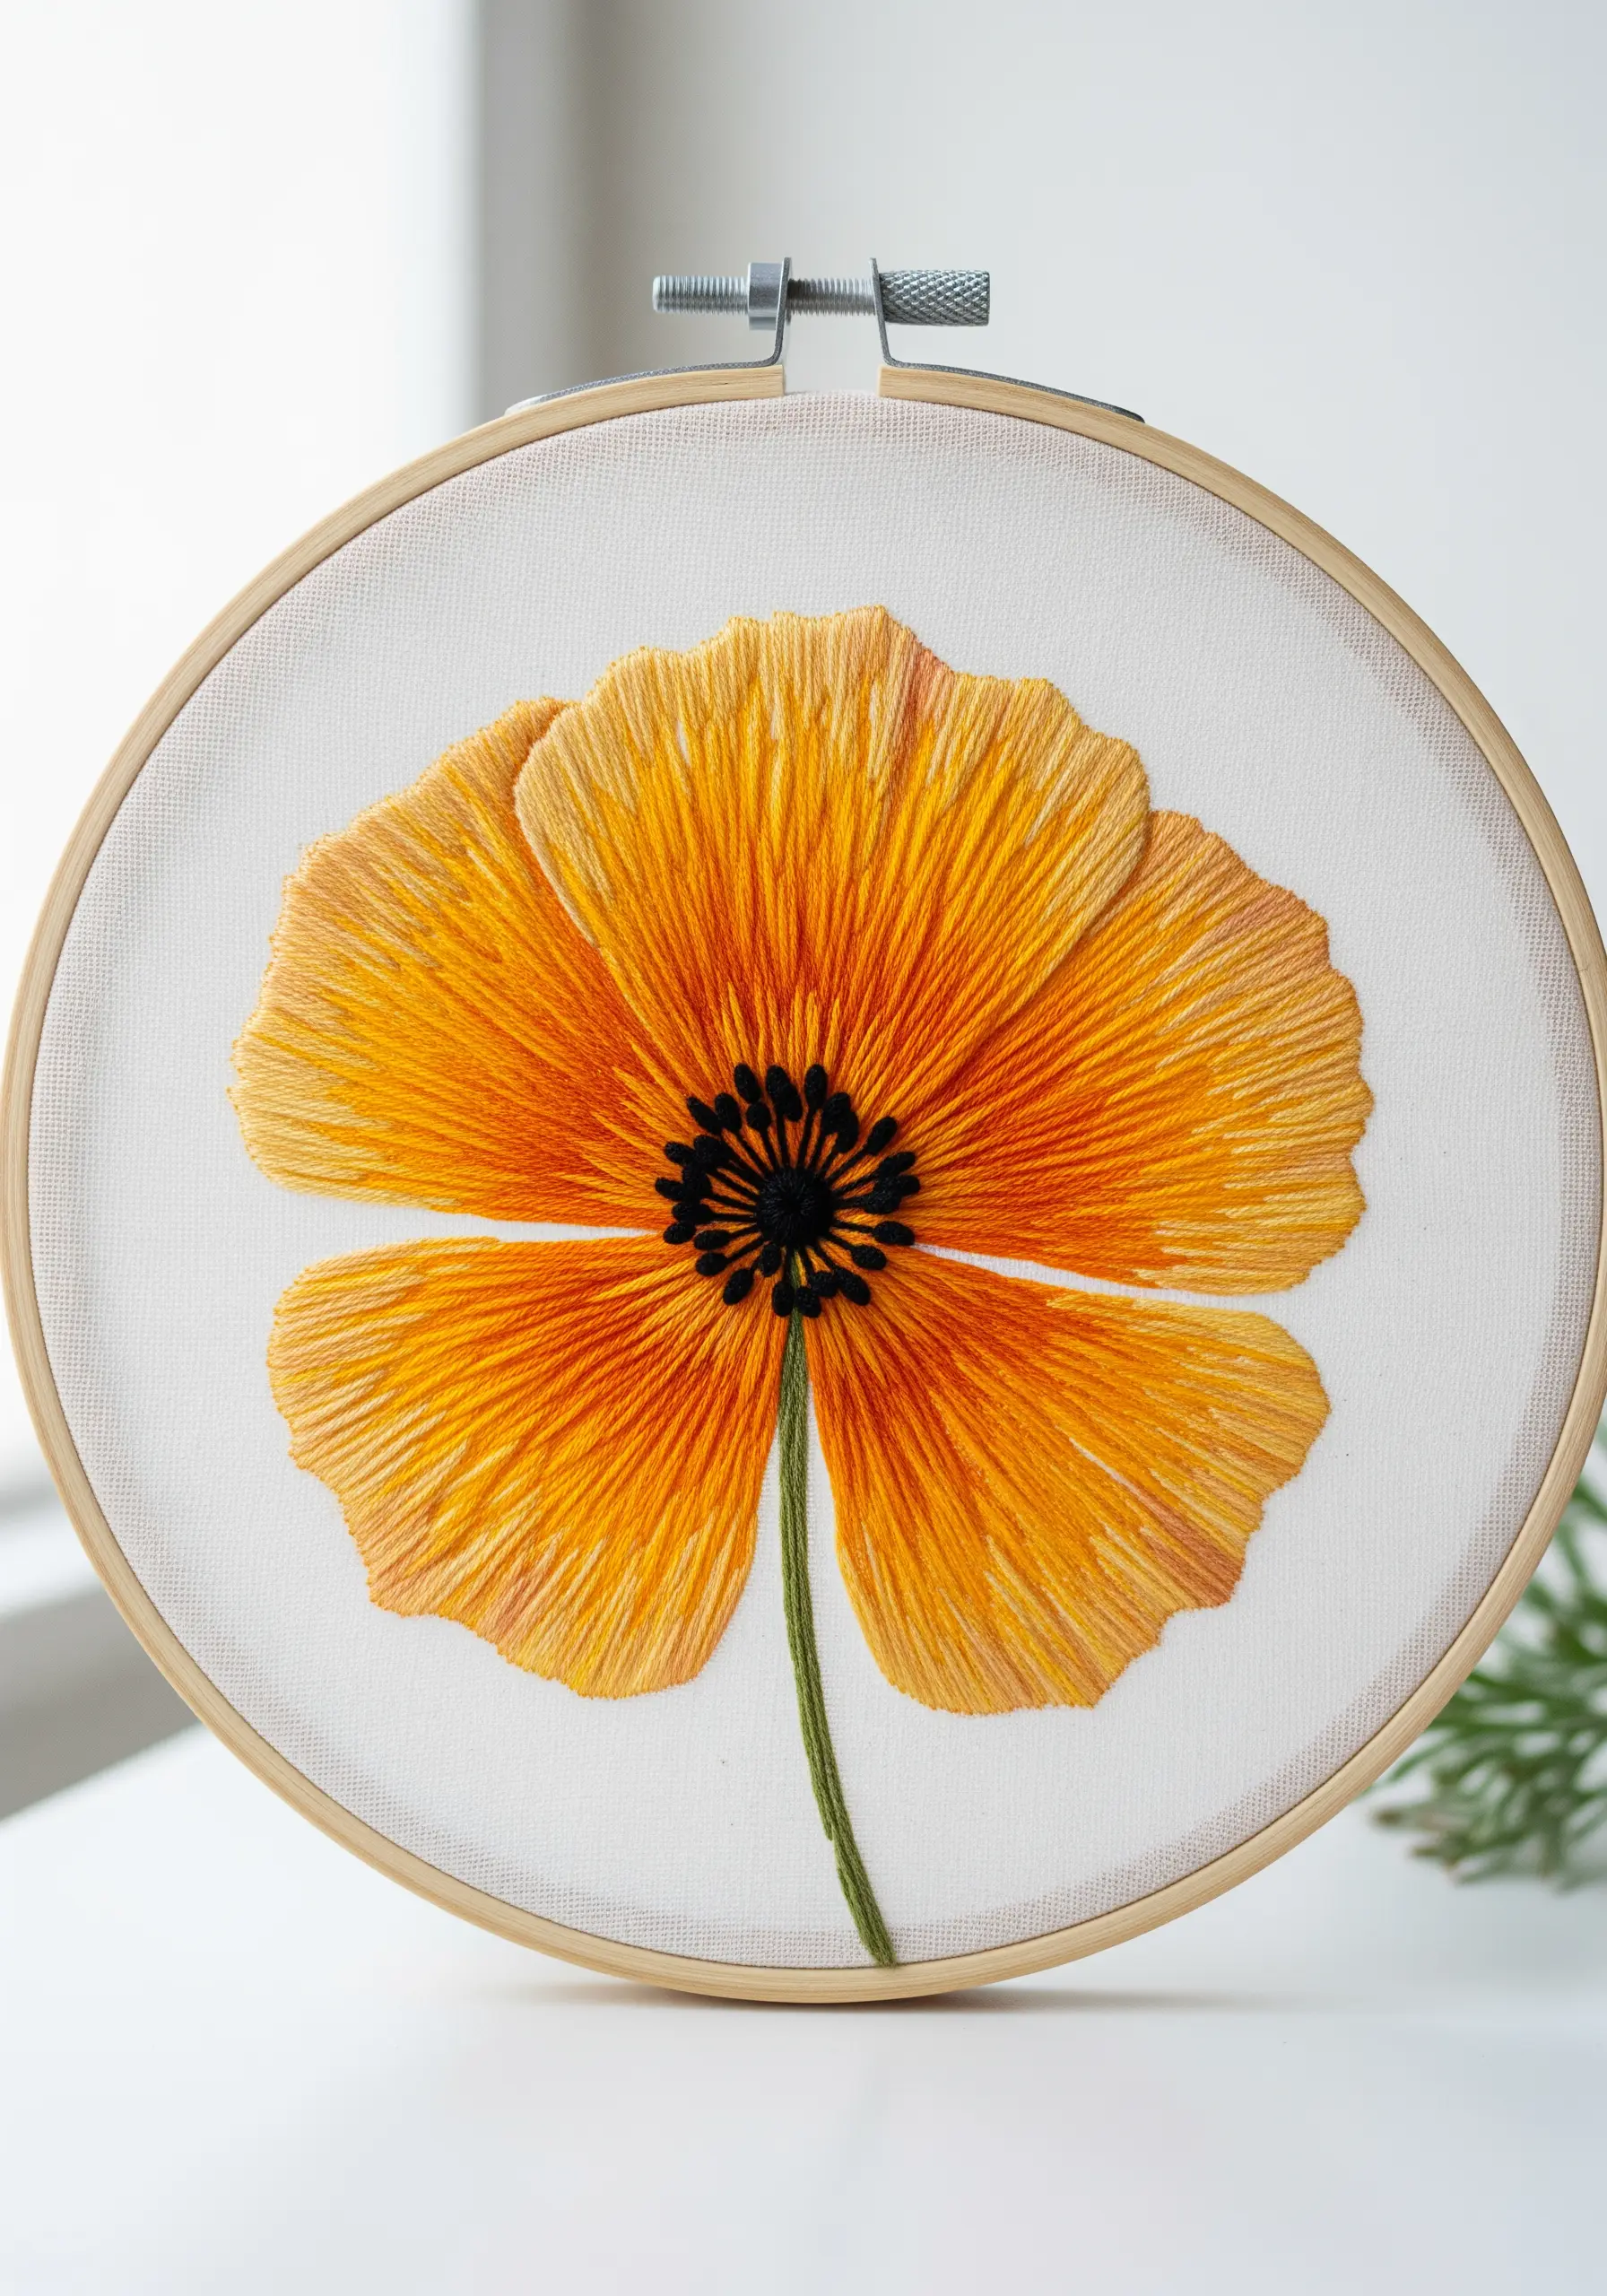
To recreate the delicate, almost transparent look of poppy petals, the direction of your stitches is everything.
Use a single strand of floss in a long and short stitch, ensuring every stitch radiates from the dark center outwards to the petal’s edge.
This technique creates the illusion of light passing through the flower, highlighting its natural growth lines and delicate texture.
Introduce a slightly lighter shade near the edges to enhance the sense of translucency and movement.
6. Scatter Forget-Me-Nots for a Meadow-Like Feel

Instead of a formal bouquet, arrange small floral clusters asymmetrically to create the feeling of a natural, wild meadow.
Work each forget-me-not using five simple detached chain stitches for the petals, pulled taut to create a delicate teardrop shape.
A single French knot in a contrasting yellow at the center anchors the design and adds a pop of realistic detail.
This scattered composition feels less rigid and more organic, making it perfect for personalizing clothing or filling a hoop with gentle movement.
7. Use Color Blocking for Bold Ginkgo Leaves

Create a modern, graphic interpretation of autumn foliage by using solid satin stitch and a bold color-blocked palette.
Divide each ginkgo leaf into sections and fill them with rich, contrasting autumnal tones like ochre, rust, and mustard.
Stitching on a dark, matte fabric like black cotton or linen makes these warm colors appear more saturated and vibrant.
The sharp, clean edges achieved with satin stitch give the design a contemporary feel that balances the organic shape of the leaves.
8. Add Dimension to Roses with Layered Stitches
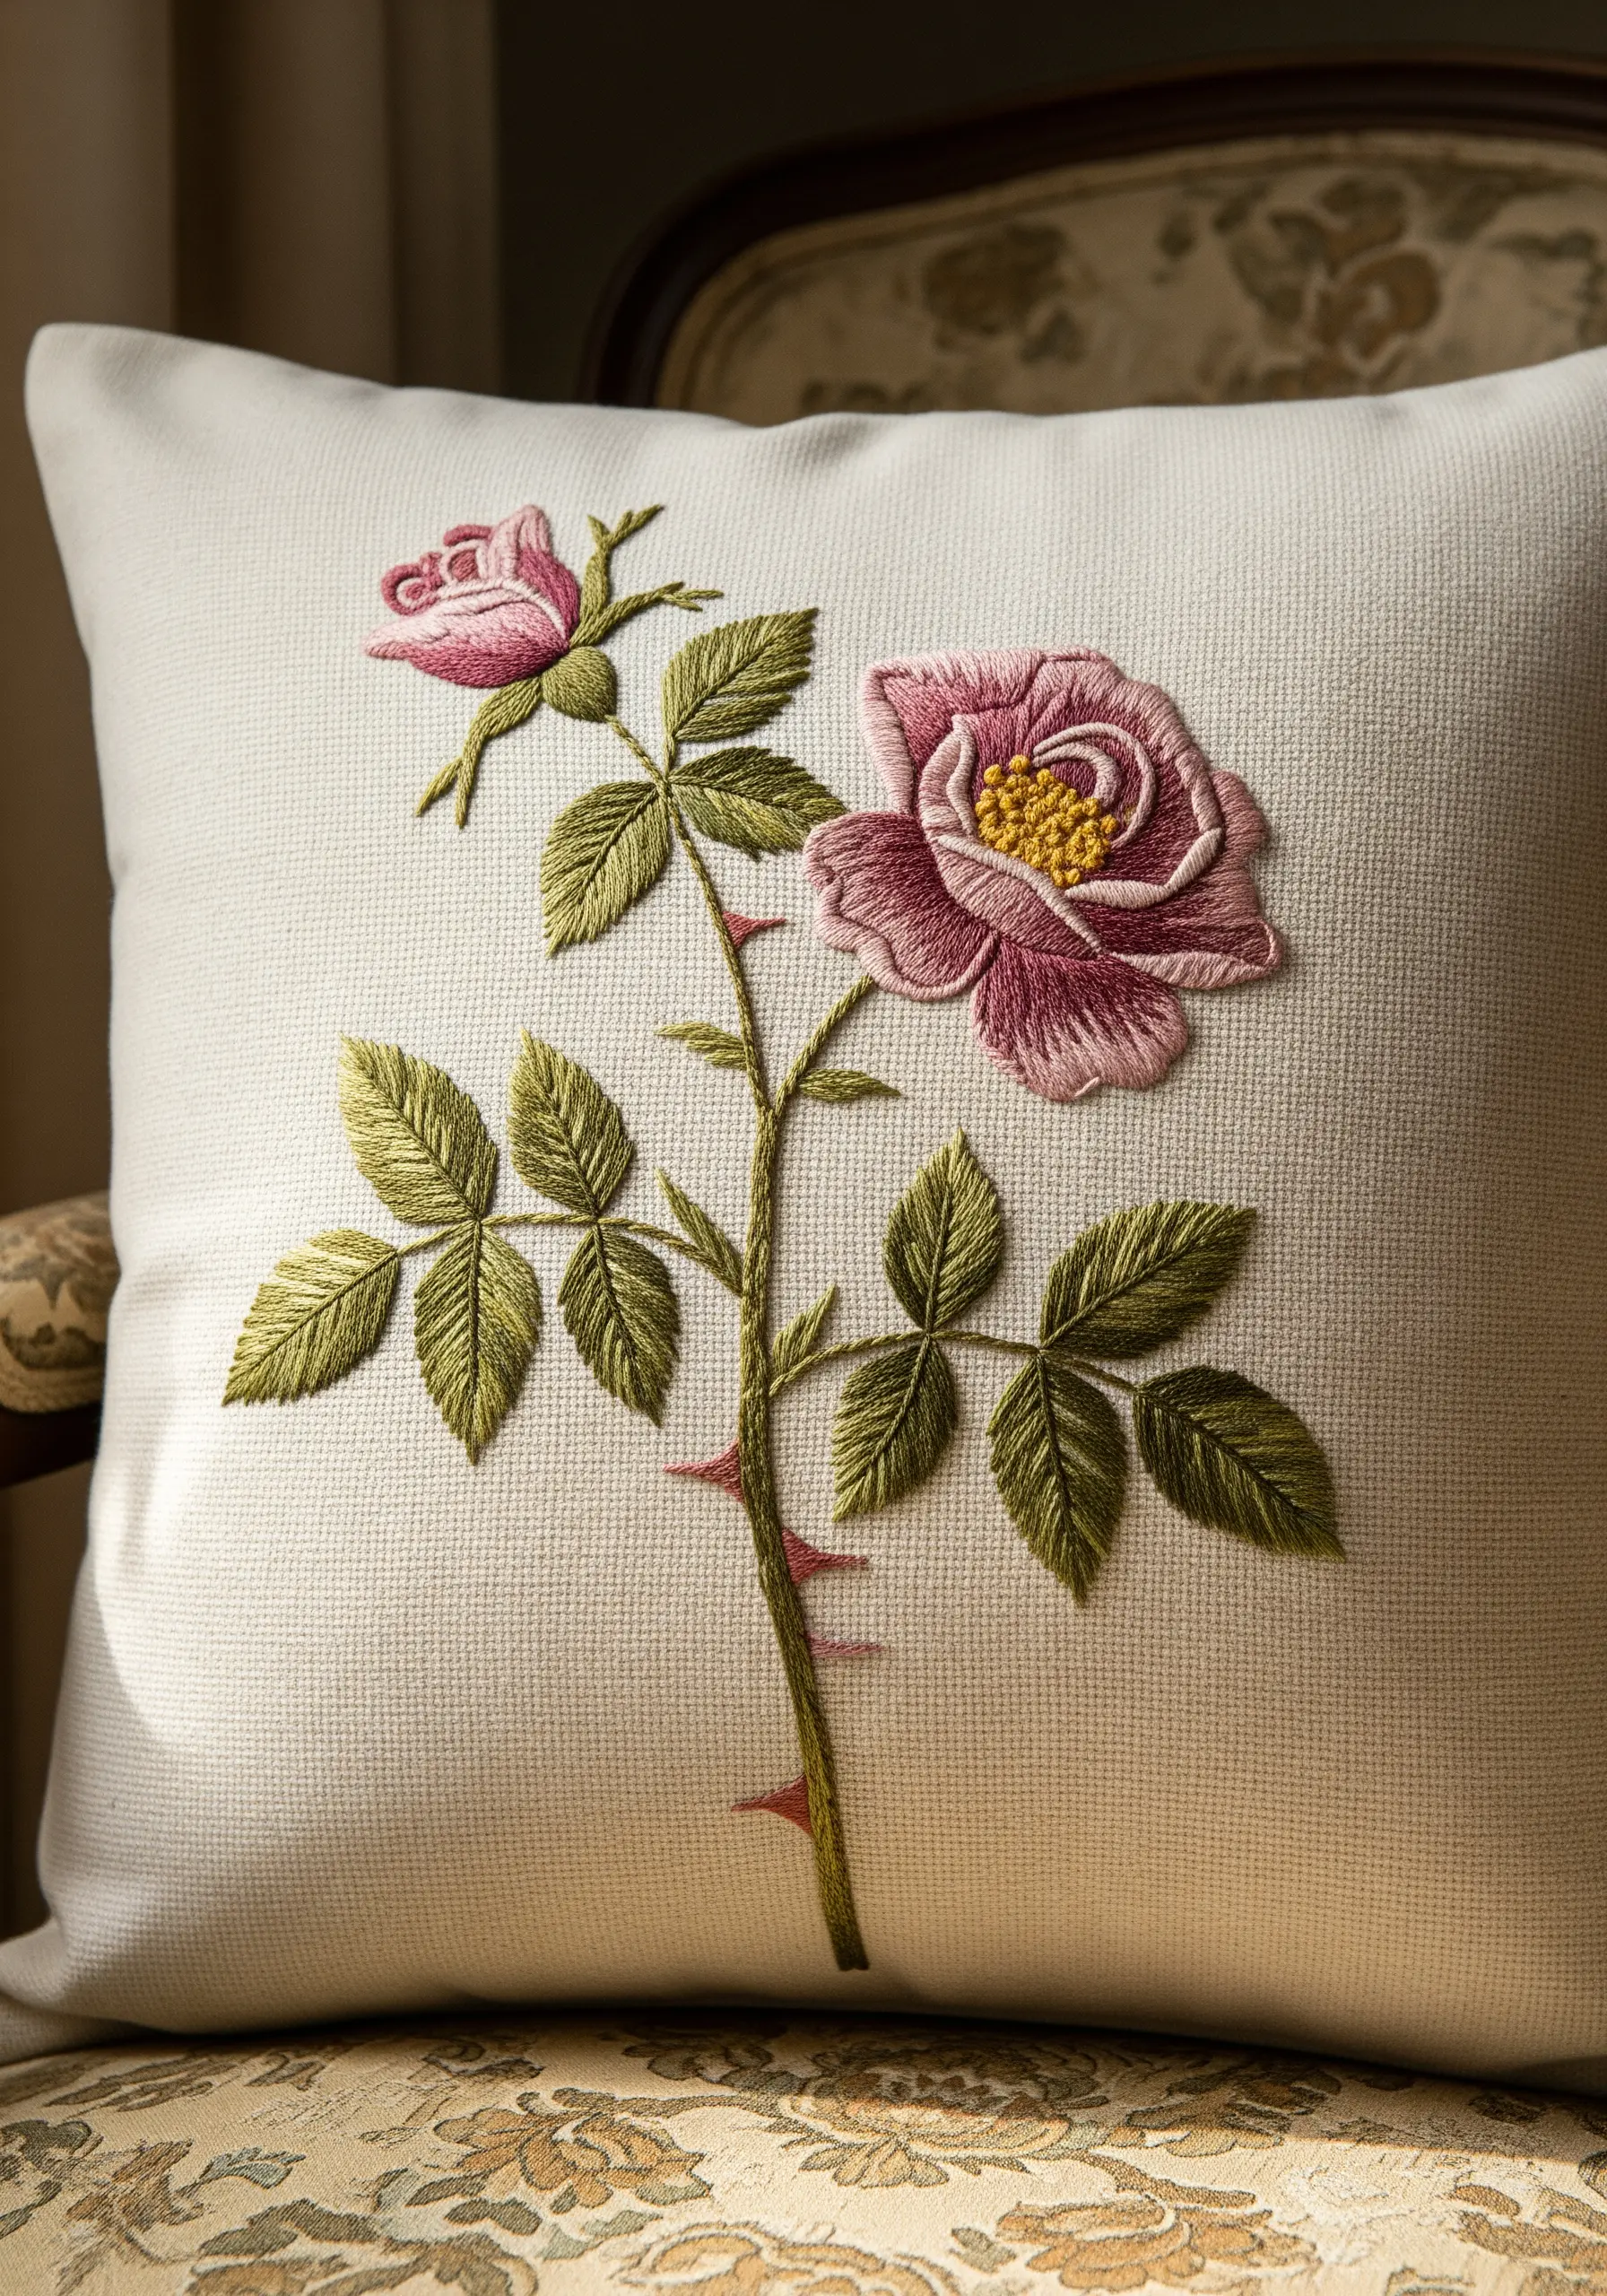
Give your embroidered roses a sculpted, lifelike quality by layering your stitches to build dimension.
Start with the outermost petals, using a long and short stitch that follows their curved shape. Then, work inwards, slightly overlapping each new layer of petals on top of the previous one.
Using a slightly darker shade of thread for the undersides of the petals creates realistic shadows and enhances the 3D effect.
This technique turns a flat motif into a plush, dimensional embellishment, ideal for transforming pillowcases into boutique home decor.
9. Capture a Field of Buttercups and Clover

Combine two simple stitch types to create a charming and textural field scene with a sense of depth.
Use woven wheel stitches for the bright yellow buttercups, which gives them a raised, button-like appearance that stands out.
For the clover, stitch three detached chain stitches in a cluster. Use straight stitches of varying heights for the grass to create a layered, foreground-background effect.
This mix of flat and raised textures makes the composition more dynamic and engaging.
10. Mimic Hydrangea Petals with Padded Satin Stitch

To achieve the full, clustered look of hydrangeas, give each tiny petal a subtle lift before you begin stitching.
First, lay down a few small, straight stitches within the shape of each petal to act as padding.
Then, cover this padding with satin stitch using a single strand of variegated blue-to-purple thread. The underlying stitches will raise the surface just enough to create a soft, pillowy dimension.
This hydrangea color blend technique makes the flower clusters look full and lush, just like the real thing.
11. Recreate Thistle Texture with Variegated Thread
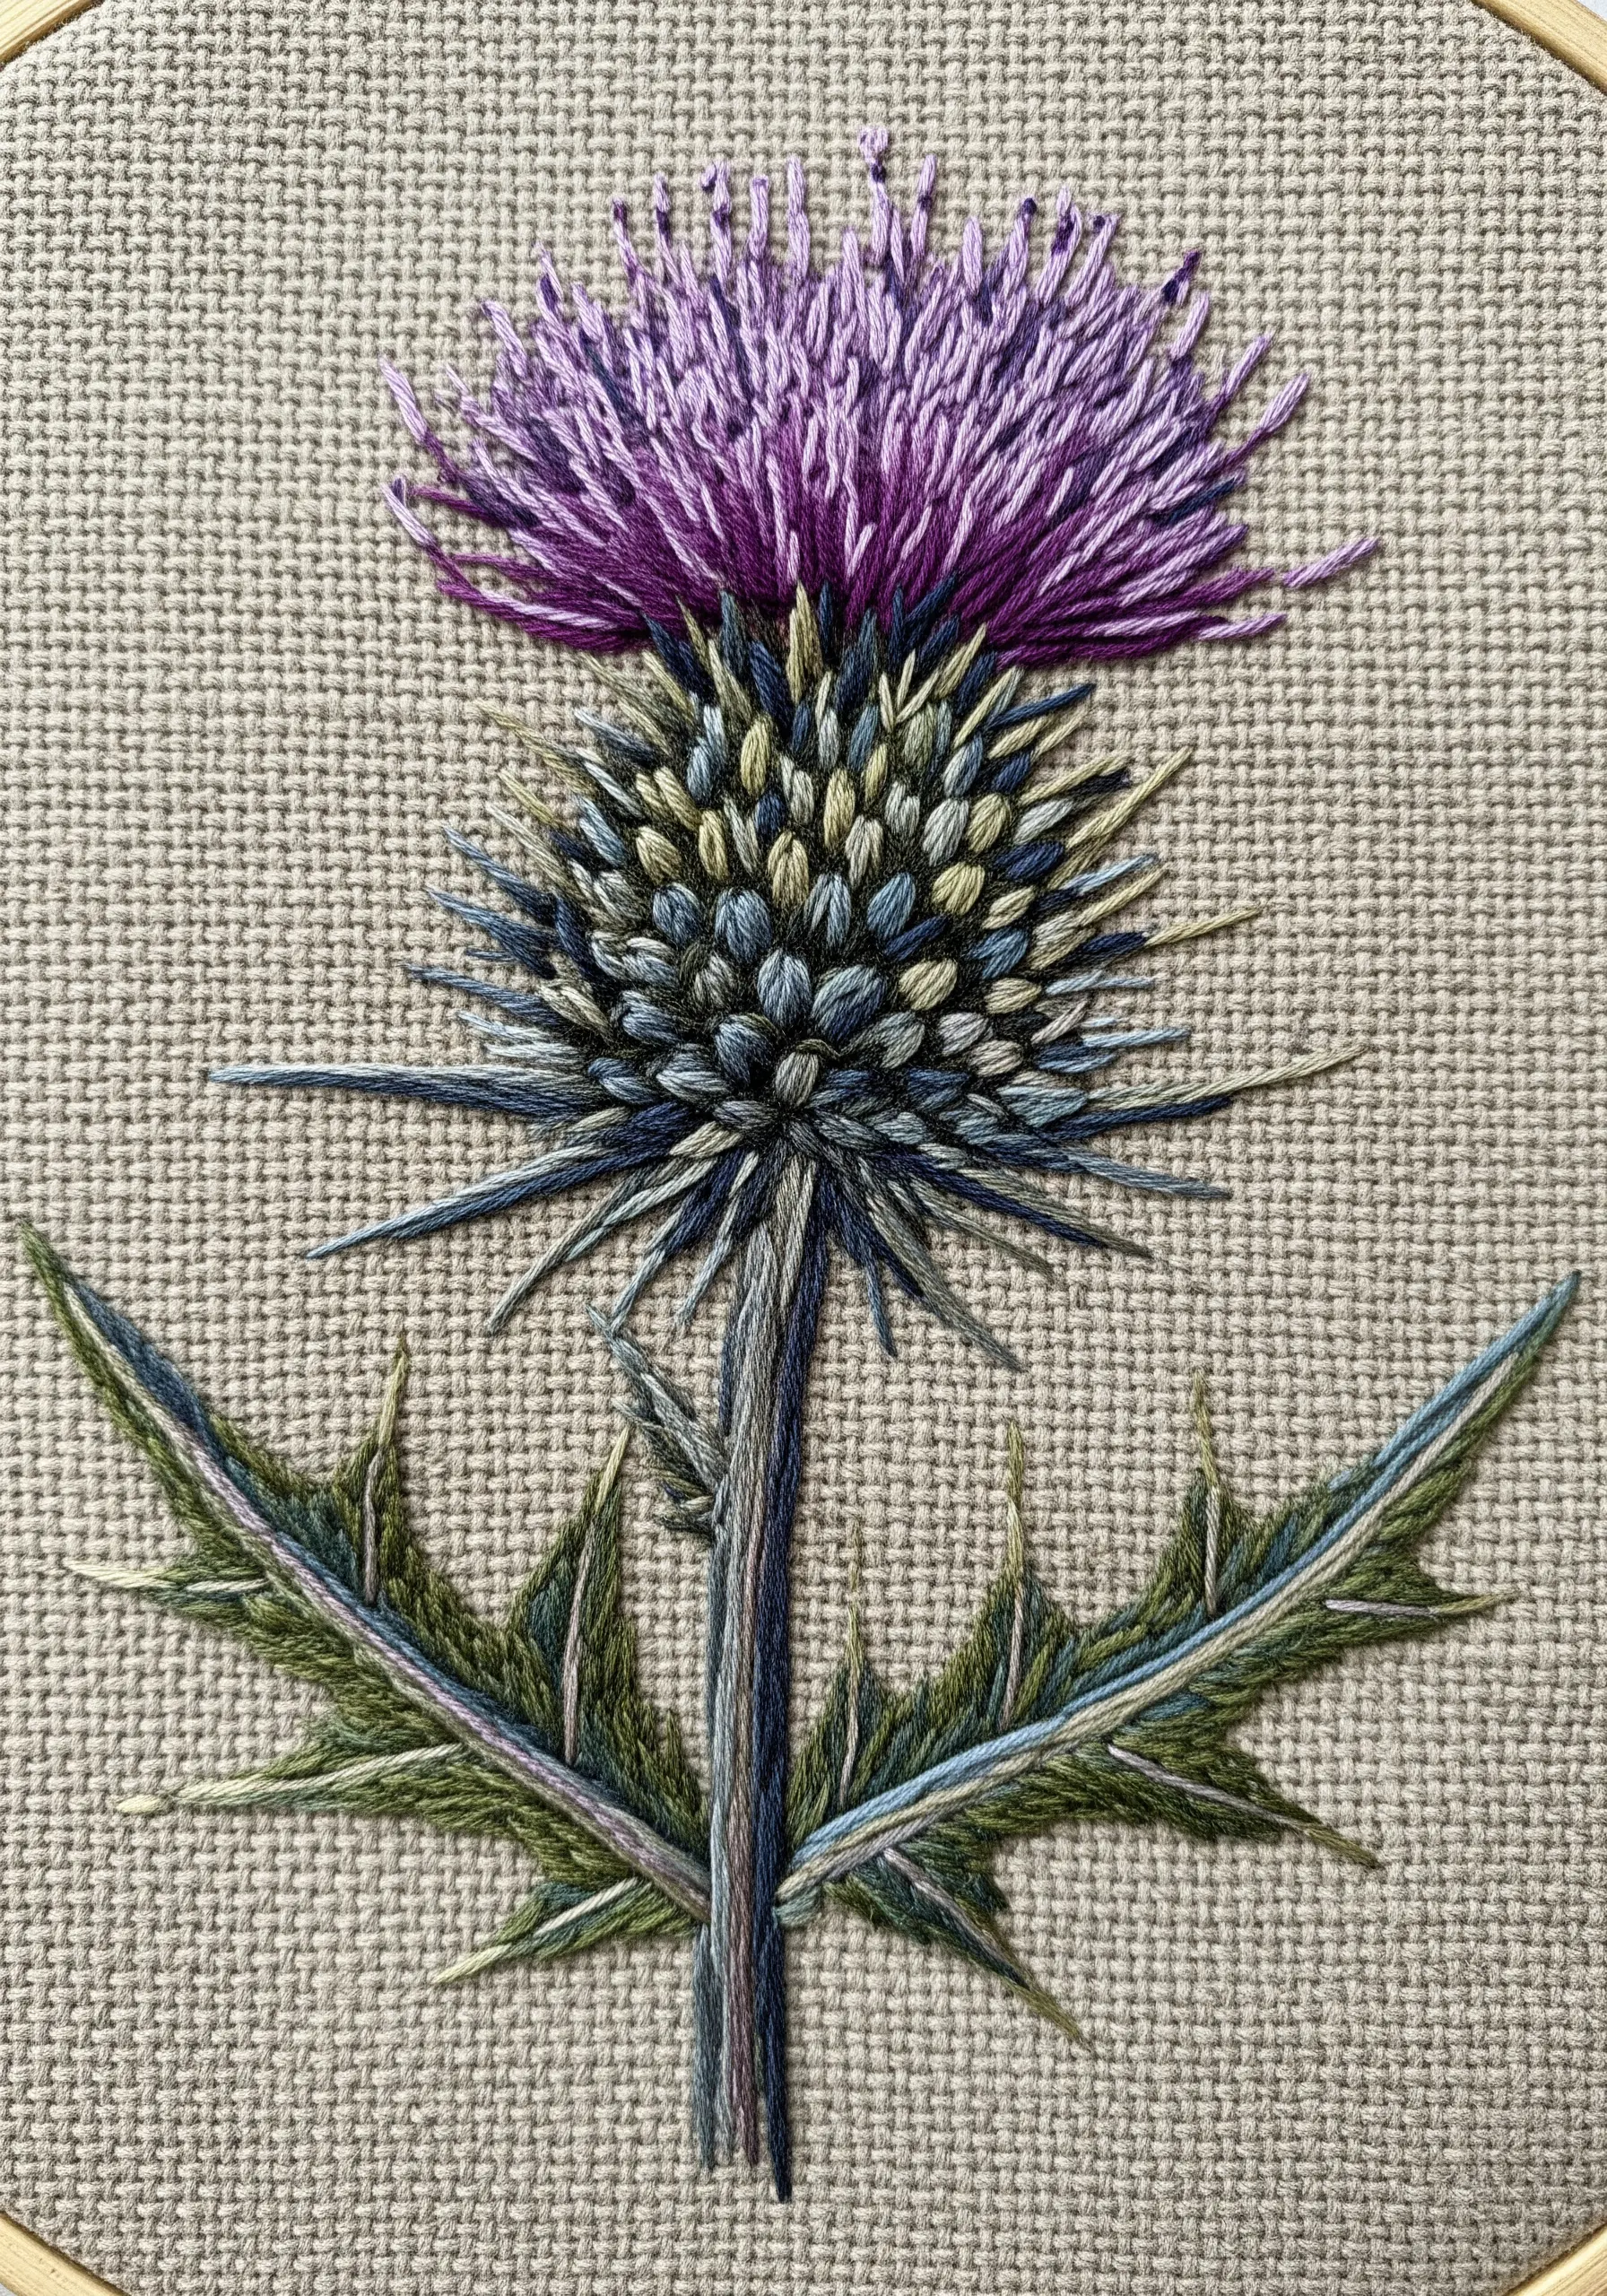
The complex, prickly texture of a thistle is perfectly suited for variegated threads, which do the color-blending work for you.
For the spiky base, use short, straight satin stitches in a variegated green-blue floss, radiating them out from the stem.
Create the fluffy purple top with long, straight stitches, allowing them to overlap freely to build a dense, brush-like texture.
Using a single variegated thread for each section provides instant depth and color variation without needing to switch floss constantly.
12. Give Dandelion Seeds a Sense of Motion
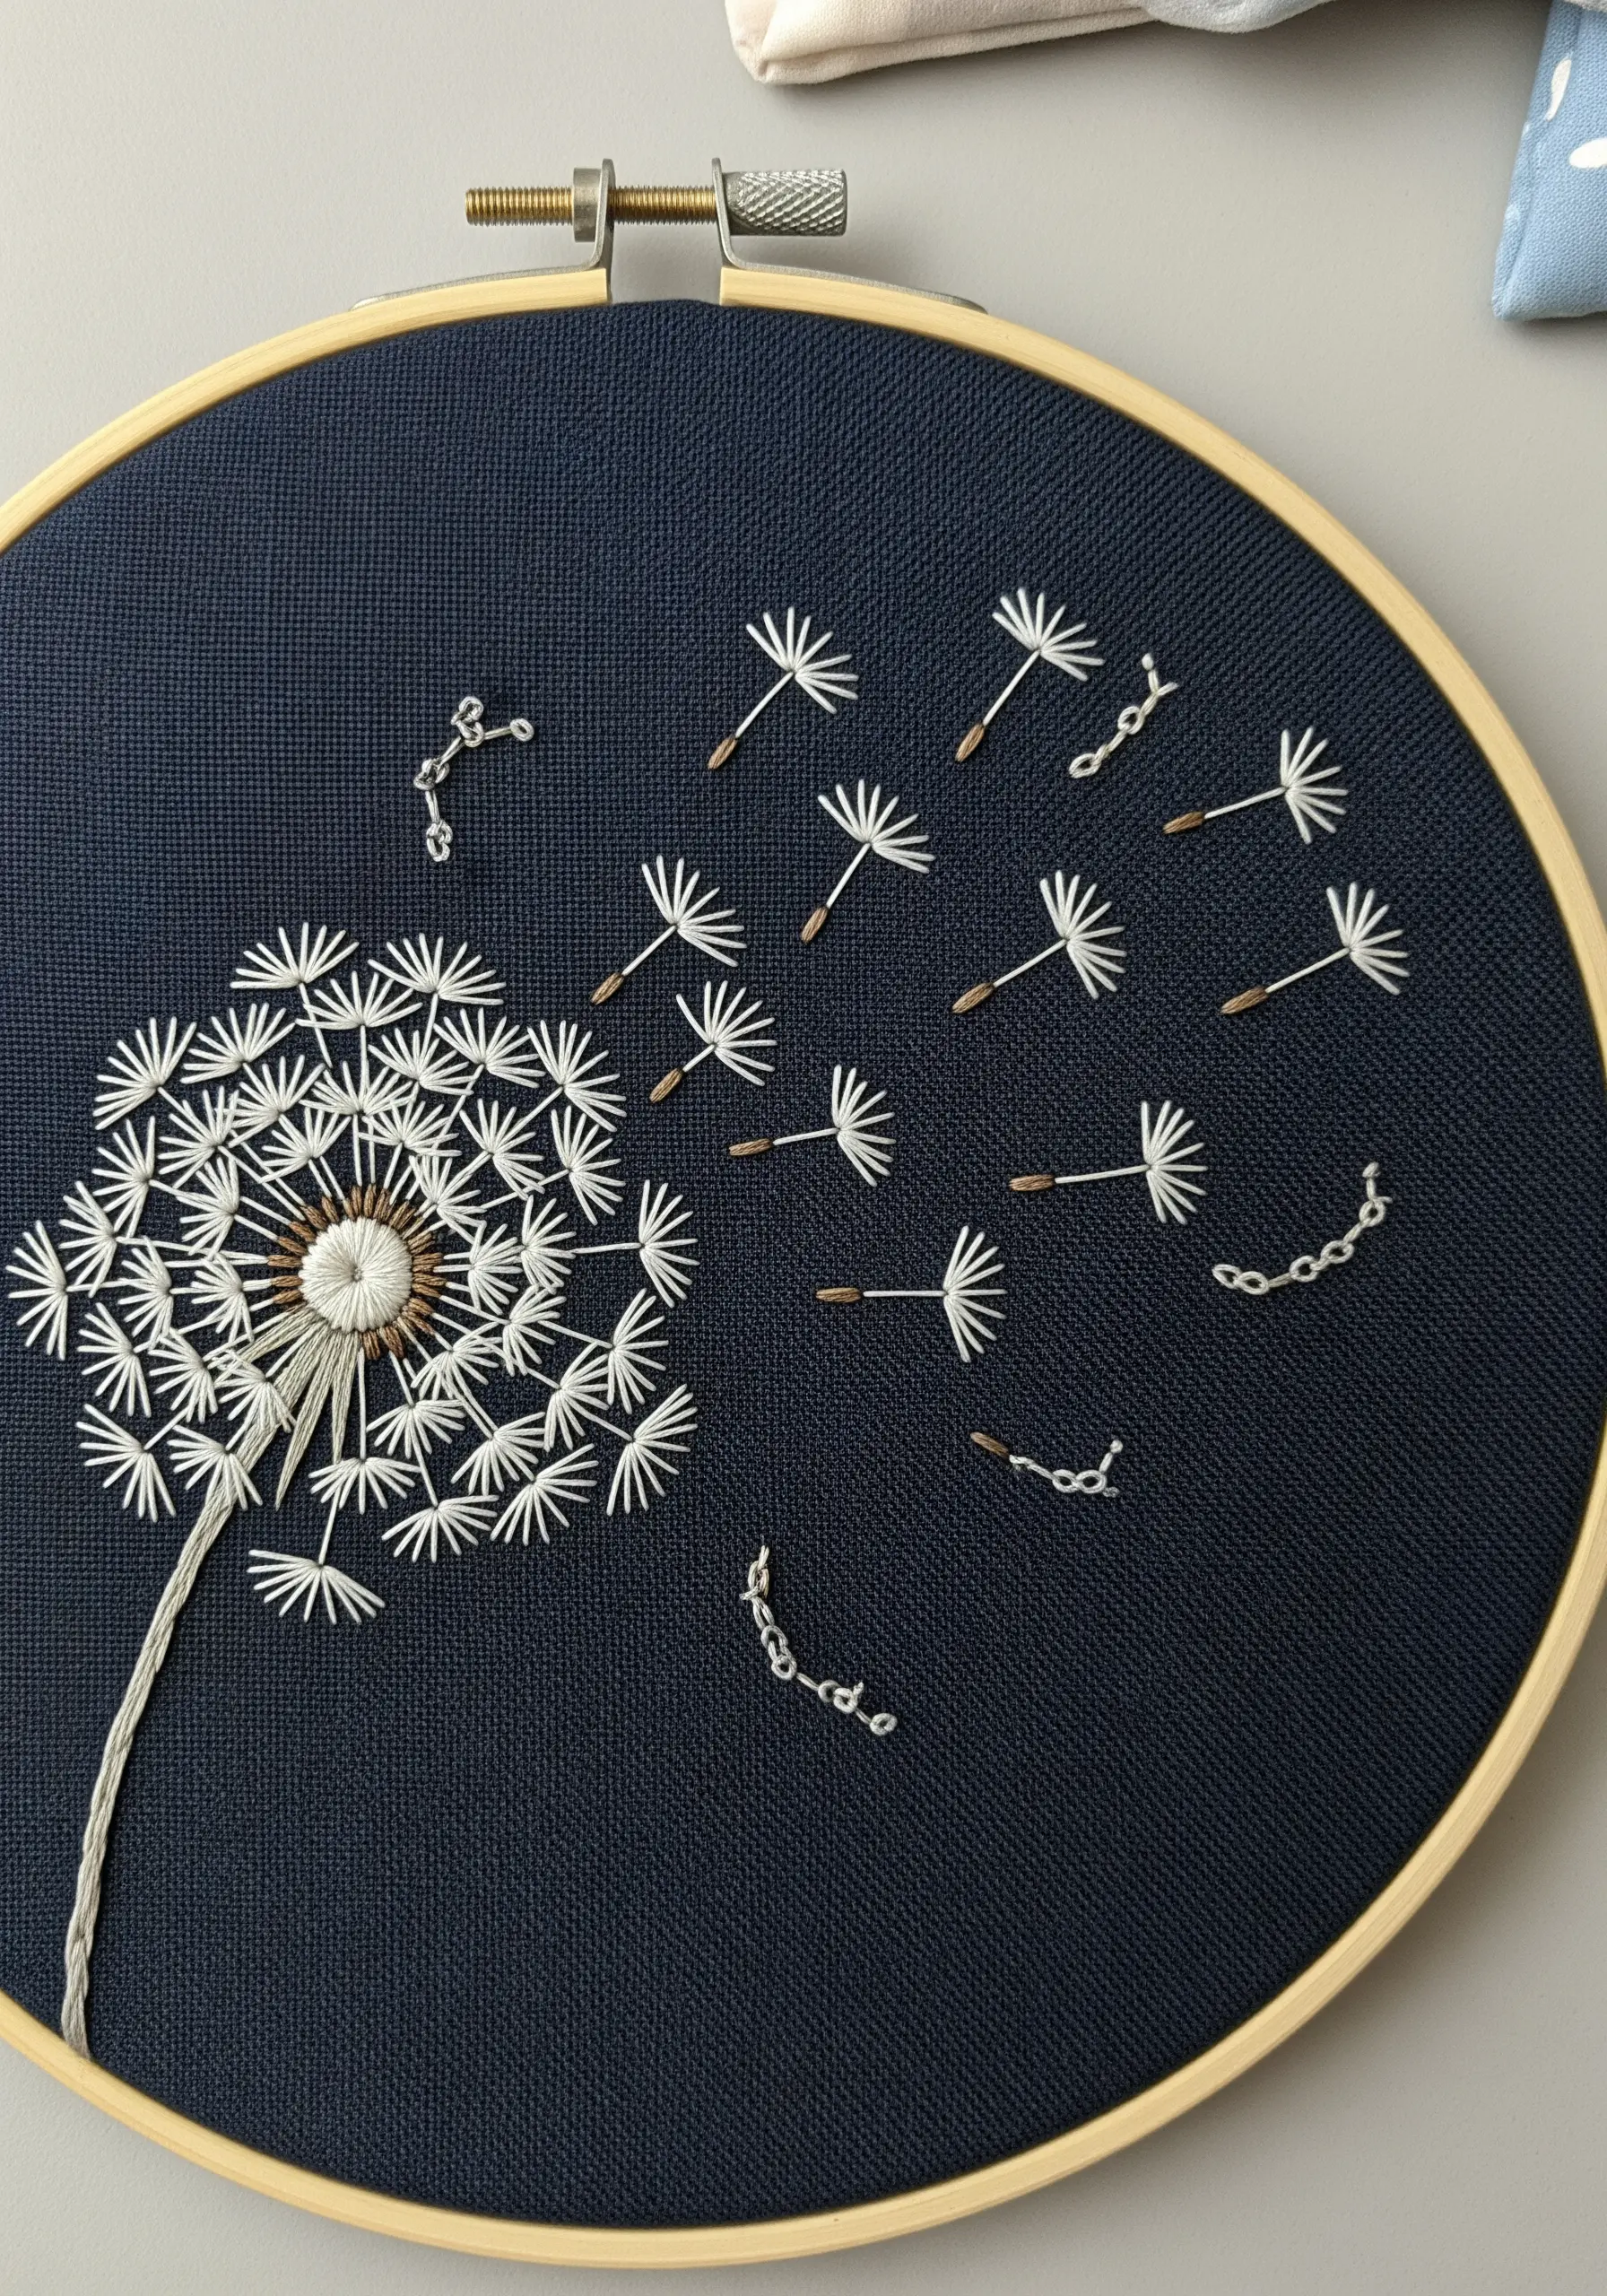
Capture the feeling of a dandelion seed head blowing in the wind by varying your stitch placement and style.
Keep the seeds attached to the head uniform, using a straight stitch for the stem and a V-shape or detached chain stitch for the pappus.
For the seeds floating away, stitch them at different angles and use a delicate, open chain stitch to suggest tumbling movement.
This contrast between stillness and motion tells a story and brings your entire composition to life.
13. Define Eucalyptus Leaves with a Center Spine
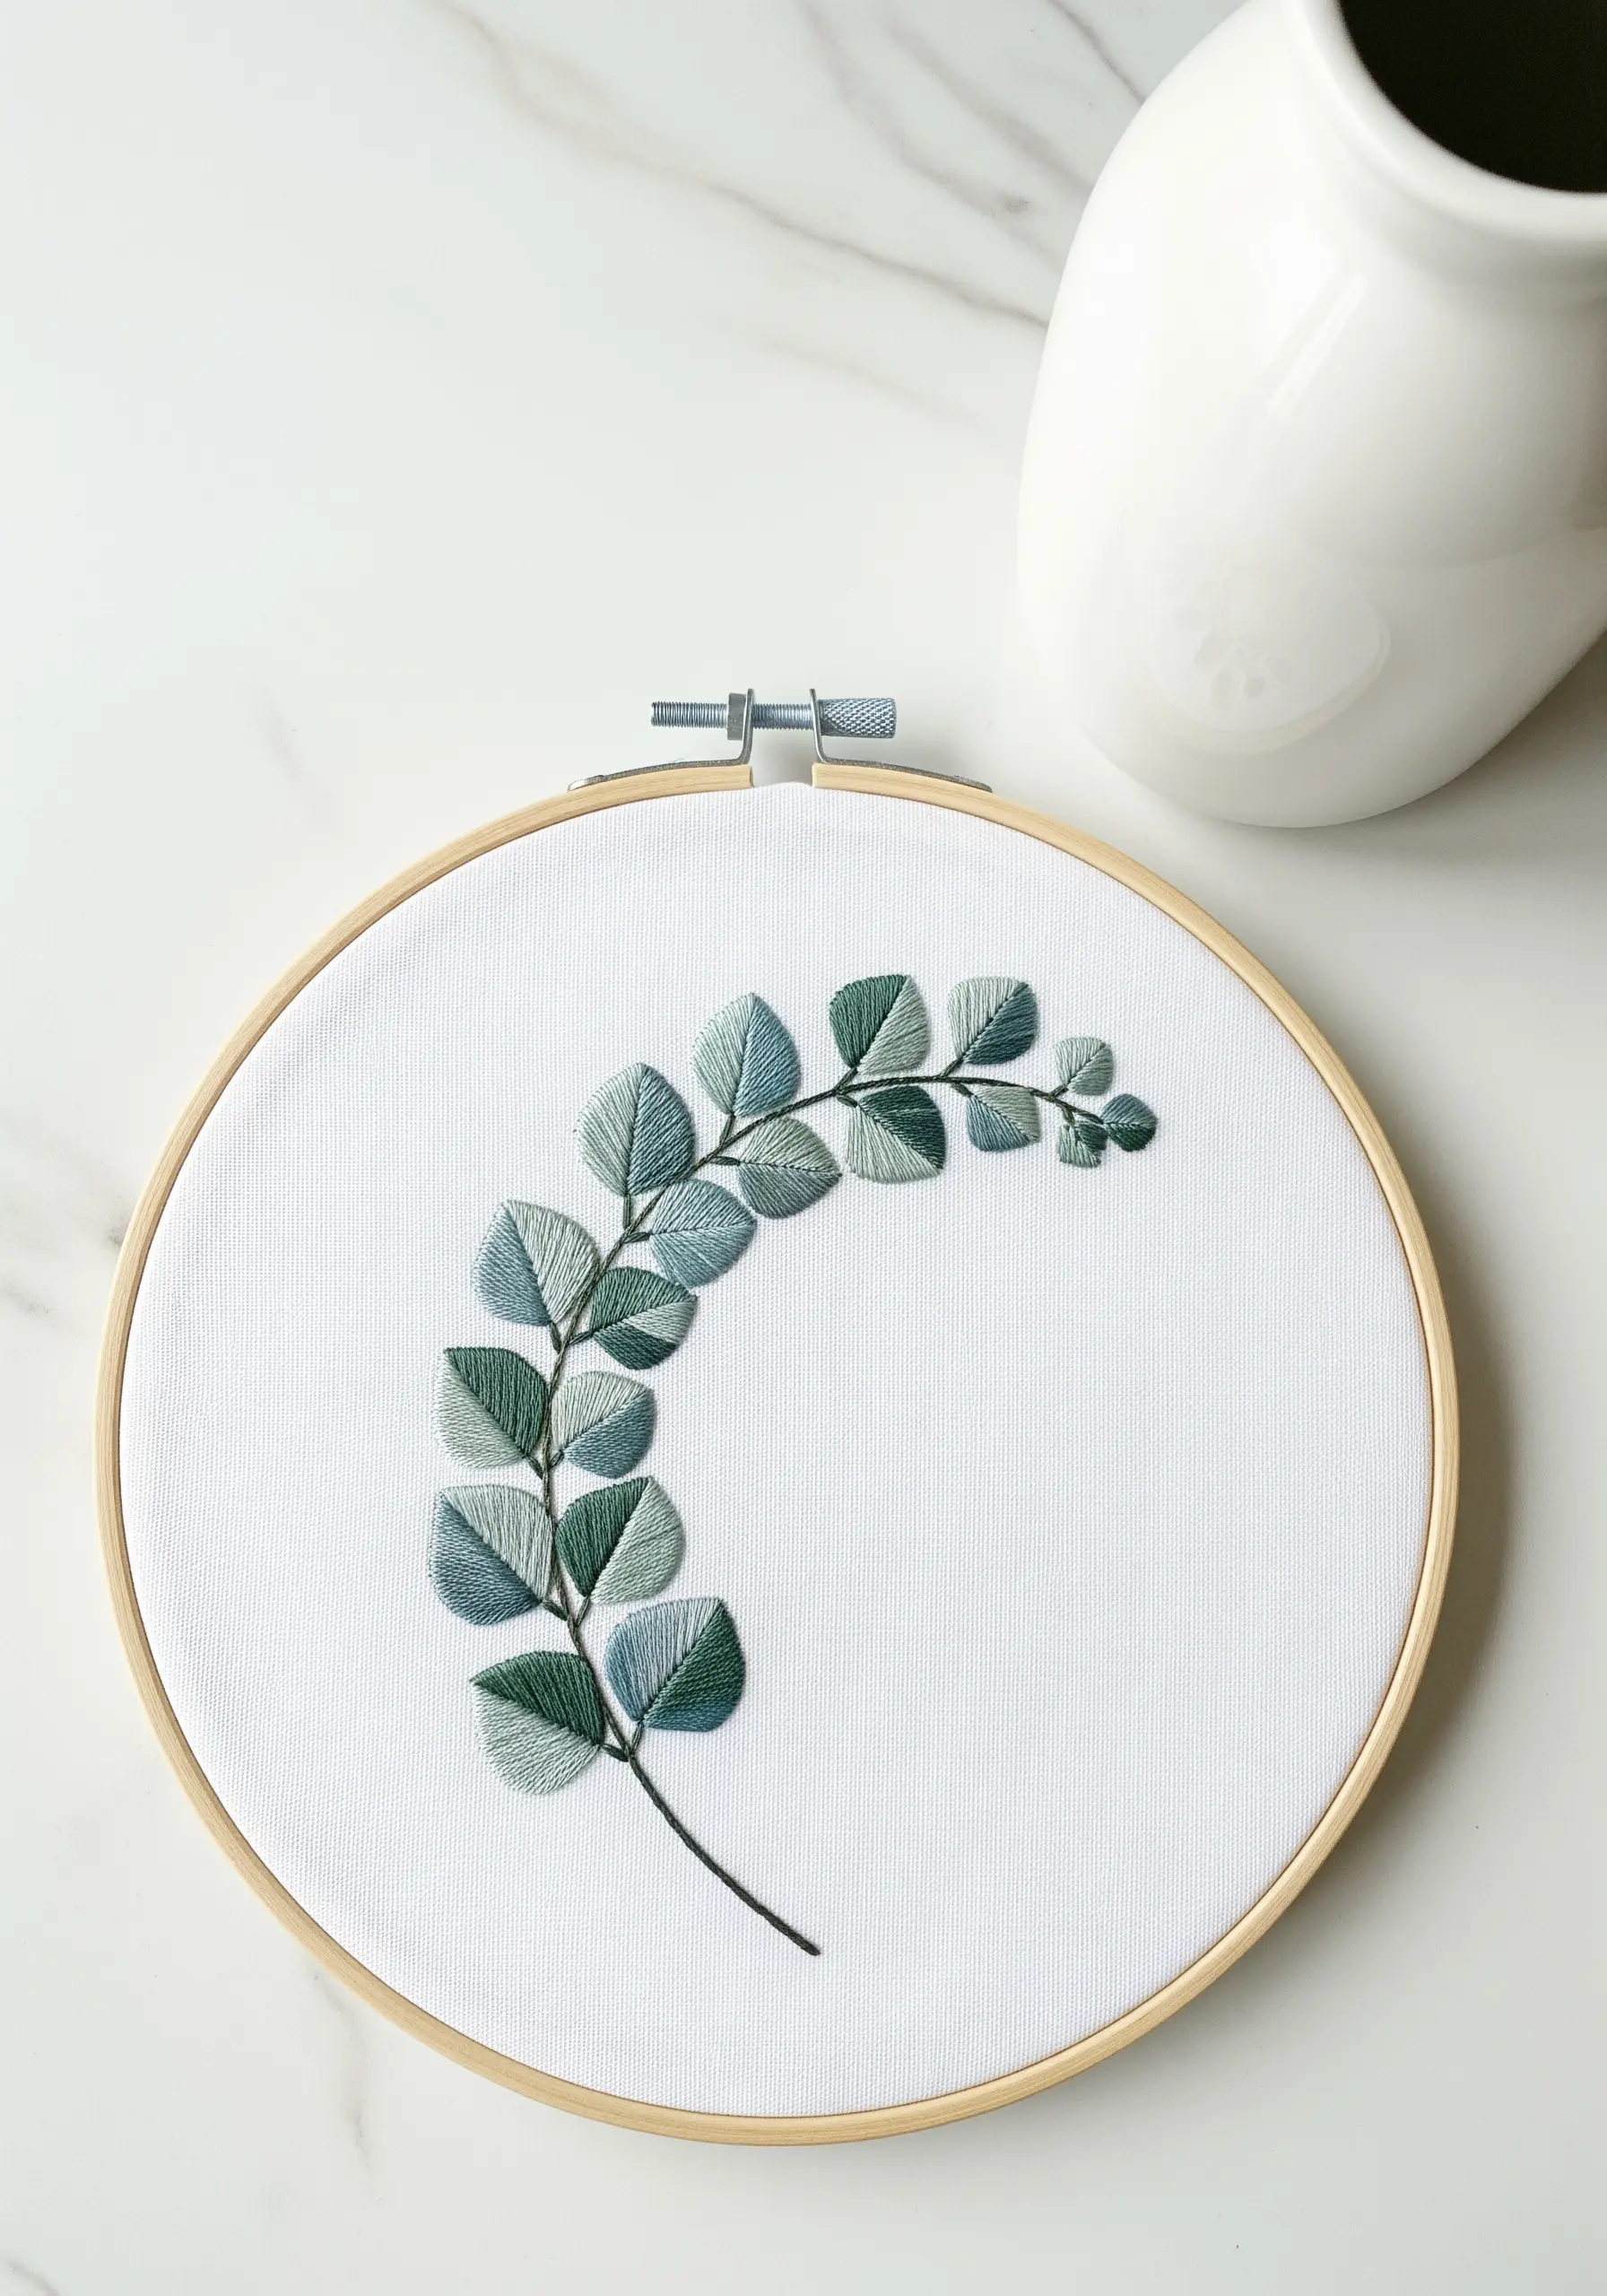
Elevate simple satin-stitched leaves by adding a central vein after the main shape is filled.
First, fill each eucalyptus leaf with a smooth satin stitch, angling the stitches slightly outwards from the center line.
Once filled, use a single strand of a darker contrasting thread to add a sharp backstitch or stem stitch down the middle.
This simple addition provides structure, definition, and a touch of realism, making each leaf look more finished and intentional.
14. Design Miniature Botanicals for Wearable Art

Scale down your favorite pressed-flower designs to fit inside a miniature locket hoop for a unique piece of jewelry.
Use a single strand of floss and the smallest stitches you can manage—tiny seed stitches are perfect for filling small areas.
Choose high-contrast colors to ensure the design remains clear and legible despite its small size.
These adorable mini stitch ideas transform your embroidery into a personal, wearable keepsake that feels intimate and special.
15. Form a Daisy Wreath with Detached Chain Stitch

Create a perfect, delicate daisy wreath using the detached chain stitch, also known as the lazy daisy stitch.
Arrange your stitches in a circle to form the petals, keeping the tension even for uniformly shaped loops.
After stitching all the white petals, add a cluster of yellow French knots in the center of each flower to complete the look.
This stitch is ideal for creating clean, consistent petal shapes, resulting in a charming and classic floral design.
16. Capture the Texture of Dried Wheat and Grasses

Replicate the papery, delicate texture of dried botanicals by choosing stitches that emphasize shape and line over solid fills.
Use a fishbone stitch for the wheat heads, which creates a natural braided pattern, and simple straight stitches for the stems.
For wispy grasses, use a single strand of floss and light, open fly stitches to give them an airy feel.
Stitching with earth-tone patterns on a neutral linen fabric enhances the rustic, dried-flower aesthetic, making it perfect for a bookmark or wall art.
17. Sculpt 3D Bleeding Hearts with Ribbon Stitch
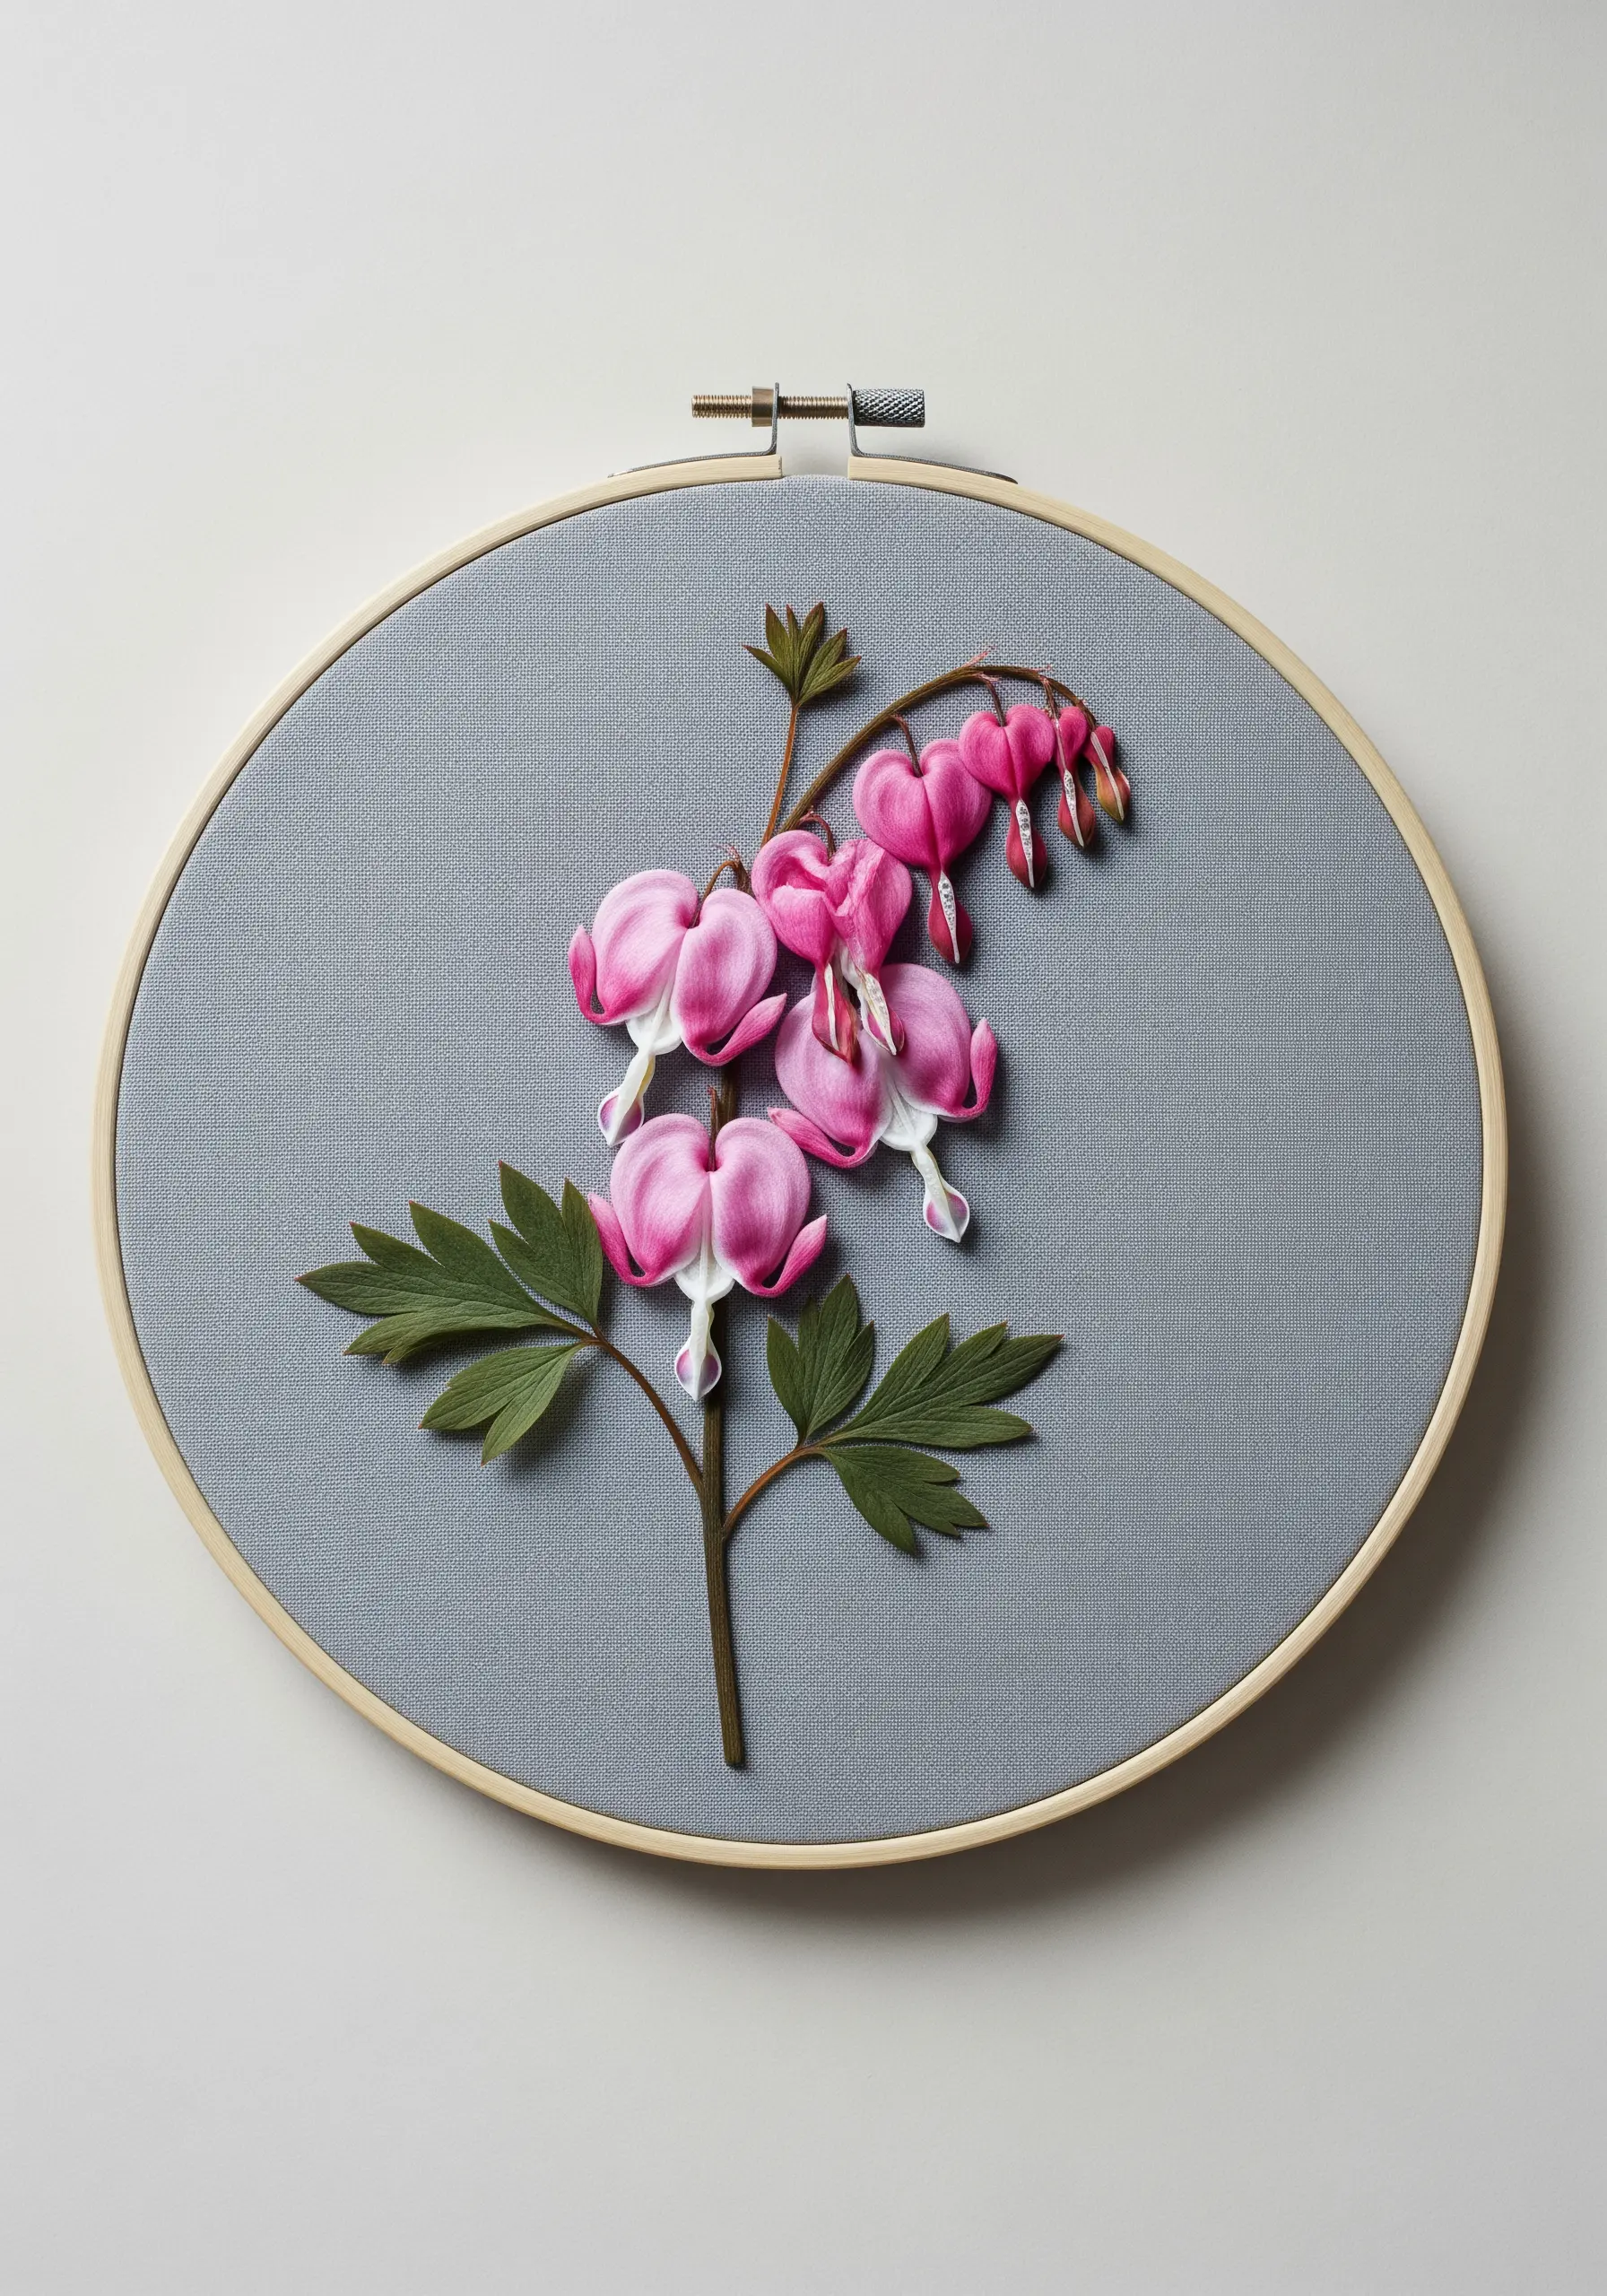
For flowers with unique, voluminous shapes like bleeding hearts, switch from floss to silk ribbon to create instant dimension.
Use a simple ribbon stitch, bringing the needle and ribbon up through the fabric and then piercing the ribbon to go back down.
Gently pull the ribbon to create the signature puffed heart shape, and add a tiny white detached chain stitch at the bottom for the ‘droplet’.
This technique allows you to build stunning, 3D floral embroidery techniques that stand out from the fabric surface with minimal effort.
18. Create Elegant Lily of the Valley Silhouettes

On dark, rich fabrics like velvet, focus on creating strong silhouettes and textures for a dramatic effect.
Use a padded satin stitch for the bell-shaped flowers, layering white thread over small foundation stitches to make them pop against the green.
For the leaves, a smooth, directional satin stitch in a soft green provides a beautiful contrast to the plush velvet background.
A delicate chain stitch connecting the two sprays adds a touch of vintage elegance and completes the symmetrical composition.
19. Translate Botanical Illustrations into Cross-Stitch

Capture the charm of vintage botanical prints by translating a flower into a graphic cross-stitch pattern.
Work on Aida cloth, as its gridded structure is perfect for creating uniform, pixel-like ‘X’ stitches.
Use a limited color palette of three or four shades to replicate the simple, clean look of old scientific illustrations.
This technique merges the precision of cross-stitch with the organic beauty of pressed flowers for a unique, stylized result.
20. Embellish Table Linens with Cascading Wisteria

When embroidering functional items like napkins, technique and thread choice are key to durability.
Use colorfast cotton floss that can withstand washing, and secure your thread ends meticulously by weaving them under existing stitches on the back.
For the wisteria blossoms, use a mix of satin stitch and French knots in shades of lavender and violet to create a full, cascading effect.
These thoughtful botanical border designs elevate everyday objects into treasured heirlooms.
21. Capture Backlit Cosmos on Sheer Fabric

Recreate the ethereal glow of a flower held up to the light by stitching a delicate outline on organza or tulle.
Use a simple backstitch or split stitch with a single strand of thread to trace the edges of the petals.
Fill in the petals with sparse, radiating straight stitches, leaving plenty of negative space.
When hung in a window, the light will shine through the sheer fabric, illuminating your stitches and bringing the translucent design to life.
22. Add Tactile Dimension to an Acorn Cap

Move beyond flat stitches to give your autumn motifs a rich, tactile quality that invites touch.
Fill the body of the acorn with a smooth satin stitch, then create the textured cap using a dense field of French knots.
Using a slightly variegated brown thread for the knots will add subtle color variation and enhance the bumpy, natural texture.
This mix of smooth and bumpy textures makes the composition more engaging and realistic.
23. Embroider a Fragrant Heather Sachet
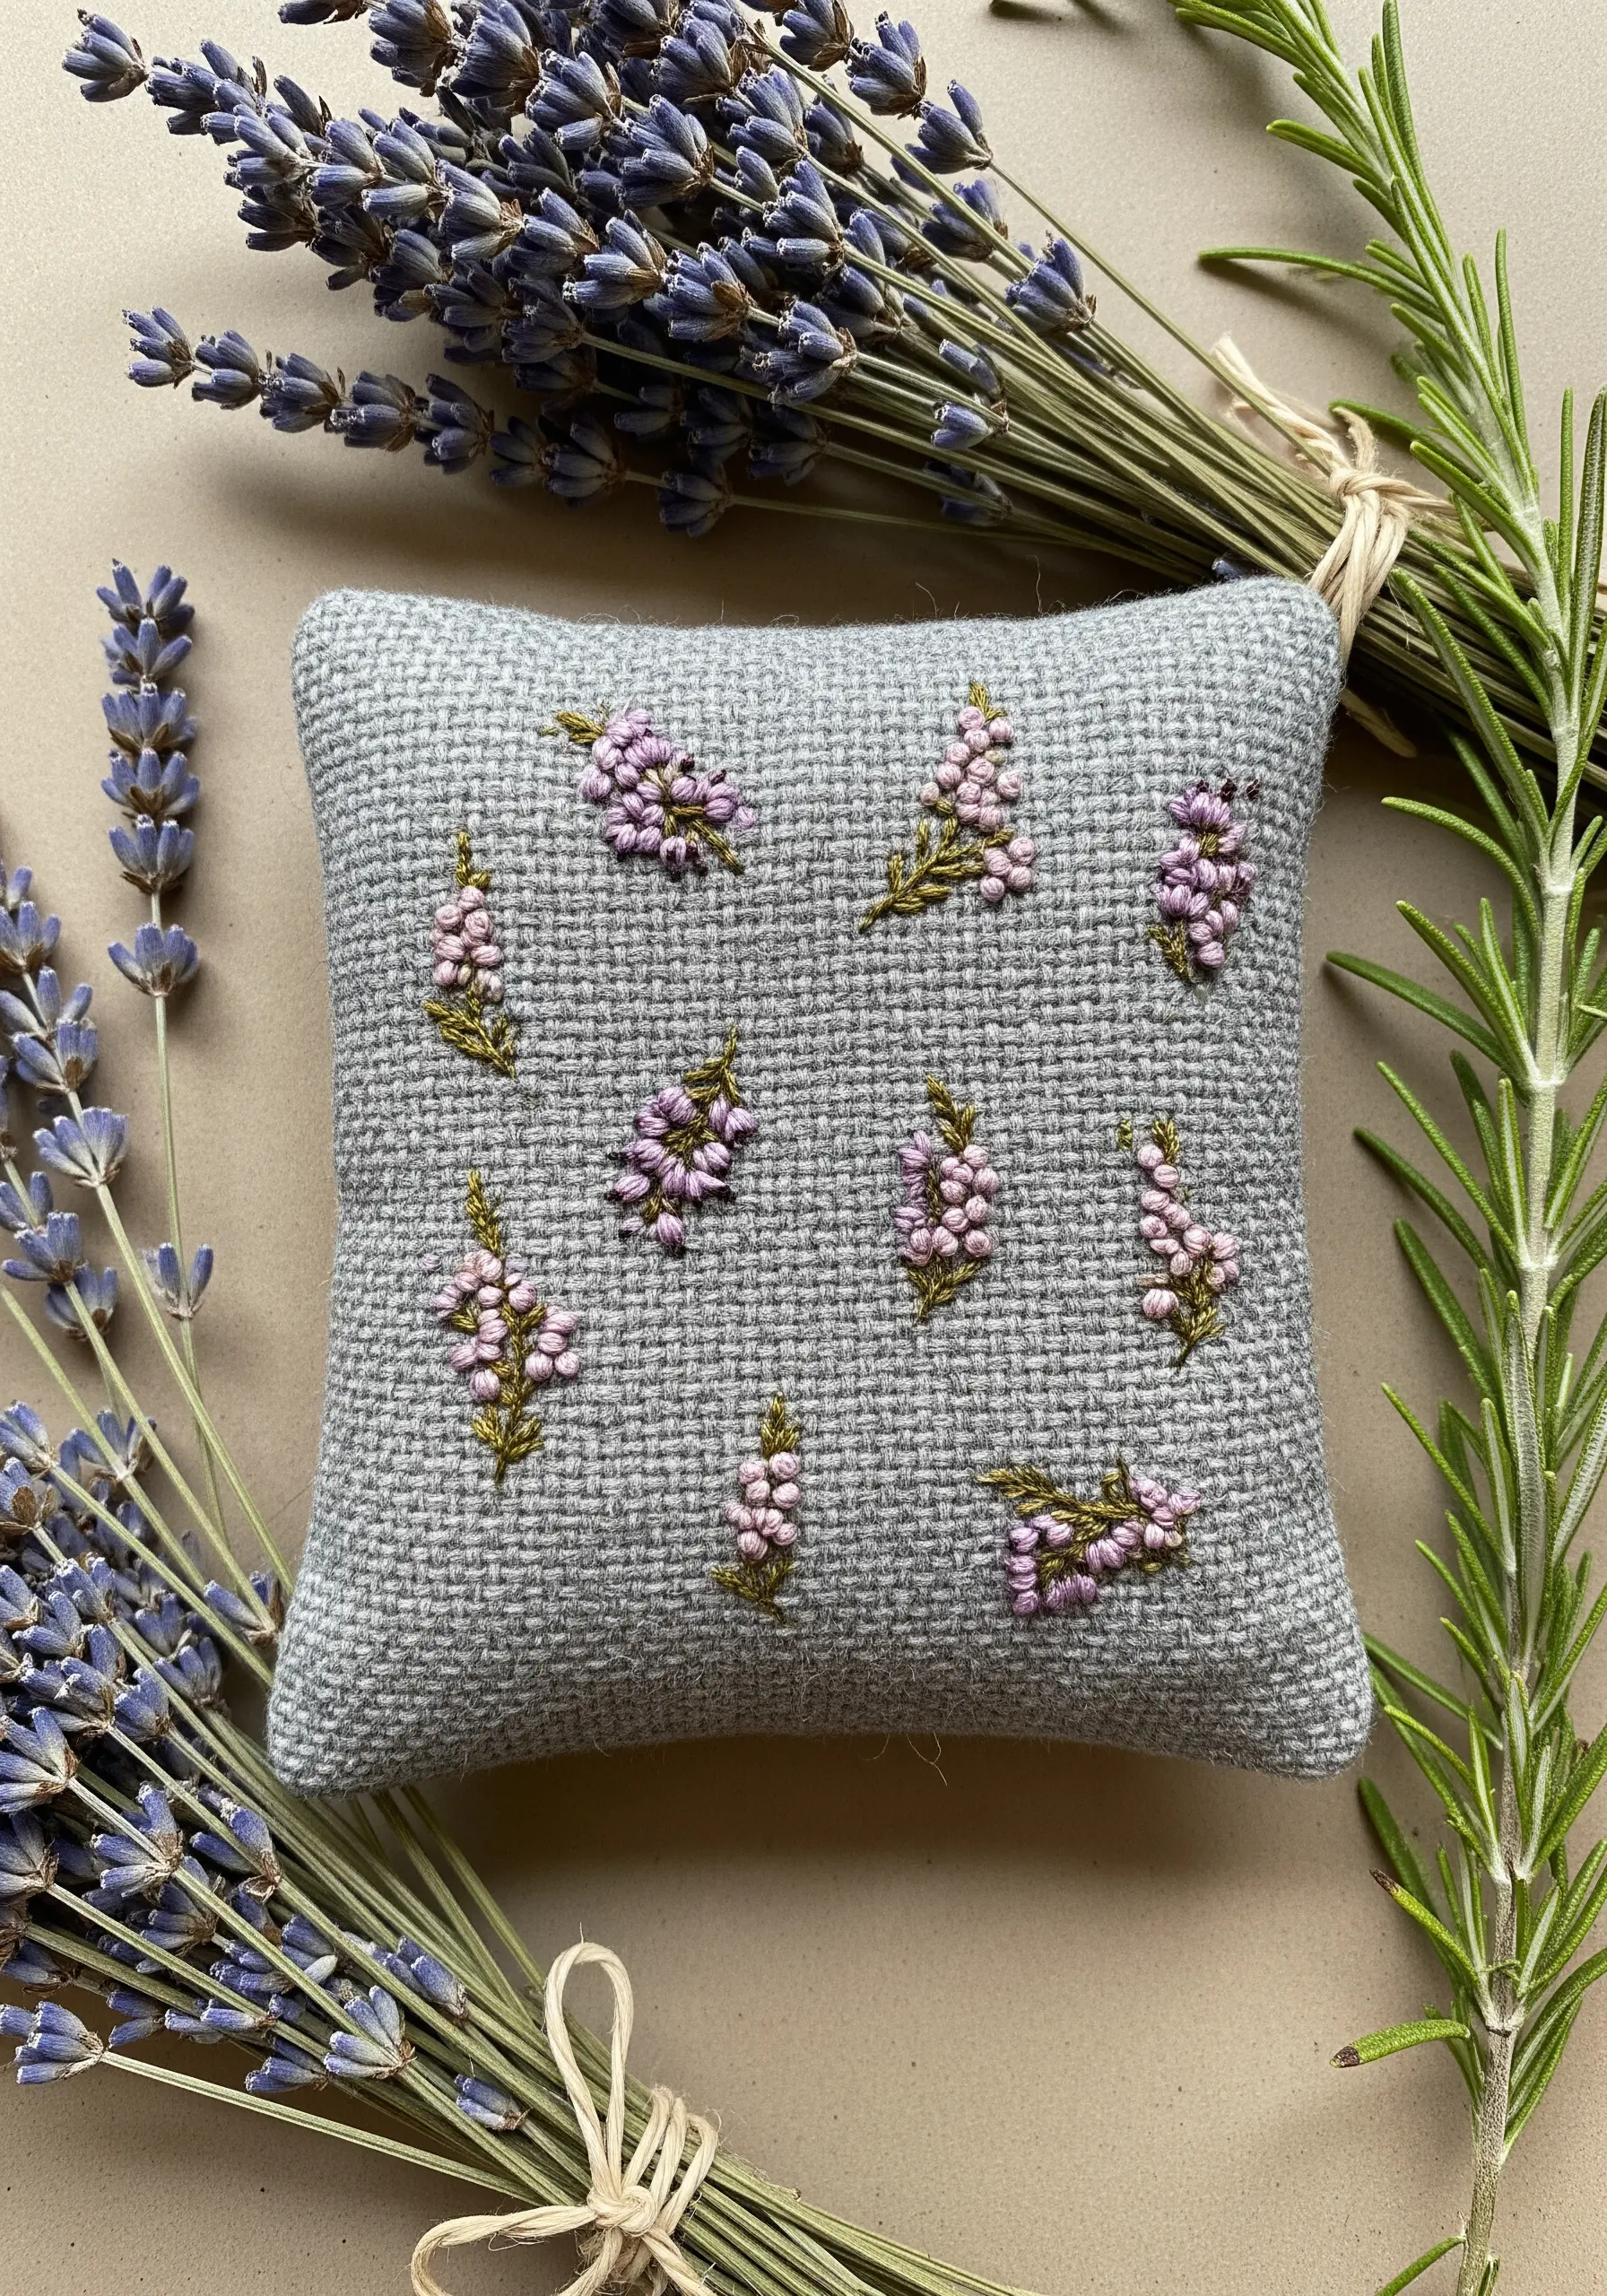
Create a small, scented keepsake by stitching tiny floral motifs onto a textured fabric like wool or tweed before sewing it into a sachet.
Use French knots and detached chain stitches to form the tiny heather blossoms, scattering them across the fabric in small, organic clusters.
The coarse weave of the fabric provides a rustic contrast to the delicate stitches.
Fill the finished pouch with dried lavender or heather for a multi-sensory piece that combines beautiful visuals with calming fragrance.
24. Paint with Thread for a Lush Peony

For complex flowers with many layers of petals like peonies, thread painting is the ultimate technique for achieving depth and realism.
Work in small sections, using the long-and-short stitch to blend dozens of shades from deep magenta to pale blush and creamy white.
Pay close attention to the direction of your stitches, following the curve and fold of each individual petal to create form and shadow.
While time-intensive, these floral thread painting techniques result in a breathtakingly detailed piece that looks more like a painting than embroidery.
25. Illustrate the Dandelion Life Cycle

Tell a botanical story within a single hoop by depicting different stages of a plant’s life.
Use a vibrant yellow woven wheel stitch for the bright, youthful flower head and tight satin stitch for the unopened bud.
For the delicate seed head, use radiating straight stitches in white, anchored by a cluster of brown seed stitches at the center.
This narrative approach transforms a simple floral portrait into a dynamic piece of botanical art that celebrates the beauty of change.


