

Sometimes, the most profound creative moments happen in the quietest hours. Embroidery is more than a craft; it’s a way to slow down, to connect with texture and color, and to create something beautiful with your own hands.
But perhaps you feel your stitches could be more refined, your designs more intentional. The secret isn’t in mastering dozens of complex techniques. It’s in understanding how small adjustments—a change in thread weight, the direction of a stitch, a surprising pop of texture—can elevate your work from simple to soulful.
Consider this your invitation to explore. Each idea here is a gentle nudge to try something new, a simple way to add depth, softness, and a touch of modern artistry to your work. Let’s make this quiet afternoon one for creating something you truly love.
1. Render Lavender with 3D Texture
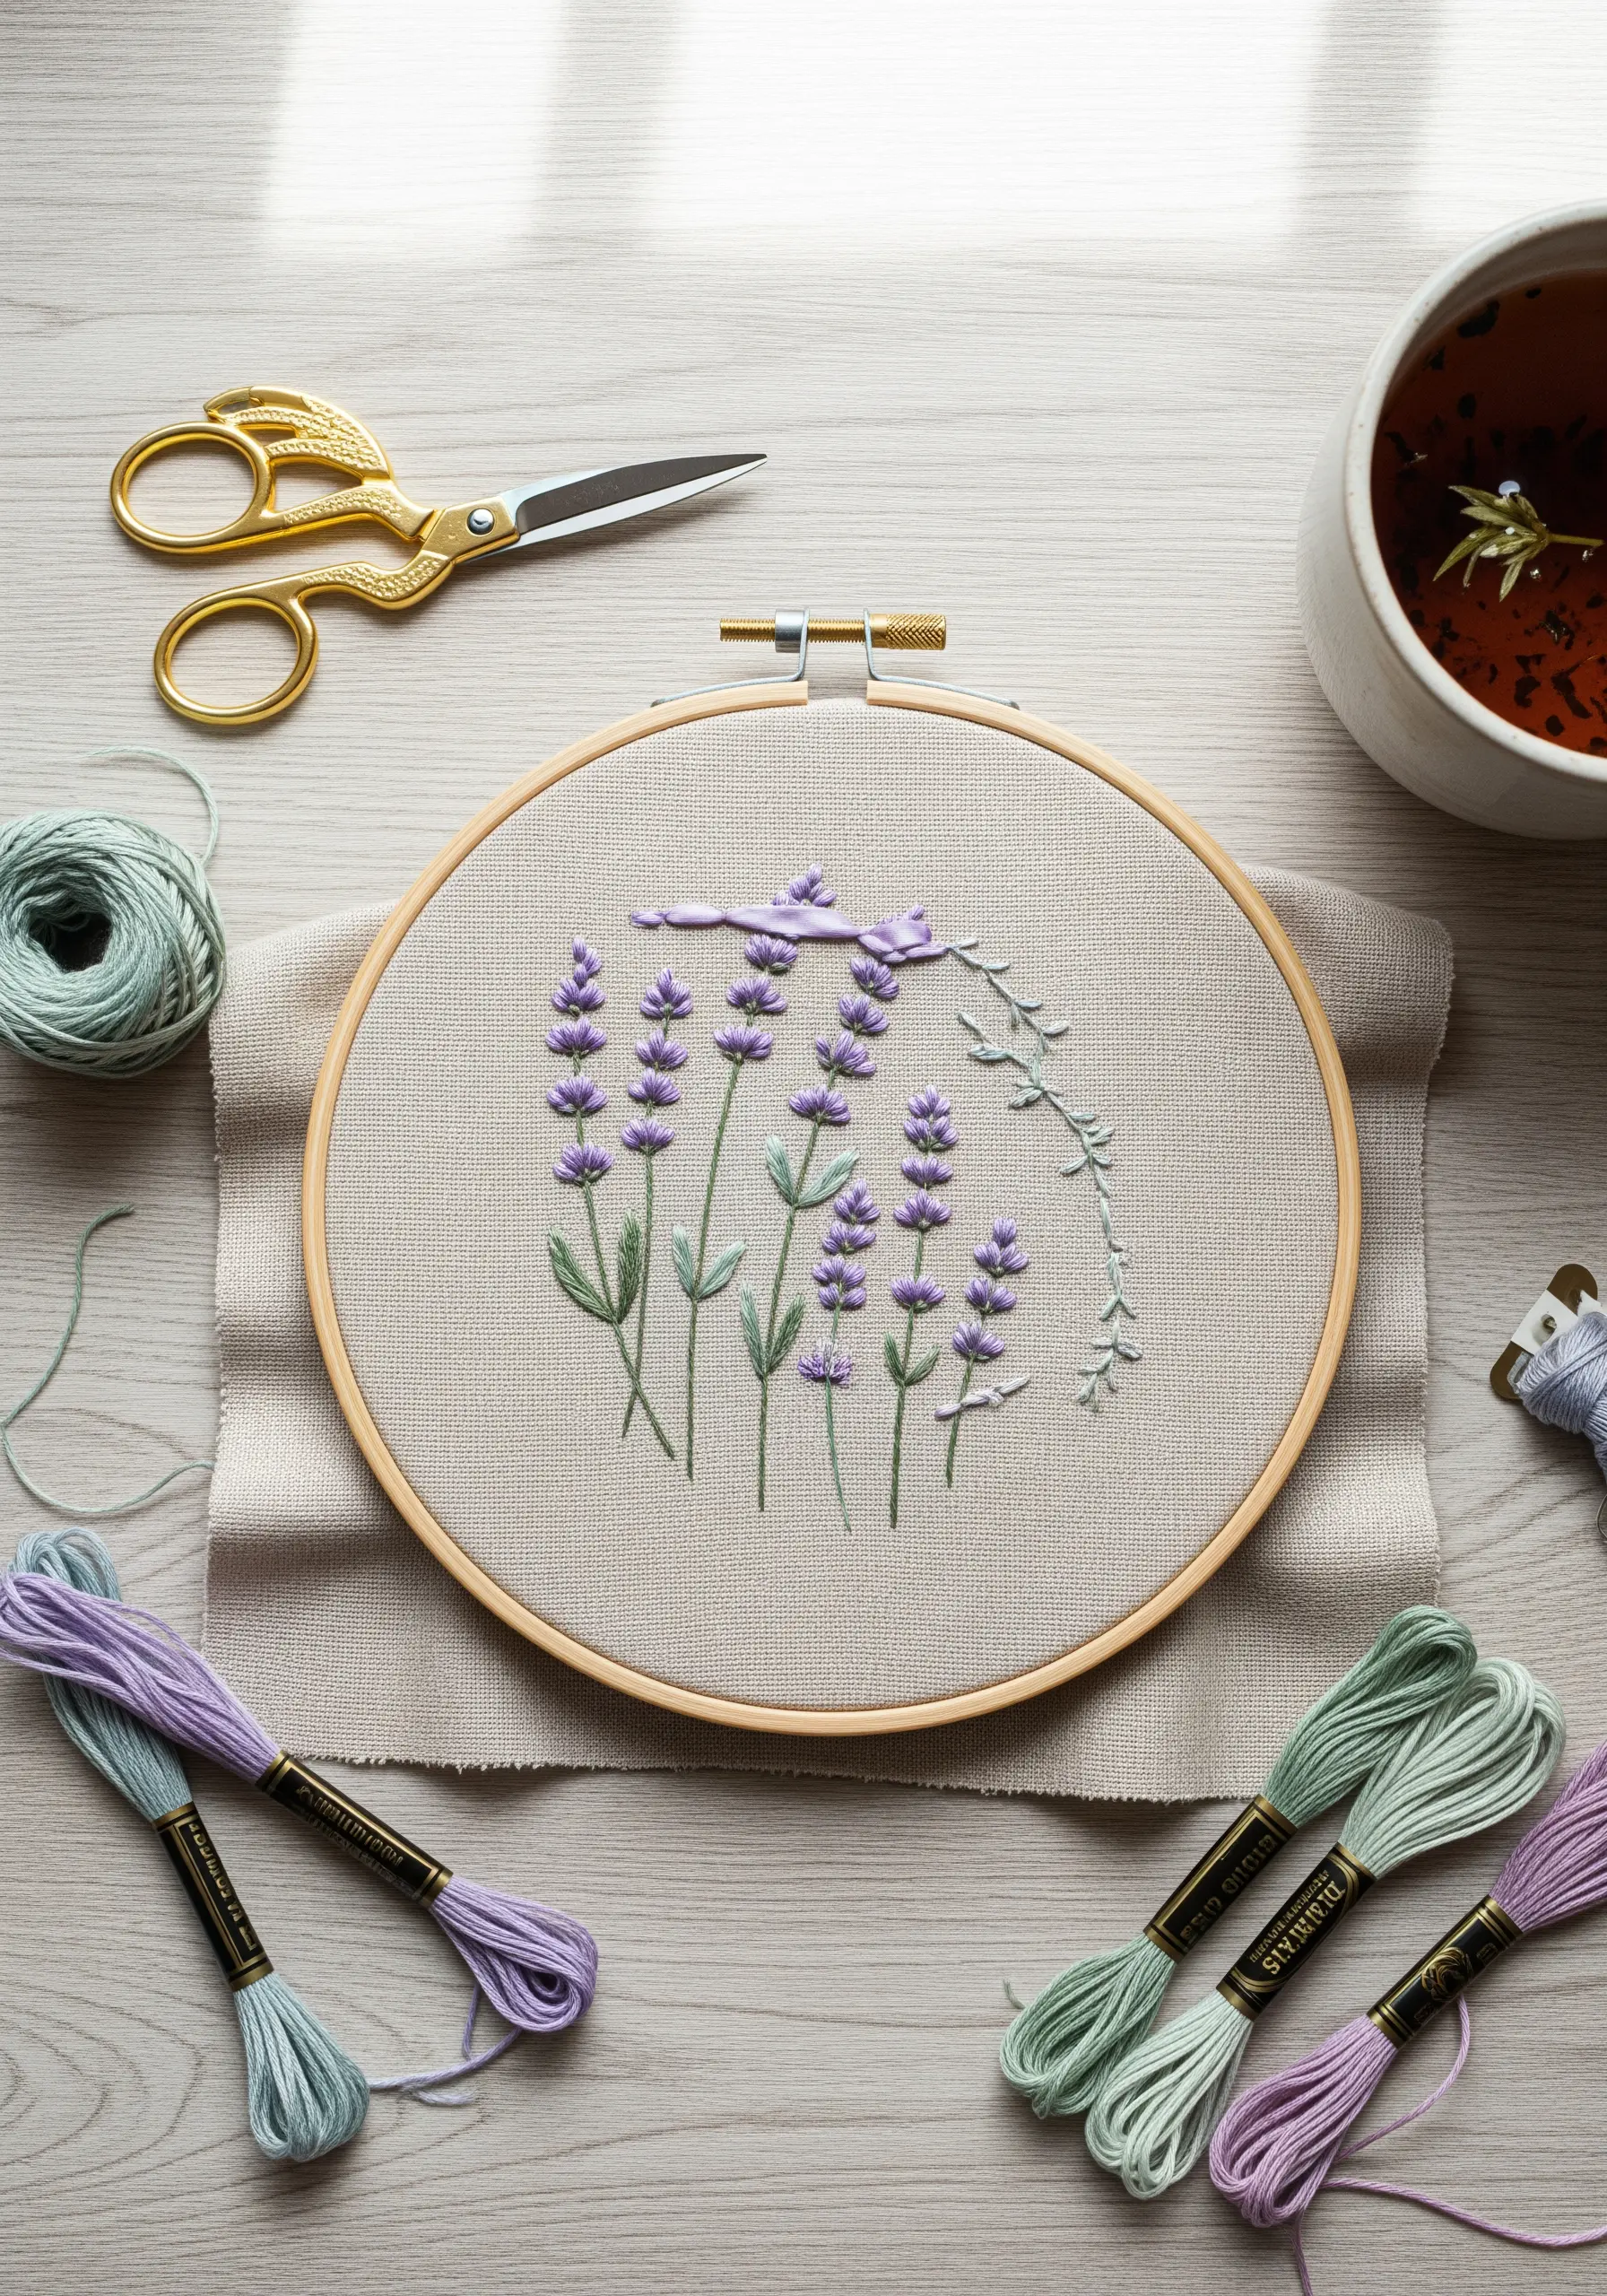
Give your lavender stems a lifelike texture by replacing standard satin stitch with bullion knots or raised stem stitch for the flower buds.
For the bullion knots, wrap your thread around the needle 6-8 times to create elongated, plump buds that stand off the fabric.
Incorporate a strand of silk ribbon for the decorative bow; its smooth, wide surface creates a beautiful contrast against the matte texture of the cotton floss.
This combination of dimensional stitches and mixed media brings a simple floral motif to life, adding both visual and tactile interest.
2. Capture Softness with Directional Stitching

To create the soft, dense fur of a sleeping fox, rely on the long-and-short stitch, ensuring your stitches follow the natural direction of hair growth.
Use a single strand of floss for finer control, blending shades of rust, orange, and cream to create realistic depth and highlights.
For the fluffy white tail, switch to tightly packed colonial knots. This stitch creates a rounder, more robust texture than French knots, giving the tail a plush, 3D quality you can almost feel.
This attention to stitch direction and texture is what separates a flat design from a lifelike pet portrait.
3. Paint Dreamy Skies with Pointillism

Create ethereal, fluffy clouds by using dense clusters of French knots on a dark, high-contrast fabric like navy blue cotton or linen.
Vary the number of strands (from one to three) and the tightness of your knots to build layers of light and shadow, just like a painter uses dots of color.
Blend pastel pinks, purples, and peaches by placing knots of different colors close together, allowing the eye to mix them optically from a distance.
The dark background pushes the soft, textured colors forward, creating a dramatic and atmospheric piece with minimal effort.
4. Create Depth with Atmospheric Perspective

To give your embroidered landscapes a sense of depth, use the principles of atmospheric perspective right in your thread choices.
Stitch the distant mountains with fewer strands of floss (one or two) in cooler, desaturated tones like grey-blues and misty greens.
As you move to the foreground, increase your thread count to three or four strands and use richer, more saturated greens and browns for the trees and bushes.
This subtle shift in thread weight and color saturation tricks the eye into seeing distance, making your nature scenes feel vast and immersive.
5. Achieve Precision with Miniature Stitches

When stitching small, detailed projects like a bookmark, precision is everything. Use a single strand of embroidery floss for all your outlines and lettering.
Work on an even-weave fabric or Aida cloth, as the grid structure helps you keep lines perfectly straight and stitches uniform.
Use a simple backstitch for the book outlines and tiny satin stitches for the colored spines. This minimalist approach ensures the design remains crisp and legible, never cluttered.
These embroidered mixed-media bookmarks are perfect for using up small scraps of thread and fabric.
6. Master Fluffy Textures with Turkey Work

To achieve that wonderfully plush, fluffy bunny, you’ll want to use the turkey stitch, also known as the Ghiordes knot.
This technique creates loops of thread on the surface of your fabric. You stitch a series of these loops to fill the entire shape of the bunny.
Once the area is completely filled, you can trim the tops of the loops with sharp embroidery scissors to create a soft, velvety pile.
This method is far more effective than French knots for creating a uniform, high-pile texture that truly mimics soft fur.
7. Blend Colors with Thread Painting
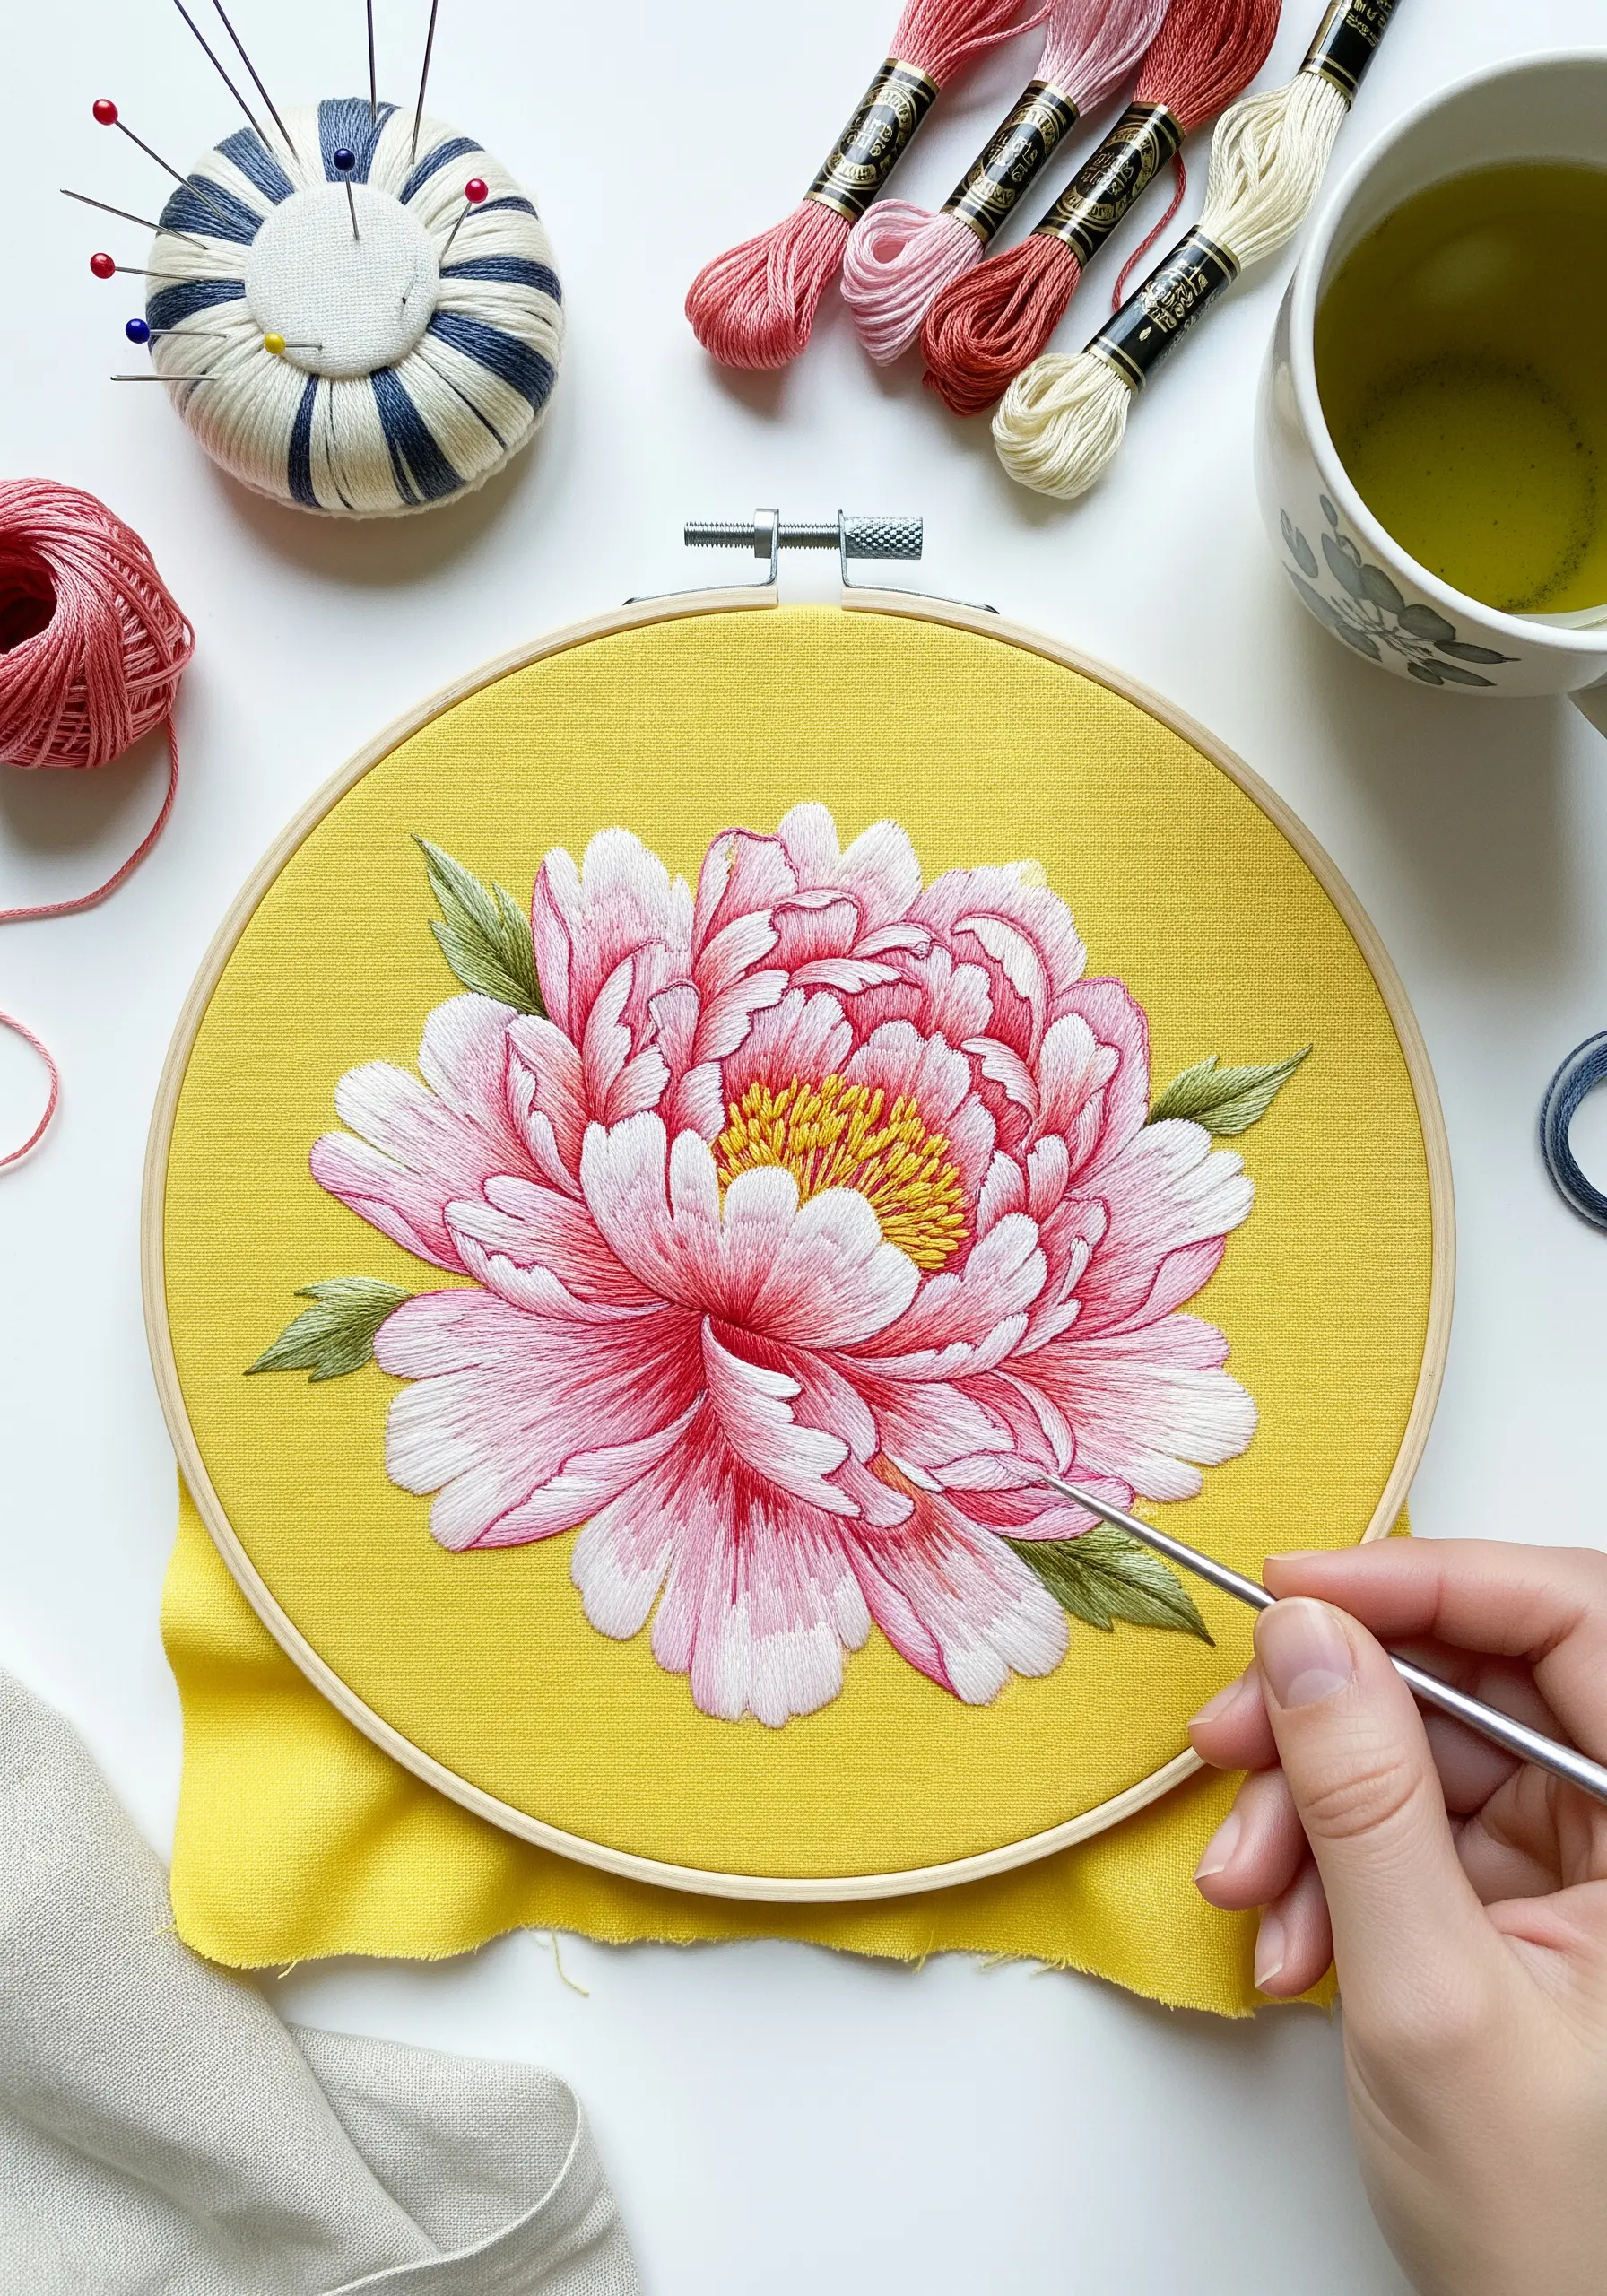
Elevate your florals from simple cartoons to realistic botanicals using the thread painting technique, primarily with the long-and-short stitch.
To create the soft gradient on the peony petals, use a single strand of floss and work in sections, blending from dark pink to light pink to creamy white.
Your stitches should follow the curve and direction of the petal’s growth, creating a natural flow of color.
Choosing a bold, contrasting background fabric like this vibrant yellow makes the delicate shading of the flower the undisputed focal point of your wild garden floral embroidery.
8. Embellish Denim with Clean Satin Stitch
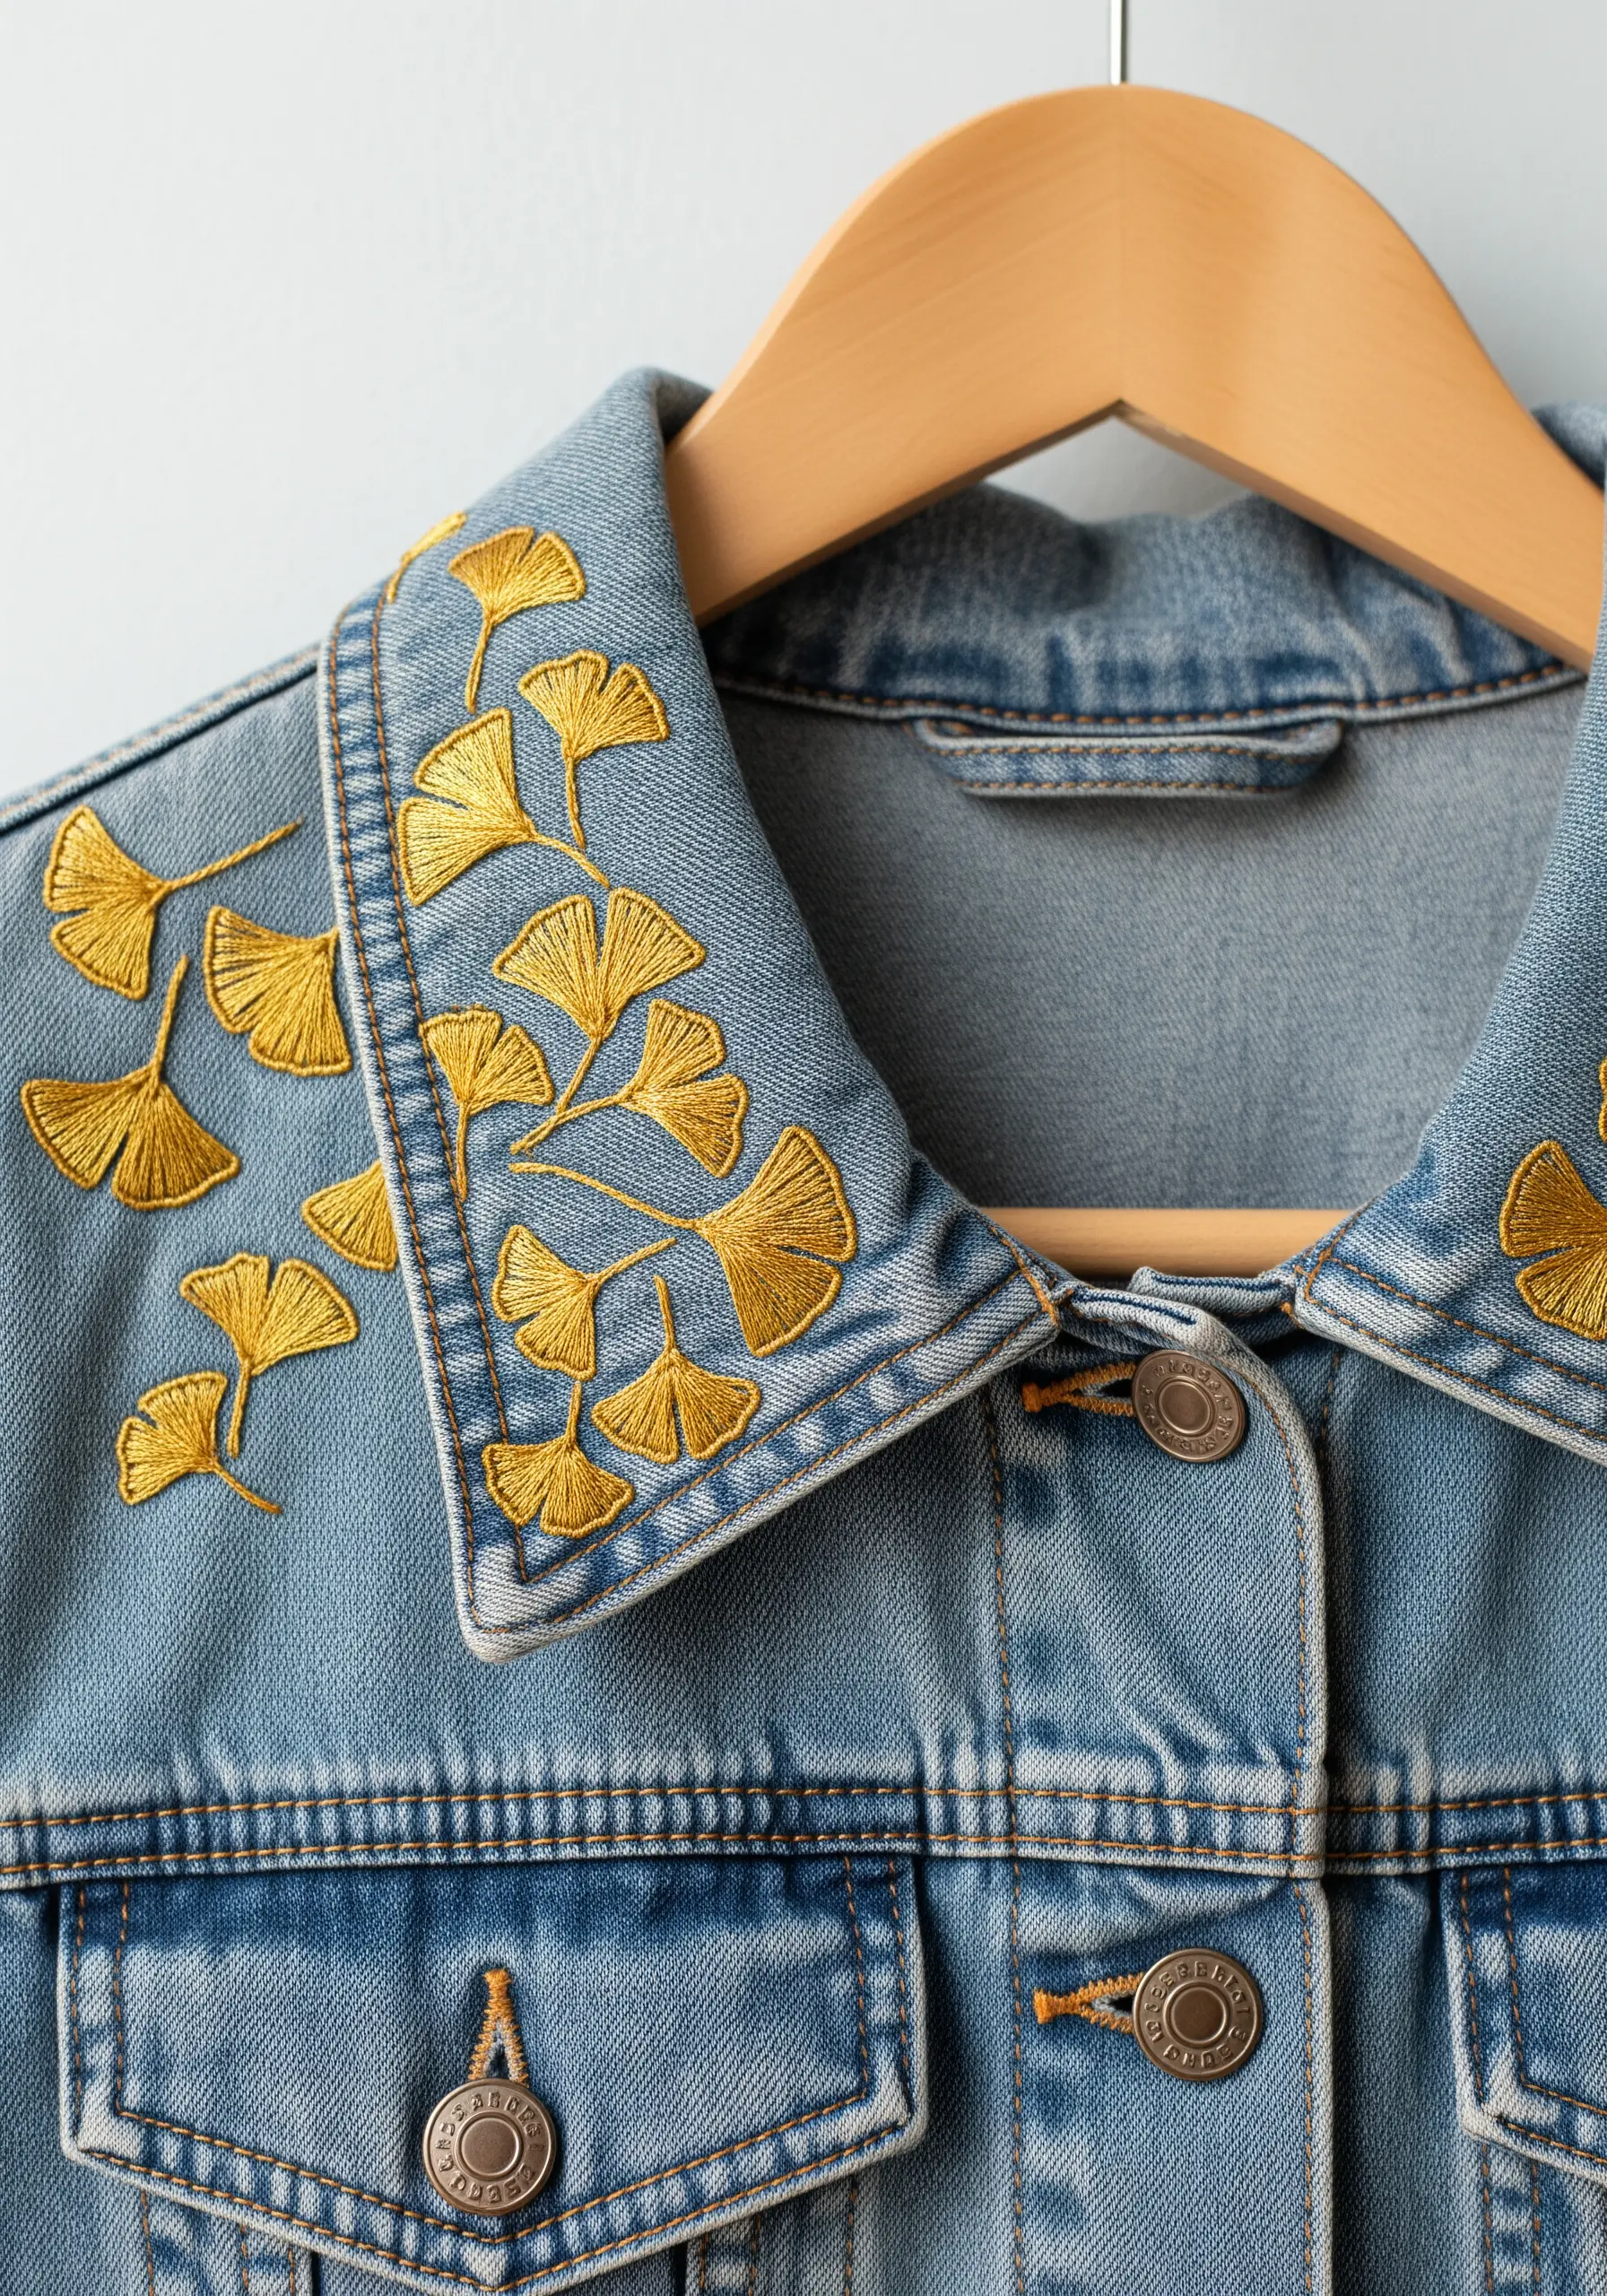
When embroidering on a heavy fabric like denim, always use a stabilizer on the reverse side to prevent the fabric from puckering and stretching as you stitch.
For a clean, graphic look like these ginkgo leaves, first outline each shape with a split stitch. This raised edge acts as a guide and gives your final satin stitch a sharp, professional finish.
Fill the shape with satin stitches, laying them close together at a slight angle. The angle helps reflect light, giving the threads a subtle sheen.
This technique can transform blank denim jackets into boho fashion statements.
9. Define Shapes with Negative Space
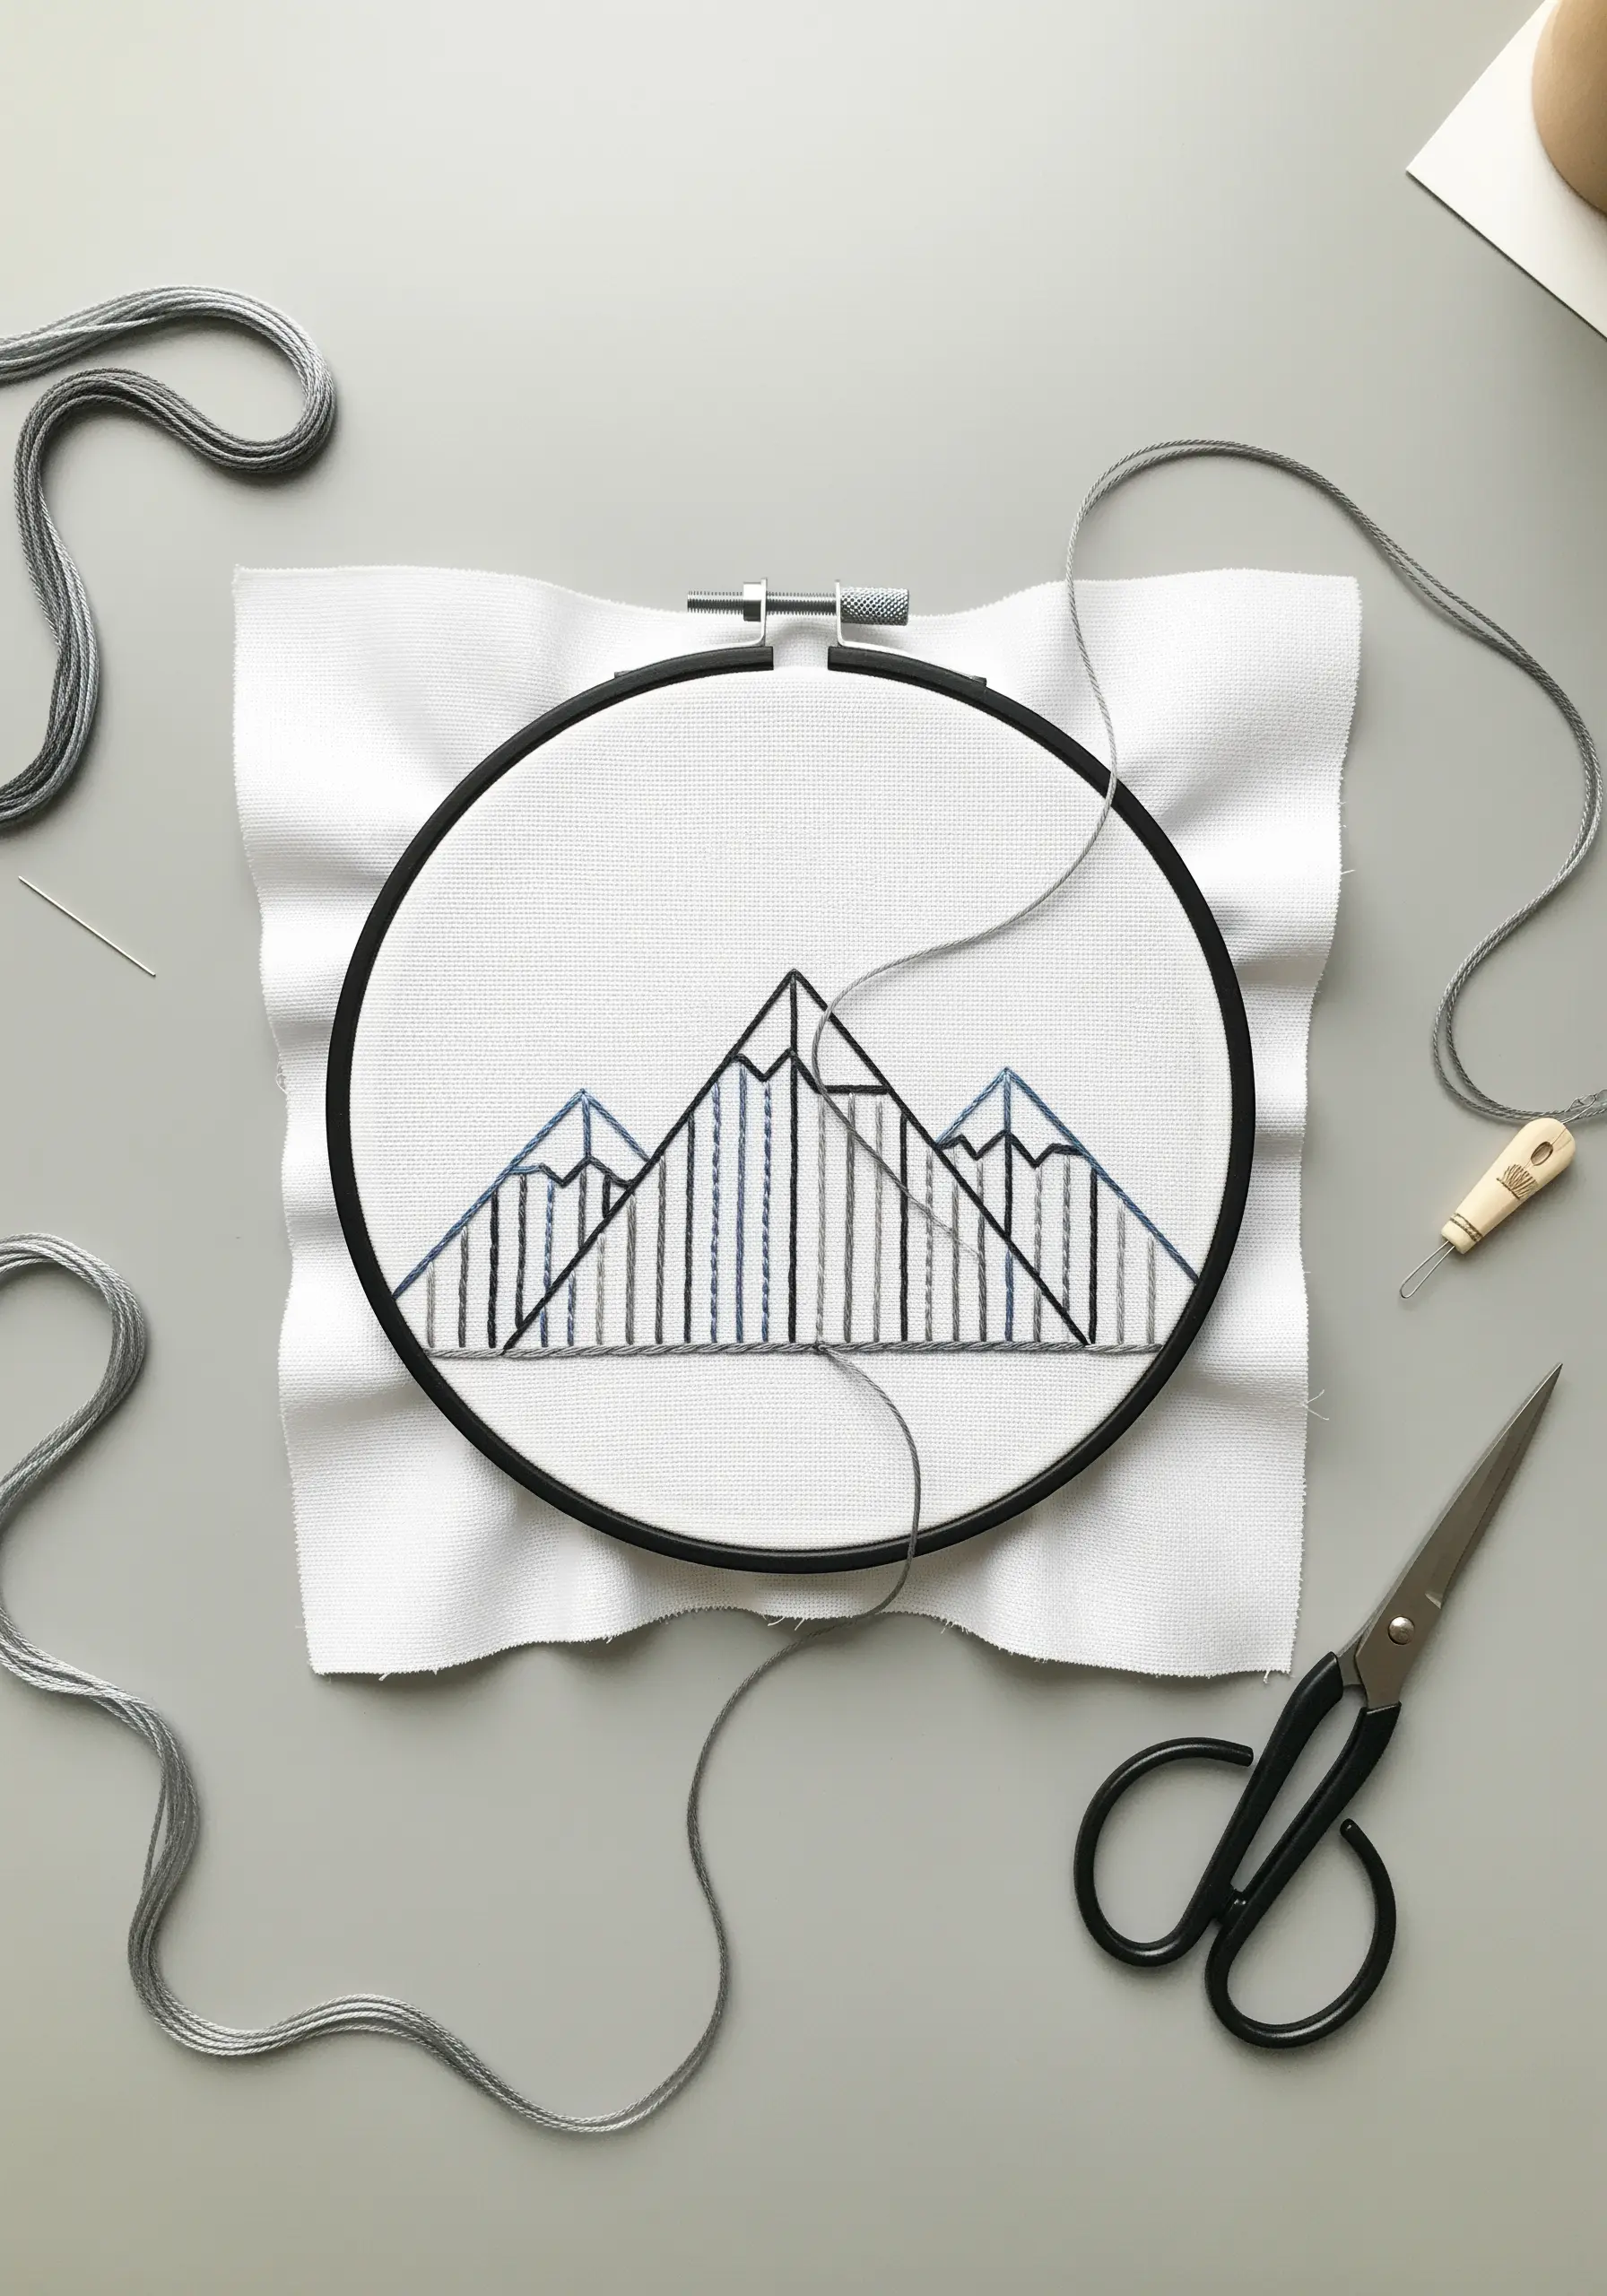
Create a modern, graphic mountain range by letting the fabric do half the work. This technique relies on negative space and clean lines.
Use a sturdy backstitch for the main outlines. For the vertical fill lines, use long straight stitches, which create a sense of elegant minimalism.
To prevent these long stitches from snagging or sagging, you can anchor them with a tiny couching stitch in the middle using a single, matching thread.
This approach transforms simple lines into striking minimalist line art embroidery hoops perfect for a contemporary space.
10. Add Whimsy to Home Décor
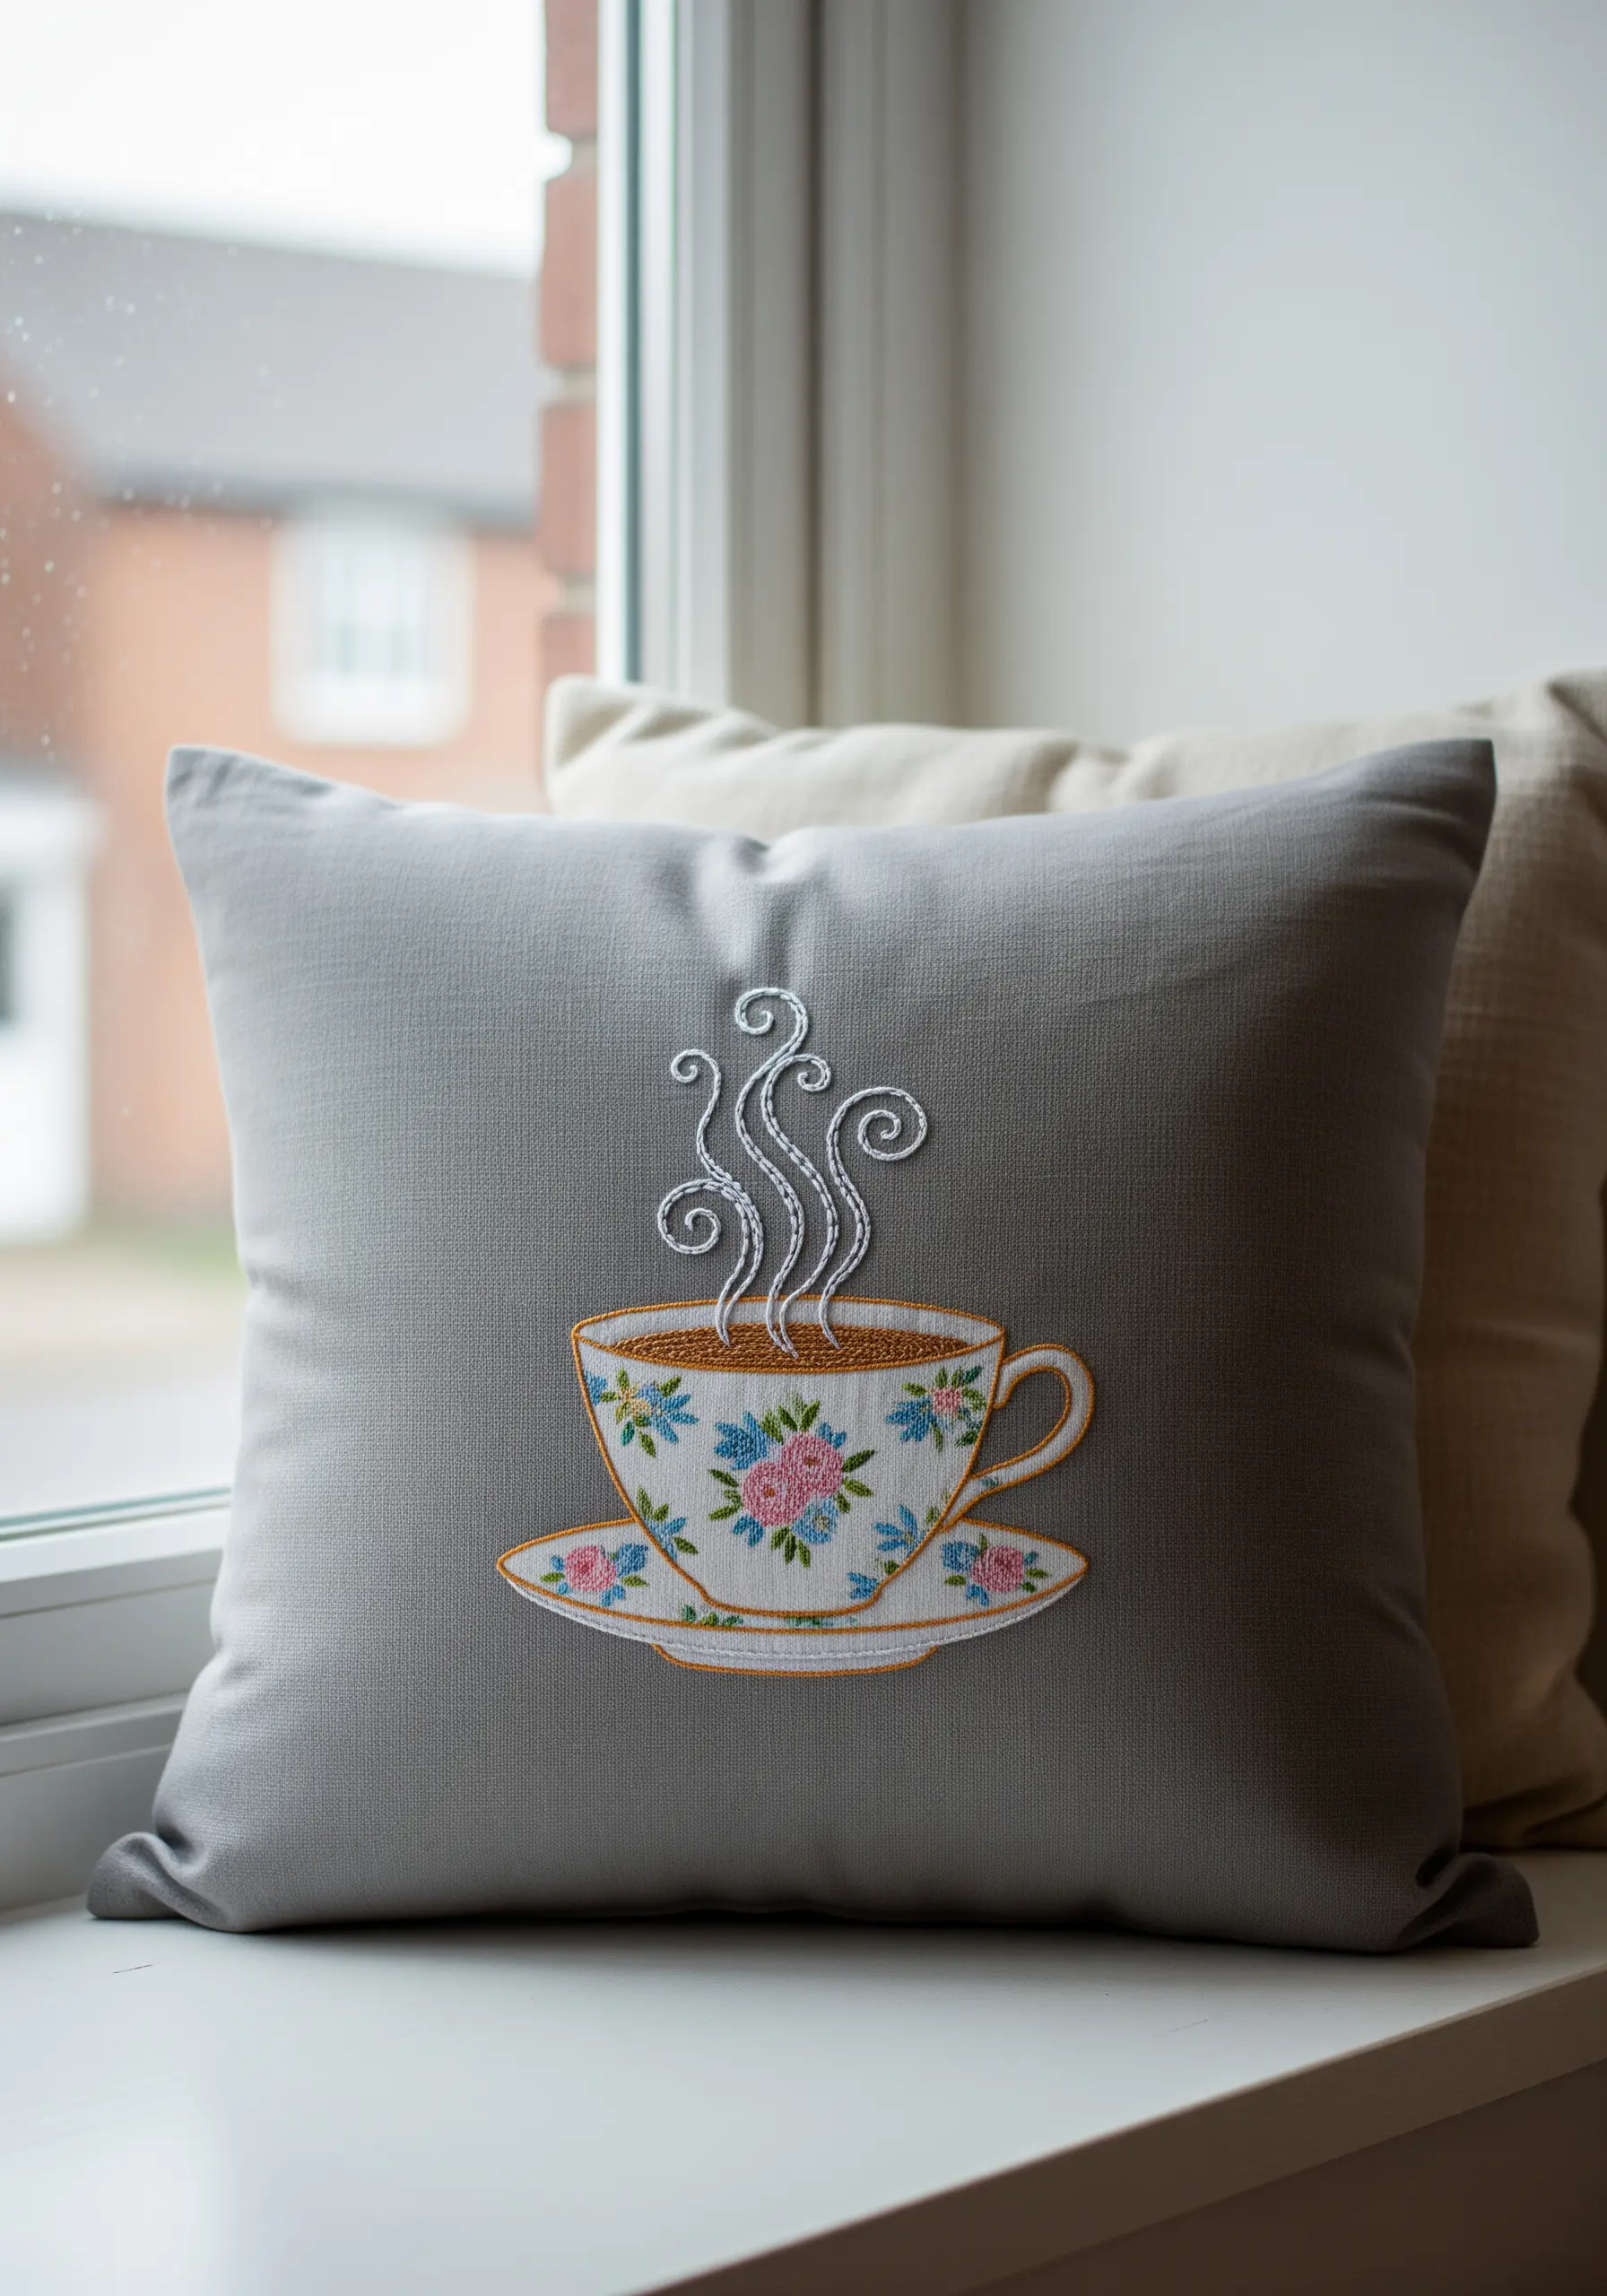
Translate a delicate illustration into a charming accent pillow. Start by outlining the teacup with a whipped backstitch for a smooth, solid line that stands out.
For the tiny florals on the cup, use simple lazy daisy stitches for petals and French knots for the centers. This adds detail without overwhelming the small scale.
The curling steam is perfect for a stem stitch, which naturally creates elegant curves. Using a brighter, contrasting thread like white makes it pop.
These simple stitch ideas that add elegance to your pillow covers can make any corner feel cozier.
11. Compose a Wreath with Varied Textures
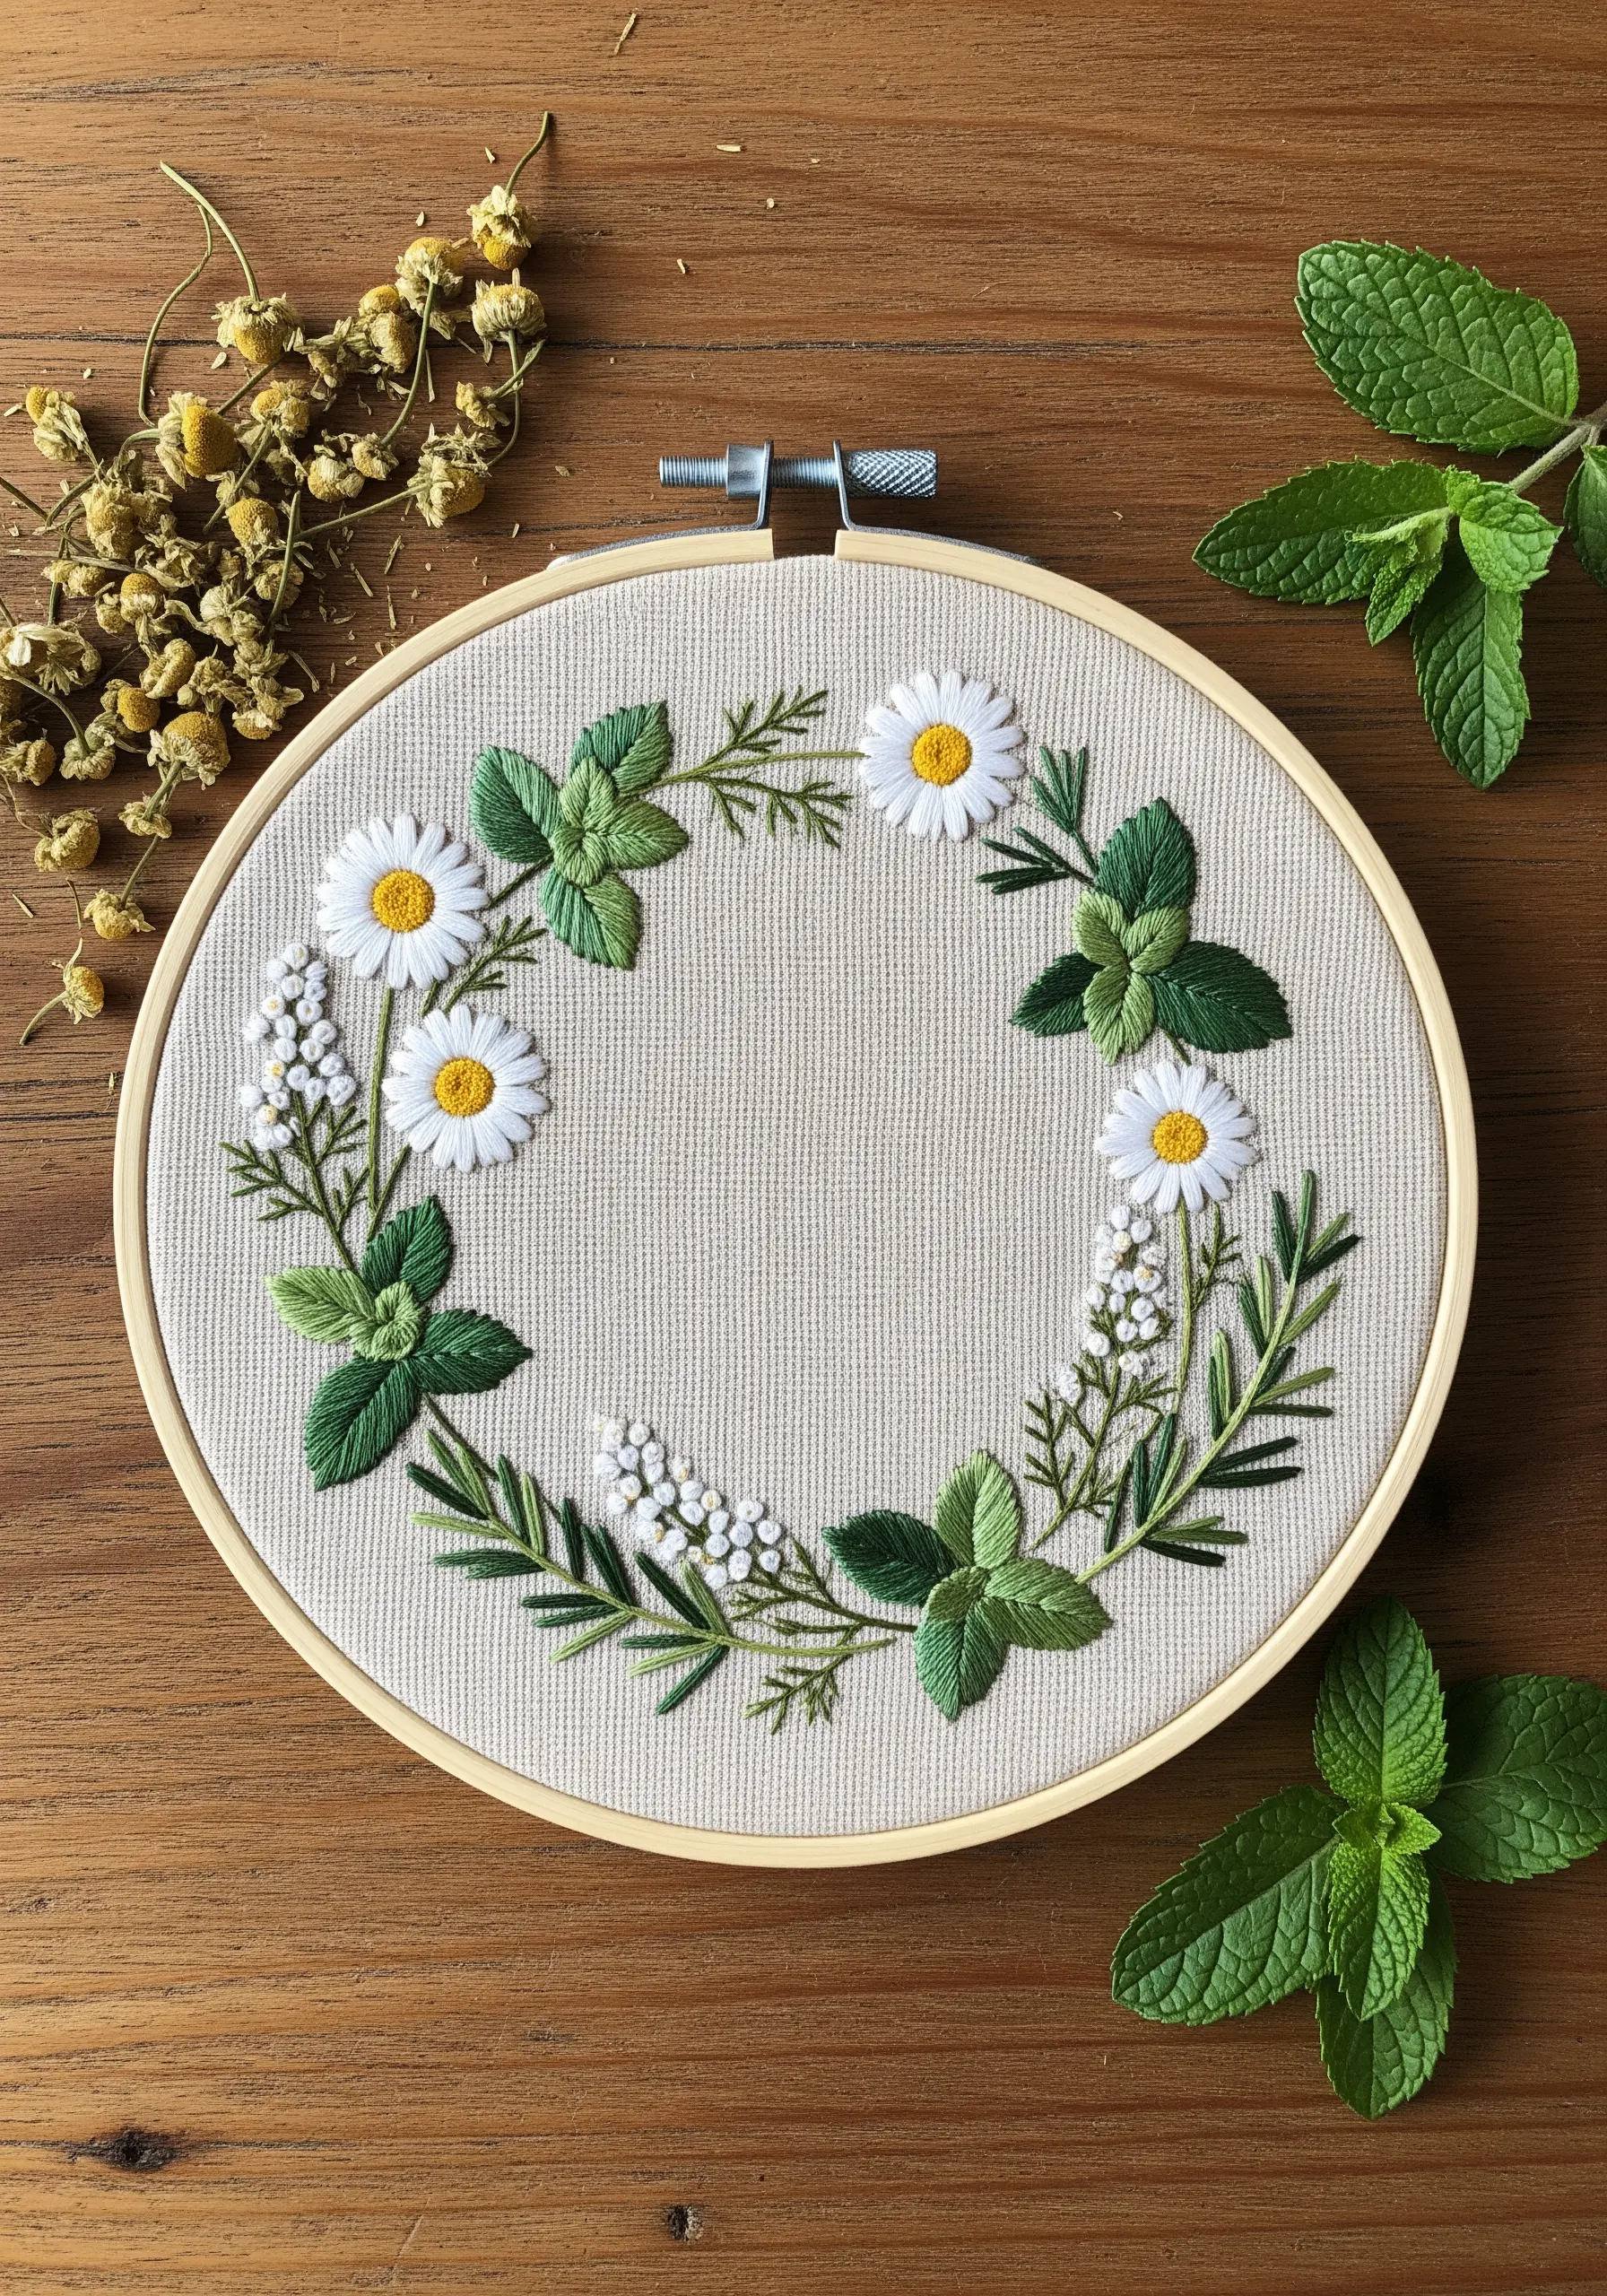
A botanical wreath becomes far more interesting when you use different stitches to represent different plants.
Use a classic satin stitch for the flat, broad mint leaves, ensuring your stitches follow the angle of the veins.
Create the chamomile flowers with detached chain stitches (lazy daisies) for the petals and a cluster of French knots for the yellow center.
For the delicate white filler flowers, use tiny French knots or seed stitches. This variety of textures makes the wreath feel lush and abundant.
12. Stitch on Sheer Fabric for an Ethereal Effect
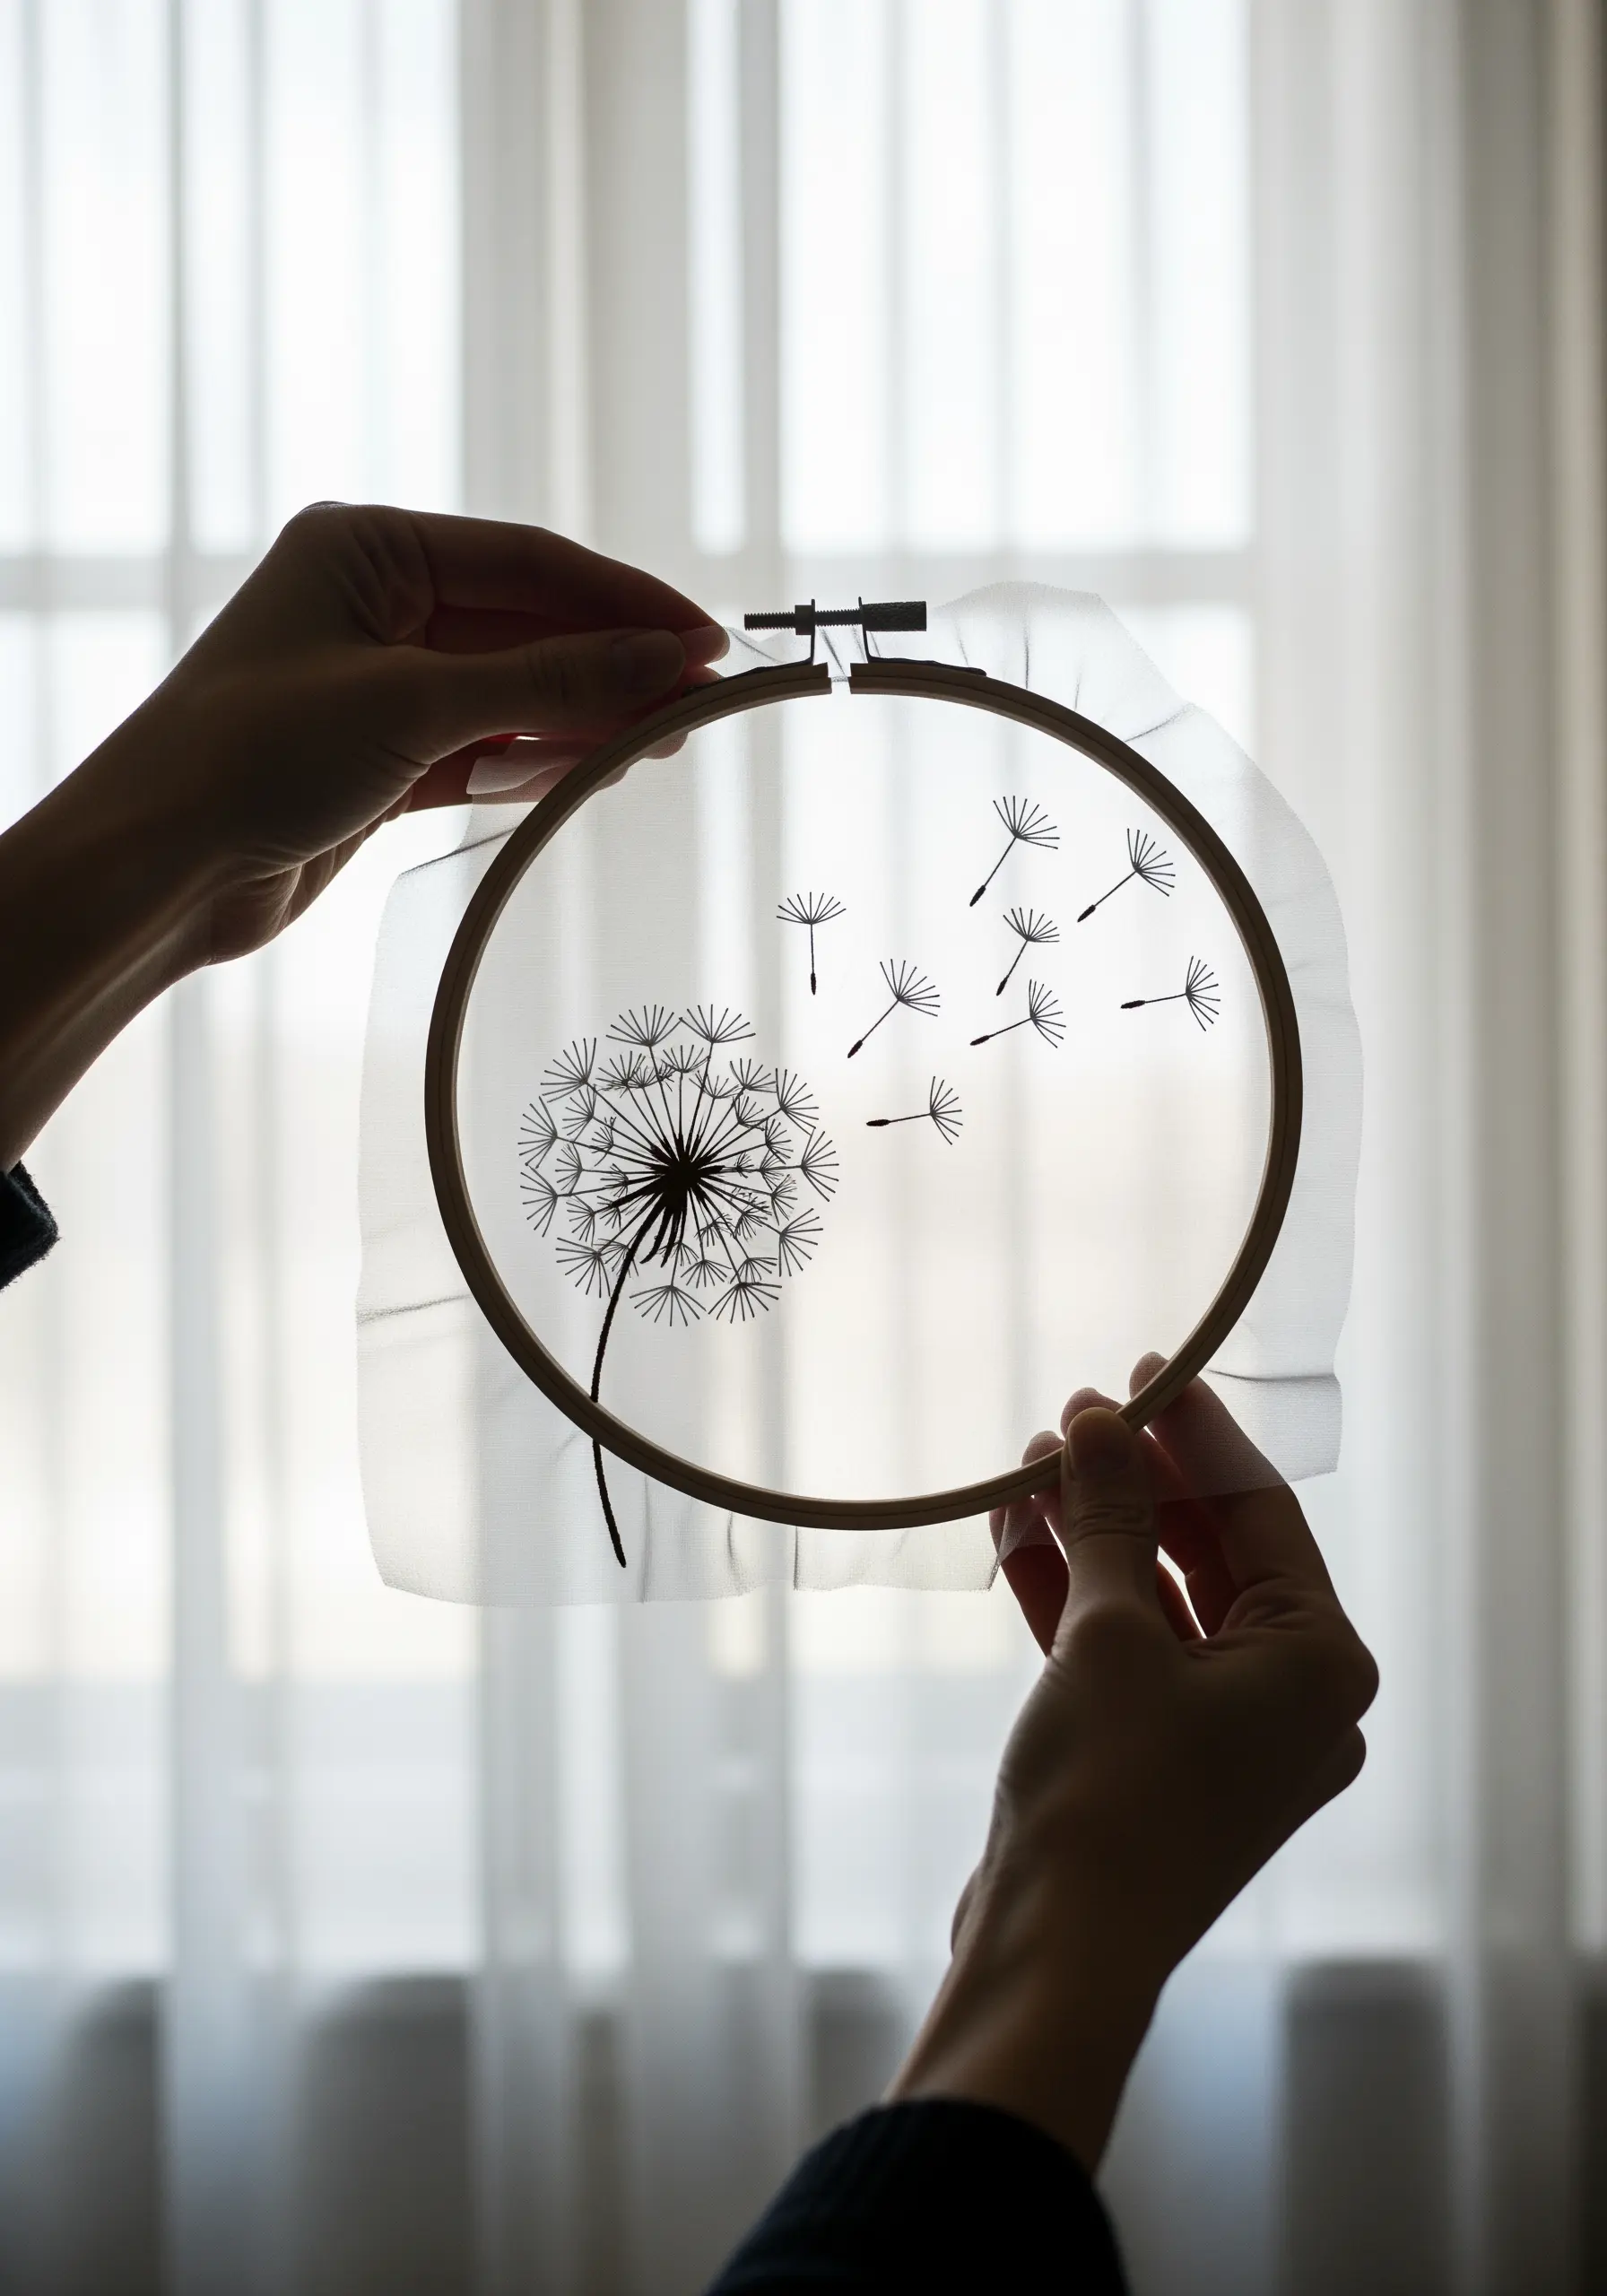
Embroidering on sheer organza or tulle creates a magical, floating effect that’s impossible to achieve on opaque fabric.
To get started, hoop your sheer fabric with a layer of water-soluble stabilizer. This provides the support you need for stitching and dissolves completely when you’re done.
Use simple, light stitches like backstitch and straight stitch. Heavy, dense stitches will weigh down and distort the delicate fabric.
This technique is perfect for minimalist designs like this dandelion, where the transparent background enhances the theme of lightness and air.
13. Create Gradients with Seed Stitch

Capture the textured, cratered surface of the moon by filling each phase with dense seed stitches—tiny, scattered straight stitches.
To create the crescent shadows, vary the density of your stitches. Pack them tightly in the illuminated areas and space them out in the shadowed parts.
Use a palette of greys, from dark charcoal to bright white, and blend them subtly where light and shadow meet.
Stitching on a dark navy fabric provides the perfect night-sky backdrop, making your moon and stars embroidery glow.
14. Capture Iridescence with Variegated Threads
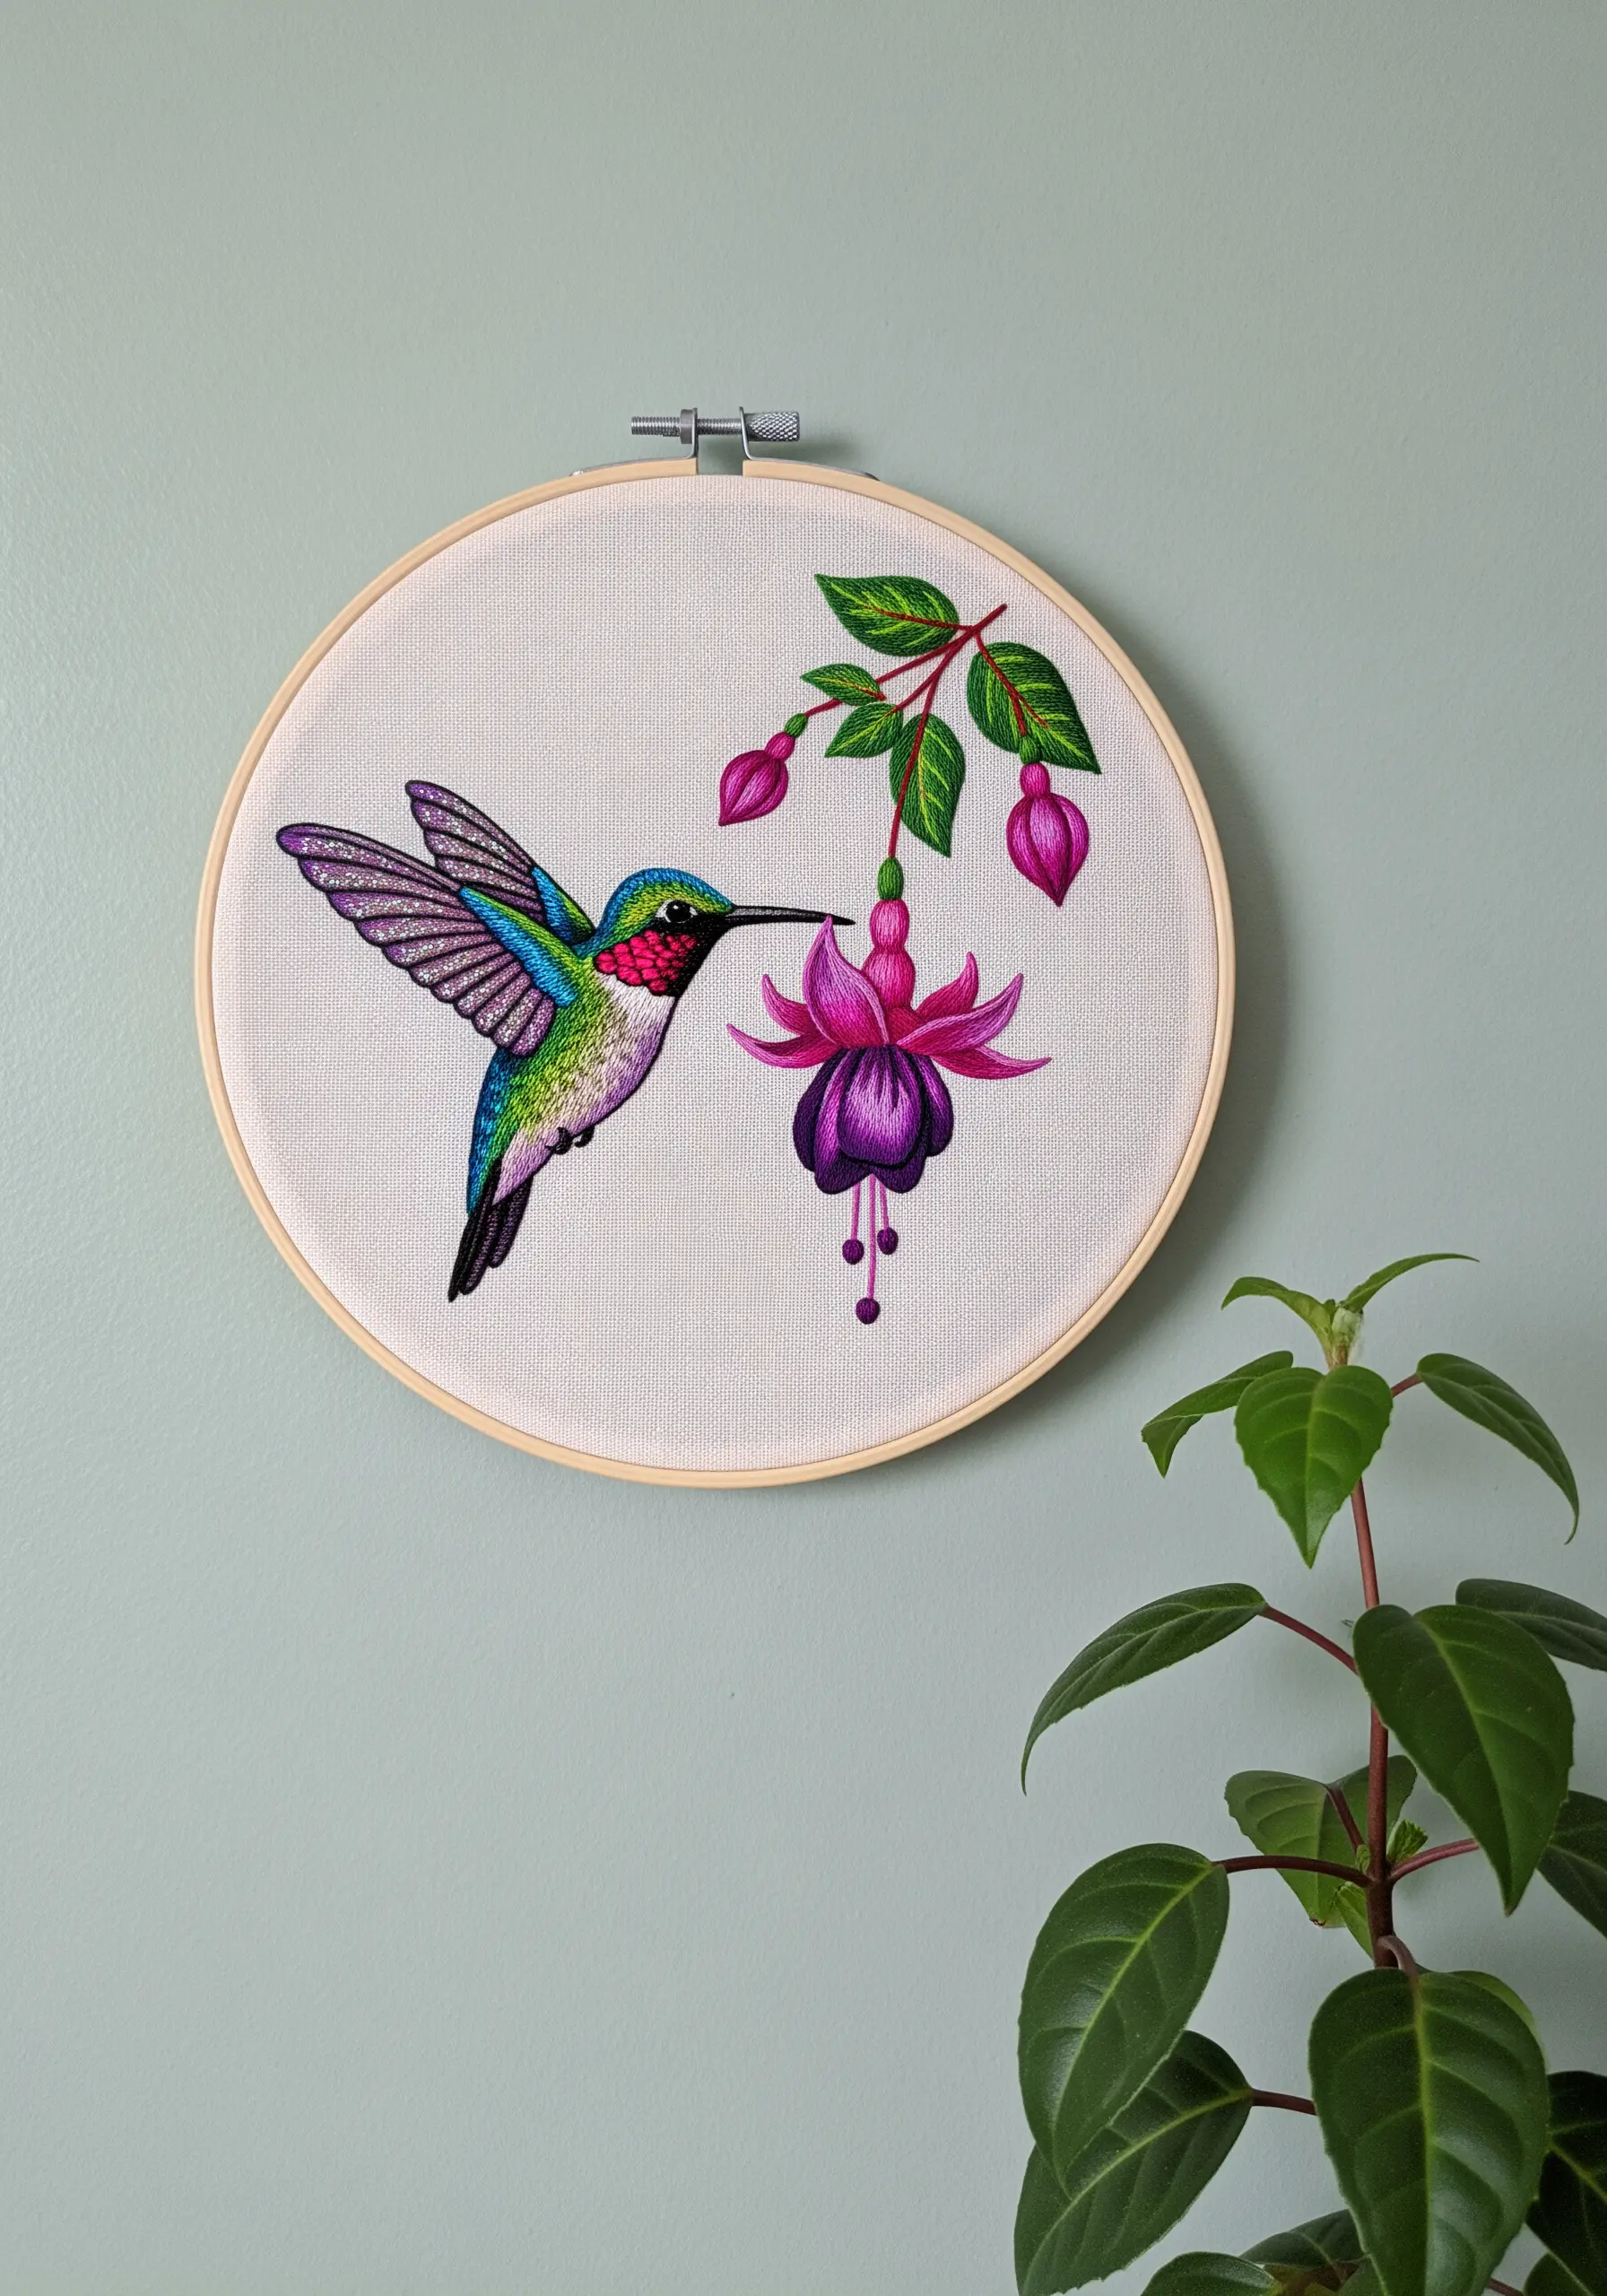
A hummingbird’s throat feathers are famously iridescent. To replicate this effect, use a variegated or silk floss that naturally shifts in color and sheen.
Use short, directional satin stitches for the bird’s body, making sure your stitches follow the contours and curves of the feathers.
For the wings, use long, open straight stitches in a grey or light purple to create a sense of transparent, rapid movement.
This thoughtful thread selection and stitch placement is key to capturing the vibrant, dynamic quality of wildlife in thread.
15. Sculpt 3D Textures with Knots and Loops
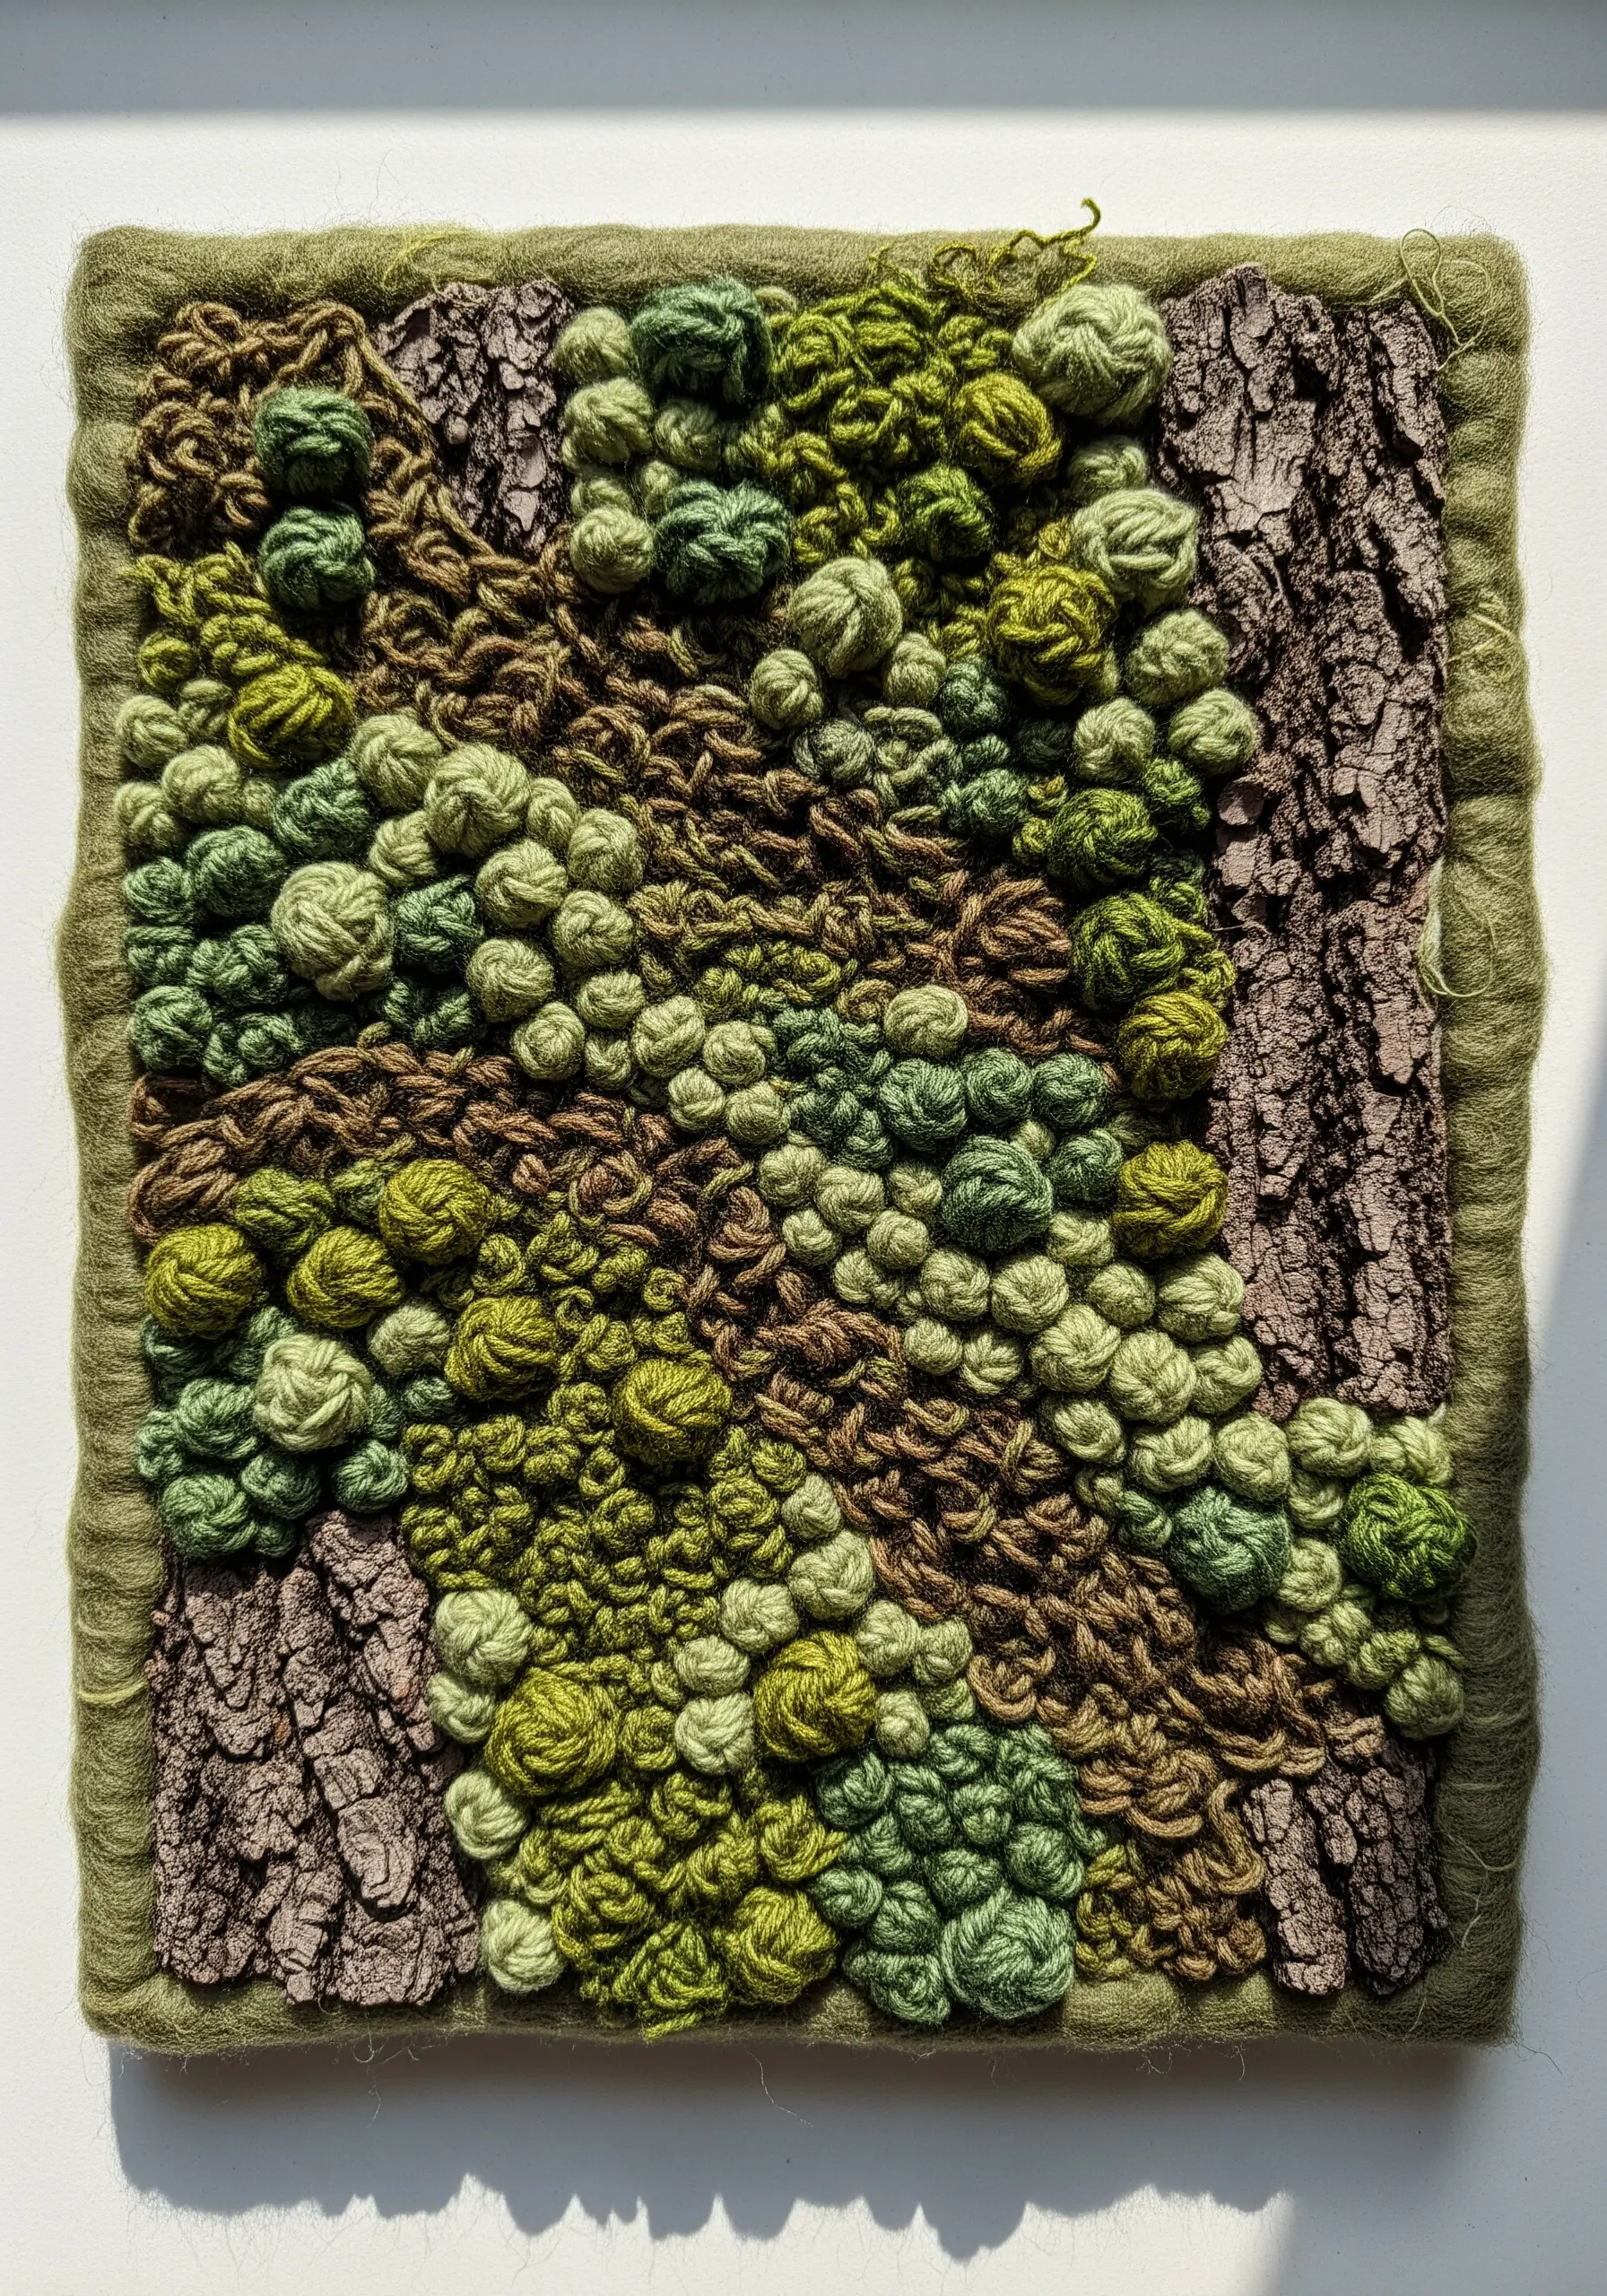
Move beyond flat stitching and explore sculptural embroidery. To create this mossy, organic texture, use a combination of French knots, bullion knots, and woven wheel stitches.
Vary the size of your knots and the thickness of your yarn or thread to build up a complex, three-dimensional surface.
You can even incorporate appliqué by stitching onto a piece of actual tree bark or textured fabric for a mixed-media approach.
These organic texture embroidery designs transform your hoop into a small, tactile world.
16. Fill Large Areas with Fishbone Stitch
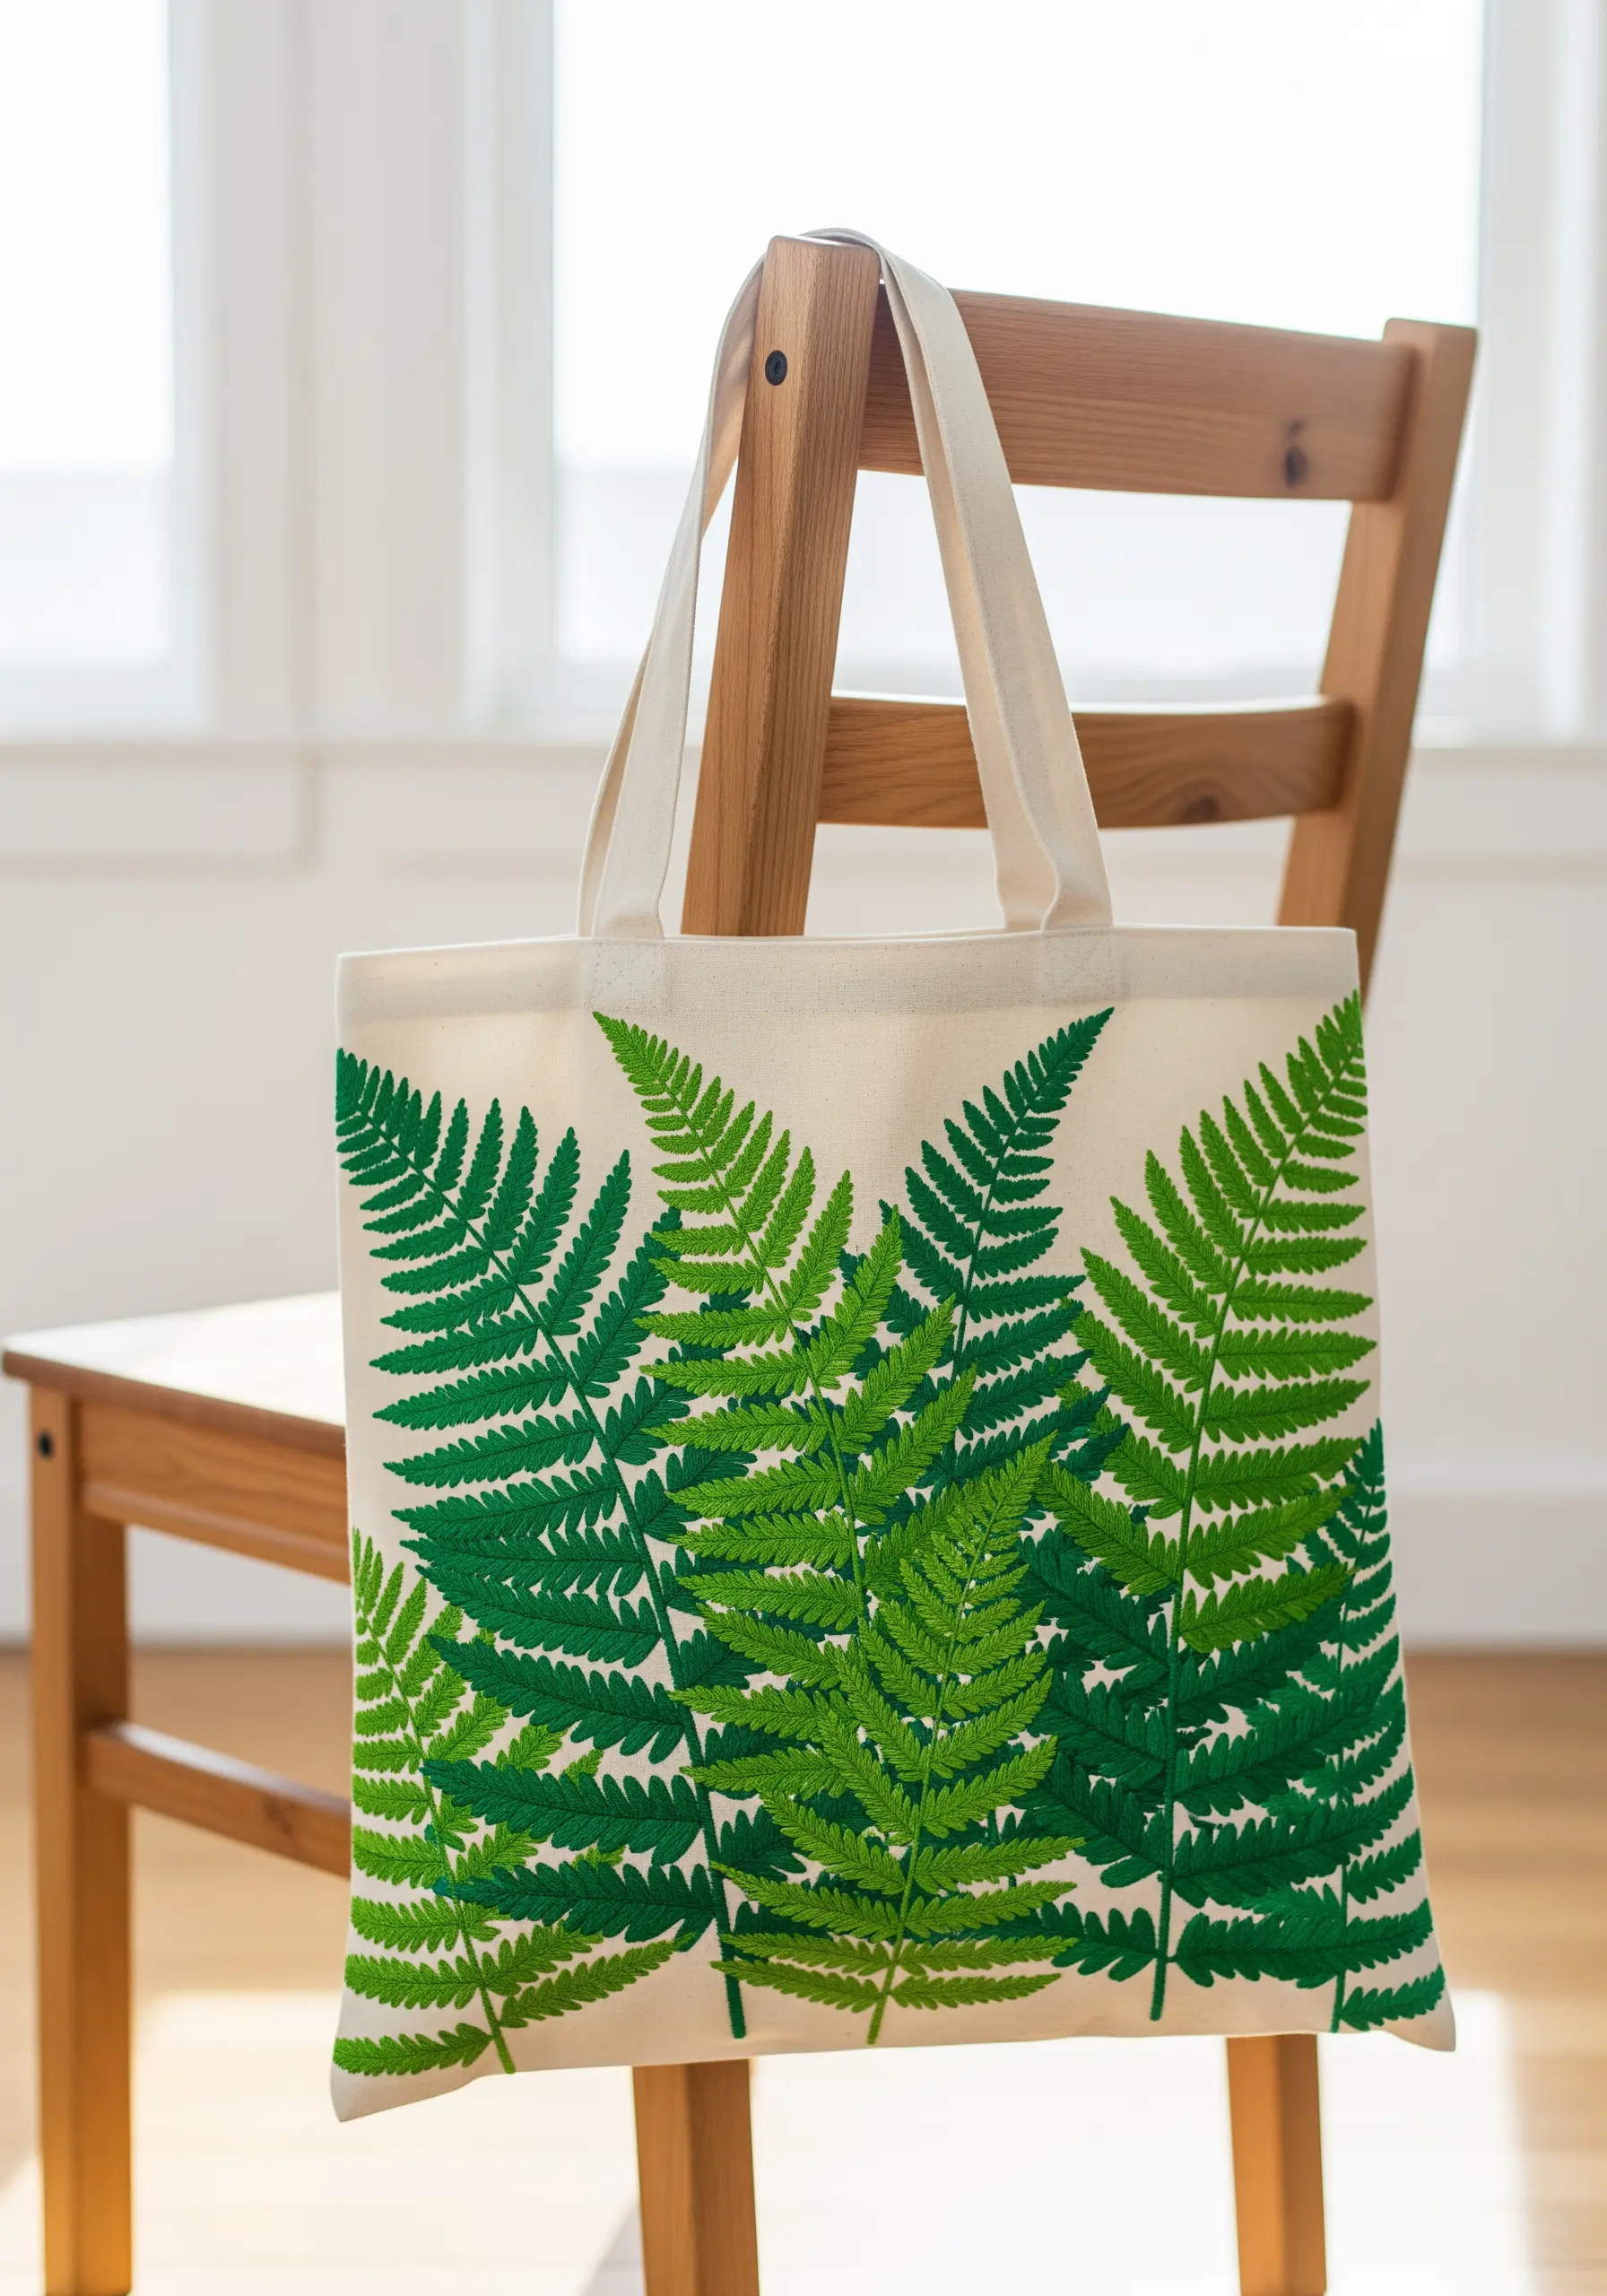
When embroidering large botanical motifs on items like tote bags, the fishbone stitch is your best friend.
This stitch is perfect for leaves, as it creates a central vein and fills the shape with smooth, angled stitches all in one motion.
Work with all six strands of your floss to fill the area quickly and create a bold, graphic statement that’s visible from a distance.
This technique makes botanical stitch art ideas both beautiful and efficient for larger surfaces.
17. Add Playful Detail with French Knots
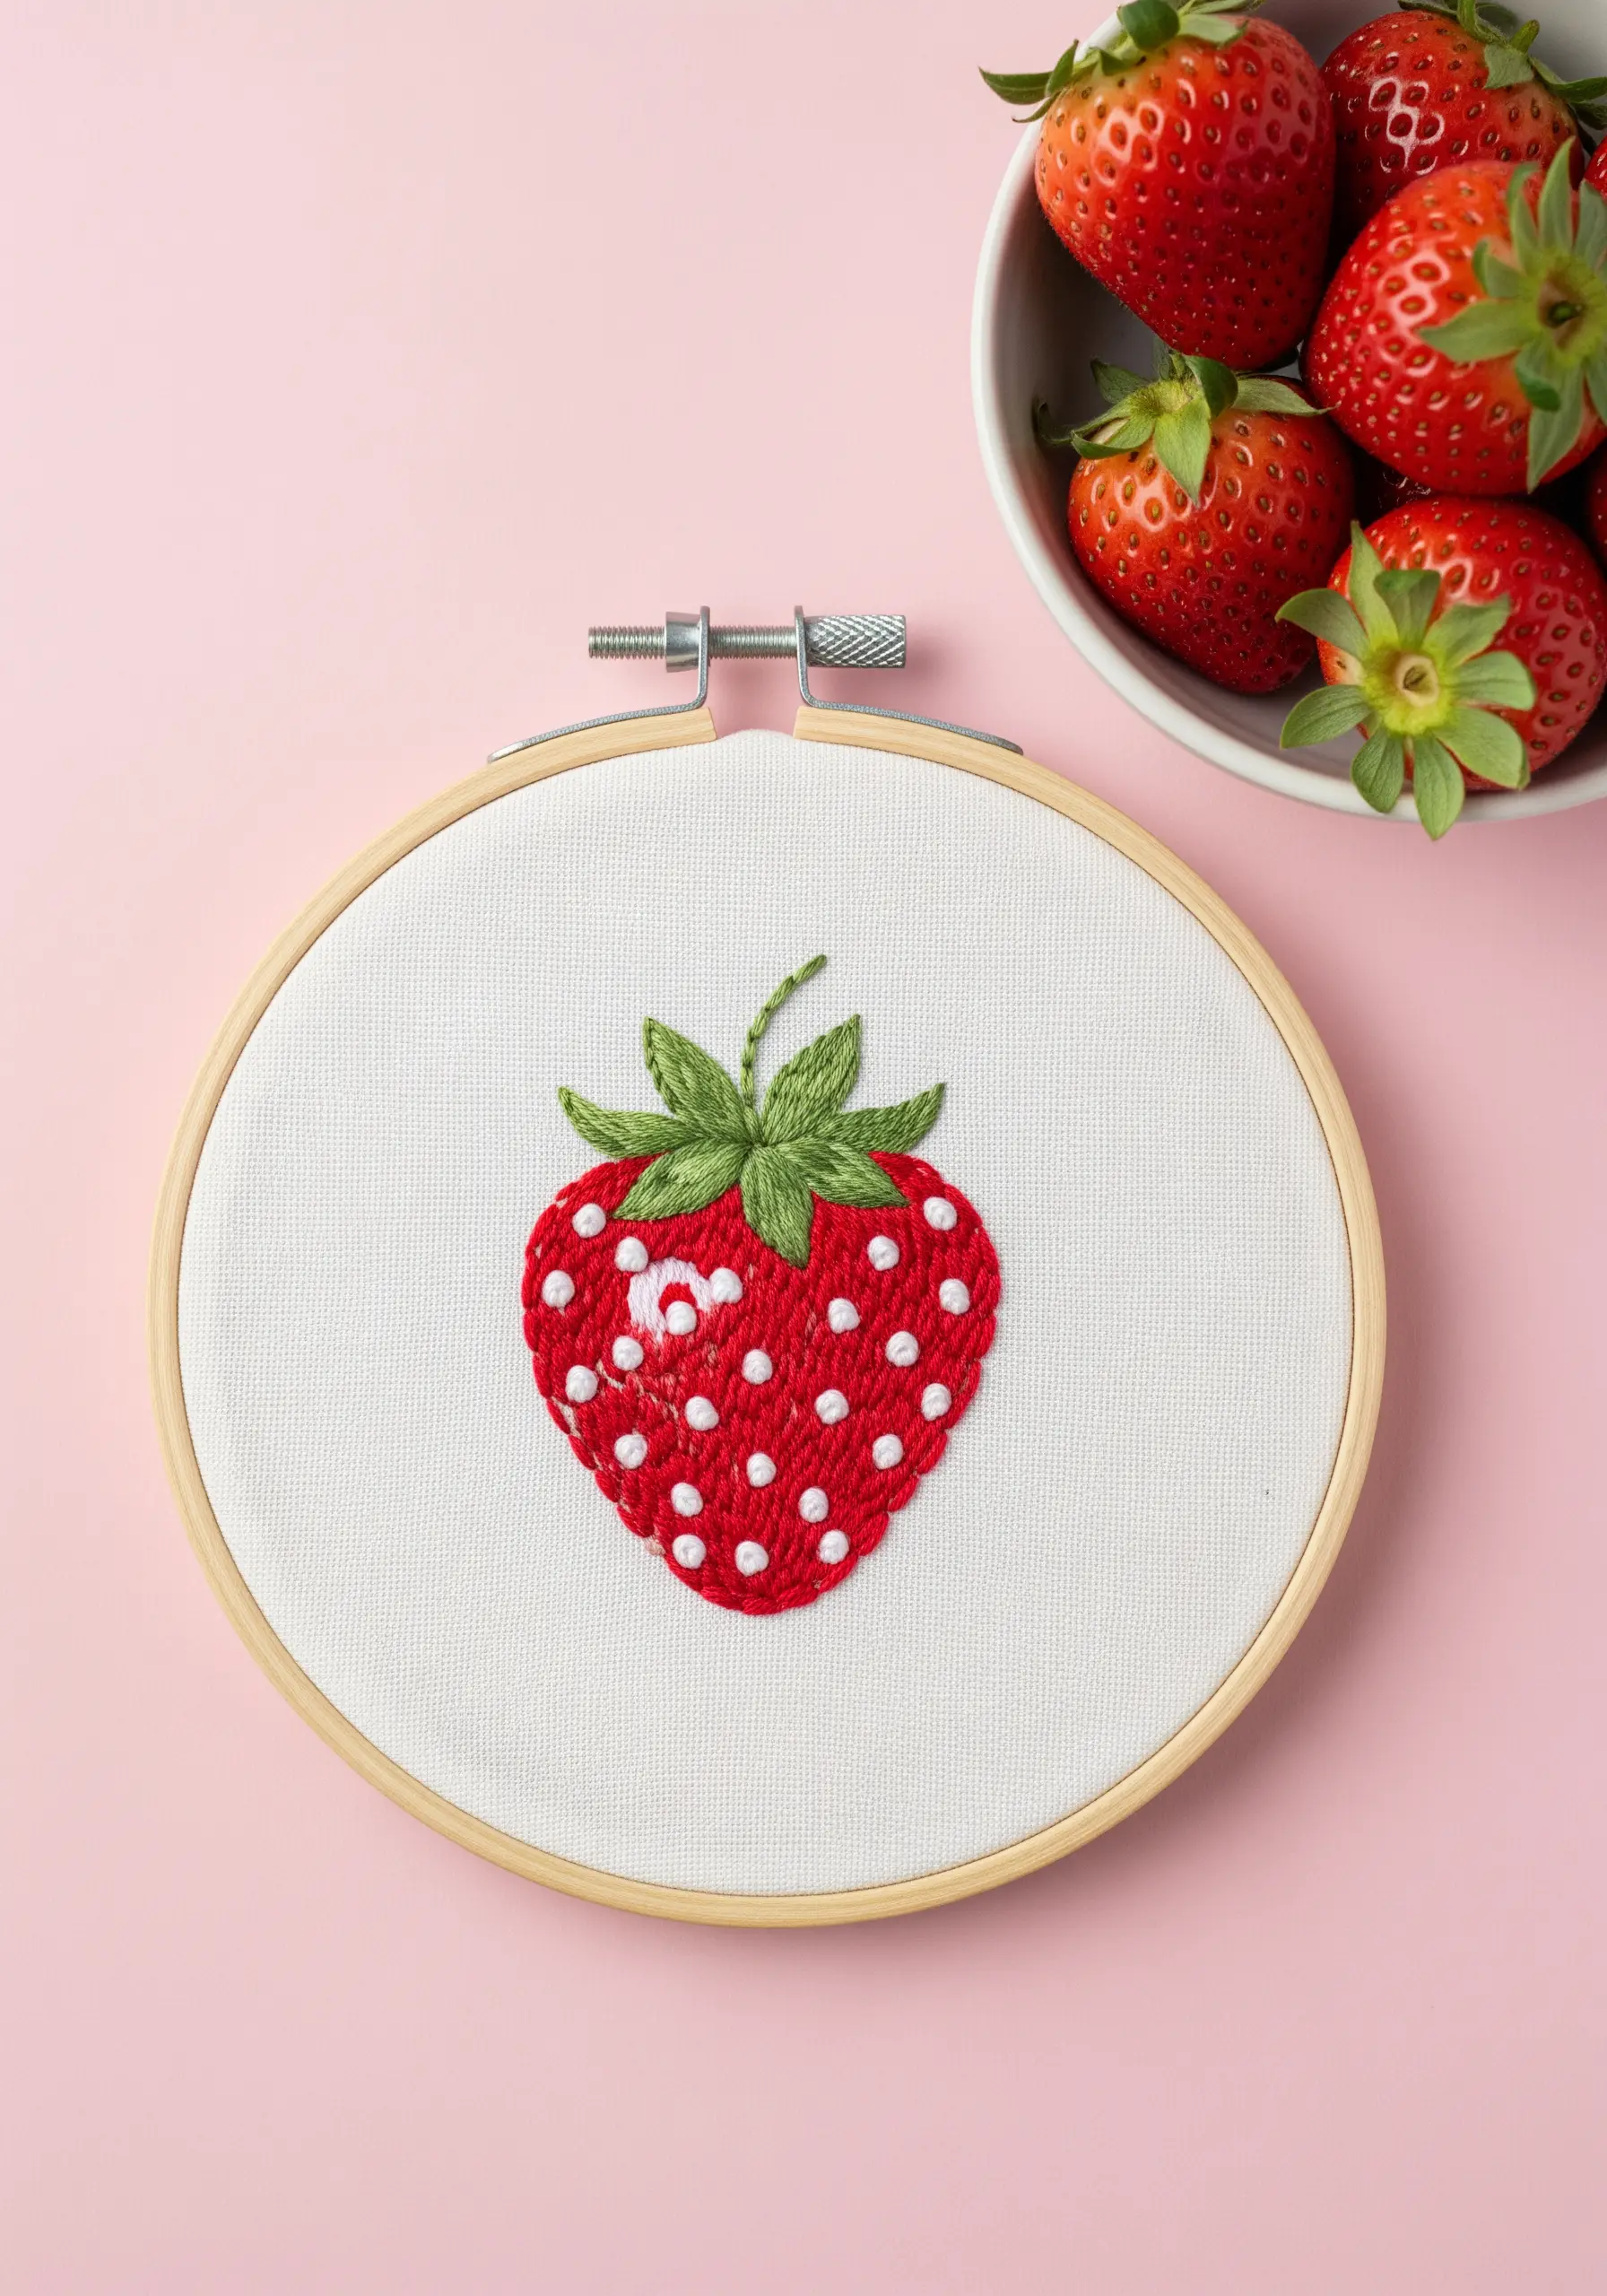
Elevate a simple fruit motif by focusing on small textural details. Fill the body of the strawberry with a smooth, glossy satin stitch in a vibrant red.
Instead of leaving the surface plain, add the seeds using tiny French knots in a contrasting color like white or pale yellow.
This simple addition does two things: it adds a fun, polka-dot pattern and gives the surface a subtle 3D texture that makes the design more engaging.
For the leaves, a fishbone or satin stitch will provide a nice contrast to the berry’s knotted texture.
18. Take Your Embroidery Beyond the Hoop
Display your work like fine art by stitching directly onto a stretched canvas. This gives your embroidery a clean, modern finish without a hoop frame.
To make stitching easier, pre-pierce your holes along the design lines using a sharp awl or a thick needle. This prevents your embroidery needle from bending or breaking.
Use simple, textural stitches like French knots for the flower heads and stem stitch for the stems. The raised texture of the stitches contrasts beautifully with the flat canvas surface.
This is one of the best ways to create modern framed embroidery designs that feel intentional and gallery-ready.
19. Combine Lettering and Texture for a Cozy Feel

Create a cozy, tactile design by pairing clean lettering with fluffy textures. For the words, use a two-strand backstitch or whipped backstitch for crisp, readable text.
To mimic the whipped cream, fill the area with a dense cluster of white French knots. Using a slightly thicker thread, like pearl cotton, will make the knots even more voluminous.
For the mug, a simple brick stitch fill gives the impression of a ceramic surface without competing with the other textures.
This thoughtful combination of stitches adds a warm, inviting quality perfect for seasonal themes.
20. Paint a Sunset with Thread Gradients
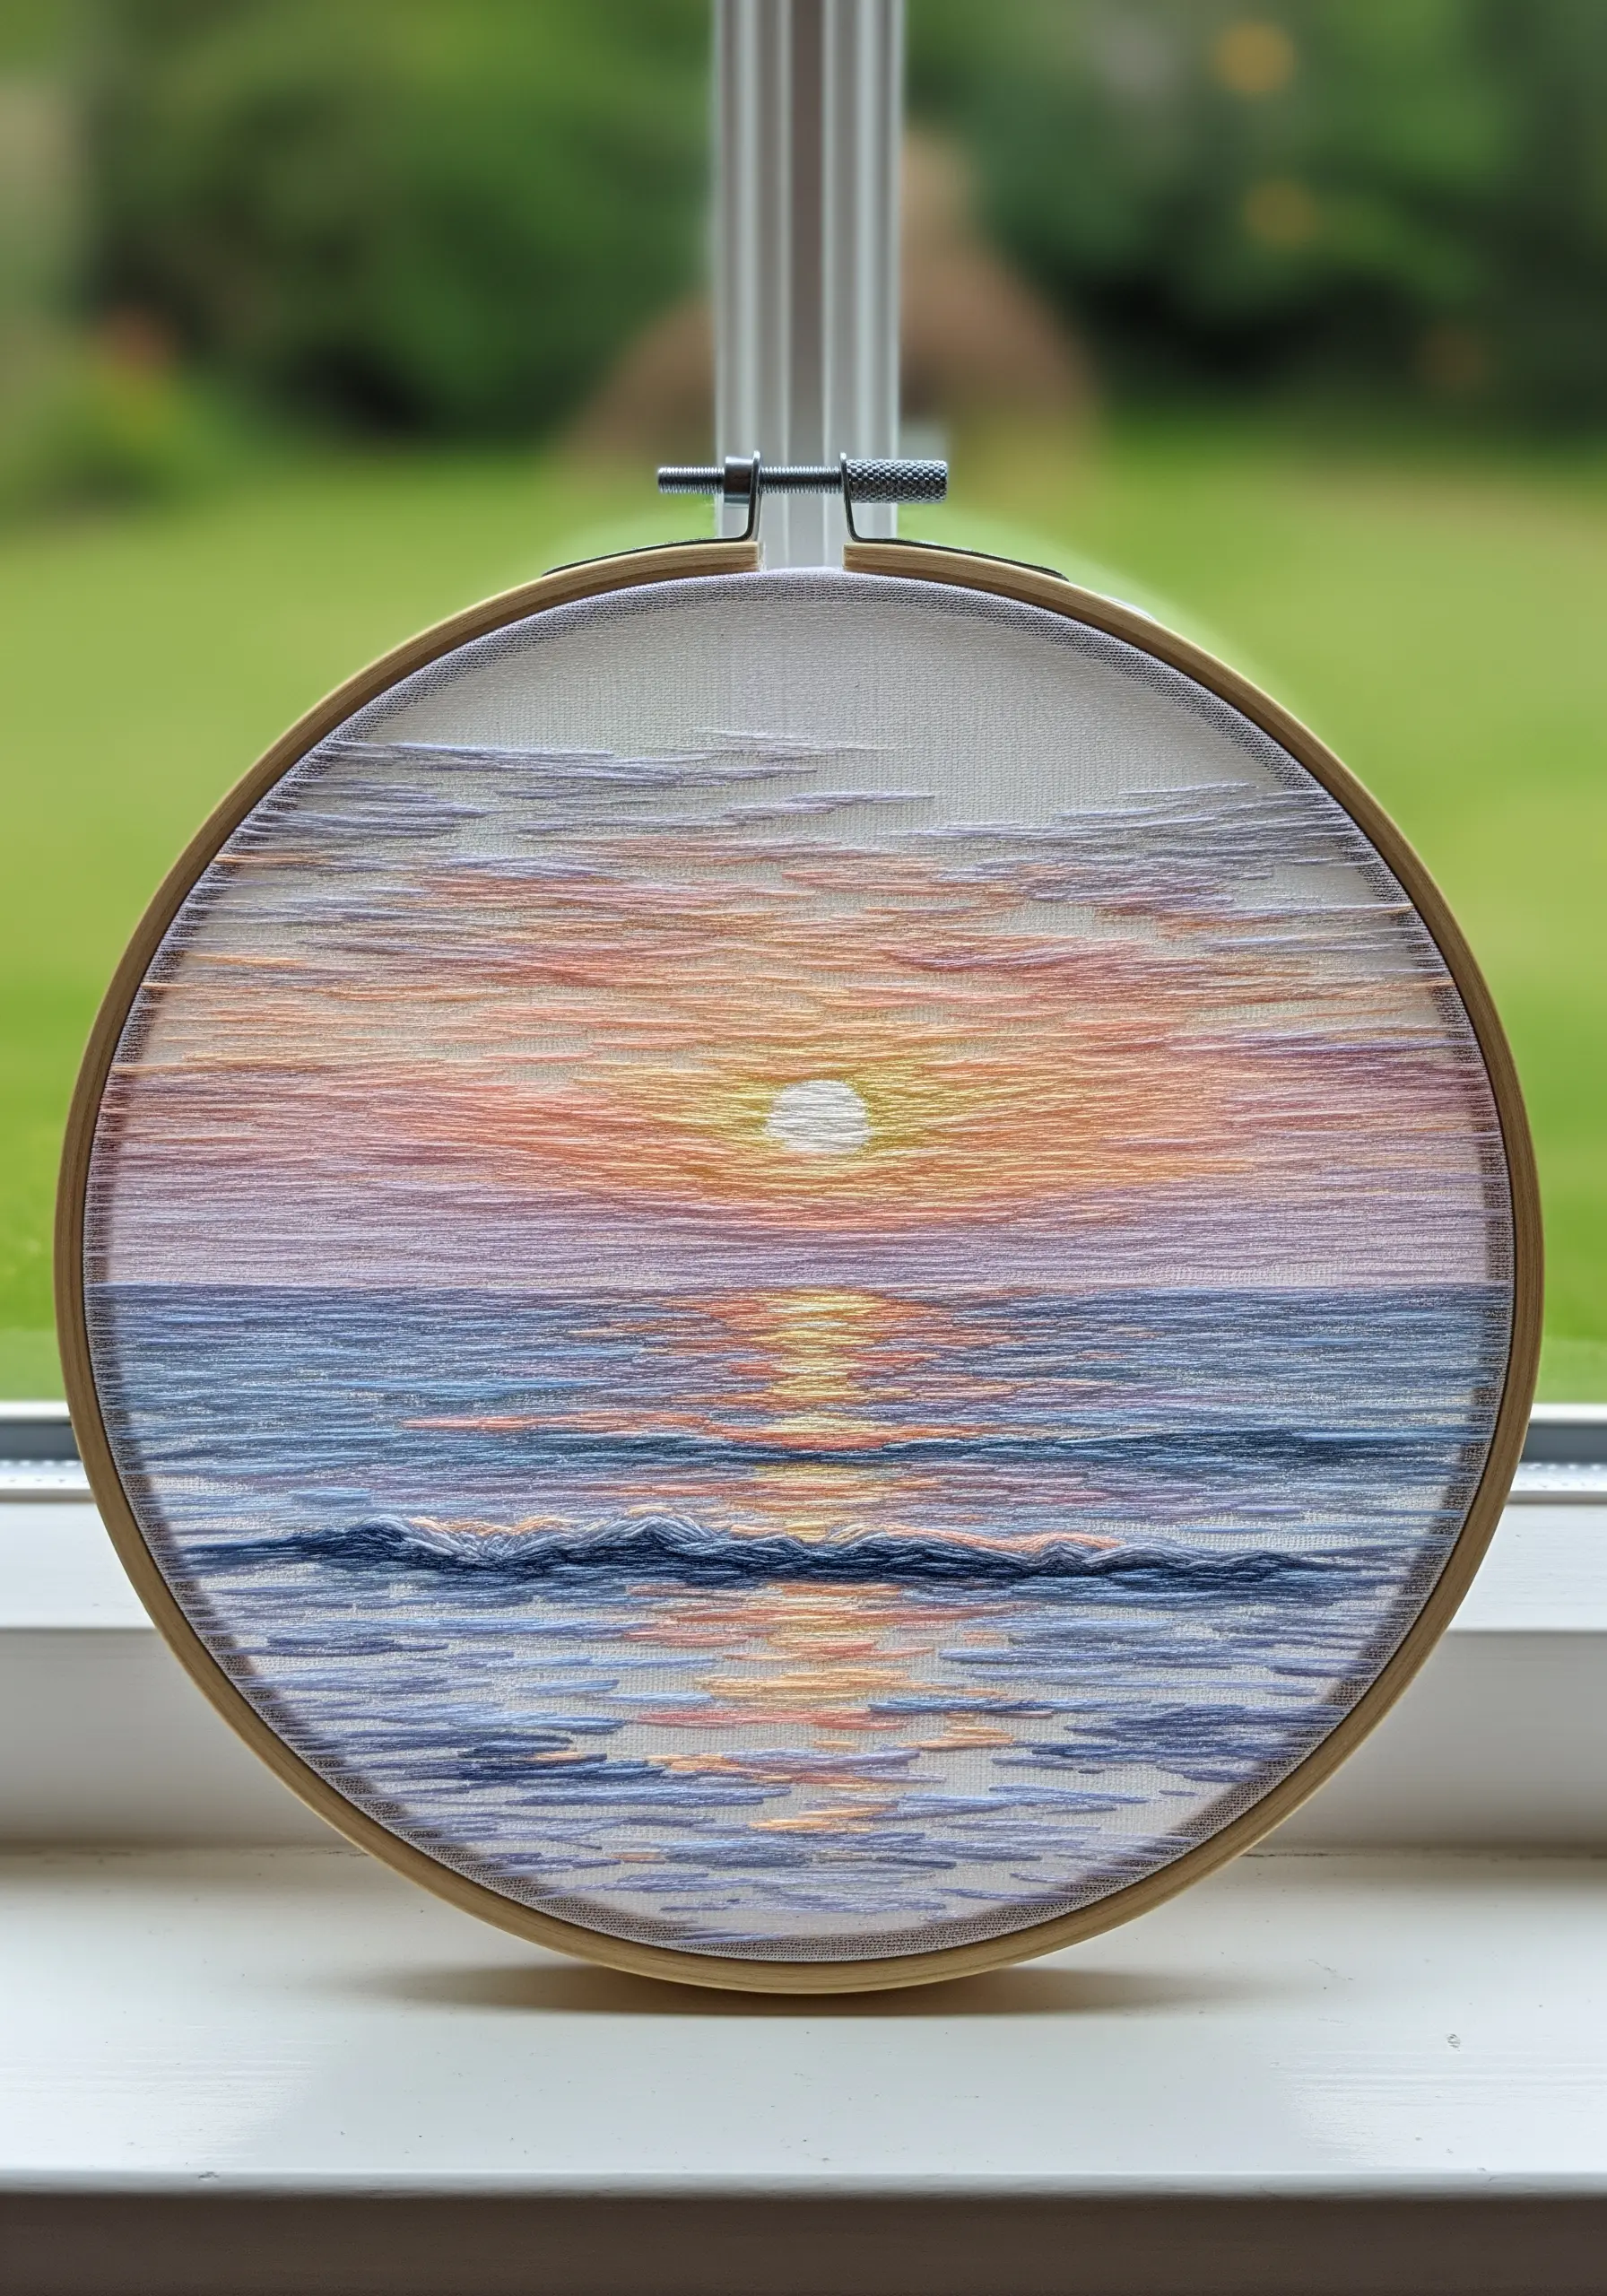
Capture the soft, blended colors of a sunset using single strands of floss and long, horizontal straight stitches.
Lay your stitches down like brushstrokes, overlapping different colors—pinks, oranges, yellows, and purples—to create a seamless gradient.
For the water’s reflection, mirror the colors of the sky but add a few wavy lines of dark blue or white thread to suggest movement.
This thread painting technique transforms your fabric into a canvas, allowing you to create beautiful ombre gradient embroidery wall hangings.
21. Use Shading to Add Dimension to Motifs

Make your embroidered mushrooms look three-dimensional with strategic shading. Use long-and-short stitch to fill the caps and stems.
Underneath the cap of each mushroom, use a darker shade of the main color to create a realistic shadow. This small detail instantly makes the mushroom feel rounded and solid.
For the iconic white spots on the red toadstool, use small, neat satin stitches or single French knots for a slightly raised effect.
This careful use of light and shadow is what gives simple motifs a charming, storybook quality.
22. Turn a Repair into a Statement Piece
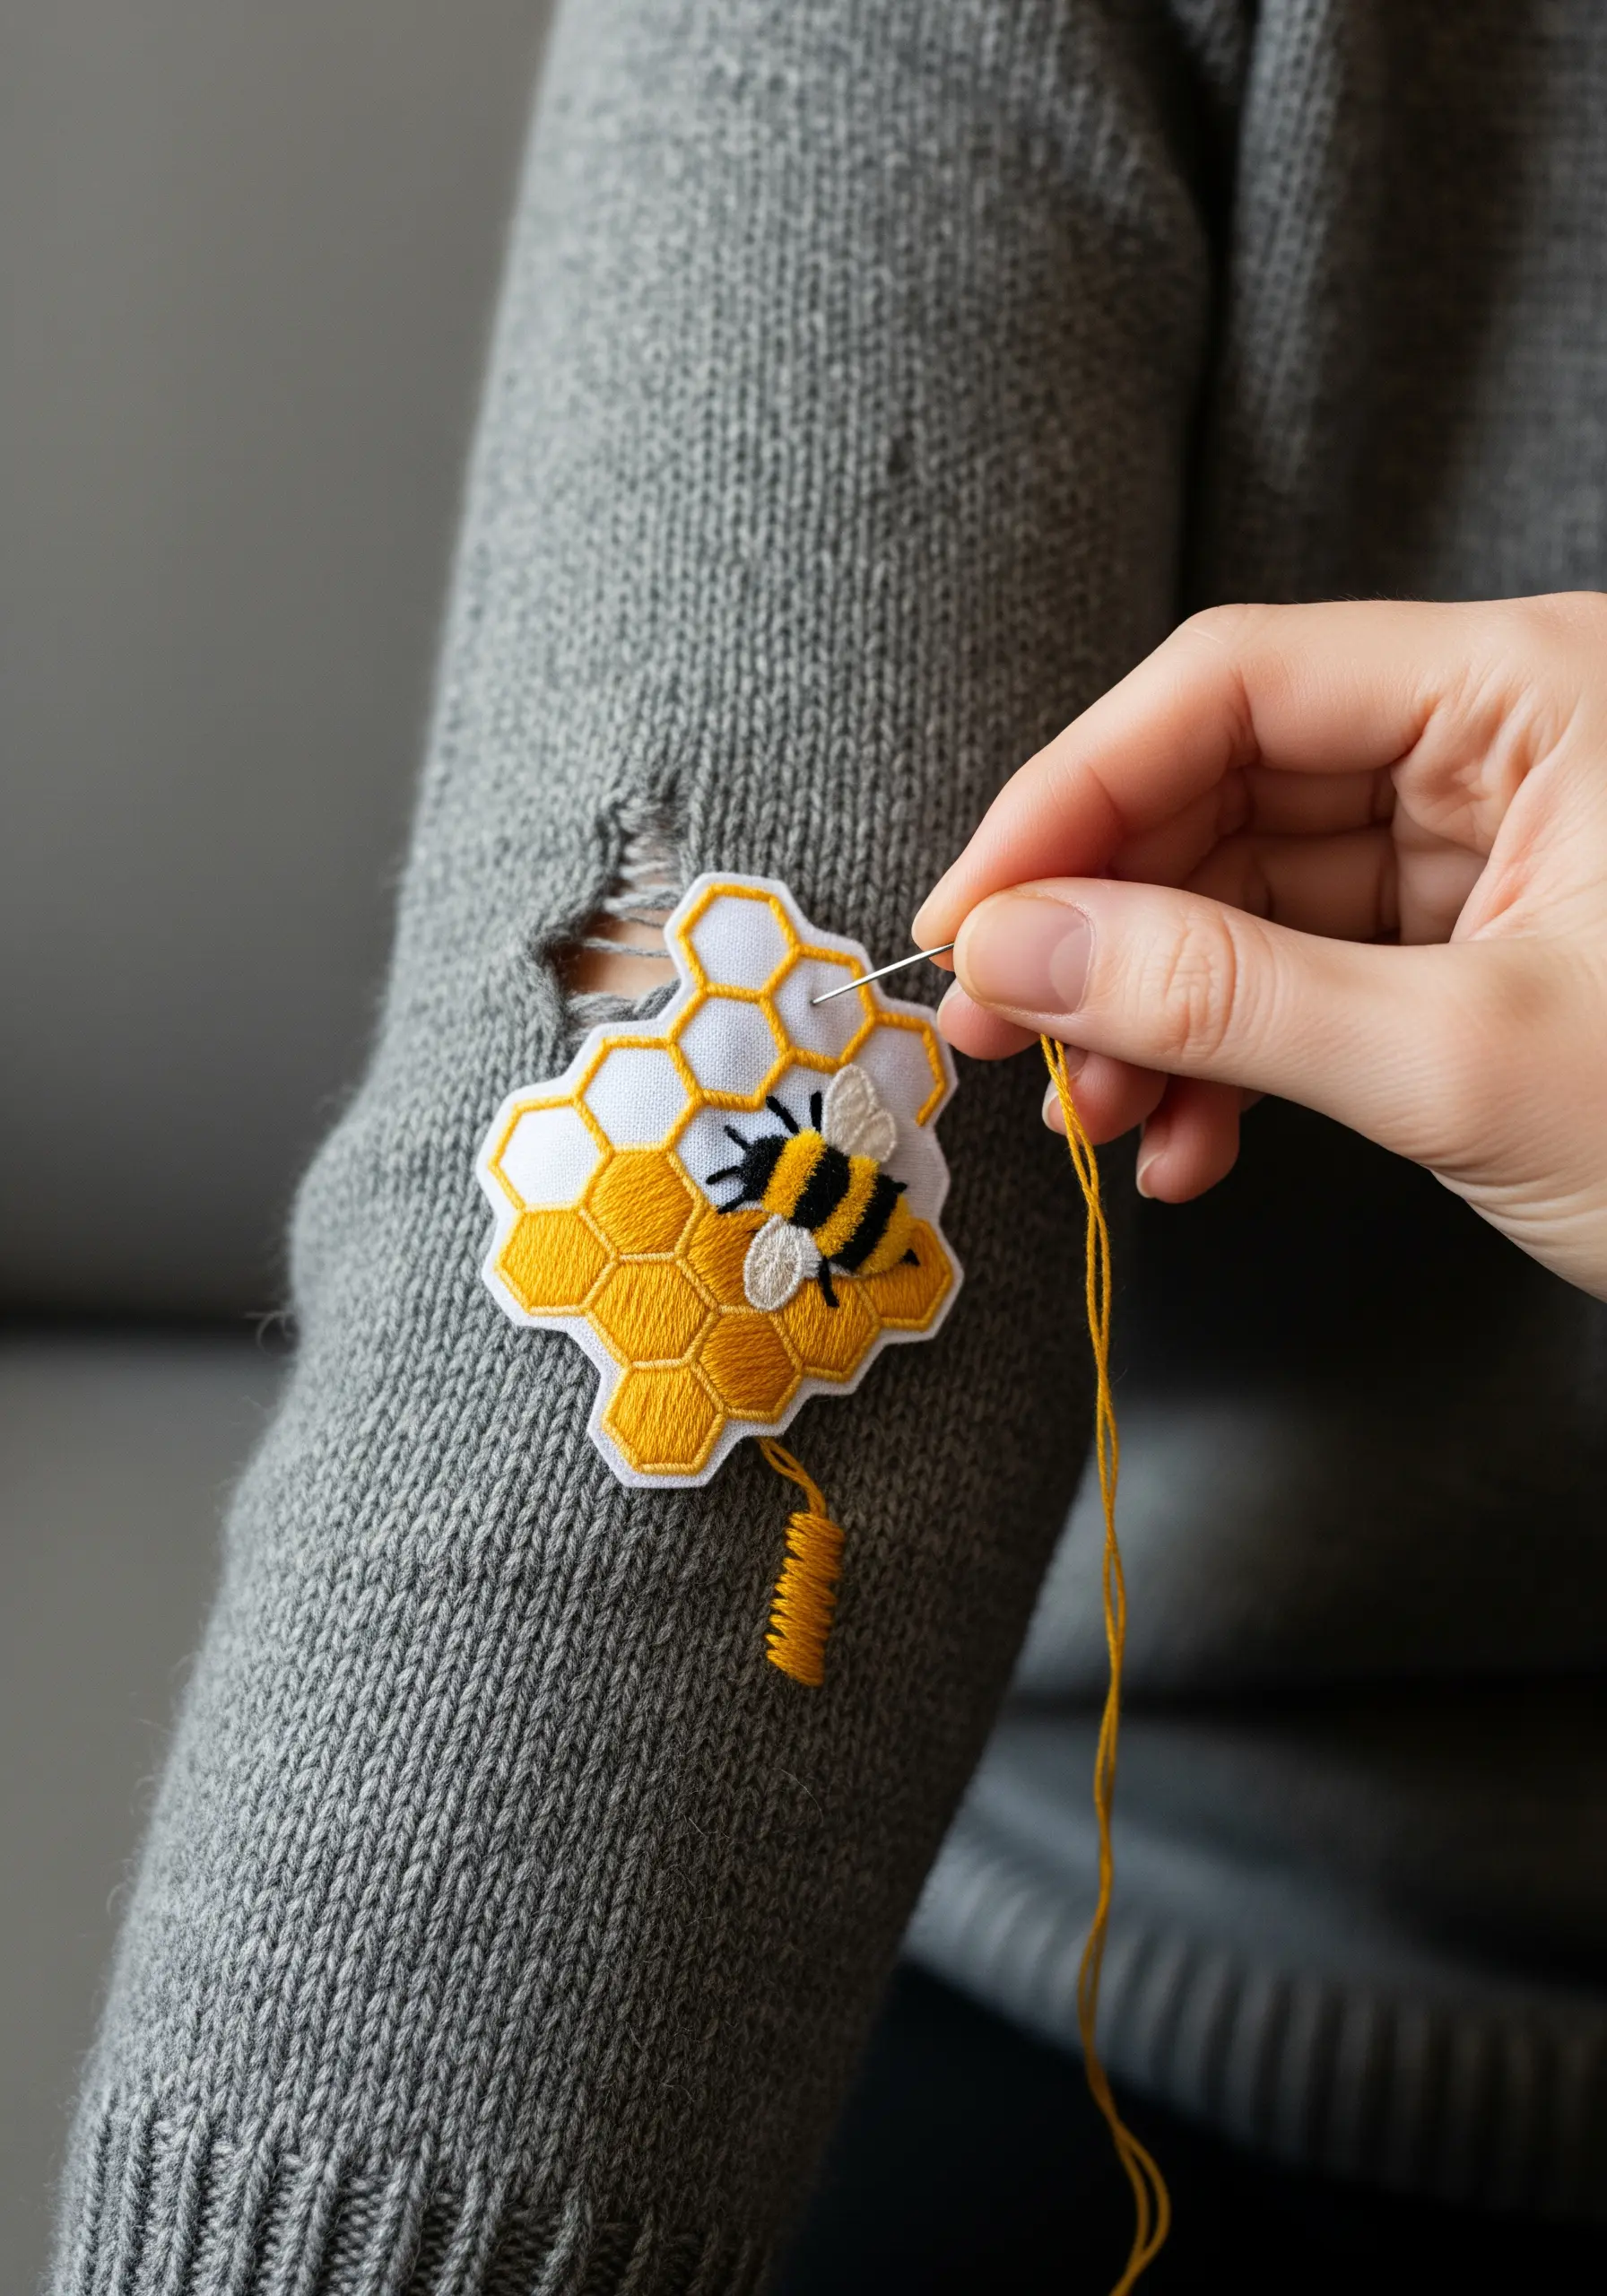
Embrace visible mending by covering a hole with a decorative embroidered patch. This technique turns a flaw into a beautiful, intentional feature.
Create your design on a separate piece of sturdy fabric or felt first. Fill the honeycomb shapes with a neat satin stitch, outlining them first with a backstitch for clean edges.
Once your patch is complete, carefully trim the excess fabric and appliqué it over the damaged area of your sweater using a tidy whipstitch.
This is a wonderfully creative way to extend the life of your favorite garments.
23. Create Movement with Layered Straight Stitches
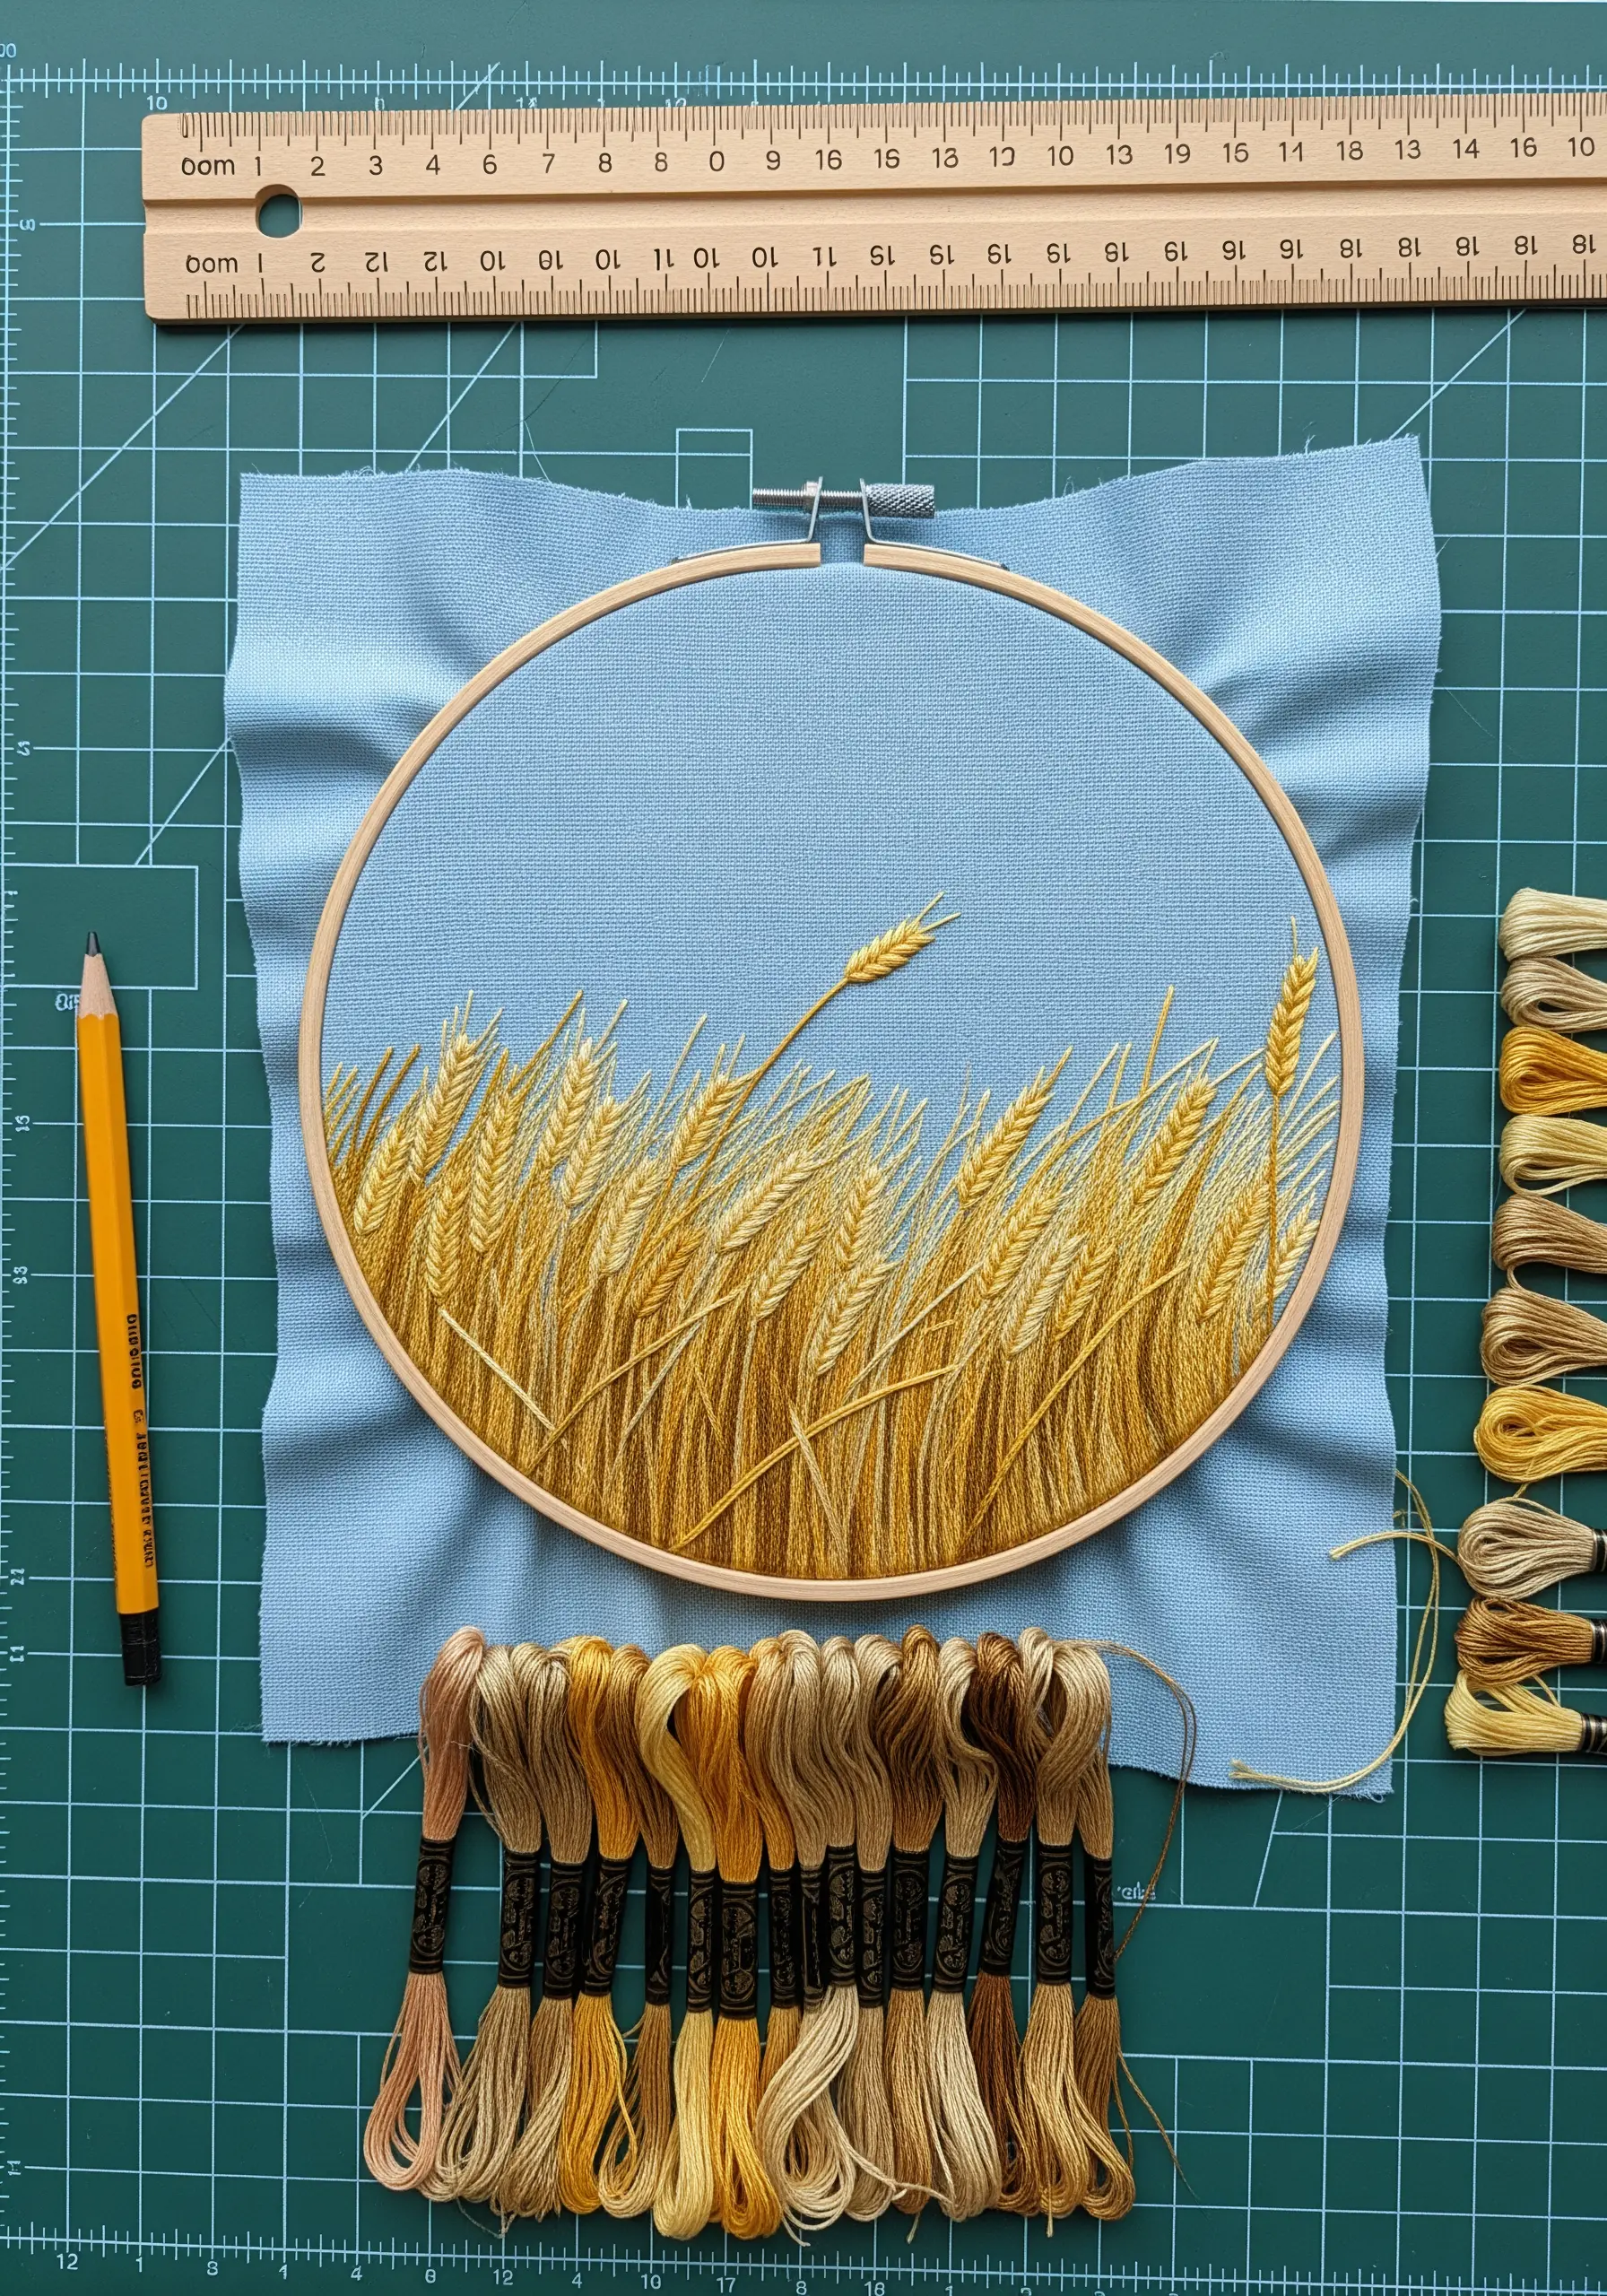
To depict a field of wheat swaying in the breeze, rely on layered straight stitches and a thoughtful color palette.
Use various shades of gold, ochre, and pale yellow to create depth. Place darker tones in the background and brighter, lighter tones in the foreground.
Vary the length and angle of your straight stitches to mimic the natural, chaotic movement of the wheat stalks.
Leaving a bit of the background fabric showing through prevents the design from feeling too dense and adds to the airy, windswept atmosphere.


