
Embroidery is more than just a pastime; it’s a way to slow down and create something of quiet beauty with your own hands. But sometimes, you might feel that your stitches, while neat, are missing a certain spark or artistic voice.
The secret to elevating your work isn’t about mastering hundreds of complex stitches. Instead, it’s about learning to make thoughtful choices—adjusting thread weight to create emphasis, using stitch direction to mimic light, or combining textures to tell a richer story. It’s in these small, intentional decisions that true artistry is born.
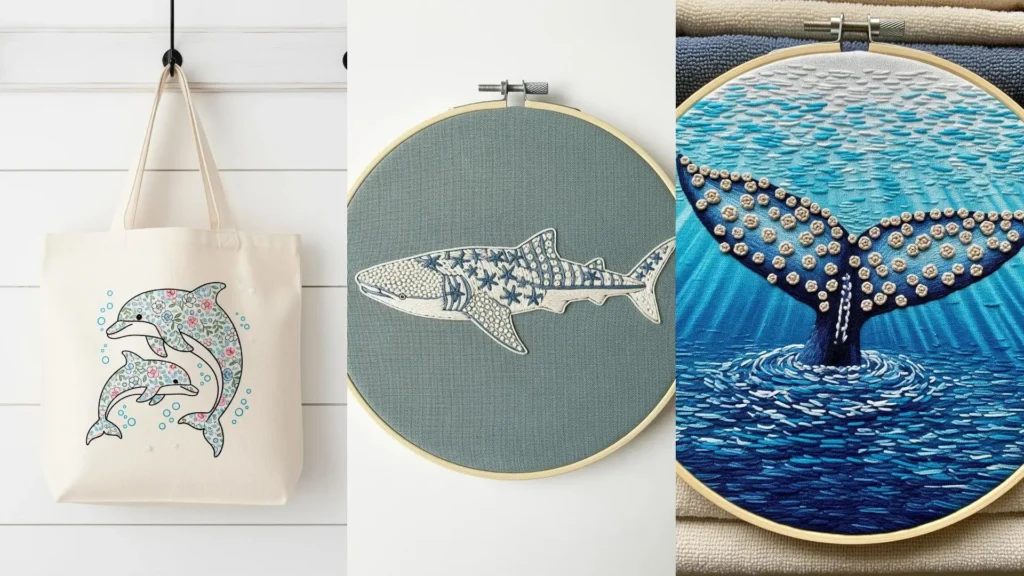
Let these serene whale and dolphin patterns be your guide. Use them as a starting point to explore how a simple change in technique can transform a flat outline into a dynamic scene, or how a surprising color palette can evoke the calm, deep magic of the ocean. You already have the skill; now it’s time to stitch with confidence and intention.
1. Weave a Botanical Whale Silhouette
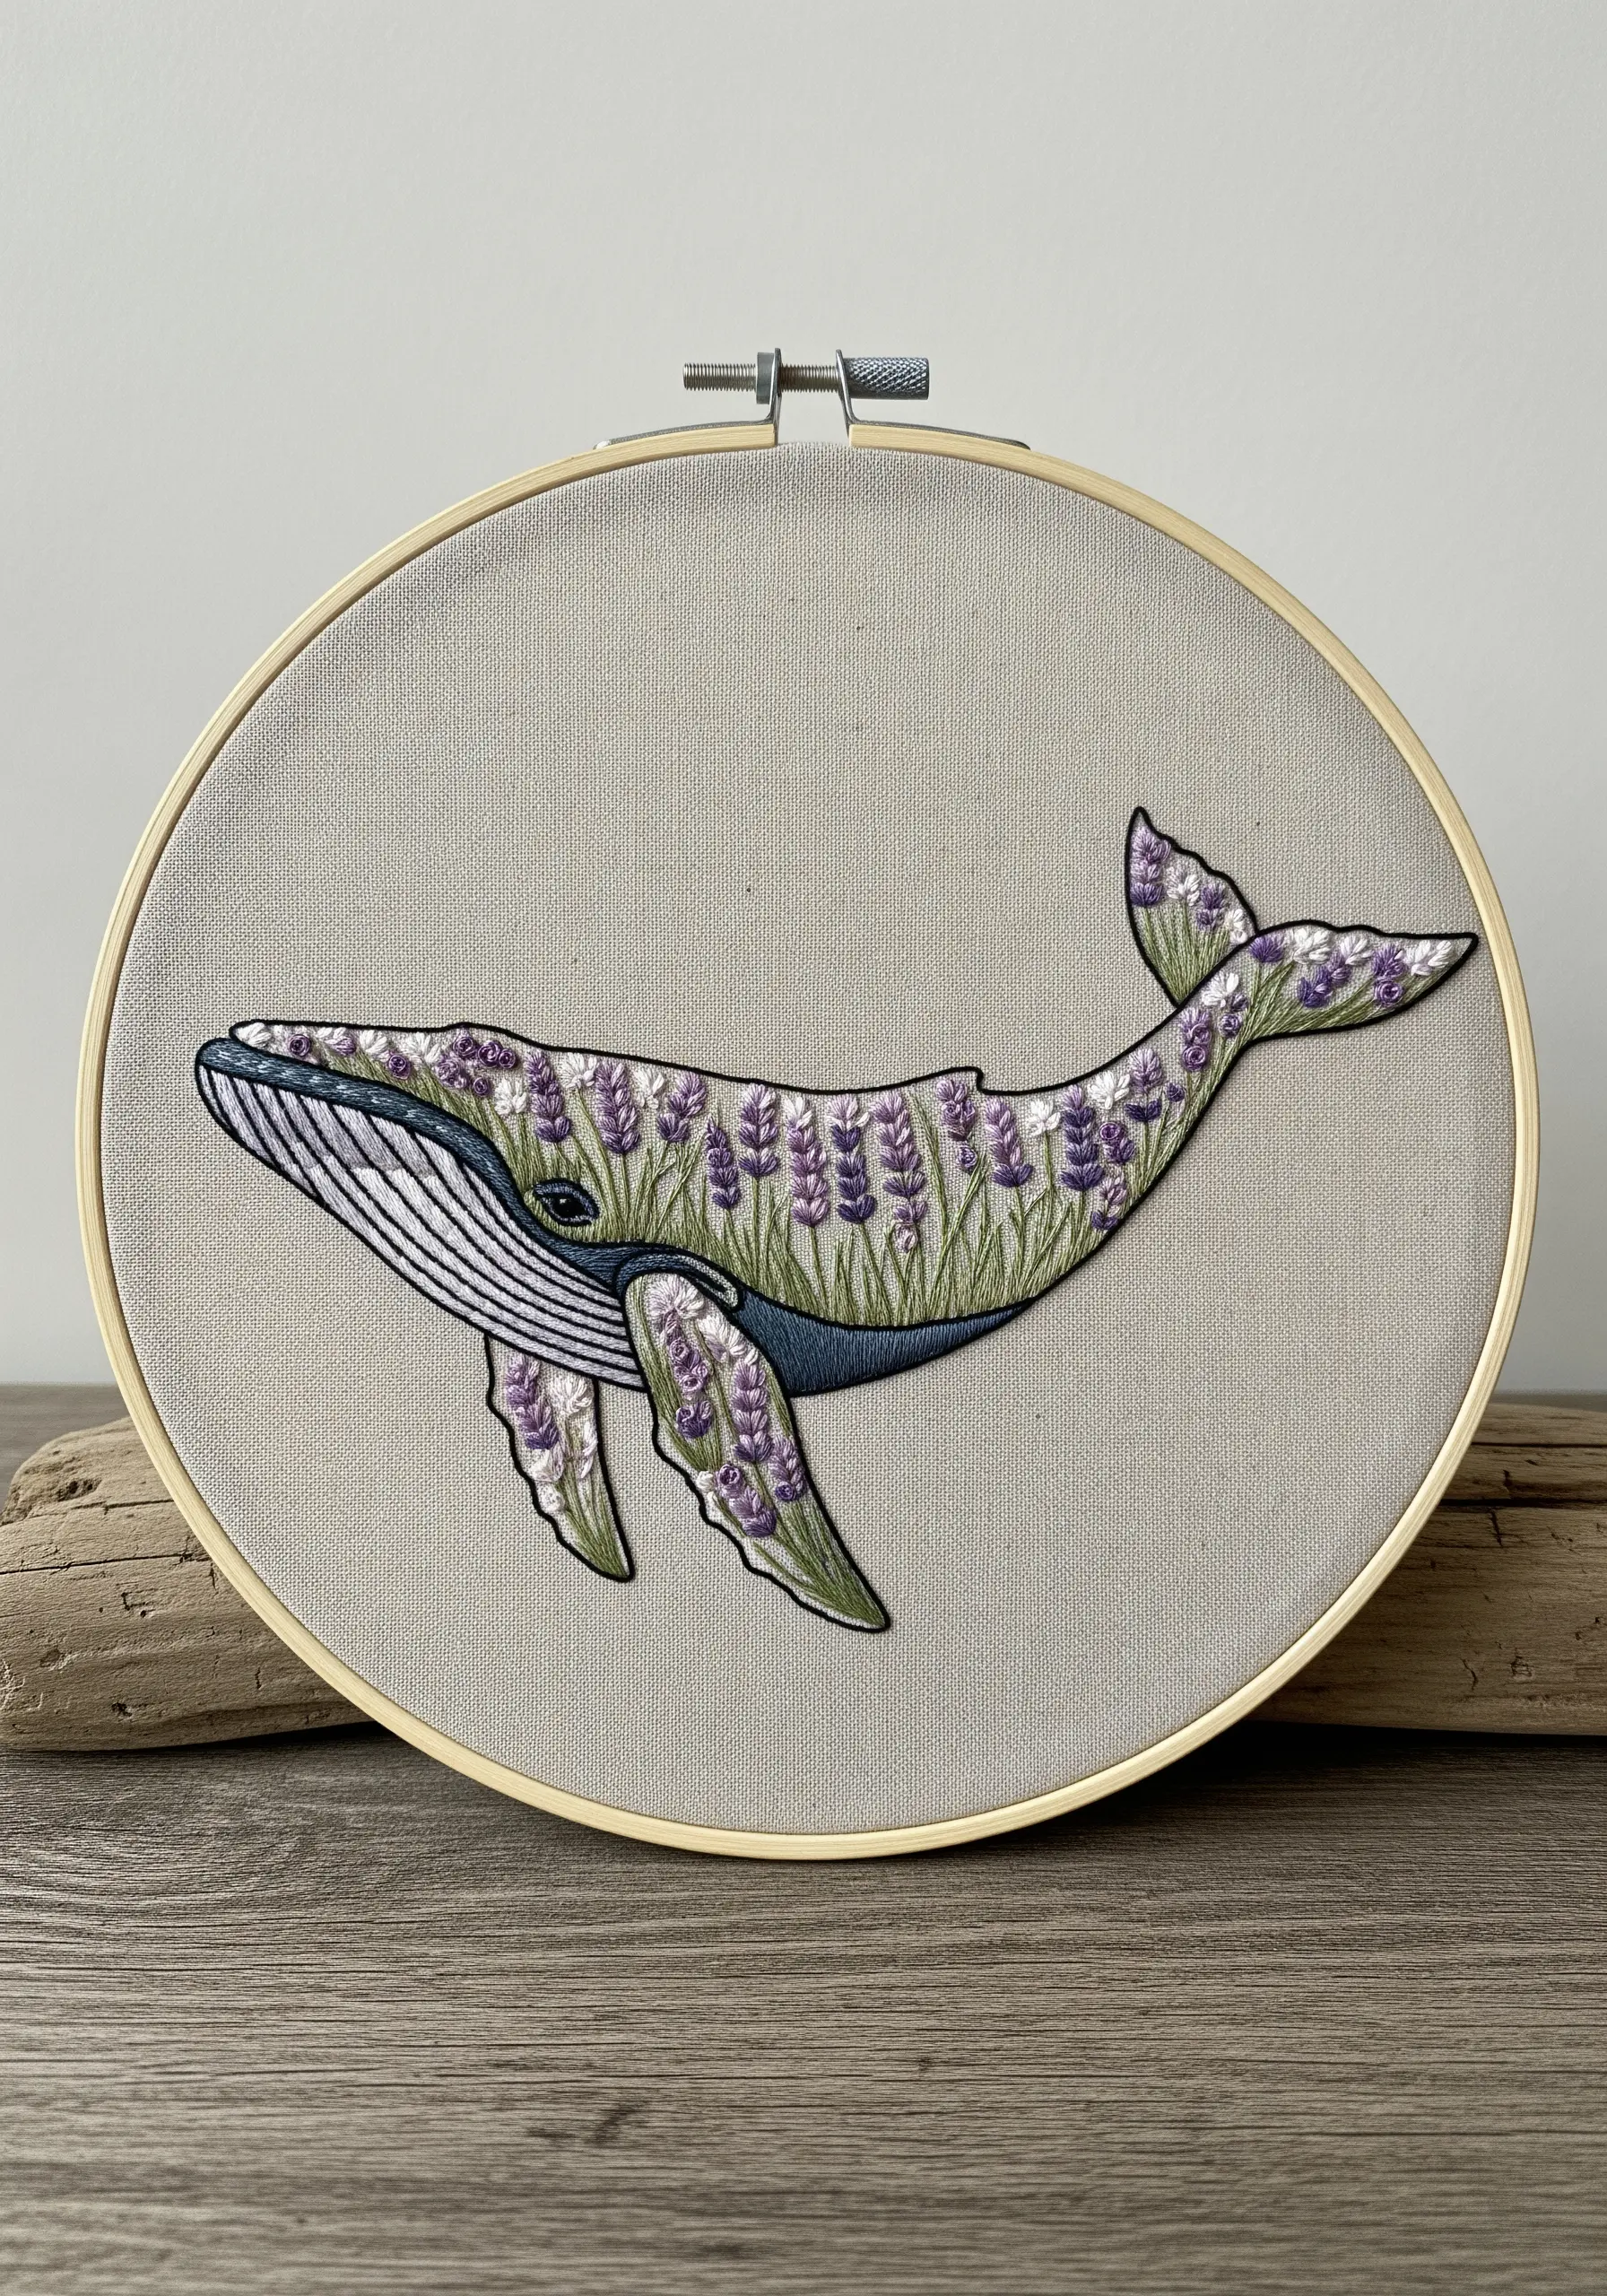
Instead of a solid fill, transform your whale’s body into a miniature meadow.
First, outline the entire shape with a sharp split stitch using two strands of dark thread for definition.
Fill the body with vertical straight stitches in green tones to create stems, then add clusters of French knots and lazy daisy stitches for the lavender blossoms.
For the whale’s underside, use tightly packed satin stitches that follow the curve, creating a clean contrast with the organic texture of the florals.
This juxtaposition of structured lines and free-form botanicals is what gives the piece its modern, surrealist charm.
2. Master the Minimalist Line for Home Décor
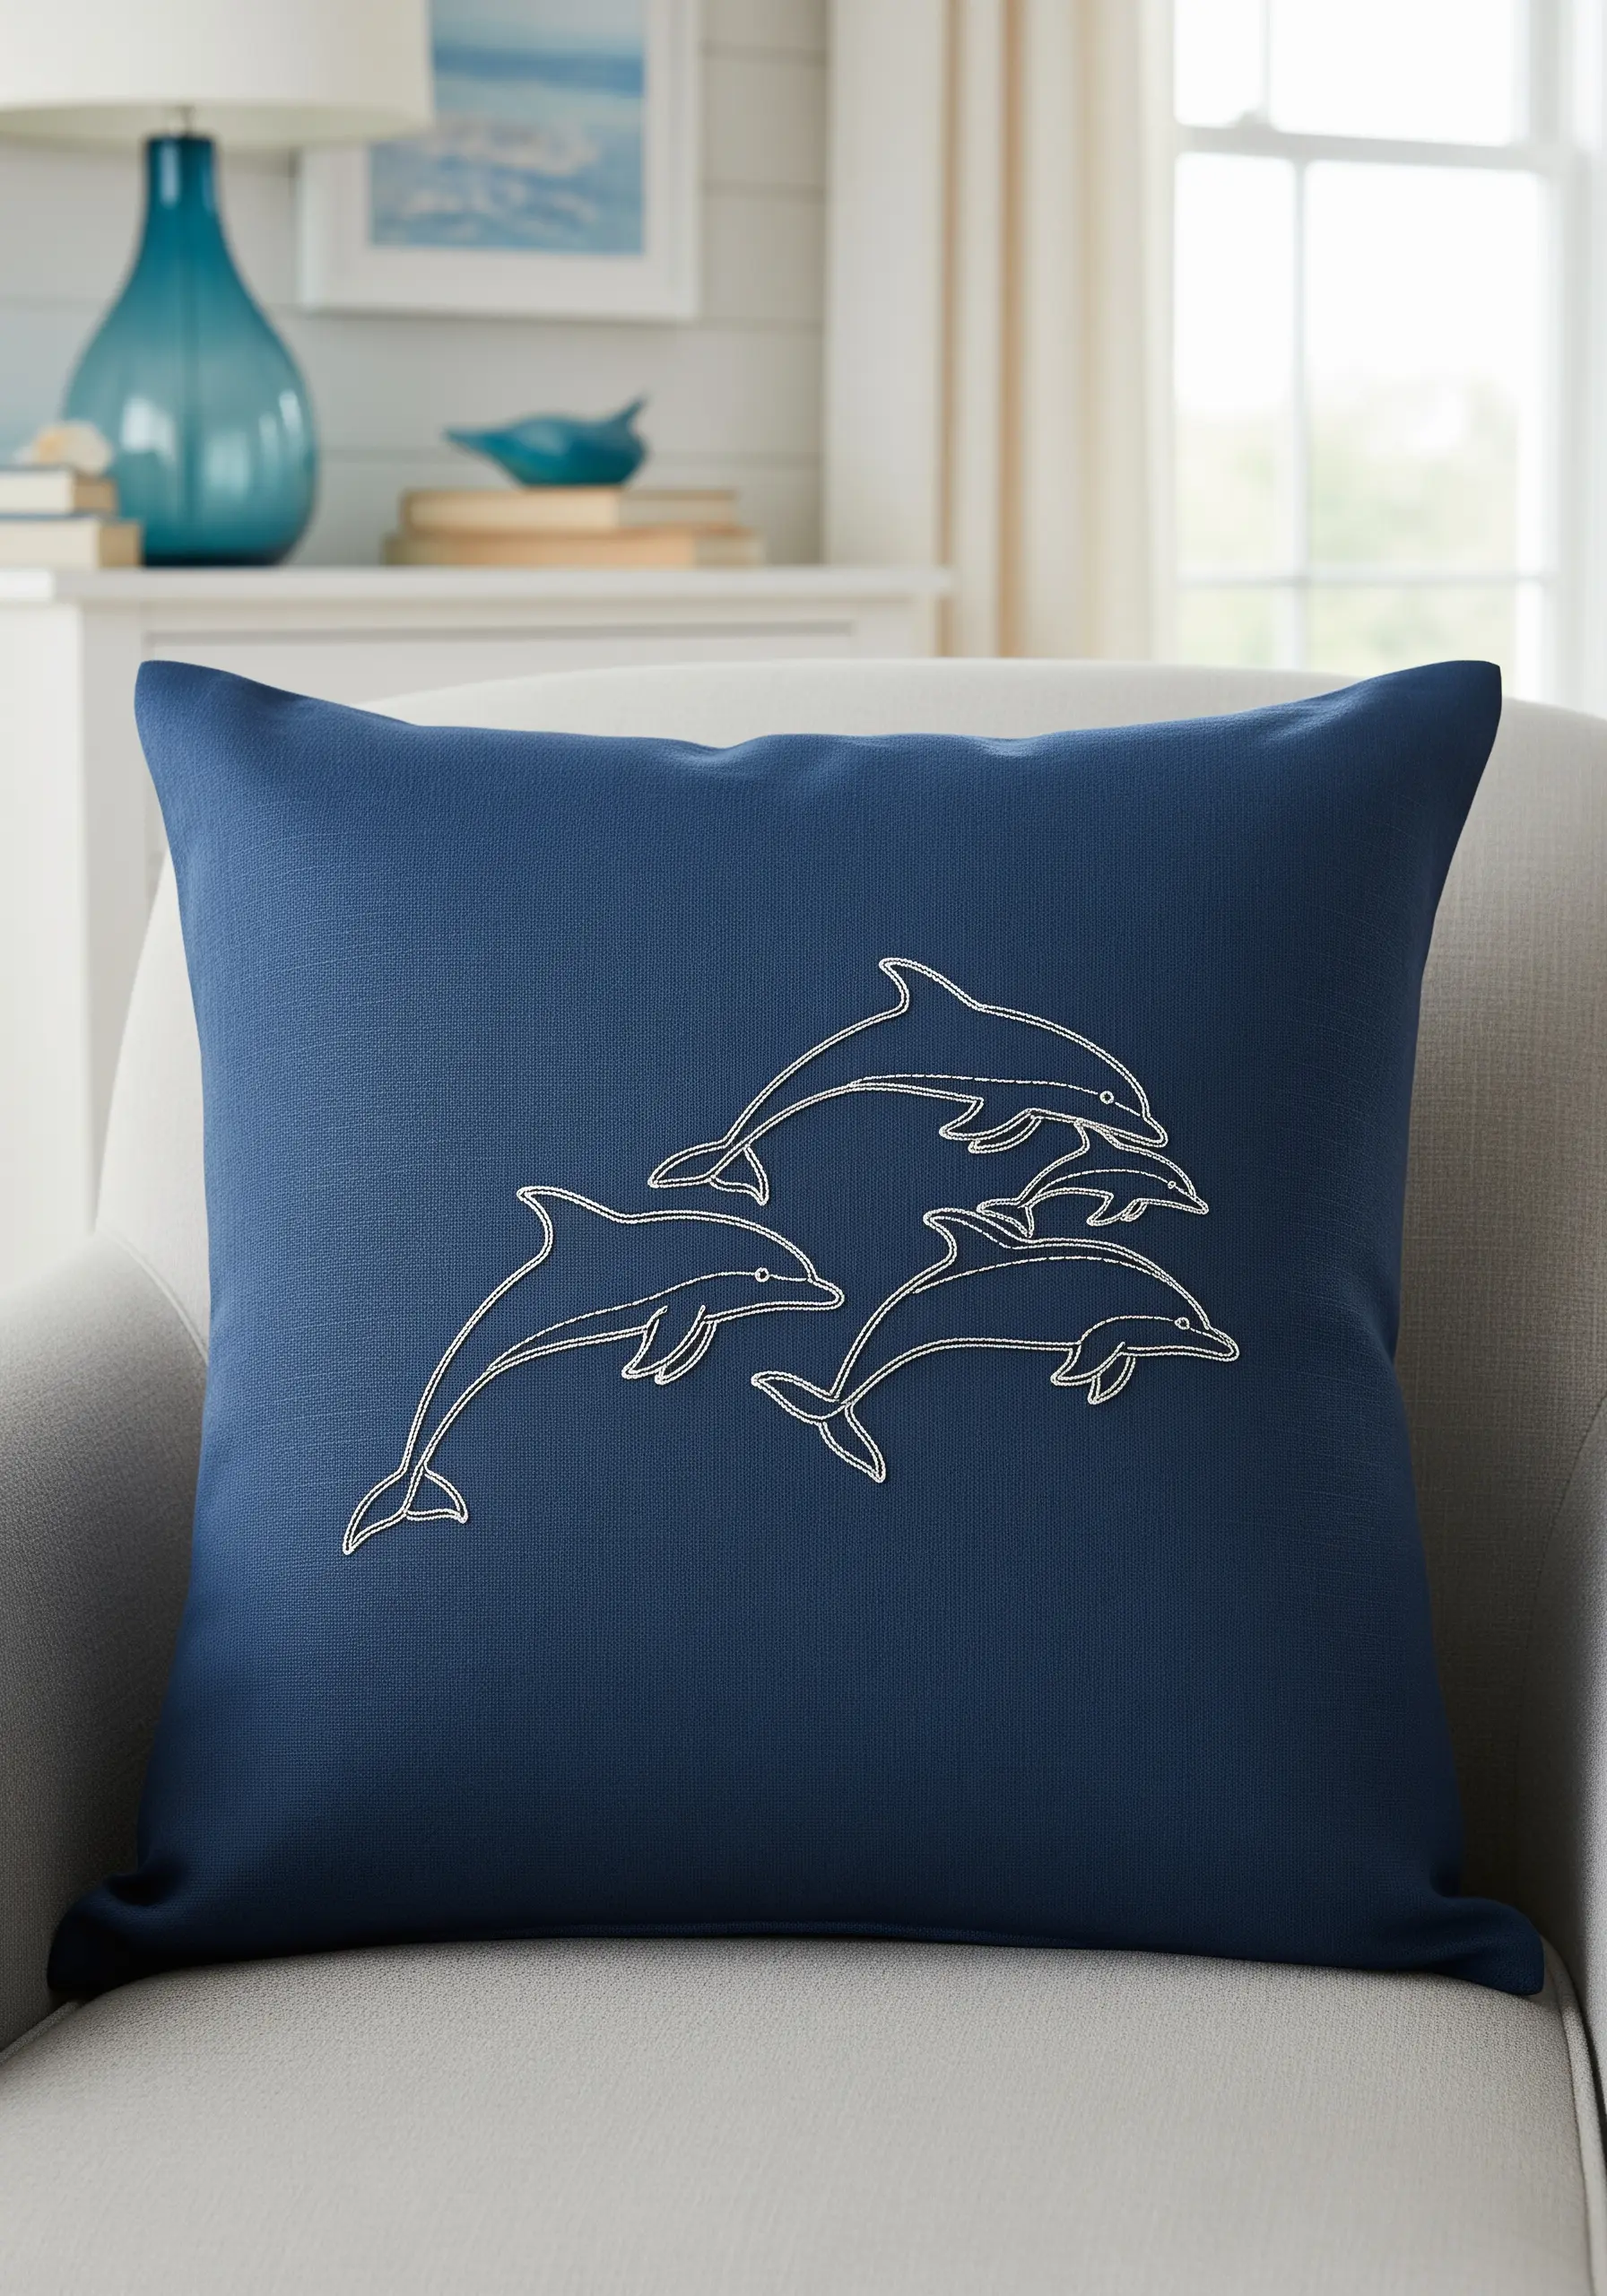
To achieve a clean, graphic look on heavier fabrics like cushion covers, elevate your backstitch into a whipped backstitch.
First, complete the entire outline using a standard backstitch, keeping your stitch length consistent.
Then, without piercing the fabric, slide your needle under each backstitch, wrapping the thread around the outline to create a smooth, cord-like effect.
Using a slightly heavier thread, like a Pearl Cotton No. 8, gives the line just enough weight to stand out against the textile’s weave, resulting in a polished, professional finish.
3. Create Dynamic Sea Spray with Dimensional Knots
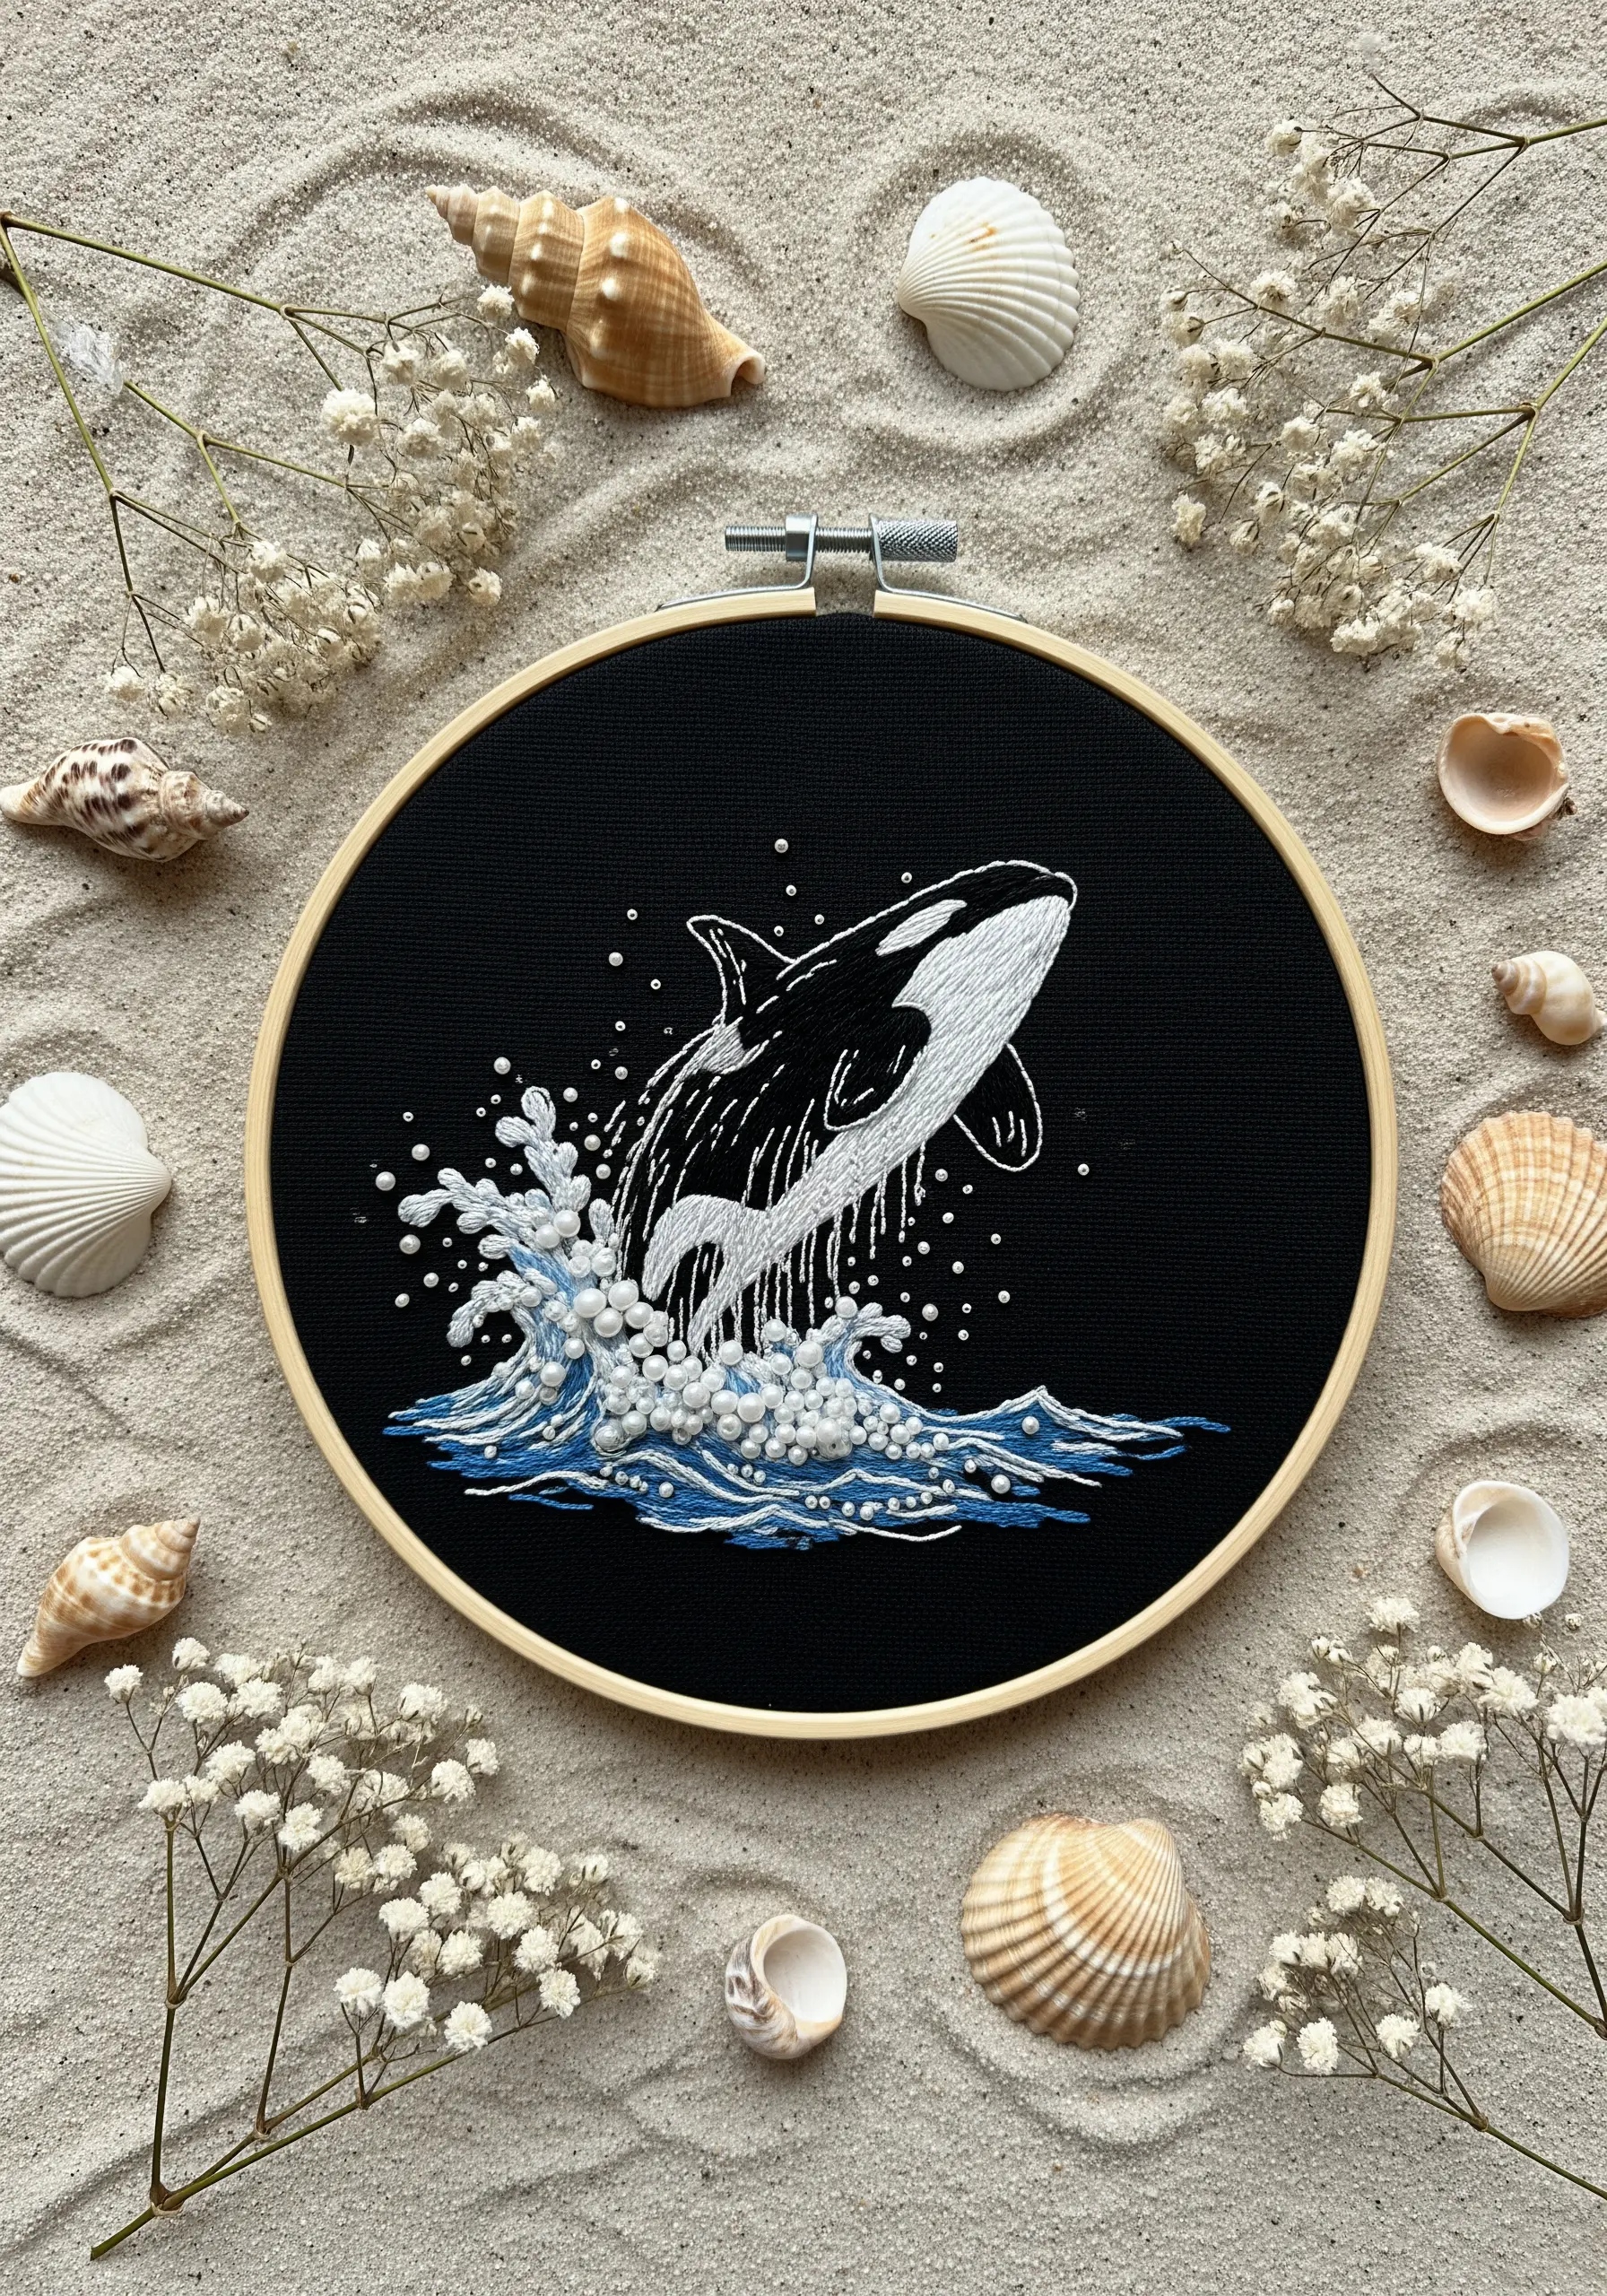
Bring an action scene to life by building texture that literally pops off the fabric.
On a dark, high-contrast background, use a mix of French knots, colonial knots, and bullion knots for the splashing water.
Vary the number of thread strands and the number of wraps around your needle to create knots of different sizes, mimicking the chaotic nature of sea spray.
Place the largest knots at the base of the splash and scatter smaller ones upward to create a sense of movement and energy.
This technique turns a flat image into a tactile, multi-dimensional moment.
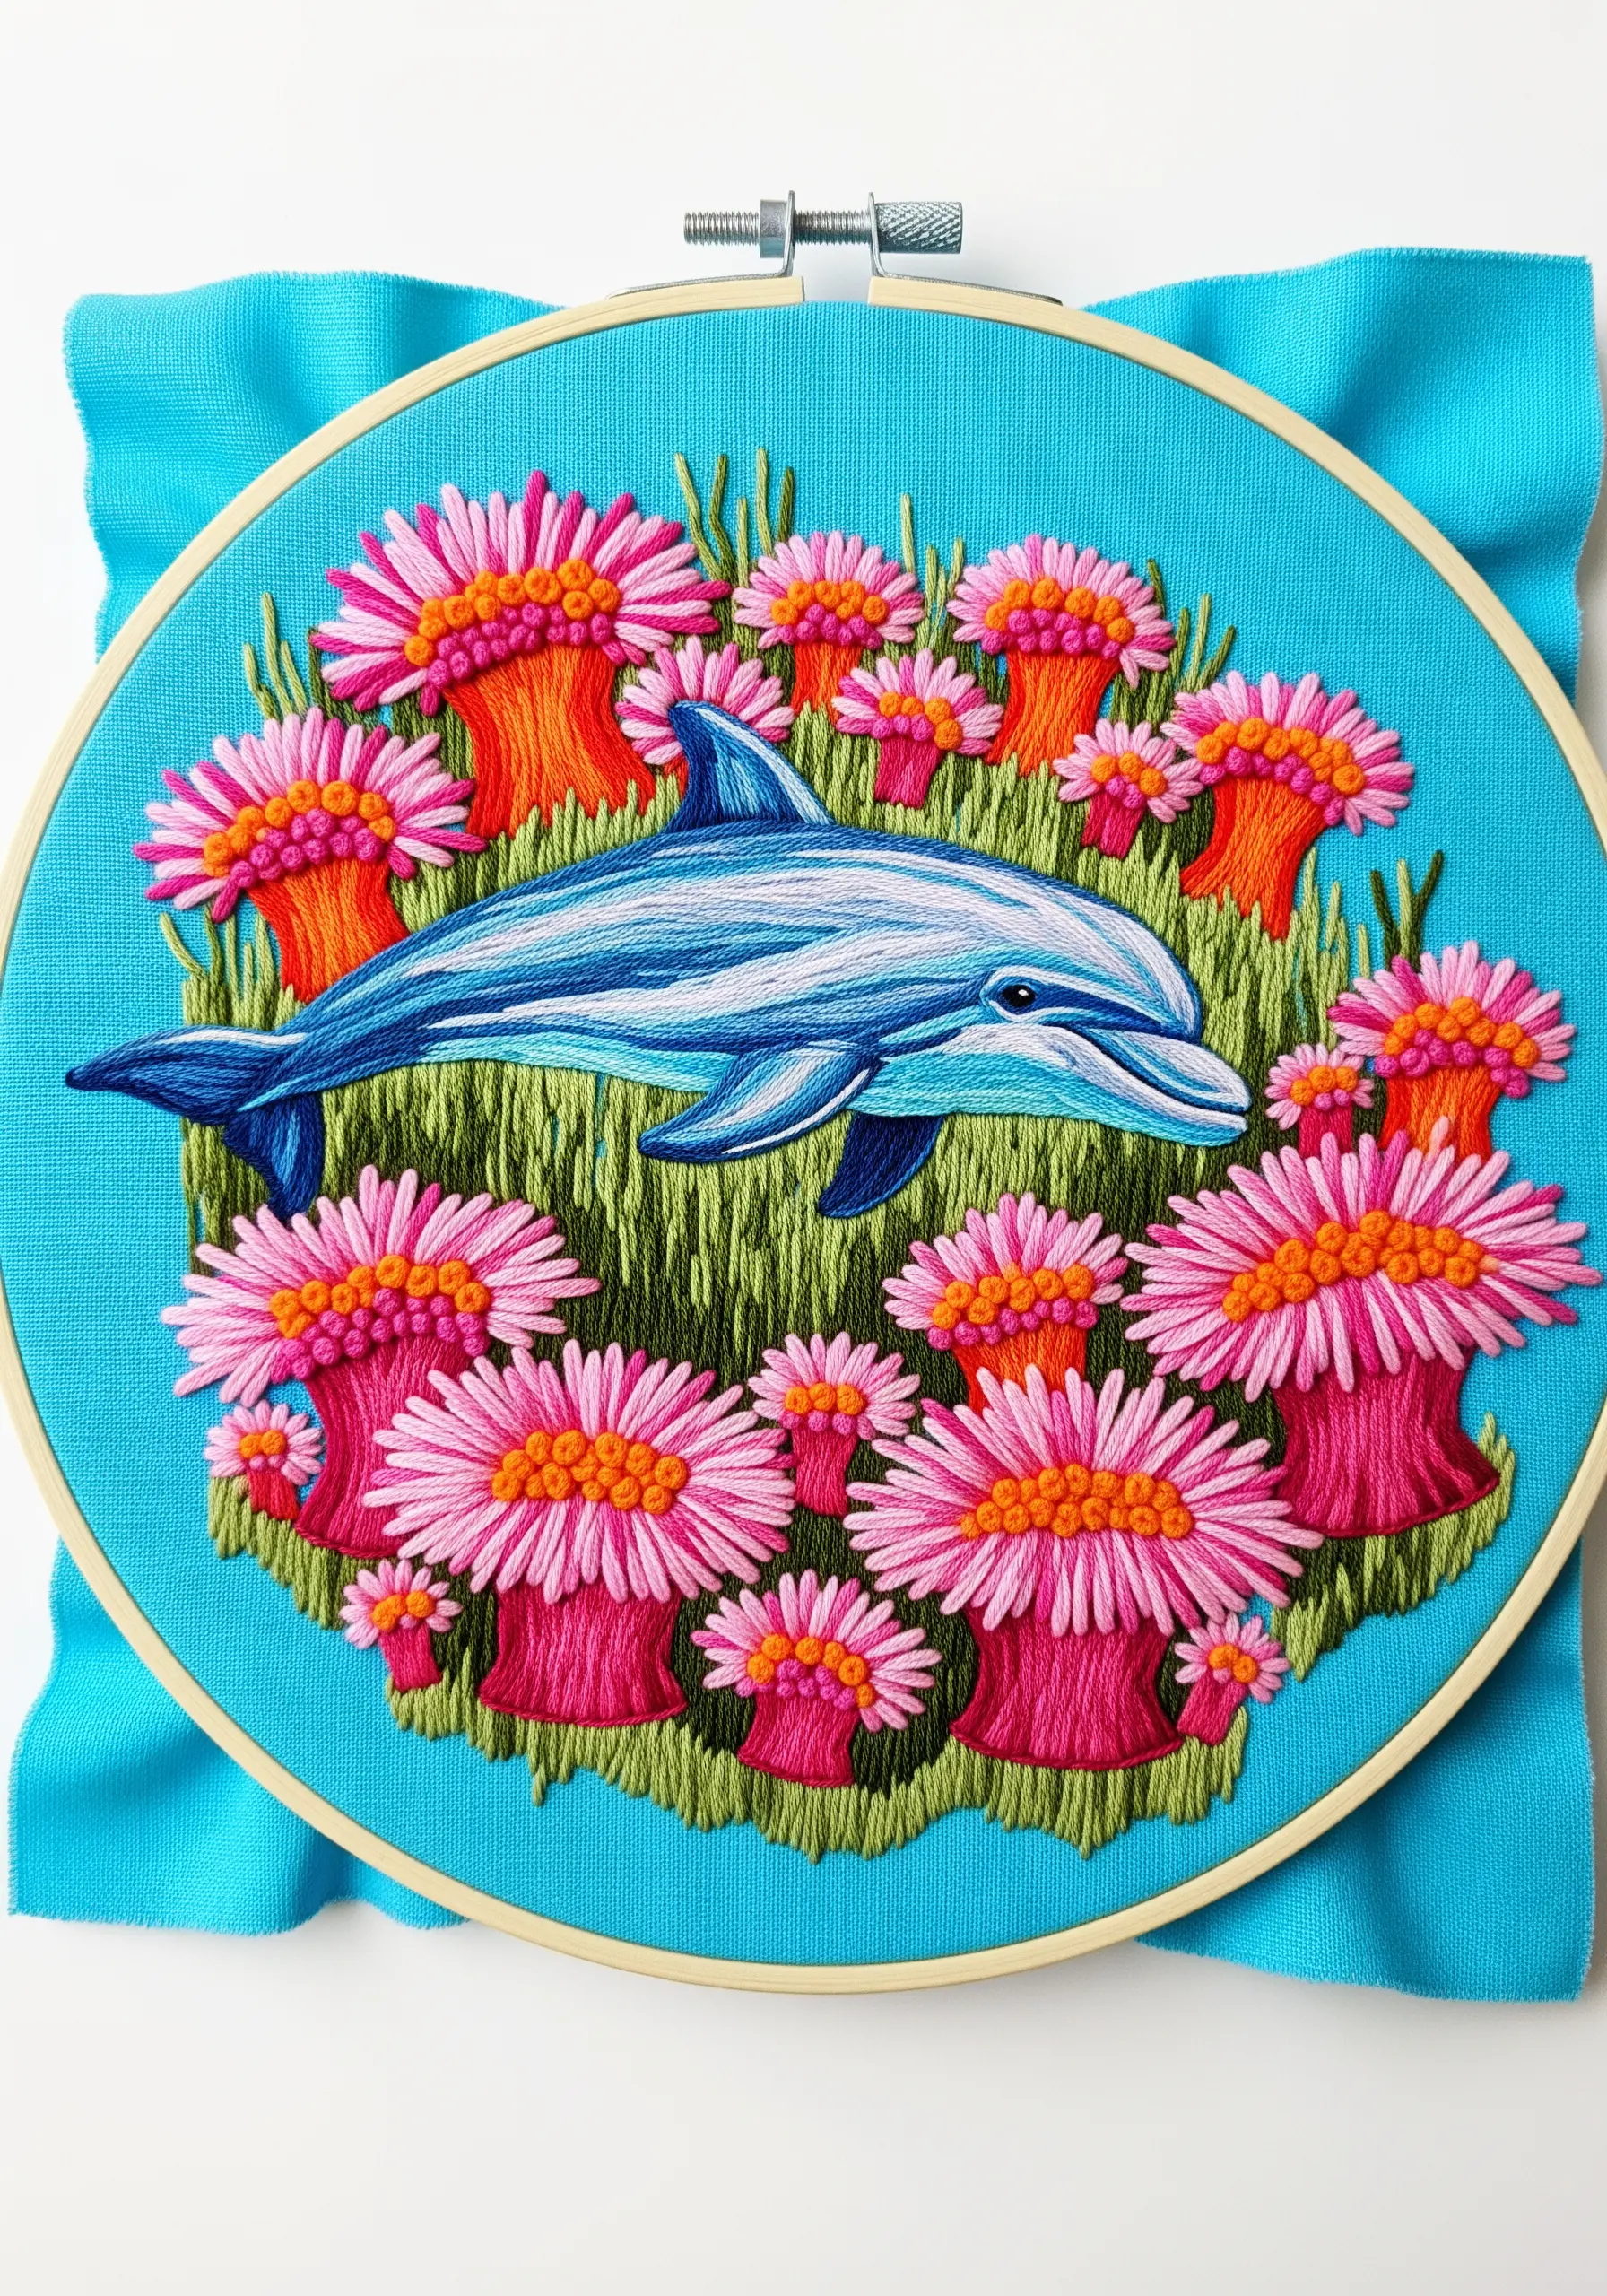
4. Build a Vibrant Underwater Scene with Layered Stitches
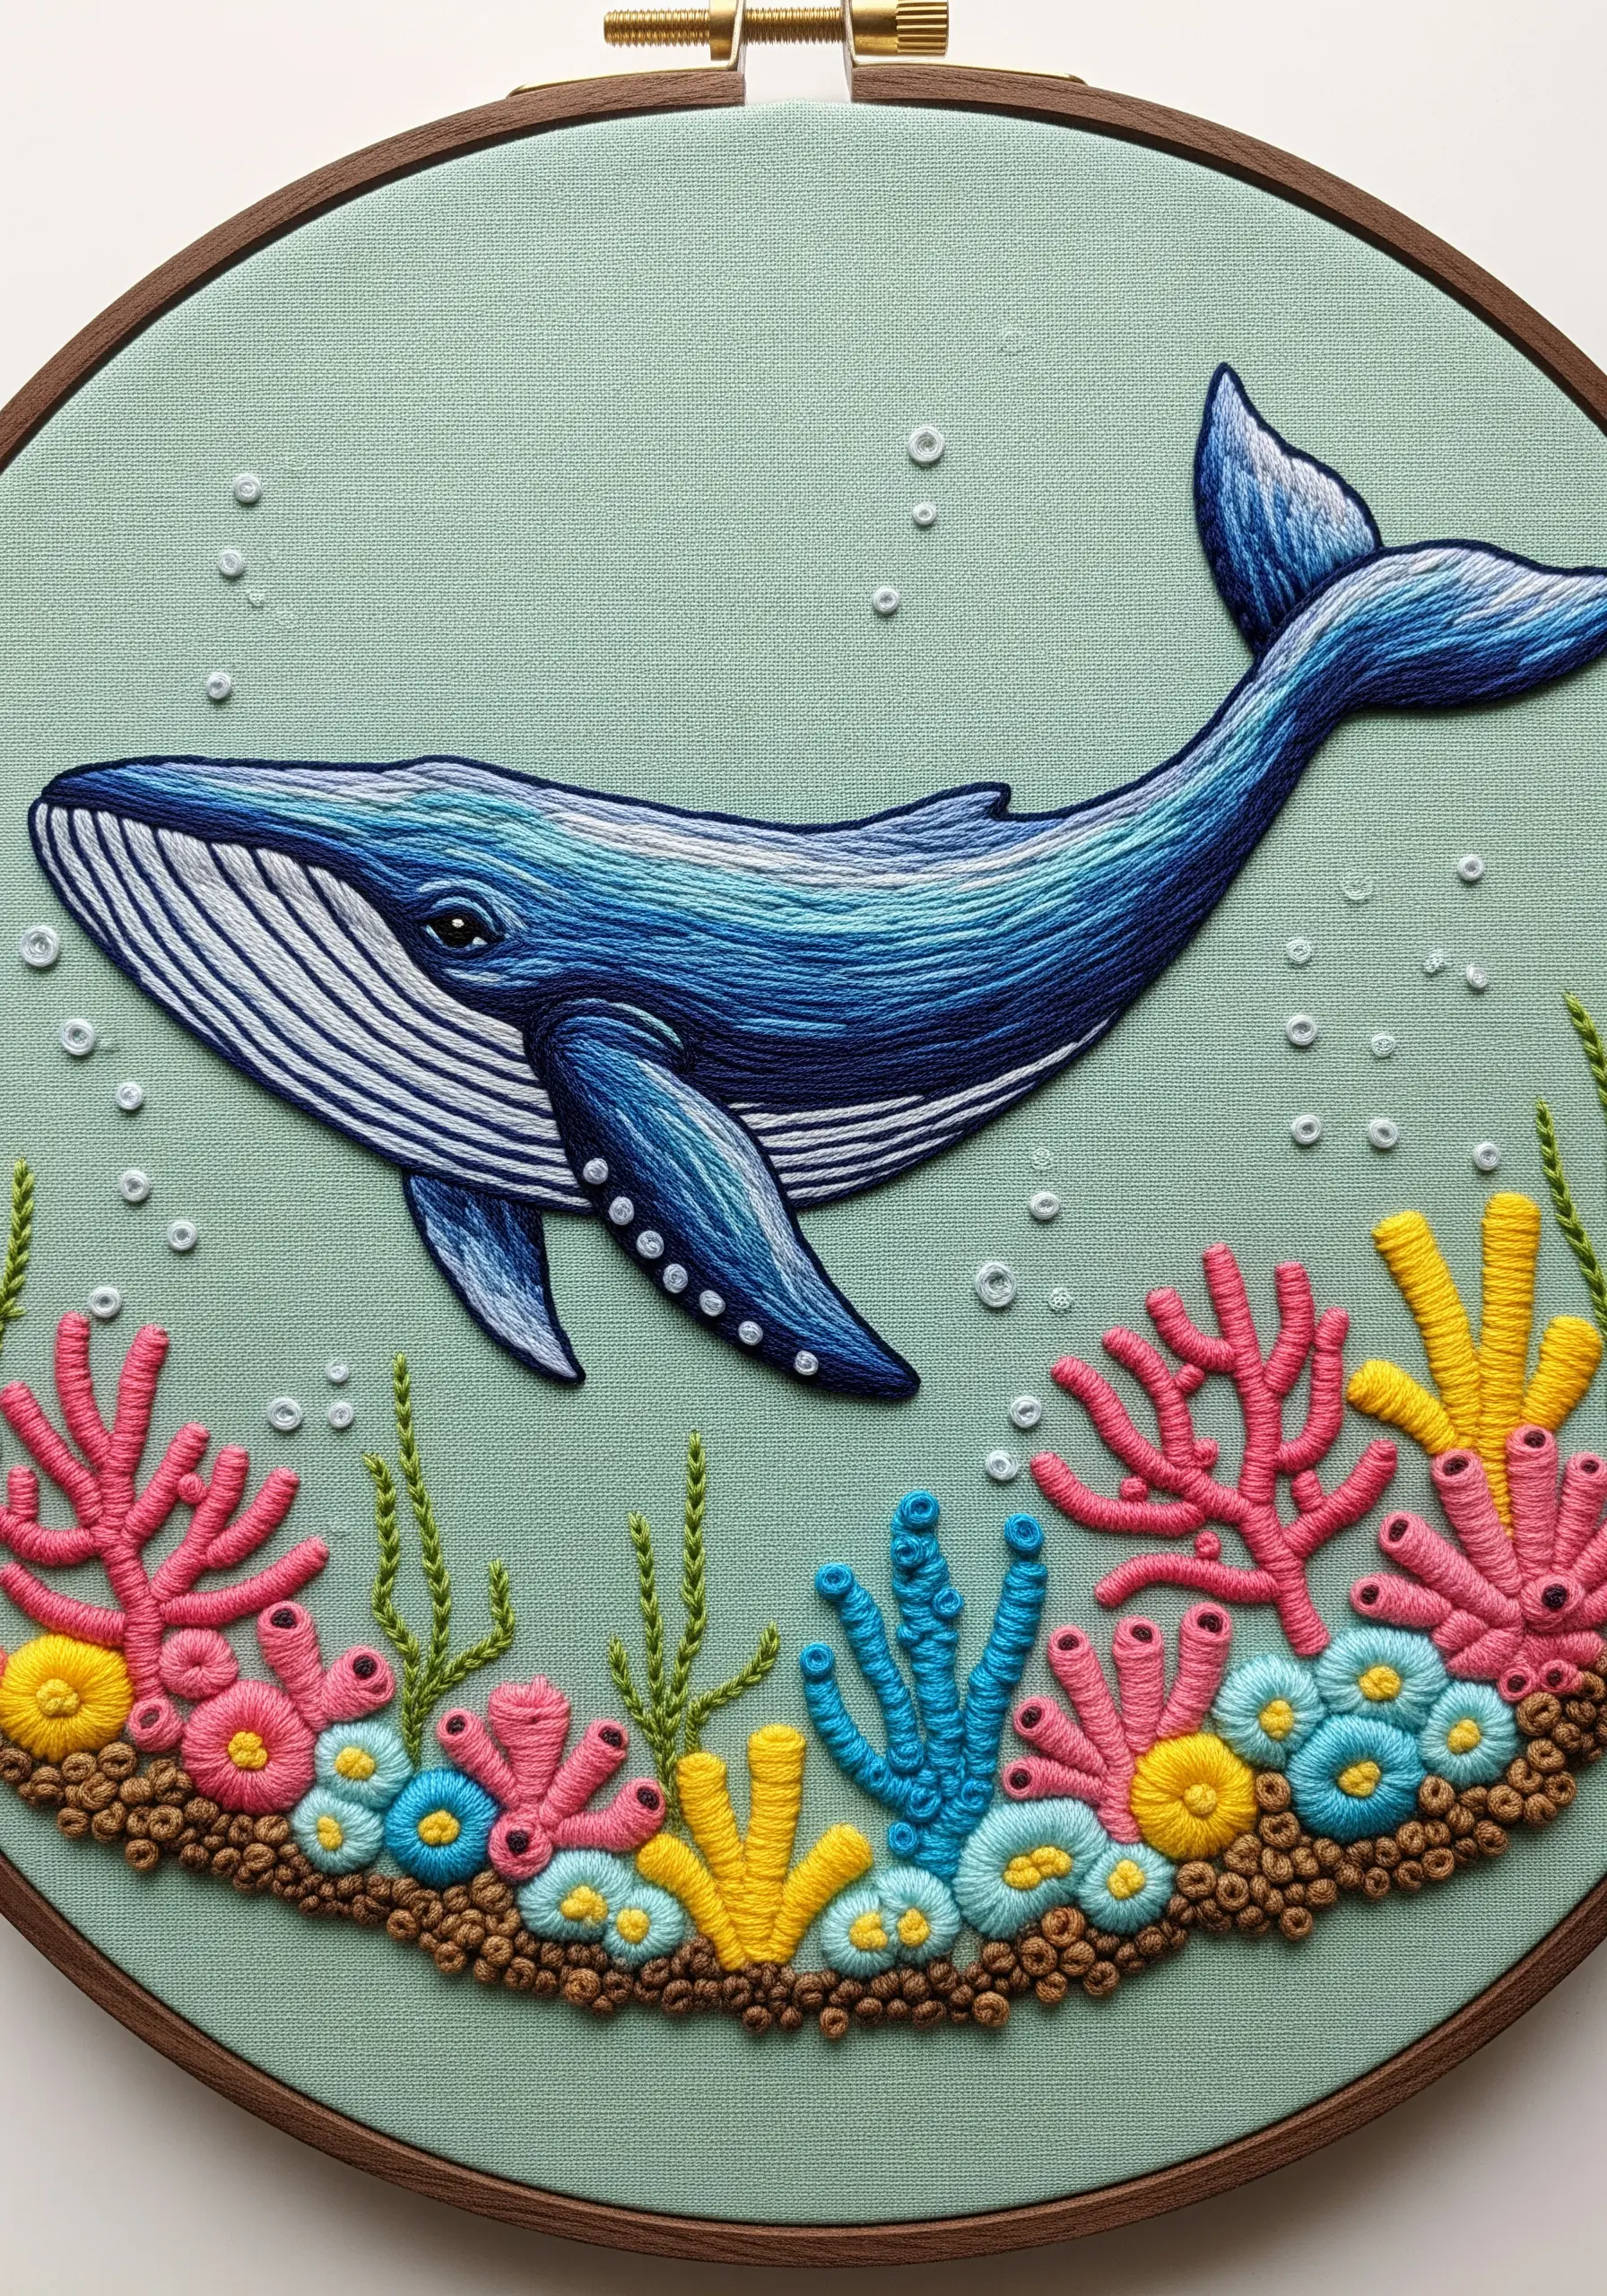
Create a sense of depth by combining smooth and highly textured stitches.
Use long-and-short stitch to blend blues and whites on the whale’s body, achieving a smooth, painted look.
For the coral reef, switch to more dimensional techniques. Use bullion knots for tubular coral, woven wheel stitches for flower-like shapes, and dense clusters of French knots for mossy textures.
This contrast in texture between the sleek whale and the intricate reef is what makes the composition so visually engaging and satisfying to stitch.
5. Fill a Silhouette with a Ditsy Floral Print
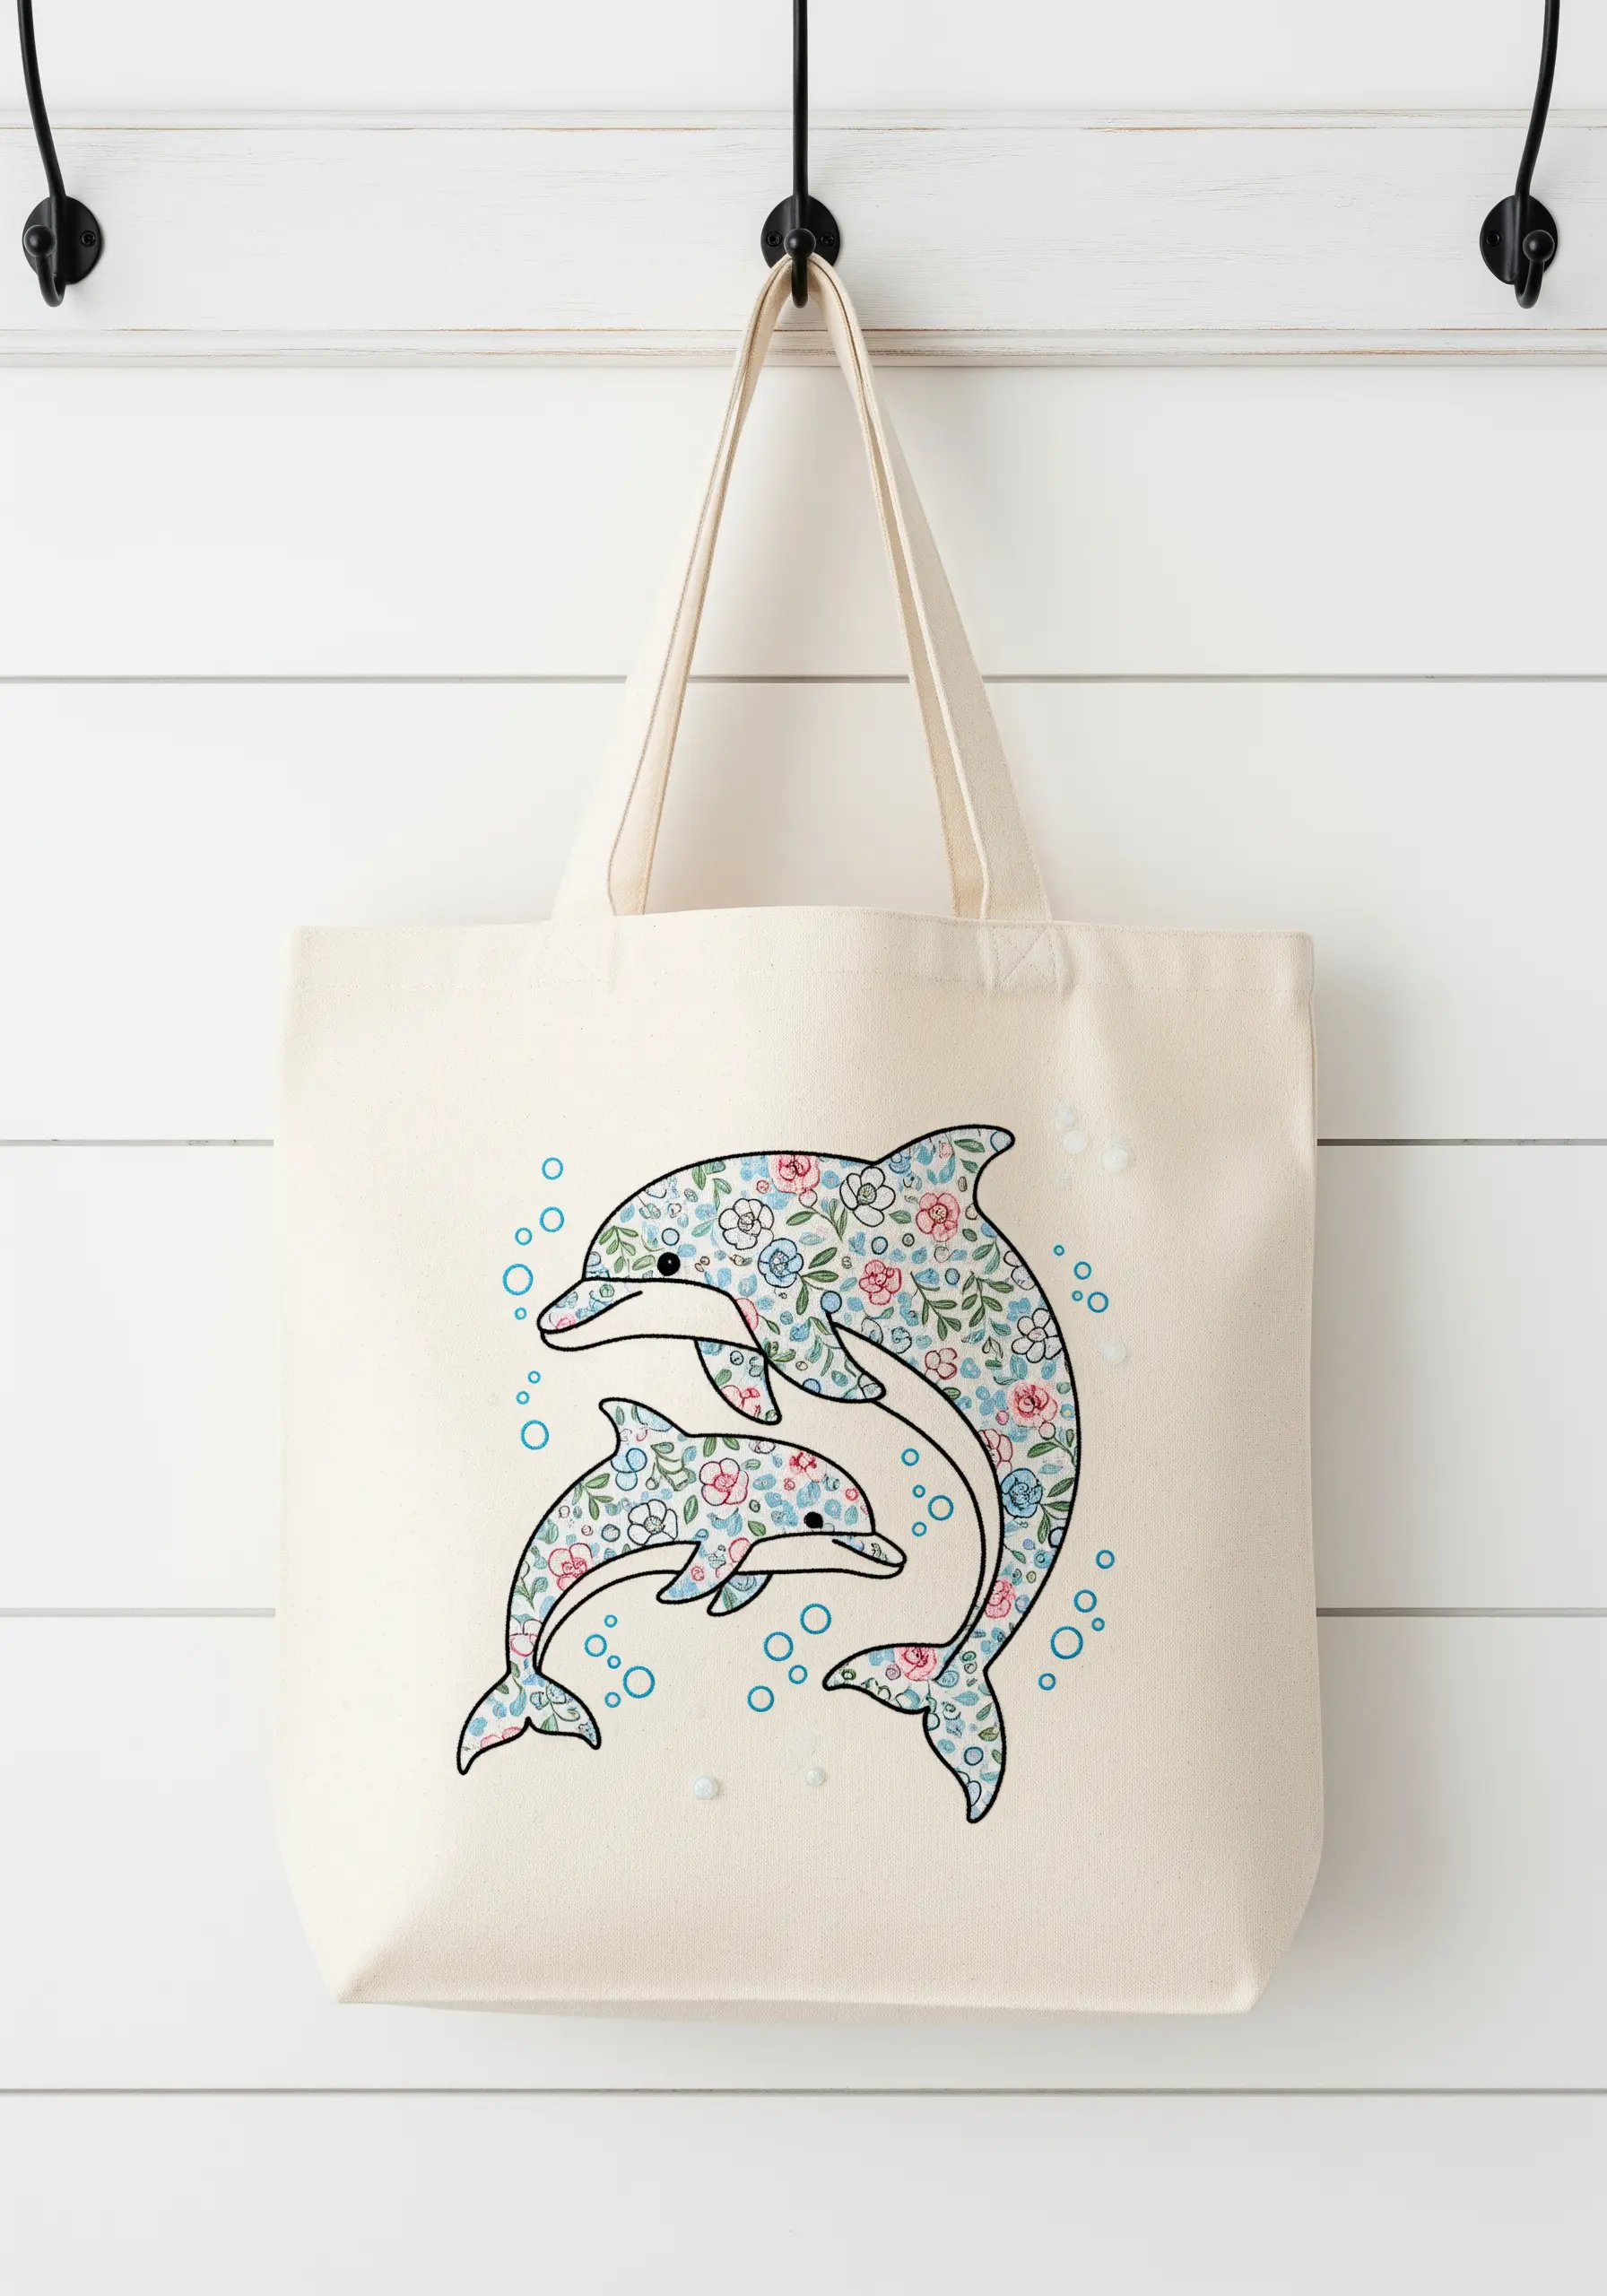
To add a whimsical touch to a tote bag or jacket, treat the dolphin’s outline as a container for a delicate pattern.
Start with a clean backstitch outline in a dark, contrasting color to define the shape.
Inside, scatter tiny floral motifs using single lazy daisy stitches for petals and French knots for centers.
Keep the motifs small and evenly spaced to mimic a printed fabric. This technique is more forgiving than satin stitch and adds a charming, cottagecore-inspired feel to any accessory.
6. Use Negative Space and Simple Accents
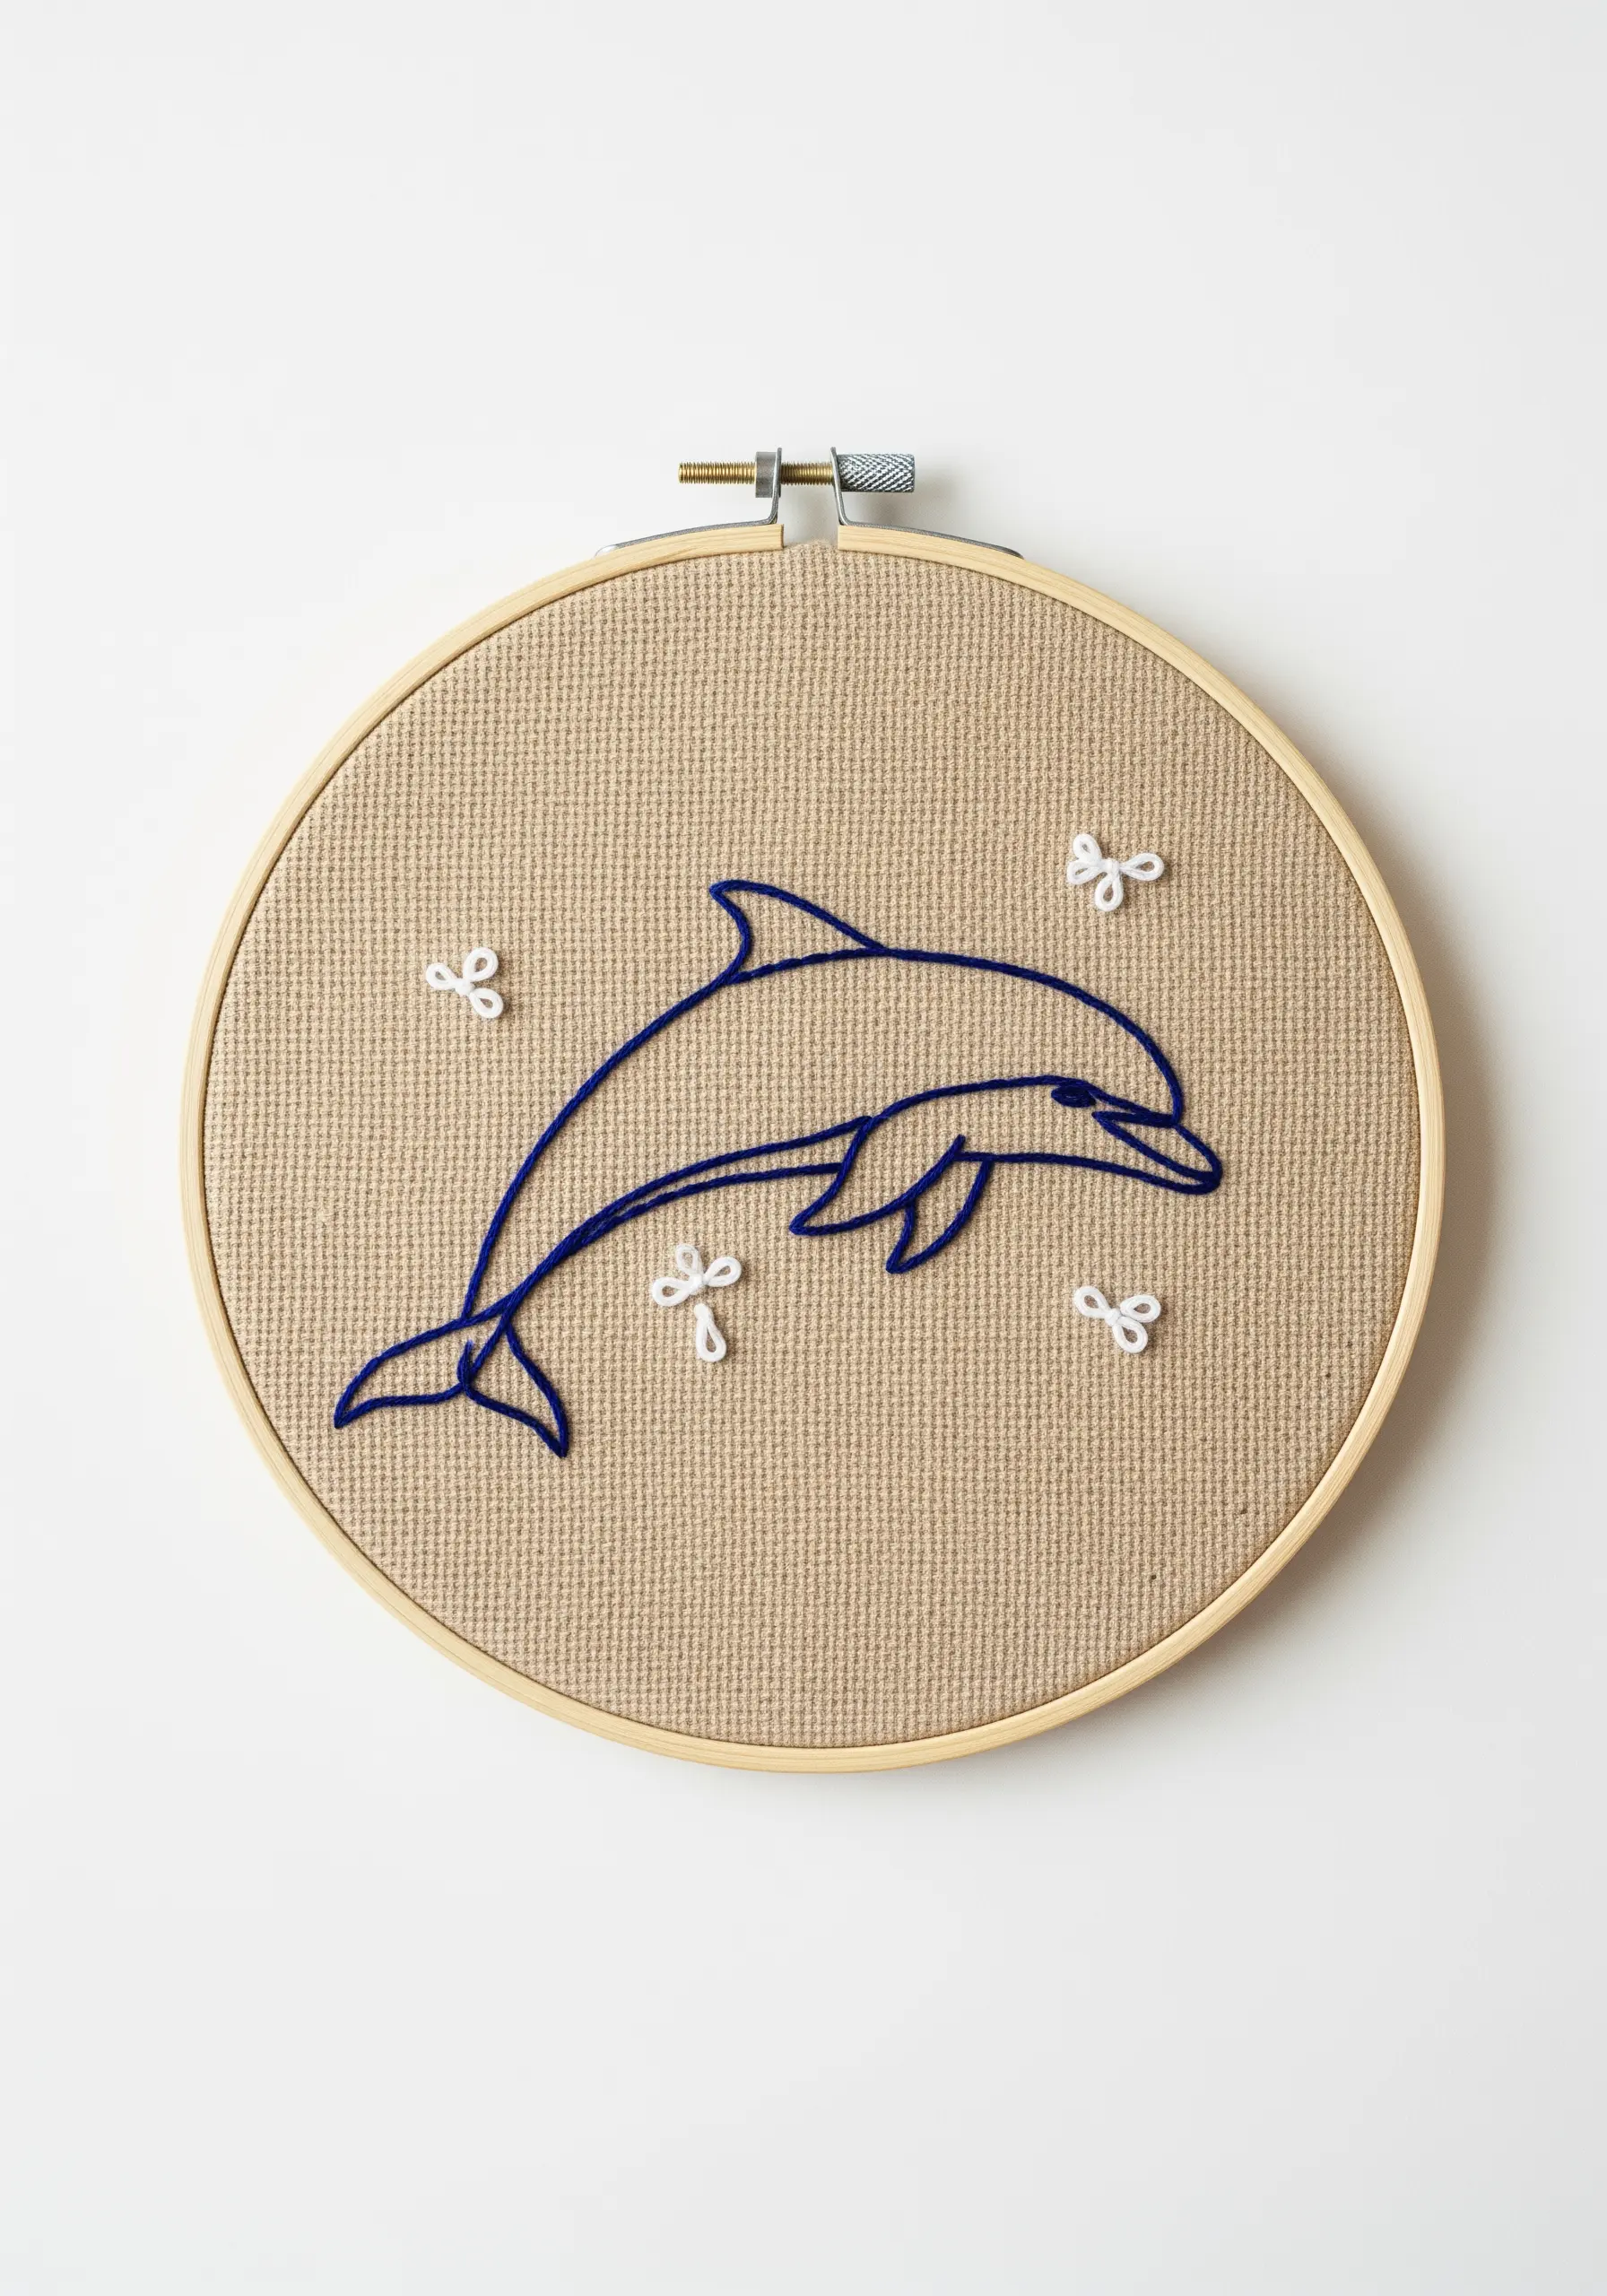
Prove that a few well-placed stitches can be more powerful than a fully rendered piece.
Use a single, bold line of stem stitch or whipped backstitch to create the dolphin’s form, letting the texture of the linen fabric show through.
Add a few detached chain stitches or woven picot stitches as abstract bubbles or floral hints.
By leaving most of the fabric unstitched, you draw the eye directly to the clean lines and thoughtful details, creating a design that feels both effortless and intentional.
7. Achieve Ethereal Transparency with Sheer Fabrics and Paint
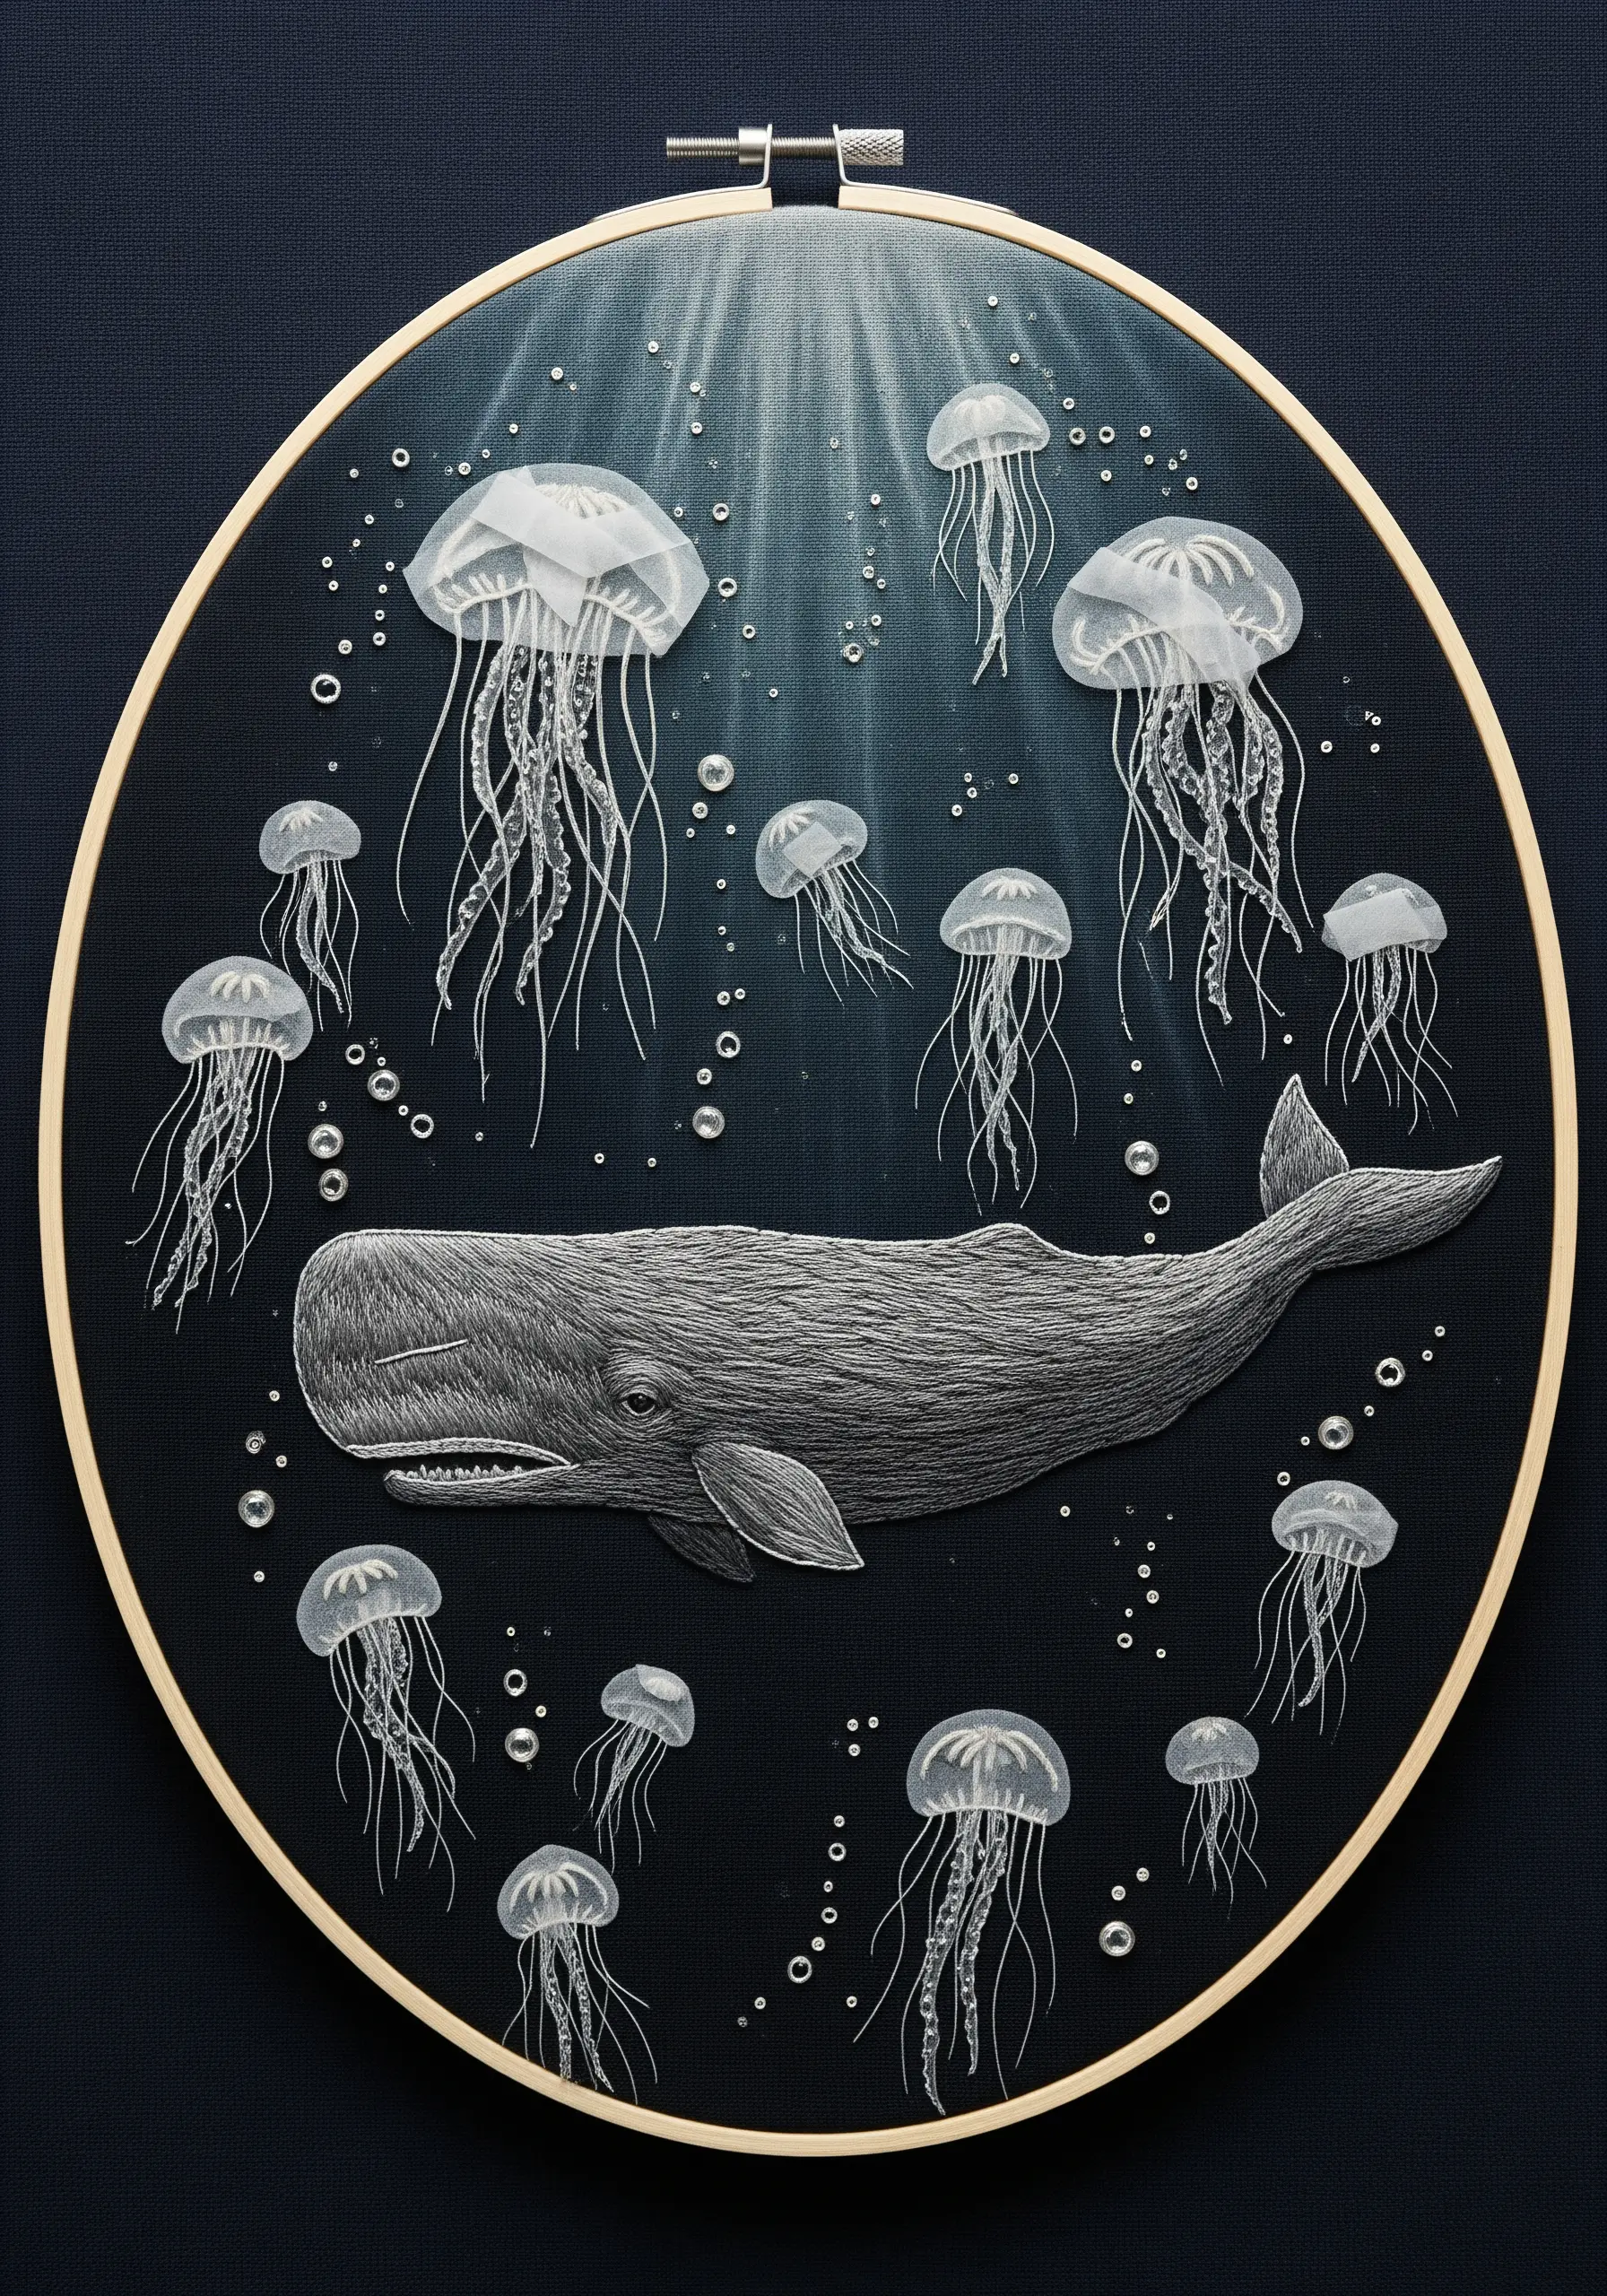
To capture the ghostly quality of jellyfish, move beyond thread alone.
Embroider the whale using fine, single-strand backstitches for a detailed, sketched look.
For the jellyfish, try a mixed-media approach: apply a sheer wash of white fabric paint for the bell, then stitch the delicate tentacles over it with a single strand of white or glow-in-the-dark thread.
This layering of paint and thread creates a beautiful illusion of transparency that traditional stitches cannot replicate.
8. Frame Your Subject with a Textural Wave Wreath
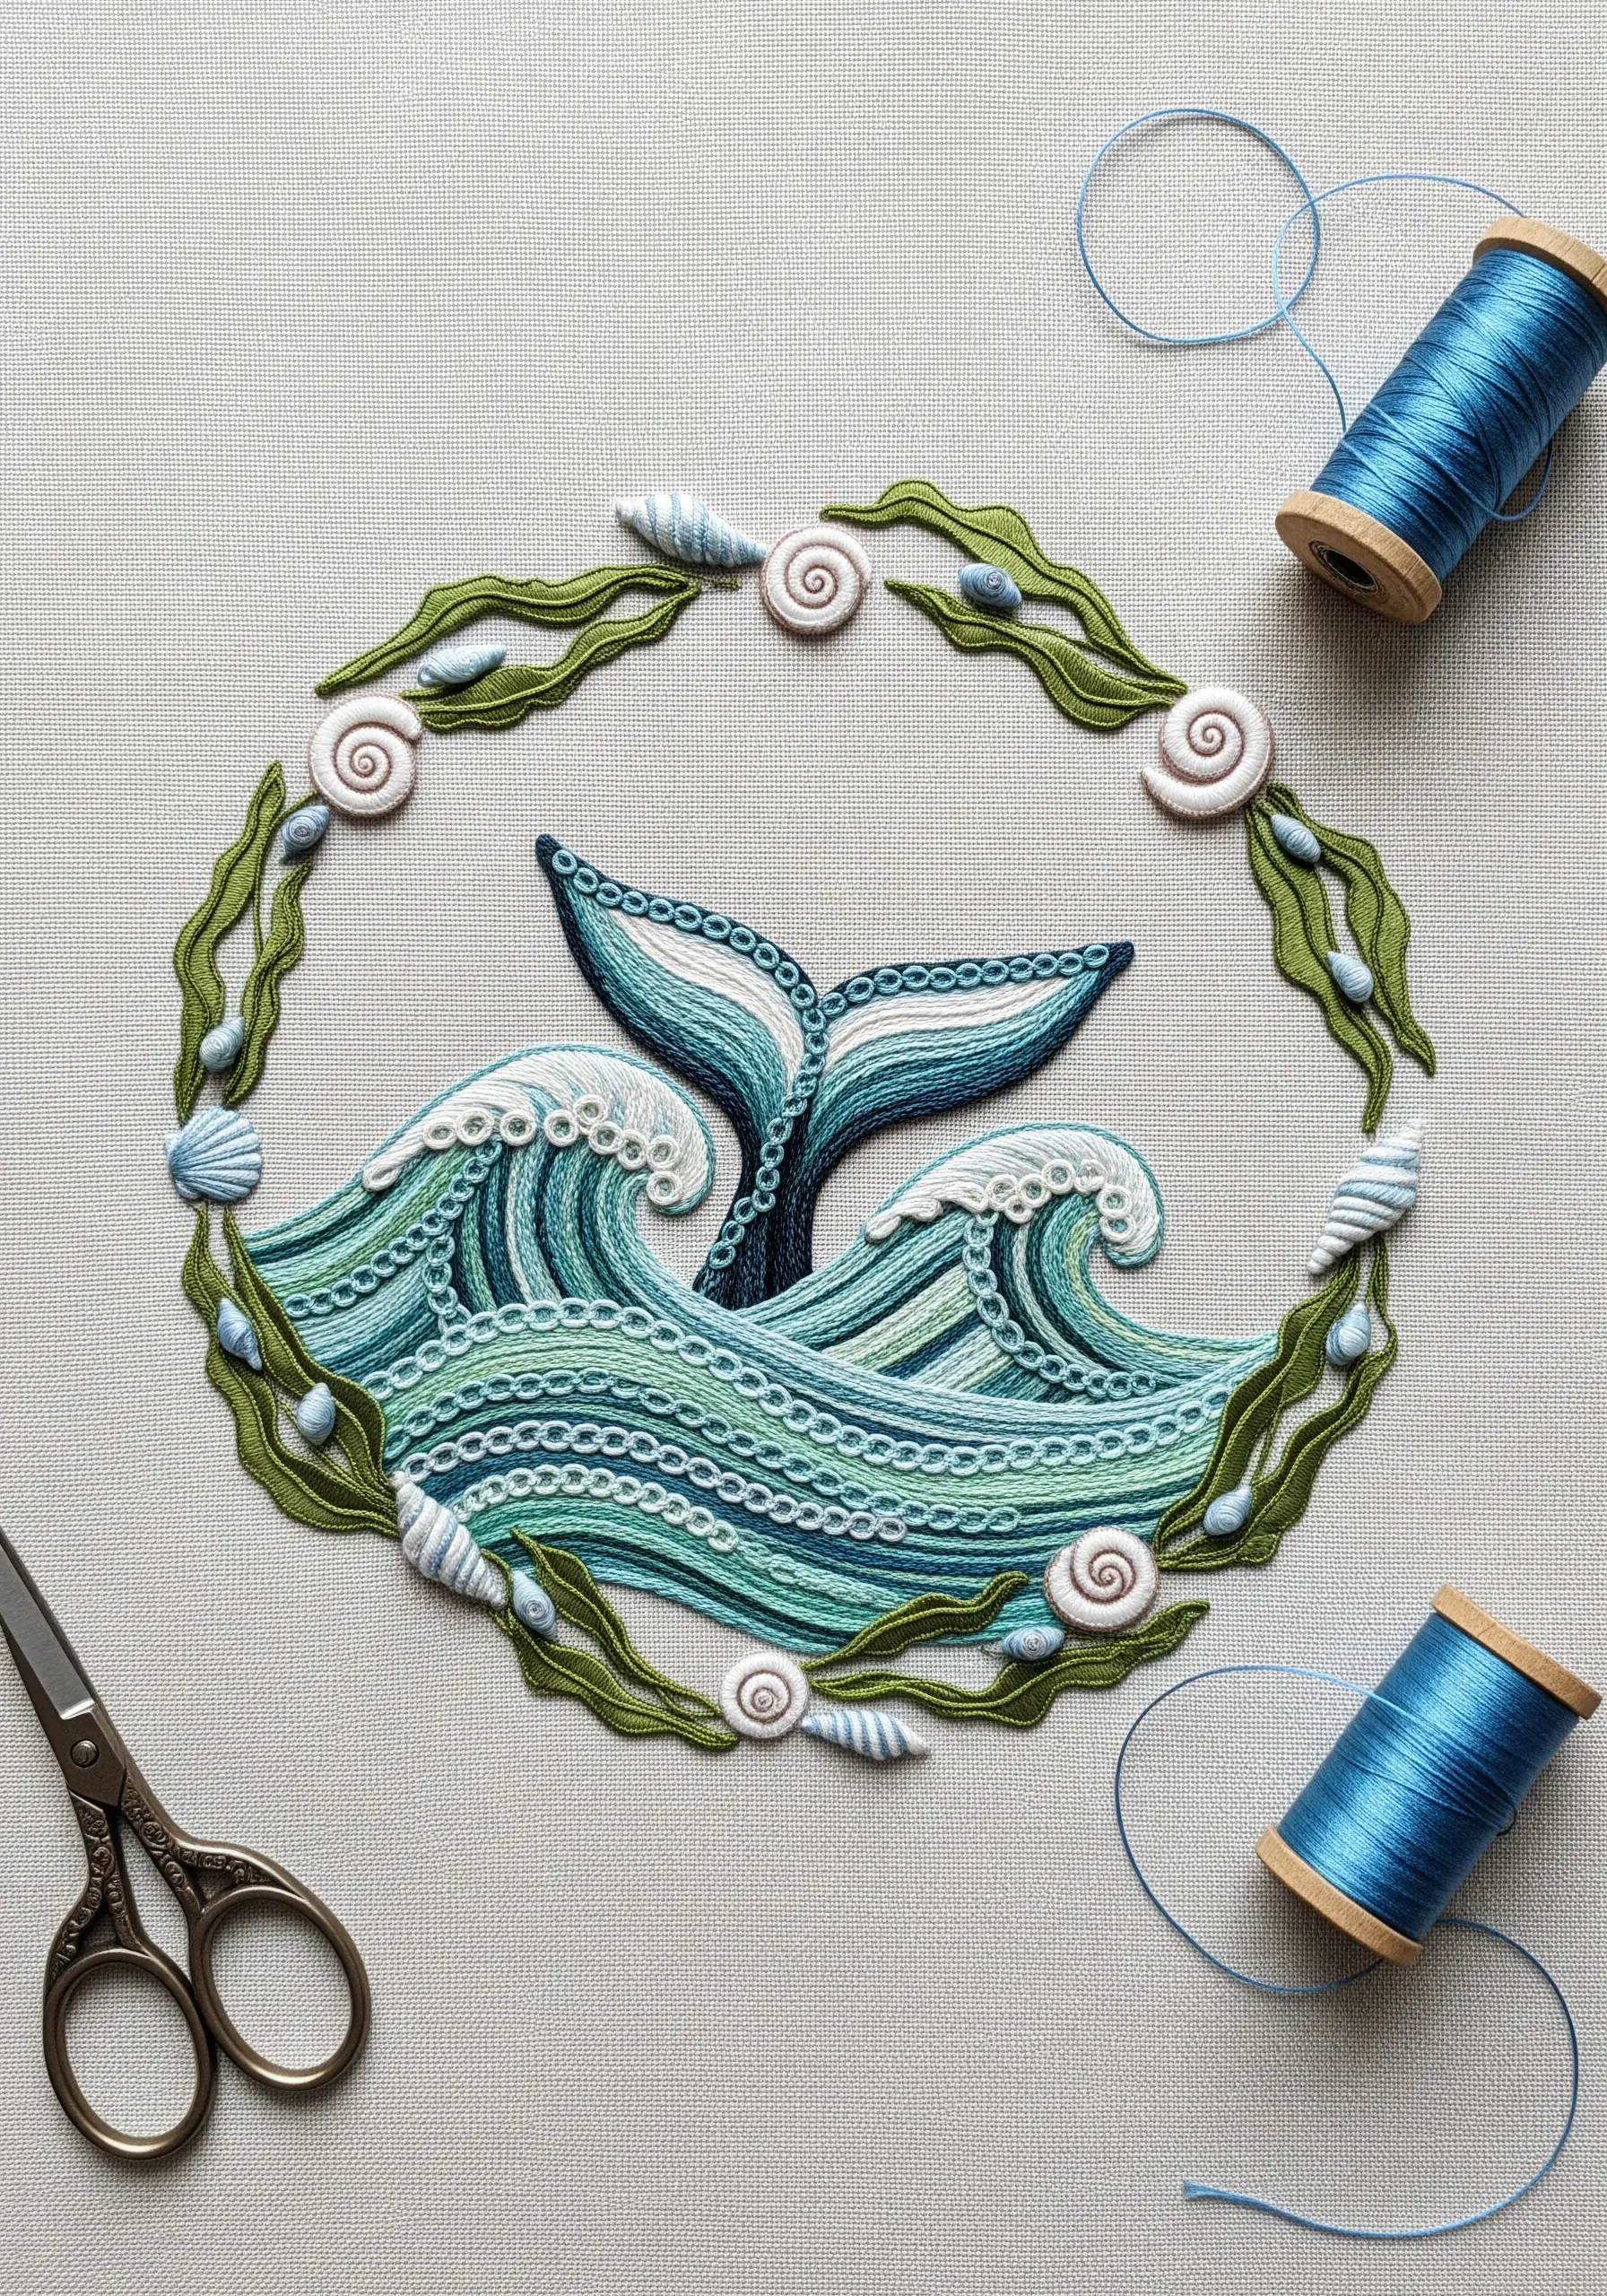
Create a focal point by encircling your motif with a highly detailed, decorative border.
Build the waves using rows of chain stitch, couching, and padded satin stitch in graduating shades of blue and green to suggest depth and movement.
Intersperse small, sculpted elements like padded satin stitch seashells or bullion knot barnacles.
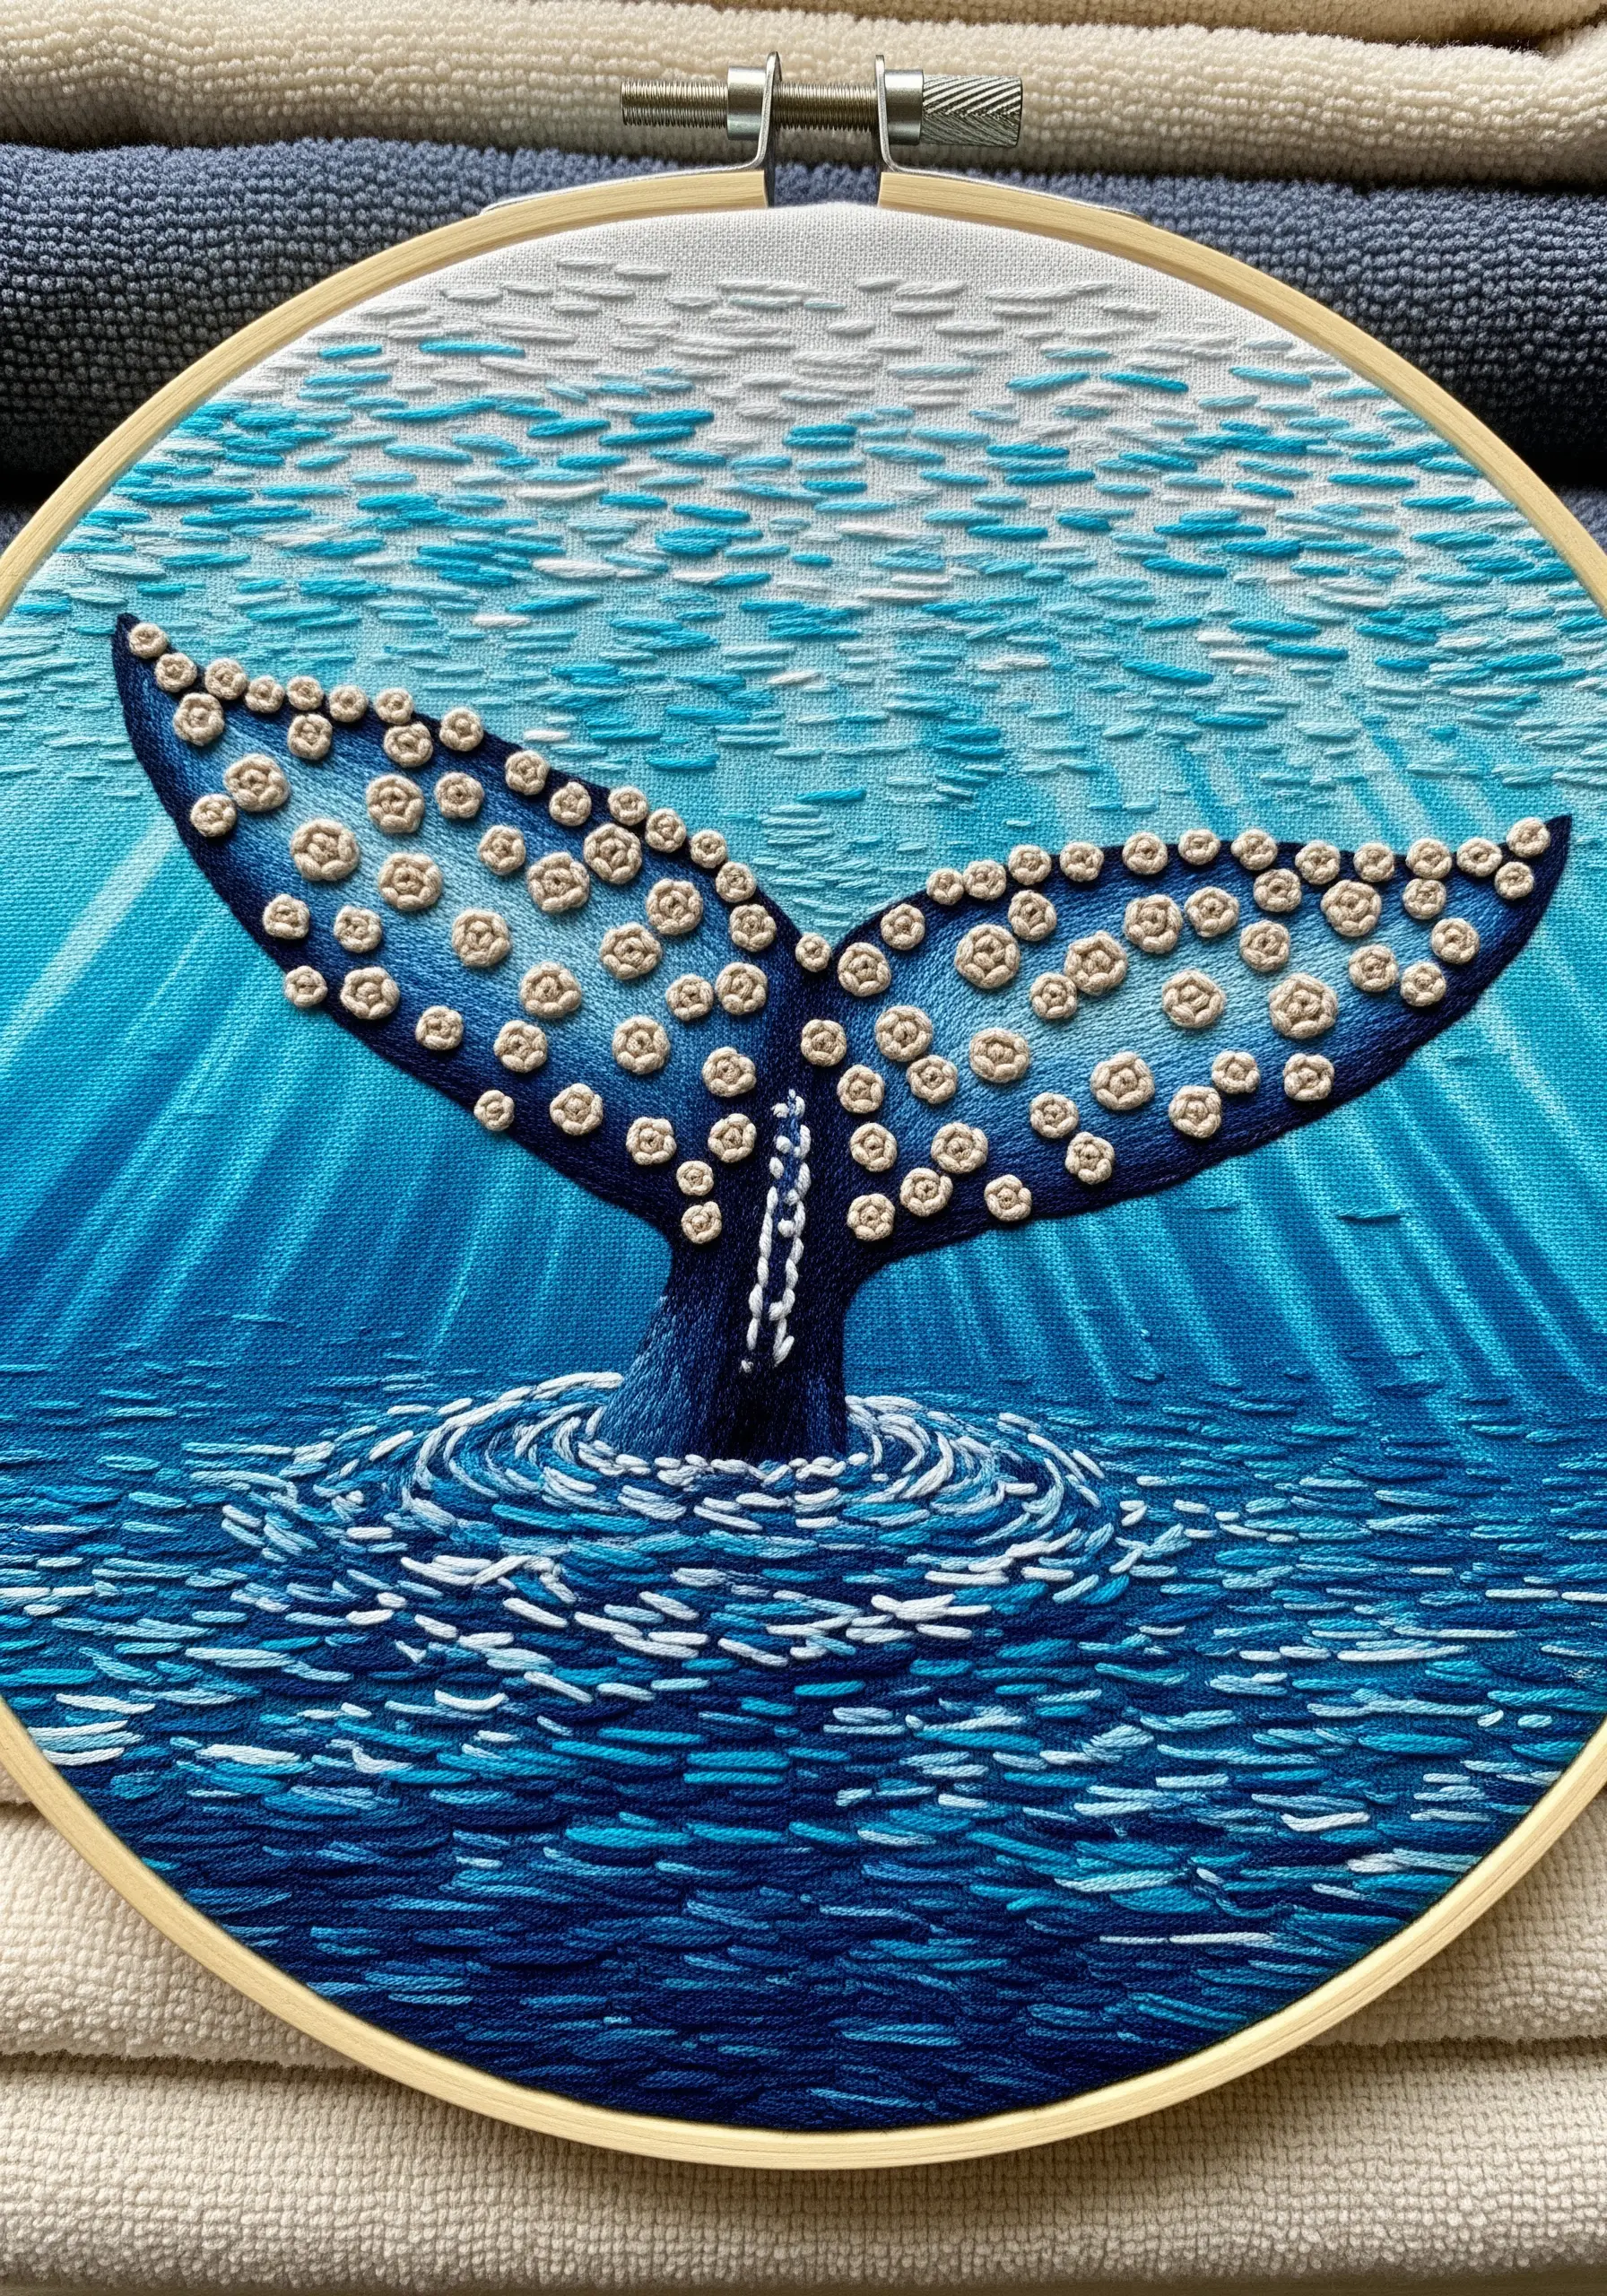
This dense, textural frame provides a stunning contrast to the smoother stitches of the central whale tail, turning your hoop into a complete, self-contained oceanic scene.
9. Map Out Clean Edges for Geometric Color Blocking

For a crisp, modern aesthetic, divide your whale into geometric sections and fill them with flawless satin stitch.
The secret to perfect edges is preparation: before you begin filling, outline each small shape with a split stitch using a single strand of matching thread.
This tiny stitched wall prevents your satin stitches from pulling or becoming uneven, ensuring each block of color has a sharp, clean boundary.
The result is a graphic, contemporary piece that looks incredibly precise.
10. Stitch a Celestial Scene with Metallics and 3D Texture
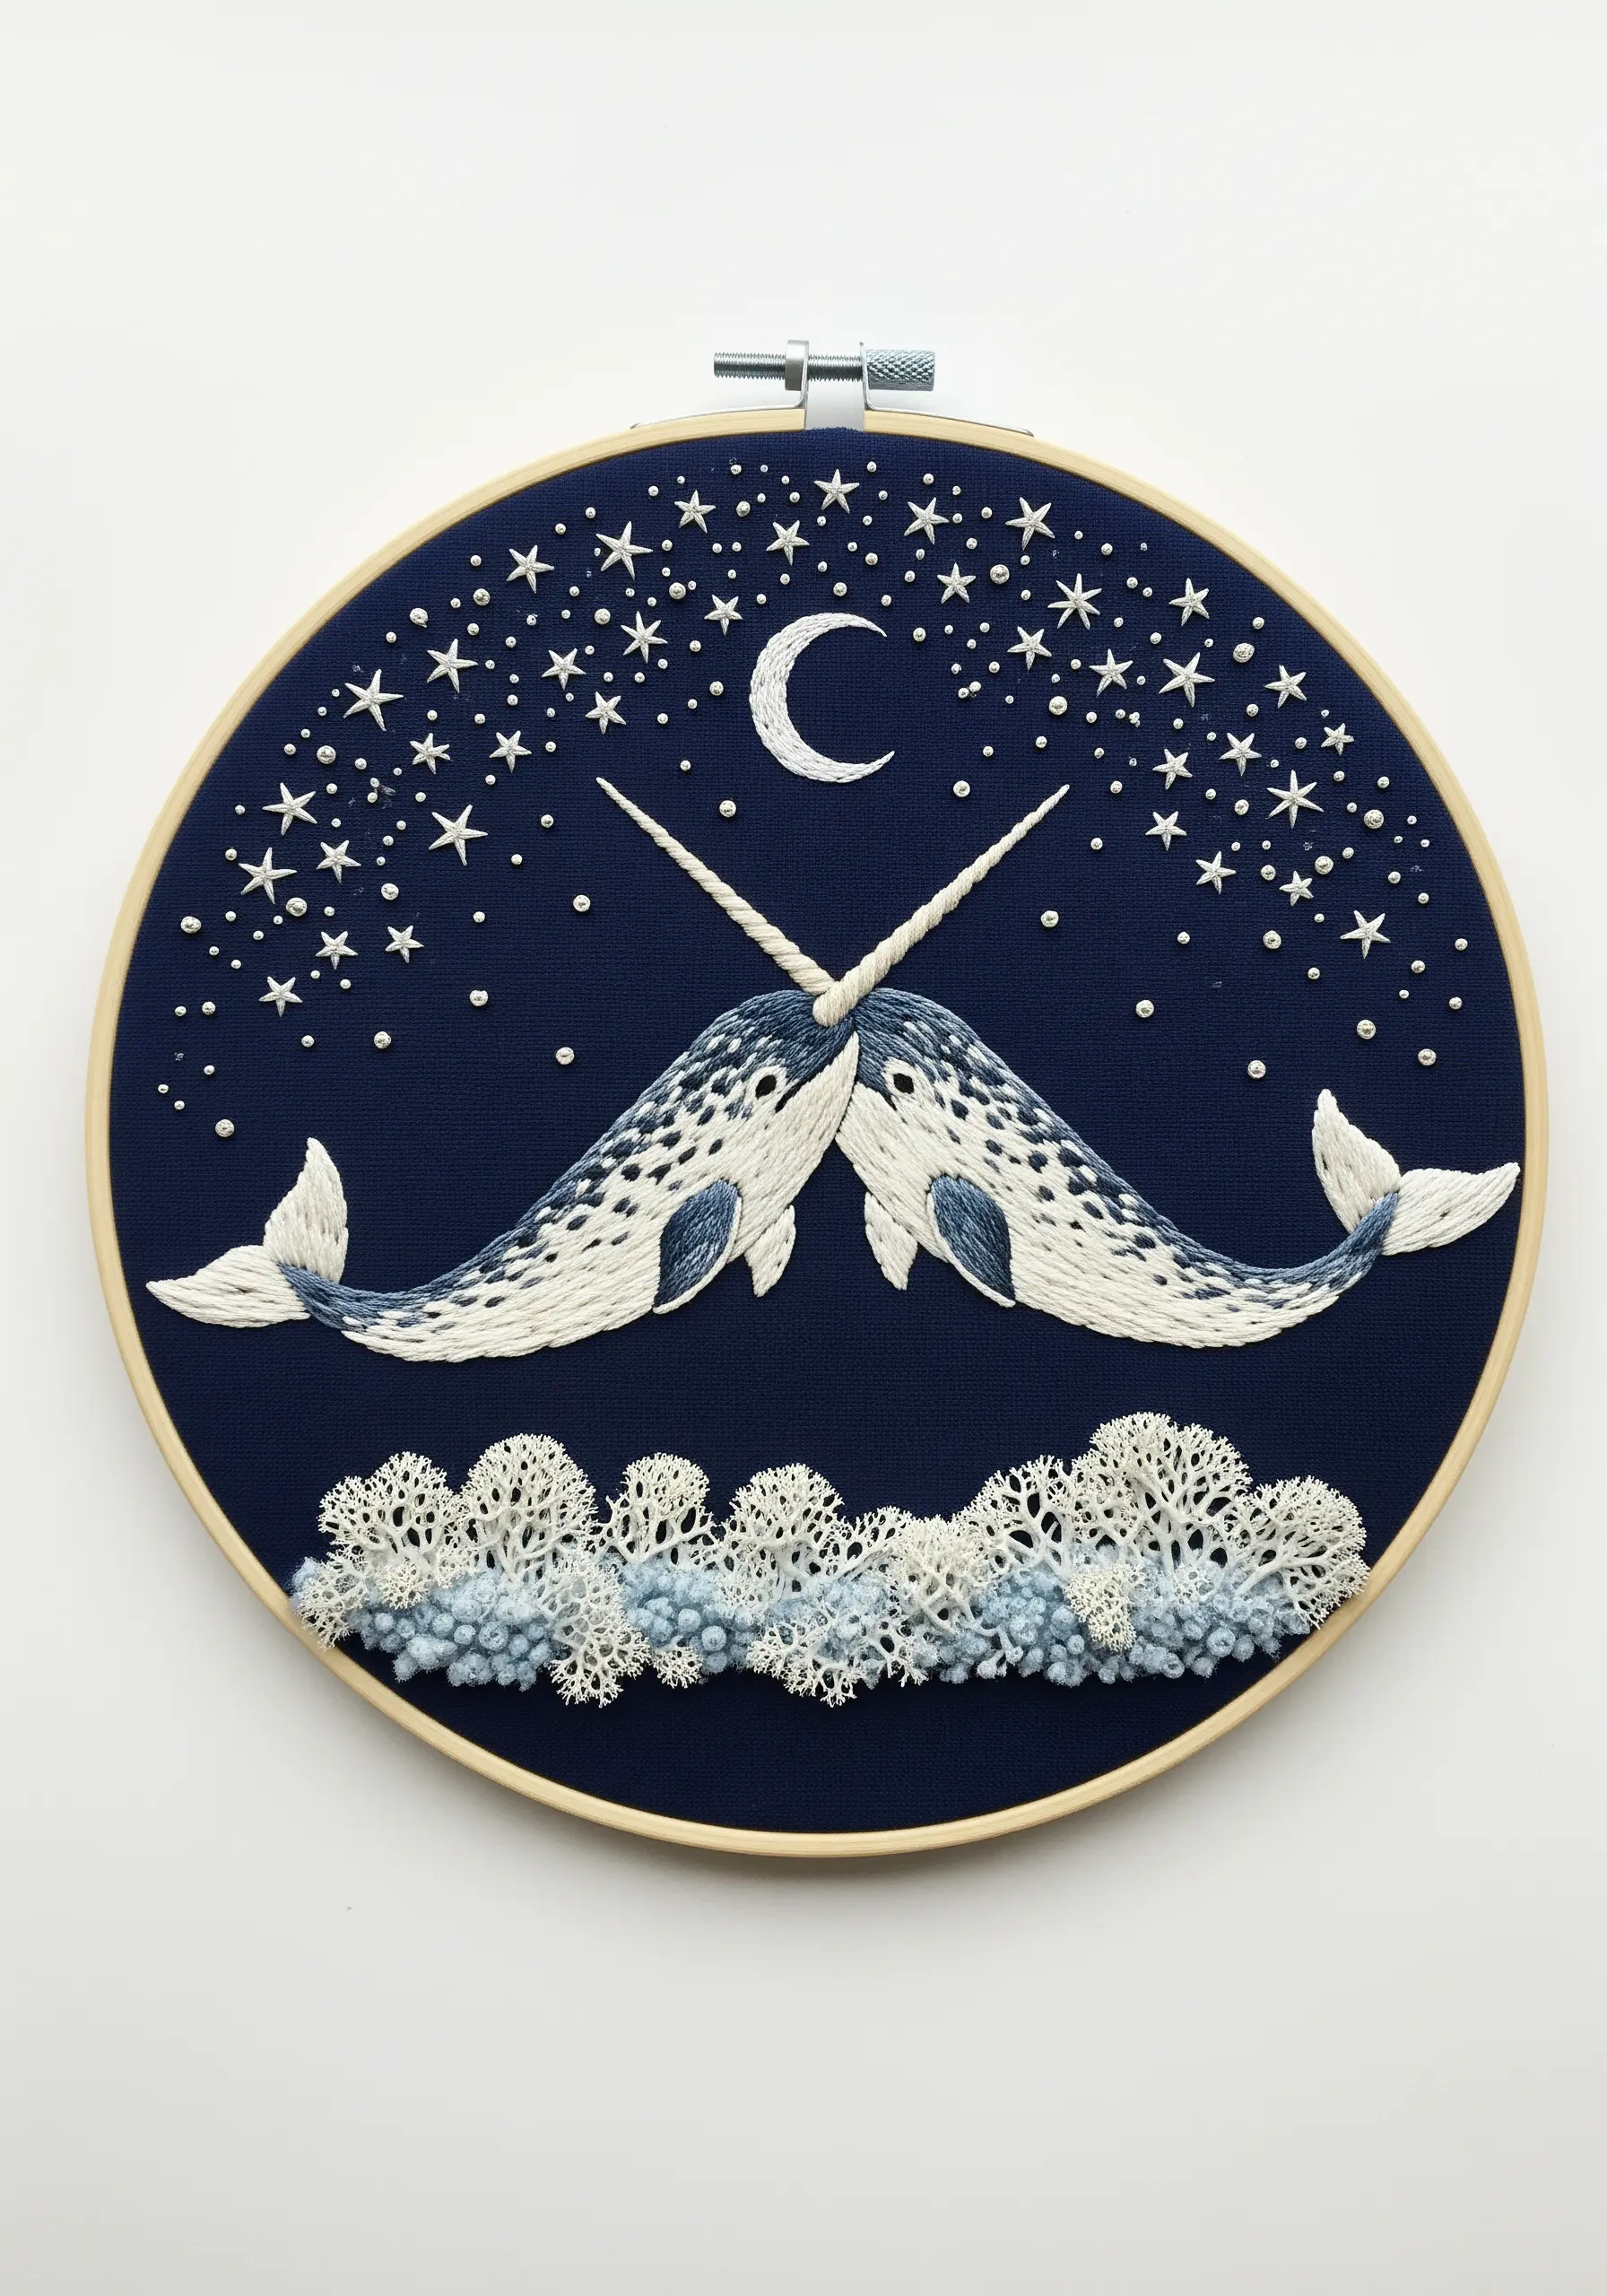
Elevate a night sky from flat to magical by choosing threads and stitches that add dimension and light.
Use a silver metallic thread for the stars and moon; a simple star stitch or a single French knot will catch the light beautifully.
For the icy coral below the narwhals, build up dense layers of French knots or use Turkey work, trimming the loops to create a plush, velvety texture.
This combination of reflective metallics and soft, raised stitches creates a dreamlike, tactile world.
11. Apply Lace Appliqué for Instant Elegance
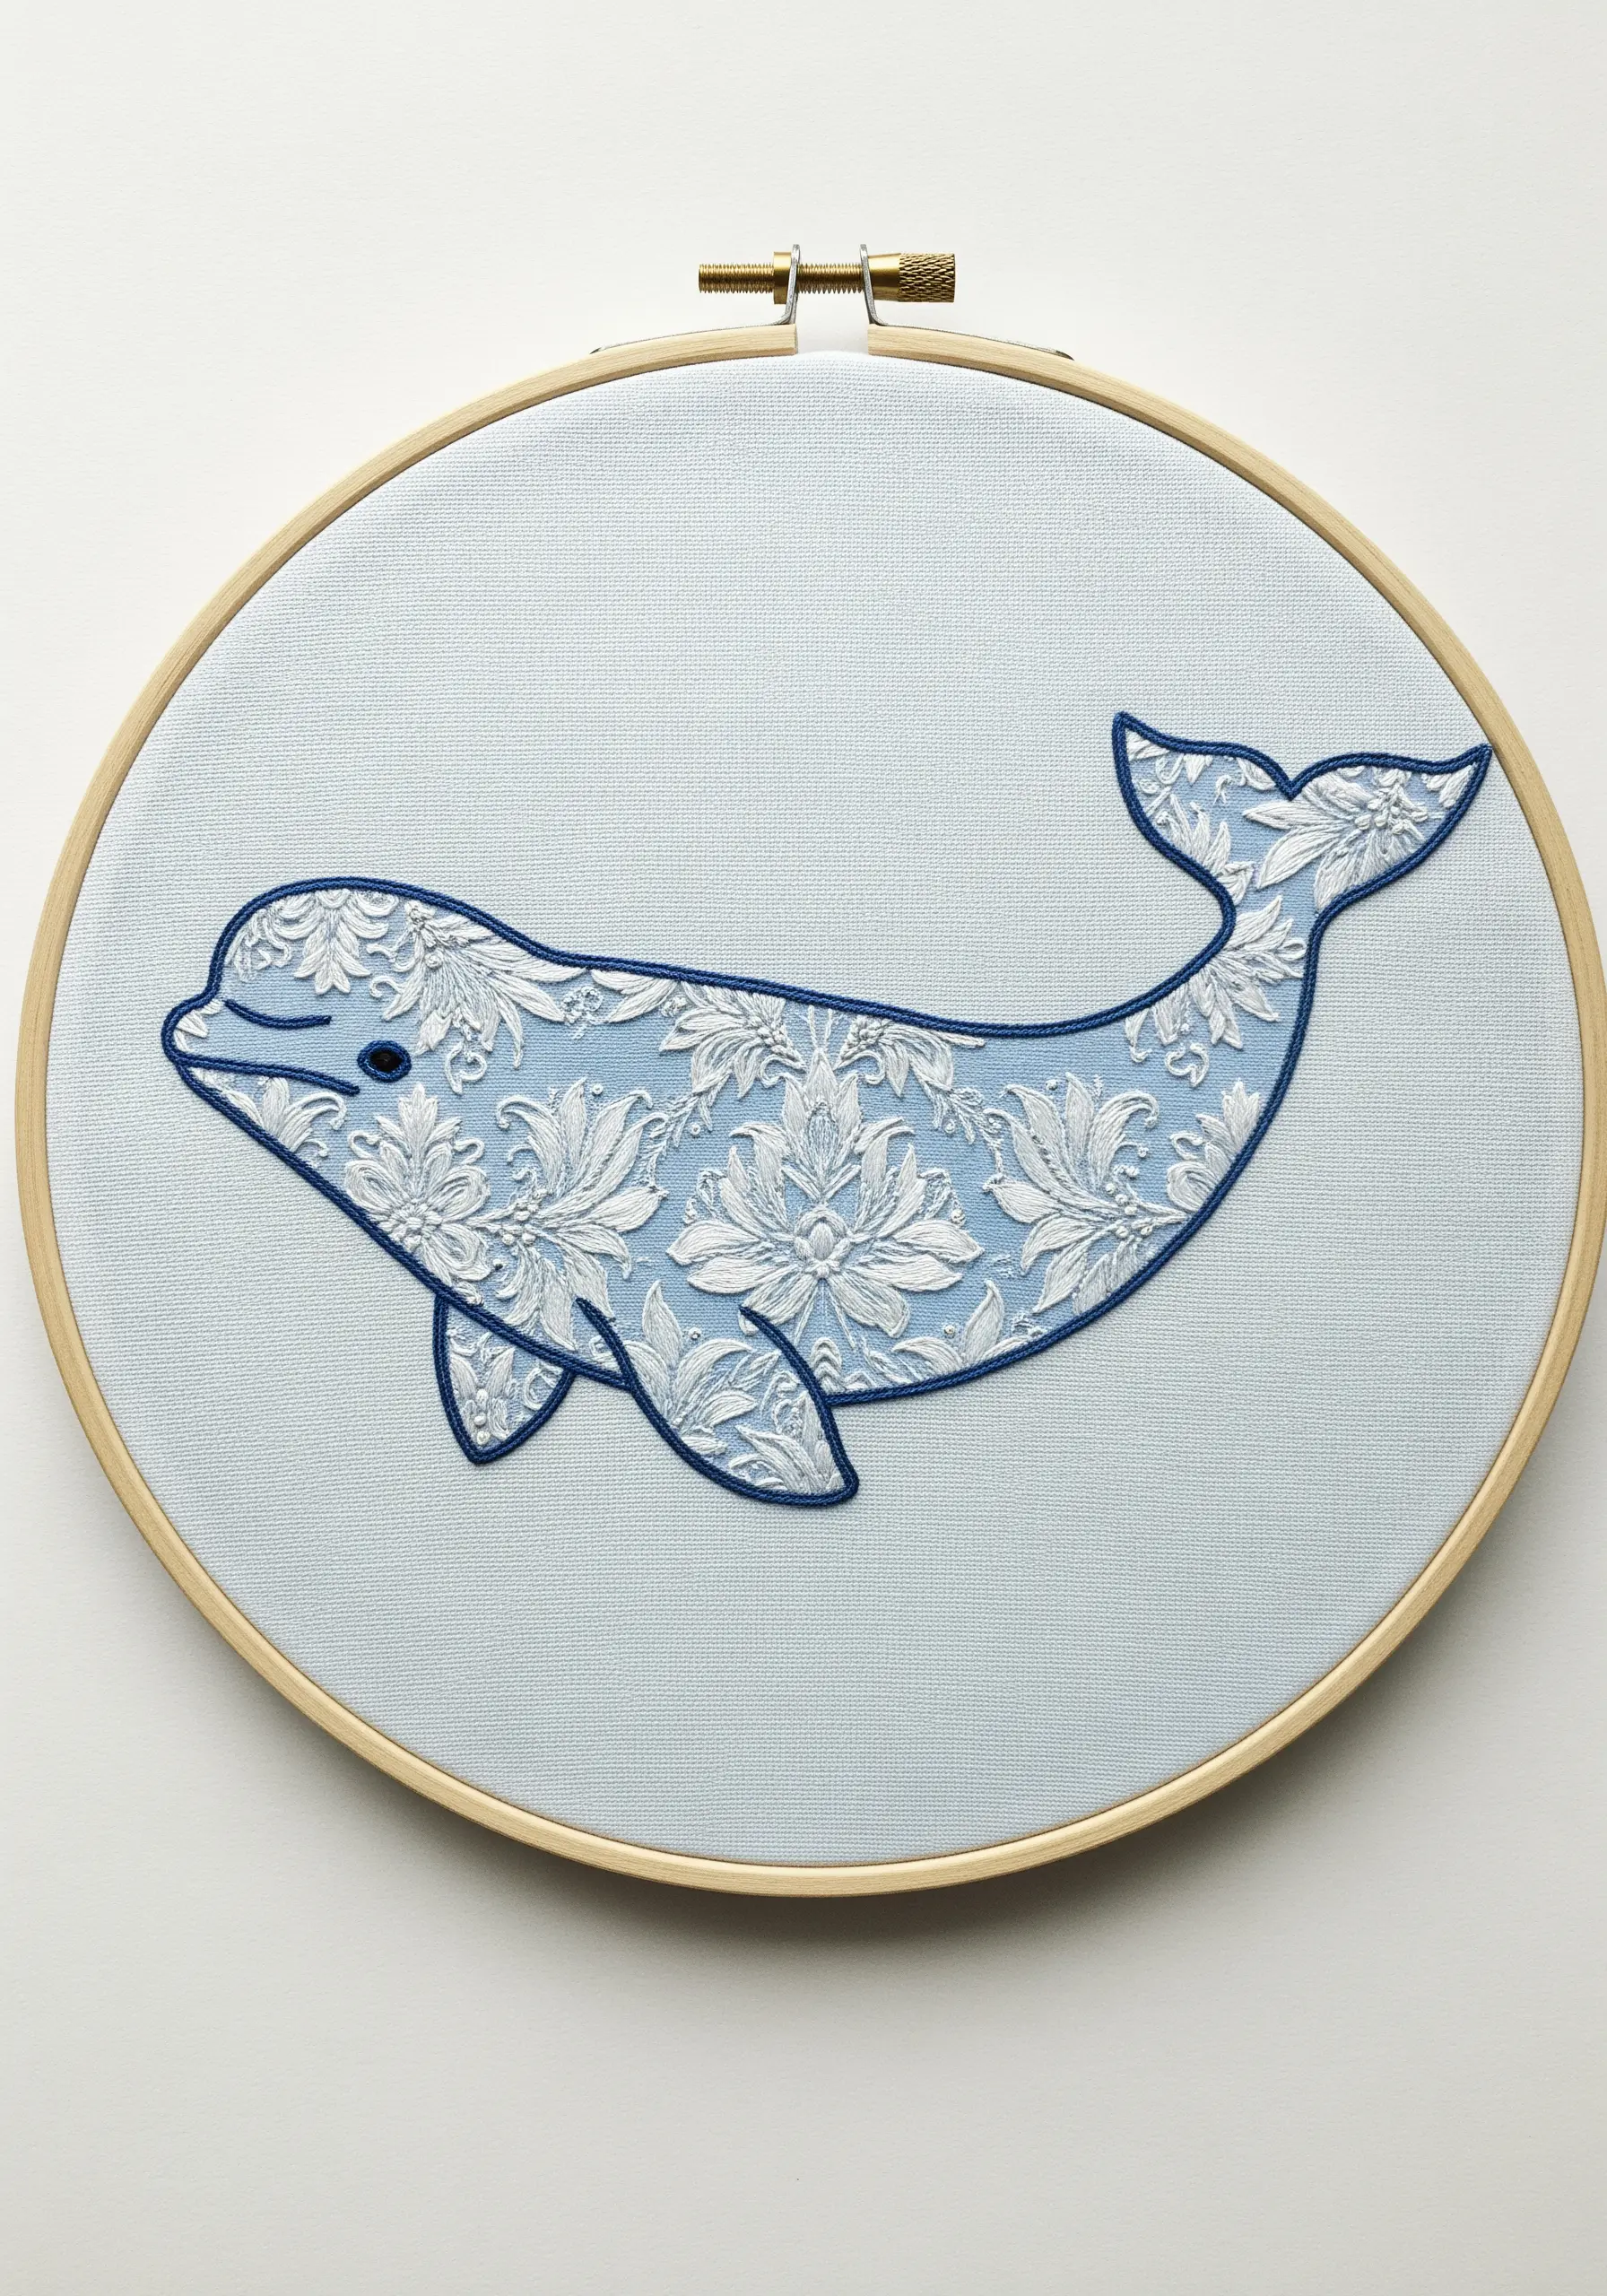
Create intricate detail without stitching every single element by using fabric itself as your fill.
Trace your whale silhouette onto a piece of delicate floral lace and carefully cut it out.
Position the lace on your background fabric and secure it using tiny, nearly invisible appliqué stitches around the edges with a single strand of matching thread.
Finally, add a clean backstitch outline in a contrasting color to define the shape. This technique offers stunning complexity with minimal effort.
12. Create Atmospheric Depth in a Kelp Forest
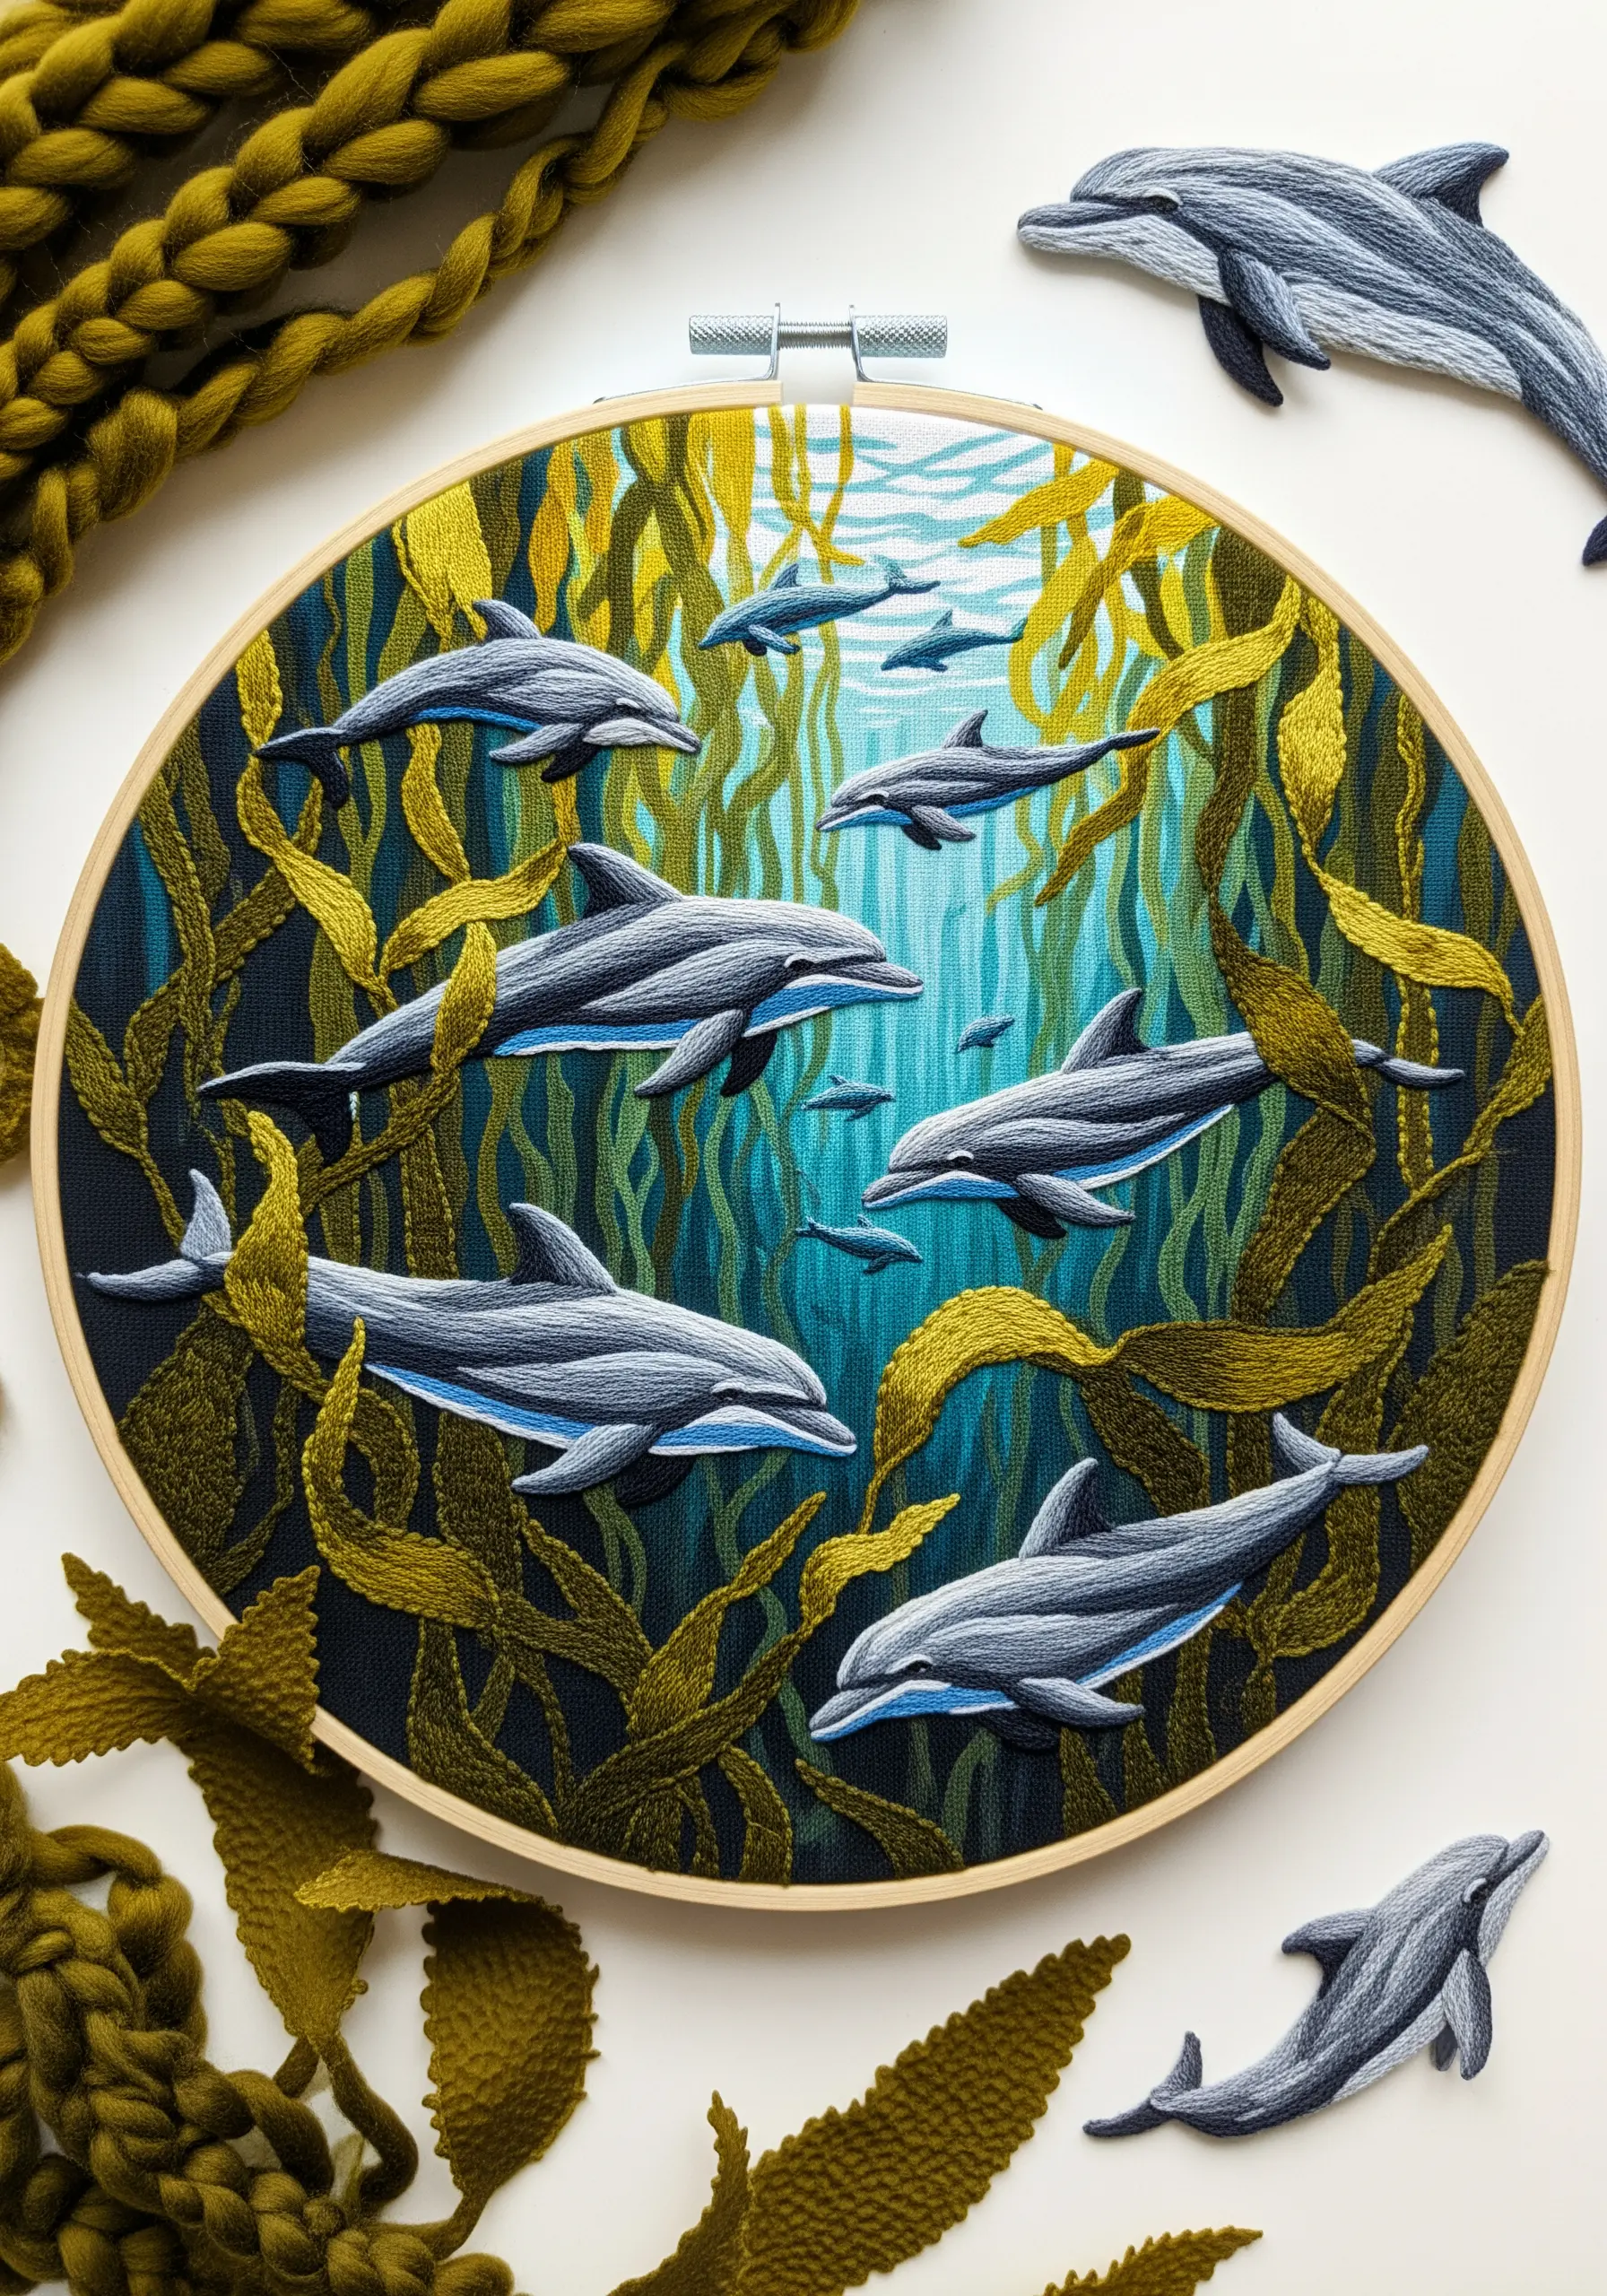
Suggest distance and a deep-water environment by carefully manipulating color and detail.
Stitch the kelp and dolphins in the background with fewer strands of thread and in muted, darker shades. Keep their details minimal.
As you move to the foreground, switch to brighter, more saturated colors and use more strands of thread for a bolder presence.
Add finer details and highlights to the closest dolphins. This mimics atmospheric perspective, making your 2D scene feel like a deep, three-dimensional space.
13. Add Realistic Texture with Scattered French Knots
Mimic the look of barnacles on a whale’s tail by using strategically placed French knots.
Fill the tail with a smooth long-and-short stitch in a deep blue.
Then, using a contrasting beige or off-white thread, scatter French knots across the surface. Vary their size slightly by changing how many times you wrap the thread around the needle.
This simple addition of texture over a smooth base adds a layer of realism and storytelling to your piece.
14. Design a Symmetrical Botanical Frame
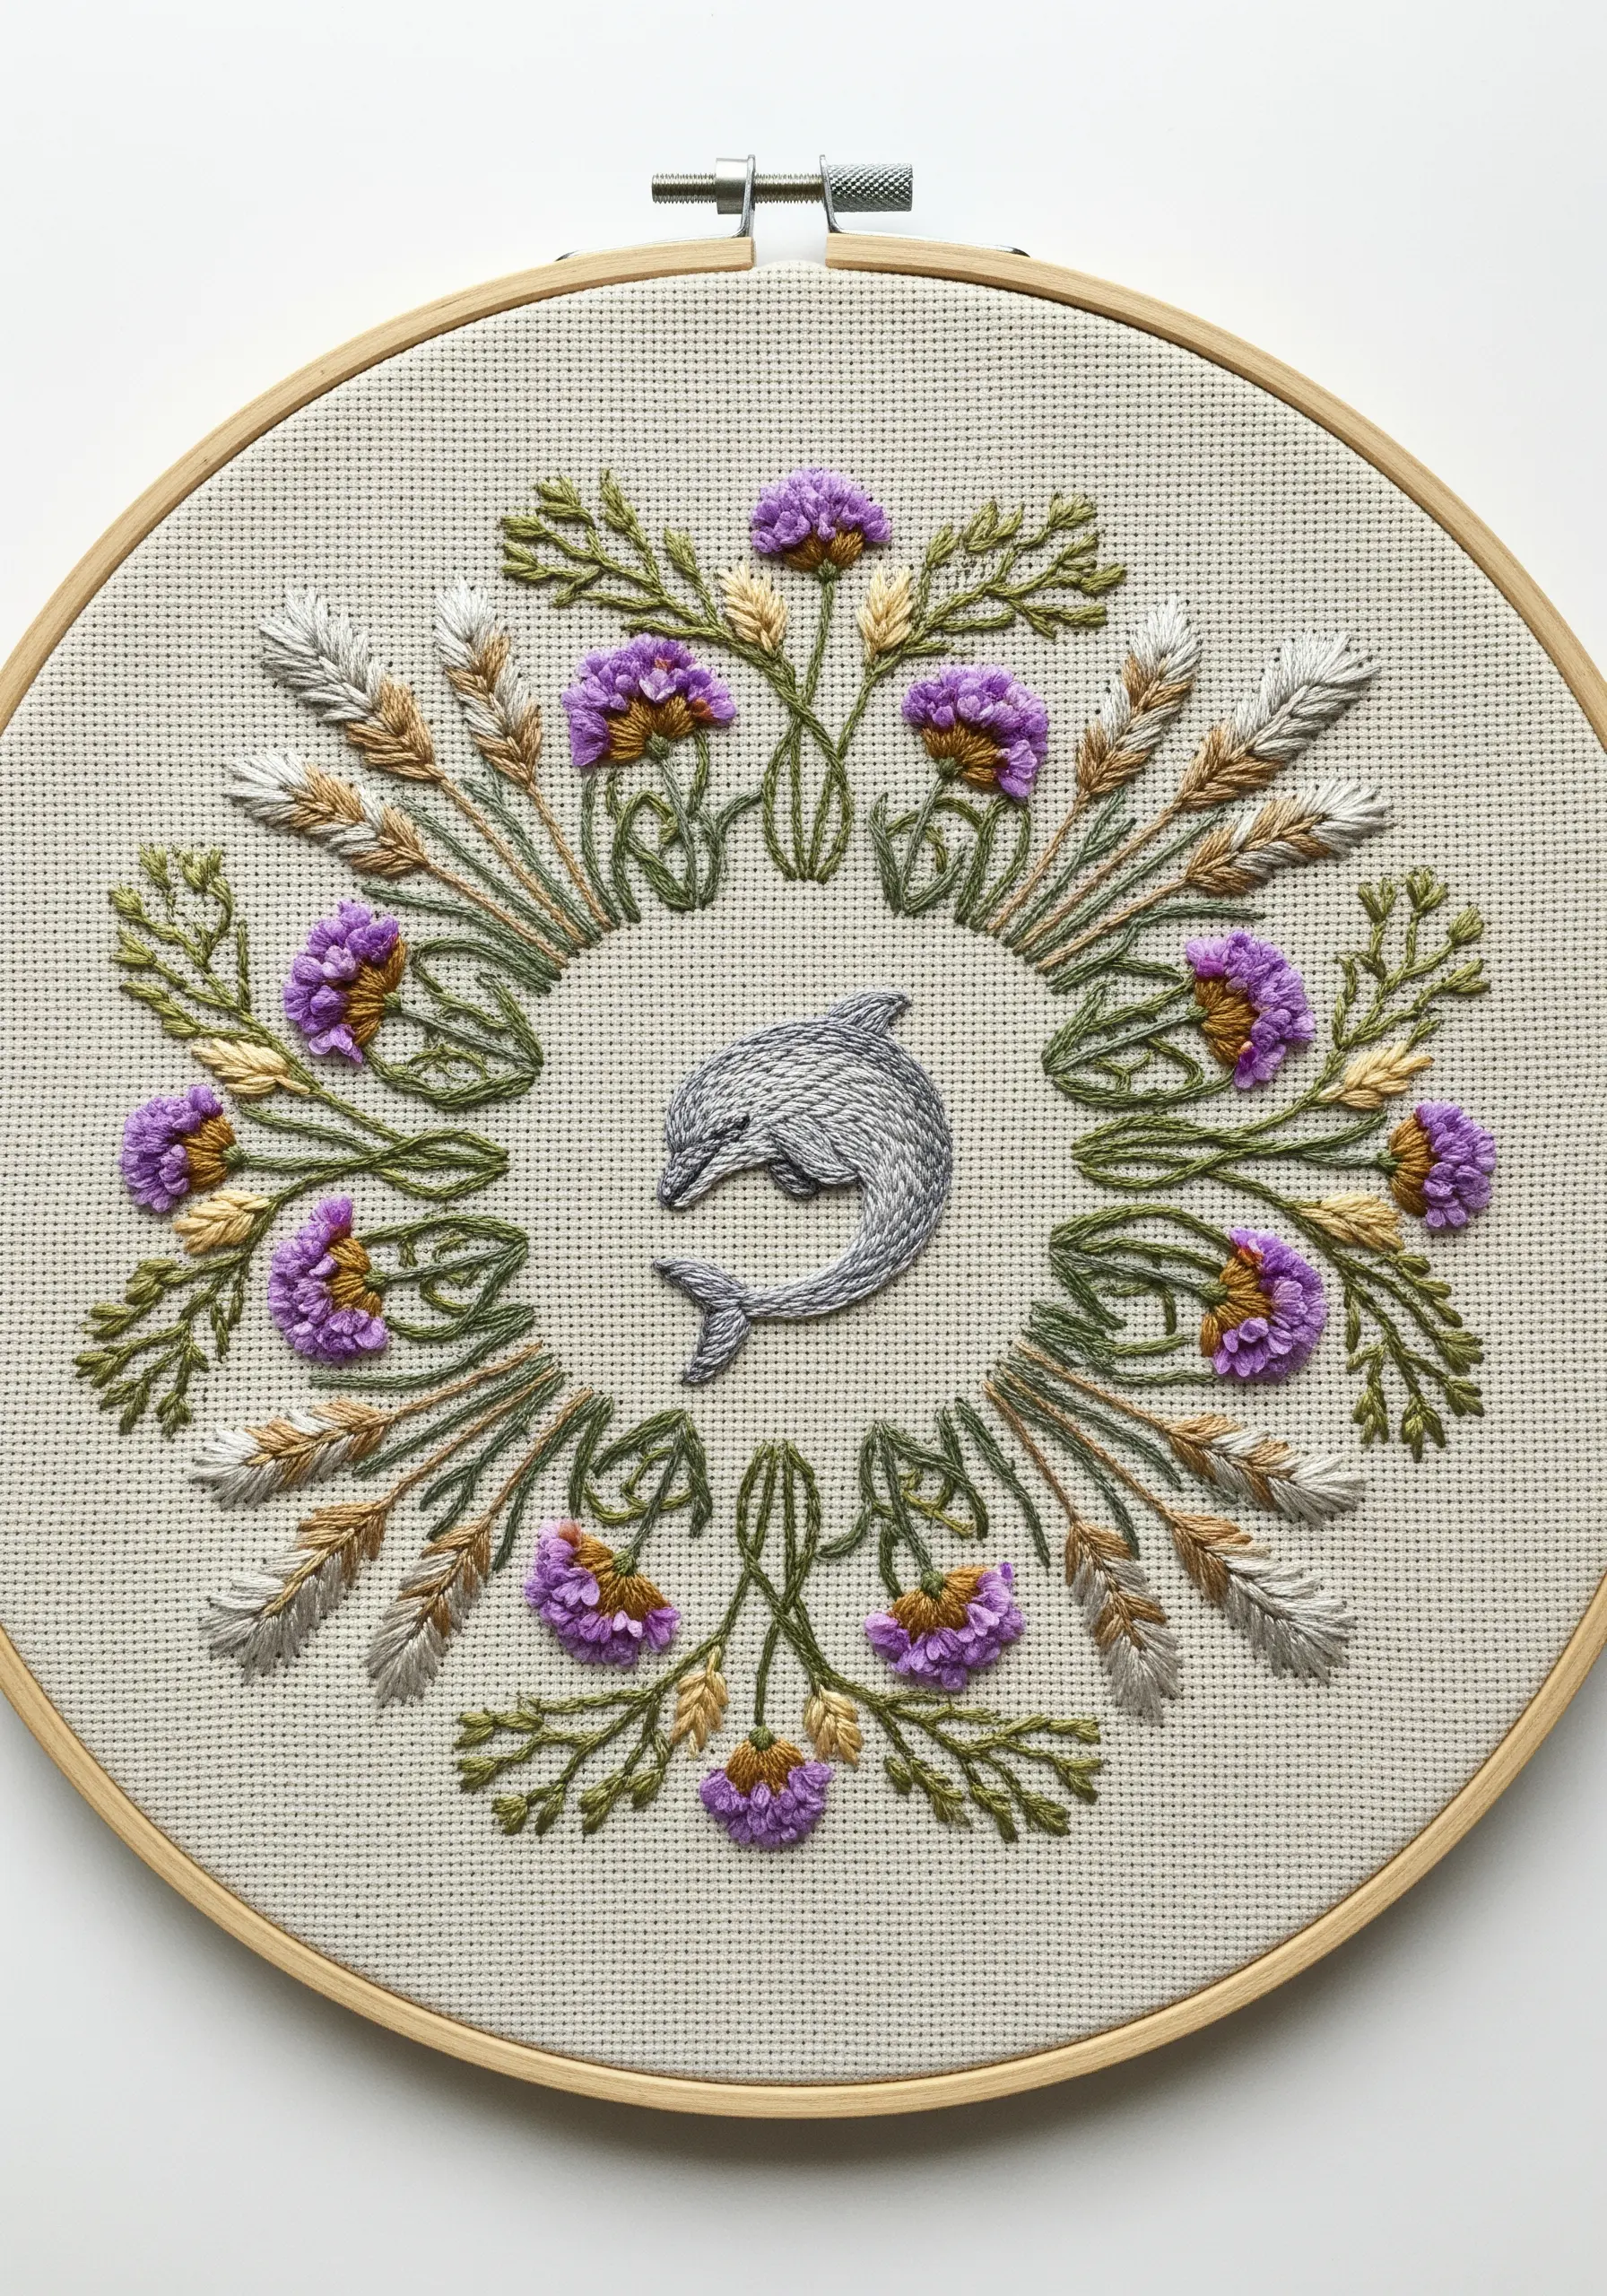
Create a sense of harmony and balance by placing your central motif within a perfectly symmetrical wreath.
Lightly draw a central vertical axis and sketch one half of your floral design. Then, trace and flip it to create a mirror image on the other side.
Use a variety of stitches to add texture—like woven wheel stitches for the purple flowers and fishbone stitch for the wheat shafts.
The formal structure of the wreath beautifully frames the gracefully curved dolphin, making it a sophisticated and classic composition.
15. Display Your Art on a Round Stretched Canvas
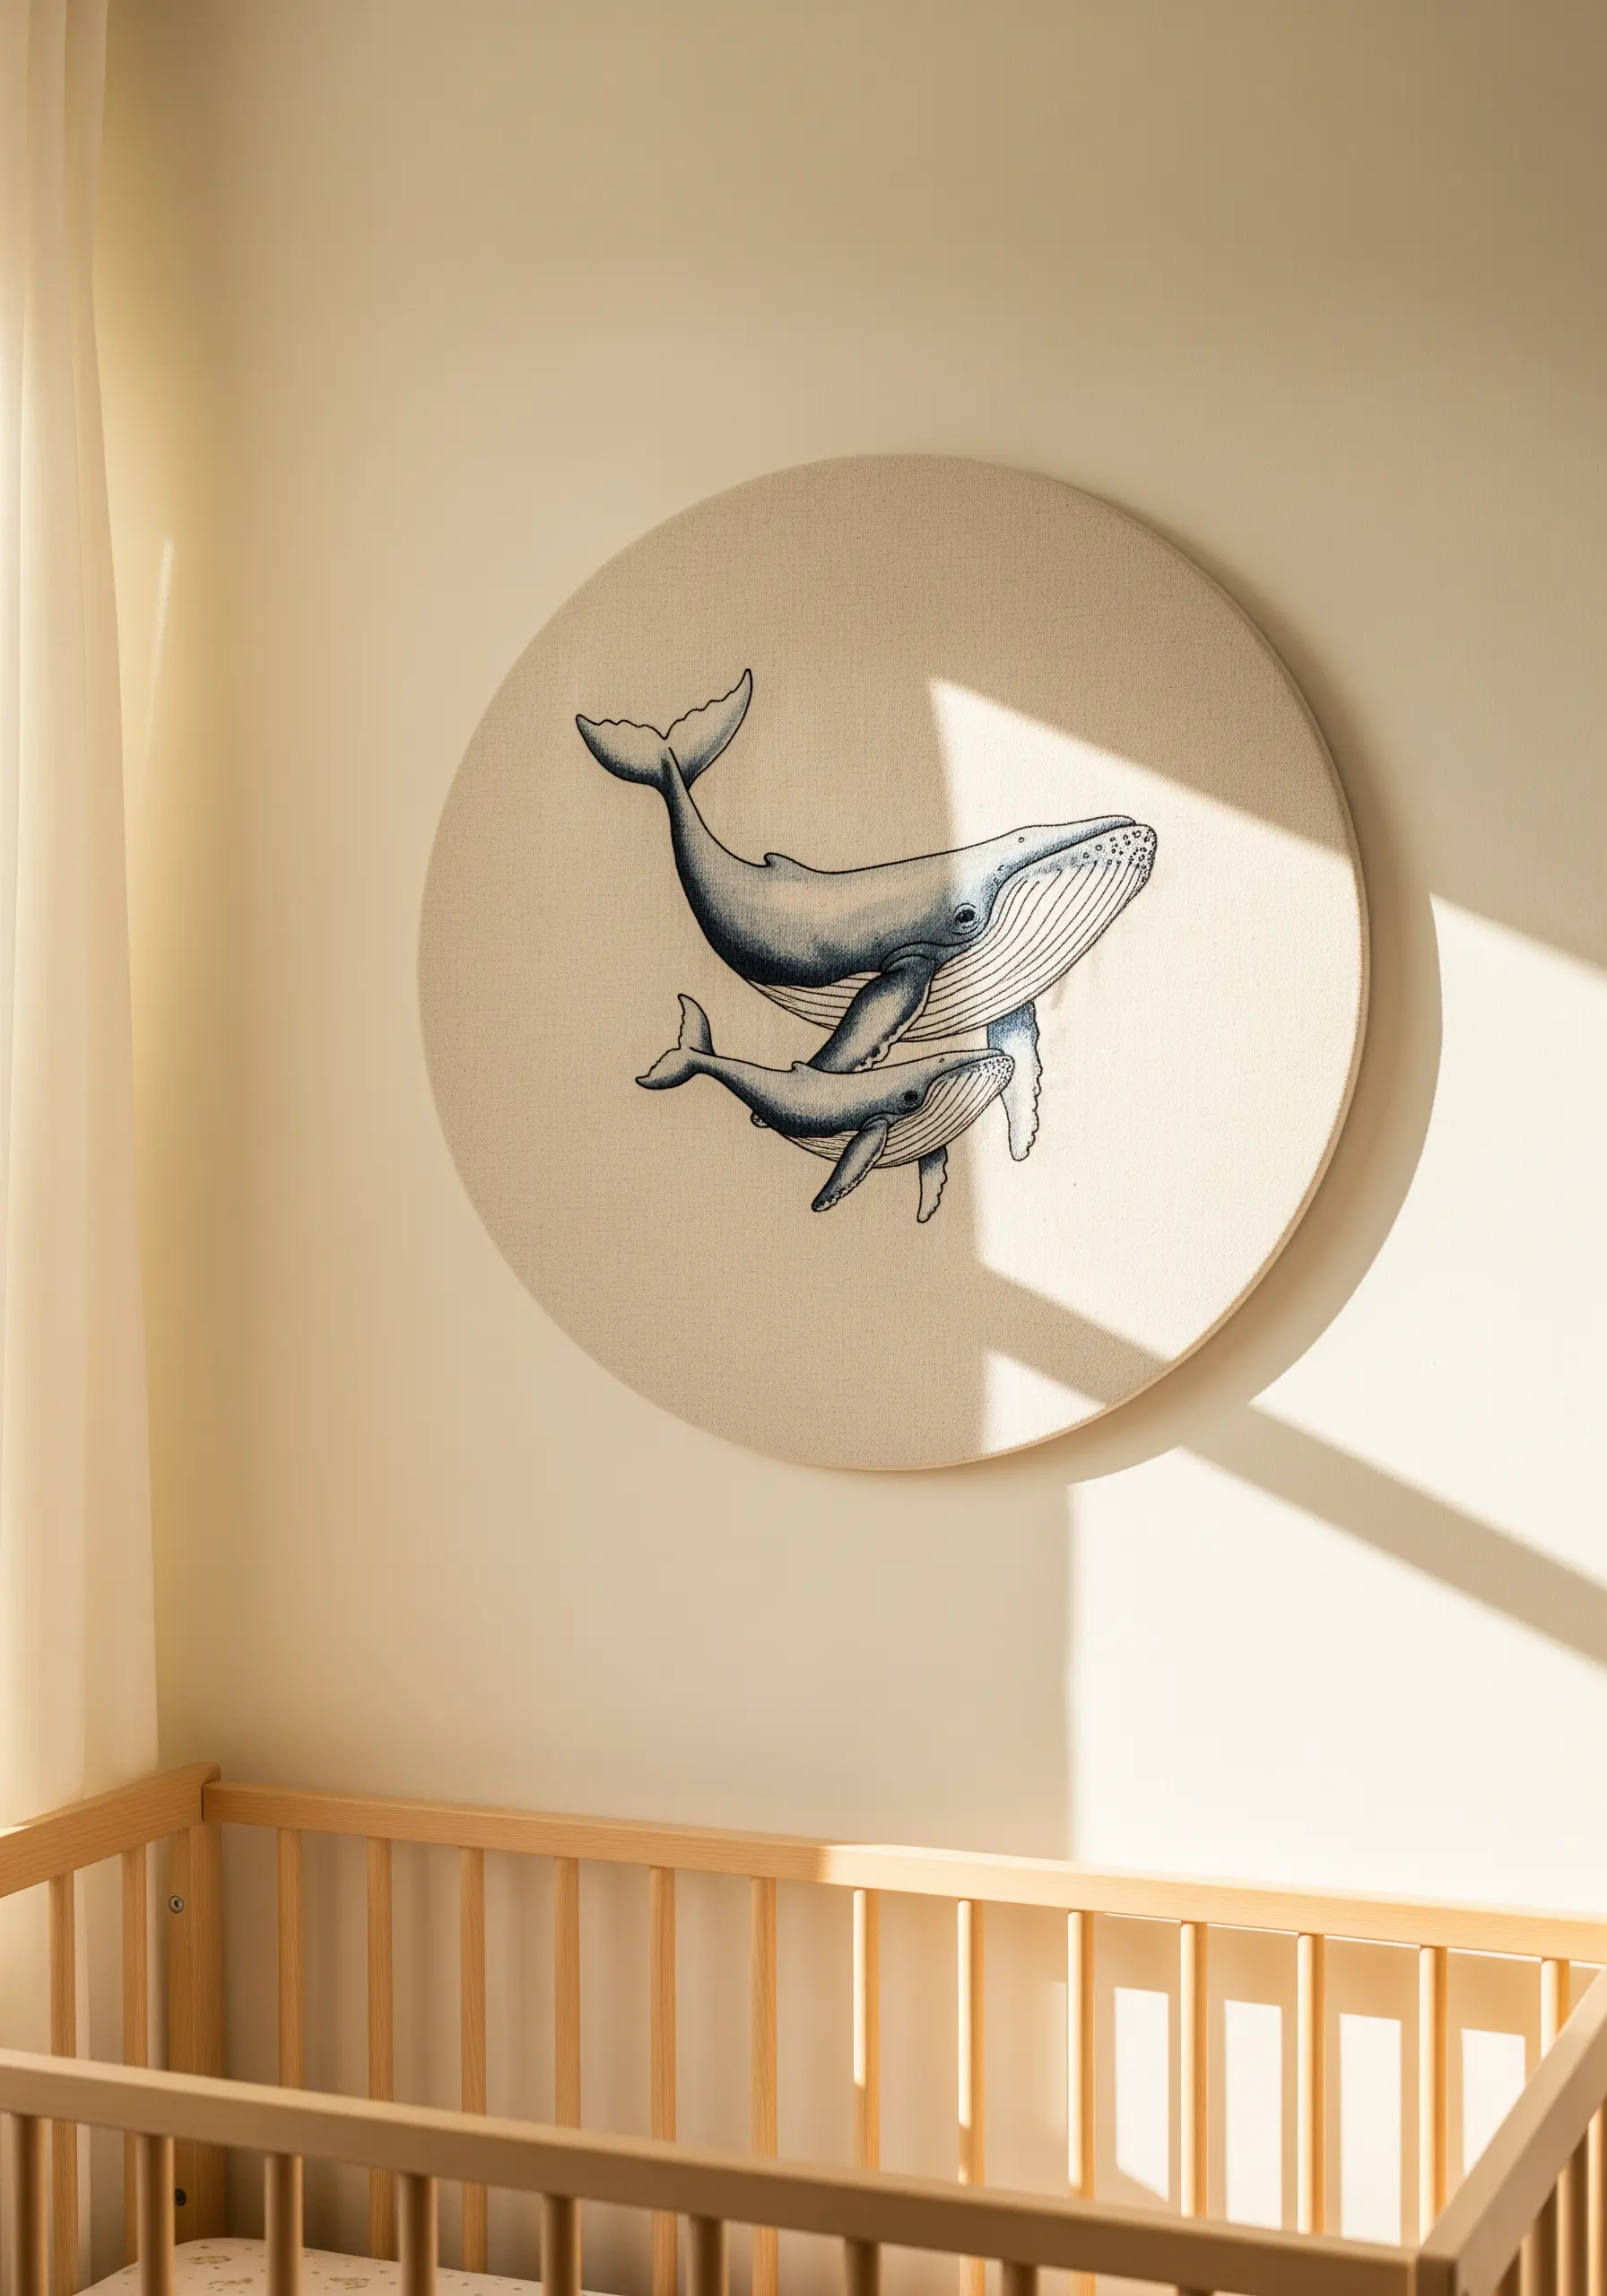
Move beyond the traditional hoop for a clean, gallery-style presentation that is perfect for nursery walls or minimalist interiors.
Embroider your design on a piece of fabric several inches larger than your canvas.
Once complete, iron your piece carefully and stretch it tightly over a round wooden artist’s canvas, securing it on the back with a staple gun or strong craft glue.
This frameless method allows the embroidery itself to be the sole focus, giving it a modern and substantial presence on the wall.
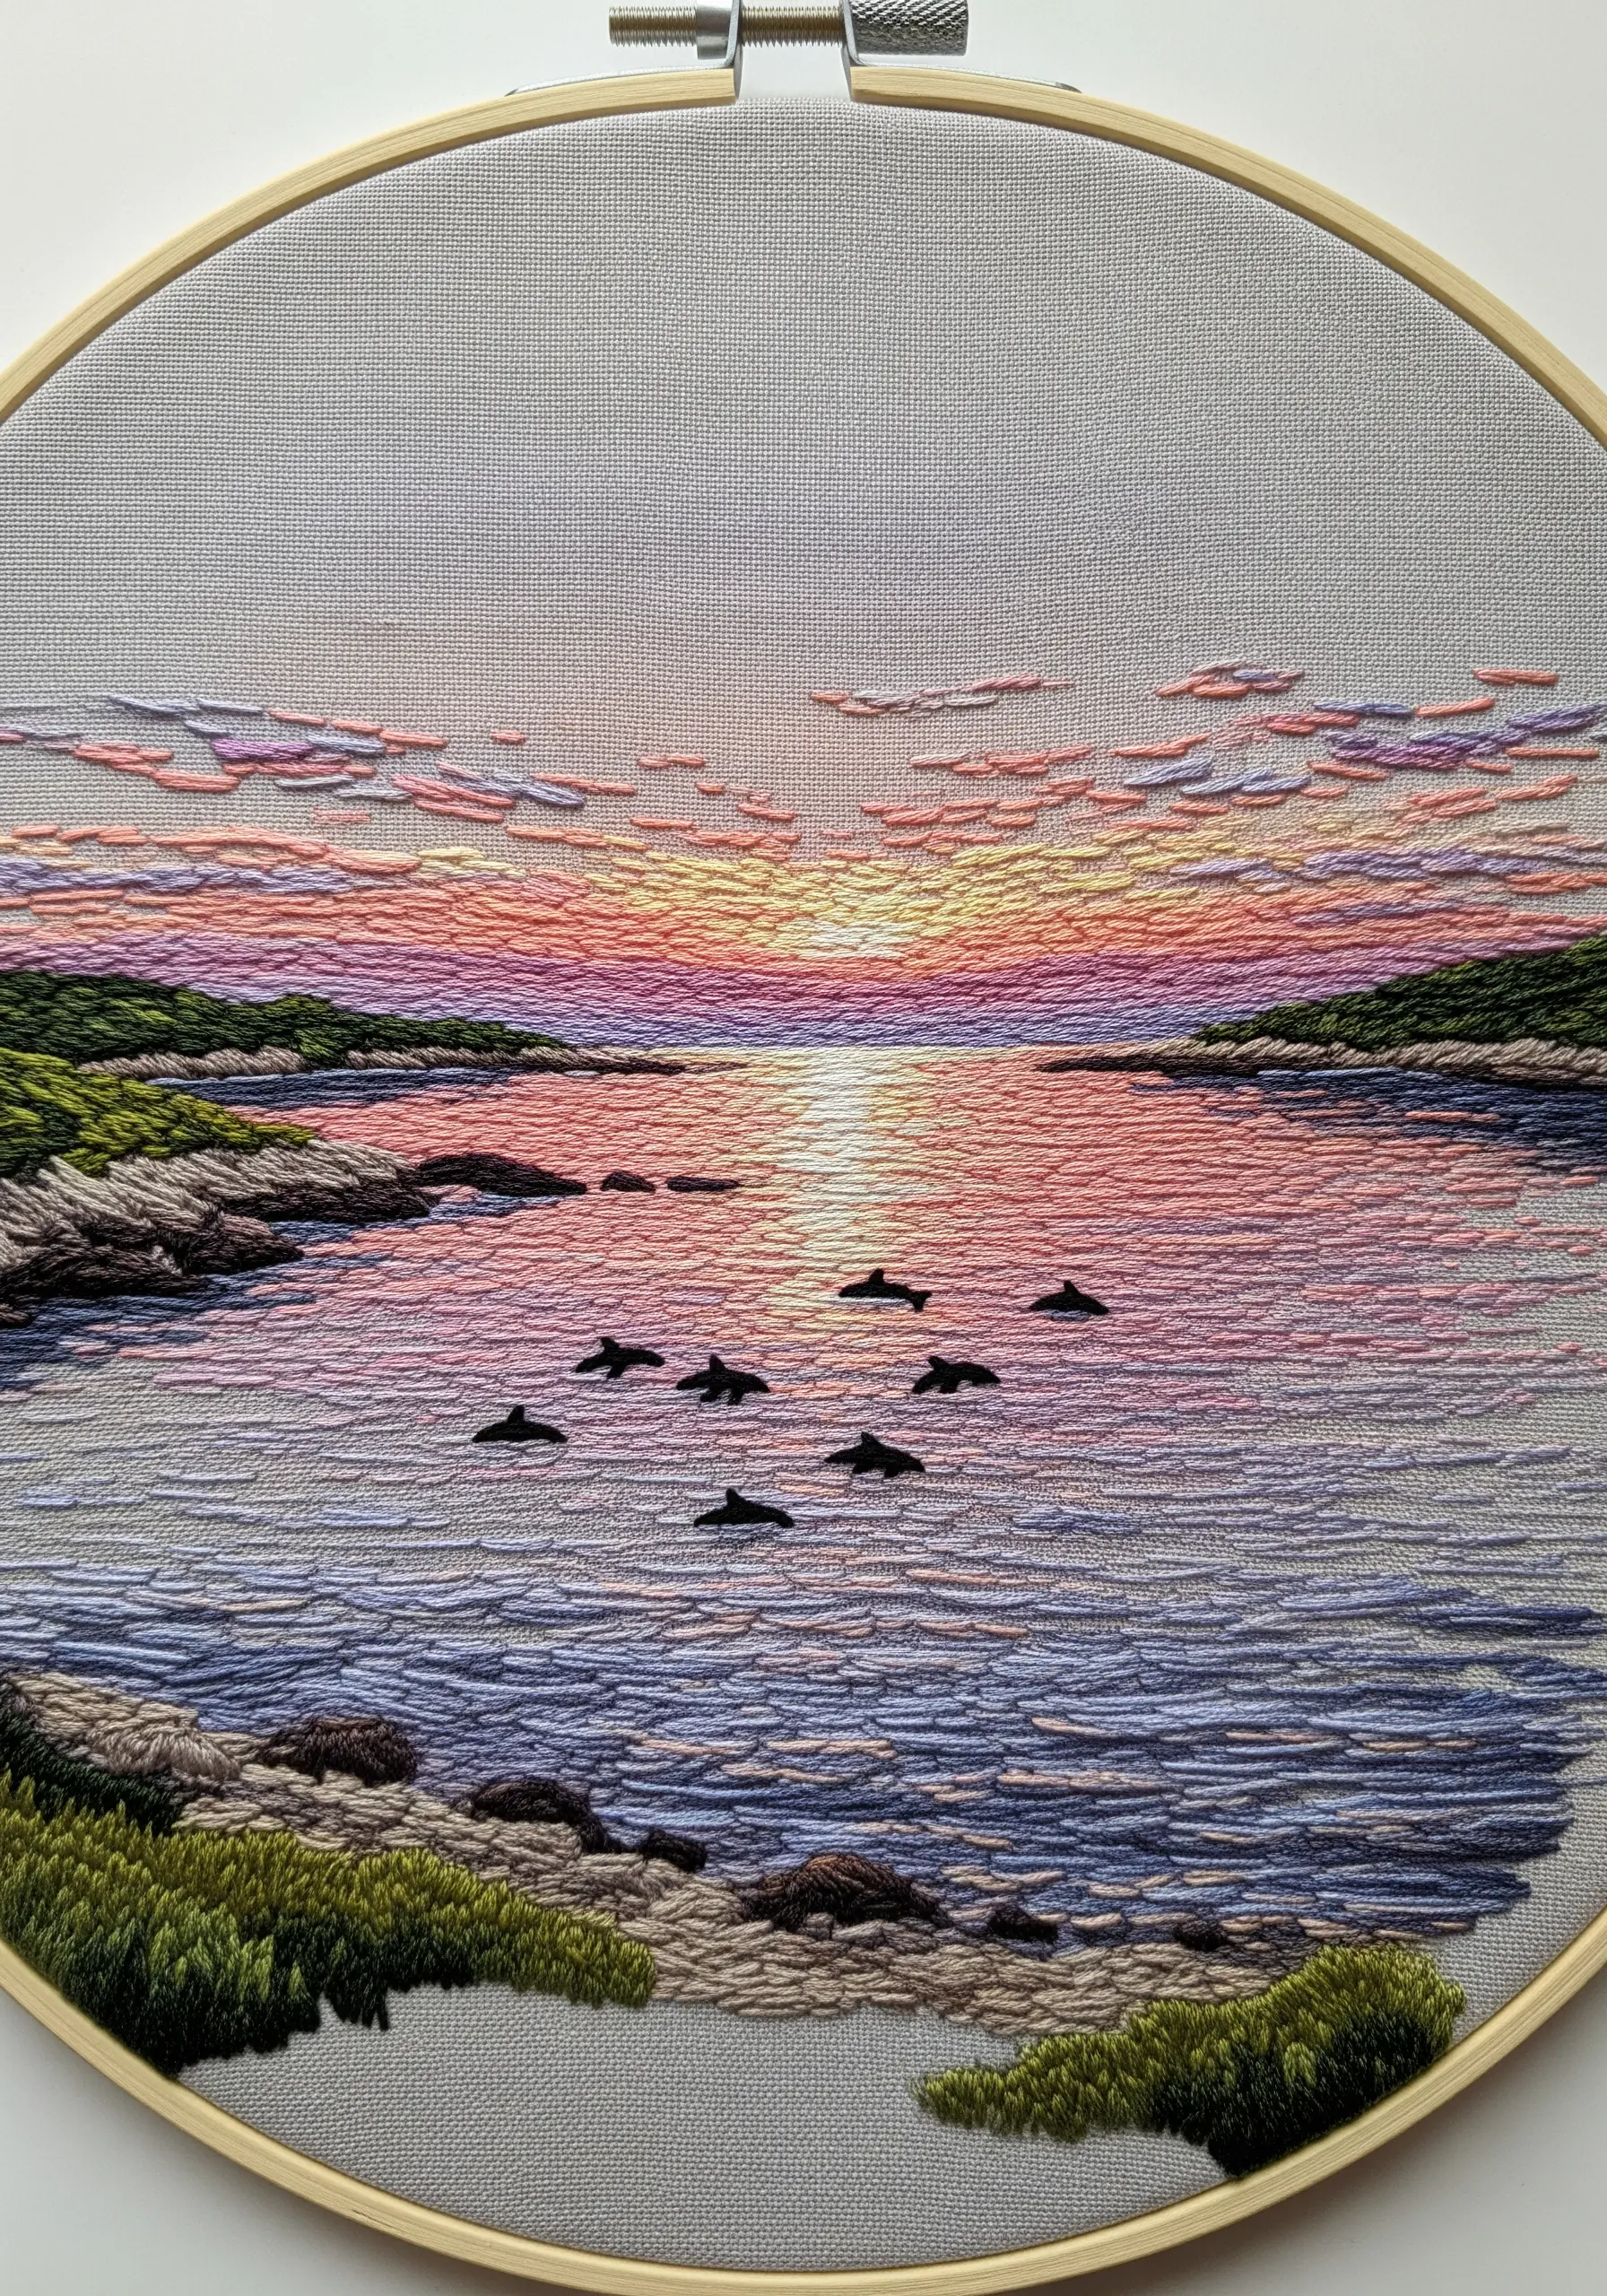
16. Paint a Sunset with Directional Stitches
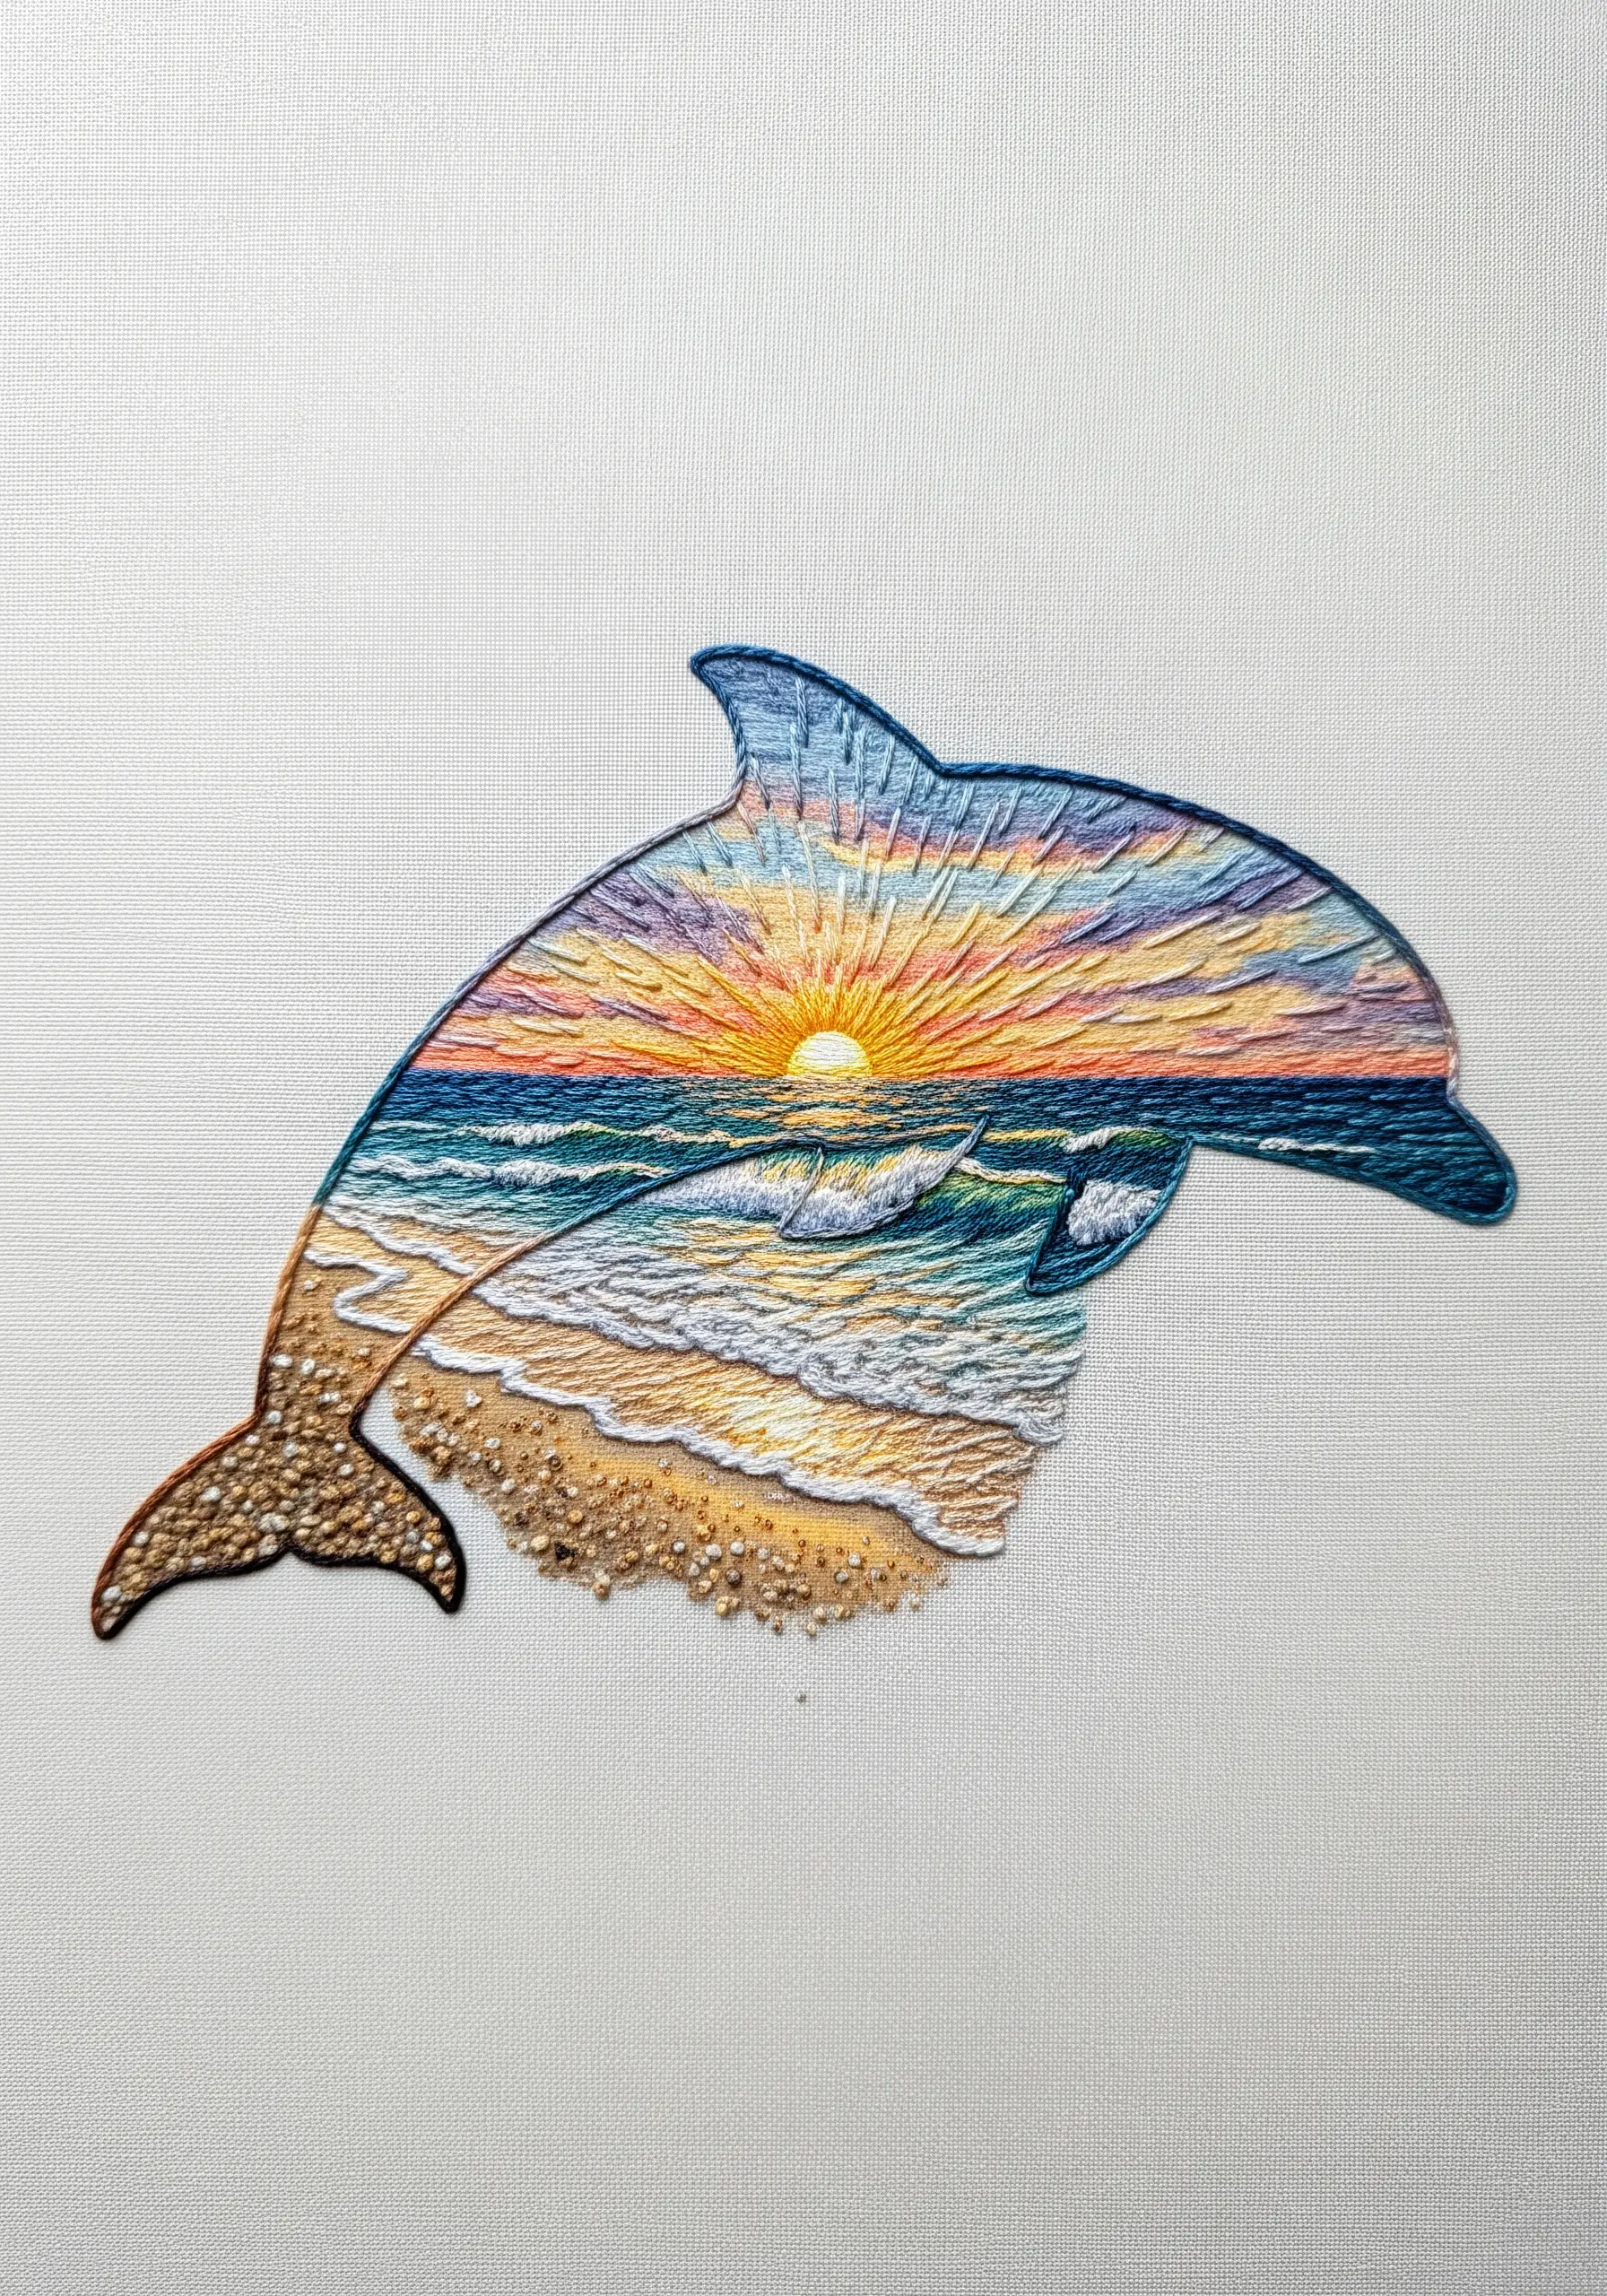
Capture the radiant glow of a sunset by using the direction of your stitches to your advantage.
For the sun’s rays, use long, straight stitches that fan out from a central point, blending yellows, oranges, and pinks.
For the water and clouds, use horizontal long-and-short stitches to create a sense of calm, layered depth.
Letting your stitches follow the natural lines of the landscape is a key principle of thread painting that transforms a simple scene into a dynamic one.
17. Illustrate the Northern Lights with Vertical Stitches
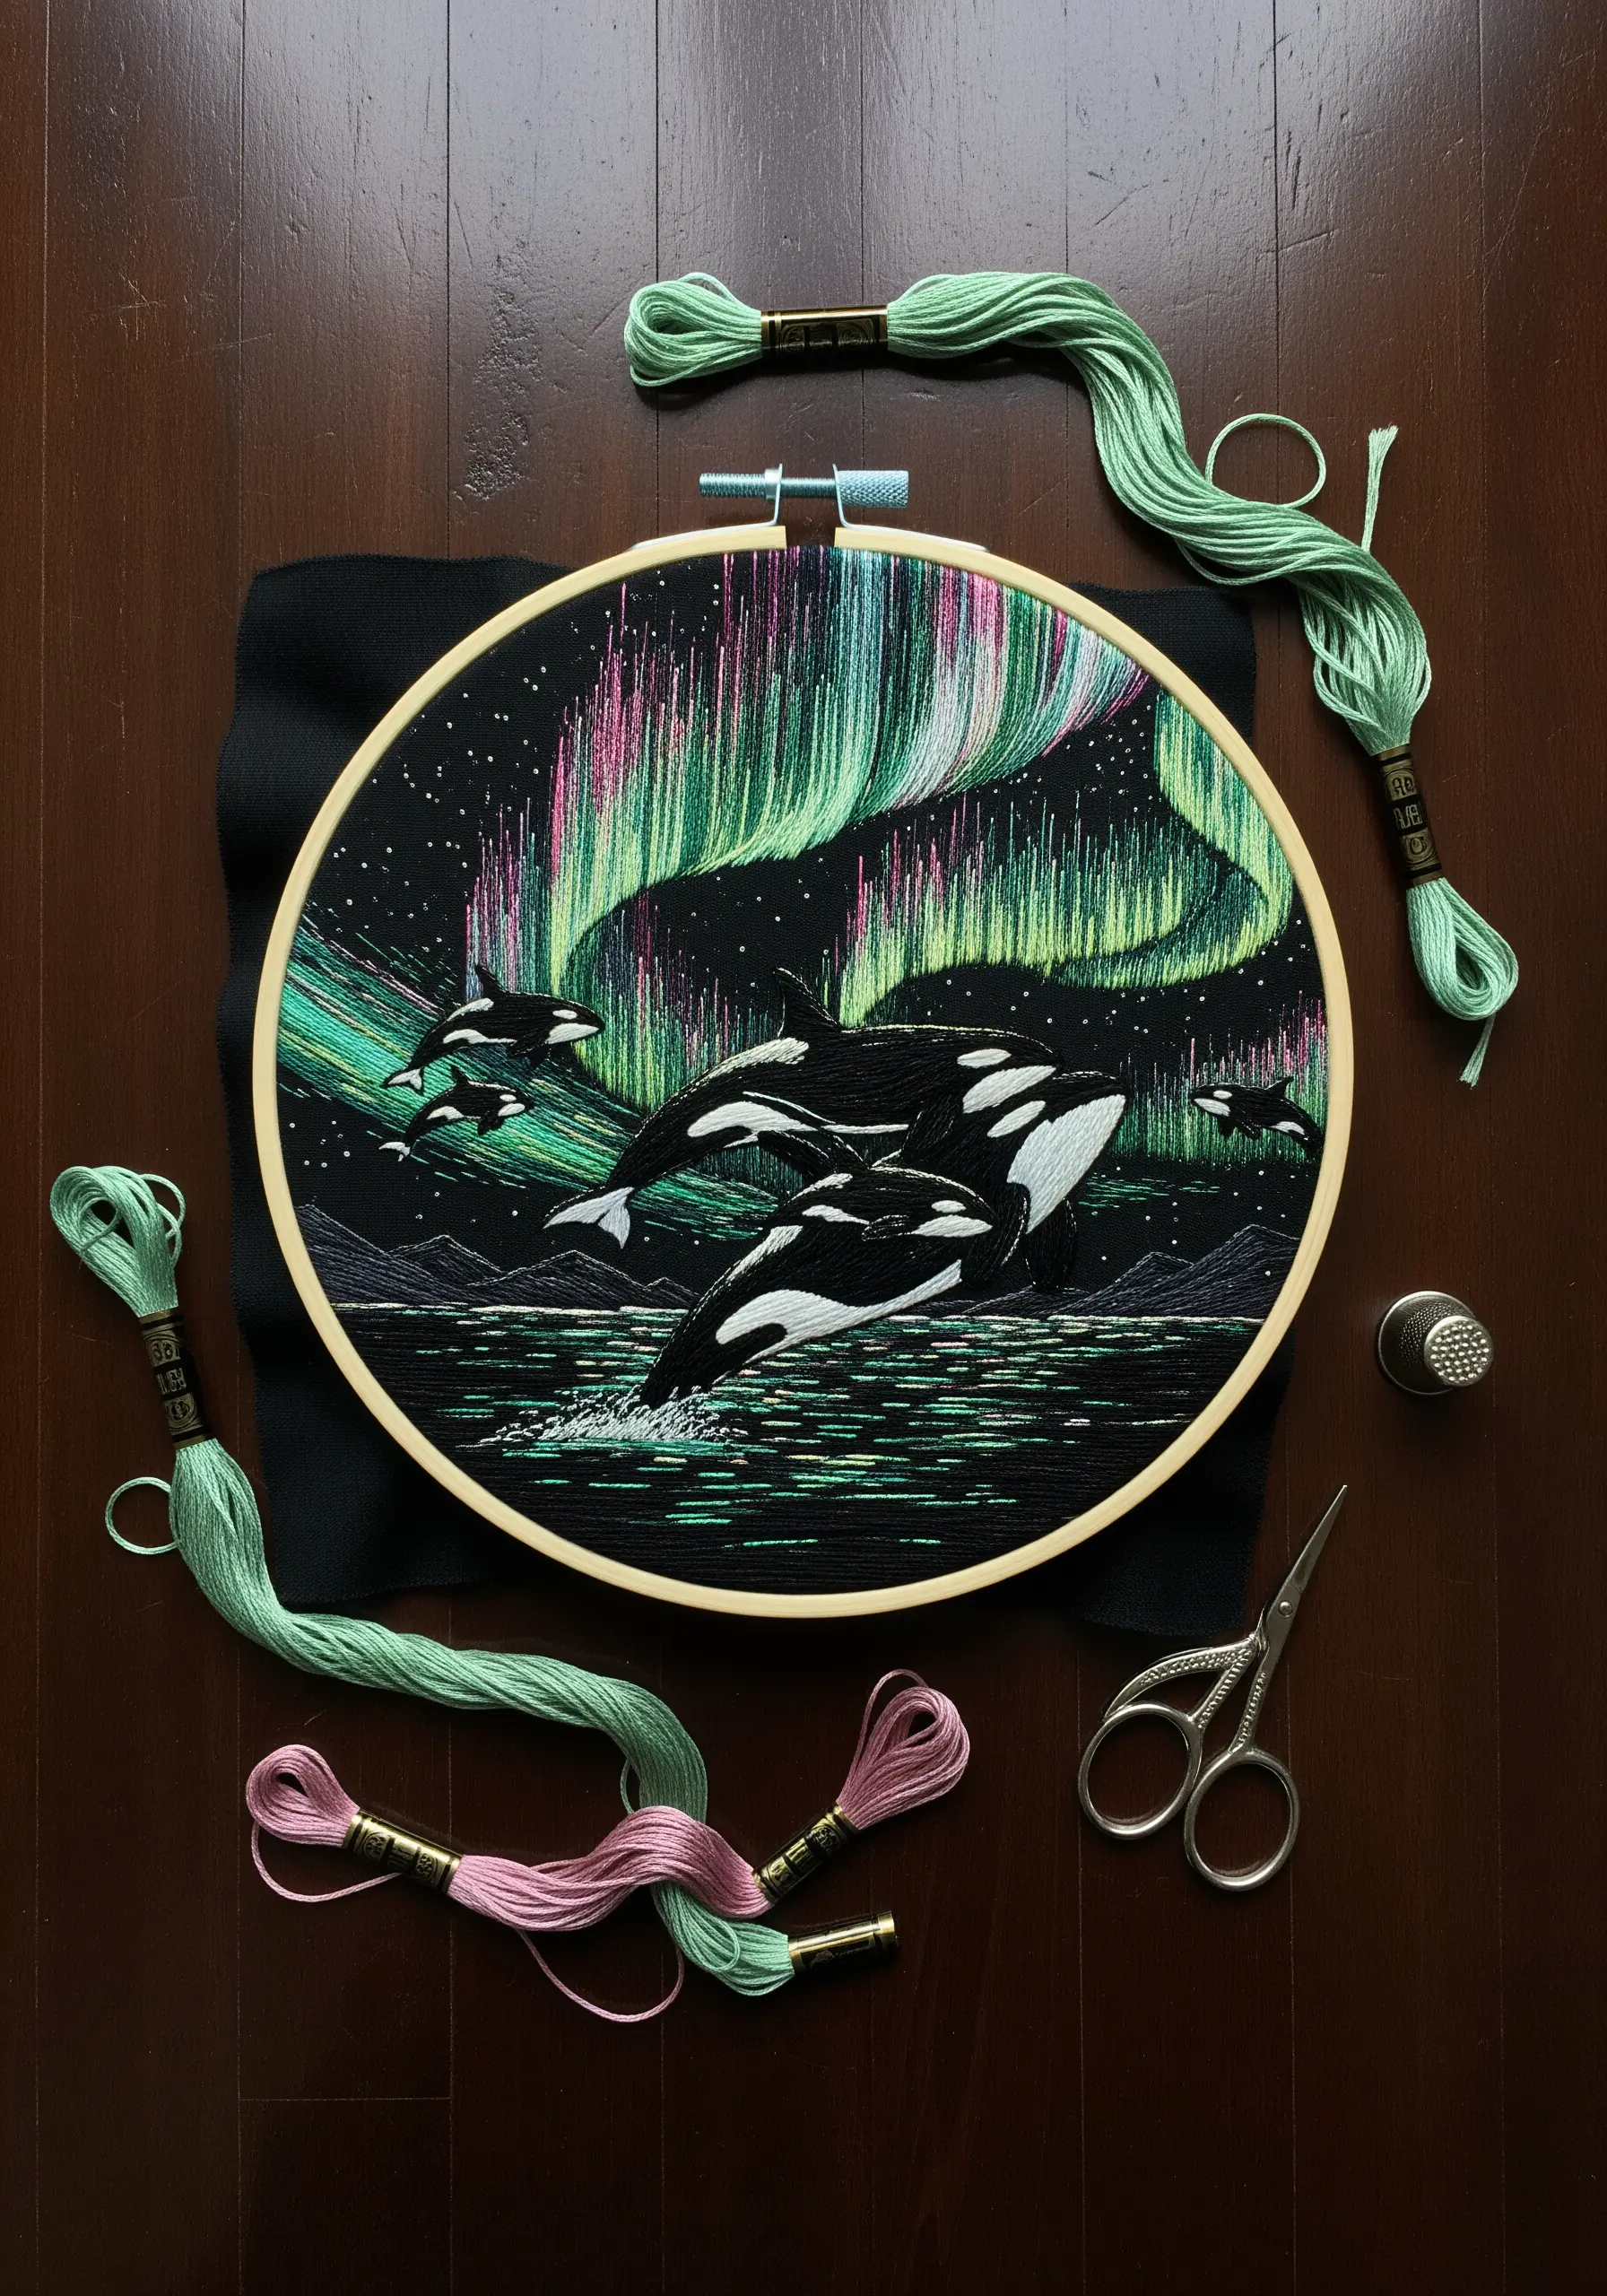
To capture the ethereal, curtain-like movement of the aurora borealis, rely on simple vertical straight stitches.
Use single strands of thread in various shades of green, aqua, and even pink. Vary the start and end points of your stitches to create a jagged, shimmering edge.
Don’t be afraid to leave small gaps of the black fabric showing through—this enhances the effect of transparent, dancing light.
The key is layering these colors without over-blending, keeping the look crisp and energetic.
18. Use Turkey Work for Plush, 3D Textures
Make elements of your embroidery stand out—literally—by using the Turkey work stitch.
Create loops of thread across the surface of the anemone shapes, securing each one with a tiny holding stitch.
Once an area is filled with loops, carefully snip them open with sharp embroidery scissors and fluff them up to create a soft, brush-like texture.
This highly dimensional effect provides a wonderful sensory contrast to the flat, smooth stitching of the dolphin.
19. Fill a Shape with Patterns Instead of Color
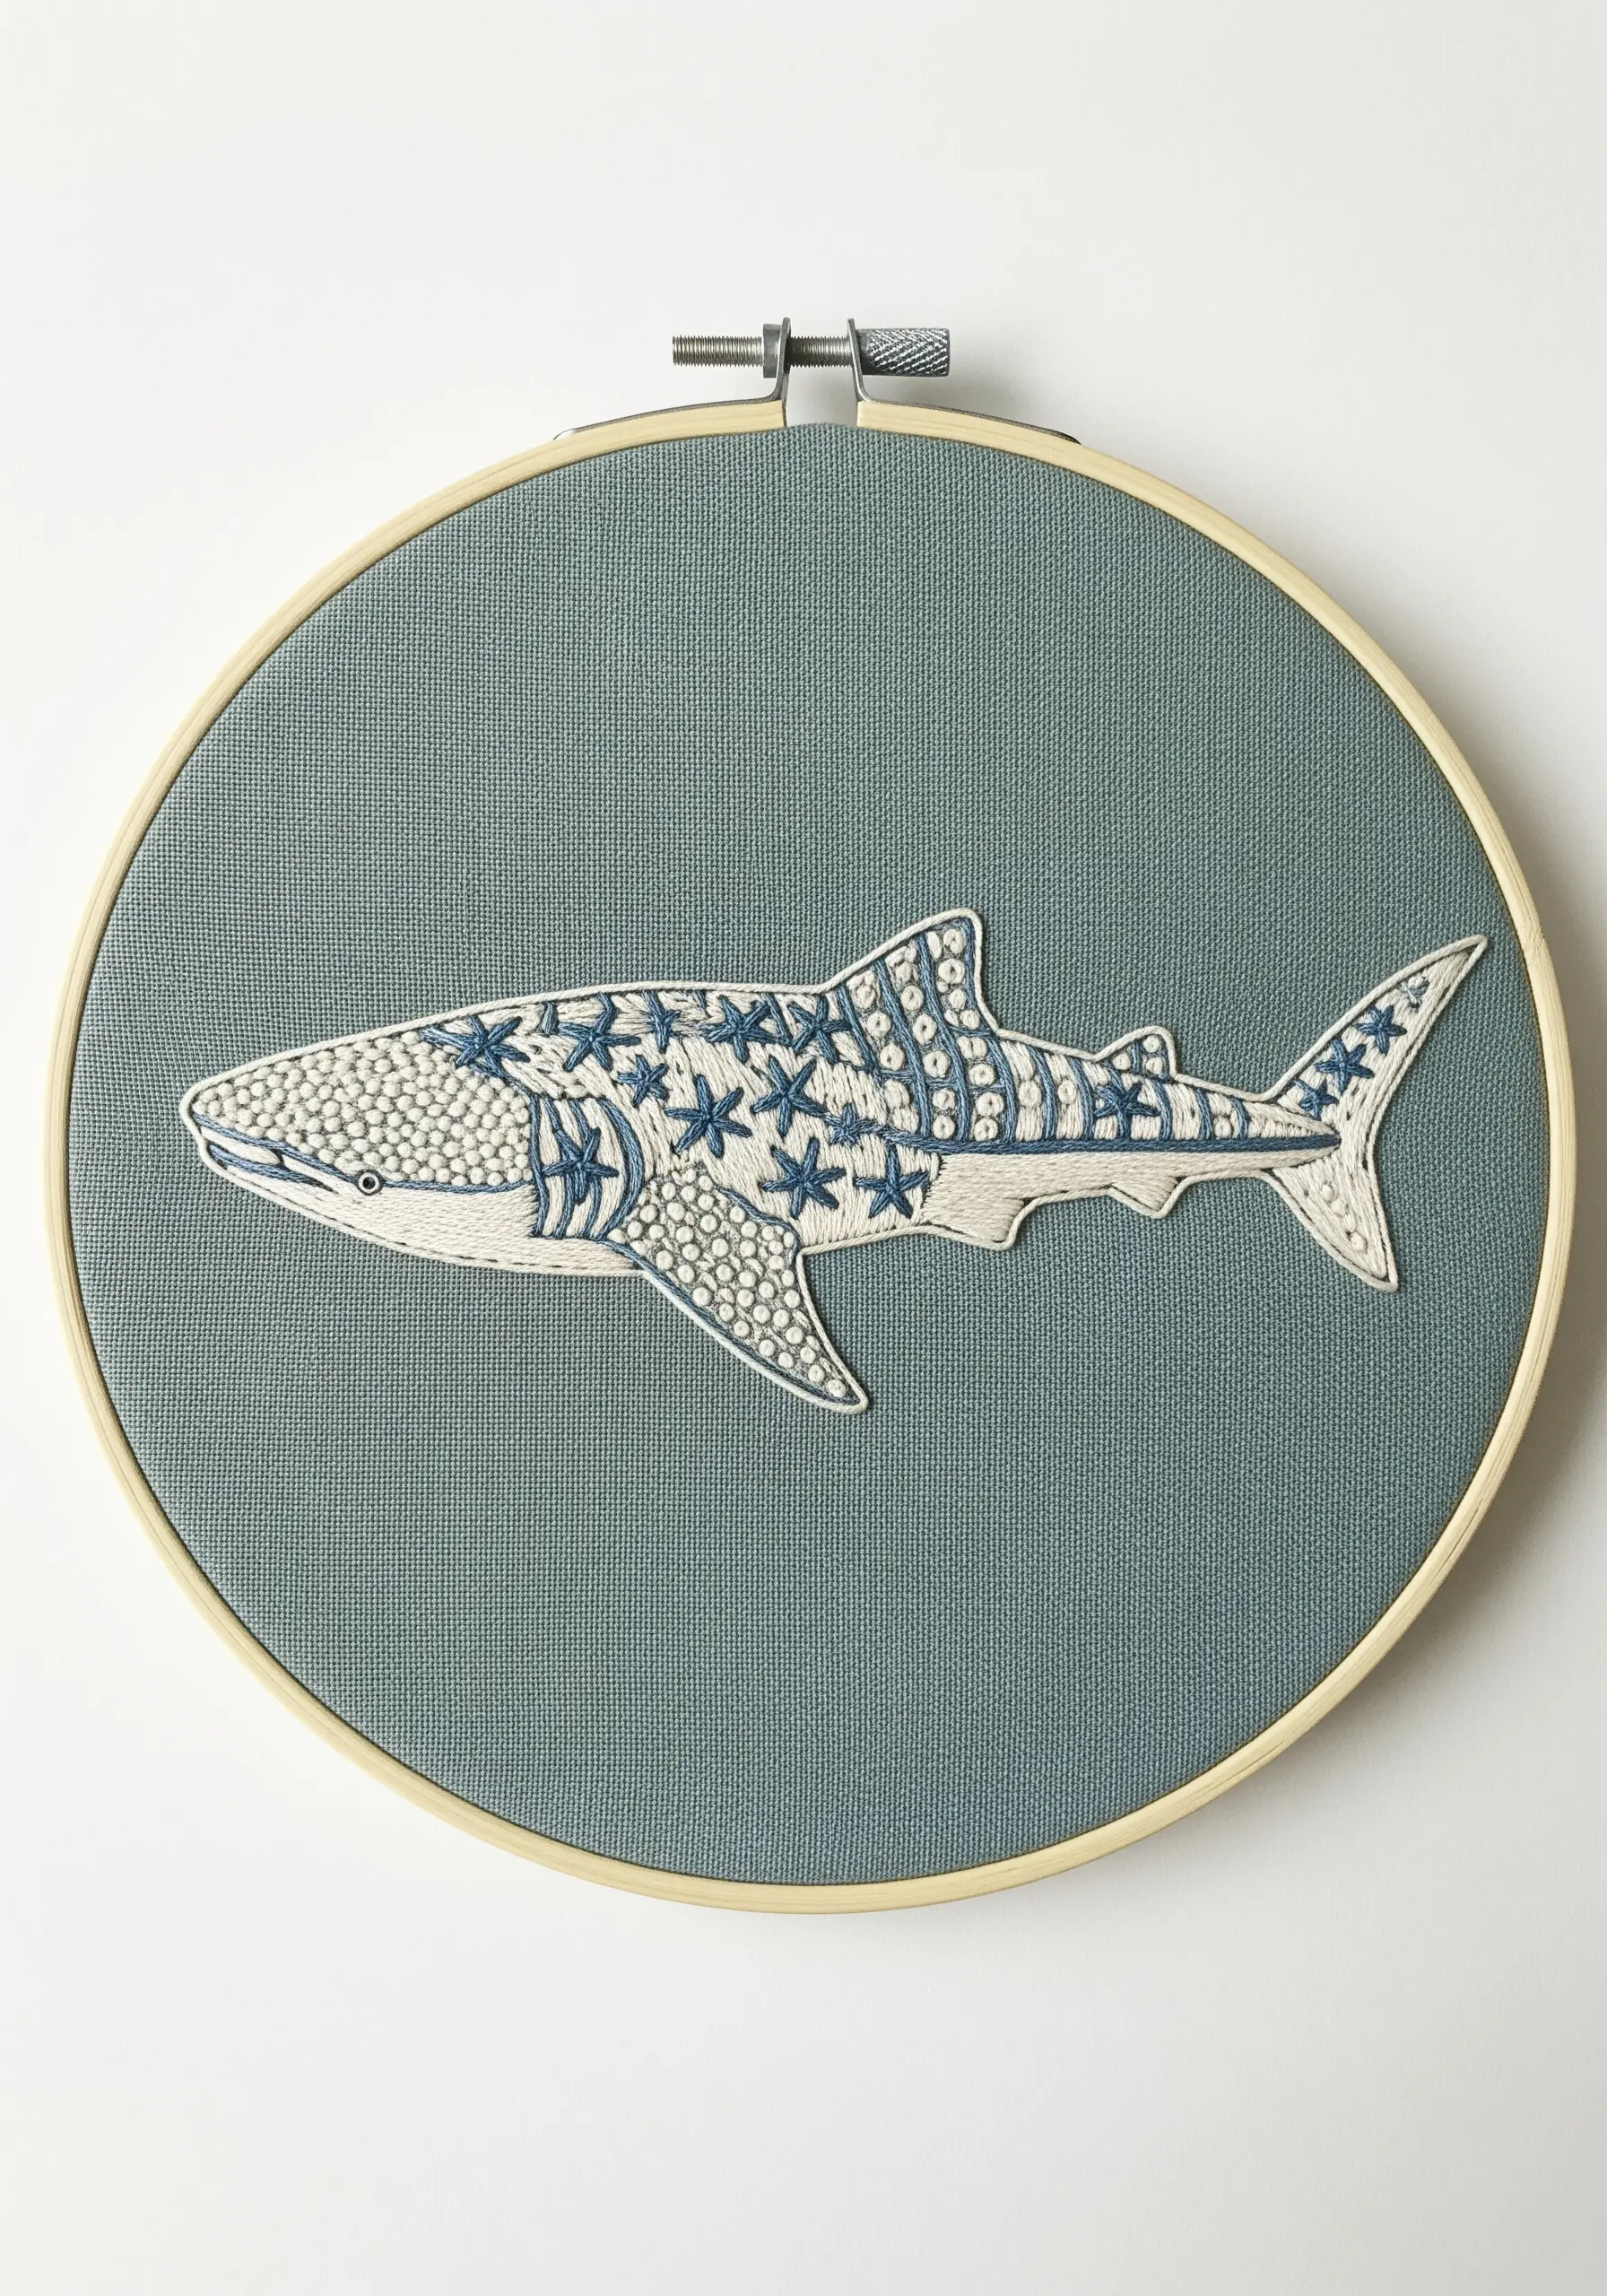
Elevate a simple silhouette by turning it into a canvas for micro-patterns.
Divide the whale shark’s body into sections and fill each one with a different textural stitch: a field of tiny seed stitches, a grid of cross stitches, or neatly aligned French knots.
This approach, often seen in Zentangle or folk art, adds incredible visual interest and personality.
It transforms the act of filling a shape from a simple task into a creative exploration of texture and rhythm.
20. Add a Touch of Sparkle with Seed Beads

Integrate subtle embellishments to catch the light and add a luxurious finish to your coastal-themed pillow stitching ideas.
After completing your embroidery, use a single strand of matching thread to secure tiny seed beads or iridescent sequins where you want to suggest water droplets or sea spray.
Scatter them lightly rather than arranging them in a dense pattern. This delicate touch adds a hint of sparkle and dimension that elevates the entire piece without overpowering the thread work.
21. Achieve Hyper-Realism Through Single-Strand Blending
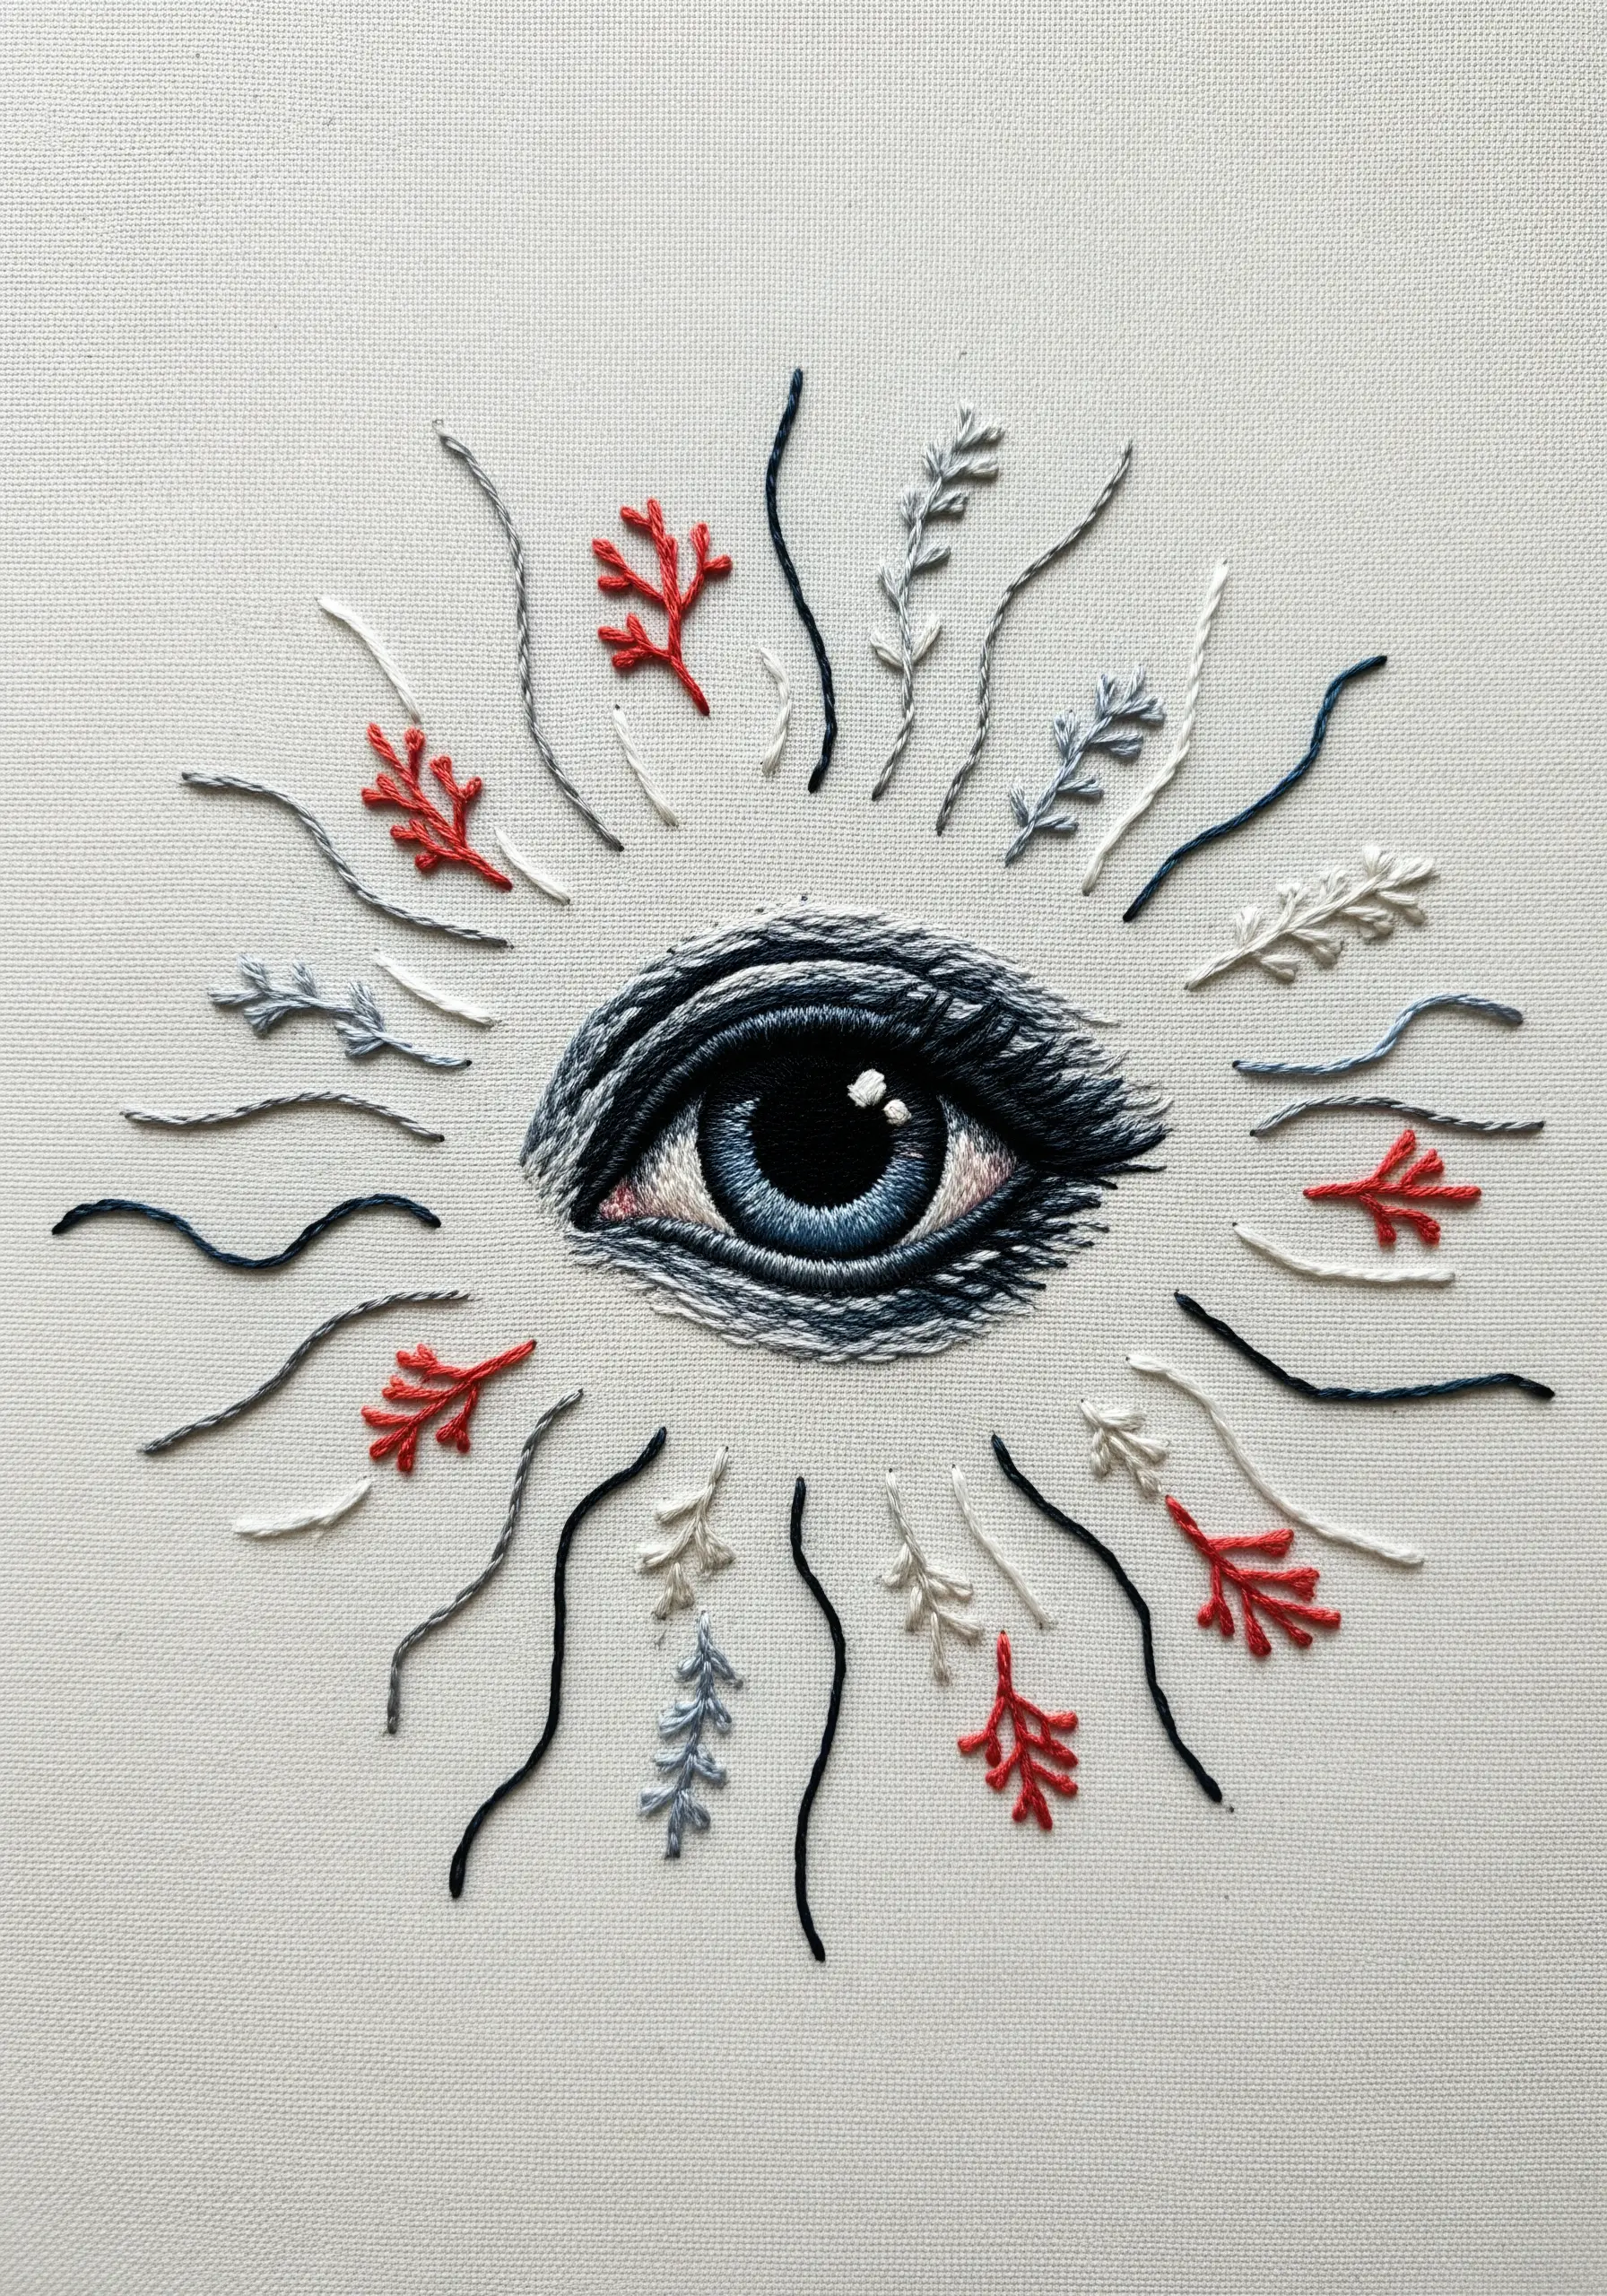
To create a truly lifelike eye, the key is subtle color blending using just one strand of thread.
Work in long-and-short stitch, laying shades of blue, grey, and black next to each other to create the iris’s depth.
Add a single stitch of bright white for the catchlight—this is the final touch that brings the eye to life.
Surrounding this realistic element with more stylized, abstract stitches creates a powerful focal point and an intriguing, surrealist composition.
22. Map a Celestial Body with Constellation Lines
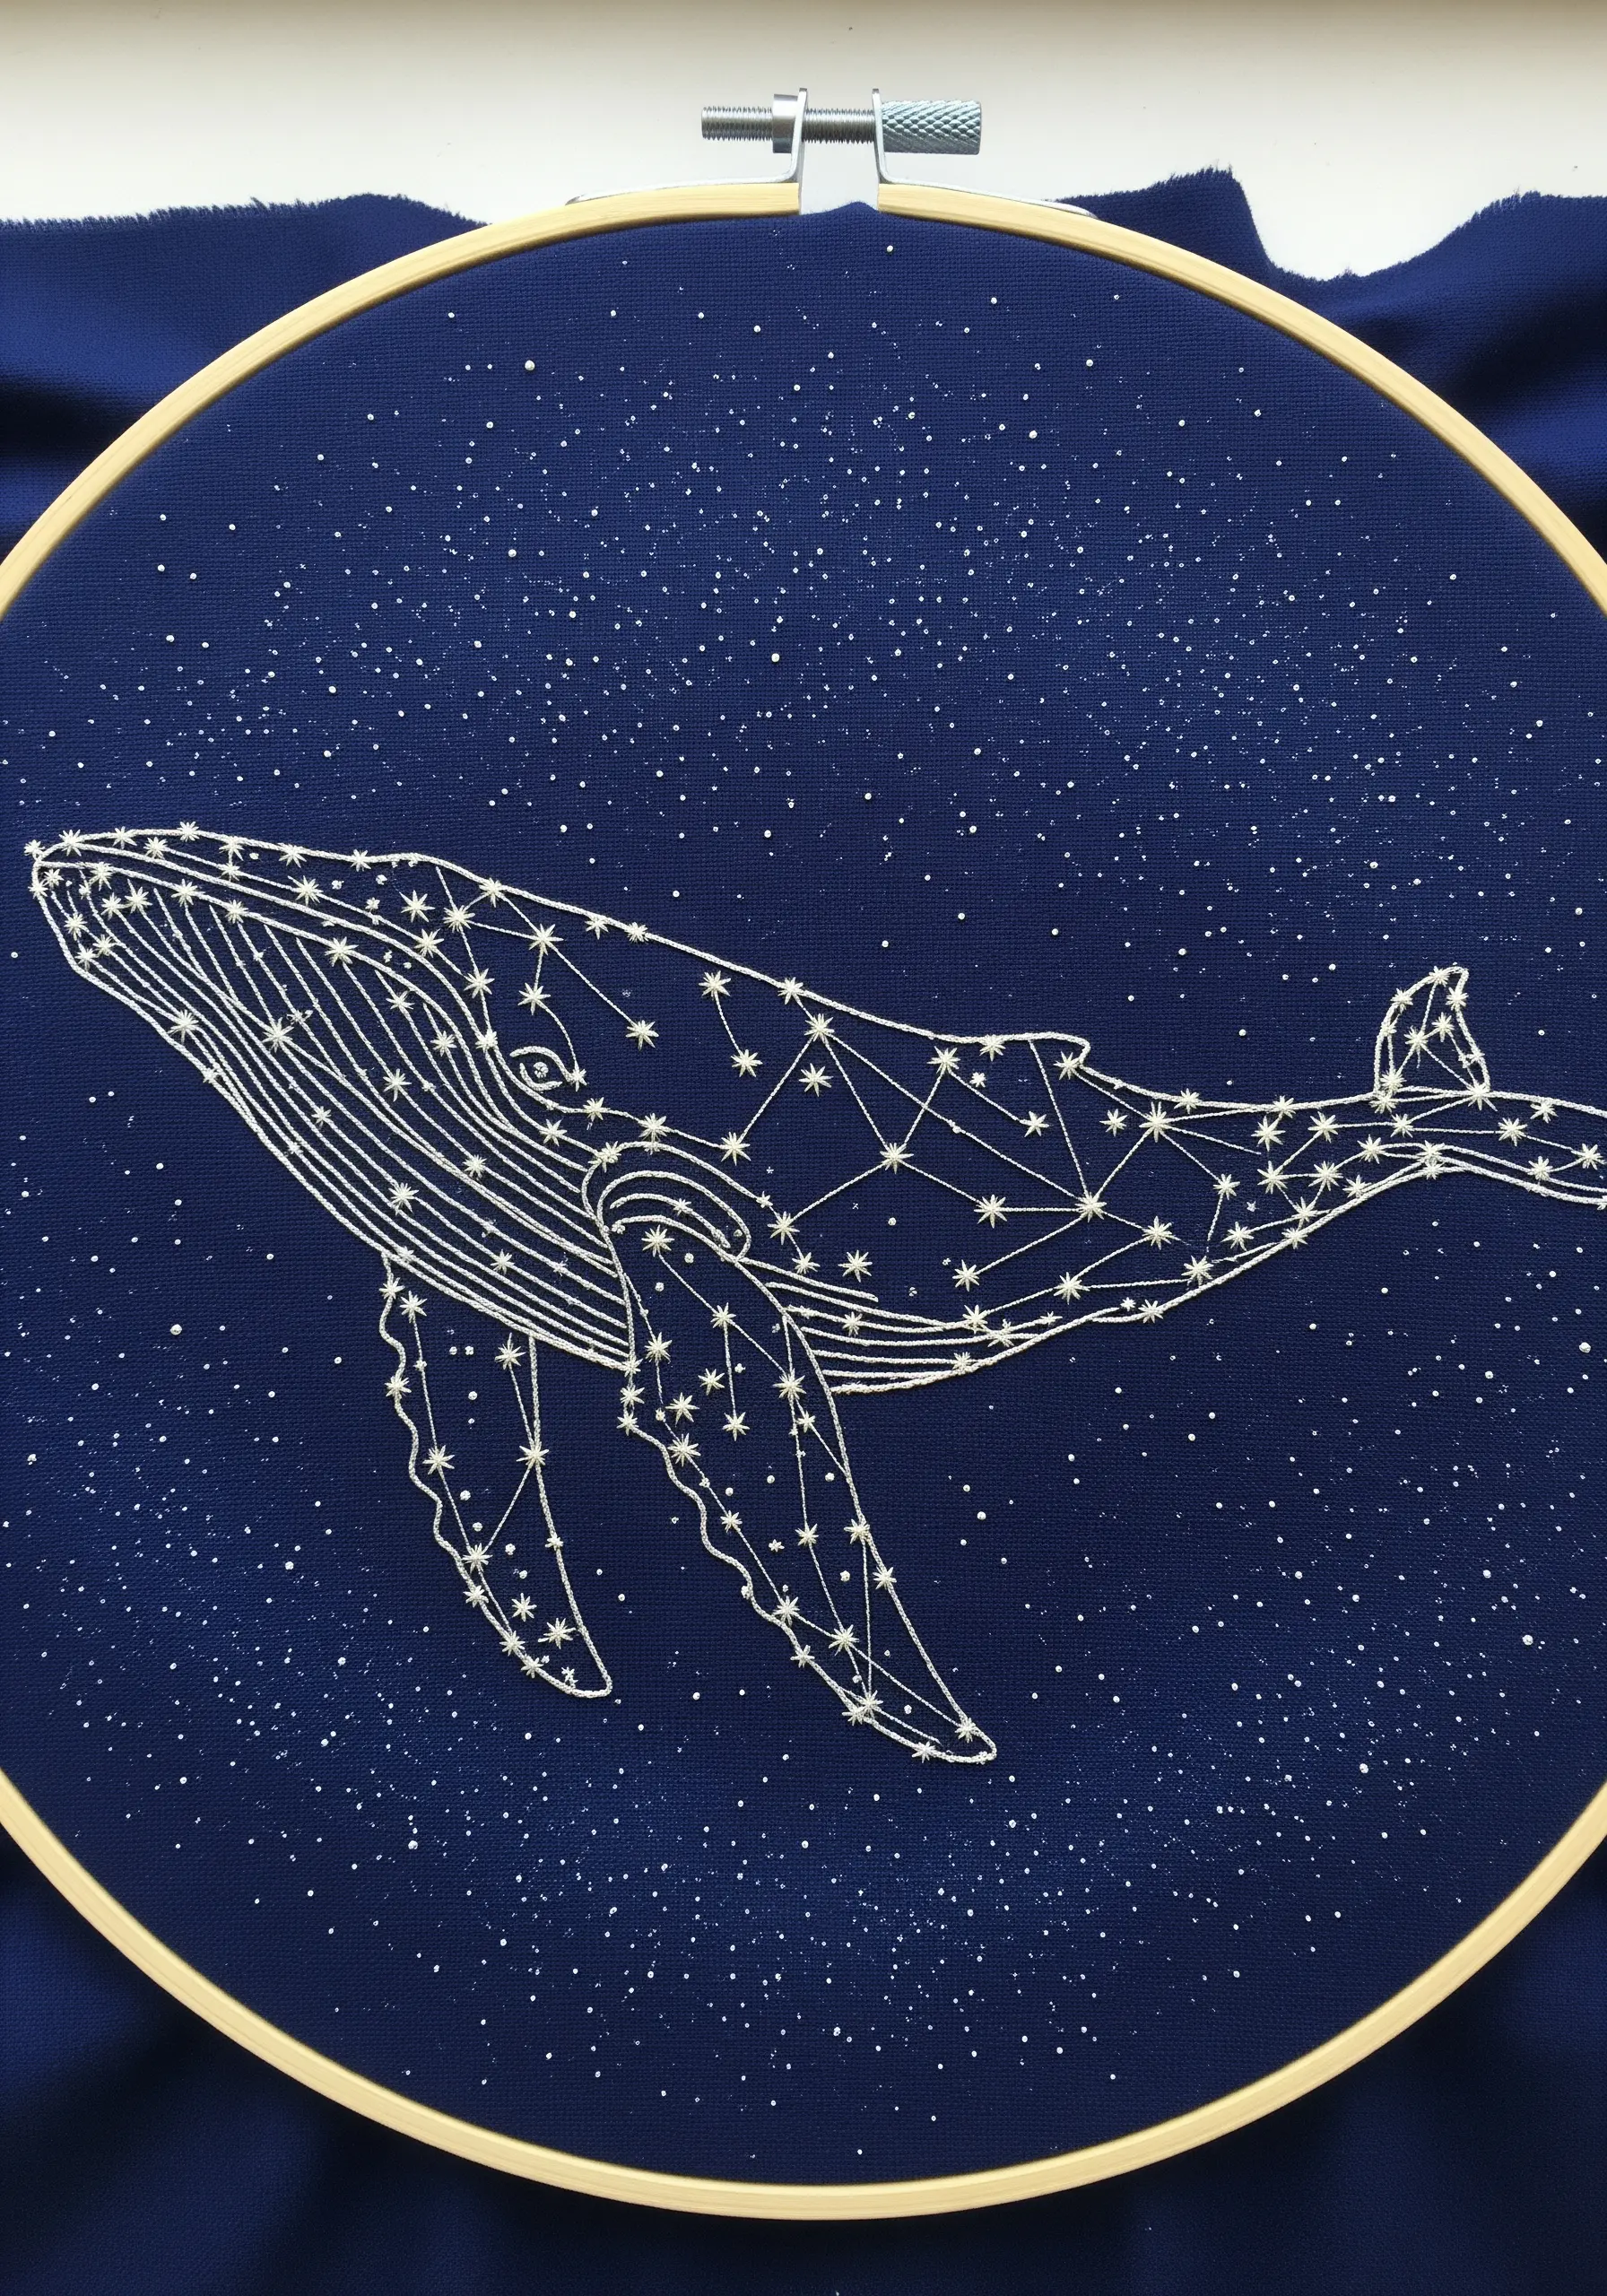
Turn a simple outline into a celestial map by connecting points with straight lines.
Use tiny French knots or star stitches to mark the key points of the whale’s anatomy—the eye, the fins, the curve of the tail.
Then, use a crisp, clean backstitch to connect these ‘stars,’ forming a constellation that reveals the animal’s shape.
This technique is wonderfully effective on dark blue or black fabric, creating a piece that feels both scientific and magical.
23. Paint with Thread Using Impressionistic Dabs
Instead of seeking perfect blending, create a vibrant, shimmering landscape with short, expressive stitches.
Fill the water and sky using small, dense seed stitches or short straight stitches, placing different colors close together.
From a distance, the colors will visually mix, creating a painterly, impressionistic effect that beautifully captures the feeling of light on water.
This technique is forgiving and allows you to build color and texture in an intuitive, organic way.
24. Build Plush, Sculptural Clouds and Moons
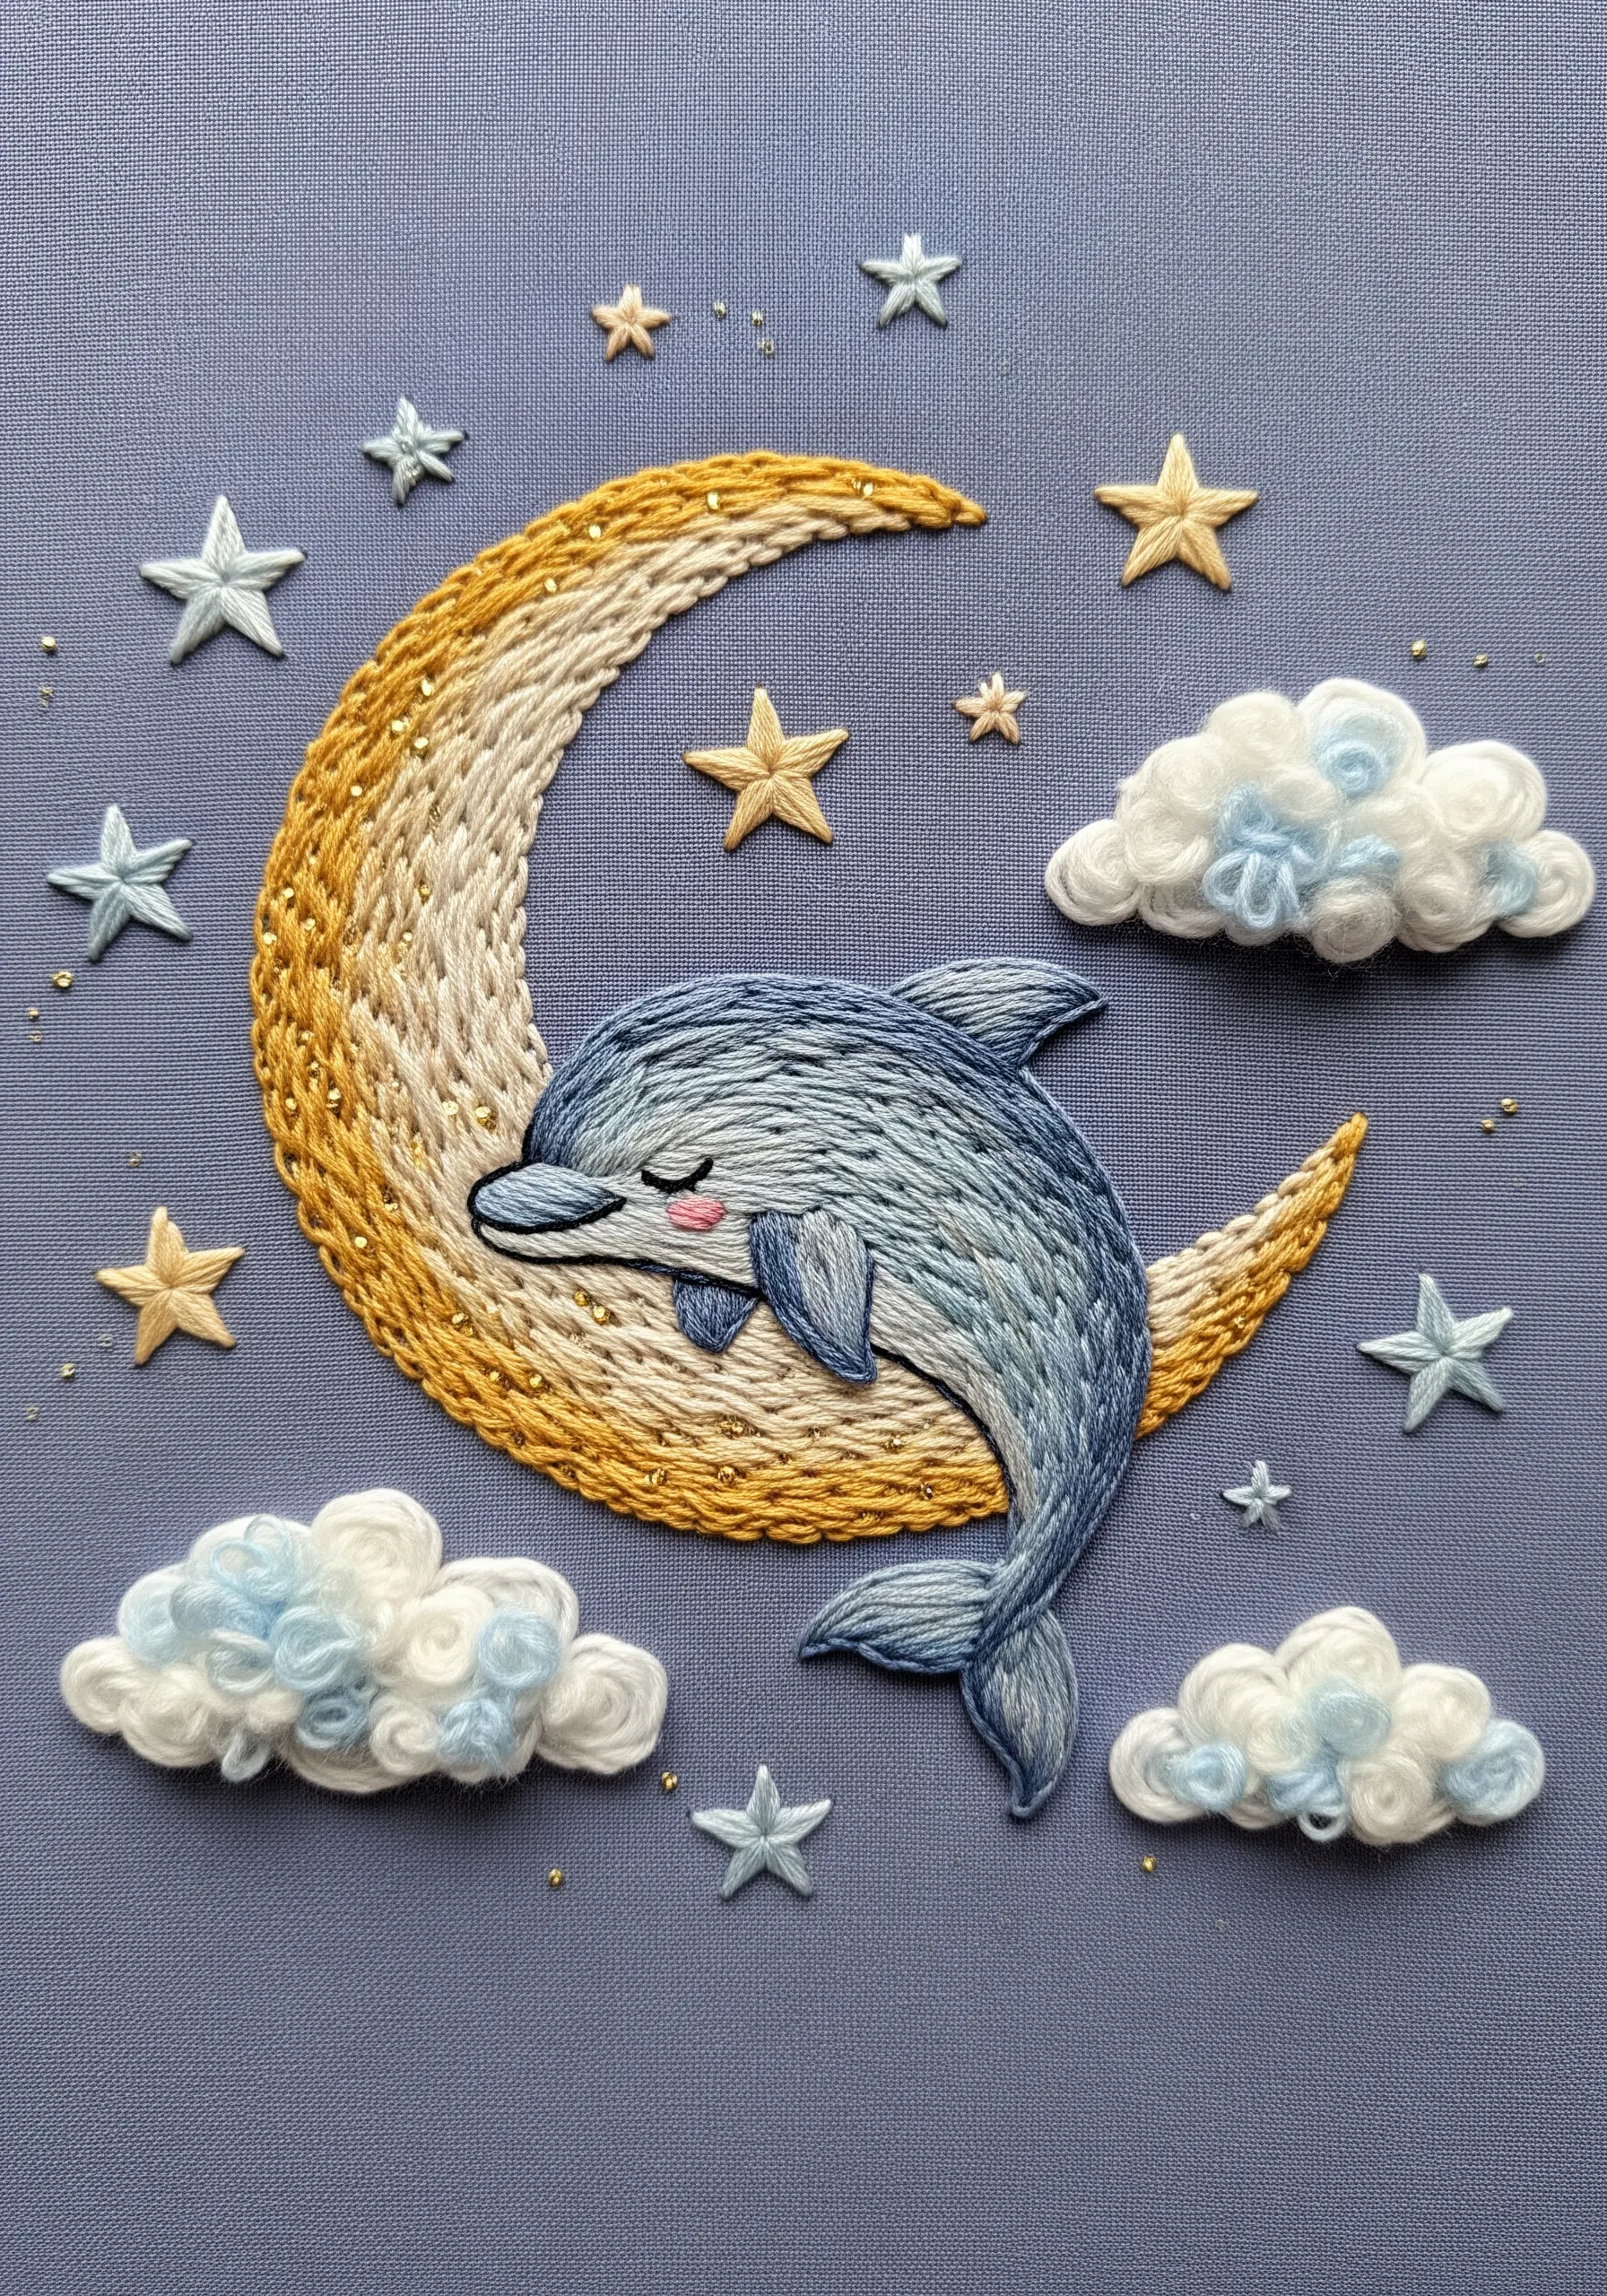
Give your celestial elements a soft, three-dimensional quality that makes them look cozy and dreamlike.
For the moon, use a padded satin stitch by first laying down a base of straight stitches and then covering them with satin stitches going in the opposite direction.
For the clouds, fill the shape with very loose French knots or untrimmed Turkey work loops, using a fluffy thread like wool or chenille for extra volume.
These Scandinavian texture embroidery ideas create a wonderfully tactile piece perfect for a nursery or bedroom.
25. Capture Nature’s Patterns with Gradient Threads
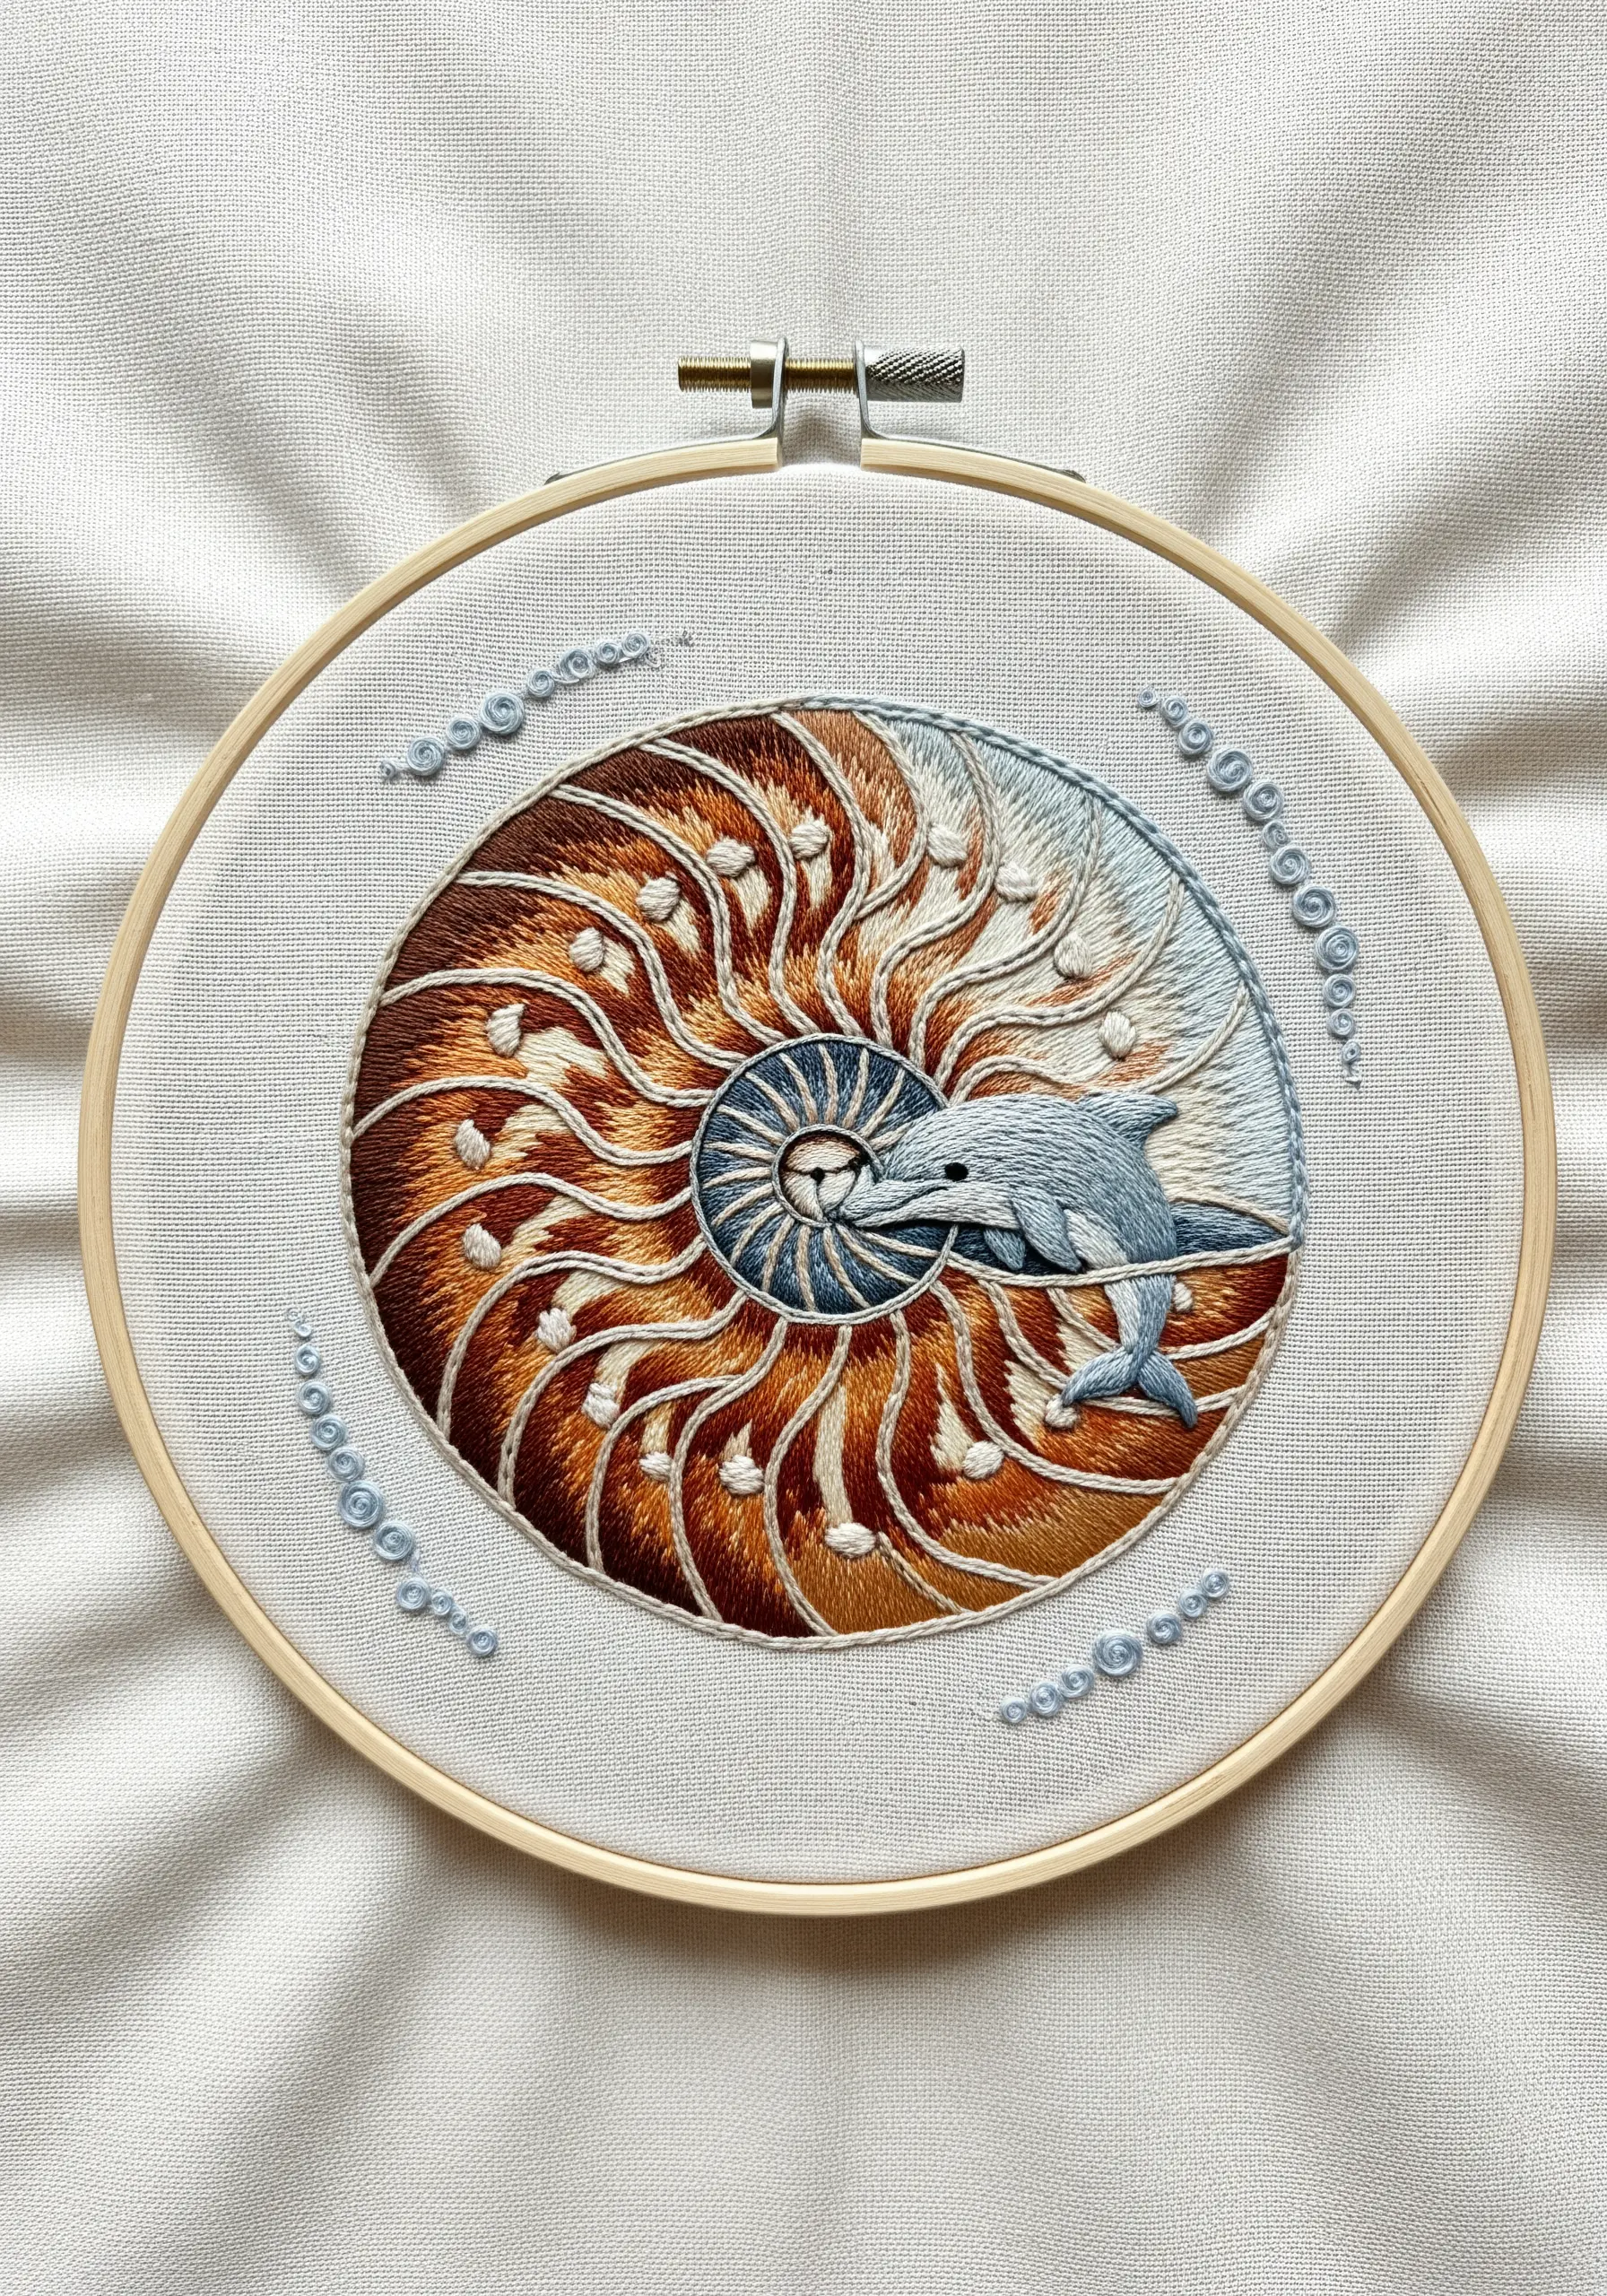
Let the thread do the color-blending for you when stitching naturally patterned objects like a nautilus shell.
Use a variegated or ombré thread that transitions between shades of brown, beige, and white.
As you fill each section of the shell with satin stitch, the thread’s color changes will automatically create a beautiful, organic gradient that mimics the shell’s natural growth pattern.
This is an efficient way to achieve complex-looking shading with minimal effort.


