

There’s a quiet satisfaction in turning a blank piece of fabric into something that speaks—not with words, but with the texture and color of thread. Yet, sometimes, your hands know how to do the stitches, but your mind isn’t sure how to translate your vision into a finished piece that feels truly *you*.
Let’s shift that focus. Instead of just following a pattern, we’re going to explore the choices that give your work its soul. We’ll look at how a different thread weight can change a design’s entire mood, why stitch direction is your secret tool for creating realism, and how combining simple stitches can build incredible depth and texture.
This isn’t about learning a hundred new, complicated techniques. It’s about refining the ones you already know and applying them with intention. Consider this a conversation about making your embroidery feel less like a craft and more like your own personal art form—one earthy, thoughtful stitch at a time.
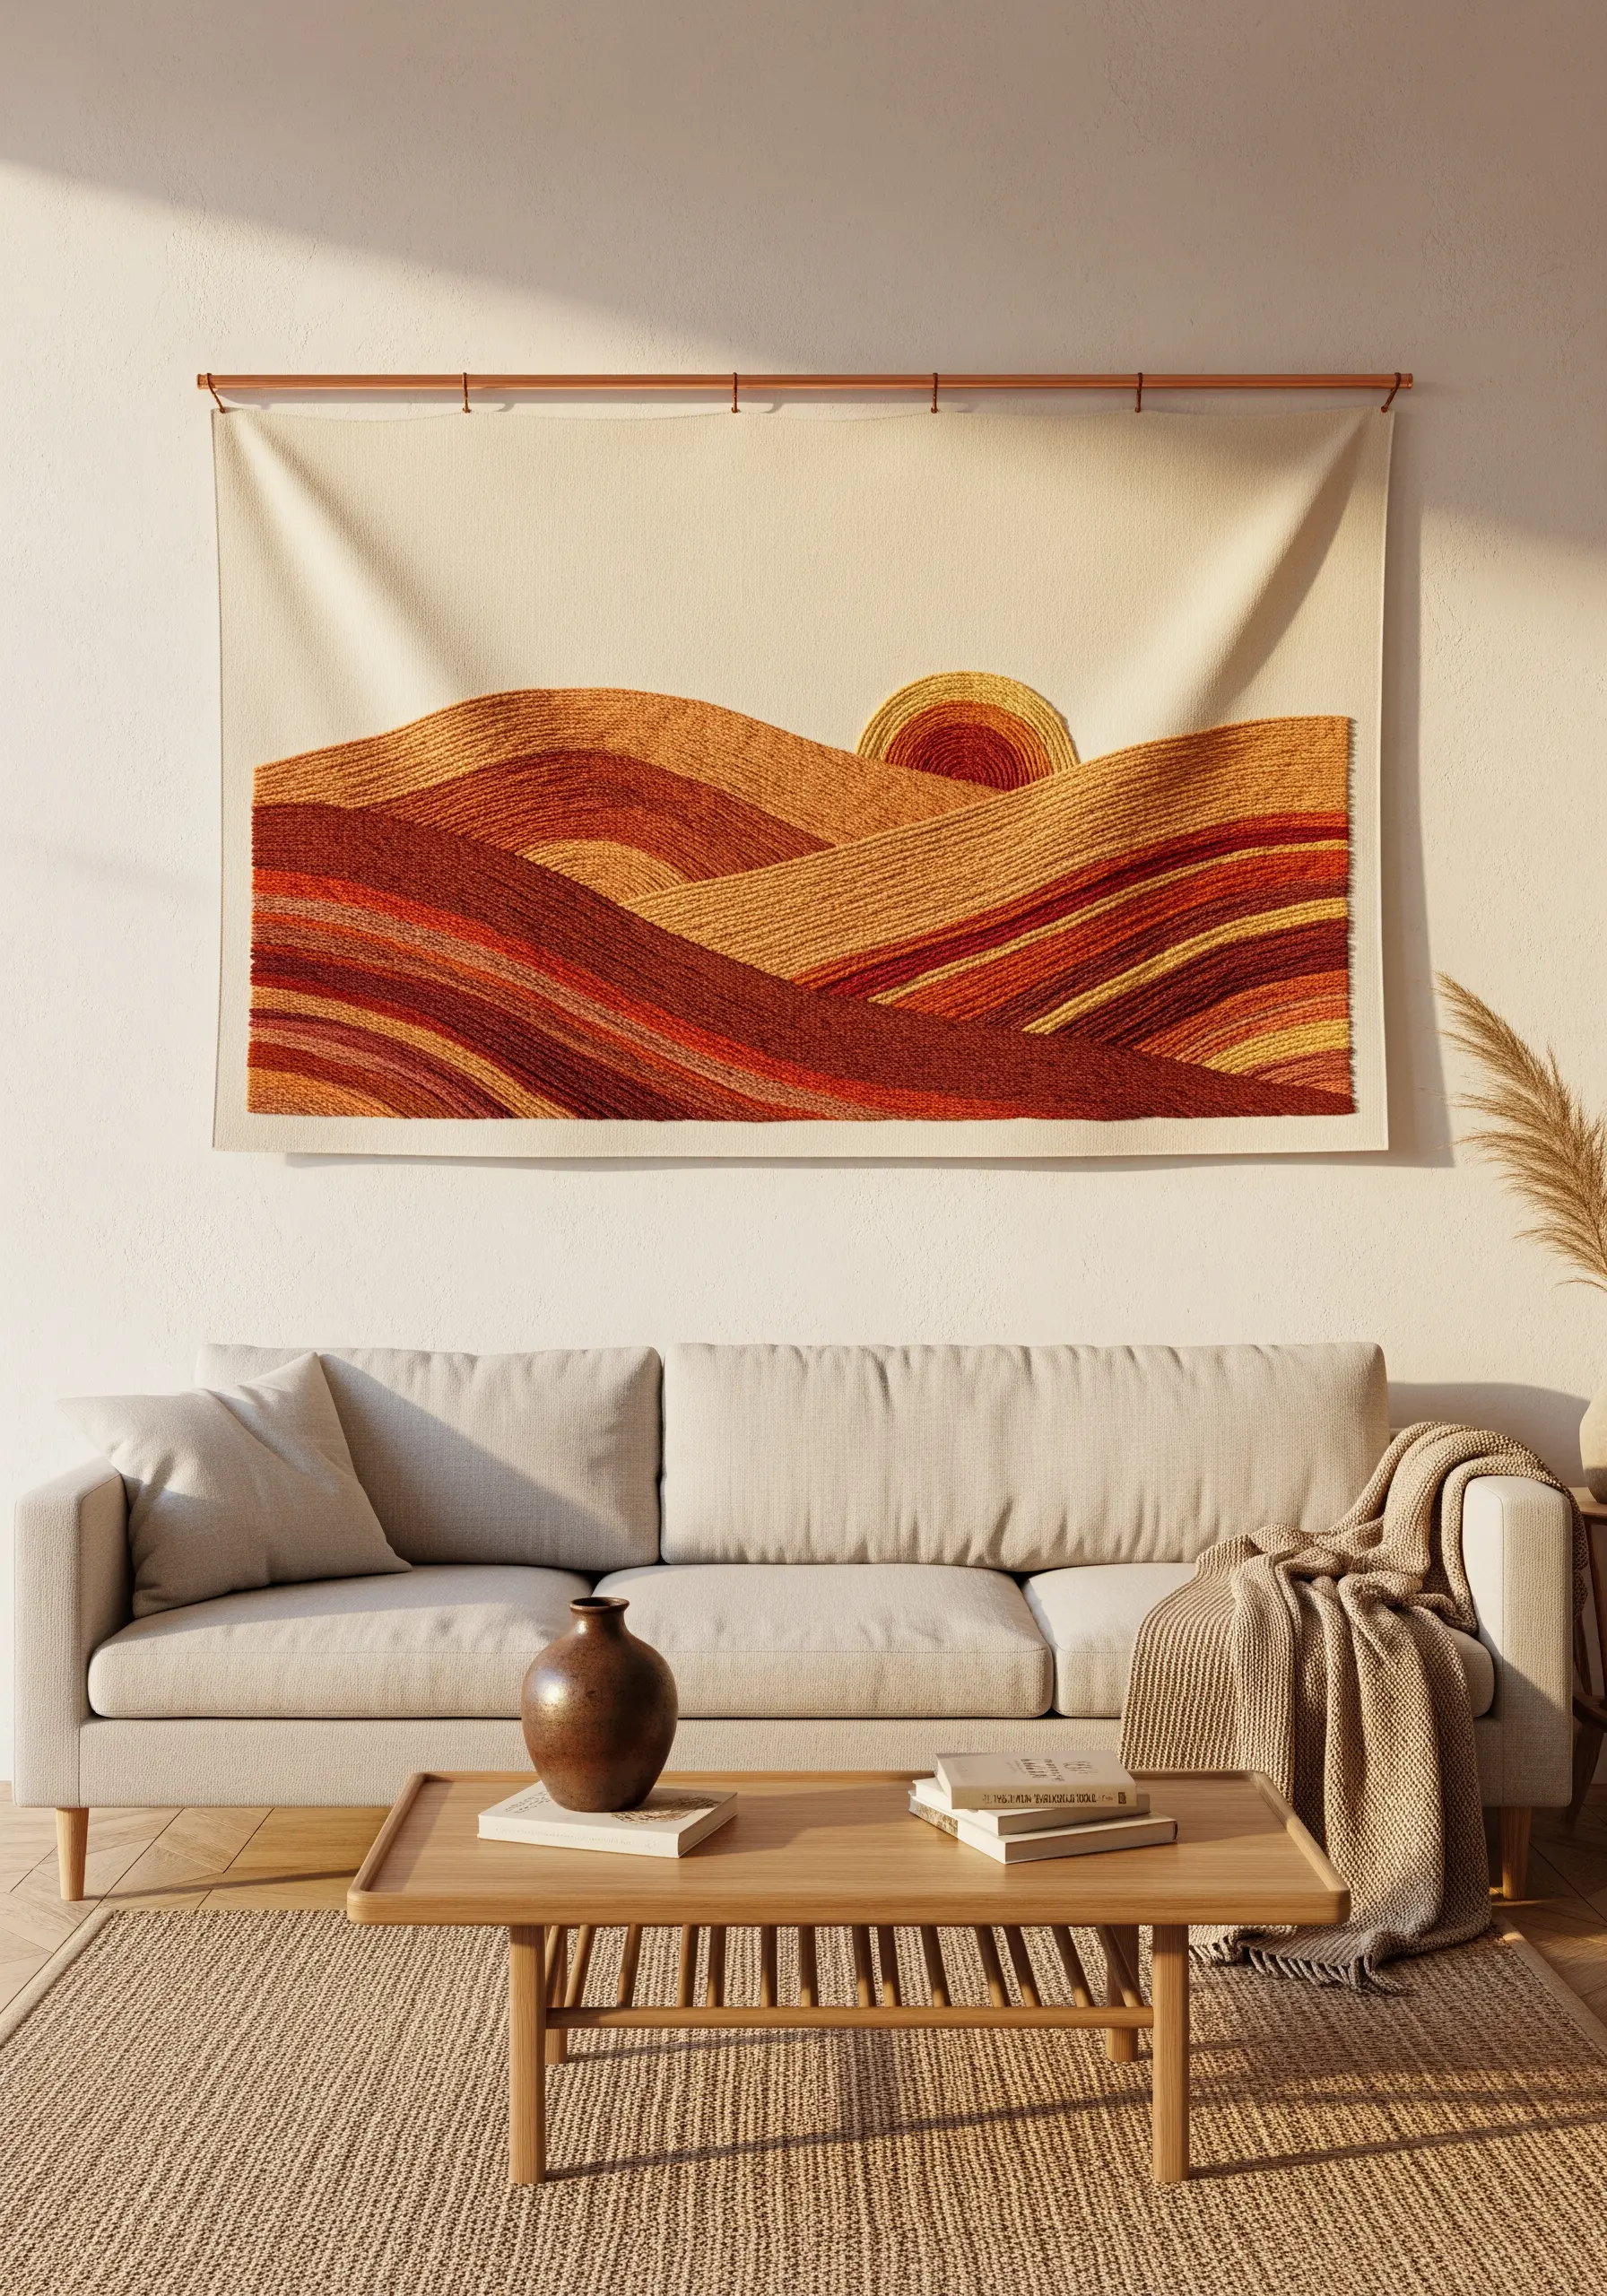
1. Master the Radiating Satin Stitch Sunburst
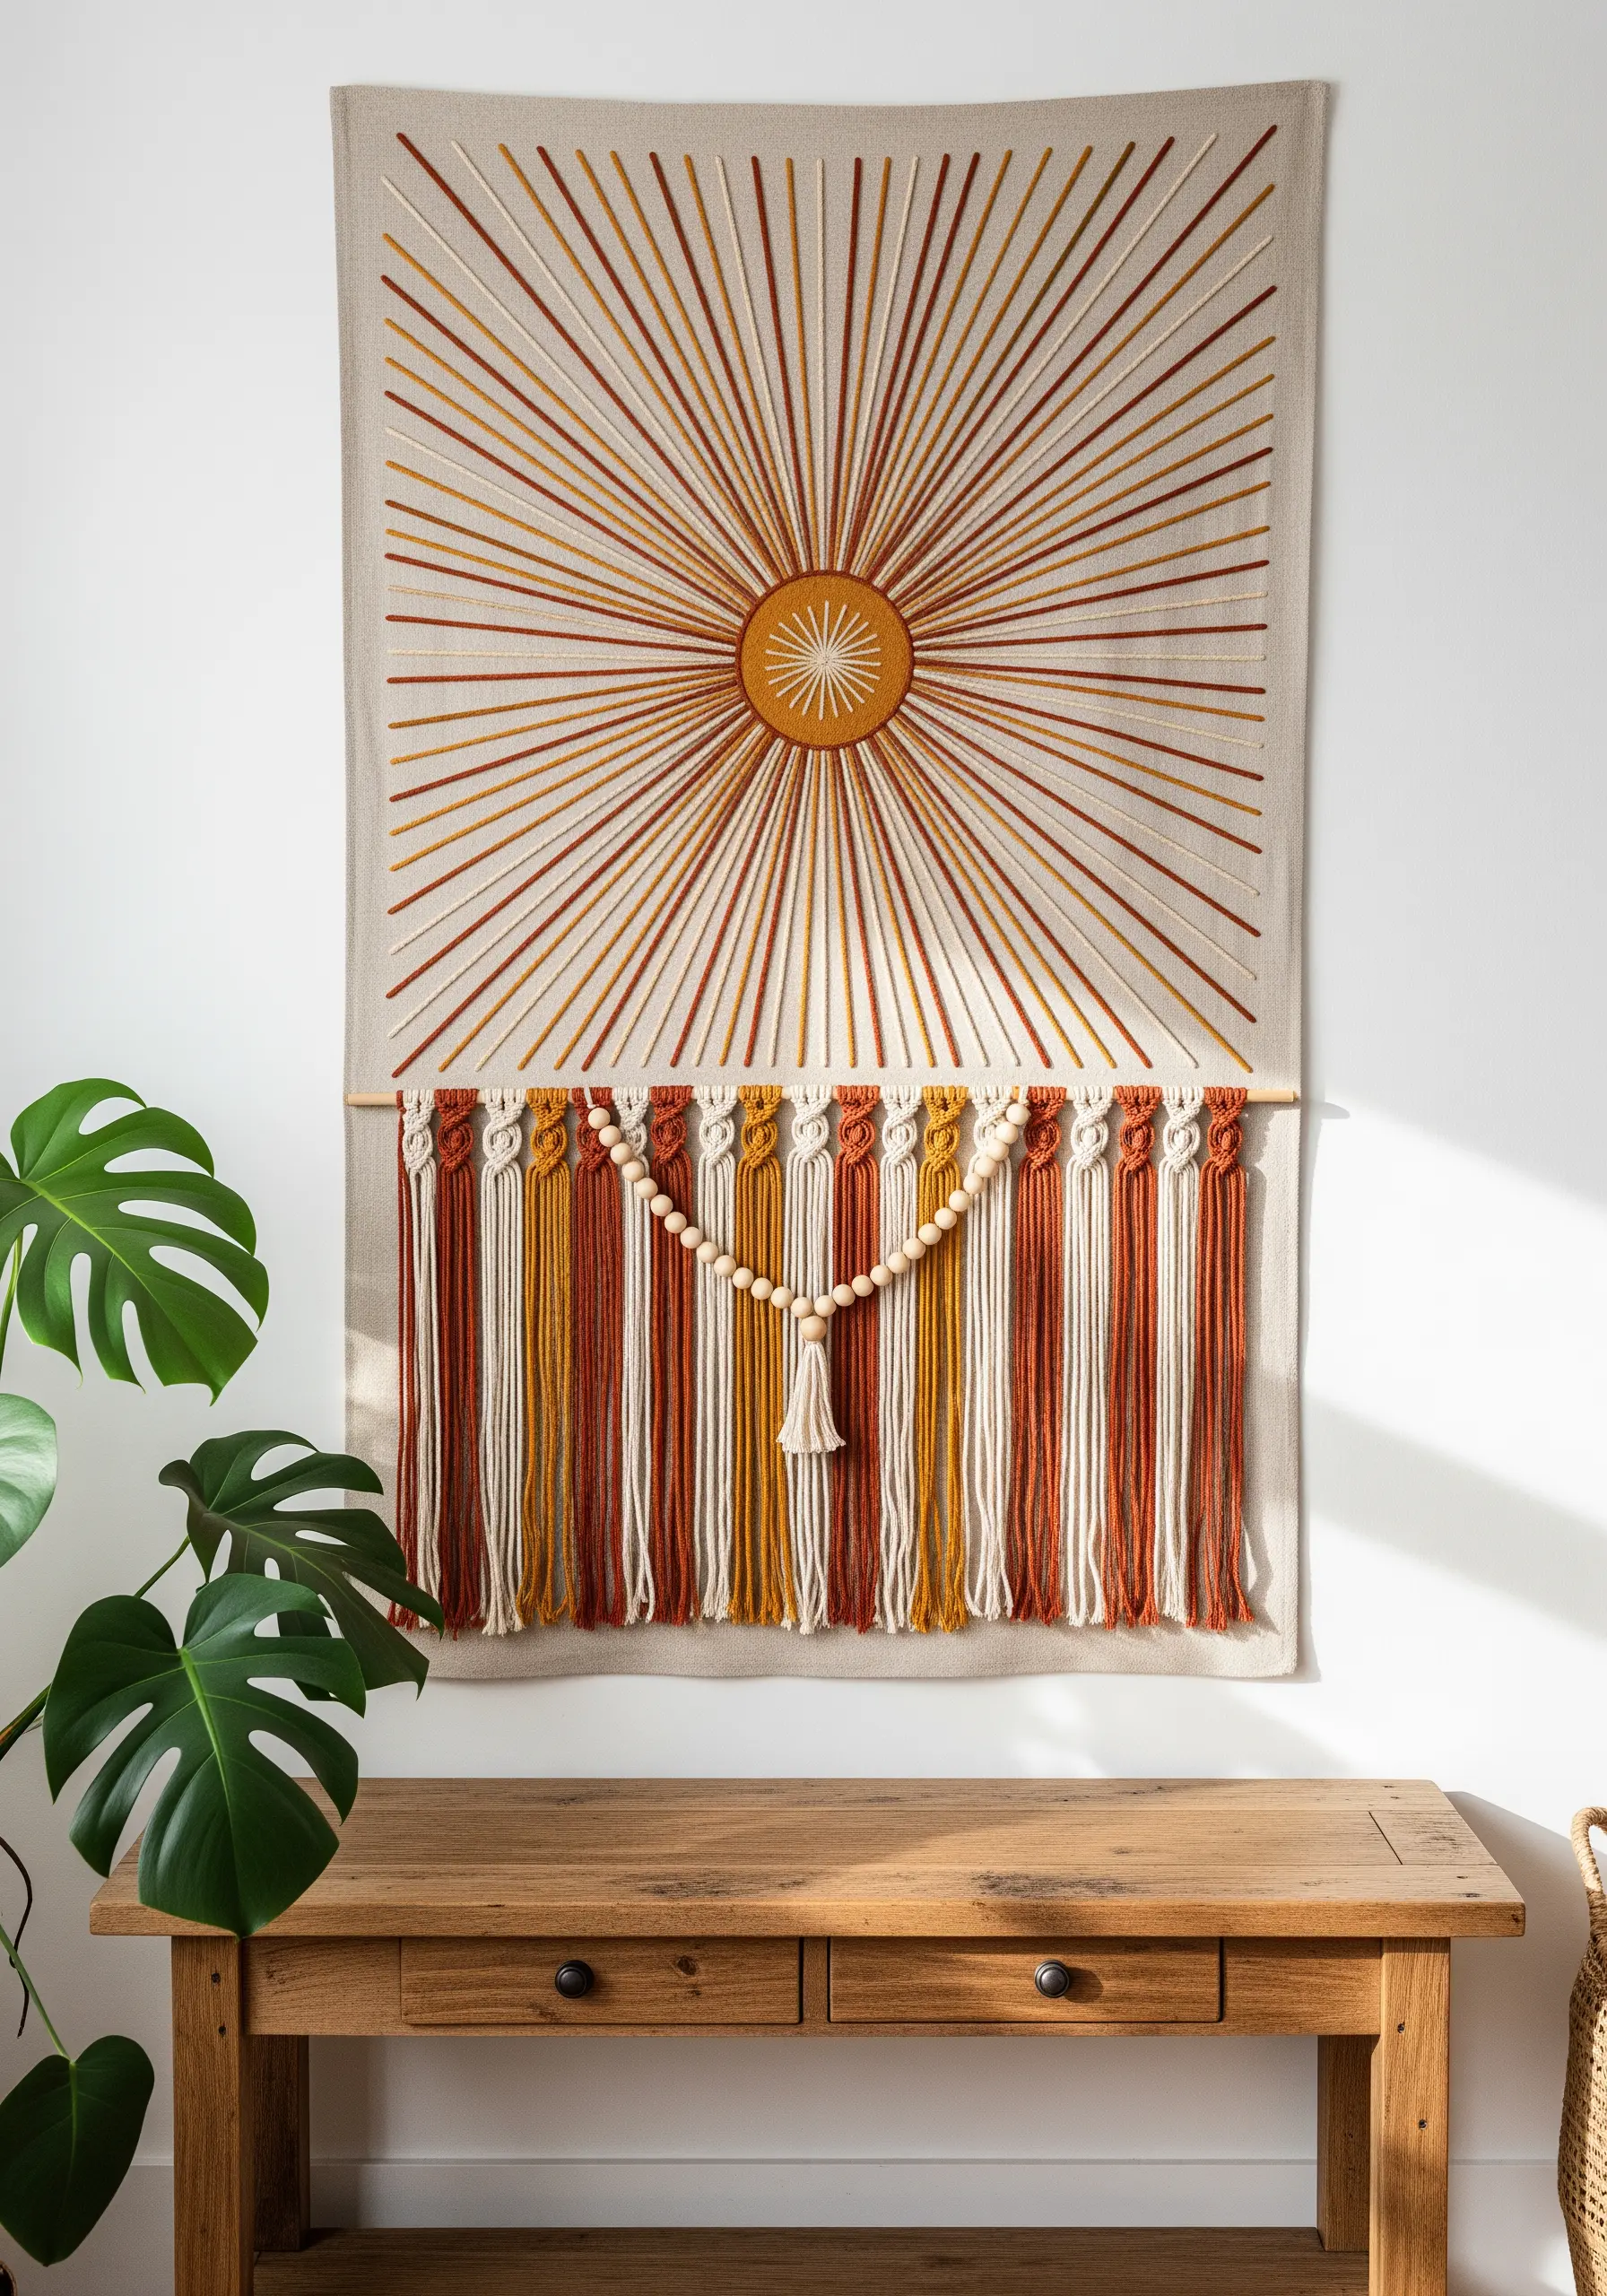
Create a powerful focal point by using radiating straight stitches or satin stitches for your sun rays.
To ensure your lines are perfectly straight and taut on large-scale embroidery tapestries, use a quilting ruler and a fabric marker to draw faint guidelines from the center outward.
Vary the number of strands in your floss (from three to six) for different rays to build subtle visual weight and rhythm.
For the macrame fringe, use the same color palette as your embroidery threads to create a cohesive, unified piece that feels intentional from top to bottom.
2. Build a Celestial Gallery with Textural Knots
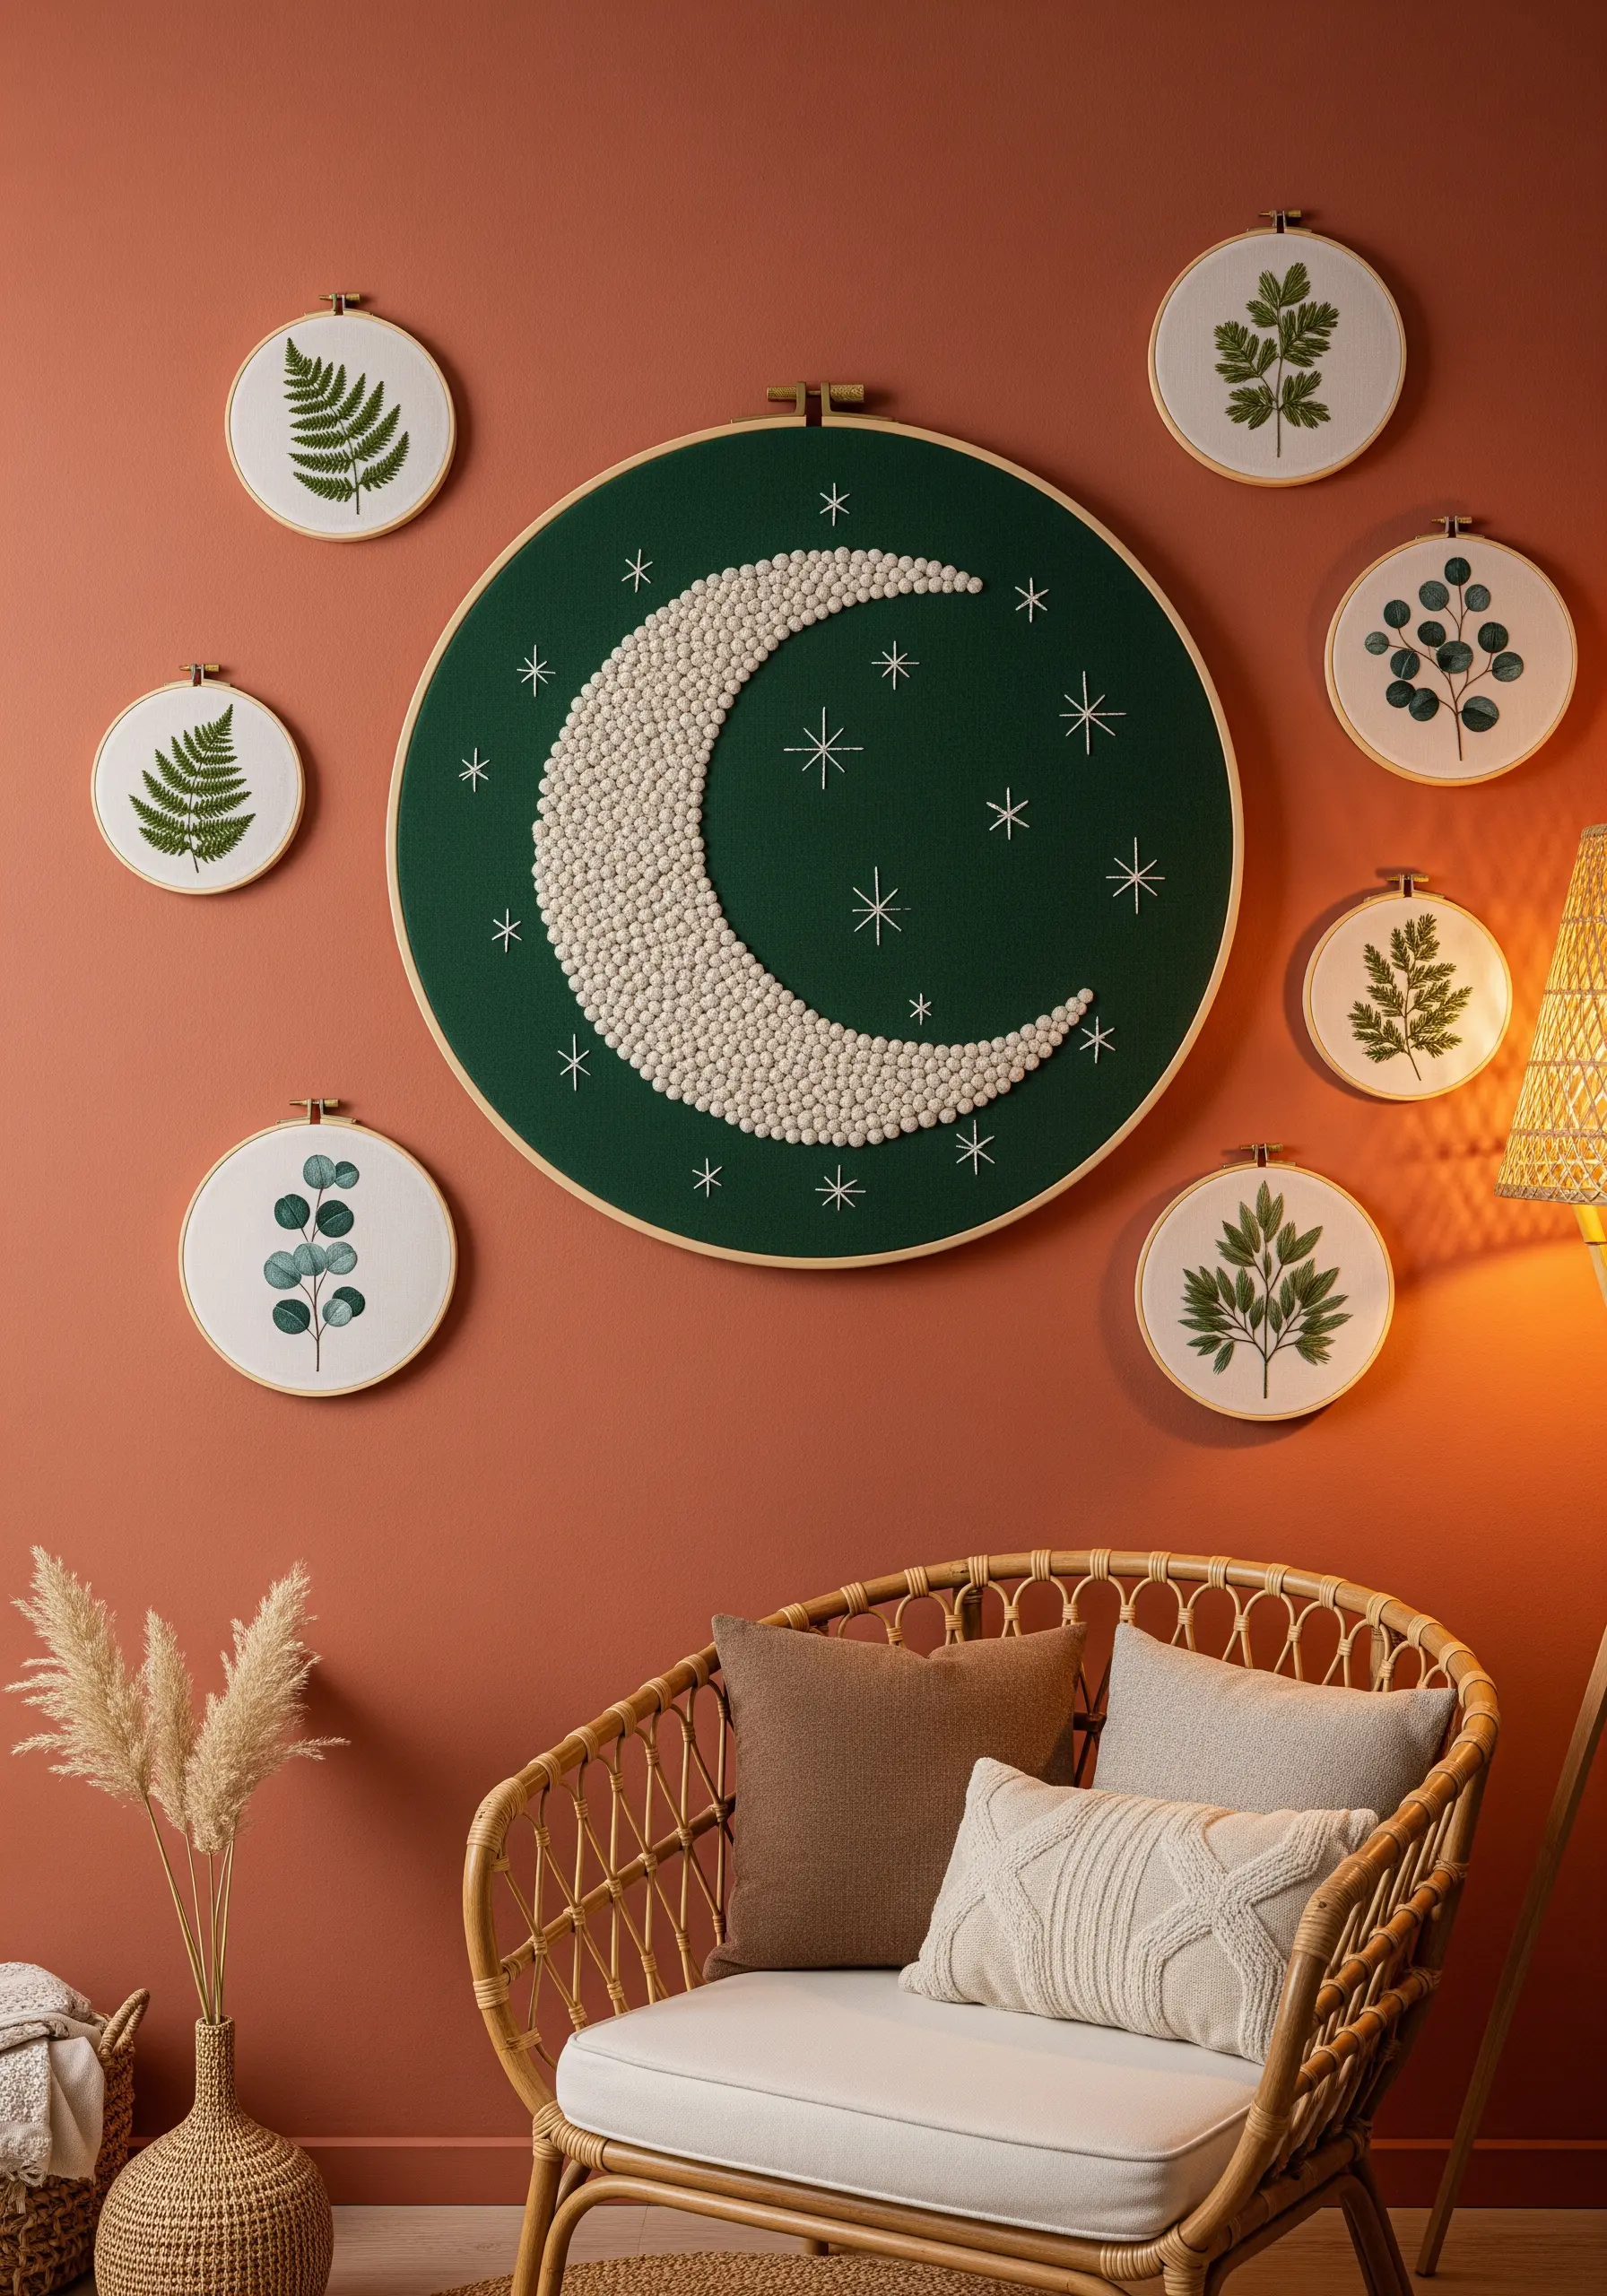
Give your crescent moon a dense, touchable texture by filling it entirely with French knots, packed tightly together.
Use a slightly thicker thread, like pearl cotton, to make the knots fuller and reduce the time it takes to fill the shape.
Surround your central piece with smaller embroidery wall hoops featuring delicate botanicals stitched in simple backstitch or stem stitch.
This contrast between the high-texture moon and the minimalist ferns creates a sophisticated and balanced gallery wall.
3. Define Foliage with Directional Satin Stitch on Burlap
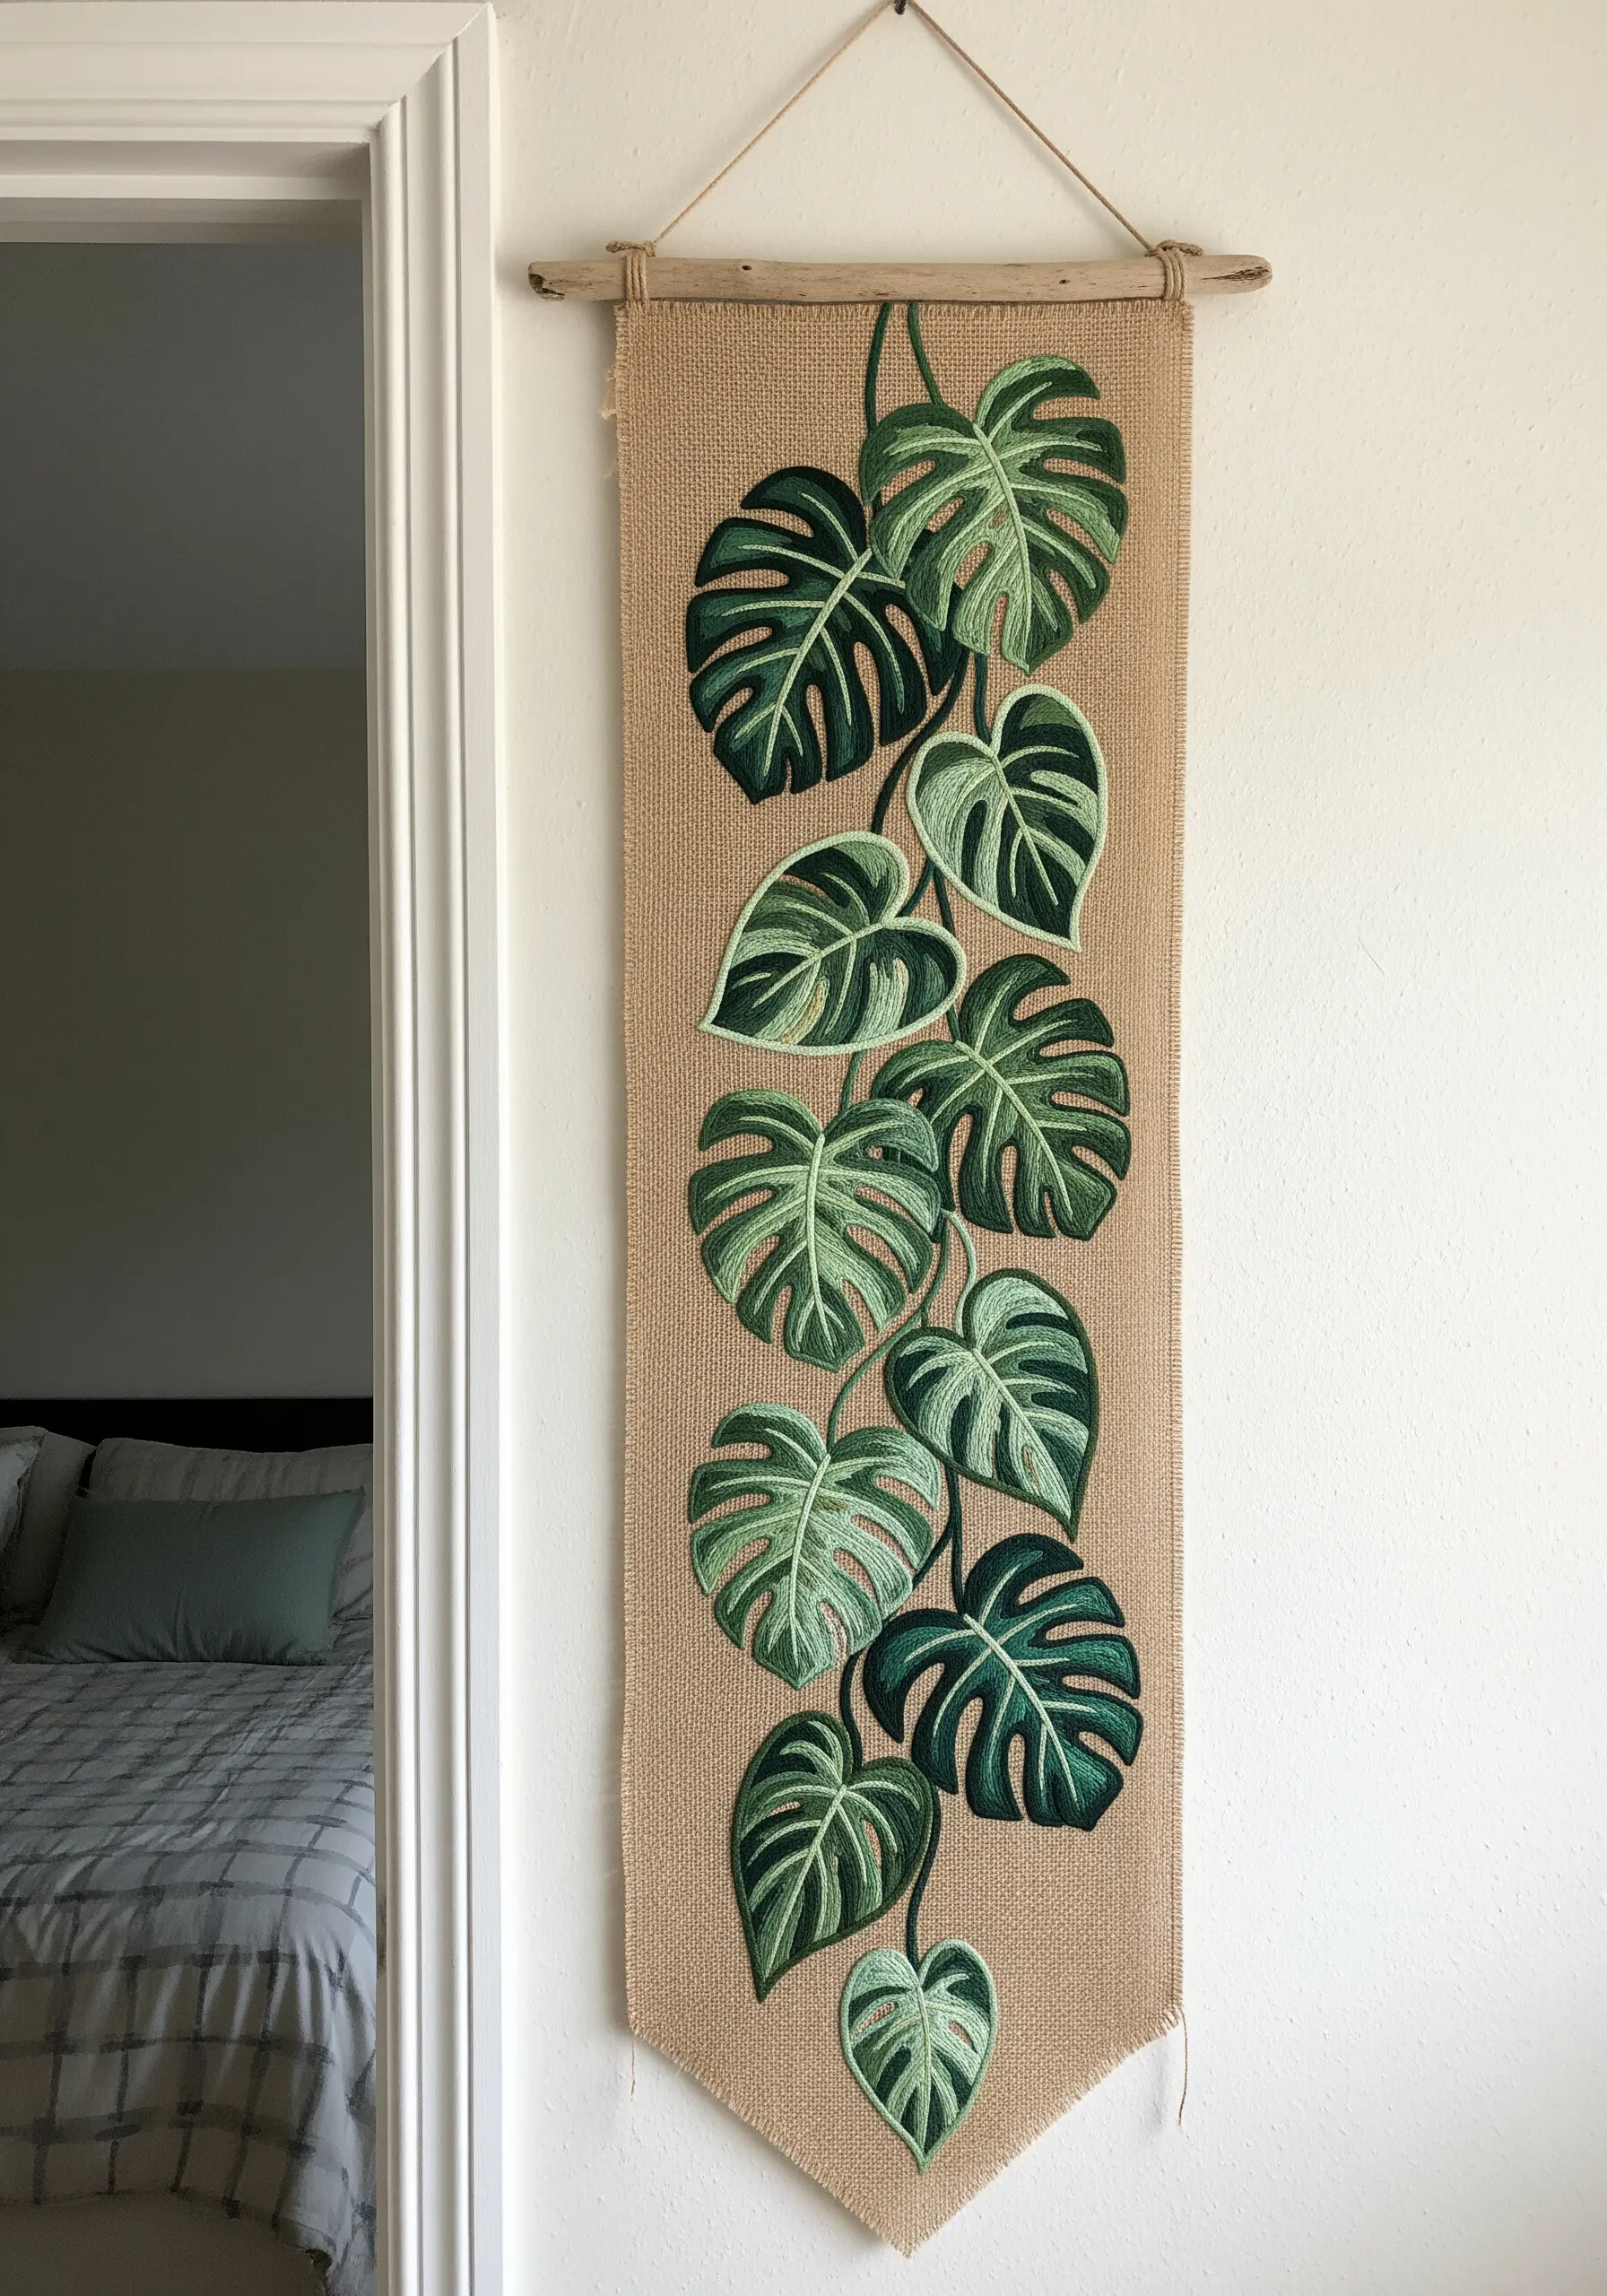
When stitching leaves, the direction of your satin stitch is everything.
Angle your stitches to follow the natural direction of the leaf’s veins, starting from the center line and working outwards towards the edge.
Use two or three shades of green for each leaf—a lighter tone for the center and darker tones for the edges—to create realistic dimension.
Stitching on a coarse fabric like burlap requires a larger needle and thicker floss, but the rustic texture it provides is perfect for earthy, botanical designs and foliage stitch variations.
4. Combine Weaving and Embroidery for a Tactile Story
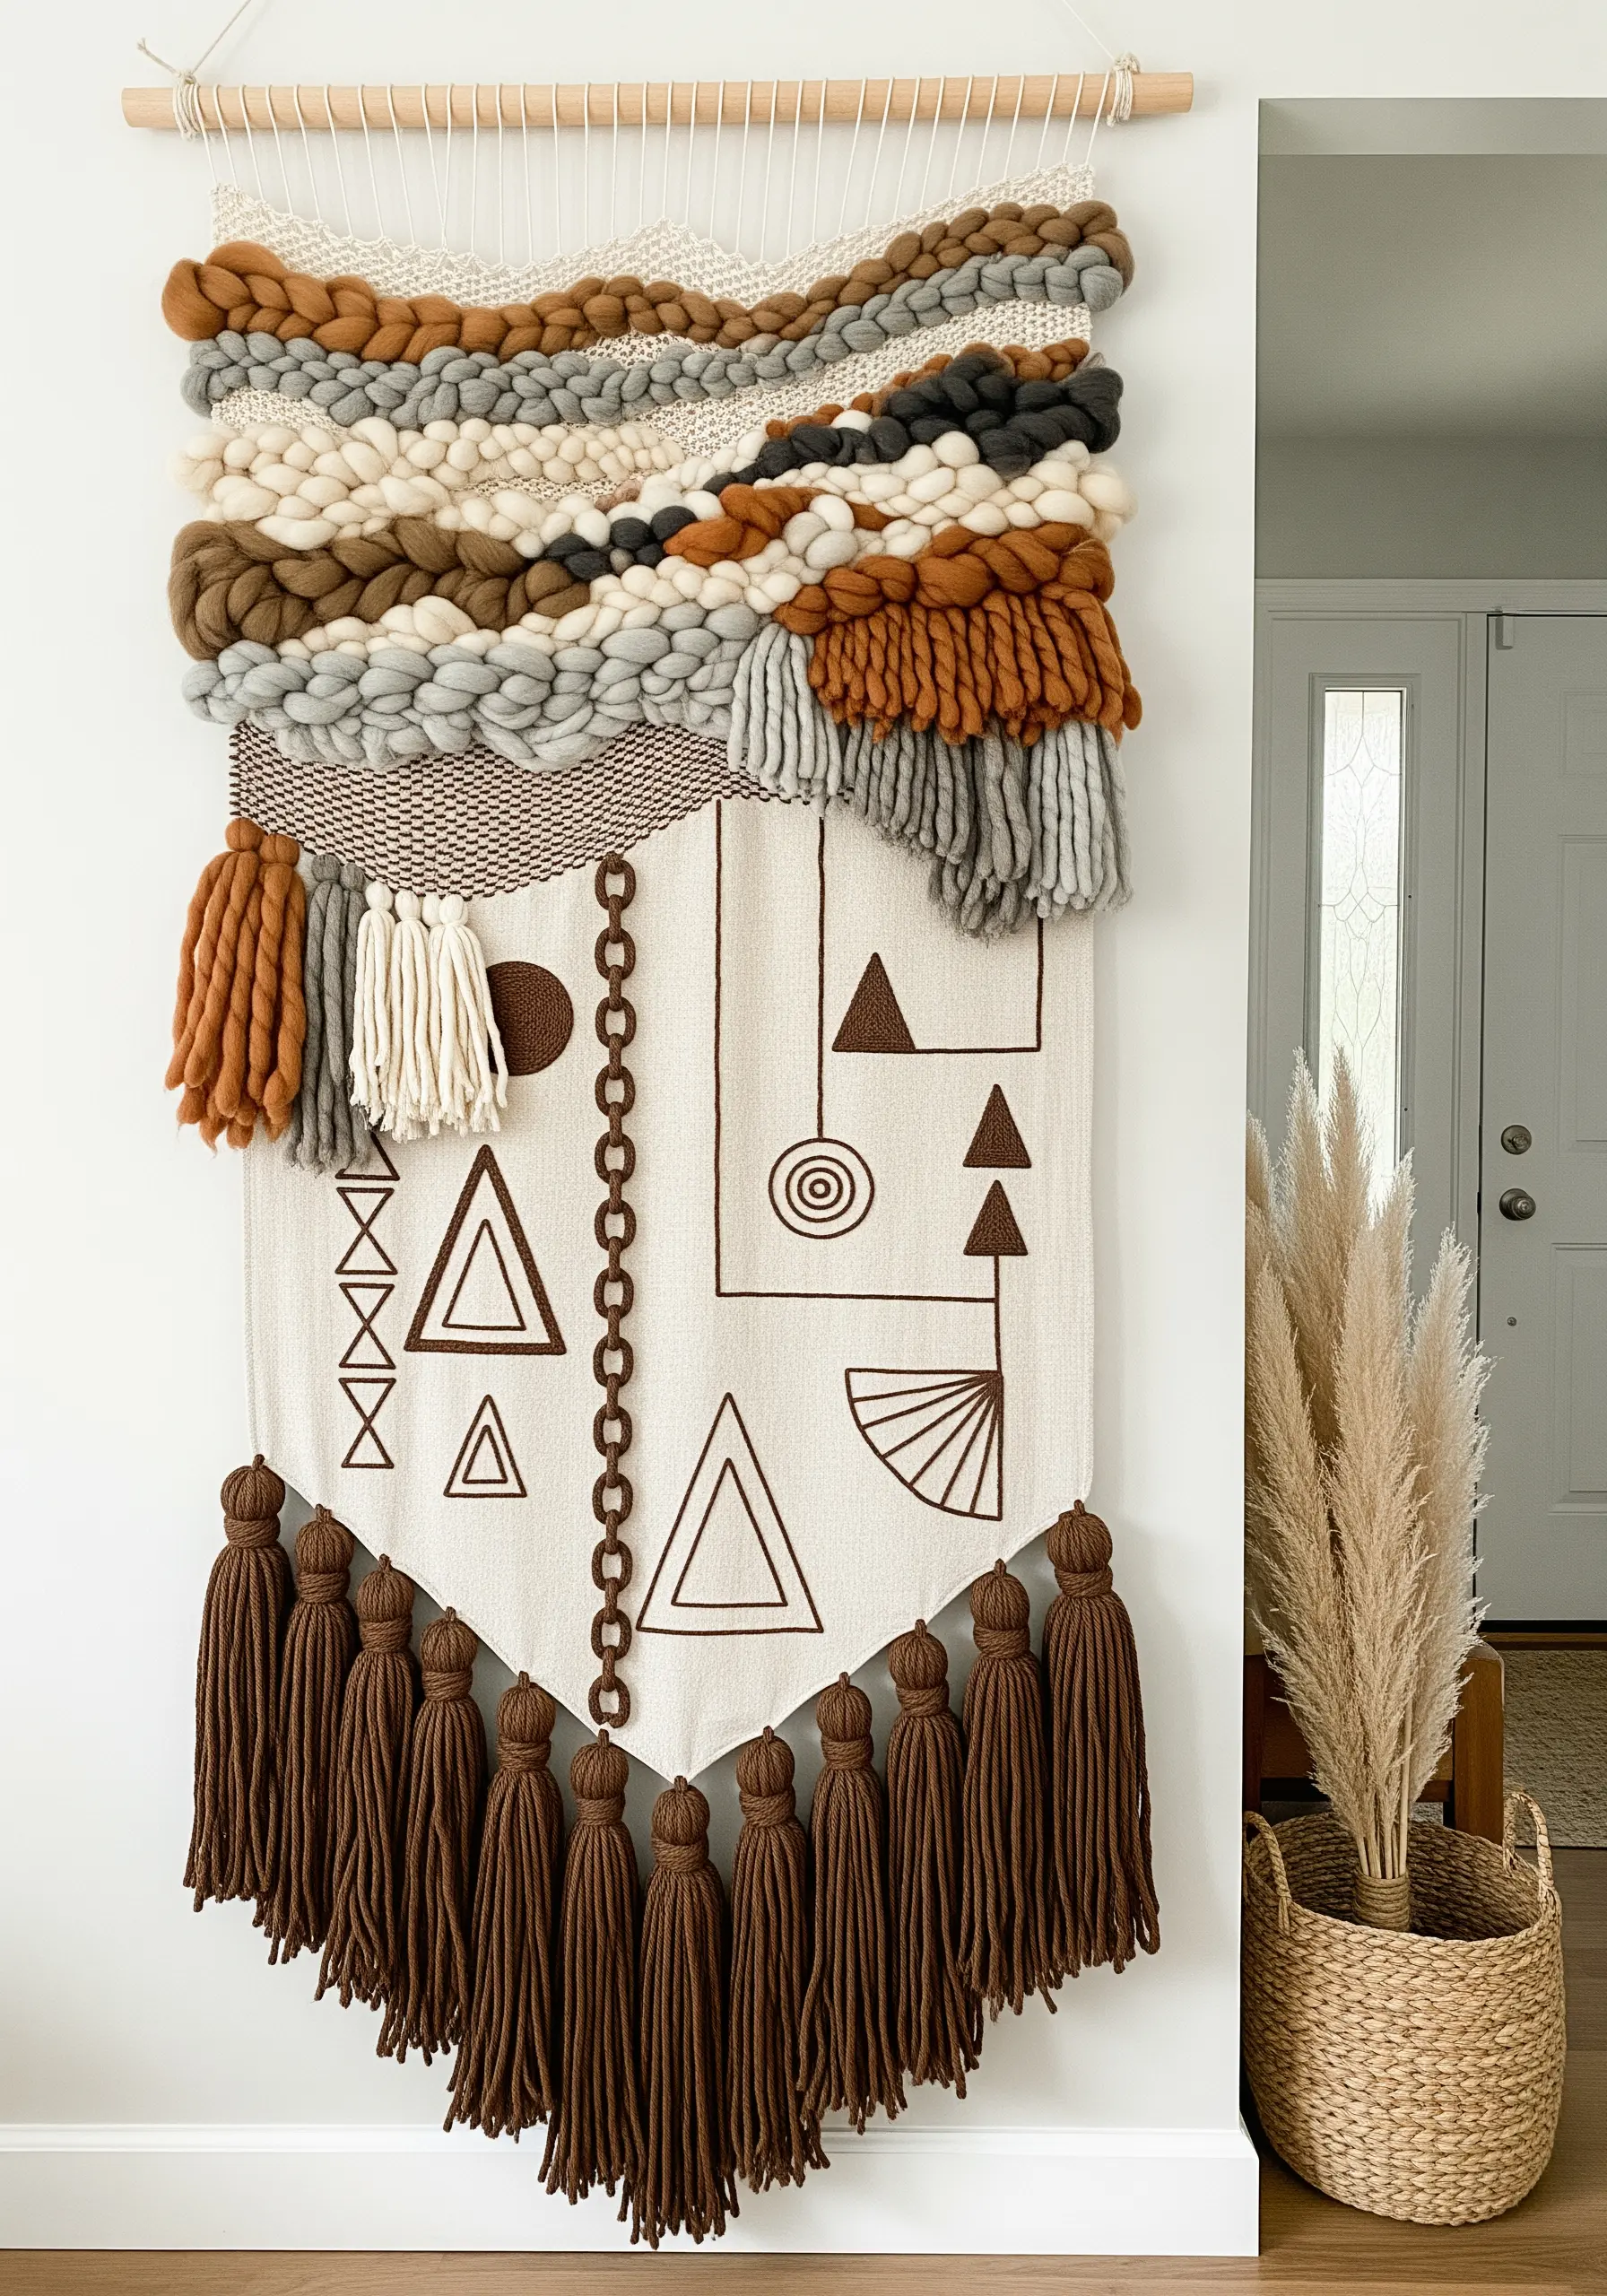
You don’t have to choose between fiber arts; you can blend them.
Create a foundation with simple weaving techniques using chunky yarn for the top section, then transition to an embroidered canvas below.
Use a simple backstitch or chain stitch with a thick, dark thread to draw clean, graphic symbols that contrast with the soft, bulky texture of the woven portion.
This approach transforms a simple wall hanging into one of those high-texture fabric collage embroidery projects that tells a story through contrasting materials.
5. Paint Rolling Hills with Blended Threads
Achieve a smooth, painterly effect by using long-and-short stitch to create contoured layers of color.
To create a seamless gradient, work with two needles at once, one for each color, and blend the threads where the two color fields meet.
Don’t be afraid to use unconventional color combinations—like deep rust next to ochre—to create warmth and depth in your abstract thread landscapes.
The key is to keep your stitches long and flowing, following the curve of the hills to enhance the sense of a rolling landscape.
6. Elevate Mandalas with Stitch Consistency on Dark Fabric

For intricate patterns like mandalas, consistency is more important than complexity.
Choose a few simple stitches—like backstitch for lines, satin stitch for small fills, and seed stitch for texture—and execute them with uniform length and tension.
Stitching with light, earthy colors on a black fabric background creates a dramatic contrast that makes every detail pop.
Embroidered mandala wall art designs become meditative focal points when the rhythm of your stitching is calm and steady.
7. Sculpt Mountains with High-Pile Stitches
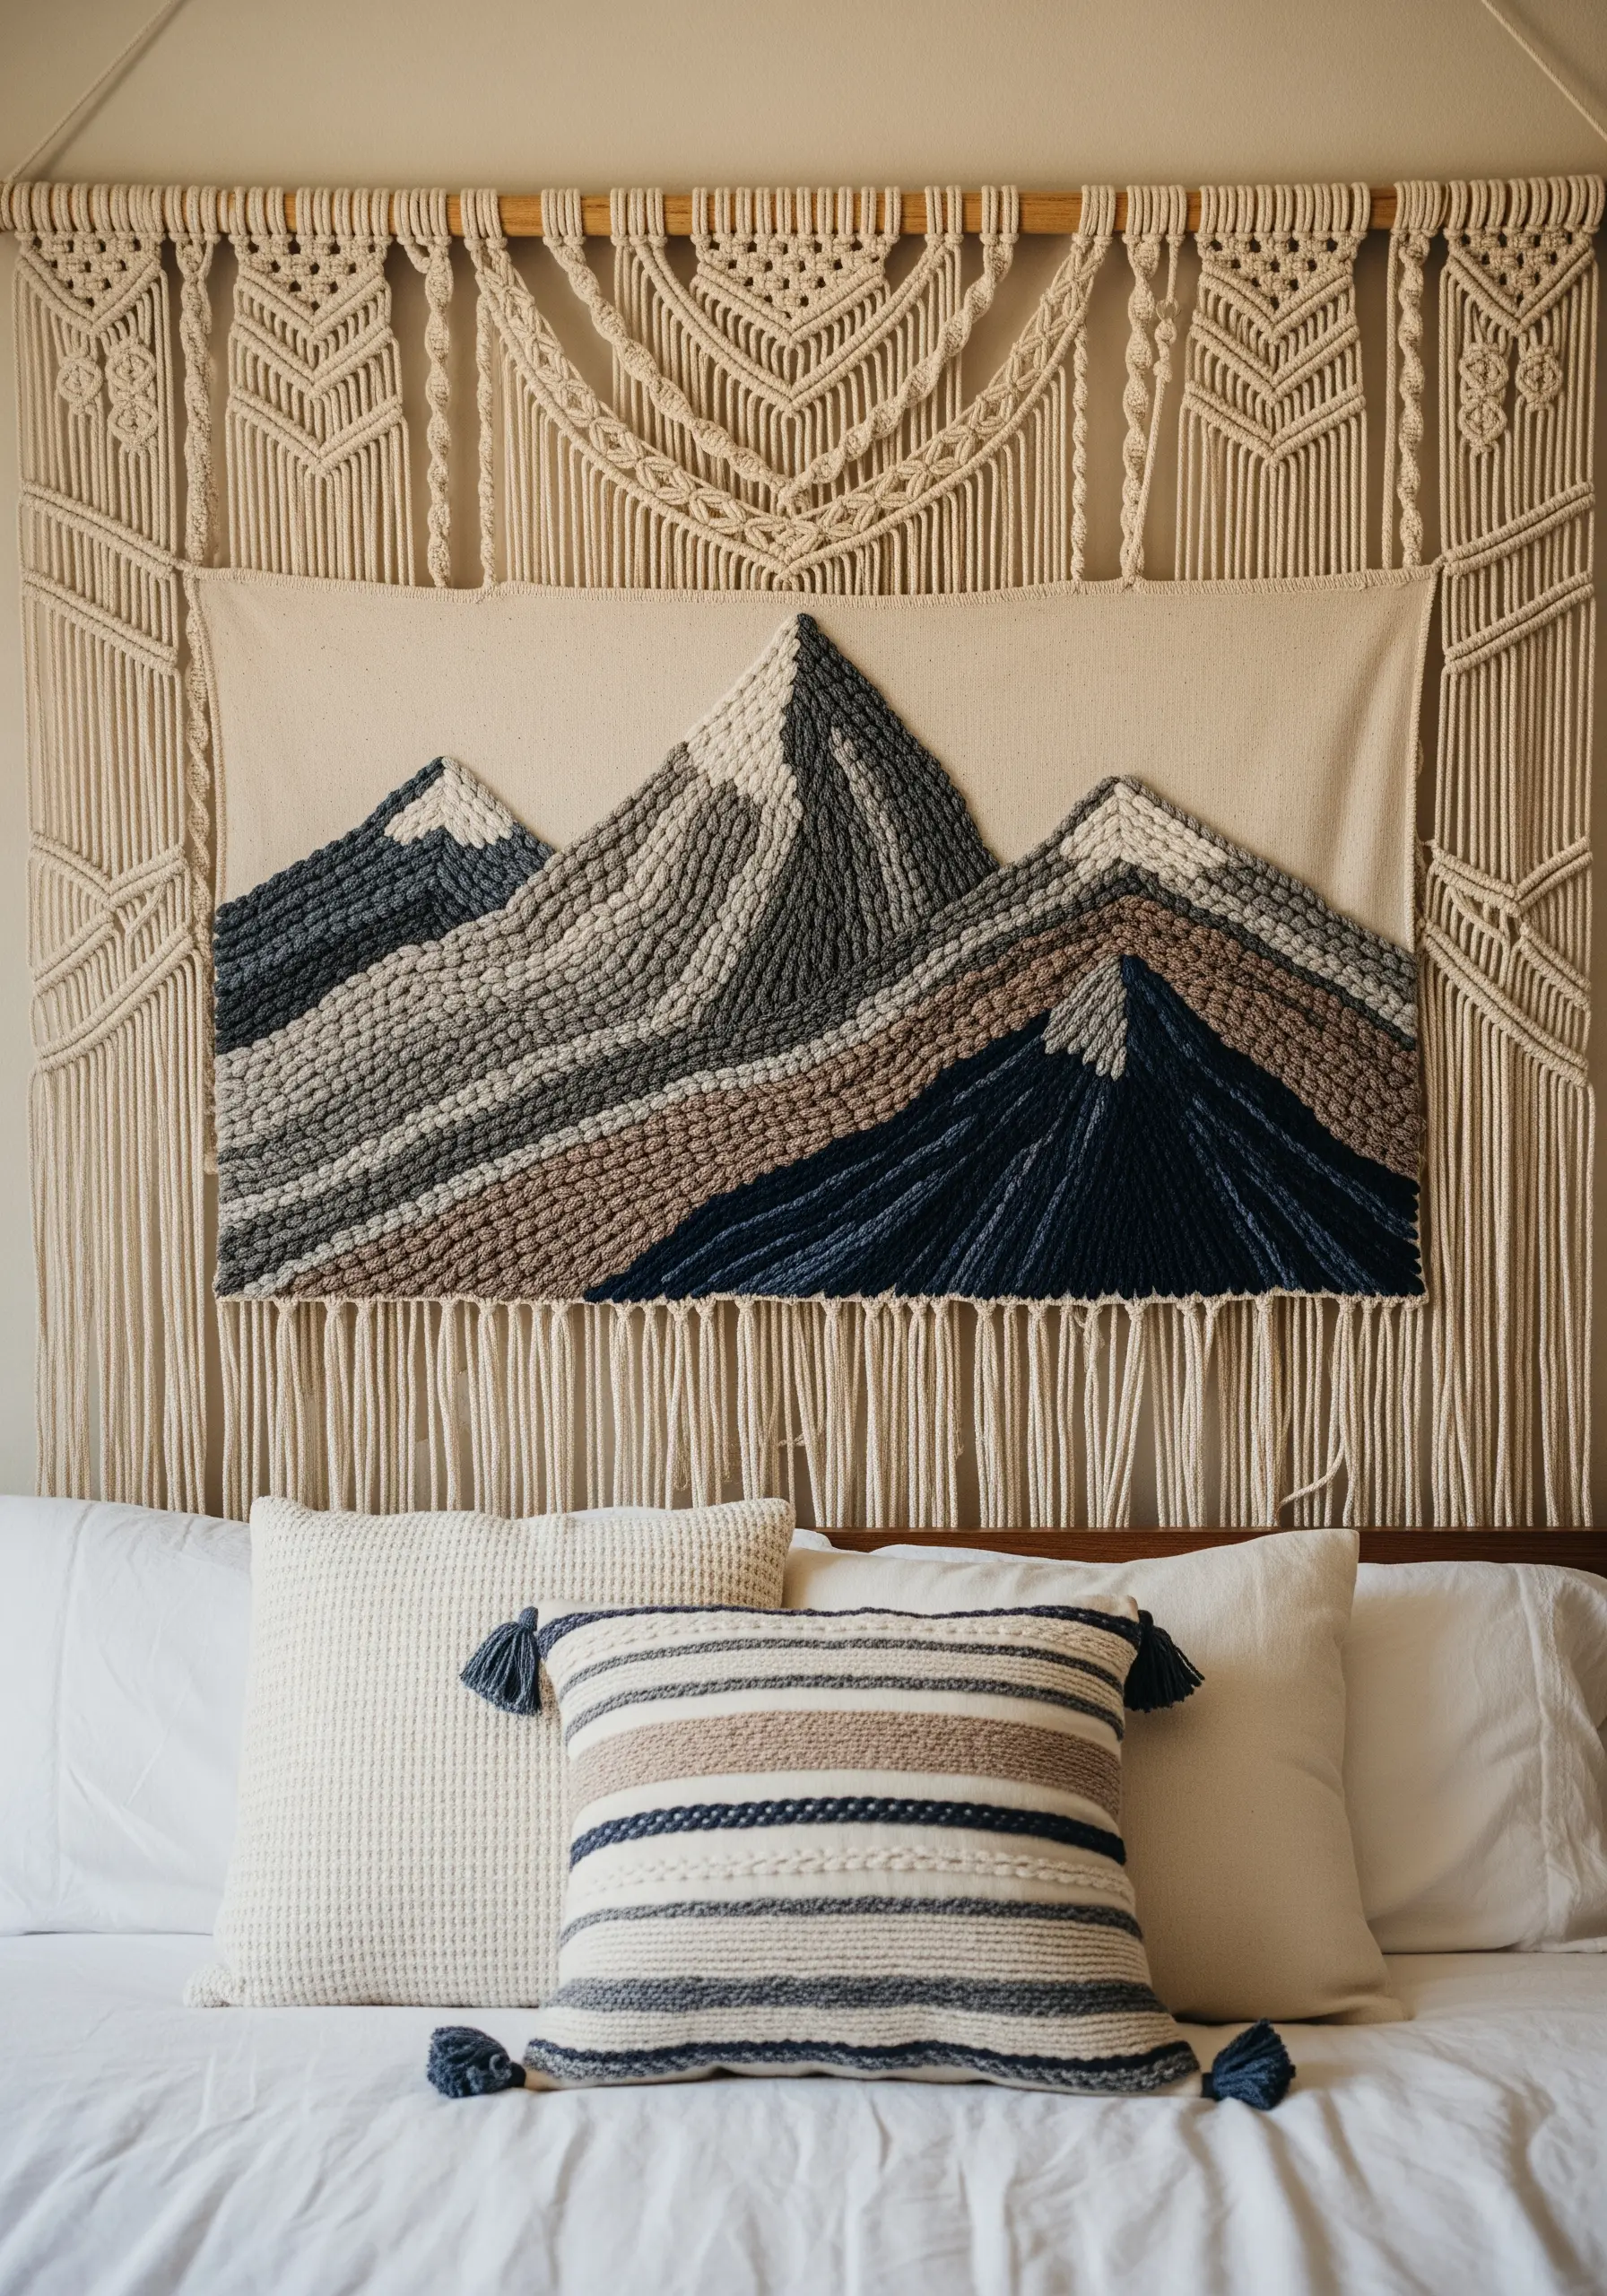
You don’t need a punch needle to get that lush, looped texture.
Use the loop stitch (or turkey work) and pack your stitches tightly together to build a dense, rug-like surface that mimics a woven look.
Work in distinct color blocks to define the mountain ranges and create depth in your embroidery, using shades of grey, blue, and brown.
Framing your embroidered panel with macrame adds another layer of boho texture that complements the softness of the stitched mountains.
8. Layer Felt Appliqué for Bold Cactus Art

For a clean, graphic look, use felt appliqué as your base.
Cut your cactus shapes from different shades of green felt and attach them to your burlap background with a simple running stitch around the edge.
Then, add embroidered details on top: a running stitch in a contrasting color down the center and detached chain stitches (lazy daisies) for vibrant flowers.
These are simple DIY collage projects that combine the softness of felt with the sharp detail of thread.
9. Capture Woodland Details with Thread Painting

To give your mushroom caps a realistic, rounded appearance, use long-and-short stitch, angling your stitches to follow the curve of the cap.
Blend several shades of rust, brown, and cream within a single cap to create natural-looking highlights and shadows.
For the mossy ground, switch to French knots using variegated green thread. This creates effortless color variation and a wonderfully tangled texture.
Realistic mushroom forest floor embroidery projects come to life through these subtle shifts in texture and color.
10. Create 3D Pampas Grass with a Turkey Work Fringe

For feathery, three-dimensional pampas grass, the turkey work stitch is your best friend.
Create loops of thread, securing each one with a small tacking stitch. Once an area is filled, carefully snip the tops of the loops to create a soft, brush-like fringe.
Combine different neutral threads—ivory, beige, and taupe—to give the plumes a more natural, varied appearance.
This technique adds stunning dimension and creates gorgeous mixed-fiber textures that lift right off the fabric.
11. Map the Cosmos with Contrasting Textures
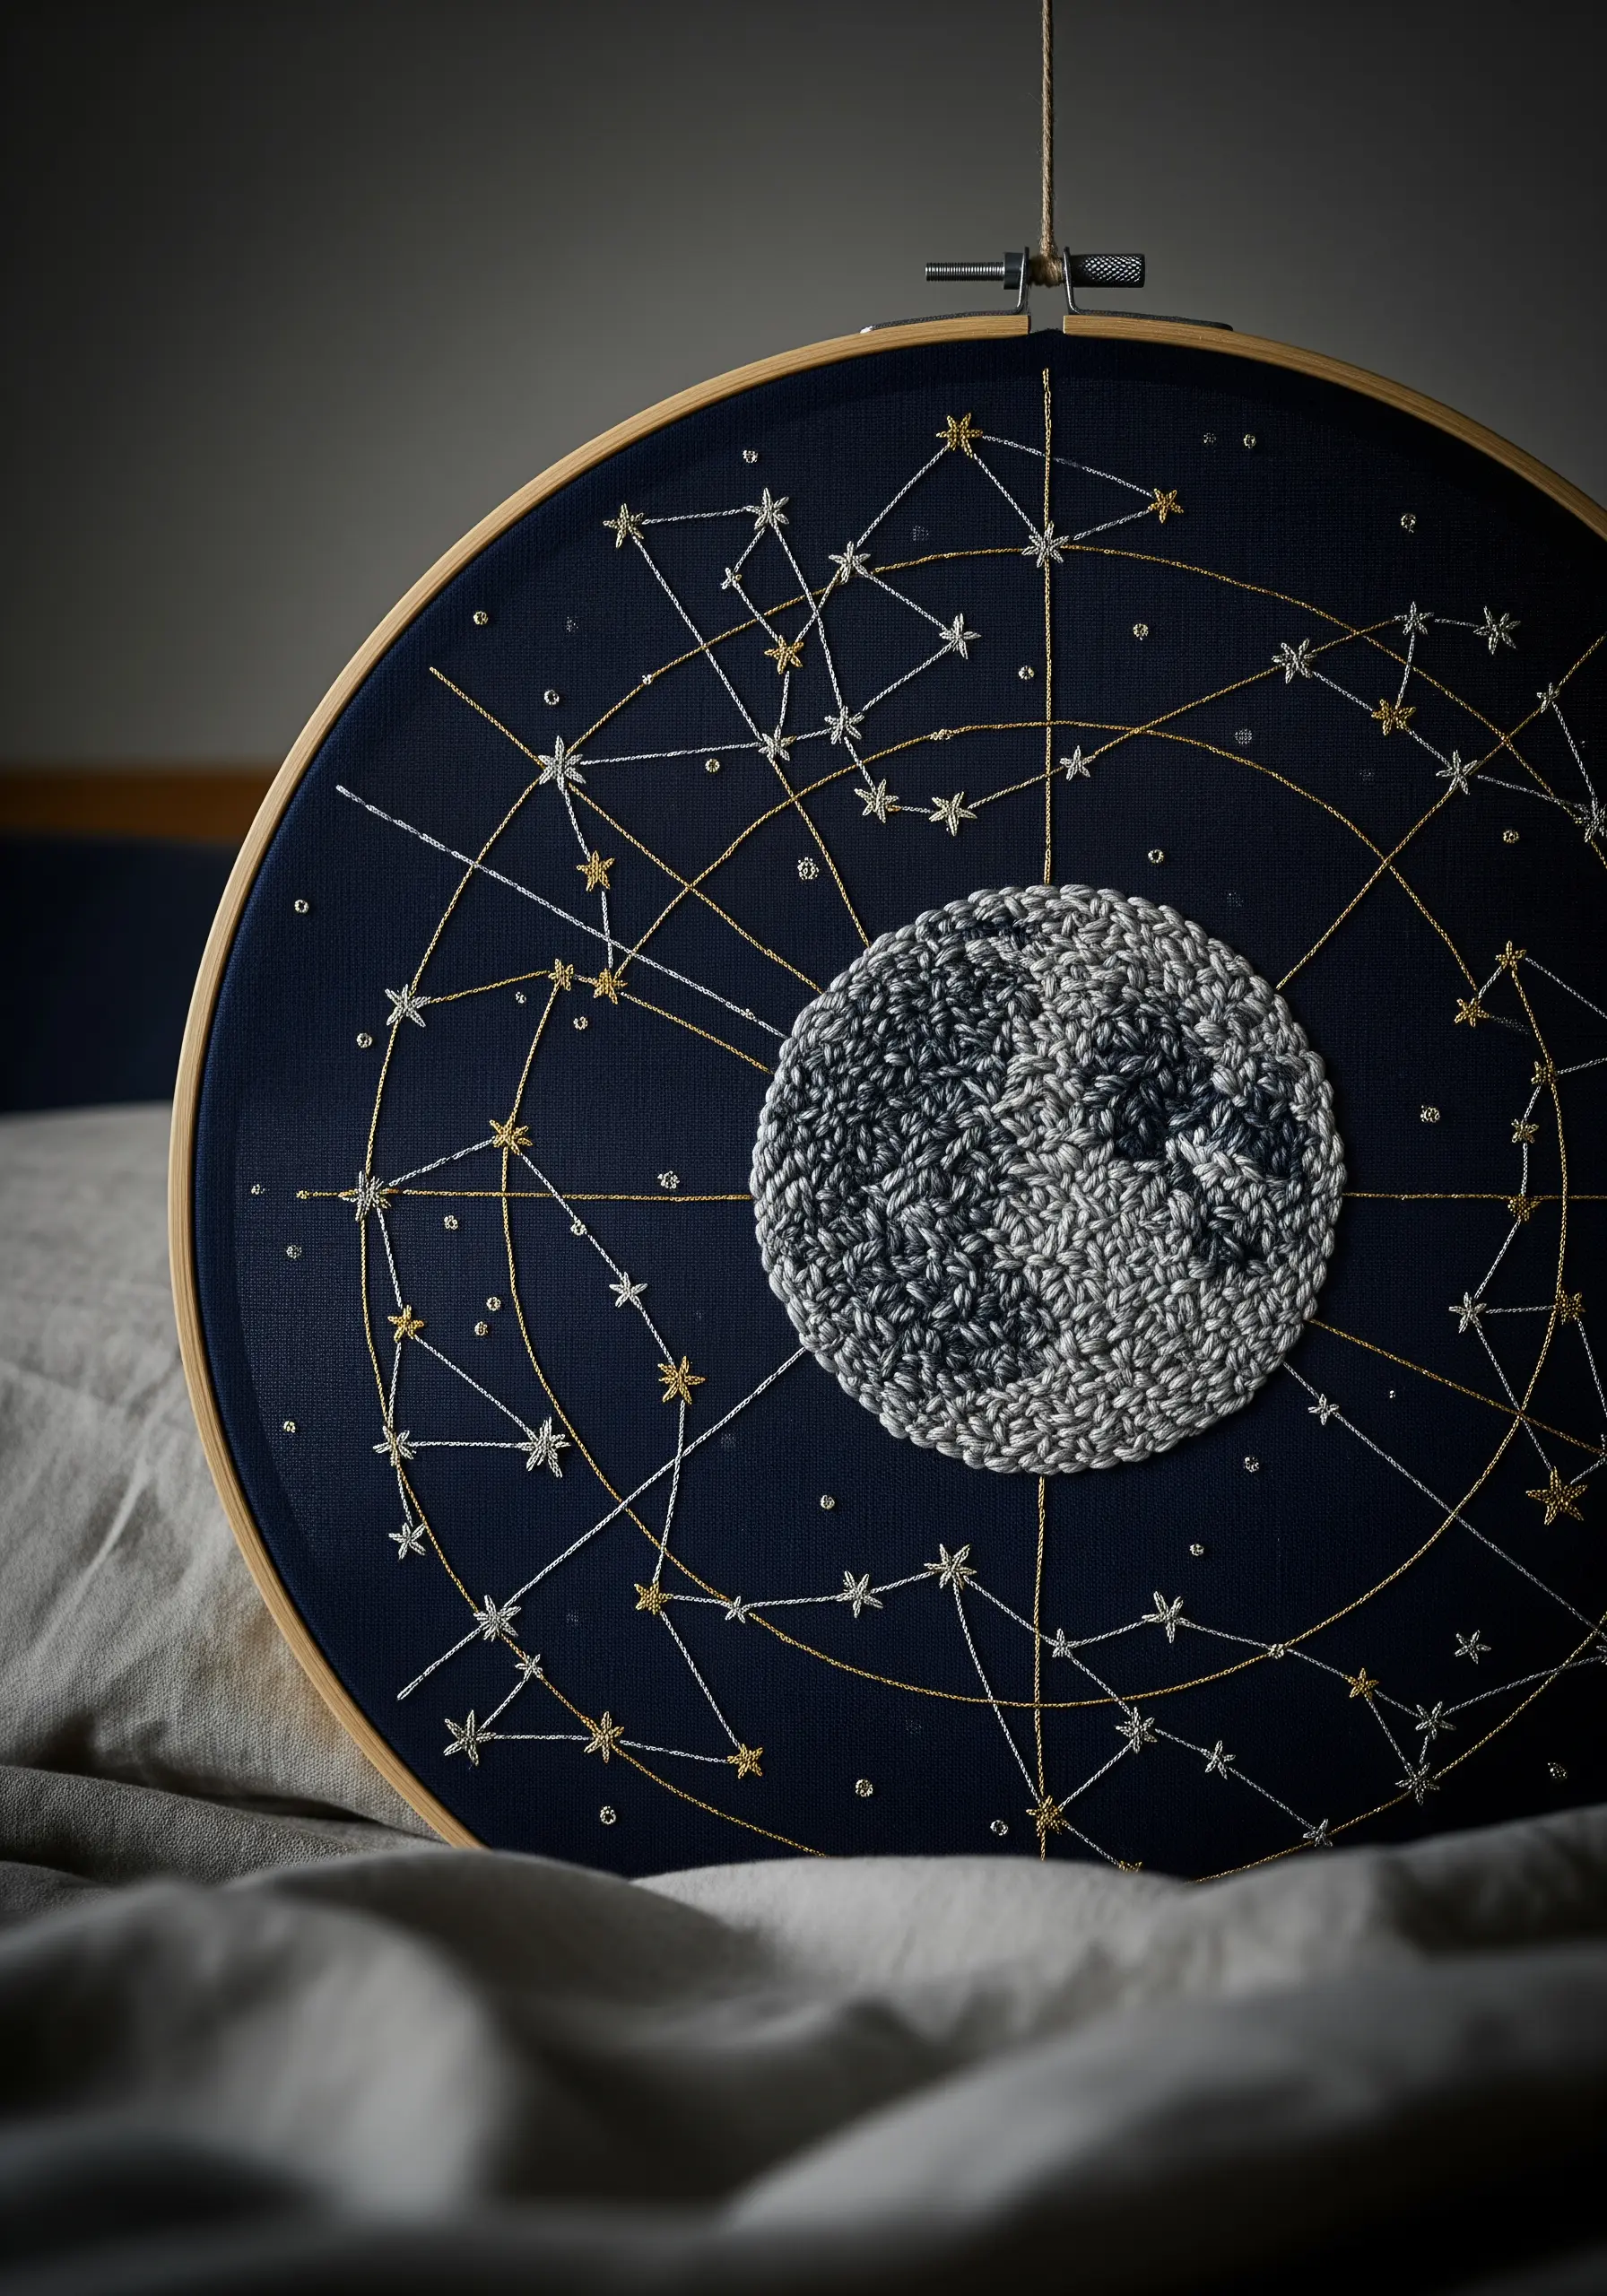
Create a stunning focal point by combining two distinct textures in your celestial pieces.
Fill the moon with a dense field of French knots using a variegated grey and white thread to mimic the cratered surface.
For the surrounding constellations, switch to a fine metallic thread and use sharp, precise straight stitches for the connecting lines and tiny star stitches for the stars themselves.
These delicate night sky embroidery designs work because the high-texture moon anchors the delicate, shimmering lines of the cosmos.
12. Achieve a Soft Watercolor Effect on Succulents
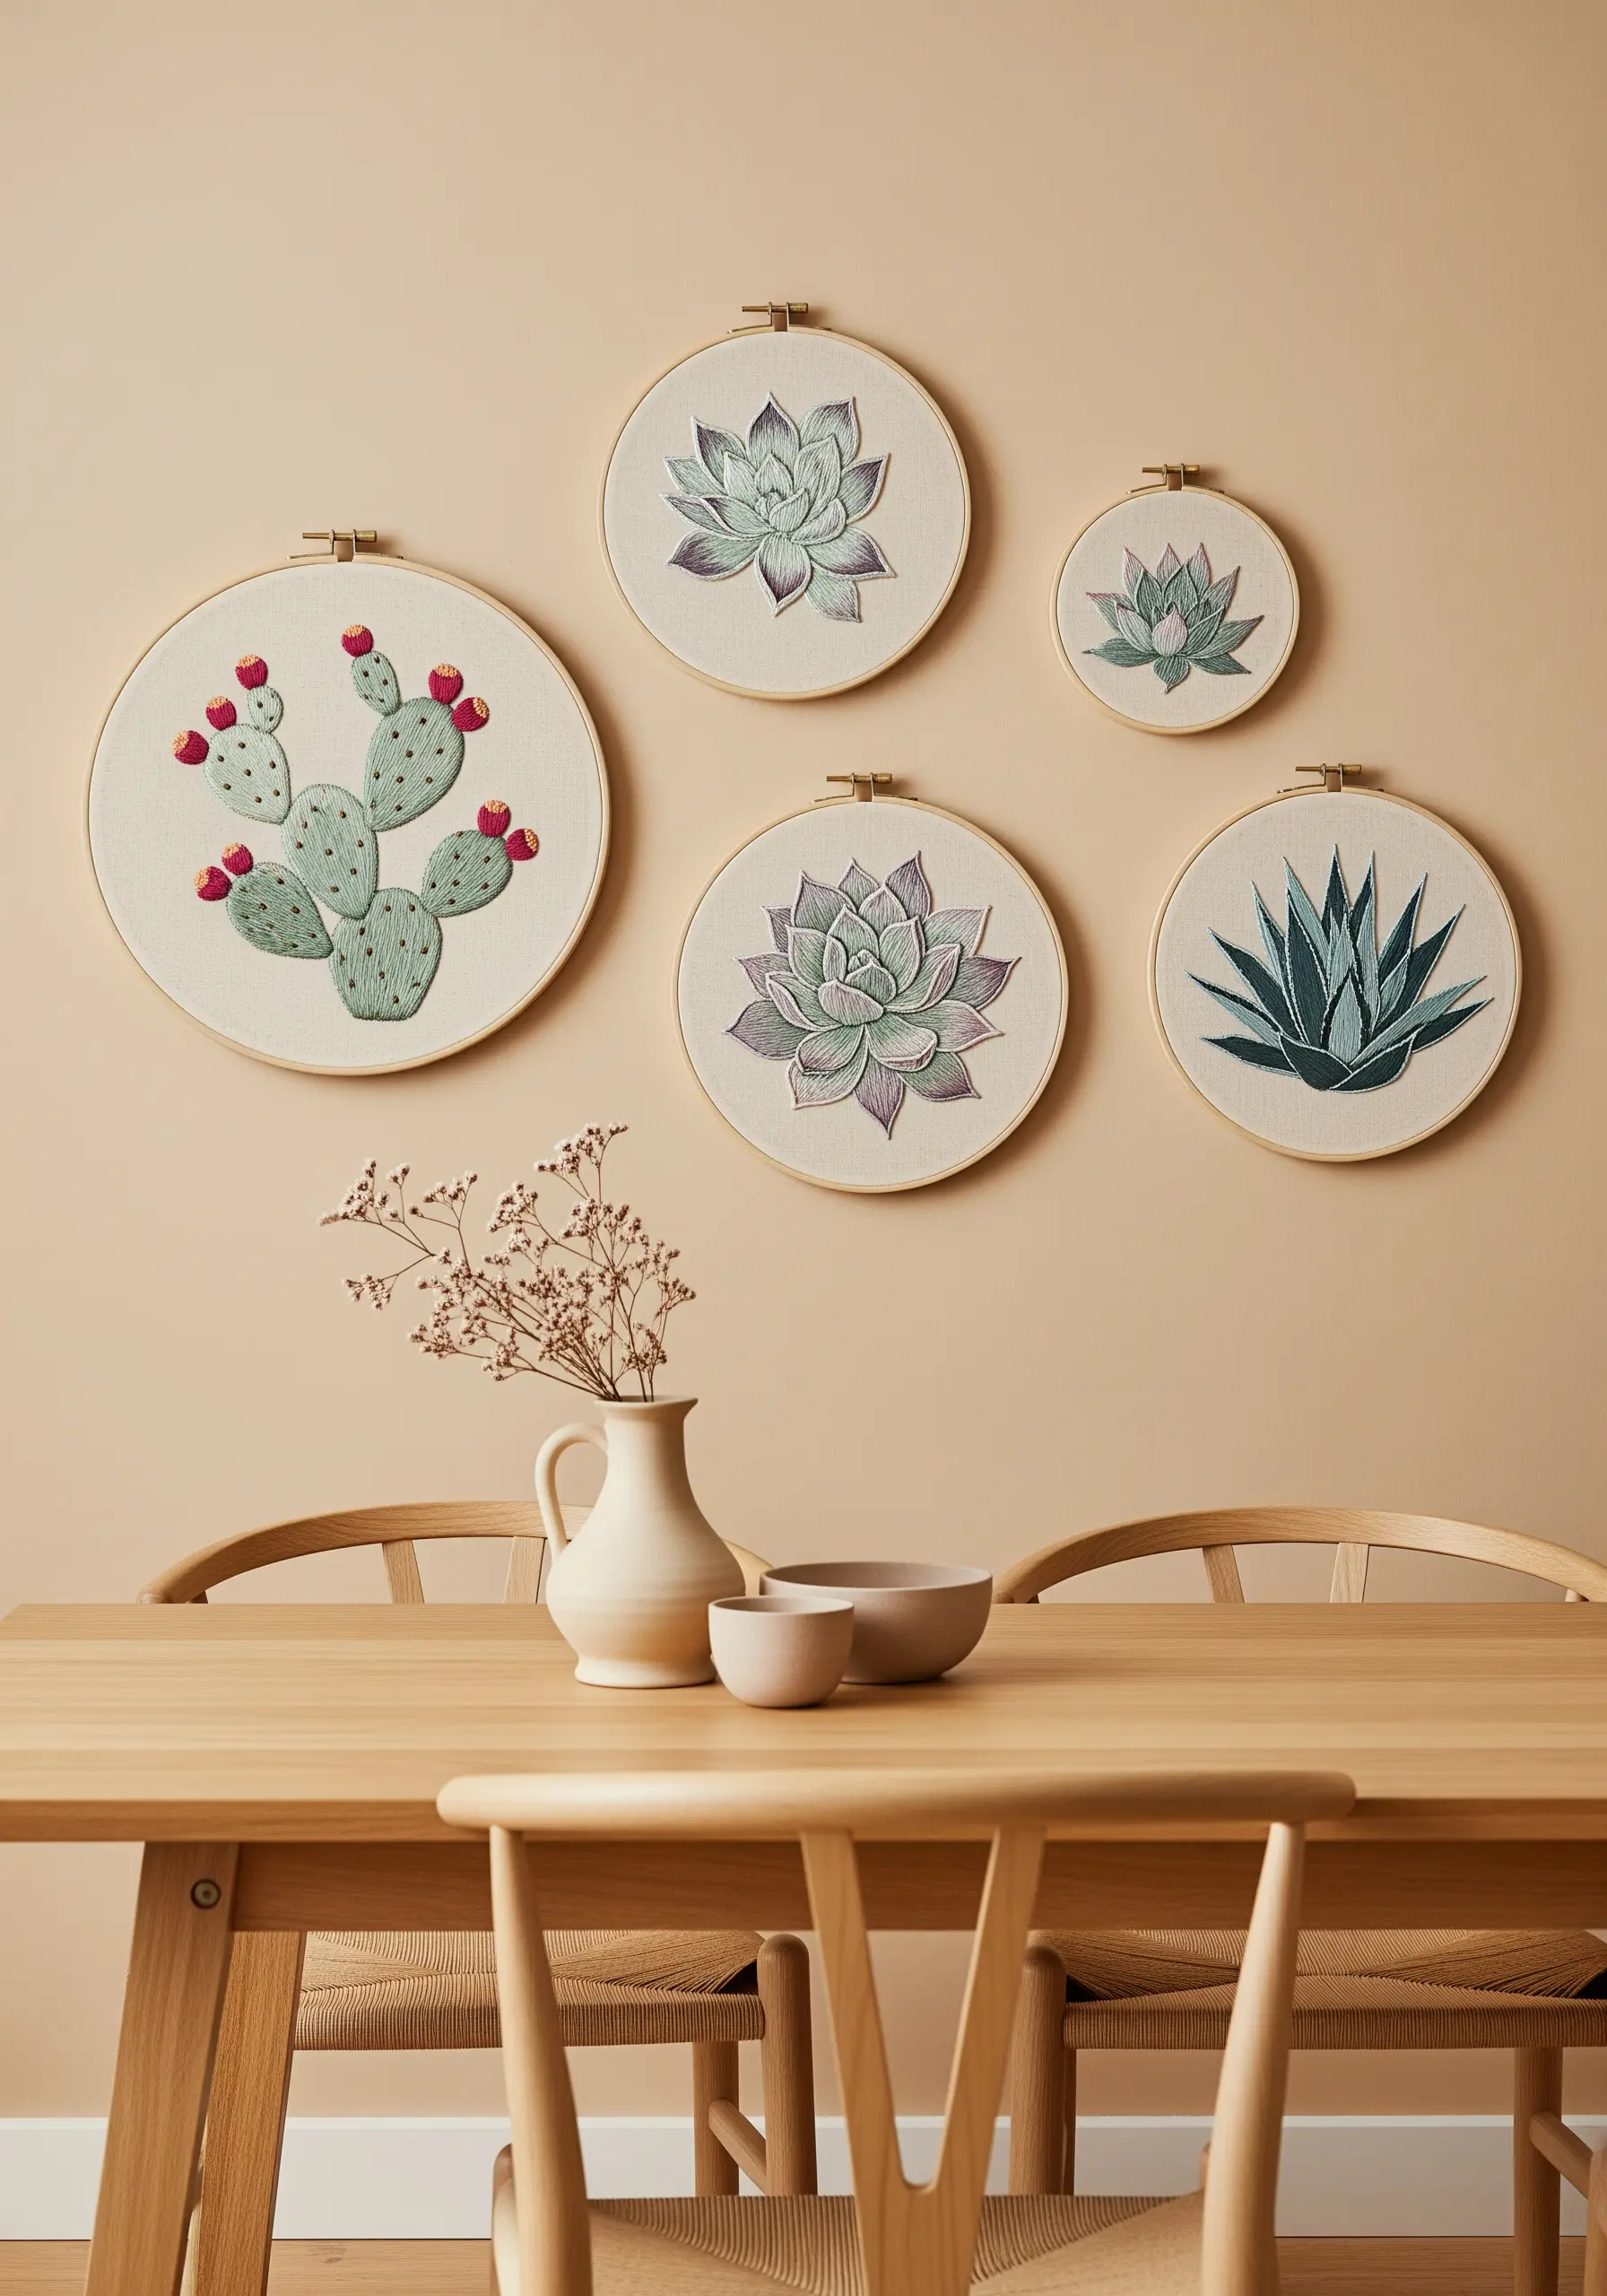
Give your succulents a soft, painterly quality by using the long-and-short stitch to blend colors seamlessly.
Instead of hard outlines, let the colors do the work of defining the shapes of the leaves.
Choose a soft, analogous color palette—like sage green, lavender, and dusty blue—to create a gentle, harmonious look.
These watercolor-style leaf embroidery blends are perfect for creating a serene and cohesive gallery wall.
13. Form Bold Arches with a Couching Technique

To create thick, perfectly curved lines without thousands of stitches, turn to couching.
Lay down a bundle of thick yarn or multiple strands of embroidery floss along your design line. Then, using a single, contrasting strand, make small tacking stitches over the bundle to secure it to the fabric.
This technique gives you bold, graphic shapes with a raised texture that stands out beautifully.
It’s a foundational technique for many yarn wall art projects and saves an incredible amount of time.
14. Design a Cascading Wildflower Meadow

For an impressively long wall hanging, focus on variation and rhythm rather than intricate detail on every single flower.
Use a limited palette of three or four colors and a handful of simple stitches: lazy daisy for petals, French knots for centers, and stem stitch for stalks.
Create a sense of depth by stitching the flowers at the bottom more densely and letting them become sparser as you move up the fabric.
Statement-size wall art ideas like this feel airy and elegant, not overwhelming.
15. Layer Fabric and Stitches for a Geode Effect
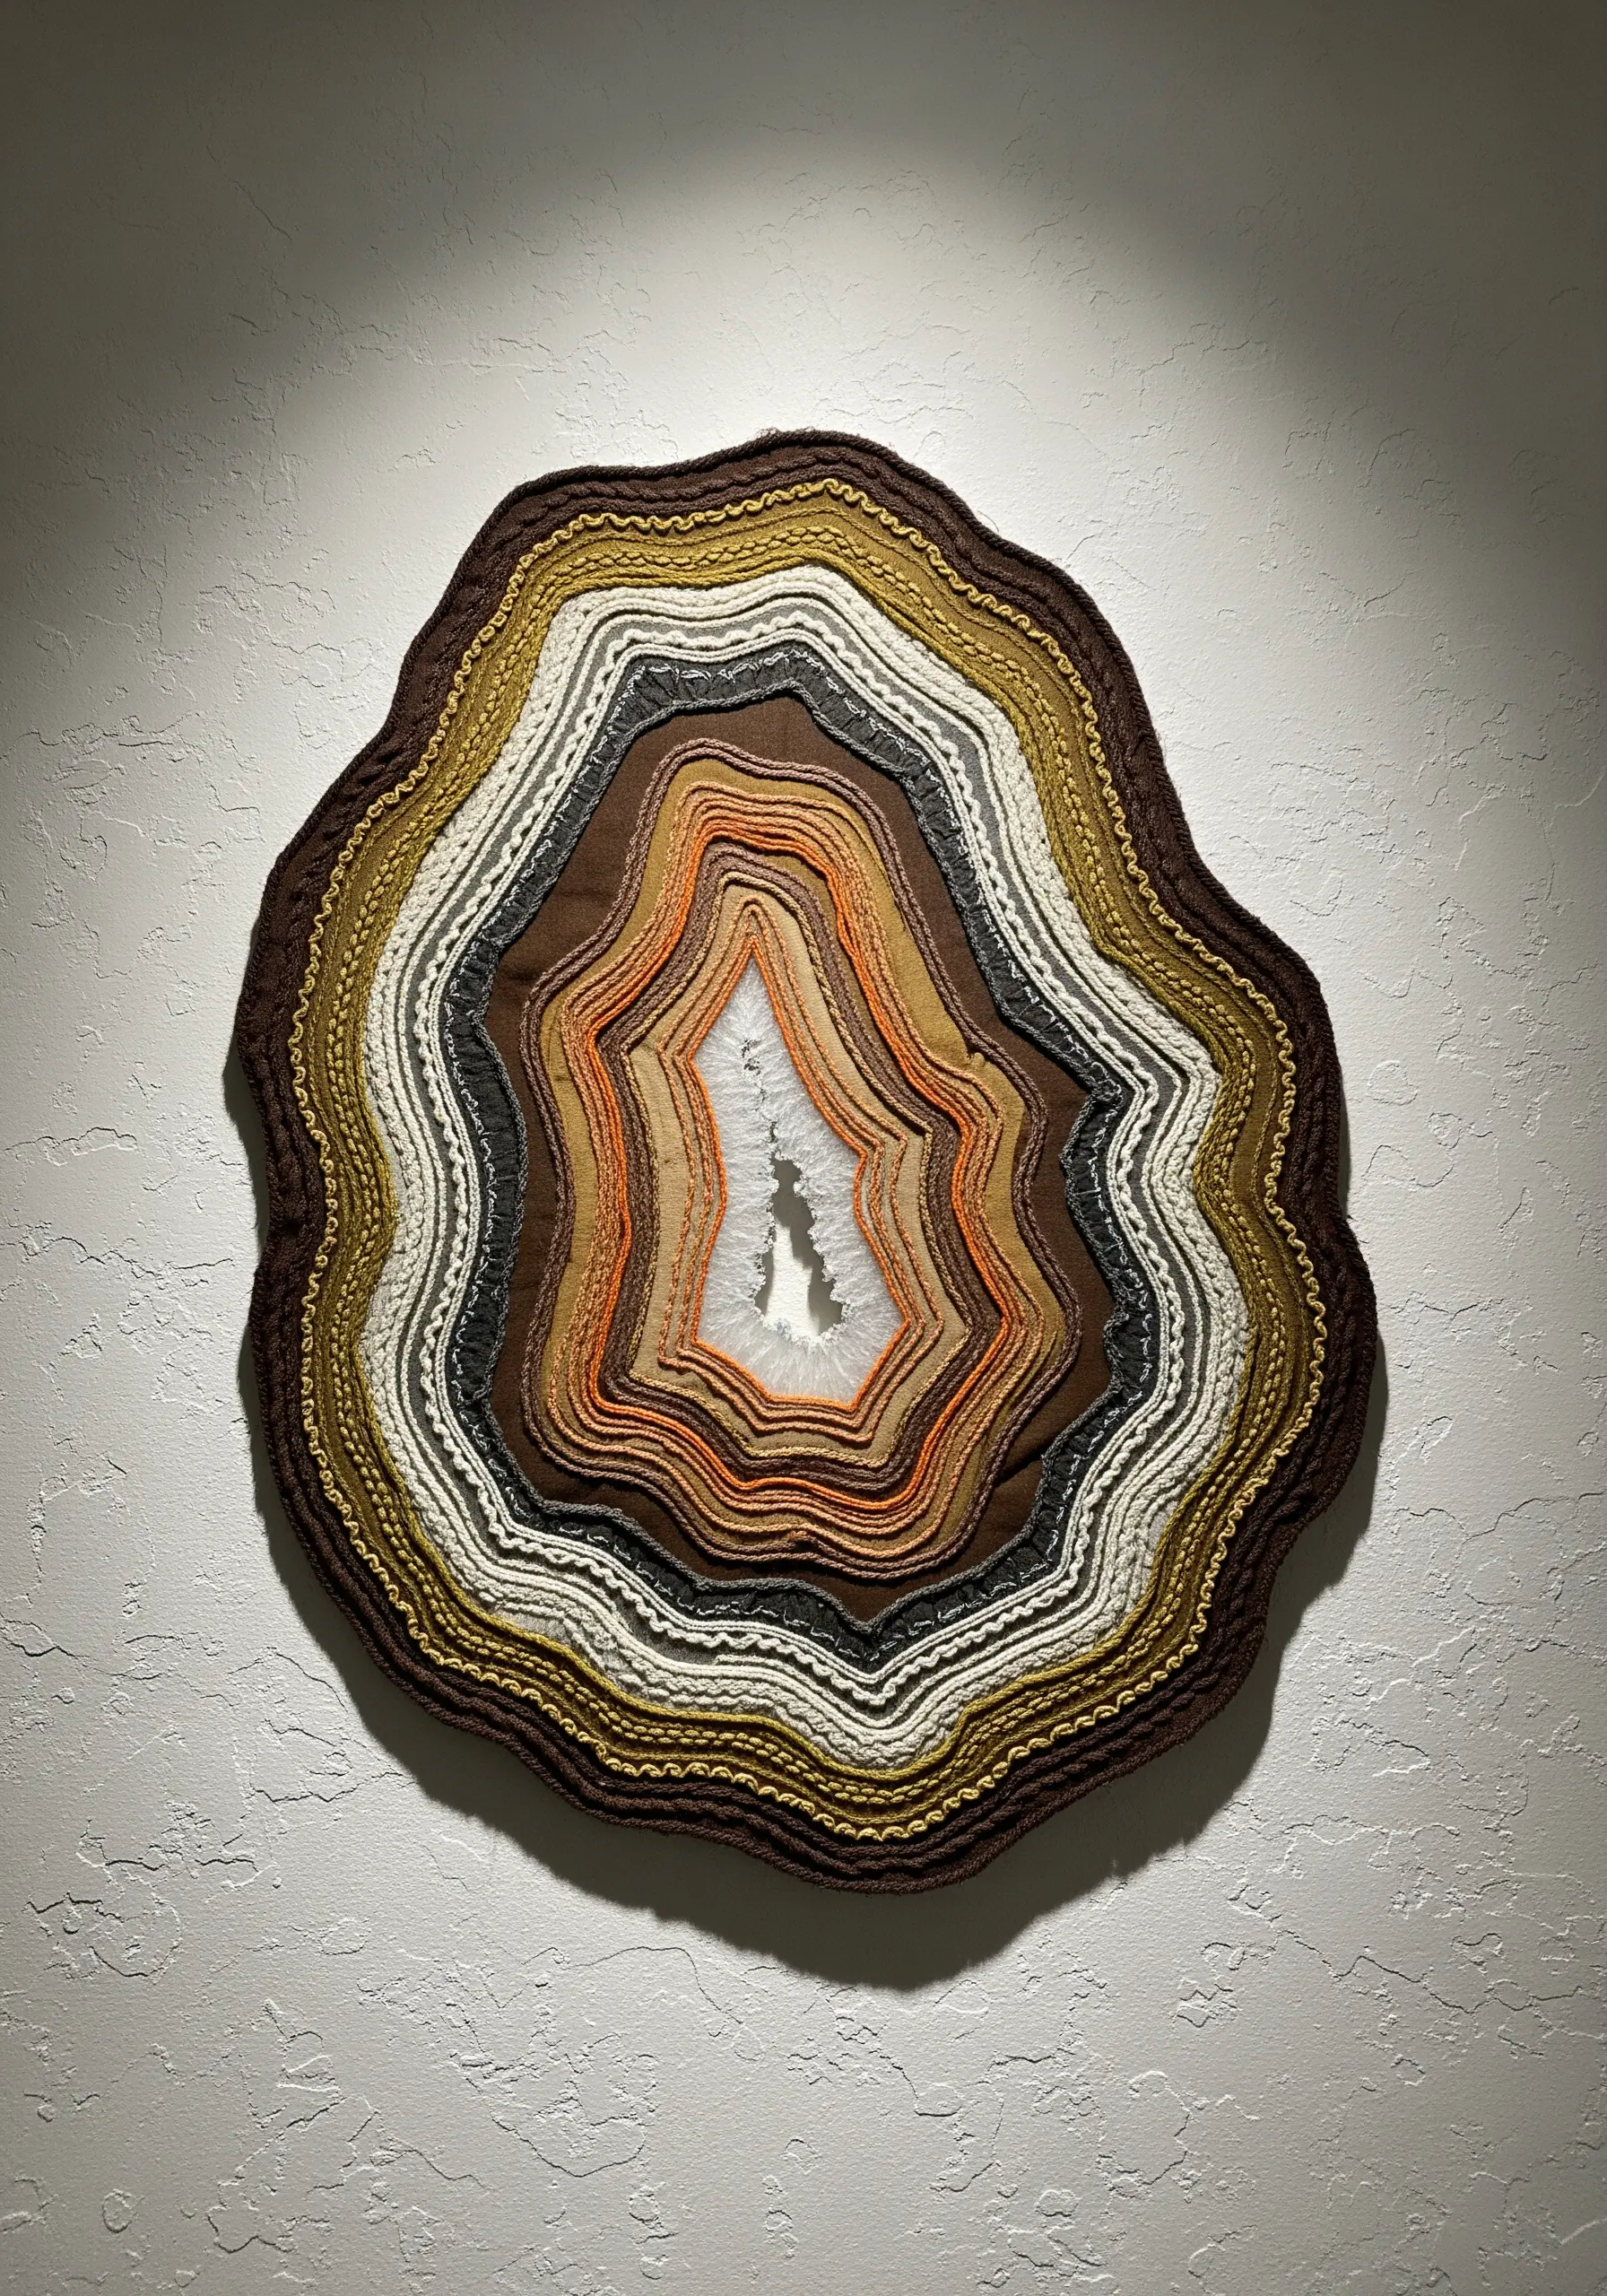
Recreate the concentric layers of a geode by using fabric appliqué.
Cut progressively smaller, organic shapes from different textured and colored fabrics. Layer them and secure each piece with a decorative edge stitch, like a blanket stitch or a tight satin stitch.
Incorporate metallic threads in some of the stitched borders to mimic the crystalline sparkle found in real geodes.
This method turns scraps of fabric into dynamic, abstract fabric collage embroidery ideas.
16. Emulate Punch Needle Texture with French Knots

You can achieve that coveted dense, nubby texture of punch needle using only your embroidery needle.
Fill large color-blocked areas with tightly packed French knots or the loop stitch (leaving the loops uncut). While it’s more time-intensive, it gives you incredible control over the final texture.
Use a thicker thread like pearl cotton or even fine yarn to create fuller knots and speed up the process.
Texture-rich embroidery ideas like this sunset are perfect for creating a statement piece that invites touch.
17. Stitch a Minimalist Herb Garden

Celebrate the simple beauty of herbs with clean, minimalist designs.
Use a fine-tipped transfer pen for precise outlines, and stick to just two or three basic stitches per plant to maintain a modern, uncluttered look.
A split stitch for stems and satin stitch for leaves is often all you need. The key is neatness and precision.
Medicinal herb embroidery designs work beautifully as a themed set, bringing a touch of green to your kitchen walls.
18. Fuse Organic Texture with Geometric Accents

Create a striking modern-folk aesthetic by combining realistic texture with bold, graphic elements.
Use long-and-short stitch with blended shades of orange and white to create soft, believable fur on the fox.
Then, add sharp, geometric shapes and floral motifs around it using flat satin stitch in contrasting colors like teal and yellow.
Fox embroidery patterns feel fresh and contemporary when this tension between soft and sharp is embraced.
19. Use Varied Stitches for Potted Plant Textures

Don’t stitch every plant the same way. Assign a different stitch to each plant to reflect its unique texture.
Use a padded satin stitch for thick, fleshy succulent leaves, a woven wheel stitch for rosette shapes, and straight stitches for spiky aloe plants.
This approach makes your composition more engaging and showcases your skill.
It’s a simple way to elevate tropical leaf embroidery designs from flat patterns into tactile botanical studies.
20. Integrate Embroidery into Macrame Hangings

Elevate your macrame by adding a custom embroidered centerpiece.
After embroidering your design in a standard hoop, carefully trim the excess fabric, leaving a small margin to tuck behind the inner hoop ring for a clean finish.
You can then seamlessly incorporate the finished hoop into your macrame design, using knots to frame it.
For a truly integrated look, let long threads from the embroidery, like the goddess’s hair, hang down and become part of the macrame fringe, creating stunning embroidered wall hangings.
21. Draw with Thread on a Patchwork Canvas
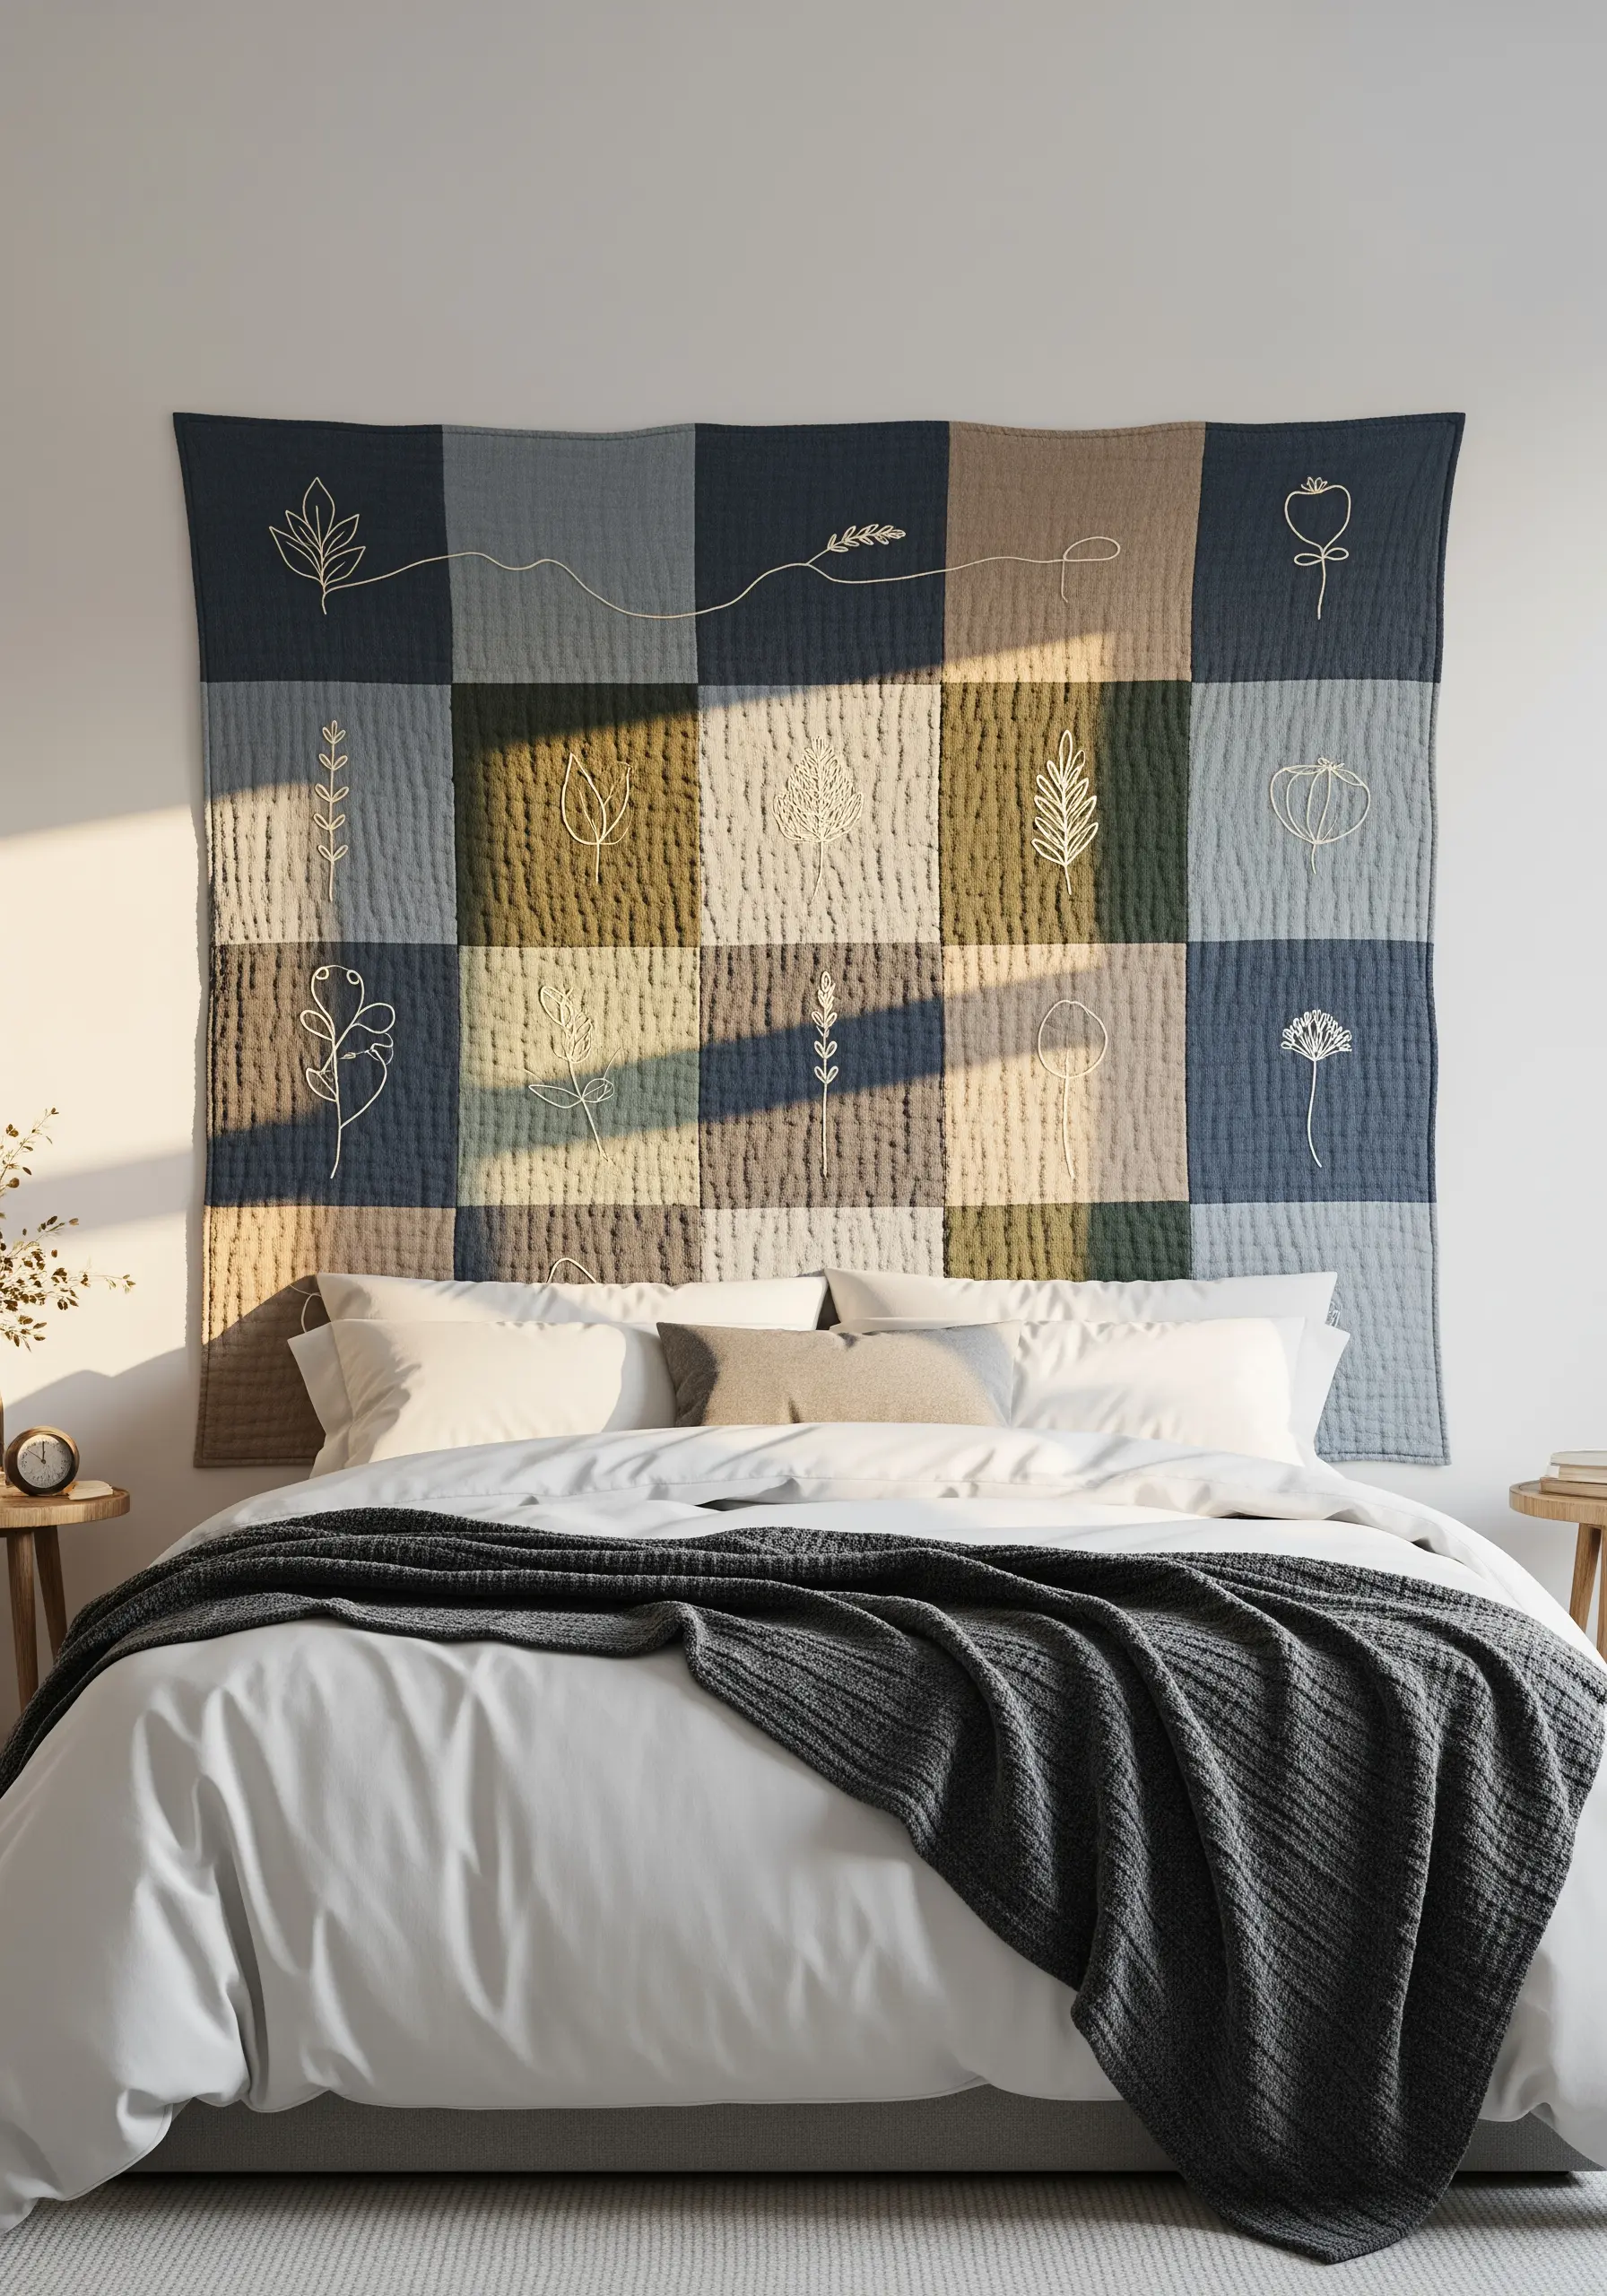
Use a simple backstitch or stem stitch as a drawing tool on a textured, quilted background.
The beauty of this style lies in its simplicity. A single, continuous line in a contrasting thread color is all you need to create elegant, minimalist botanical silhouettes.
The patchwork itself provides the color and texture, allowing your stitched lines to be the quiet, defining element.
This technique is perfect for applying minimalist line art embroidery patterns to larger, more substantial pieces like blankets or headboards.
22. Tell a Vertical Story with Stacked Hoops

Create a cohesive narrative by connecting multiple hoops into a single, tiered wall hanging.
Design each hoop to represent a different layer of a landscape—sky, mountains, forest, and field—and then link them together with simple macrame knots.
This format encourages you to think about how different environments connect and flow into one another.
It’s a creative way to display a series of smaller works, turning them into a single piece of travel-inspired string art.
23. Illustrate Moon Phases with Fabric Collage

Use appliqué to create crisp, clean shapes for your moon phases.
Select a variety of white and grey textured fabrics—some with subtle prints, some with a woven feel—to give each moon its own personality.
Secure the fabric shapes with a neat backstitch or a small, invisible hem stitch. Then, add fine details like craters using seed stitches or tiny French knots.
These celestial micro-embroidery ideas feel sophisticated when you focus on the interplay of textures within a monochrome palette.
24. Tackle Large-Scale Designs with Couching
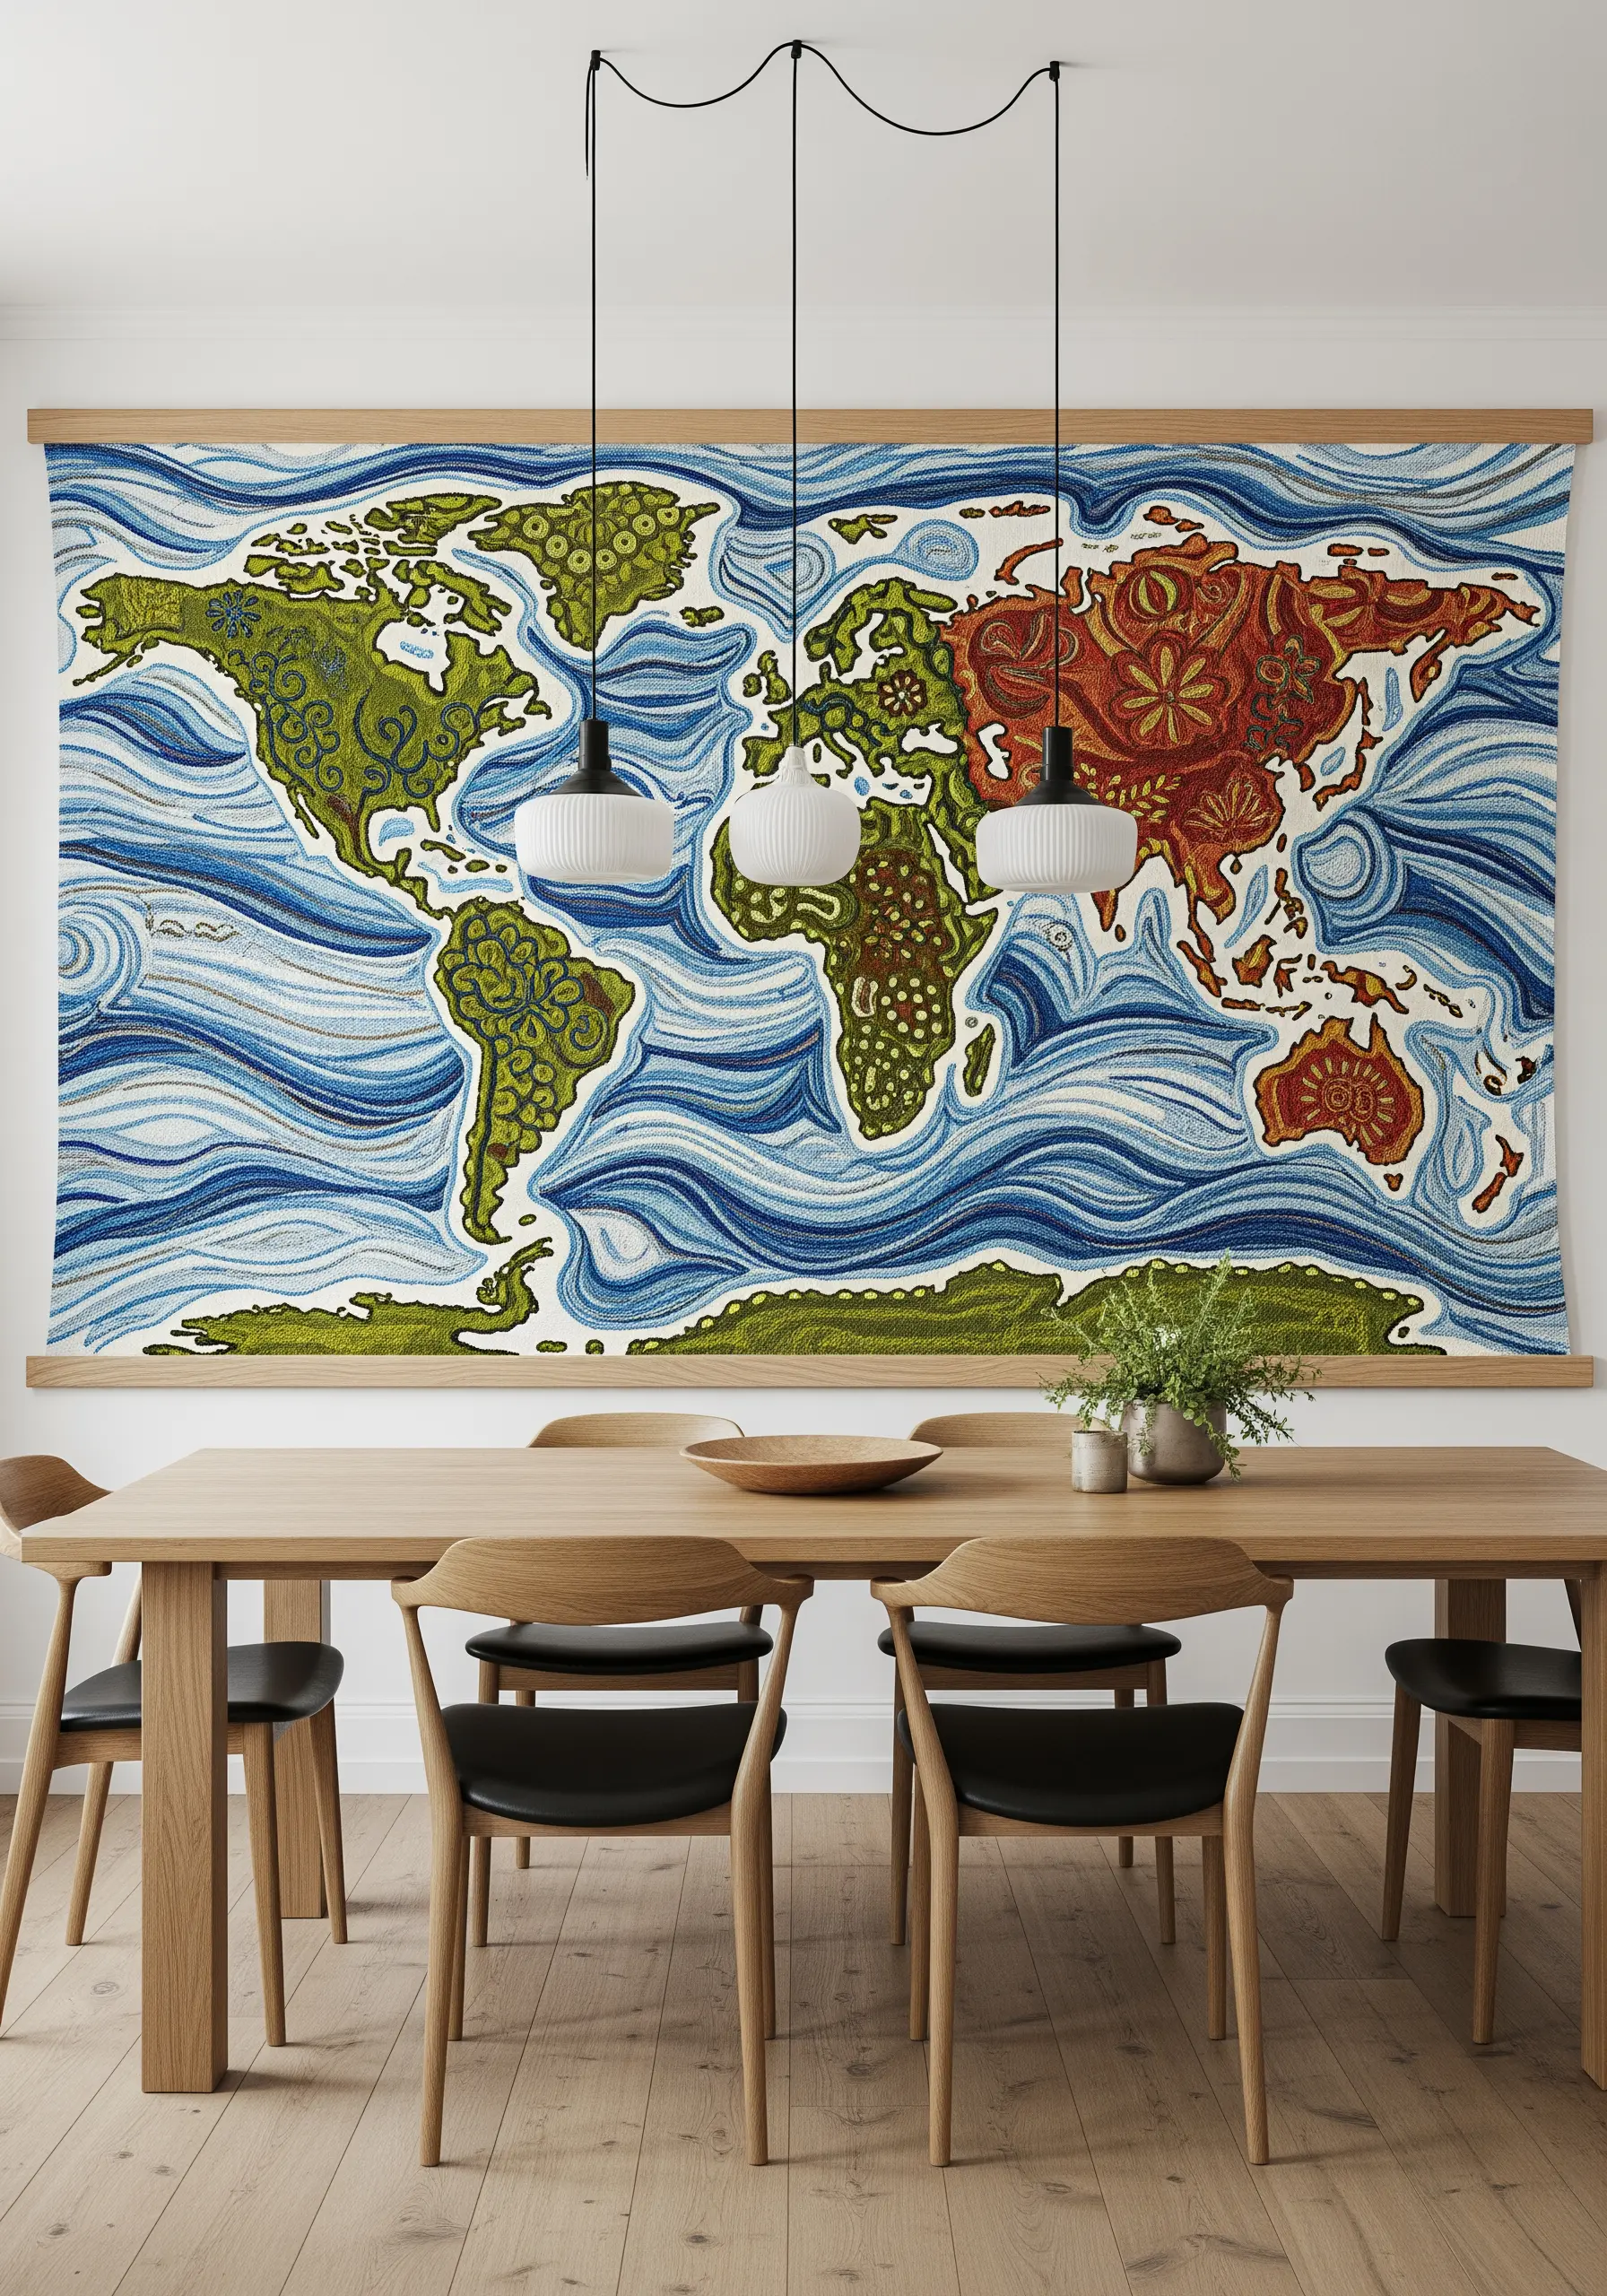
When faced with a massive design like a world map, filling it with satin stitch would take forever.
Instead, outline your continents with a couching stitch using thick yarn. Then, fill the interior spaces with textural stitches that cover ground quickly, like the seed stitch or long, random straight stitches.
This approach allows you to create impressive, large-scale DIY wall art embroidery projects without getting bogged down in endless filling.
The ocean’s swirling texture is easily achieved with wavy lines of chain stitch.
25. Build Dimensional Lines with Padded Stitches

To create those thick, raised lines that pop off the fabric, use a padding technique.
First, stitch a series of long, straight stitches within the shape of your line. Then, cover those stitches with a dense satin stitch, working in the opposite direction.
The underlying stitches act as a foundation, raising the final satin stitch for a sculptural, 3D effect.
This is one of the most effective abstract thread embroidery ideas for creating touchable, organic forms.
26. Plan Your Composition Before Committing
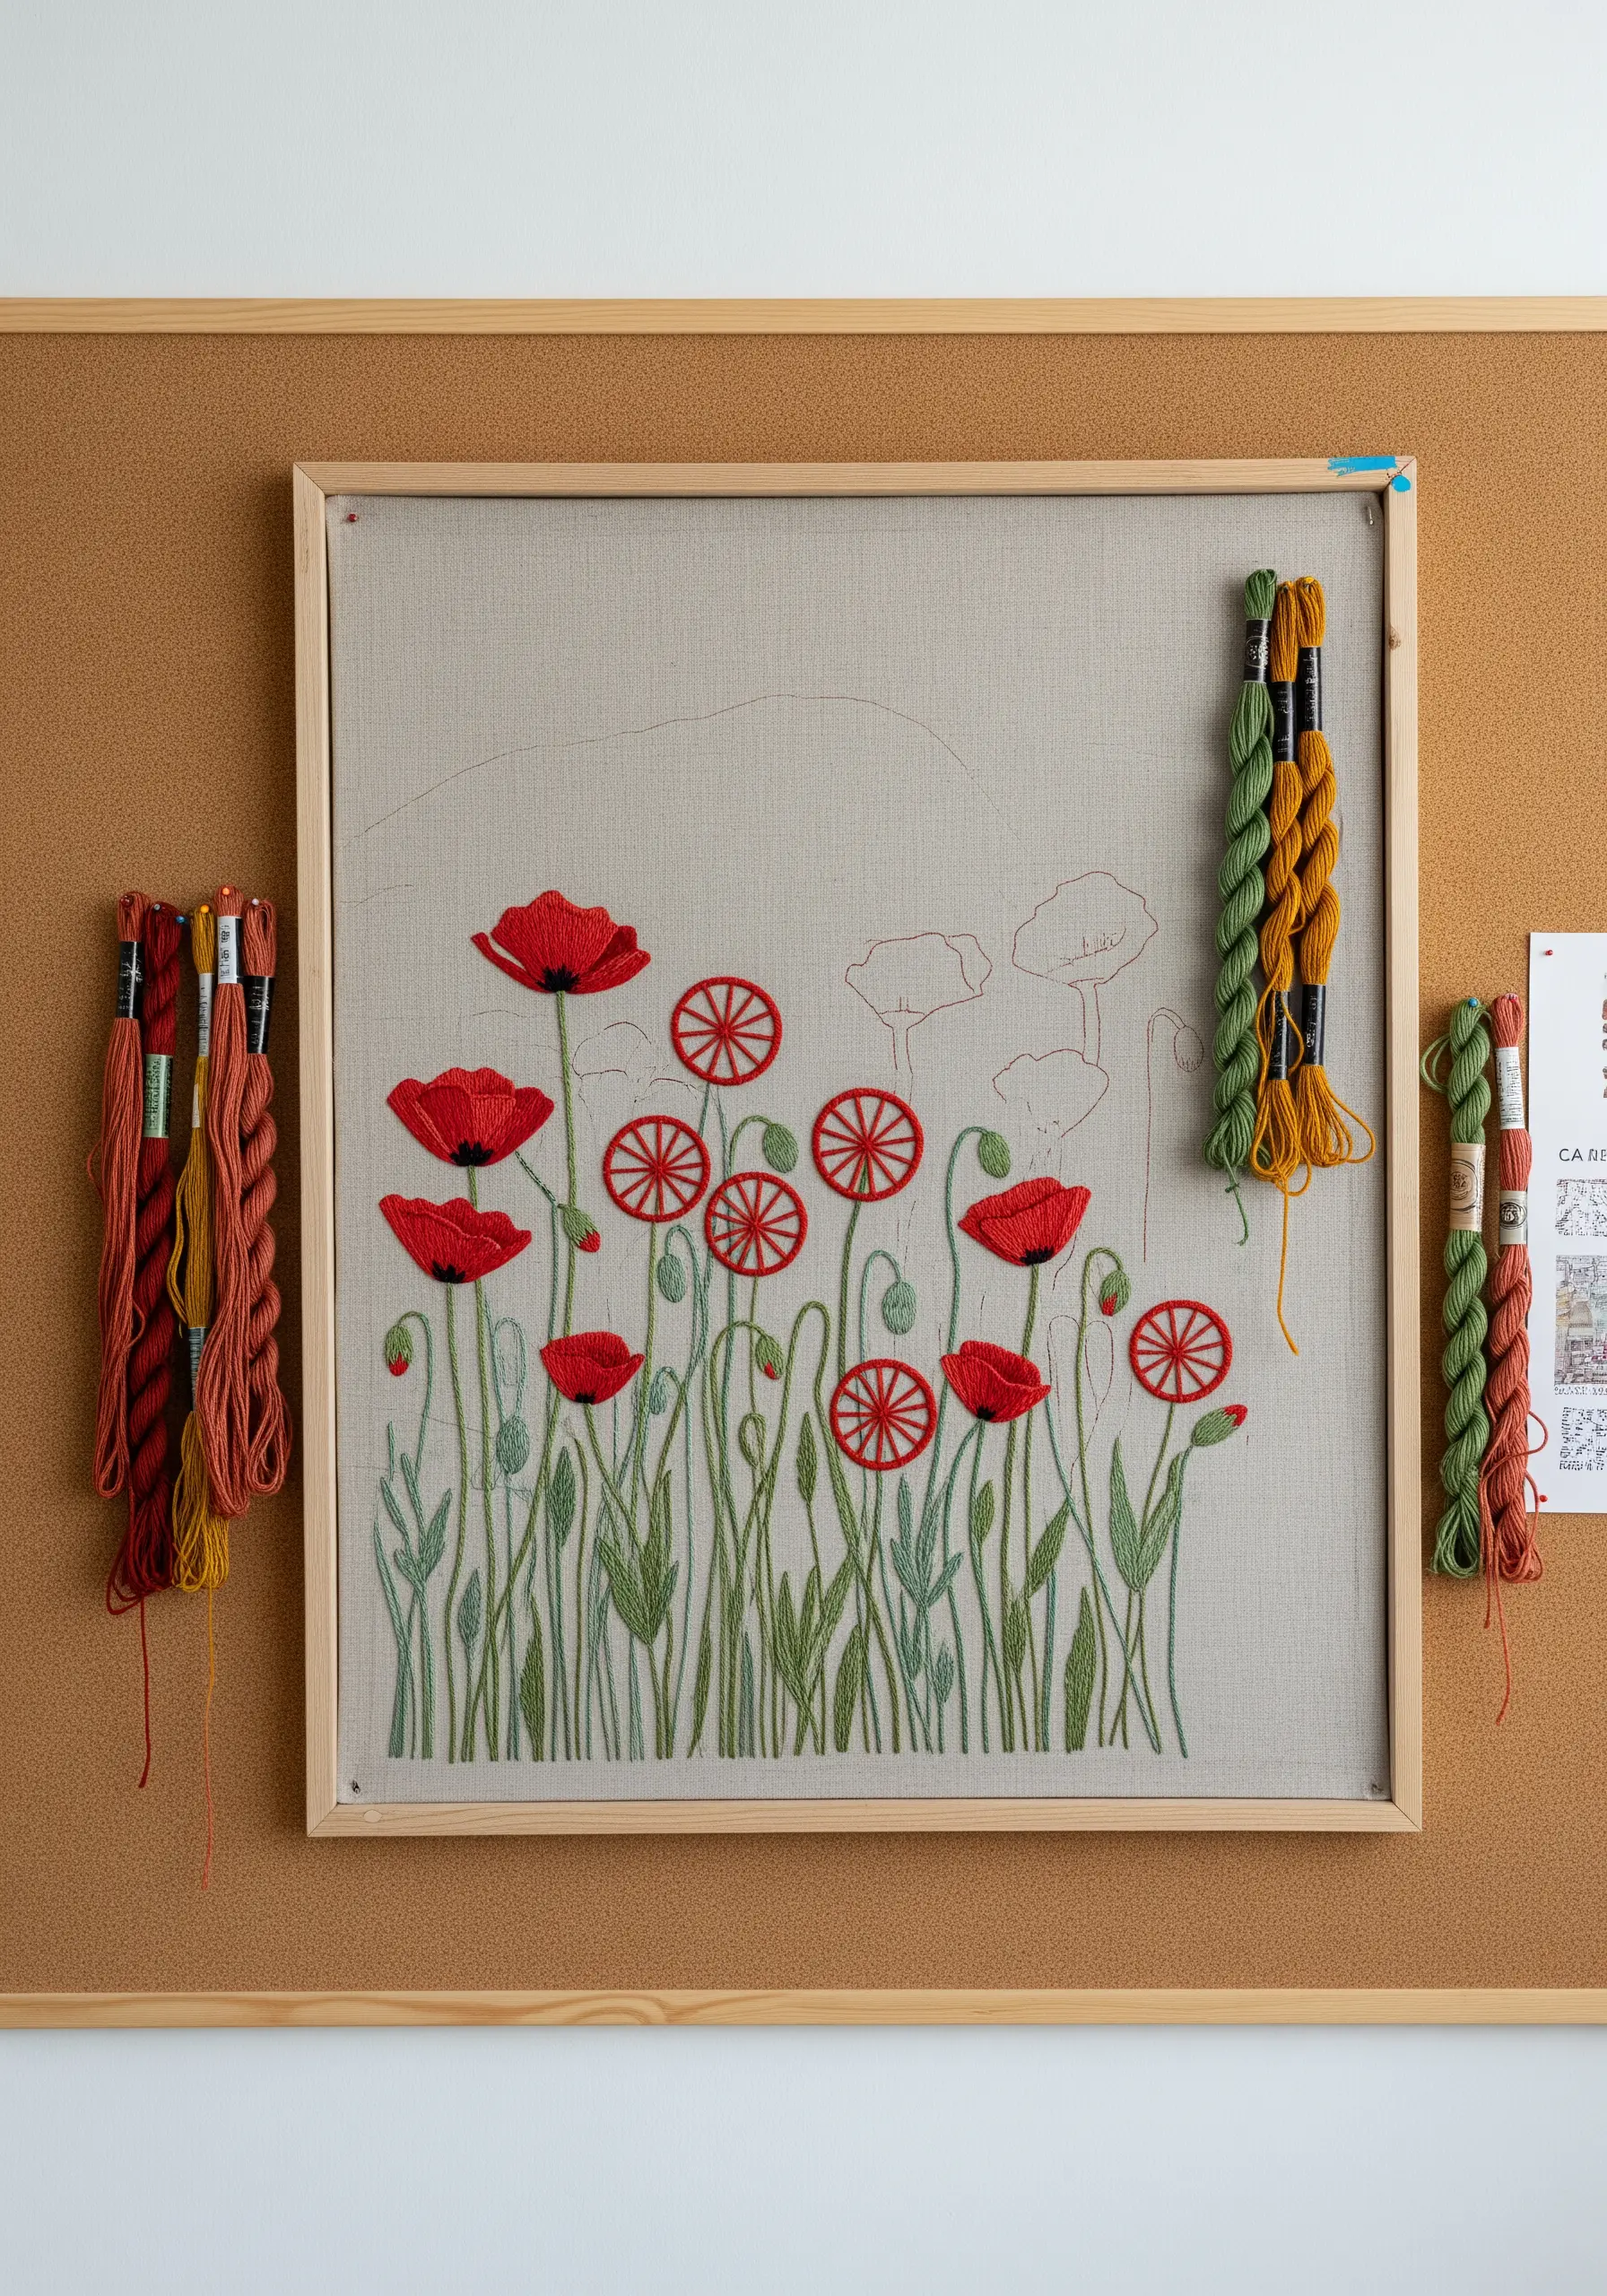
For a multi-element piece like a field of flowers, lightly sketch your entire design onto the fabric before you begin stitching.
Stitch the elements in the foreground first with full detail. Then, as you work your way back, use fewer strands of floss and less detail for the flowers in the distance.
This creates an illusion of depth and makes your cottage garden embroidery themes feel more like a real landscape.
Leaving your thread skeins pinned to your work helps you maintain a consistent color palette.
27. Add Dimension to Lettering with Padding

Make your embroidered text stand out with a padded satin stitch.
First, outline your letters with a split stitch. Then, fill the inside of the letters with a layer of seed stitches or straight stitches. Finally, cover the entire letter with a smooth, tight satin stitch.
This technique elevates simple lettering, giving it a professional, raised finish that catches the light beautifully.
Wild botanical wreath patterns provide the perfect frame for this kind of impactful text.
28. Construct a Soft-Sculpture Rainbow
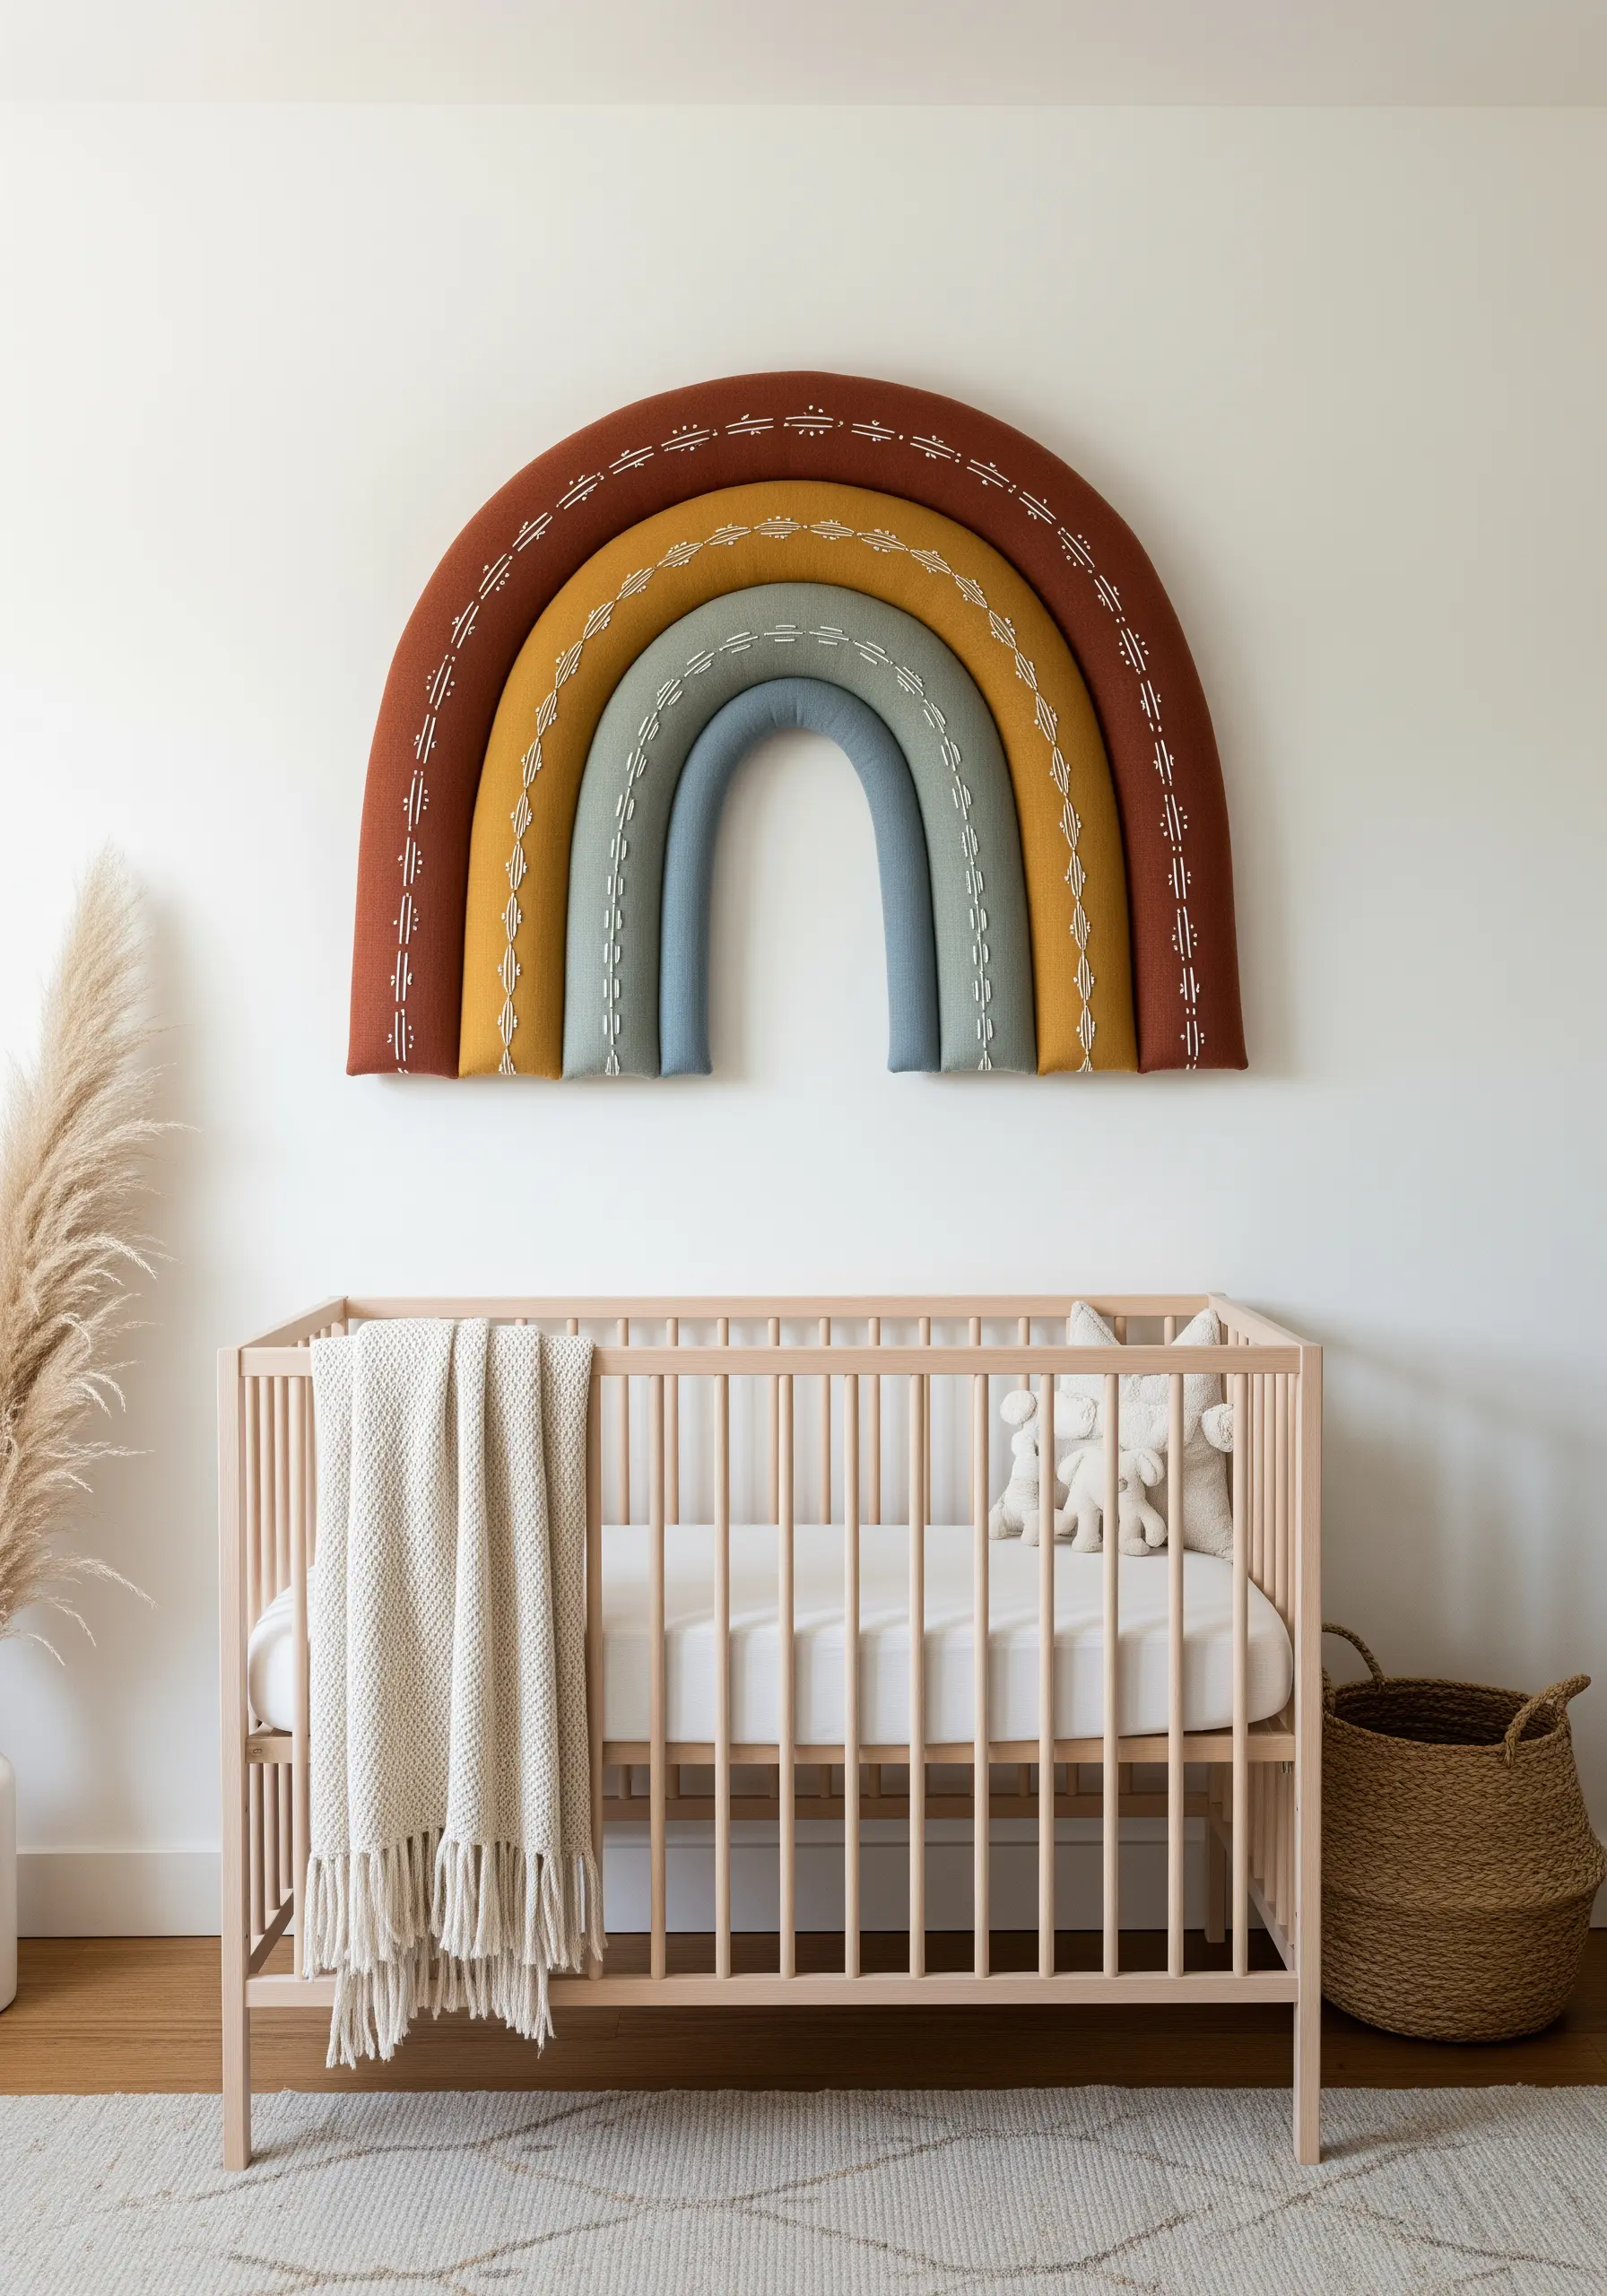
Create a playful, three-dimensional wall hanging by combining sewing with embroidery.
Cut long strips of fabric for each color of the rainbow, sew them into tubes, and stuff them lightly with batting. Arrange them in an arch and hand-sew them together from the back.
Add a final decorative touch with a simple running stitch in a contrasting white thread along each arch.
These tactile and gentle embroidered nursery decor ideas add softness and warmth to a child’s room.
29. Frame Your Stitches with Fiber Art

Create a truly unique mixed-media piece by setting your embroidery within a larger fiber art context.
Here, a simple rainbow stitched with a couching technique becomes the centerpiece when framed by a woven panel and macrame details.
This layering of textures—smooth couched yarn, nubby weaving, and knotted cord—creates a rich visual and tactile experience.
Mixed-fiber projects like this allow each technique to shine while contributing to a cohesive whole.
30. Harness the Power of Light and Dark

Explore the dramatic potential of contrast by creating a complementary pair of celestial designs.
On the light-colored fabric, use warm, dense satin stitches to create a sun that feels solid and radiant.
For the moon, switch to a dark fabric and use fine, silvery-white thread. Rely on delicate line work (backstitch) and sparse star stitches to create a sense of ethereal light.
These night garden embroidery ideas demonstrate how background choice fundamentally changes a design’s mood.
31. Achieve Photorealism with Thread Painting

The key to realistic still life is mastering the long-and-short stitch to create seamless color gradients.
Study your subject and notice where the light hits. Use your lightest threads for highlights and your darkest for shadows, blending them meticulously in between.
Angle your stitches to follow the natural curves and contours of the object—this is what creates the illusion of form and volume.
Advanced floral thread painting techniques can be applied to any subject to bring it to life.
32. Create Bold Outlines with Couching
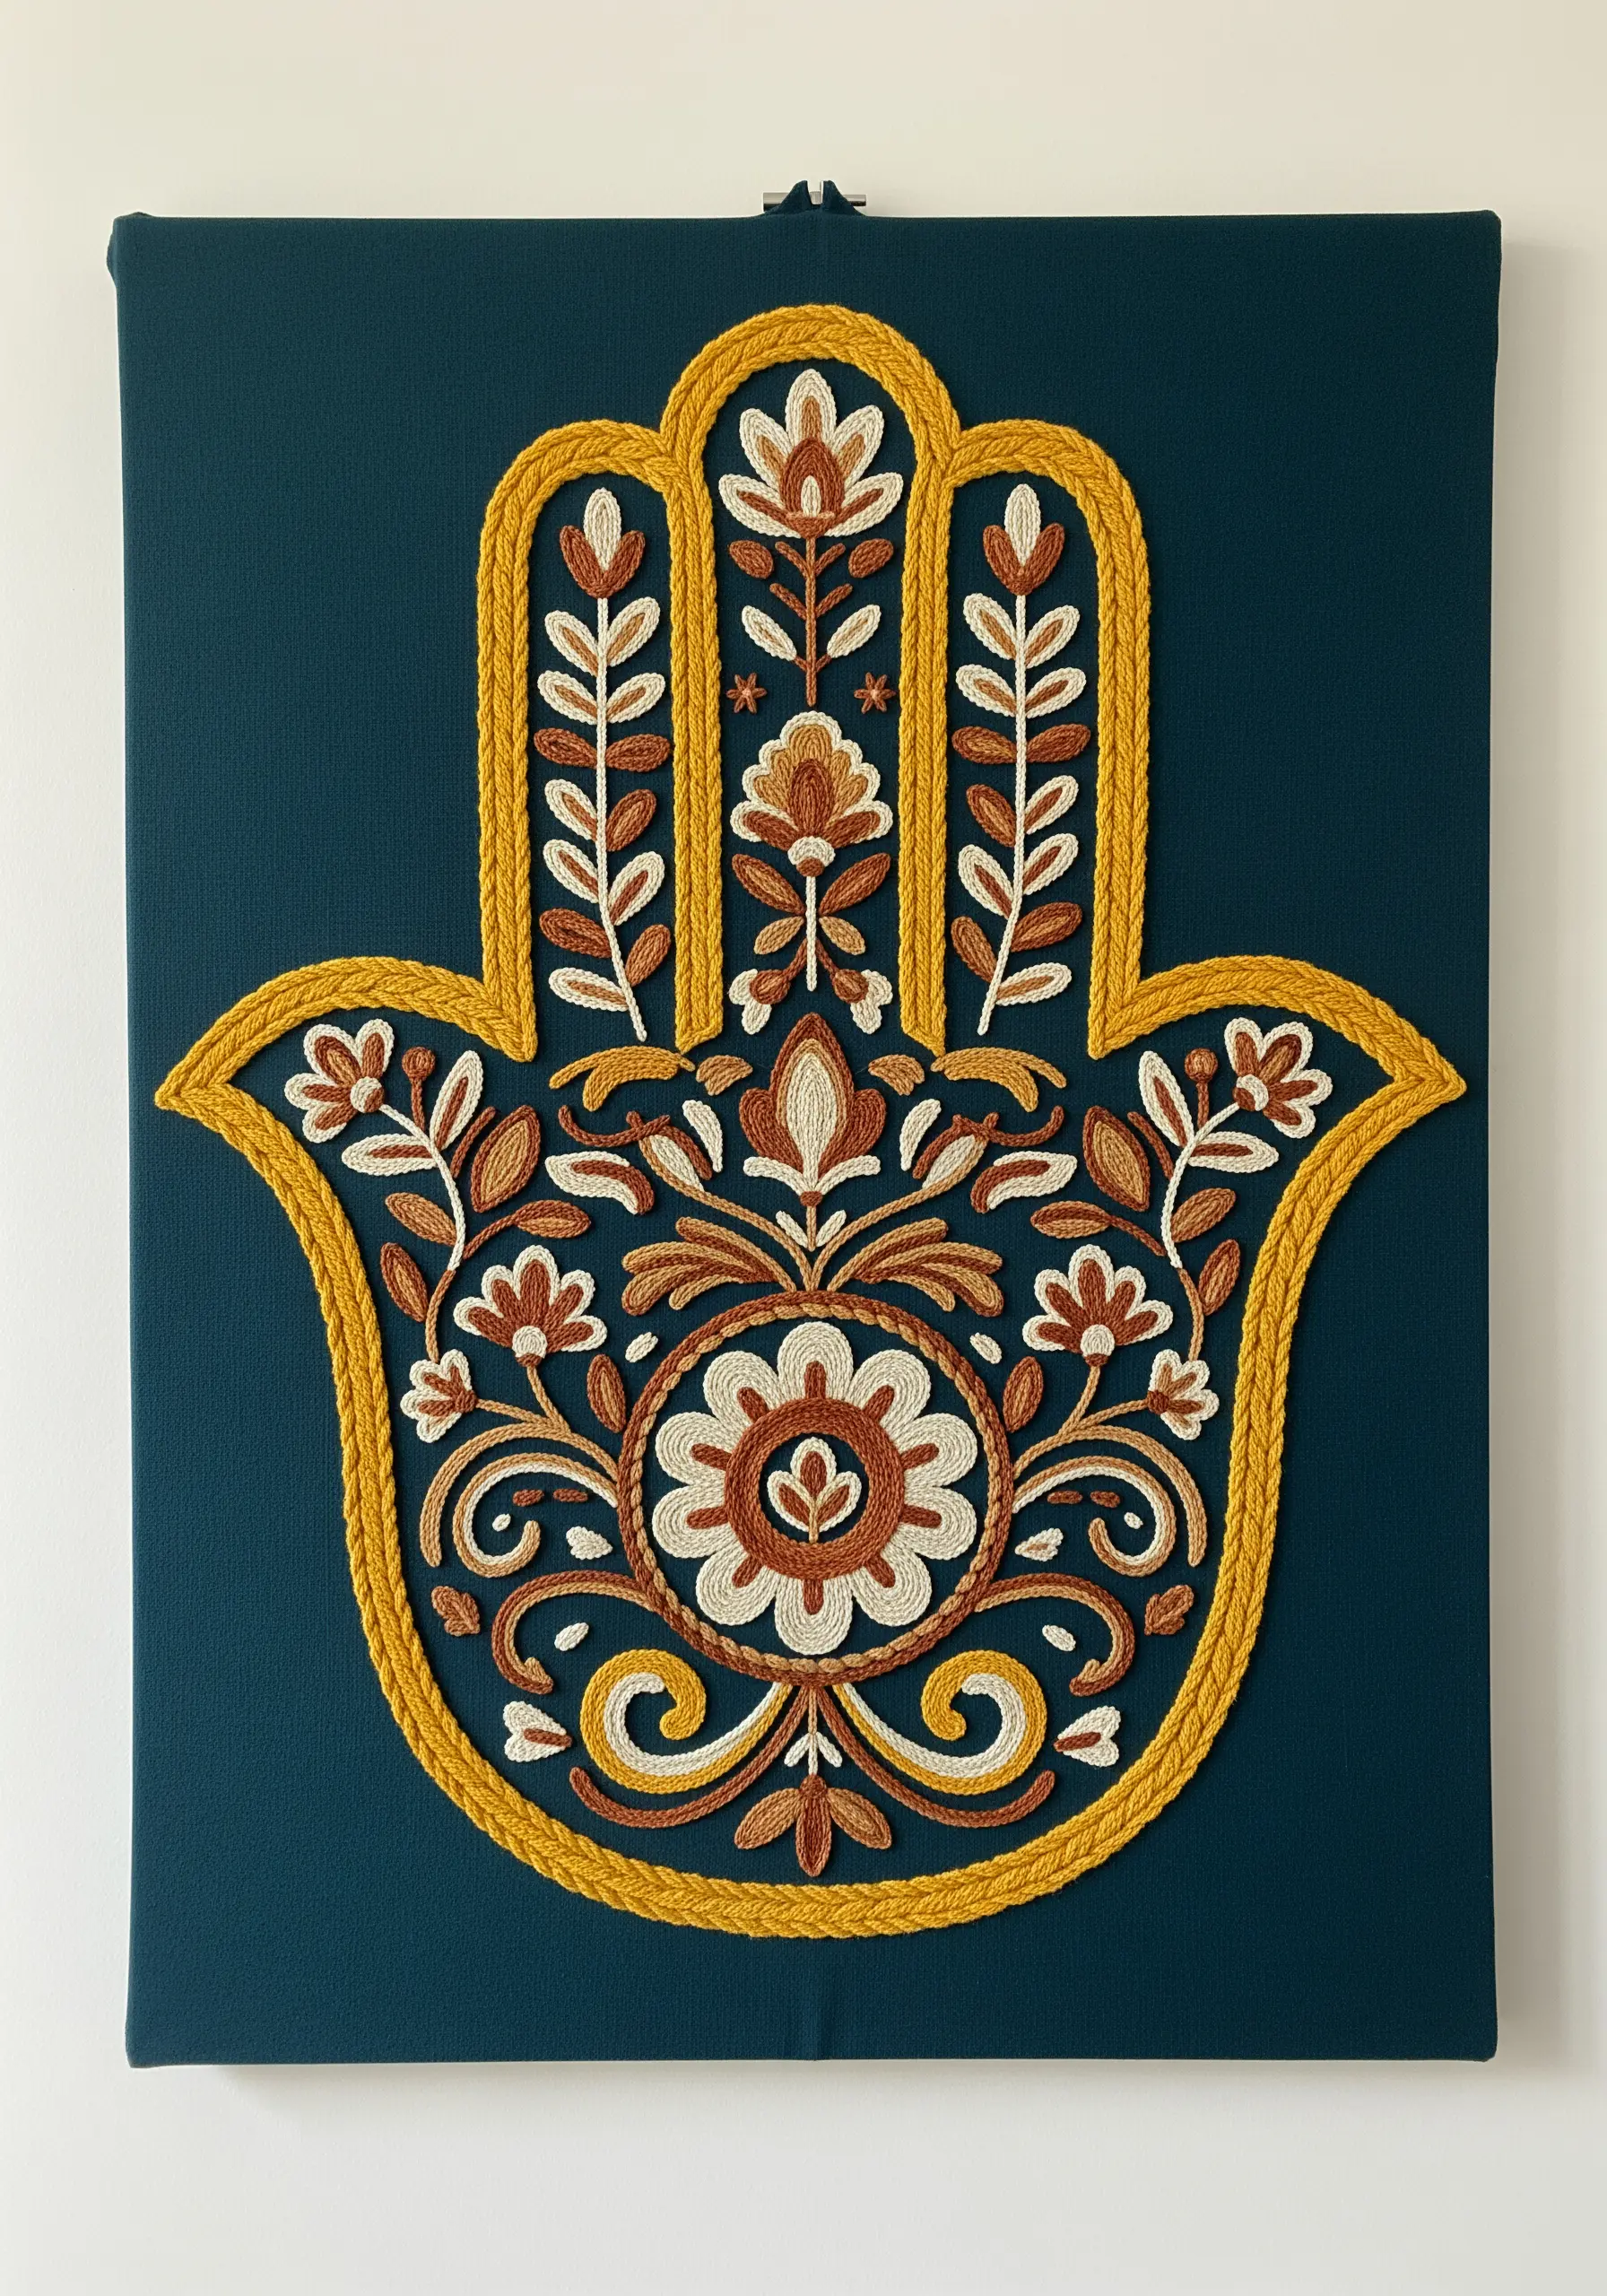
To make the intricate patterns within this Hamsa hand stand out, a strong outline is essential.
Use a thick, cord-like yarn and the couching technique to create a bold, raised border around the hand and its main sections.
This defines the space and allows the more delicate satin stitch and straight stitch details inside to feel contained and purposeful.
Cultural embroidery motifs often benefit from this clear separation between outline and fill.
33. Stitch on Sheer Fabric for a Floating Effect

Create an ethereal, layered look by embroidering on sheer or semi-sheer fabric like organza.
To prevent the delicate fabric from puckering, you must use a stabilizer. A water-soluble or tear-away stabilizer on the back will provide the support needed for clean stitches.
A simple backstitch or running stitch is often all that’s required; the transparency of the fabric itself provides the artistic effect.
These delicate abstract thread embroidery projects look like they are floating in mid-air when hung in a window.
34. Build Atmospheric Perspective in a Small Space

Even within a small design, you can create a powerful sense of depth.
Stitch the foreground elements, like the flowers and the river, using a full six strands of floss and dense satin stitches to make them feel close and vibrant.
For the hills in the mid-ground, drop to three or four strands. For the sky and distant stars, use only one or two strands and sparser stitches.
This subtle shift in thread weight tricks the eye and makes your travel-inspired embroidery hoops feel like miniature worlds.


