

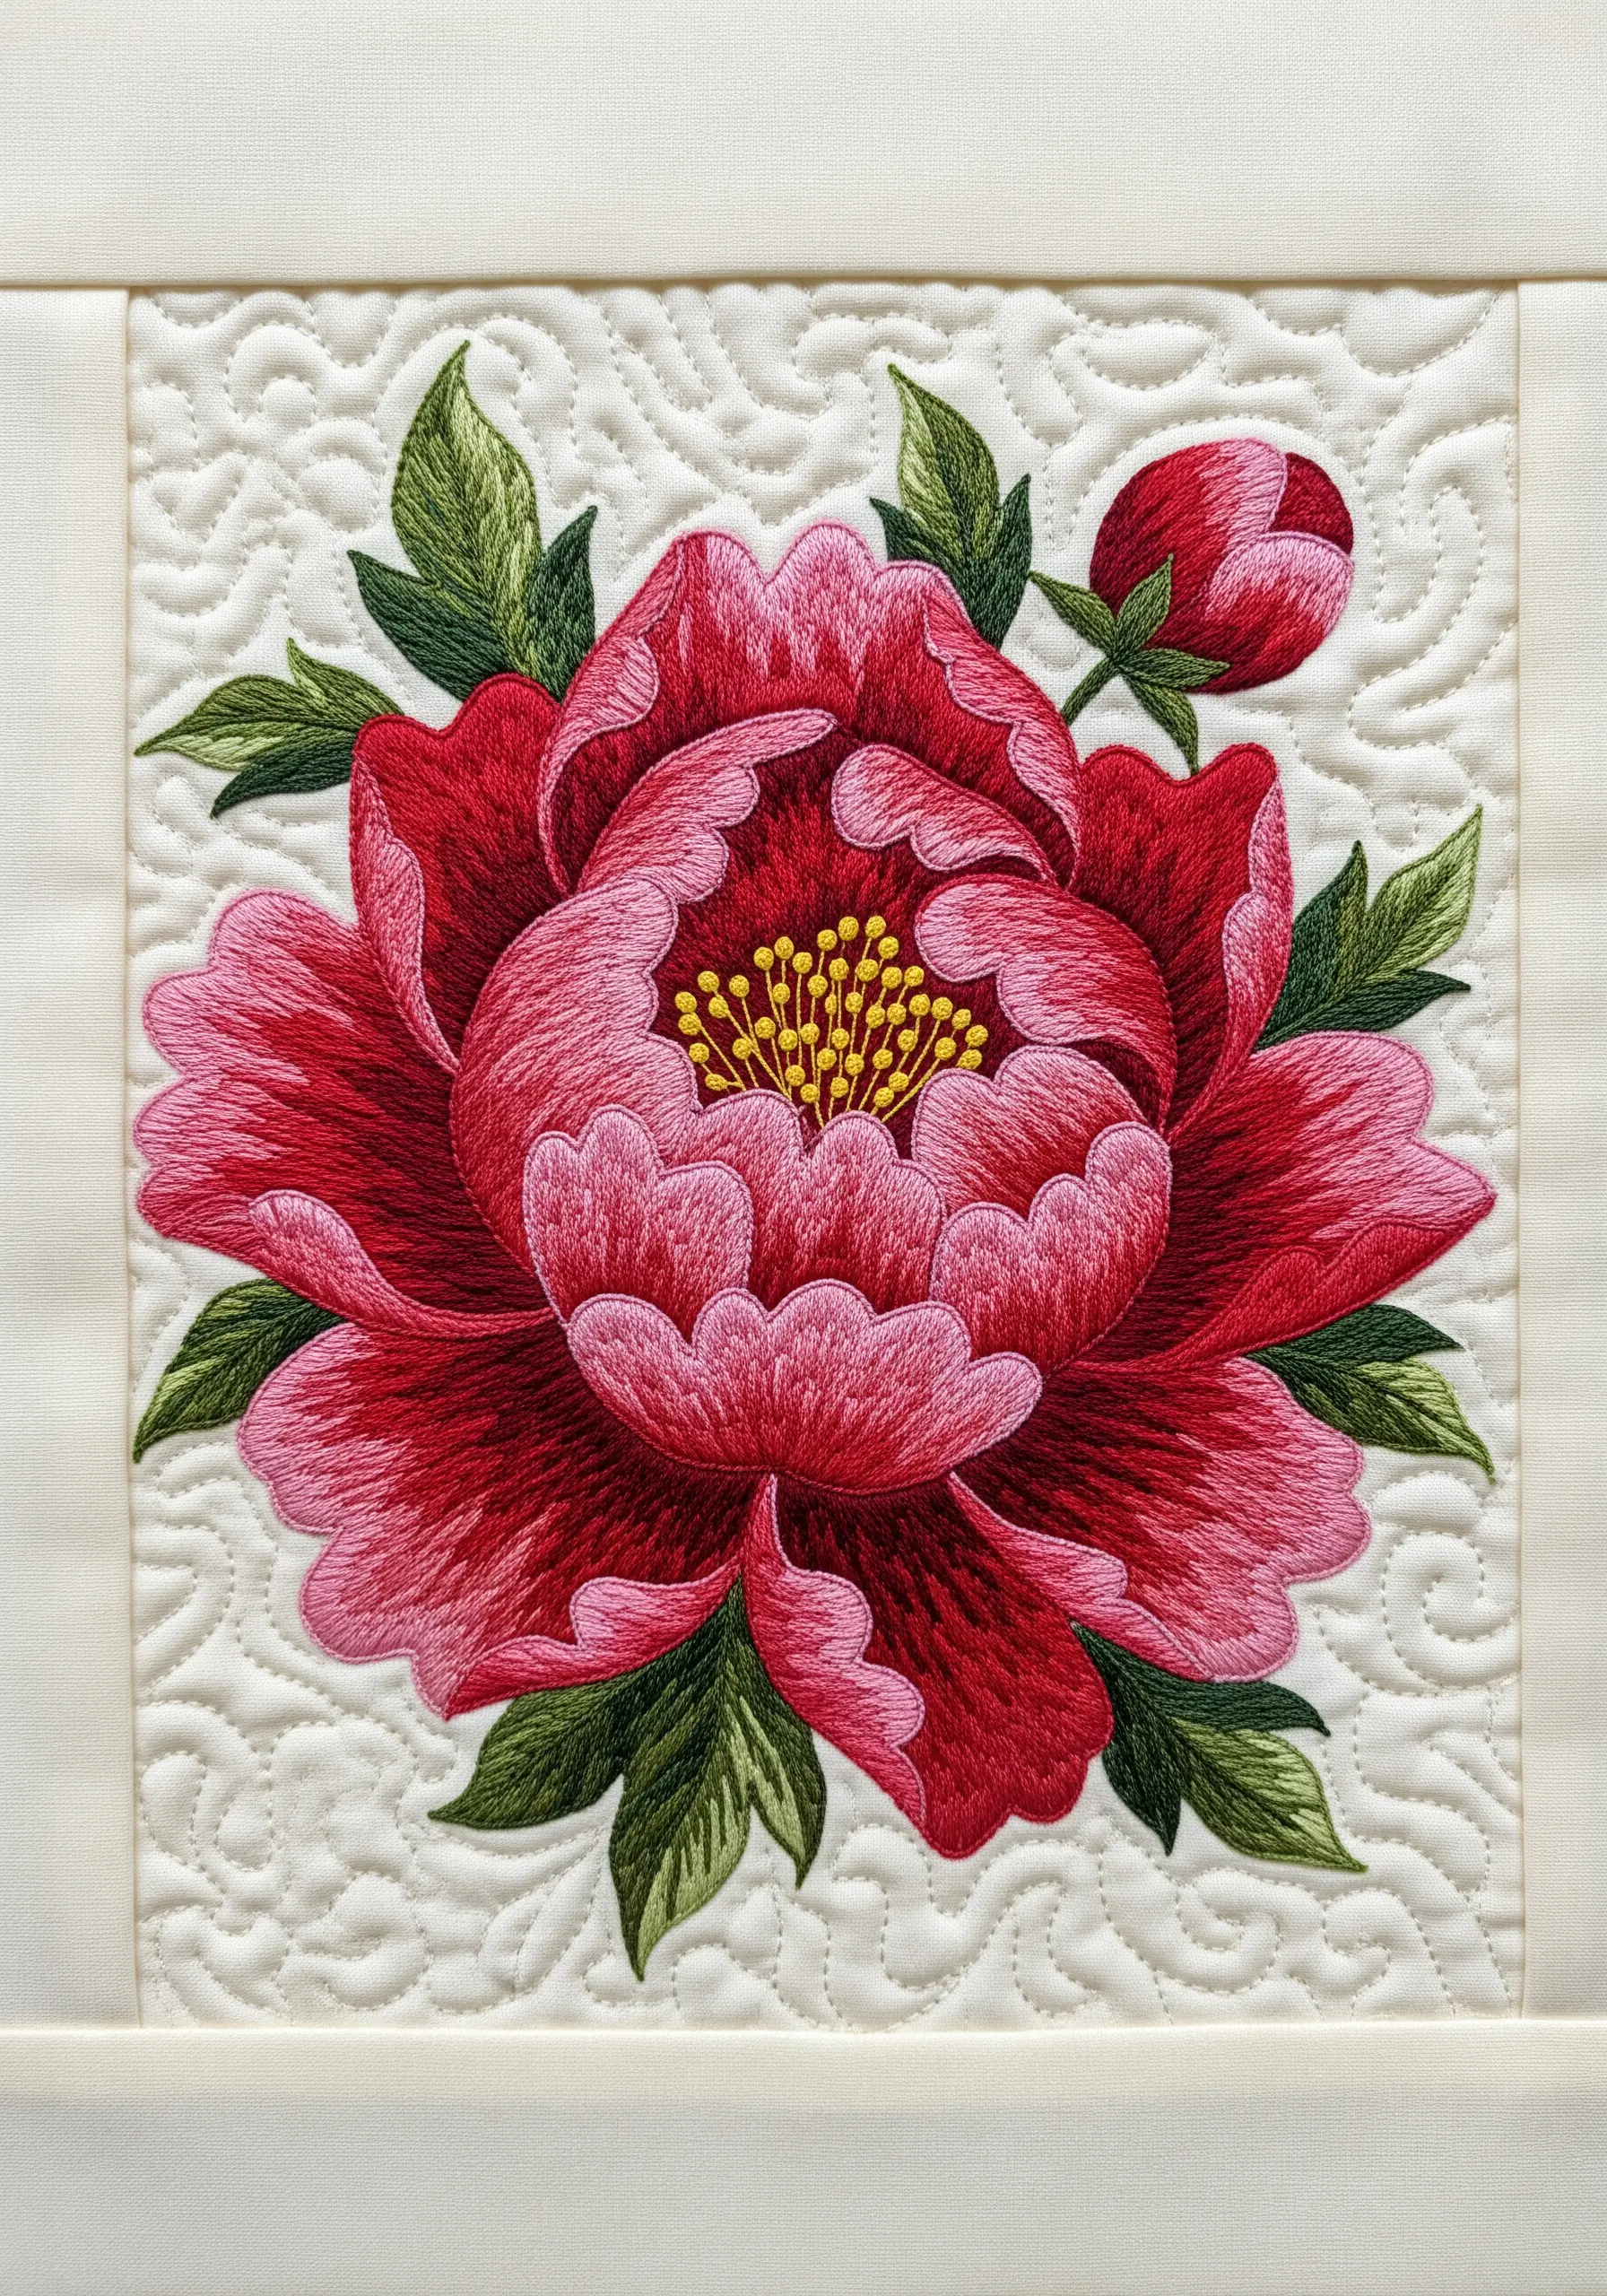
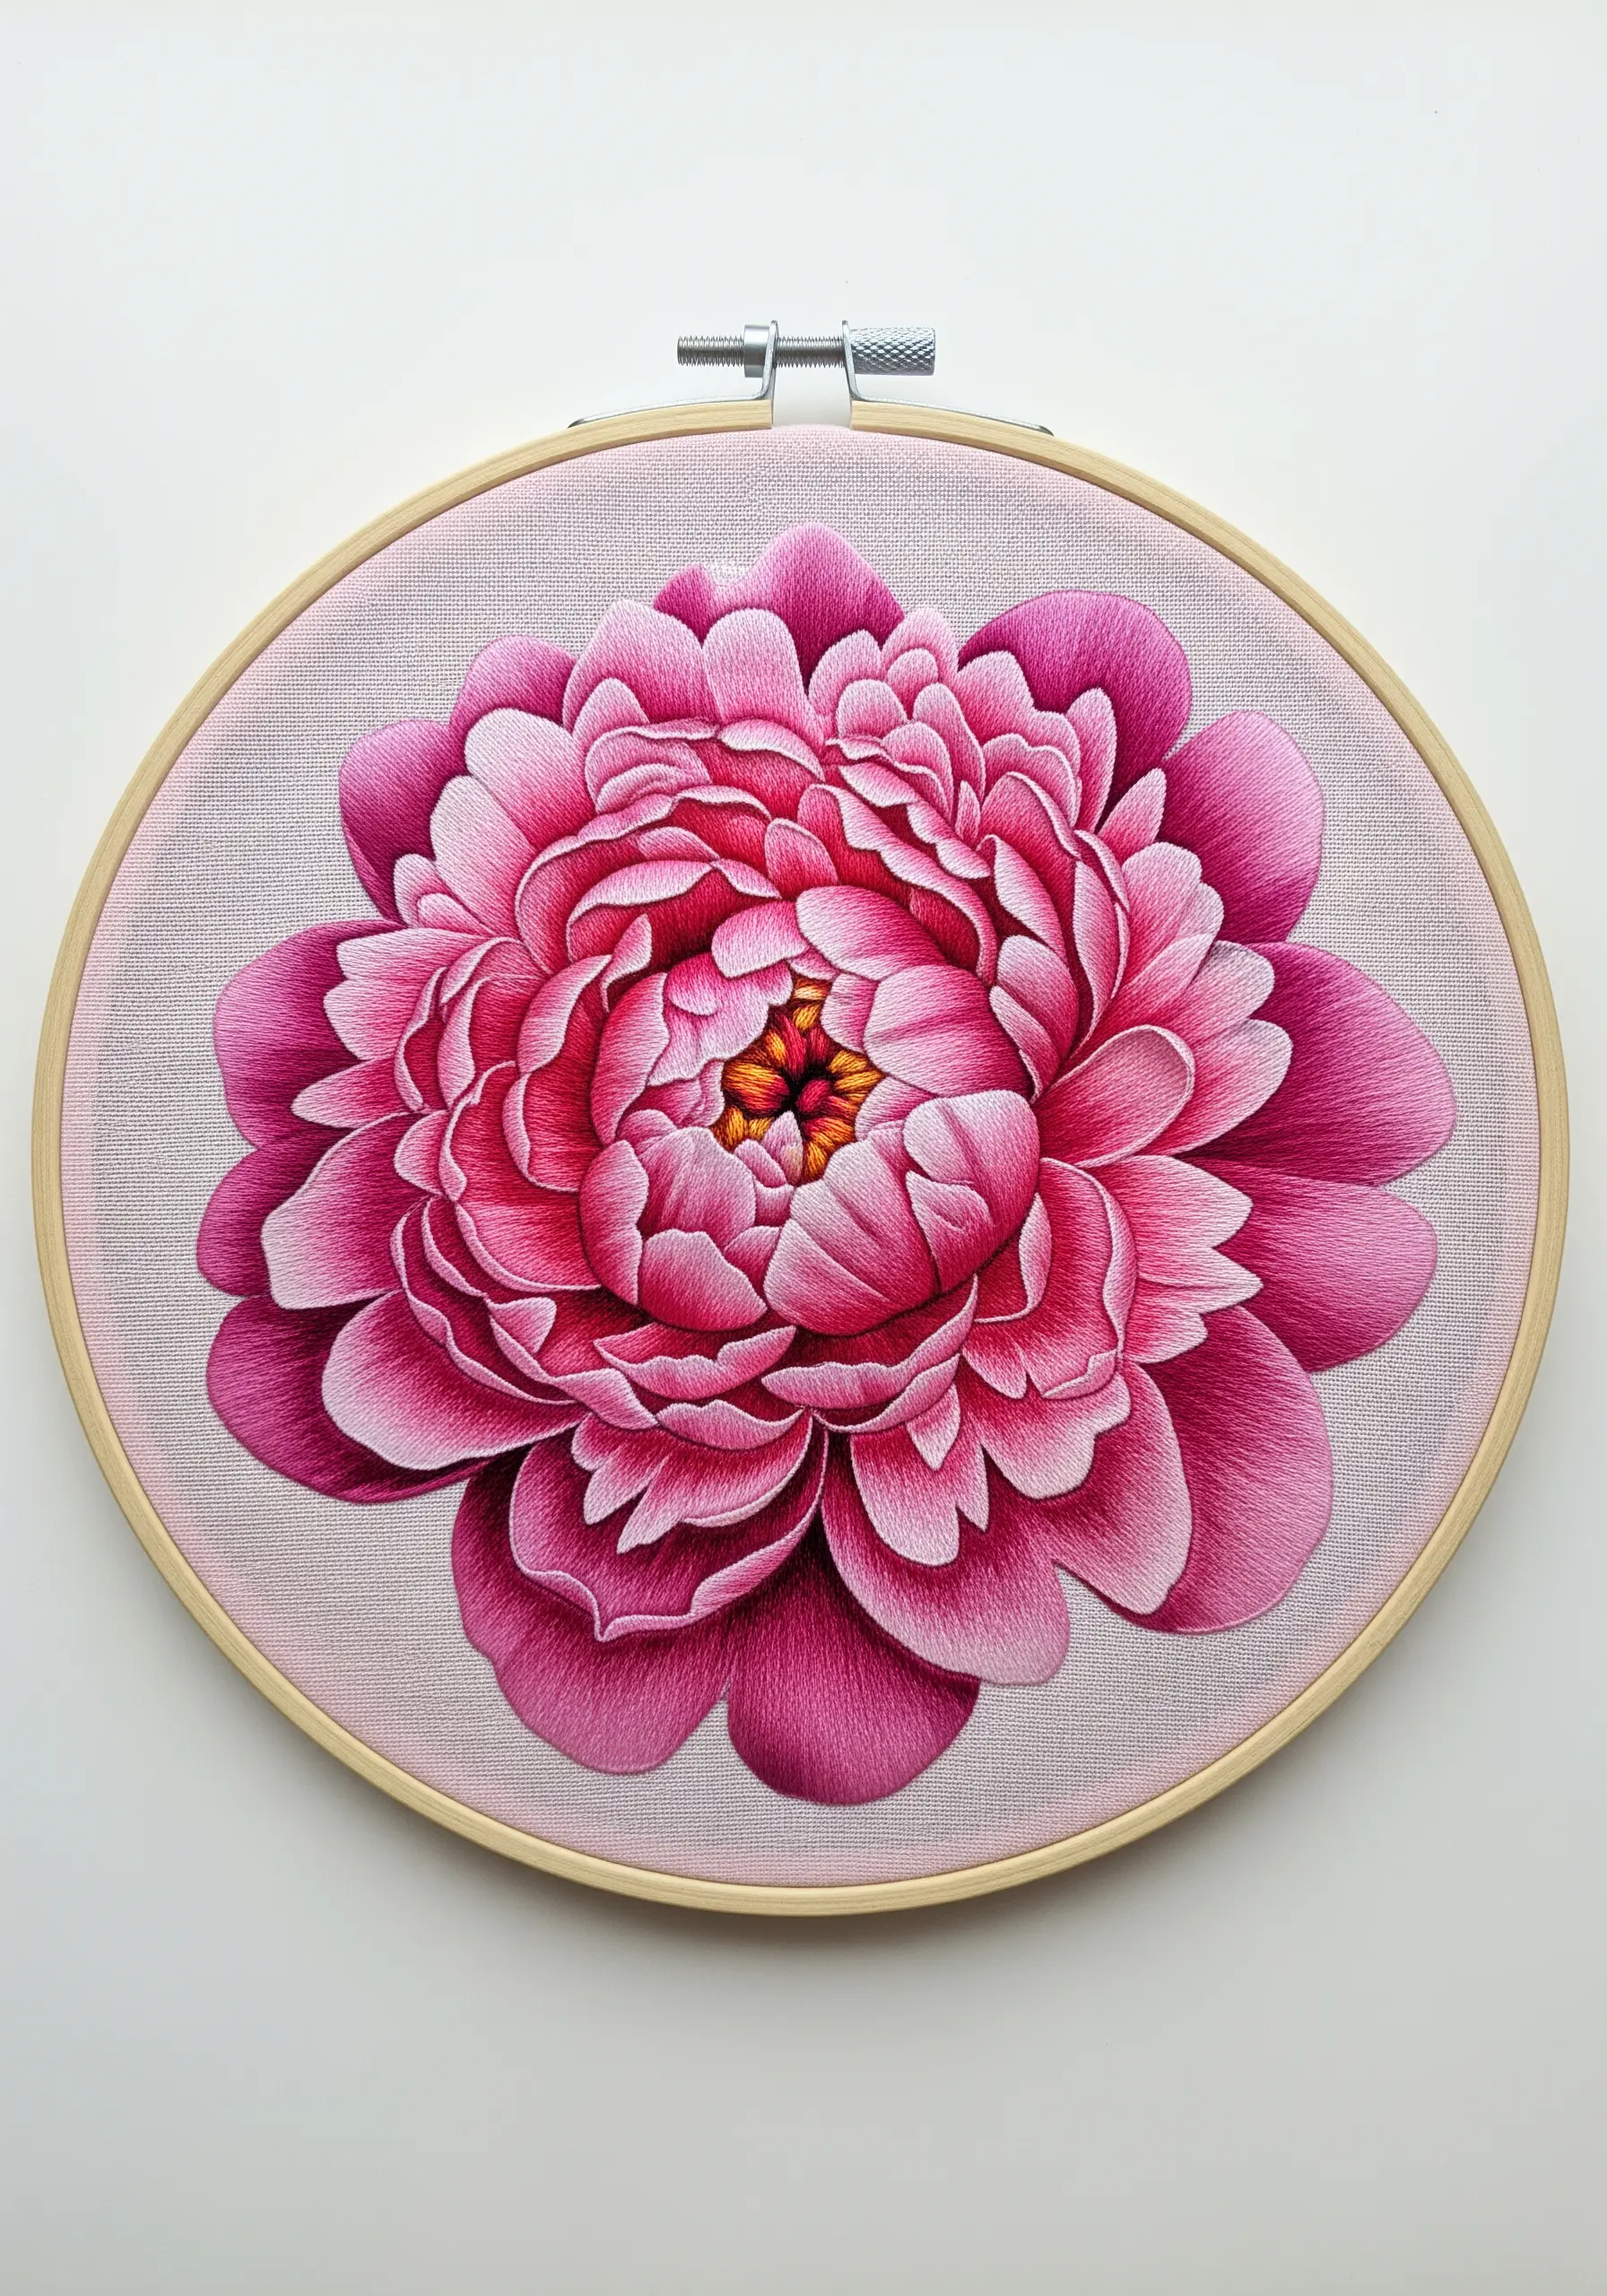
You want to stitch peonies that look and feel alive—full of soft, overlapping petals that seem to catch the light. Yet so often, the attempt to create fullness results in heavy, bulky stitching that feels stiff rather than delicate.
The secret isn’t about using more thread, but about mastering how light, shadow, and color work together. It’s about creating the illusion of depth with techniques like thread painting, where a single strand of floss can build more volume than six ever could. It’s about understanding how the direction of a stitch can mimic the curl of a real petal.
Here, you’ll find ideas that focus on that refined control. Whether you’re adding a tiny bud to a shirt cuff or creating a statement piece of wall art, these techniques will help you move beyond just filling in shapes and start sculpting with thread. Your peonies are about to find a new, more graceful dimension.
1. Master Realistic Depth with Thread Painting
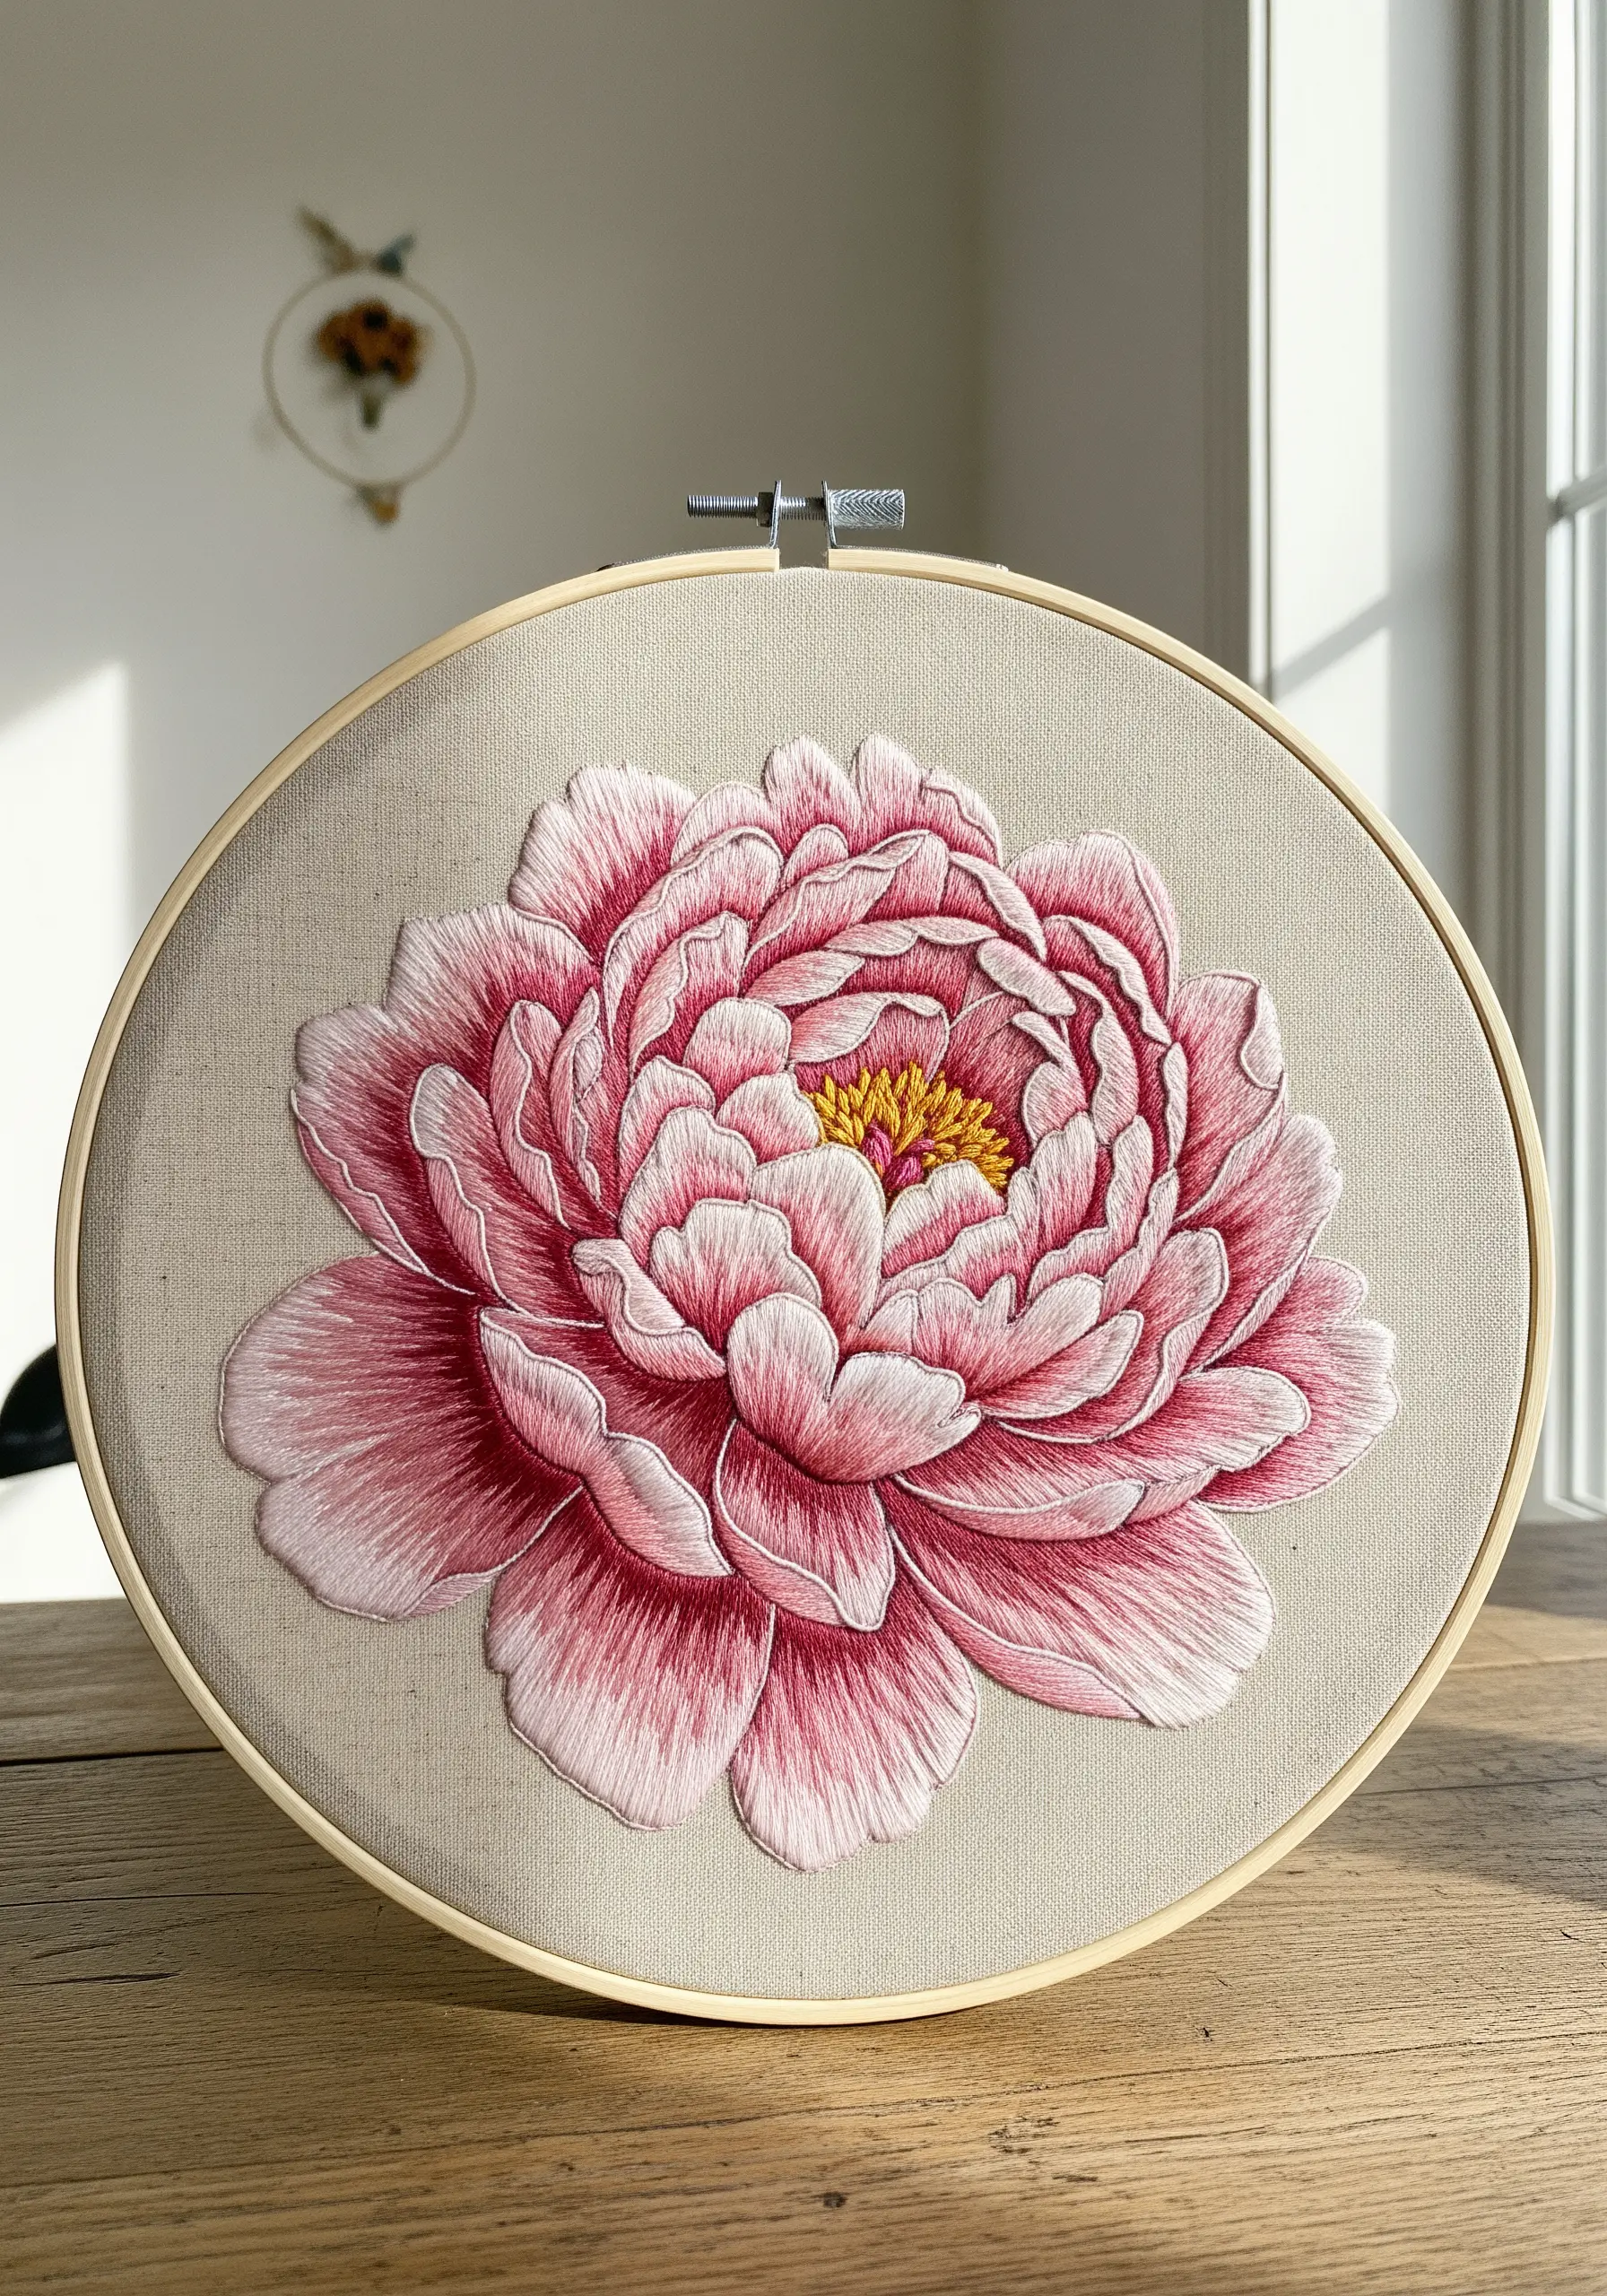
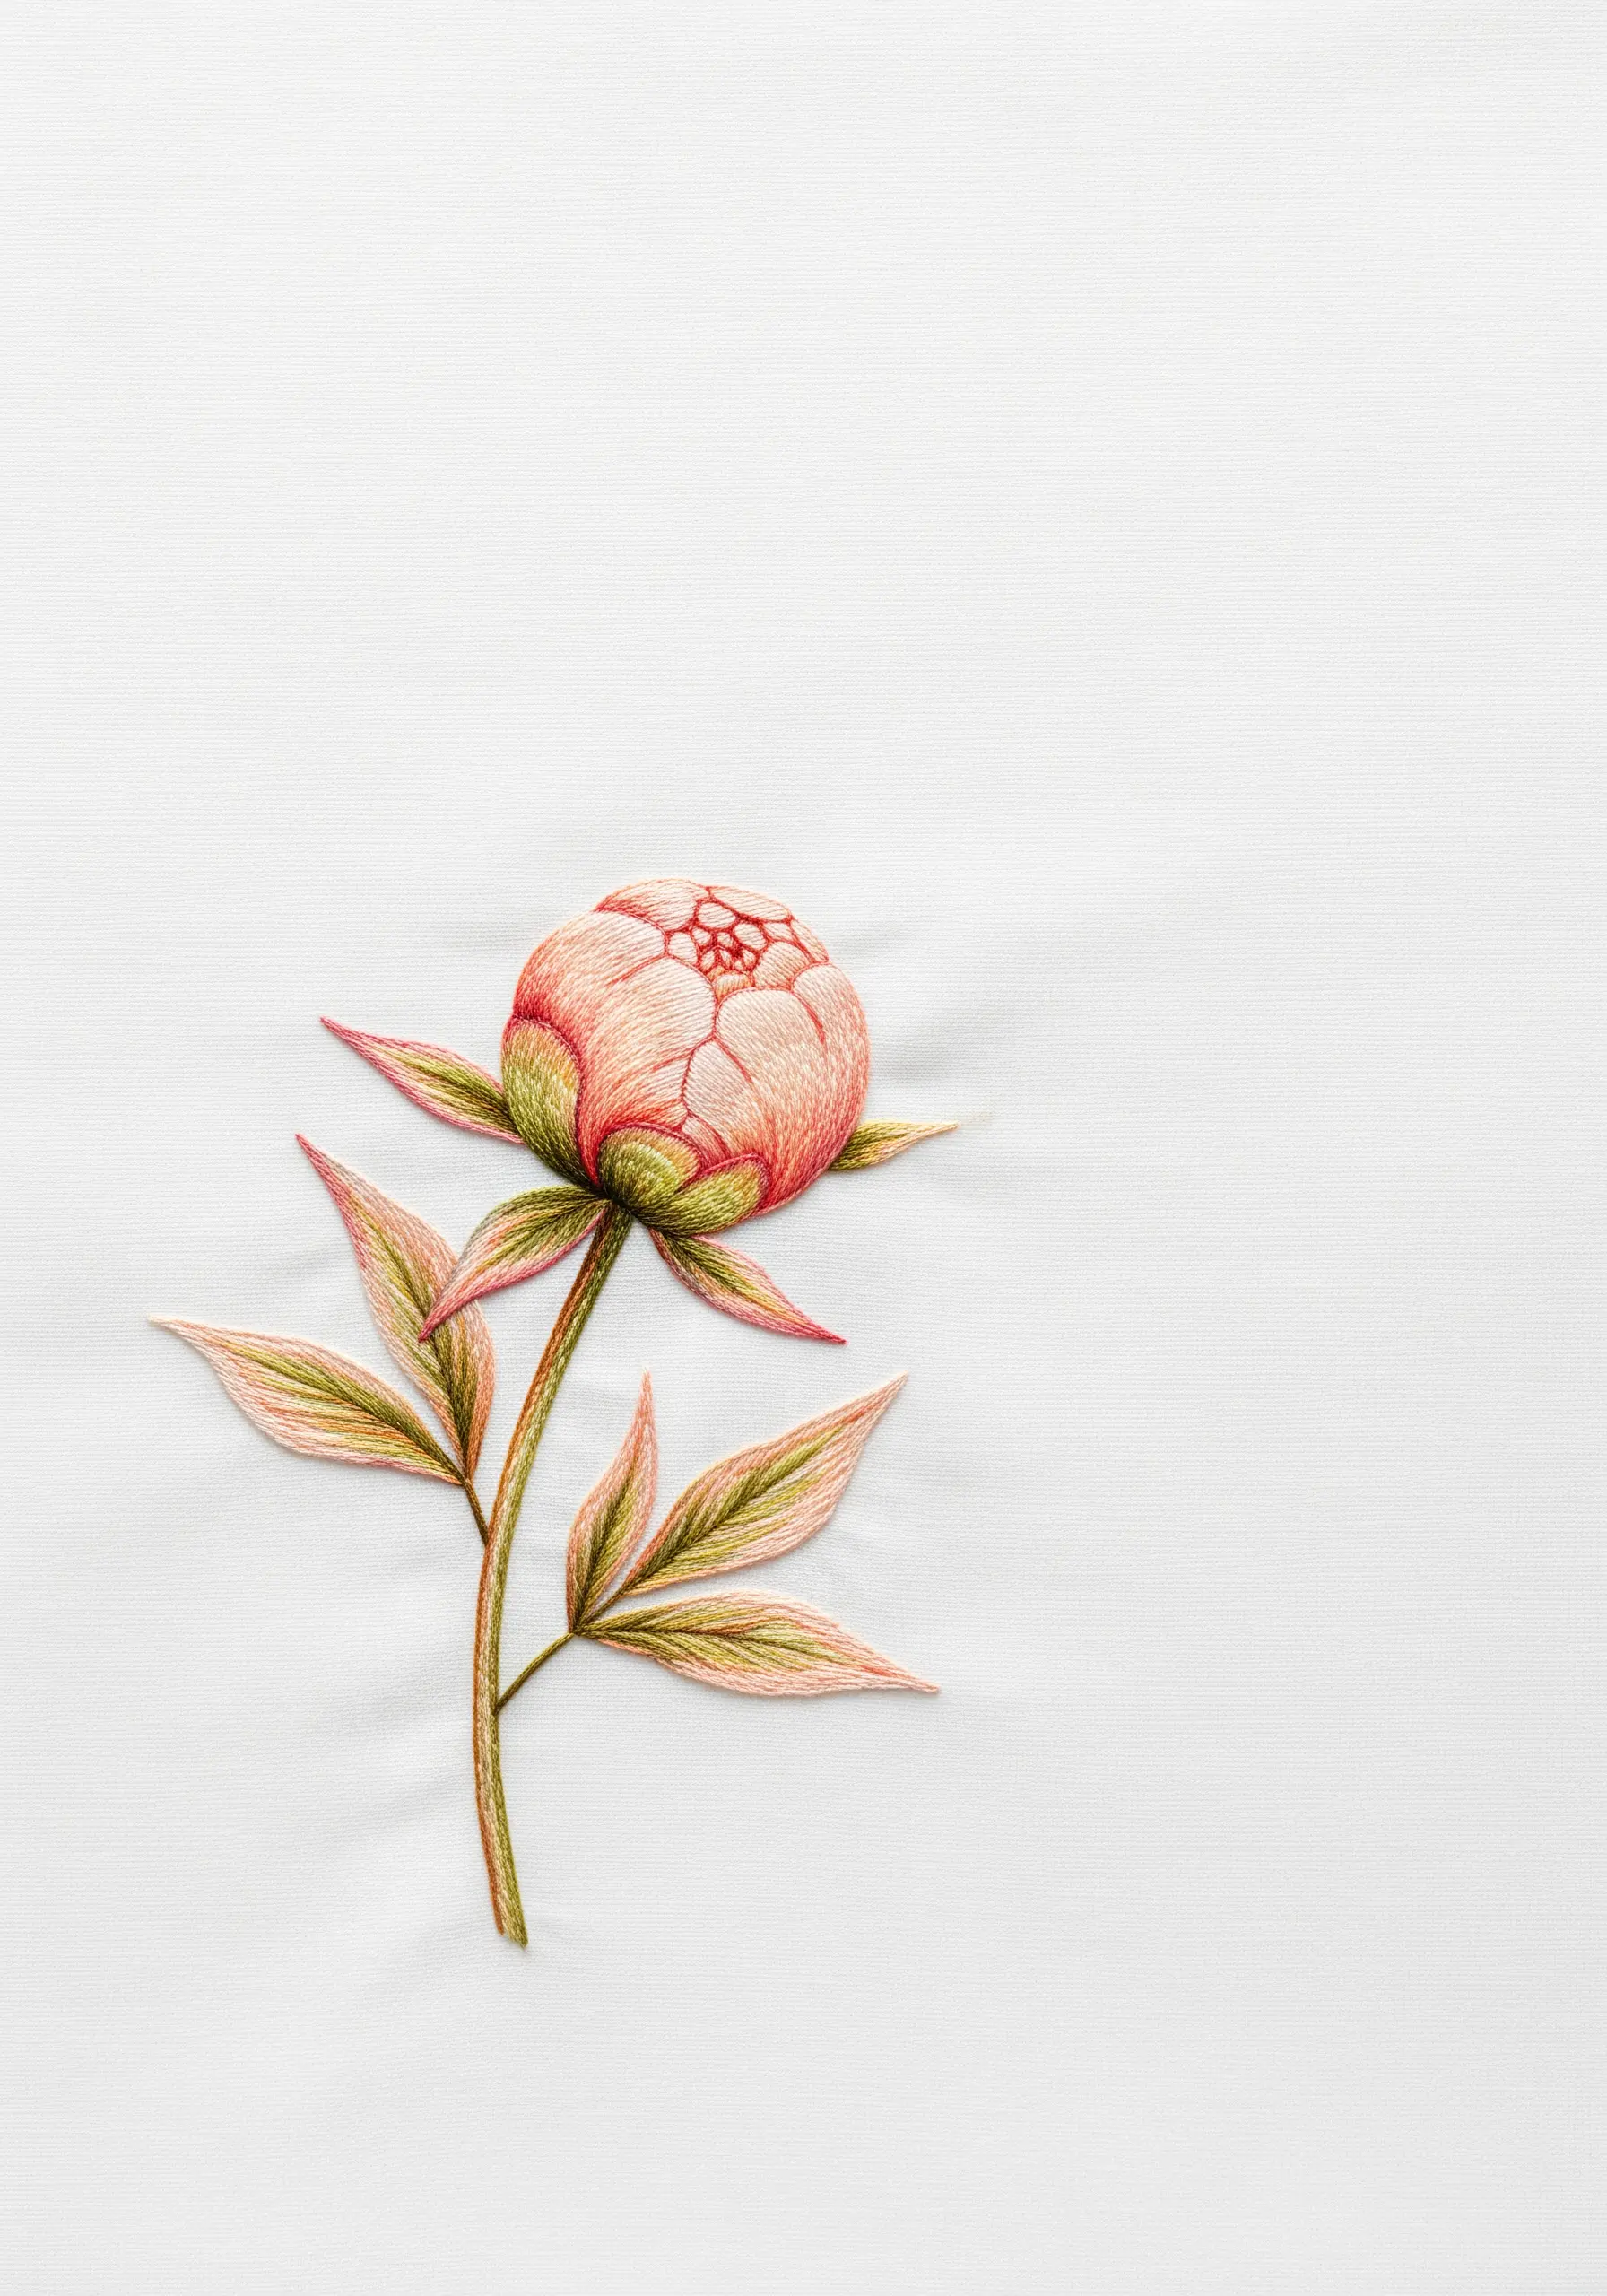
To achieve this hyper-realistic dimension, use a single strand of six-strand floss and the long-and-short stitch technique.
Before you begin, map out your color zones on each petal—a light highlight, a mid-tone, and a darker shadow area at the base.
This pre-planning prevents abrupt color changes and allows your stitches to blend seamlessly, creating the illusion of curved, overlapping petals without adding any physical bulk.
The key is to slightly angle your stitches to follow the natural curve of the petal, making the flower feel like it’s unfolding.
Explore more floral thread painting techniques to elevate your work from flat to lifelike.
2. Use High-Contrast Fabric for Dramatic Effect
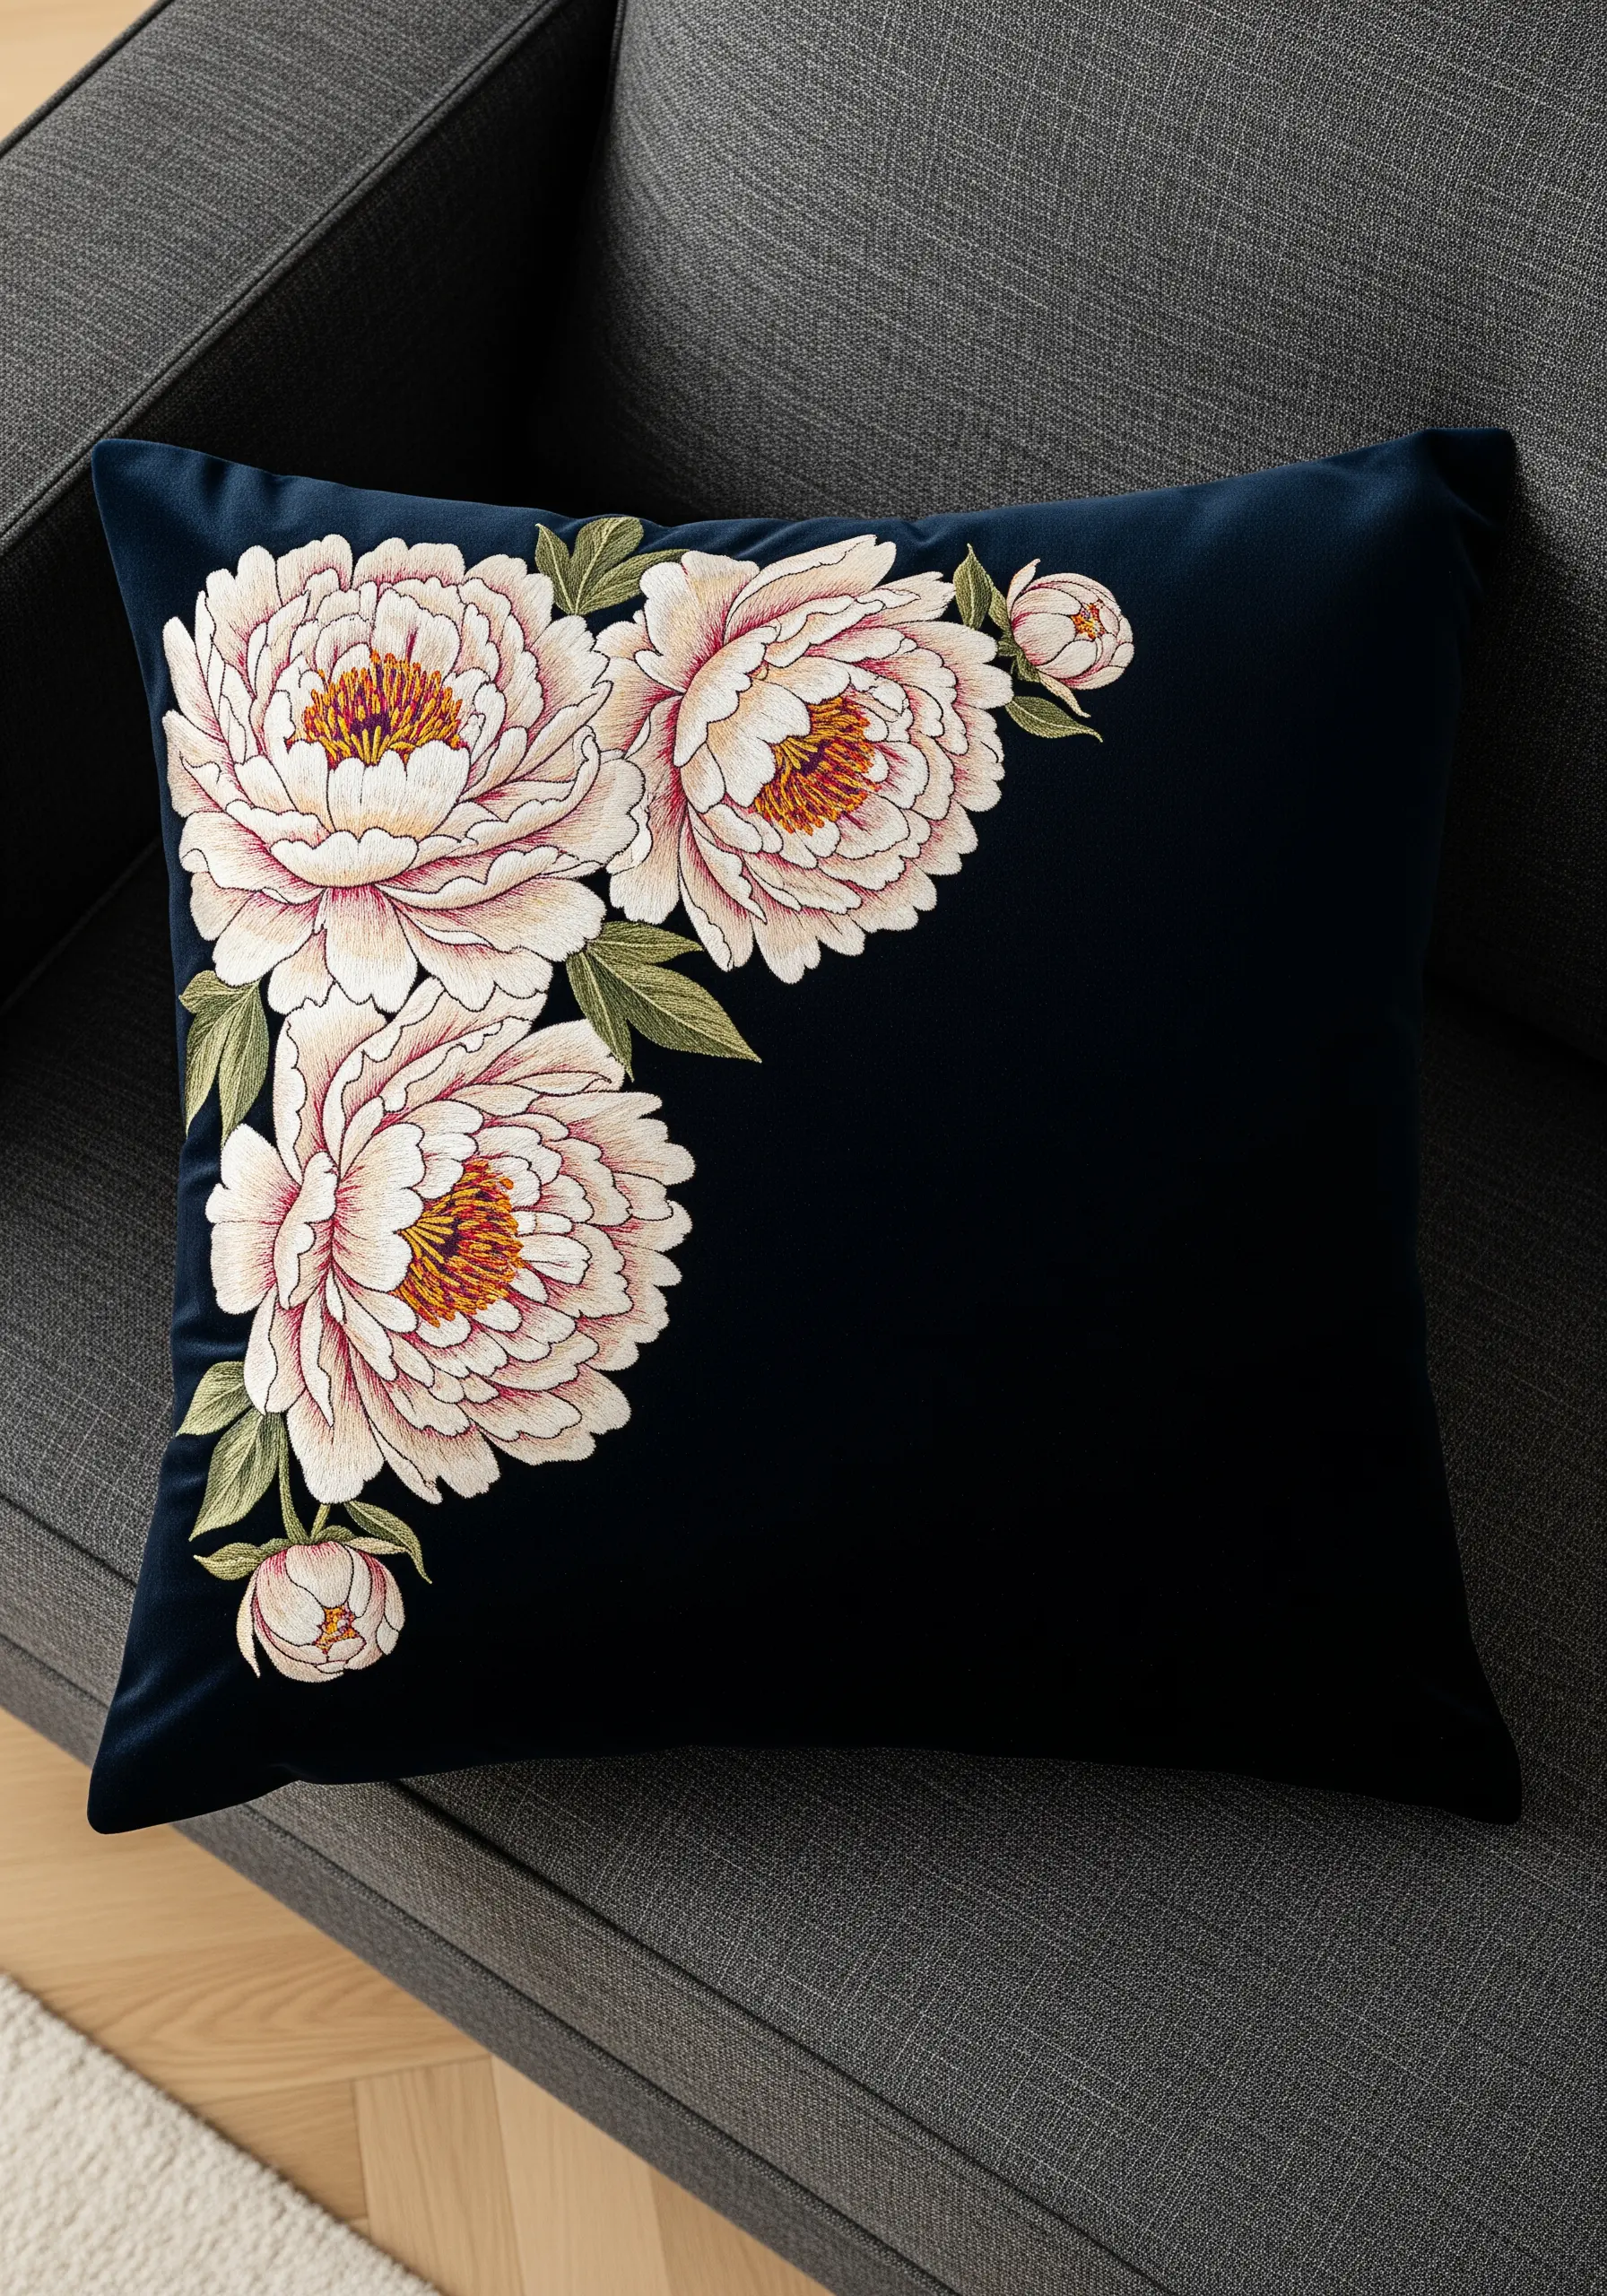
Make your peonies command attention by stitching them on a dark, luxurious fabric like navy or black velvet.
The deep background makes even the palest pinks and whites pop, creating an immediate sense of drama and sophistication.
When working with velvet, use a stabilizer to prevent the pile from swallowing your stitches and a sharp needle to pierce the dense weave cleanly.
Outline each petal with a fine split stitch before filling to ensure your edges remain crisp and defined against the plush texture.
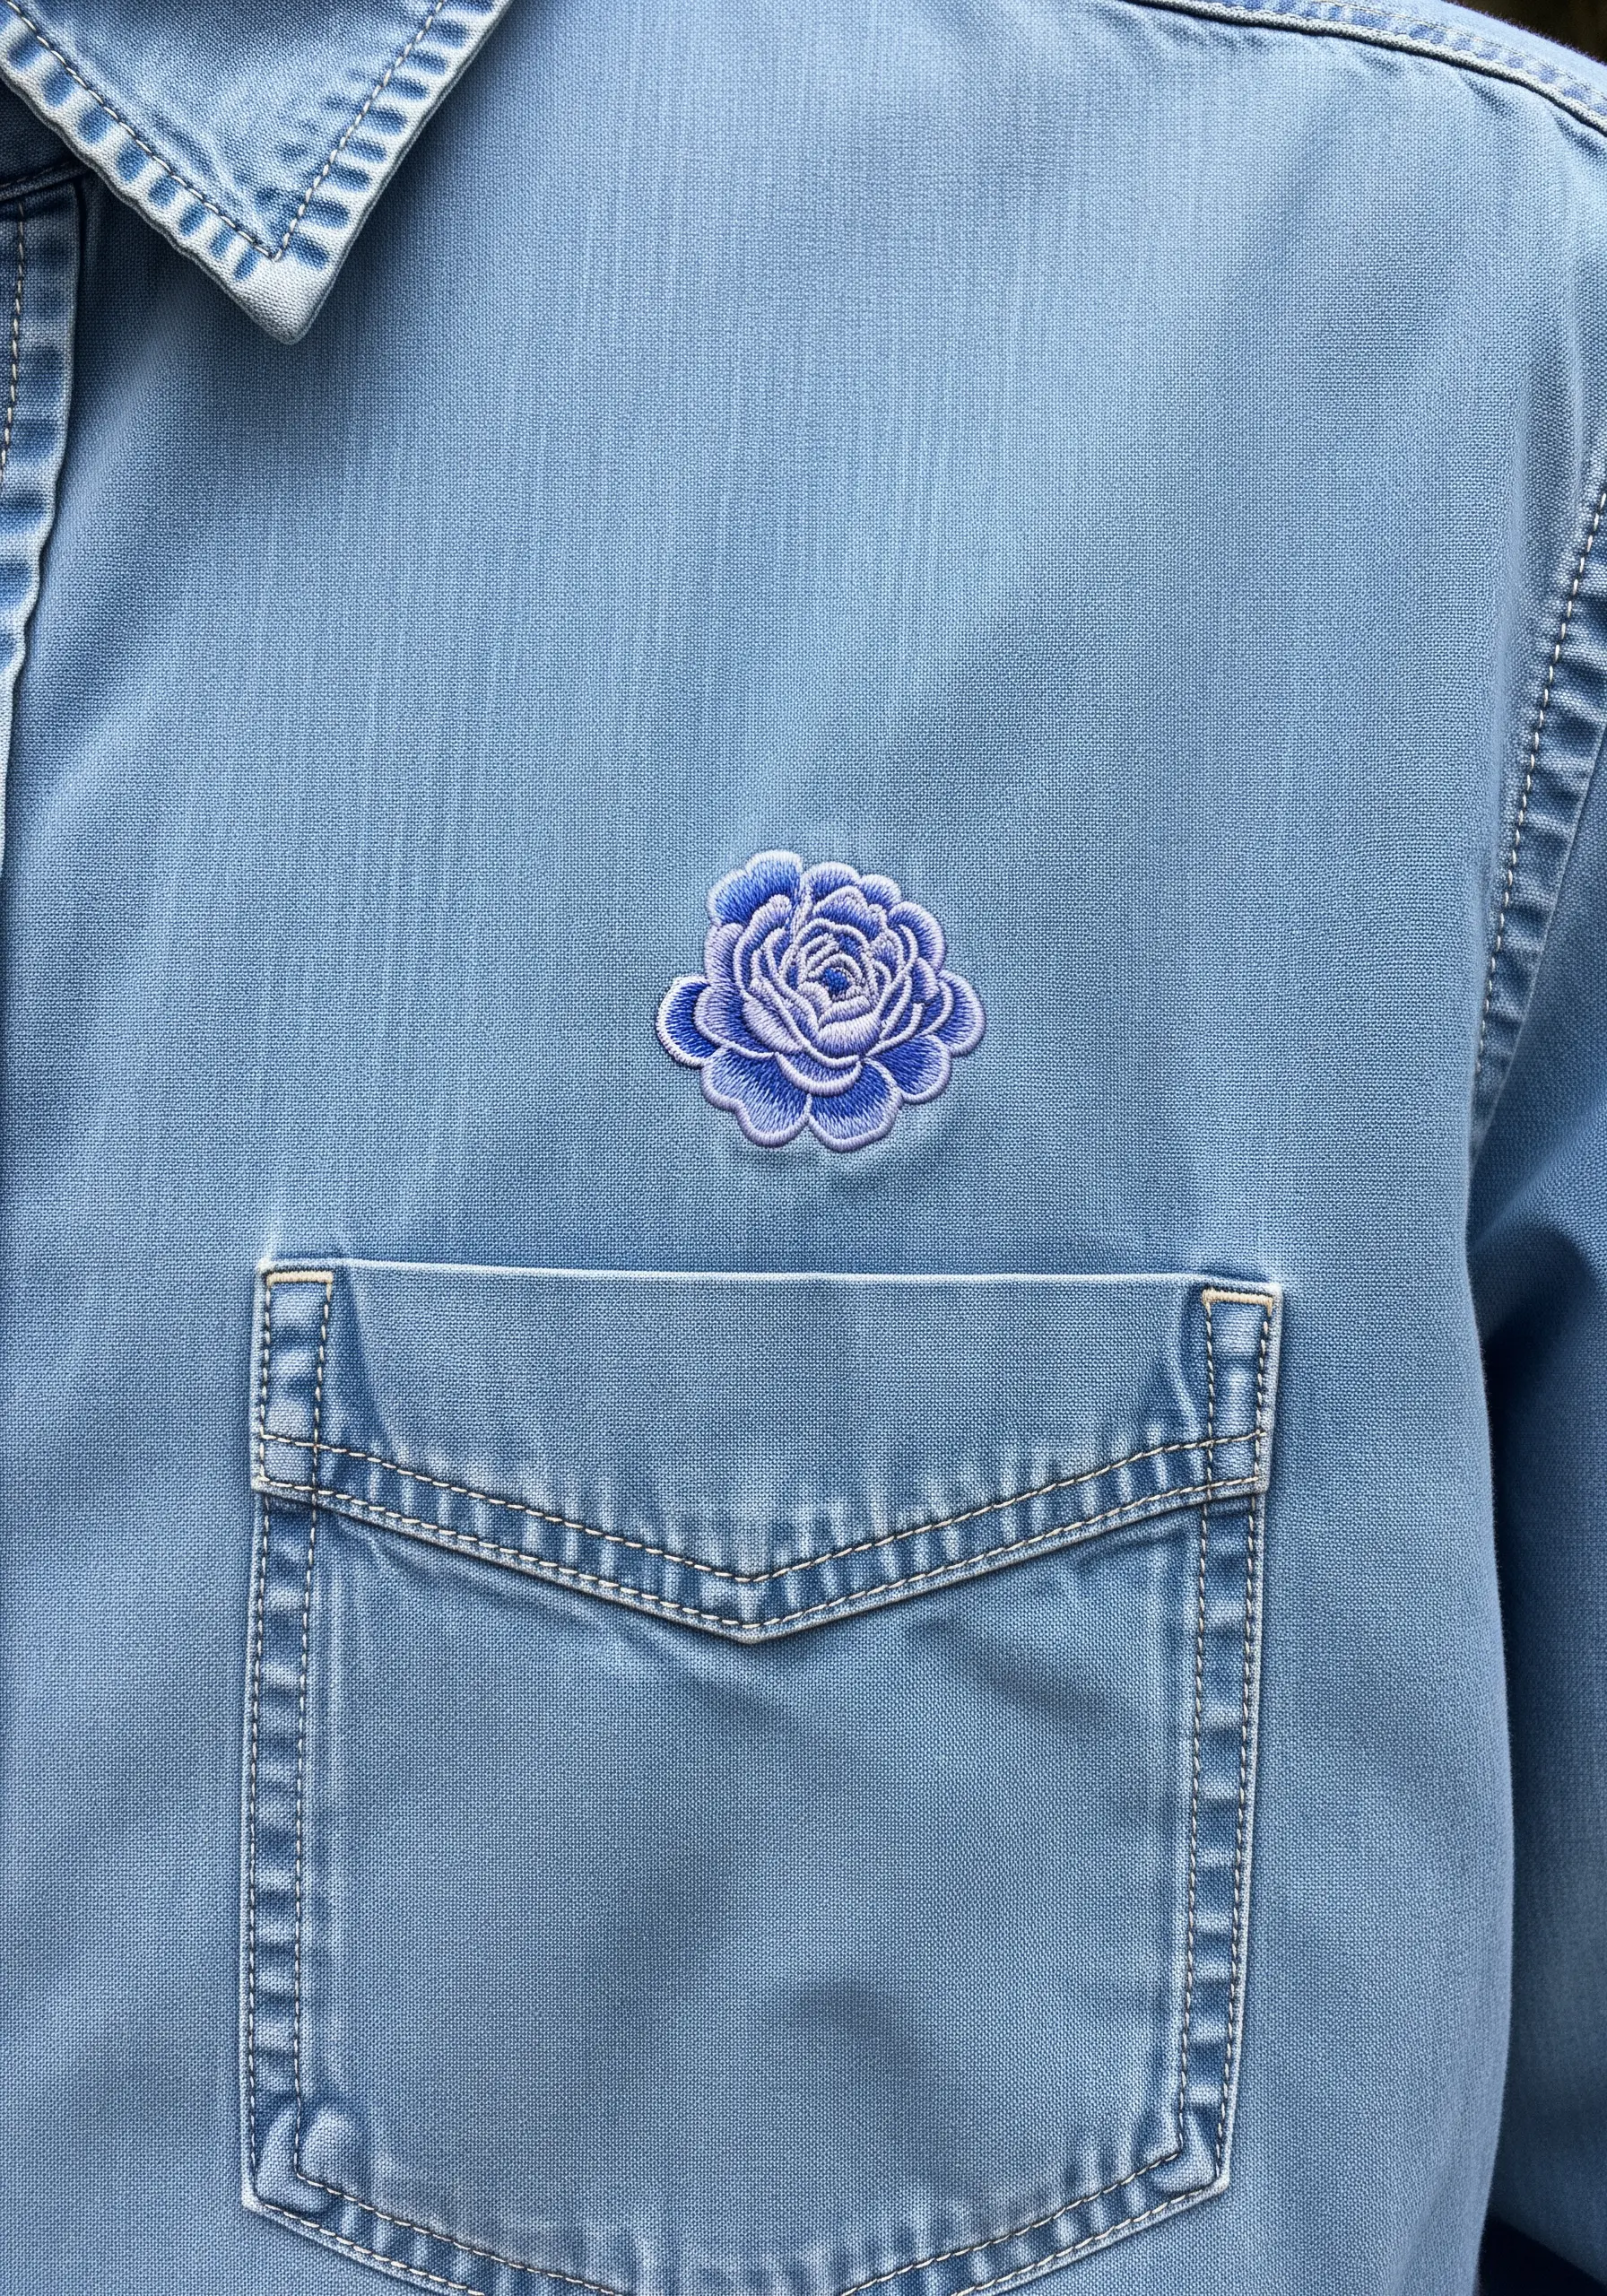
3. Select Complementary Colors for Apparel
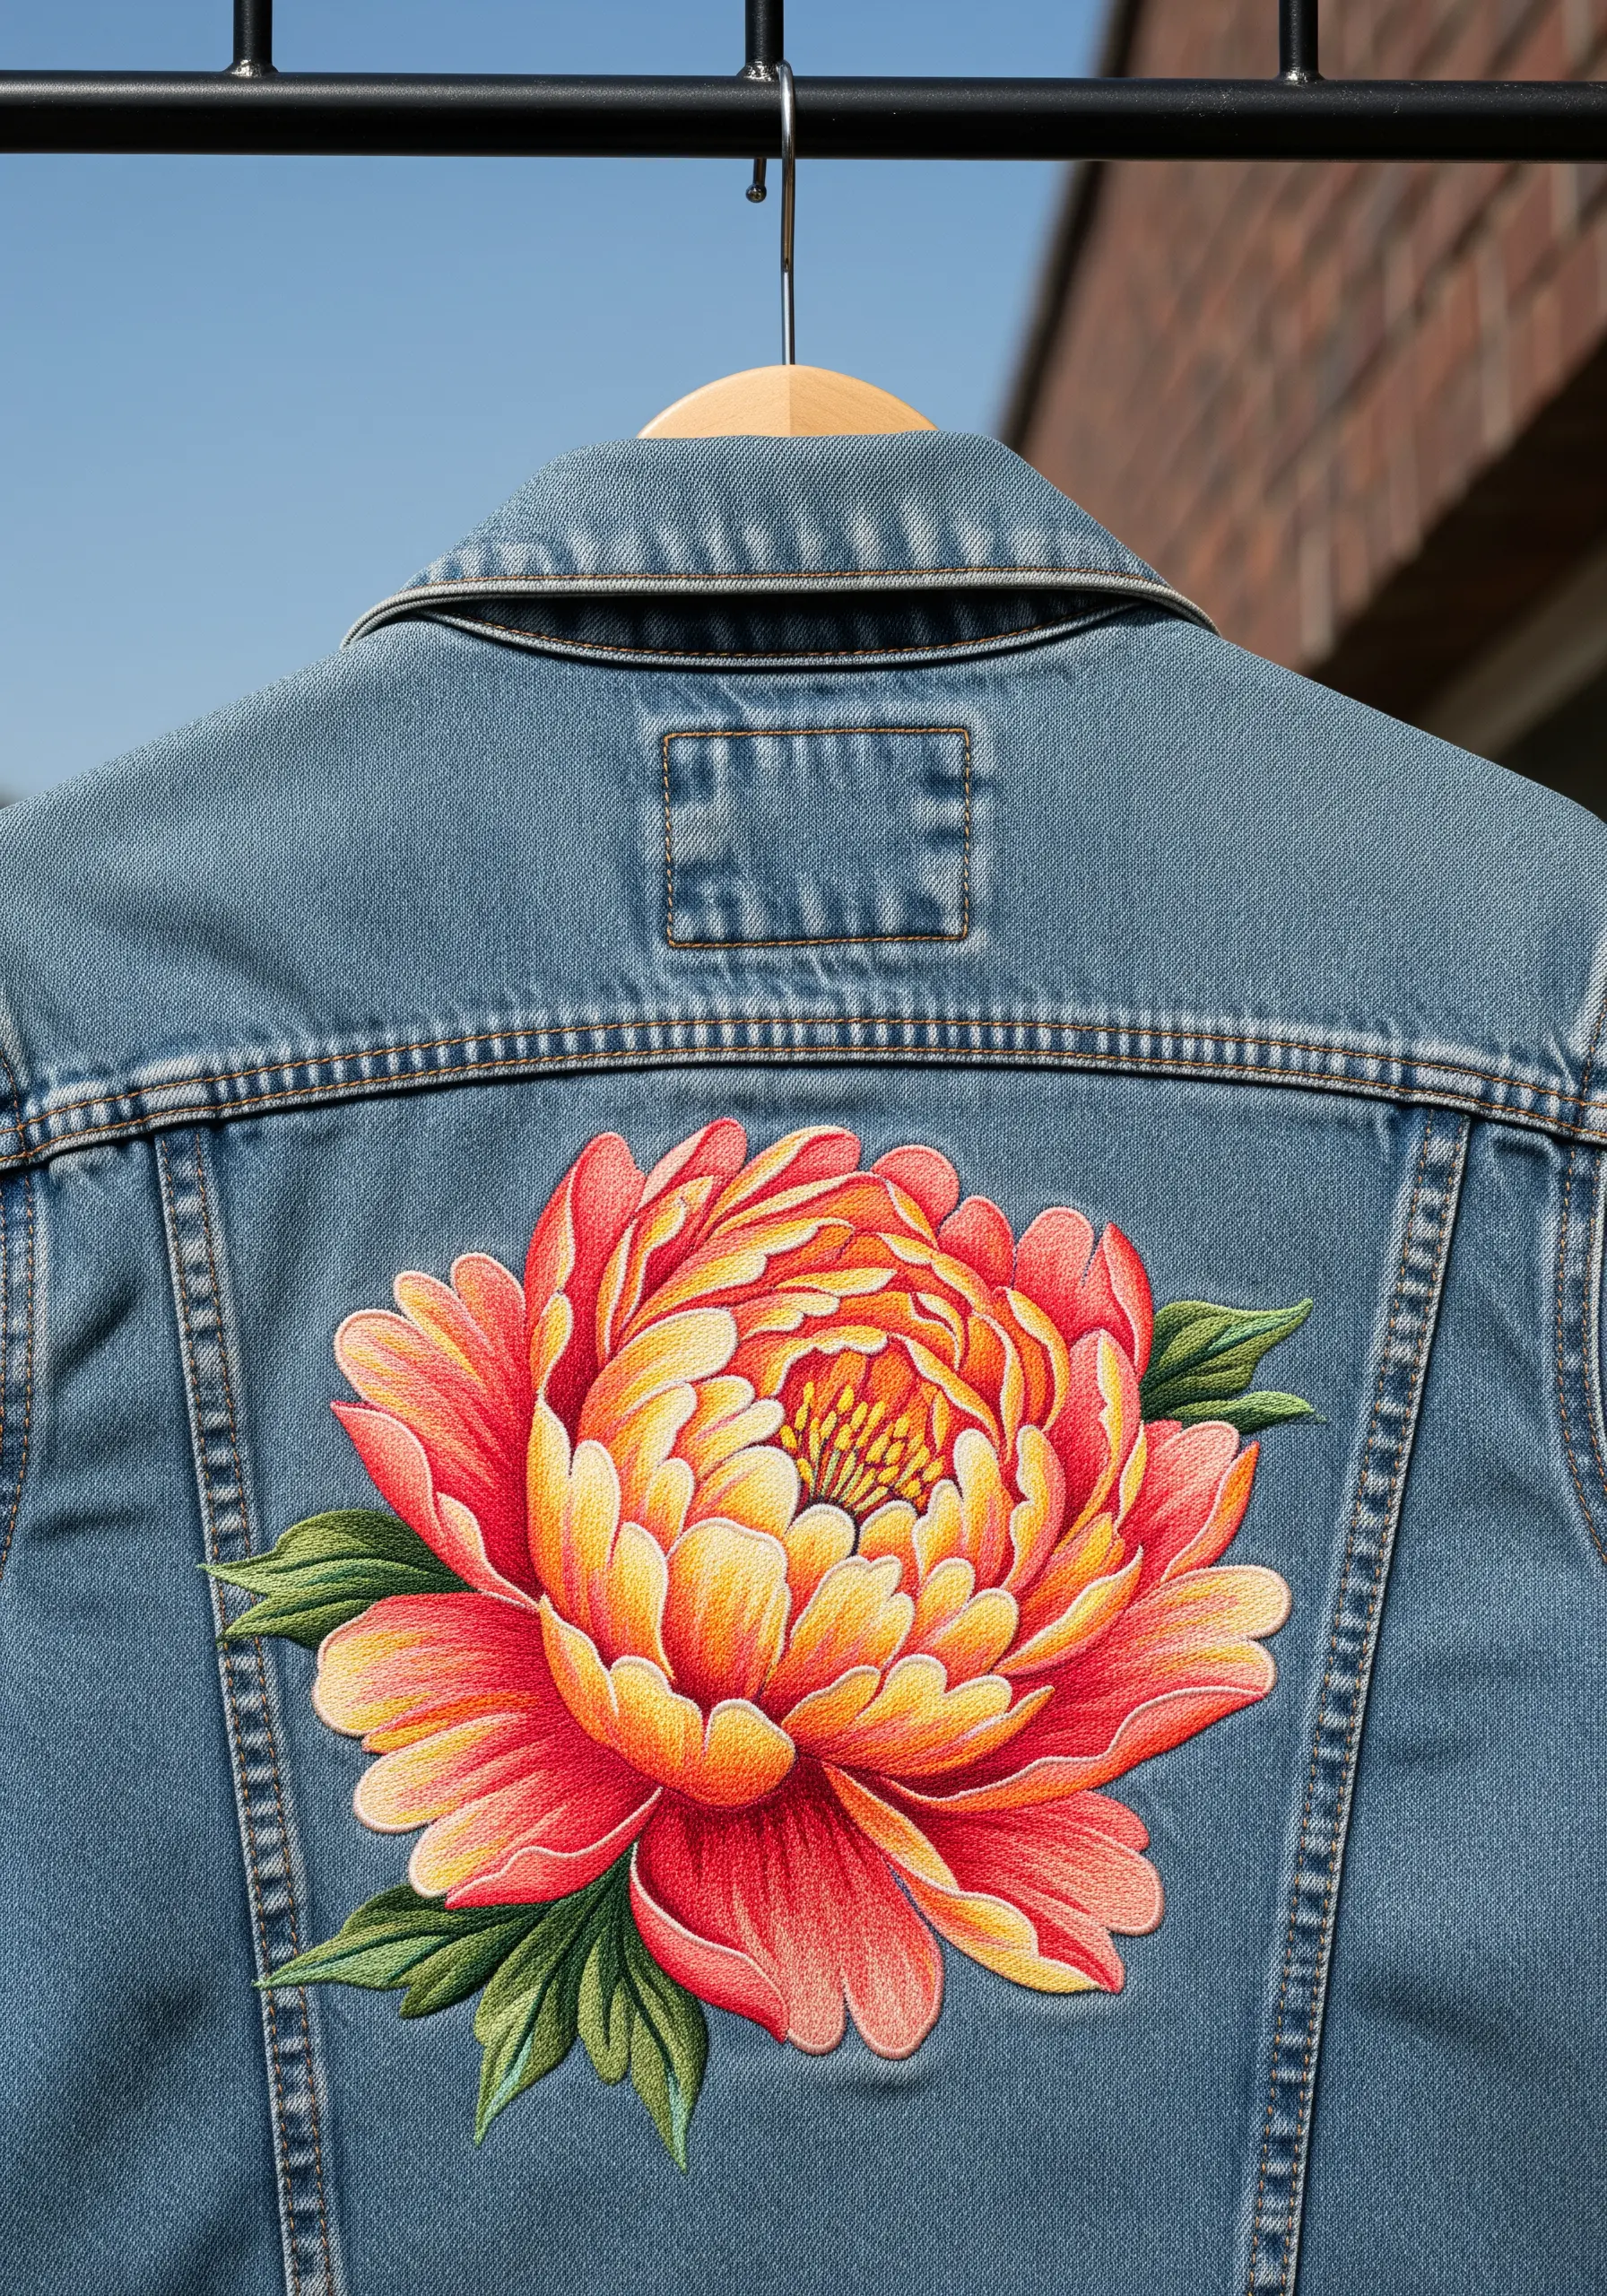
When embellishing denim, choose a color palette that contrasts with the cool blue of the fabric.
Warm tones like coral, orange, and yellow create a vibrant, eye-catching effect that feels both modern and intentional.
Always use a cut-away stabilizer on the inside of the jacket to support the stitches and prevent the fabric from puckering, especially with a dense design.
This ensures your artwork remains smooth and durable, even after washing.
Find more inspiration with these denim jacket embroidery motifs.
4. Sculpt with Shadow on Stretched Canvas
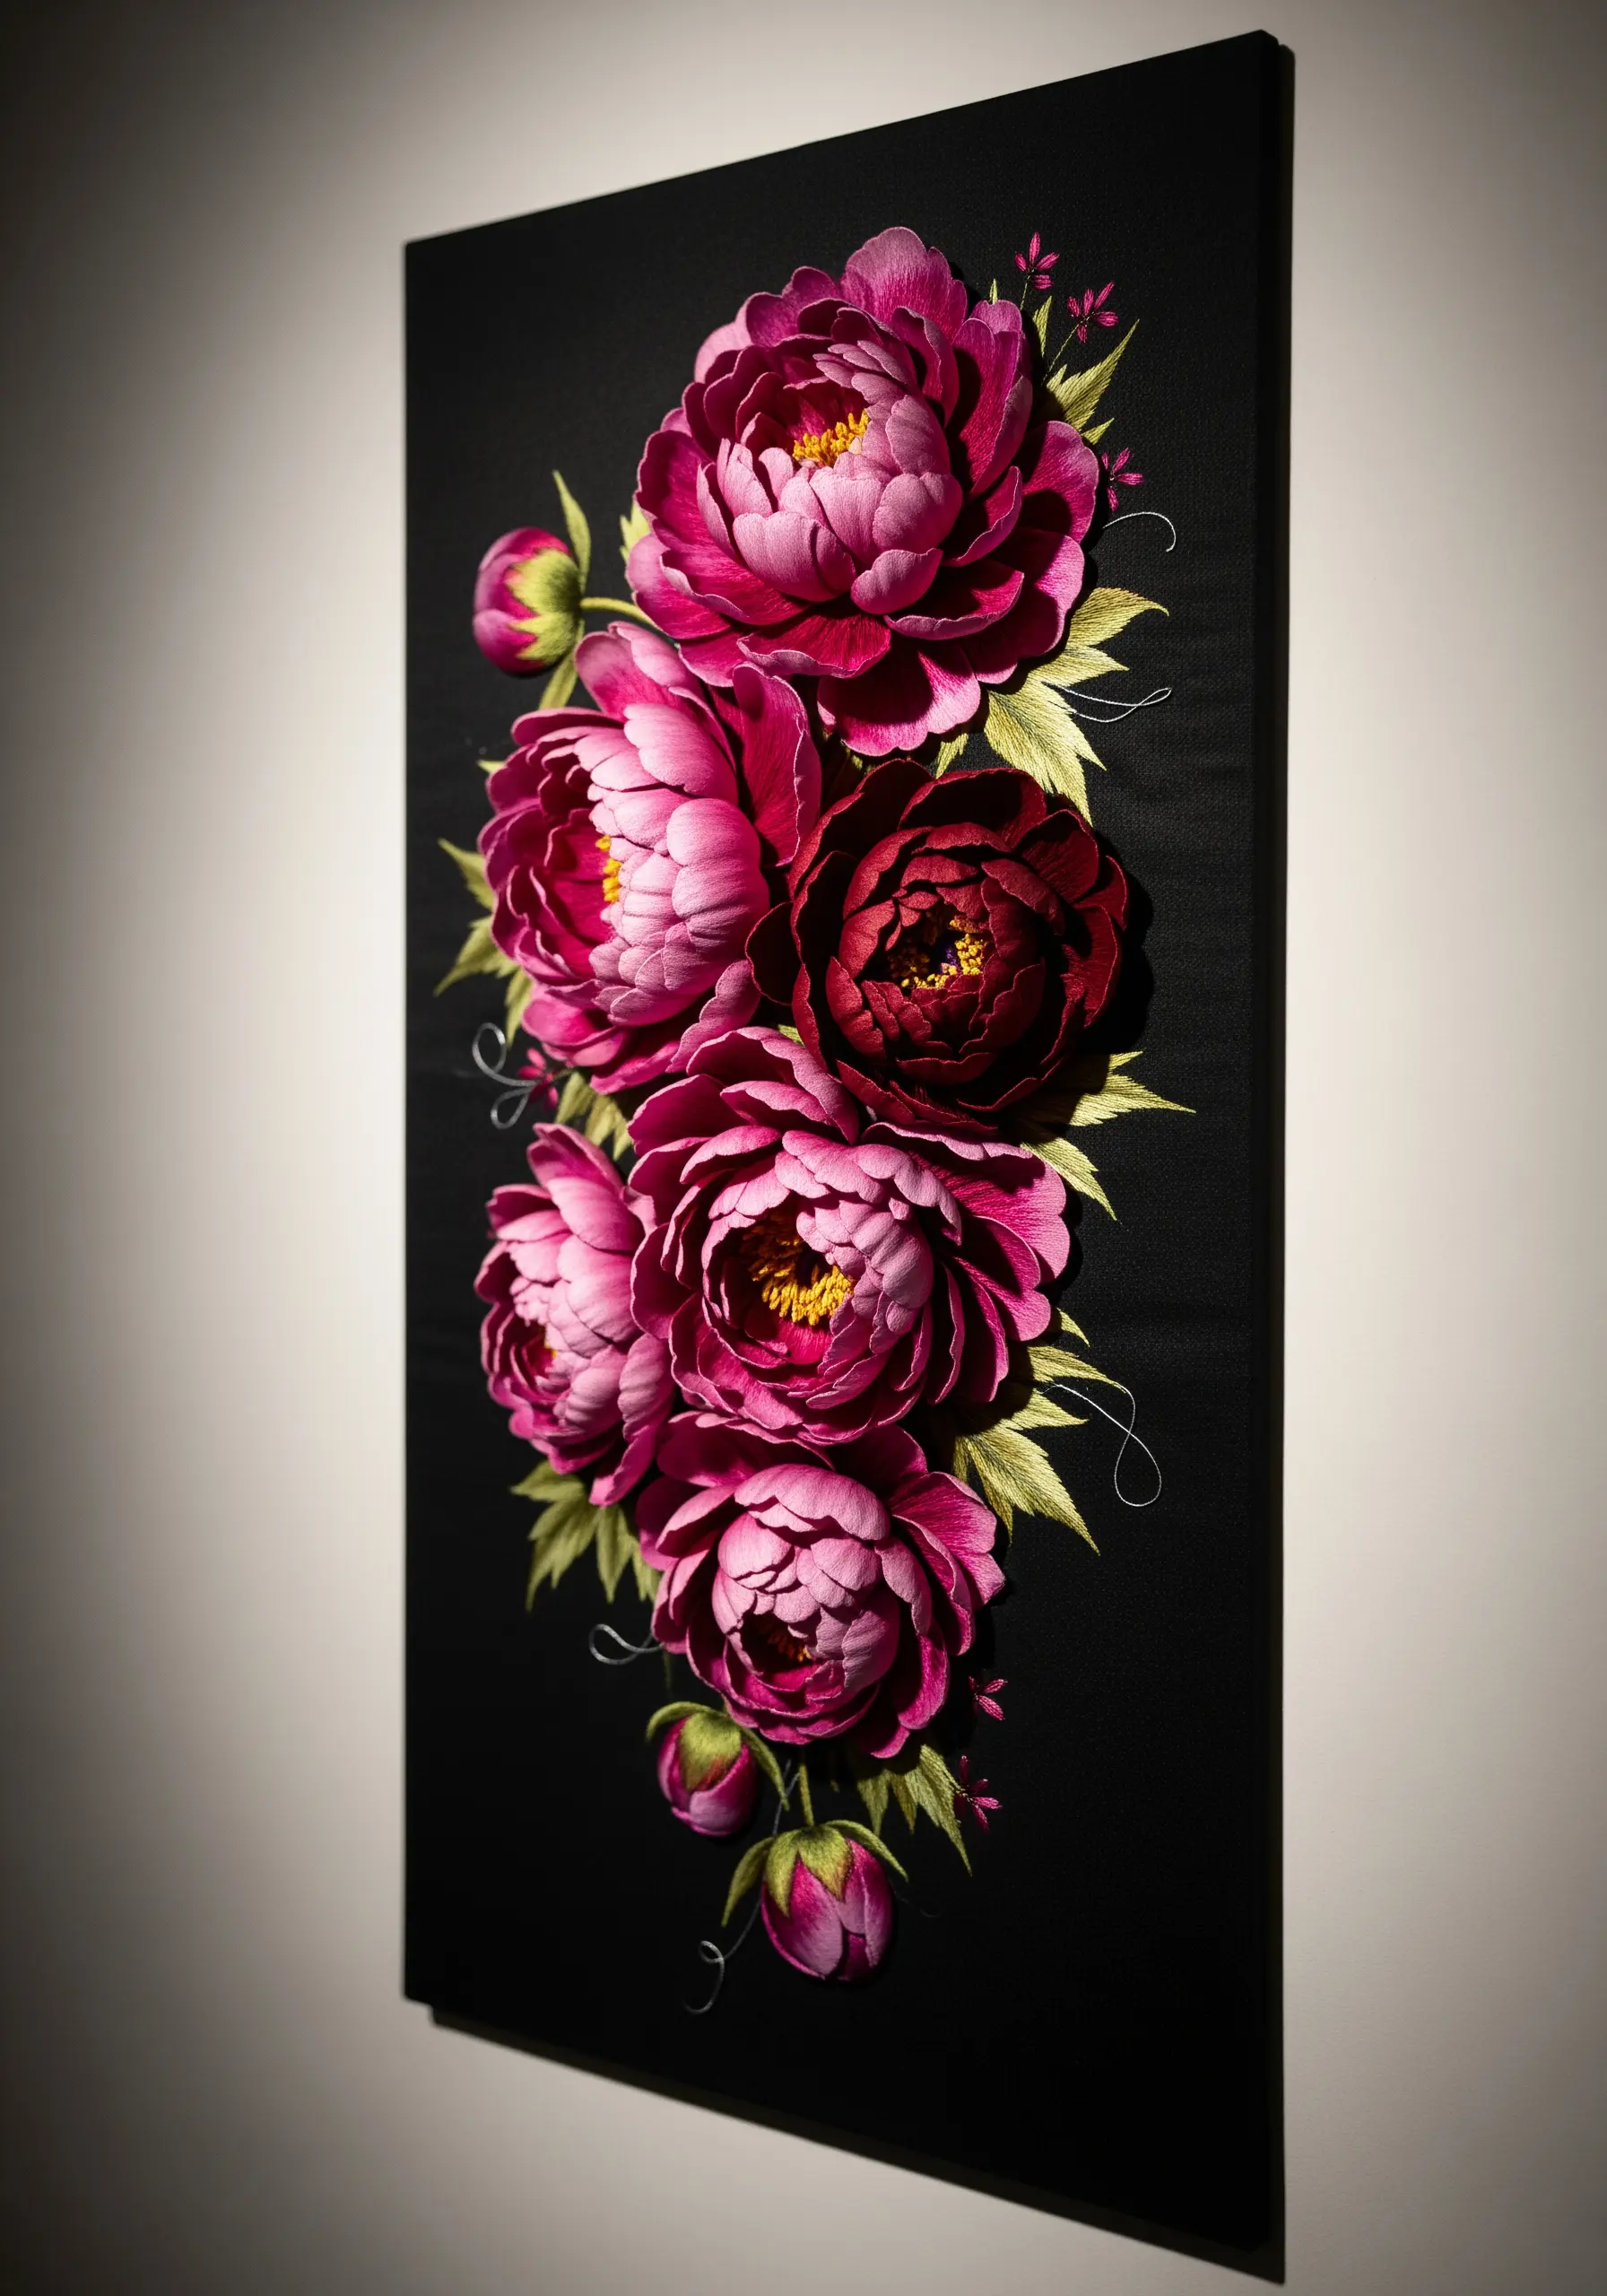
For a gallery-worthy piece, treat your thread like paint and use deep, saturated colors to build dramatic shadows.
Instead of jumping straight to black for shadowed areas, blend deep magentas, burgundies, and violets to give the petals a rich, velvety depth that feels more natural.
Work on a tightly stretched black canvas, which absorbs light and makes your thread colors appear even more luminous.
Once complete, you can hang the canvas as-is for a modern, frameless presentation.
5. Embrace Elegance with Minimalist Line Work
A single peony bud can carry more visual weight than a full bouquet when you use negative space effectively.
Focus on a delicate, well-executed form using just a few shades to hint at the bud’s shape.
This approach highlights the quality of your stitching and the beauty of the linen itself, proving that powerful embroidery doesn’t always require dense fills.
It’s a perfect exercise in restraint and precision, ideal for adding a sophisticated touch to fine fabrics.
Explore more minimalist embroidery ideas for a chic, modern aesthetic.
6. Build Volume with a Monochromatic Palette
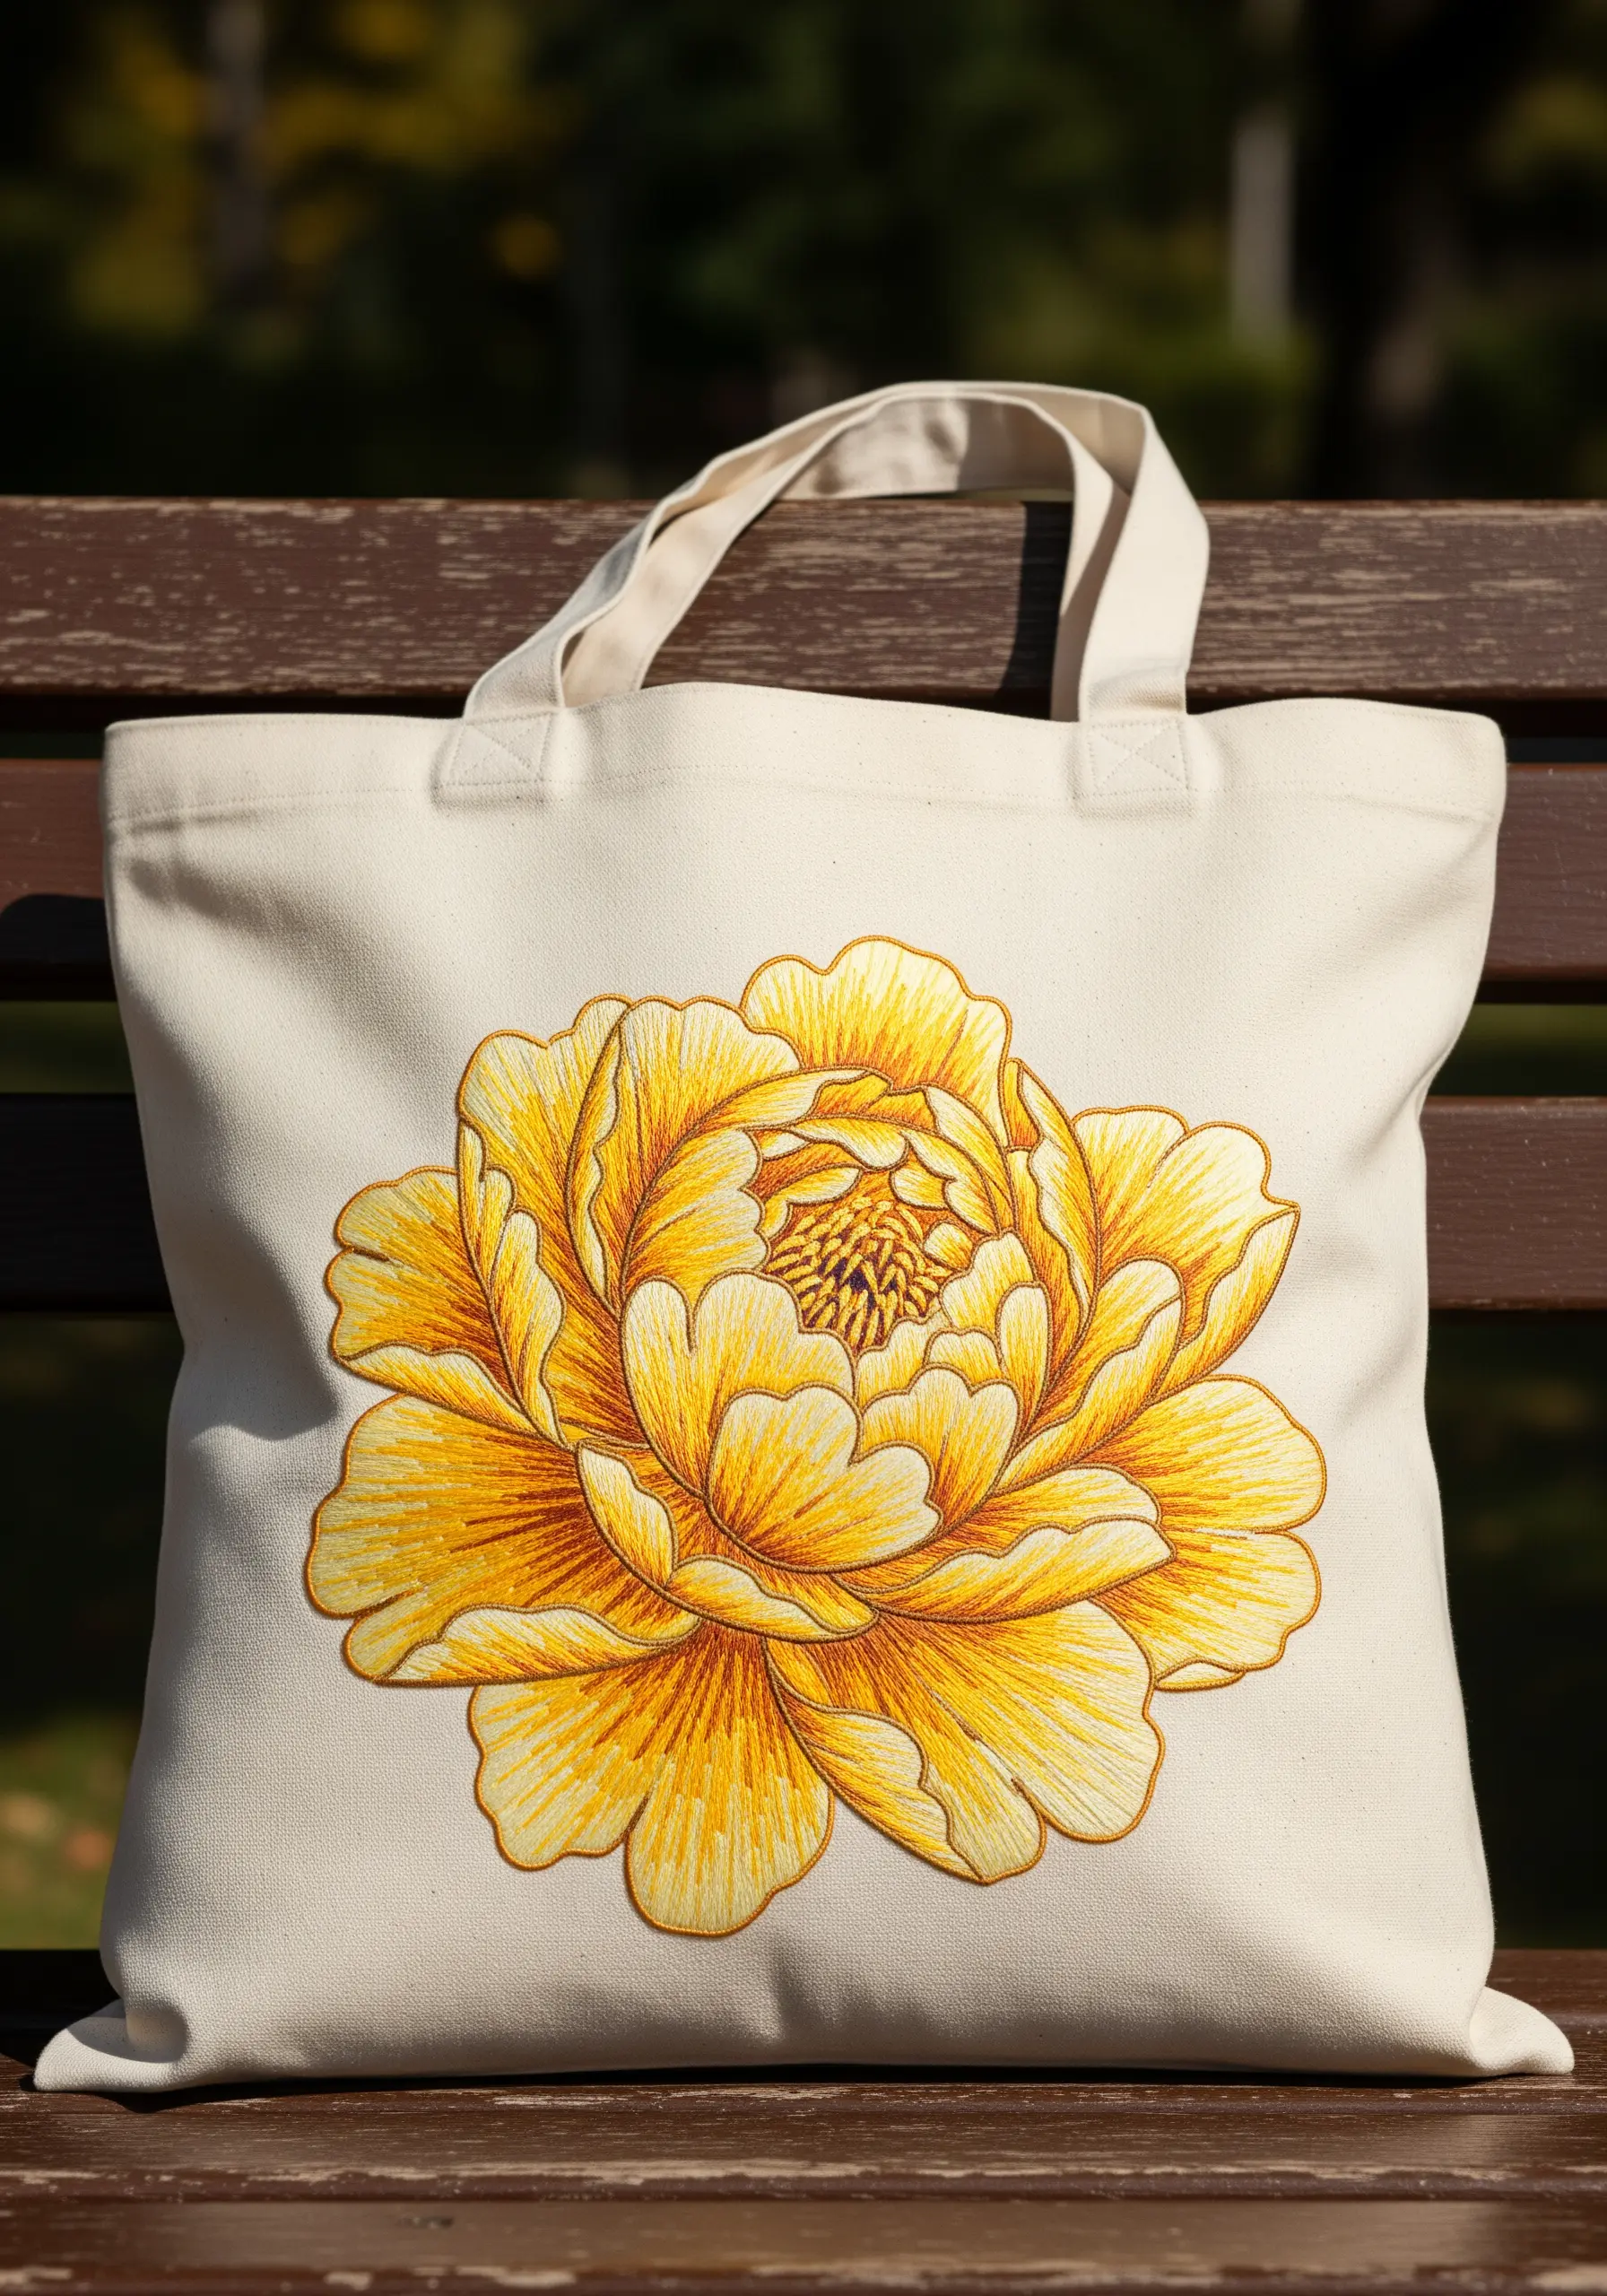
You don’t need dozens of colors to create a lush peony; you just need a few shades from the same color family.
Work with a range of yellows—from pale buttercream to rich gold and burnt ochre—to define each petal’s shape and curl.
This monochromatic approach creates a cohesive and sophisticated look while still achieving impressive depth.
Use the darkest shade for outlines and the deepest folds, and the lightest for the petal edges that catch the light.
These floral tote bag embroidery motifs are perfect for functional, beautiful pieces.
7. Create Texture with Directional Chain Stitch
Move beyond smooth satin stitches and fill your petals with rows of chain stitch for a woven, tactile surface.
Instead of laying the stitches flat, direct them to follow the curve of each petal, creating ridges and valleys that mimic natural texture.
Define the edge of each petal with a contrasting color in a simple backstitch to contain the texture and add graphic definition.
This technique is perfect for framed art where the textural quality can be appreciated up close.
8. Scale Down for Elegant Table Linens
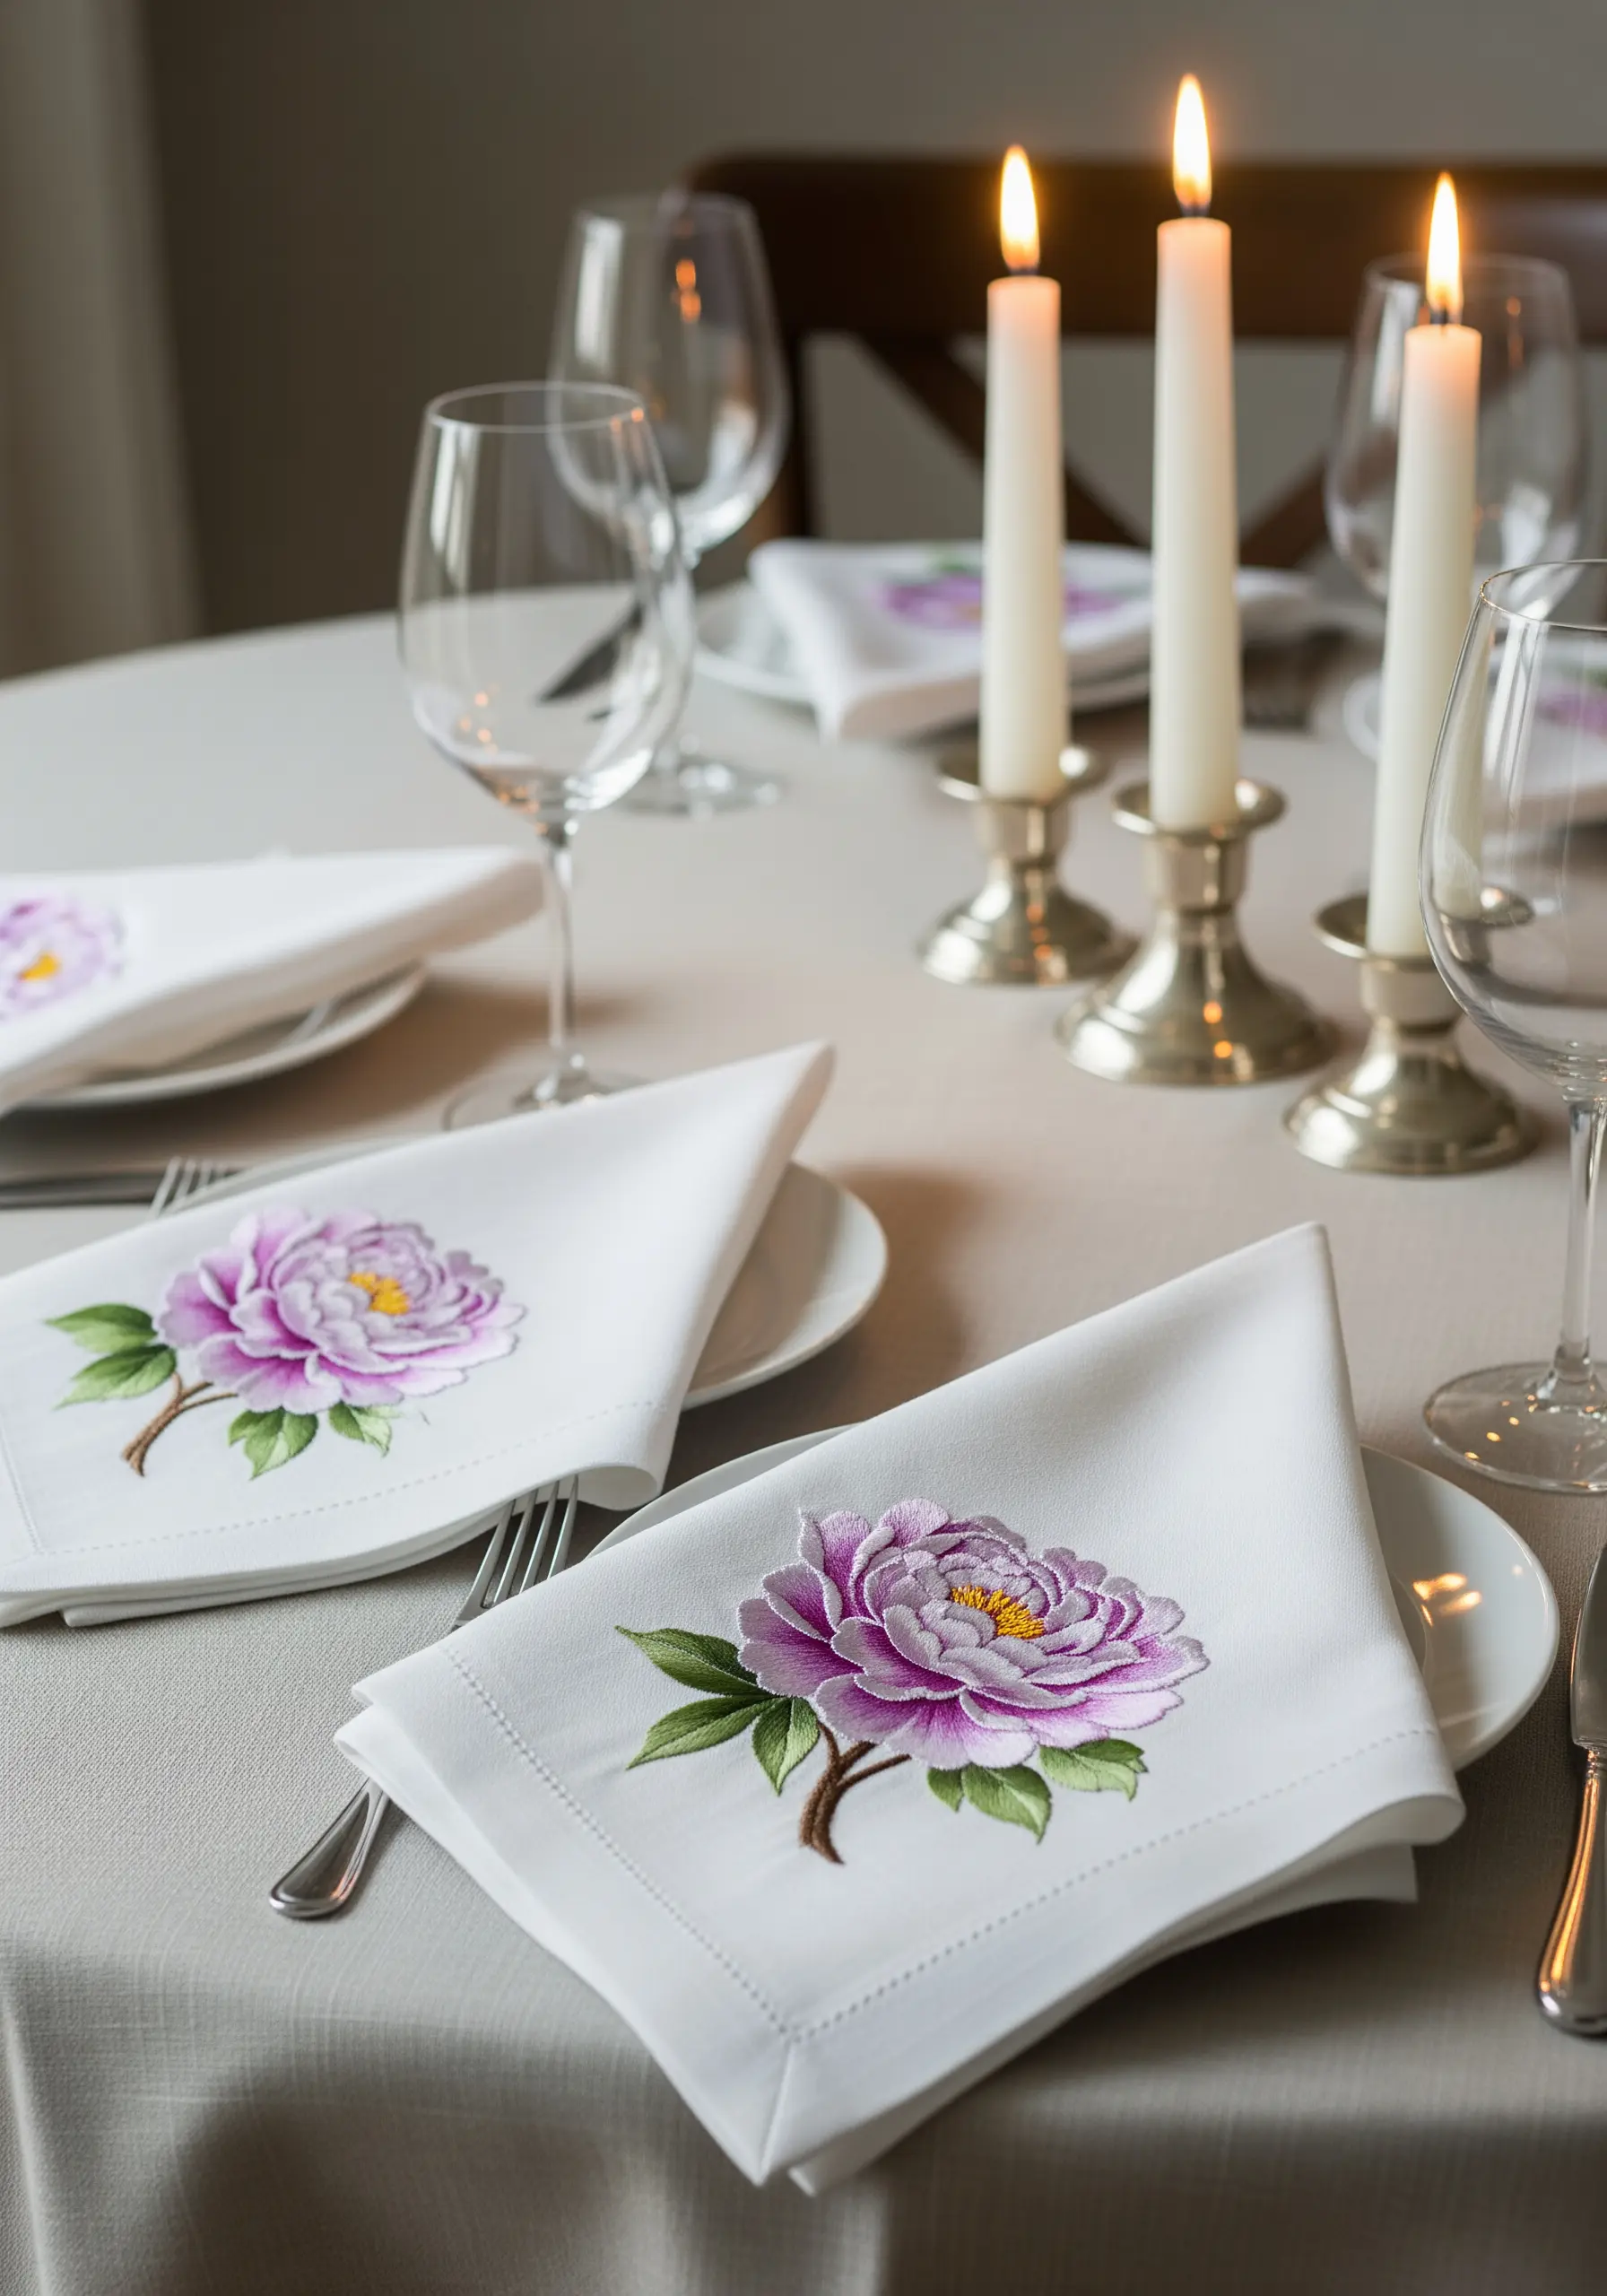
When embroidering functional items like napkins, scale is everything.
Choose a smaller, less dense peony motif that adds a touch of artistry without interfering with the napkin’s drape or function.
Use high-quality, colorfast threads that can withstand repeated washing, and secure your thread tails meticulously on the back.
A simple, elegant design elevates everyday items into cherished pieces.
Try adapting hand-stitched table runner embroidery designs for a coordinated look.
9. Define White Petals with Cool Gray Shadows
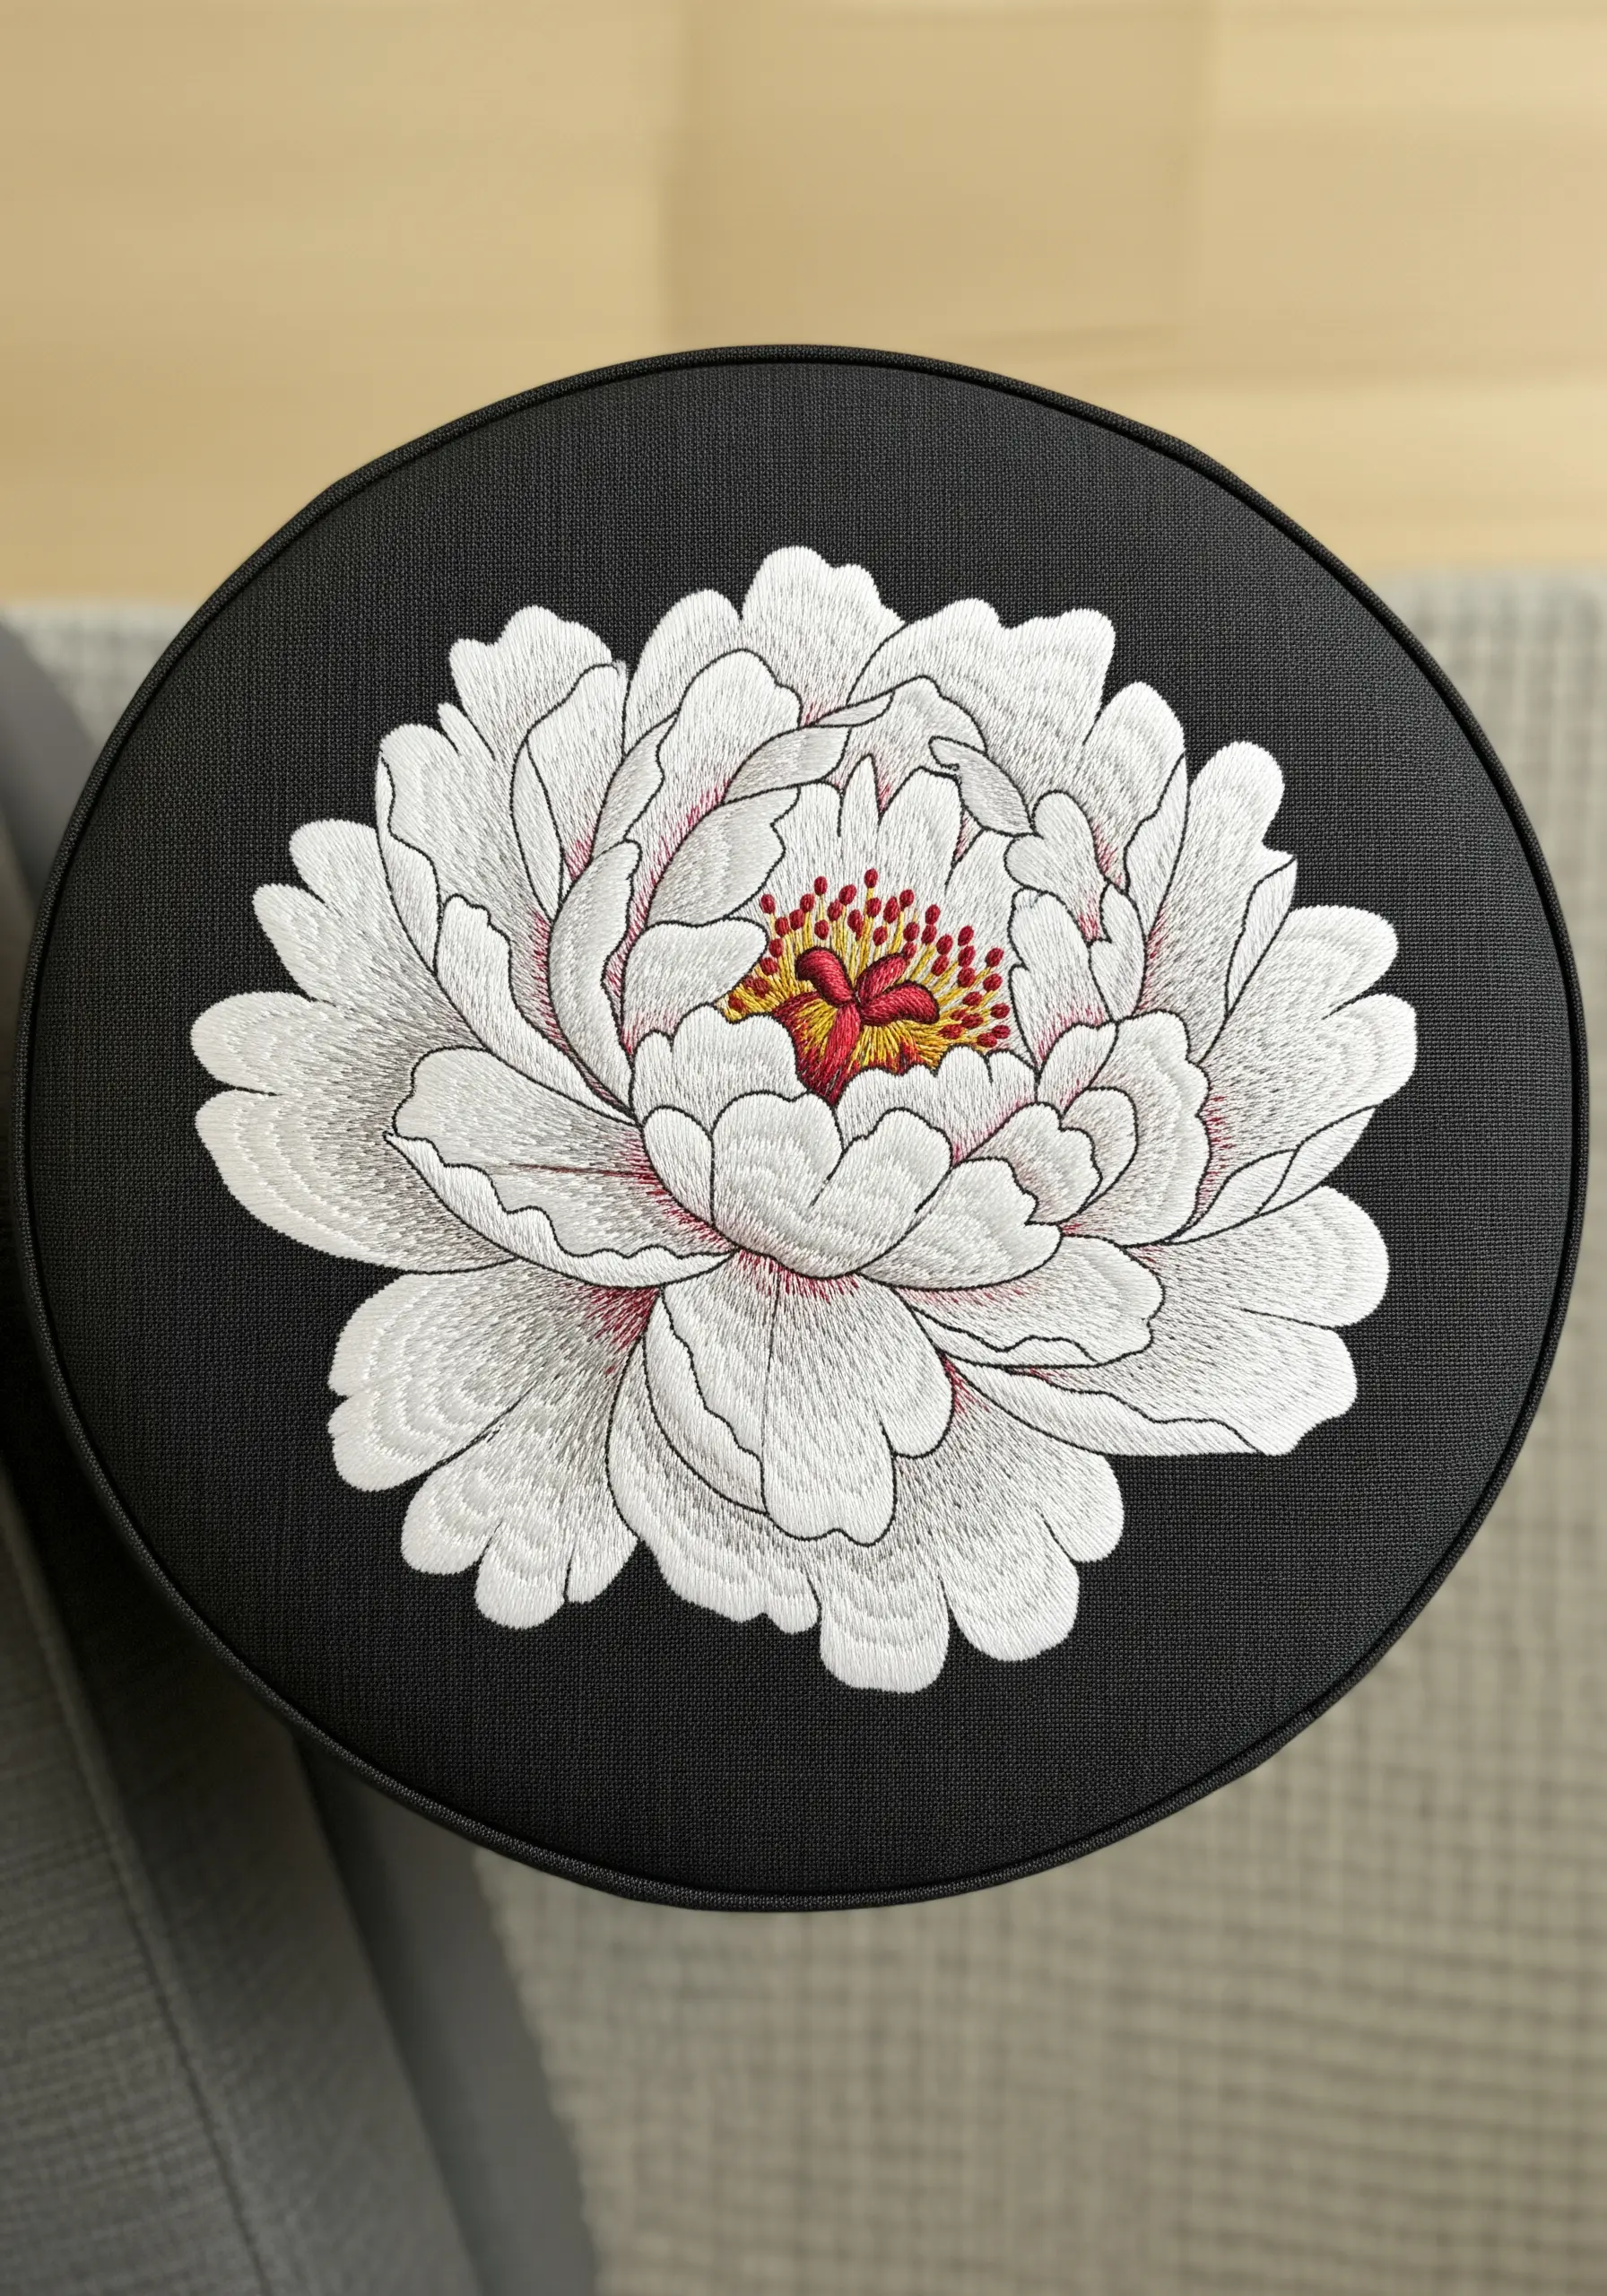
Stitching a white flower on a dark background requires careful shading to prevent it from looking flat.
Use shades of pale gray and muted lavender, not black, to define the folds and undersides of the white petals.
This creates a soft, natural-looking shadow that gives the flower form and dimension.
Reserve pure white for the highlights on the very top edges of the petals to create a focal point and enhance the illusion of light.
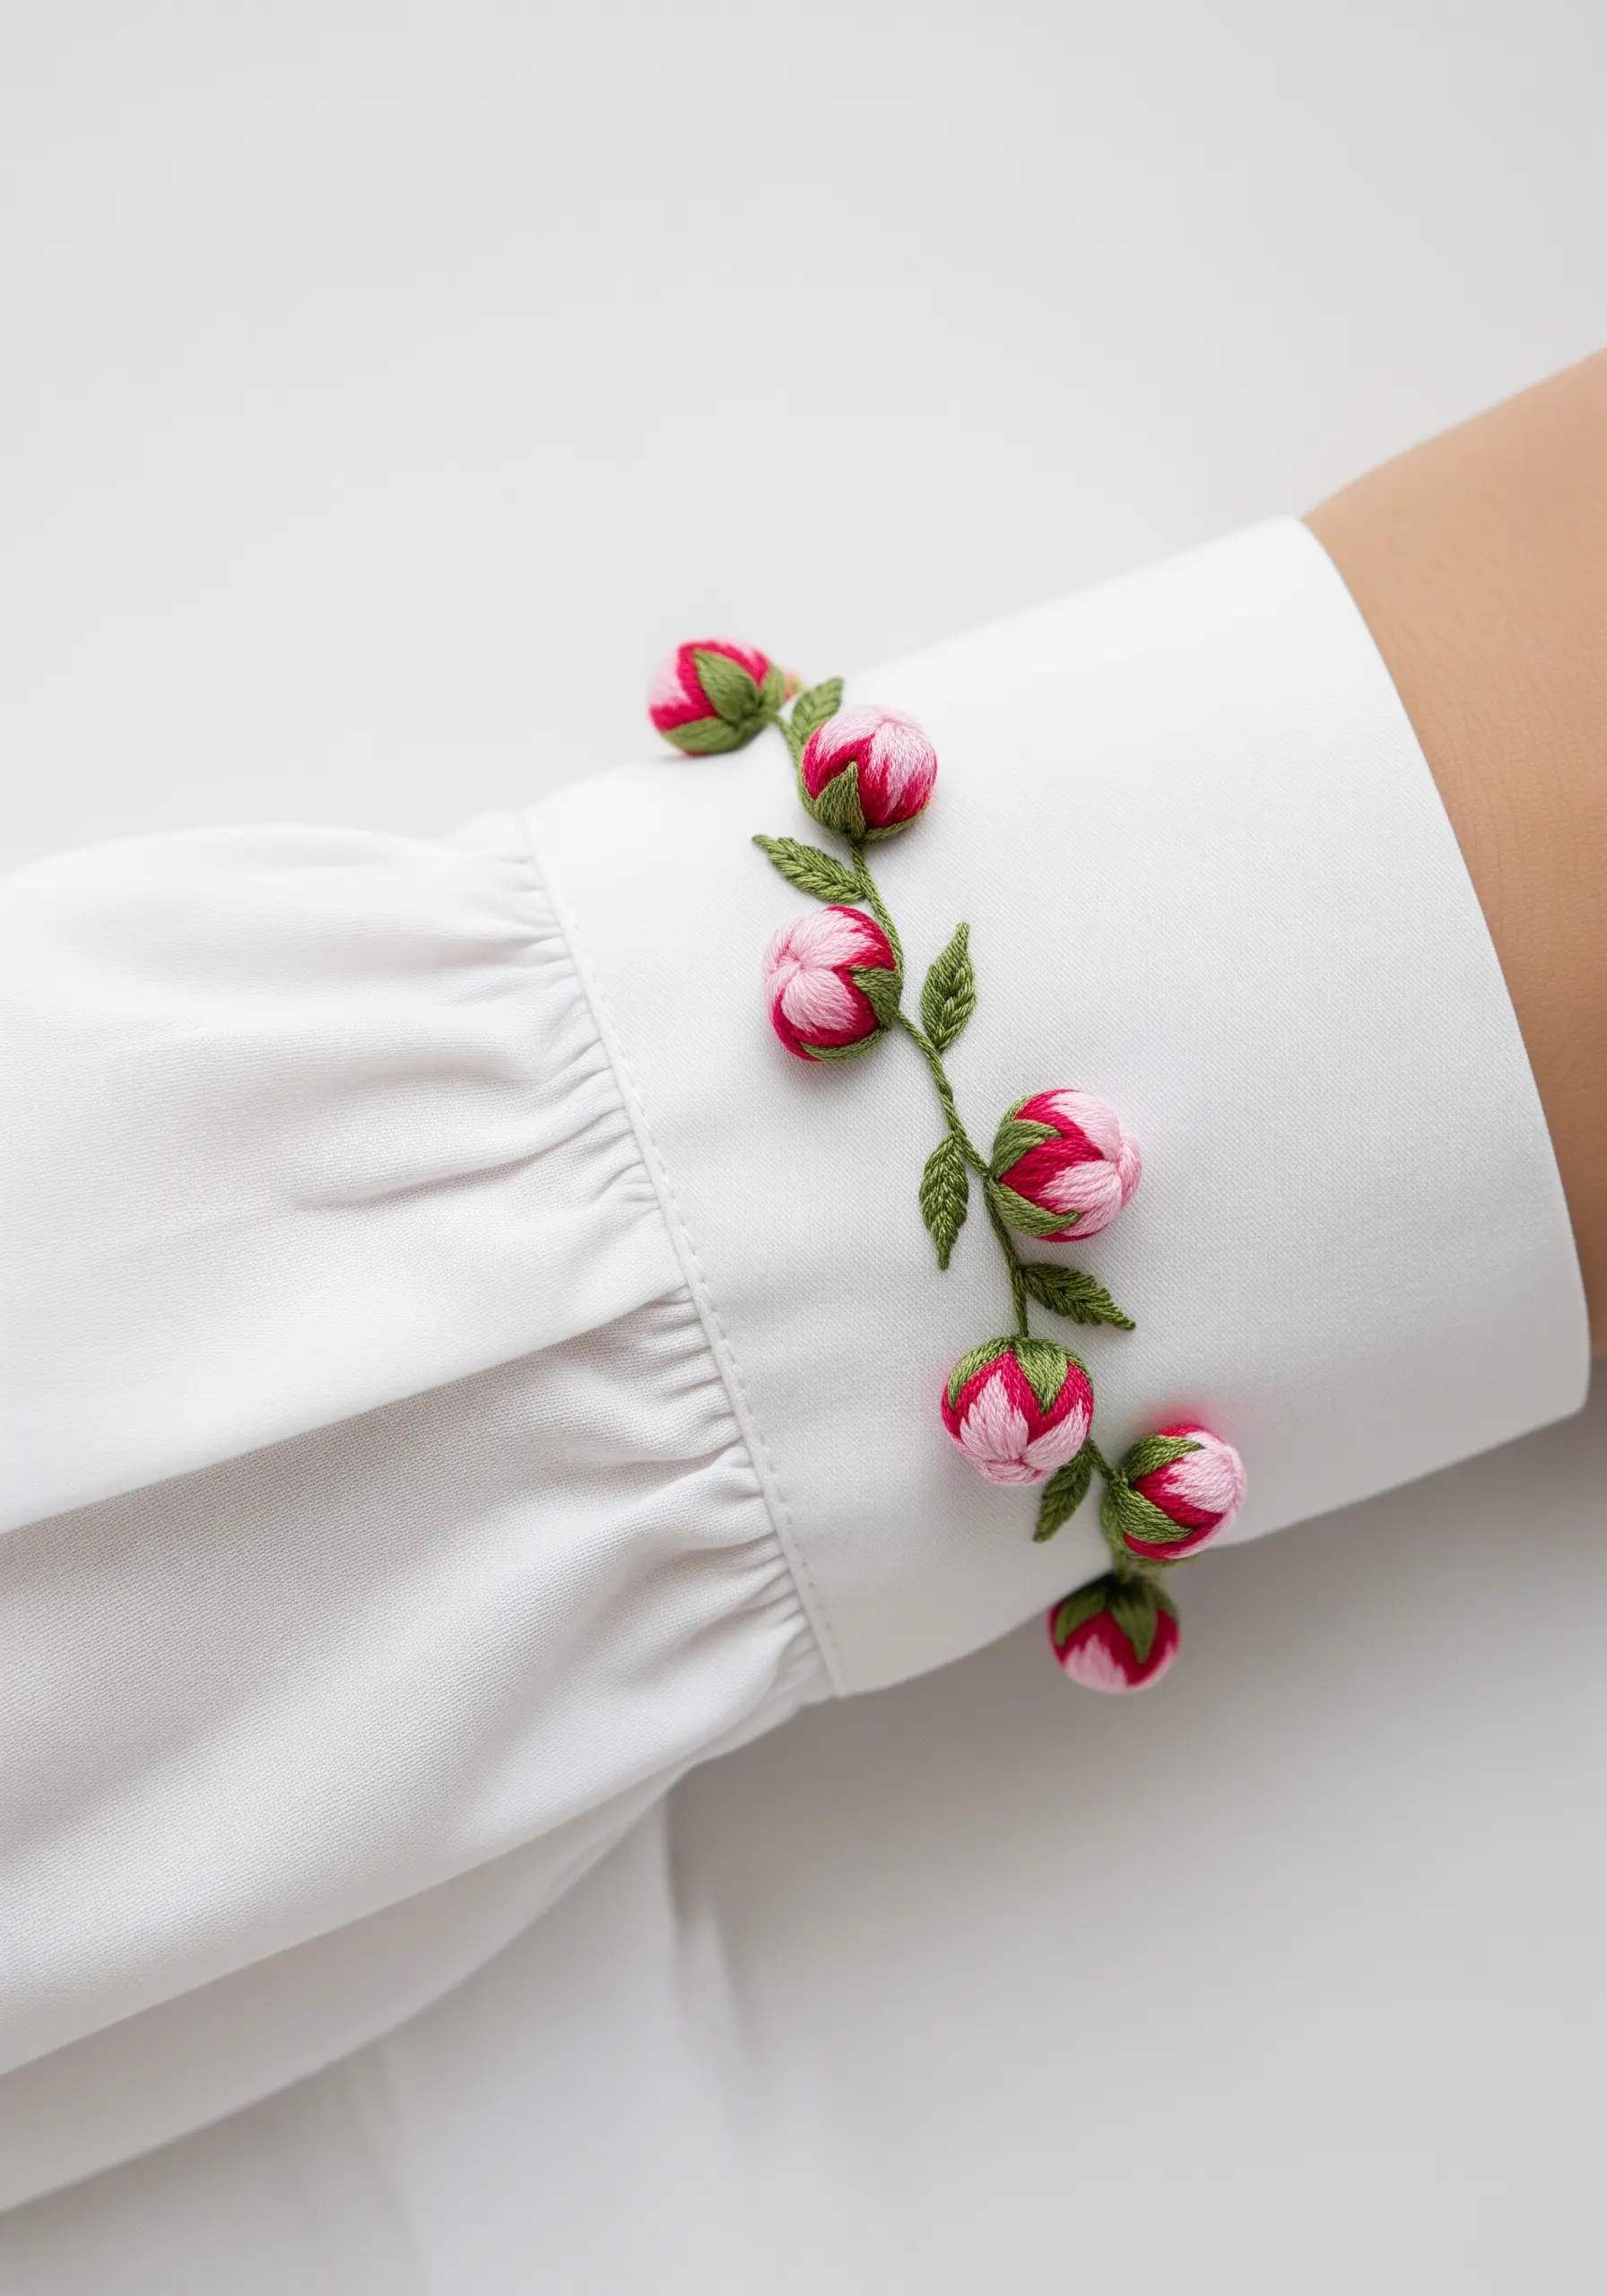
10. Craft a Standalone Micro-Patch
For a subtle yet personal touch on clothing, create a tiny embroidered patch.
Stitch your miniature peony onto a piece of felt or heavy-duty stabilizer, which provides a stable base and prevents fabric puckering.
Once complete, trim it closely, leaving a small border, and then appliqué it onto your shirt pocket or collar using small, discreet stitches.
This method gives you more control and results in a clean, professional finish.
Discover more tiny floral embroidery ideas for secret, personal details.
11. Tell a Story with a Hoop Art Triptych
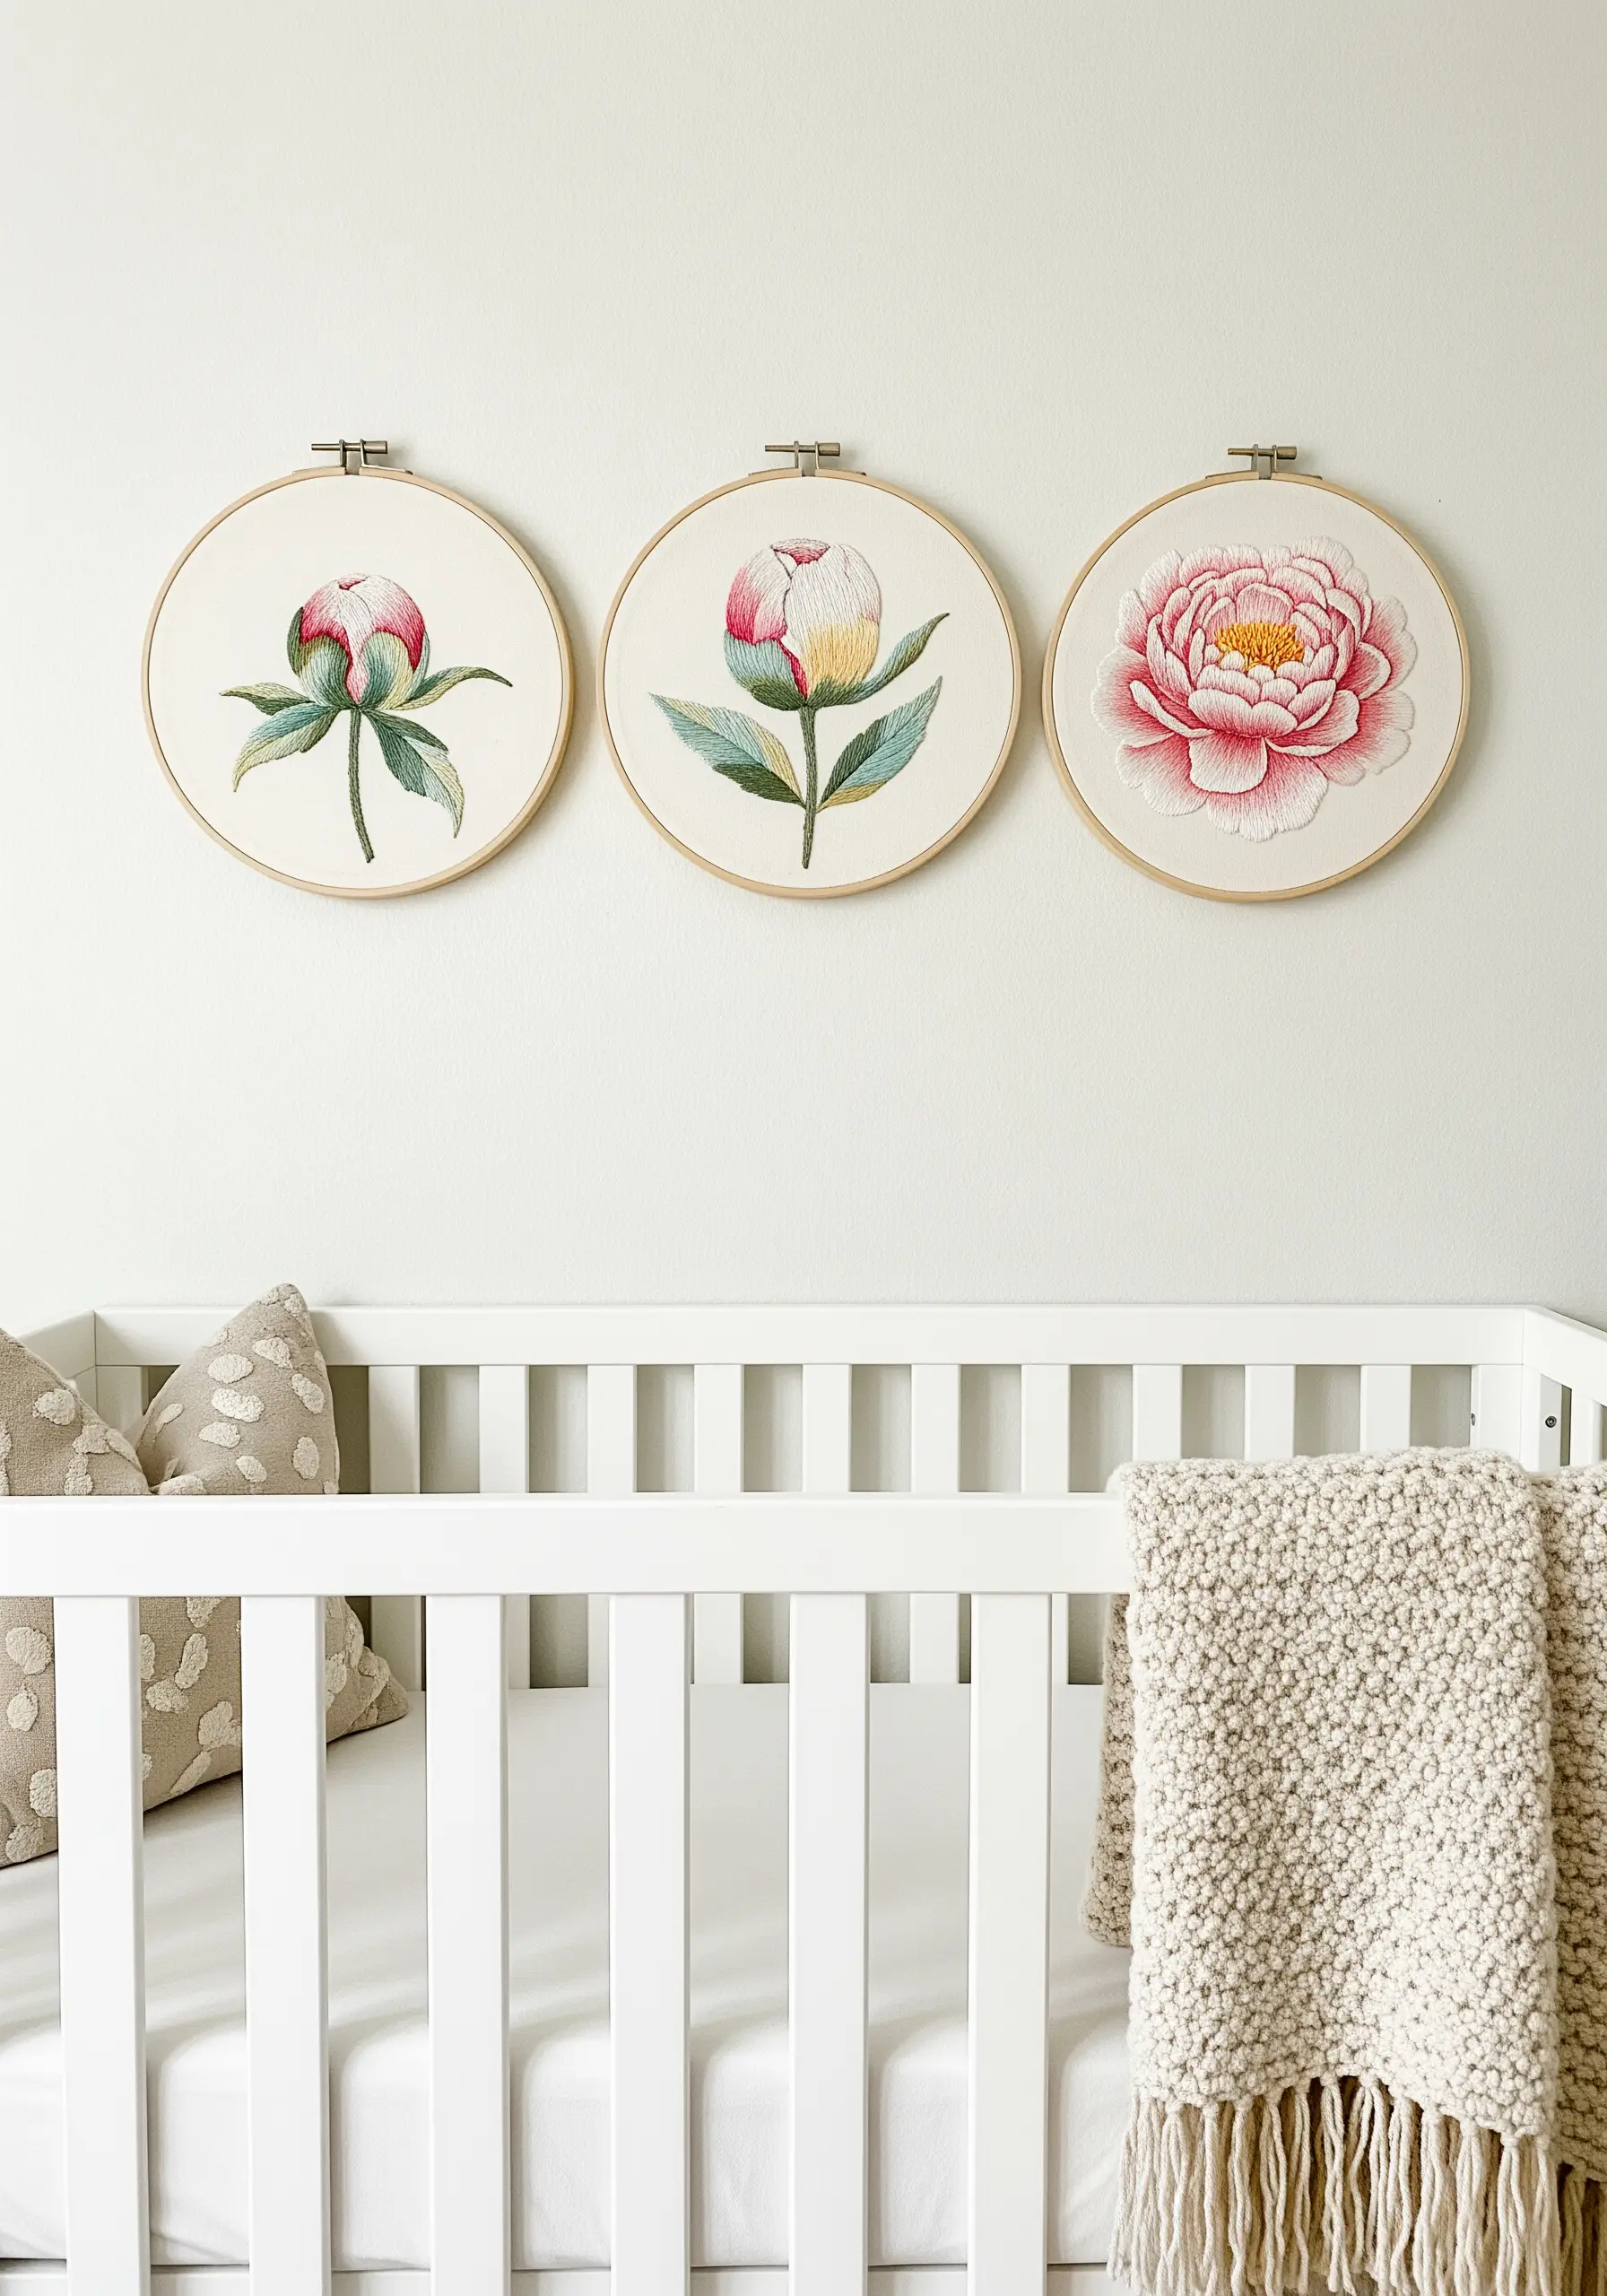
Elevate your embroidery from a single motif to a narrative series by displaying the life cycle of a peony across three hoops.
Stitch a closed bud, a half-open flower, and a full bloom to create a sense of progression and growth.
Using the same color palette and fabric across all three pieces creates a cohesive, gallery-like installation that feels intentional and thoughtful.
This approach is perfect for creating serene and meaningful embroidered nursery decor ideas.
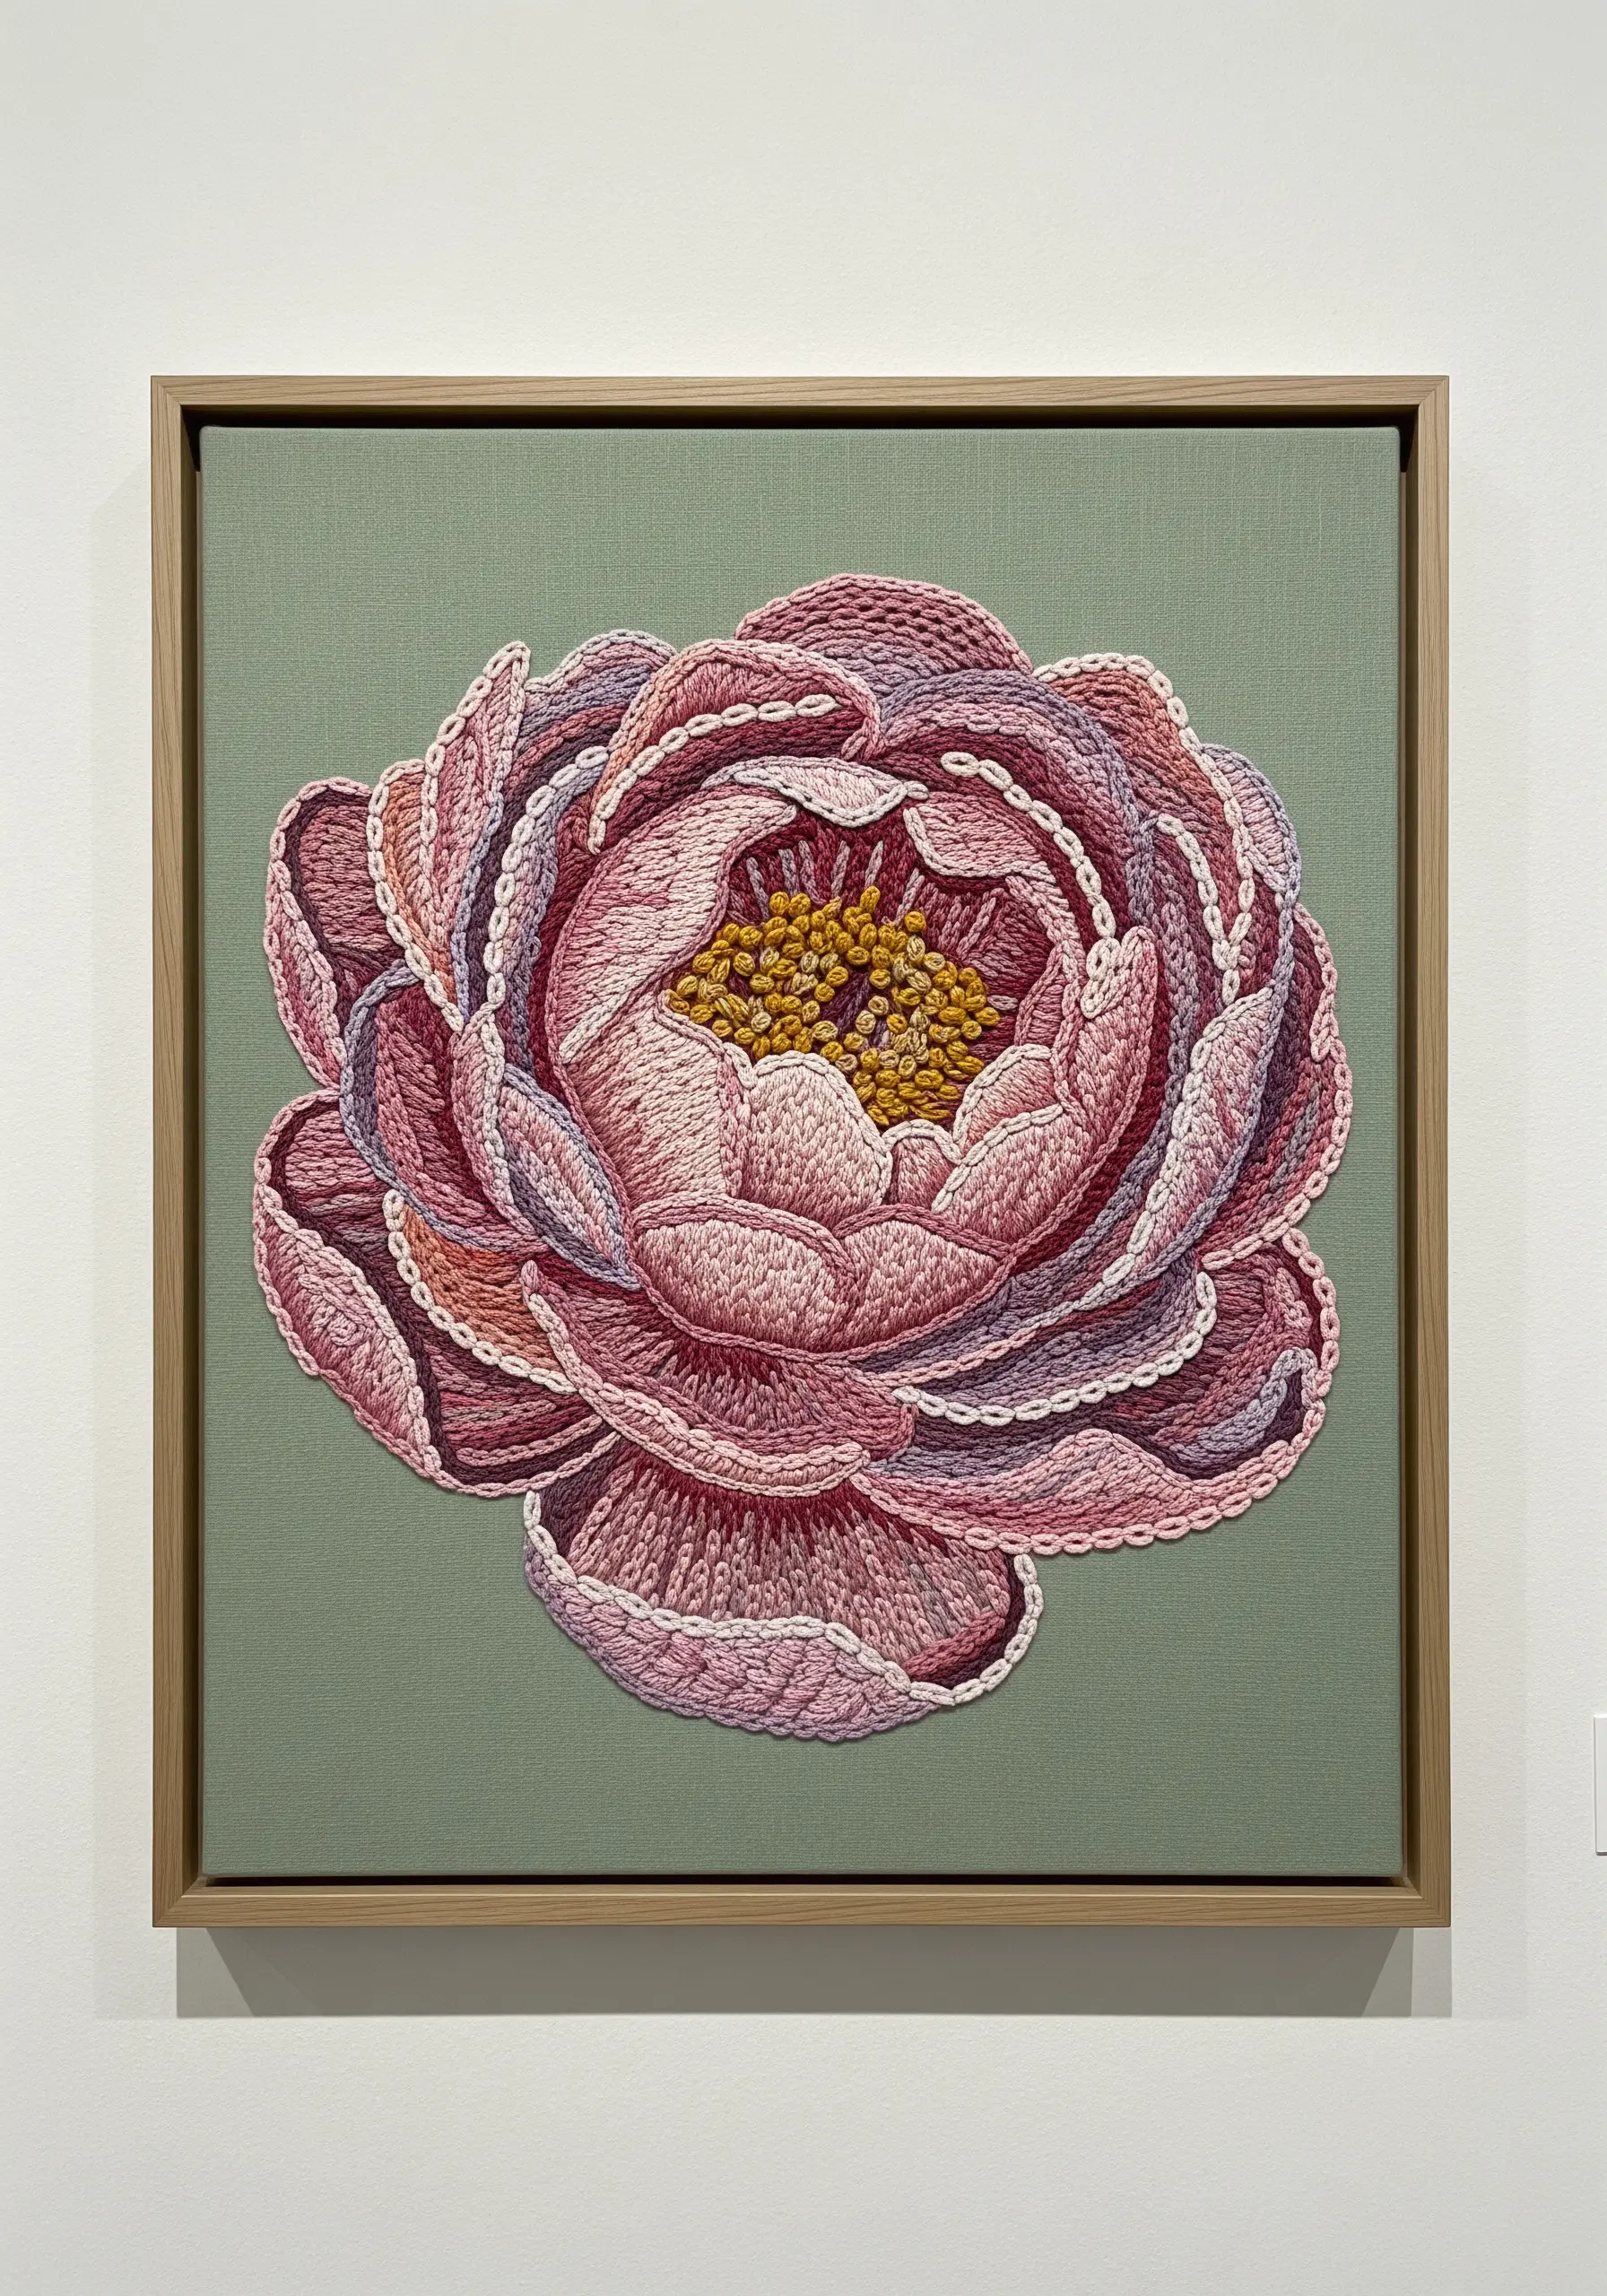
12. Build Raised Petals with Woven Wheel Stitches
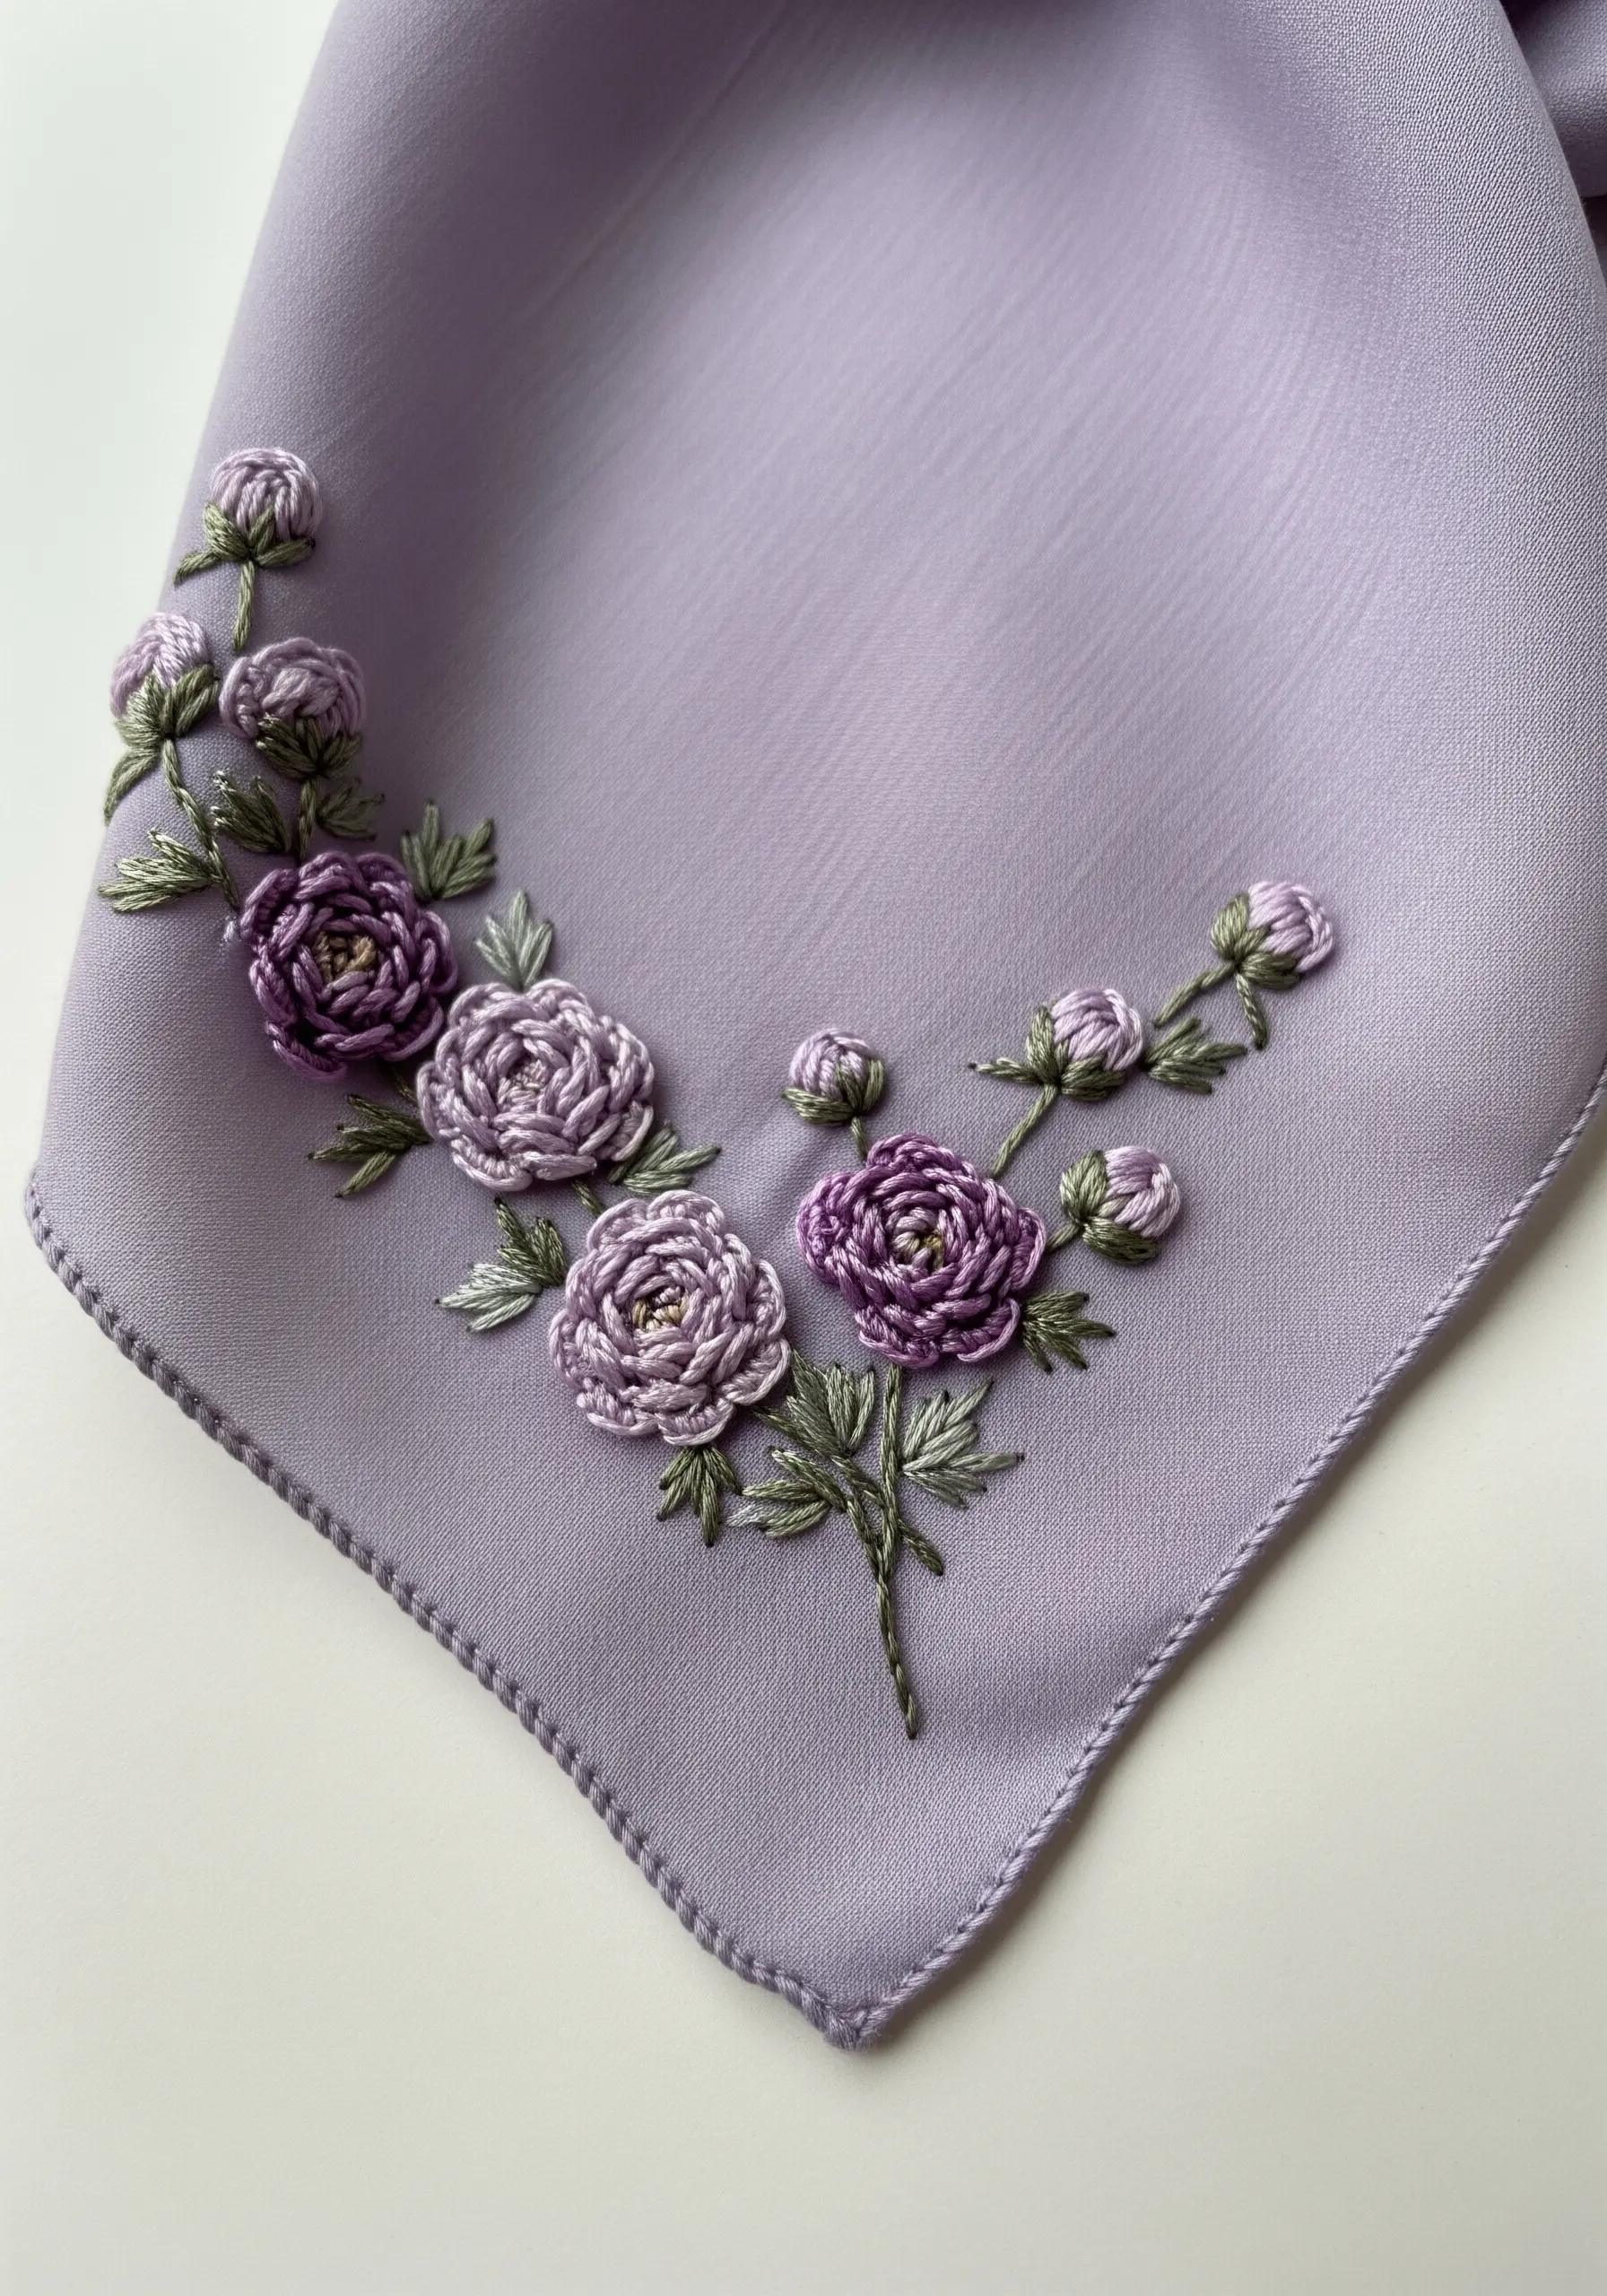
To create highly dimensional, plush florals without padding, use the woven wheel stitch, also known as a spider web rose stitch.
Create a star of straight stitches as your base, then weave your thread over and under these spokes until the shape is filled.
The more you weave, the fuller and more raised your flower becomes. This technique works beautifully for smaller, stylized peonies or ranunculus on delicate fabrics like scarves.
13. Adapt Your Technique for Non-Fabric Surfaces
When embroidering on materials like a faux-leather journal, your approach needs to change slightly.
Use a sharp, sturdy needle (like a leather needle) to pierce the material cleanly, and consider using a thimble to protect your fingers.
You can also pre-punch your stitch holes with an awl for smoother stitching.
Use shorter stitches and secure your ends firmly on the back with a dab of fabric glue, as knots can pull through.
14. Go Large-Scale with Textured Yarn
For a statement piece like a throw blanket, standard embroidery floss won’t provide enough coverage.
Switch to thicker fibers like tapestry wool or chenille yarn and use techniques like punch needle or crewelwork.
These methods allow you to fill large areas with rich color and texture much more efficiently, resulting in a plush, inviting design that becomes the focal point of a room.
Explore more ideas for large-scale embroidery tapestries to make a bold statement.
15. Replace Color with Tactile Texture
Create a sophisticated, monochrome design by focusing on the interplay of textures rather than colors.
Combine the smooth sheen of satin-stitched petals with the dense, bumpy surface of French knots for the flower’s center.
Stitching this on black velvet adds another layer of texture—the way the light hits the different surfaces creates depth and interest.
This proves that a limited palette can be incredibly dynamic and engaging.
These monochrome black thread designs showcase the power of texture over color.
16. Conquer Textured Fabrics with a Stabilizer
To achieve clean, precise stitches on an uneven surface like a waffle-weave towel, a topper is essential.
Place a sheet of water-soluble stabilizer over your design area before you start stitching.
This creates a smooth, temporary surface for your needle and prevents the stitches from sinking into the fabric’s texture.
When you’re finished, simply wash the towel, and the stabilizer will dissolve completely, leaving behind a crisp, professional-looking embroidery.
17. Secure Patches on Unconventional Items
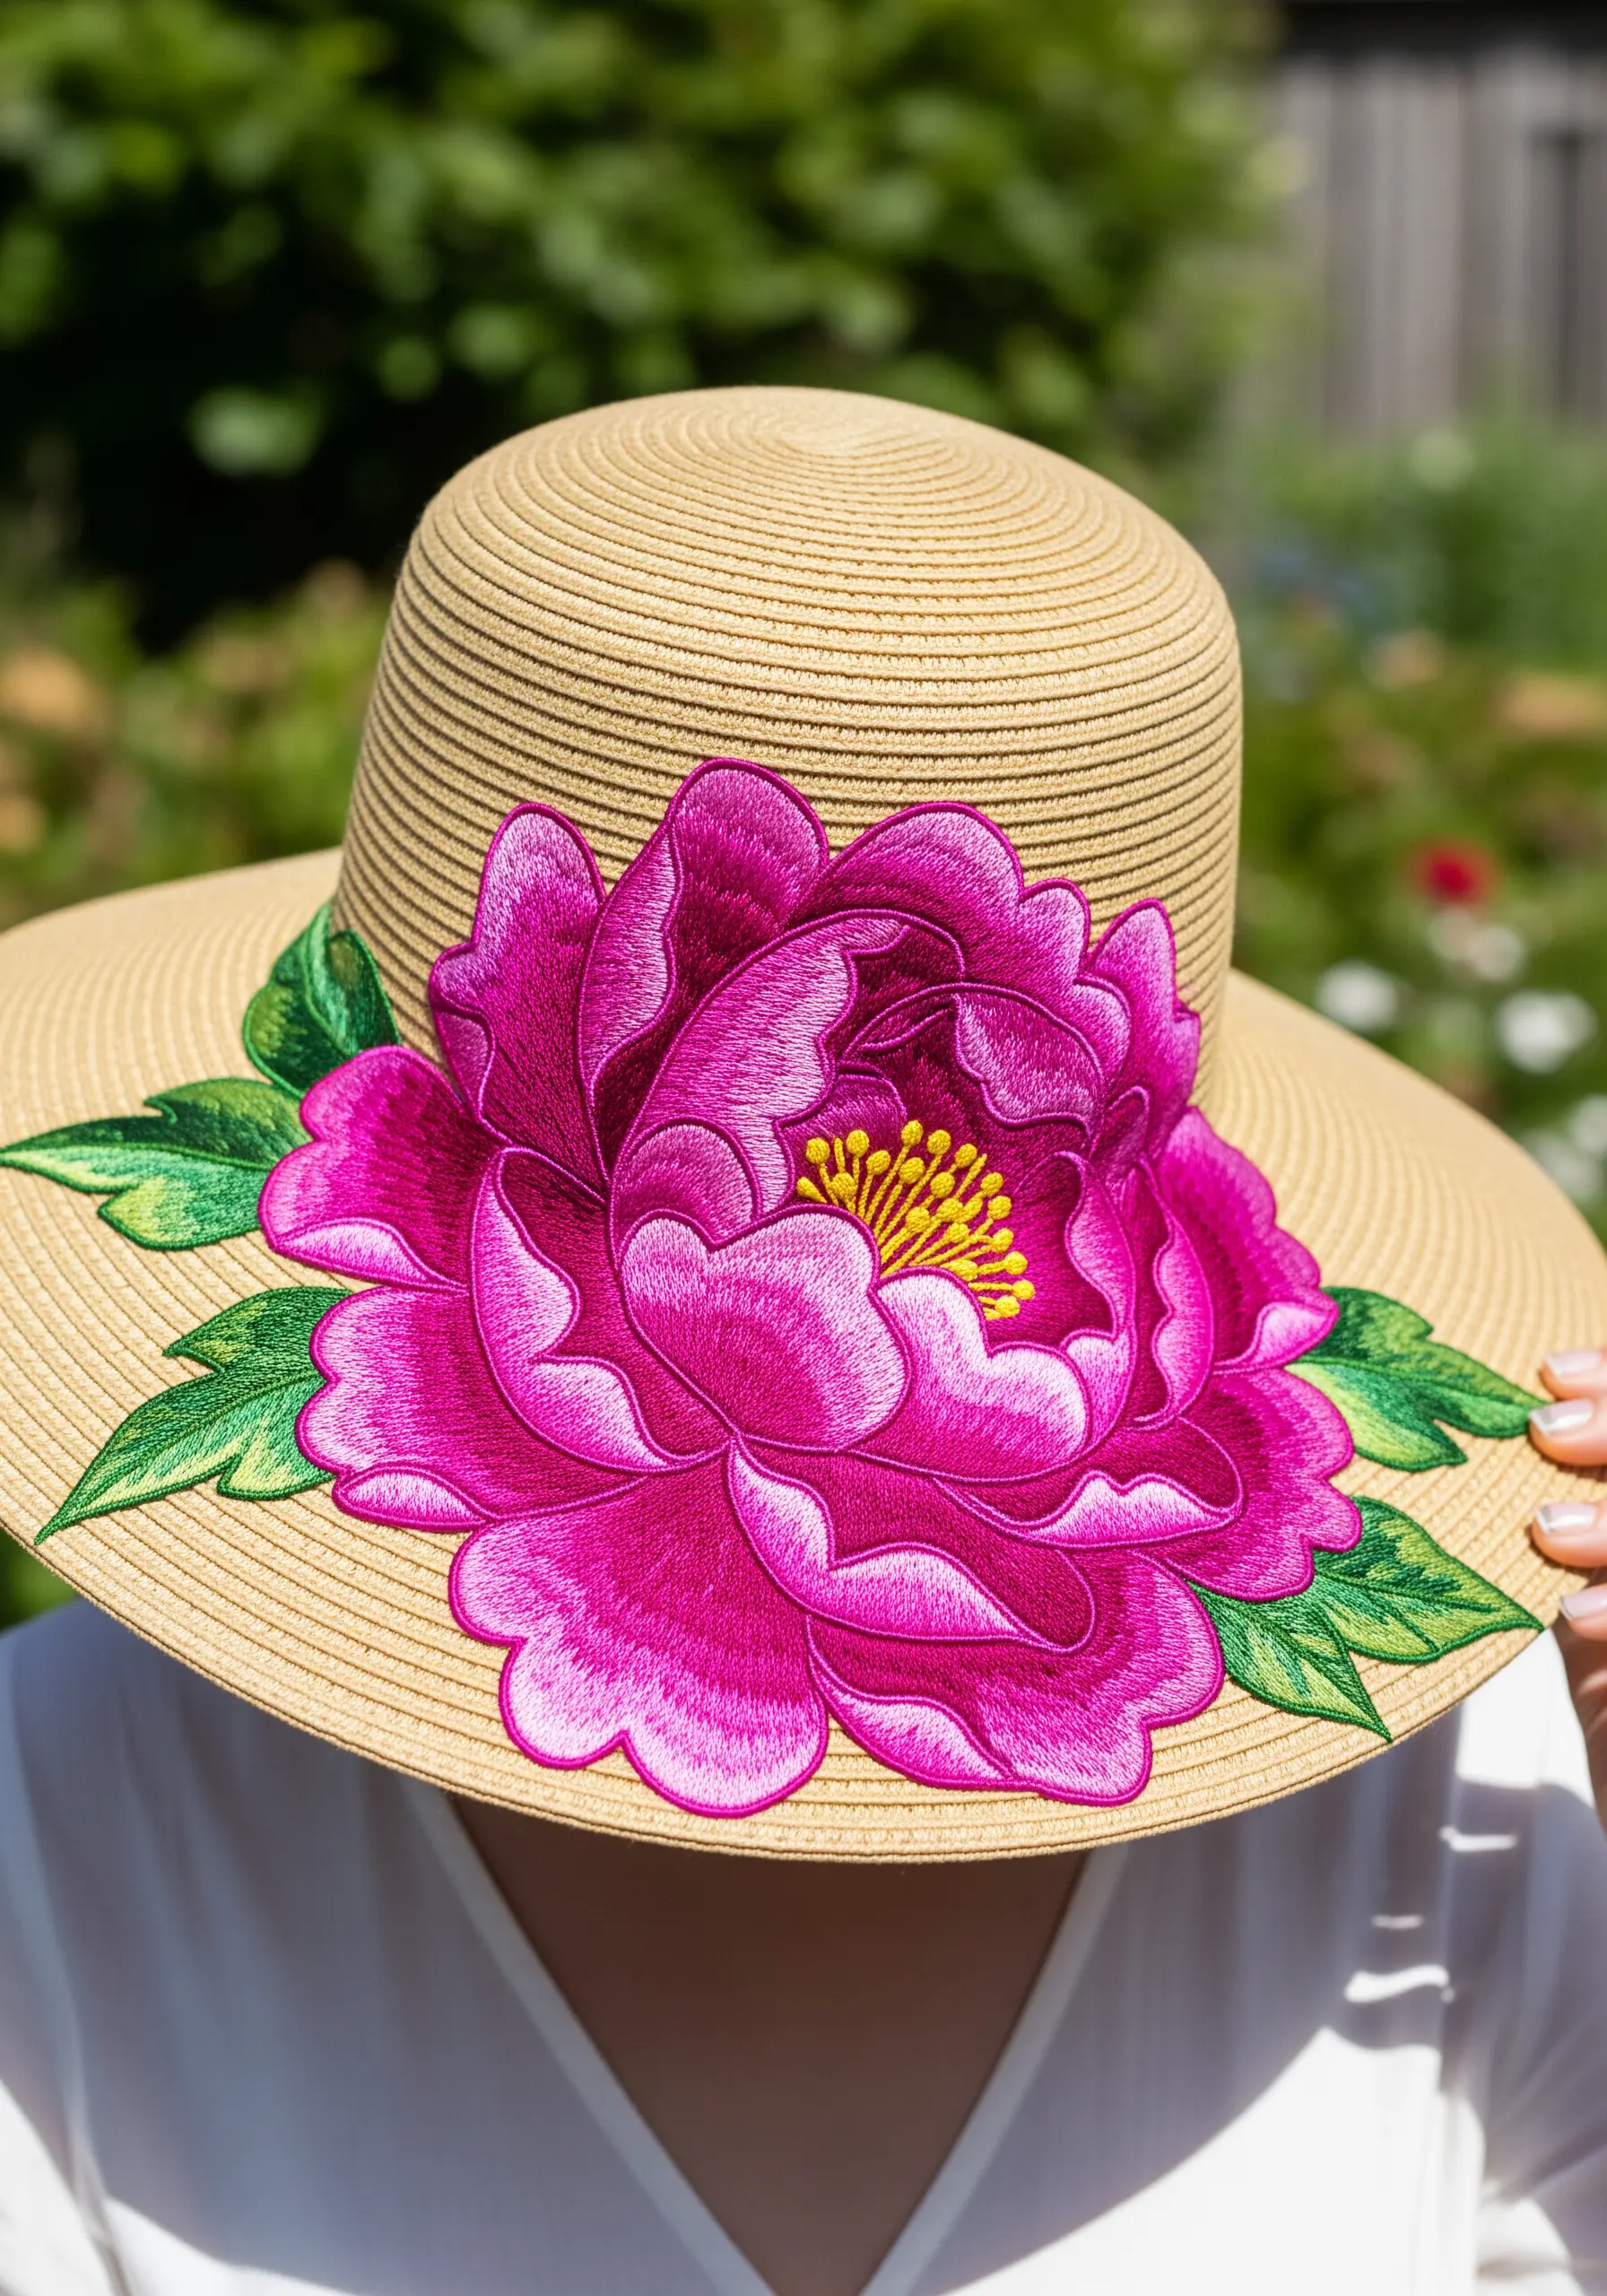
To embellish a straw hat or a woven bag, first create your peony as a separate appliqué patch on a sturdy base like felt.
Stitch a clean, dense satin stitch border around the entire design to prevent fraying and give it a finished edge.
To attach it, use a combination of a strong fabric adhesive and several discreet tacking stitches around the perimeter, ensuring it’s secure enough to handle wear and tear.
18. Create Ethereal Designs on Sheer Fabric
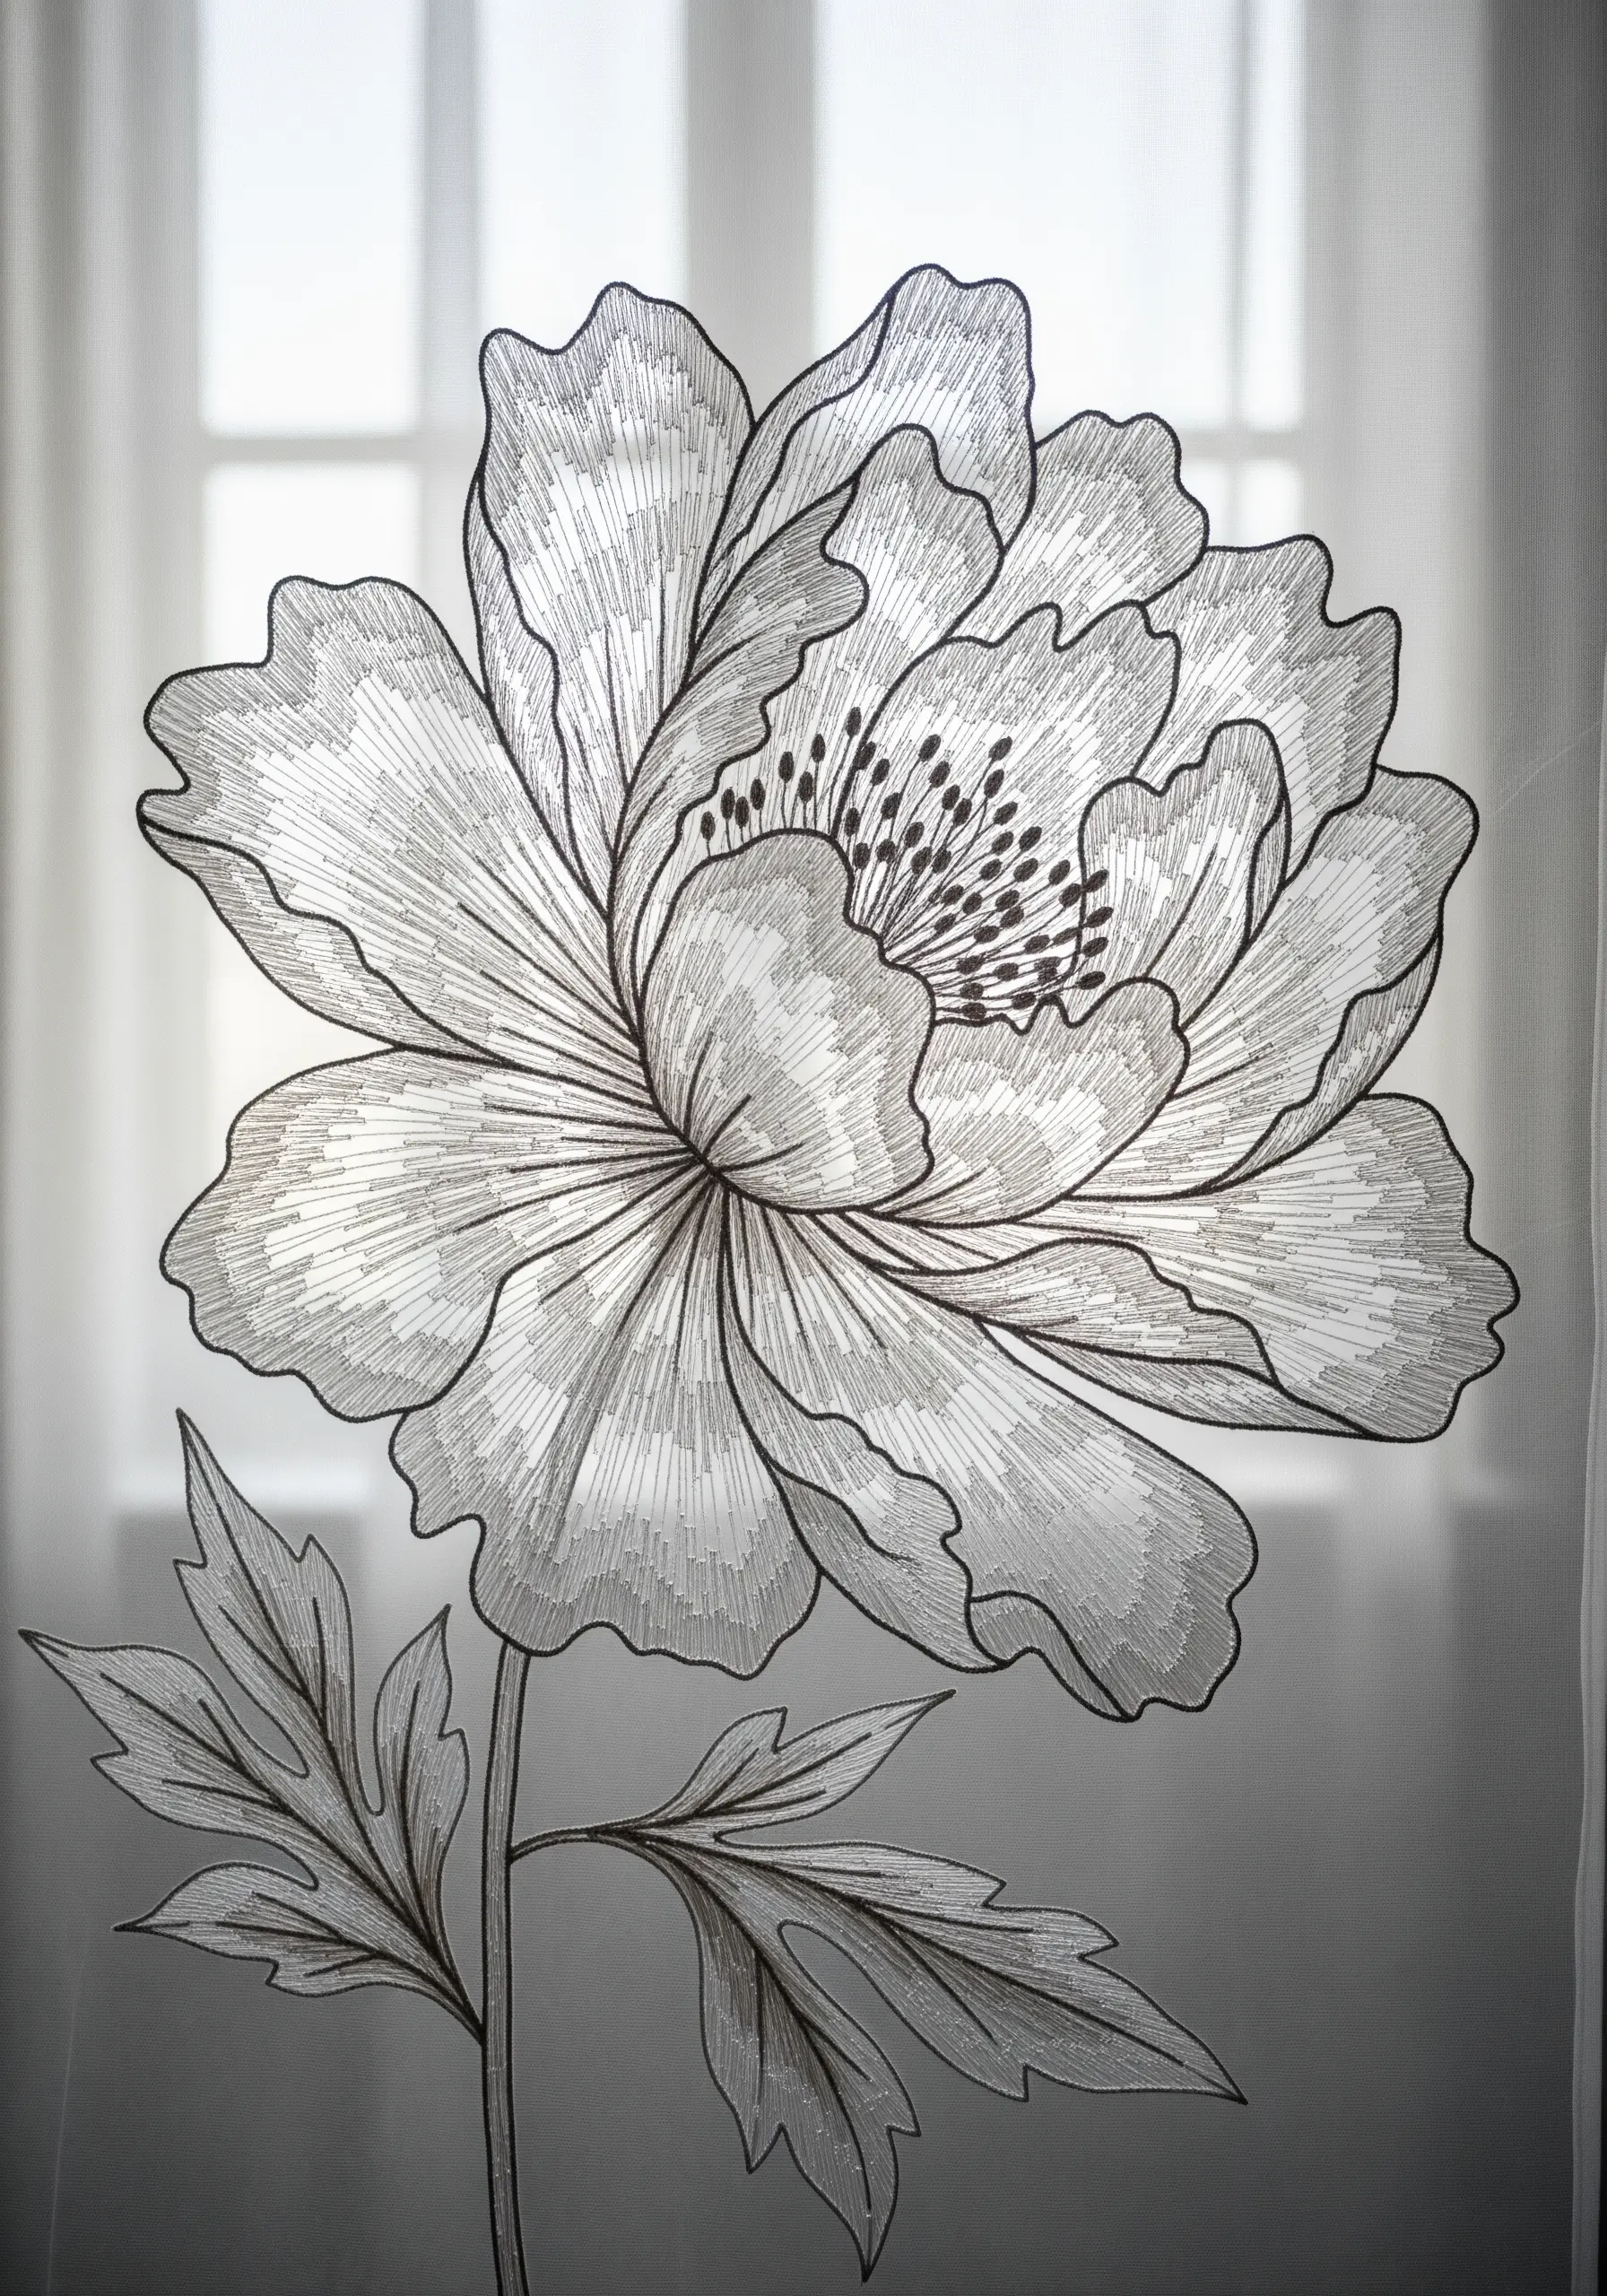
For a delicate, almost ethereal effect, embroider your peony outline on a sheer fabric like organza or voile.
The magic of this technique lies in the interplay of thread and negative space, where the transparent fabric allows light to pass through.
Use a simple backstitch for the outlines and fill select areas with light, open stitches to create shading without losing transparency.
This technique is perfect for elegant curtains or decorative overlays.
19. Construct 3D Florals with Layered Fabric
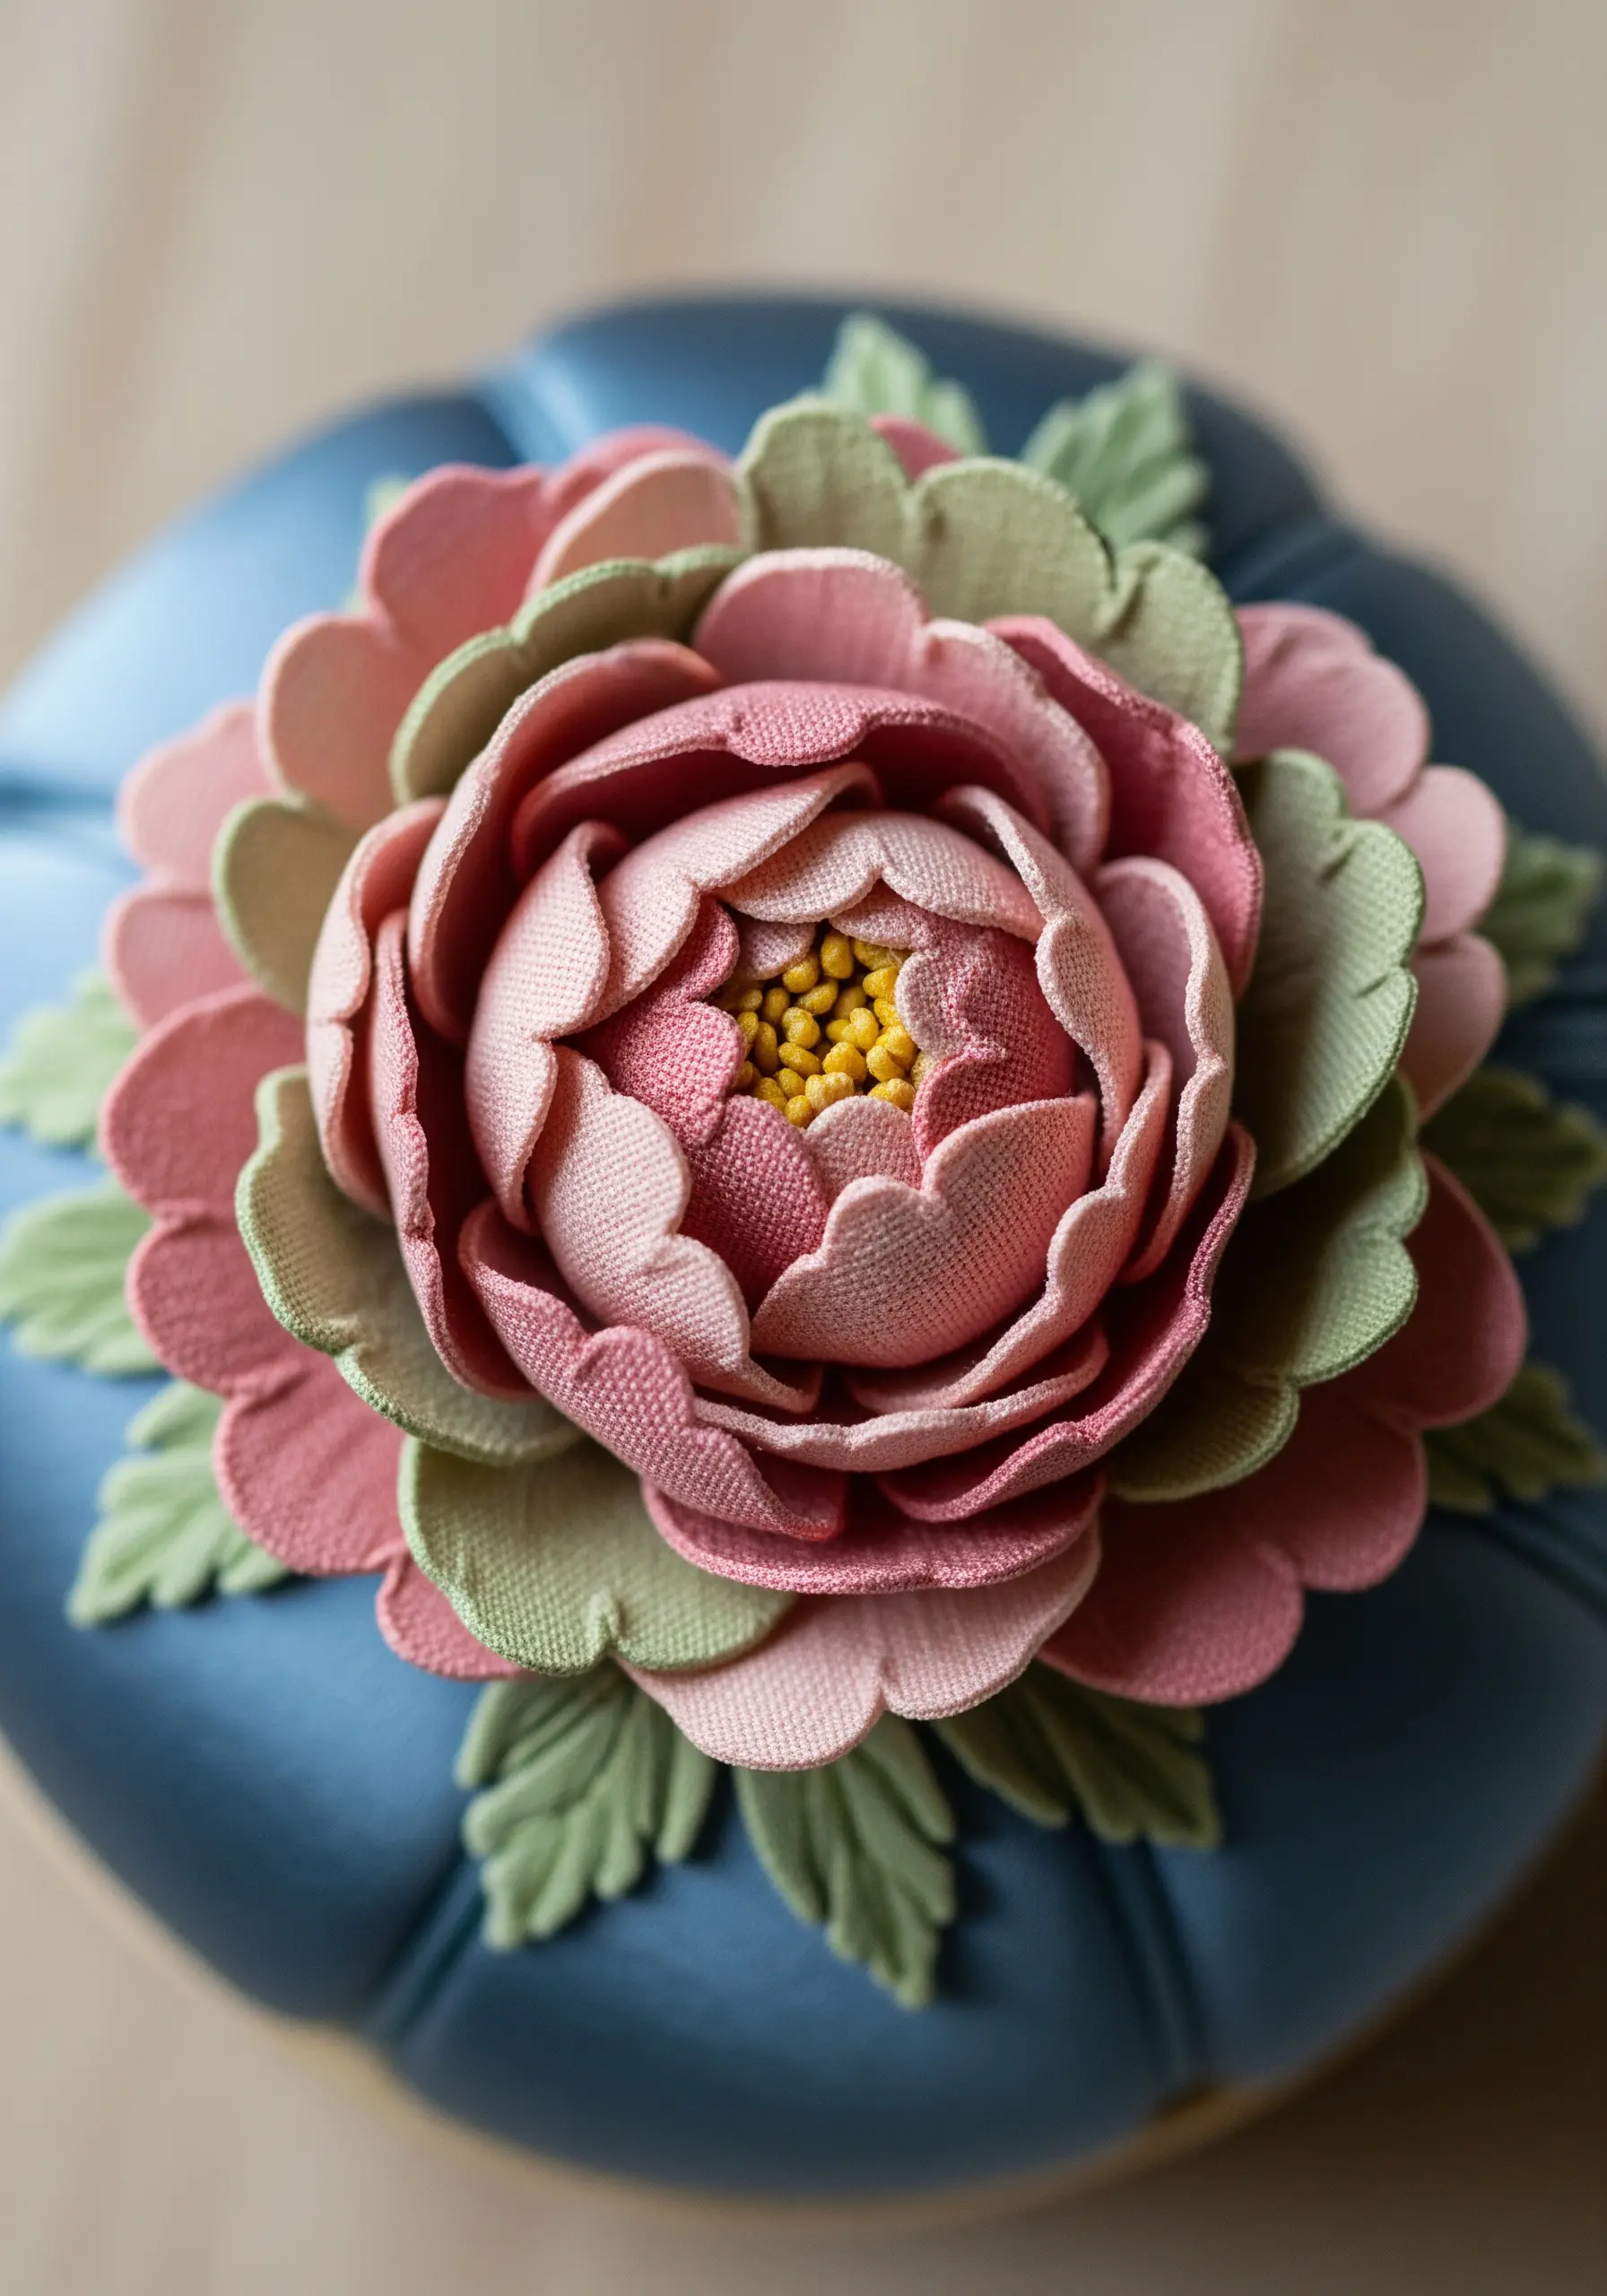
Move beyond the hoop by creating a sculptural, three-dimensional peony using layered fabric pieces.
Cut individual petal shapes from different colored fabrics, then layer and fold them to build the flower’s form.
A few central anchoring stitches, perhaps combined with some French knots for the stamen, are all you need to hold the composition together.
This mixed-media approach adds stunning physical depth to decorative items.
20. Make a Statement with Bold Line Art
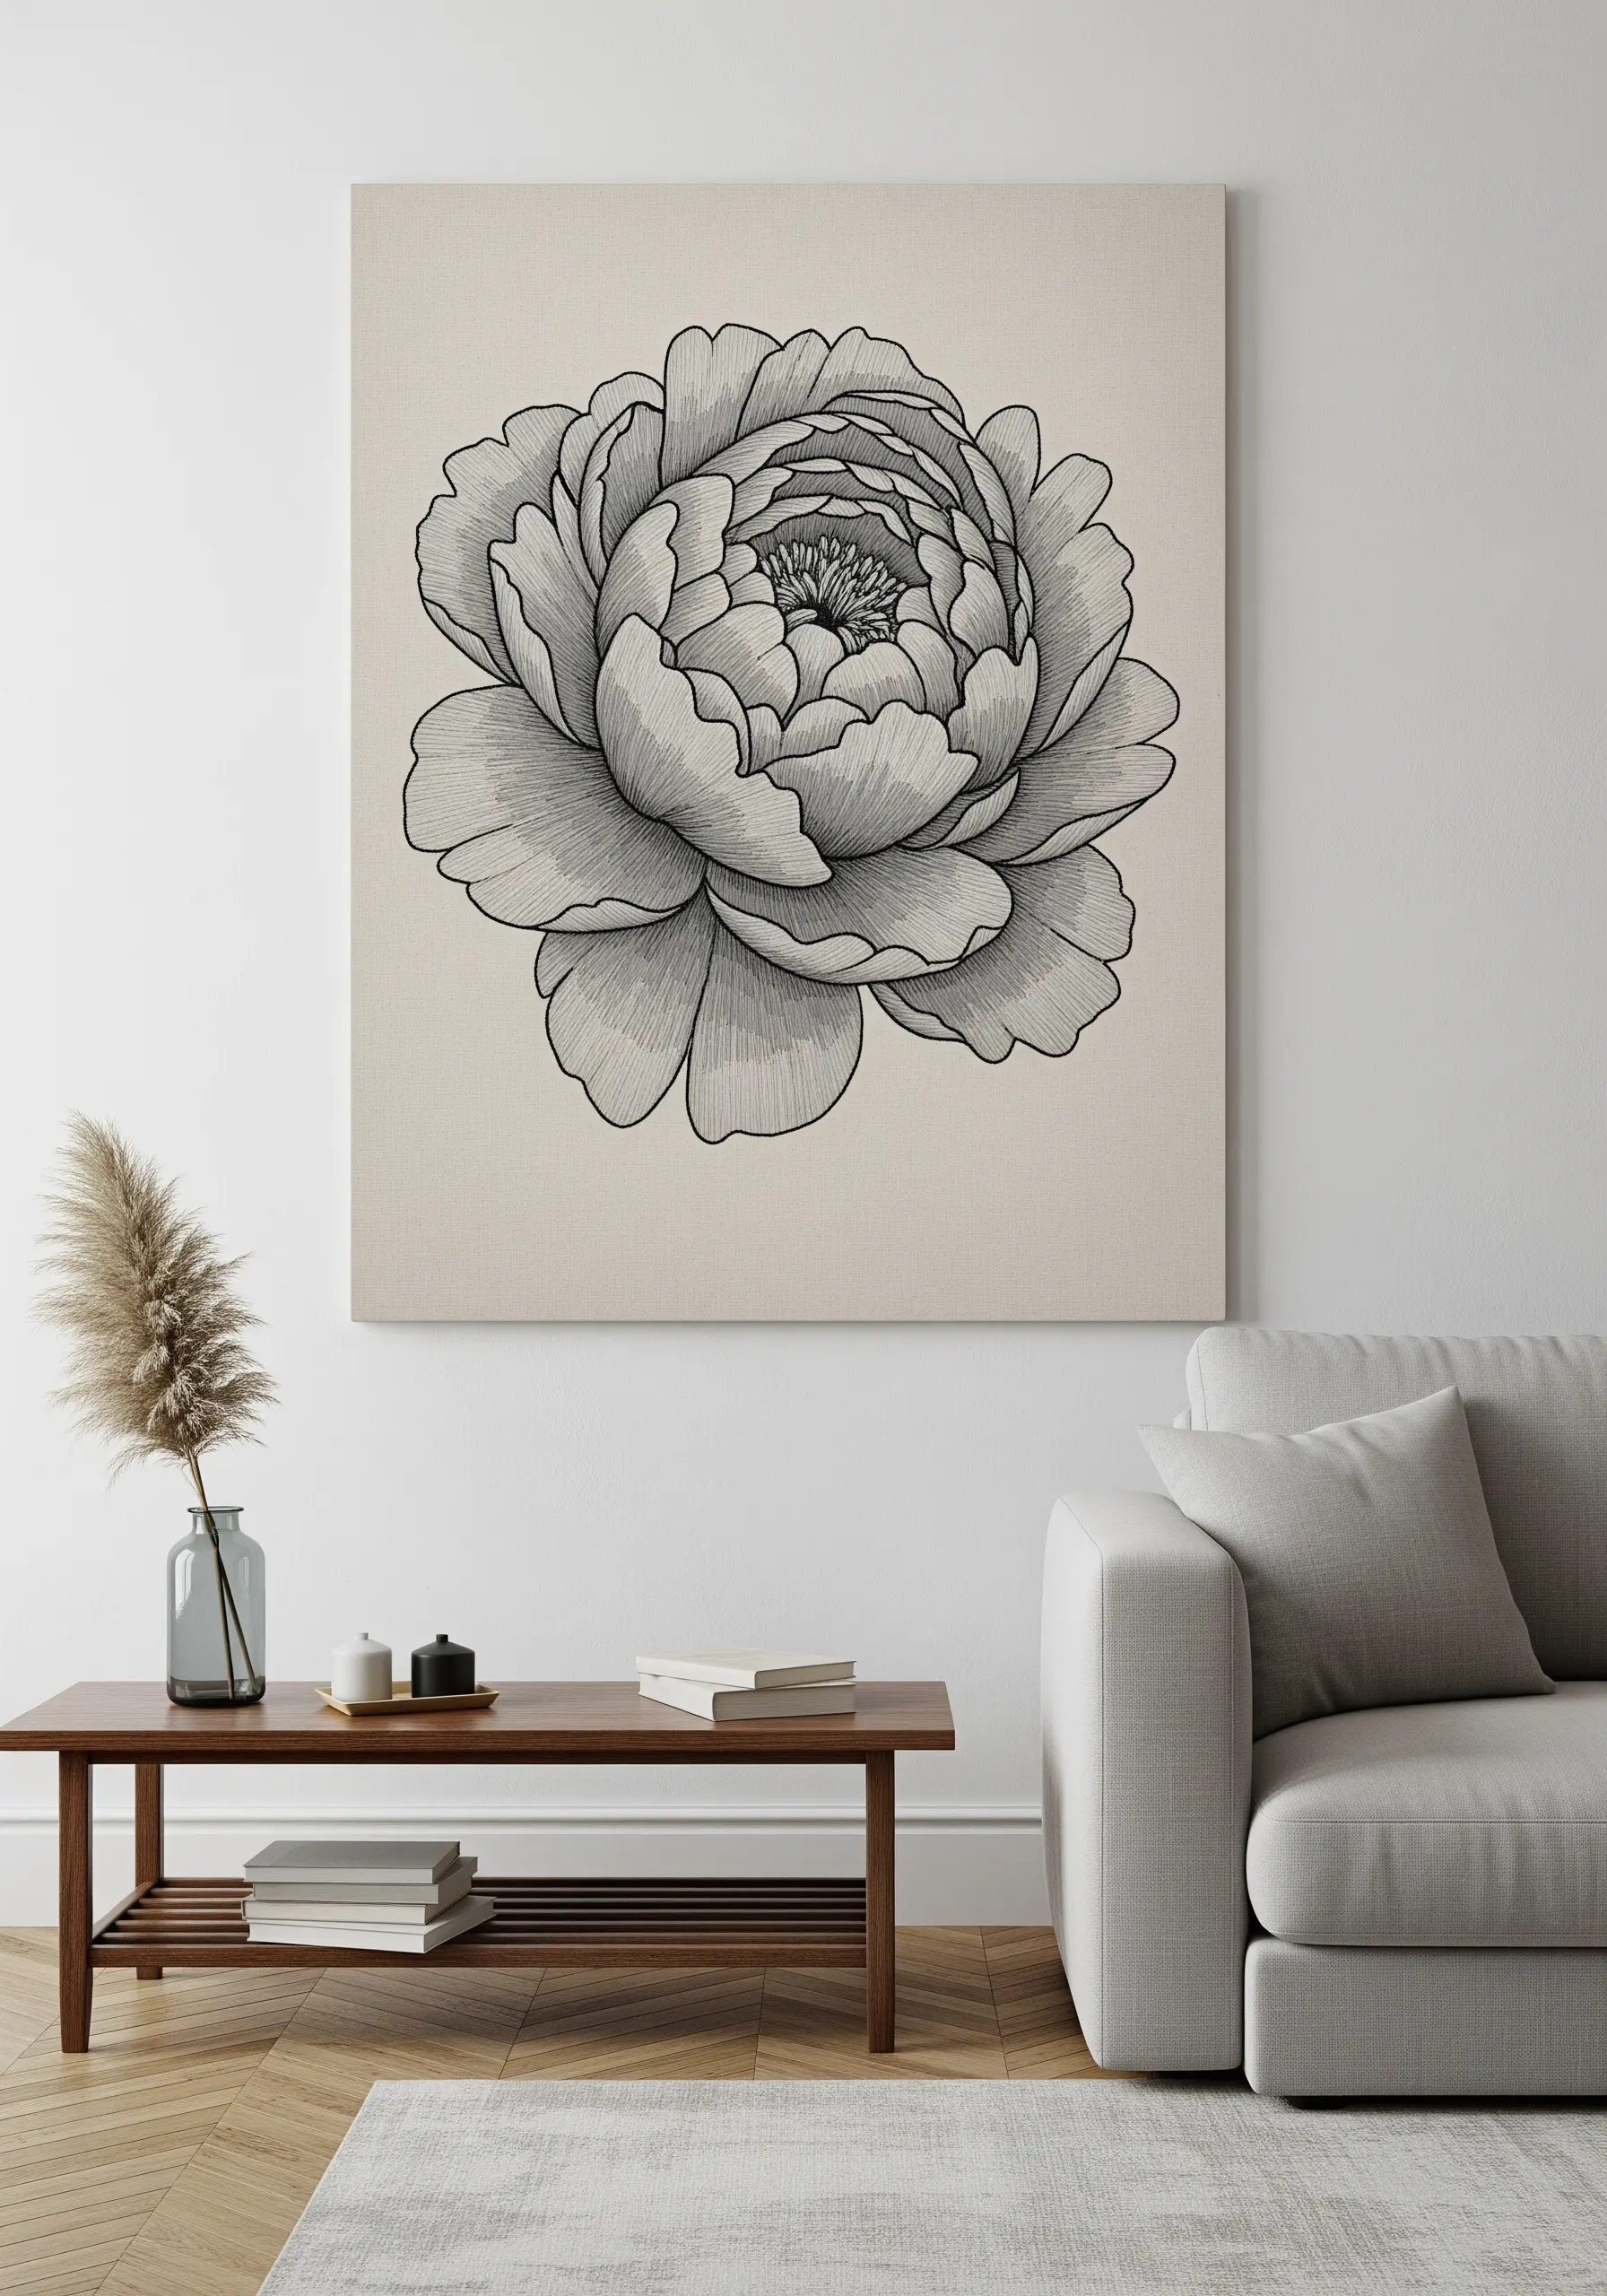
For a modern, graphic interpretation of a peony, focus entirely on the power of the line.
Use a single, dark-colored thread and a consistent stitch—like a stem stitch or backstitch—to trace the intricate outlines of the petals.
This minimalist approach allows the complexity of the peony’s structure to take center stage. Transferred onto a large canvas, it becomes a striking piece of wall art.
These minimal embroidery wall pieces are perfect for modern interiors.
21. Use Felt for a Forgiving Bookmark Base
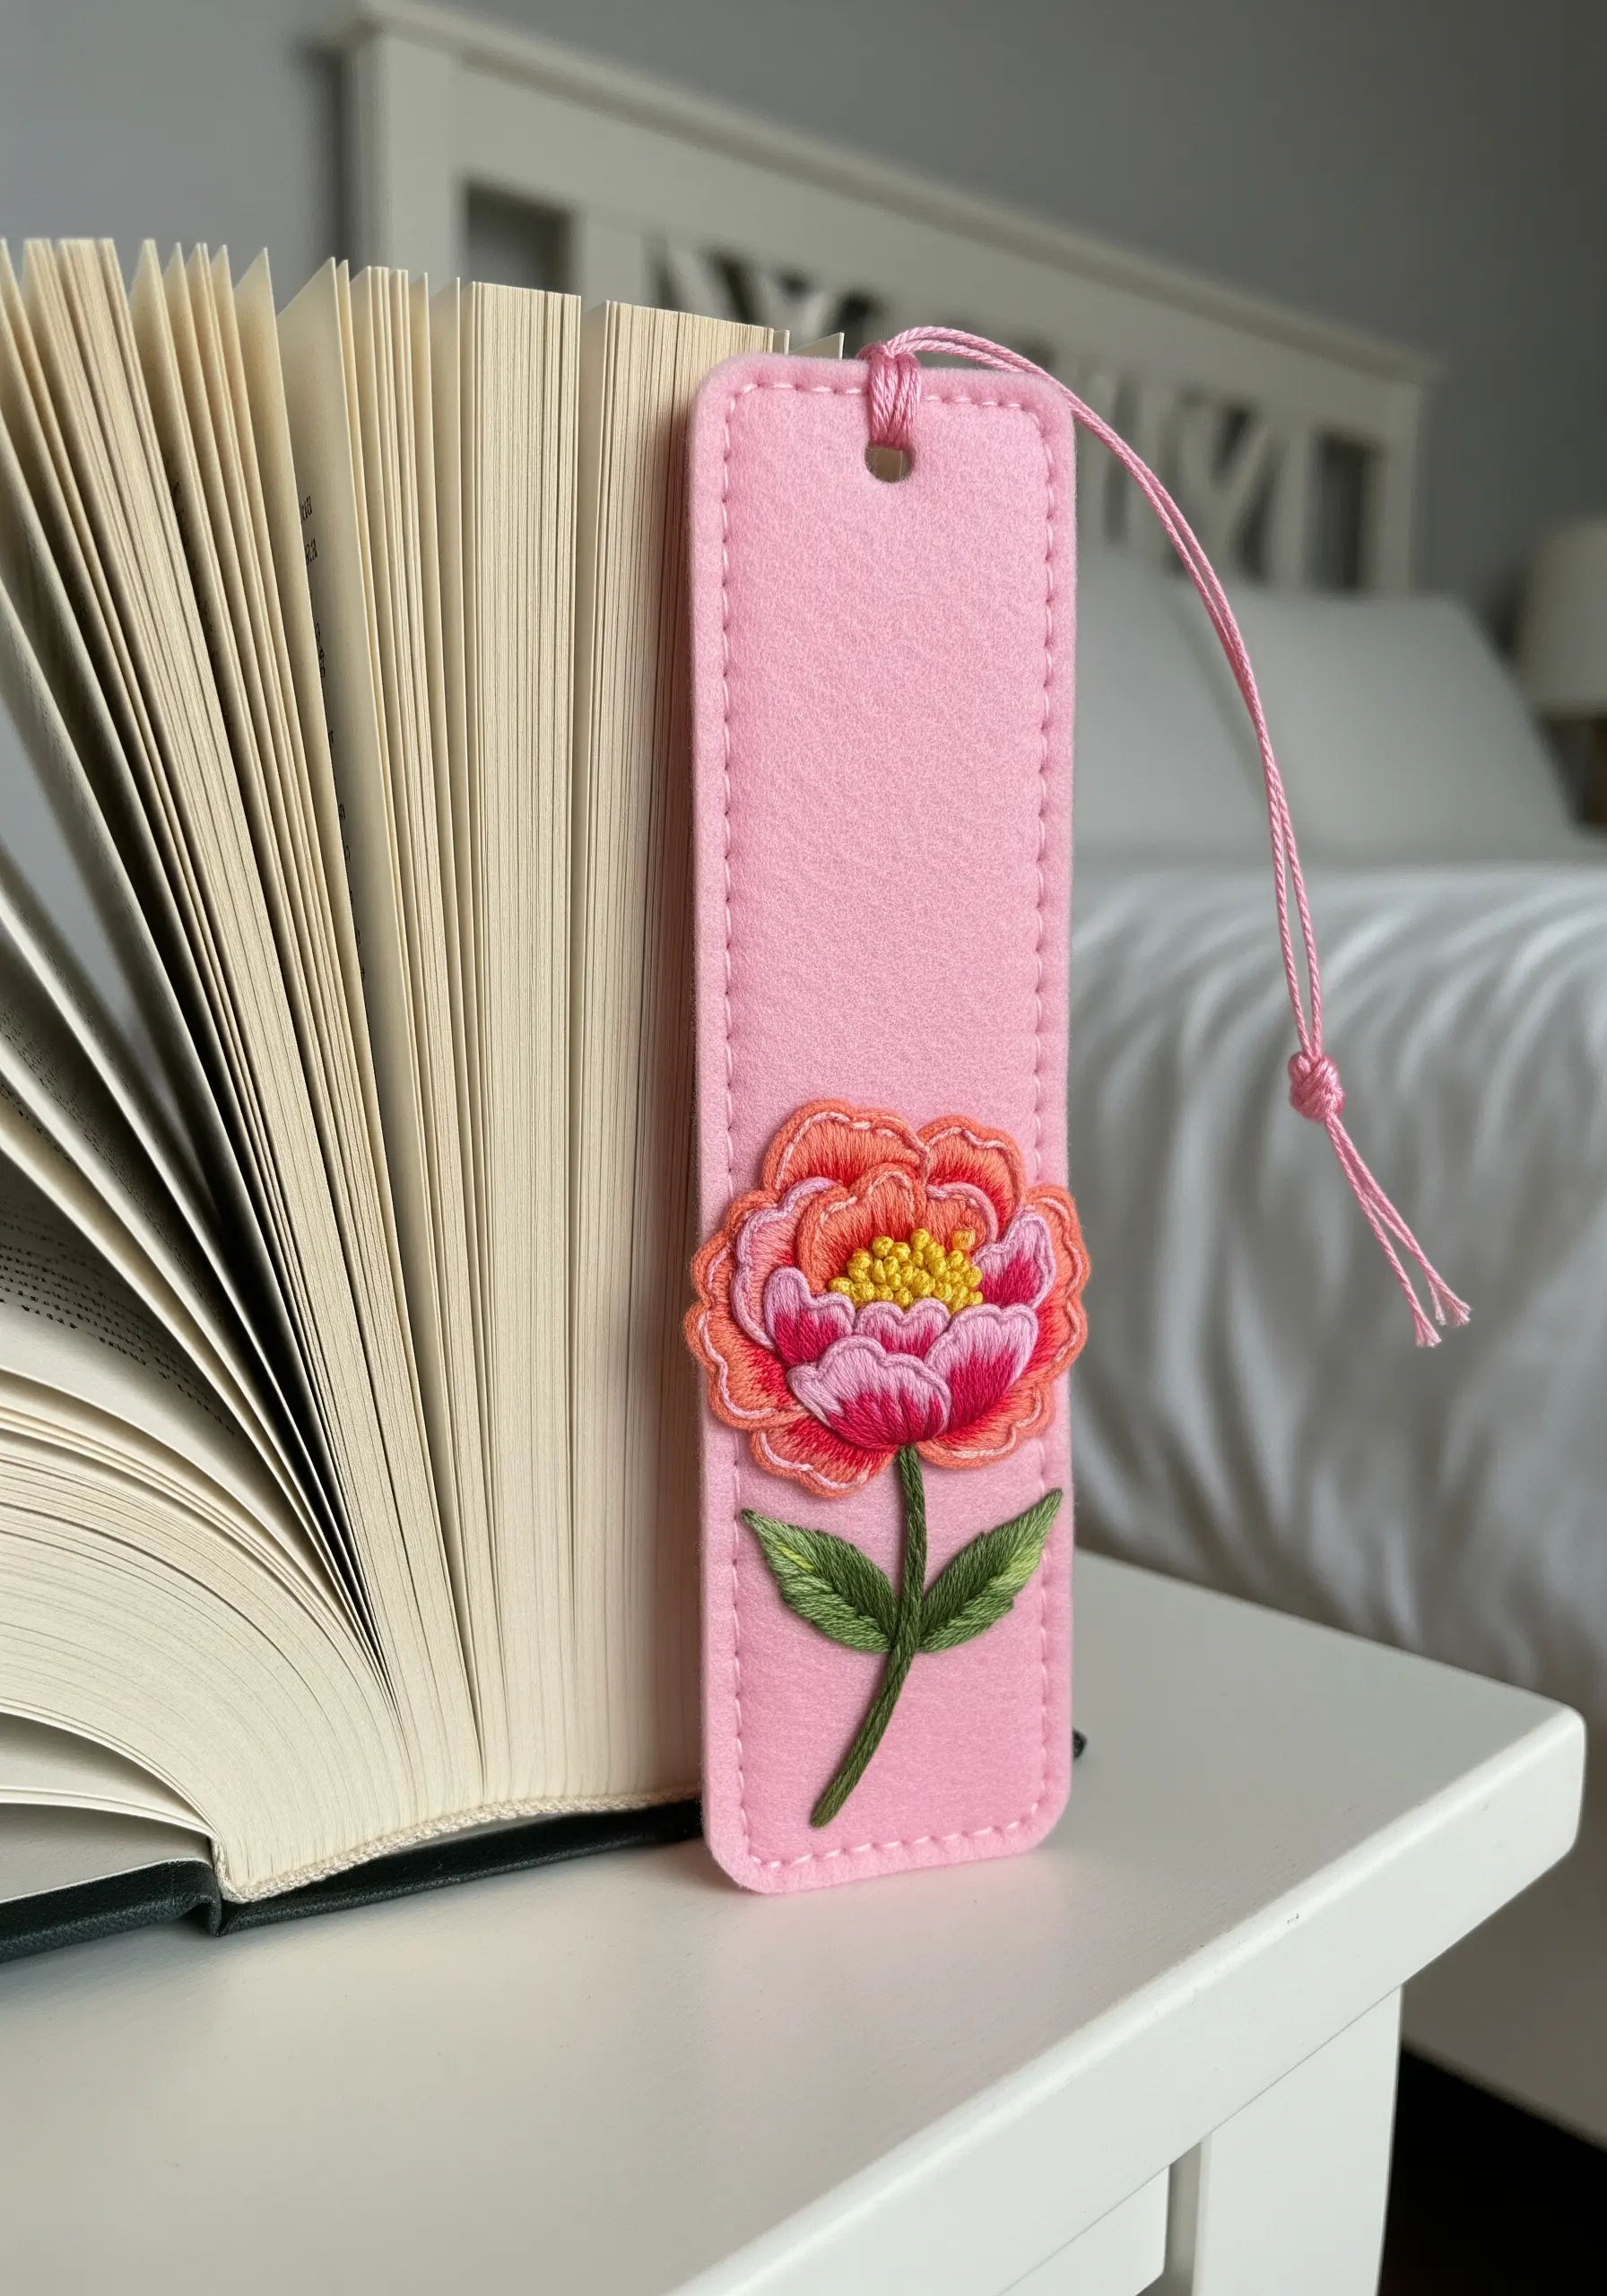
Felt is an ideal canvas for small, functional projects like bookmarks because its edges don’t fray, eliminating the need for hemming.
Its stable, non-woven structure also makes it very easy to stitch on, as the needle passes through without distorting the fabric.
Embroider your peony directly onto the felt, then add a simple blanket stitch around the perimeter for a decorative, durable finish that protects the edges.
22. Design with Function in Mind for Tableware
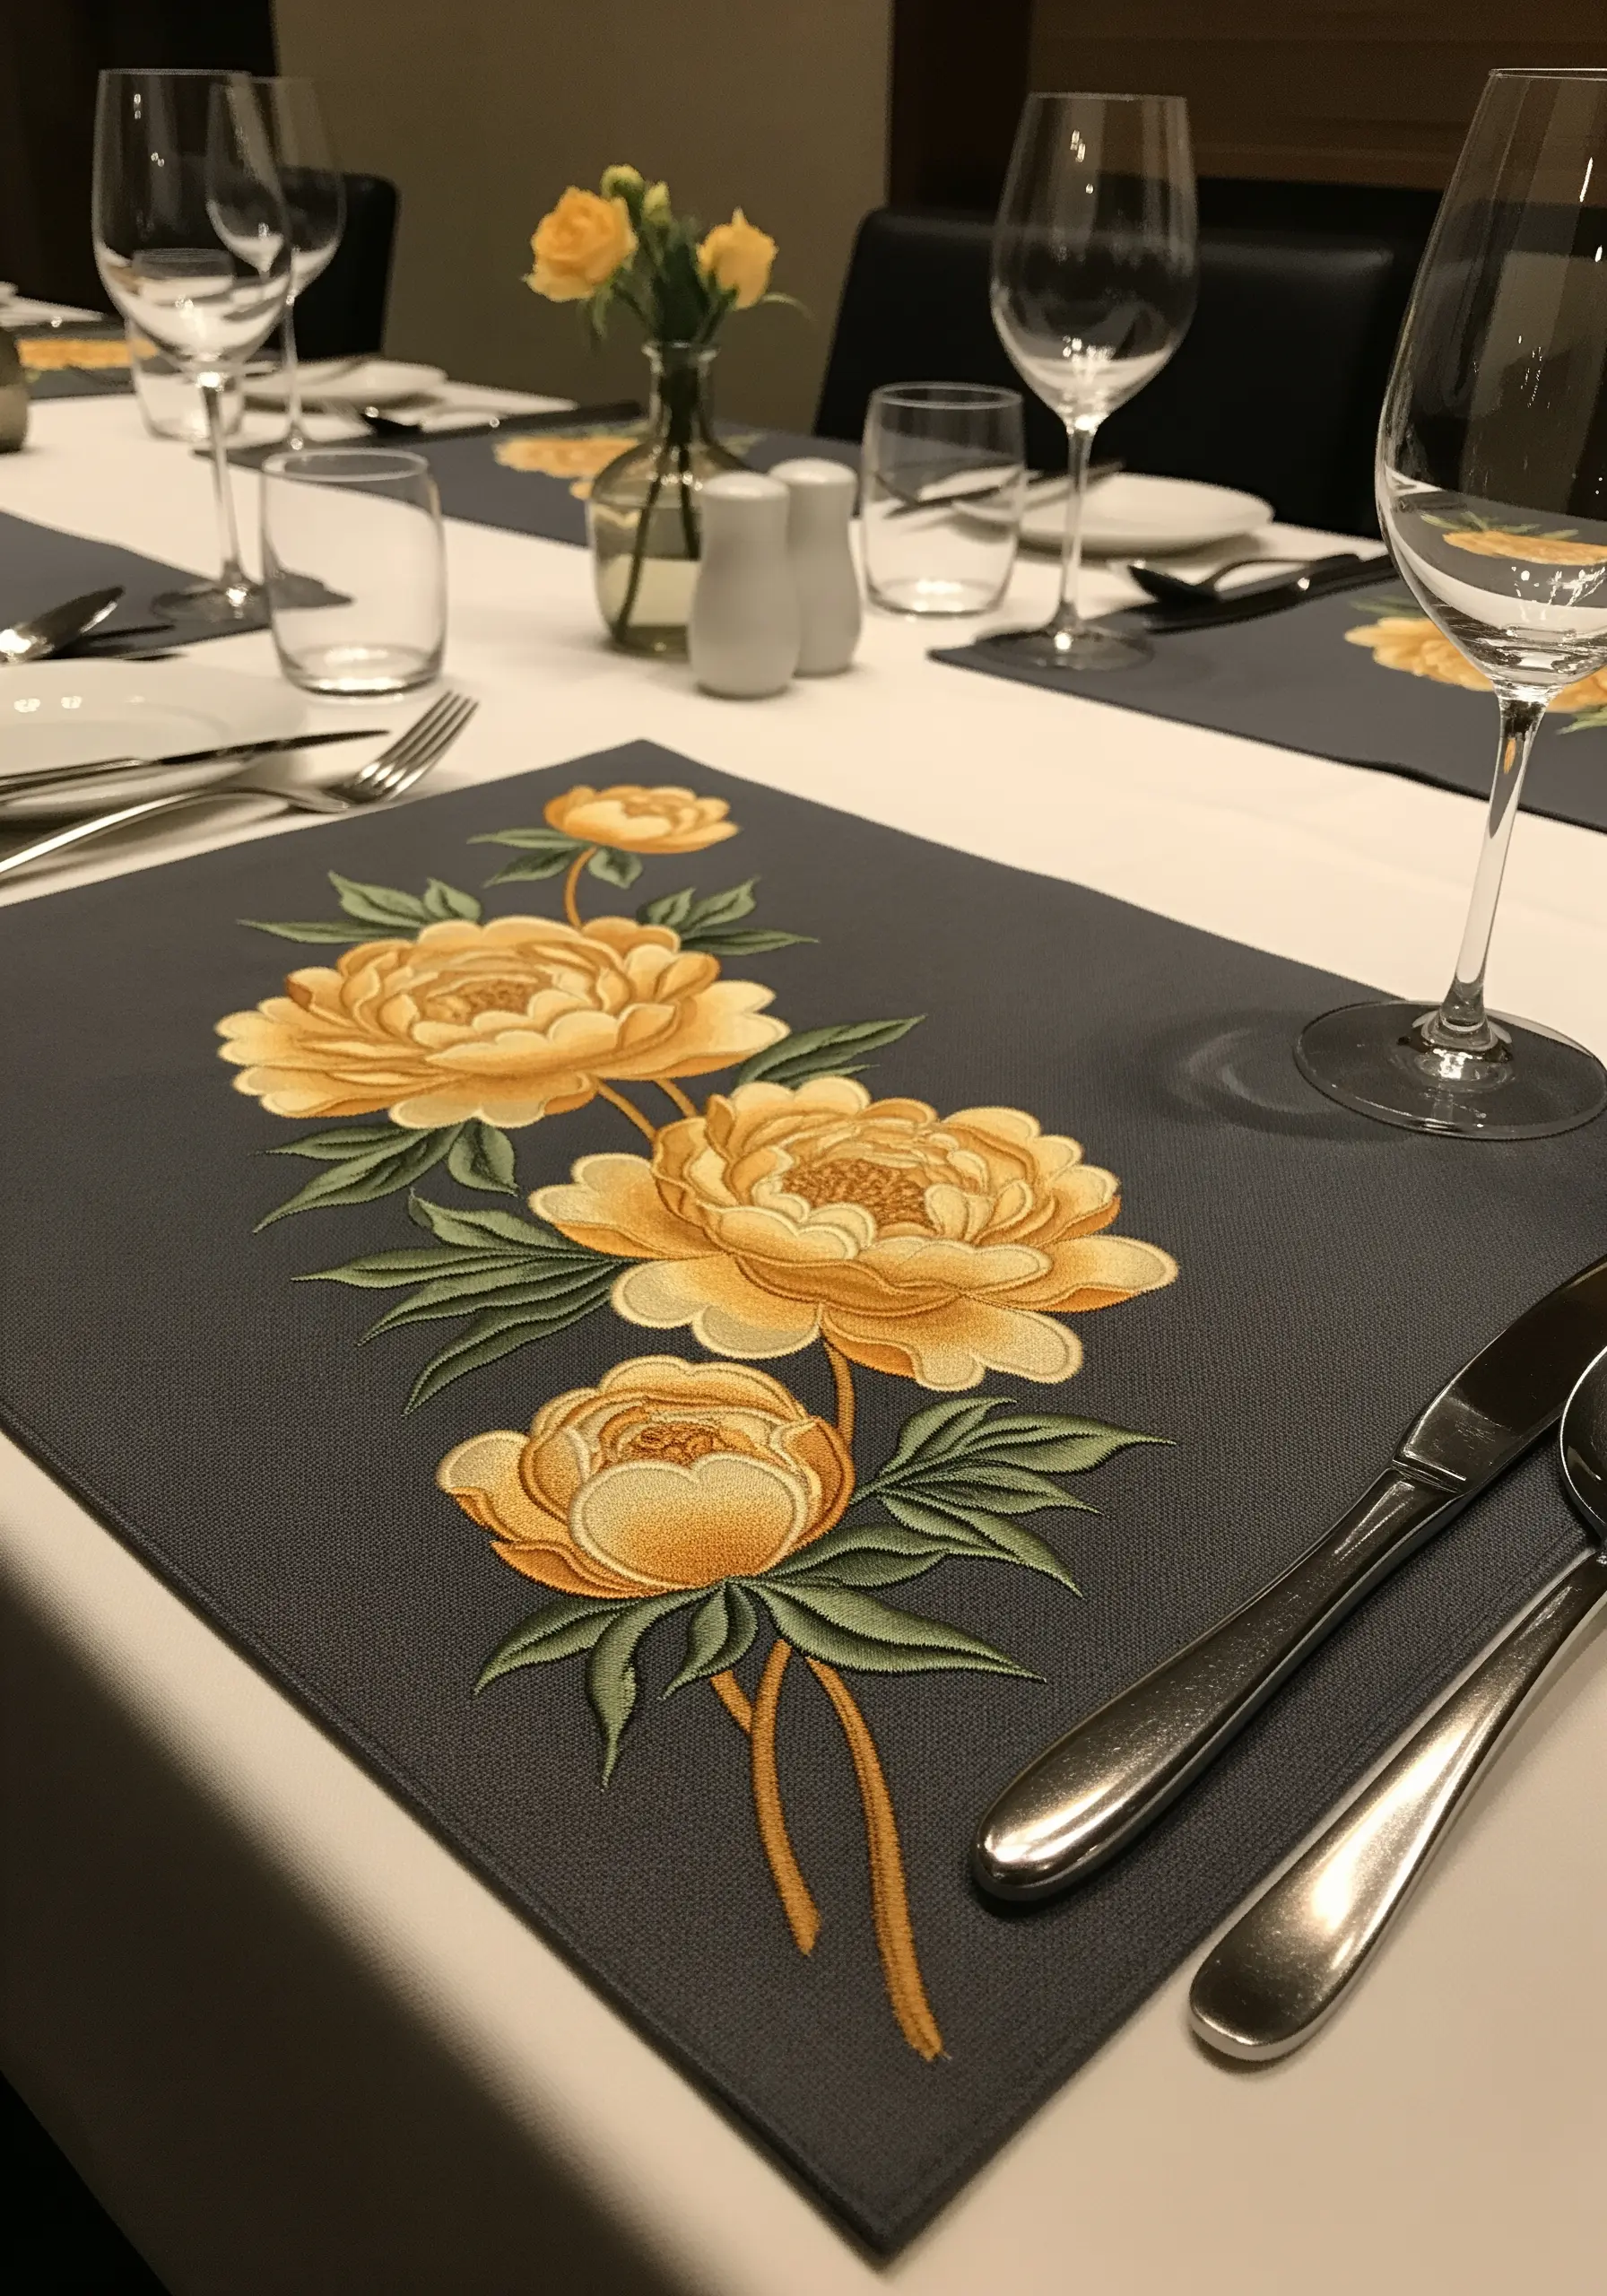
When creating embroidered placemats, the composition should be as practical as it is beautiful.
Place your peony vine along one side or corner, leaving the central area clear for plates and cutlery.
This asymmetrical design adds a touch of bespoke elegance to your table setting without interfering with its purpose.
The contrast between the warm golden thread and the cool charcoal fabric creates a timeless, sophisticated look.
23. Elevate Your Work with Padded Mounting
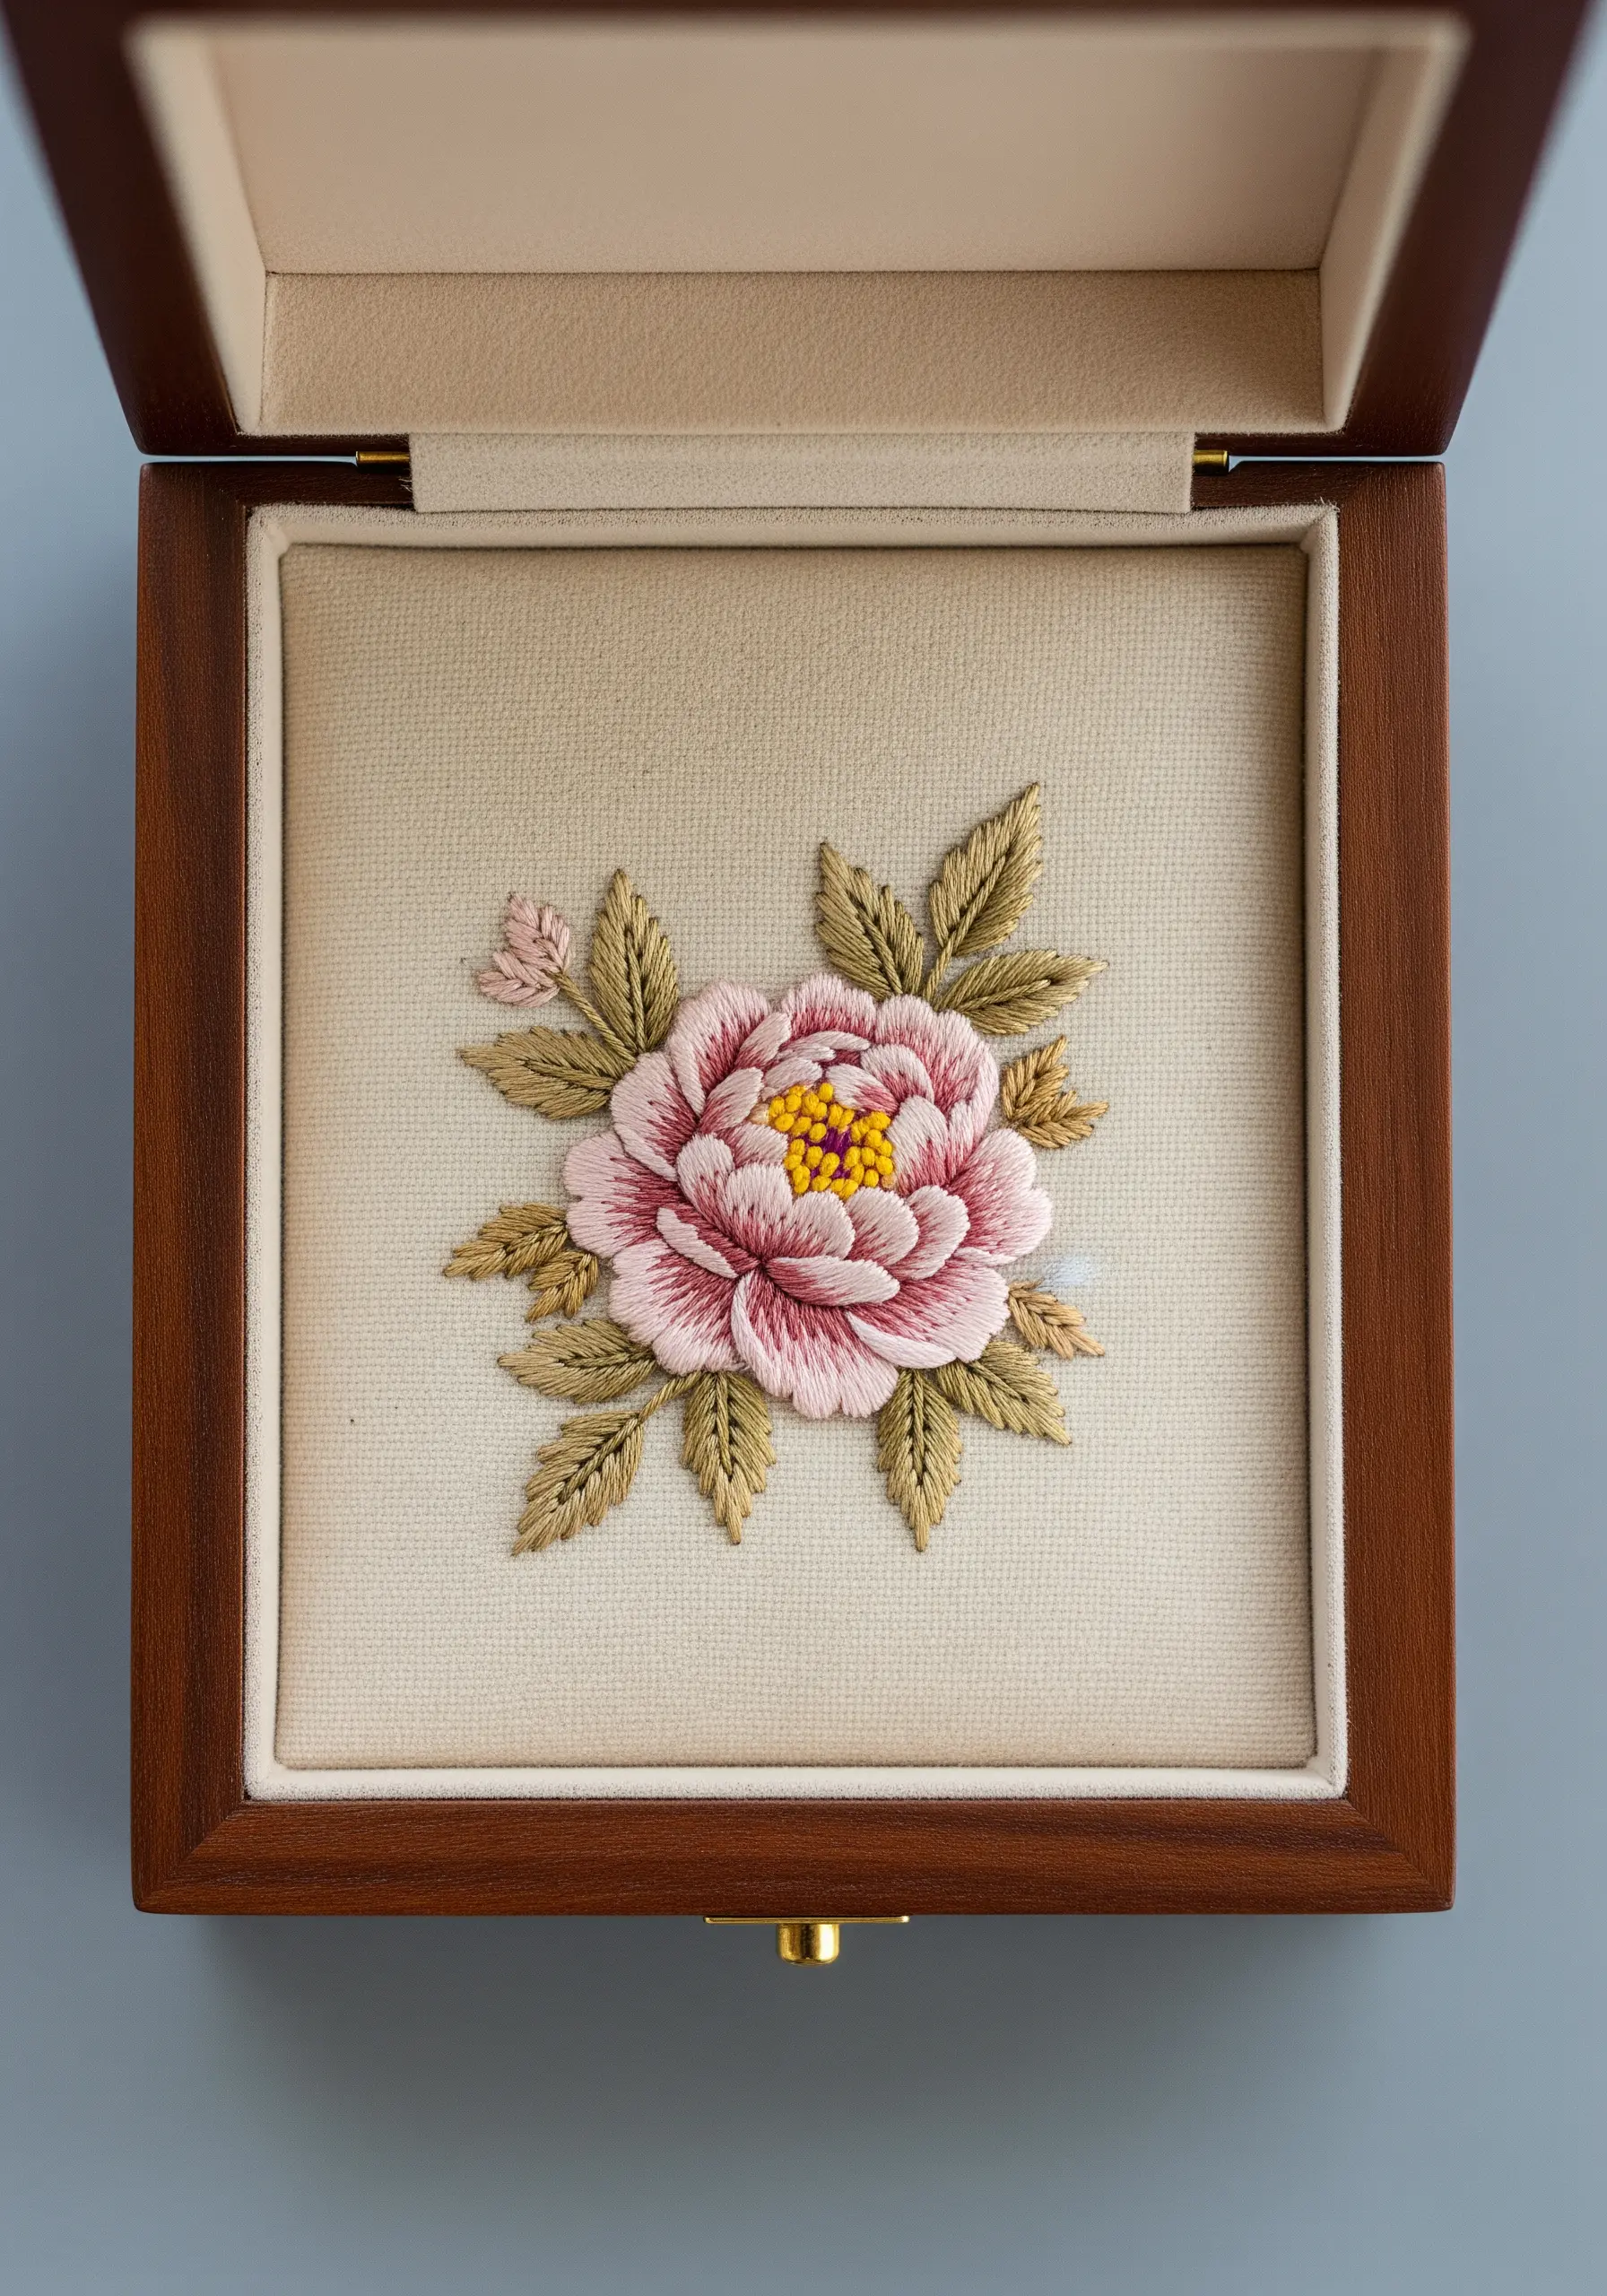
Turn a small piece of embroidery into a precious object by mounting it inside a keepsake box.
First, wrap your finished embroidery around a piece of acid-free mat board that has a thin layer of batting on top.
This padding gives the piece a soft, raised profile that enhances the texture of the stitches and gives it a professional, high-end finish.
Secure the fabric on the back with archival tape or lacing stitches before setting it in the box.
24. Engineer Functional Embroidered Objects
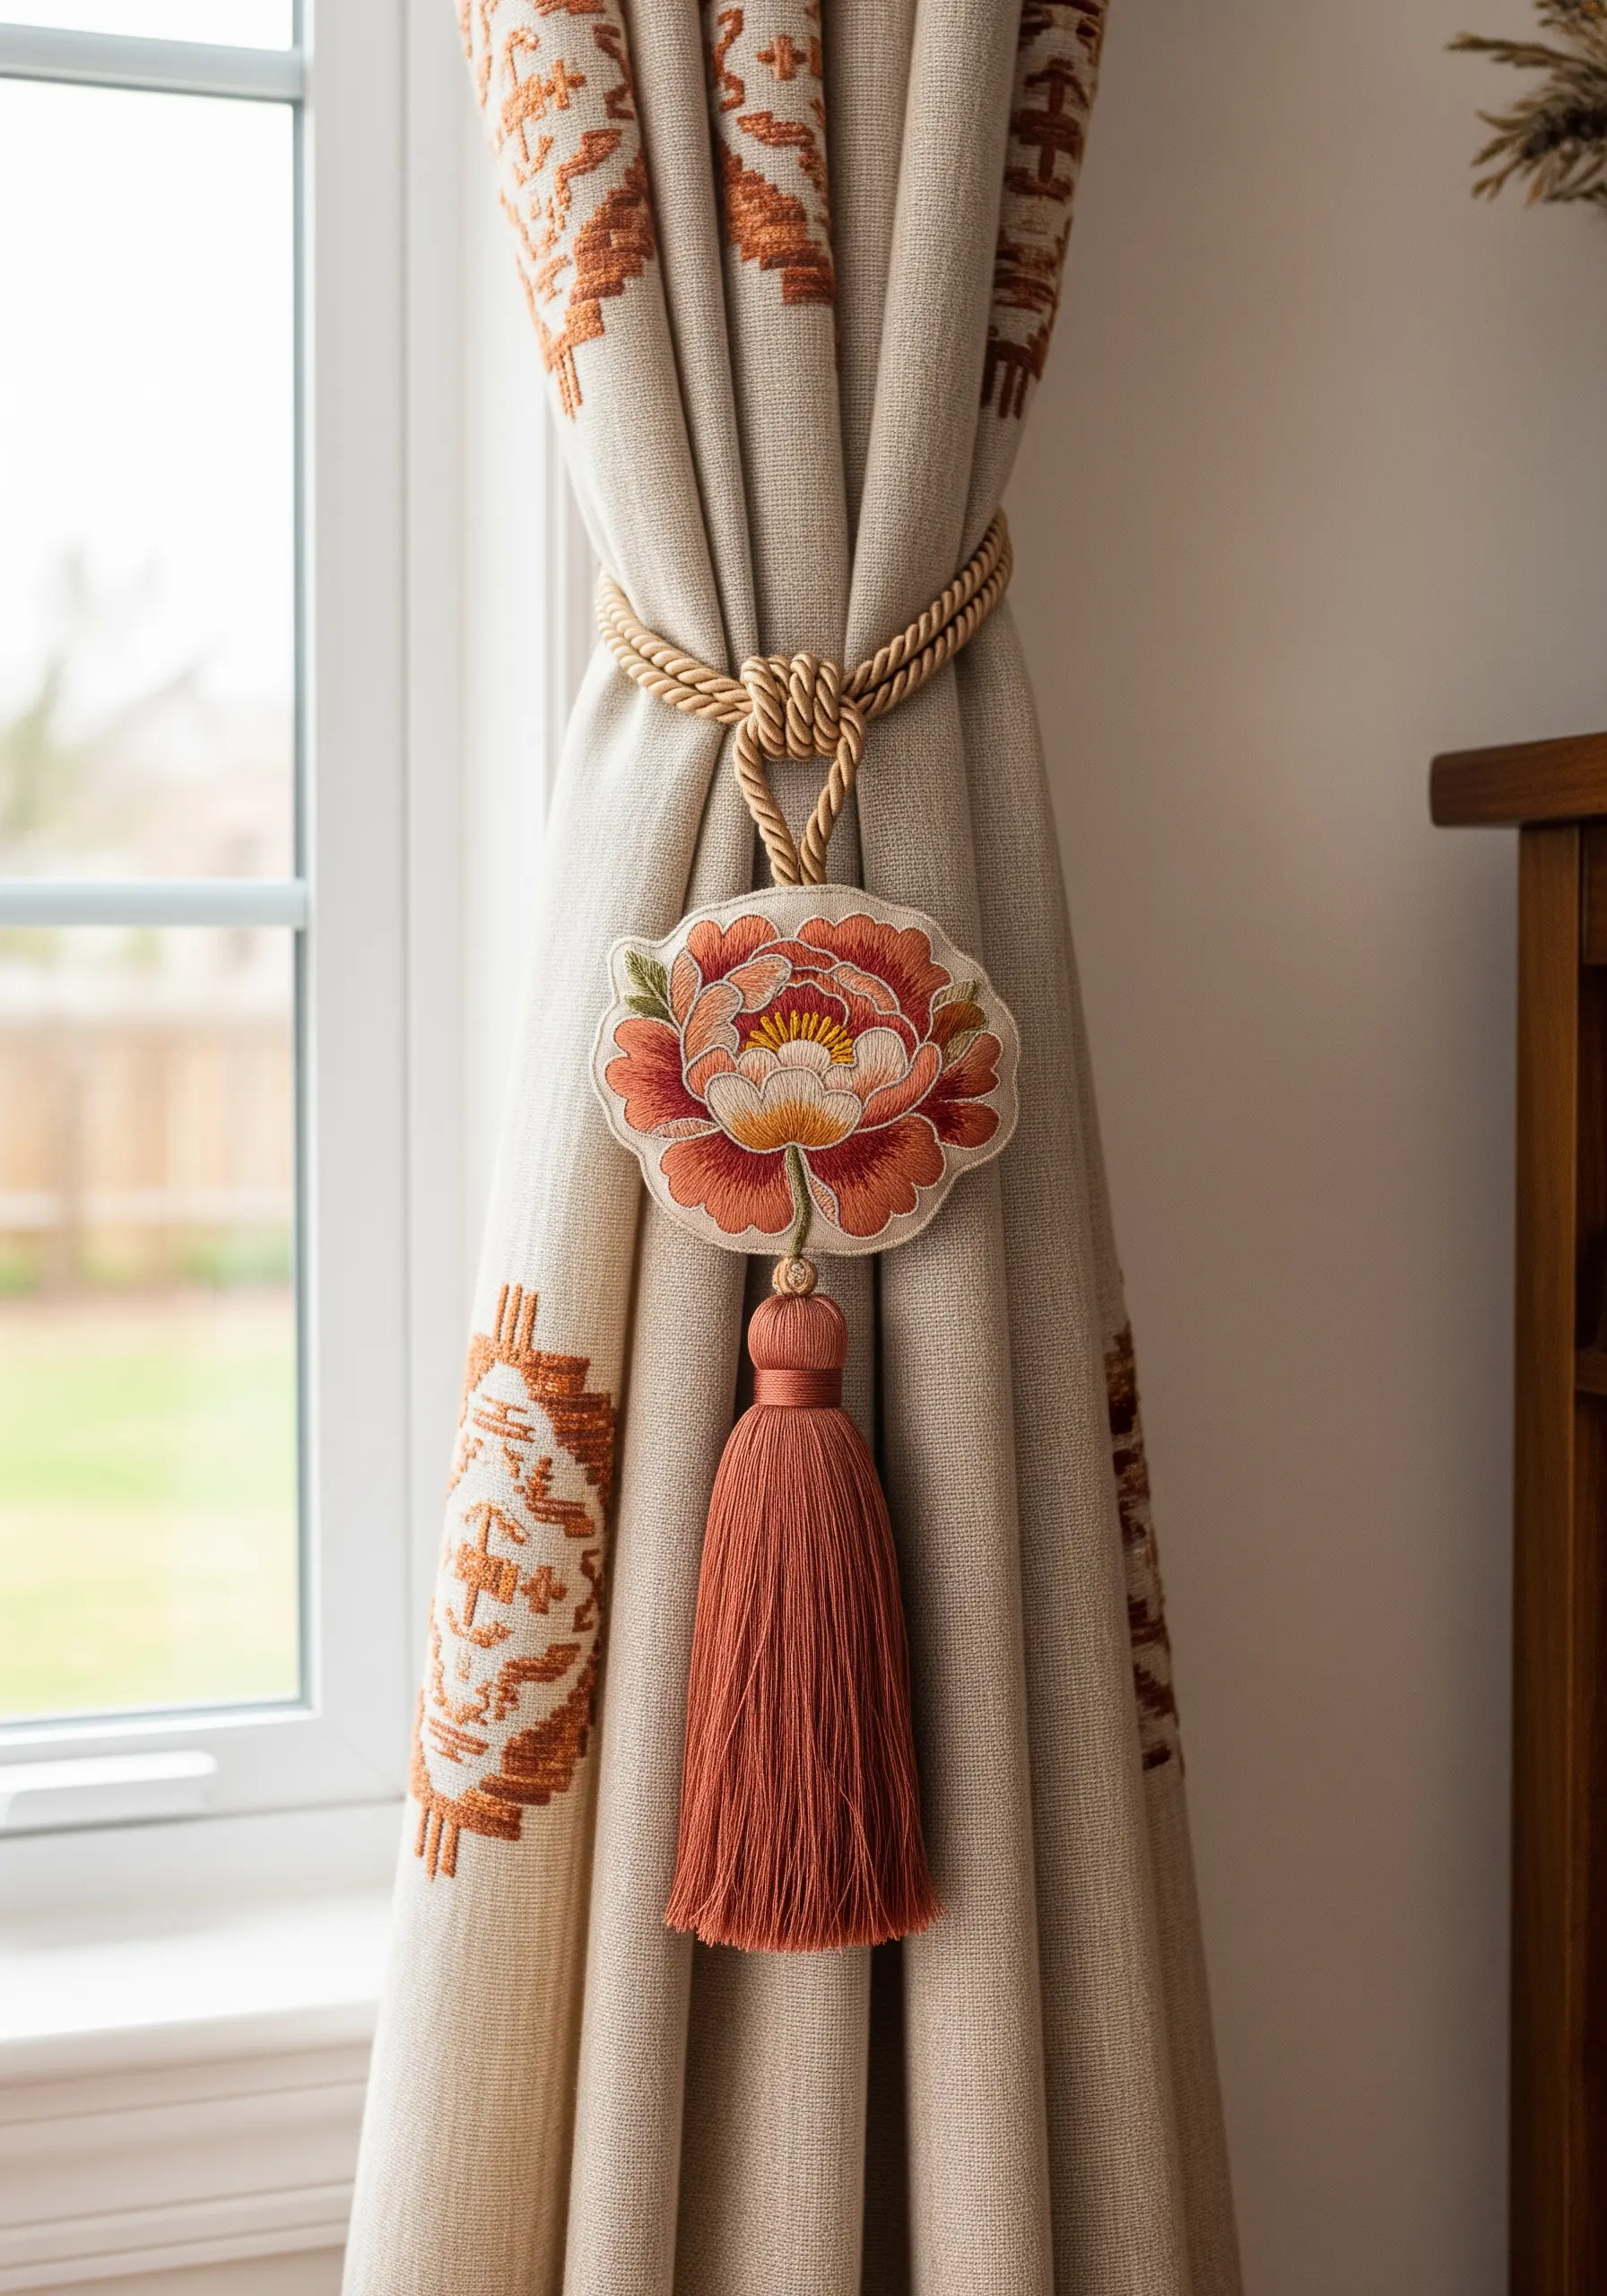
Transform your embroidery into a practical home accessory like this curtain tie-back.
To create a sturdy, double-sided piece, stitch your design and then back it with a layer of stiff felt or another piece of fabric.
Cut out the shape and finish the raw edges with a neat blanket or whip stitch. Adding a tassel and a loop for hanging completes the transition from simple motif to functional art.
25. Add Dimension with Padded Satin Stitch
To make small elements like these peony buds physically pop from the fabric, use a technique called padded satin stitch.
First, create a foundation of small, straight stitches or a seed stitch fill within the outline of your shape.
Then, work your final layer of satin stitches over this padding, perpendicular to the base stitches.
This underlayer raises the surface, creating a subtle, three-dimensional effect that catches the light beautifully.
26. Combine Embroidery with Quilting for Texture Play
Make your embroidered peony the undeniable star by setting it against a quilted background.
The tight, stippled texture of the quilting creates a visual contrast with the smooth, lustrous surface of the thread painting.
This technique, known as echo quilting, not only adds stability to the fabric but also frames the central motif, drawing the eye directly to your intricate stitch work.
27. Scale Up Your Design for Upholstery
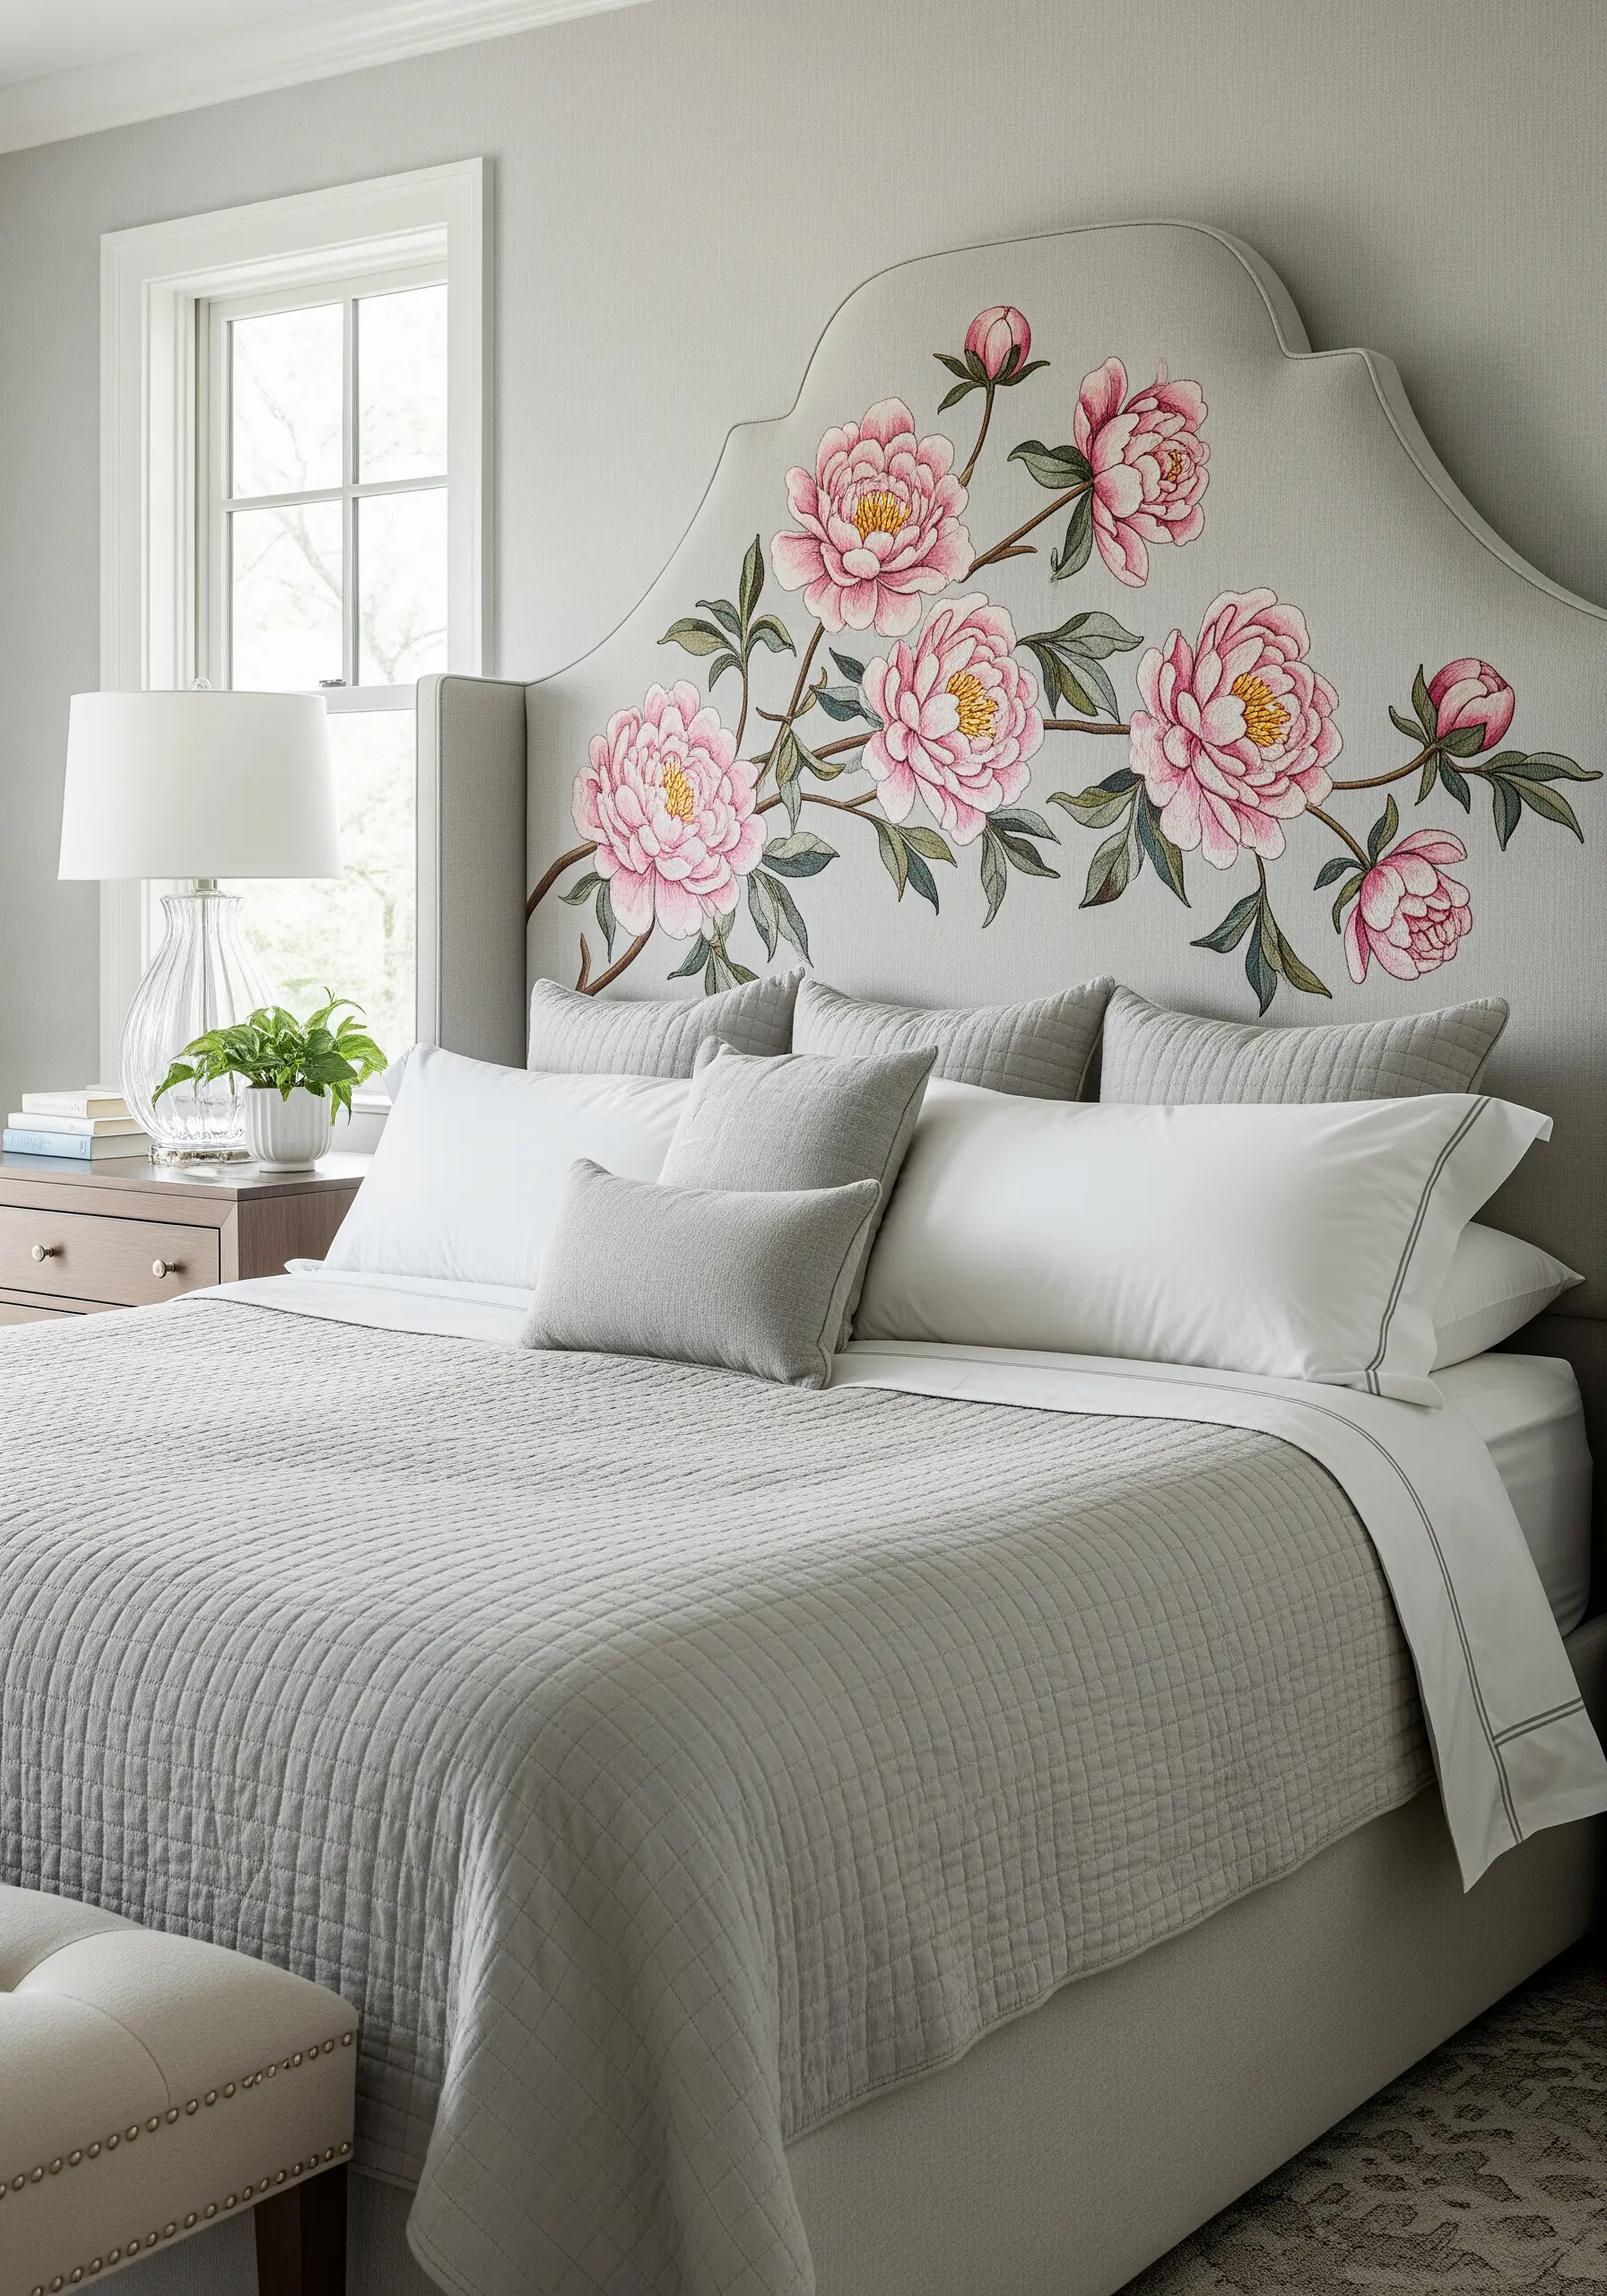
Embroidering directly onto furniture is a bold move that transforms a simple piece into a custom work of art.
For a project of this scale, you must plan your design to flow across the unique shape of the headboard.
Use an embroidery machine for consistency over a large area, or if stitching by hand, use a heavy-duty needle and durable upholstery thread to handle the thick fabric.
The result is a breathtaking, integrated design that becomes the room’s centerpiece.
28. Create a Modern, Geometric Interpretation
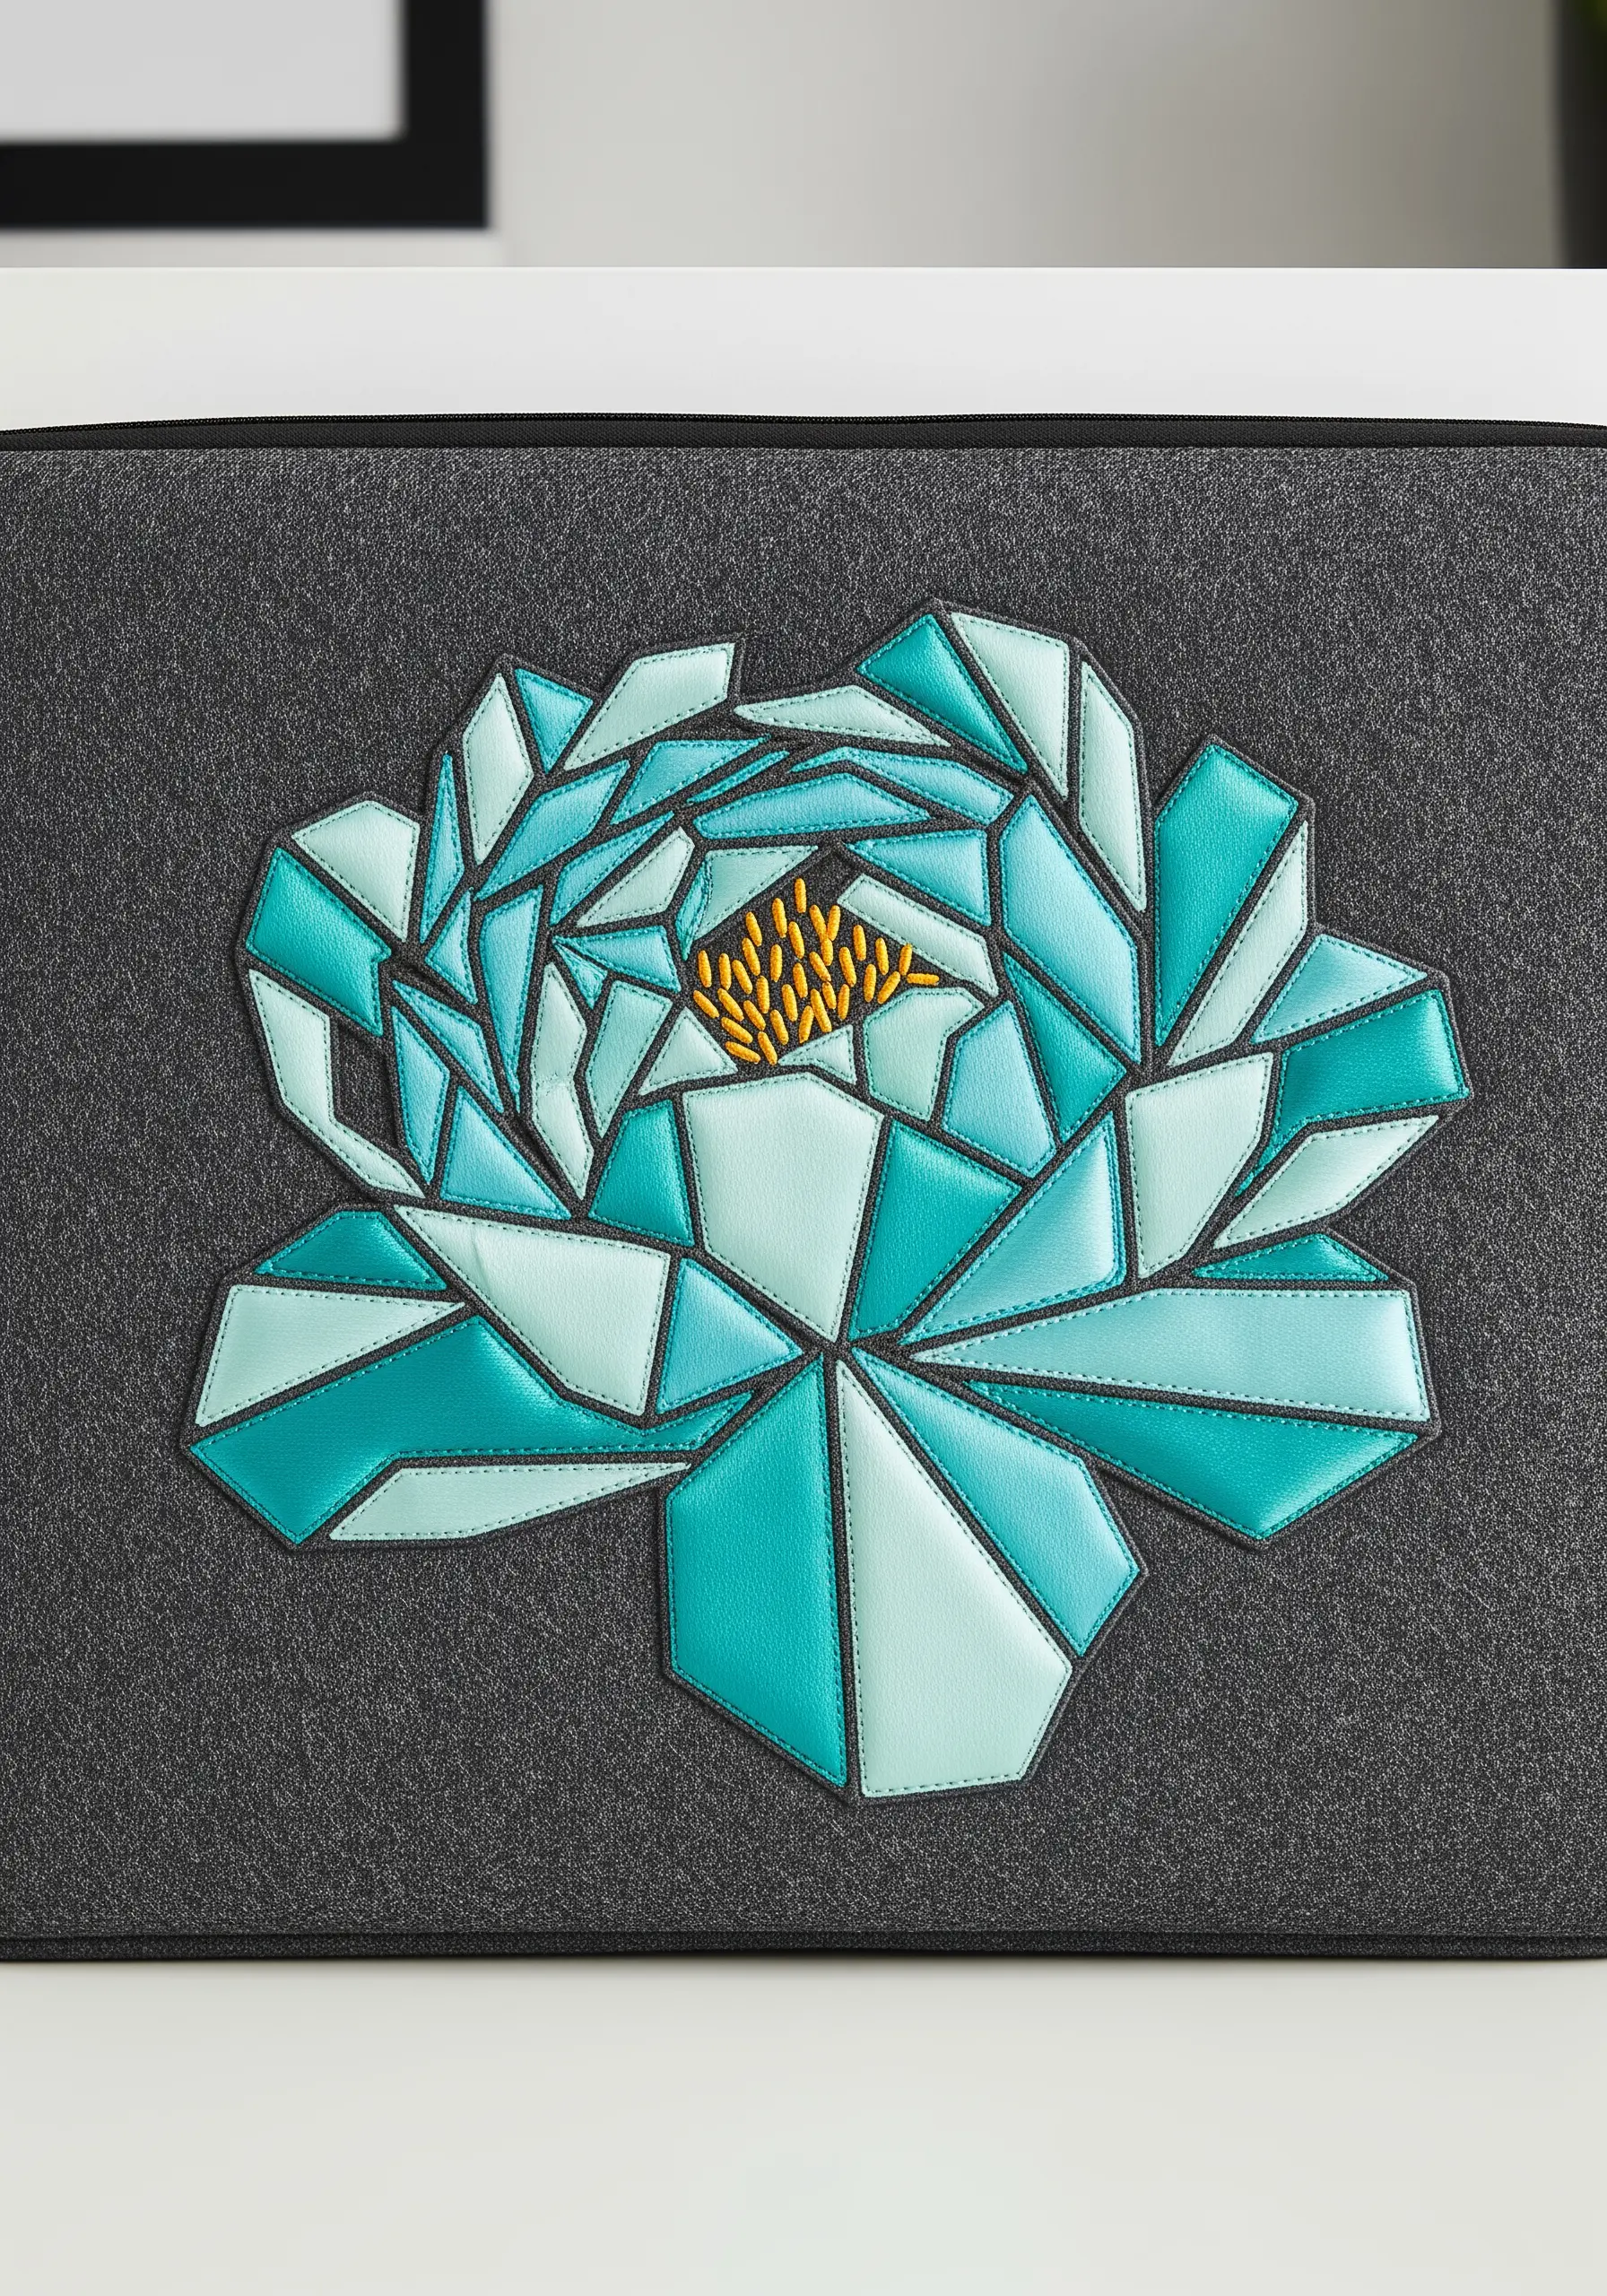
Reimagine the soft curves of a peony with a sharp, geometric aesthetic using a faux-leather appliqué technique.
Cut faceted shapes from different shades of teal and mint, then arrange them to form the flower.
Secure each piece with a clean, precise backstitch outline. This method combines the precision of patchwork with the clean lines of embroidery, resulting in a contemporary and highly textural piece.
29. Master the Art of Stitching on Paper
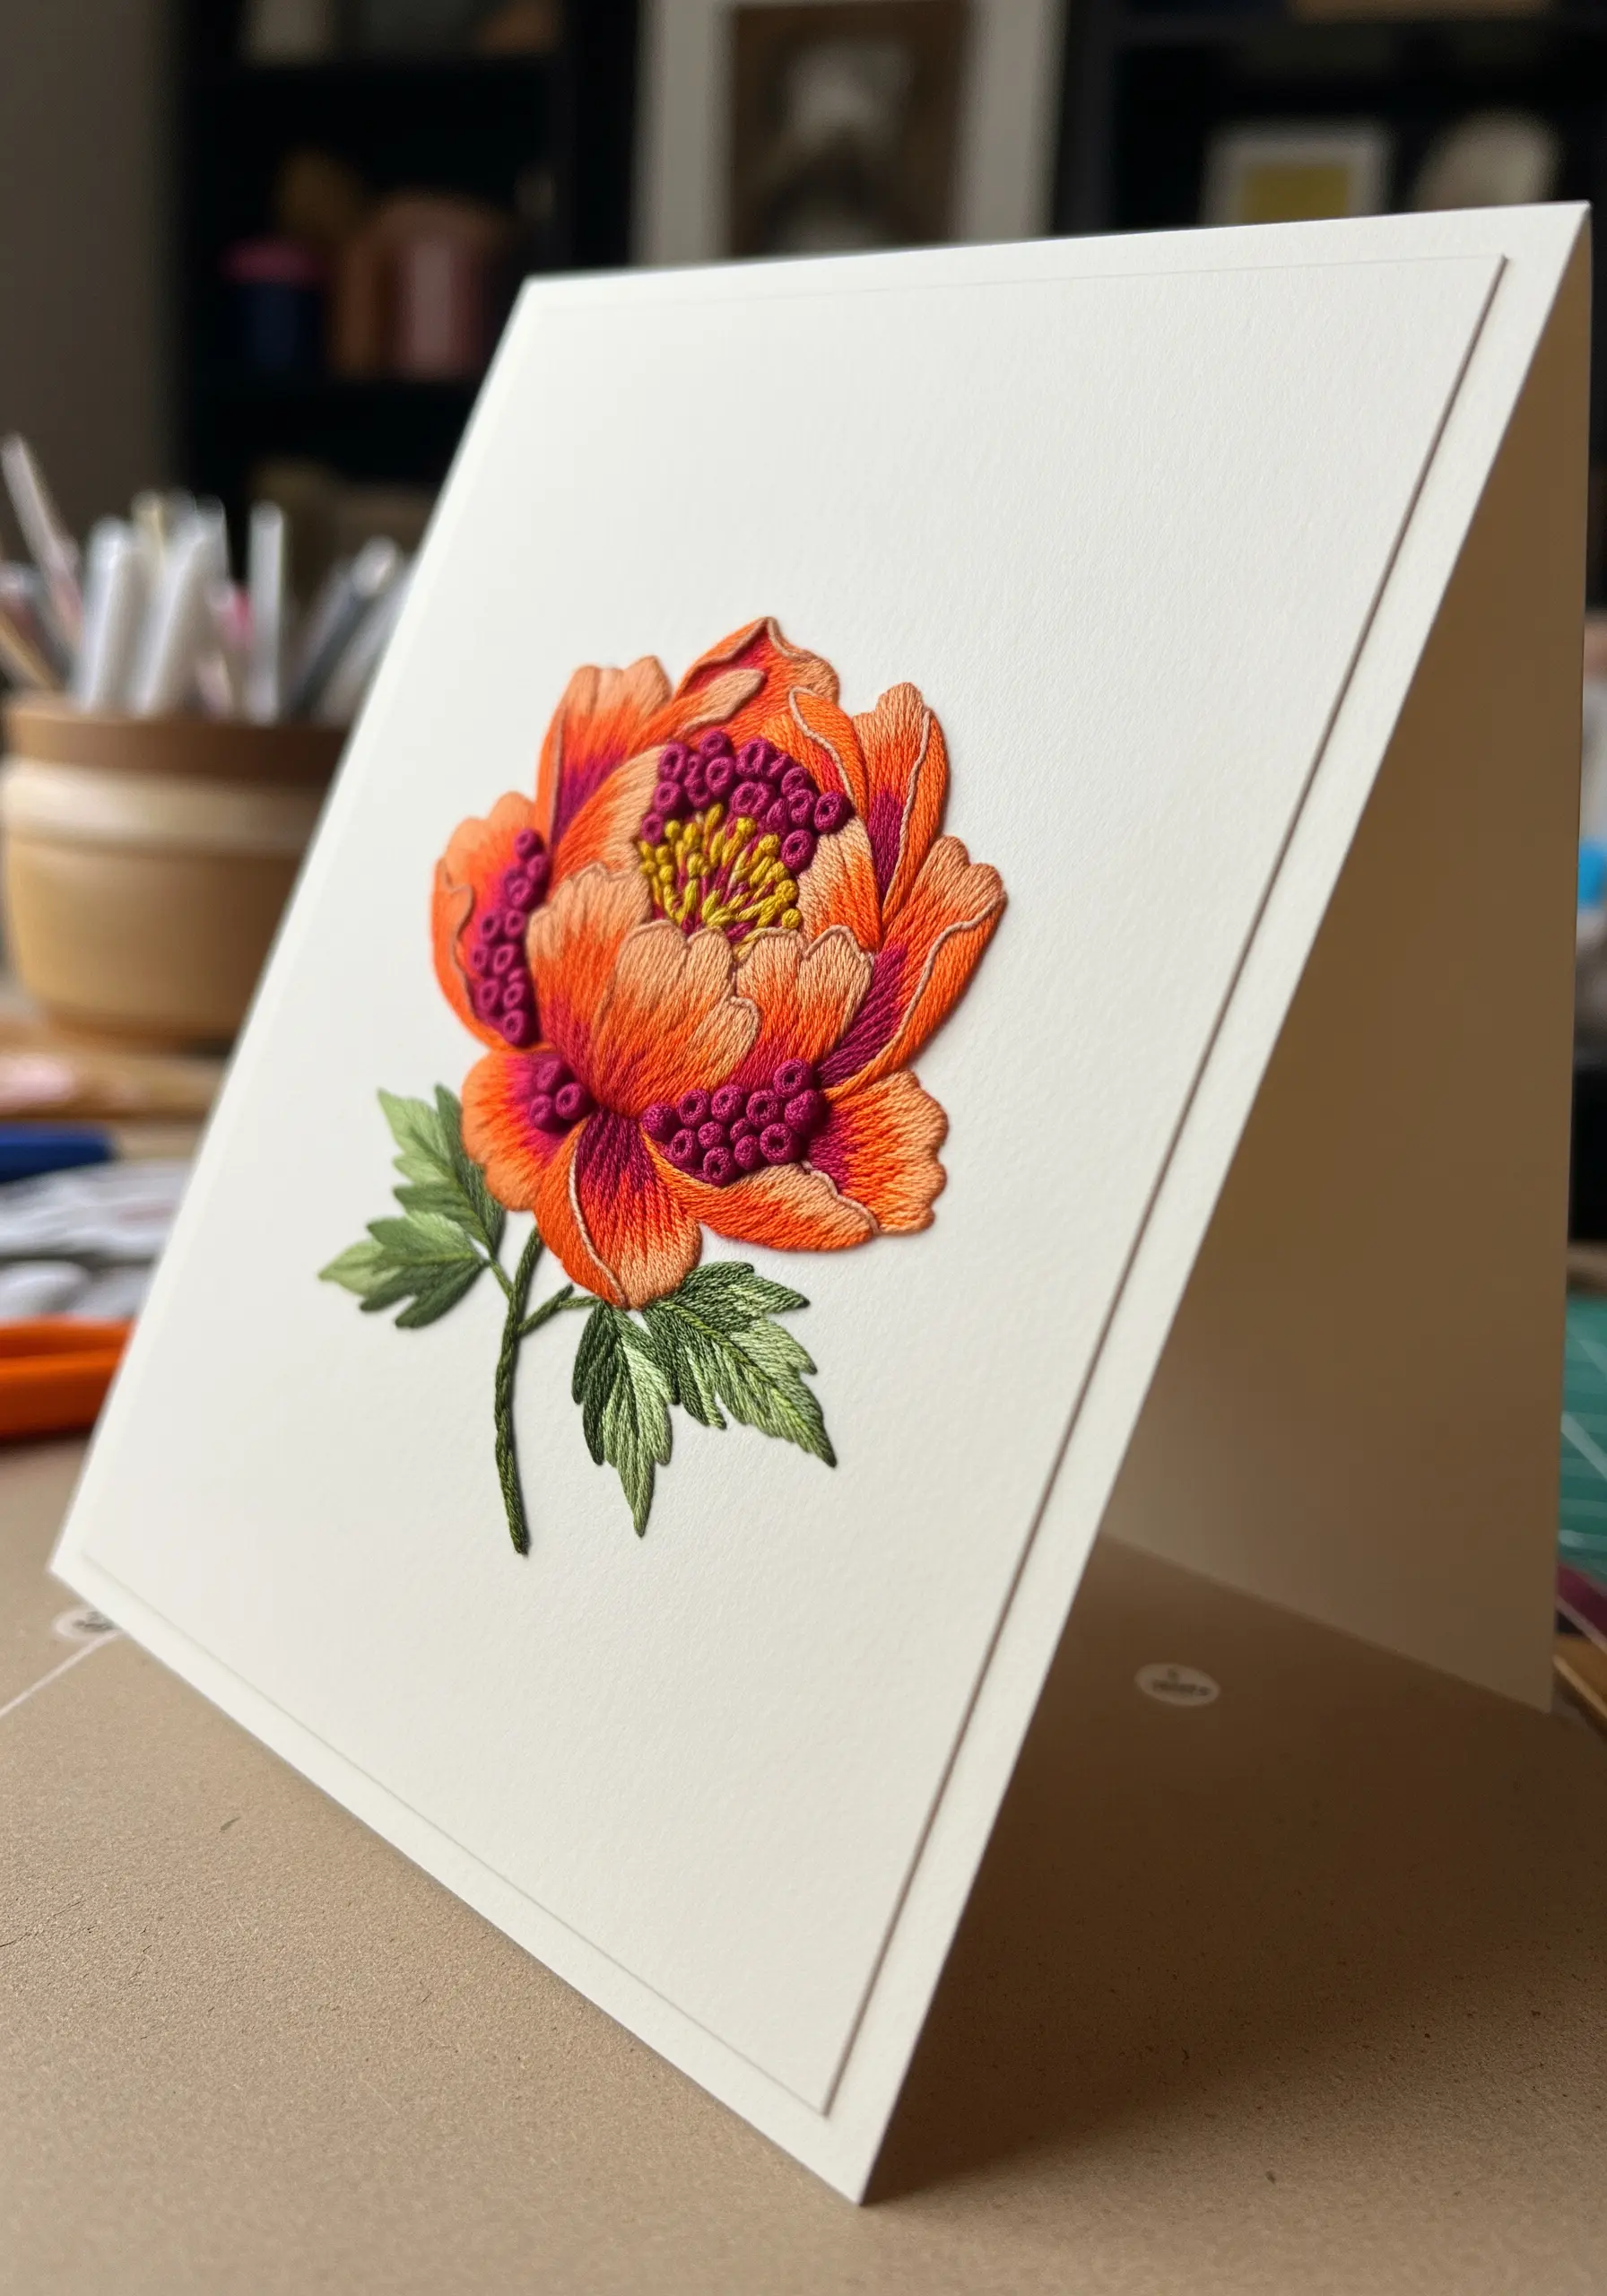
Embroidering on cardstock creates stunning, tactile greeting cards, but it requires a delicate touch.
Always pre-pierce your holes along the stitch lines using a pin tool or a small needle. This prevents the paper from tearing as you pull the thread through.
Use a single strand of floss and maintain gentle, even tension to avoid warping the card.
Secure the threads on the back with acid-free tape for a clean finish.
There are many paper art embroidery ideas that turn simple stitches into stunning decor.
30. Complement Lustrous Threads with Silk Fabric
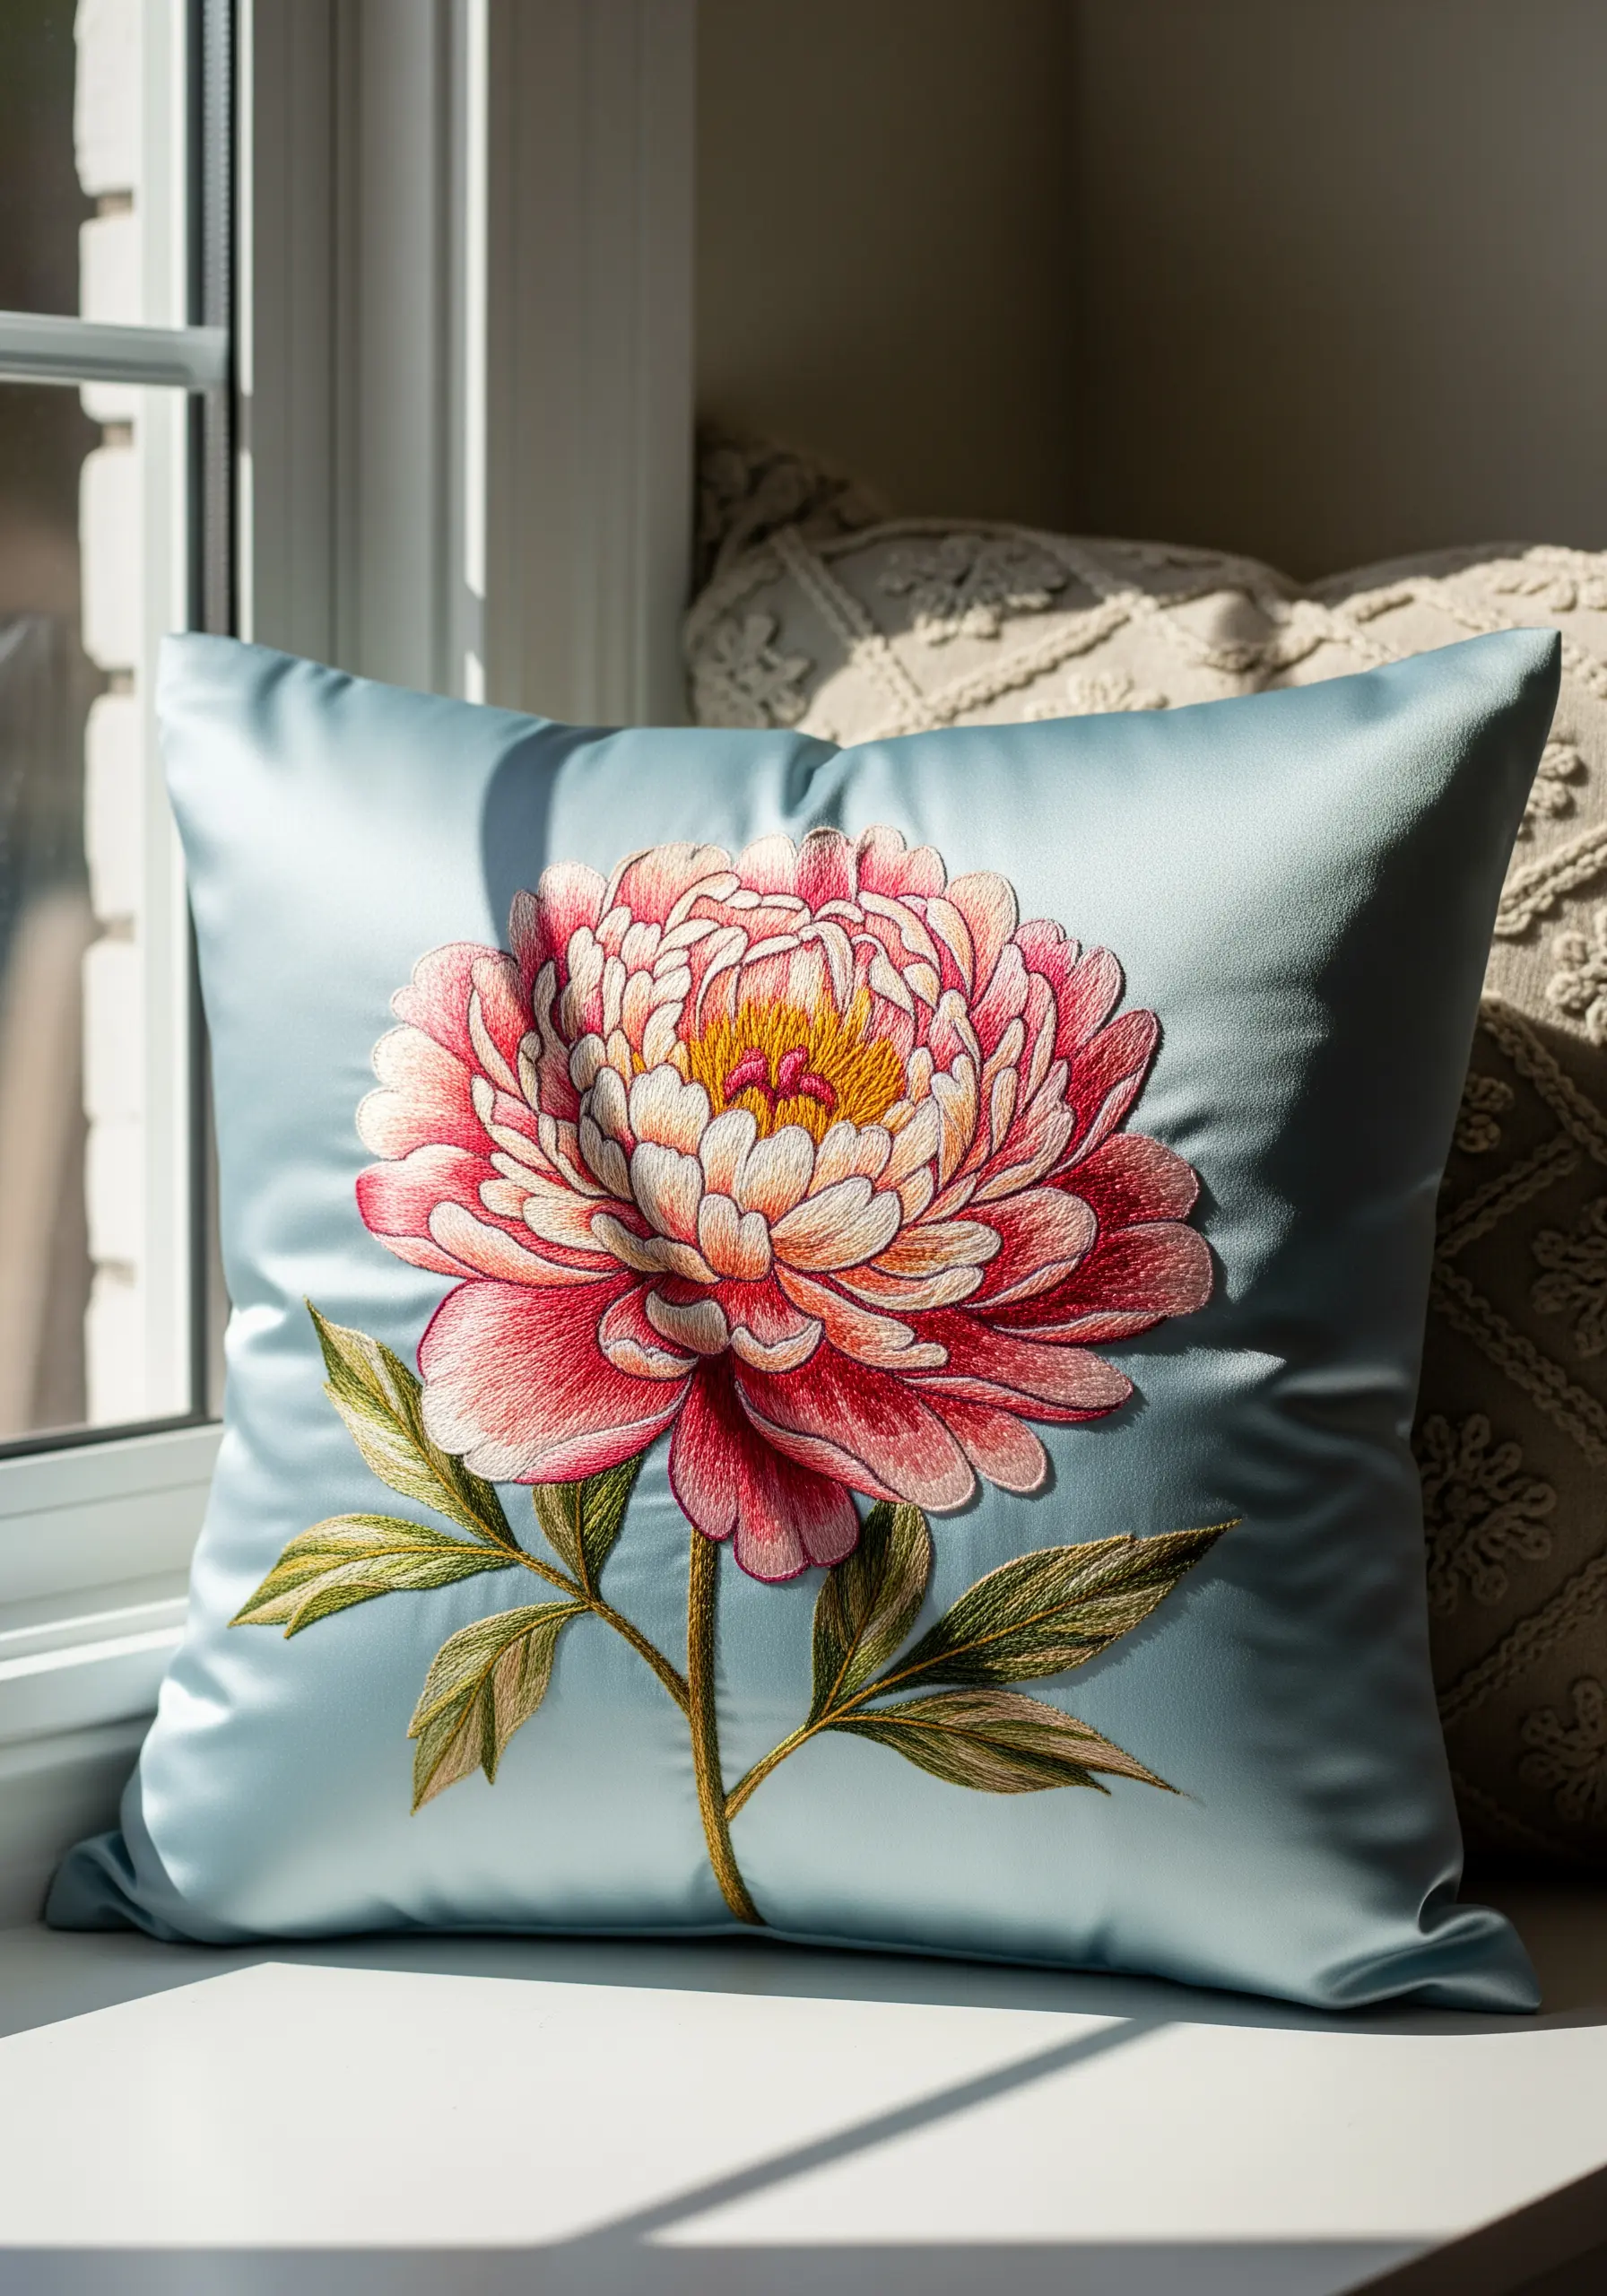
When you want to create a truly luxurious piece, pair high-quality embroidery floss with a fabric that has its own natural sheen, like silk or satin.
The smooth surface of the silk reflects light, enhancing the gloss of the thread and making the colors appear richer and more vibrant.
Always use a backing stabilizer to prevent puckering on this delicate, slippery fabric, and a fine, sharp needle to avoid snags.
31. Create the Illusion of Glass with Thread
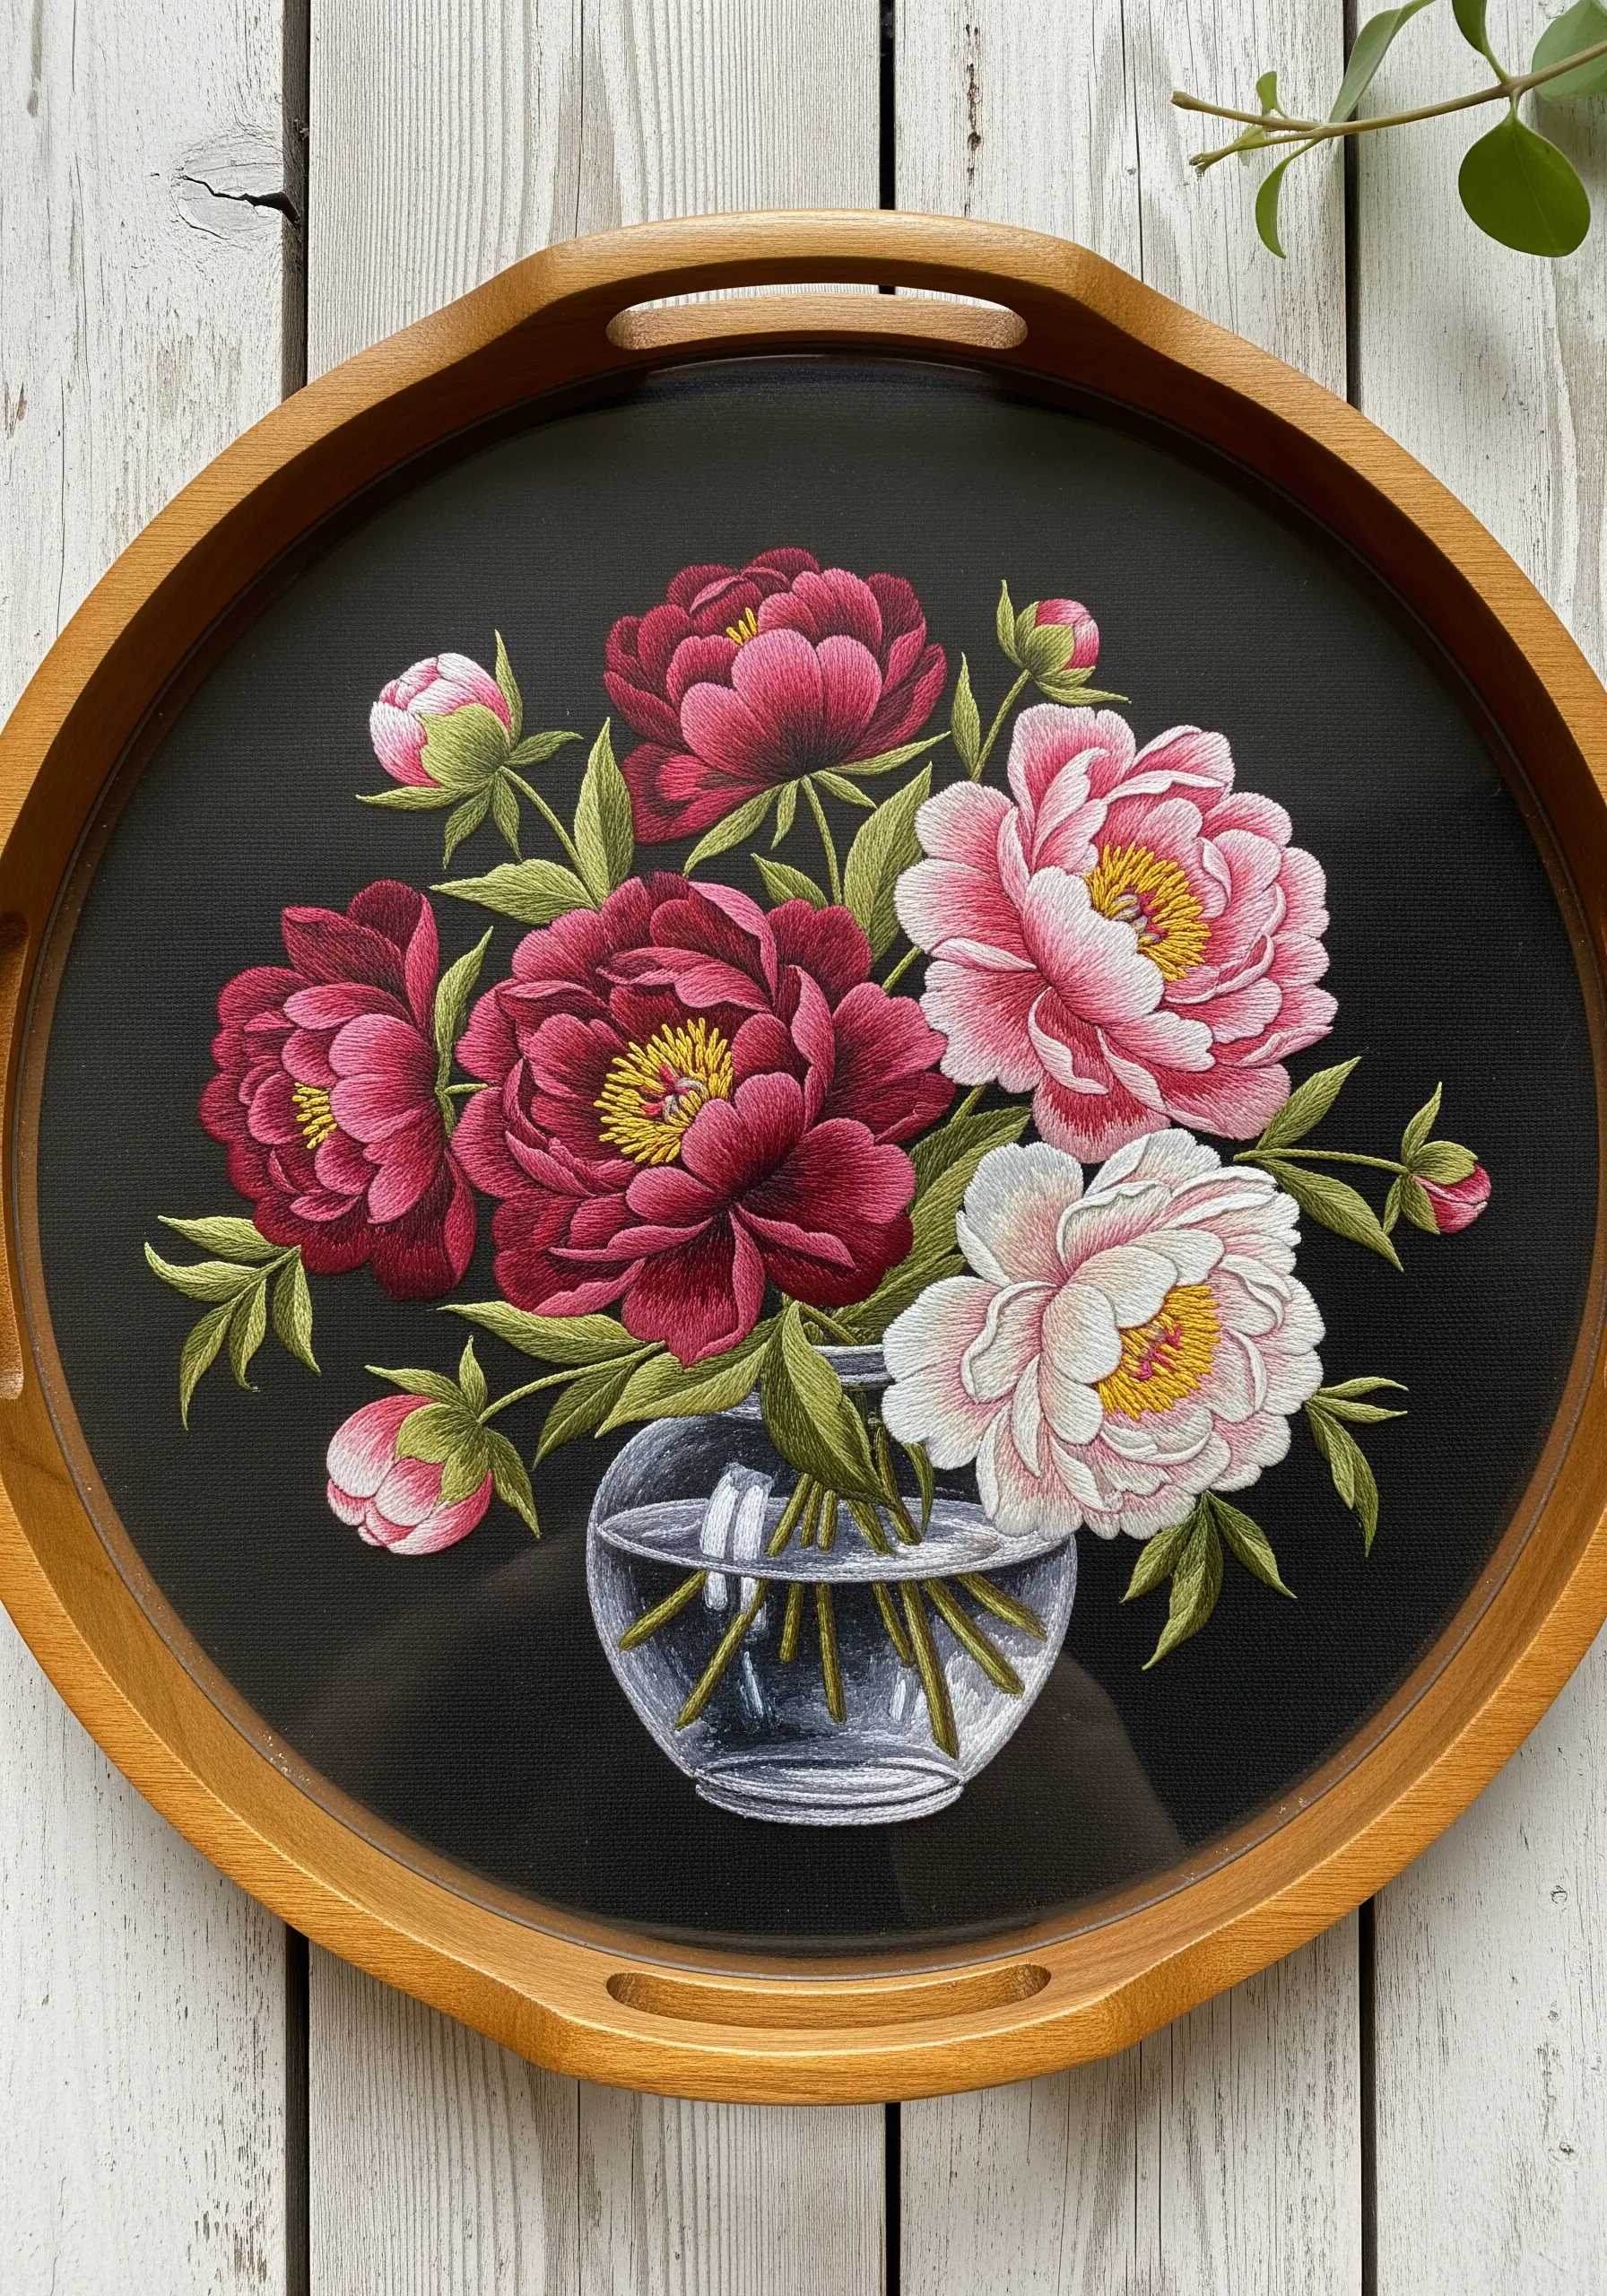
Stitching a transparent object like a glass vase is an exercise in observing and replicating light.
Use a limited palette of white, grey, and light blue to represent reflections and refracted light. Employ long, straight stitches, varying their direction slightly to mimic the curve of the glass.
Leaving small gaps between stitches allows the dark background fabric to show through, enhancing the illusion of transparency.
32. Finish Your Patches with a Satin Stitch Border
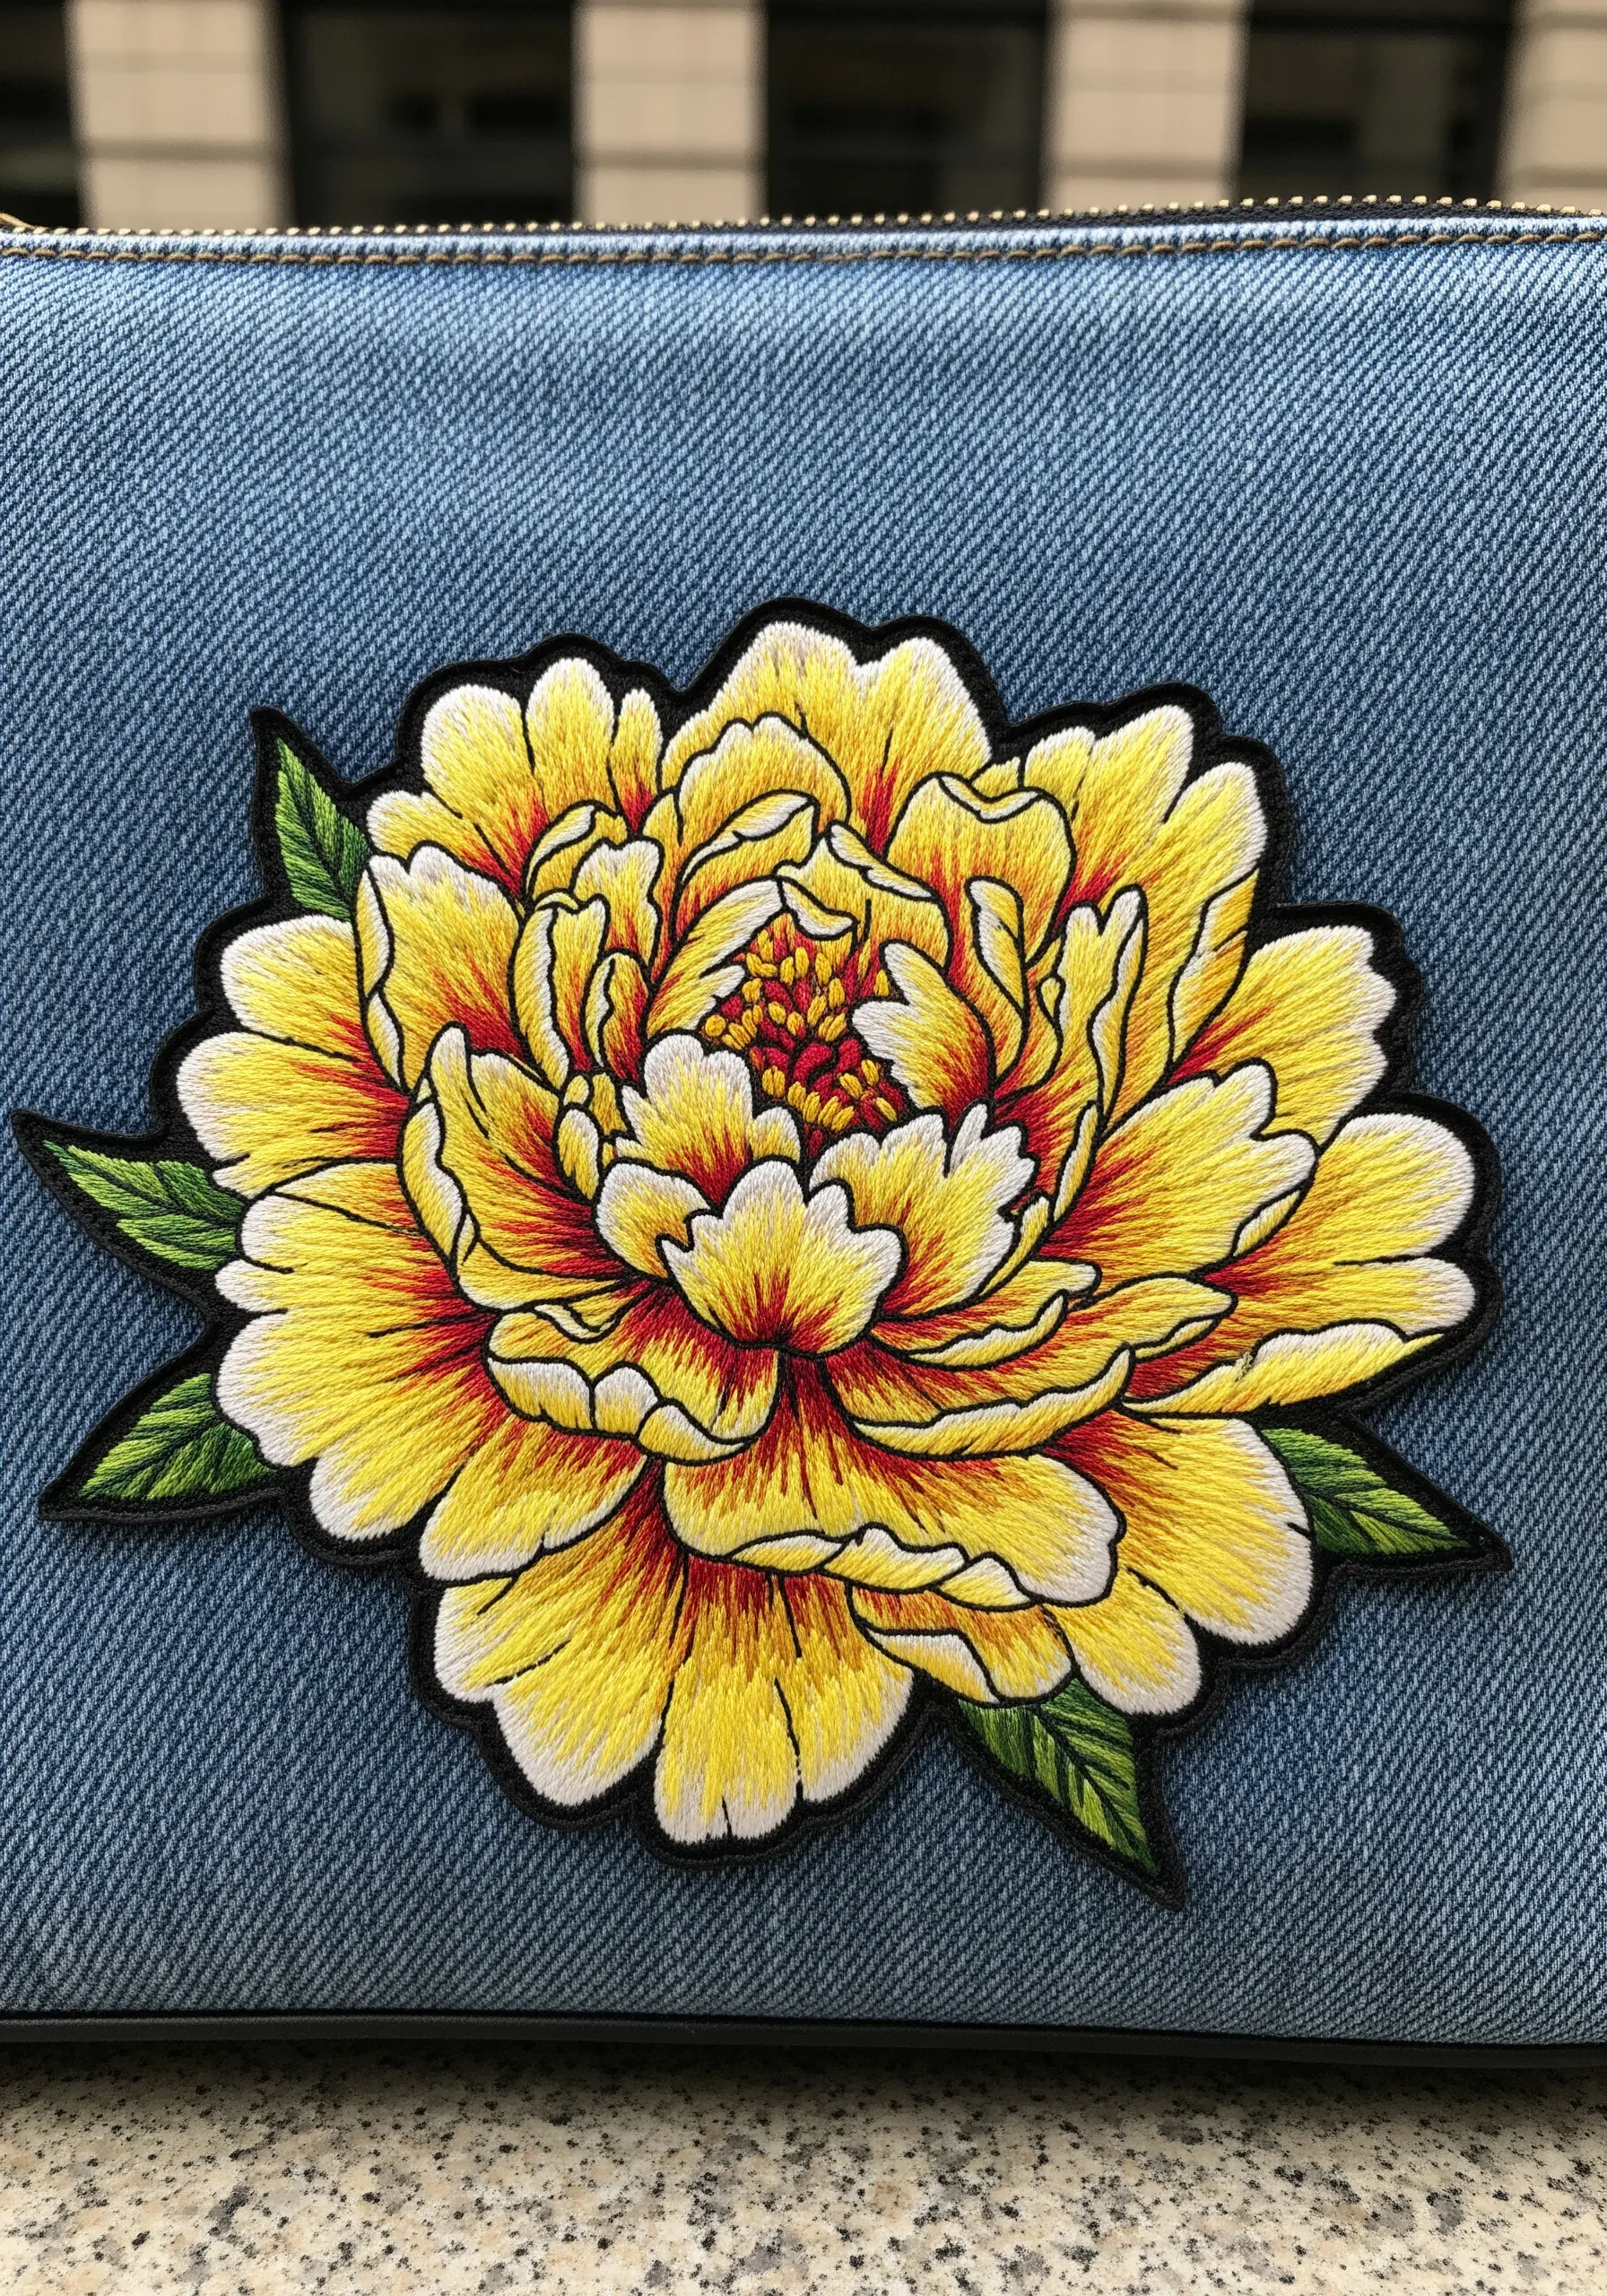
To give your handmade patches a clean, professional edge, finish them with a dense satin stitch border.
After completing your central design on a piece of felt or canvas, draw a crisp outline around it.
Work tight, uniform satin stitches over this line, ensuring each stitch touches the last one. This creates a raised, durable edge that looks polished and prevents the patch from fraying when cut out.
33. Plan a Repeating Border for Garments
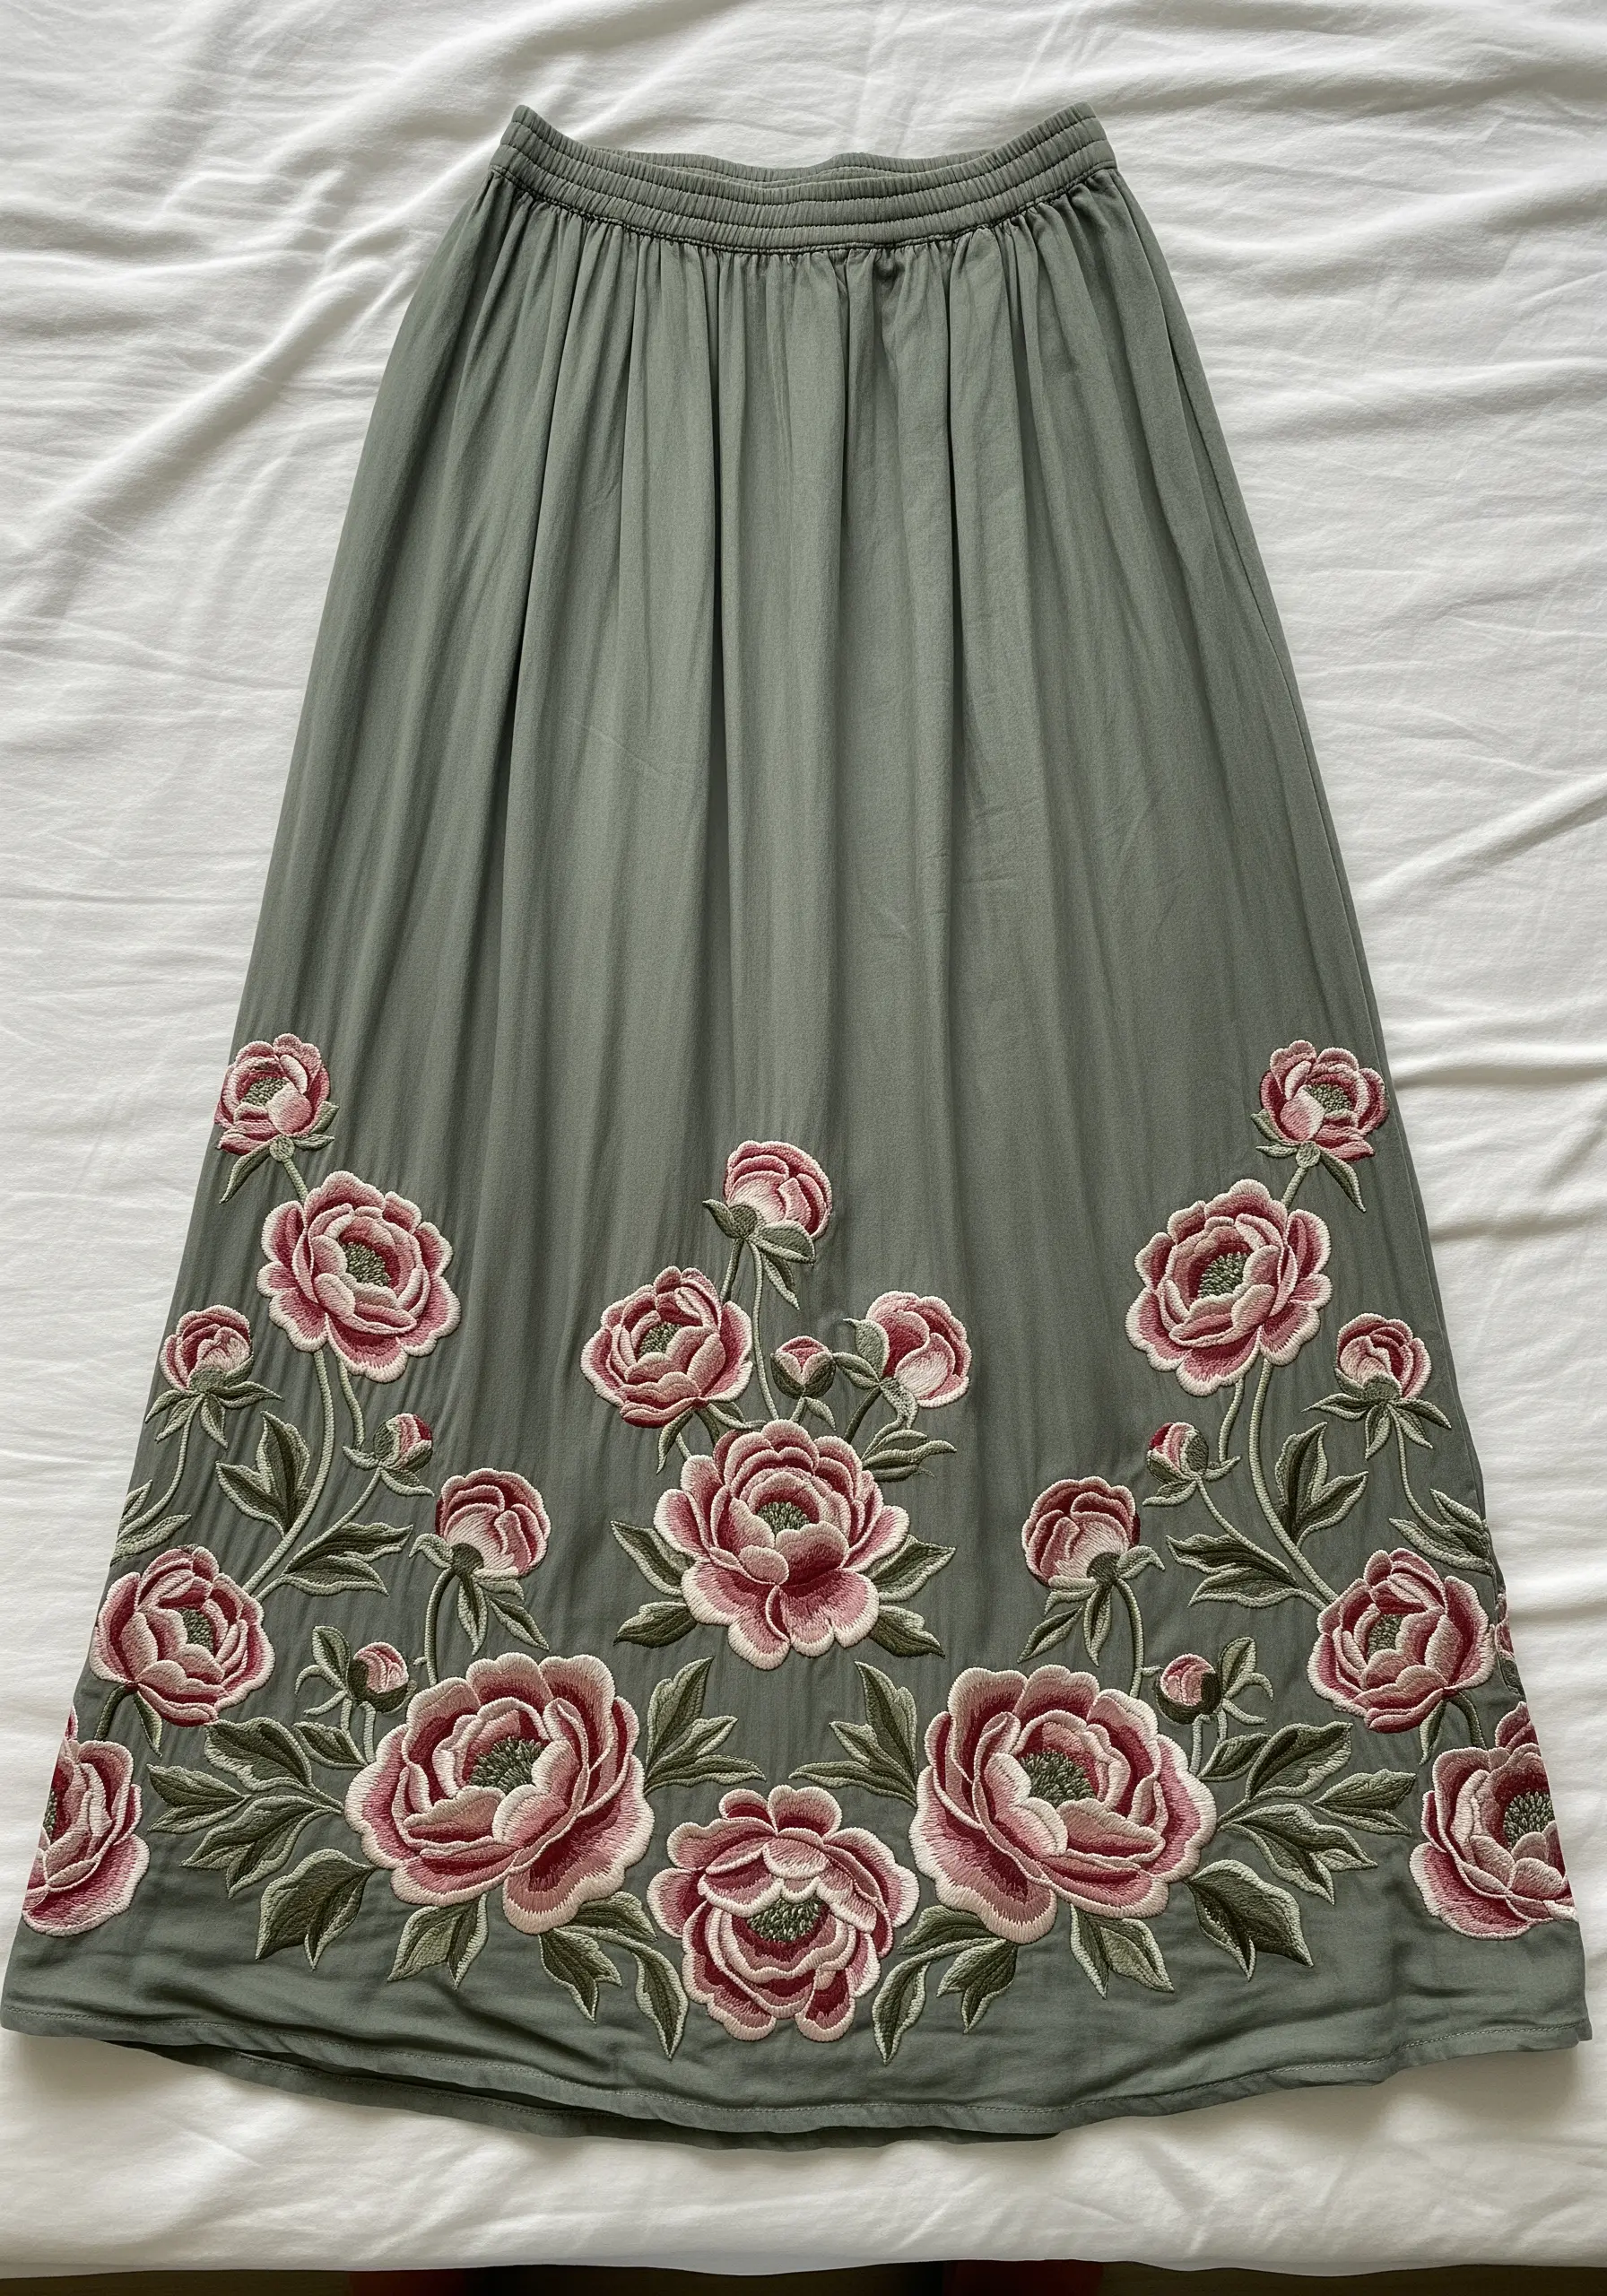
To create a balanced and beautiful embroidered hem on a skirt or dress, careful planning is crucial.
Use a removable fabric marker to map out the placement of each peony and bud, ensuring even spacing all the way around.
A repeating pattern of two or three slightly different motifs will look more natural and organic than using the exact same flower over and over.
34. Achieve Hyper-Smooth Blends with Single Strands
The secret to incredibly smooth, painterly color transitions is using a single strand of embroidery floss.
While it takes more time, working with one strand allows you to blend colors with the precision of a paintbrush, creating soft gradations from shadow to mid-tone to highlight within each tiny petal section.
This method eliminates the visible ridges that can occur with thicker threads, resulting in a finish that looks almost impossibly smooth.
35. Adapt Stylized Stitches for a Graphic Look
You can apply the techniques used for simple flowers, like anemones, to create a more graphic peony.
Instead of realistic thread painting, fill each petal with a solid block of satin stitch, using one color per petal or section.
Outline each shape in a contrasting color to emphasize its form. This stylized approach creates a bold, modern floral that focuses on shape and color over realistic detail.
36. Center Your Design for Maximum Impact
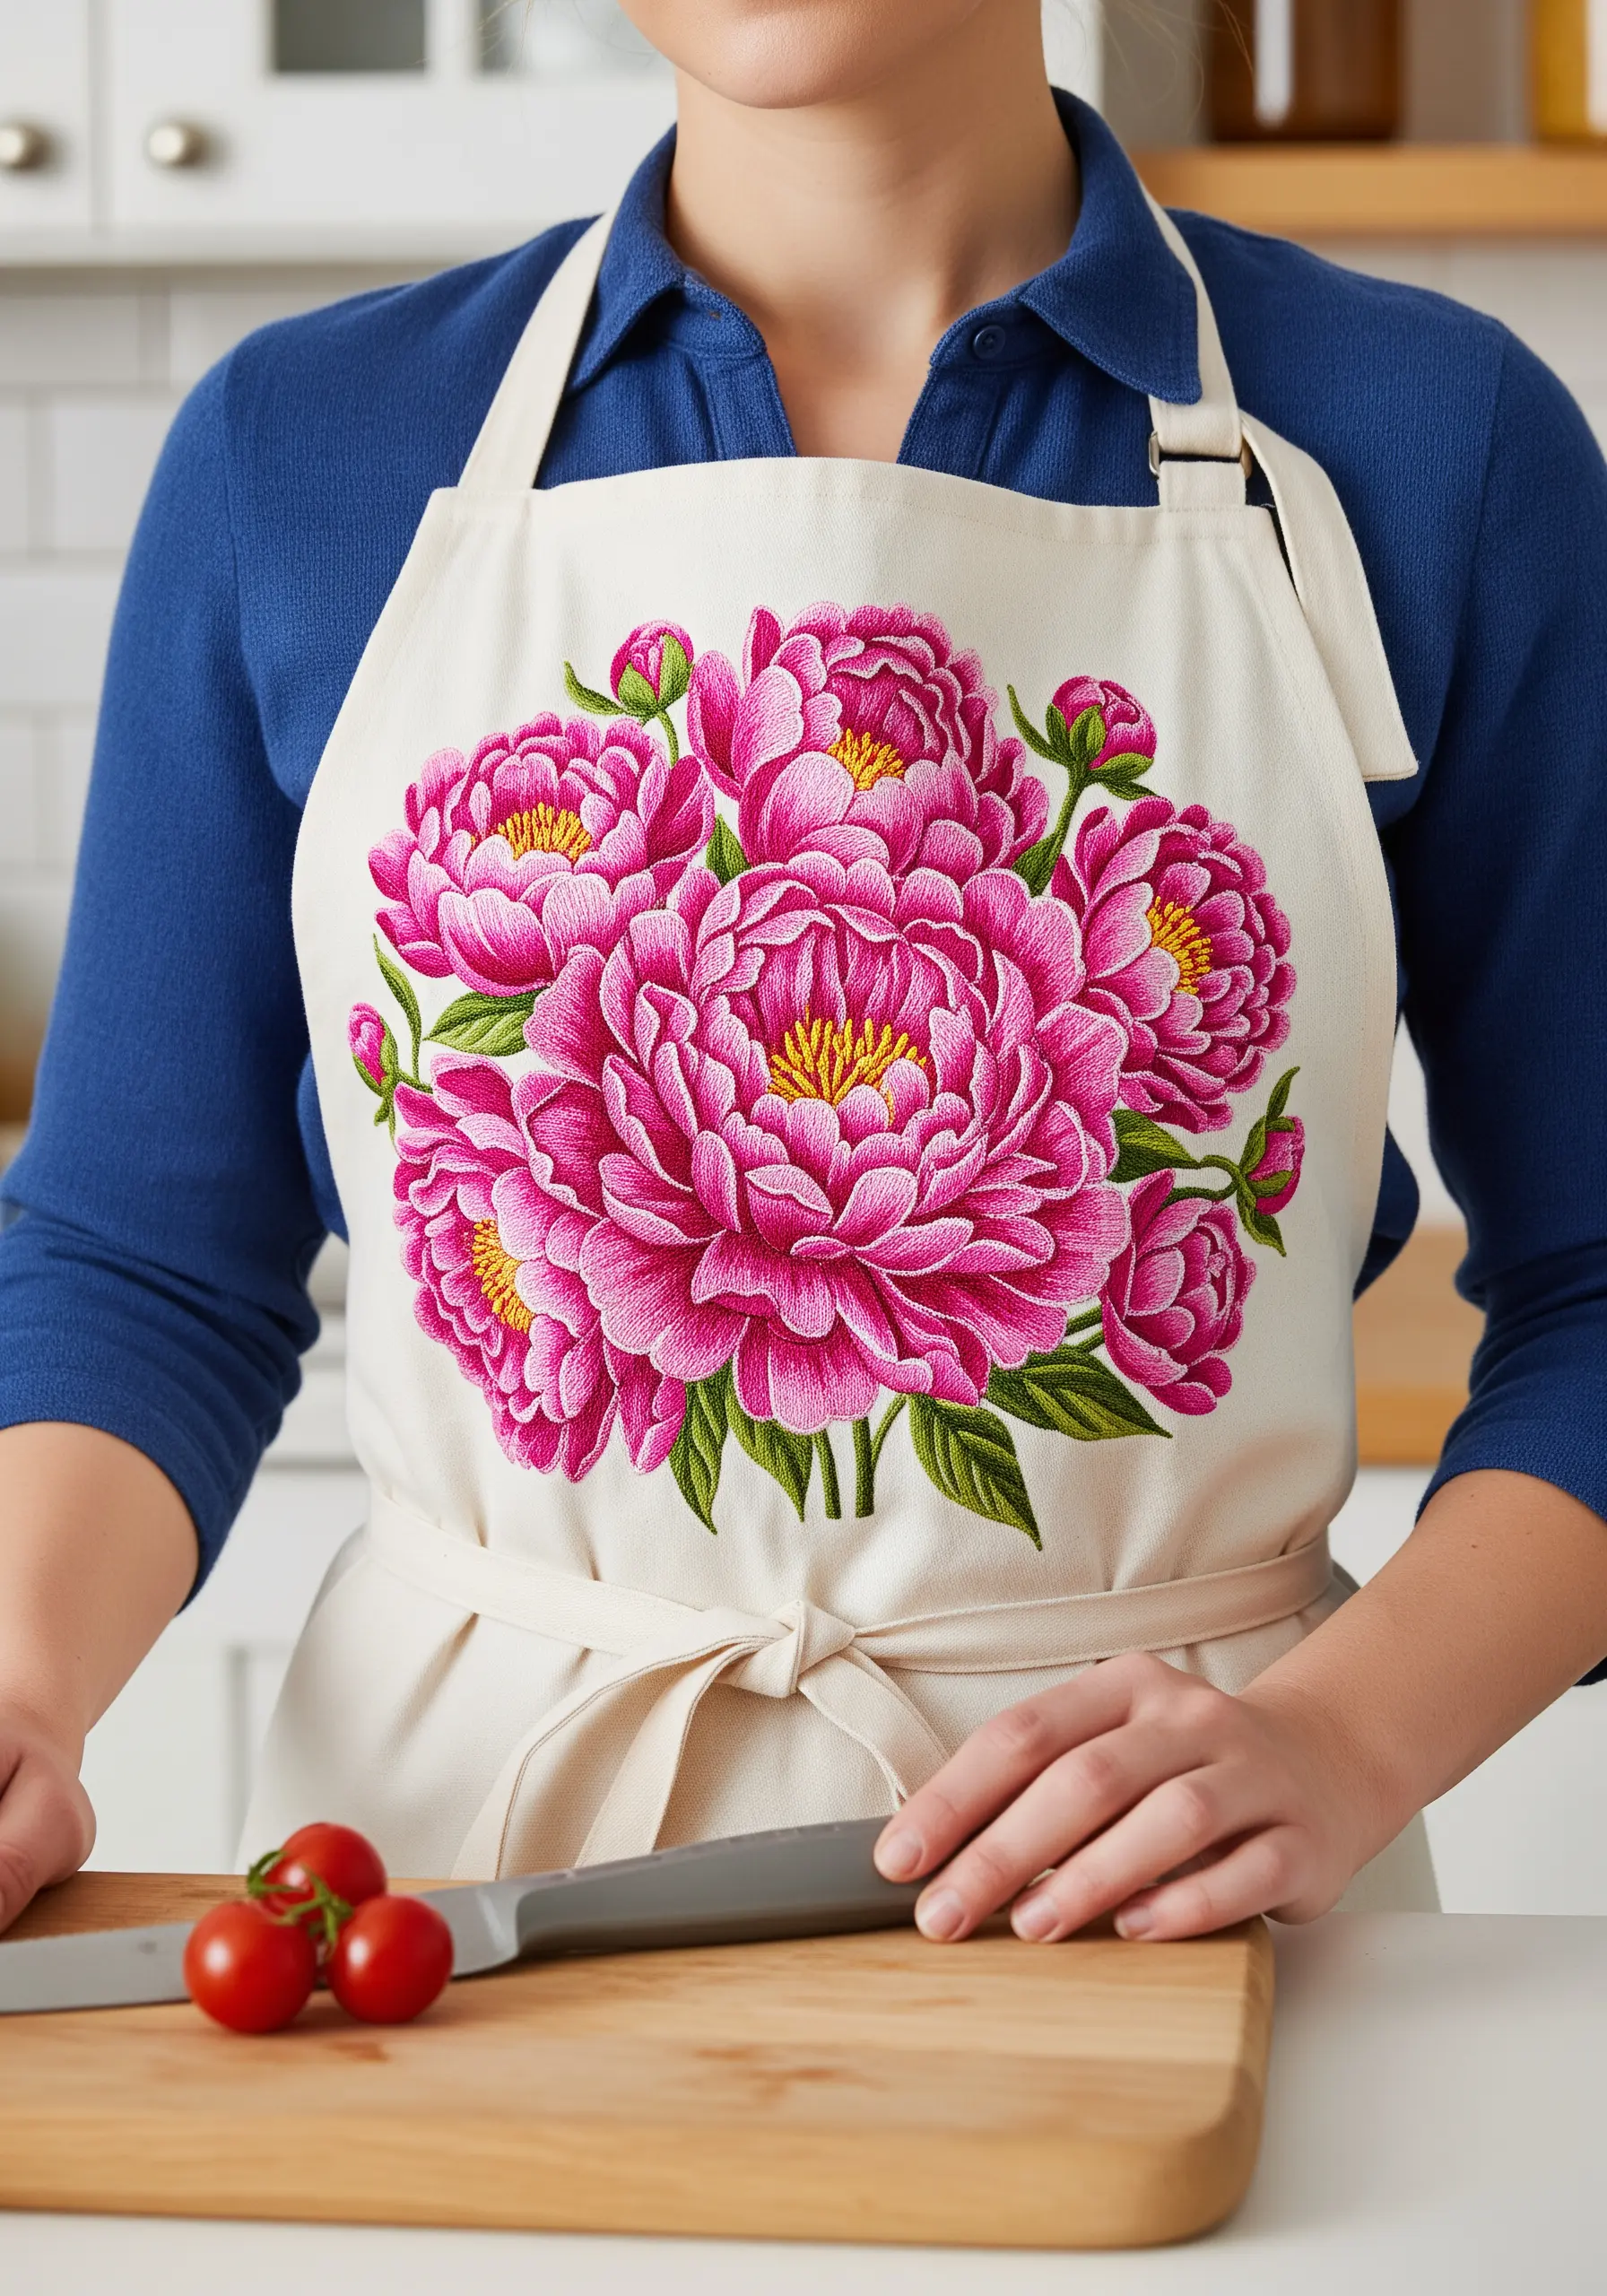
On functional items like an apron, placing a large, vibrant bouquet squarely in the center turns a practical piece into a statement accessory.
This central composition creates a clear focal point and feels balanced and intentional.
Ensure your design is scaled appropriately for the item—large enough to be impressive but not so large that it gets distorted when worn or tied.
Always use colorfast threads to ensure your beautiful work withstands the rigors of the kitchen.


