

Before you thread your next needle, I want you to look at the pressed flowers you’ve saved—not just as static objects, but as partners for your stitches. This isn’t about simply placing a flower on fabric; it’s about creating a conversation between the delicate, papery texture of a petal and the soft, tactile line of a thread.
Combining these two mediums allows you to build art that is beautifully layered, both visually and emotionally. Your embroidery can give a pressed leaf the stem it lost, or a preserved blossom the energetic rays of a sun it once turned towards. The thread adds structure, movement, and narrative, while the flower offers a tangible piece of a moment in time.
In the ideas that follow, I’ll guide you through techniques that go beyond decoration. We’ll explore how to use stitching to frame, enhance, and transform natural elements into sophisticated wall art. You’ll see how a simple backstitch can become a geometric counterpoint to an organic shape, or how a cluster of French knots can echo the form of a flower’s center. Prepare to see both your thread and your flowers in a completely new light.
1. Create a Celestial Pansy Moon
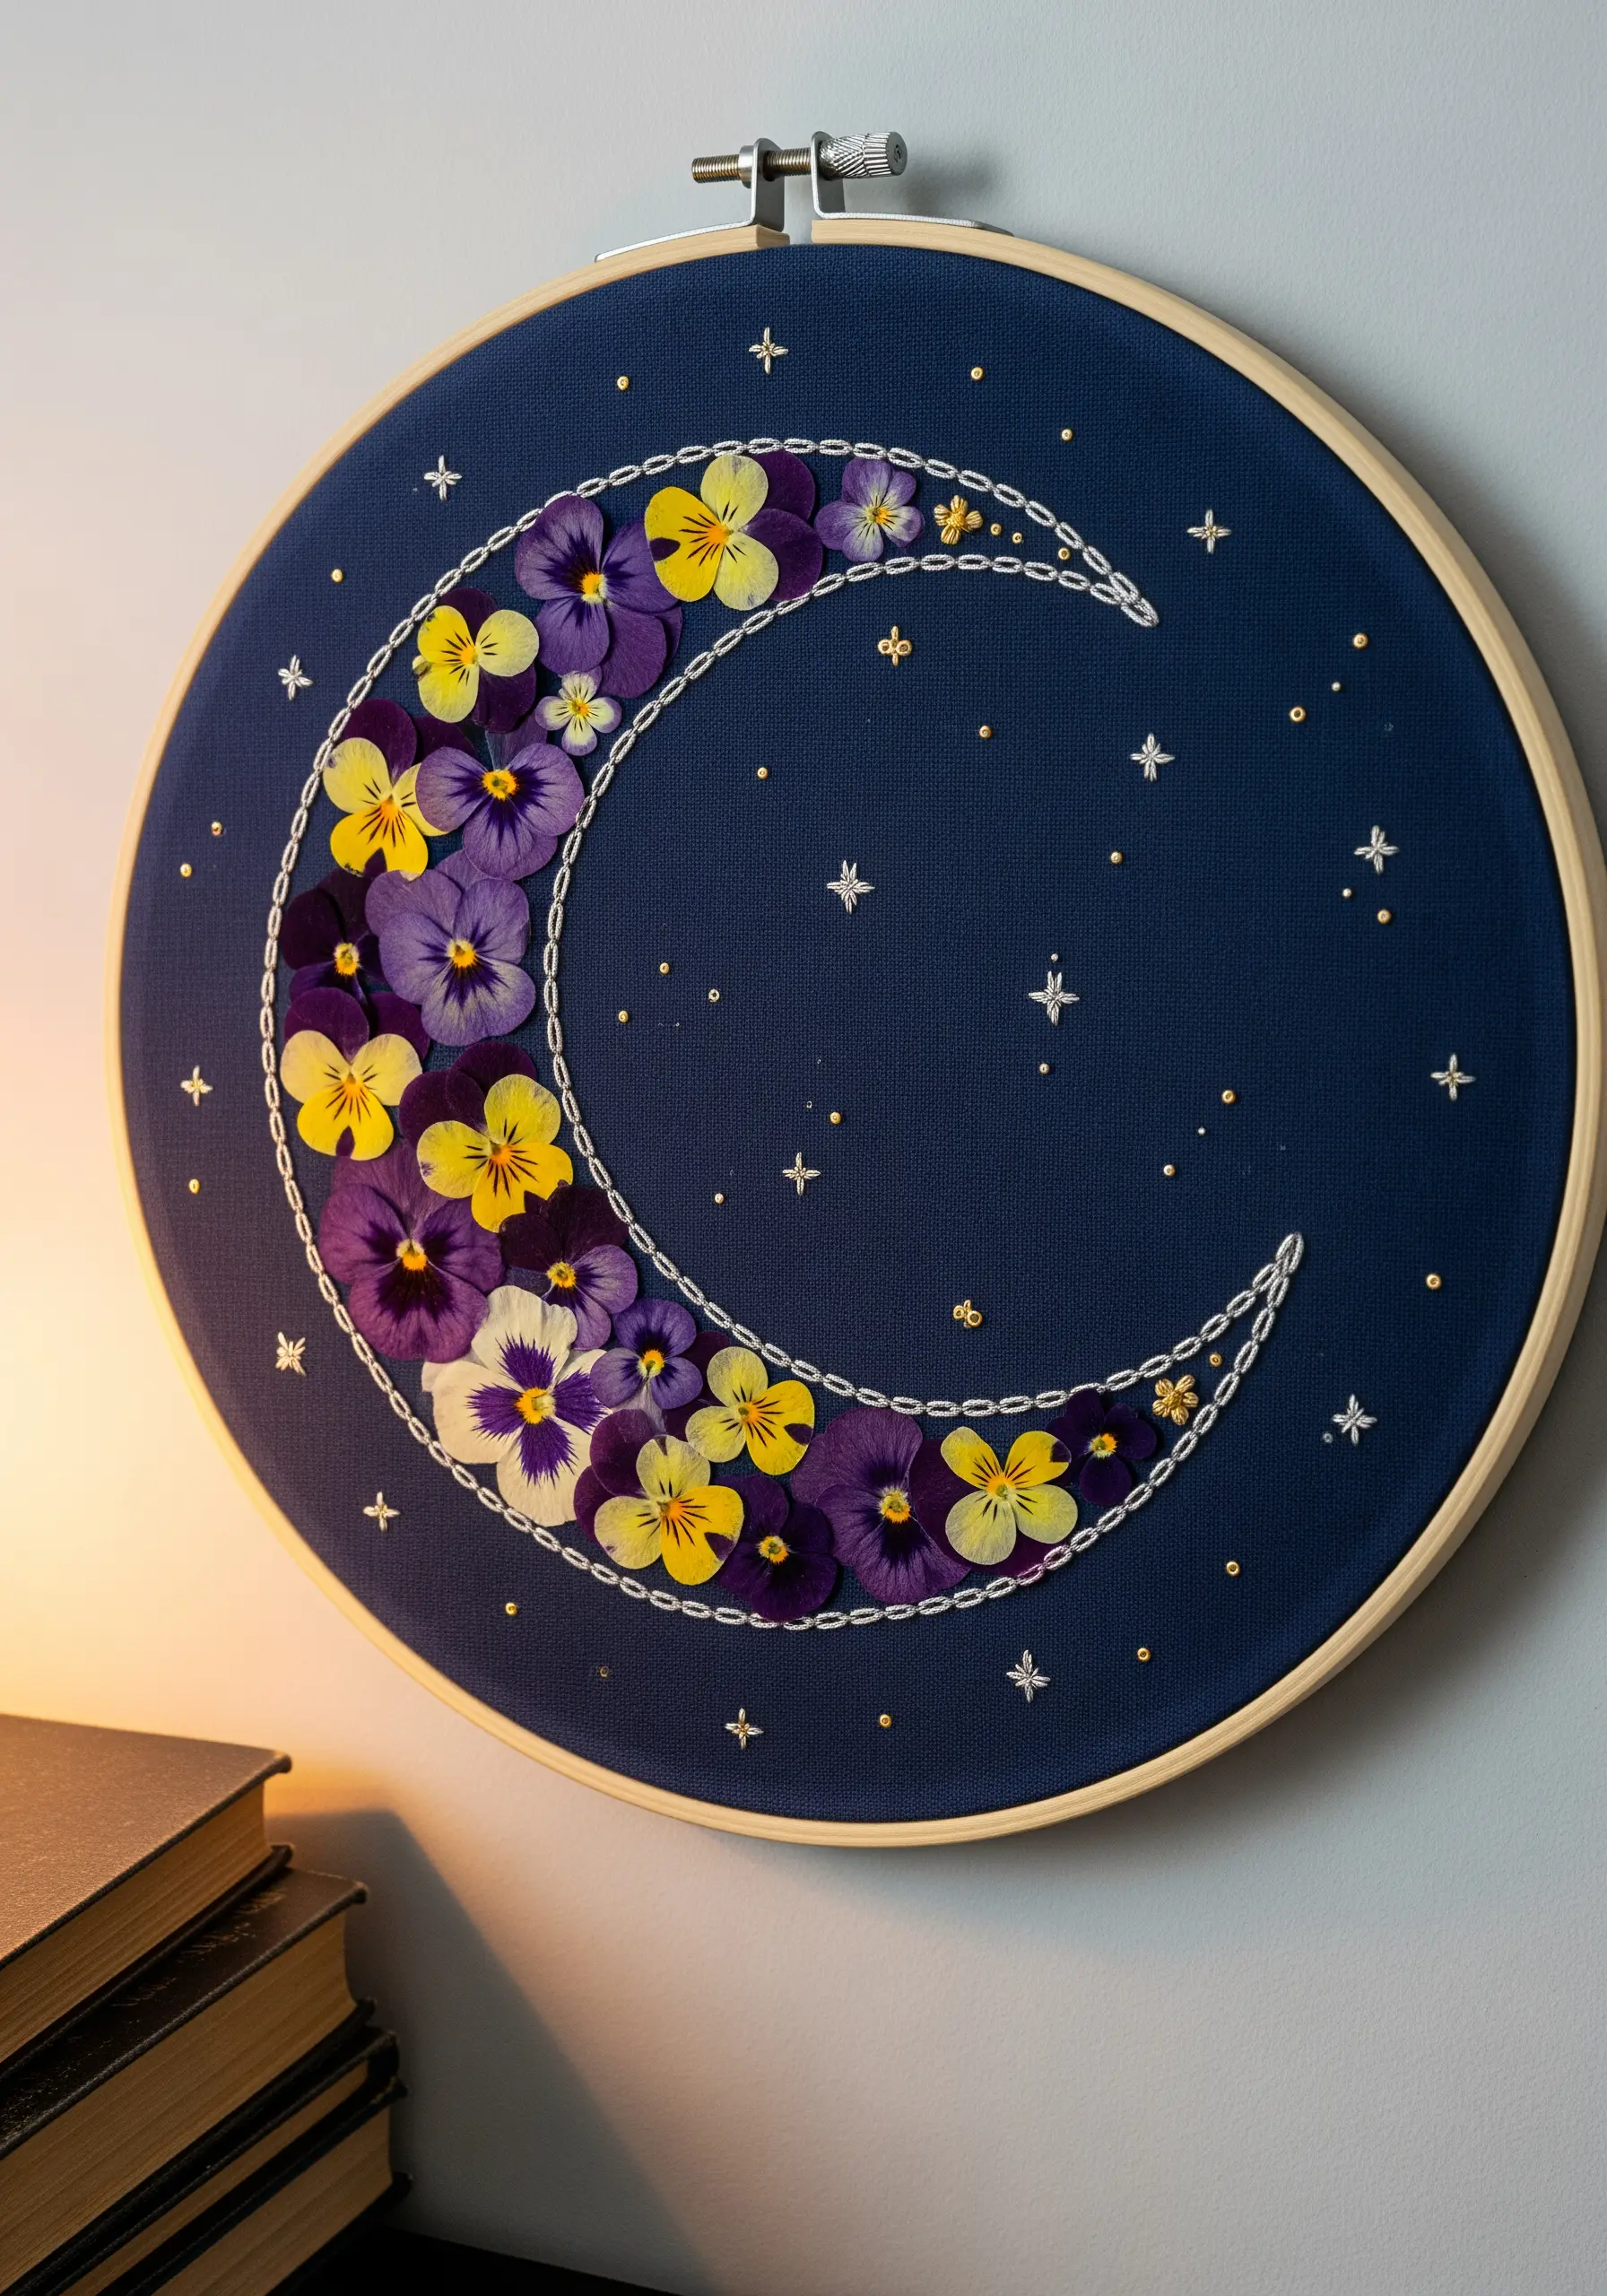
Outline a crescent moon on dark blue or black linen using a simple backstitch in a contrasting light thread, such as silver or white.
Fill the shape with an arrangement of pressed pansies, overlapping their petals to create a dense, floral texture that mimics lunar craters.
This technique works because the sharp, stitched outline provides a clean container for the organic shapes of the flowers, creating a balanced composition.
Scatter tiny star stitches (using single straight stitches) and French knots in metallic gold thread across the negative space to complete your cosmic garden.
These dreamy nature-inspired embroidery designs turn a simple hoop into a piece of enchanting wall art.
2. Design a Modern Botanical Chart
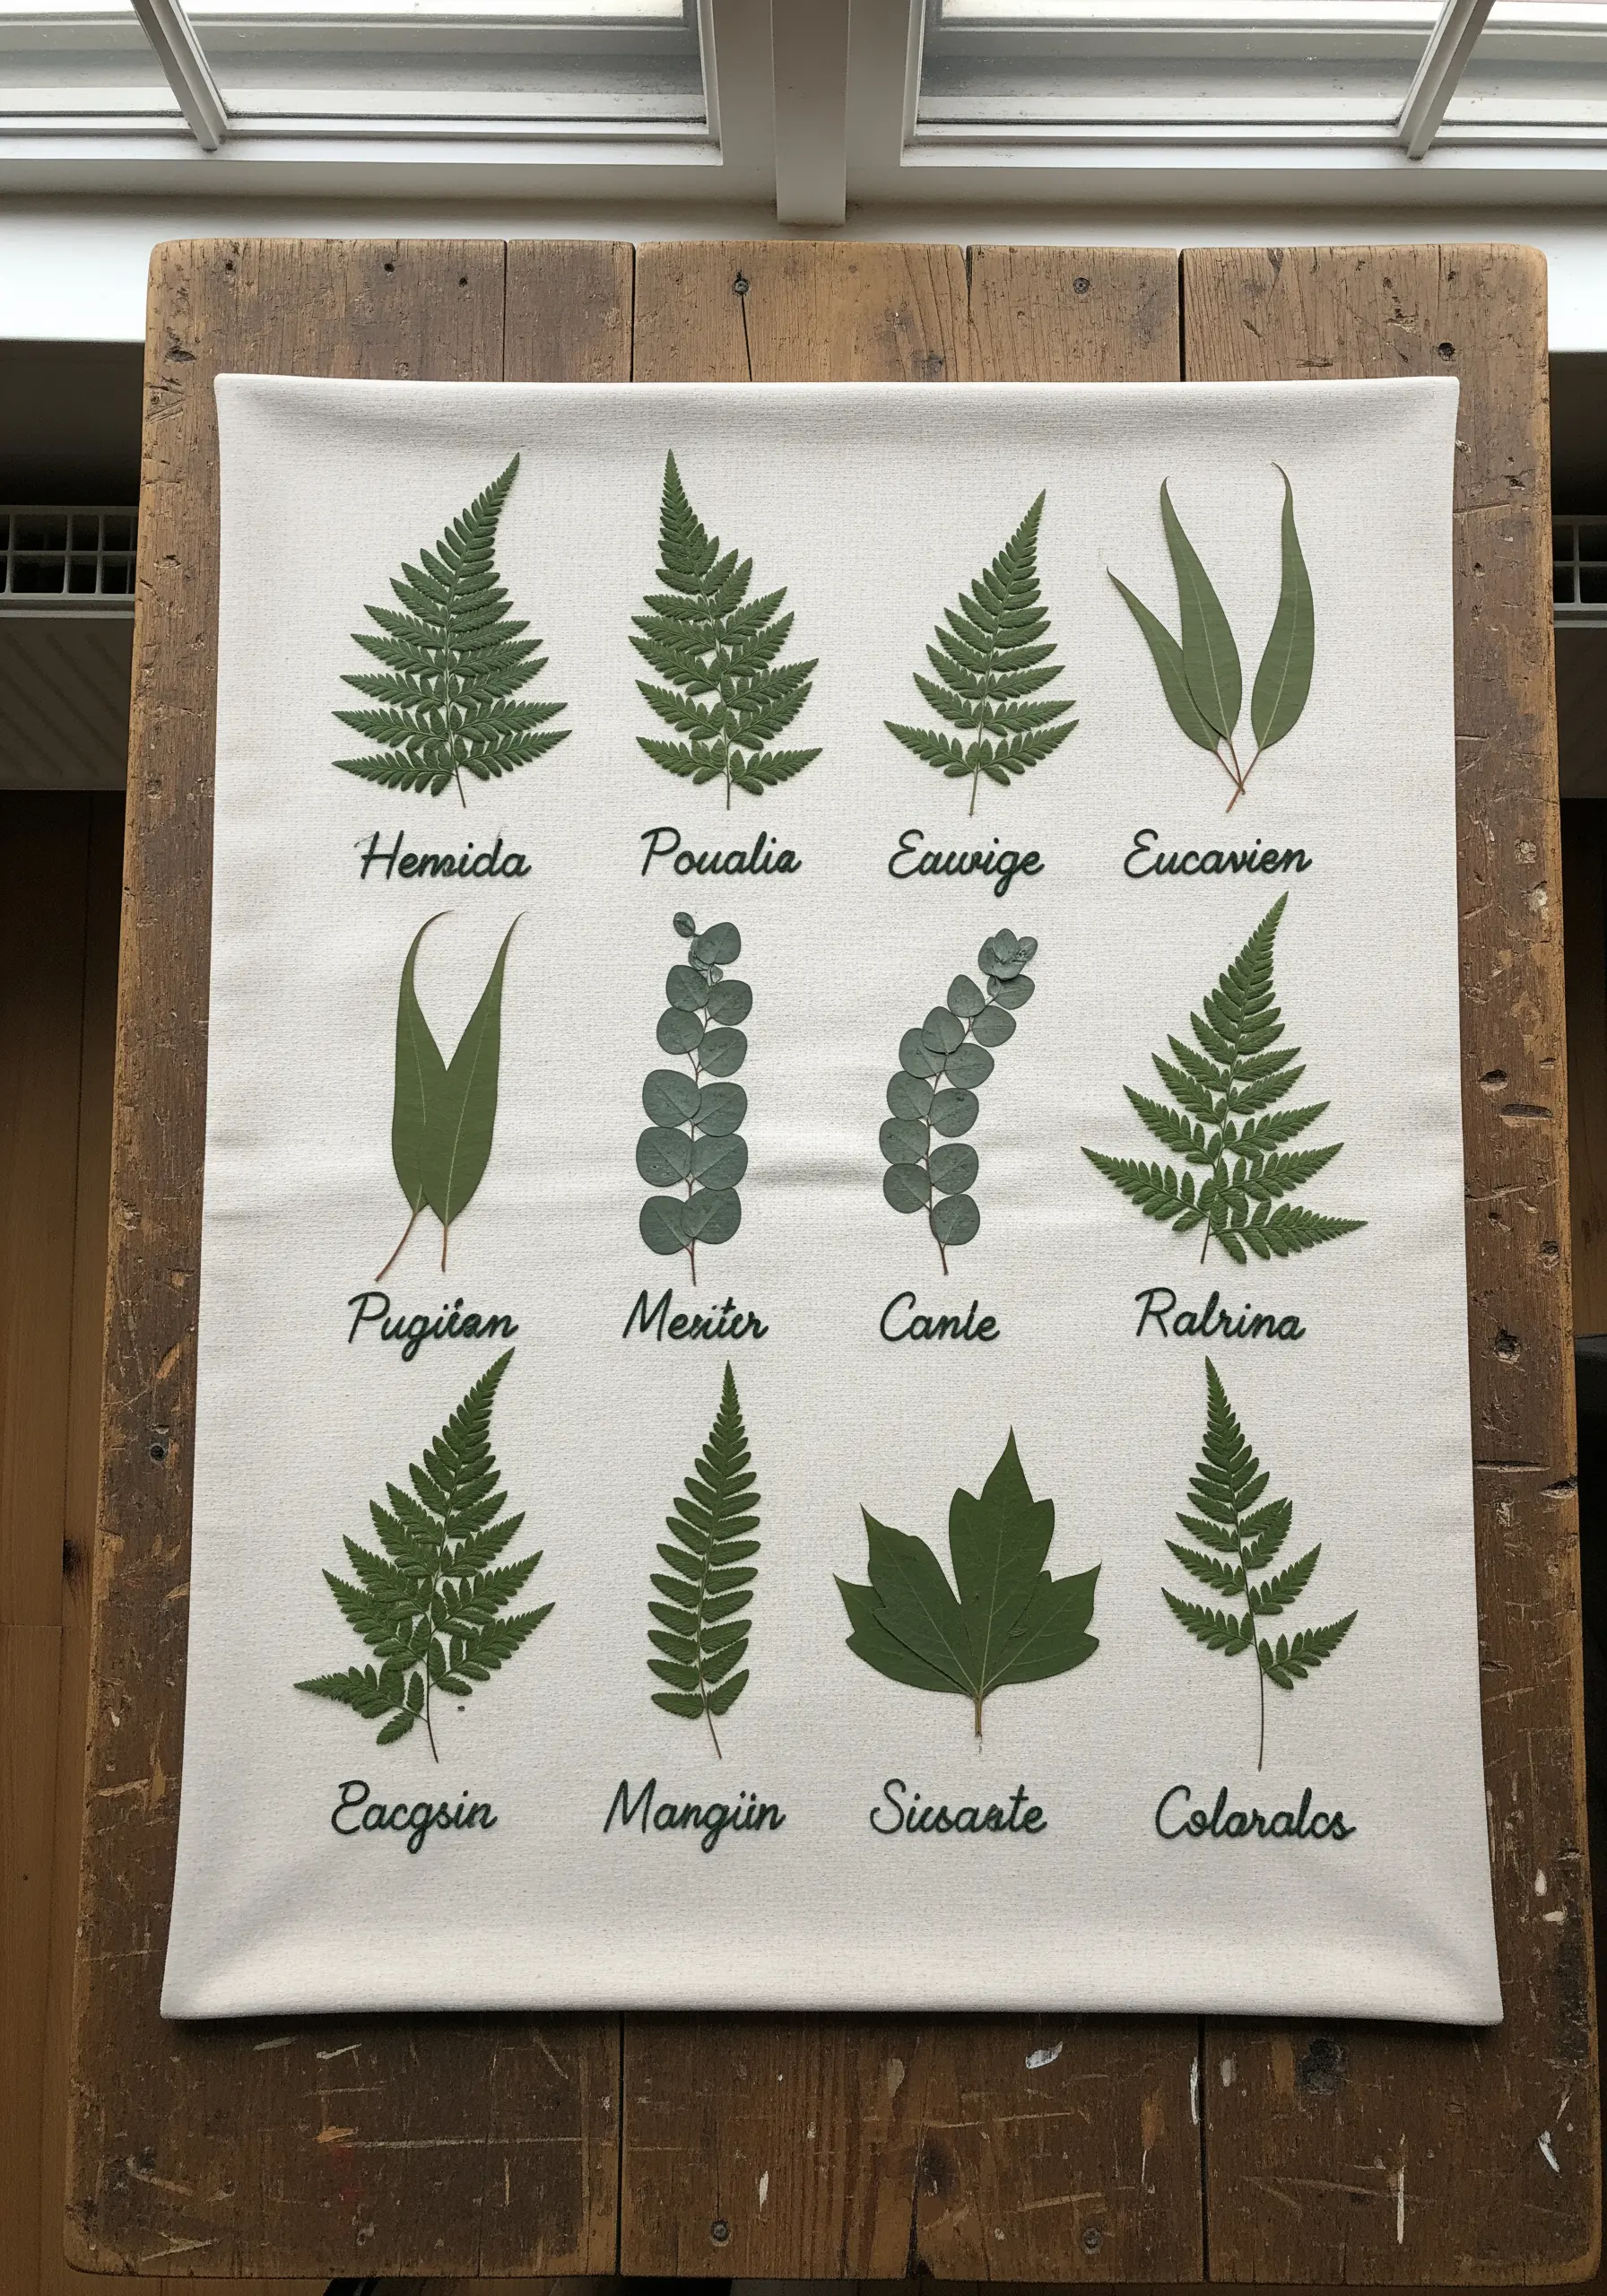
Arrange pressed ferns and leaves in a clean grid on a neutral-colored, even-weave fabric like linen or cotton canvas.
Instead of using scientific names, stitch imaginative or personal words beneath each specimen using a fine, single-strand backstitch for crisp lettering.
This approach transforms a traditional specimen display into a piece of personal art, where the focus is on form and creative expression rather than scientific accuracy.
Using a single dark color for the text, like a charcoal gray or deep green, ensures the embroidered words complement the botanicals without overpowering them.
These are great projects to try with real garden leaf tracing ideas to capture authentic shapes.
3. Craft a Floating Wildflower Triptych
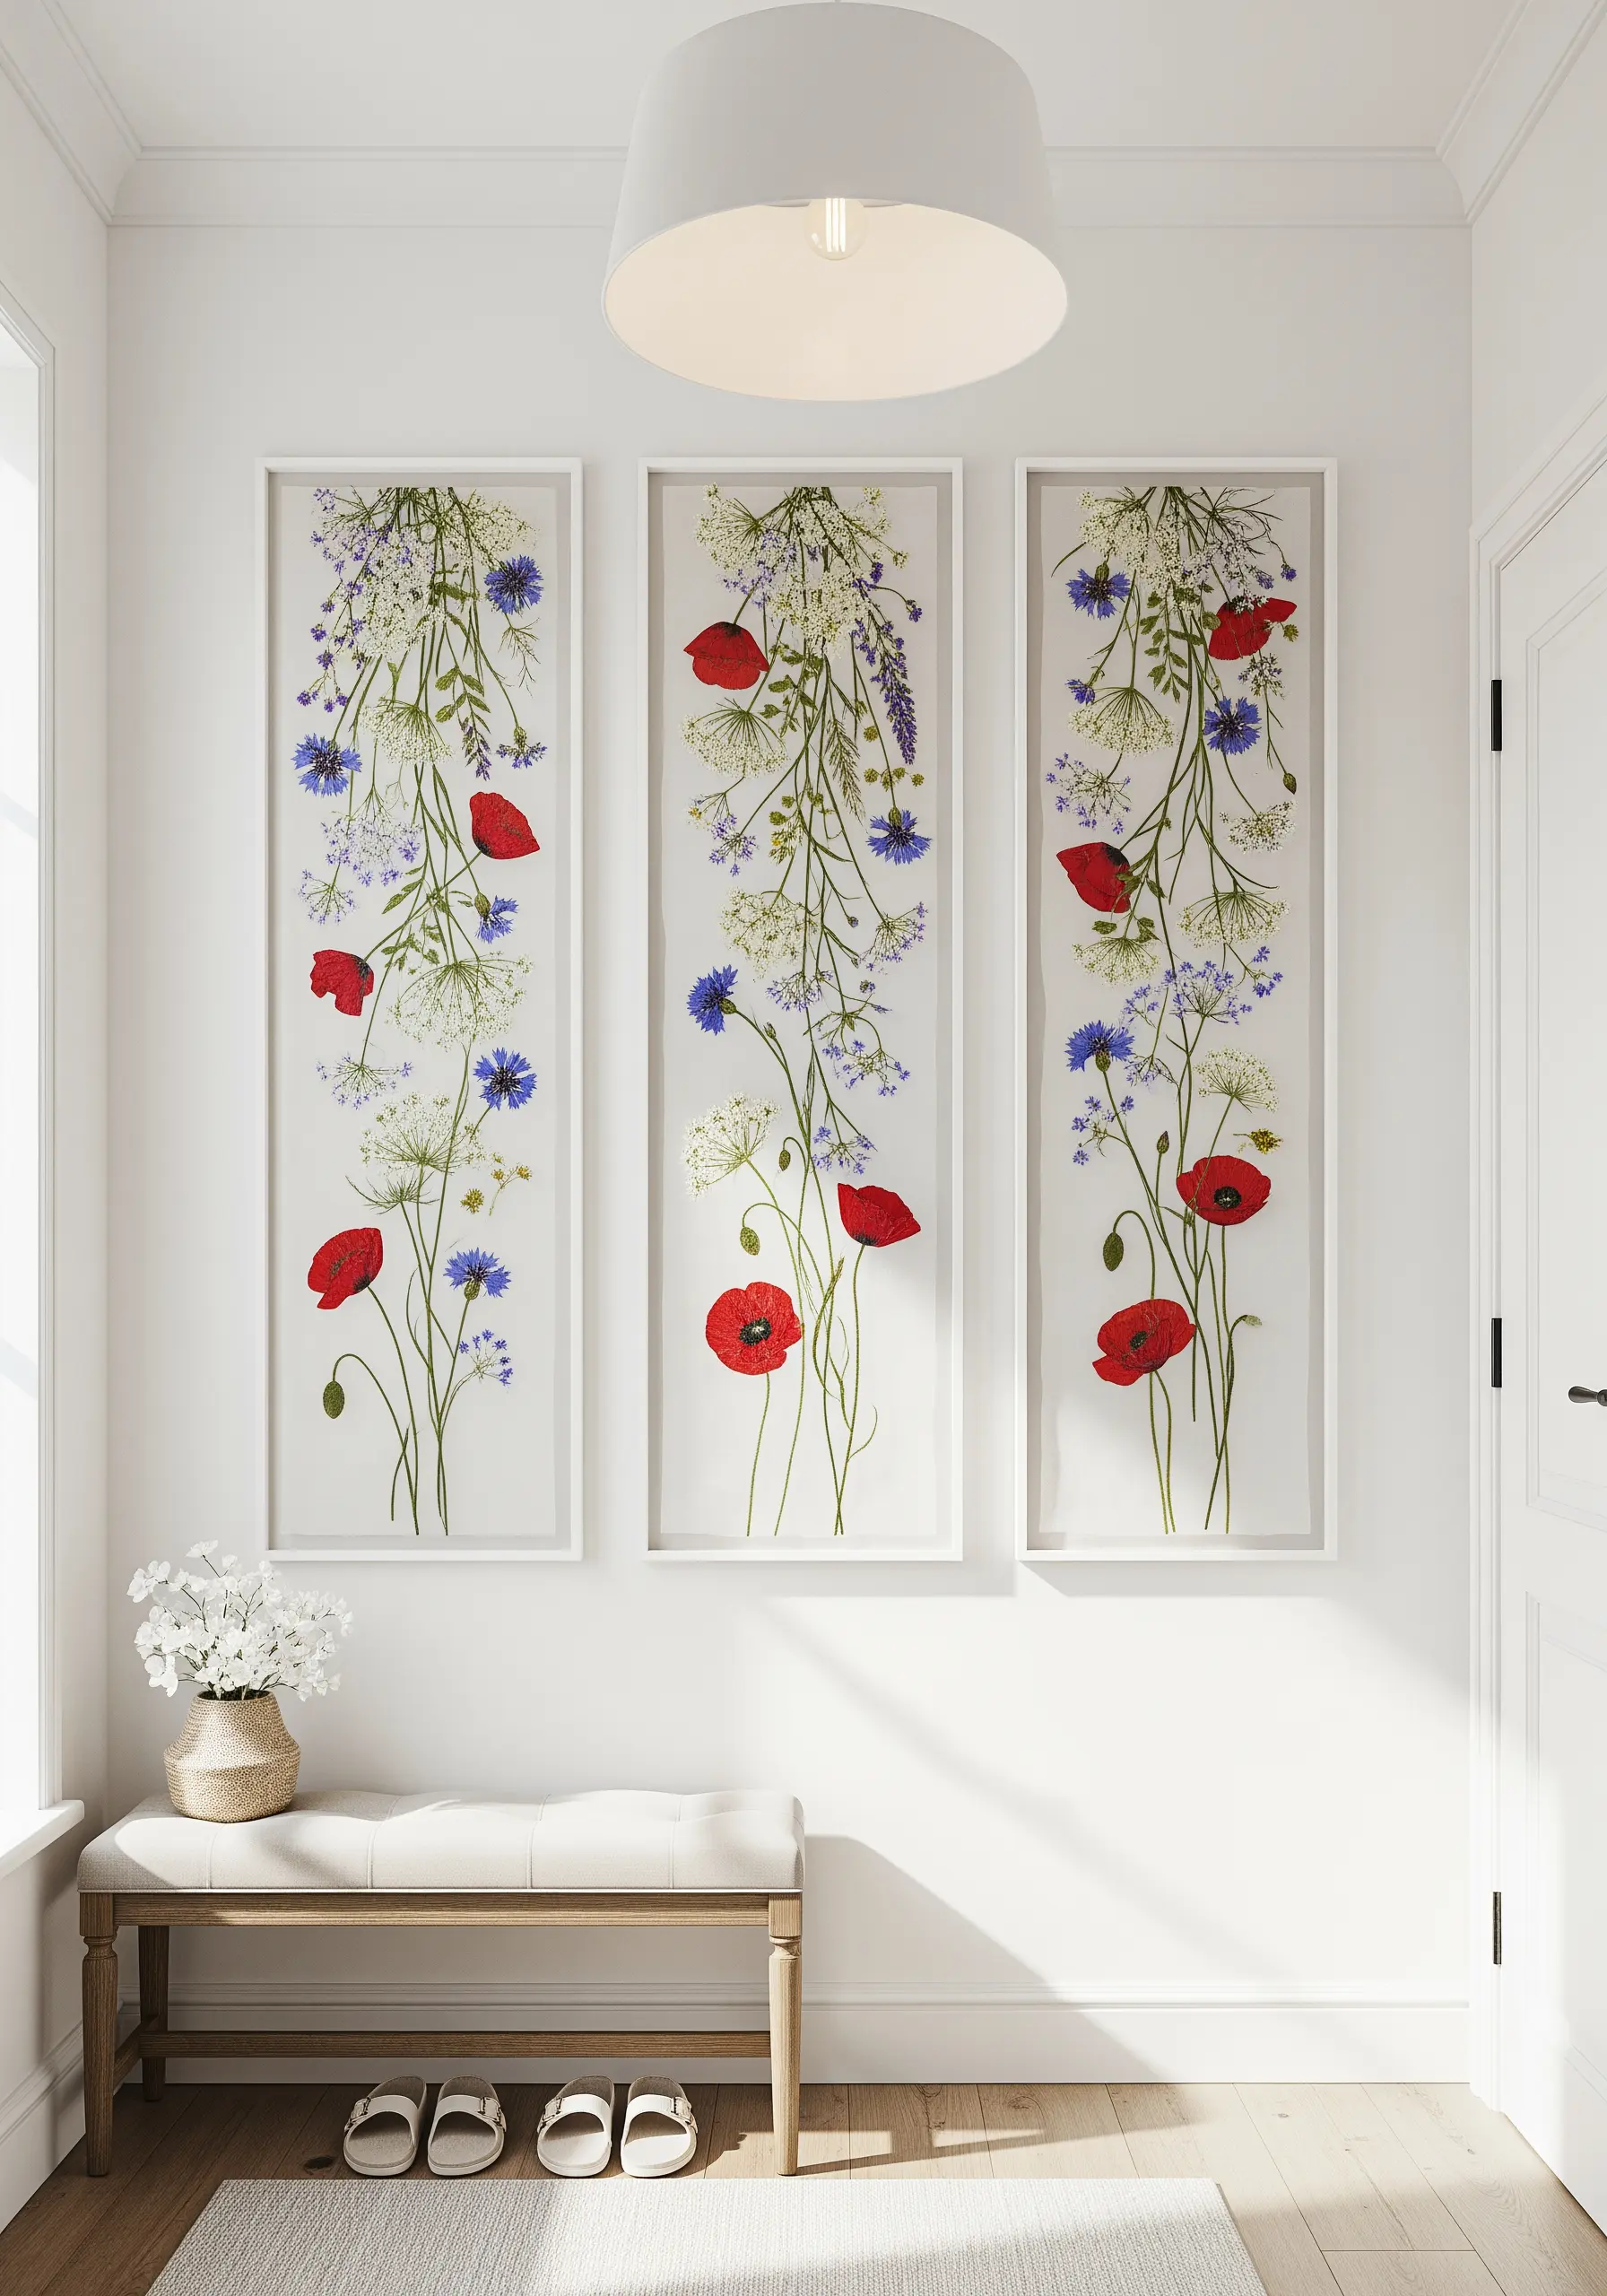
Select long-stemmed pressed flowers like poppies, cornflowers, and Queen Anne’s lace for a vertical composition.
Instead of placing them directly on fabric, use a sheer material like tulle or organza stretched in a floating frame.
Use single strands of green thread to stitch delicate stems and leaves, connecting the pressed blossoms and creating the illusion that they are growing suspended in air.
This method enhances the natural delicacy of the flowers, and grouping three narrow frames together creates a powerful, gallery-style statement piece.
Framed embroidery art pieces like this can transform an entire wall.
4. Anchor Abstract Stitches with a Floral Center
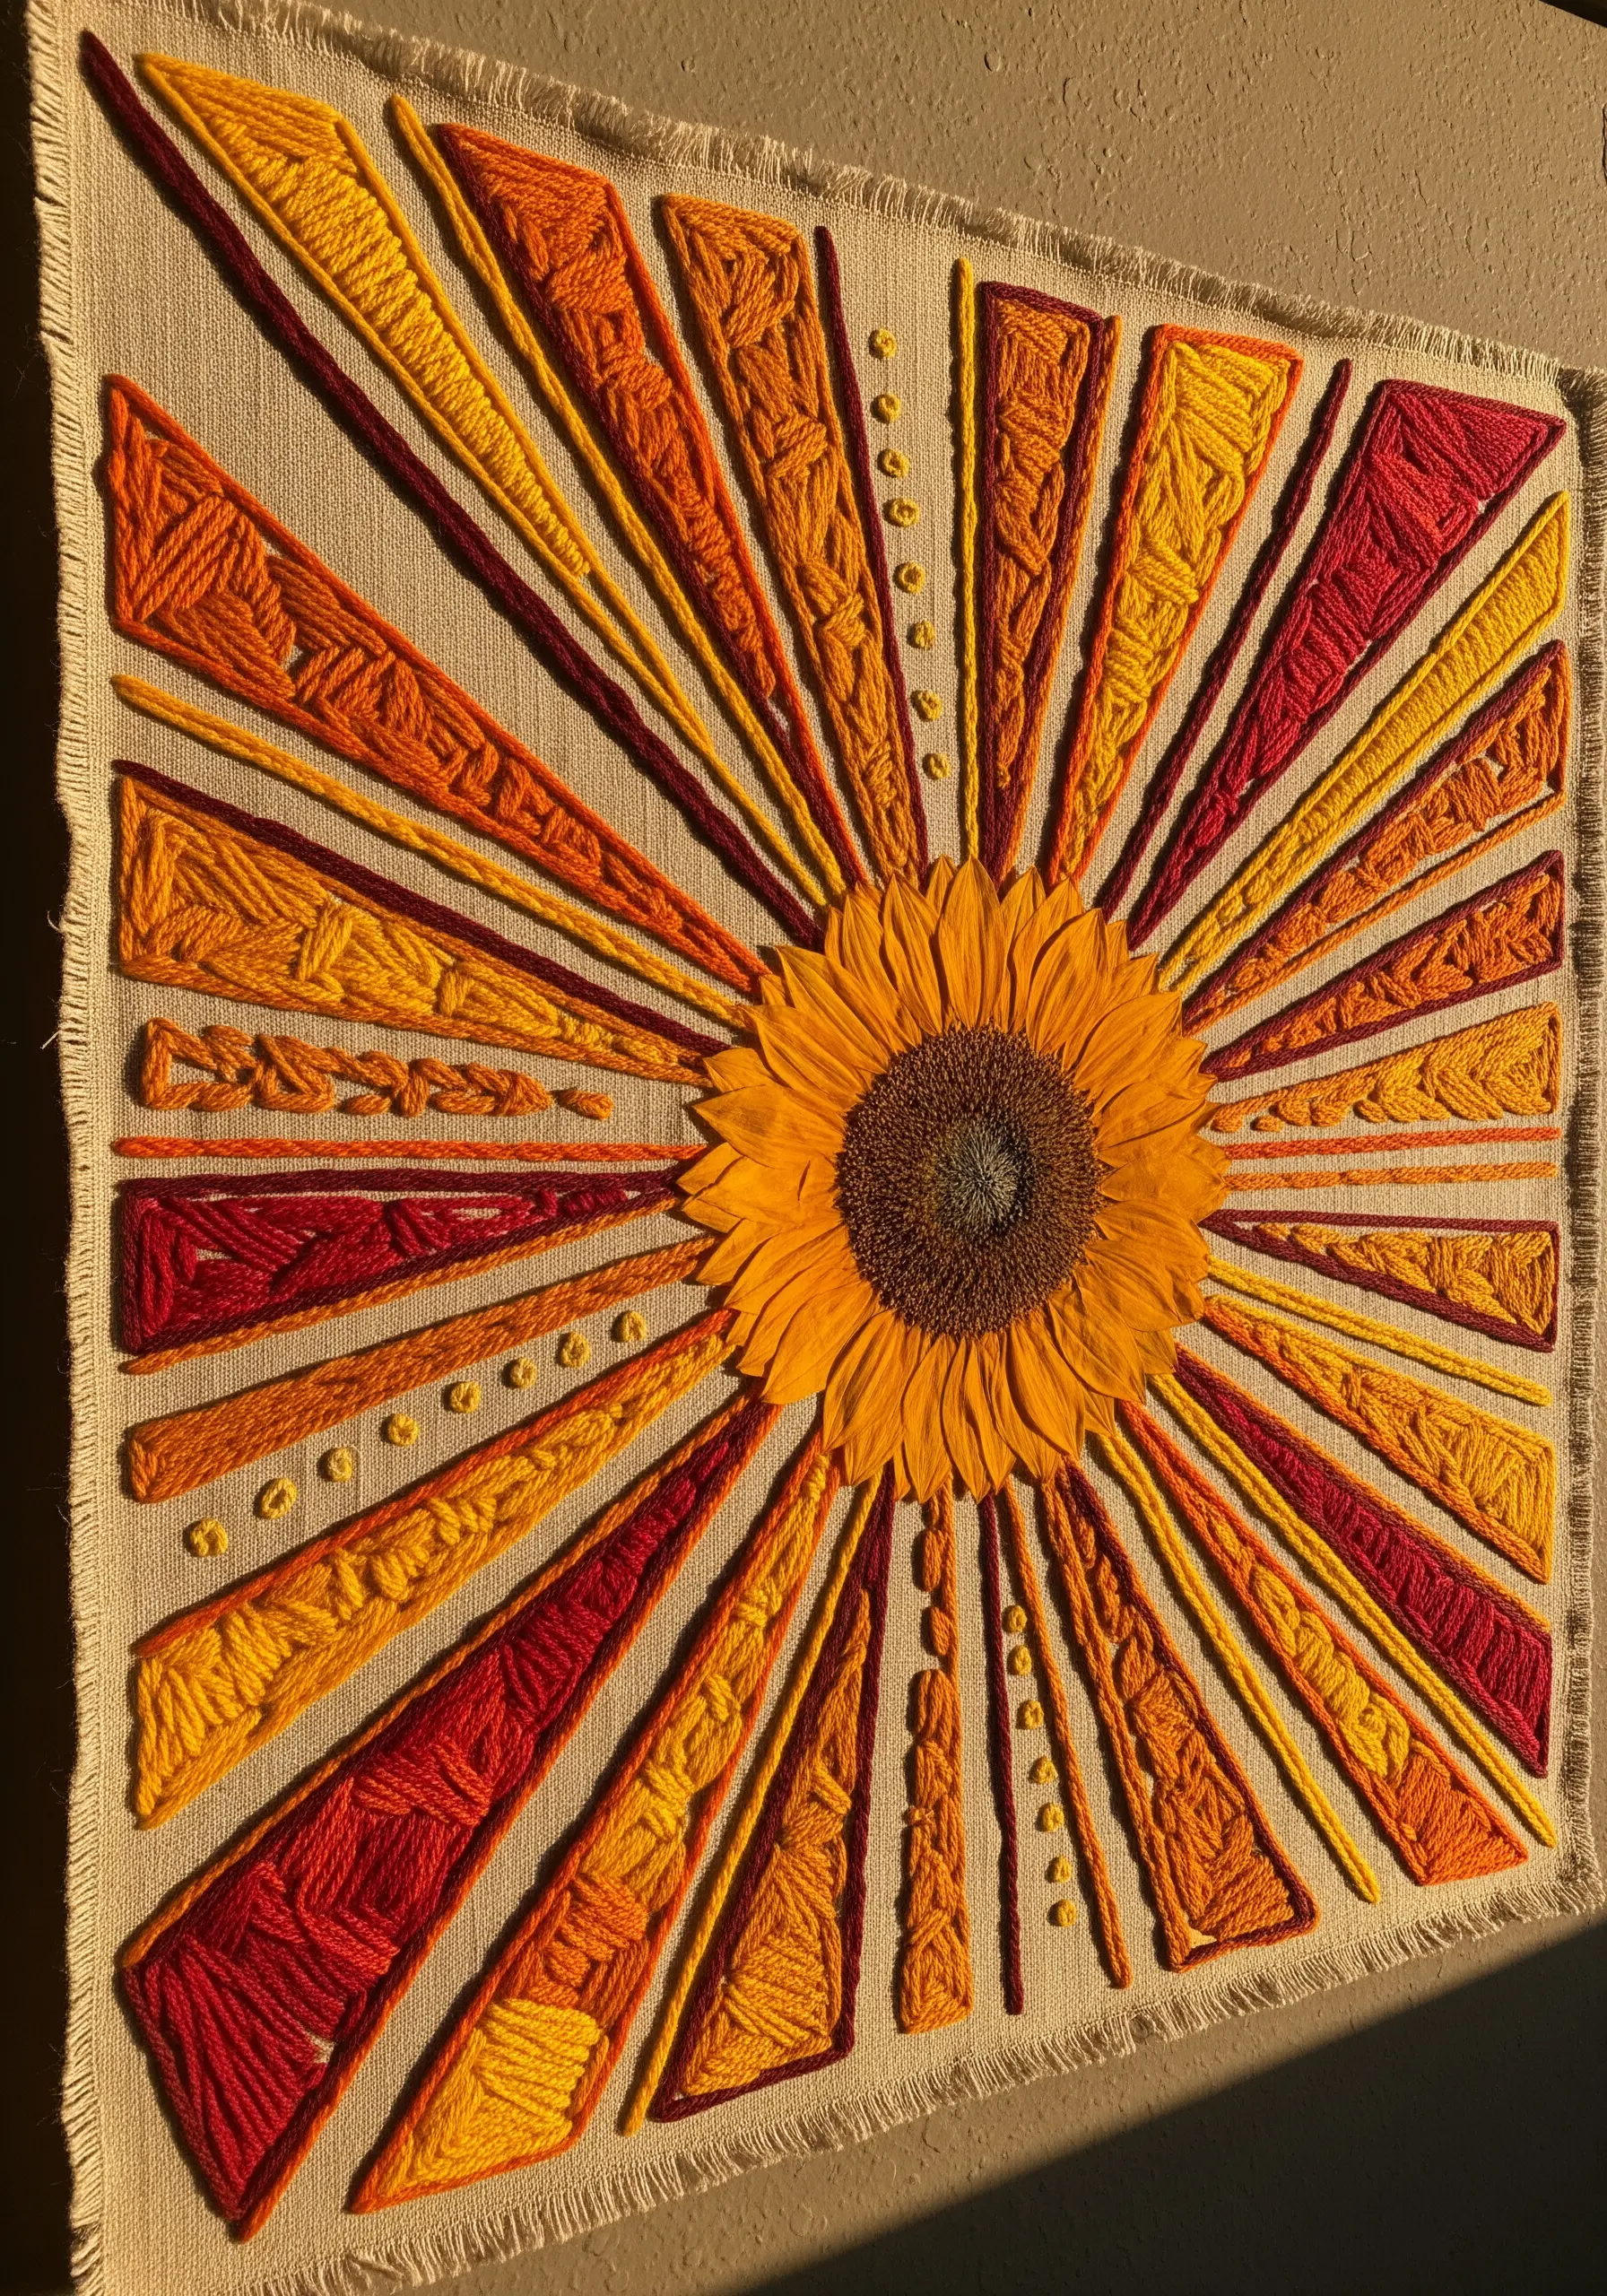
Place a large, bold pressed flower, like a sunflower, in the center of your fabric to act as a powerful focal point.
Embroider radiating lines outward using thick yarns or multiple strands of floss in a warm, analogous color palette of reds, oranges, and yellows.
Vary the stitch techniques within the rays—satin stitch, seed stitch, and wrapped bars—to add texture and visual interest to your abstract design.
This composition works by balancing the natural detail of the flower with the graphic energy of the embroidered sunburst.
Explore more abstract color-blend stitch ideas to make your work feel dynamic and modern.
5. Map the Stars with Floral Constellations
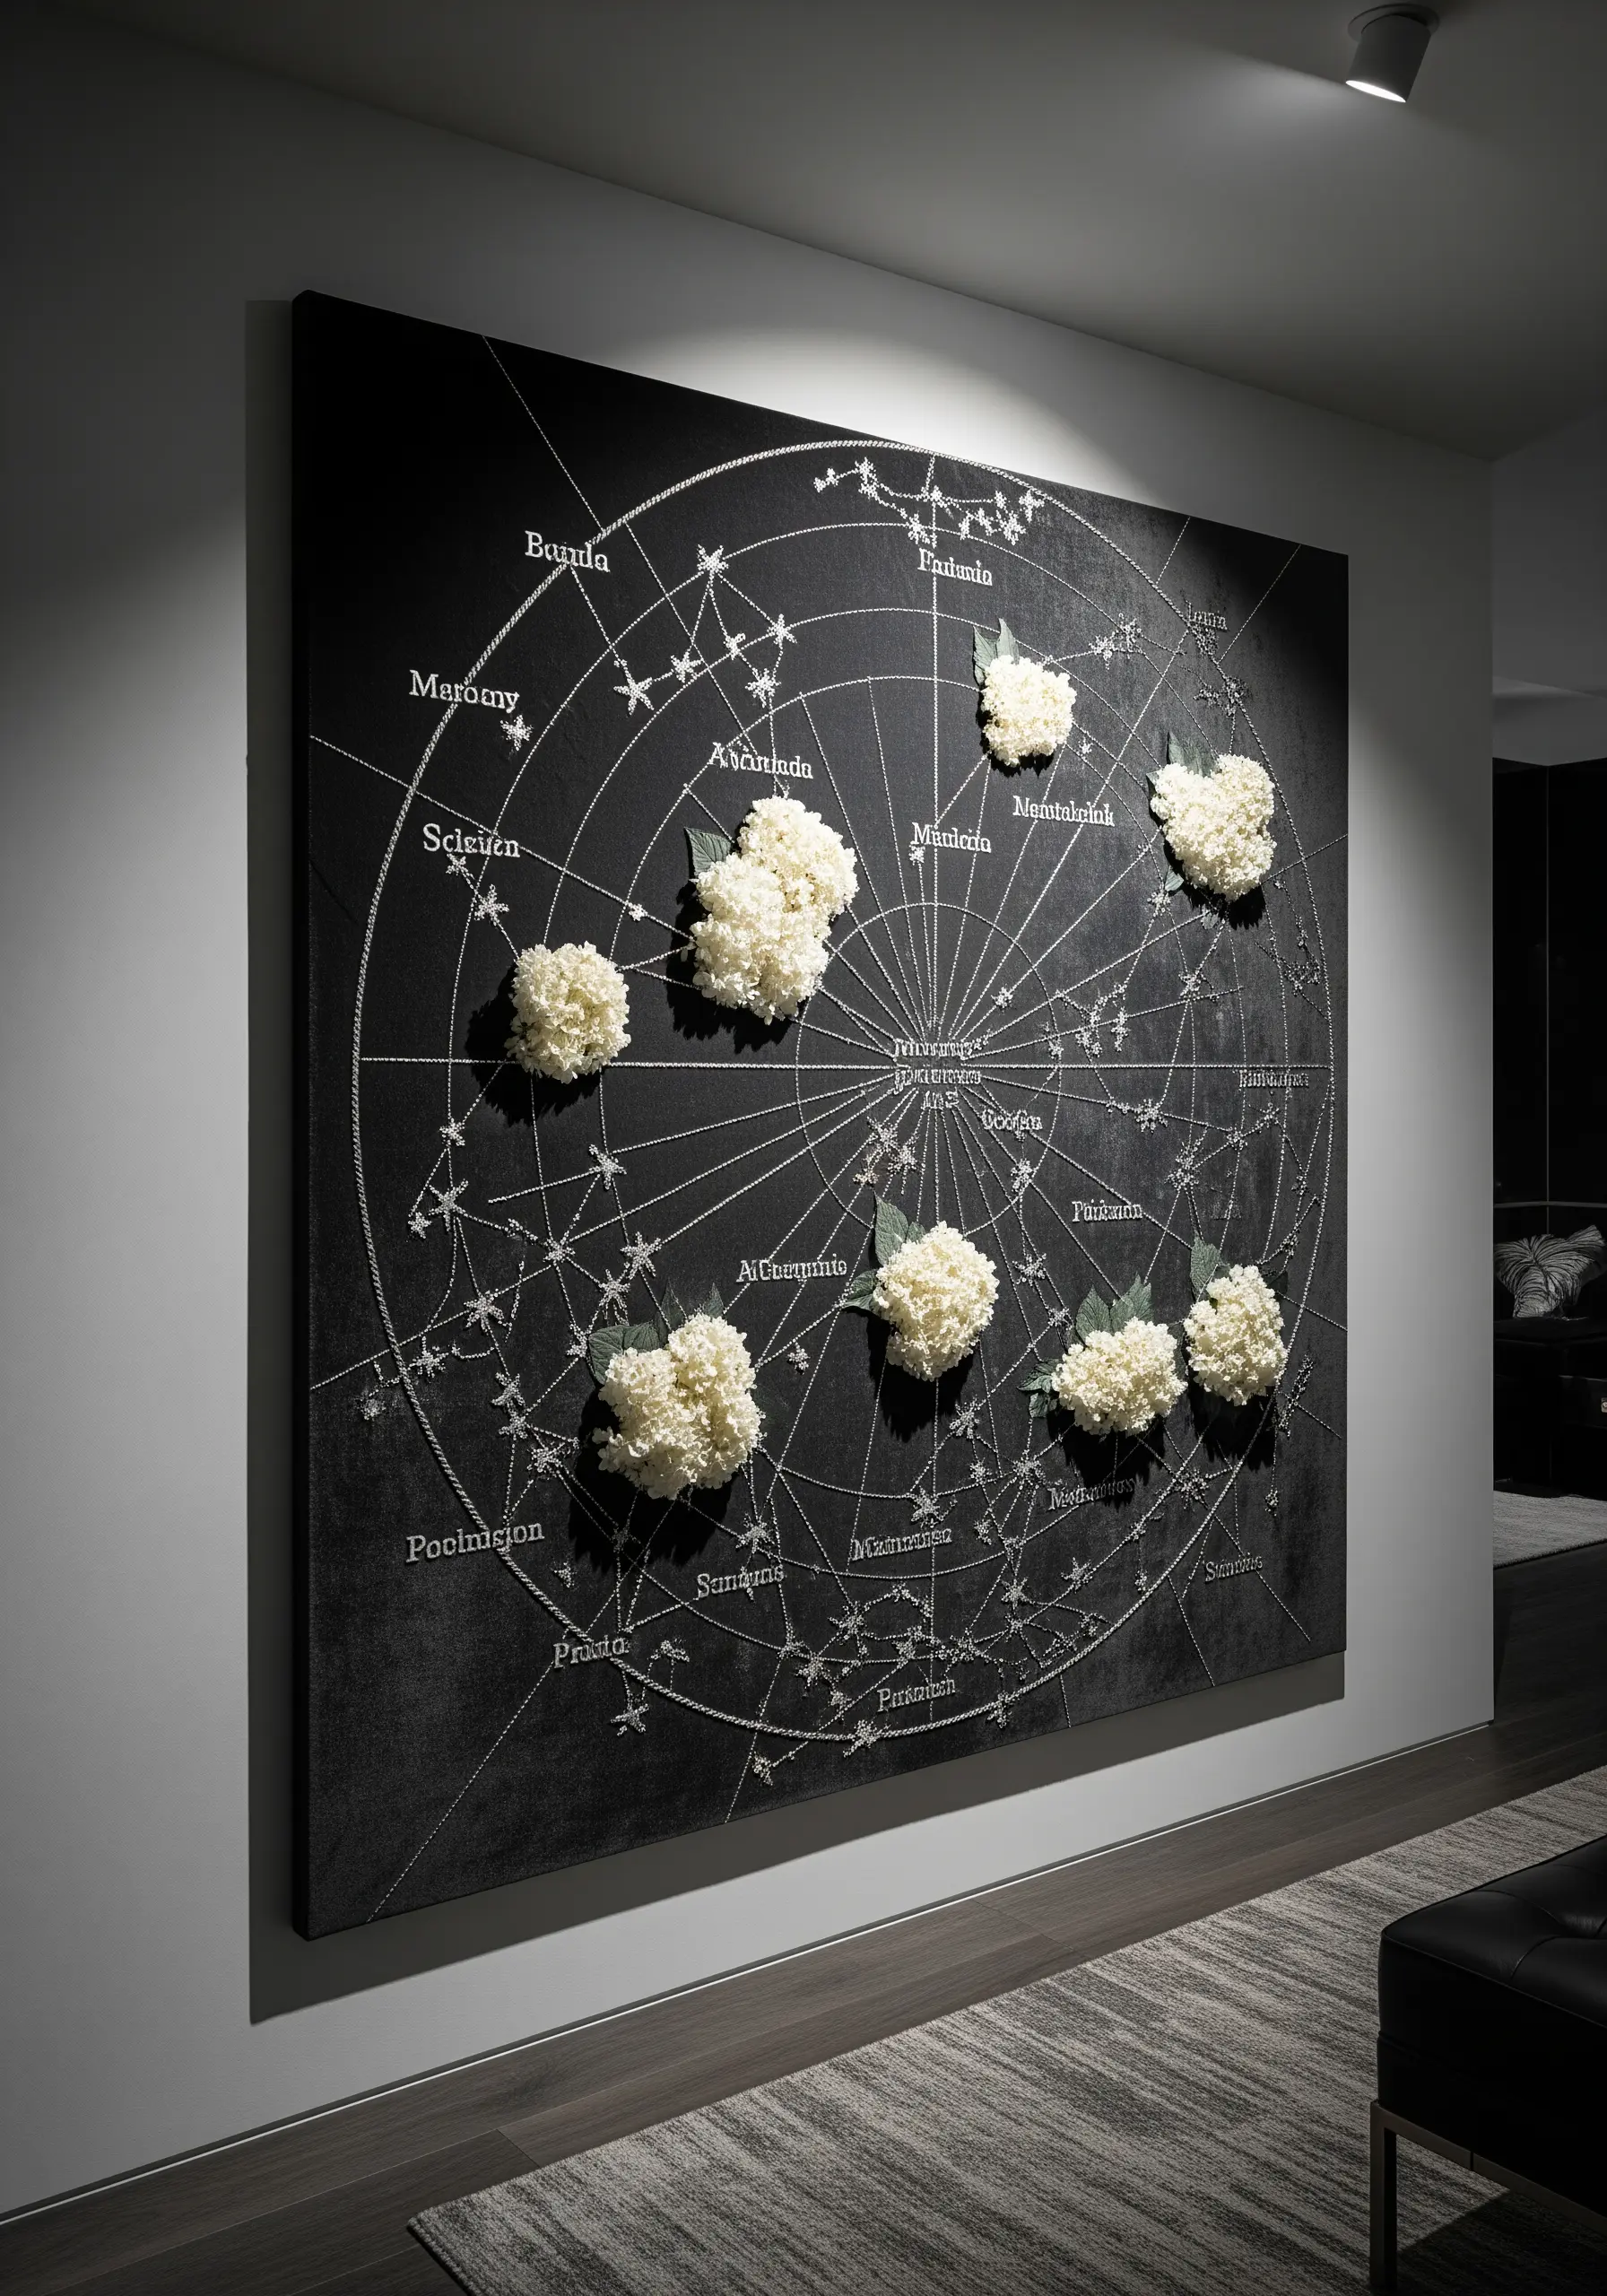
Use a high-contrast background, such as black canvas, to make your stitches and flowers pop.
Embroider a celestial map or zodiac constellations using a fine, metallic silver thread in a simple backstitch or whipped backstitch for clean lines.
Instead of stitching the largest stars, secure clusters of small, light-colored pressed flowers—like baby’s breath or hydrangea—to represent prominent celestial bodies or nebulae.
This technique elevates a simple line drawing into a sophisticated mixed-media piece with layers of texture and meaning.
Consider adding other metallic thread wall art designs for extra shimmer.
6. Build a Botanical Terrarium Banner
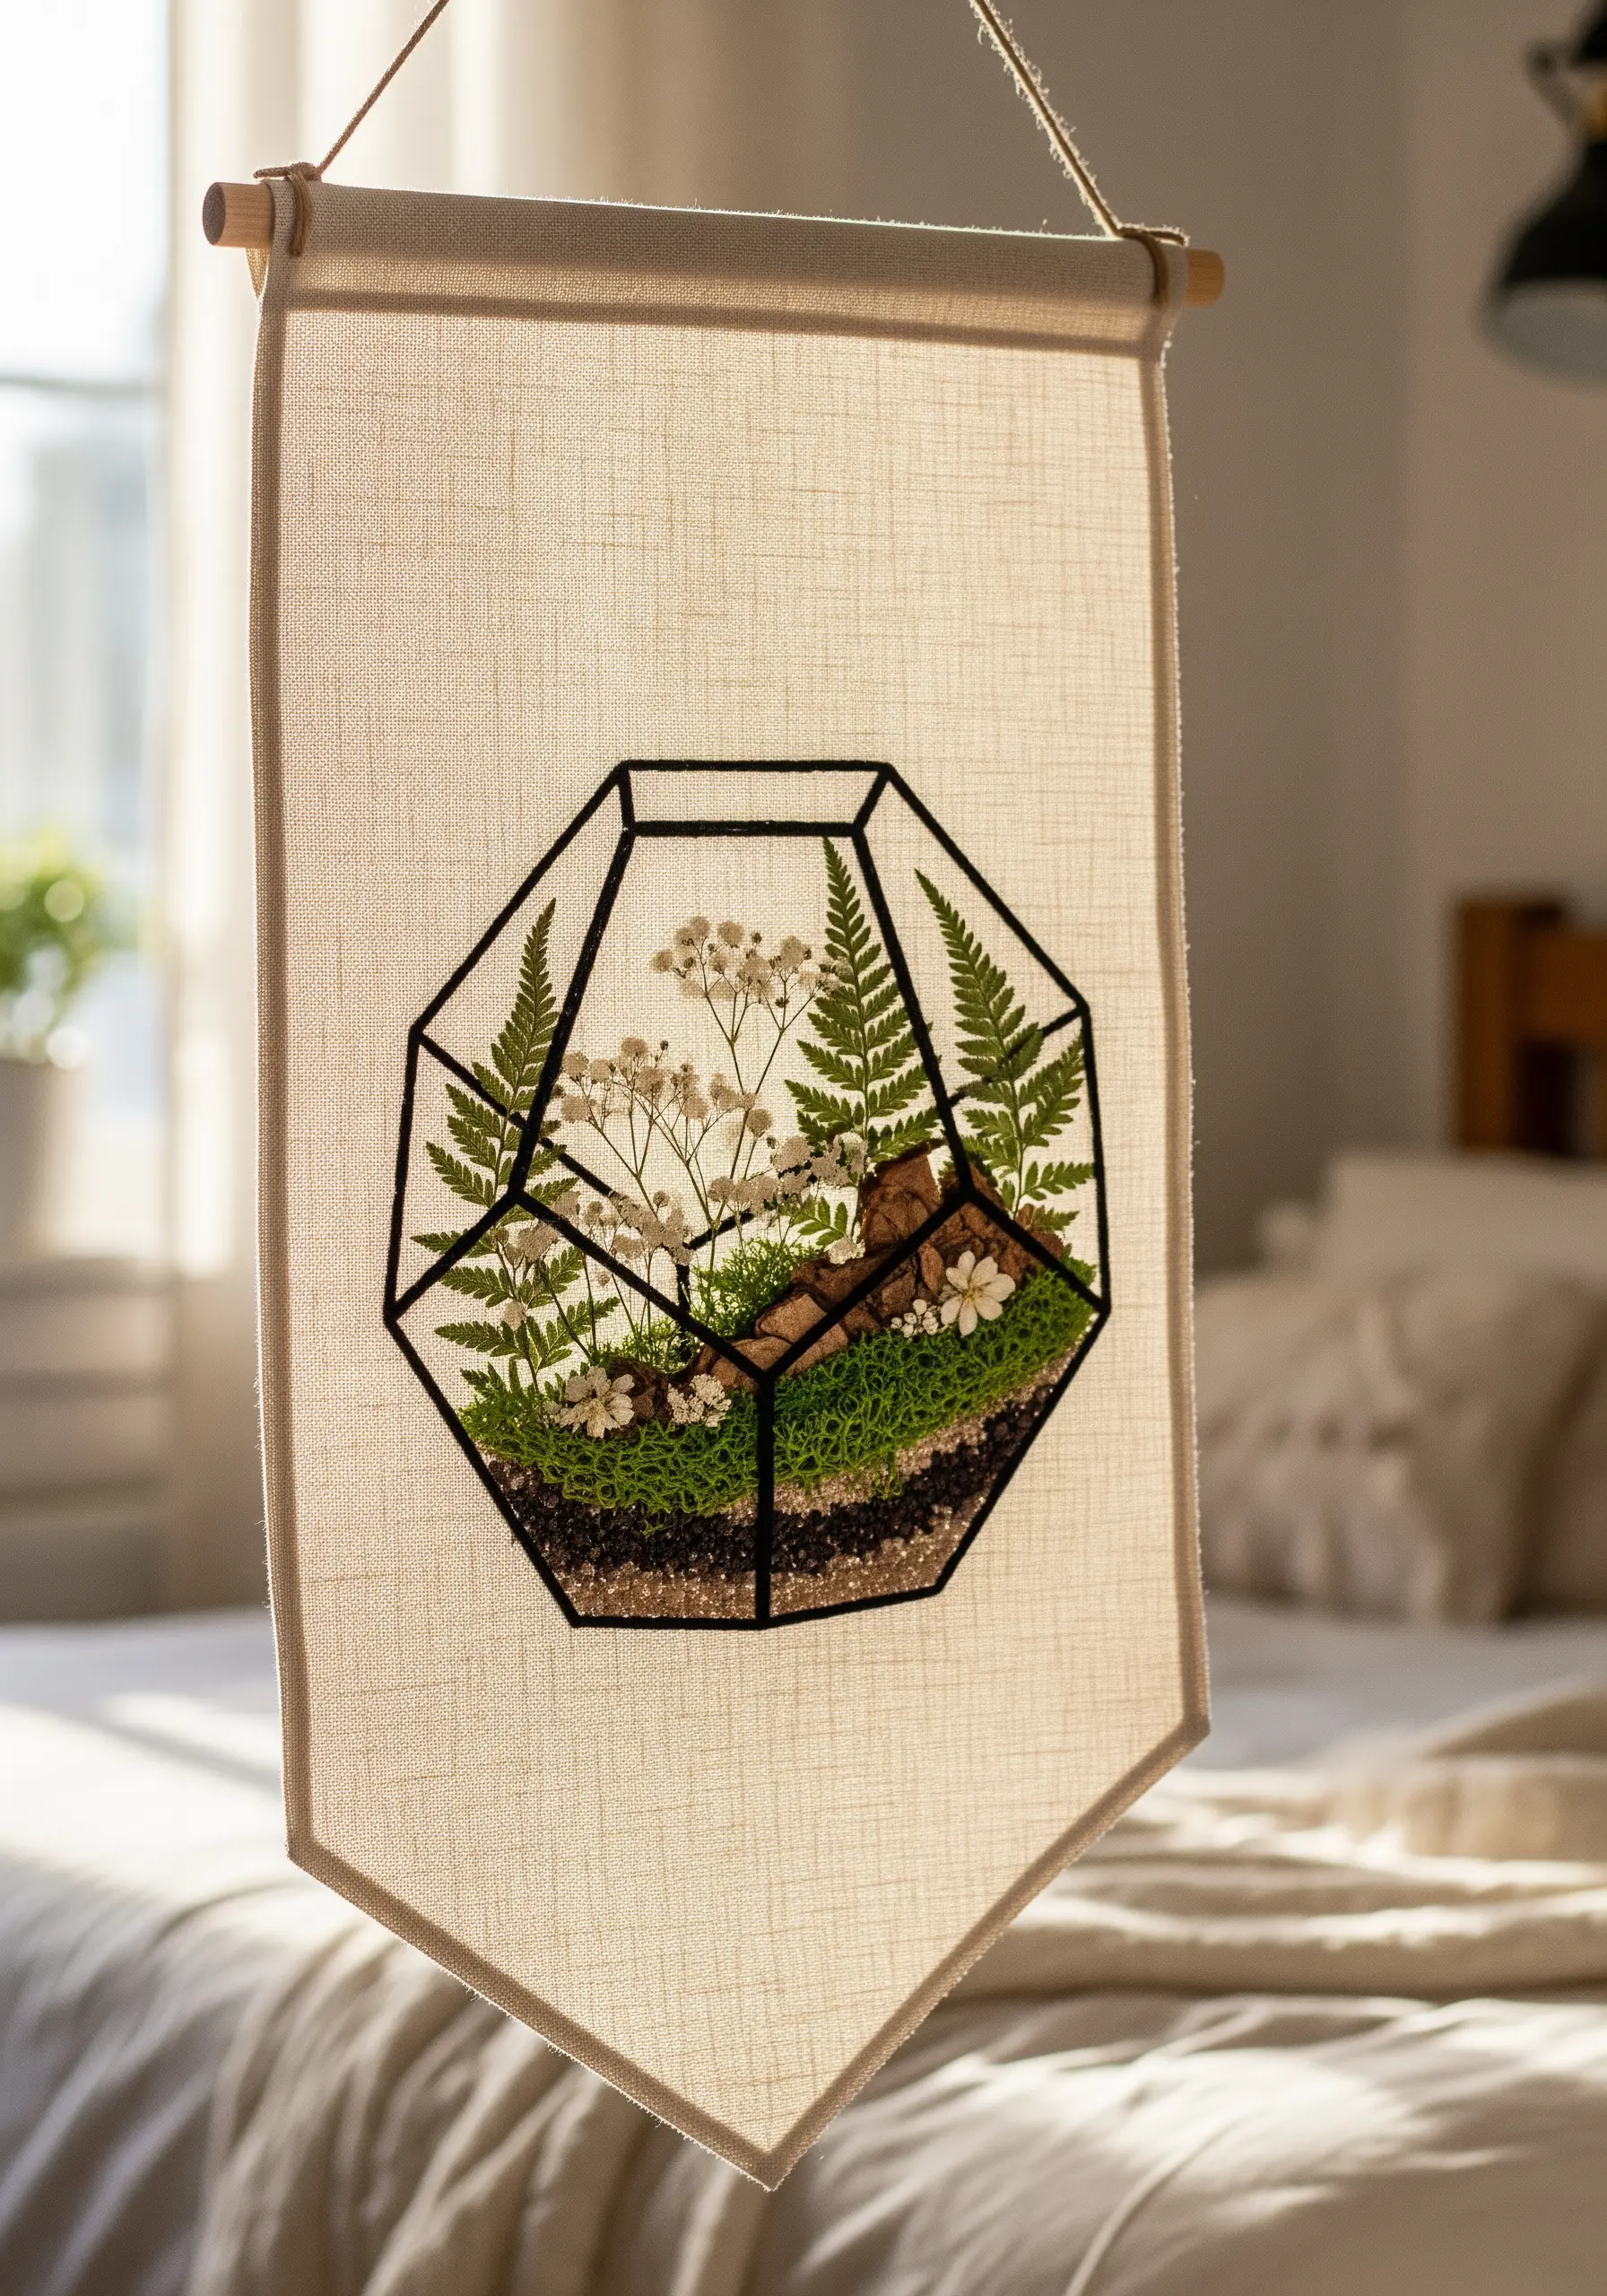
Stitch the geometric outline of a terrarium onto a linen wall banner using a bold black thread and a sharp backstitch.
Create layers of ‘soil’ and ‘sand’ at the bottom of the design using dense seed stitches or French knots in earthy tones.
Carefully arrange small pressed ferns, flowers, and leaves inside the stitched outline, securing them with tiny, discreet stitches or fabric glue.
The contrast between the rigid, embroidered geometry and the organic, delicate botanicals is what gives this piece its modern appeal.
Add other gentle botanical embroidery stitches to enhance the foliage inside your terrarium.
7. Add Dimension with 3D Floral Buds
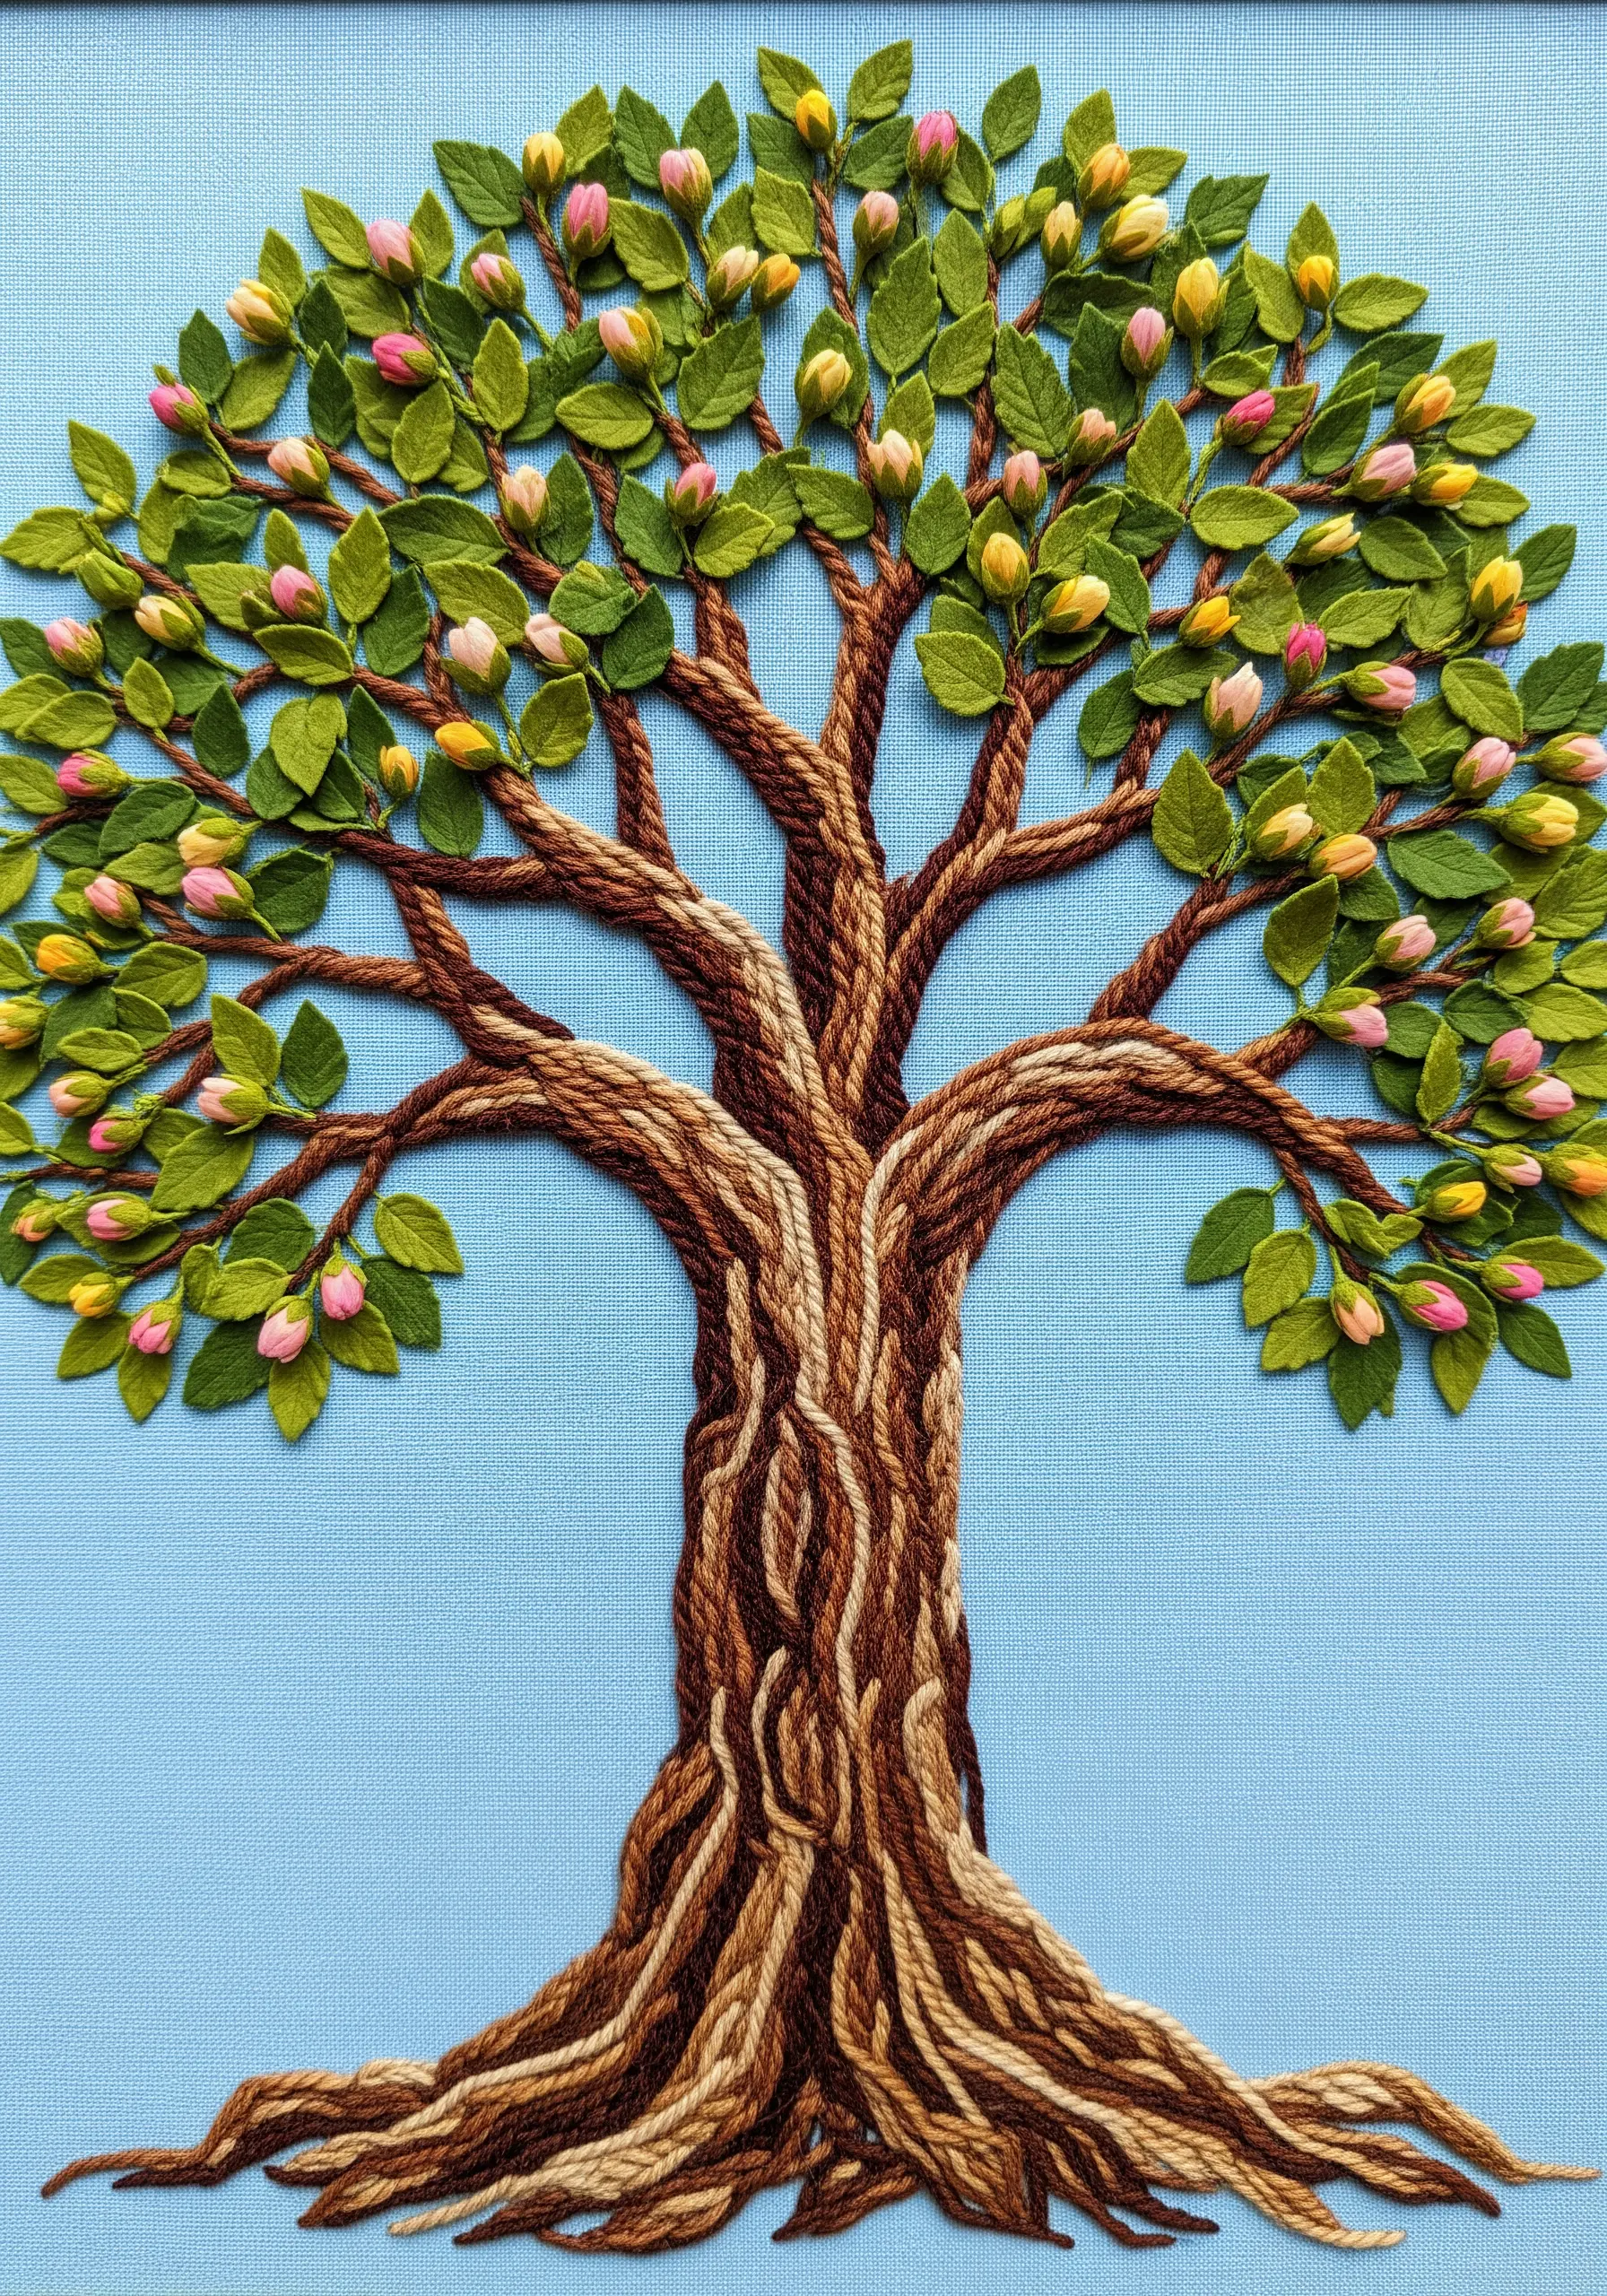
Embroider a tree with a heavily textured trunk and branches using couching stitches, where you lay down thick threads and tack them with a finer thread.
For the leaves, use detached chain stitches or satin-stitched shapes in various shades of green to create depth.
Instead of using French knots for blossoms, carefully attach tiny, real dried flower buds at the tips of the branches.
This creates a stunning three-dimensional effect that blends embroidered texture with natural forms, making the tree feel exceptionally lifelike.
You can learn to stitch natural textures like a pro to give your tree trunk even more realism.
8. Illustrate Movement with Minimalist Stitches

Arrange a cluster of small, delicate flowers like forget-me-nots at the top of your hoop, as if they are floating clouds.
From the base of each flower, stitch a single, vertical line of running stitches or seed stitches in a soft, coordinating color.
This minimalist approach creates a sense of gentle movement, suggesting falling rain or dripping petals, and draws the eye downward.
The beauty of this design lies in its simplicity and the use of negative space, allowing the delicate flowers to remain the focal point.
Minimalist embroidery ideas like this prove that less is often more impactful.
9. Fill a Silhouette with a Floral Collage
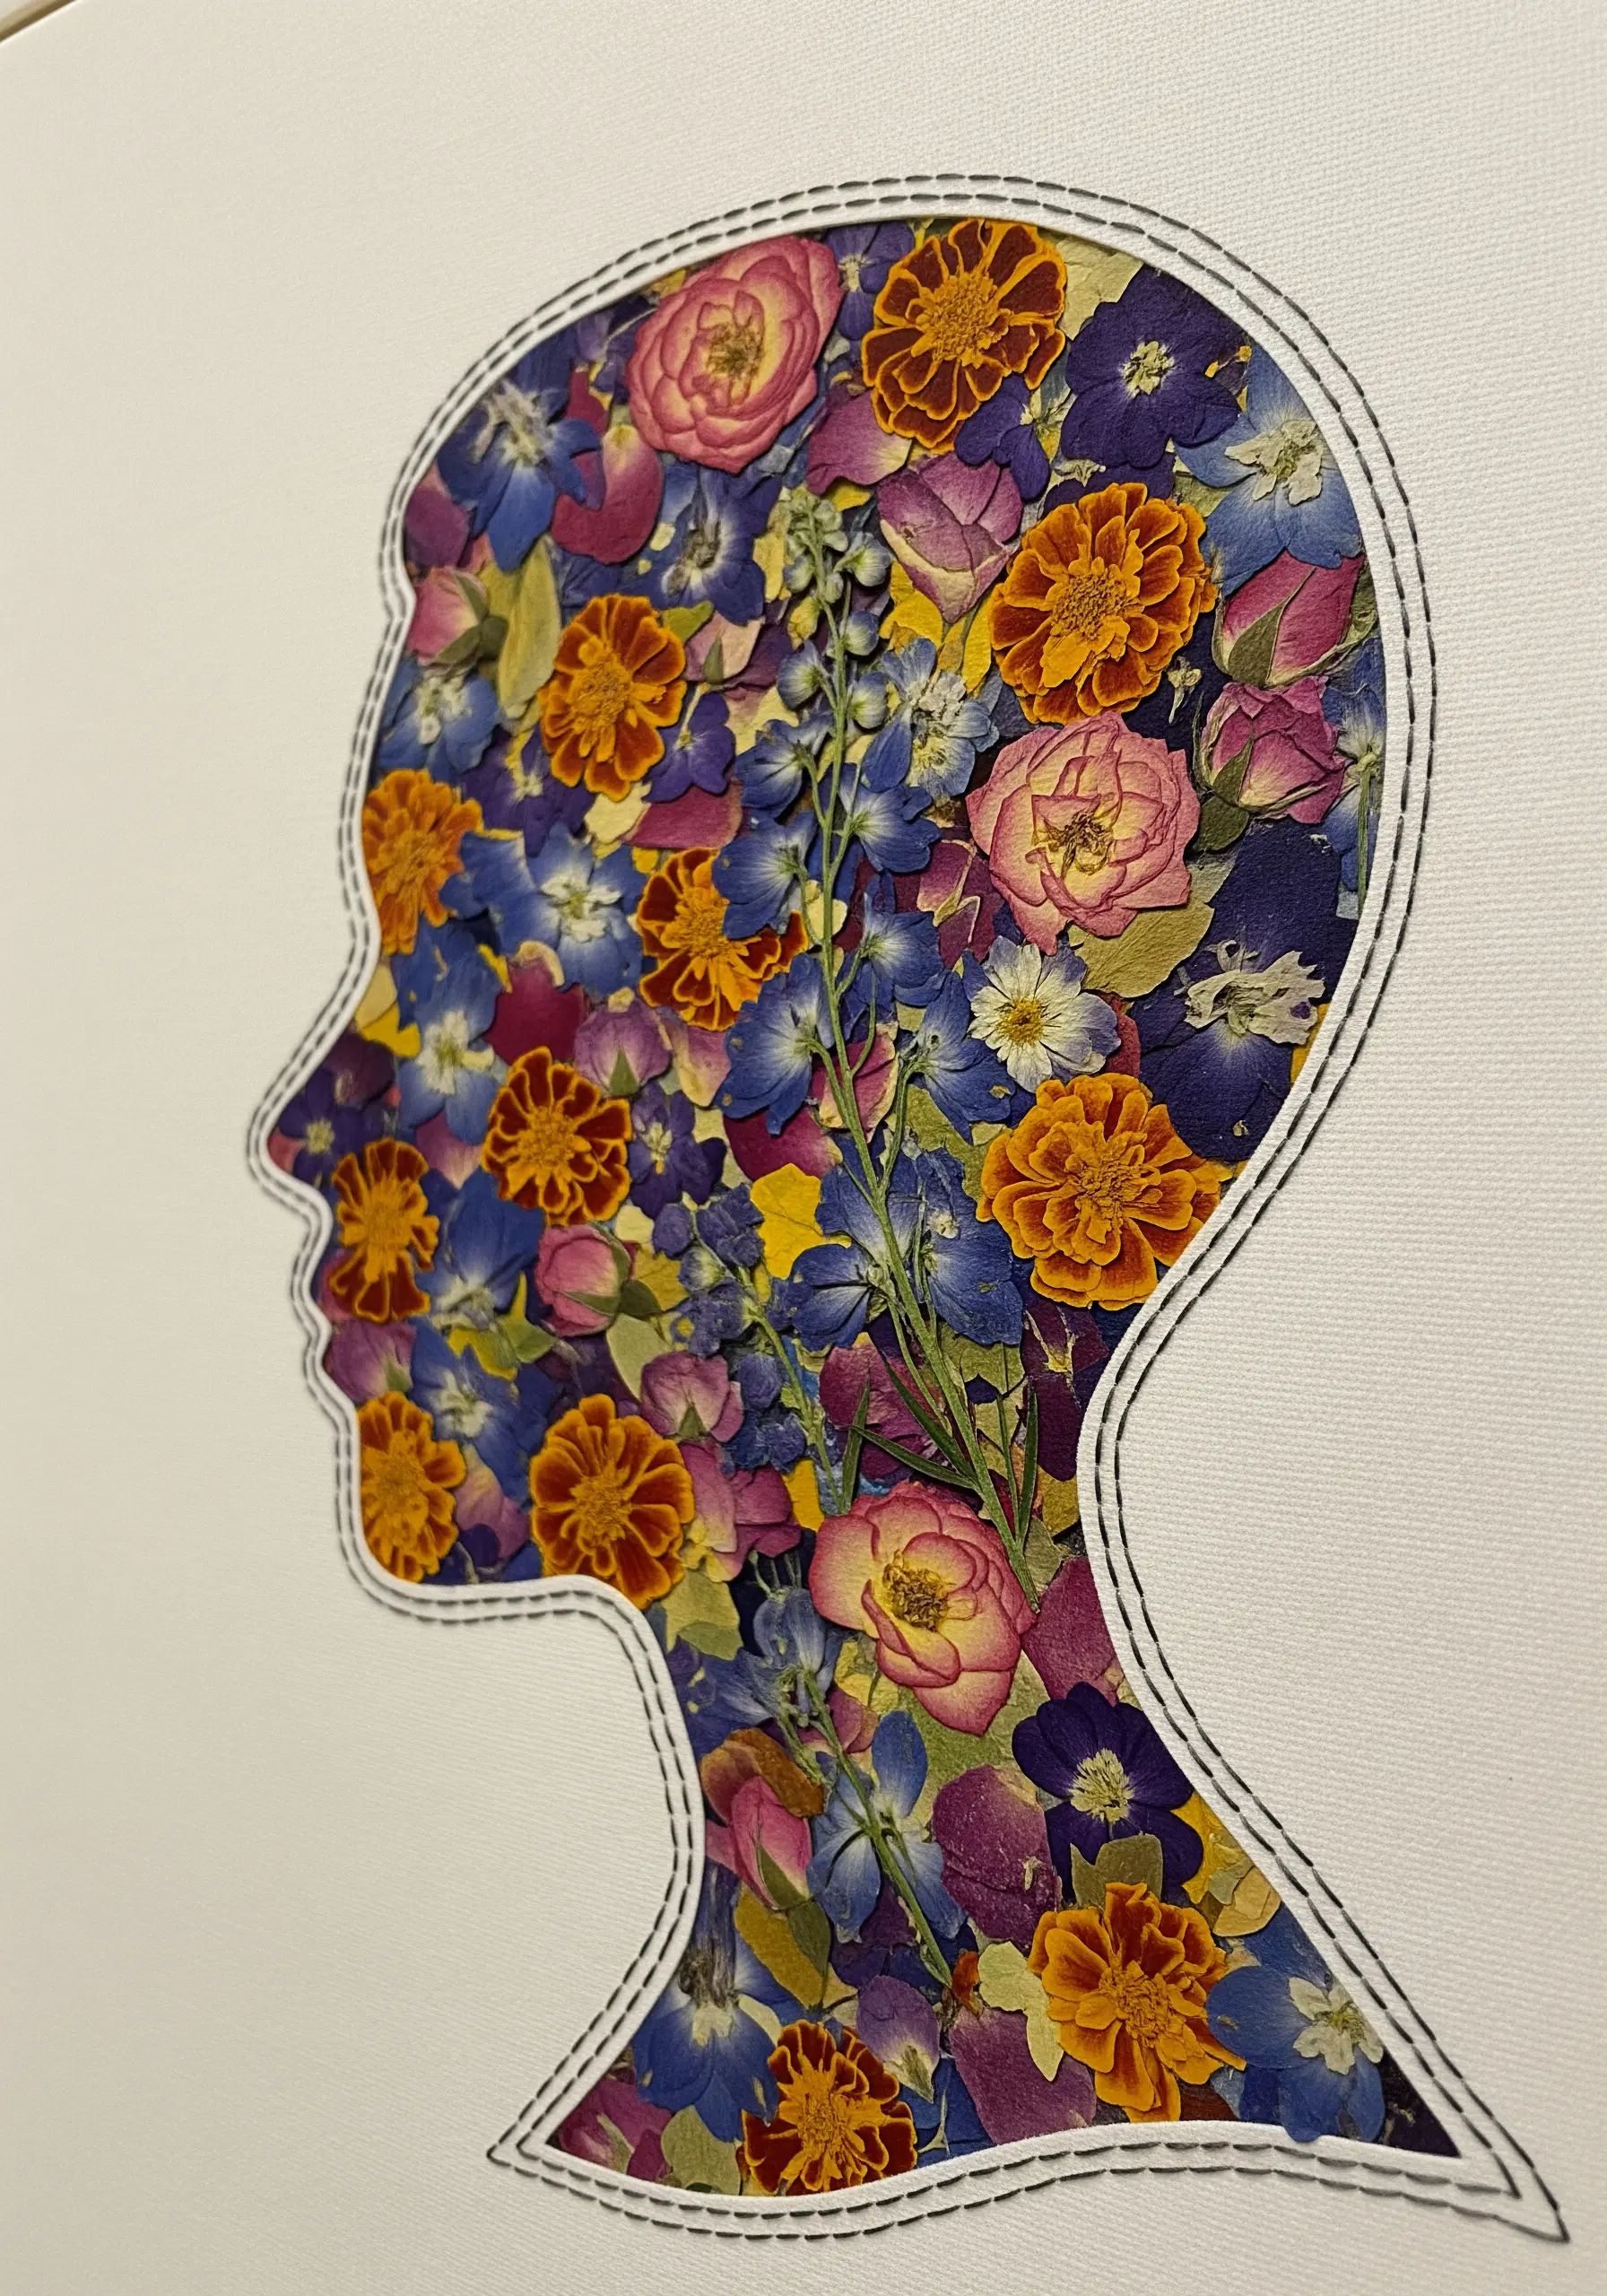
Begin by embroidering a simple, clean outline of a shape—such as a portrait profile, an animal, or a hand—using a basic backstitch or running stitch.
Fill the interior of the stitched shape with a dense collage of colorful pressed flowers and petals, arranging them carefully to fit within the lines.
The embroidered border acts as a frame, containing the wild, organic texture of the floral collage and giving the final piece a polished, graphic quality.
For a clean finish, use a light-colored thread that recedes, or a dark one for a bold, illustrative look.
Pair this technique with other minimal portrait line embroidery projects for a stunning gallery wall.
10. Mimic Stained Glass with Floral Panes
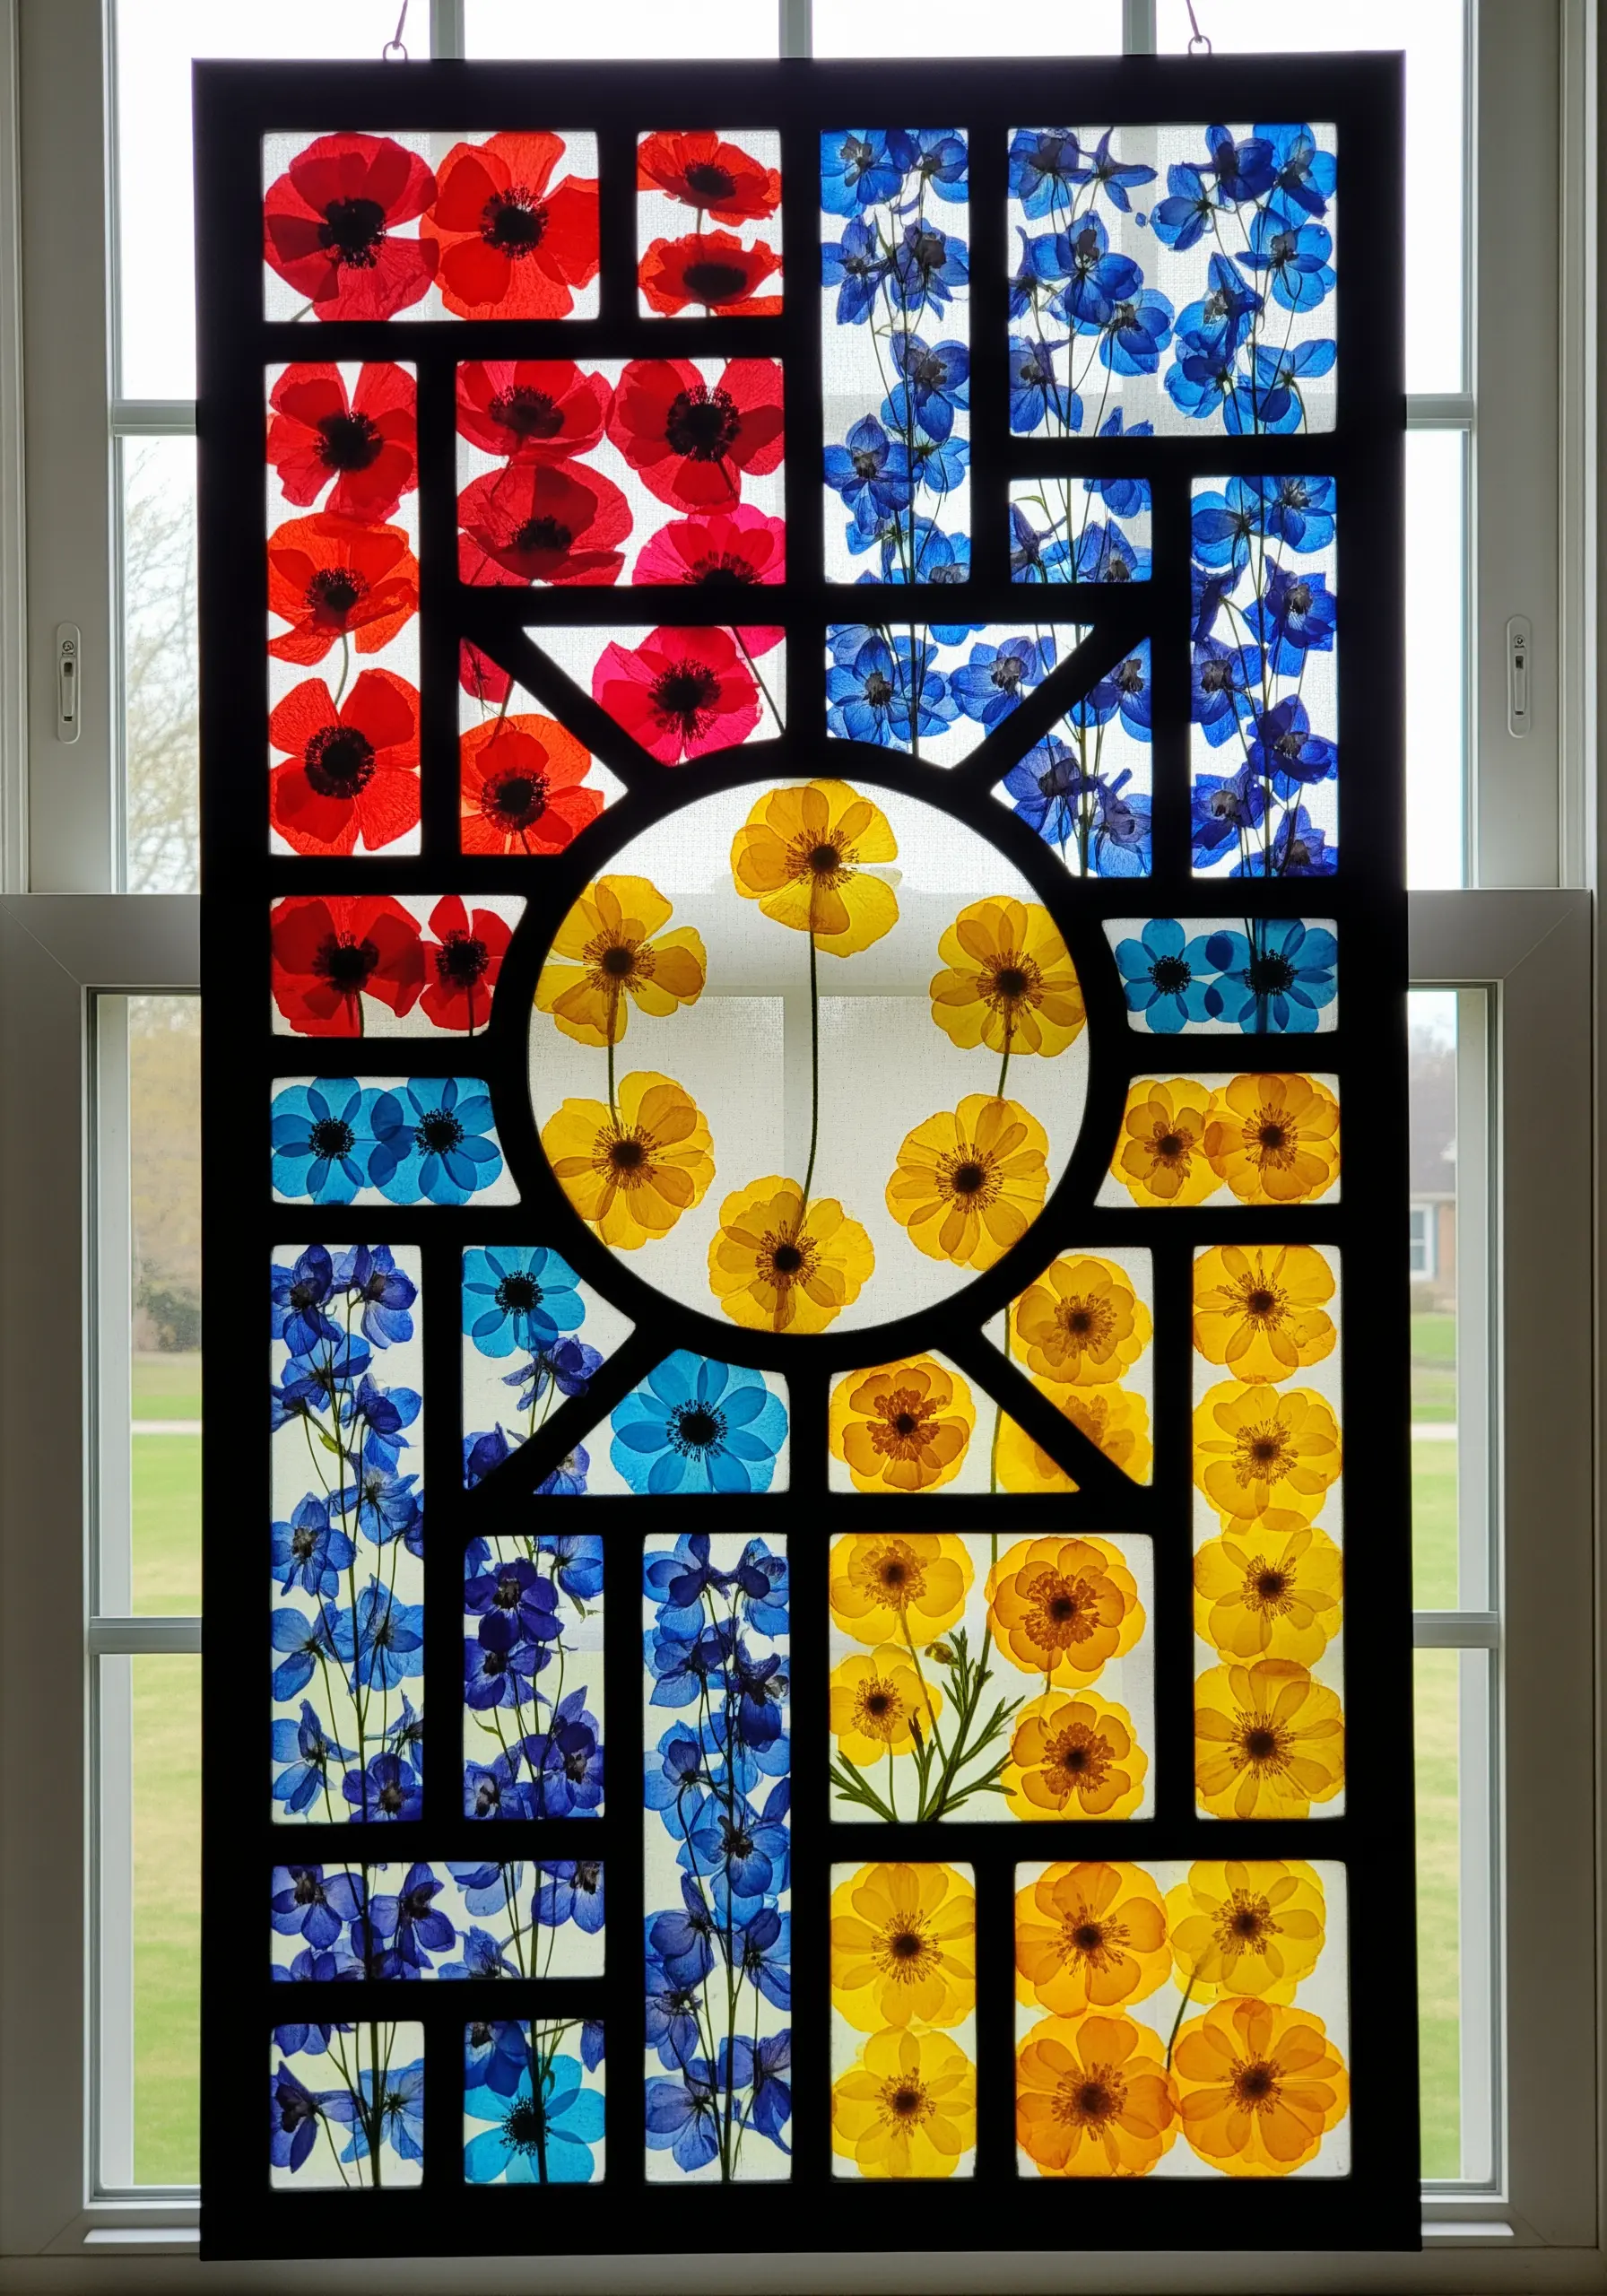
Create a geometric framework on sheer fabric using thick, bold lines of black satin stitch or couched yarn to mimic the lead lines of stained glass.
Fill each ‘pane’ of your design with a single color of pressed flowers—red poppies in one section, blue delphiniums in another, and so on.
When hung in a window, the light will shine through the petals, creating a luminous, colorful effect very similar to real stained glass.
The key is to keep the embroidered lines strong and consistent to provide a powerful structure for the delicate, translucent flowers.
Explore more geometric framed embroidery patterns to inspire your next light-catching creation.
11. Construct Delicate Wings from Petals
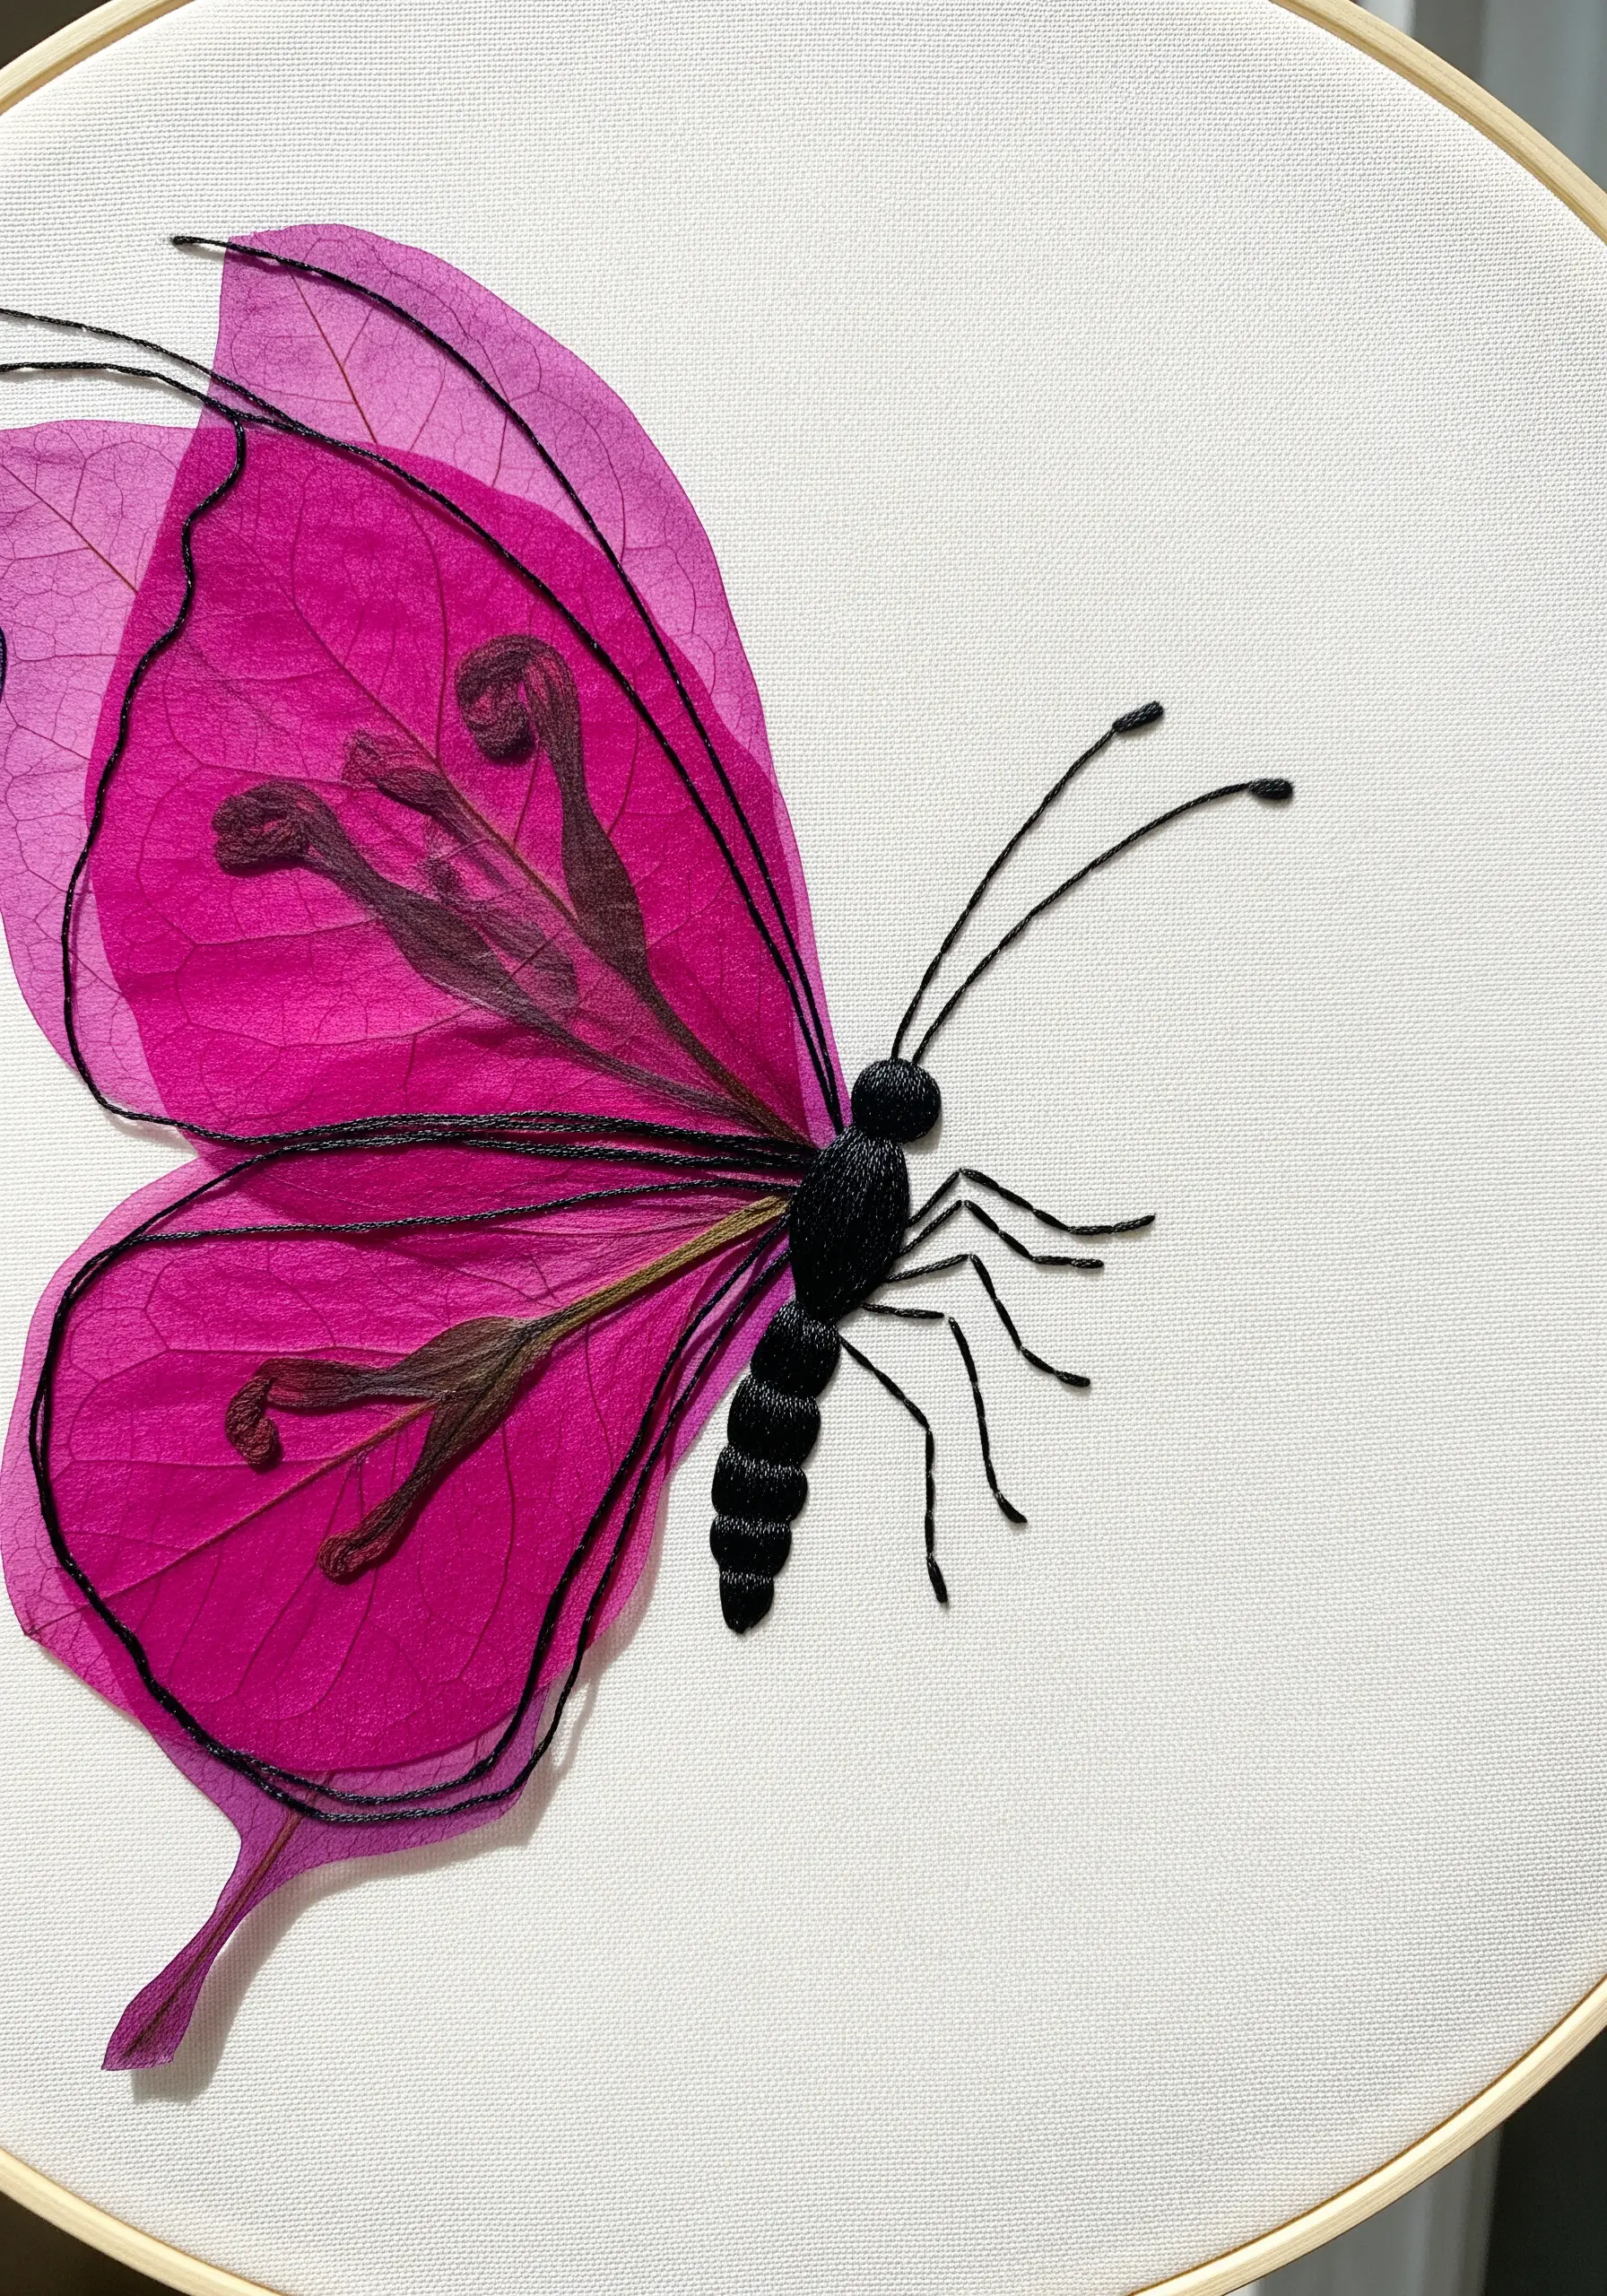
Use large, sheer pressed petals, like those from a bougainvillea or poppy, to form the shape of butterfly wings.
Embroider the butterfly’s body directly onto the fabric with a dense satin stitch in a dark color to give it weight and dimension.
Extend fine straight stitches from the body to create delicate antennae and legs, and use a single backstitch to outline the veins on the petal wings.
This technique beautifully combines the fragility of real petals with the precision of embroidery to create a lifelike, ethereal creature.
Bird & butterfly embroidery patterns are perfect for experimenting with this mixed-media style.
12. Layer a Landscape with Natural Textures
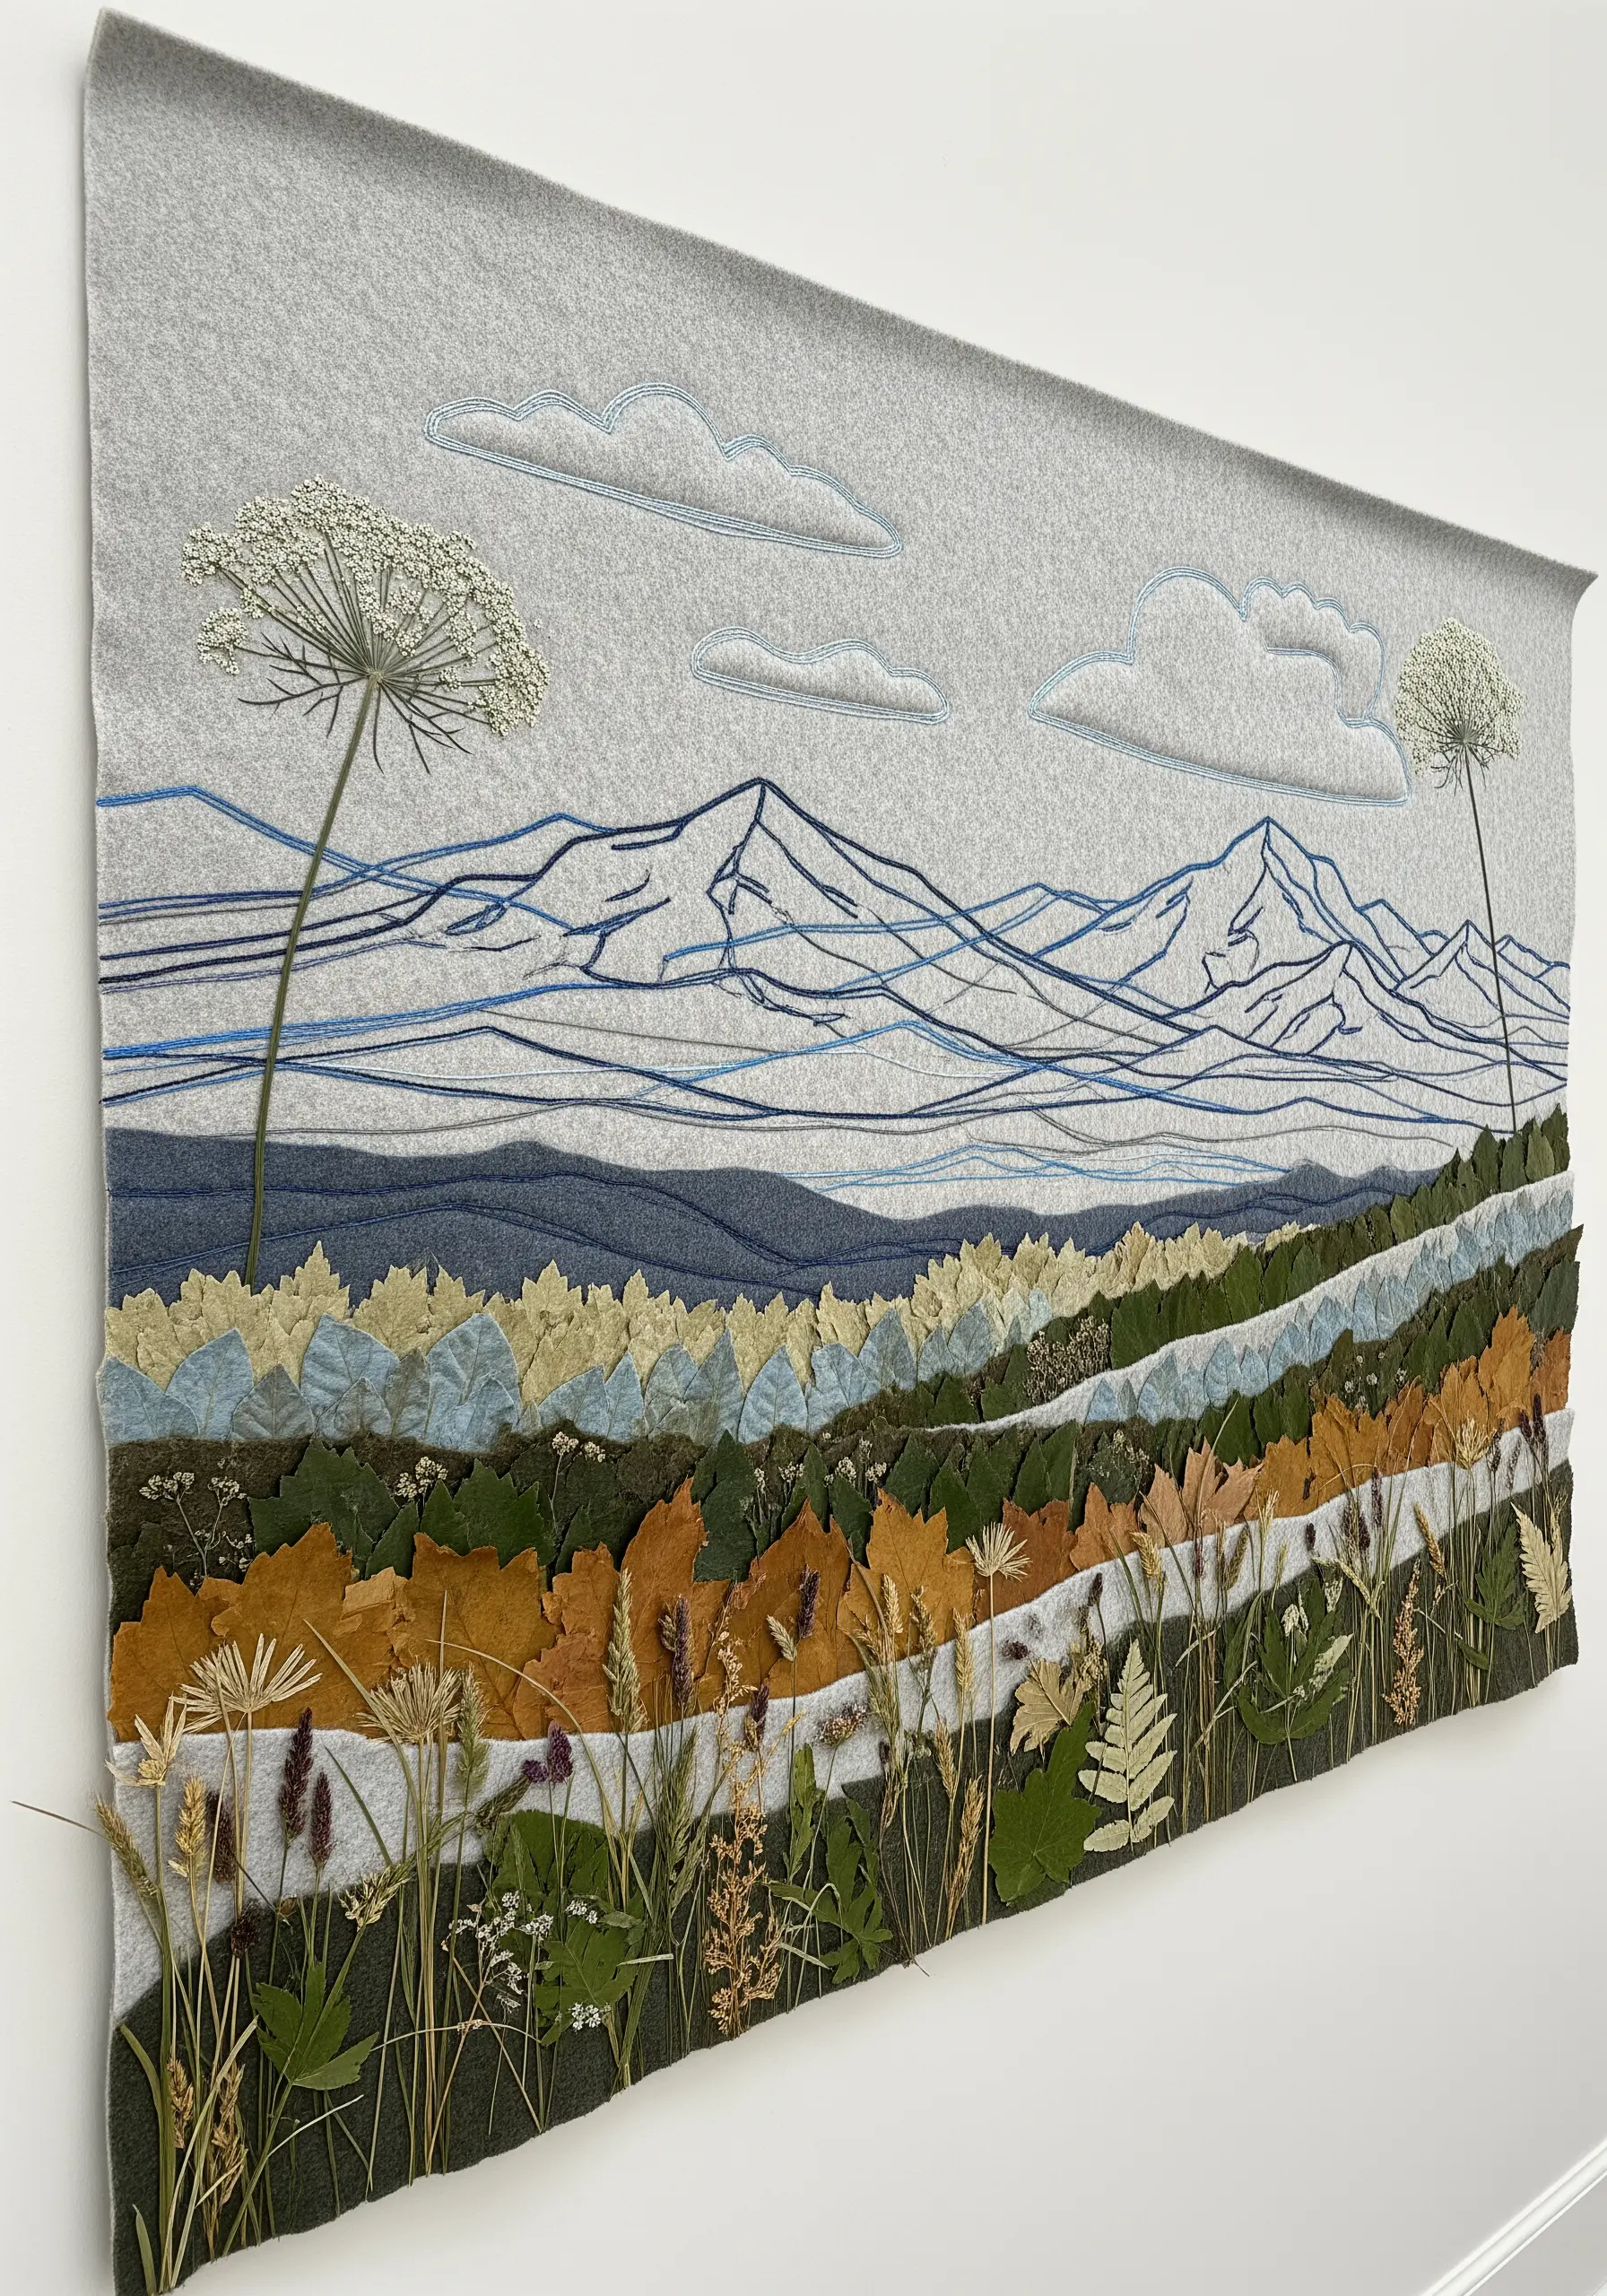
Create a background of distant mountains and sky using simple line embroidery on a felt or wool base fabric.
Build up the middle ground by layering pieces of colored felt for hills and forests, adding texture and dimension.
For the foreground, create a rich, tactile layer by attaching a variety of pressed leaves, grasses, and flower heads.
This multi-layered, mixed-media approach results in a landscape with incredible depth, drawing the viewer from the stitched details into the real botanical elements.
This method is perfect for creating abstract thread landscapes with a natural, tangible feel.
13. Weave a Wreath on Burlap
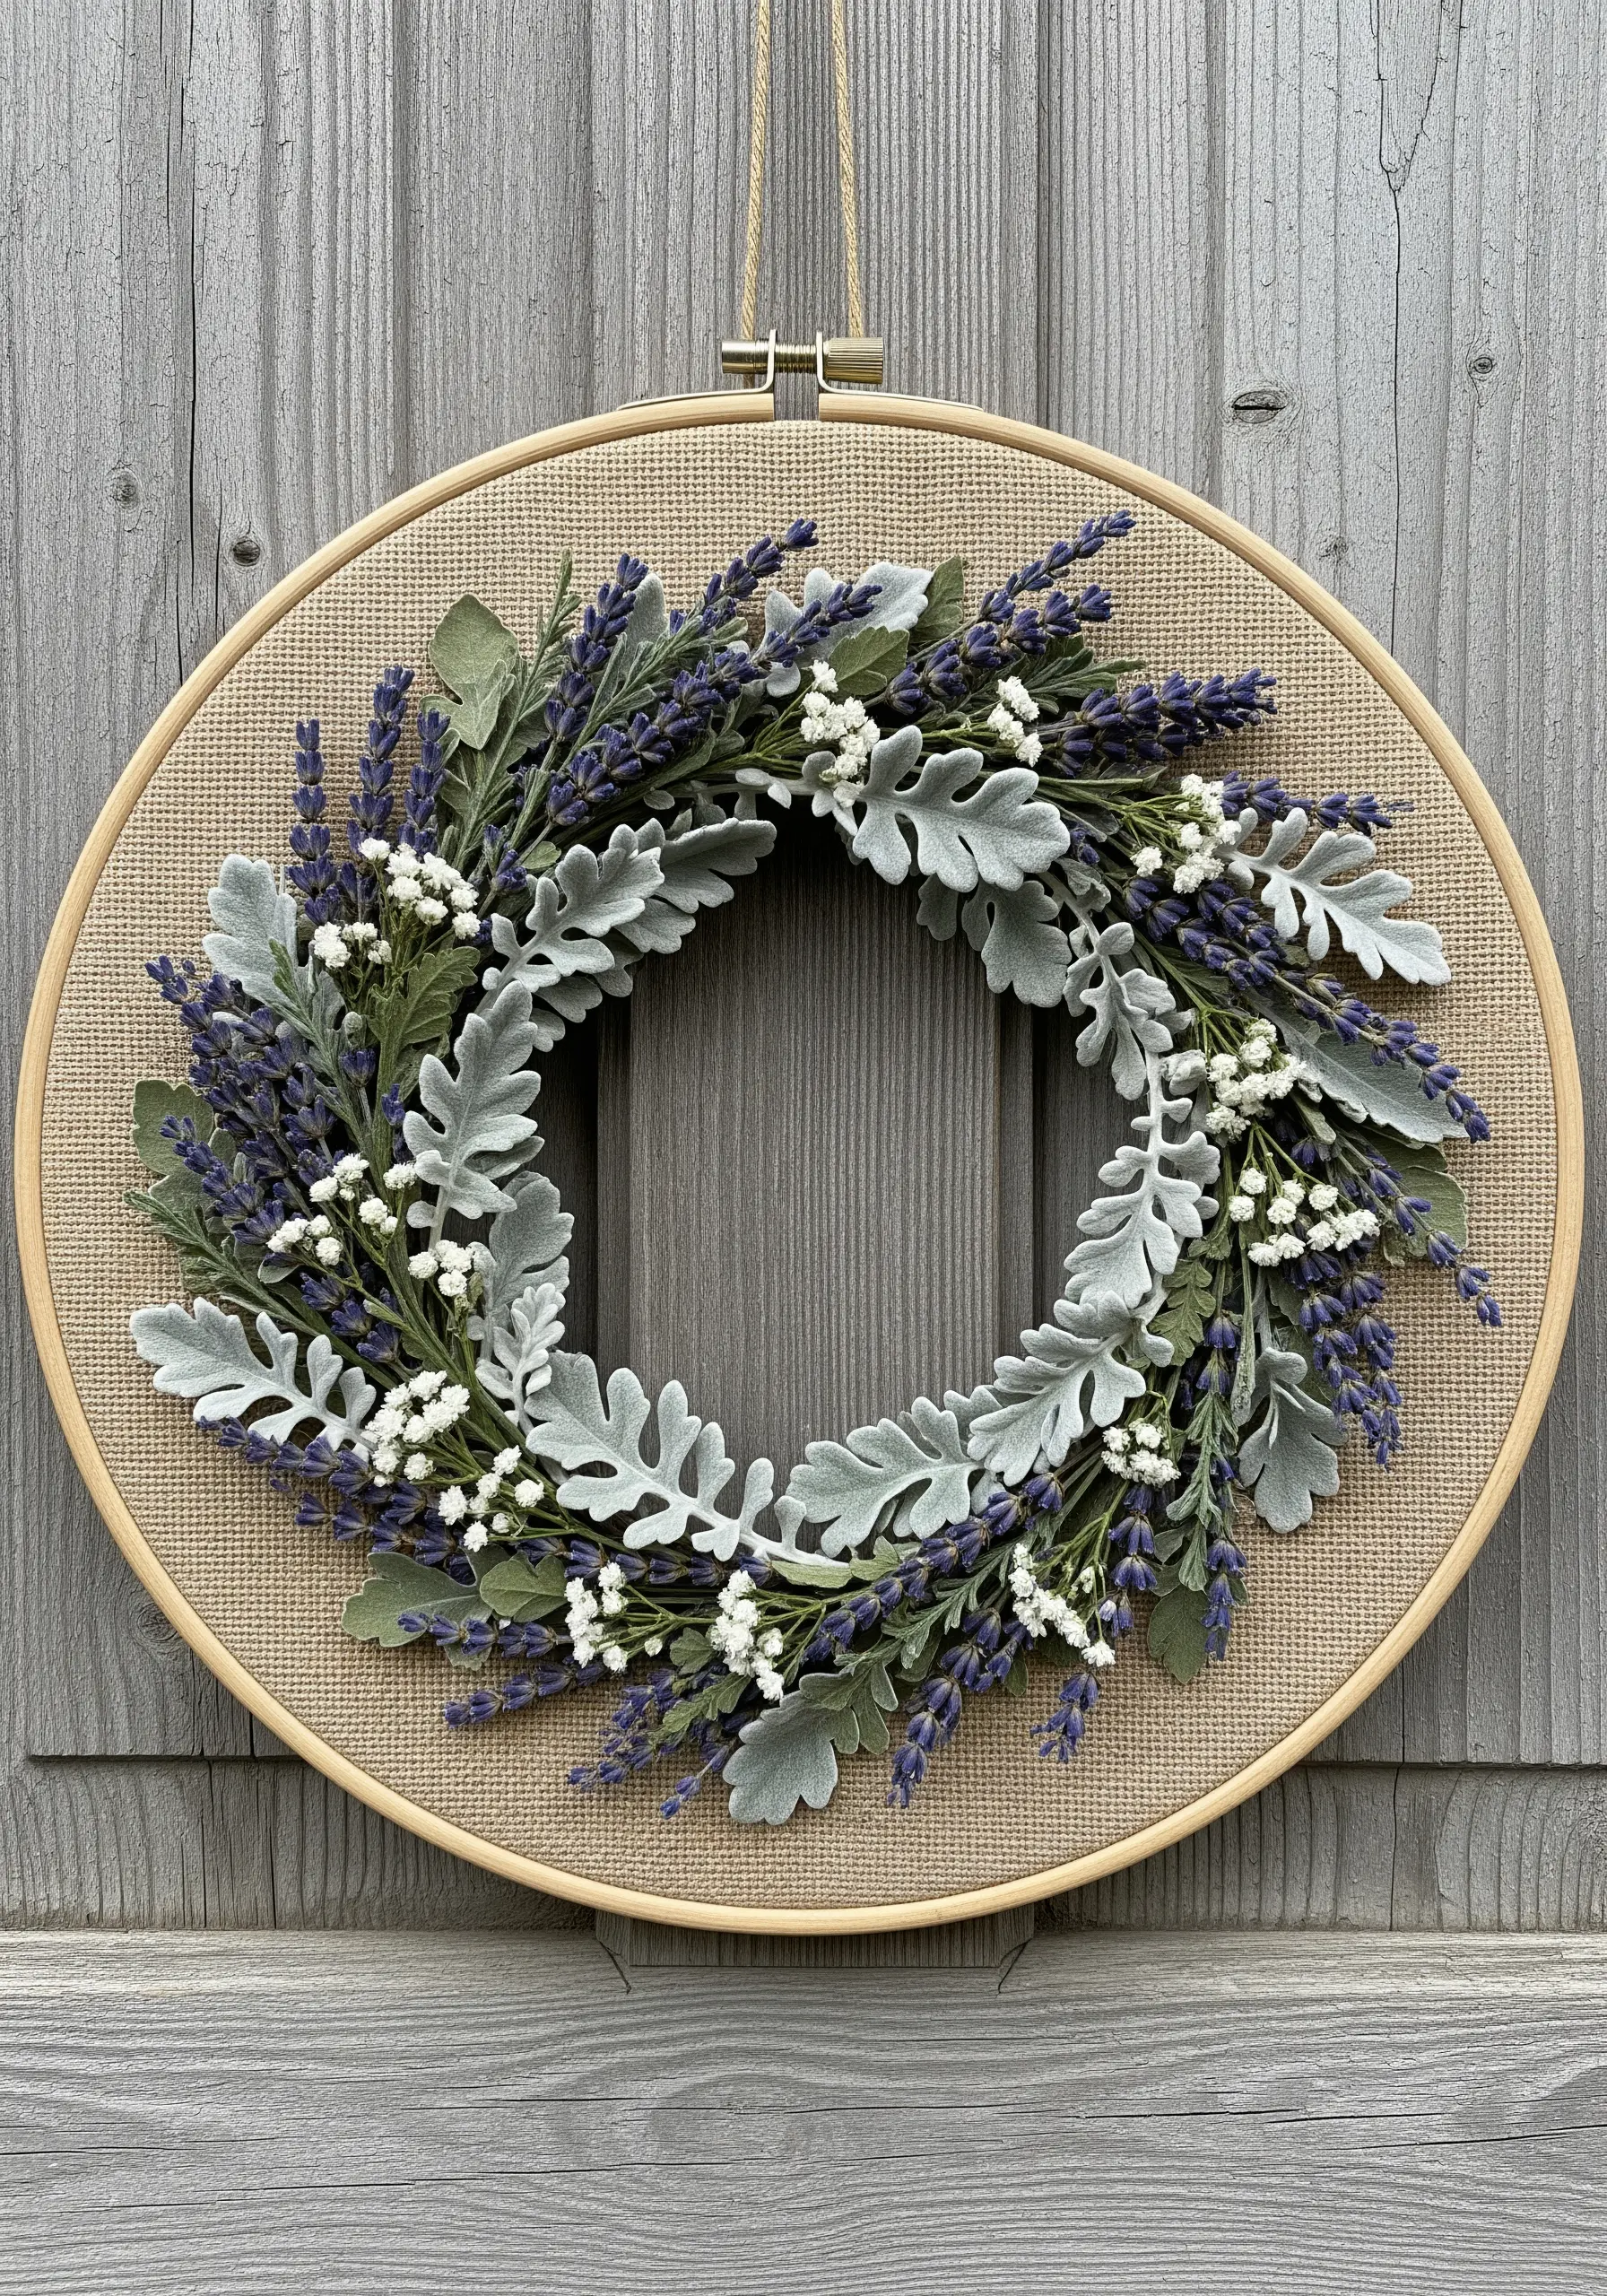
Stretch a piece of rustic fabric like burlap or linen in your hoop to provide a neutral, textured background.
Instead of stitching a full wreath, simply embroider a few subtle guide stitches in a circular shape to map out your design.
Weave and attach pressed lavender, dusty miller leaves, and small white flowers like baby’s breath directly onto the fabric.
The minimal stitching allows the natural textures and forms of the botanicals to be the main focus, resulting in a beautifully organic and three-dimensional piece.
These types of hand-stitched flower wreath hoop ideas celebrate the beauty of the plants themselves.
14. Juxtapose Geometric Stitches and Organic Leaves
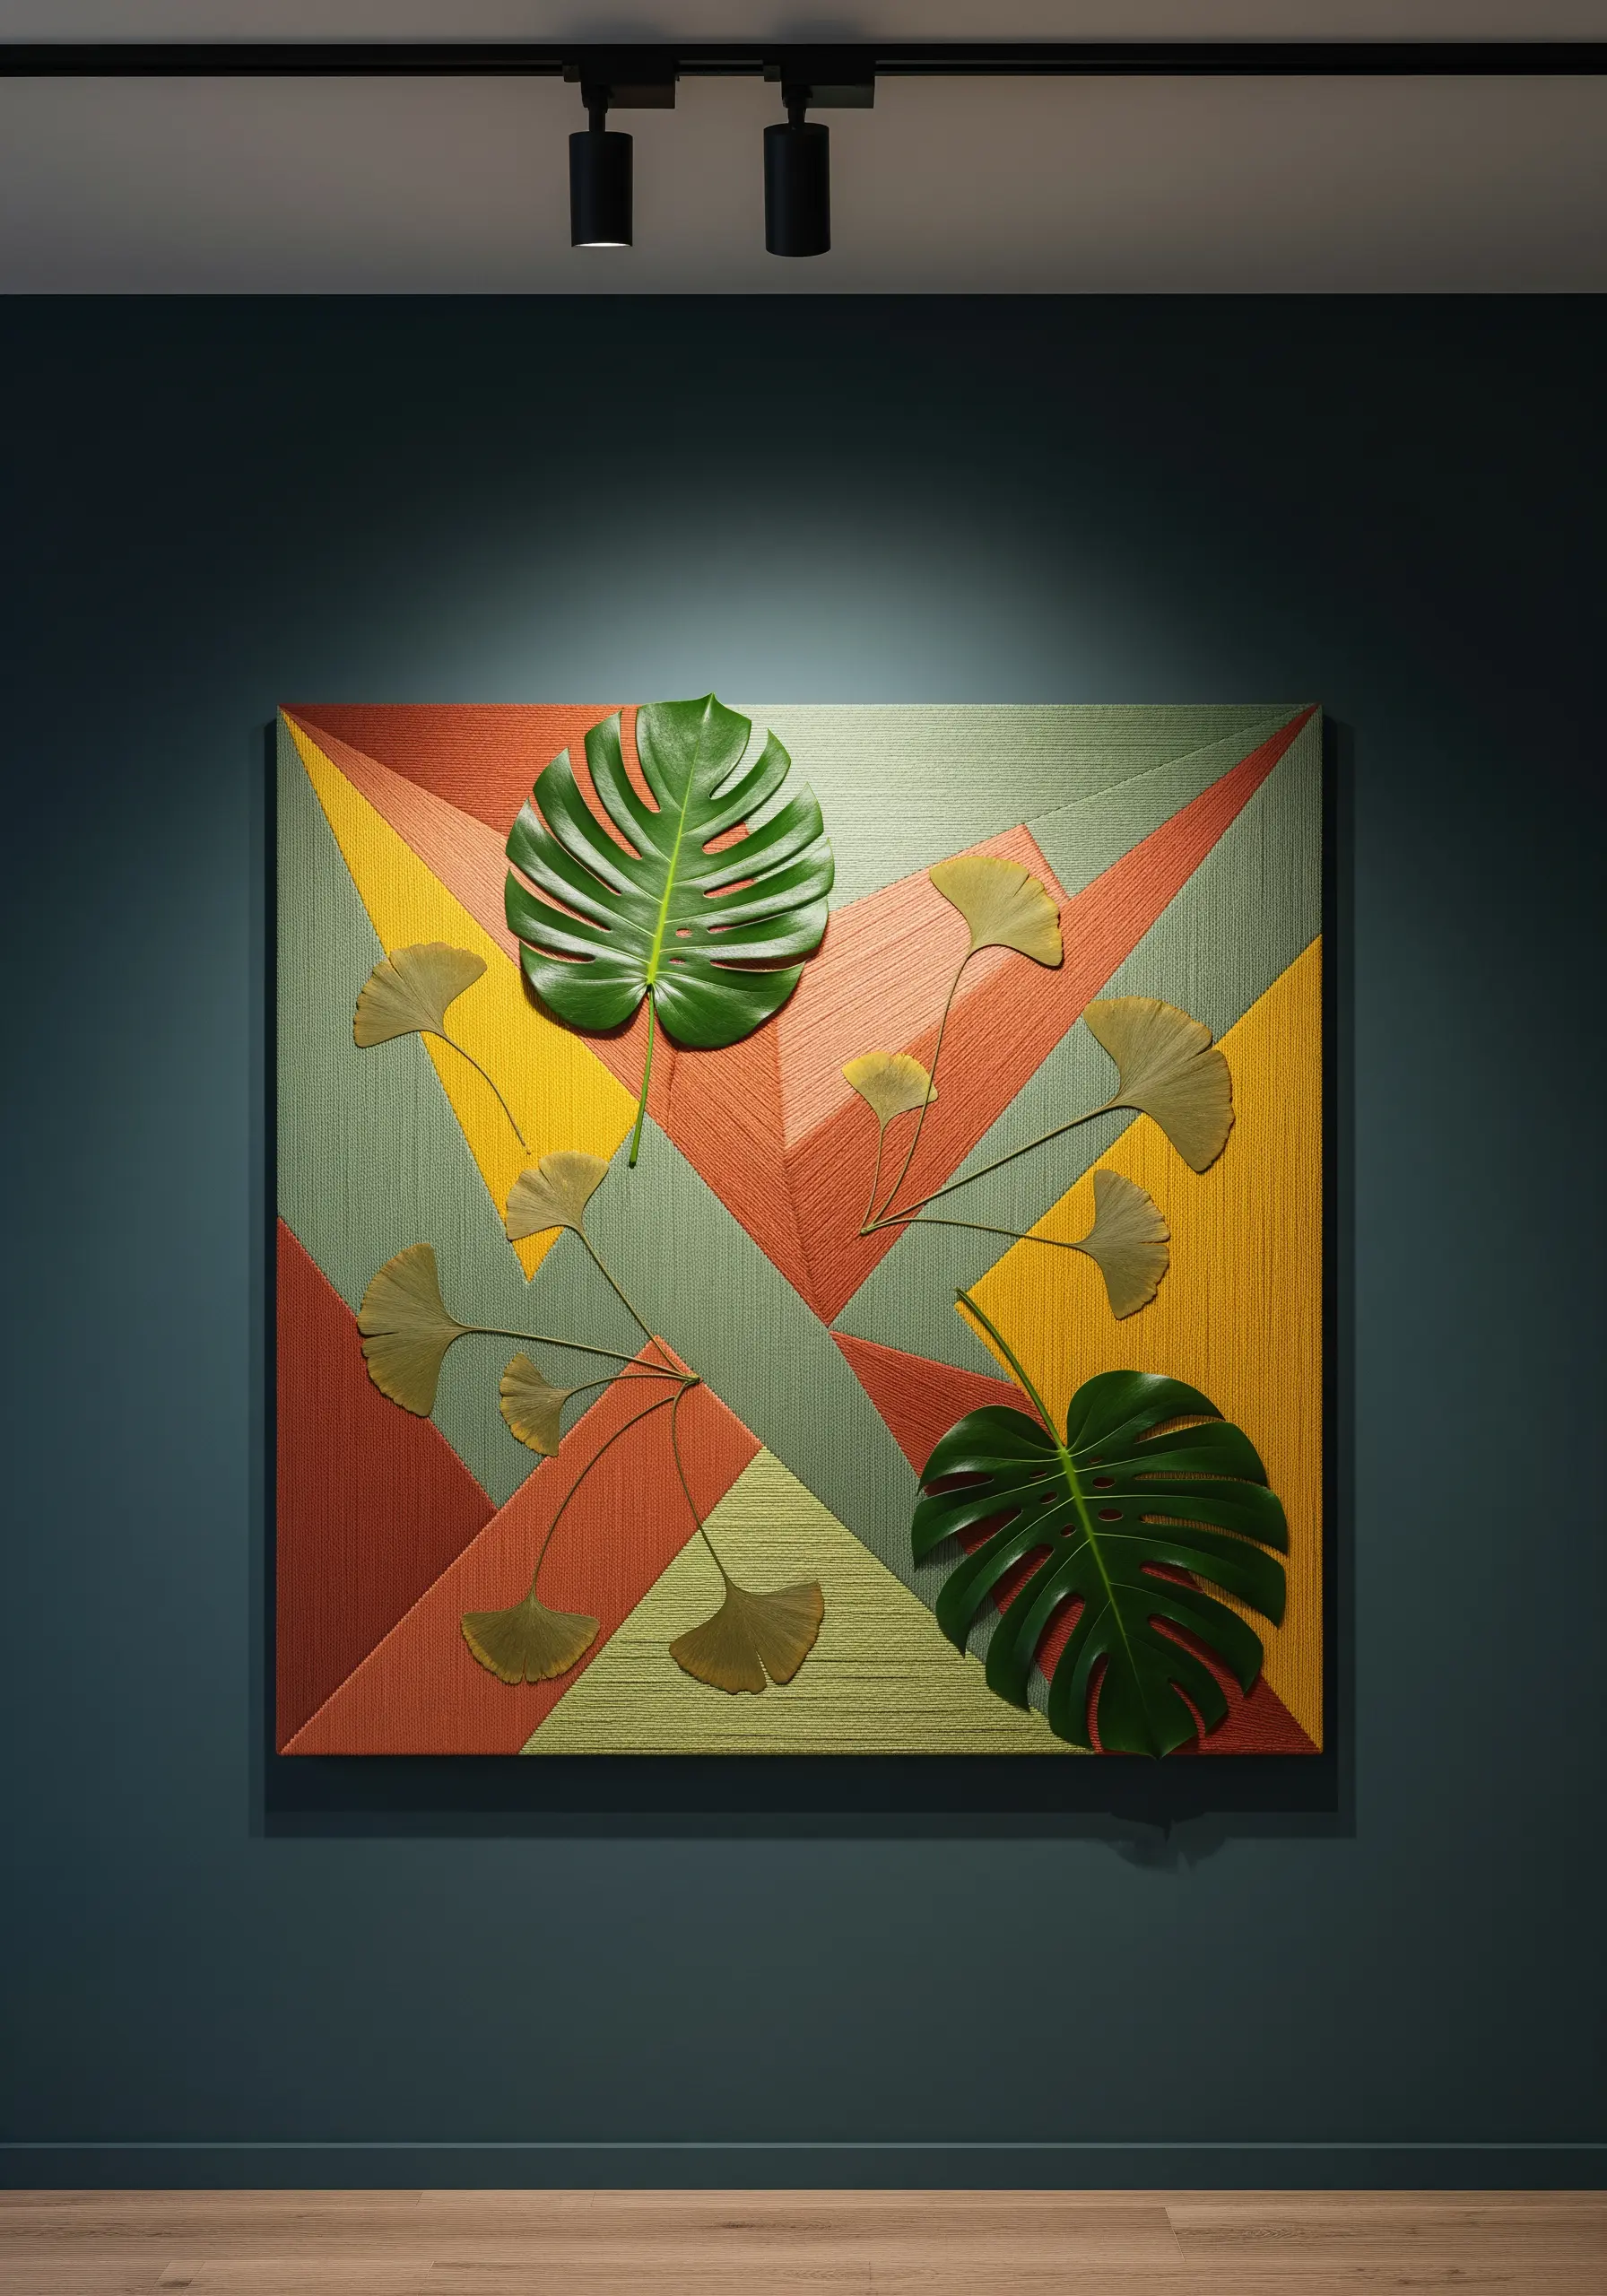
Create a background of bold, geometric color blocks using satin stitches or thread wrapping on a stretched canvas.
Choose colors that complement your chosen botanicals—earthy reds, oranges, and greens often work well.
Once the embroidered background is complete, strategically place large, architectural leaves like Monstera or delicate Ginkgo branches on top.
The sharp lines and flat texture of the embroidery provide a striking contrast to the organic shapes and natural veins of the real leaves.
This is a fantastic way to combine embroidery and mixed media for a contemporary art piece.
15. Add Whimsy with Floating Seeds
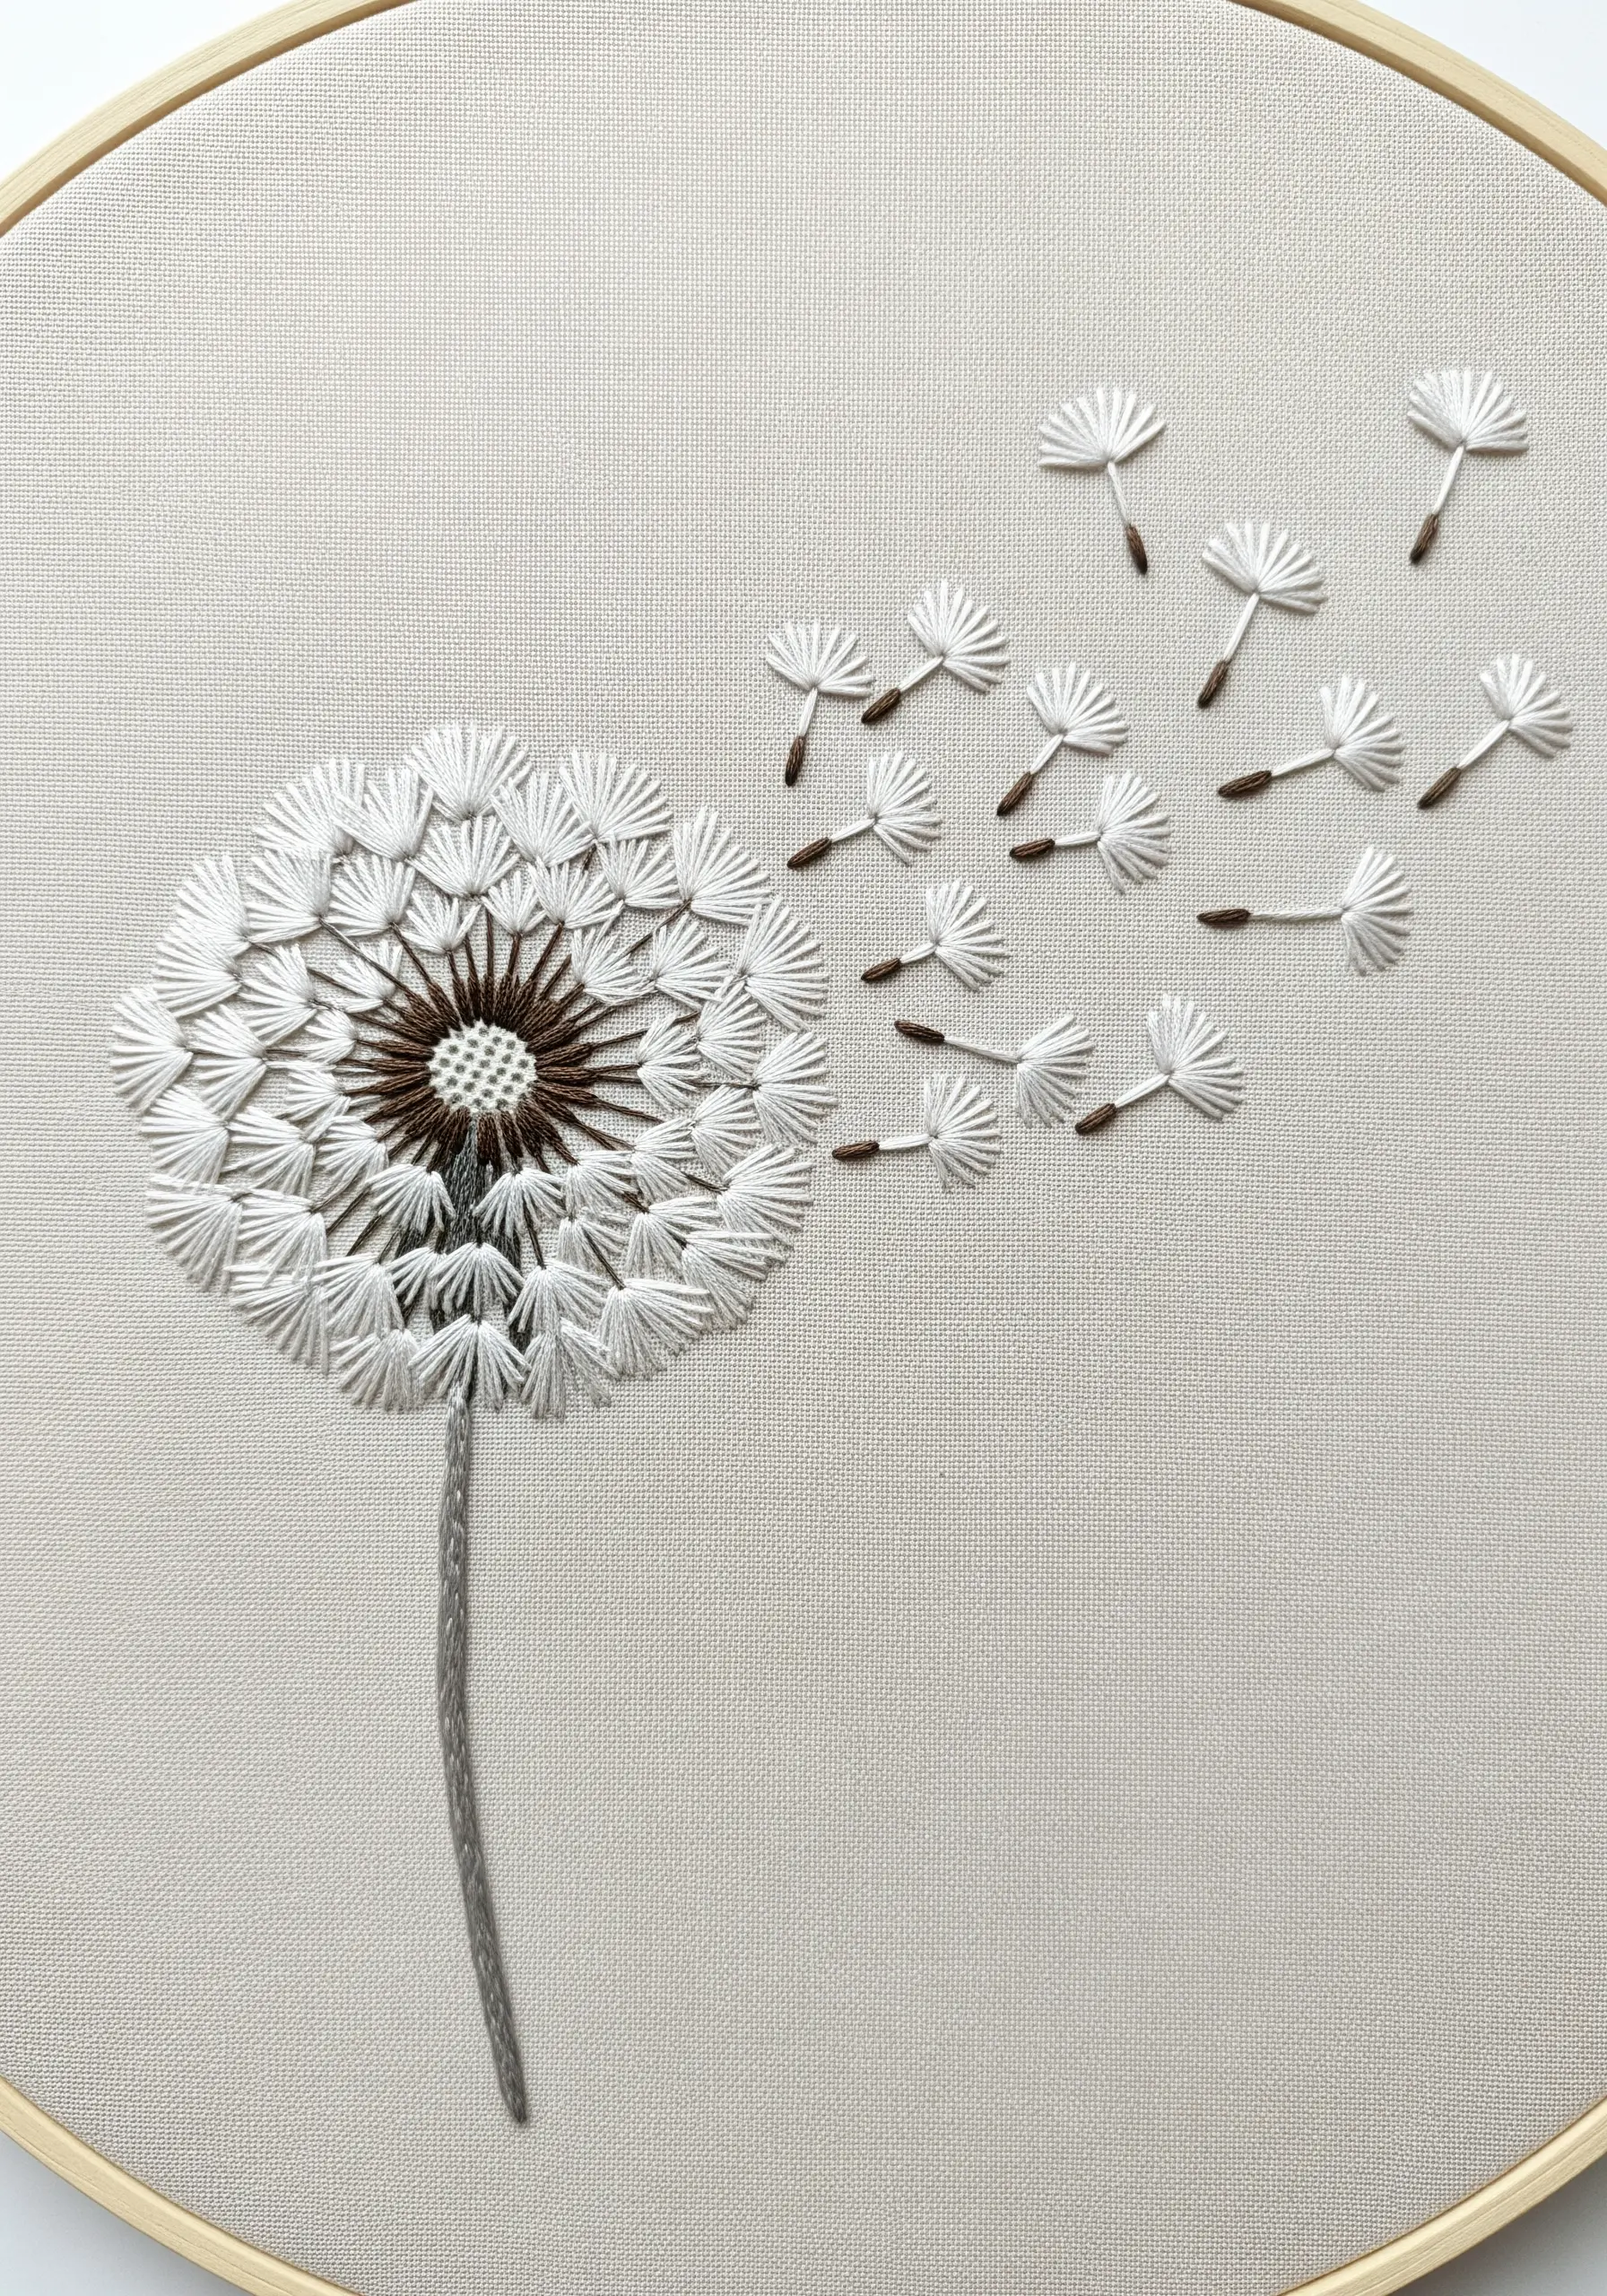
Embroider a dandelion head with dense straight stitches for the seed pack and a satin-stitched center, leaving some threads loose for texture.
Use a single, wrapped stem stitch for a clean, strong stalk.
Instead of stitching the floating seeds, carefully attach tiny real pressed florets or seed heads to the fabric, arranging them in a natural, windswept arc.
This simple substitution adds a touch of realism and delicate, three-dimensional detail that makes the entire piece come to life.
This is one of the easiest step-by-step pressed flower embroidery designs to try right now.
16. Depict Duality with Sun and Moon Motifs
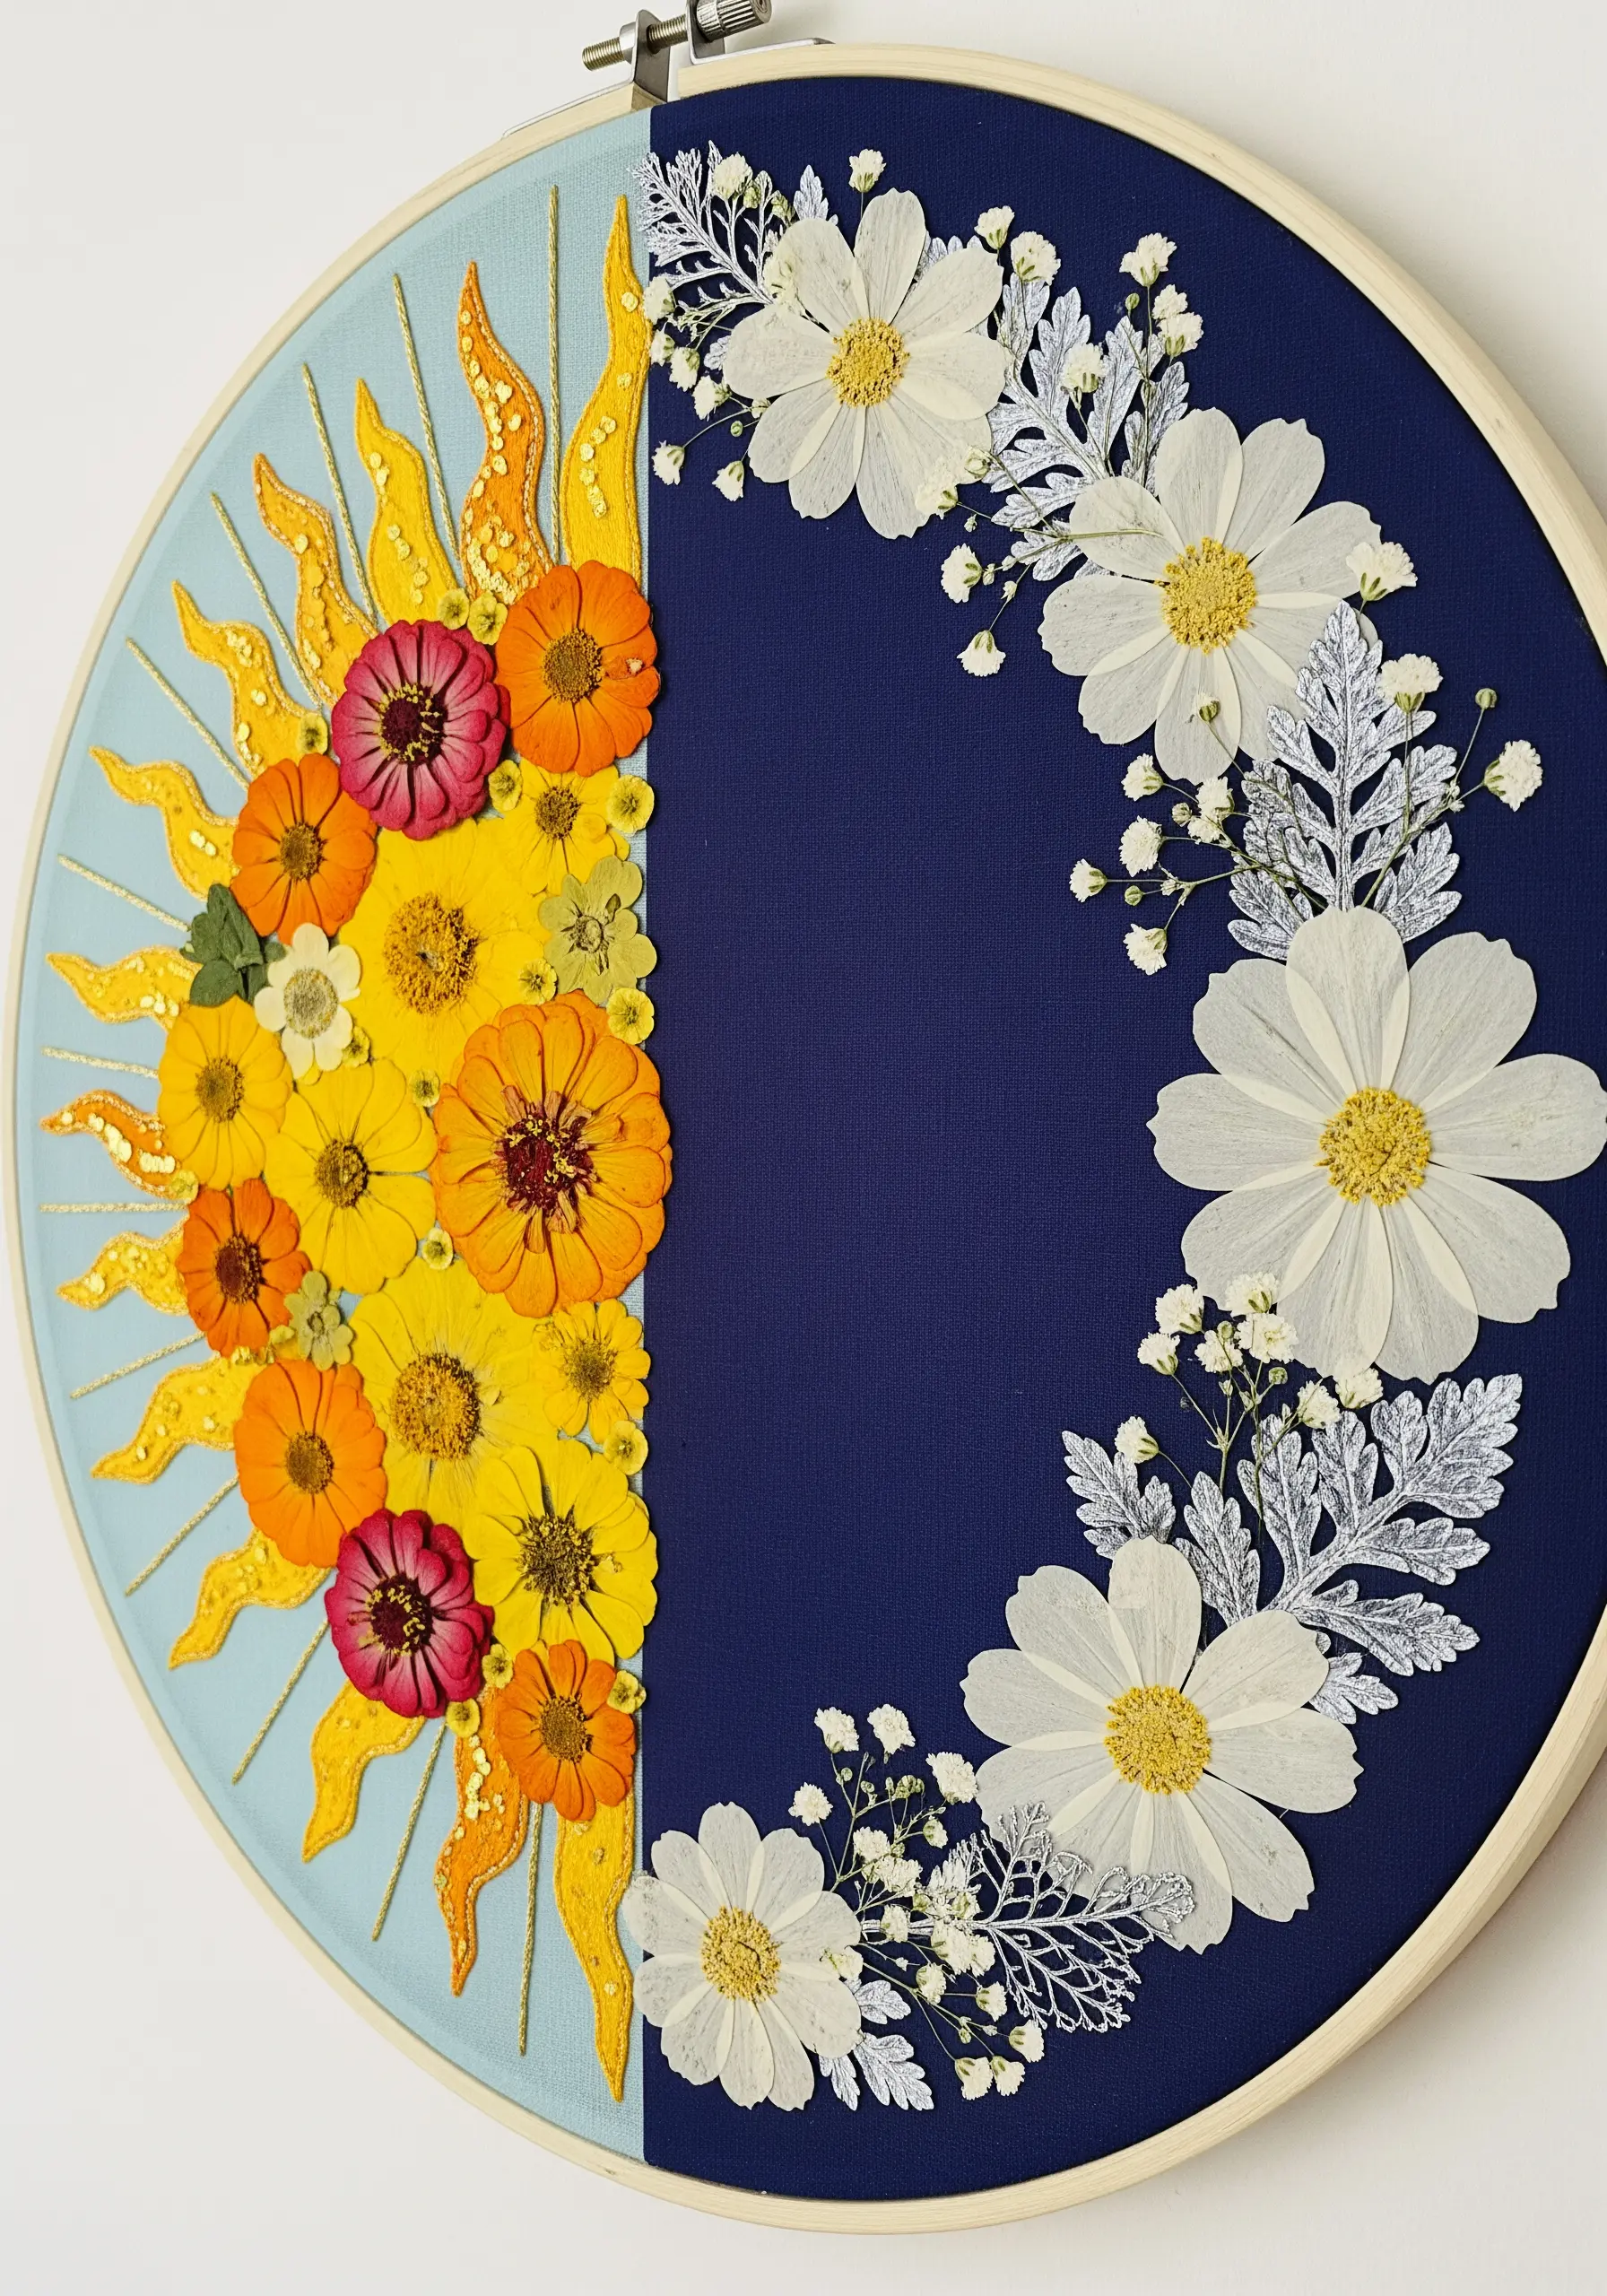
Divide your hoop in half, using two contrasting background fabrics—one light blue for day, one dark navy for night.
On the ‘day’ side, embroider a vibrant sun motif and embellish it with a collage of warm-colored pressed flowers like zinnias and marigolds.
On the ‘night’ side, create a crescent moon shape using delicate, cool-toned botanicals like white cosmos, baby’s breath, and silver dusty miller leaves.
This design creates a powerful visual narrative through color, texture, and symbolism, all within a single hoop.
Pressed flower embroidery ideas are perfect for exploring themes of contrast and balance.
17. Weave an Underwater Garden

Create flowing, seaweed-like forms by couching thick, variegated green yarns onto a blue fabric background.
Incorporate pressed ferns and skeleton leaves among the threads, securing them with tiny stitches to blend them into the scene.
Scatter small pressed flowers, like violets or lobelia, to represent deep-sea blossoms or coral.
For a final touch of magic, add tiny clear beads or gel medium droplets to mimic air bubbles, enhancing the aquatic illusion.
These imaginative ocean-inspired hoop embroidery ideas transform botanicals into something otherworldly.
18. Curate a Collection of the Four Seasons
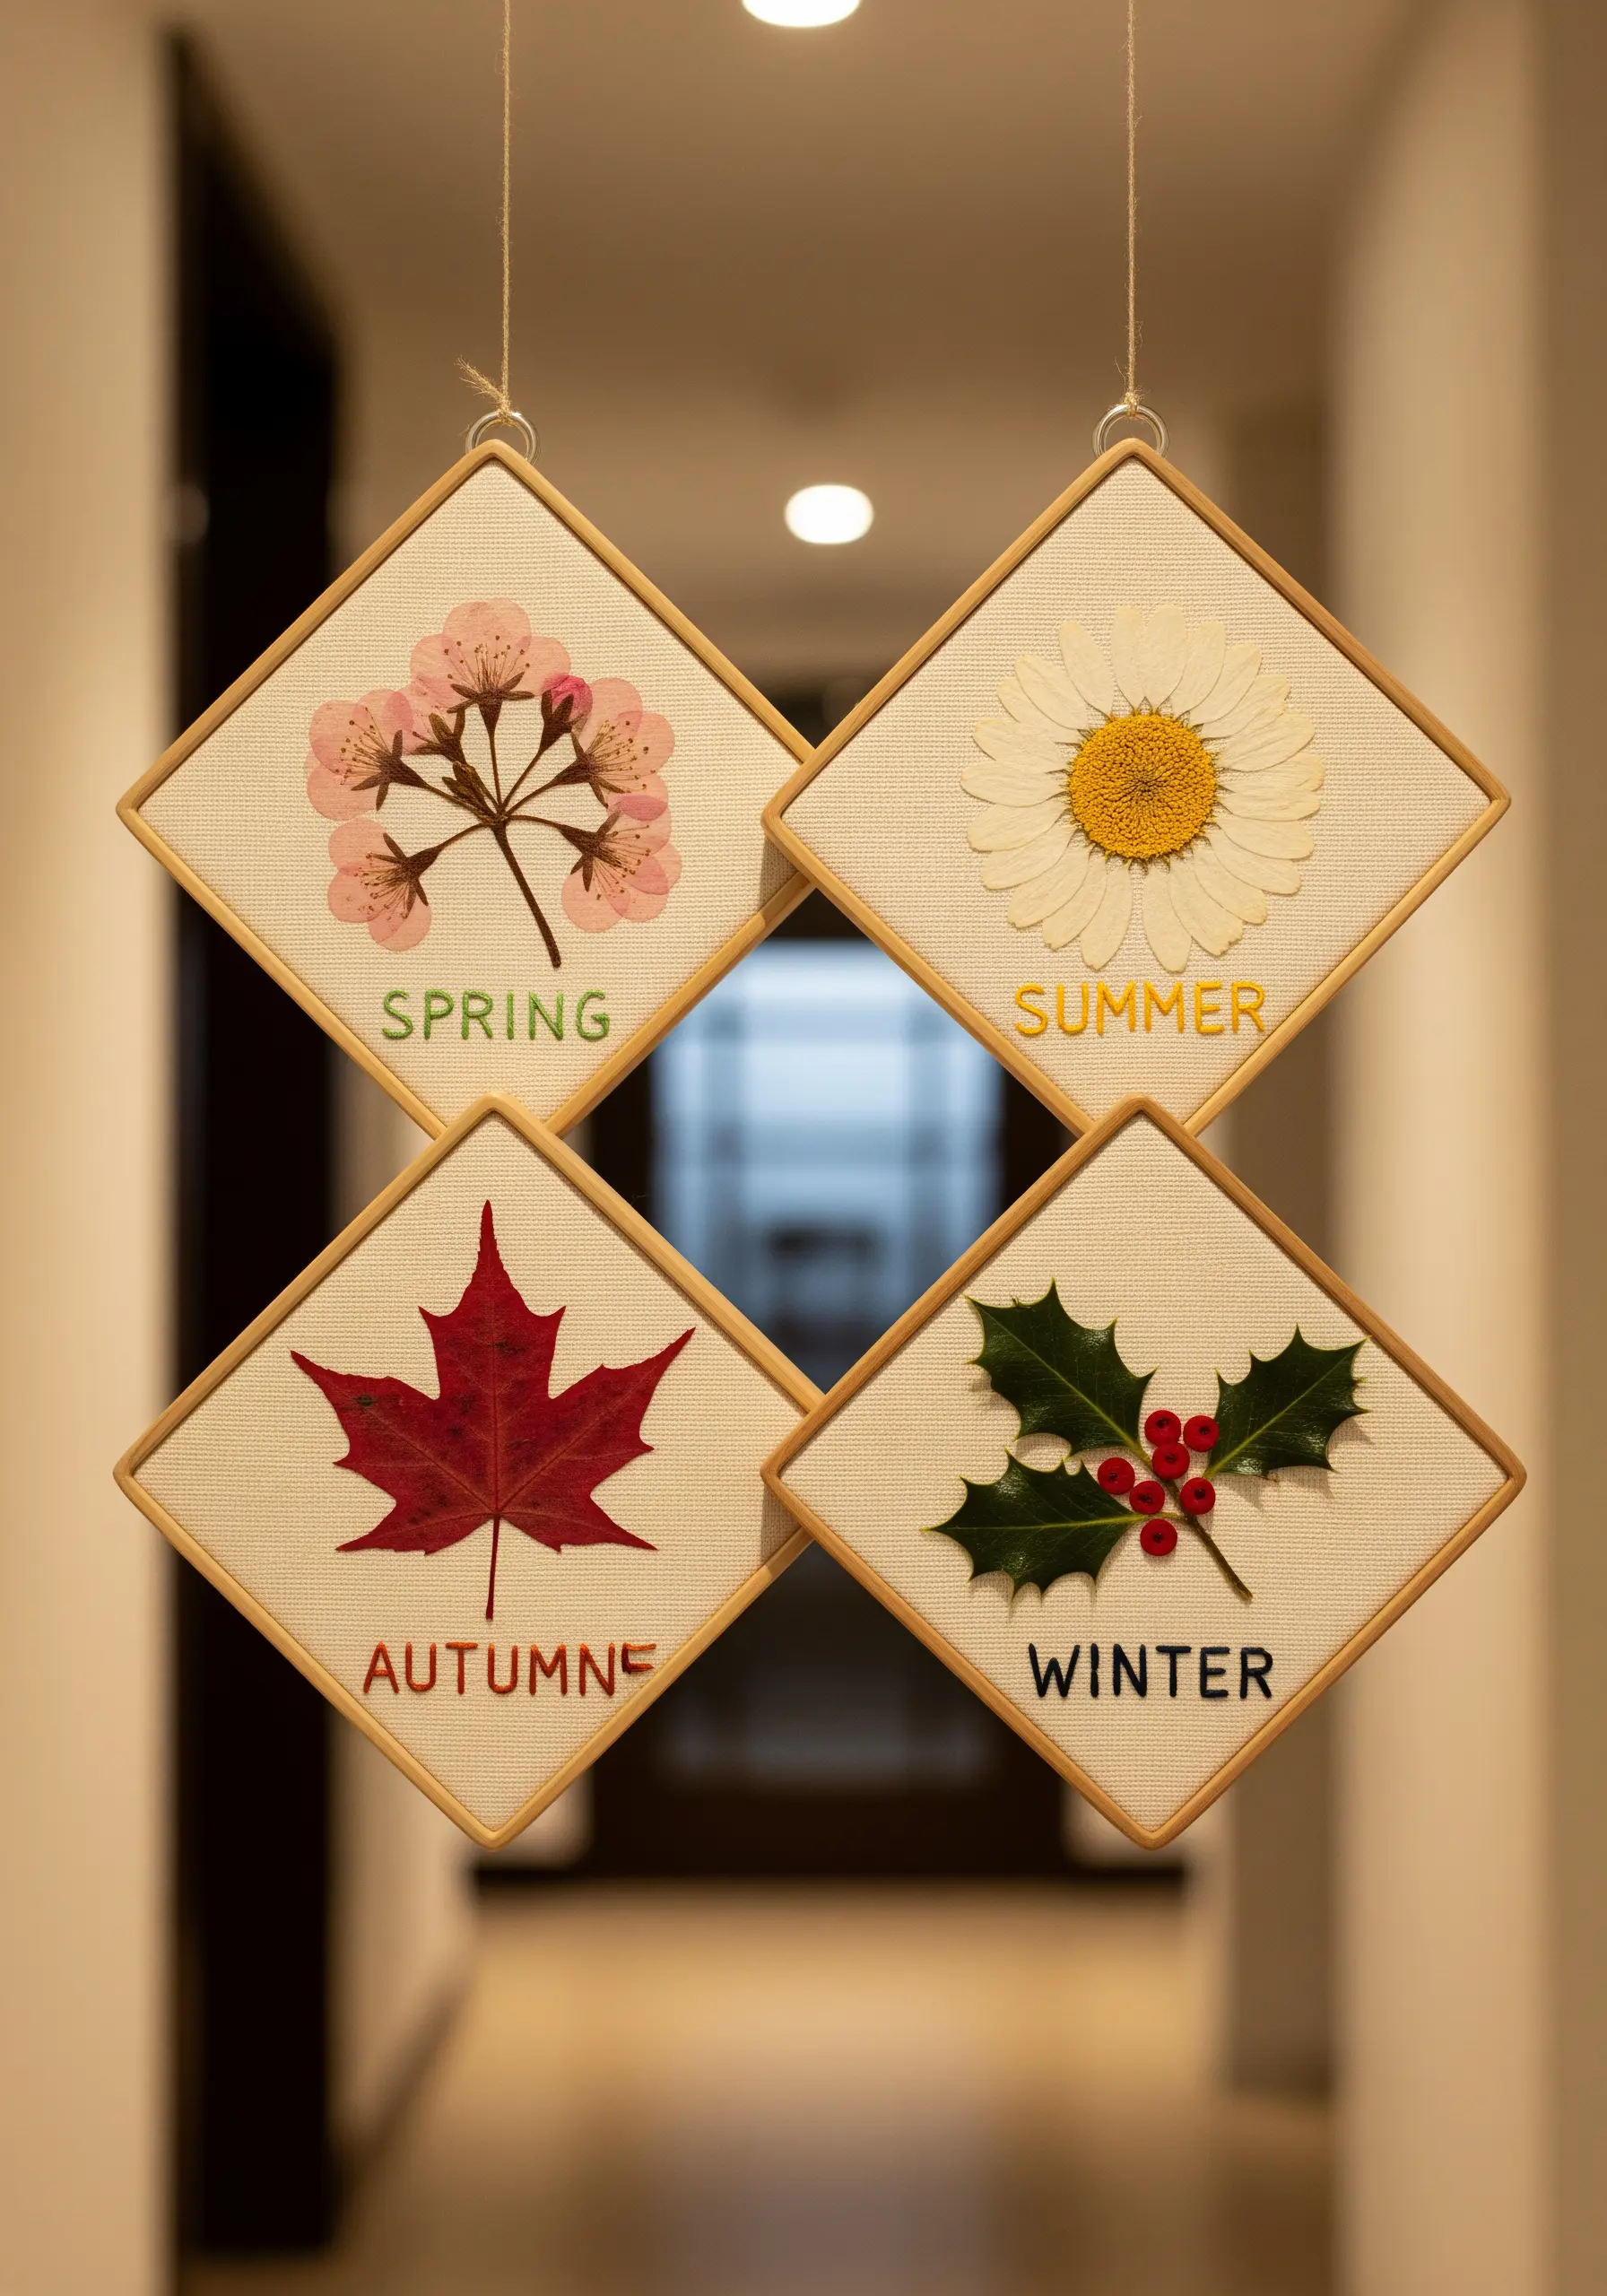
Create a set of four small, matching art pieces, each representing a season.
For each piece, select a pressed flower or leaf that strongly evokes that time of year: cherry blossoms for spring, a daisy for summer, a maple leaf for autumn, and a sprig of holly for winter.
Mount each specimen on a neutral linen fabric and embroider the name of the season underneath in a simple, clean font.
Displaying them together as a cohesive group creates a timeless and elegant tribute to the cycle of nature.
This is a beautiful way to create seasonal embroidery wall decor ideas that you can enjoy year-round.


