

You sit with your needle and thread, but you feel a gap between the textures you see in nature and what your stitches can create. You’re ready to move beyond flat surfaces and translate the tactile world of moss, bark, and stone onto your fabric.
The secret isn’t in learning dozens of complicated stitches. It’s in learning how to use simple stitches—the French knot, the satin stitch, the straight stitch—with intention. It’s about knowing when to pack them tightly for density, when to pad them for dimension, and when to combine them with beads or fabric for a truly sculptural effect.
Think of these techniques as a new language for your needle. With them, you can capture the fuzzy pile of a cattail, the smooth curve of a river rock, or the delicate shimmer of frost on a sheer surface. Let’s begin.
1. Master Mossy Bark with Layered Knots

To capture the lush texture of moss, rely on densely packed French knots.
Use a variegated thread in shades of chartreuse and forest green to create natural color variations with every stitch, saving you from constant color switching.
Vary the number of times you wrap the thread around your needle—once for small, tight buds and twice for fuller, more prominent knots.
Contrast the soft moss with long, vertical straight stitches in muted browns and greys to represent the underlying bark, letting the textures tell the story.
2. Create Sculptural Stones with Padded Satin Stitch
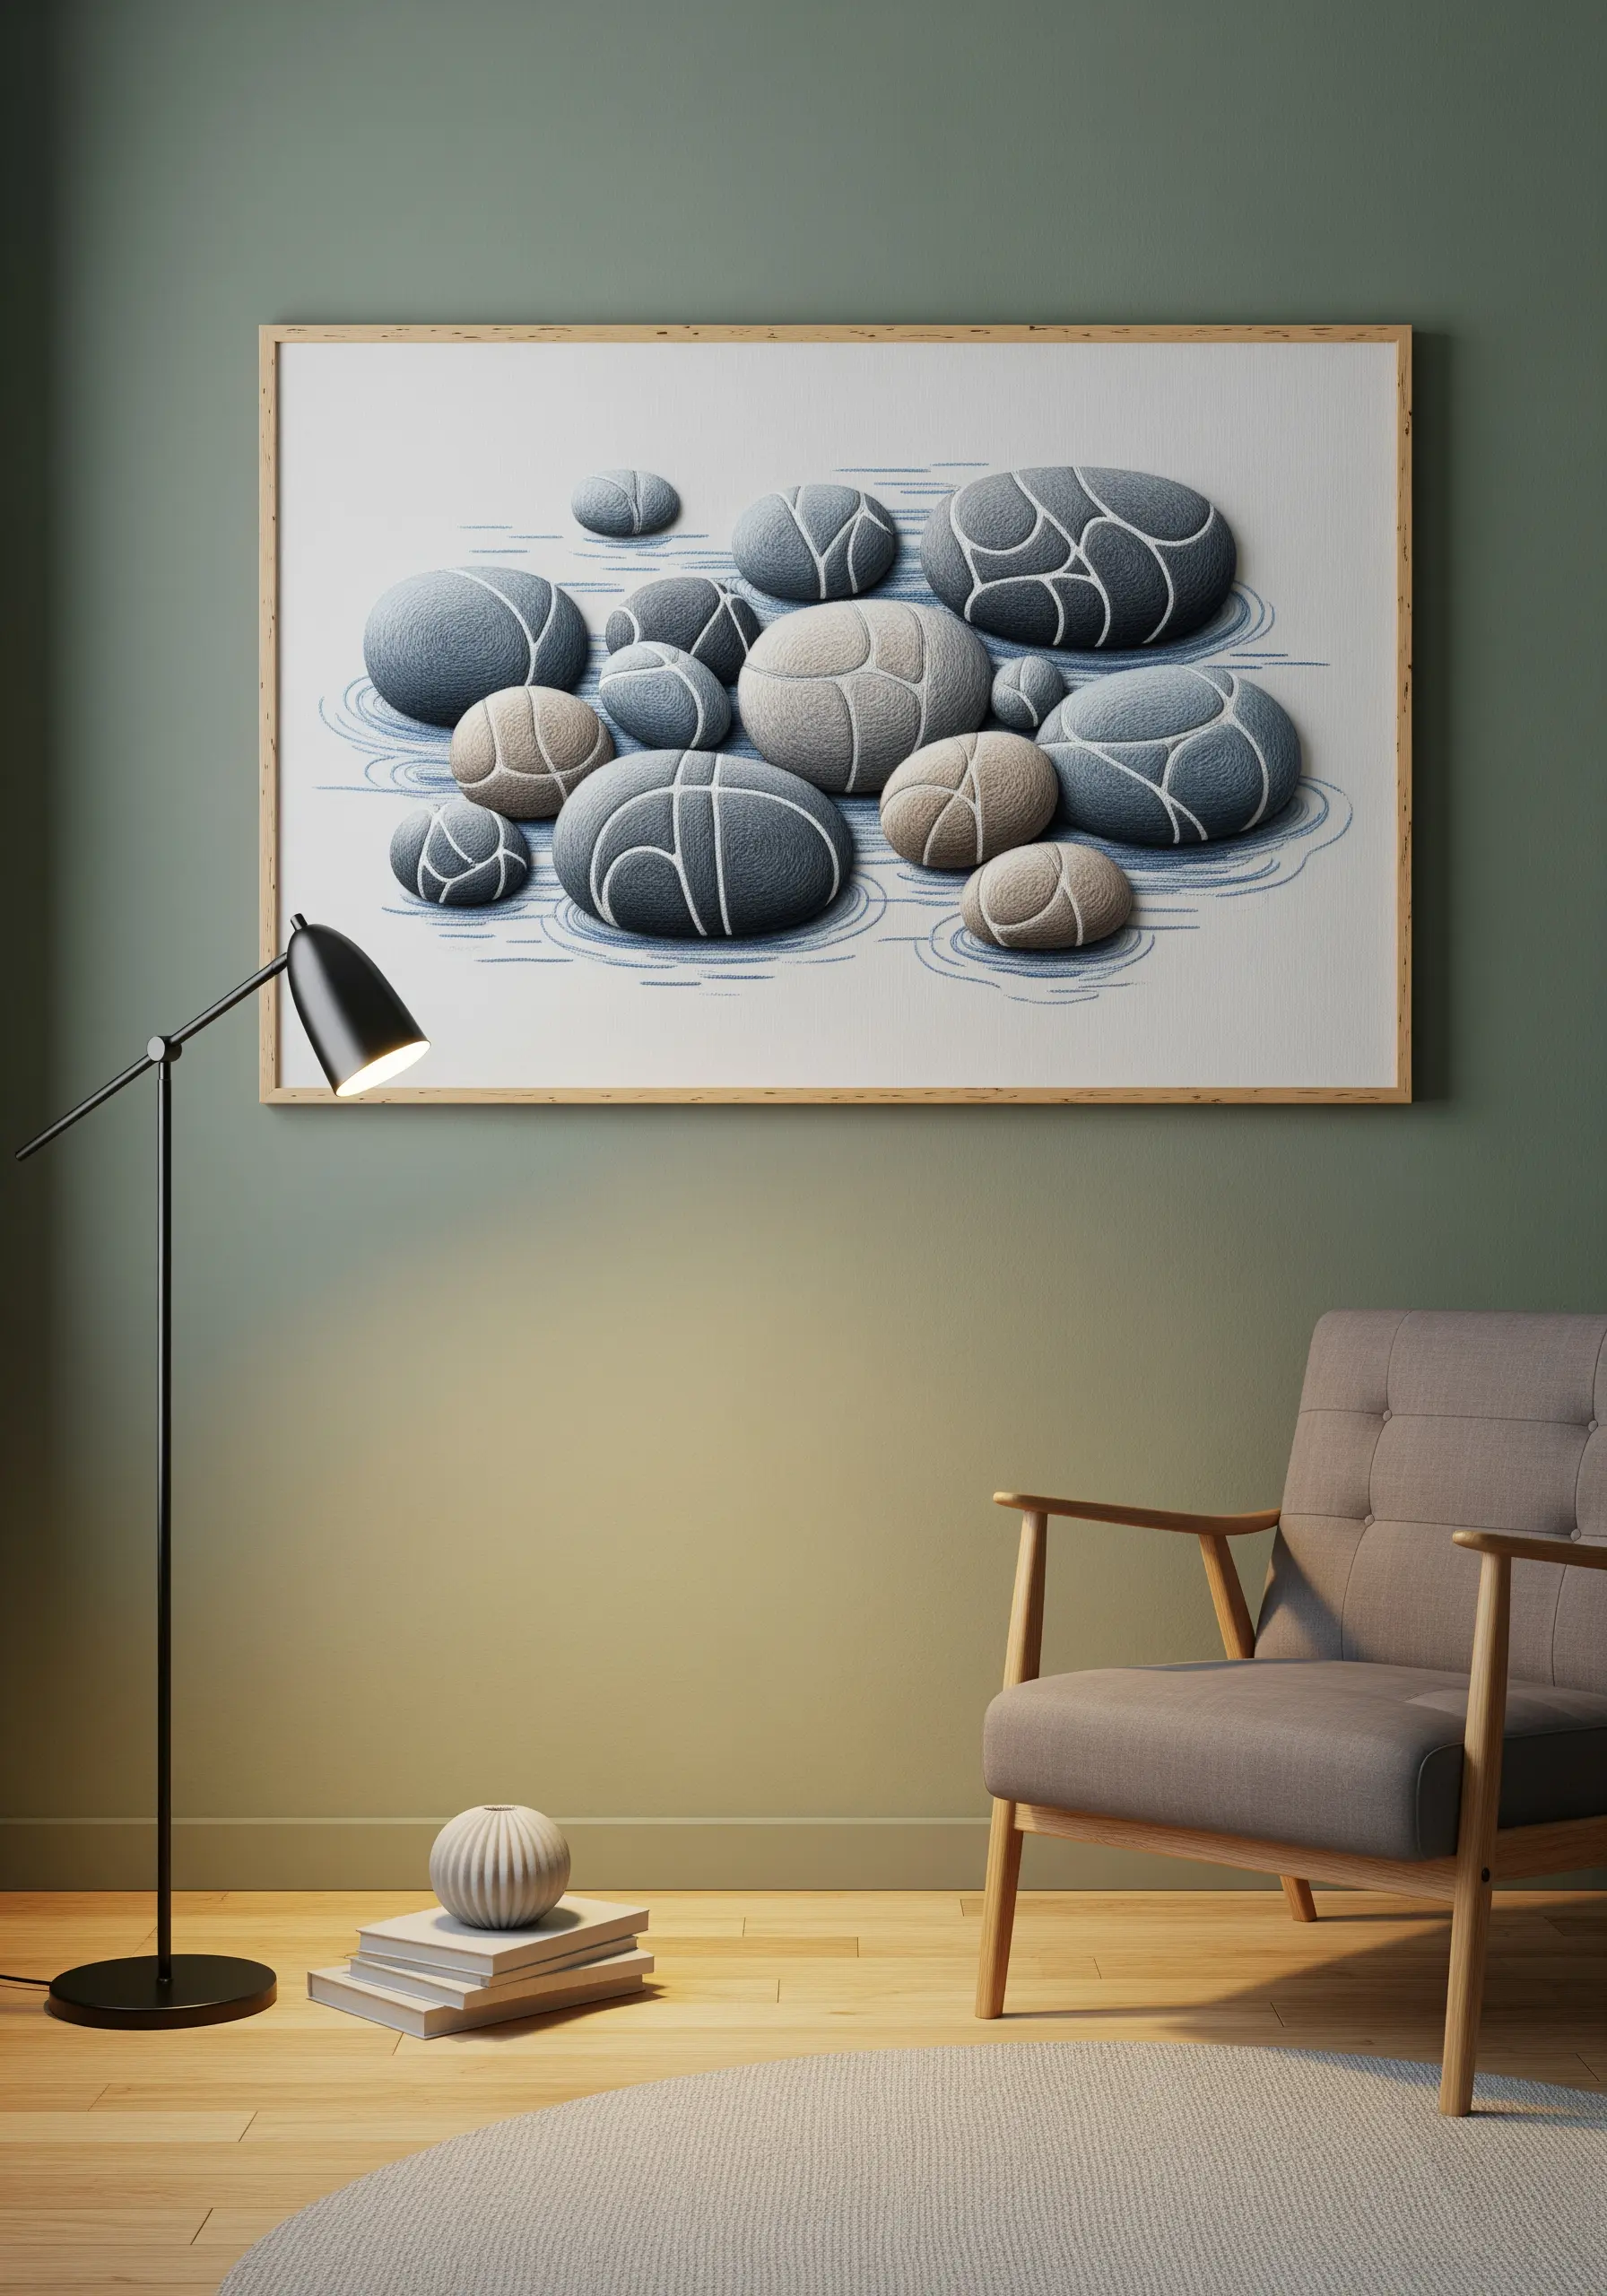
Give simple stone shapes a smooth, three-dimensional form by using padded satin stitch.
First, cut a small piece of felt slightly smaller than your stone shape and secure it to your fabric.
Stitch over the felt with smooth, even satin stitches, allowing the thread to glide over the raised surface. This technique, known as stumpwork, instantly creates volume.
Use a thread with a subtle sheen, like a silk or rayon floss, to mimic the way light reflects off water-worn pebbles.
3. Weave Realistic Texture for Fungi and Logs
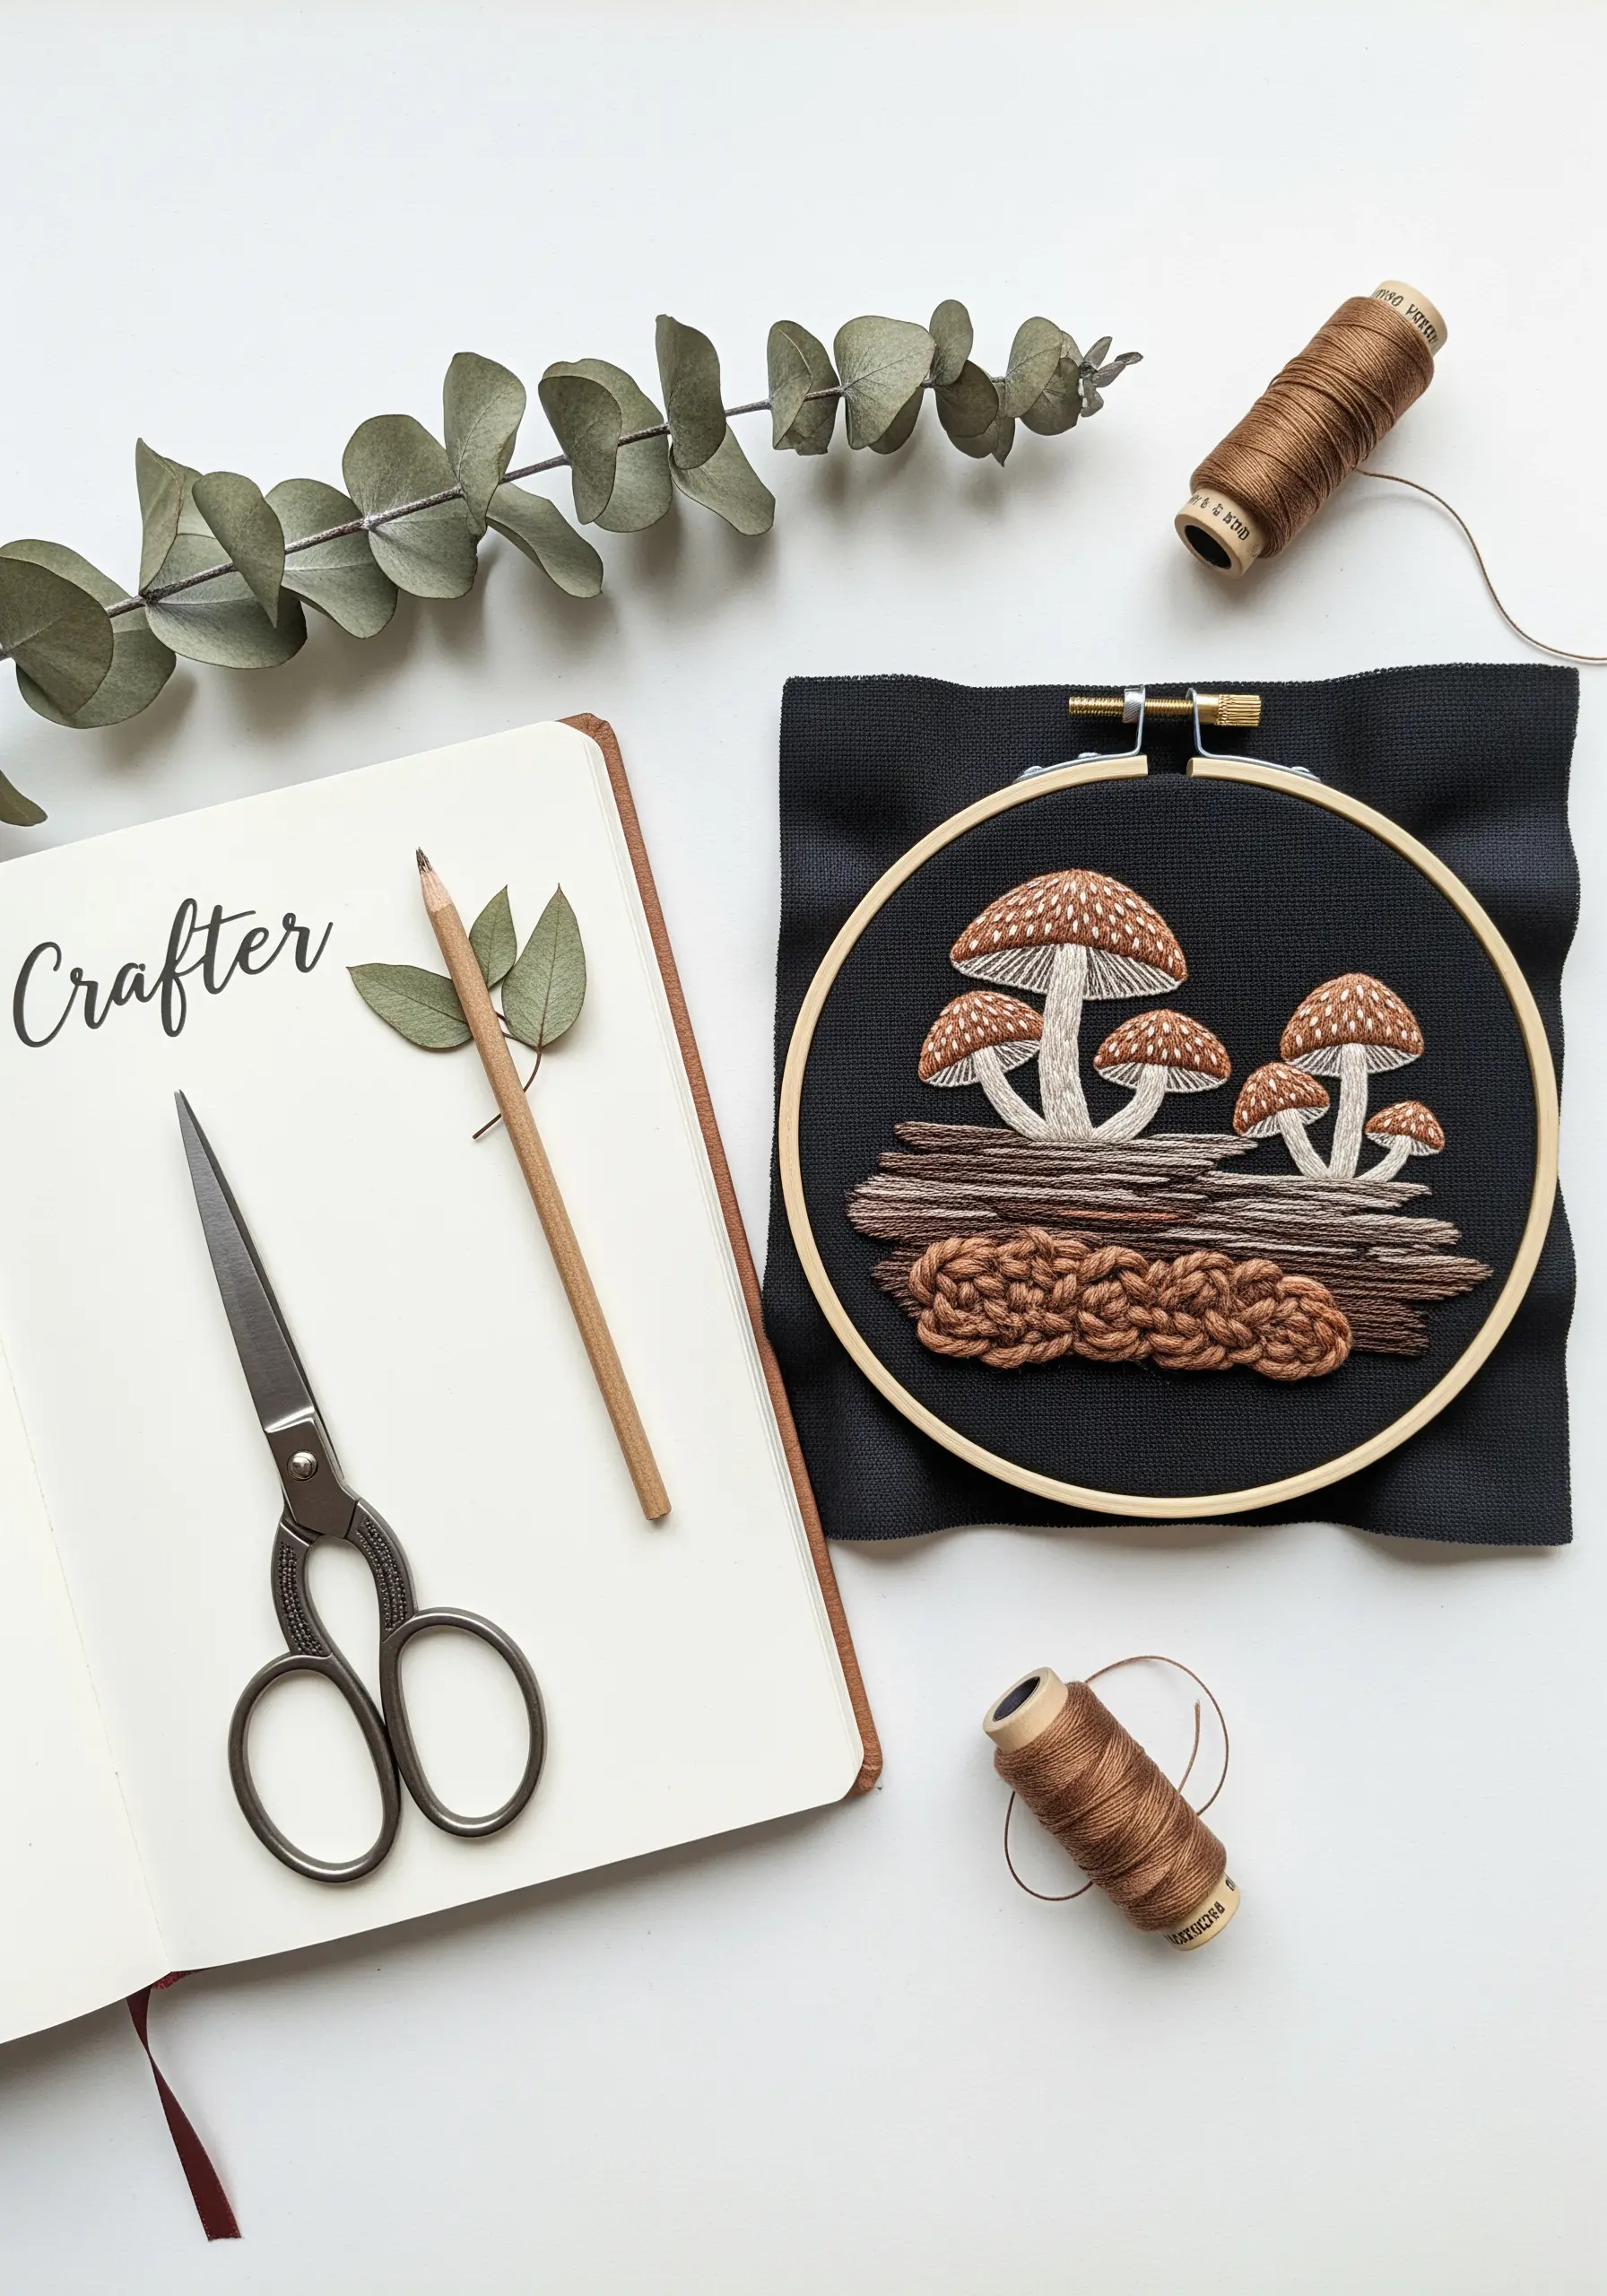
Mimic the rough, layered texture of a fallen log by using a couching technique.
Lay down several long, parallel strands of a thick, rustic thread, like wool or multiple strands of cotton floss. Then, use a single, finer thread to tack them down with small stitches, creating a woven, bark-like surface.
Contrast this rugged base with the delicate, smooth satin stitch of the mushroom caps and stems, making them appear to grow right out of the textured ground.
4. Mimic Water Ripples with High-Sheen Thread
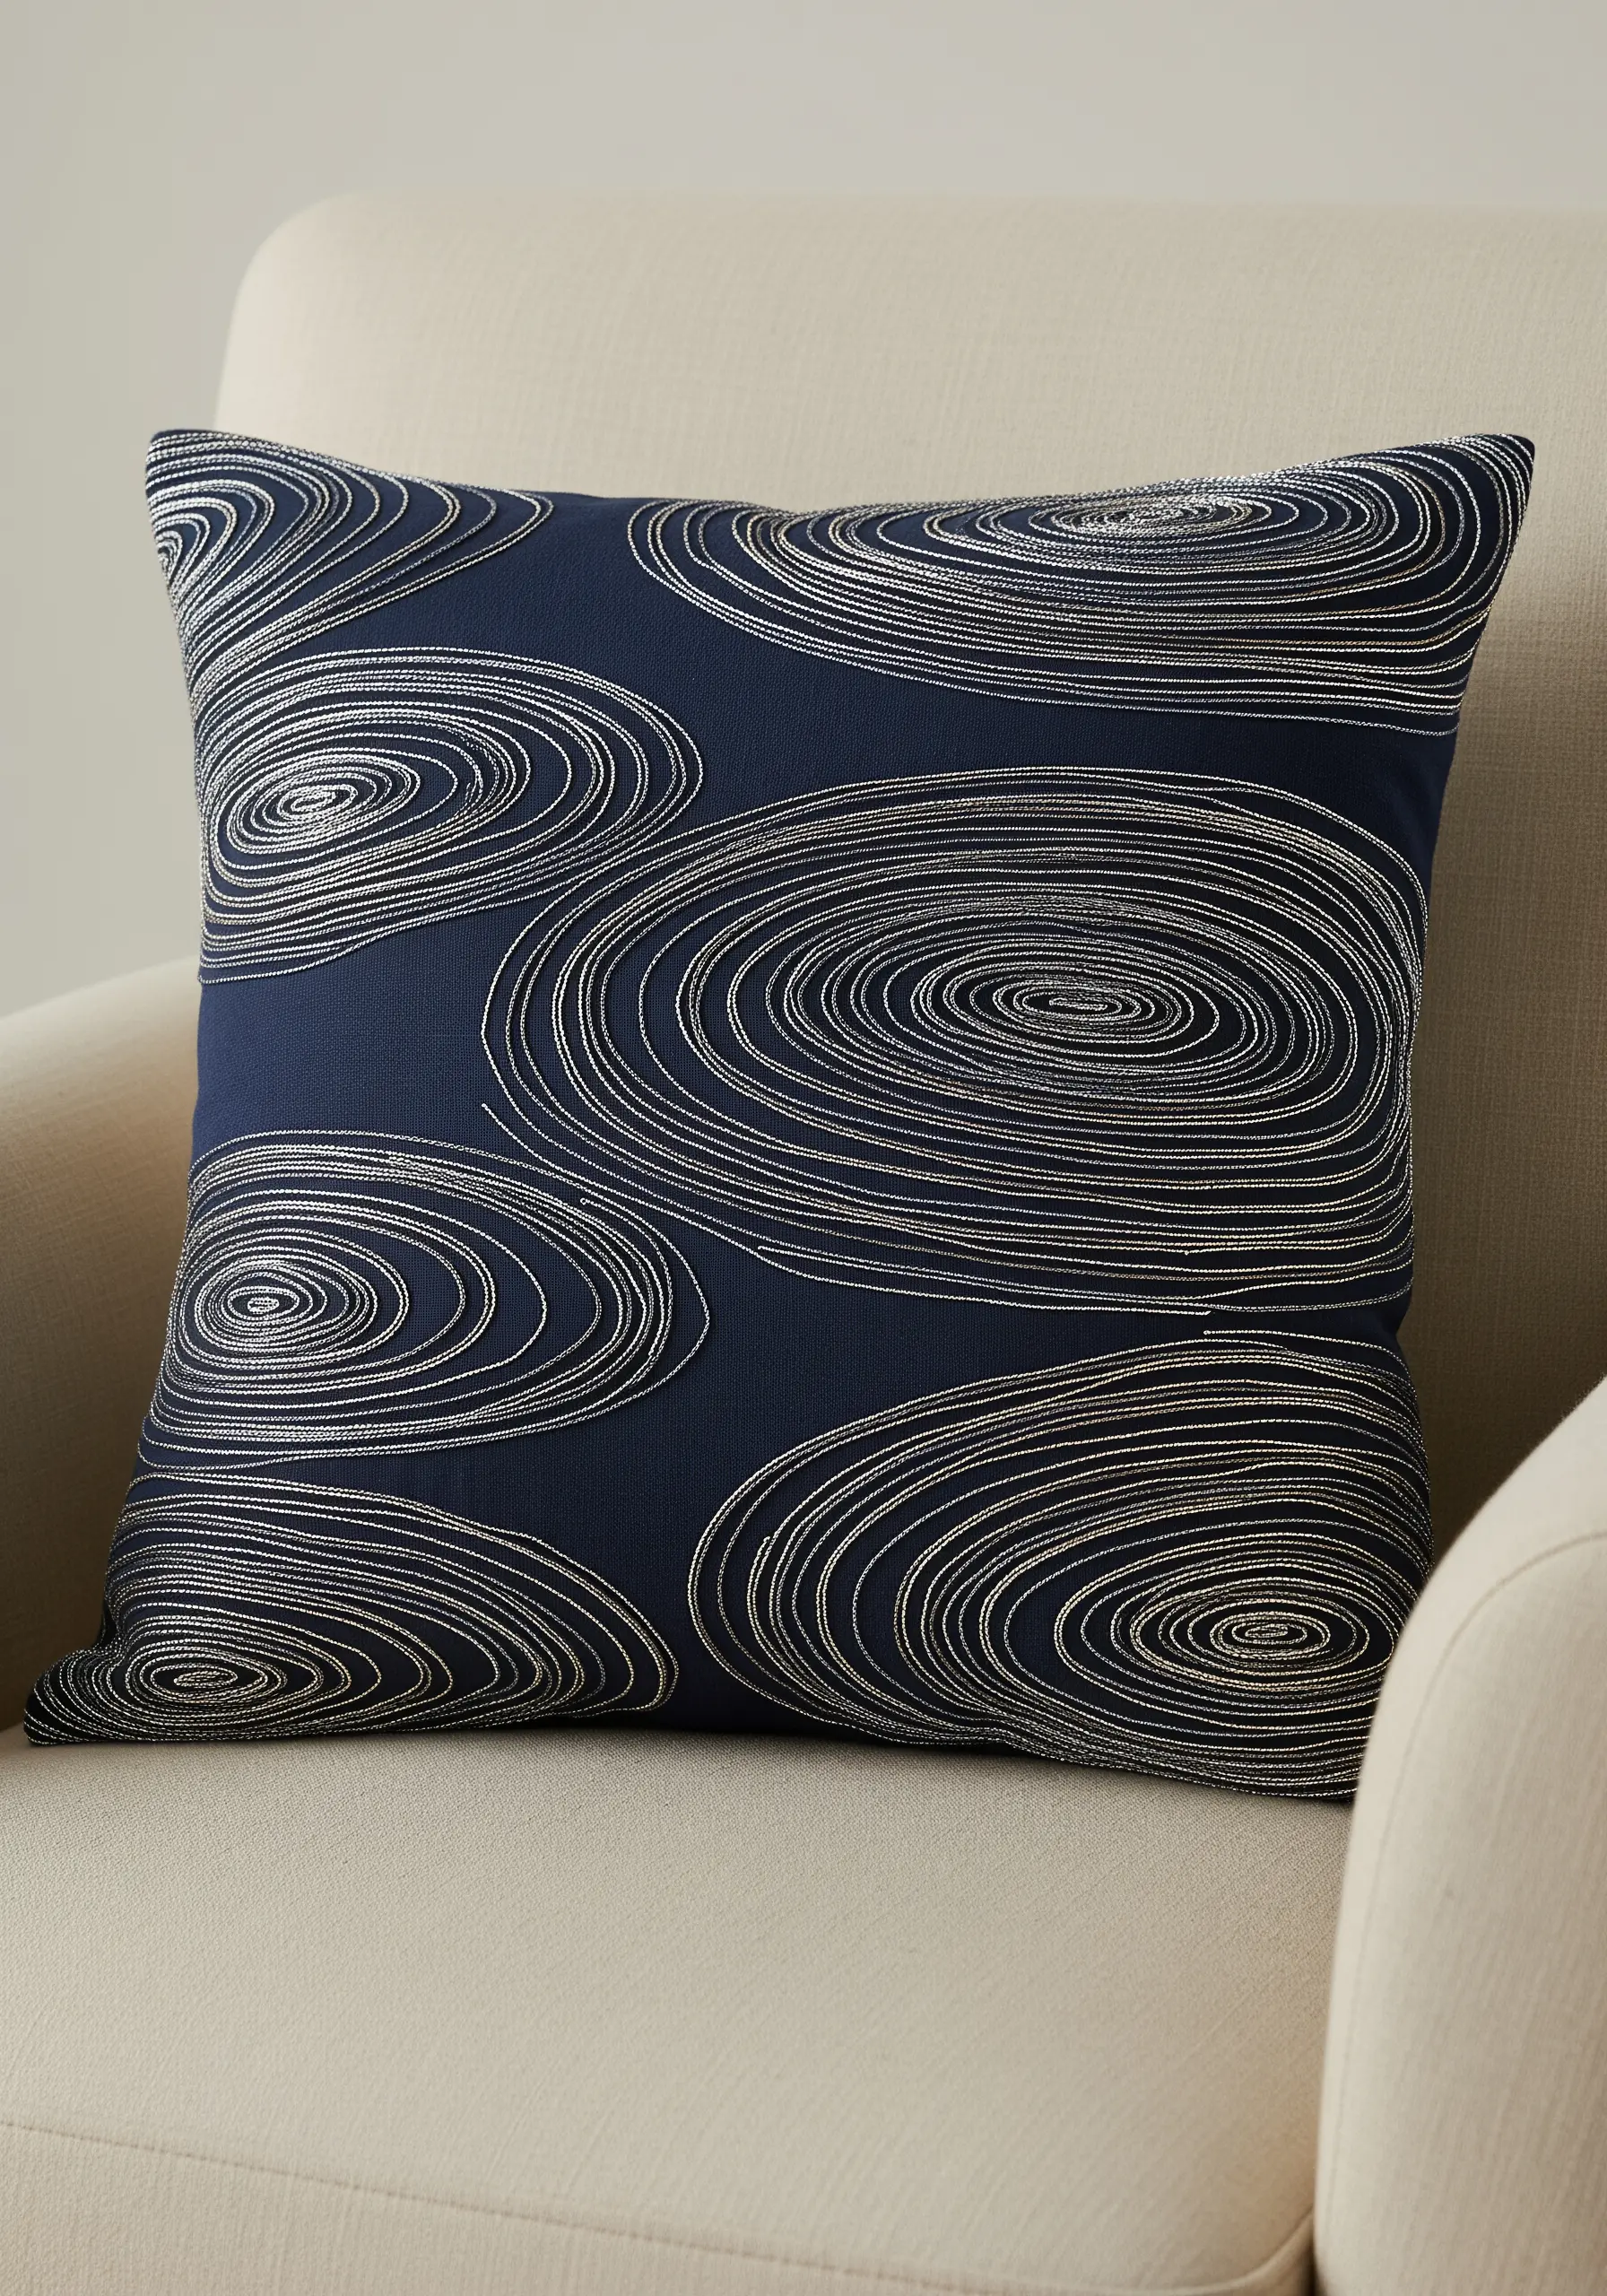
Capture the subtle shimmer of light on water by stitching concentric circles with a high-sheen or metallic thread.
The key is the contrast between the reflective thread and a matte background fabric, such as navy linen or black cotton.
Use a whipped backstitch to create perfectly smooth, raised lines that flow beautifully around curves. This simple adjustment turns a basic outline into a seamless, cord-like ripple.
This is a wonderfully effective way to transform plain fabric instantly, adding movement and elegance to home décor.
5. Engineer Cracked Earth with Appliqué and Bold Outlines
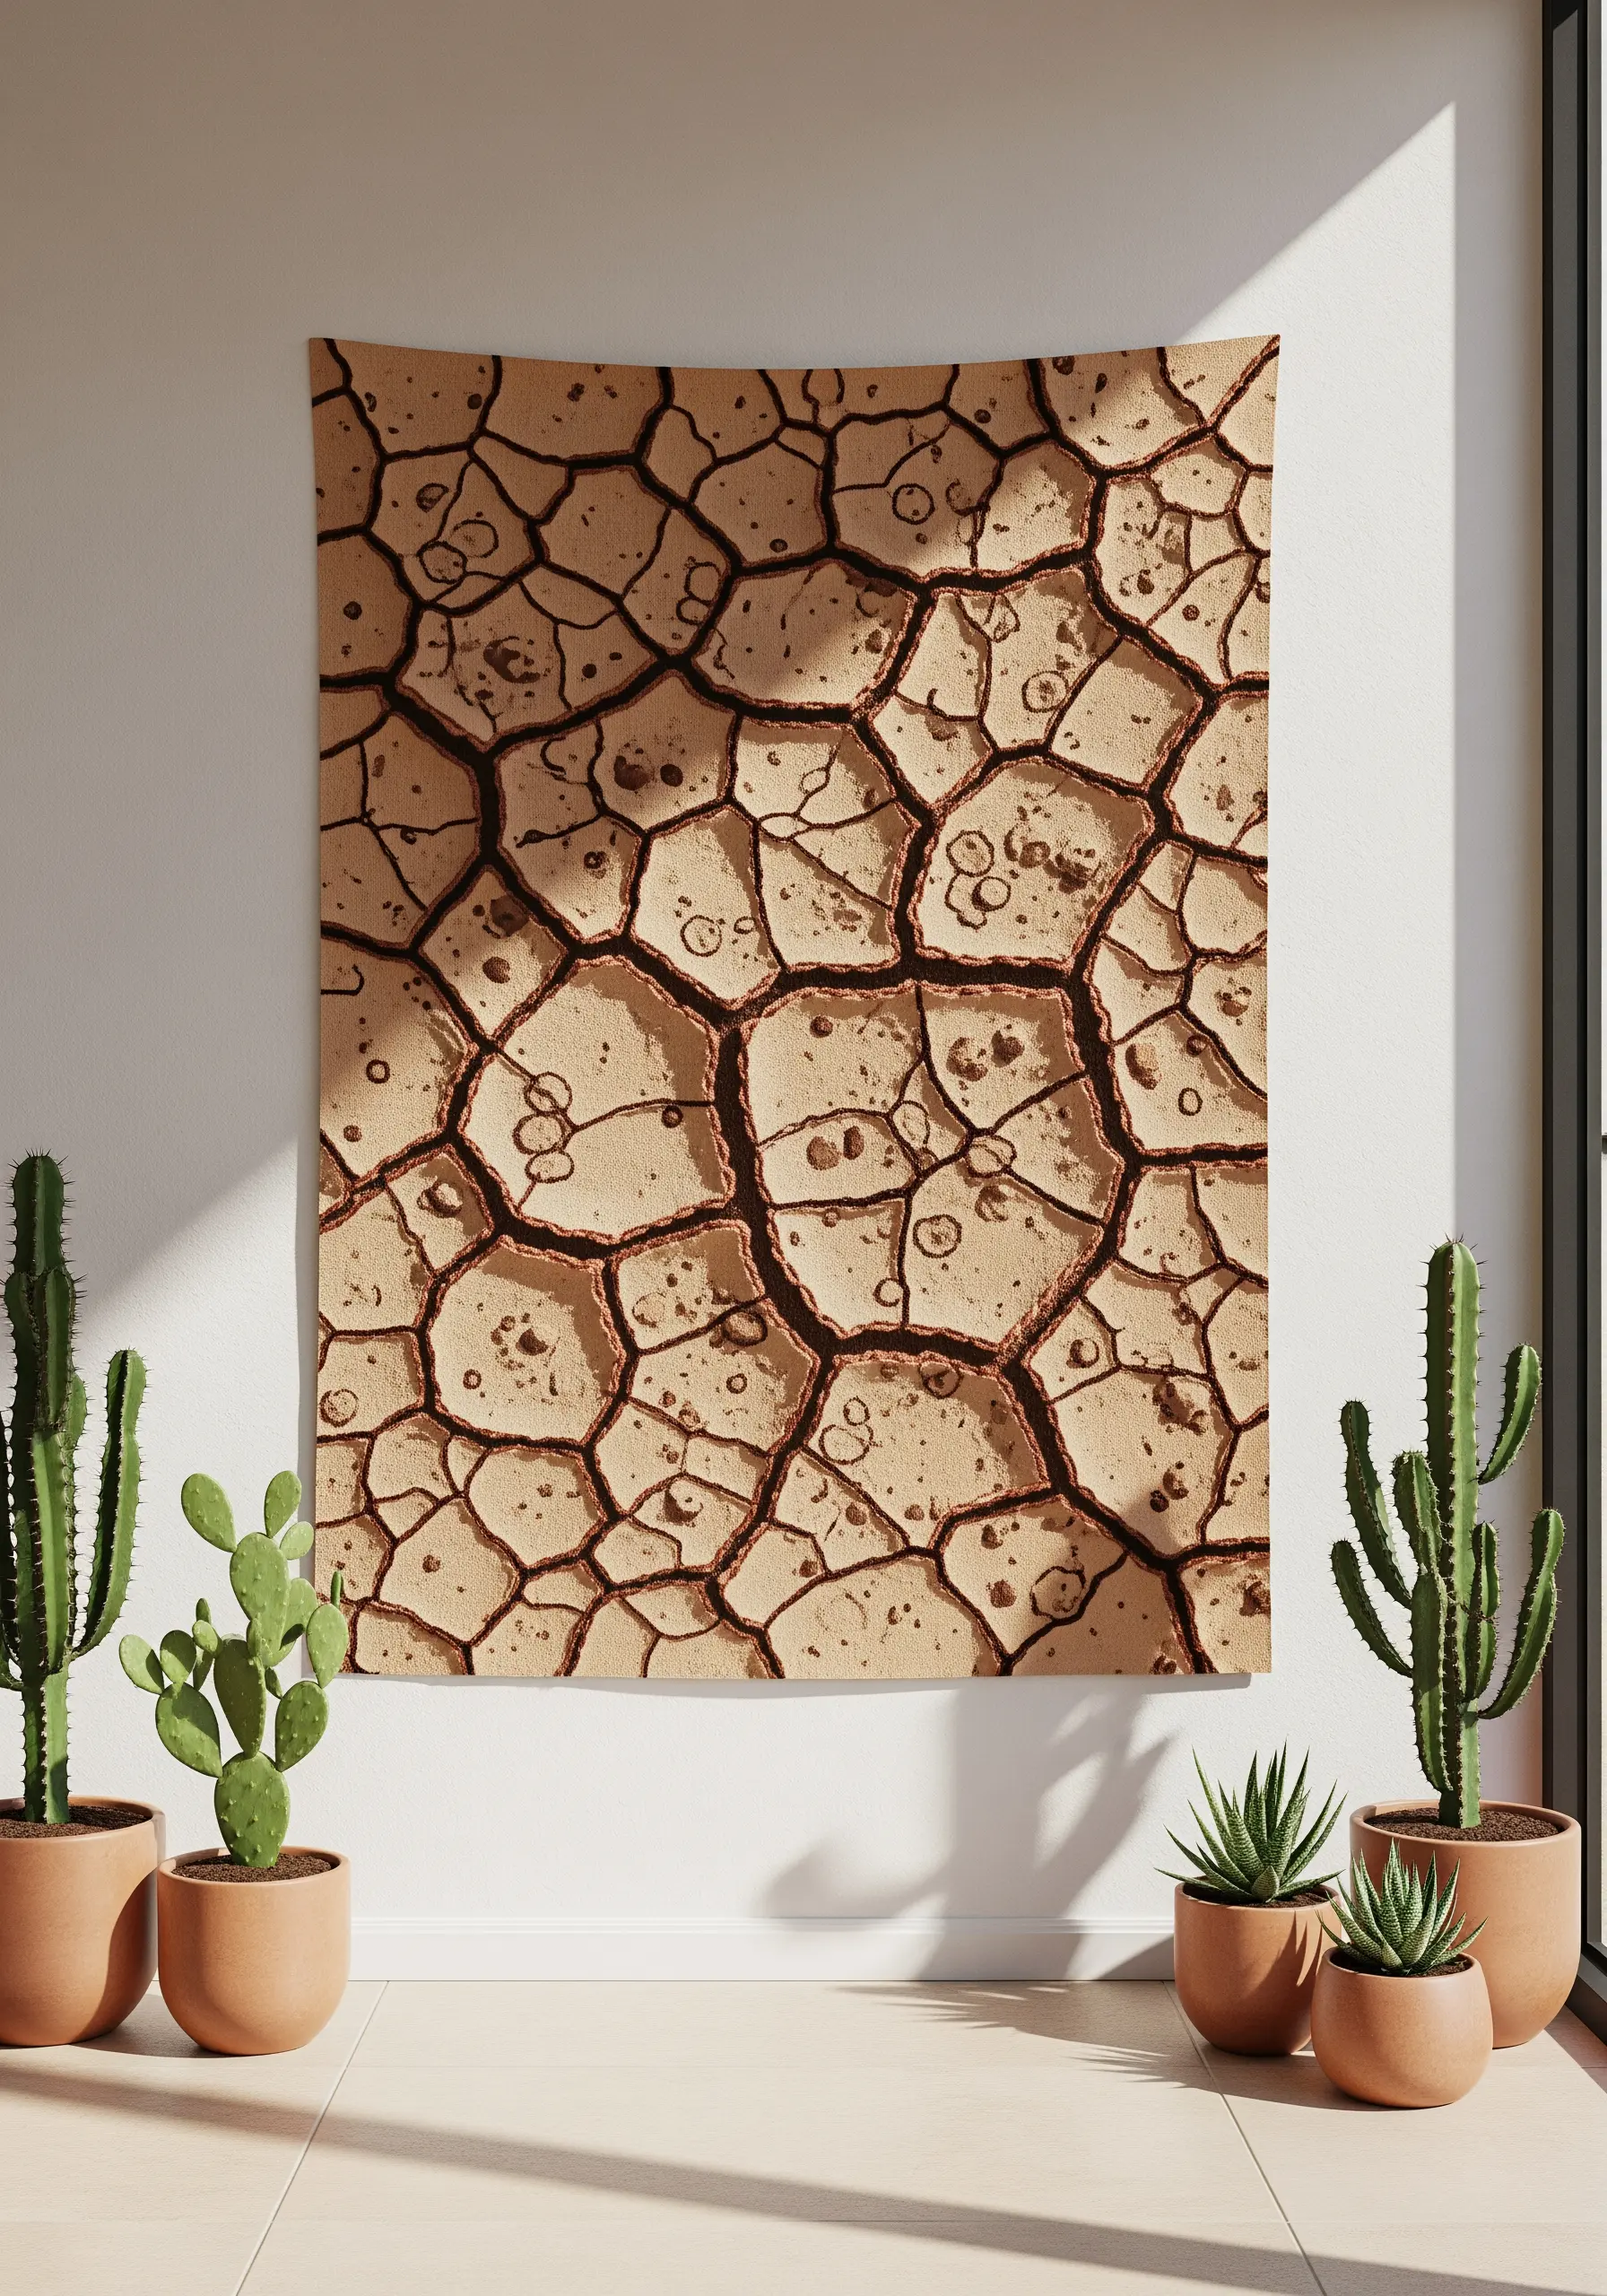
For large-scale textures like parched earth, combine fabric appliqué with bold stitching.
Cut irregular shapes from a textured fabric like raw canvas or linen and arrange them on your background fabric, leaving small gaps in between.
Secure the shapes with a simple running stitch, then use a thick, dark thread and a jagged stem stitch to outline the gaps, emphasizing the deep cracks.
This method allows you to cover a large area with authentic texture far more quickly than stitching alone.
6. Build Hyper-Realistic Lichen with Cast-On Stitches
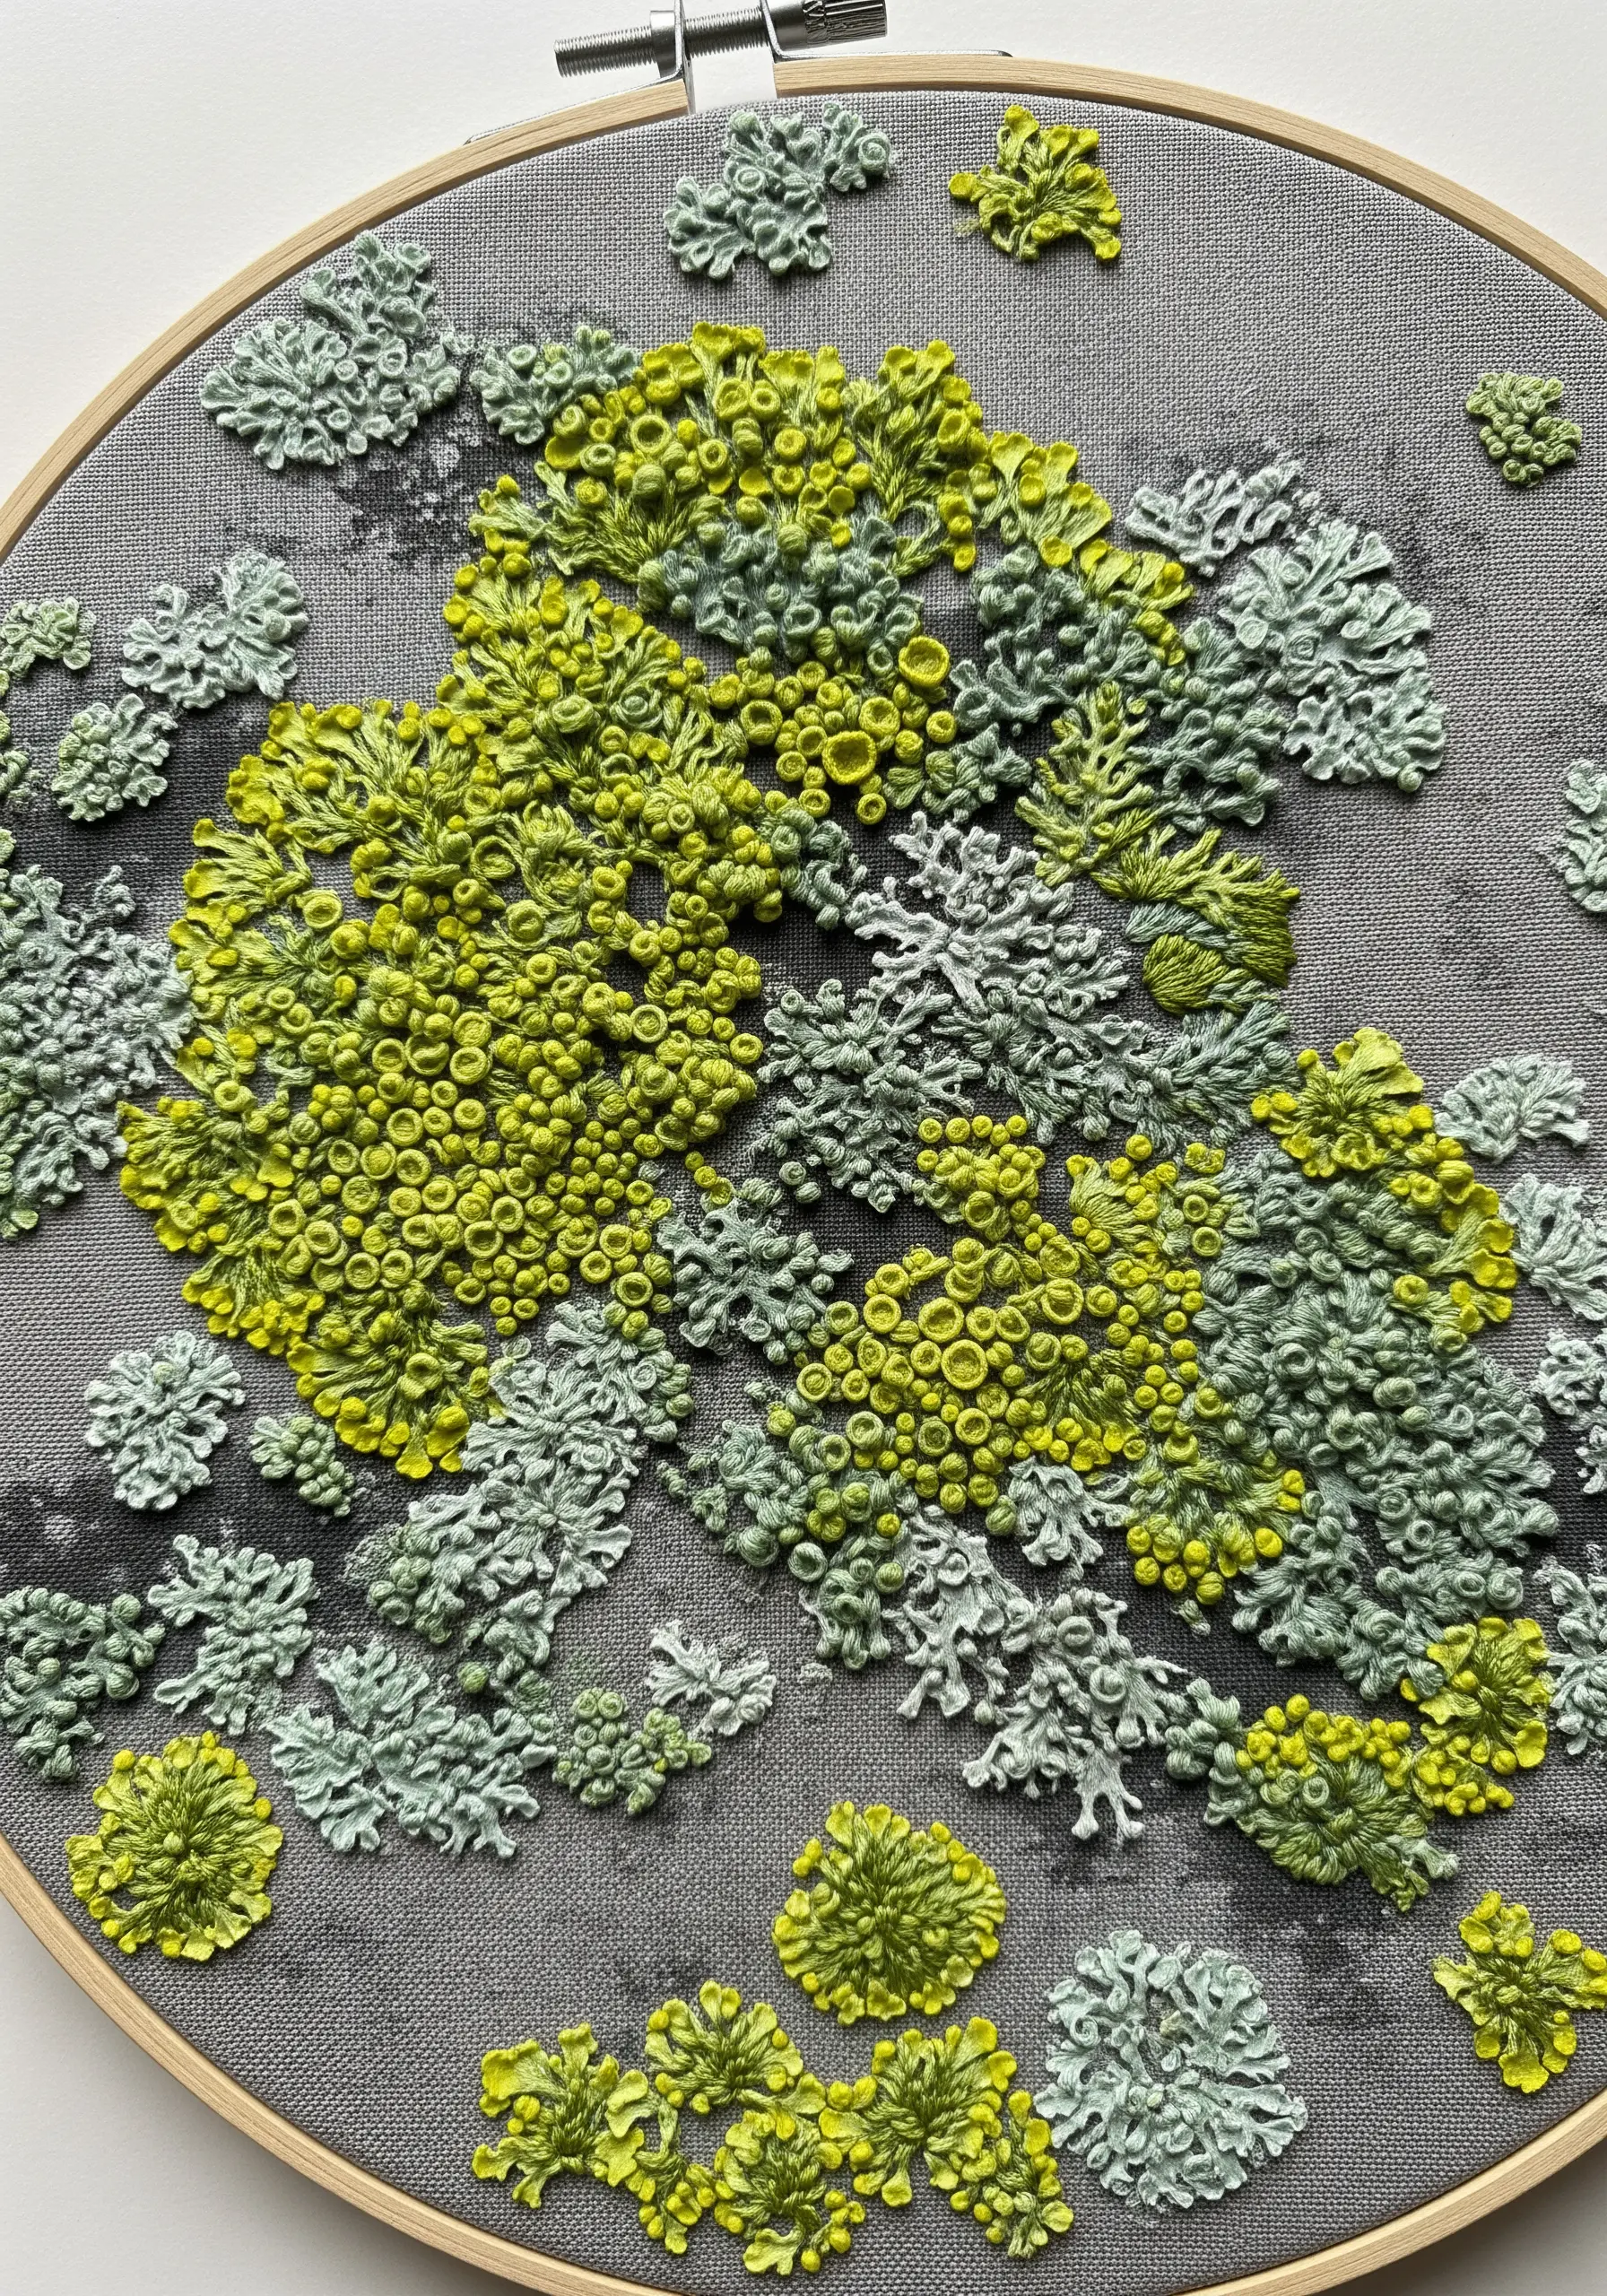
Replicate the delicate, leafy structure of lichen by mastering the cast-on stitch.
This dimensional stitch creates raised loops that stand away from the fabric, perfectly mimicking the frilly edges of lichen clusters.
Combine these with dense groupings of French knots for a varied, organic look. Use variegated threads in chartreuse, pale grey, and mint green to achieve the complex coloring found in nature.
The goal is to create dense, overlapping clusters, not neat rows, which makes it an ideal technique for high-texture fabric collage embroidery projects.
7. Recreate Shorelines with Dense Beading
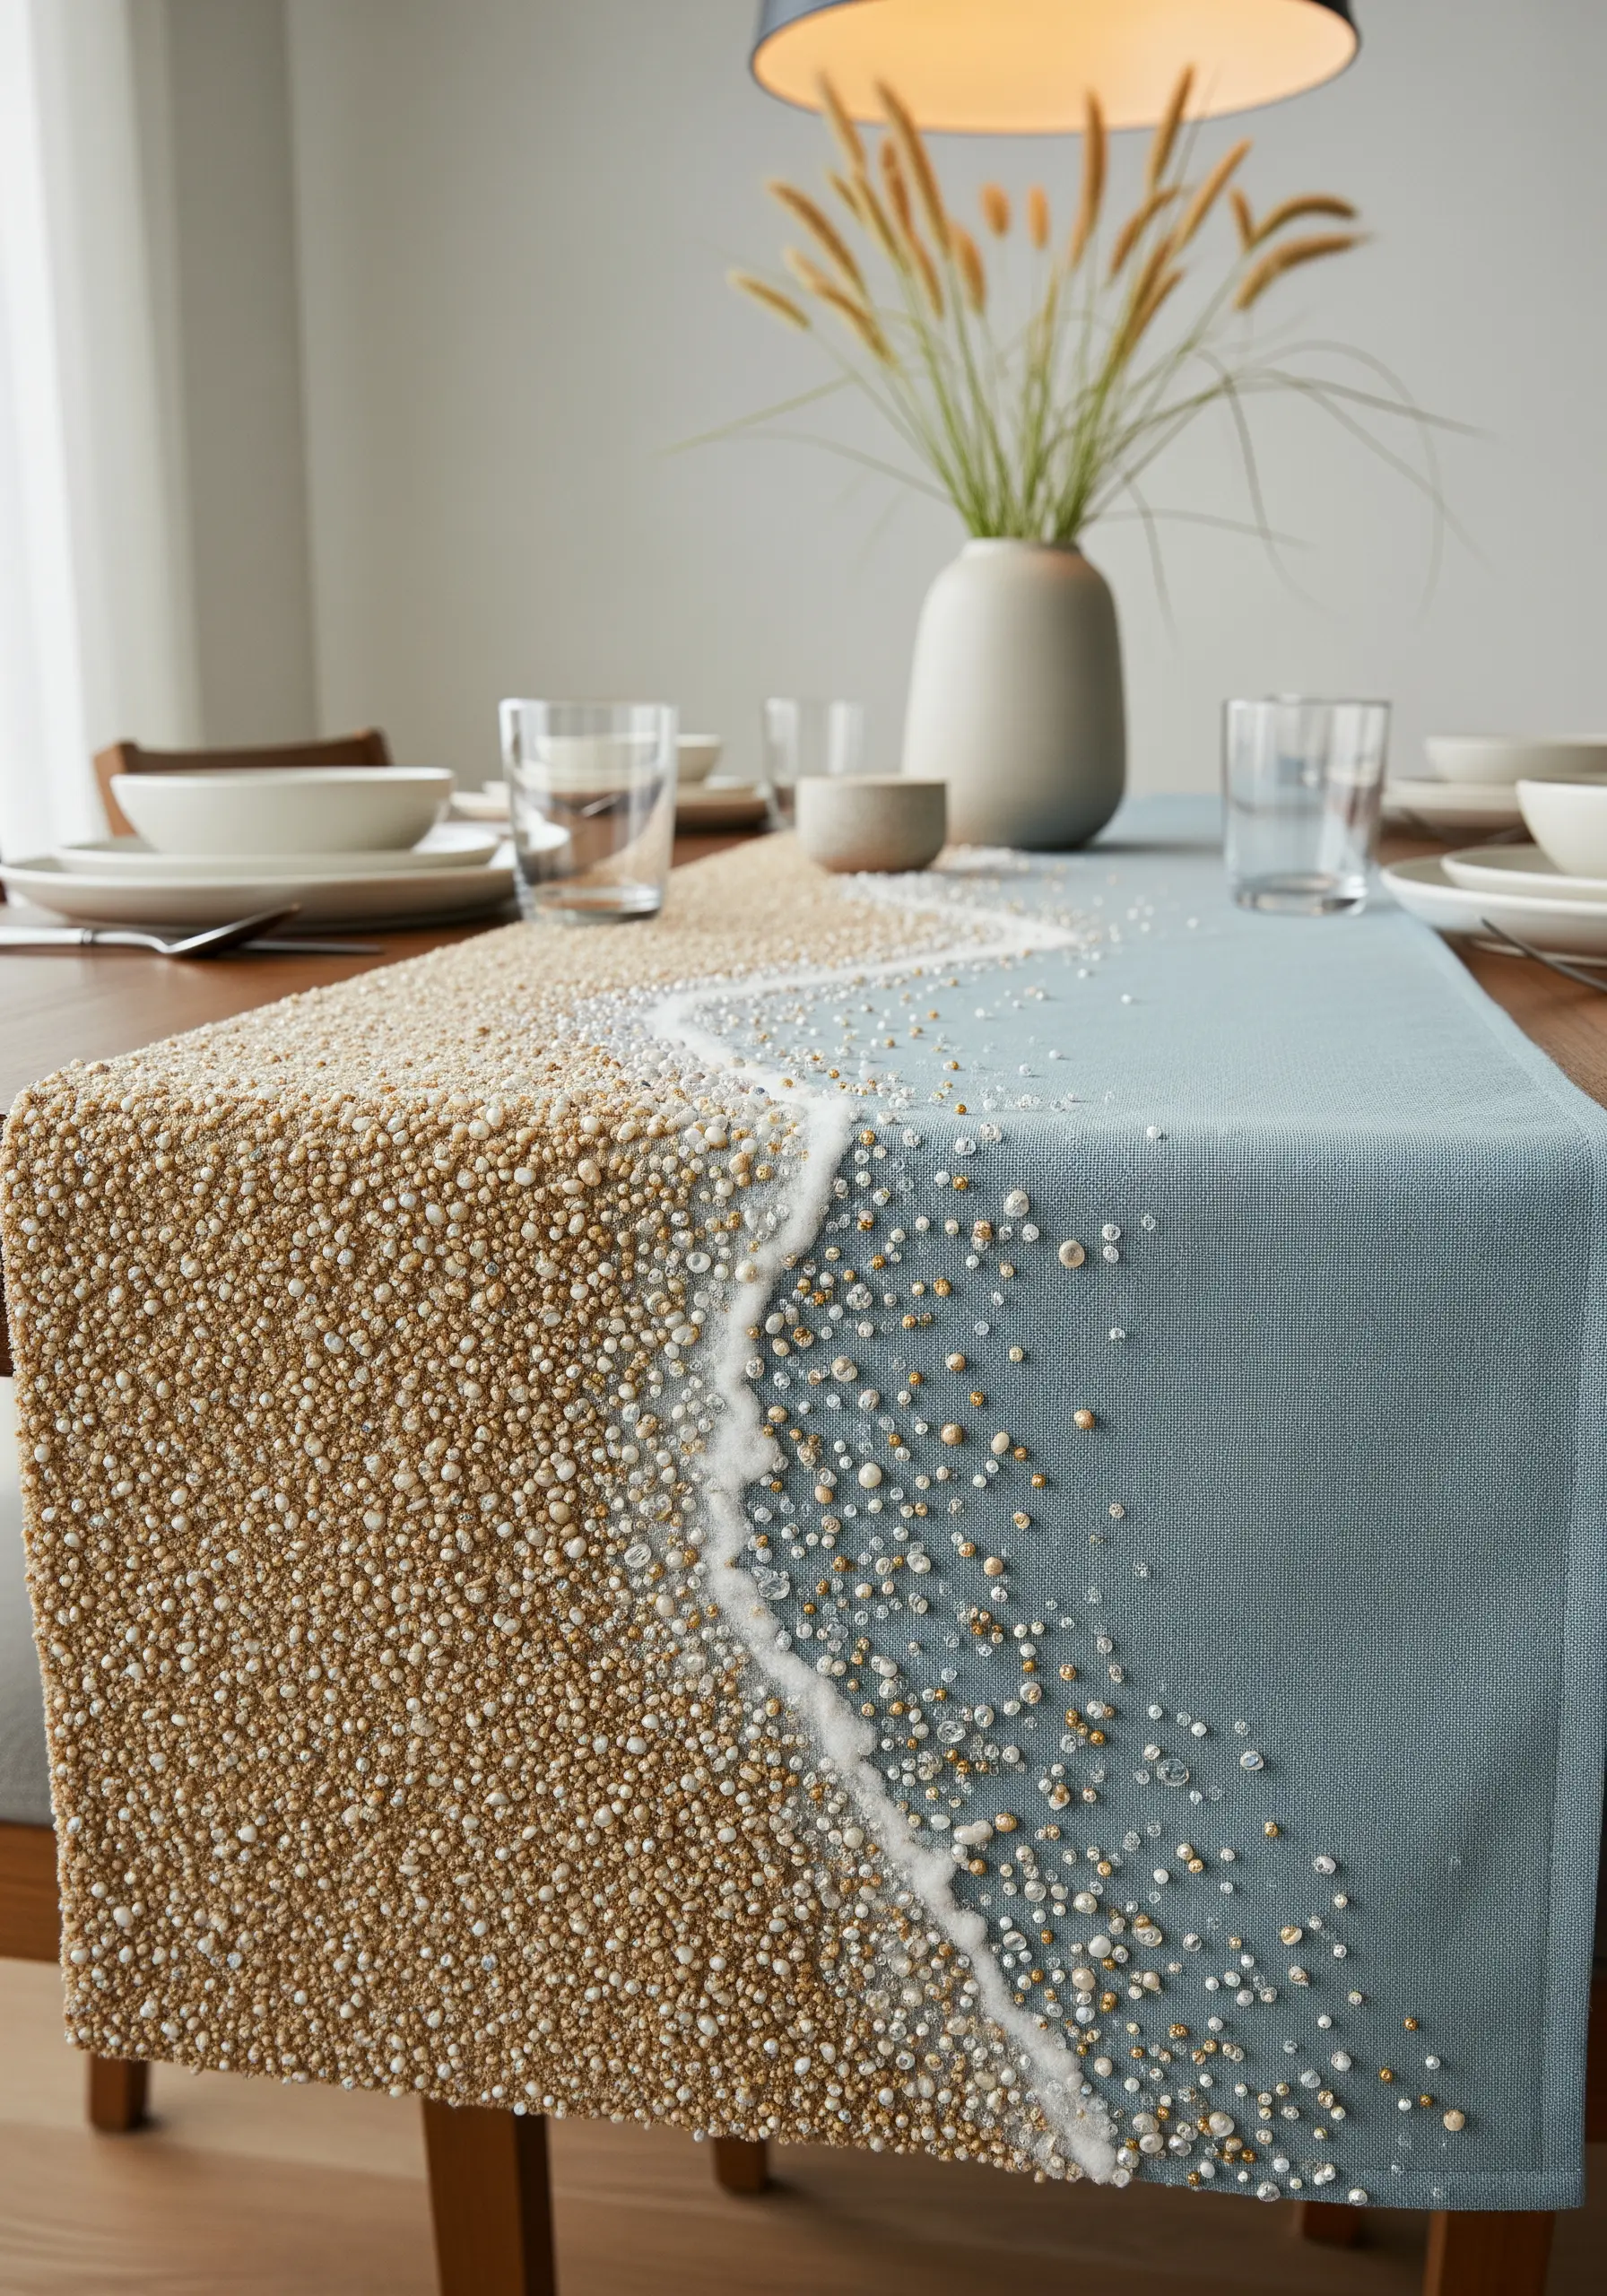
Capture the sparkling, granular texture of a sandy beach by using a dense field of seed beads.
Choose a mix of bead colors and finishes—matte, translucent, and lustrous—in shades of gold, cream, and beige to mimic the look of wet and dry sand.
Stitch them on in tight, irregular clusters rather than straight lines to create a more natural surface. For the delicate line of seafoam, use a contrasting row of white thread or tiny white bugle beads.
This tactile approach adds both visual weight and a delightful shimmer to your work.
8. Define Leaf Veins with Directional Stitching
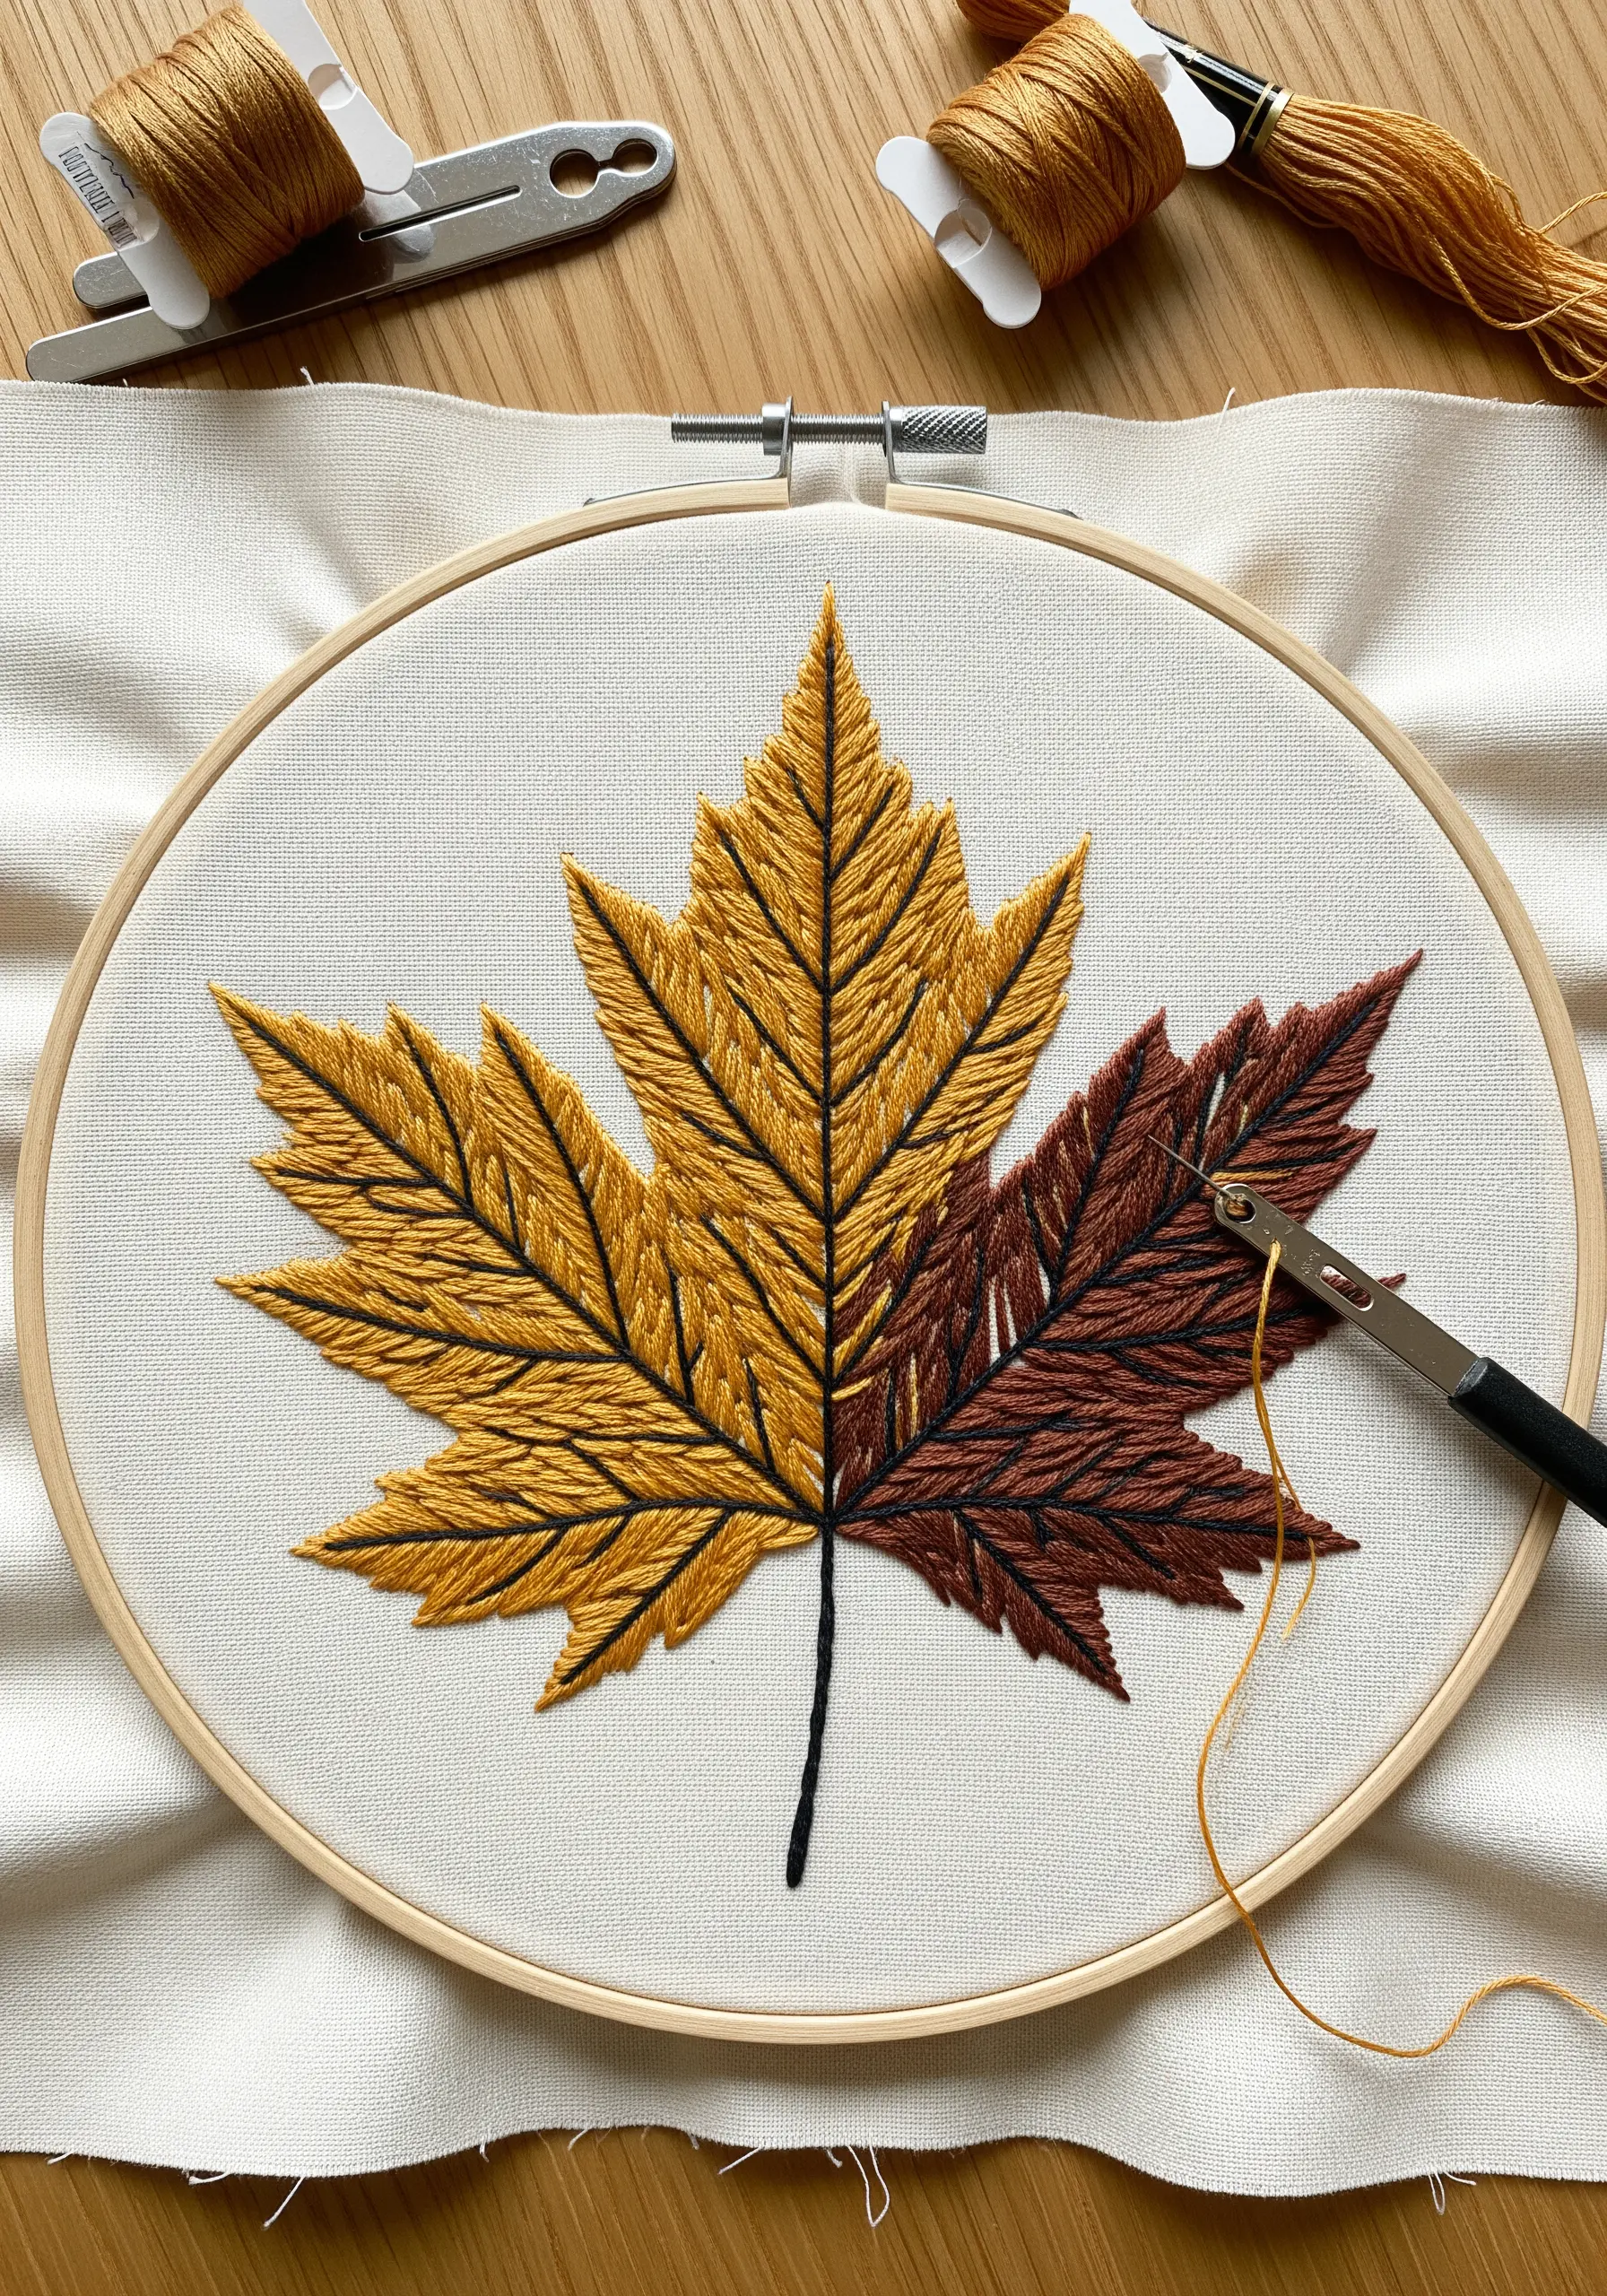
The fishbone stitch is your best tool for creating leaves with a perfect, built-in central vein.
The stitch works from the outer edge inward, with each stitch overlapping slightly at the center to form a defined line. This directional work gives the leaf a natural sense of structure and growth.
For a modern, graphic effect, work each half of the leaf in a different color. Outline the entire shape with a single strand of dark split stitch to make the colors pop and give the design a crisp, clean finish.
This is a foundational technique for all kinds of leaf and plant embroidery ideas.
9. Capture Frost’s Delicacy on Sheer Fabric

To embroider something as ethereal as frost, you need a fabric that can disappear. Choose a sheer material like tulle or organza.
The transparent background allows your stitches to float, creating a truly magical effect when held up to the light.
Use a light, airy stitch like the fern stitch with a single strand of white, silver, or pale blue thread. The branching nature of this stitch perfectly mimics the crystalline patterns of ice on a windowpane.
10. Sculpt Powerful Tree Roots with Couching
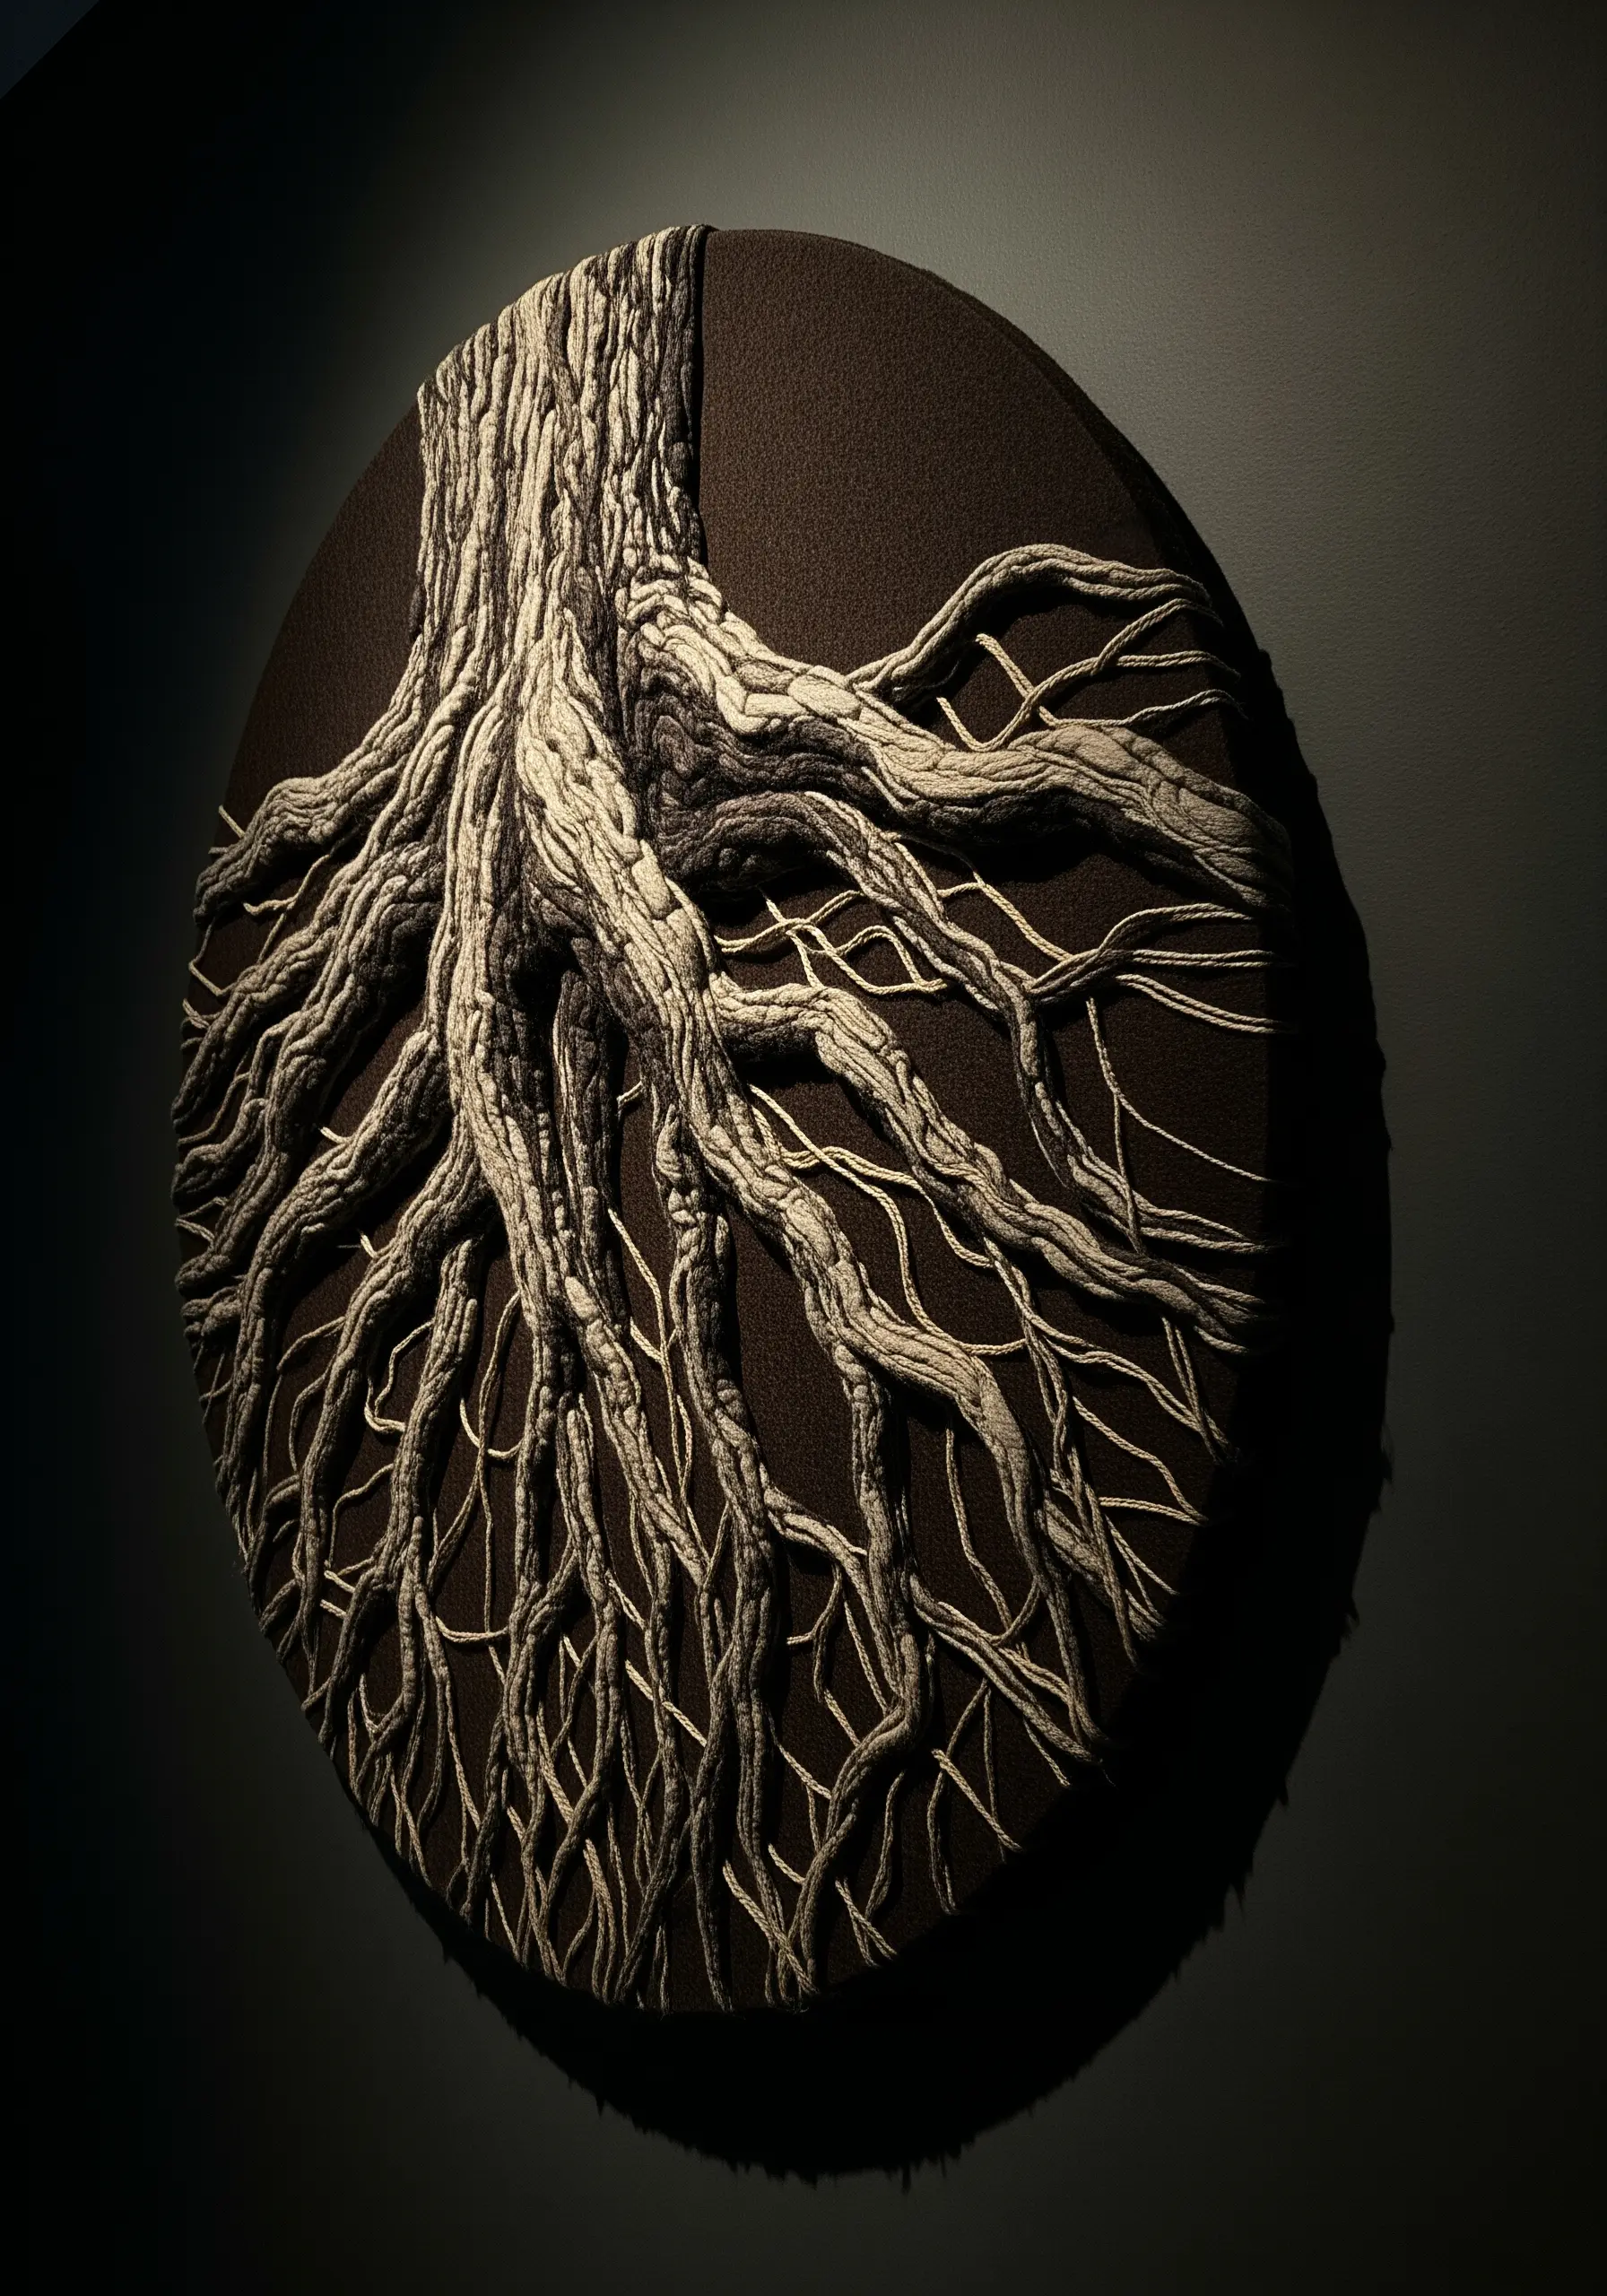
For dramatic, high-relief textures like gnarled tree roots, traditional stitches won’t provide enough volume. Instead, turn to couching.
Lay down thick cords, textured yarns, or even bundled strands of embroidery floss onto your fabric. Then, use a separate, finer thread to tack them down with small, evenly spaced stitches.
This method gives you complete control over the placement of your textured lines and builds a powerful, sculptural effect that stands right off the fabric.
It’s a perfect technique to explore in mixed-fiber creations inspired by nature.
11. Build a Tactile Sunflower Center with French Knots
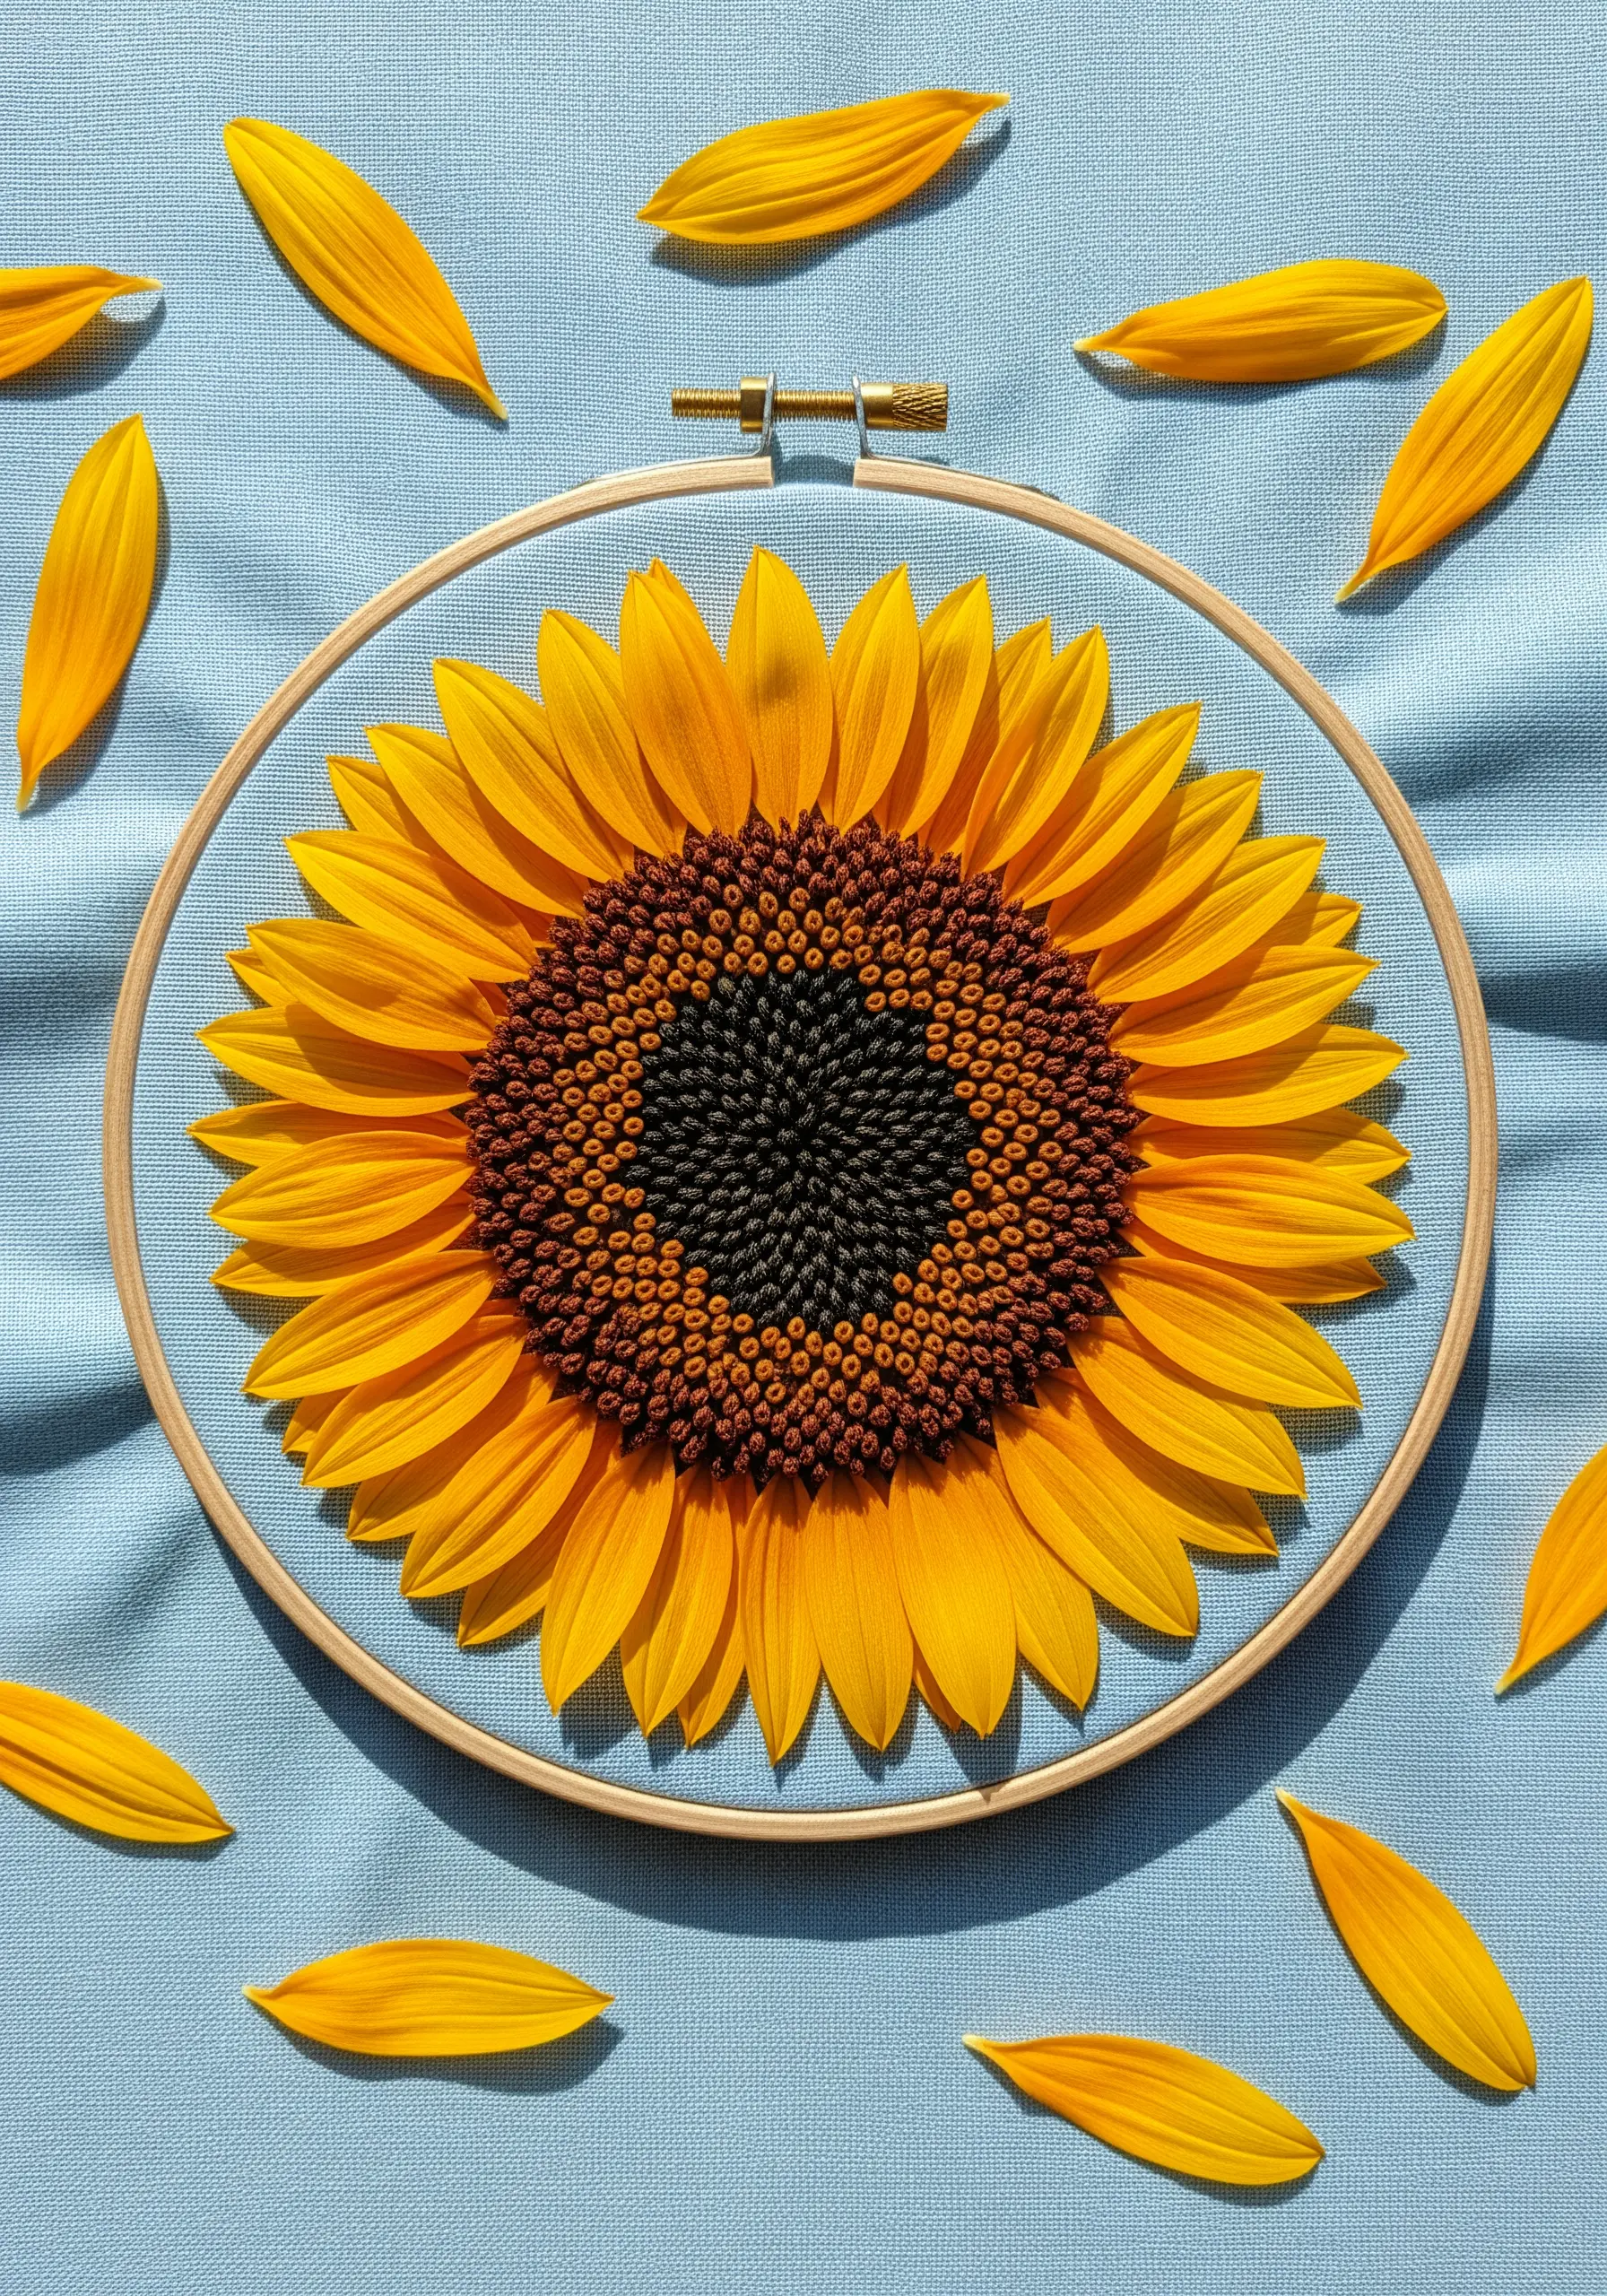
The key to a convincing sunflower is the deep, nubby texture of its seed head.
Achieve this by filling the center completely with a dense field of French knots. Use at least three shades of dark brown and black floss to create realistic depth and shadow.
Pack the knots so tightly that none of the background fabric shows through. For an extra touch of realism, make the knots in the very middle slightly smaller (one wrap) than the ones at the edge (two wraps).
This is a great starting point for abstract mixed-media embroidery ideas using fabric scraps.
12. Create Atmospheric Depth with Layered Organza
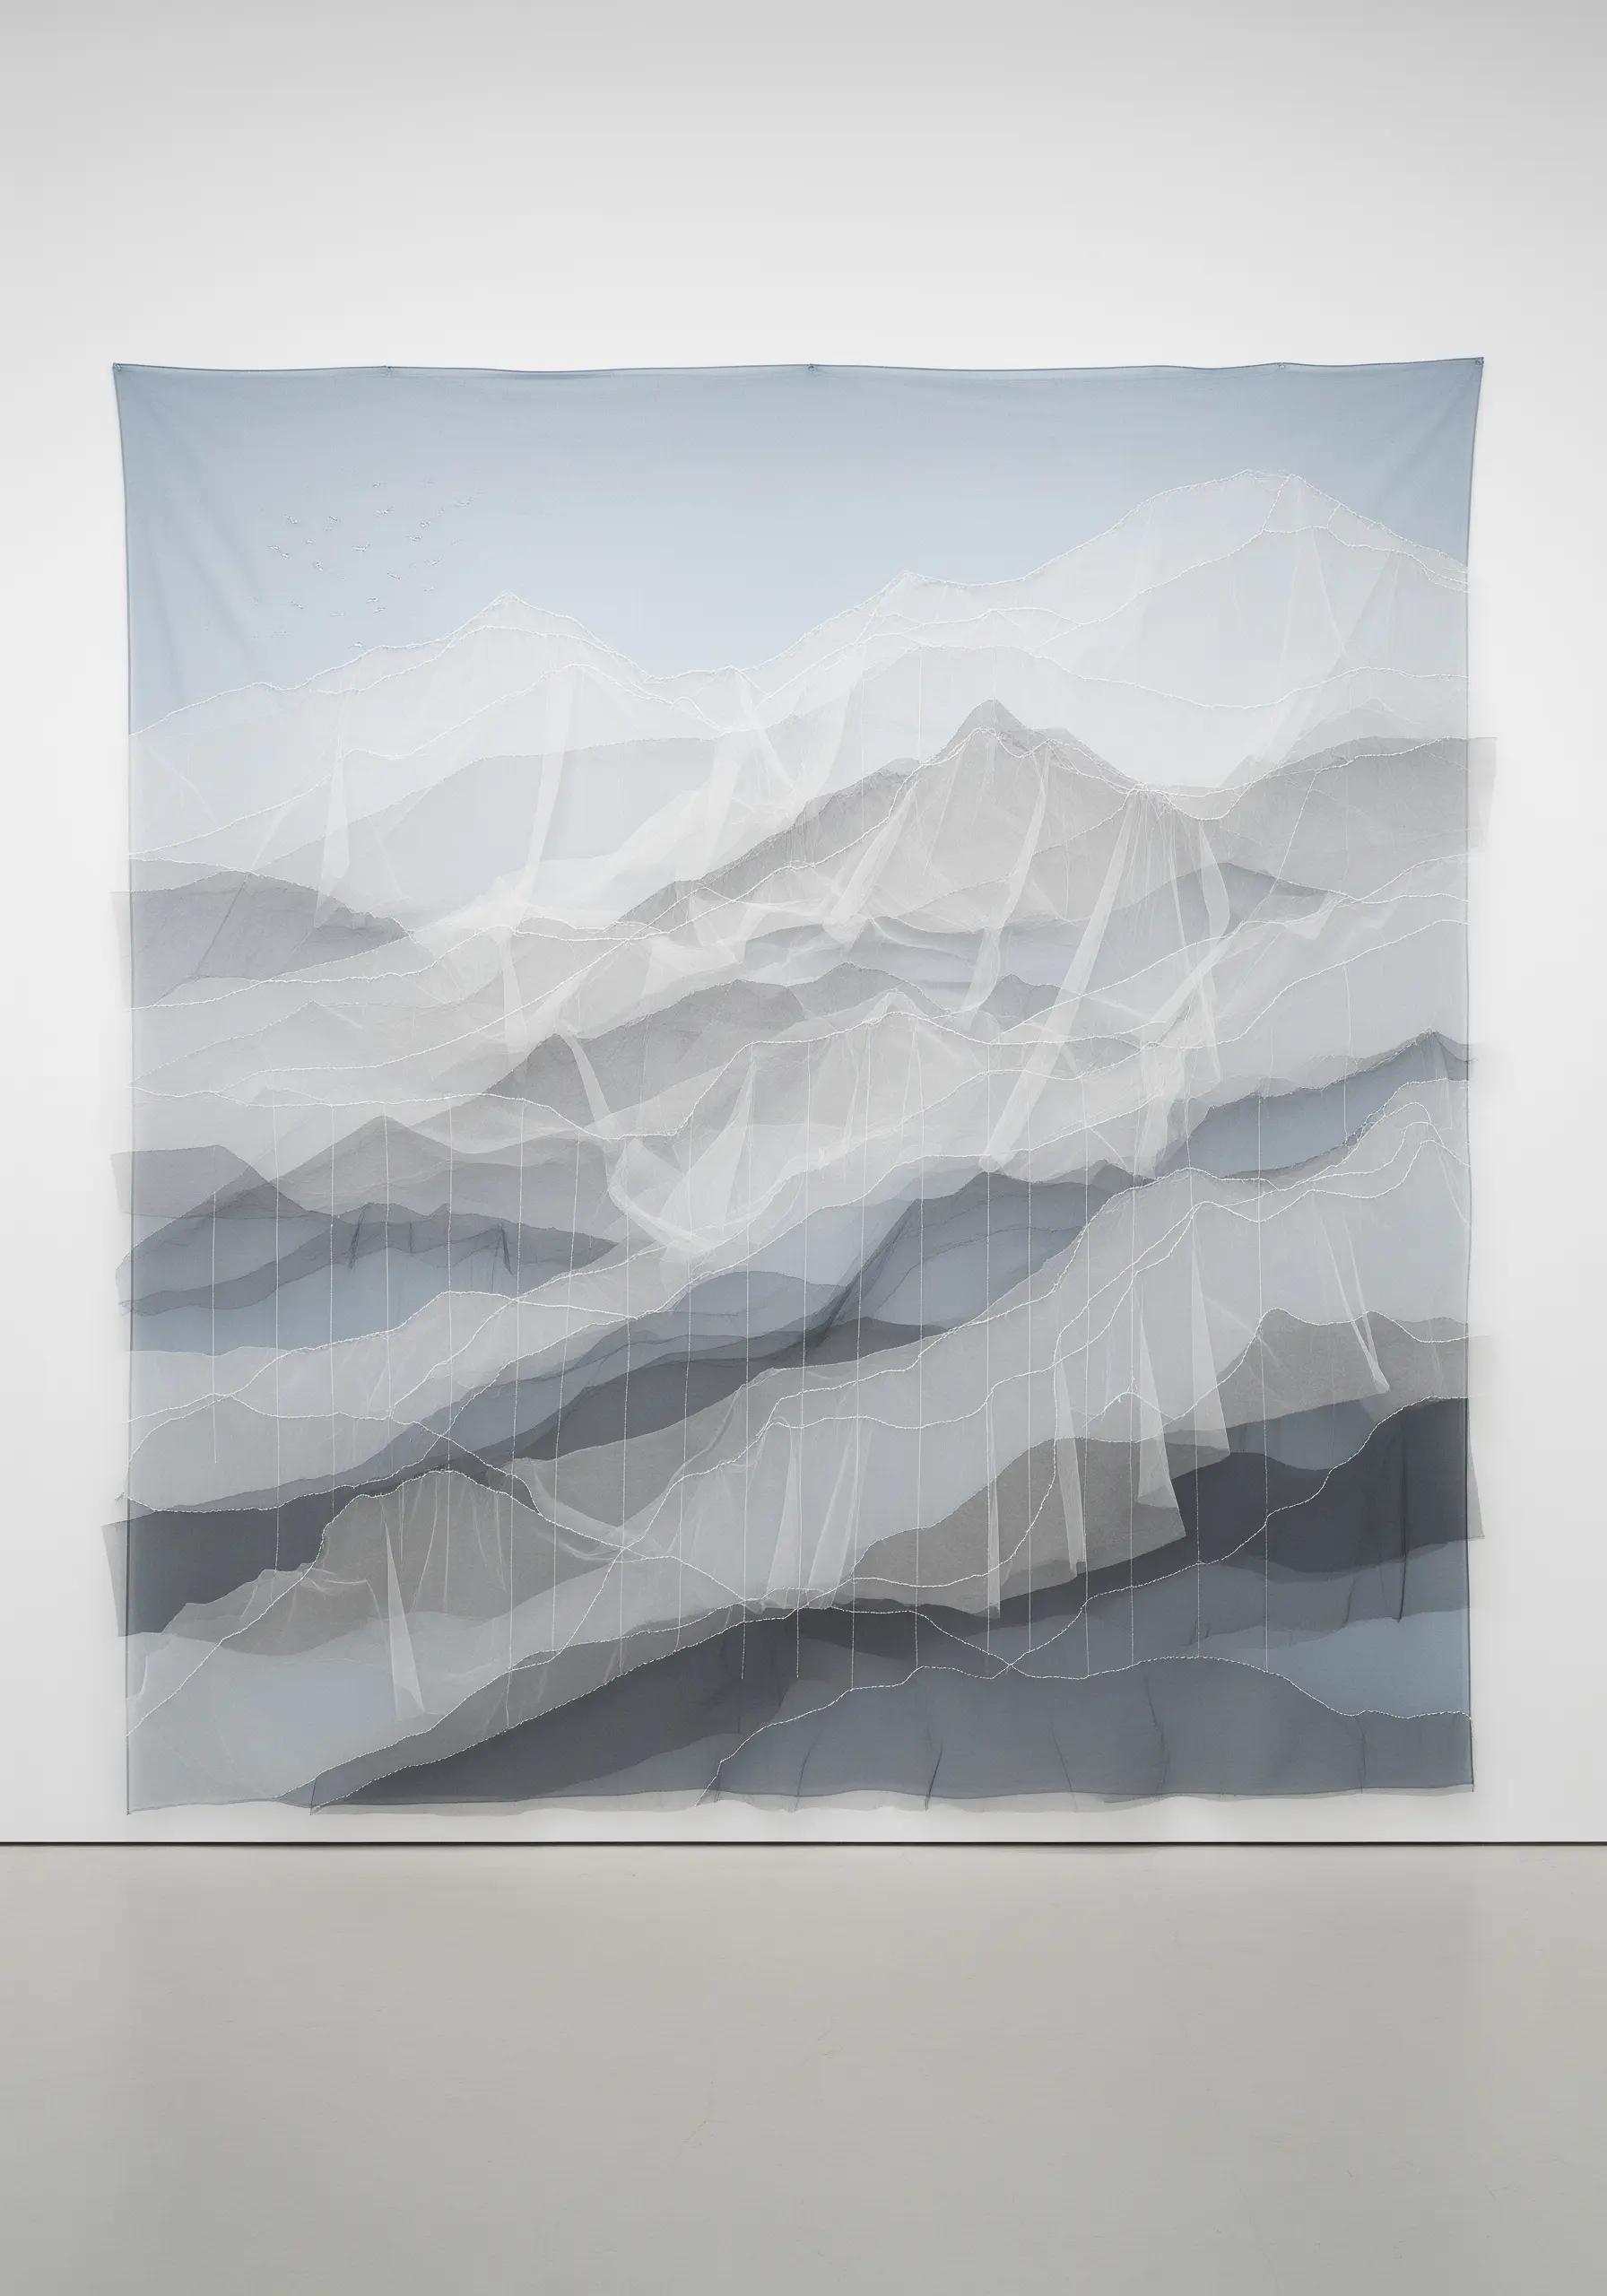
To suggest the haze and distance of a mountain range, think beyond thread and use layers of translucent fabric.
Cut soft, organic shapes from different shades of organza or chiffon. The magic happens when you layer them—the overlapping colors create new tones and a beautiful sense of atmospheric depth.
Secure the layers with a simple, visible running stitch in a contrasting color. This not only holds the fabric but also adds a delicate, map-like contour line that defines the landscape.
13. Replicate Shell Ridges with Padded Satin Stitch
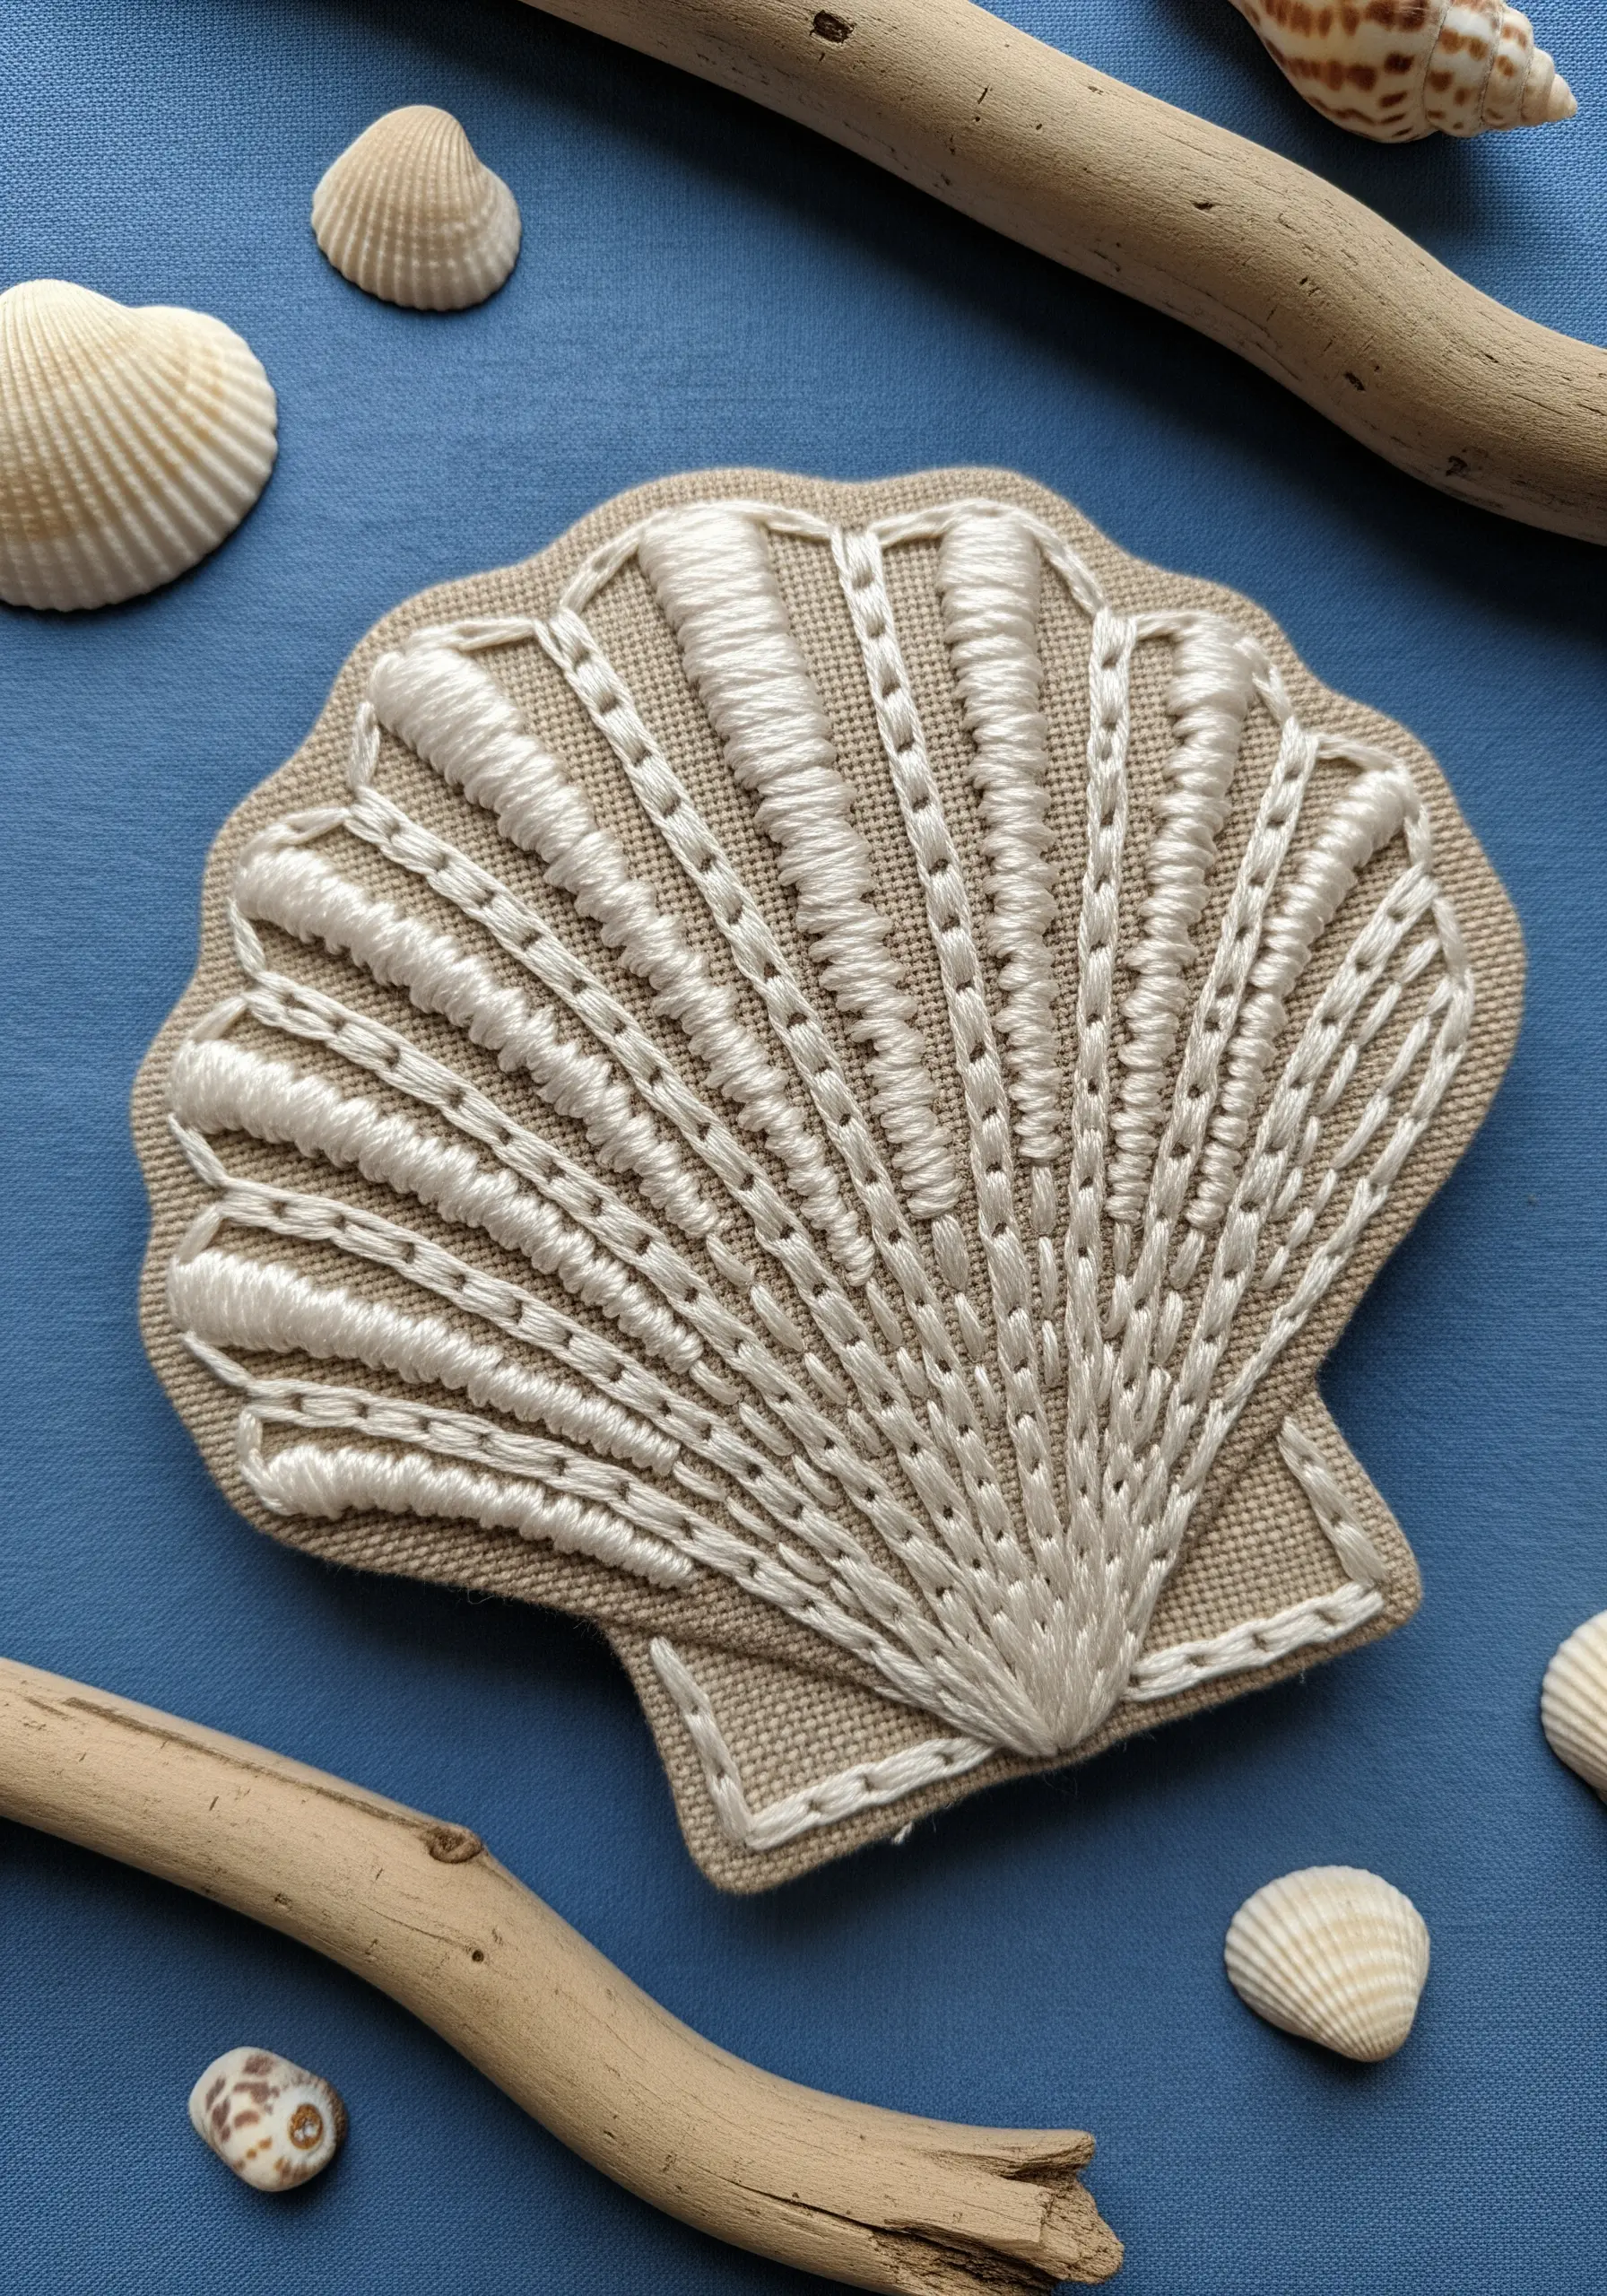
To capture the elegant, raised ribs of a seashell, use padding to give your satin stitches sculptural form.
First, create a foundation for each rib using several parallel straight stitches or a tiny strip of felt. Then, cover this padding with smooth, even satin stitches worked perpendicular to the foundation.
The thread will stretch taut over the padding, creating a perfectly rounded, three-dimensional ridge. An outline of split stitch will provide the final crisp definition for your coastal theme tiny embroidery art.
14. Illustrate Movement with Dispersed Stitches
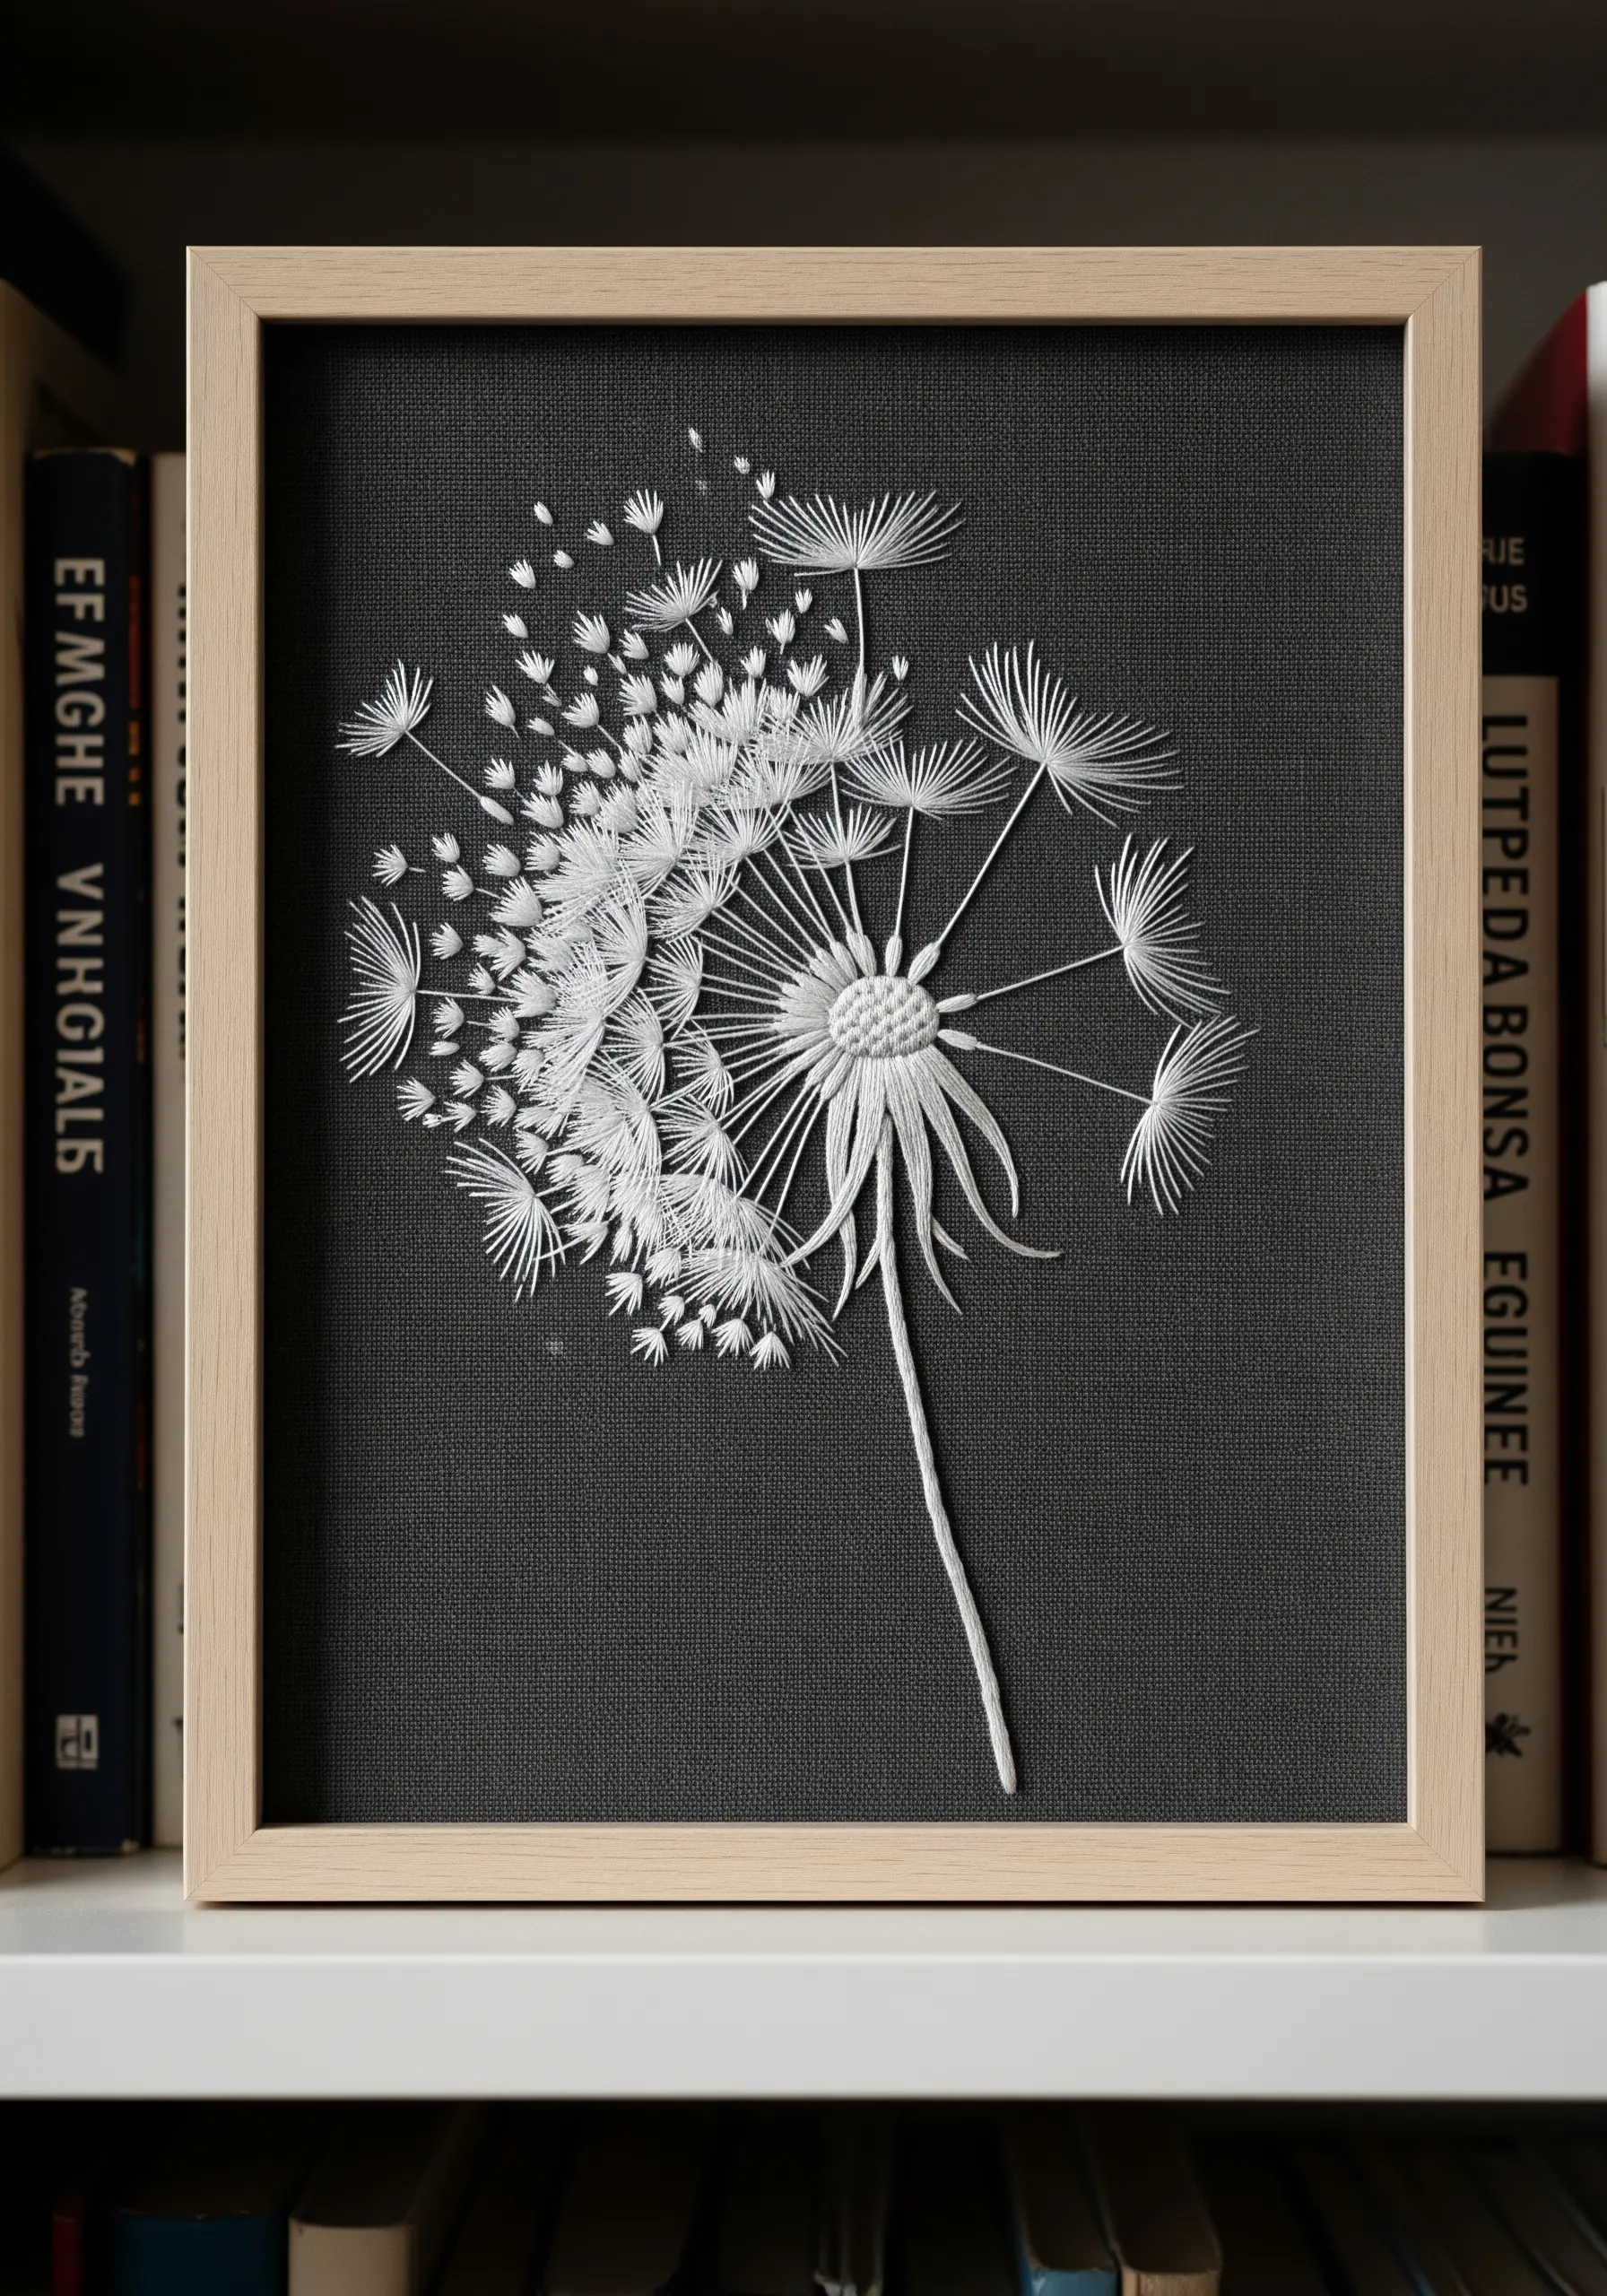
To make it look like dandelion seeds are truly floating on the wind, you need to convey motion through stitch placement.
Start with a dense core of stitches for the main seed head. Then, create individual seed motifs—a single straight stitch for the stem and a detached chain stitch for the parachute.
As you stitch these motifs away from the center, gradually increase the space between them and vary their angles. This decreasing density creates a powerful illusion of dispersal and lightness, a core principle in delicate line art embroidery.
15. Achieve Geometric Precision with Satin Stitch Walls
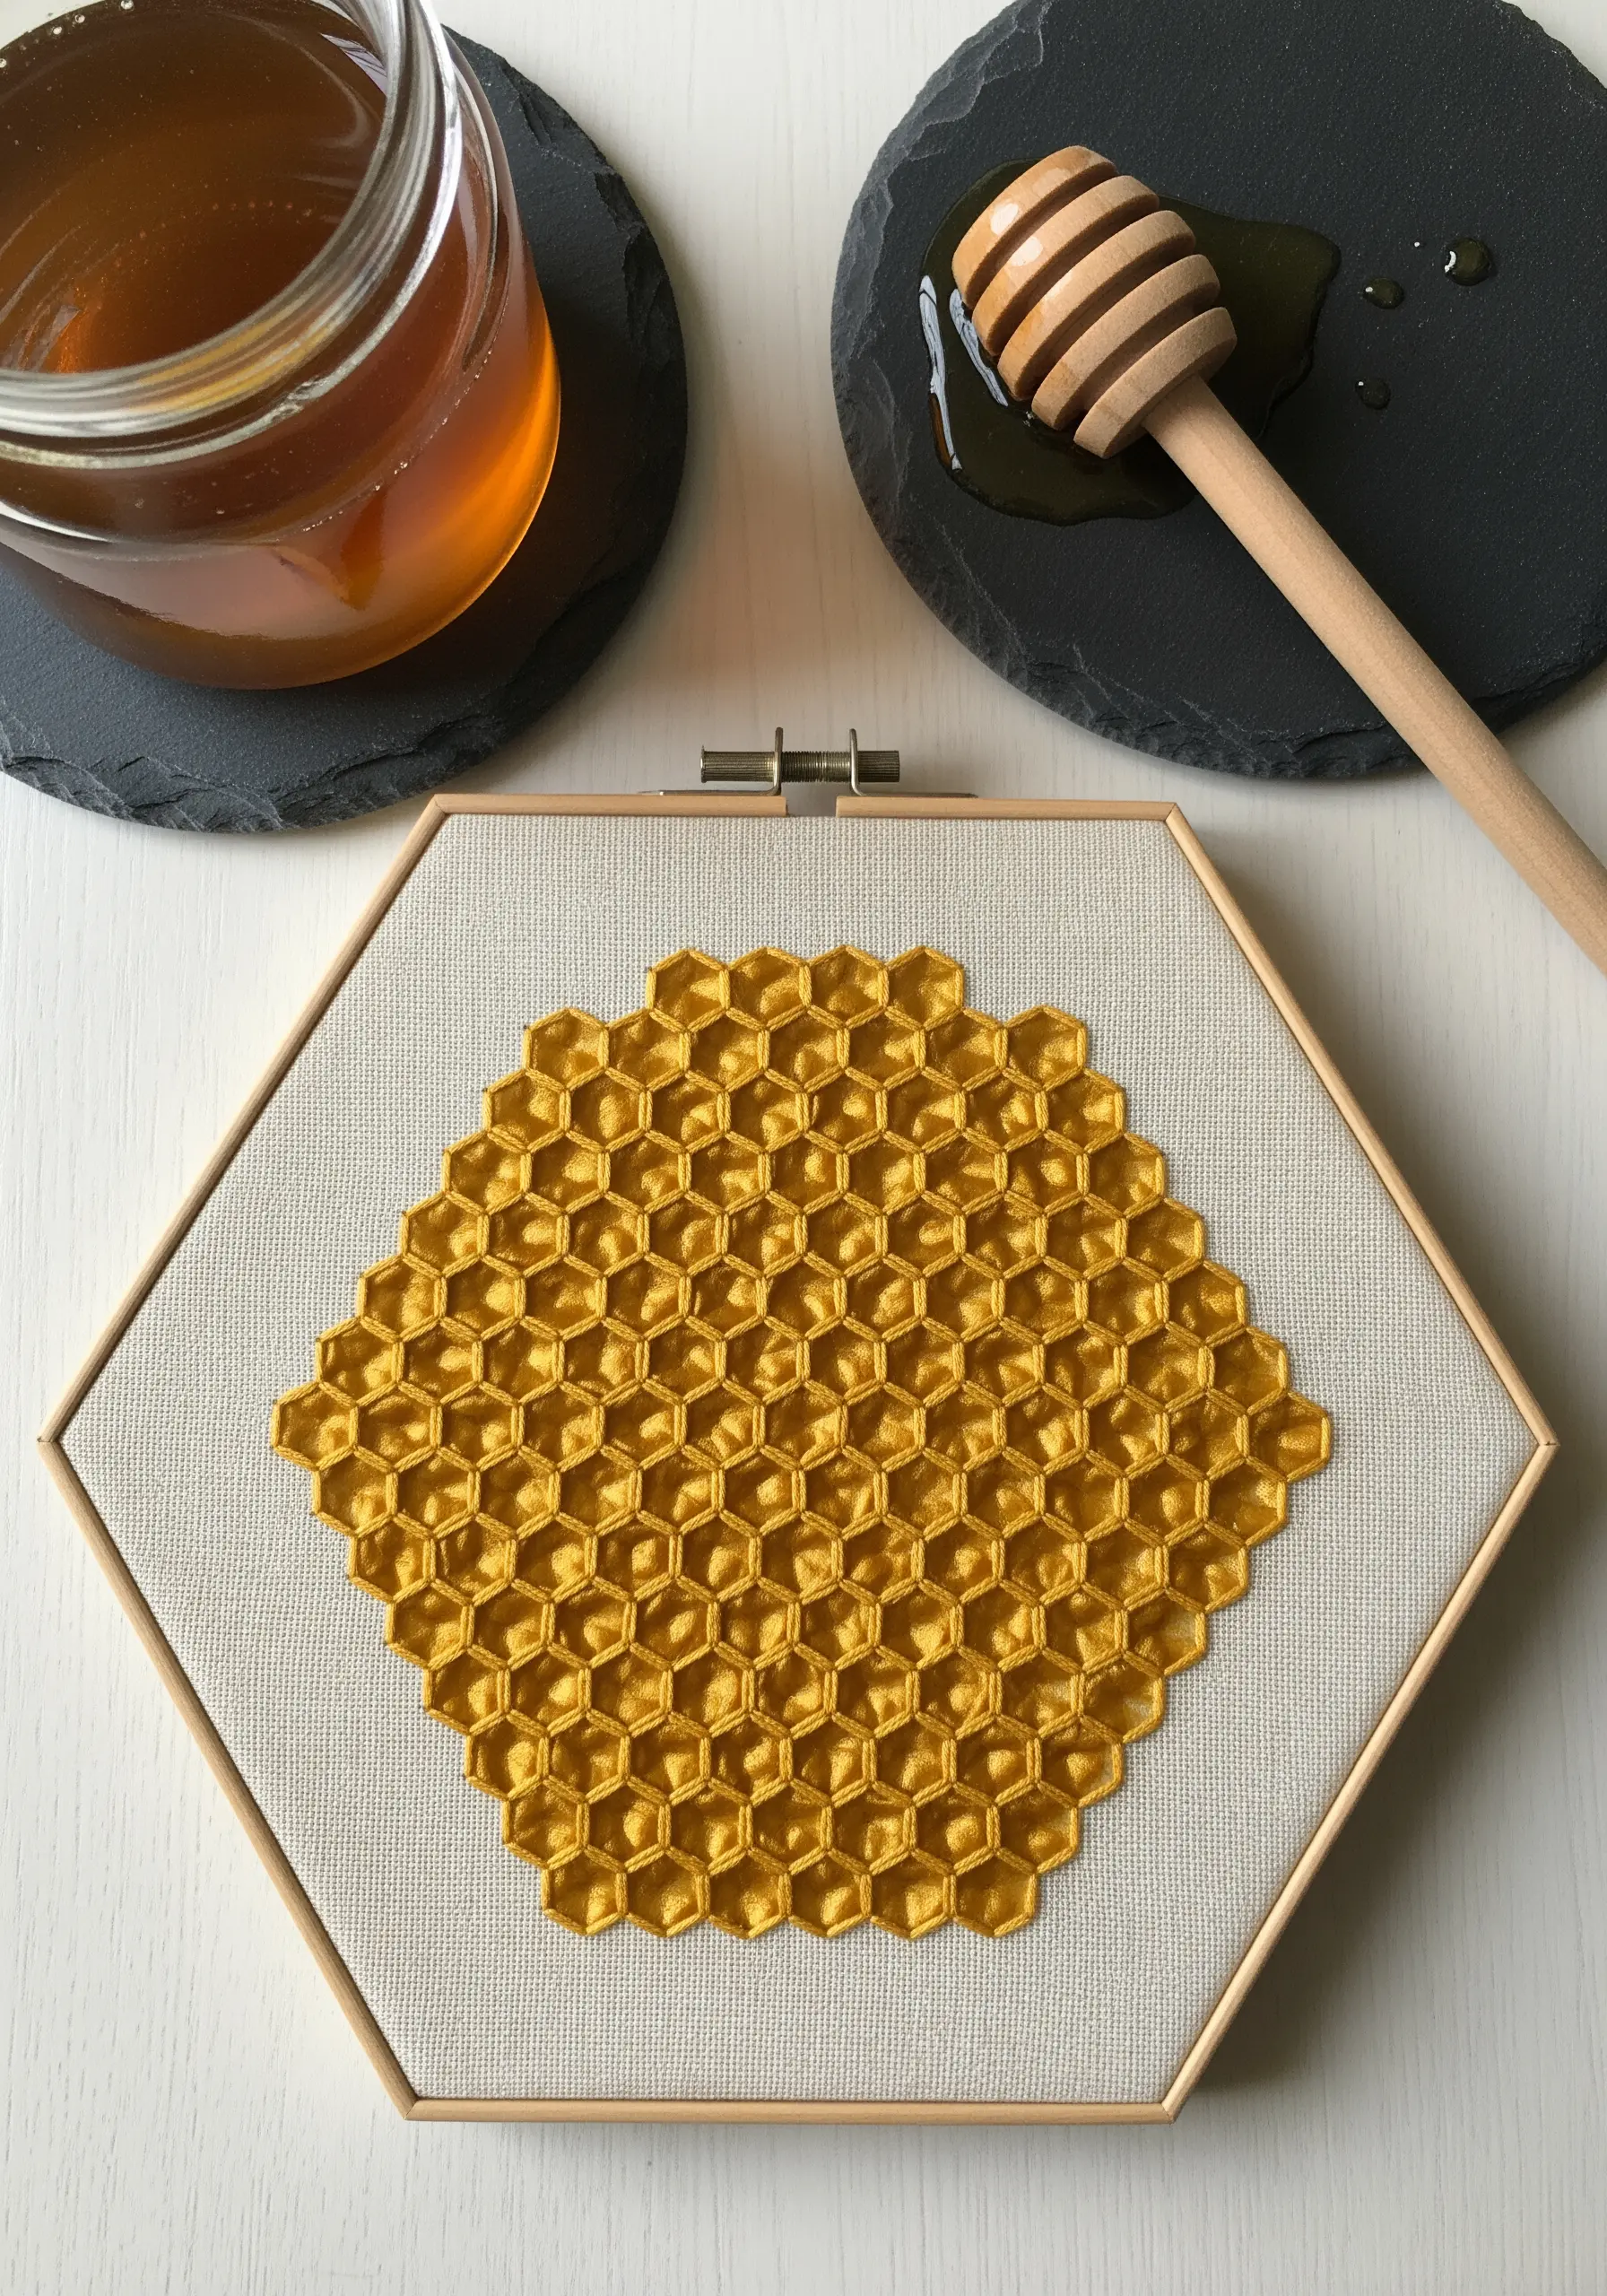
The beauty of a honeycomb lies in its geometric perfection. To achieve this, a precise pattern is non-negotiable.
Use a water-soluble marker and a ruler to draw a perfect hexagonal grid on your fabric before you begin.
Fill the walls of each cell with a clean, tight satin stitch. To create a subtle 3D effect, make sure the stitches within each segment are perfectly parallel. The result is a crisp, graphic texture that feels both natural and orderly.
16. Emulate Geodes with Beading and Metallic Threads
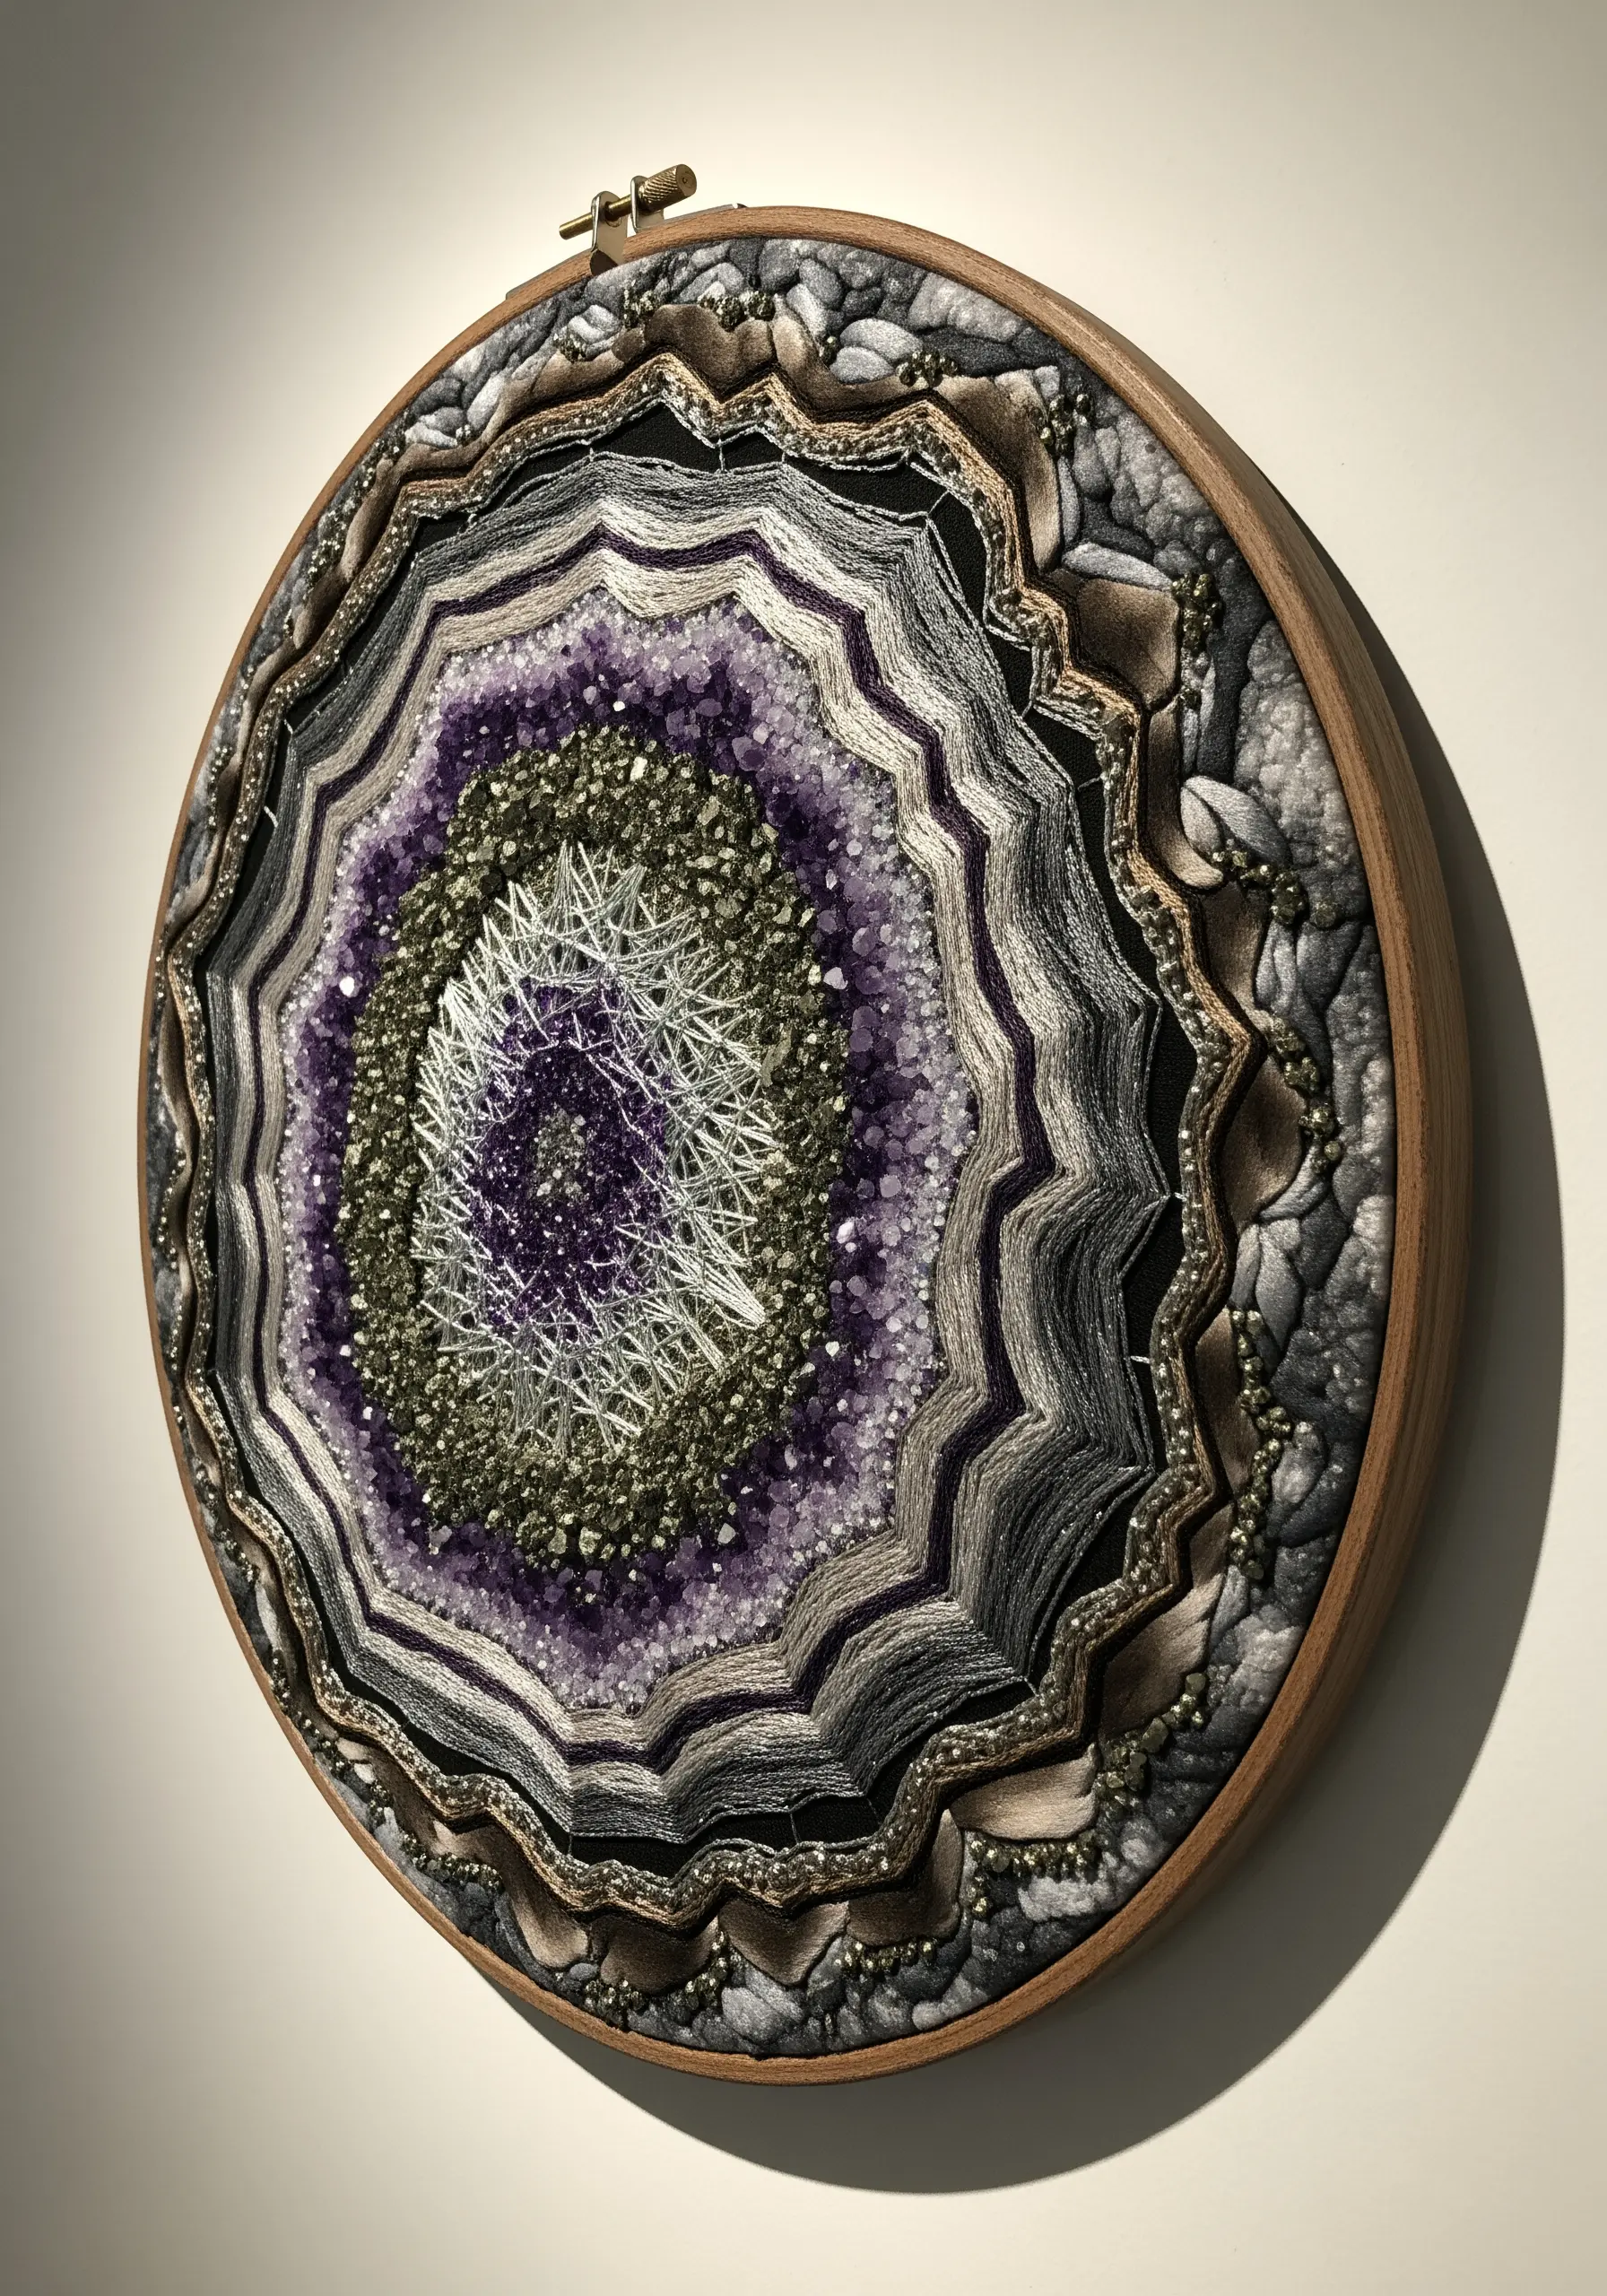
A geode is a masterclass in mixed textures, and your embroidery should be too.
Create the crystalline core by stitching down a dense cluster of tiny seed beads or small crystal chips. Surround this sparkling center with rings of variegated and metallic threads worked in a long-and-short stitch to mimic crystal growth.
For the outer rock layers, switch to a padded satin stitch in matte, earthy tones. The constant shift in texture and sheen is what makes these embroidery projects inspired by textures you’d find on a nature walk so captivating.
17. Craft Velvety Cattails with Turkey Work
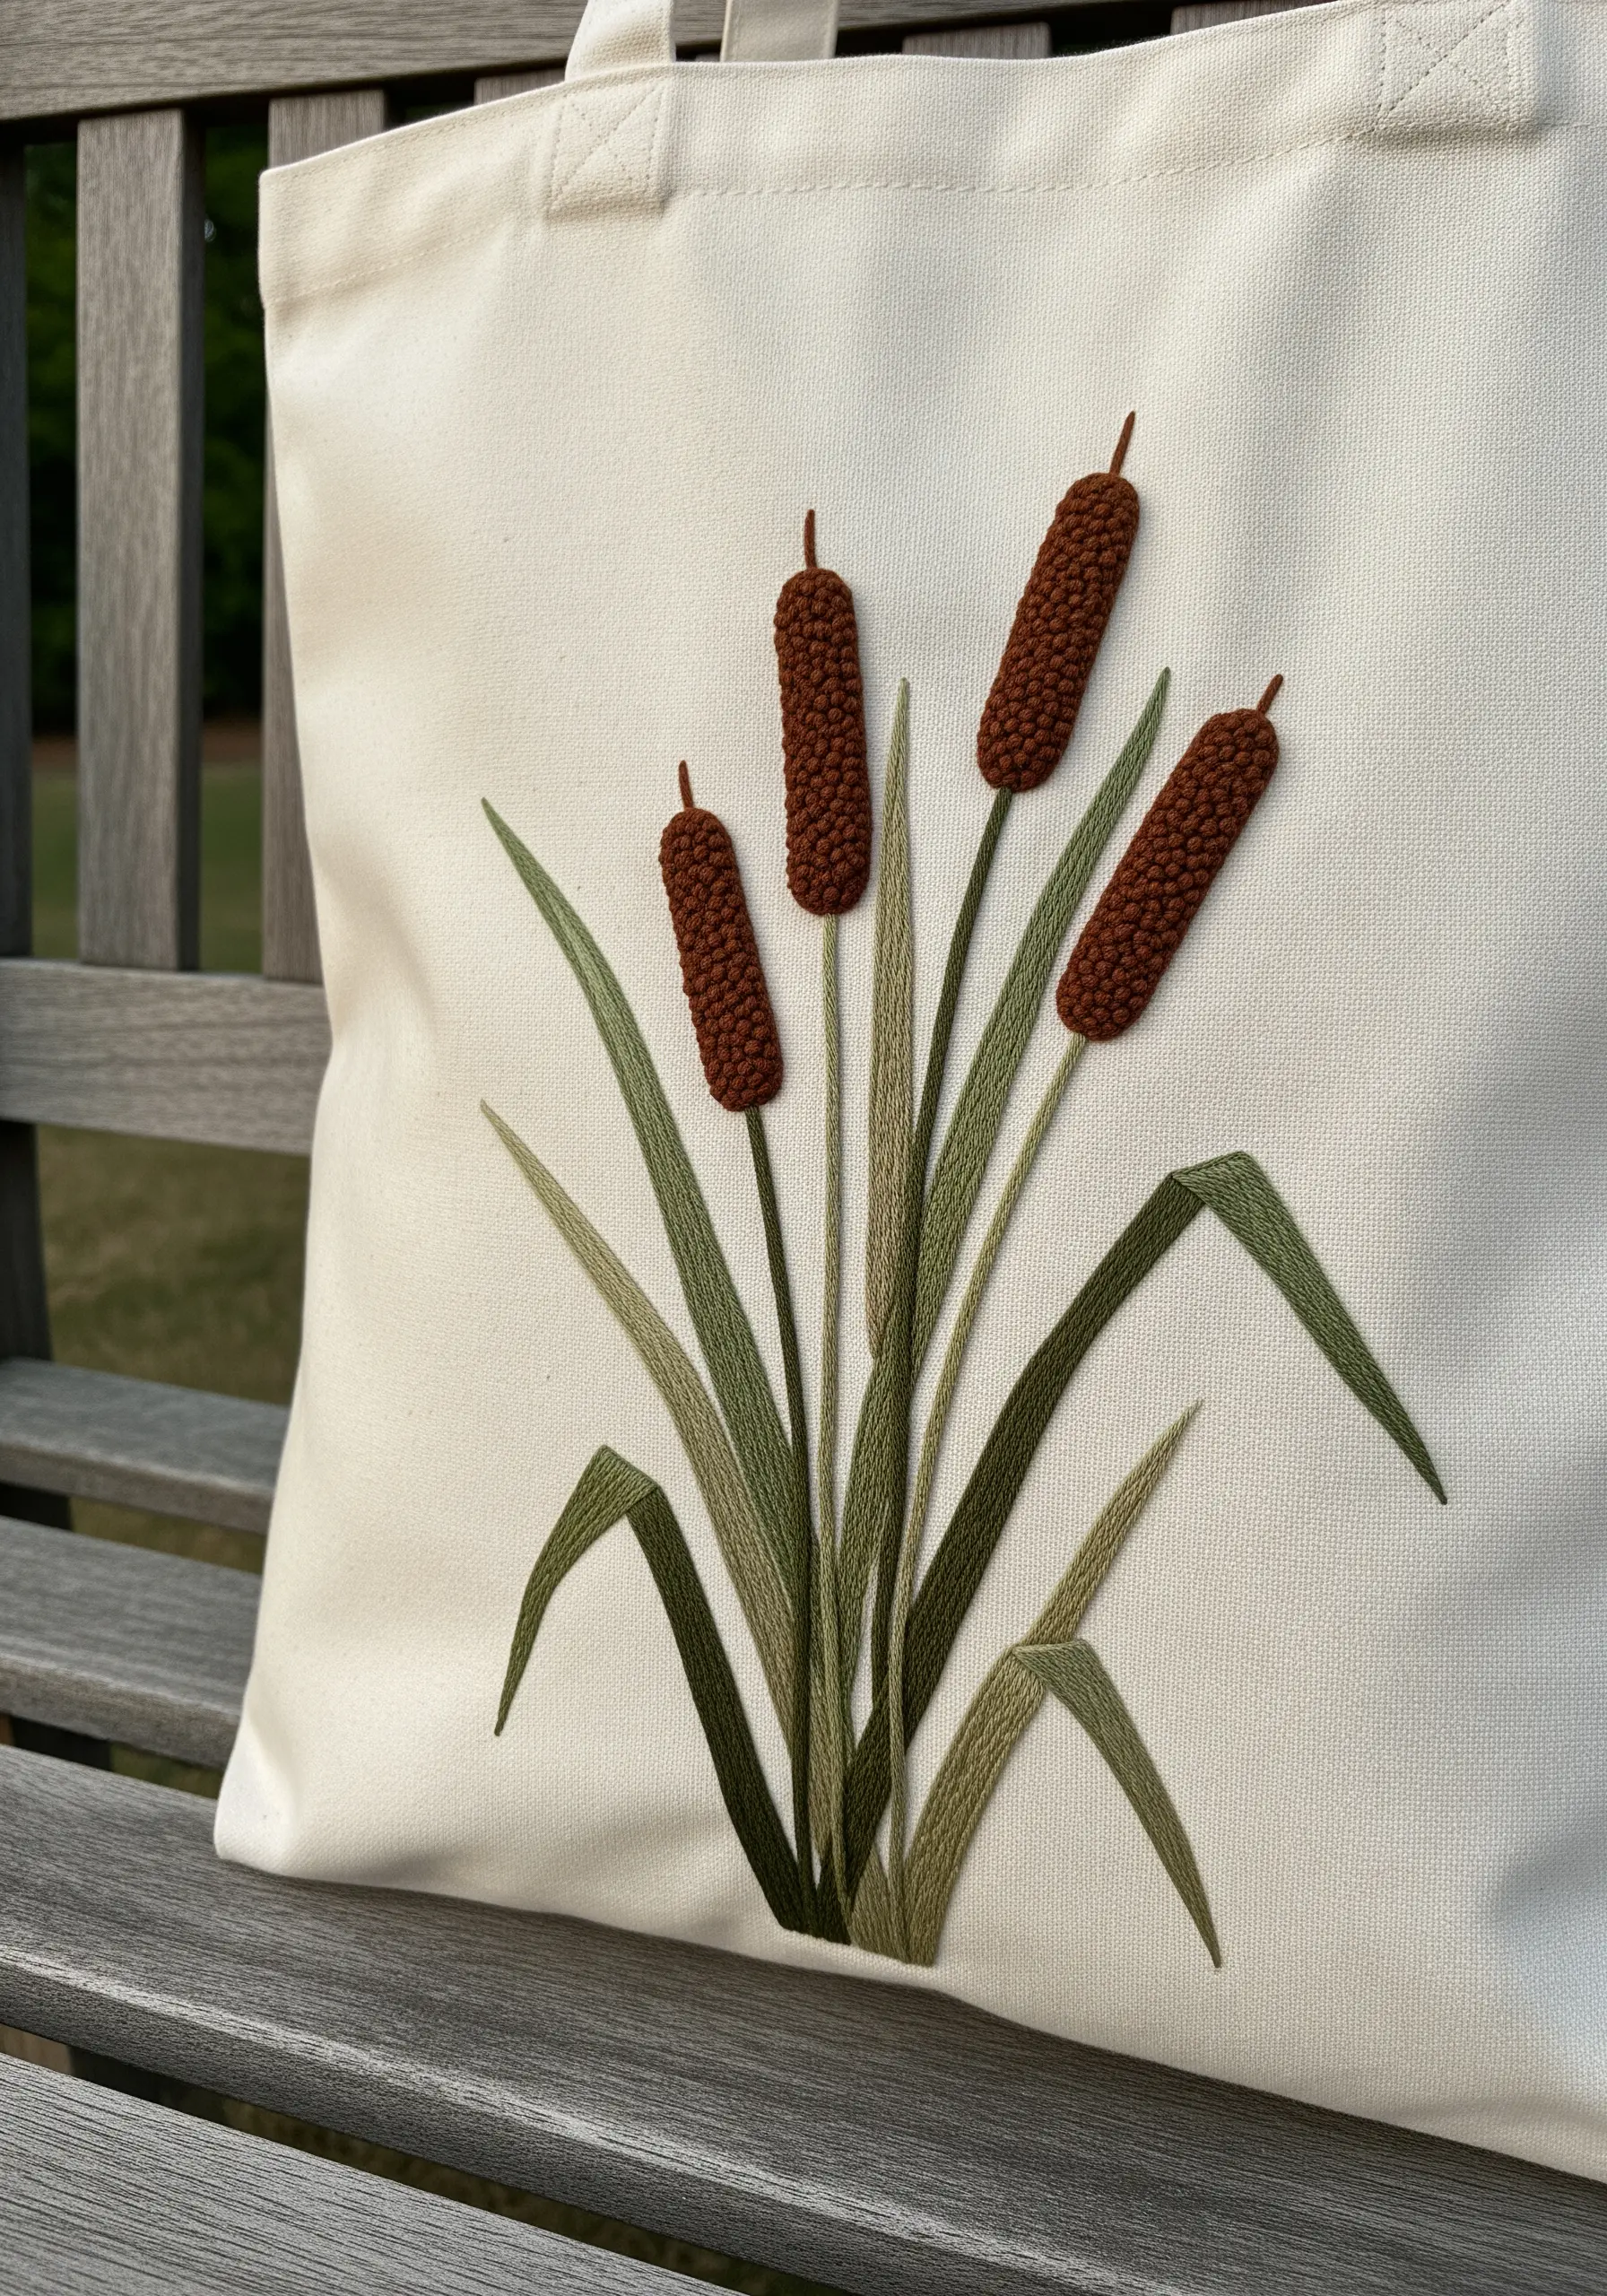
To get that distinctively fuzzy, plush texture of a cattail head, the Turkey work stitch is your best friend.
This stitch involves creating a series of loops on the surface of your fabric. Once an area is filled with loops, you take a sharp pair of scissors and carefully snip them open.
The cut threads spring apart to form a soft, dense pile that looks and feels remarkably like velvet. Contrast this with sleek, flat satin stitches for the long green leaves.
18. Build a 3D Riverbed with Stumpwork Pebbles
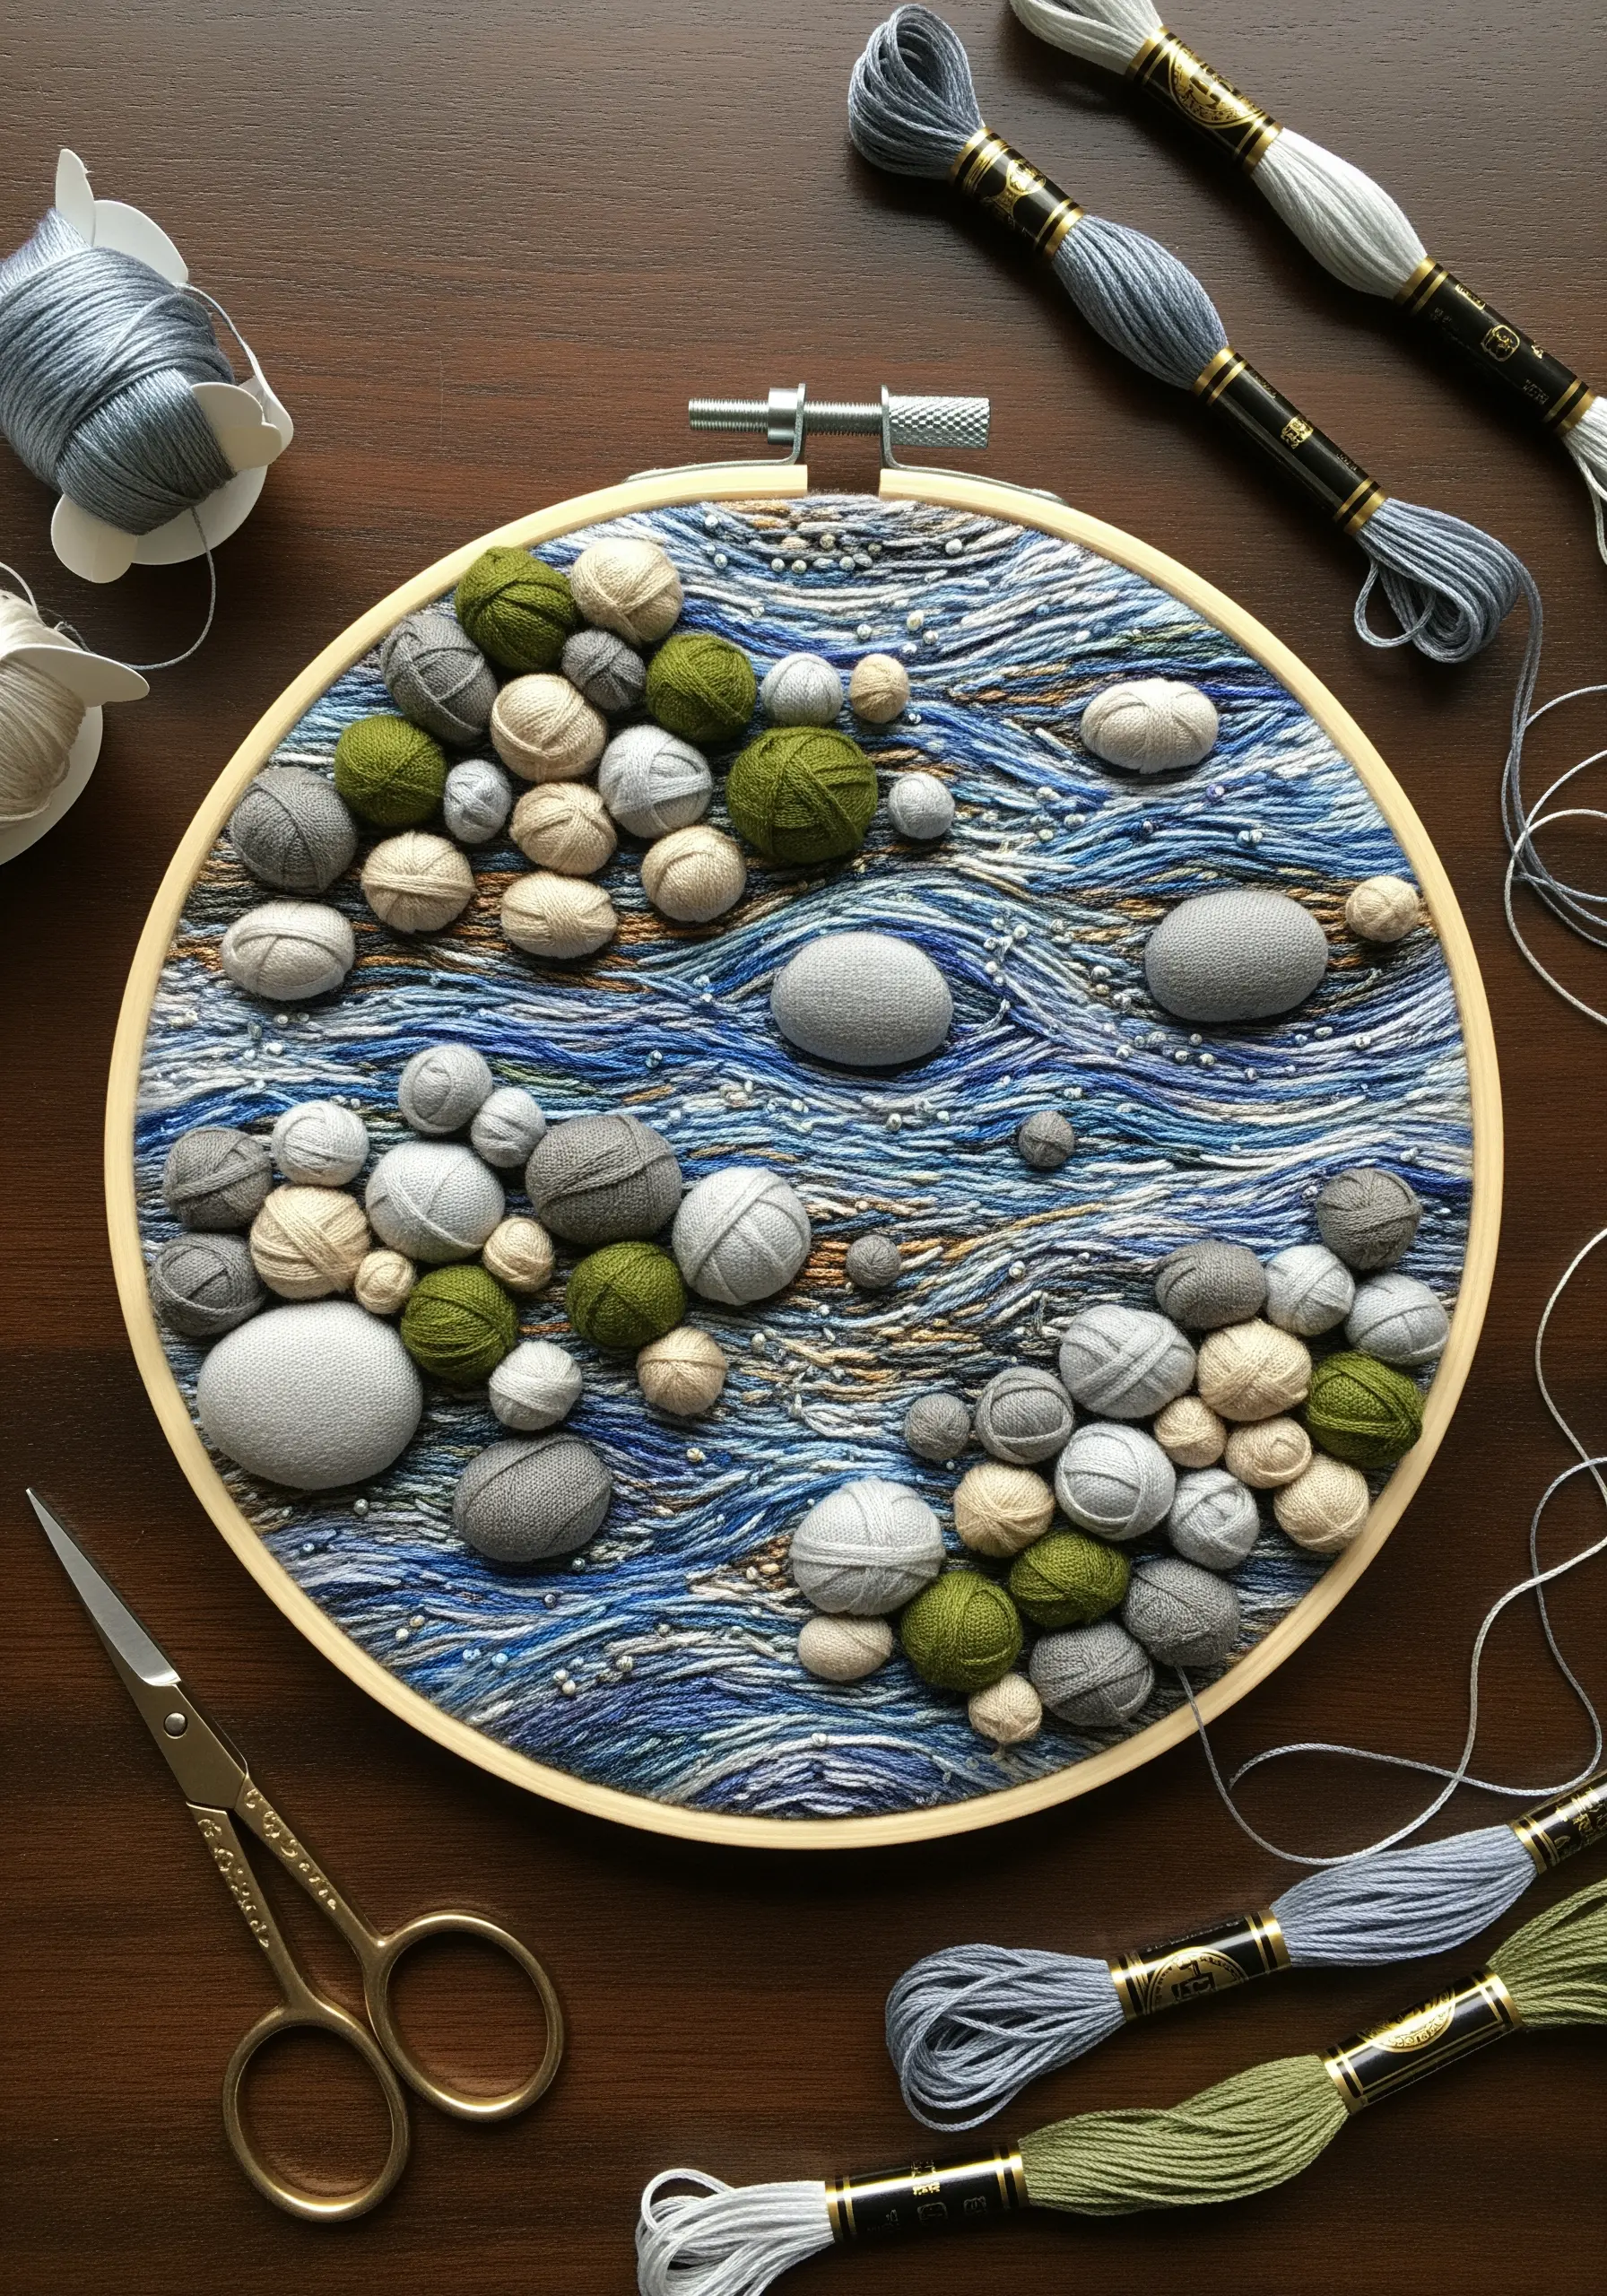
For perfectly smooth, rounded pebbles that rise high off the fabric, stumpwork is the ideal technique.
Instead of padding with thread, you create individual pebble forms. Wrap a small bead or a tuft of cotton in a circle of fabric, pull the edges tight with a gathering stitch, and then appliqué this 3D shape onto your background.
Surround these sculptural pebbles with a flowing river of straight stitches in various blues and greys to complete the scene.
19. Layer Stitches to Form Pinecone Scales
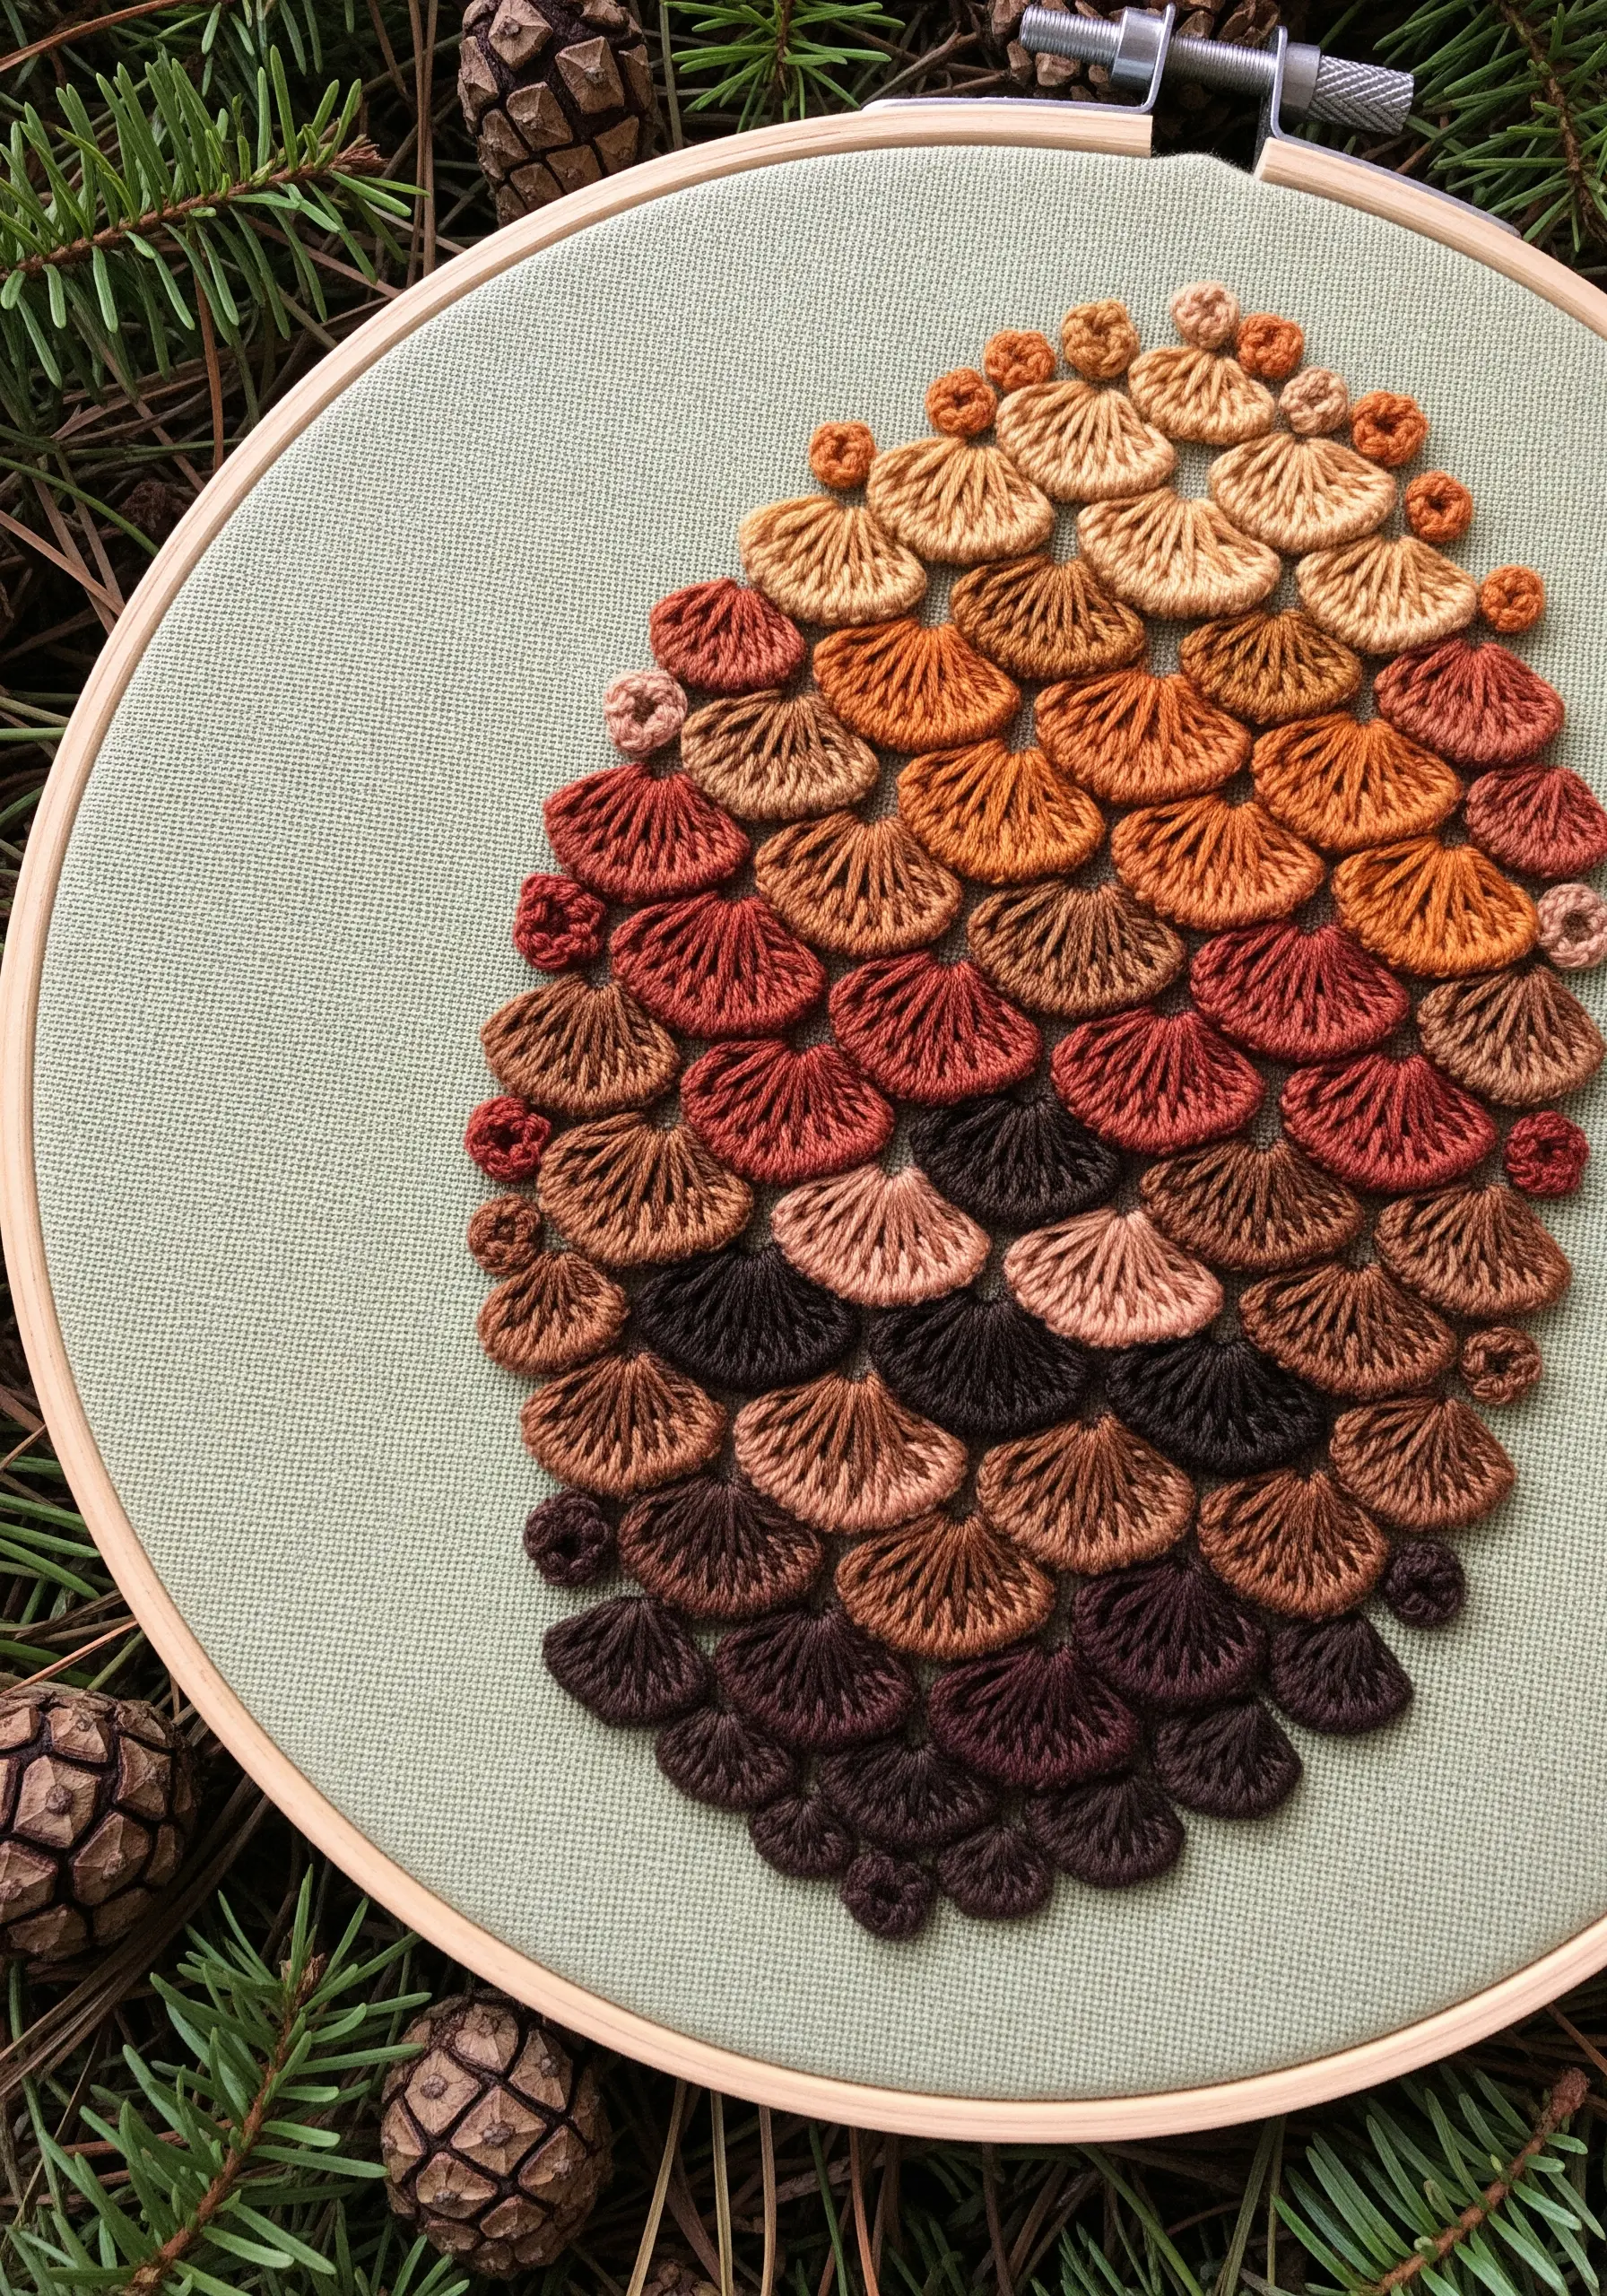
The trick to a realistic pinecone is building the scales in overlapping rows.
Start at the bottom of the pinecone and work your way up. Create each individual scale with a single, wide detached chain stitch (lazy daisy).
As you begin the next row, position your stitches so that the top of each new scale slightly overlaps the base of the scales in the row below it. This simple layering technique creates incredible dimension and realism.
This is a wonderful motif for small embroidery patterns to customize your home decor.
20. Add “Dewdrops” to a Spiderweb with Seed Beads

To elevate a simple stitched spiderweb into something magical, add the glistening effect of dewdrops.
First, create the web using a whipped backstitch with a fine, strong thread for a smooth, cord-like finish. Then, using a beading needle, secure tiny, clear seed beads at the junctions and along the threads.
When stitched on a dark fabric, these beads catch the light and create a delicate, sparkling illusion of water droplets.
21. Create Seed Pods with Dense French Knots
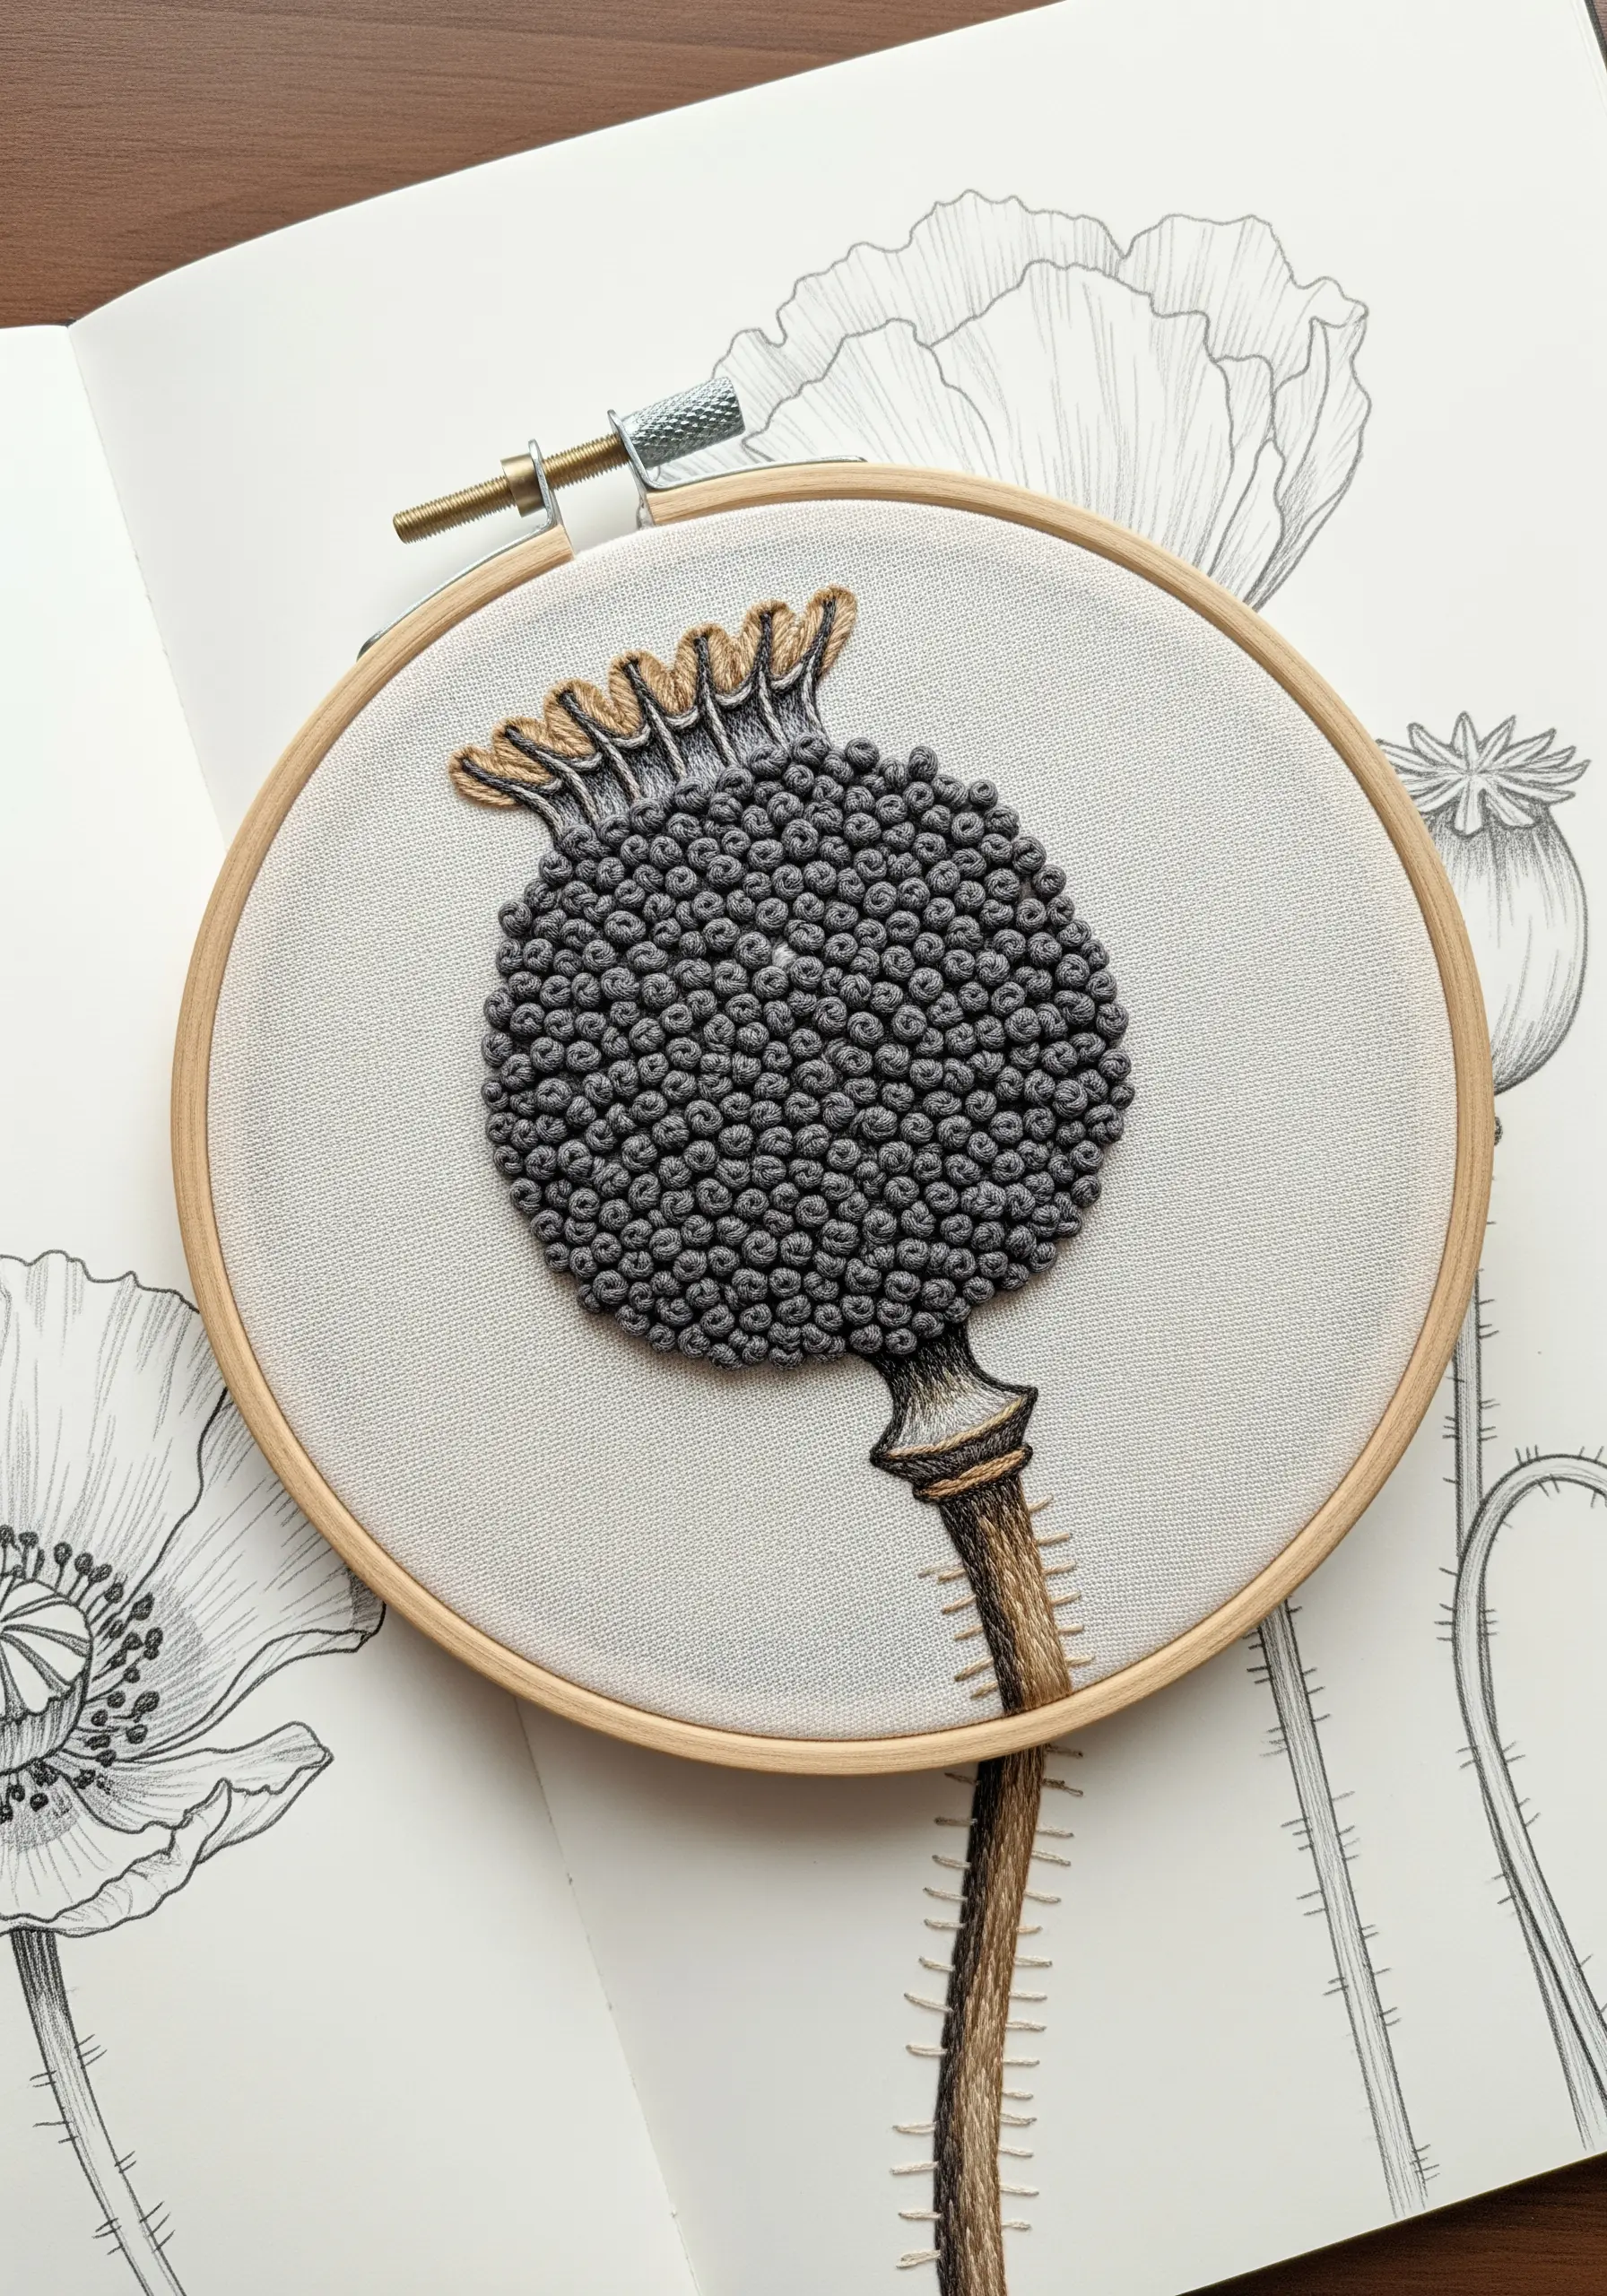
The visual power of a poppy seed pod comes from the sheer density of its seeds. Replicate this with a tightly packed field of French knots.
Using a dark grey or charcoal floss, fill the entire circular area of the pod, making sure your knots are close enough to touch and that no background fabric is visible.
For the delicate crown on top, switch to a padded satin stitch to create a smooth, raised element that contrasts beautifully with the bumpy texture of the seeds below.
22. Mimic Birch Bark with Appliqué and Stitch
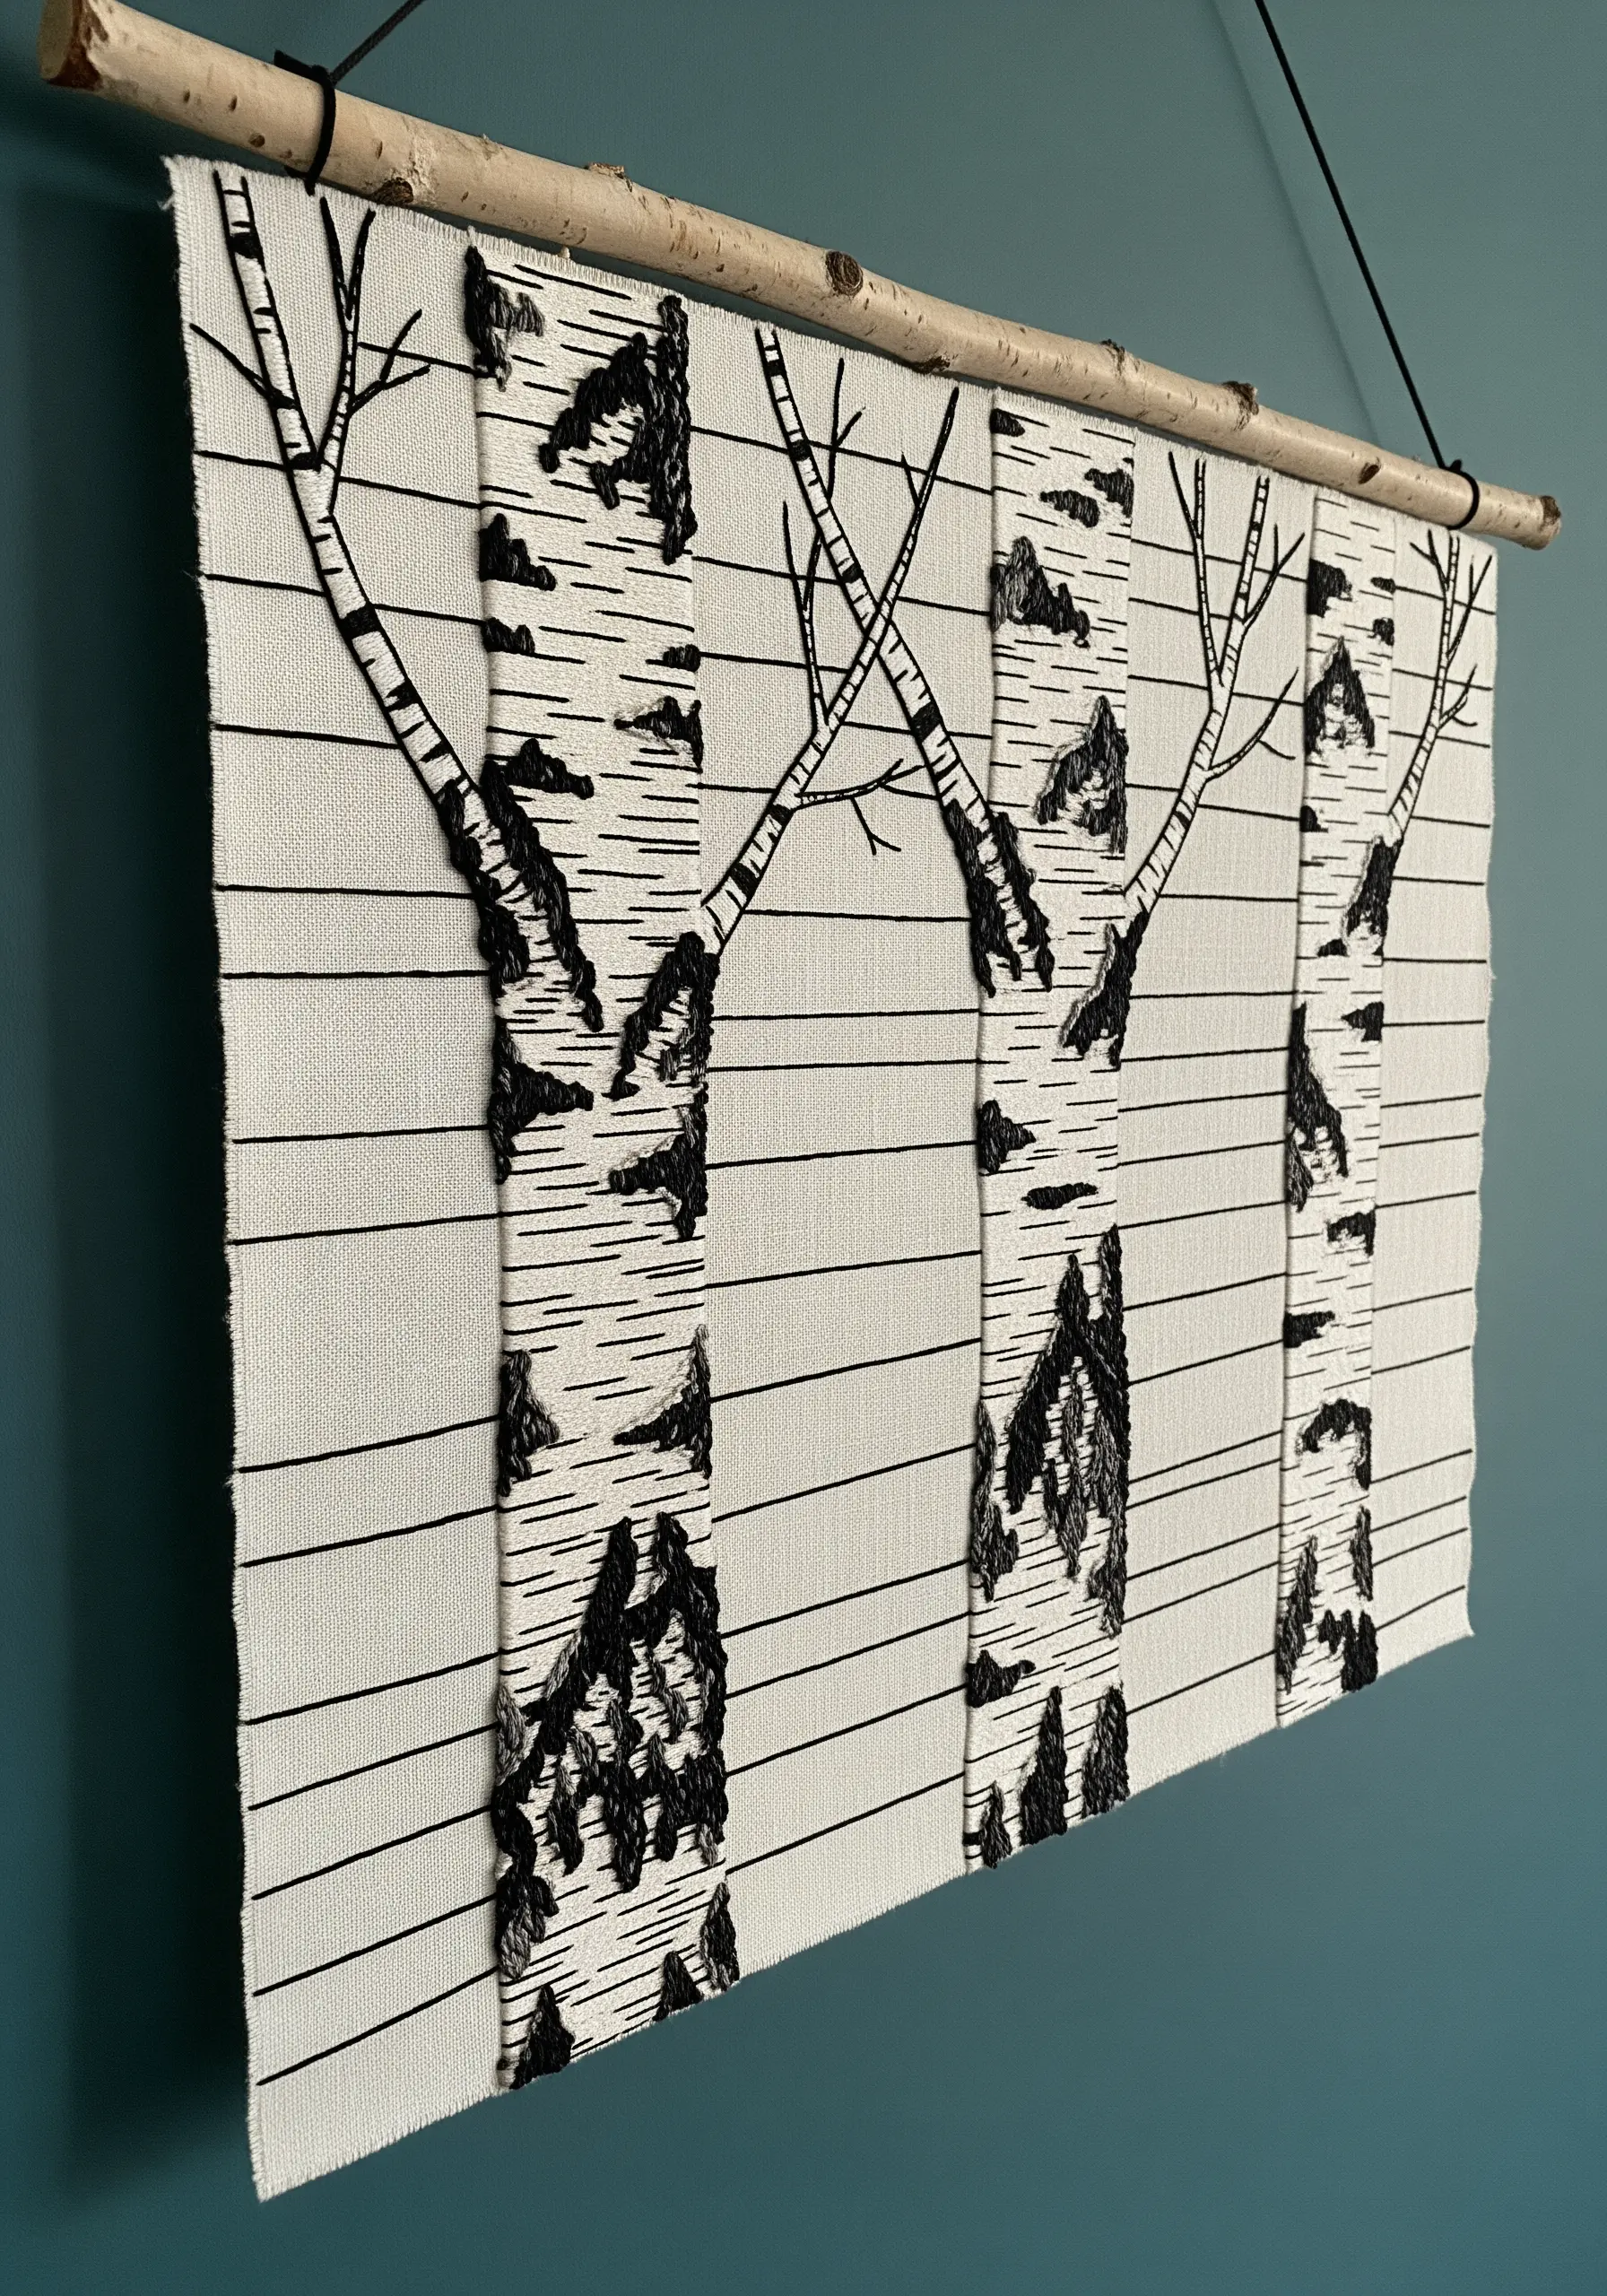
Instead of trying to fill an entire tree trunk with white satin stitch, use appliqué for a cleaner, more graphic result.
Cut long, slightly irregular strips of white or cream-colored fabric and secure them to your background to form the tree trunks.
Then, use black thread to add the characteristic texture directly on top of the fabric. Use long, horizontal straight stitches for the fine lines and small, dense satin stitch blocks for the rougher, darker patches.
This mixed-media approach could inspire beautiful yarn wall art projects inspired by geometric patterns.
23. Delineate Soil Layers with Varied Textures
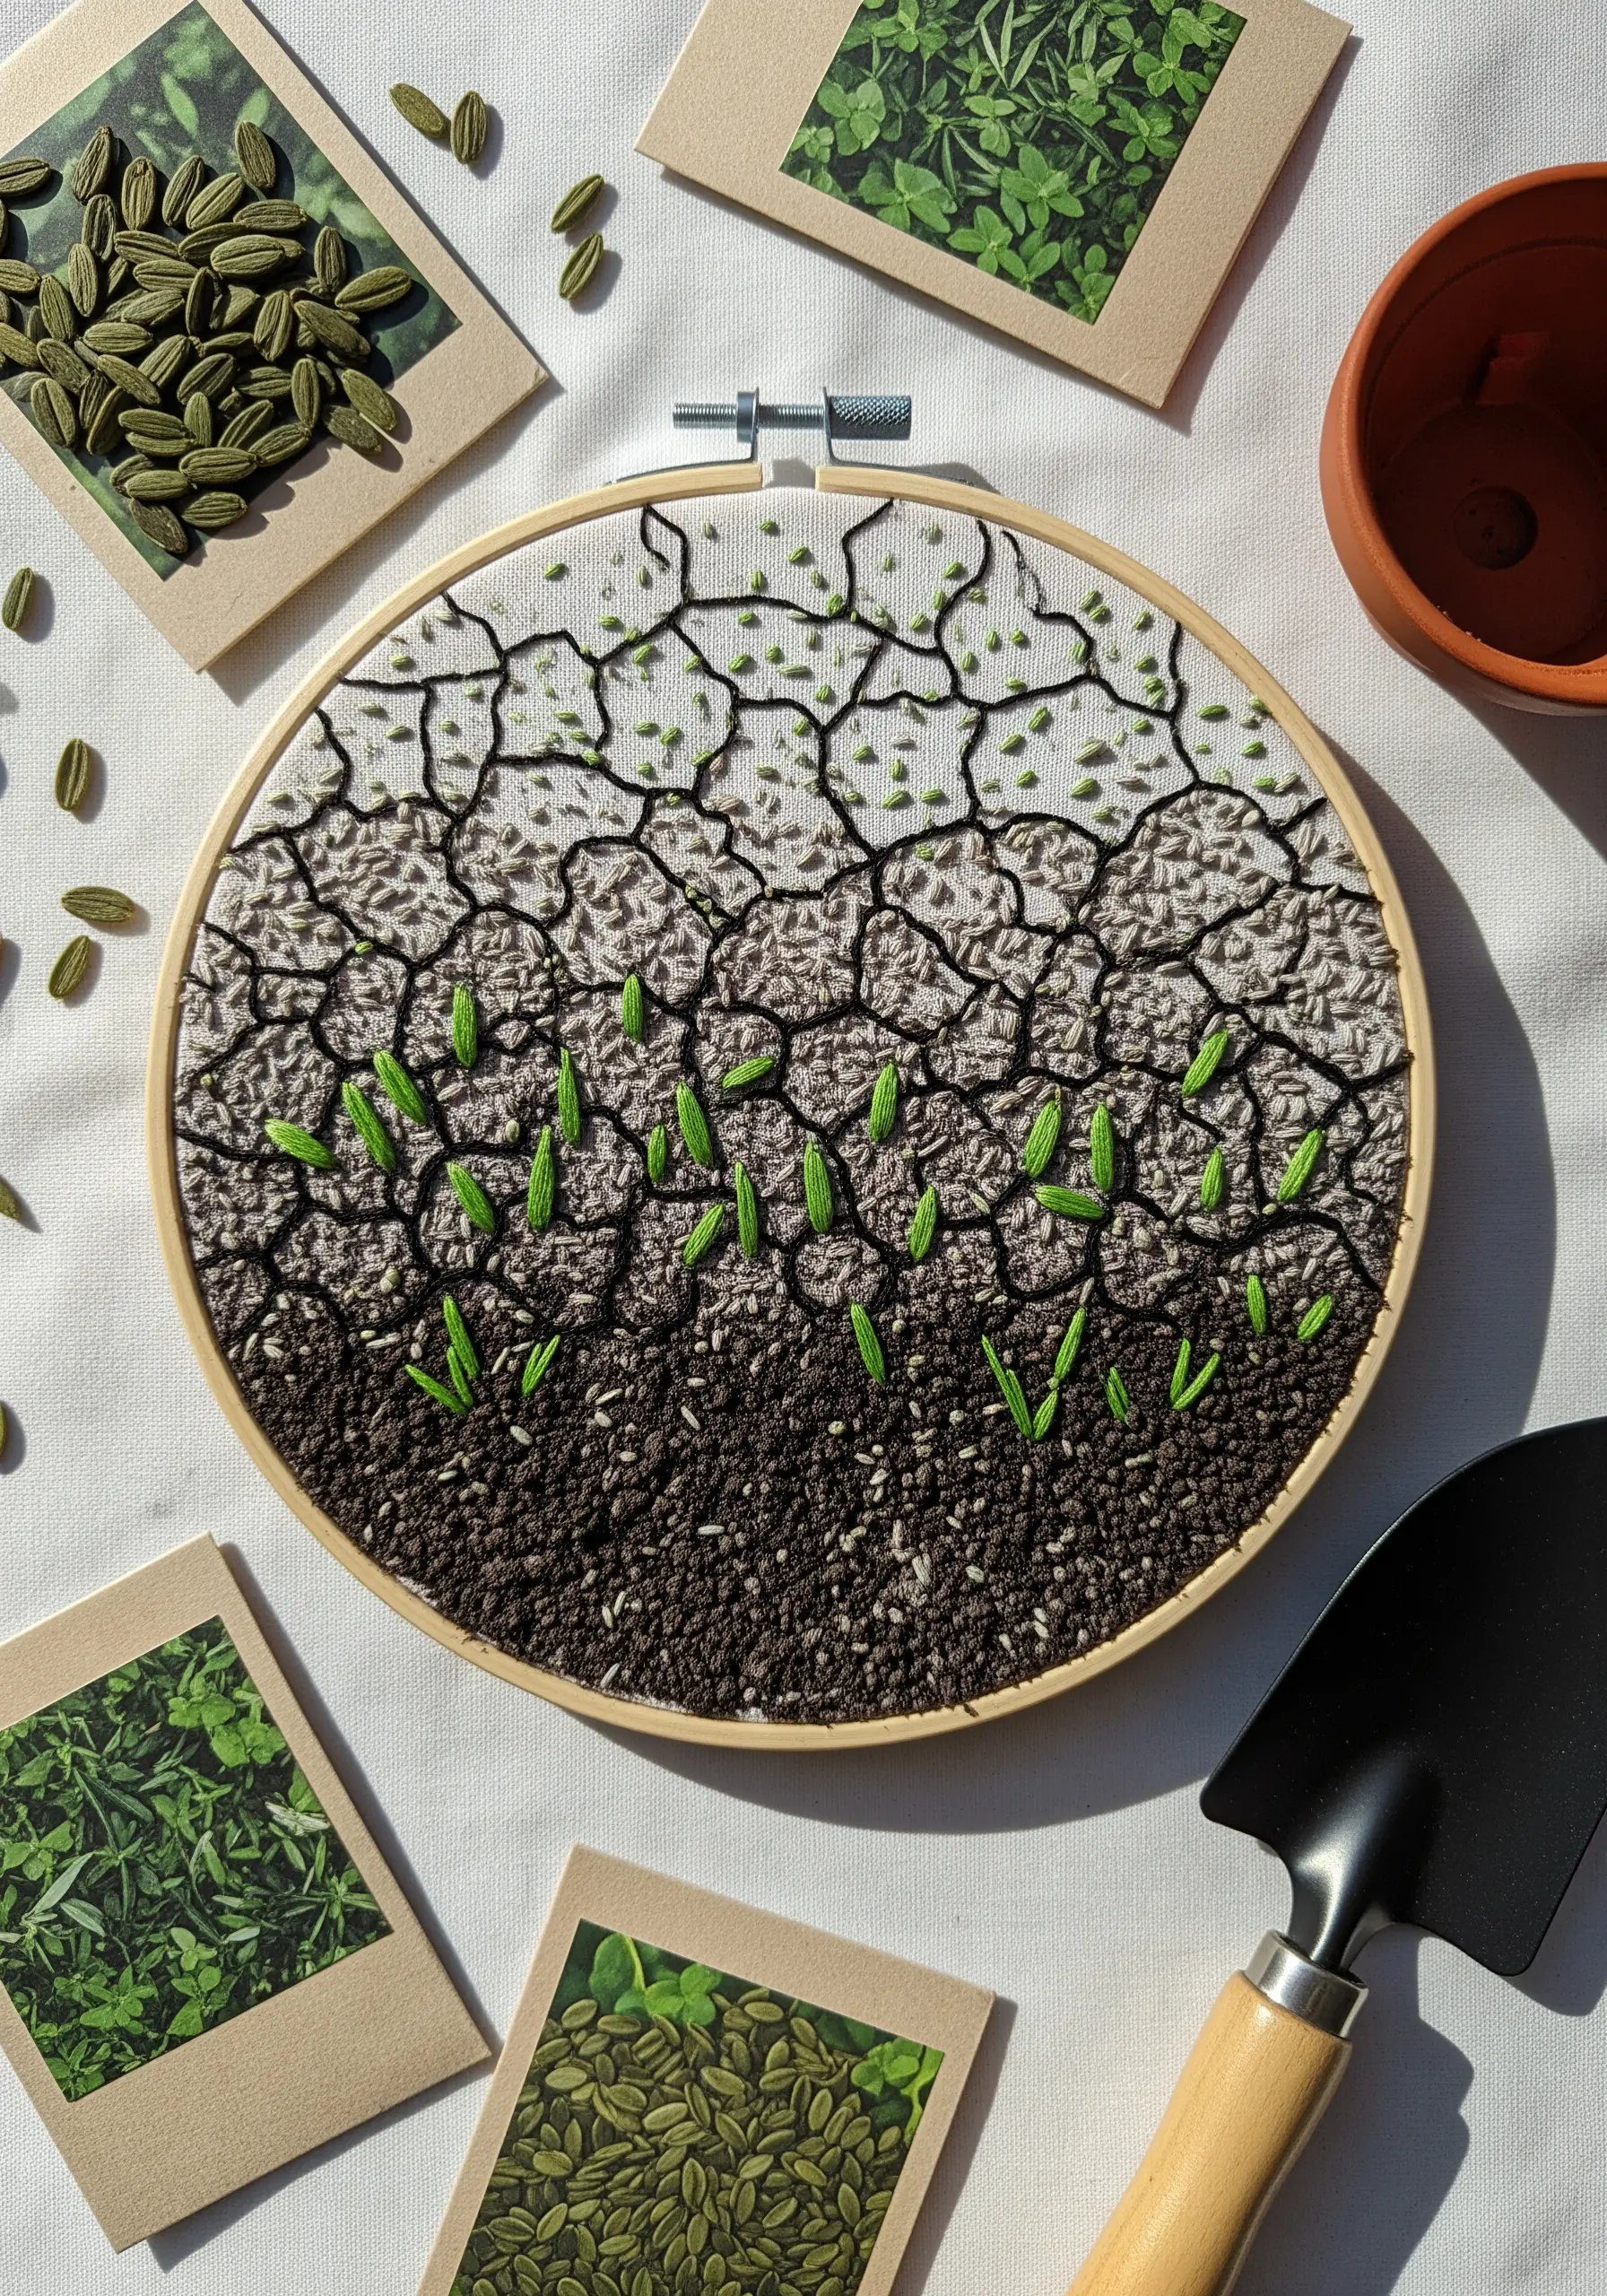
Tell a story of growth by using different stitch textures to represent different types of earth.
For the dry, cracked surface, use a simple backstitch outline on bare fabric. Below that, create a transitional layer with loosely spaced French knots in grey and taupe.
Finally, for the rich, fertile soil at the bottom, switch to very dense, tightly packed French knots in a deep brown. The bright green stitches of the new sprouts will pop dramatically against this varied textural landscape.
This is an excellent exercise for nature-themed embroidery samplers to practice real plant shapes.


