

Have you ever looked at a beautifully embroidered cushion and wondered how to achieve that same sense of polish and luxury in your own work? That feeling of richness often comes not from complex, difficult patterns, but from intentional, thoughtful choices.
The secret is learning to think about thread and fabric in a new way. It’s in choosing a padded satin stitch over a flat one to give a motif dimension, or combining a metallic thread with tiny beads to catch the light just so. It’s about understanding how the texture of velvet demands a different approach than the smoothness of satin.
Consider these motifs less as strict instructions and more as invitations. Each one holds a specific technique—a way to handle color, texture, or composition—that can transform your stitching. Your cushions are the perfect canvas to practice this refined artistry, turning a simple sofa into a throne of your own making.
1. The Heraldic Lion in Raised Goldwork
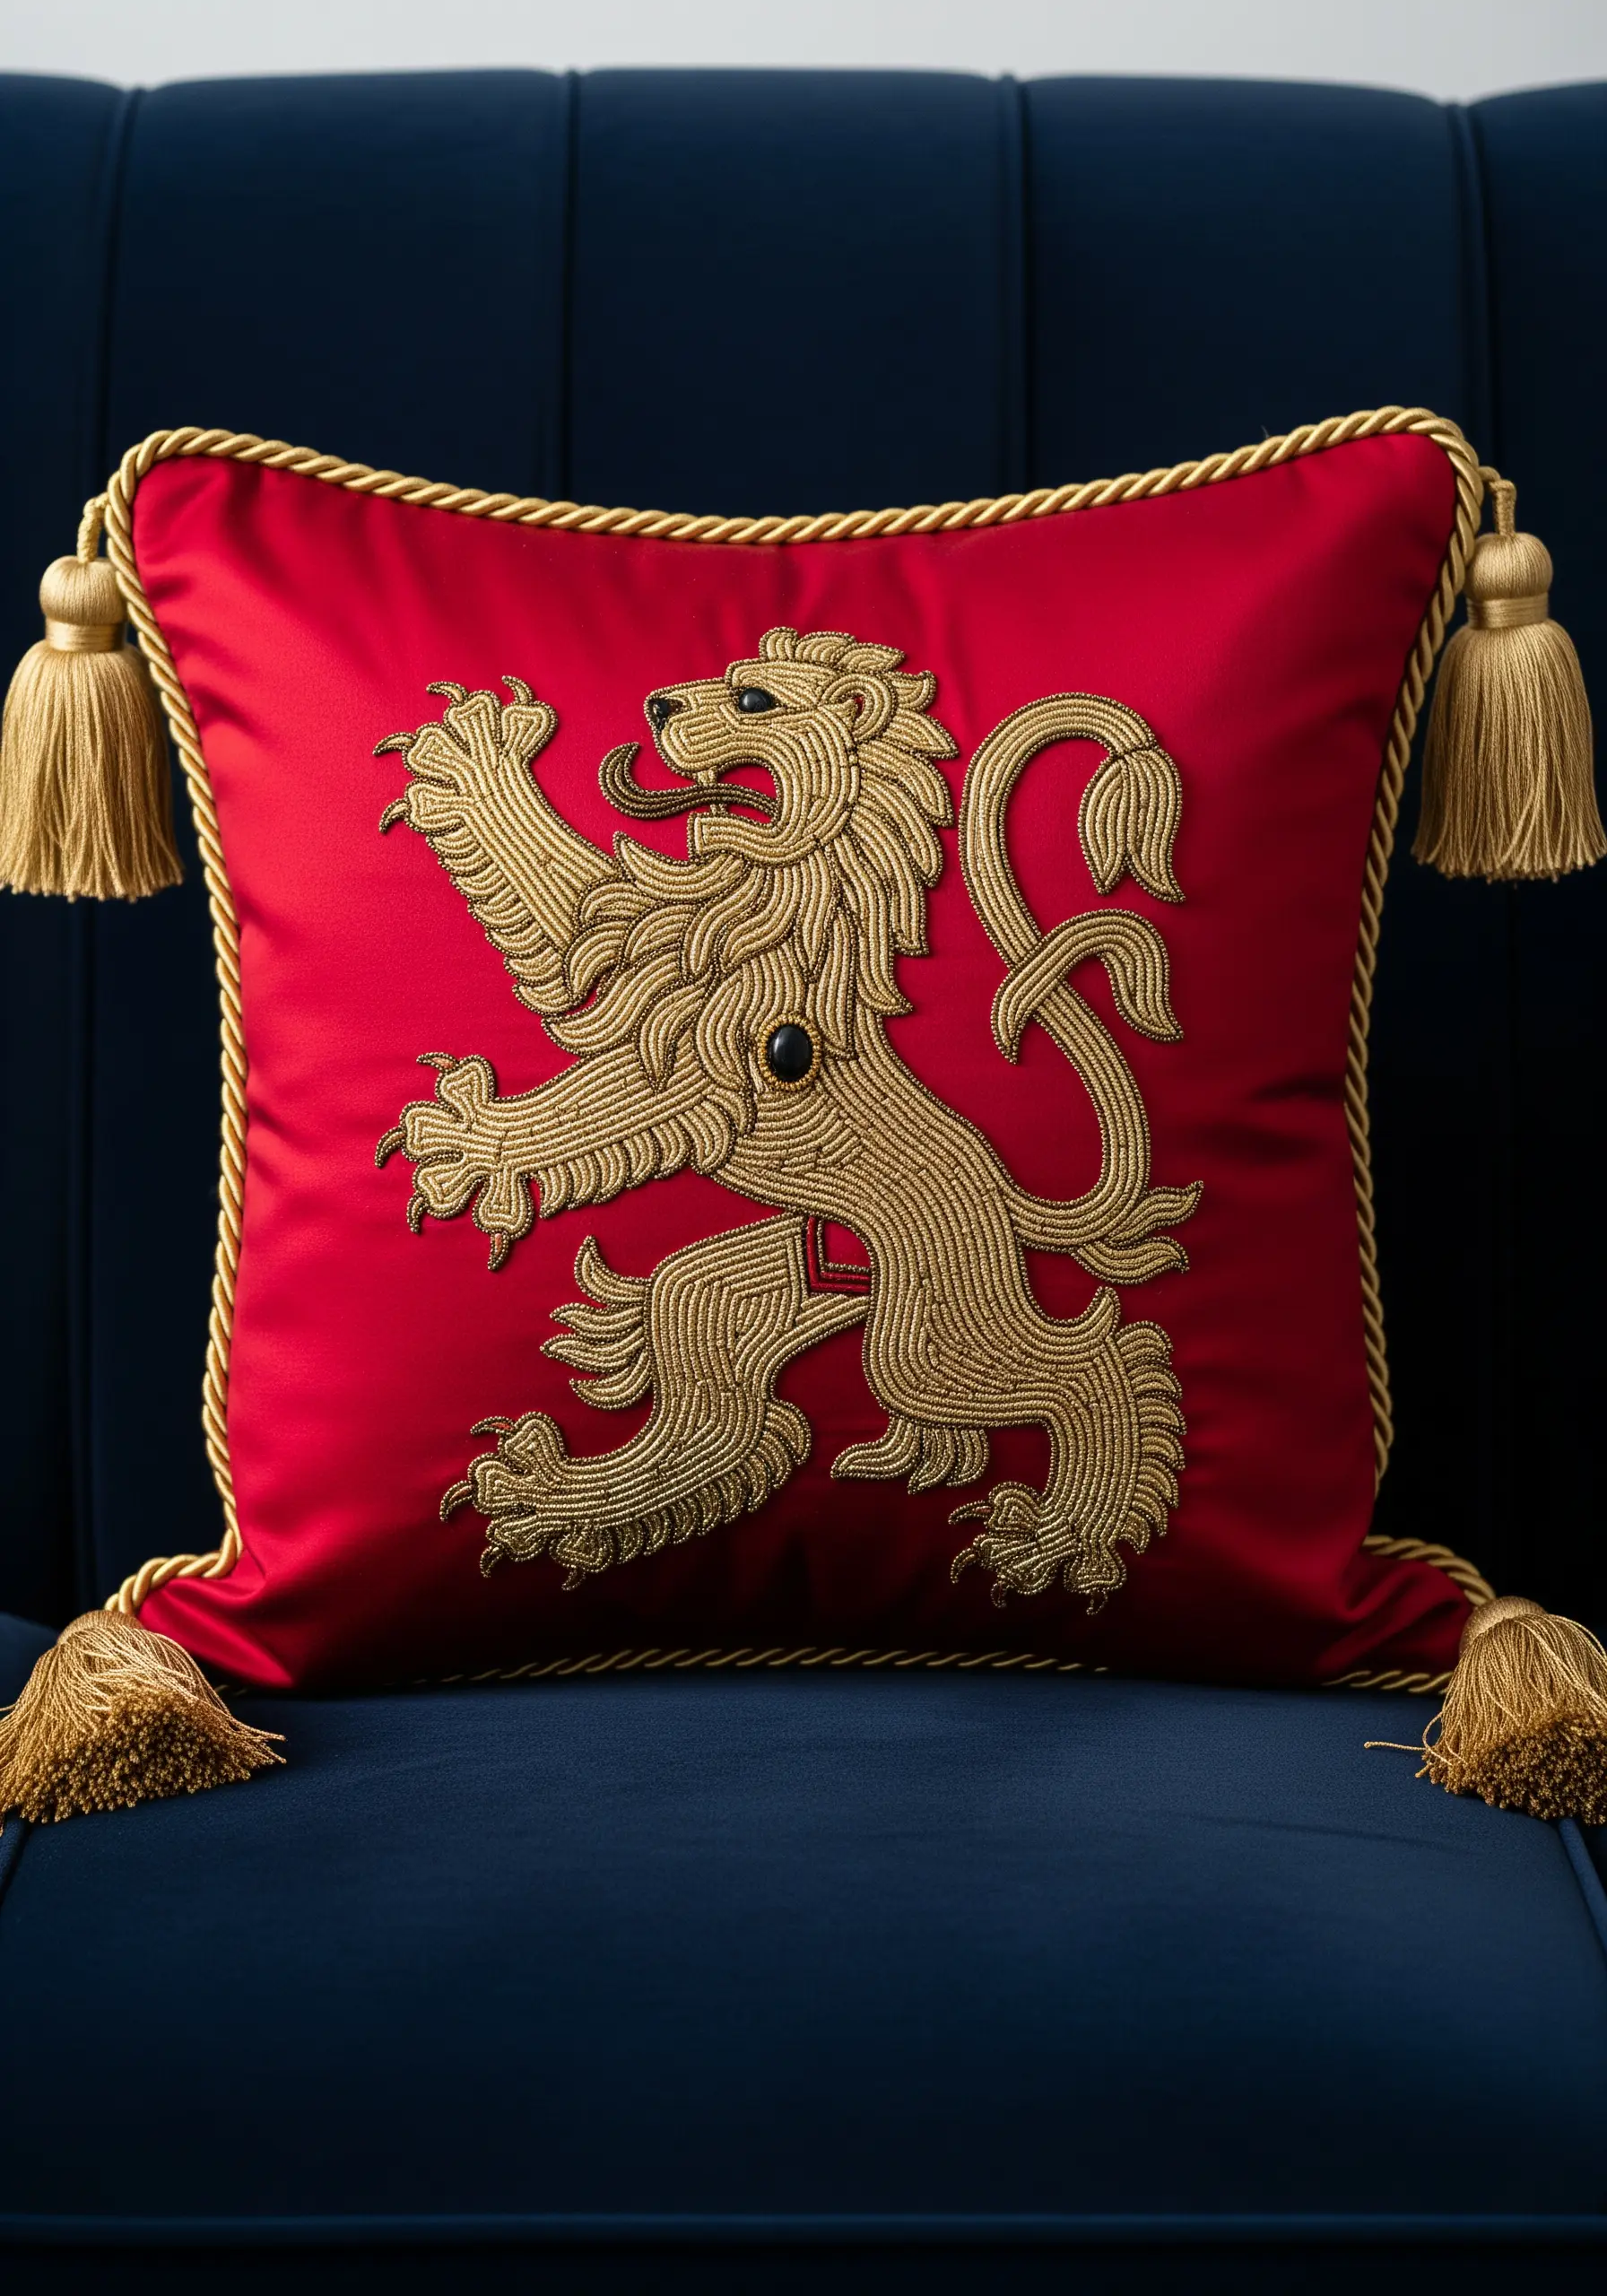
To achieve this powerful, sculptural effect, use a couching stitch over a heavy gold cord to outline the entire motif.
For the mane and body, fill the sections with directional satin stitch, angling your stitches to mimic the flow of fur and muscle; this simple adjustment creates dynamic movement.
Instead of stitching the eye, secure a single black onyx bead, which adds a sharp, polished focal point and draws attention.
The contrast between the high-sheen metallic thread and the deep matte of the red fabric is what gives this design its commanding presence.
2. Beaded Fleur-de-Lis on Velvet
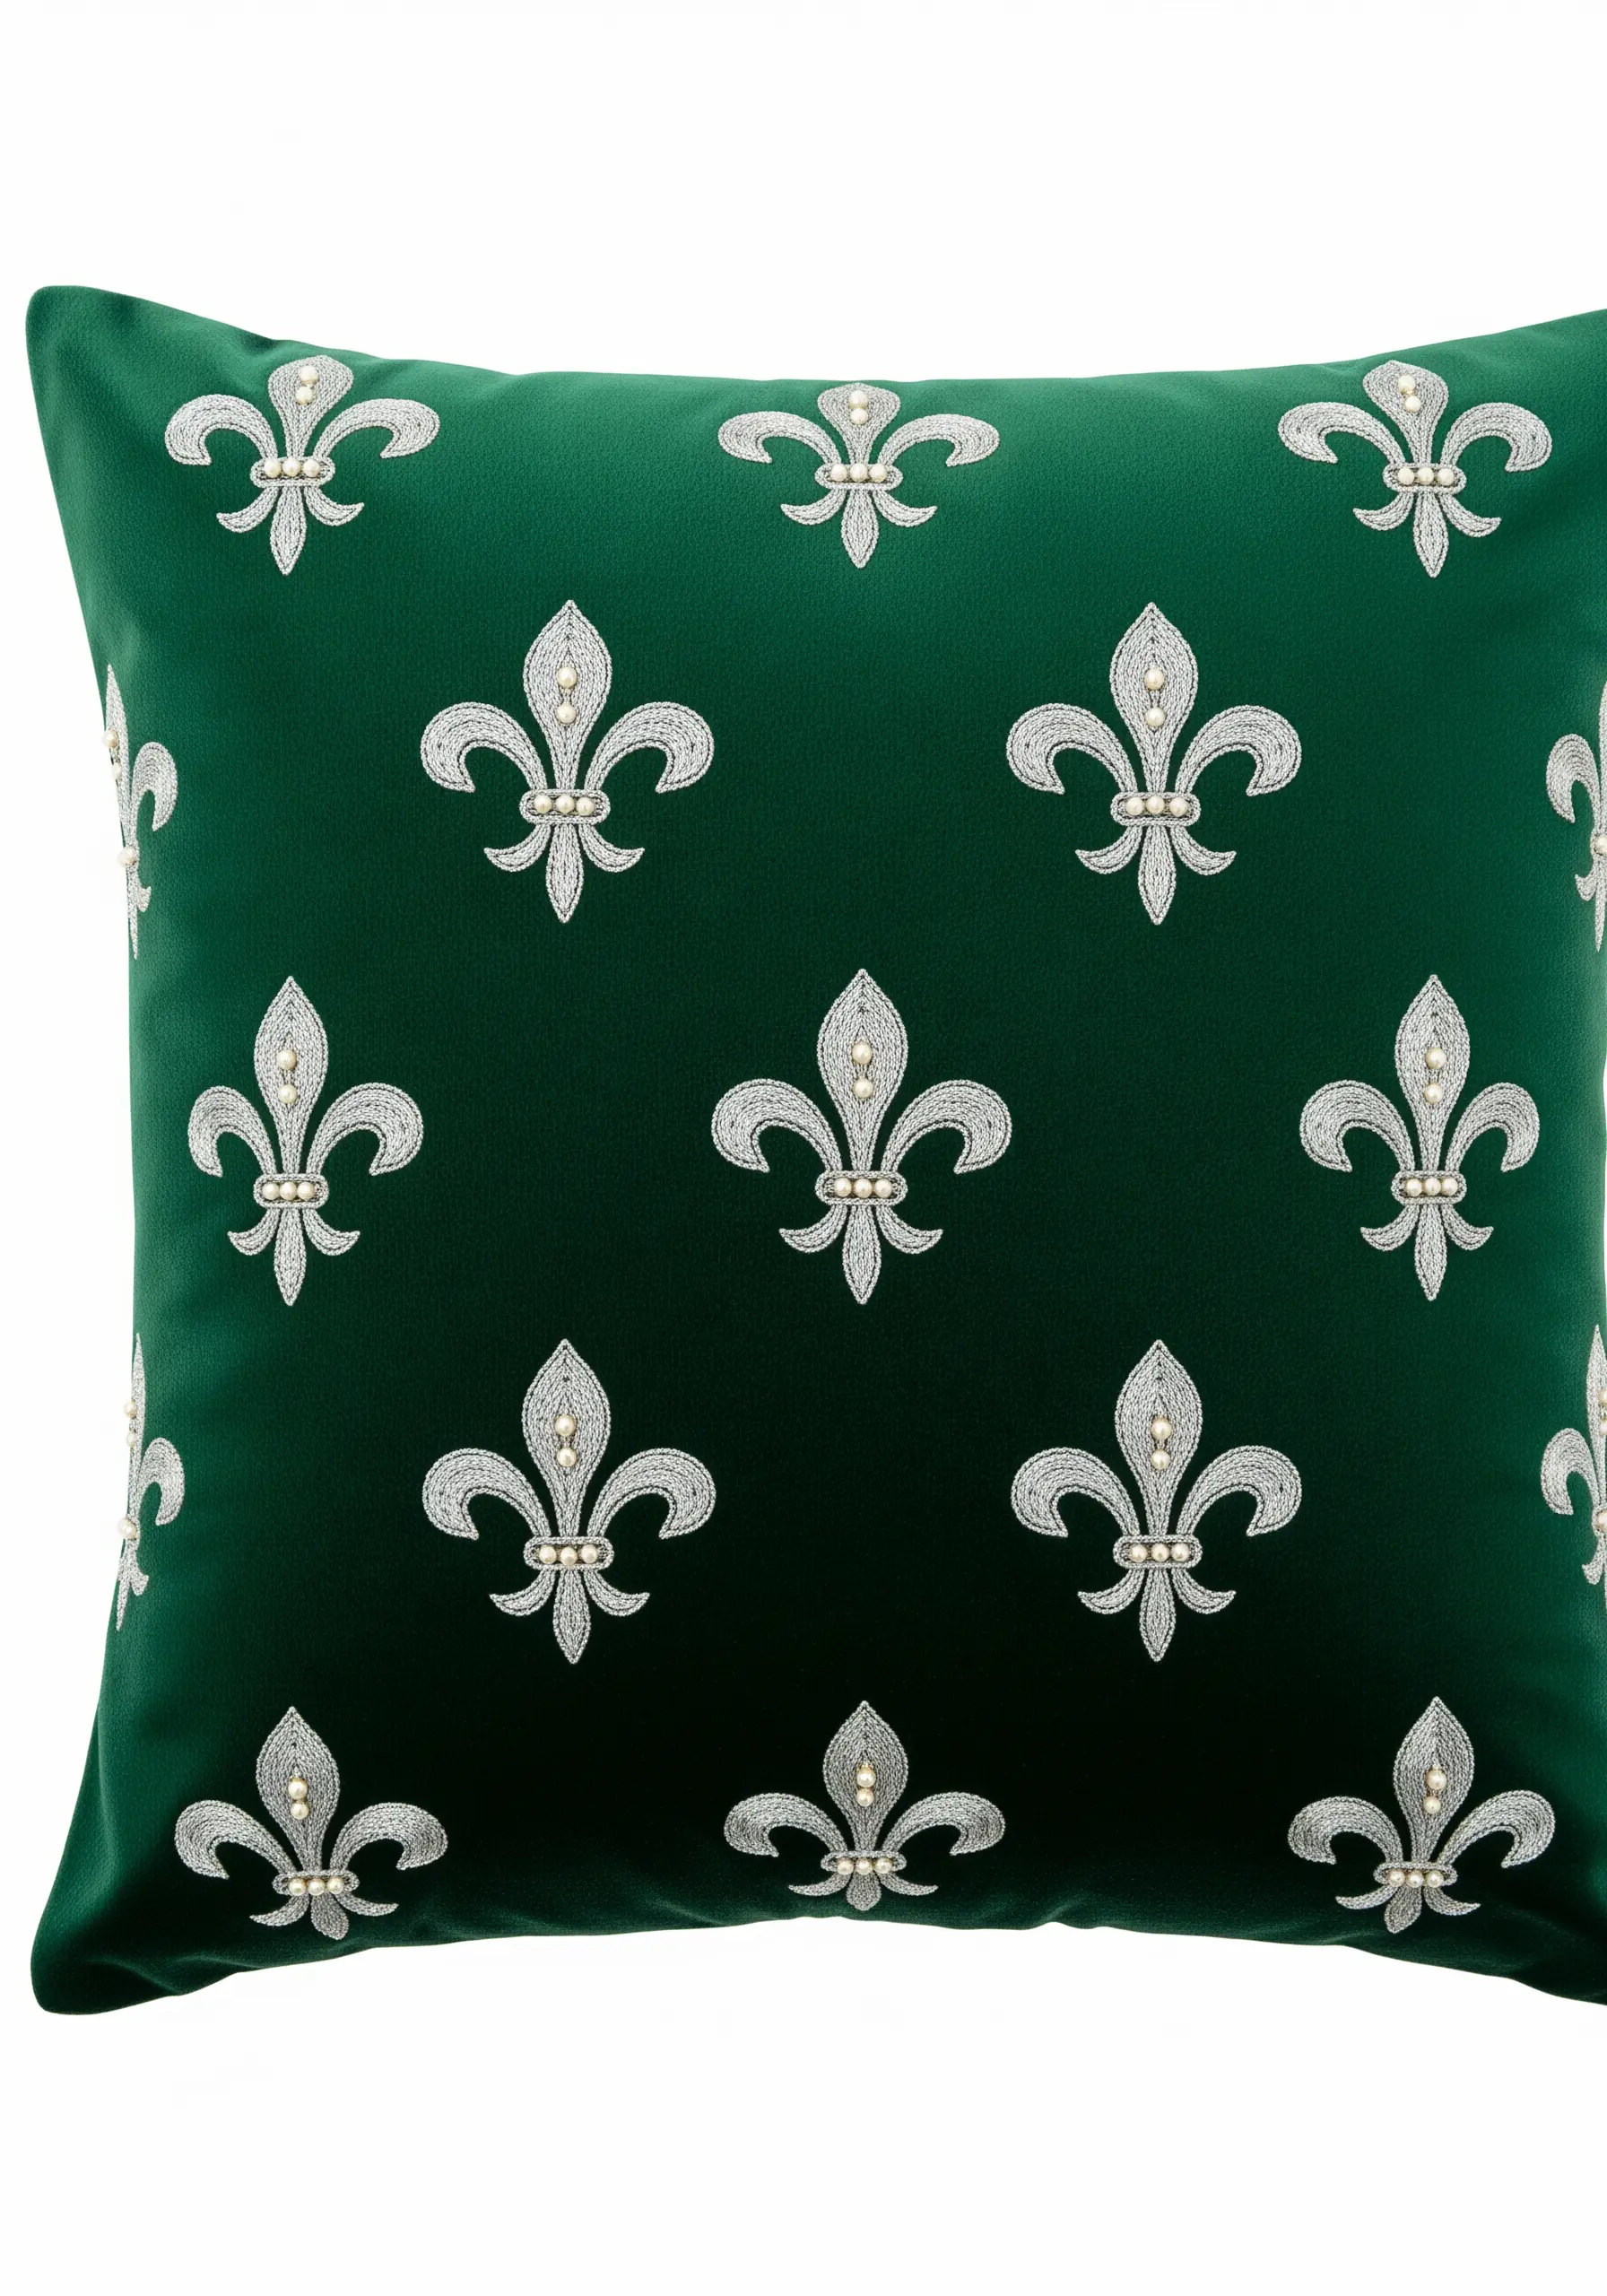
Combine metallic thread with beads to give a classic pattern a luxurious, tactile quality.
Use a simple split stitch with a silver thread for the outlines of the fleur-de-lis, which provides a solid, clean line on the velvet pile.
Anchor tiny pearl beads at the intersections and center of the motif to catch the light and add subtle dimension.
Always use a tear-away stabilizer on the back of velvet; this prevents the fabric’s nap from swallowing your stitches and ensures they remain crisp.
3. Pastel Thread Painting in a Rococo Cartouche
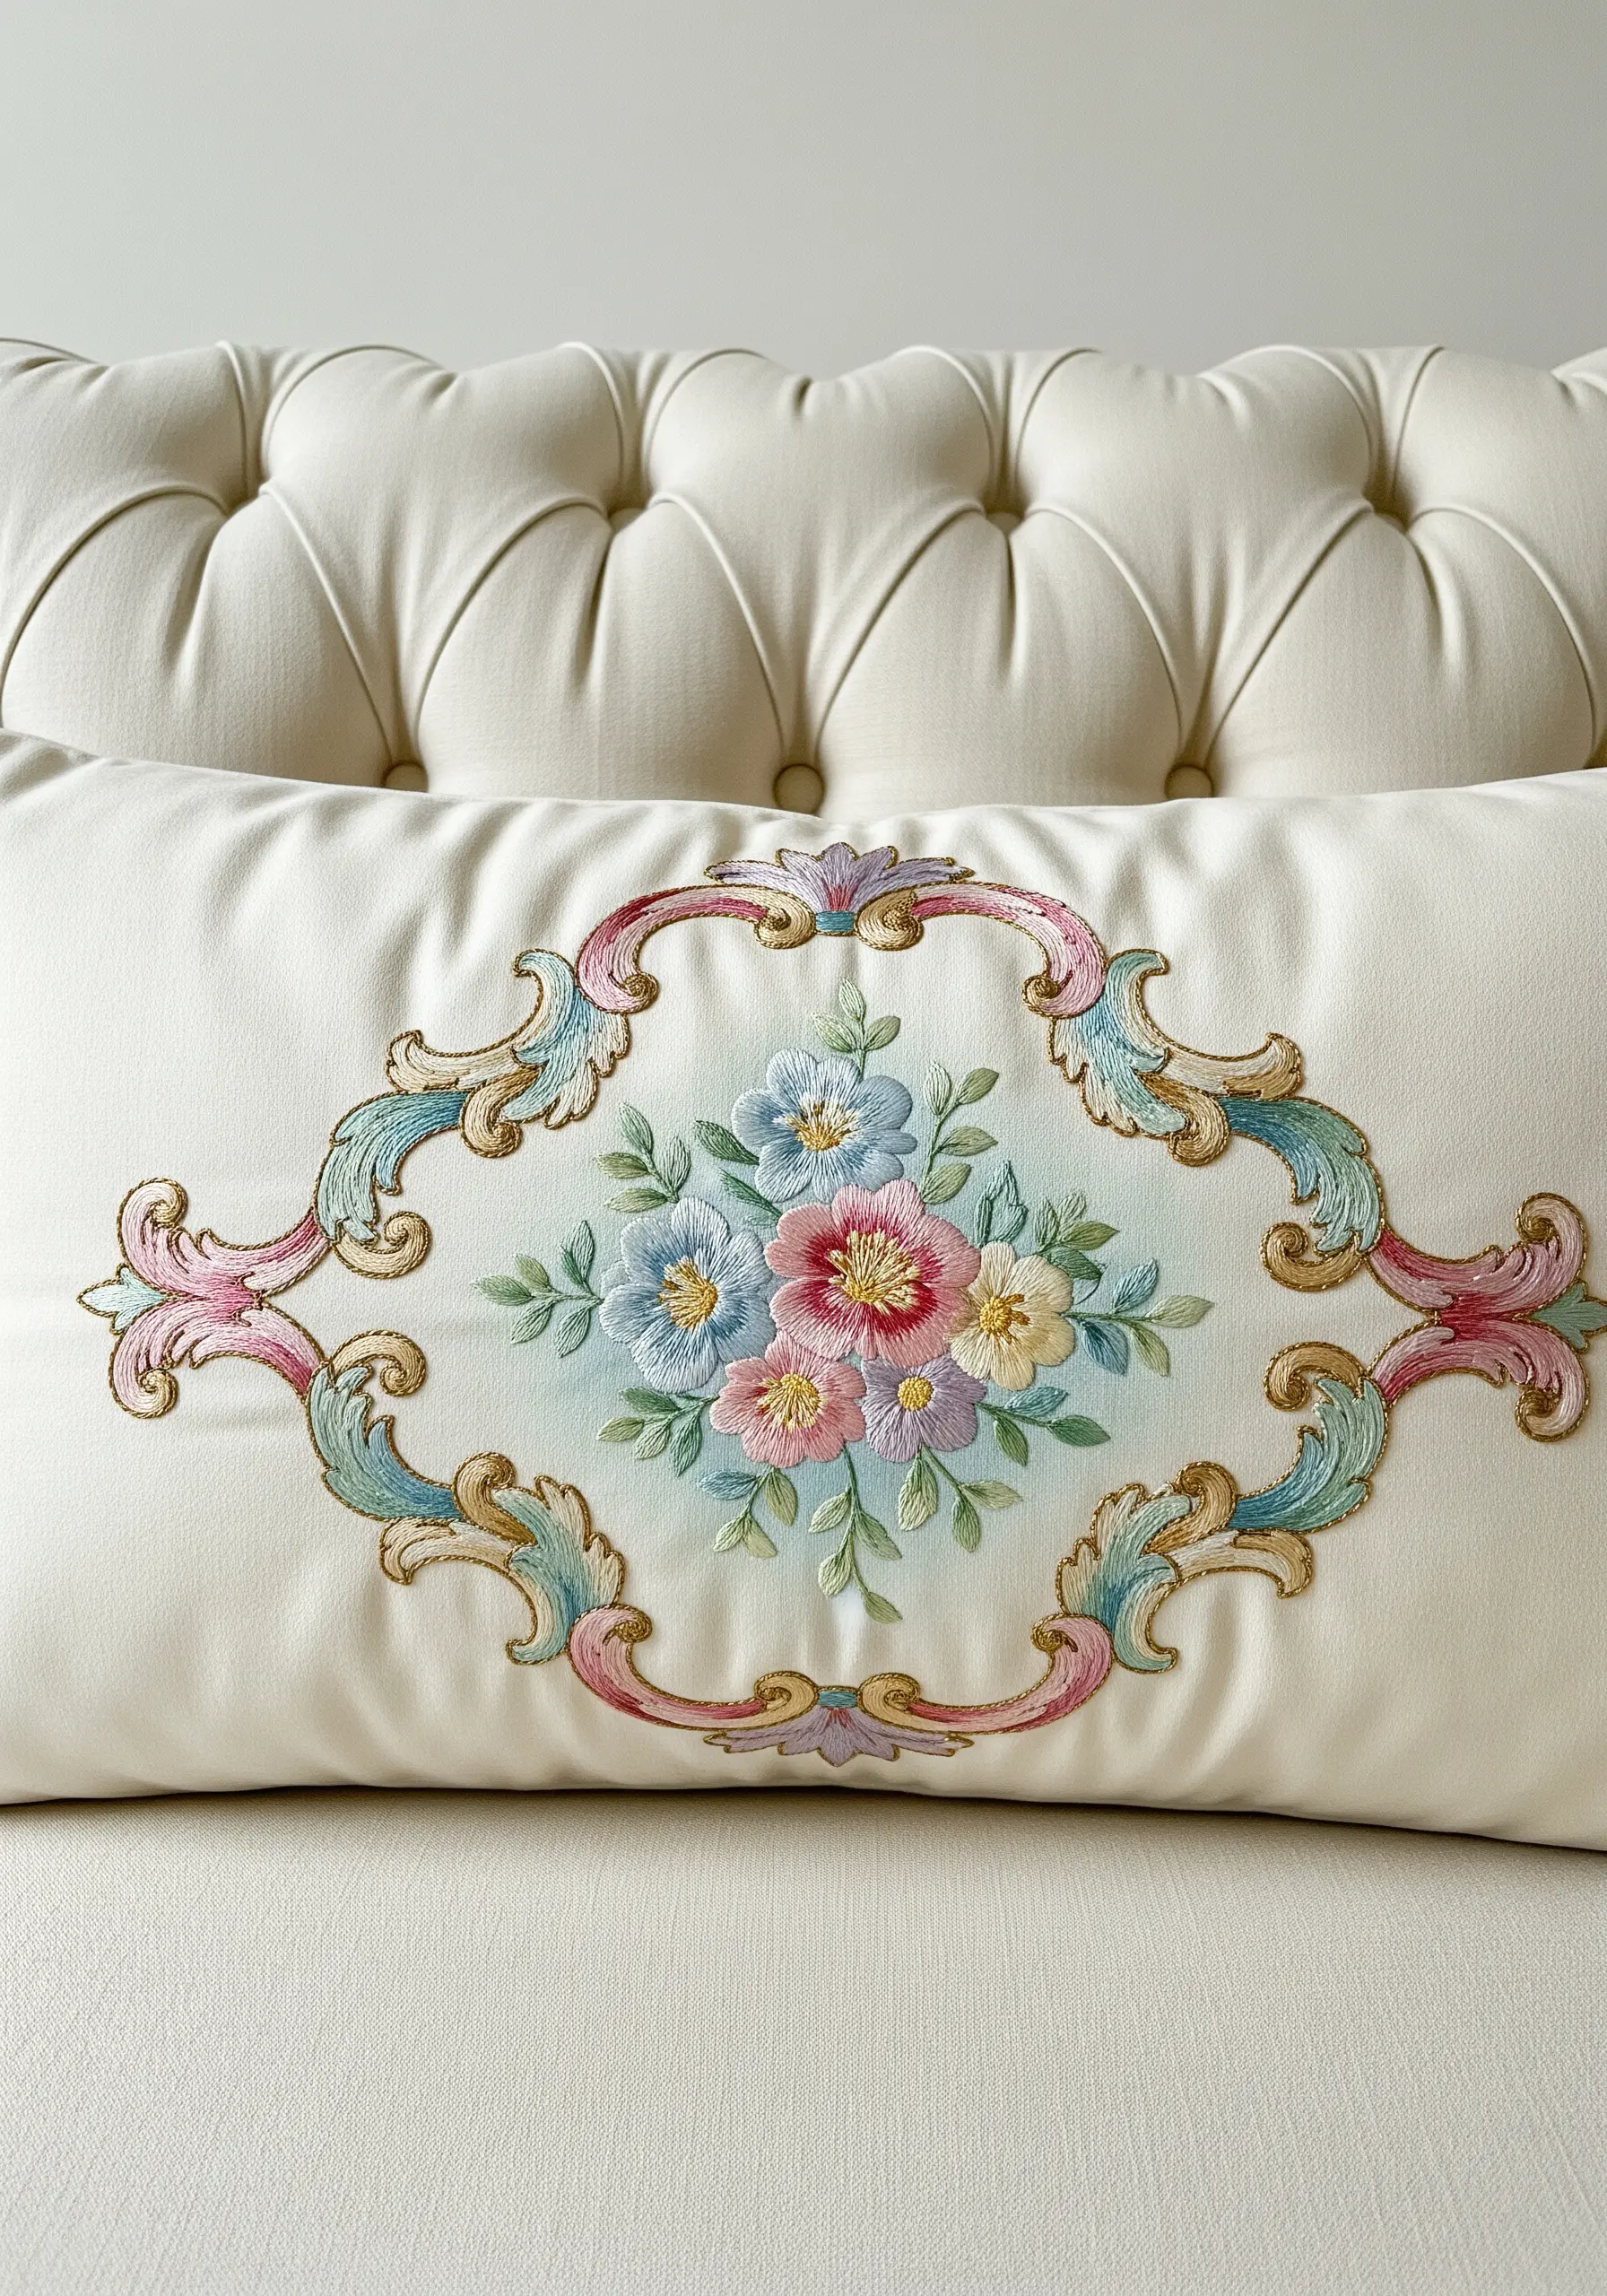
For florals that look truly painted, use the long-and-short stitch with a single strand of cotton floss to blend your colors seamlessly.
Work from the outer edge of each petal inward, gradually shifting from darker to lighter shades to create realistic depth and highlights.
Create the ornate cartouche frame by first outlining it with a split stitch, then filling it with satin stitch; the split stitch base will give your edges a cleaner, more defined finish.
This gentle pastel palette on a neutral cream background ensures the intricate stitch work remains the star of the show.
4. Bold Satin Stitch for a Graphic Tudor Rose
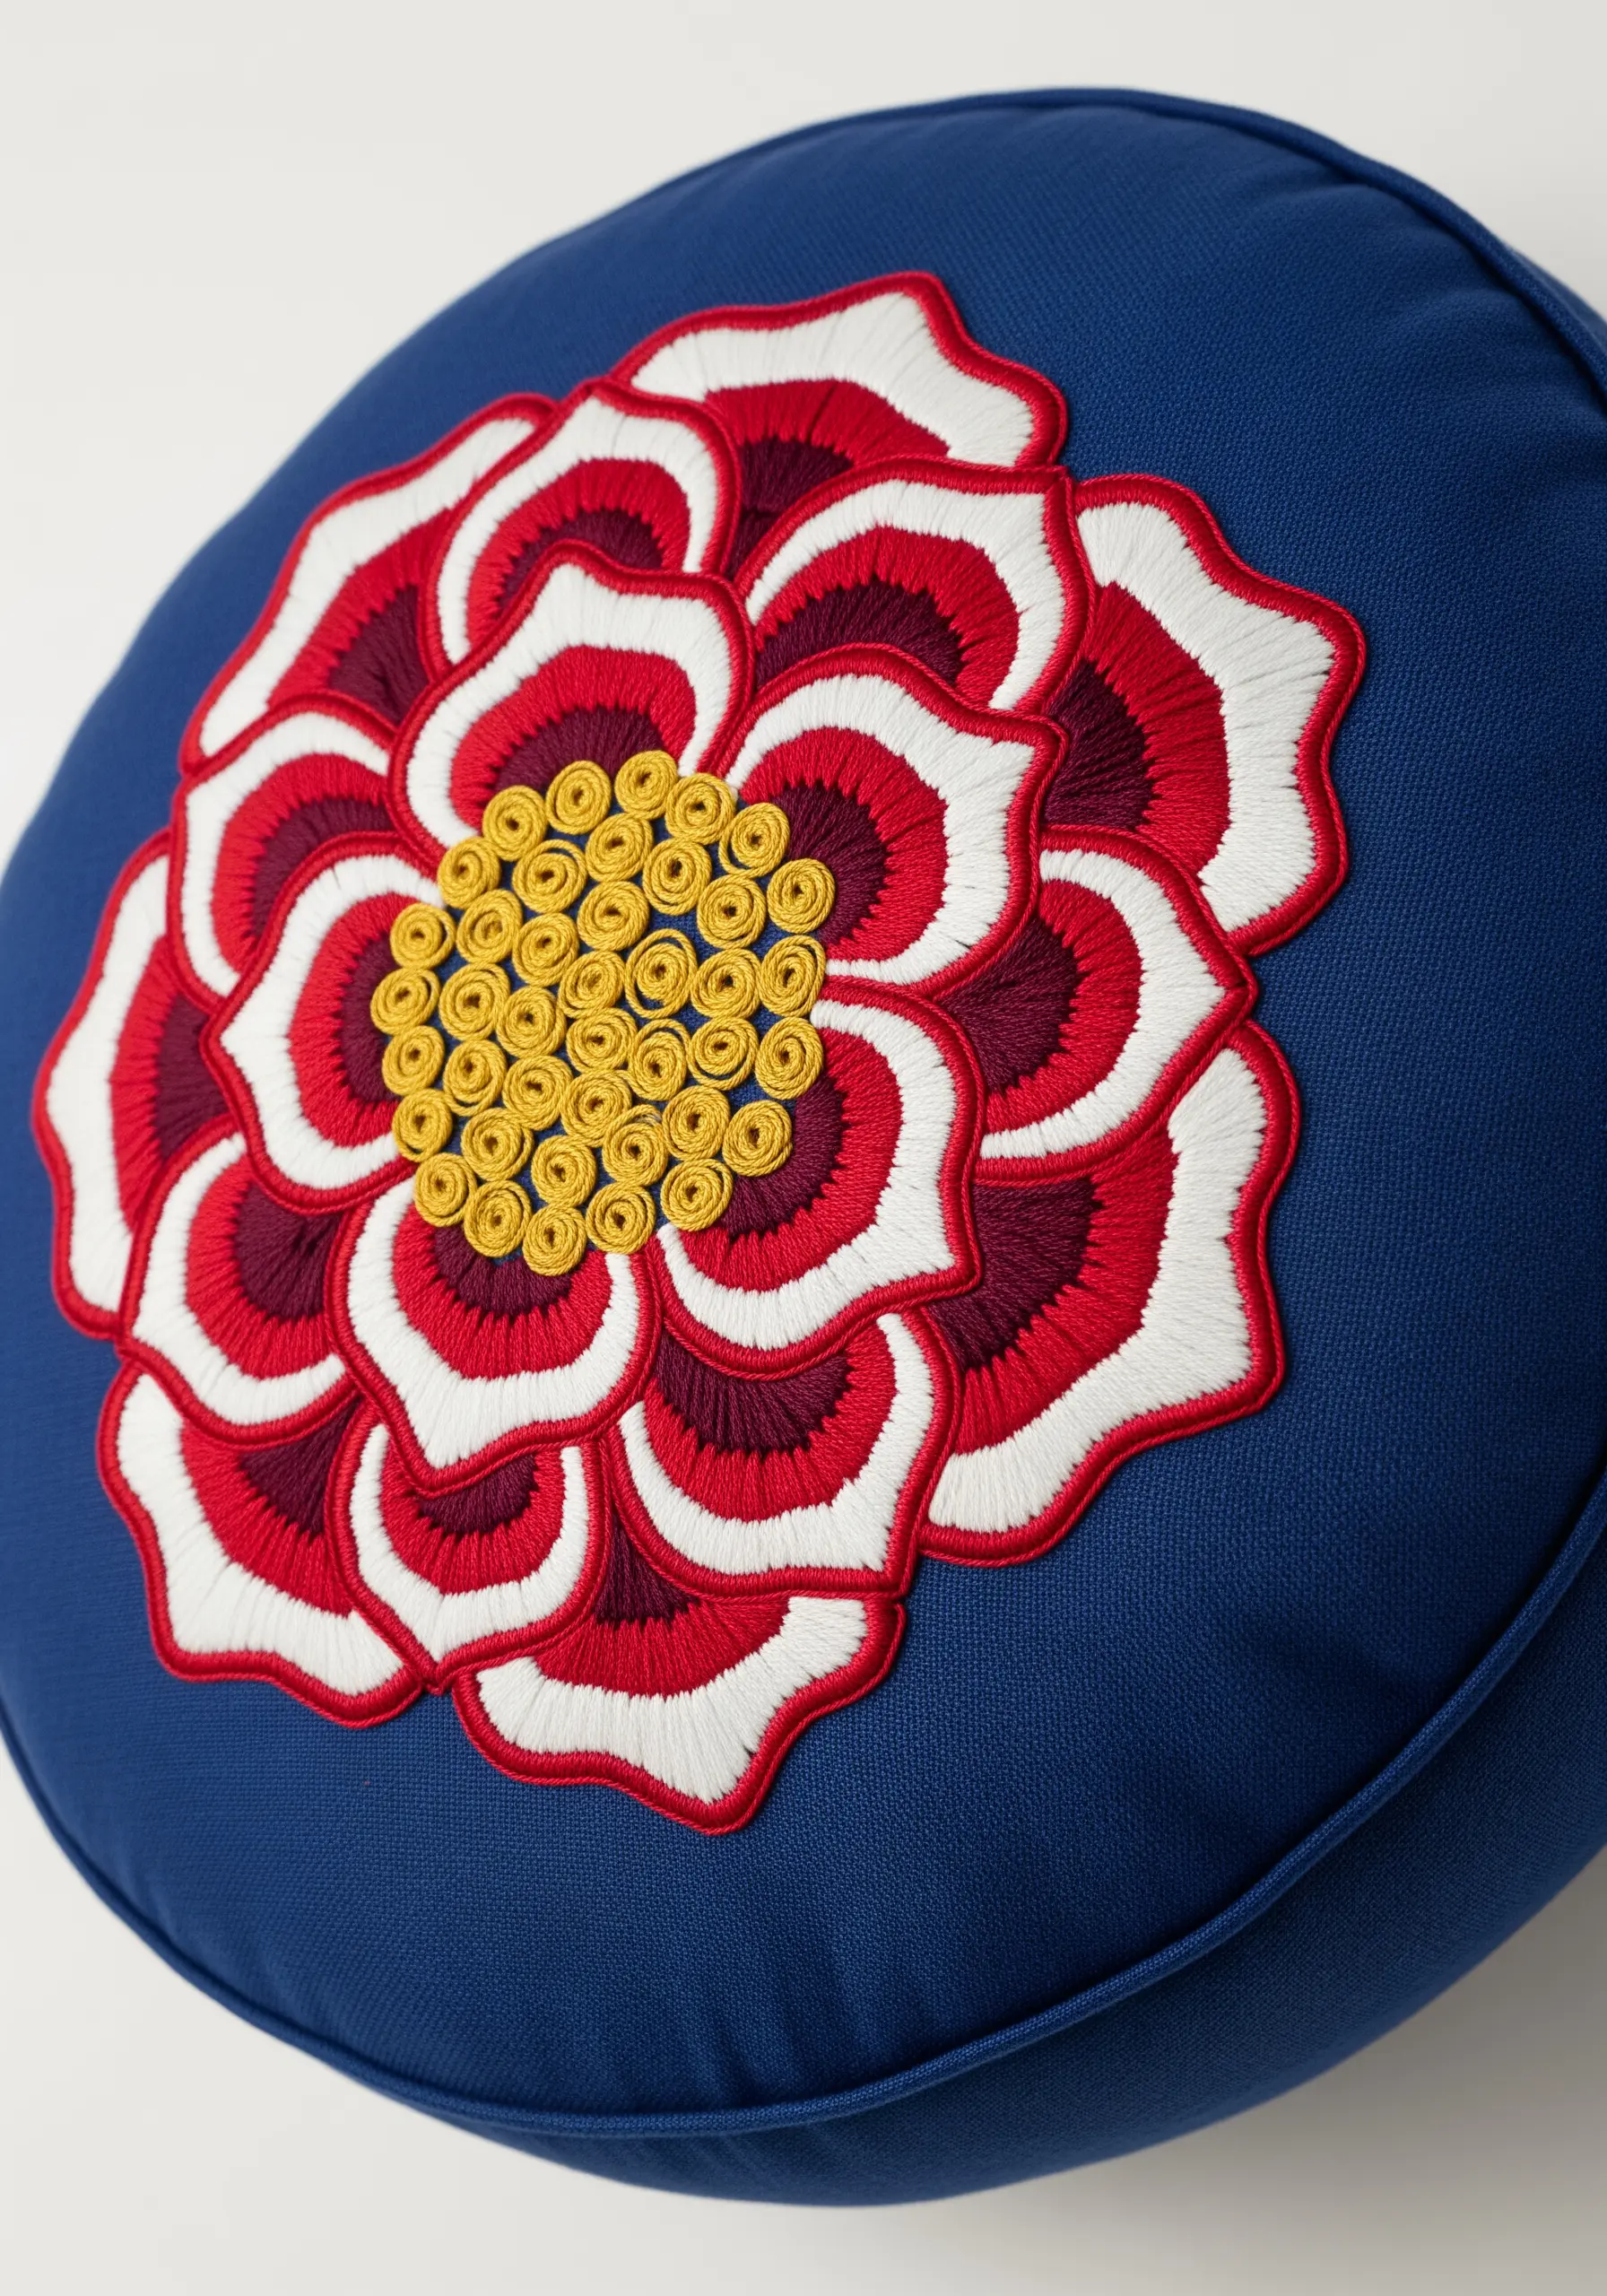
The key to this bold, graphic look is a flawless satin stitch with slightly raised dimension.
Achieve this by creating a padding of split stitches underneath your satin stitch; this elevates the stitches from the fabric surface, making them look fuller and more substantial.
Work each petal individually, ensuring your satin stitches lie perfectly parallel and tight against one another for a smooth, uniform block of color.
A dense cluster of French knots in the center adds a satisfying textural contrast to the sleek petals.
5. A Regal Monogram with Couching and Pearls
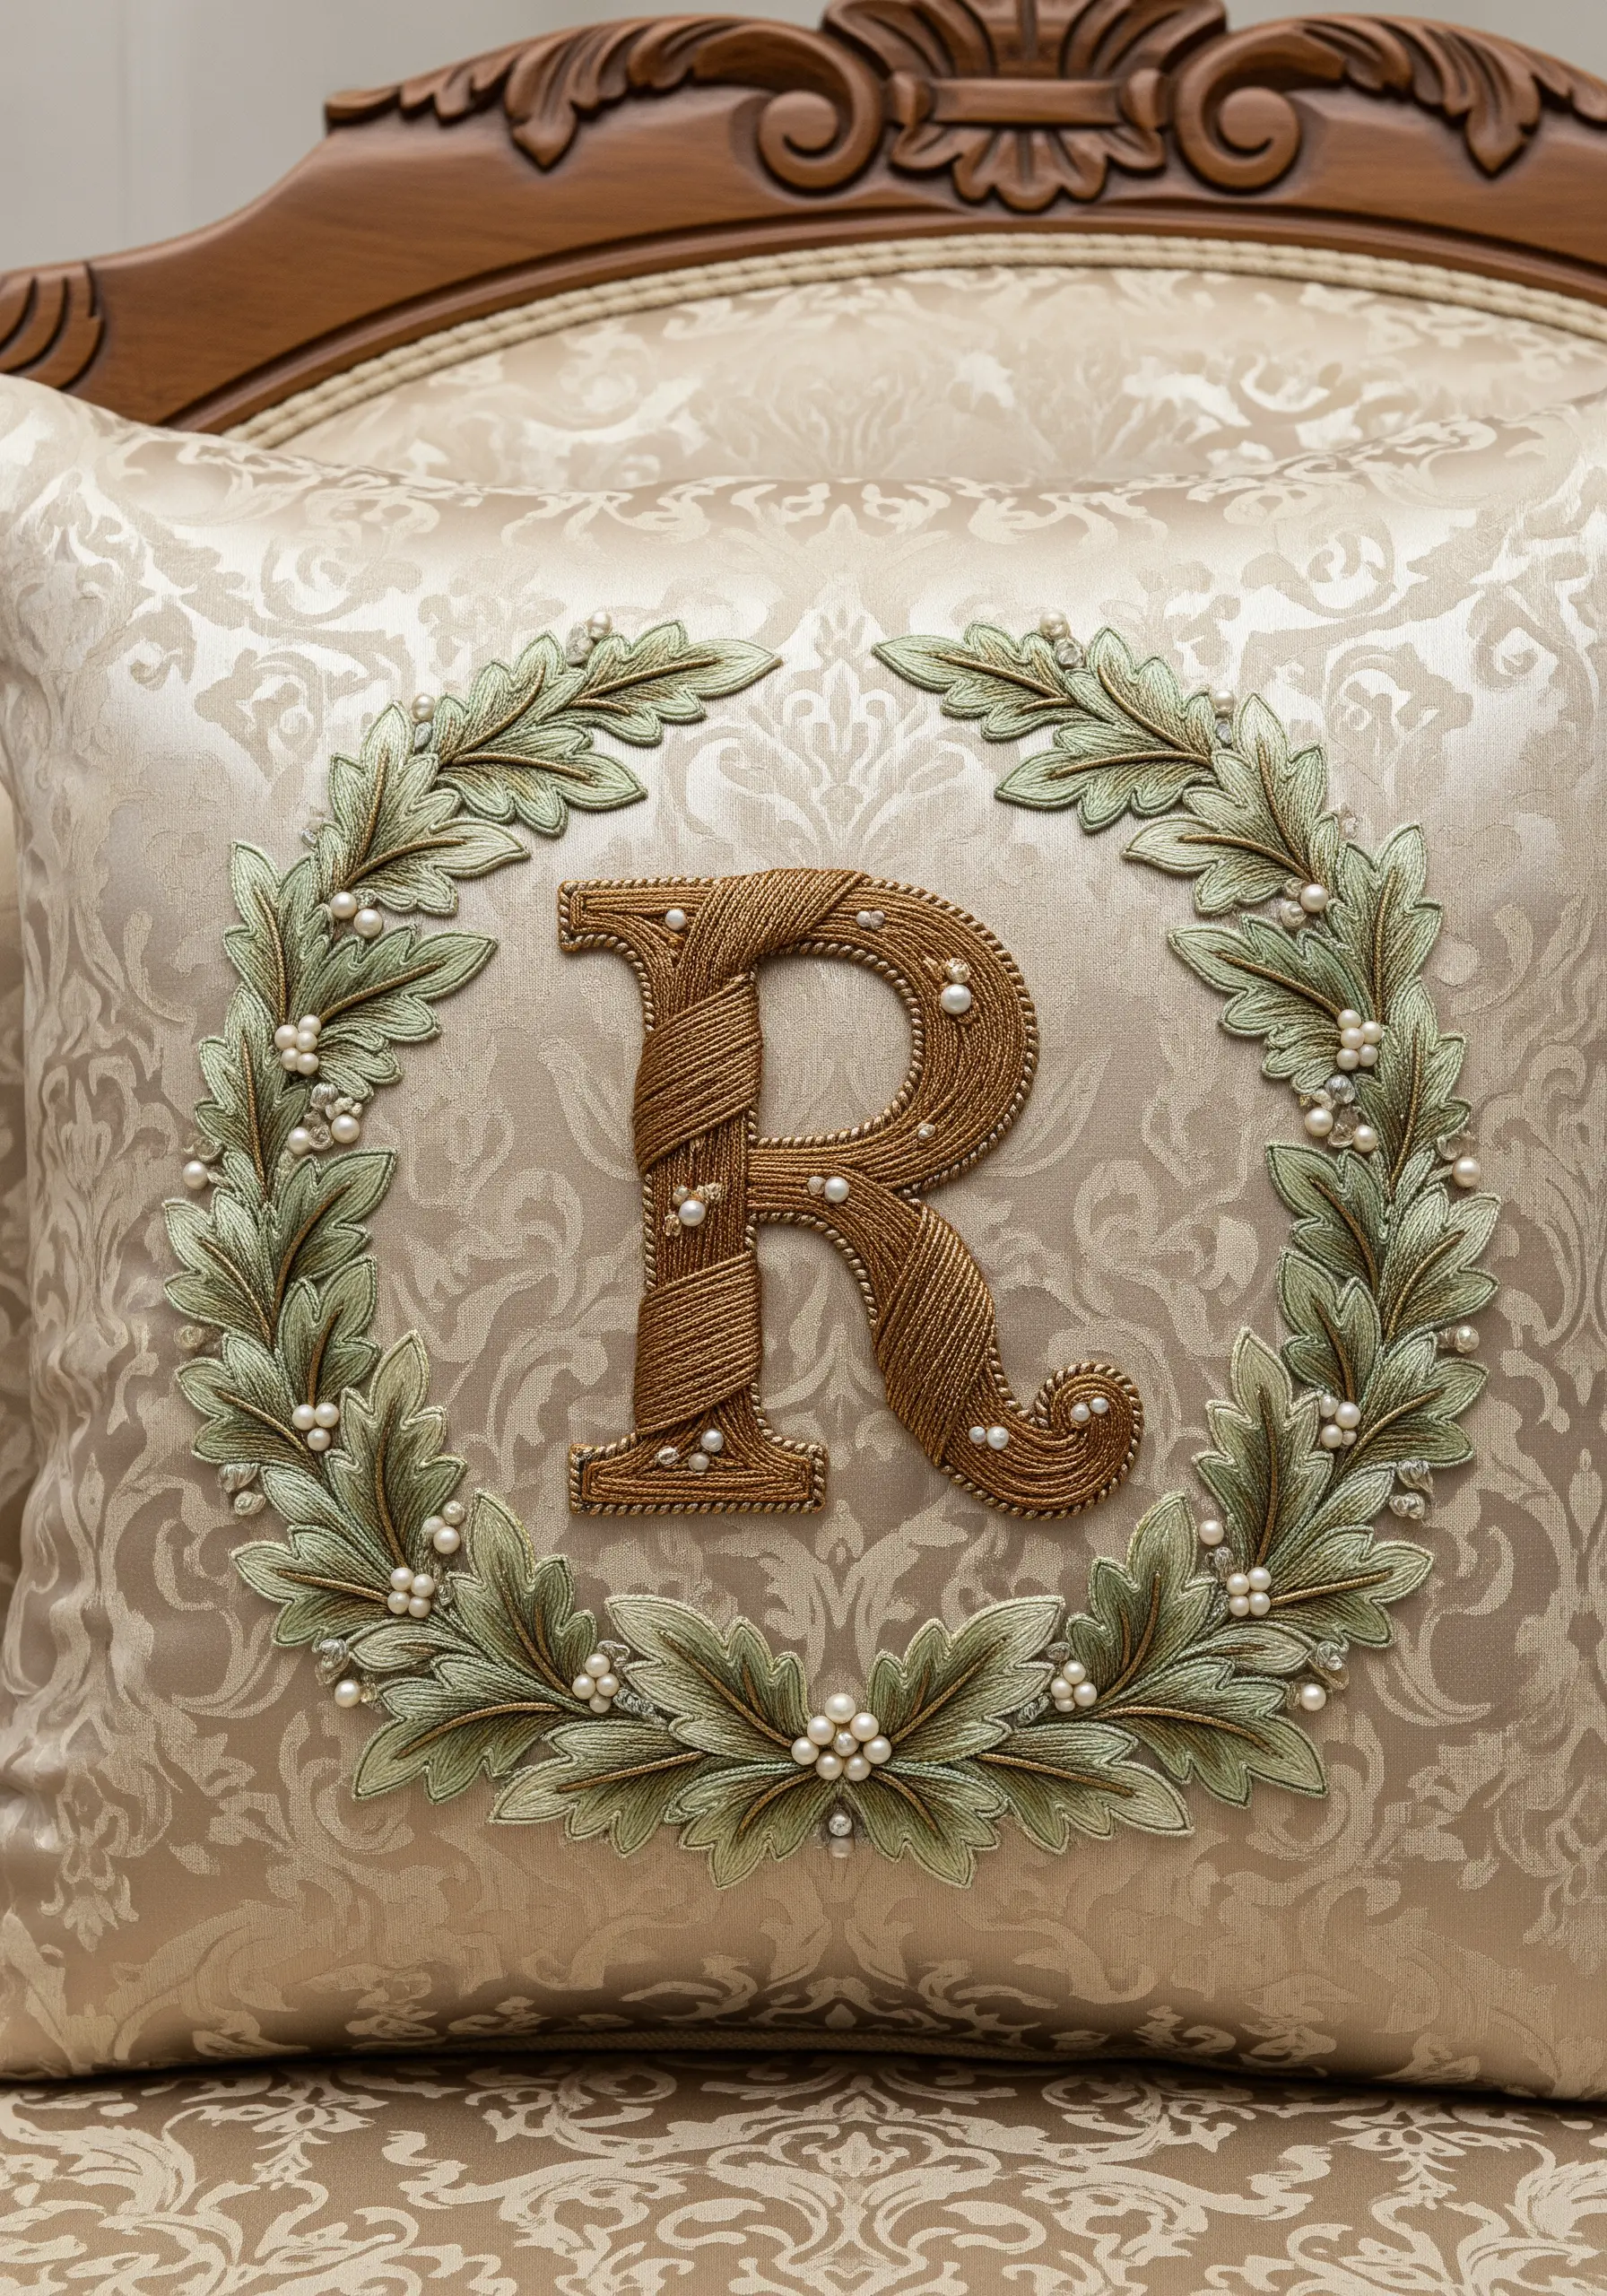
Create a monogram with stunning texture by couching multiple strands of metallic cord to form the letter.
Lay down three or four strands of gold cord side-by-side and use a finer, matching thread to tack them down at regular intervals, creating a wrapped, rope-like effect.
For the surrounding wreath, use fishbone stitch to create leaves with a natural central vein, and scatter tiny pearls between them for a touch of light.
This technique works beautifully on damask or brocade fabric, as the raised texture of the embroidery stands out against the woven pattern.
6. Ornate Scrollwork Bands for Bolster Cushions
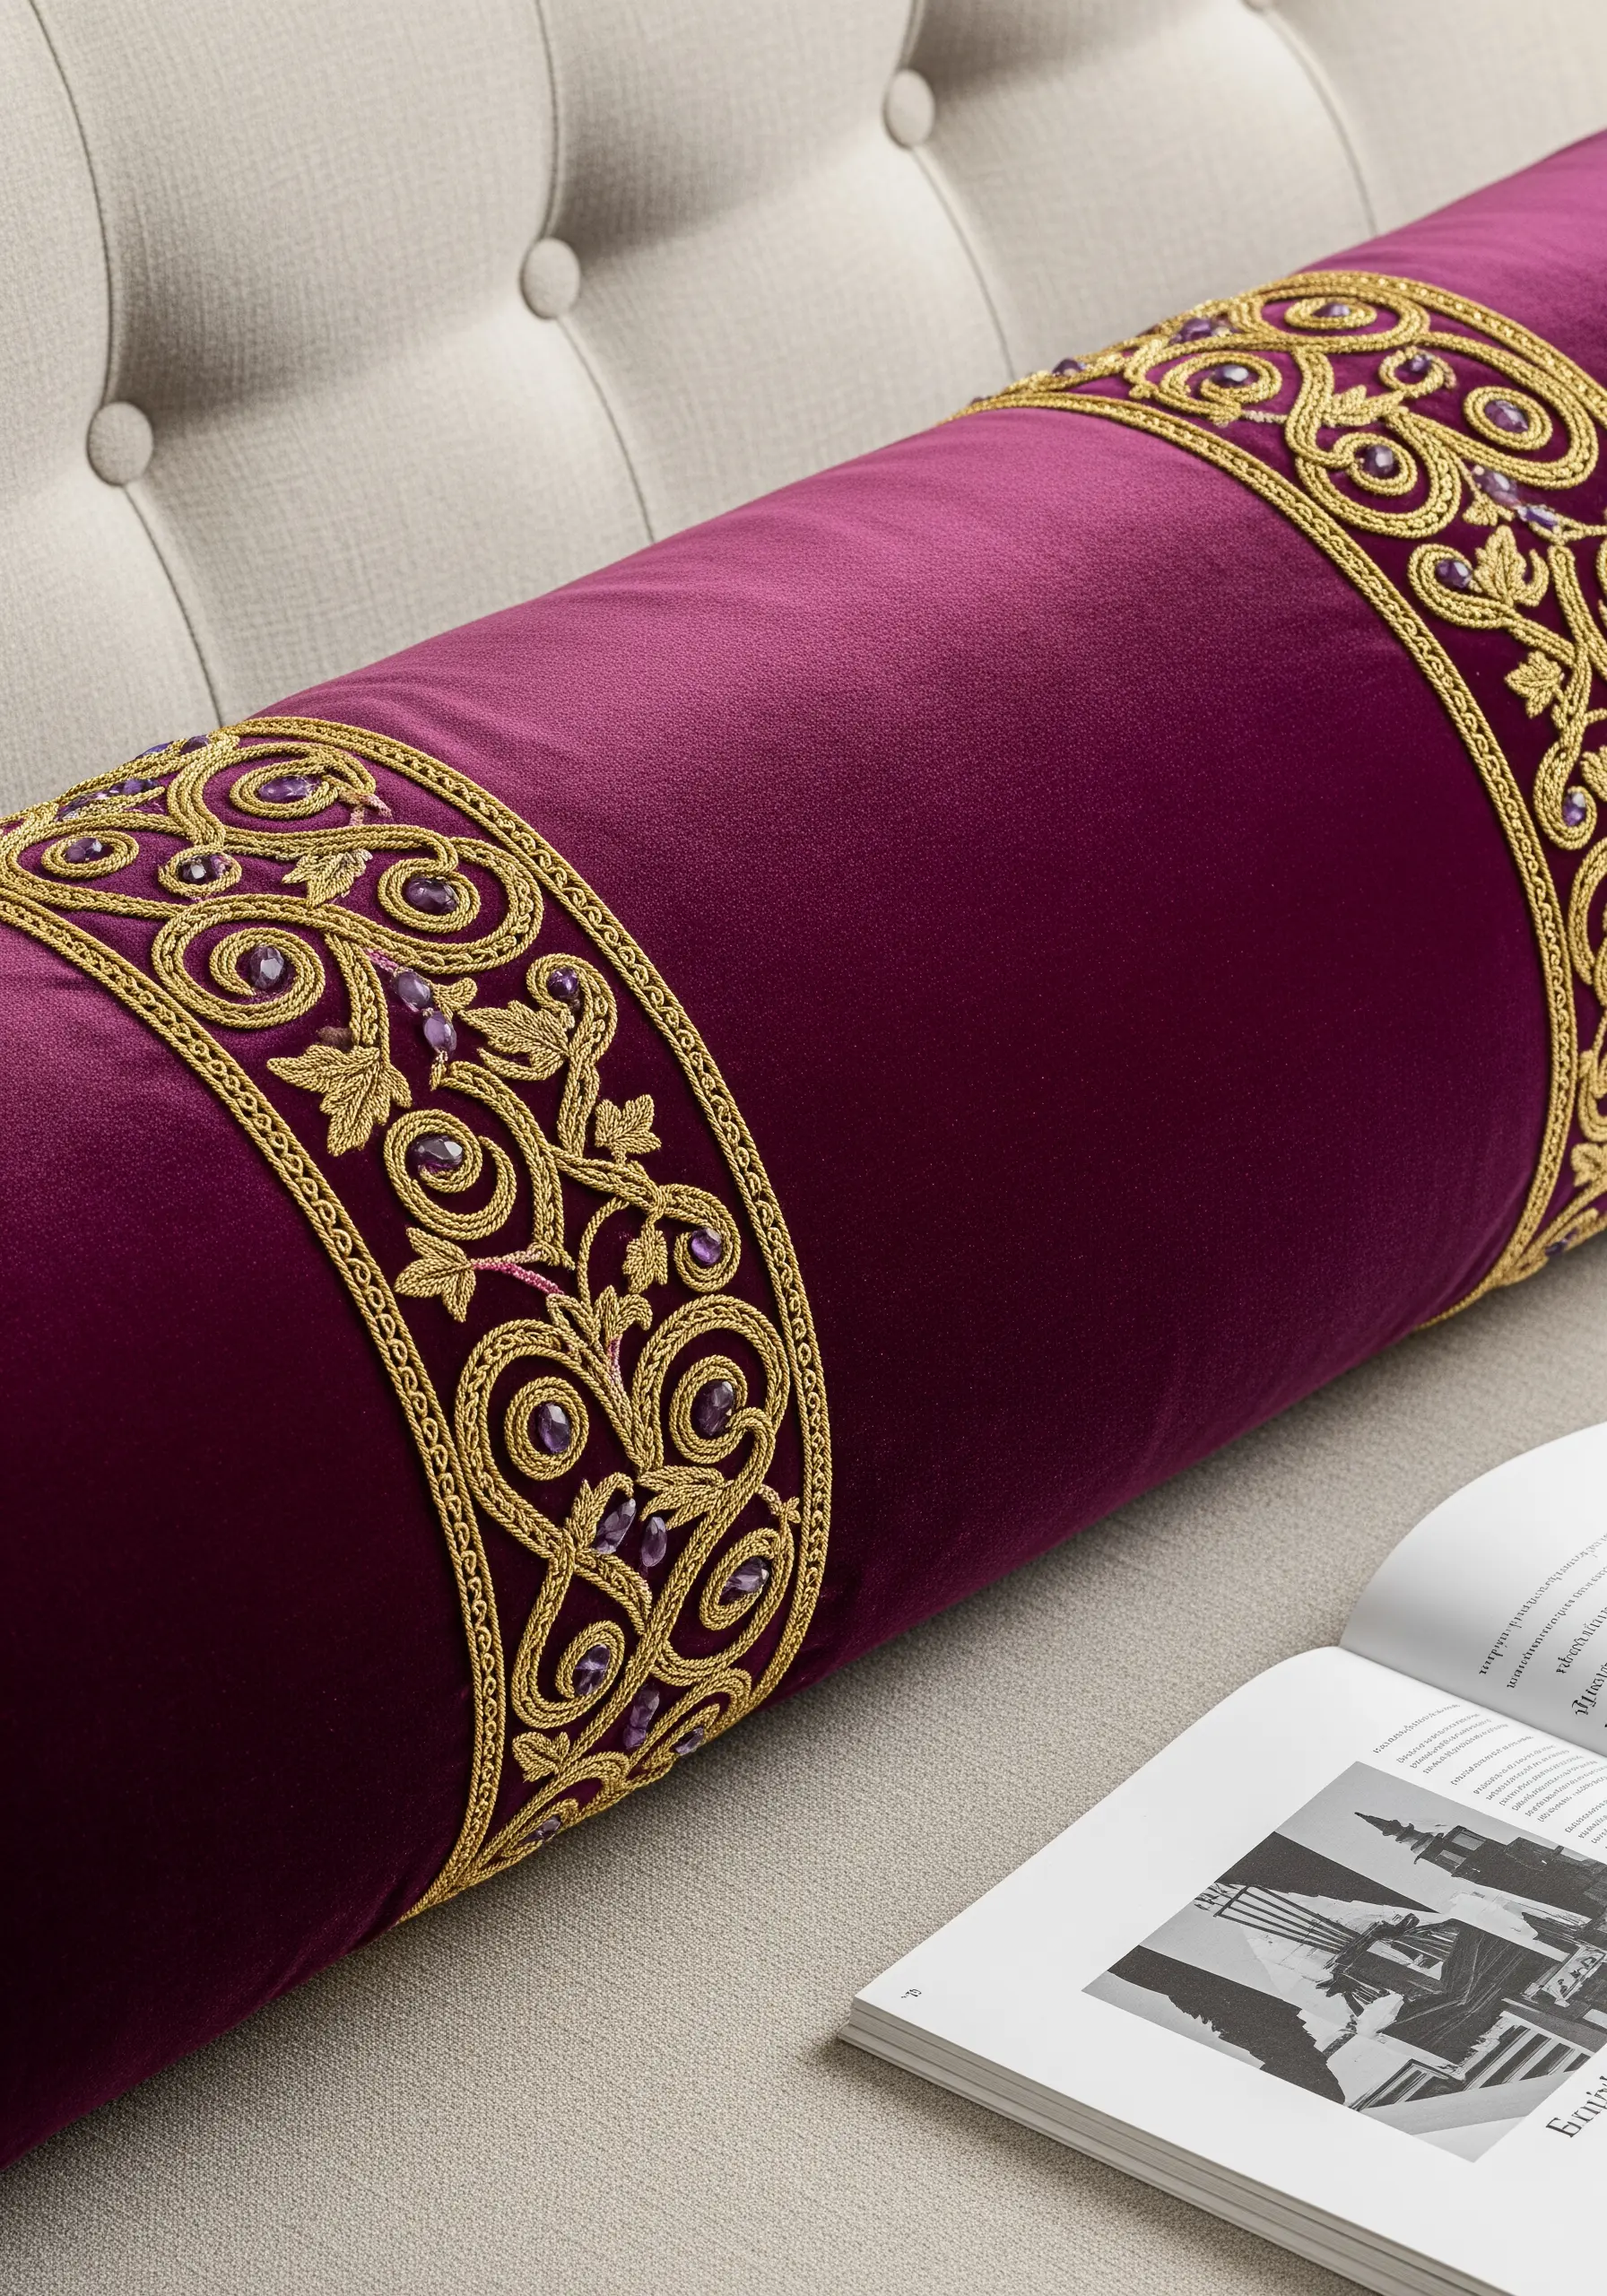
Frame a bolster cushion with decorative bands for a truly finished, professional look.
Use couching with a thick gold cord to create the primary outlines of the scrollwork; it’s faster than satin stitch for long lines and provides a perfectly uniform, raised edge.
Fill the negative spaces within the scrolls with scattered seed stitches or tiny amethyst-colored beads to add a jeweled effect.
Placing the embroidery only on the ends of the cushion makes it a practical yet opulent accent piece.
7. The Iridescent Peacock Feather
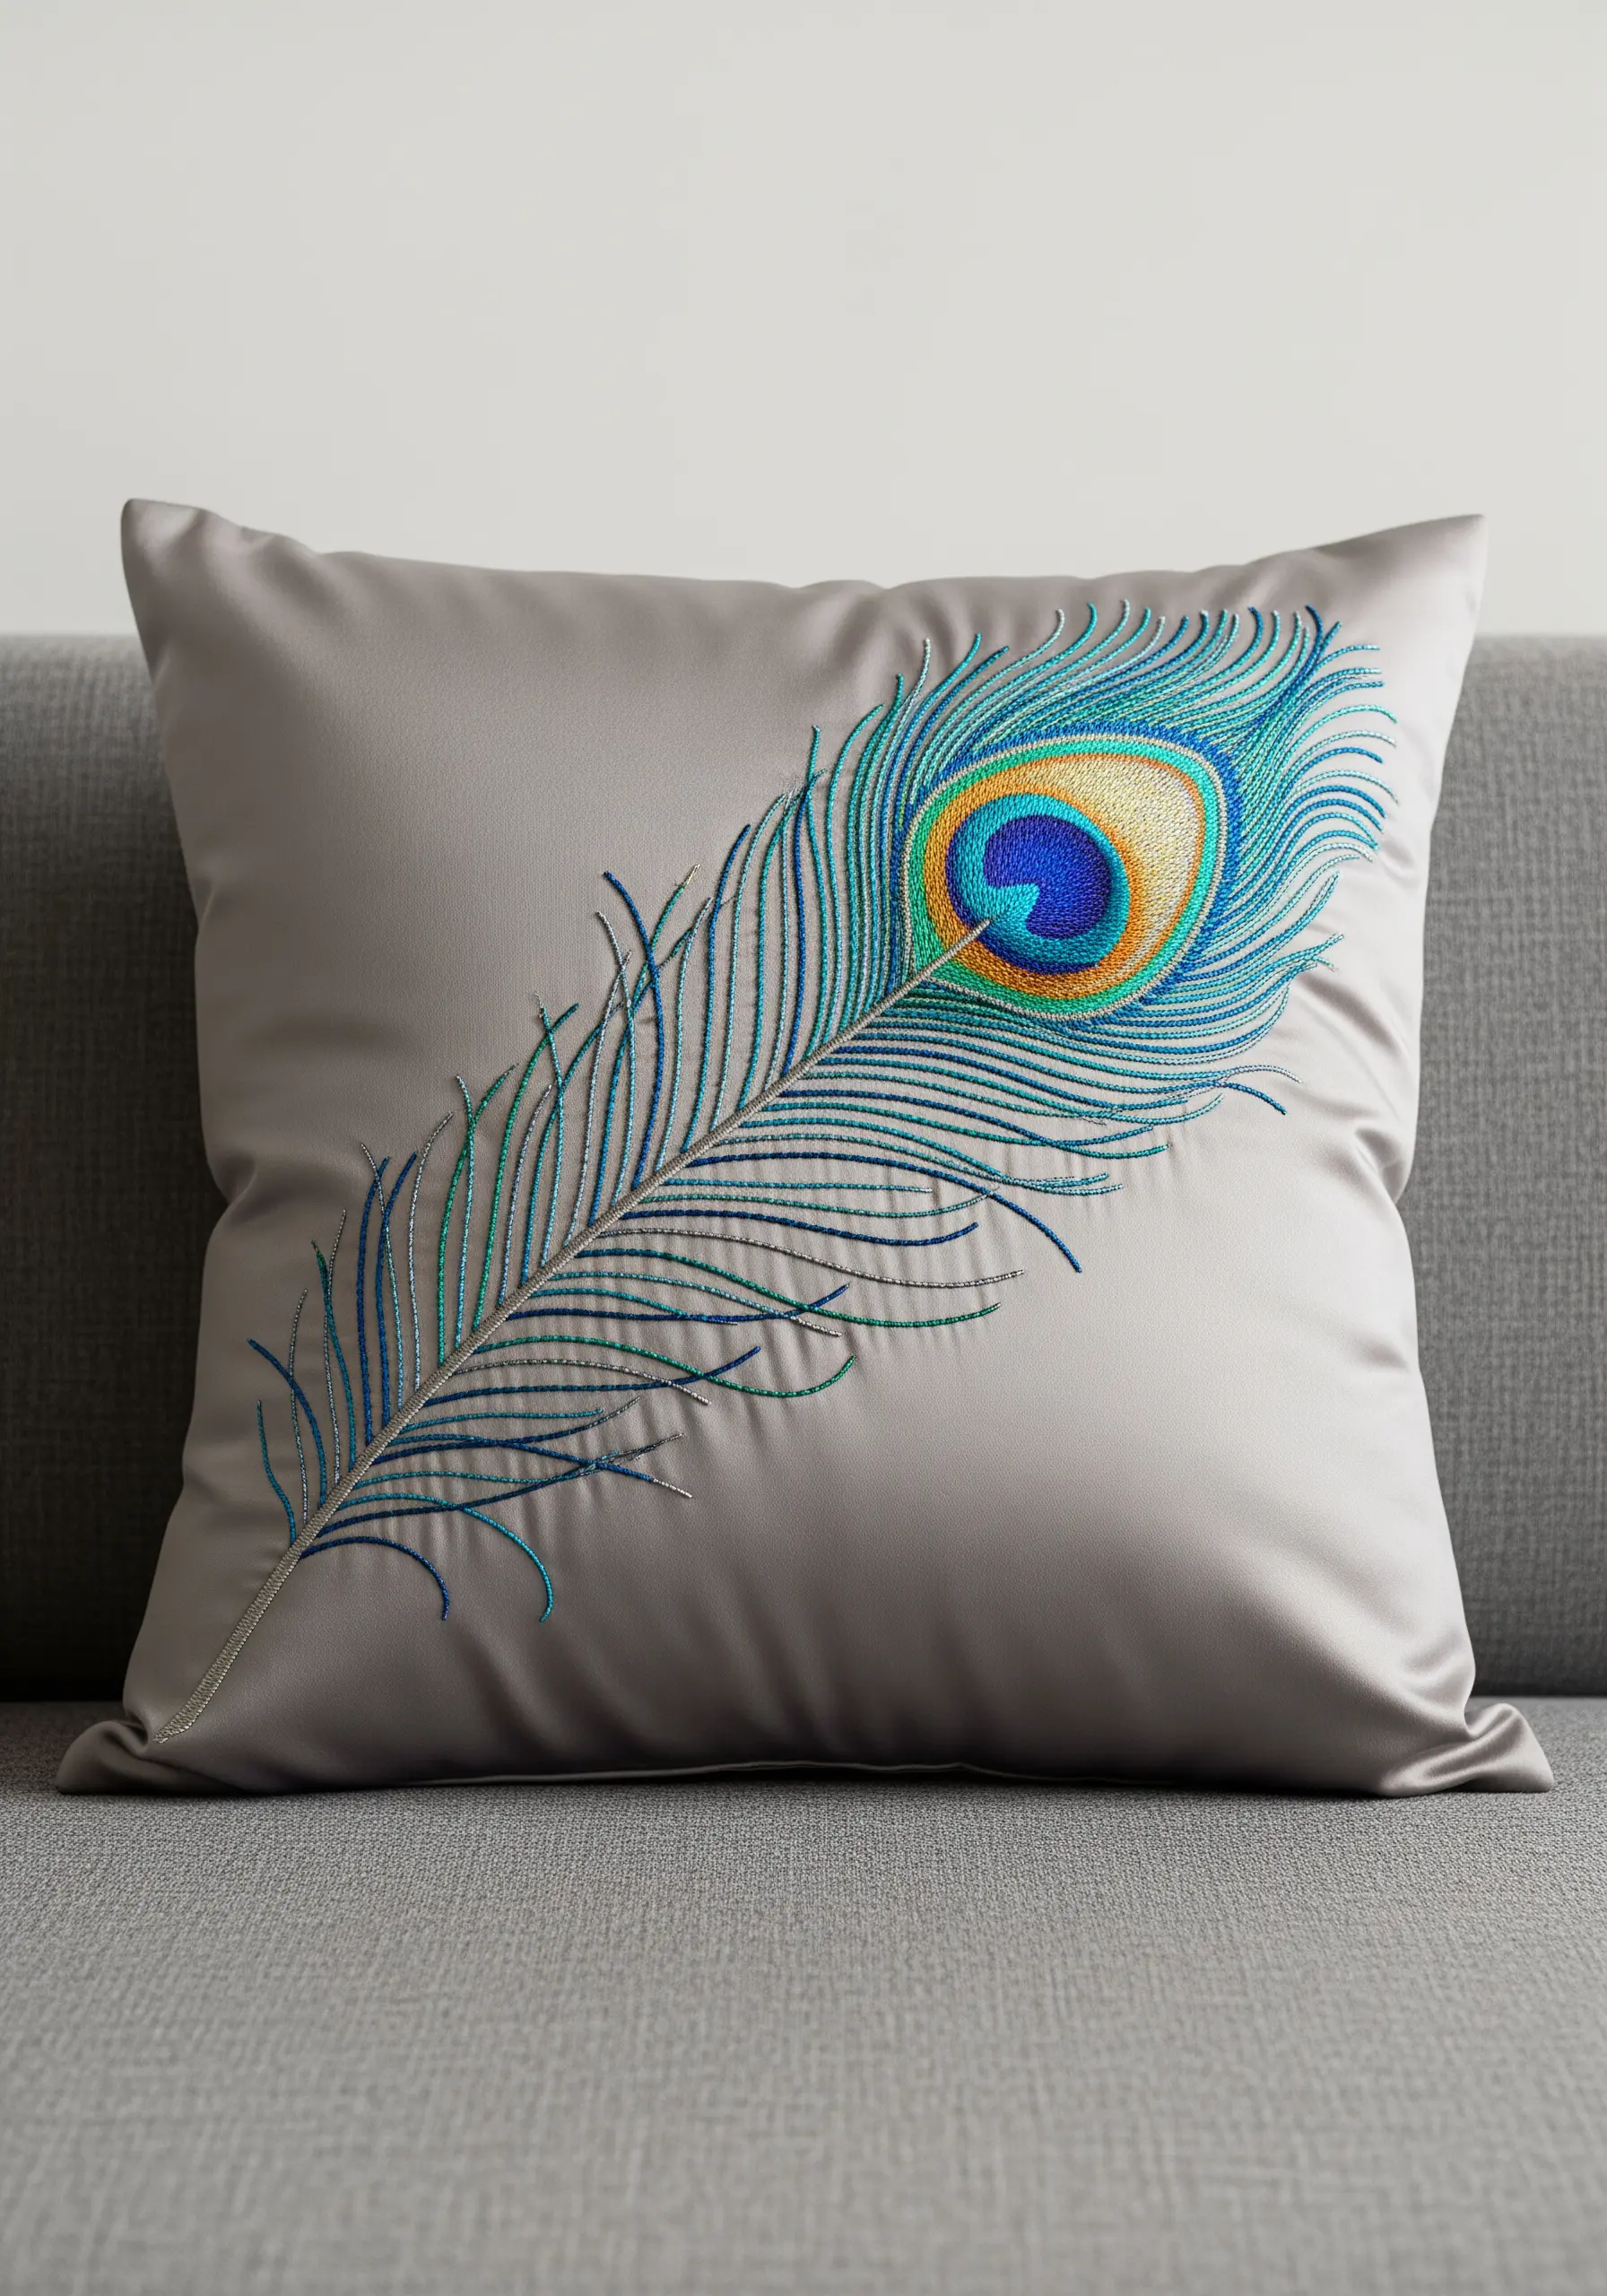
You can capture the signature shimmer of a peacock feather by carefully blending threads of different sheens and colors.
In the “eye” of the feather, use long-and-short stitch with single strands of blue, green, and gold rayon or silk floss to create a smooth, iridescent gradient.
For the long, delicate barbs, use simple straight stitches, fanning them out from the central stem and slightly varying their angles to create a light, airy look.
This motif is especially stunning on satin fabric, as the material’s natural luster enhances the sheen of the threads.
8. A Jeweled Crown with Mixed-Media Embellishment
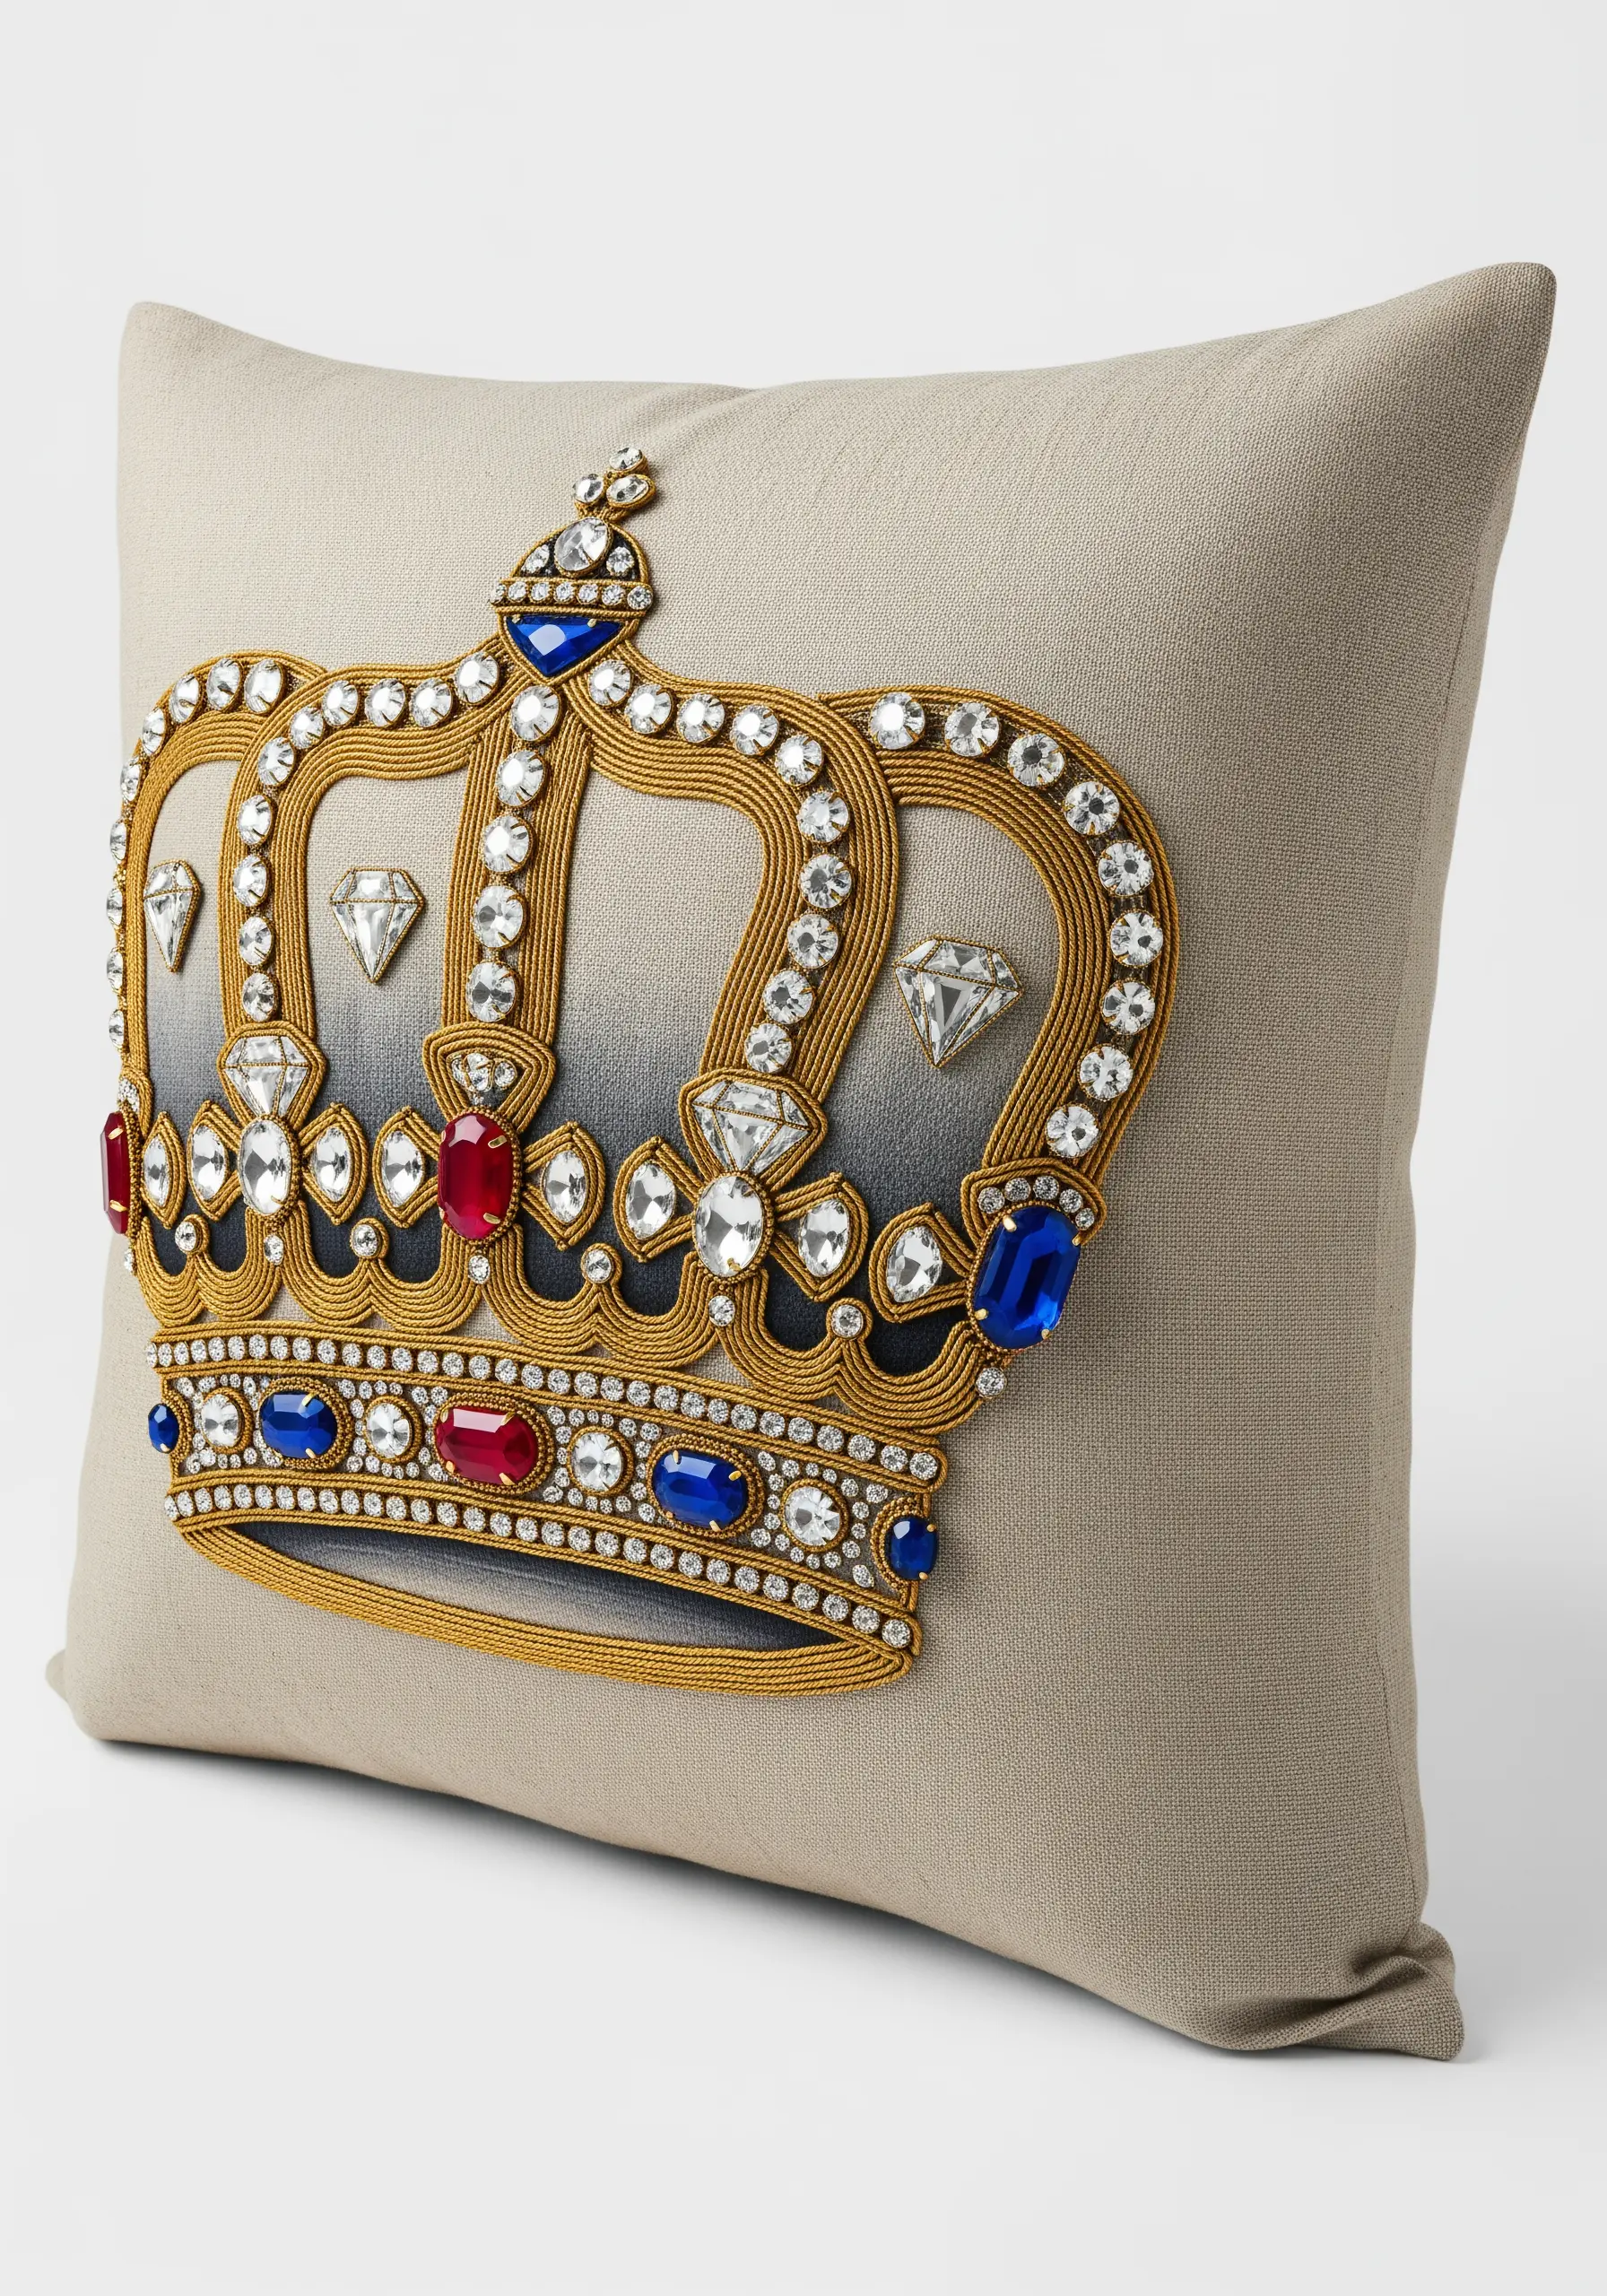
For a design that truly glitters, combine thread with beads and rhinestones.
Outline the crown’s structure with couched gold cord, which provides a clean, firm boundary for your other embellishments.
To create the illusion of shadow and depth, fill parts of the crown with a satin stitch gradient from dark grey to black before adding the jewels.
This mixed-media approach of sewing on faceted gems gives an authentic sparkle that thread alone cannot replicate, transforming your cushion into a treasure.
9. The Imperial Bee Repeat Pattern
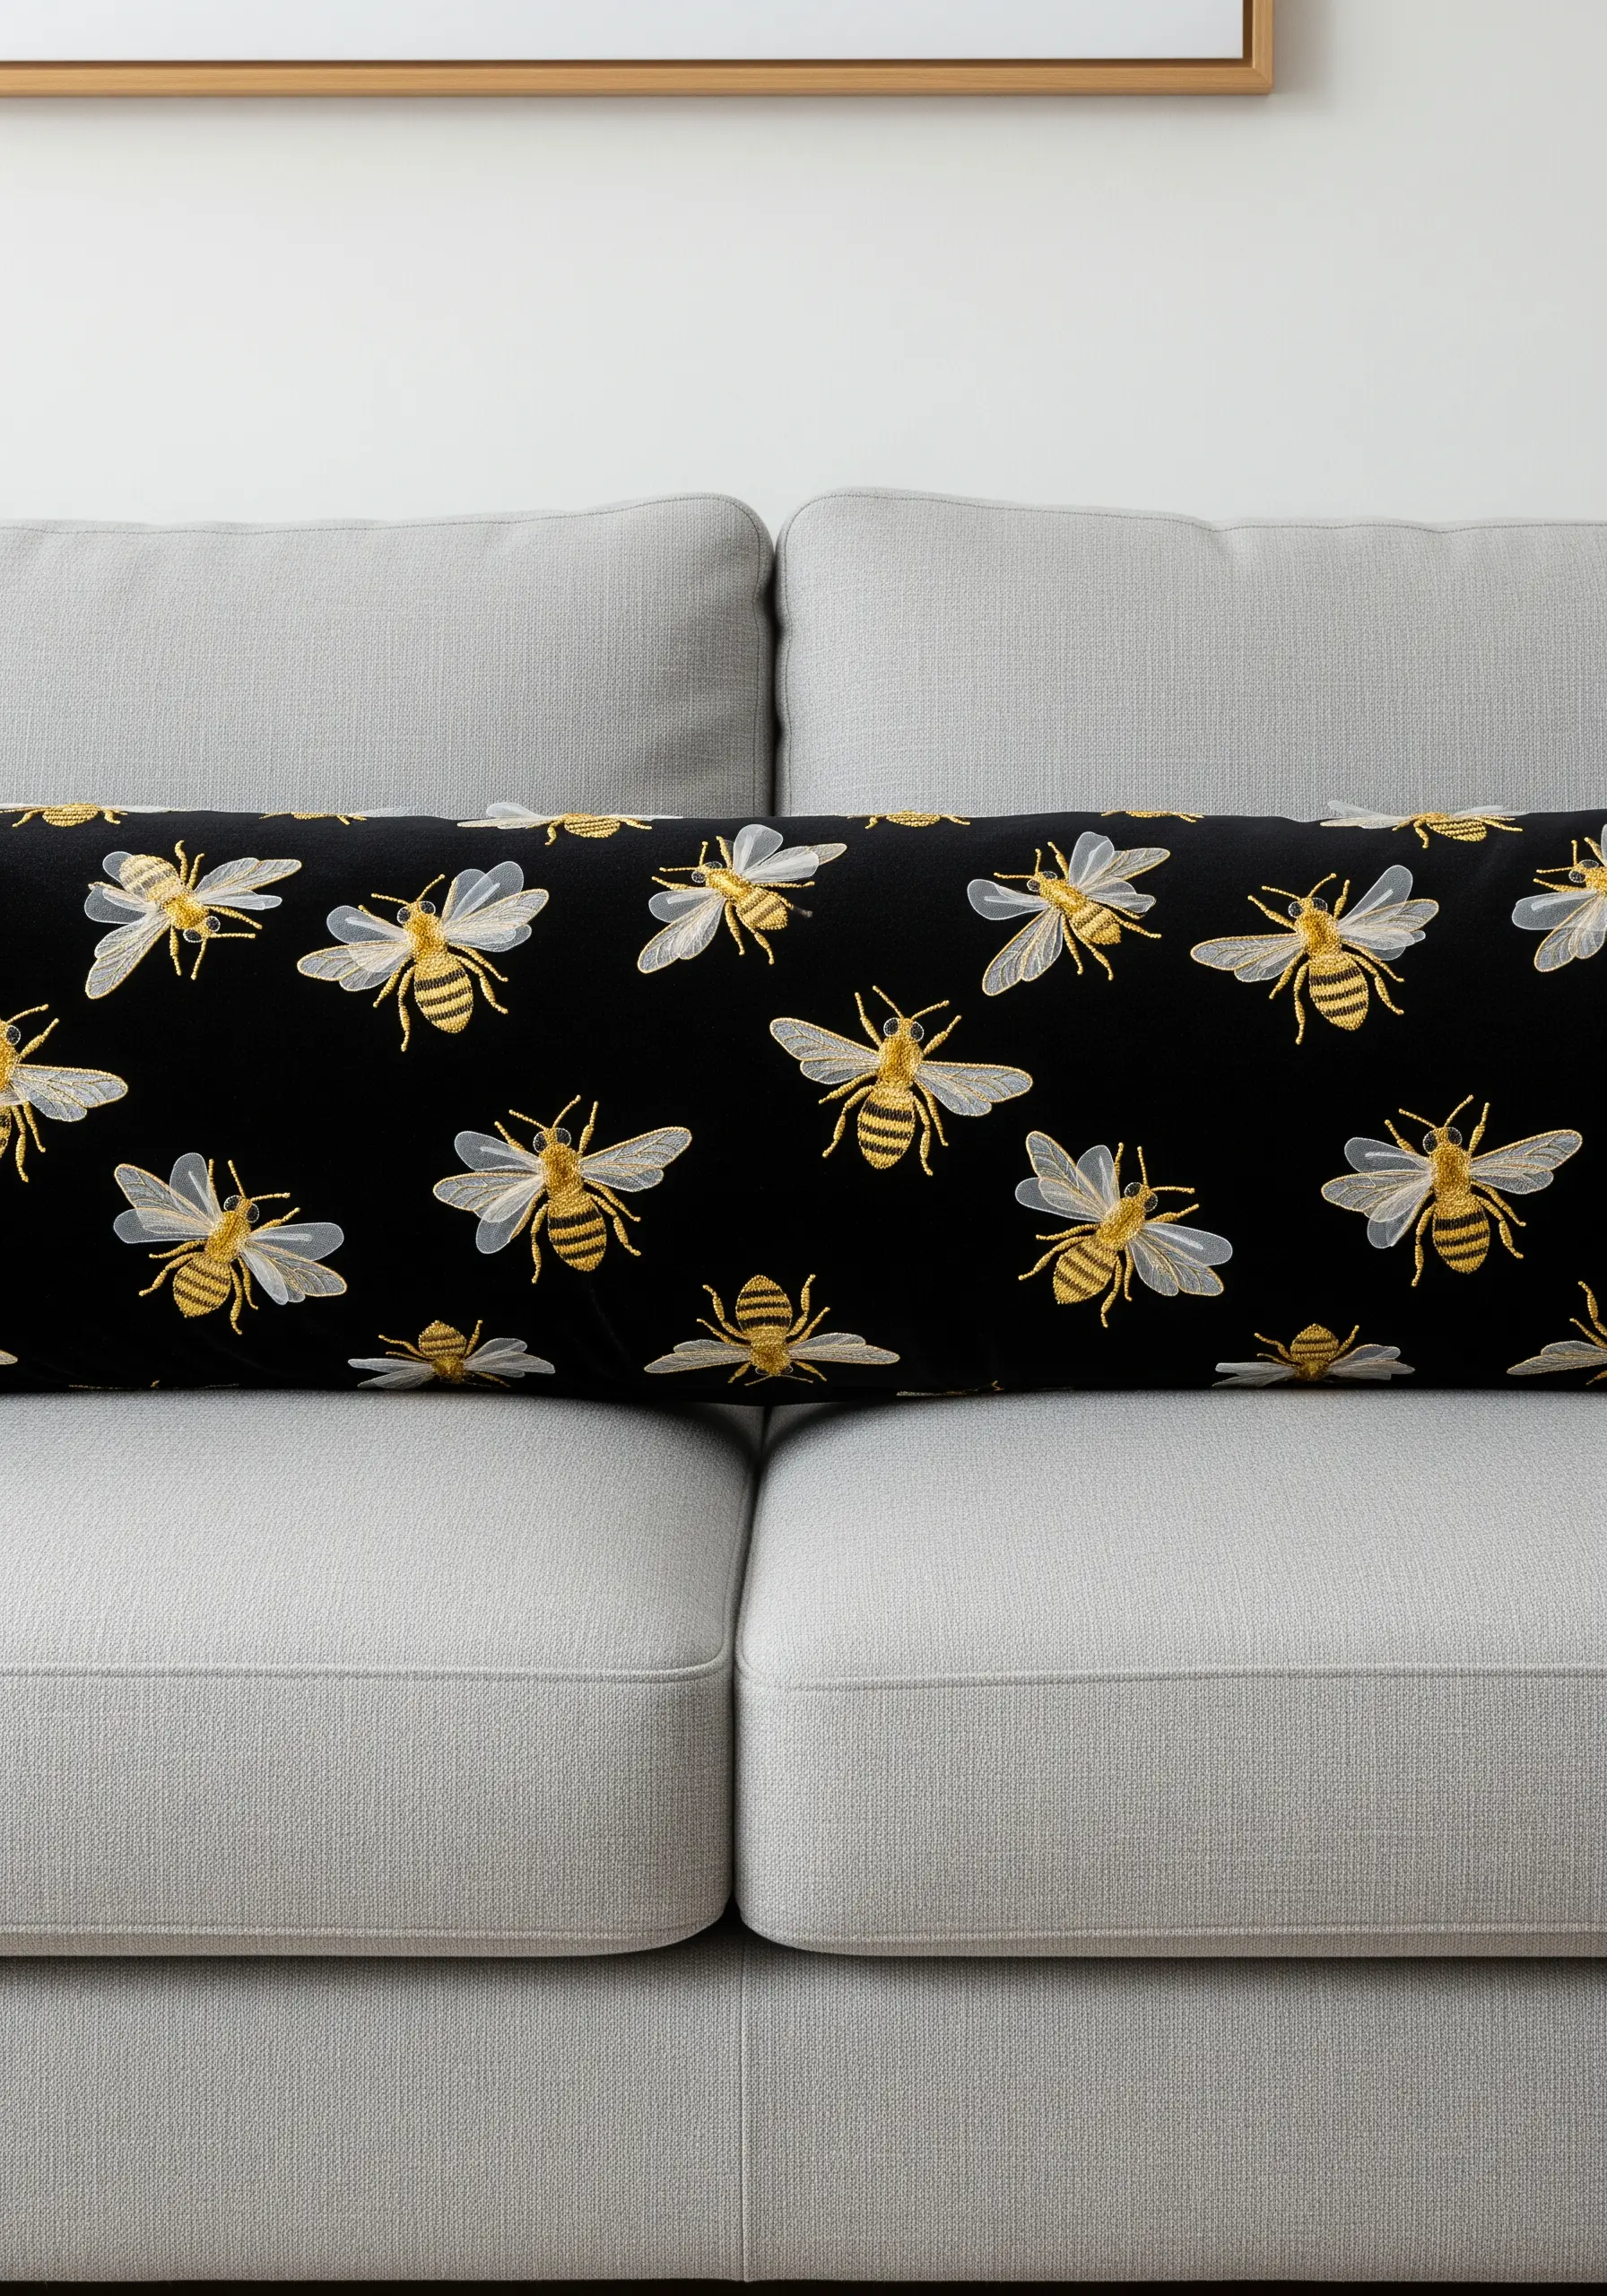
Elevate a simple repeat pattern by introducing an unexpected texture, especially for the wings.
Stitch the bee’s body with dense satin stitch using gold and black threads for a solid, opaque look.
For the wings, appliqué a small piece of sheer organza or tulle, then outline it with a fine silver backstitch. This gives the wings a delicate, translucent quality that contrasts beautifully with the bee’s fuzzy body.
Placing the motifs in a regular, ordered pattern on a dark background creates a look that feels both classic and contemporary.
10. Textural Appliqué for a Royal Swan
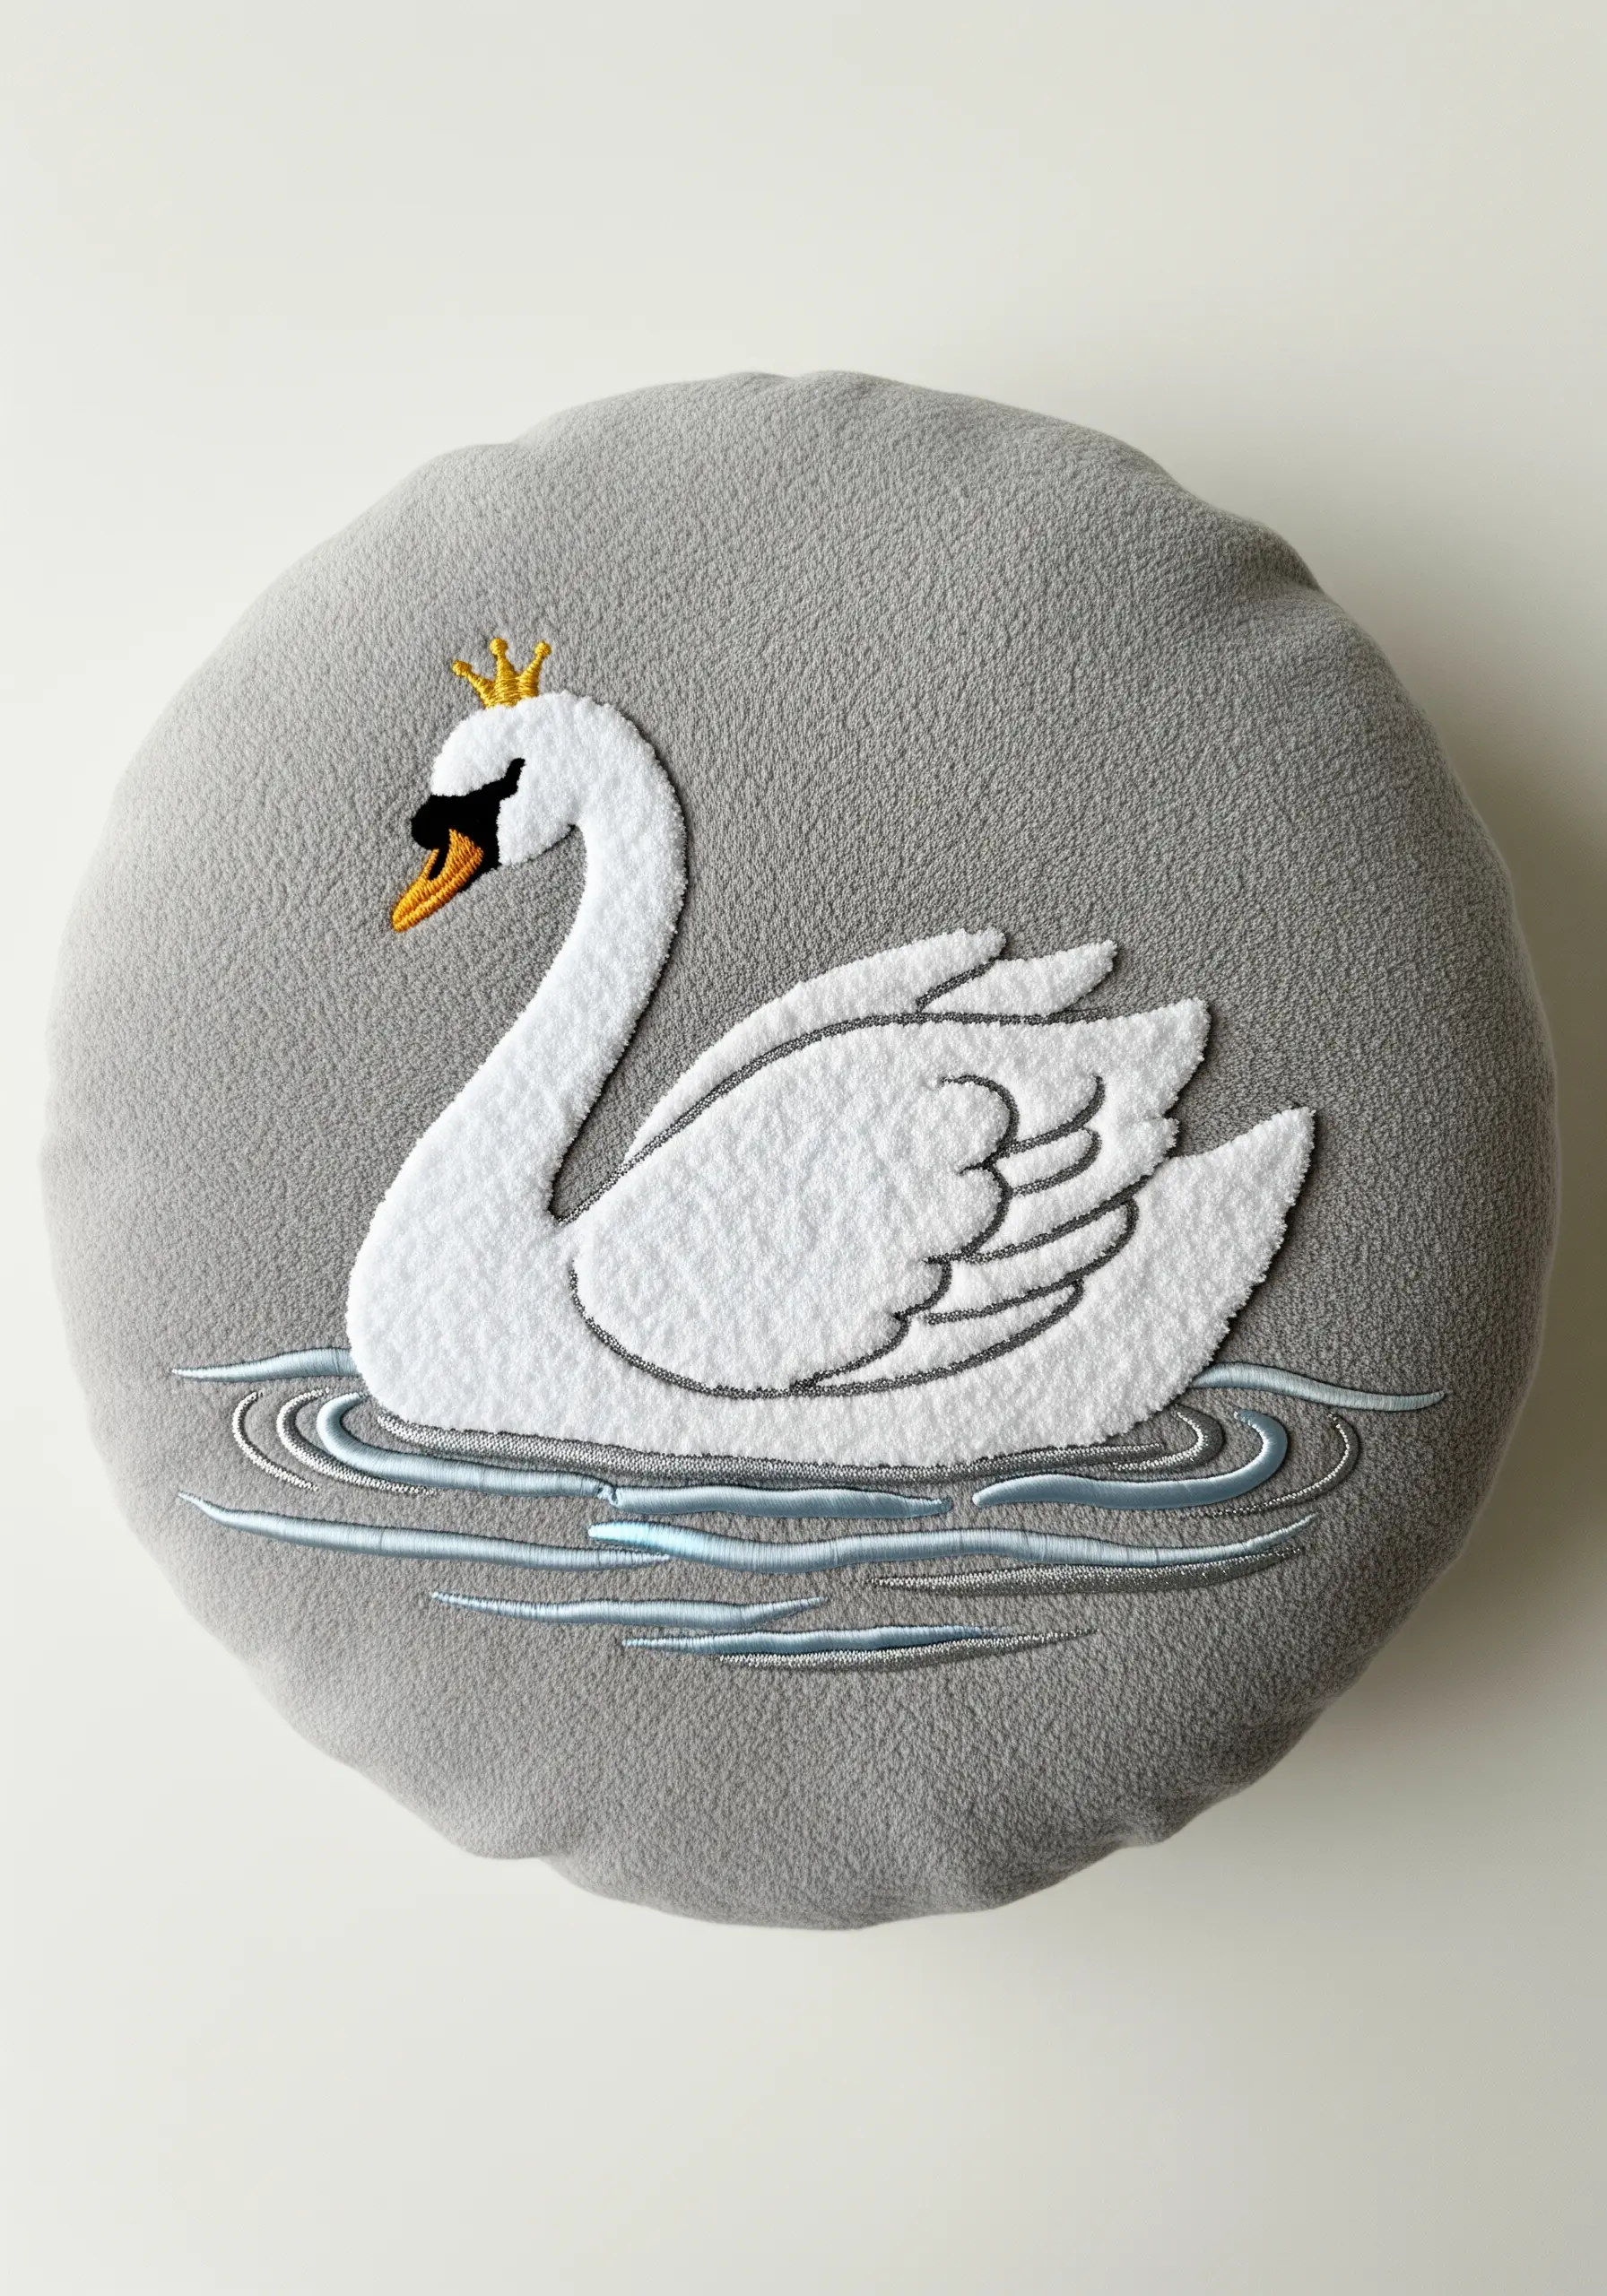
For large filled areas, fabric appliqué is a brilliant technique for adding texture quickly and effectively.
Cut the swan’s body from a piece of soft white chenille, fleece, or velvet, and secure it to your cushion fabric with a tight satin stitch border.
Embroider the finer details, like the wing contours and the crown, directly onto the appliqué piece.
This method not only saves time but also creates a wonderful tactile contrast between the soft appliqué and the smooth base fabric.
11. A Quilted Trellis with Pearl Accents
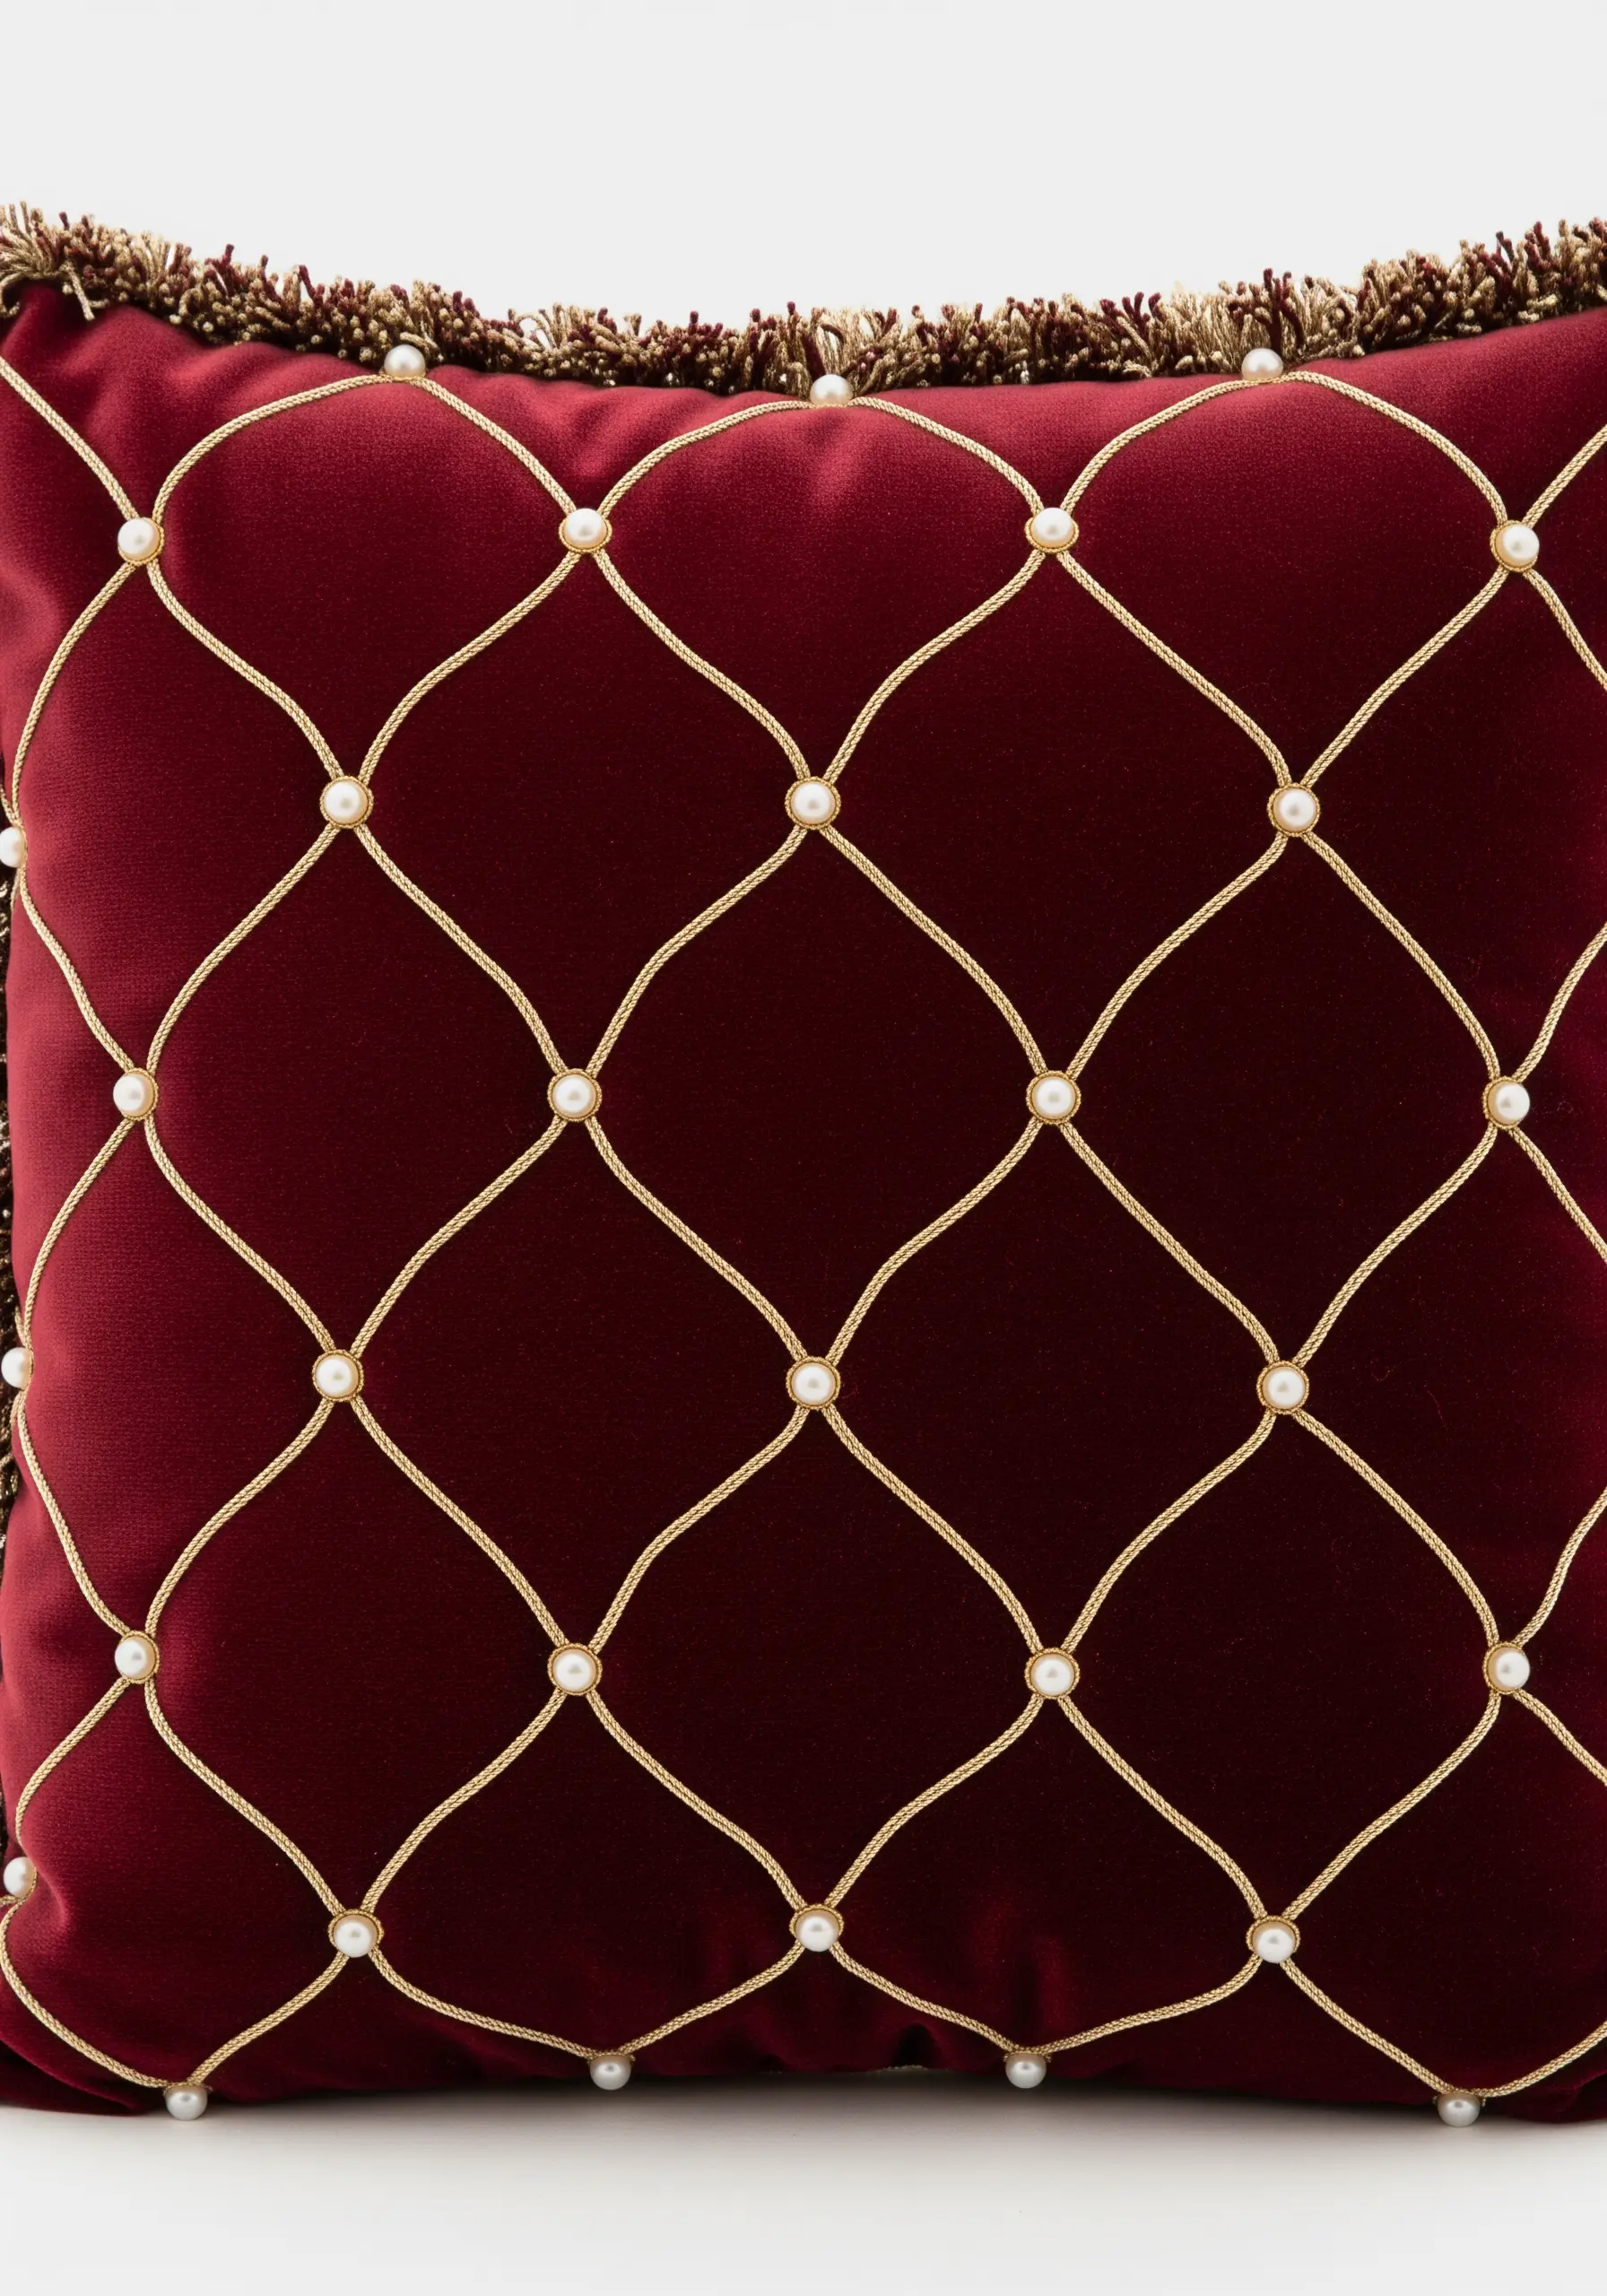
Create the effect of luxurious diamond quilting without ever touching a sewing machine.
Use a fine gold cord, couched down with an invisible thread, to create a perfectly even and raised trellis pattern on rich velvet.
Secure a single pearl bead at each intersection with a tiny, discreet stitch to anchor the design and add a touch of luminosity.
The rigid geometry of the trellis combined with the plush fabric and lustrous pearls creates an effect of pure, understated opulence.
12. Dimensional Thistle with Turkey Work
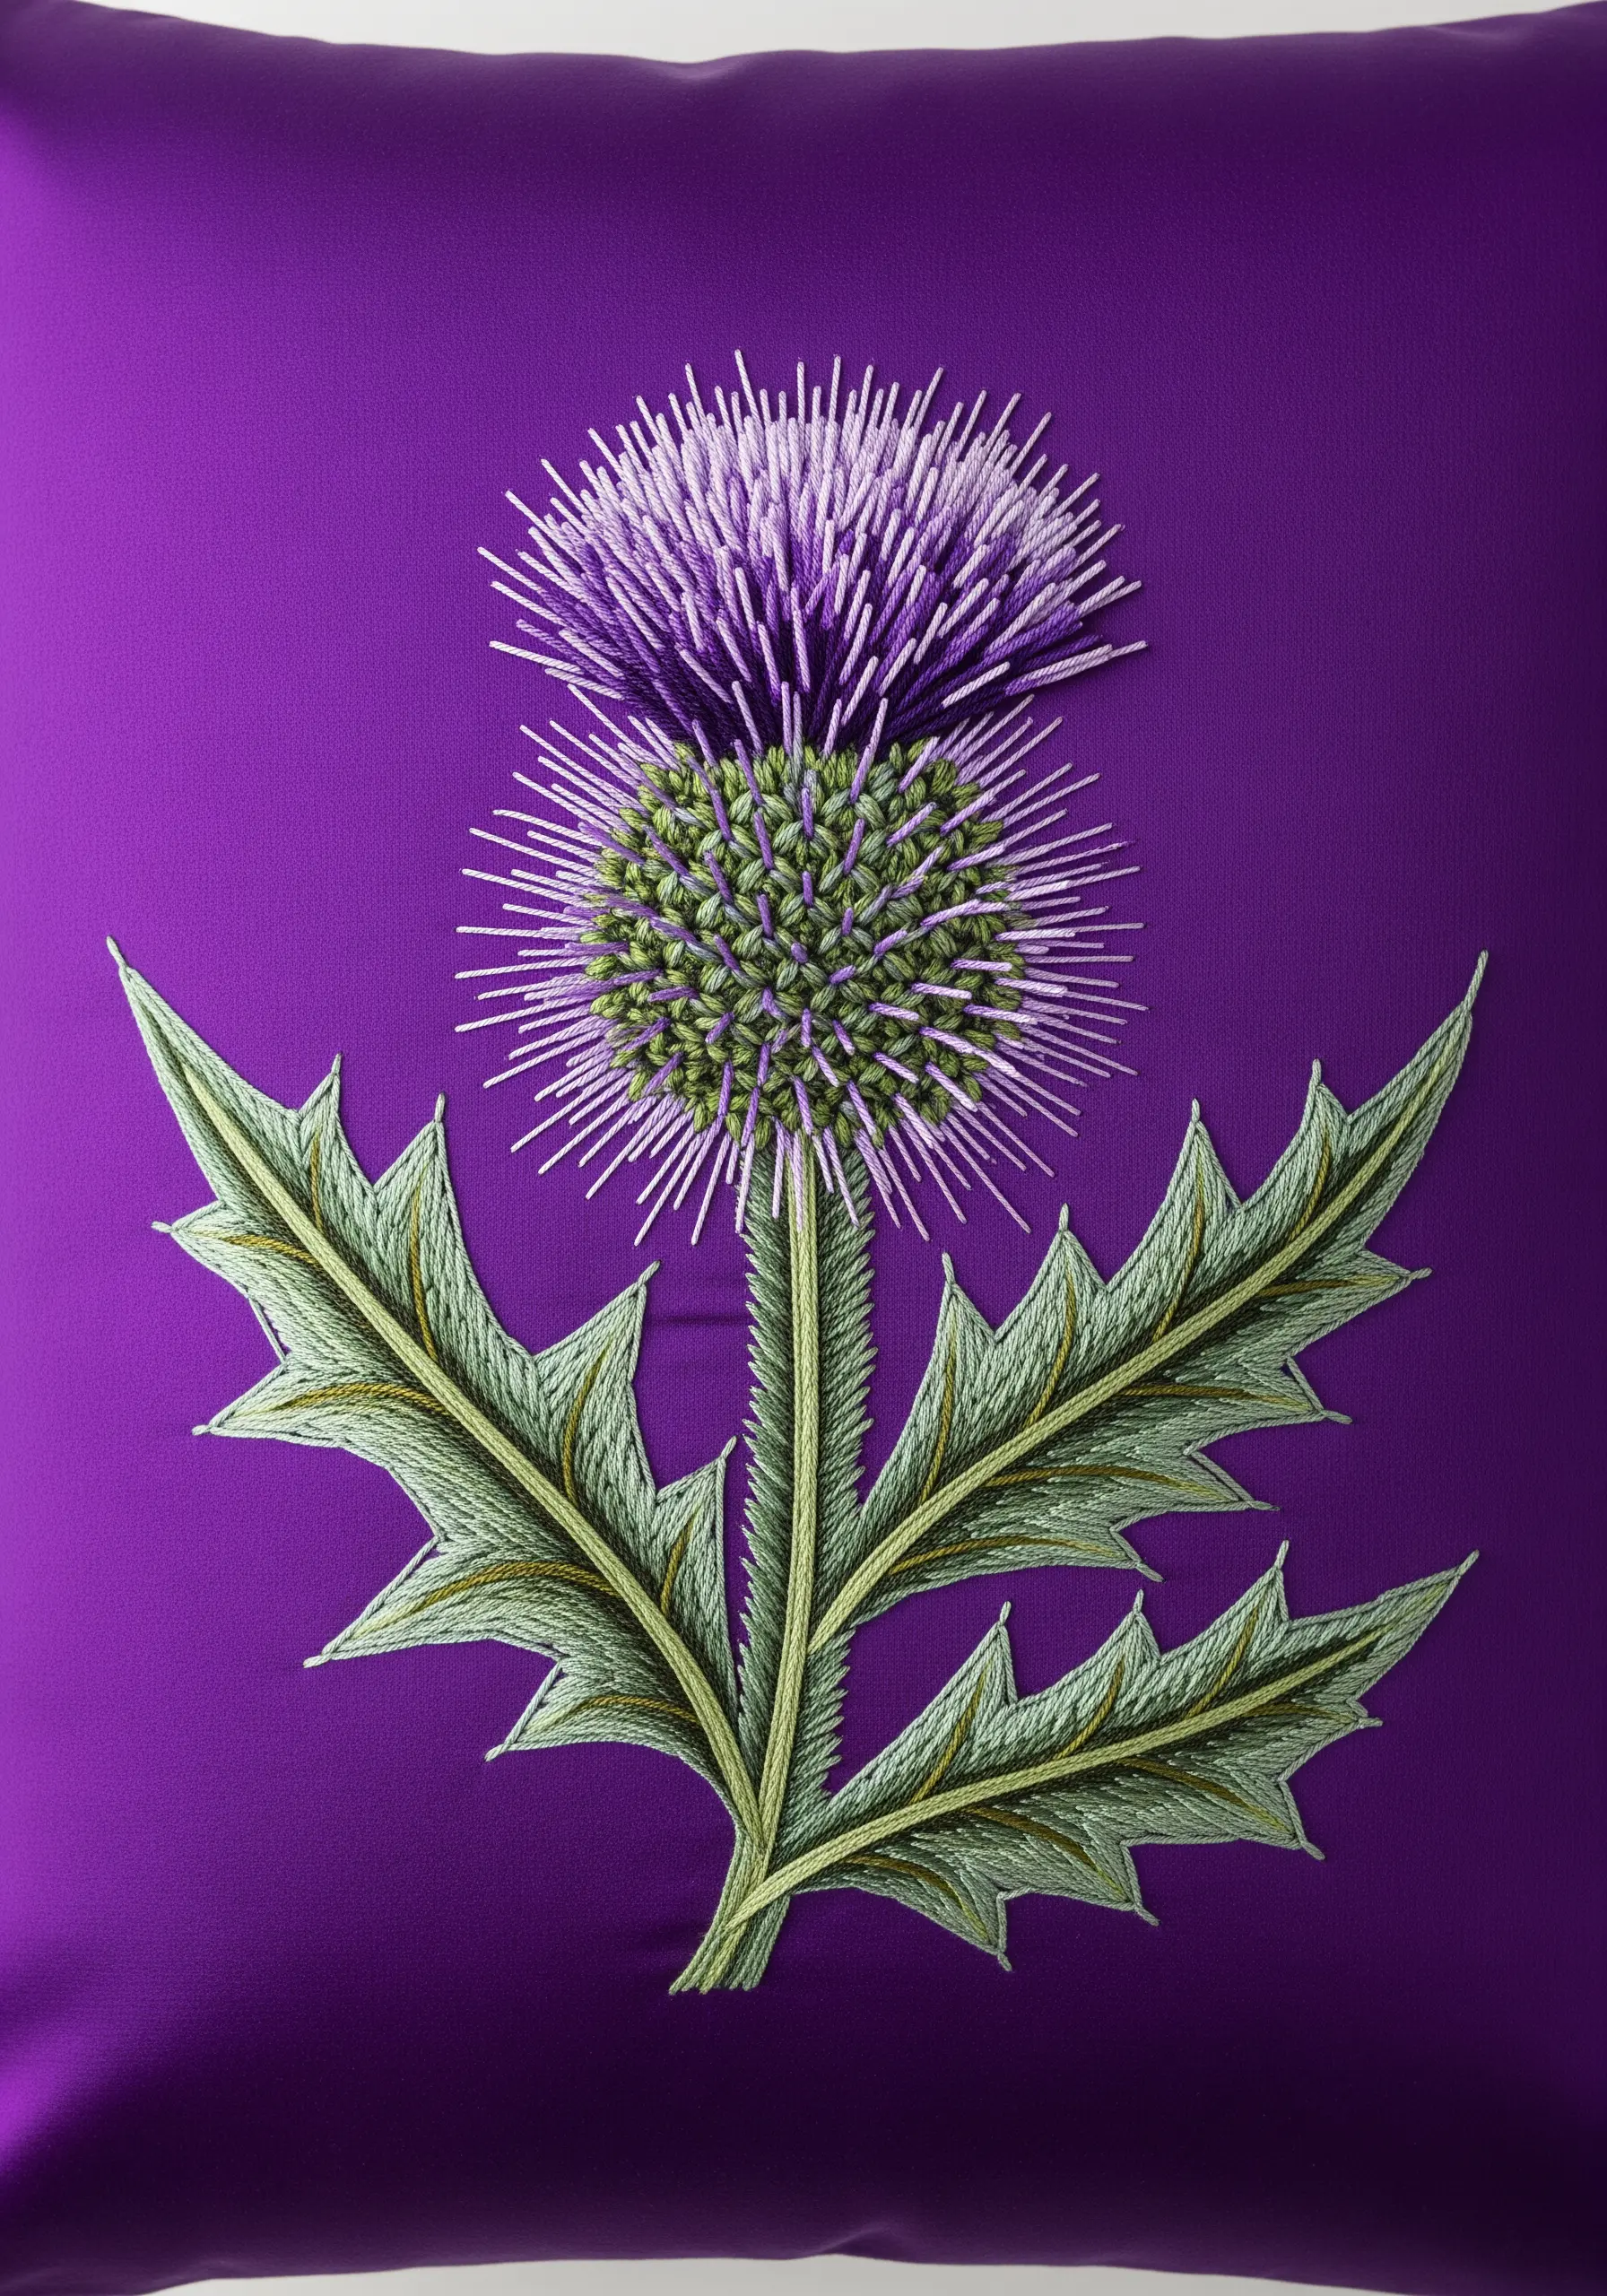
To give the thistle flower its signature fluffy texture, you need a stitch that creates loops: the turkey work stitch.
Work rows of turkey stitch loops across the flower head, packing them densely. Once complete, carefully snip the tops of all the loops to create a soft, brush-like pile that you can trim to shape.
Contrast this soft texture with sharp, spiky leaves stitched using fishbone stitch and outlined in a darker green to emphasize their pointed tips.
13. Art Nouveau Iris Border
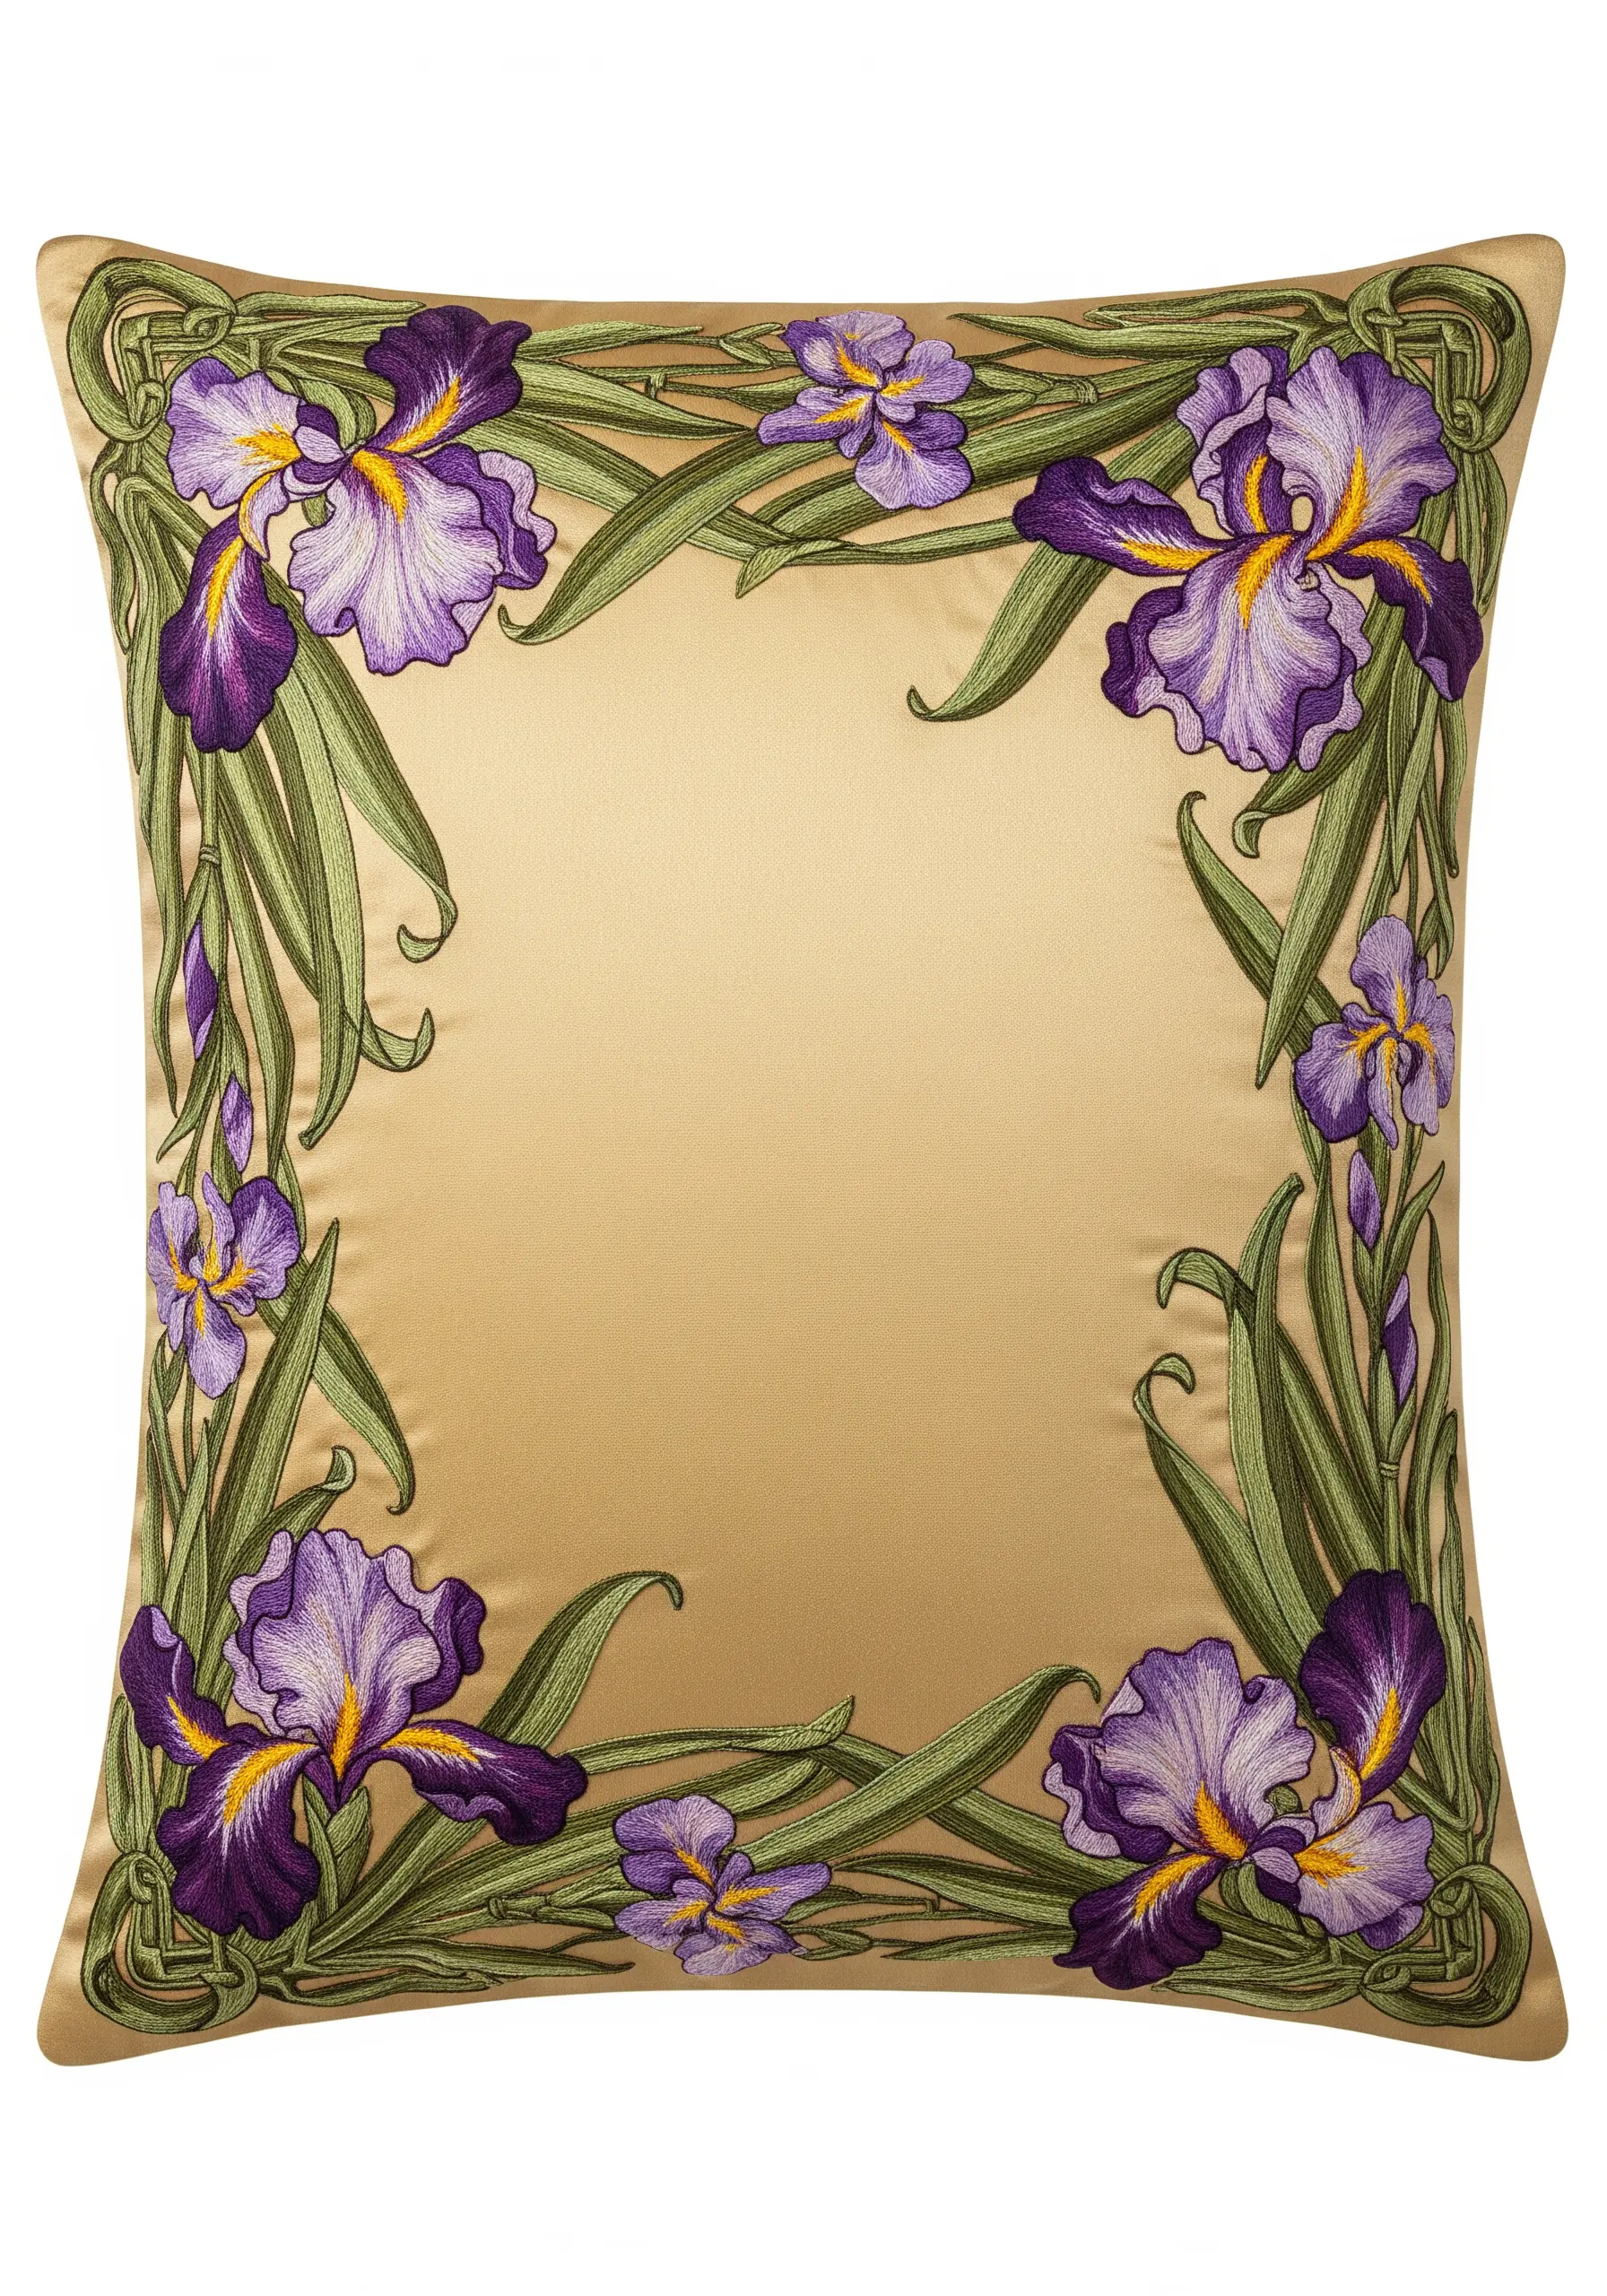
Frame a cushion with the sweeping, organic lines of an Art Nouveau-inspired floral border.
Use long-and-short stitch to shade the iris petals from deep purple to pale lilac, giving them a painterly, realistic quality.
For the long, curving stems and leaves, a smooth split stitch or stem stitch will maintain the graceful lines characteristic of the style.
By leaving the center of the cushion empty, the embroidered border becomes the focal point, creating a sophisticated and balanced composition.
14. Monochrome Griffin with Metallic Highlights
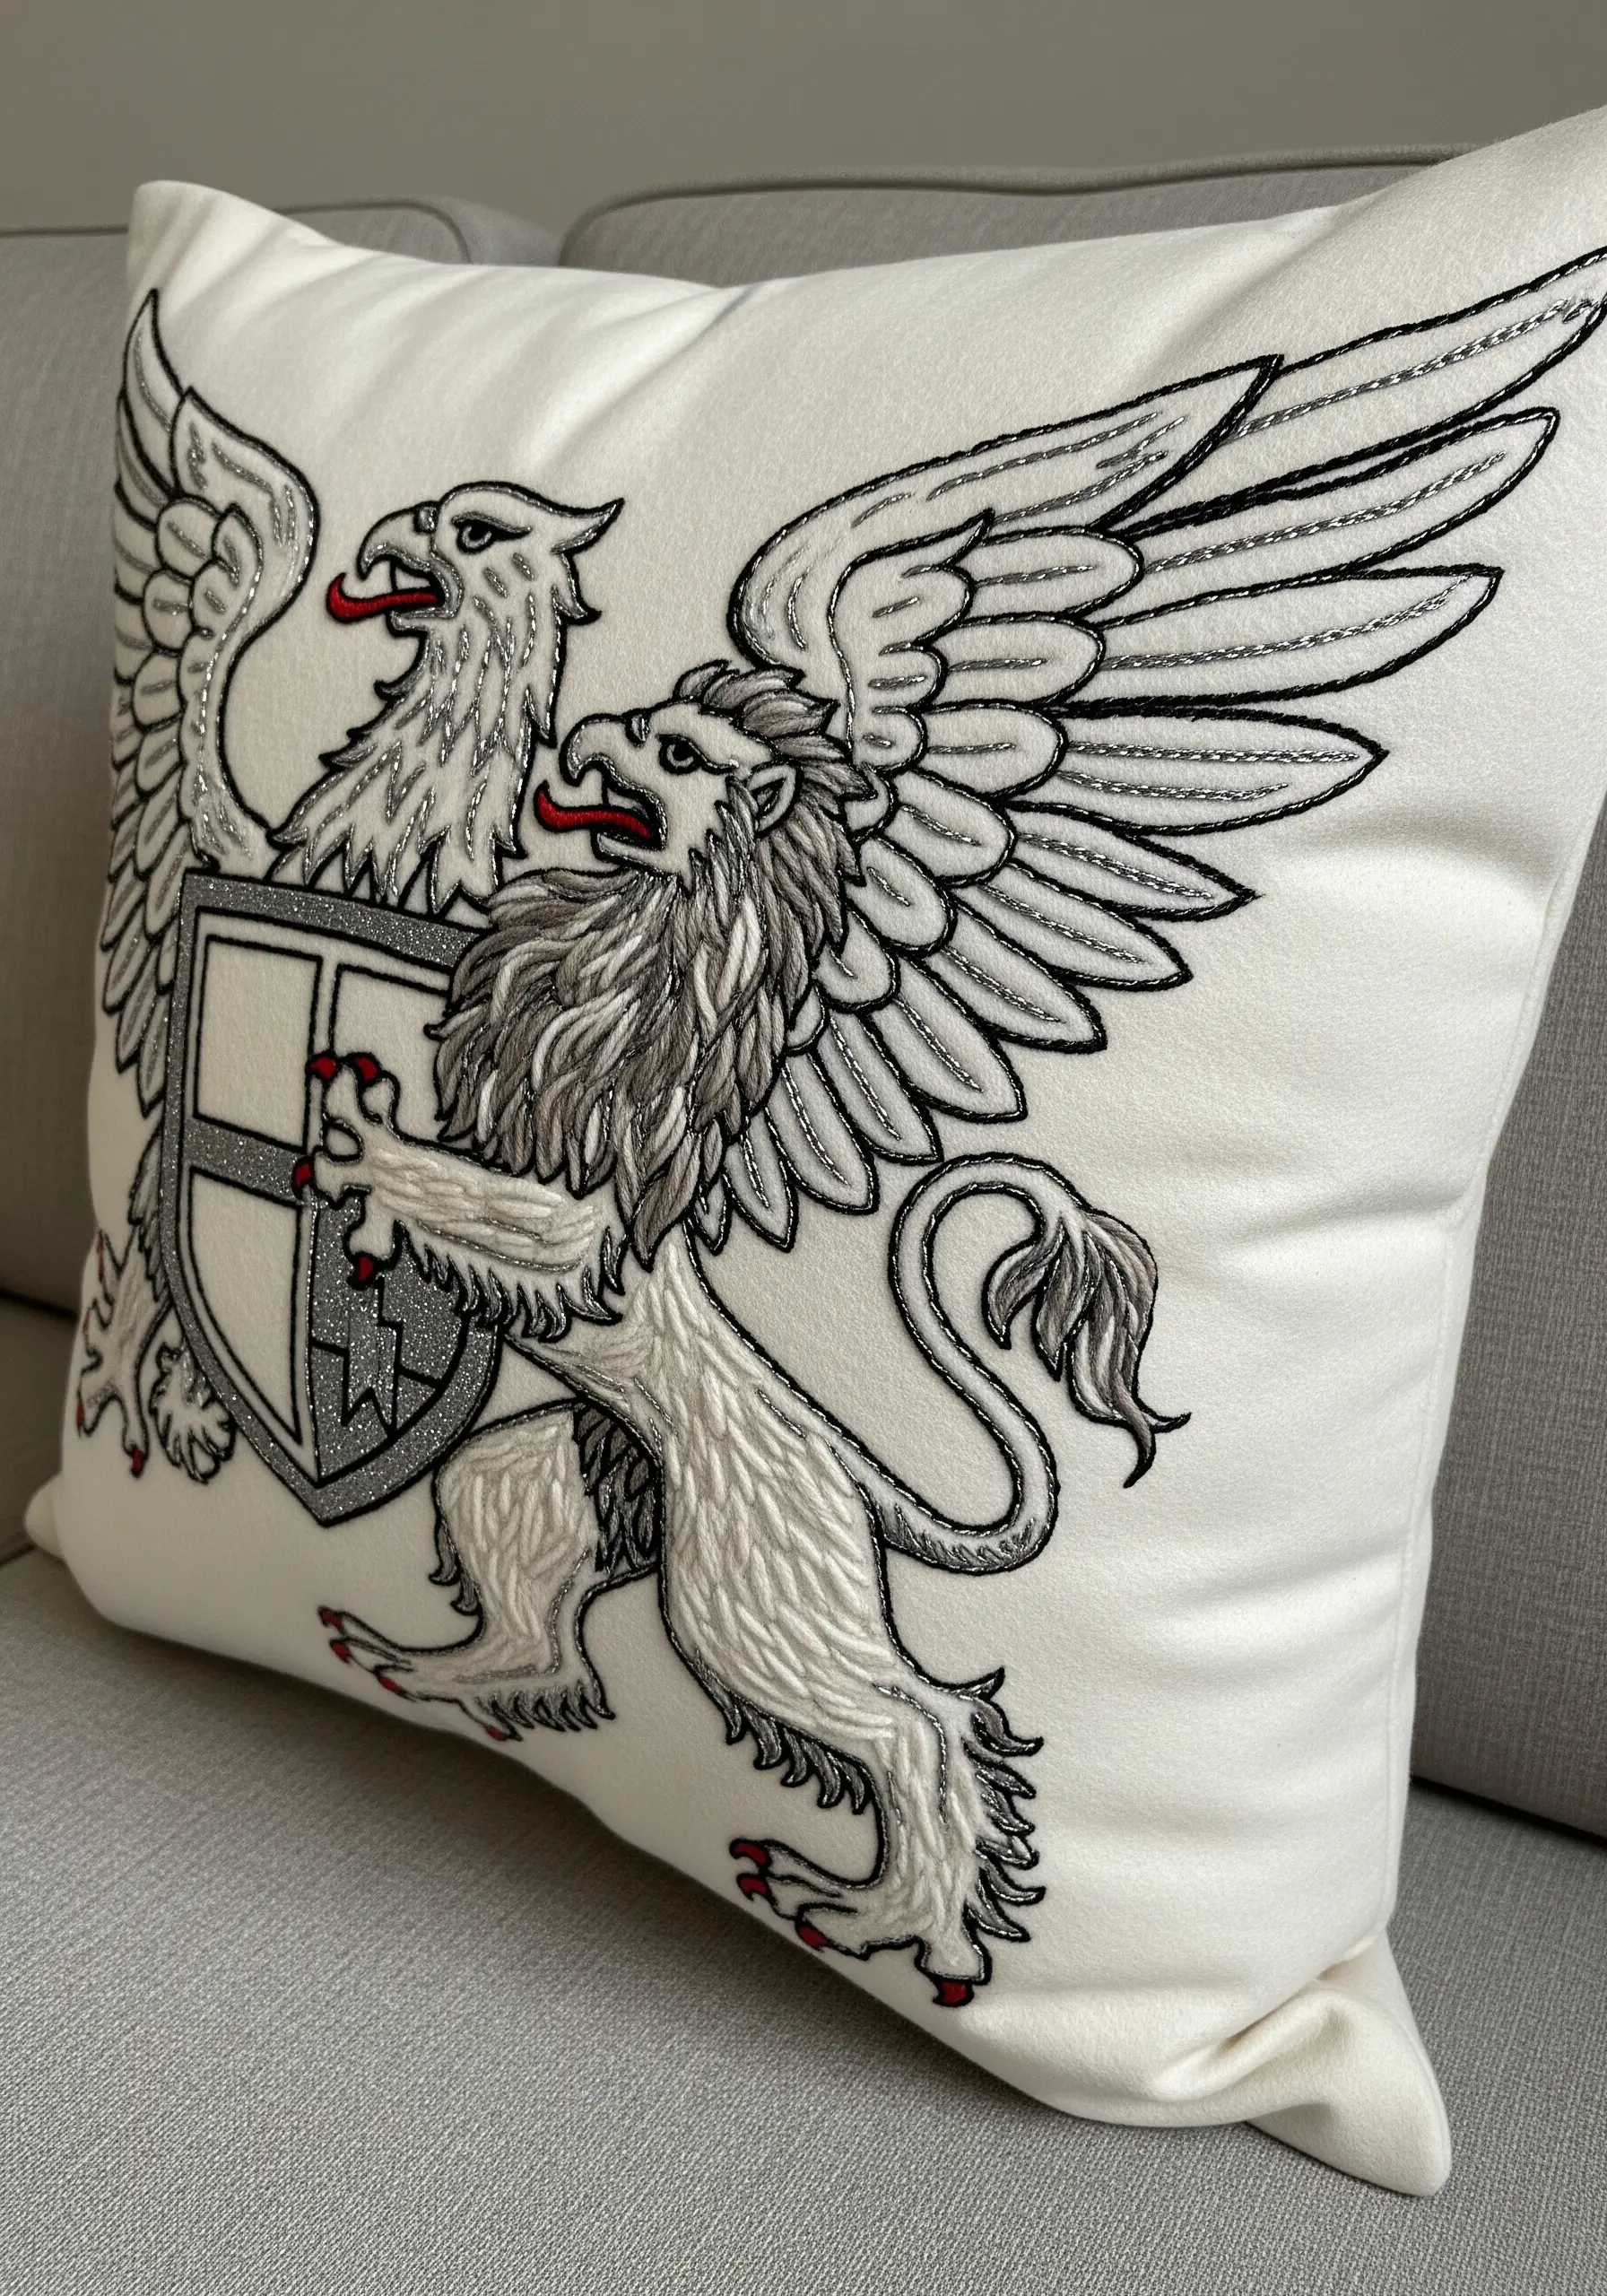
A limited color palette doesn’t have to be boring; in fact, it can be incredibly dramatic.
Build the griffin’s form using satin stitch and long-and-short stitch in shades of grey, silver, and off-white.
Introduce a single high-sheen metallic silver thread for select details—like the outlines of the wings or the edge of the shield—to catch the light and add a touch of luxury.
A tiny pop of a contrasting color, like the red on the claws and tongue, creates a striking accent that brings the entire motif to life.
15. Fabergé-Inspired Opulence
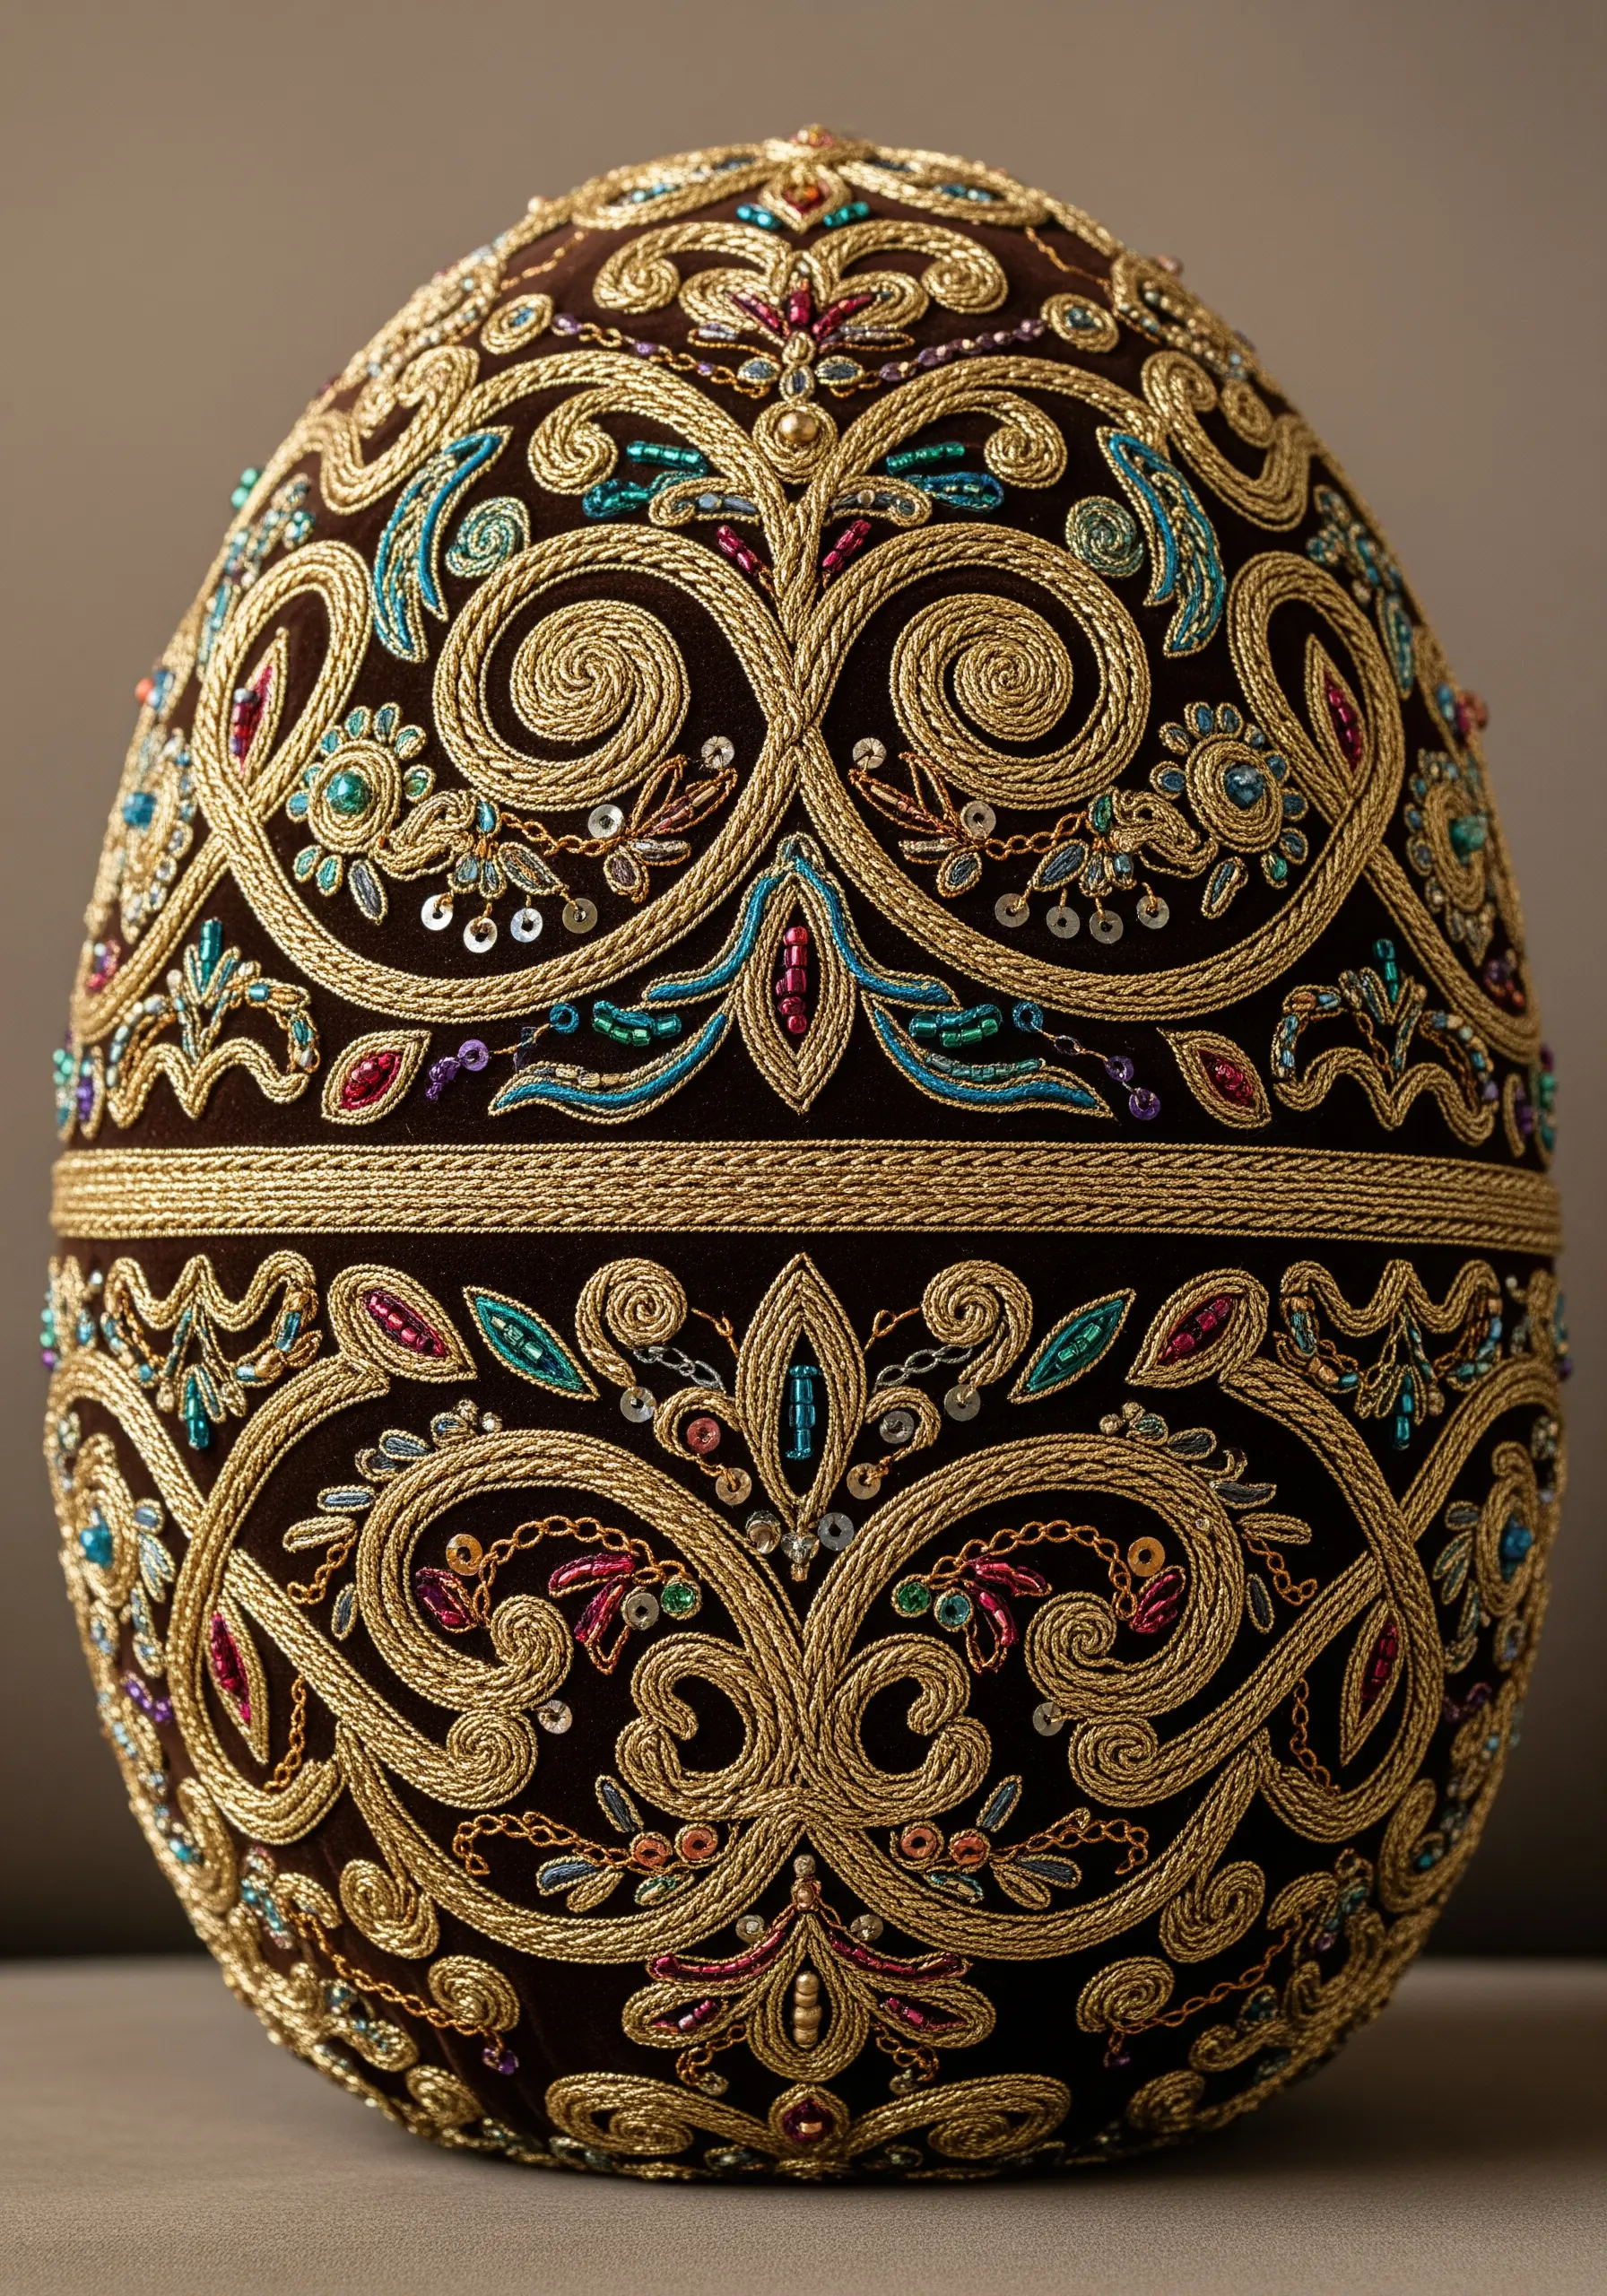
Channel the lavish detail of a Fabergé egg by layering multiple textures and embellishments.
Start by creating the main structure of your design with couched gold cord; this provides a strong visual skeleton.
Fill the intricate spaces with a mix of colorful seed beads, tiny sequins, and delicate chain stitches in metallic threads.
The key to keeping this maximalist style looking refined is to work within a defined color palette and repeat small patterns, creating a sense of rhythm and cohesion.
16. Elegant Chinoiserie in Tone-on-Tone Stitching
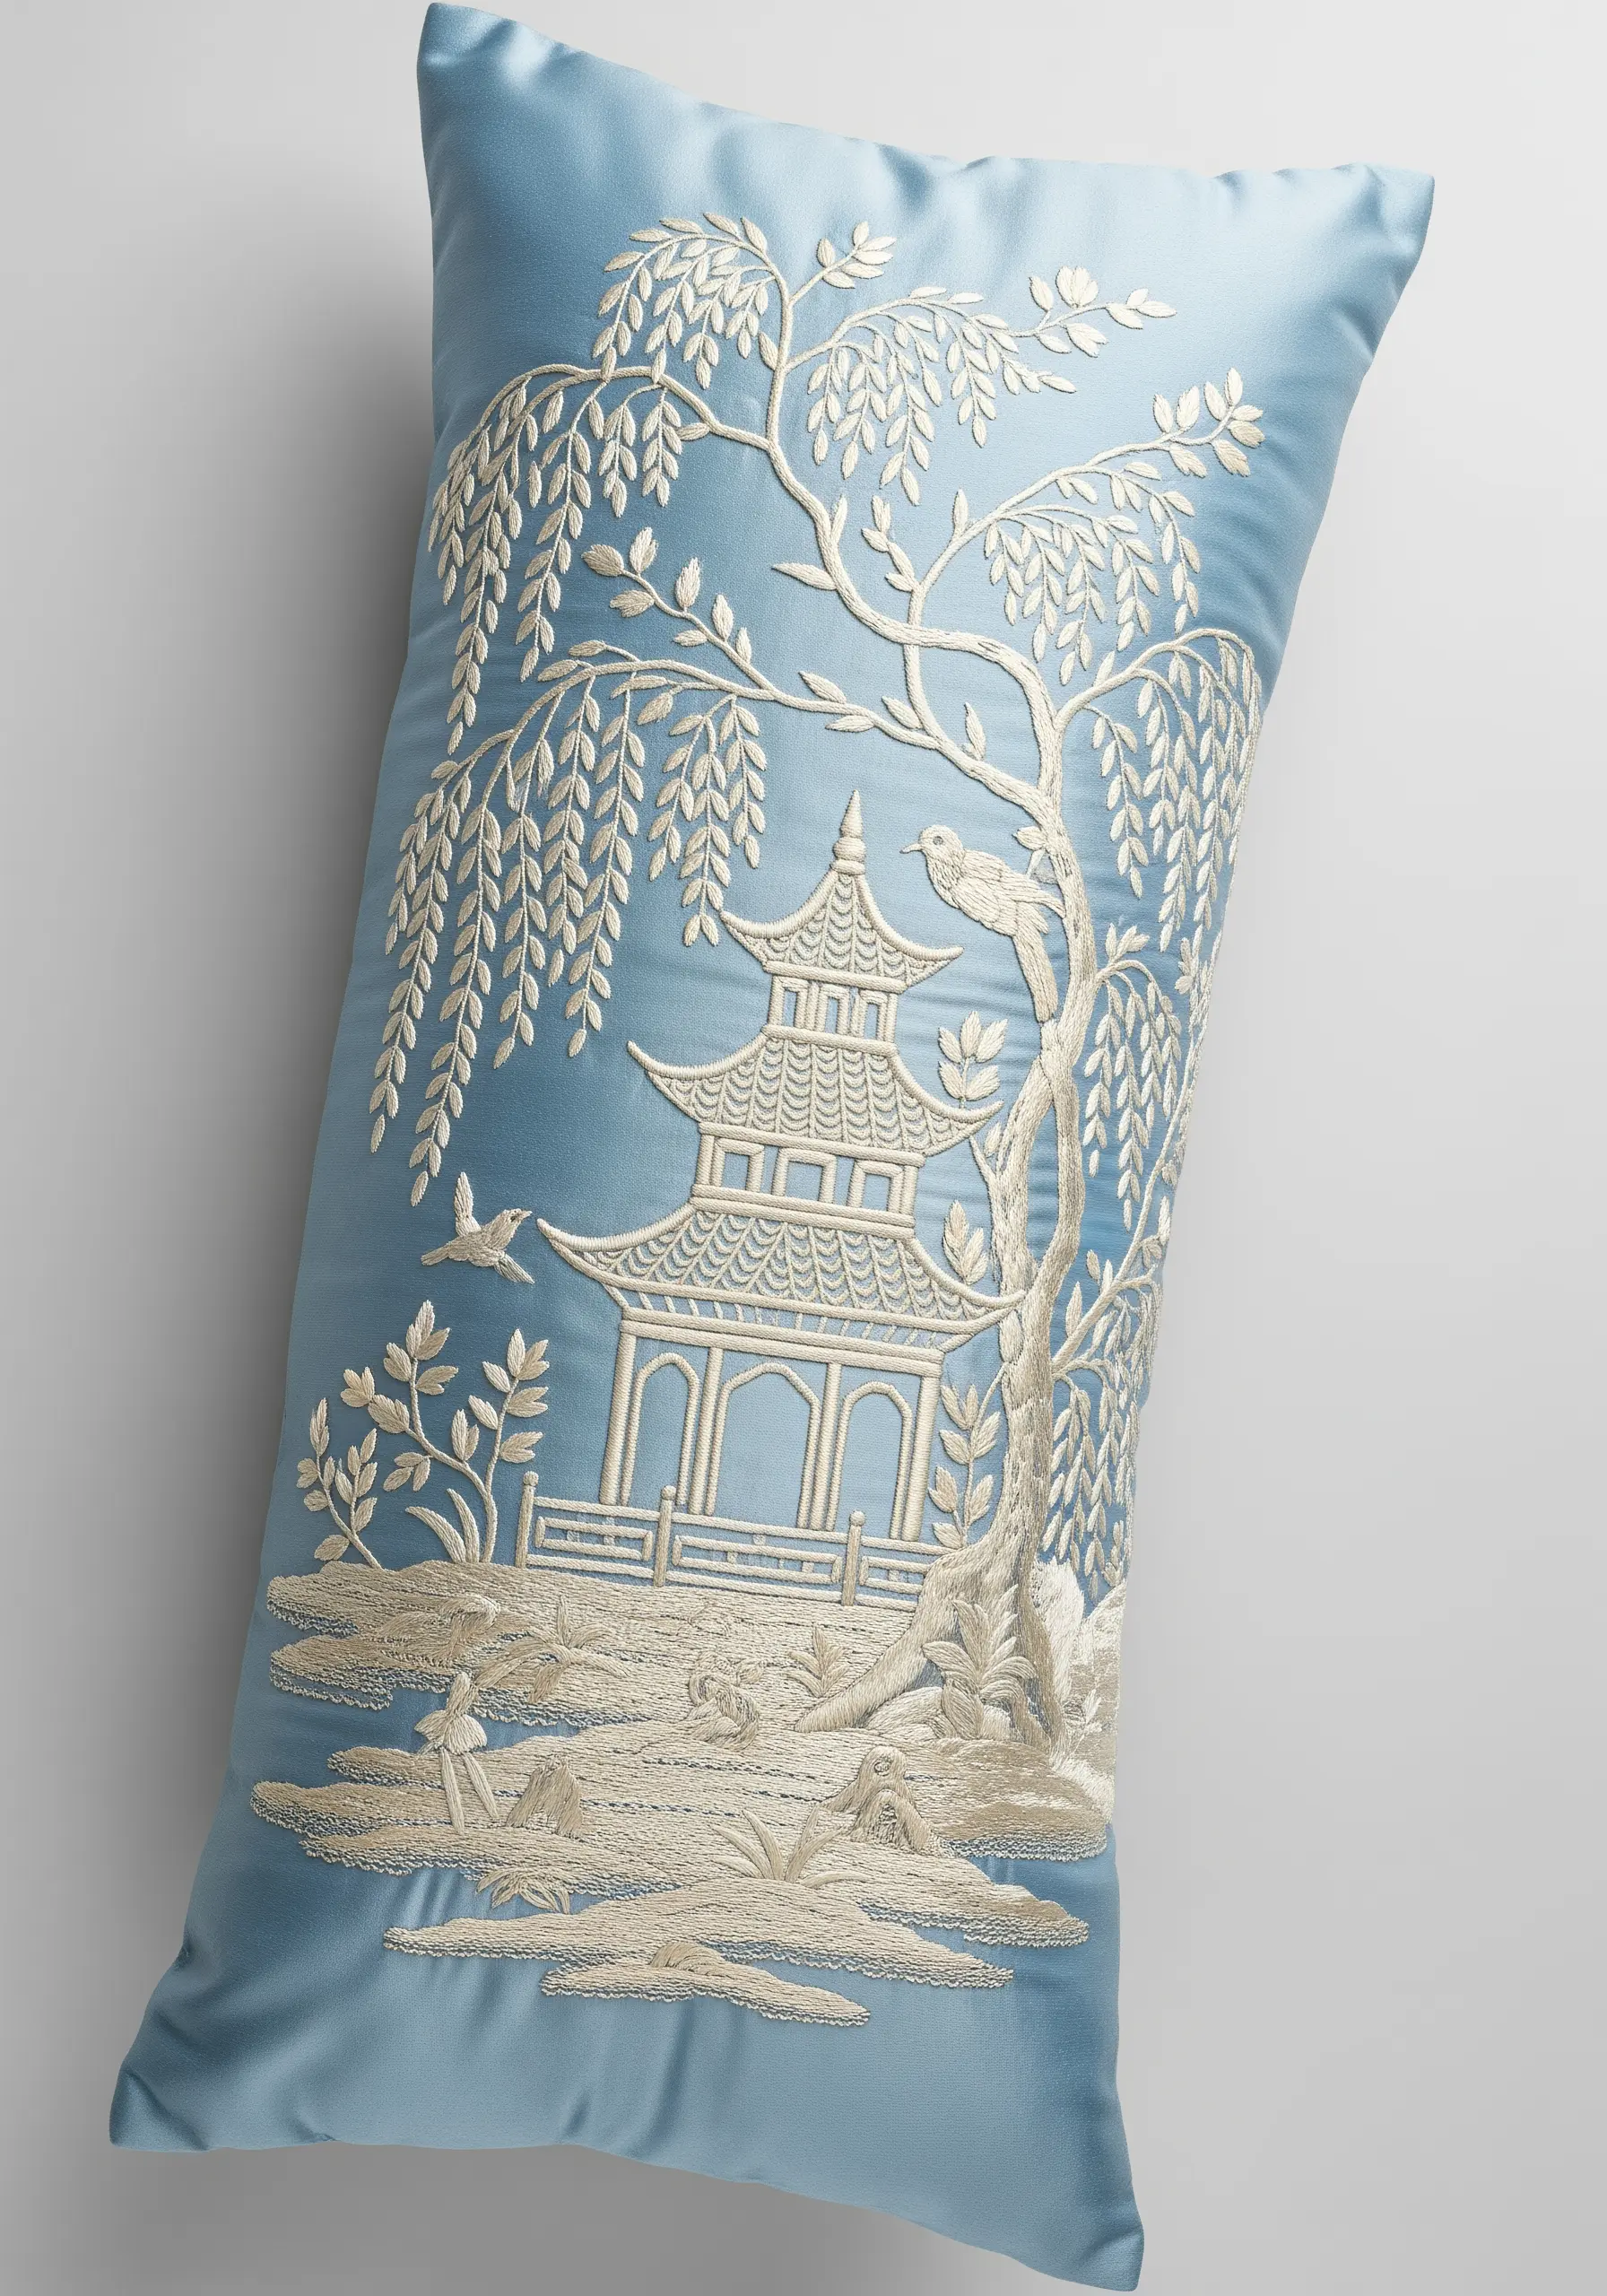
You can achieve a delicate, porcelain-like effect with a tone-on-tone palette, where texture does all the talking.
Choose a single color of thread, like ivory or pale silver, and stitch it onto a contrasting satin fabric like this serene blue.
Create visual interest by varying your stitches: use satin stitch for the pagoda roofs, French knots for foliage, and flowing straight stitches for the weeping willow leaves.
The sheen of the satin enhances the shadows and highlights of the monochrome thread, making this a perfect example of elegant tone-on-tone embroidery.
17. The Sun King Motif in Gold Thread
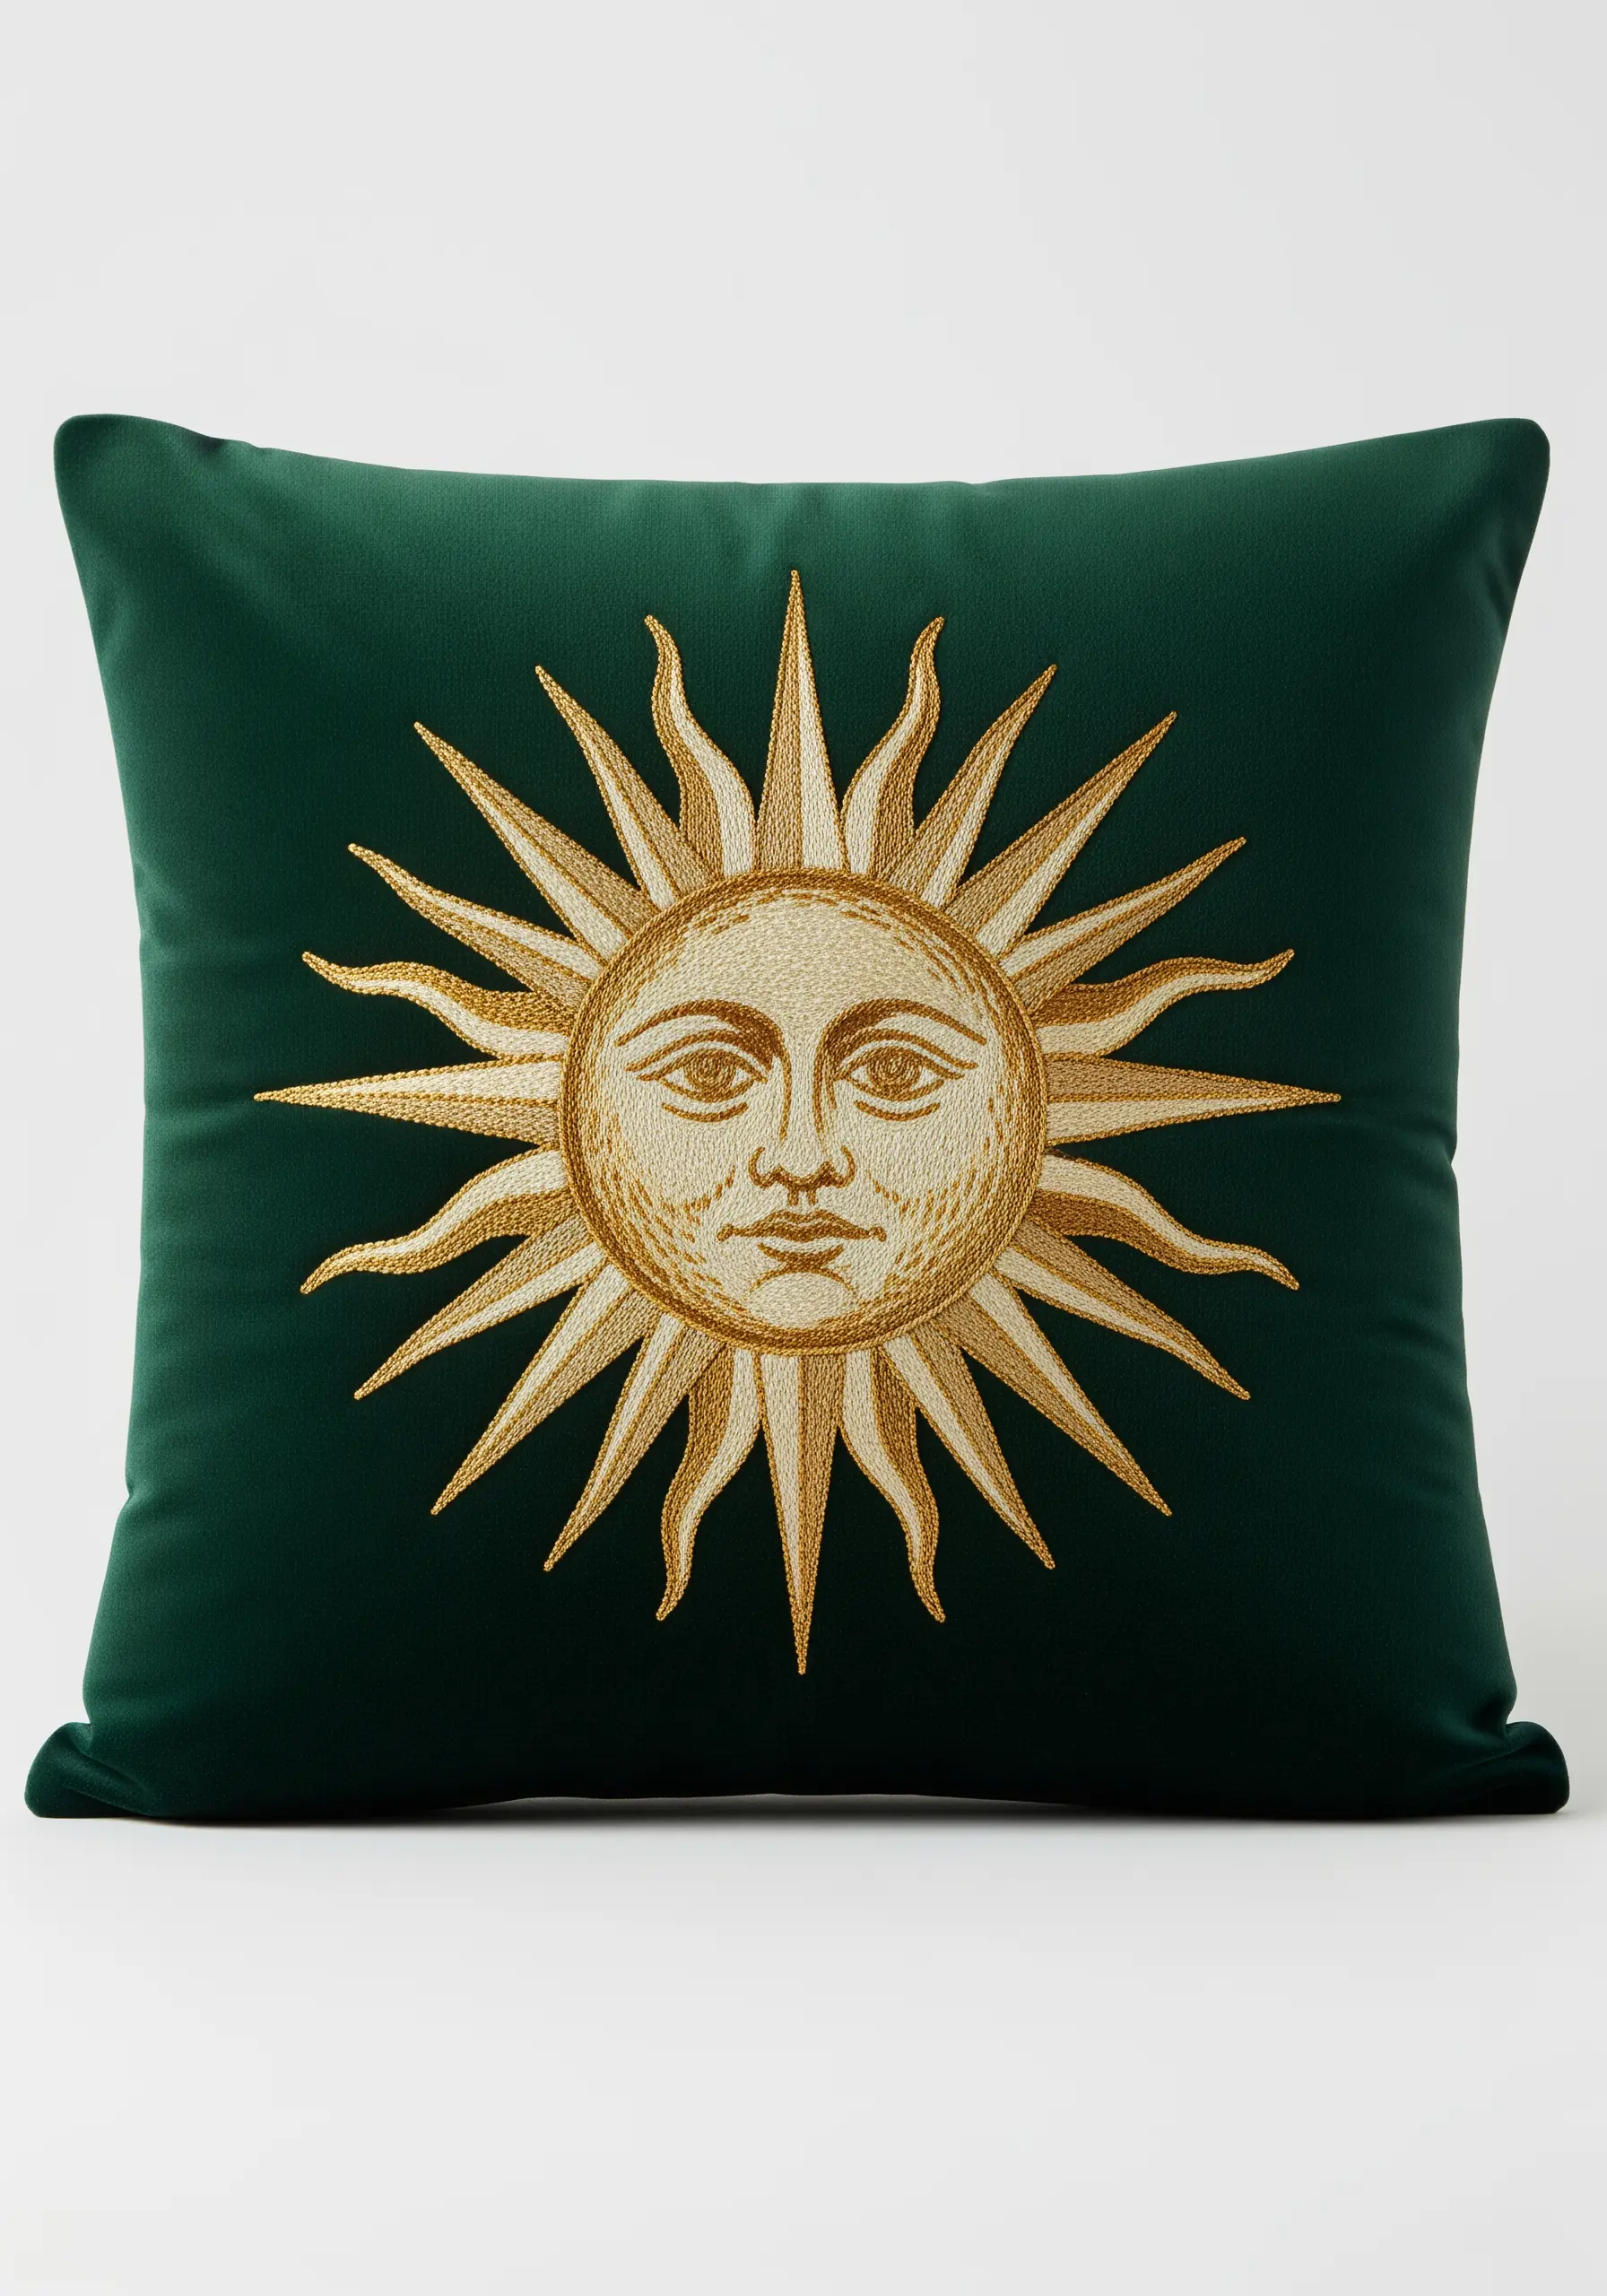
A sun motif must feel radiant, and you can achieve this by varying your stitch textures.
For the sun’s face, use a dense, circular satin stitch to create a smooth, reflective surface.
Create the rays using two alternating styles: sharp, thin rays made with single straight stitches, and wider, triangular rays filled with padded satin stitch.
This variation in texture and dimension gives the sun a dynamic quality, making it feel as though it’s actively emitting light.
18. Modern Royal Insignia with Graphic Fill

Reimagine a traditional royal symbol, like the ermine spot, as a modern, graphic repeat pattern.
Use a dense white satin stitch for the main shape, ensuring your stitches are perfectly parallel for a clean, almost machine-embroidered finish.
The black “tails” are rendered as simple, sharp straight stitches. This high-contrast, minimalist approach on a smooth satin fabric feels bold and strikingly contemporary.
19. Beaded Pomegranate for Textural Abundance
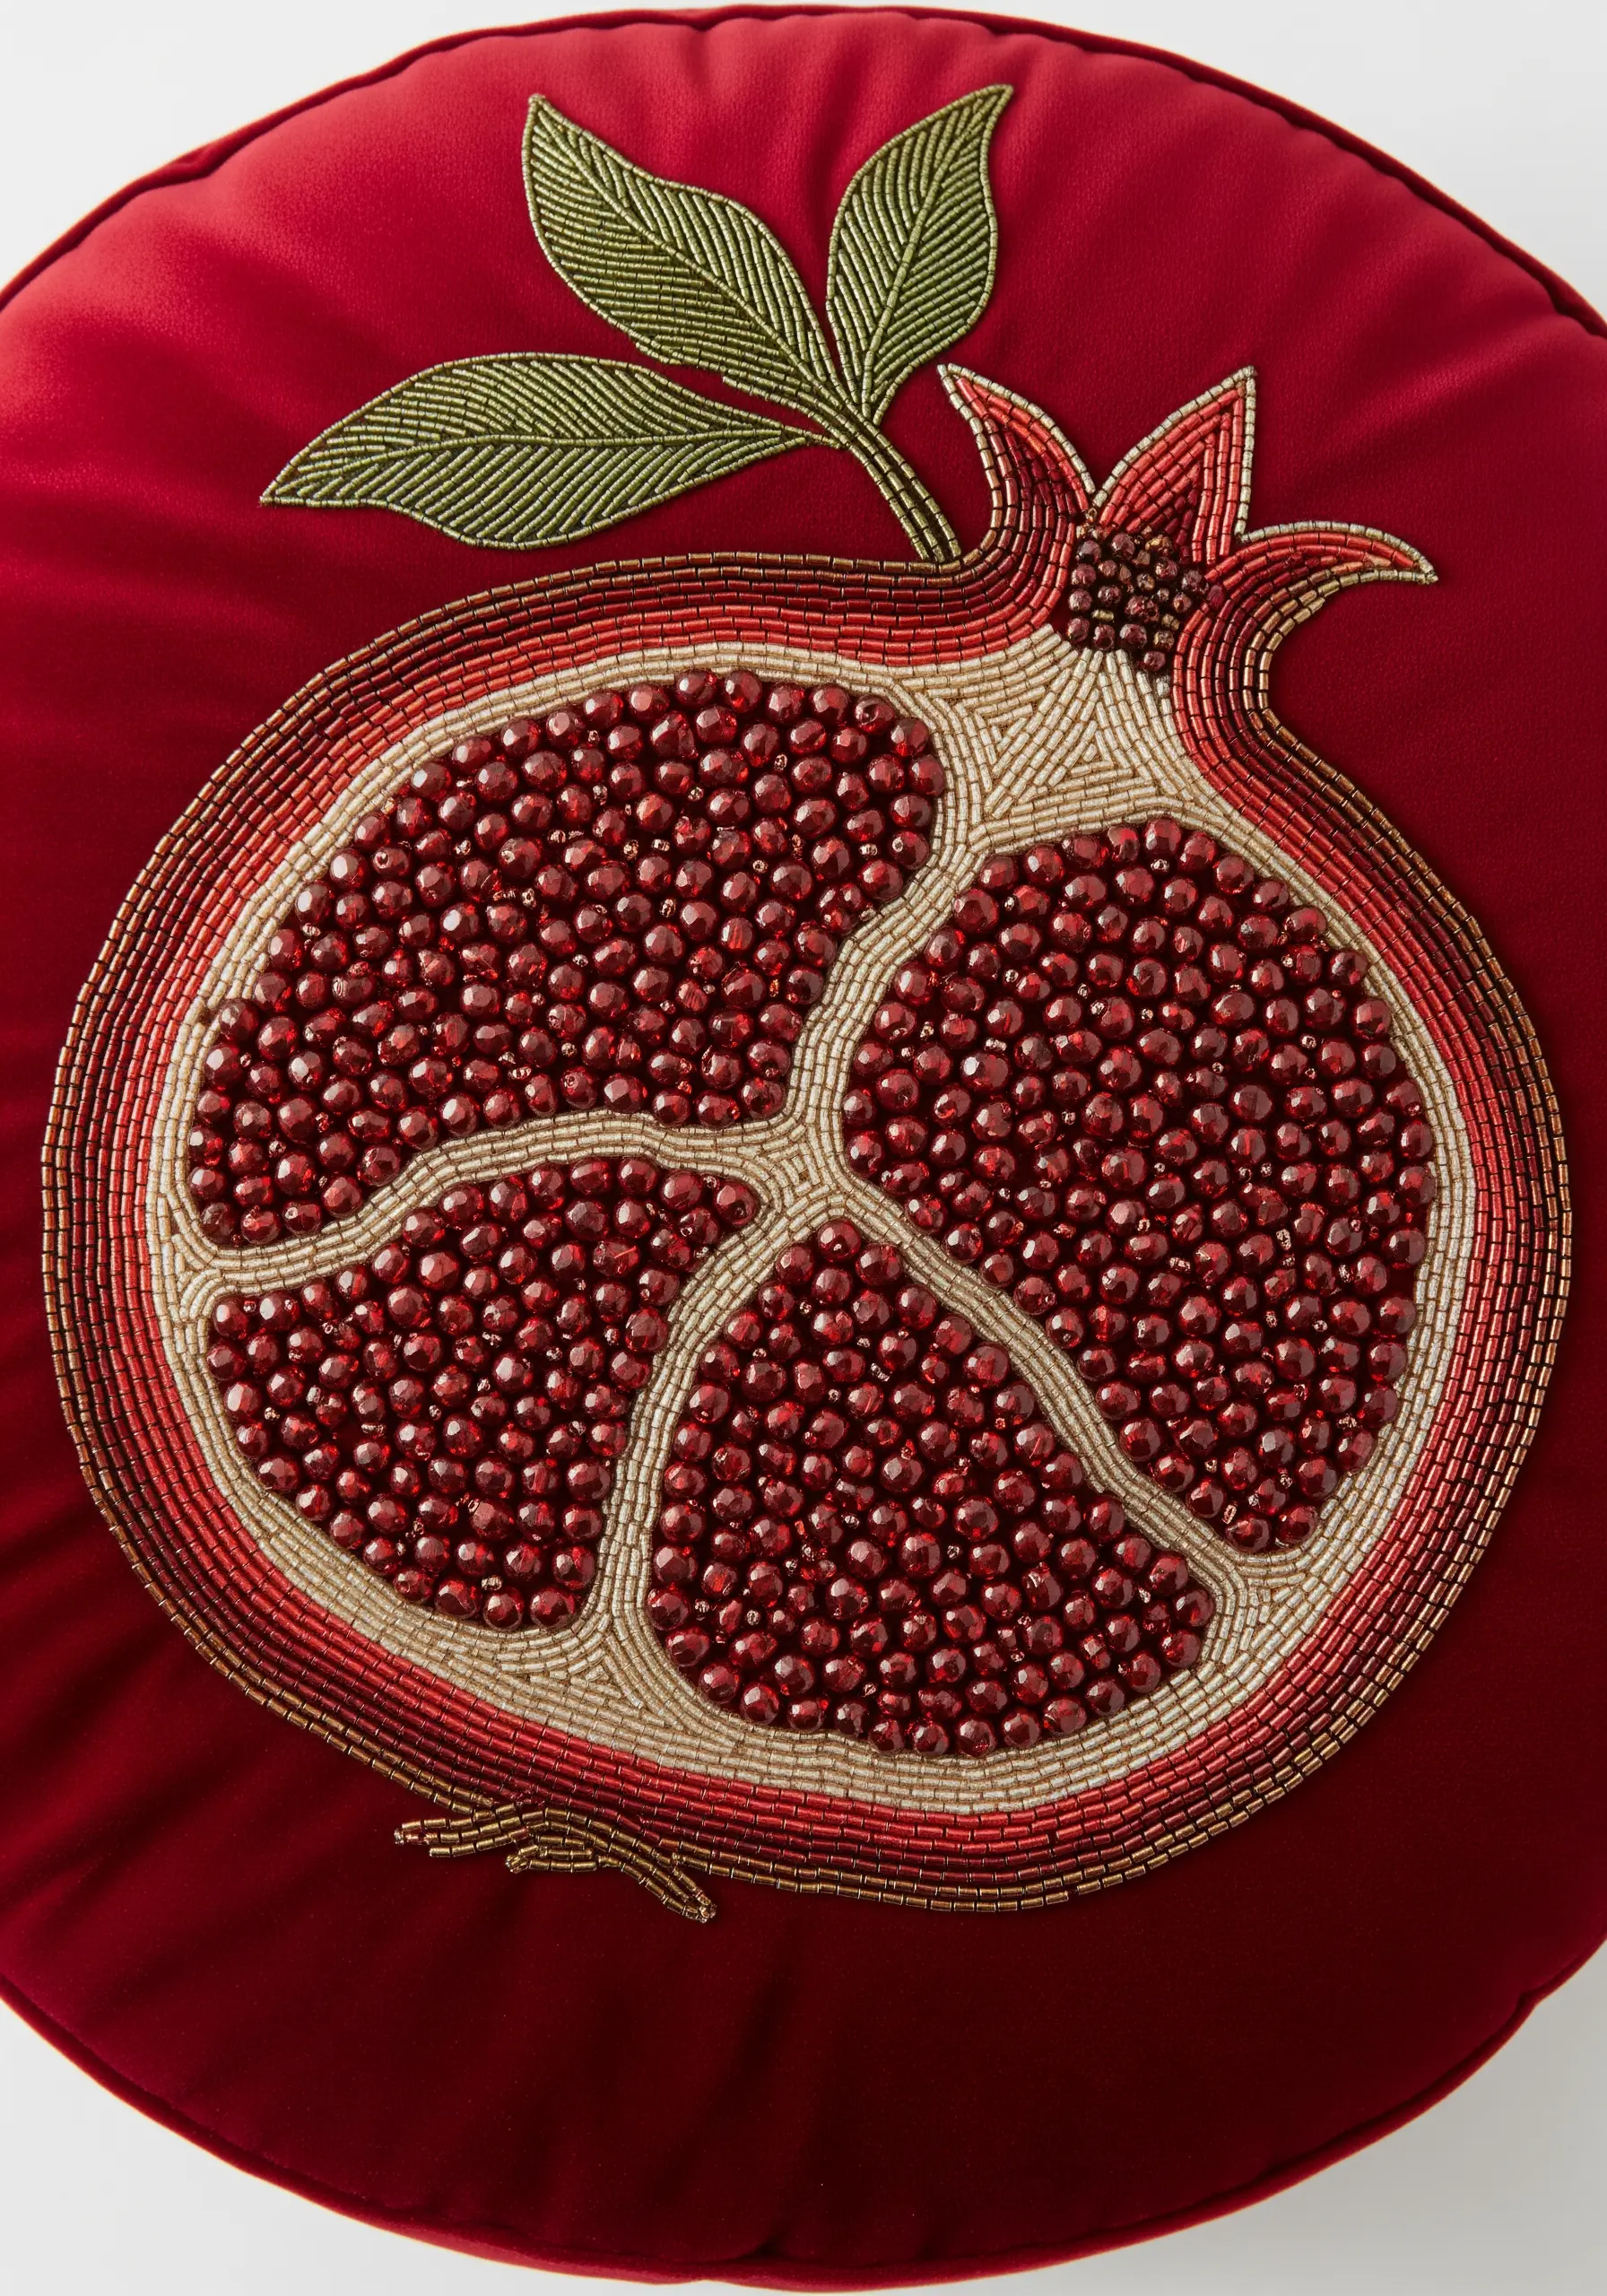
Instead of trying to replicate the texture of pomegranate seeds with thread, use beads to create a truly authentic, jewel-like effect.
Fill each segment of the fruit with tightly packed red seed beads or small faceted garnets, which will catch the light beautifully.
Outline the segments and the outer skin with couched gold cord to provide definition and a clean edge.
Contrast the sparkling fruit with simple, matte green leaves stitched in fishbone stitch to make the beaded sections pop even more.
20. Minimalist Laurel Wreath with a Floating Crown
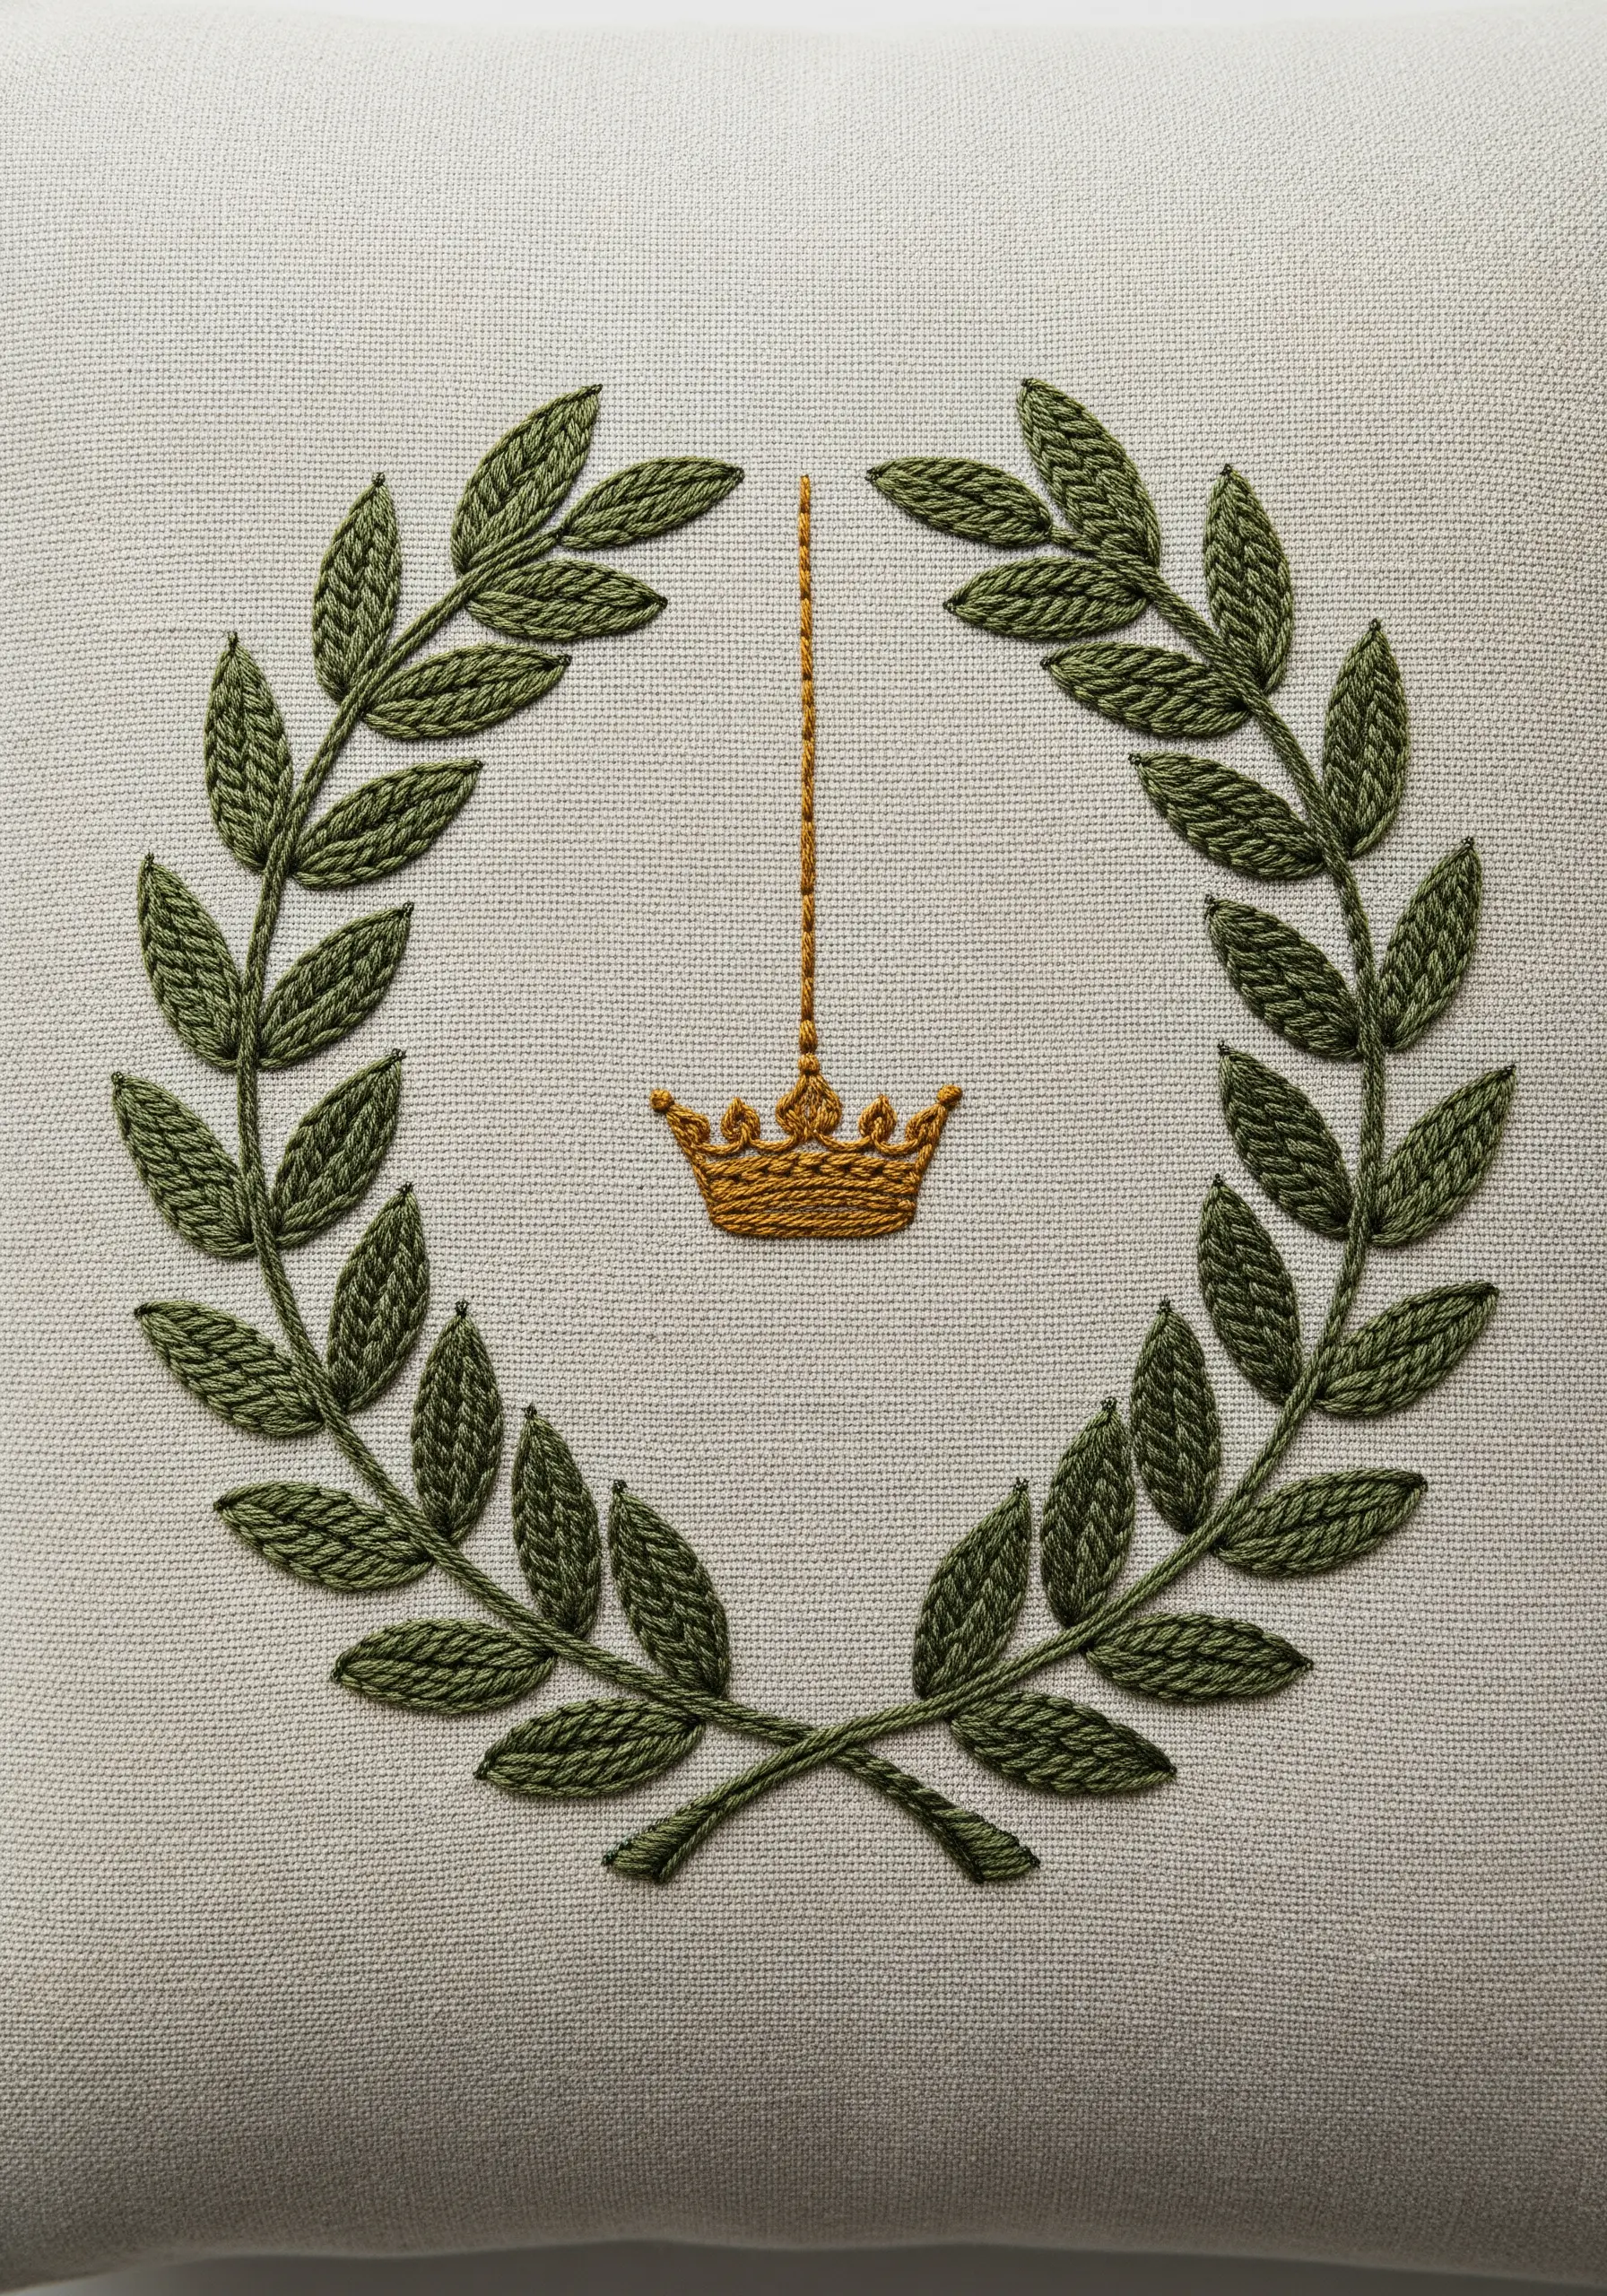
This design is a masterclass in the power of negative space and refined simplicity.
Stitch the laurel leaves using a simple fishbone stitch in a muted, olive-green thread; the key is uniform, neat stitching.
The tiny gold crown, suspended by a single line of backstitch, becomes the undisputed focal point precisely because of the empty space surrounding it.
This is a beautiful execution of balanced, minimalist embroidery that feels both modern and timeless.
21. Symbolic Keys with a Dimensional Ribbon
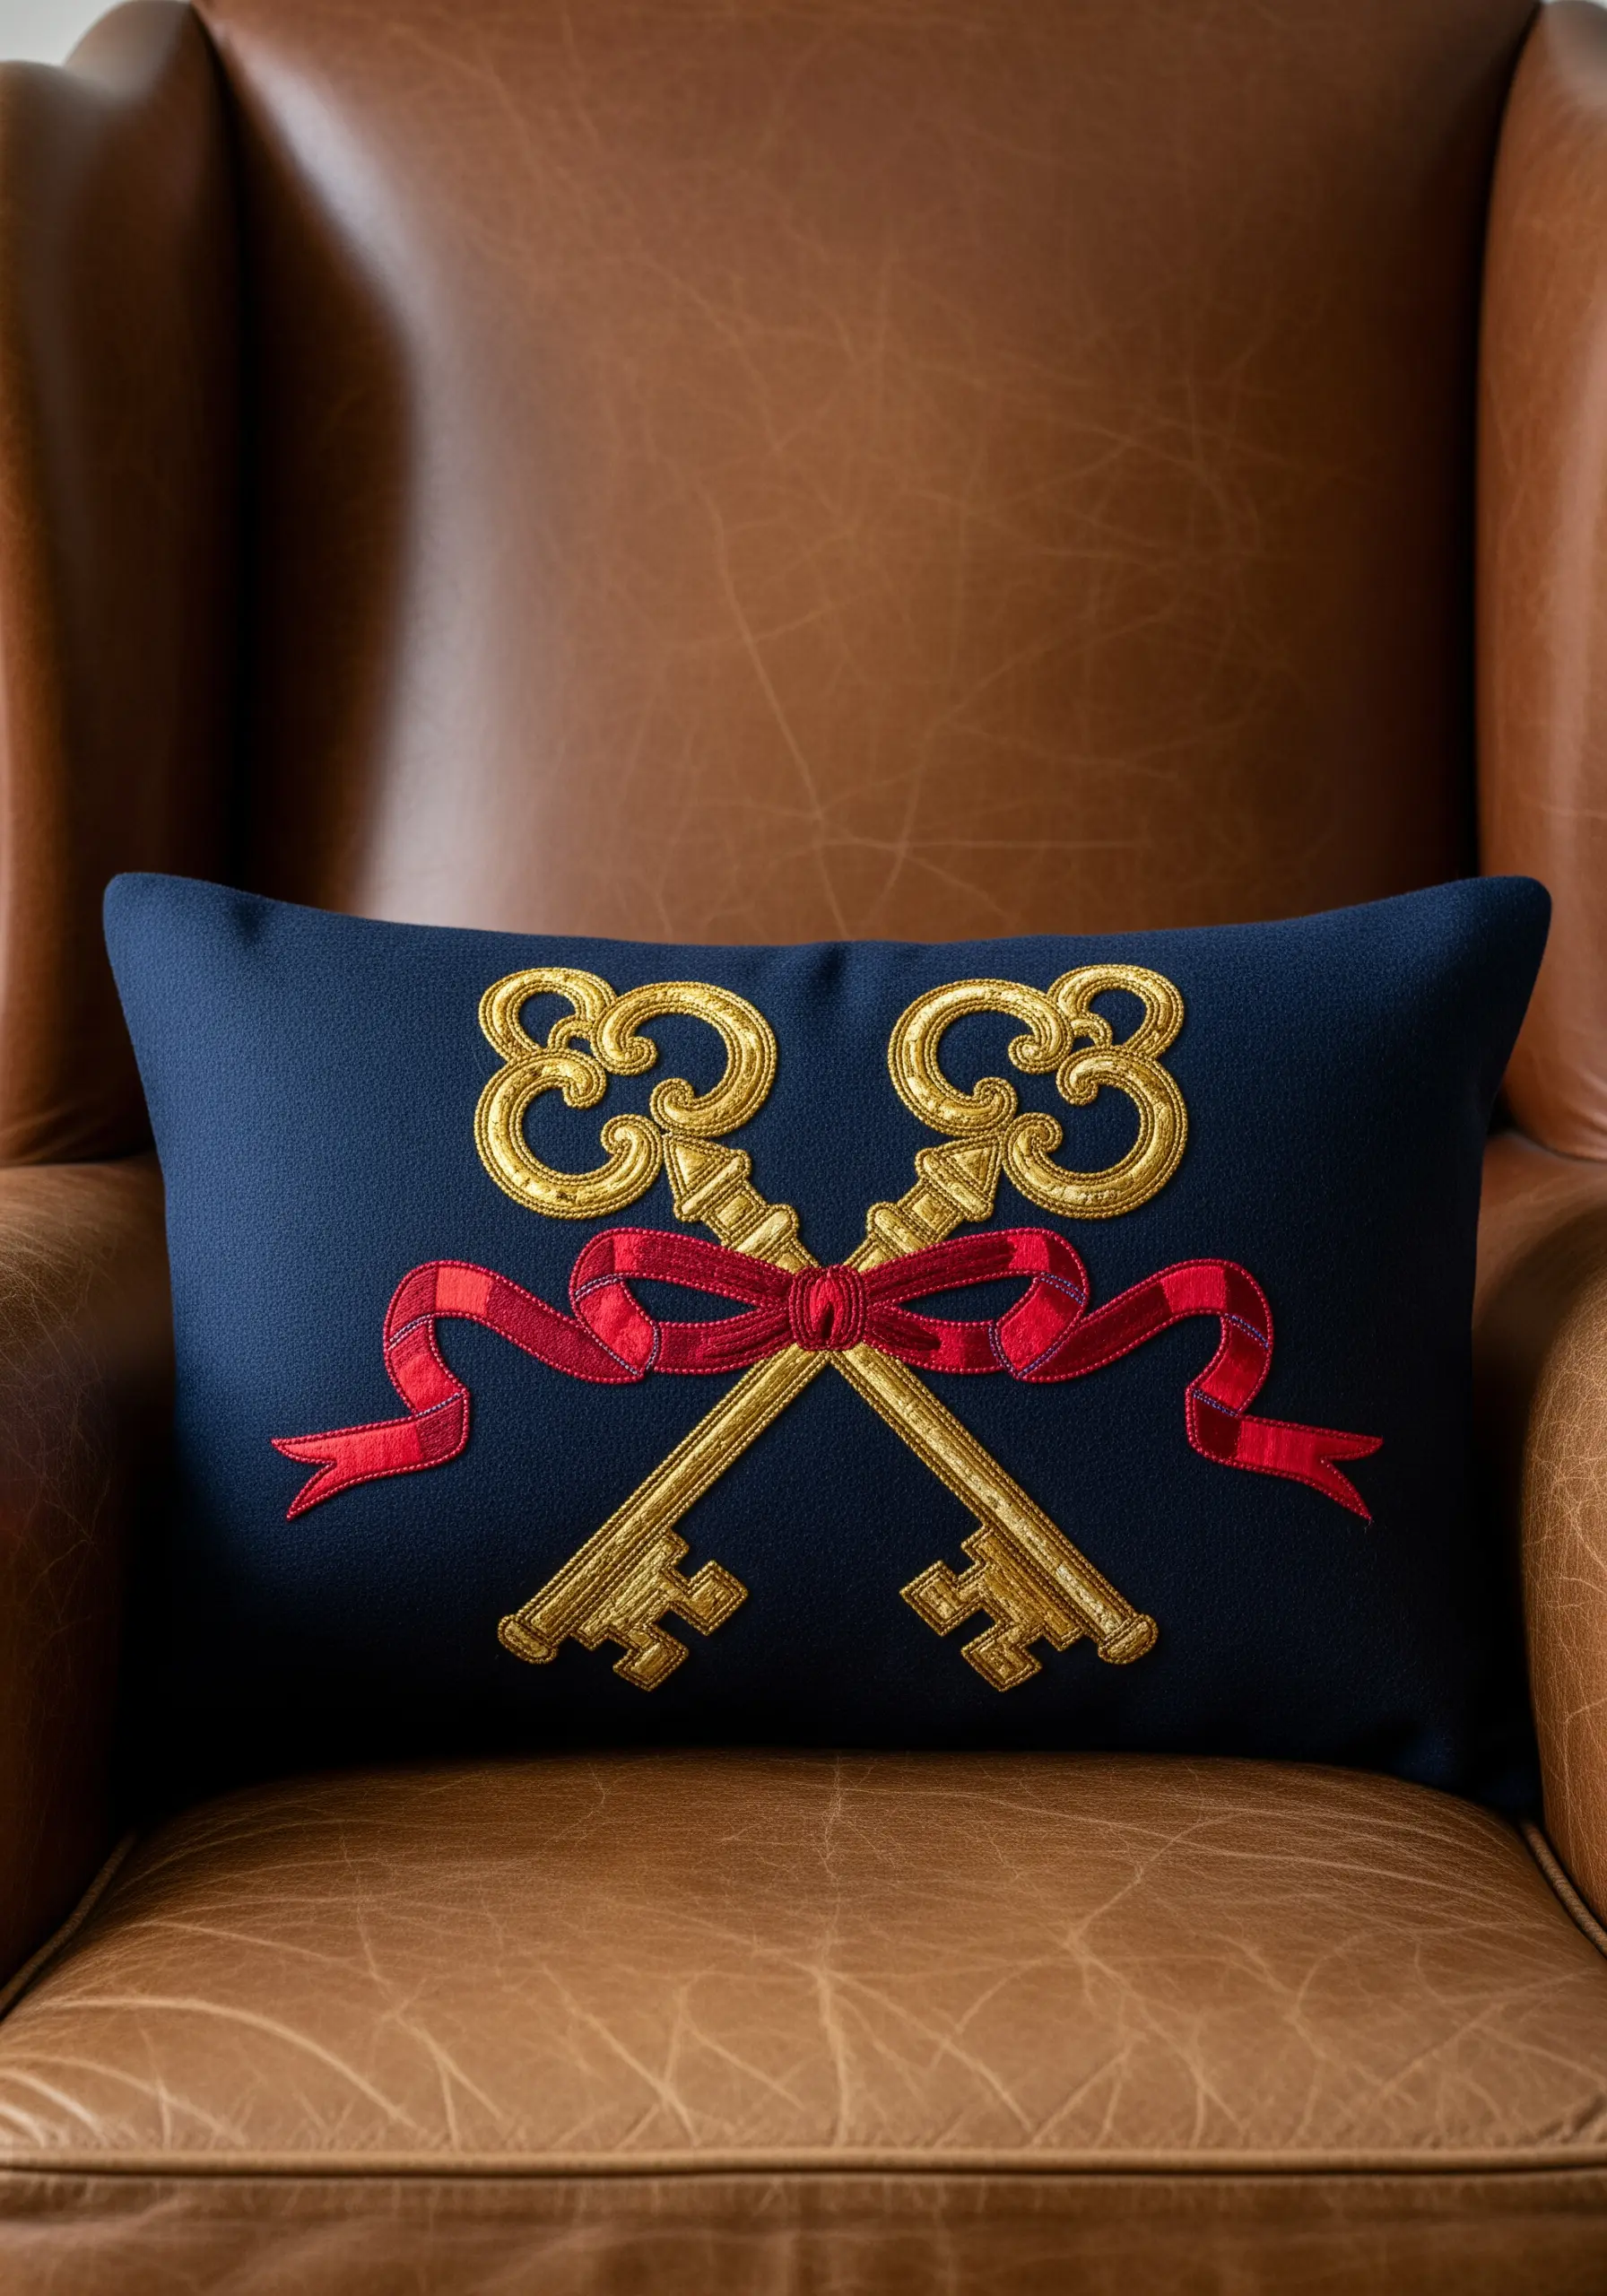
Create a convincing illusion of depth by physically layering your embroidered elements.
First, stitch the crossed keys using a flat satin stitch in a high-sheen gold thread.
For the ribbon, use a padded satin stitch—working over a base of seed stitches or felt—to make it physically rise above the keys.
Add fine black backstitch lines to suggest folds and shadows, which completes the illusion and makes the ribbon look truly three-dimensional and dynamic.
22. A Mythical Unicorn in a Bed of Ribbon Roses
Combine the softness of thread painting with the lush texture of silk ribbon for a truly magical, fairytale effect.
Stitch the unicorn’s body using long-and-short stitch with single strands of white and grey floss for gentle shading.
Then, create the surrounding meadow using silk ribbon: work woven wheel roses and French knots in various colors to build up a dense, three-dimensional field of flowers that stands off the fabric.
The contrast between the flat unicorn and the 3D flowers is what makes this composition so captivating, and it’s a great way to try floral-inspired ribbon embroidery.
23. Bold Heraldic Crest in a Single Color
When working with a single dark color on a bright, textured background like velvet, stitch direction is your most powerful tool.
Use satin stitch for the eagle’s feathers, carefully angling your stitches to follow the curves of the wings and create the illusion of form and shadow.
Use a fine backstitch for the intricate details on the central shield to keep them crisp and readable.
The dramatic contrast between the matte black thread and the high sheen of the gold velvet creates a look of pure, unapologetic luxury.
24. A Rococo Frame in Stumpwork and Couching
Create an embroidered frame so dimensional it looks like it was carved, not stitched.
Lay down the main structure of the frame with couched silver cord to establish the flowing lines.
For the raised, shell-like elements, use stumpwork techniques: create a padded base with layers of felt or stitches, then cover it completely with a smooth layer of satin stitch.
This three-dimensional technique gives the frame an architectural depth that is perfect for housing a monogram or simply standing on its own.
25. The Imperial Dragon with Textured Scales
You can create the intricate look of dragon scales efficiently without stitching each one individually.
After outlining the dragon’s body with a bold chain stitch, fill it with overlapping, horizontal rows of detached chain stitches (lazy daisies).
This method, also known as fish scale stitch, is much faster than satin stitch and adds a beautiful, uniform texture that perfectly mimics scales.
Reserve a smooth satin stitch for the head, claws, and spines to make them stand out against the textured body.
26. Botanical Elegance with a Fern Scatter
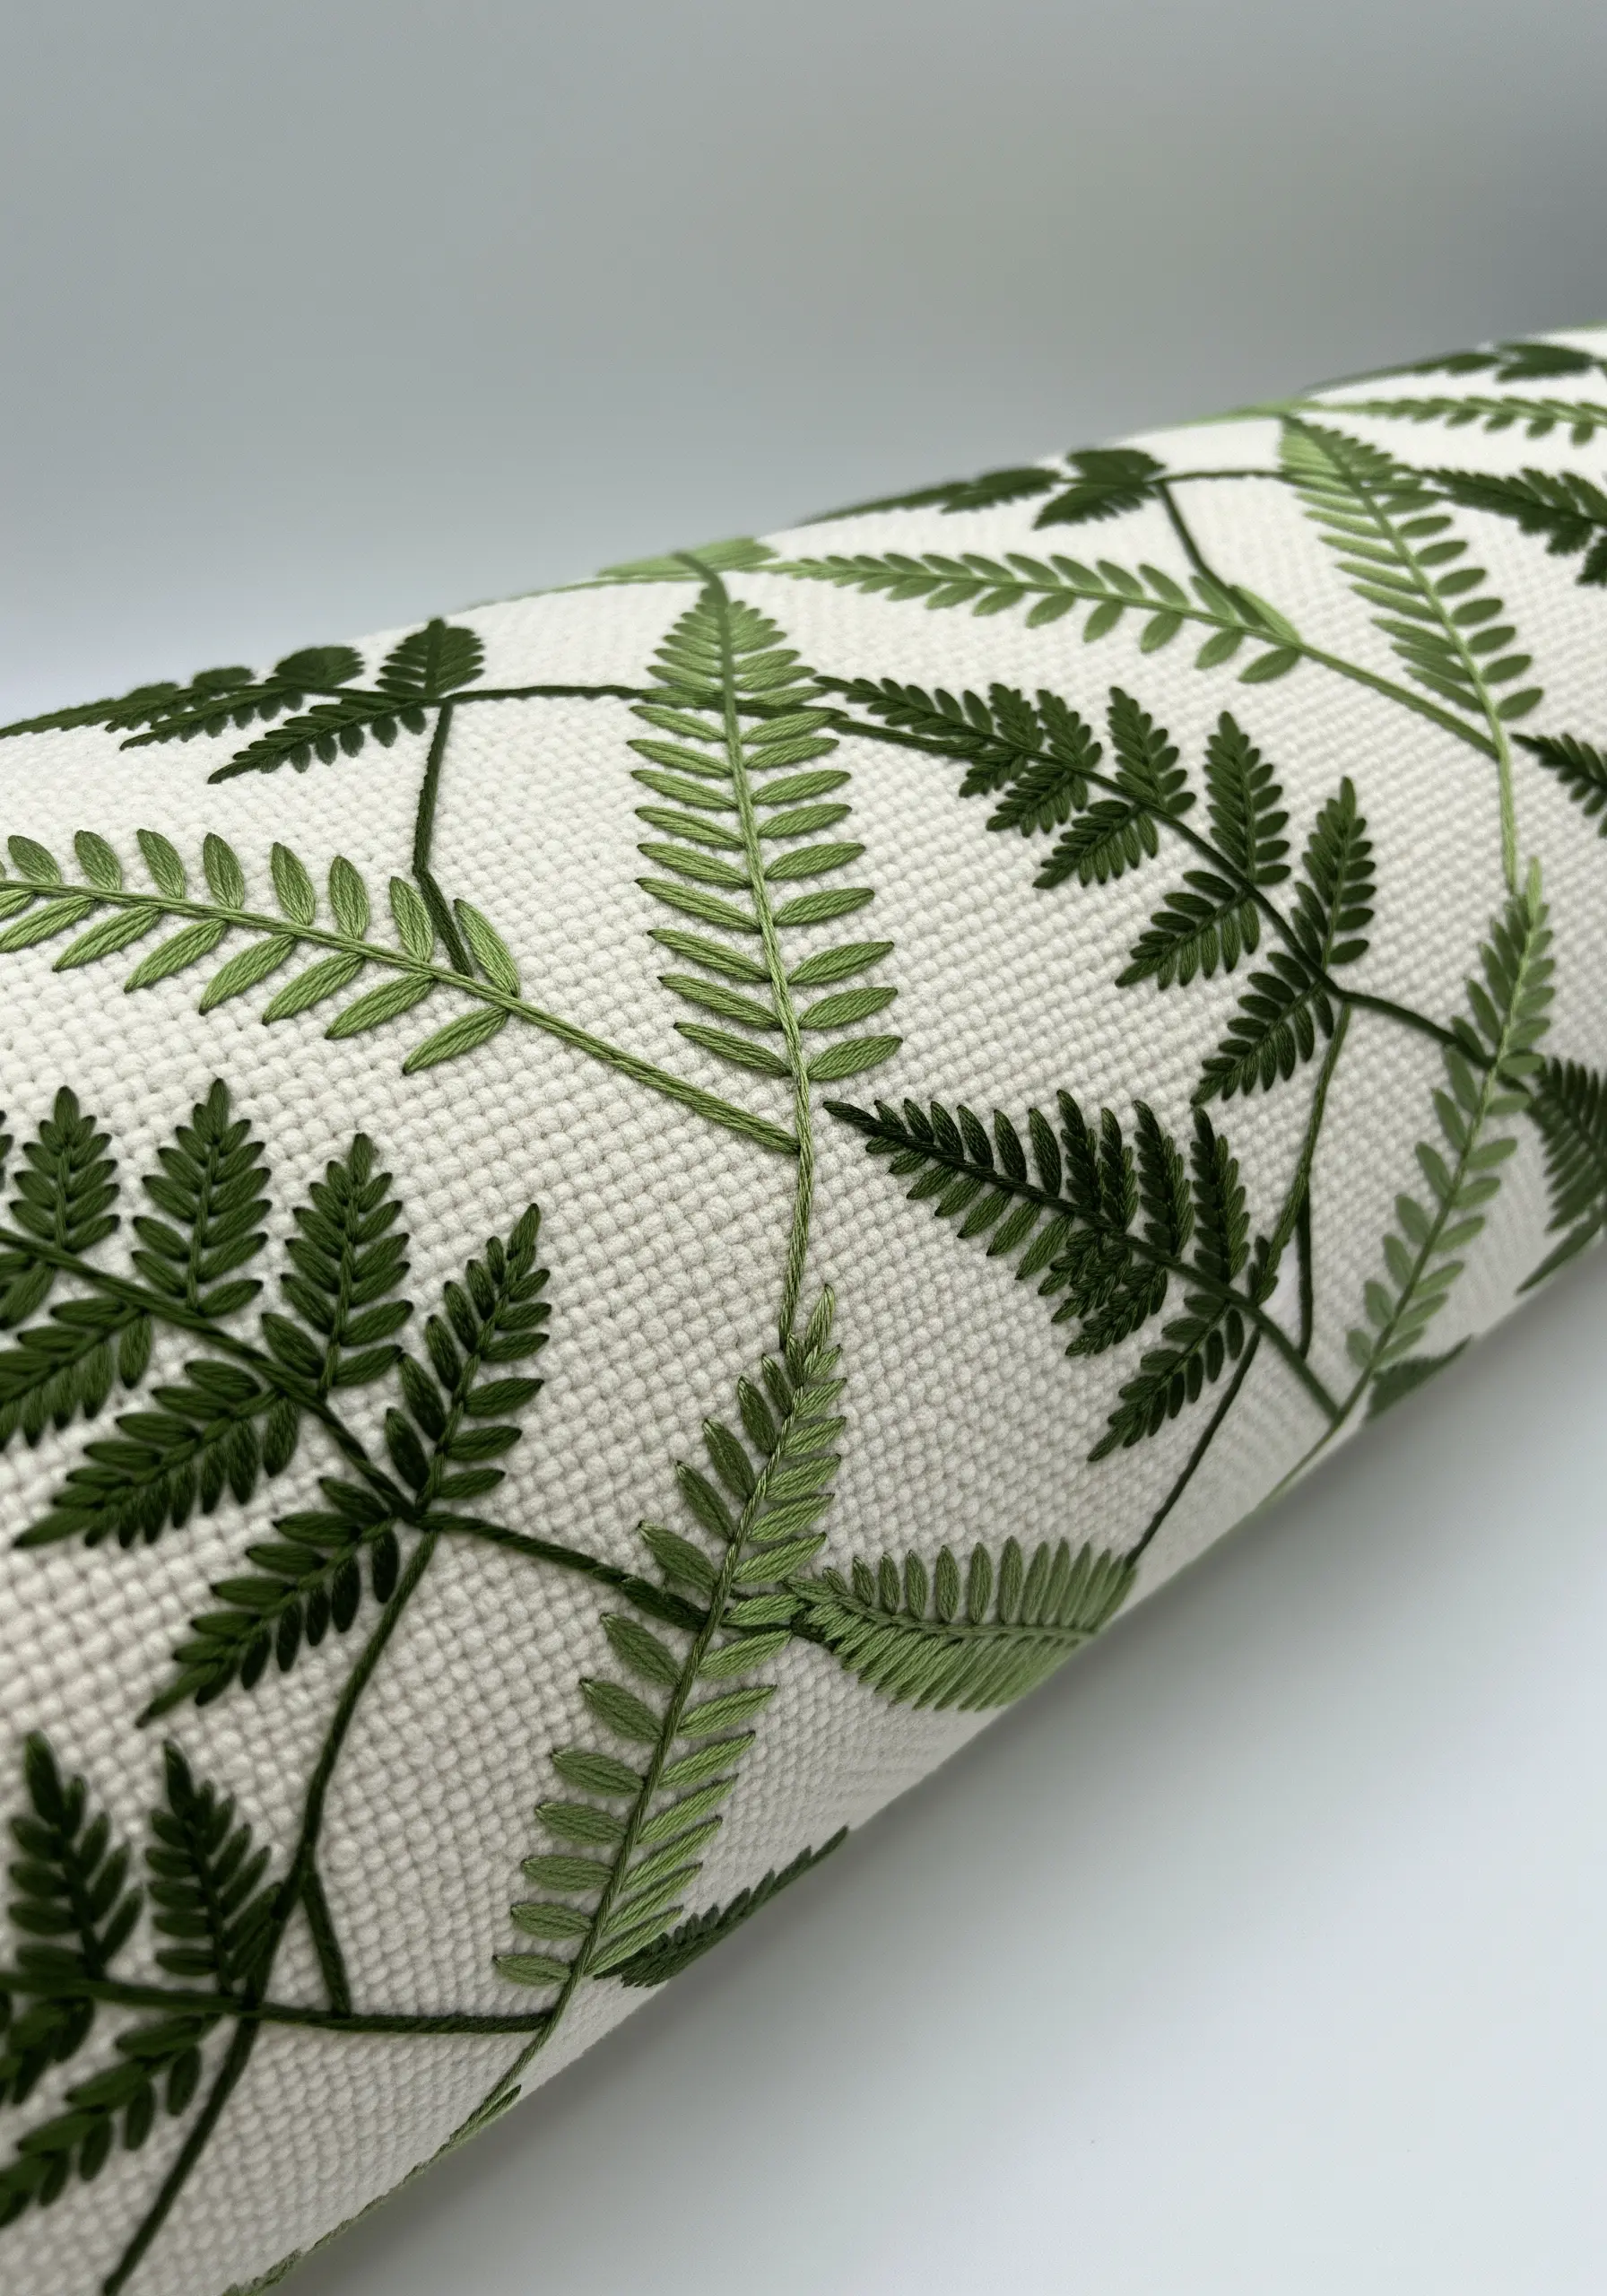
An all-over pattern can feel serene and sophisticated rather than busy if you choose a light, airy motif.
Stitch these delicate ferns using a combination of stem stitch for the central stalk and fly stitches for the individual leaves (pinnae).
Vary the shades of green slightly between ferns and alter their orientation to create a more natural, scattered look.
This composition is a beautiful example of how simple delicate leaf stitch techniques can result in an incredibly refined and organic design.
27. The Tree of Life with a Braided Trunk
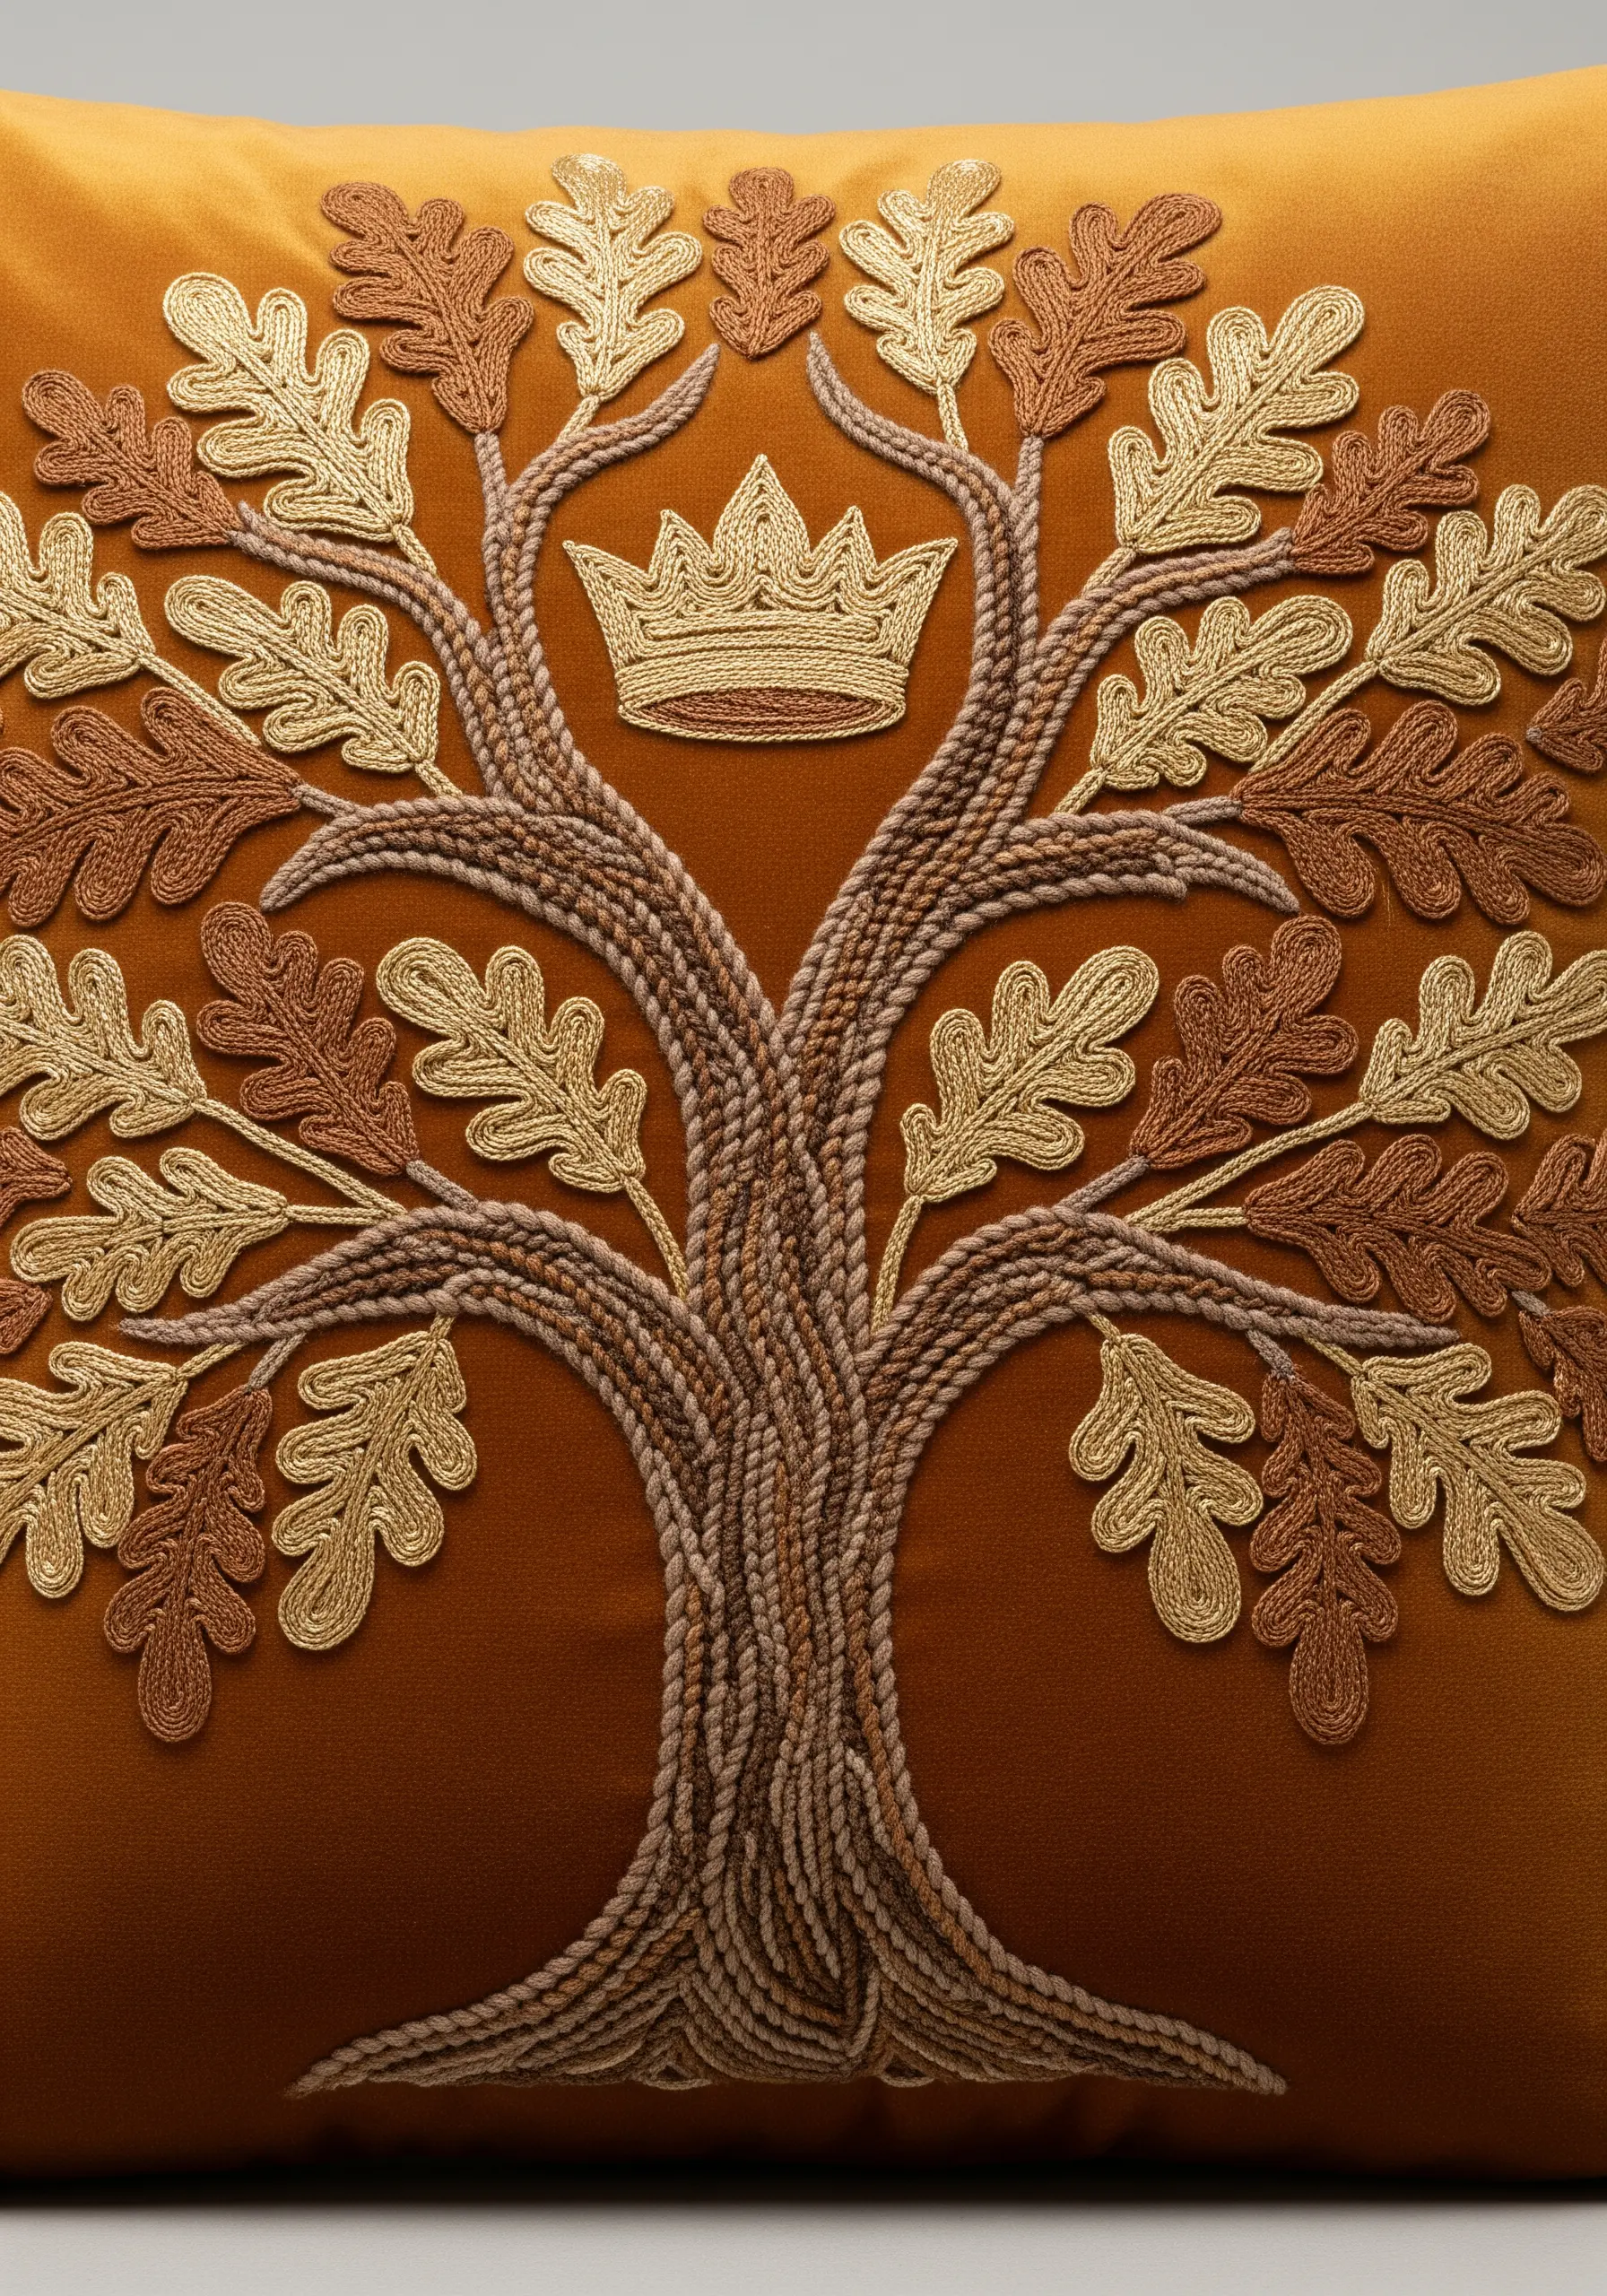
Give a tree trunk a rich, woven texture that makes it look truly three-dimensional.
Use a plaited braid stitch or a heavy, raised chain stitch with multiple strands of floss in slightly different shades of brown.
This simple switch from a flat fill stitch immediately adds dimension and draws the eye.
For the leaves, use satin stitch in two contrasting metallic colors, like gold and bronze, to create a shimmering effect that complements the textured trunk.
28. A Filigree Heart with Lattice Work
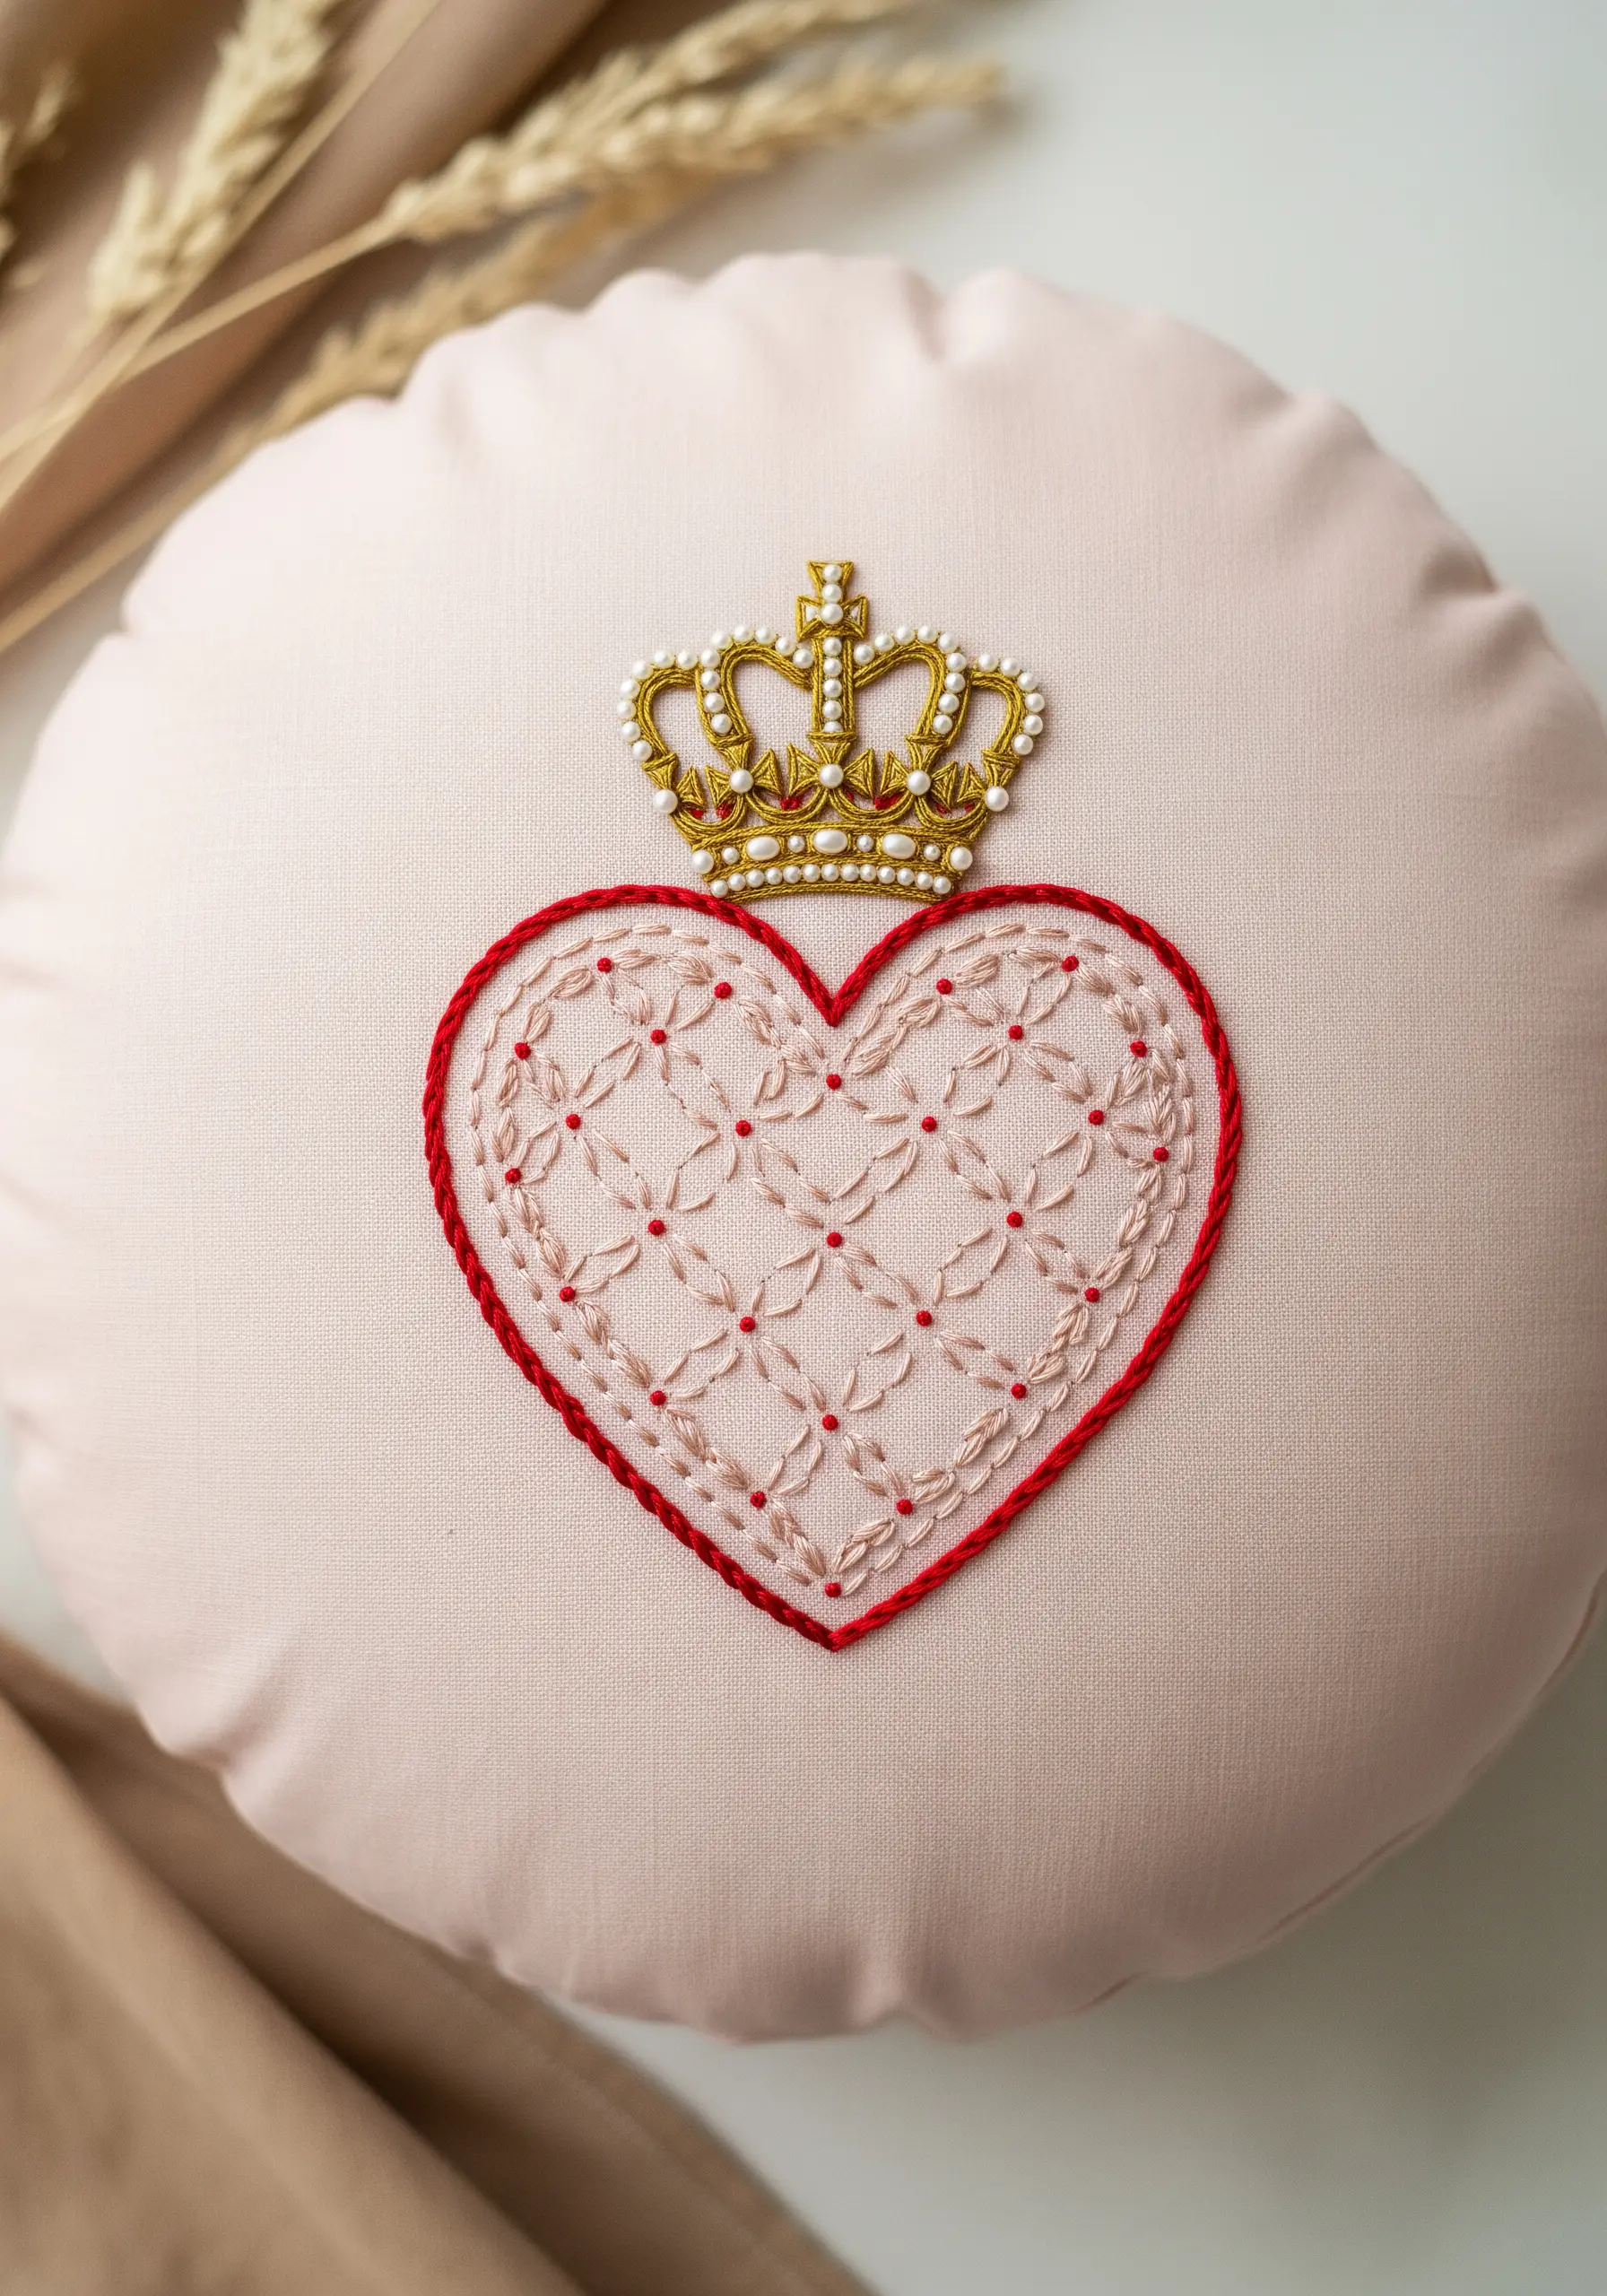
To create a delicate, lace-like fill, use a technique called couched filling or lattice work.
First, lay down a grid of long straight stitches across the interior of the heart shape.
Then, using a finer contrasting thread, stitch a tiny cross-stitch or French knot over each intersection to tack the grid down.
Outline the entire heart with a bold, solid stitch like a chain stitch to provide a strong frame for the intricate, airy filling inside.
29. Gothic Architecture in Graphic Line Work
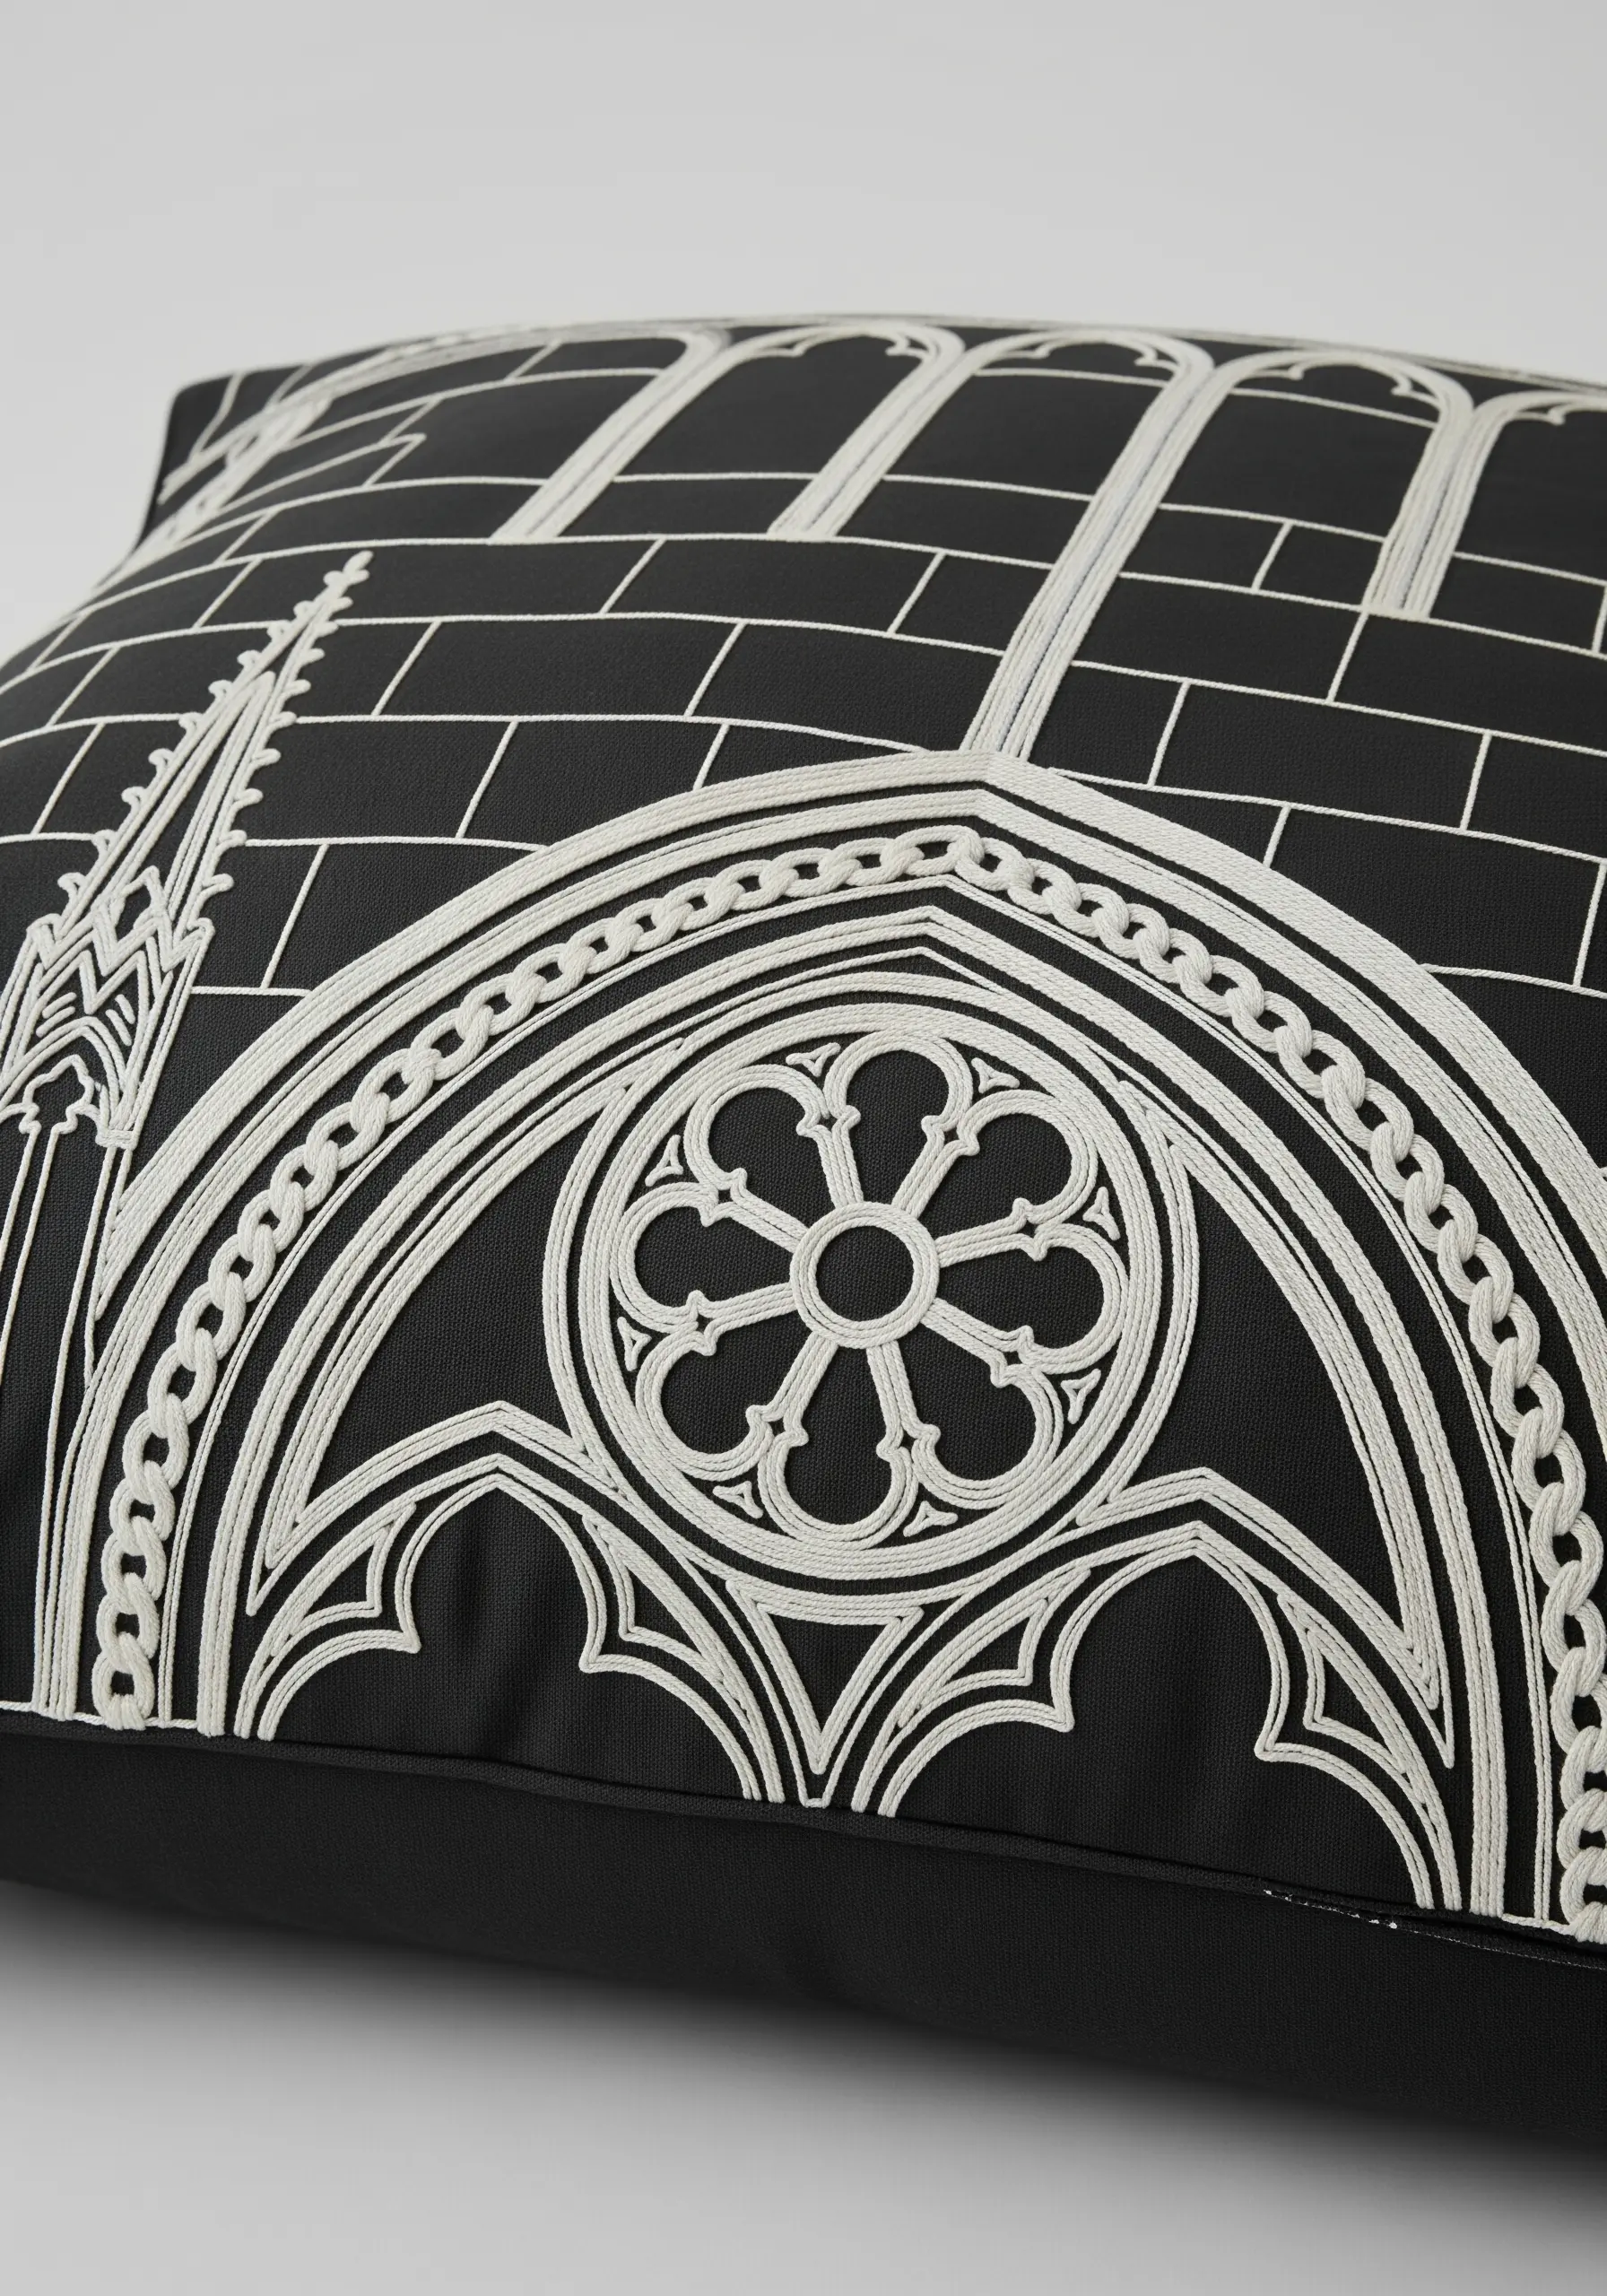
Translate the complexity of architecture into a bold, modern statement by focusing entirely on line.
This design relies on the high contrast between a bright white thread and a deep black fabric.
Use a whipped backstitch or a heavy chain stitch to achieve those clean, solid lines that define the arches and traceries.
Forget shading and intricate details; the power here lies in the graphic purity of the form, which feels both historic and contemporary.
30. A Subtle Palm Motif in Tone-on-Tone Satin
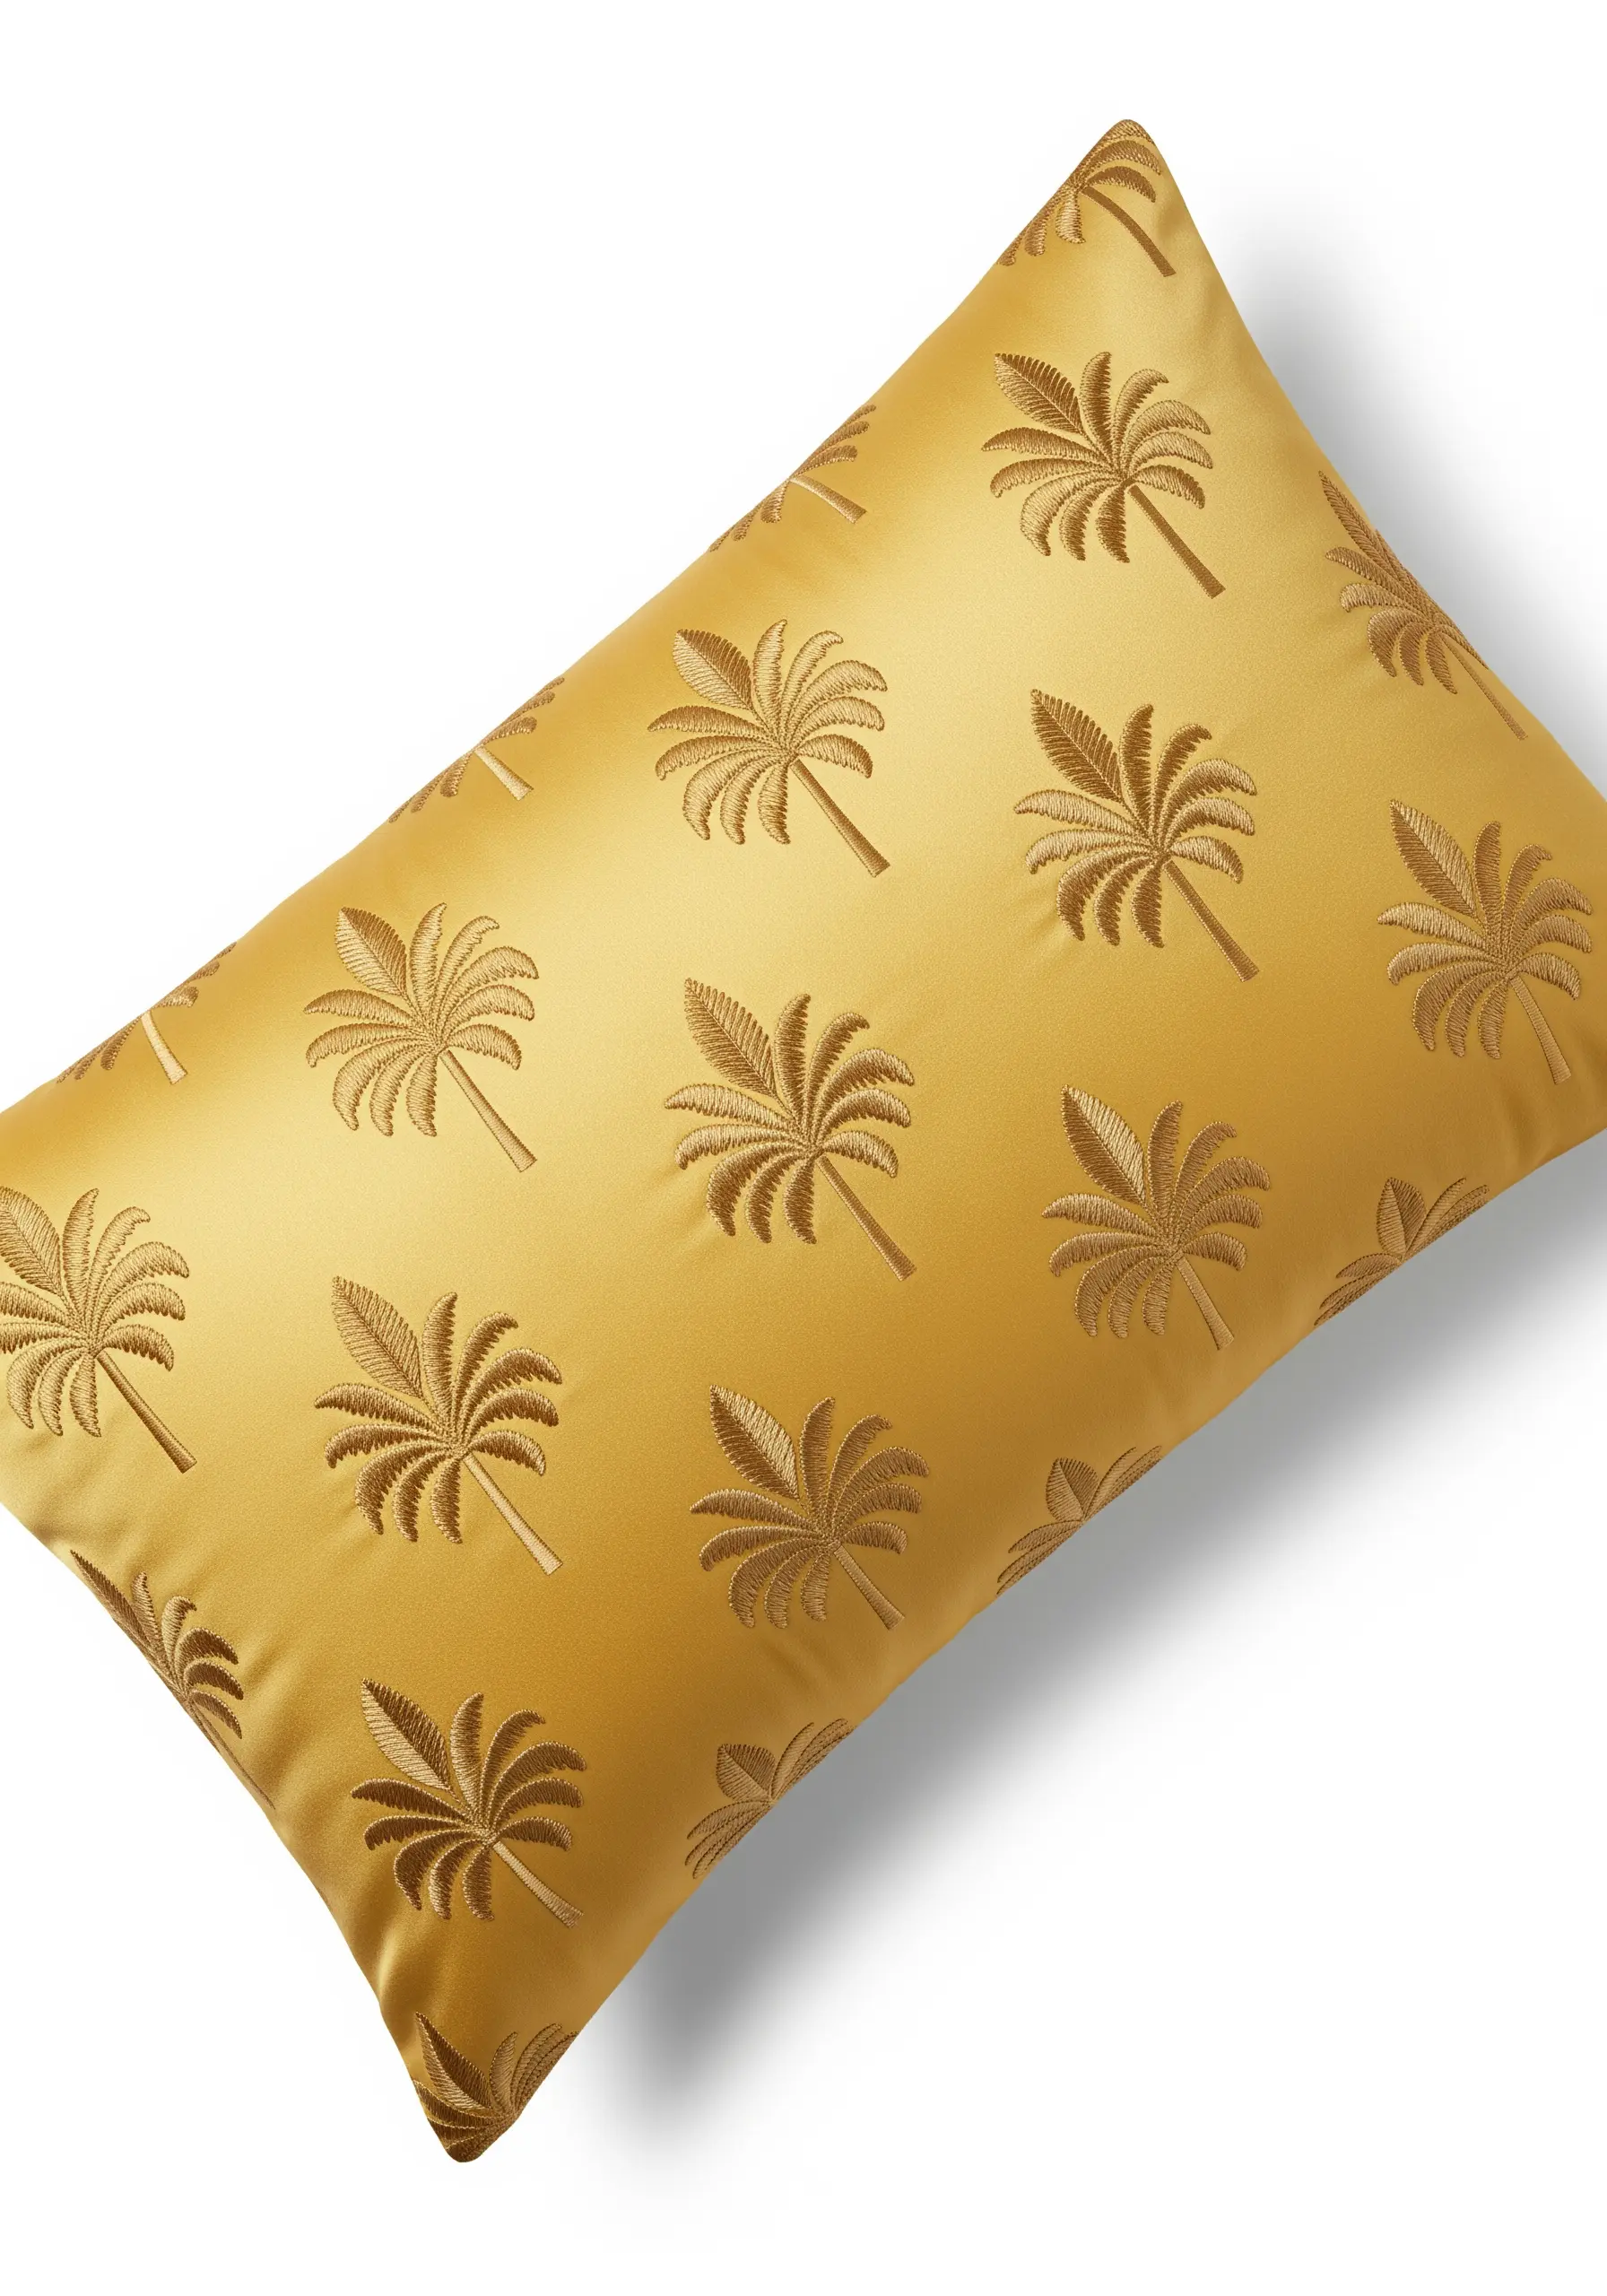
For an effect that whispers luxury rather than shouts it, explore tone-on-tone embroidery.
Choose a thread that is only a few shades lighter or darker than your base fabric.
The design’s impact comes from the subtle interplay of light on the different textures—the sheen of the thread against the sheen of the satin.
Use a simple fishbone stitch for the palm fronds to create a sense of direction and movement within each small motif, adding to the textural interest.
31. A Royal Carriage in Delicate Line Art
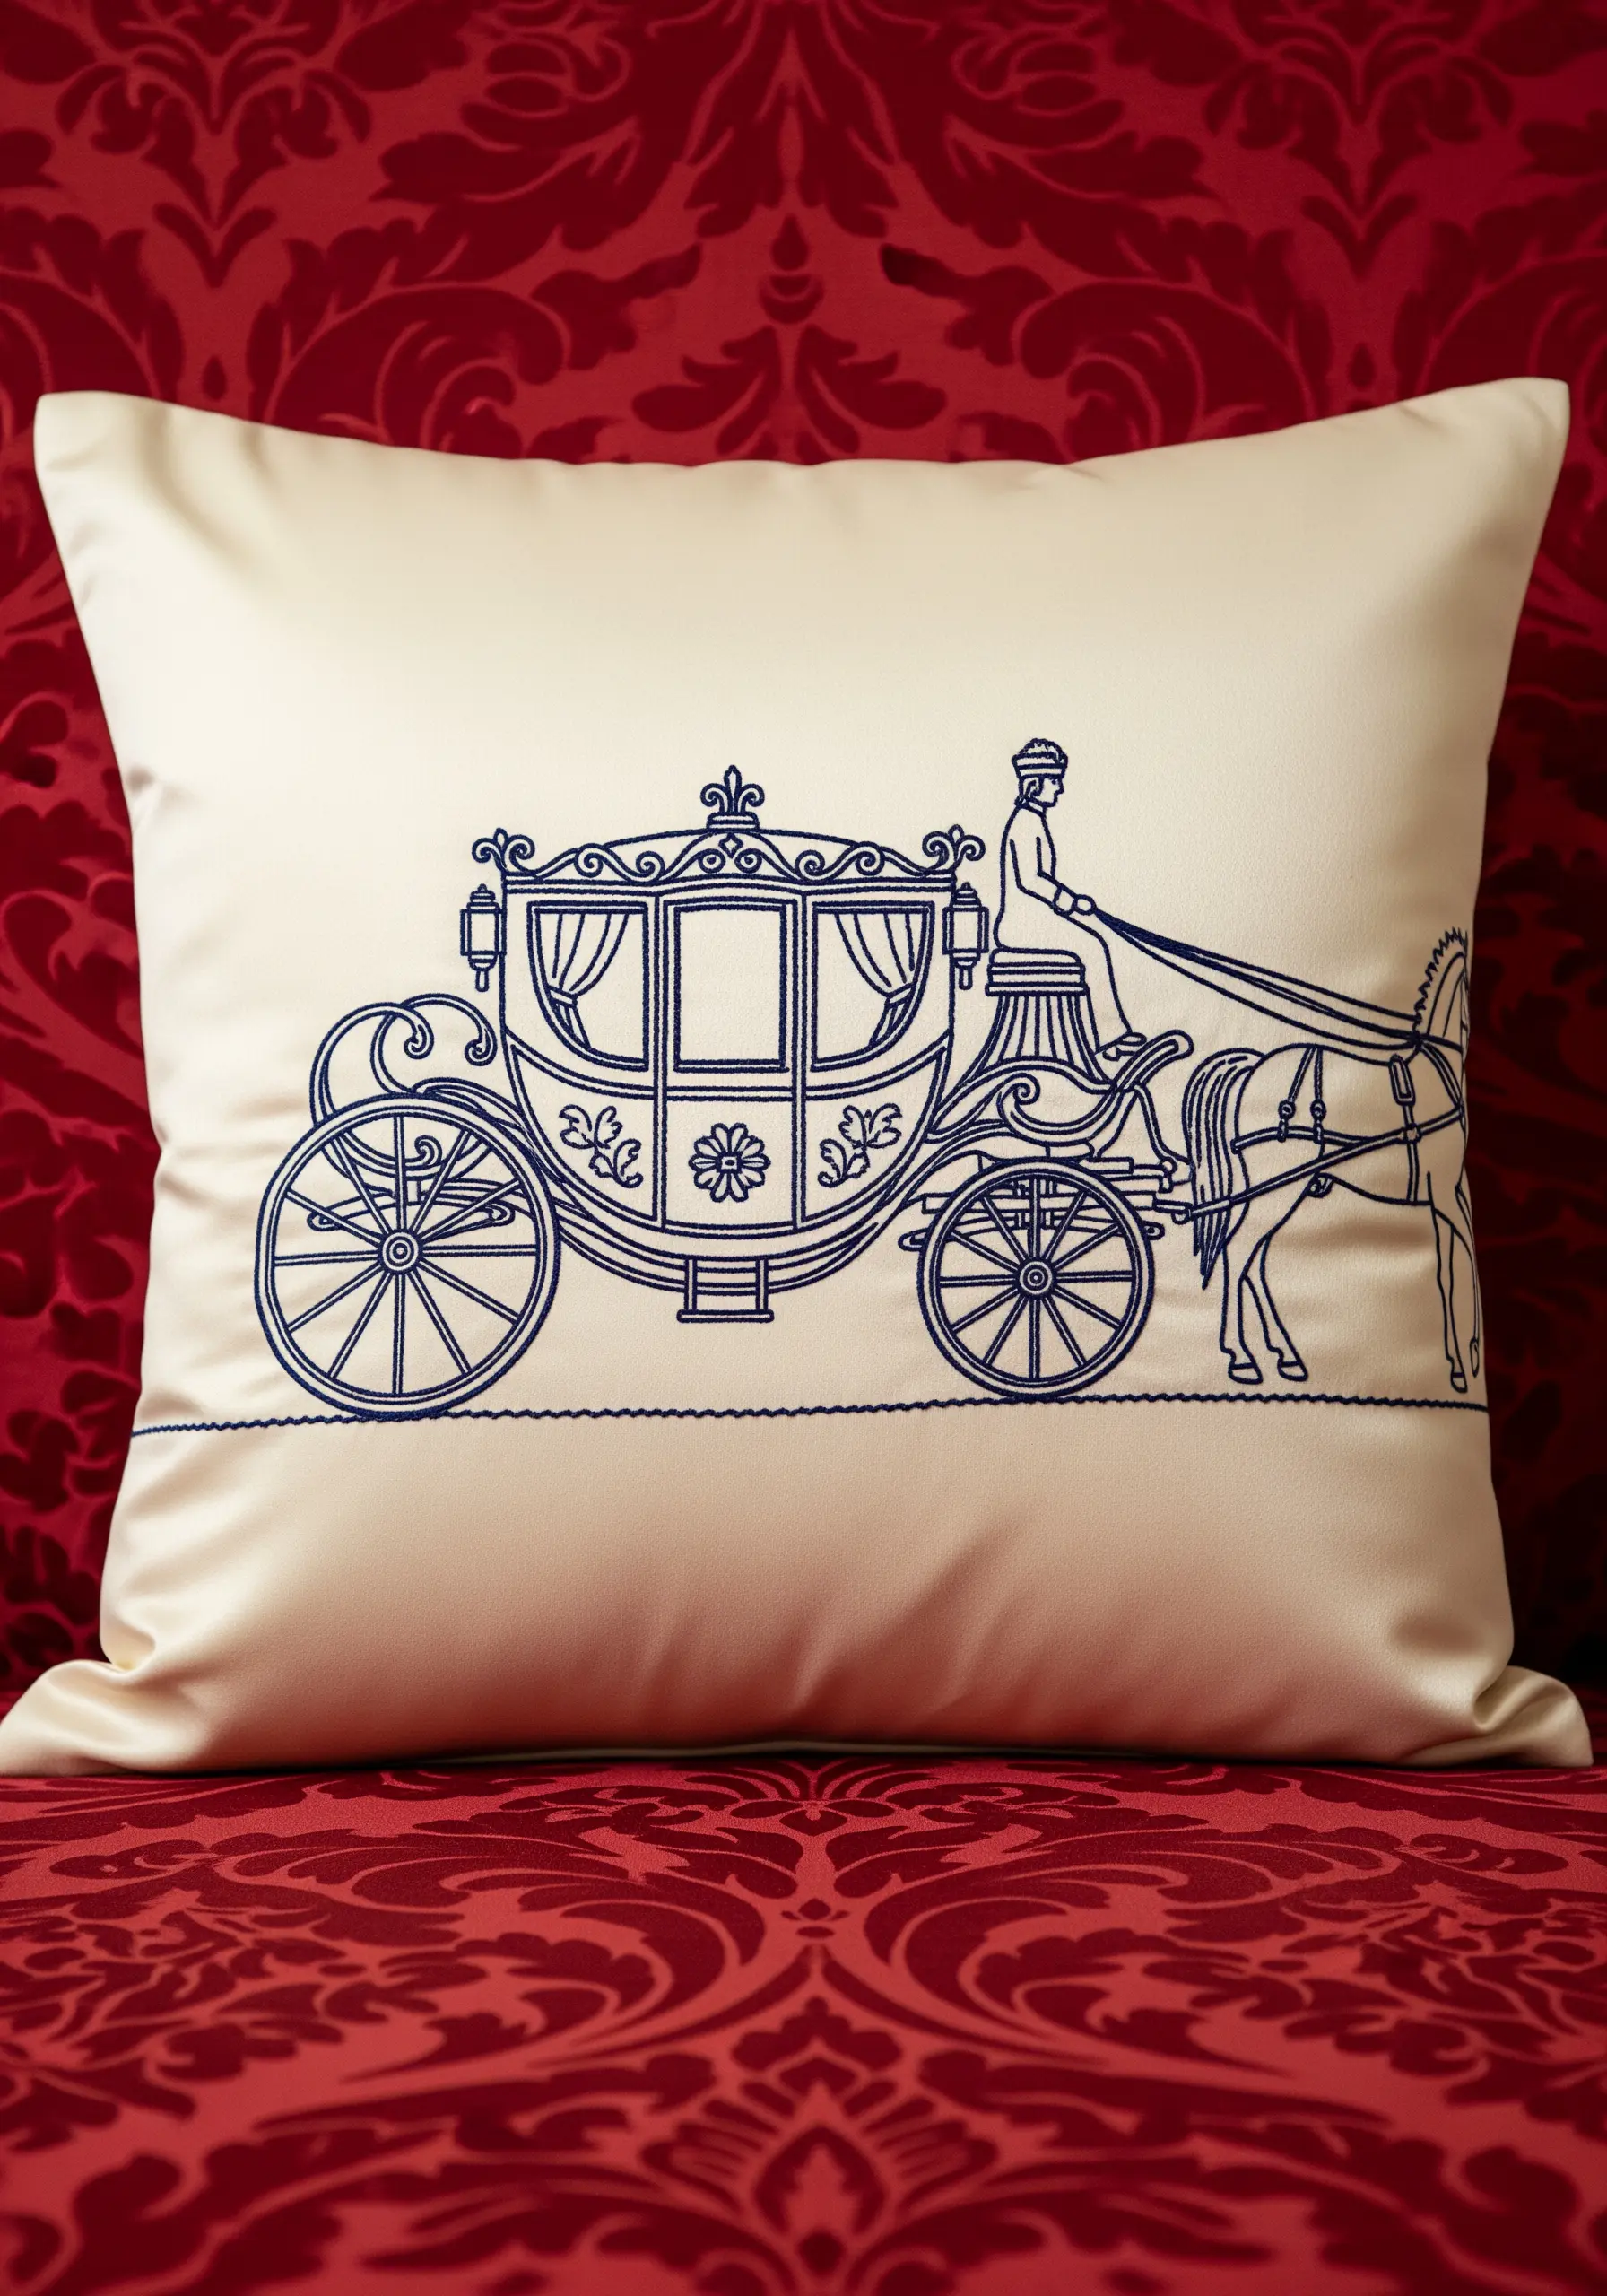
You can convey immense detail without overwhelming your design by using the elegance of line art.
The key to a successful line art piece is consistency in your stitch. Use a neat backstitch or stem stitch with two or three strands of floss to give the line presence without bulk.
Maintain the same stitch length throughout to create a smooth, unbroken line that flows around the intricate shapes.
This technique allows for complex subjects to feel light and uncluttered, a perfect example of sophisticated minimal line art embroidery.


