

A blank hoop of fabric is not an empty space to be filled, but a quiet place for your hands and mind to meet. Think of your next sampler not as a test of skill, but as a conversation between needle, thread, and cloth.
Each stitch is a decision. A French knot can be a tiny seed or a bold flower bud. A satin stitch can be a glossy petal or a calm reflection on water. Your power lies not in knowing every stitch, but in understanding how to use a few stitches with intention.
In these botanical studies, you will find opportunities to slow down and observe. Notice how a change in thread weight adds depth, how the direction of a stitch suggests movement, and how a surprising color choice can bring a simple leaf to life. This is where your unique artistry begins.
1. Render Lavender with Dimensional Knots
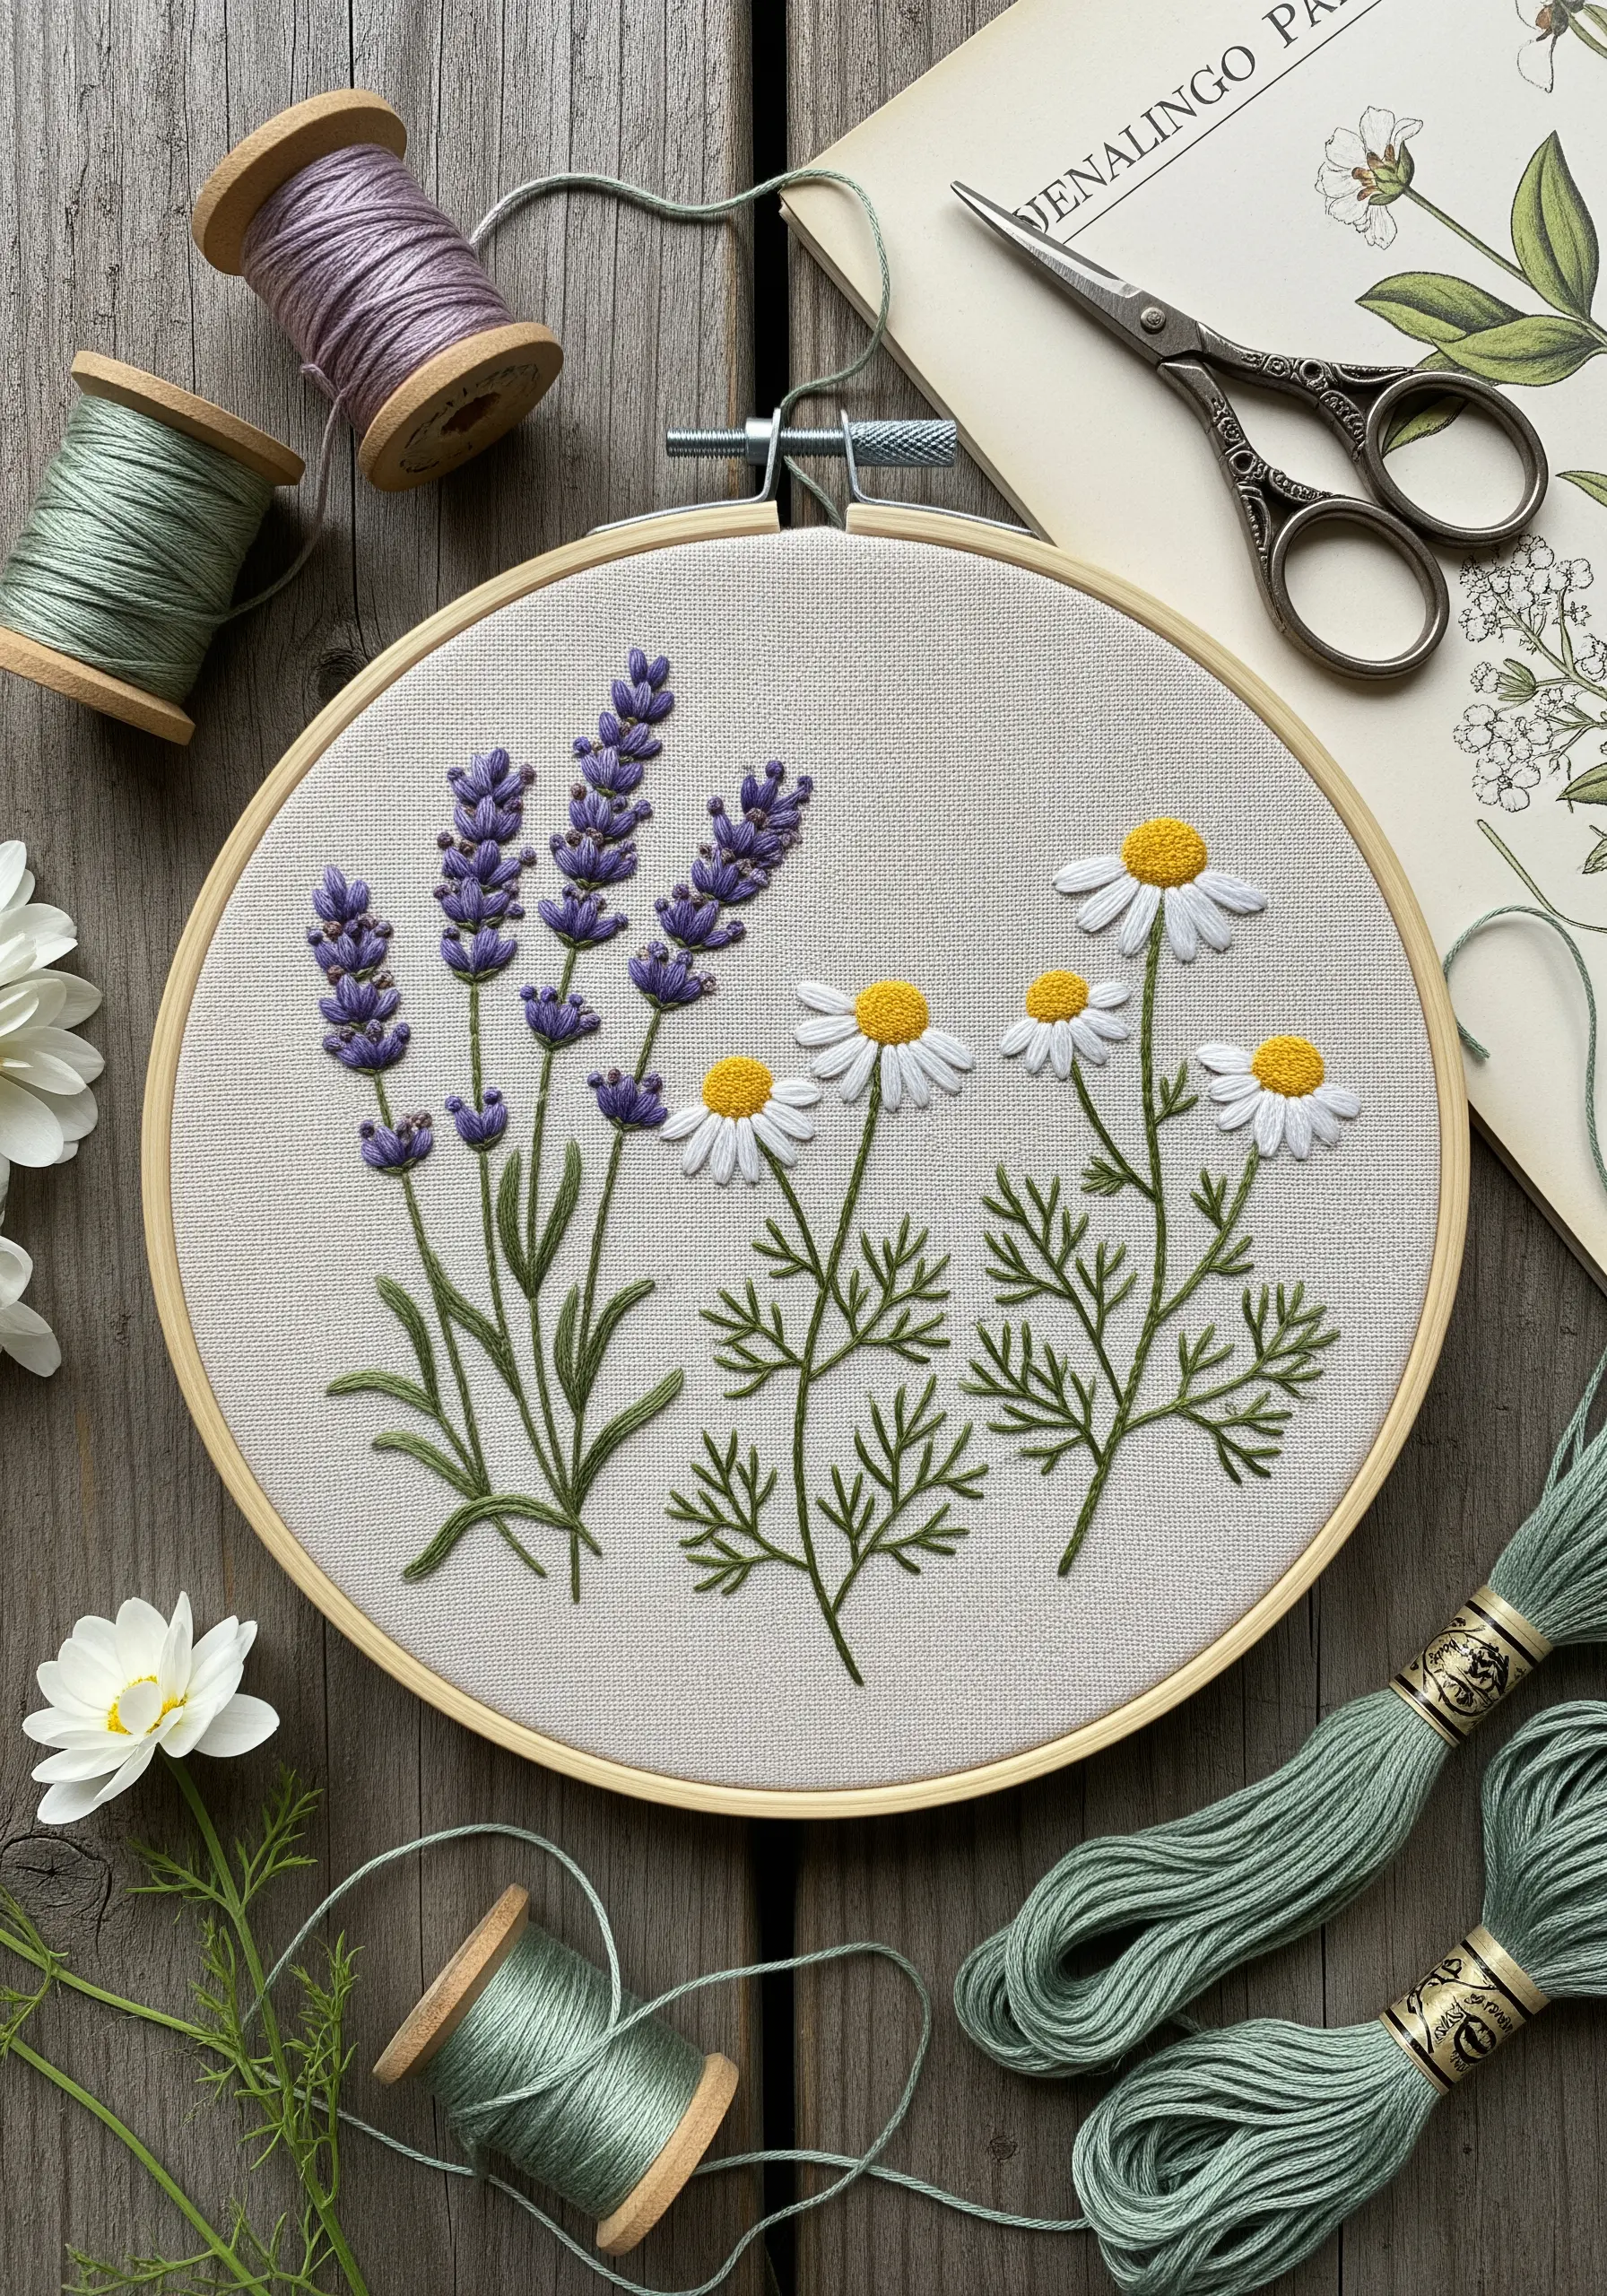
Give your lavender sprigs a lifelike, plush texture by replacing simple straight stitches with French knots or bullion knots for the tiny flower buds.
Use two strands of a medium purple for the base knots, then add a few knots with a single strand of a lighter lavender on top to create subtle highlights.
For the chamomile, use a padded satin stitch for the white petals to make them pop against the fabric, creating a beautiful textural contrast with the lavender.
This technique moves beyond flat color-filling and invites the viewer to appreciate the tactile quality of your work.
2. Master Realistic Shading on Dark Fabric
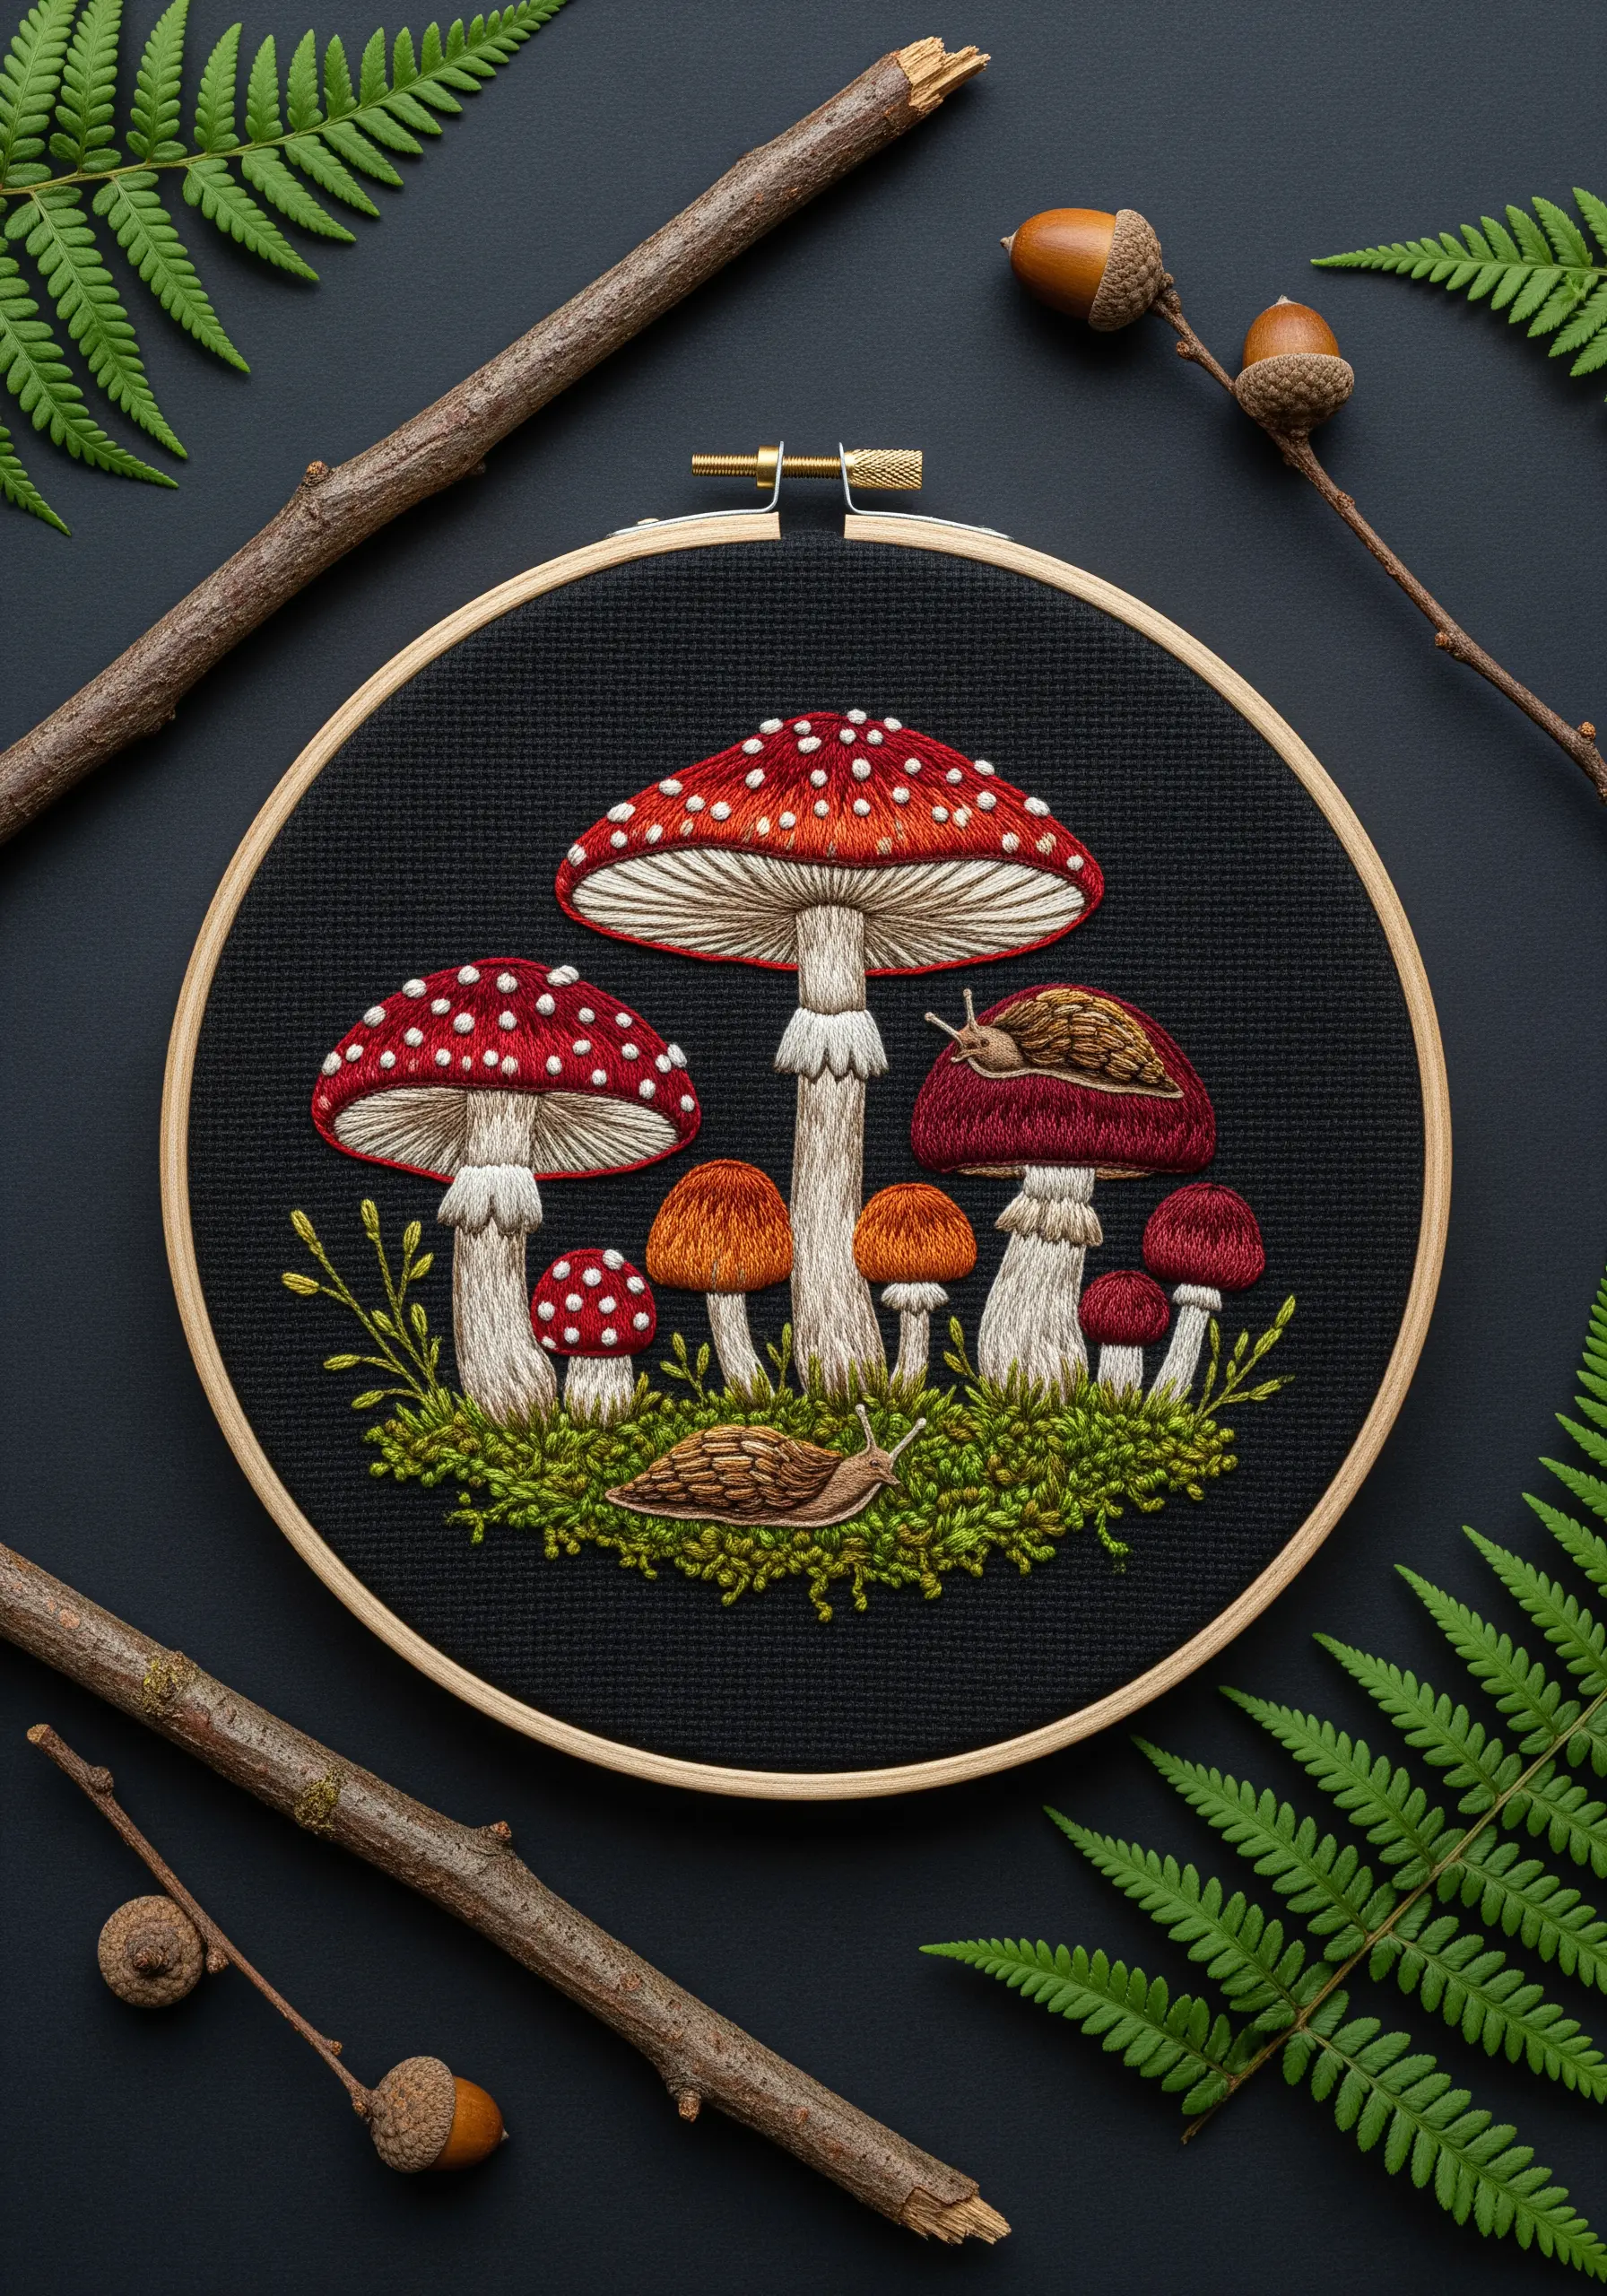
Make your motifs glow by stitching on black or navy Aida cloth, which forces you to be intentional with every highlight and shadow.
For the mushroom caps, use a long-and-short stitch with three shades of red—from a deep crimson to a vibrant scarlet—to create a rounded, 3D effect.
Create a dense, mossy ground using clusters of French knots in various shades of green and olive; this adds depth and makes the mushrooms appear grounded in the scene.
The high contrast of bright thread on a dark background is a professional technique for creating dramatic, visually striking handmade wall art.
3. Compose a Dynamic Wildflower Meadow
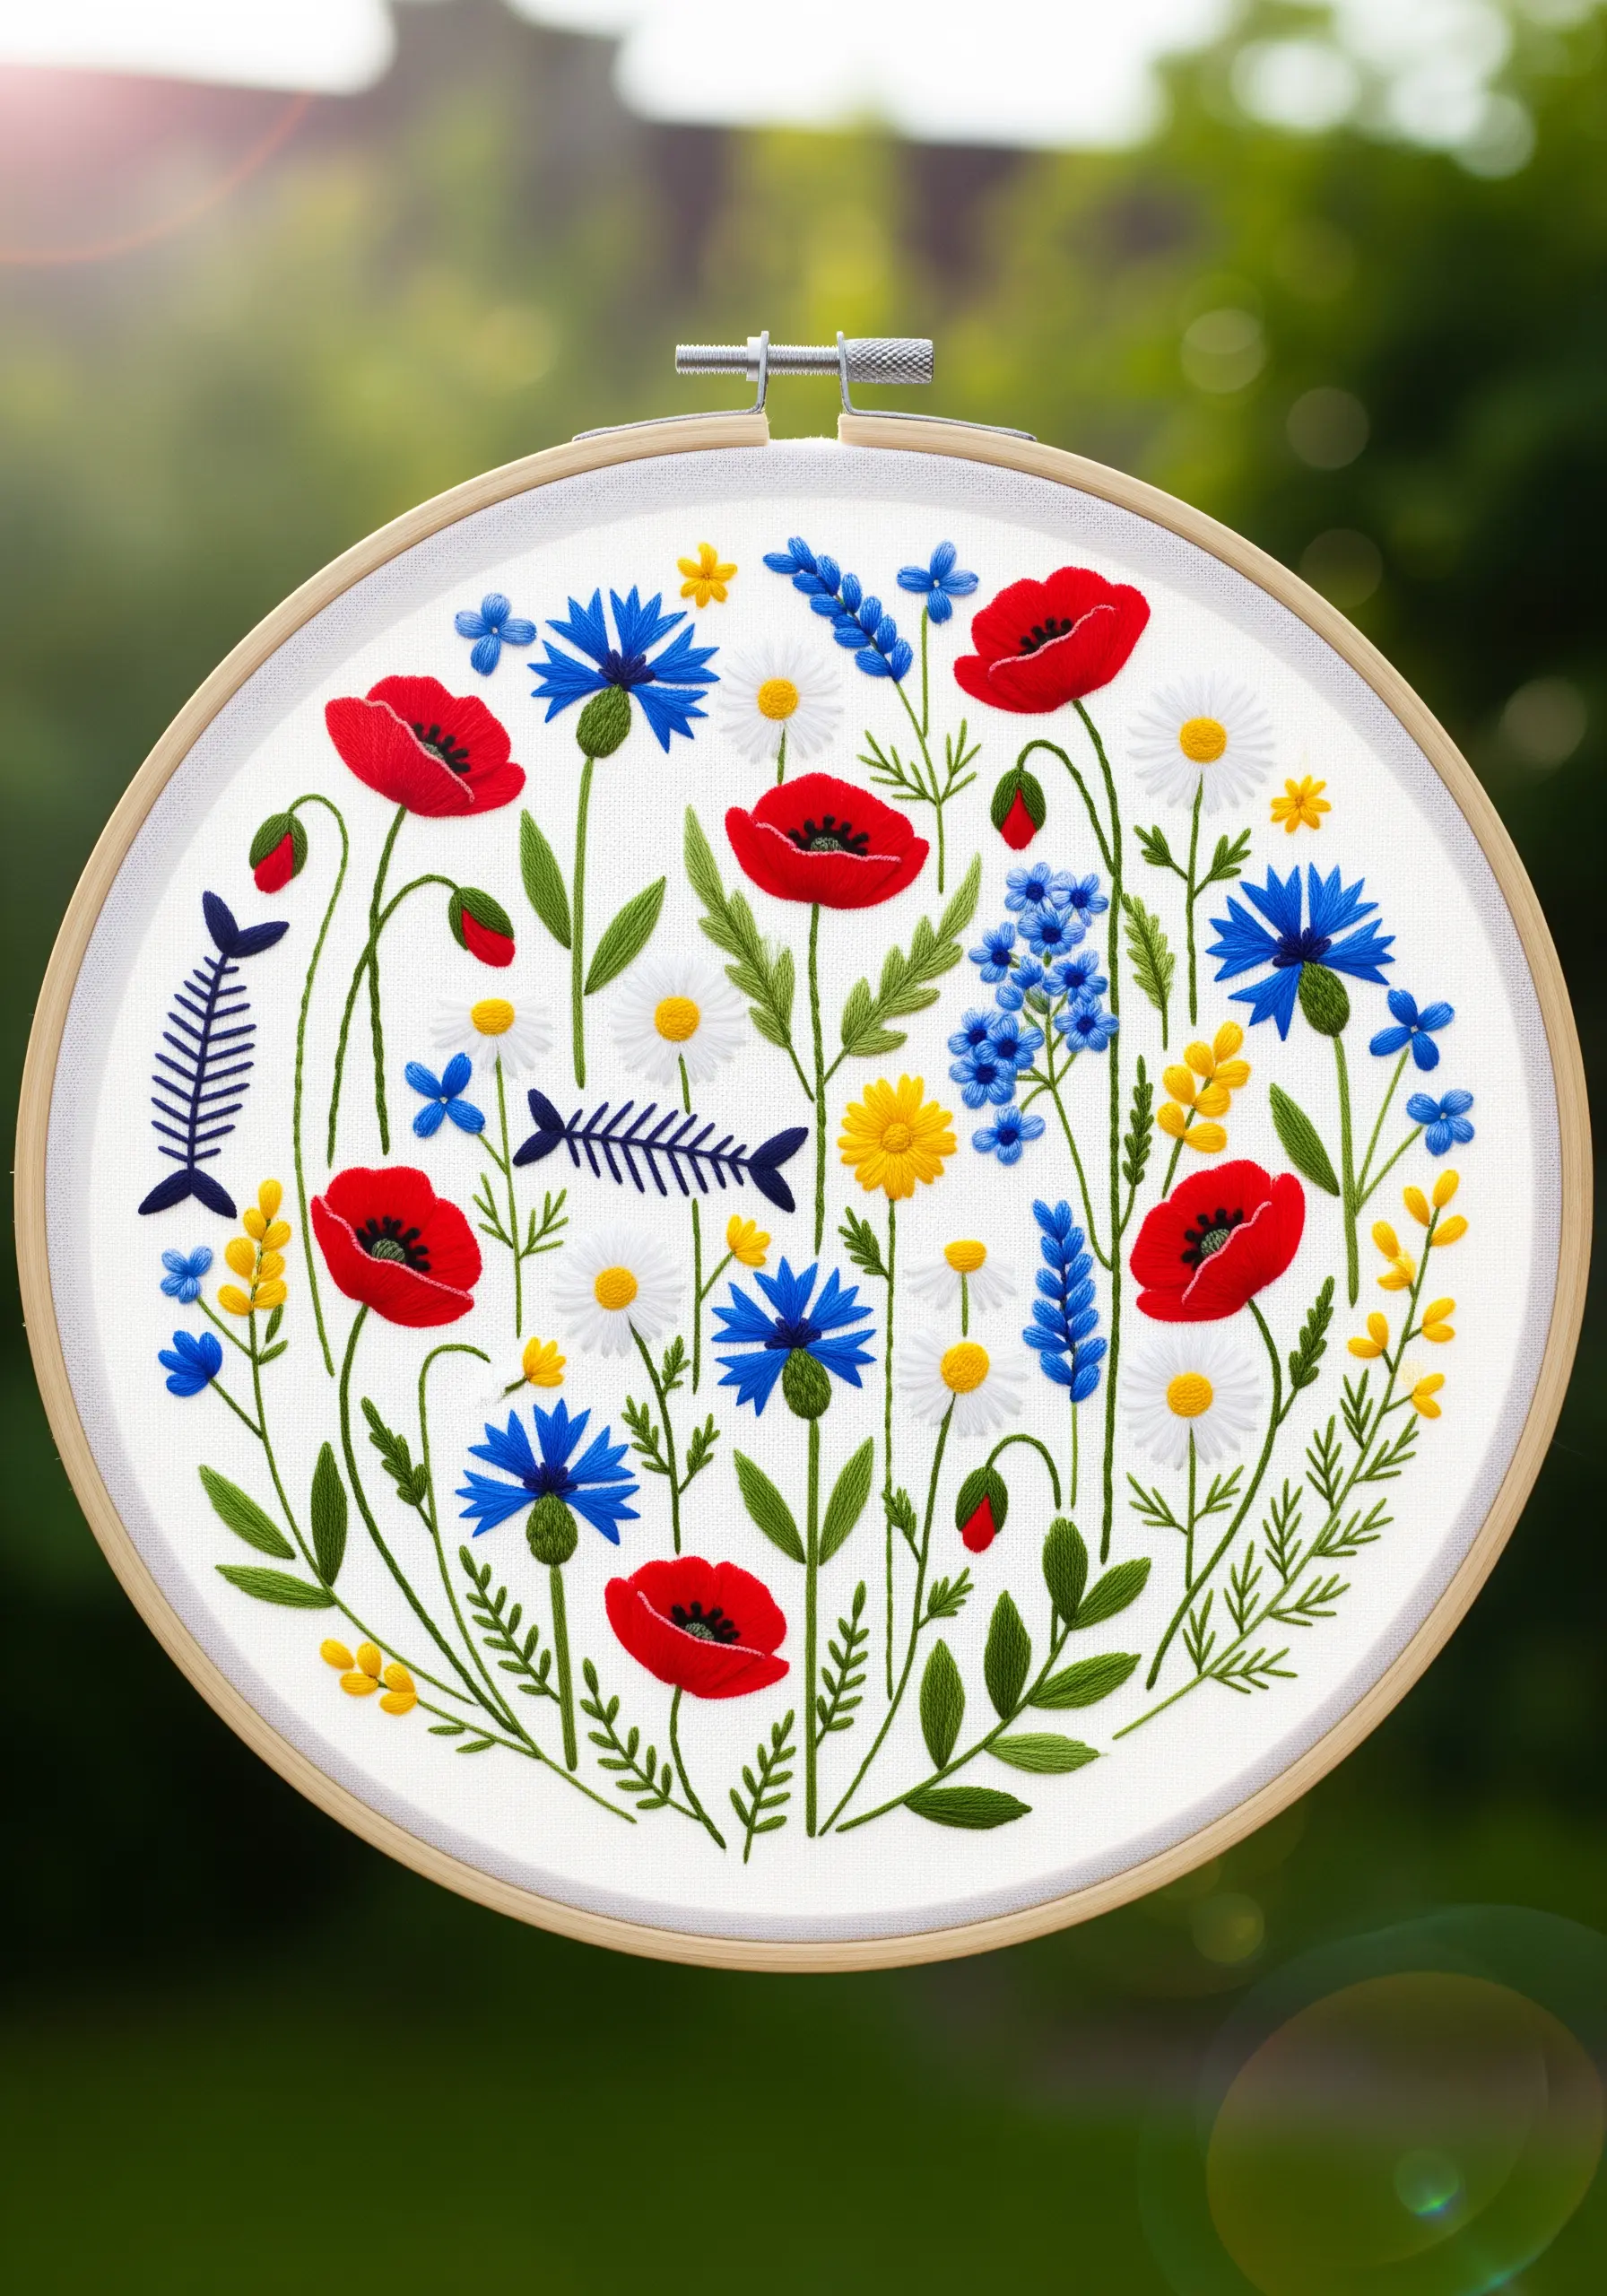
Create a sense of vibrant, untamed nature by varying the height and density of your flowers instead of arranging them in a predictable pattern.
Combine bold satin-stitched poppies with delicate lazy daisy cornflowers and tiny French knot fillers to create layers of visual interest.
Incorporate whimsical, non-botanical elements like the fish skeletons to add a touch of personality and surprise, turning a simple floral piece into a narrative.
This approach to composition ensures the viewer’s eye travels across the entire hoop, discovering new details with every glance.
4. Capture Delicate Ferns with Precision Stitches

Practice your control and consistency by stitching delicate fern fronds, where every stitch contributes to the overall form.
Use a fishbone stitch or fly stitch for the individual leaflets, ensuring each one is angled slightly downward from the central stem for a natural look.
For a modern twist, experiment with negative space by stitching only the tiny white tips on one of the ferns, suggesting frost or light.
Working on a colored fabric like this sage green cotton allows the deep green thread to feel both harmonious and distinct.
5. Blend Thread with Sheer Fabric for Ethereal Effects
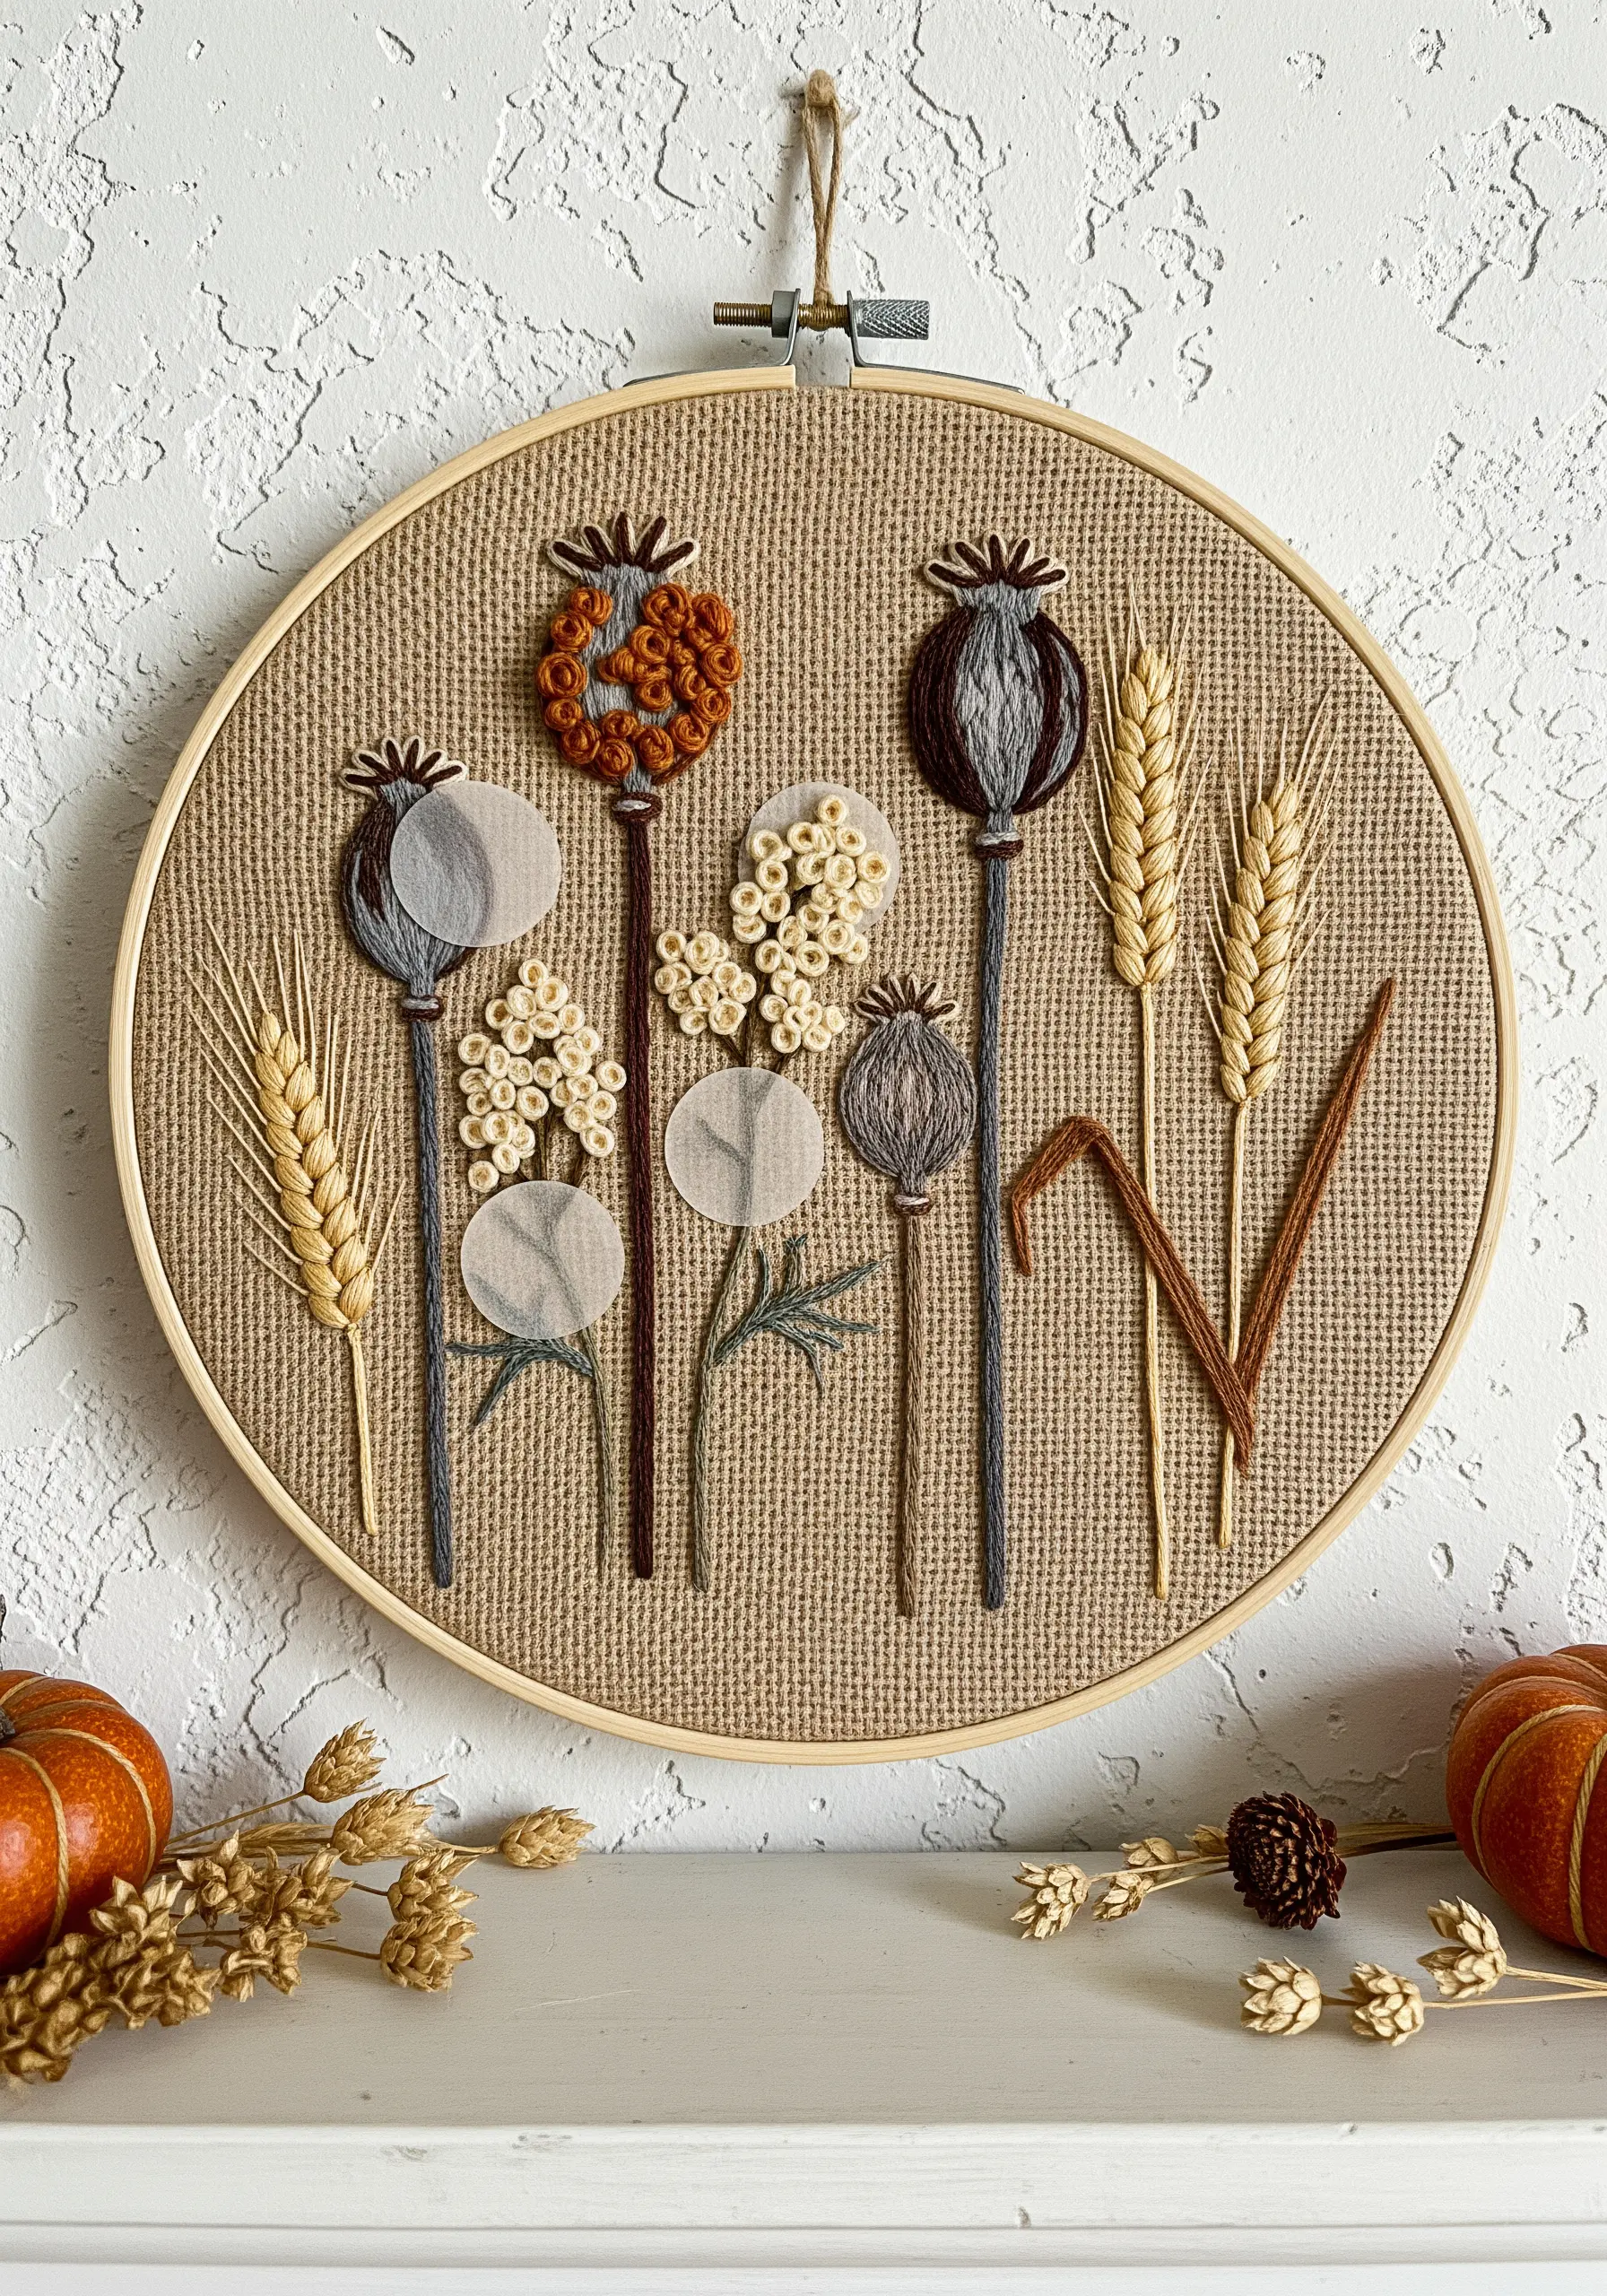
Elevate your botanical sampler by incorporating mixed-media elements, like using sheer organza for the poppy seed heads.
First, stitch the outline of the pod, then lay a small piece of organza over the shape and secure it with tiny running stitches before trimming the excess.
The transparency of the fabric creates a delicate, ghostly effect that thread alone cannot replicate, adding a layer of sophistication.
Stitching on a rustic fabric like burlap or linen enhances the earthy aesthetic and provides a wonderfully tactile background for your threads.
6. Design a Technical Leaf Stitch Sampler
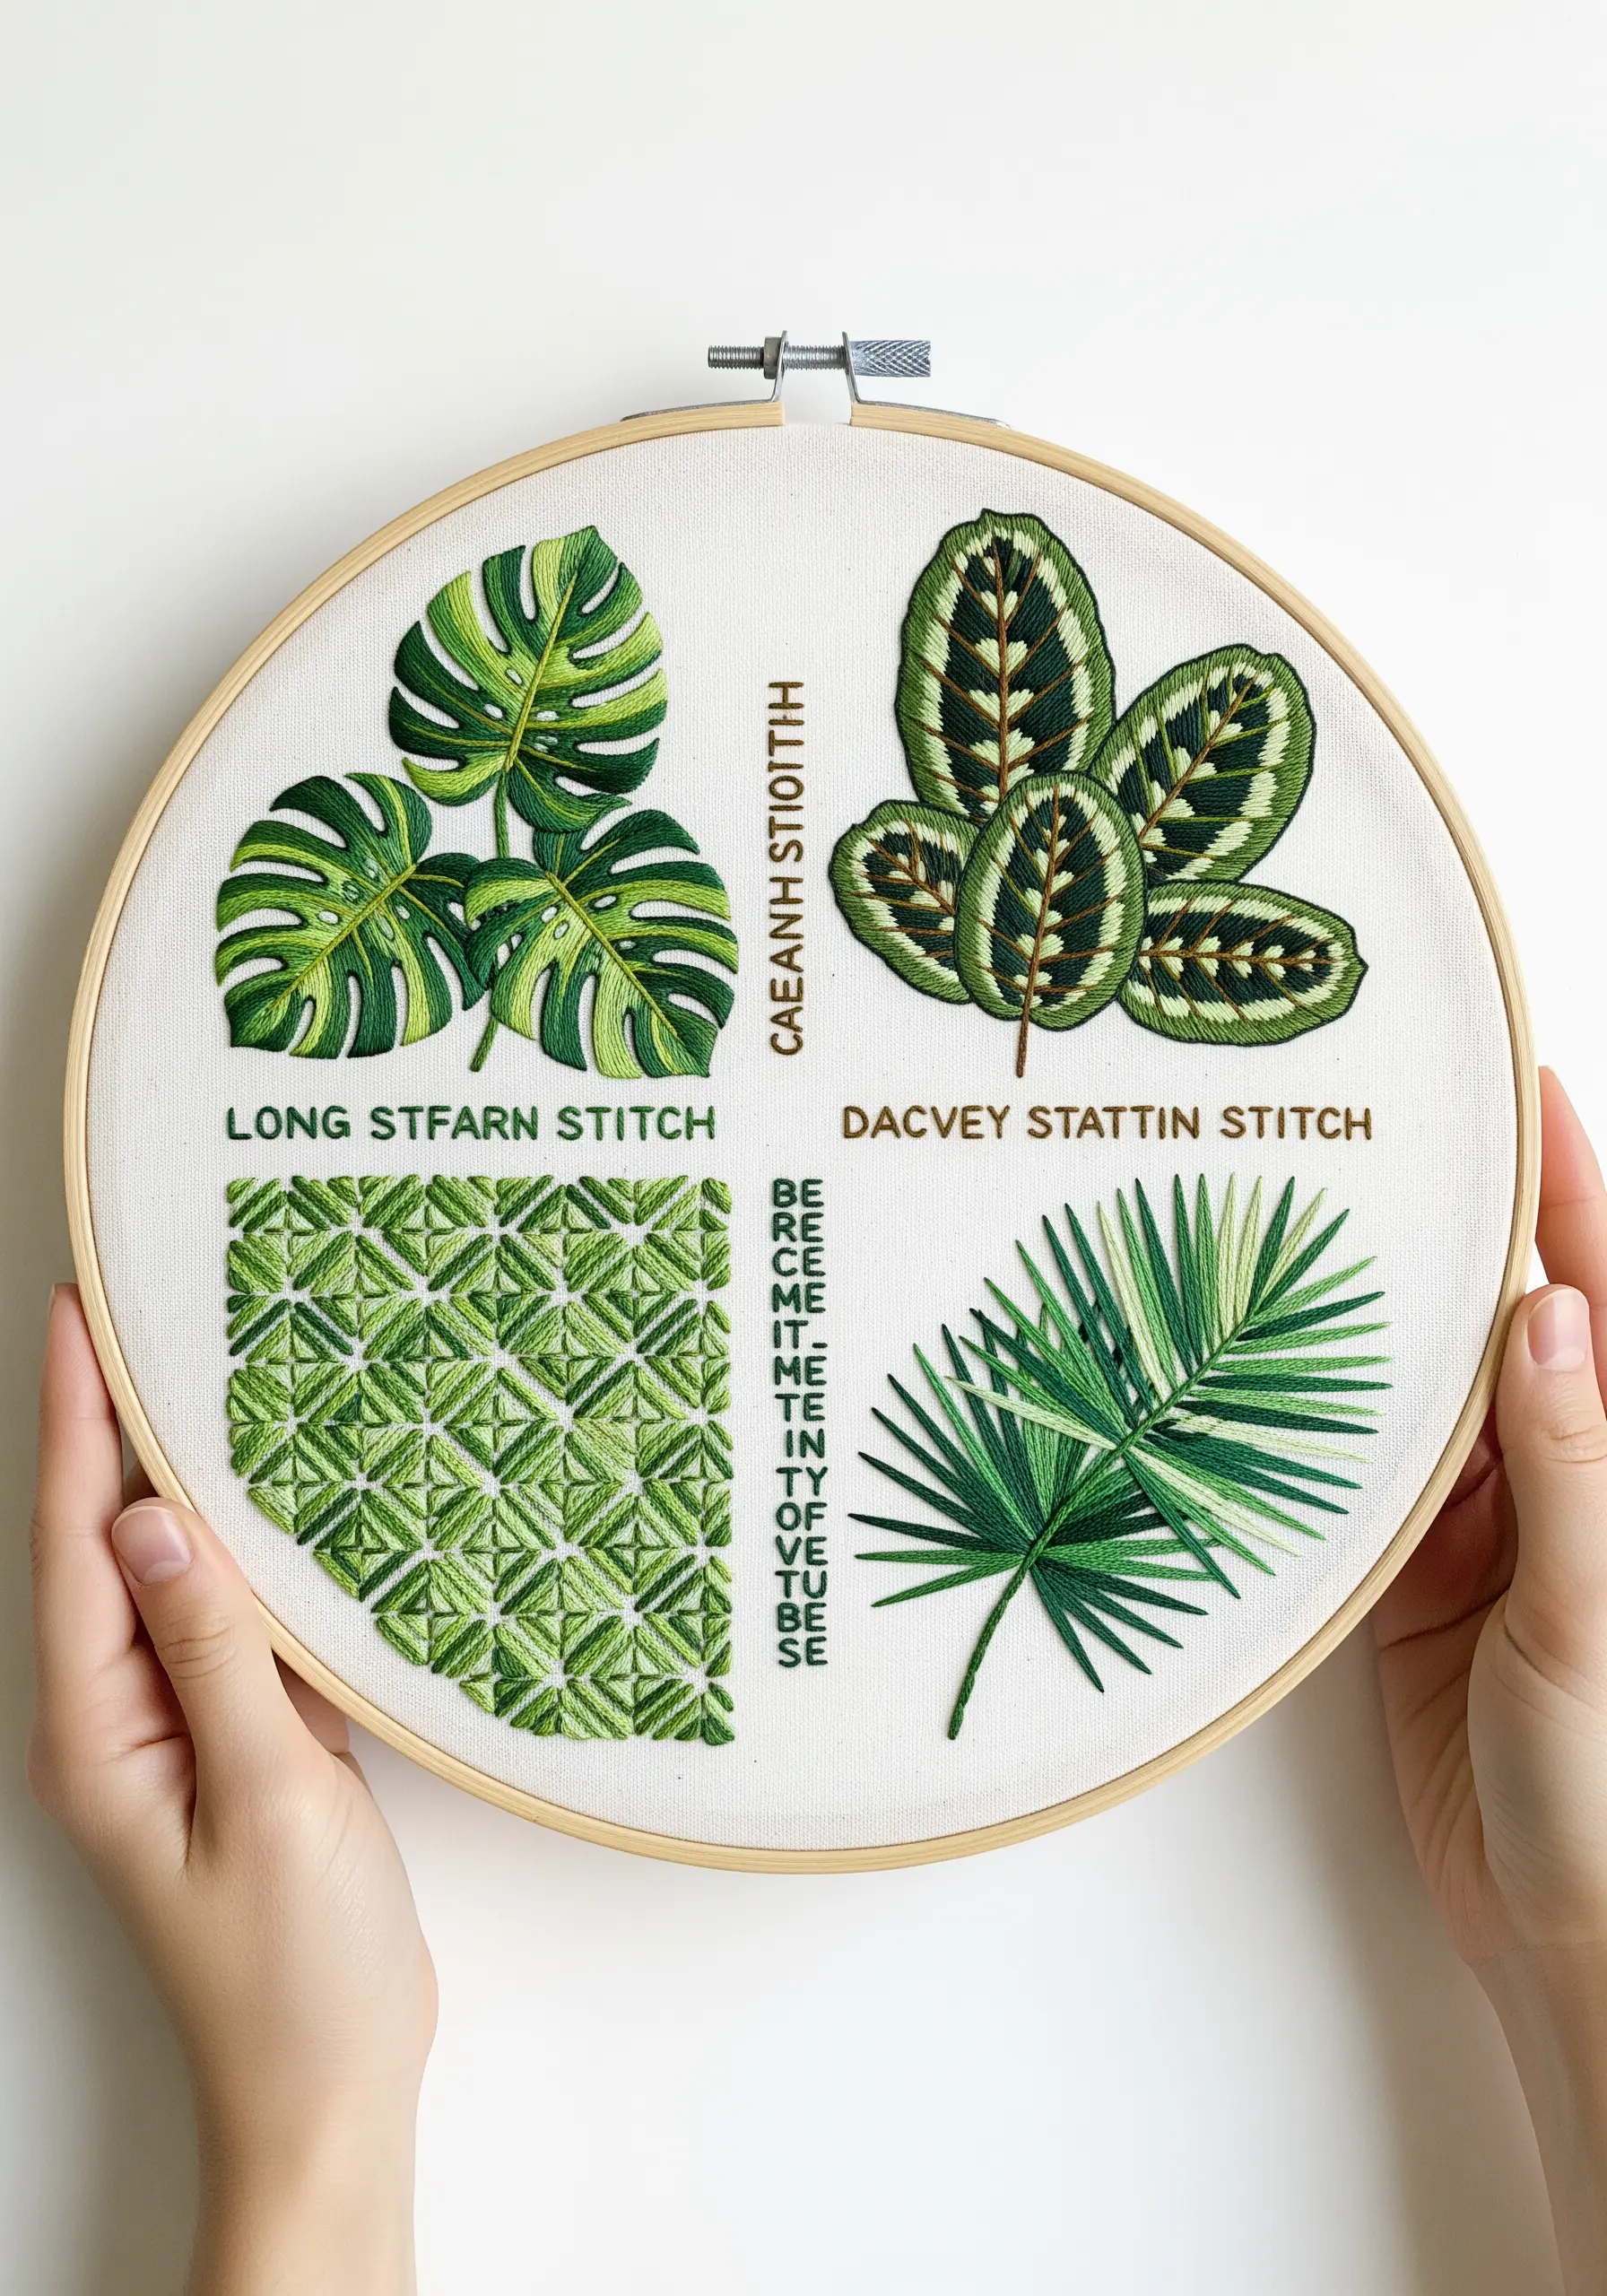
Dedicate a hoop to practicing four distinct leaf-filling techniques to see how stitch choice dramatically alters texture and realism.
Try a long-and-short stitch for the Monstera to achieve smooth color blending, and a directional satin stitch for the Calathea to mimic its sharp, graphic veins.
Explore geometric fills, like the bargello-inspired pattern, to understand how structured stitching can represent organic forms in an abstract way.
This exercise builds your stitch vocabulary and helps you make more intentional choices in future minimal botanical patterns.
7. Weave in Metallics for a Touch of Magic
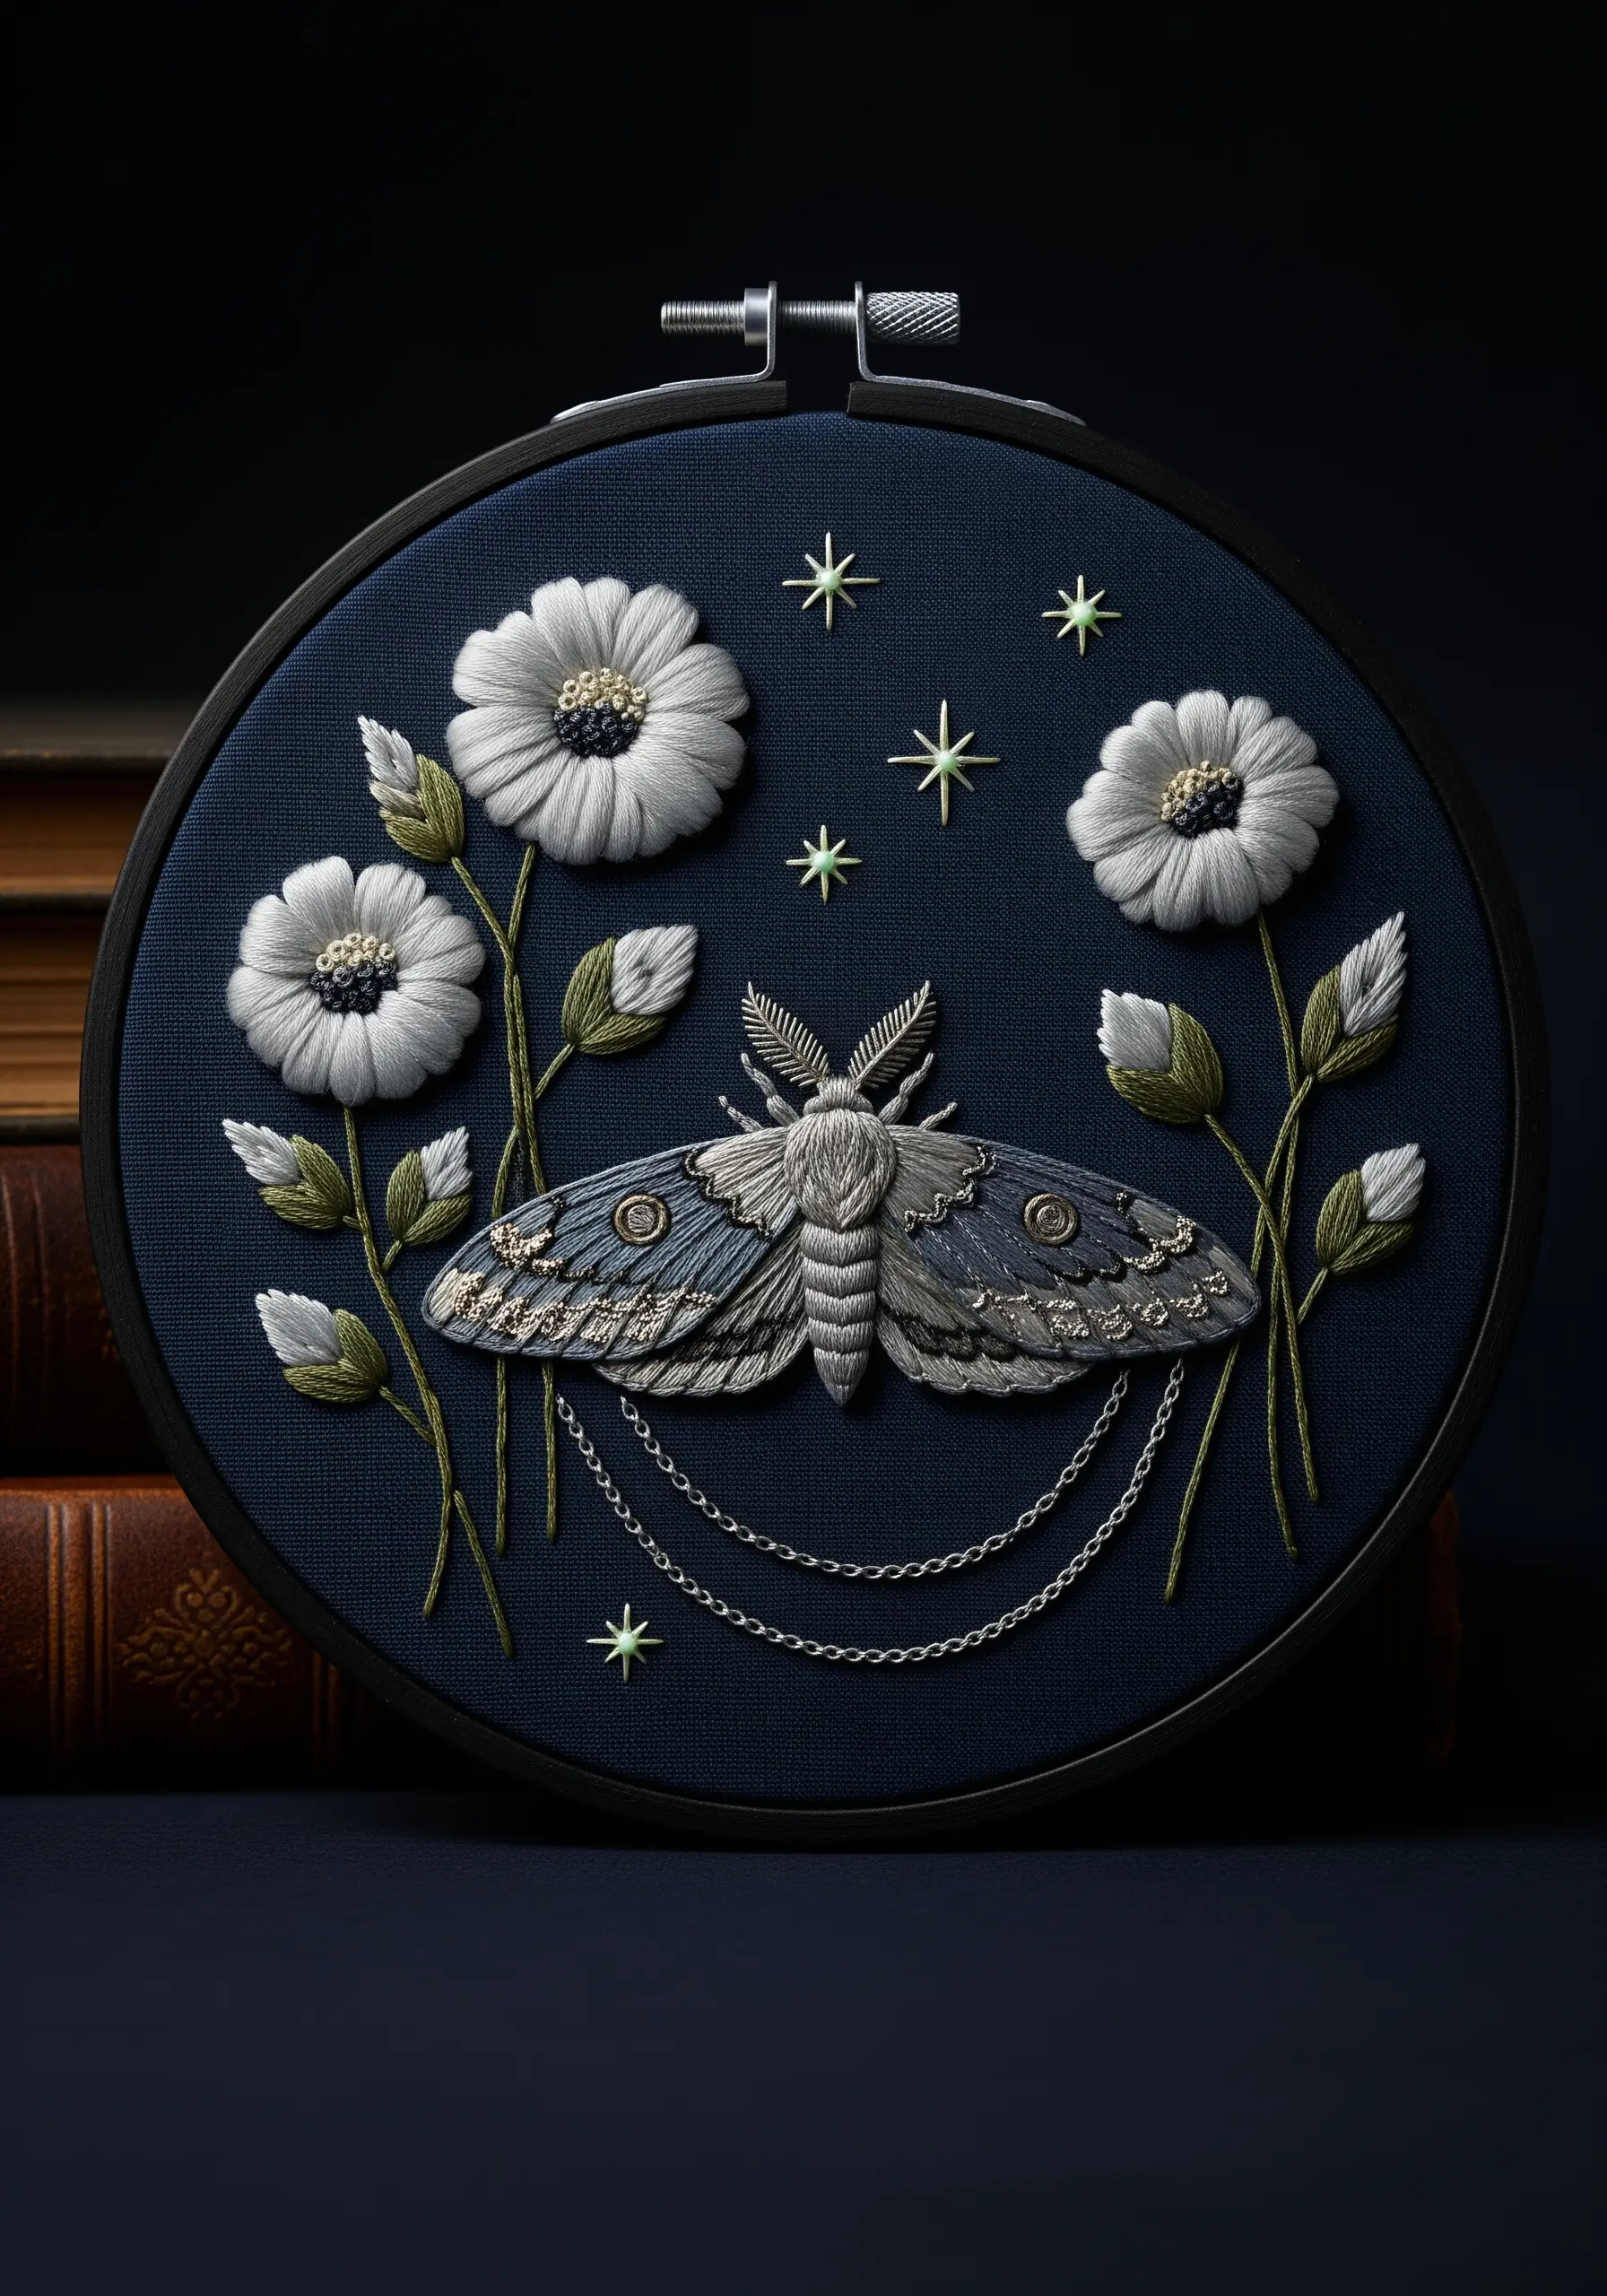
Introduce a single metallic thread to an otherwise matte composition to create a focal point that catches the light.
Use a fine gold or silver thread to outline the moth’s wings or to stitch the delicate chain details, which instantly elevates the piece from simple to sophisticated.
For the white flowers, use a padded satin stitch to give them a raised, sculptural quality that contrasts beautifully with the intricate, flat stitching on the moth.
This selective use of metallics adds a hint of luxury without overwhelming the design, making your work feel curated and precious.
8. Animate Your Scene with Directional Stitches

Bring your embroidery to life by adding small details that suggest movement and energy.
Use a simple dashed backstitch to create flight paths for the bees, guiding the viewer’s eye around the composition and connecting the different elements.
Stitch the coneflower petals using a detached chain stitch (lazy daisy) instead of a flat satin stitch; this gives each petal a subtle lift off the fabric, enhancing its three-dimensional feel.
The vibrant color palette on the bright blue fabric creates a cheerful, high-energy mood that perfectly complements the lively scene.
9. Create Calm with a Muted Coastal Palette
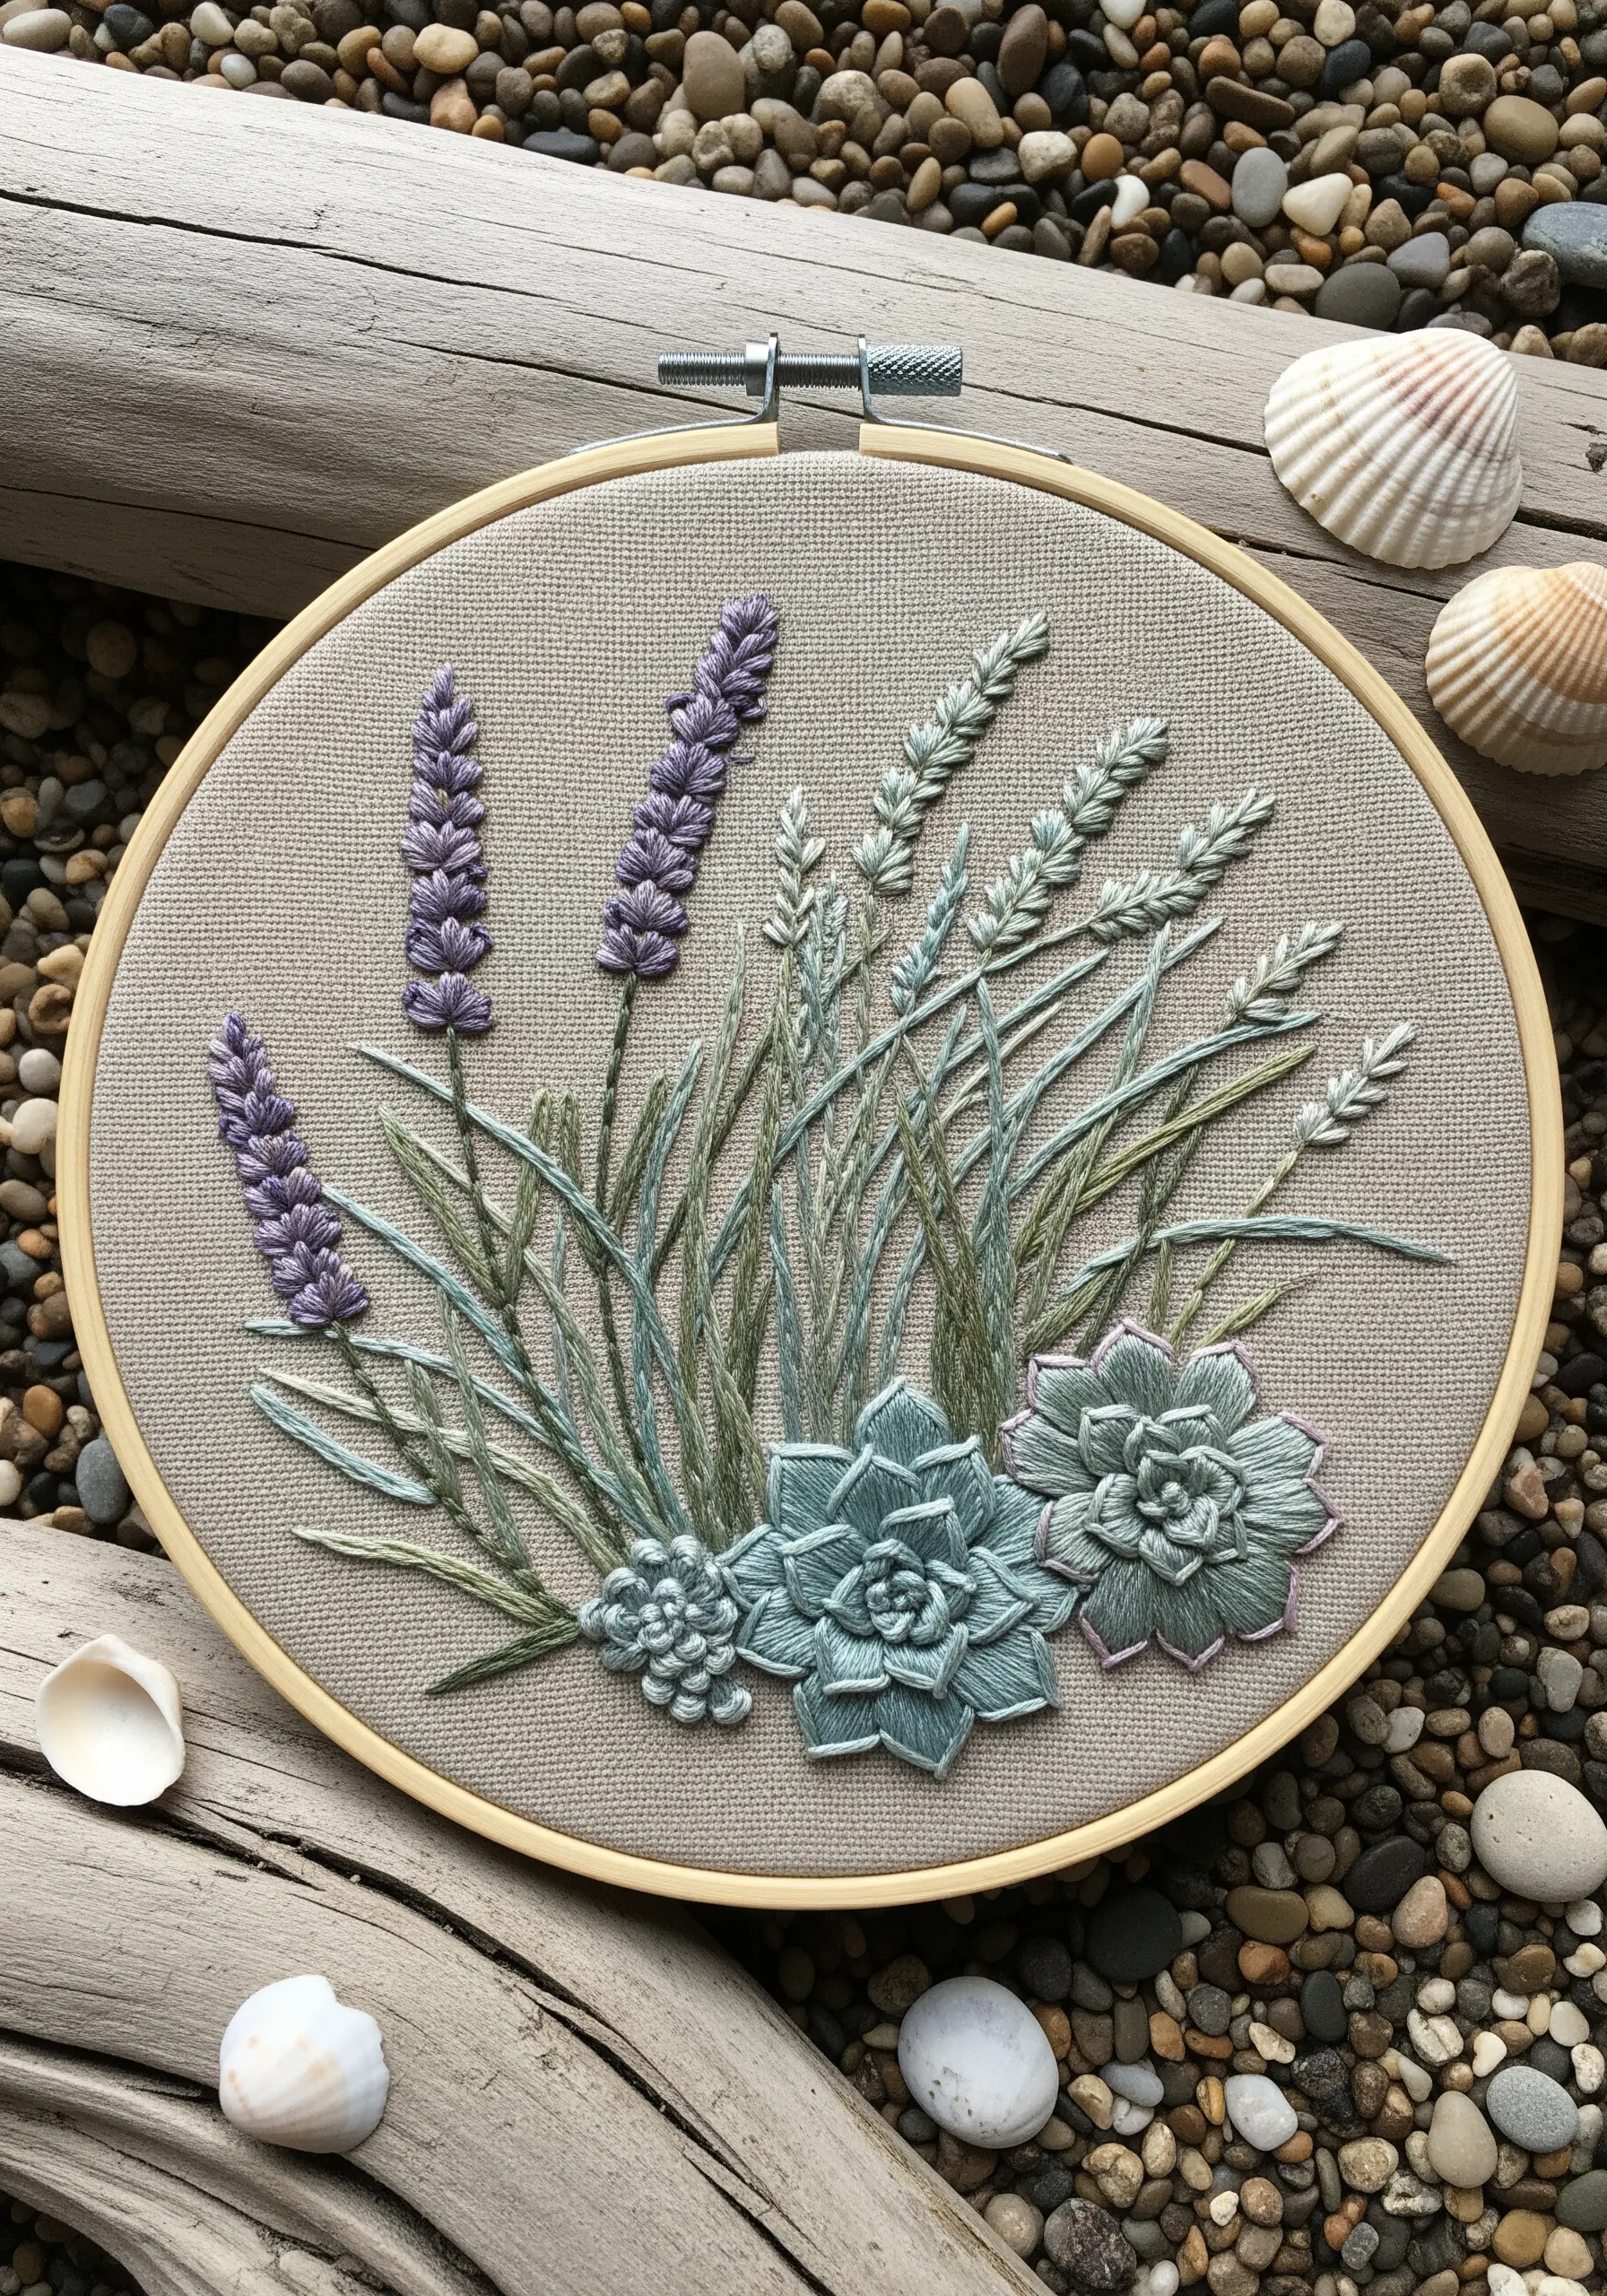
Explore the subtlety of a monochromatic or analogous color scheme to create a serene, harmonious design.
For the succulents, use long-and-short stitch with closely related shades of seafoam green and dusty blue to create soft, realistic gradients.
Vary the number of strands you use—from three or four for the lavender buds to a single strand for the delicate grass blades—to create texture and depth even with a limited palette.
This approach is perfect for creating coastal-vibe embroidery projects that feel soothing and sophisticated.
10. Build a Miniature Woodland Scene
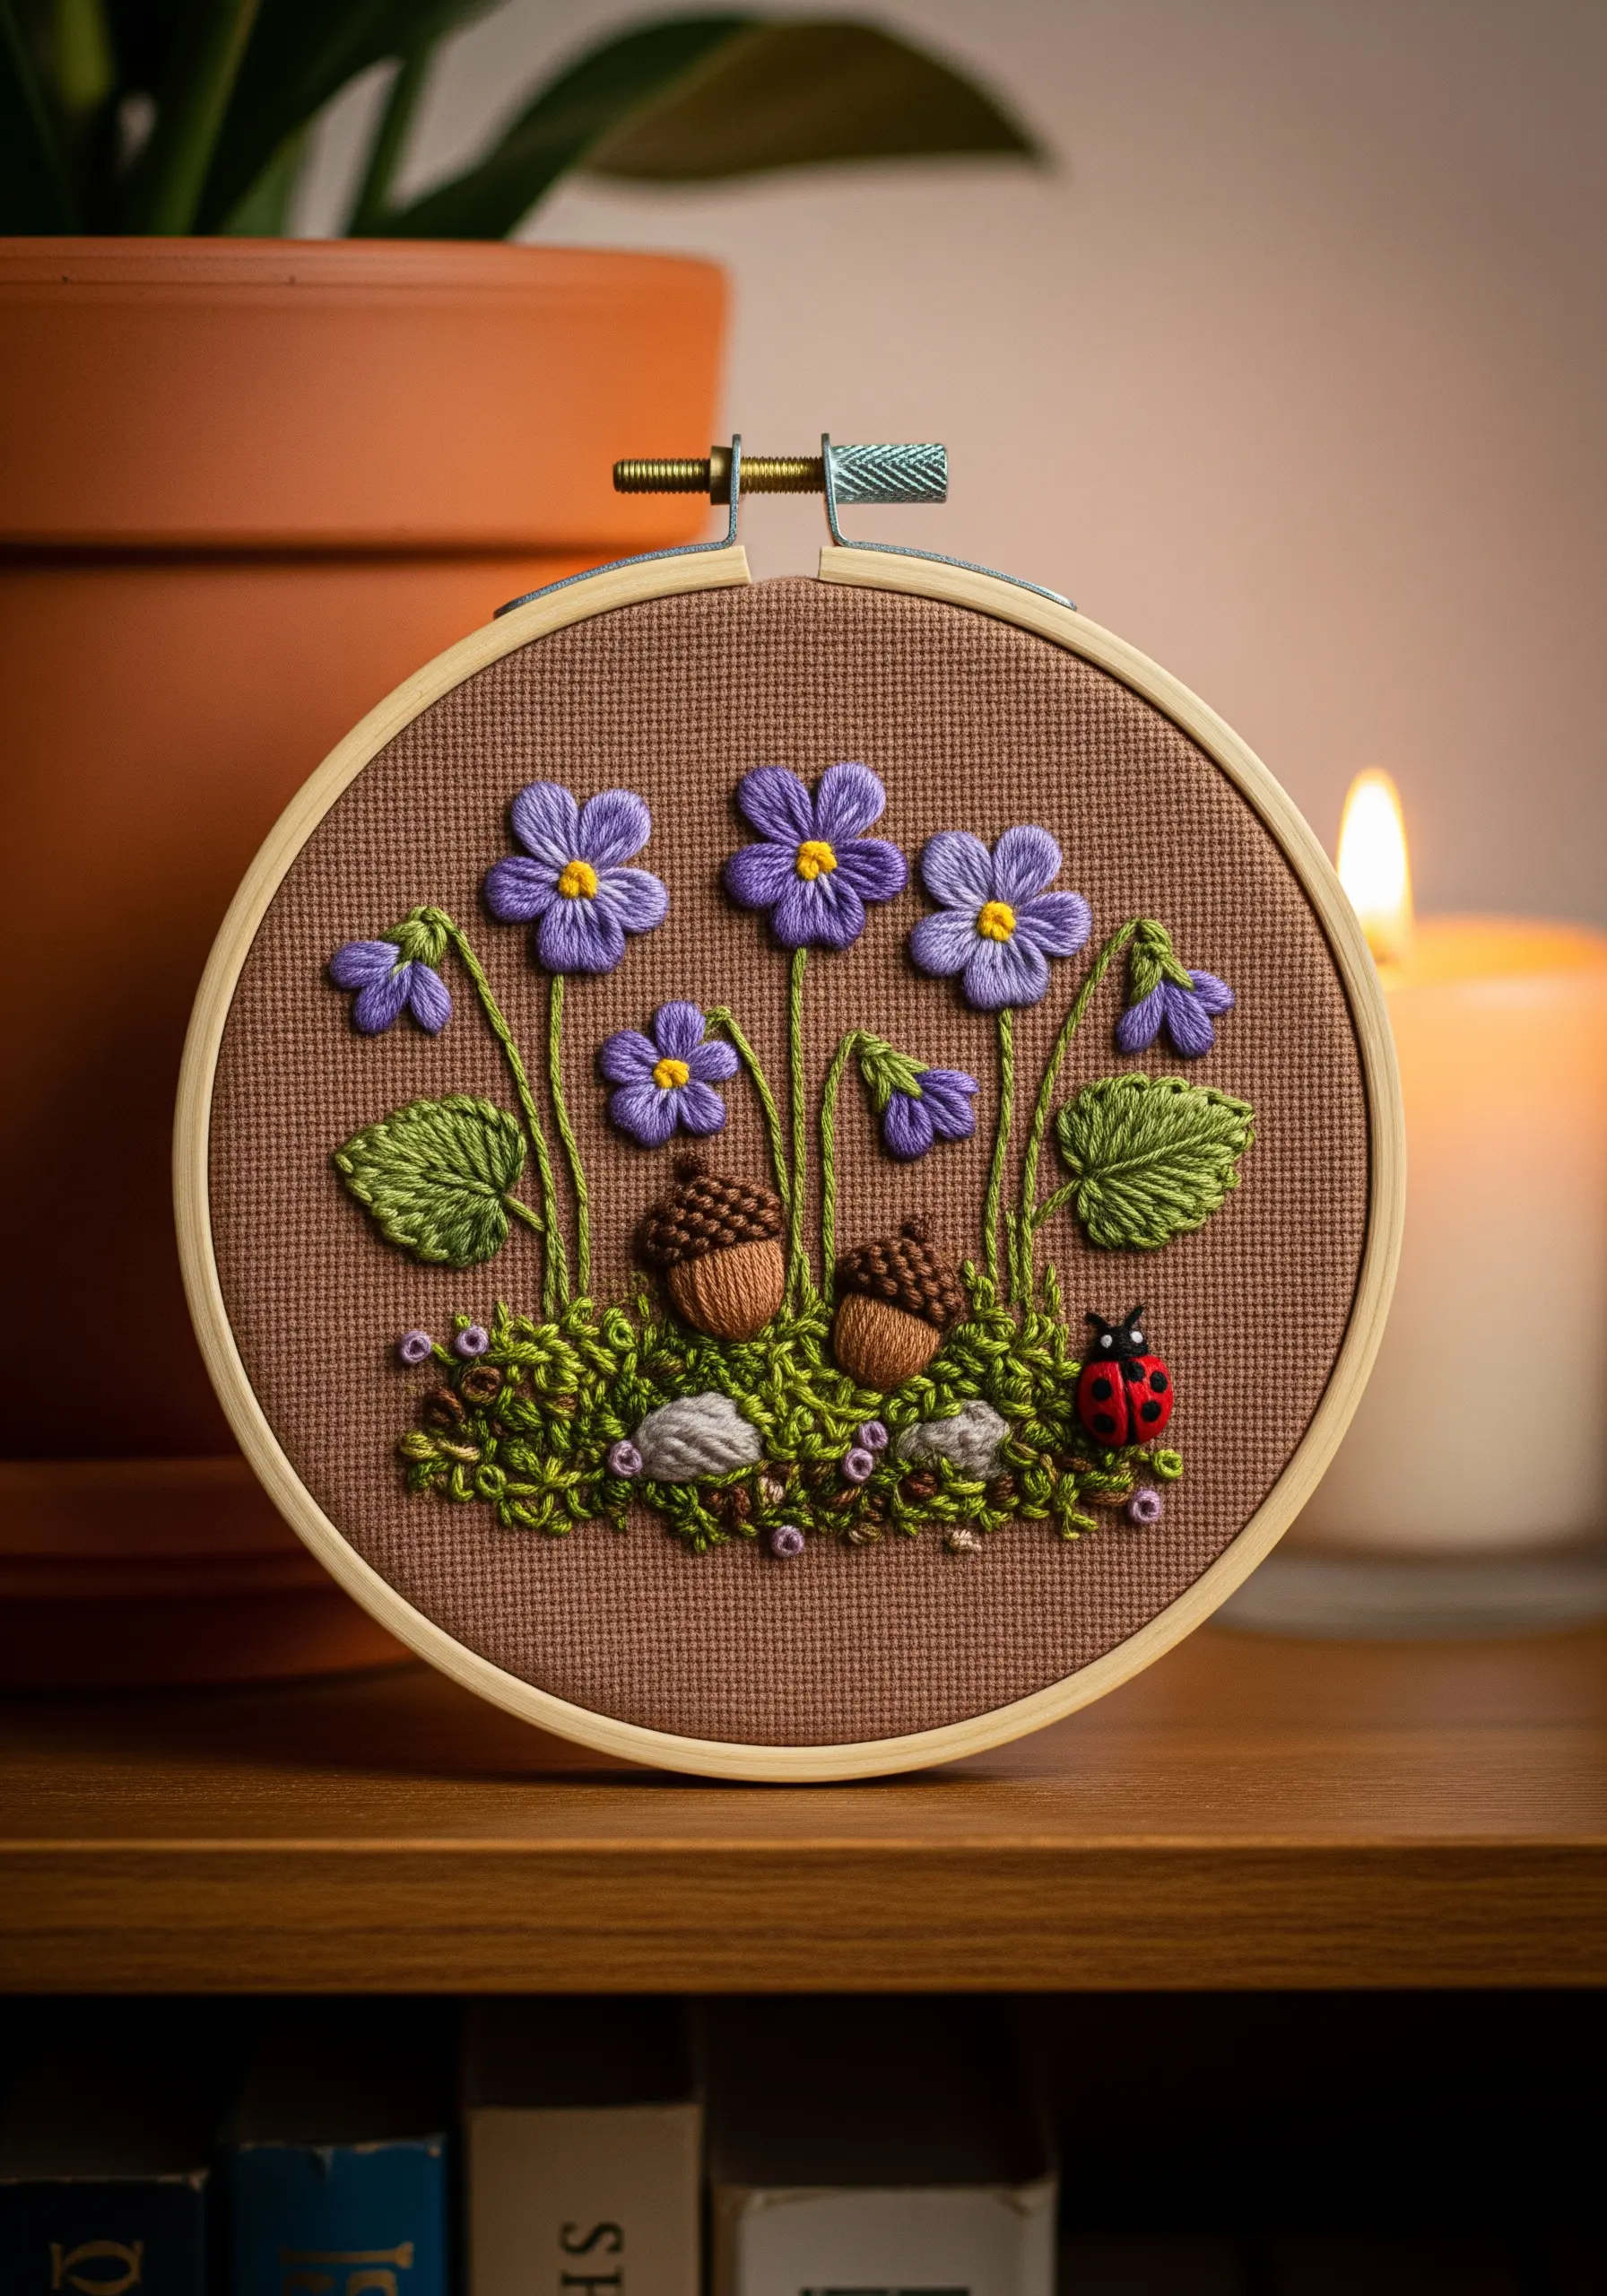
Practice creating a small, self-contained world within your hoop by layering different textural stitches.
Use a dense collection of French knots in several shades of green and grey to build up a mossy, uneven forest floor.
Place tiny details, like the ladybug or small pebbles made from satin stitch, strategically to add narrative charm and a sense of scale.
Working on a small hoop encourages you to focus on detail and composition, making it a perfect cozy creative embroidery gift.
11. Explore Pixel Art with Cross-Stitch Berries
Translate the smooth shapes of botanicals into the structured grid of cross-stitch for a charming, stylized effect.
On Aida cloth, each ‘X’ acts like a pixel, allowing you to blend colors and create highlights with surprising subtlety.
Use three or four shades for each berry to give them a rounded, dimensional appearance, and add a single white stitch to suggest a light reflection.
This sampler format is an excellent way to practice color theory and shading within the satisfying constraints of a grid.
12. Practice Geometric Line Work on Terracotta Pots

Combine organic plant shapes with structured, geometric patterns for a modern and playful contrast.
Use a crisp backstitch or stem stitch to create the intricate patterns on the pots. To keep your lines sharp, use fewer strands of floss (one or two) and focus on consistent stitch length.
The simple, bold shapes of the cacti allow the detailed pot designs to become the main focal point.
This is a fantastic exercise for improving your line work, which is a foundational skill for all types of embroidery.
13. Master Petal Shading in a Floral Wreath
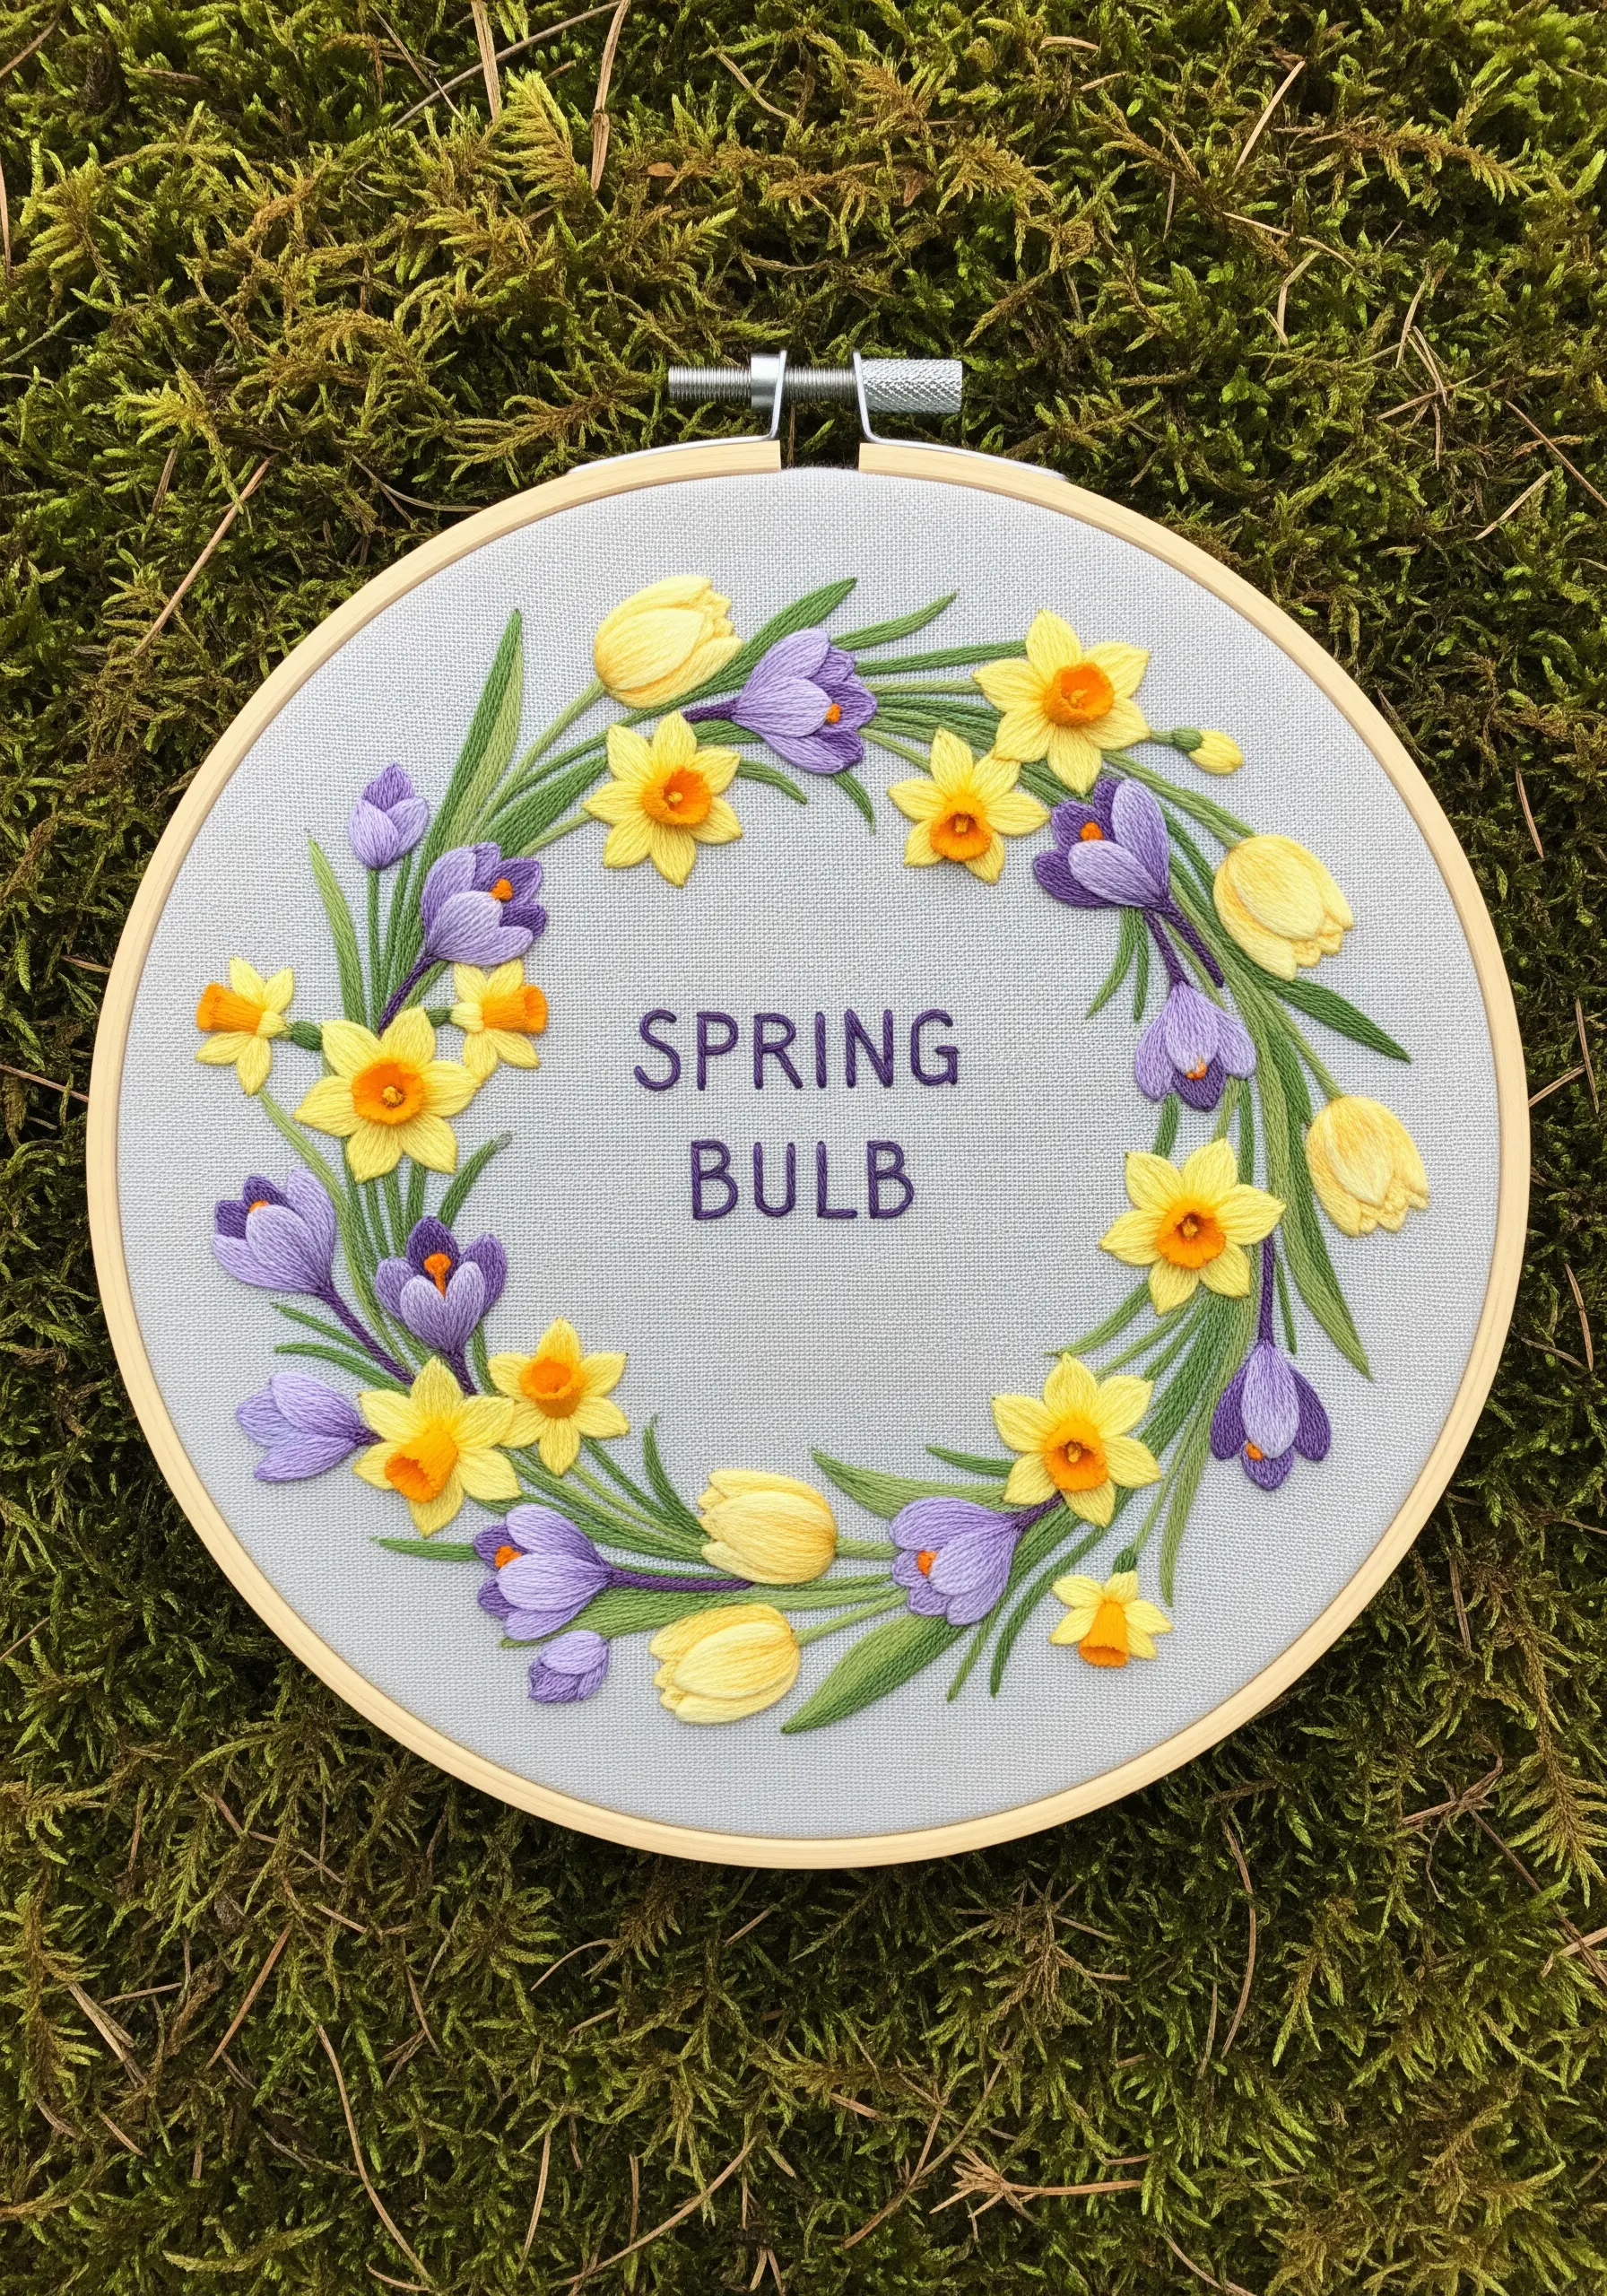
A wreath is the perfect canvas for practicing the long-and-short stitch, as the repeating flower shapes help you build consistency.
For the crocus and tulip petals, blend two or three shades of thread, starting with the darkest at the base and moving to the lightest at the tip, to create a natural gradient.
Use bullion knots for the daffodil centers to give them a distinct, trumpet-like shape that stands out from the flat petals.
This design teaches you how to create depth and realism in floral embroidery wall decor.
14. Experiment with Needle Lace and Raised Stitches

Move beyond surface embroidery by incorporating needle lace techniques to create stunning, three-dimensional texture.
For the large rose, create a framework of straight stitches and then weave your thread through them (without piercing the fabric) to build up the intricate, lace-like center.
Use padded satin stitch for the outer petals, layering your stitches over a base of seed stitches to make them physically rise from the fabric.
These contemporary texture techniques transform a classic floral motif into a truly sculptural piece of art.
15. Design for Vertical Spaces with a Banner Sampler

Break away from the hoop by designing a botanical sampler for a vertical wall hanging or banner.
This format encourages you to think about composition differently, creating a sense of downward growth and movement.
Practice a variety of leaf and flower stitches, such as the fishbone stitch for the ivy and satin stitch for the clematis, to represent different species accurately.
The long, narrow canvas is perfect for stitching climbing plant stitch designs and adds an elegant, unique element to your decor.
16. Capture the Vibrancy of Edible Flowers

Challenge yourself to match the intense, saturated colors of real edible flowers like nasturtiums, borage, and pansies.
Use a long-and-short stitch to blend oranges and reds in the nasturtium petals, creating the subtle color shifts found in nature.
For the delicate, fuzzy texture of borage, outline the petals with a fine split stitch and then fill the center with tiny seed stitches.
This project sharpens your color observation skills and your ability to translate natural beauty into thread.
17. Tell a Seasonal Story in Four Quadrants

Use a simple grid layout to practice four distinct styles of stitching that represent the changing seasons.
For Spring, use a simple, clean backstitch outline to convey fresh, new growth. For Summer, use a dense satin stitch to show a full, lush leaf.
In Autumn, practice directional satin stitch with multiple colors to capture the beauty of changing leaves. For Winter, use couching for the branches and French knots for buds, representing stark beauty.
This structured approach is a fantastic way to build your skills and create a meaningful piece of seasonal embroidery decor.
18. Stitch on Felt for a Soft, Forgiving Base

Experiment with stitching on wool felt for a completely different tactile experience.
Felt’s stable, non-woven surface is very forgiving for beginners, as it won’t fray and holds stitches beautifully.
The slightly fuzzy texture of the felt adds instant depth and softness to your background, making your stitches appear even more defined.
Use bullion knots for the centers of the edelweiss, as their worm-like shape contrasts wonderfully with the felt’s matte finish, creating a professional-looking piece of organic handmade decor.
19. Create a Balanced Asymmetrical Composition
Practice the art of visual balance by arranging your botanical elements in a crescent or ‘S’ shape rather than a perfectly symmetrical circle.
Place larger, more complex elements like the rose at one anchor point, and balance it with a trail of smaller leaves and chamomile flowers.
This creates a sense of natural, organic growth and guides the eye gracefully across the hoop.
Adding simple text can help ground the asymmetrical design and provide a clear focal point.
20. Frame a View with a Negative Space Wreath

Master the art of negative space by creating a design where the unstitched fabric in the center becomes the focal point.
This technique challenges you to create a beautiful frame with your stitches, focusing on the flow and balance of the outer wreath.
Use French knots and satin stitch for the small blossoms, packing them densely to create a clear, defined edge against the empty center.
When displayed, this style of fun hoop art interacts with its environment, allowing the wall color or even the view behind it to become part of the piece.
21. Layer Stitches for Bold, Cheerful Textures
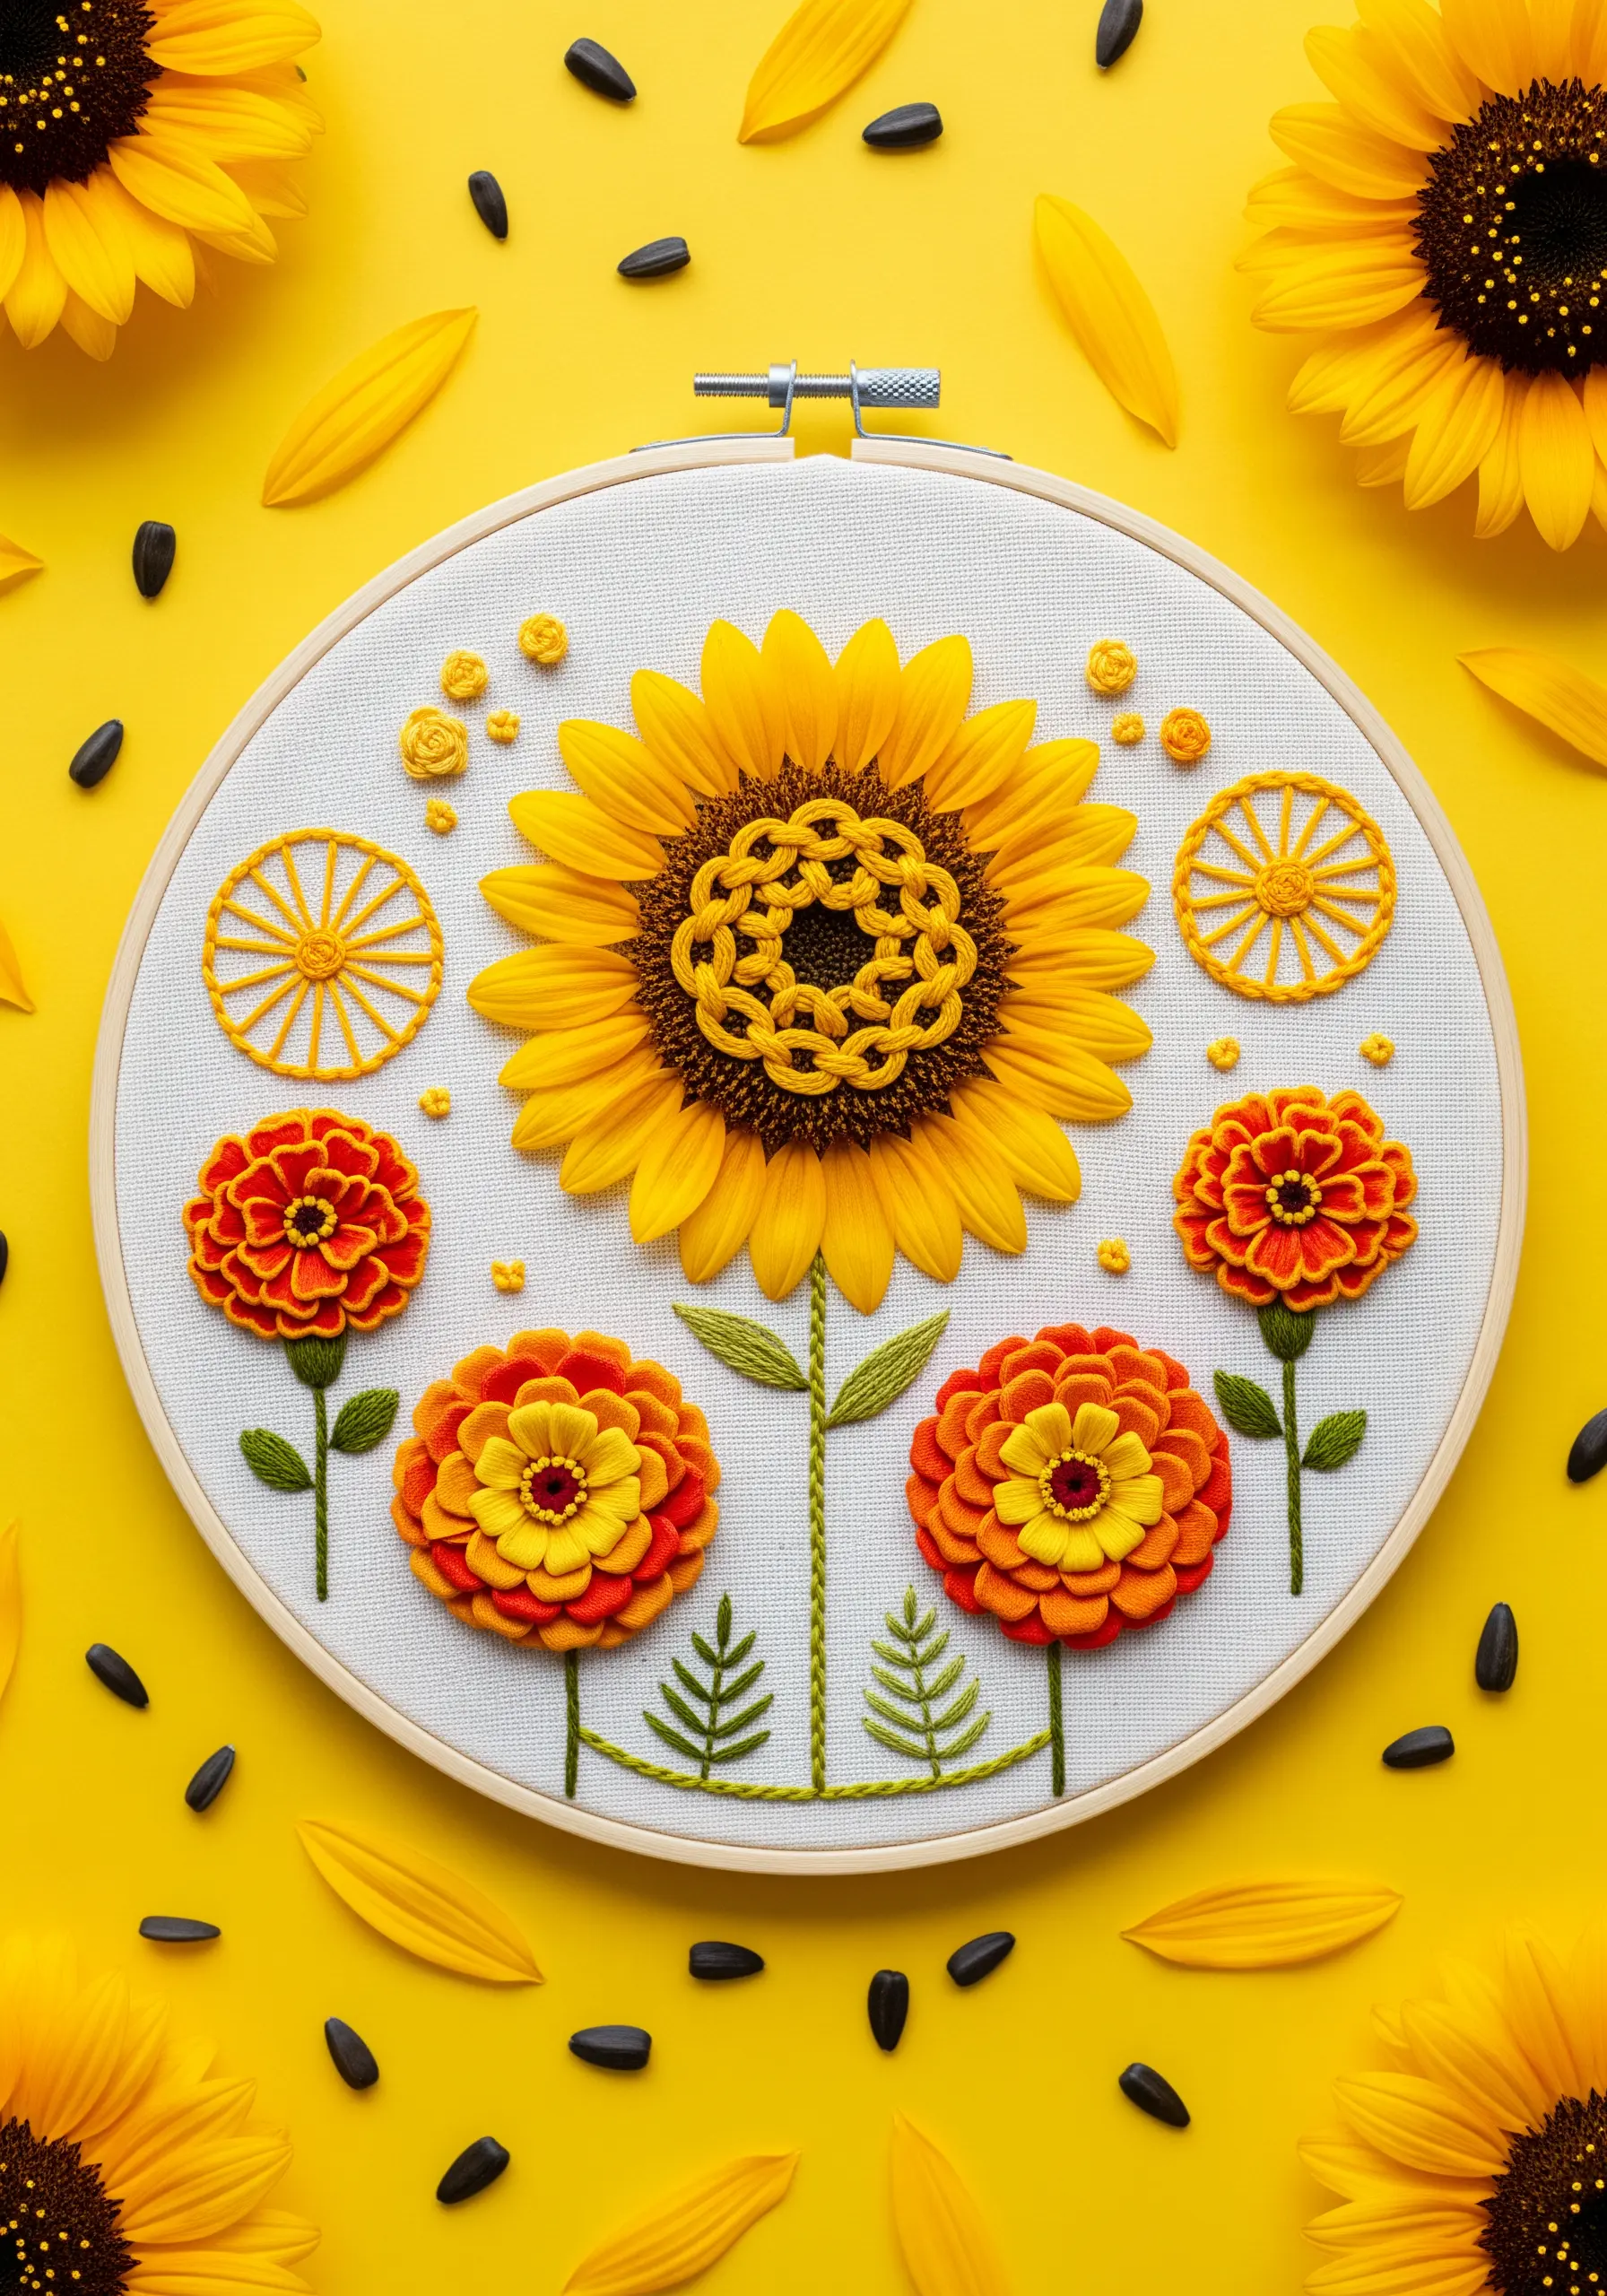
Create an explosion of color and texture by layering different stitches to build up your floral motifs.
For the sunflower’s center, try a woven wheel stitch or a dense cluster of French knots, then couch a darker thread over it to create a grid pattern.
Give the zinnia petals a ruffled, 3D effect by using layered, detached buttonhole stitches or by stitching on top of small felt circles.
This maximalist approach is a joyful way to experiment with how different textures can be combined in a single, vibrant piece.
22. Explore Texture and Form with a Monochromatic Palette
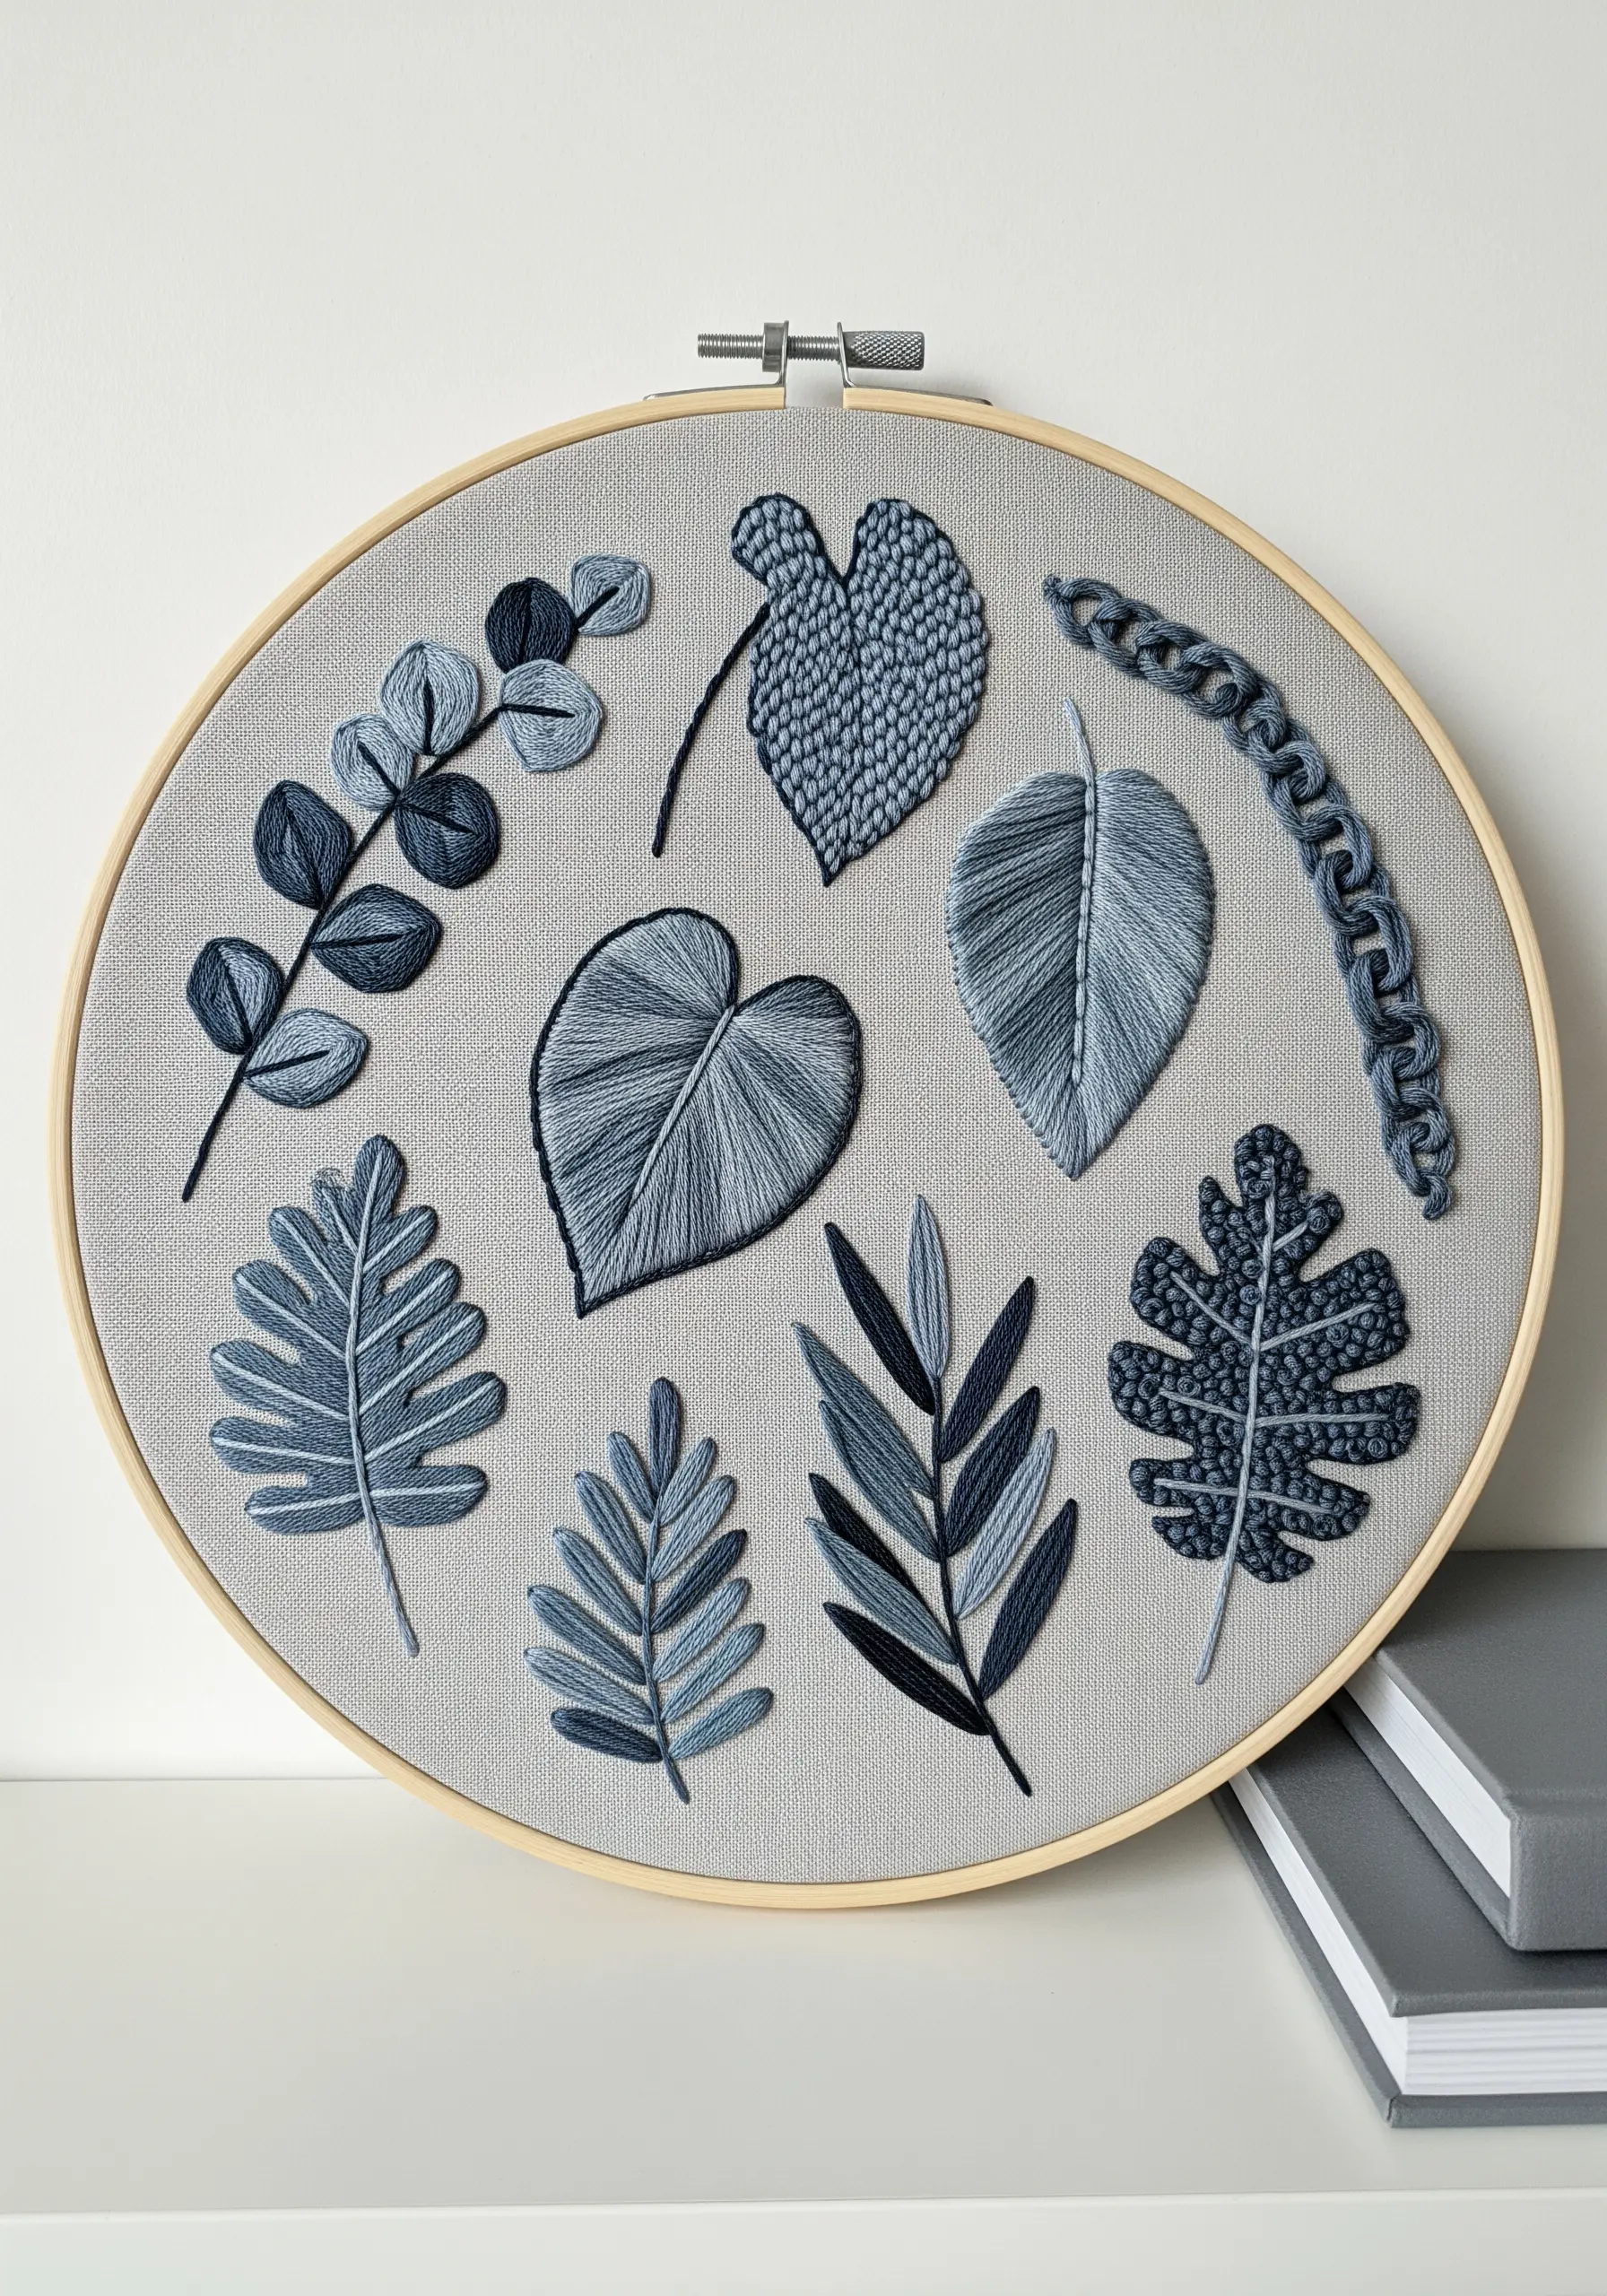
Challenge your creativity by limiting your color palette to shades of a single color, forcing you to focus on texture and stitch direction.
Assign a different fill stitch to each leaf—try long-and-short stitch, seed stitch, brick stitch, or satin stitch—to see how each one creates a unique surface and reflects light differently.
Use the direction of your stitches to mimic the natural veins of the leaves, adding another layer of subtle detail.
This exercise is a sophisticated way to practice abstract texture play and proves that you don’t need a rainbow of colors to create a captivating design.
23. Create the Illusion of Water with Thread
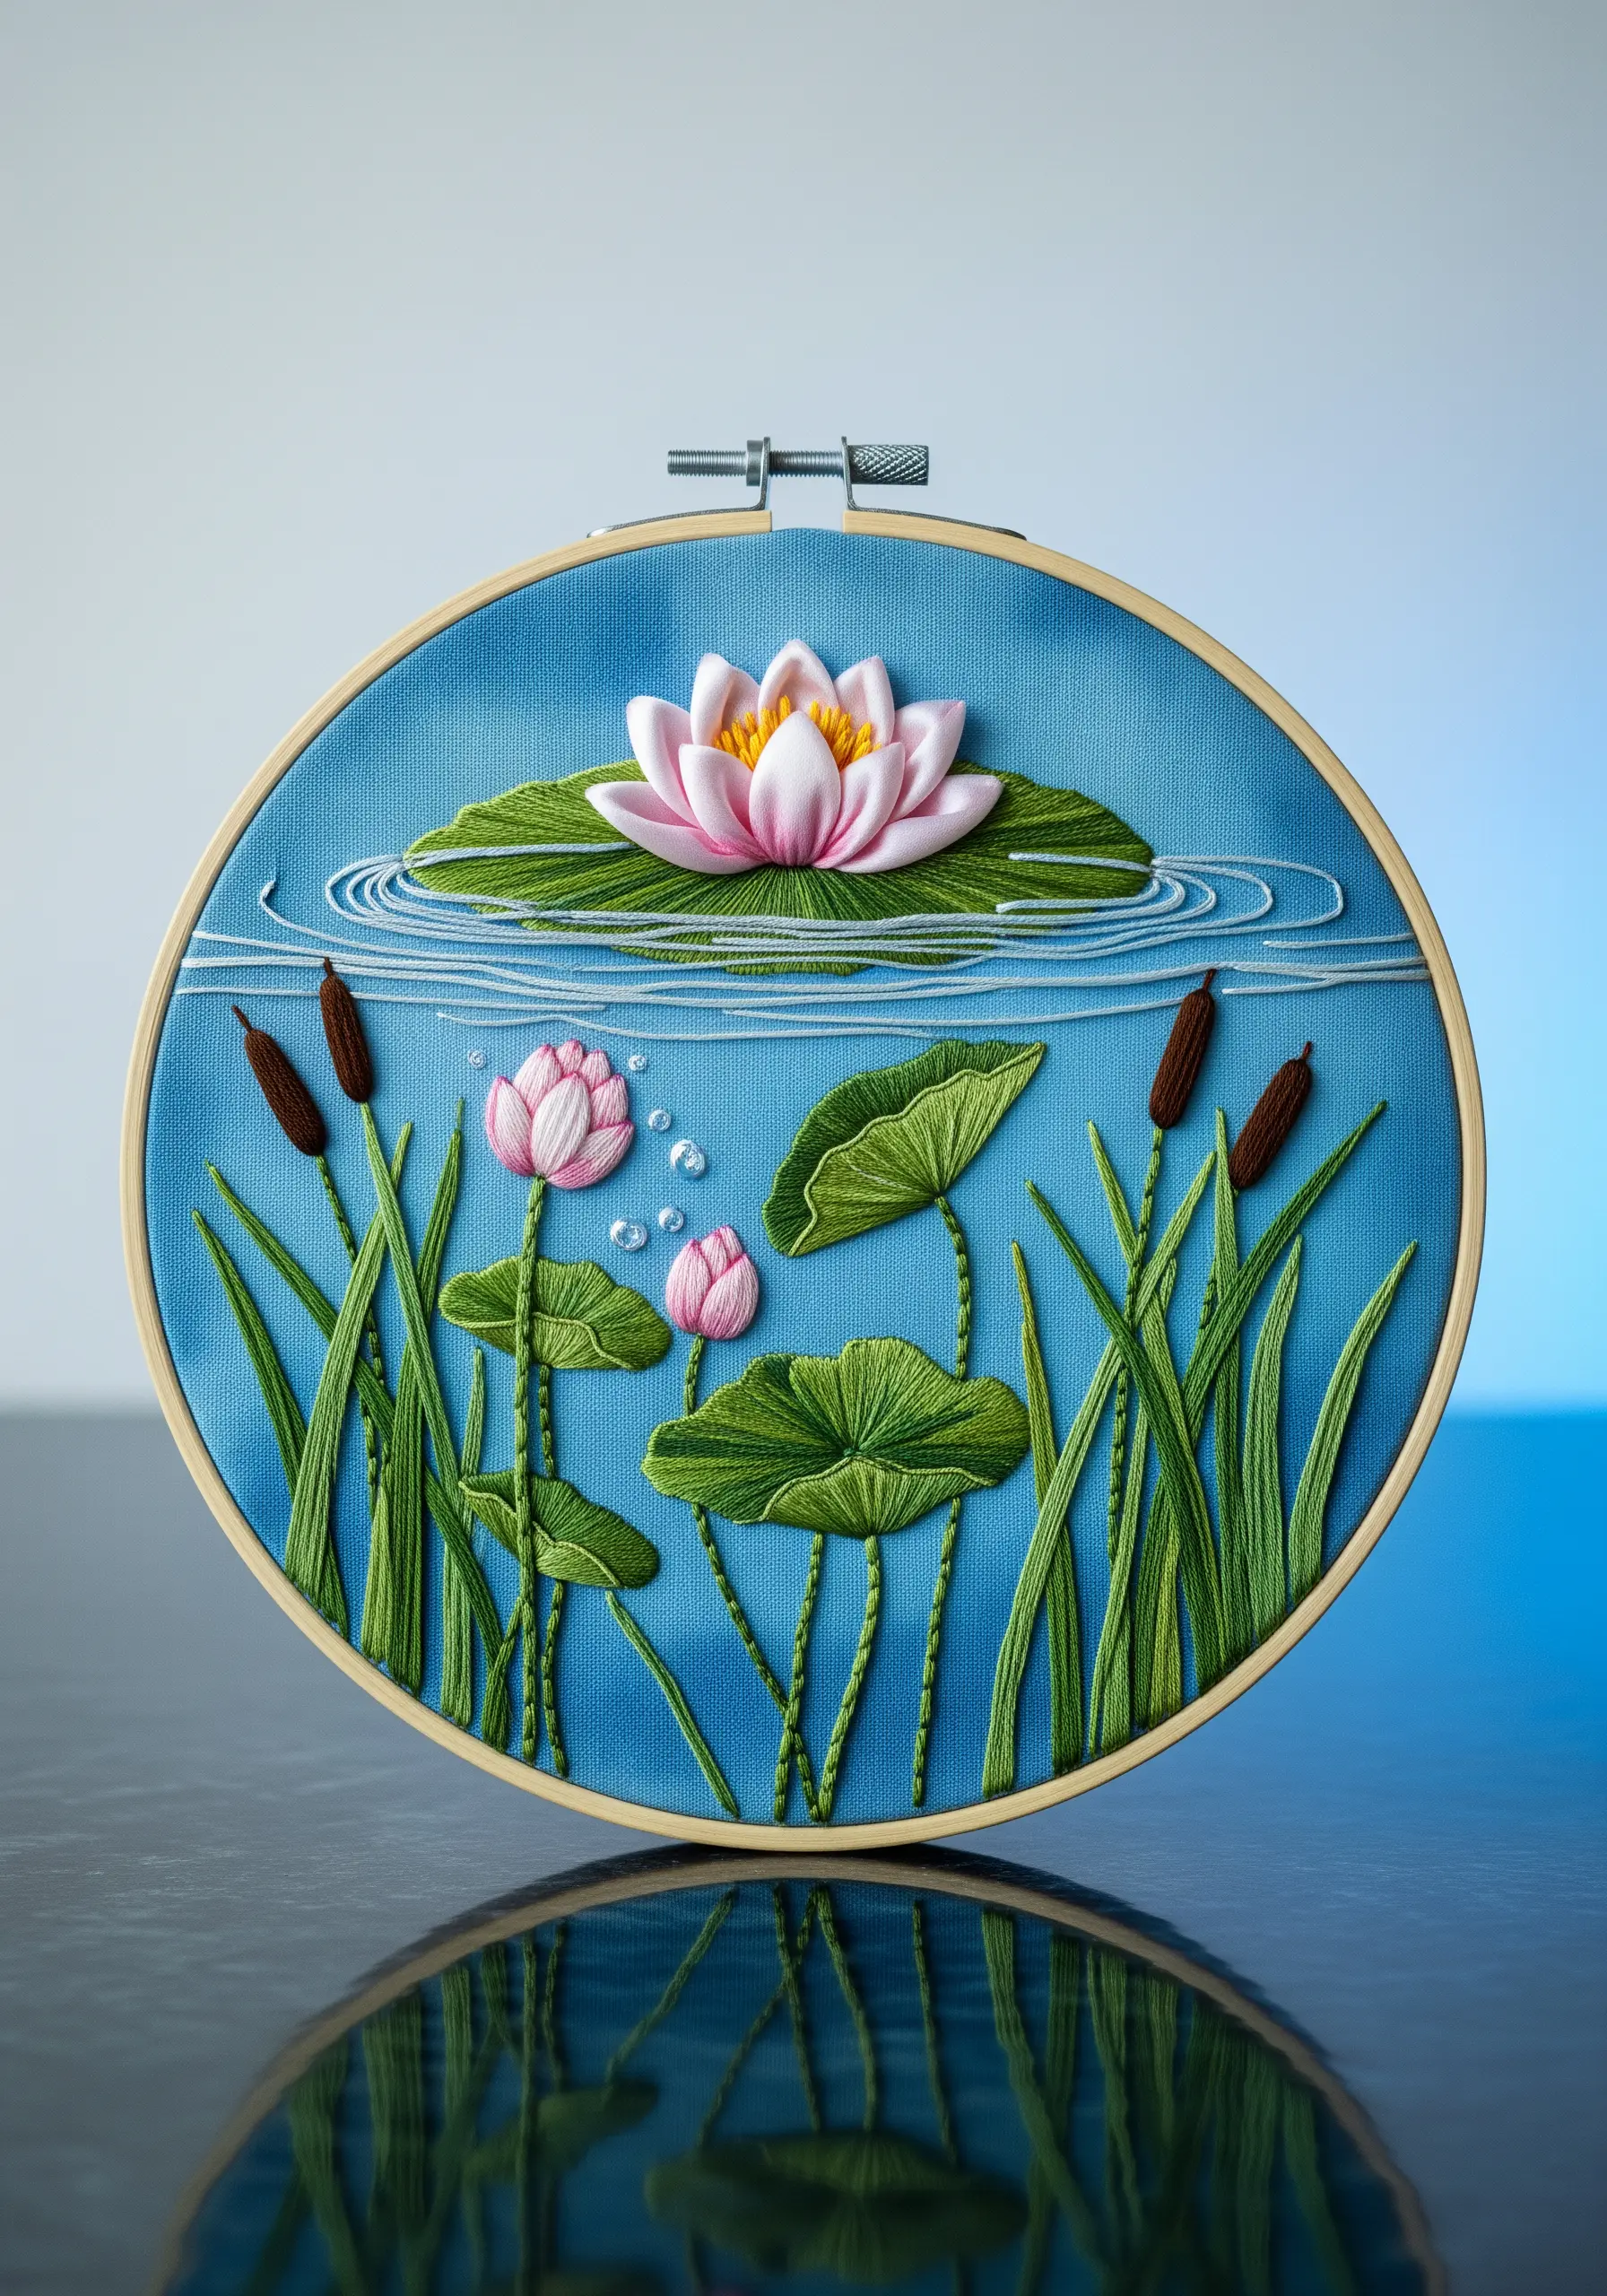
Capture the serene quality of a pond scene by using specific stitches to represent water and reflections.
Use long, slightly wavy straight stitches in a glossy white or light blue thread to create the concentric ripples around the lily pad.
For the lily itself, use a padded satin stitch, building up layers of thread to make the flower appear to float on the surface.
The contrast between the flat, graphic reeds and the sculptural lily creates a convincing sense of depth and perspective in this nature-inspired embroidery.
24. Stitch Whimsical Garden Critters with 3D Stitches
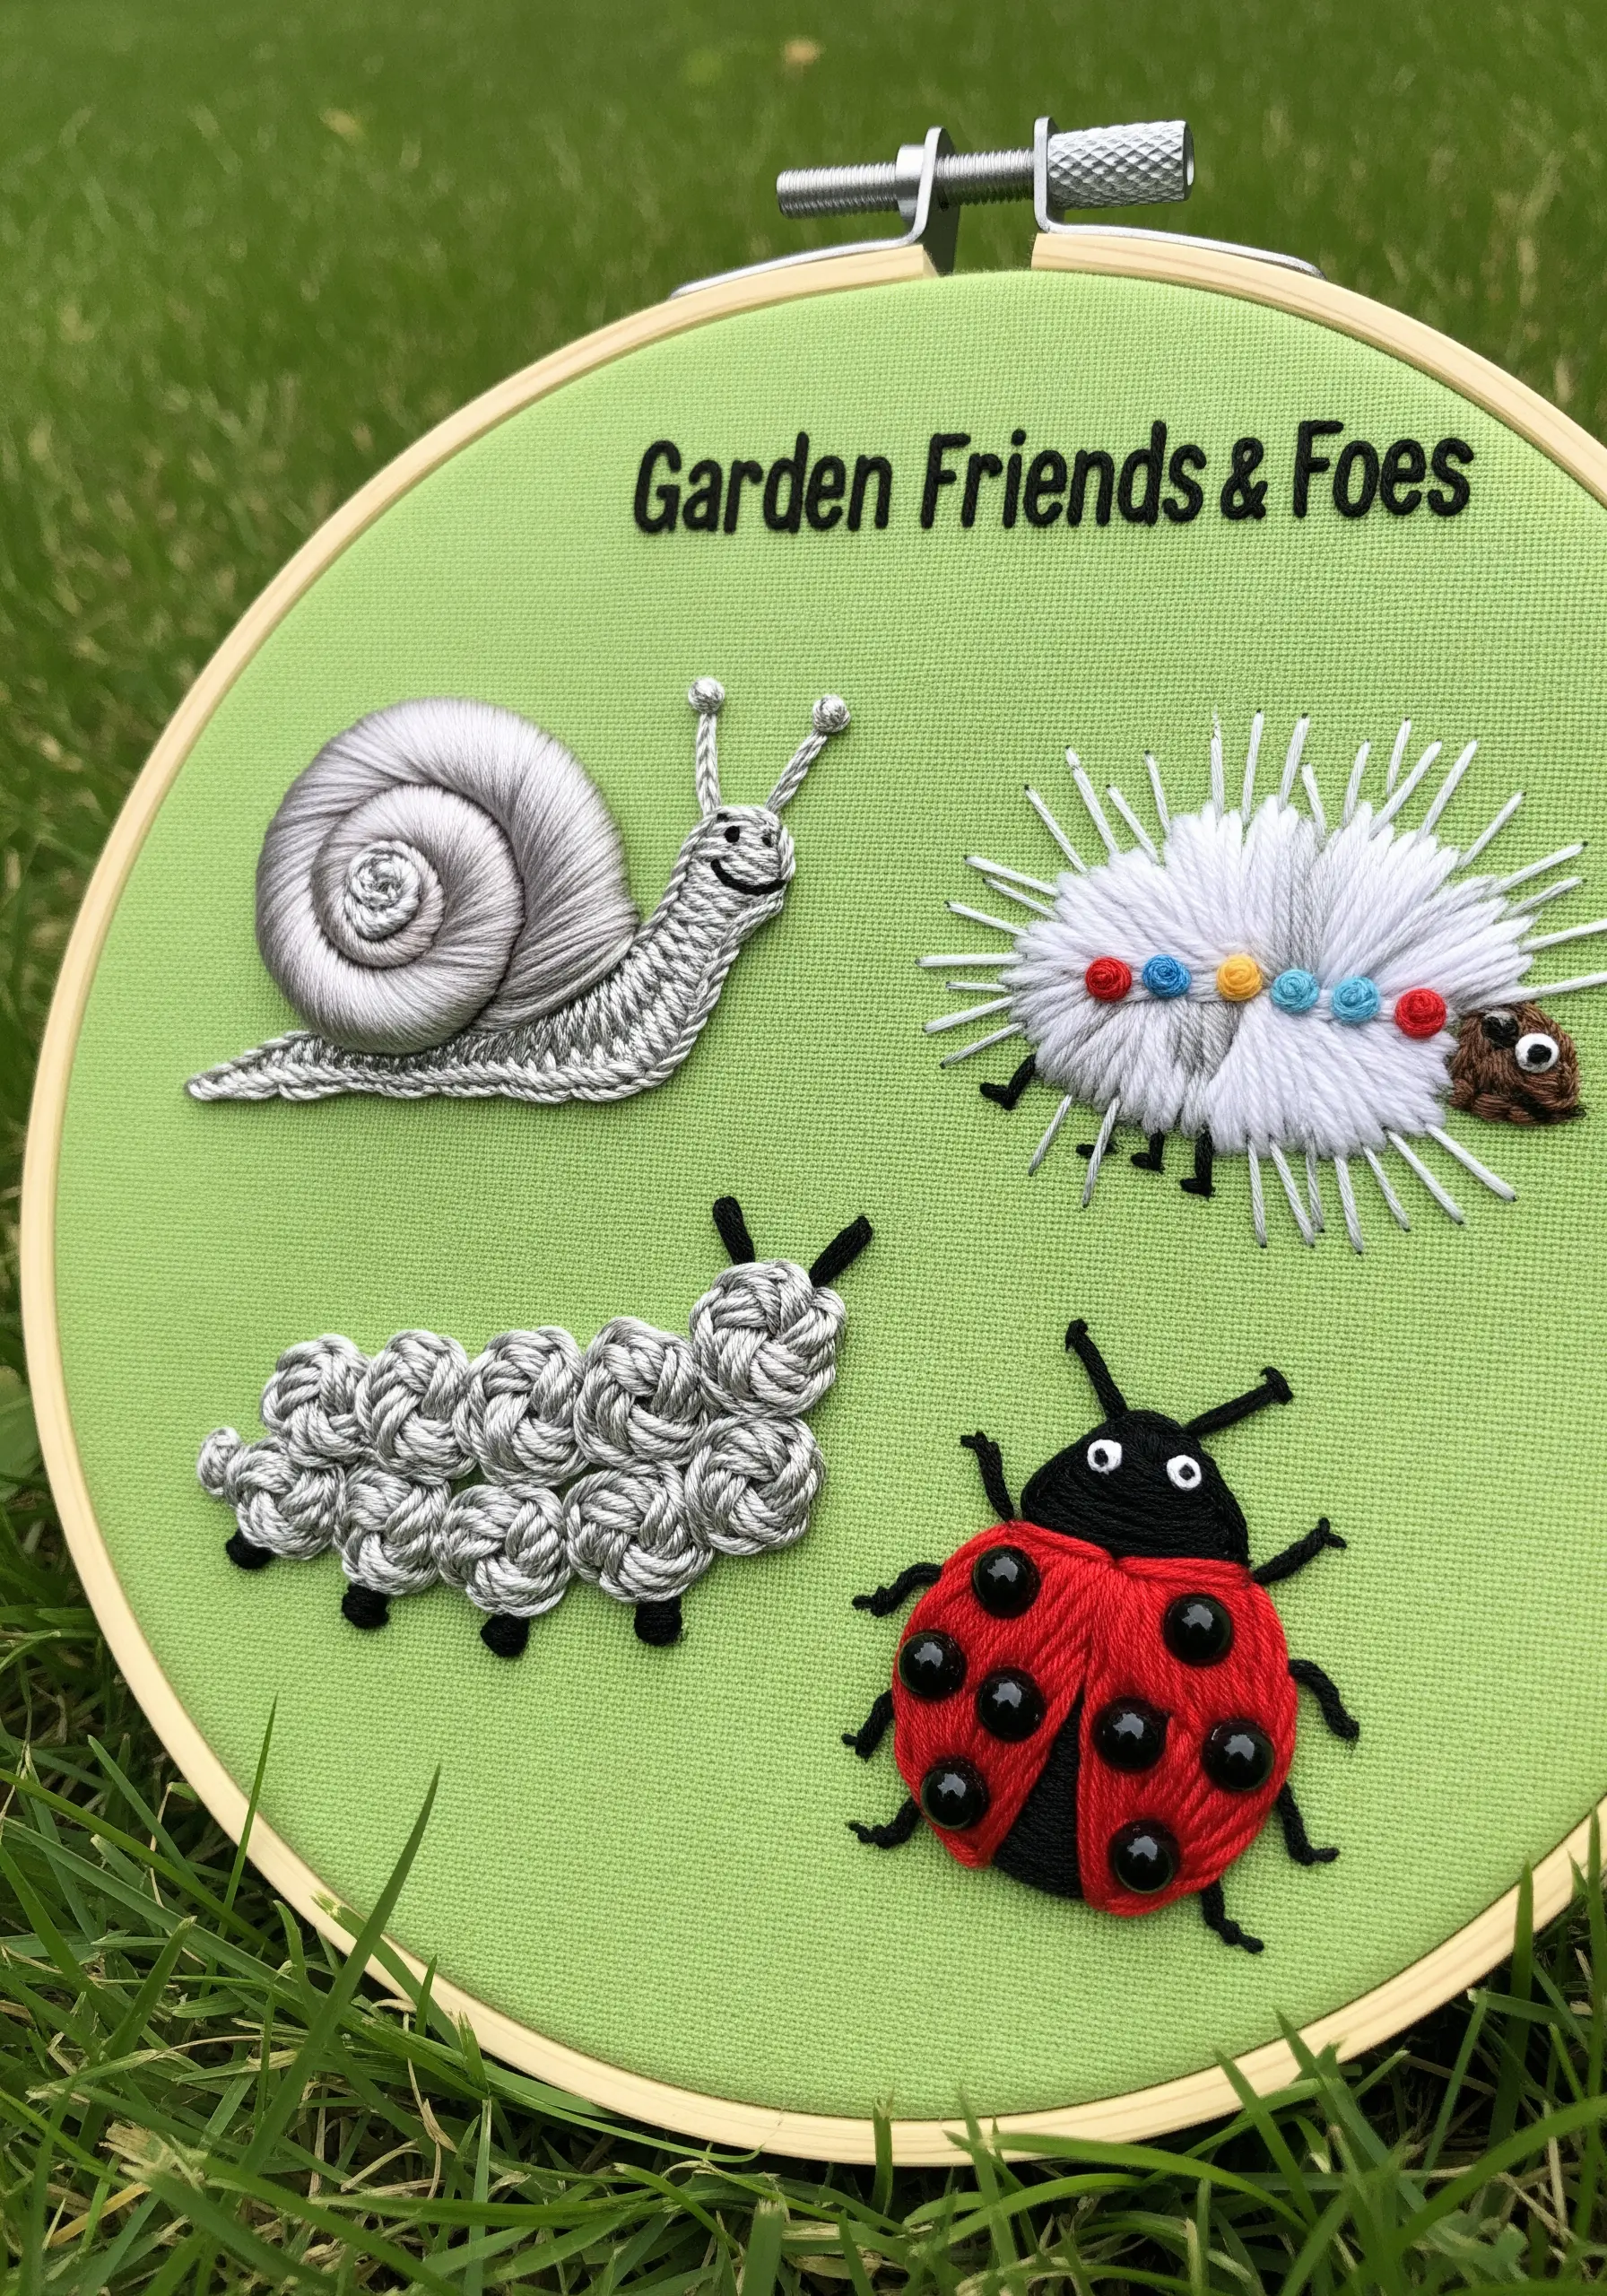
Practice a variety of sculptural stitches by creating a sampler of cute garden insects.
Use a tightly packed couching stitch or whipped backstitch to create the segmented, shiny shell of the snail.
For the fuzzy caterpillar, experiment with turkey work (ghiordes knot) to create loops that you can trim for a plush, velvety texture.
Incorporate beads for the ladybug’s spots to add a hard, glossy texture that contrasts with the softness of the thread.
25. Unite the Four Seasons in a Circular Wreath

Tell the story of the year in a single, continuous design by blending four seasonal floral motifs into a cohesive wreath.
For spring, use delicate satin-stitched crocuses. For summer, stitch bold poppies with French knot centers.
Transition to autumn with fishbone-stitched maple leaves in warm oranges, and finish with winter’s holly leaves and red berry French knots.
This project is a beautiful way to practice color blending and composition, ensuring each season flows gracefully into the next.
26. Create a Moody ‘Poison Garden’ Sampler
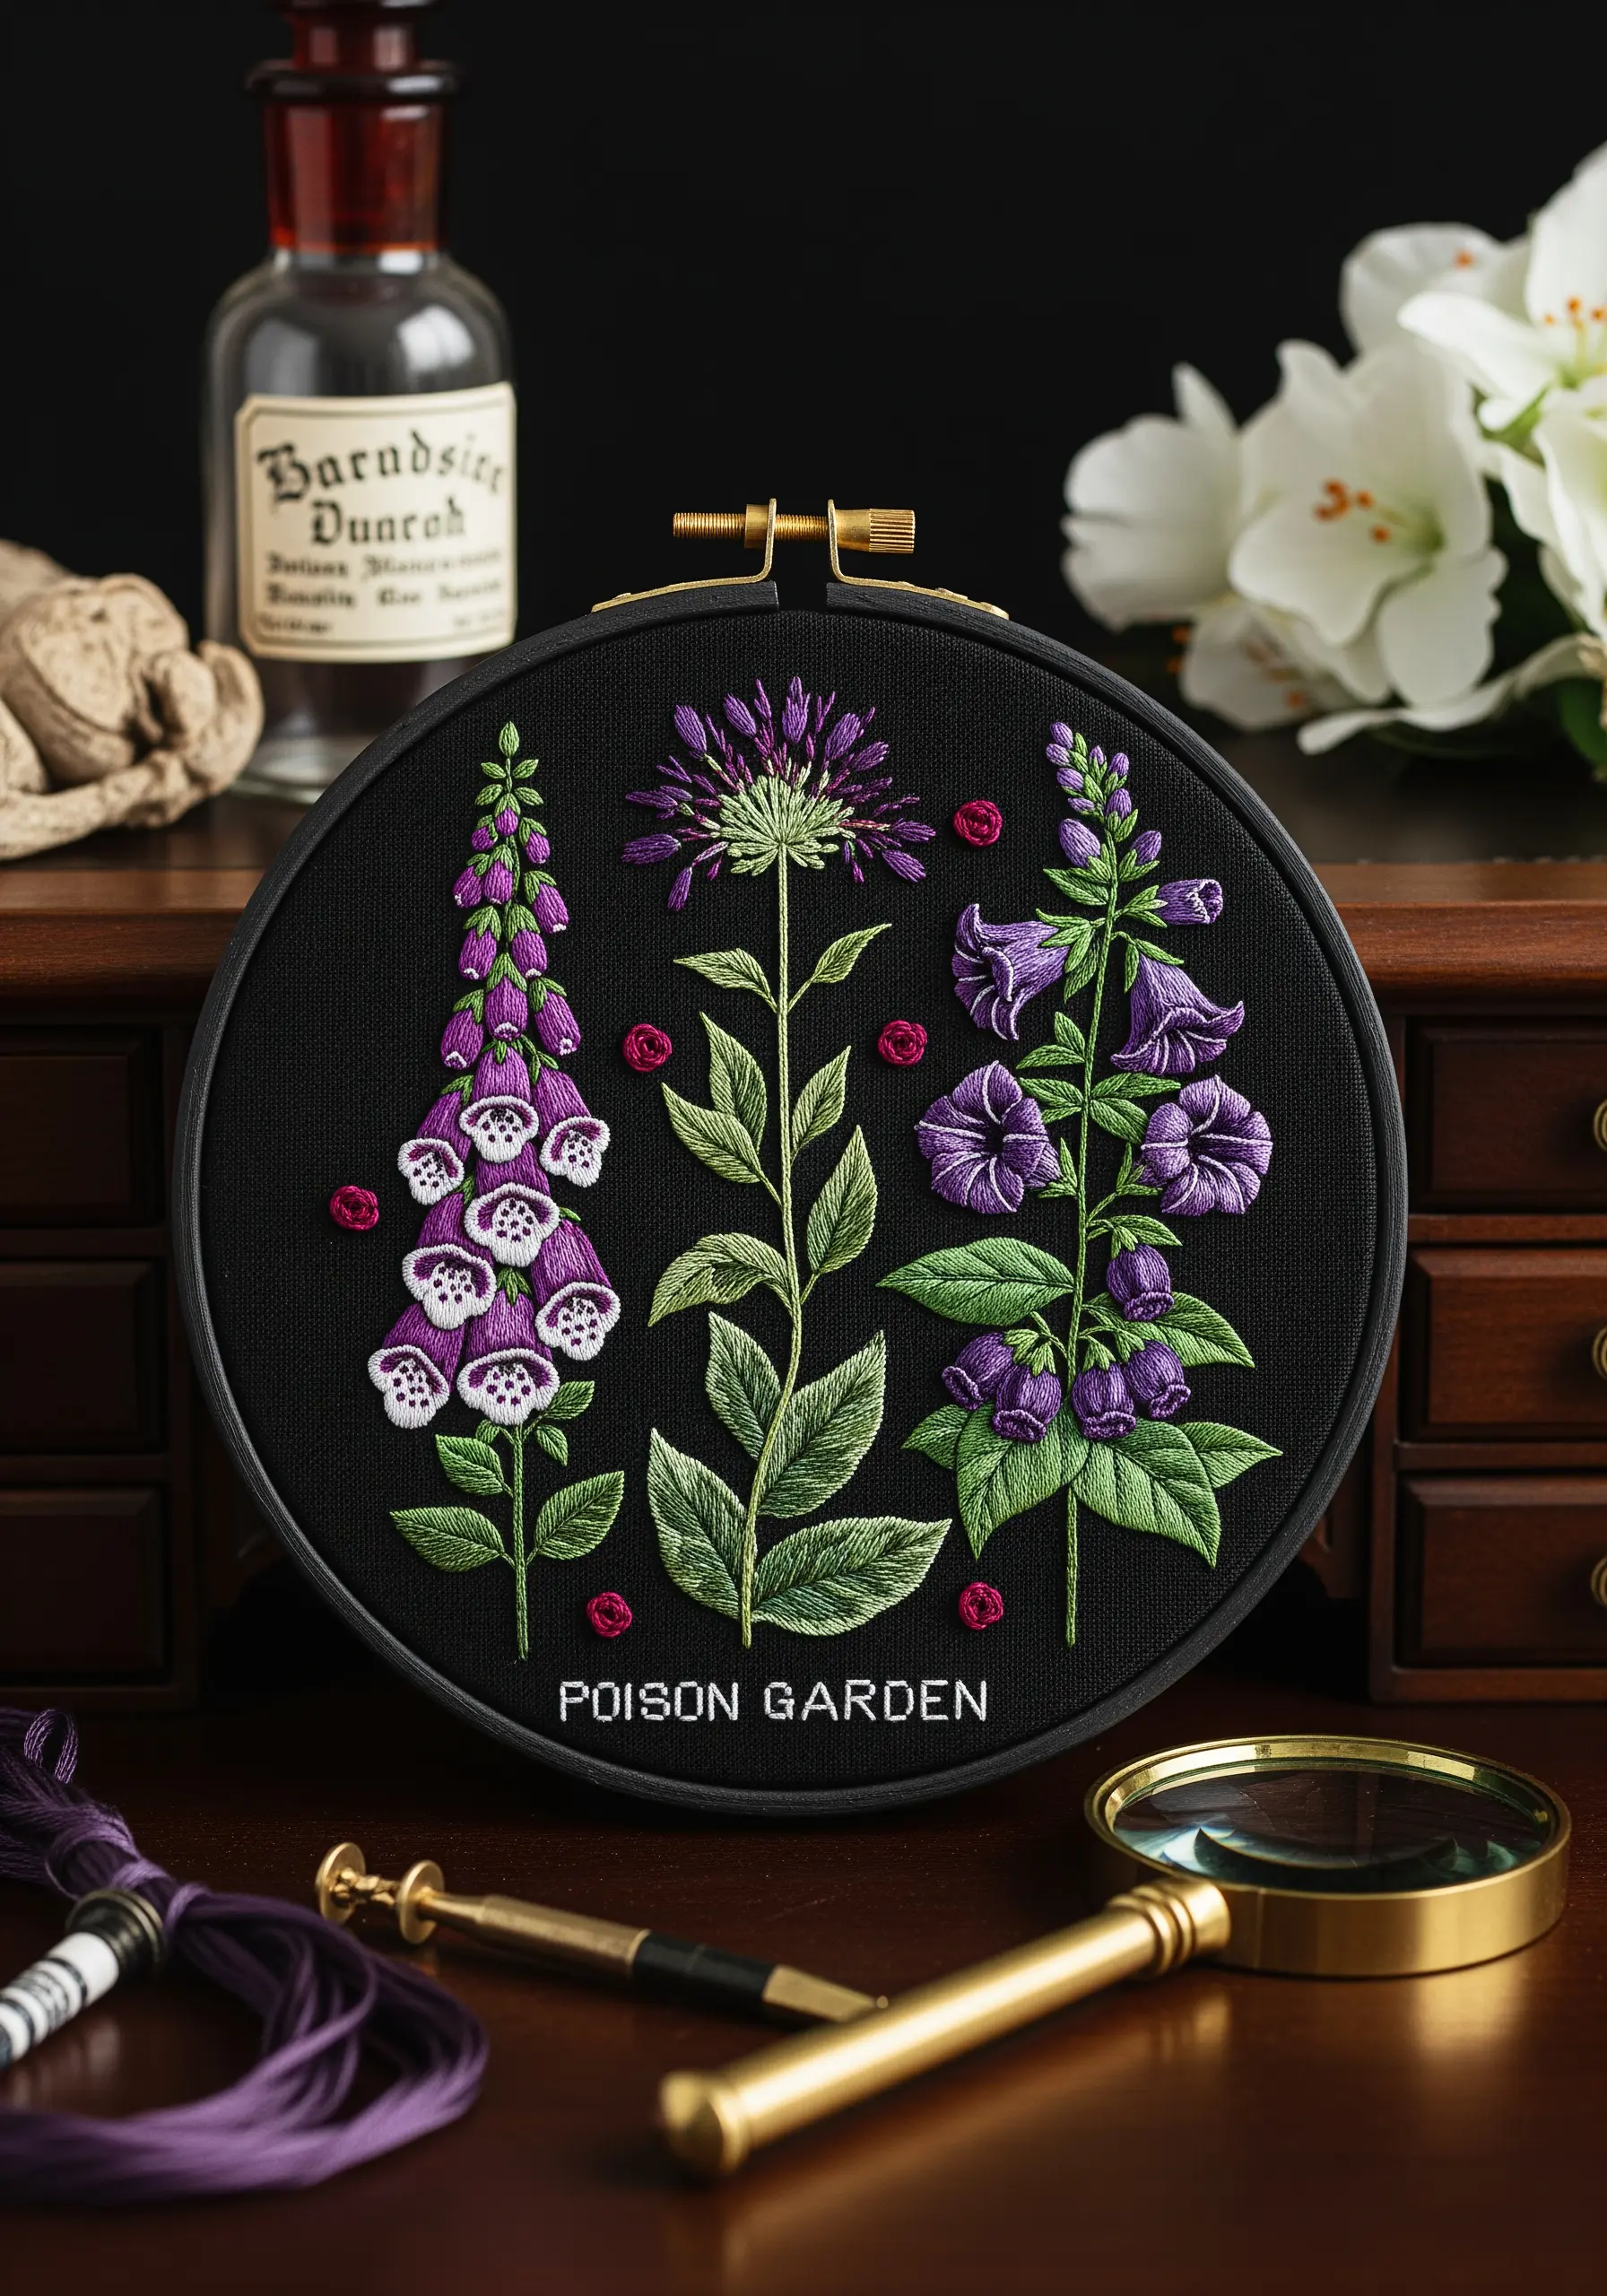
Explore a darker, more dramatic theme by focusing on the beautiful yet dangerous plants of a poison garden.
Use long-and-short stitch to create the iconic speckles on the foxglove bells, blending white, purple, and a deep magenta for a realistic look.
Stitch on black fabric to make the jewel-toned purples and greens pop, creating a mysterious, nocturnal atmosphere.
This theme allows you to practice intricate details and shading while creating a piece of dramatic dark thread embroidery with a unique narrative.
27. Add Whimsy to a Vegetable Patch with Beads and Knots
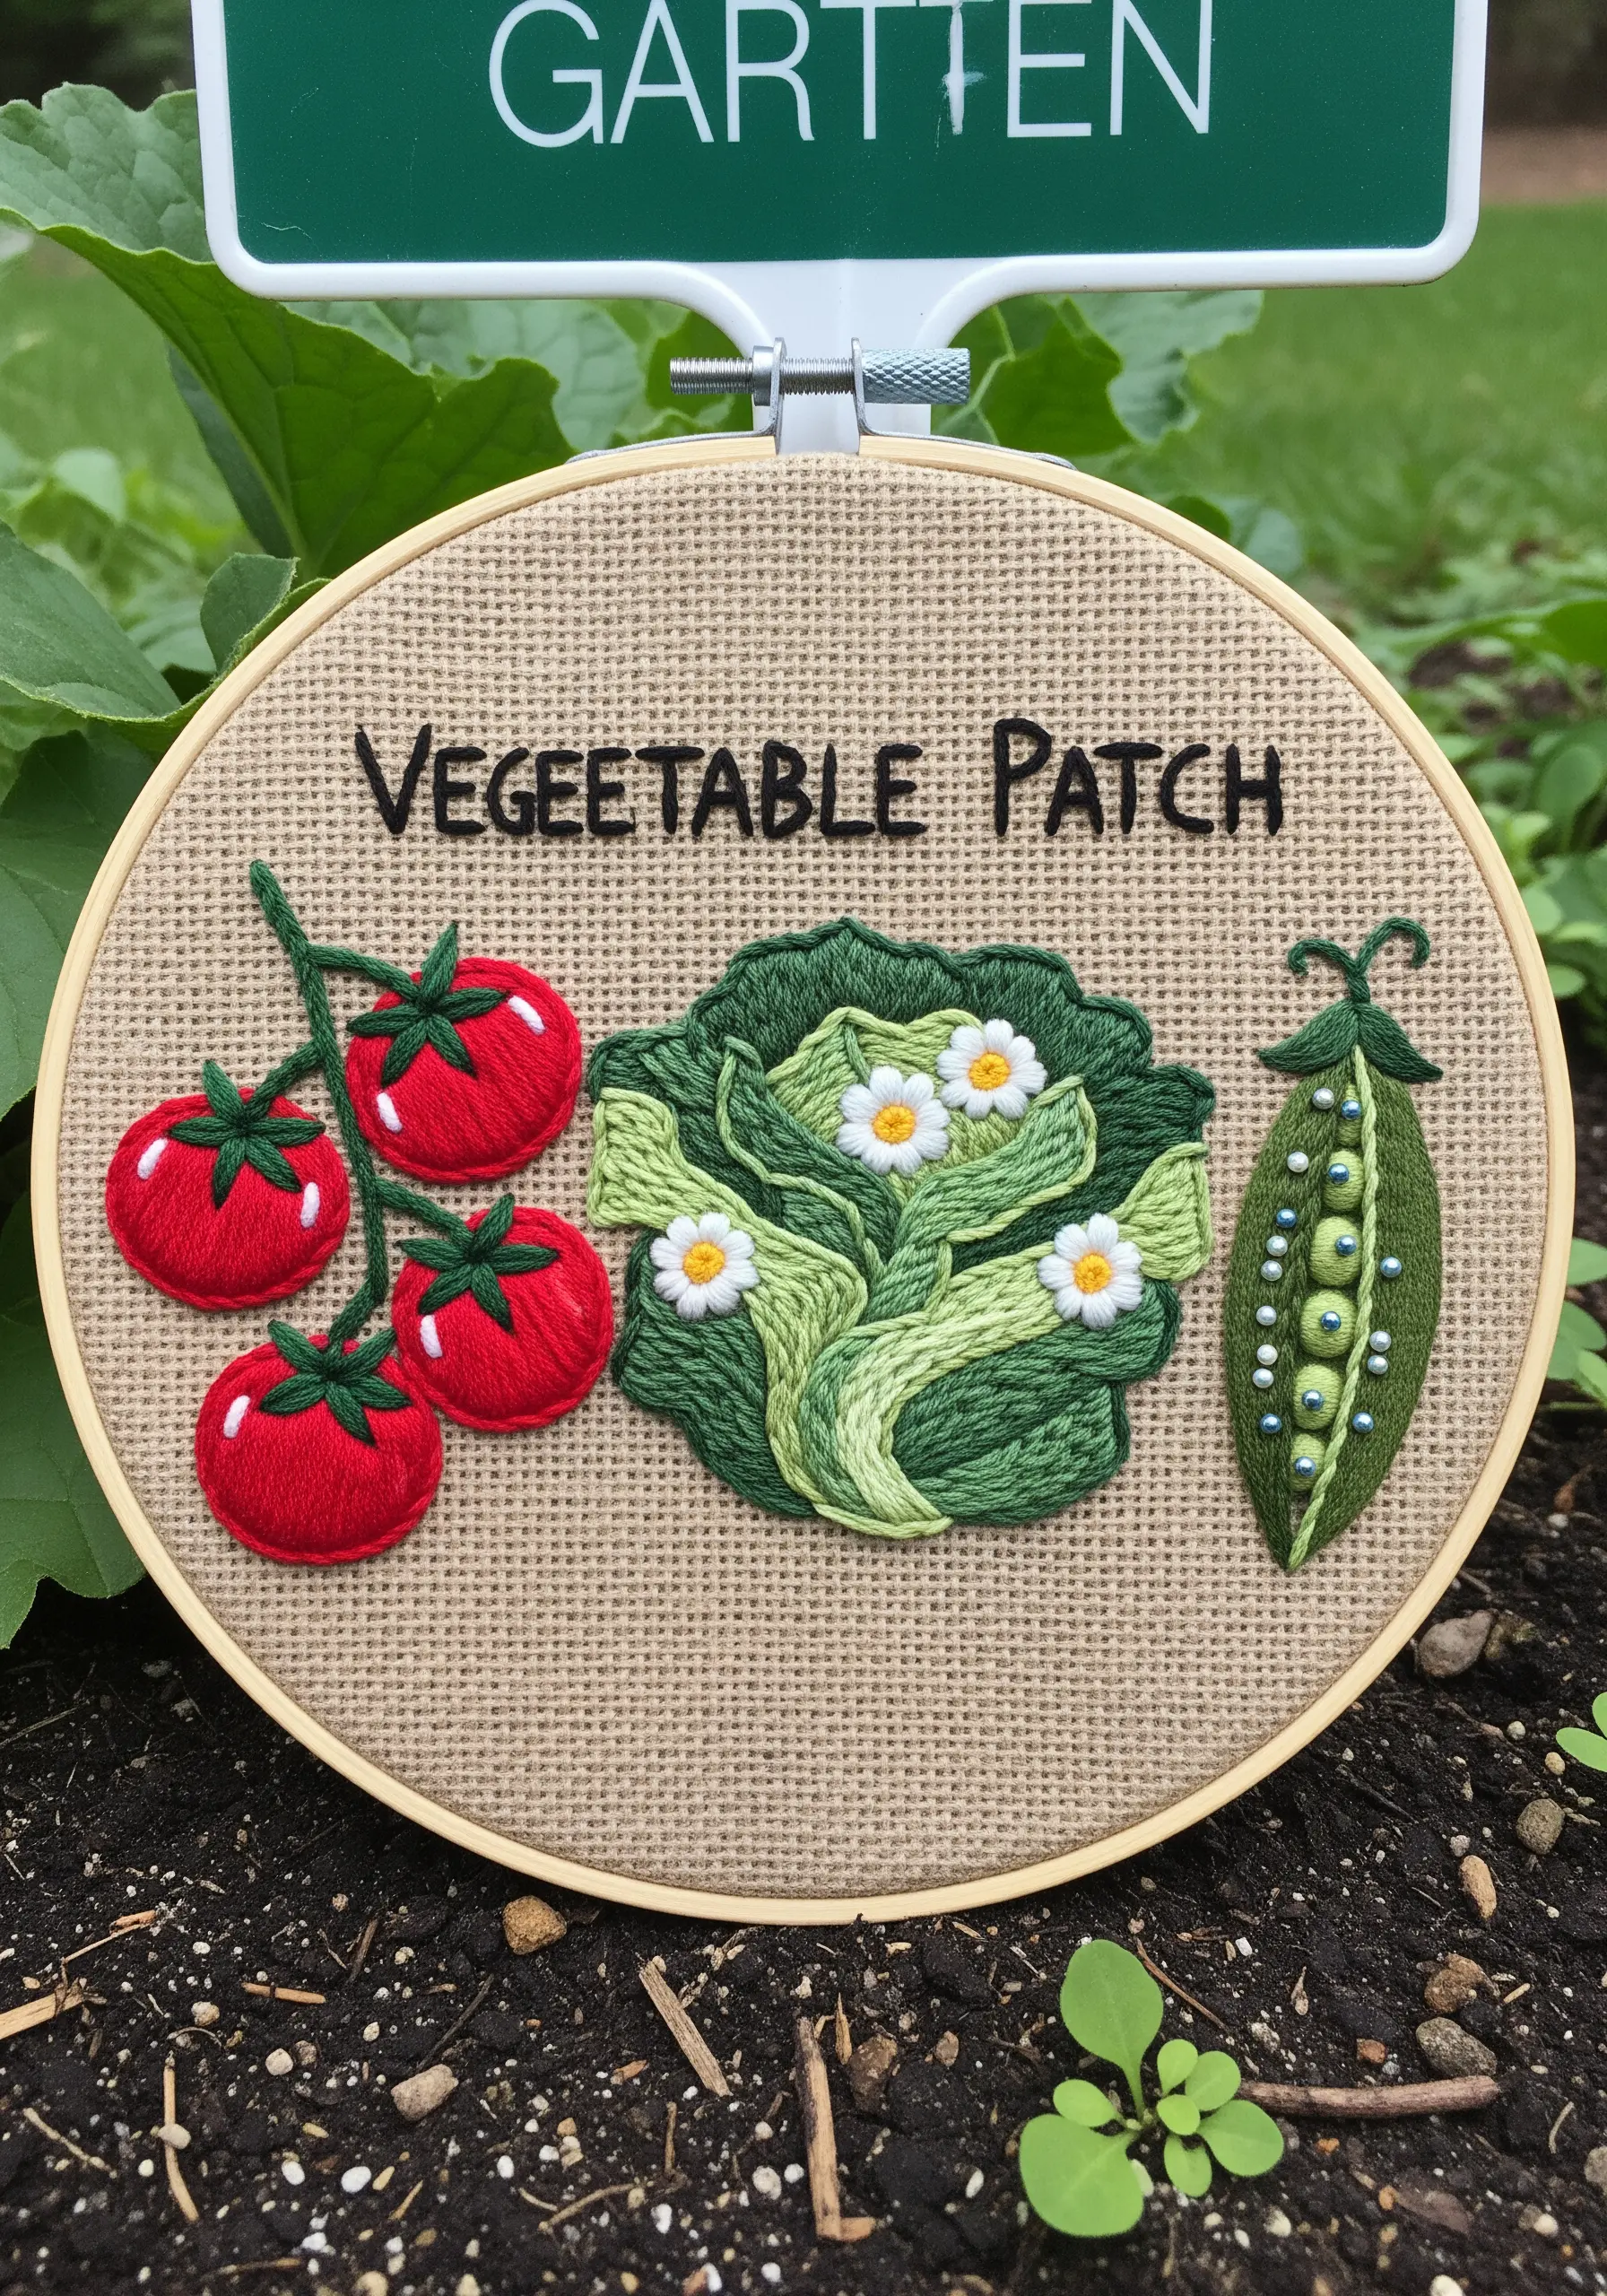
Give your vegetable embroidery a playful, tactile quality by incorporating beads and textural stitches.
Stitch the pea pod open and fill it with small, green seed beads for a delightful, three-dimensional surprise.
Use French knots and bullion knots in shades of green and white to create the wonderfully bumpy, layered texture of a cabbage head.
These tiny artistic touches elevate a simple vegetable sampler into a charming and engaging piece of art.
28. Perfect Your Satin Stitch with Ginkgo Leaves
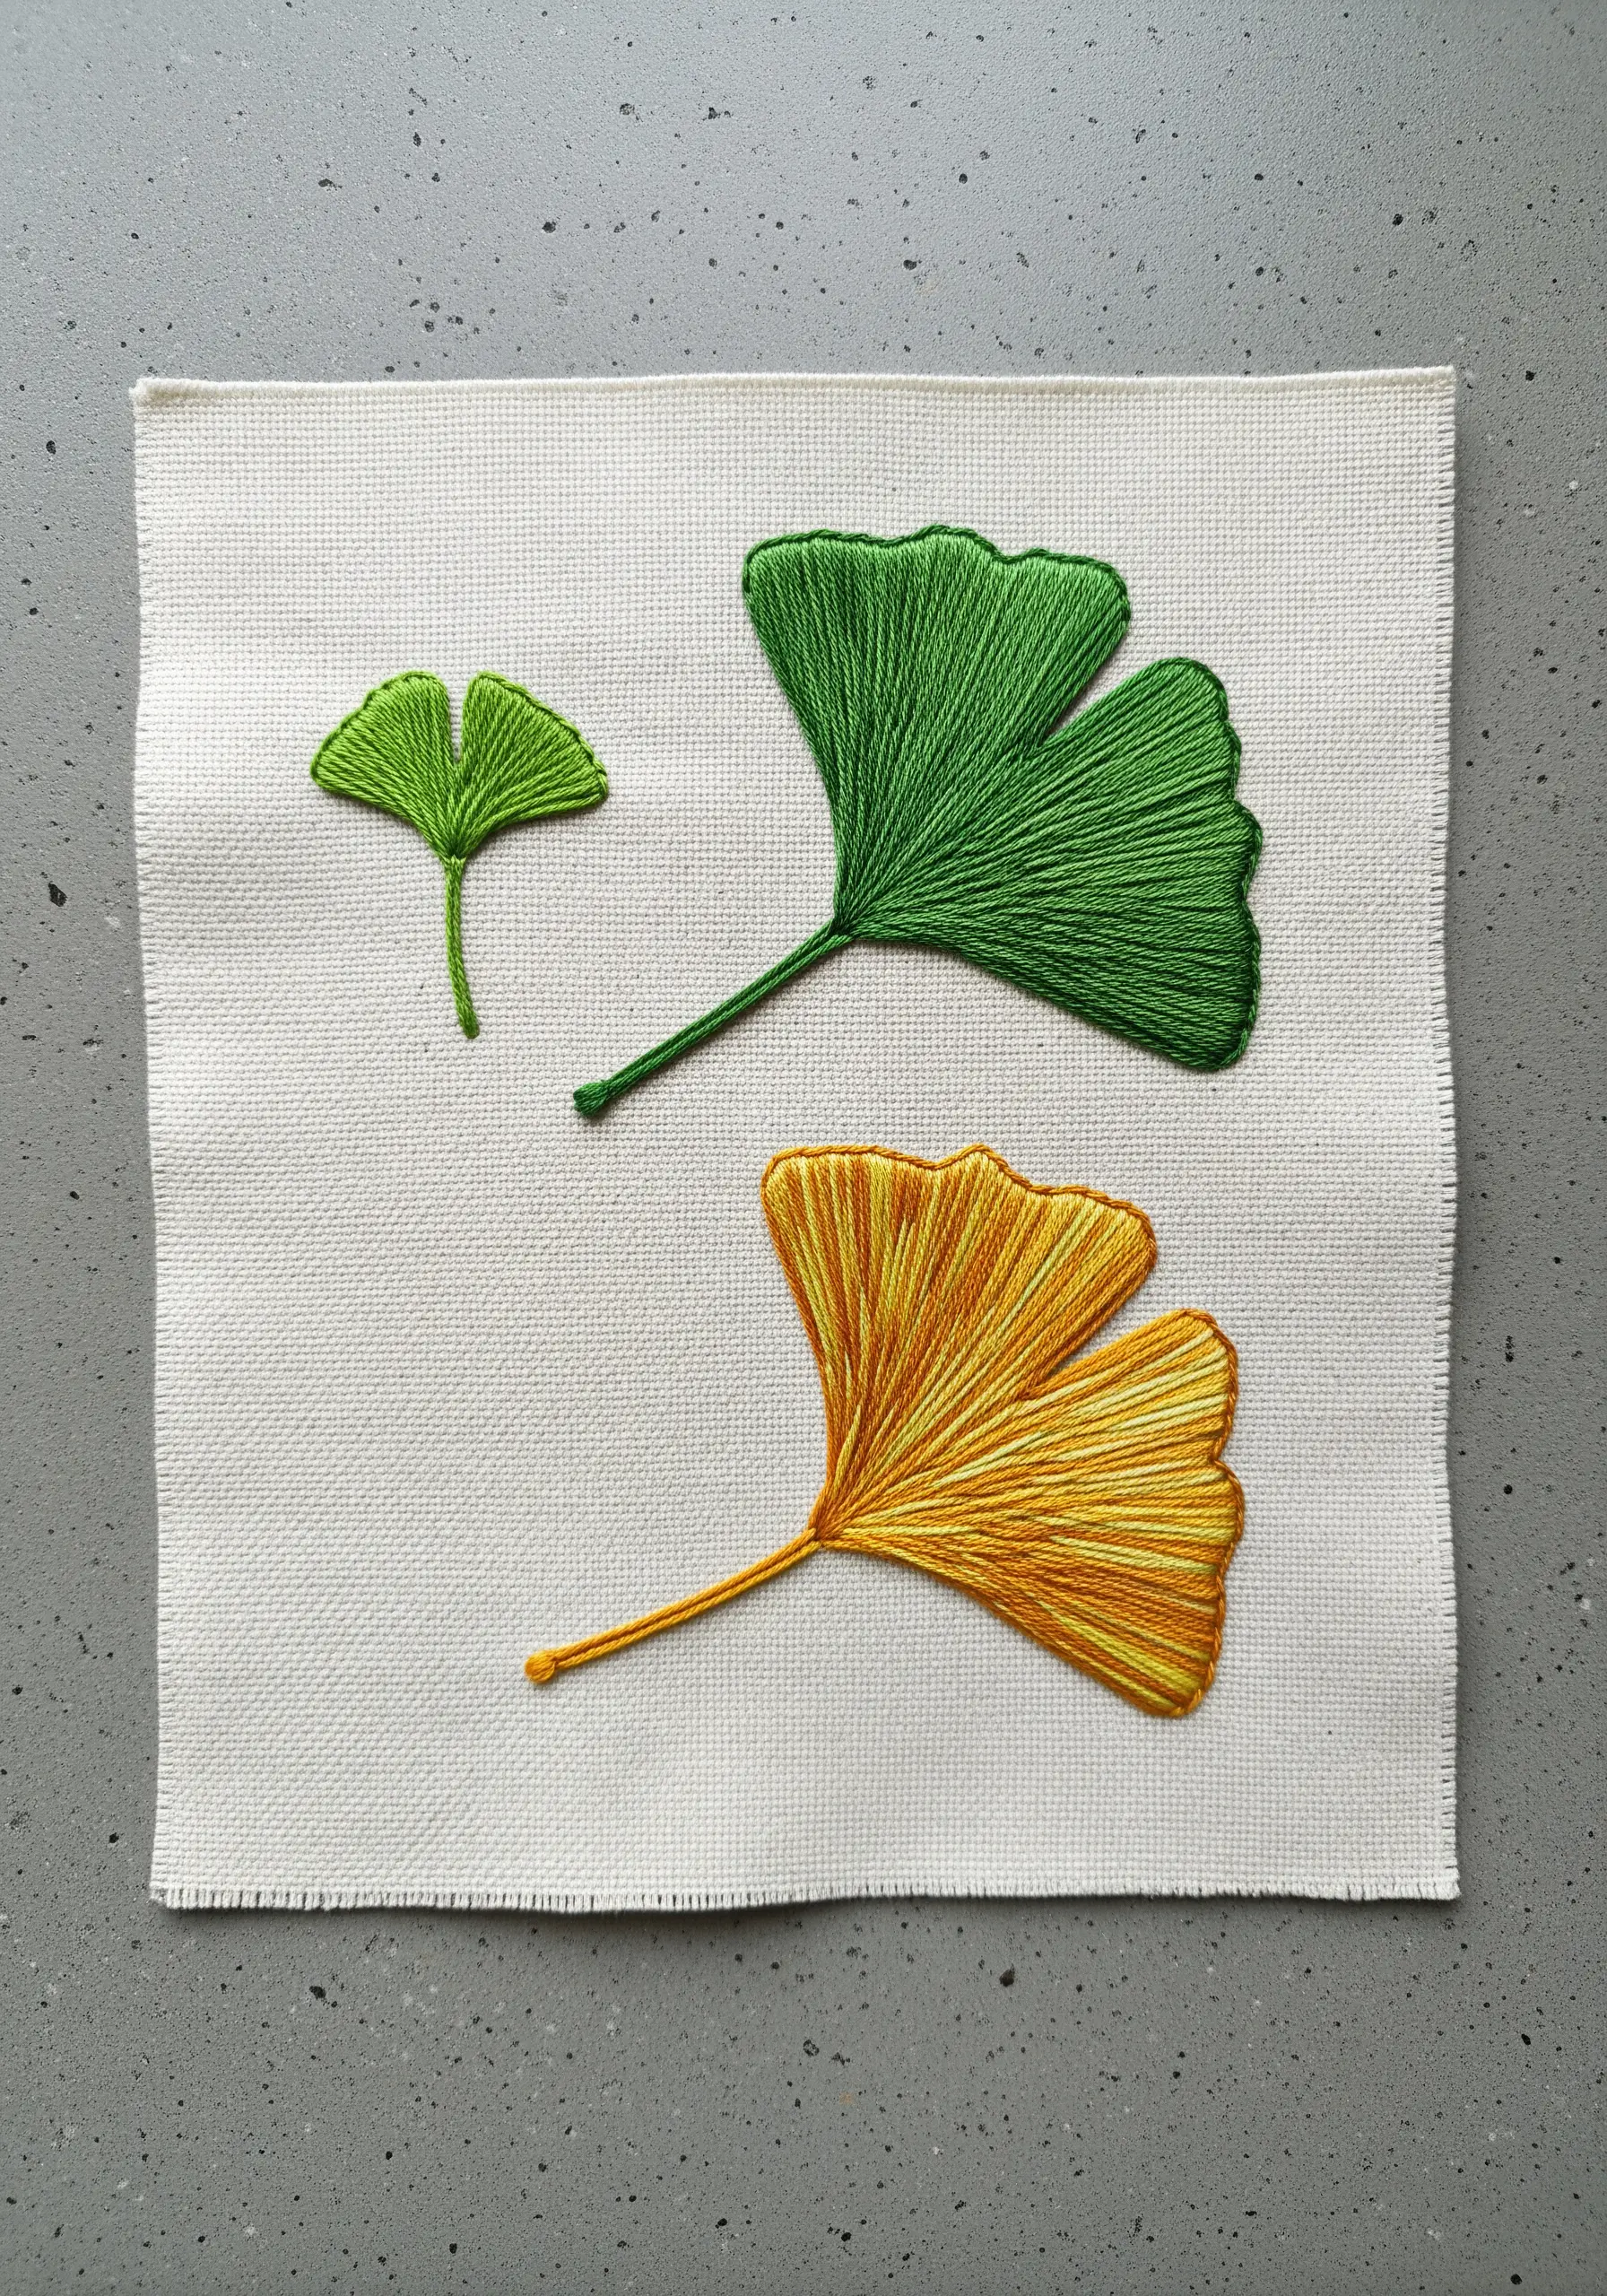
Use the elegant, fan-like shape of ginkgo leaves as a focused exercise for mastering a perfectly smooth satin stitch.
To achieve that signature sheen, ensure your stitches are laid close together without overlapping, all following the natural, radiating lines of the leaf.
Outline the shape first with a split stitch; this creates a raised edge to tuck your satin stitches under, resulting in a much cleaner, more defined border.
Practice with different thread colors to see how variegated or multi-toned floss can create stunning gradients with this single, powerful stitch.
29. Tell a Story Above and Below the Soil
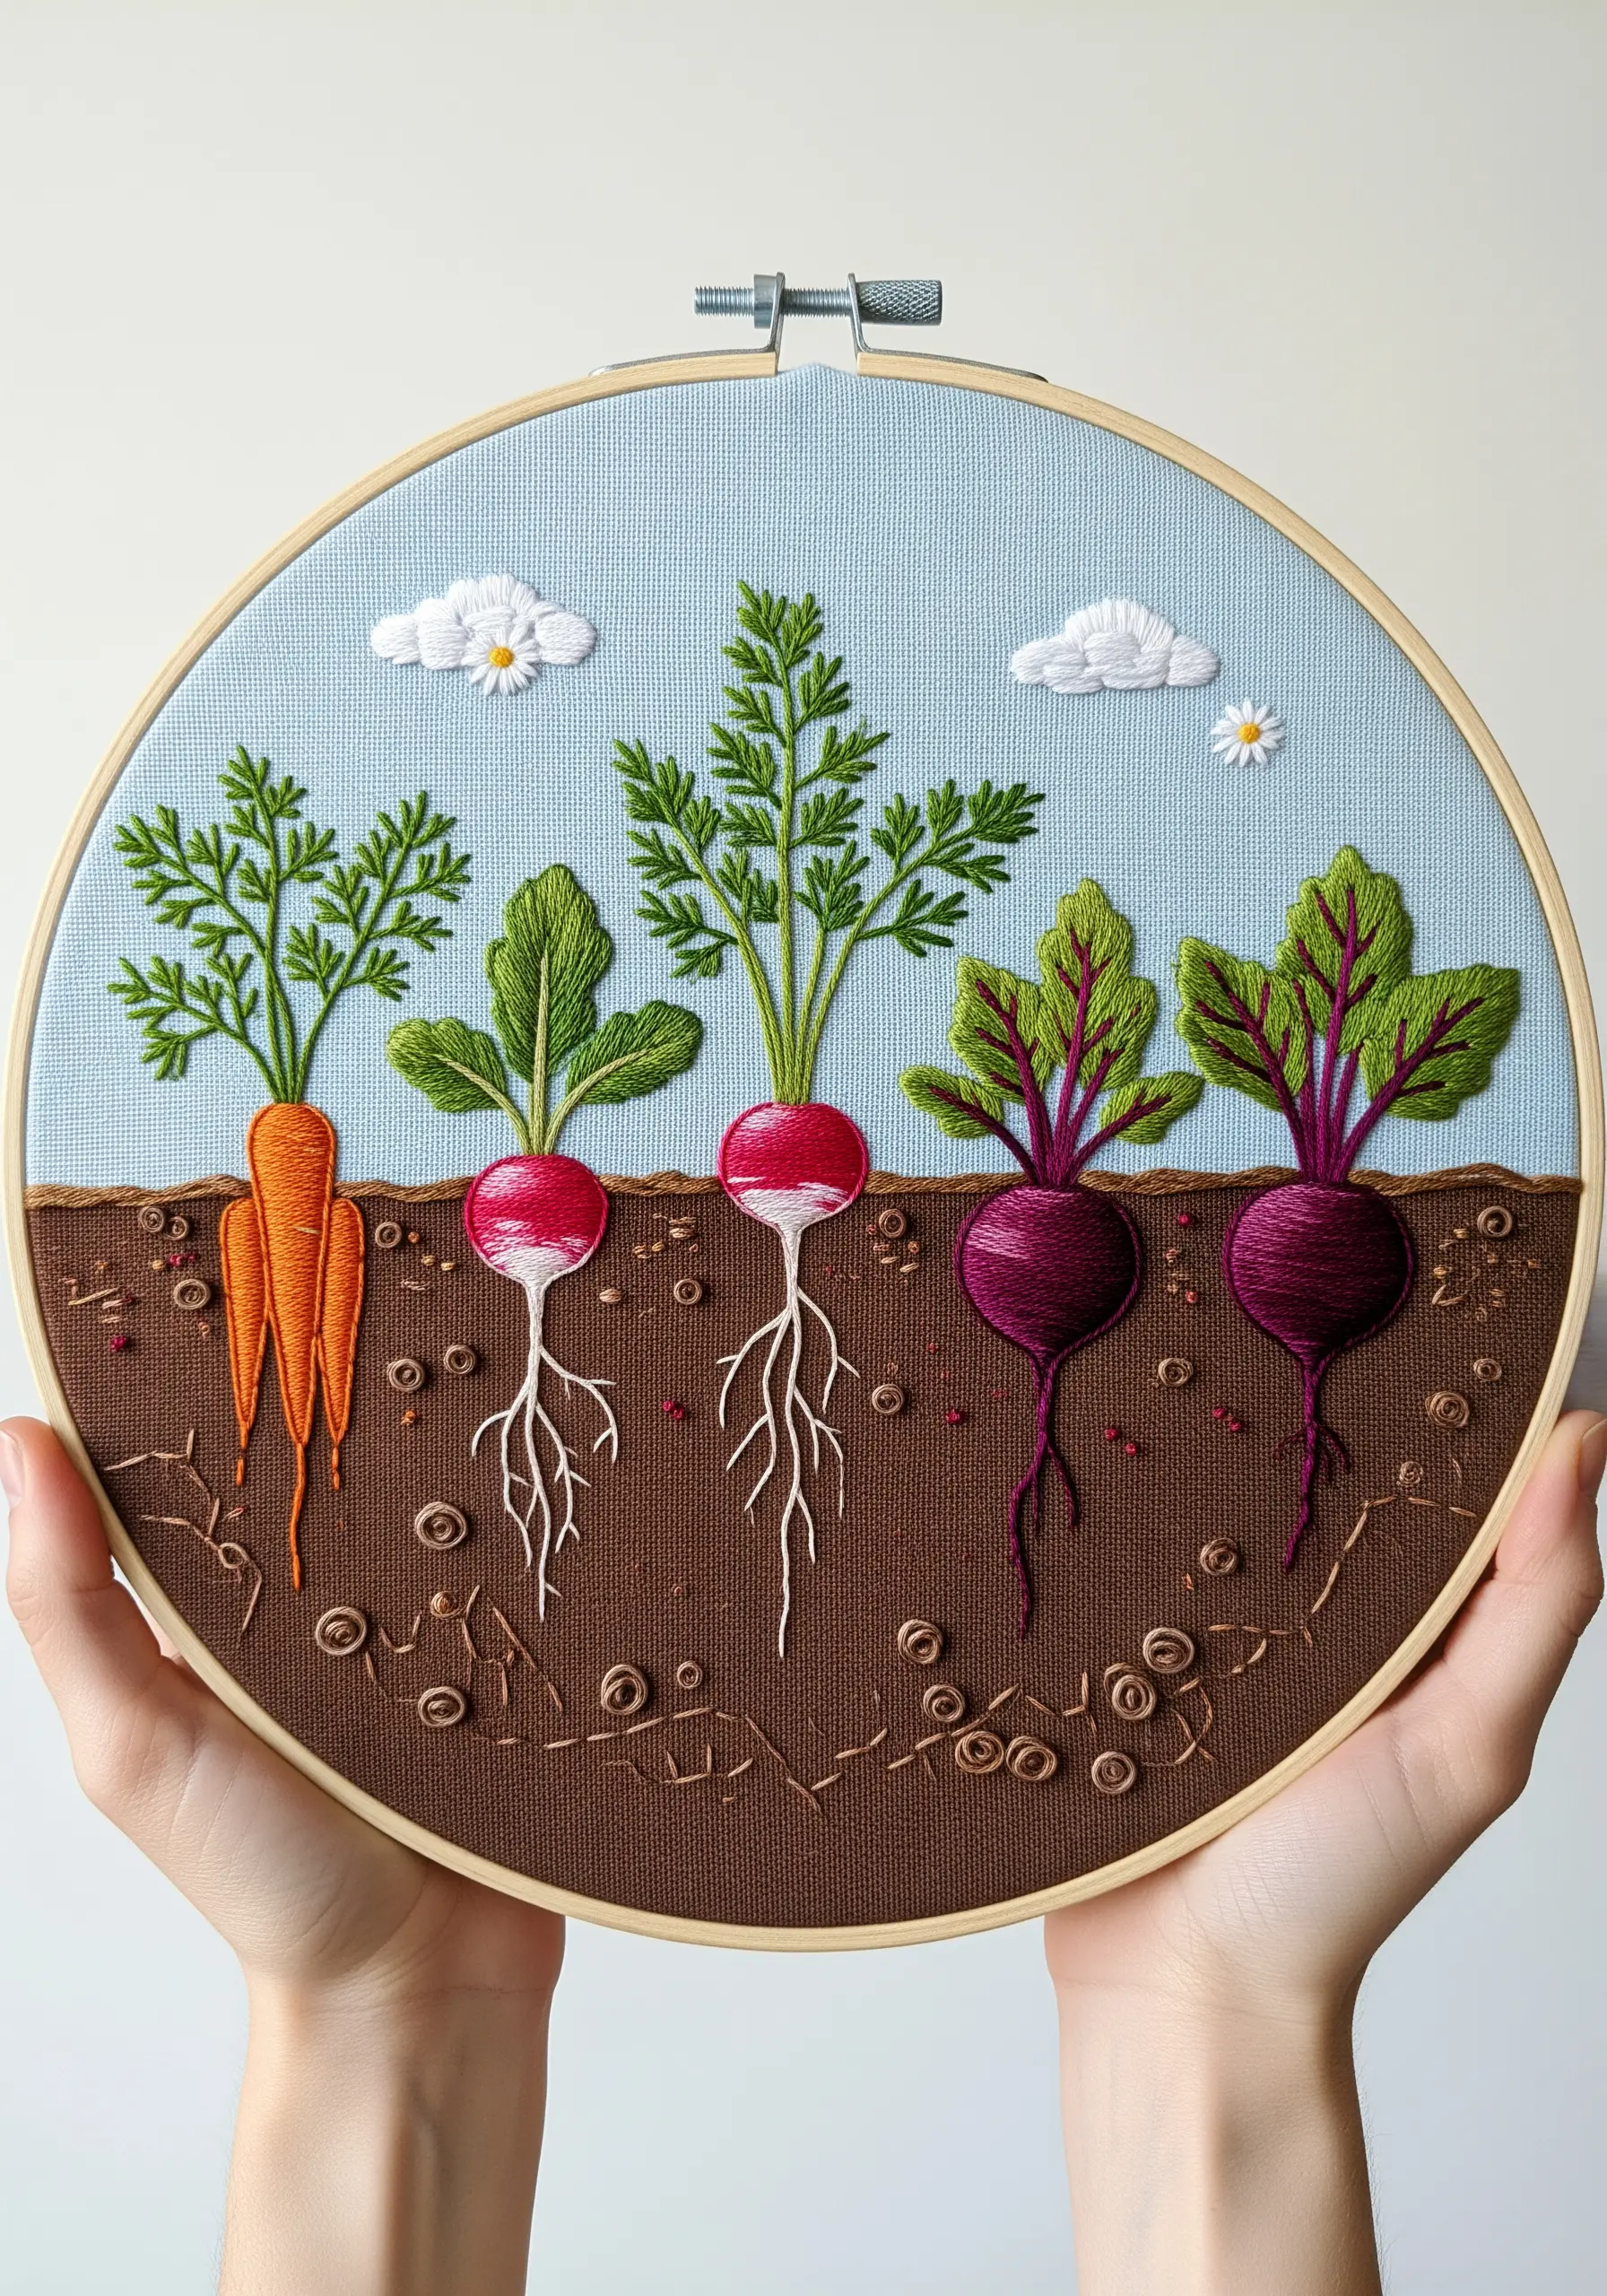
Create a captivating cross-section view by stitching both the leafy tops and the hidden roots of your vegetables.
Use a dense collection of French knots and seed stitches in various browns to build up a rich, textured soil layer.
For the fine, delicate roots, use a single strand of white or off-white floss and a series of tiny, branching straight stitches.
This design encourages creative composition and offers a wonderful opportunity to play with contrasting textures—the smooth vegetables, the leafy greens, and the earthy soil.
30. Capture Tropical Vibrancy with Thread Painting

Challenge your blending skills by recreating the intense, saturated gradients of tropical flowers like hibiscus and orchids.
This technique, known as thread painting, relies entirely on the long-and-short stitch. Use a single strand of floss and blend multiple shades of pink, orange, or purple to create a seamless, painted effect.
Pay close attention to the direction of your stitches, following the natural curve of each petal to enhance the realism.
Stitching on a bold, turquoise fabric makes the warm colors of the flowers feel even more vibrant and lush.
31. Illustrate the Seed Pod Life Cycle

Create a sophisticated and delicate study by focusing on the beauty of plants after they have bloomed.
Use long, elegant straight stitches to create the fluffy, airborne seeds of a dandelion, varying their length and direction to suggest movement.
Incorporate French knots or tiny beads for the packed seeds inside the poppy head, and use sheer fabric appliqué to mimic the paper-thin membrane of an empty pod.
This monochromatic project is a beautiful exercise in using line and texture to convey fragility and grace.
32. Study Simplicity with a Wild Grass Banner
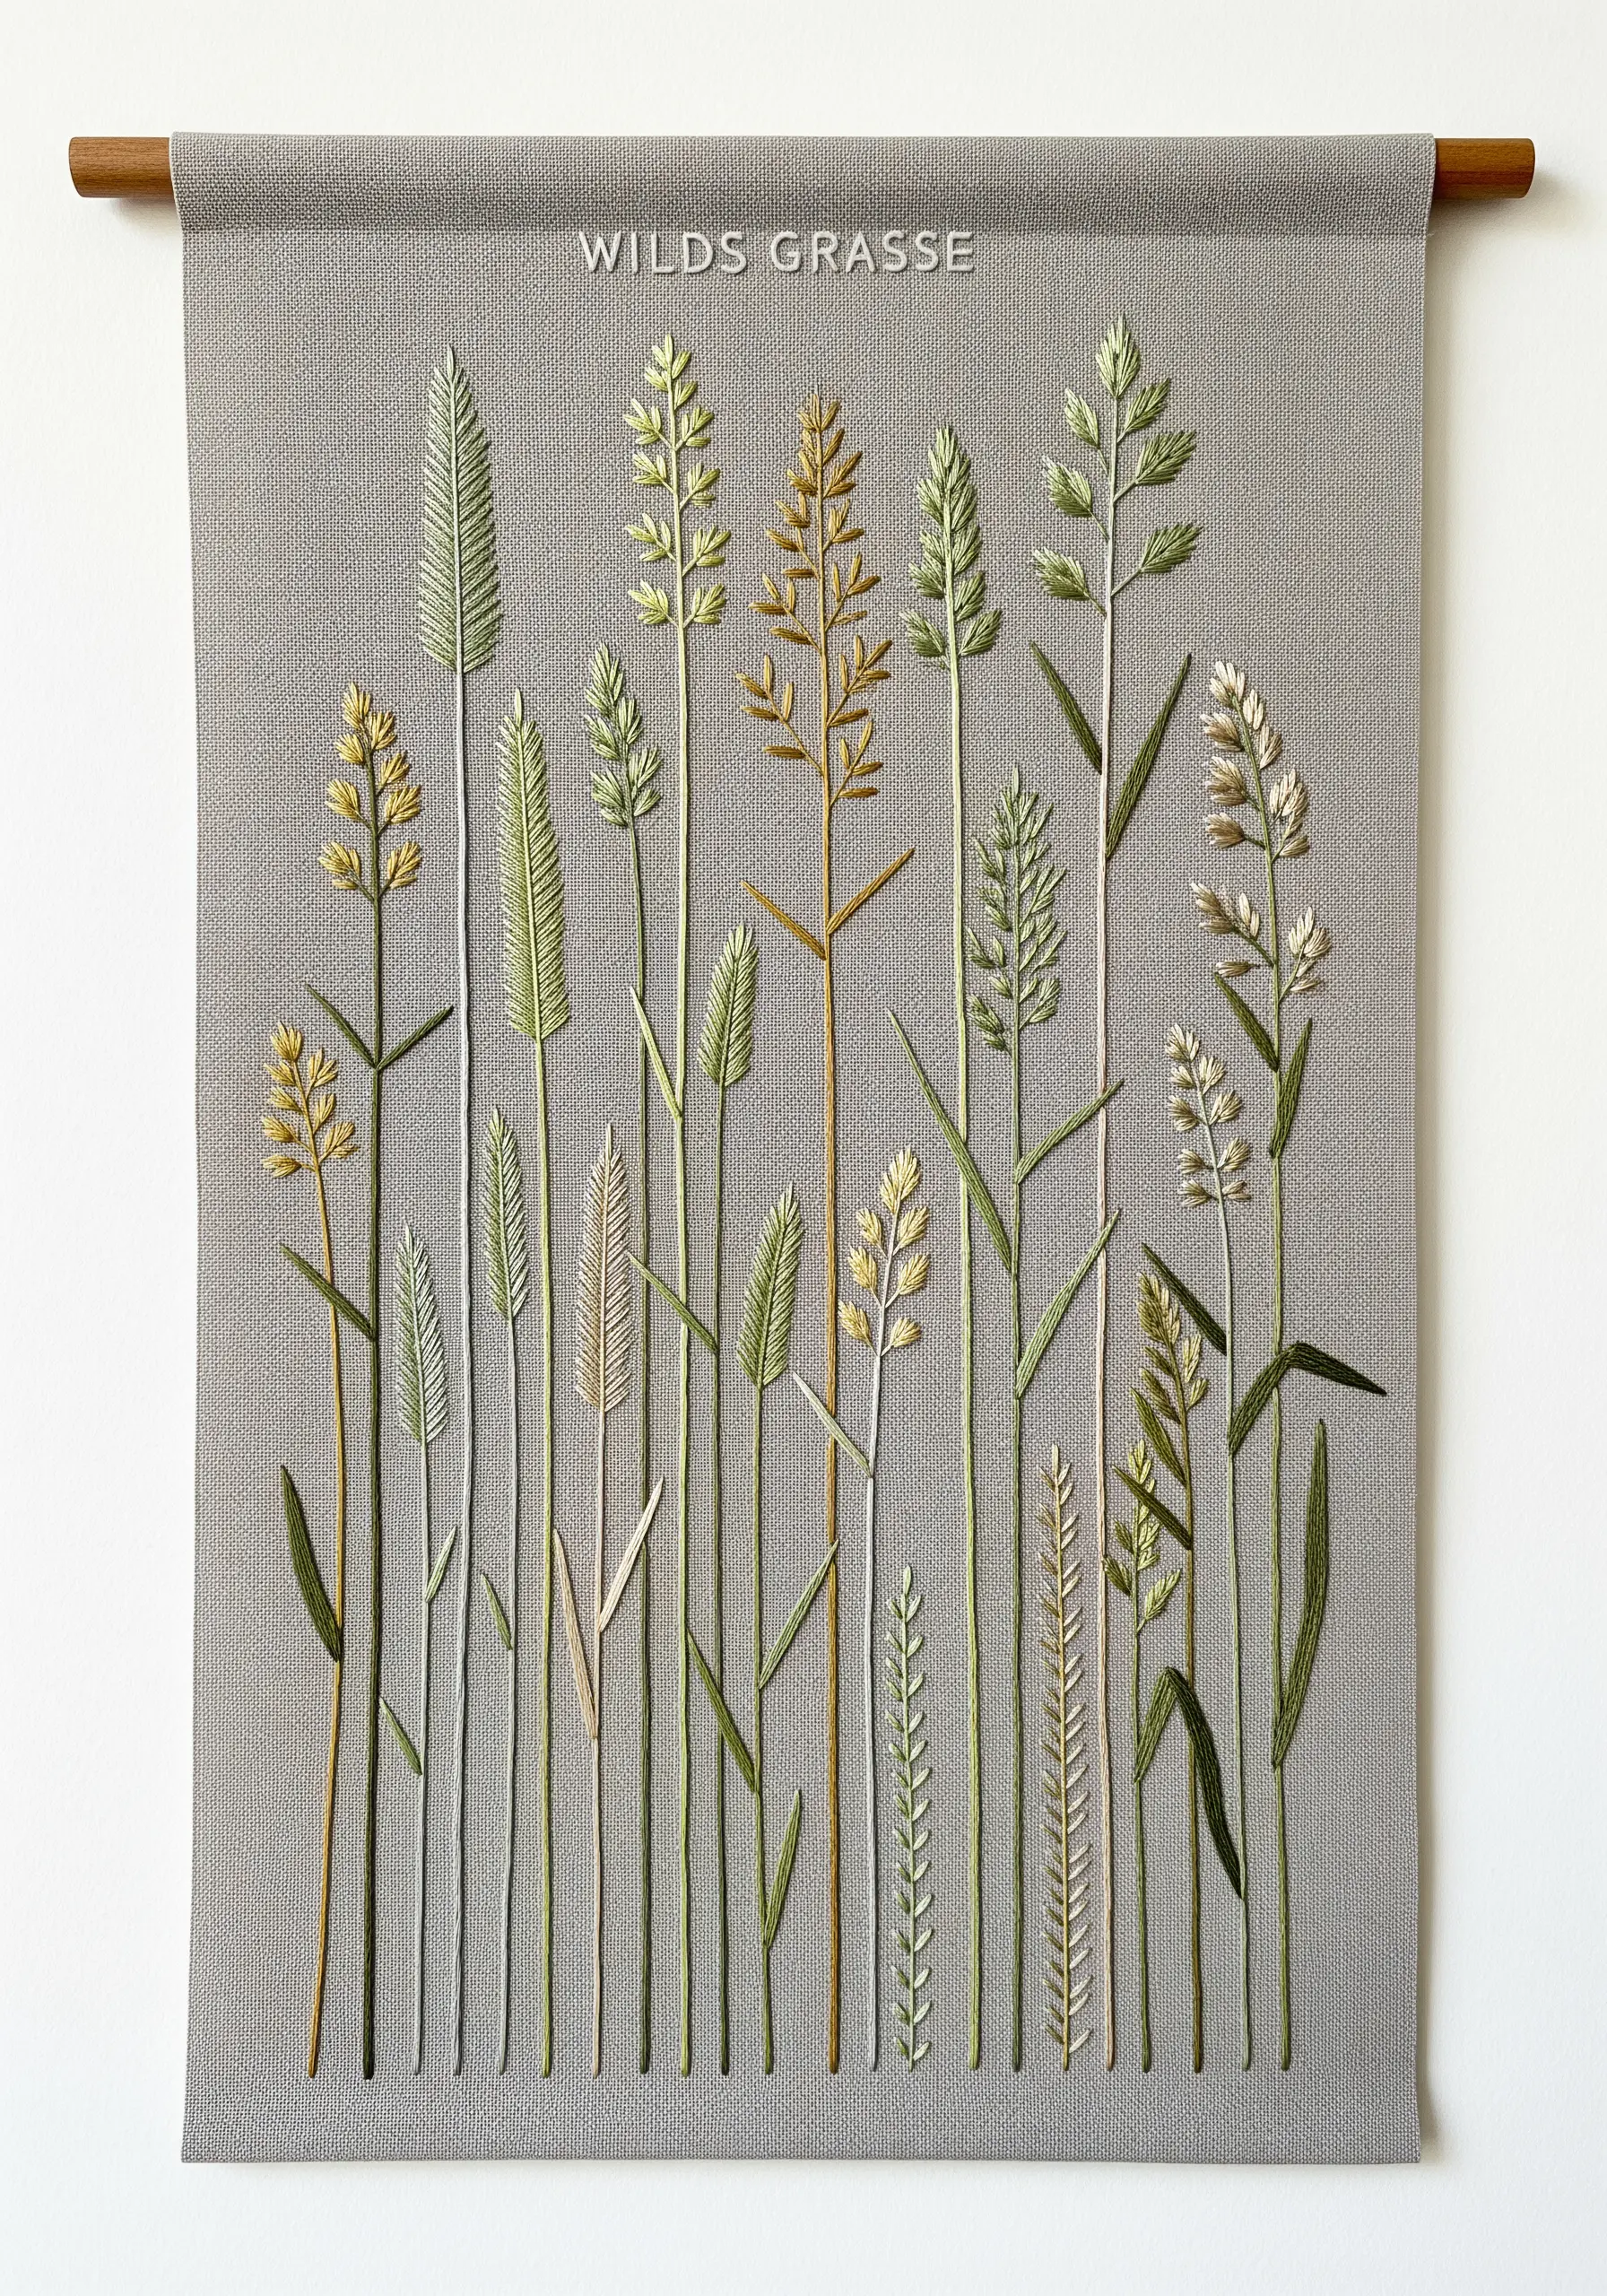
Prove that stunning botanical art doesn’t have to be complex by creating a sampler of various wild grasses.
This project is a masterclass in using simple, foundational stitches. Experiment with fly stitch, feather stitch, seed stitch, and straight stitch to see how many different textures you can create.
Arrange the grasses at varying heights and use a subtle, earthy color palette to create a composition that feels both organized and natural.
This is a wonderfully meditative project that hones your skills in precision and subtle variation.
33. Define Unusual Shapes with Precise Outlines

Tackle the fascinating and complex shapes of carnivorous plants as an exercise in precision and detail.
Use a split stitch or a whipped backstitch for all the outlines. This creates a sharp, slightly raised edge that contains your fill stitches and keeps the unique silhouettes of the plants crisp.
For the interior of the pitcher plants, use long-and-short stitch to blend colors and create a sense of depth and shadow inside the tube.
This kind of detailed work sharpens your control and your ability to translate intricate biological illustrations into thread.
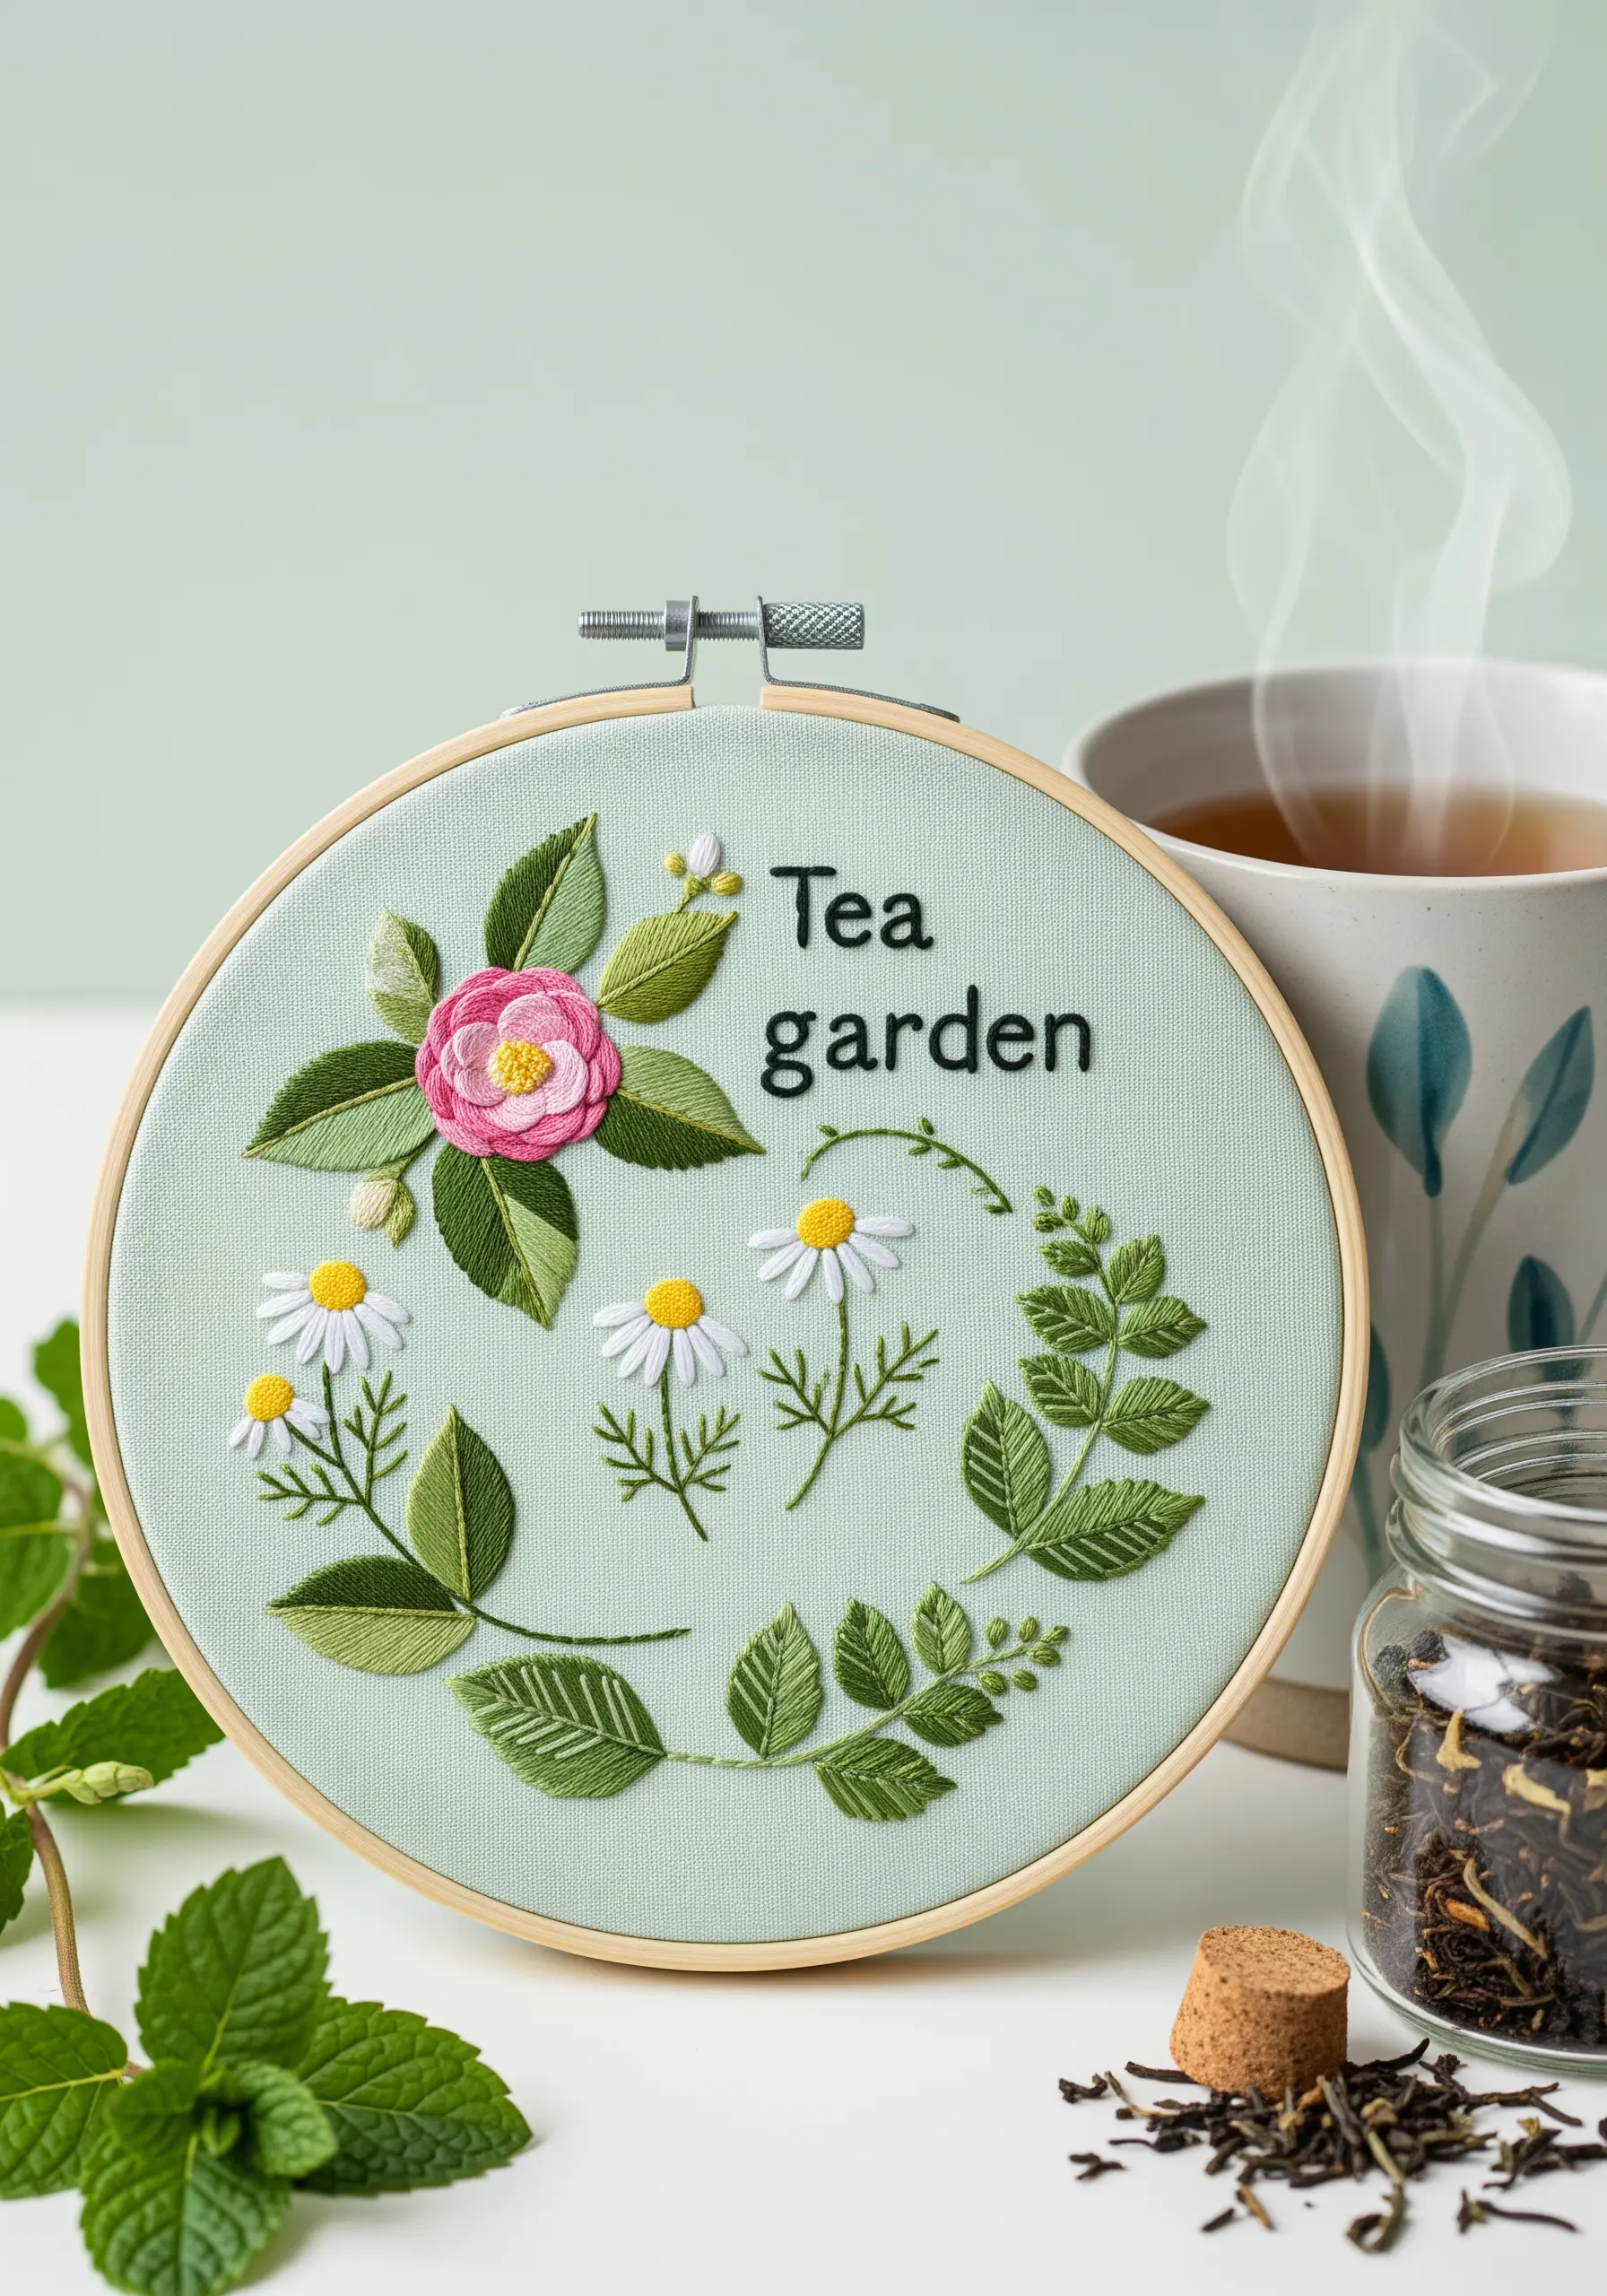
34. Master Recognizable Herbs with Simple Stitches
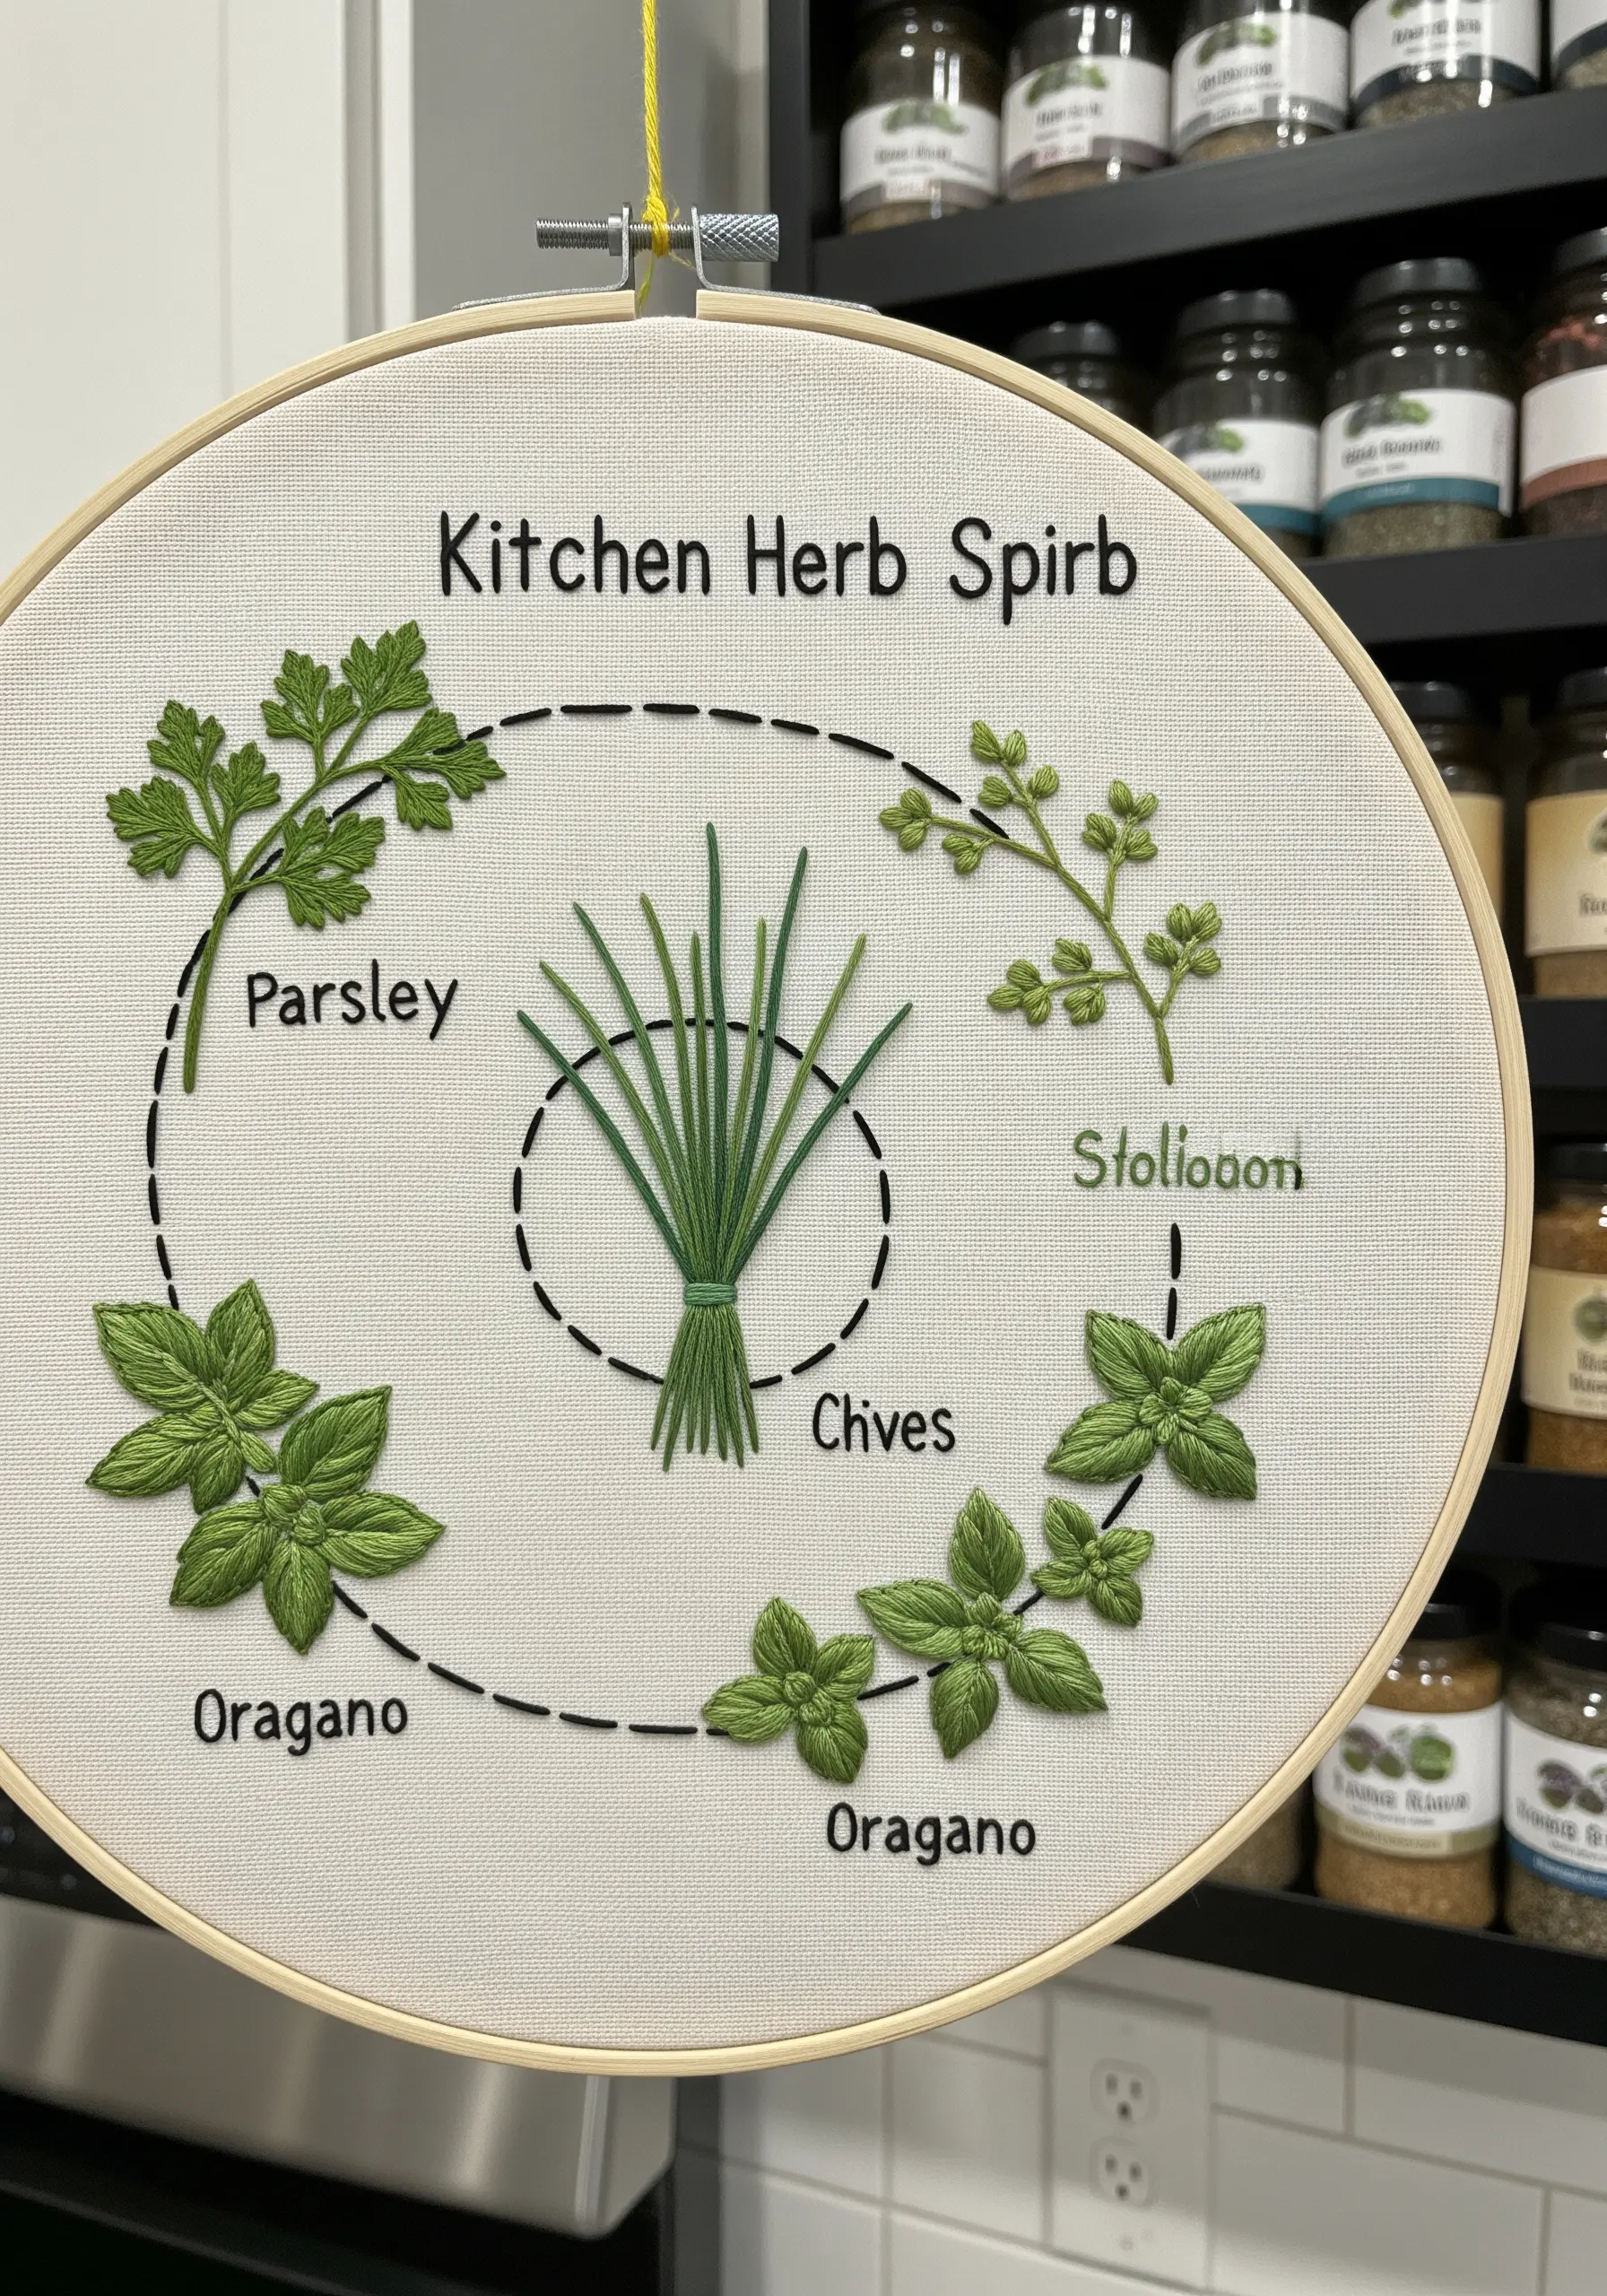
Challenge yourself to capture the essence of common kitchen herbs using only a few well-chosen stitches.
Use a combination of fishbone stitch and satin stitch for the broad leaves of oregano and basil. For the delicate, frilly texture of parsley, try small, detached chain stitches.
The chives offer a great opportunity to practice clean, parallel straight stitches. Bundle them at the base to create a convincing clump.
This practical sampler is a great way to improve your ability to create identifiable shapes on a small scale.
35. Stitch a Meadow with Varied Textural Flowers
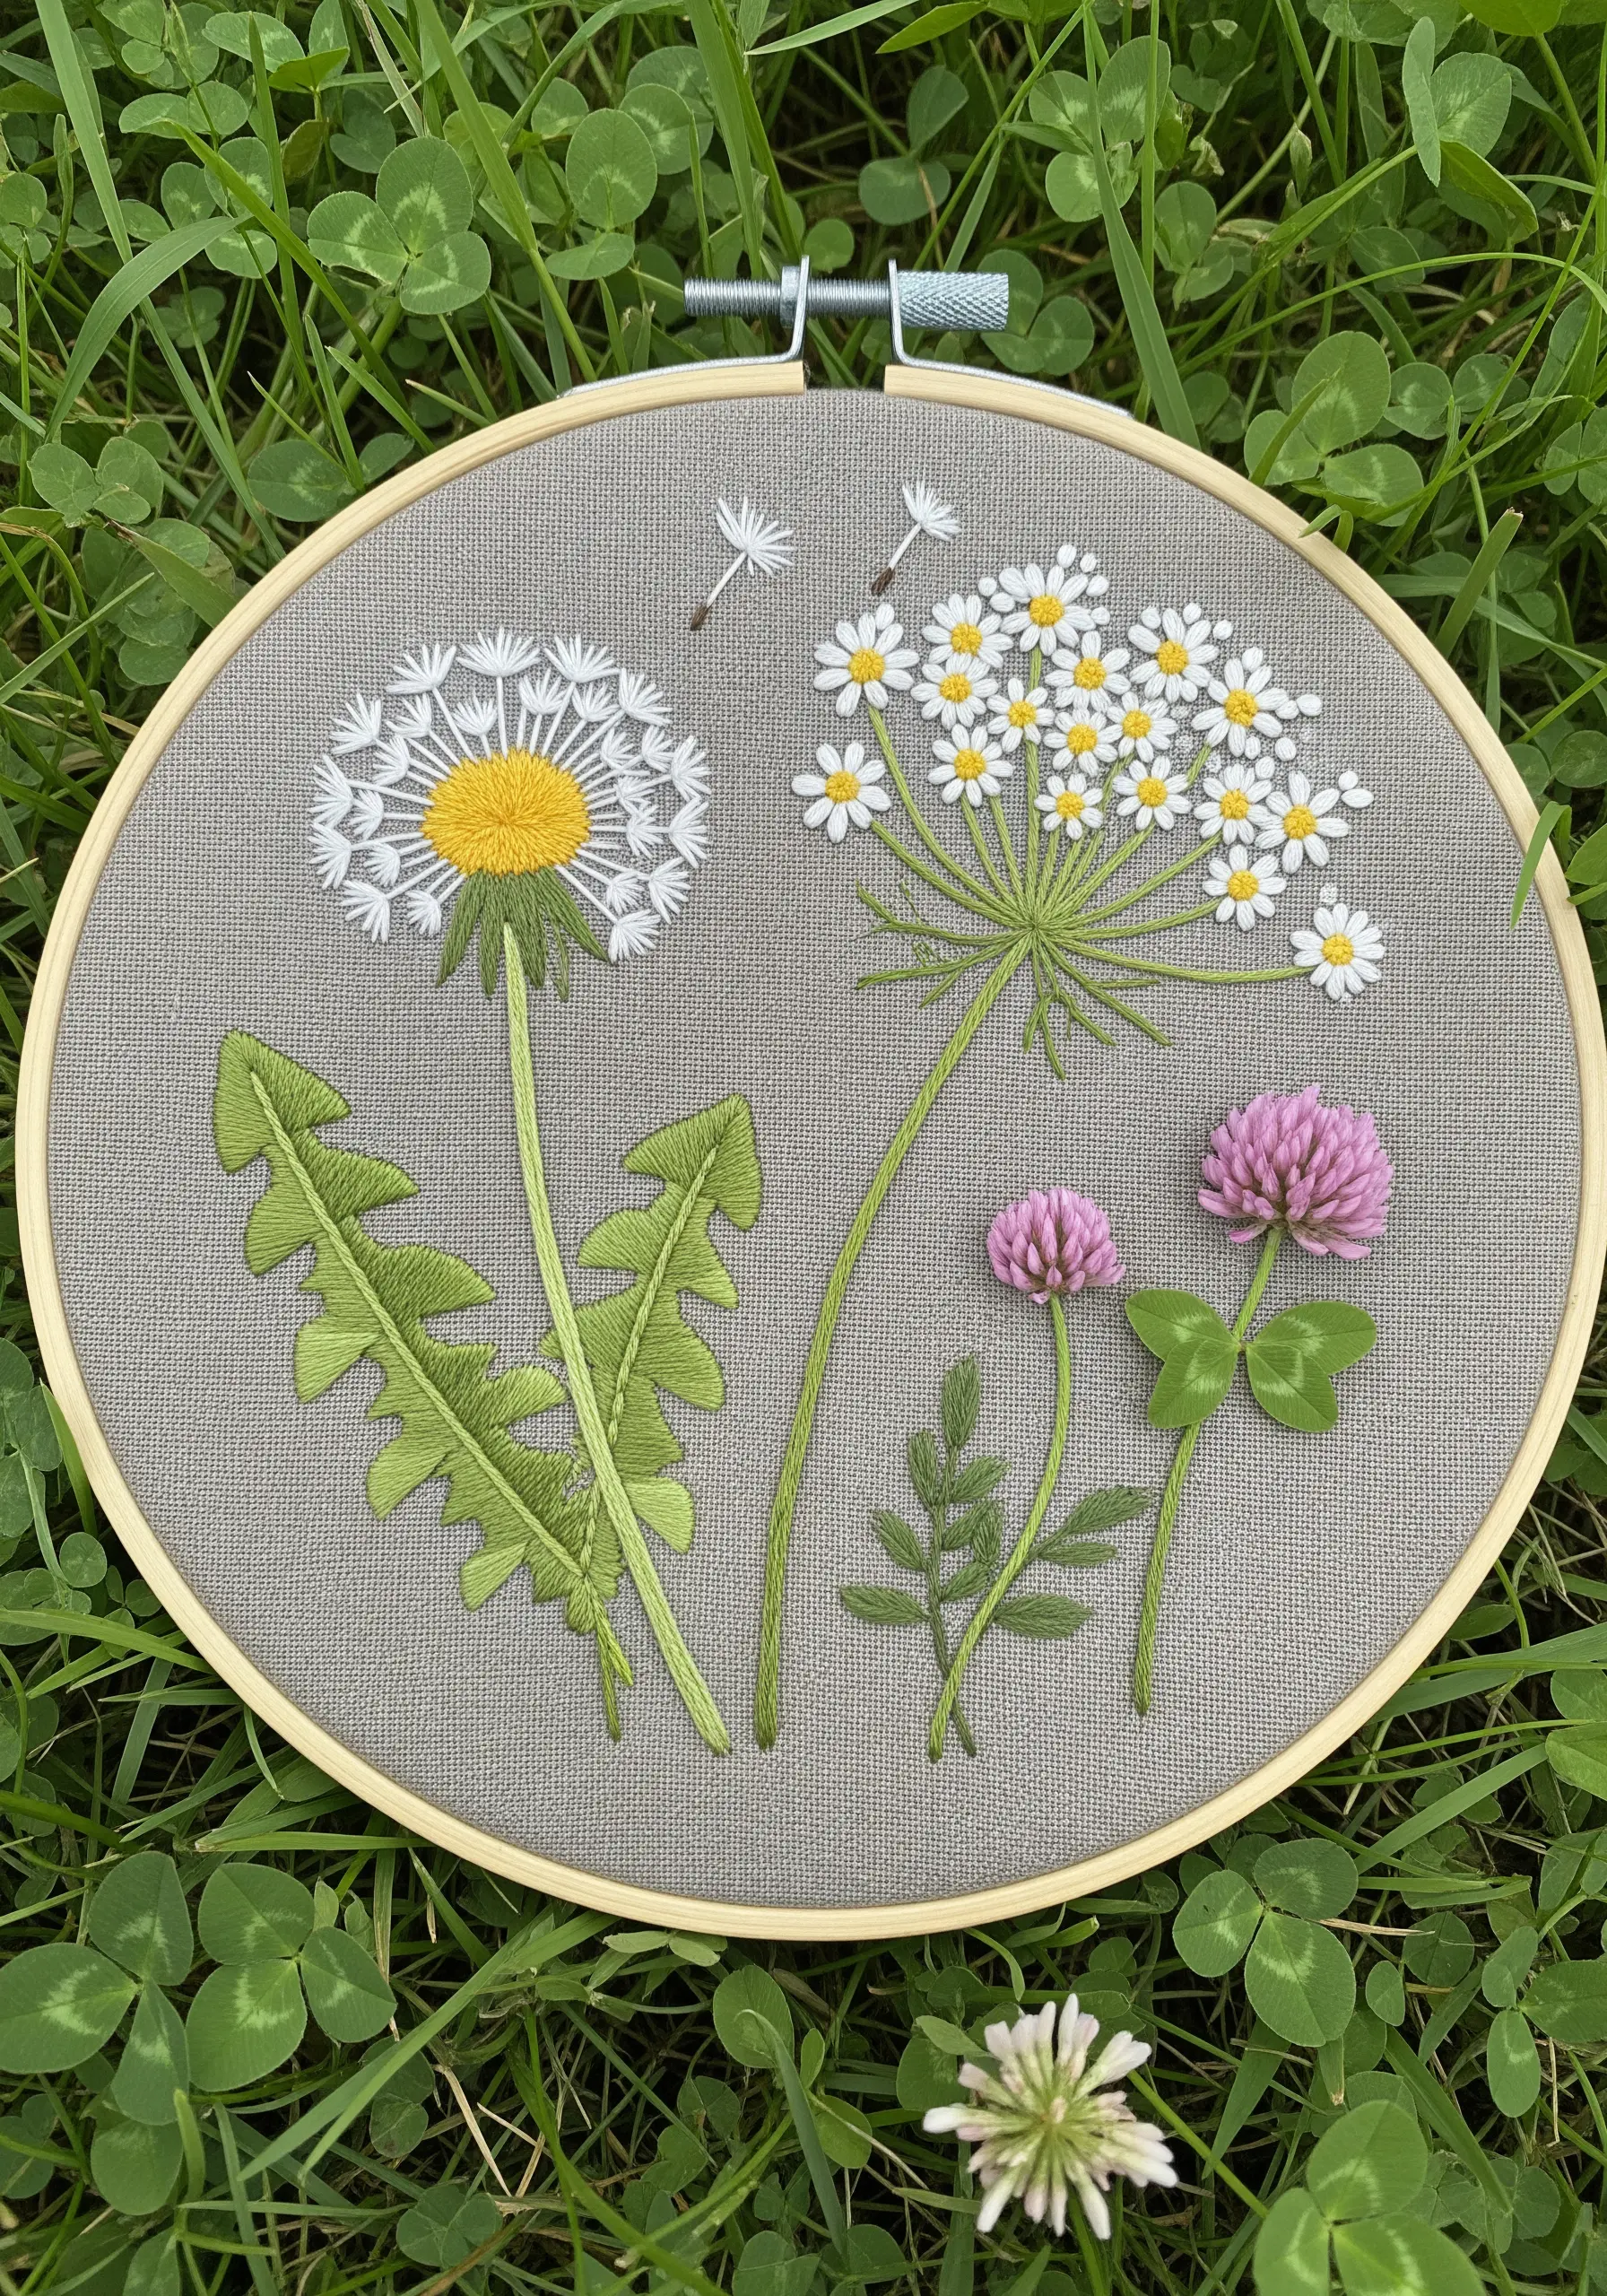
Create a sampler that captures the delightful variety of a wild meadow by assigning a unique stitch technique to each plant.
Use a woven wheel stitch (or spider web rose stitch) for the pink clover blossoms to give them a dense, rounded, and highly textural look.
For the Queen Anne’s lace, create a base of radiating straight stitches and then top them with tiny white lazy daisy stitches or French knots.
This project encourages you to think like a textile artist, choosing the perfect stitch to not just color, but truly embody the character of each flower.


