

I know you have the threads, the fabric, and the desire to create something beautiful for your home. But sometimes, what you envision in your mind doesn’t quite translate through the needle, and your finished pieces feel… nice, but not quite *art*.
Let’s change that. The difference between a simple craft and a piece of art often lies in the small, intentional decisions you make along the way—choosing the right stitch for texture, understanding how color can create depth, or knowing when to break a rule to serve your design.
Here, you won’t find generic advice. Instead, I’ll guide you through specific techniques and thoughtful approaches that will elevate your work. You will learn not just *what* to do, but *why* it works, giving you the confidence to turn your creative impulses into stunning fabric art that truly transforms your space.
1. Weave a Statement with High-Texture Fiber Art
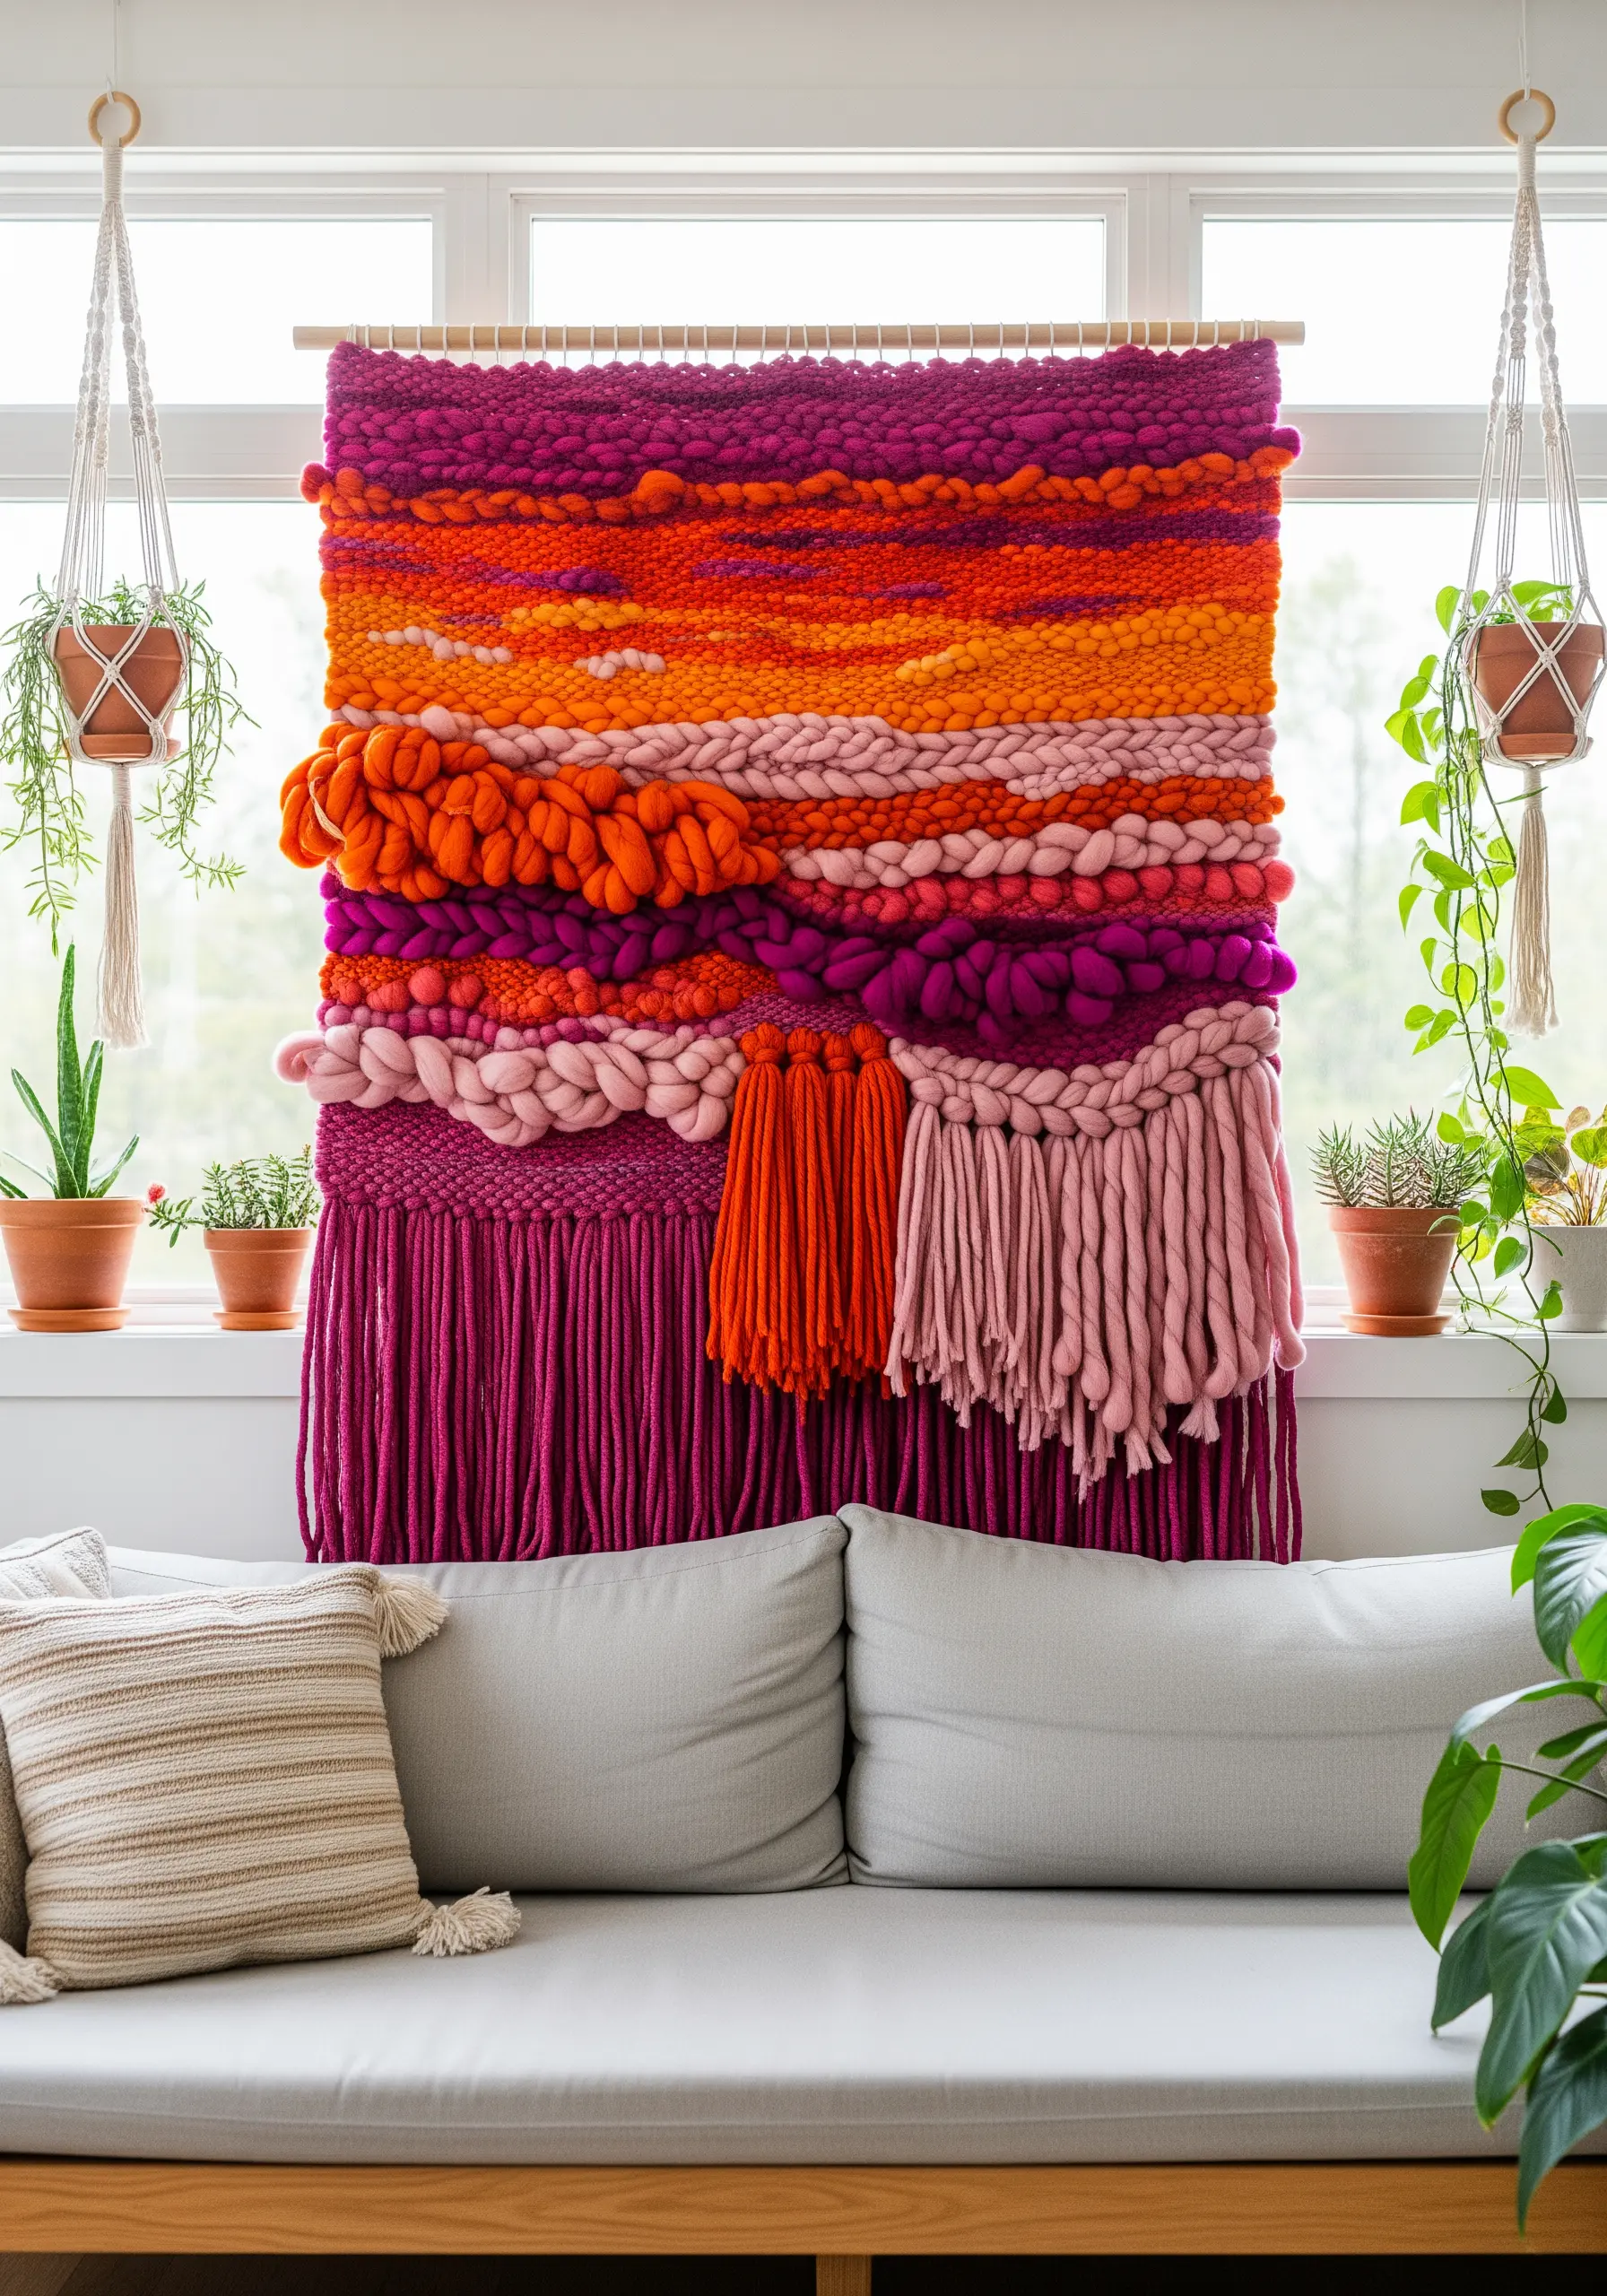
Move beyond the hoop and create a woven wall hanging that commands attention with its rich texture and color.
Incorporate chunky merino wool roving for soft, cloud-like sections, and use the soumak braid technique to create raised, horizontal lines that add structure and rhythm.
Don’t be afraid to mix yarn weights and textures—from thick, single-ply yarns to finer threads—as this contrast is what gives the piece its dynamic, tactile quality.
For a bold color statement, work in distinct color blocks rather than trying to blend them, allowing each hue to have its own moment.
Finish with a variety of fringe styles—some tightly knotted, others loose and long—to add a final layer of complexity and movement.
2. Curate a Cohesive Botanical Gallery Wall
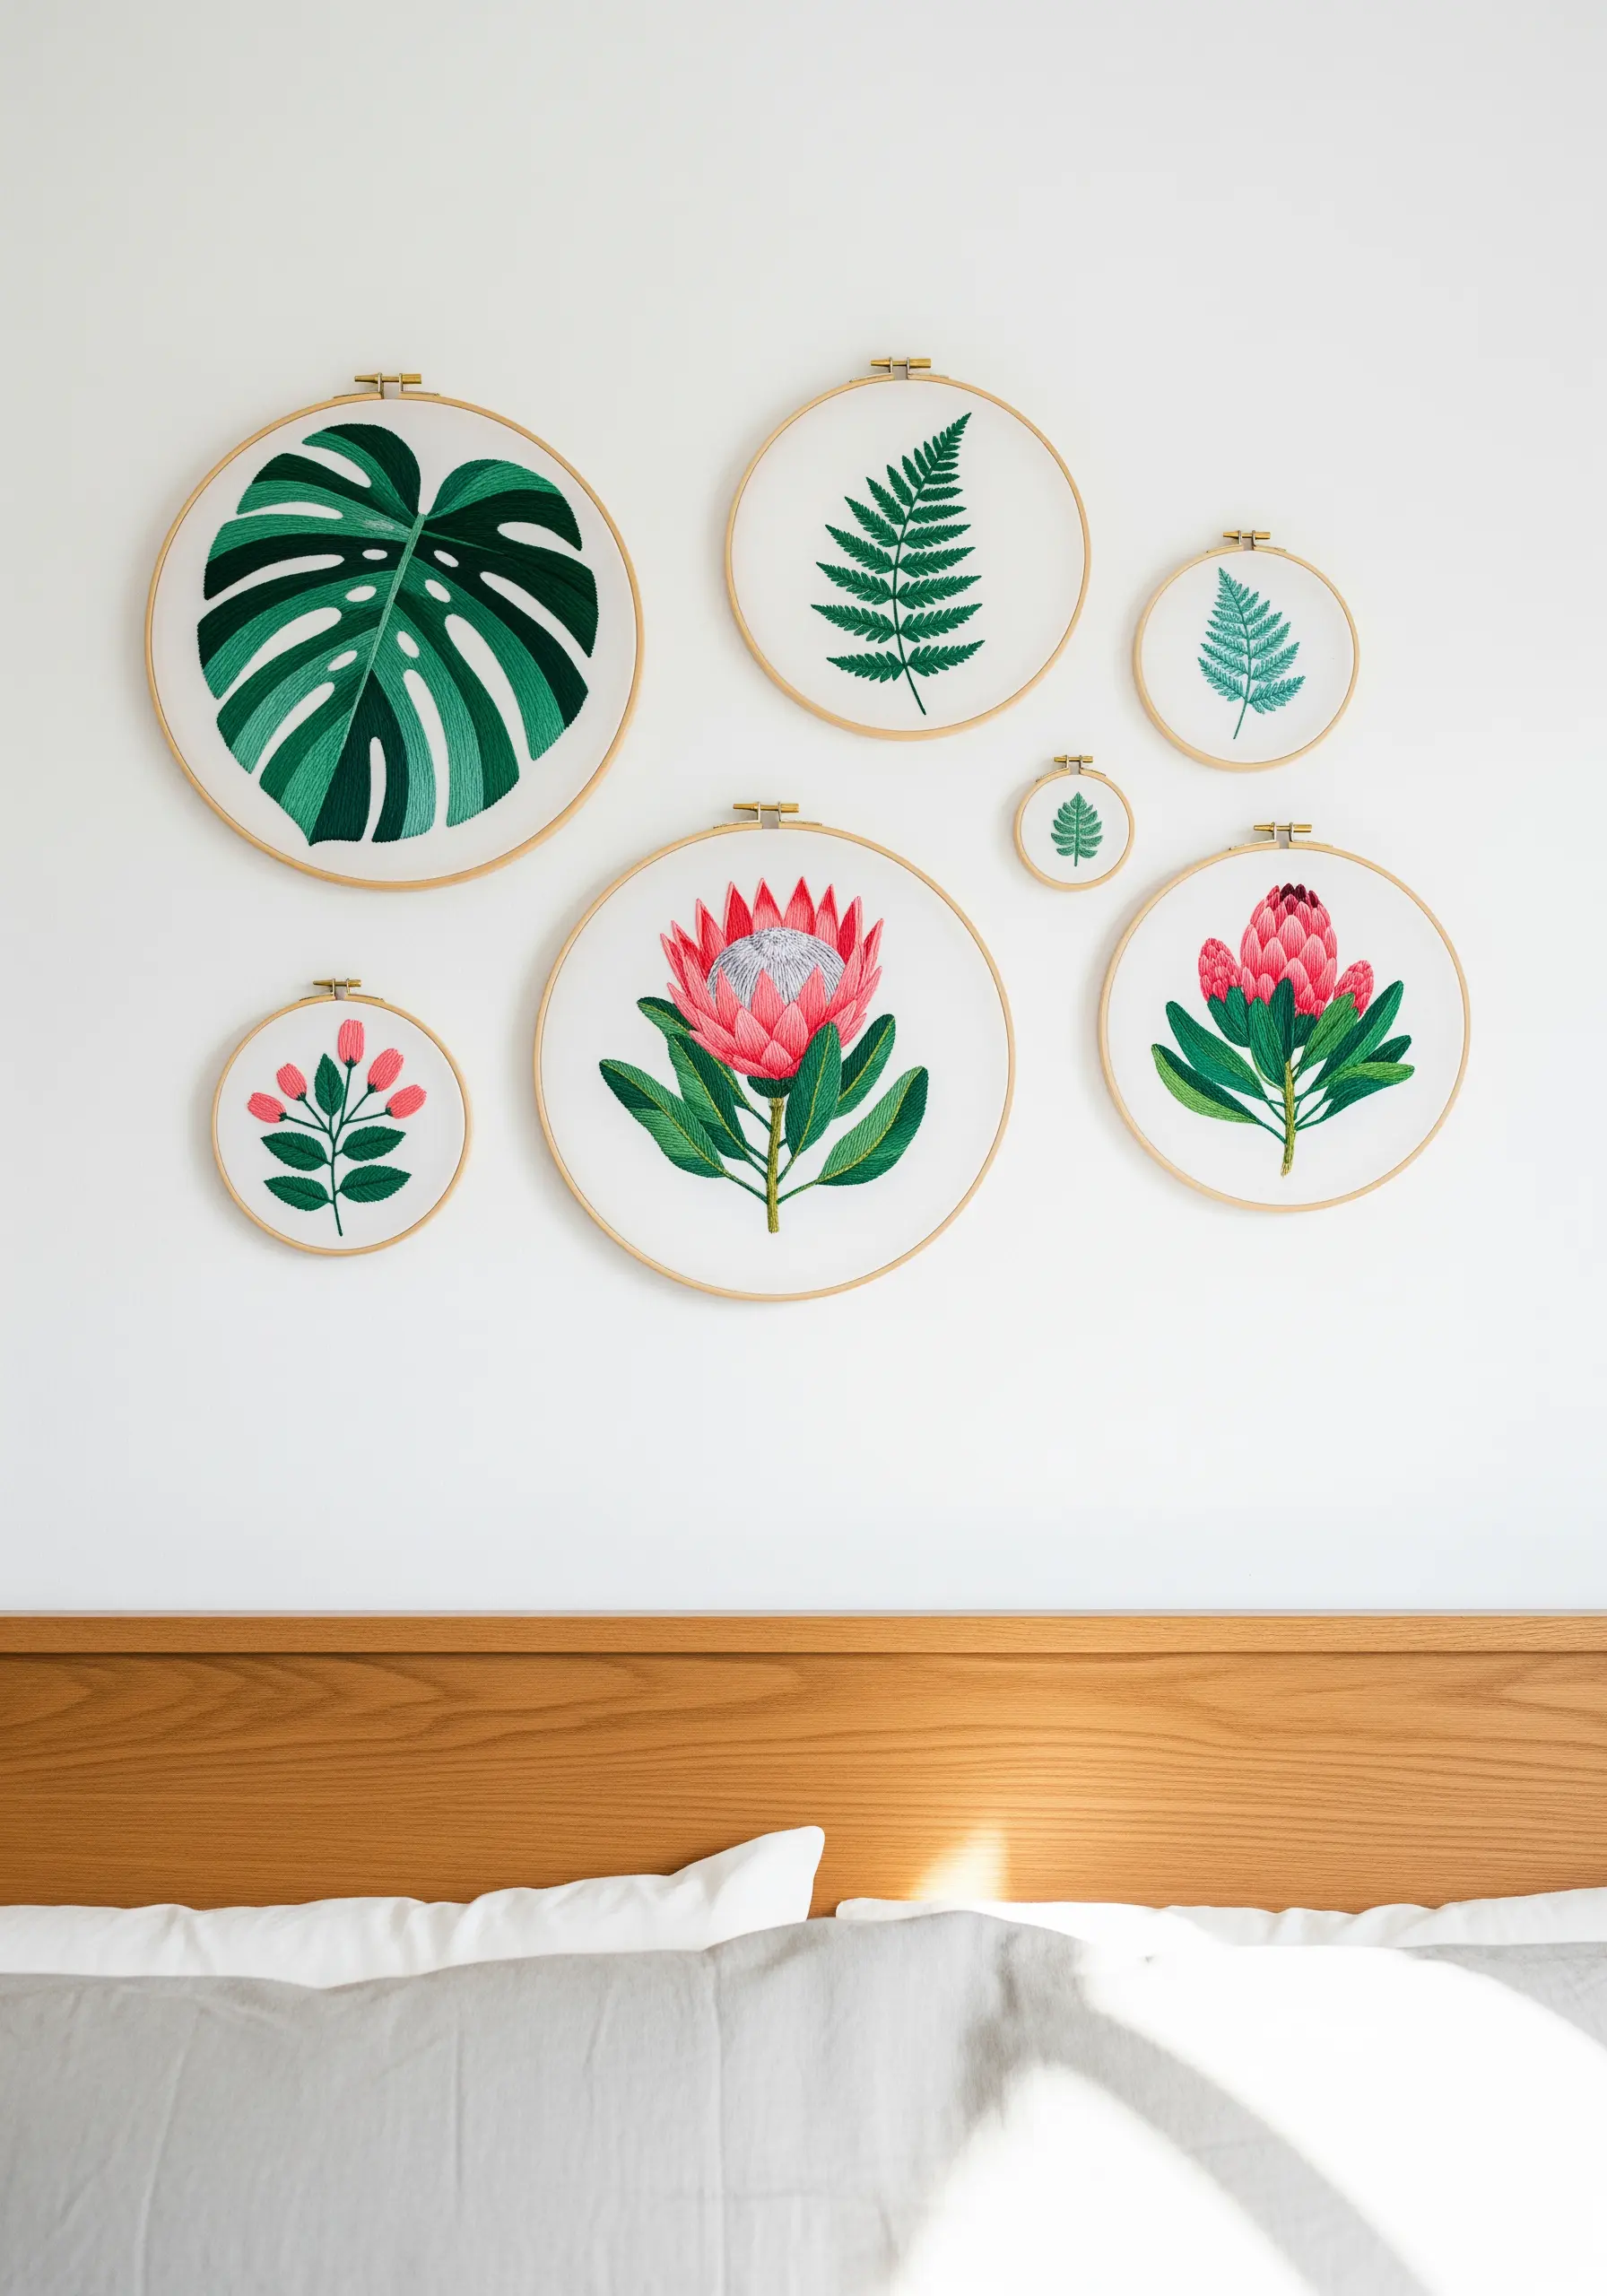
Transform a blank wall into a sophisticated botanical story by grouping several embroidery hoops into a single, cohesive display.
To create a unified look, select a limited color palette—here, greens, pinks, and a touch of blue—and repeat it across the different designs.
Vary the scale of your motifs, from a large, dramatic monstera leaf to a delicate fern, to create visual interest and guide the eye through the collection.
For the large leaf, use long-and-short stitch instead of satin stitch; this will allow you to blend shades of green seamlessly, giving the leaf realistic dimension and light.
Arrange the hoops asymmetrically to give the display a modern, organic feel that complements the natural subject matter.
3. Explore Graphic Storytelling with Modern Quilting
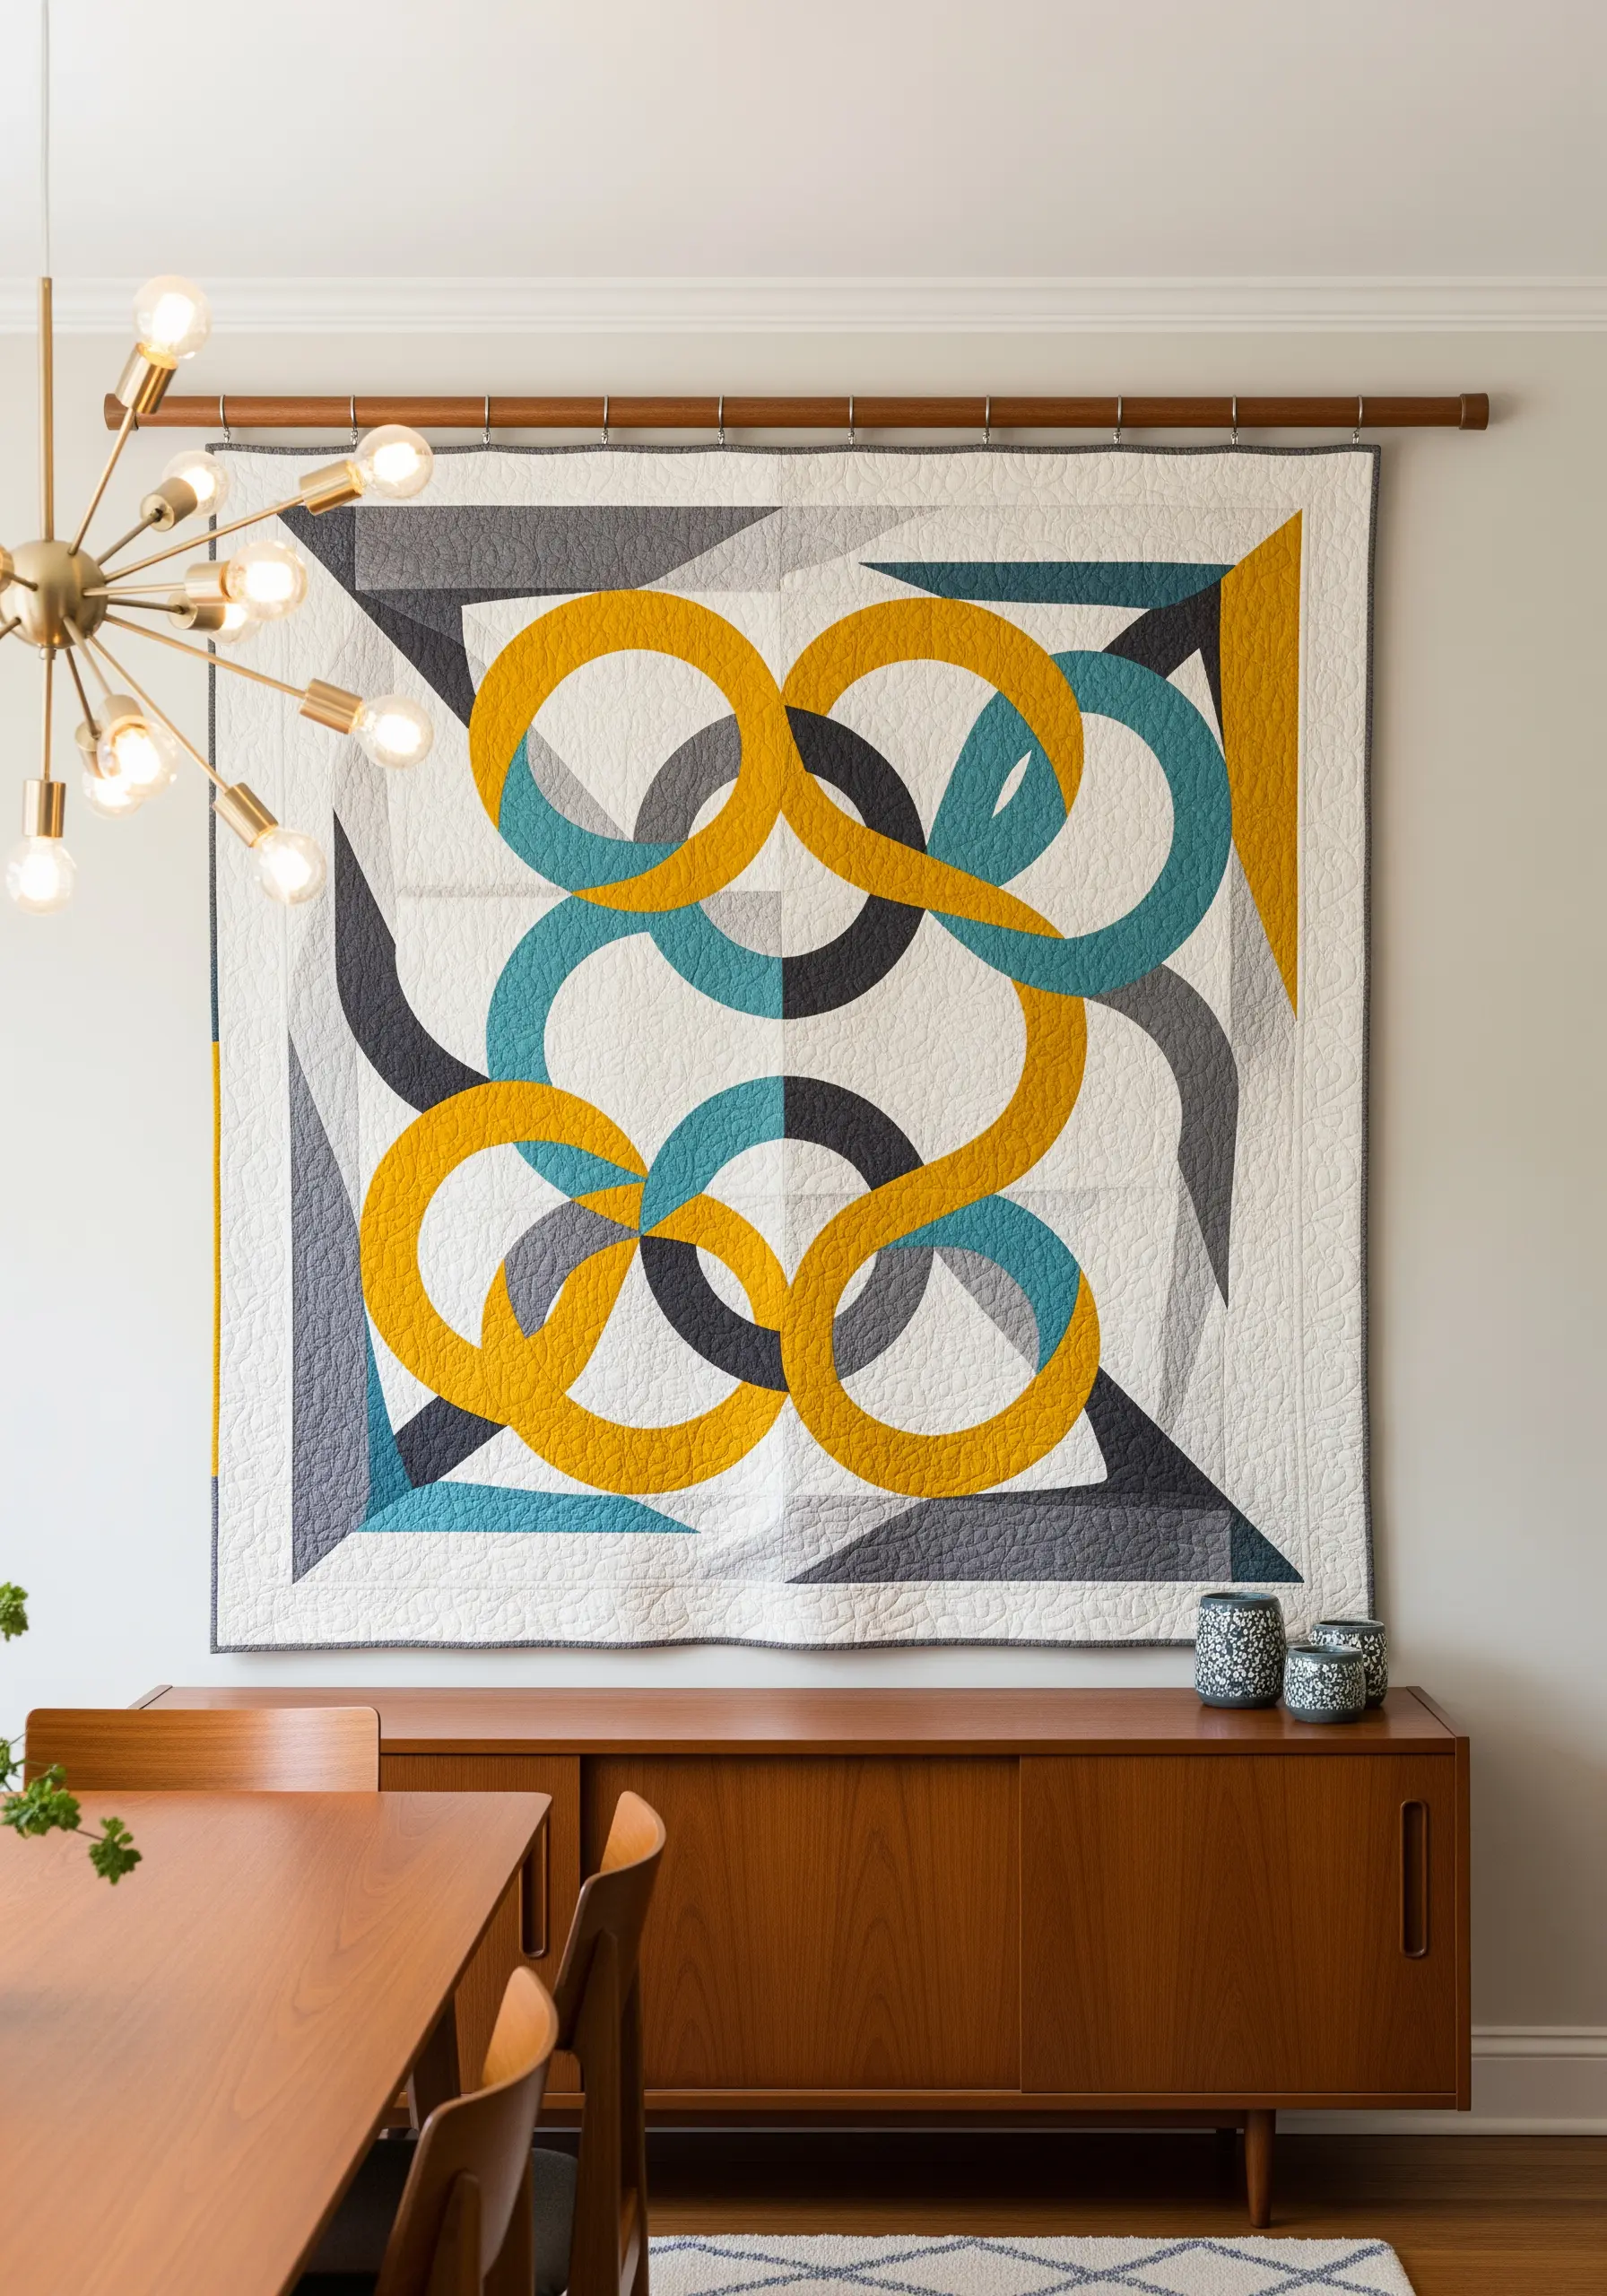
Use quilting not just for warmth, but as a large-scale canvas for abstract art.
Design your composition around bold, interlocking shapes and a tightly controlled color scheme—mustard yellow, teal, and charcoal gray create a sophisticated, mid-century modern feel.
This technique relies on precise appliqué, where fabric shapes are carefully cut and stitched onto a background fabric to create clean, graphic lines.
The quilting stitches themselves can become part of the design; use them to echo the curves of your shapes or to add subtle geometric texture to the negative space.
This approach transforms a traditional craft into a powerful piece of wall art that can anchor an entire room.
4. Craft a Polished Felt Appliqué Banner

Elevate simple felt letters by focusing on the finishing details that create a clean, handmade look.
Instead of glue, secure your felt shapes with a contrasting thread using a neat running stitch or a classic blanket stitch around the edges.
This not only adds a decorative touch but also gives the letters a subtle, pillowy dimension that makes them stand out from the canvas background.
Use a whip stitch to attach a second layer of felt in a contrasting color, creating a shadow effect that adds depth and visual interest.
Finish with colorful yarn tassels that echo the colors in your letters, tying the entire design together with playful movement.
5. Build Abstract Landscapes with Fabric Collage
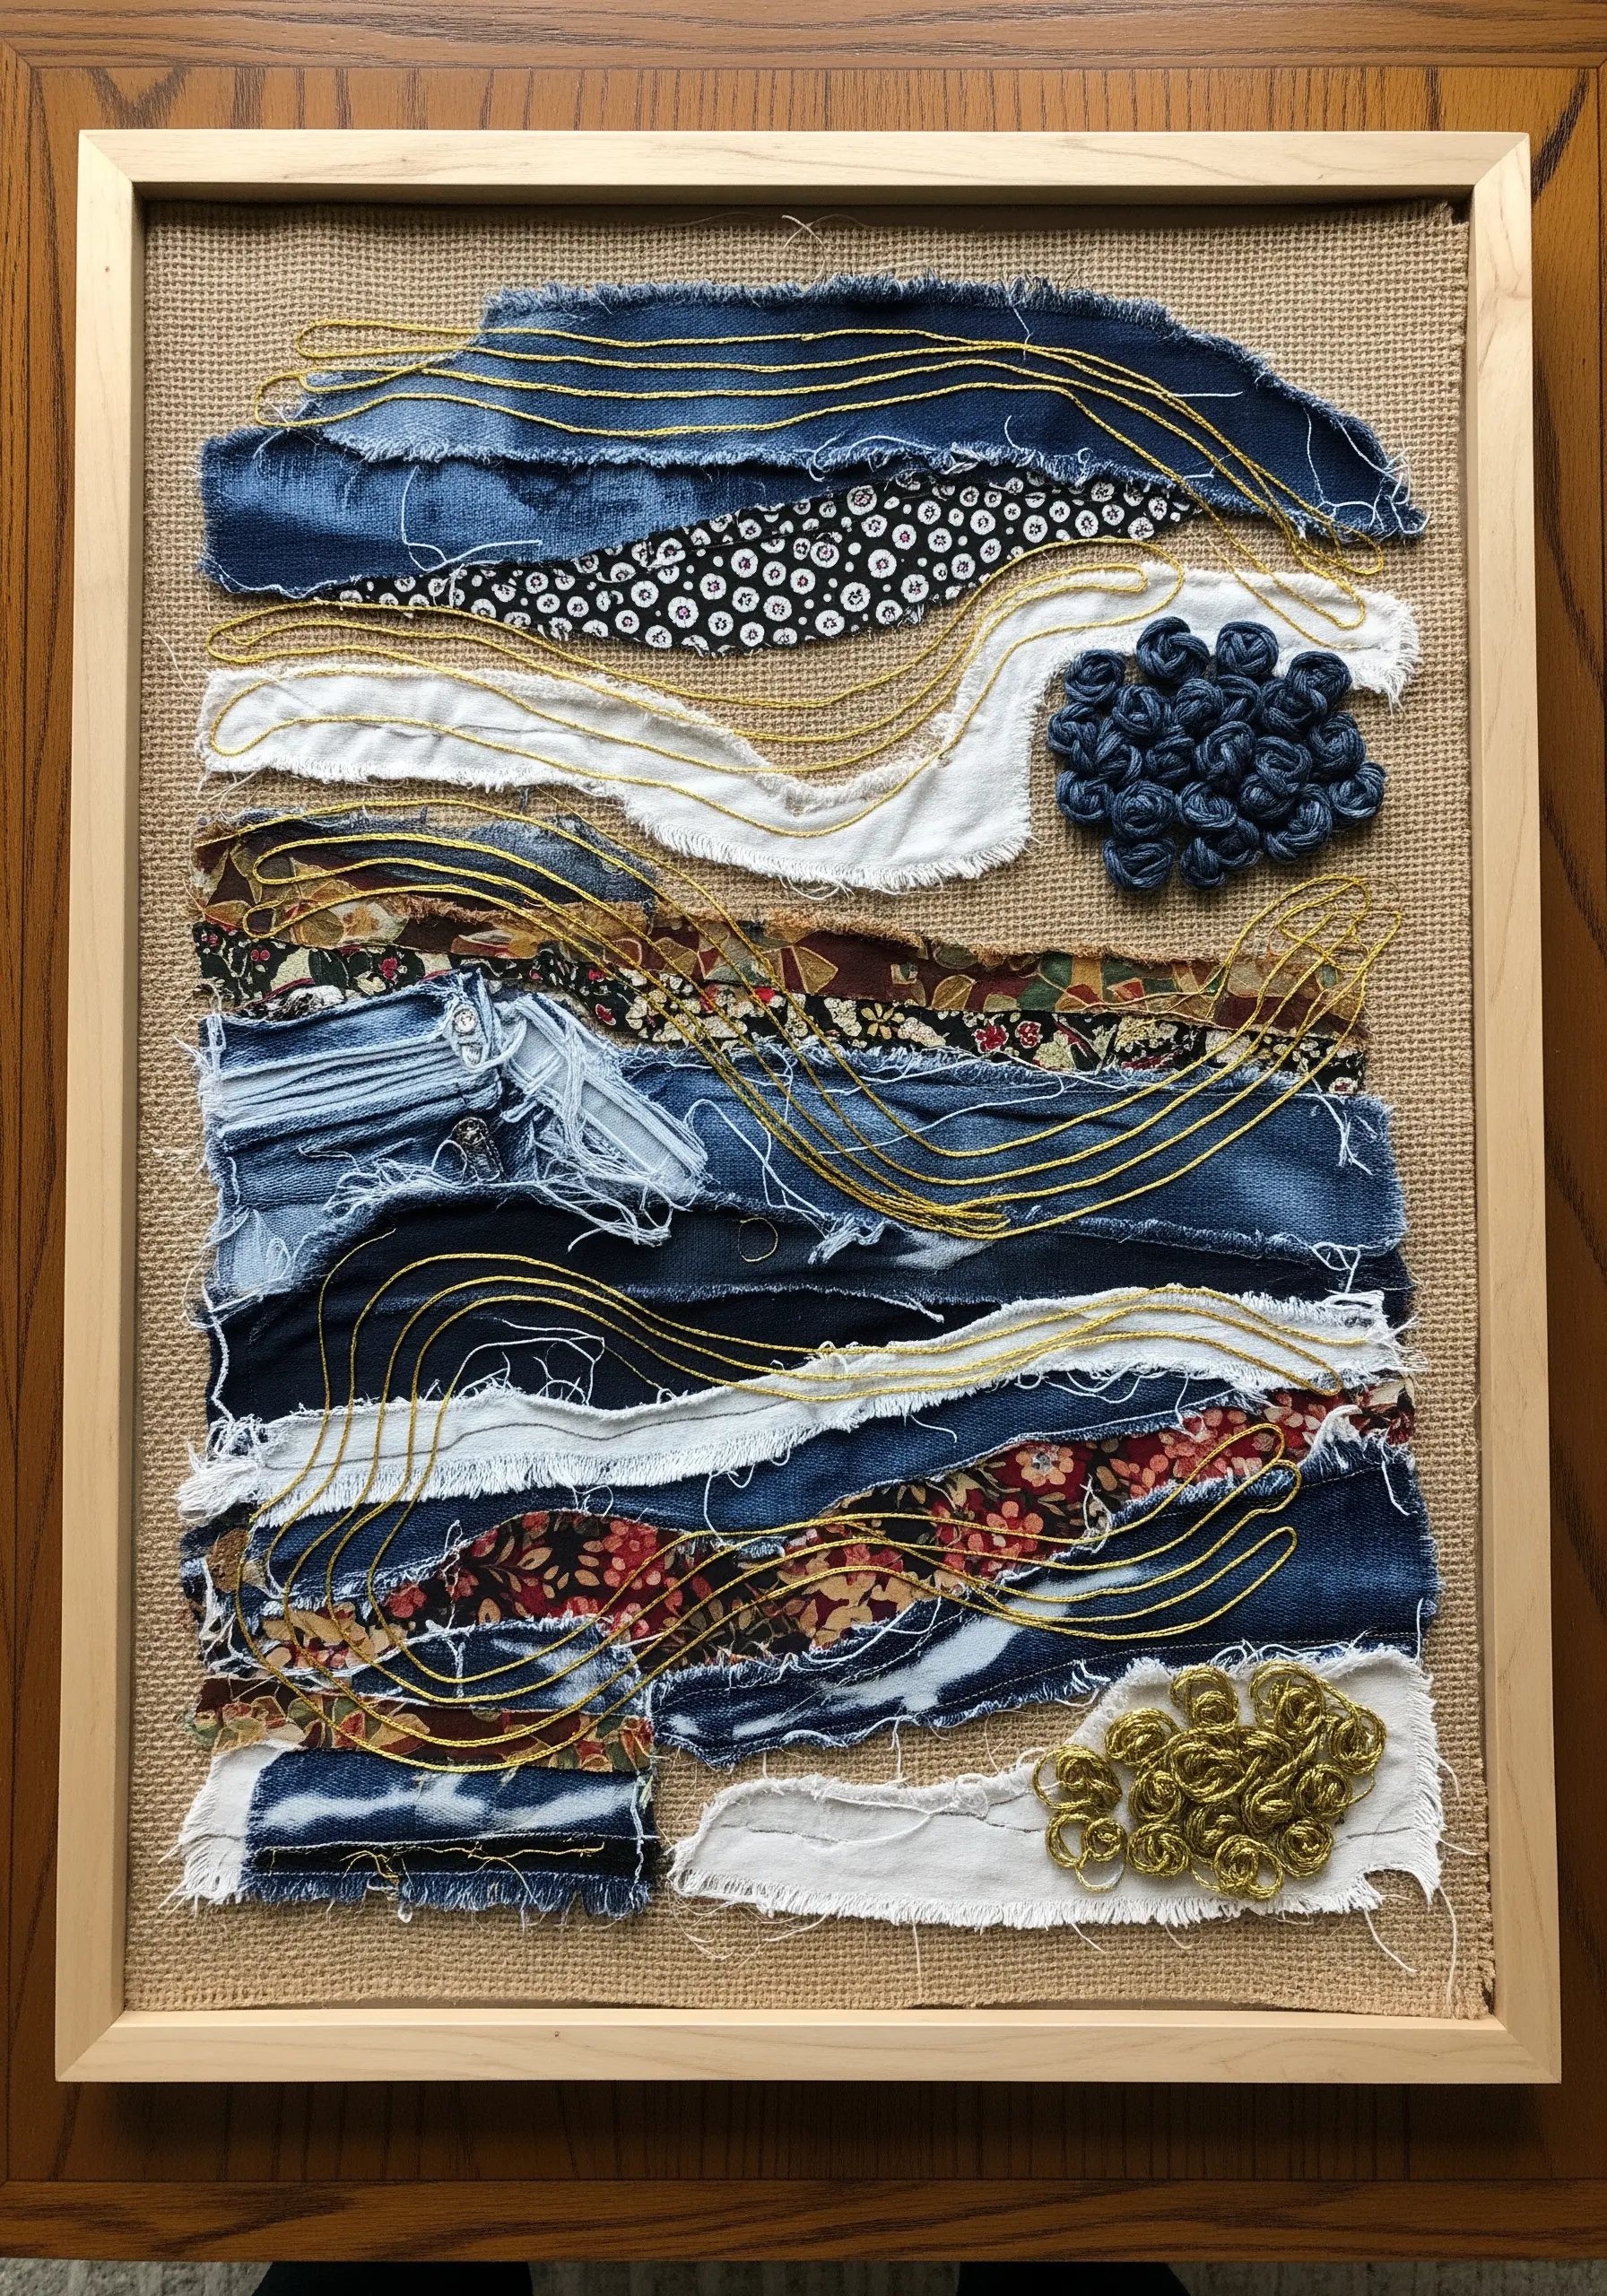
Create a stunning piece of high-texture fabric collage by layering scraps of denim, cotton, and patterned fabrics.
Arrange the torn or raw-edged strips to evoke the feeling of a landscape—think rolling hills or a stormy sea—letting the frayed edges add organic texture.
Introduce a shimmering accent by couching a thick metallic thread over the collage; this technique involves laying the thread on the surface and tacking it down with small, discreet stitches, creating elegant, flowing lines.
For concentrated points of interest, add small clusters of French knots or woven wheel stitches, which mimic the texture of tiny flowers or pebbles.
Frame the final piece on a burlap or linen background to enhance its rustic, tactile appeal.
6. Find Serenity in Sashiko Stitching
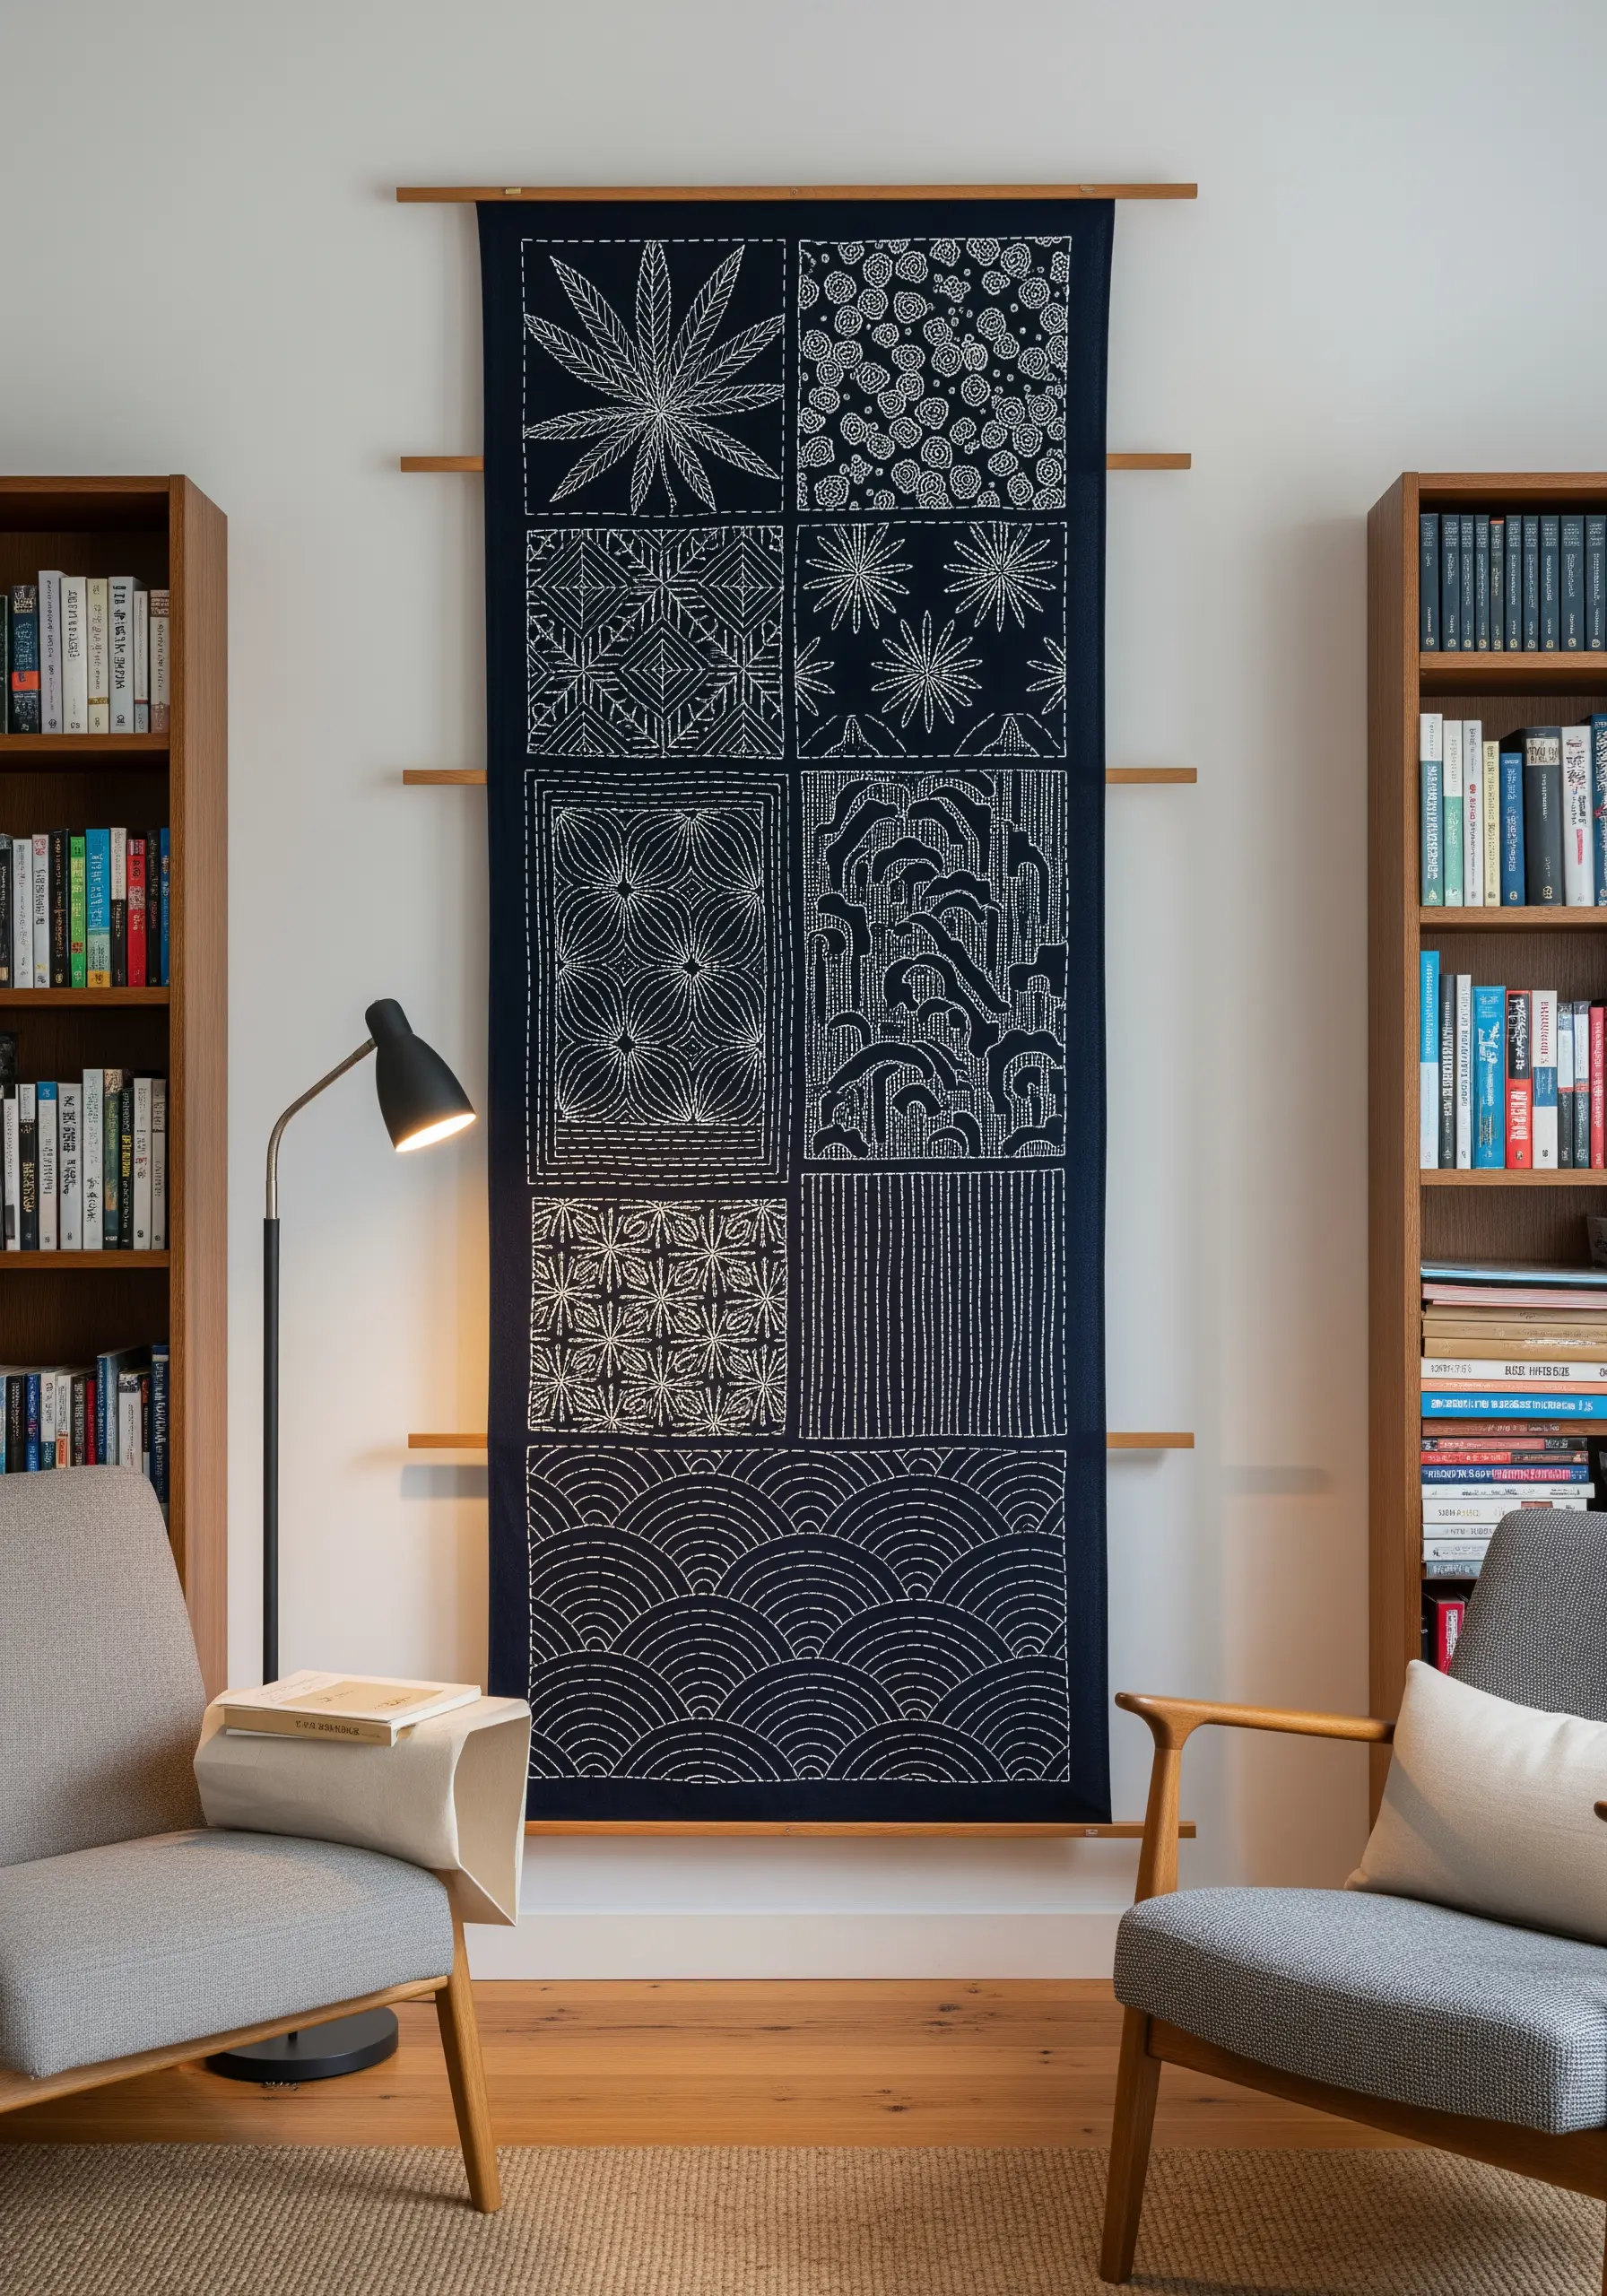
Embrace the meditative rhythm of Sashiko, a traditional Japanese embroidery style that uses a simple running stitch to create stunning geometric patterns.
The power of Sashiko lies in its precision and consistency; focus on keeping your stitch length and the spaces between them as uniform as possible.
Use a traditional Sashiko thread, which is thicker and has a tighter twist than standard embroidery floss, to create bold, defined lines that stand out against the dark indigo fabric.
Plan your stitching path to minimize knots and thread-carrying on the back, which is a hallmark of skilled Sashiko work.
Display the finished panel as a wall hanging or table runner, where its graphic elegance can be fully appreciated.
7. Create Dimensional Florals with Ribbon Embroidery

Bring your embroidered scenes to life by incorporating silk ribbon, which adds unparalleled dimension and texture.
Use a simple ribbon stitch—where the needle pierces the ribbon itself upon re-entry—to create soft, realistic flower petals that lift off the fabric surface.
For smaller blossoms, the lazy daisy stitch works beautifully with narrow ribbon, forming delicate, looped petals.
Combine the ribbon work with traditional embroidery floss for finer details like stems (stem stitch), leaves (fishbone stitch), and flower centers (French knots).
This mix of textures creates a captivating 3D effect that makes your botanical art truly pop.
8. Paint with Thread for an Abstract Landscape
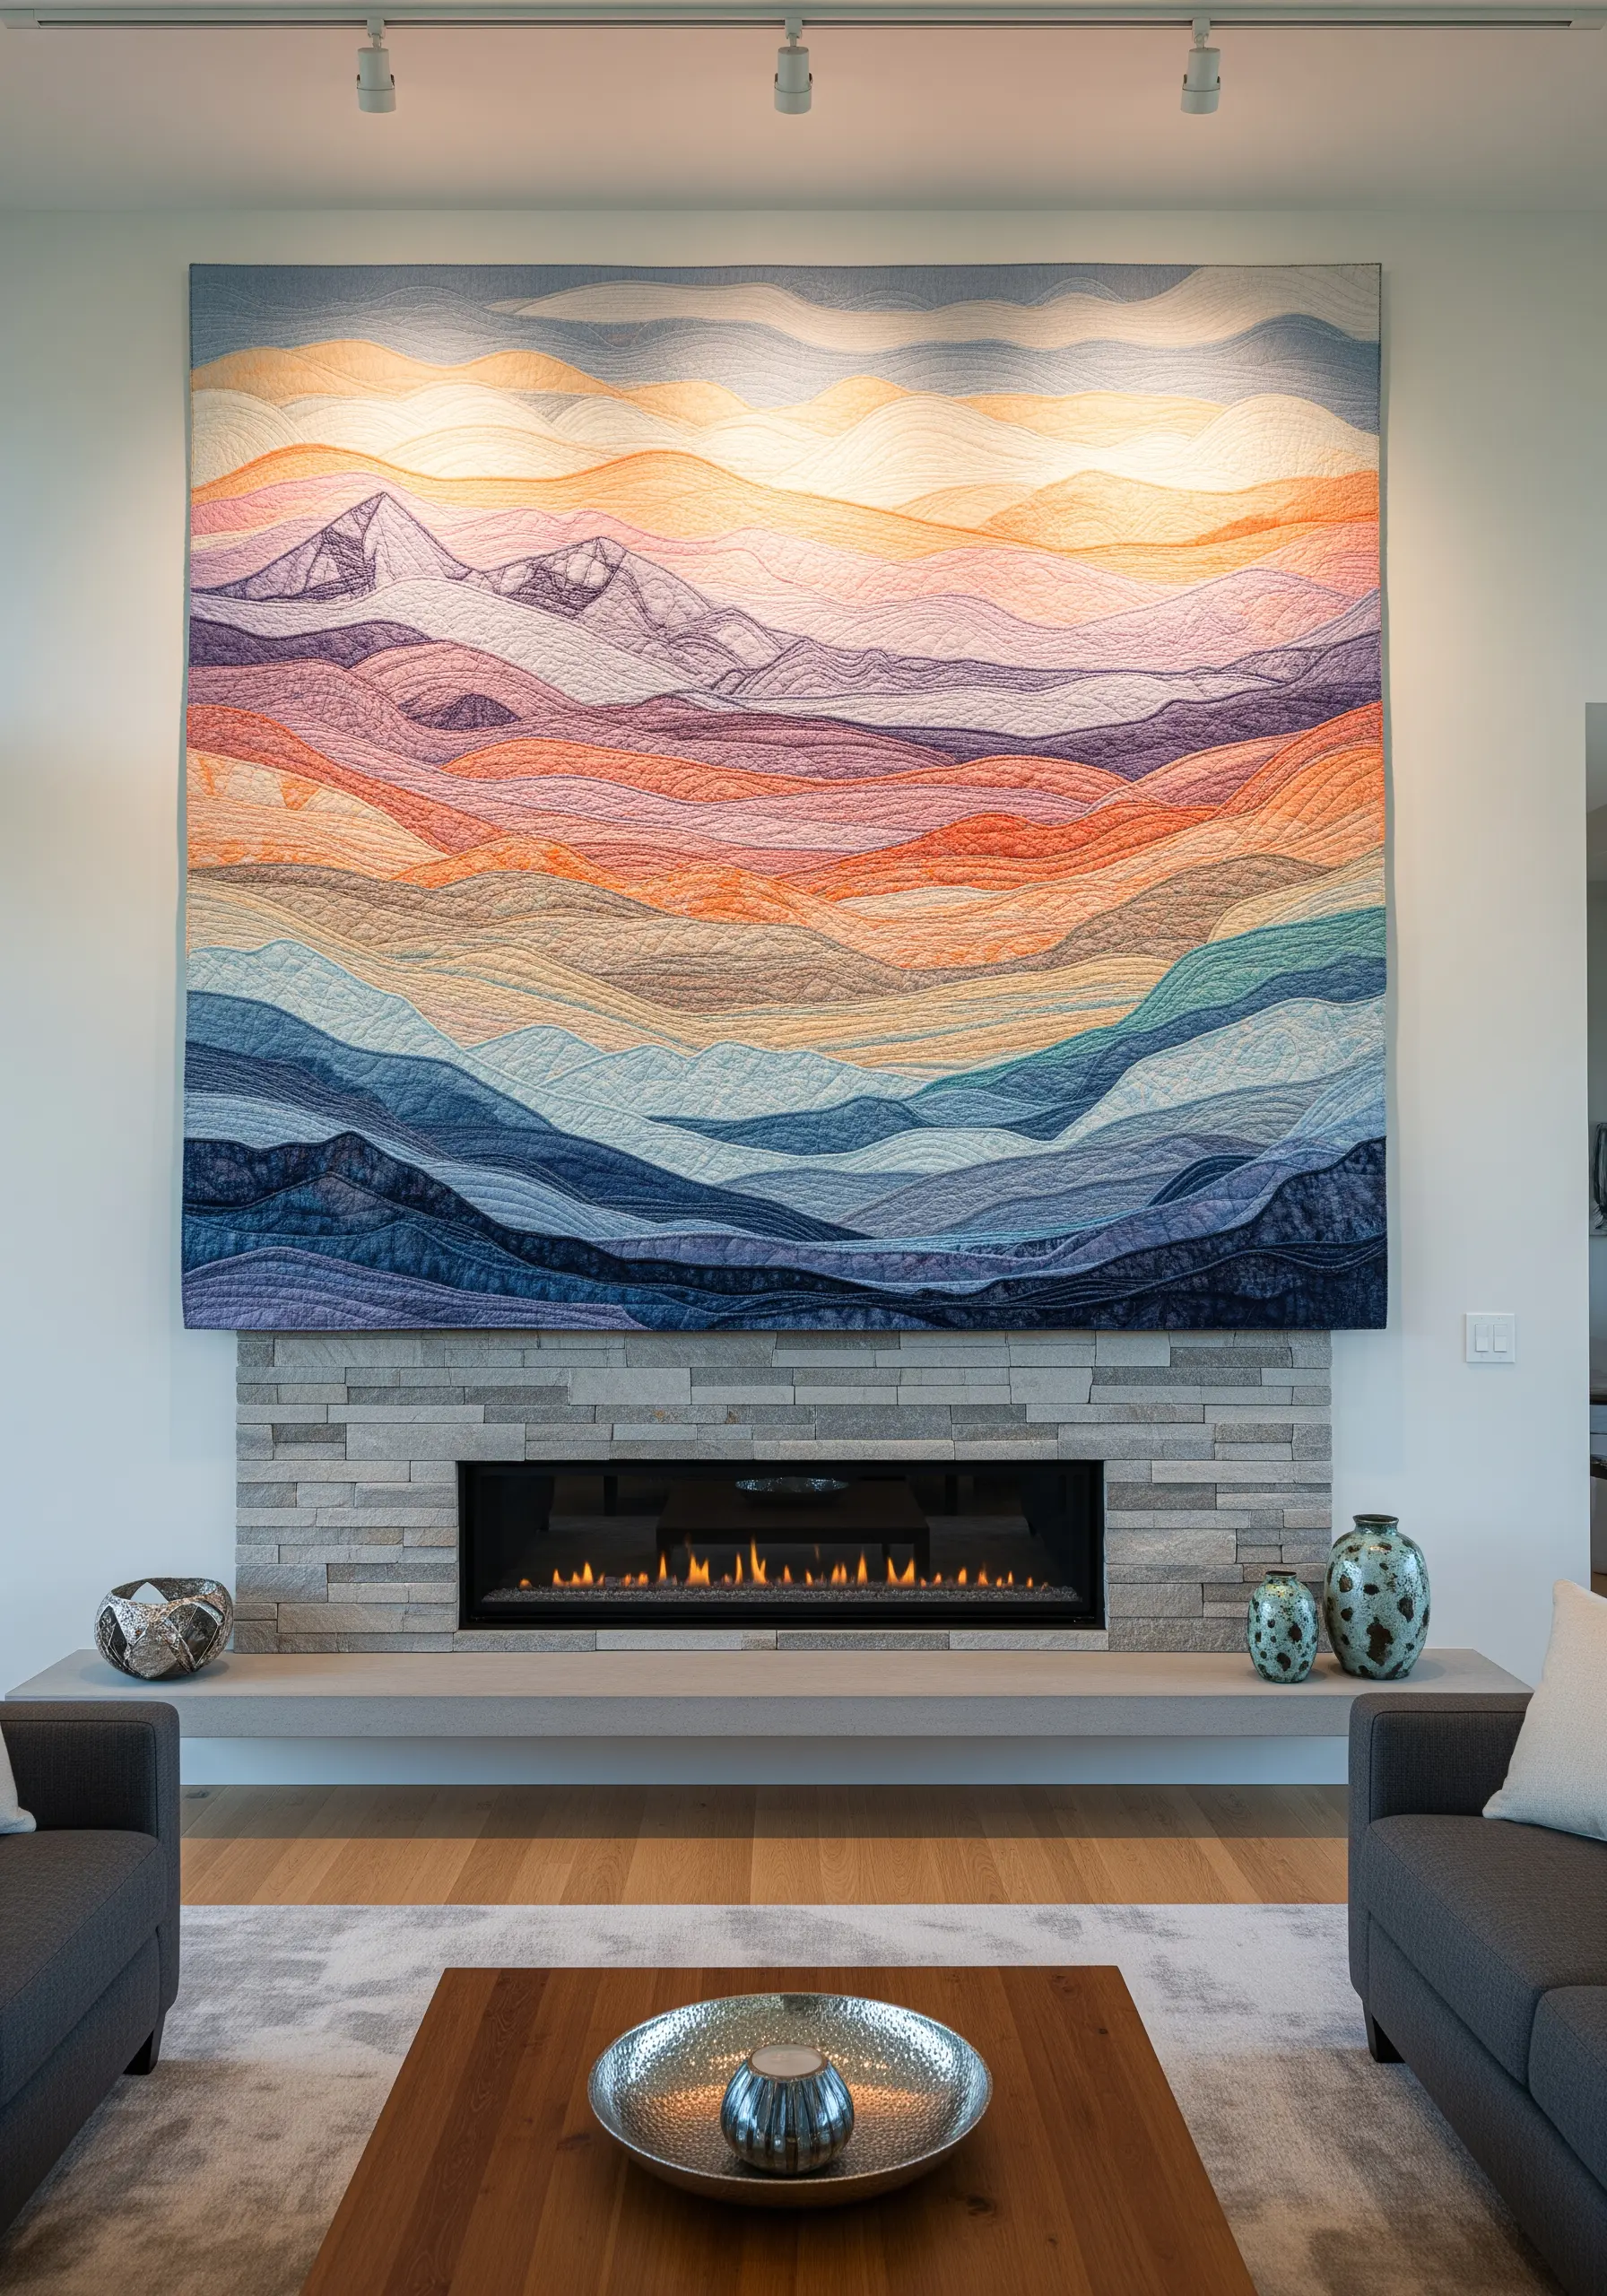
Create a breathtaking, large-scale landscape by using your sewing machine and thread as if they were a paintbrush and paint.
This technique, known as free-motion embroidery or thread painting, involves layering dense, expressive stitches to blend colors and build texture.
Work with a variegated thread or switch colors frequently to create soft, painterly transitions that mimic the subtle color shifts in a sunset or mountain range.
Vary the direction and length of your stitches to follow the contours of the landscape, adding a sense of movement and flow to the composition.
The final result is a monumental piece of fabric art that has the depth and emotional resonance of a fine art painting.
9. Weave a Coastal Narrative into Macrame

Elevate a standard macrame wall hanging by blending different fiber techniques and incorporating natural elements for a coastal-inspired story.
Integrate sections of weaving directly into your macrame design, using a soumak stitch with thick, colorful yarn to create wavy, textured bands that evoke the sea.
Secure a piece of driftwood within the design to serve as a second anchor point, adding an organic, structural element.
Subtly attach small seashells and starfish with a fine, neutral-colored thread, allowing them to nestle into the woven sections as if washed ashore.
This mixed-fiber creation tells a richer story than macrame alone, capturing the textures and treasures of the coastline.
10. Design a Joyful, Large-Scale Felt Mural
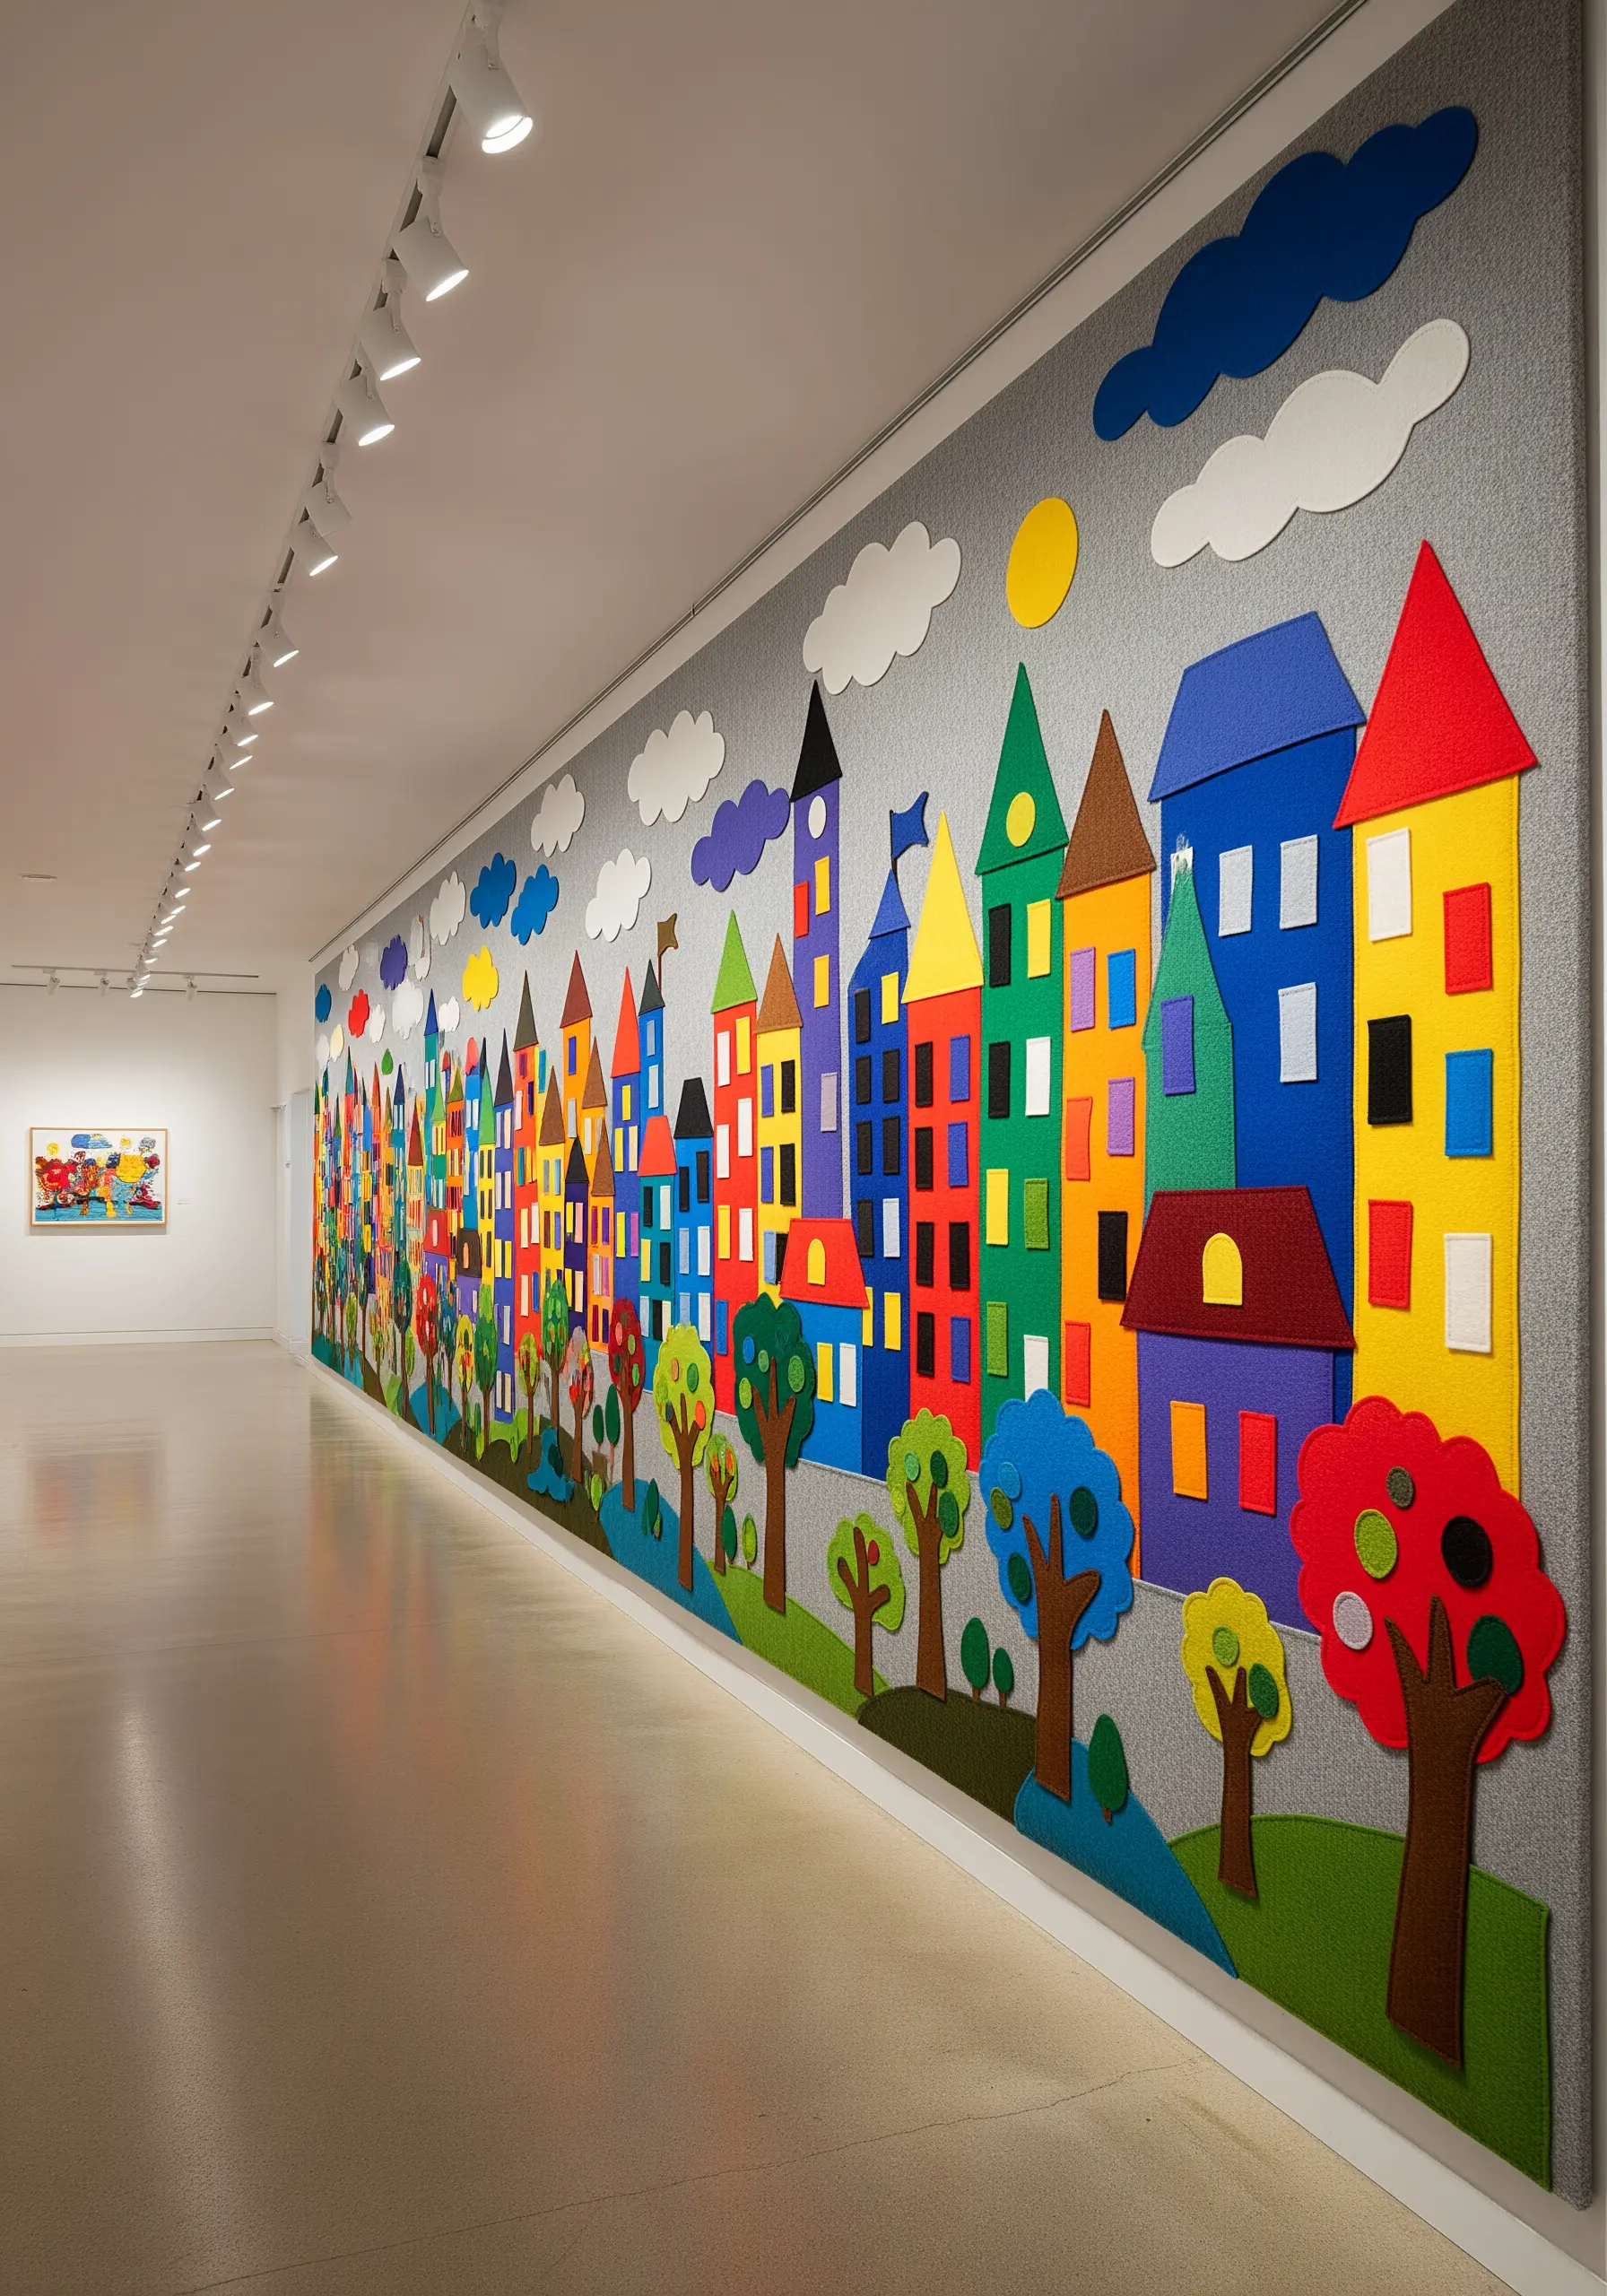
Think beyond the frame and use felt to create an immersive, gallery-style wall installation that fills a space with color and joy.
This technique works best with simple, graphic shapes—houses, trees, clouds—that can be easily cut from large sheets of felt.
Create a dynamic cityscape by layering the felt pieces, placing smaller shapes on top of larger ones to build a sense of depth and perspective.
Attach the felt directly to a fabric-covered wall or a large foam core panel using fabric glue or small, hidden stitches.
The beauty of this approach is its scalability; you can create a small scene for a playroom or an expansive mural that transforms an entire hallway.
11. Master a Modern Aesthetic with Punch Needle
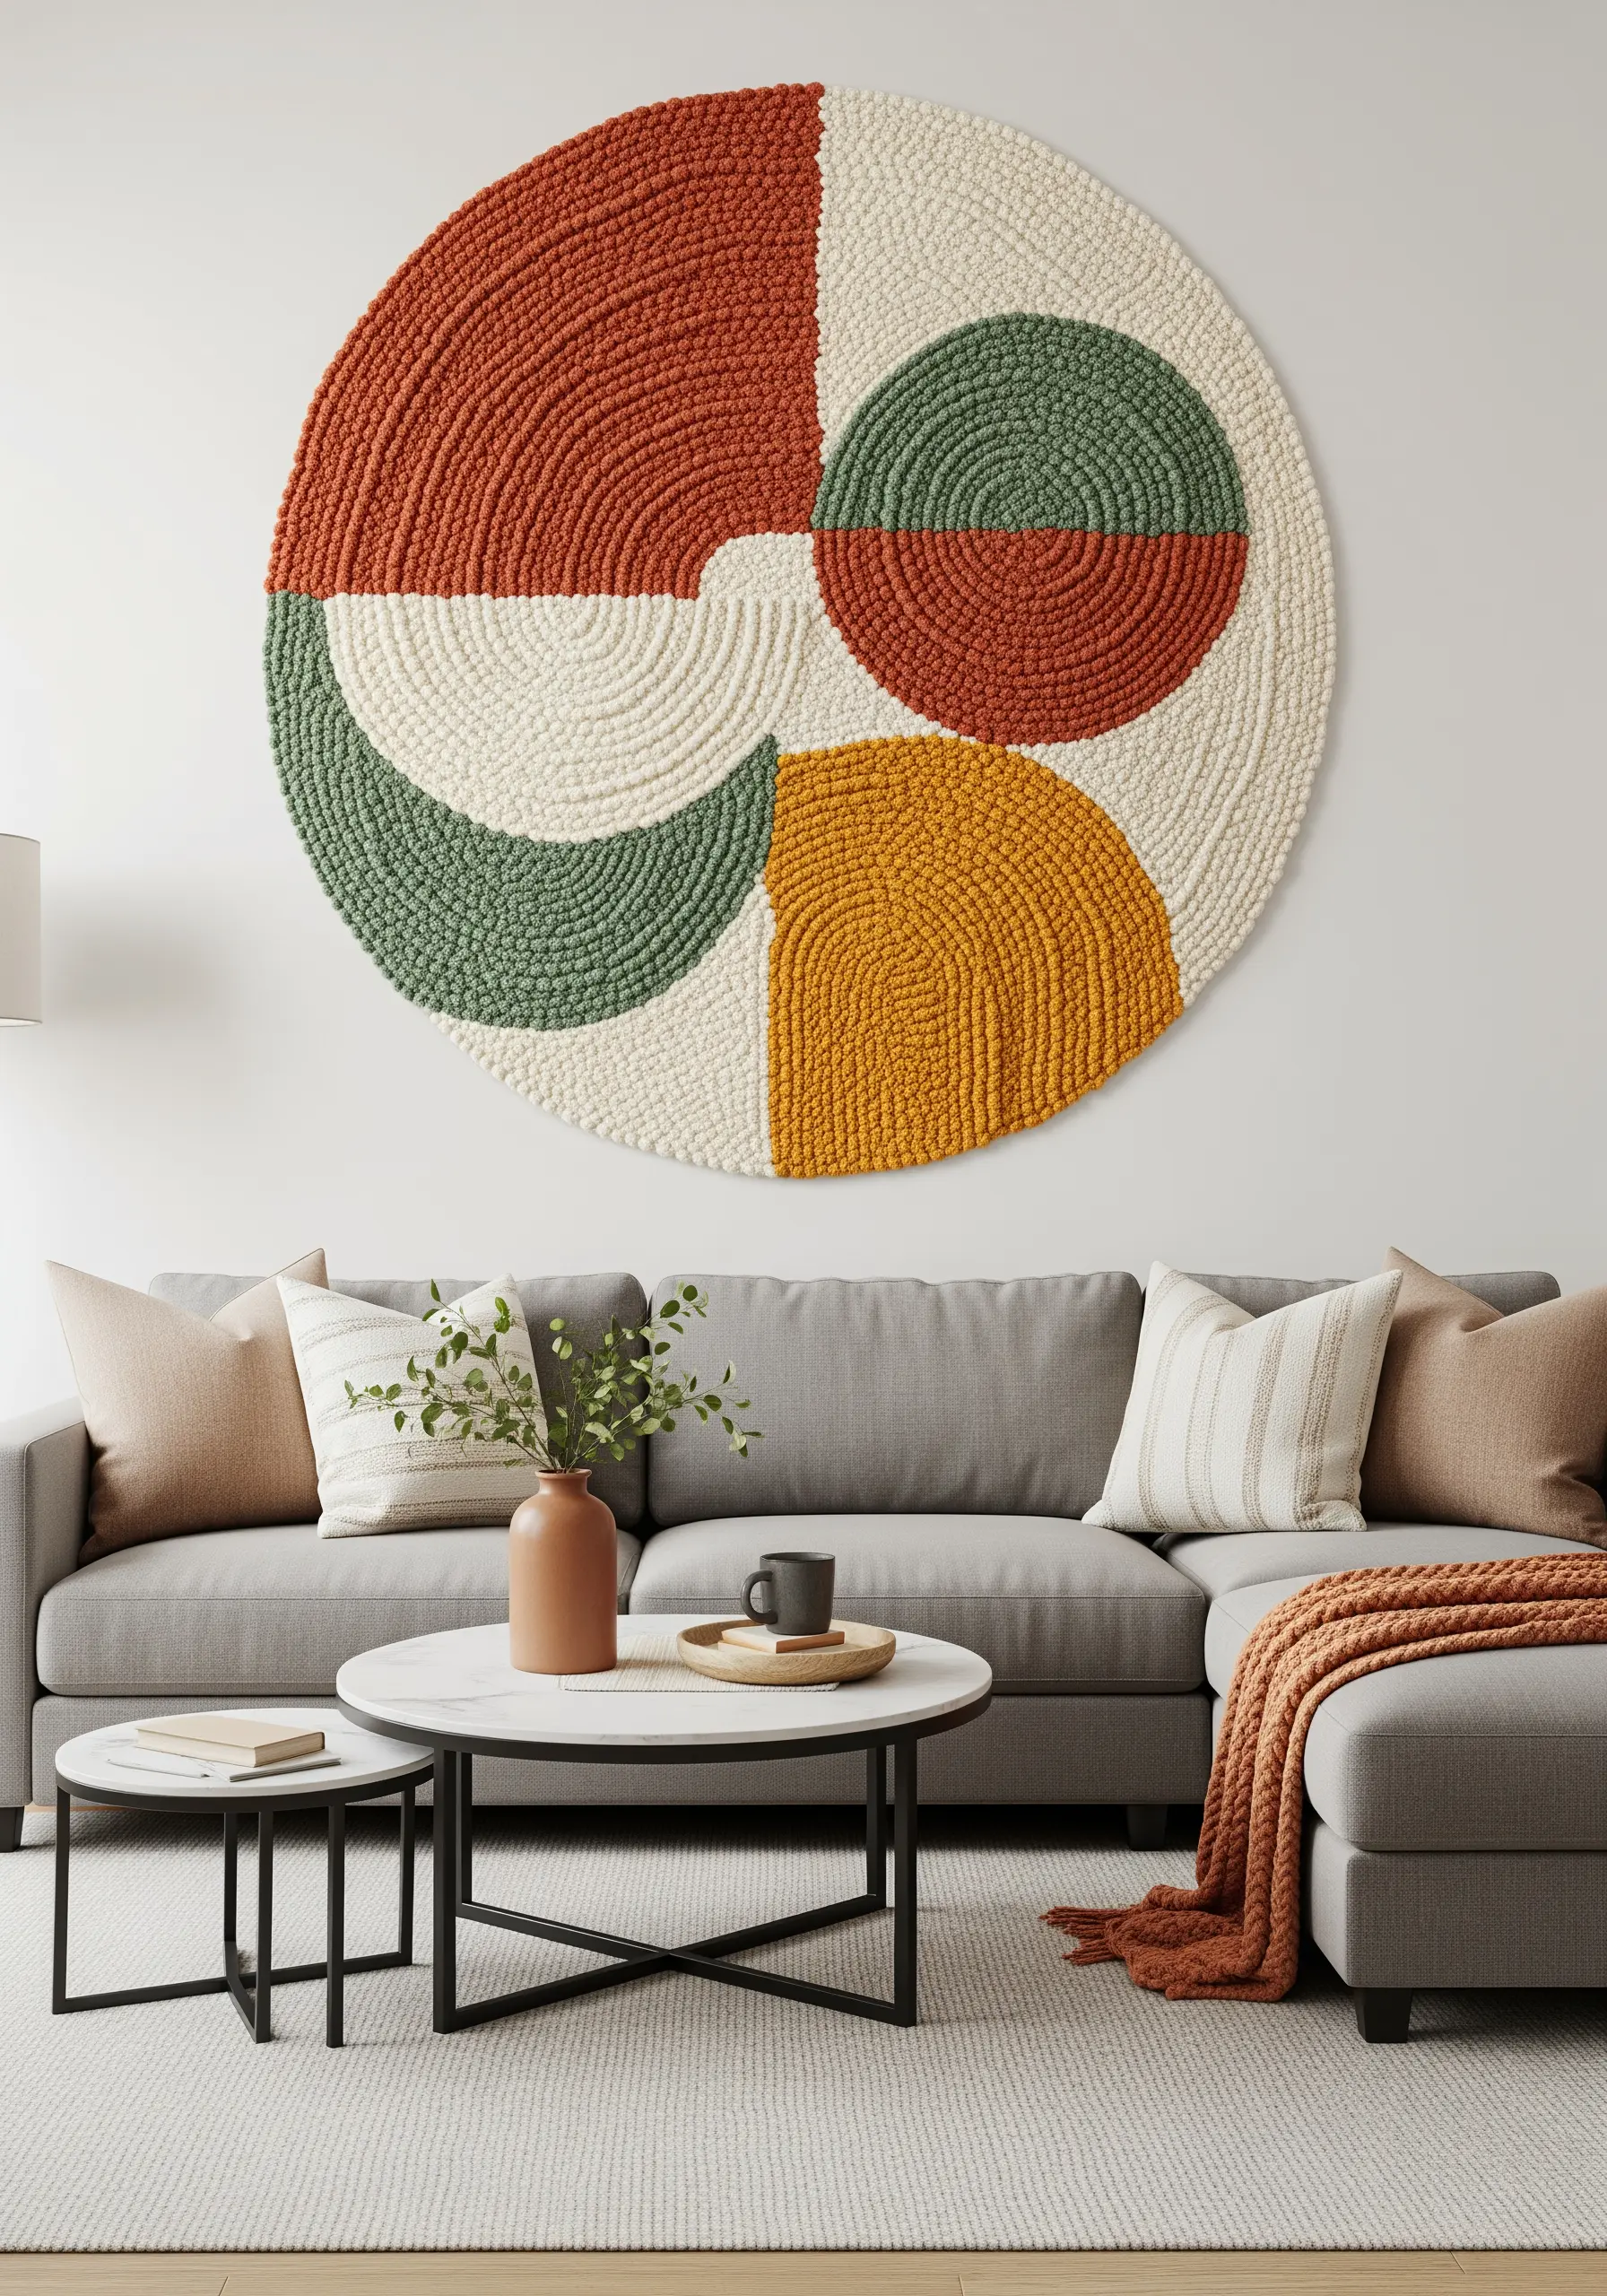
Explore the satisfying texture of punch needle to create bold, graphic art with a modern sensibility.
The key to a clean design is to work in distinct color blocks, outlining each section first and then filling it in with tight, concentric rows of loops.
Use a high-quality weaver’s cloth or monk’s cloth stretched tightly in a frame to ensure your loops are even and secure.
Play with loop height by adjusting your punch needle settings; a combination of flat stitches (the reverse side) and plush loops can add subtle textural variation.
This technique is perfect for creating yarn wall art projects inspired by geometric patterns that feel both contemporary and cozy.
12. Capture Elegance with Single-Line Thread Art
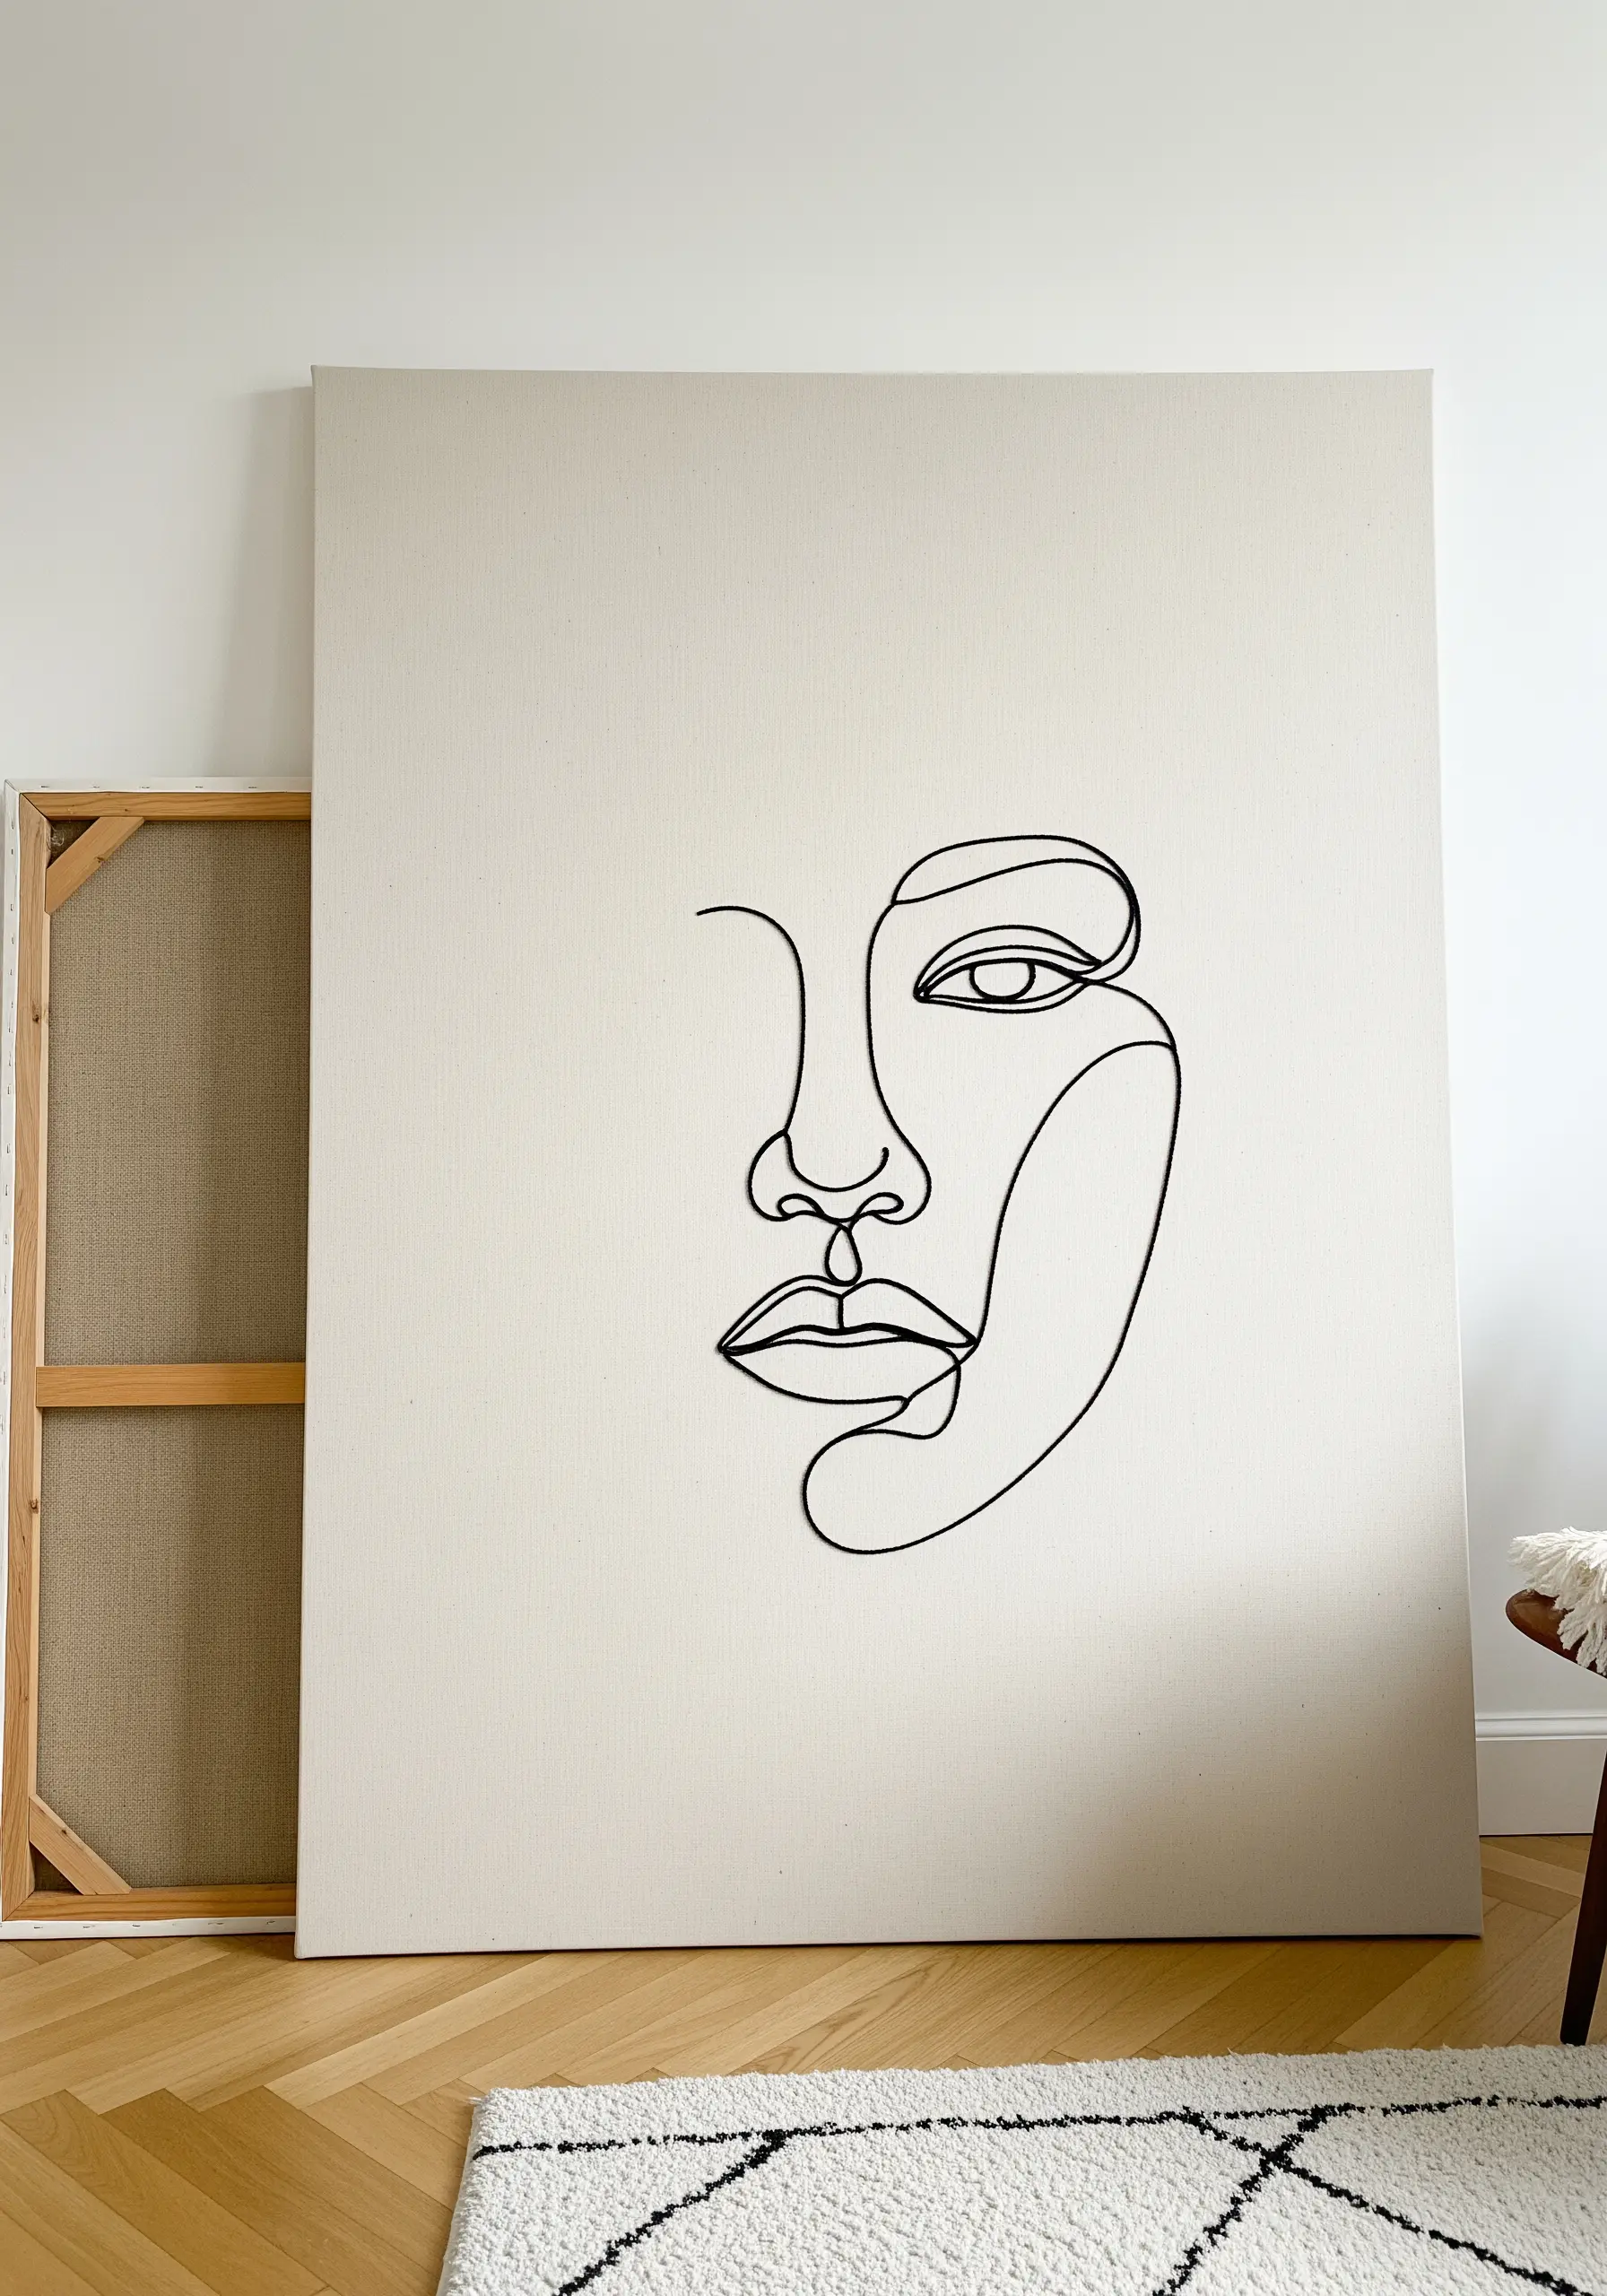
Recreate the minimalist beauty of a continuous line drawing by using thread on a stretched canvas.
To achieve the smooth, unbroken line, use the couching technique: lay down a thick, dark yarn or cord along your design and secure it with small, evenly spaced stitches in a matching, finer thread.
This method allows you to create fluid curves and sharp angles without the start-and-stop appearance of individual stitches like backstitch.
Choose a tightly woven, neutral-colored fabric like cotton canvas or linen to provide a stable, gallery-worthy background that makes the dark line pop.
This technique translates beautifully into single line face profiles that create gallery-style hoop art.
13. Embellish with Art Deco-Inspired Beadwork

Craft a statement piece of textile art that exudes glamour by incorporating intricate beadwork and sequins.
Work on a dark, luxurious fabric like velvet, which provides a rich background that makes metallic and iridescent beads shine.
Create linear patterns with bugle beads, sewing them down individually to form precise, geometric lines reminiscent of Art Deco design.
Fill larger areas with clusters of sequins, anchoring each one with a tiny seed bead in the center for a secure and decorative finish.
Add movement and opulence by creating beaded fringes that drape from the main design, catching the light as they sway.
14. Fold and Dye Fabric with Shibori Techniques
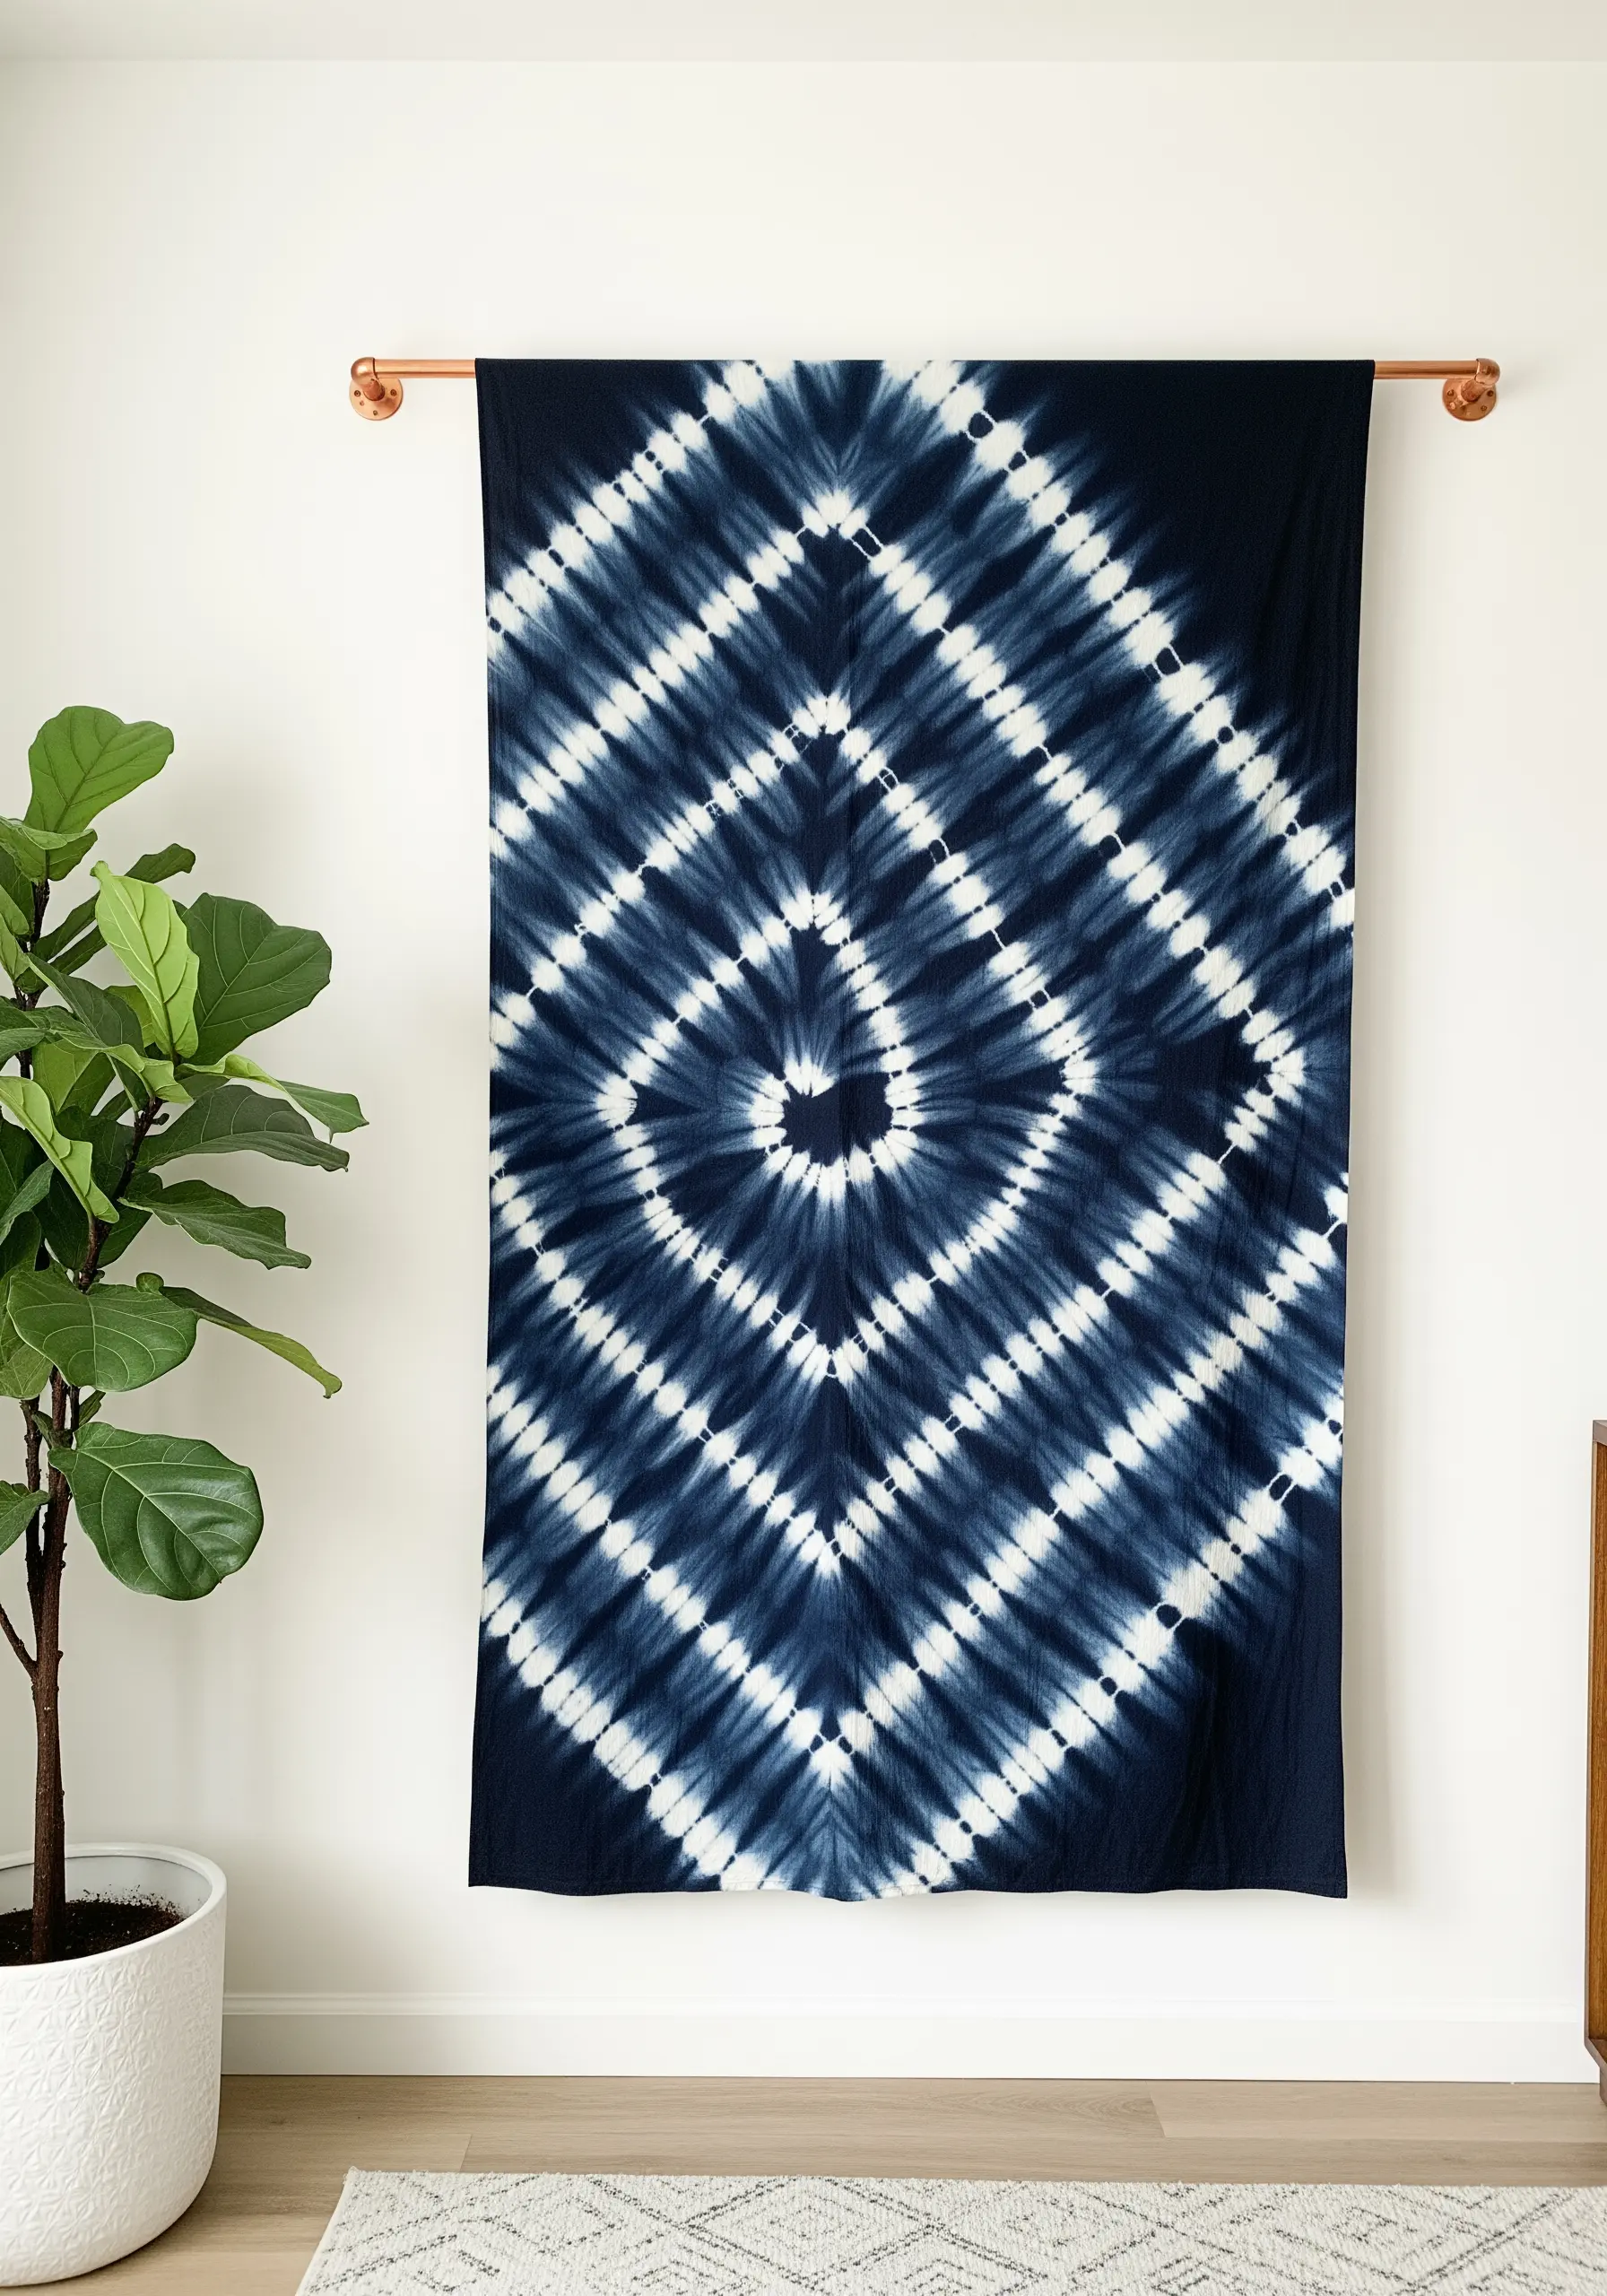
Explore the ancient Japanese art of Shibori to create mesmerizing, geometric patterns on fabric using only folding, binding, and dye.
To create a diamond pattern like this one, accordion-fold your fabric into a long strip, then accordion-fold it again into a small square.
Secure the folded bundle tightly between two square blocks of wood with string or rubber bands; the pressure from the blocks will resist the dye and create the white lines.
Submerge the bundle in an indigo dye bath, which creates the iconic deep blue color associated with traditional Shibori.
The magic happens when you unfold the fabric to reveal the intricate, symmetrical pattern created by your folds.
15. Layer a Serene Landscape with Torn Fabric
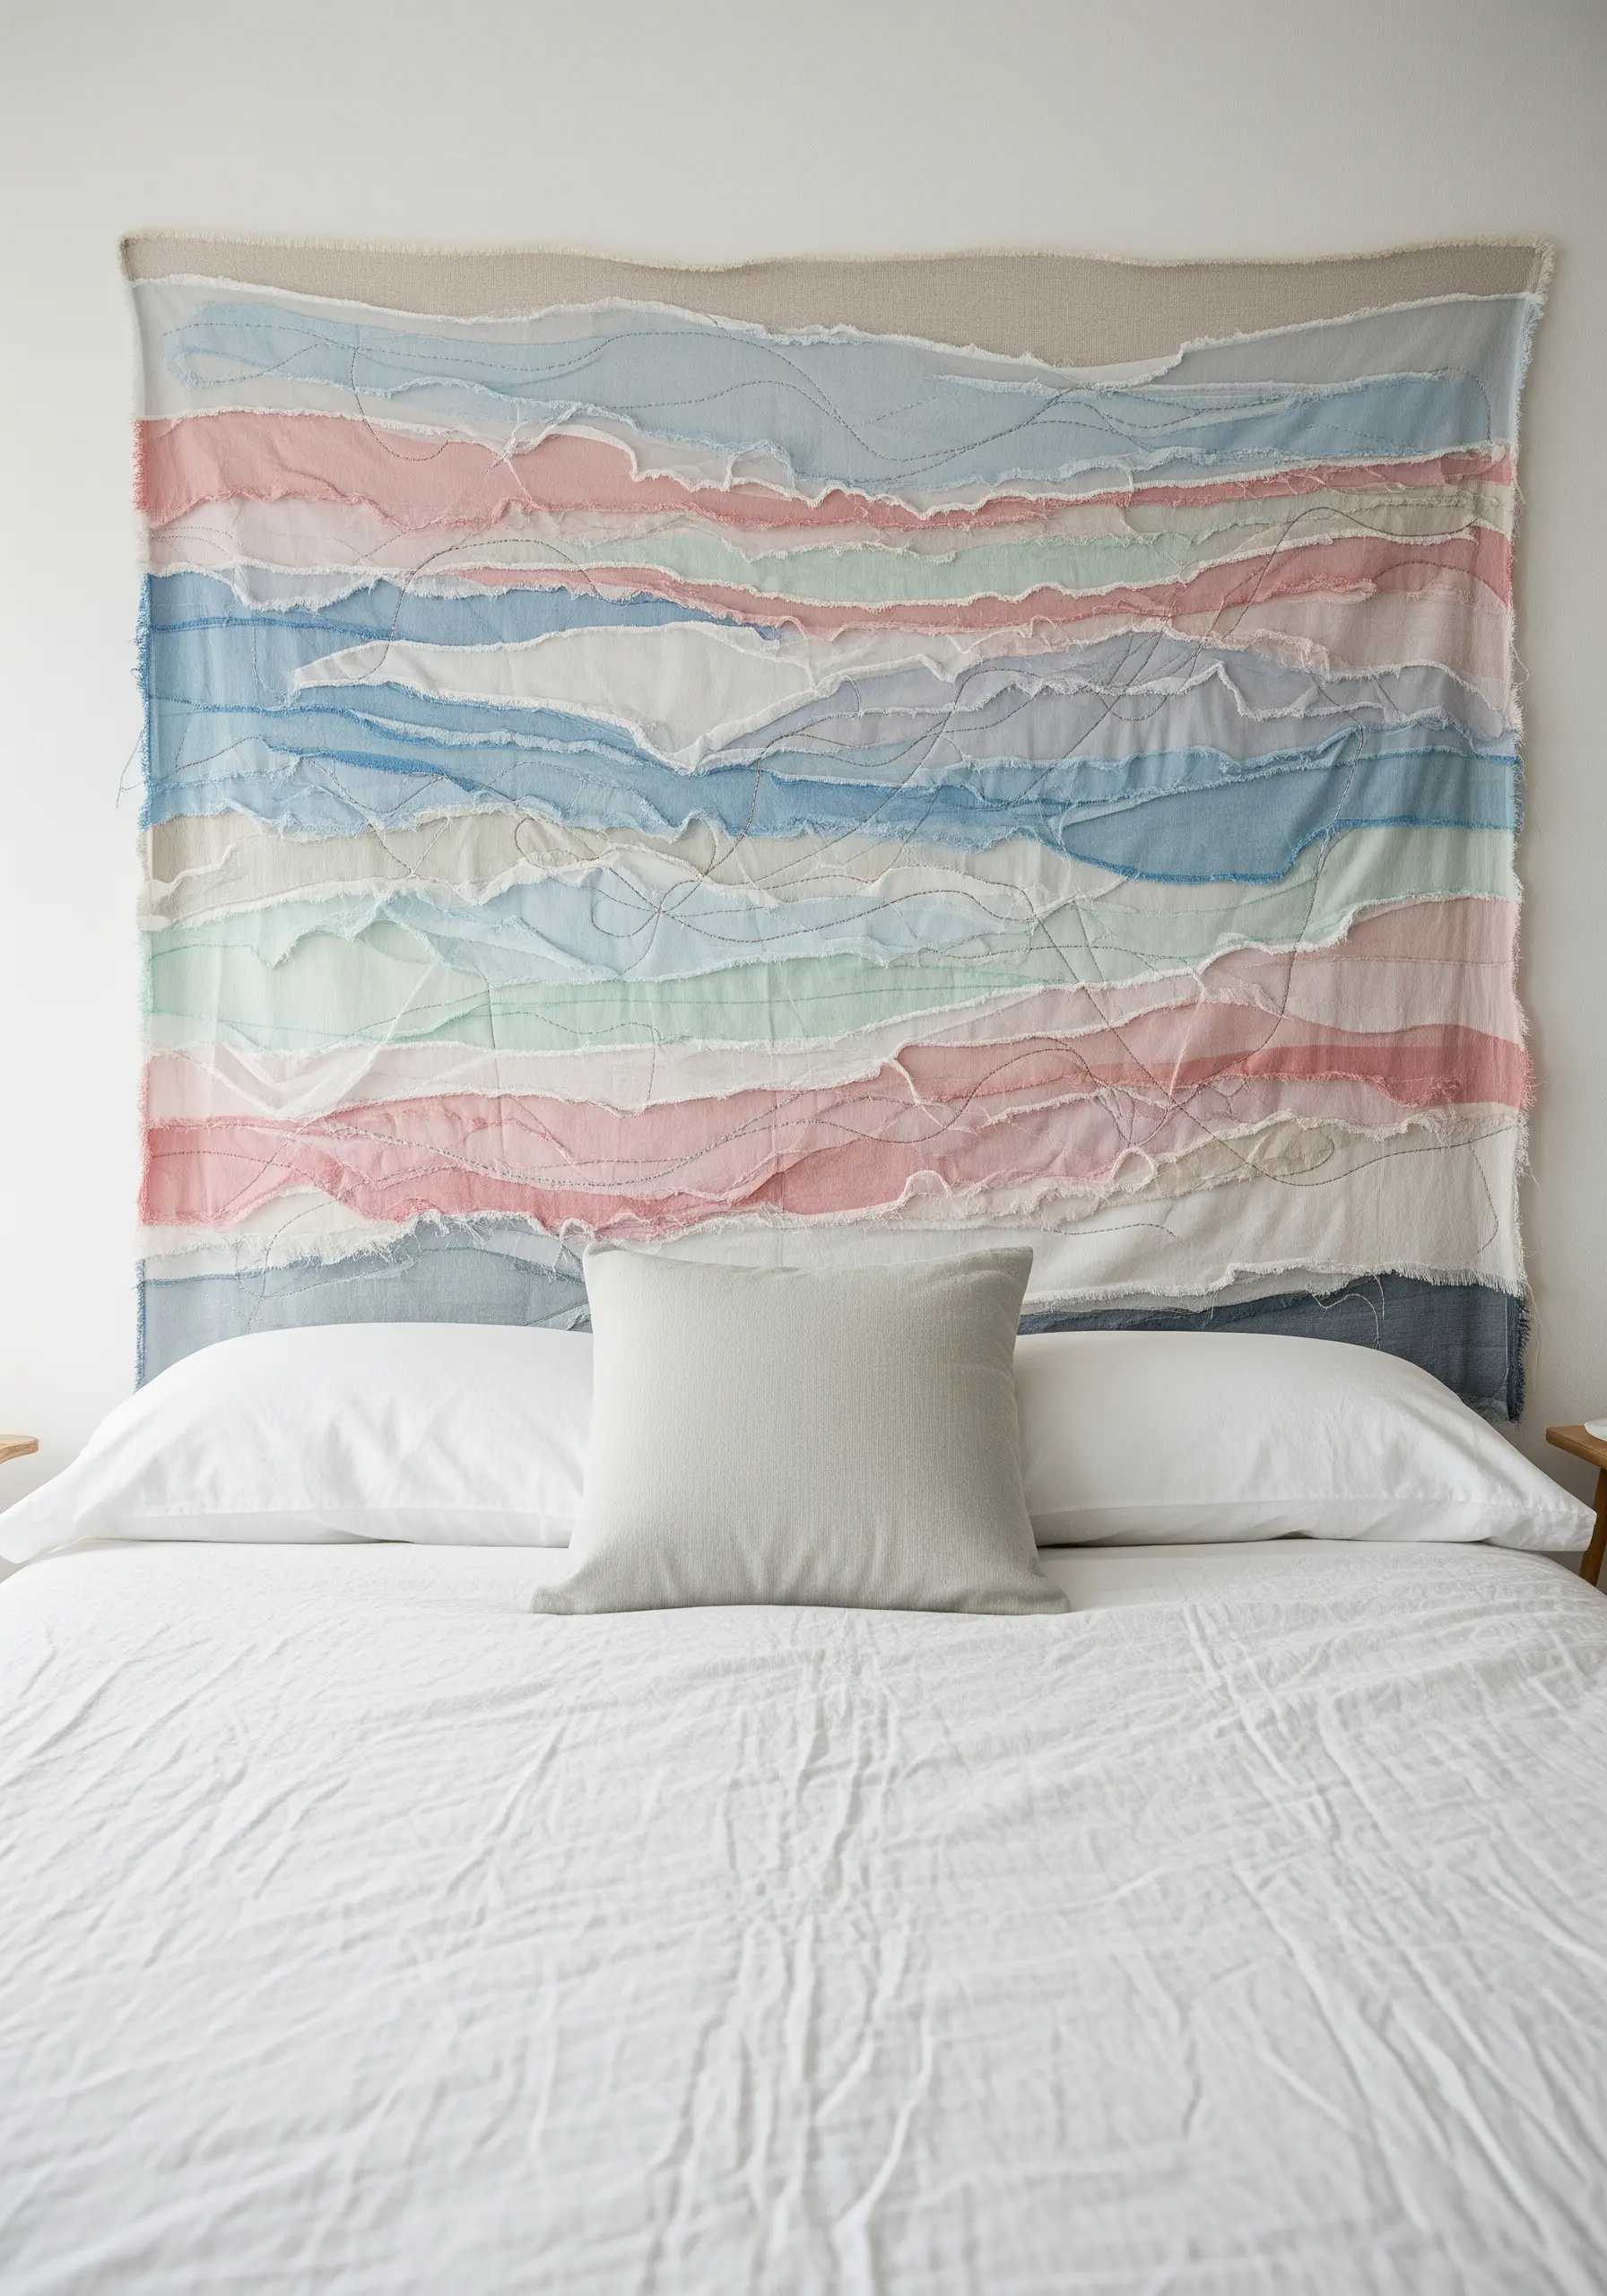
Construct a soft, abstract headboard or wall hanging using layers of torn fabric strips in a calming, pastel palette.
Tearing the fabric, rather than cutting it, creates a beautiful, frayed edge that adds organic texture and softness to the overall piece.
Layer the strips horizontally, allowing them to overlap slightly to create subtle color blending and a sense of depth, like a watercolor painting.
Secure the layers to a backing fabric with simple, wandering running stitches in a contrasting or complementary thread color.
The gentle, undulating lines and soft colors make this an ideal technique for creating a tranquil atmosphere in a bedroom.
16. Chart Your Adventures on an Embroidered Map
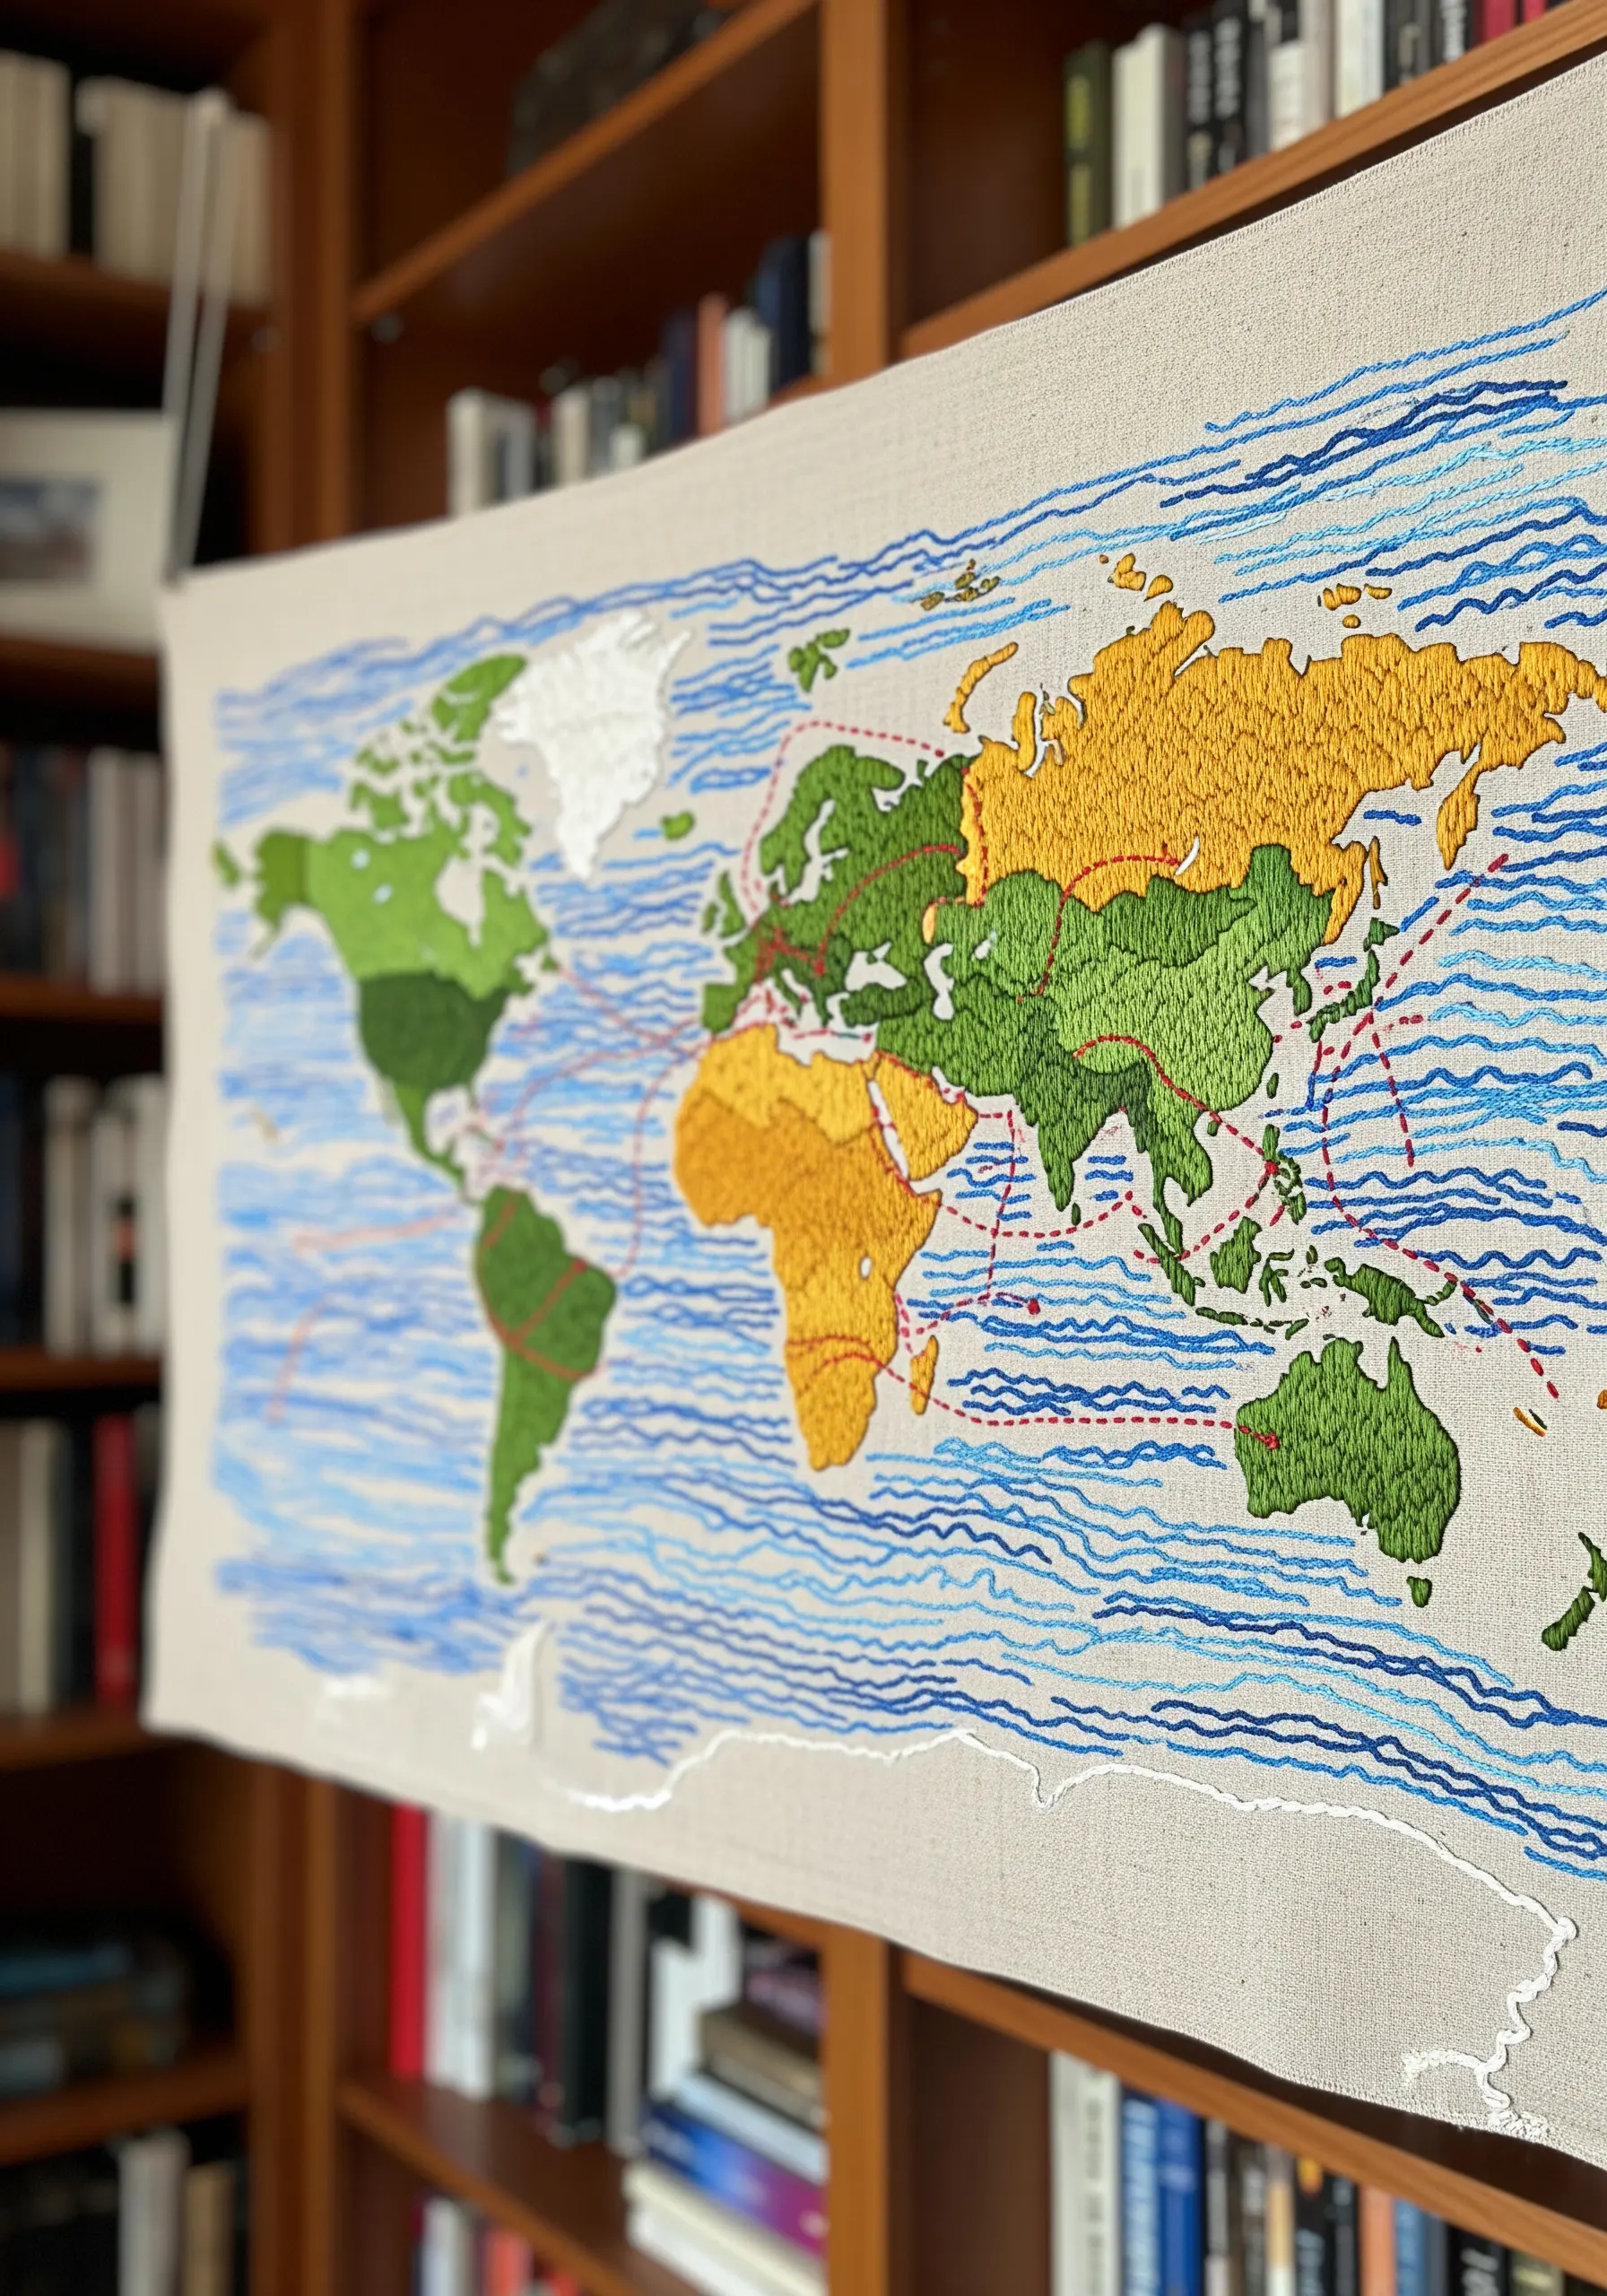
Turn a world map into a personal, evolving piece of art by stitching it onto fabric.
Outline the continents with a simple backstitch or split stitch, then fill them in with satin stitch or seed stitch for texture and color.
Use different shades of the same color family—like the greens and golds here—to differentiate countries or regions while maintaining a cohesive look.
The most meaningful part of this project is its interactive nature; use a bright red thread to stitch lines that trace your past travels or dream destinations, turning the map into a living record of your adventures.
This is one of the most personal travel-inspired string art maps you can create.
17. Amplify Color with Bold Crewel Embroidery
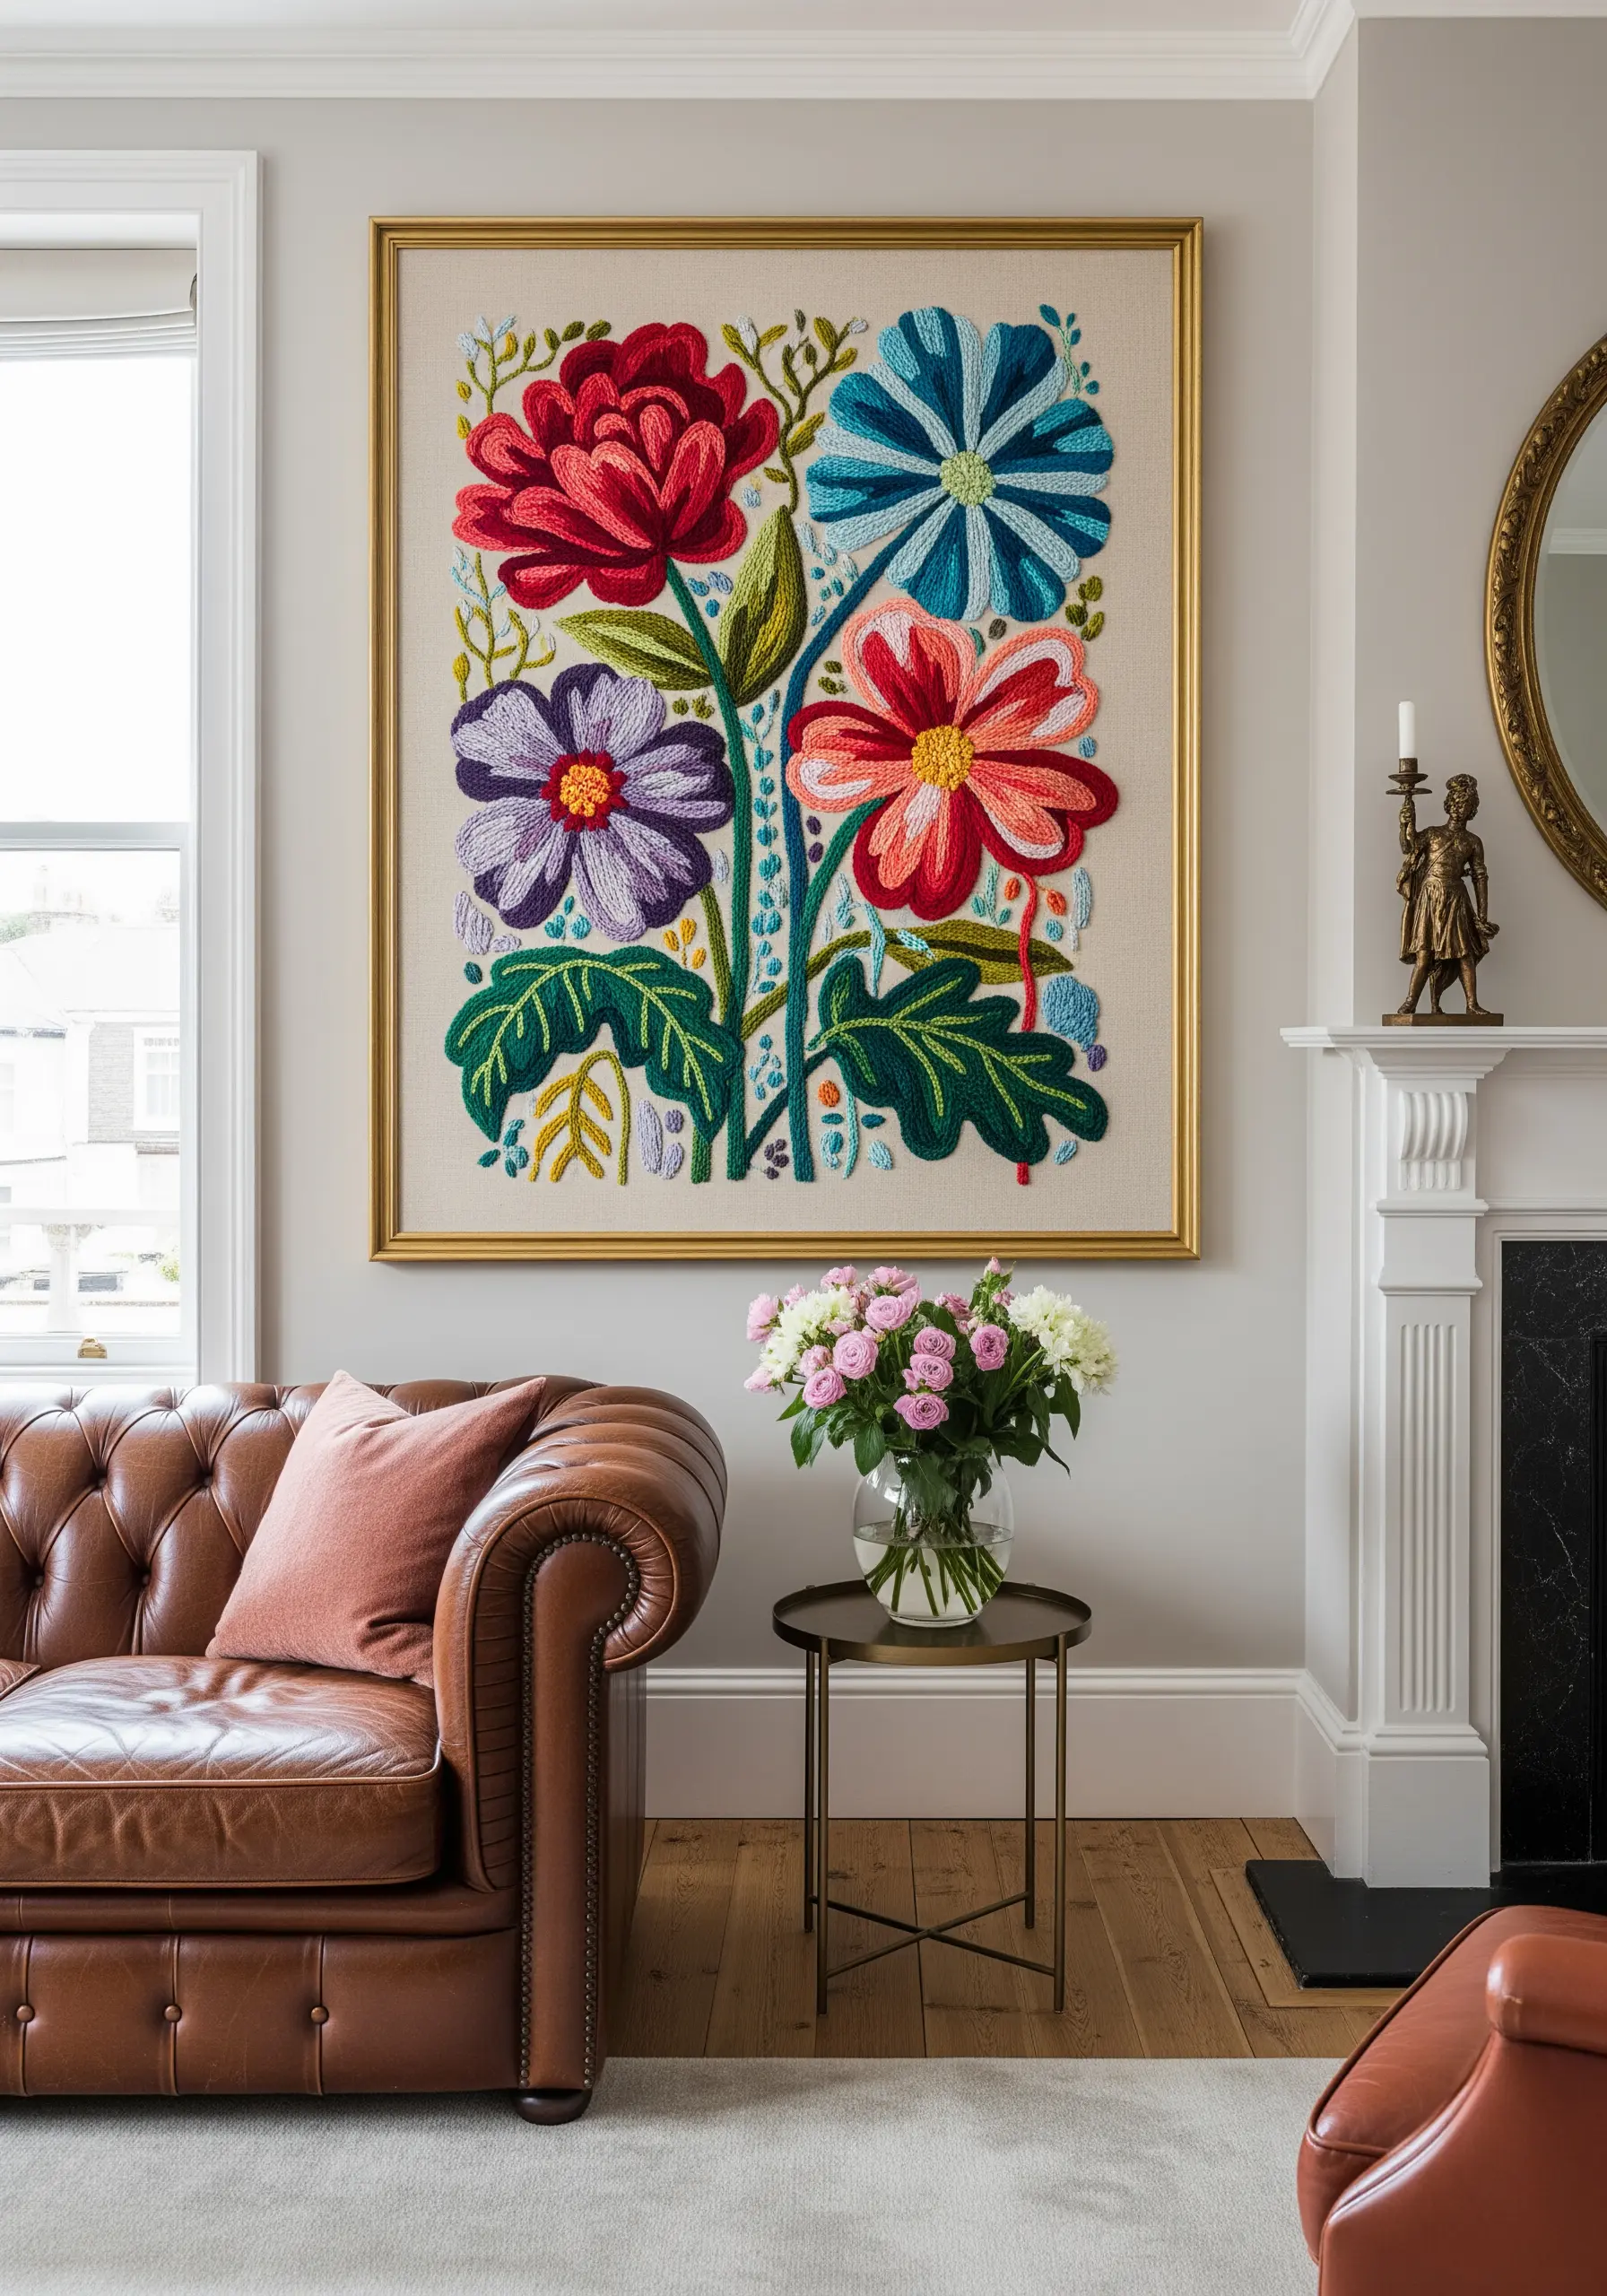
Make a powerful statement with crewel embroidery, which uses thick wool thread to create bold, highly textured designs.
The wool thread’s thickness allows you to fill large areas quickly, making it ideal for large-scale pieces like this framed floral artwork.
Outline your shapes with a chain stitch for a strong, defined edge, then fill them with long-and-short stitch or satin stitch for smooth, dense color.
Embrace a vibrant, unapologetic color palette; the matte texture of the wool gives even the brightest colors a sophisticated, non-garish finish.
This technique produces substantial, tactile art that bridges the gap between embroidery and painting.
18. Construct a Whimsical Soft Sculpture Mobile
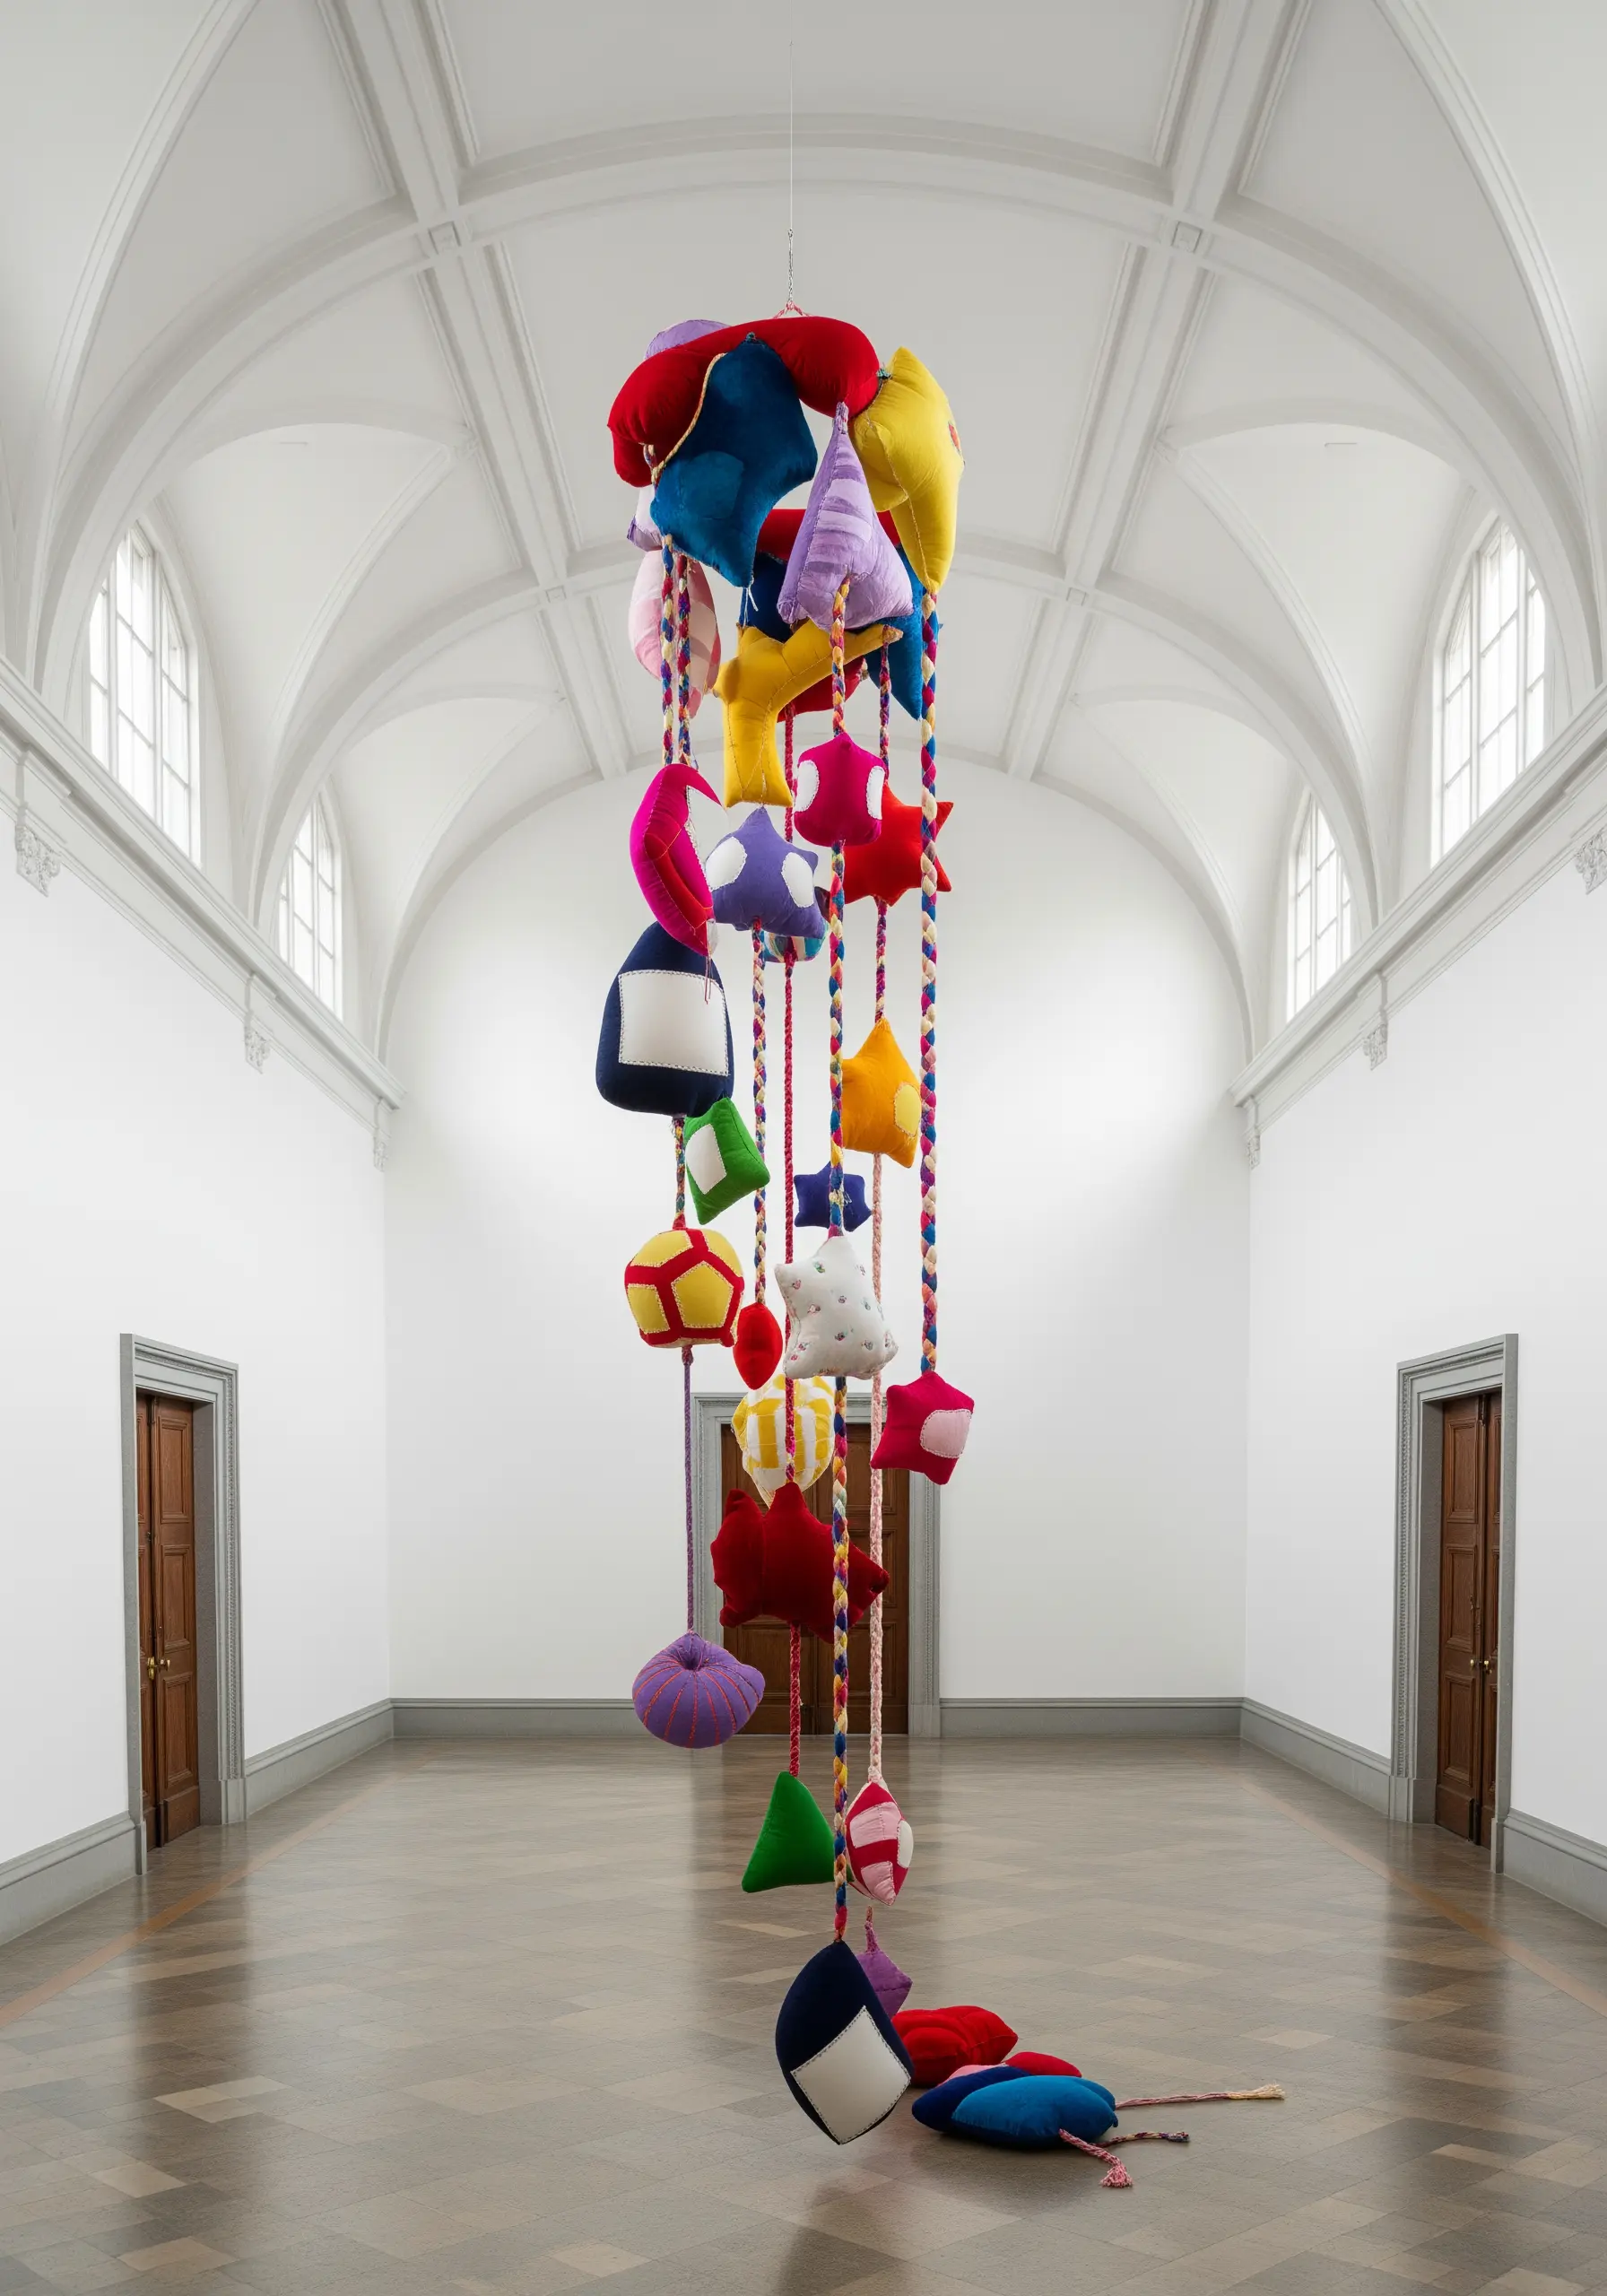
Explore the third dimension by creating playful, stuffed fabric shapes and assembling them into a hanging installation.
Design a collection of simple geometric and organic shapes—cones, stars, spheres—using brightly colored, durable fabrics like felt or cotton twill.
Sew the shapes, leaving a small opening to stuff them with poly-fil, then stitch the opening closed. For a clean finish, use an invisible ladder stitch.
String the finished soft sculptures onto a strong, braided cord or rope, knotting them at intervals to create a dynamic, vertical arrangement.
This approach transforms basic sewing skills into a large-scale, whimsical piece of stunning fiber art installation that activates the space with color and form.
19. Sculpt a Portrait with Directional Thread Painting
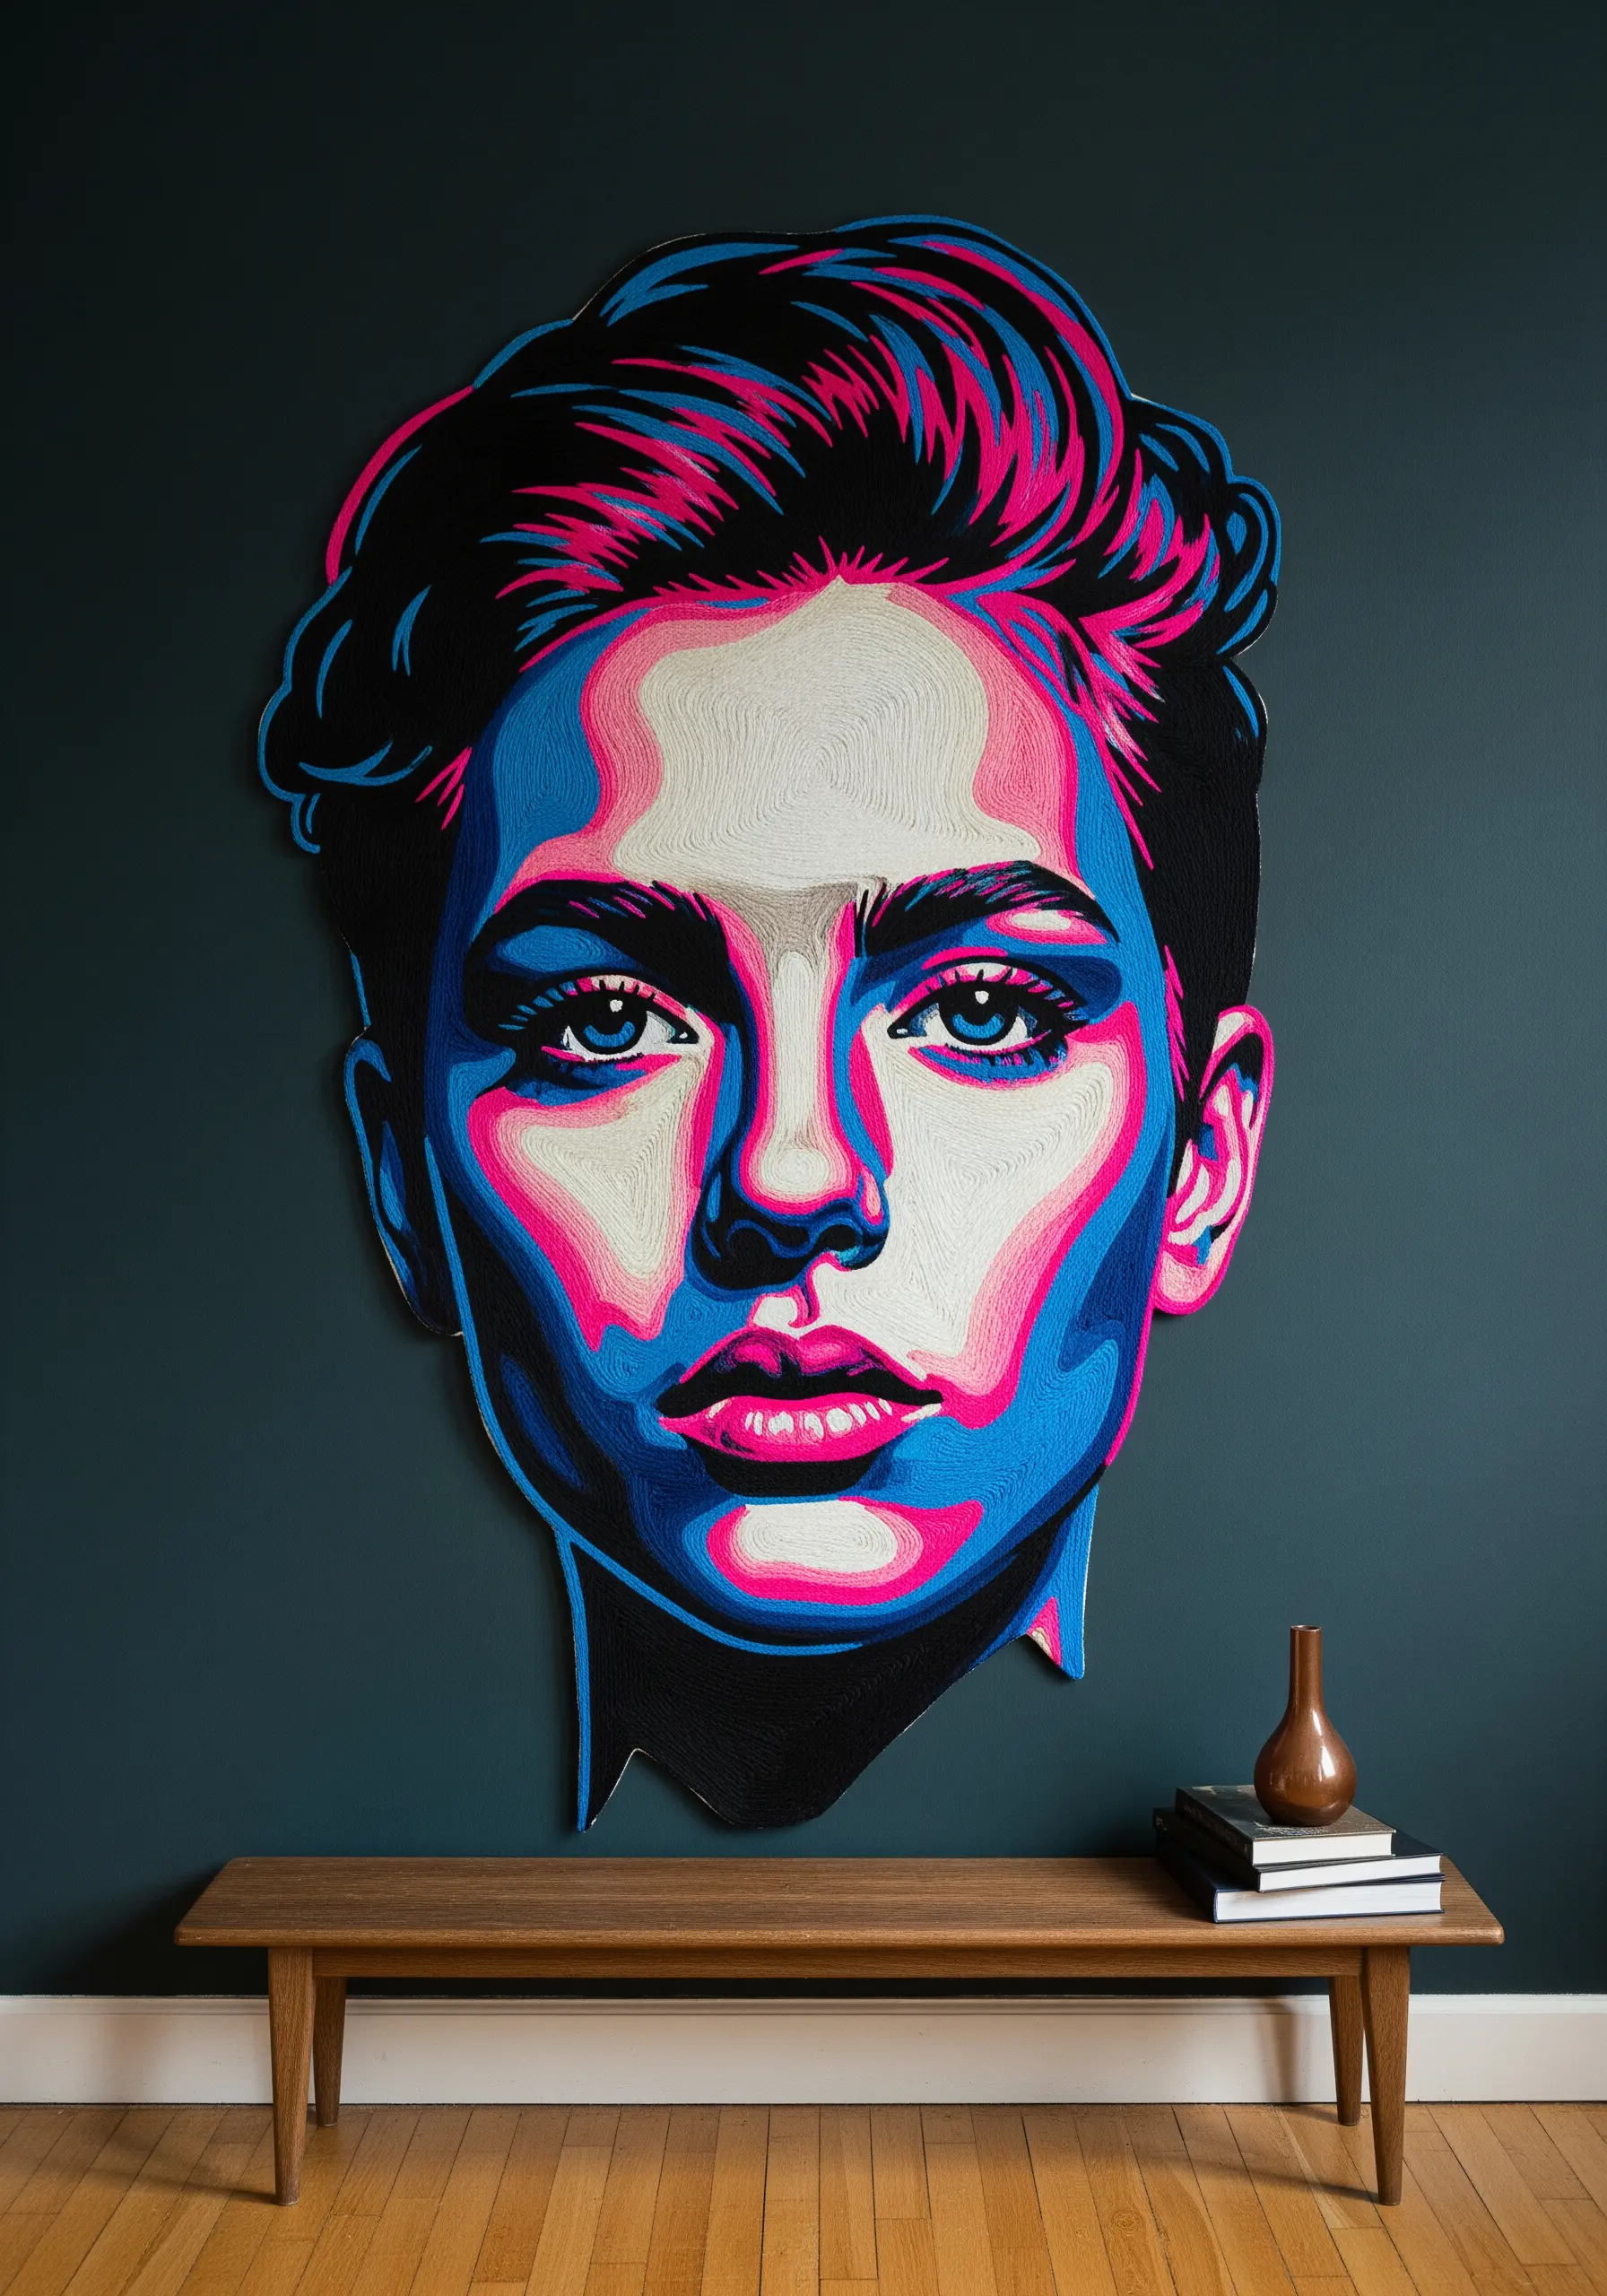
Create a graphic, high-impact portrait by using thread painting with a focus on line and contour.
Instead of blending colors for realism, use distinct, high-contrast hues like pink, blue, and black to create a stylized, almost topographical effect.
The key to this technique is directional stitching; make your stitches follow the natural curves and planes of the face—around the eyes, along the cheekbones, and down the neck.
This approach gives the portrait a sense of form and volume, as if the face were sculpted from thread.
The result is a powerful, modern piece that combines the precision of embroidery with the expressive energy of pop art.
20. Build a Joyful Tapestry of Pom-Poms and Tassels
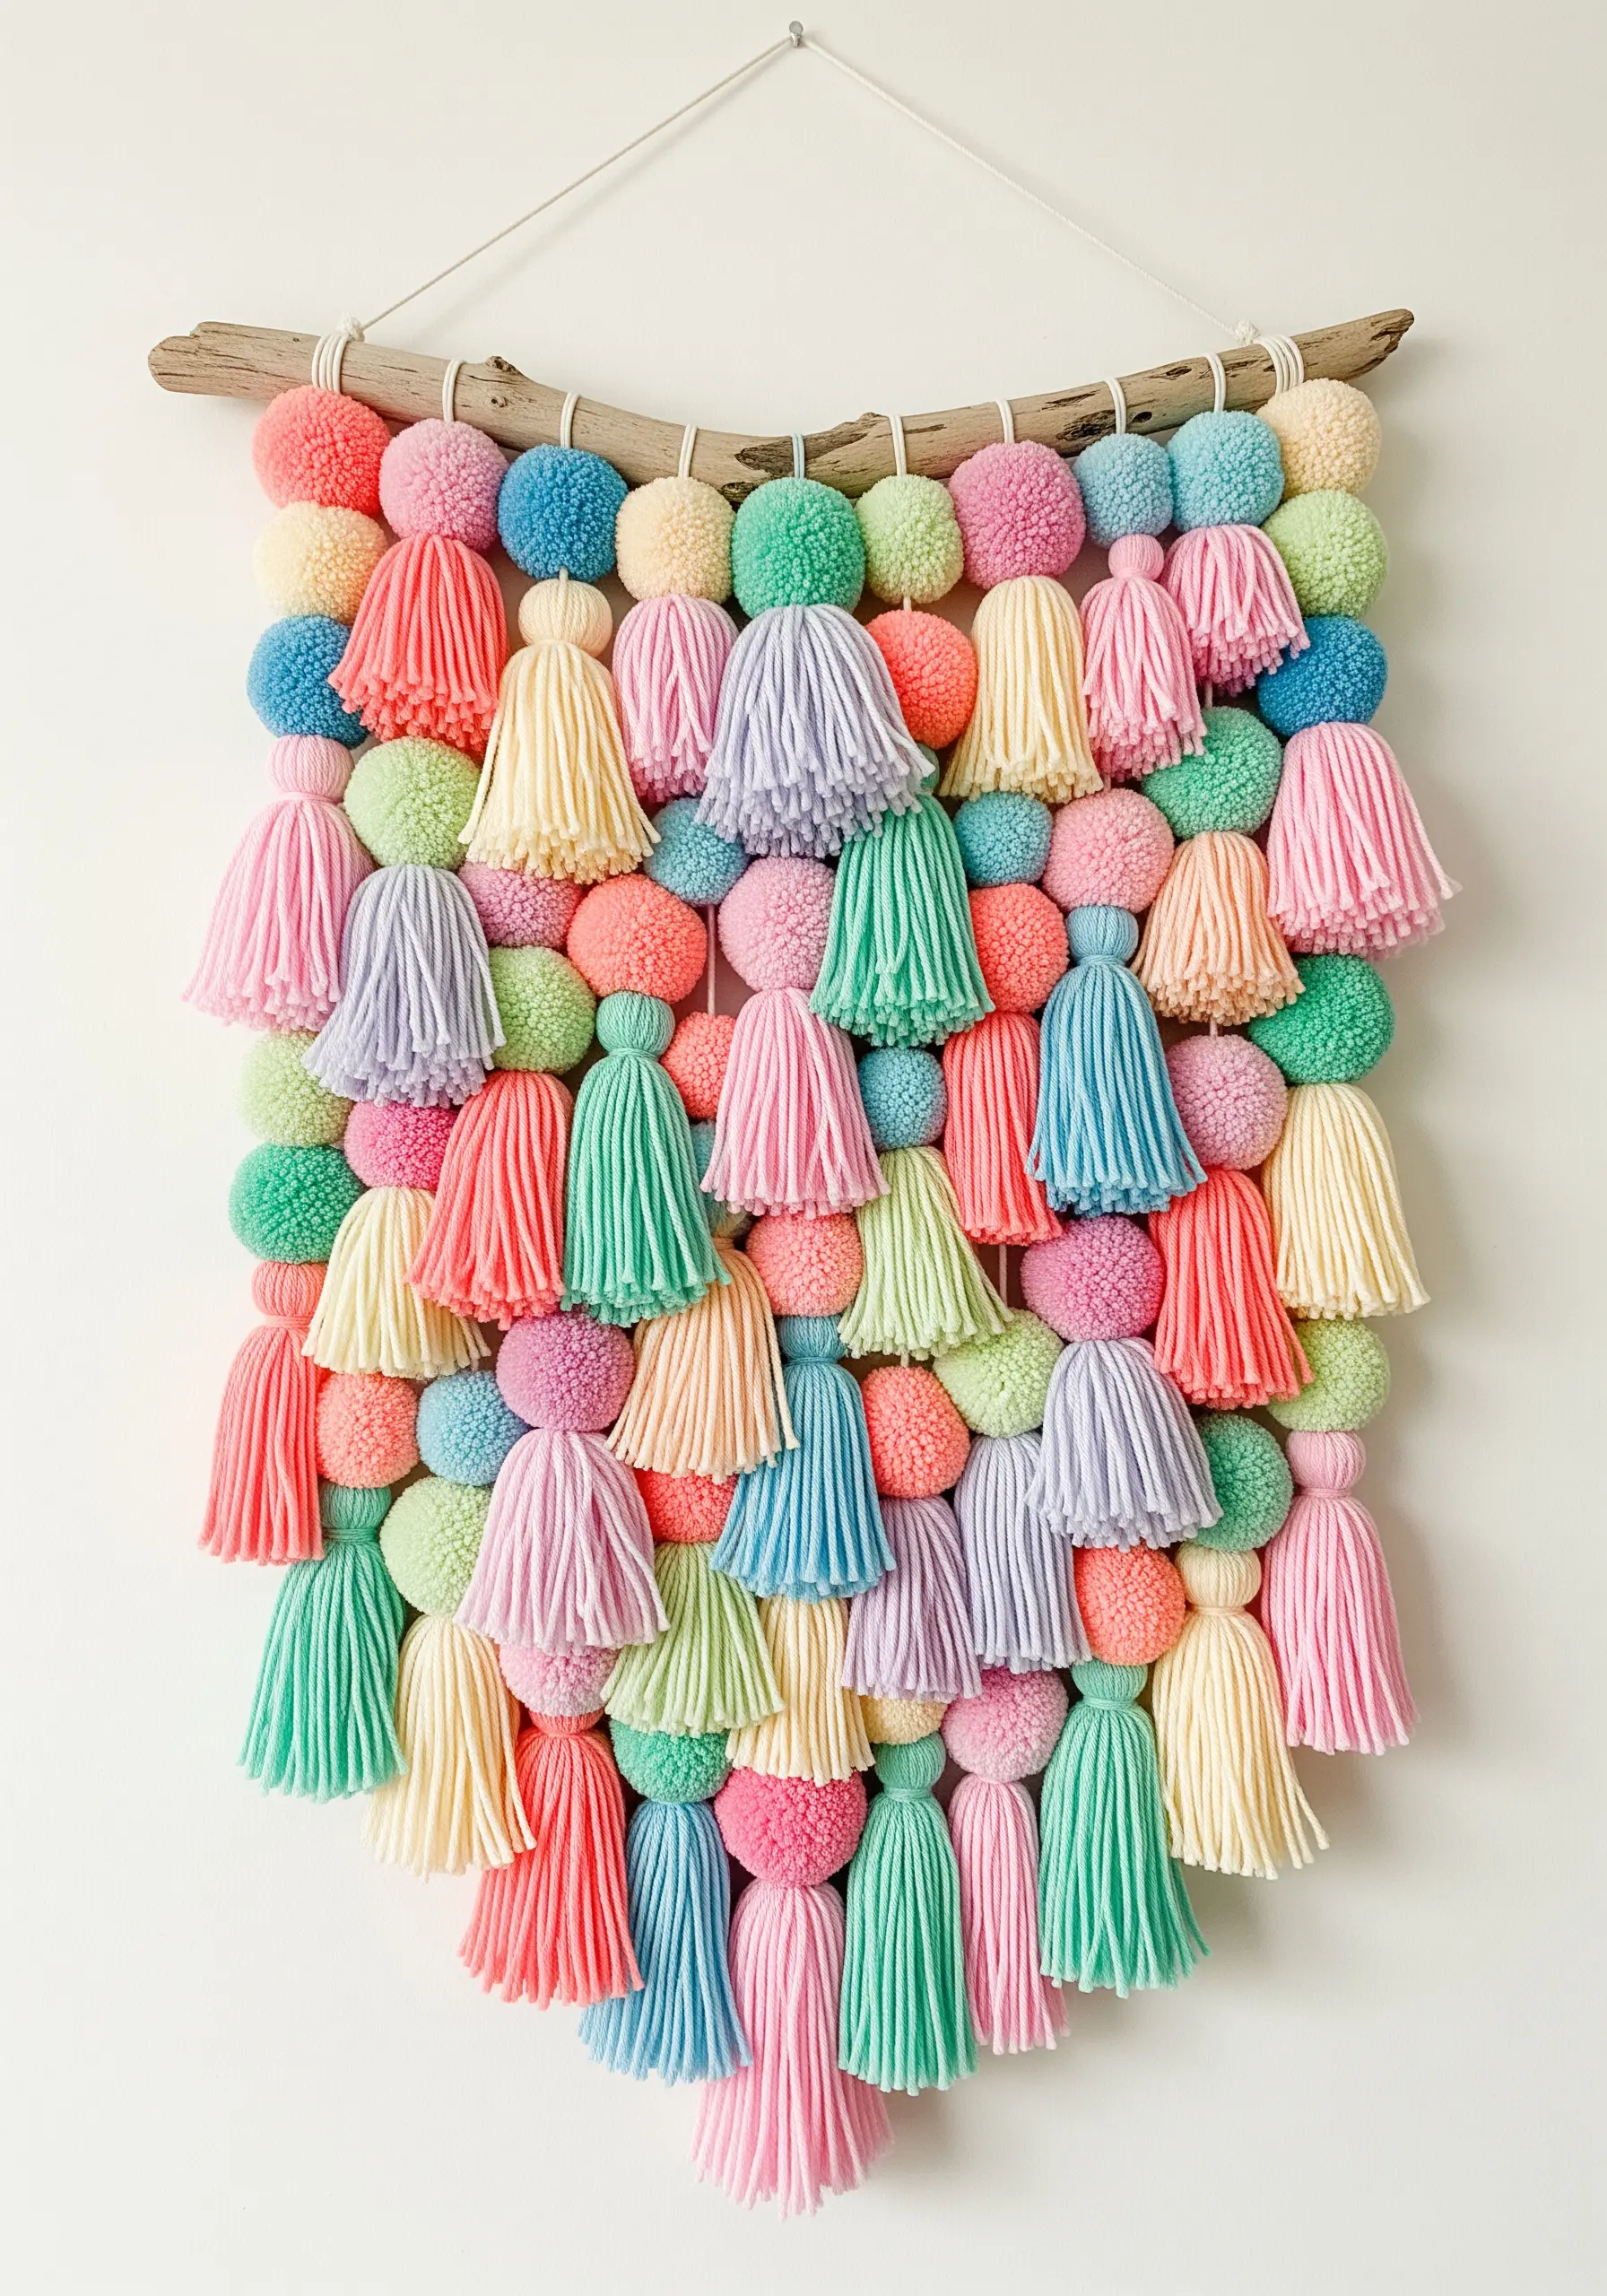
Craft a wall hanging that radiates pure joy by focusing on the simple, tactile pleasures of pom-poms and tassels.
Create a sense of rhythm and visual interest by varying the size and color of your pom-poms and the length of your tassels.
Use a pastel color palette to keep the overall look soft and cheerful, rather than overwhelming.
String your finished pieces onto multiple rows of sturdy twine or yarn, tying them closely together to create a dense, plush tapestry.
Attach the rows to a piece of driftwood or a simple wooden dowel for a natural, bohemian-inspired display.
21. Layer Embroidery onto Photography for Mixed-Media Art
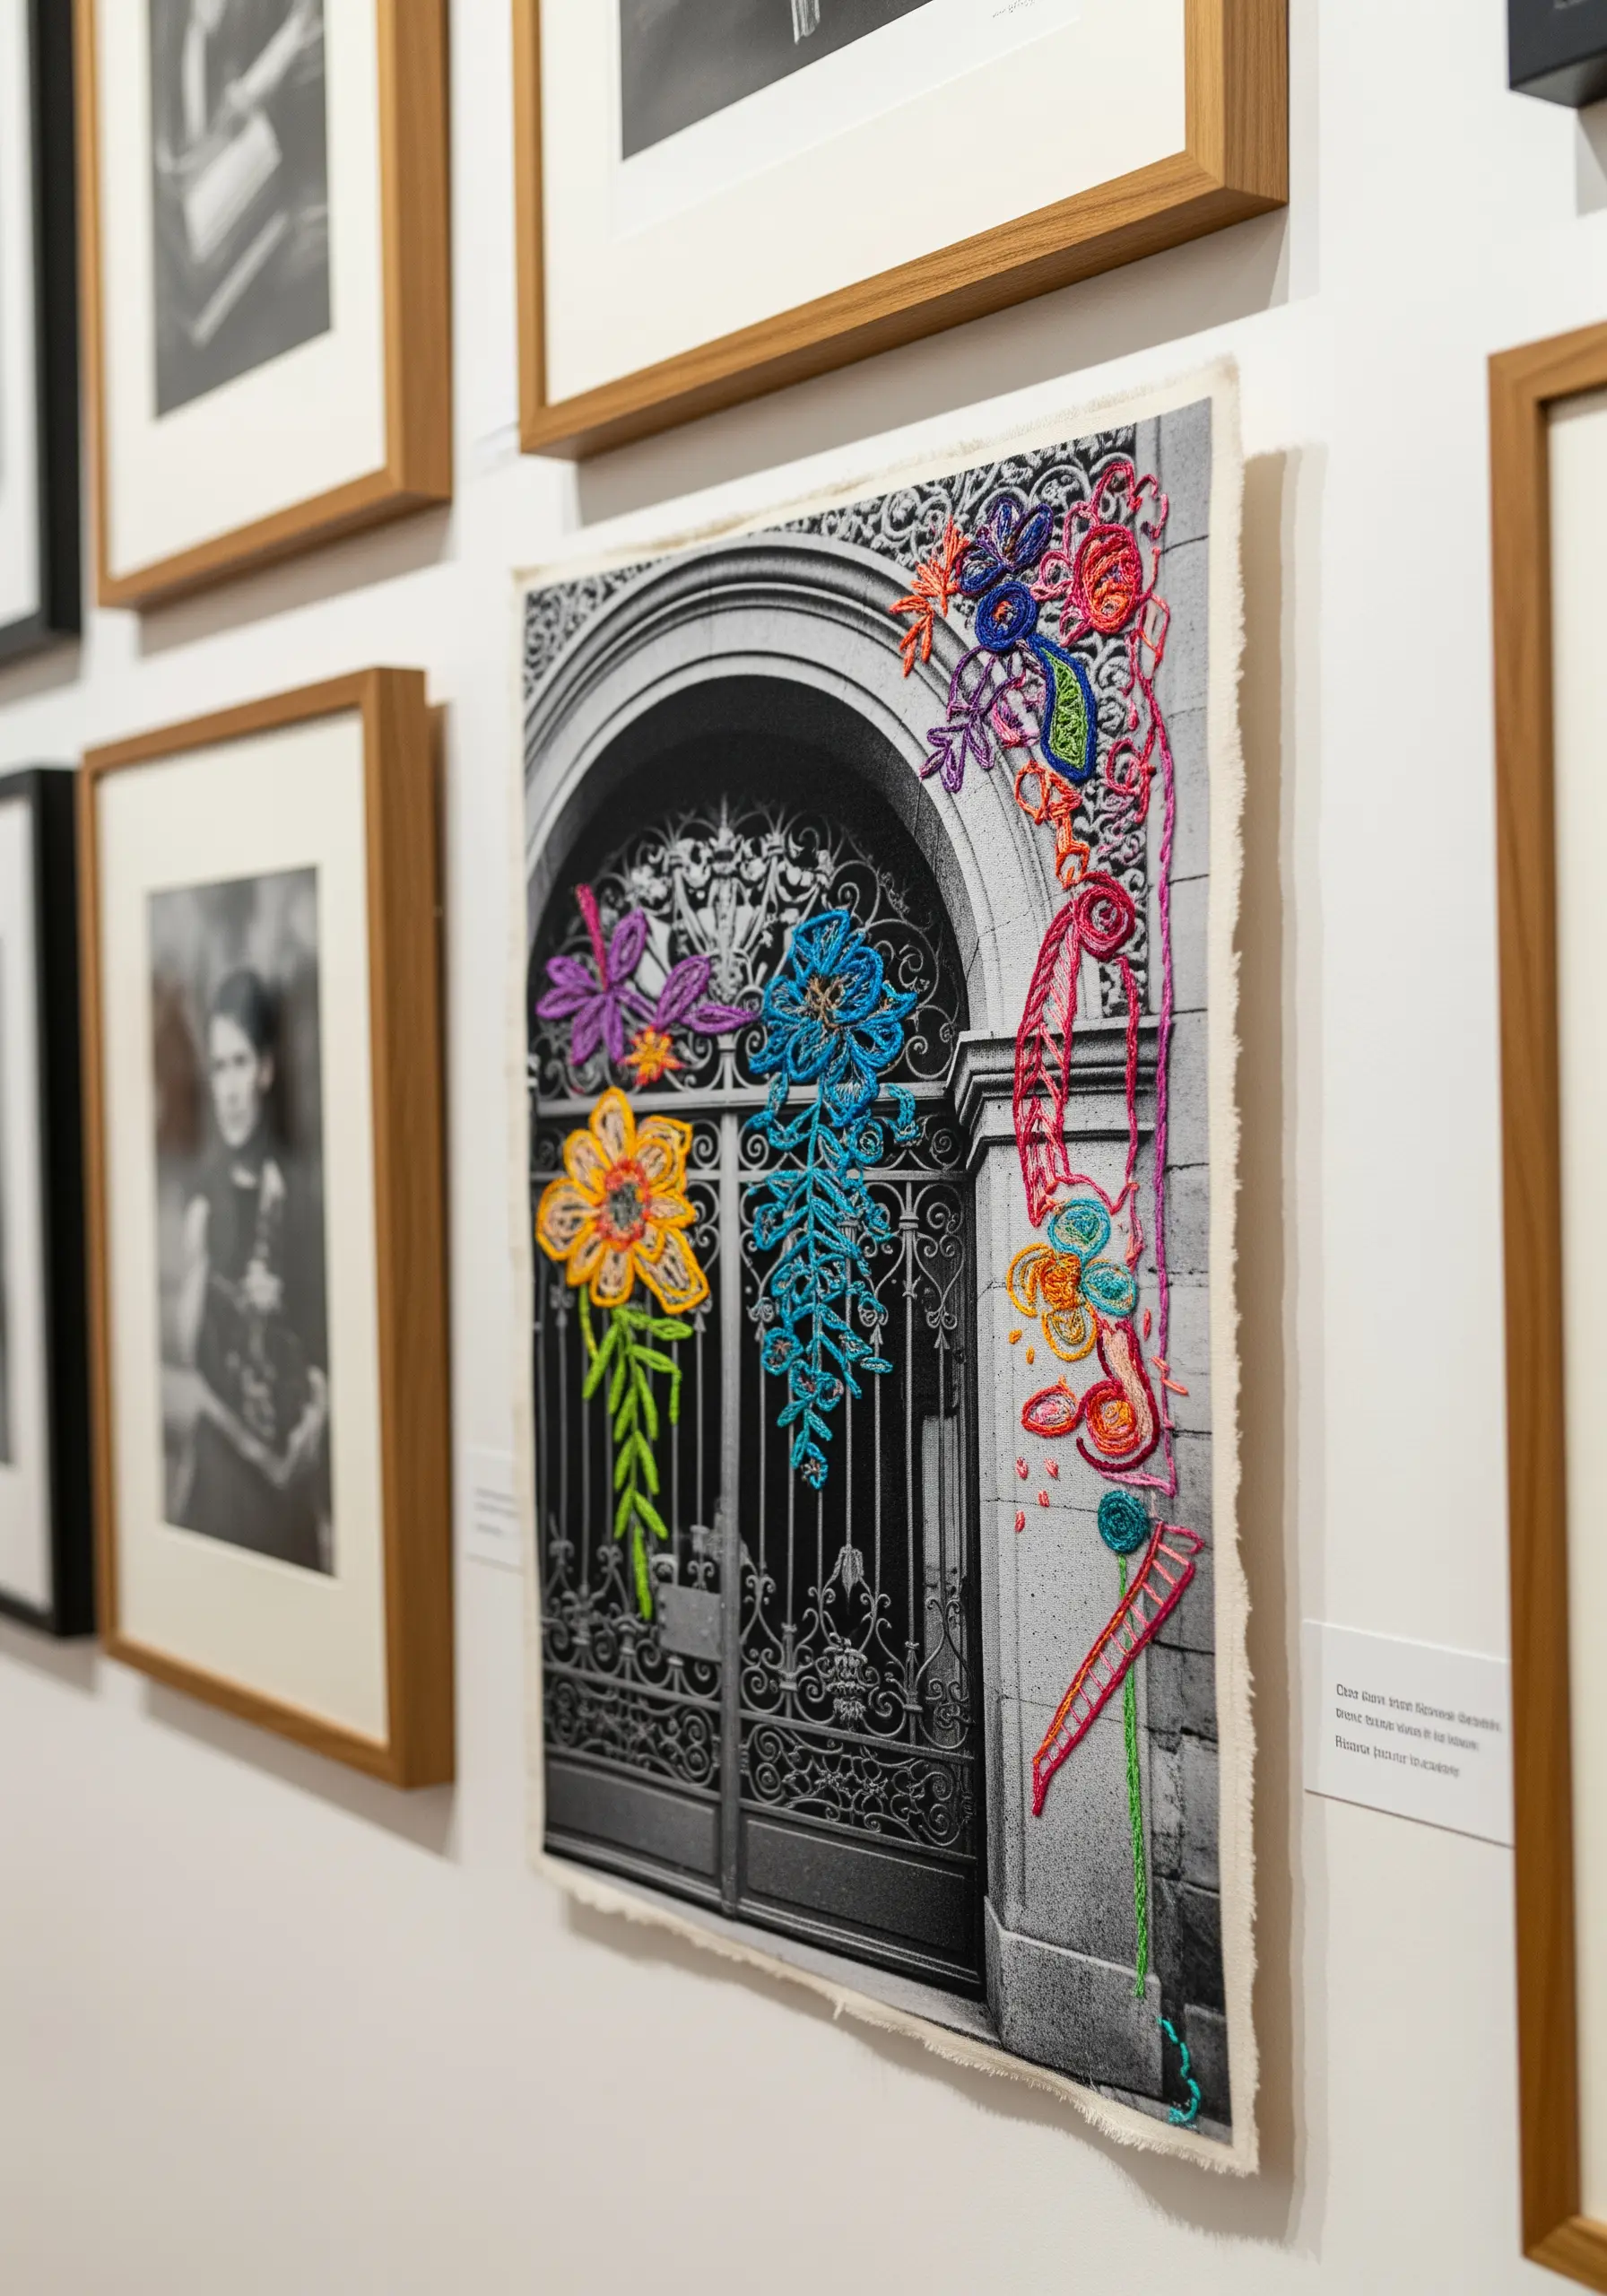
Elevate a simple photograph by adding a layer of vibrant, textural embroidery, creating a compelling piece of mixed-media art.
Choose a high-contrast, black-and-white photograph printed on matte paper or fabric; this provides a neutral canvas that makes your thread colors pop.
Instead of simply outlining shapes, use dimensional stitches like woven wheels, French knots, and couched threads to add sculptural elements that interact with the underlying image.
Let your stitching spill beyond the architectural lines of the photo, creating an organic, imaginative layer that transforms the original scene.
This technique allows you to collaborate with an existing image, adding your own narrative and artistic voice through thread.


