

A blank canvas bag is more than just a utility item; it’s an invitation. It’s a quiet space waiting for you to tell a story with thread, and you already have the skills to make it beautiful. The only thing separating a good piece from a great one is often just a small shift in technique or perspective.
Instead of just filling in a shape, think about the direction of your stitches. Consider how using one less strand of floss could make a line feel more delicate, or how a single, unexpected French knot could add the perfect touch of texture. These are the small, intentional decisions that elevate your work from a simple craft to a piece of personal art.
Here, you won’t find complicated instructions. You’ll find twenty clear ideas designed to refine your eye and your technique. Let’s explore how to make your next stitch your best one yet.
1. Botanical Depth with Directional Satin Stitch

Create realistic dimension in leaves by paying close attention to the direction of your satin stitches.
Instead of filling the entire shape in one direction, angle your stitches to follow the natural lines of the leaf veins.
This simple adjustment creates the illusion of light and shadow, making the leaf feel sculpted rather than flat.
For even more depth, use two or three closely related shades of green and blend them subtly where the planes of the leaf would shift.
2. Celestial Sheen with Metallics and French Knots

Capture the moon’s ethereal glow by working with metallic threads on a dark canvas, which makes them stand out dramatically.
To prevent fraying, use shorter lengths of metallic floss and a thread conditioner.
For the full moon’s cratered surface, fill the area with dense French knots in varying sizes—this creates a tactile, uneven texture.
Contrast this by using a smooth, flat satin stitch for the sharp crescent moons, creating a beautiful interplay of light and texture.
3. The Modern Elegance of a Single, Continuous Line

The power of a single line design lies in its smoothness and confidence.
To achieve a fluid, unbroken line, use a whipped backstitch or a stem stitch, which conceals the individual stitches and creates a rope-like finish.
Use four to six strands of floss to give the line substantial weight and presence against the canvas.
This technique turns minimalist drawings into sophisticated modern line art faces that feel both delicate and bold.
4. Vibrant Folk Art with Bold Color Blocking

Create a striking folk art look by focusing on dense, flat areas of color and crisp outlines.
Before you begin filling a shape, secure its edges with a backstitch or split stitch—this acts as a barrier, ensuring your satin stitches have a sharp, clean border.
Don’t be afraid to use a high-contrast palette; the charm of this style is in its unapologetic celebration of vibrant, pure color.
Keep your satin stitches parallel and tightly packed for an opaque, fabric-like finish.
5. A Personal Library with Stitched Typography

Embroidering text requires clarity and precision to ensure it remains legible.
Use a simple backstitch with two or three strands for small letters to maintain crisp lines.
For the book covers, you can play with different fill stitches—satin stitch, long-and-short stitch, or even a simple seed stitch for a textured feel.
Always use a high-quality stabilizer on the back of your tote bag fabric to prevent puckering, especially when filling large areas.
6. Landscape Gradients with Thread Painting

To create a realistic mountain range, use the long-and-short stitch to blend multiple shades of a color seamlessly.
Start with the darkest color at the bottom of a section and gradually introduce lighter shades as you work your way up, mimicking atmospheric perspective.
For the radiating sun, use a disciplined satin stitch in concentric circles, which creates a clean, graphic contrast to the softly blended mountains.
This technique allows you to paint with thread, capturing the quiet majesty of a landscape.
7. Delicate Botanicals with a Vocabulary of Stitches
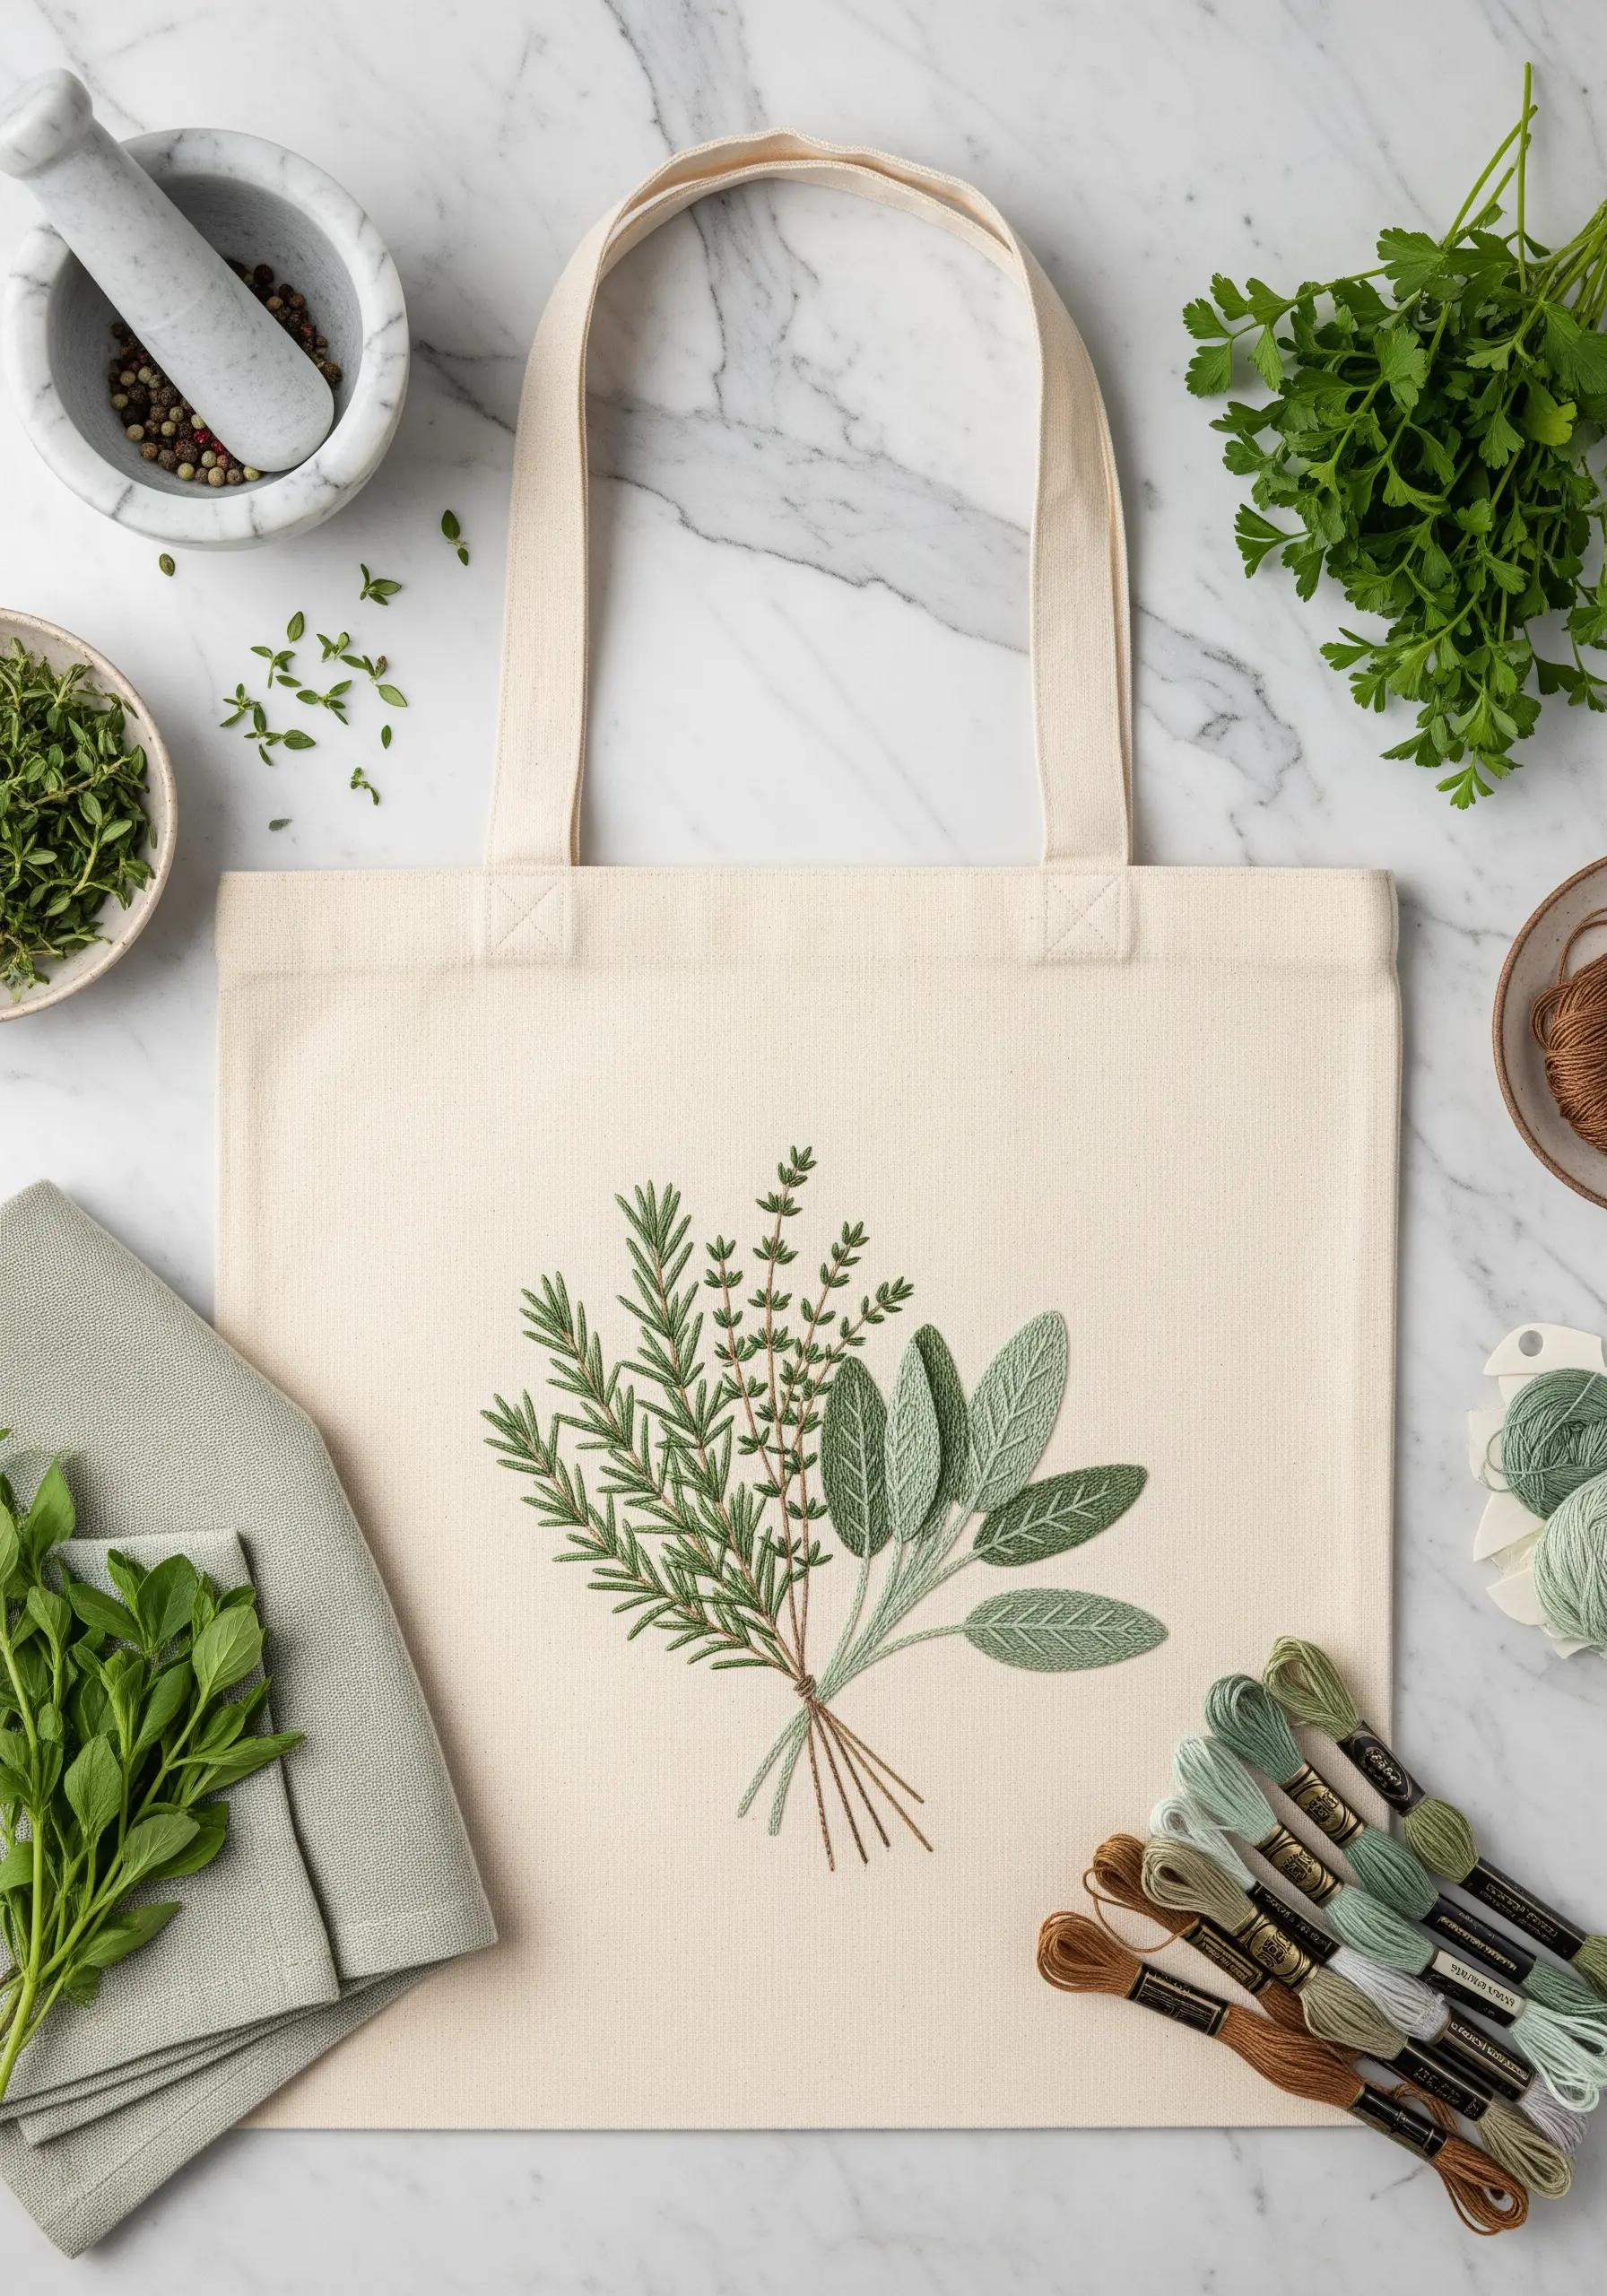
Give each herb in a bouquet its unique character by assigning it a specific stitch.
Use fishbone stitch for the broad, veined leaves of sage, a simple stem stitch for the woody stalks of rosemary, and tiny French knots for delicate blossoms.
Working with just one or two strands of floss preserves the fine, illustrative quality of the herbs.
This approach transforms a simple floral design into a thoughtful botanical stitch art sampler.
8. Sculptural Dimension with Thick Yarn and Raised Stitches

For embroidery that begs to be touched, swap your floss for thicker tapestry wool or yarn.
To give your motifs a truly three-dimensional feel, use a padded satin stitch: create a base of underlying straight stitches, then cover them with satin stitches worked in the opposite direction.
This elevates the surface and creates dramatic shadows, perfect for bold, retro designs.
A thick chain stitch border adds a satisfyingly chunky finish.
9. Abstract Composition with Geometric Fills
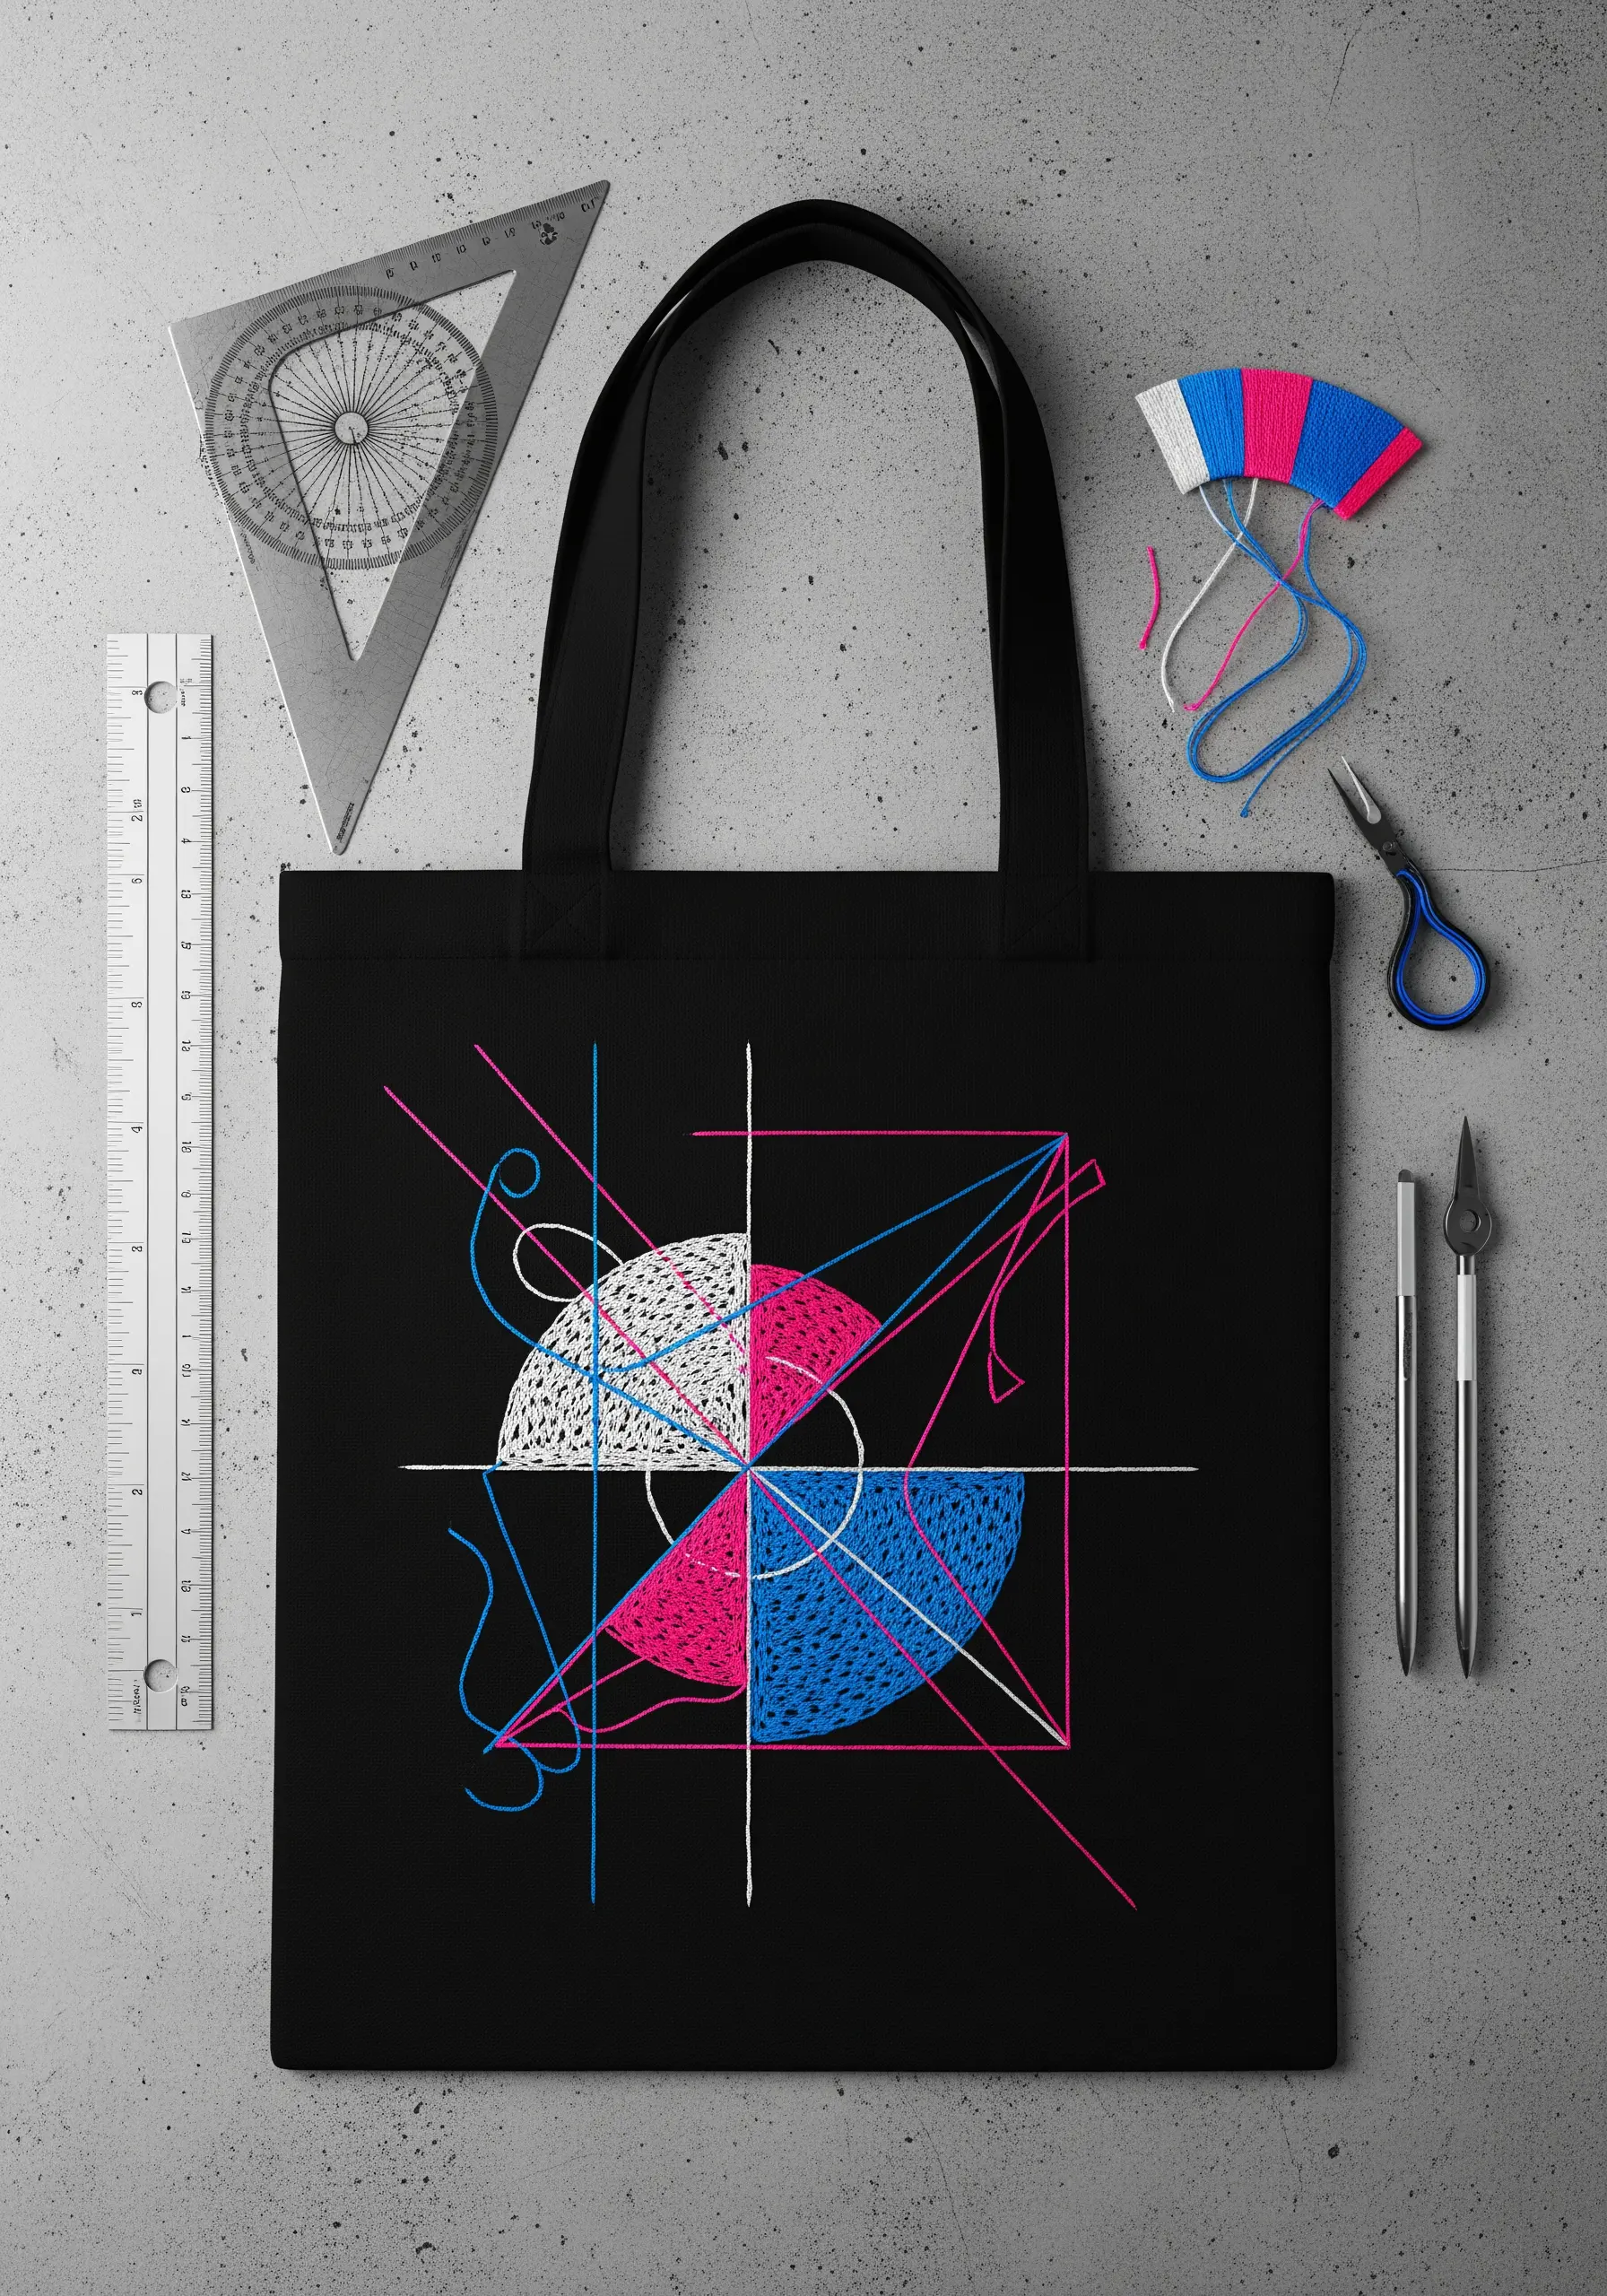
Elevate simple geometric shapes by filling them with textural stitches instead of flat color.
Use dense seed stitches, cross-hatching, or tightly packed French knots to create visual interest and movement within a contained shape.
Contrast these textured areas with clean, sharp lines made from a simple backstitch.
This technique transforms a basic drawing into sophisticated abstract minimal embroidery pieces with depth and rhythm.
10. Capturing Fur and Soul in Pet Portraits

The key to realistic pet portraits is mastering the art of thread painting with a single strand of floss.
Lay your stitches in the direction that the fur naturally grows, using short, overlapping straight stitches to blend colors smoothly.
The eyes are the focal point; capture their life by using a tiny satin stitch for the main color and adding a single, well-placed white French knot to create a glint of light.
Creating small pet portrait embroidery is an act of love that brings a canvas to life.
11. Iconic Artistry on a Patterned Canvas

Don’t shy away from embroidering on patterned fabric—instead, make the pattern part of the composition.
On a striped tote, the lines can represent the sea or sky, integrating the background with your stitched artwork.
To create the chaotic texture of sea foam, use a dense cluster of French knots and a few bullion knots, varying their size and tightness.
Always use a stabilizer to prevent the fabric’s pattern from distorting under the tension of your stitches.
12. Elegant Script with Botanical Flourishes

For beautiful, flowing script, a whipped backstitch is your best friend. It creates a smooth, solid line that mimics calligraphy.
Give your letters prominence by using three or four strands of floss, then switch to just one or two strands for the more delicate botanical elements.
Use lazy daisy stitches for lavender buds and simple straight stitches for the stems, keeping the flourishes light and airy to perfectly frame your message.
13. A Crafter’s Tribute with Fine-Line Details

This style celebrates precision and clean lines, making it perfect for illustrative designs.
Use a single strand of black floss with a tiny backstitch to achieve the crisp, sharp edges of the scissors.
To give the ball of yarn a realistic, rounded appearance, work your satin stitches in a circular or curved direction rather than straight across.
Using a variegated thread for the yarn will effortlessly add subtle color variation and depth.
14. Creating Faceted Illusions with Shaded Stitches

To embroider realistic crystals, think like a painter and break the image down into small, geometric planes or facets.
Fill each facet with satin stitch, making sure all stitches within that single plane lie in the same direction.
Use a range of analogous colors—from deep purple to pale lilac and white—to give each facet a different tone.
This careful shading is what creates the stunning illusion of light hitting a three-dimensional object.
15. Root-to-Leaf Texture with Layered Stitches

Bring a garden scene to life by using different stitches to convey different natural textures.
Create a rich, bumpy soil by scattering dense French knots and colonial knots at the base of your design.
For the smooth surface of root vegetables, use a vertical satin stitch. For the leafy greens, a fishbone stitch or fly stitch beautifully mimics the central vein and delicate structure of real leaves.
16. Architectural Minimalism with a Pop of Color

A minimalist skyline relies on the strength and simplicity of its lines.
Use a basic backstitch or stem stitch with two or three strands of black floss to create a clean, graphic outline of the buildings.
To draw the eye and add a point of interest, choose one small element—a window, a door, or a billboard—and fill it with a vibrant, contrasting color using satin stitch.
This selective use of color makes the entire composition feel intentional and modern, turning simple outlines into minimal geometry stitch projects.
17. Capturing Impressionism with Impasto Stitching

To translate the thick, expressive brushstrokes of a painting into embroidery, you must embrace texture.
Use all six strands of your floss—or even chunky tapestry wool—and work with long, directional straight stitches that mimic the application of paint.
For the sunflower centers, build up layers of French knots and bullion knots in dark, rich colors.
Let your stitches be loose and energetic; this style is not about perfection, but about capturing movement and emotion.
18. Mixed-Media Magic with 3D Organza Wings

Introduce appliqué to give your embroidery an unexpected and delightful 3D element.
First, stitch the bee’s body directly onto the tote bag, using a padded satin stitch to make it plump and fuzzy.
For the wings, embroider their outlines onto a separate piece of sheer organza, carefully cut them out, and then tack them securely onto the bag at the base.
This mixed-media embroidery technique adds a layer of delicate realism that makes the design fly off the fabric.
19. An Autumnal Scatter with Blended Threads

Capture the gentle color shifts of autumn leaves by using a long-and-short stitch to blend two or three colors within a single leaf.
For the birch bark, lay down horizontal satin stitches in off-white and grey, then add small, vertical black stitches to suggest texture.
Arrange your finished motifs in an organic, cascading pattern rather than a static row.
This sense of movement gives the composition a natural, breezy feel, as if the leaves just landed on your bag.
20. A Modern Sampler in a Textured Color Grid

Turn your tote bag into a canvas for experimentation by creating a color-blocked grid.
Assign a different textural stitch to each block: fill one with French knots, another with woven wheel stitches, a third with chain stitch rows, and so on.
This is a fantastic way to practice and showcase a variety of techniques within one cohesive design.
Working with a thoughtfully chosen color palette ensures that even though the textures are different, the final piece feels harmonious and intentional. Modern embroidery stitches are all about this kind of playful exploration.


