

There is a quiet power in transforming something overlooked—a faded tablecloth, a beloved pair of jeans, a simple linen curtain—into a piece of art that holds your story. Before you reach for a fresh canvas, look around. The textiles already woven into your life are waiting for a new purpose.
This isn’t about simply decorating old fabric. It’s about seeing its inherent character as a starting point. The sturdy weave of denim, the delicate transparency of voile, the nostalgic pattern of a vintage napkin—these qualities are not limitations, but collaborators in your design.
Here, you’ll find ways to listen to these materials and enhance them with intentional stitches. You’ll learn to add dimension to a printed flower, use a gingham grid to guide your needle, and frame an entire garment as a testament to its journey. Let’s turn what you already have into the art you’ve always wanted to create.
1. Frame a Vintage Tablecloth as Monumental Art

Repurpose a beautifully embroidered tablecloth by treating it as a finished canvas waiting for a frame.
Instead of letting it hide on a table, build a simple wooden stretcher frame, just as you would for a painting.
Carefully stretch the fabric taut and staple it to the back, ensuring the tension is even to prevent any puckering around the embroidery.
This technique instantly elevates the textile, turning heirloom needlework into a large-scale focal point that balances modern furniture with handmade warmth.
2. Construct a Denim Canvas for Textured Landscapes

Create a uniquely textured backdrop for your embroidery by deconstructing old jeans.
Arrange and stitch together squares of denim, using the pockets, seams, and varying washes to build a patchwork “sky” with inherent depth and character.
For the embroidered mountains, use chunky yarn and high-relief stitches like French knots or punch needle to create the feeling of snow-capped peaks.
The contrast between the rugged, recycled denim and the soft, tactile thread makes the final piece a compelling work of fabric collage embroidery.
3. Elevate a Headboard with an Embroidered Velvet Throw

Transform your bedroom by using a large, embroidered textile as a dramatic headboard alternative.
Choose a piece with significant weight and texture, like a velvet curtain or an ornate throw, as it adds softness and helps absorb sound.
Simply hang the textile from a decorative dowel rod mounted to the wall behind your bed.
The richness of the fabric and the shimmer of the threads create an instant sense of luxury and make a statement embroidery piece without any permanent installation.
4. Create a Cohesive Gallery with Abstract Color Blocking
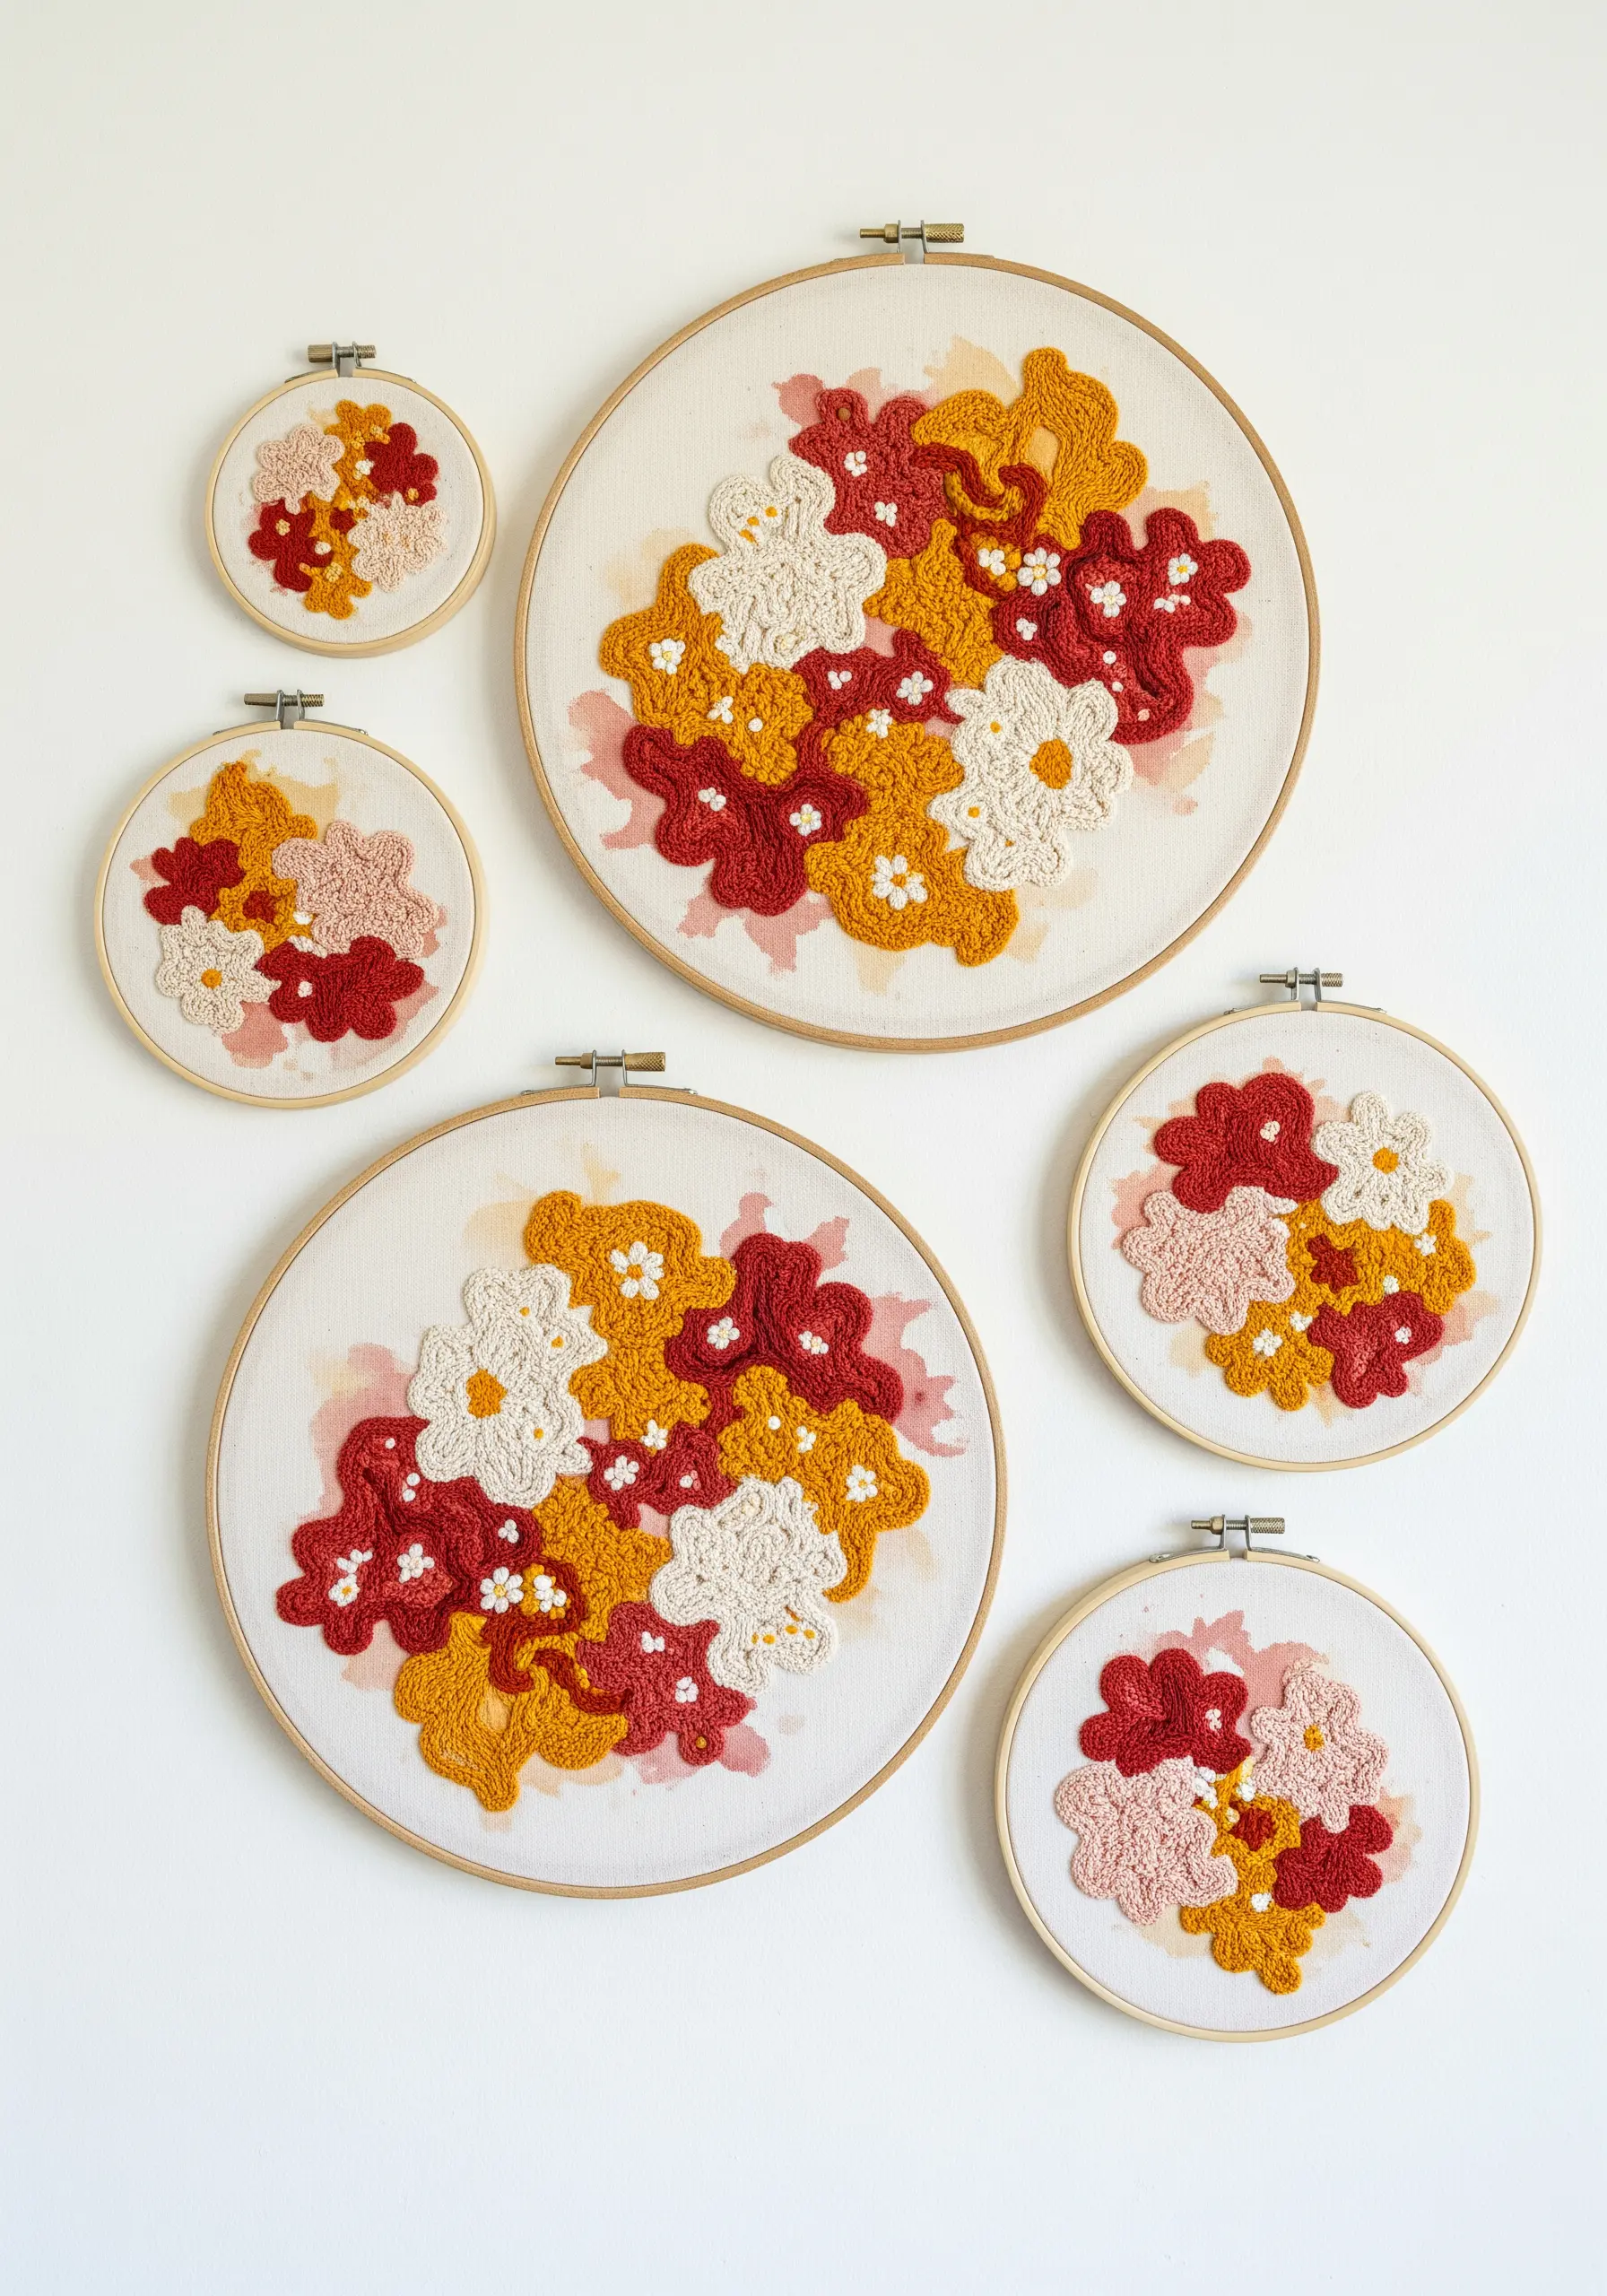
Design a stunning hoop art gallery wall by starting with a painted foundation on your fabric.
Before you stitch, apply diluted fabric paint or watercolor in organic, bleeding shapes across several pieces of fabric.
Once dry, use densely packed textural stitches—like French knots, bullion knots, or punch needle—to fill abstract floral forms within your painted areas.
By using a consistent color palette across hoops of various sizes, your hooped wall collage layouts will feel like a single, unified installation.
5. Transform a Single Jean Leg into Sculptural Line Art

Isolate a piece of a garment to create a focused, modern art piece.
Cut a single leg from a pair of old jeans and treat it as a long, narrow canvas for your needle.
Fill the entire surface with repeating geometric patterns using a high-contrast thread, such as bright white on dark indigo denim.
Simple stitches like running stitch, backstitch, and tiny satin stitch bars work best to create a clean, graphic texture that feels both contemporary and handmade.
6. Use Sheer Curtains to Create Floating Motifs

Stitch onto a sheer curtain panel to make your embroidery designs appear as if they are floating in mid-air.
Use a water-soluble stabilizer to support your stitches on the delicate fabric, then wash it away after you’ve finished.
Choose a simple, elegant line-art motif, like birds in flight, and use a single color of thread to maintain a light, airy aesthetic.
When hung in a window, the design will cast beautiful shadows that change with the light throughout the day.
7. Add 3D Dimension to Printed Floral Fabrics

Instead of starting with a blank canvas, use a floral-printed tablecloth or curtain as your pattern.
Select a few key flowers in the existing design and stitch directly over them to add stunning 3D texture.
Use floral-inspired ribbon embroidery for petals and chunky French knots for flower centers to make them pop from the surface.
This technique transforms a flat, mass-produced print into a unique, tactile piece of art with incredible depth.
8. Repurpose Gingham Tablecloths as a Cross-Stitch Guide

Use a vintage gingham or checkered tablecloth as a built-in grid for perfect cross-stitching.
The woven squares of the fabric act as a natural guide, eliminating the need for Aida cloth and tedious counting.
Stretch a section of the tablecloth in a hoop and fill the squares with simple, bold motifs like fruits or letters.
This hack gives your work an effortlessly charming, cottagecore feel that is perfect for kitchen or dining room art.
9. Frame Upcycled Denim with High-Contrast Line Art

Treat an entire piece of clothing as a canvas by mounting it for display.
Select an old denim skirt or jacket and stretch it over a canvas frame or place it in a deep shadow box.
Use a thick, vibrant thread—like a neon perle cotton—to stitch a continuous line drawing onto the surface.
The sharp contrast between the bright, clean line and the worn texture of the denim creates powerful modern line art faces that feel both graphic and expressive.
10. Stitch Textural Waves onto a Shower Curtain
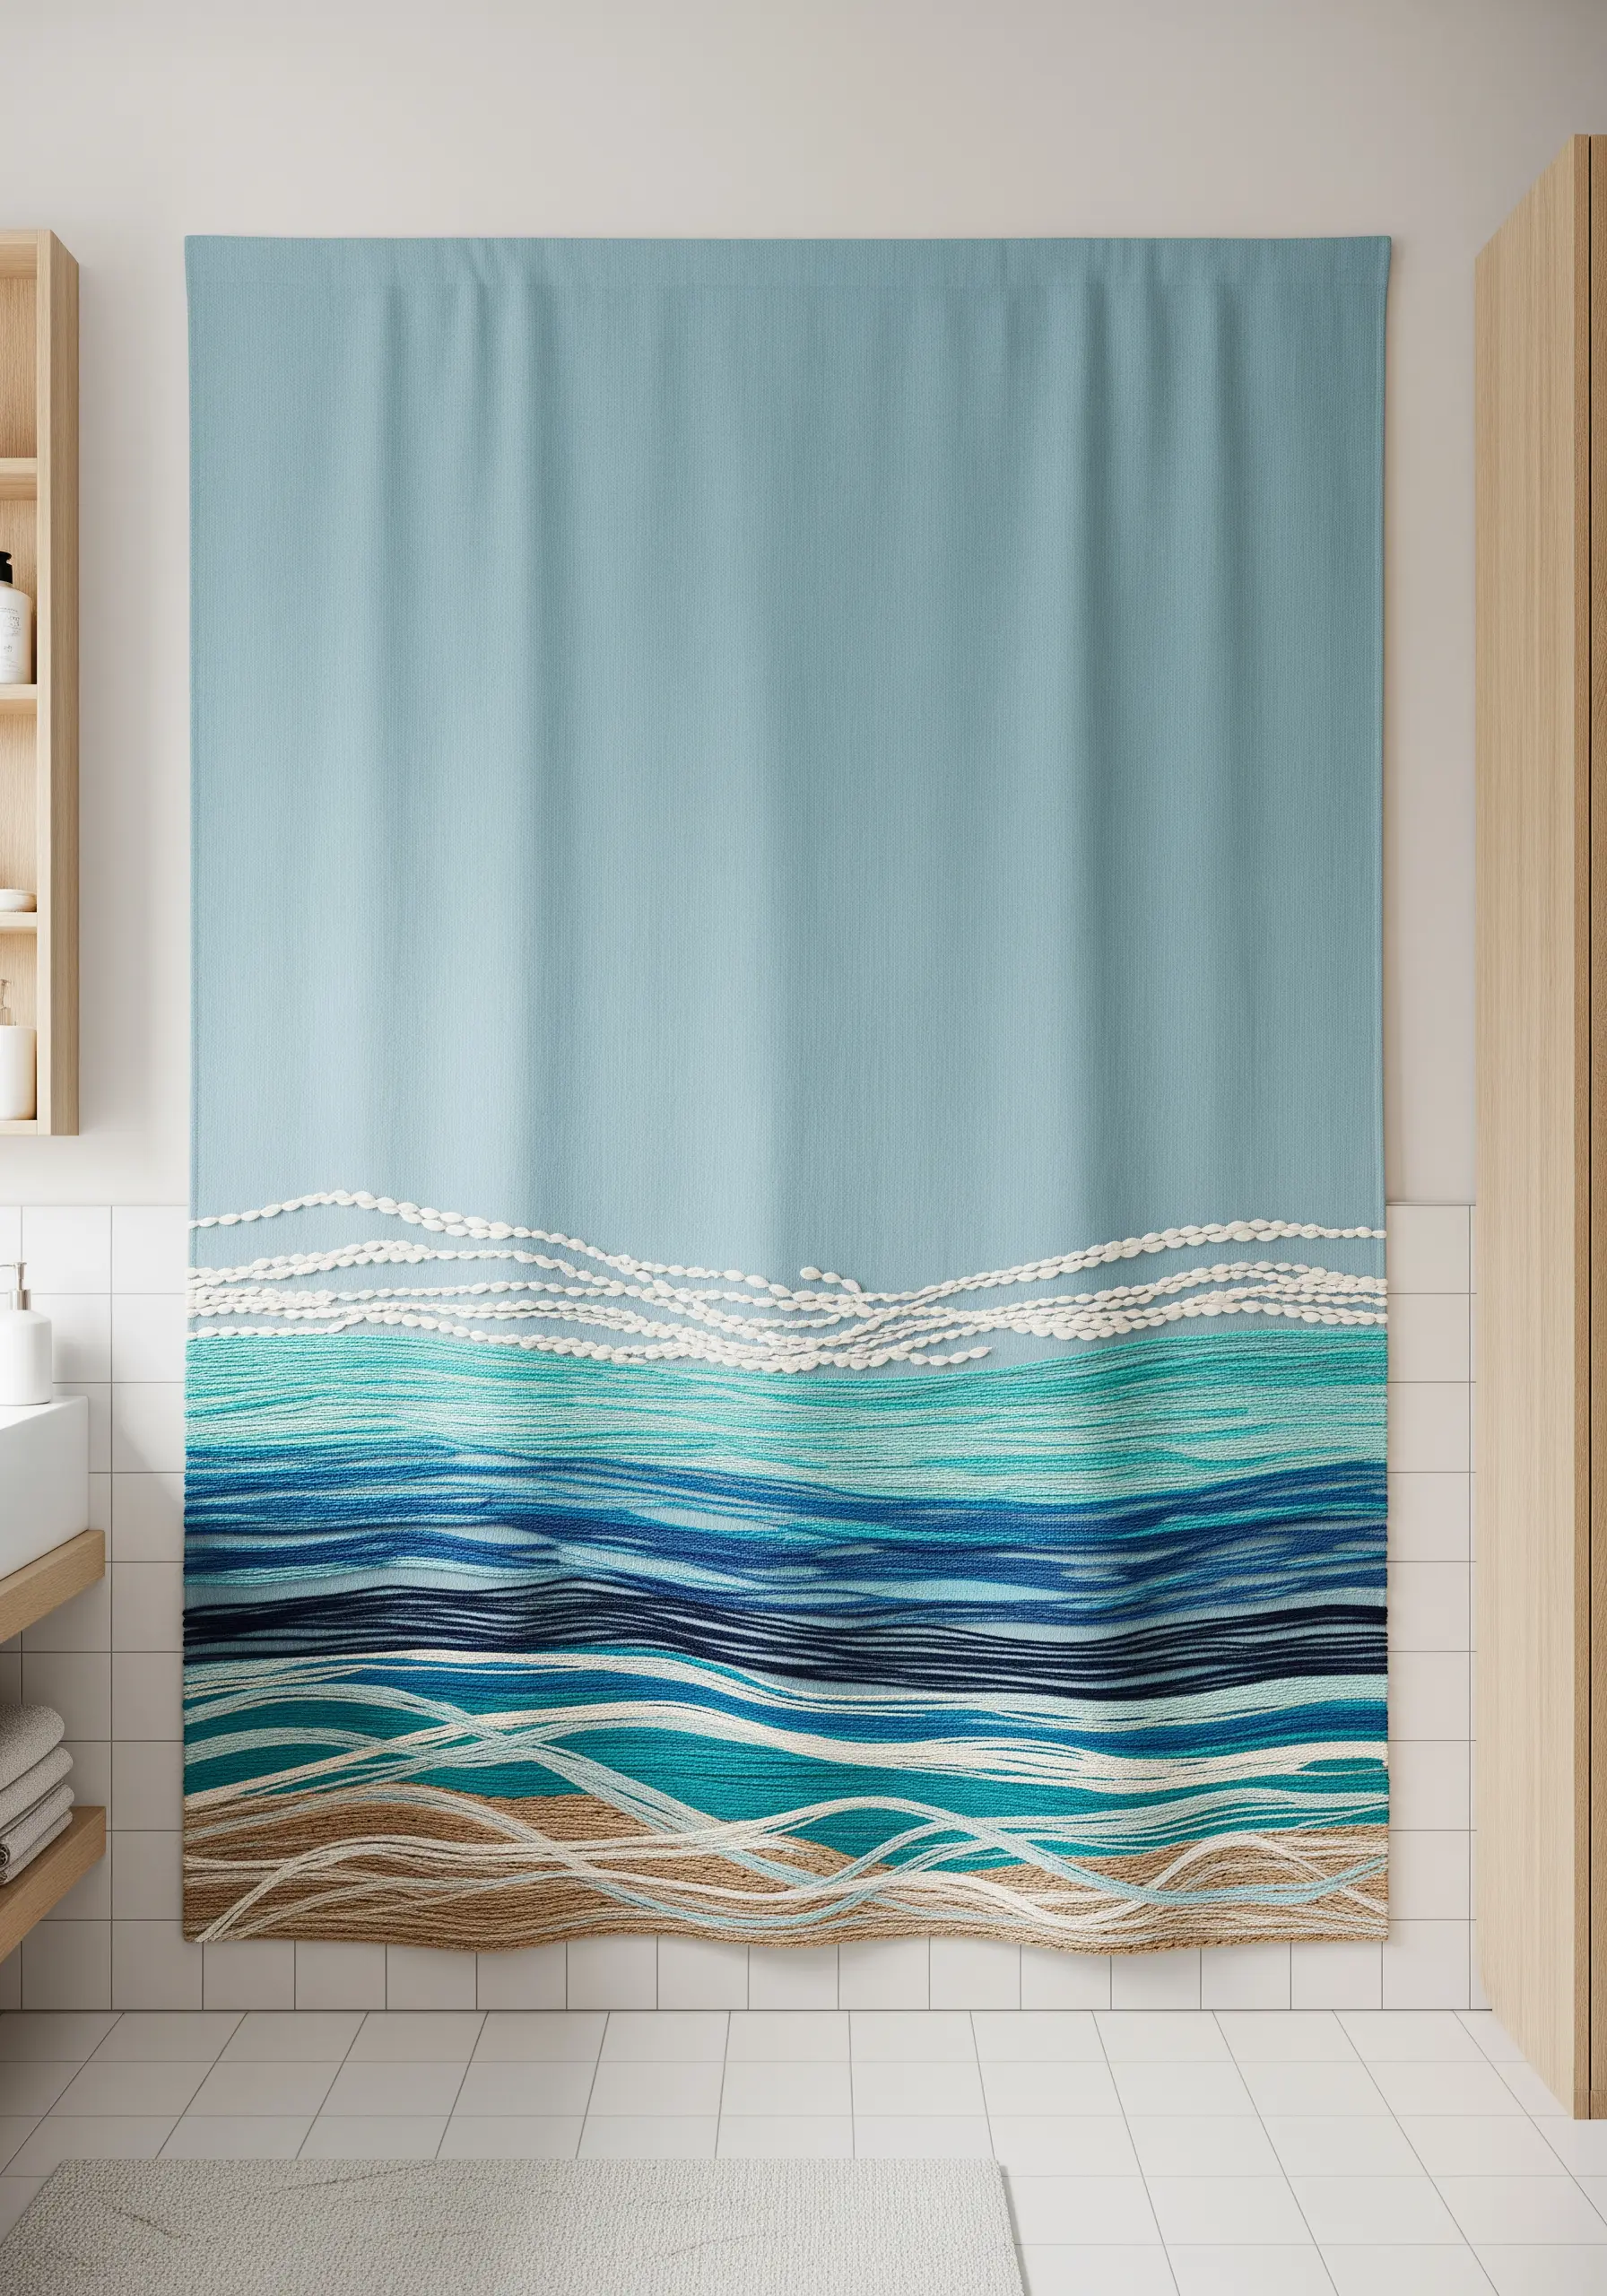
Bring textile art into an unexpected space by embroidering a plain fabric shower curtain.
Use a variety of threads, yarns, and stitches to create an abstract seascape across the bottom third of the curtain.
Incorporate chunky French knots for seafoam, couched thick yarn for smooth swells, and long, blended satin stitches for shimmering water.
Ensure you use colorfast, water-resistant threads like polyester to create a piece of functional abstract thread sculpting that can withstand a humid environment.
11. Create a Botanical Collection with Framed Denim Pockets
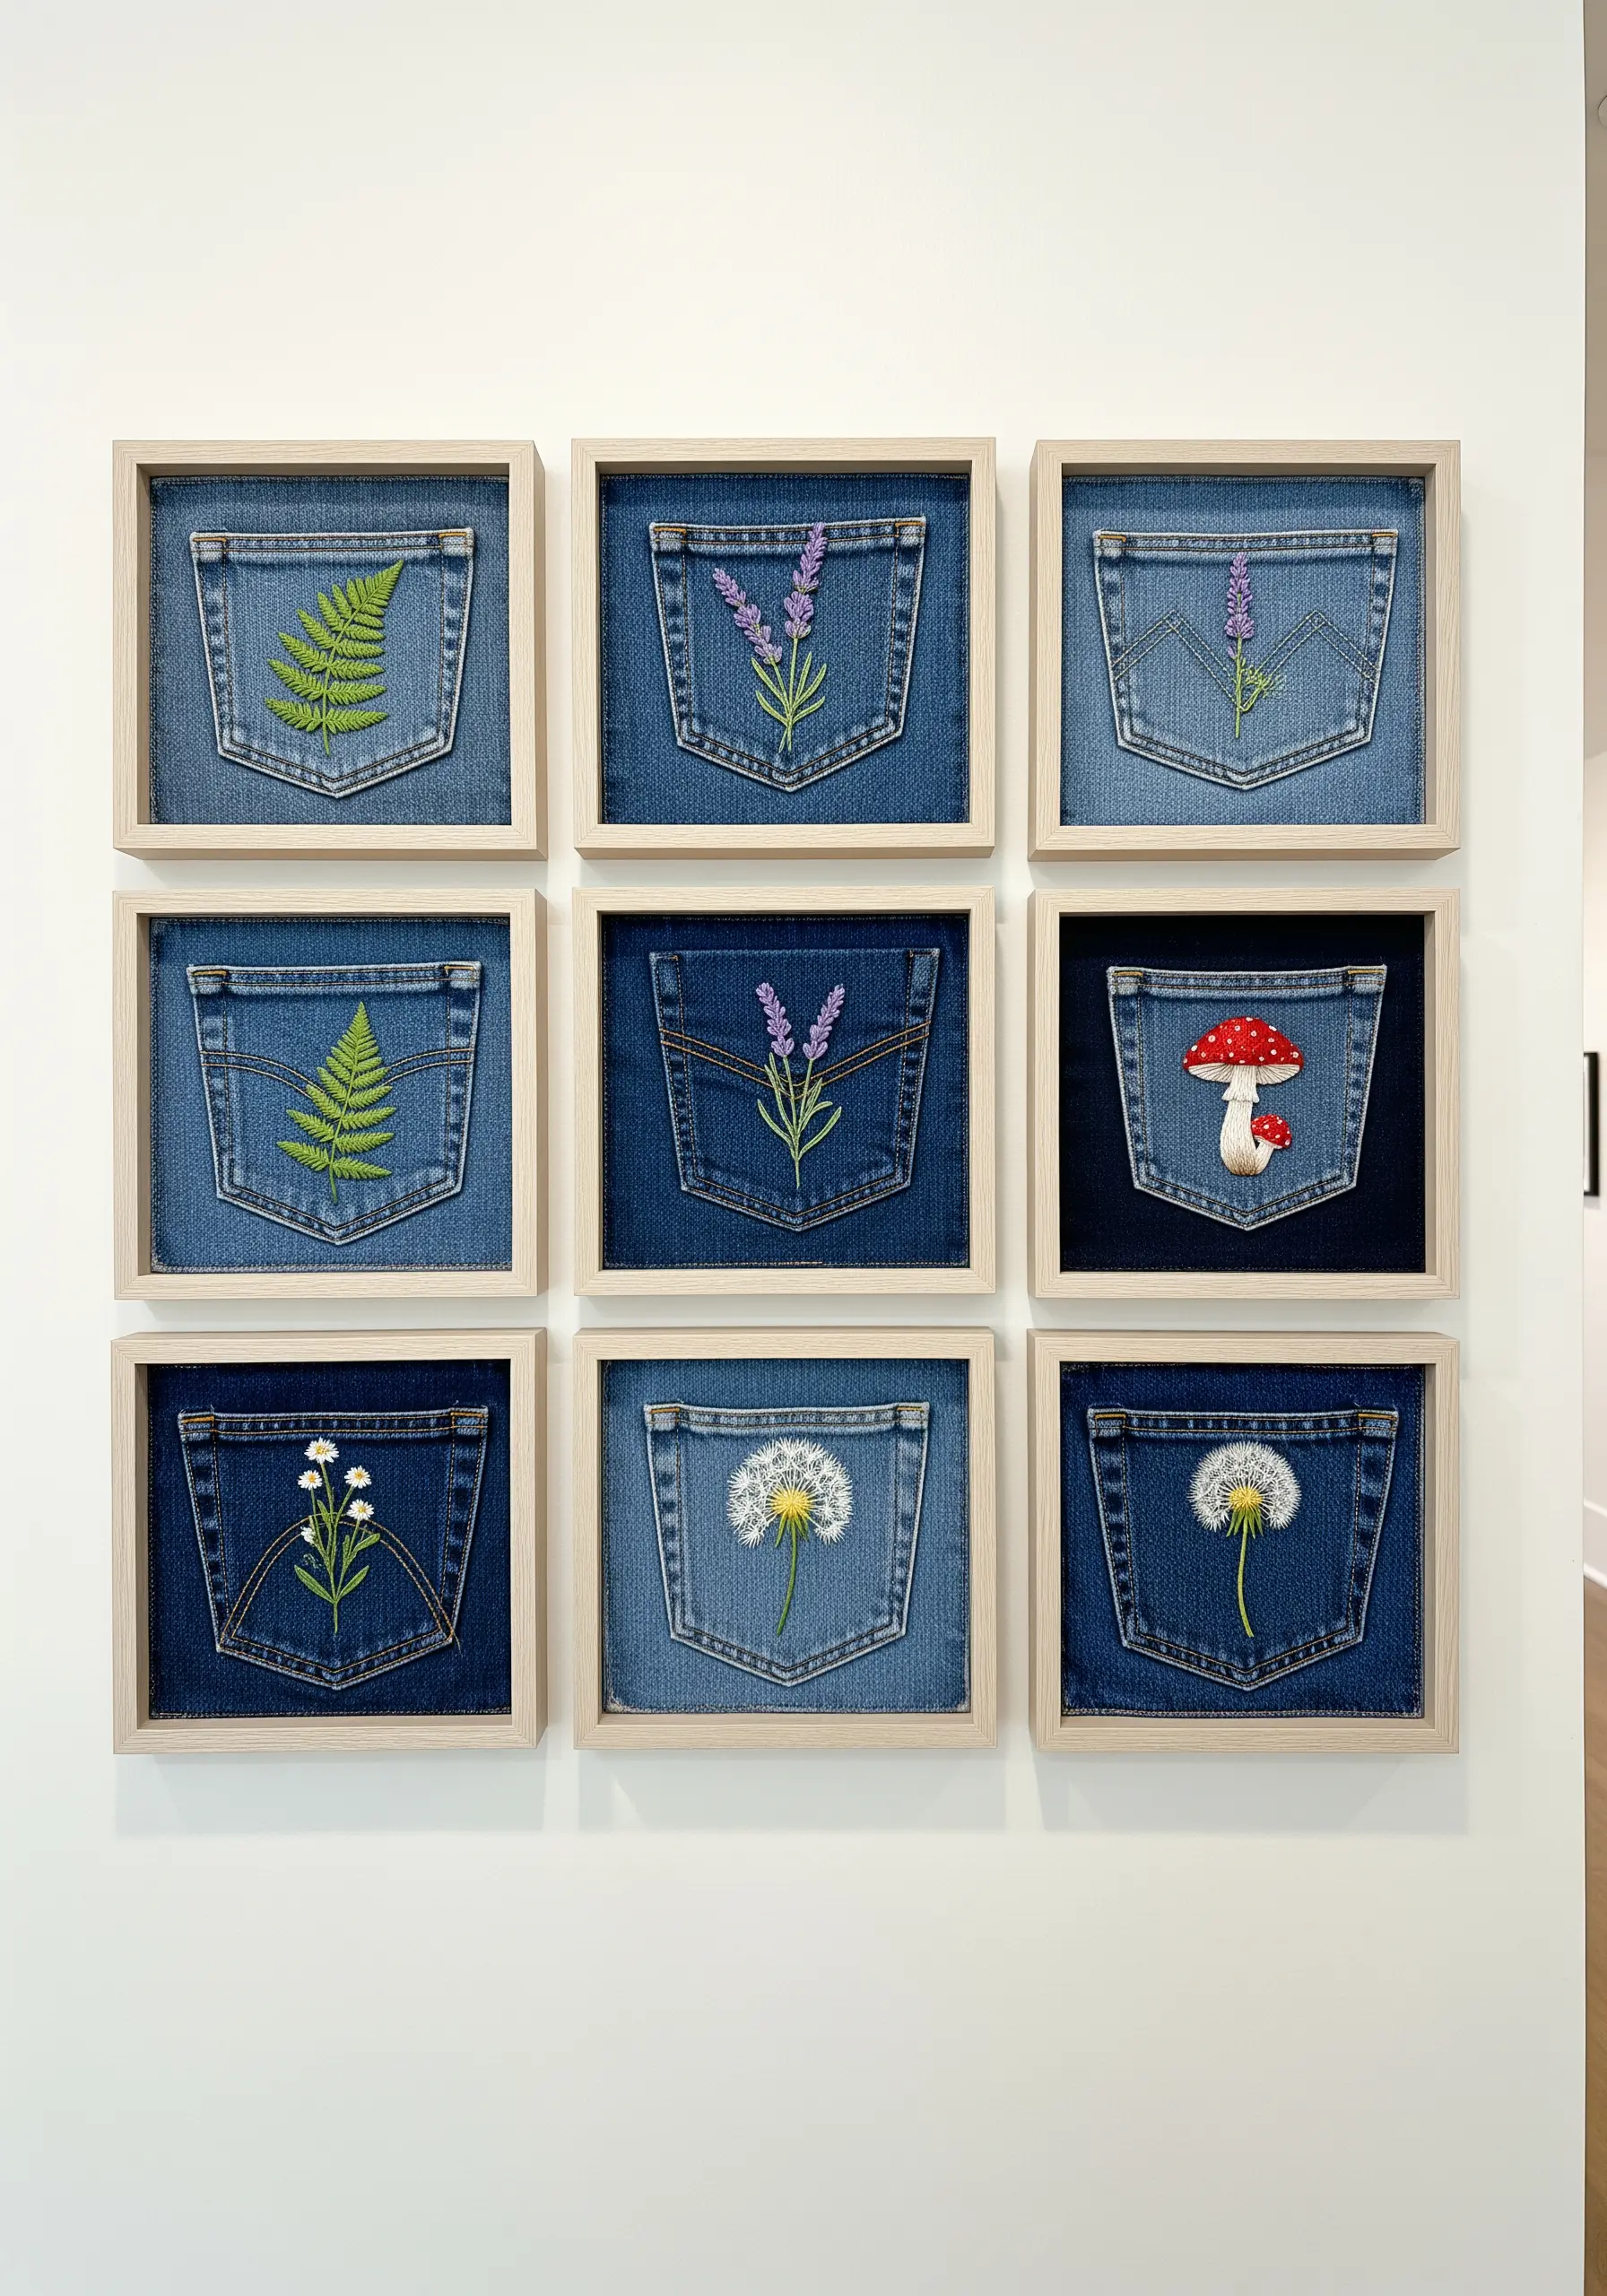
This hack transforms small scraps into a high-impact gallery wall through the power of repetition.
Carefully cut out the back pockets from several pairs of old jeans, preserving the seams and shape.
Treat each pocket as a miniature canvas for a single embroidered botanical specimen—a fern, a flower, a mushroom.
Mounting each finished pocket in an identical simple frame and hanging them in a tight grid turns these tiny stitches into a sophisticated and cohesive art installation.
12. Mount Vintage Lacework for Bold Mandala Art

Repurpose an intricate crochet doily or a piece of vintage lace by giving it a modern context.
Stretch a solid, deeply colored fabric over a large round canvas or hoop to serve as a dramatic background.
Carefully position and tack the lacework onto the fabric with tiny, invisible stitches.
You can then add your own embroidery, using colorful yarn to trace and highlight certain patterns within the lace, transforming it into vibrant, modern mandala stitch patterns.
13. Design a Soft Nursery Scene with Punch Needle Appliqué

Create a touchable, child-friendly wall hanging by combining punch needle with appliqué.
Work your motifs—like these hot air balloons and clouds—on separate pieces of monk’s cloth.
Once complete, cut each shape out, leaving a small fabric border to tuck underneath, and then hand-stitch them onto a larger canvas backdrop or a simple curtain panel.
This layered technique gives your nursery stitch art a soft, 3D quality that is much safer and more tactile than traditional framed art.
14. Achieve Dramatic Detail with Goldwork on Black Canvas

Create a powerful visual statement by stitching with high-contrast materials.
Choose a deep, matte black fabric, like linen or cotton twill, to make every stitch of metallic and jewel-toned thread vibrate with intensity.
Use techniques like padded satin stitch and couching to give your anatomical design a raised, almost sculptural dimension.
The combination of technical goldwork and a stark background results in a piece that feels both scientifically precise and artistically luxurious.
15. Create a “Stitch Journal” on a Repurposed Curtain

Turn your practice exercises into a meaningful piece of art by creating a large-scale sampler.
Use a single, expansive piece of fabric, like a plain cotton curtain, as a long-term canvas for your experiments.
As you learn new stitches or test color palettes, add them to the fabric in a loose, organic grid.
Over time, this “stitch journal” becomes a beautiful and personal record of your creative growth, far more interesting than a collection of disparate scraps.
16. Frame an Embroidered Jacket as Graphic Wall Art

Immortalize a favorite piece of embroidered apparel by turning it into permanent wall art.
Whether you stitched the design yourself or embellished a pre-made patch, framing the entire back panel of a jacket captures a piece of your personal history.
The distressed texture of the denim adds character and context, turning a fashion item into a framed story.
It’s a bold way to display embroidery that carries a fierce energy and personal meaning.
17. Use Plaid Fabric for Instant Color and Structure

Let your fabric do the heavy lifting by choosing a patterned base like plaid flannel.
Scraps from old shirts, napkins, or tablecloths provide an immediate background of color and lines, perfect for rustic or holiday-themed decor.
To ensure your design stands out, use a very thick, textural thread for your lettering, such as a chunky yarn applied with a couching stitch or multiple strands of floss in a chain stitch.
Grouping several hoops with a simple theme creates a cozy, coordinated display with minimal effort.
18. Appliqué Silhouettes onto Striped Curtains

Achieve the clean, bold look of embroidery on a large scale with this simple appliqué hack.
Start with a fabric that has a strong vertical pattern, like a striped curtain, which provides an excellent graphic background.
Cut sharp silhouettes from a non-fraying fabric like wool felt—a dark color will create the most impact.
Arrange your shapes in a dynamic composition and attach them using a fusible web adhesive, giving you crisp edges and a flawless finish without a single stitch.


