
Woodland embroidery is more than just stitching a fox or a deer; it’s about capturing a feeling—the quiet stillness of the forest, the richness of autumn leaves, the magic of a moonlit clearing.
In these patterns, I want you to look beyond the outlines and see the opportunities for texture and depth. Think about how the direction of a stitch can mimic the softness of fur, or how a simple knot can become a plump berry.
This is where your work transforms from a pattern into a piece of art. It’s in the deliberate choice of a thread, the density of a stitch, and the courage to blend colors in a way that feels true to you. Let’s create something with soul.
1. Create Fur with Directional Stitching
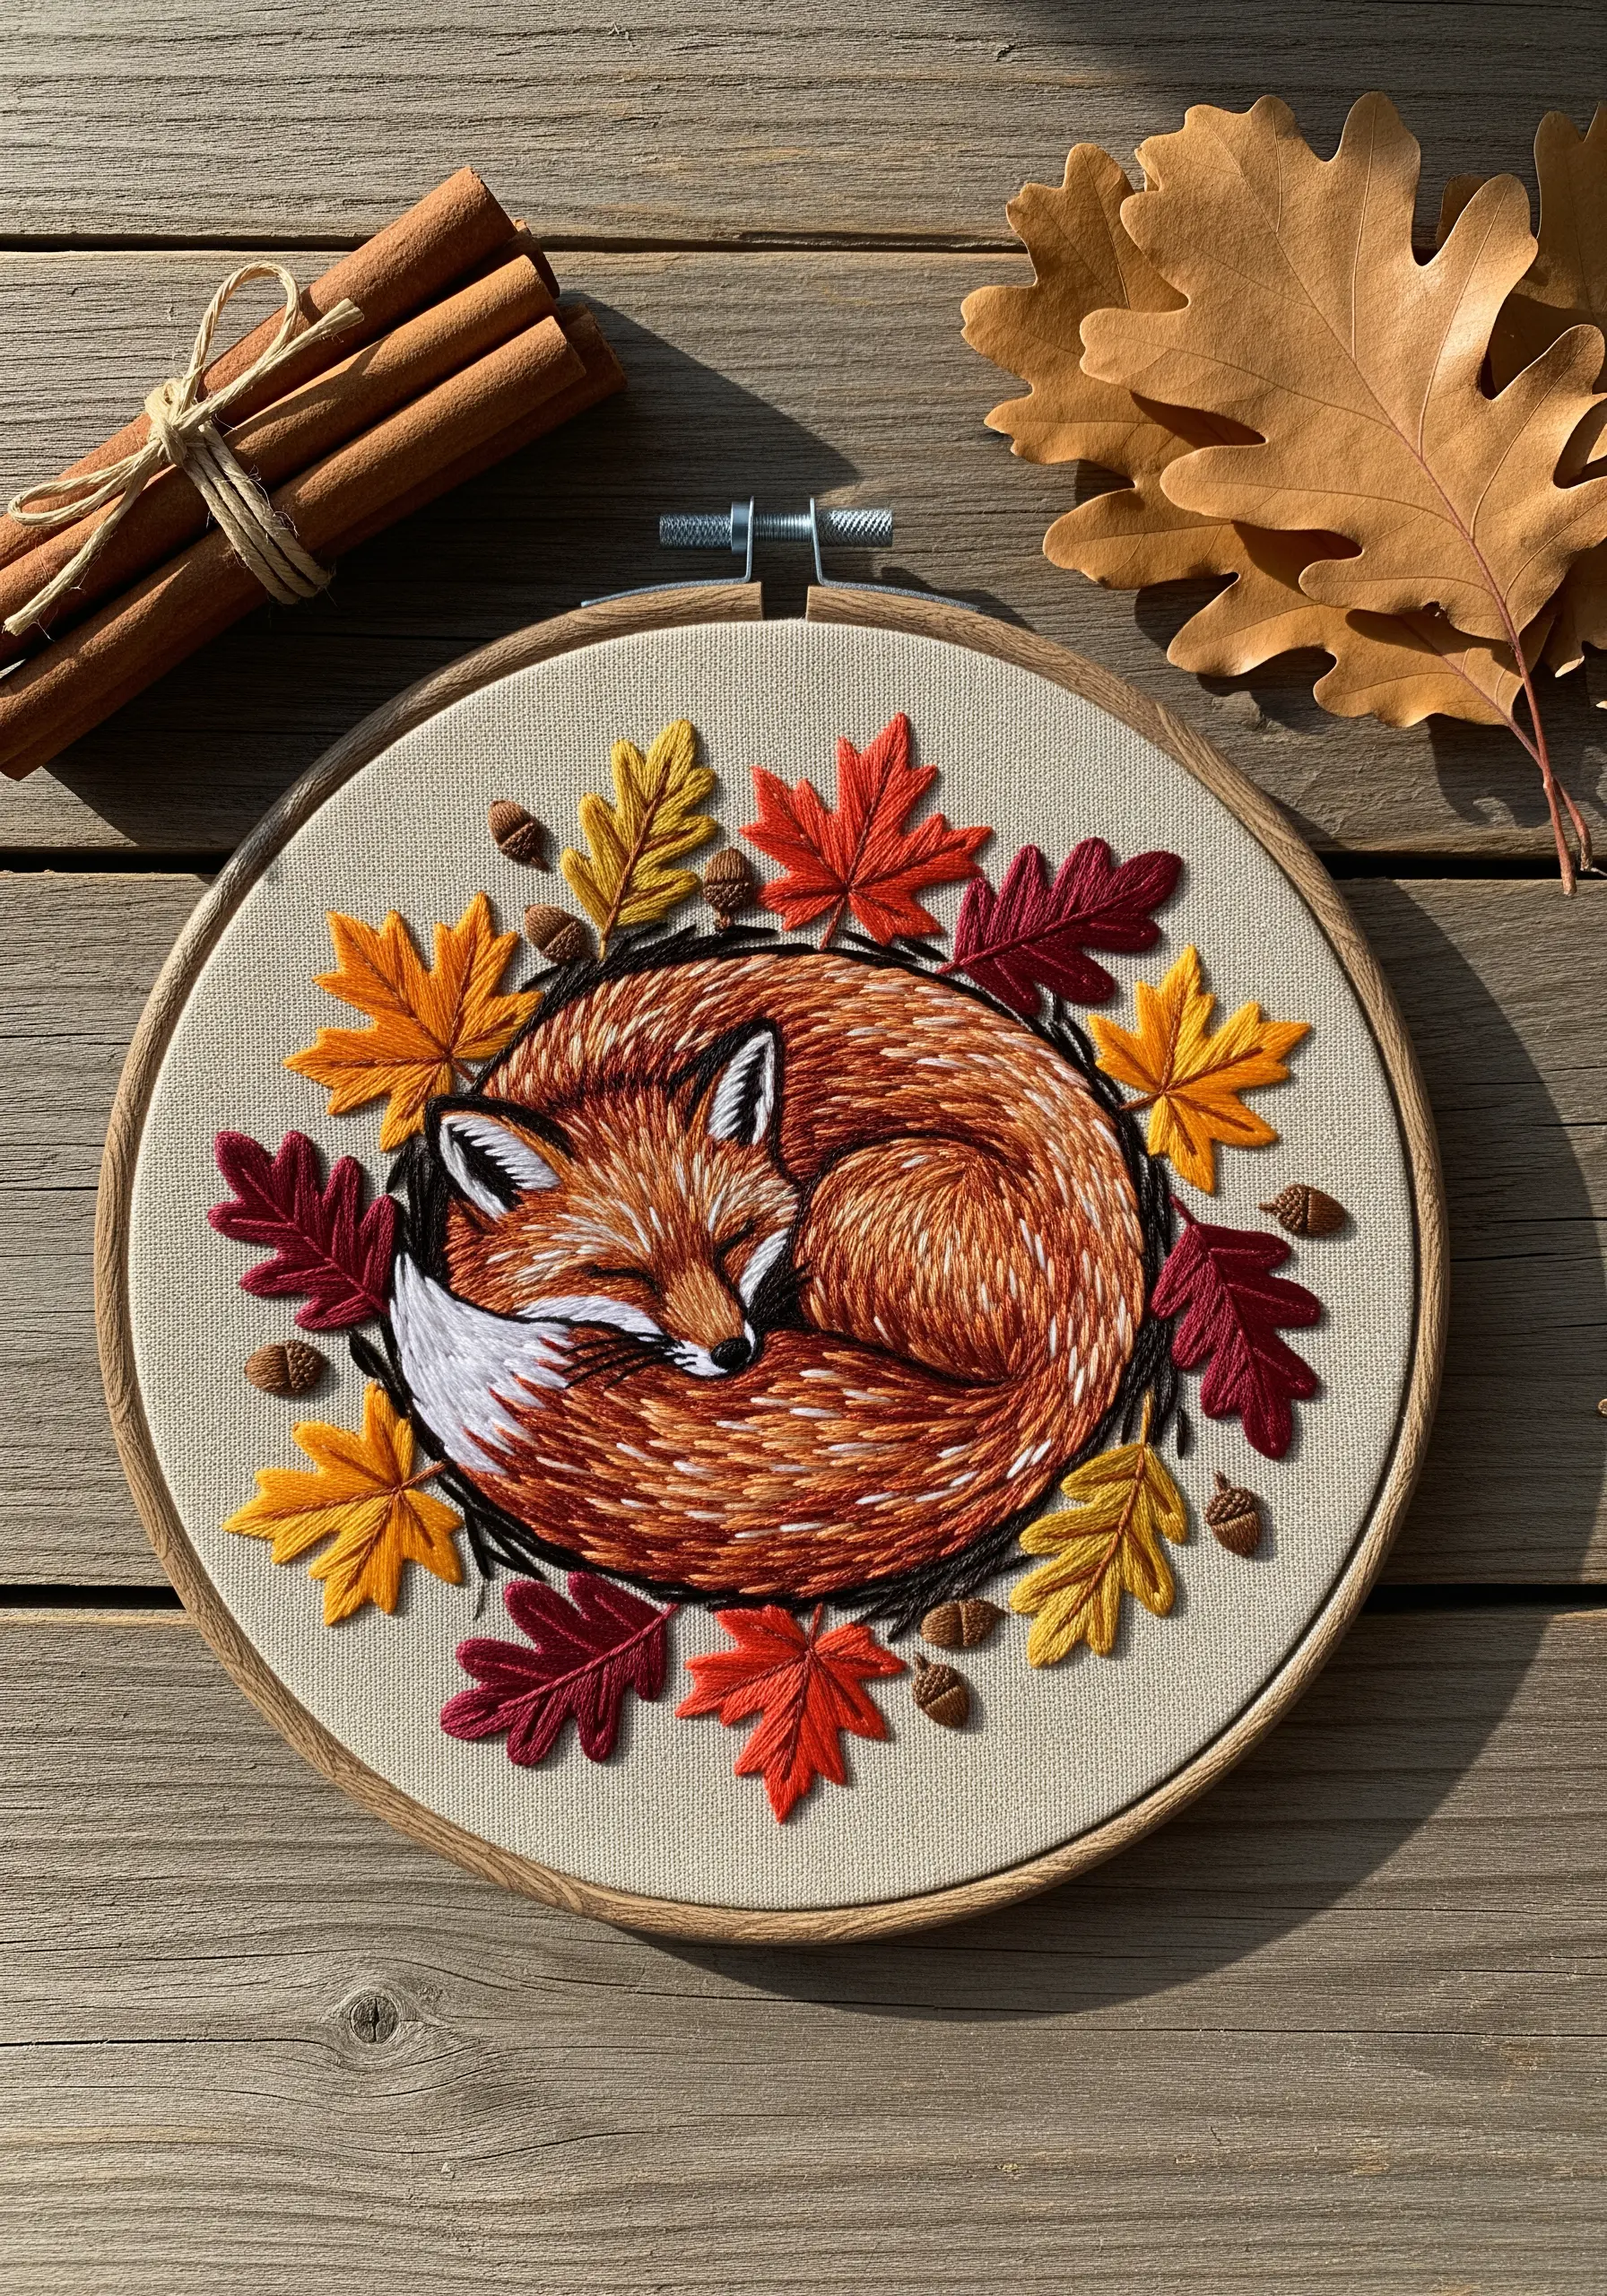
To give your sleeping fox a soft, realistic coat, use a long-and-short stitch that follows the natural direction of its fur.
Vary the length and angle of each stitch slightly to mimic the way fur clumps and flows, especially around the curve of its body.
Use three or four closely related shades of orange and rust, blending them subtly to create depth and highlights without sharp lines.
This technique turns a flat fill into a tactile, dynamic texture that invites a closer look.
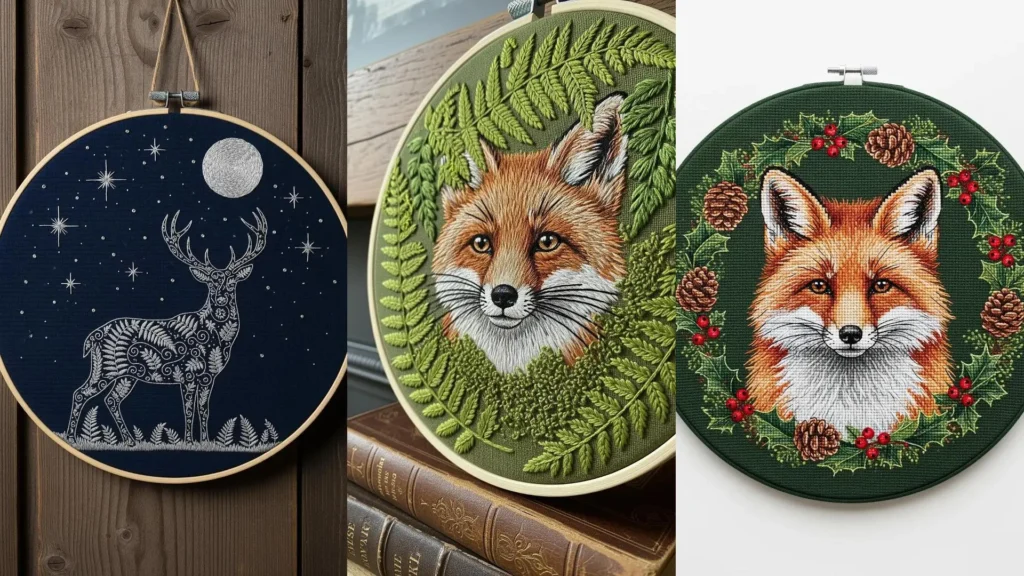
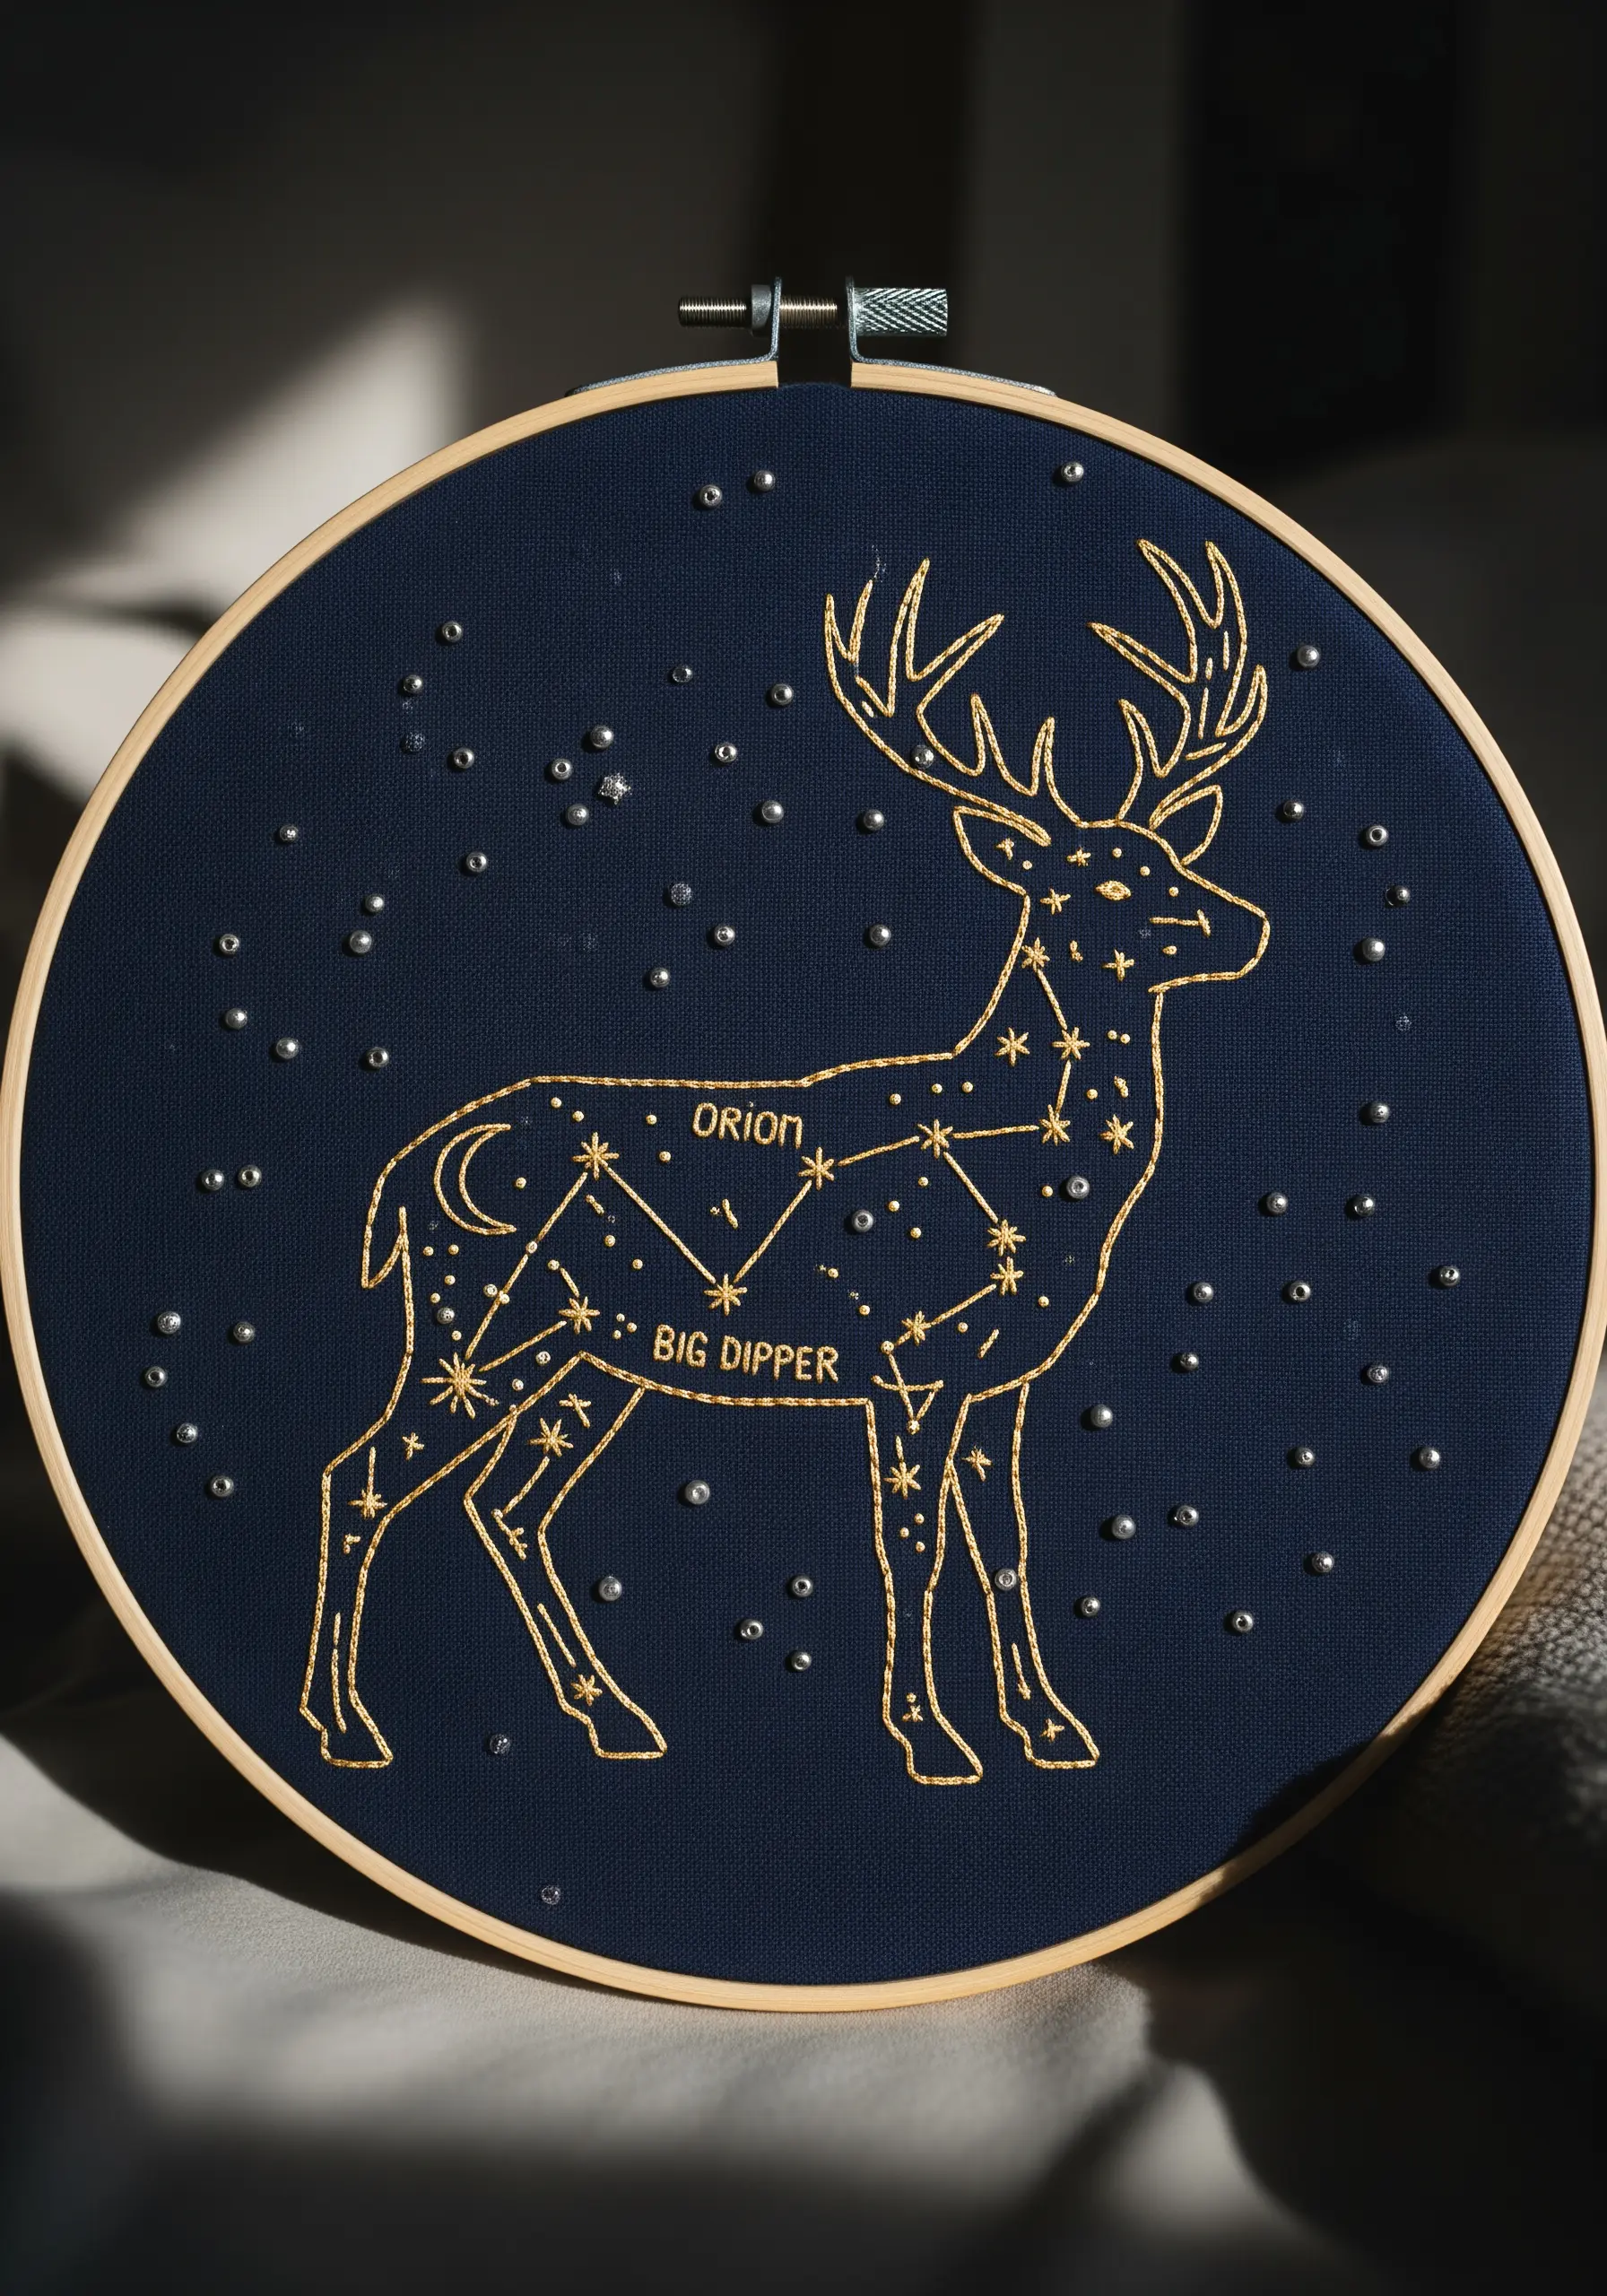
2. Master High-Contrast Line Art on Dark Fabric
Make your celestial deer stand out by using a high-sheen thread, like silver metallic or a bright white rayon, on navy or black cotton.
This stark contrast is what gives the piece its dramatic, night-sky feel.
Use a precise backstitch or stem stitch for the outlines to ensure every line is crisp and unbroken.
For the tiny starbursts, use a simple straight stitch, but vary the number and length of the ‘rays’ to create a scattered, organic starfield.
The moon’s texture is achieved with a dense, circular satin stitch, which catches the light differently than the linear deer motif, adding another layer of visual interest to your minimal sky moon designs.
3. Use Padded Satin Stitch for 3D Elements

To make the mushroom caps pop, create a base layer of small, dense stitches (like seed stitches) within the outline of each cap.
Then, work your red satin stitch directly over this padding. This simple step physically raises the embroidery from the fabric surface, creating soft dimension and realistic shadows.
For the fawn’s coat, use a classic long-and-short stitch to blend the browns and whites smoothly, ensuring a soft, painted look.
This combination of flat and dimensional stitching makes your animal-themed pillow stitching ideas more engaging and tactile.
4. Stitch on Sheer Fabric for Ethereal Depth
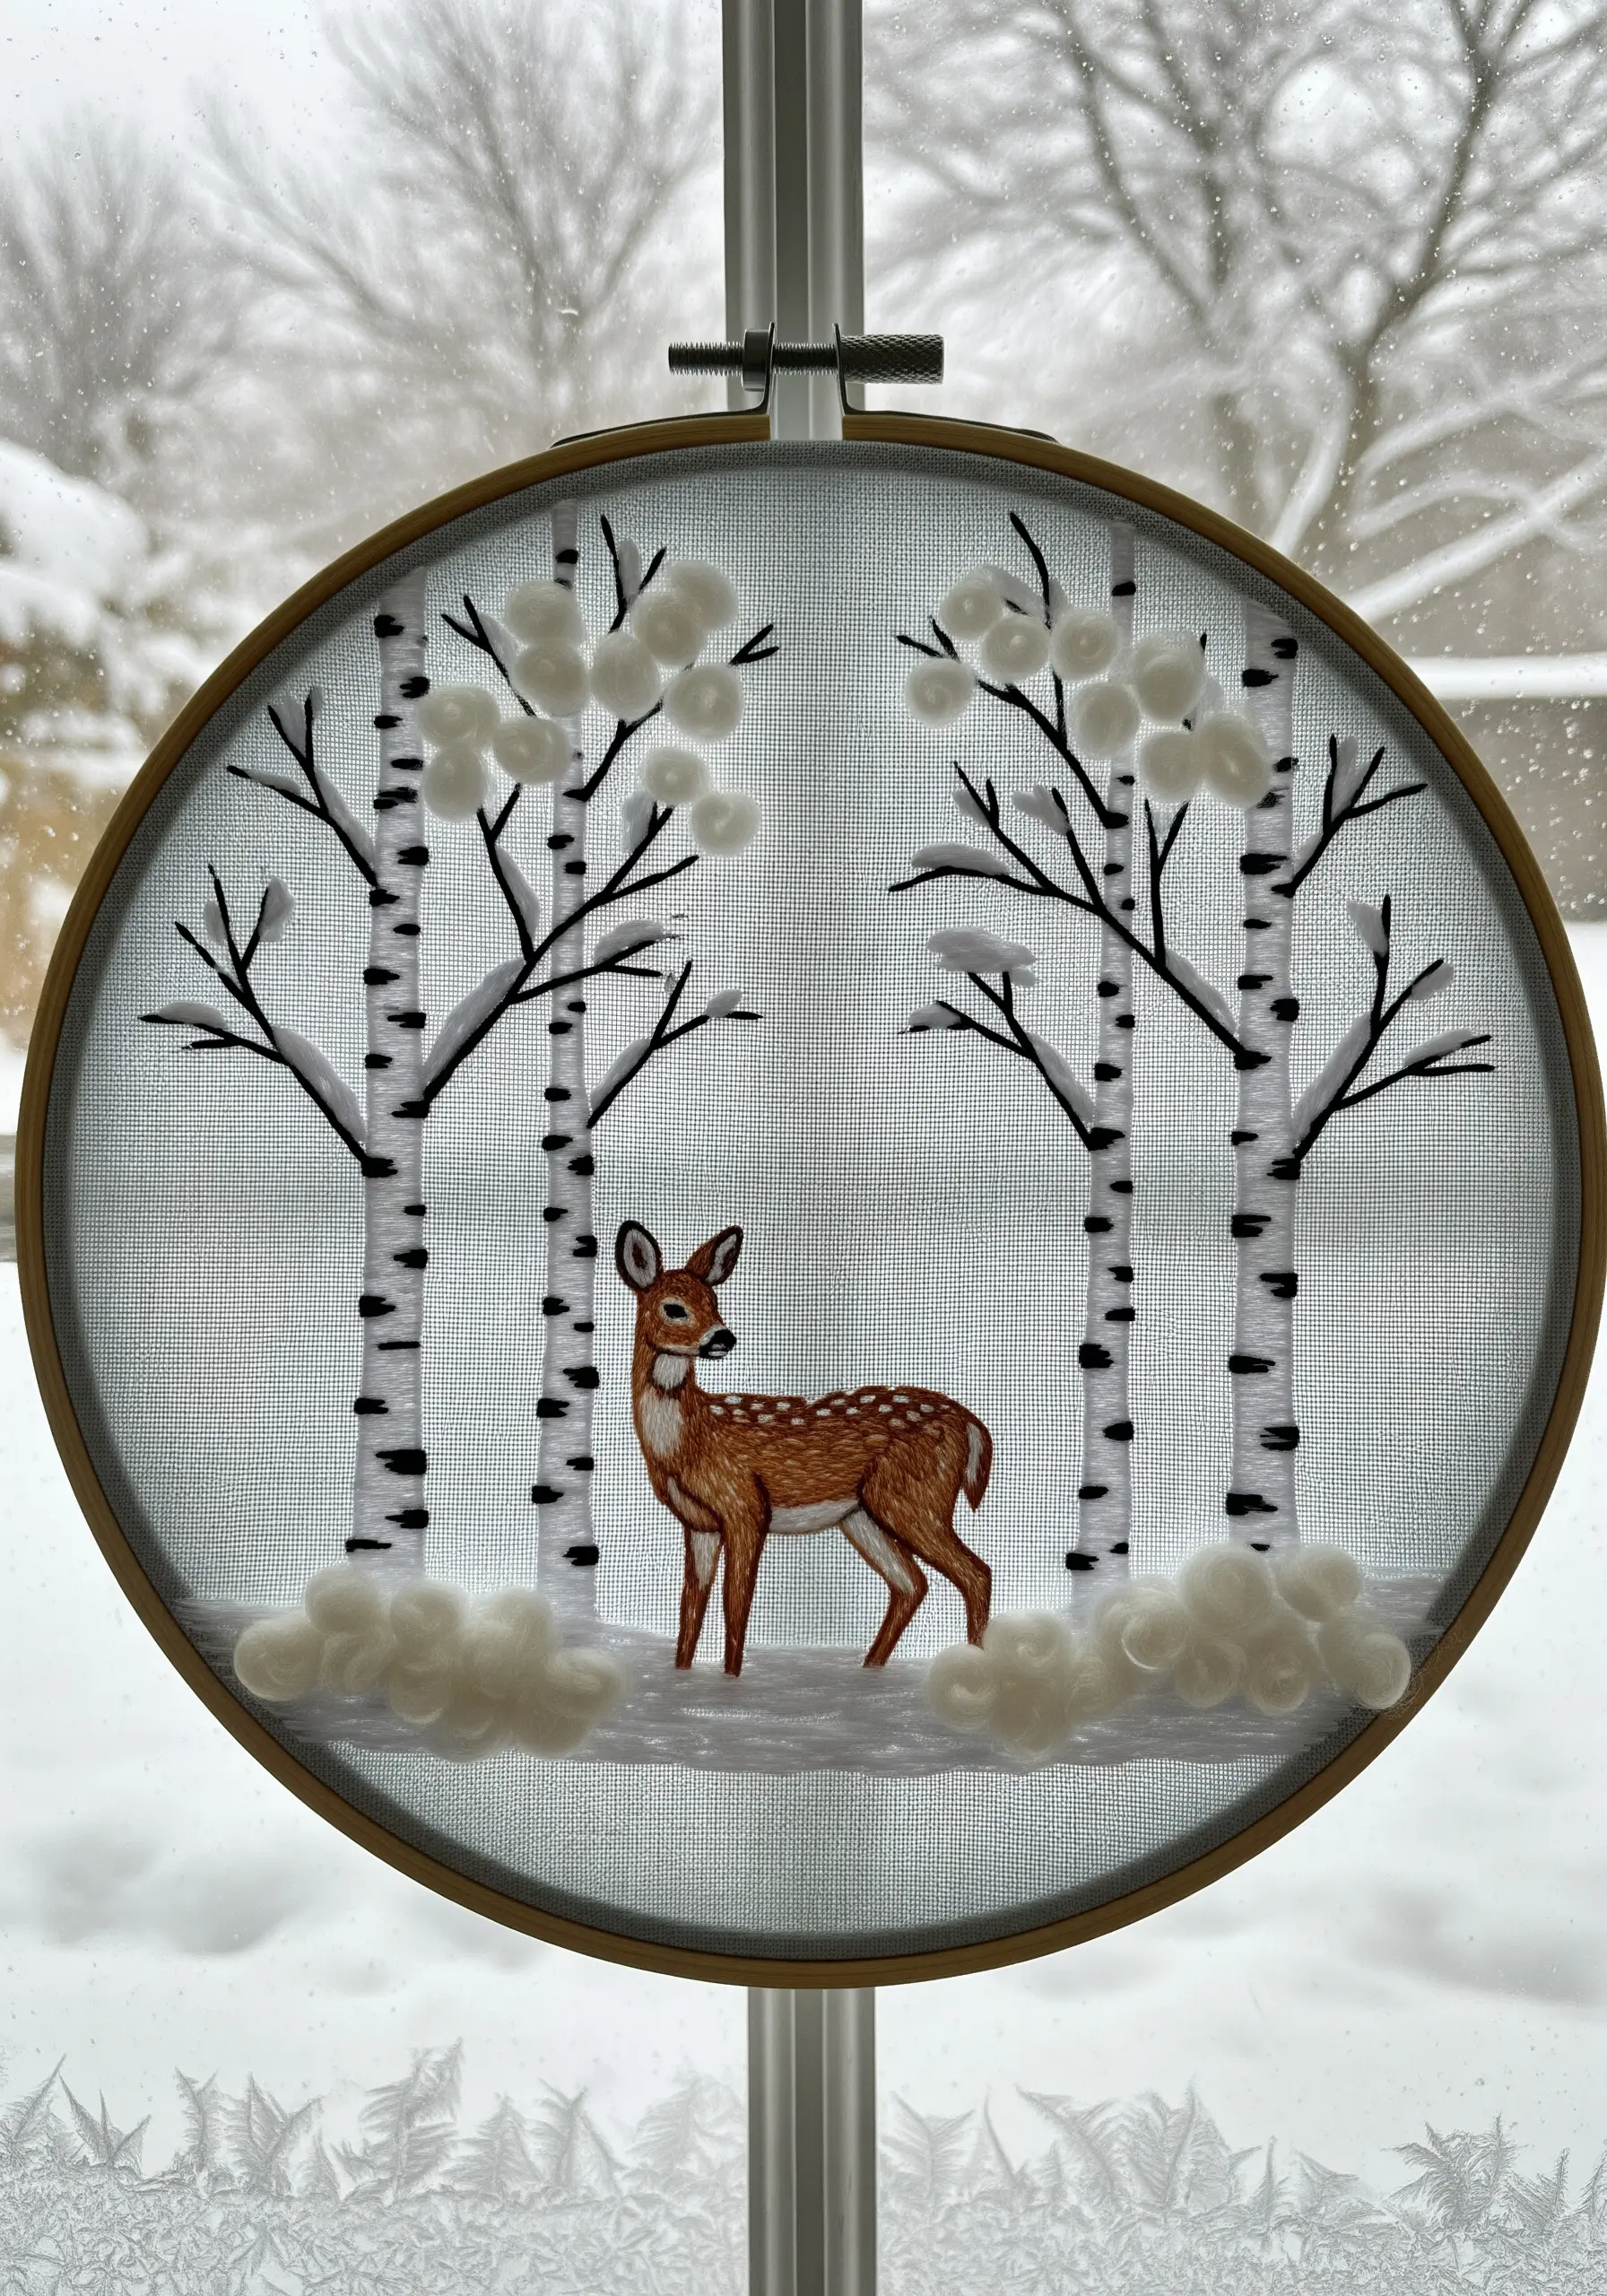
Create a magical, layered winter scene by embroidering on a sheer fabric like organza or tulle stretched in the hoop.
This allows the background—whether it’s a snowy window or another piece of fabric—to become part of the composition.
For the snow on the branches and ground, use tufted stitches like turkey work or clusters of French knots with soft, fluffy yarn.
This technique adds texture that beautifully contrasts with the smooth, thread-painted deer and stark tree trunks.
5. Combine Thread Painting with High-Texture Stitches
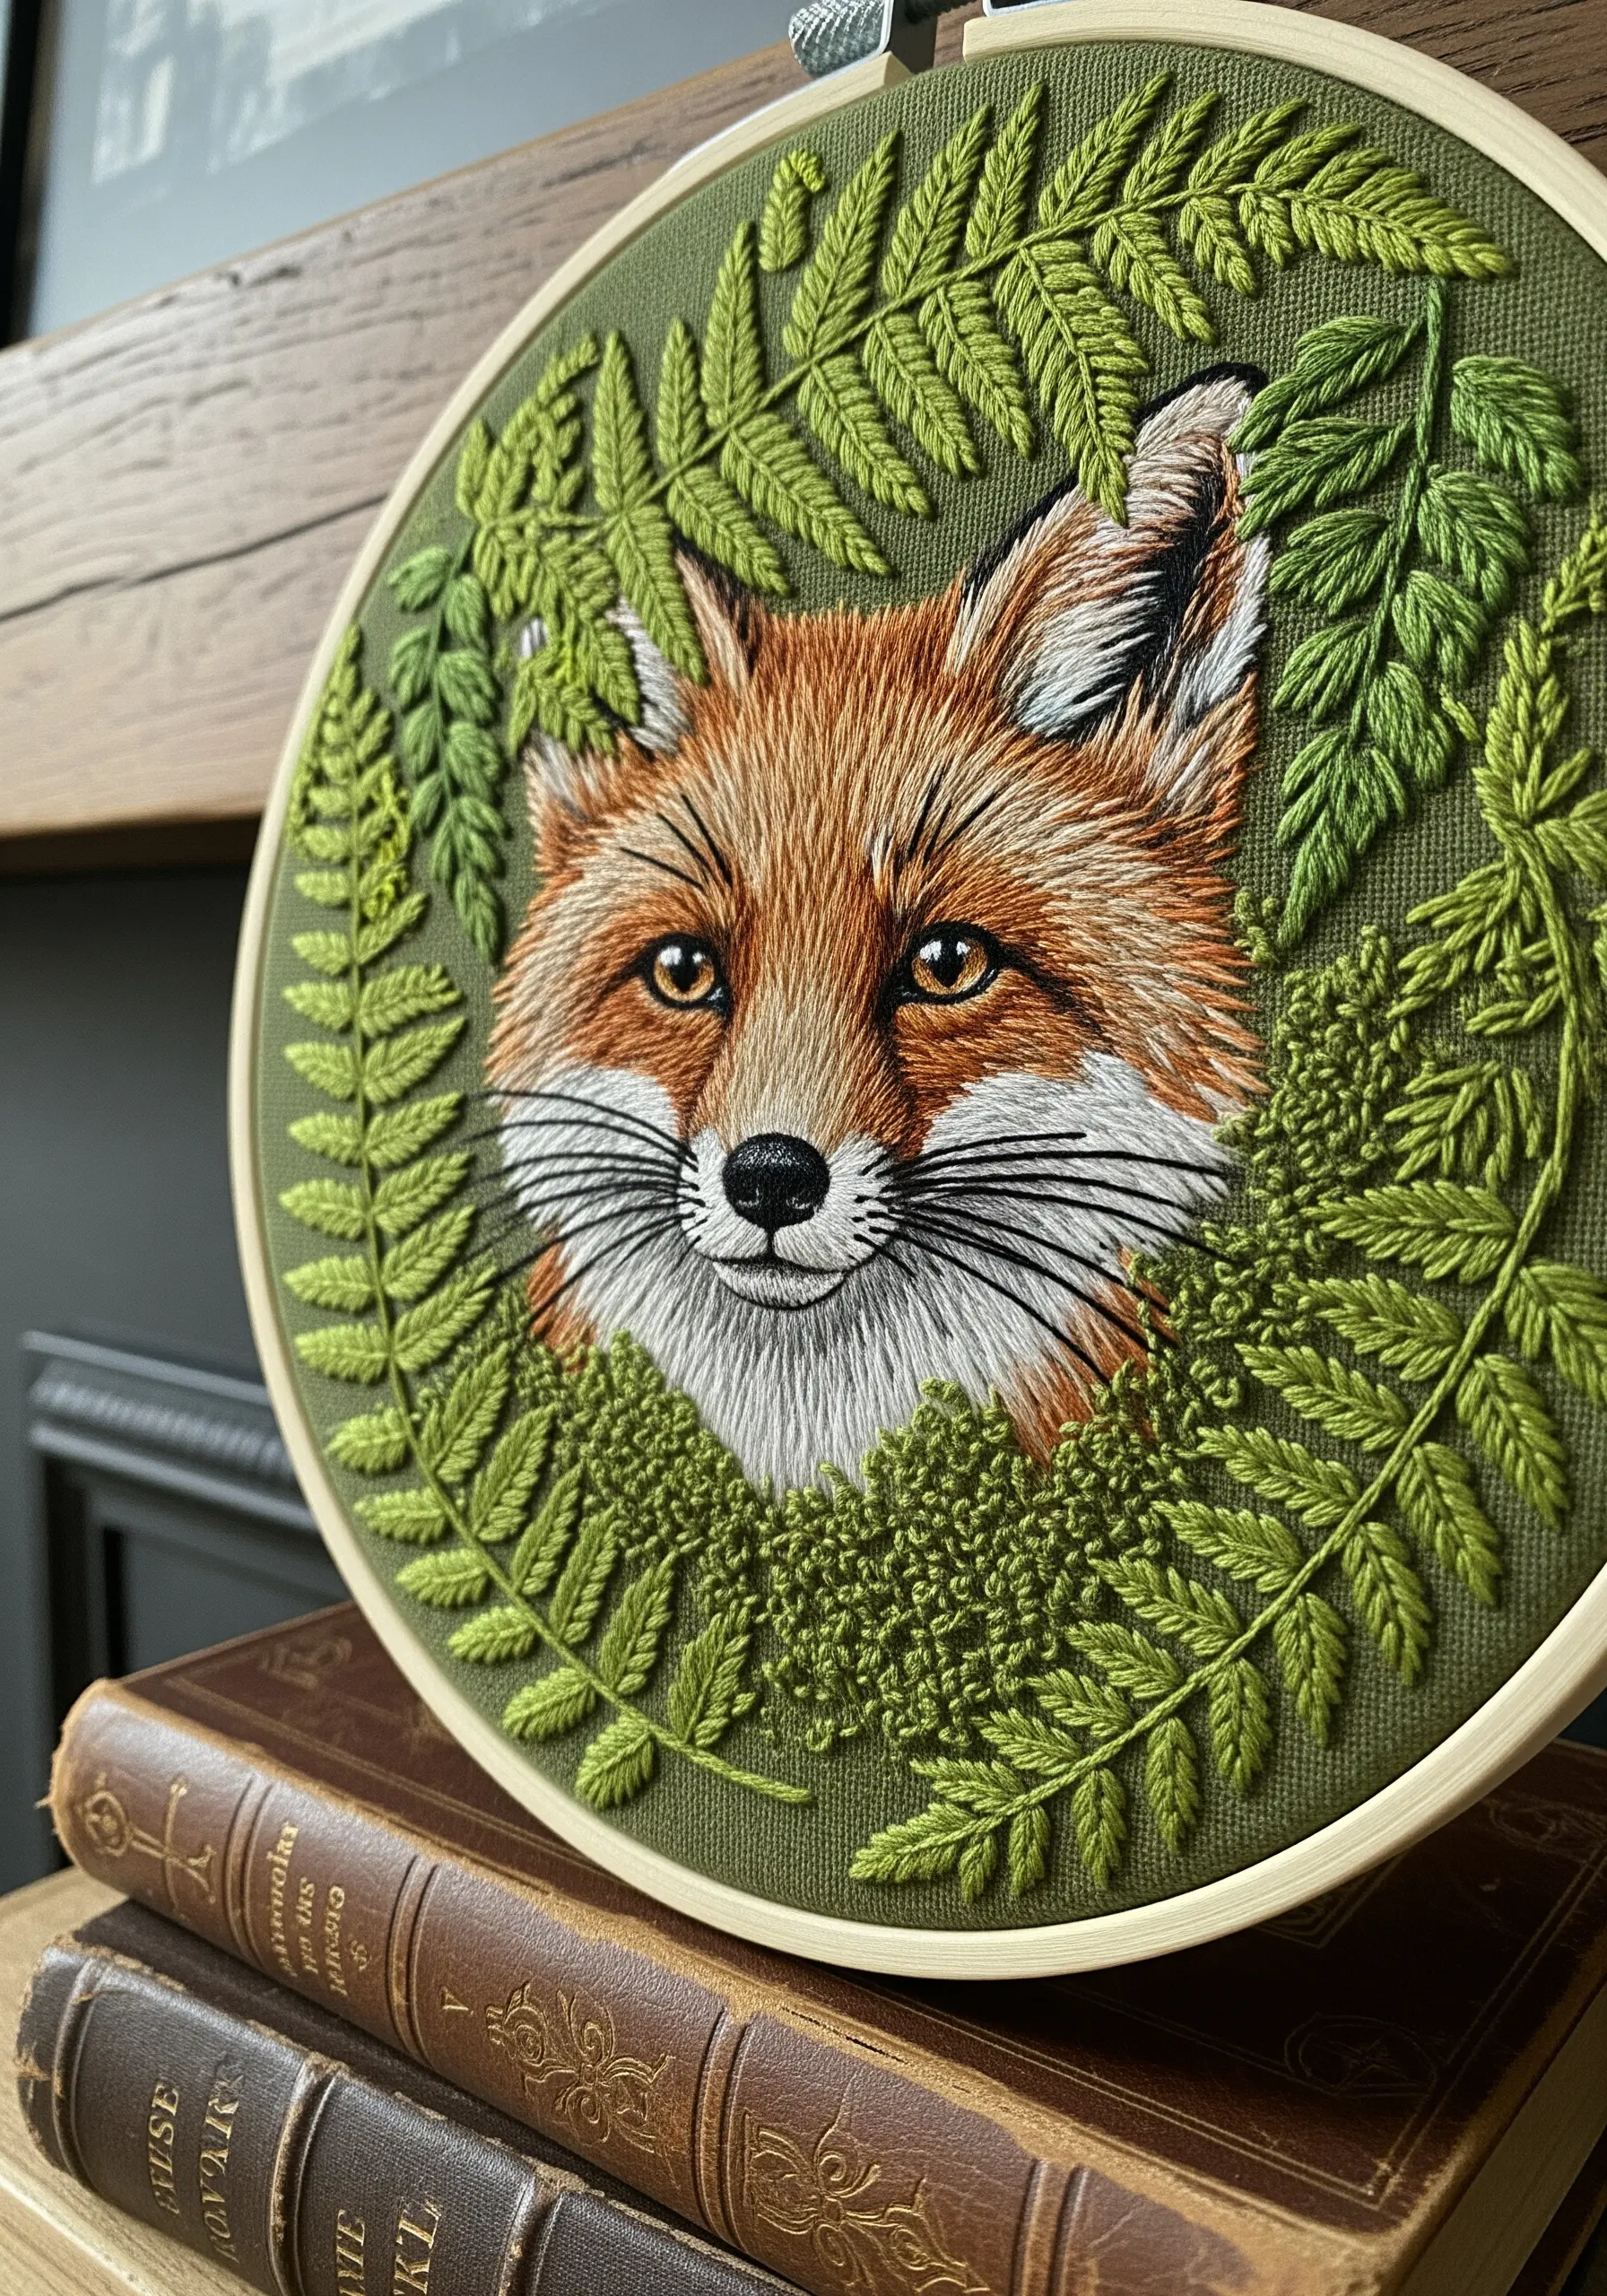
To achieve a photorealistic fox, use a single strand of thread for the face, employing long-and-short stitch to blend colors seamlessly.
This is the essence of thread painting—treating your needle like a paintbrush to create smooth gradients.
Then, frame the face with high-texture ferns. Use a mix of fishbone stitch for the larger fronds and dense clusters of French knots for the fuzzy, new-growth fiddleheads.
This textural contrast makes the fox’s smooth fur appear even softer and draws the viewer’s eye directly to its face, creating one of the most realistic animal insect embroidery patterns you can achieve.
6. Capture Motion and Organic Textures
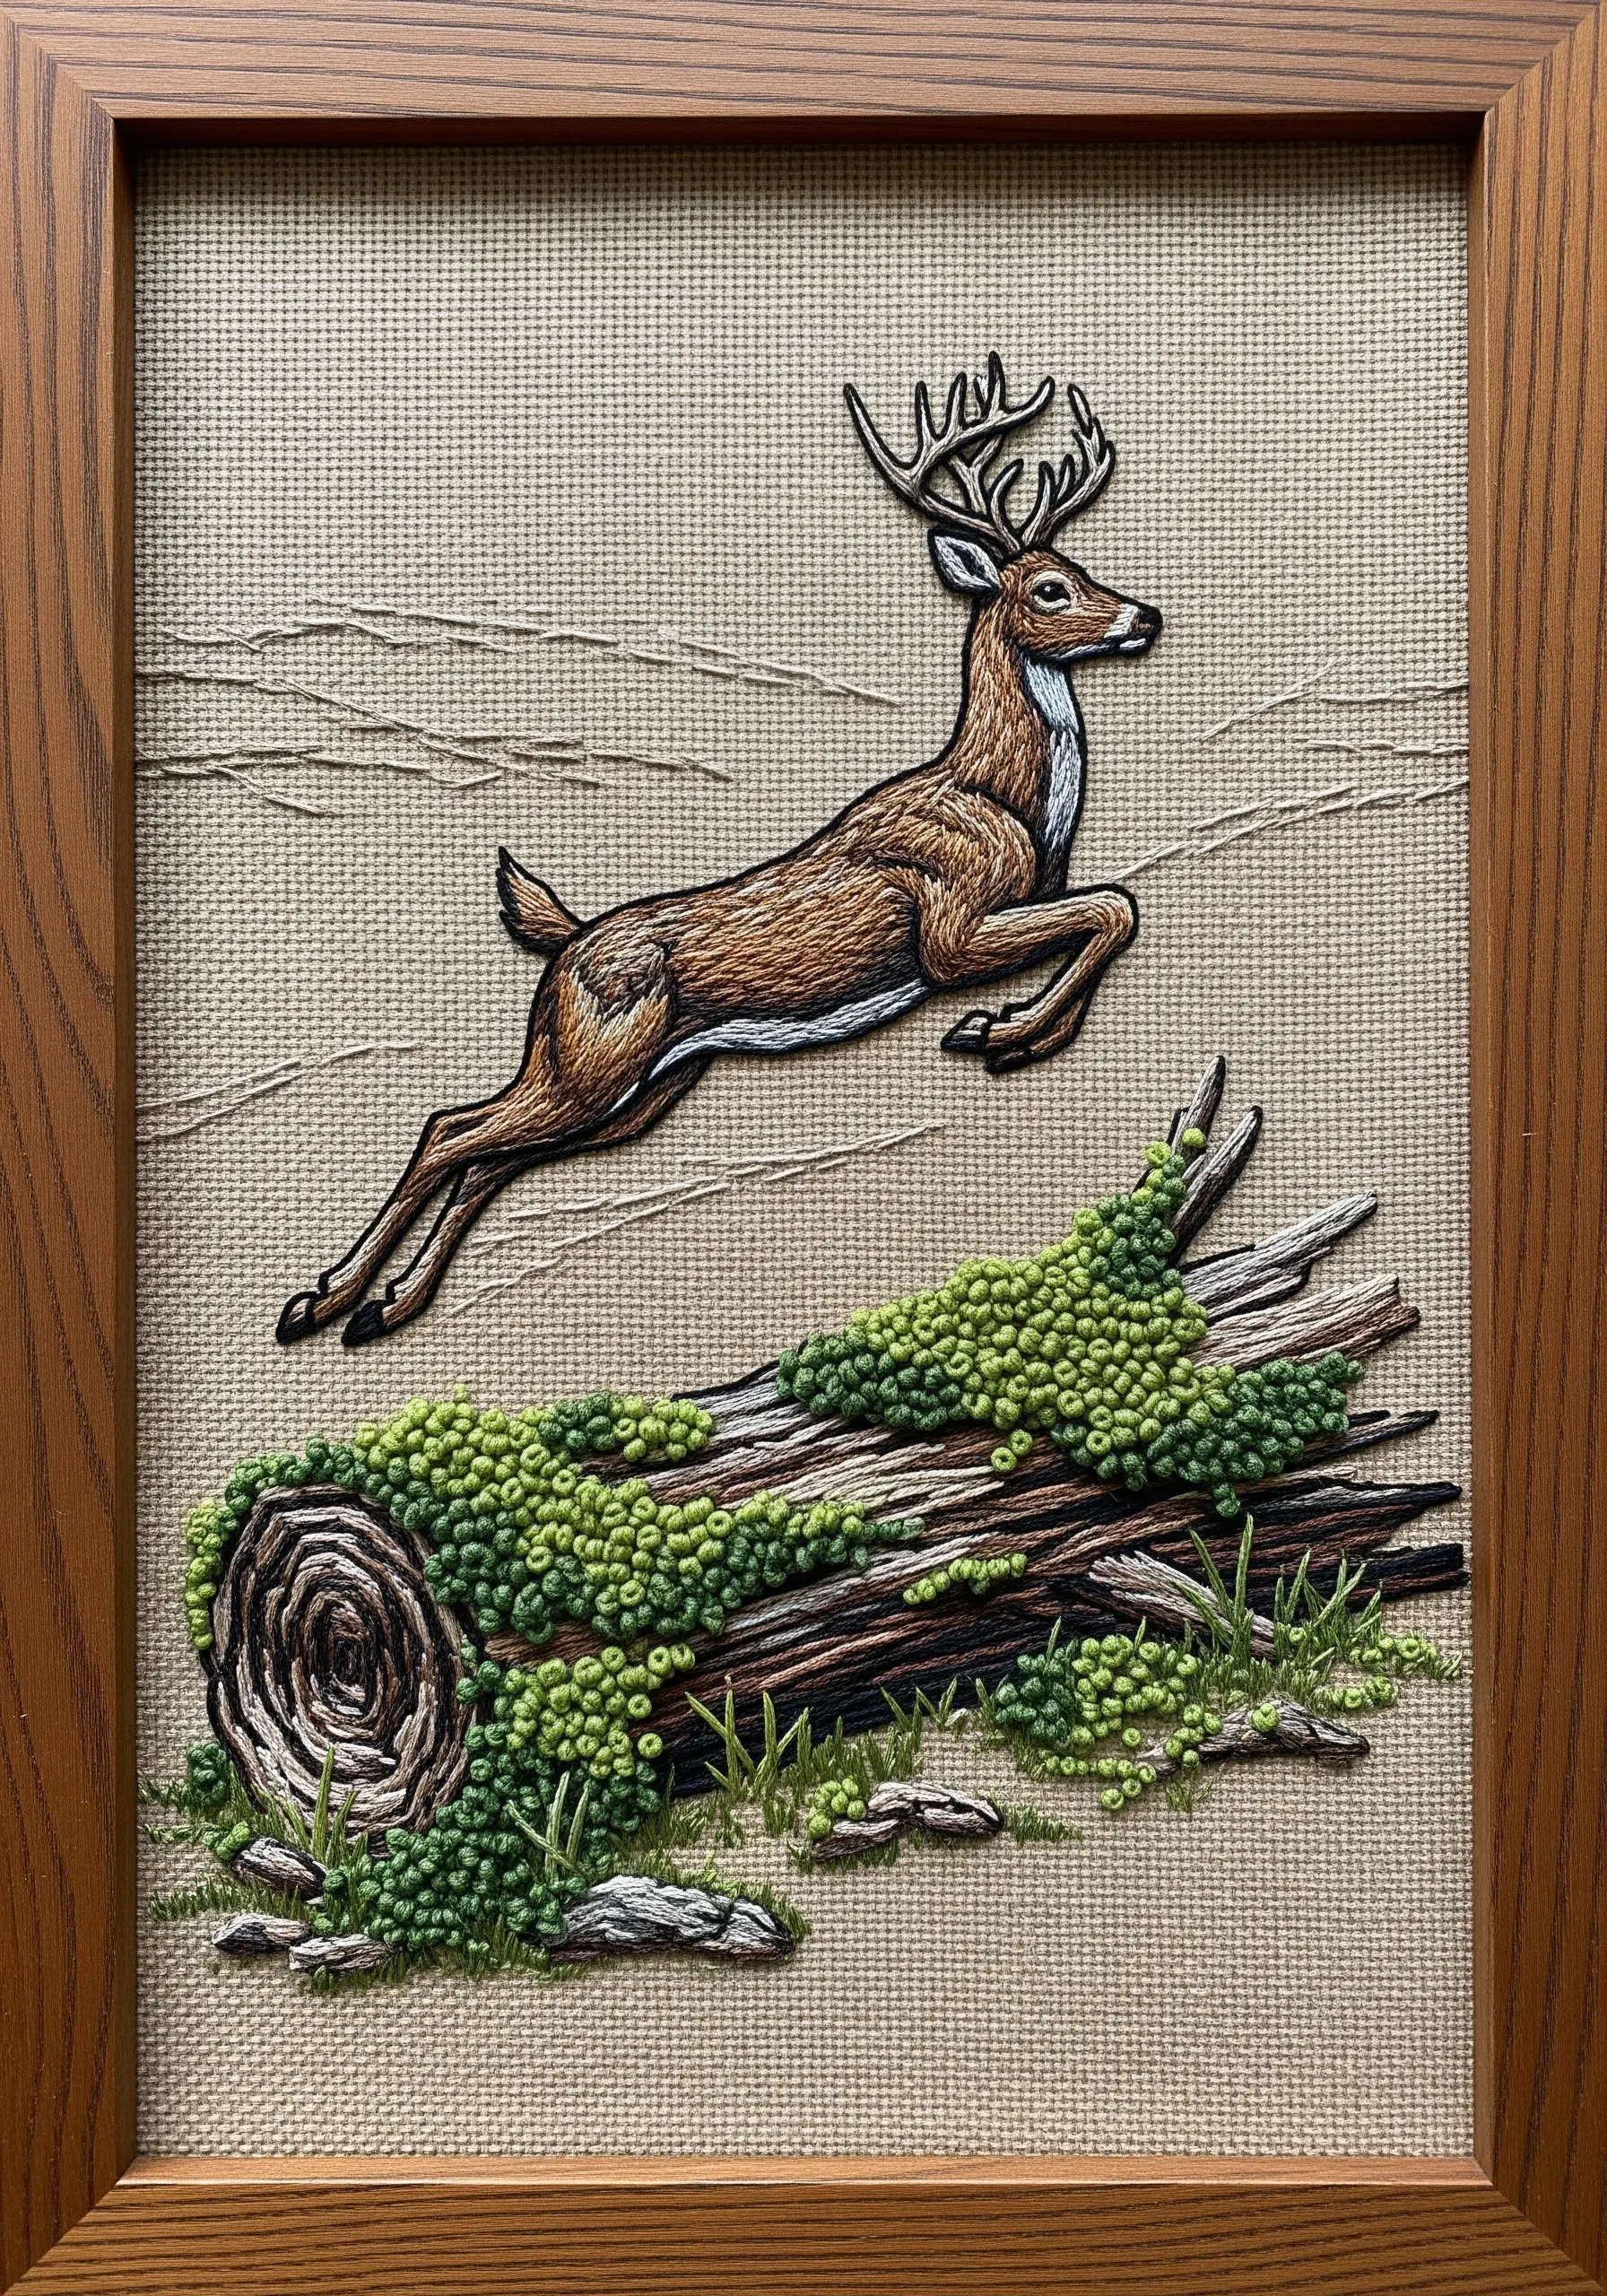
Emphasize the leaping deer’s energy by angling your satin stitches to follow its muscle structure, creating a sense of dynamic movement.
For the mossy log, abandon uniform stitches. Instead, create dense clusters of French knots using several shades of green and yellow-green variegated thread.
Vary the size and tightness of the knots to build an uneven, organic surface that mimics real moss.
This approach transforms a simple nature scene into a study of motion and natural texture embroidery patterns.
7. Define Cross-Stitch with Backstitch Outlines
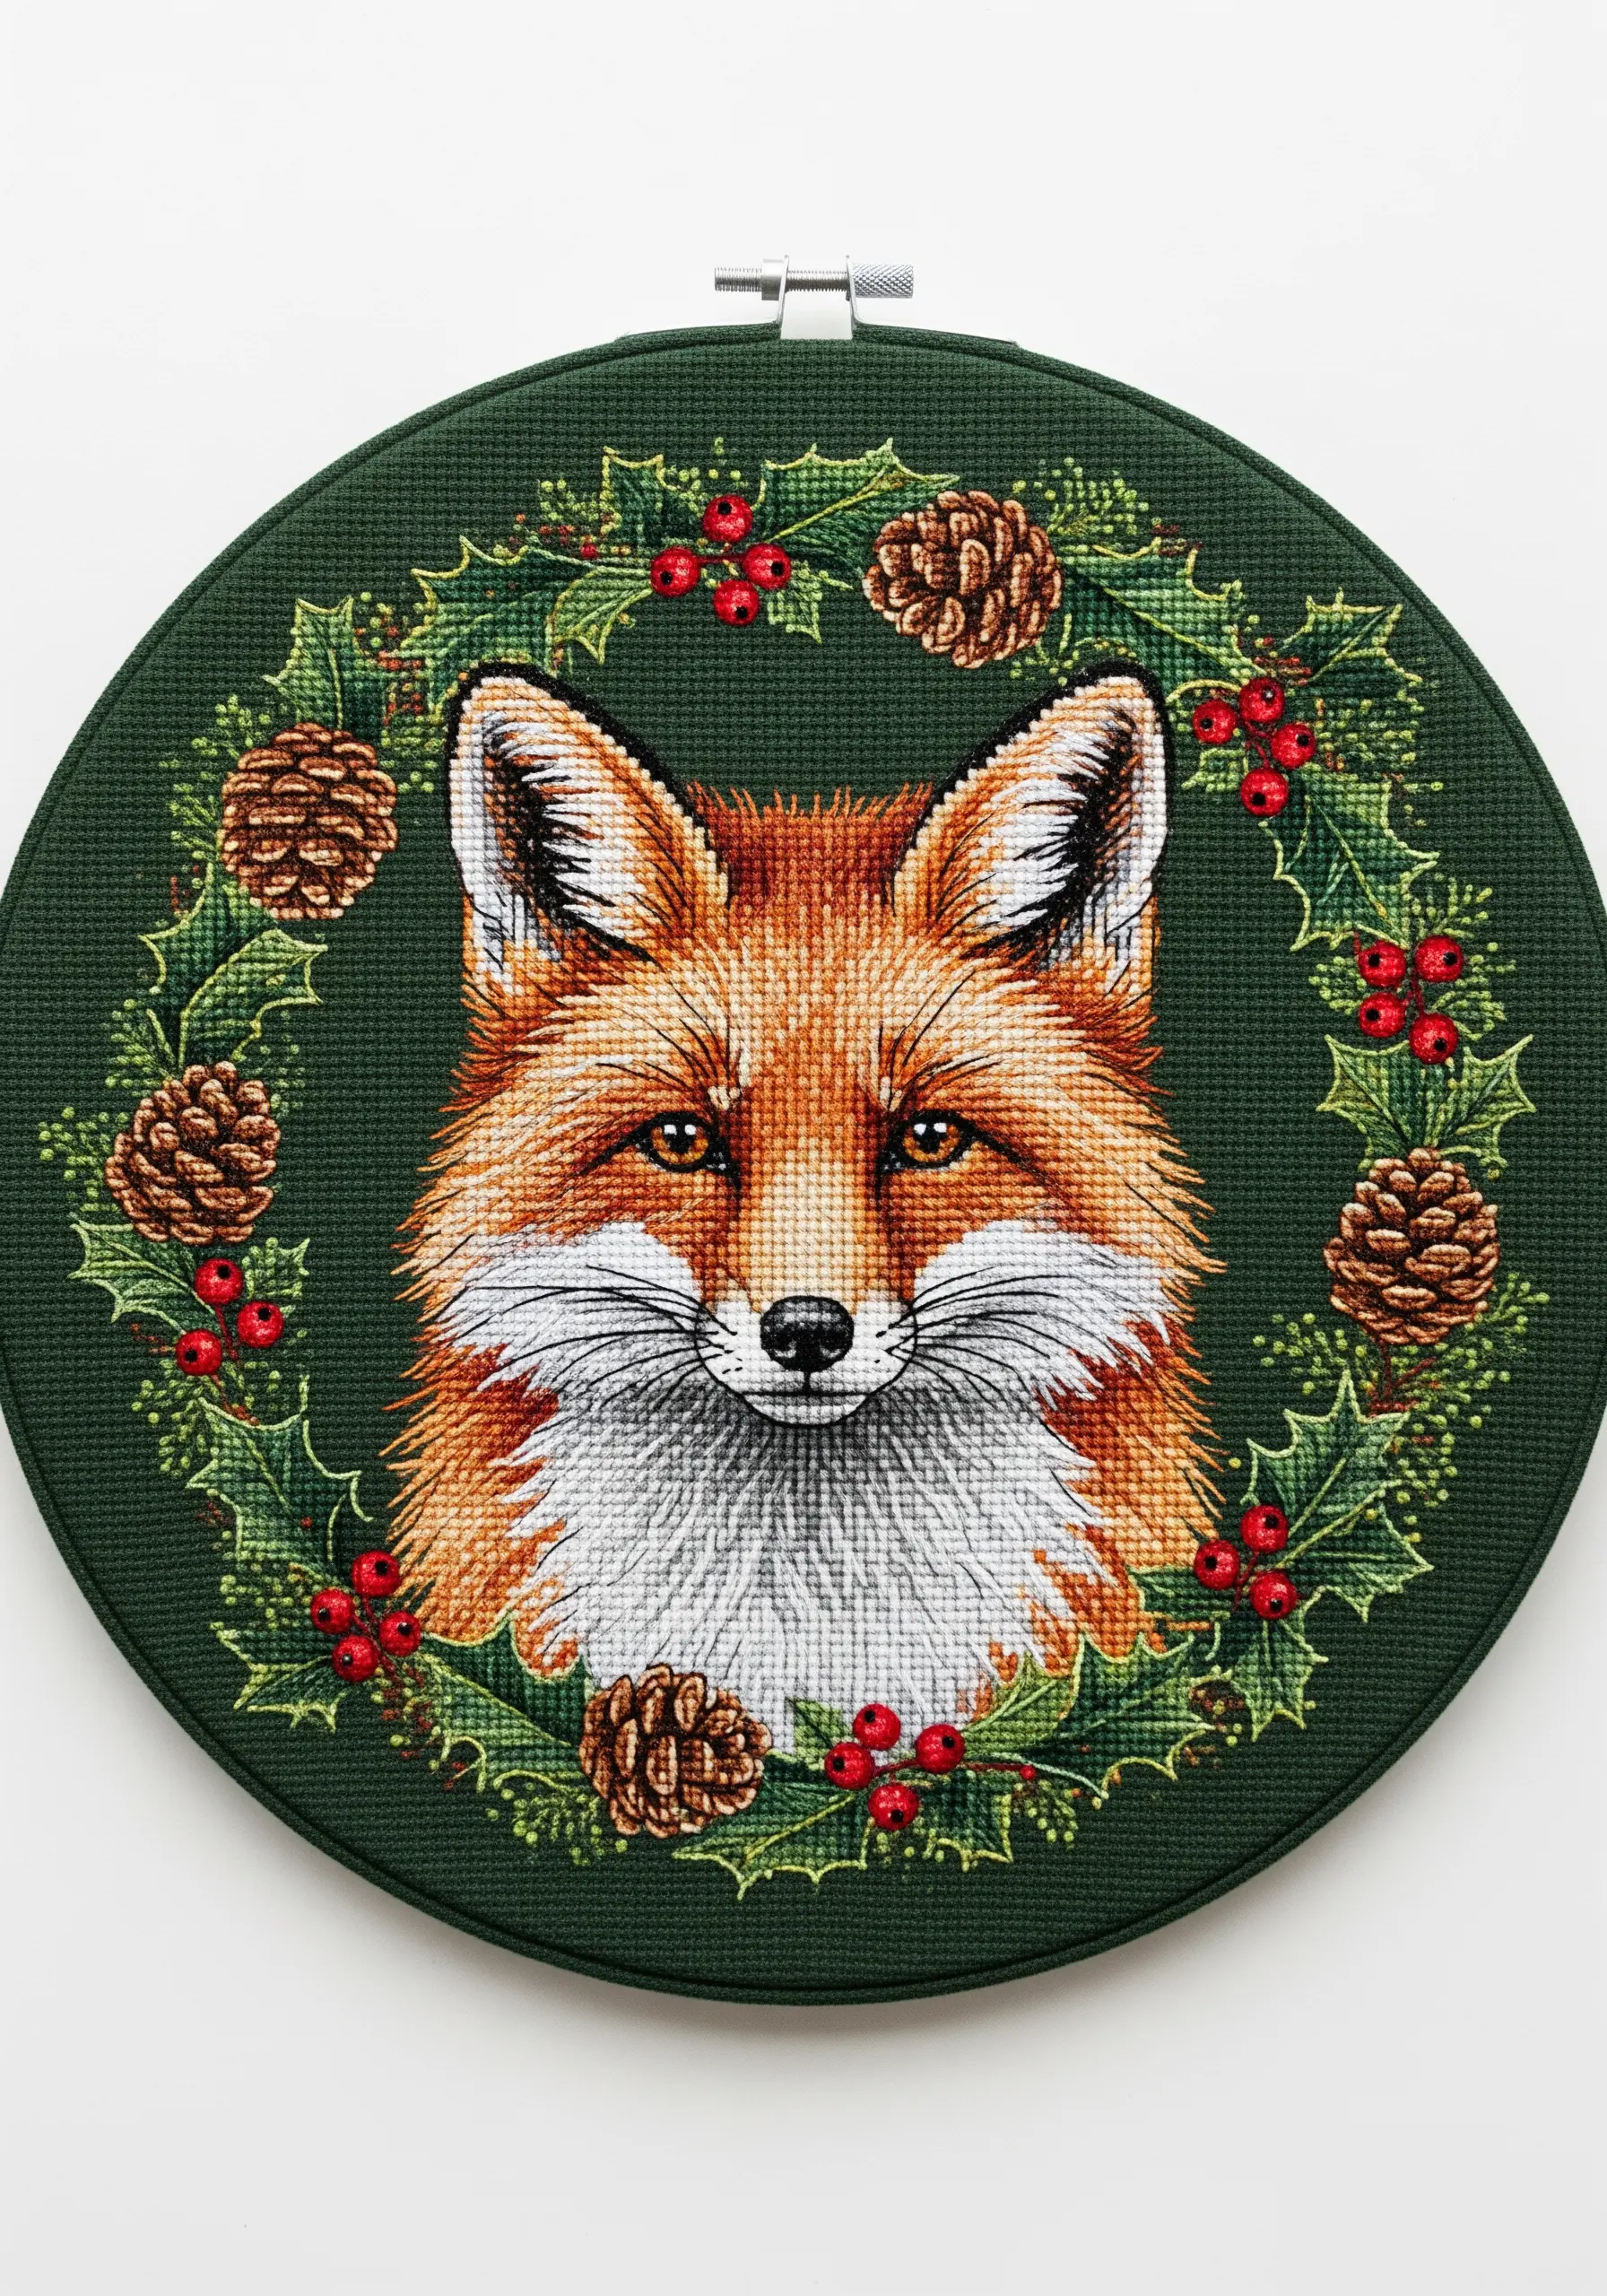
While this fox is worked in cross-stitch, you can elevate the final piece by adding sharp backstitch outlines around the key features.
Use a single strand of black or dark brown thread to trace the edges of the fox’s ears, eyes, and fur sections.
This simple addition contains the ‘pixelated’ look of cross-stitch, adding a crispness and definition that makes the portrait pop against the fabric and wreath.
Apply the same technique to the pinecones and berries to give them structure.
8. Embellish Line Work with Beads for Subtle Sparkle
Combine elegant line work with delicate beading to create a celestial map on fabric.
Use a fine, whipped backstitch with metallic thread for the constellation lines to give them a smooth, unbroken appearance.
Instead of using French knots for all the stars, strategically add tiny silver or crystal seed beads.
The beads catch the light in a way thread cannot, creating a subtle, three-dimensional shimmer that brings the night sky to life.
This mix of matte and sparkle elevates minimalist stitch designs into something truly special.
9. Build a Cozy Scene with a Limited Palette
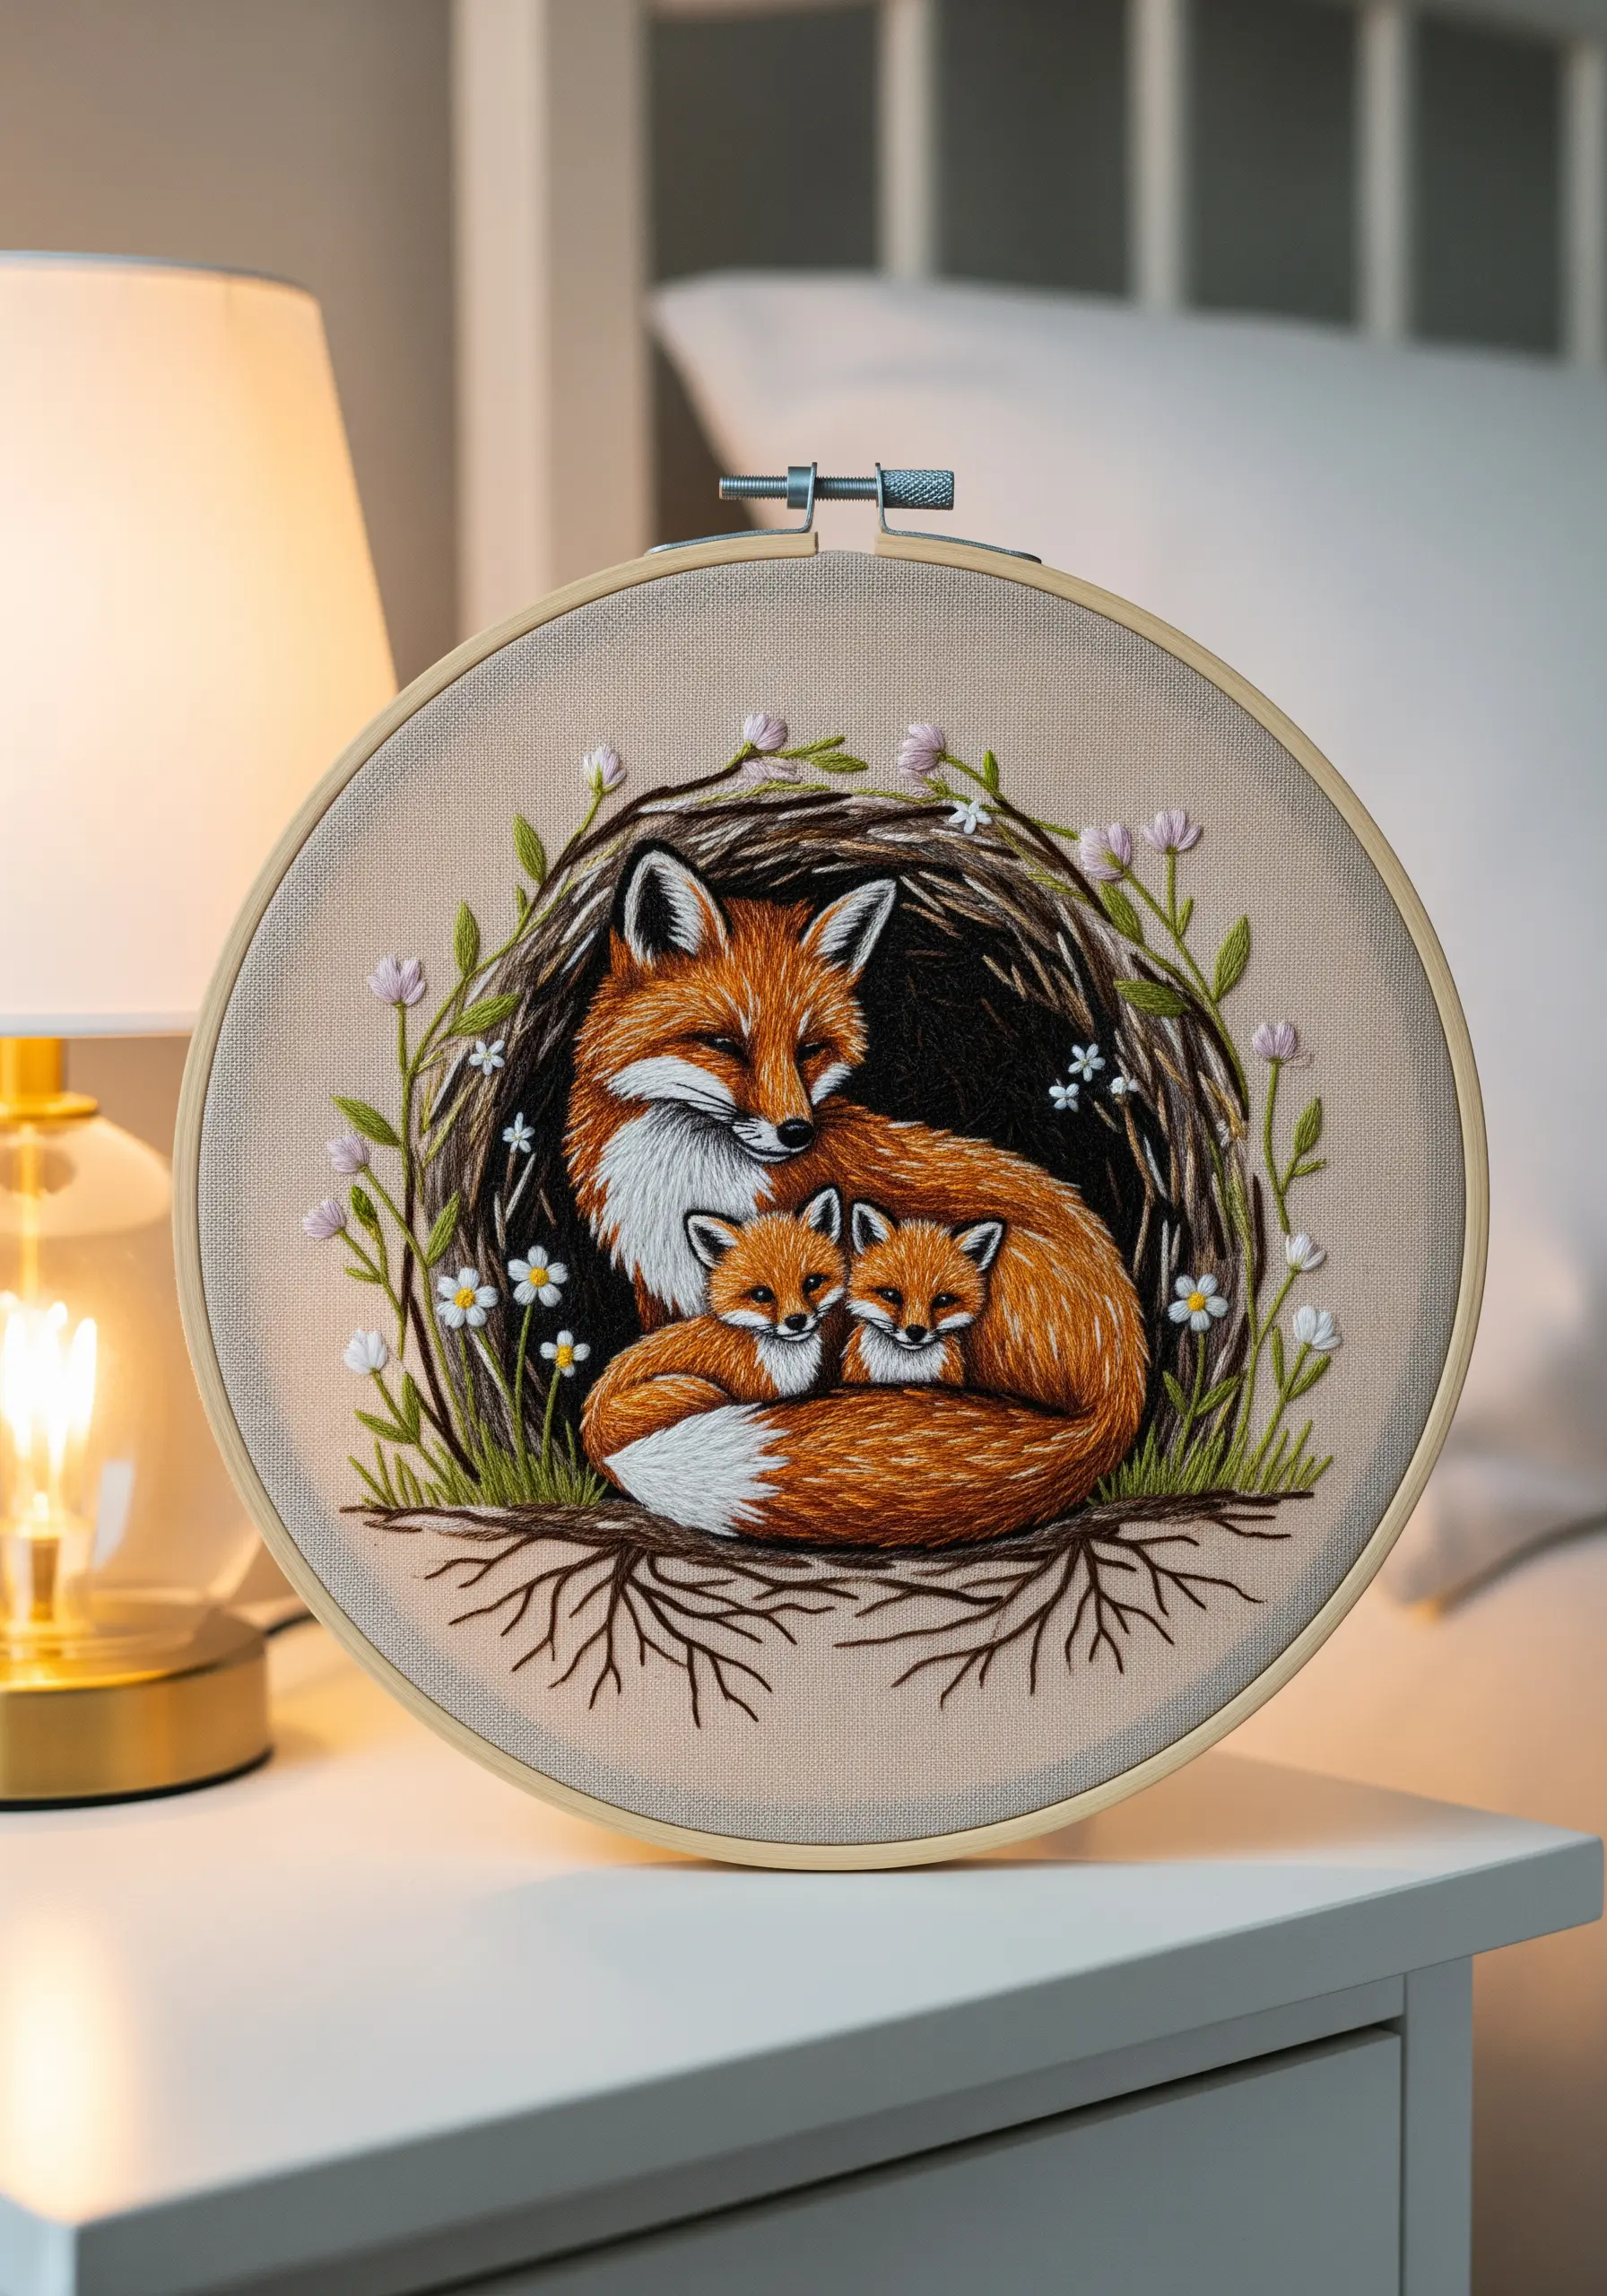
Create an intimate and harmonious scene by strictly limiting your color palette to warm, earthy tones.
This fox family uses shades of russet, cream, and soft brown, which automatically creates a feeling of warmth and unity.
For the den’s opening, use a messy satin stitch or random straight stitches with darker brown thread to suggest roots and soil without becoming too literal.
This technique ensures your embroidered nursery decor ideas feel gentle and cohesive.
10. Create Delicate Details with Variegated Threads
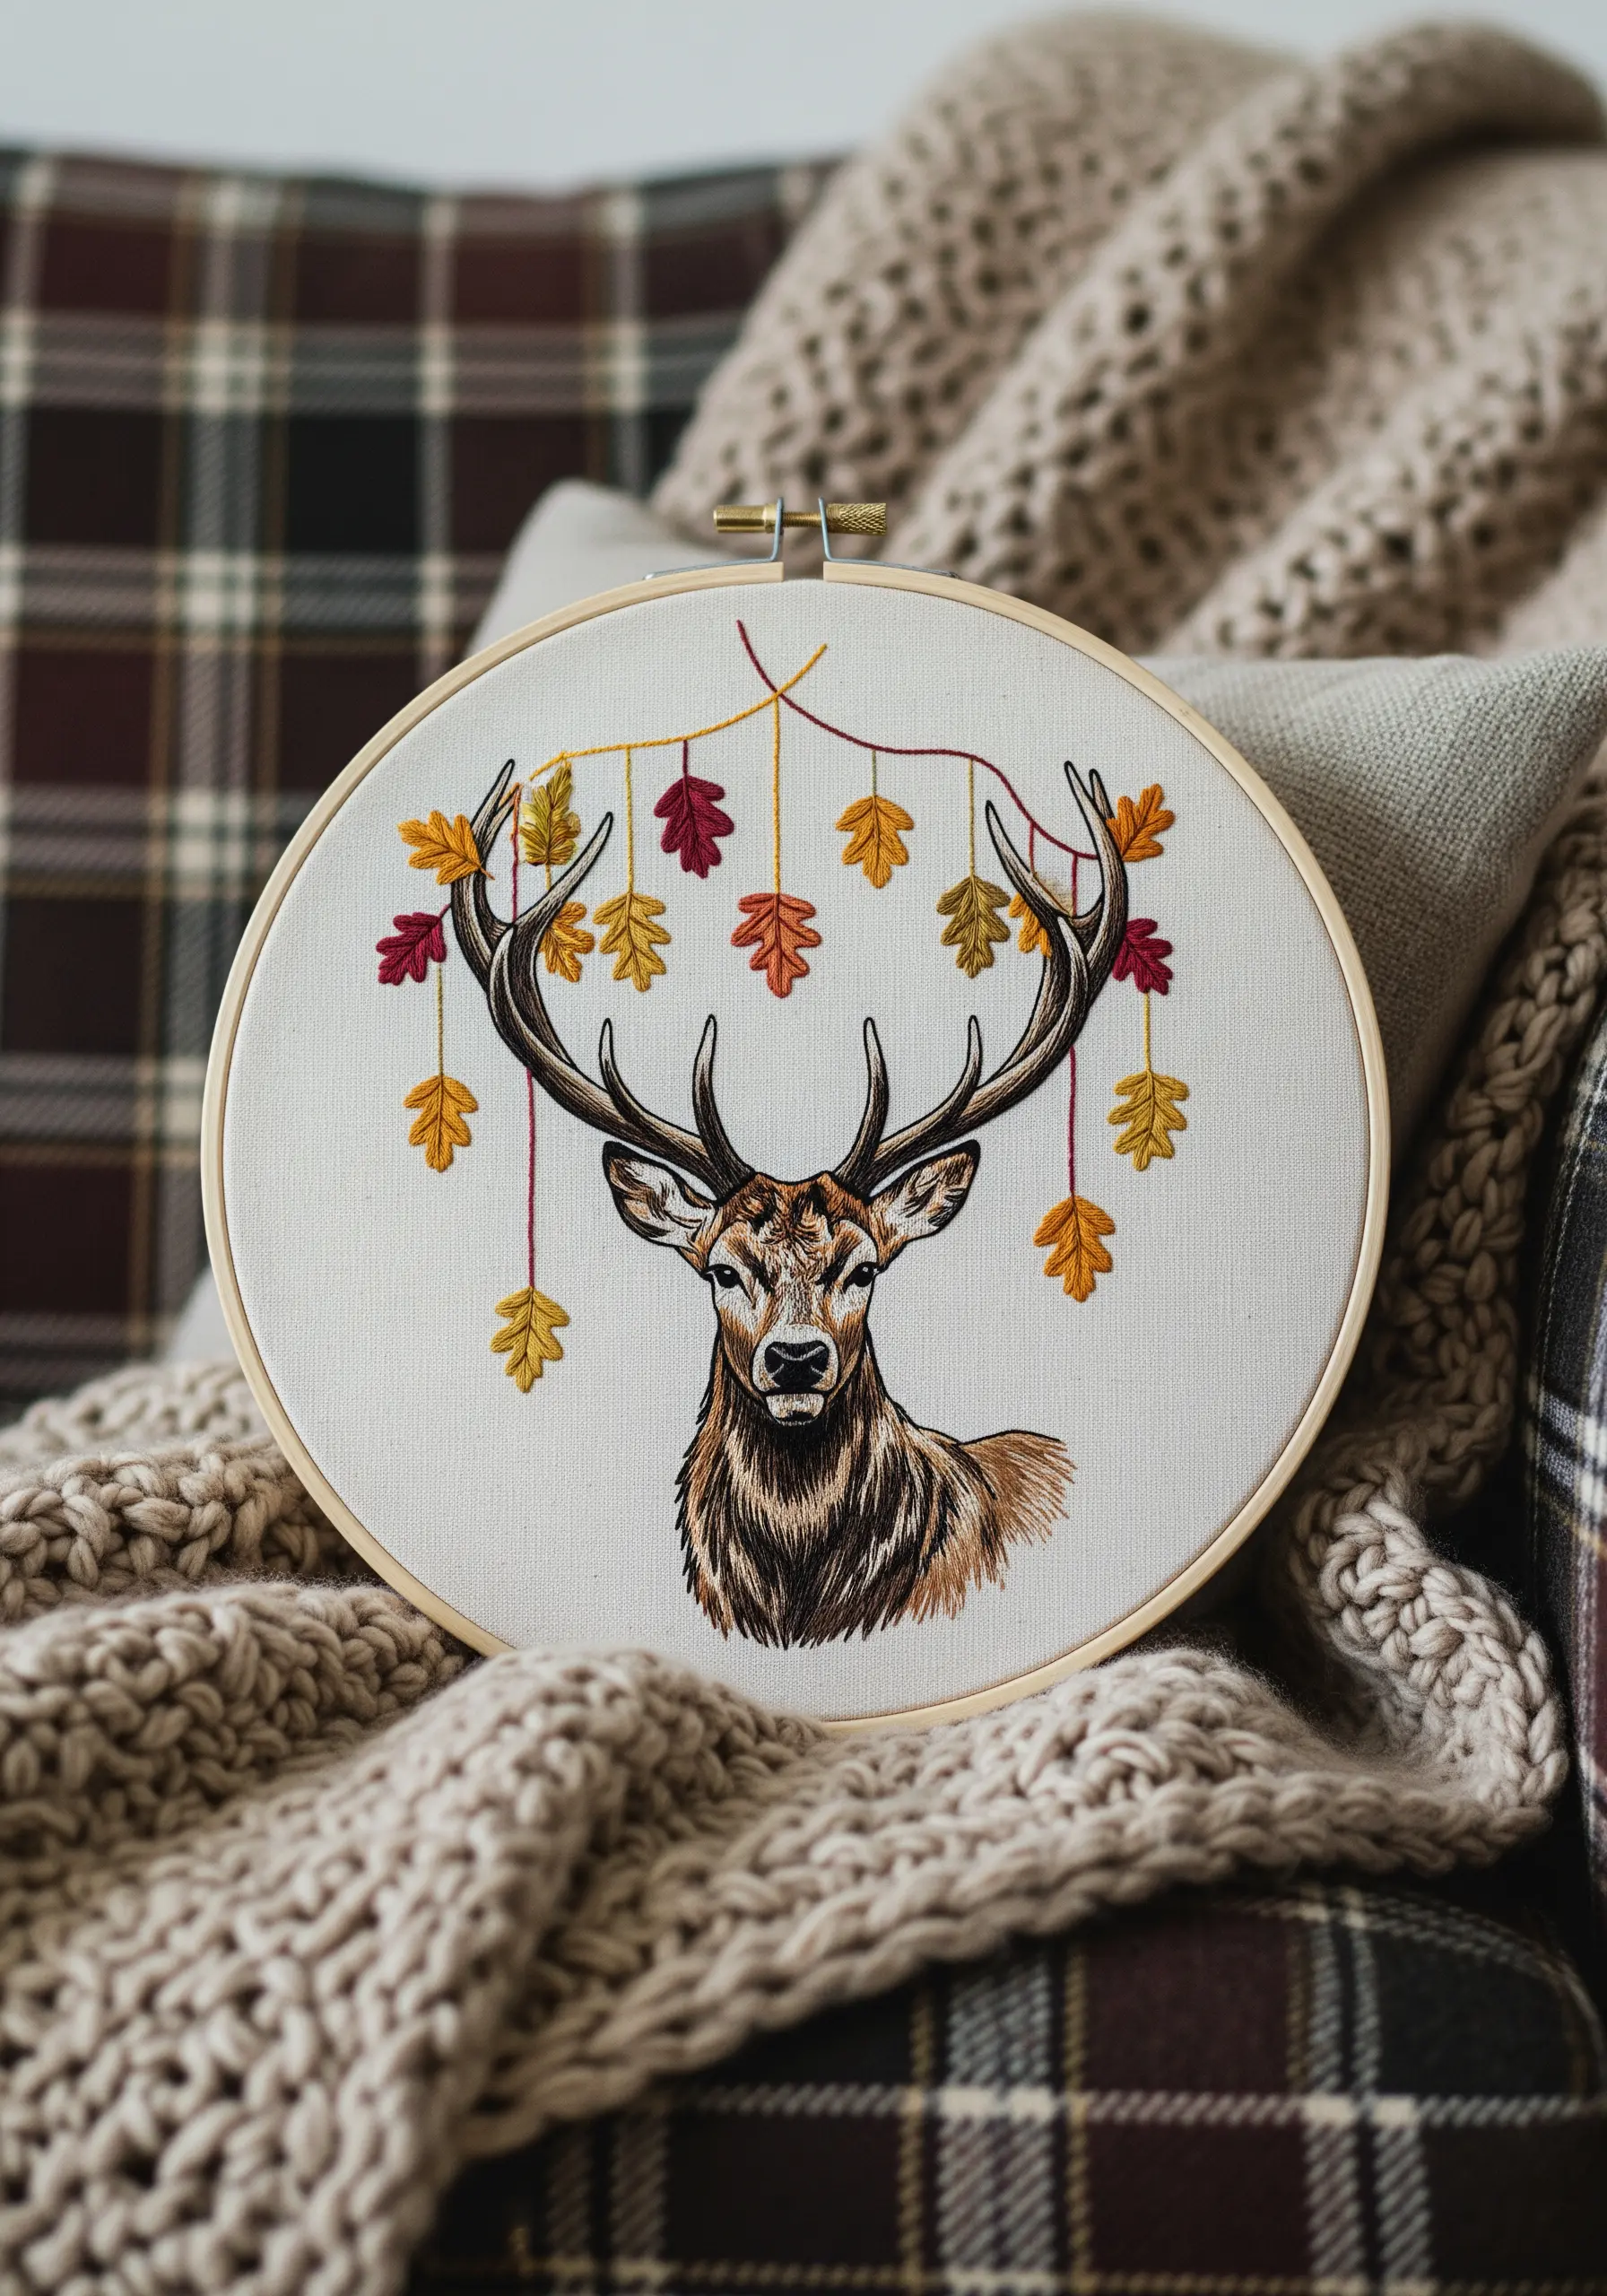
To stitch the hanging oak leaves, use a variegated floss in autumnal shades of red, yellow, and orange.
As you stitch, the thread will change color on its own, giving each leaf a unique, natural gradient without the effort of changing threads.
Use a fishbone stitch for the leaves to create a central vein and an organic shape.
This simple choice of material adds instant sophistication and complexity to your leaf embroidery stitches.
11. Achieve Precision in Geometric Embroidery
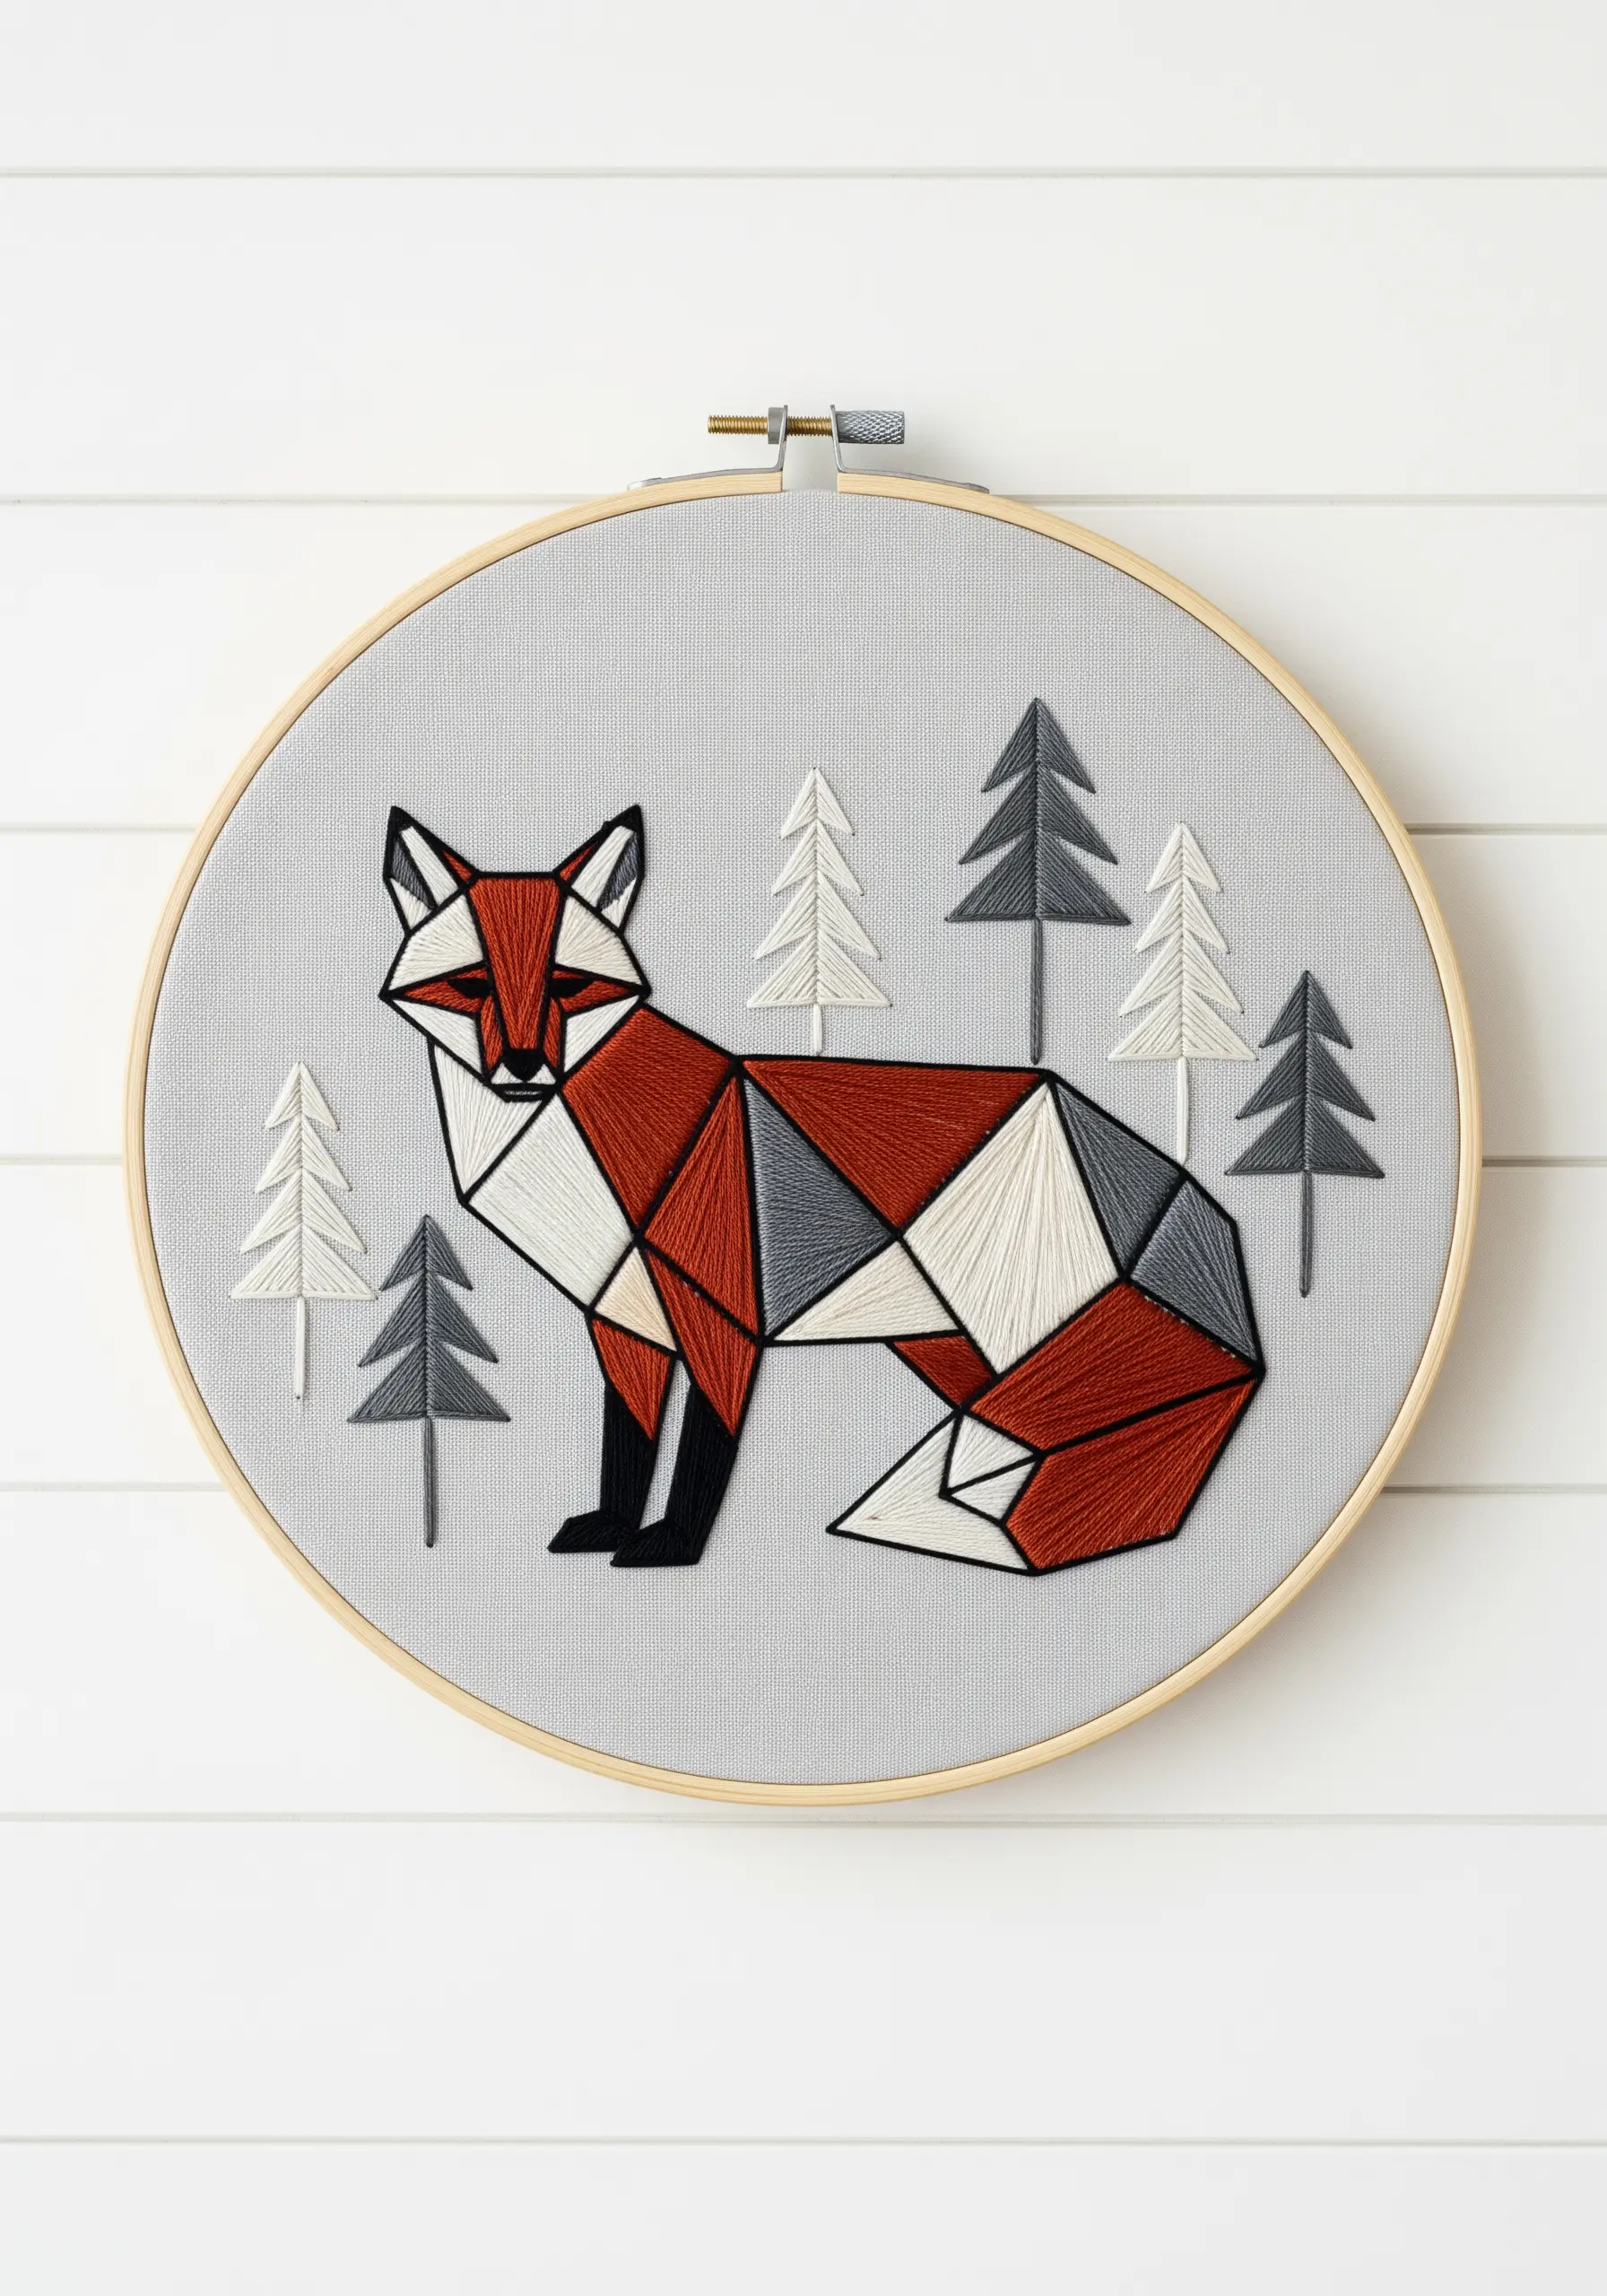
For a crisp geometric design, precision is everything. First, outline each polygon with a sharp split stitch using two strands of floss.
This creates a raised, firm edge that will contain your fill stitches.
Next, fill each shape with a satin stitch, ensuring your needle enters and exits just inside the split stitch outline, not through it.
Keep your stitches parallel and your tension even to achieve a perfectly smooth, block-like surface. This turns a simple fill into a piece of modern thread art.
12. Use Open Fill Stitches for a Delicate Look
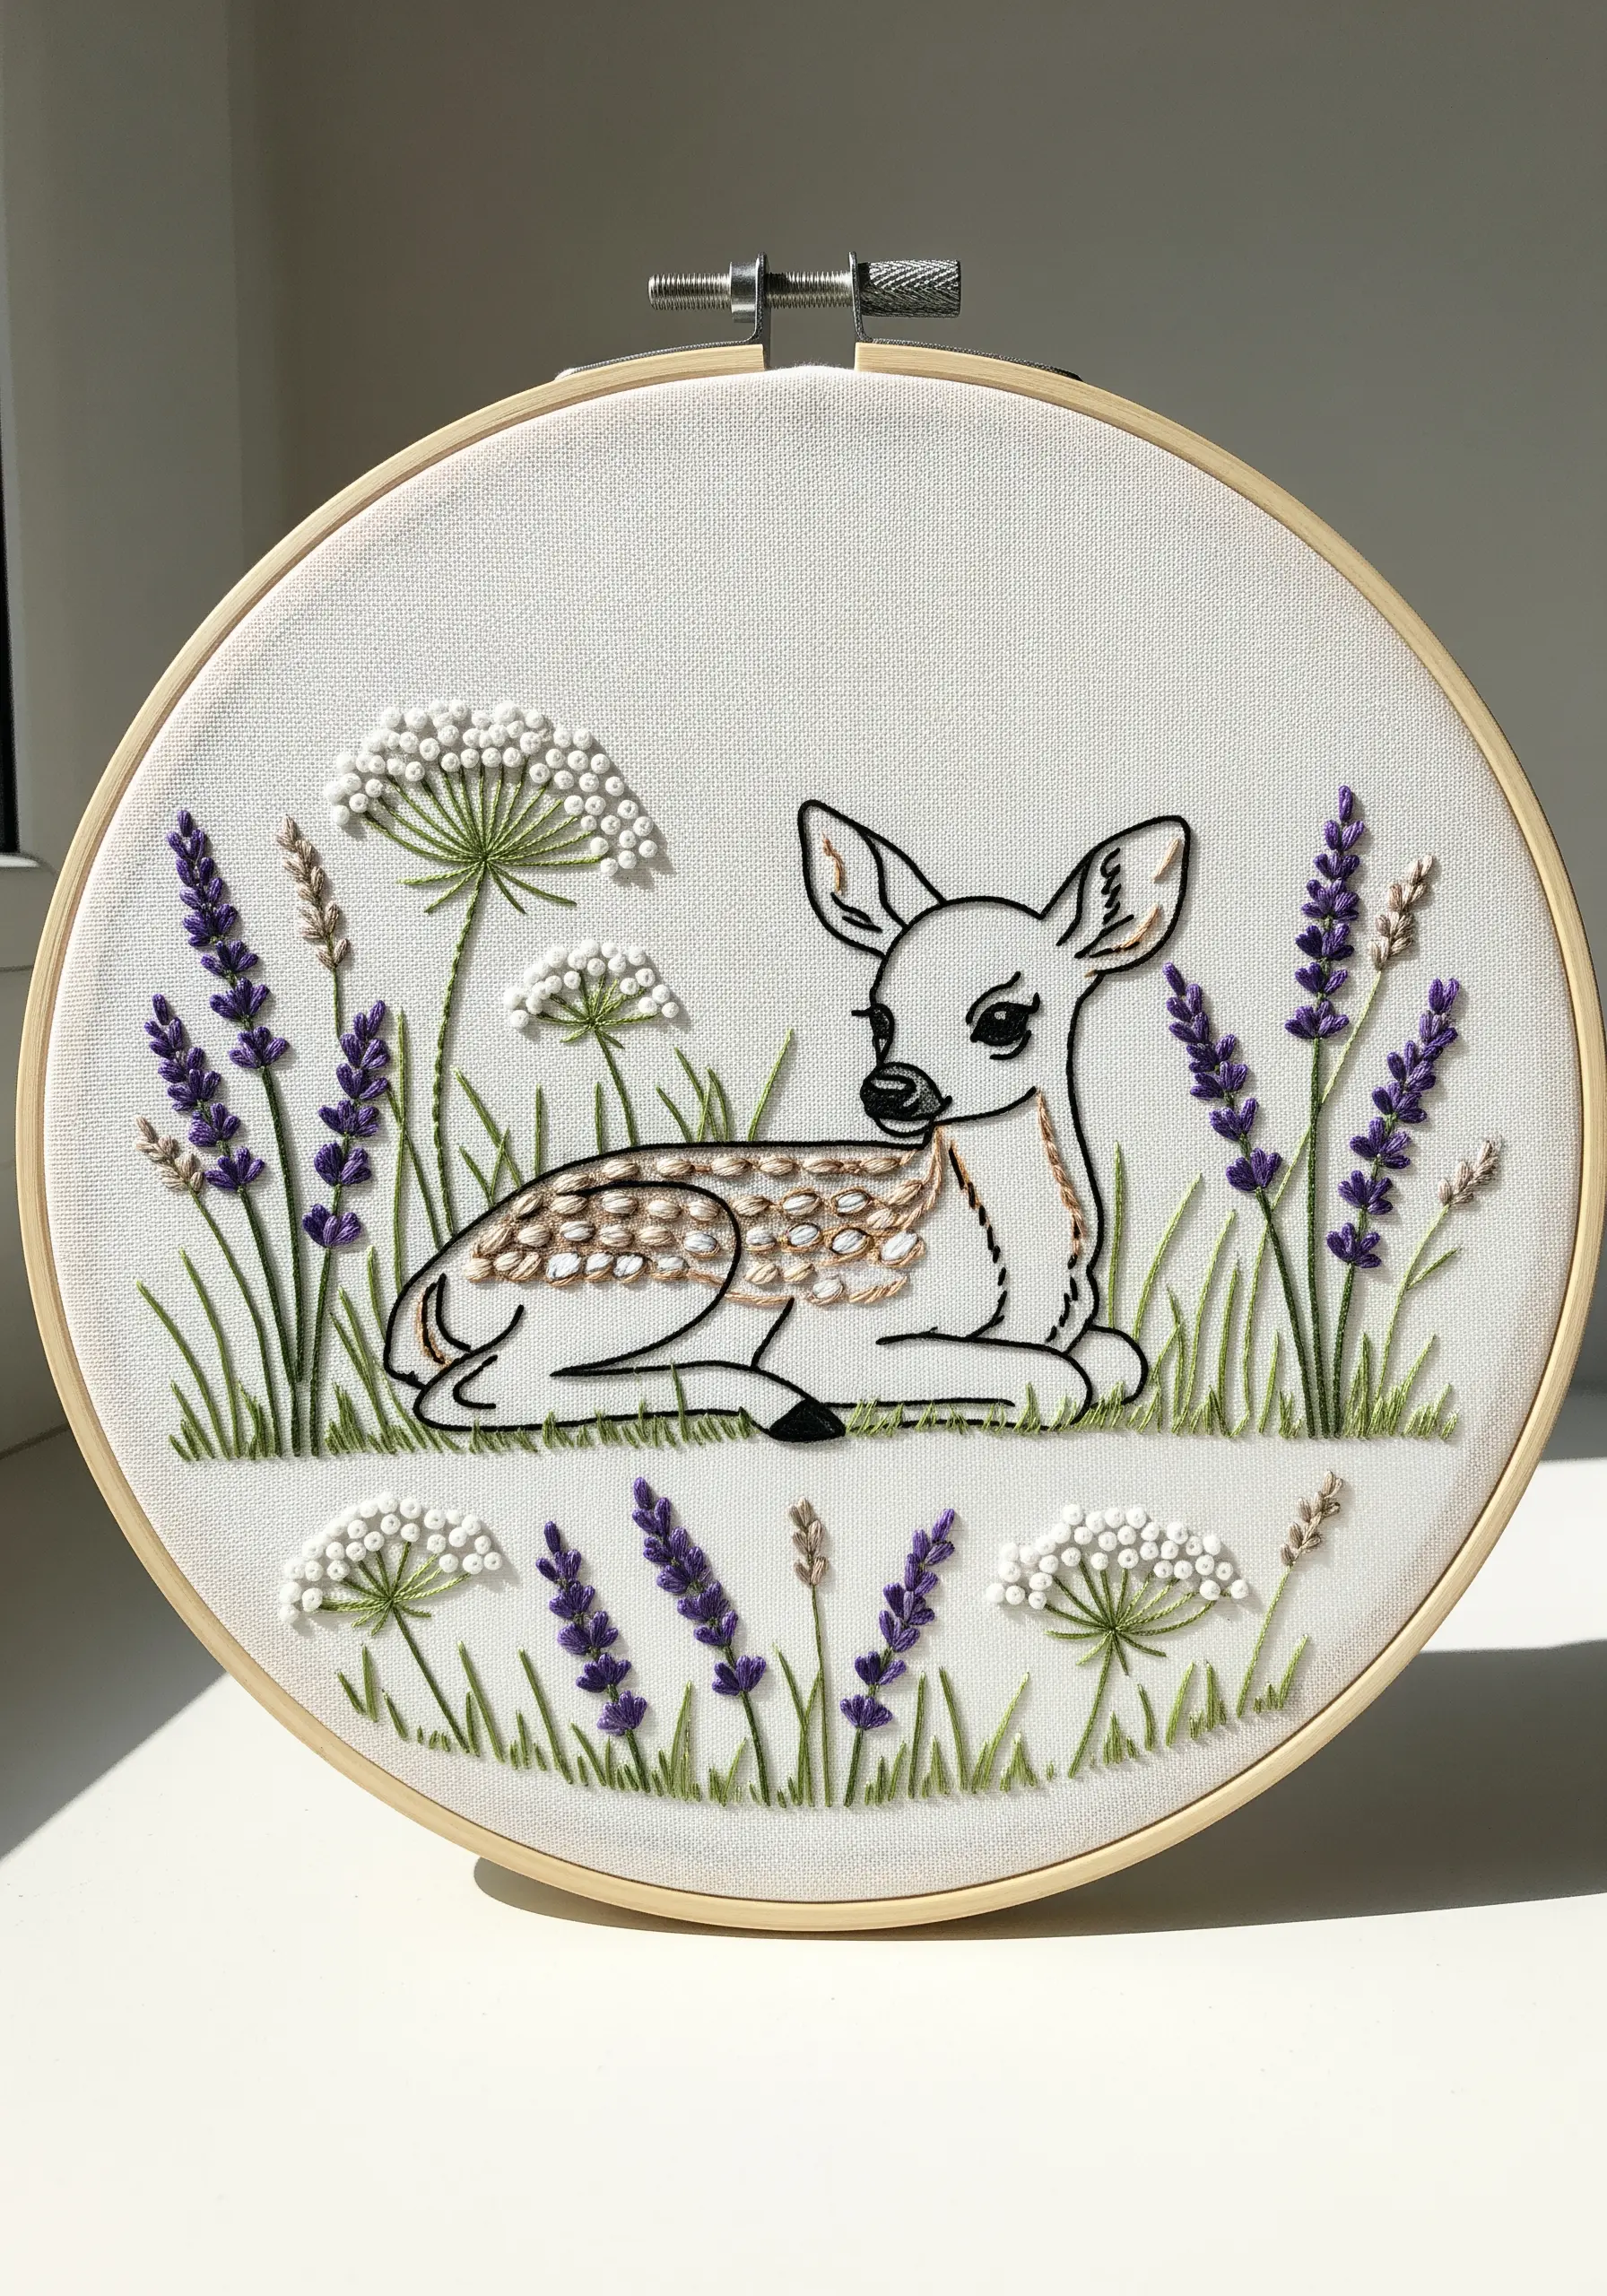
Instead of a solid fill, give the fawn’s coat a light, delicate texture using an open fill stitch like the seed stitch.
Use a single strand of thread to make tiny, scattered straight stitches, which suggest texture and pattern without adding visual weight.
This technique allows the background fabric to show through, creating a soft, illustrative quality that pairs beautifully with simple botanical line art patterns.
For the lavender, use bullion knots or French knots to add a pop of concentrated texture.
13. Craft Dimensional Berries with Padded Stitching
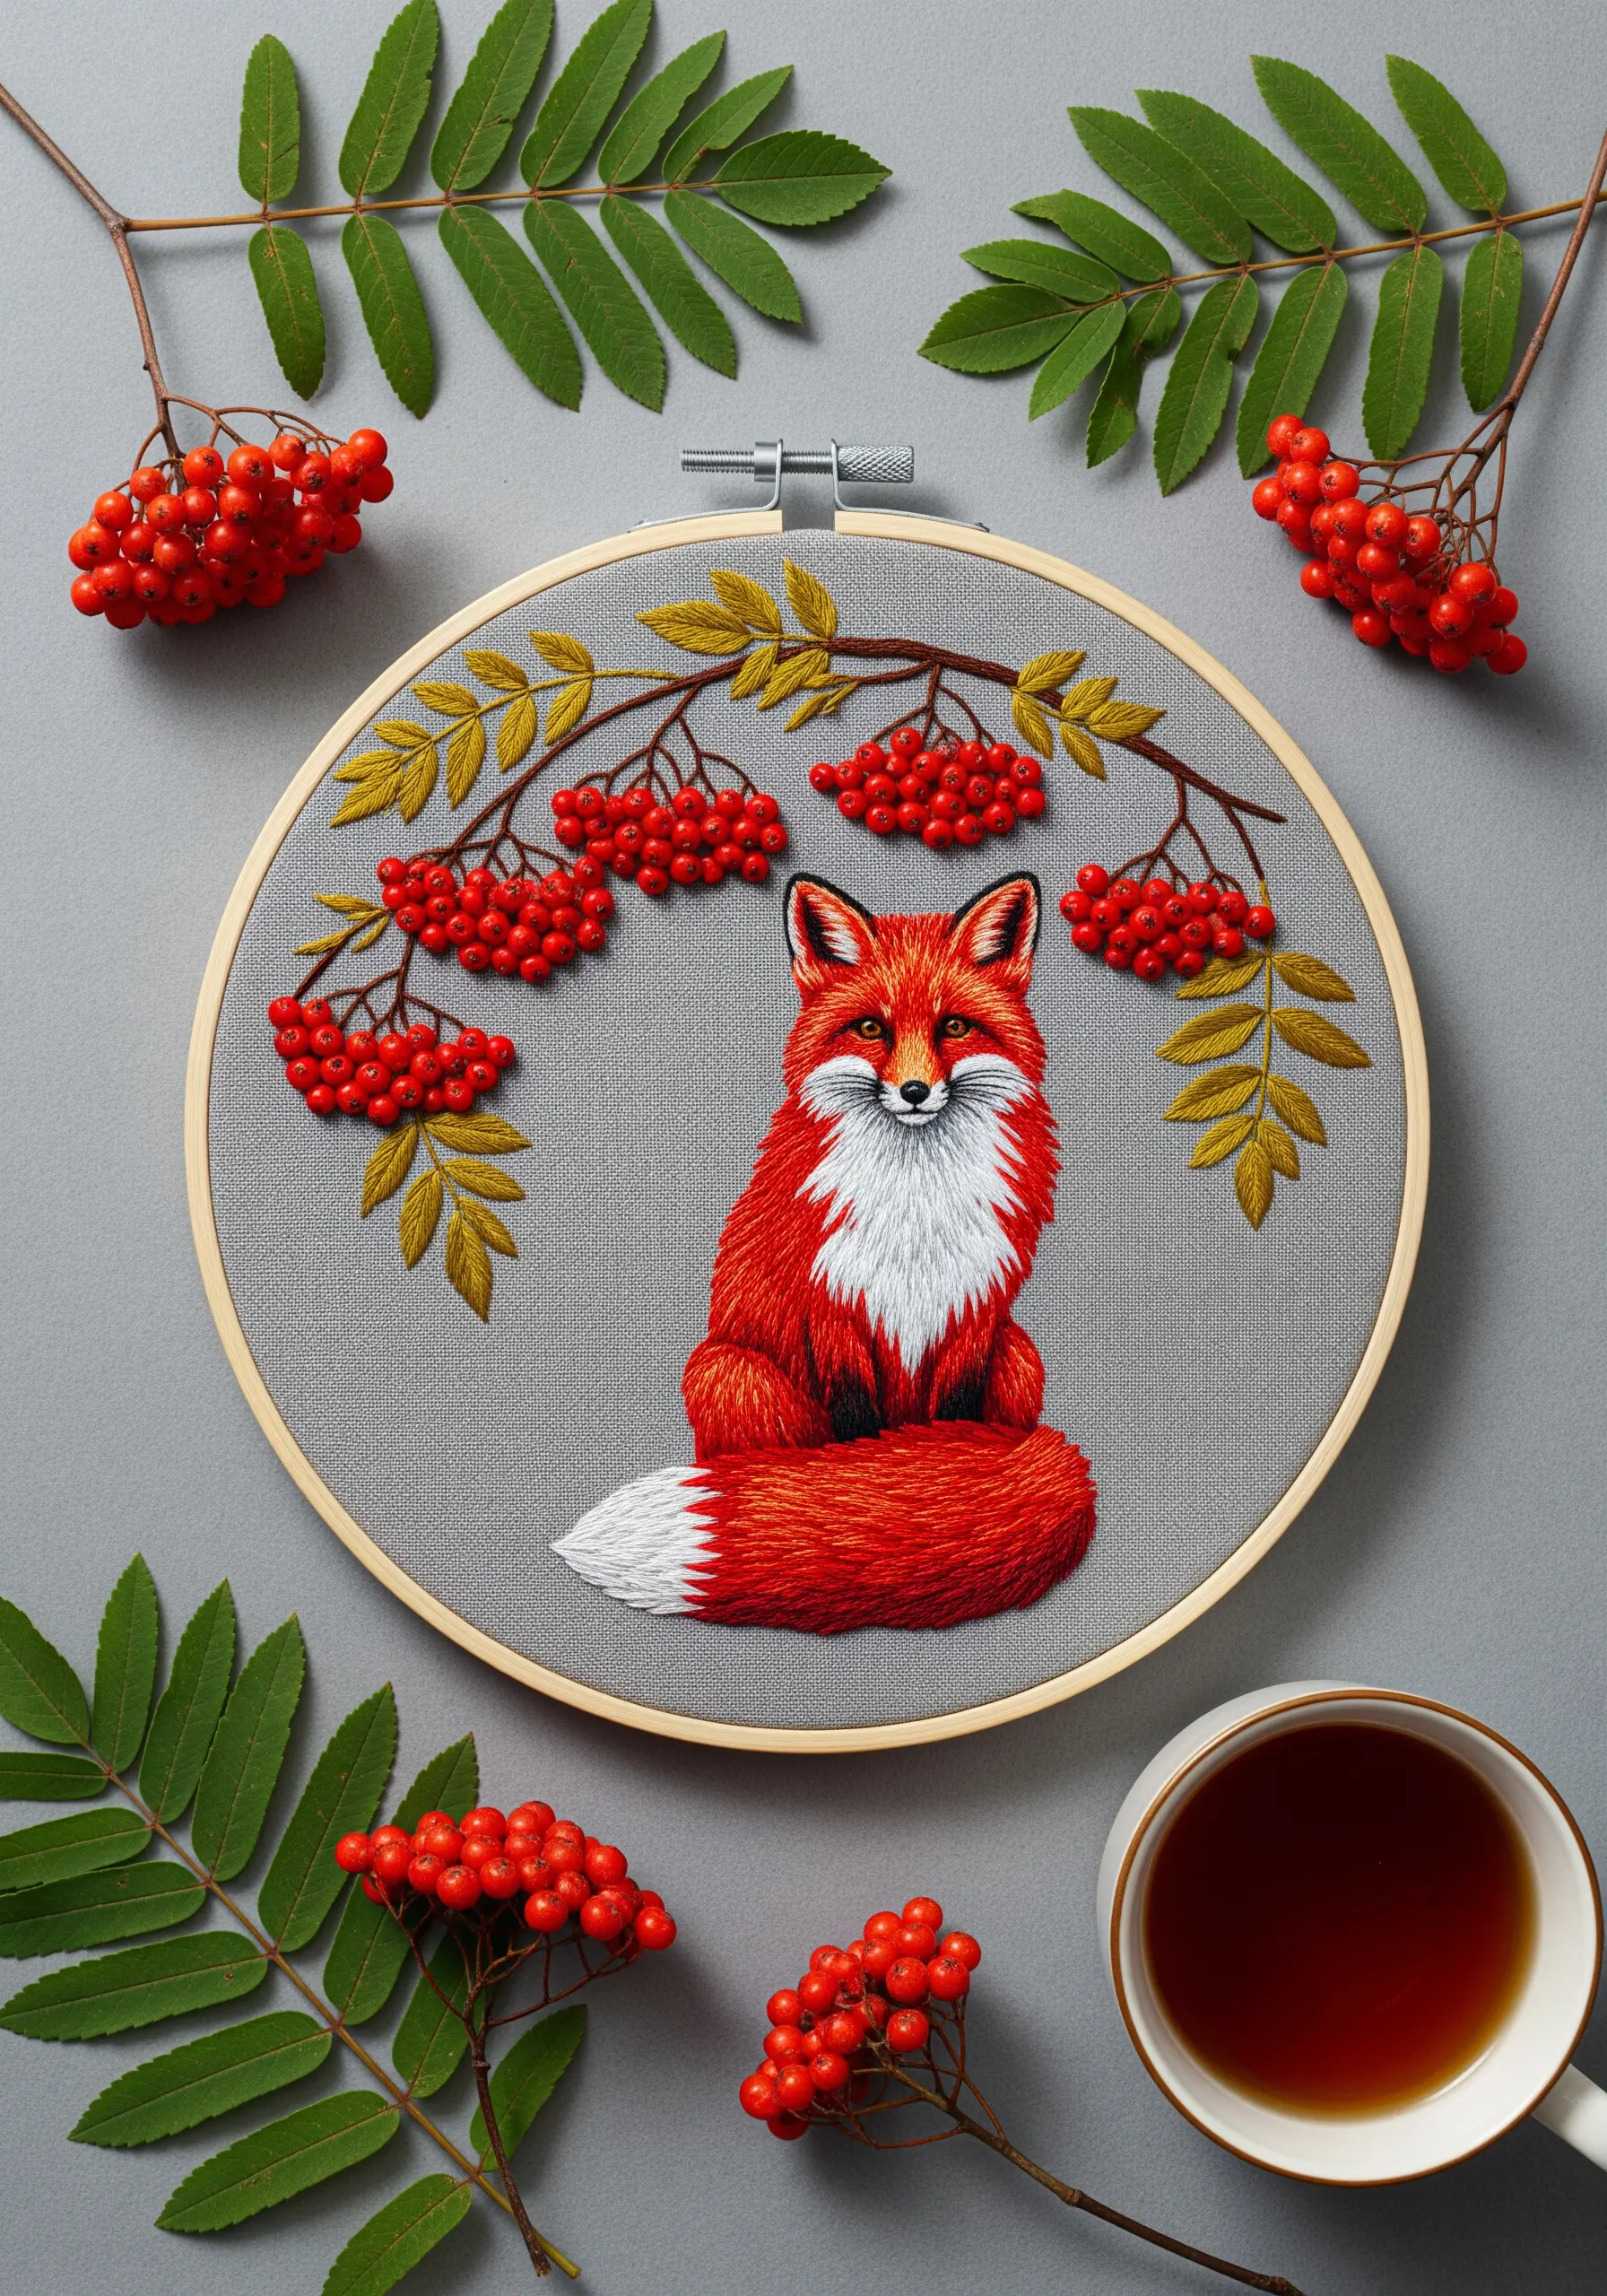
To make the rowan berries look plump and three-dimensional, use a padded satin stitch.
First, fill each small berry circle with a base of tiny seed stitches or a small French knot.
Then, cover this padding with smooth satin stitches using a high-sheen red thread. The underlying stitches will push the satin stitch up, creating a rounded, berry-like shape that catches the light beautifully.
This technique adds a delightful tactile quality to your work.
14. Build Abstract Texture with Layered Stitches
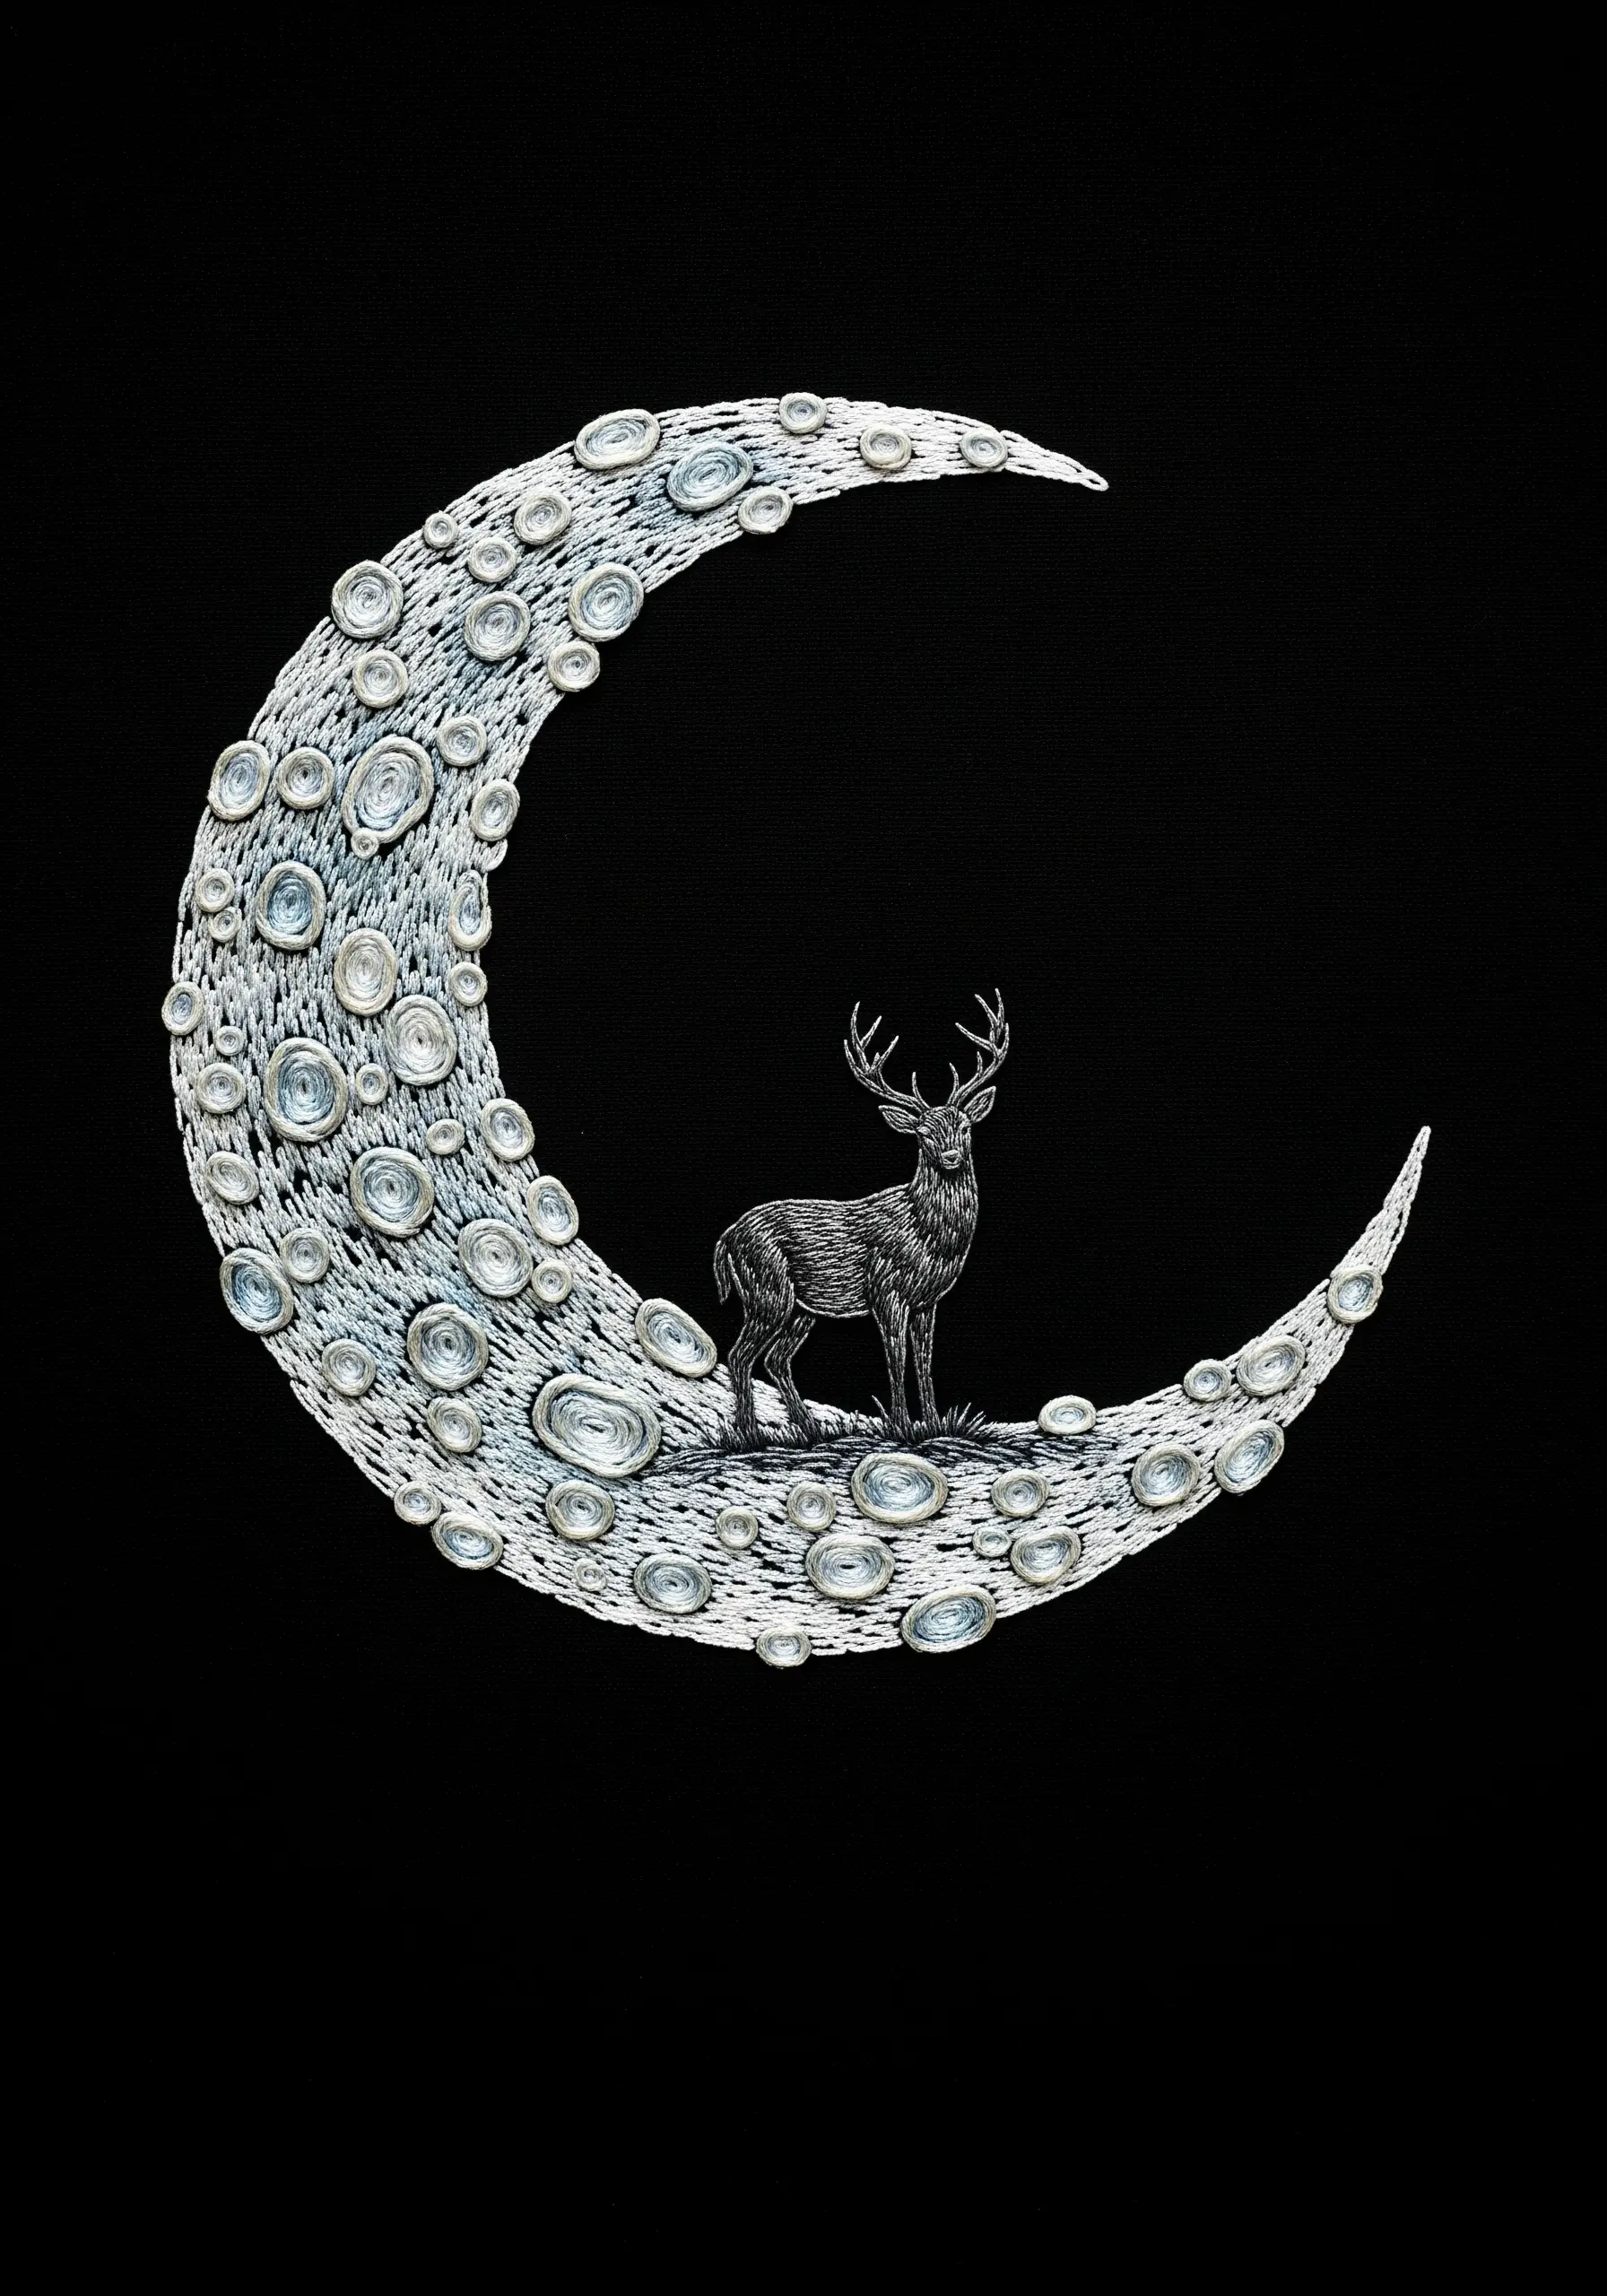
To create the heavily cratered moon, move beyond simple fills and build layers of abstract texture.
Start with a base of grey and white satin stitches laid in swirling patterns.
On top of this, add clusters of French knots in varying sizes and shades. Finally, couch down thicker threads or metallic cords in circular shapes to define the largest craters.
This mixed-media approach results in a uniquely tactile surface that feels both chaotic and controlled.
15. Replicate Wood Grain with Directional Stitches
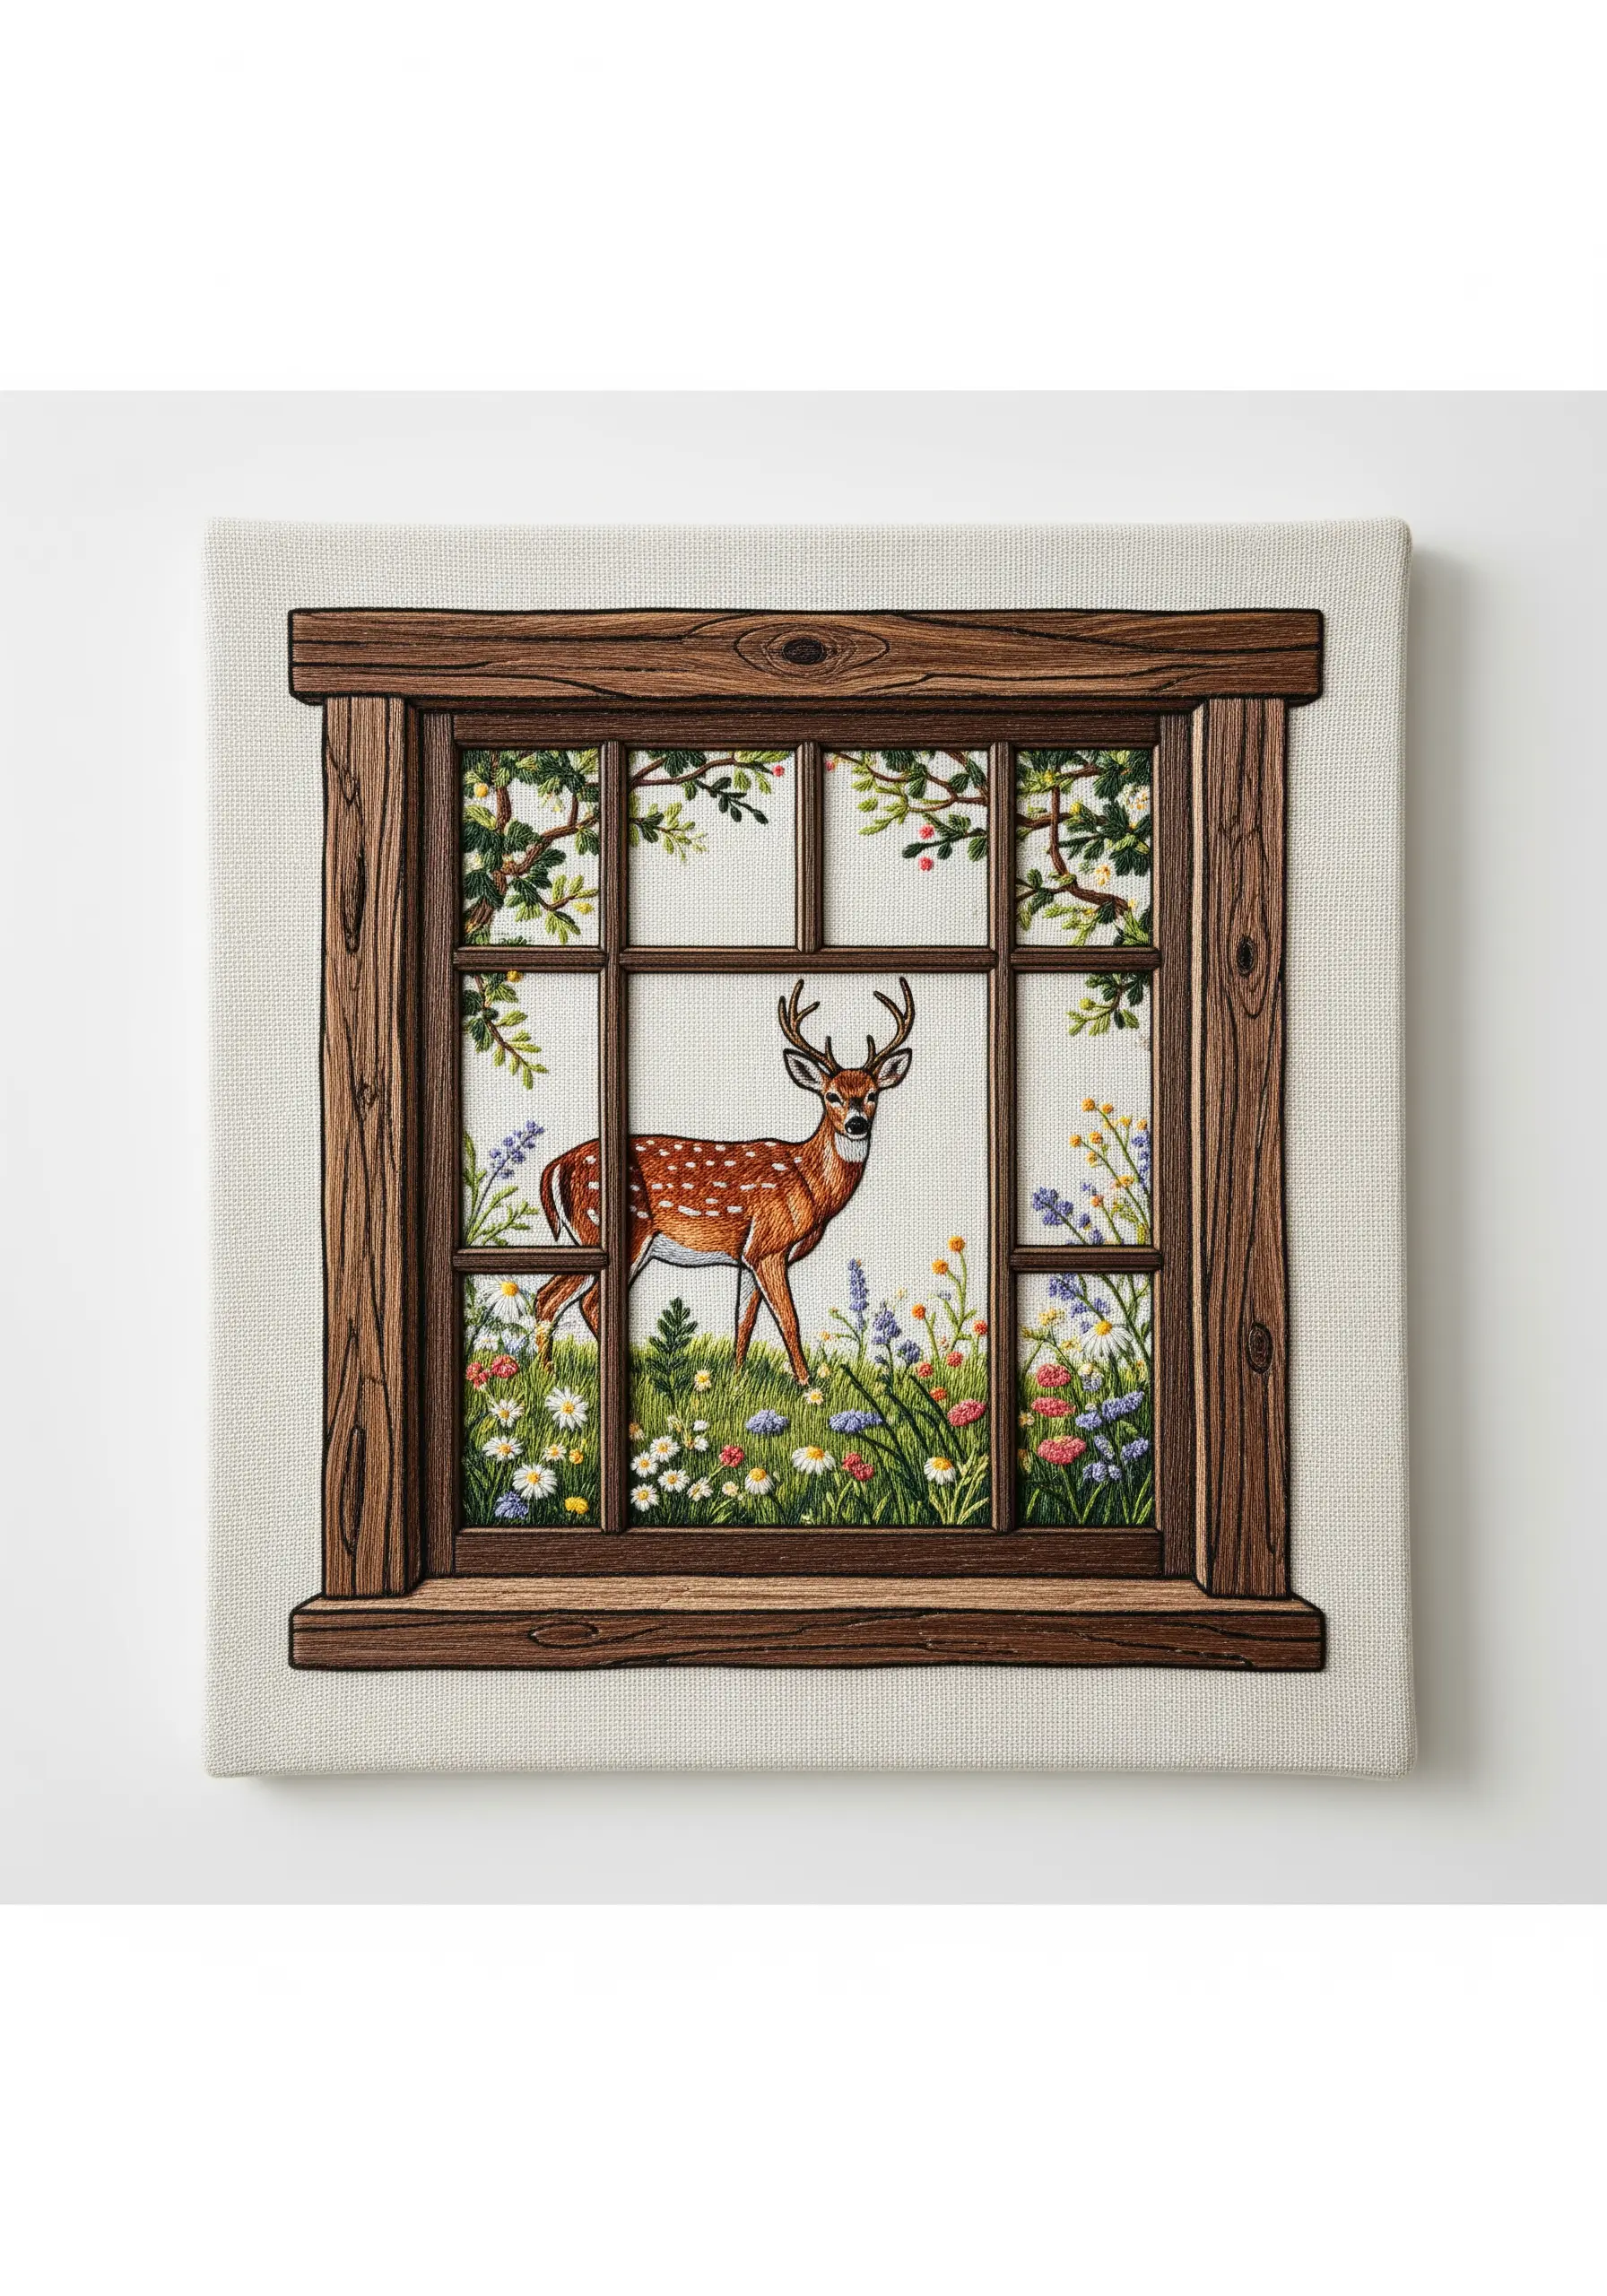
To make the embroidered window frame look like real wood, use long-and-short stitch with several shades of brown floss.
The key is to keep your stitches running in the same direction as the wood grain would.
Incorporate a few stitches of a lighter tan for highlights and a darker brown for knots and shadows.
This attention to stitch direction turns a simple border into a realistic element, adding depth to your framed embroidery ideas.
16. Create a 3D Flower Crown with Dimensional Stitches
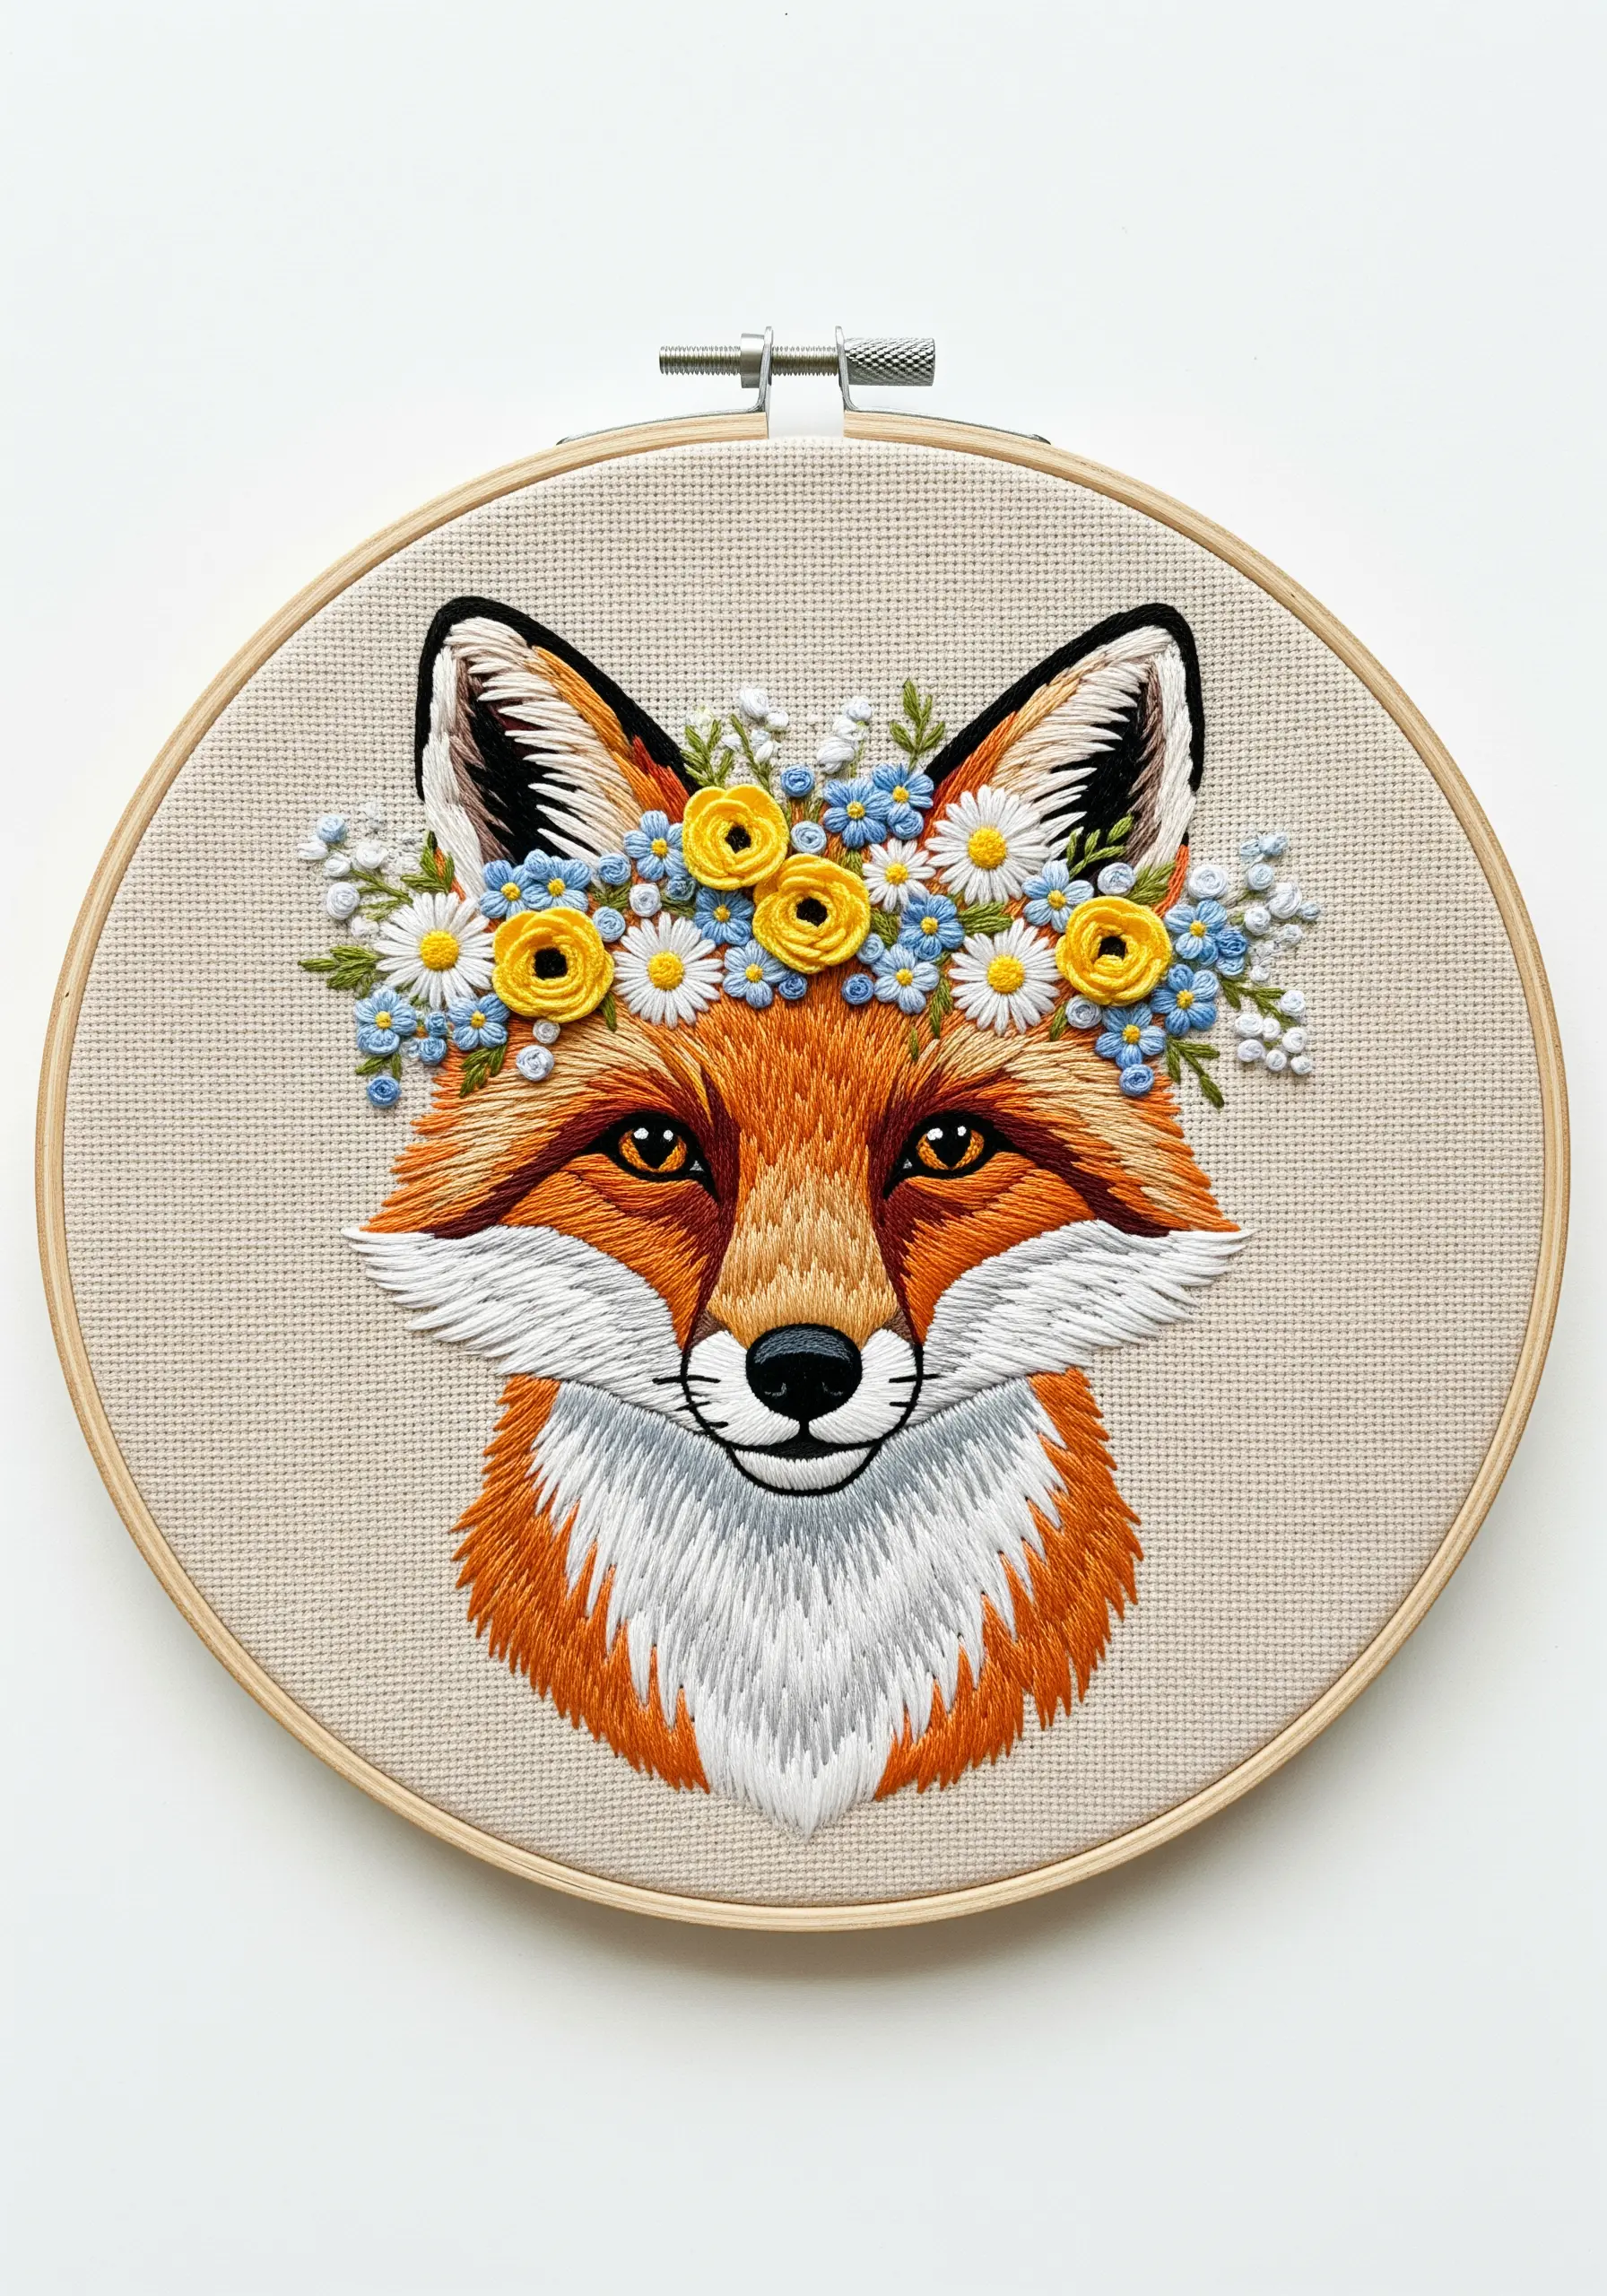
Elevate a simple portrait by adding a dimensional flower crown. This requires a mix of classic floral stitches that sit raised off the fabric.
Use woven wheel stitches for the yellow roses, bullion knots for the small white daisies, and French knots for the blue forget-me-nots.
Use a slightly thicker thread (3-4 strands) for the flowers to give them more volume compared to the single-strand thread painting of the fox’s fur.
This contrast in texture is what makes the floral framed embroidery ideas so captivating.
17. Finish a Professional-Looking Embroidered Patch
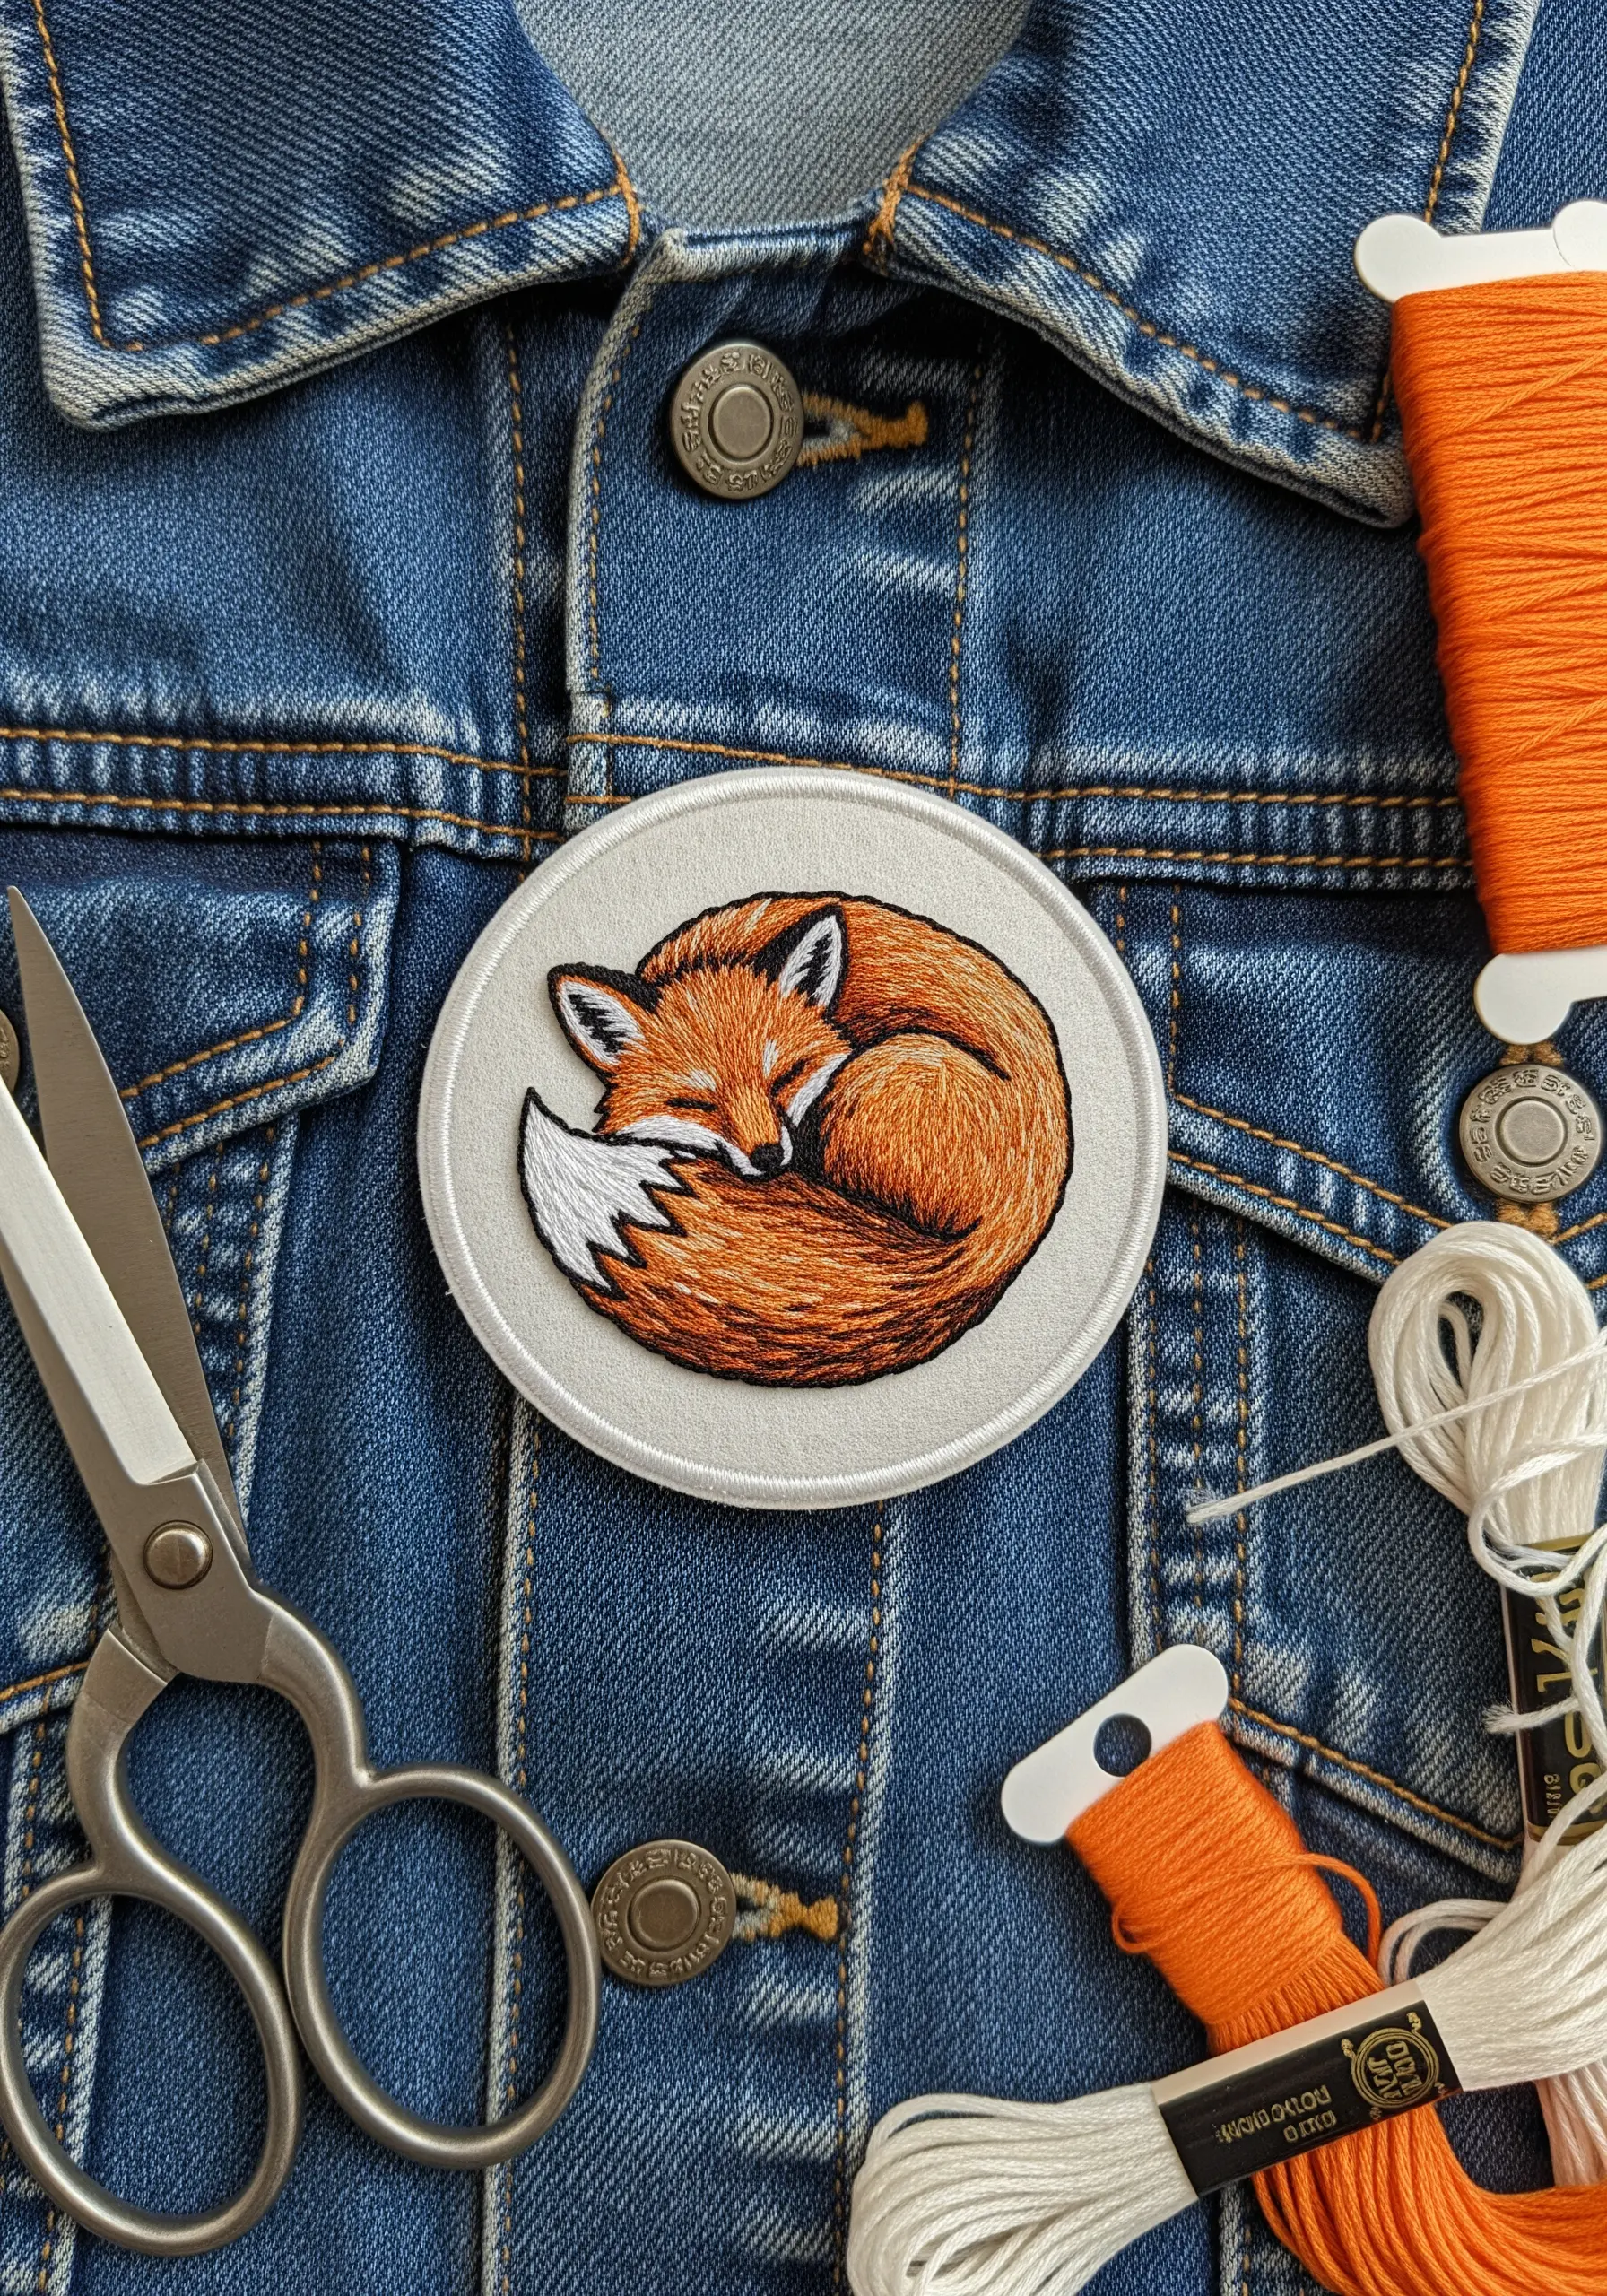
To turn your embroidery into a wearable patch, stitch your design on a non-stretchy, sturdy fabric like felt or cotton canvas.
Once the embroidery is complete, carefully trim the fabric, leaving a 1/4 inch border around the design.
Fold this border to the back and secure it with an iron-on adhesive backing for a clean finish.
Alternatively, for a stitched edge, place your fabric in the hoop with a water-soluble stabilizer and satin stitch a thick border directly around your design before trimming close to the edge.
This detail is key for turning aesthetic embroidery ideas into durable art.
18. Define Compositional Sections with Texture
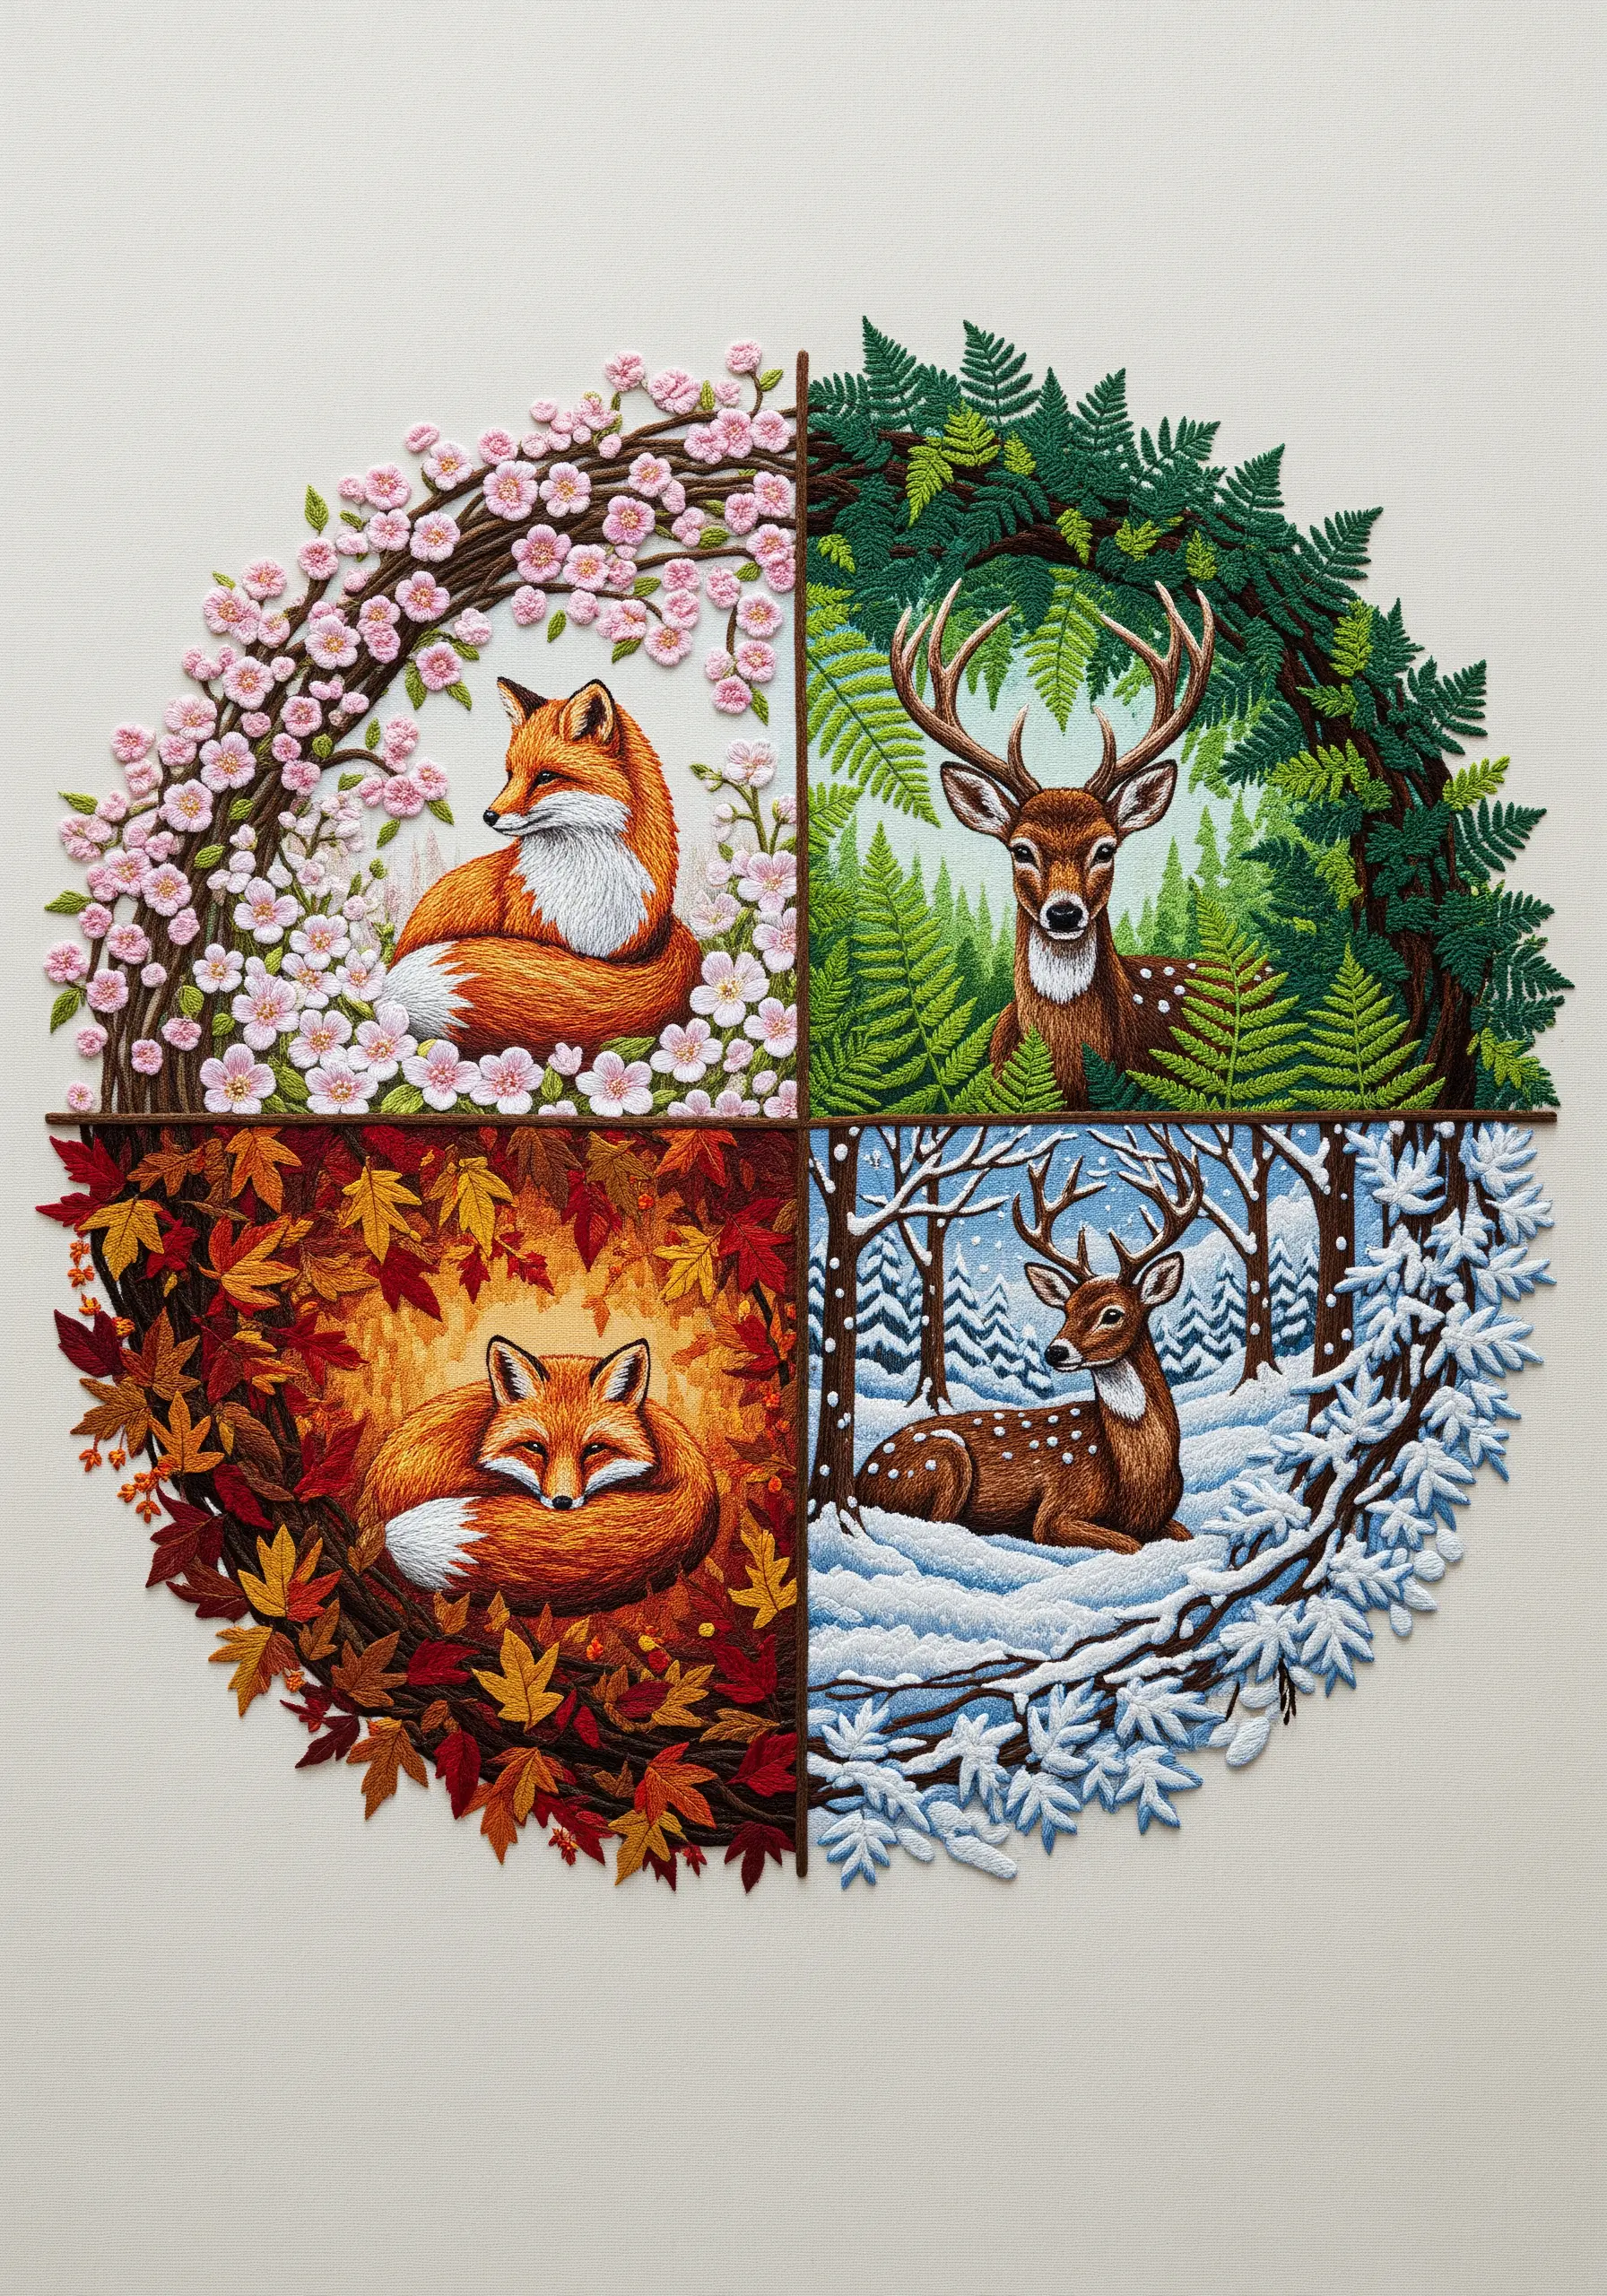
When combining multiple scenes in one piece, use distinct textures to define each quadrant while maintaining a cohesive look.
Assign a dominant stitch to each season: clusters of French knots and lazy daisies for spring’s blossoms, dense fishbone stitch for summer’s ferns, layered satin stitch for autumn’s leaves, and sparse seed stitch for winter’s snow.
This approach uses texture, not just color, to tell the story of each season, creating a rich, tactile narrative.
19. Build Atmospheric Perspective with Thread Weight

Create a sense of depth in your forest scene by strategically varying your thread weight and stitch density.
Use more strands of floss (4-6) and dense, textured stitches like French knots for the foreground elements—the fox, the large mushroom, and the closest trees.
For the mid-ground and background trees, switch to fewer strands (1-2) and simpler, flatter stitches like backstitch or stem stitch.
This technique, known as atmospheric perspective, makes the foreground pop and the background recede, adding incredible depth to your realistic mushroom forest floor embroidery projects.
20. Use Blackwork Hatching for Elegant Shading
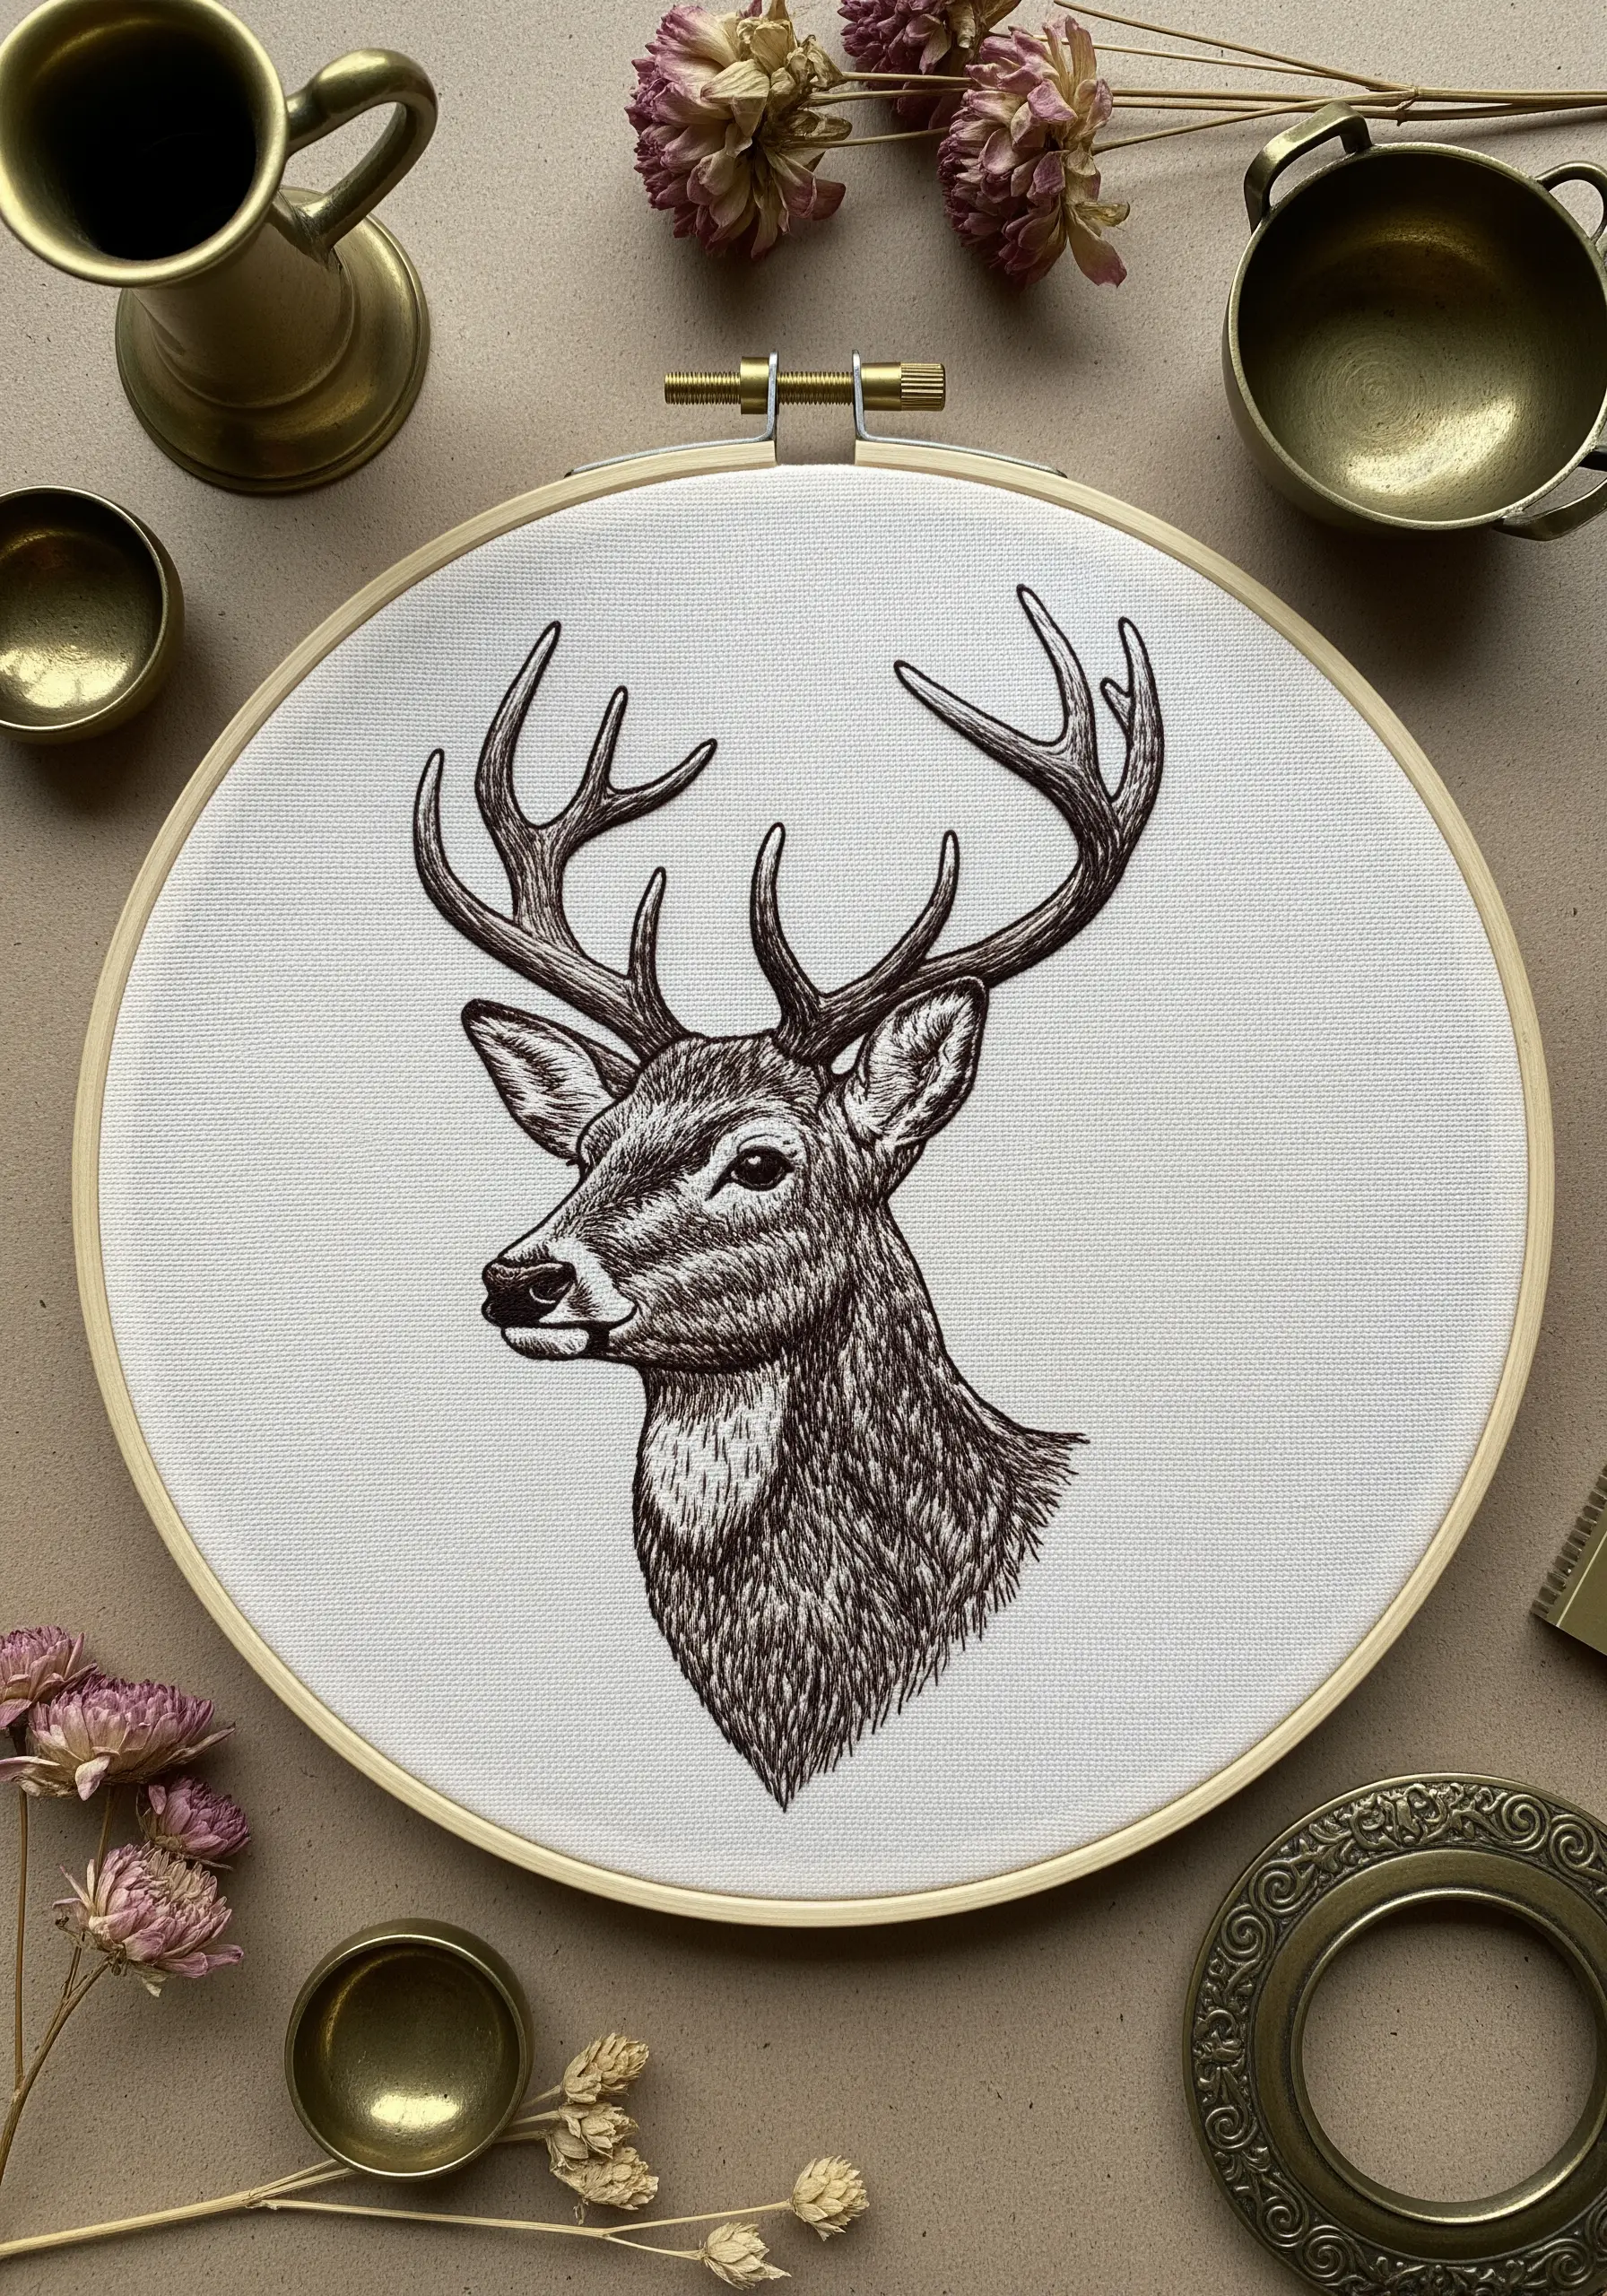
Instead of filling areas with satin stitch, create depth and shadow using blackwork techniques like hatching and cross-hatching.
Use a single strand of dark brown or black thread and fill shaded areas with tiny, parallel straight stitches (hatching).
For darker shadows, add another layer of stitches going in a different direction (cross-hatching).
The density of your lines controls the tone, allowing you to create a sophisticated, sketch-like portrait with incredible detail. It’s a perfect technique for minimal DIY embroidery pieces.
21. Add Tactile Details with Beads or Colonial Knots
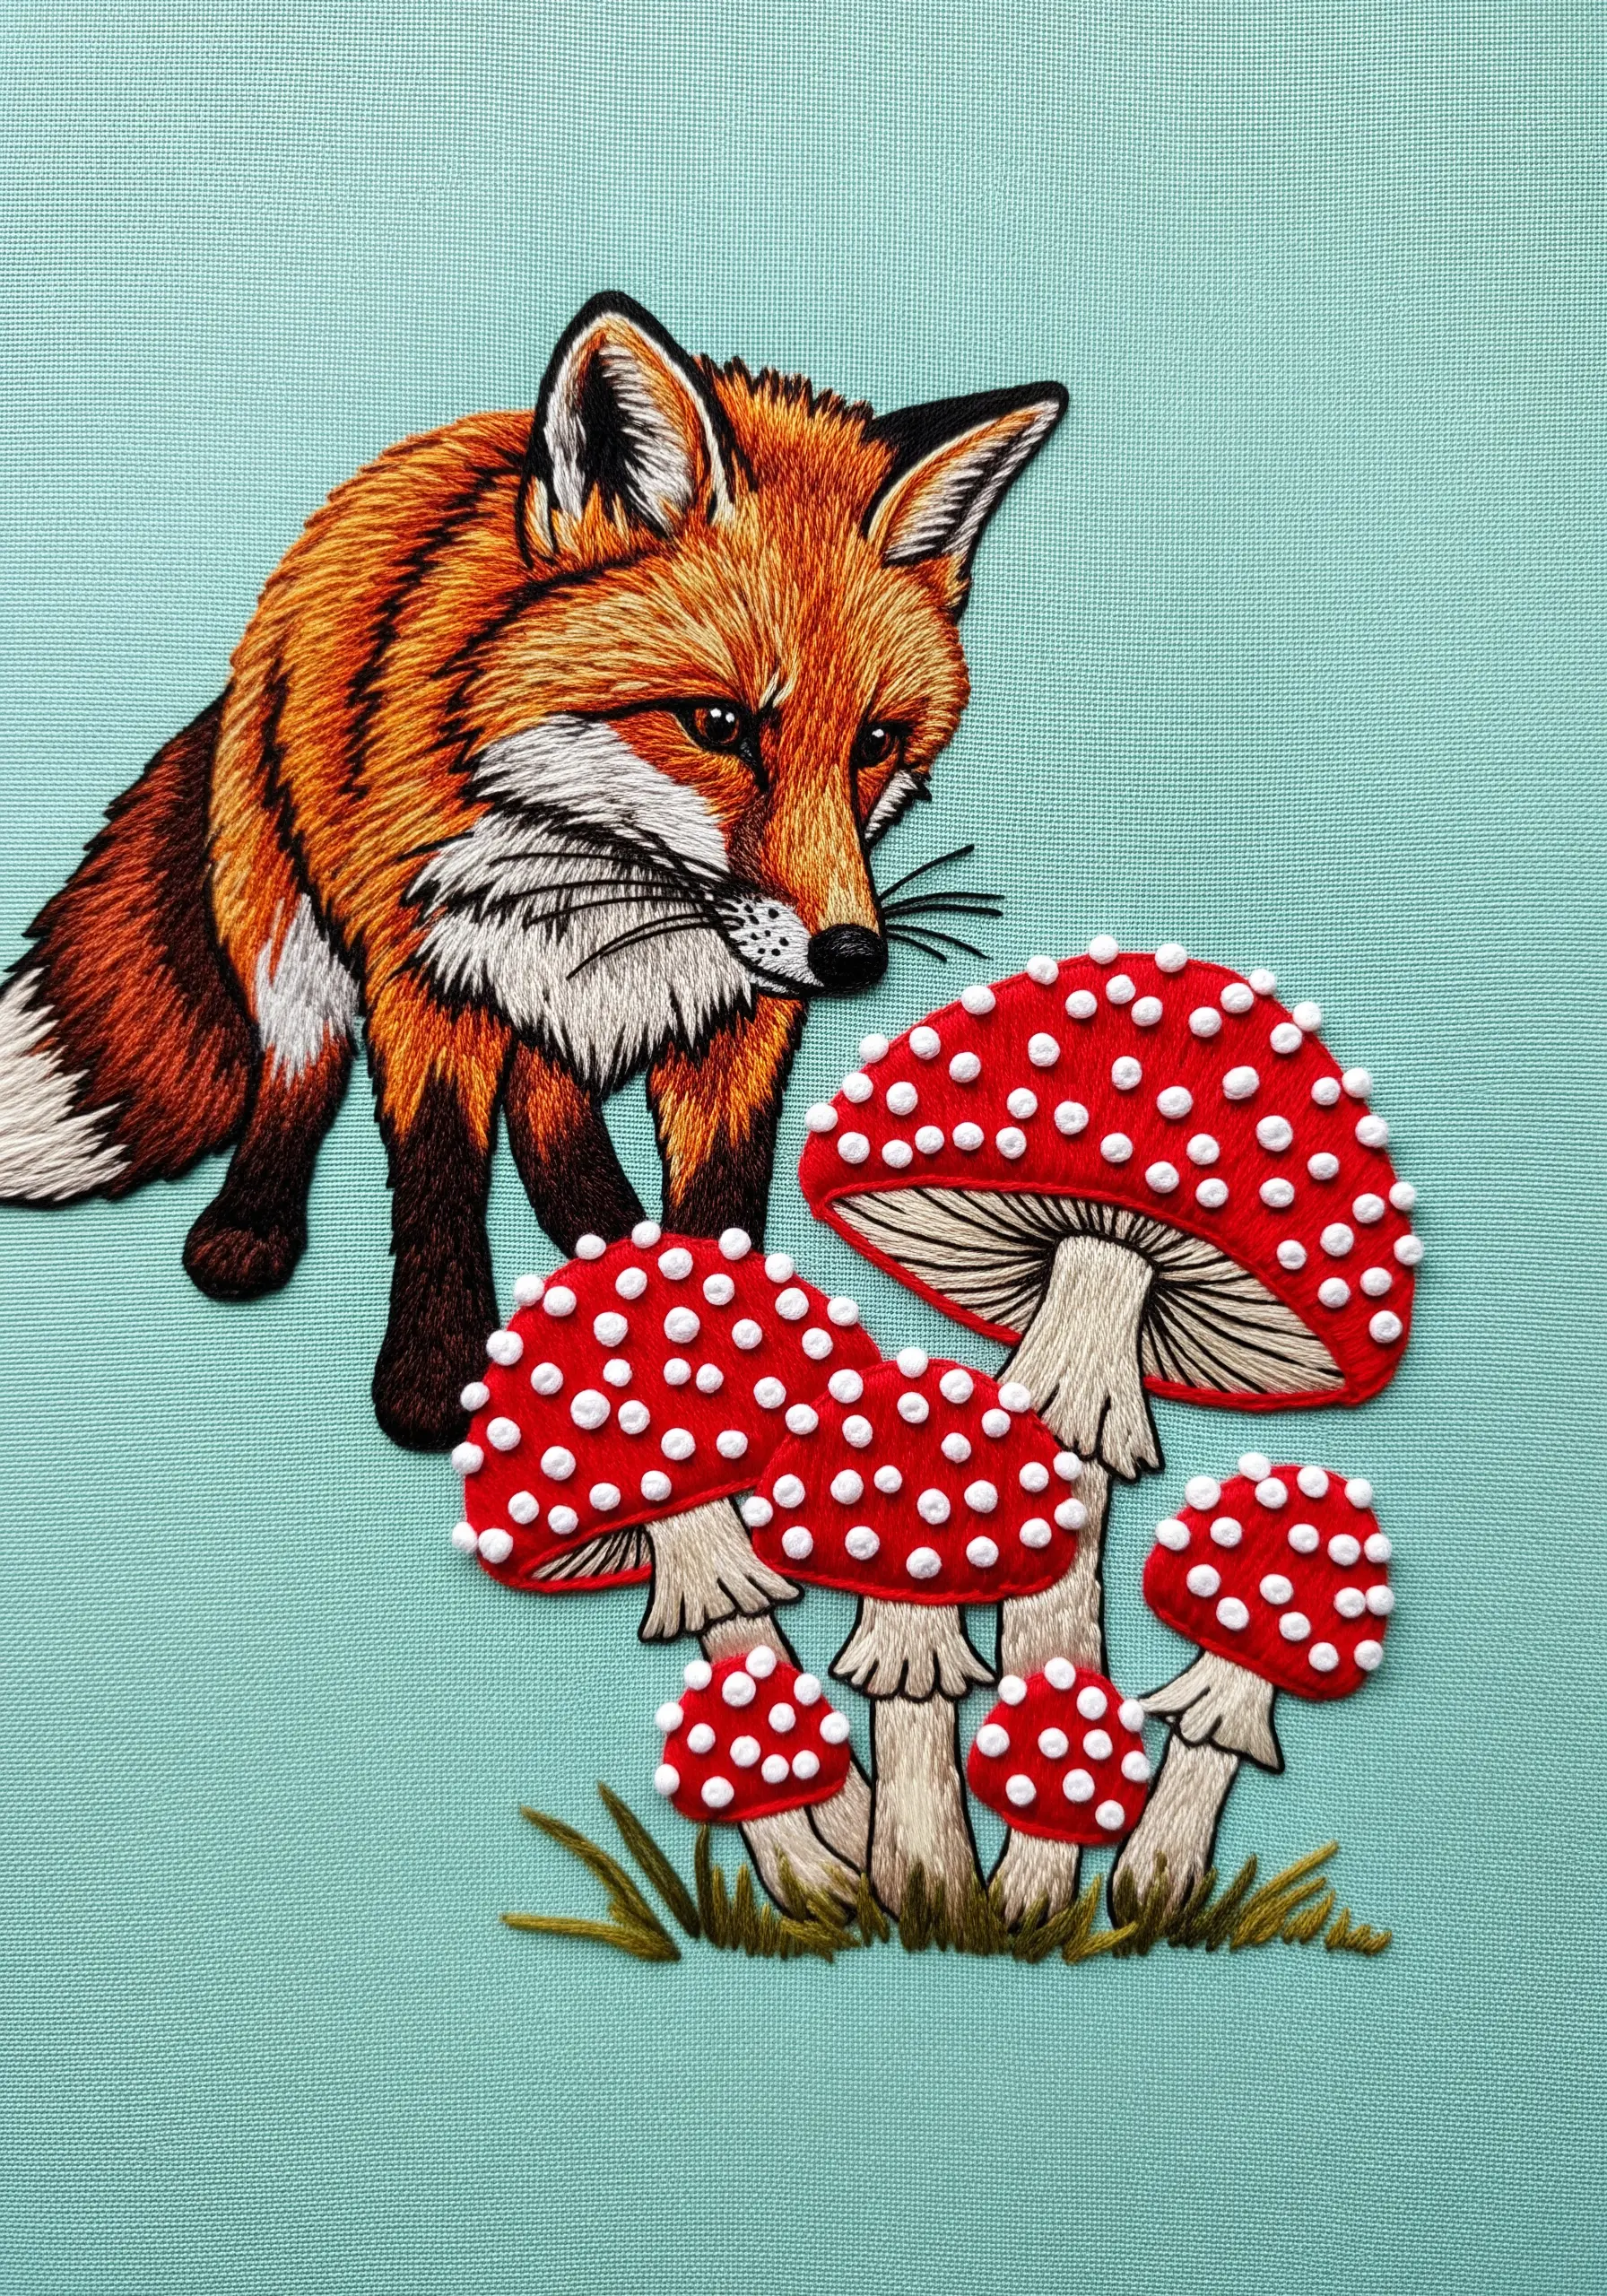
To make the mushroom spots truly stand out, add a three-dimensional, tactile element.
You can achieve this by sewing on tiny white seed beads, which add a subtle sheen and a perfectly round shape.
For a pure embroidery approach, use Colonial knots instead of French knots. Colonial knots are sturdier, rounder, and less likely to pull through the fabric, making them perfect for creating uniform, raised dots.
This technique is a simple way to introduce high-texture fabric collage embroidery projects.
22. Select Fabric and Stitches for Functional Decor
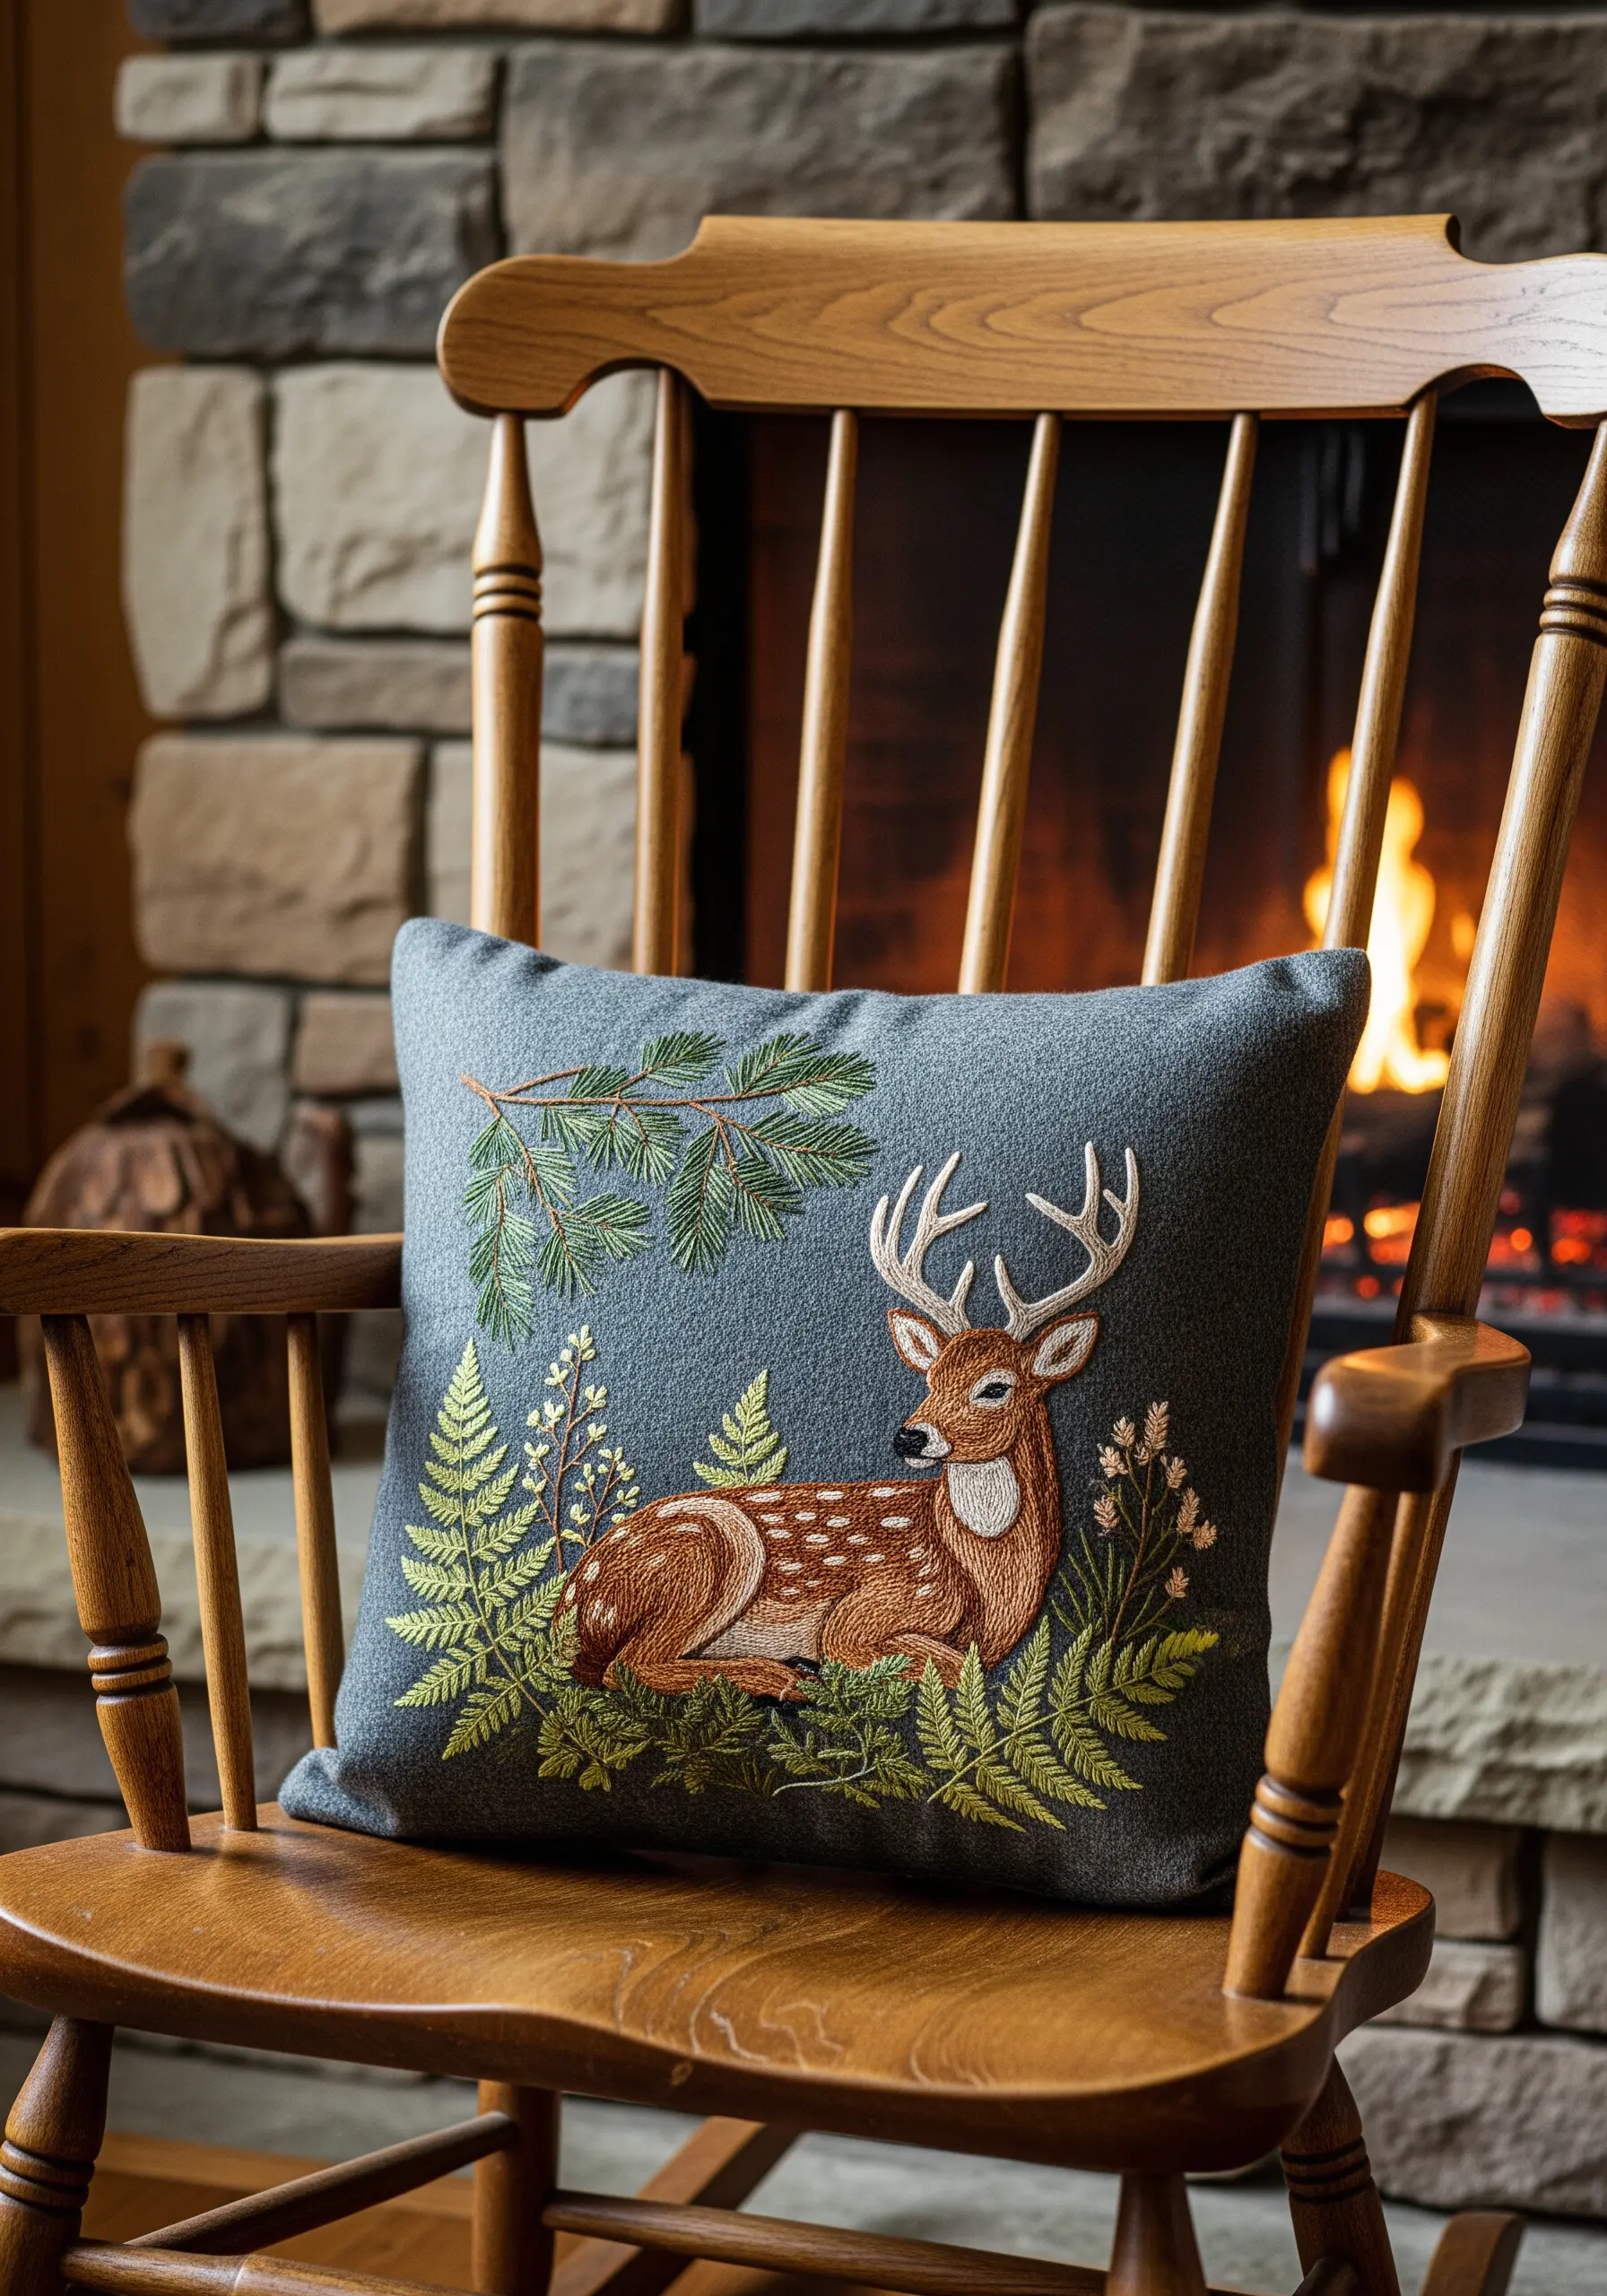
When embroidering home decor like a pillow, choose your materials for durability as well as beauty.
Work on a medium-weight, tightly woven fabric like cotton canvas or a linen blend, which can withstand both dense stitching and everyday use.
For the foliage, use sturdy stitches like the fern stitch or fishbone stitch that won’t easily snag.
These practical choices ensure your beautiful handmade embroidery touches are also lasting ones.


