

A table runner is more than just a piece of fabric; it’s a canvas waiting for your story. With just a needle and thread, you can transform this simple textile into a piece of art that feels intentional, personal, and far more luxurious than its materials suggest.
Forget the idea that impressive embroidery requires years of practice. The secret to an expensive-looking finish often lies in a few thoughtful choices: the perfect stitch for a leaf, a color palette that brings a design to life, or a composition that guides the eye with grace.
Here, you’ll discover techniques that offer immediate visual impact. From mastering the smooth curve of a whipped backstitch to blending colors with a simple long-and-short stitch, these ideas are designed to elevate your work, build your confidence, and help you create something truly beautiful for your home.
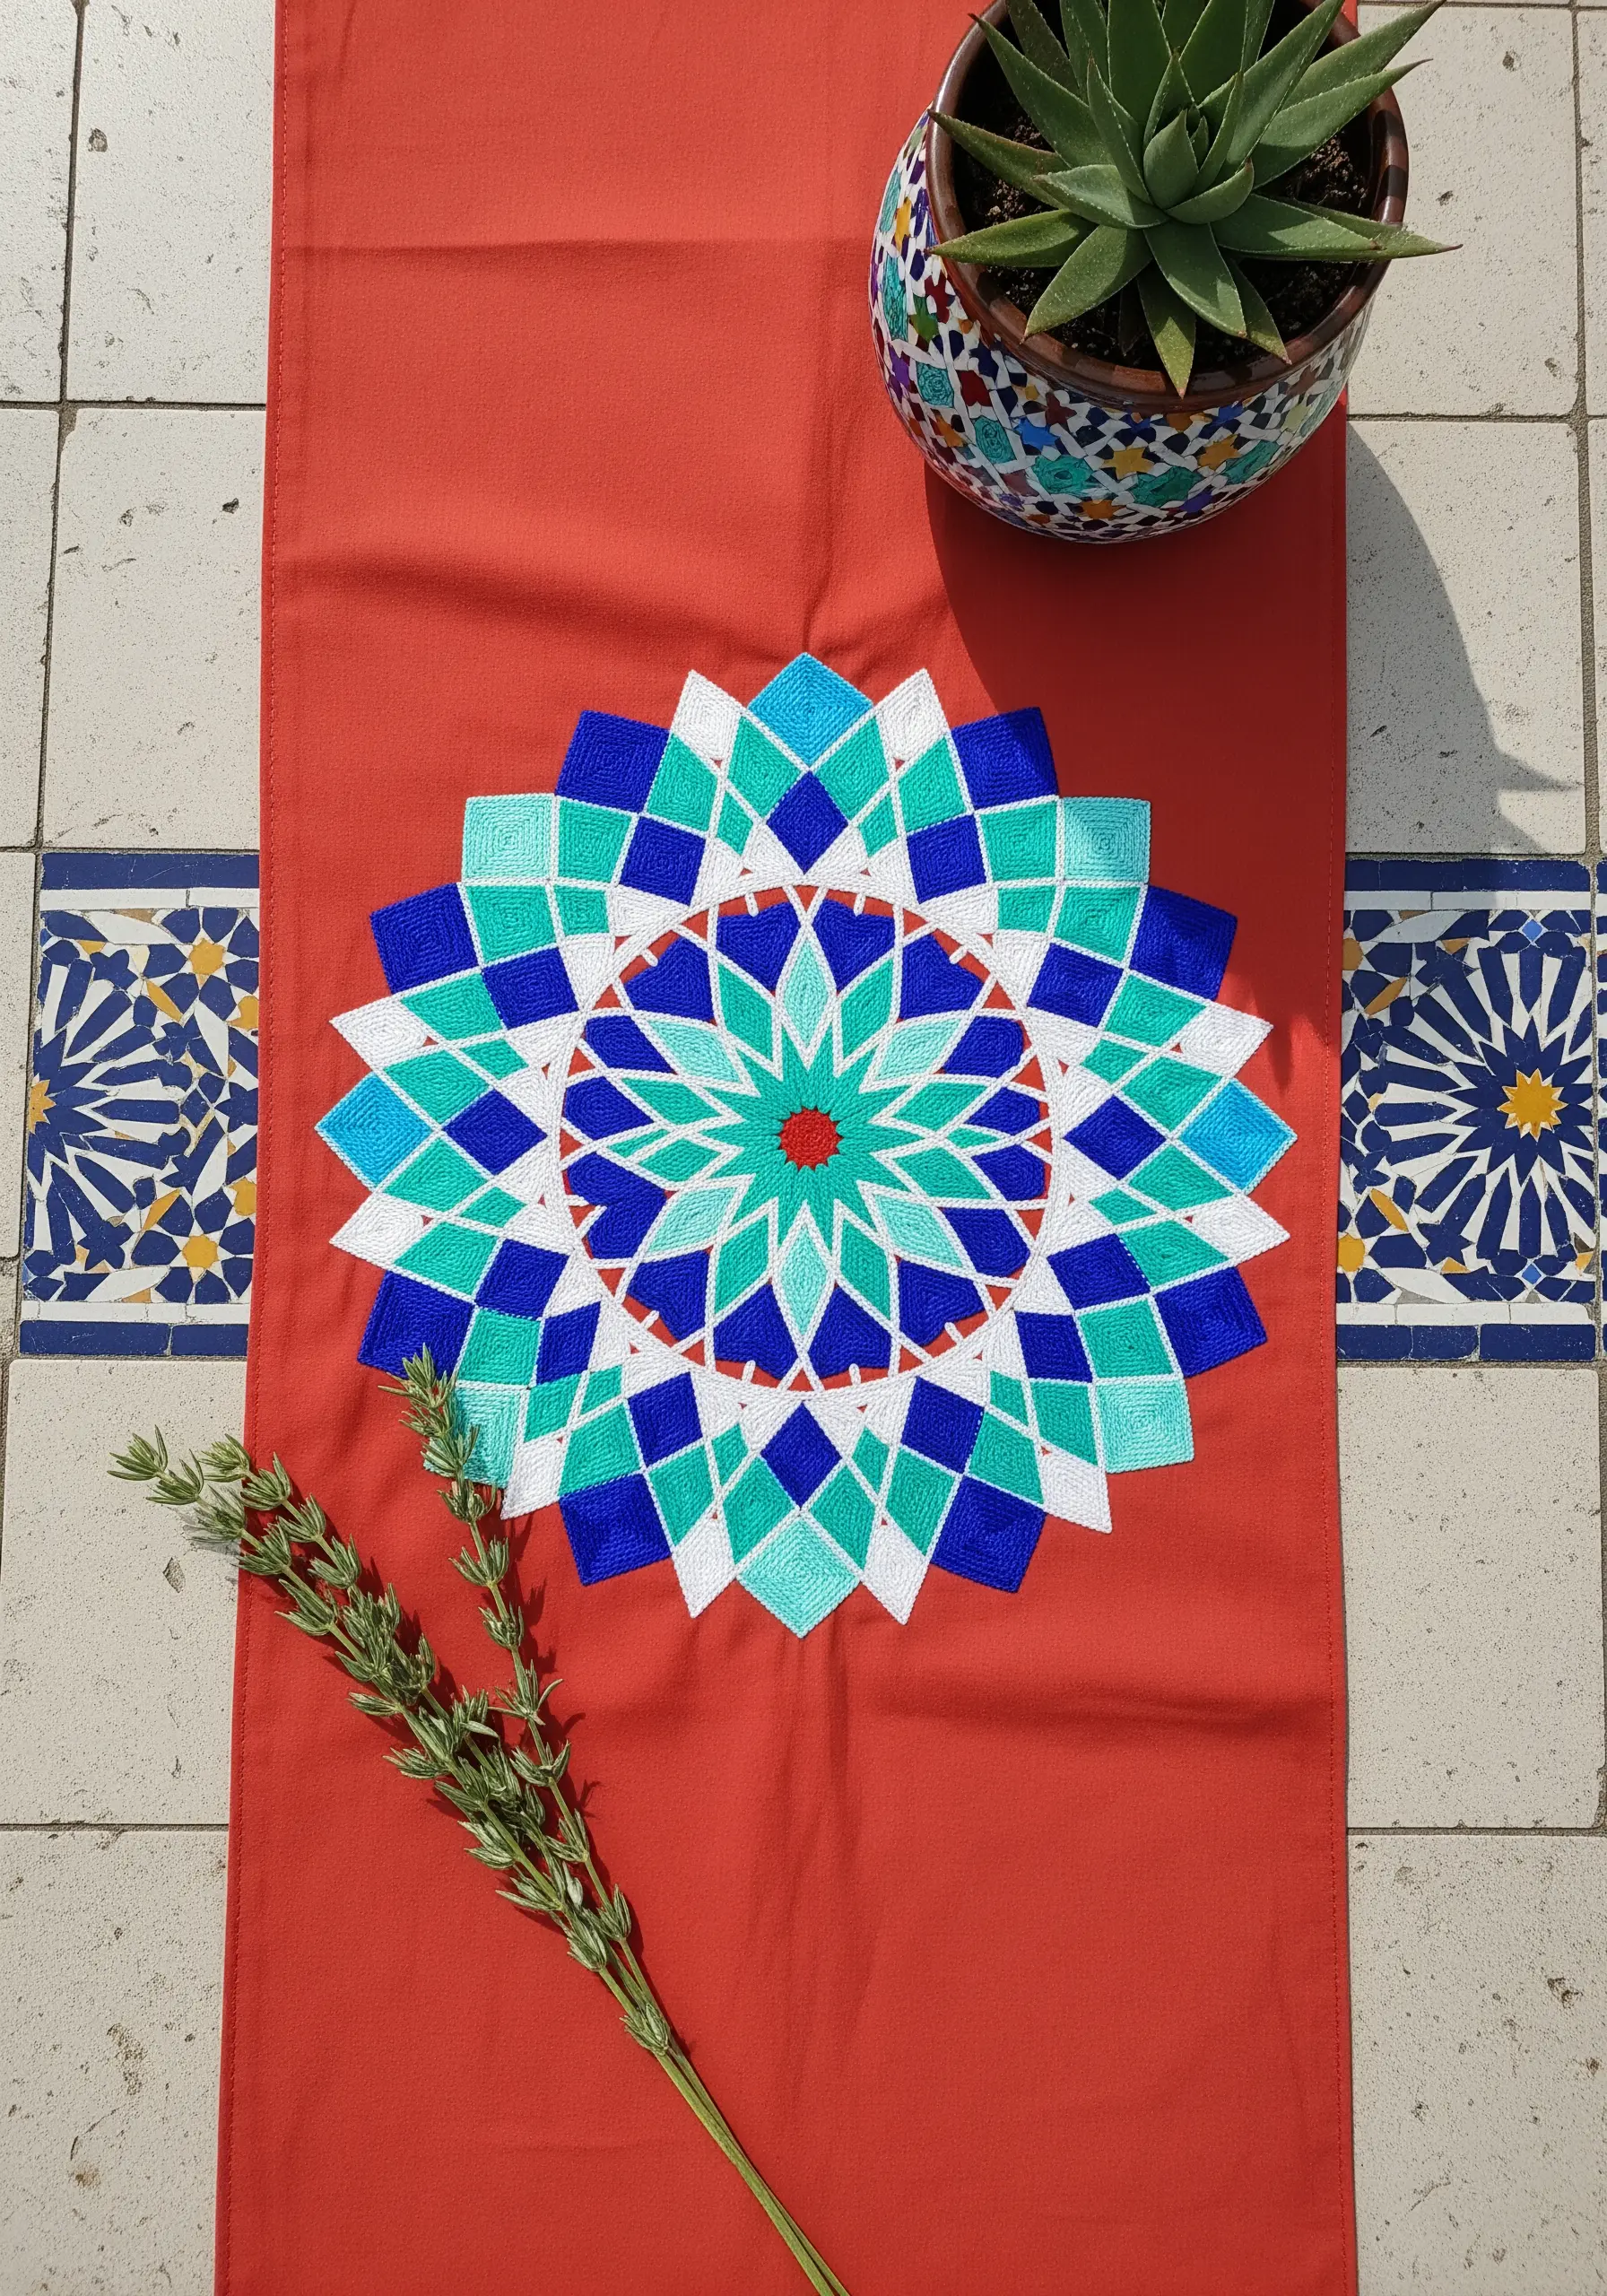
1. Frame Your Table with Folk-Art Charm

Create a bold, graphic border using dense cross-stitches or vertical satin stitches on an even-weave linen or Aida cloth.
The grid-like nature of the fabric ensures your stitches are uniform, giving the design a clean, polished look that feels both traditional and modern.
Stick to a limited palette of three high-contrast colors—like red, white, and blue—to let the geometric shapes stand out.
This method simplifies the process, turning each motif into a manageable block of color that any handmade decor enthusiast can master.
2. Embrace Art Deco Elegance with Metallics
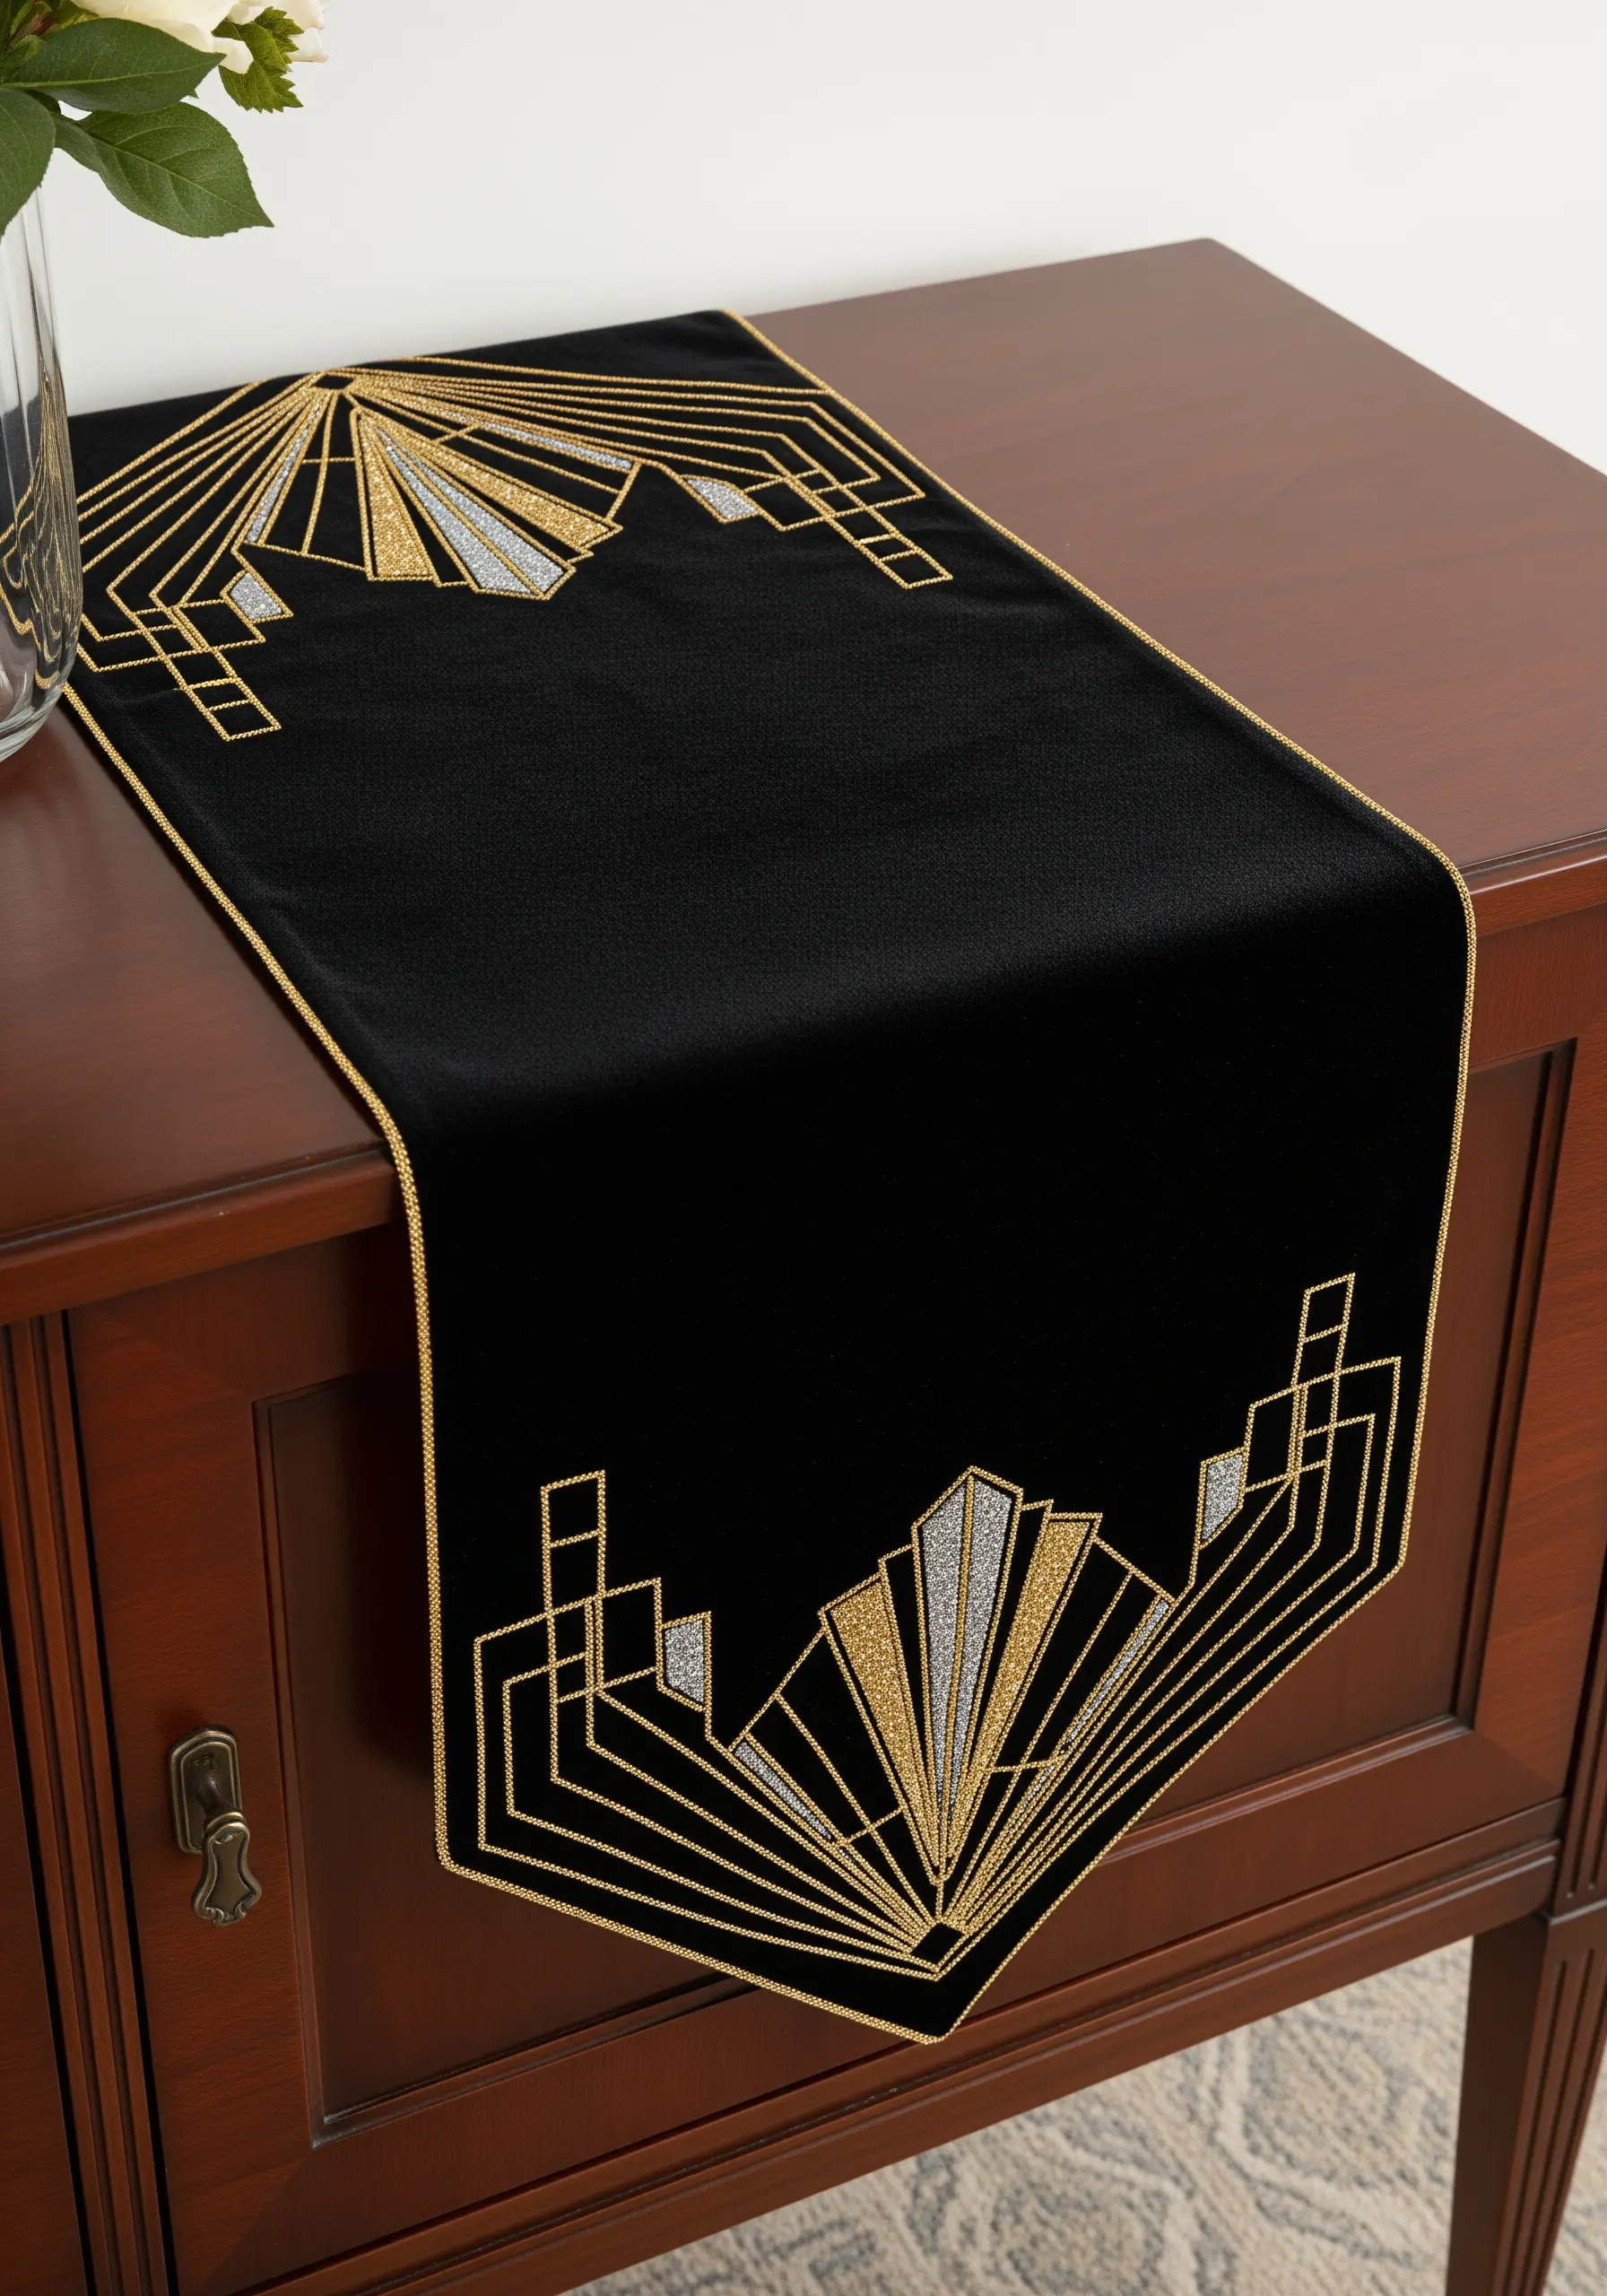
Capture the glamour of Art Deco by outlining your geometric shapes with a fine split stitch before filling them with satin stitch.
This preliminary outline acts as a containing wall, making your satin stitches lie flat and creating incredibly sharp, defined edges—especially important for slippery metallic threads.
Work on a dark, heavy fabric like black velvet or linen to make the gold and silver threads pop, creating a look of pure luxury.
Consider using metallic thread wall art projects as inspiration for your shapes and lines.
3. Create a Realistic Botanical Corner

Achieve lifelike texture by assigning a different stitch to each plant element.
Use a fishbone stitch for the eucalyptus leaves to create a central vein and gentle curve, then add tiny detached chain stitches (lazy daisies) for the daisy petals.
For the lavender, cluster French knots tightly at the top of the stem, using a slightly darker purple at the base to create depth.
This multi-stitch approach makes your botanical embroidery wall pieces feel dimensional and alive.
4. Stitch a Minimalist Ginkgo Branch

When stitching on a shiny, slippery fabric like satin, always use a stabilizer on the back to prevent puckering and keep your tension even.
Use a single color of thread to focus entirely on the graceful lines and texture of the ginkgo leaves.
Vary the direction of your satin stitches within each leaf segment to mimic the way light reflects off its natural fan shape.
This technique elevates a simple design into a sophisticated statement, similar to monochrome floral embroidery ideas.
5. Master Meditative Sashiko Stitching
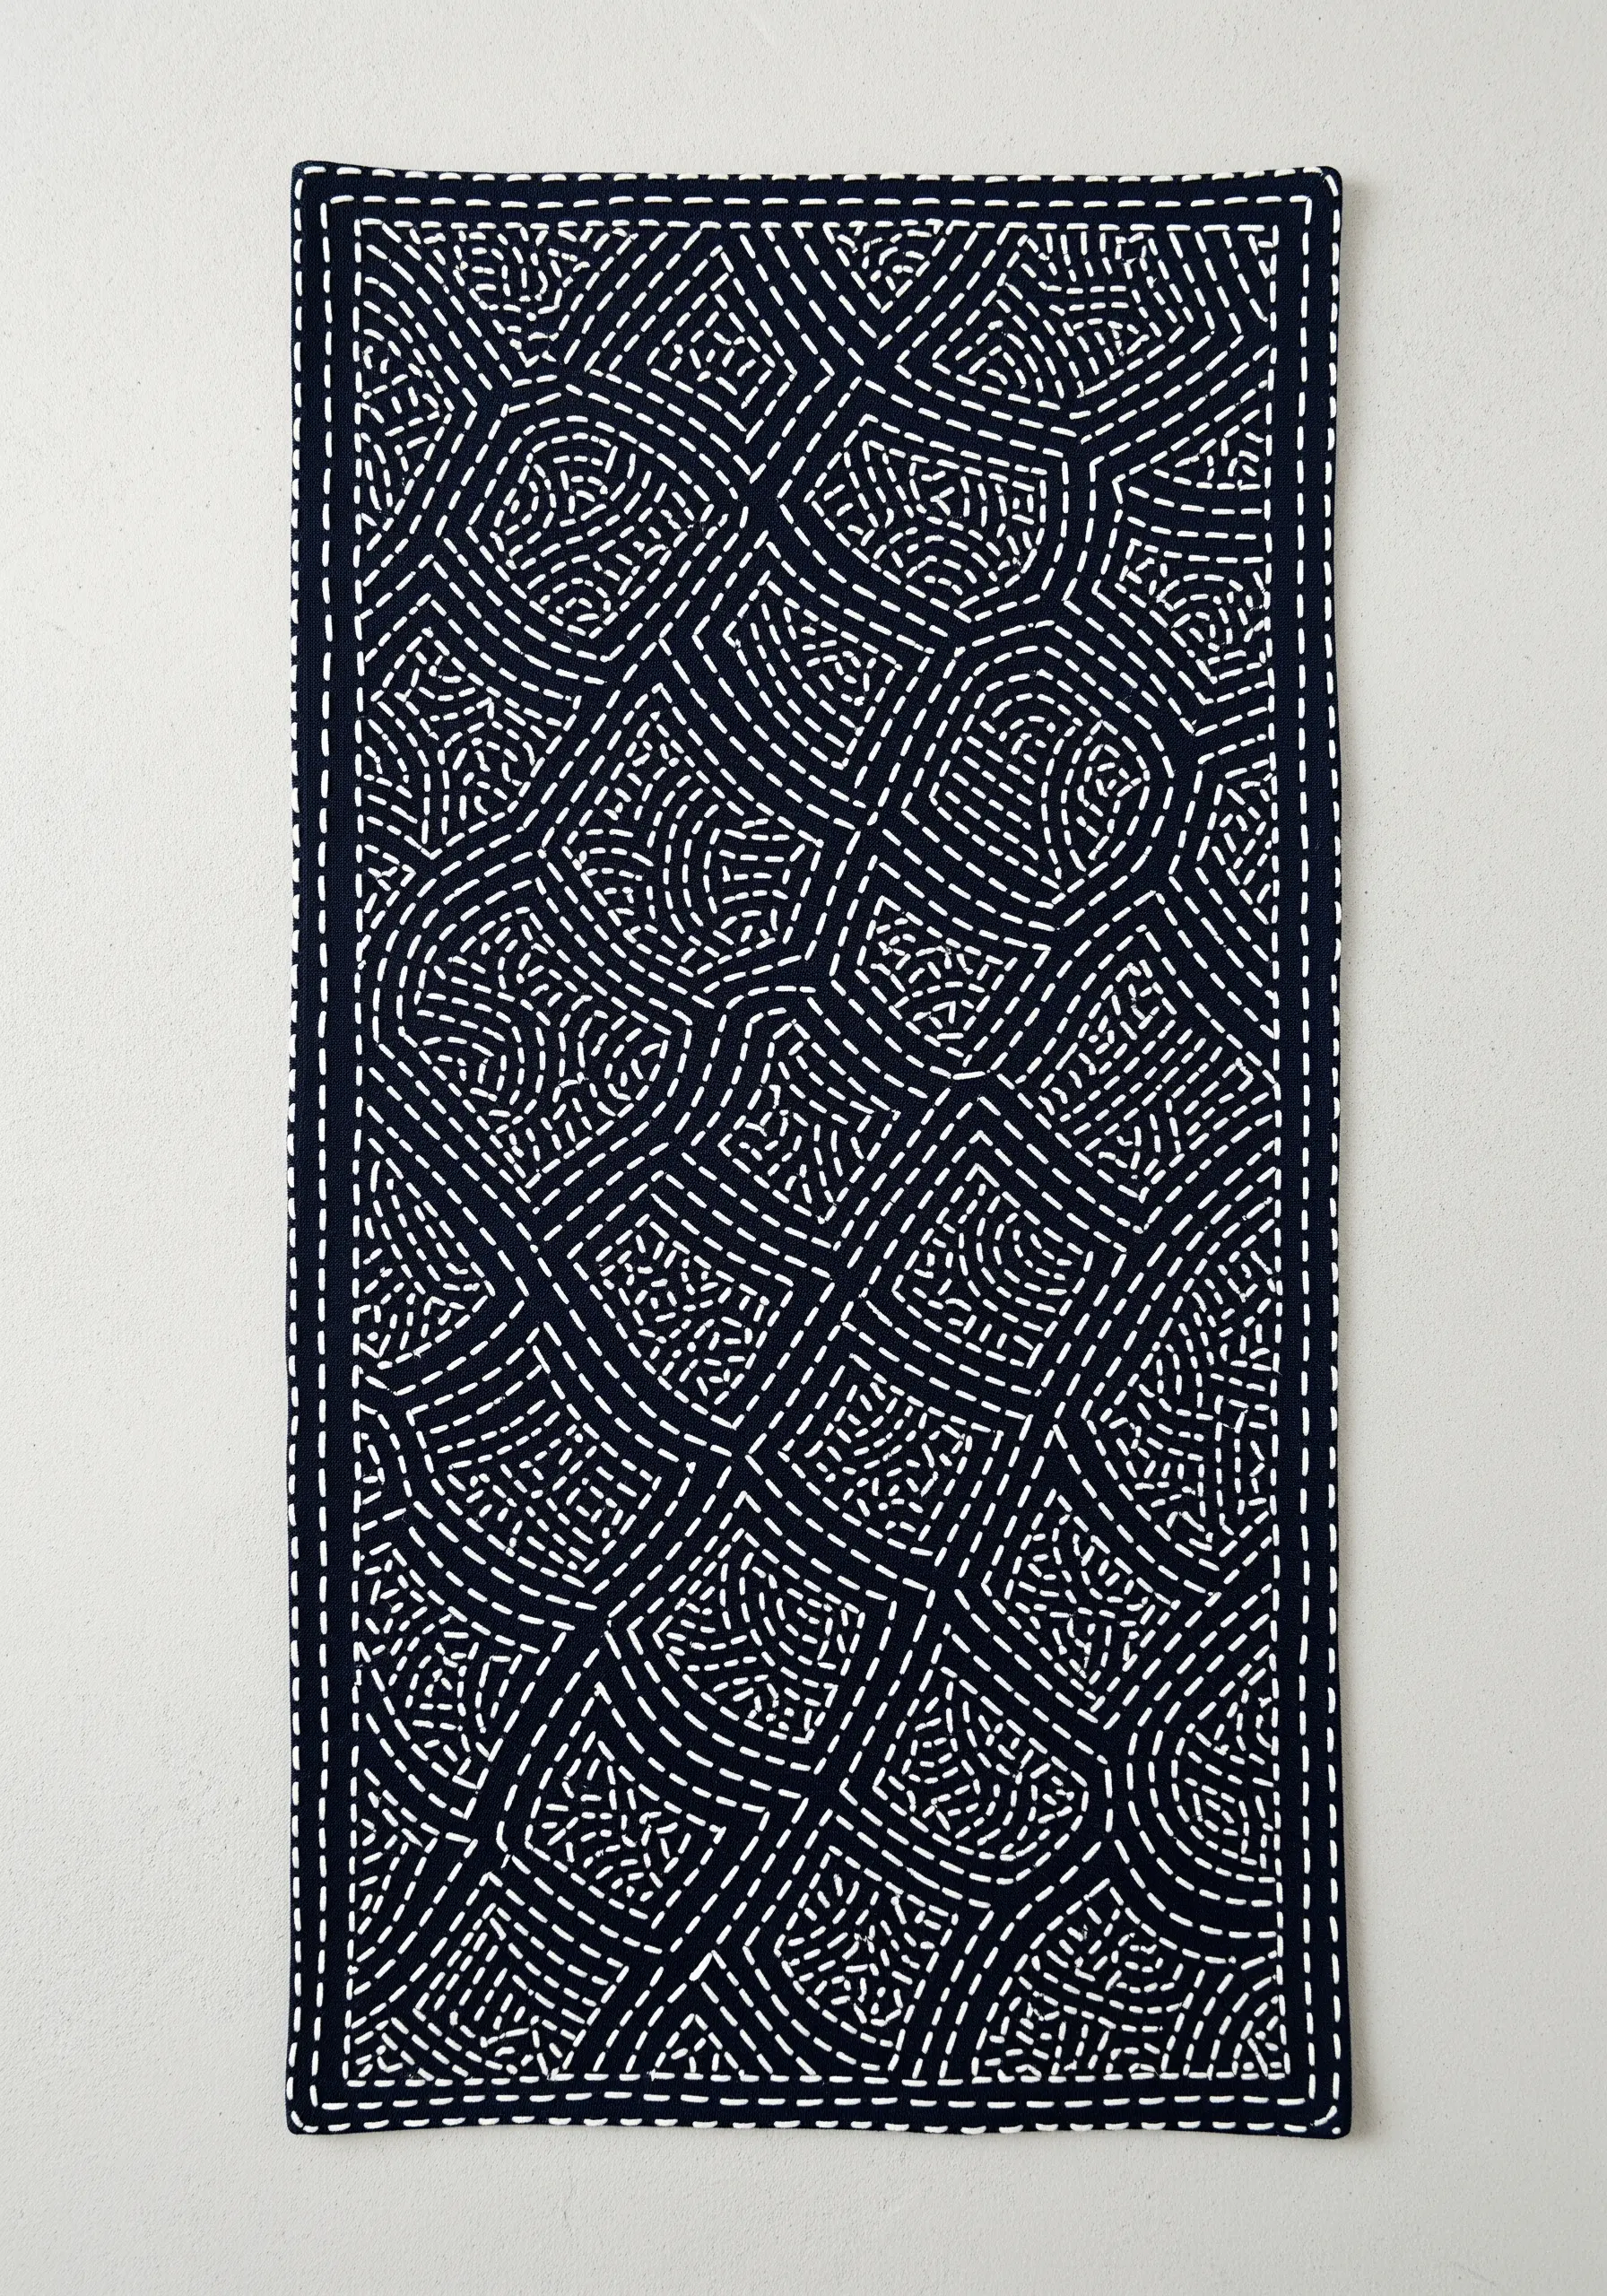
This entire design is created with a simple running stitch, proving that consistency is more impactful than complexity.
Use a traditional Sashiko thread, which is thicker and has a tighter twist than standard embroidery floss, to make your stitches pronounced against the dark fabric.
Focus on keeping your stitch length and the gaps between them as even as possible—this rhythm is what gives Sashiko its serene, captivating beauty.
It’s one of the most elegant minimalist stitch designs, perfect for creating a large-scale pattern without overwhelm.
6. Blend Colors for Lush Tropical Leaves

To achieve a smooth, painted look on the monstera leaves, use the long-and-short stitch instead of a standard satin stitch.
This technique allows you to blend multiple shades of green seamlessly, creating realistic gradients without harsh lines.
For the delicate palm fronds, switch to a simple backstitch or stem stitch. This contrast in texture makes the large leaves feel even more lush and full.
Experiment with different tropical leaf flower combination patterns to create your own unique jungle design.
7. Design a Playful Autumn Scatter

Let your fabric do the heavy lifting by choosing a rich, autumnal color like burnt orange or mustard yellow.
Stitch your leaf and acorn motifs using a simple satin fill, scattering them in a seemingly random pattern across the runner.
To create a sense of movement, rotate the direction of each motif slightly so they don’t all face the same way.
These earth-tone patterns feel dynamic and festive, perfect for seasonal decor.
8. Capture Mid-Century Modern Vibes

The key to this retro style is precision. Use a fine-tipped, heat-erasable pen to transfer your boomerang and starburst shapes onto the fabric for crisp results.
Use a tight satin stitch for the solid shapes and tiny French knots or seed stitches for the dots at the end of the starbursts.
Outlining the boomerangs with a single line of split stitch in a contrasting color will give them that clean, graphic-novel definition.
These modern thread art techniques turn simple shapes into a stylish composition.
9. Add Dimension with Lace Appliqué

Combine embroidery with mixed media by creating a celestial scene on dark velvet.
First, carefully cut a crescent shape from a piece of lace fabric. Secure it to your runner with tiny, nearly invisible whip stitches around the edge using a matching thread.
Then, scatter satin-stitched stars around the lace moon, varying their sizes and using a metallic gold thread for a magical shimmer.
This technique is perfect for creating night garden embroidery ideas with depth and texture.
10. Stitch a Meandering Wildflower Path
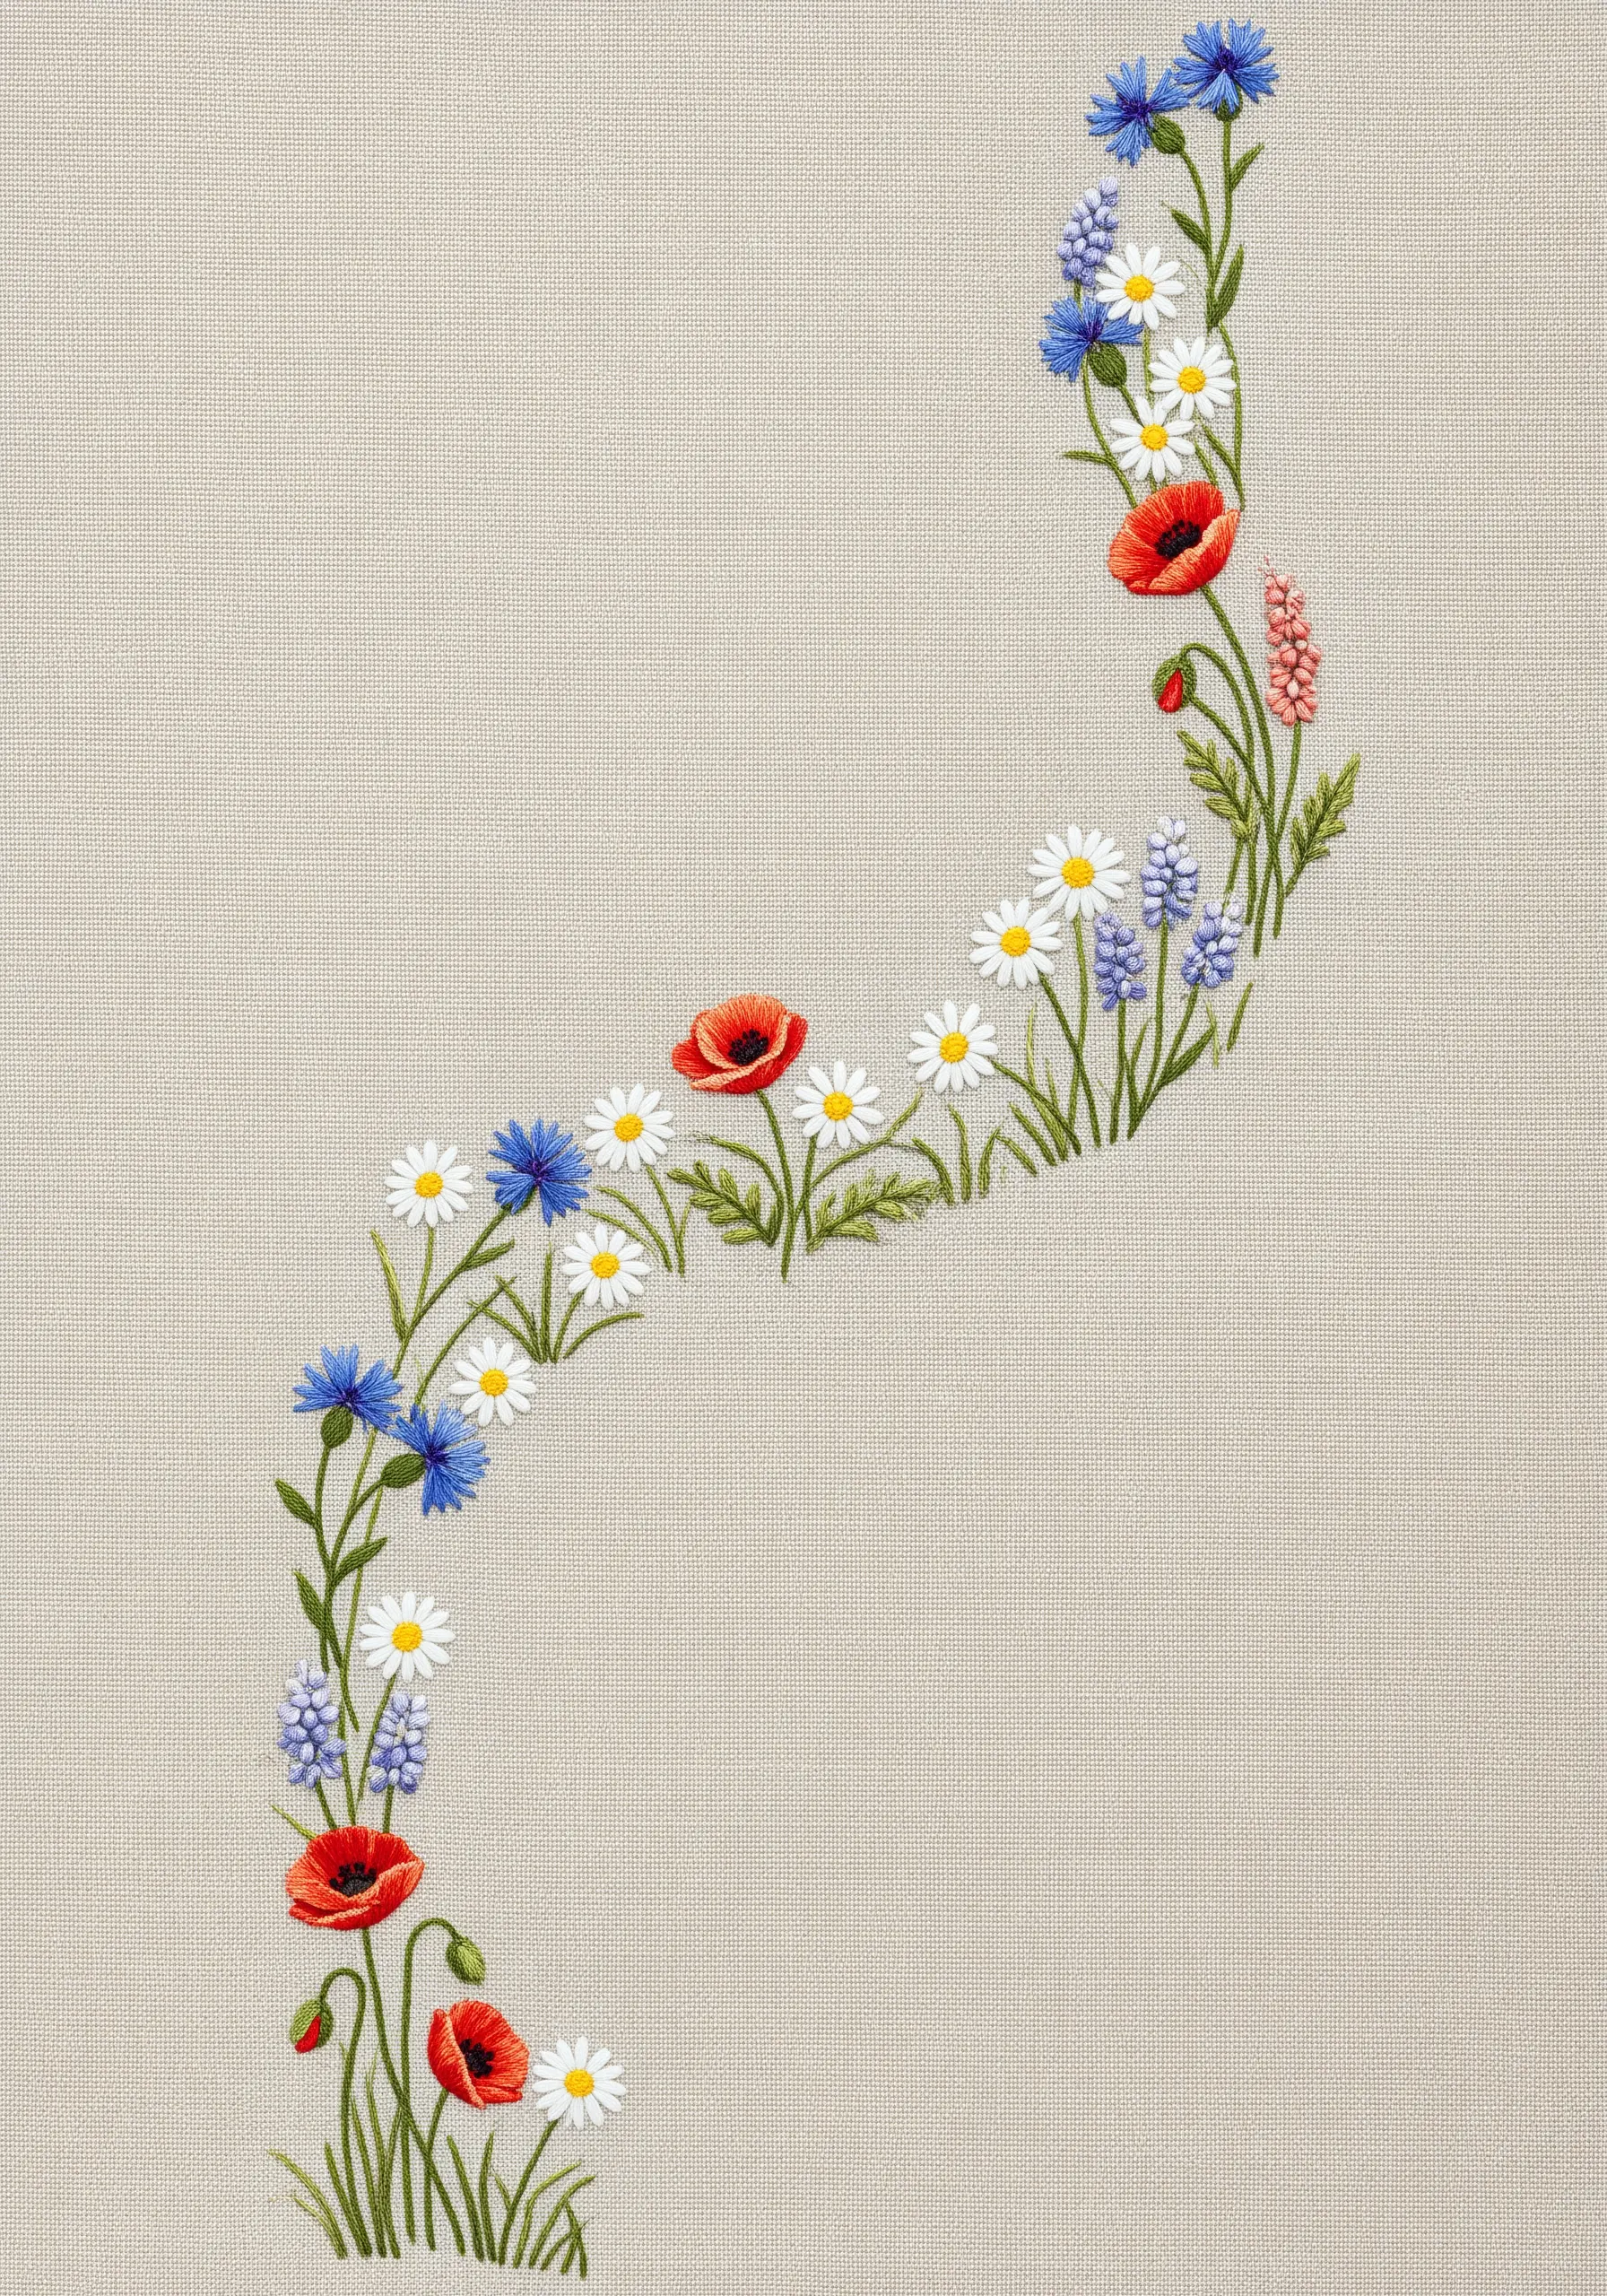
Create a natural, flowing composition by arranging your wildflowers in a gentle S-curve down the center of the runner.
This organic line guides the eye gracefully across the fabric, unlike a stiff, straight border.
Use a variety of simple stitches: lazy daisies for petals, French knots for flower centers, and stem stitch for the vines.
This approach transforms simple motifs into elegant, wild botanical wreath patterns that feel alive.
11. Play with Line and Texture

This design creates impact through the powerful contrast between clean lines and dense texture.
Use a simple backstitch or stem stitch in a bright white to create the sharp, geometric honeycomb outline.
Then, fill in select hexagons with hundreds of tightly packed French knots. The resulting bumpy texture will be raised and wonderfully tactile.
This is a fantastic way to explore natural texture embroidery patterns within a modern, graphic framework.
12. Create a Zesty Citrus Scatter

To make your satin-stitched fruits look extra neat, first outline each segment with a split stitch in the same color.
This creates a slightly raised edge that your satin stitches can tuck up against, resulting in perfectly smooth, contained shapes.
Scatter a few simple lazy-daisy flowers between the fruits to add a delicate accent and break up the larger shapes.
These simple line art fruit food motifs bring a fresh, cheerful energy to any kitchen.
13. Achieve Art Nouveau’s Flowing Lines

The signature of Art Nouveau is its elegant, swirling line work. To replicate this, use a couching stitch.
Lay down a thick cord or several strands of embroidery floss along your design line, then use a second, finer thread to tack it down with small, perpendicular stitches.
This technique allows you to create bold, smooth curves that would be difficult to achieve with a standard stitch.
It evokes the style of fiber art installations inspired by famous painters like Alphonse Mucha.
14. Stitch a Frosty Winter Scene
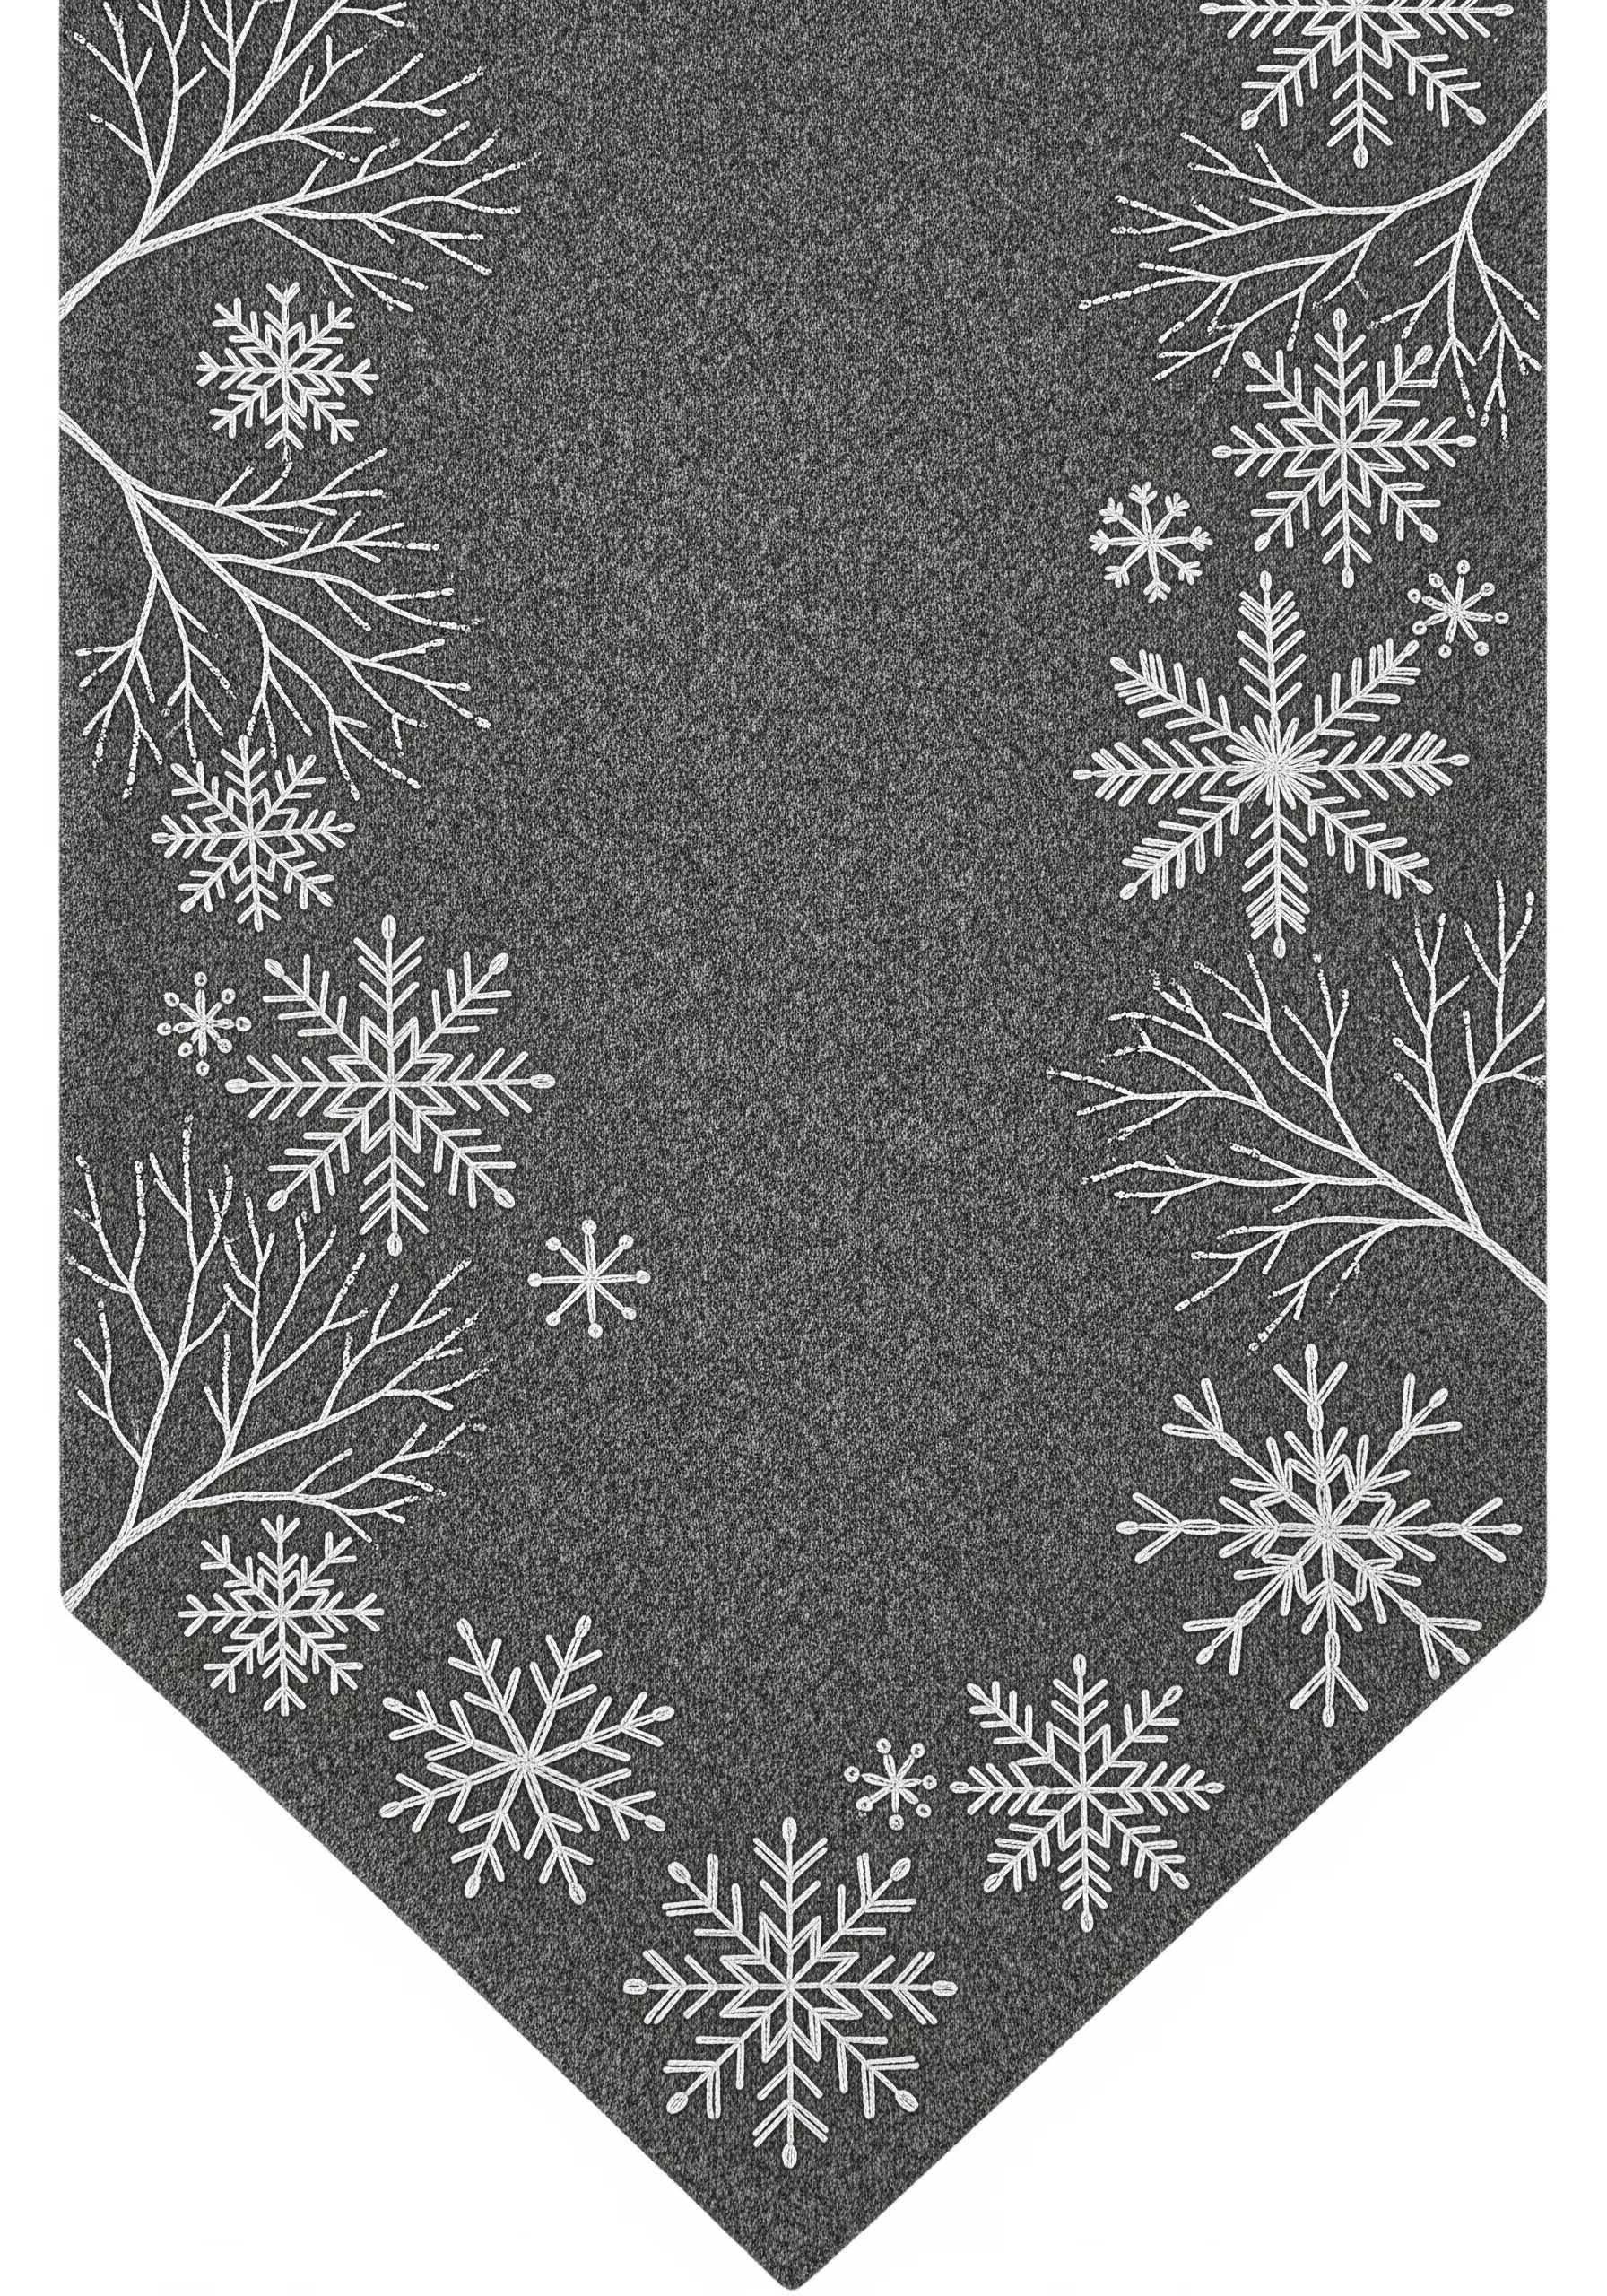
For a crisp, wintery look, choose a textured fabric like dark grey wool felt as your base.
The slightly fuzzy surface of the felt provides a beautiful contrast to the sharp, clean lines of your stitched snowflakes.
Use a bright white or silver metallic thread and simple backstitches to create the delicate, crystalline shapes.
These minimal festive motifs feel sophisticated and timeless for holiday decor.
15. Create a Mosaic with Thread
Recreate the look of intricate tilework using blocks of satin stitch.
To ensure your geometric shapes are perfectly uniform, print your design onto a water-soluble stabilizer and stick it to your fabric.
Stitch directly through the paper, following the lines precisely. When you’re finished, the stabilizer washes away, leaving only your flawless stitching.
This method is perfect for complex cultural embroidery motifs that require precision.
16. Add Dimension with Bullion Knot Roses

The texture in this design comes from the highly dimensional bullion knot. This stitch creates small, coiled tubes of thread that look like tiny rosebuds.
Vary the number of wraps around your needle to create buds of different sizes for a more natural look.
Connect your floral clusters with a simple chain stitch vine, which adds a lovely texture that complements the smooth fabric.
These are perfect for romantic rose embroidery designs that feel lush and three-dimensional.
17. Paint with Thread in Abstract Blocks
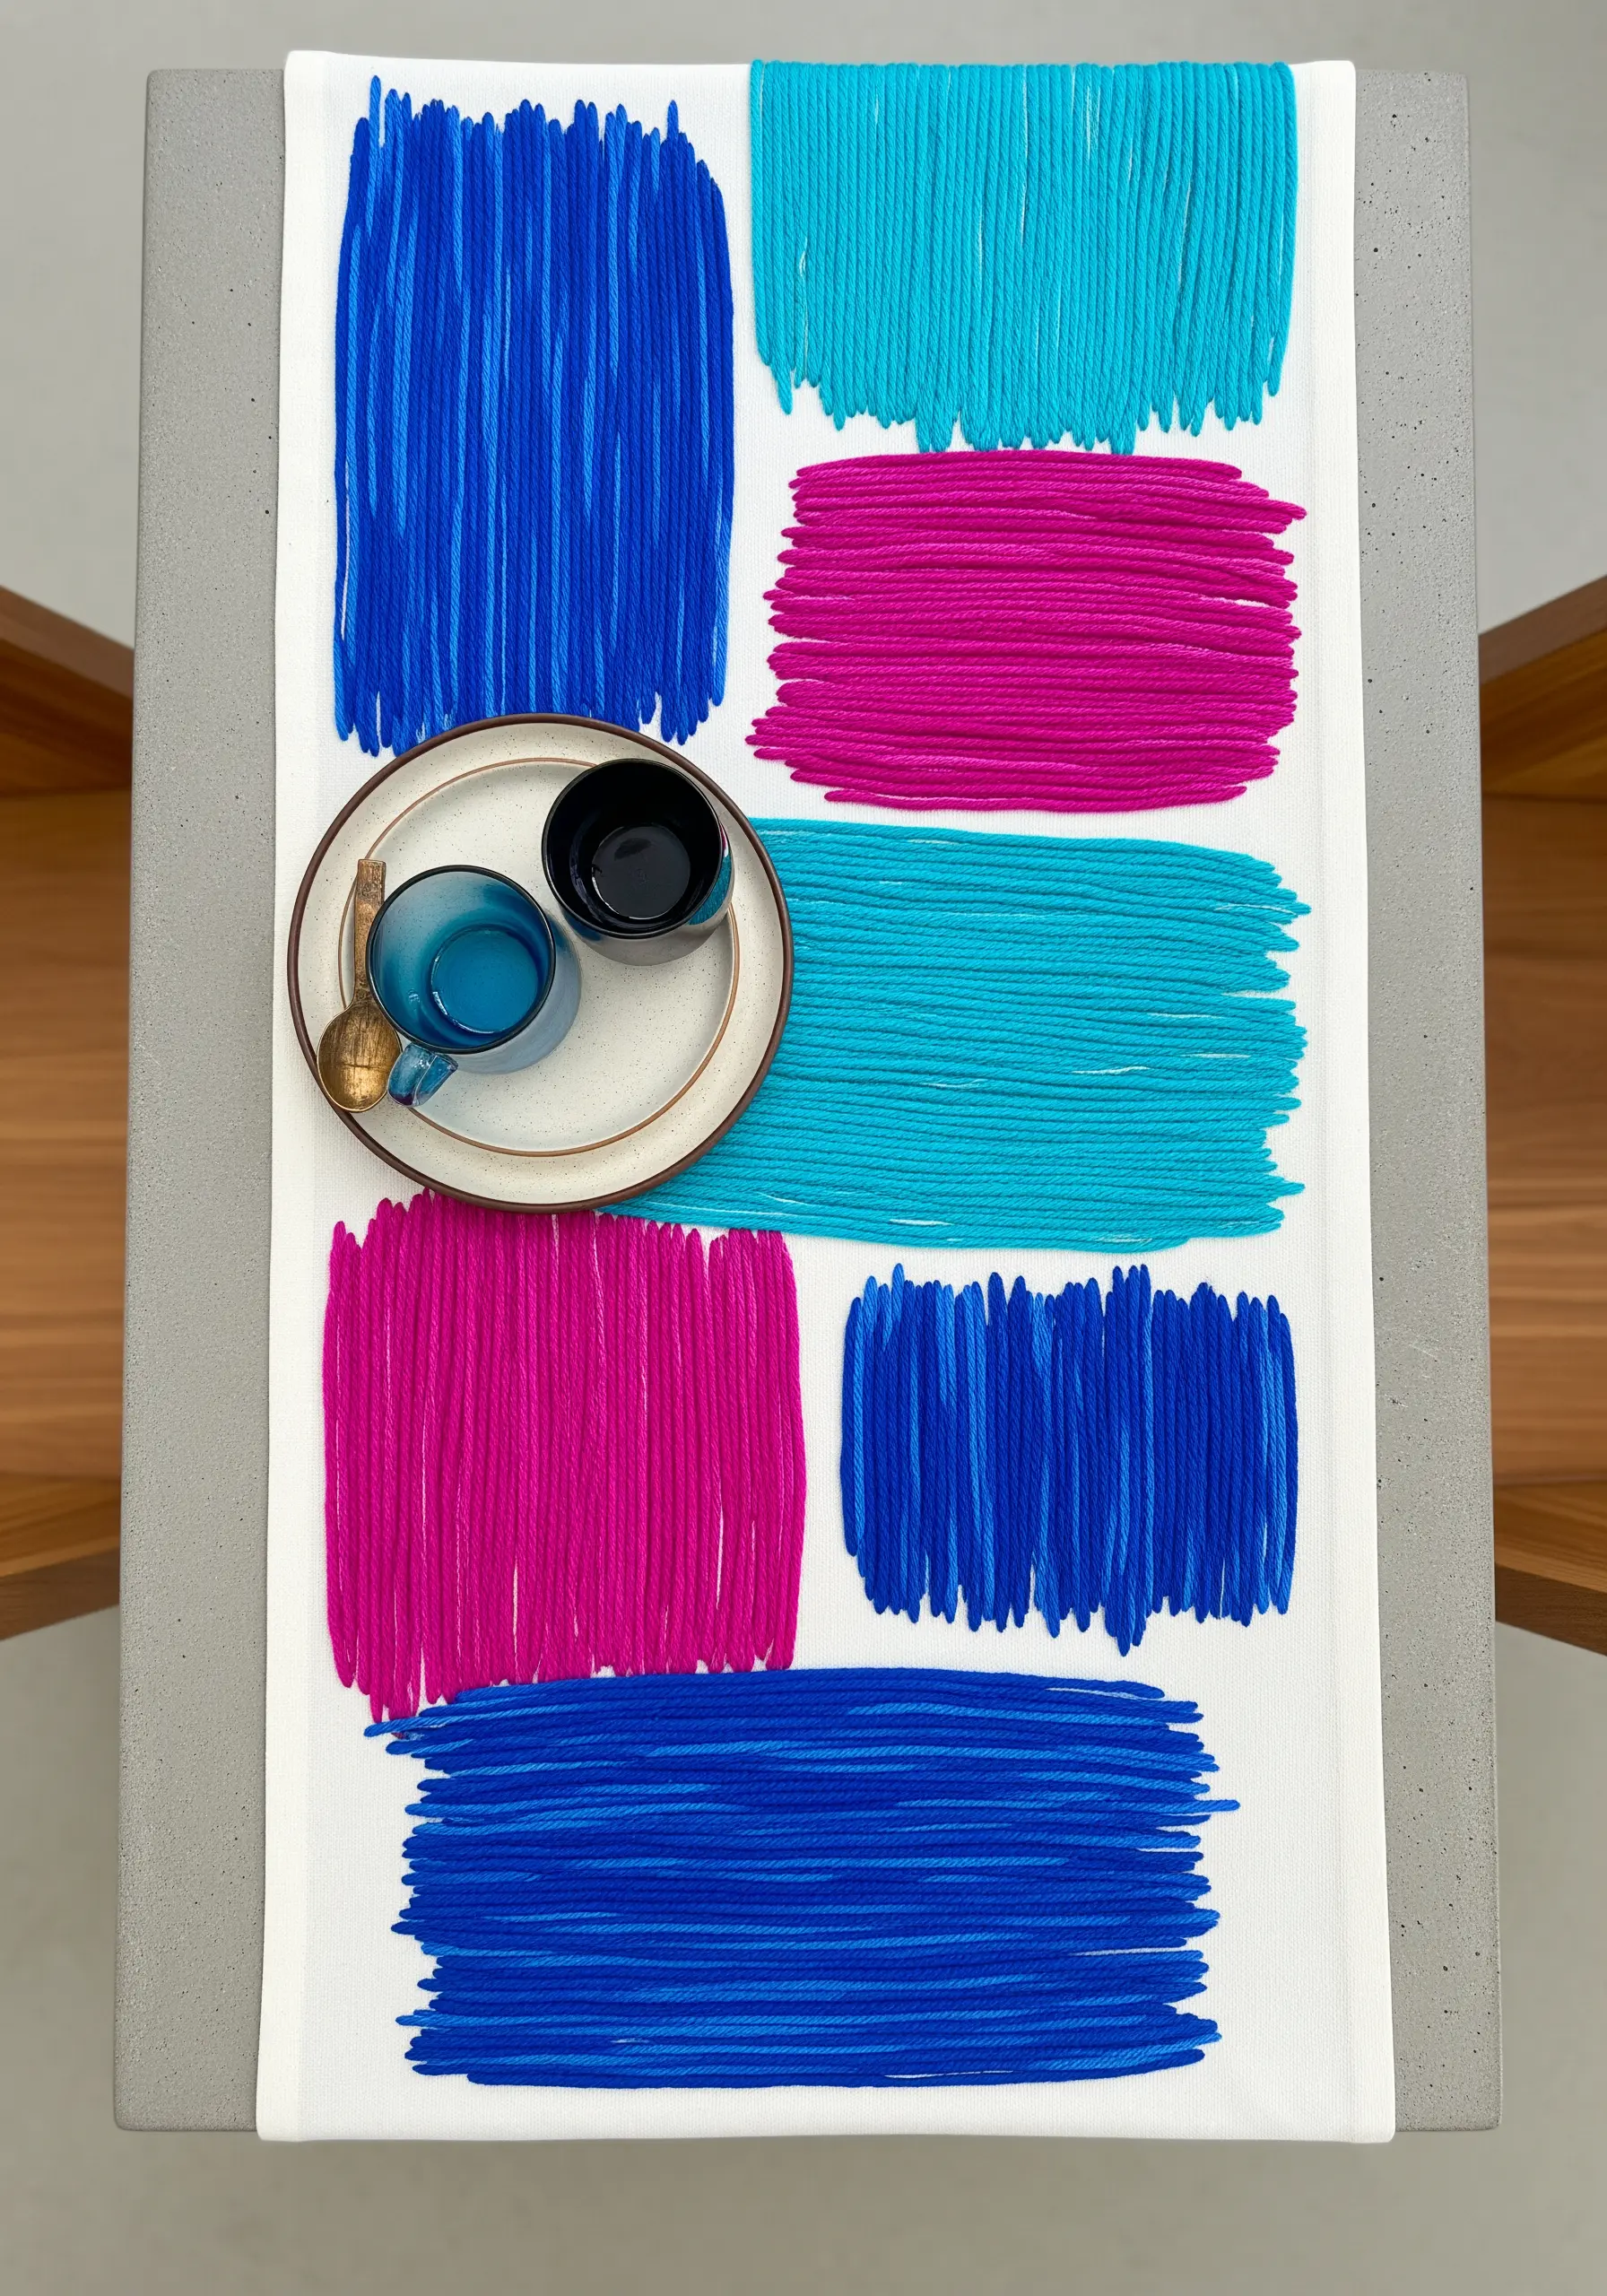
This bold, modern design uses thread like paint, creating blocks of pure color and texture.
Achieve this look quickly by using a thicker thread, like pearl cotton or even fine yarn, and filling rectangular shapes with long, vertical satin stitches.
Don’t worry about perfect edges; the slightly uneven, raw finish is part of the artistic charm.
This is a great project for using up leftover thread in fun abstract thread pattern mashups.
18. Replicate Damask with Simple Stitches

You can achieve the opulent look of woven damask using just one color of thread and a basic stitch.
Transfer an intricate pattern onto a rich, jewel-toned fabric like this burgundy velvet.
Then, simply trace the lines with a stem stitch or a fine backstitch. The texture of the raised stitches against the plush fabric creates a subtle, tone-on-tone effect that looks incredibly luxurious.
This technique is ideal for subtle neutral embroidery designs as well.
19. Form Clean Arches with Whipped Stitch

For perfectly smooth, raised curves like these rainbow arches, use a whipped backstitch.
First, create a line of simple backstitches. Then, take a second thread and weave it under and over the backstitches without piercing the fabric.
This technique covers the gaps in the backstitch, resulting in a solid, rope-like line that’s perfect for clean, graphic designs and organic shape embroidery patterns.
20. Capture Motion with Variegated Thread

Let your thread do the color work for you by choosing a variegated floss in shades of blue and white.
As you stitch, the color will change randomly, perfectly mimicking the multi-tonal look of ocean waves.
Use a simple backstitch and lay your stitches in curving lines to create a sense of movement and flow. Overlap your lines to build depth and energy.
This is a great way to depict abstract thread waves swirls with minimal effort.
21. Illustrate a Harvest Wheat Sheaf
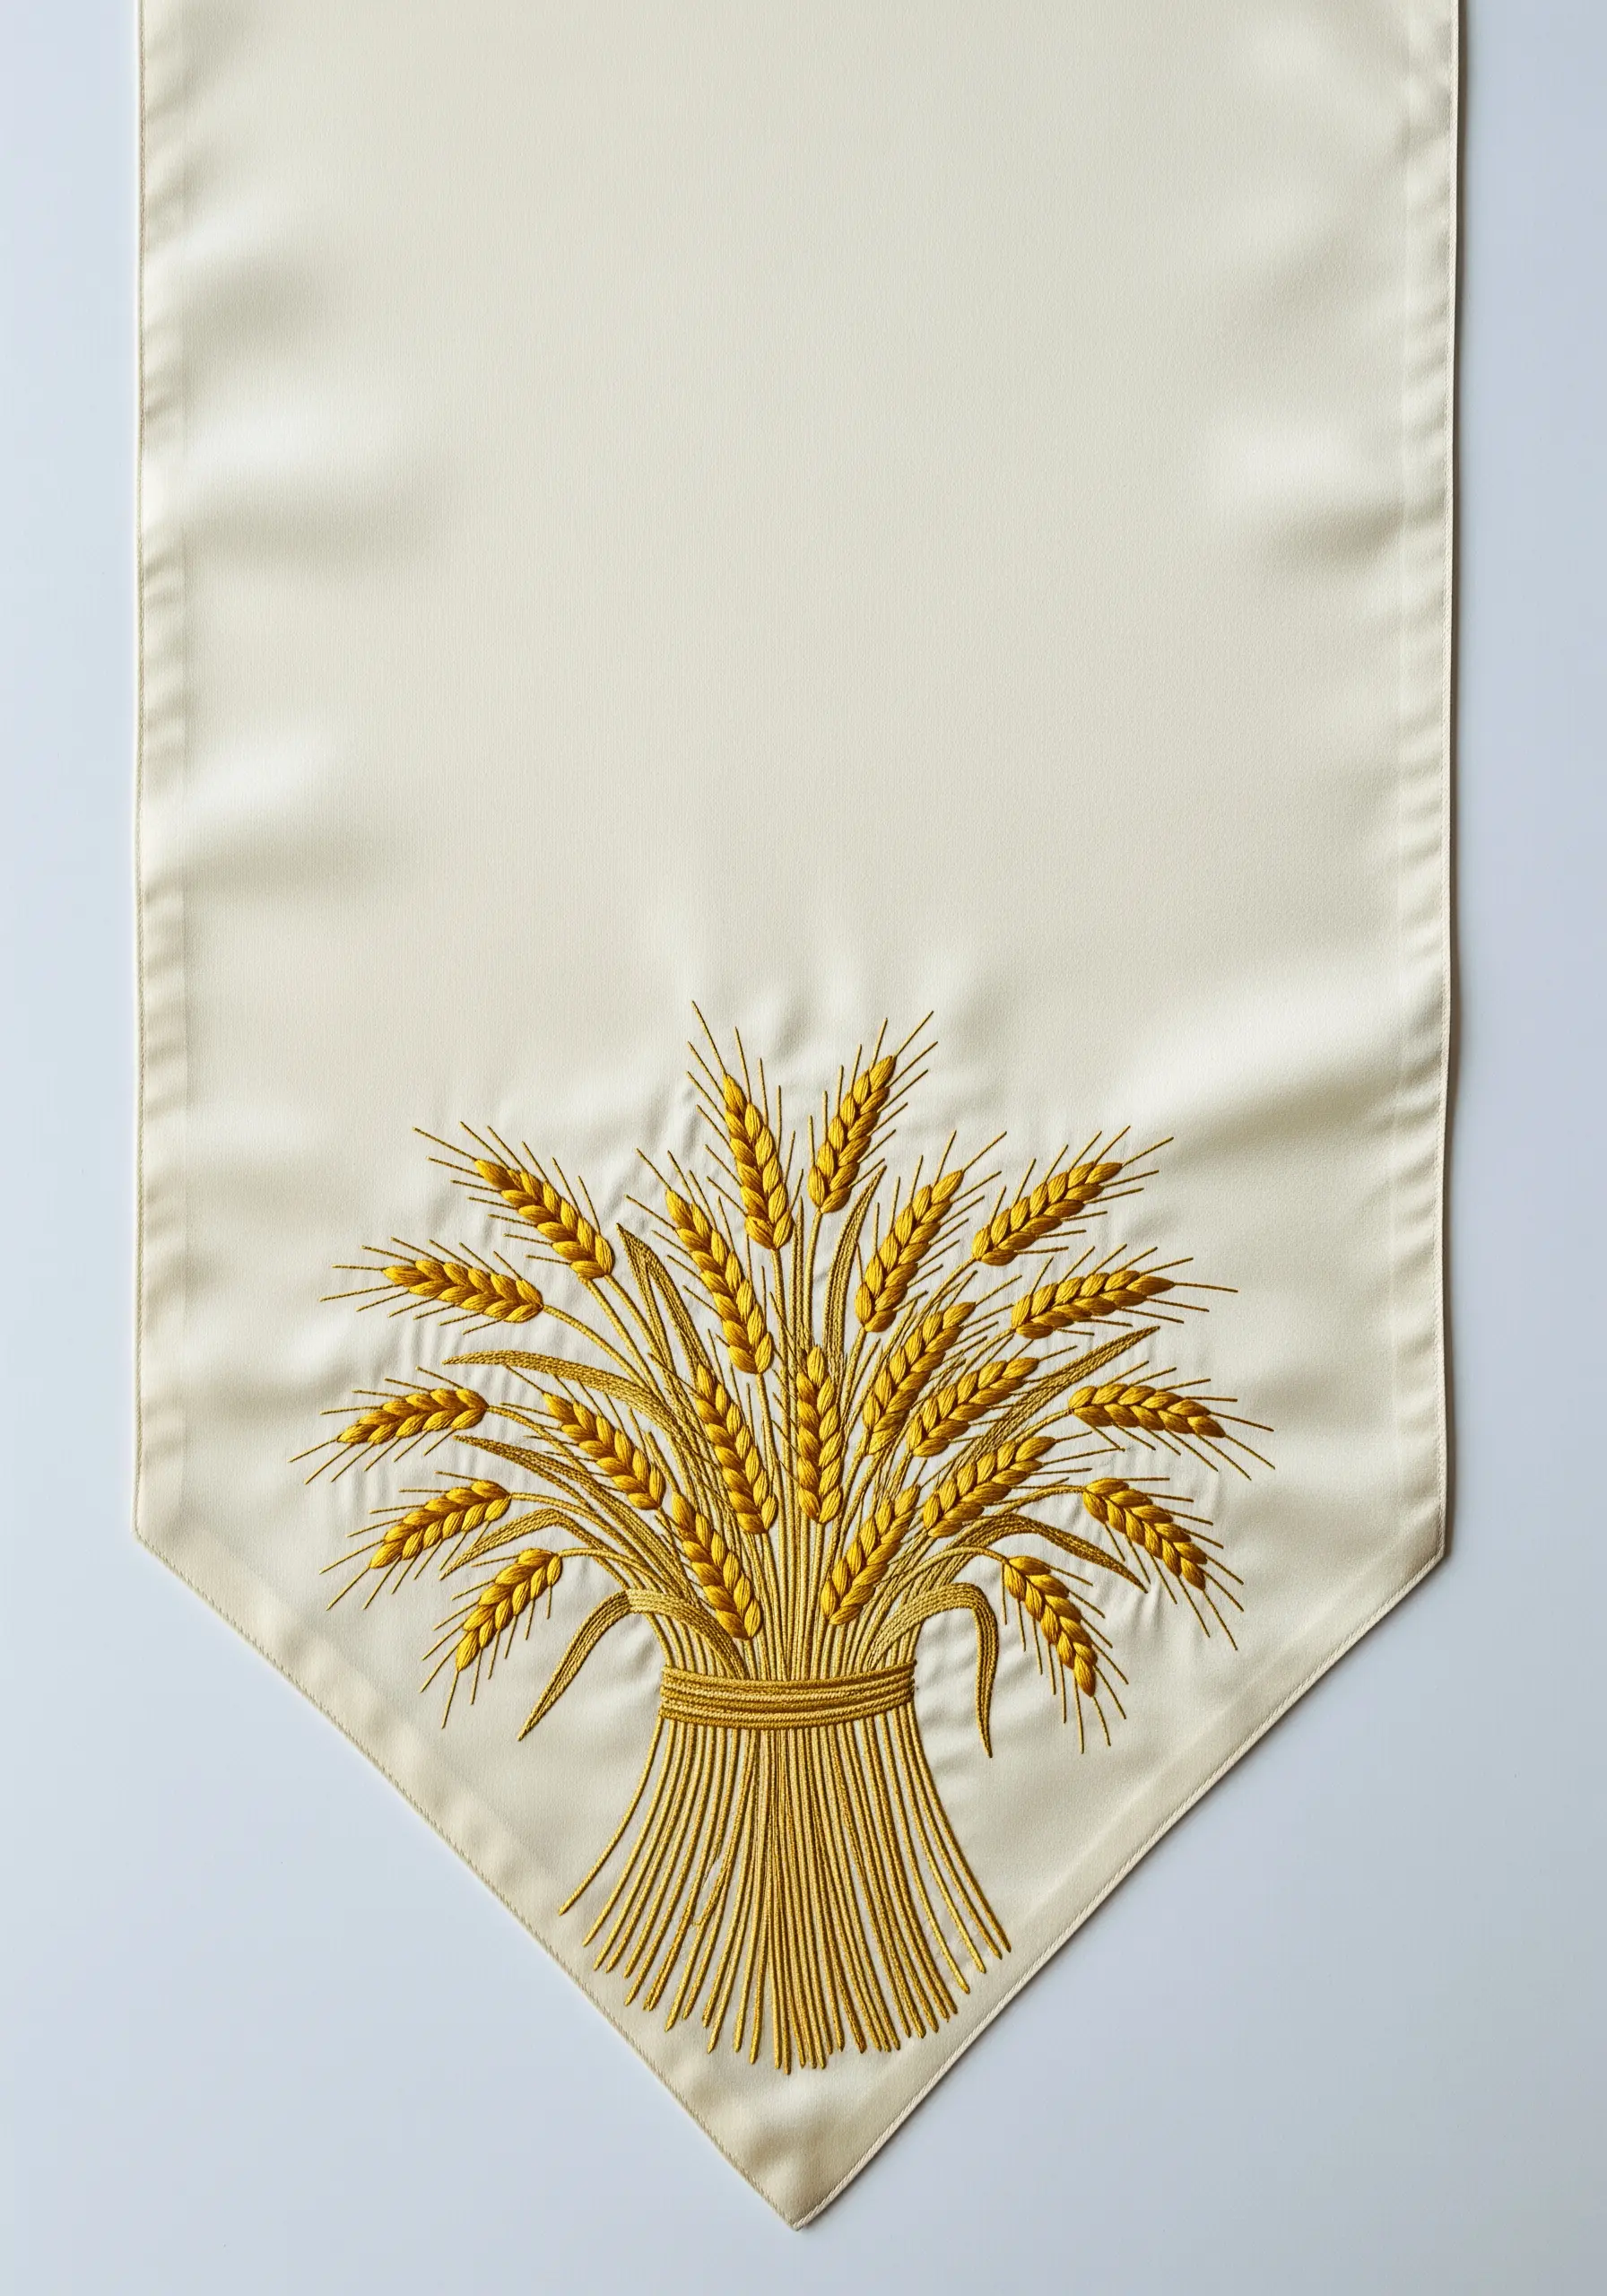
Create a sense of depth and form by paying close attention to stitch direction.
For the wheat stalks, use long, vertical satin stitches. For the grains, angle your satin stitches outwards from a central line, mimicking their natural shape.
Use a slightly darker shade of gold for the stitches at the bottom of the sheaf to create a subtle shadow effect.
This approach helps you learn ways to capture nature’s textures with just thread.
22. Create Texture with Pointillism Stitching

This design uses beads, but you can achieve a similar sparkling, textured effect with French knots or seed stitches.
Outline your geometric shapes with a silver backstitch, then fill each shape with hundreds of tiny, tightly packed French knots in a single color.
The resulting texture will have a dimensional, almost pixelated look that catches the light beautifully, like abstract optical illusion stitches.
23. Stitch a Dandelion in Motion
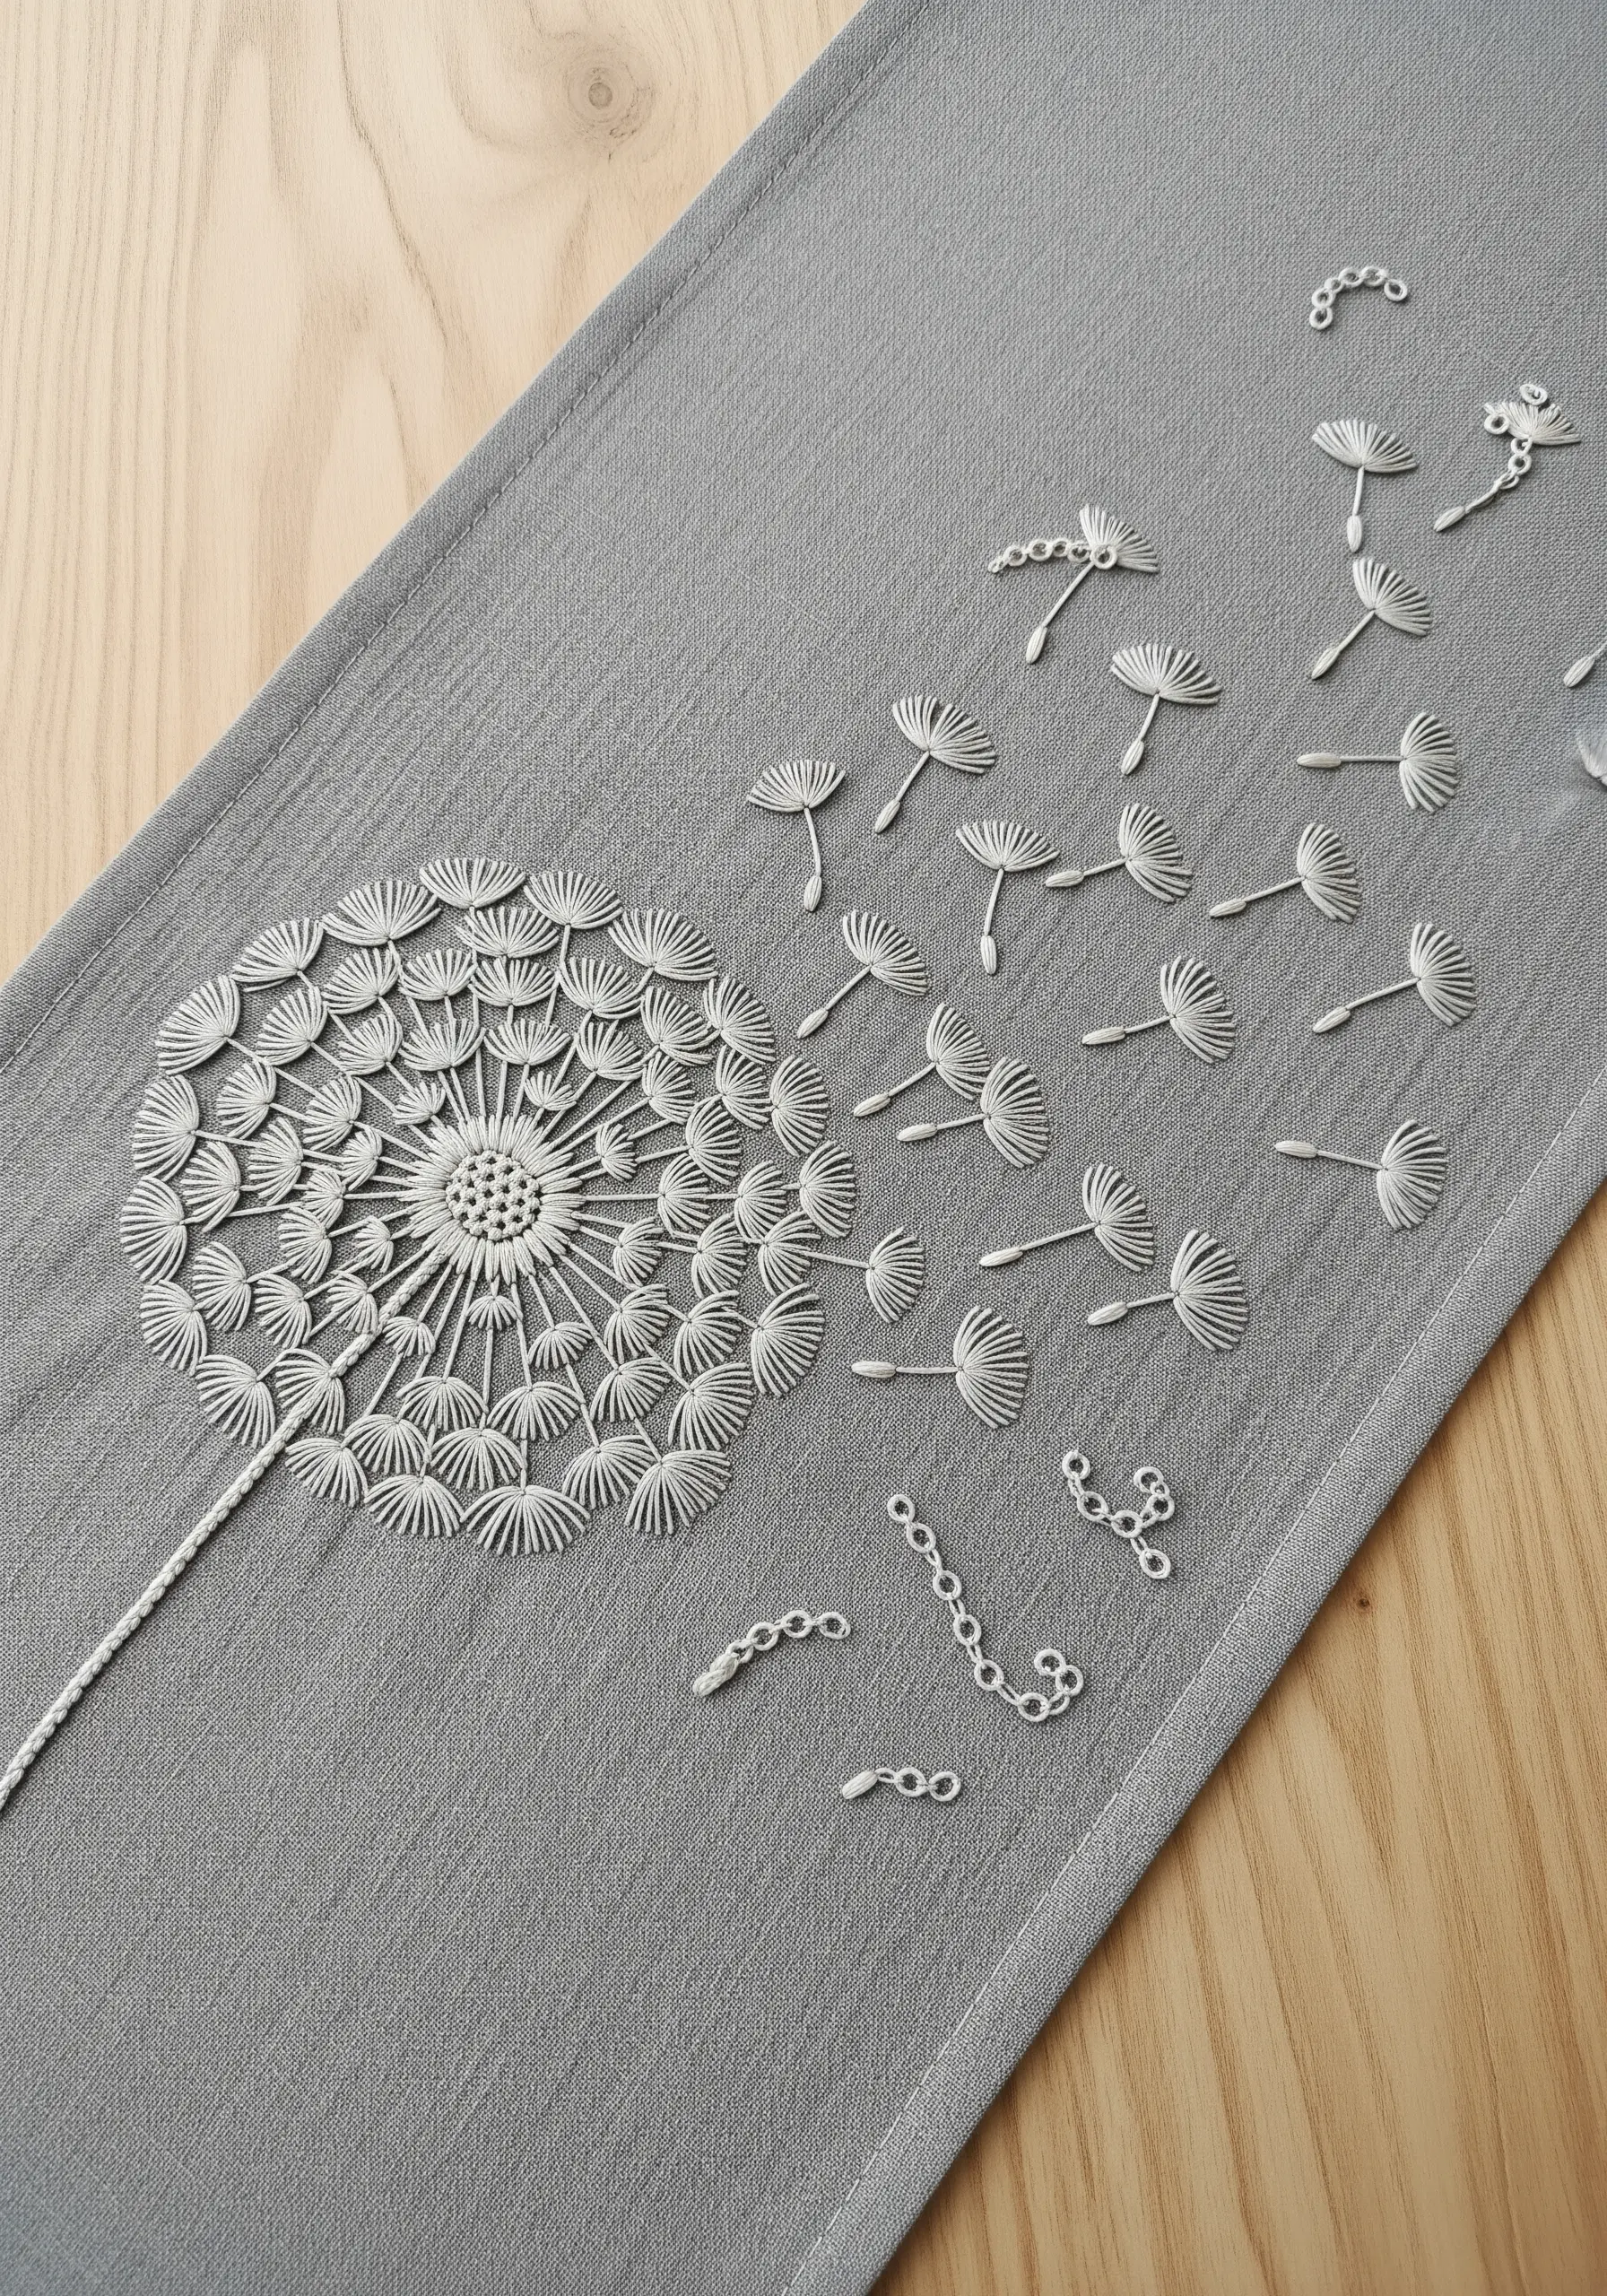
To capture the delicate, airy quality of a dandelion, use a light touch and a mix of stitches.
Create the central puff with satin stitches radiating from the center. For the floating seeds, use a combination of a single straight stitch for the stem and a tiny detached chain stitch for the parachute.
Scatter the seeds with increasing space between them as they move away from the flower to create a convincing sense of wind and movement.
These are the kinds of delicate line art embroidery ideas that tell a story.
24. Find Calm in Concentric Circles

This minimalist design is an exercise in meditative stitching. The beauty lies in the repetition and precision.
Use a compass and a fabric-safe marker to draw perfect concentric circles as your guide.
Then, trace the lines with a simple running stitch or a backstitch. Using a thread color that is only a few shades lighter than your fabric creates a subtle, elegant, tone-on-tone texture.
This is one of the most effective minimalist embroidery wall art ideas for creating a serene atmosphere.
25. Craft an Ornate, 3D Monogram
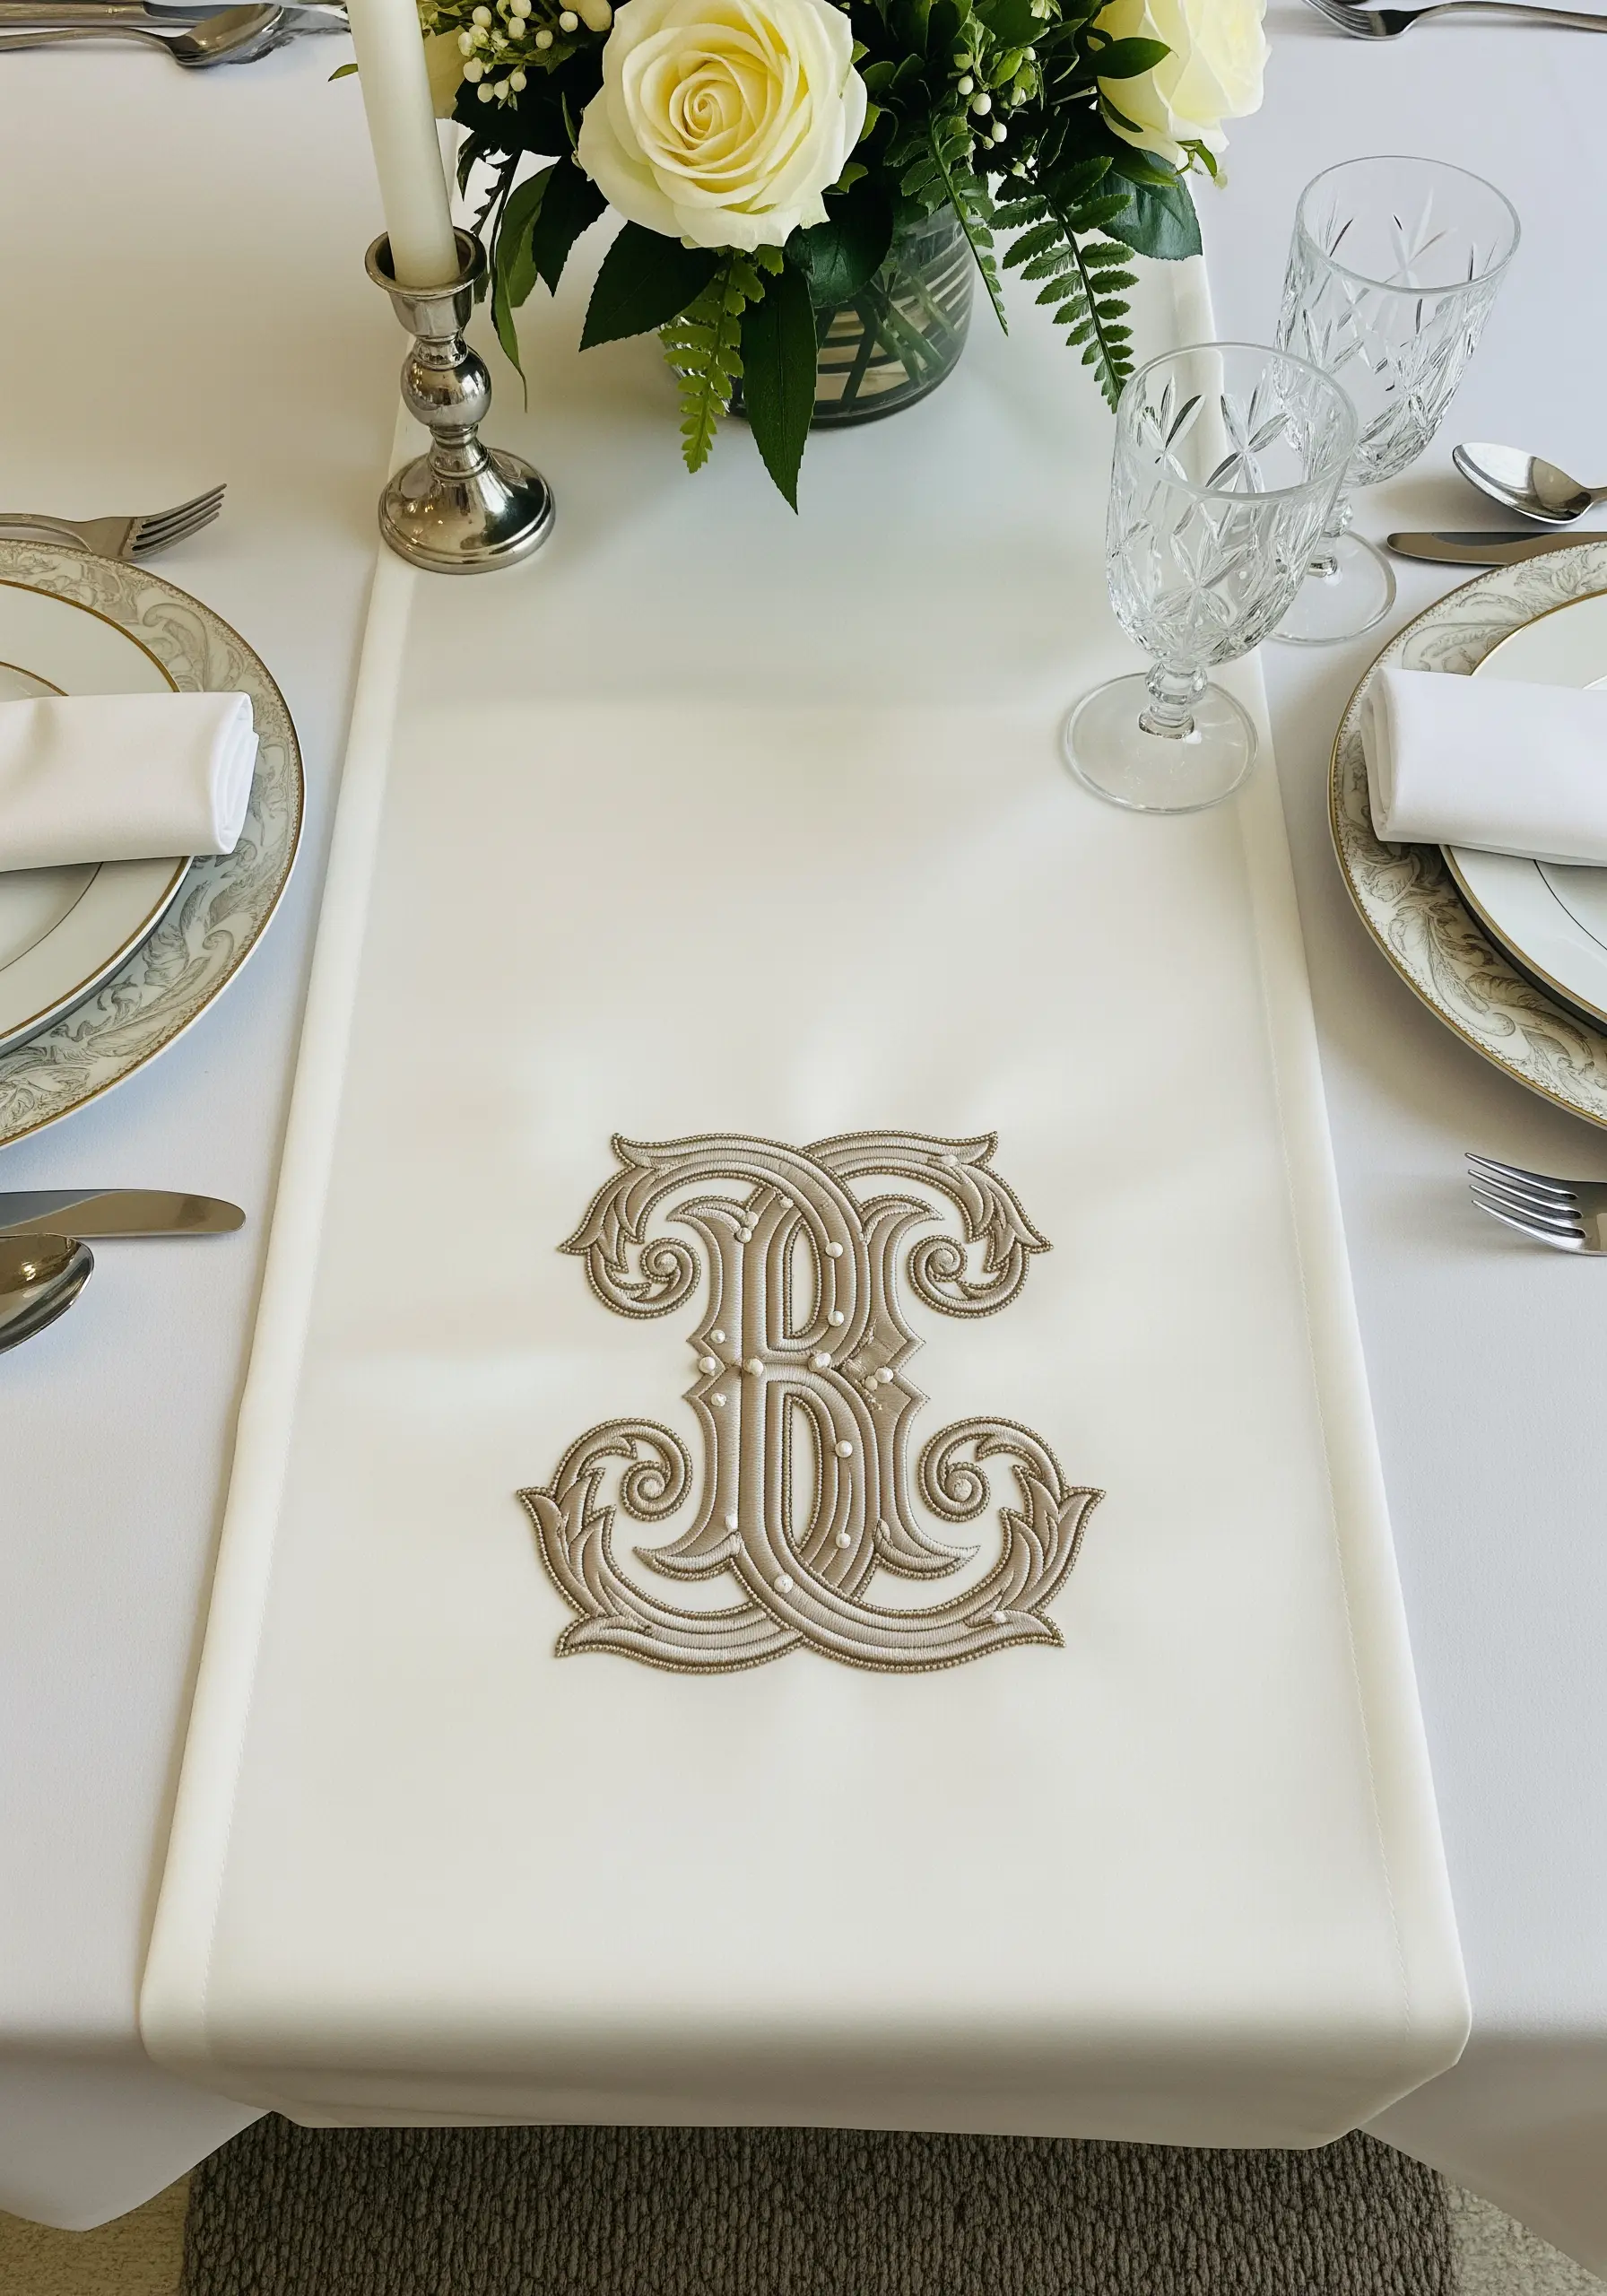
To give your monogram a raised, almost carved appearance, use padded satin stitch.
First, fill the shape of the letter with a base layer of small seed stitches. Then, cover this padding with a smooth layer of satin stitch, working in the opposite direction.
The underlying stitches push the top layer up, creating a beautiful, three-dimensional effect that makes your minimal monogram styles look incredibly professional.
26. Contrast Rustic Fabric with Delicate Stitches
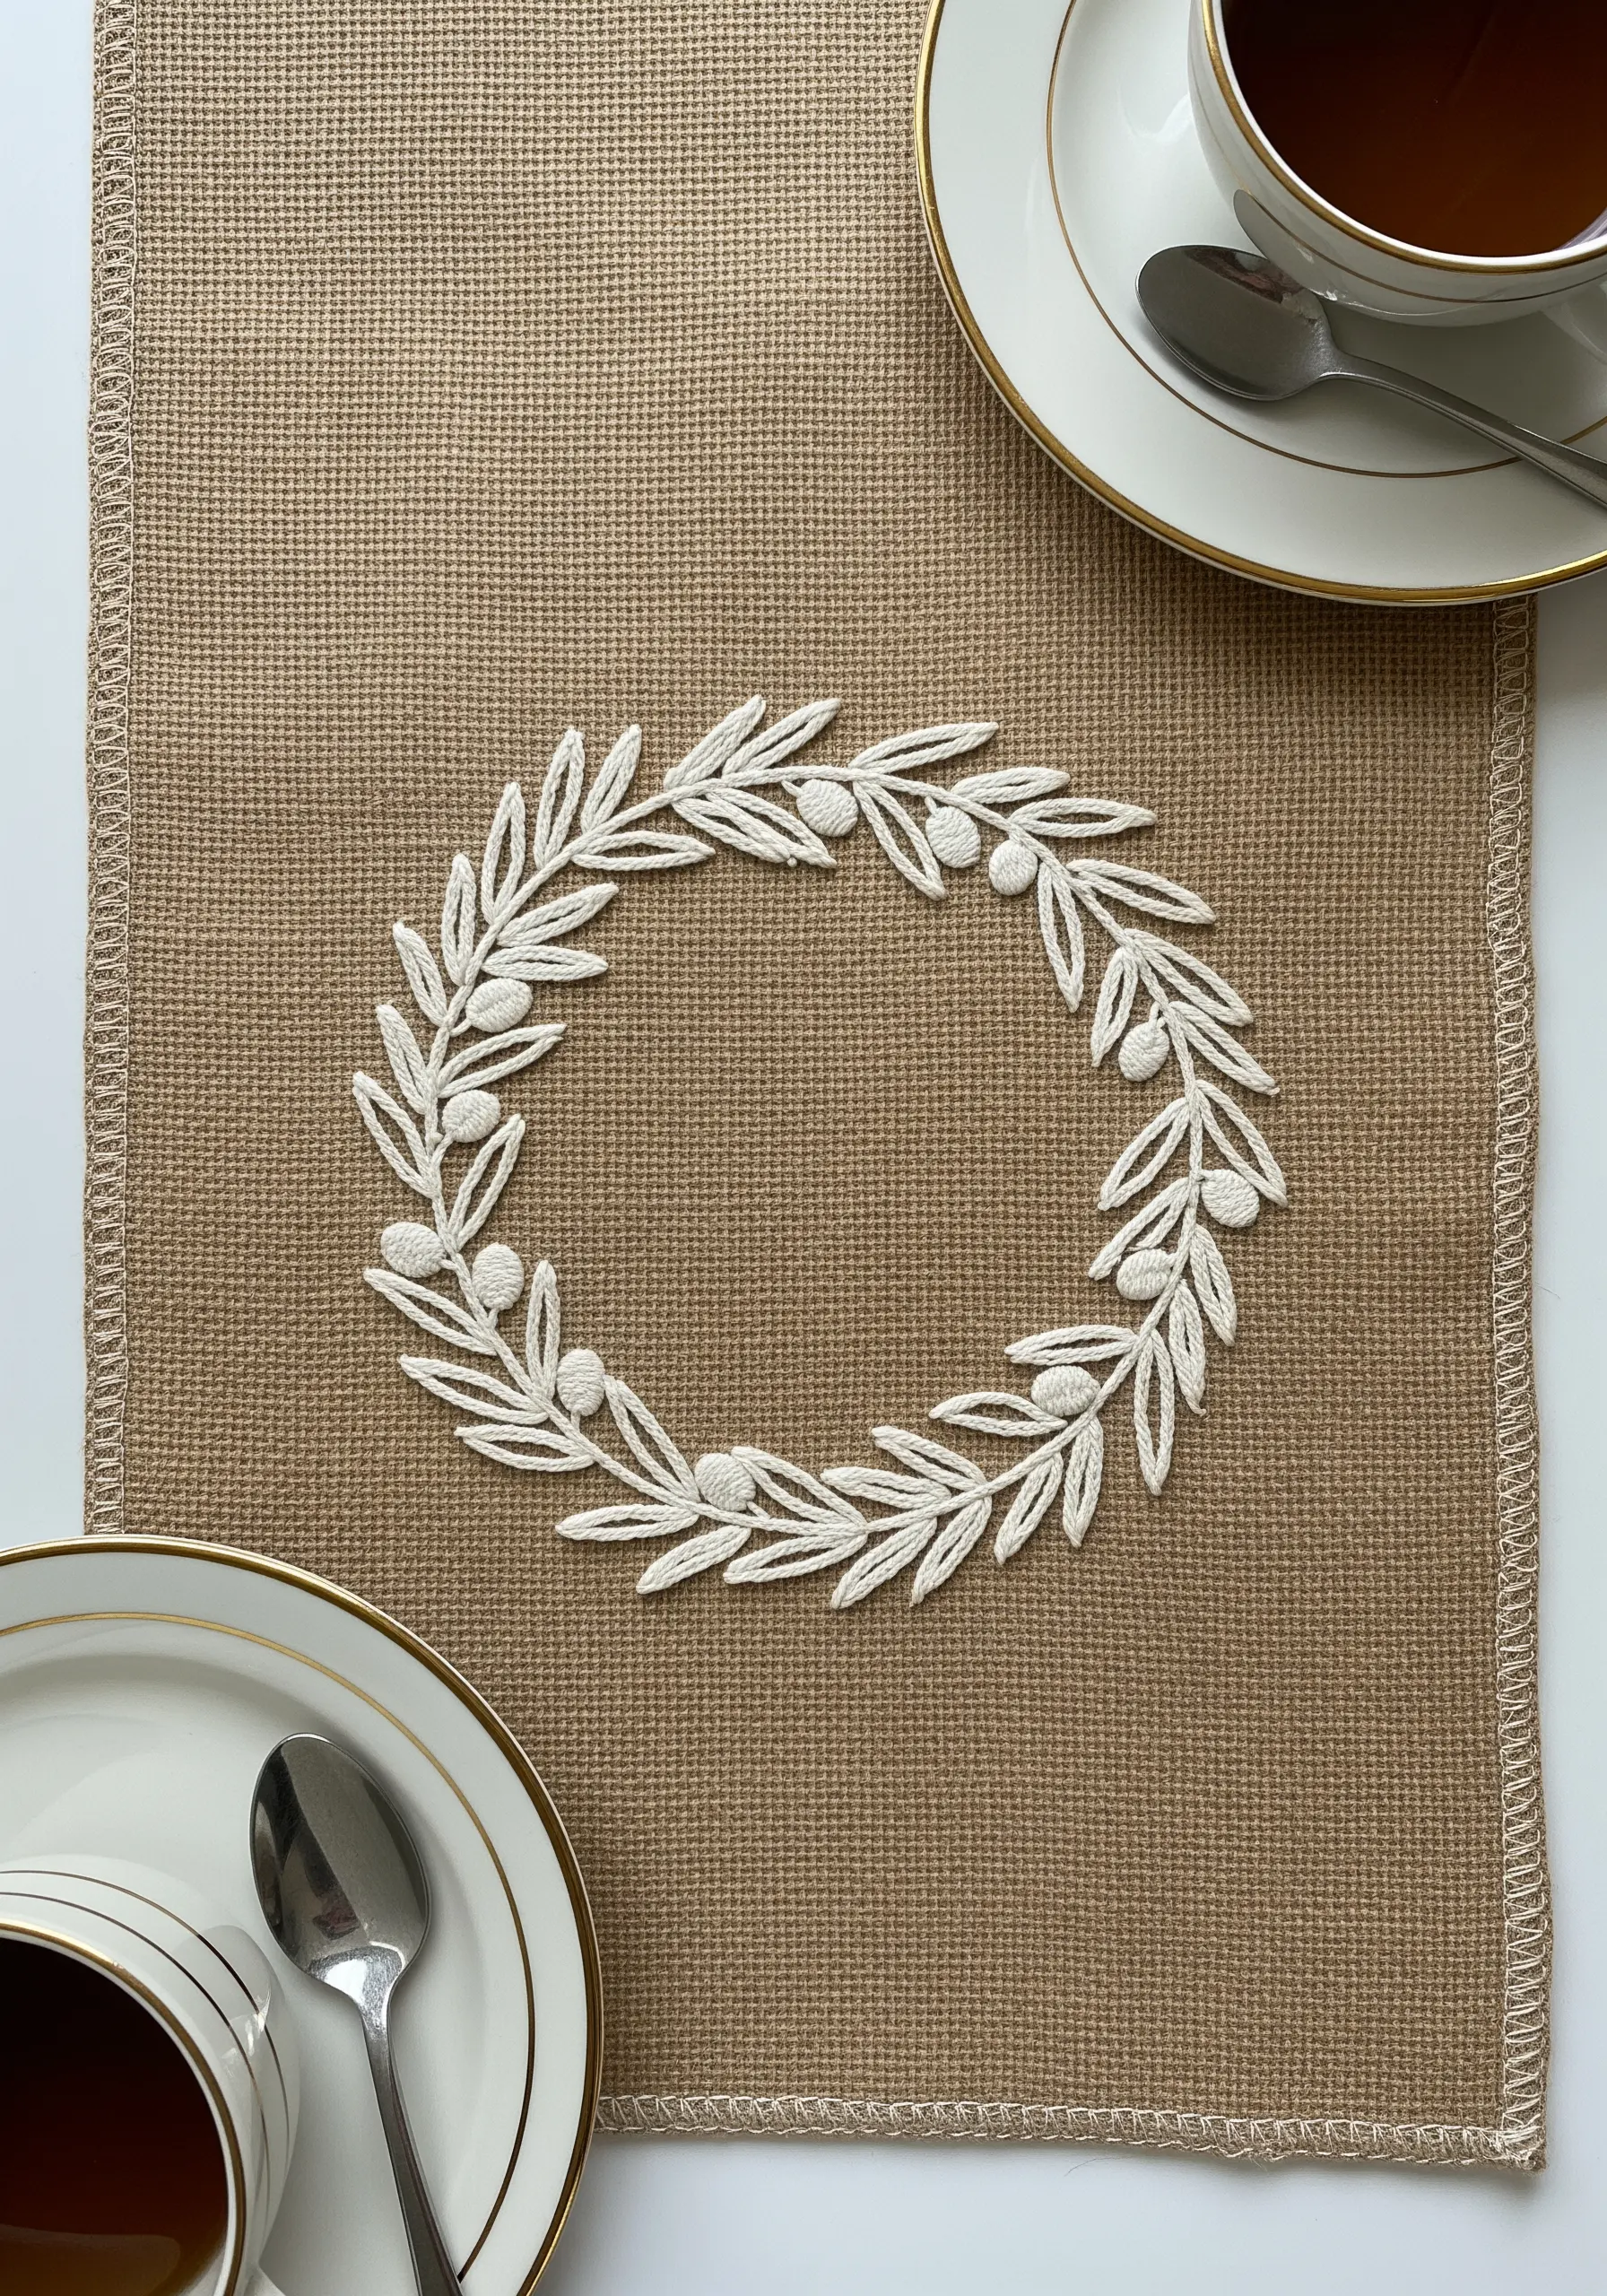
The magic of this design is the contrast between the coarse, rustic burlap fabric and the refined, delicate stitching of the olive wreath.
To ensure your stitches don’t sink into the loose weave of the burlap, use a thicker thread like a #8 pearl cotton or use all six strands of standard floss.
A simple stem stitch for the branches and detached chain stitches for the leaves is all you need to create an elegant, farmhouse-style centerpiece.
These are the handmade pieces that bring natural beauty into every corner.
27. Create a Woodland Border with Line Art
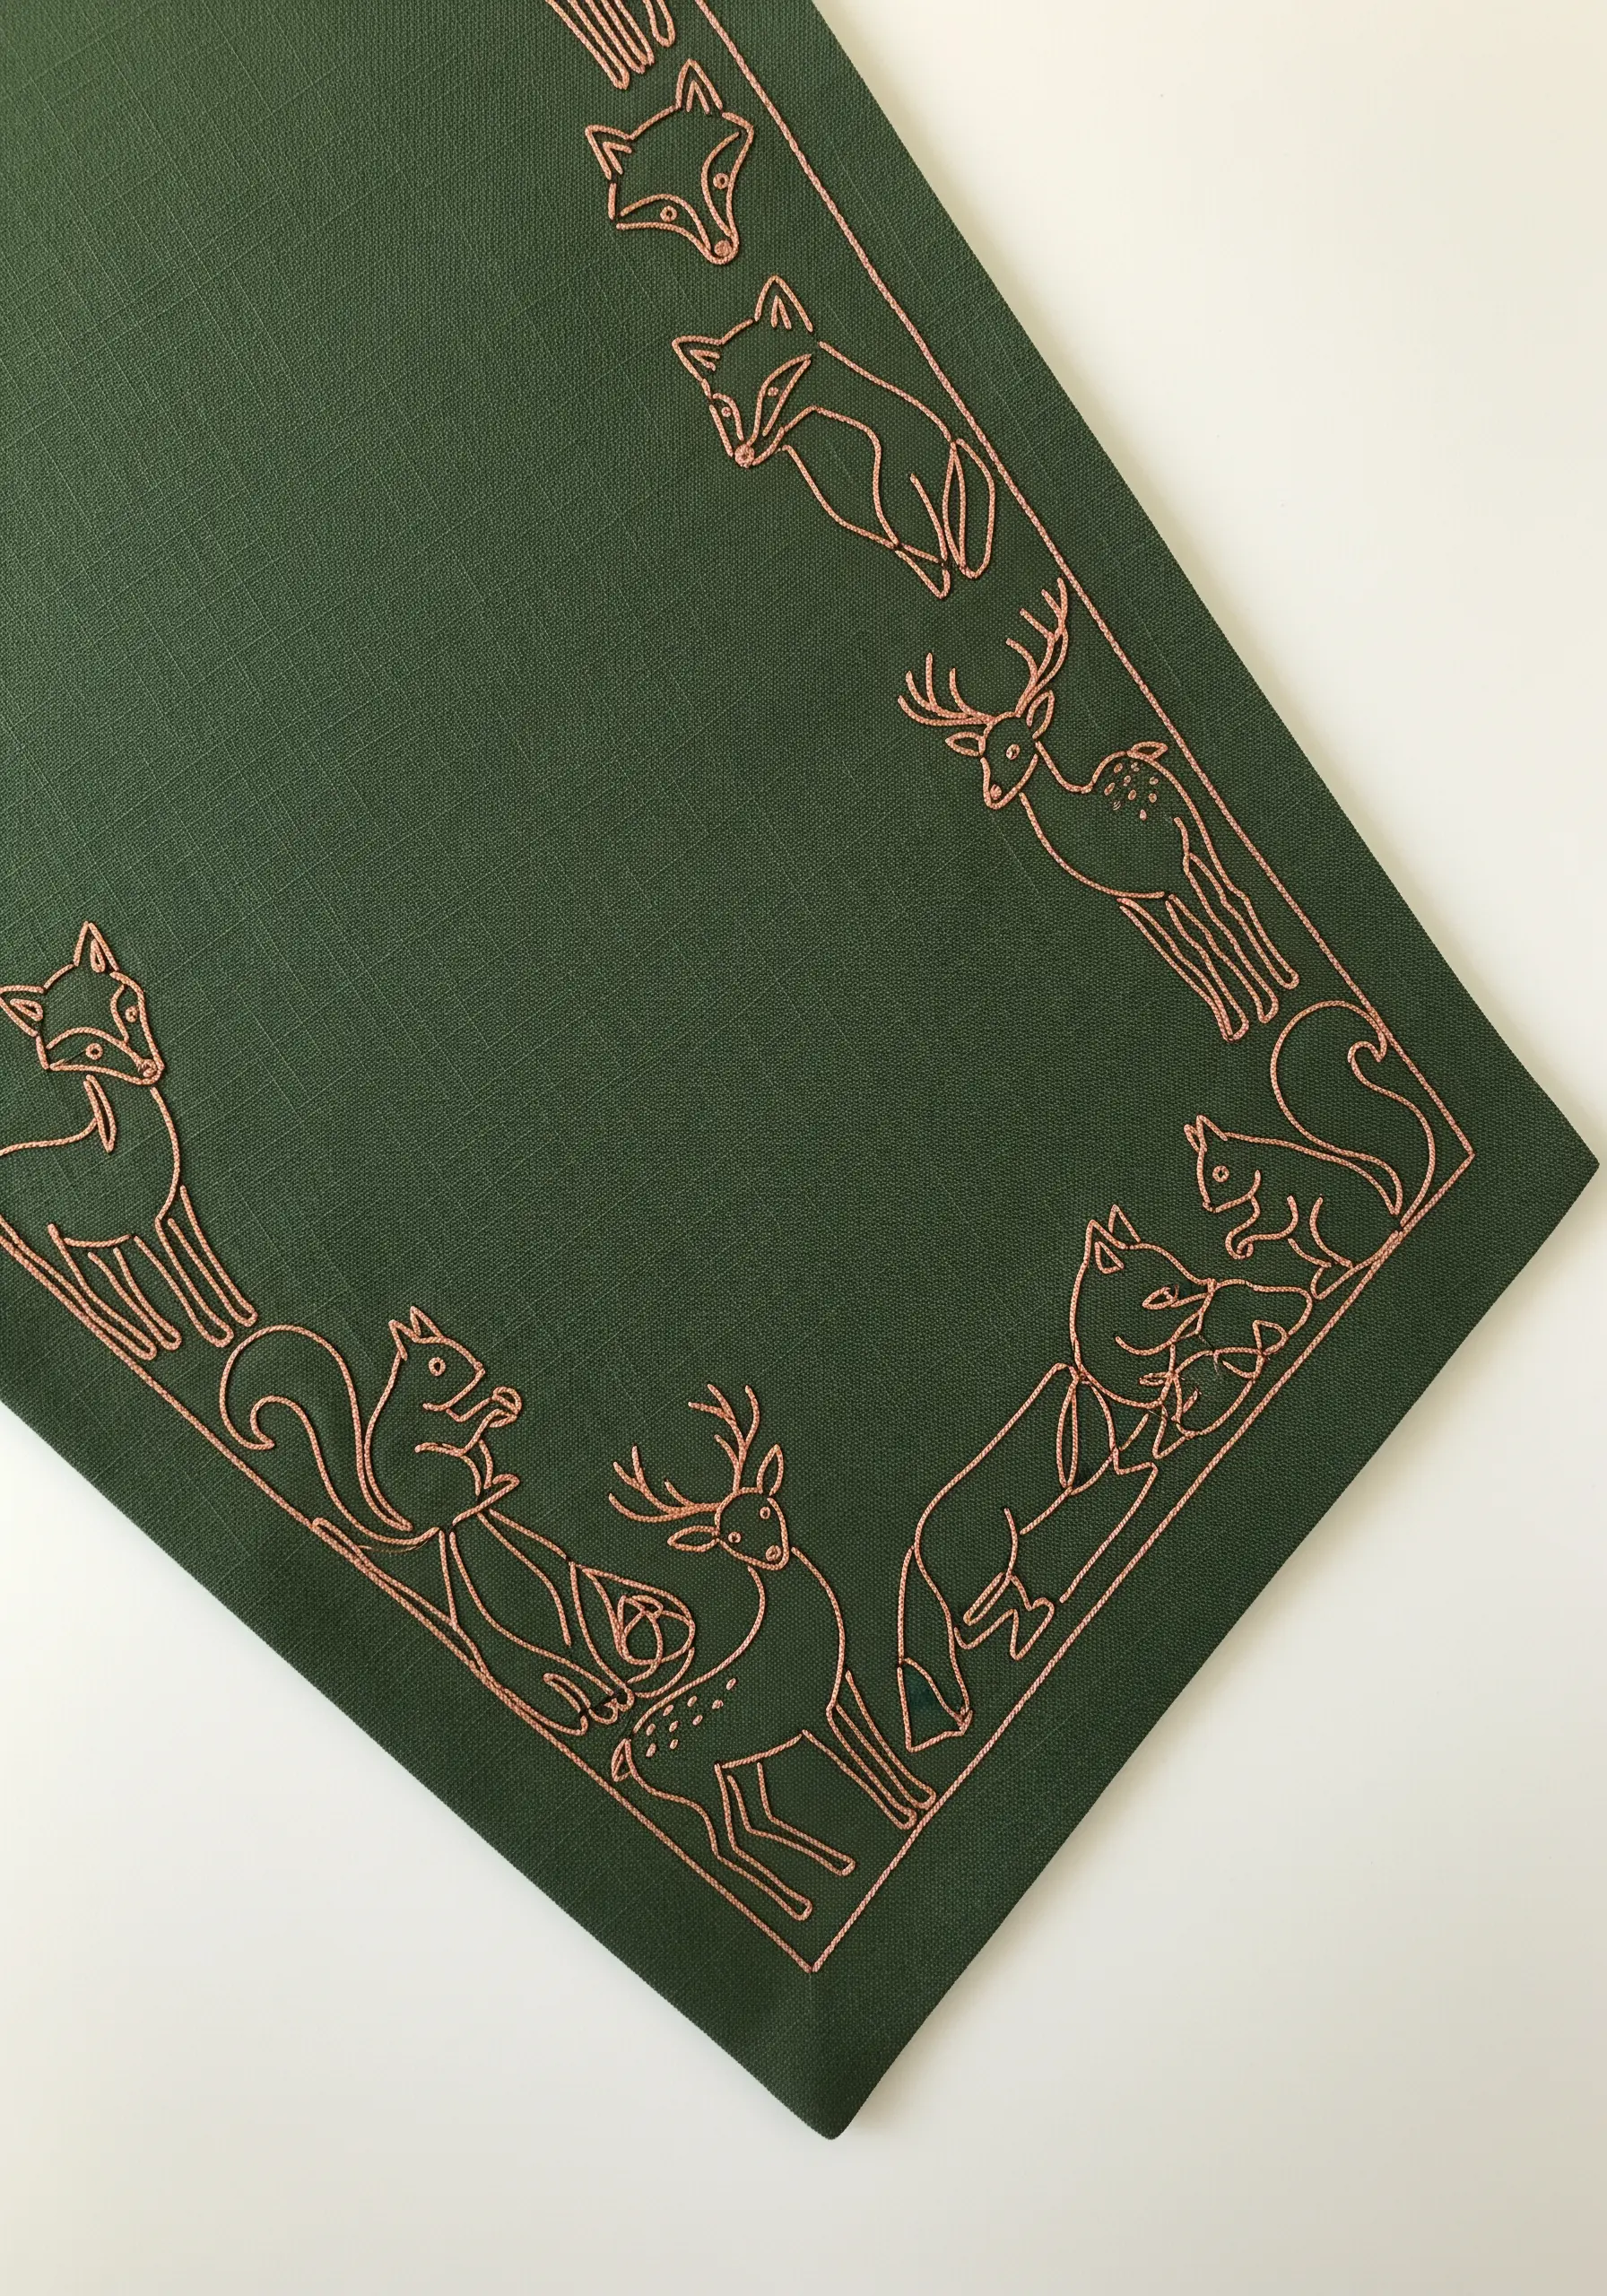
You don’t need complex fill stitches to make a statement. A simple outline can be just as impactful.
Choose a single, high-contrast color of thread—like this copper against forest green—and trace your animal shapes using a clean backstitch or stem stitch.
Focus on maintaining a consistent stitch length throughout the design. This uniformity is what gives the finished piece its polished, illustrative quality.
This is a great way to approach fox deer embroidery patterns for a modern, minimalist look.
28. Stitch a Scattered Herb Garden
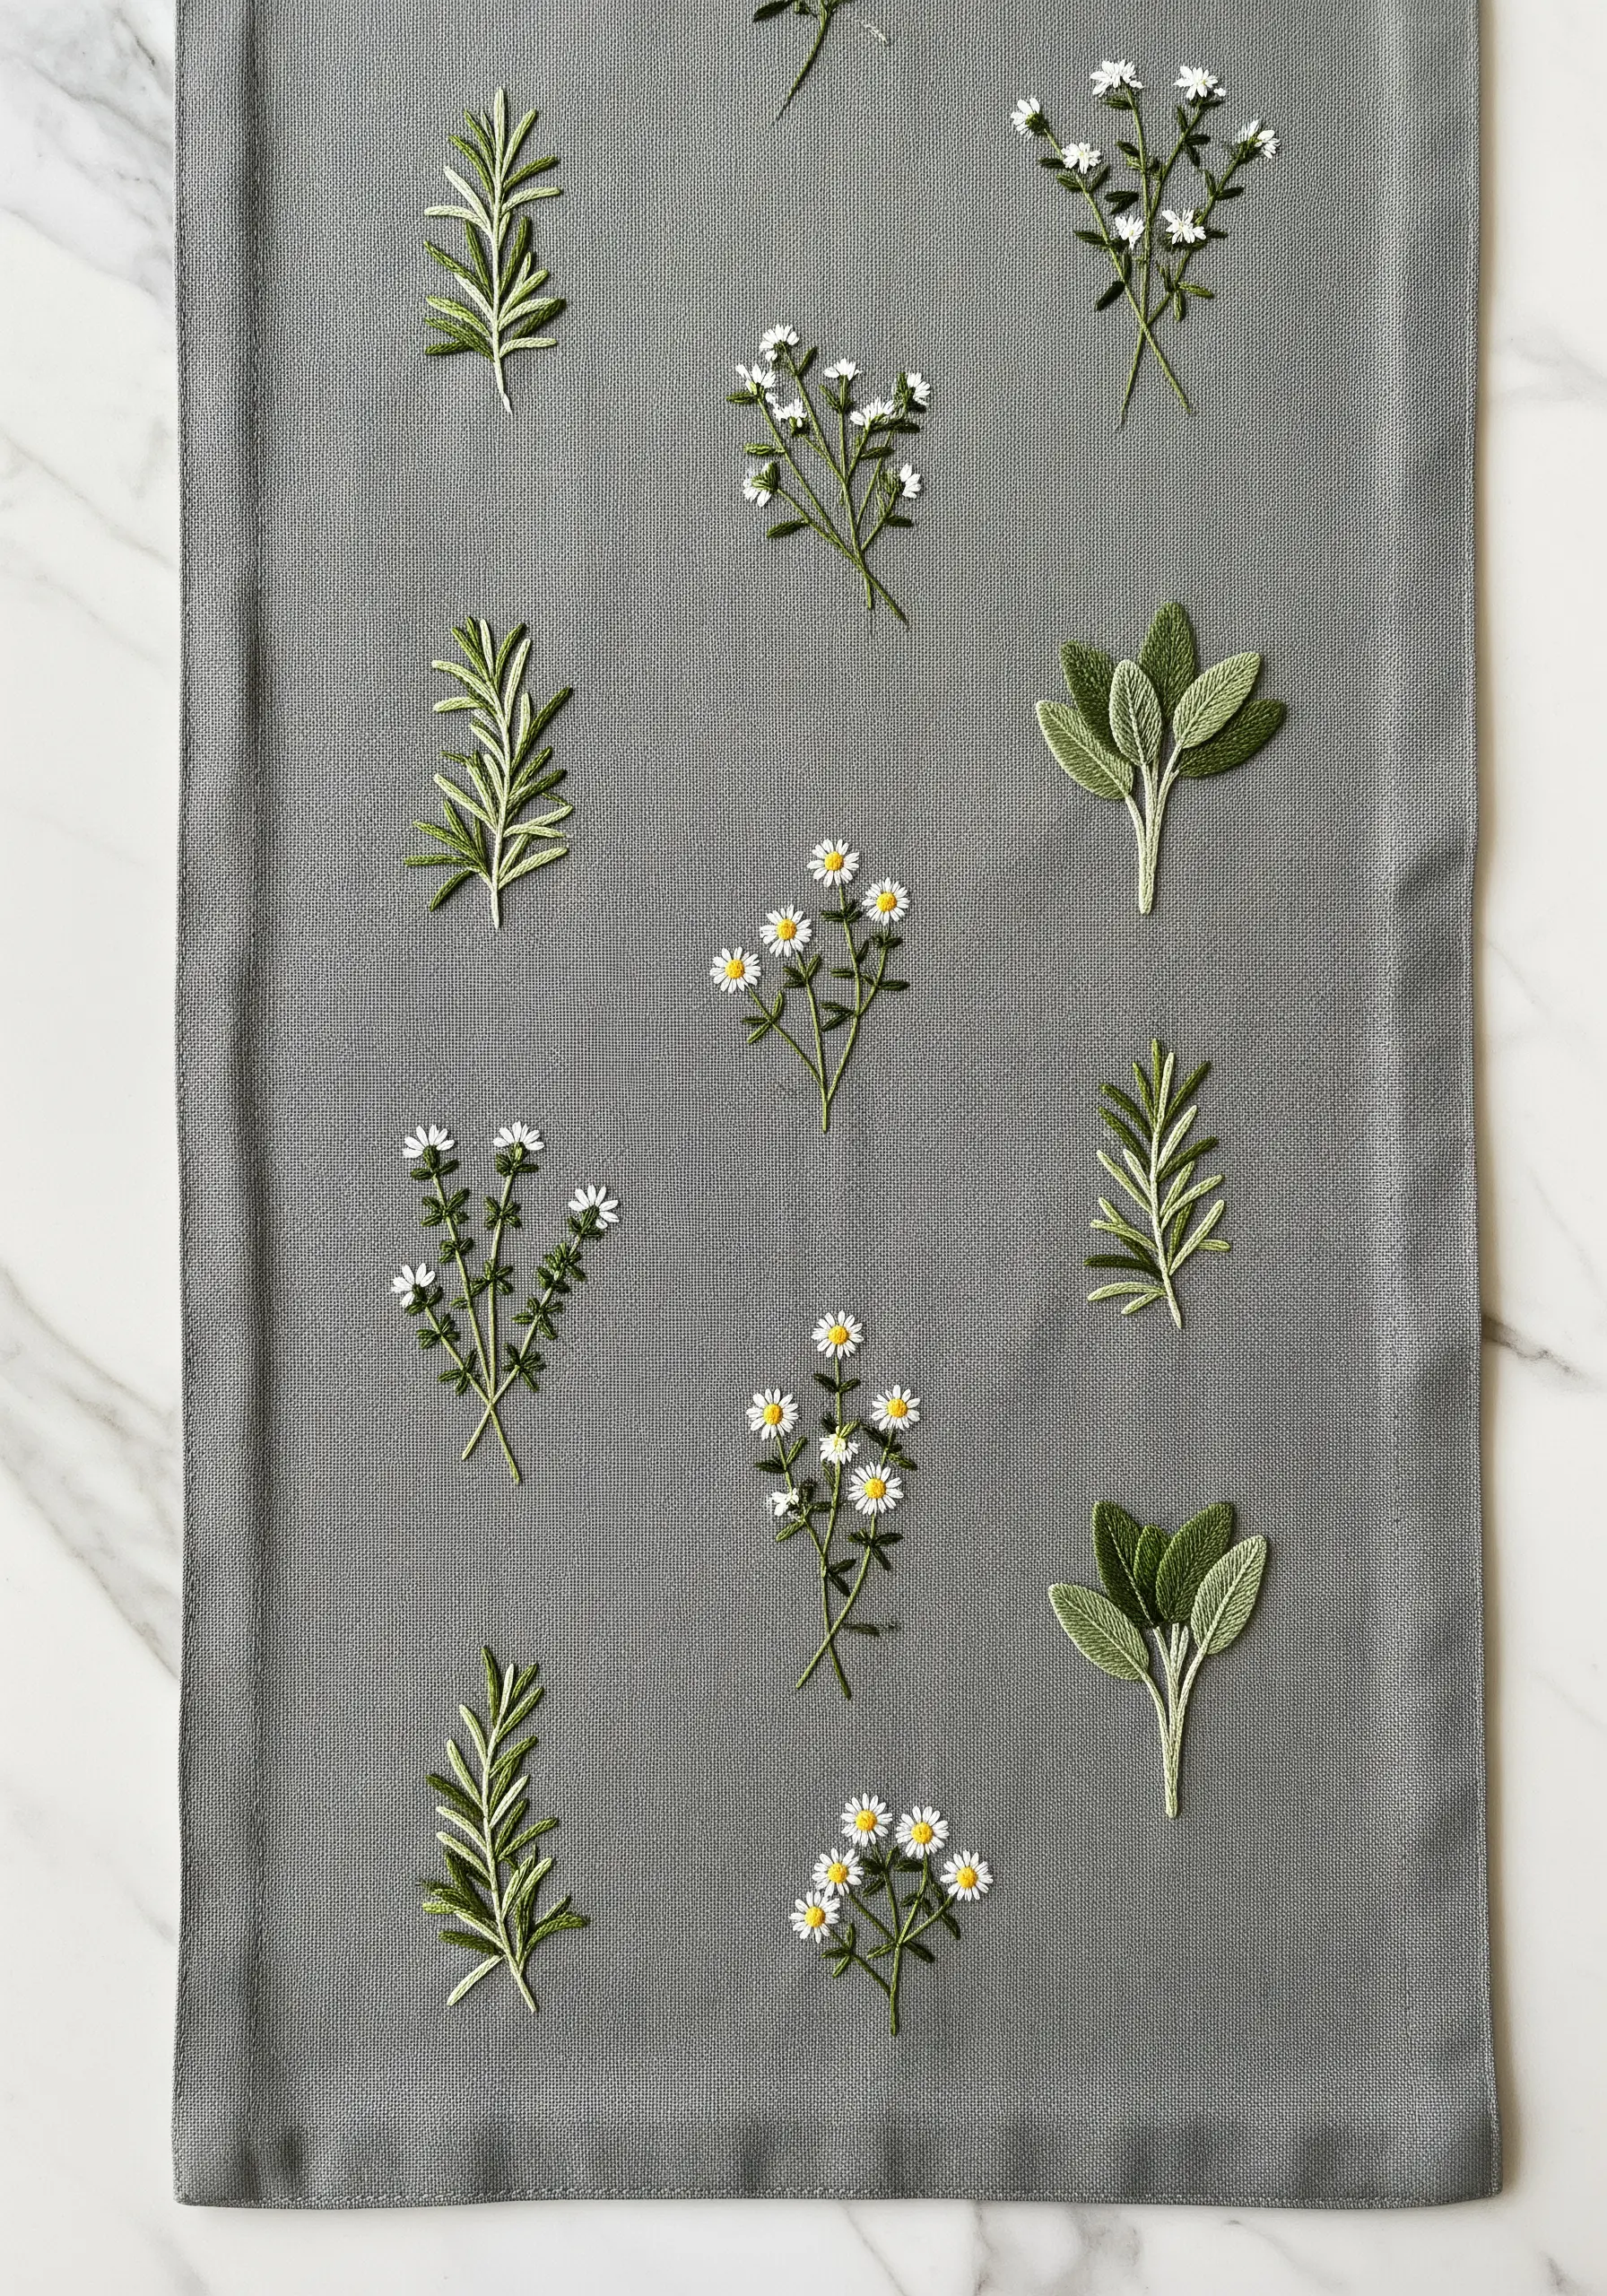
To create a design that feels balanced yet natural, arrange your herb sprigs in a “scatter” pattern rather than a grid.
Vary the orientation of each sprig, pointing them in different directions to avoid a stiff, repetitive look.
Use a fishbone stitch for the sage leaves, a stem stitch for the rosemary, and tiny lazy daisies for the chamomile flowers.
These varied botanical stitch ideas add subtle texture and realism to your composition.
29. Embroider Elegant, Flowing Script

While this design appears stained, you can achieve a similar effect by embroidering a single, elegant word.
For delicate, cursive lettering, use a split stitch. This stitch creates a smoother, less broken line than a backstitch, which is ideal for capturing the fluid curves of script.
Use only two or three strands of floss to keep the line fine and graceful.
This is the perfect technique for stitching inspirational quote embroidery hoops and personalized linens.
30. Design a Textural Coastal Border

This stunning coastal scene gets its texture from dense clusters of French knots or seed stitches.
Outline the starfish with a simple backstitch, then fill them with a pattern of knots to mimic their bumpy surface.
For the coral, vary the density of your knots—placing them closer together at the base of the branches and farther apart at the tips to create a sense of shadow and dimension.
This is a beautiful idea for coastal theme tiny embroidery art that feels wonderfully tactile.


