
Have you ever finished a piece and felt that something was missing? You’ve mastered the stitches, chosen your colors, but the final result feels flat, lacking the depth and texture you envisioned. It’s a common feeling, but the solution isn’t necessarily more complex stitch work.
The secret often lies in expanding your definition of thread. By thoughtfully incorporating different fibers—chunky wool, smooth rope, soft felt, or even shimmering beads—you introduce a new language of texture into your work. This isn’t about making things complicated; it’s about making them intentional.
Think of it as being a composer. Your needle is the conductor, and the fibers are your instruments. Each one has a unique voice. Learning to blend them is how you transform a simple melody into a symphony. Let these ideas be your guide to creating art that doesn’t just look beautiful, but feels alive.
1. Weaving Landscapes with Roving and Yarn
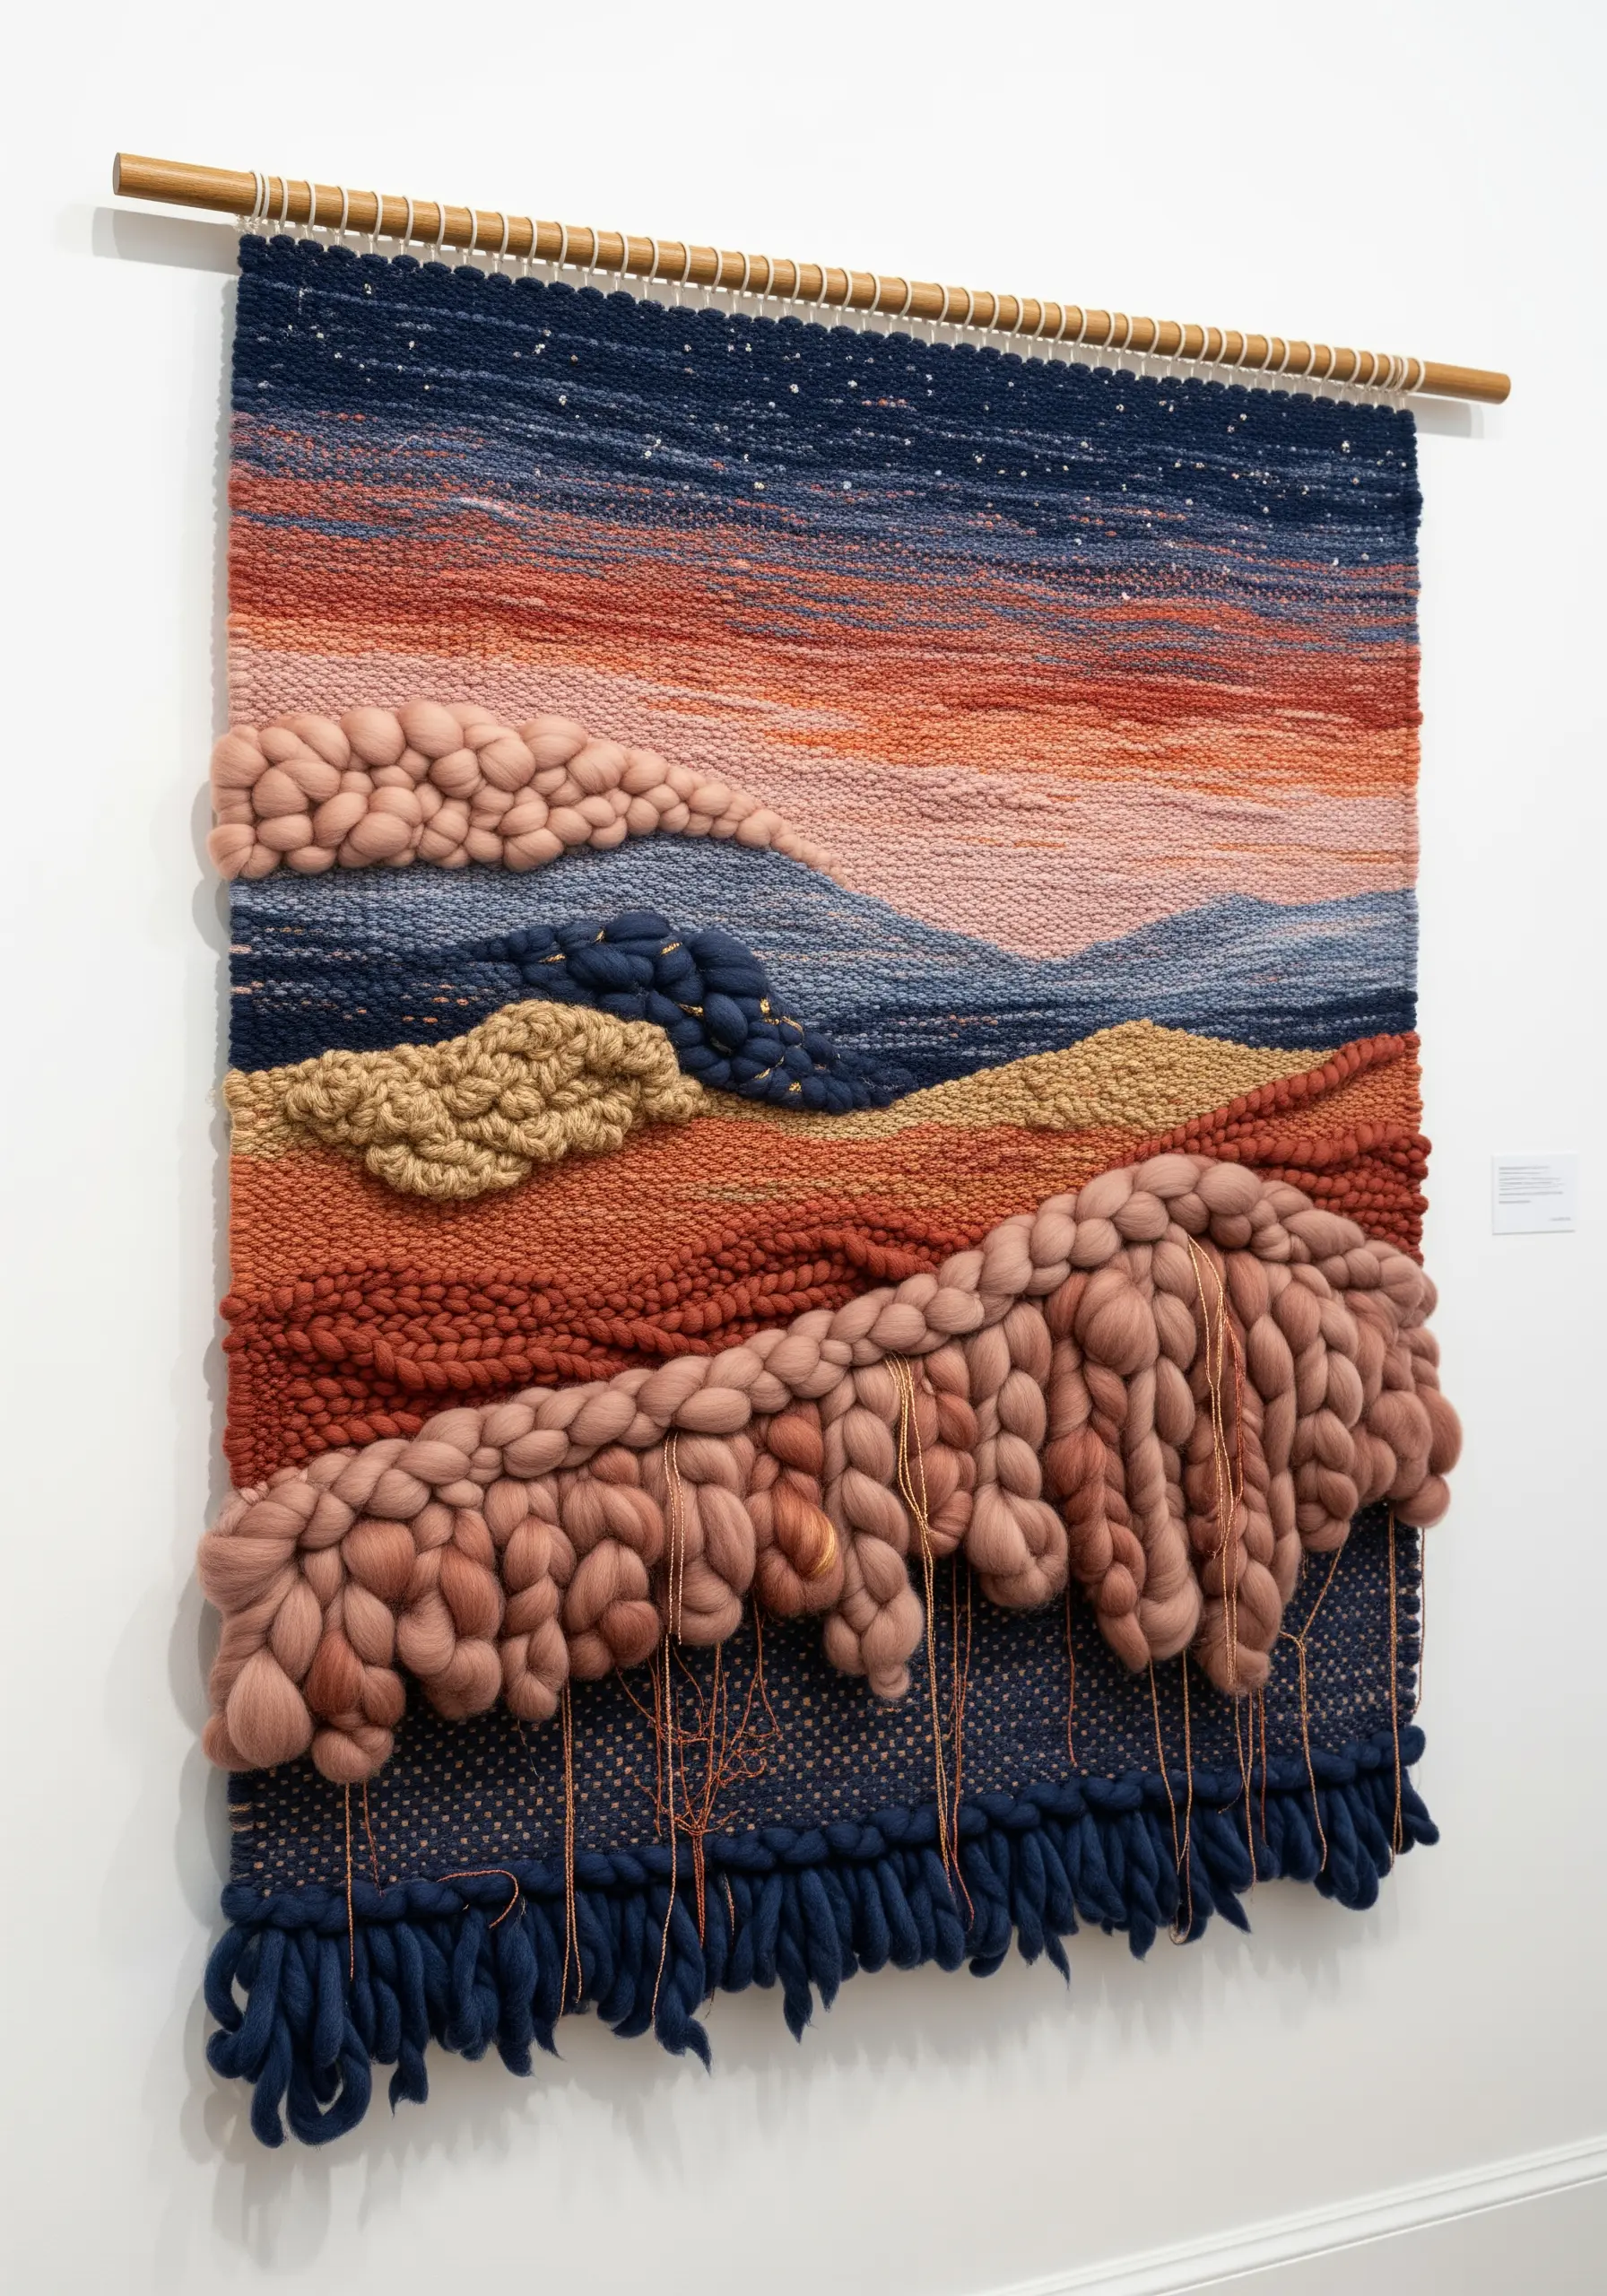
Introduce extreme texture variations to create depth in your woven pieces.
Use bulky merino wool roving for foreground elements like hills or clouds, creating soft, sculptural forms that command attention.
Contrast this with tightly woven sections using standard yarn for the sky or distant mountains; this juxtaposition makes your landscape feel dynamic and touchable.
Allow some warp threads to show through in select areas, adding a delicate, grid-like detail that enhances the composition’s airiness.
A loose, hanging fringe grounds the piece and introduces a final layer of movement, completing the narrative.
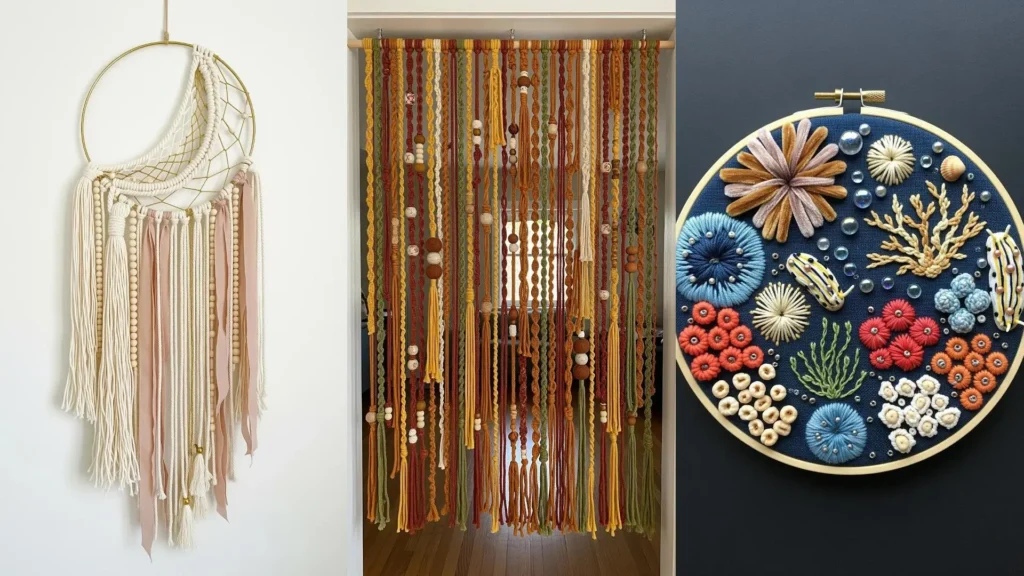
2. Sculptural Sea Gardens in a Hoop

Go beyond flat stitches to create a sculptural underwater world that invites touch.
Use bullion knots for sea slugs, adjusting the number of wraps around the needle to create their distinctive curved bodies.
For anemones and coral, combine tightly packed French knots with raised satin stitch pads to build varied, organic shapes.
Incorporate a few clear beads to mimic air bubbles; this adds a layer of realism and catches the light beautifully.
Vary your thread types—use matte cotton for soft textures and a lustrous rayon for elements you want to highlight with a subtle sheen.
3. Building Freestanding Fiber Sculptures
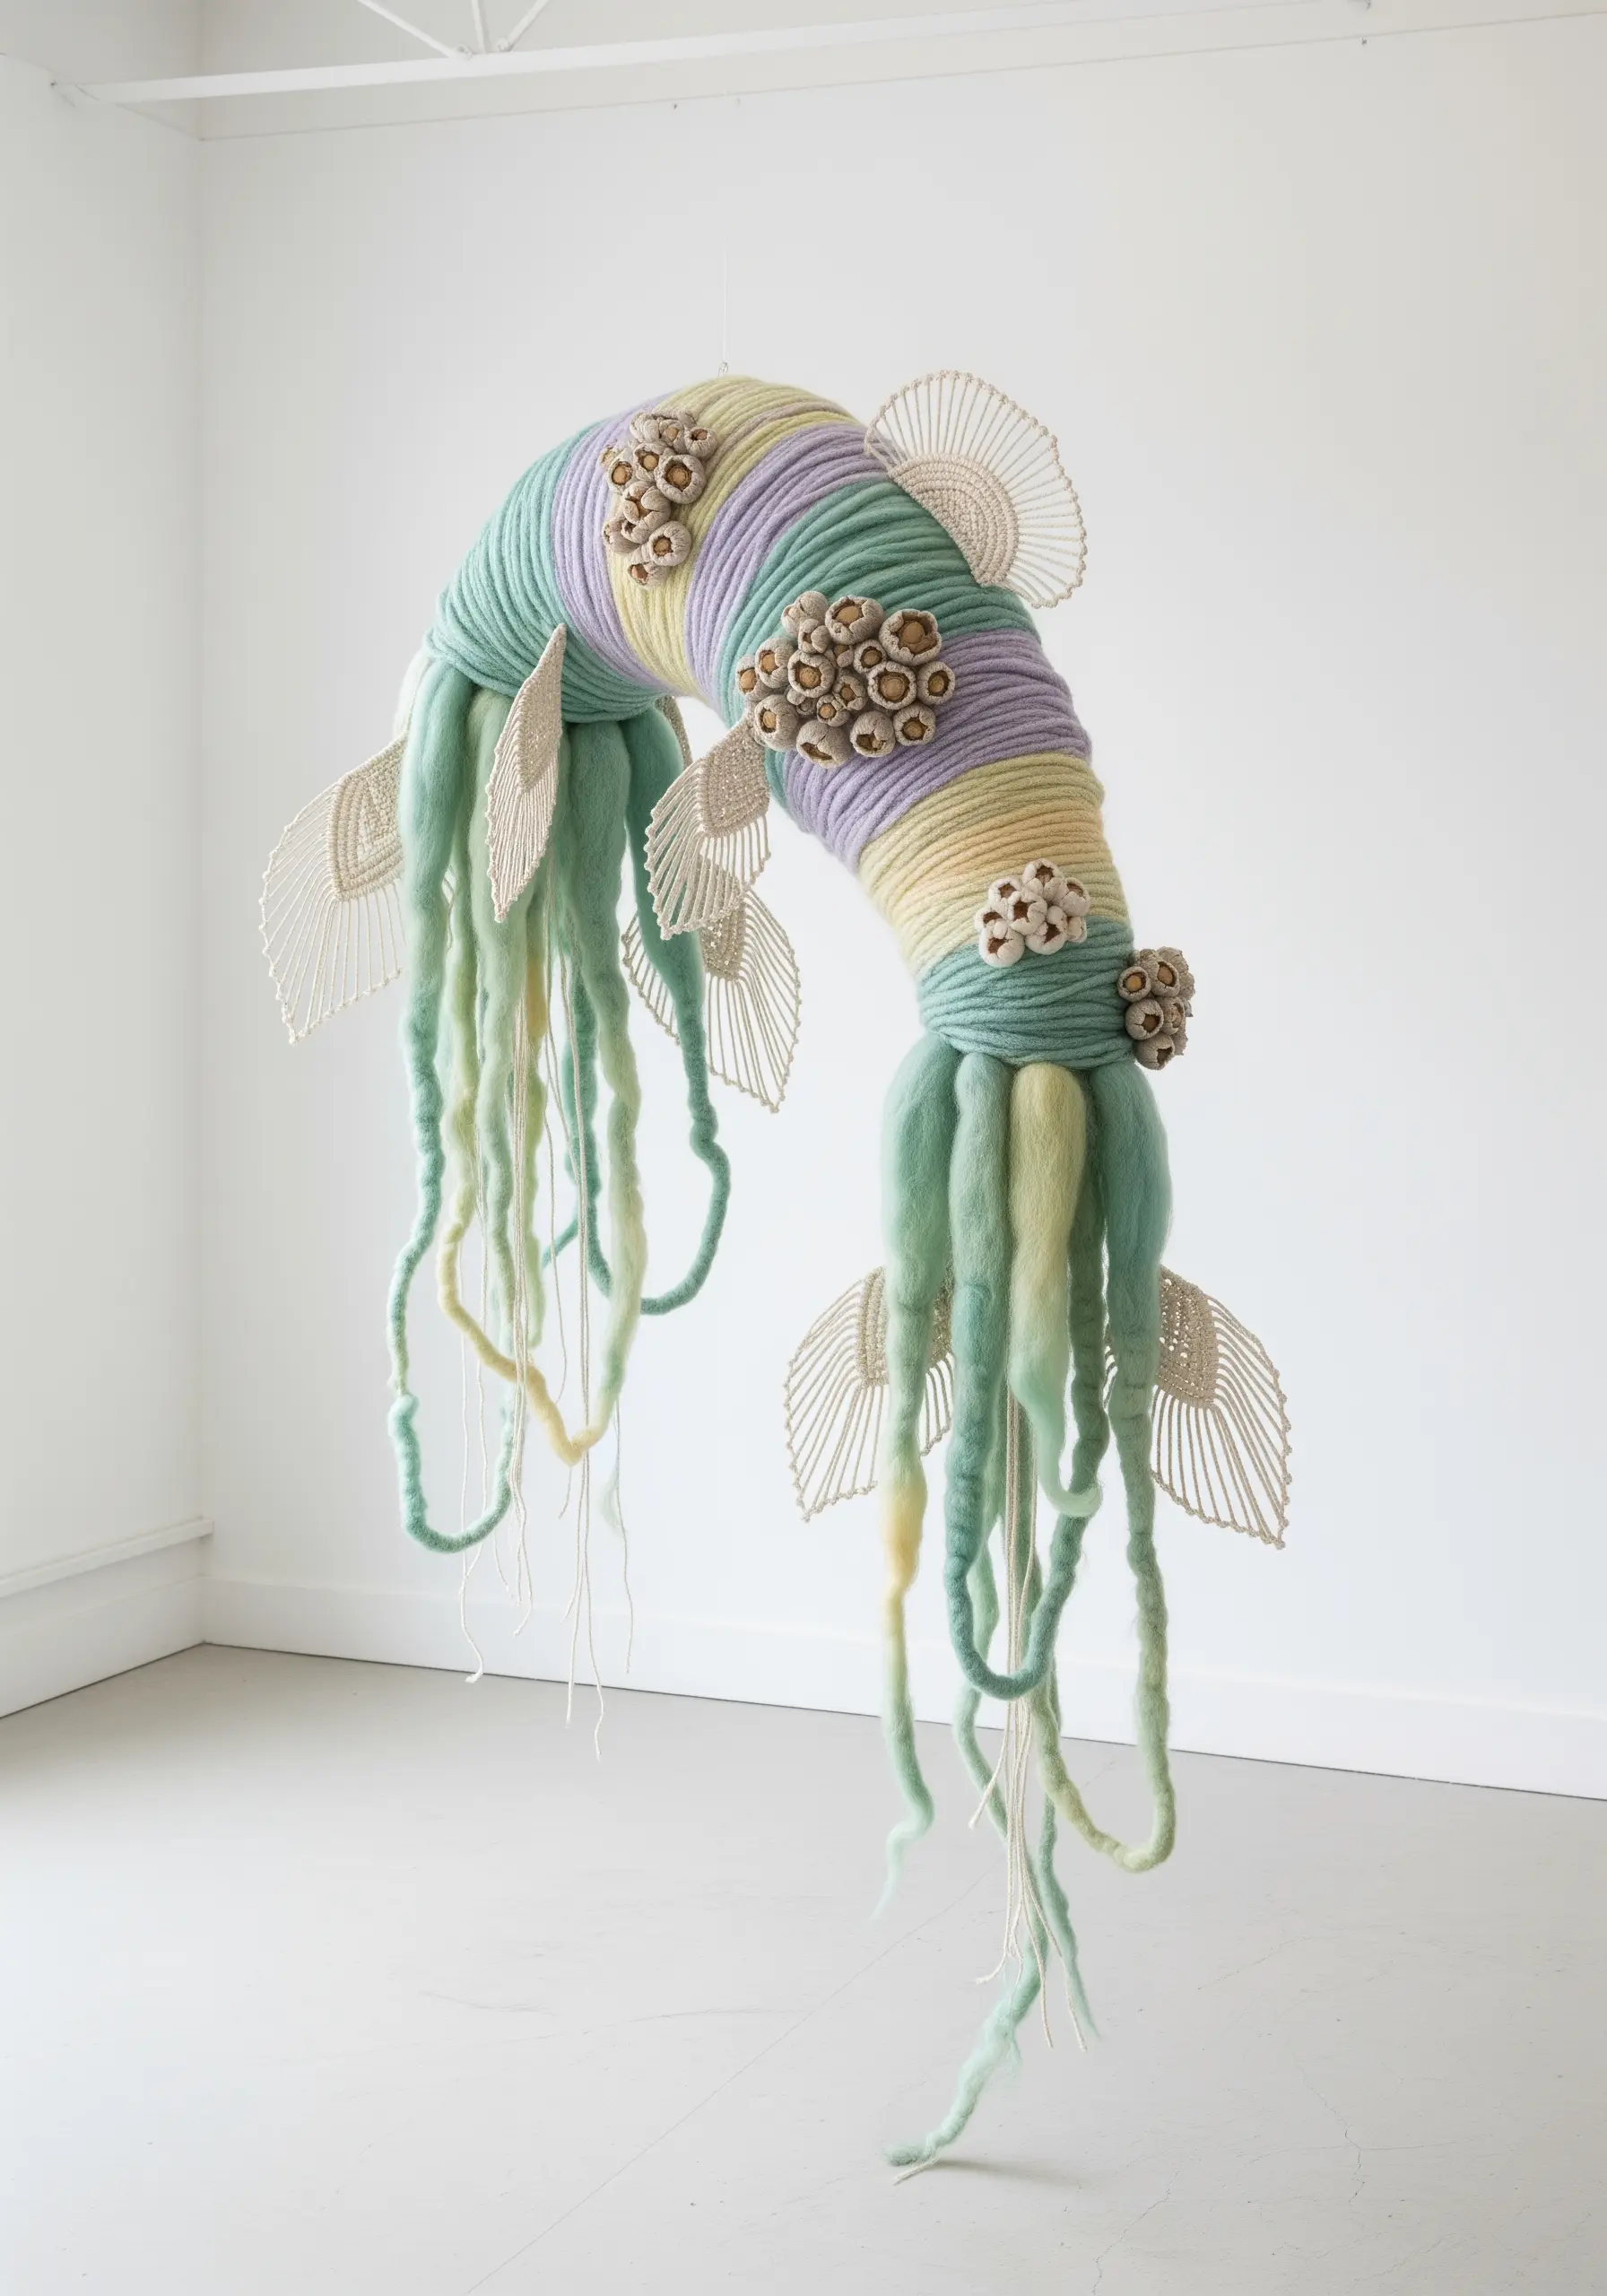
Move your fiber art off the wall by building it around a hidden armature.
You can use thick, bendable wire or flexible tubing to create the core shape of your sculpture, giving it structure and form.
Wrap this base tightly with yarn in color-blocked sections to define the shape and create a smooth surface.
Introduce felted wool roving for softer, organic textures and macrame for details like fins or tentacles.
This approach transforms linear threads into a self-supporting, three-dimensional object that interacts with space from every angle.
4. Telling a Story with a Fiber Art Triptych

Use a triptych format to explore a theme across three distinct but connected canvases.
Assign a unique color palette and textural technique to each panel to give it its own identity while contributing to the whole story.
Combine fabric appliqué for bold shapes like tree trunks with dense clusters of French knots for richly textured foliage.
For a soft, snowy effect, try needle felting wool roving directly onto the canvas—it blends seamlessly and adds instant dimension.
This multi-technique approach creates a cohesive narrative that feels both illustrative and deeply tactile.
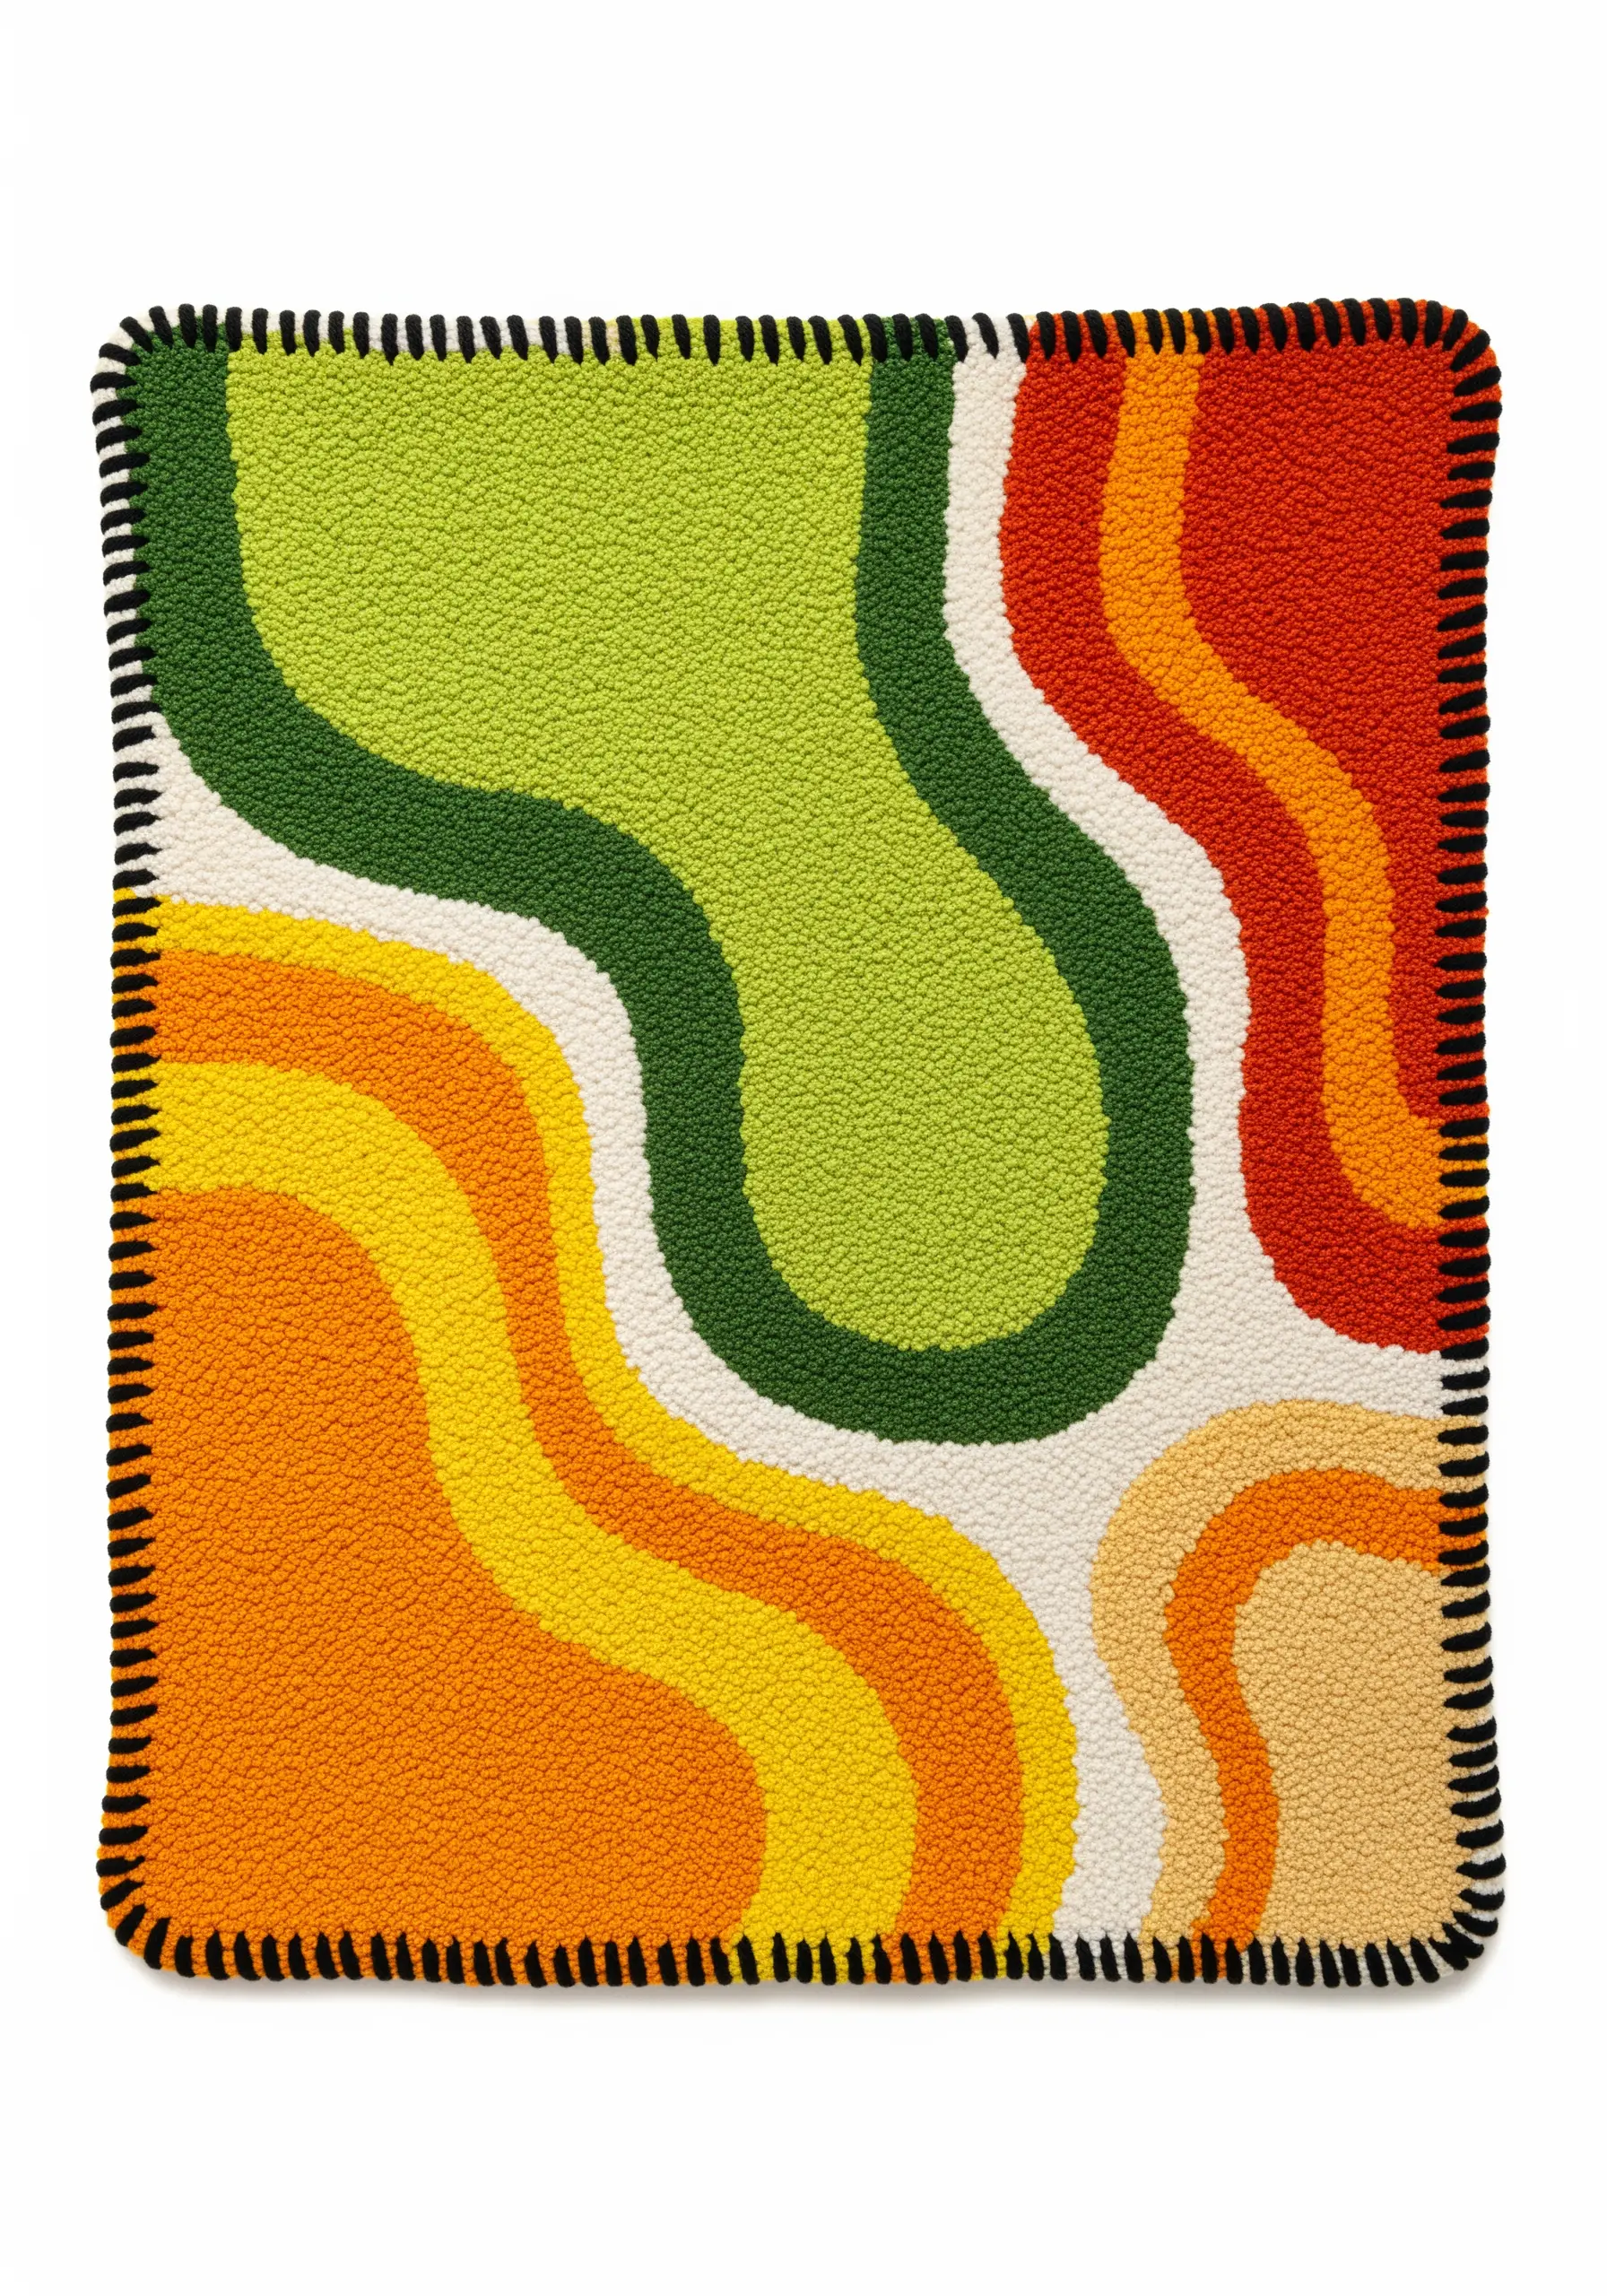
5. Crafting Coiled Baskets with Fabric Scraps
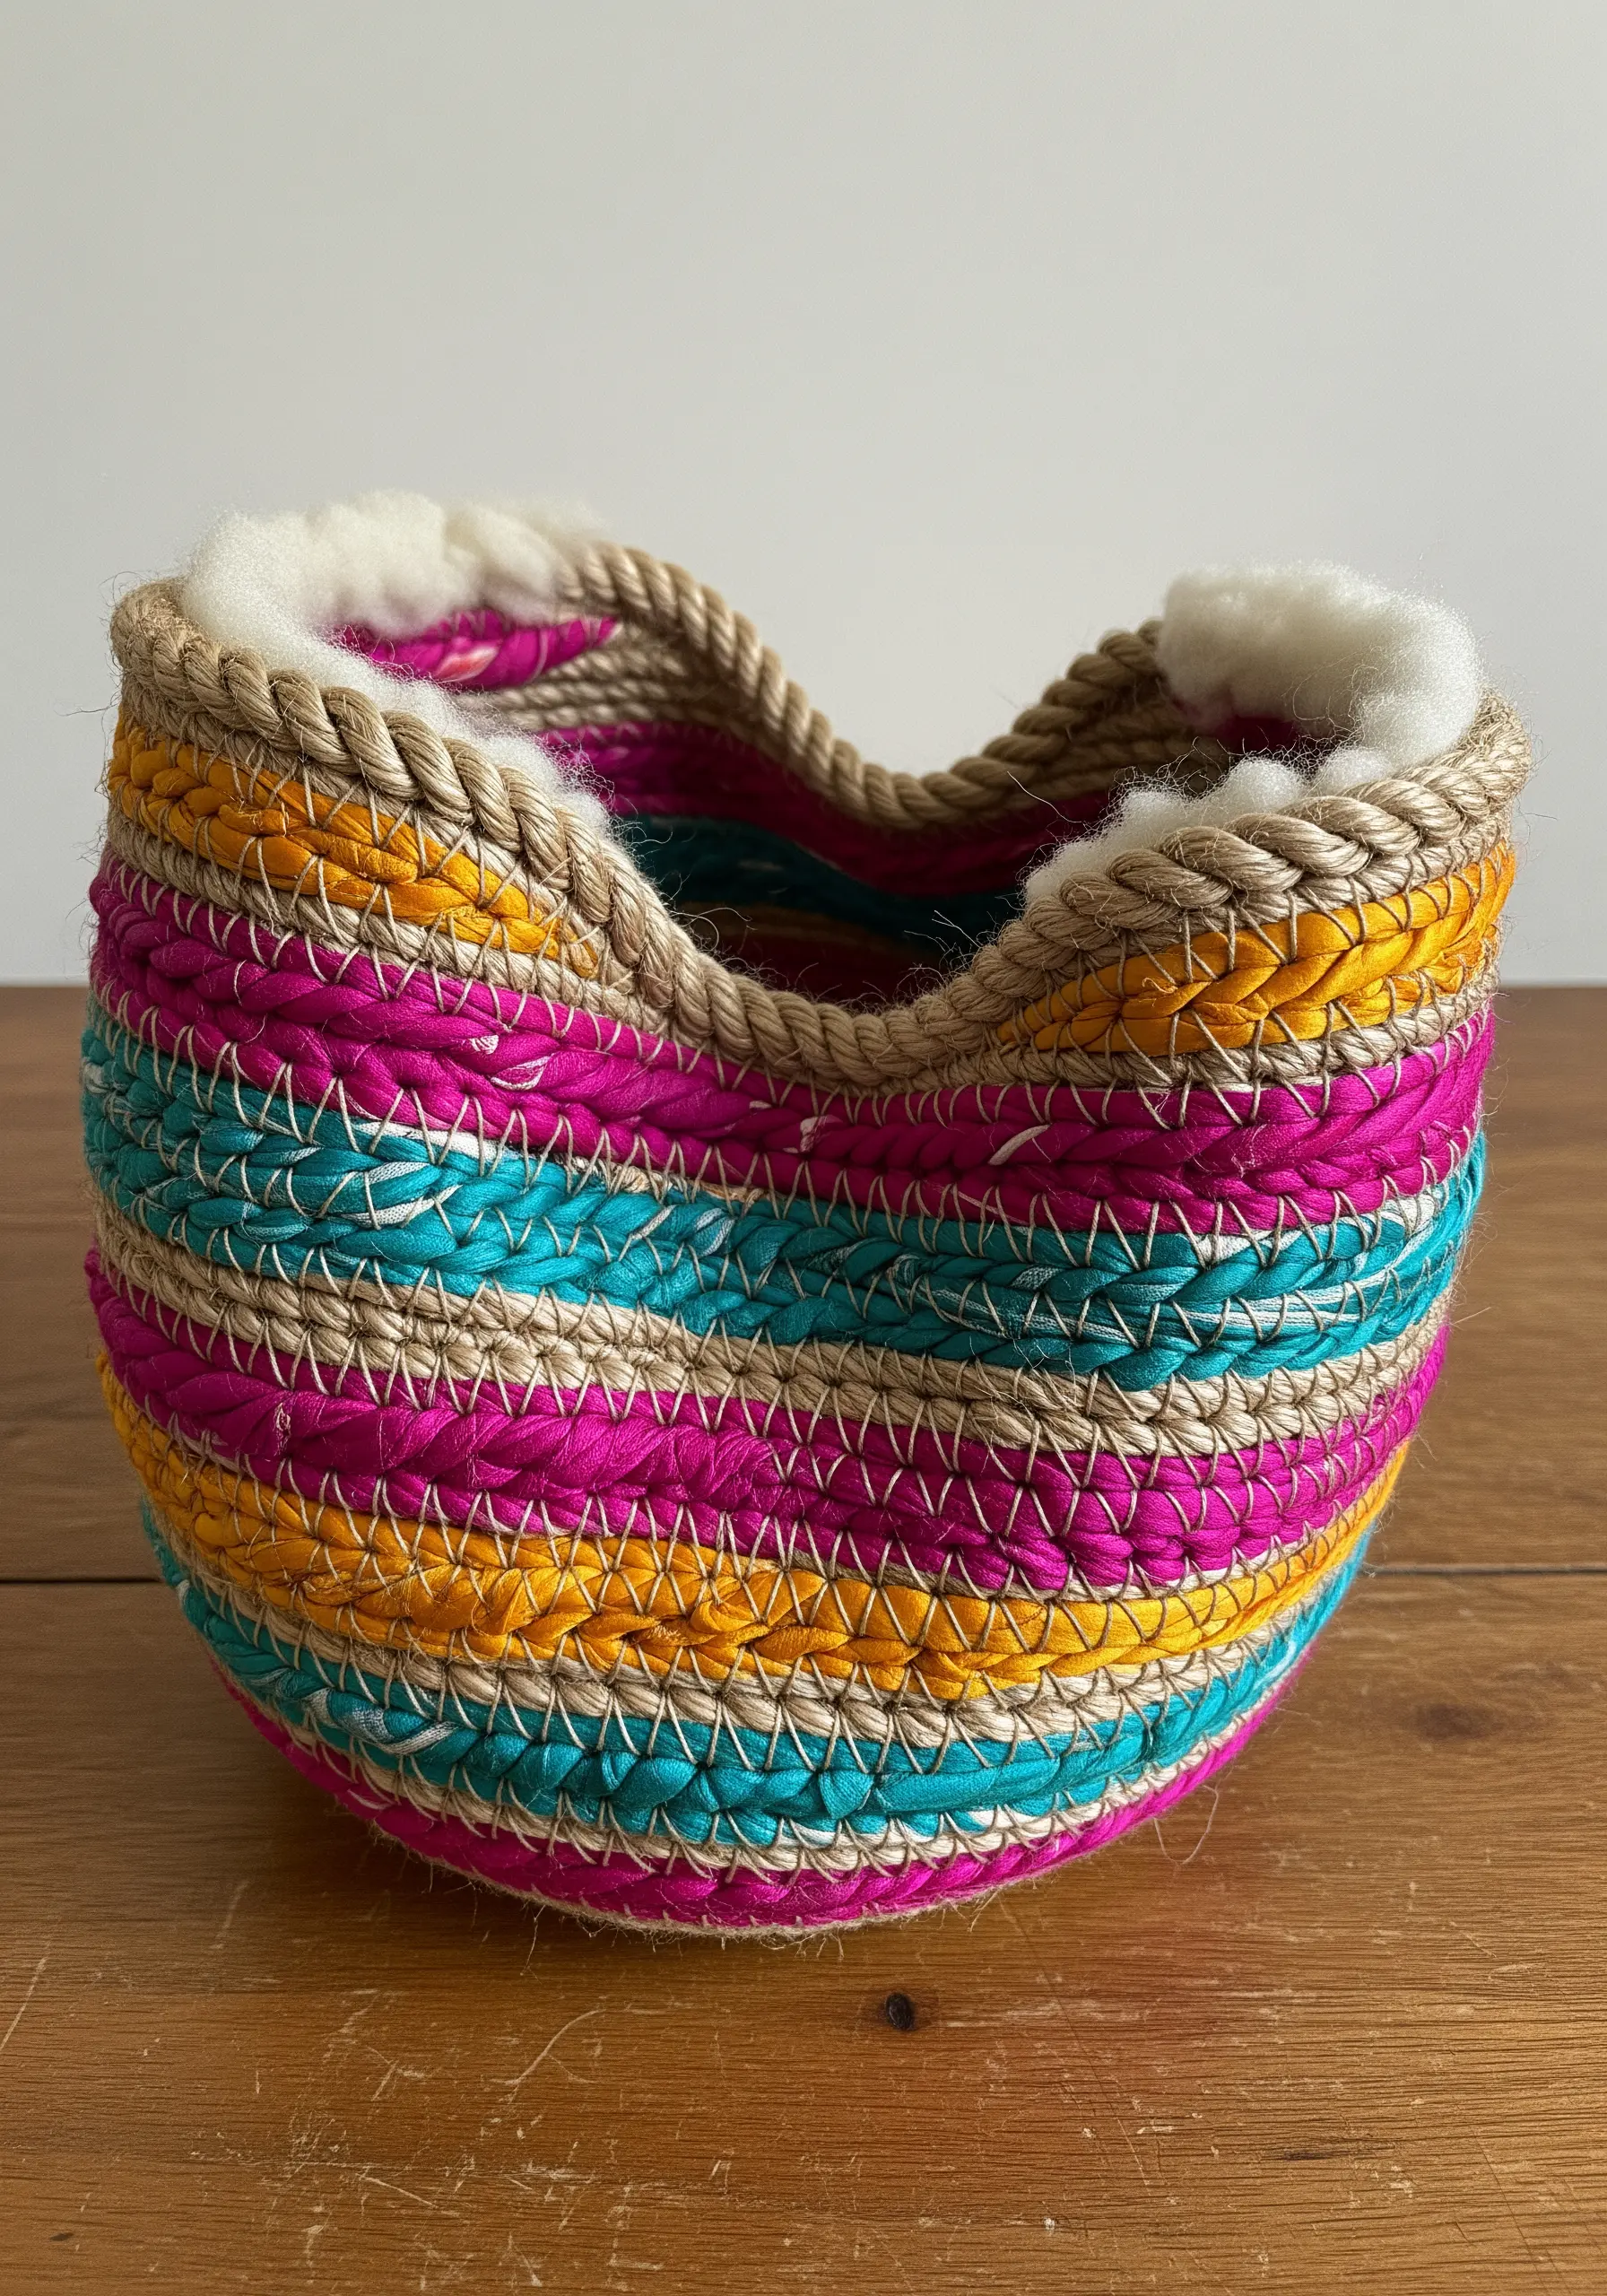
Transform leftover fabric and simple rope into a functional art object with color and personality.
Start with a thick cotton rope as your core for sturdiness.
Tightly wrap strips of colorful fabric around the rope, then begin coiling it, stitching each new layer to the one below using a durable thread like waxed linen.
Introduce sections of unwrapped rope for a subtle textural contrast that breaks up the color.
Lining the final row with soft wool gives the basket a refined, gentle edge.
6. Integrating Hardware into Woven Designs
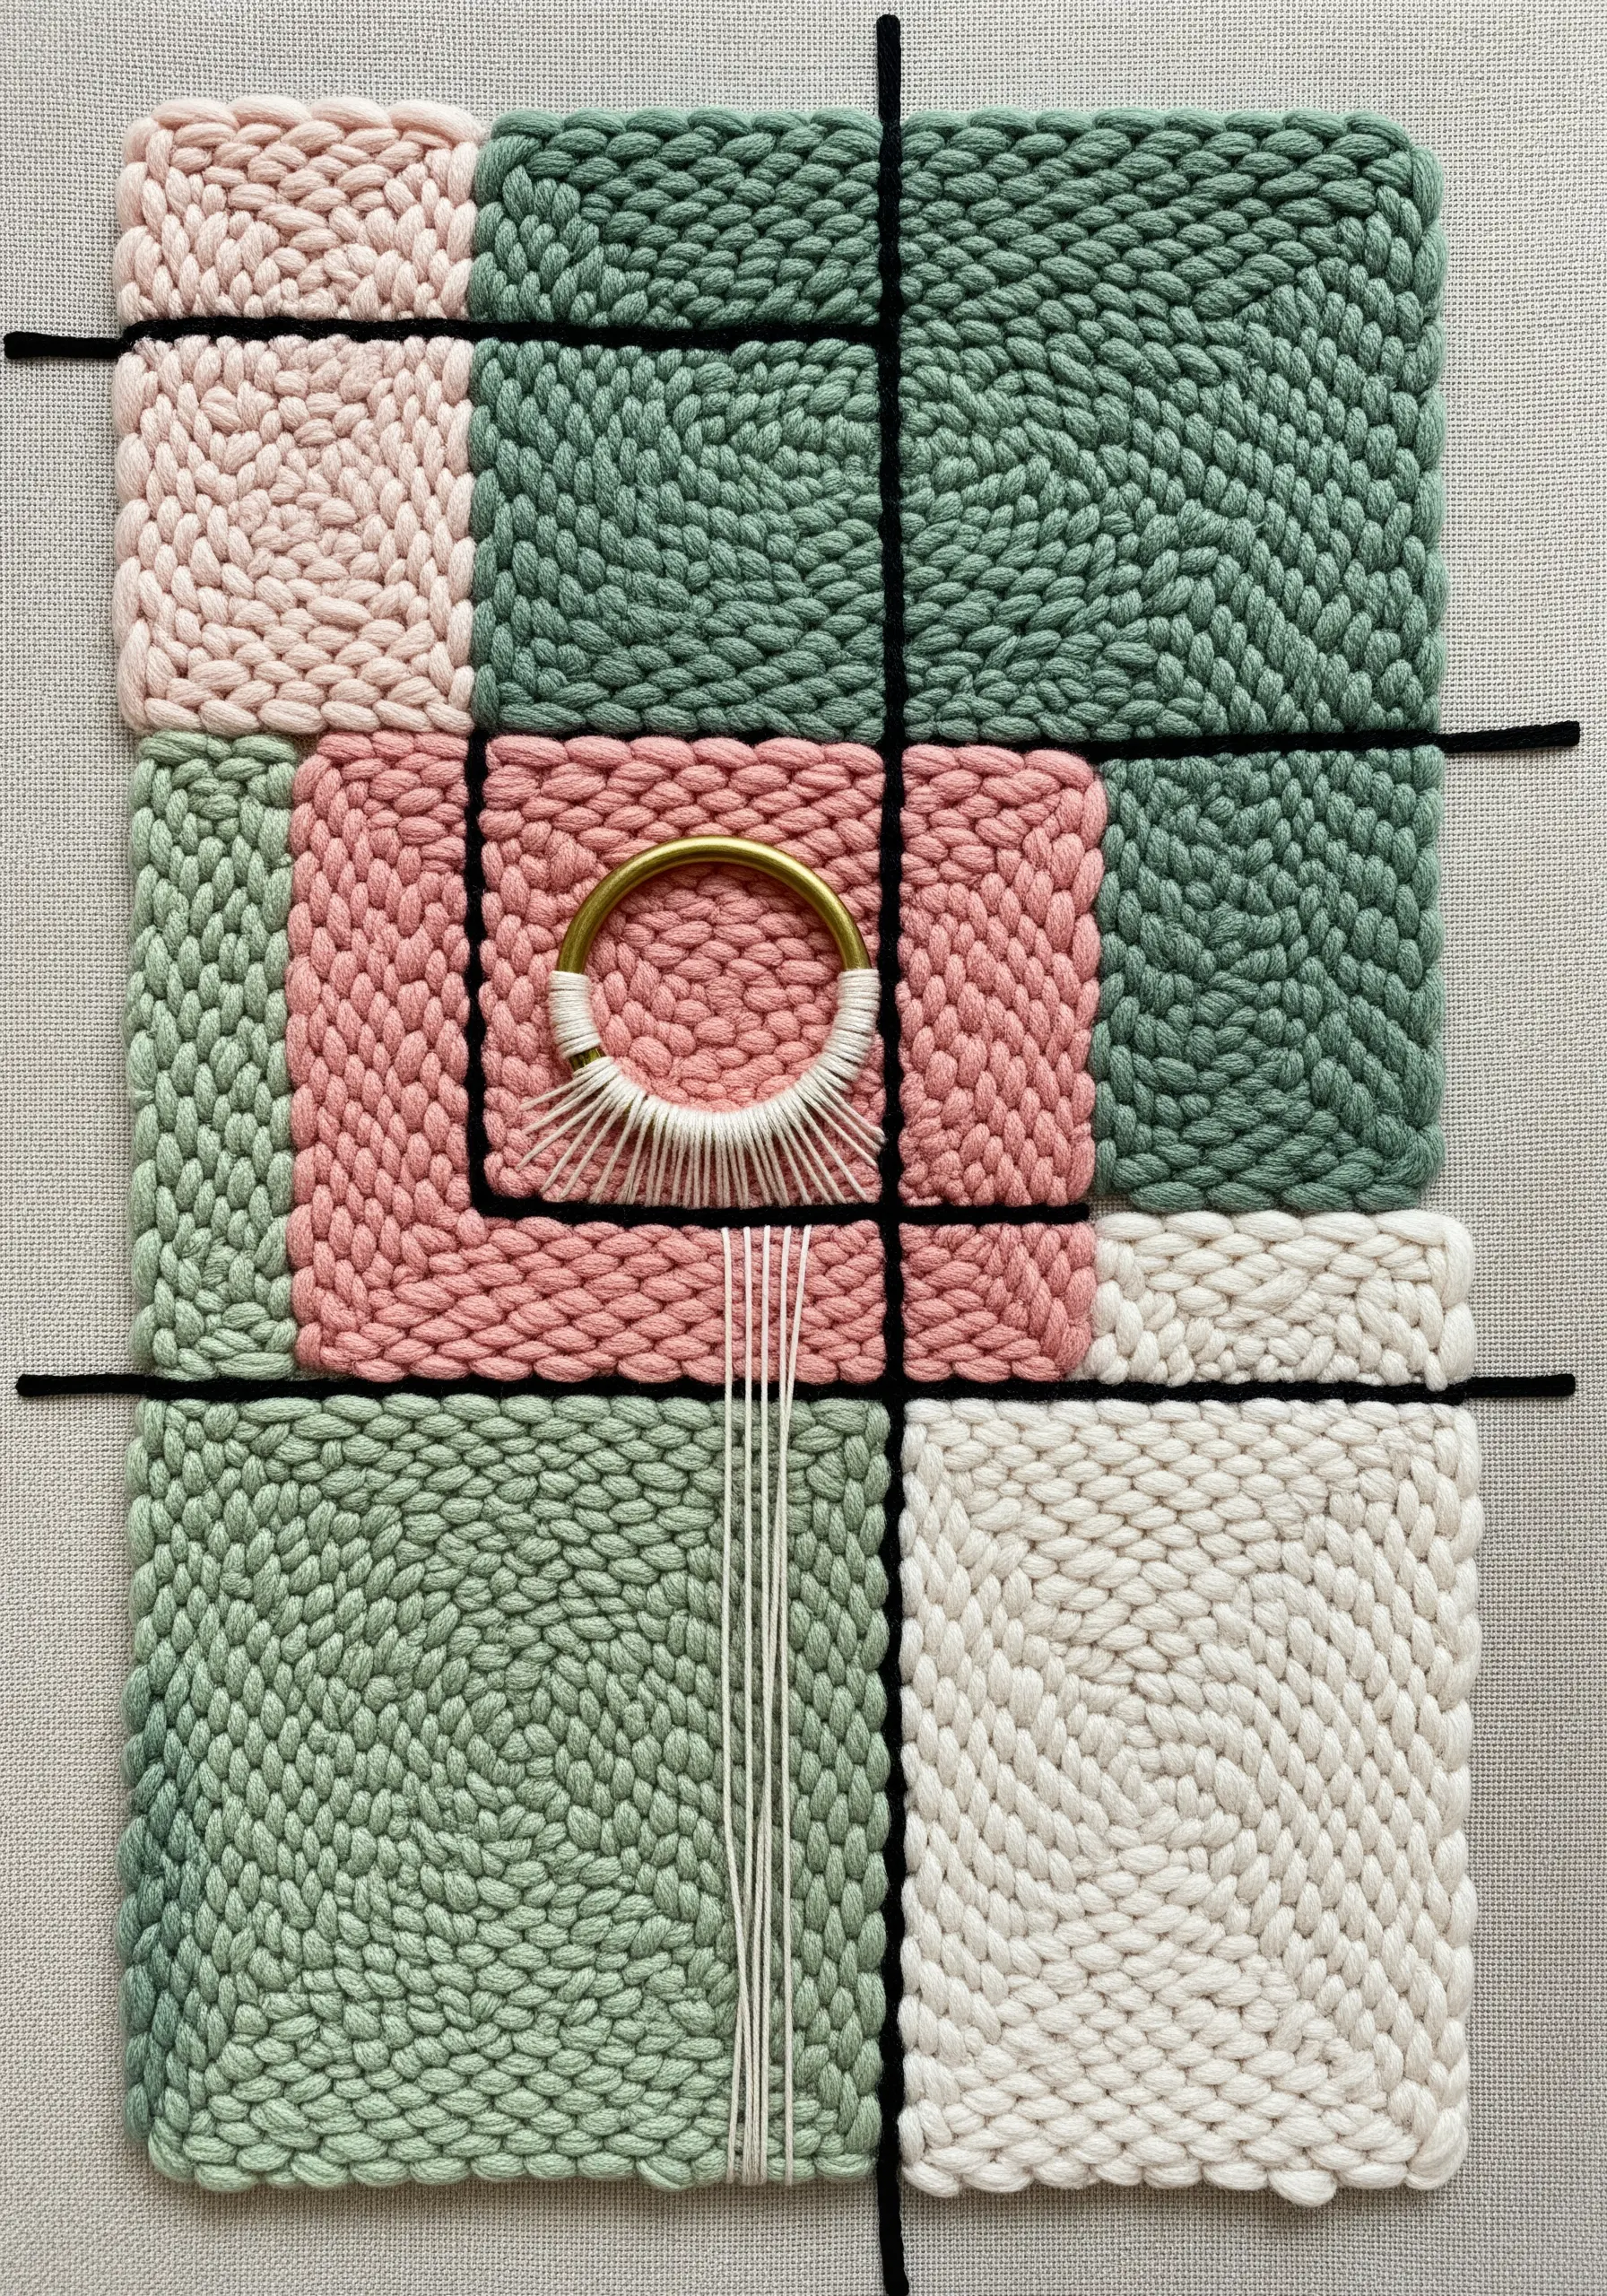
Elevate a simple geometric weaving by incorporating an unexpected element like a metal ring or wooden dowel.
Weave your piece in color-blocked sections on the loom, planning a negative space where the hardware will sit.
Once the weaving is finished, securely stitch the metal ring into place.
Use the ring as a new anchor point for threads, creating a waterfall or sunburst effect that contrasts with the structured grid of the weaving.
This technique blends hard and soft materials for a modern, architectural feel.
7. Creating a Woven Geode with Mixed Fibers
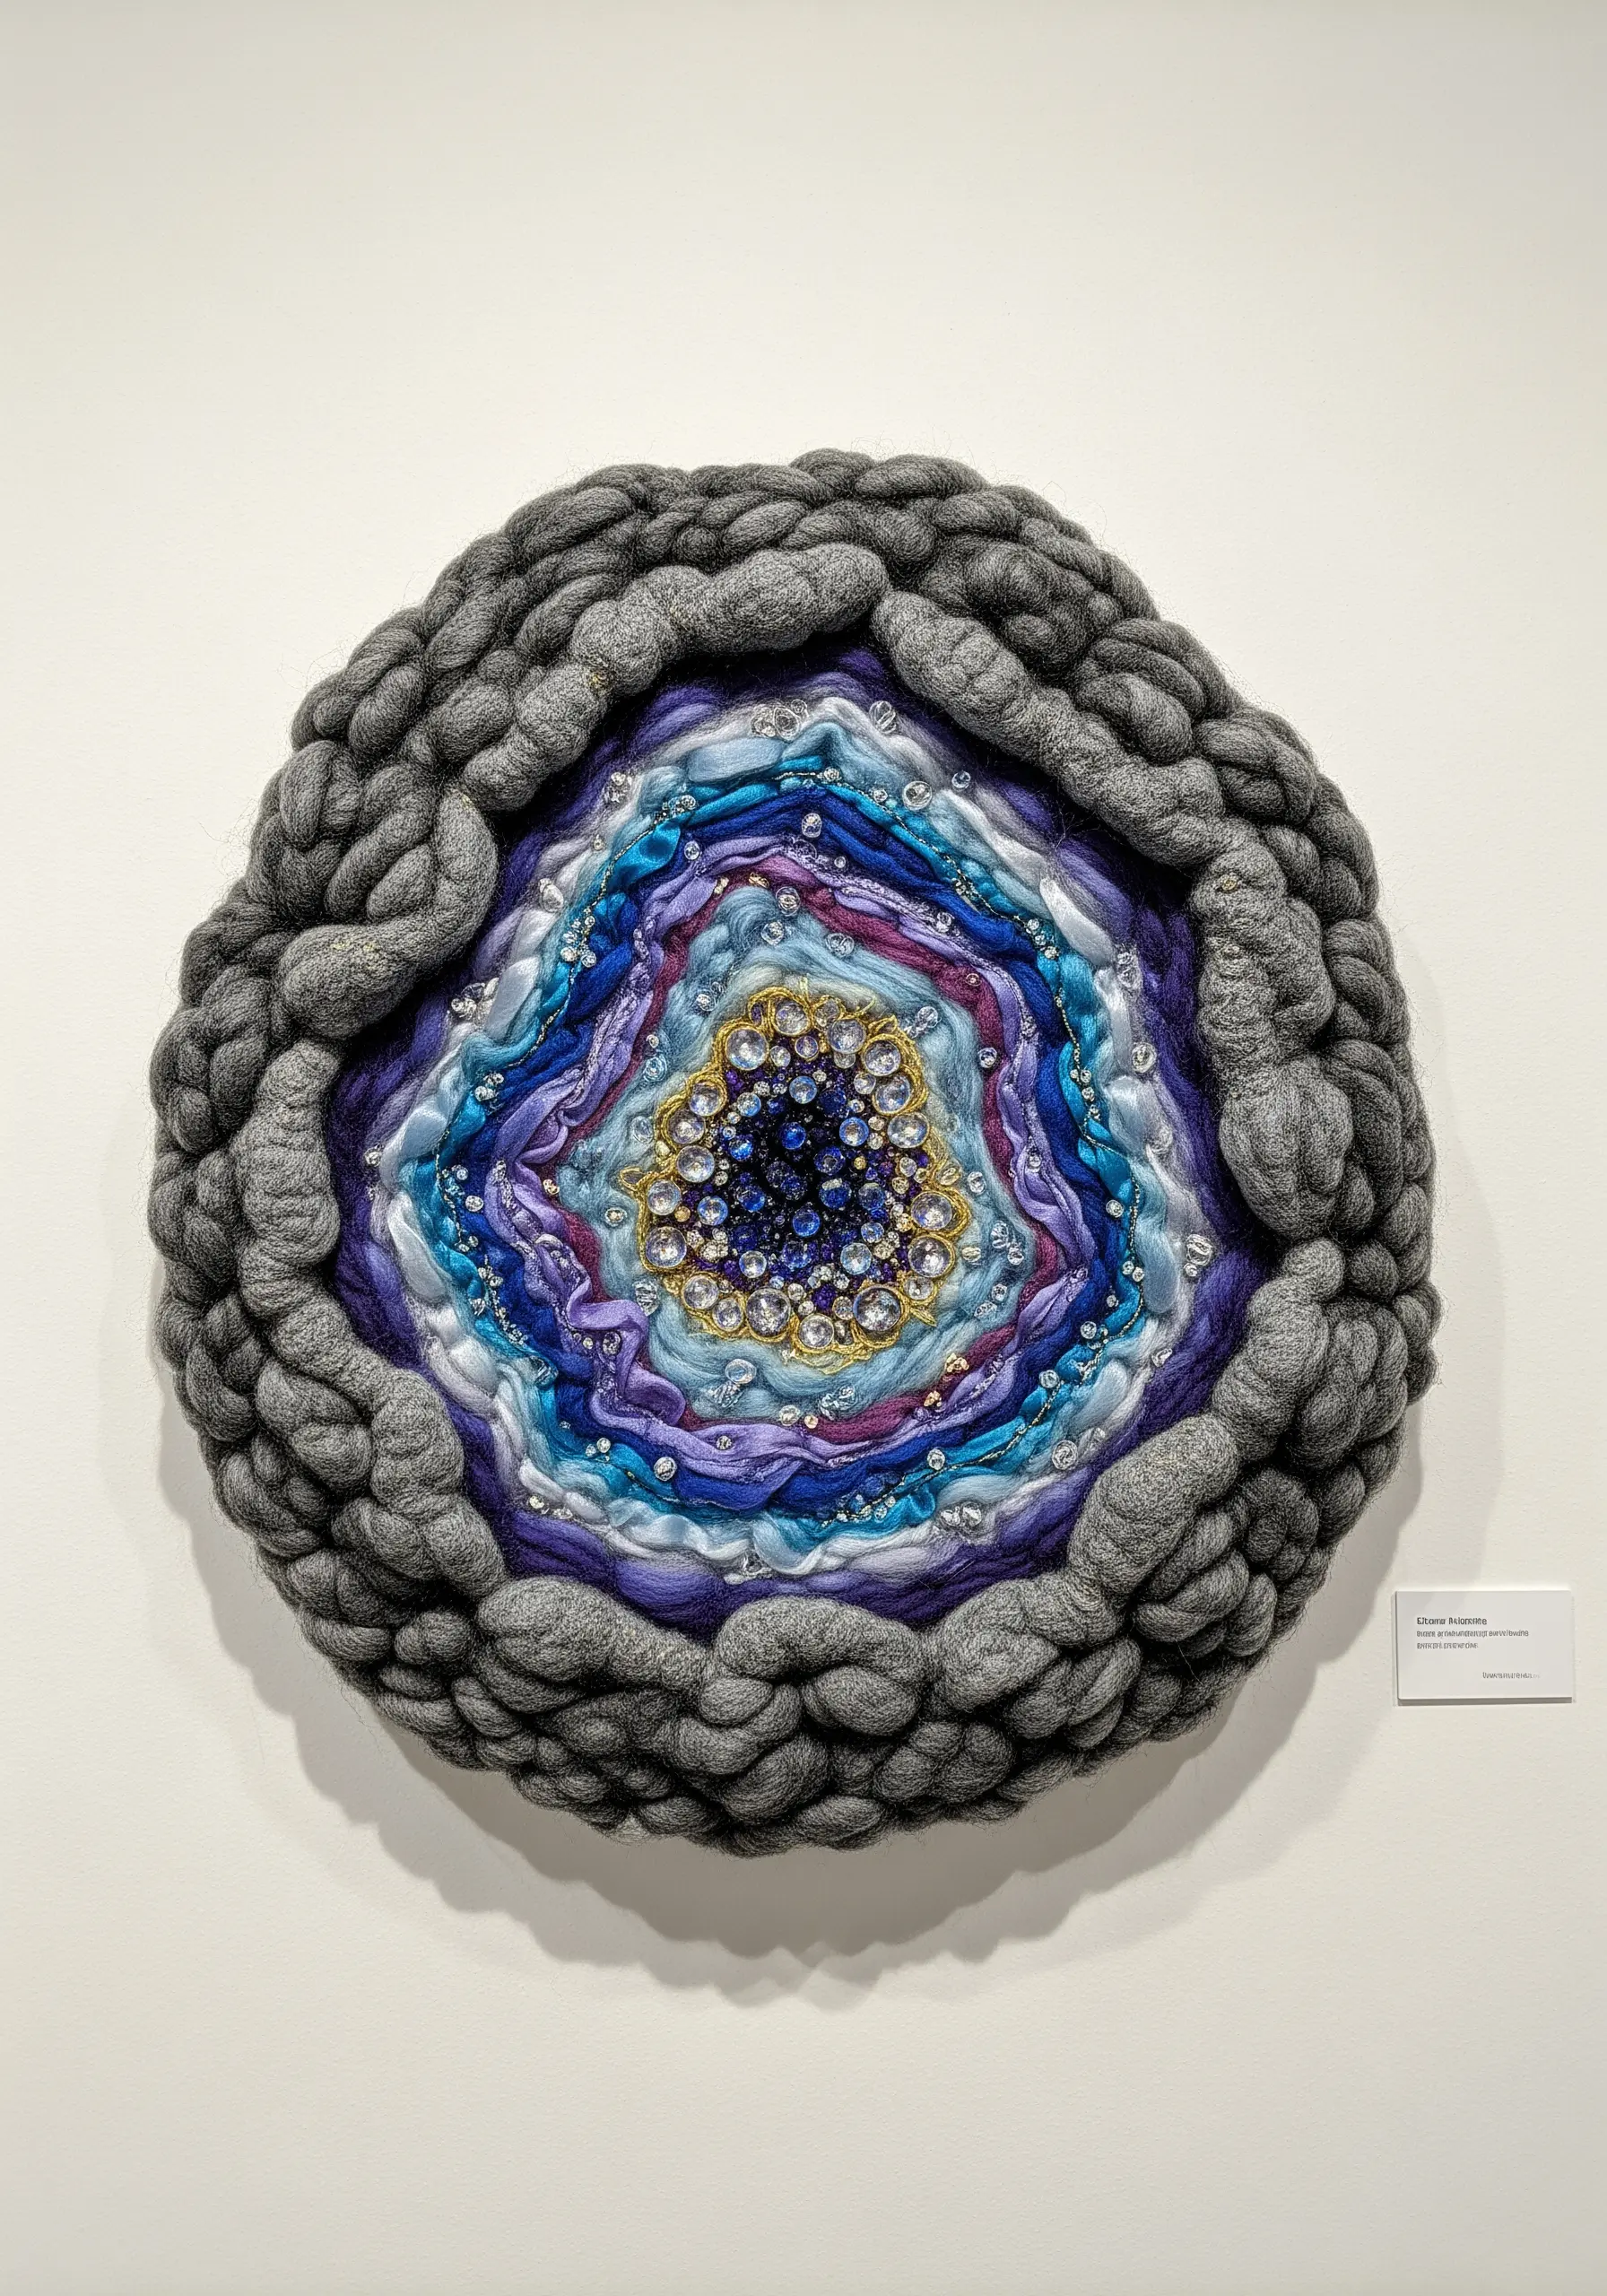
Recreate the mesmerizing layers of a geode using a thoughtful progression of fiber and embellishments.
Start on a circular loom or frame, using chunky, braided wool for the rough outer “rock” layer.
For the inner rings, switch to finer, shinier threads like silk or satin floss, varying the colors to create a smooth gradient.
In the center, couch down metallic threads and stitch in crystals or seed beads to mimic crystalline formations.
The power of this piece lies in the dramatic shift from matte and bulky to fine and sparkling textures.
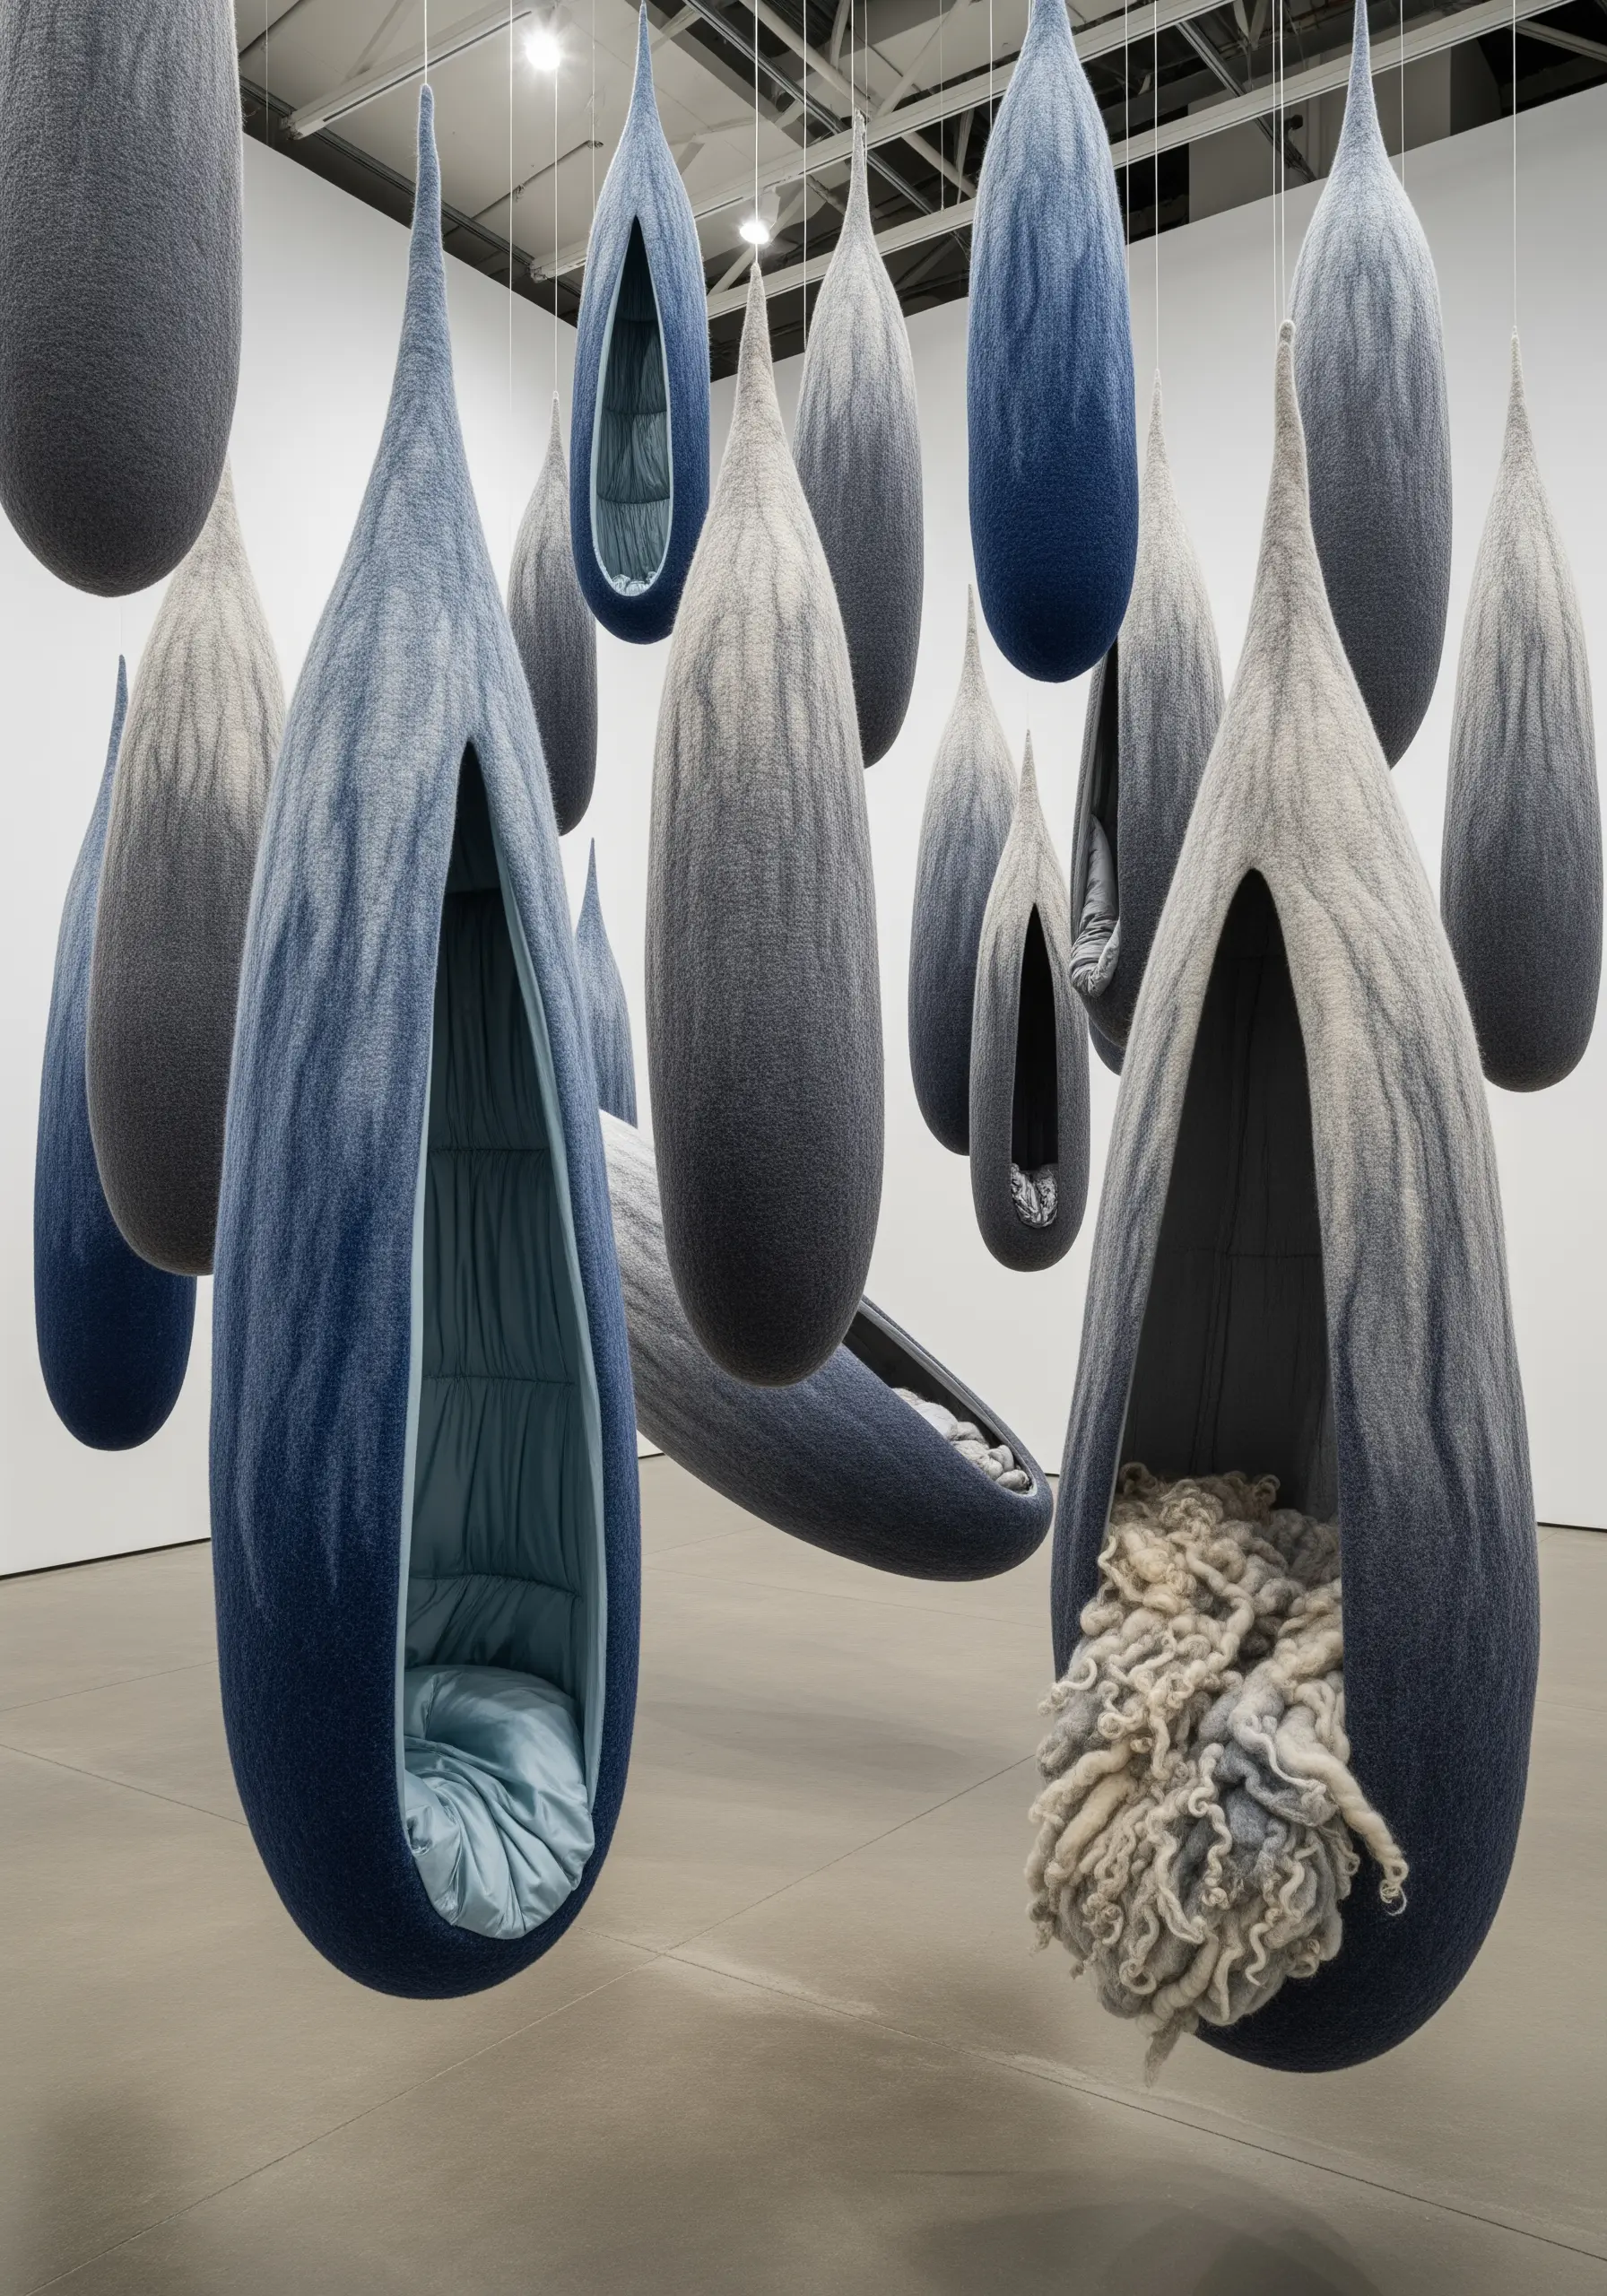
8. Large-Scale Installations with Rope and Knots

Think beyond the hoop and consider how fiber can transform an entire space with architectural presence.
For a large-scale installation, use thick, industrial ropes to form the main structure, twisting multiple strands together for stability and visual texture.
For finer details like branches or leaves, untwist the ends of the rope or attach thinner cords using simple macrame knots.
This approach scales up familiar fiber art techniques to create immersive experiences that redefine a room.
9. Celestial Charting with String Art and Wool
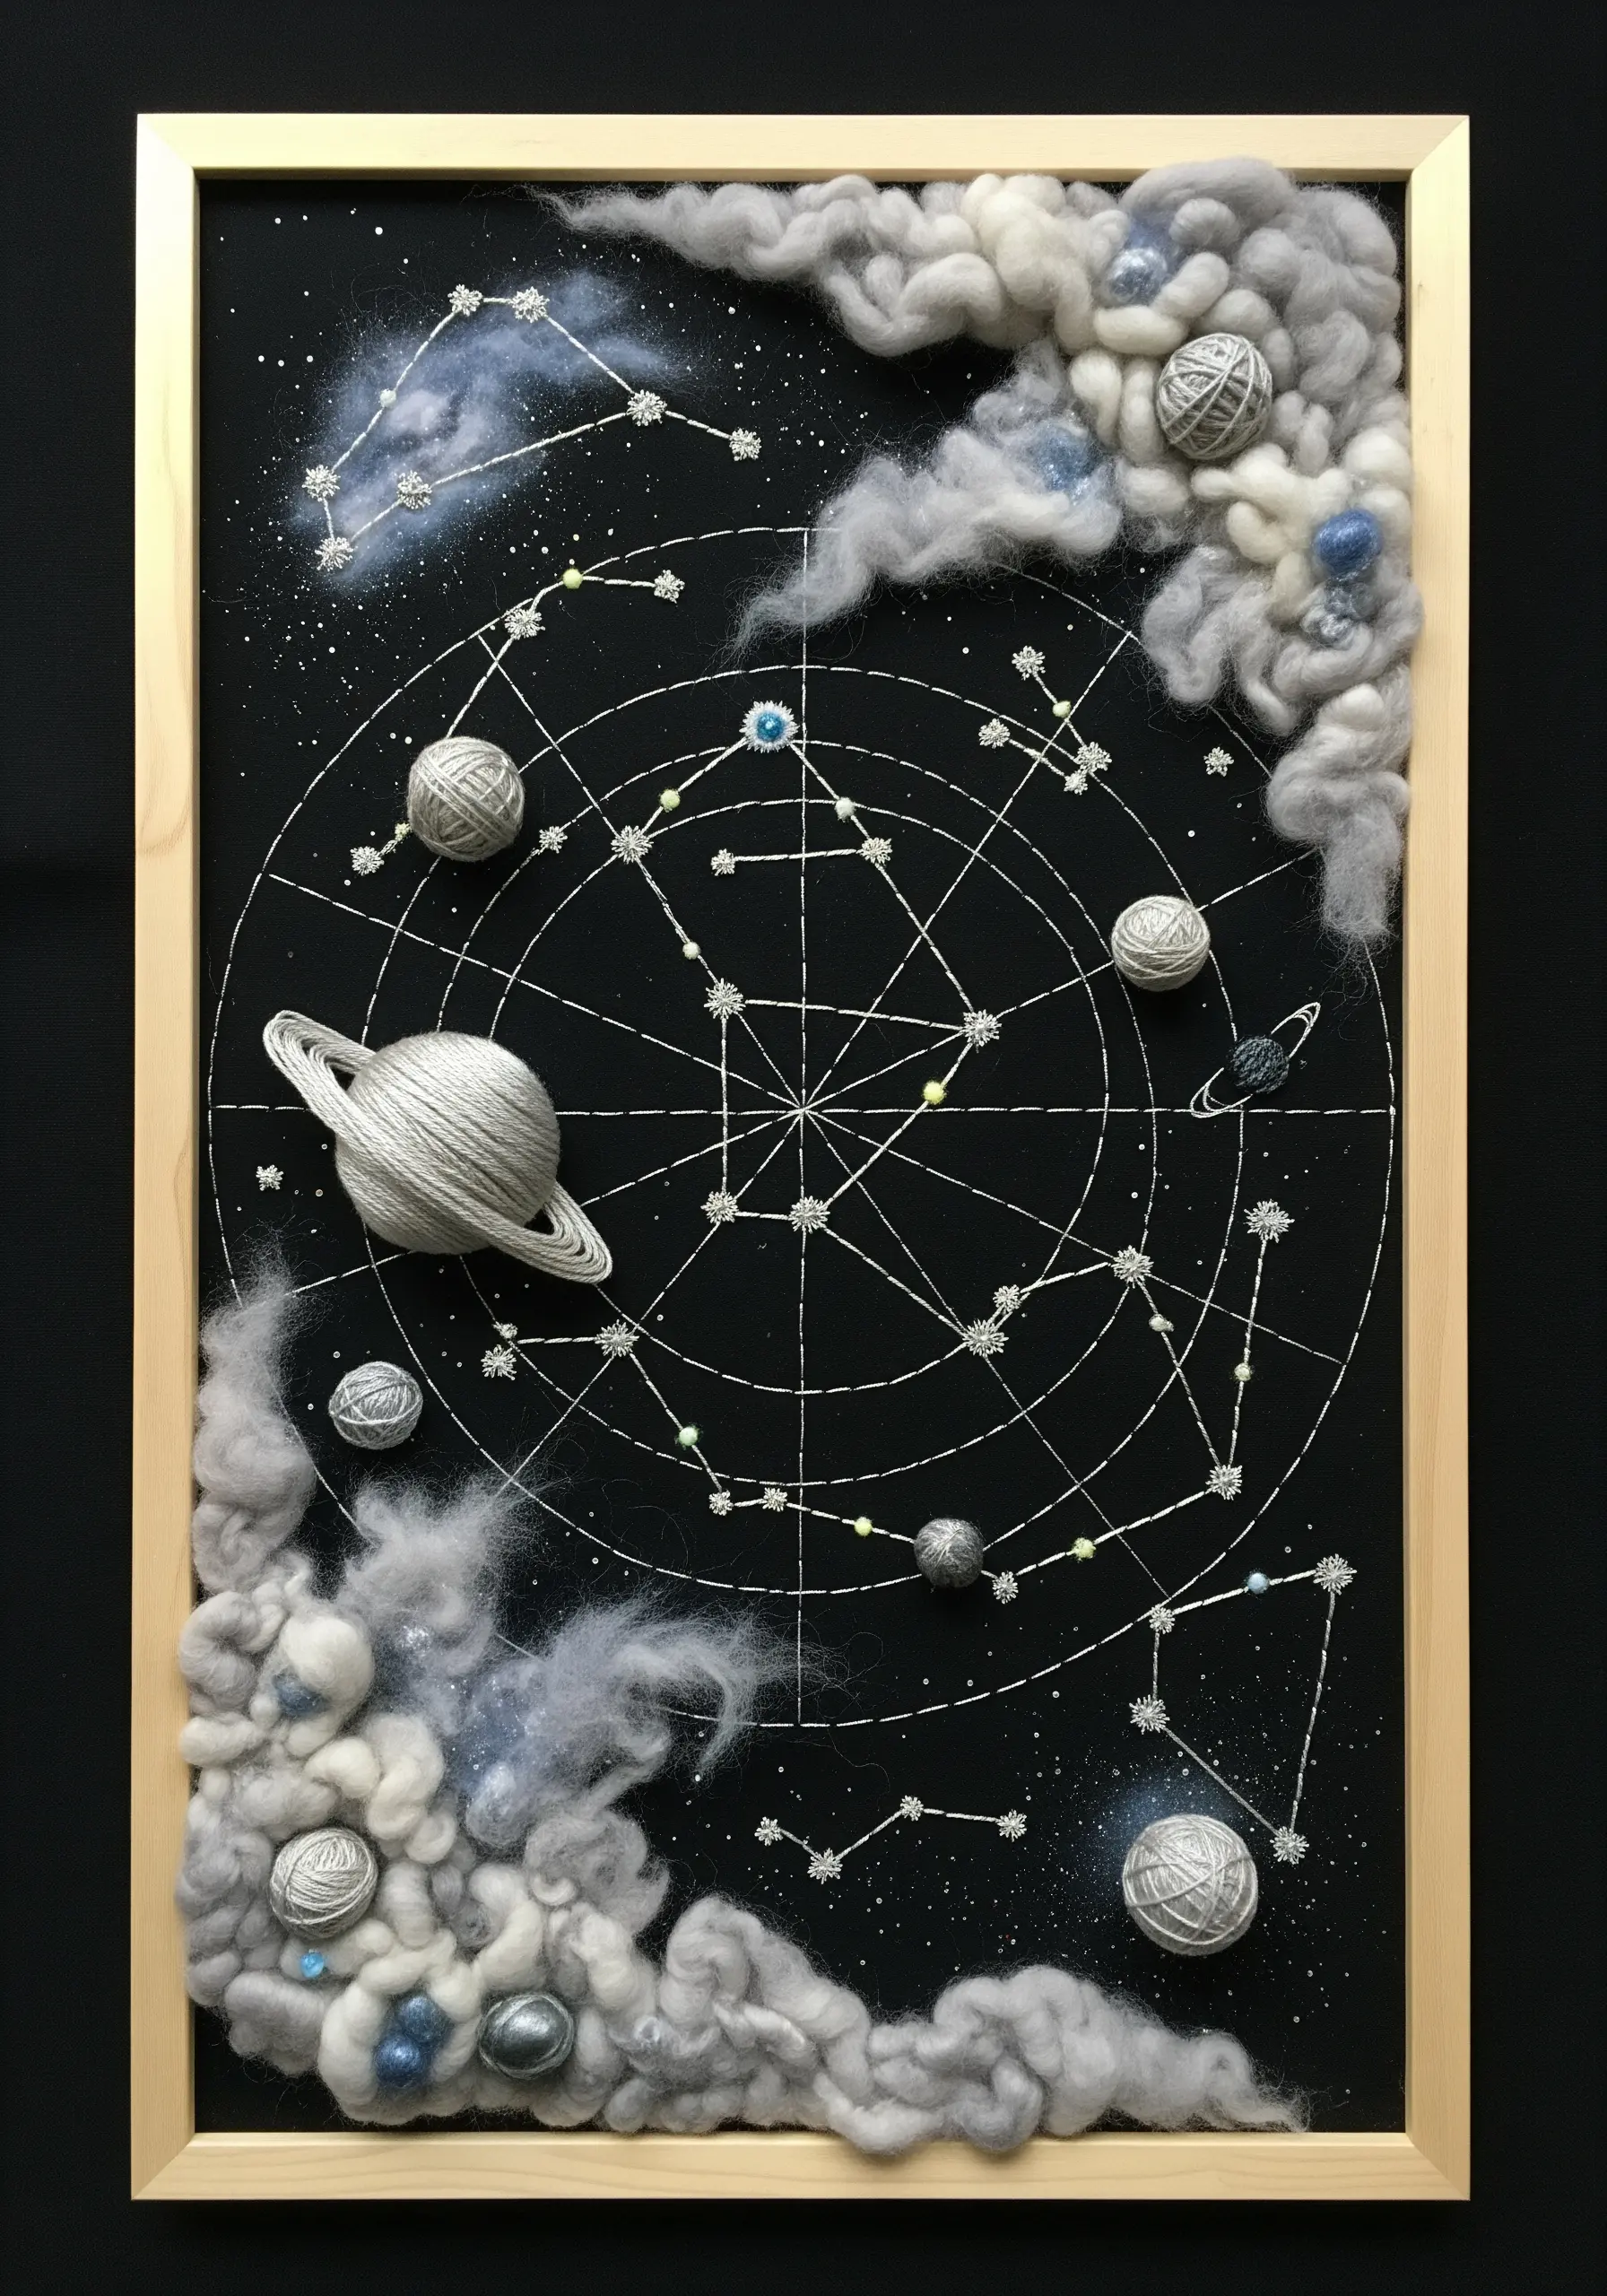
Map out the cosmos using a mixed-fiber approach on a dark, dramatic background.
Use small pins to mark the stars of constellations, then connect them with a fine metallic thread to create crisp string art lines.
For planets, wrap yarn tightly around spherical forms like wooden beads or styrofoam balls and stitch them in place.
Create soft, ethereal nebulae by needle felting wisps of wool roving directly onto your background fabric.
This combination of sharp lines and soft textures perfectly captures the structure and mystery of space.
10. The Art of Deconstructed Weaving

Embrace imperfection by intentionally creating a deconstructed, organic weaving.
Use an open weave, leaving plenty of space between your weft threads to let the warp become part of the design.
Introduce unconventional materials like raw straw, thick jute, or even dried grasses for unexpected texture.
Instead of weaving from edge to edge, work in expressive patches, allowing threads to trail off freely.
This technique shifts the focus from a perfect finished object to the raw, inherent beauty of the materials.
11. Layering Stitches for Botanical Realism
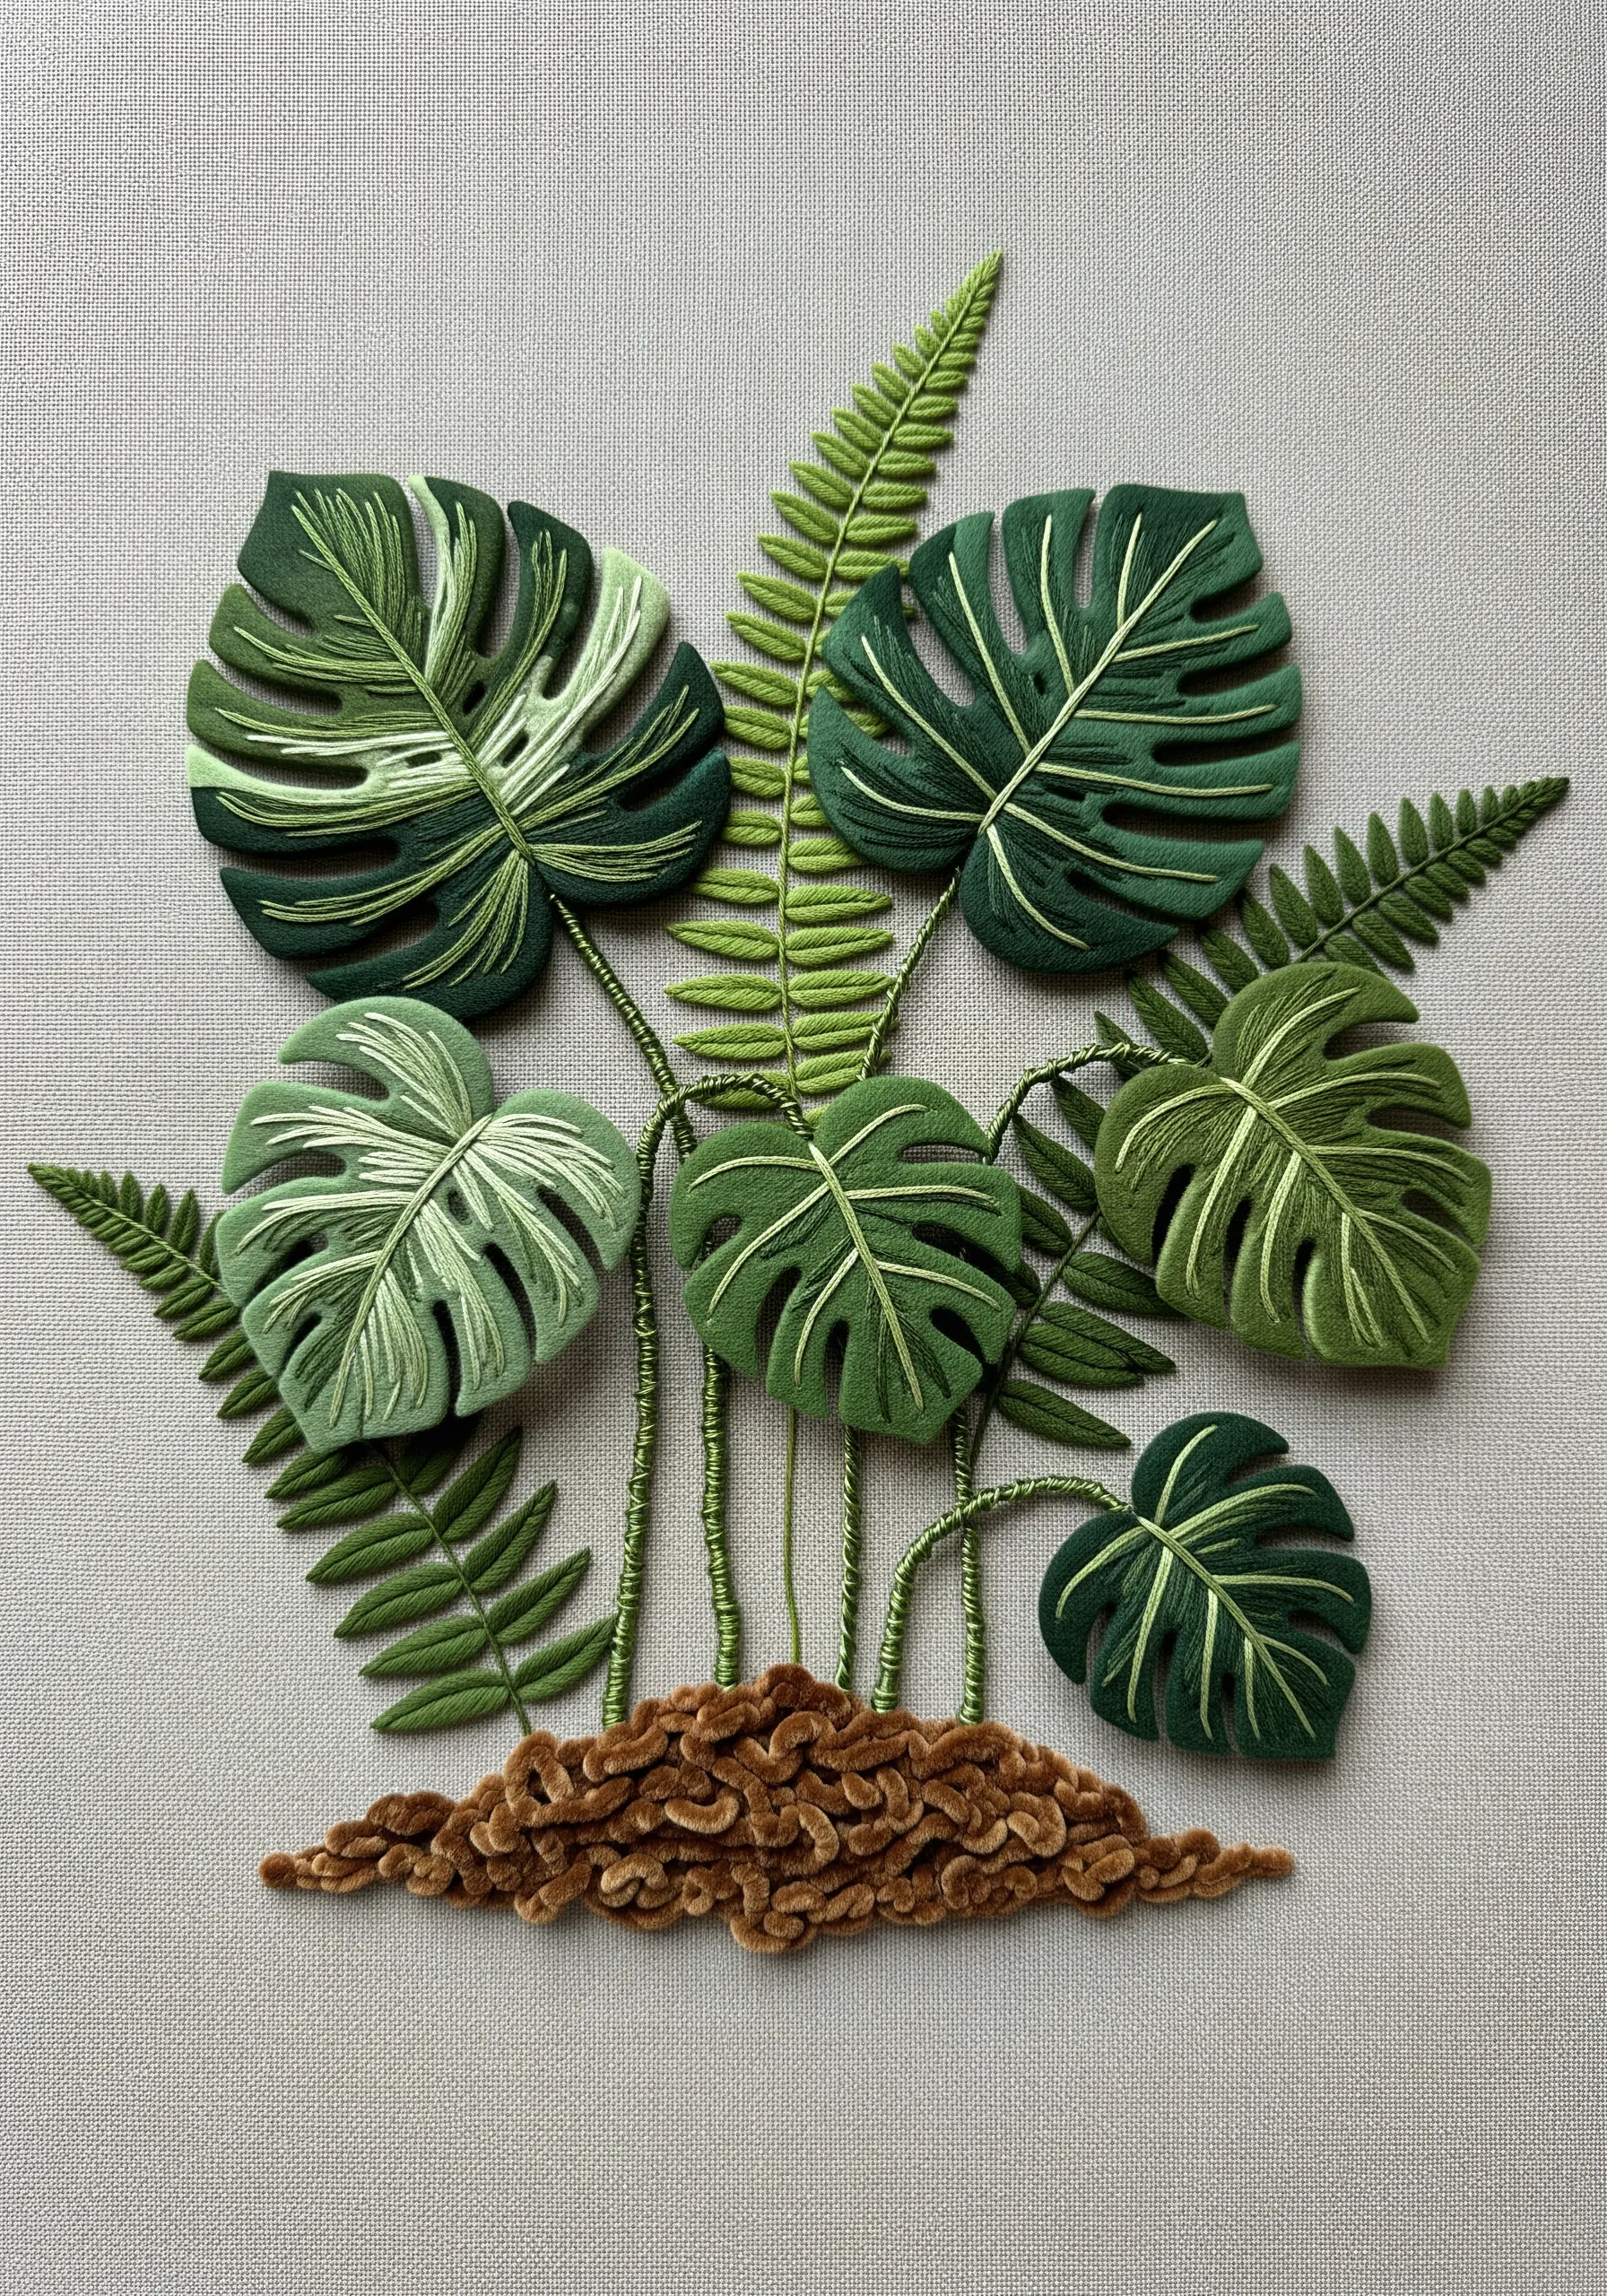
Achieve realistic, multi-tonal leaves not by using more colors, but by layering your stitches thoughtfully.
Create a base layer with long and short stitch in a medium green hue.
Then, add highlights and shadows directly on top using single strands of a lighter or darker shade.
Define the veins with a contrasting color using a simple backstitch, which adds crispness and detail.
For the soil, a bed of chunky French knots in brown and ochre tones creates a rich, crumbly texture that grounds the entire composition.
12. Painting with Yarn: The Punch Needle Technique
Use a punch needle to essentially “paint” with yarn, creating a dense, plush texture with incredible speed.
The magic of this tool is the uniform loops it creates, which gives your work a consistent and professional finish.
Draw your design onto monk’s cloth, then fill in the color blocks by punching from the back of the fabric.
For crisp outlines between shapes, work your border stitches first to create a clean divide.
This technique allows you to create large, textural pieces much faster than traditional embroidery.
13. Ethereal Compositions on an Open Grid
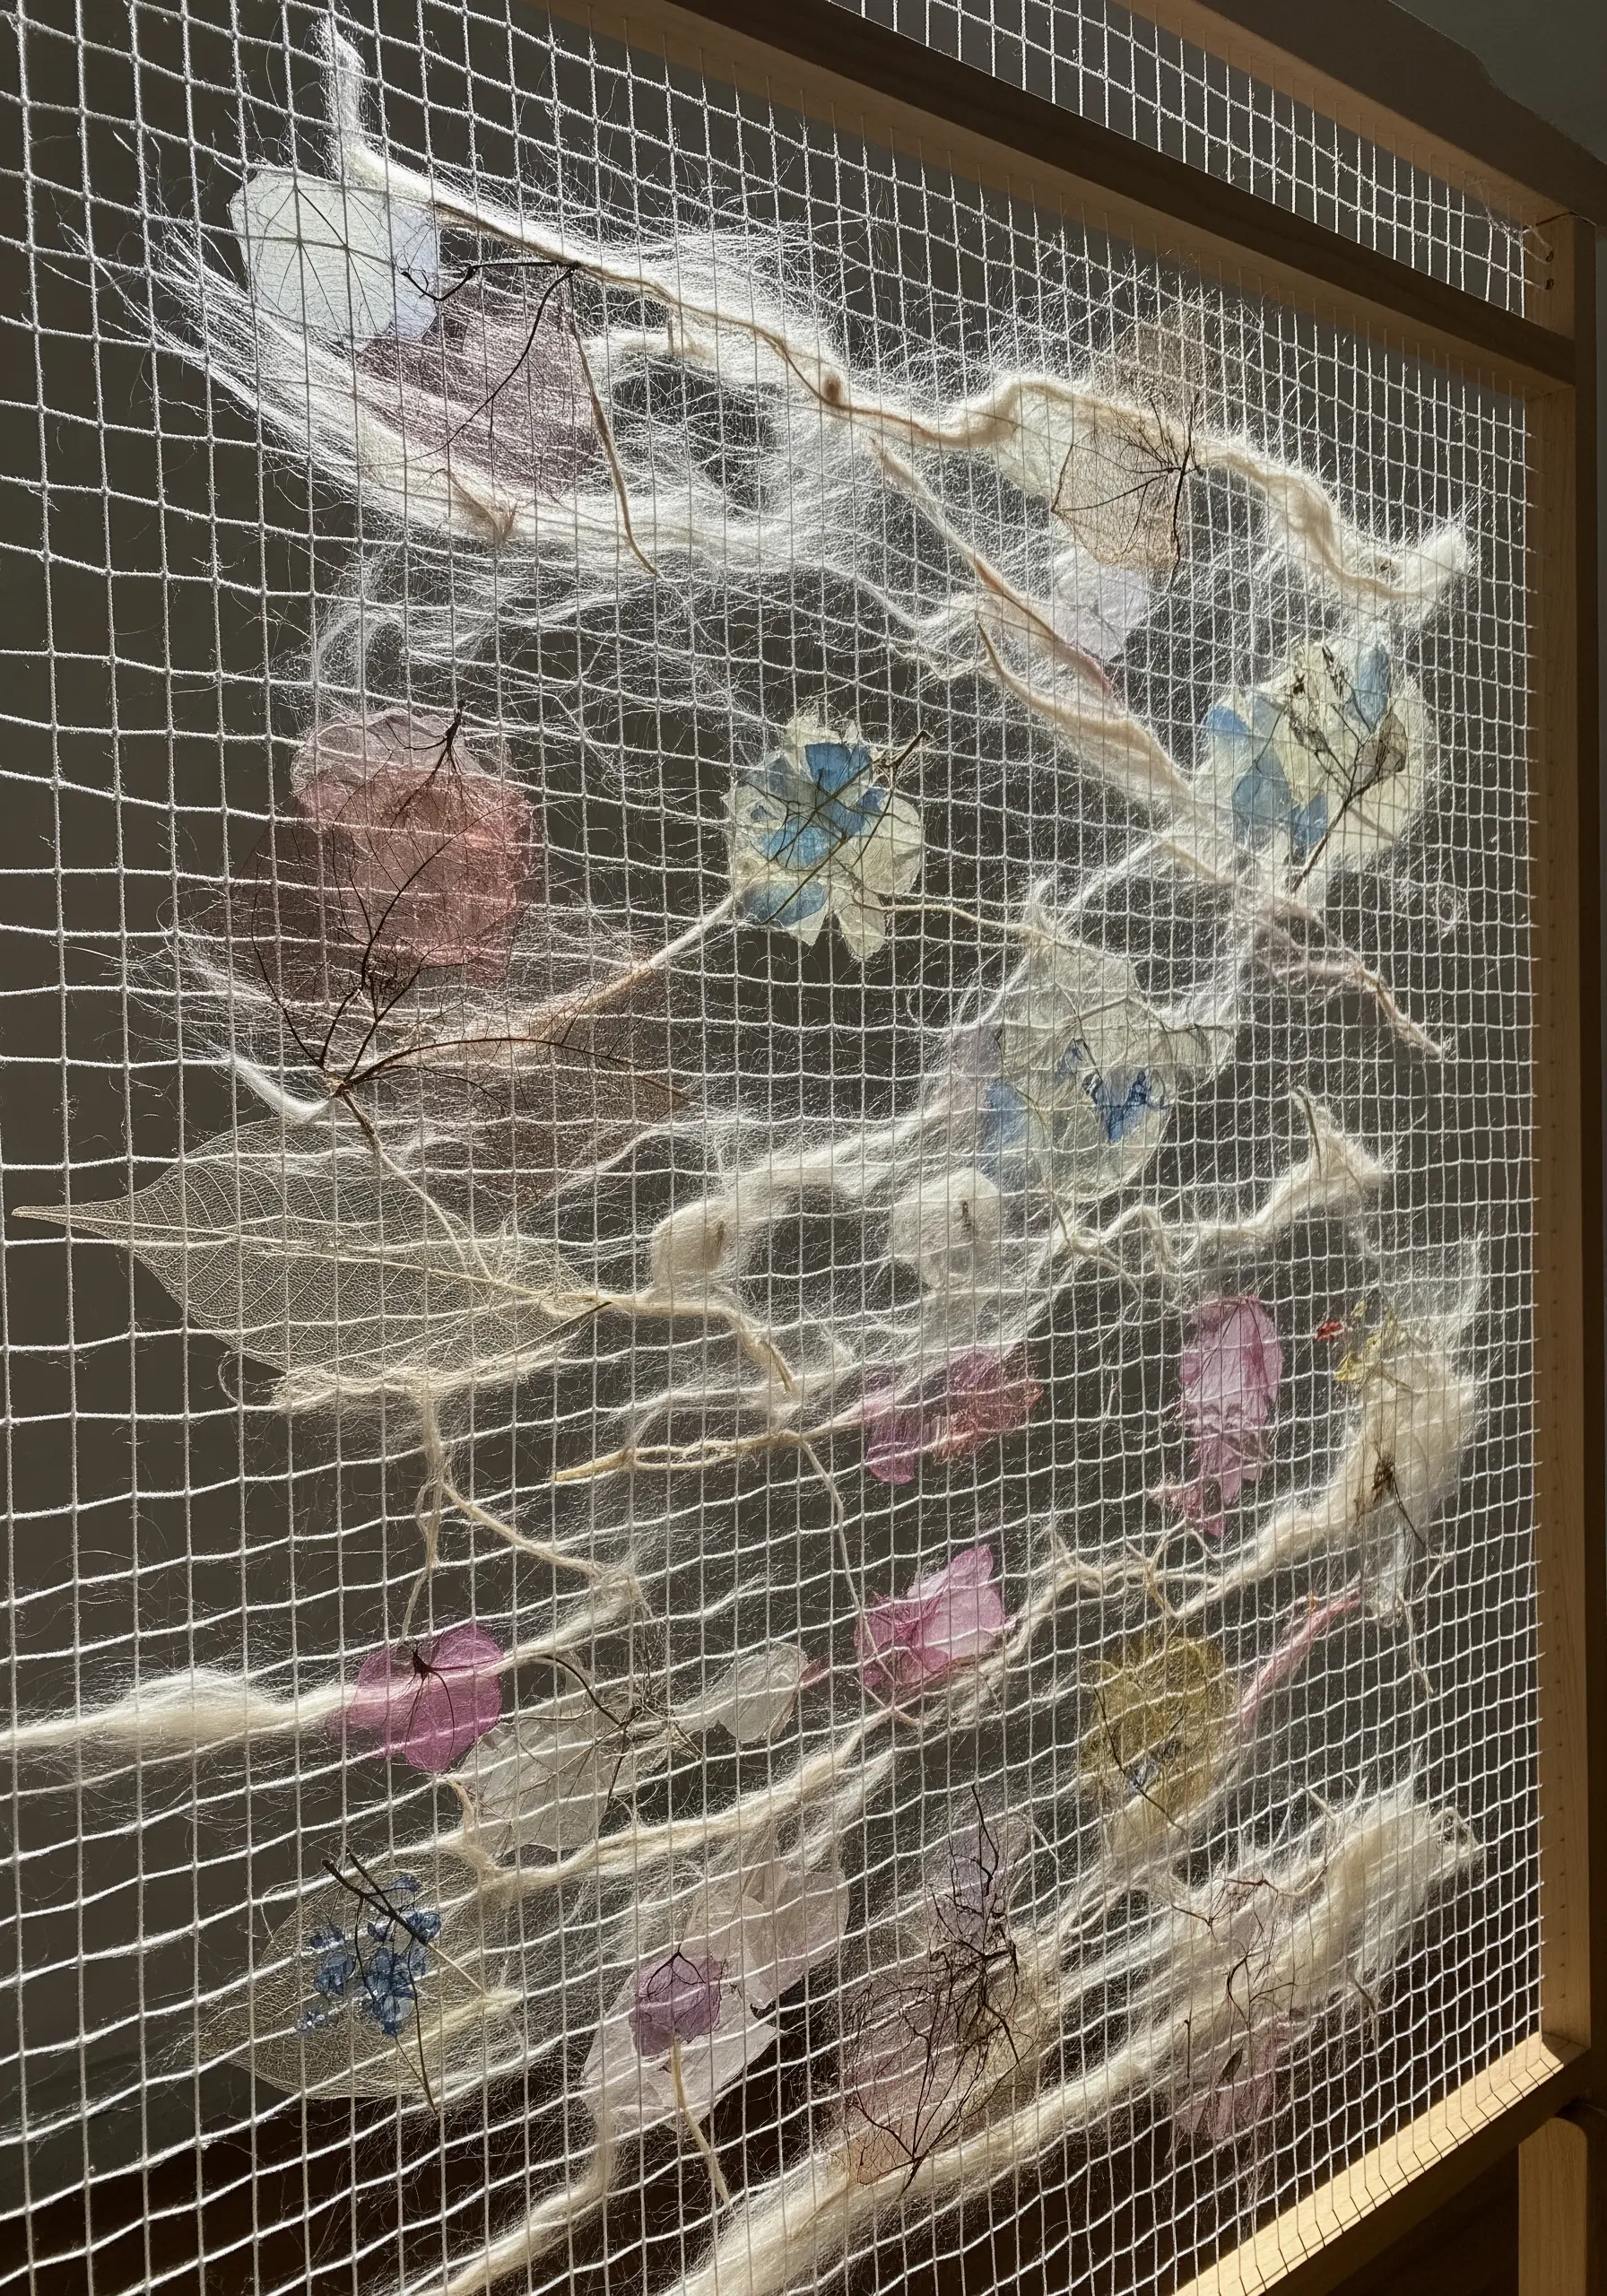
Move beyond traditional fabric and use a wire mesh or grid as an innovative canvas.
This allows you to play with transparency, light, and suspension in a way solid fabric cannot.
Weave delicate materials like wool roving, silk threads, or wispy fibers directly through the grid.
Incorporate fragile natural elements like skeleton leaves or dried petals, securing them with a few discreet stitches.
The open structure makes the elements appear to float, creating a piece that interacts beautifully with shadows and light.
14. Microscopic Worlds with Felt and Beadwork
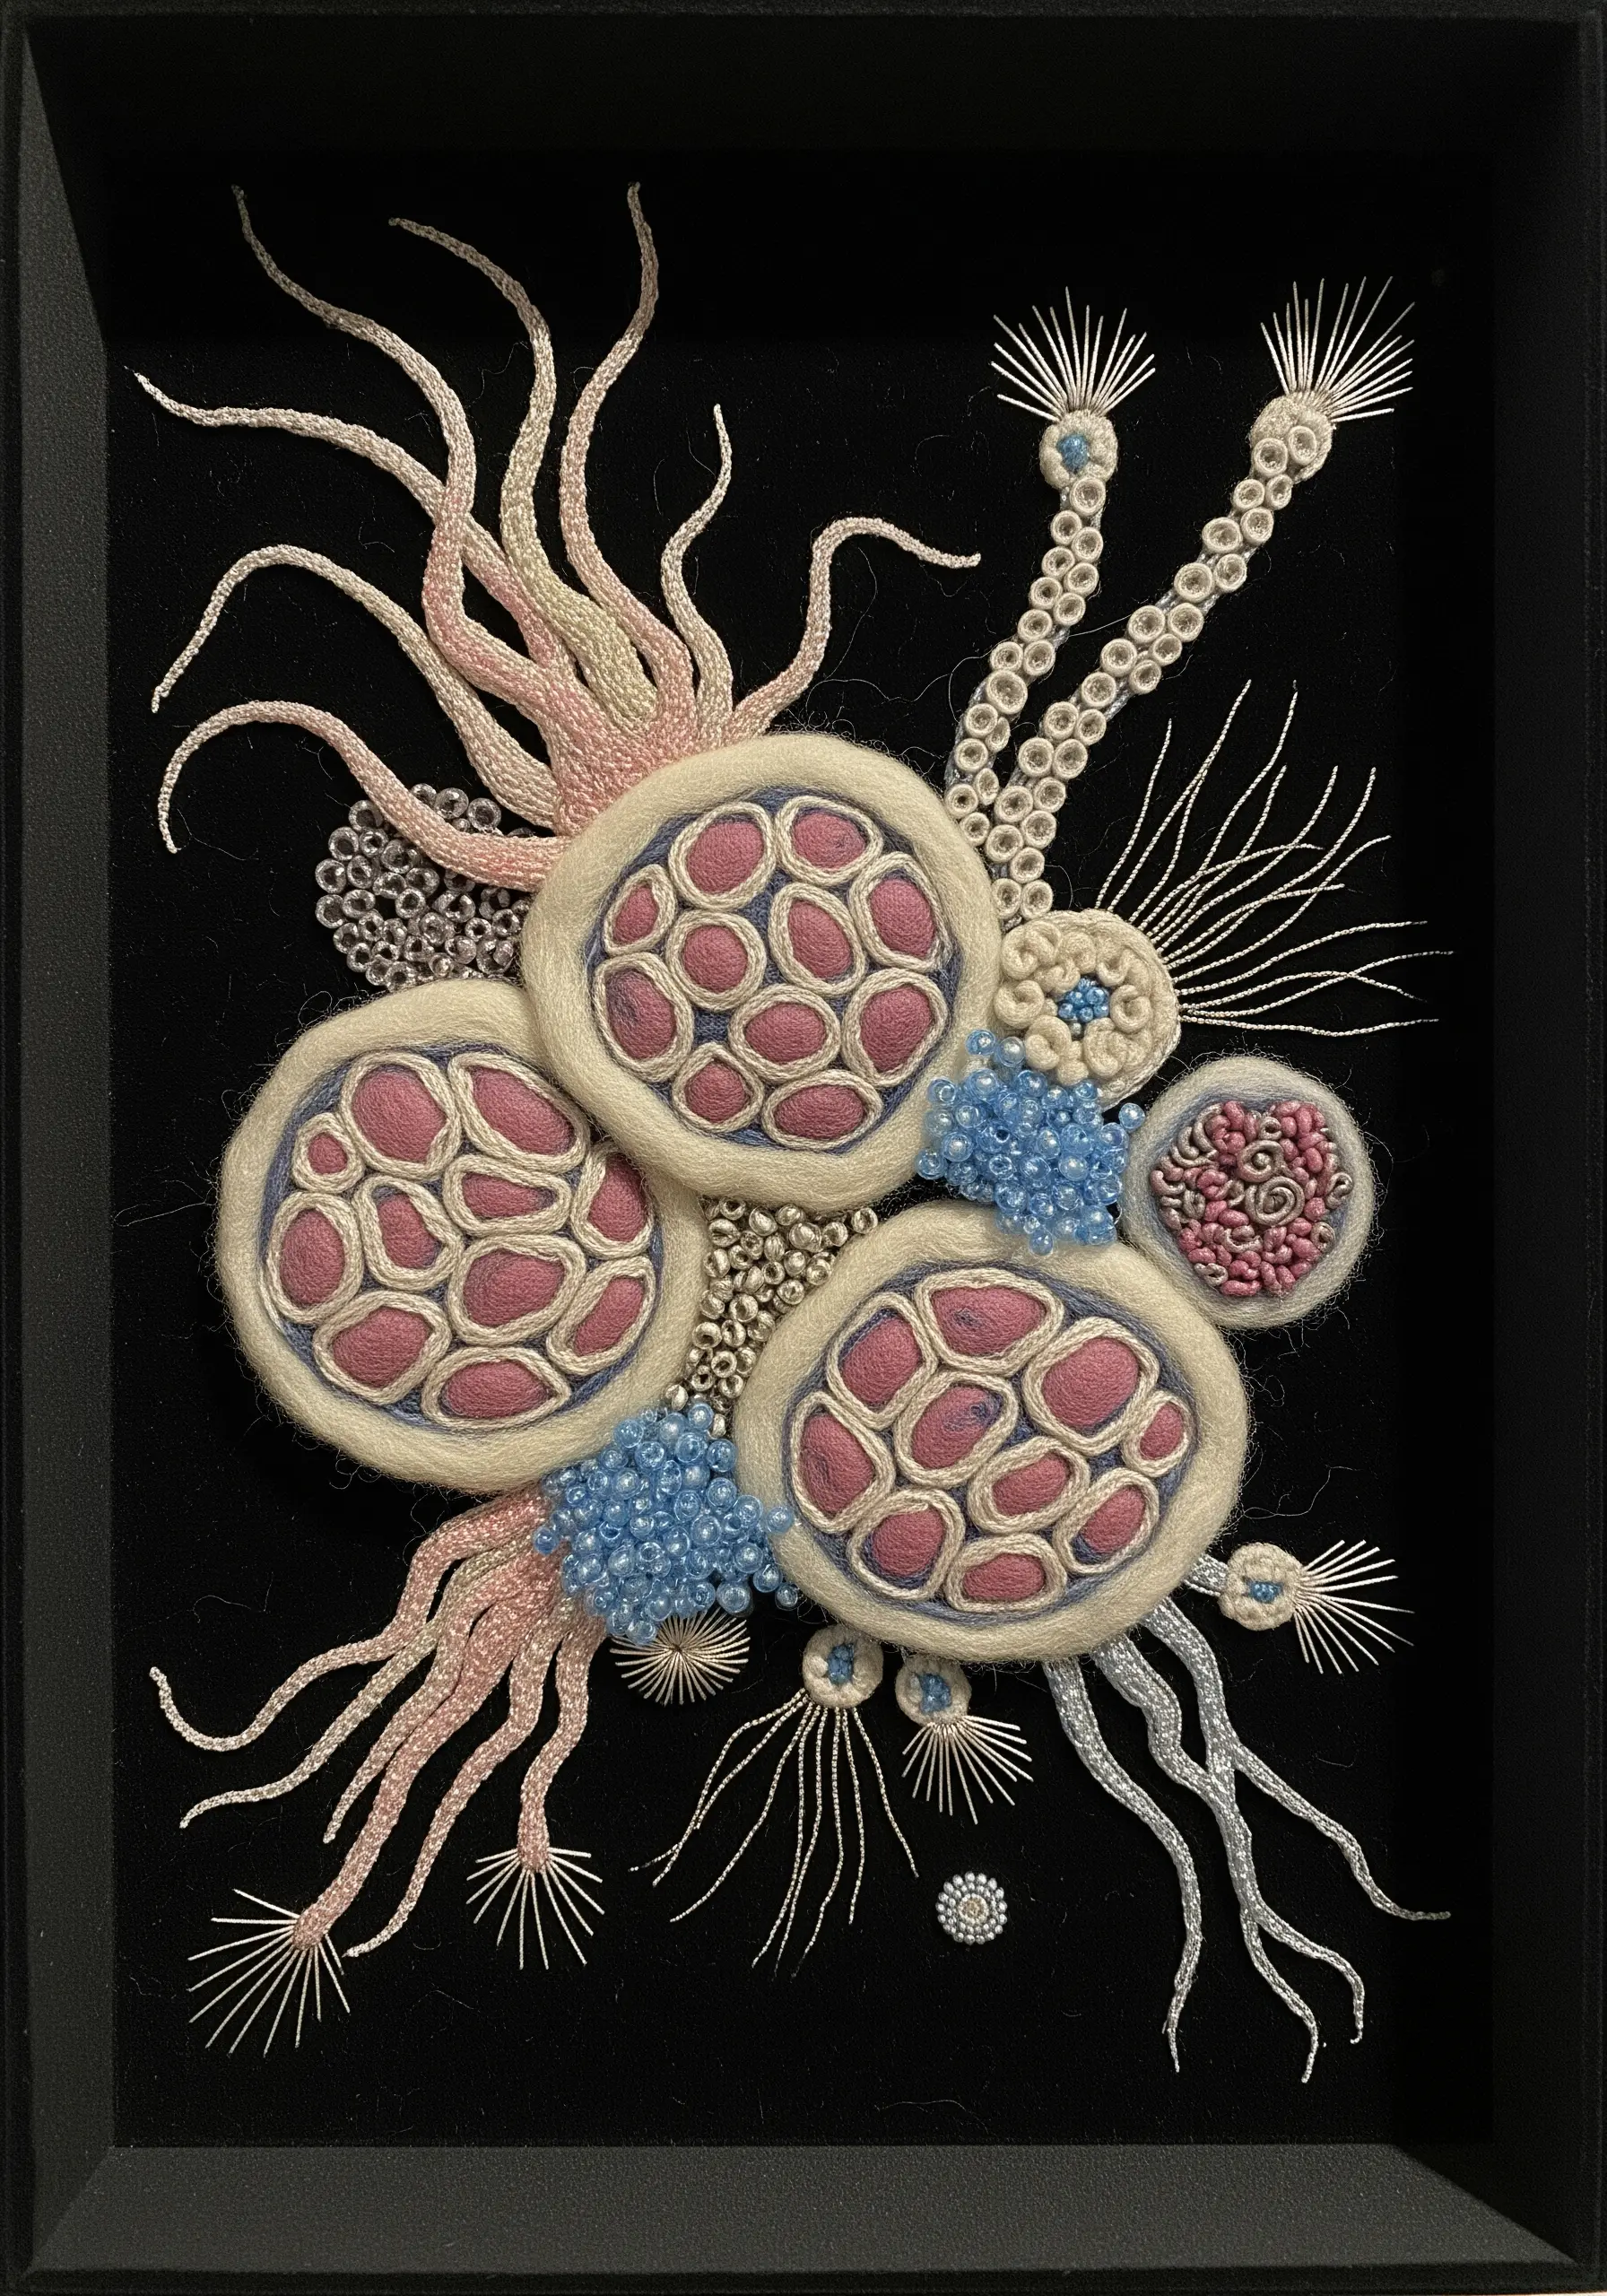
Create an abstract piece inspired by cellular life using needle felting and strategic beadwork.
Use wool roving to felt soft, rounded shapes onto a dark felt background, establishing your main forms.
Define the “cell walls” by couching a thicker thread around the edges for a clean, graphic outline.
For intricate internal details, fill the shapes with tiny seed beads or dense clusters of French knots.
The contrast between the soft, fuzzy felt and the hard, reflective beads creates a fascinating and complex surface.
15. Weaving Natural Textures into Paper Collage
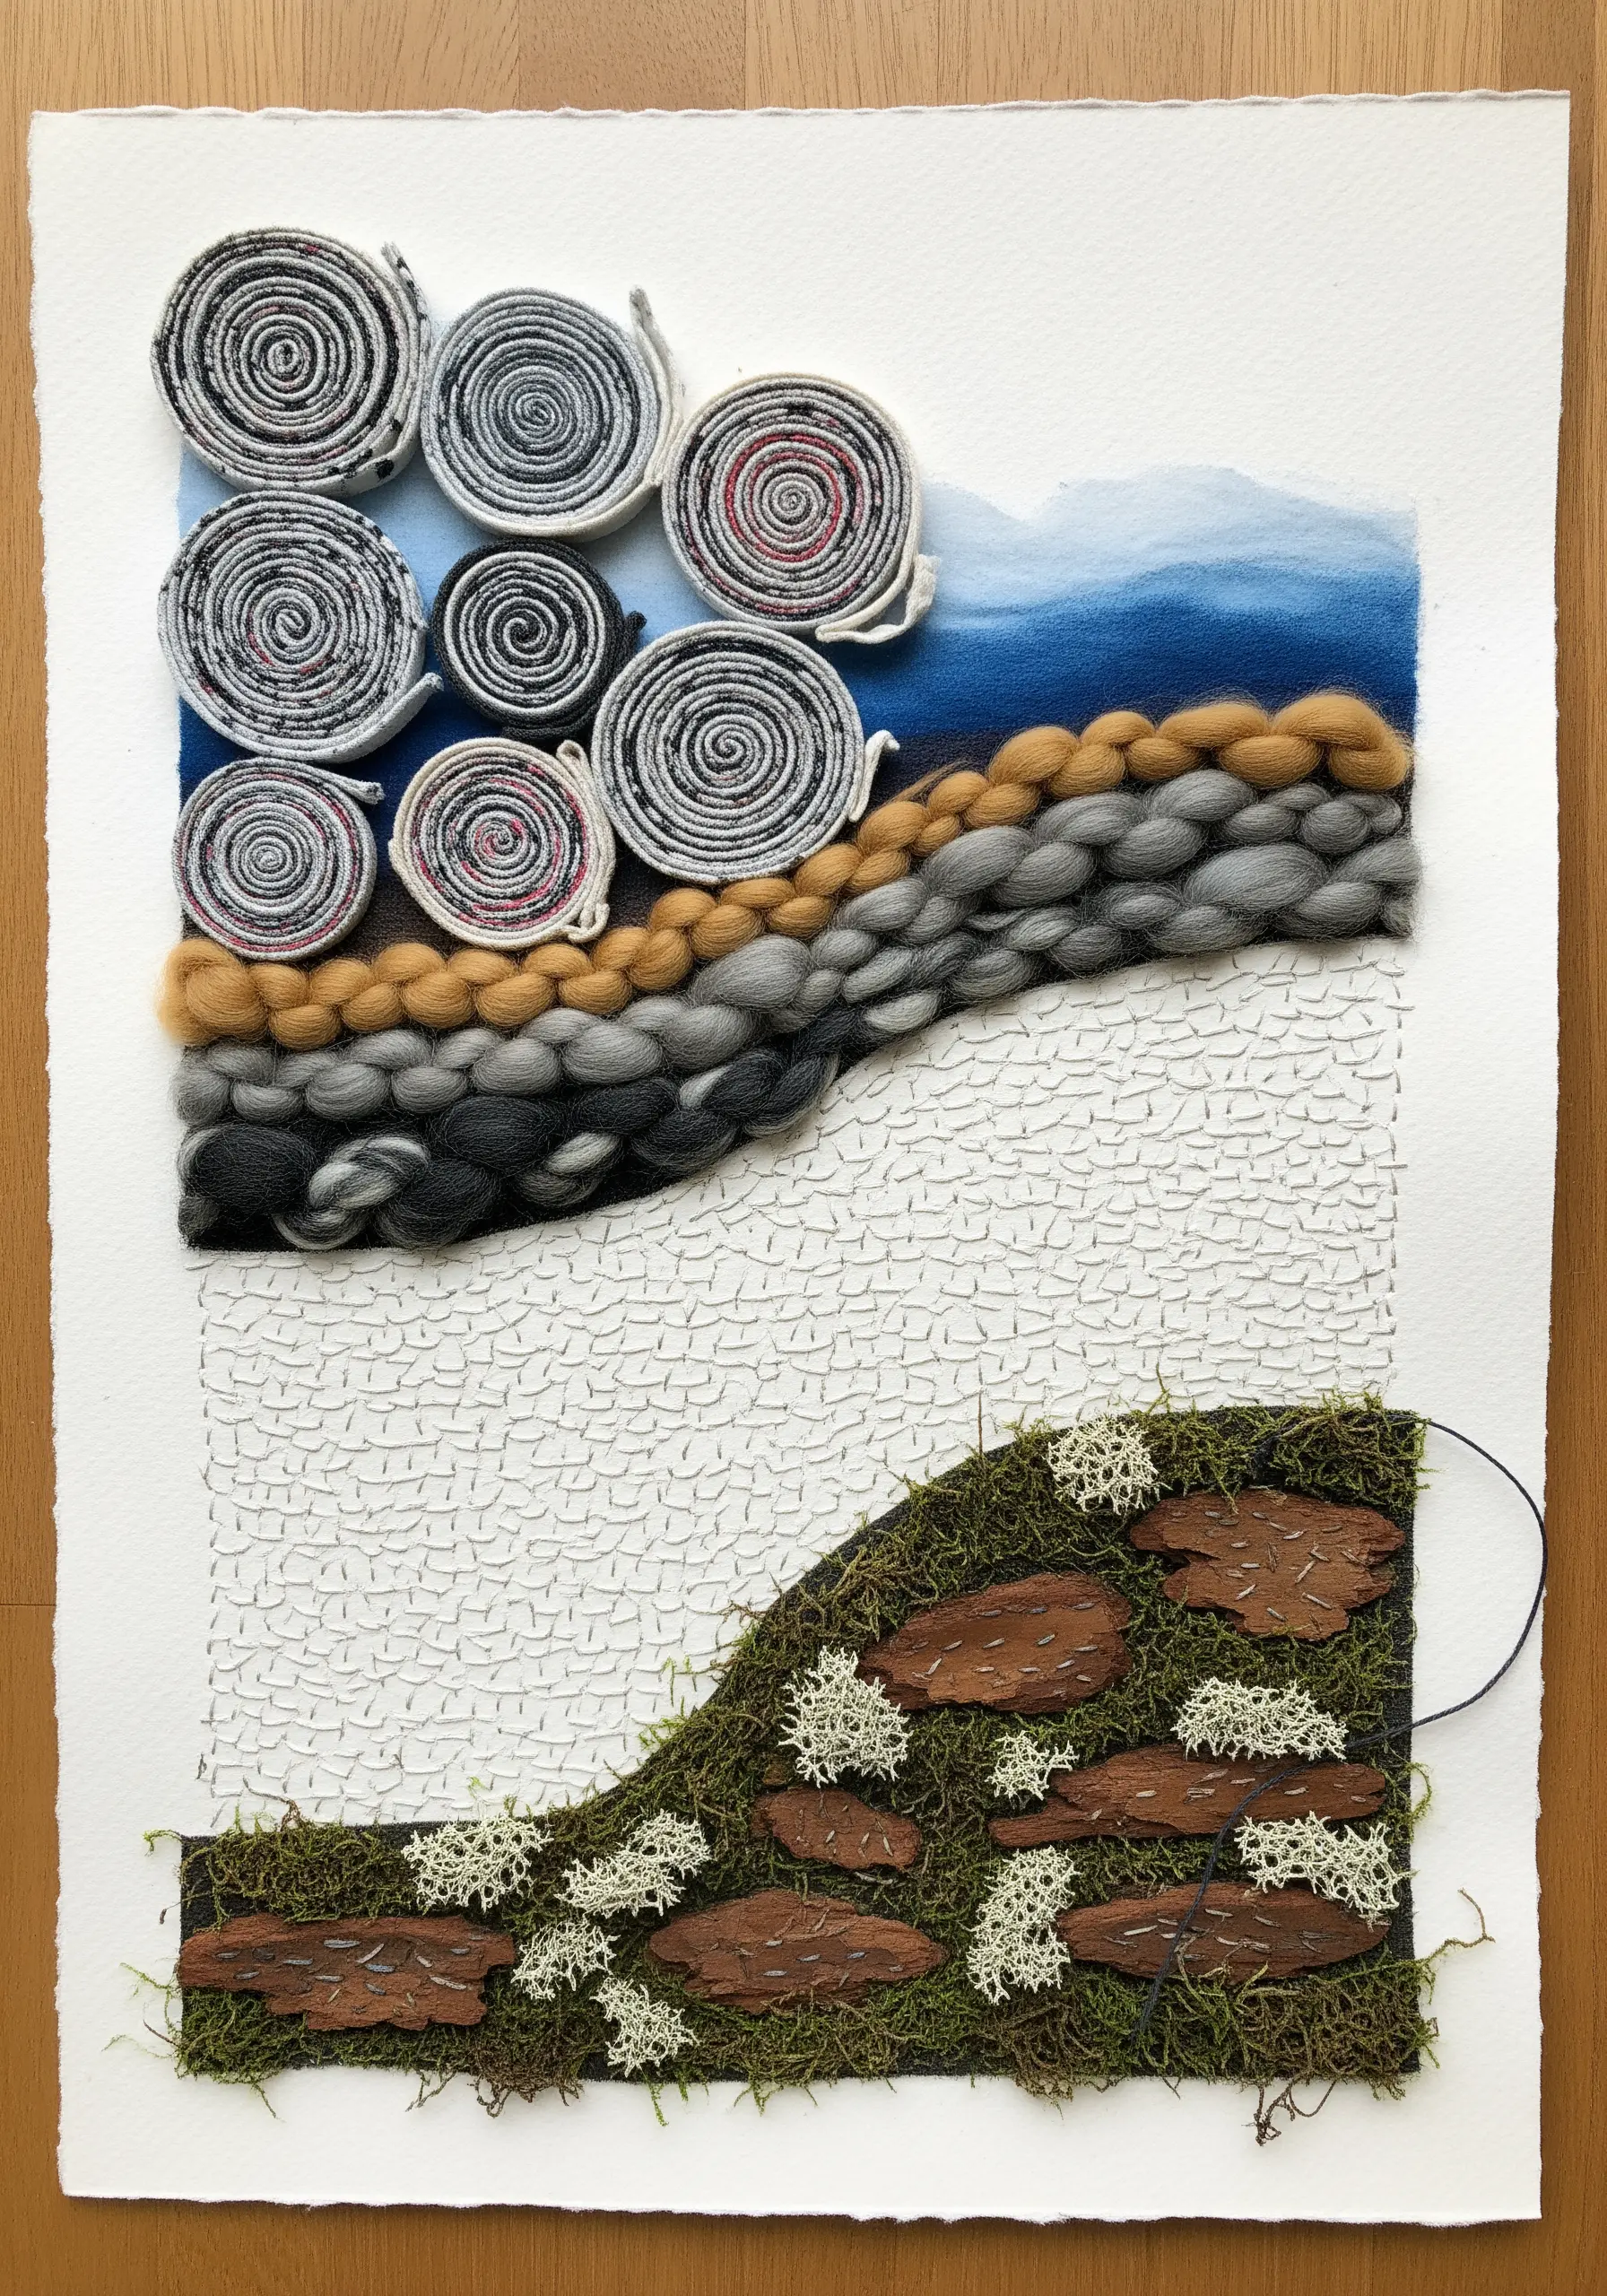
Merge your love of fiber with paper art by creating a rich, multi-layered mixed-media collage.
Use a heavy watercolor paper as your base, as it can handle the weight of various elements.
Instead of stitching, attach small weavings, coils of yarn, or rolled paper circles with a strong archival glue.
Integrate natural elements like dried moss, lichen, or pieces of bark to build an organic, textural landscape.
A few simple running stitches added directly to the paper can create subtle grid patterns that unify the disparate elements.
16. Modern Macrame with Asymmetrical Designs
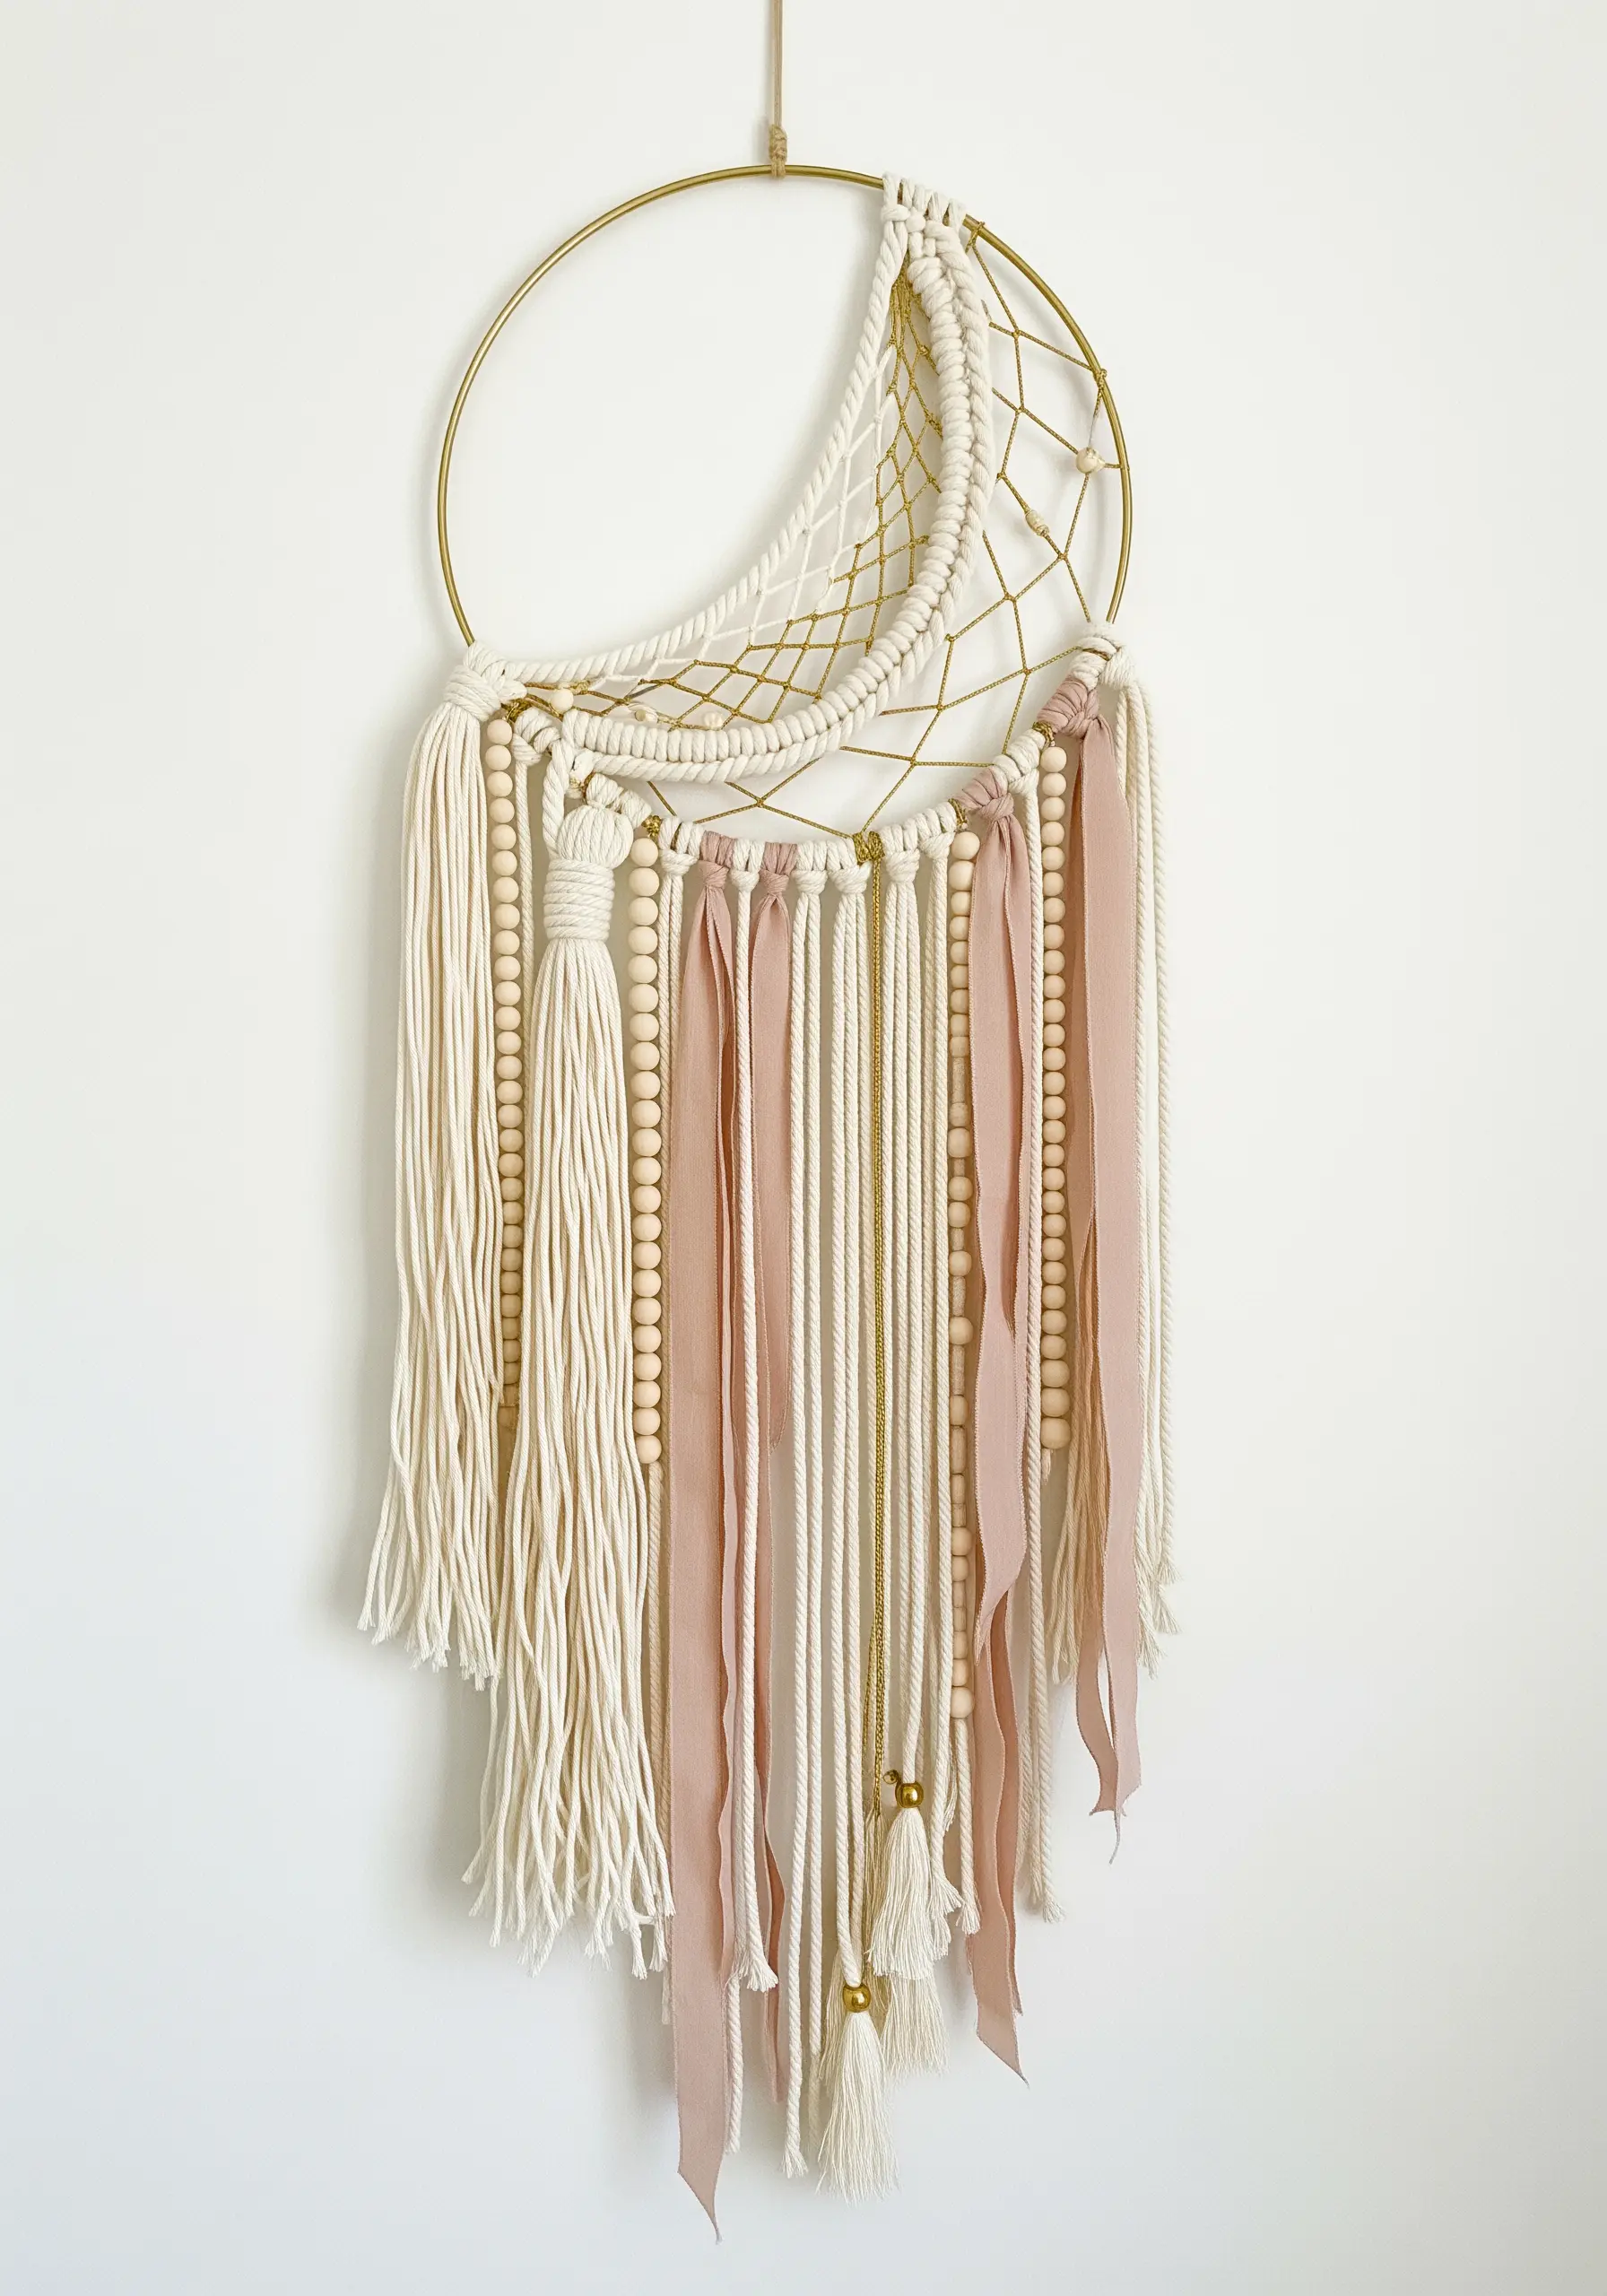
Update the classic dreamcatcher by working your macrame on an asymmetrical frame, like a crescent moon shape inside a hoop.
Use classic knots like the lark’s head and square knot, but vary the tension and spacing for a more organic, less rigid feel.
Incorporate different materials into the hanging tassels, such as smooth wooden beads or soft strips of silk ribbon.
This adds layers of texture and a modern, romantic touch that elevates the traditional craft.
17. Sculptural Pods with Wet Felting Techniques
Create hollow, three-dimensional forms using the transformative magic of wet felting with a resist.
Place a resist—a piece of thin, flexible plastic cut to your desired shape—between layers of wool roving.
Apply soap and hot water, then agitate the fibers until they fuse together into a seamless fabric around the resist.
Once the wool is fully felted, you can cut a small slit and remove the resist, leaving you with a hollow, sculptural pod.
This technique allows you to create organic, seamless shapes that are impossible with other fiber methods.
18. Layering Weaving Over a Painted Canvas

Give your weaving a dynamic background by mounting it on an abstract painted canvas.
Create a small, textural weaving on a frame loom, focusing on interesting fibers and techniques.
Separately, prepare a canvas with expressive, painterly strokes that complement the colors in your yarn.
Instead of traditional framing, mount the weaving directly onto the canvas, letting the painted background peek through the warp threads.
This mixed-media approach turns a simple weaving into a piece of contemporary gallery art.
19. Miniature Landscapes with Needle Felted Details
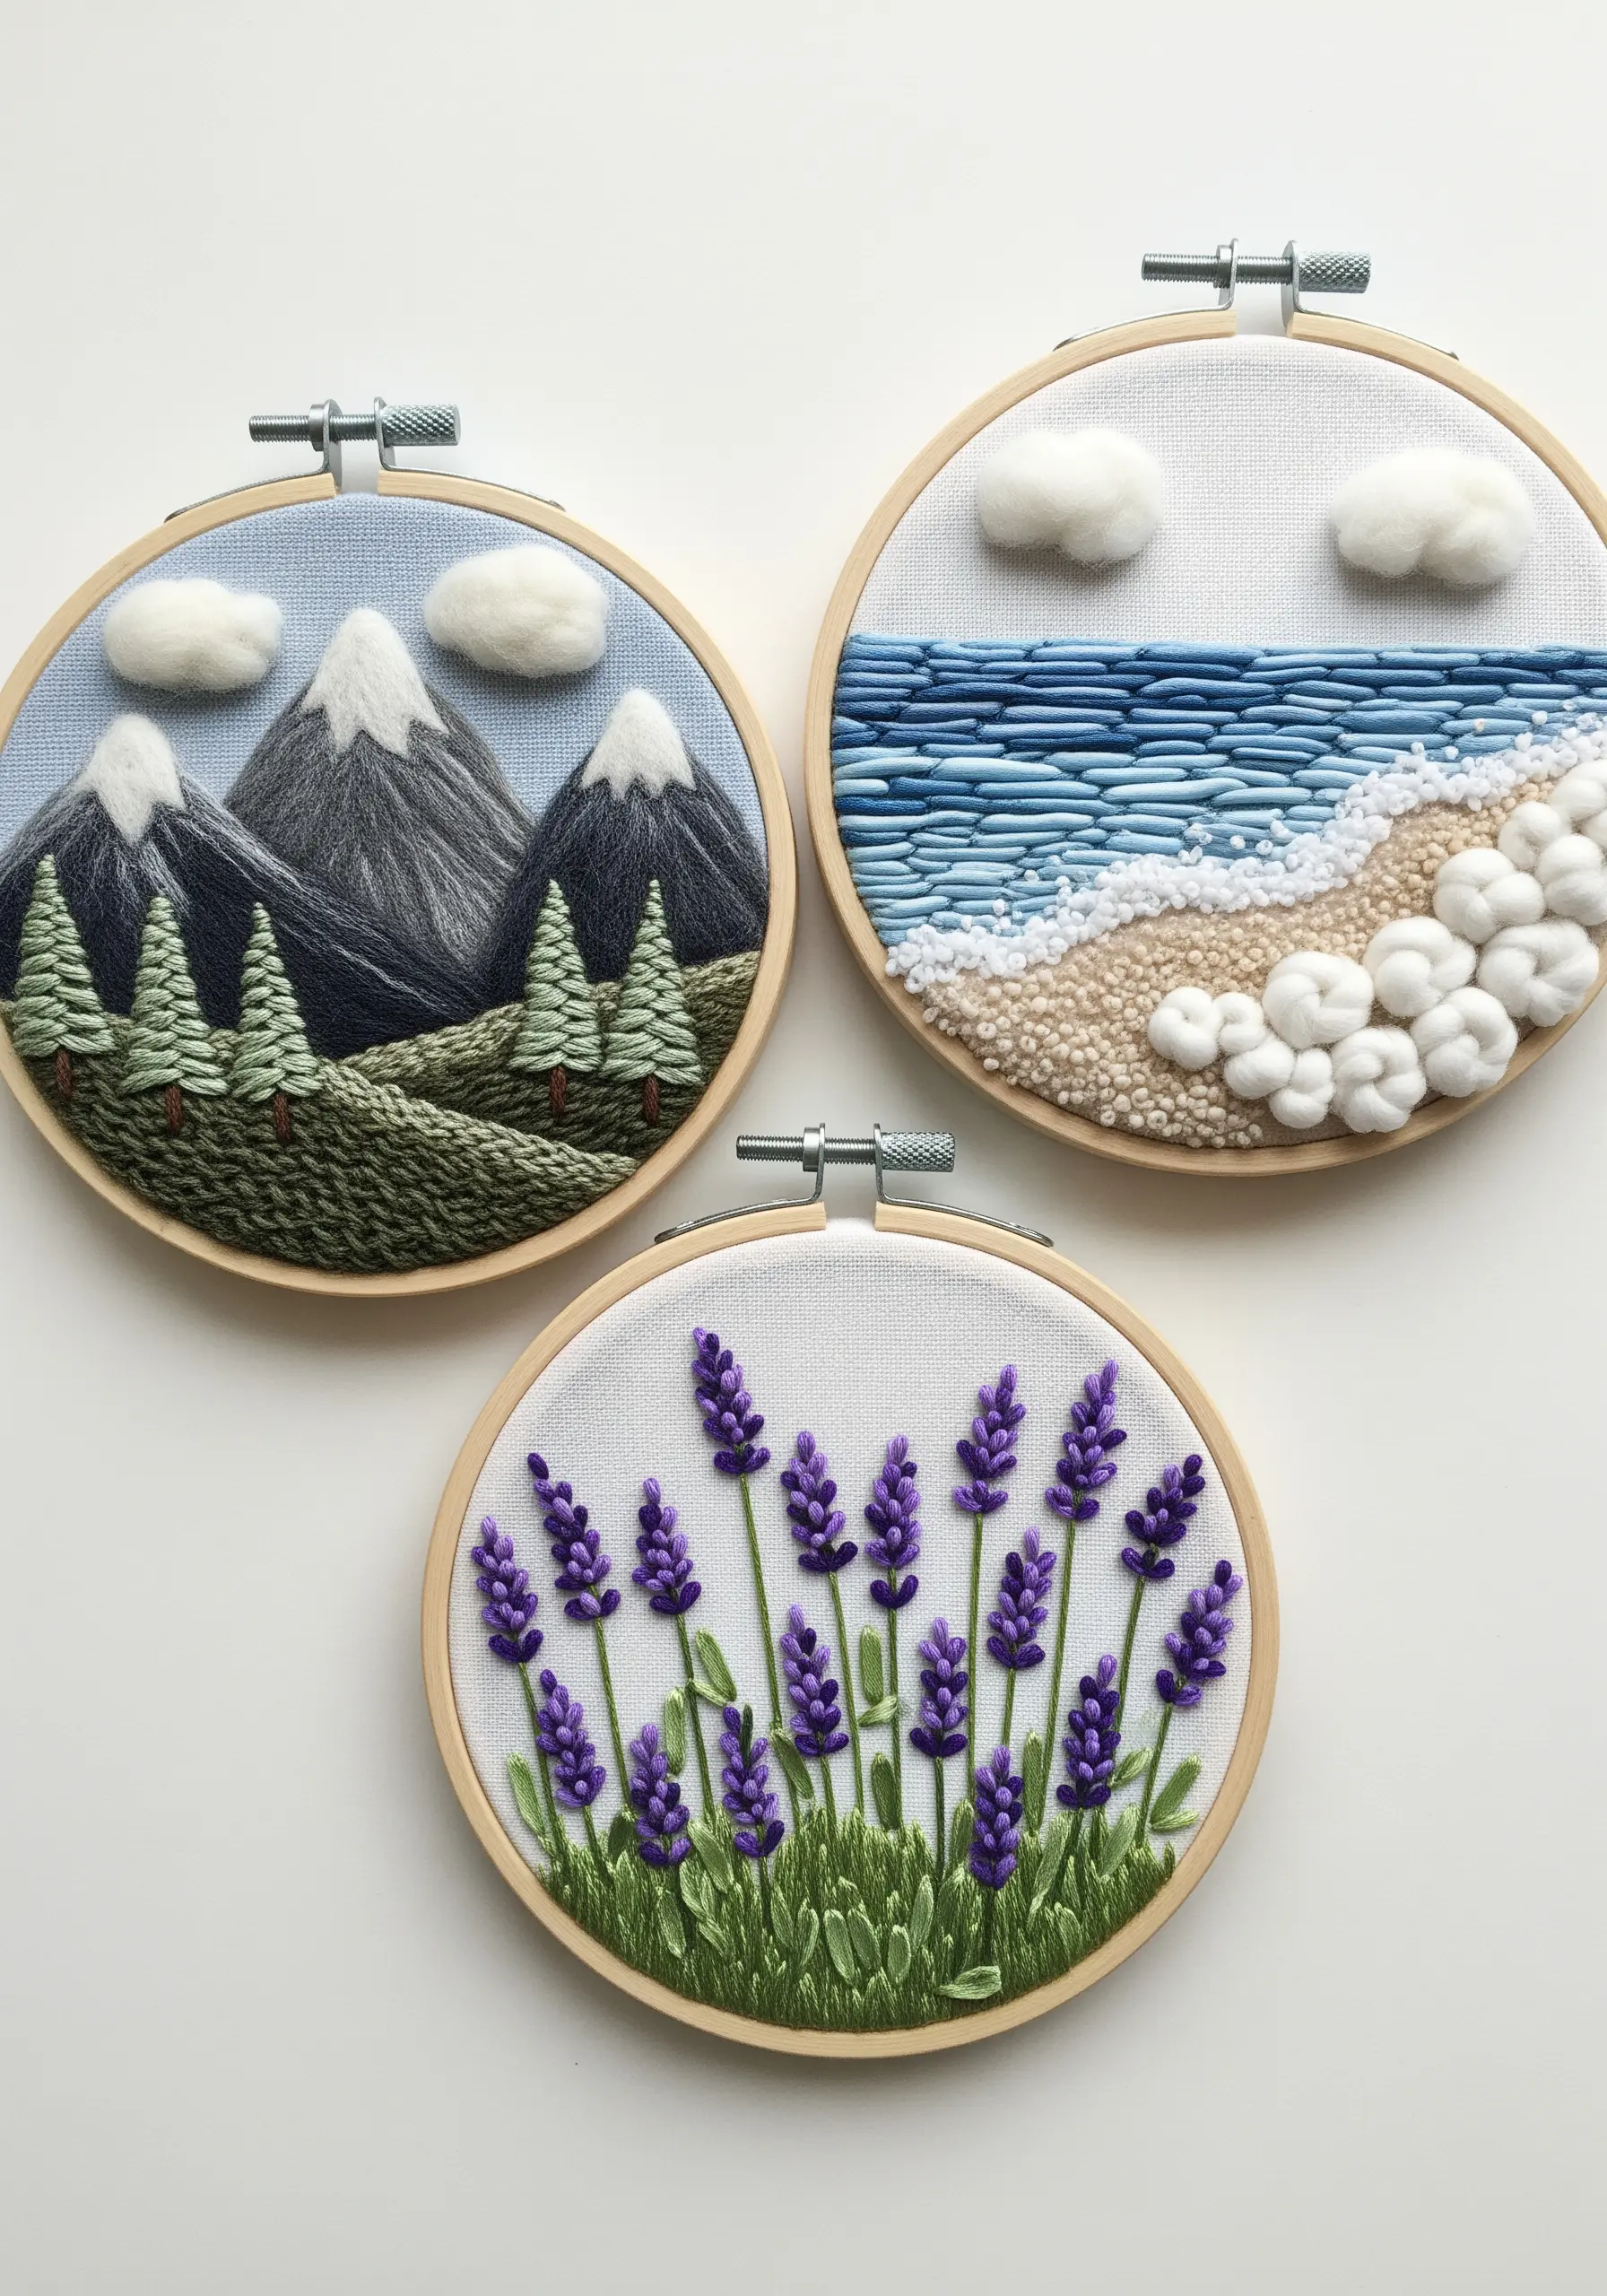
Add remarkable softness and dimension to your embroidered landscapes with touches of needle felting.
Use wool roving to create fluffy clouds, soft-looking snow on mountains, or the delicate foam of ocean waves.
Simply place a small tuft of wool on your fabric and poke it with a felting needle until the fibers integrate and hold their shape.
This technique blends seamlessly with traditional stitches like French knots for sand or satin stitch for water, allowing you to build incredibly tactile scenes.
20. Couture Embellishment with Beadwork and Found Objects
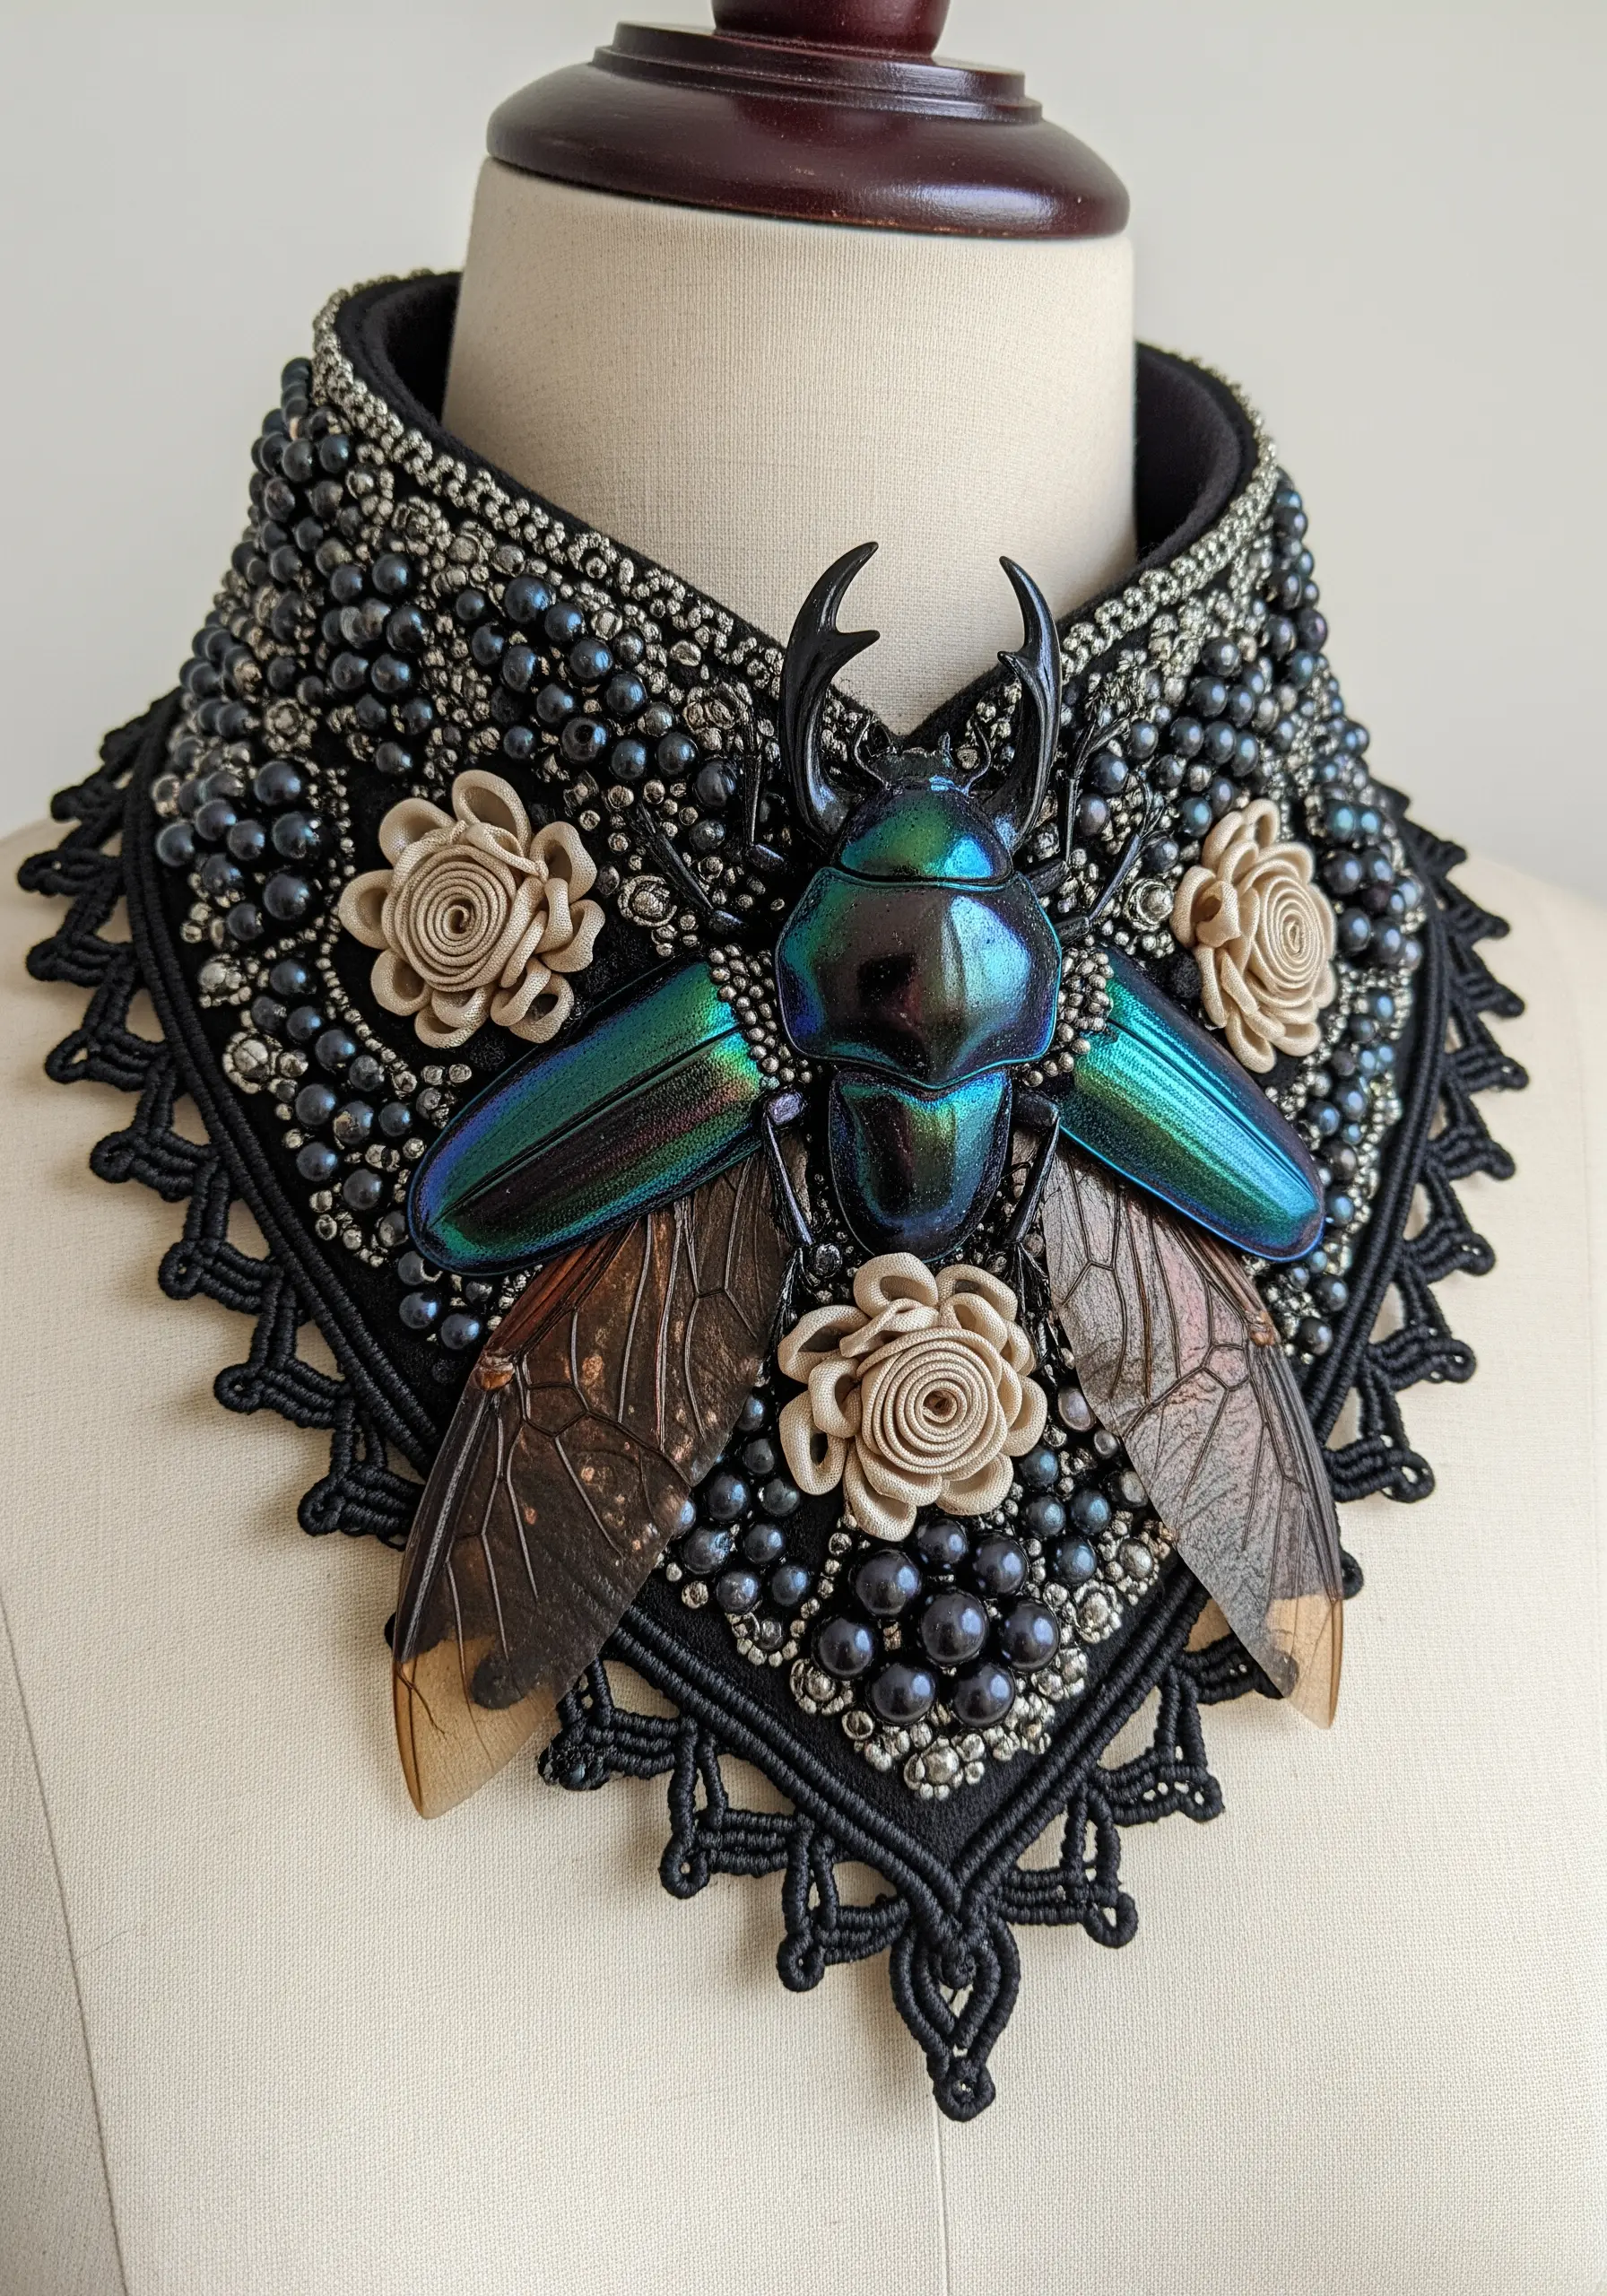
Create a stunning piece of wearable art by combining intricate beadwork with a central focal object.
Build up texture on a sturdy fabric base like felt using seed beads, pearls, and crystals in dense clusters.
Use a beading backstitch for clean lines and fill areas with scattered stitches for a pavé effect.
Anchor a larger object—like a vintage cabochon or a realistic faux insect—as the centerpiece.
Finishing the edge with macrame or lace adds a final layer of professional, couture-level detail.
21. The Monochrome Texture Sampler
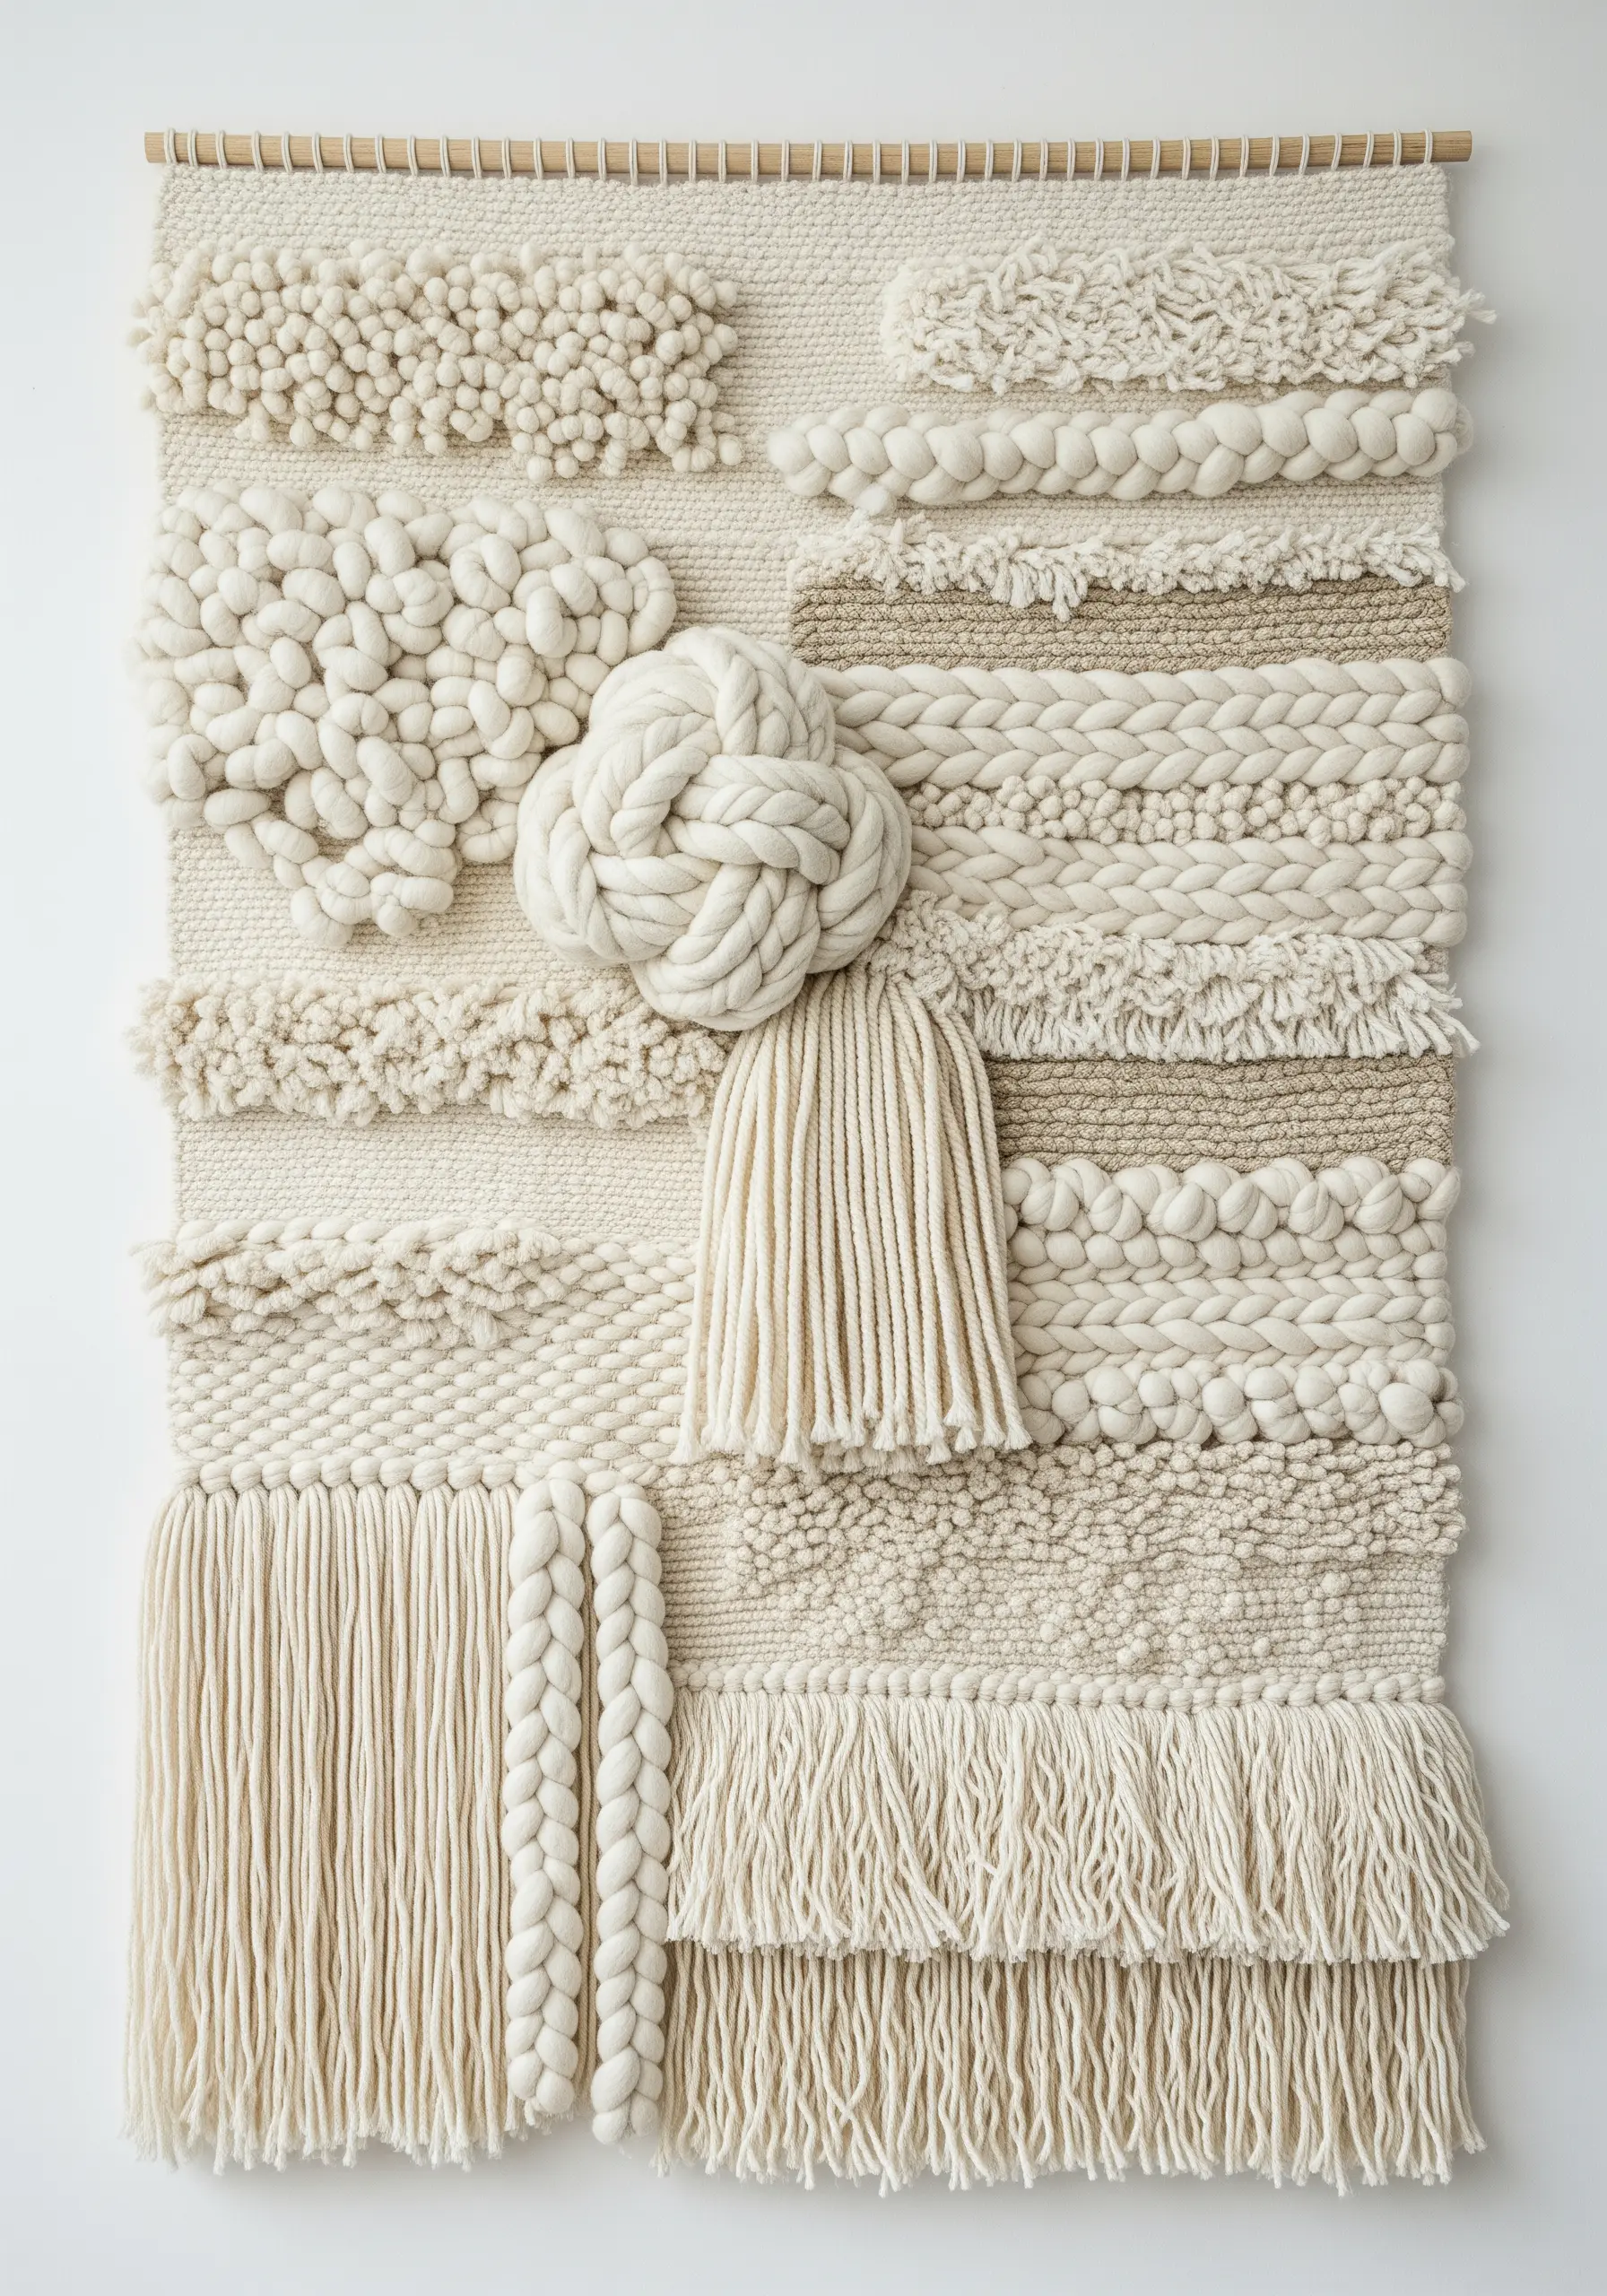
Explore the pure power of texture by creating a weaving using only one or two neutral colors.
The limited palette forces you to focus entirely on form and technique, making each choice more impactful.
Experiment with different materials in the same color family, like chunky wool, soft cotton rope, and fine linen yarn.
Incorporate various weaving techniques in a single piece: soumak stitch for braids, rya knots for plushness, and a simple tabby weave for flat areas.
This approach results in a sophisticated, subtle earth-tone piece where texture is the undisputed star.
22. Functional Art: The Modern Macrame Curtain
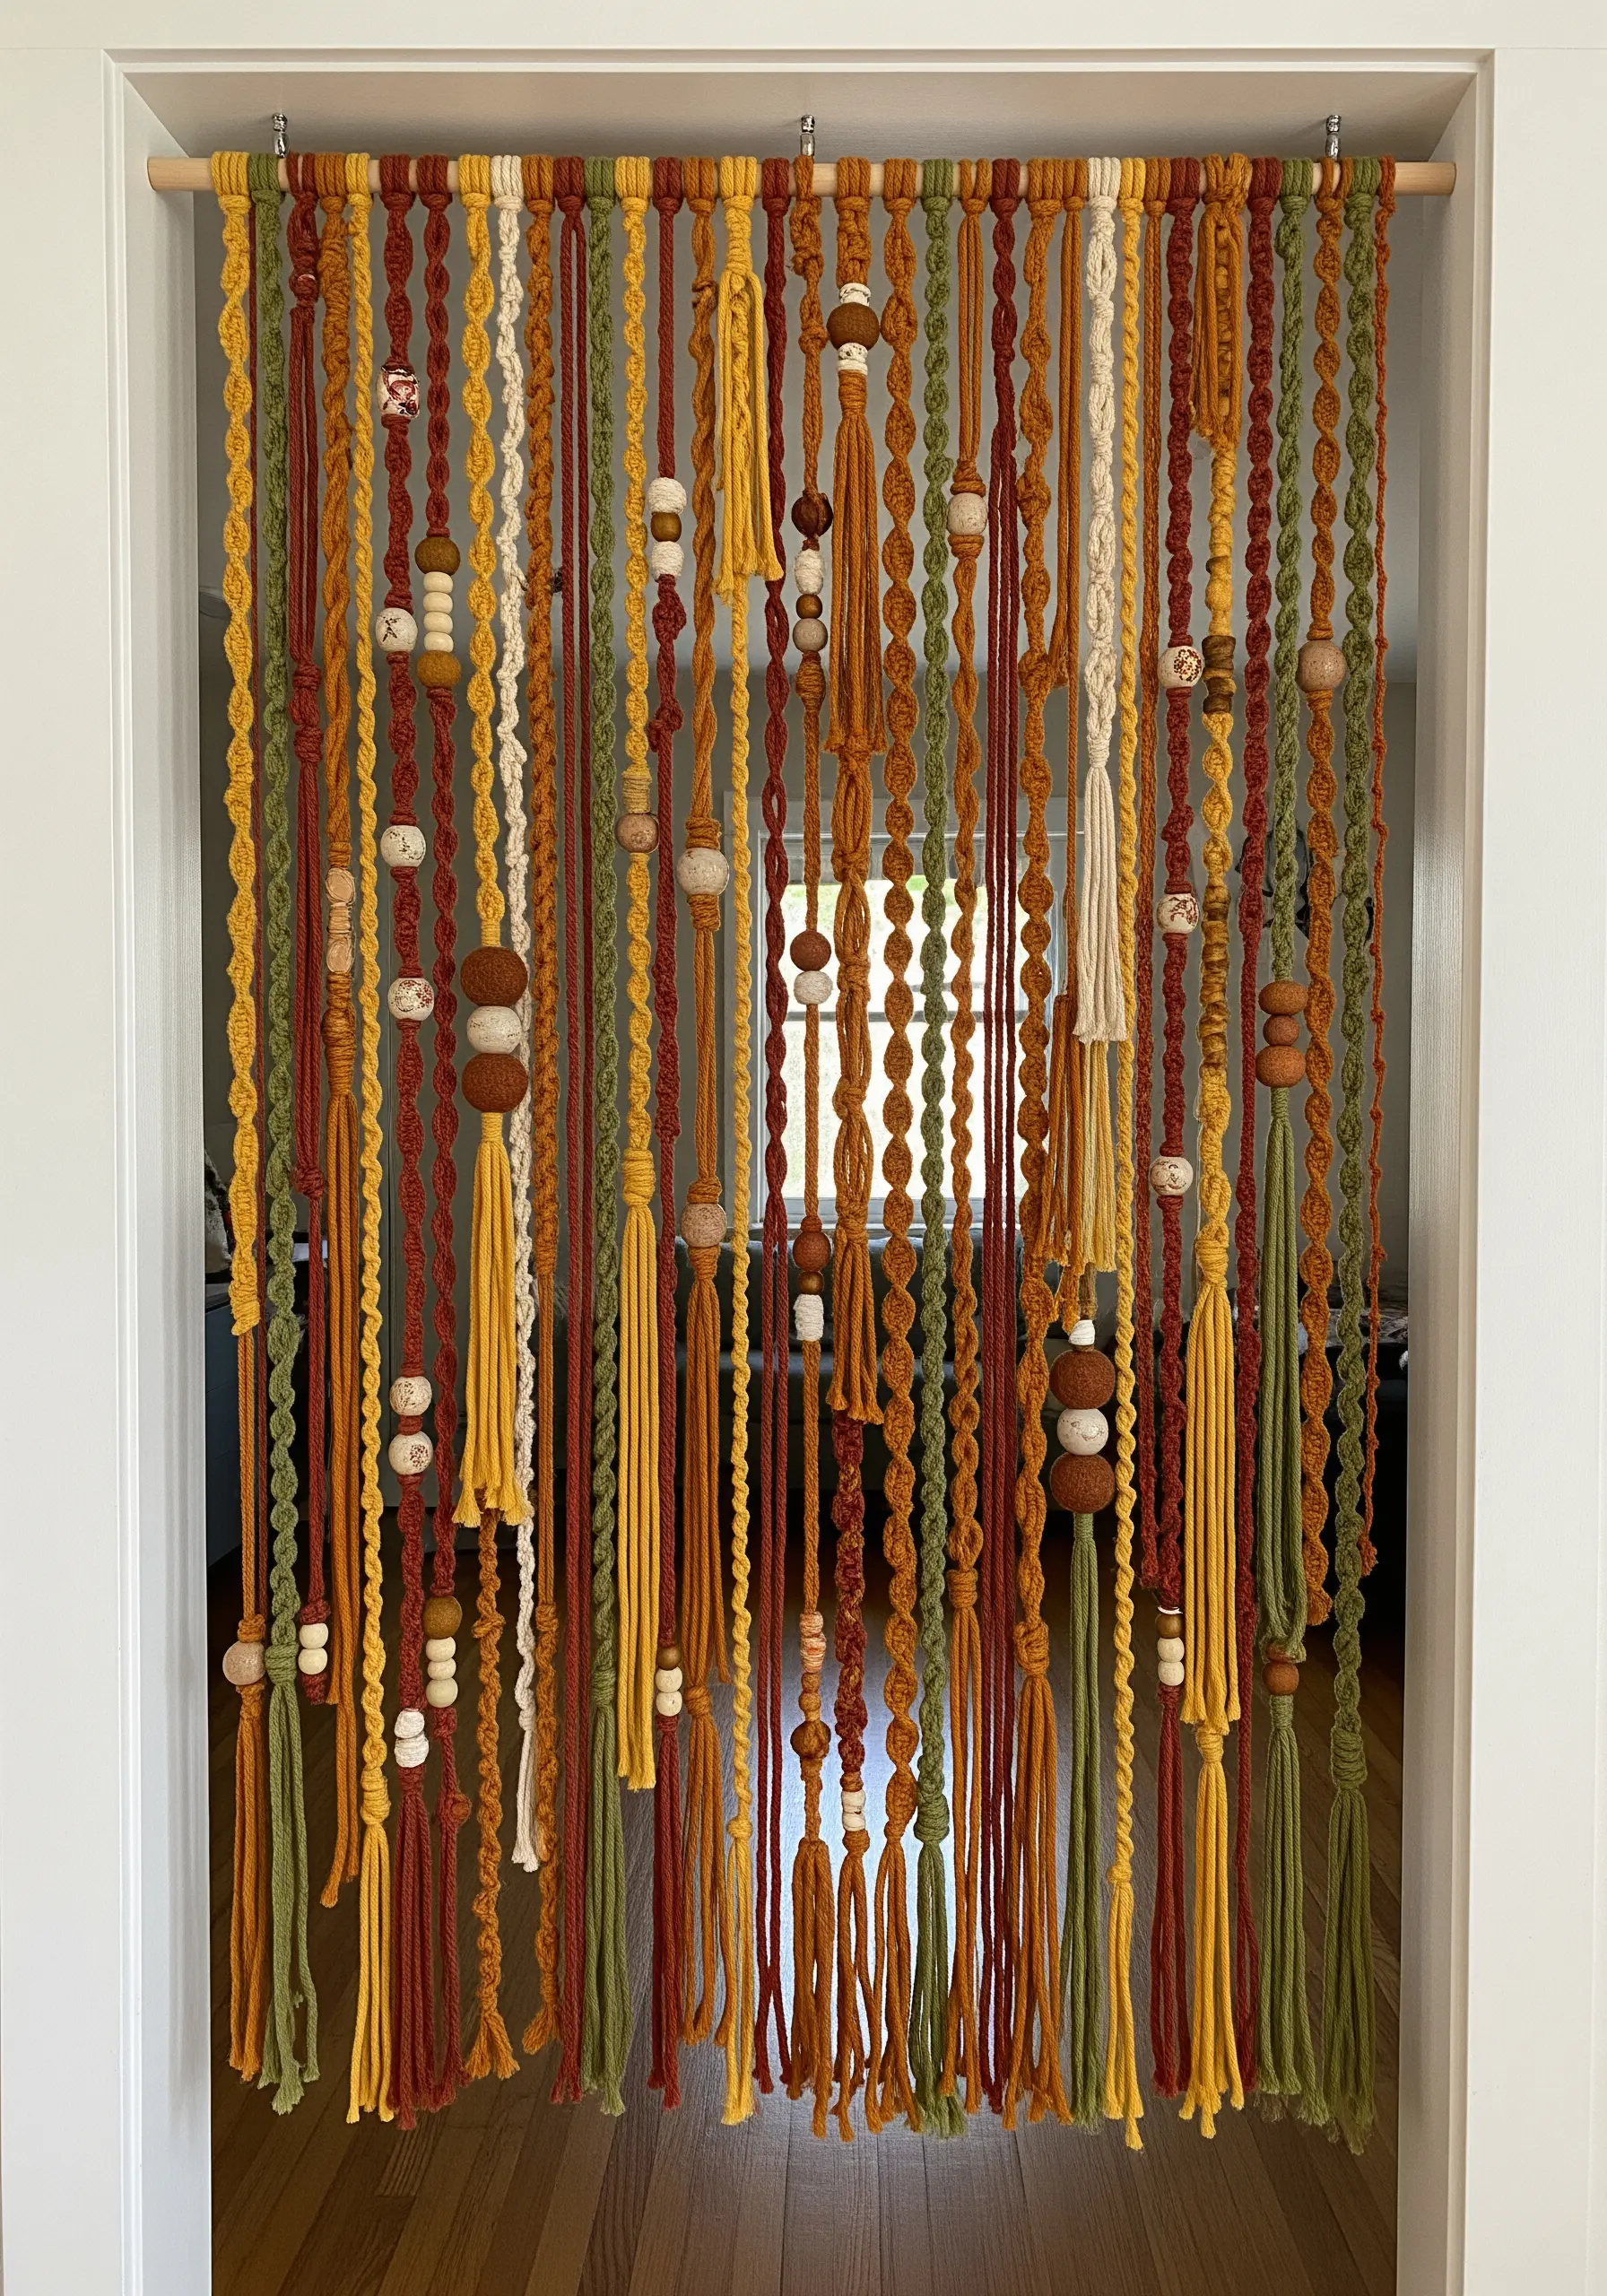
Create a functional room divider or door curtain that doubles as a piece of art using macrame.
Instead of a dense, complicated pattern, focus on simple knotted strands for an airy, modern feel.
Vary the types of knots you use—spiral knots, square knots, and simple overhand knots—to create different visual rhythms.
String wooden beads of various sizes onto the cords between knotted sections to add weight and bohemian character.
This project turns a simple curtain into a piece of beautiful, interactive decor.
23. Layered Felt Appliqué for Architectural Depth
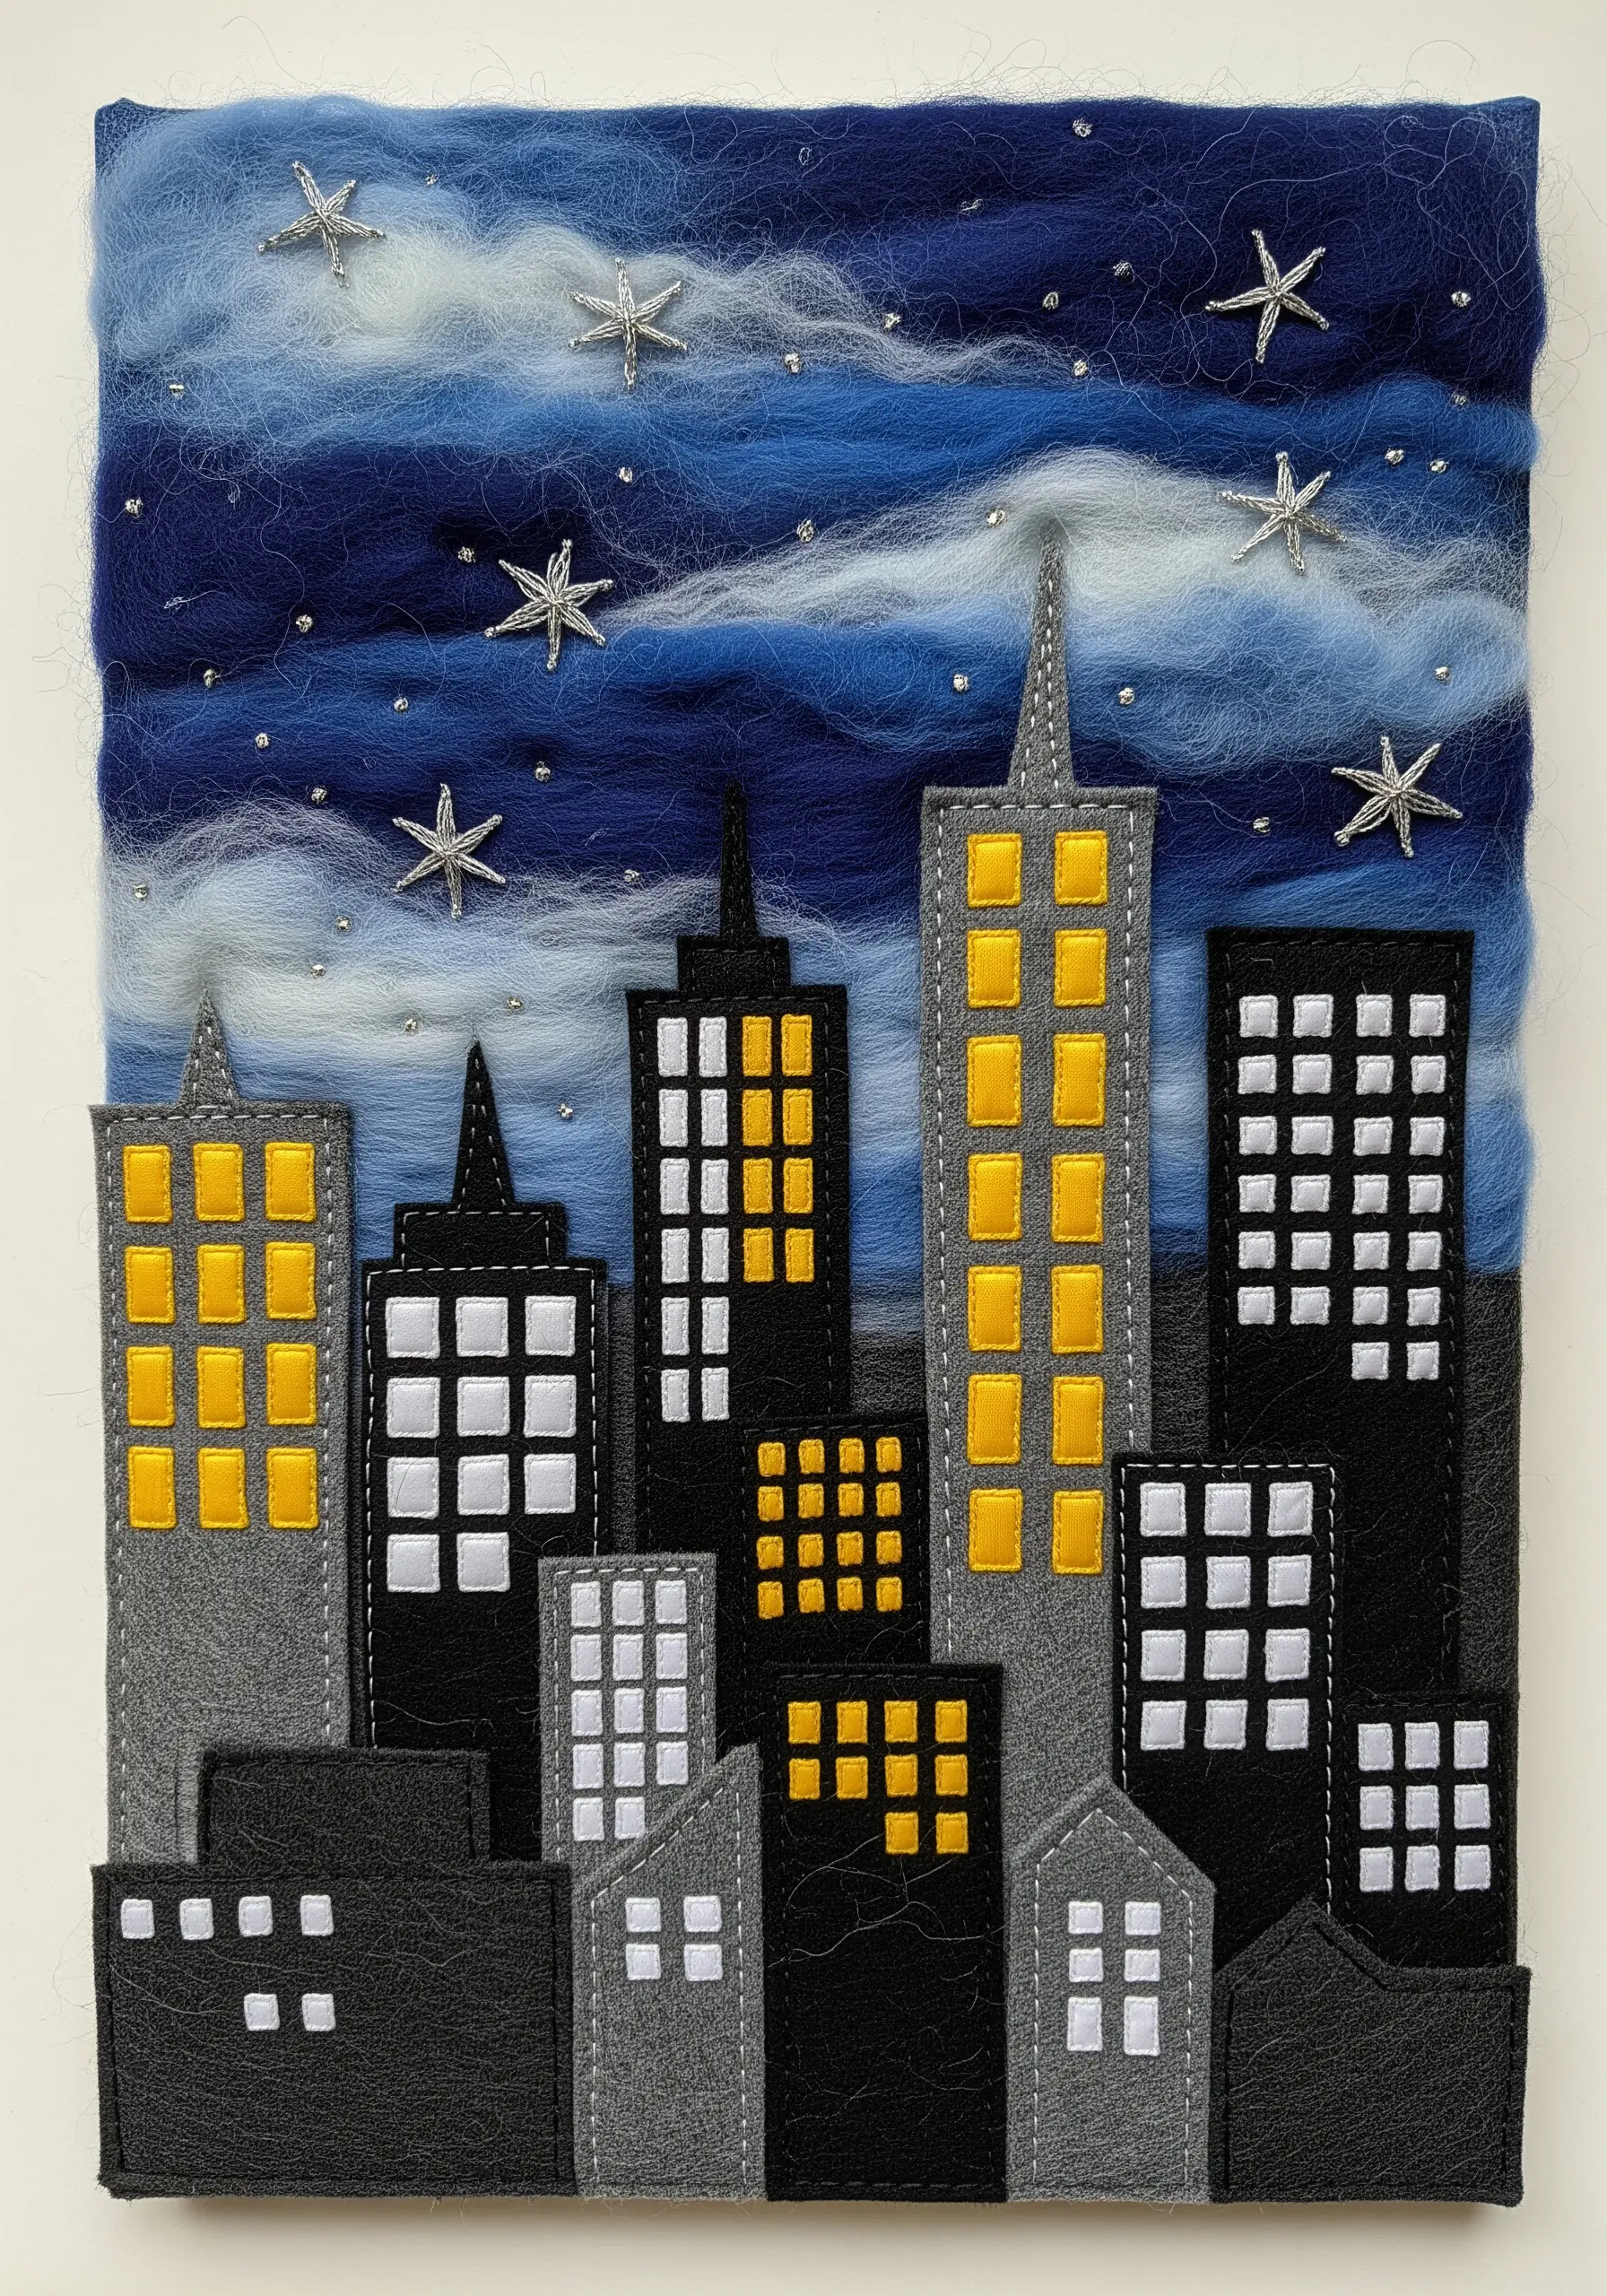
Build a cityscape with a strong sense of perspective by using layered felt appliqué.
Cut out your building shapes from different shades of felt to create visual separation.
Begin by stitching down the buildings that are furthest away in the scene first.
Then, layer the foreground buildings on top—this physically raises them, creating instant and effective depth.
Use a simple running stitch for details like windows and outlines, and add a soft sky of needle-felted wool to contrast the sharp, geometric lines of the city.
24. Kintsugi Mending with Gold Thread

Translate the beautiful philosophy of Kintsugi—the Japanese art of repairing broken pottery—into your embroidery.
Use a layer of sheer organza over your base fabric; this creates a subtle depth and a unique surface for stitching.
Stitch the “cracks” using a couching stitch: lay down a thick gold metallic cord and tack it in place with a finer, matching thread.
This technique gives you a prominent, raised line that mimics gold lacquer, turning a perceived flaw into a beautiful, meaningful feature.
25. Woven Wildflower Fields with 3D Embroidery
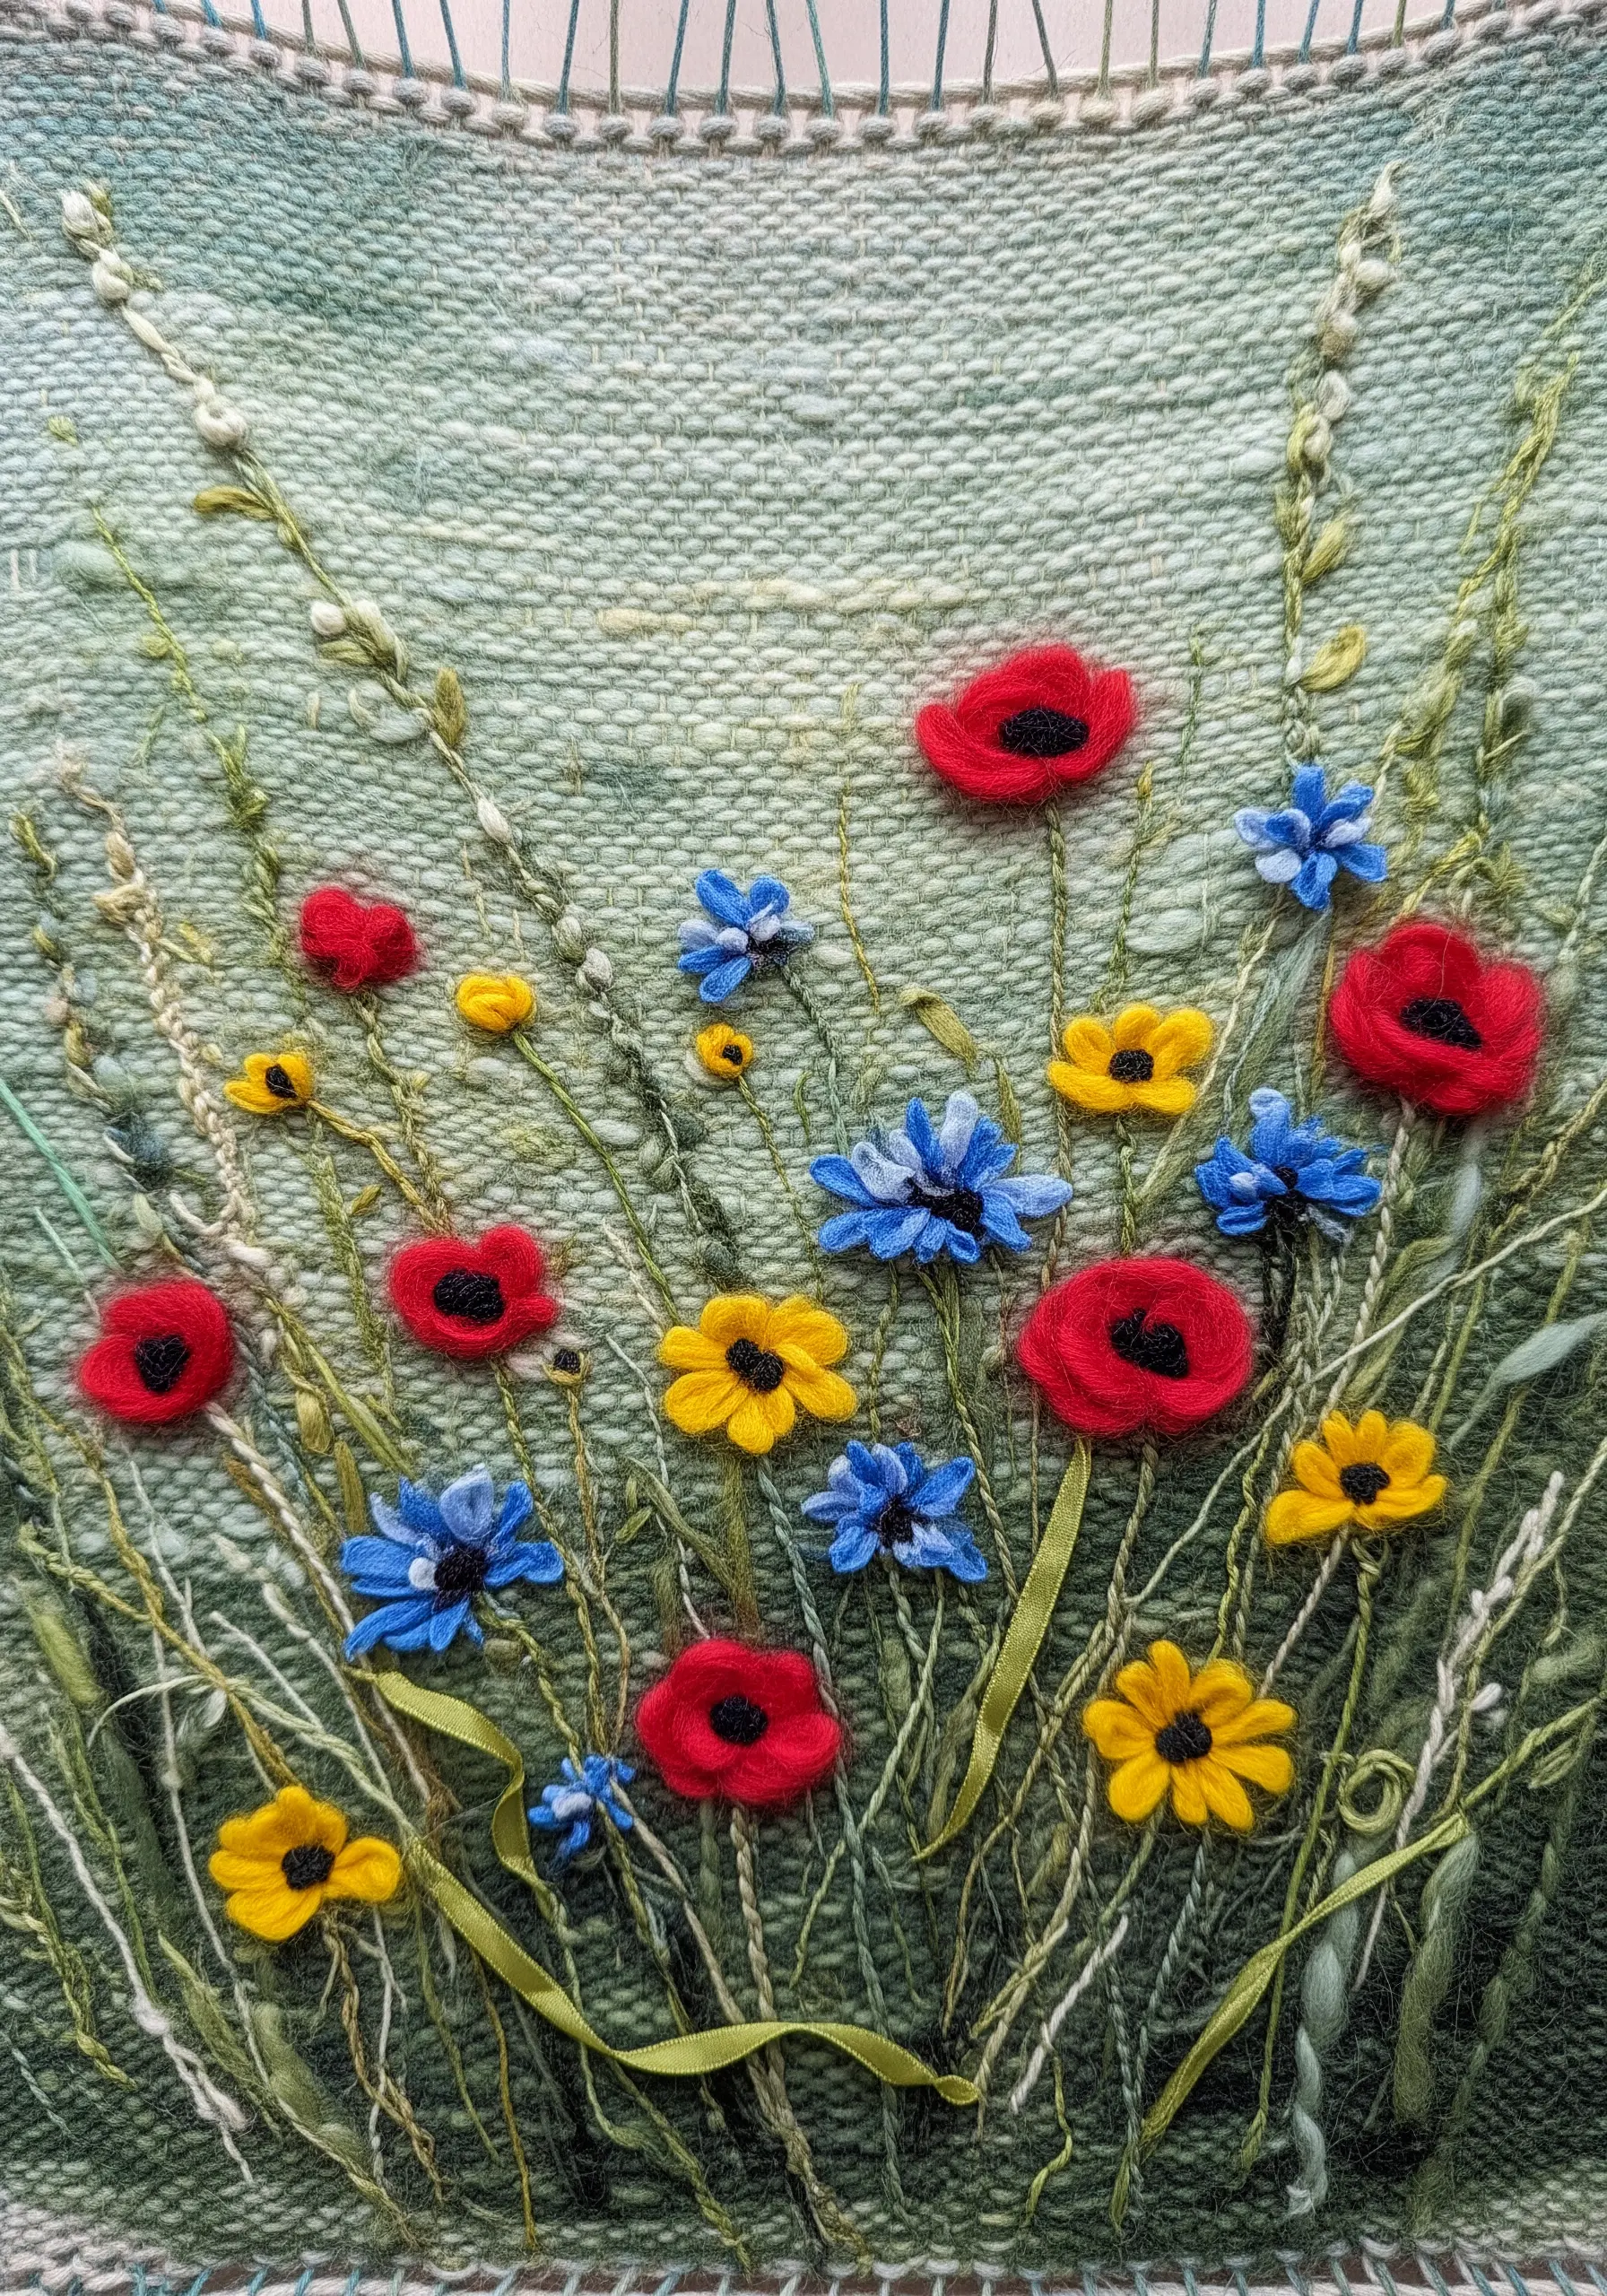
Combine weaving with dimensional embroidery to create a wildflower meadow that feels alive with texture.
First, weave a background of varied green and earthy tones on a loom to represent the grasses and soil.
Once it’s off the loom, use this custom woven fabric as your canvas for stitching.
Add flowers using silk ribbon for delicate petals and needle felting for bolder blooms like poppies.
The contrast between the flat woven background and the three-dimensional flowers makes the entire scene pop.


