
You have the stitches. You have the thread. But what if the surface you’ve been dreaming of isn’t fabric at all? What if it’s paper? I want you to think about the crisp fold of cardstock, the fibrous texture of a handmade sheet, and the way light passes through vellum. These are not just alternatives to linen or cotton; they are new worlds for your needle.
Combining paper and thread allows you to create art that is both delicate and structural. Your stitches are no longer just for embellishment—they become architectural lines, textural details, and focal points that demand attention. This is where your embroidery evolves from a craft into a mixed-media art form, full of dimension and unexpected elegance.
Forget the rules that say you can only stitch on fabric. Here, we will explore projects that empower you to pierce, sculpt, and transform paper into something entirely new. You will see how a simple running stitch can build a 3D sculpture or how a single strand of floss can turn a flat cutout into a botanical specimen. Let’s begin.
1. Weaving Celestial Spirals on Paper
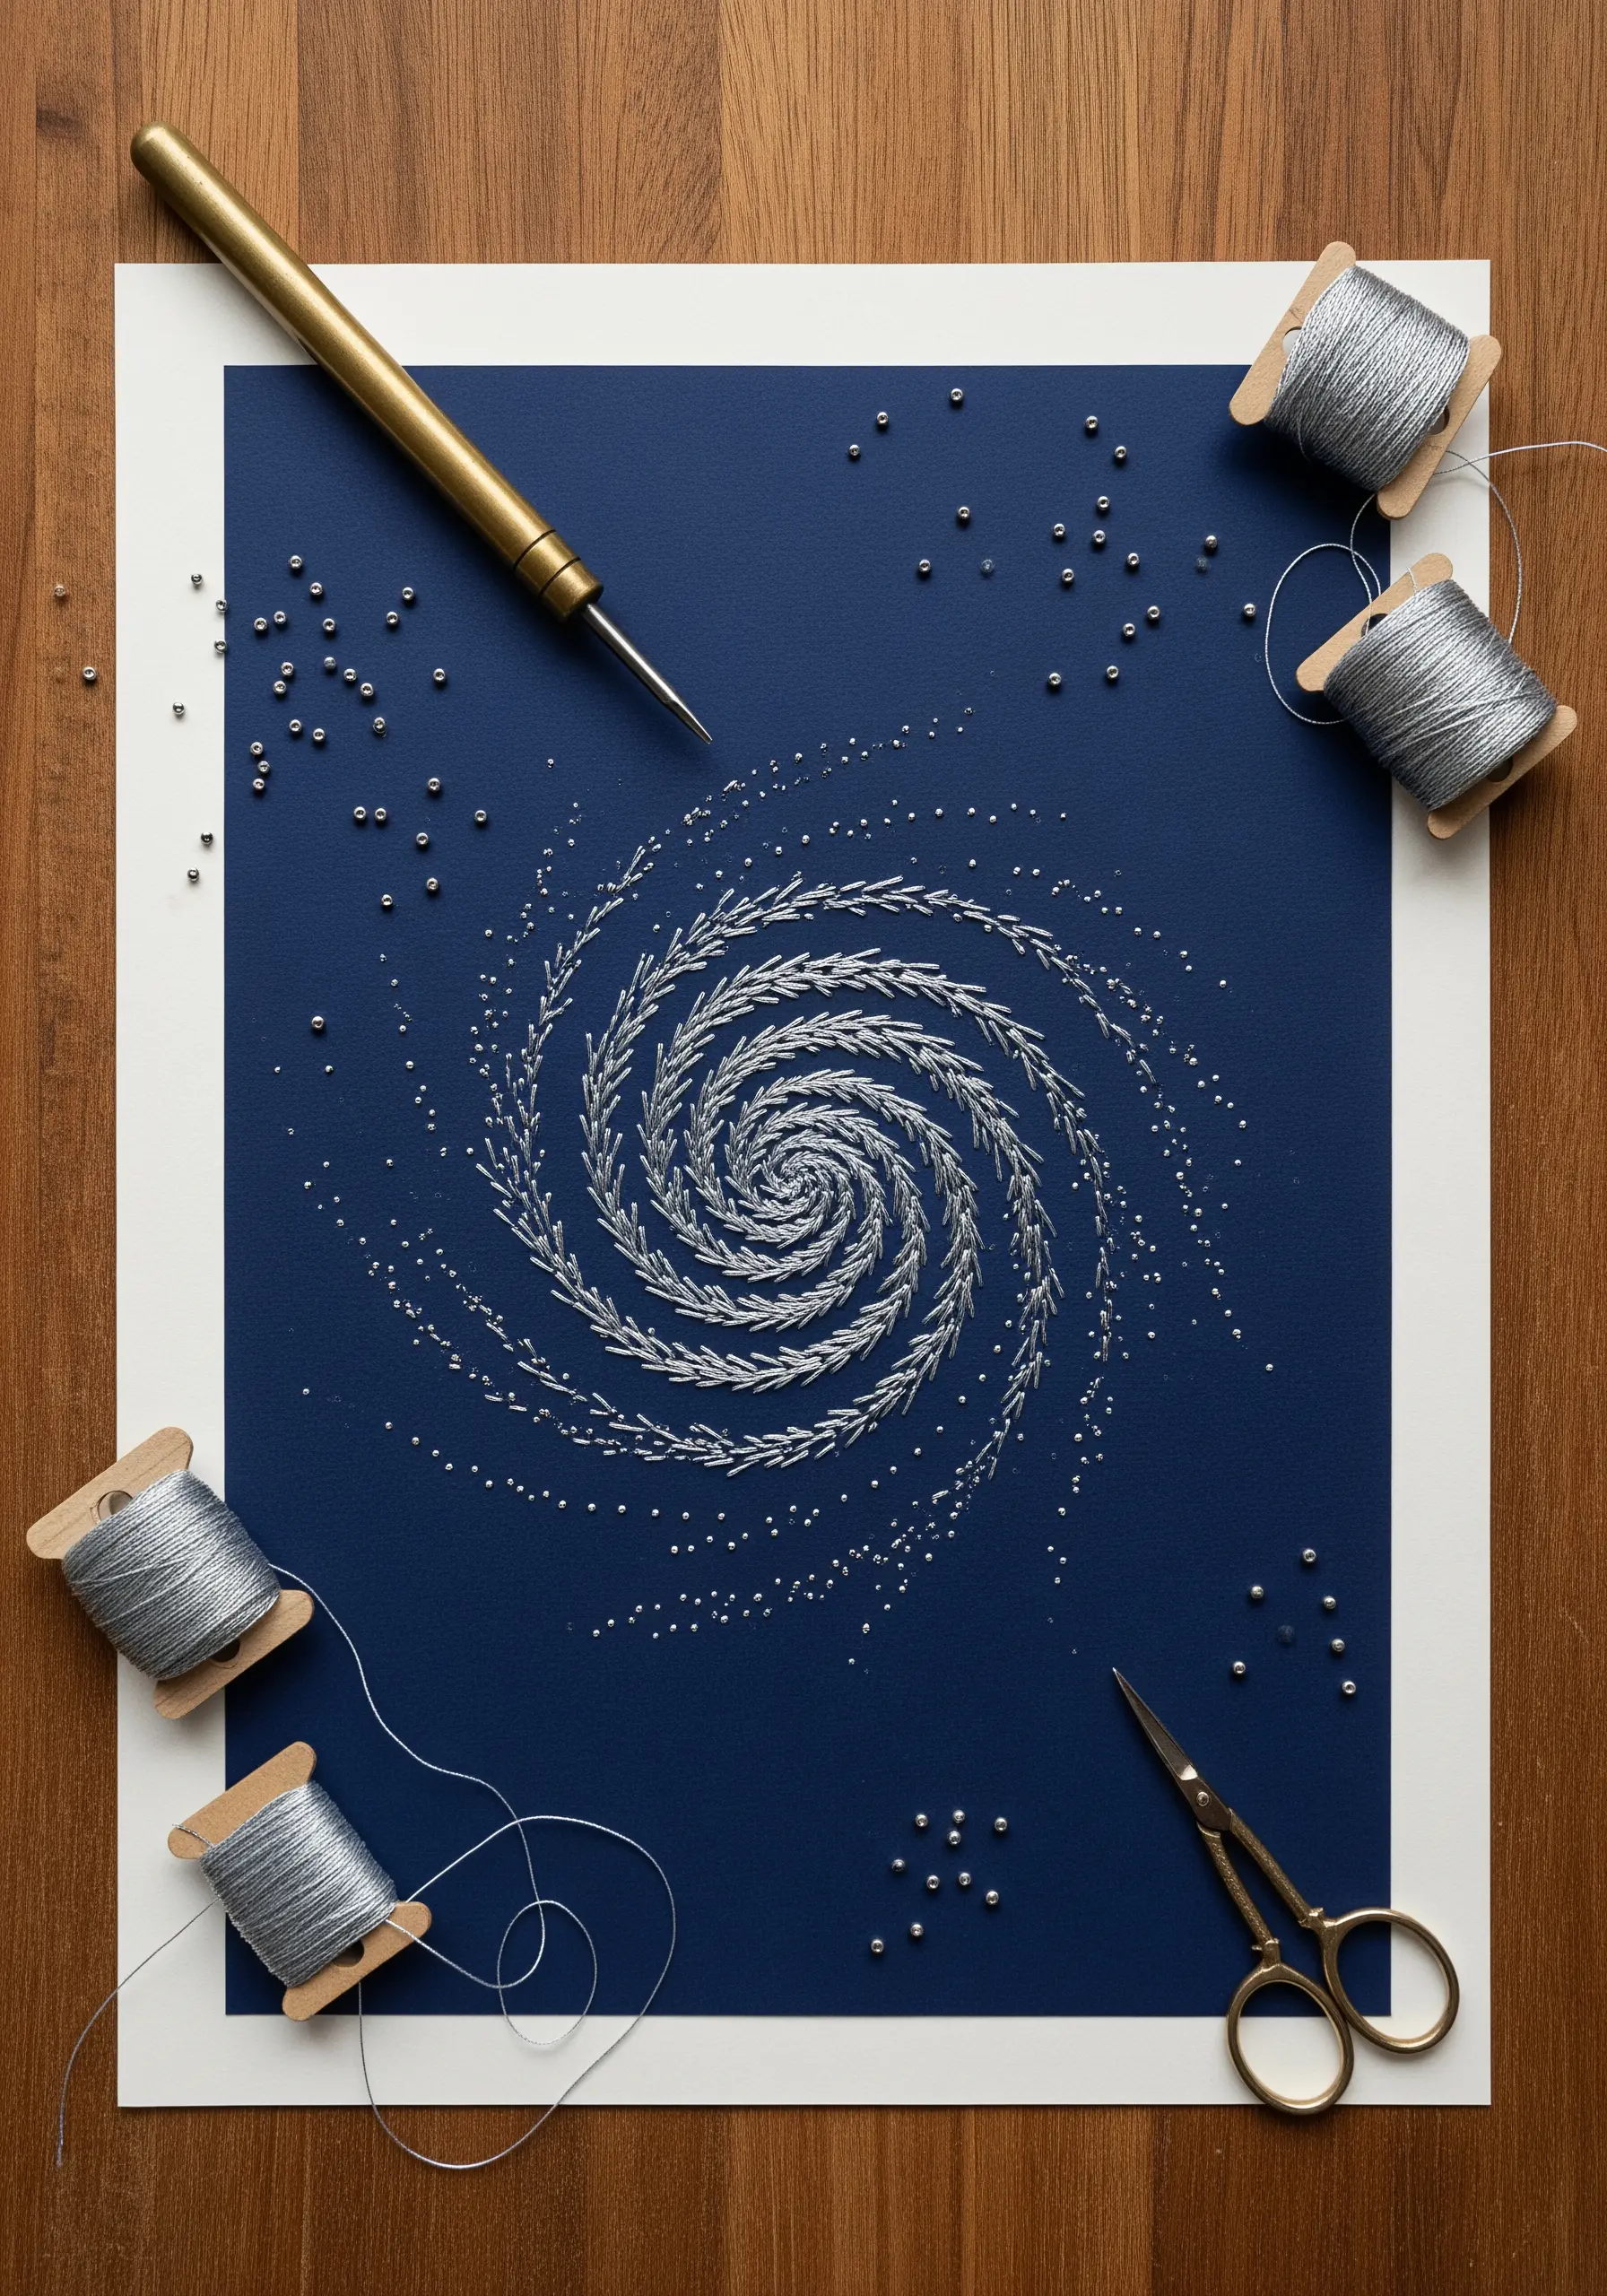
Stitching on paper requires a gentle hand and careful preparation.
Use a piercing tool or a simple pushpin to create your holes beforehand, following a printed spiral template to ensure perfect spacing.
This step is crucial—it prevents the paper from tearing and keeps your stitches remarkably even.
Choose a metallic thread for its brilliant contrast against dark cardstock; its inherent stiffness also helps maintain clean, sharp lines.
As you stitch, scatter tiny seed beads across the design, securing each one with a separate, small stitch on the back to add a delicate, starlit texture that catches the light.
2. Building Dimension with Layered Paper Landscapes
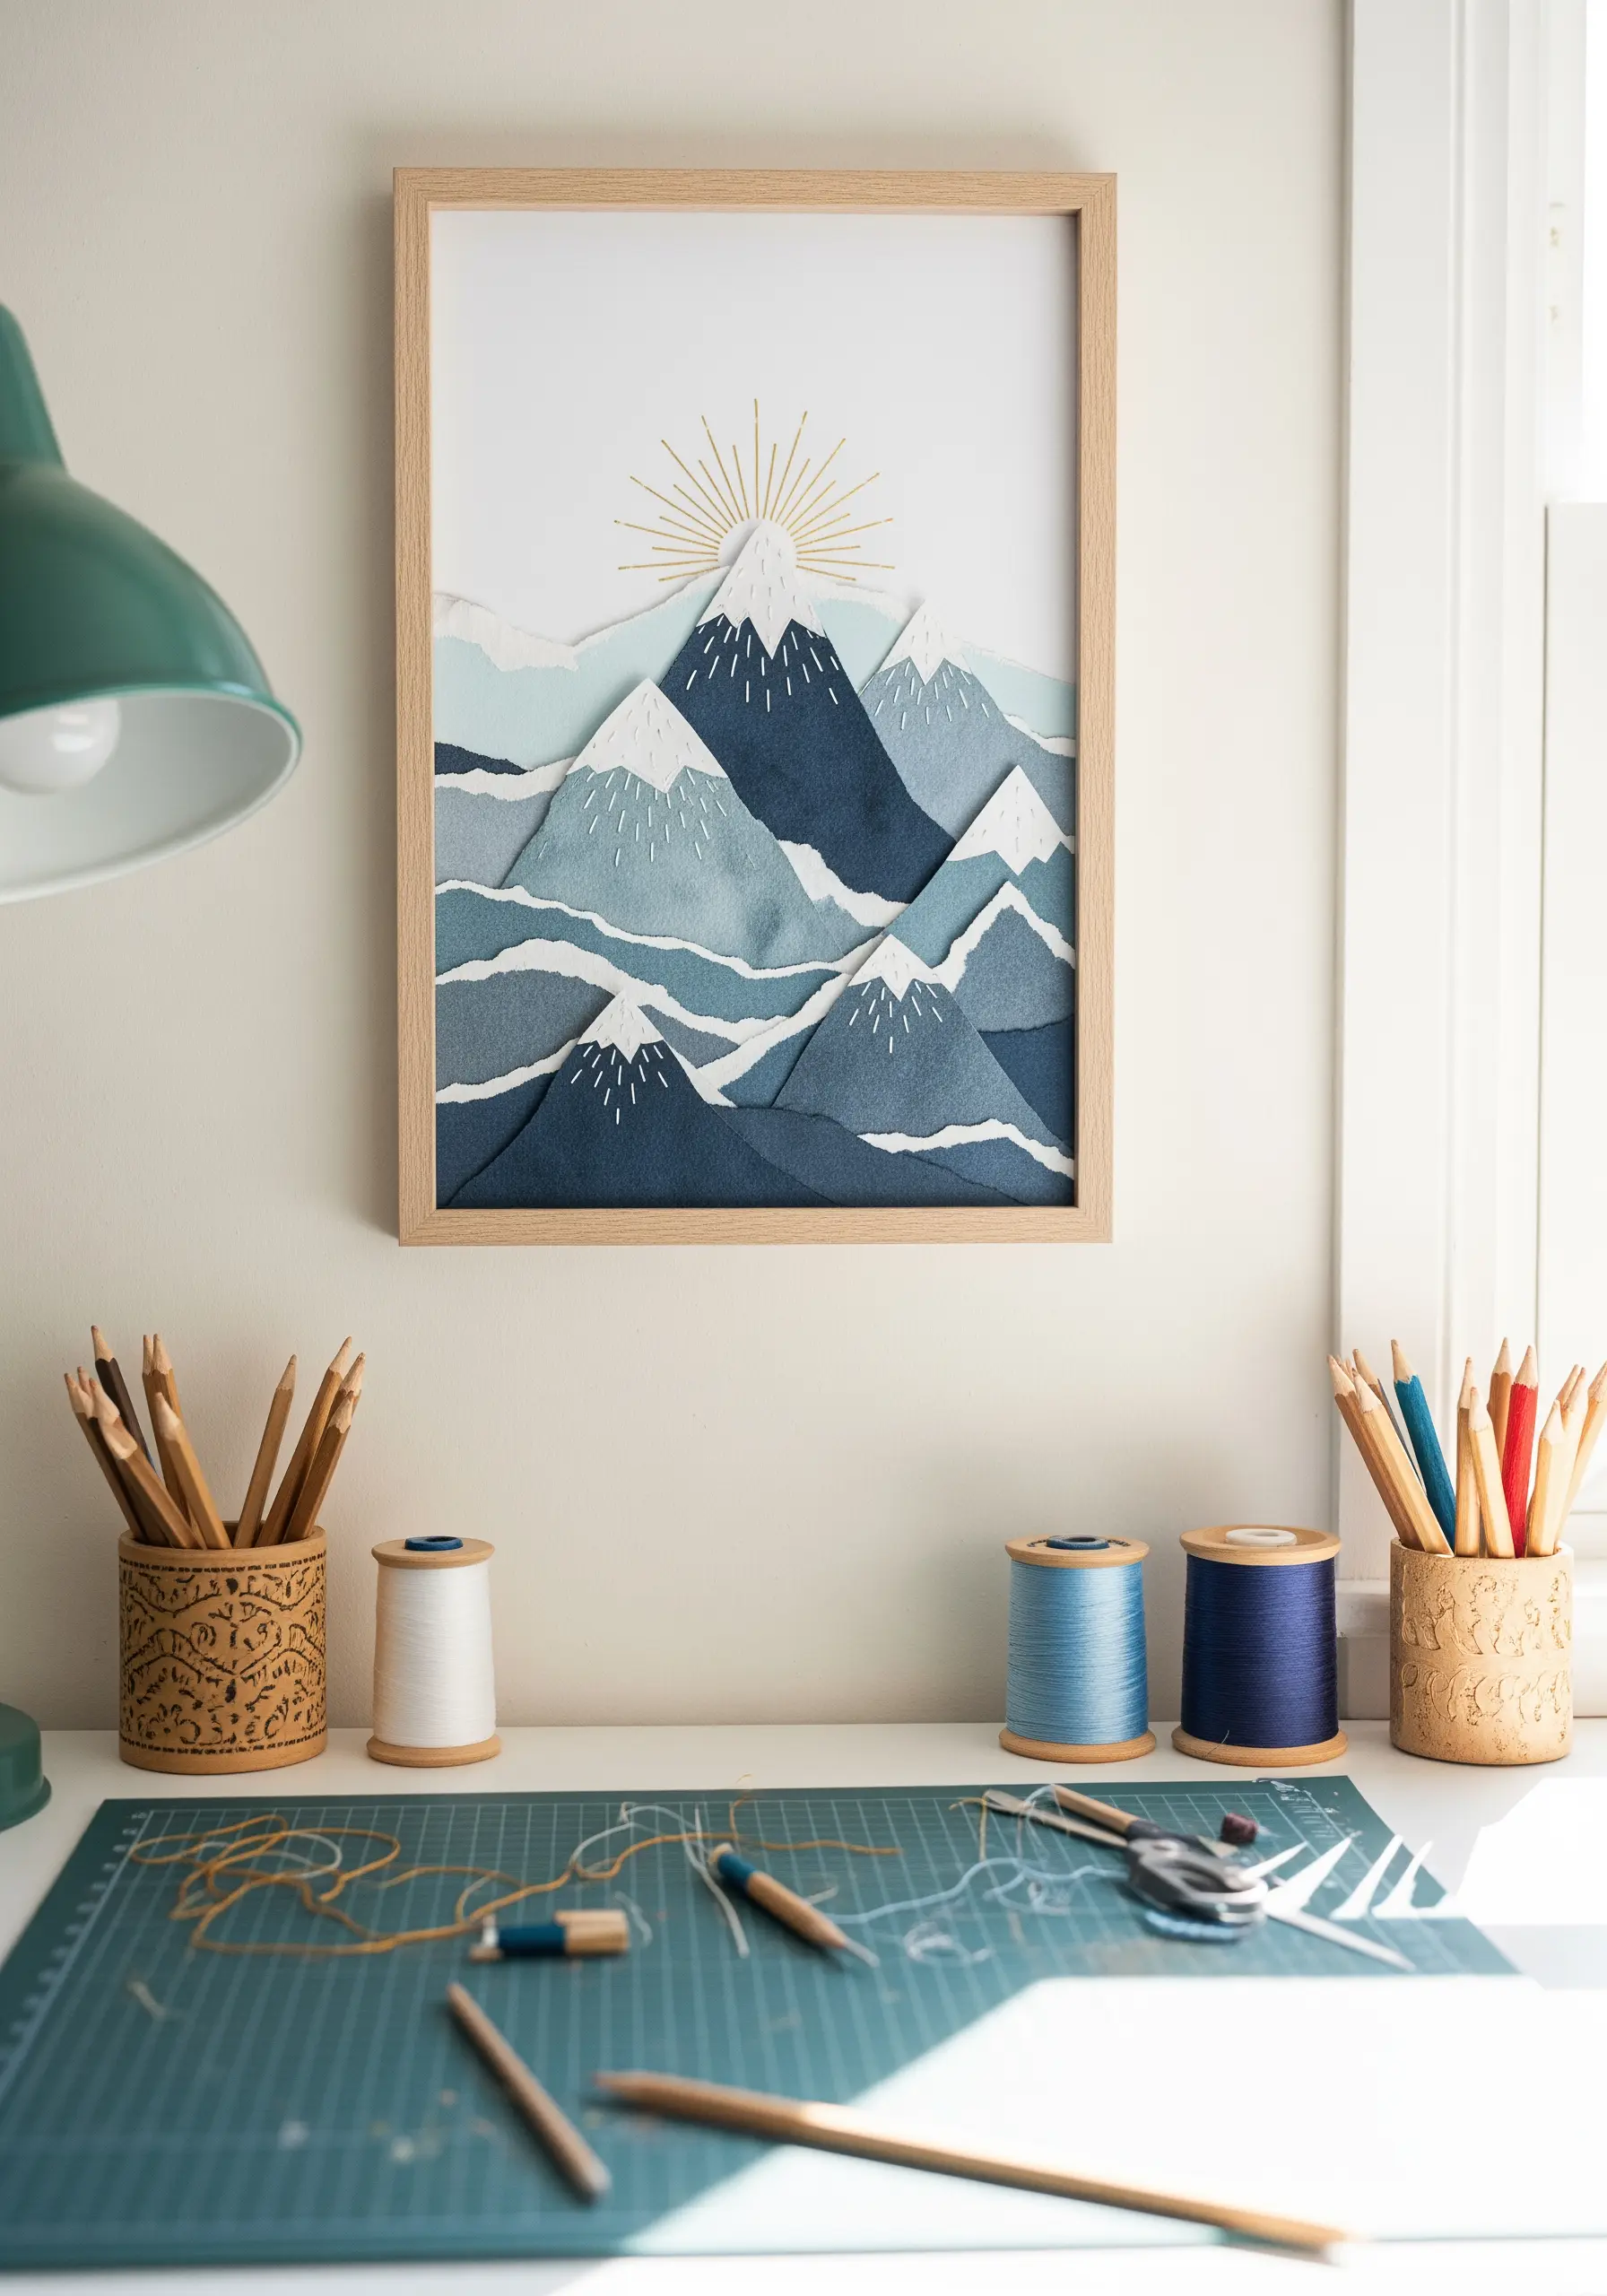
Create extraordinary depth by layering paper with torn edges to form a mountain range.
Use cardstock of varying weights and shades of blue for a natural gradient effect.
The torn edges mimic rugged, organic terrain far more effectively than scissor-cut lines ever could.
Reserve your stitches for a single, powerful focal point, like a sunburst made of simple straight stitches.
Using a bright gold metallic thread provides a warm contrast to the cool tones of the mountains, drawing the eye upward and transforming a flat piece into a landscape embroidery wall piece with tangible depth.
3. Stitching Mandalas onto Everyday Objects
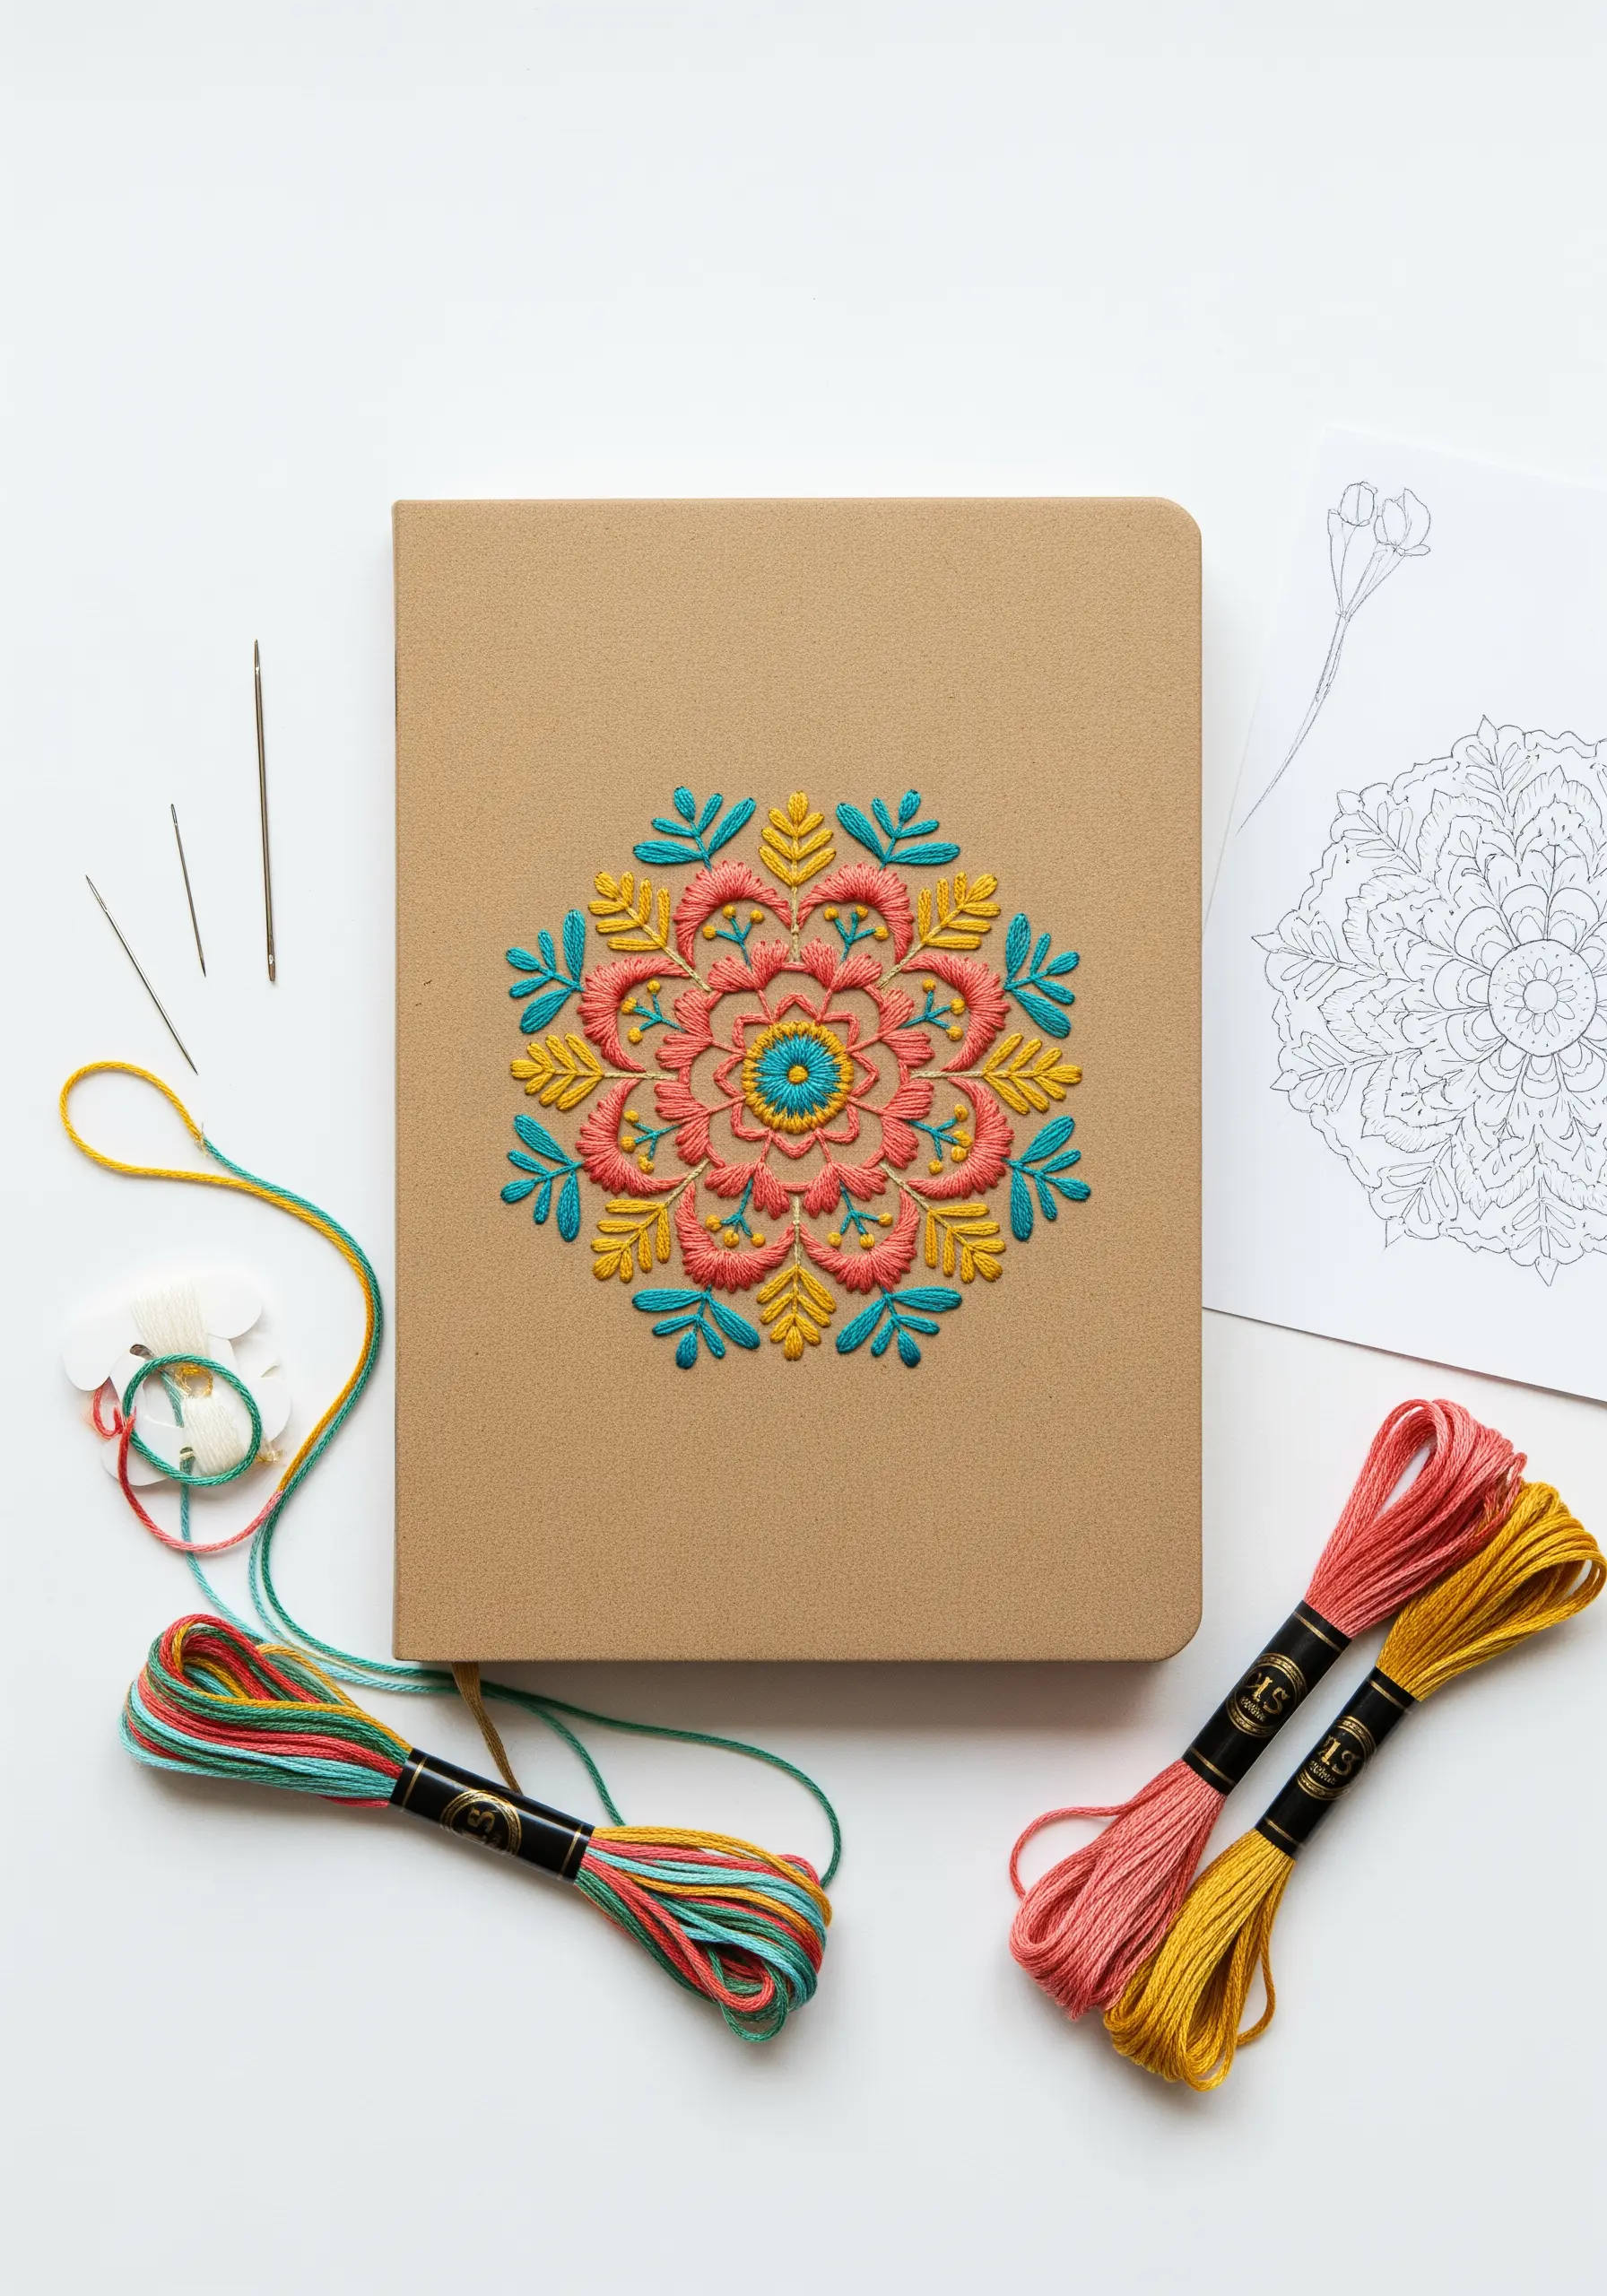
Transform a simple journal by embroidering its cover with a vibrant mandala.
To manage the thick cardstock, pre-pierce your entire design using an awl or a sturdy needle, following a printed template taped securely in place.
Use a bold, six-strand cotton floss to ensure your stitches have presence and texture against the flat paper surface.
The key to a stunning mandala is a balanced color palette; select three or four complementary colors to maintain harmony without overwhelming the intricate design.
Satin stitch works beautifully for filling the larger shapes, while a simple backstitch provides clean, crisp outlines that define the pattern.
4. Engineering 3D Paper Forms with Stitch Accents

This project moves your stitching beyond the flat page and into the realm of sculptural art.
Construct hot air balloons from shaped paper panels, using a simple running stitch along the seams to join them.
This visible stitch not only secures the structure but adds a charming, handcrafted detail that glue could never replicate.
Choose lightweight patterned scrapbook paper for visual interest and color variety.
The thread acts as both a structural element and a decorative outline, highlighting the form of each balloon and creating beautiful nursery stitch art that floats.
5. Achieving Botanical Realism on Watercolor Paper
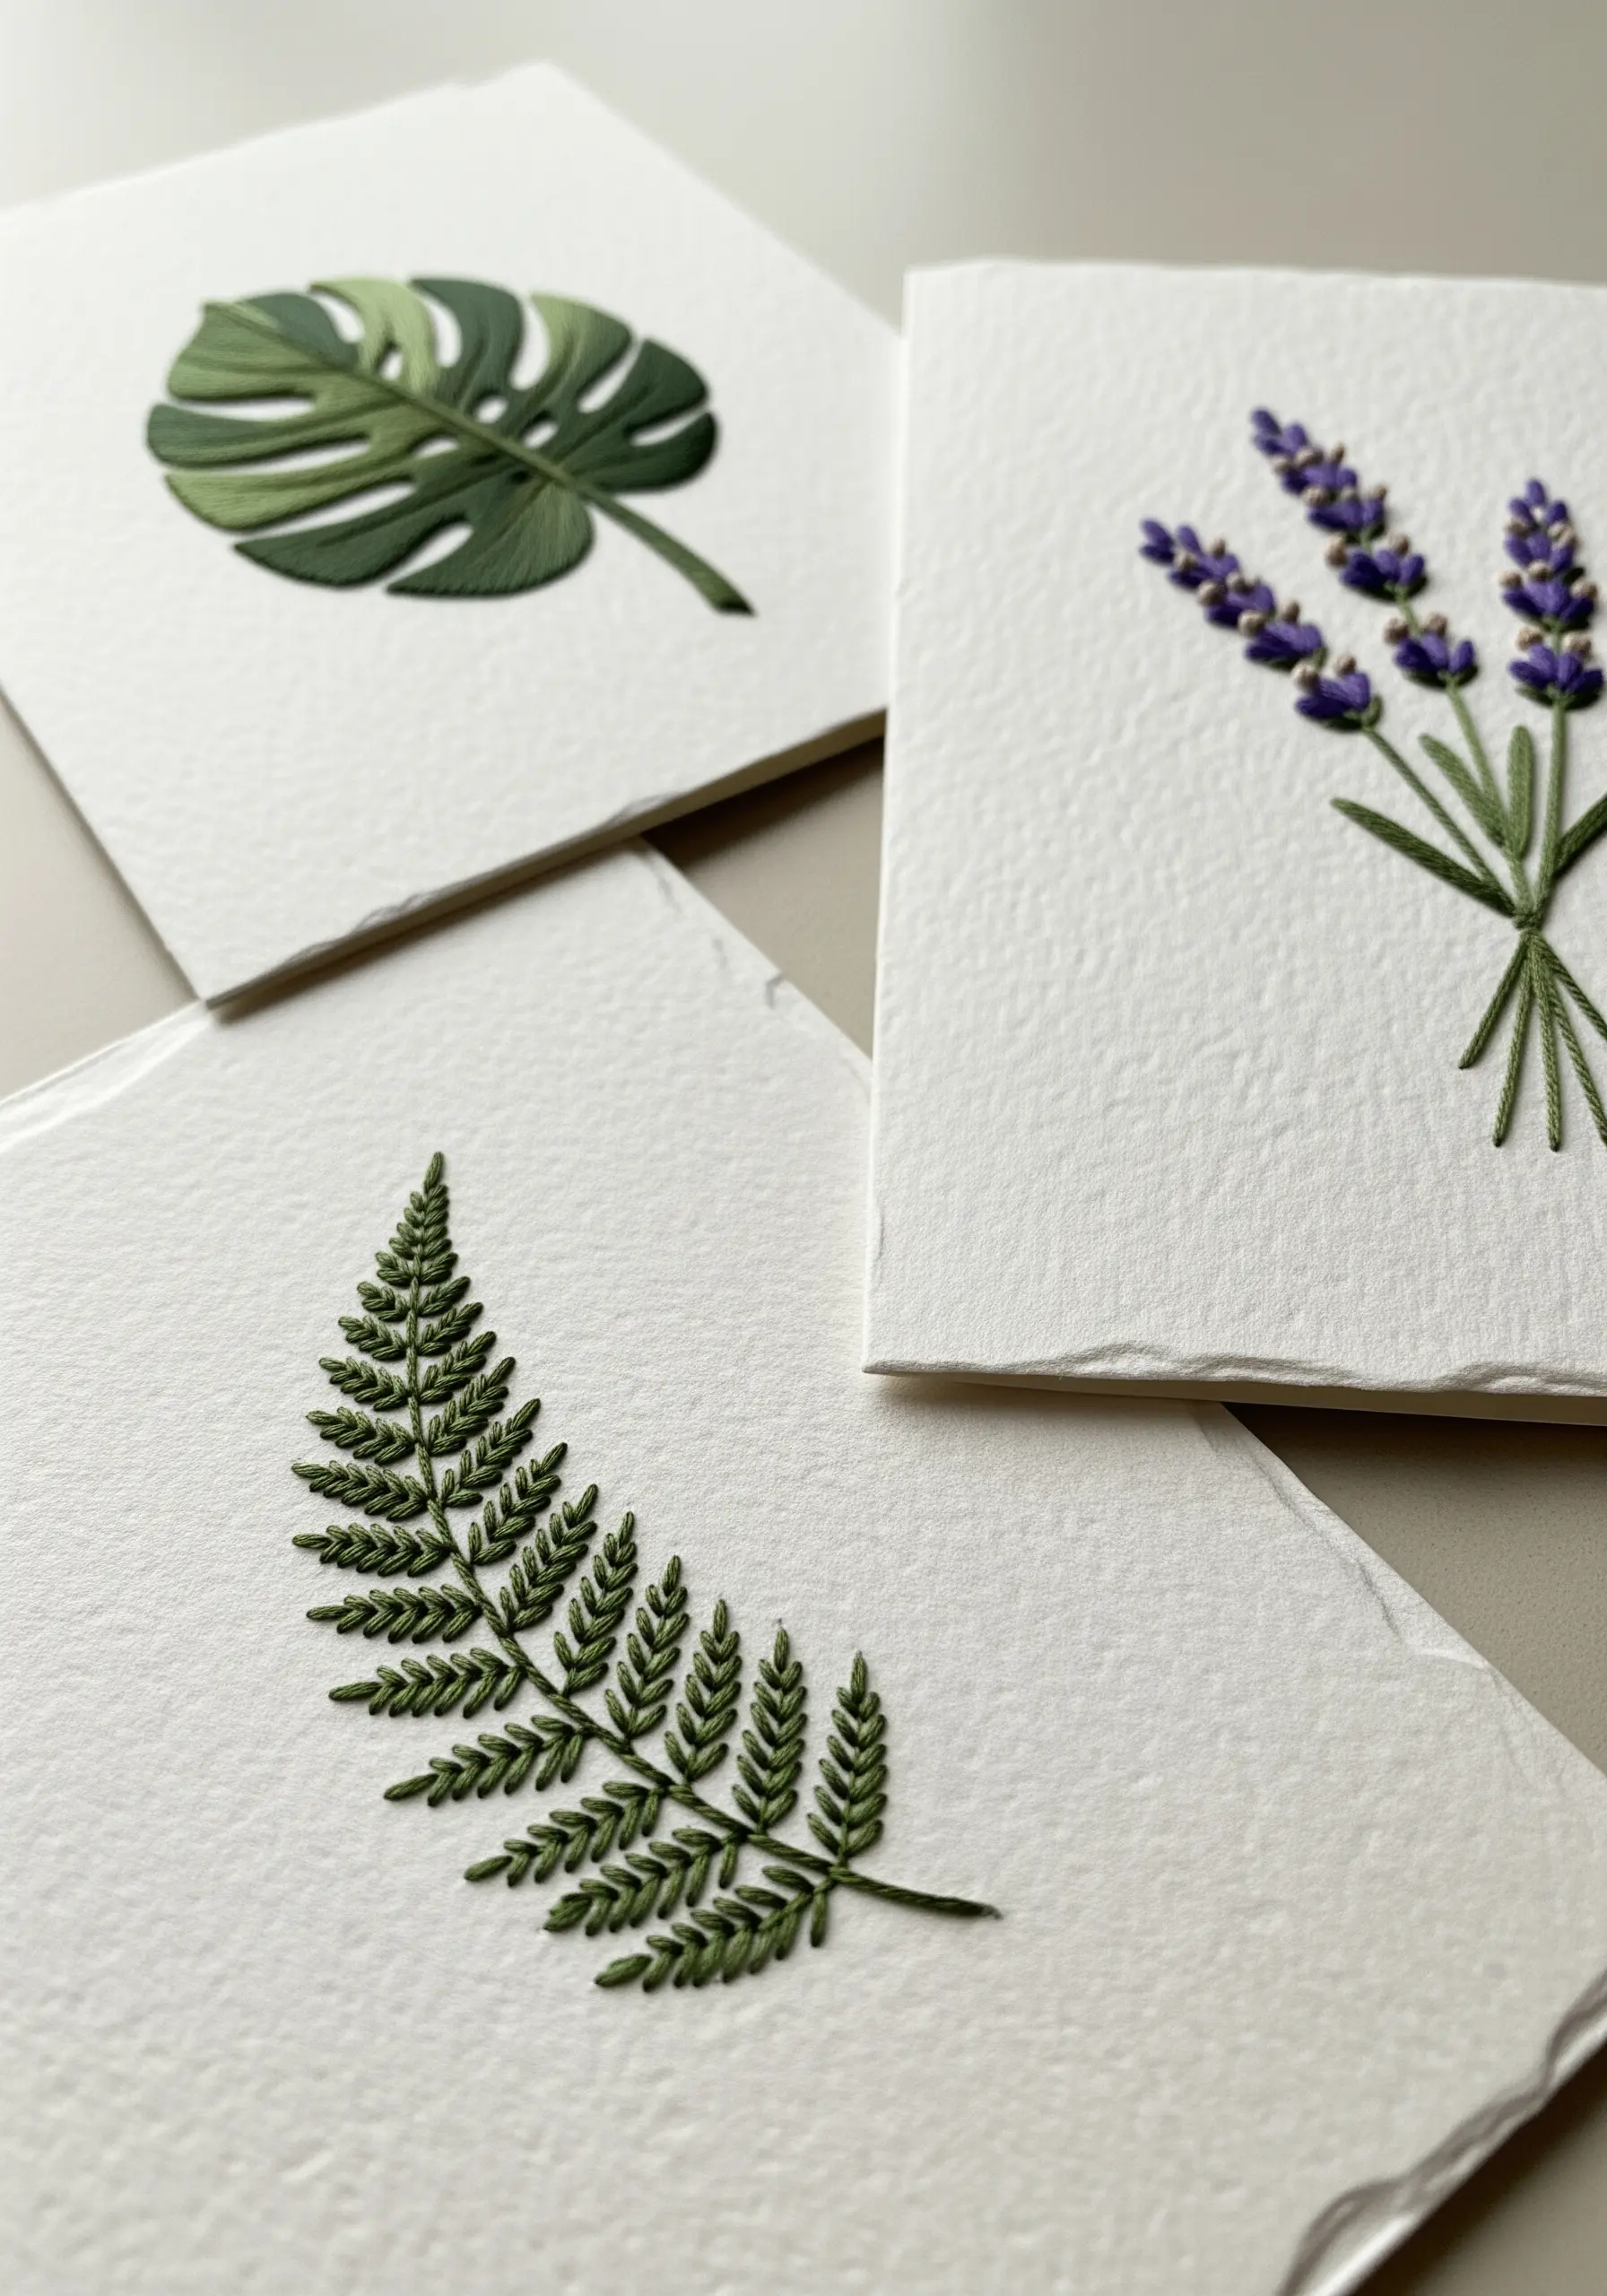
The unique texture of cold-press watercolor paper provides a beautiful, tactile background for delicate stitches.
To create realistic leaves, use a fishbone stitch for the fern and a combination of satin stitch and long-and-short stitch for the monstera leaf.
Use only two or three strands of floss to keep the details fine and avoid overpowering the paper’s delicate surface.
The paper’s natural tooth grips the thread subtly, adding to the organic feel of your botanical subjects.
This method produces elegant minimalist framed embroidery designs perfect for a sophisticated gallery wall.
6. Architectural Stitching for Geometric Sculptures
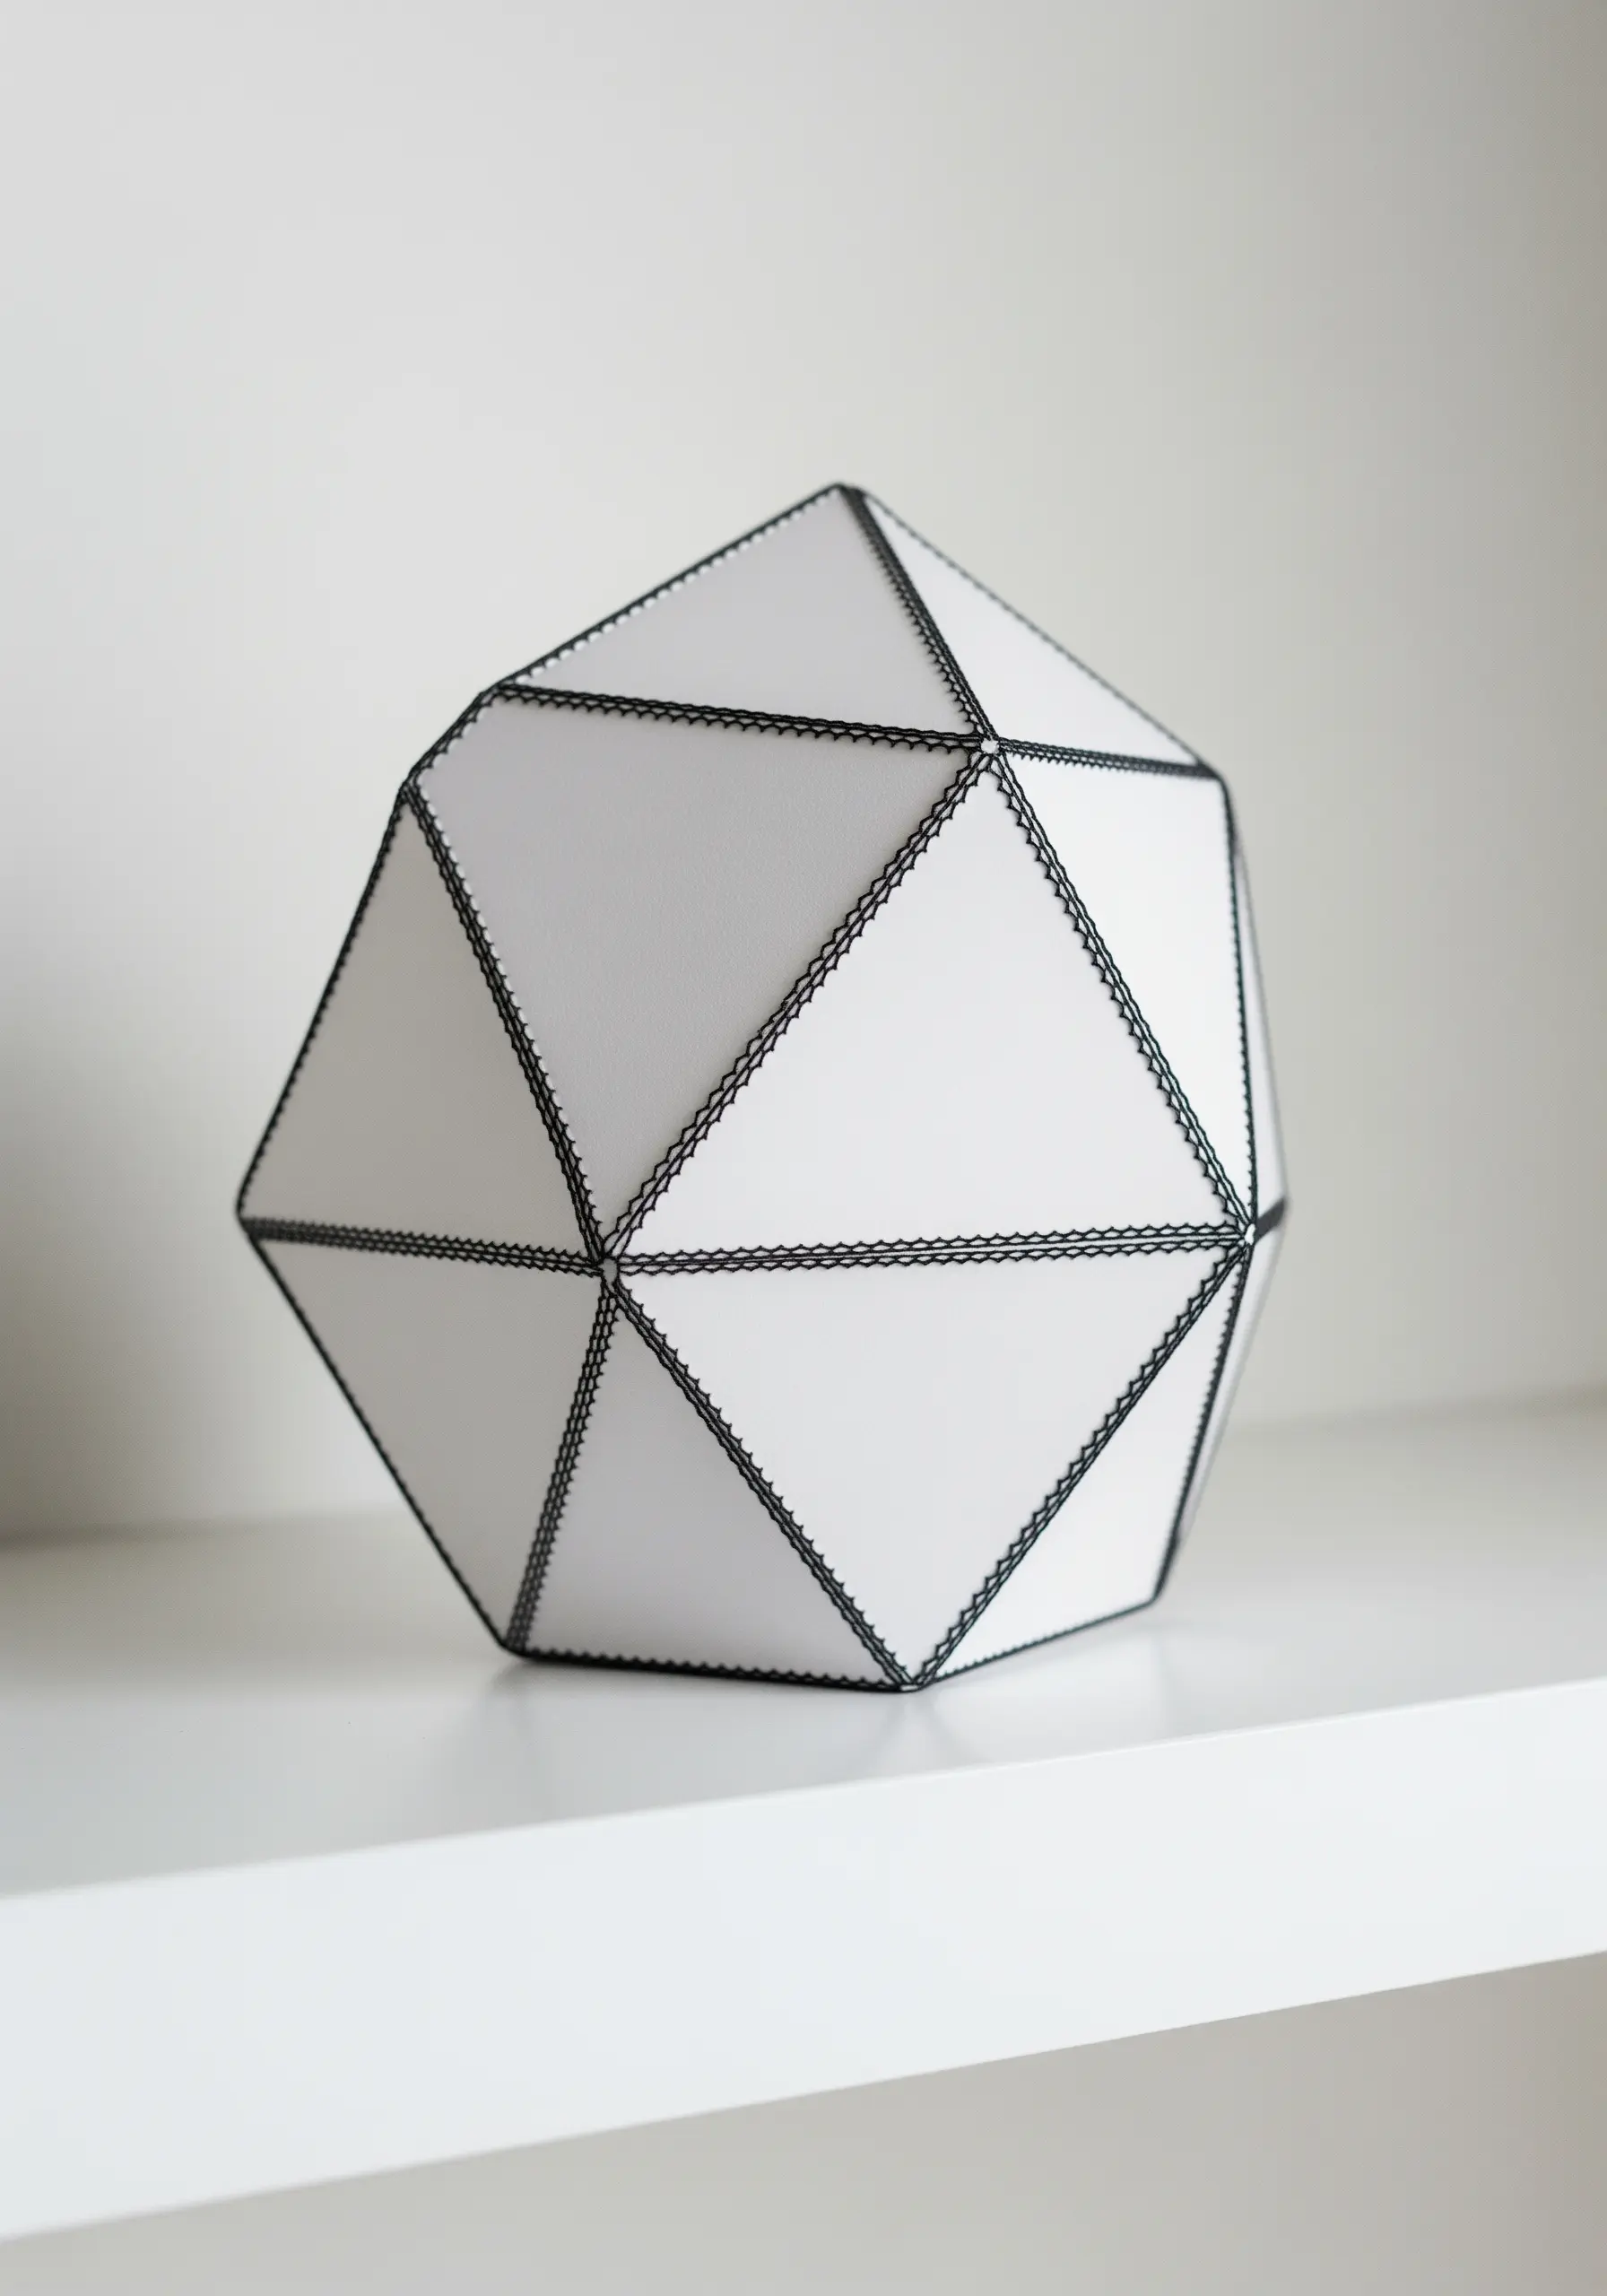
Use thread to define the edges and construct a 3D geometric object from paper.
Cut your polygonal shapes from heavy cardstock or vellum for stability.
Pre-punch holes along all edges with precise, even spacing—a quilting ruler can help with this.
Then, use a simple cross-stitch or whipstitch to join the panels together, turning the seams into a graphic design element.
The high contrast of dark thread against white paper emphasizes the object’s form, showcasing how thread can be both structural and aesthetic in handmade sculptures that combine modern design with craft.
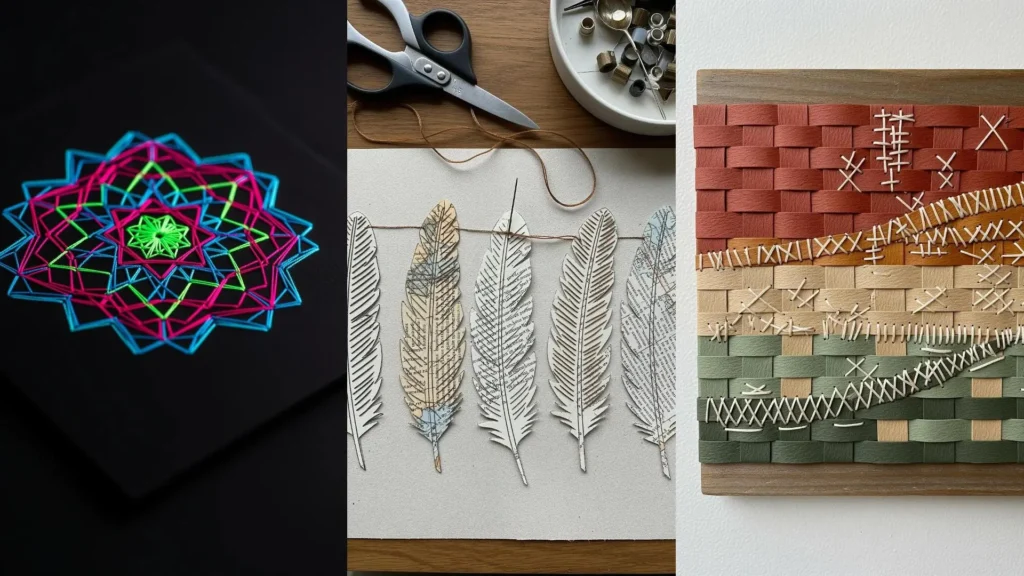
7. Embellishing Paper Cutouts with Linear Stitches
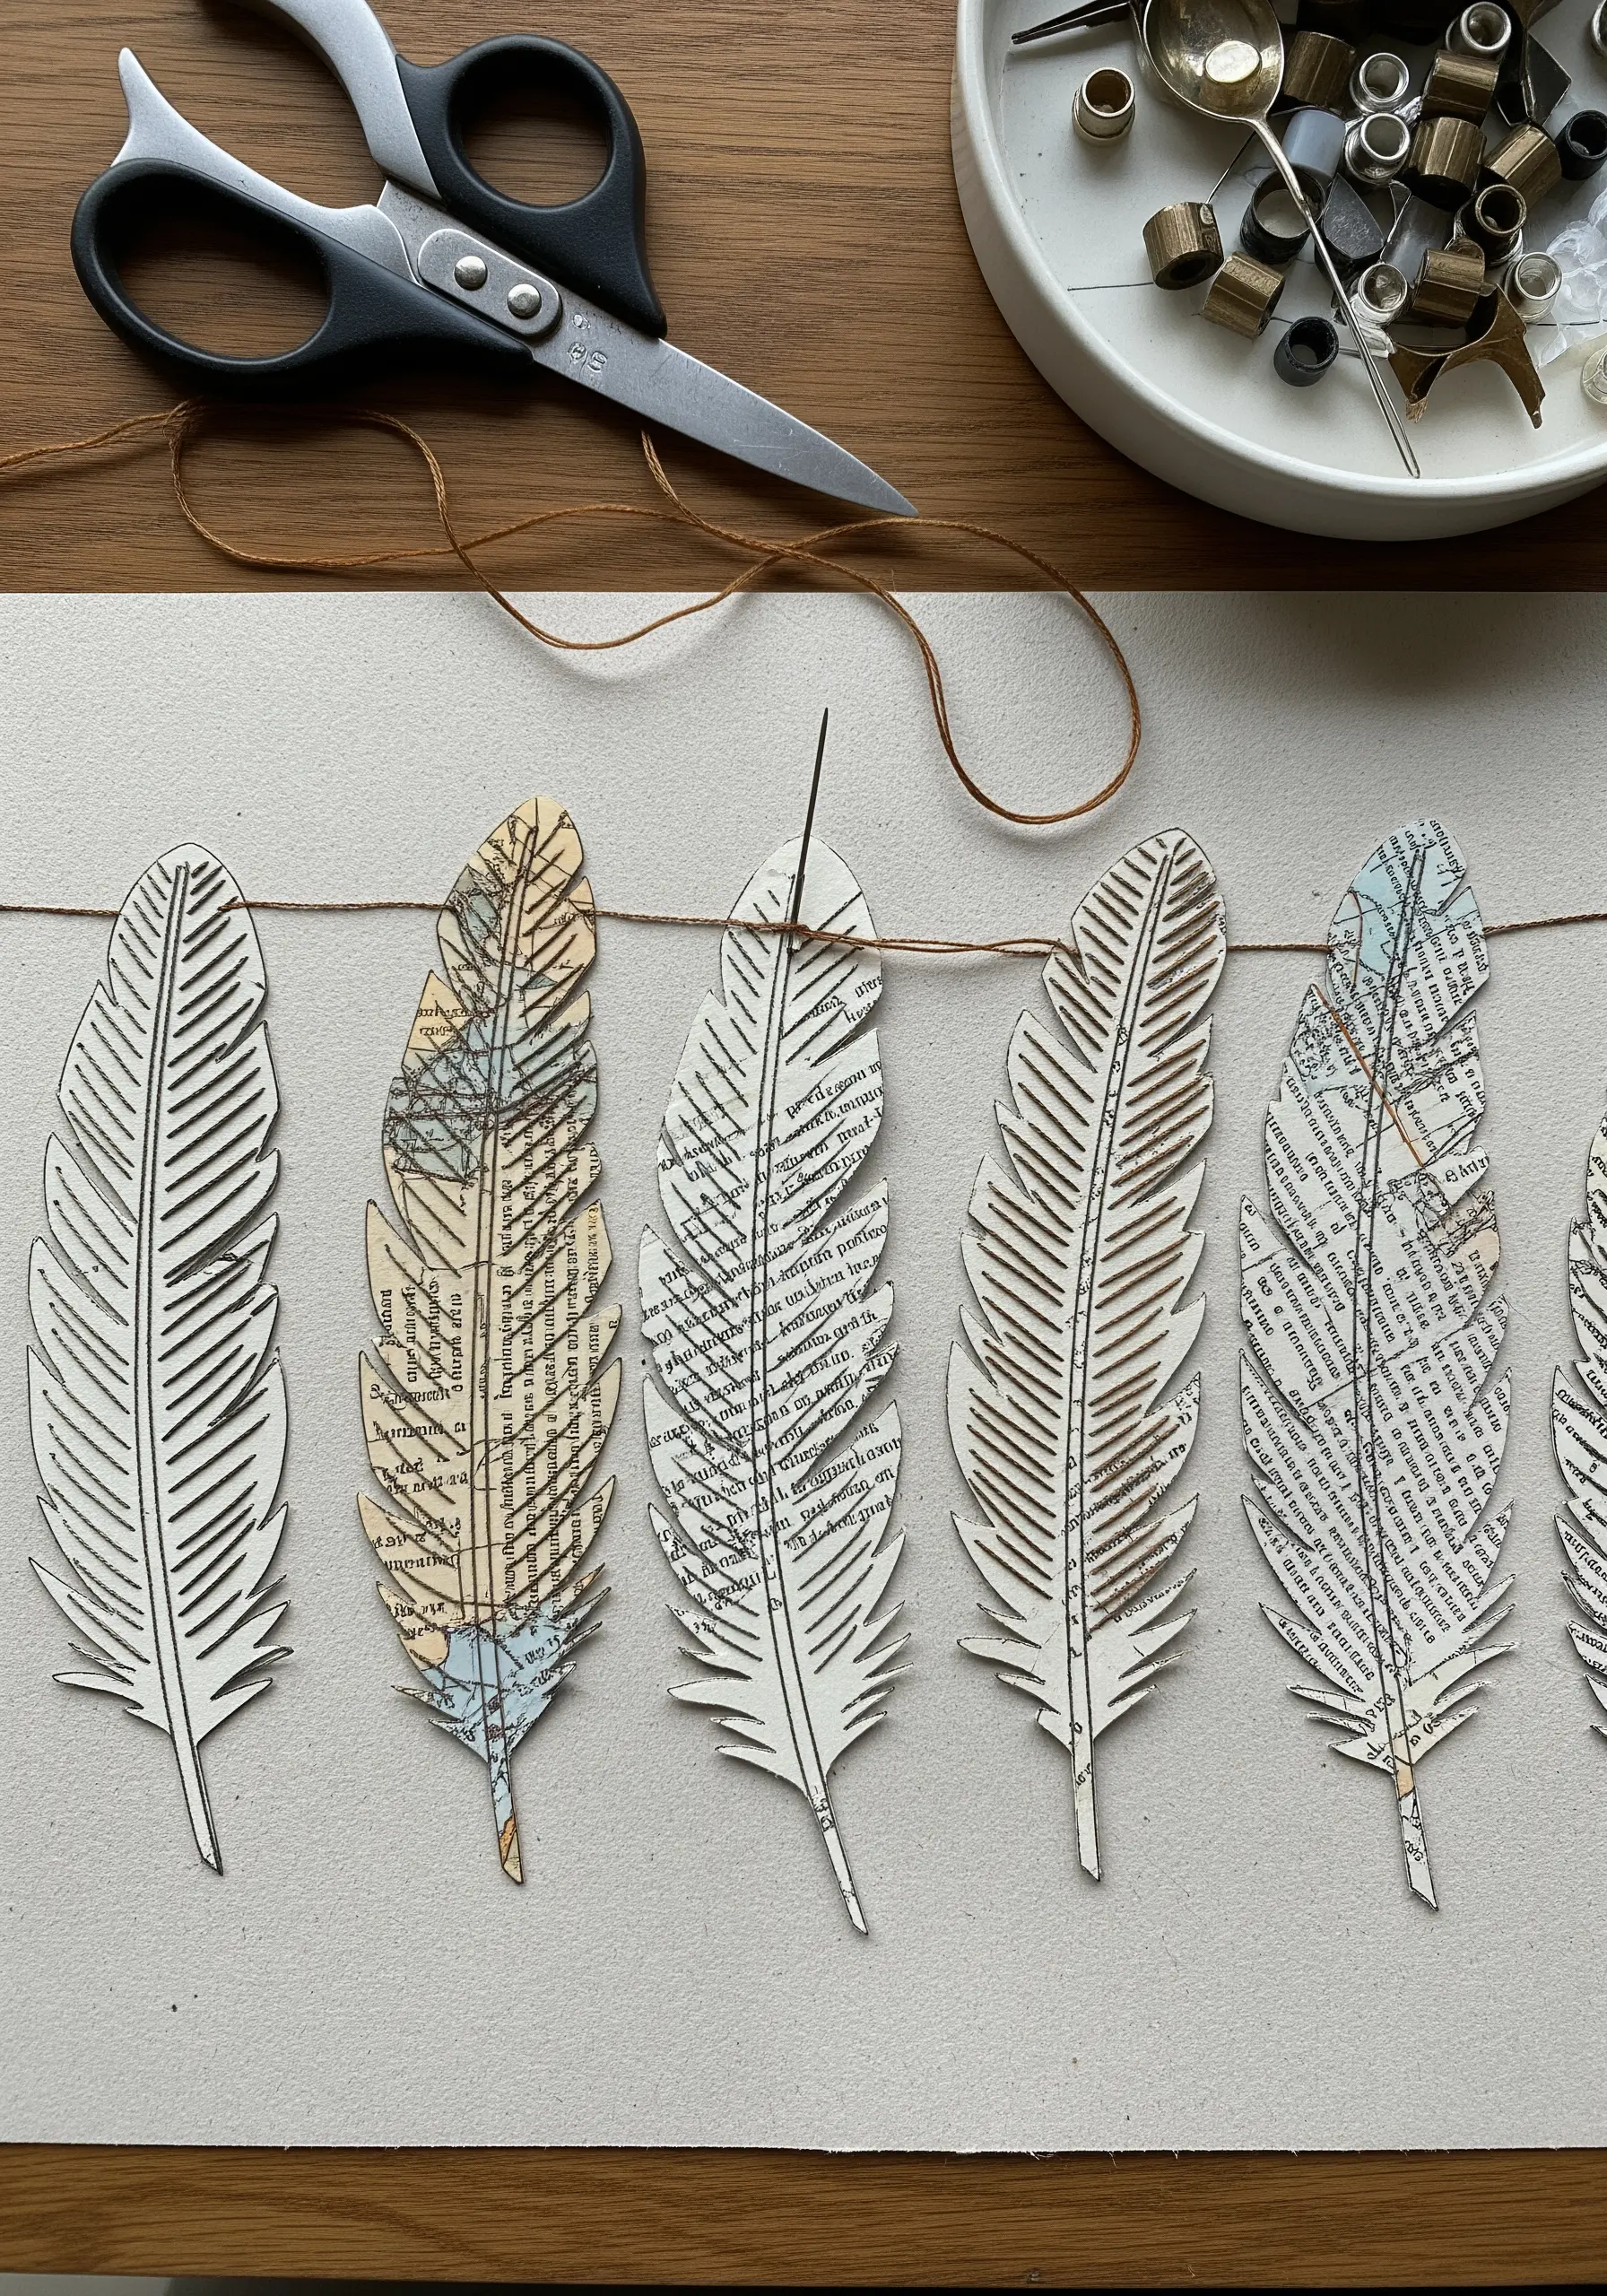
Elevate simple paper cutouts by adding fine, stitched details.
After cutting your feather shapes from various papers—such as old maps, book pages, or sheet music—use a single strand of thread to stitch the central quill and delicate barbs.
A simple backstitch is all you need to add texture and definition that an ink pen cannot replicate.
This technique turns flat paper into a more dynamic and tactile object, adding a layer of handcrafted artistry to party garlands, gift toppers, or wall decor.
8. Layering Thread Over Painted Abstract Canvases

Combine the fluid, spontaneous nature of paint with the controlled structure of thread.
Start by creating a background of abstract color blocks on heavy canvas or watercolor paper mounted in a hoop.
Once the paint is completely dry, use thread to create geometric overlays that contrast with the organic painted shapes below.
Thick, multi-strand floss or even fine yarn will create bold lines that command attention.
This mixed-media approach allows you to create striking abstract thread line art creations that explore the interplay between color, form, and texture.
9. Illuminating Paper Art with Backlit Threadwork
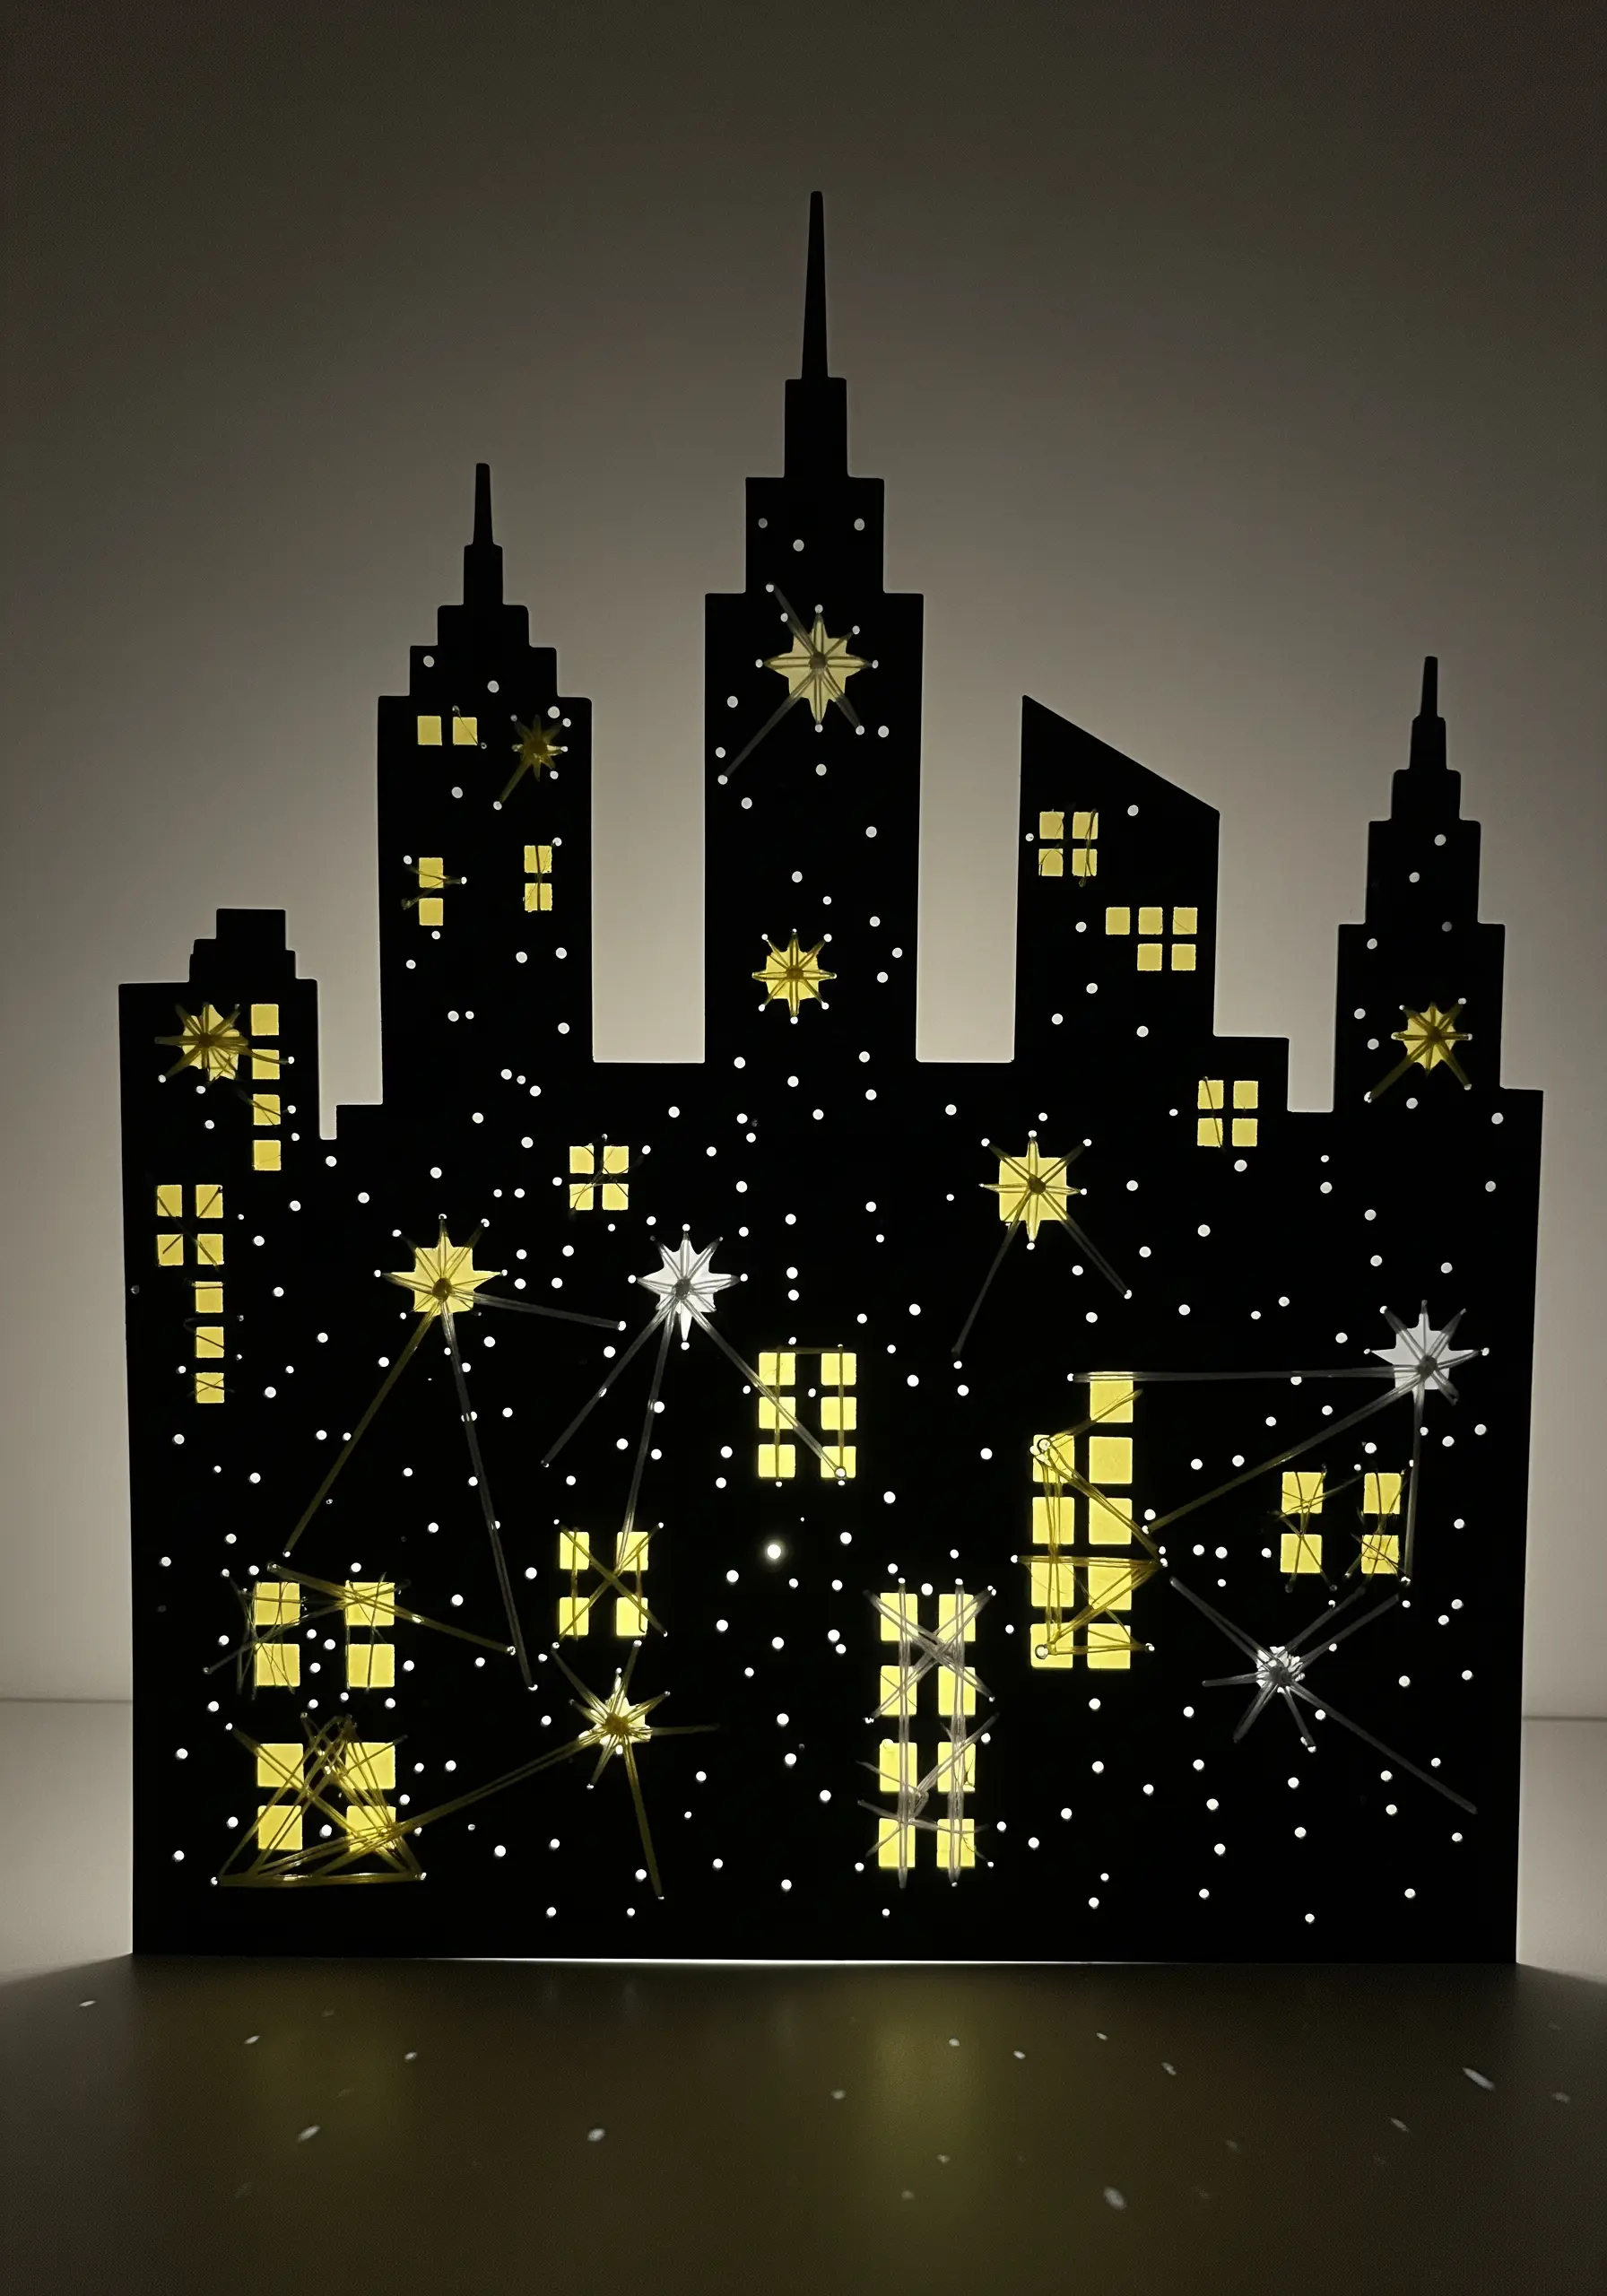
Create a magical cityscape by merging paper cutting with embroidery and light.
First, cut a skyline silhouette from heavy black cardstock.
Then, stitch star and constellation patterns directly onto the paper using a shimmering metallic or even a glow-in-the-dark thread.
Place a small string of LED fairy lights behind the finished artwork.
The light will shine through the pre-pierced holes and reflect off the thread, bringing the night sky to life in these modern thread landscape projects.
10. Adding Minimalist Stitches to Handmade Paper
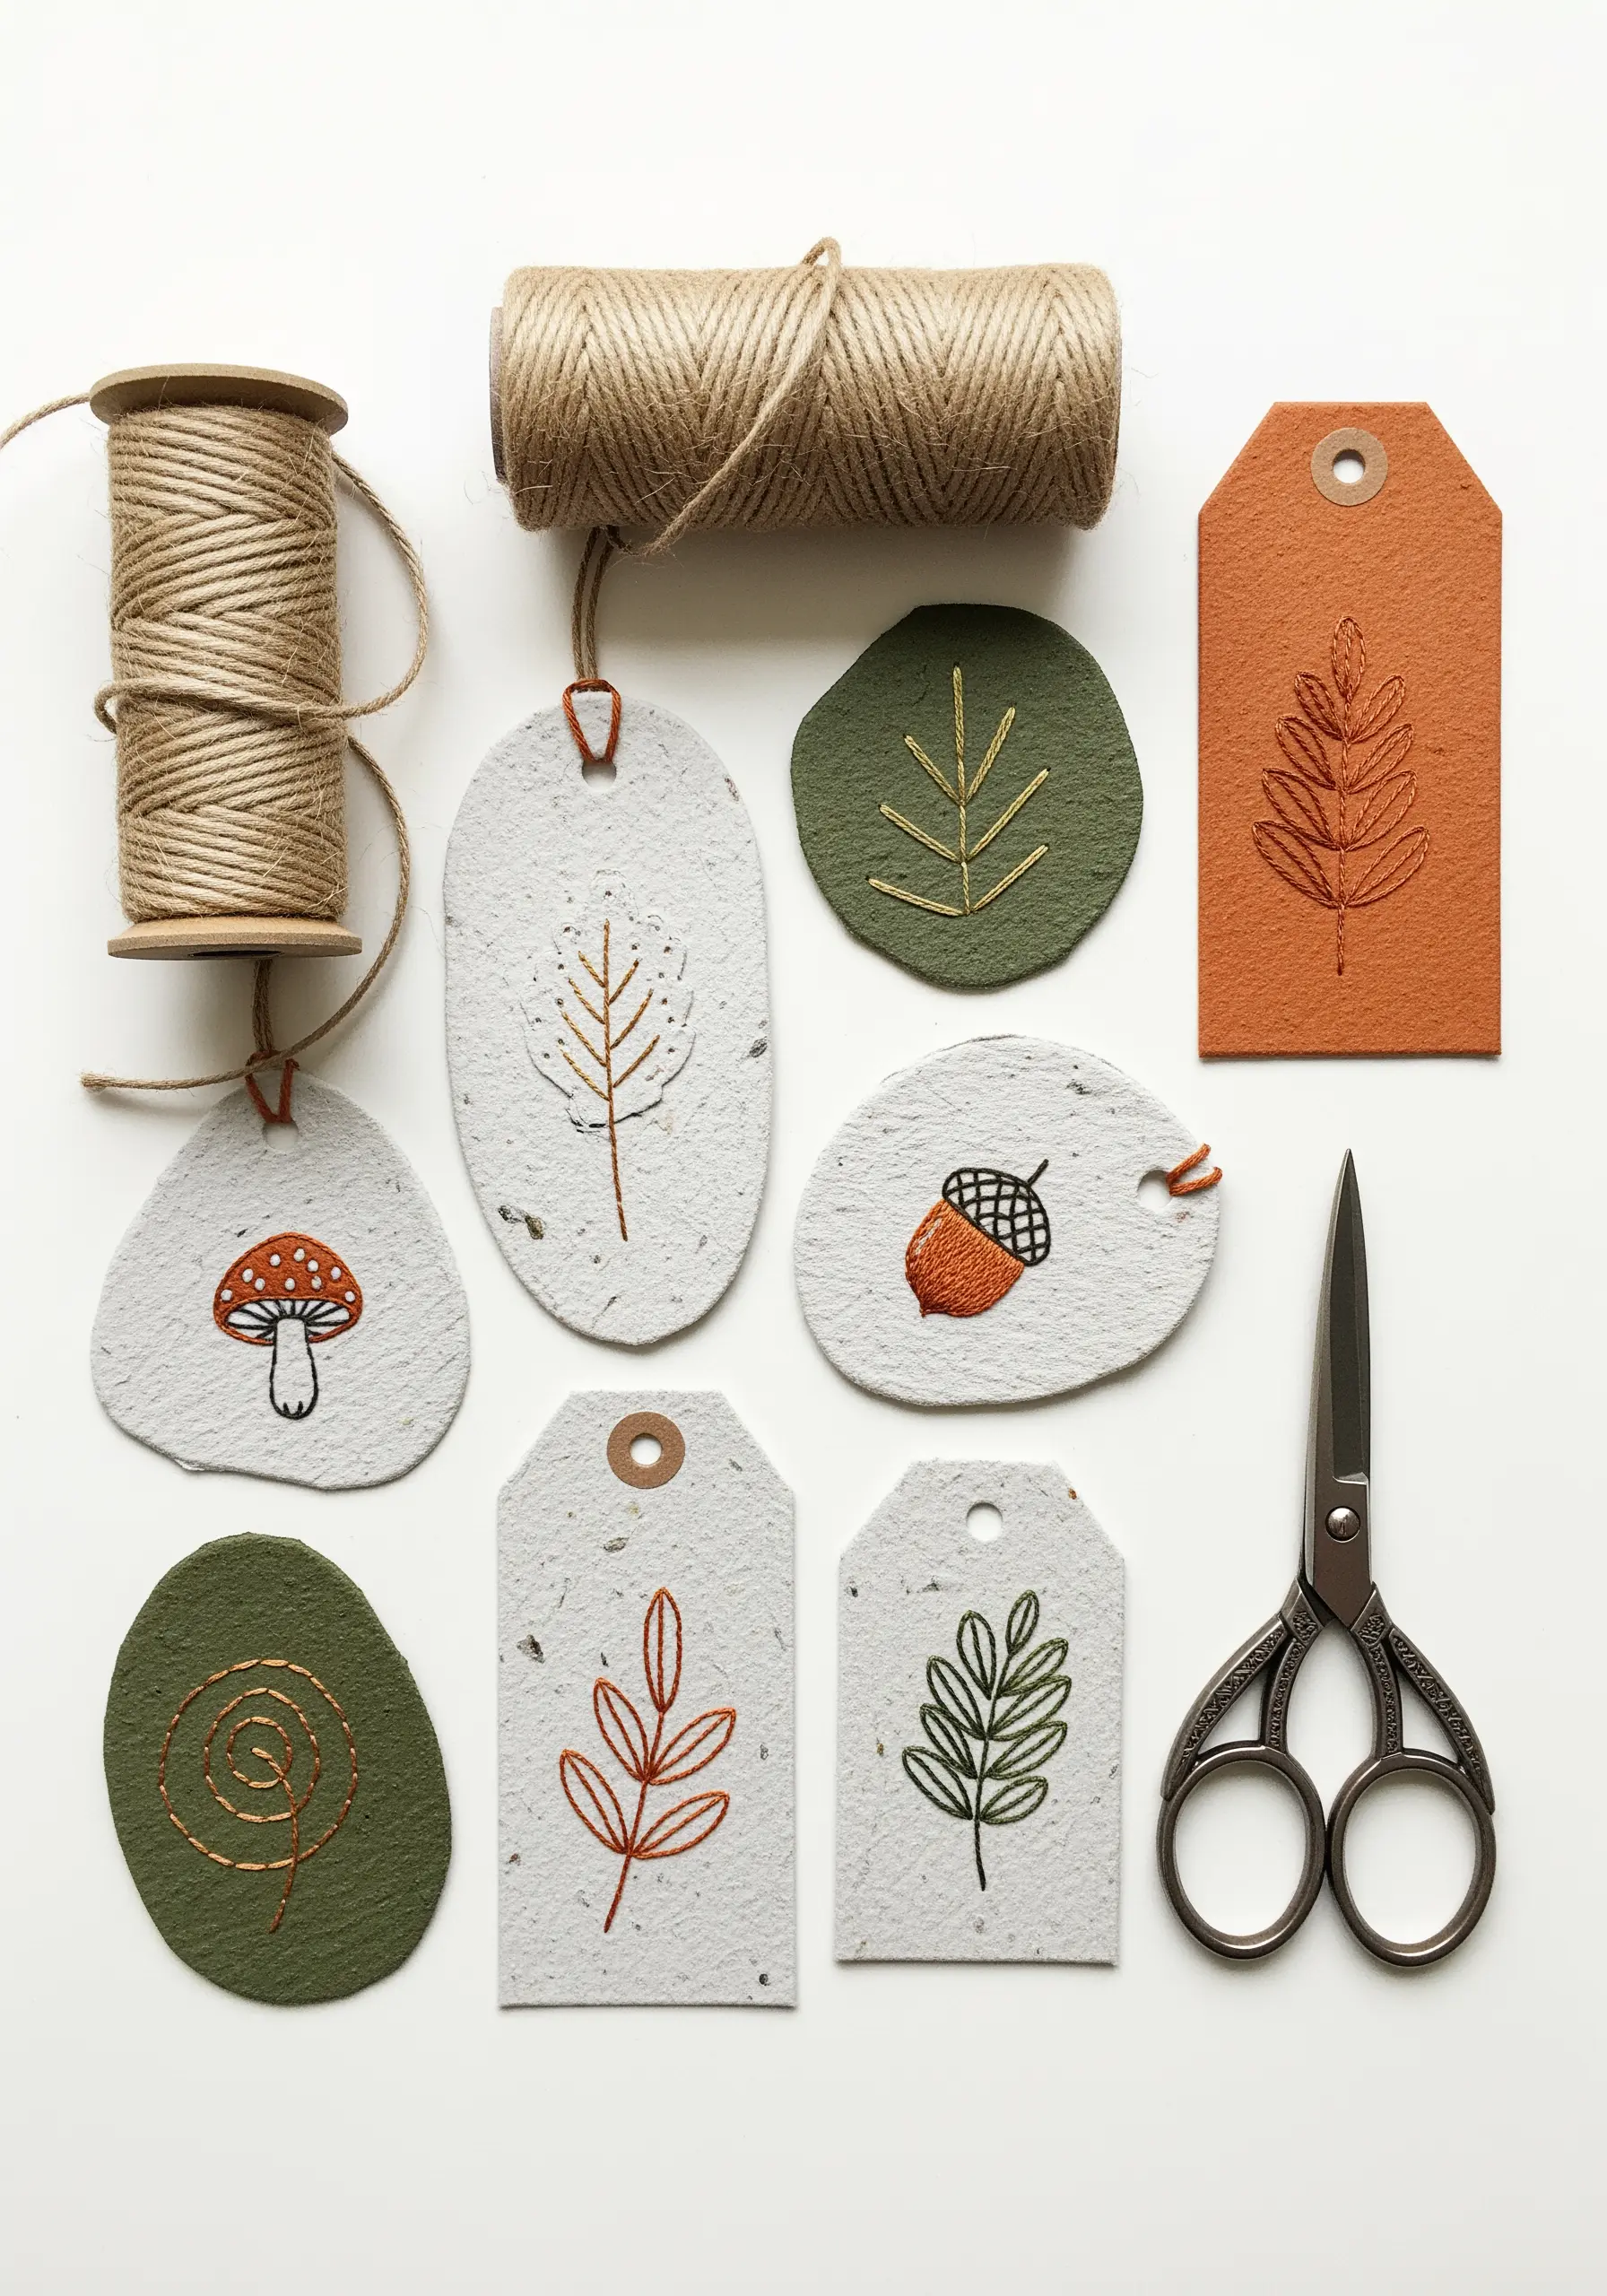
The rustic, fibrous texture of handmade paper provides the perfect backdrop for simple, elegant embroidery.
Choose minimalist motifs that won’t overwhelm the material, such as a single leaf, an acorn, or a simple spiral.
Use a backstitch or stem stitch with just two or three strands of floss.
The key here is subtlety; you want the stitch to complement the paper’s inherent beauty, not compete with it.
This thoughtful approach turns functional items like gift tags into small, treasured works of art and makes for beautiful, minimal embroidery projects that double as thoughtful gifts.
11. Integrating Stitches into Woven Paper Textures
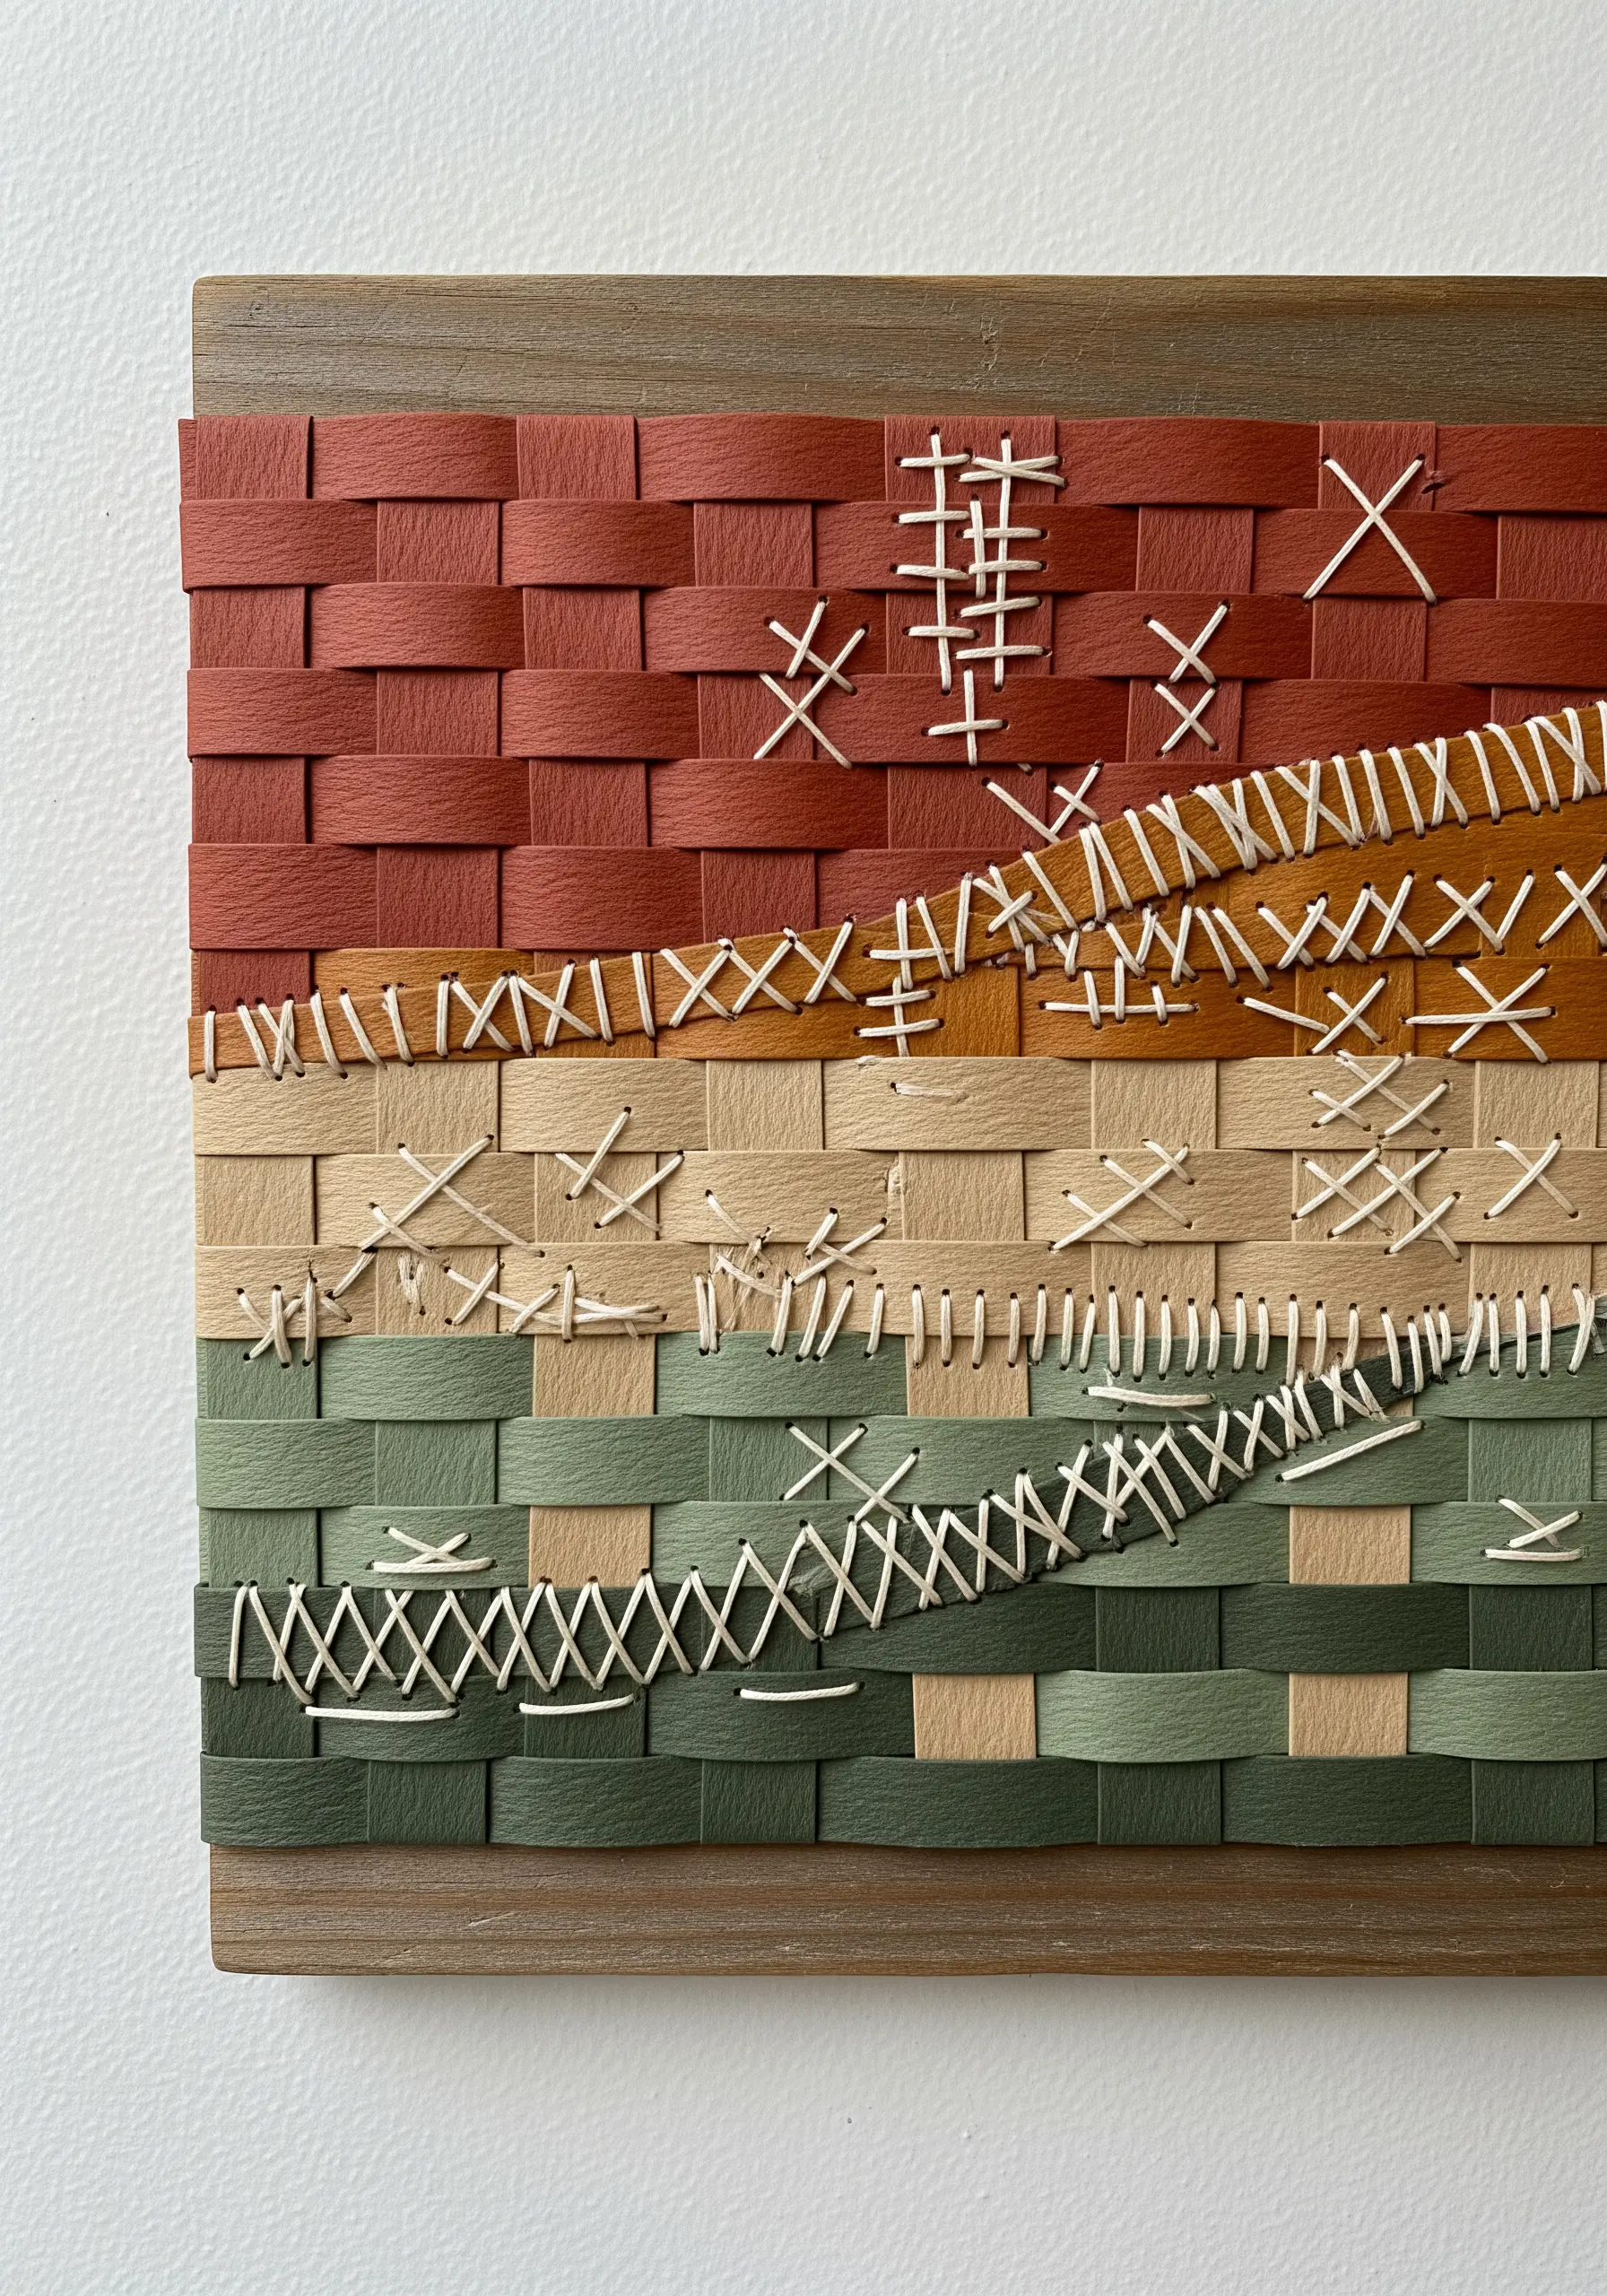
Begin by weaving strips of colored cardstock to create a textured, grid-like canvas for your embroidery.
Then, use this unique surface for expressive, freeform stitching.
Instead of following a rigid pattern, use your stitches to respond to the woven structure—add clusters of seed stitches in the squares, run lines of cross-stitches along the intersections, or add bold whipped running stitches.
Use a thick, contrasting thread like white perle cotton to make your marks stand out against the colored paper and celebrate the intersection of these two crafts.
12. Outlining Iridescent Film with Delicate Stitches
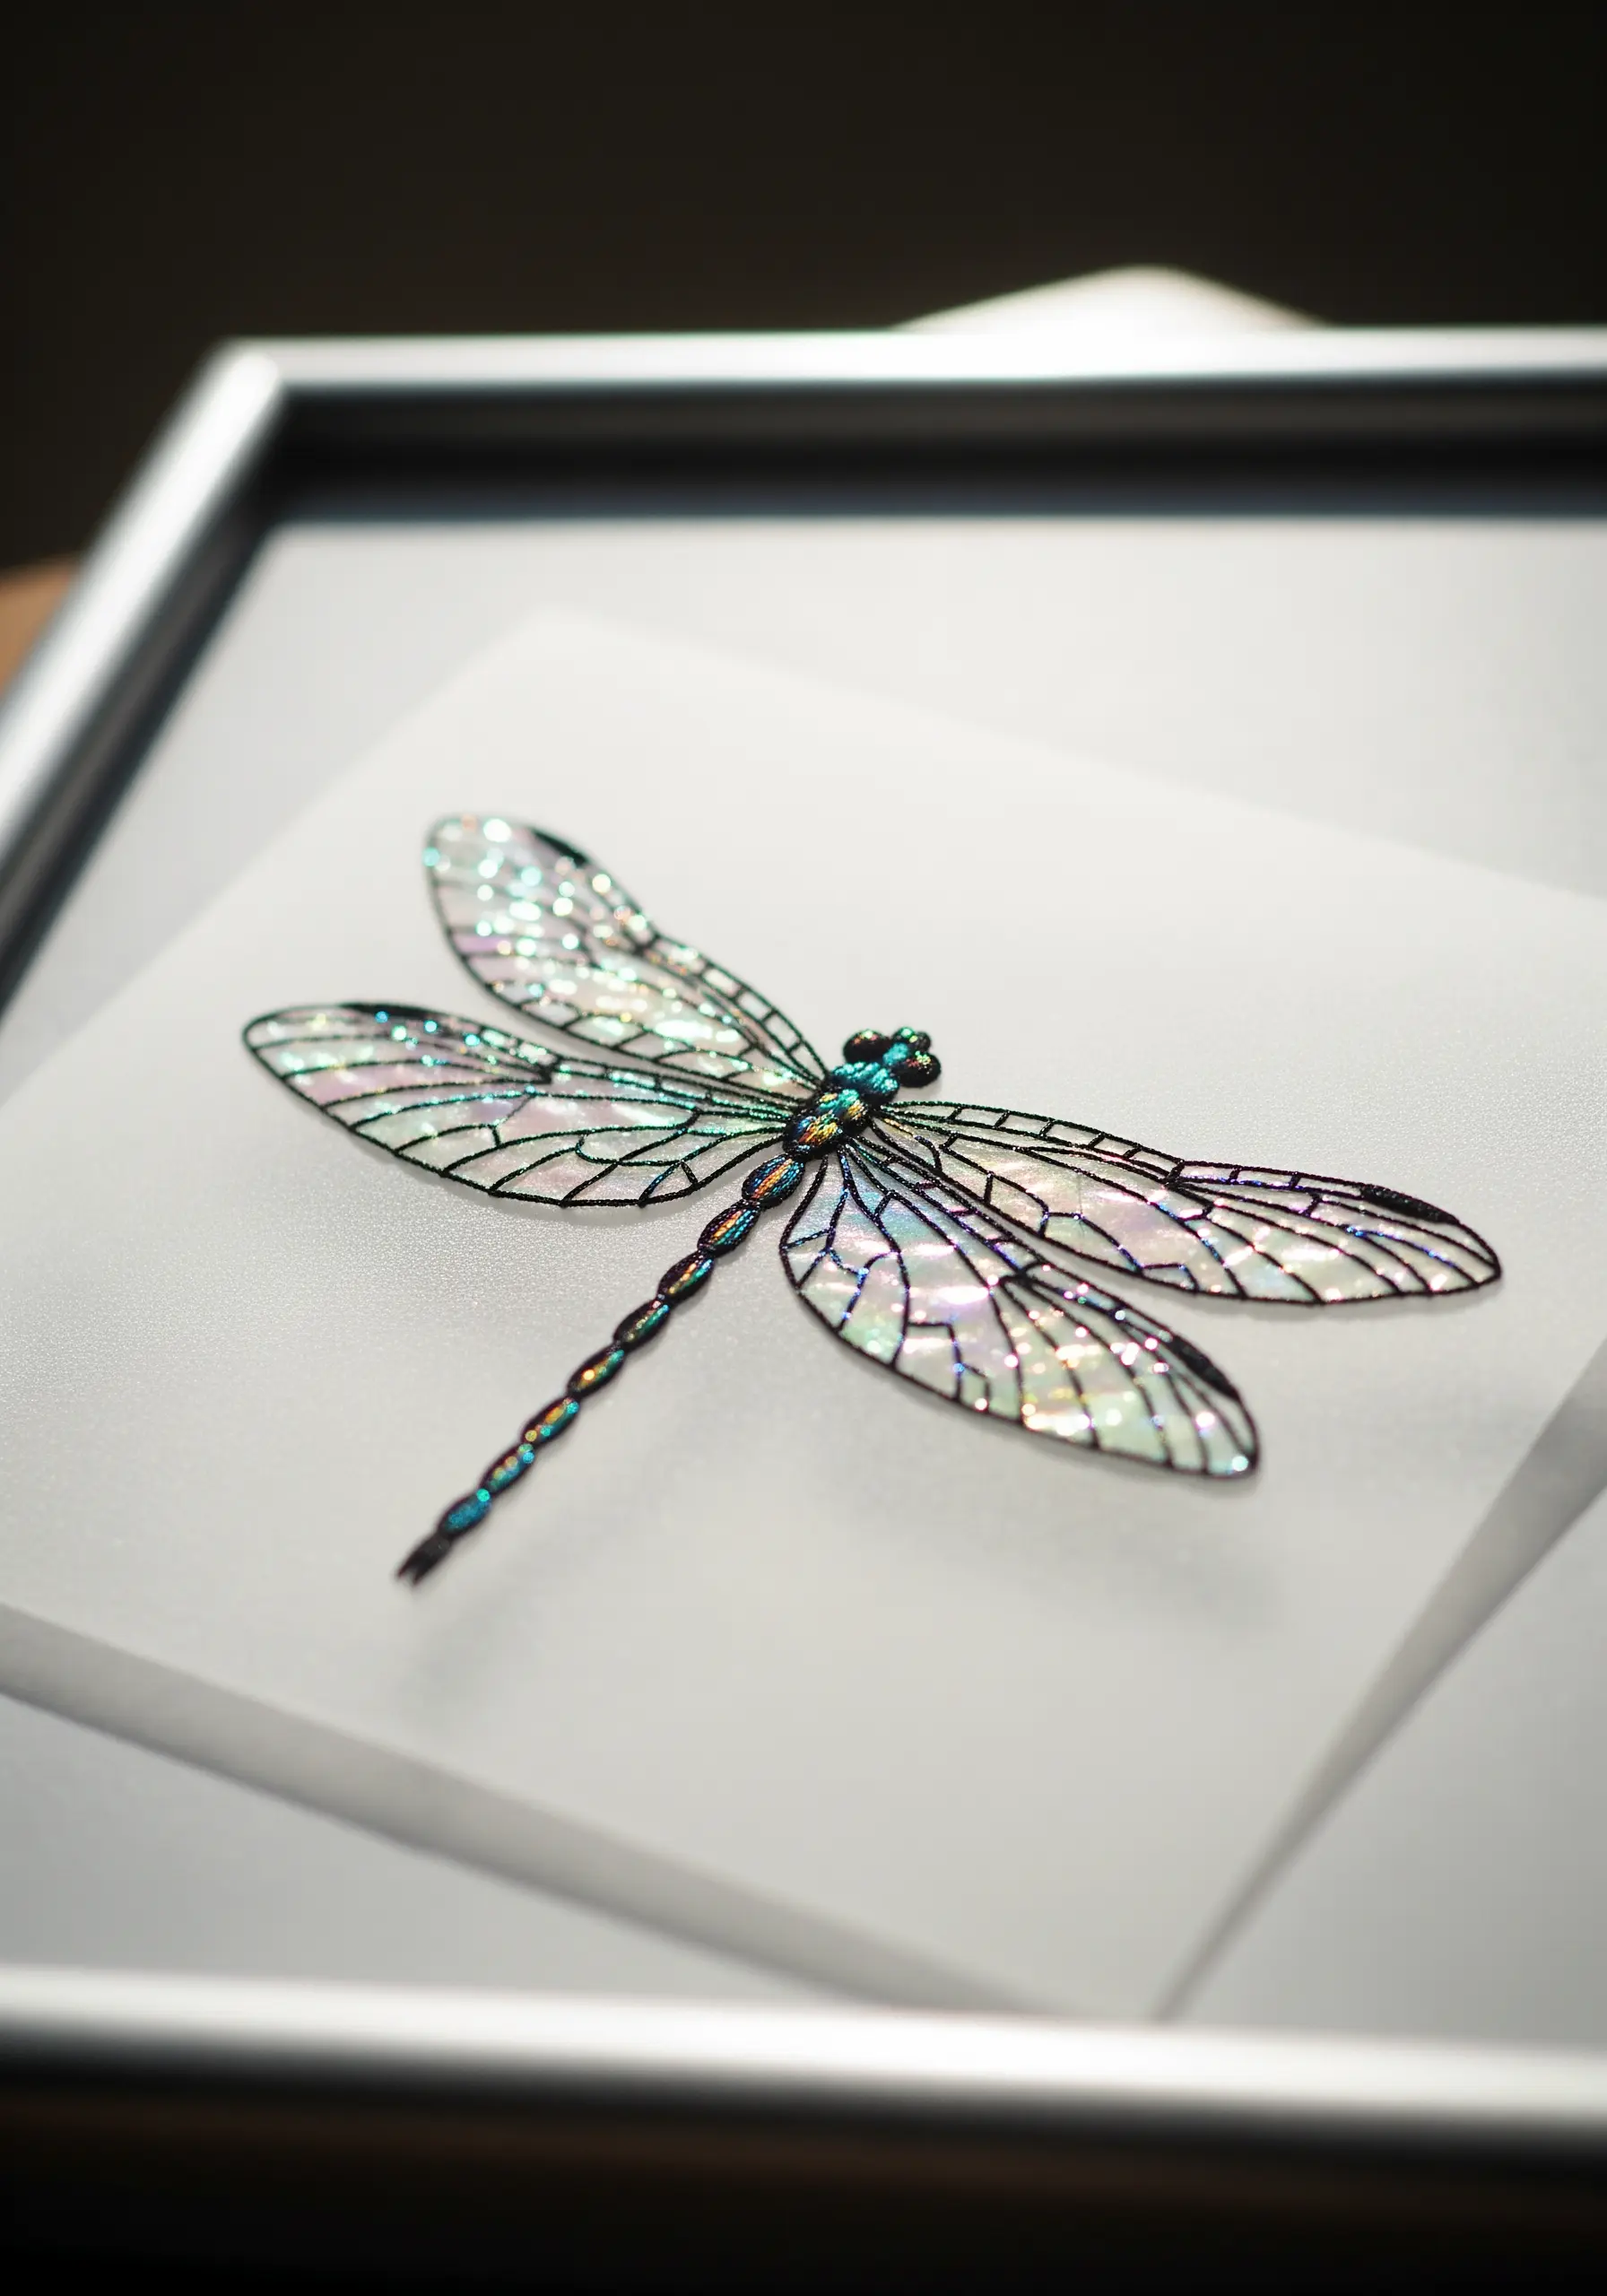
Create ethereal insect wings by layering iridescent film over a sturdy paper base.
Carefully cut your wing shapes and secure them to heavy cardstock with a clear, acid-free adhesive.
Then, use a fine, dark thread and a delicate backstitch to outline the entire dragonfly and add the intricate veins in the wings.
The thread provides essential structure and definition, containing the wild shimmer of the film and making the entire piece feel more grounded and polished.
This combination creates stunning 3D embroidery wall art pieces that seem to change with the light.
13. Mimicking Quilt Blocks with Paper Collage
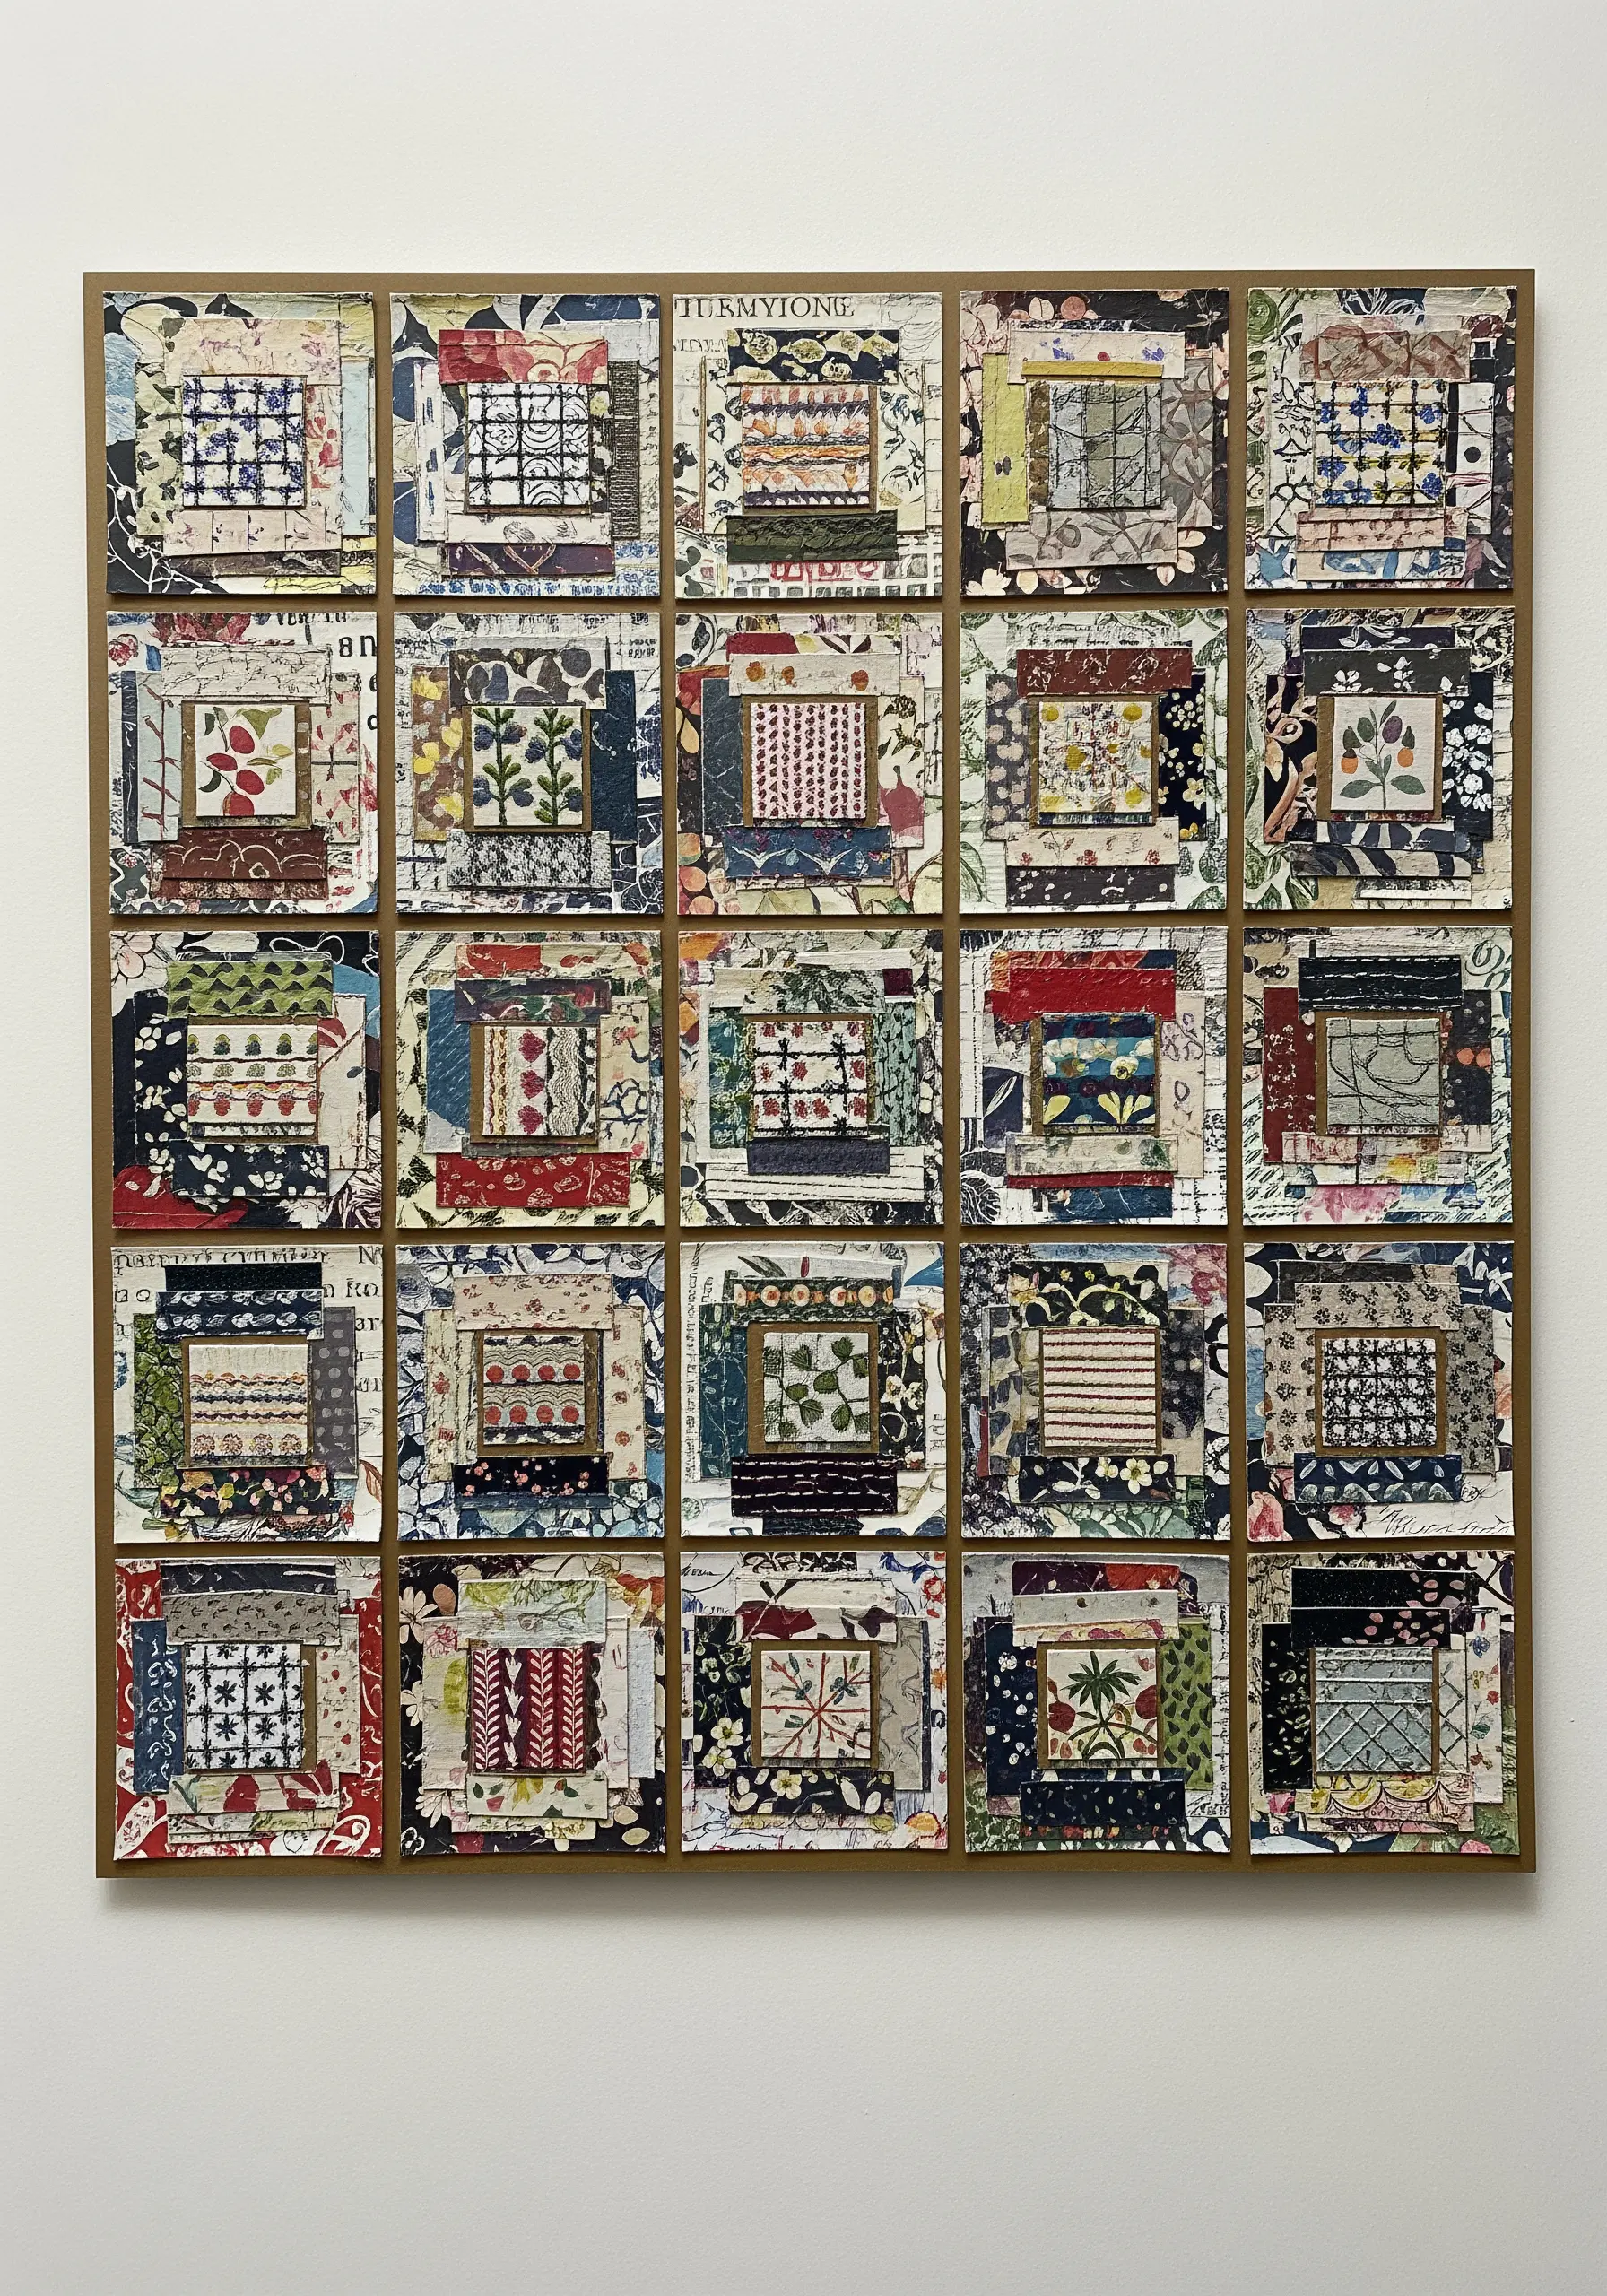
Recreate the timeless charm of a traditional log cabin quilt using intricately patterned paper instead of fabric.
Cut strips of decorative paper and arrange them in squares to mimic classic quilt blocks, playing with color and pattern to create a cohesive design.
You can introduce stitch-like marks with a fine-tipped pen, or use actual stitches to add authentic texture and depth.
This project beautifully blends quilting concepts with paper craft, resulting in complex, creative collage projects that turn scrap paper into embroidery-inspired masterpieces.
14. Crafting Perforated Paper Lanterns
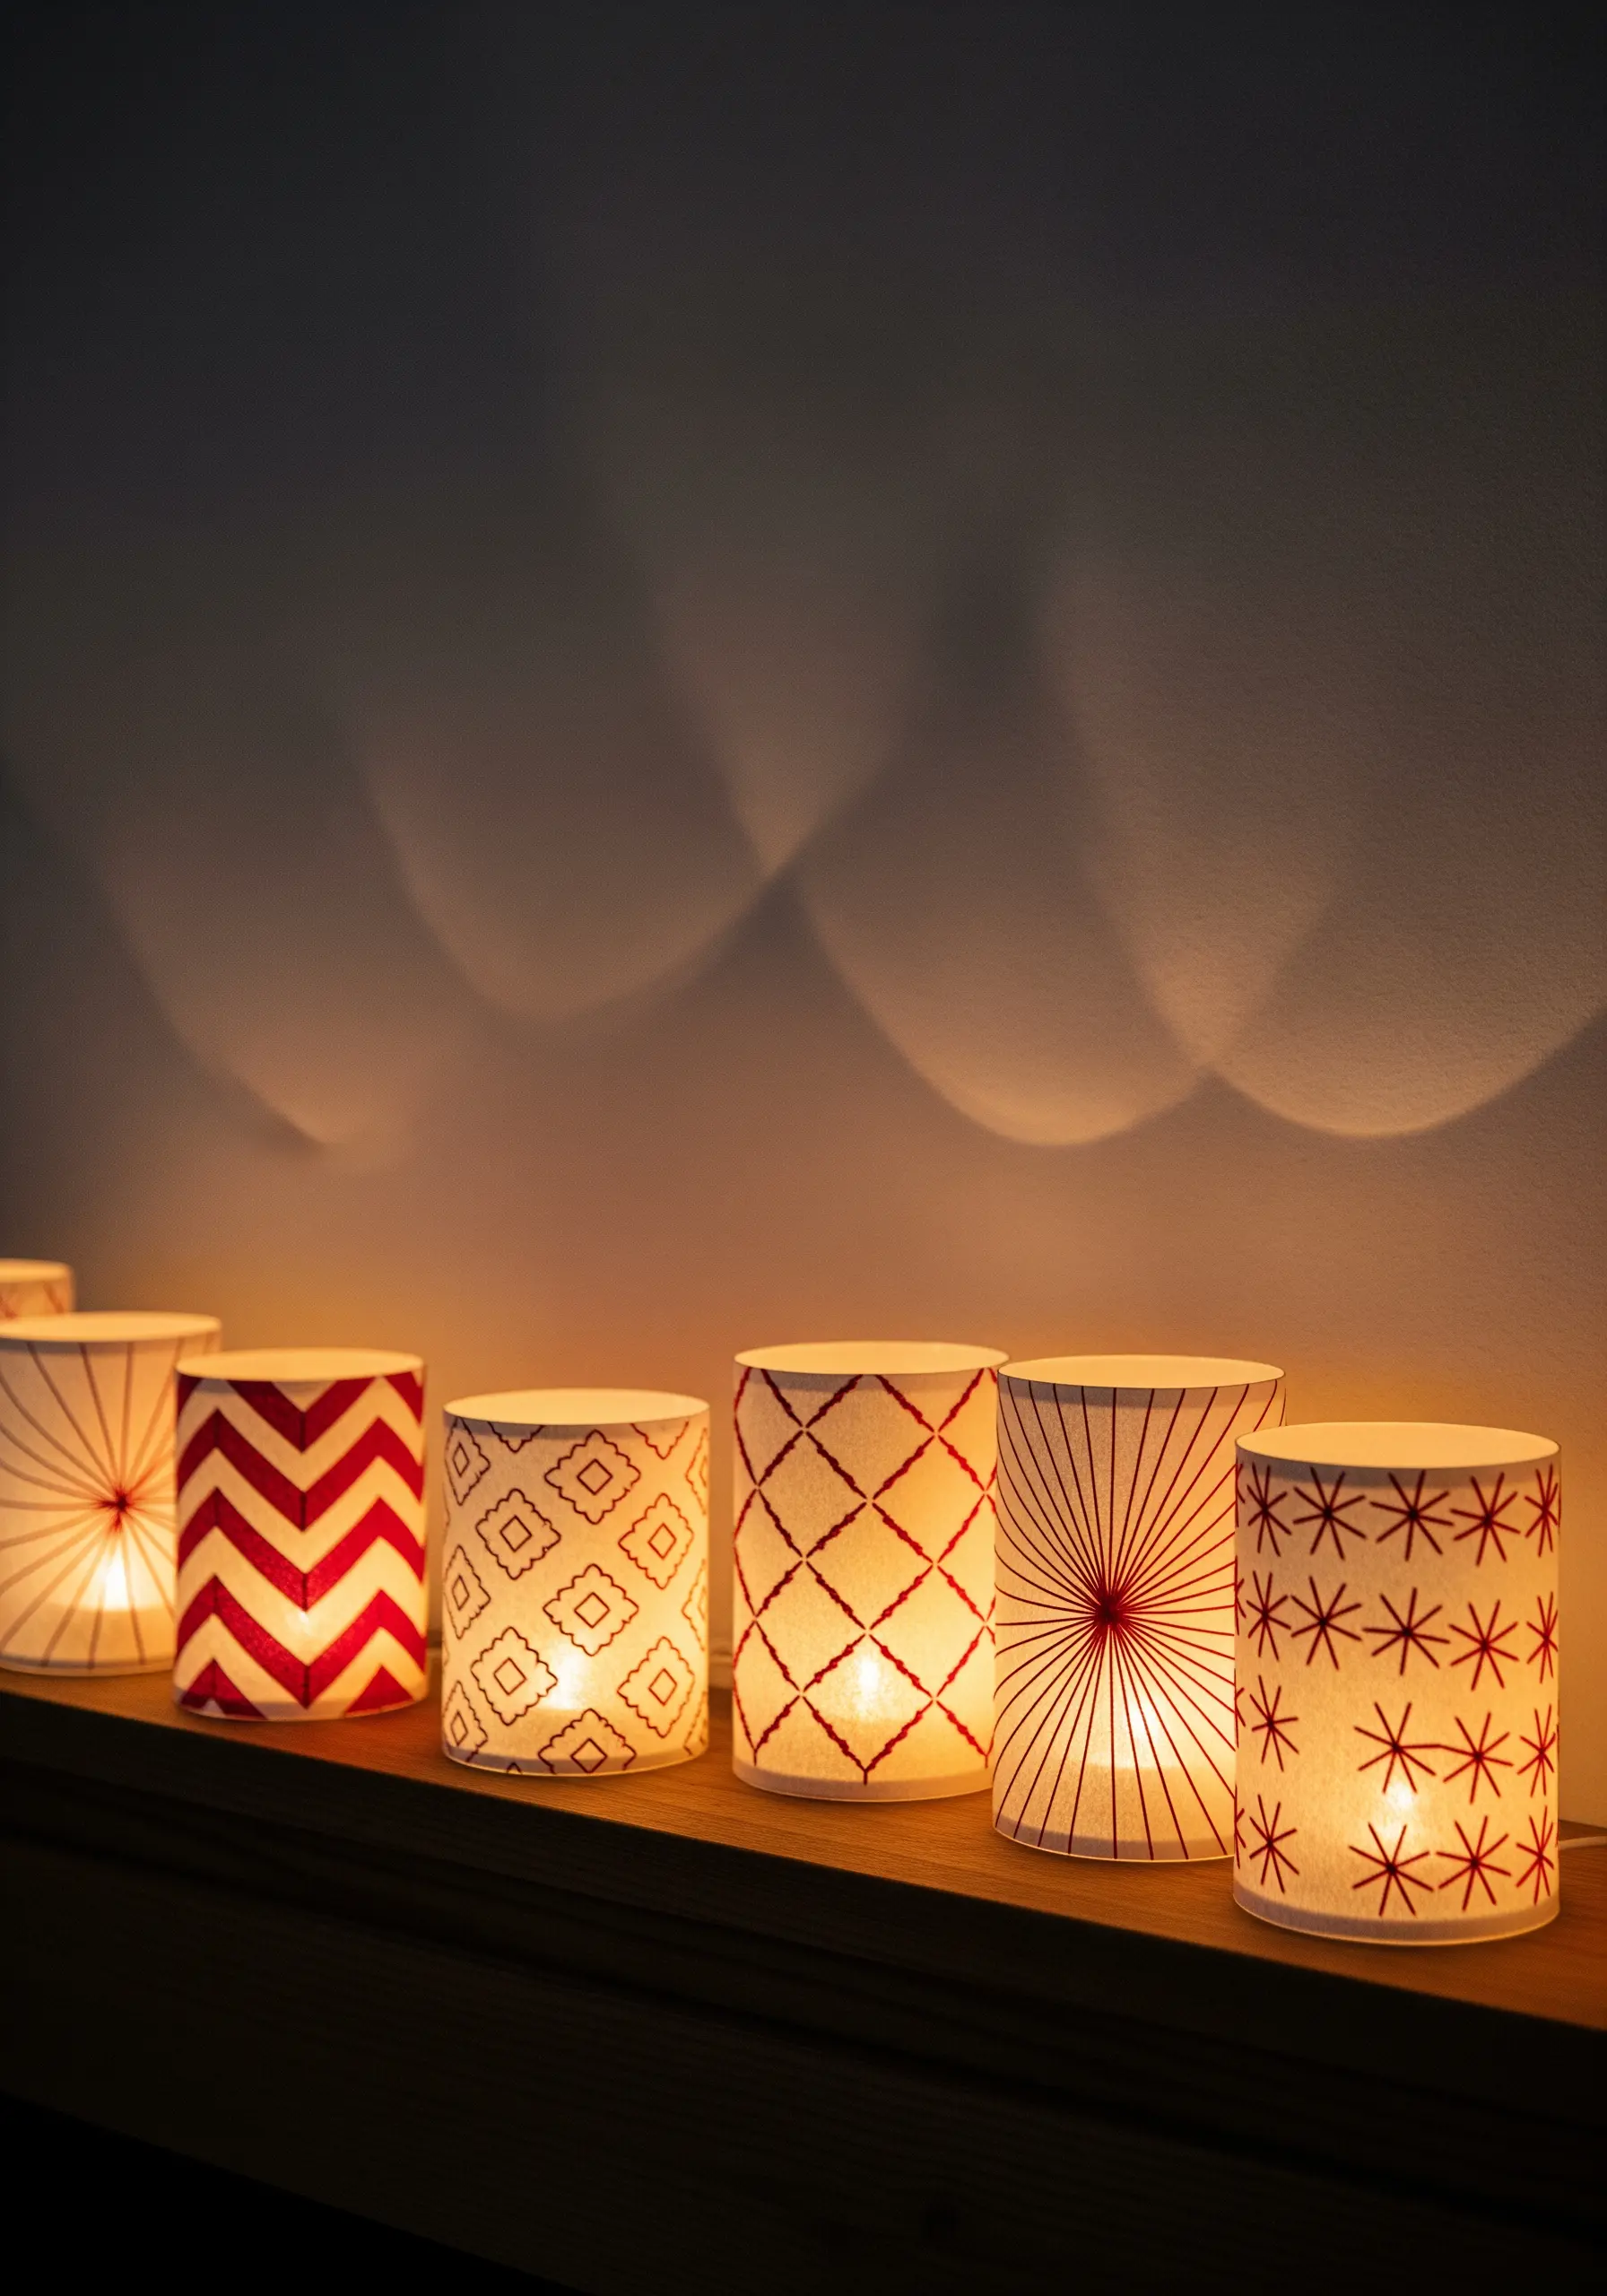
Use stitching not for color, but to create perforated designs on vellum or other translucent papers.
Once your pattern is stitched, roll the paper into a cylinder and place it over a battery-operated LED candle.
The light will shine through the tiny holes your needle made, projecting your stitched pattern into the room.
Simple geometric motifs—chevrons, sunbursts, or grids—are incredibly effective.
Use a bold, contrasting thread color so the design is just as beautiful when unlit.
15. Sculpting Waves with Paper and Thick Fiber
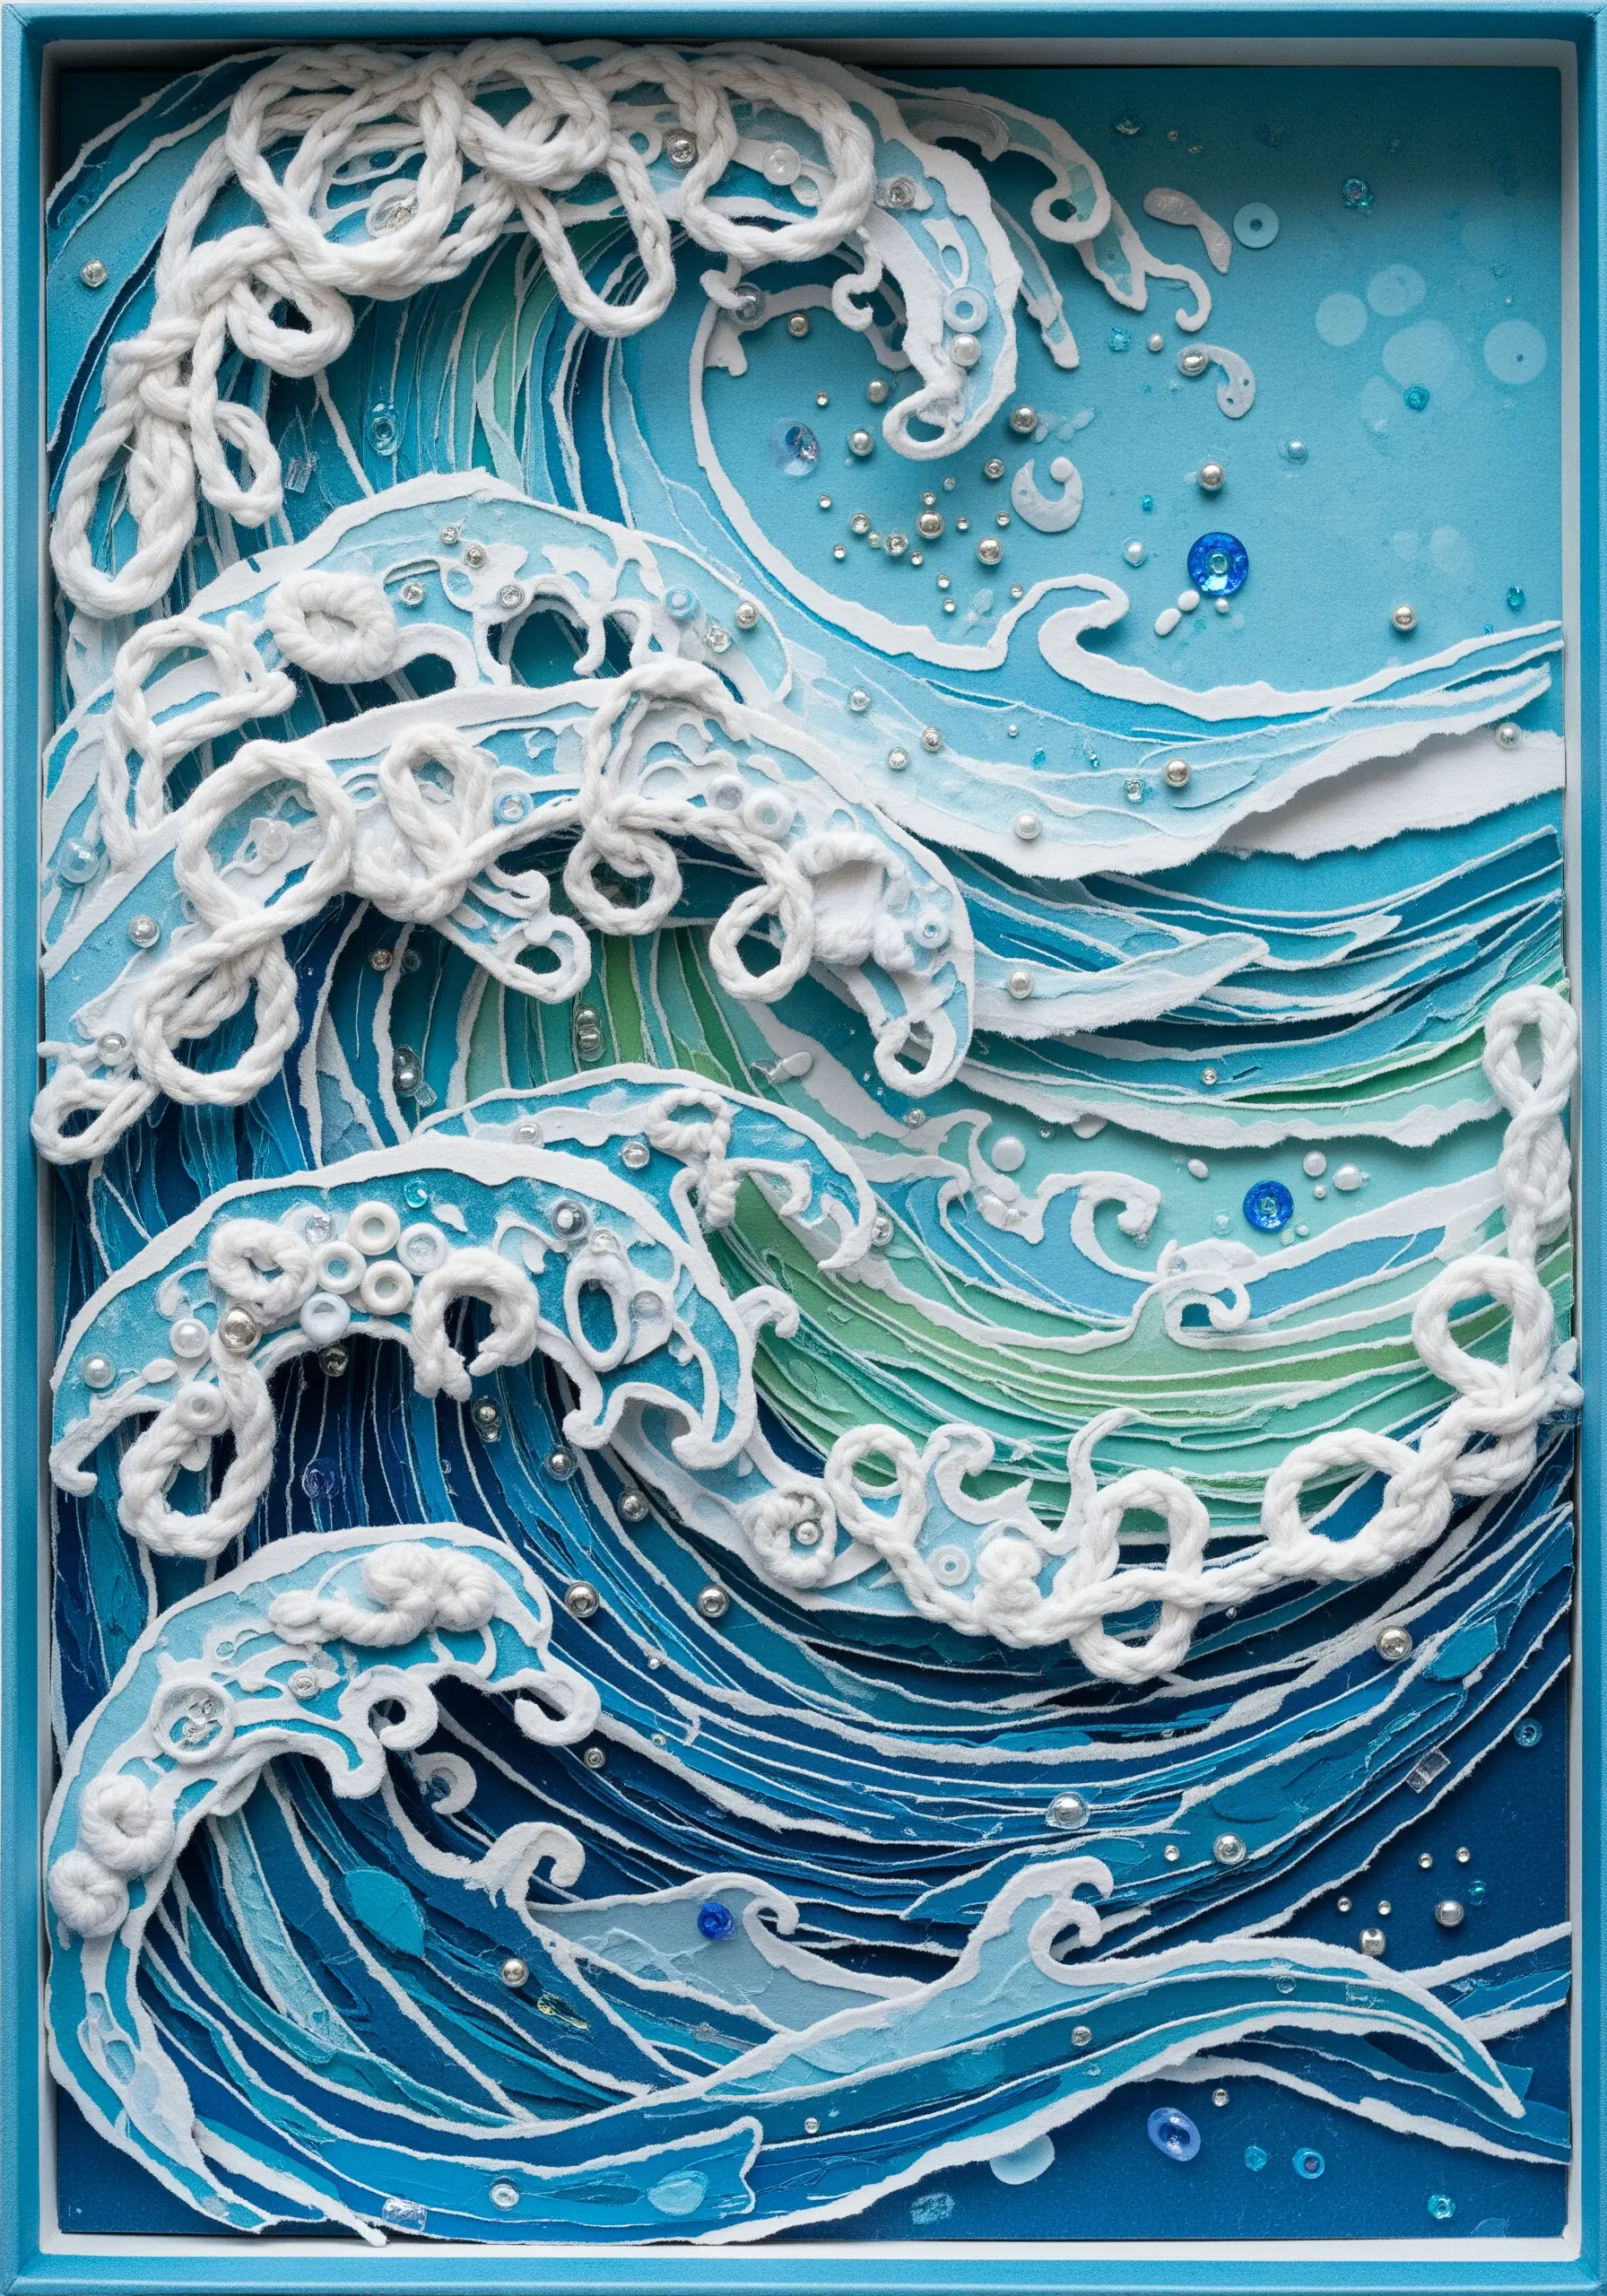
Build a dynamic ocean scene by layering cut and torn paper in various shades of blue, teal, and green.
To create the seafoam, use a thick, soft fiber like yarn, wool roving, or even chunky macrame cord.
Couch this fiber onto the paper surface with a matching, finer thread, creating swirling, organic lines that mimic crashing waves.
This technique gives the wave crests a tangible, frothy texture that contrasts beautifully with the flat paper beneath, resulting in incredible mixed-fiber creations combining yarn, thread, and unexpected materials.
16. Juxtaposing Science and Art on Found Paper
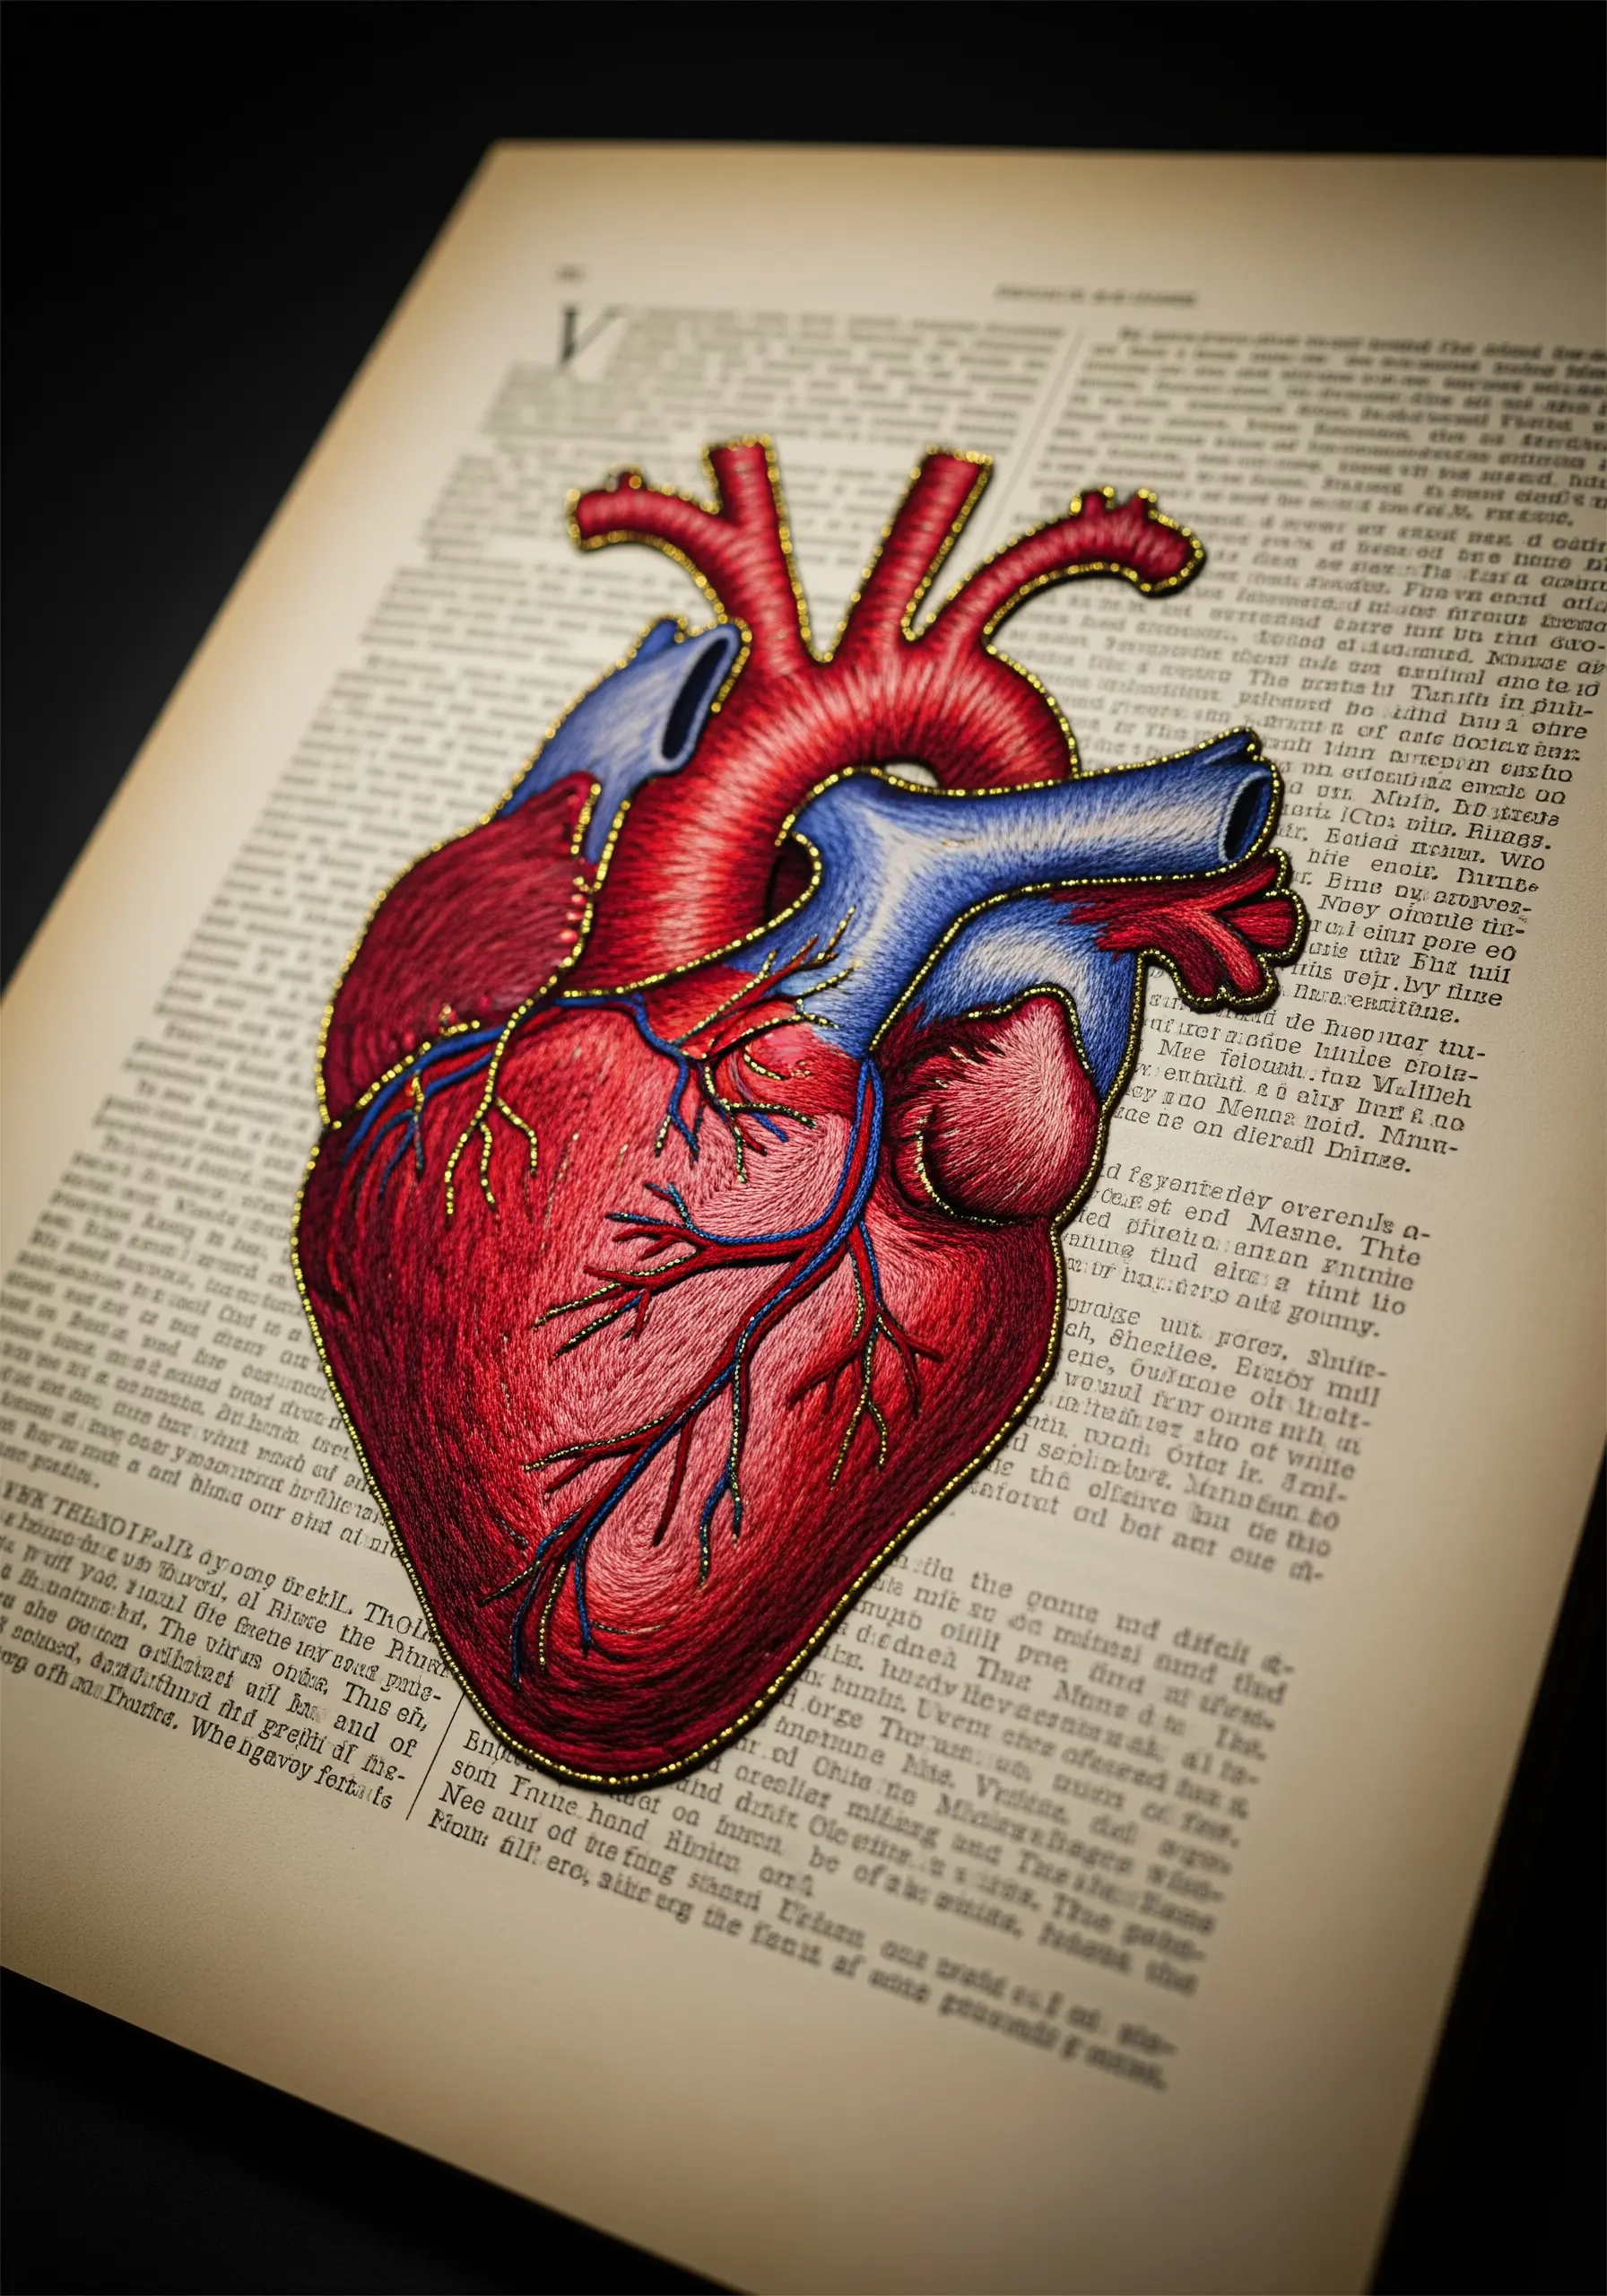
Stitching onto a found surface like a vintage book page adds an immediate layer of history and context to your work.
Choose a page with text that enhances or contrasts with your chosen subject in a meaningful way.
For a detailed design like an anatomical heart, use thread painting techniques—primarily long-and-short stitch—to blend colors and create realistic shading.
Outlining the design with a single strand of metallic gold thread adds a touch of light and elevates the piece from a simple study to a true work of art.
17. Creating a Paper Appliqué Garden
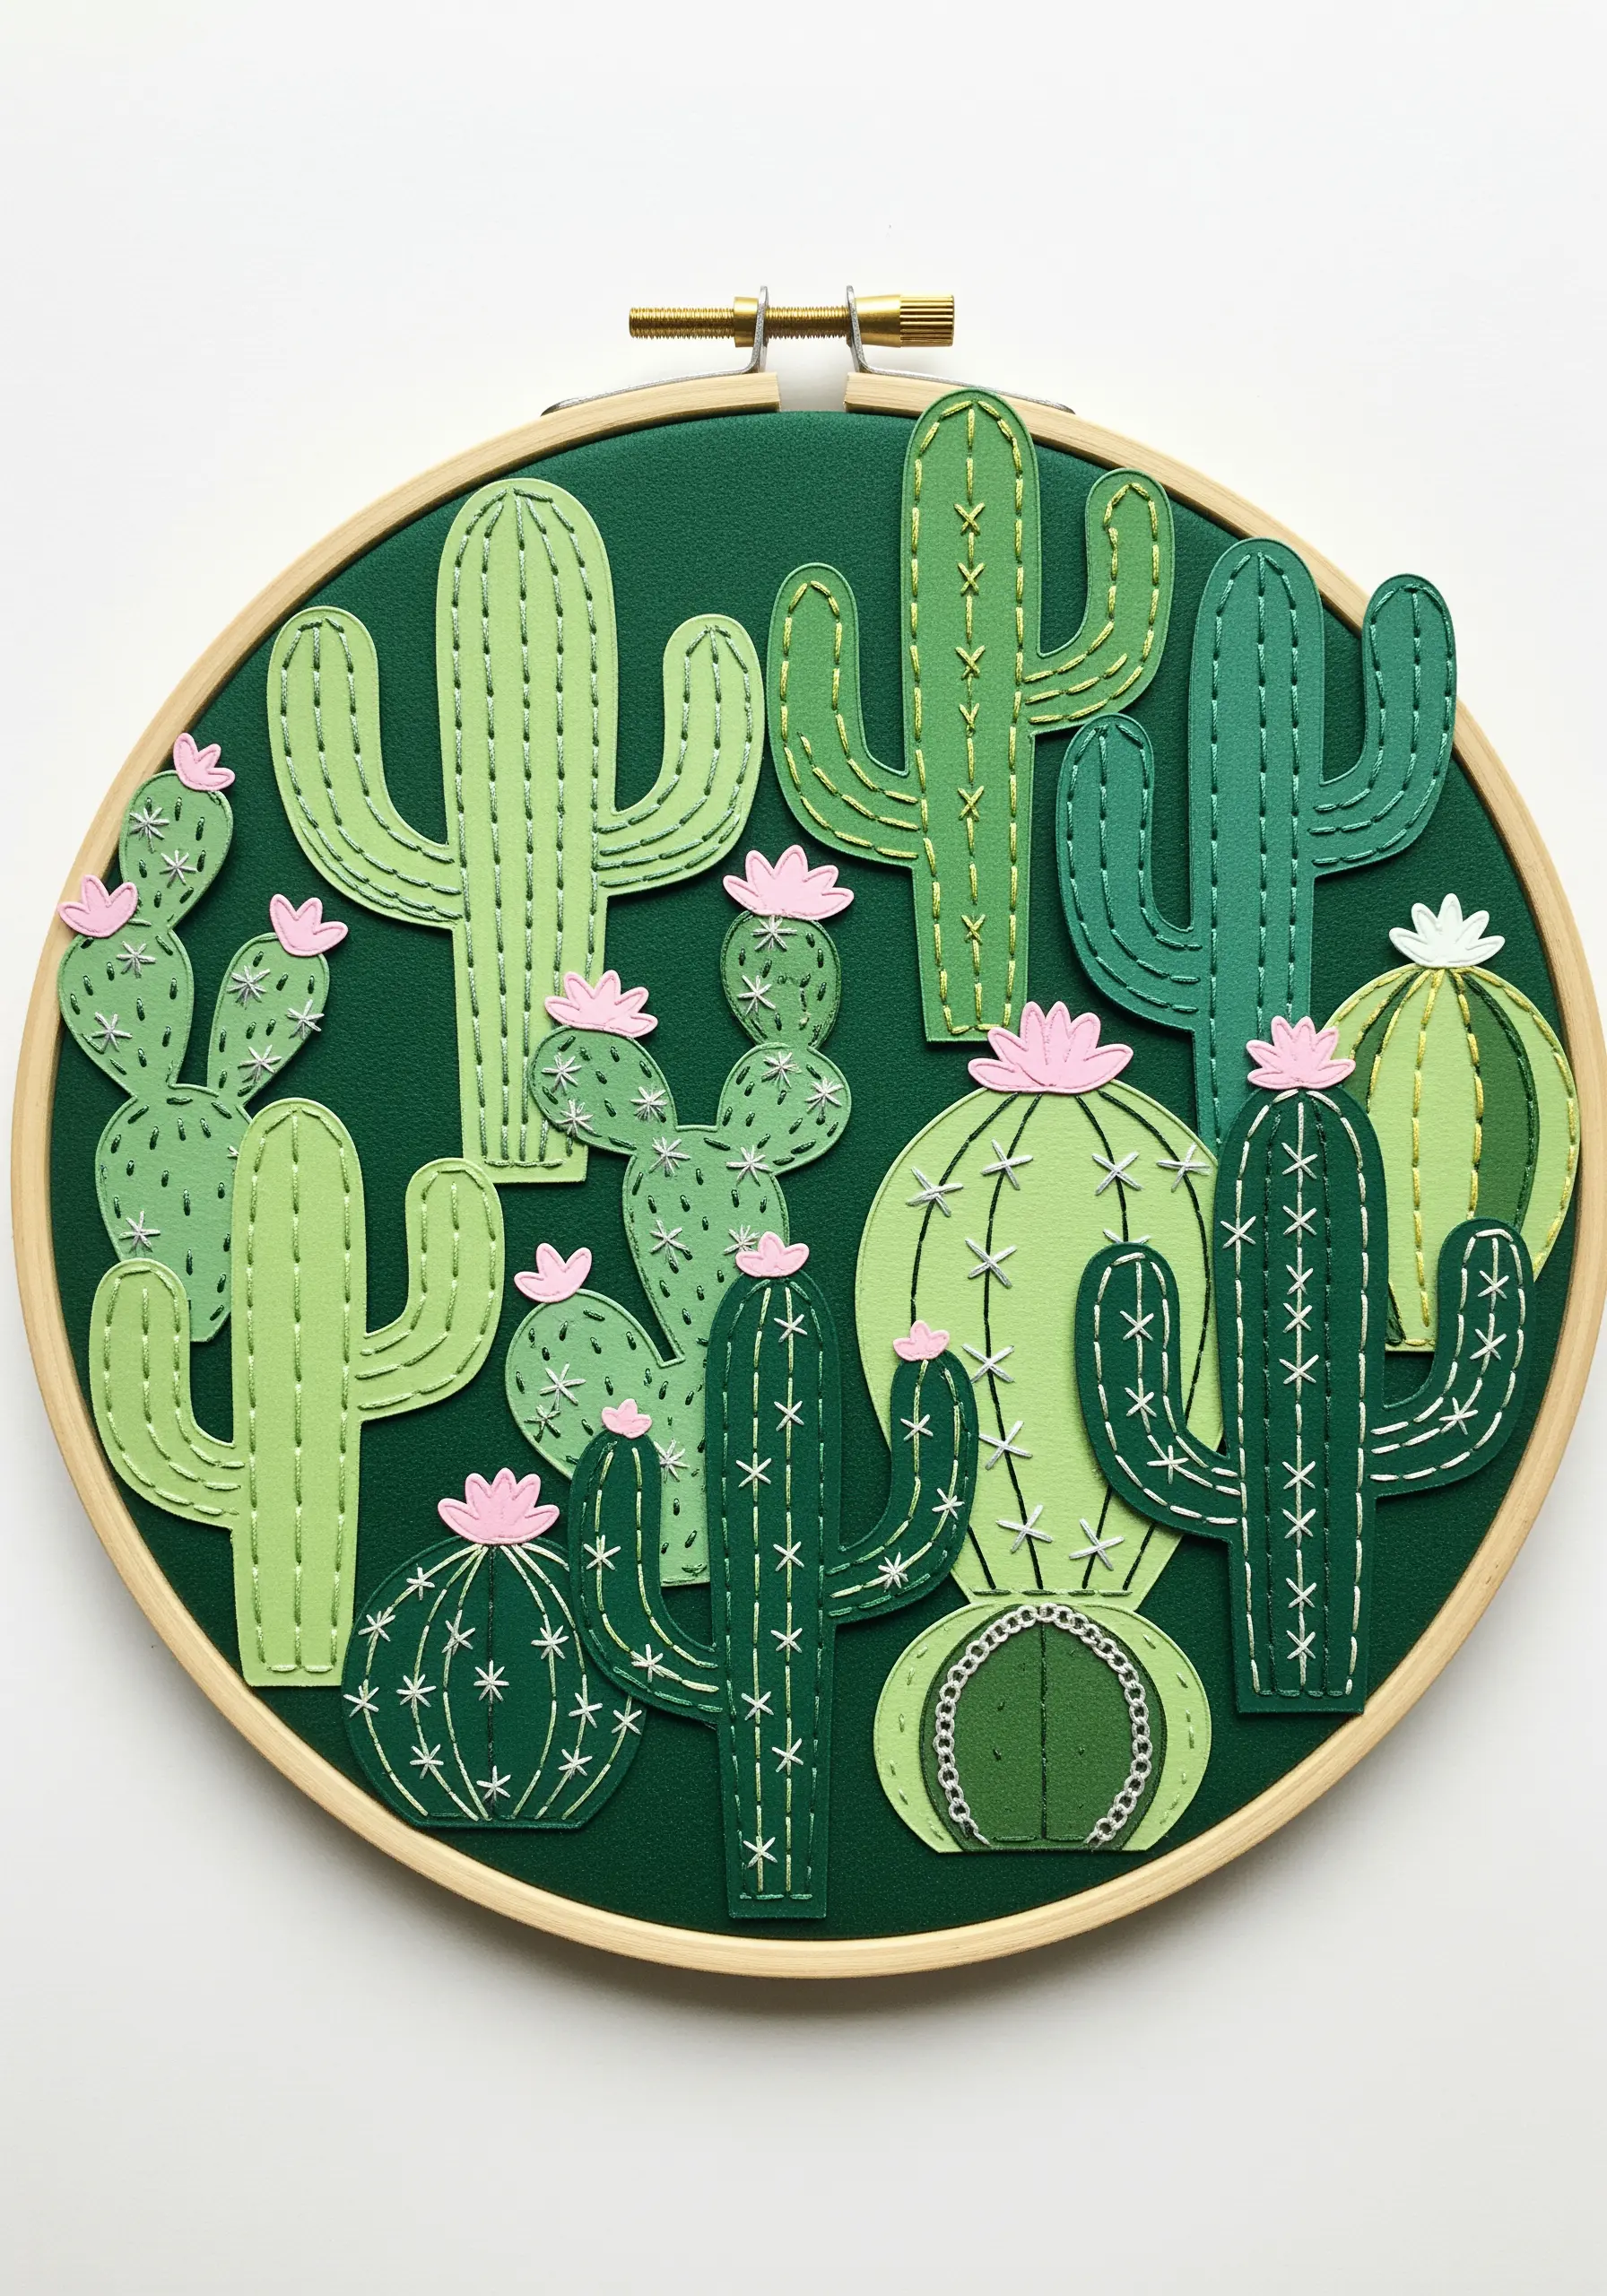
Cut cactus shapes from various shades of green cardstock and arrange them in a dense, layered composition on a fabric background.
Instead of using glue, attach the paper pieces with simple stitches—a running stitch for the outlines and scattered seed stitches for prickly texture.
This method, borrowed from traditional fabric appliqué, adds dimension and a soft, handcrafted feel that glue cannot achieve.
Complete your desert scene by adding tiny paper flowers, each secured with a single French knot in the center.
18. Weaving Gradients in Celestial Motifs
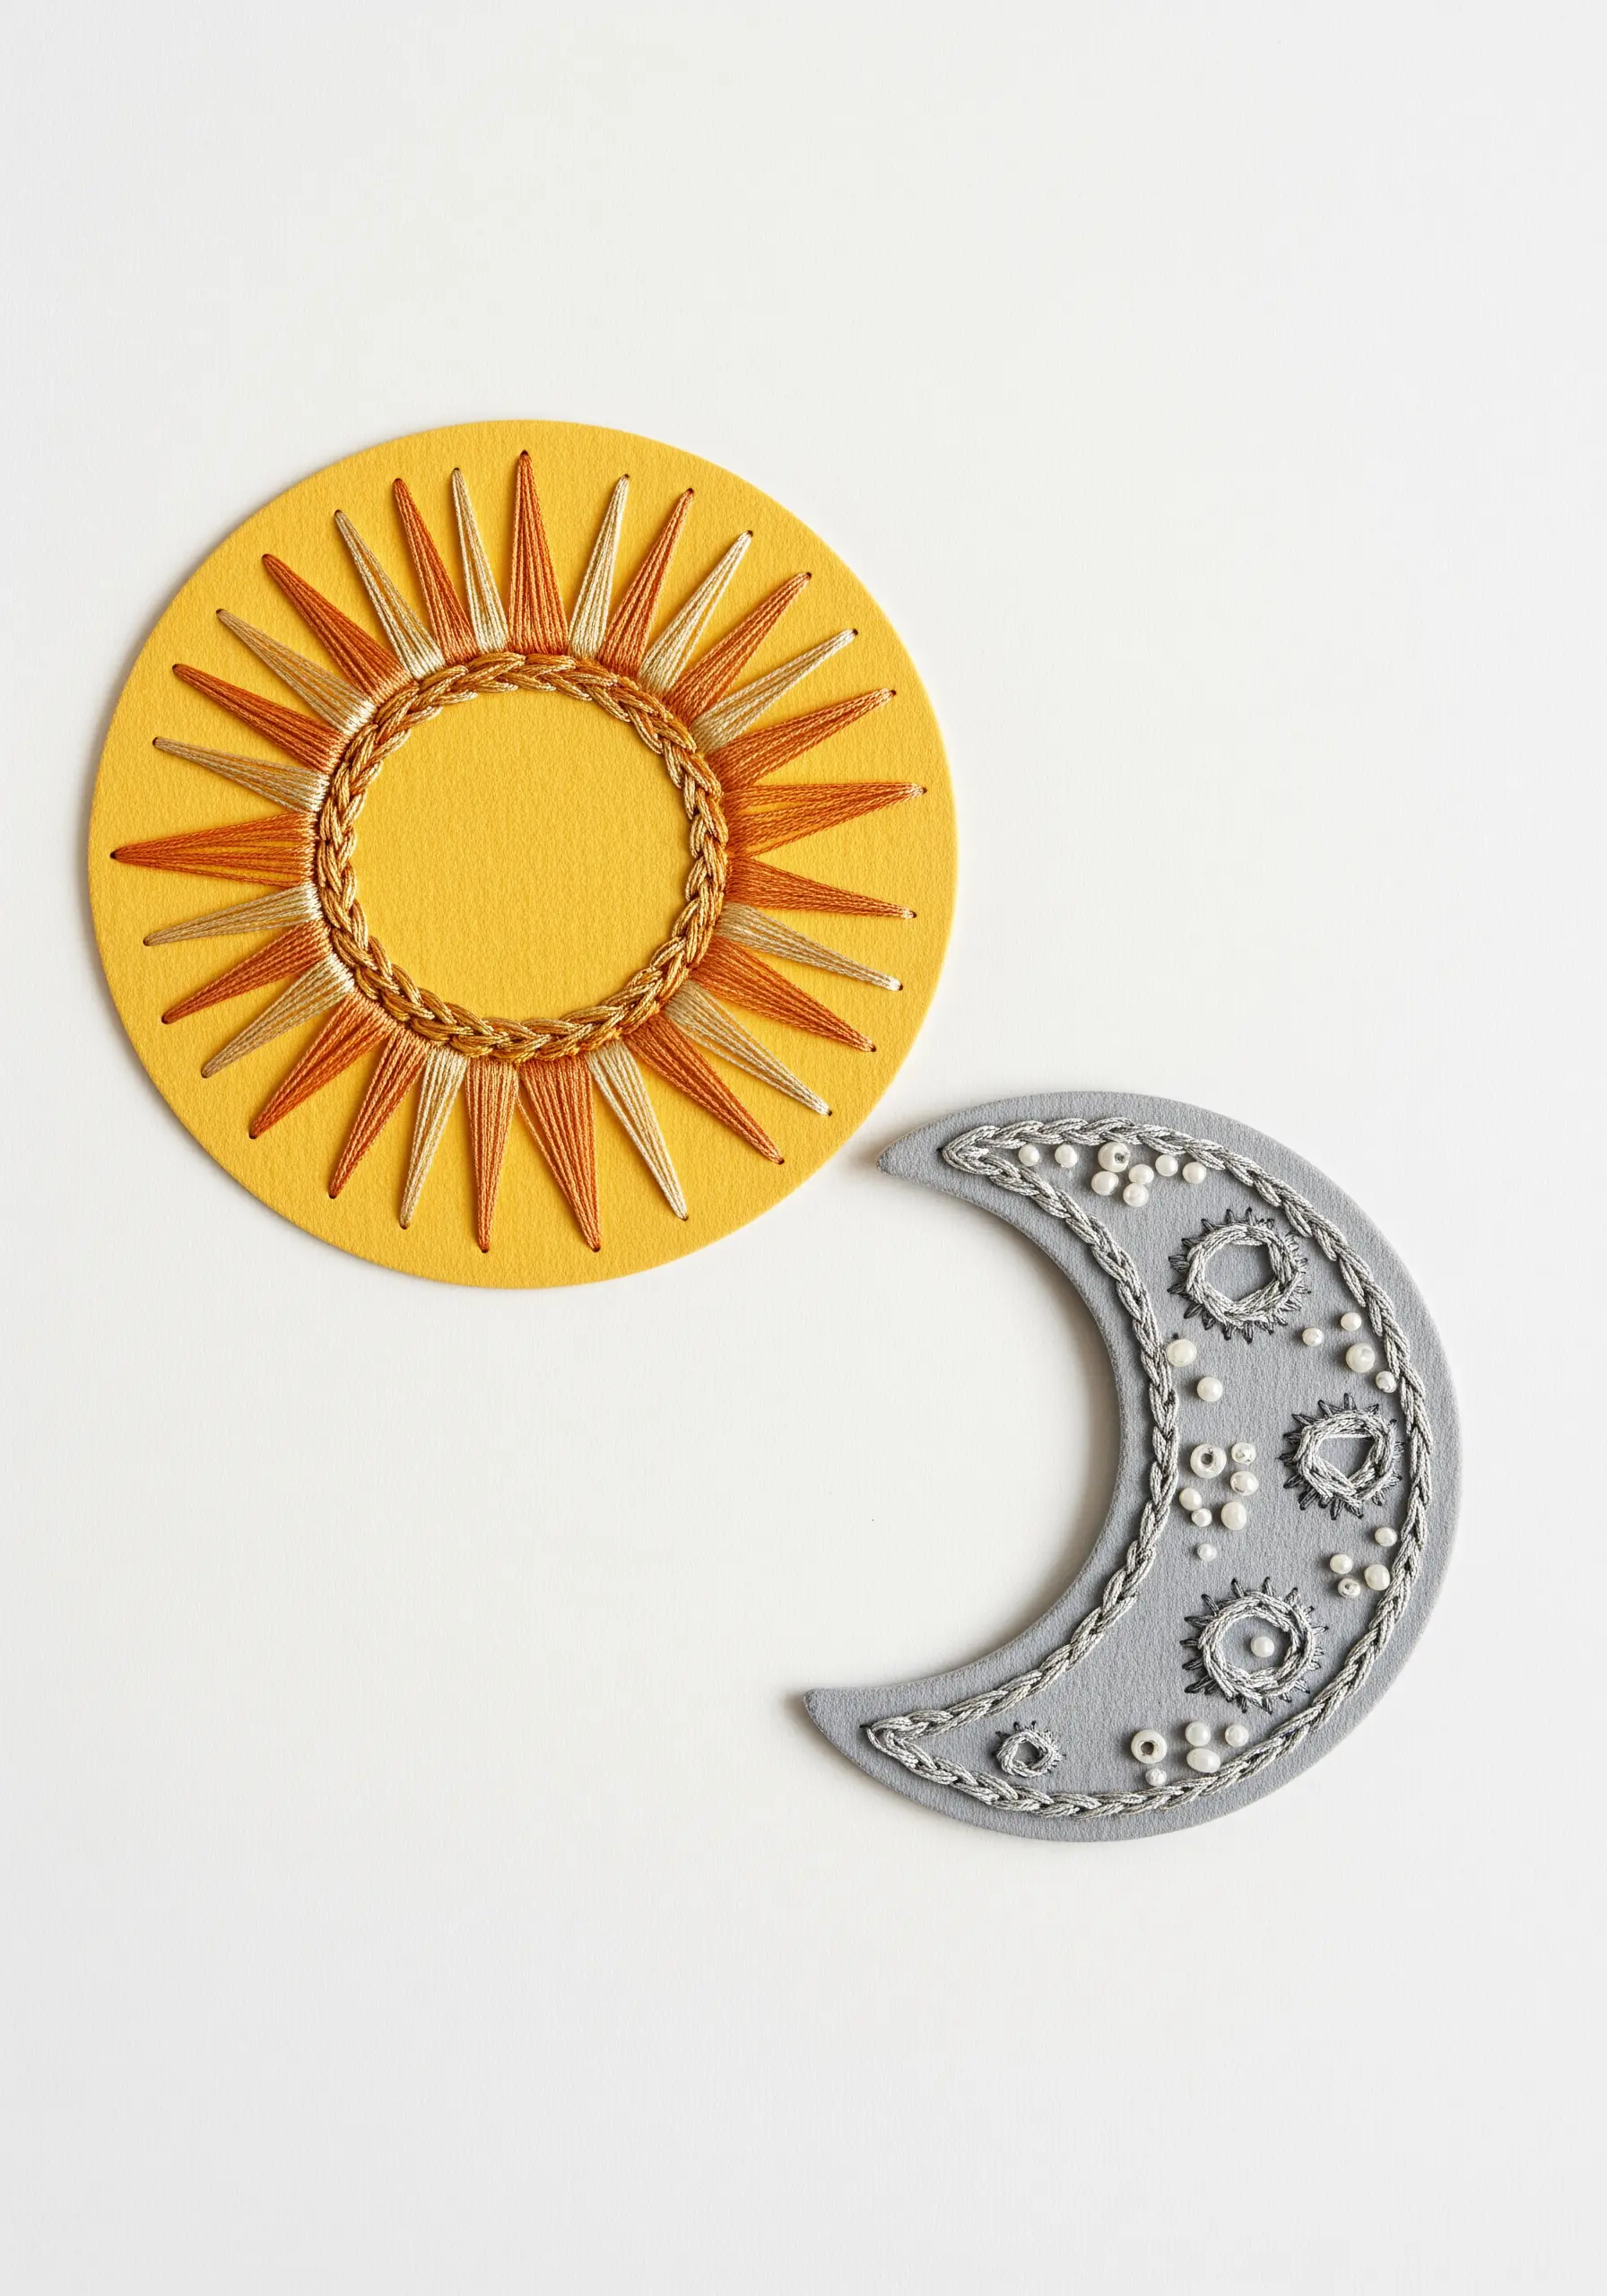
Elevate simple shapes like a sun and moon with more sophisticated and textural stitch techniques.
For the sun’s rays, use a fishbone stitch but allow the threads to overlap and blend, creating a smooth color gradient from gold to copper.
On the moon, use couching to outline crater shapes with a metallic cord, and fill the negative space with a delicate scattering of French knots and seed beads.
This approach transforms basic symbols into detailed and tactile minimal celestial embroidery wall designs.
19. Sculpting 3D Paper Butterflies
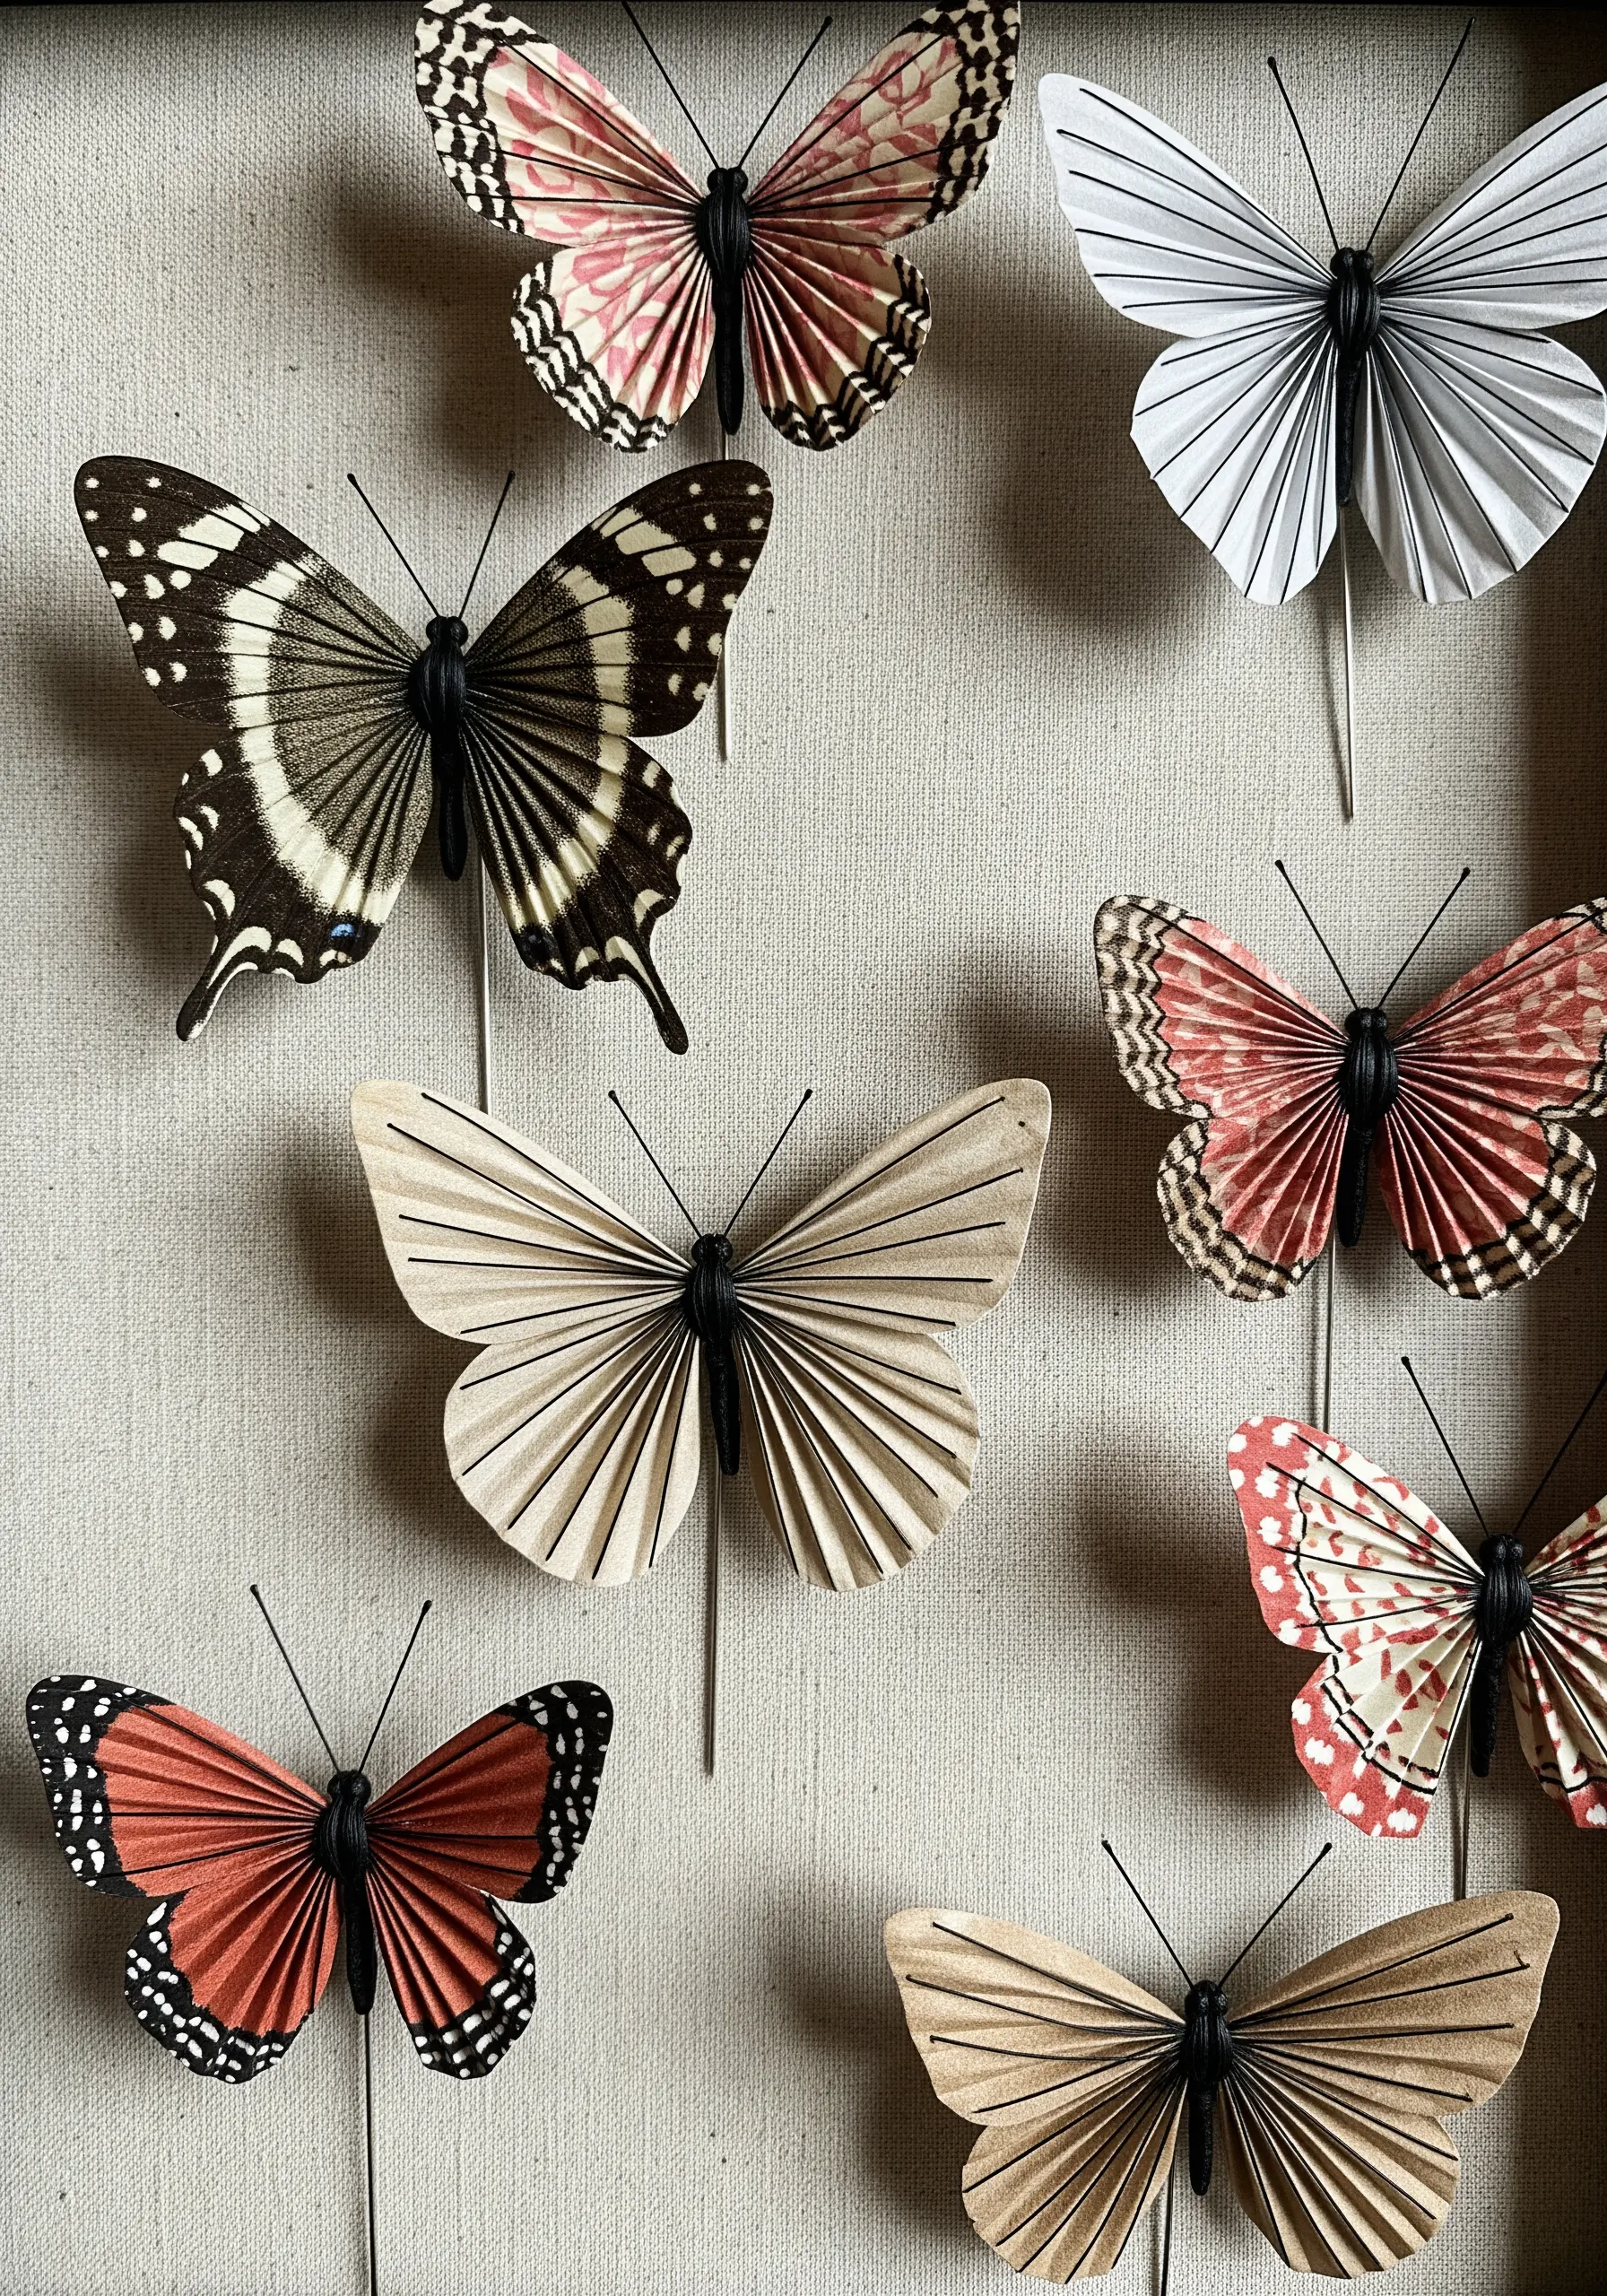
Give life and movement to paper butterflies by combining paper folding with a simple stitched body.
Select patterned paper for the wings and fold them accordion-style to create realistic texture and dimension.
The body can be formed by wrapping black thread tightly around a thin piece of wire, or by building up layers of satin stitches directly on the paper.
The thread adds a soft, organic element that contrasts beautifully with the crisp paper wings, making them look as if they are poised for flight.
20. Creating Neon String Art on Cardstock
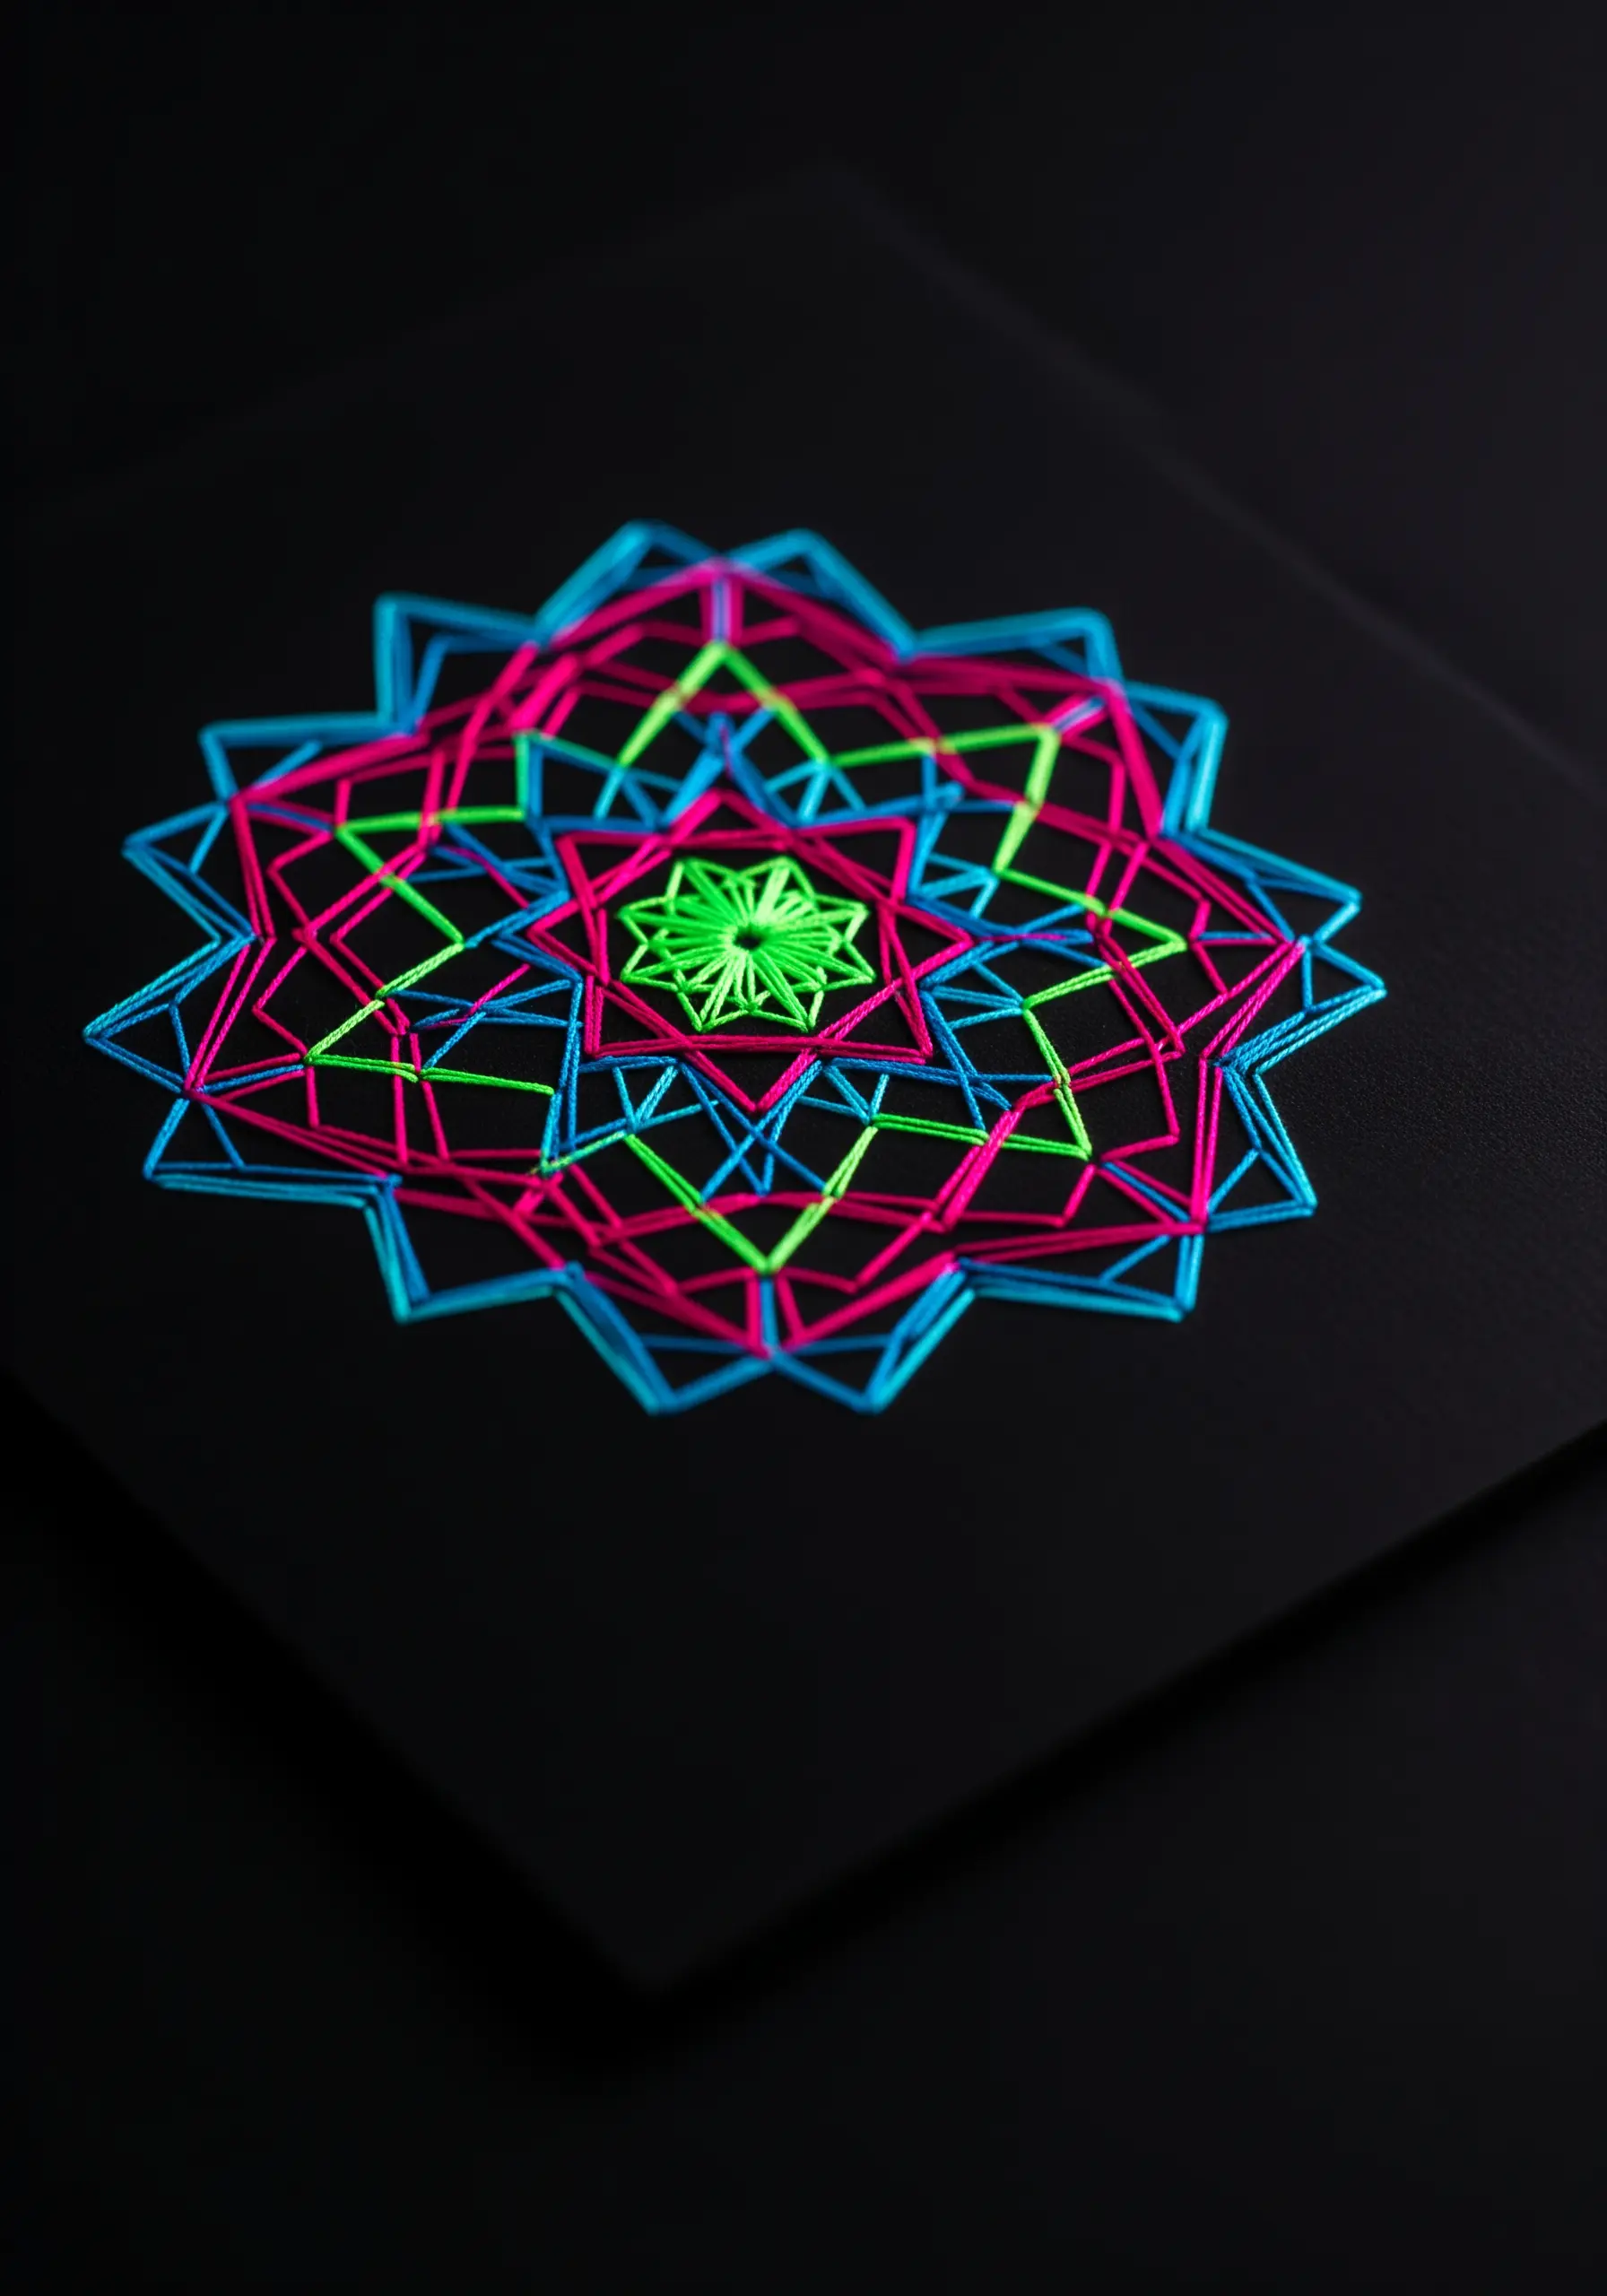
This technique uses thread to create complex geometric patterns by stretching it between pre-punched points on cardstock.
Use a compass and protractor to map out a precise grid of holes for a flawless foundation.
The magic happens when you use vibrant neon thread on a black background.
The high contrast creates a glowing effect that makes the straight lines appear to curve and vibrate, producing eye-catching modern neon thread designs that blend mathematical precision with electric color.
21. Embellishing Papercraft with Dainty Stitches
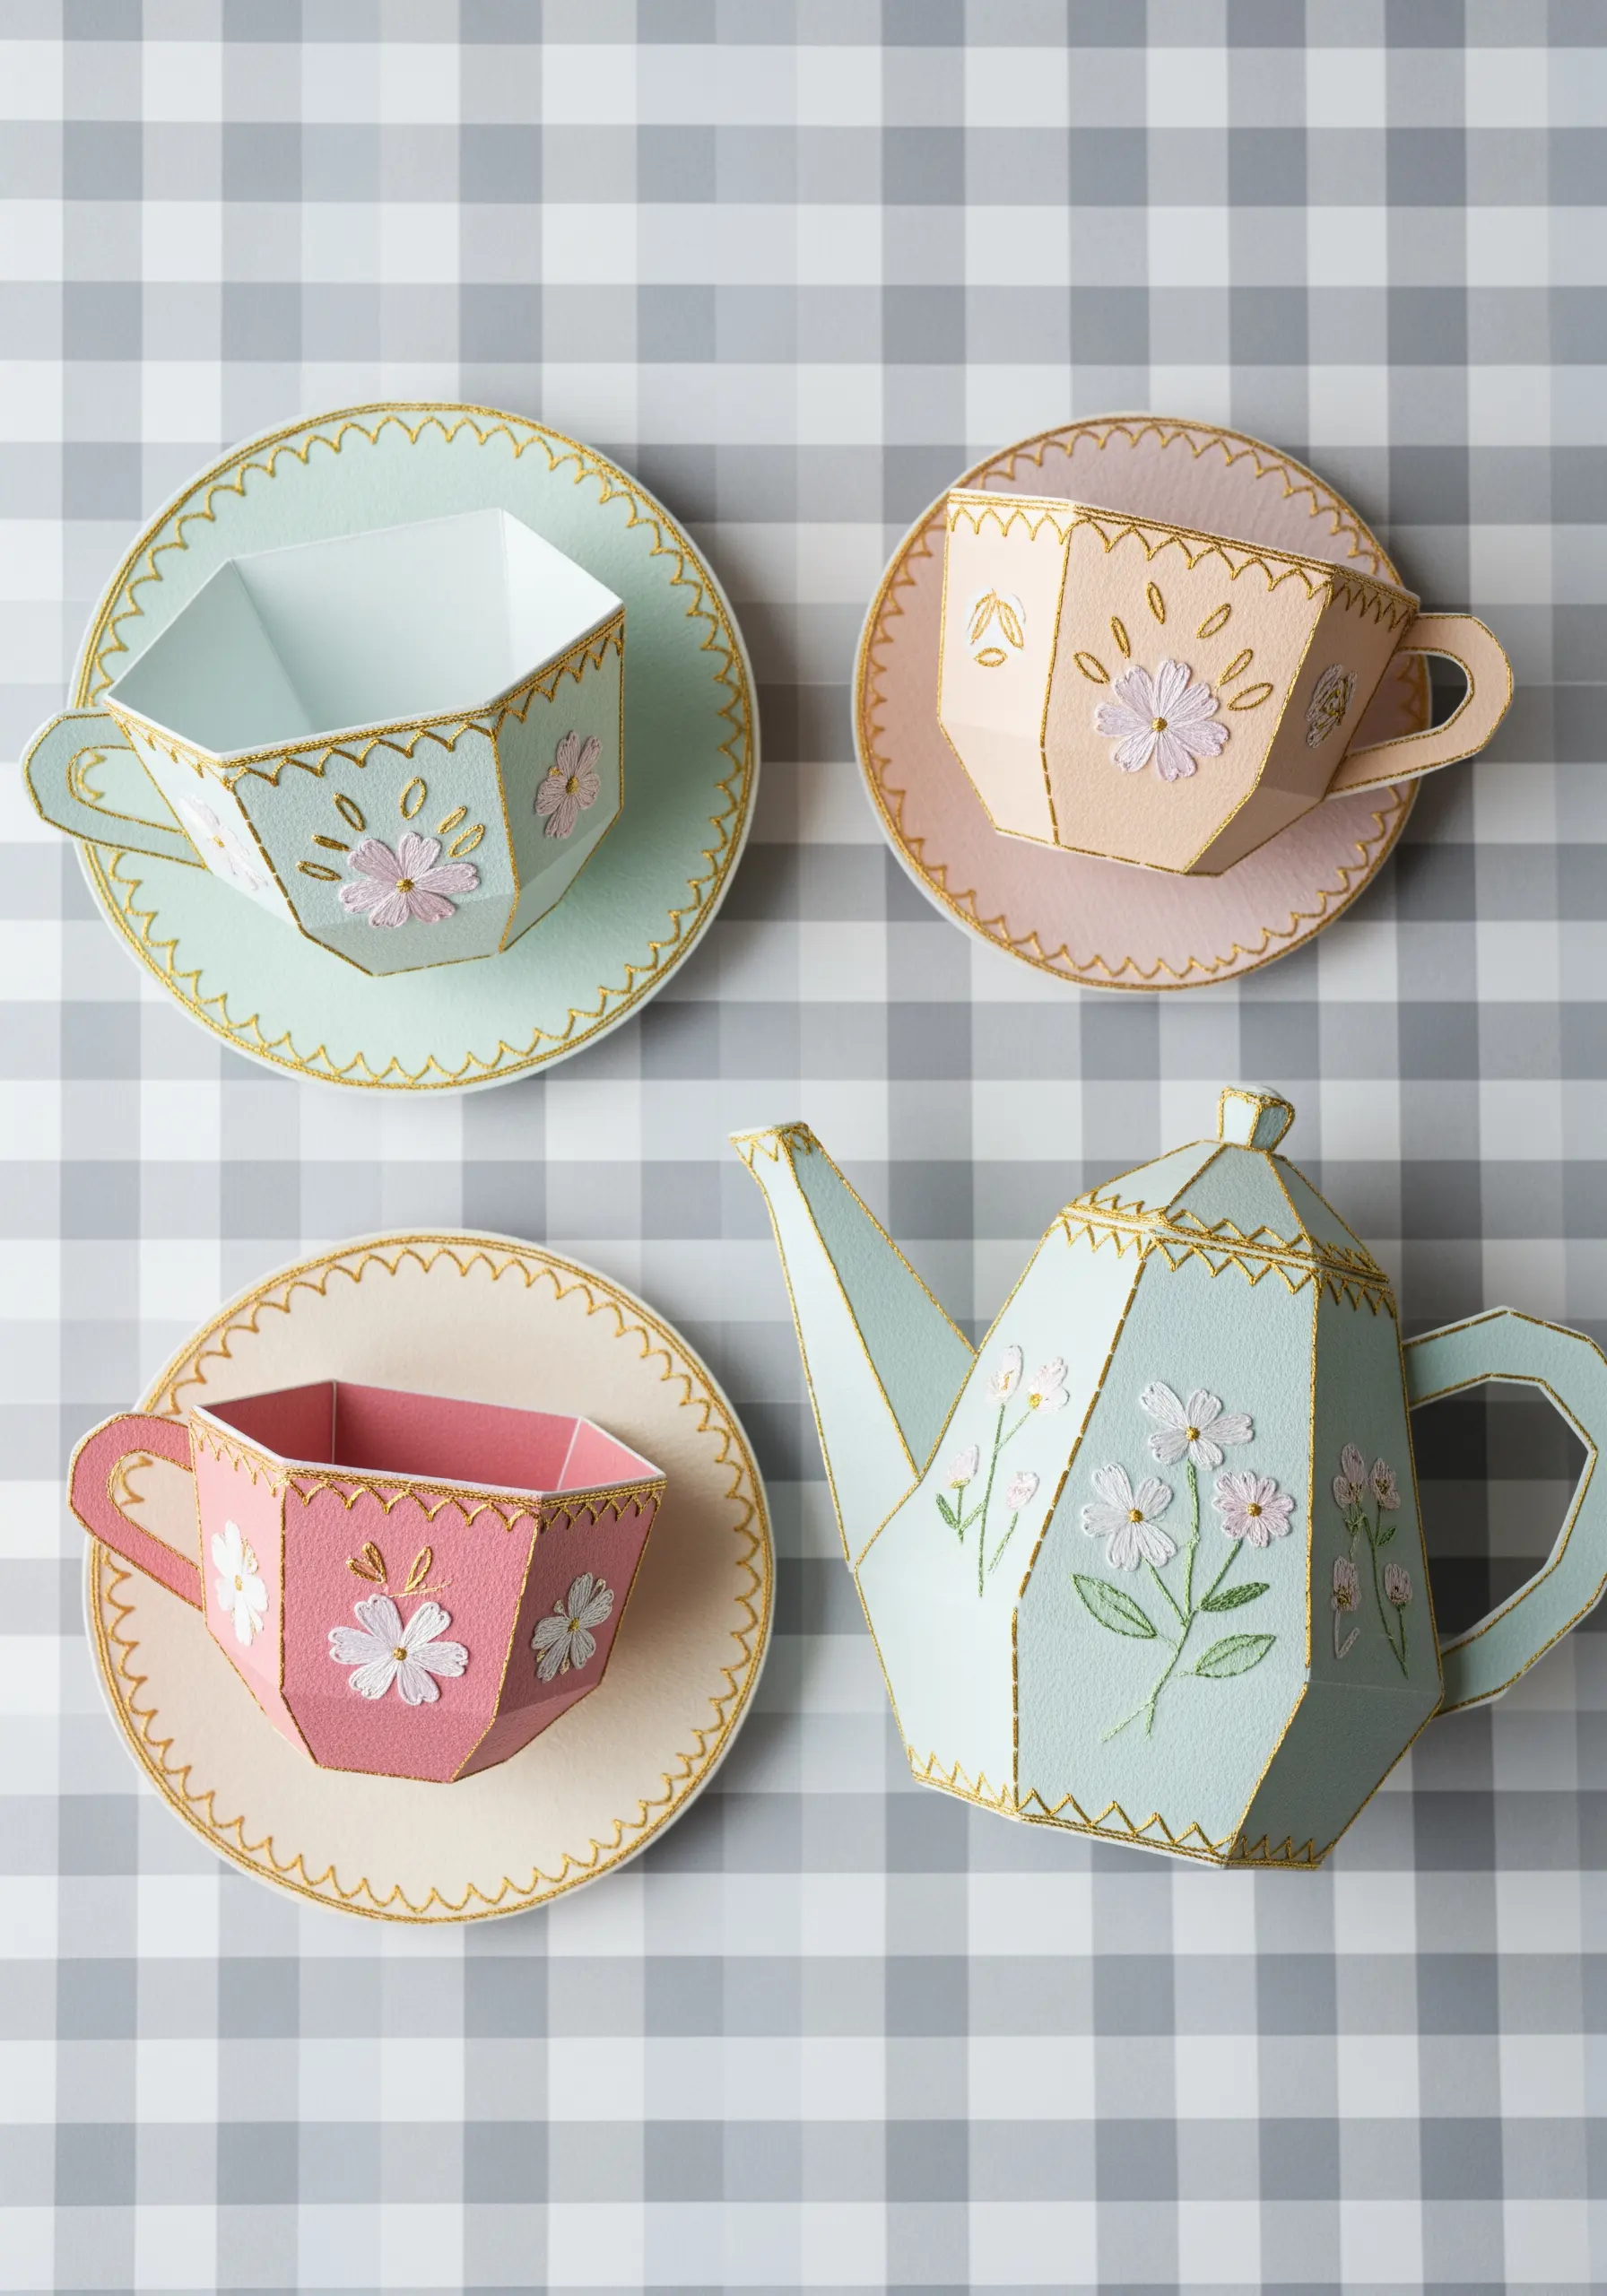
Before you assemble your 3D paper models, take the time to add delicate embroidered details.
On this charming paper tea set, simple lazy daisy stitches are used to create sweet floral motifs.
Use just two strands of floss to keep the stitches from overwhelming the small scale of the objects.
A fine metallic thread stitched along the rims adds a final touch of elegance.
Remember to stitch on the flat paper panels first—it is far easier than trying to embellish the finished 3D form.
22. Designing Typographic Samplers on Grid Paper
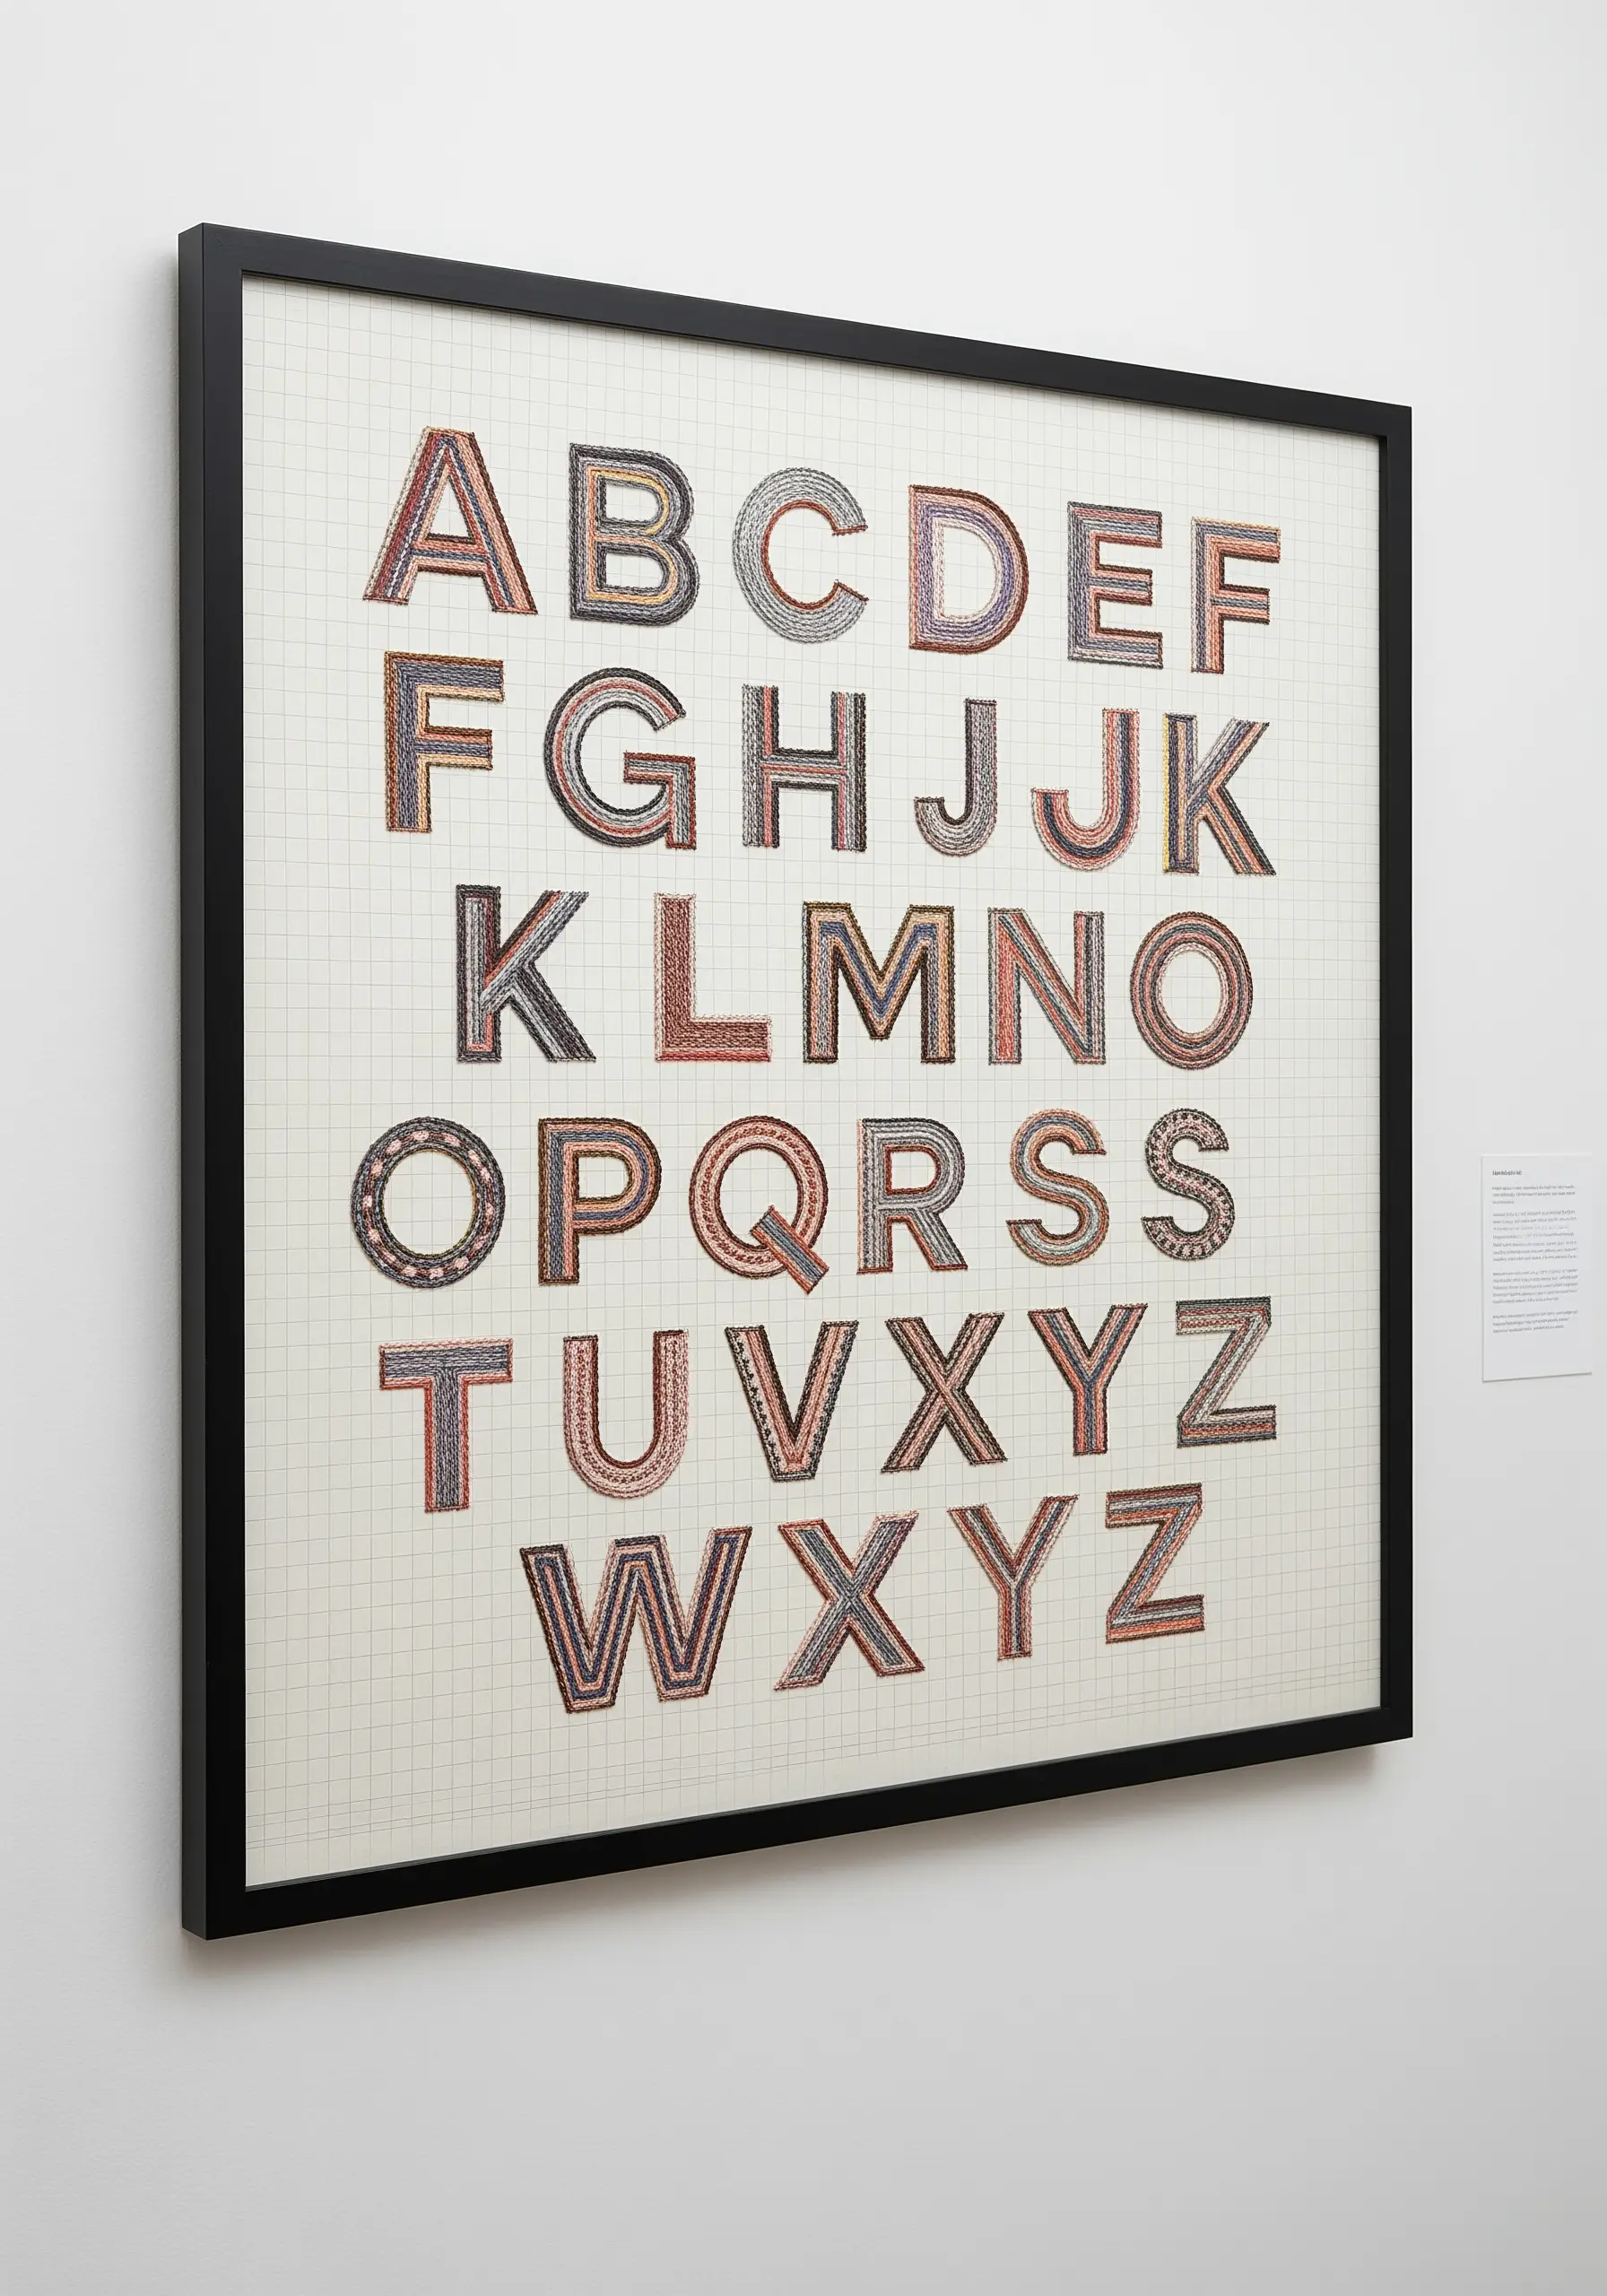
Use graph paper as a built-in guide for creating perfectly formed and spaced embroidered letters.
The grid removes the guesswork, helping you maintain consistent height, width, and kerning across your entire design.
Experiment with a different fill stitch for each letter—chain stitch, cross stitch, satin stitch, or even French knots can create a wide variety of textures.
This approach turns a simple alphabet sampler into a sophisticated study of texture, pattern, and typography.
23. Charting Journeys with a Stitched Line
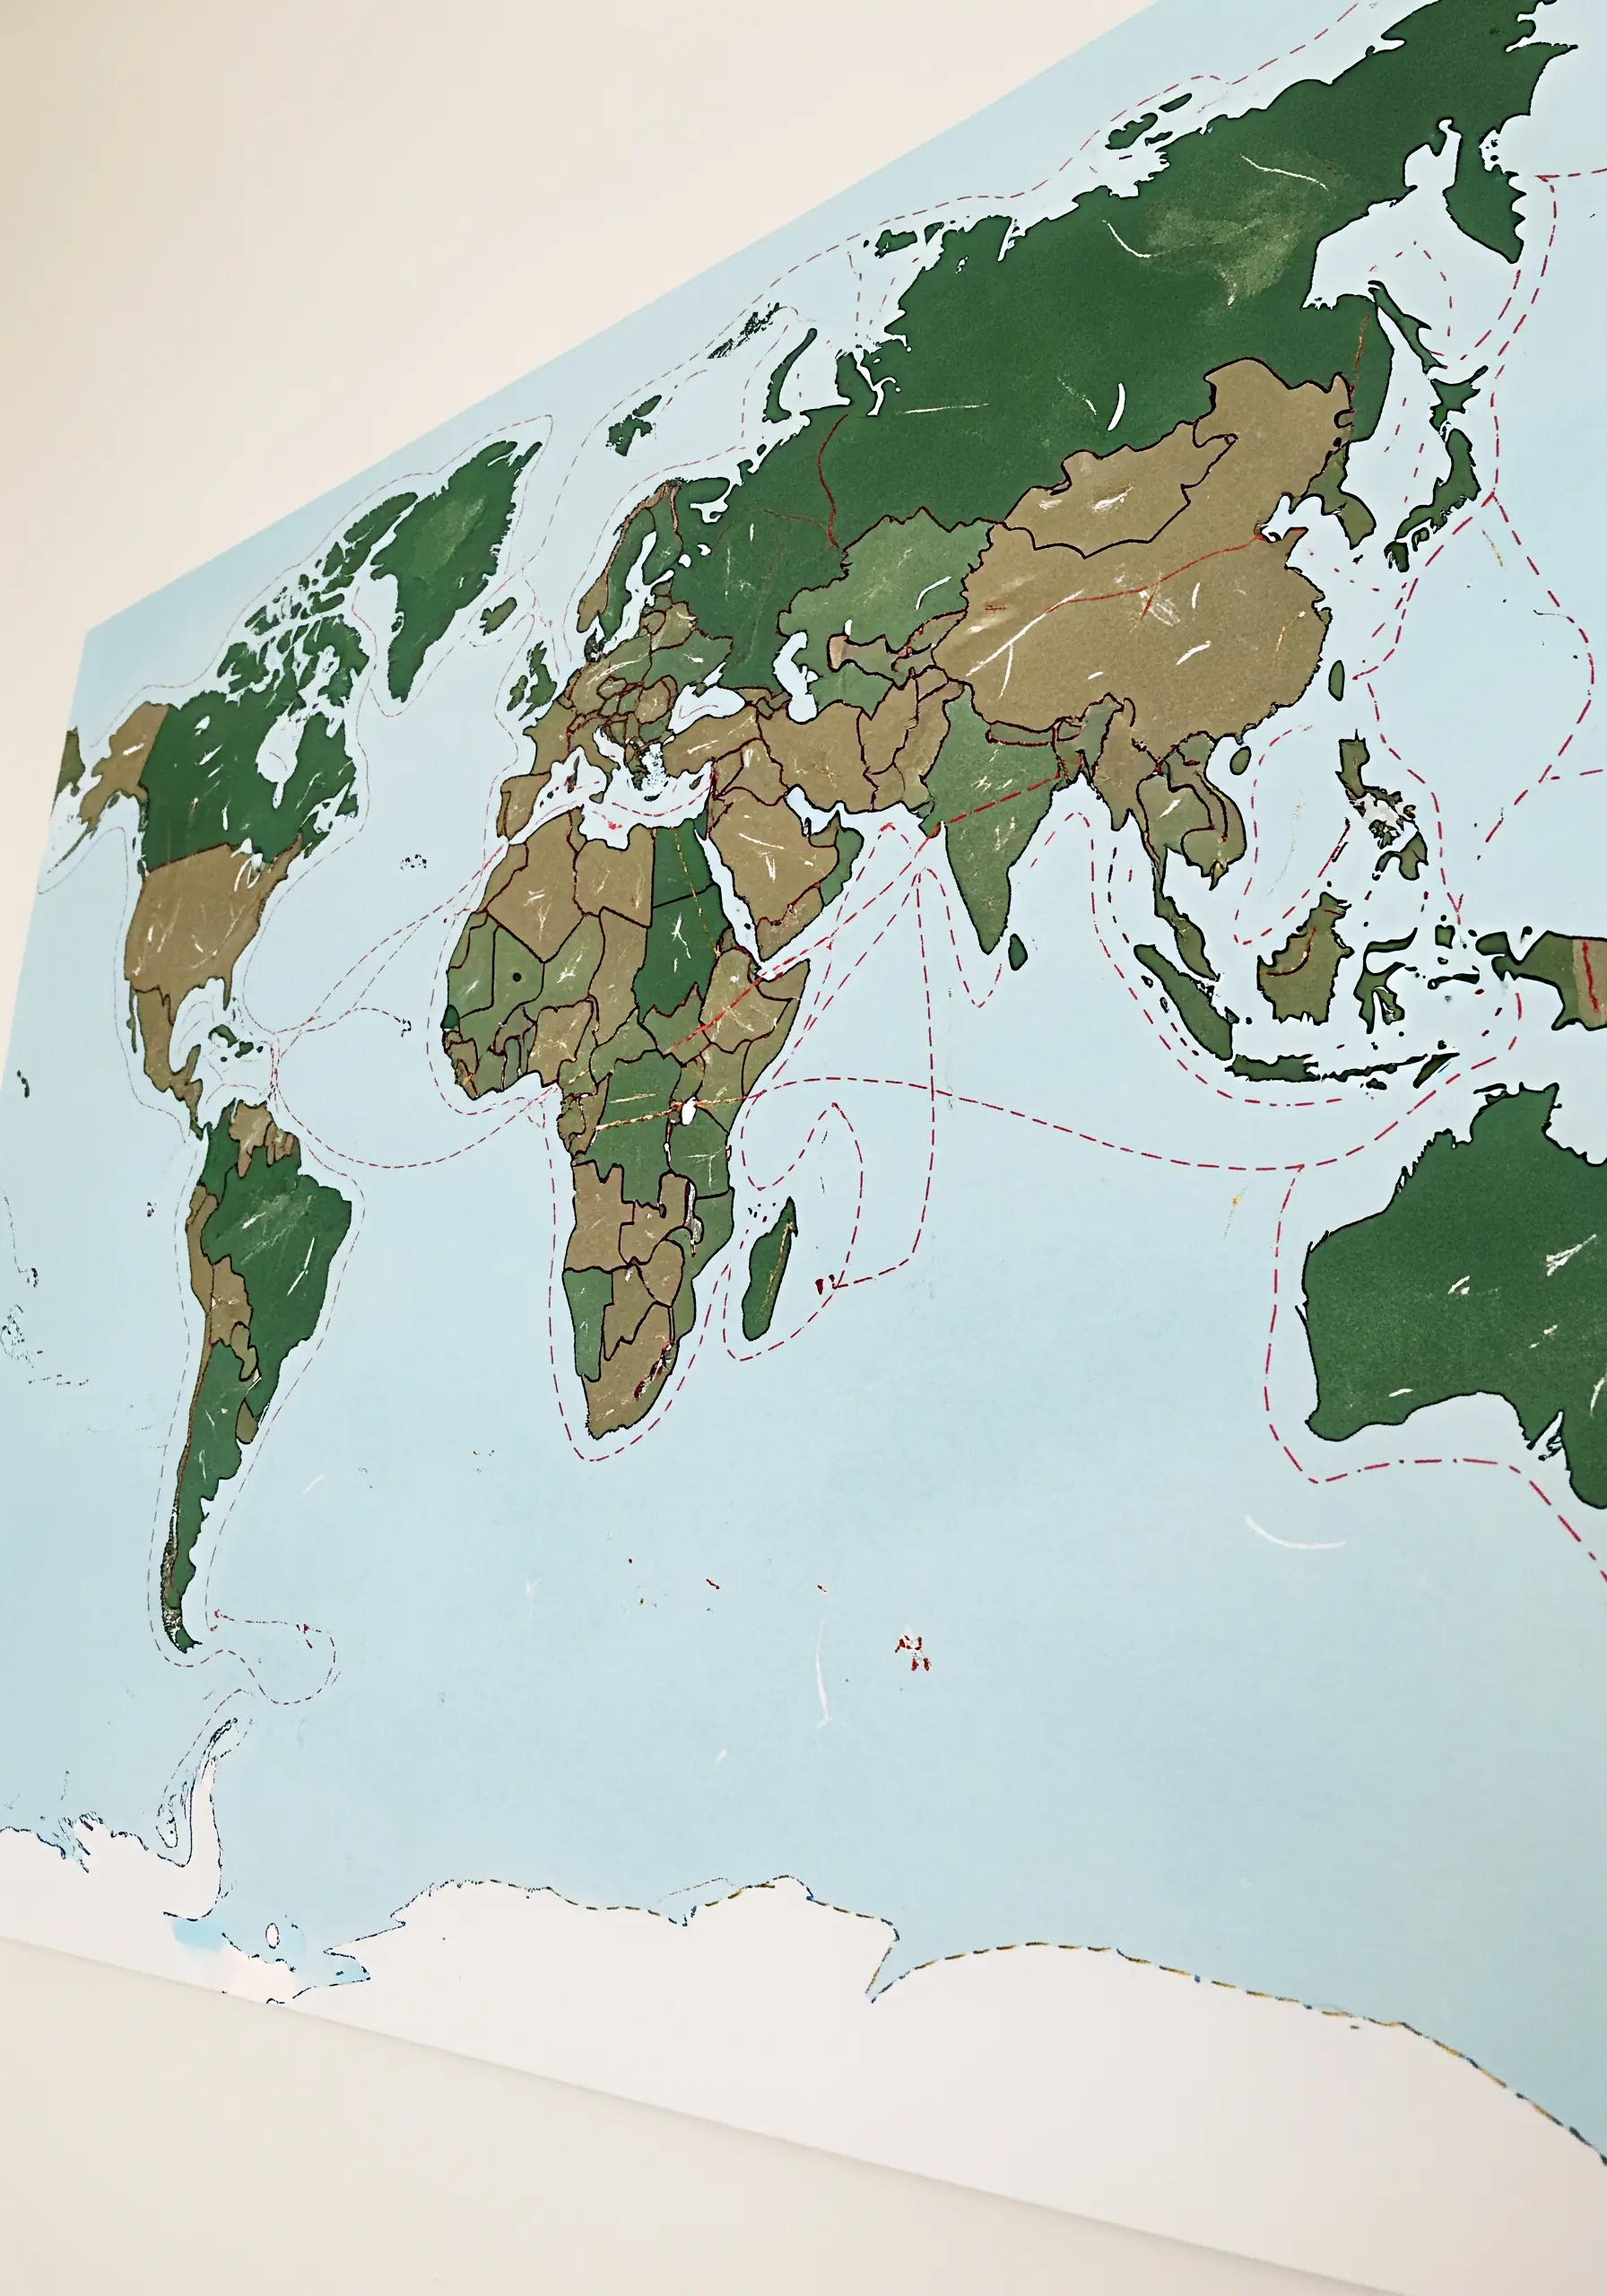
Personalize a printed map by stitching over routes, borders, or coastlines that hold personal meaning.
A simple red running stitch or backstitch is perfect for tracing a travel route, creating a delicate, dashed line that feels both intentional and handmade.
This technique adds a powerful layer of narrative and charm to a standard map, turning it into a visual diary of your adventures.
It’s an incredibly simple yet effective way to create meaningful abstract stitch maps that tell a story.
24. Capturing Fruit Textures with Satin Stitch
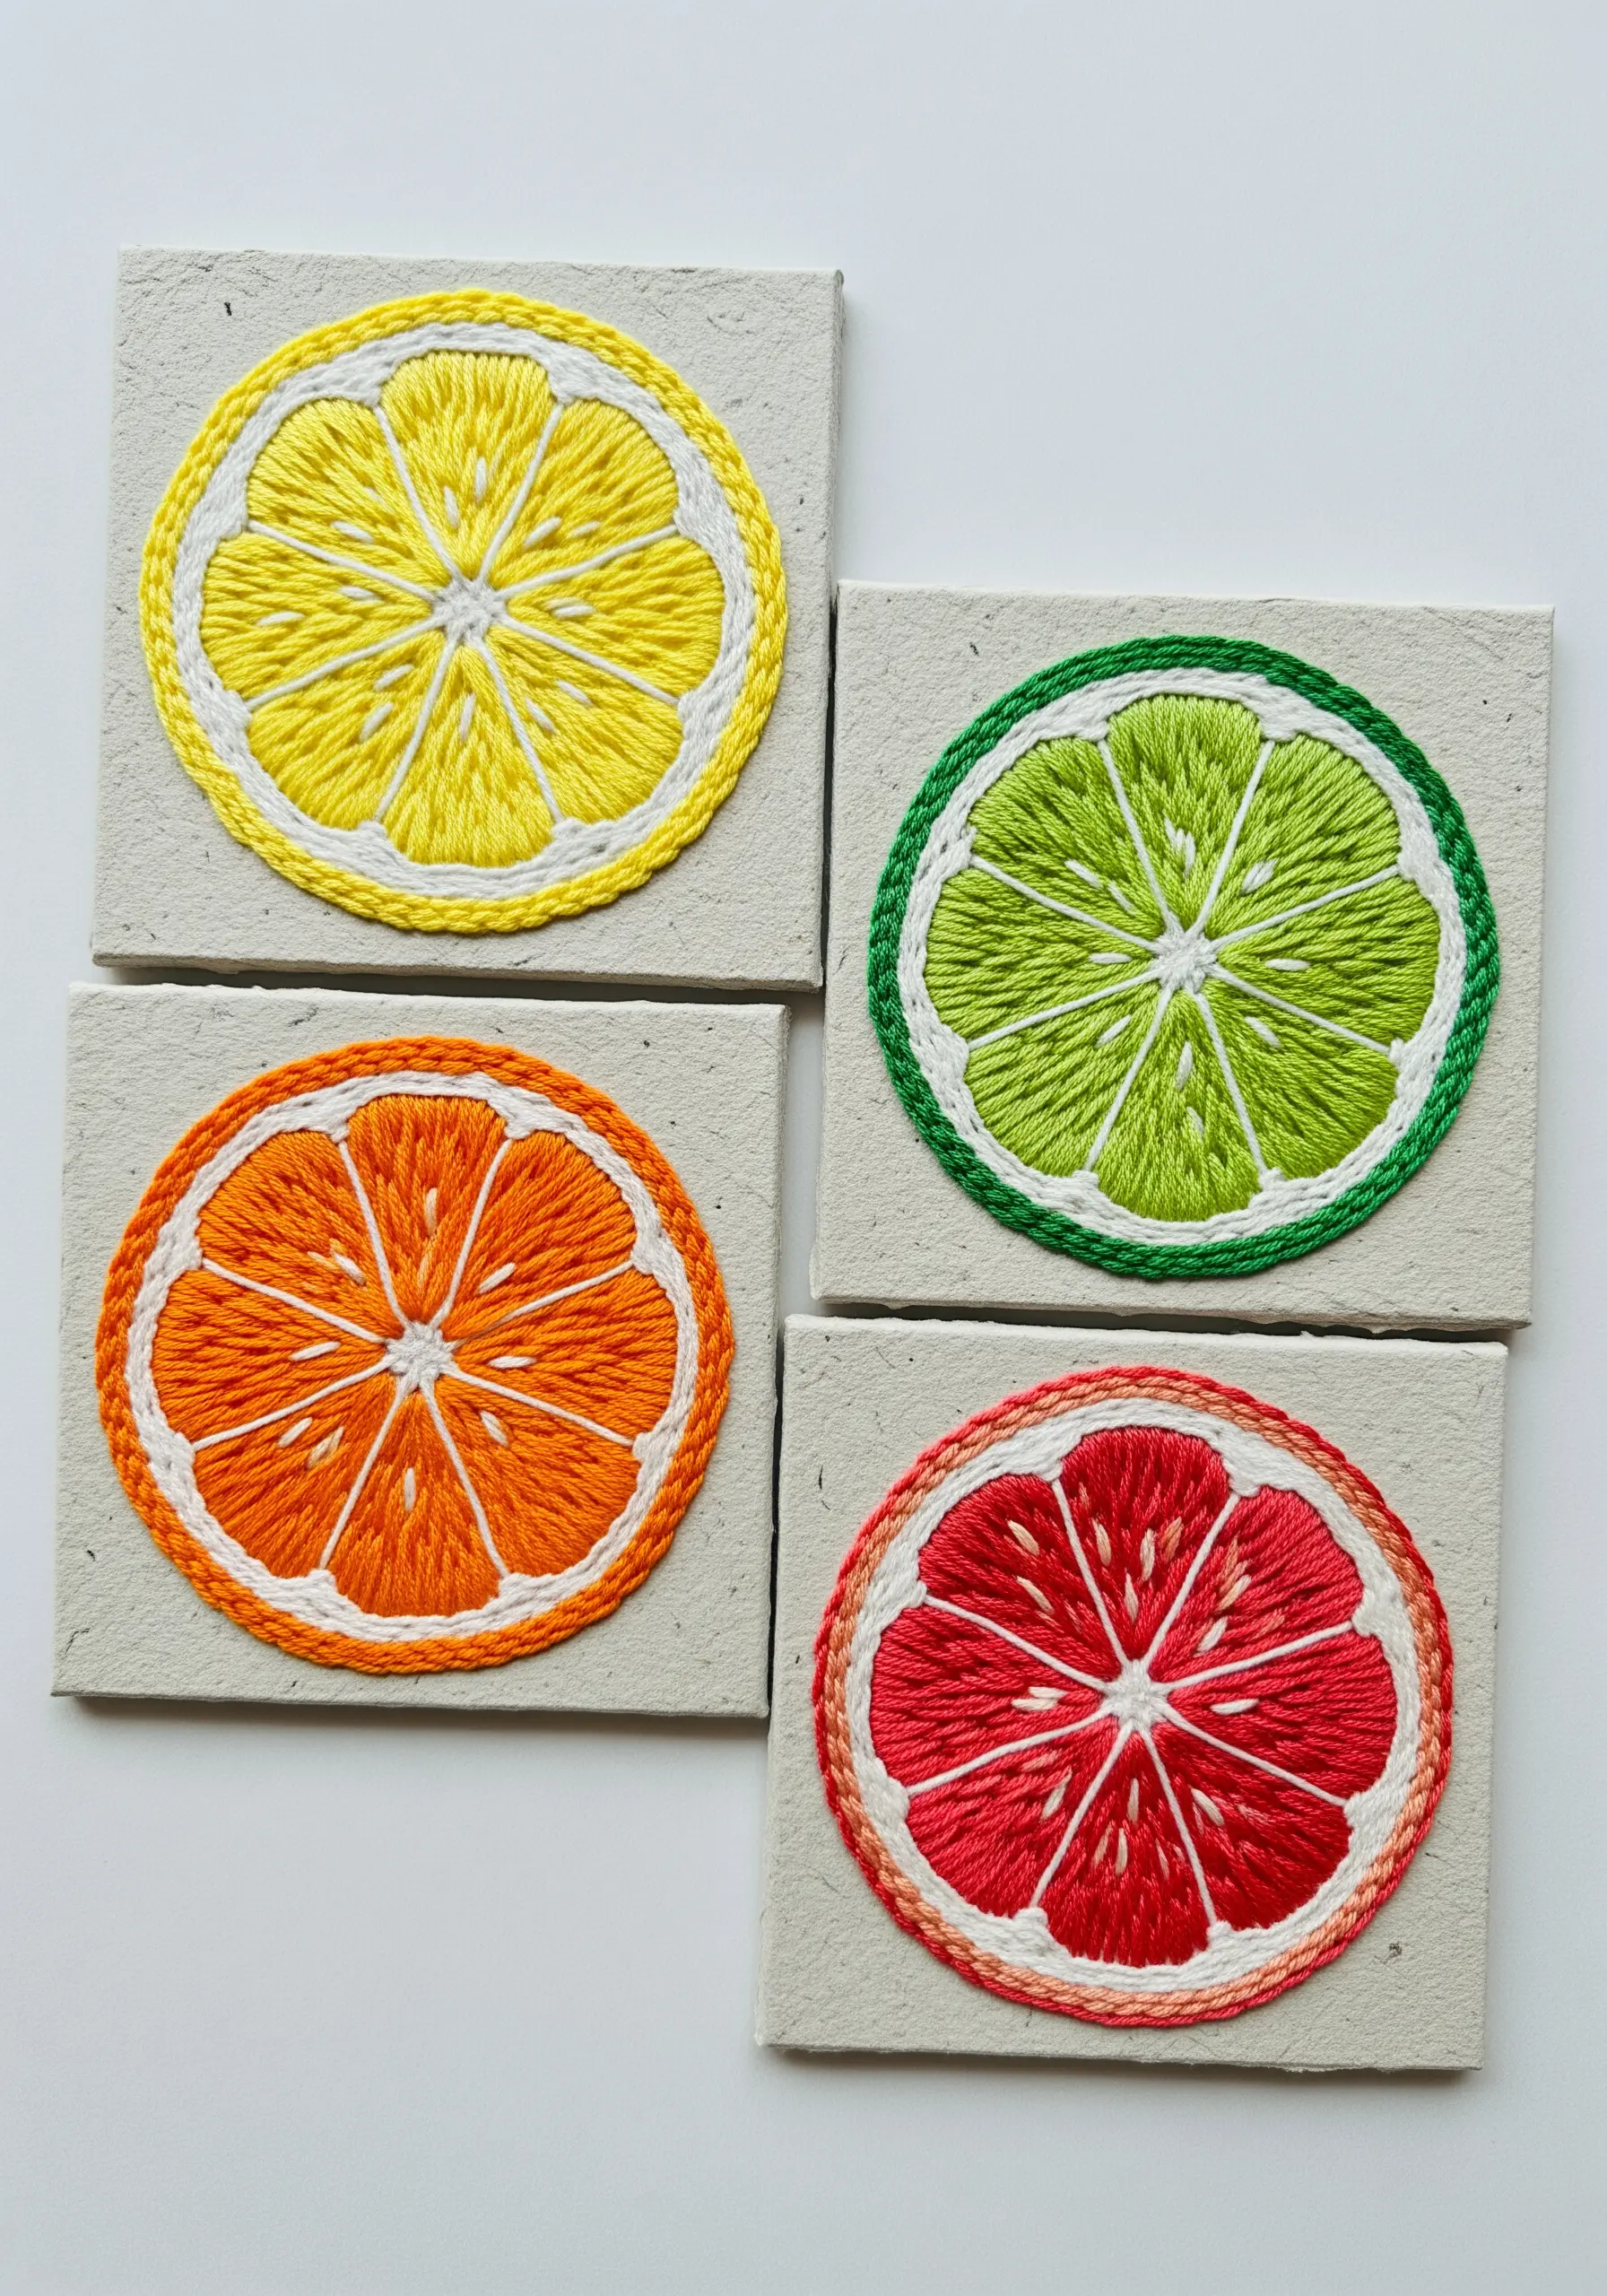
Recreate the juicy texture of citrus slices by using directional satin stitch on small paper canvases.
For the individual segments, angle your stitches toward the center to perfectly mimic the fruit’s natural structure and sheen.
Use a slightly lighter shade of floss to outline the segments, creating the subtle dimension of the pith.
A tightly wound coil stitch or a neat chain stitch makes a perfect outer rind.
The contrast between the smooth, lustrous satin stitch and the matte paper creates a vibrant, tactile effect.
25. Detailing Paper Leaves with Stitched Veins
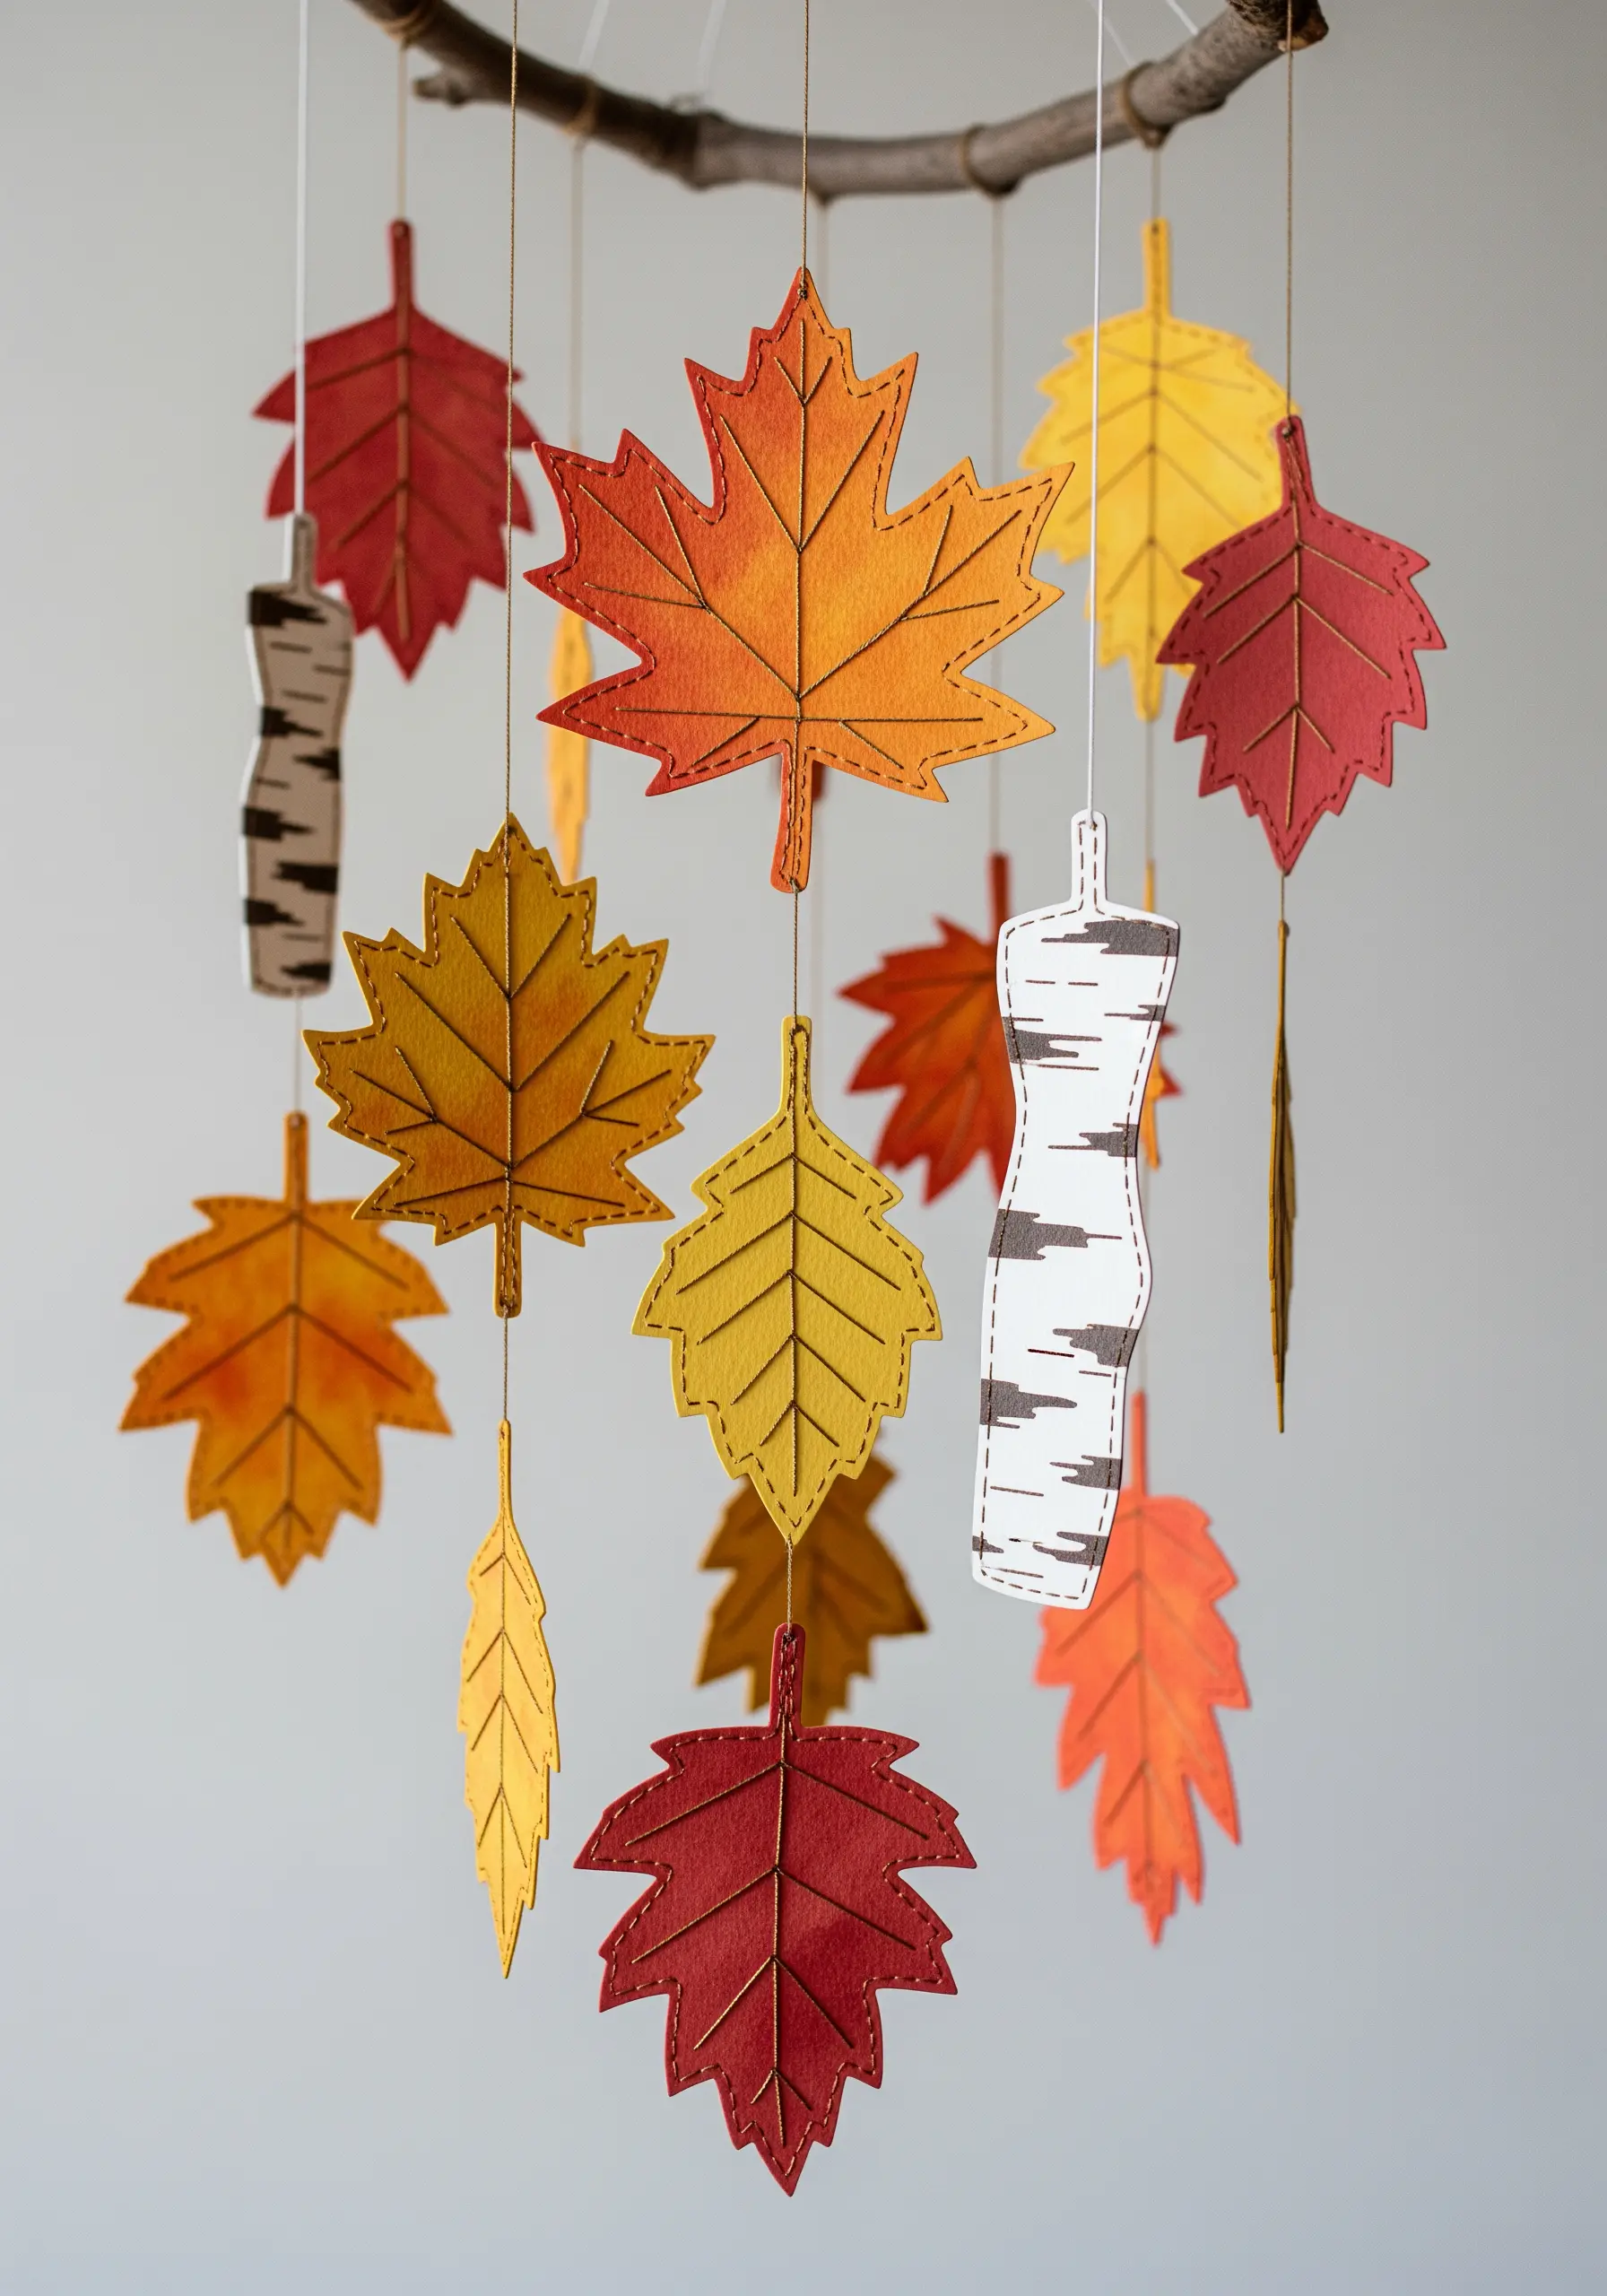
Add a layer of delicate realism to paper-cut leaves by embroidering the veins.
A simple backstitch or stem stitch in a contrasting or slightly darker thread is all you need.
This small detail adds texture and dimension, making the leaves feel more organic and alive.
You can also use a running stitch along the outer edge of each leaf to create a subtle, decorative border that ties the whole mobile together.
These small additions create stunning DIY paper art ideas with minimal effort and maximum impact.


