

Have you ever finished an embroidery piece and felt it was missing… something? A spark, a sense of life? You have the skill, the patience, and the love for the craft, but you want your work to step off the fabric, to have a presence in the room that feels tangible and real.
The secret isn’t in mastering hundreds of complex stitches. It’s in learning how to use a few key techniques to build texture, depth, and shadow. It’s about thinking less like a stitcher and more like a sculptor, using thread, yarn, and fabric to manipulate a flat surface until it breathes.
Here, we will move beyond the flat and familiar. I’ll show you how to pad your stitches for volume, layer your work for perspective, and choose fibers that create their own dramatic texture. This is how you transform your embroidery from a beautiful image into an immersive experience—one your guests won’t be able to resist reaching out to touch.
1. Build a Dimensional Forest Floor
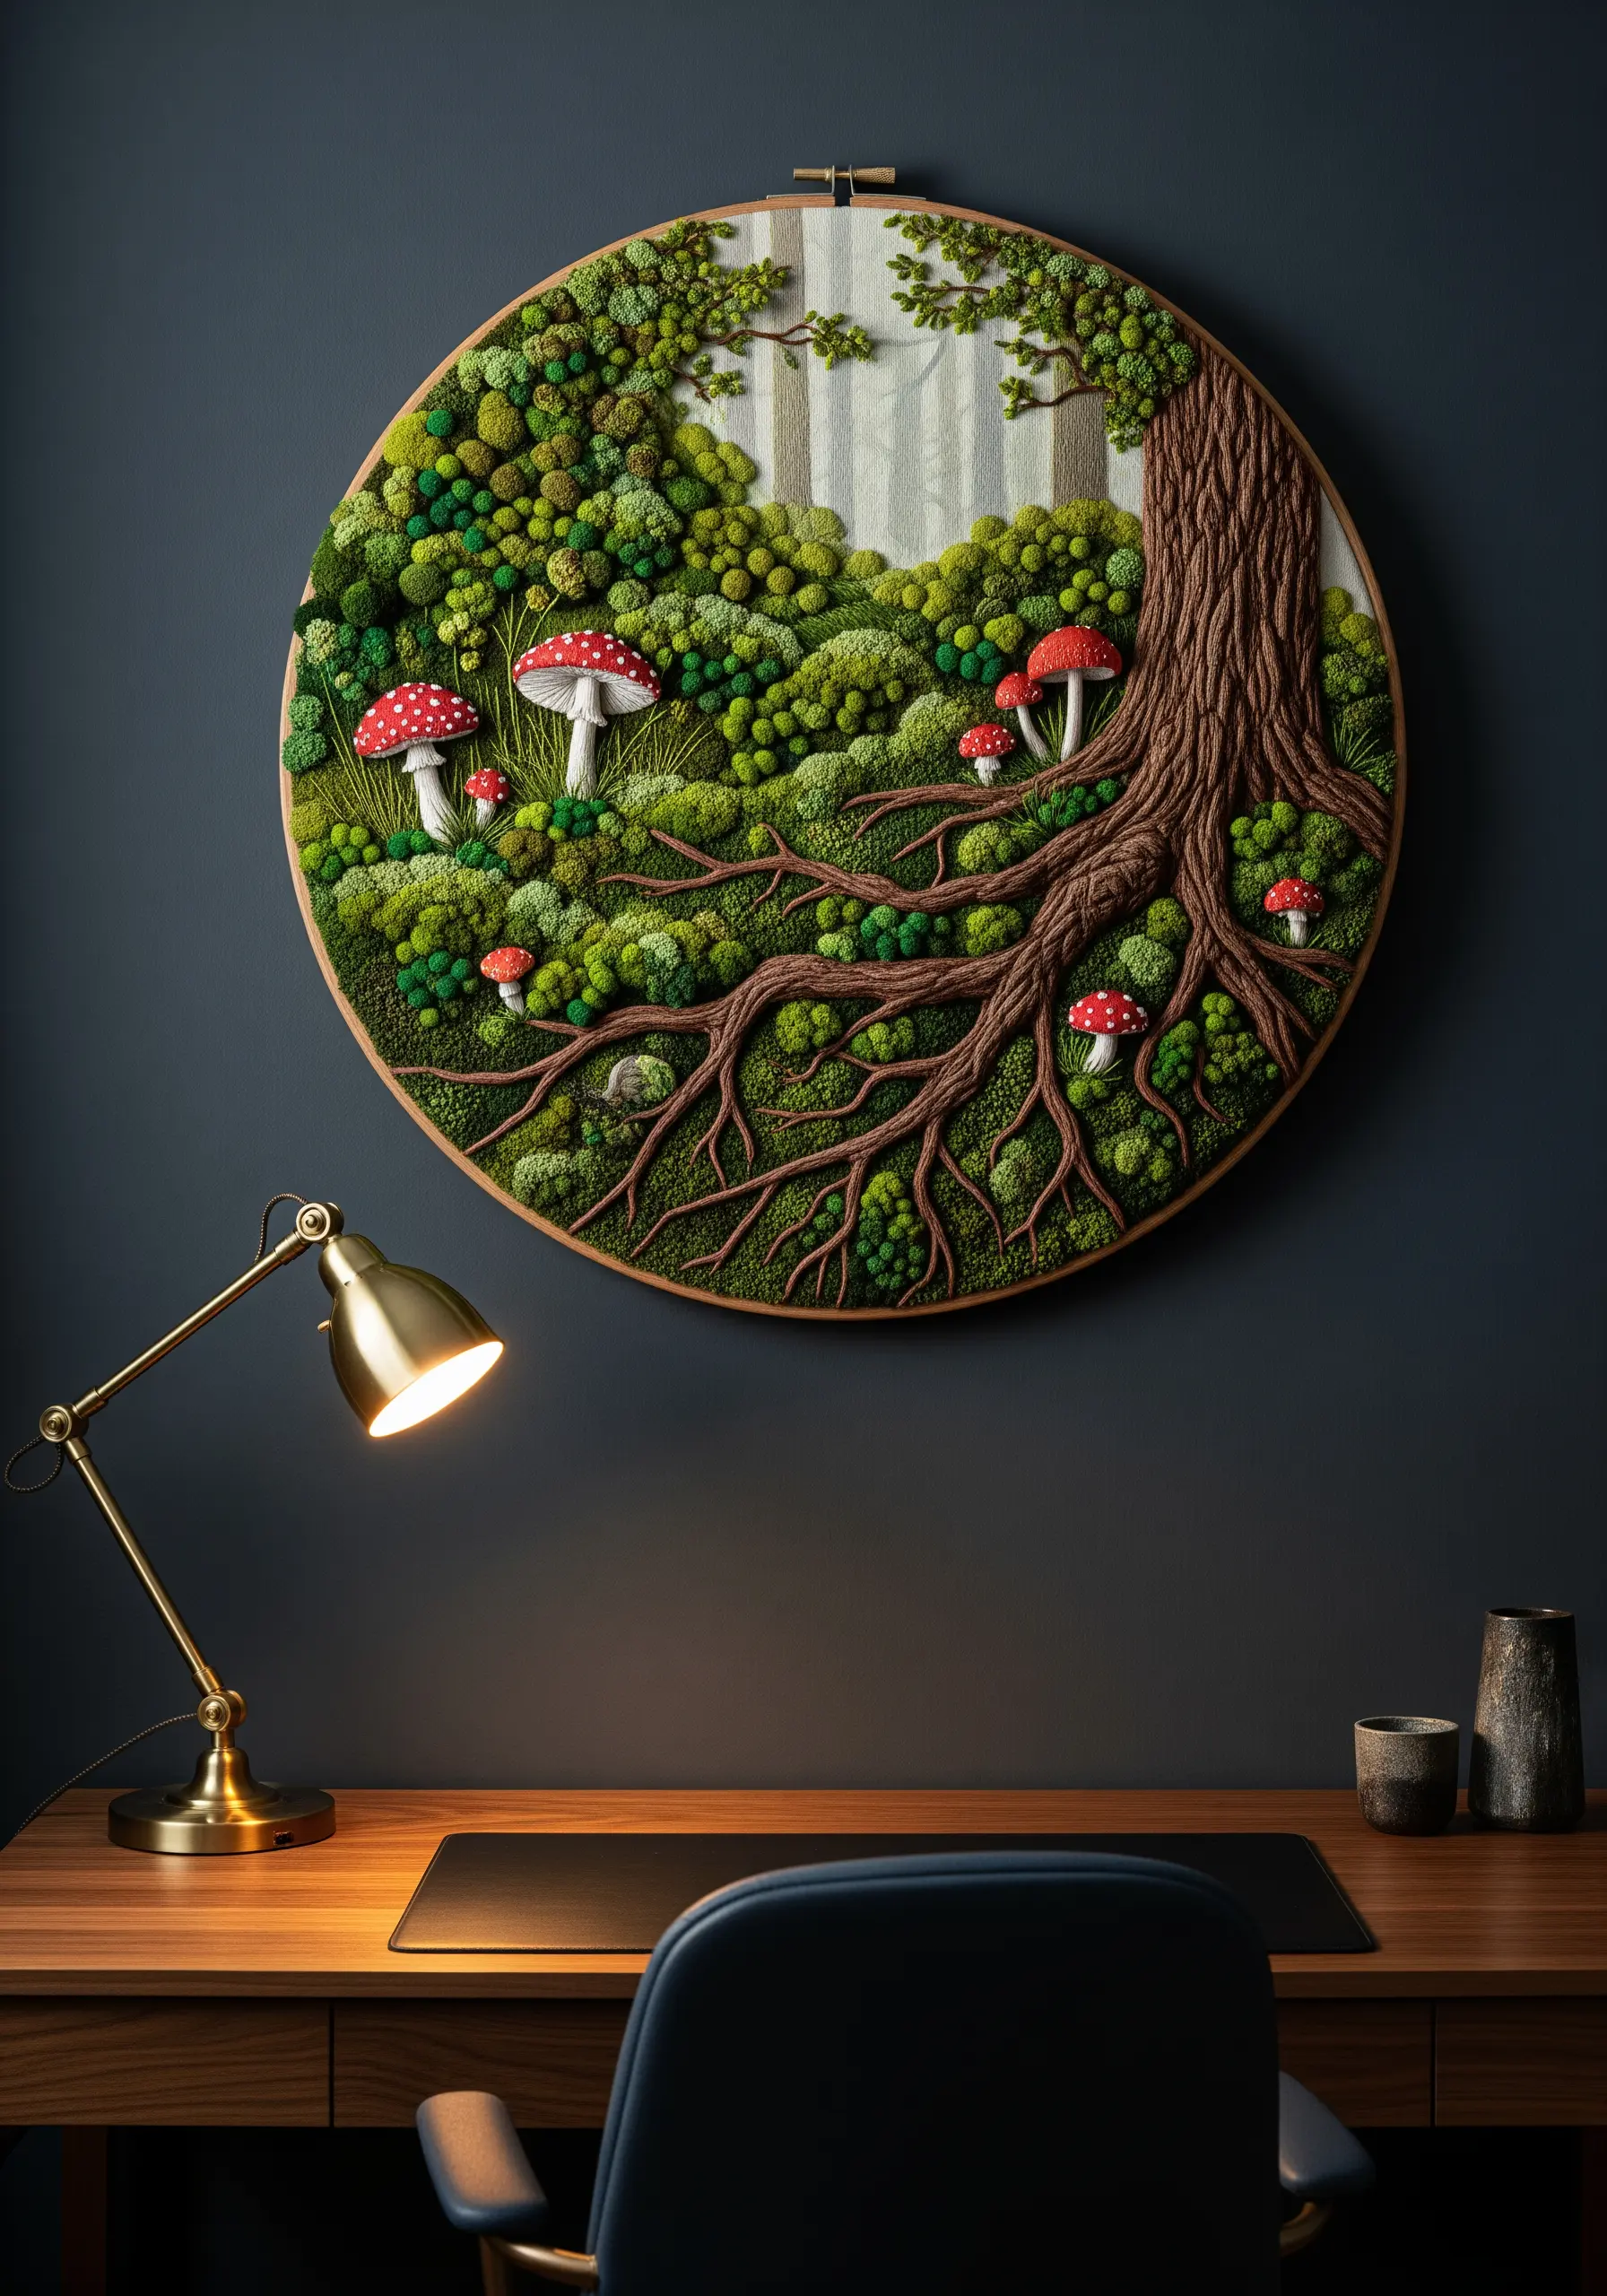
Create an immersive woodland scene by focusing on layered textures that invite touch.
Use dense French knots and turkey work with variegated green threads to form a mossy base that rises off the fabric.
For the mushrooms, apply padded satin stitch by layering felt shapes underneath your stitching—this gives them a soft, rounded volume.
The tree roots gain realism from couching thick, twisted brown yarn onto the surface, which mimics the gnarled texture of real bark far better than simple stitches alone.
This combination of high-relief knots and sculptural forms turns a flat hoop into a miniature ecosystem.
2. Sculpt Crashing Waves with Chunky Fibers

Move beyond flat seascapes by sculpting waves with thick, dimensional materials.
Use chunky wool yarn or cotton roving to form the crest of each wave, securing it to the canvas with discreet couching stitches in a matching, thinner thread.
This technique builds dramatic height and form quickly and effectively.
For the seafoam, pack thousands of white and pale blue French knots together, varying their size slightly to create the illusion of bubbling water.
The contrast between the smooth, couched yarn and the pointillist texture of the knots gives the piece its dynamic energy.
3. Weave an Underwater Coral Garden
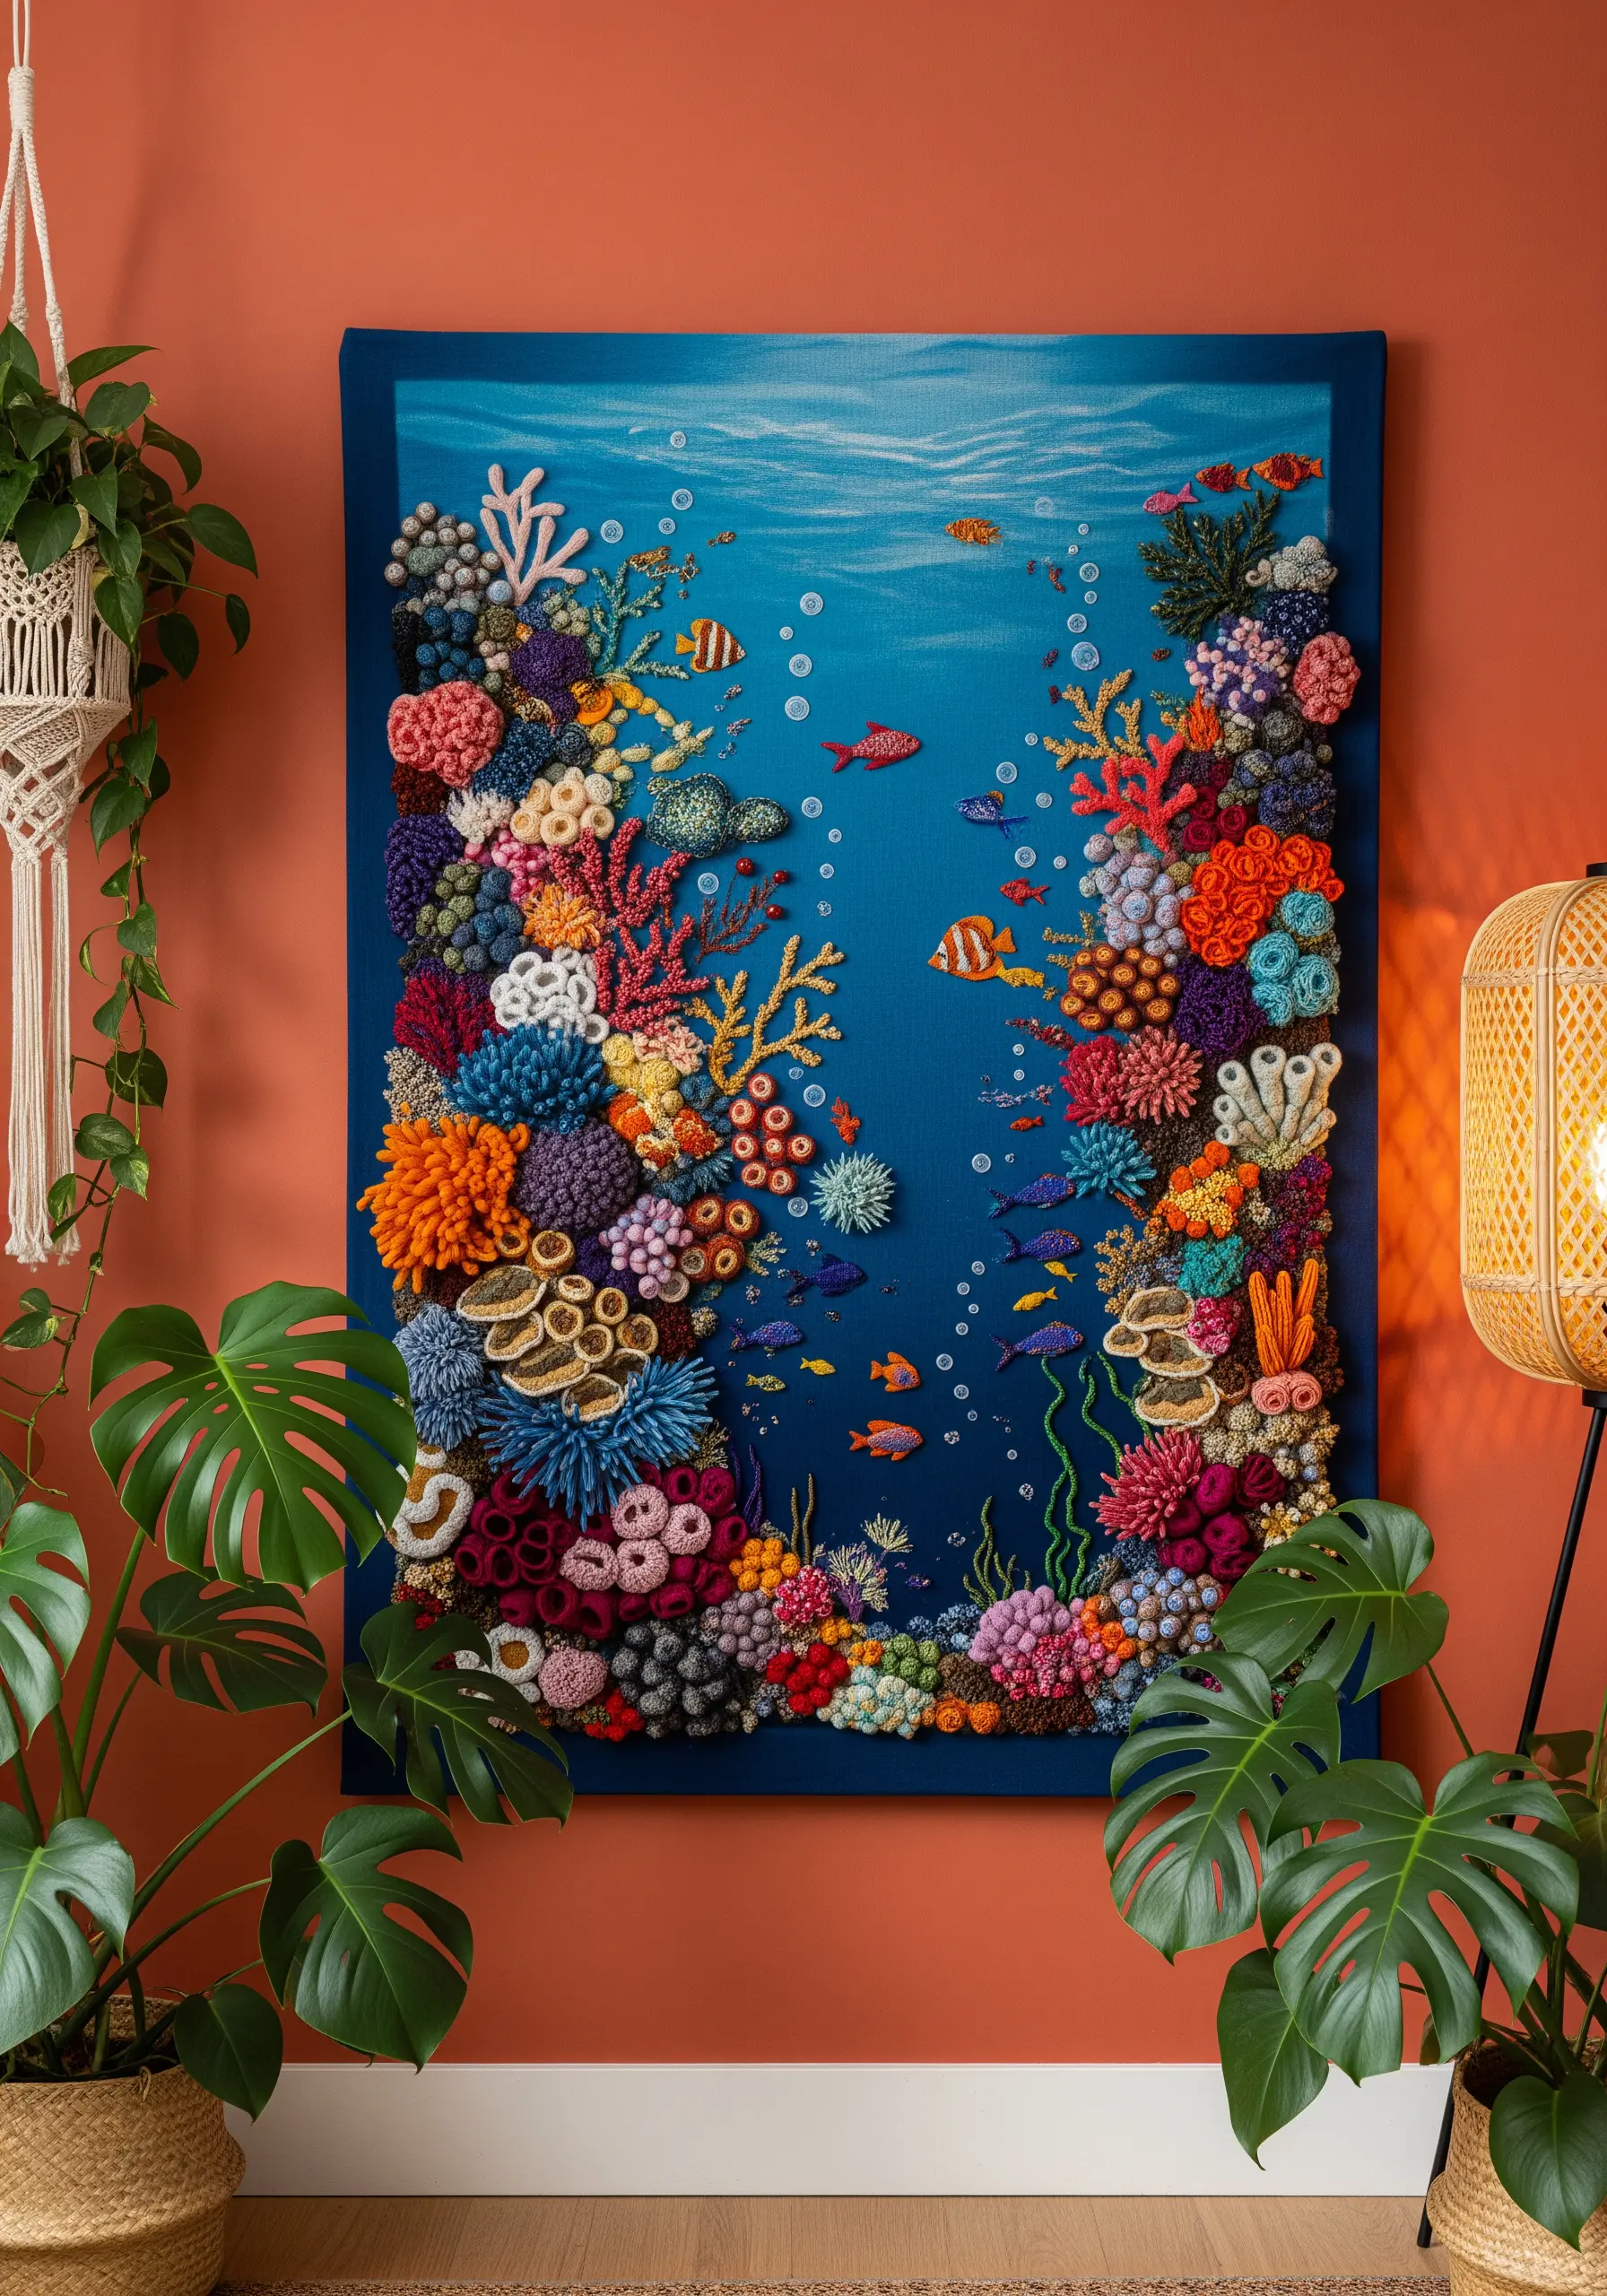
A vibrant coral reef is the perfect subject for a sampler of dimensional stitches.
Combine bullion knots for tubular corals, turkey work for soft, anemone-like textures, and cast-on stitches for fan shapes.
Don’t stitch everything flat against the fabric; allow some elements to rise and overlap, just as they would in nature.
Integrate seed beads and tiny pearls to mimic the sparkle of light underwater and add another layer of texture.
The key is density and variety—group different stitches and colors closely to build a rich, tactile ecosystem that feels alive.
4. Create Delicate Blossoms with Stumpwork
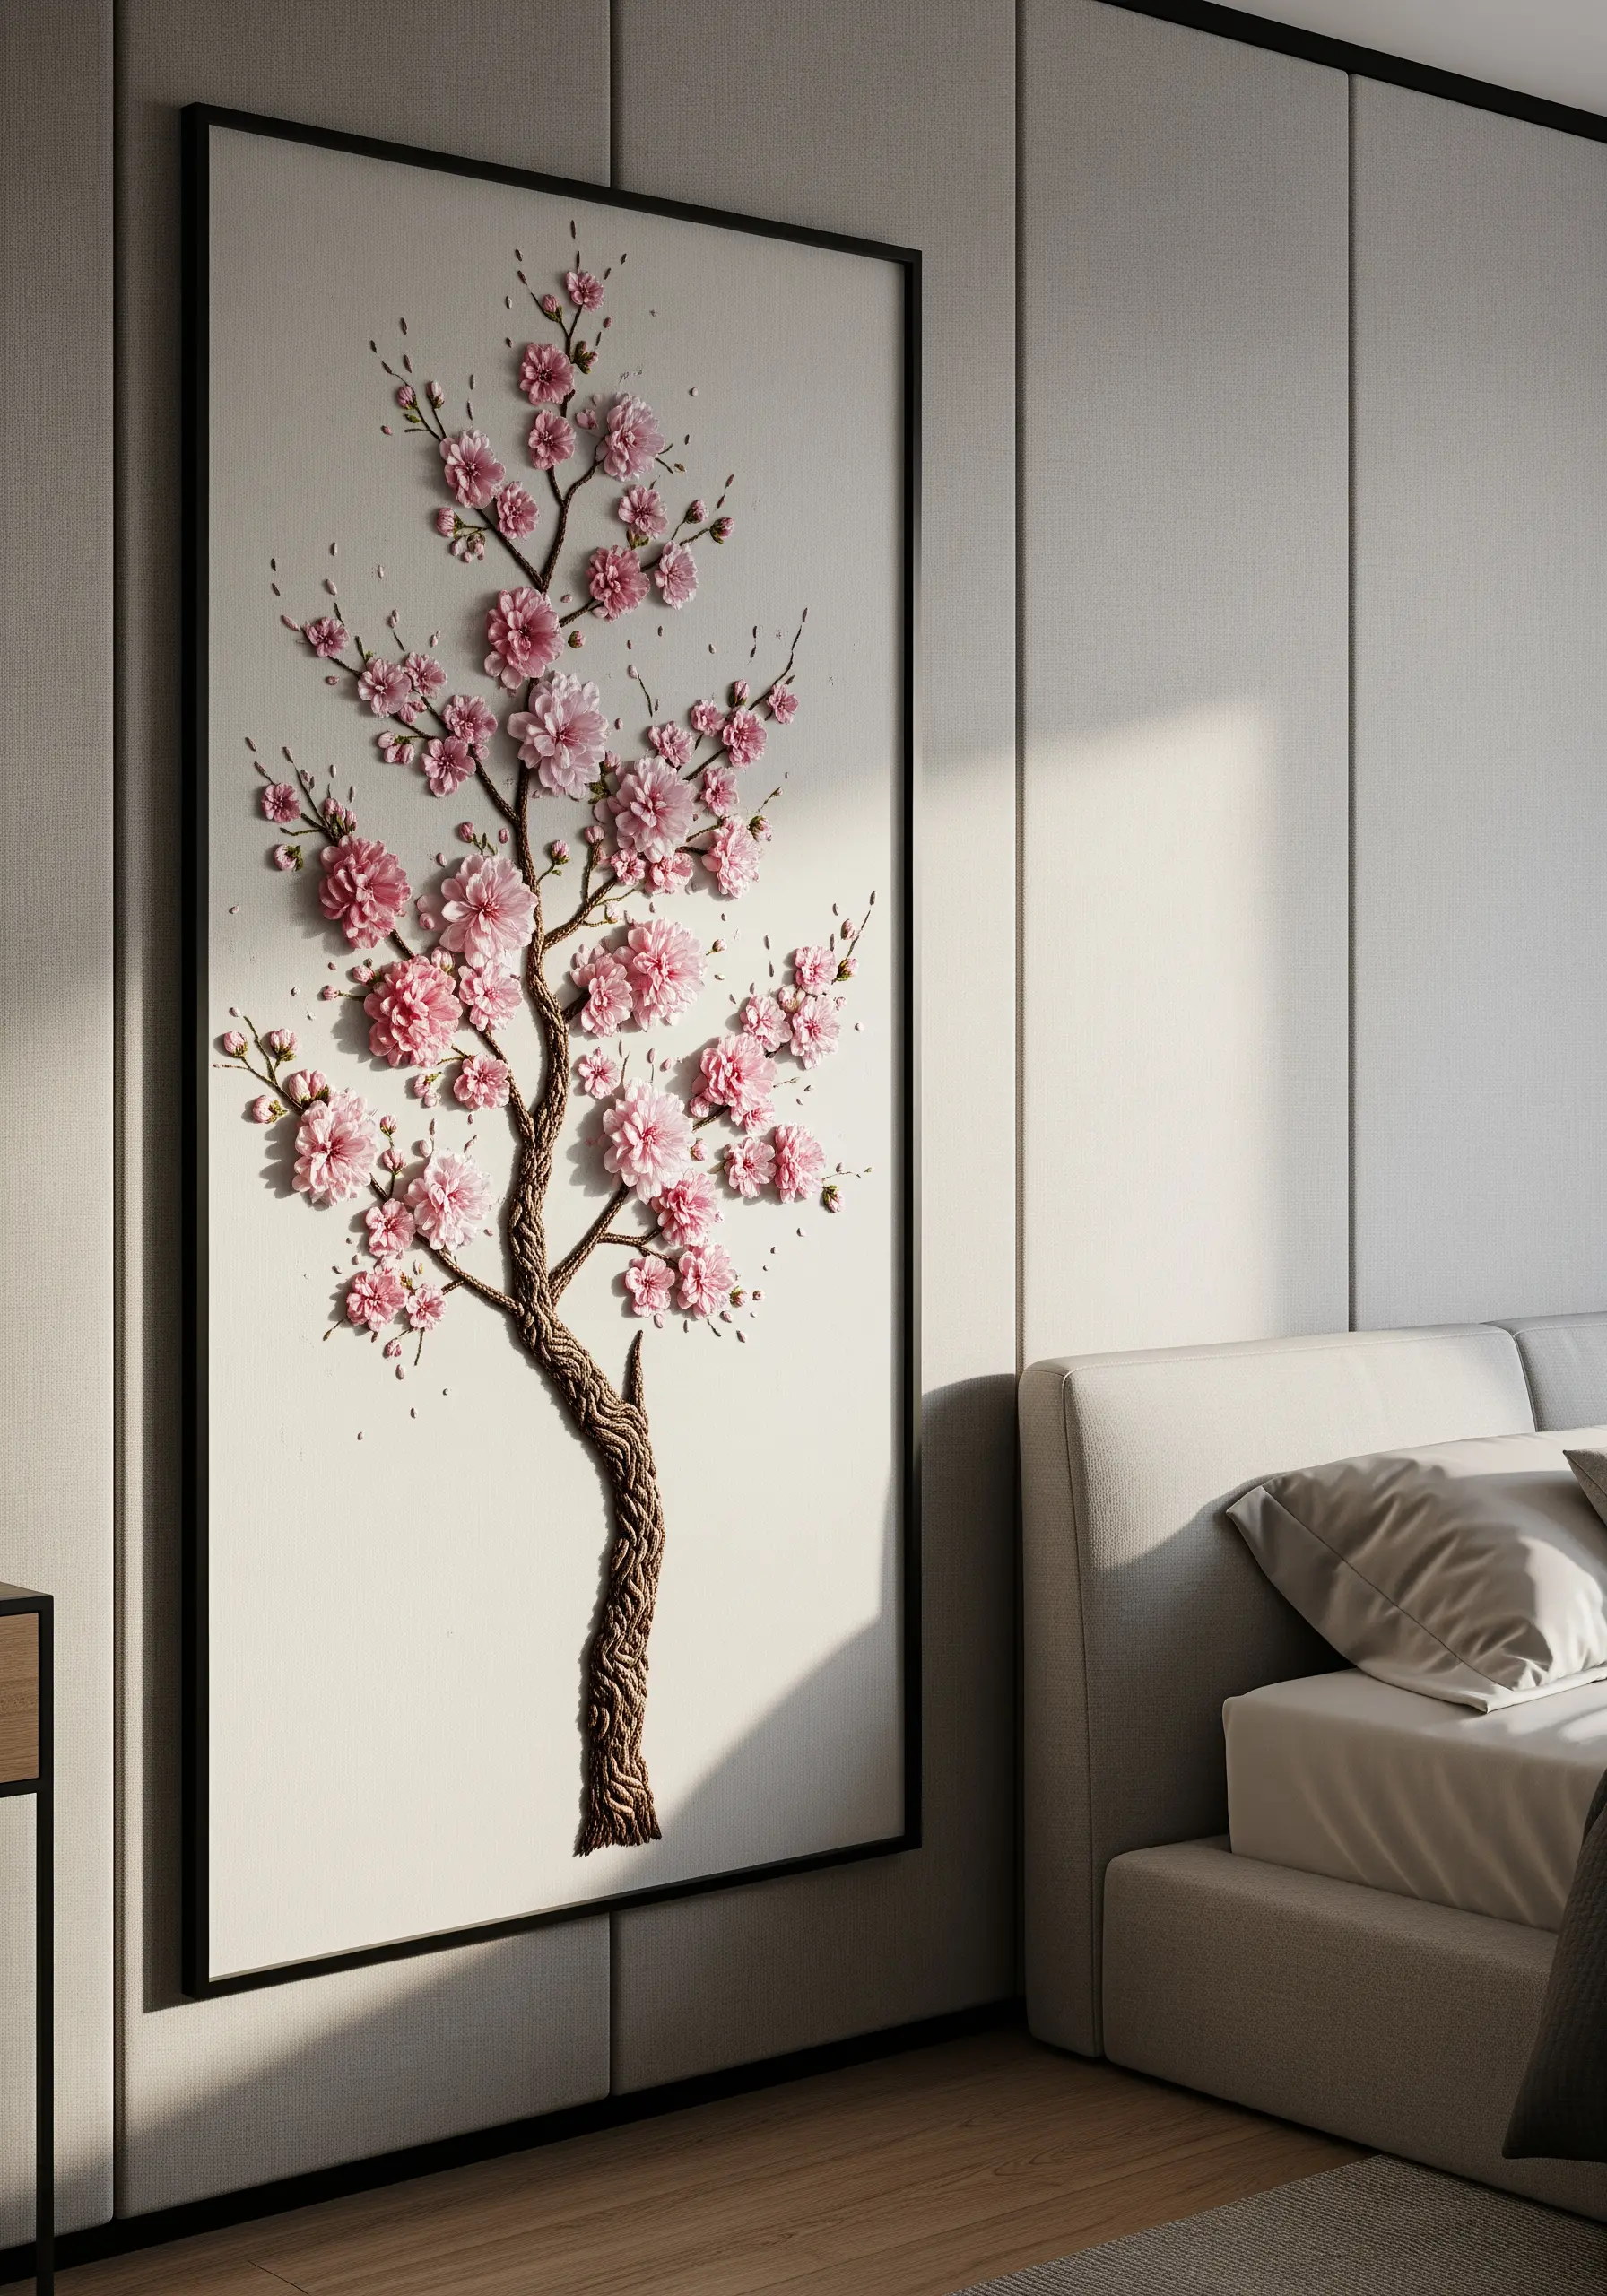
Give your floral embroidery realistic dimension by crafting the petals separately from the background fabric.
Using the stumpwork technique, create individual petals over a wire frame with buttonhole stitch or use floral-inspired ribbon embroidery.
Once complete, you can bend and shape these petals, attaching them to the branch at just the base.
This allows them to lift off the canvas, creating natural shadows and a sense of fragility.
For the trunk, use a heavily textured stitch like raised stem band or couch a thick, coarse yarn to contrast with the delicate flowers.
5. Master Fur Texture with Directional Thread Painting
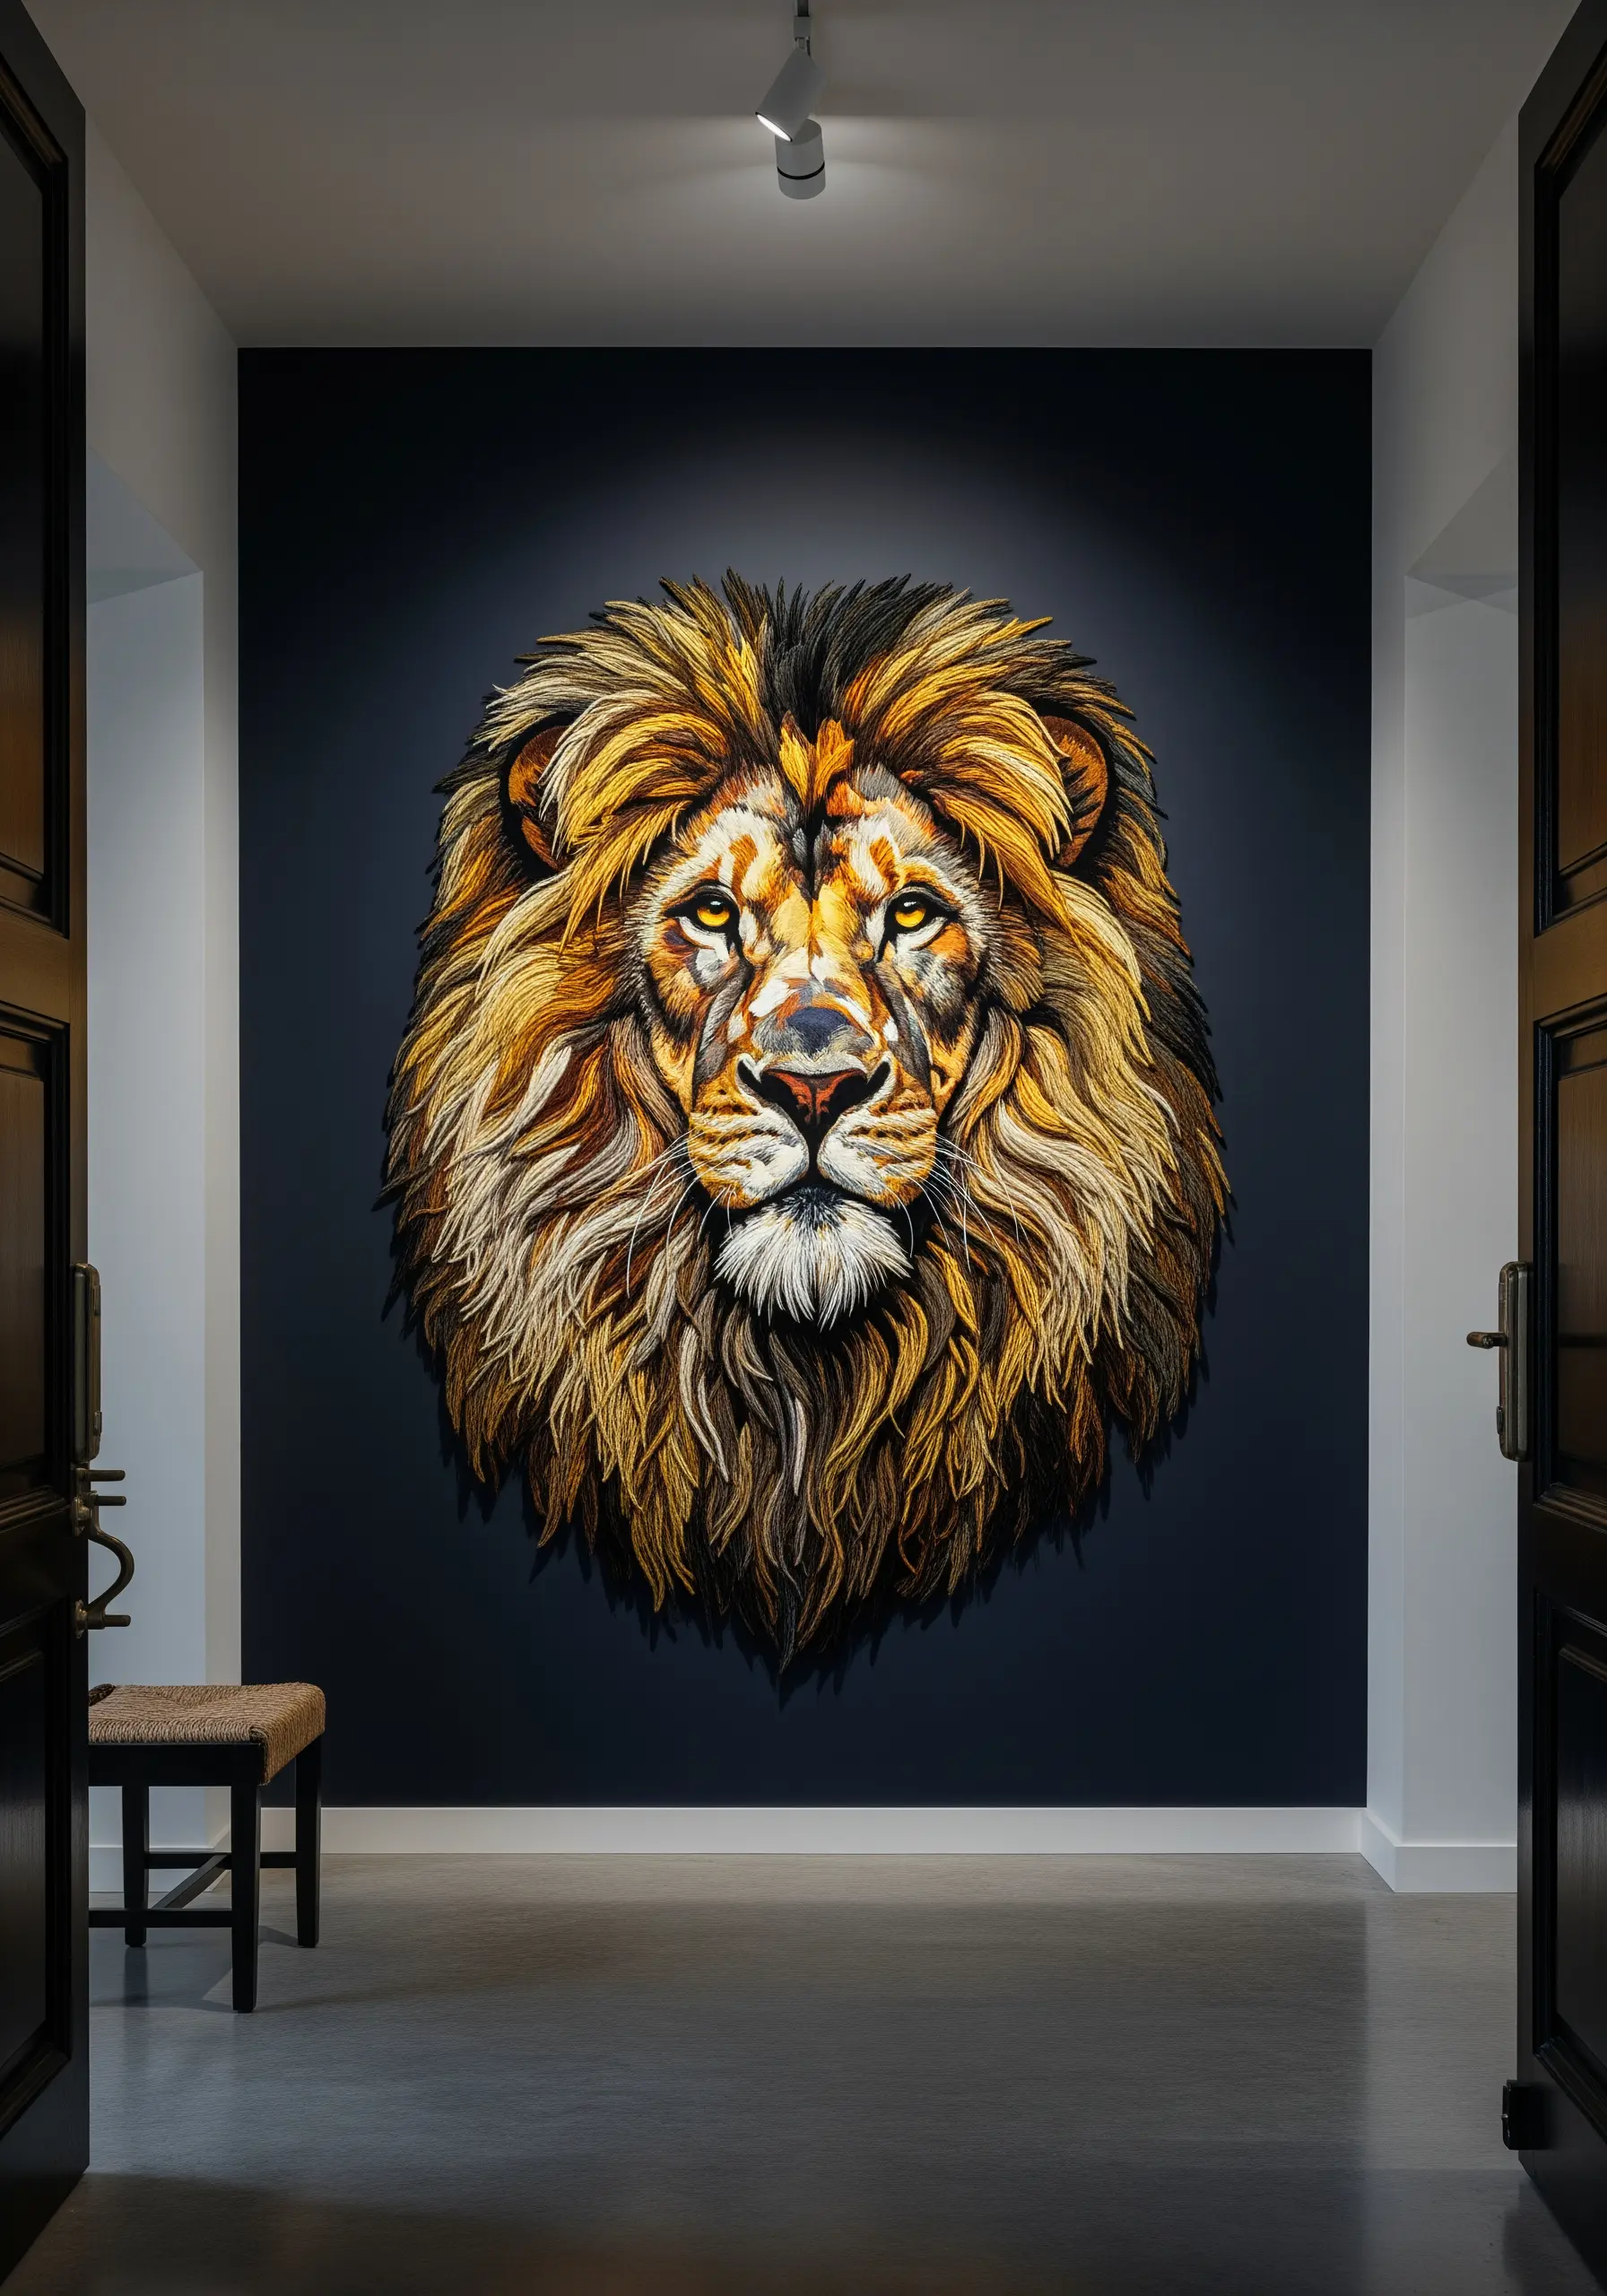
To make an animal portrait feel truly alive, the direction of your stitches is everything.
Map out the flow of the fur before you begin, noting how it radiates from the face and clumps in the mane.
Use single-strand long-and-short stitch, layering colors to build depth—start with darker base tones and add lighter highlights on top.
Vary your stitch length to avoid a uniform look, creating small, soft stitches around the eyes and long, sweeping ones for the mane.
This meticulous technique is what separates a flat image from a portrait that breathes.
6. Sculpt Succulents with Padded Stitches
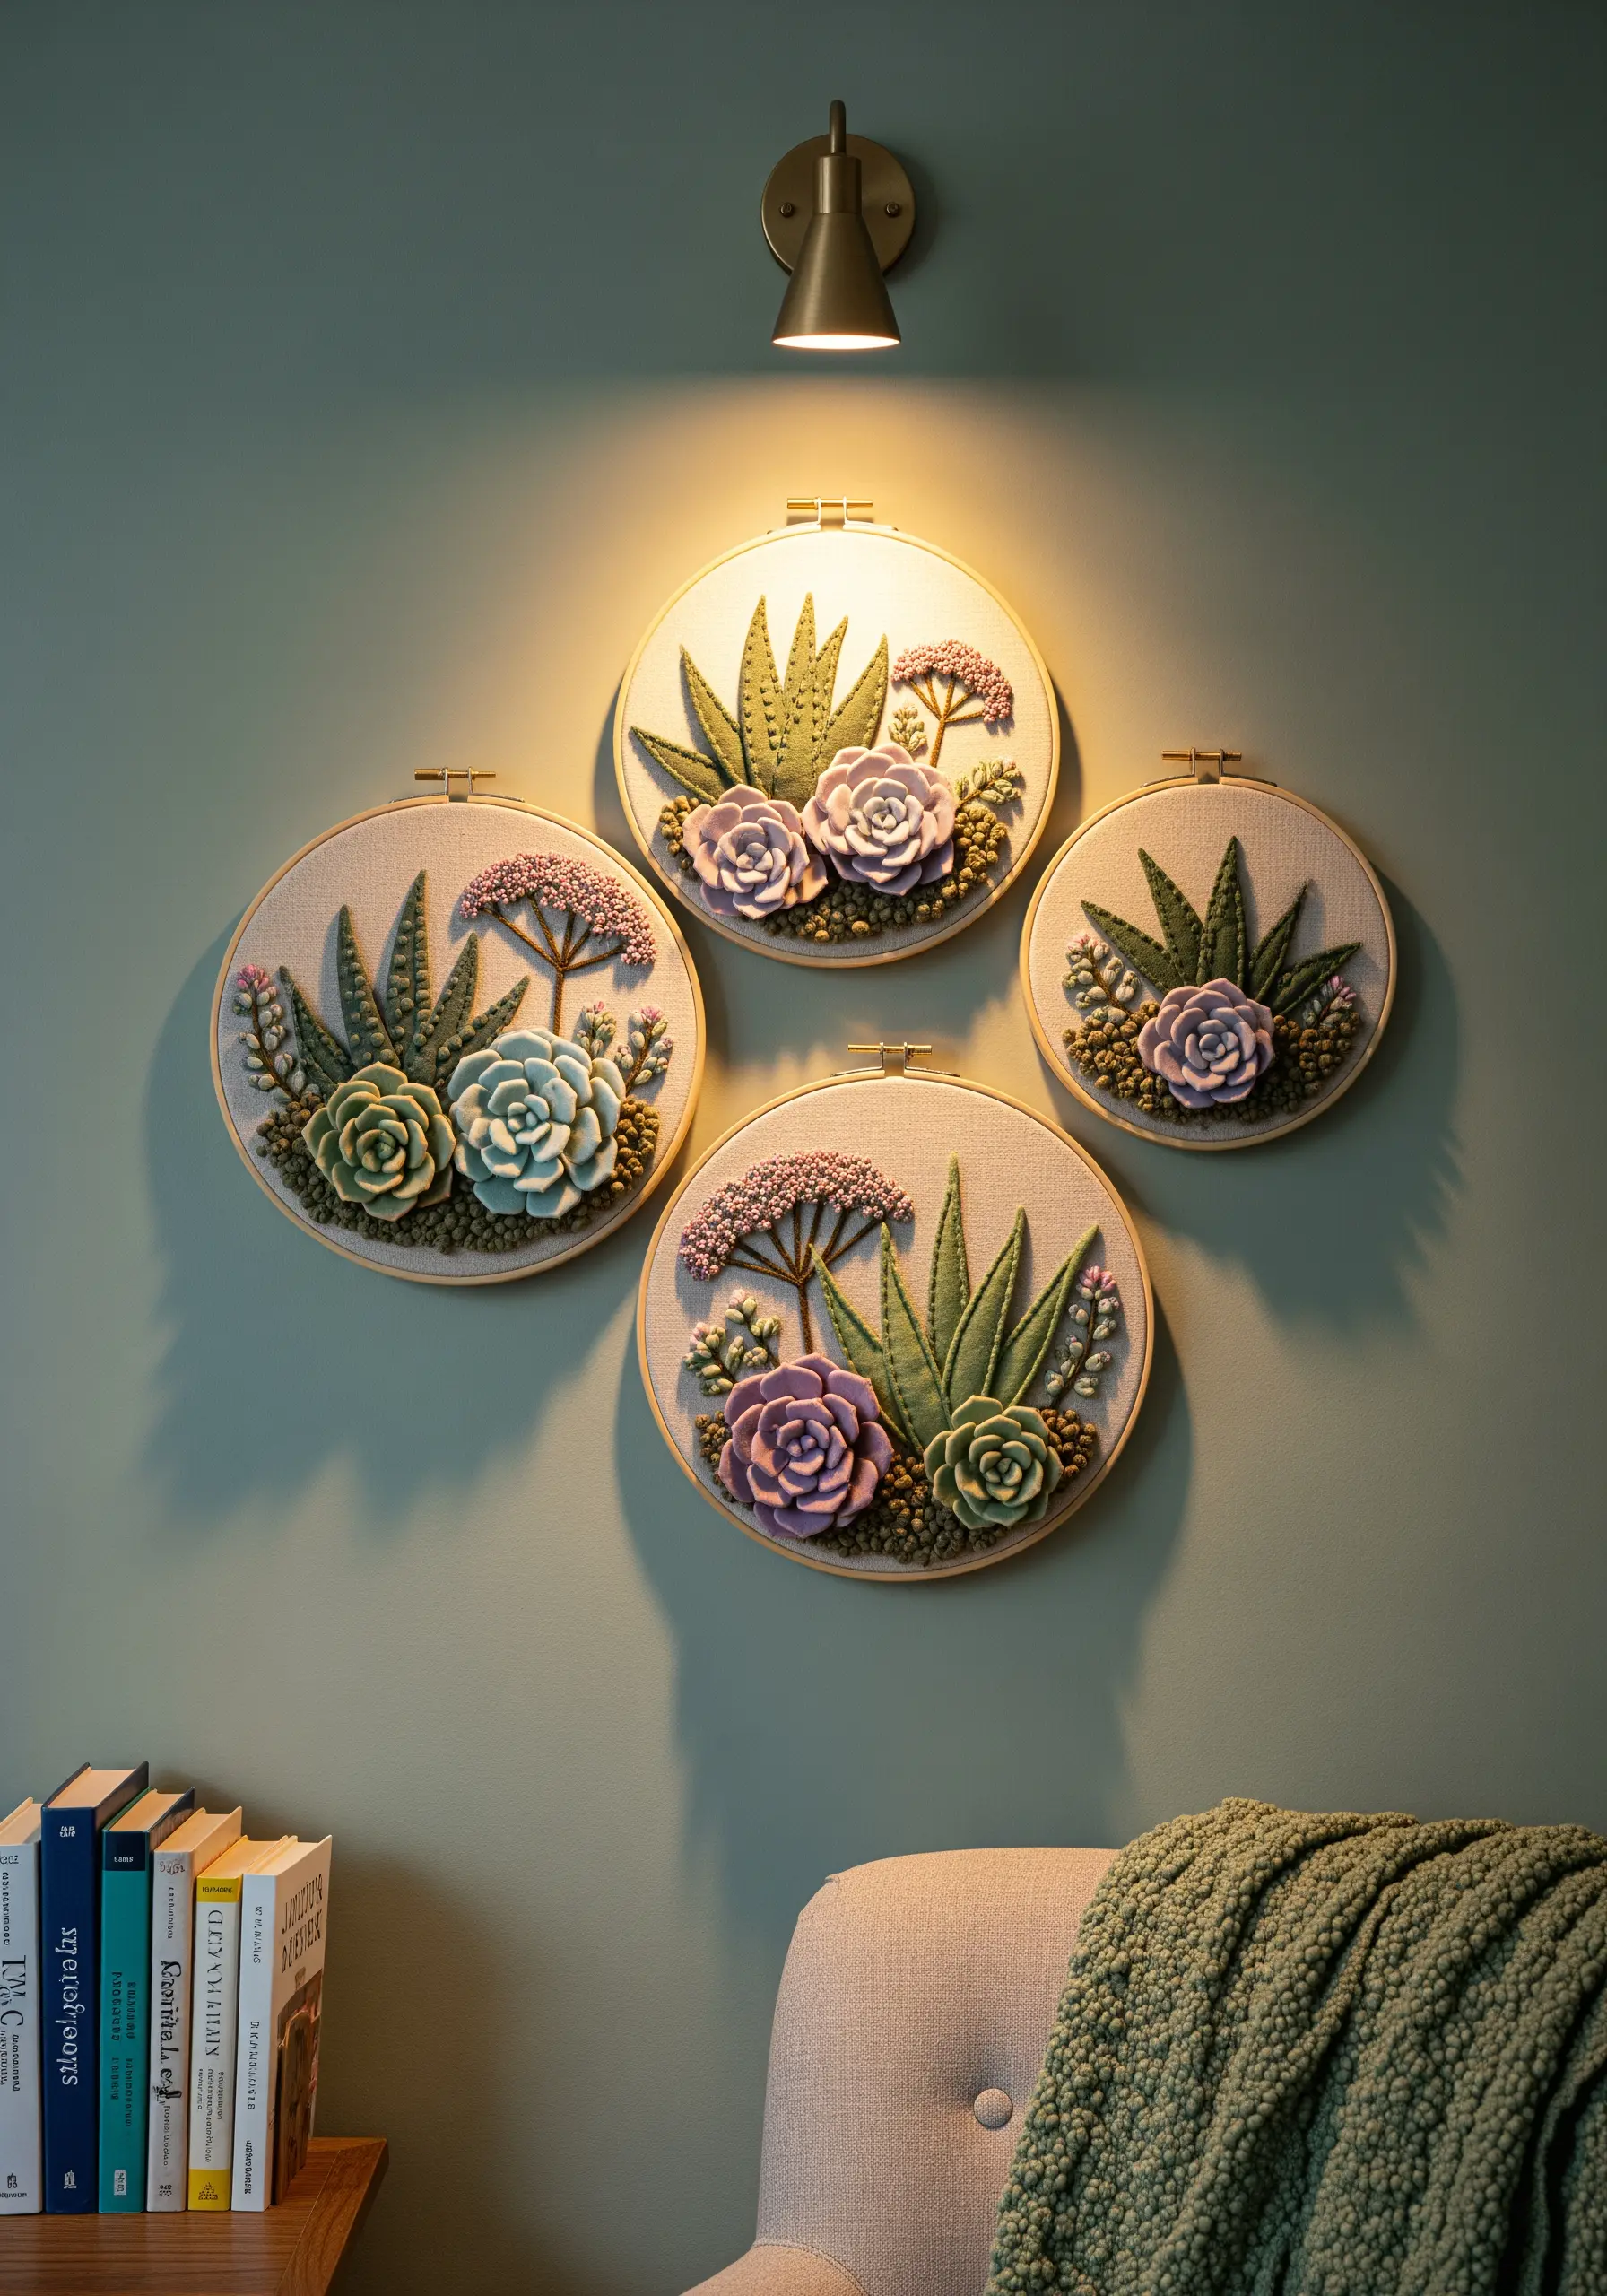
Capture the plump, fleshy look of succulents by building their form with dimensional stitches.
The cast-on stitch is perfect for creating the individual leaves of an Echeveria; work them in a spiral from the center out.
For flatter, rosette-style succulents, use detached buttonhole stitch worked in a round.
The spiky leaves of an aloe or agave plant can be made with long, tapered padded satin stitches or wired stumpwork slips for extra rigidity.
Arrange them in a tight cluster in hooped wall collage layouts to create a beautiful, low-maintenance botanical arrangement.
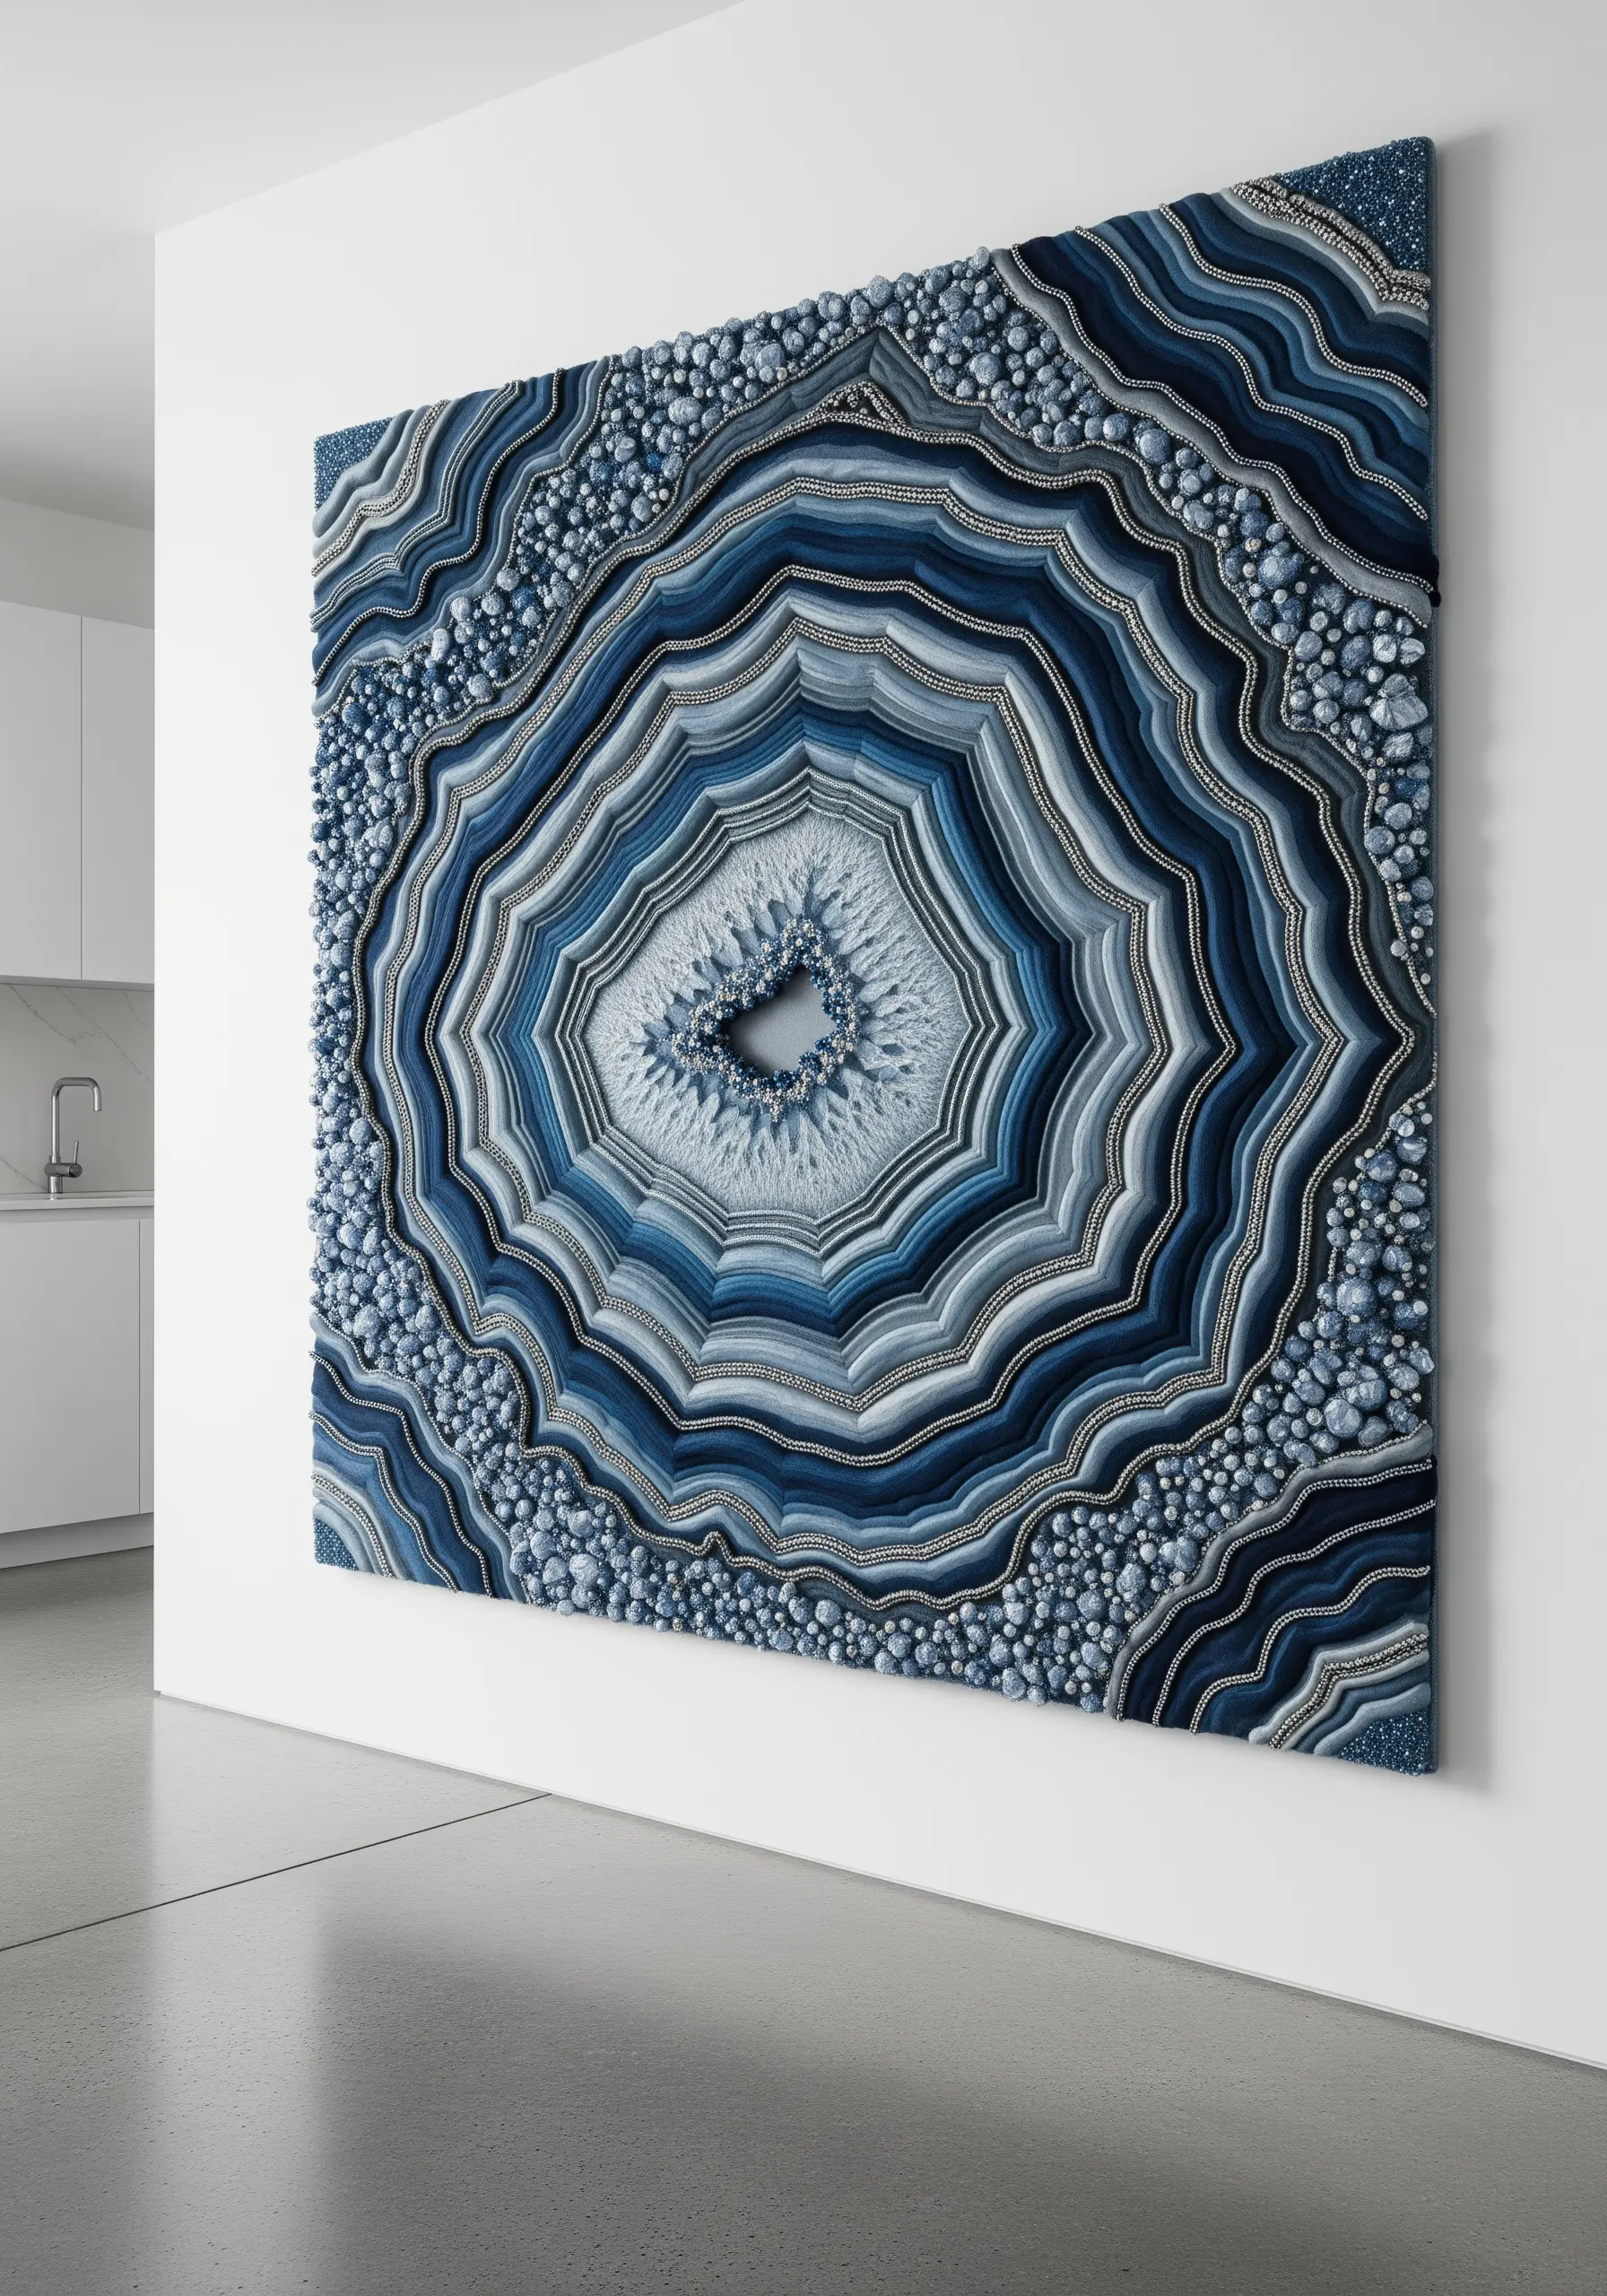
7. Recreate Geode Formations with Beads and Knots
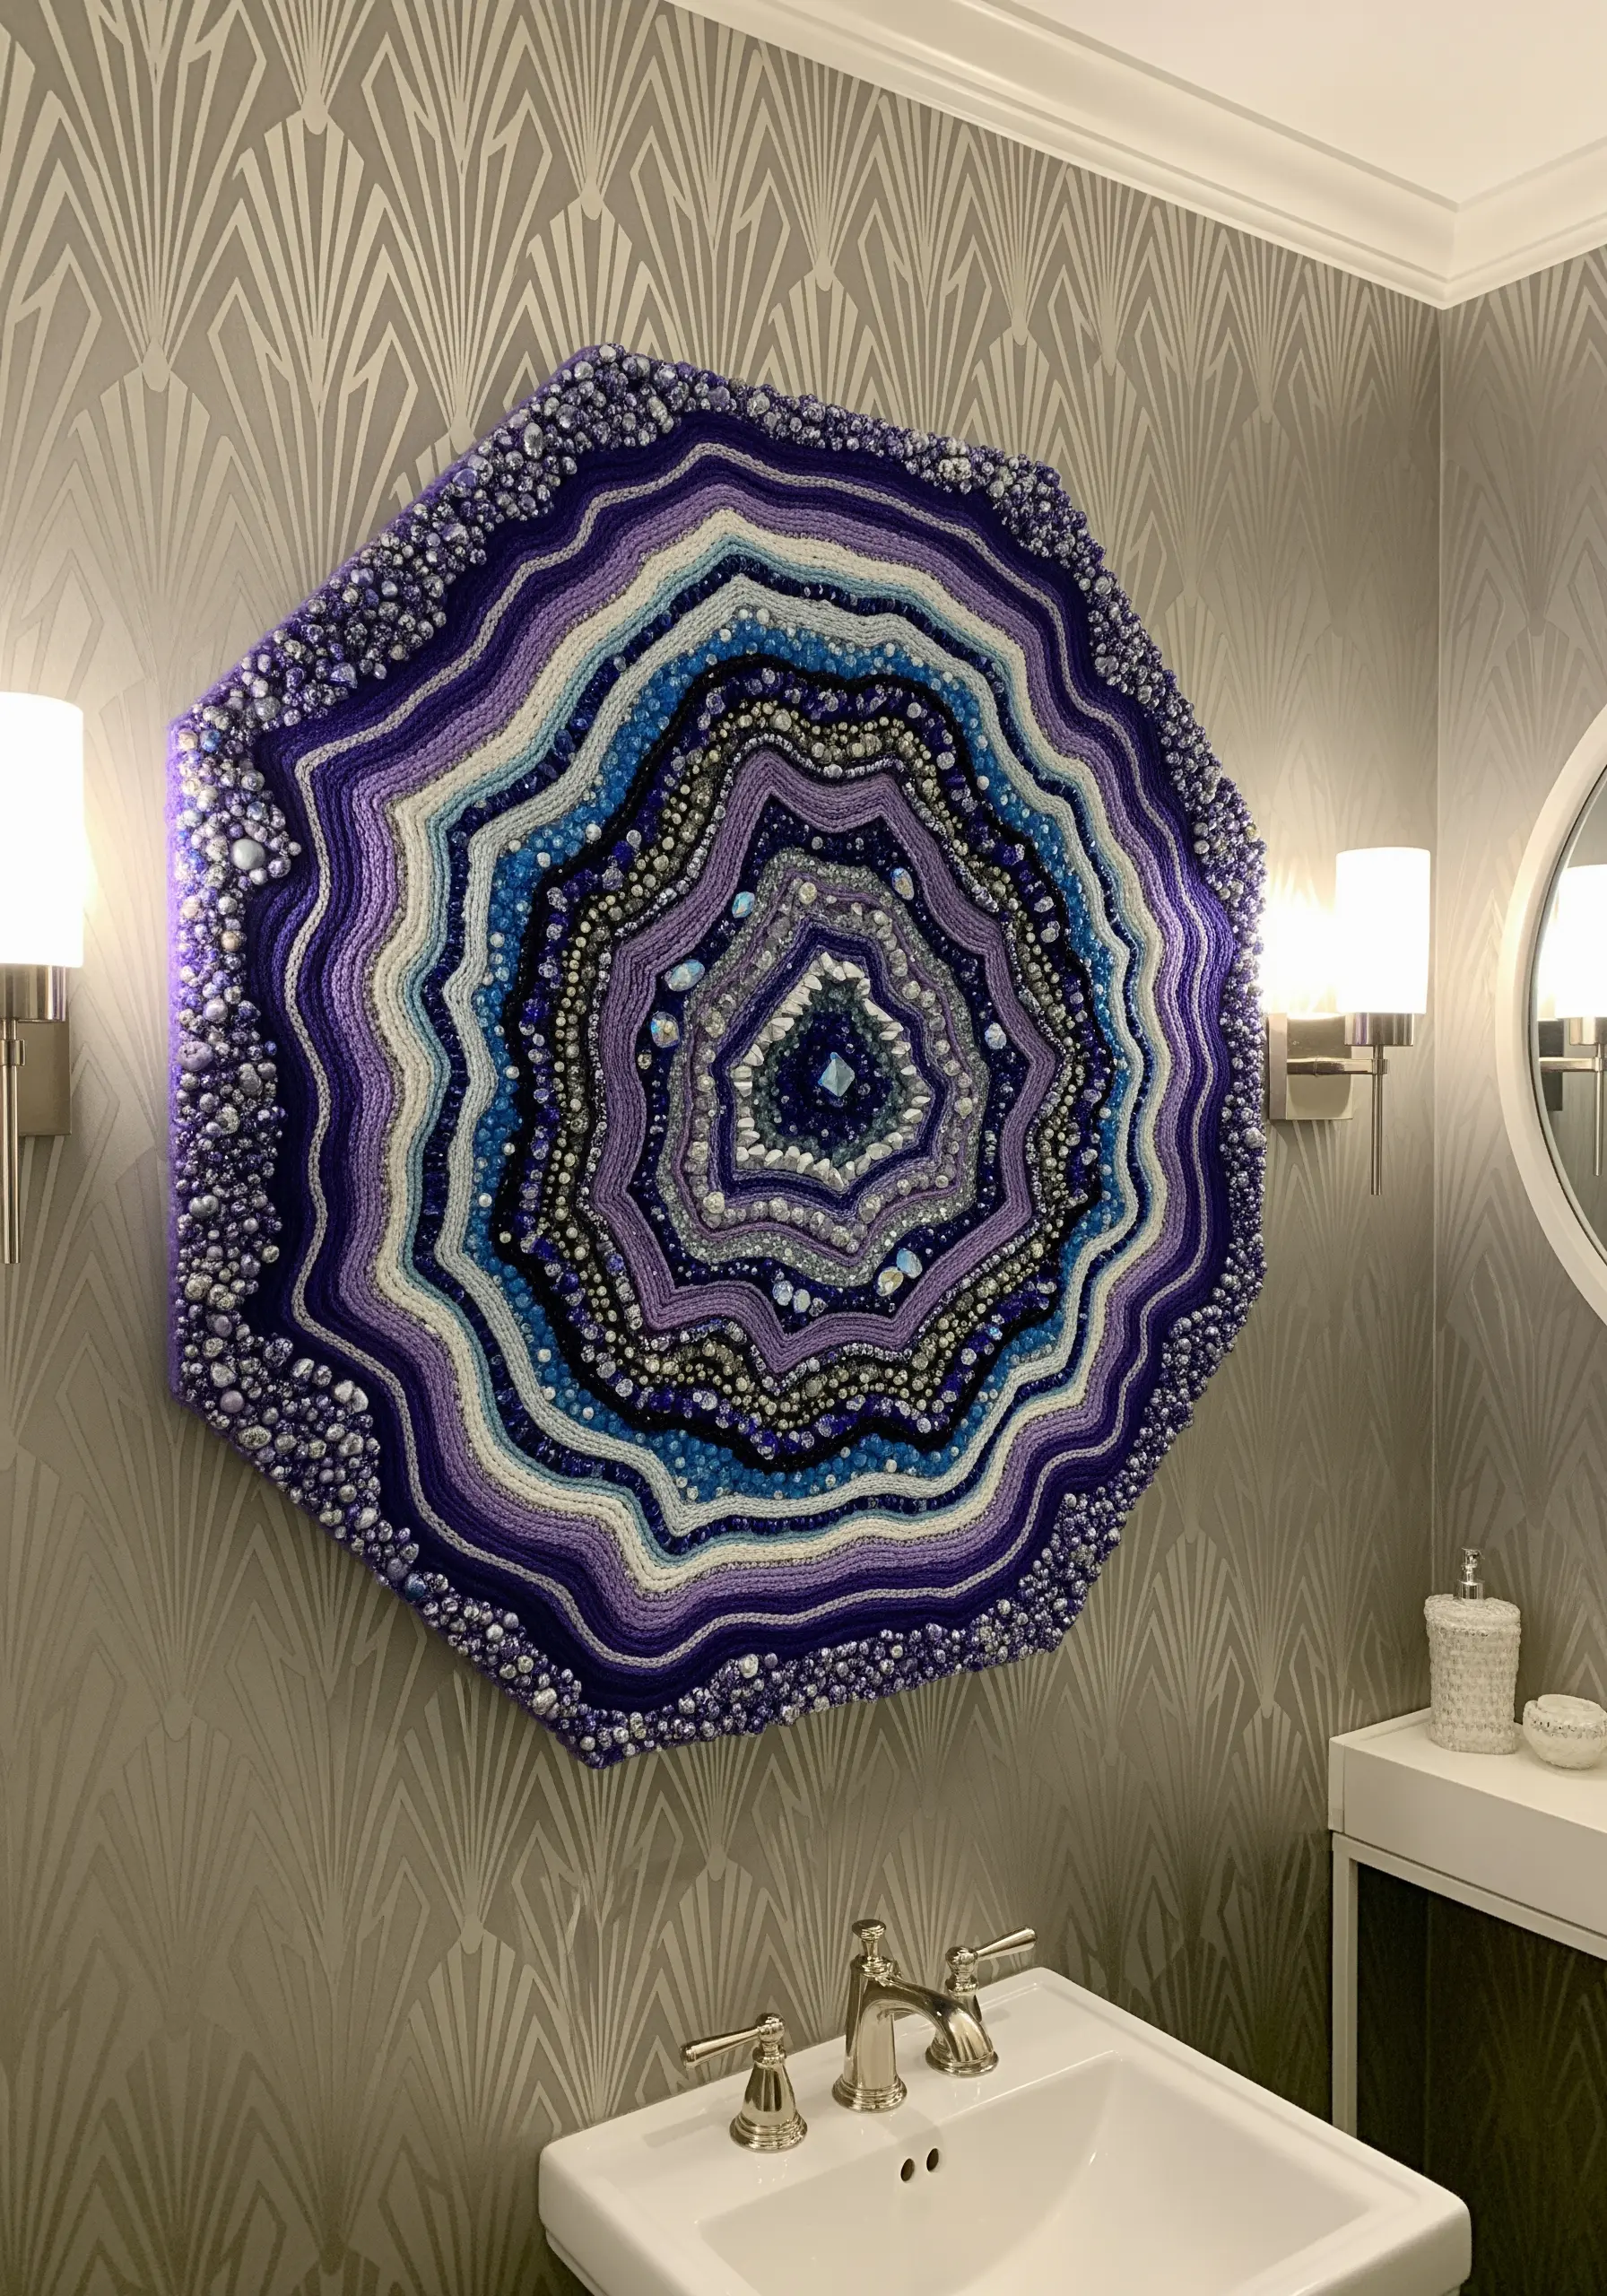
Translate the crystalline structure of a geode into fiber by mixing textures and sheens.
Use concentric rings of stitches, alternating between matte cotton floss and shiny rayon or metallic thread.
Create the rough, crystalline outer layers with dense clusters of French knots and seed beads in various sizes—this is where you can build the most height.
For the smooth inner bands, use perfectly even satin stitch or chain stitch.
This contrast between rough, beaded sections and smooth, stitched lines is what makes the final piece so convincing and tactile.
8. Paint a Landscape with Thread and Perspective
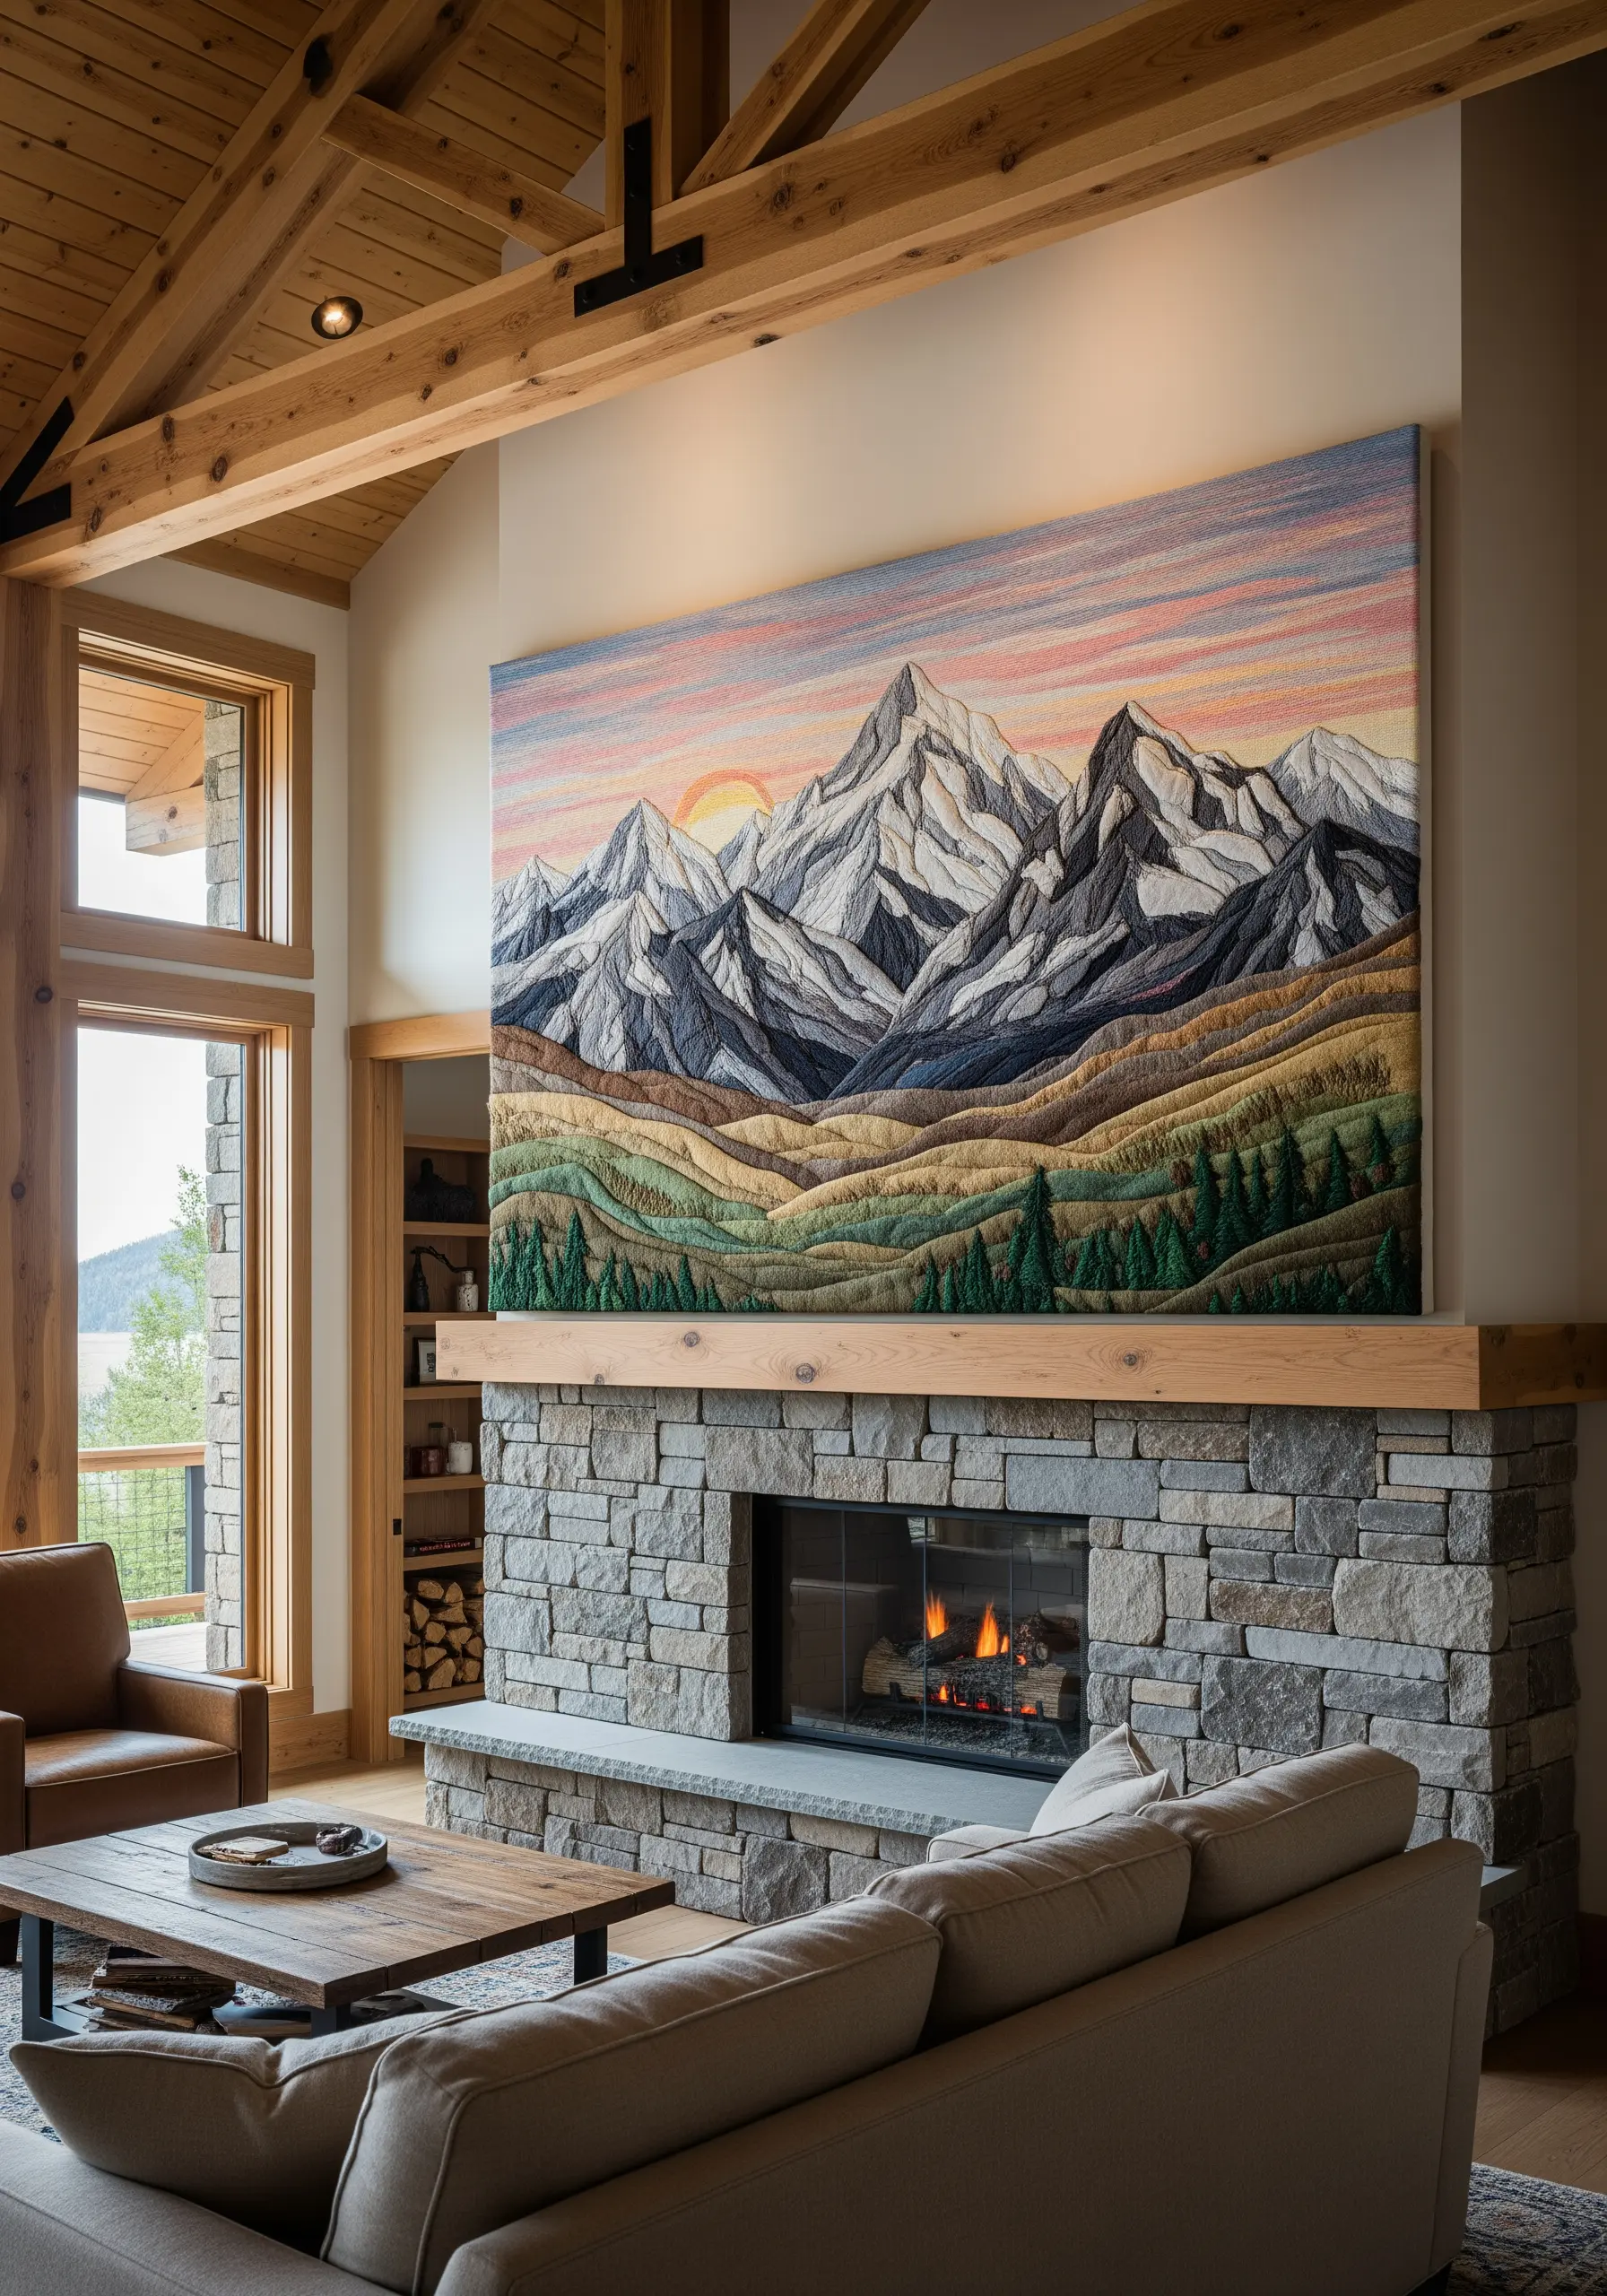
For a large-scale landscape, think like a painter and use thread to create atmospheric perspective.
Stitch the foreground elements, like trees and hills, with thicker threads (perle cotton or multiple strands of floss) and textured stitches like French knots to make them feel closer.
As you move toward the mountains and sky, switch to finer, single-strand threads and smoother stitches like long-and-short or satin stitch.
Use paler, cooler colors for the distant peaks to mimic how the atmosphere affects our perception of color over distance.
9. Form Plump Berries with Padded Knots
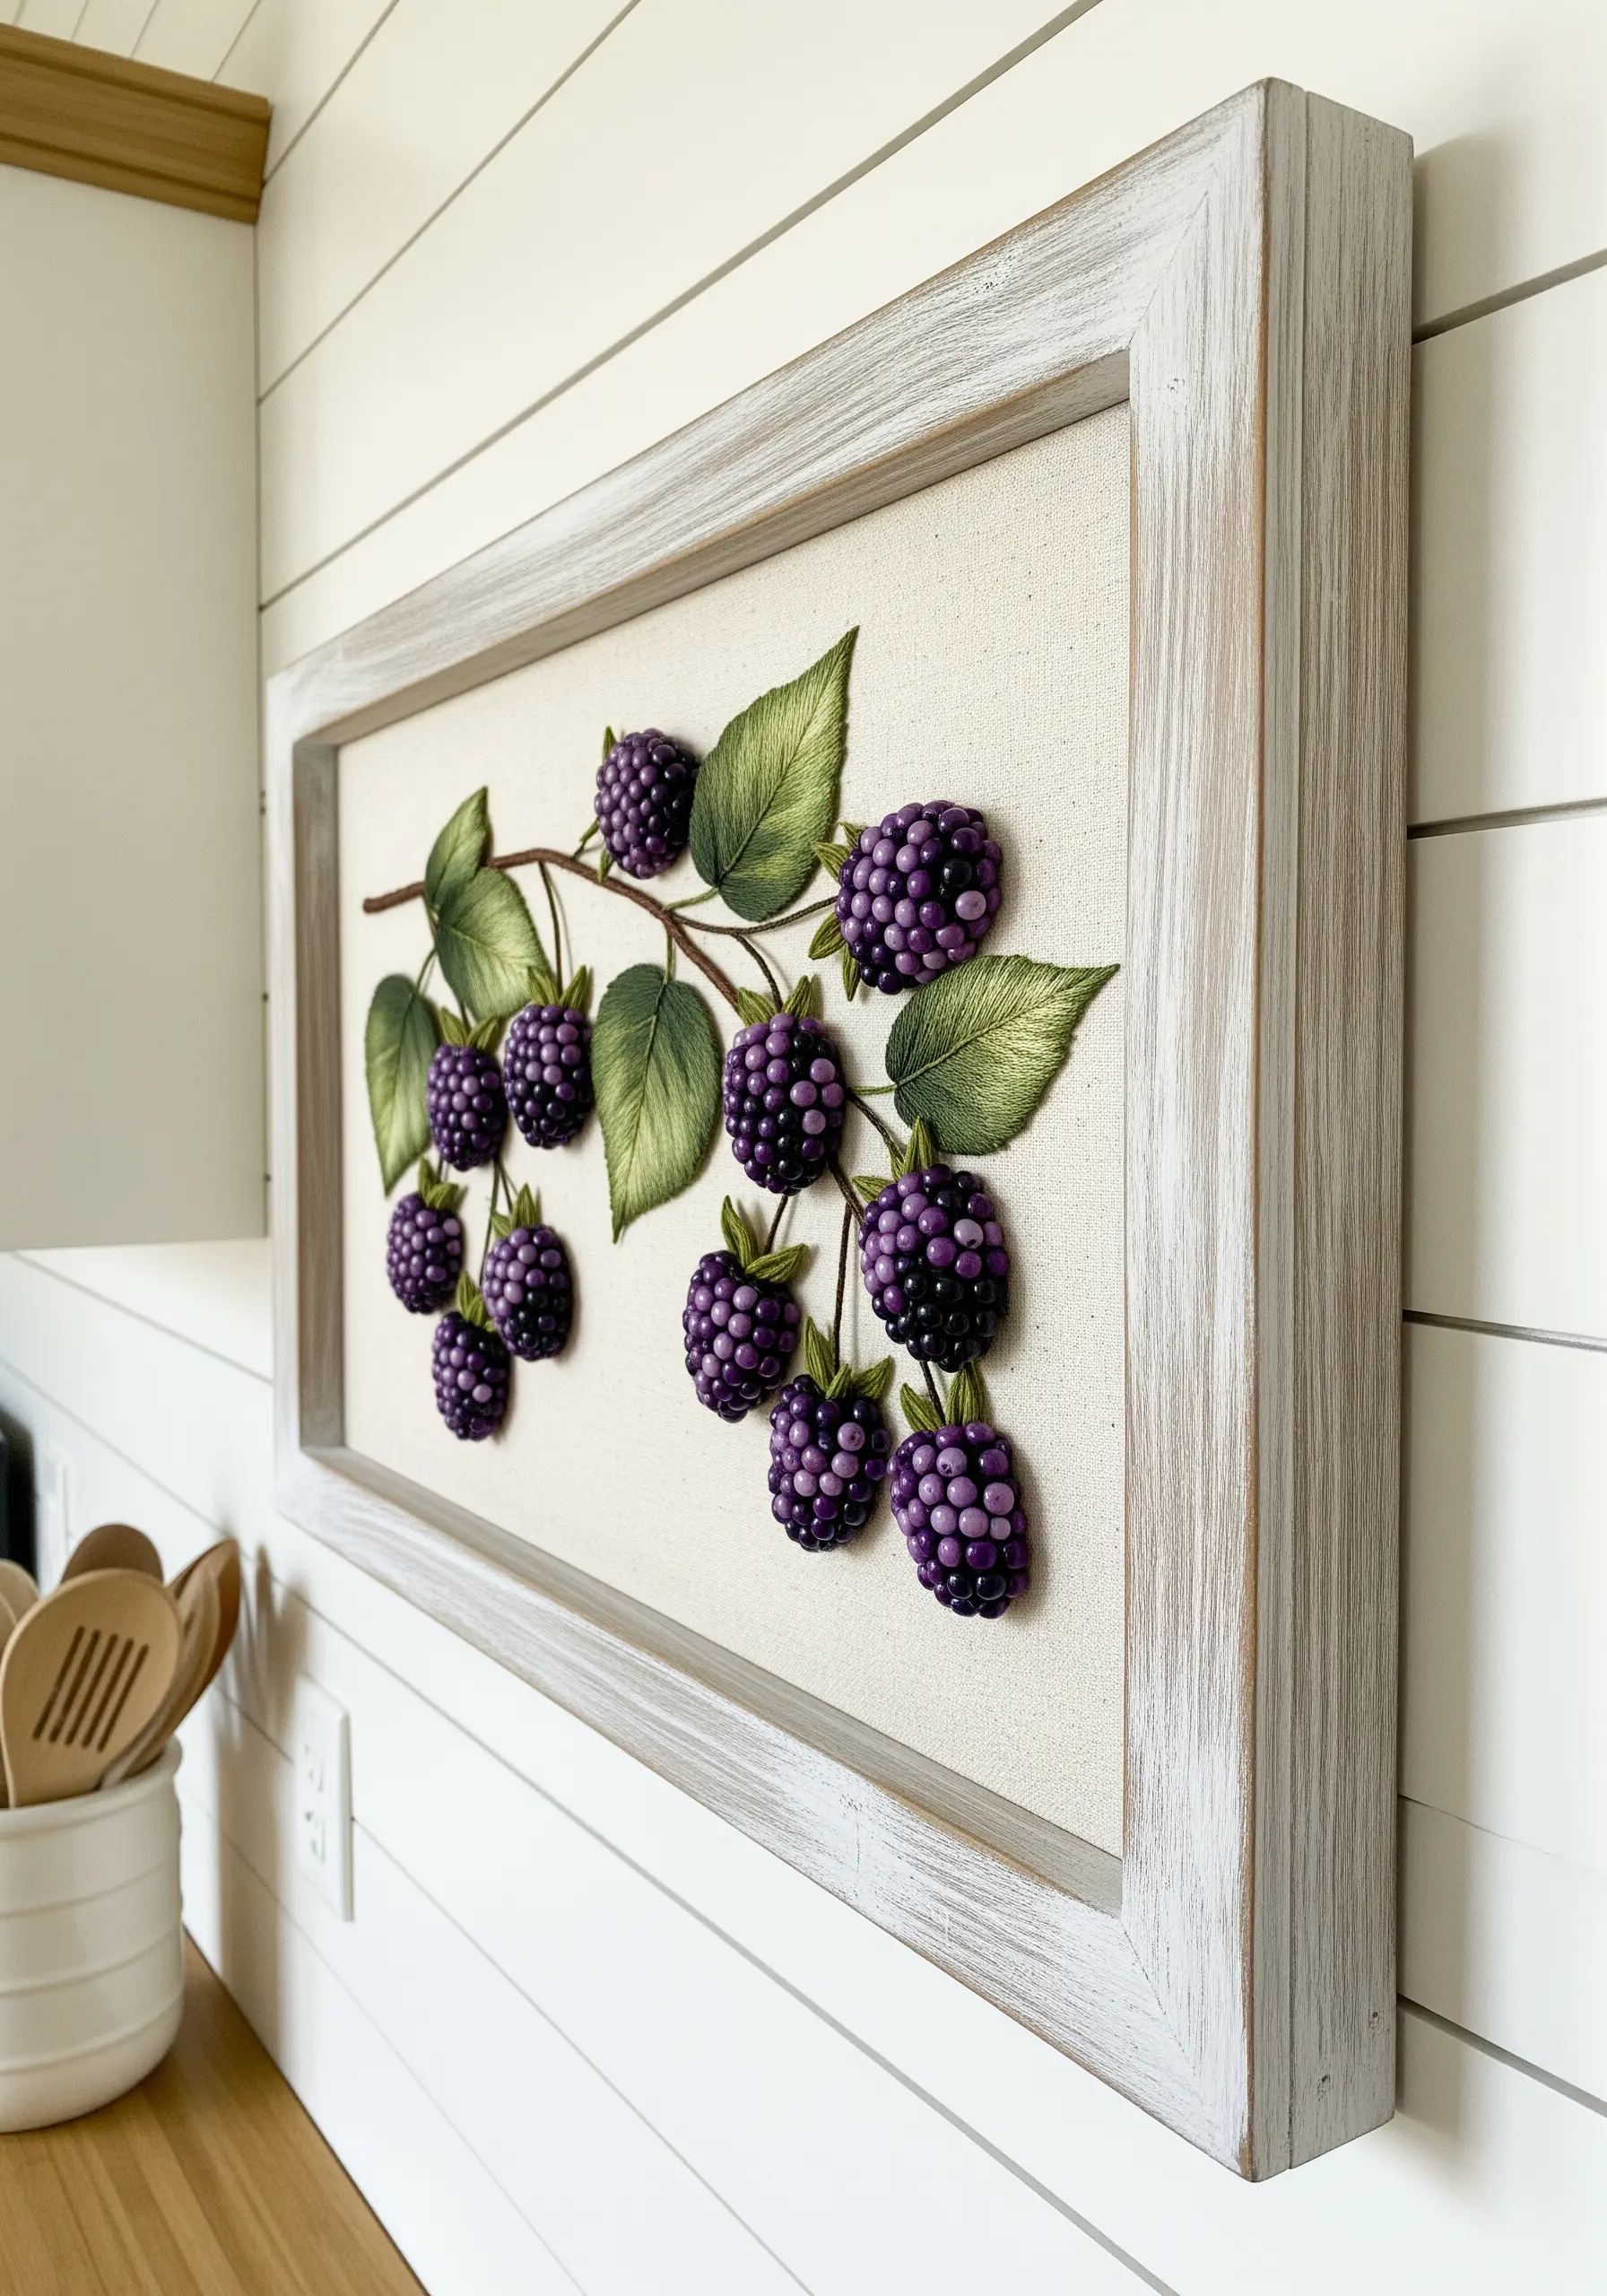
To give berries a juicy, three-dimensional look, build them up from the fabric.
First, create a padded base for each berry using layers of felt or satin stitch.
Then, cover this base with a dense layer of French knots, bullion knots, or seed beads in rich purples and blacks.
This technique gives each drupelet a distinct, rounded shape, making the entire berry cluster look incredibly realistic.
For the leaves, a fishbone stitch with a central vein provides a clean, contrasting shape to the bumpy texture of the fruit.
10. Carve Zen Lines with Raised Stitches
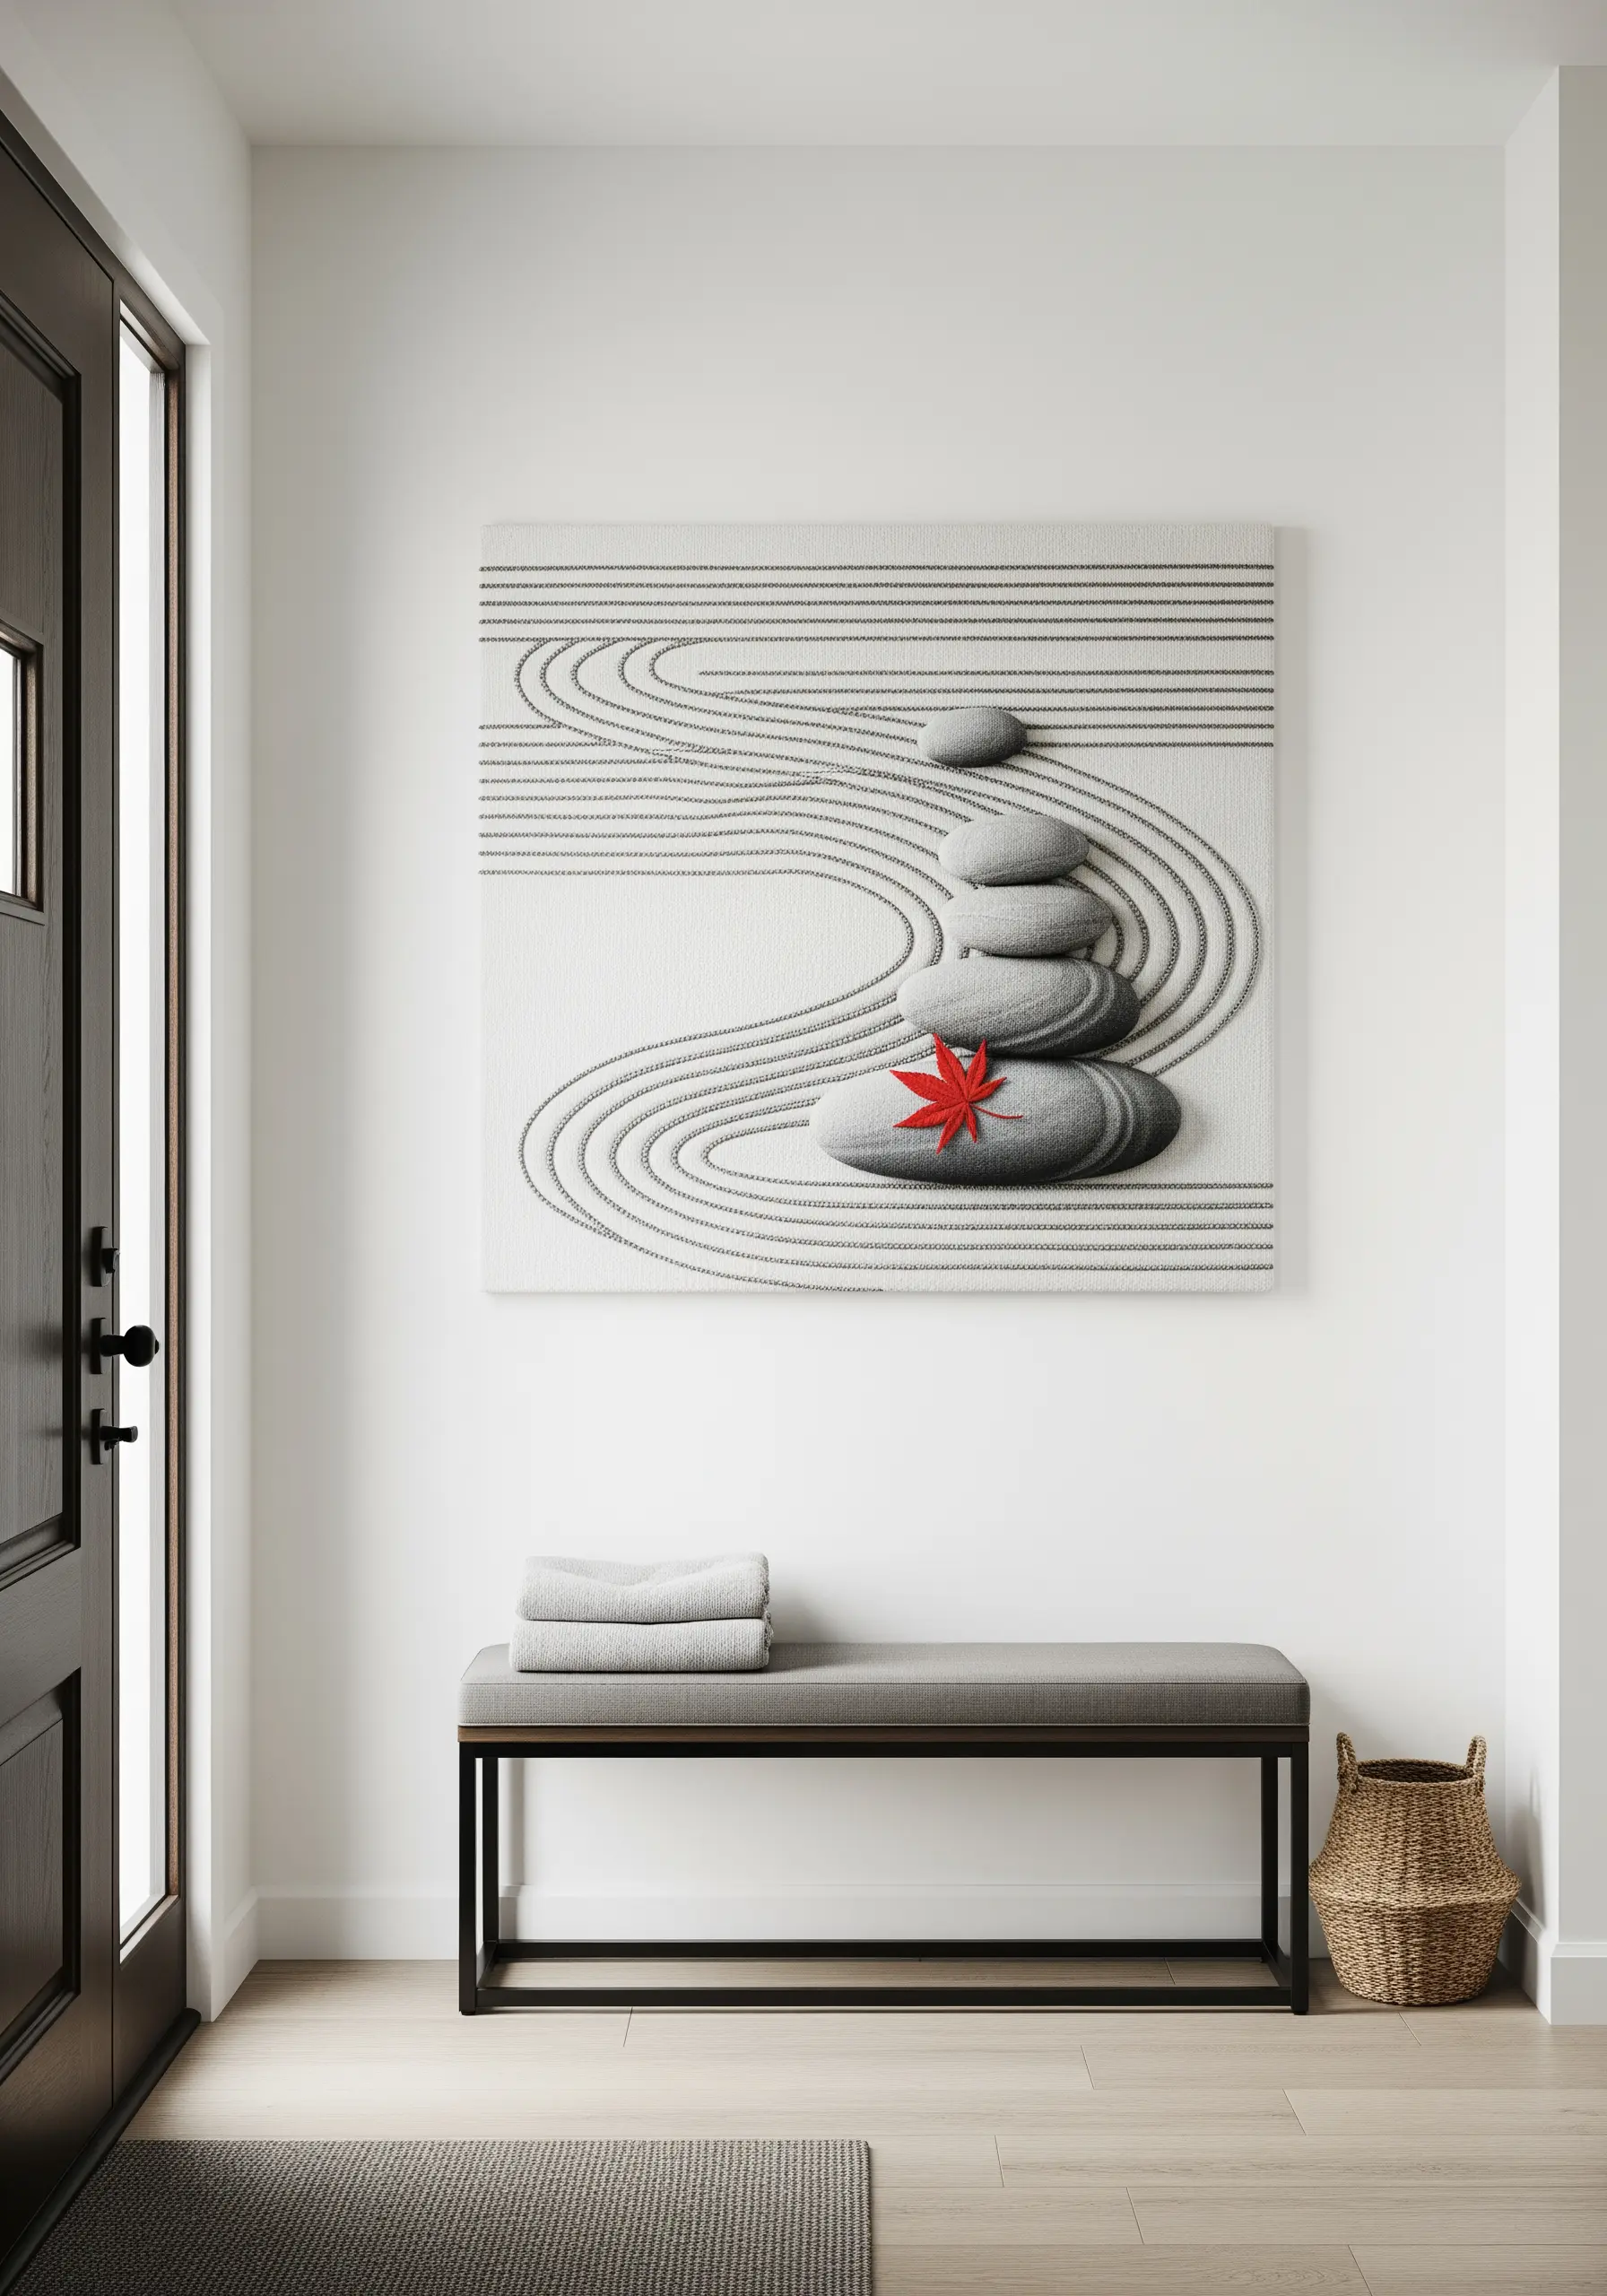
Capture the serene, meditative quality of a zen garden by focusing on clean lines and subtle texture.
Use a whipped backstitch or a heavy chain stitch to create the raked sand patterns; the extra layer of thread gives the lines a defined, raised quality.
The stacked stones are achieved with padded satin stitch—cut small ovals of felt, layer them on your fabric, and cover them with smooth, dense stitches.
This ensures they have a perfect, rounded volume that casts a soft shadow, anchoring them in the minimalist composition.
11. Engineer a Feather with Precise Stitch Direction
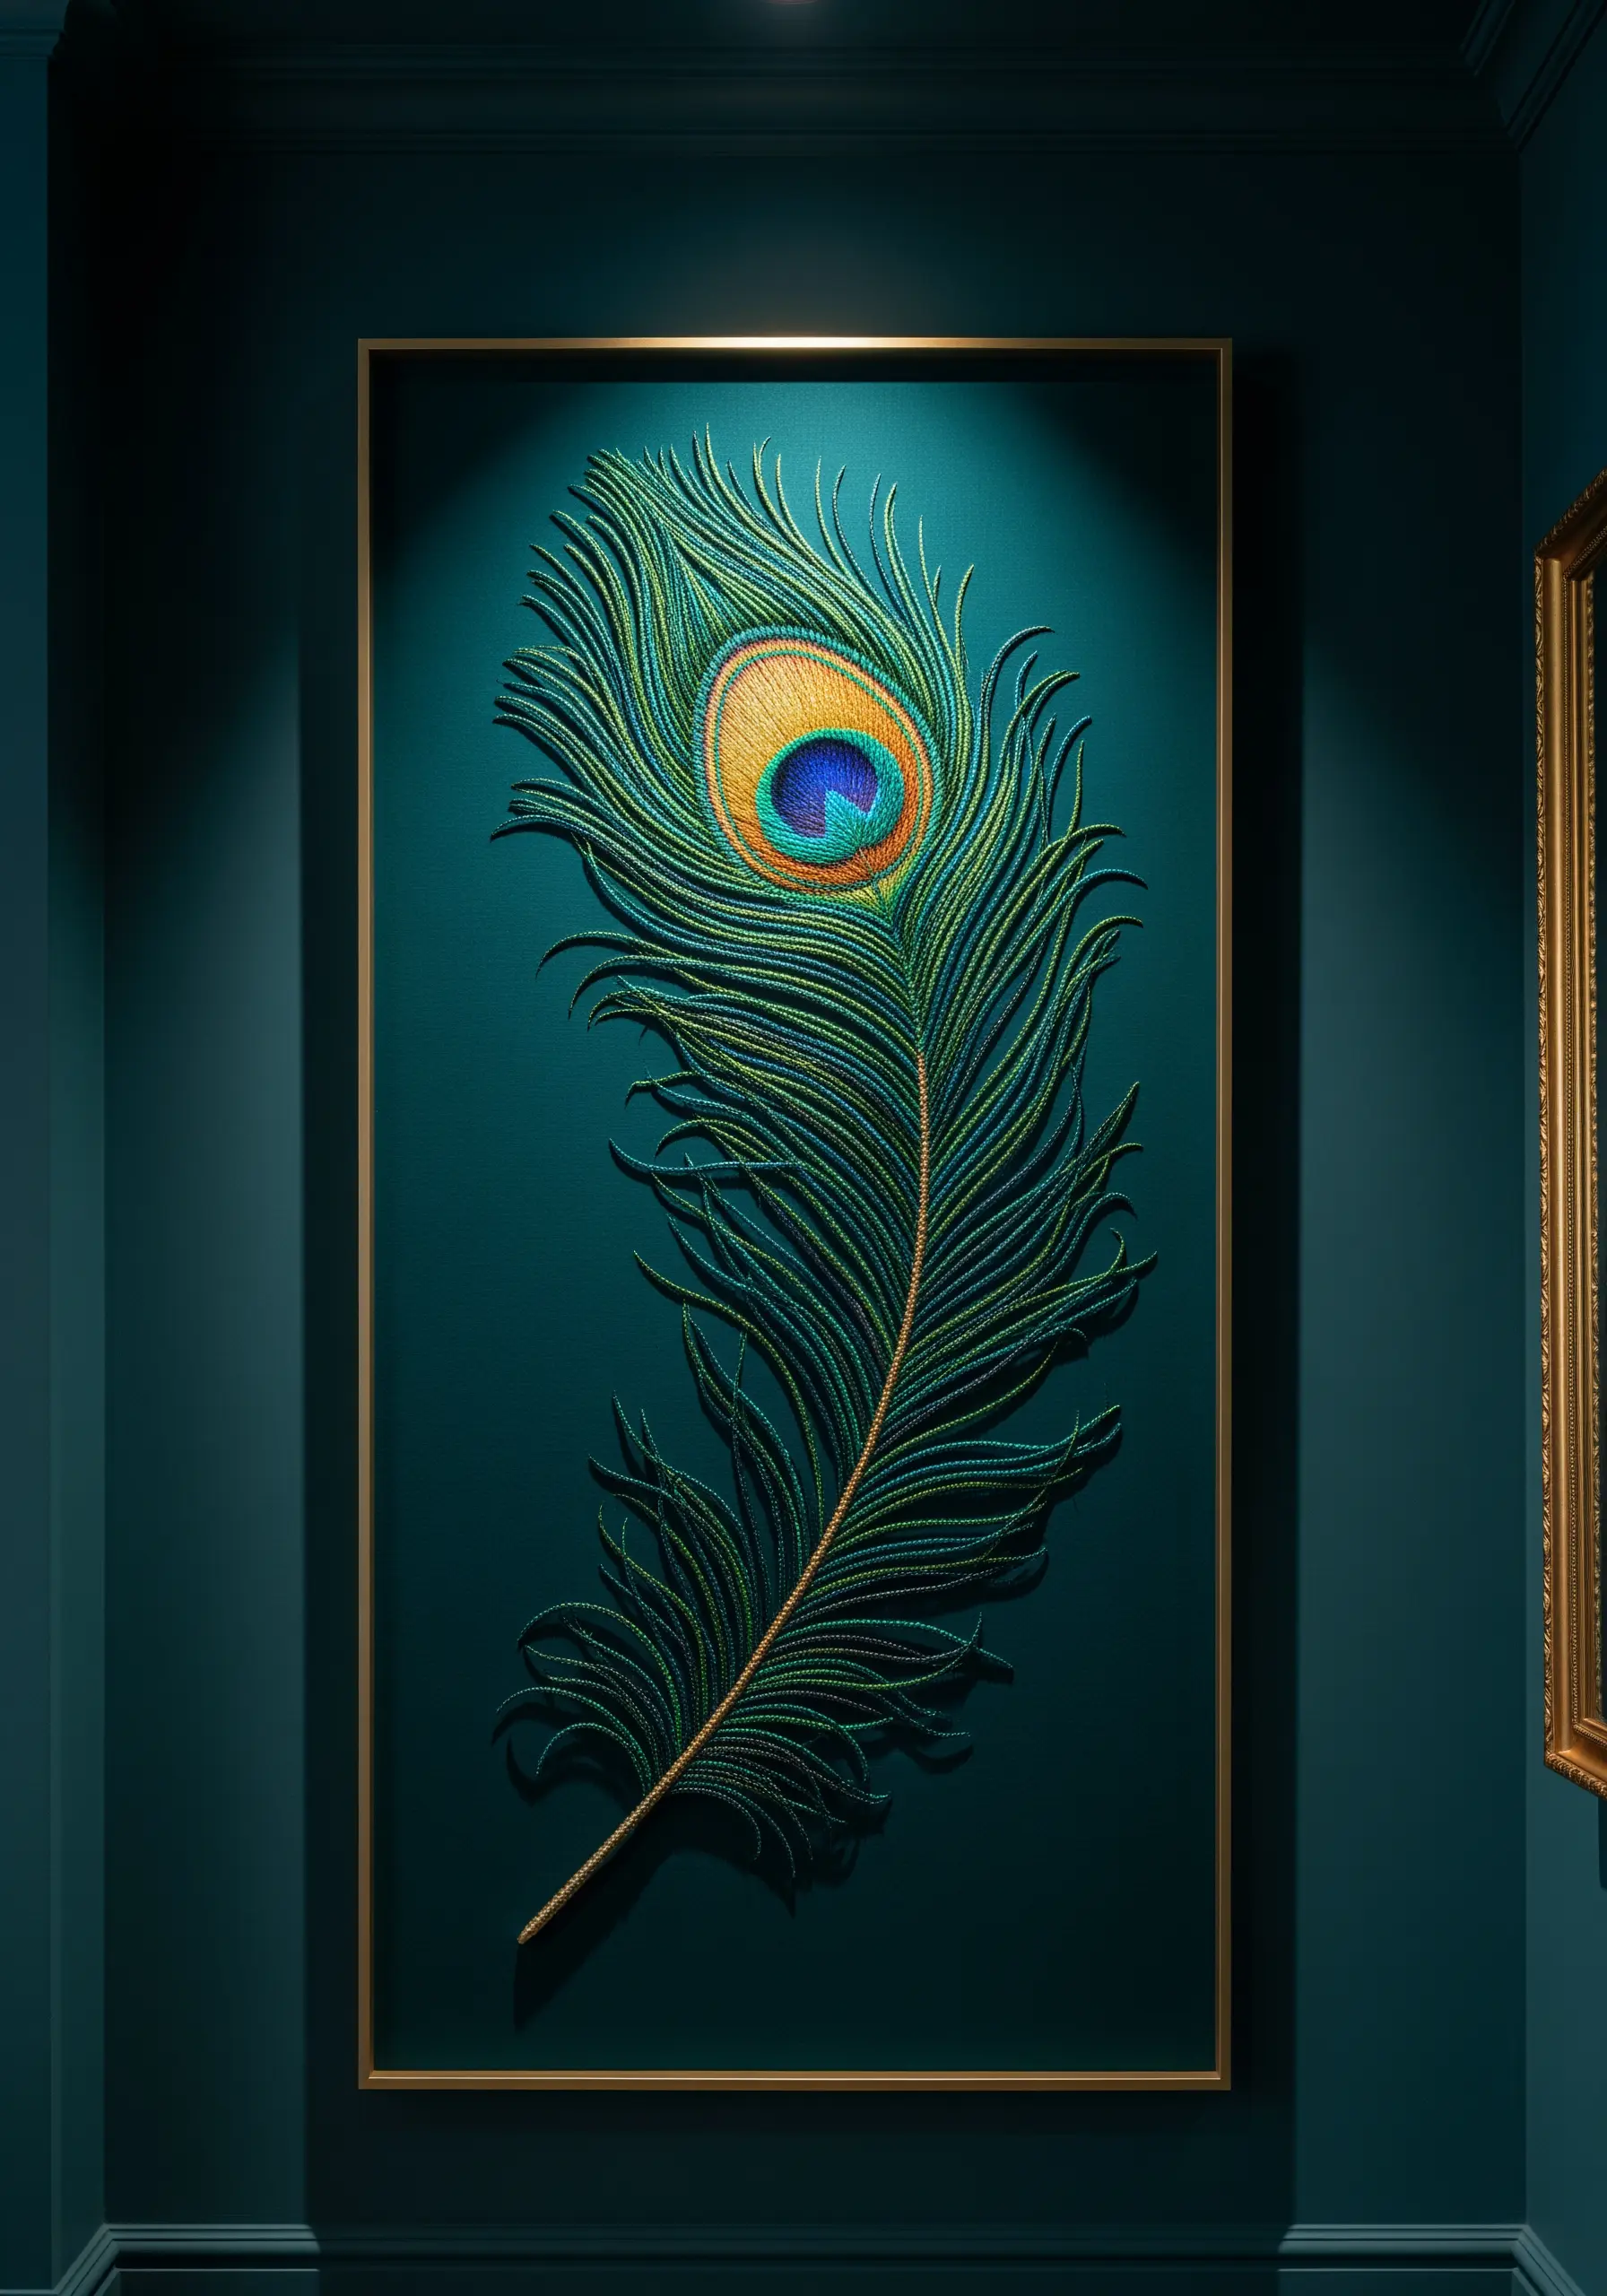
The beauty of a feather lies in its perfect structure, which you can replicate with disciplined stitching.
Create the central shaft (rachis) first, using a raised stem stitch or by couching a piece of wire for stability and shape.
Then, work the barbs outward from the shaft using long, single satin stitches or fishbone stitches.
Pay close attention to the angle of your stitches, keeping them consistent and tightly packed.
Using a mix of glossy rayon and matte cotton threads in iridescent colors will capture the feather’s natural shimmer.
12. Give Flowers and Wings Lifelike Form
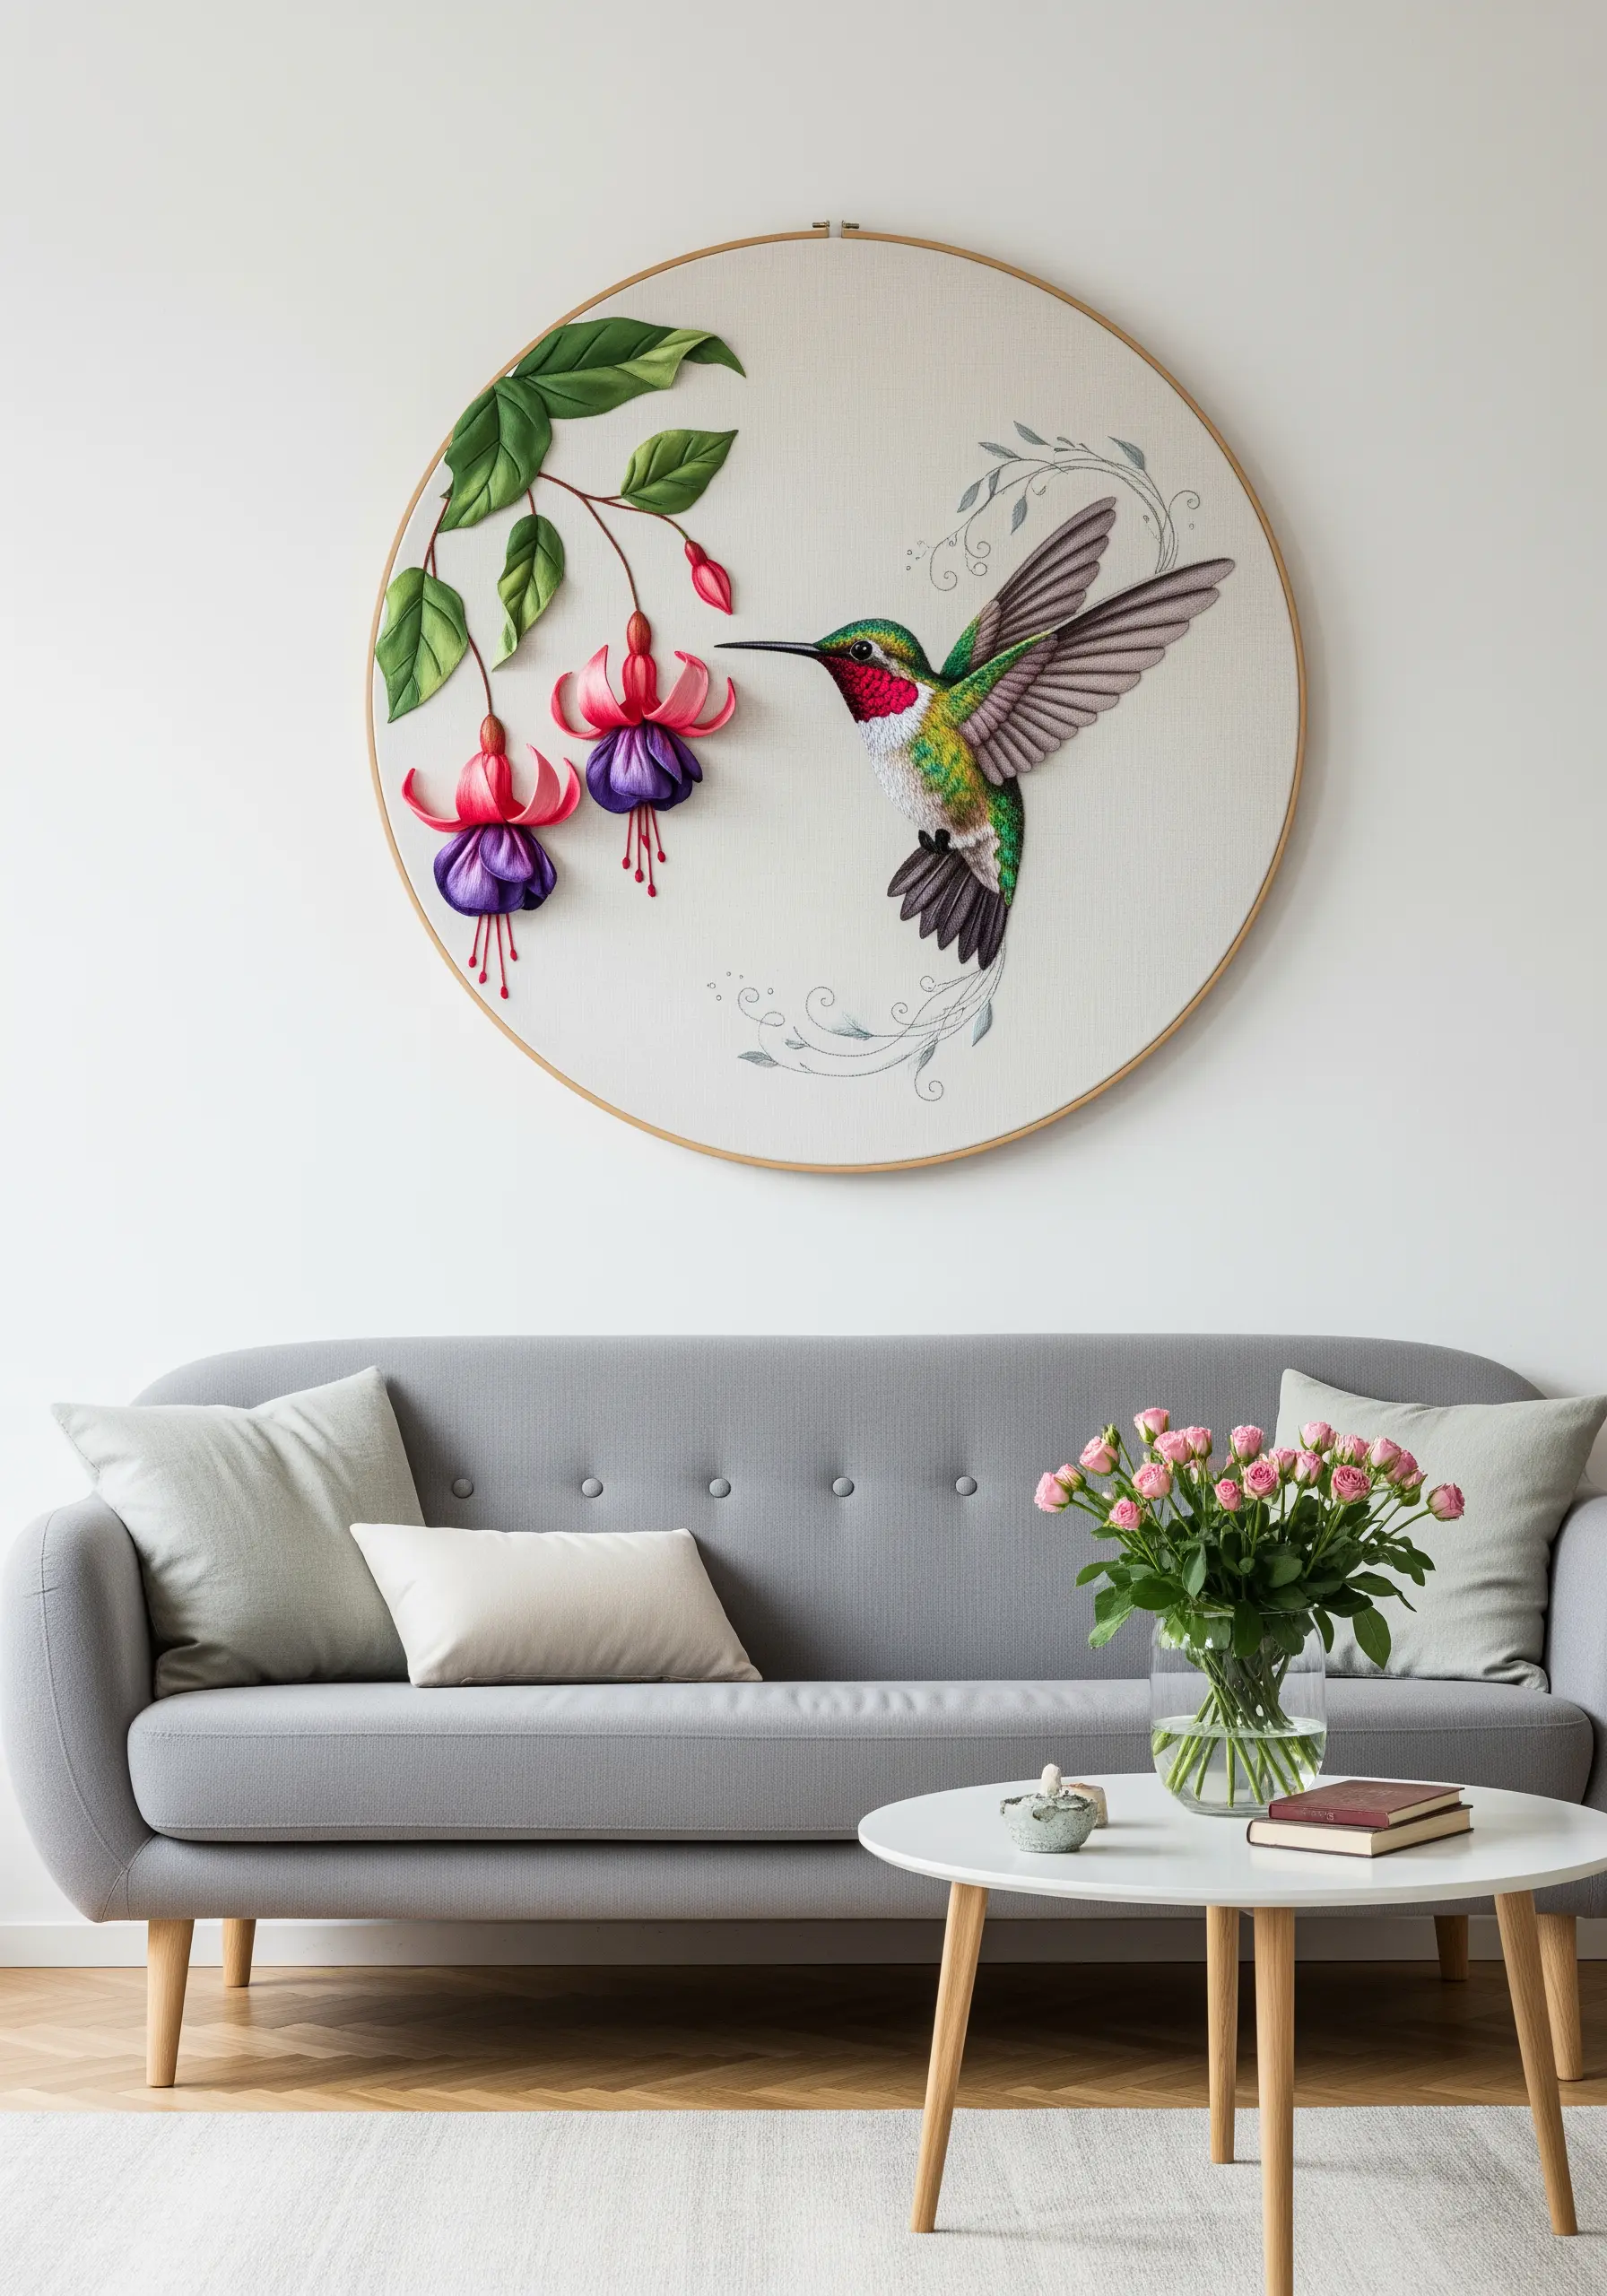
Combine different 3D techniques in one piece for a dynamic composition.
For the fuchsia flowers, use stumpwork or ribbon stitch to create detached petals that hang realistically.
The hummingbird’s body can be rendered with intricate thread painting (long-and-short stitch) to blend its jewel-toned colors smoothly.
To make the wings appear to be in motion, stitch them on a separate layer of sheer organza and attach it to the main fabric only along the bird’s body.
This allows the wings to float slightly above the surface, suggesting lightness and flight.
13. Illustrate the Cosmos with Raised Textures

Bring the solar system to life by giving each celestial body a unique and touchable texture.
Pad the planets with felt before covering them in dense satin stitch or concentric circles of backstitch to create their spherical shape.
Use couching to lay down metallic thread for Saturn’s rings, giving them a sharp, defined edge.
The sun is a perfect candidate for turkey work or layered bullion knots to create a fiery, radiant texture.
Finally, scatter small French knots and seed beads across the dark fabric to represent a field of distant stars.
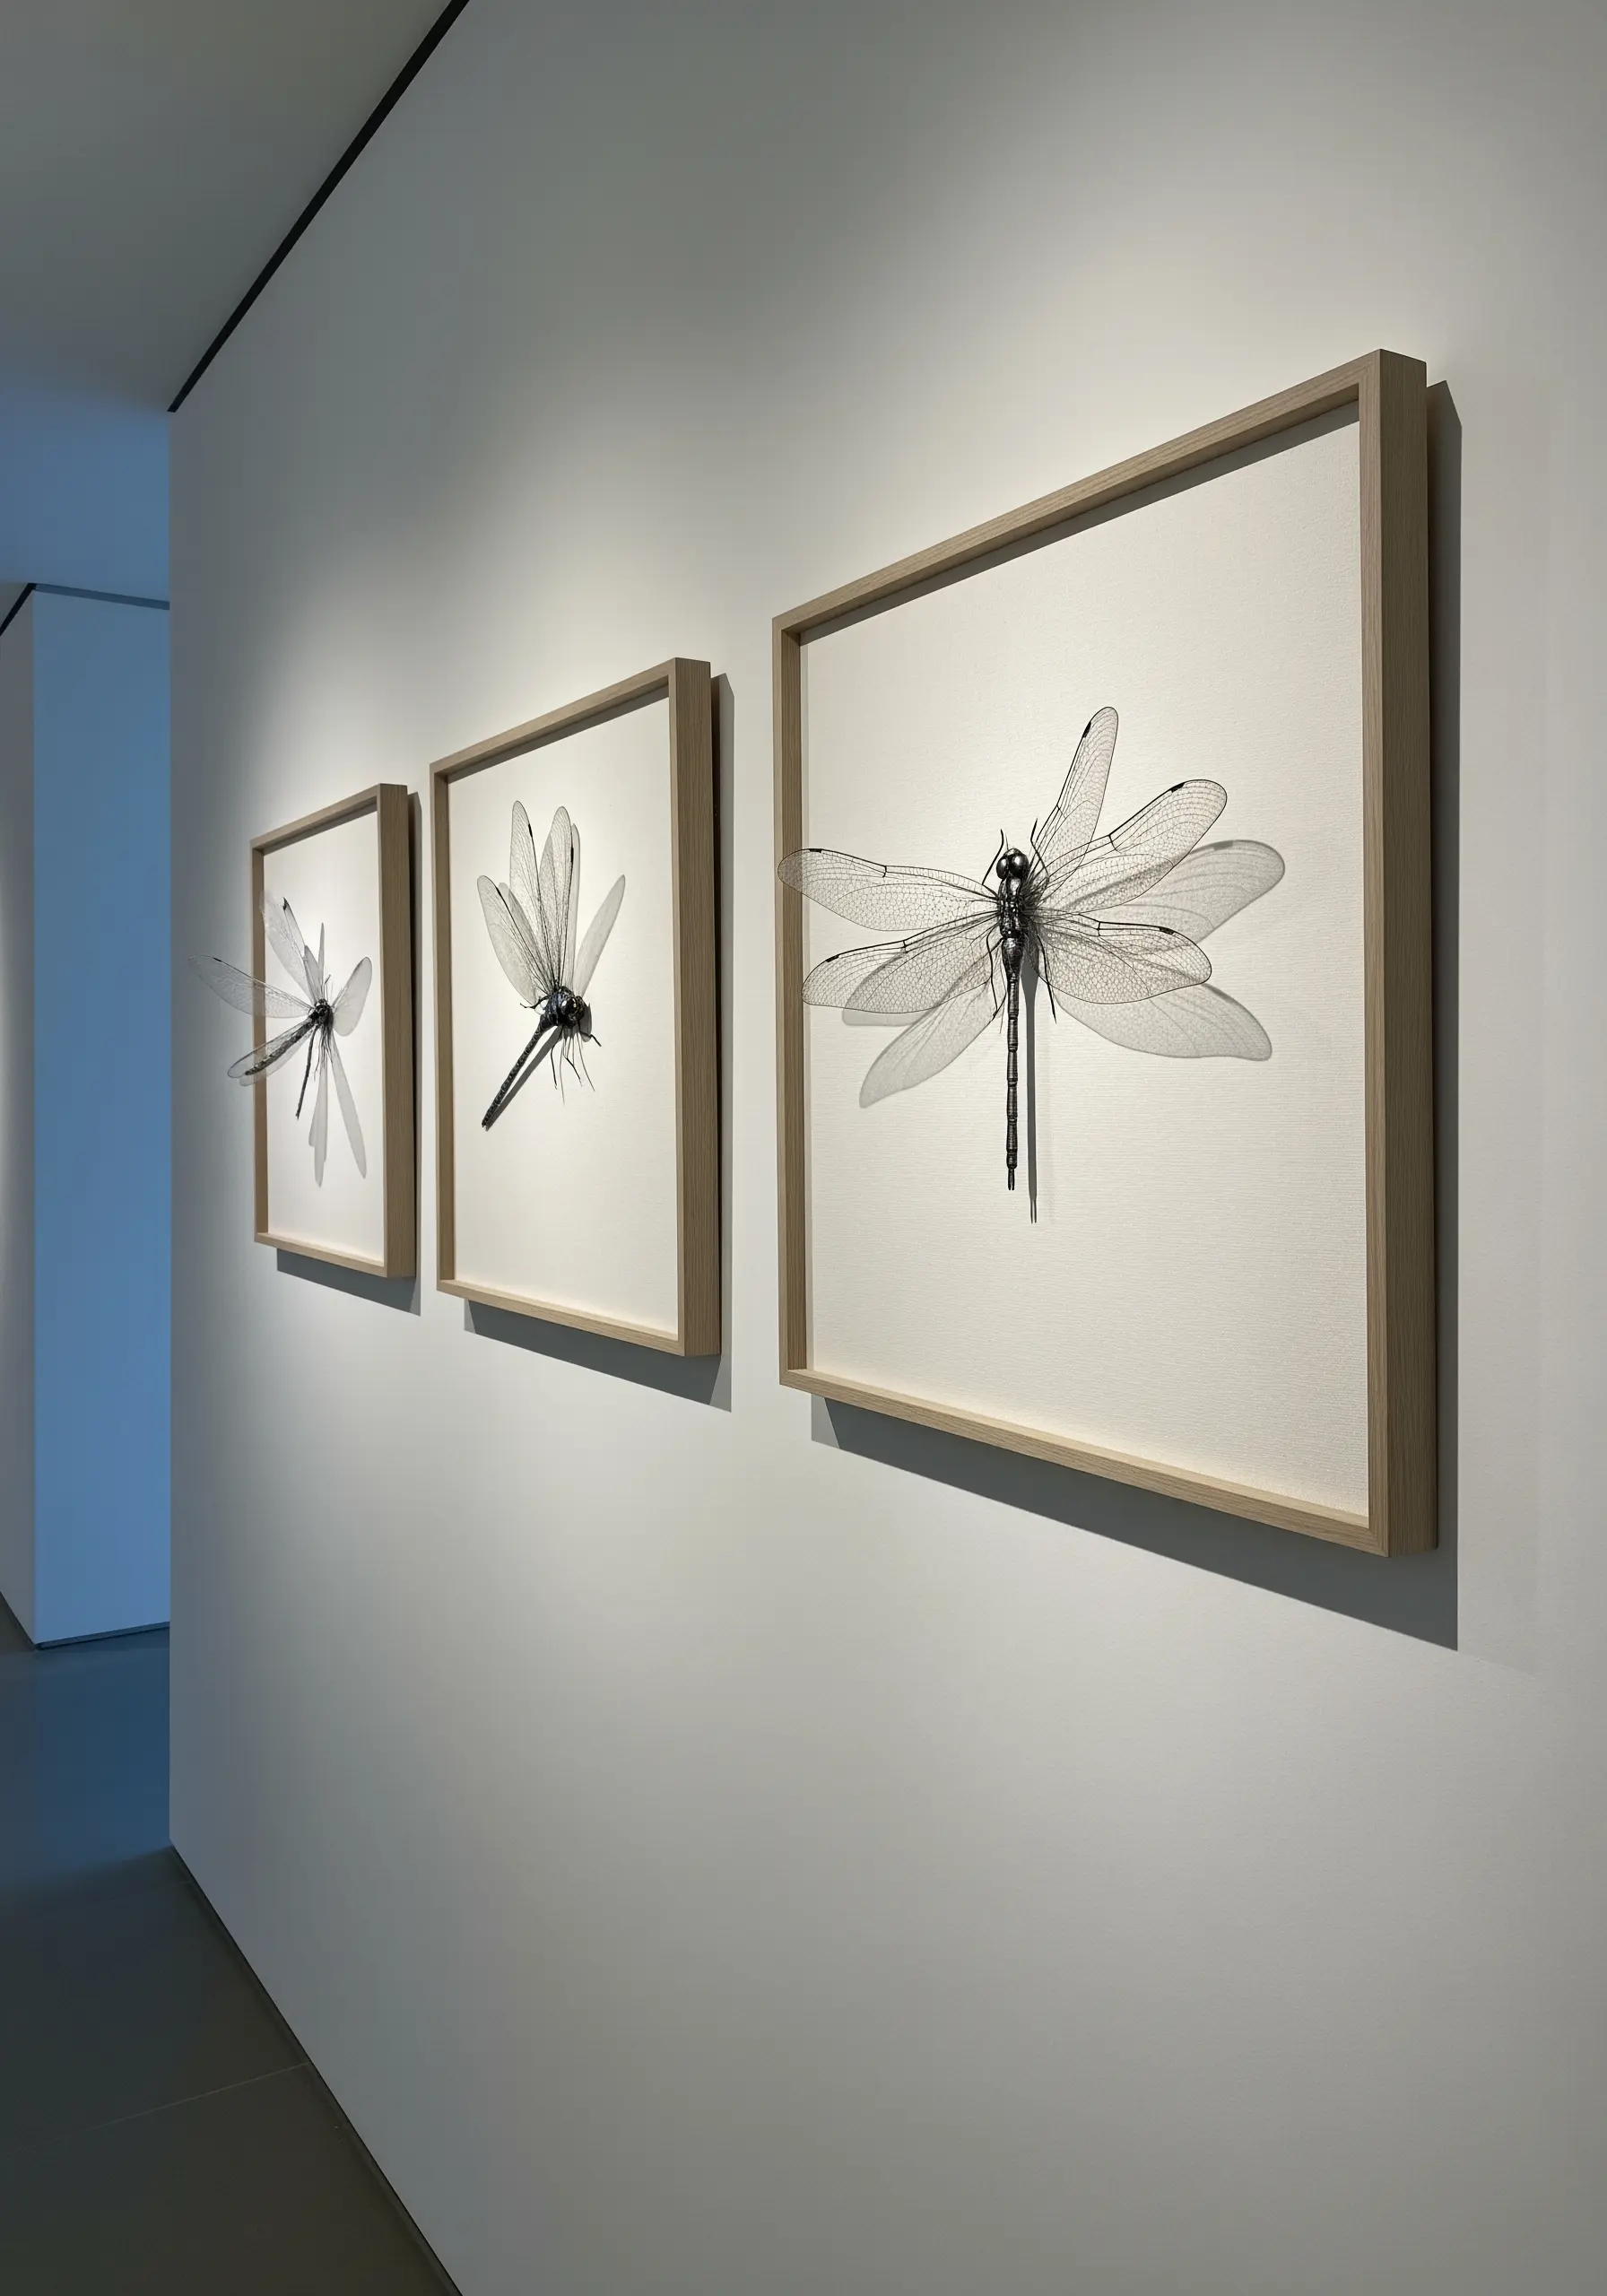
14. Add Fuzzy Texture and Sheer Wings to Insects
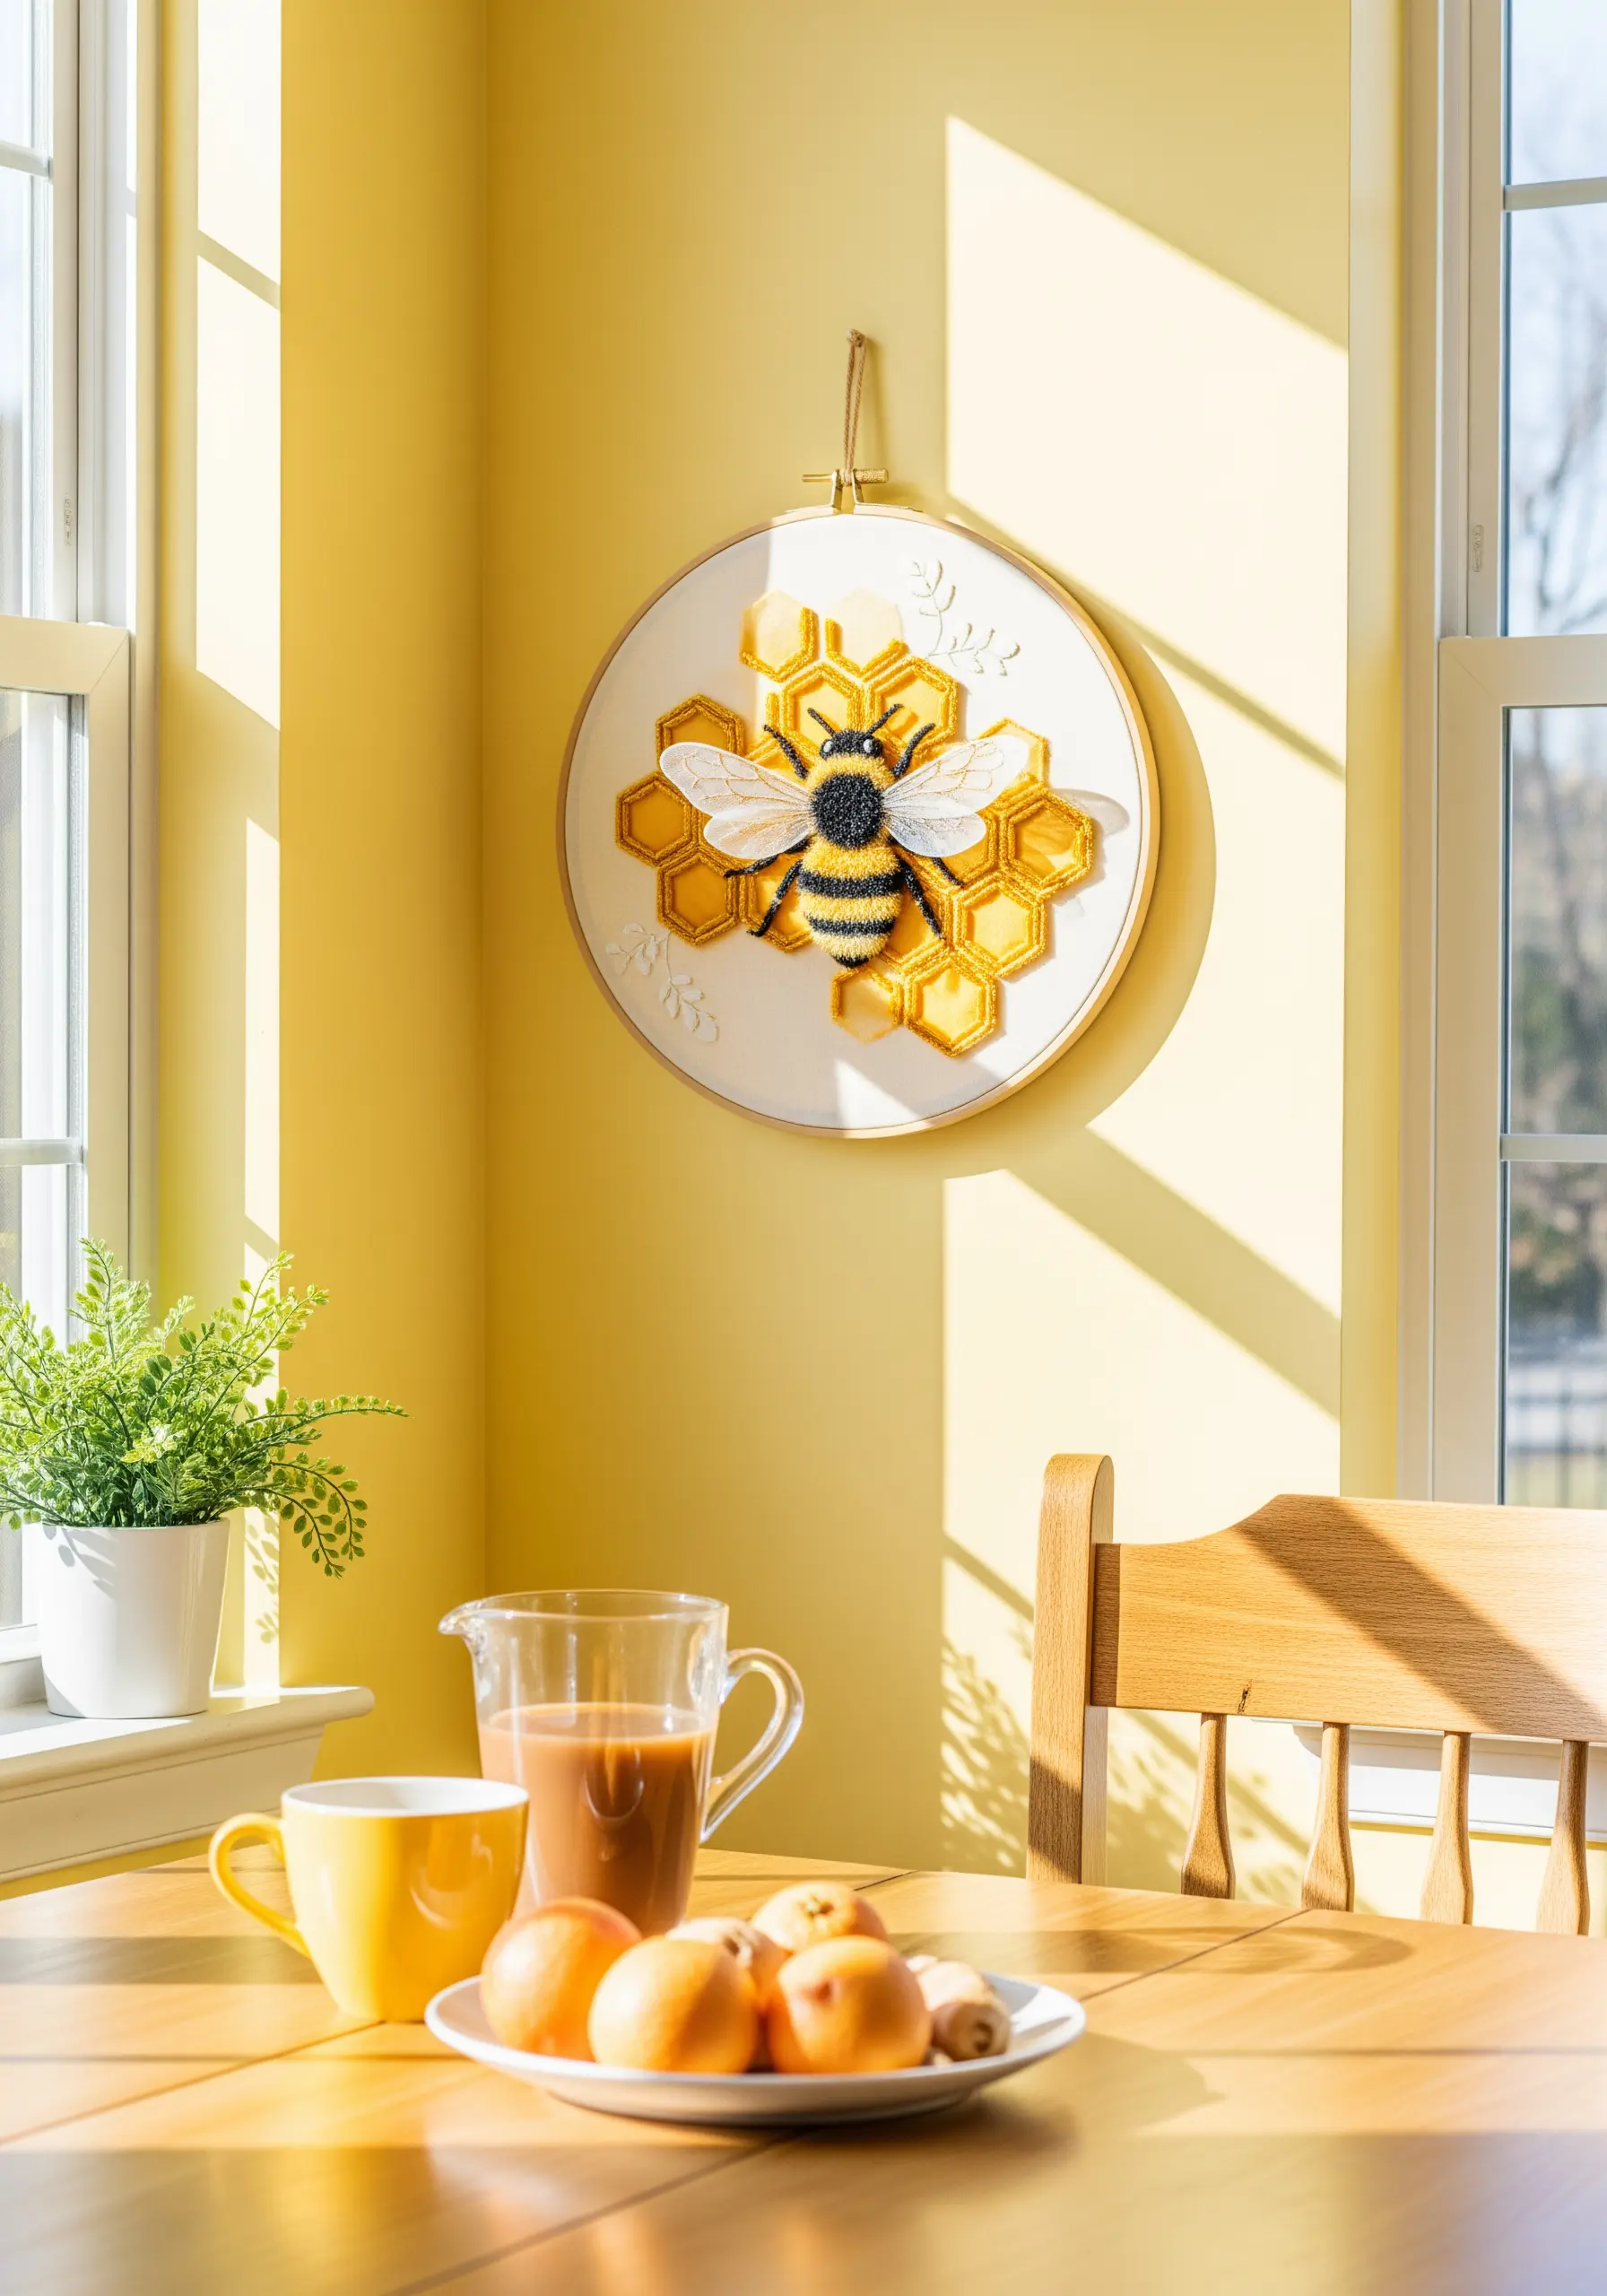
To make an embroidered bee look like it could fly right off the hoop, focus on its contrasting textures.
Use turkey work for the fuzzy thorax; stitch the loops, trim them short, and fluff them up to create a soft, pollen-dusted effect.
For the wings, stitch the outlines onto a piece of sheer organza or tulle. Cut them out carefully and attach them to the body.
This creates a delicate, transparent look that perfectly mimics real insect wings and makes your creation feel much more lifelike.
15. Create Watery Motion with Directional Stitches
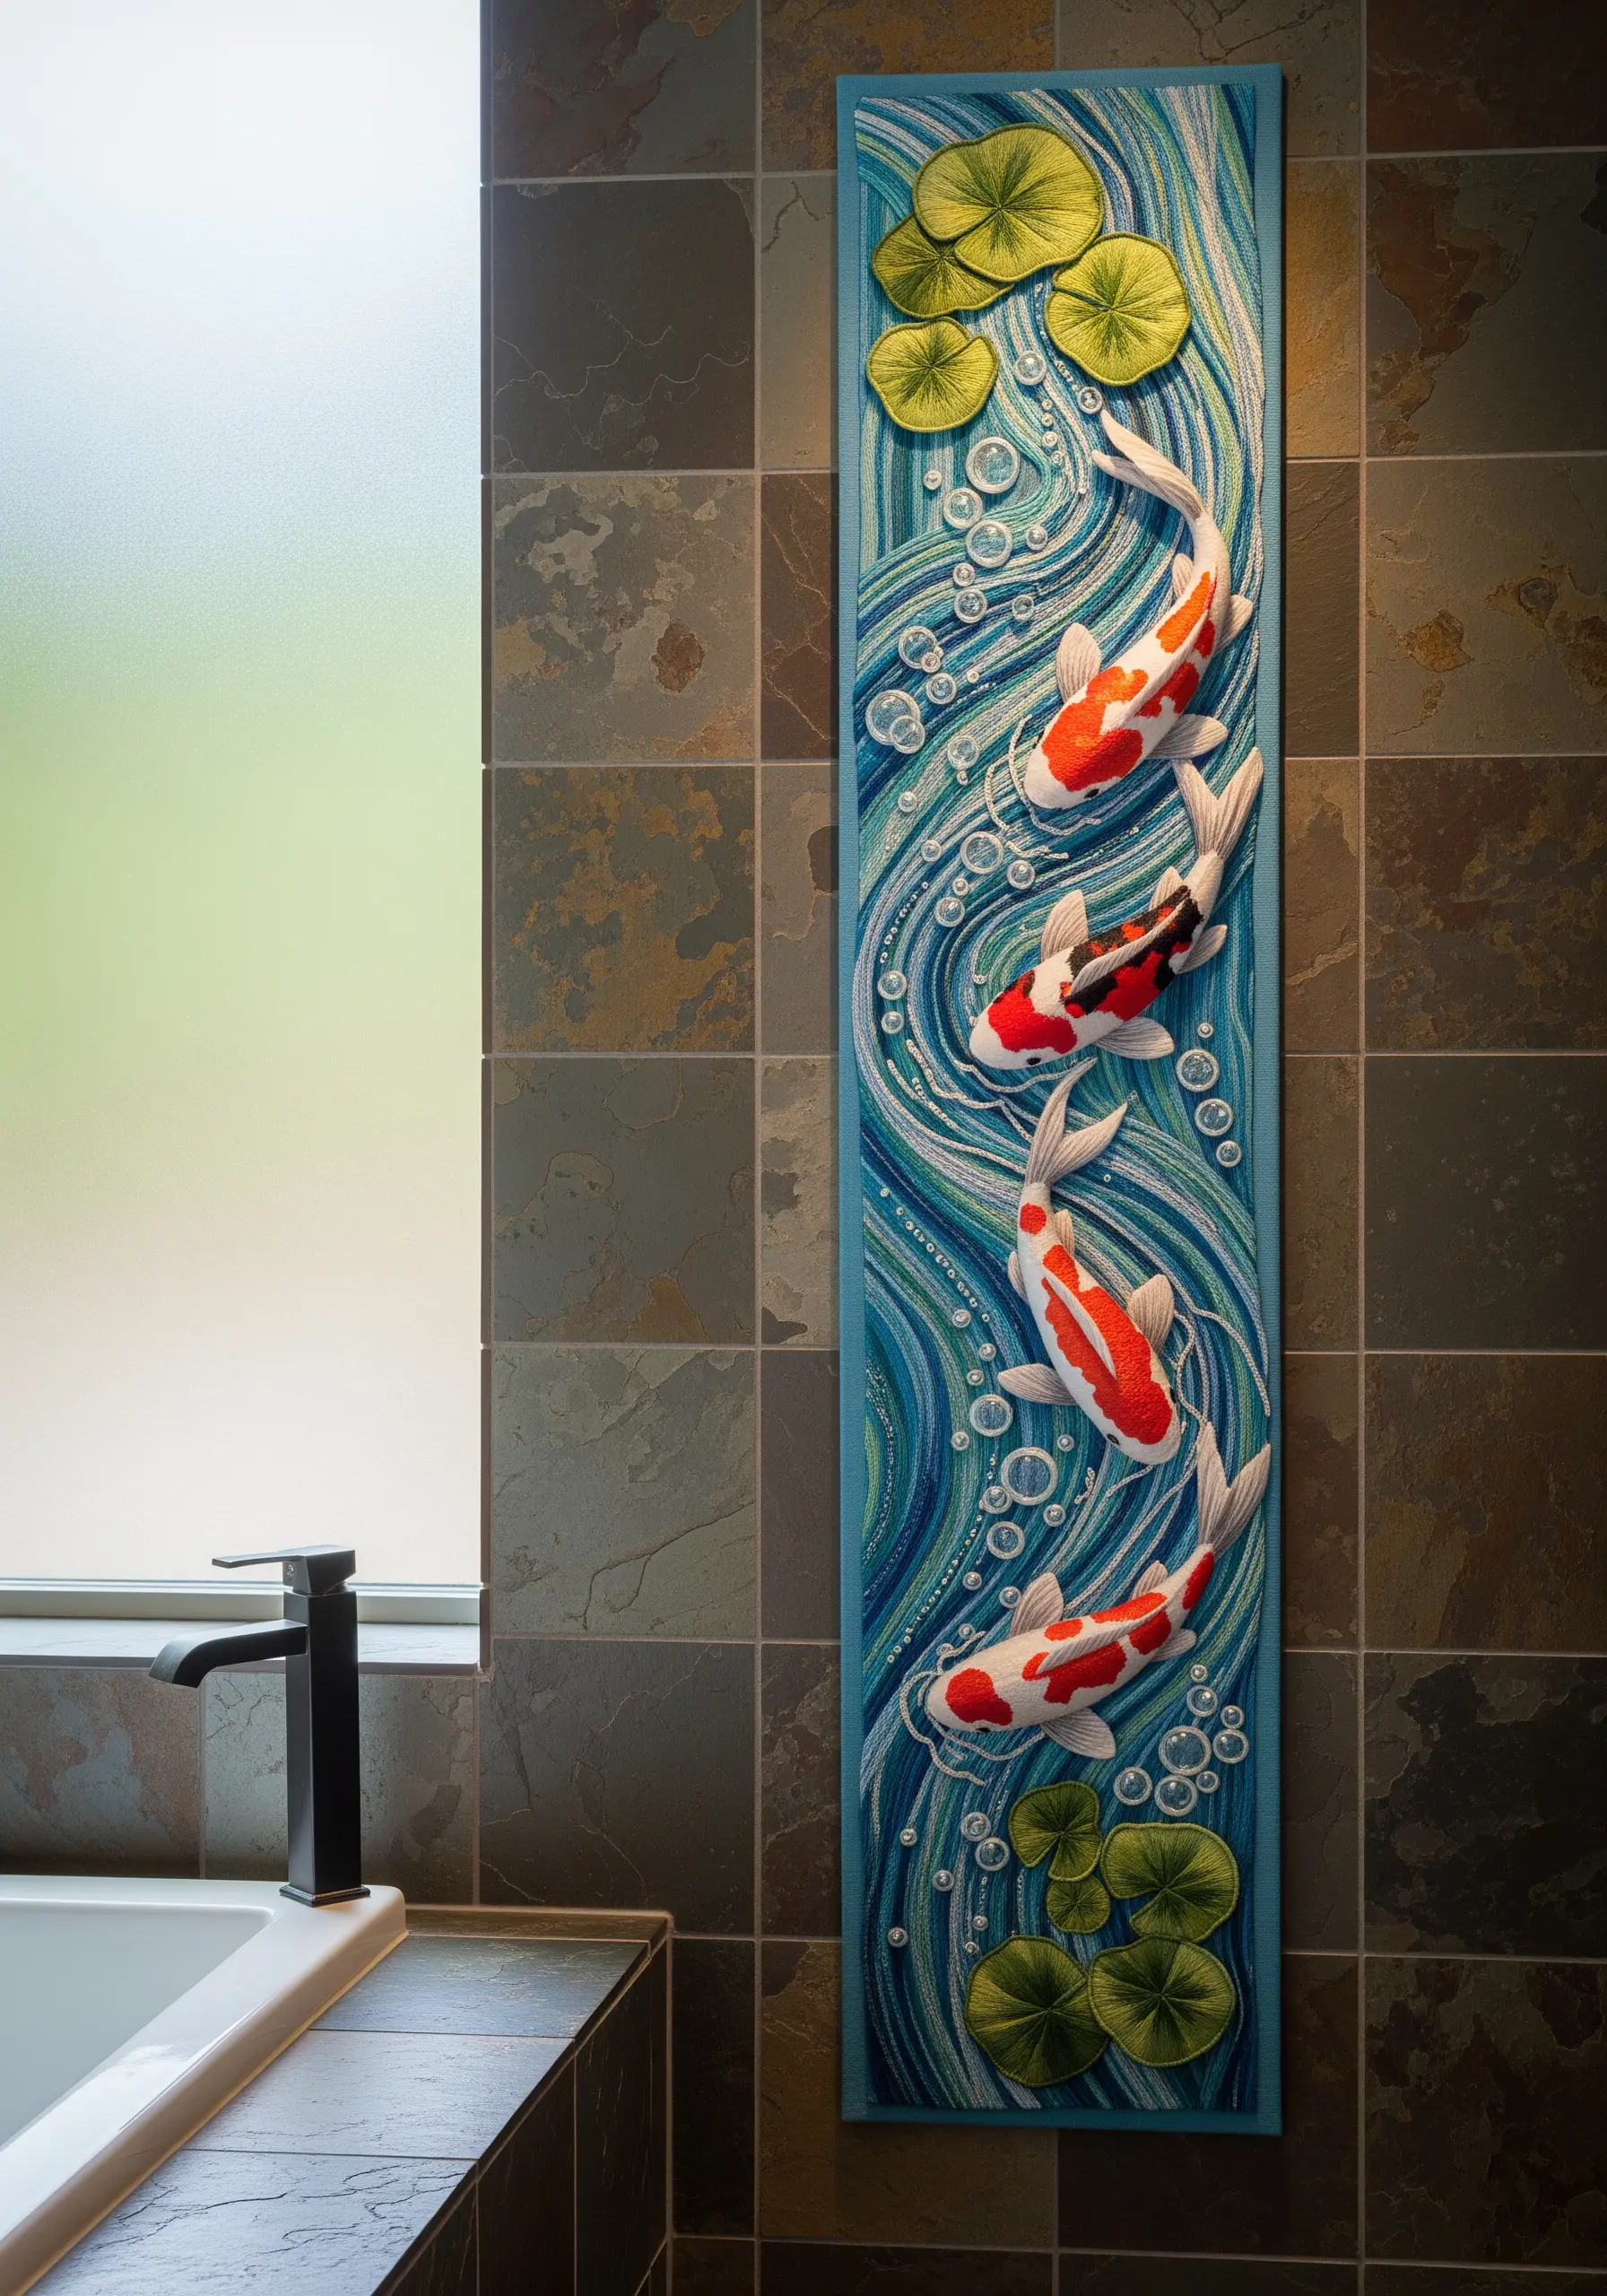
Suggest the movement of water not just with color, but with the flow of your stitches.
Use long, swirling lines of stem stitch, backstitch, or split stitch that follow the current around the subjects, like the koi fish.
Vary the number of thread strands—using more strands for the darker, deeper parts of the water and fewer for the lighter, faster-moving ripples.
Incorporate lines of white or light blue to suggest reflections and speed.
The lily pads can be created with padded satin stitch to make them float on top of this stitched current.
16. Craft Cactus Pads with Padded Appliqué
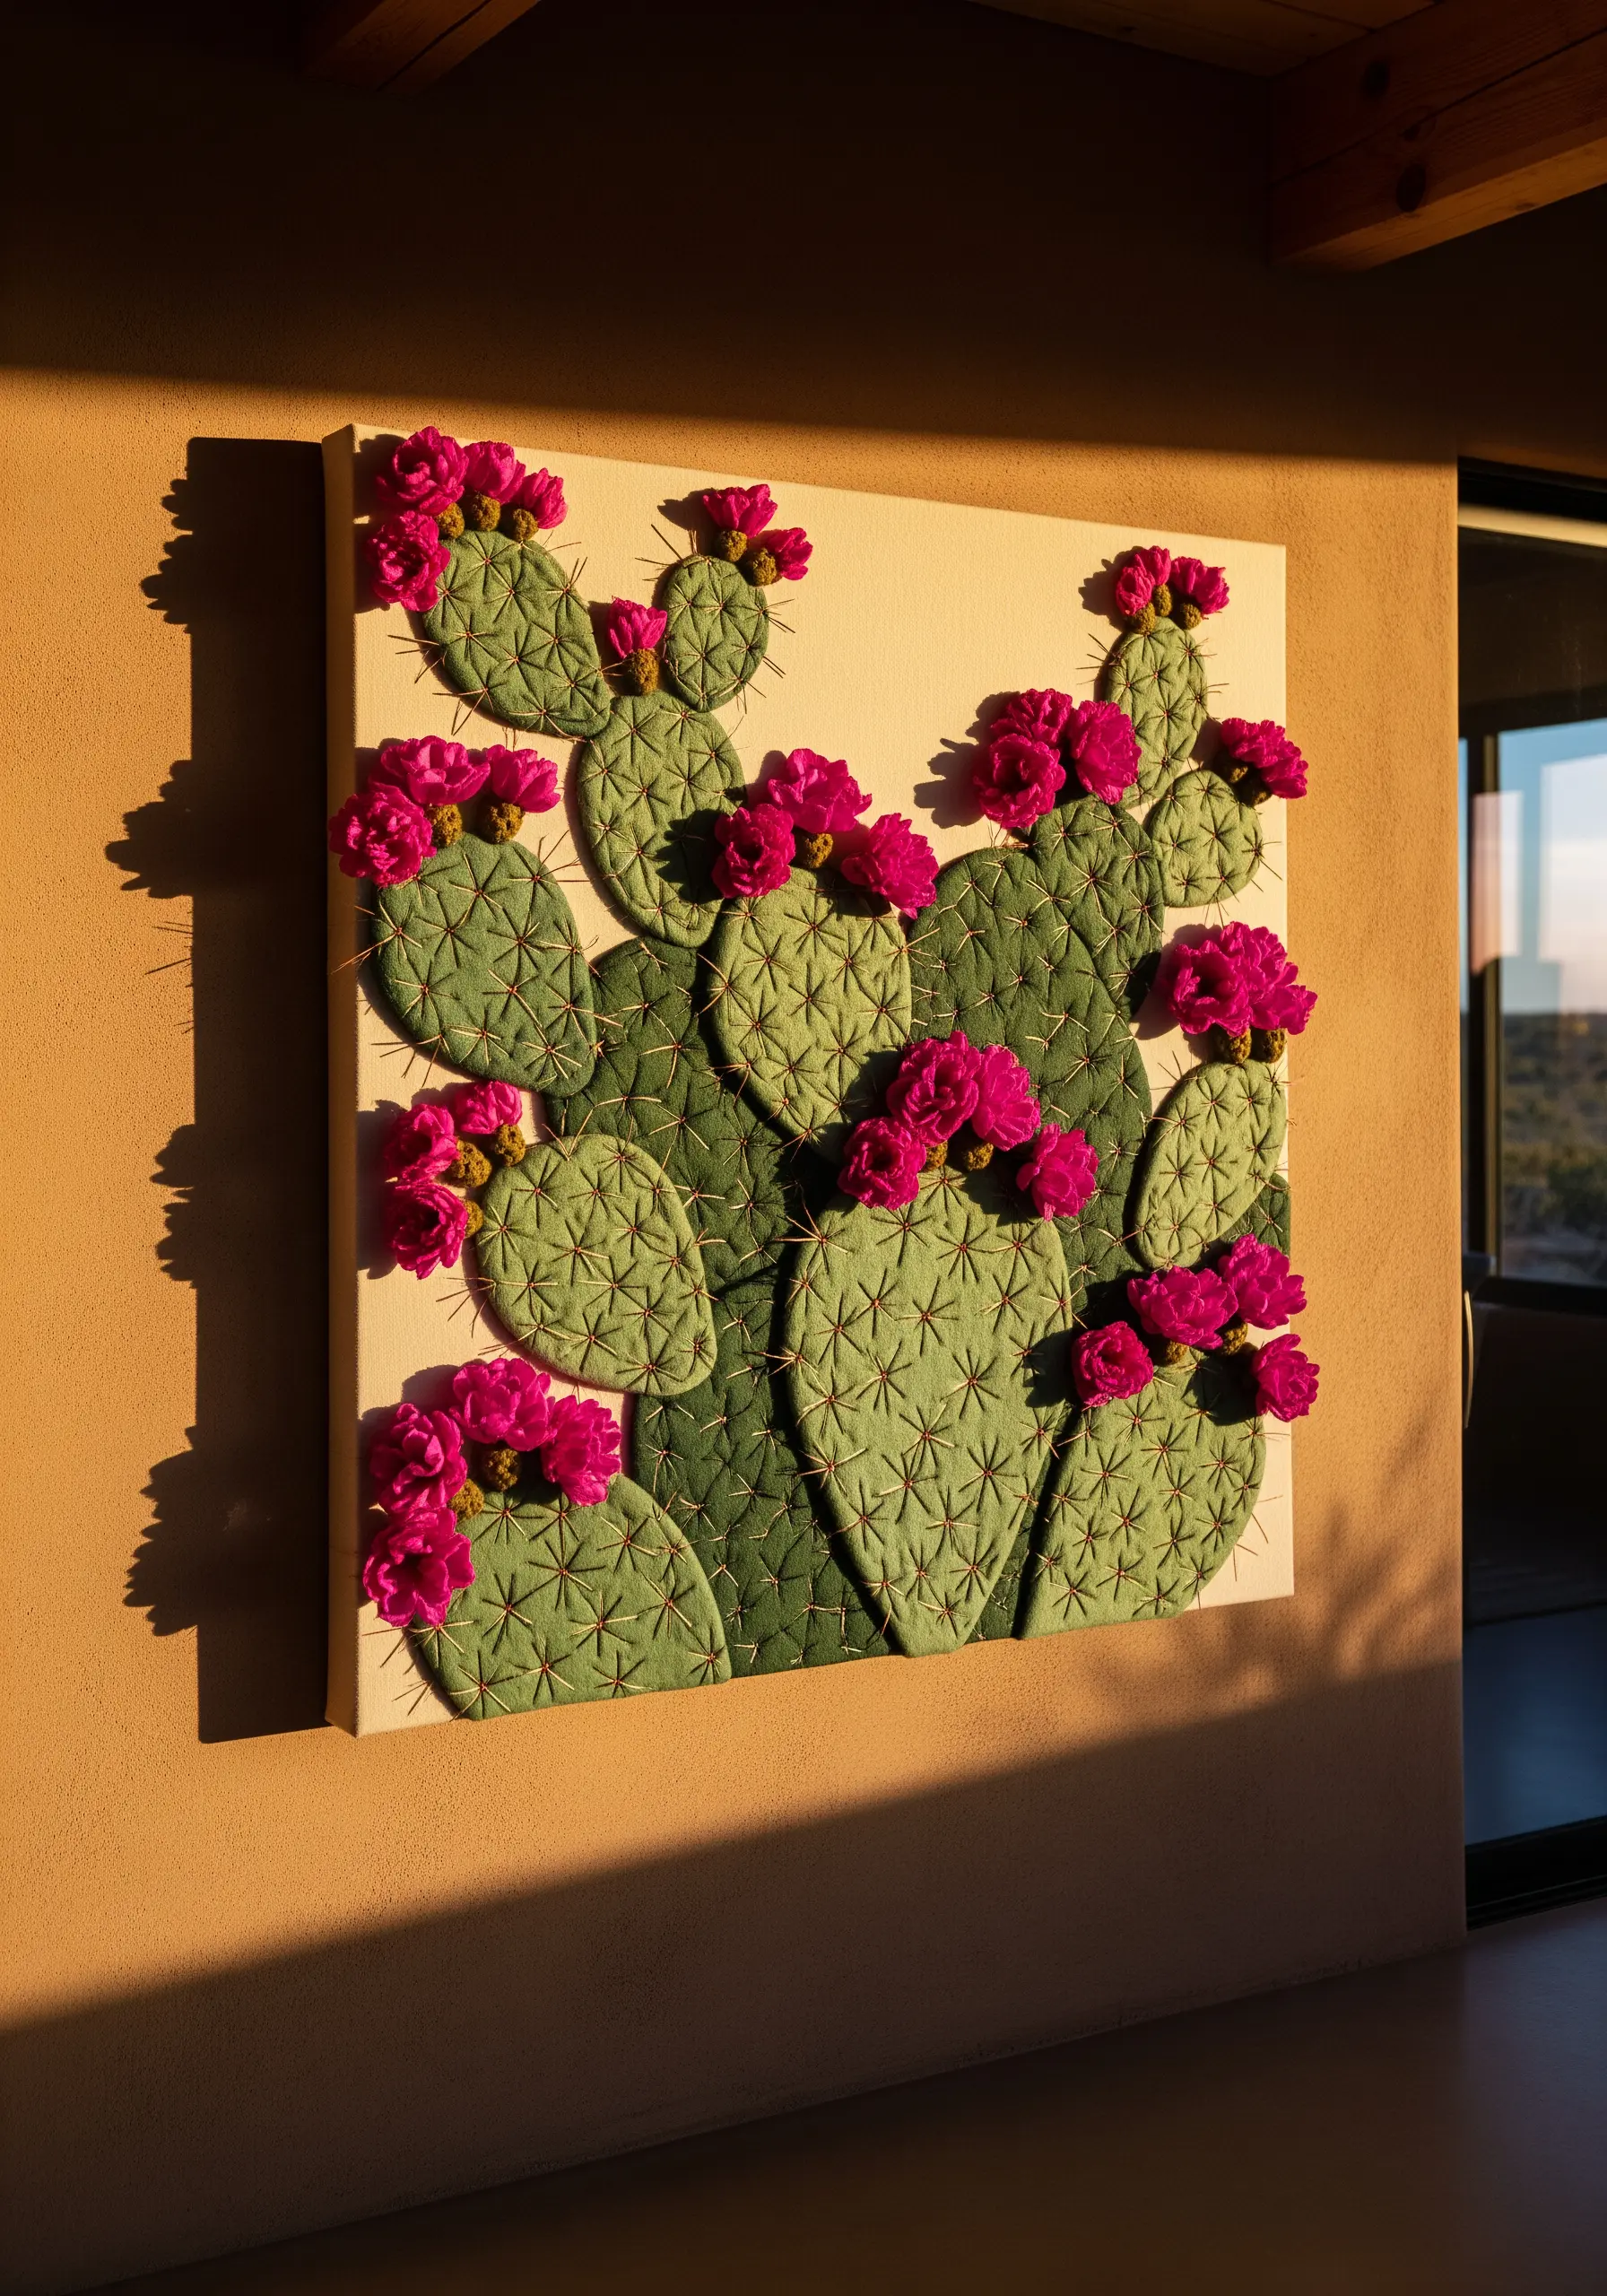
Recreate the distinct shape of a prickly pear cactus by building it in layers.
Cut the individual pad shapes from felt and stitch them onto your background fabric, overlapping them to build the structure of the plant.
Cover each felt pad with a smooth layer of green satin stitch.
To add the spines, use a grid of tiny seed stitches or detached chain stitches in a lighter color.
The vibrant flowers can be made from dense clusters of French knots or woven picot stitches, providing a pop of color and a soft textural contrast.
17. Construct Architectural Details in Thread
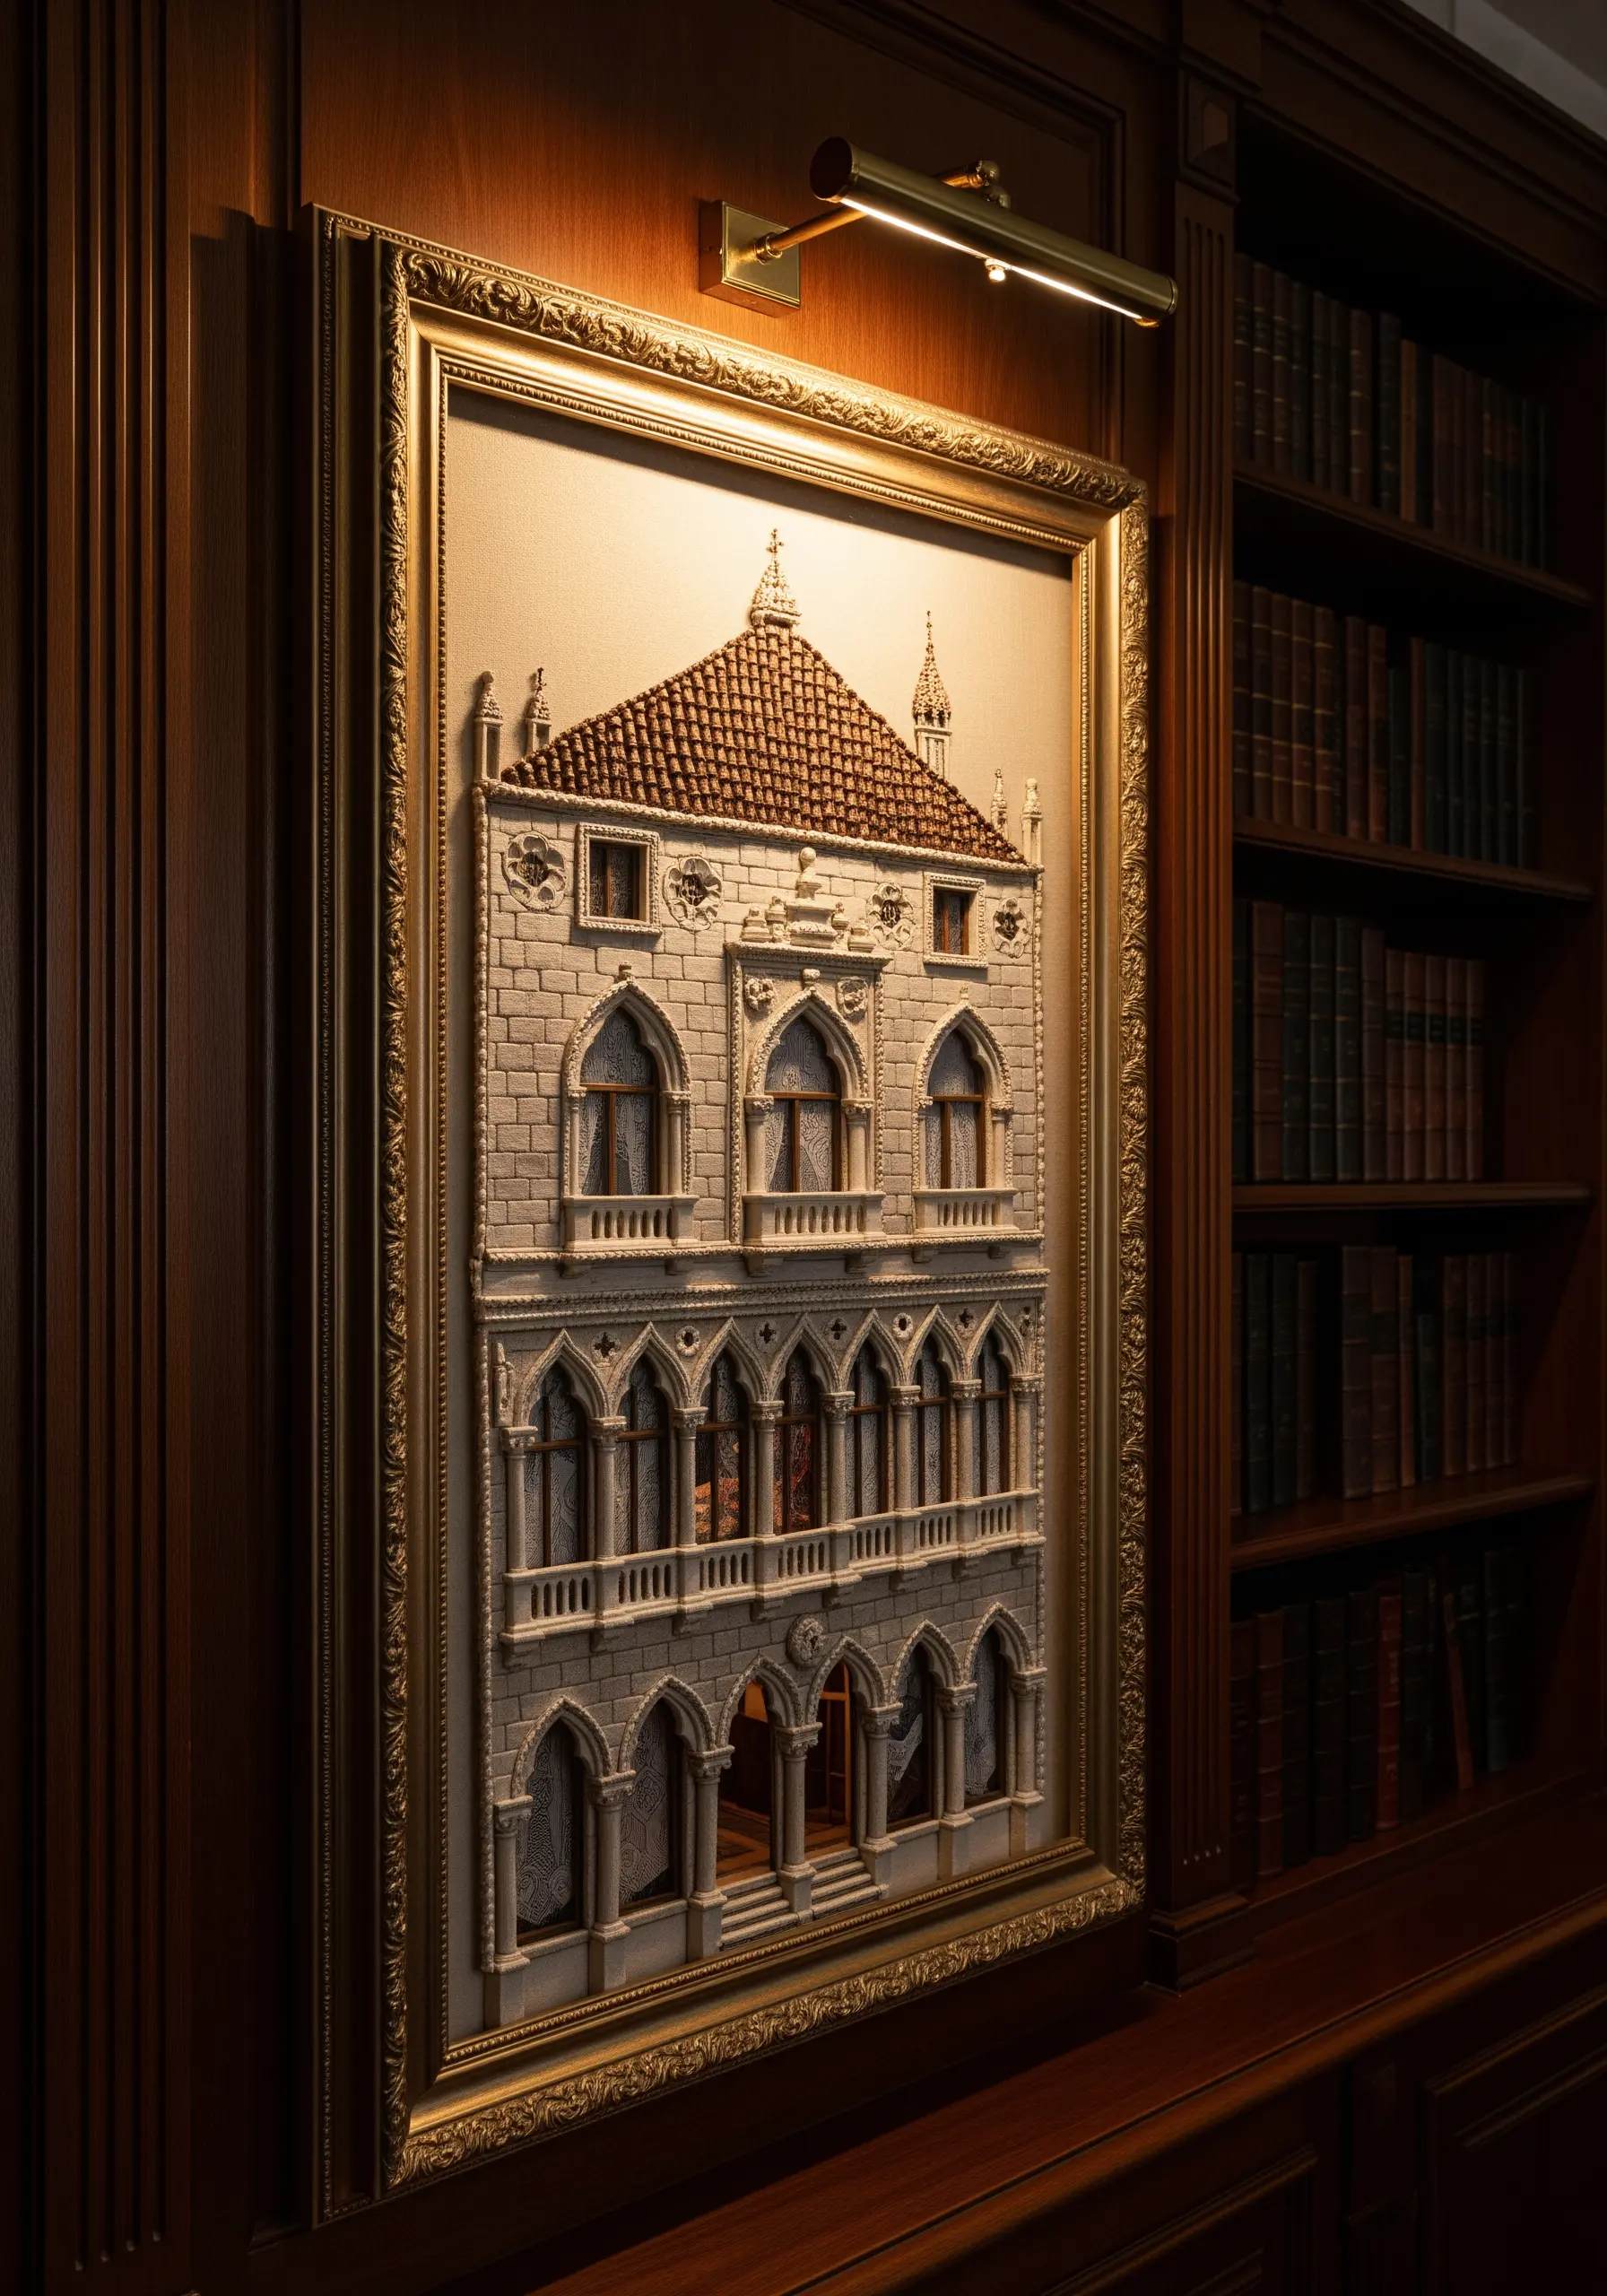
Approach architectural embroidery like a blueprint, focusing on structure and texture.
Use brick stitch to create realistic stone or brick walls. For smooth columns or arches, use padded satin stitch.
Create depth by allowing some elements, like balconies or window frames, to be stitched as separate stumpwork pieces and applied on top.
Use thinner threads for fine details like windowpanes and thicker, coarser threads for roof tiles to create a sense of scale and material difference.
This technique turns fabric into a canvas for miniature, touchable architecture.
18. Incorporate Natural Elements for Hyperrealism
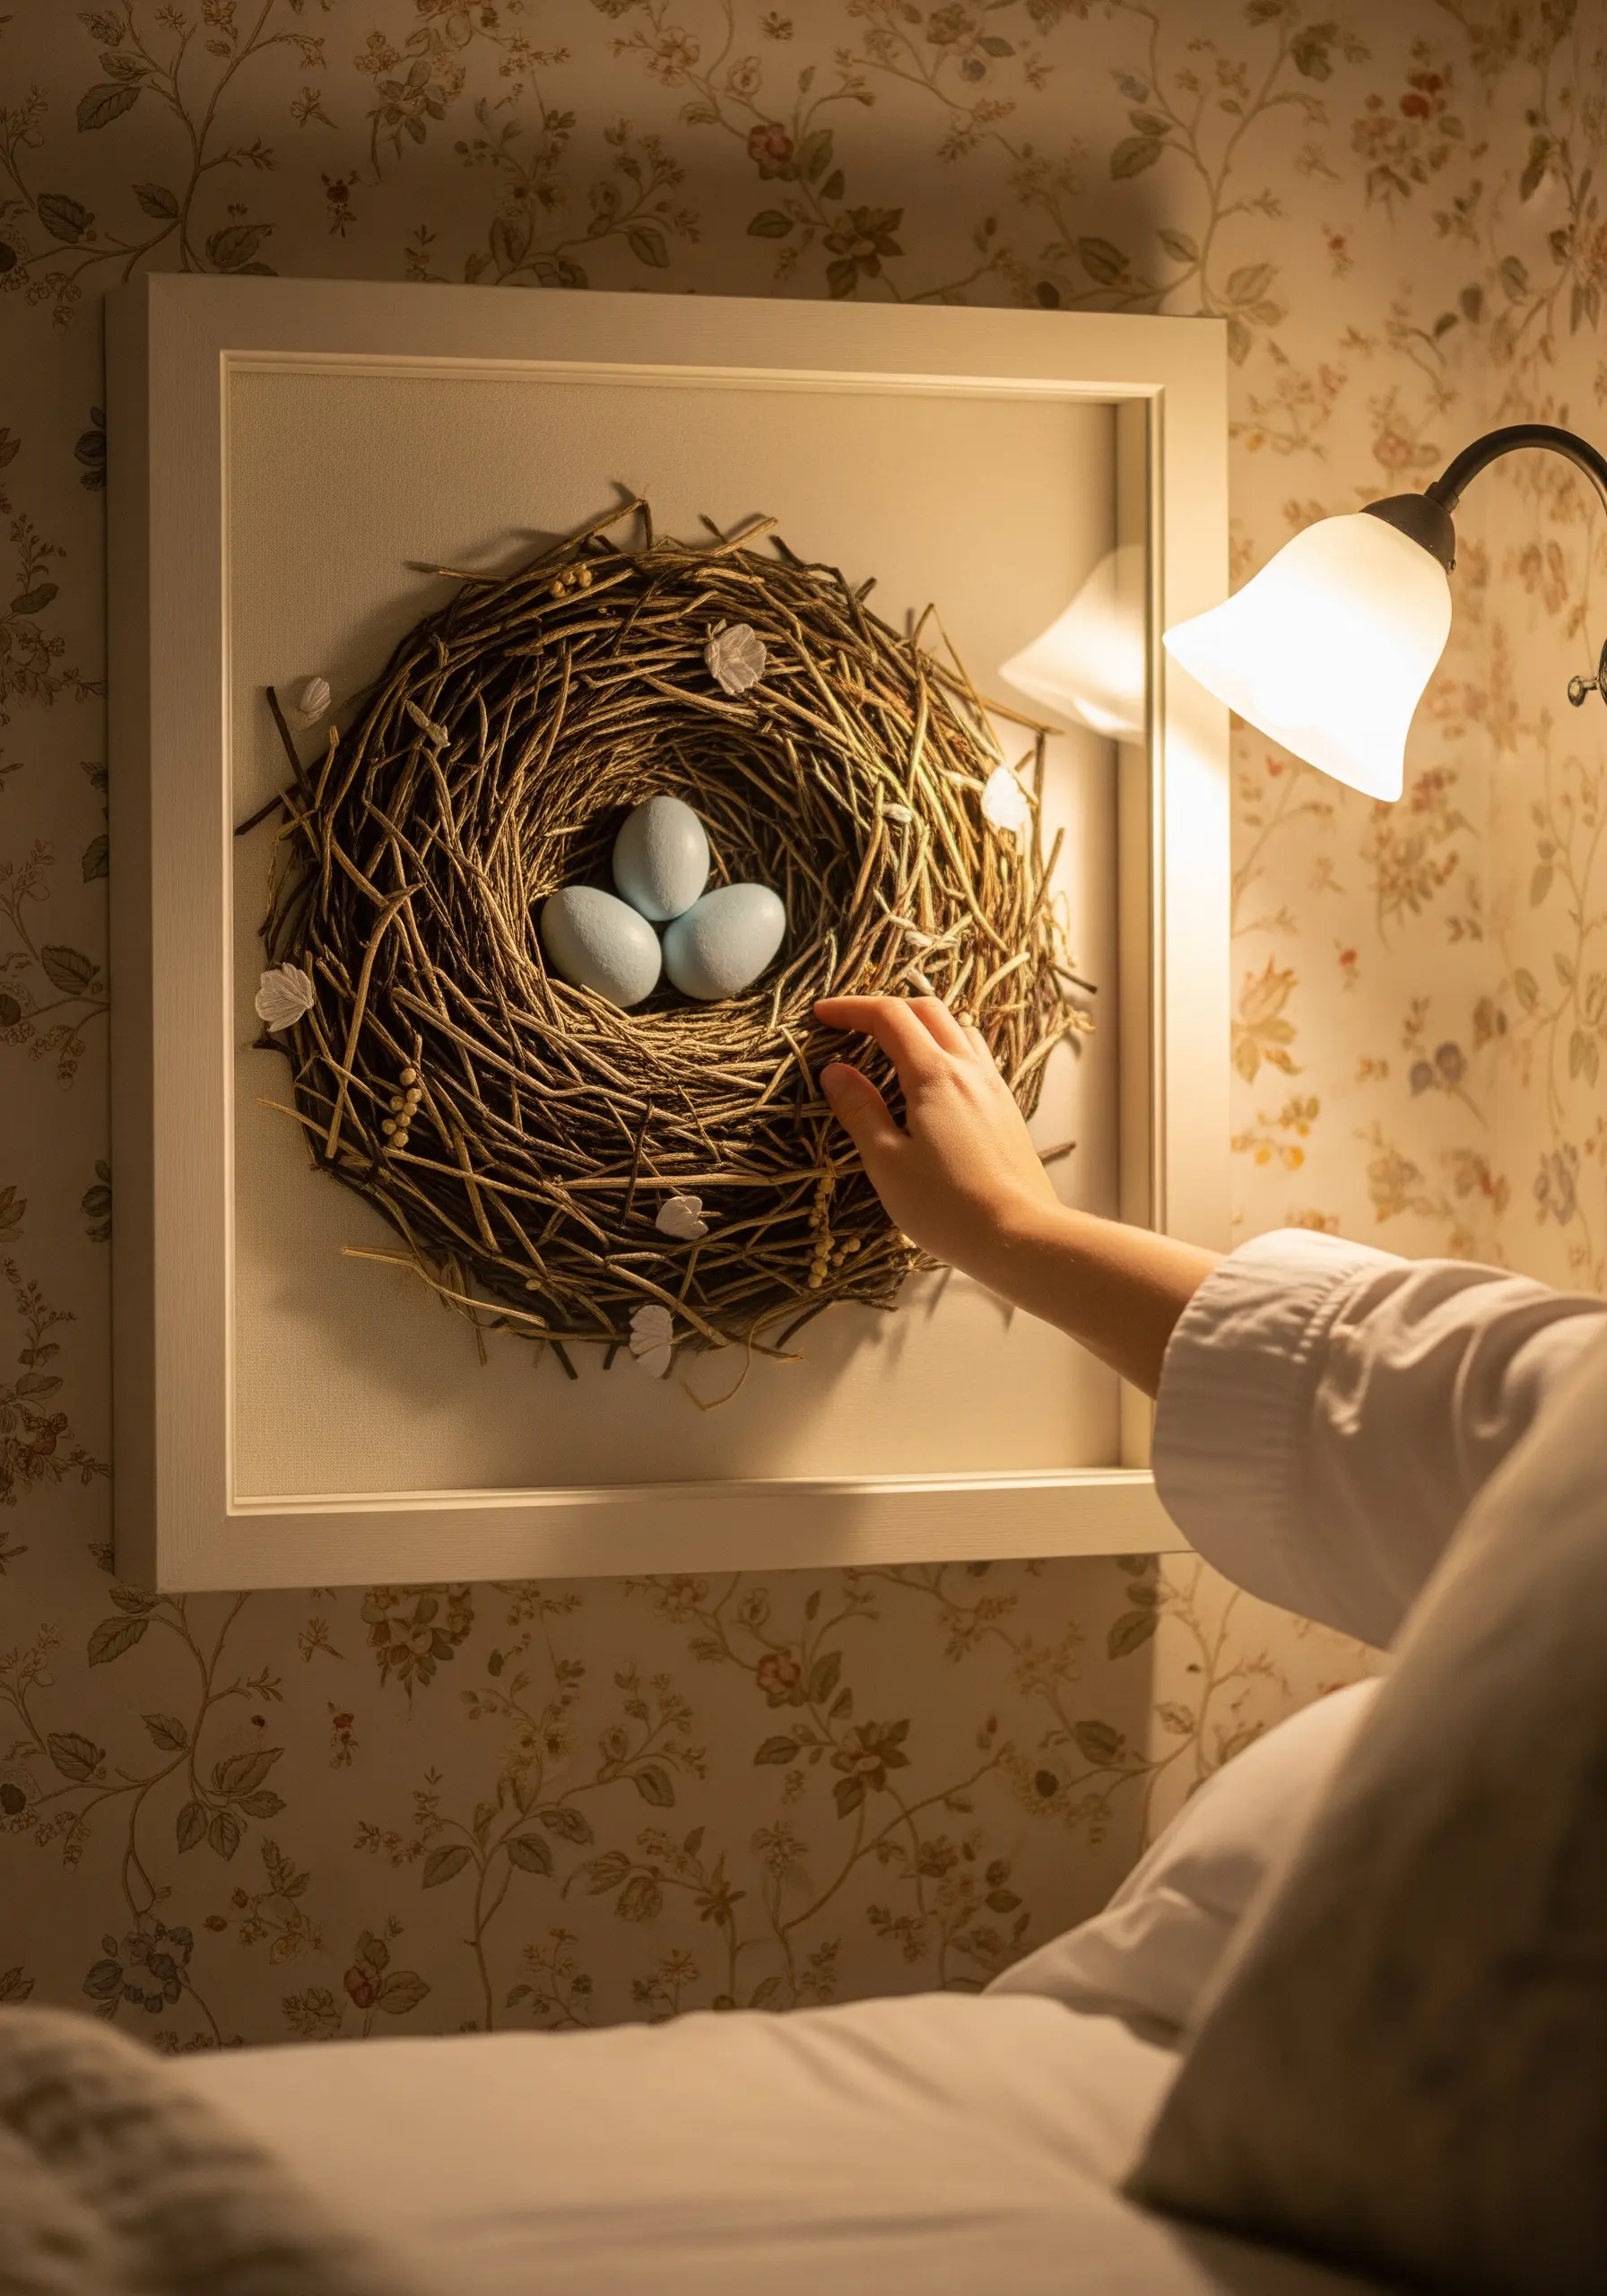
For a truly convincing natural object like a bird’s nest, sometimes the best material is the real thing.
Gather small, clean twigs, dried grasses, or raffia and arrange them in a nest shape on your fabric.
Use long, discreet couching stitches with a fine, matching brown thread to tack these elements down securely.
This mixed-media technique adds an unparalleled level of authentic texture and dimension that thread alone cannot replicate.
You can then add your own embroidered eggs or flowers into the finished nest.
19. Achieve Delicacy with Sheer Fabric Appliqué
To replicate something as delicate and transparent as an insect’s wing, you must work off the main canvas.
Stretch a piece of organza or tulle in a separate hoop and embroider the veins and outline of the wings onto it.
Once finished, carefully trim away the excess sheer fabric, leaving a fine border.
Attach this translucent wing to the embroidered body of the insect on your primary fabric.
This creates a stunningly realistic, layered effect where the background is visible through the wings.
20. Depict Flowing Water with Vertical Stitches
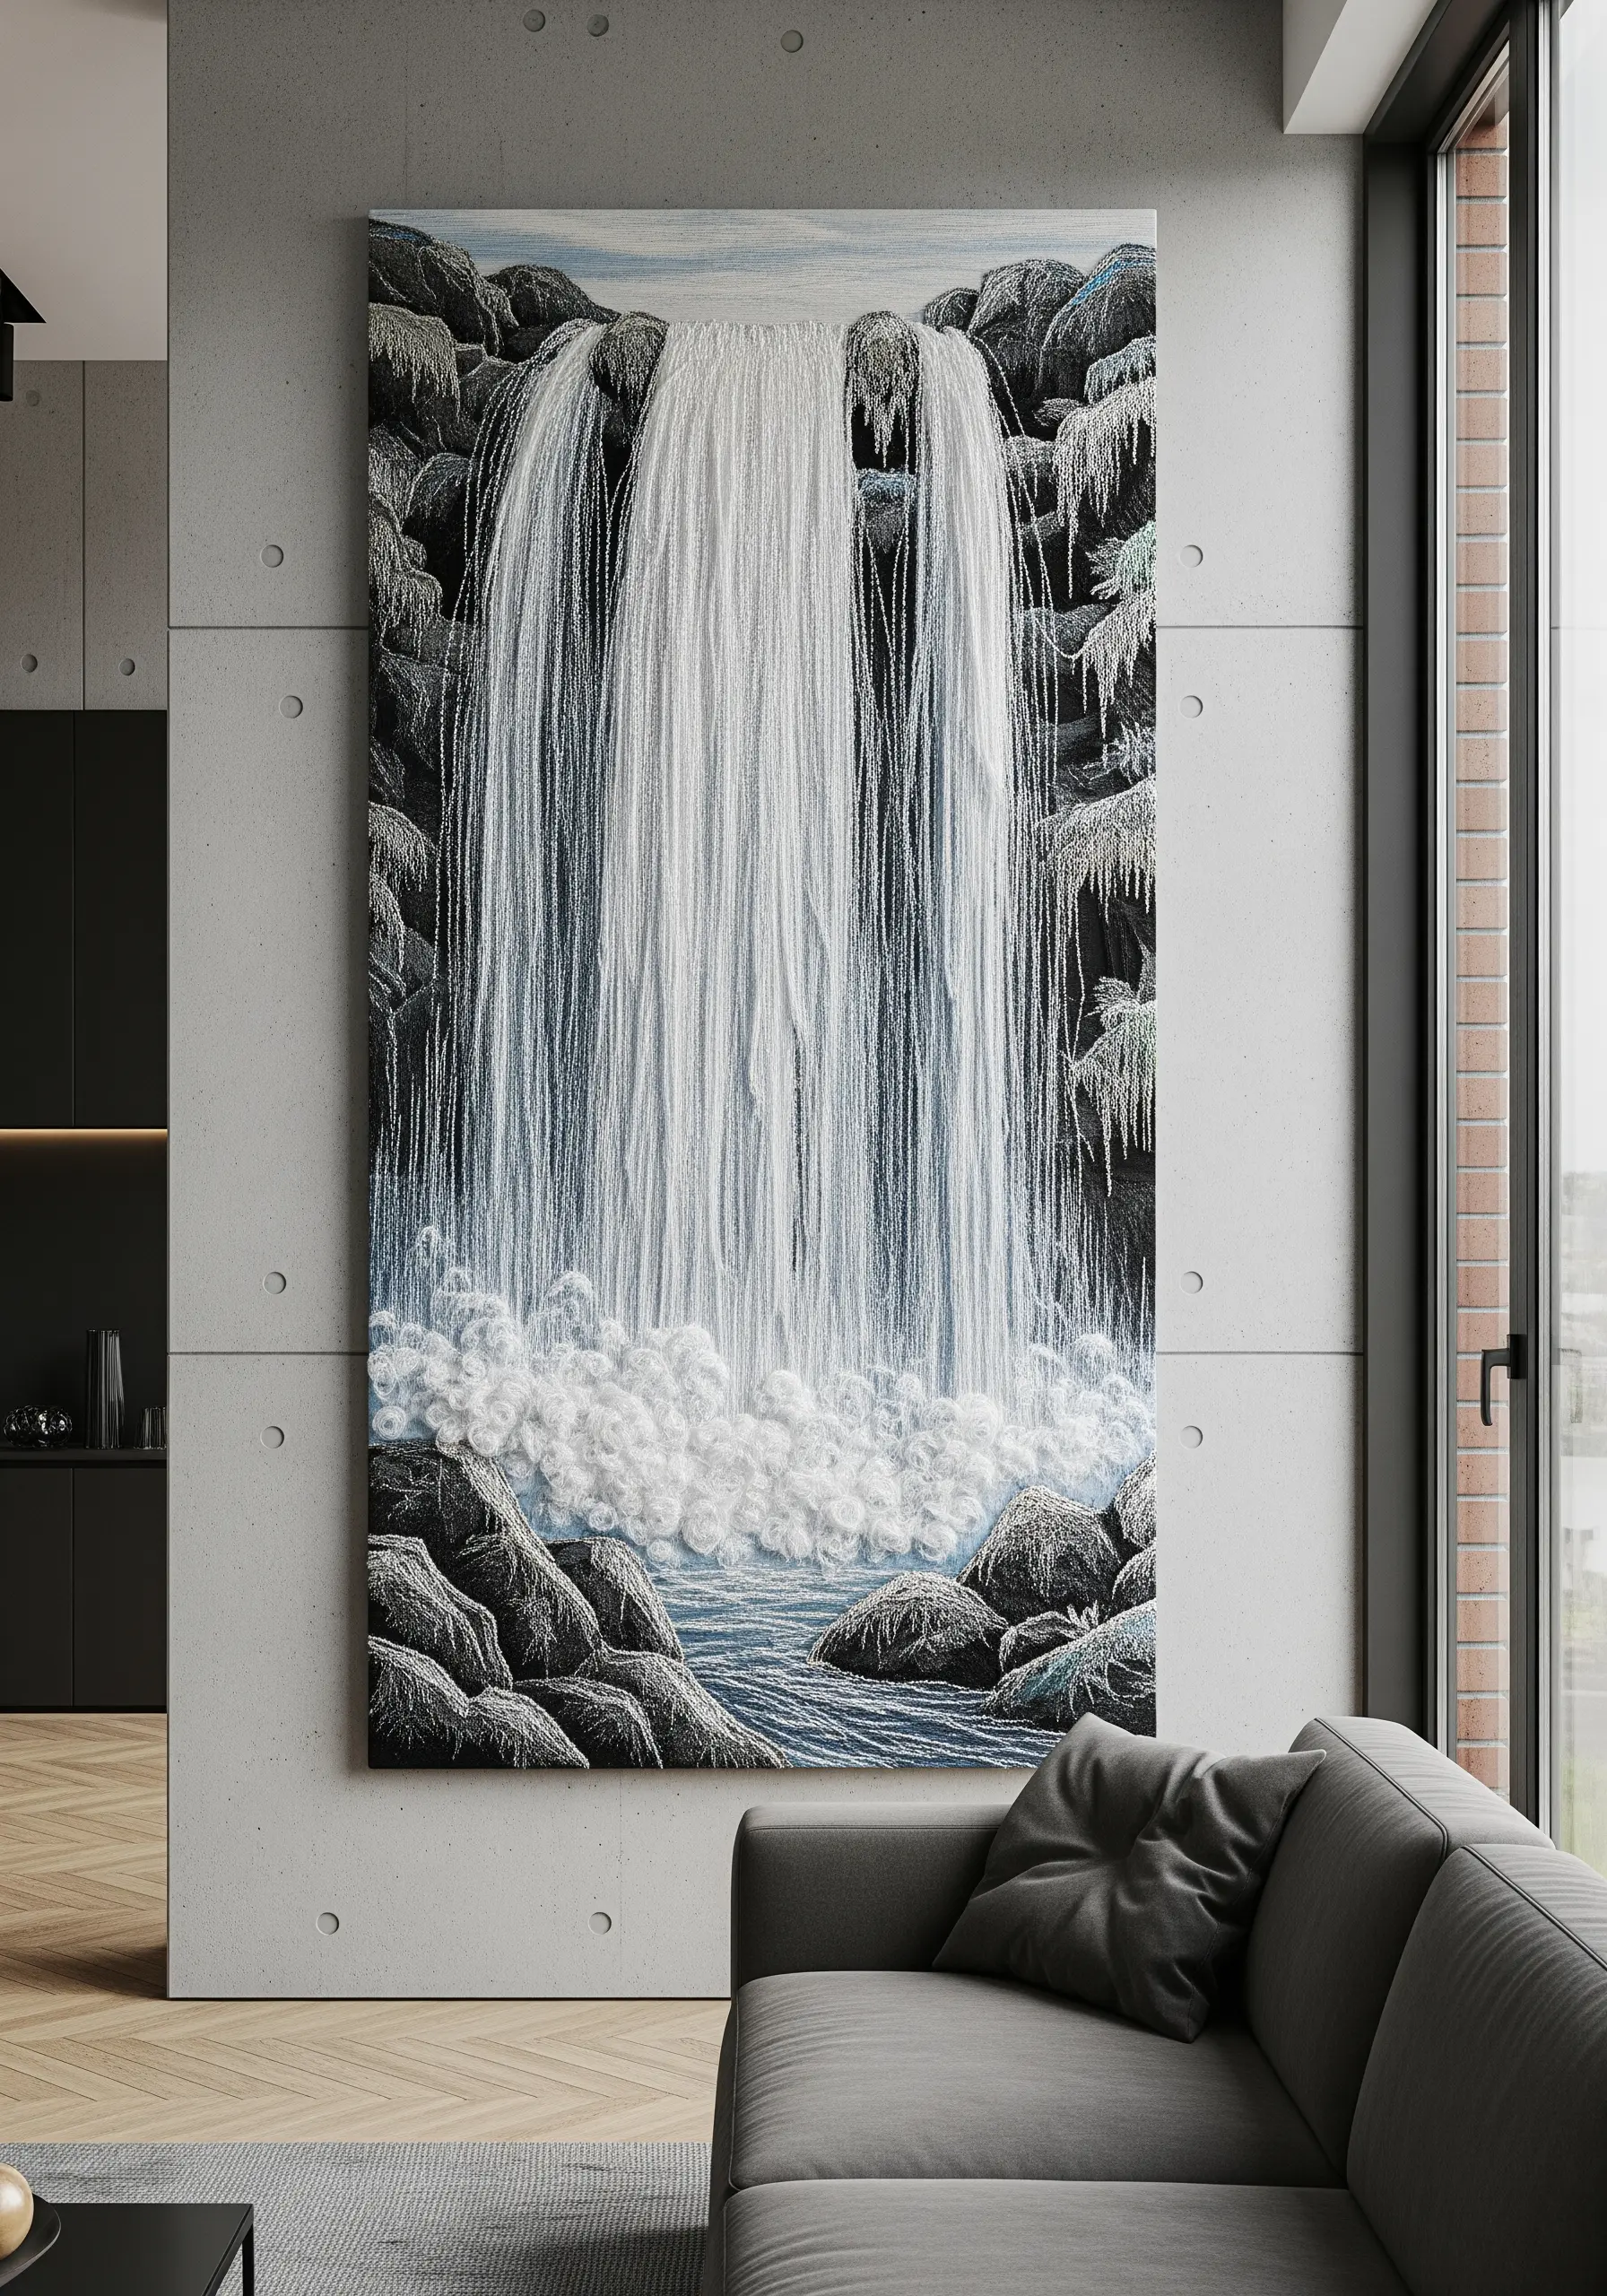
Capture the powerful, downward rush of a waterfall with long, vertical stitches.
Use a variety of threads—white, grey, pale blue, and even a hint of metallic silver—and let them hang loosely in long straight stitches from the top to the bottom.
Don’t pull them too tight; a little slack enhances the sense of movement.
At the base, create the churning spray with a dense, chaotic mix of French knots and turkey stitch loops.
The contrast between the orderly vertical lines and the clustered knots at the bottom creates a convincing illusion of falling water.
21. Layer Stitches for a Lush Botanical Scene
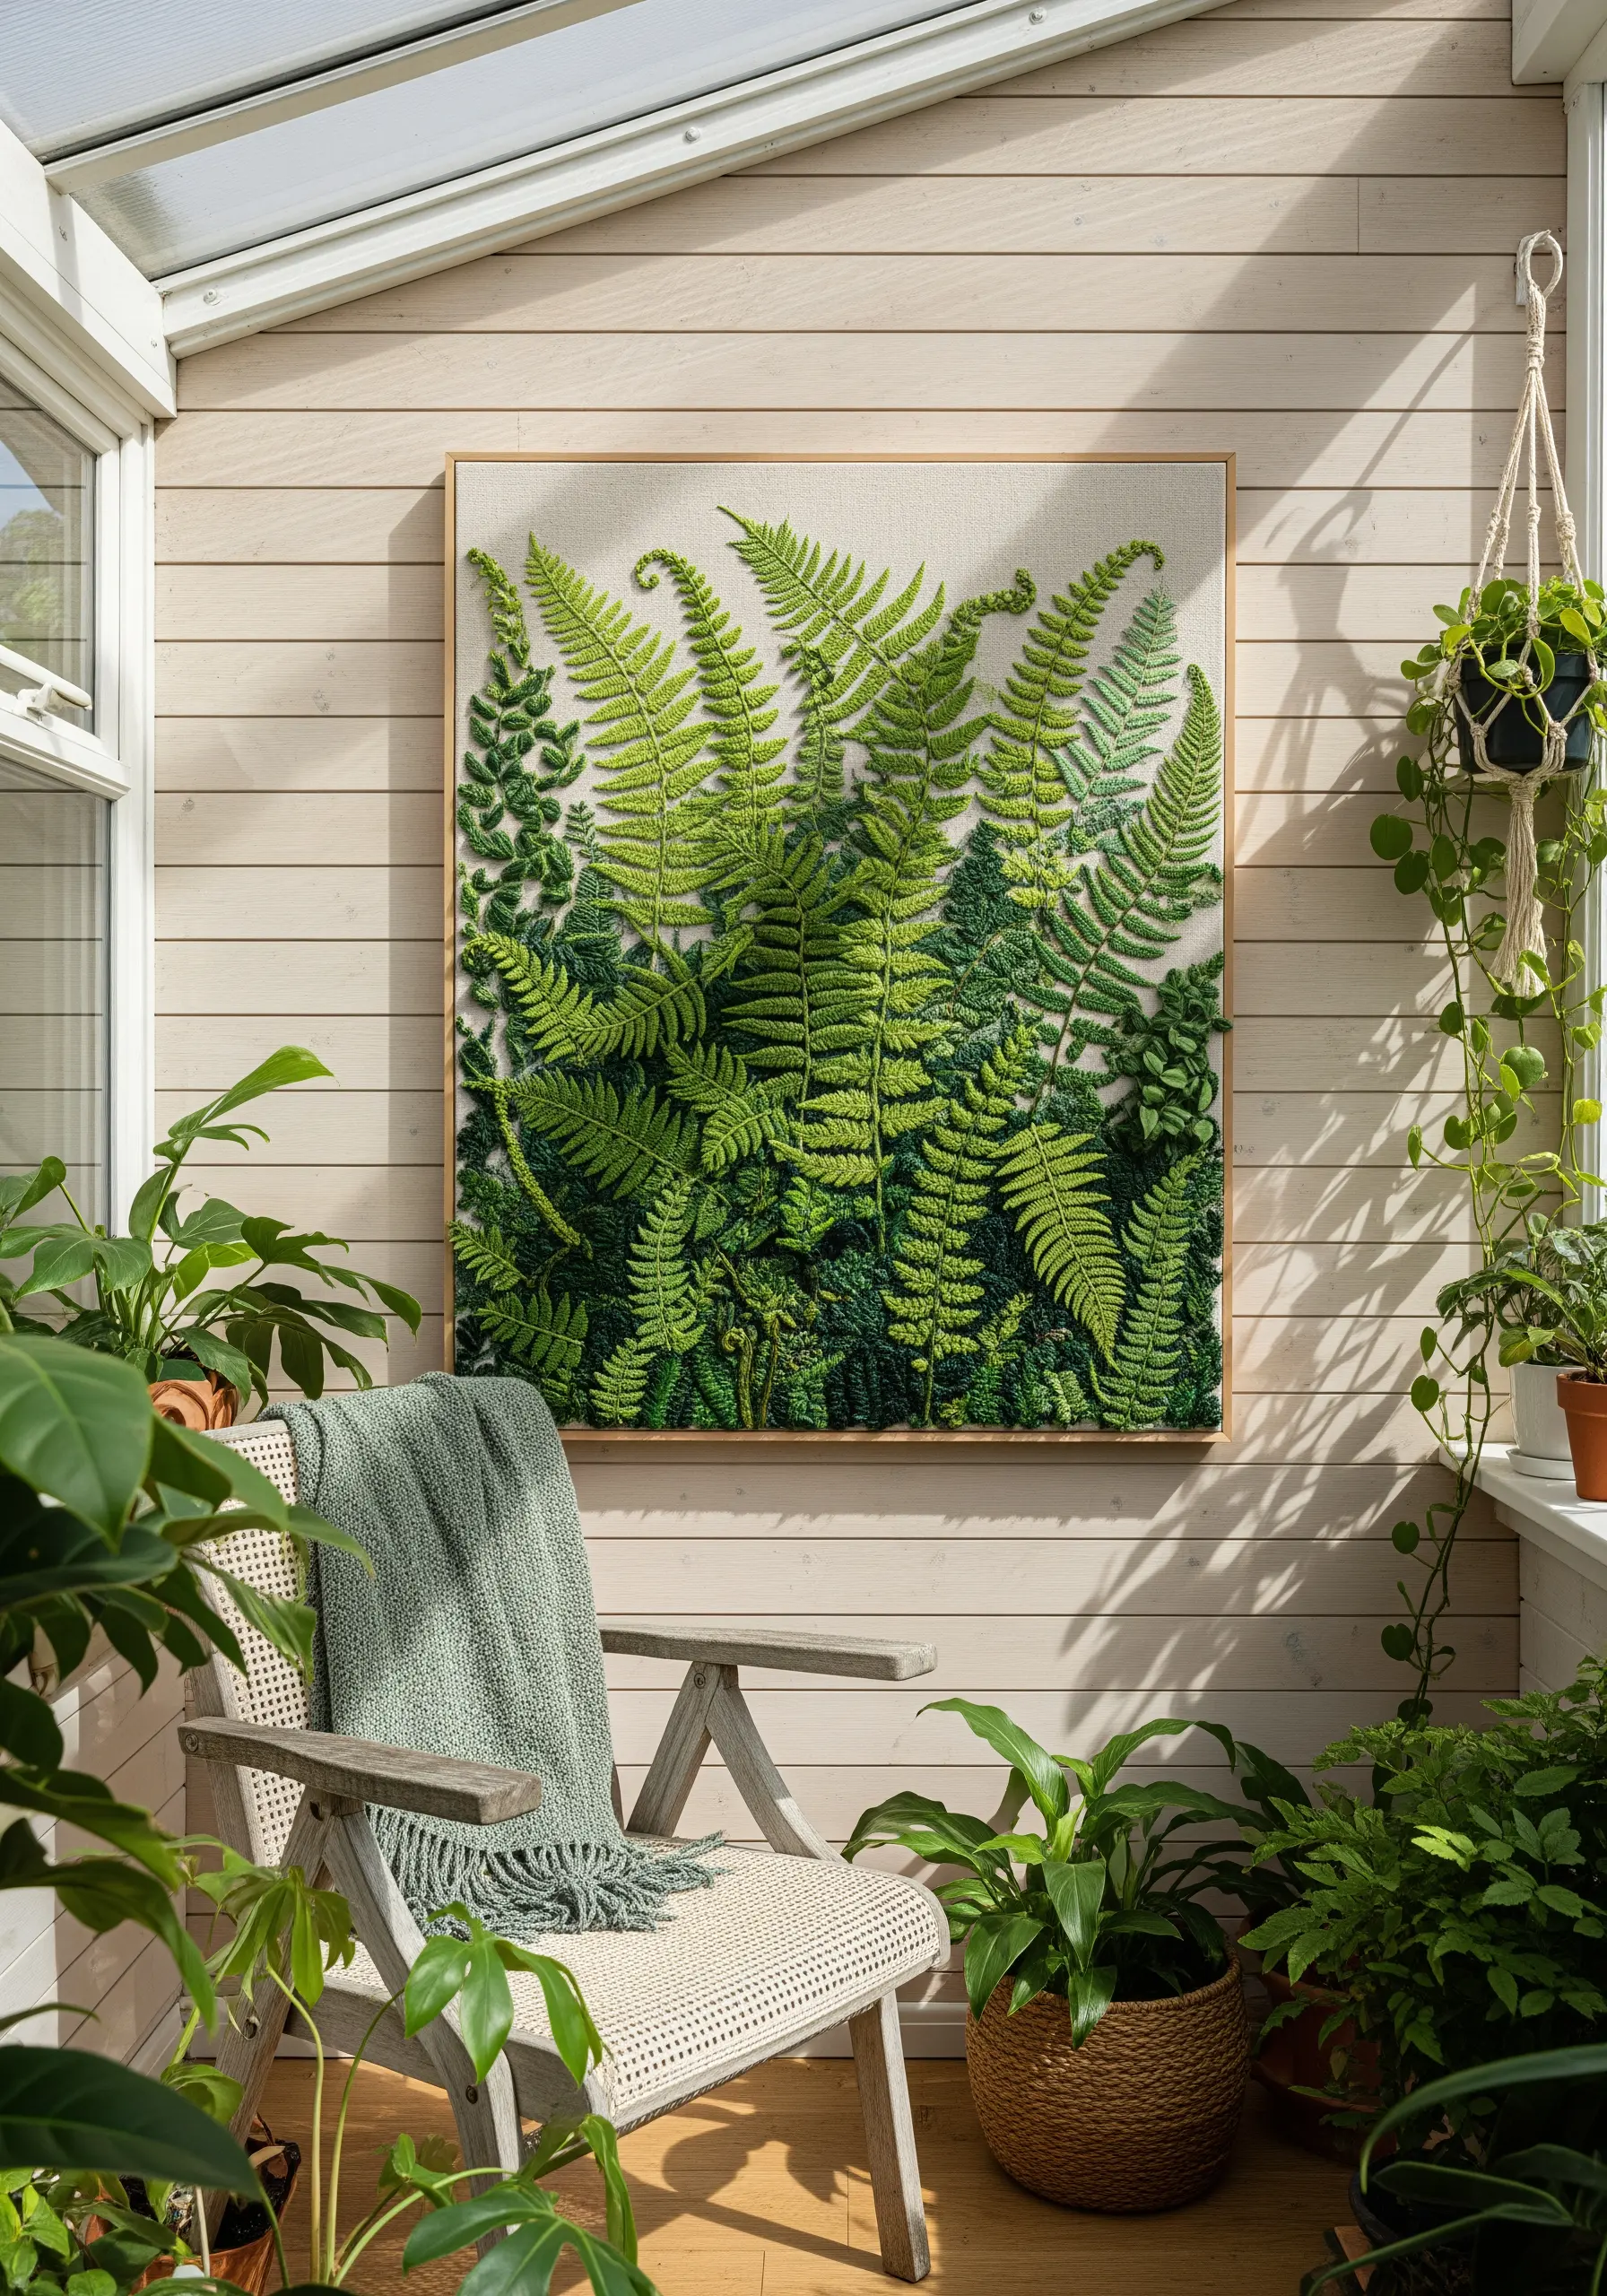
To prevent a dense foliage piece from looking flat, you must build it in layers from back to front.
Start by stitching the leaves that are furthest away using flatter stitches like satin stitch in darker shades of green.
For the middle ground, use more defined stitches like fishbone or leaf stitch.
Finally, stitch the foreground ferns using dimensional techniques like detached buttonhole stitch or wired stumpwork slips, allowing them to physically overlap the elements behind them.
This layering technique is the key to creating realistic depth in any botanical fabric collage.
22. Create Celestial Swirls with Couching
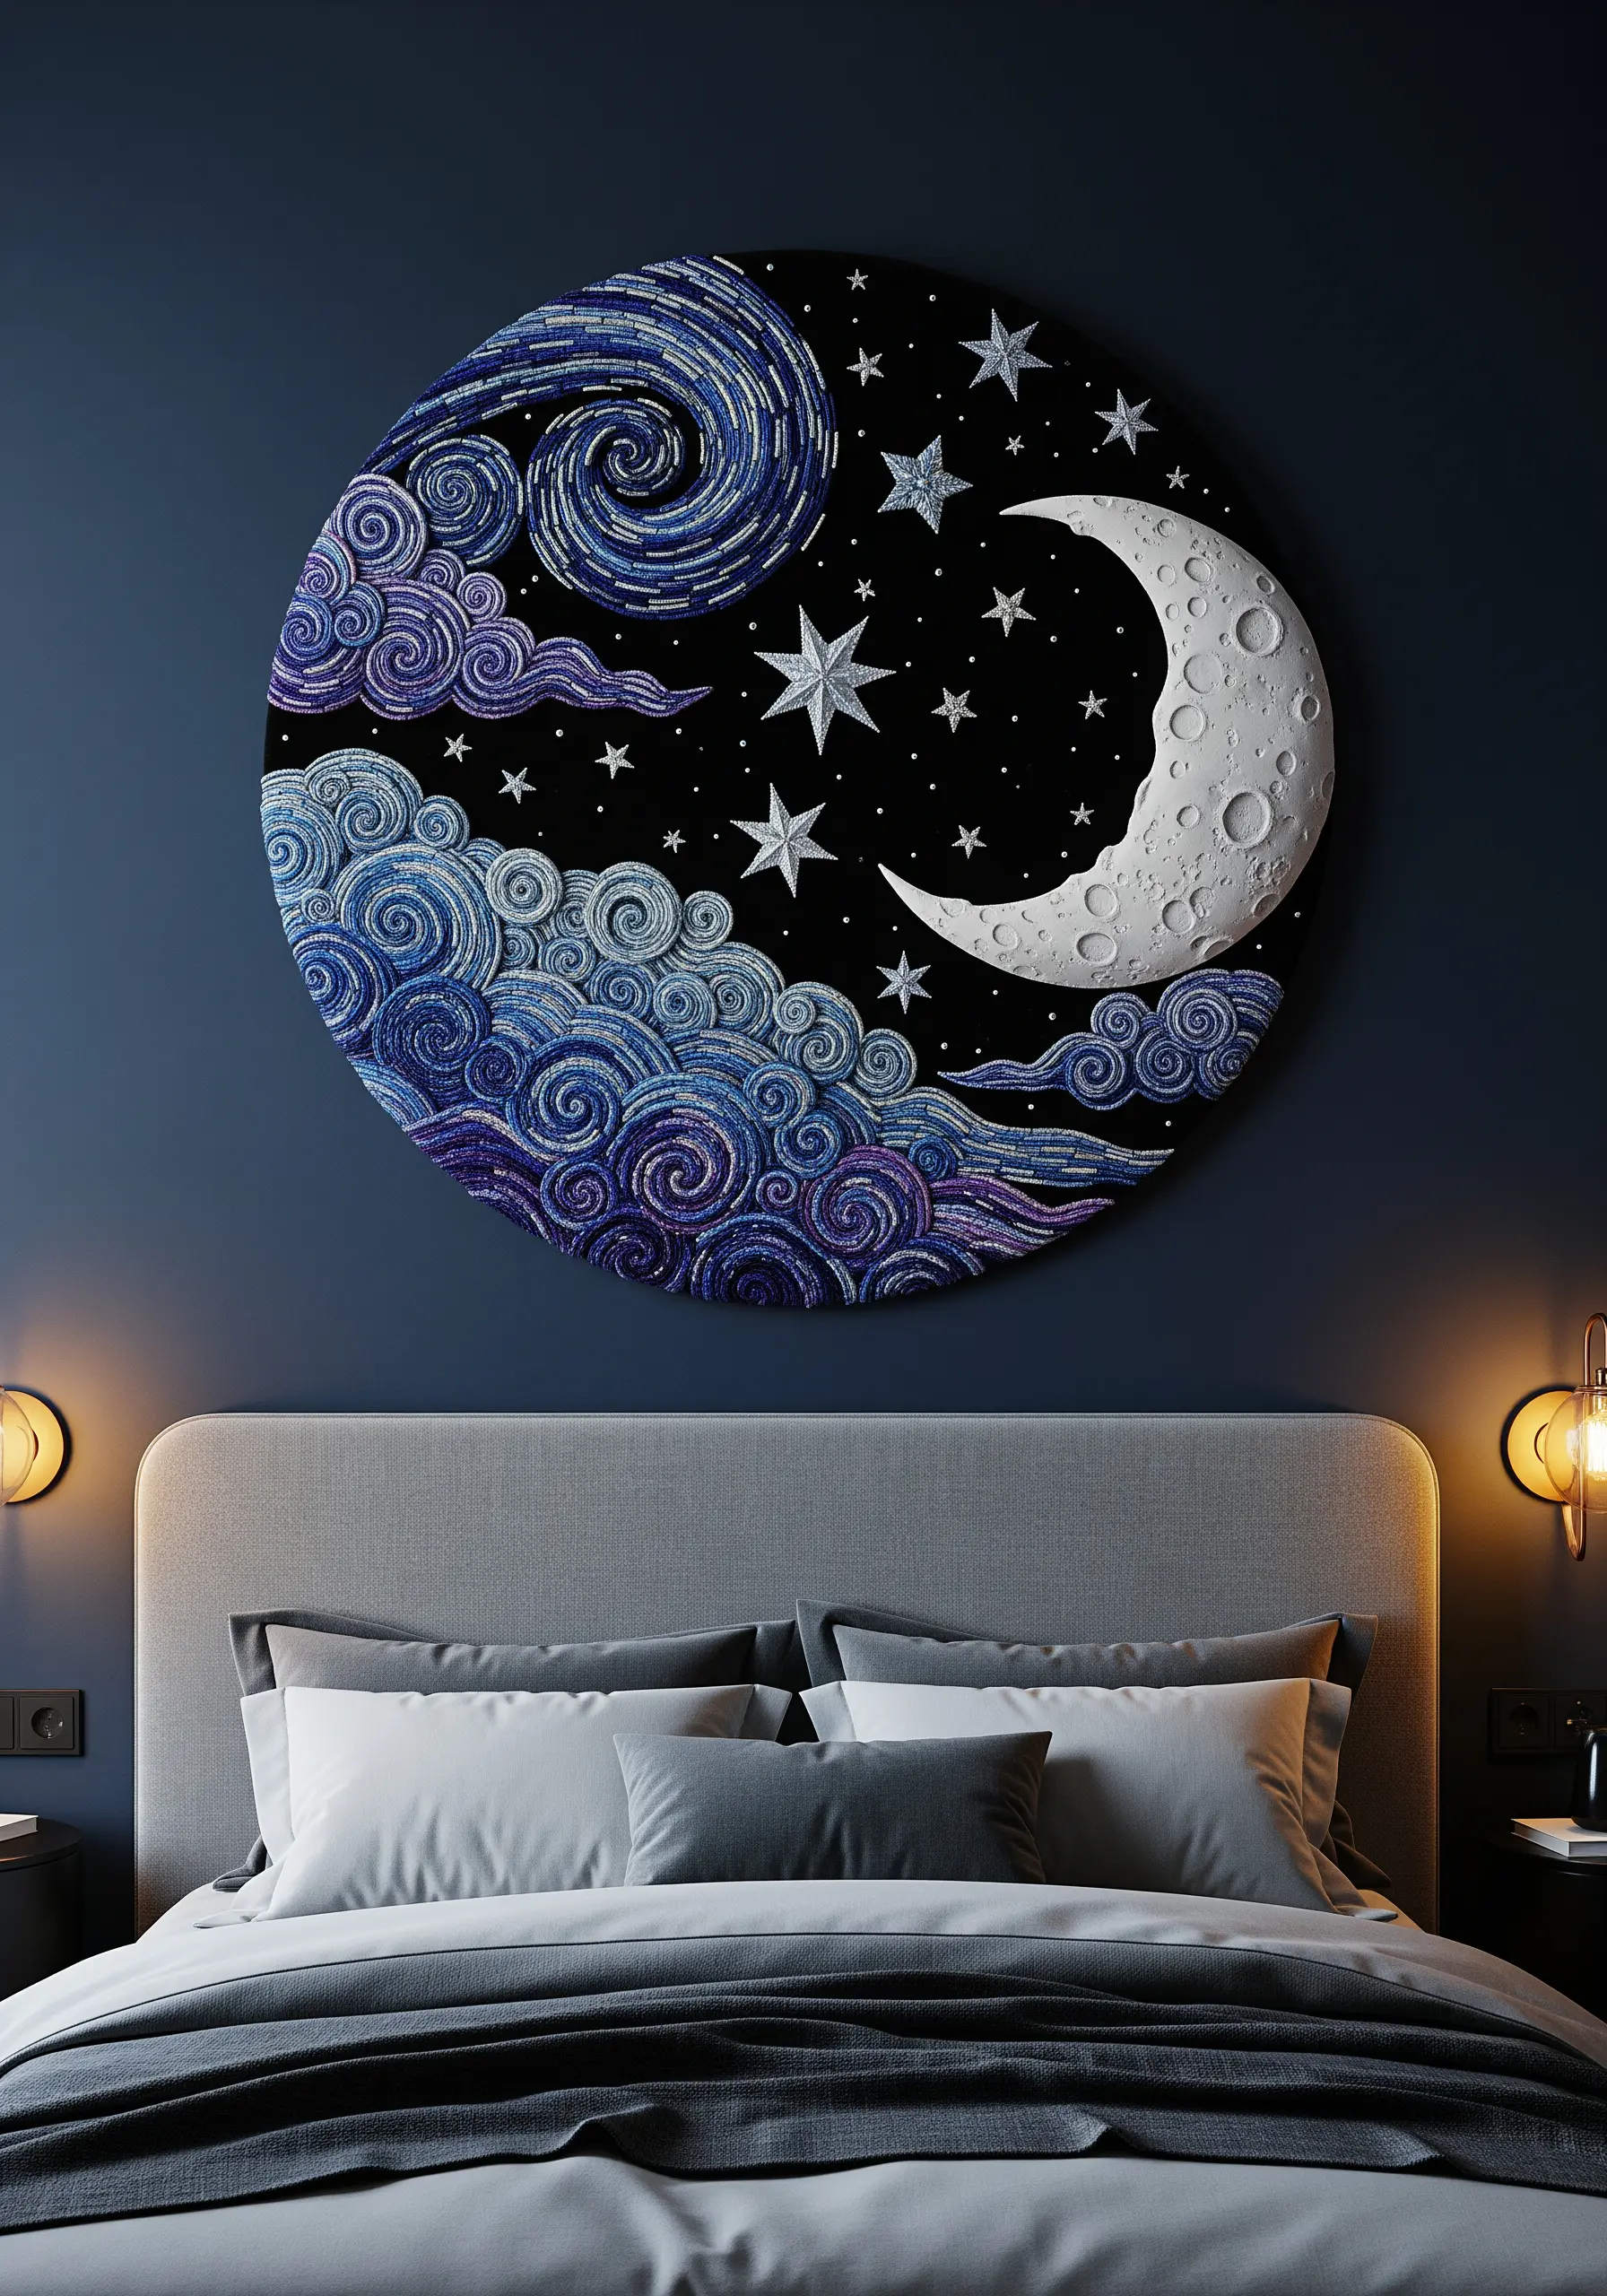
For a design with bold, graphic swirls like a stylized night sky, couching is your most powerful tool.
Bundle several strands of floss or a thicker yarn together and lay it on your fabric along the swirl pattern.
Then, use a single, contrasting strand of thread to tack the bundle down at regular intervals.
This technique creates clean, raised lines with far more texture and definition than a simple line stitch.
Fill the spaces between the swirls with dense French knots or seed beads to complete the celestial effect.
23. Explore Sculptural Form with Arm Knitting
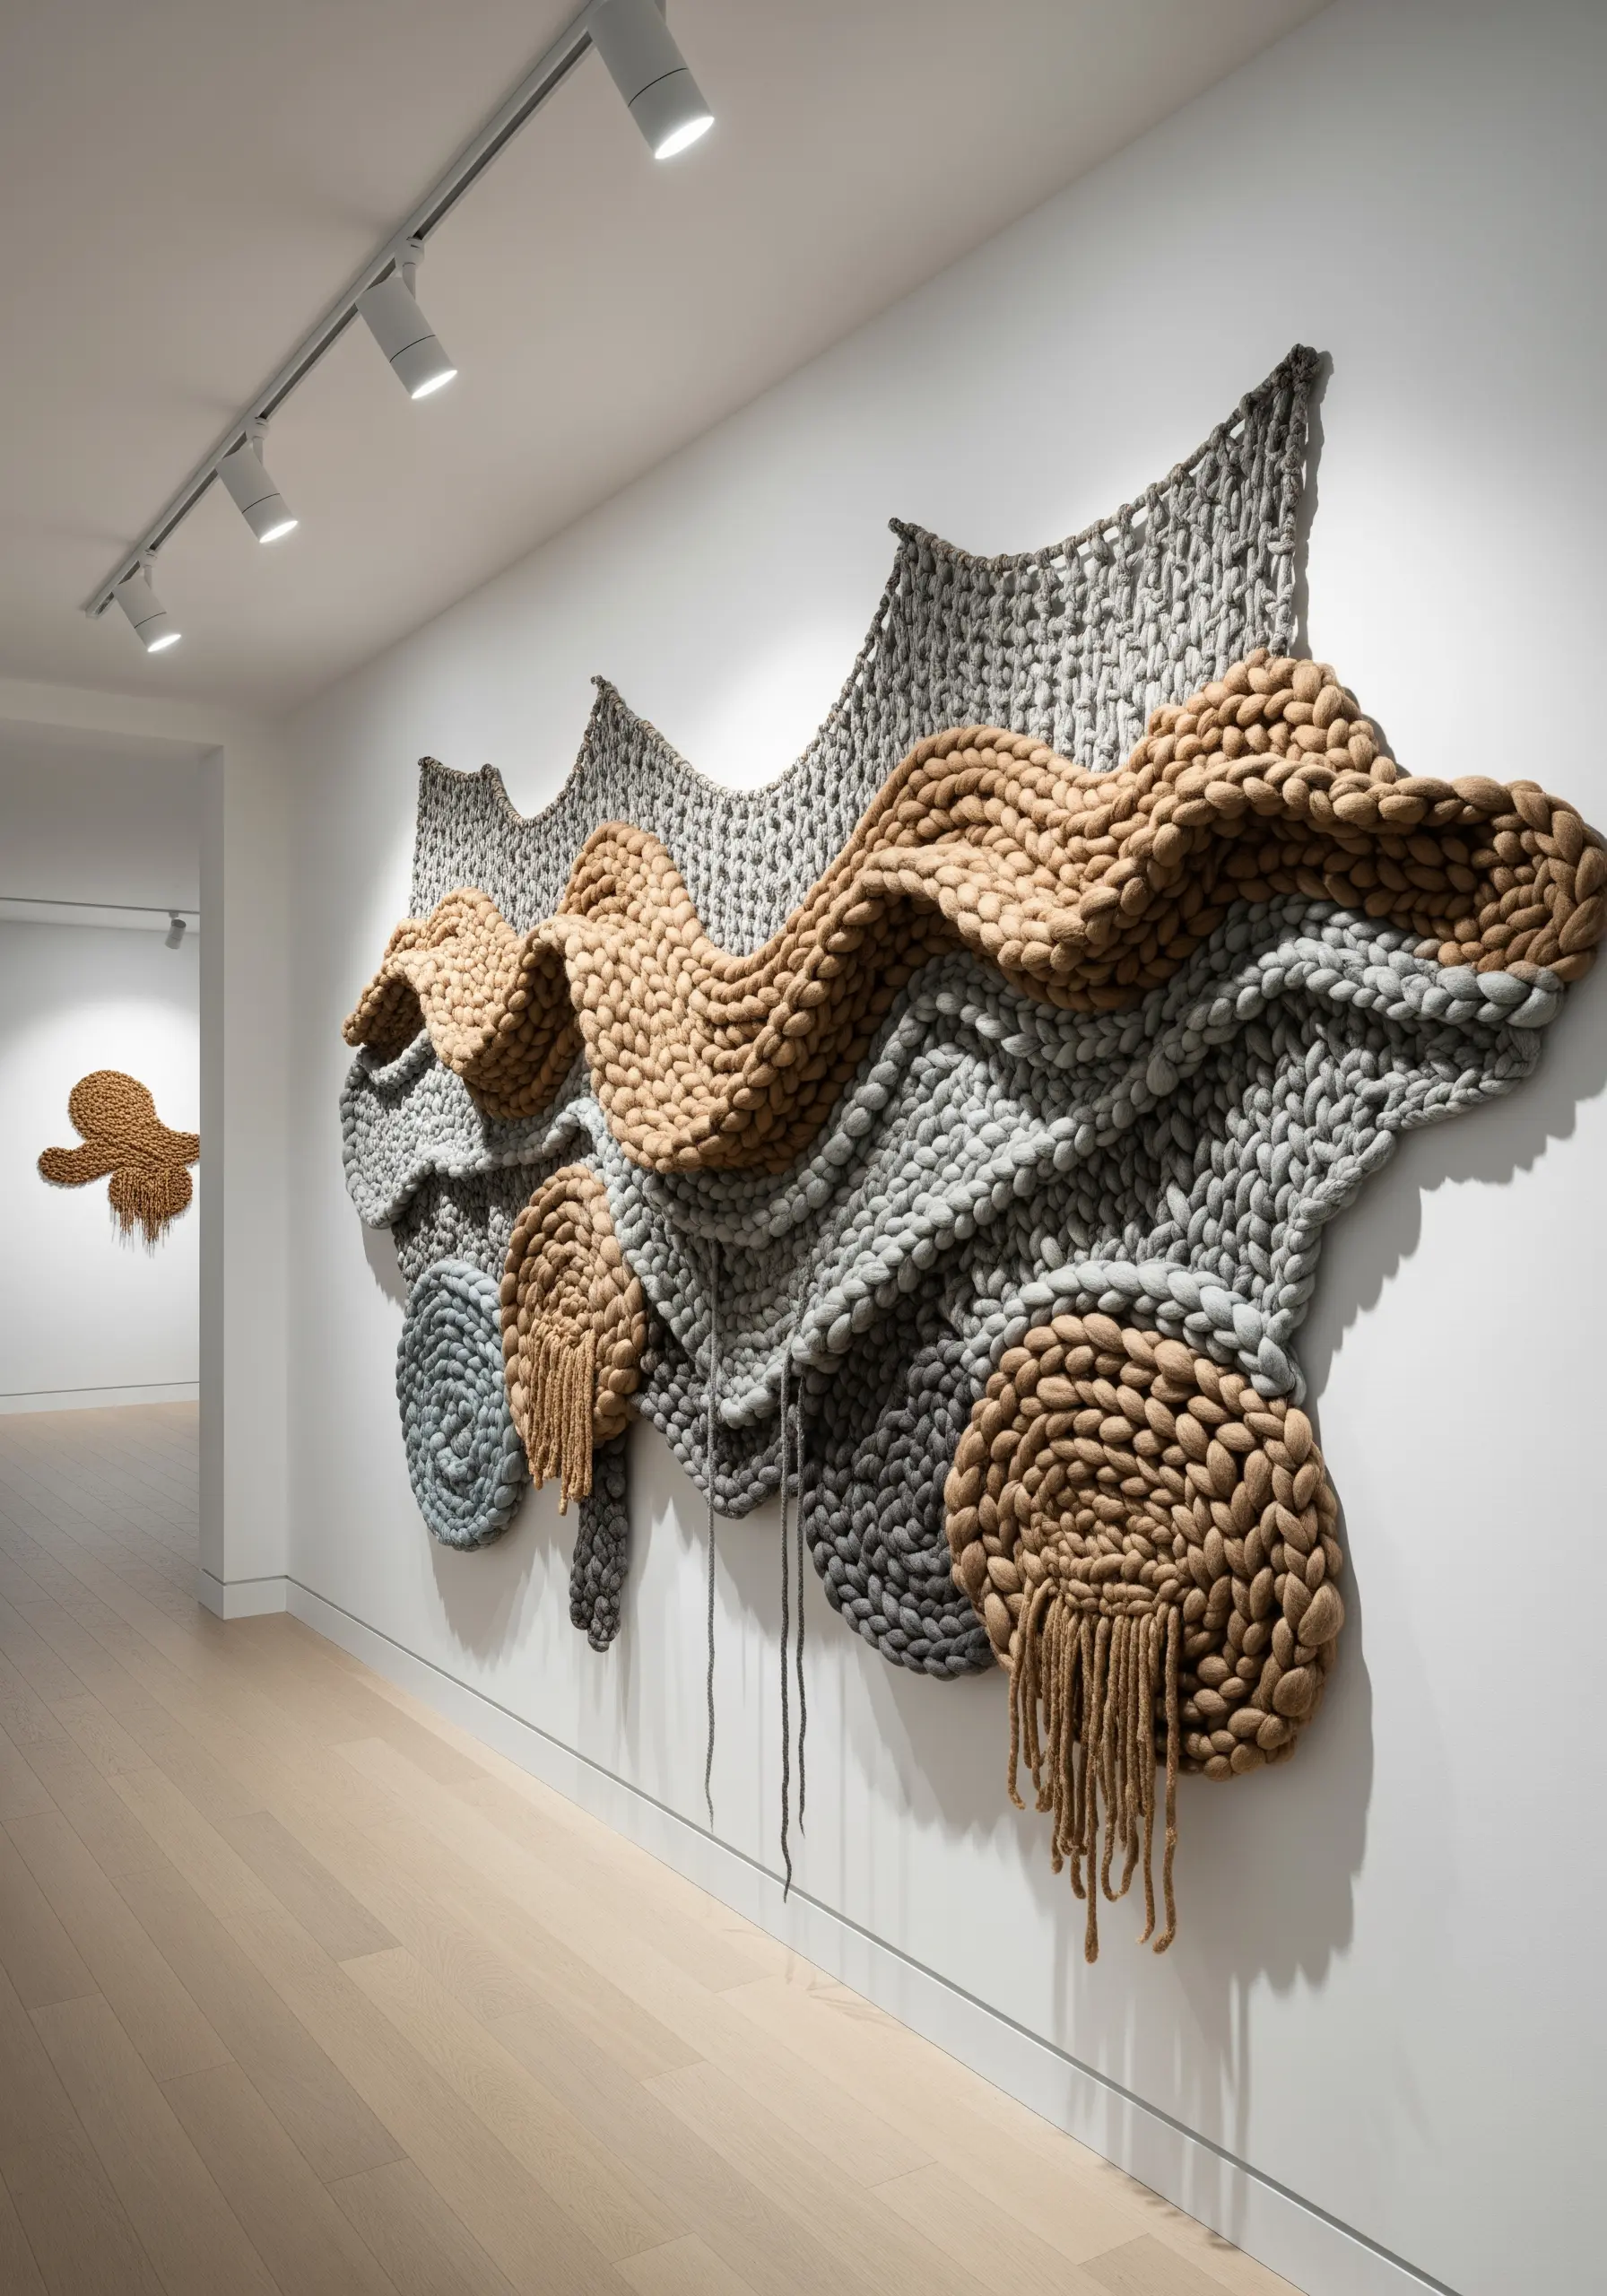
For large-scale abstract art, move beyond the needle and thread and explore macro fiber techniques.
Using jumbo chenille yarn or merino wool roving, you can create massive, sculptural pieces using arm knitting or large-scale weaving techniques.
Instead of stitching onto fabric, you create the fabric itself, mounting the finished organic shape directly to the wall.
This approach focuses entirely on form and the inherent texture of the material, resulting in eye-catching mixed-fiber wall hangings that make a dramatic statement.
24. Achieve a Smooth Finish with Cross-Stitch
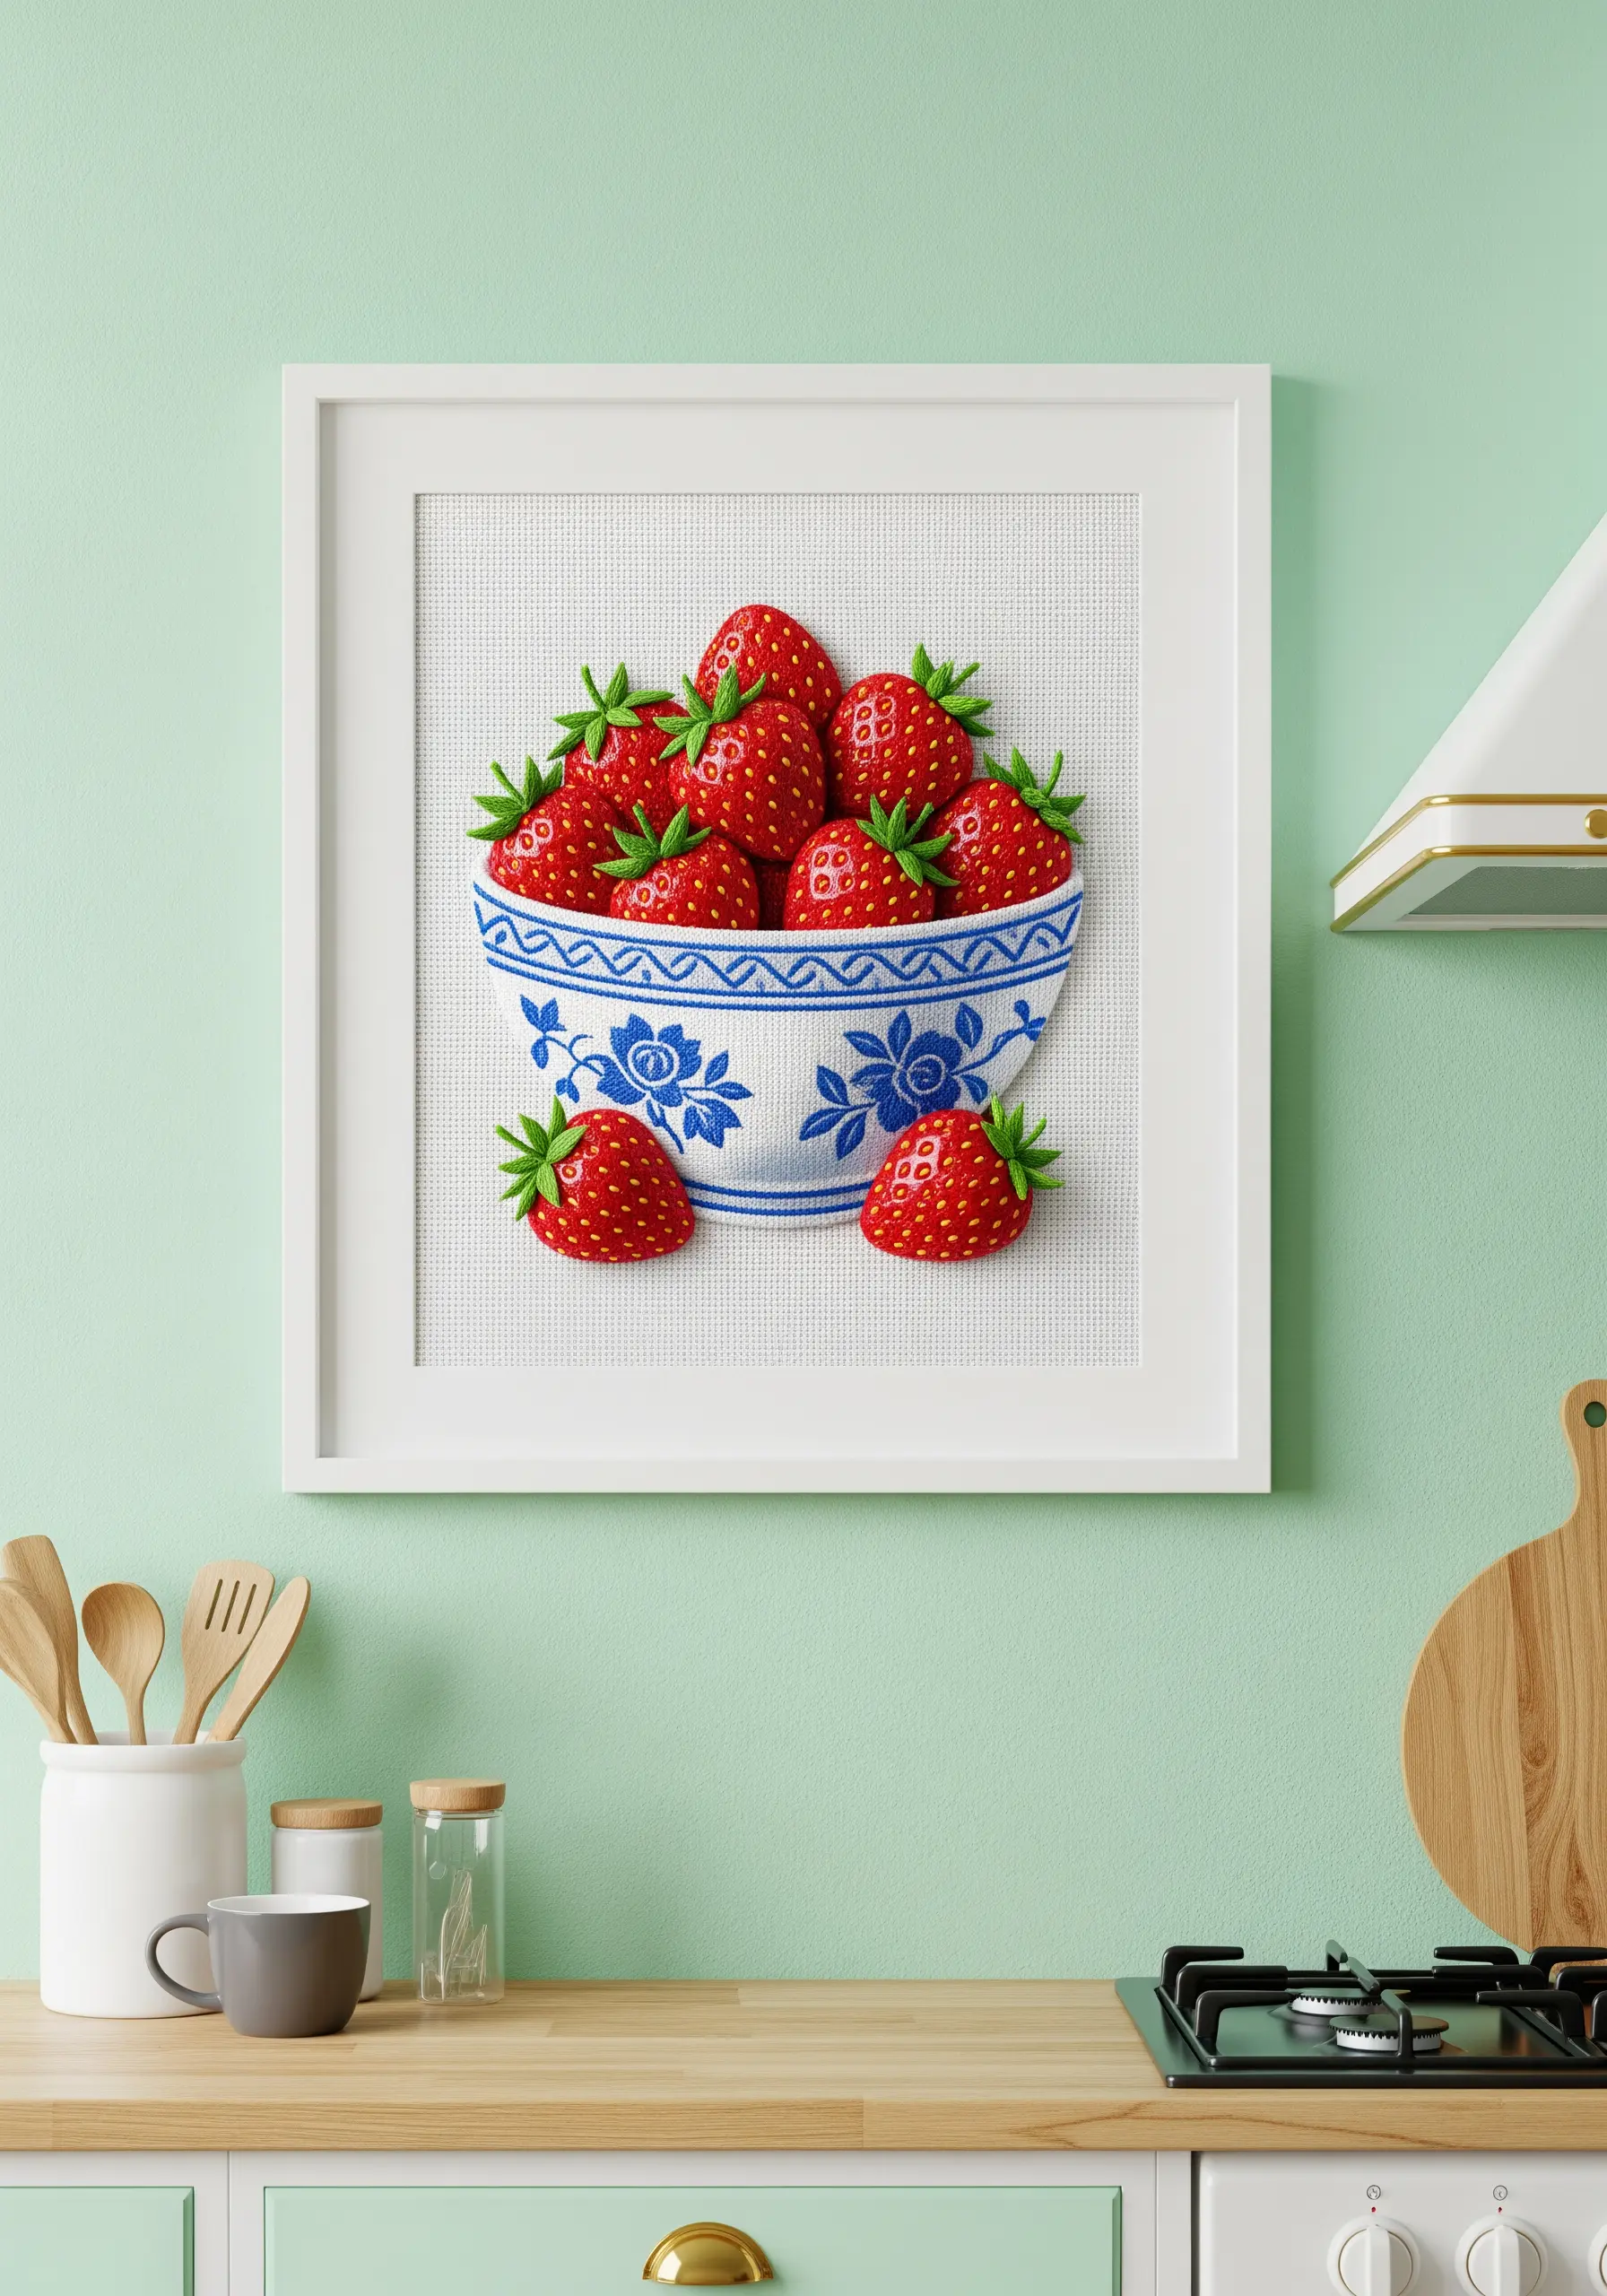
For a piece that blends 3D form with a clean, almost pixelated aesthetic, use cross-stitch on Aida cloth.
The gridded nature of the fabric ensures perfectly uniform stitches, giving a polished look to the illustrative elements, like the blue-and-white bowl.
You can still introduce dimension by padding the strawberries with felt before cross-stitching over them.
This combination of flat, graphic pattern and raised, sculptural fruit creates a charming and unique visual tension.
25. Sculpt Tentacles with Padded Appliqué
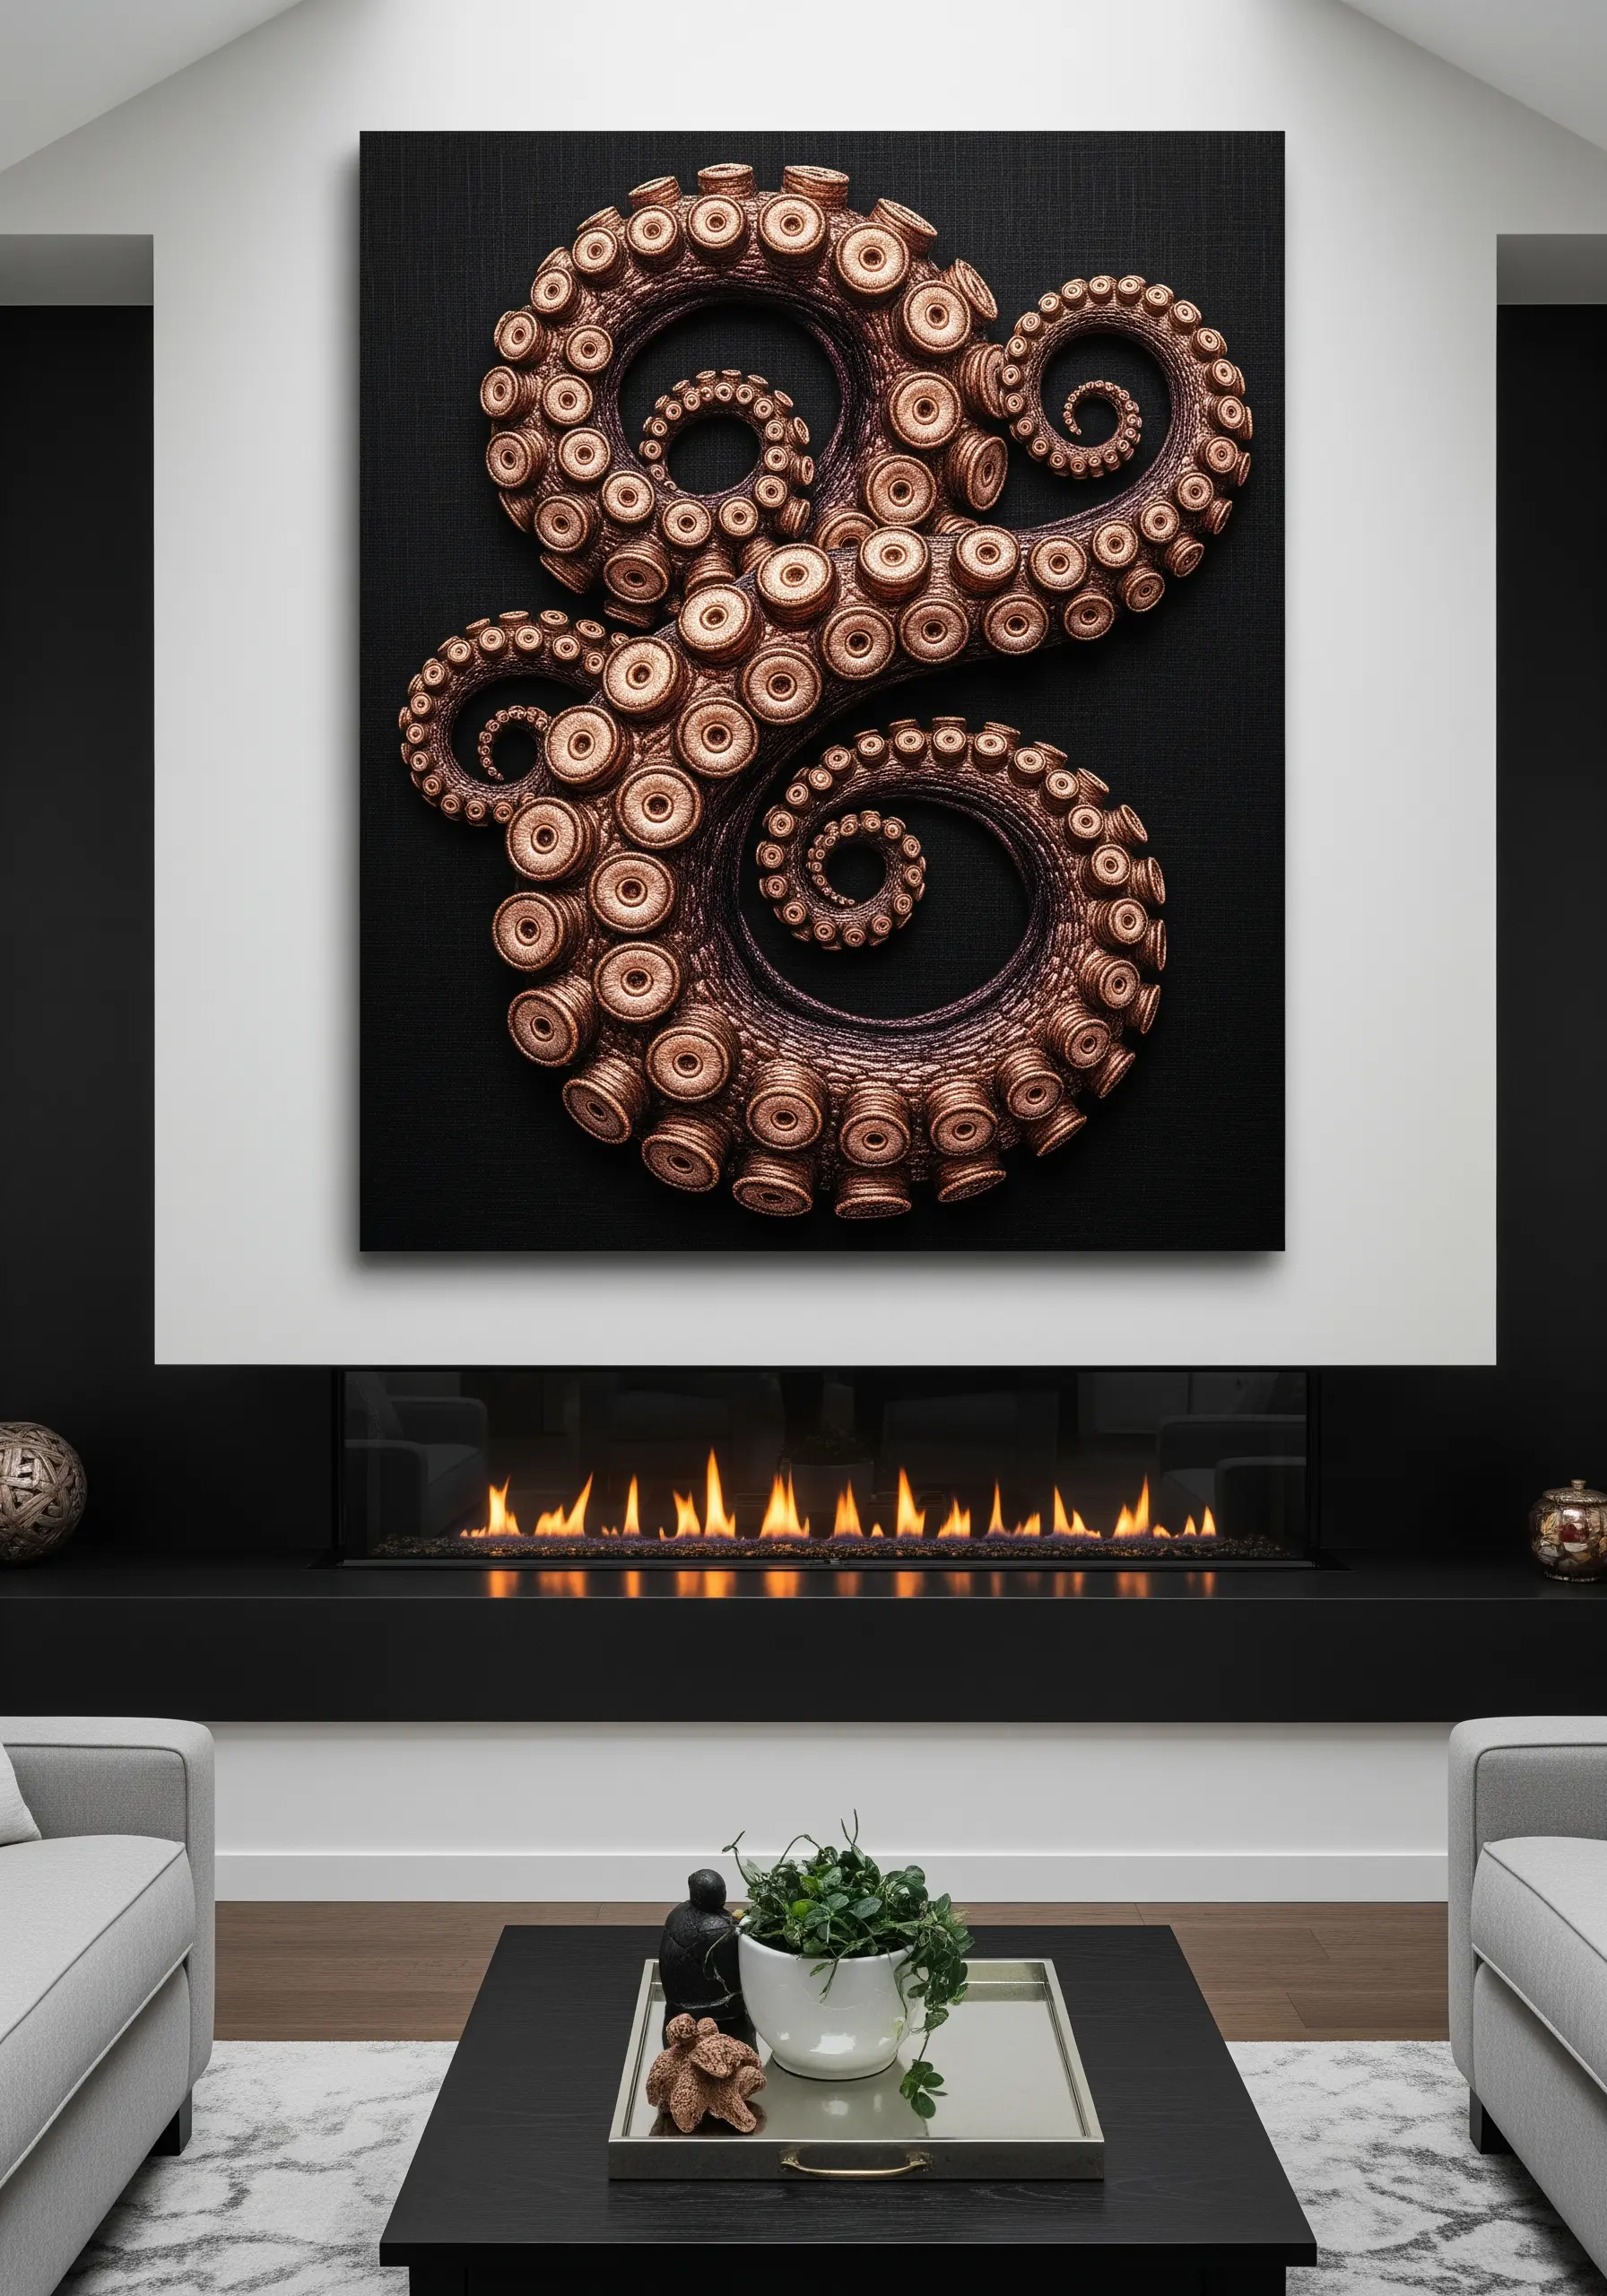
To create the powerful, curling form of octopus tentacles, you need to build a strong foundation.
Cut the main tentacle shapes from thick felt or craft foam and stitch them to the canvas.
For the suckers, use raised satin stitch dots or bullion knots, making them larger near the base and smaller toward the tip.
Cover the main tentacle form with a smooth skin of satin stitch or couched threads, working around the suckers.
Using a thread with a slight sheen, like silk or rayon, will give the final piece a realistic, wet appearance.
26. Plant a Field with Bullion Knots
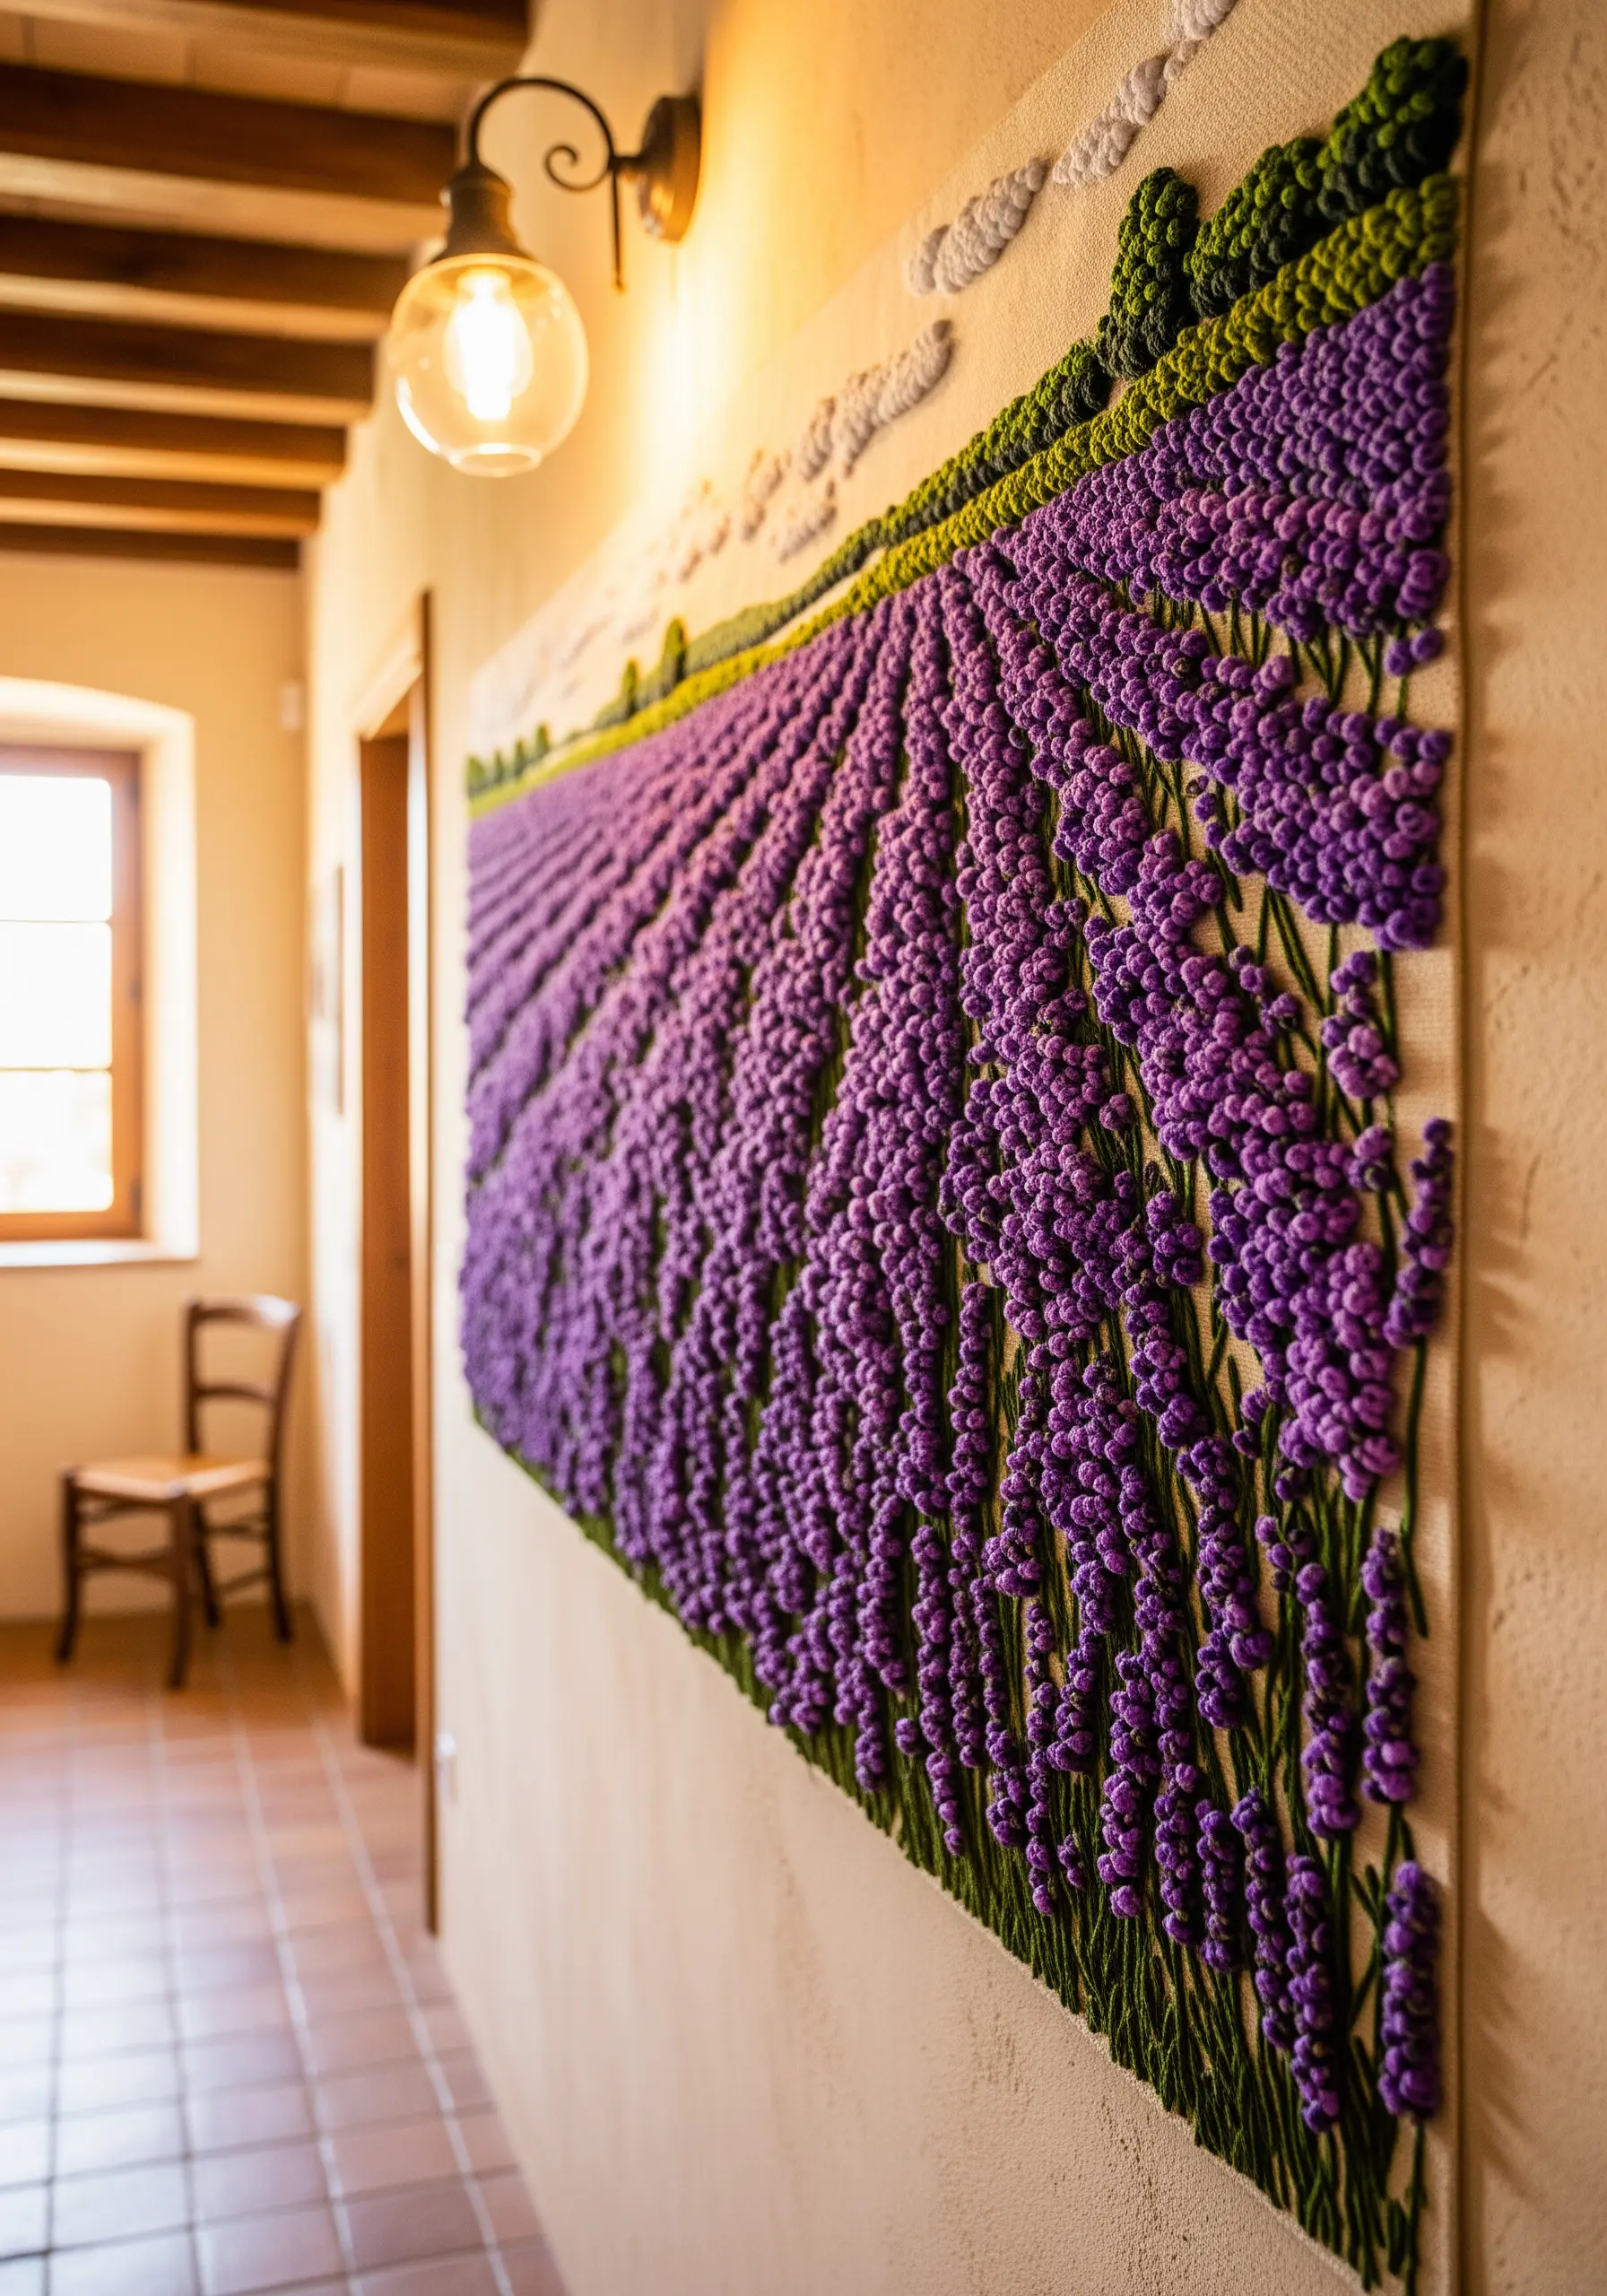
To create the effect of a dense field of flowers stretching into the distance, rely on the texture of a single, repeated stitch.
Use bullion knots for the individual lavender blossoms, varying their length and tightness.
In the foreground, make the knots longer, plumper, and stitch them with thicker thread so they stand tall.
As you move up the canvas into the background, make the knots smaller, tighter, and use finer thread.
This simple shift in scale is a classic perspective trick that creates an incredible illusion of depth.
27. Embellish with Bead Embroidery for Crystalline Textures
When you want to capture the complex sparkle of rock and crystal, thread alone may not be enough.
Incorporate bead embroidery to create areas of high texture and light reflection.
Stitch down larger, pebble-like beads for the outer edges, then fill in areas with dense clusters of smaller seed beads.
You can outline bands of color with a neat line of couched metallic thread or a single row of bugle beads.
This mixed-fiber creation balances the softness of thread with the hard glimmer of glass for a stunning effect.
28. Mimic Bark with Couching and French Knots
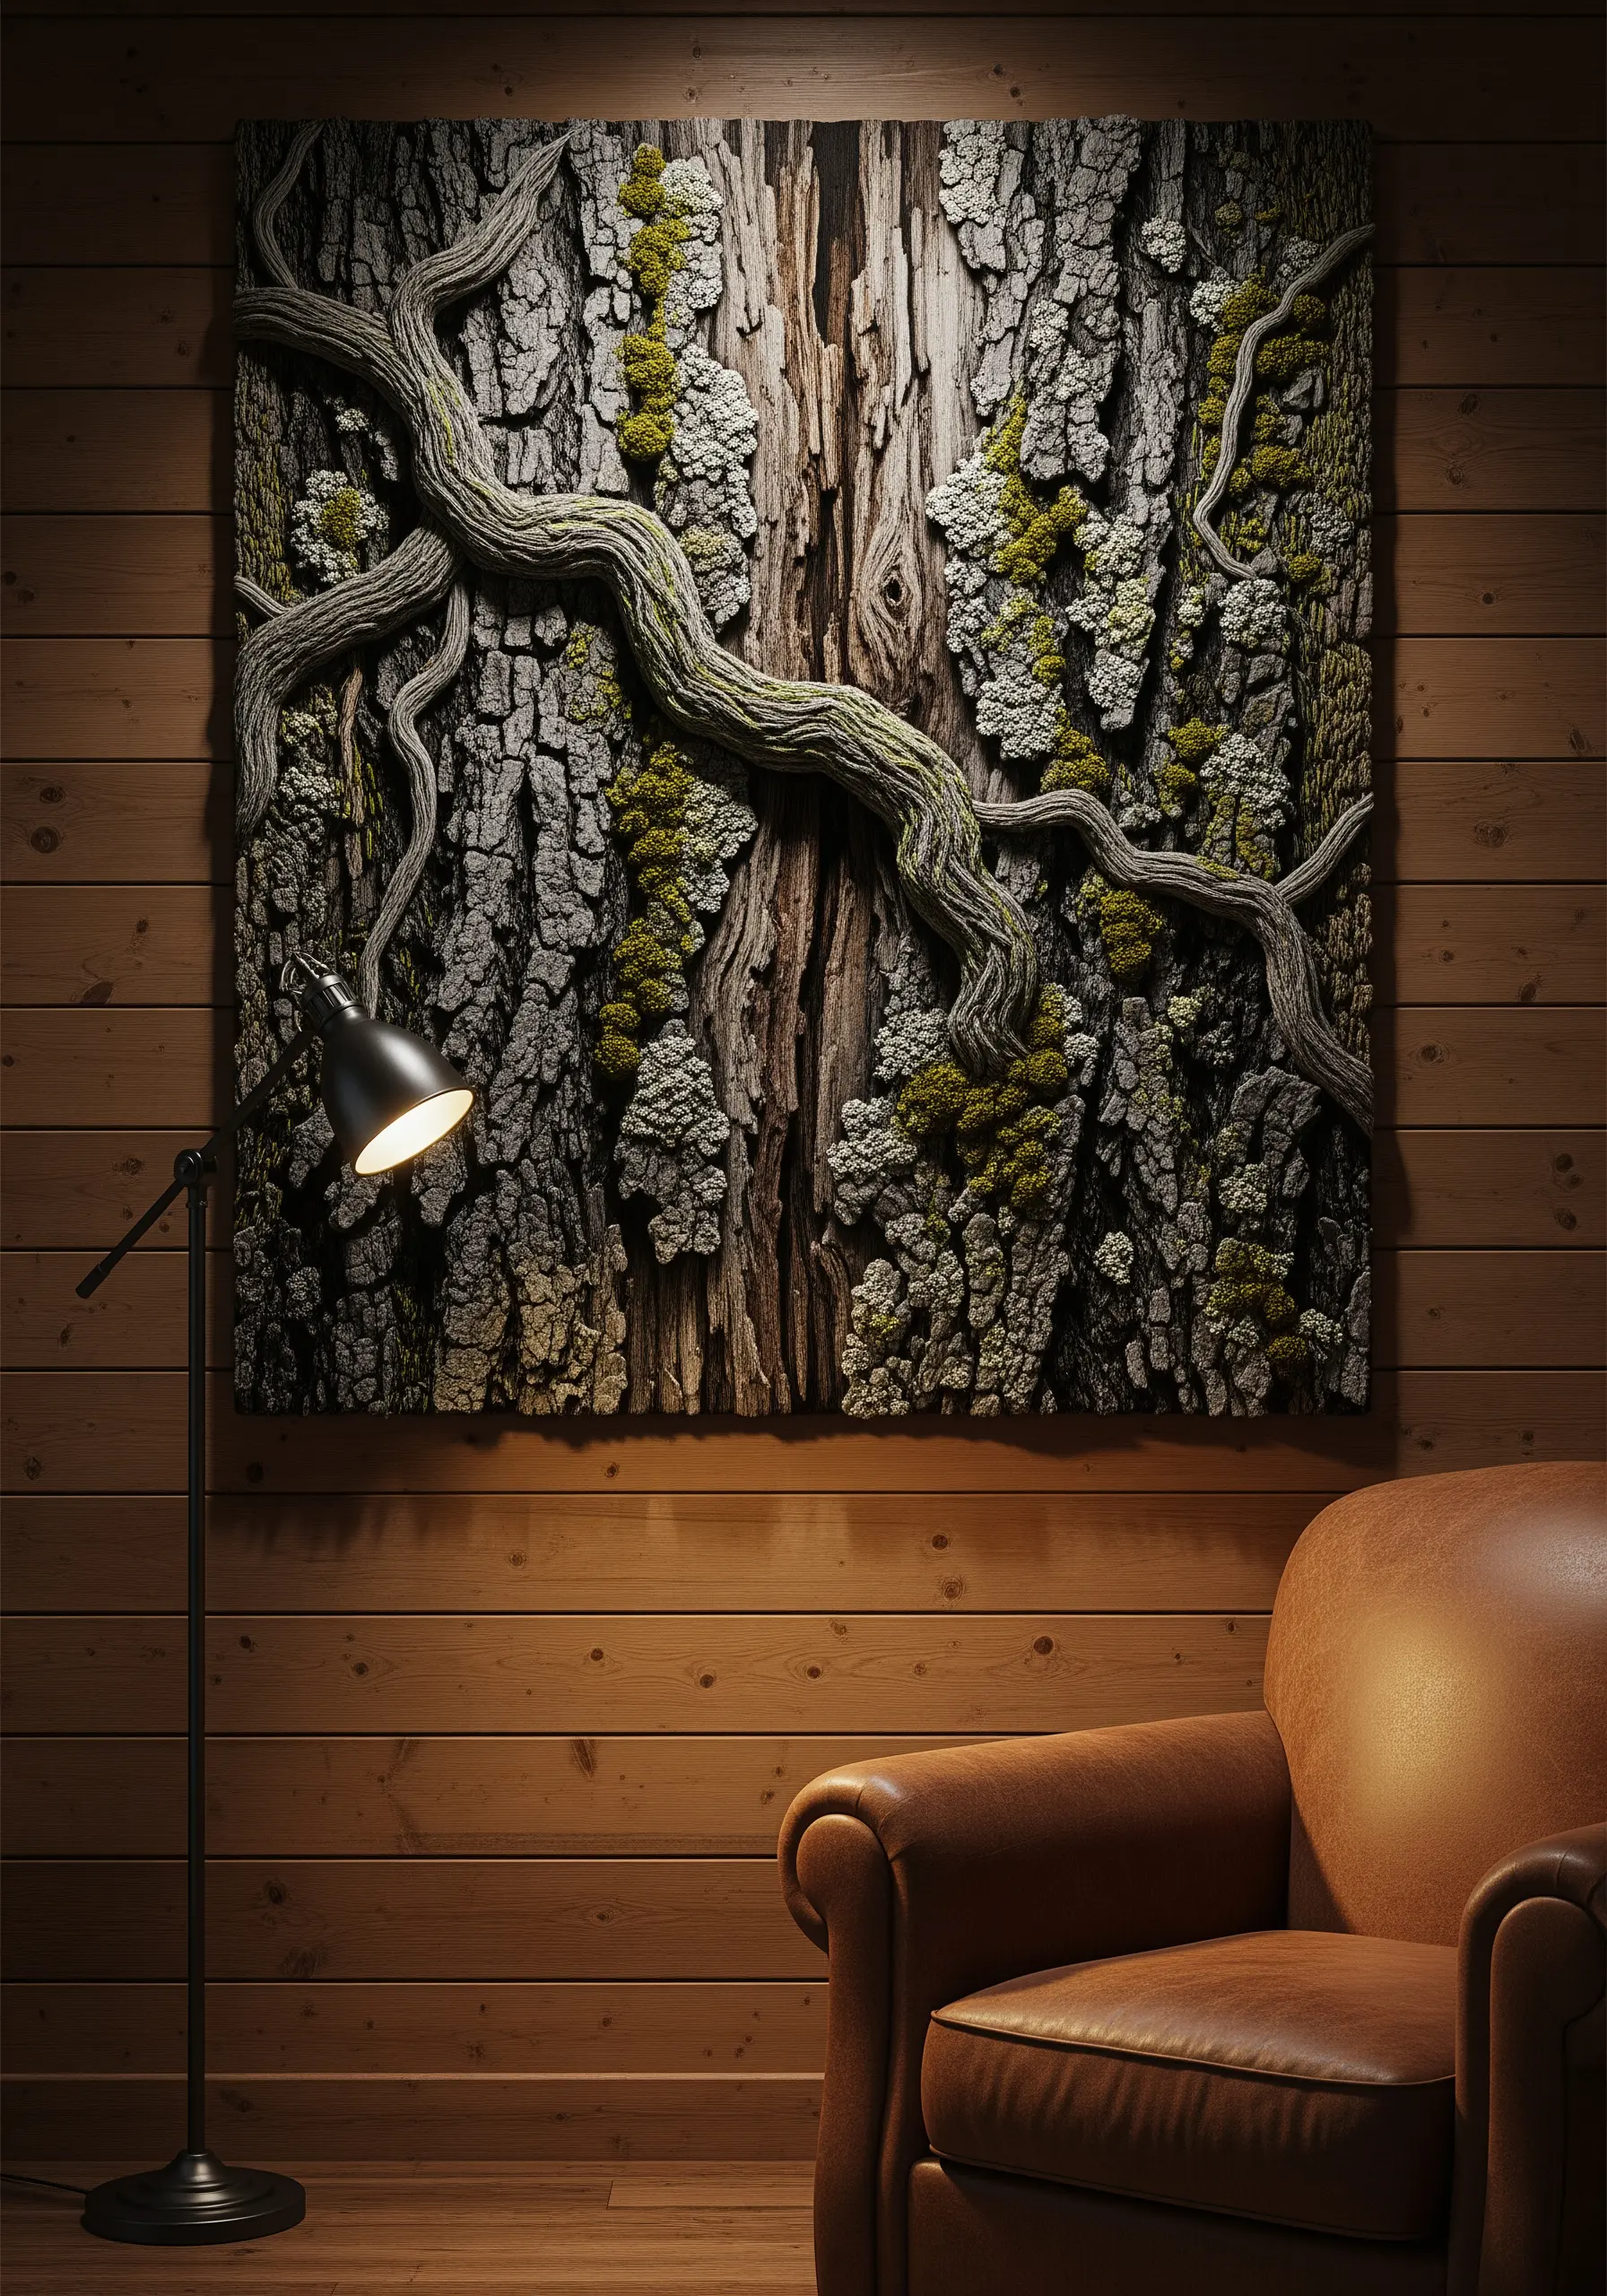
Replicating the rough, organic texture of tree bark requires a layered, mixed-stitch approach.
Lay down a base of long, vertical satin stitches in various shades of grey and brown to represent the wood grain.
Over this, couch thick, gnarled yarns or twisted cords to create the deep ridges and branches.
Finally, add clusters of French knots in mossy greens and pale greys to mimic lichen growing in the crevices.
These combined tree ring bark texture embroidery patterns create a deeply realistic and tactile surface.
29. Create Floating Elements with a Stabilizer
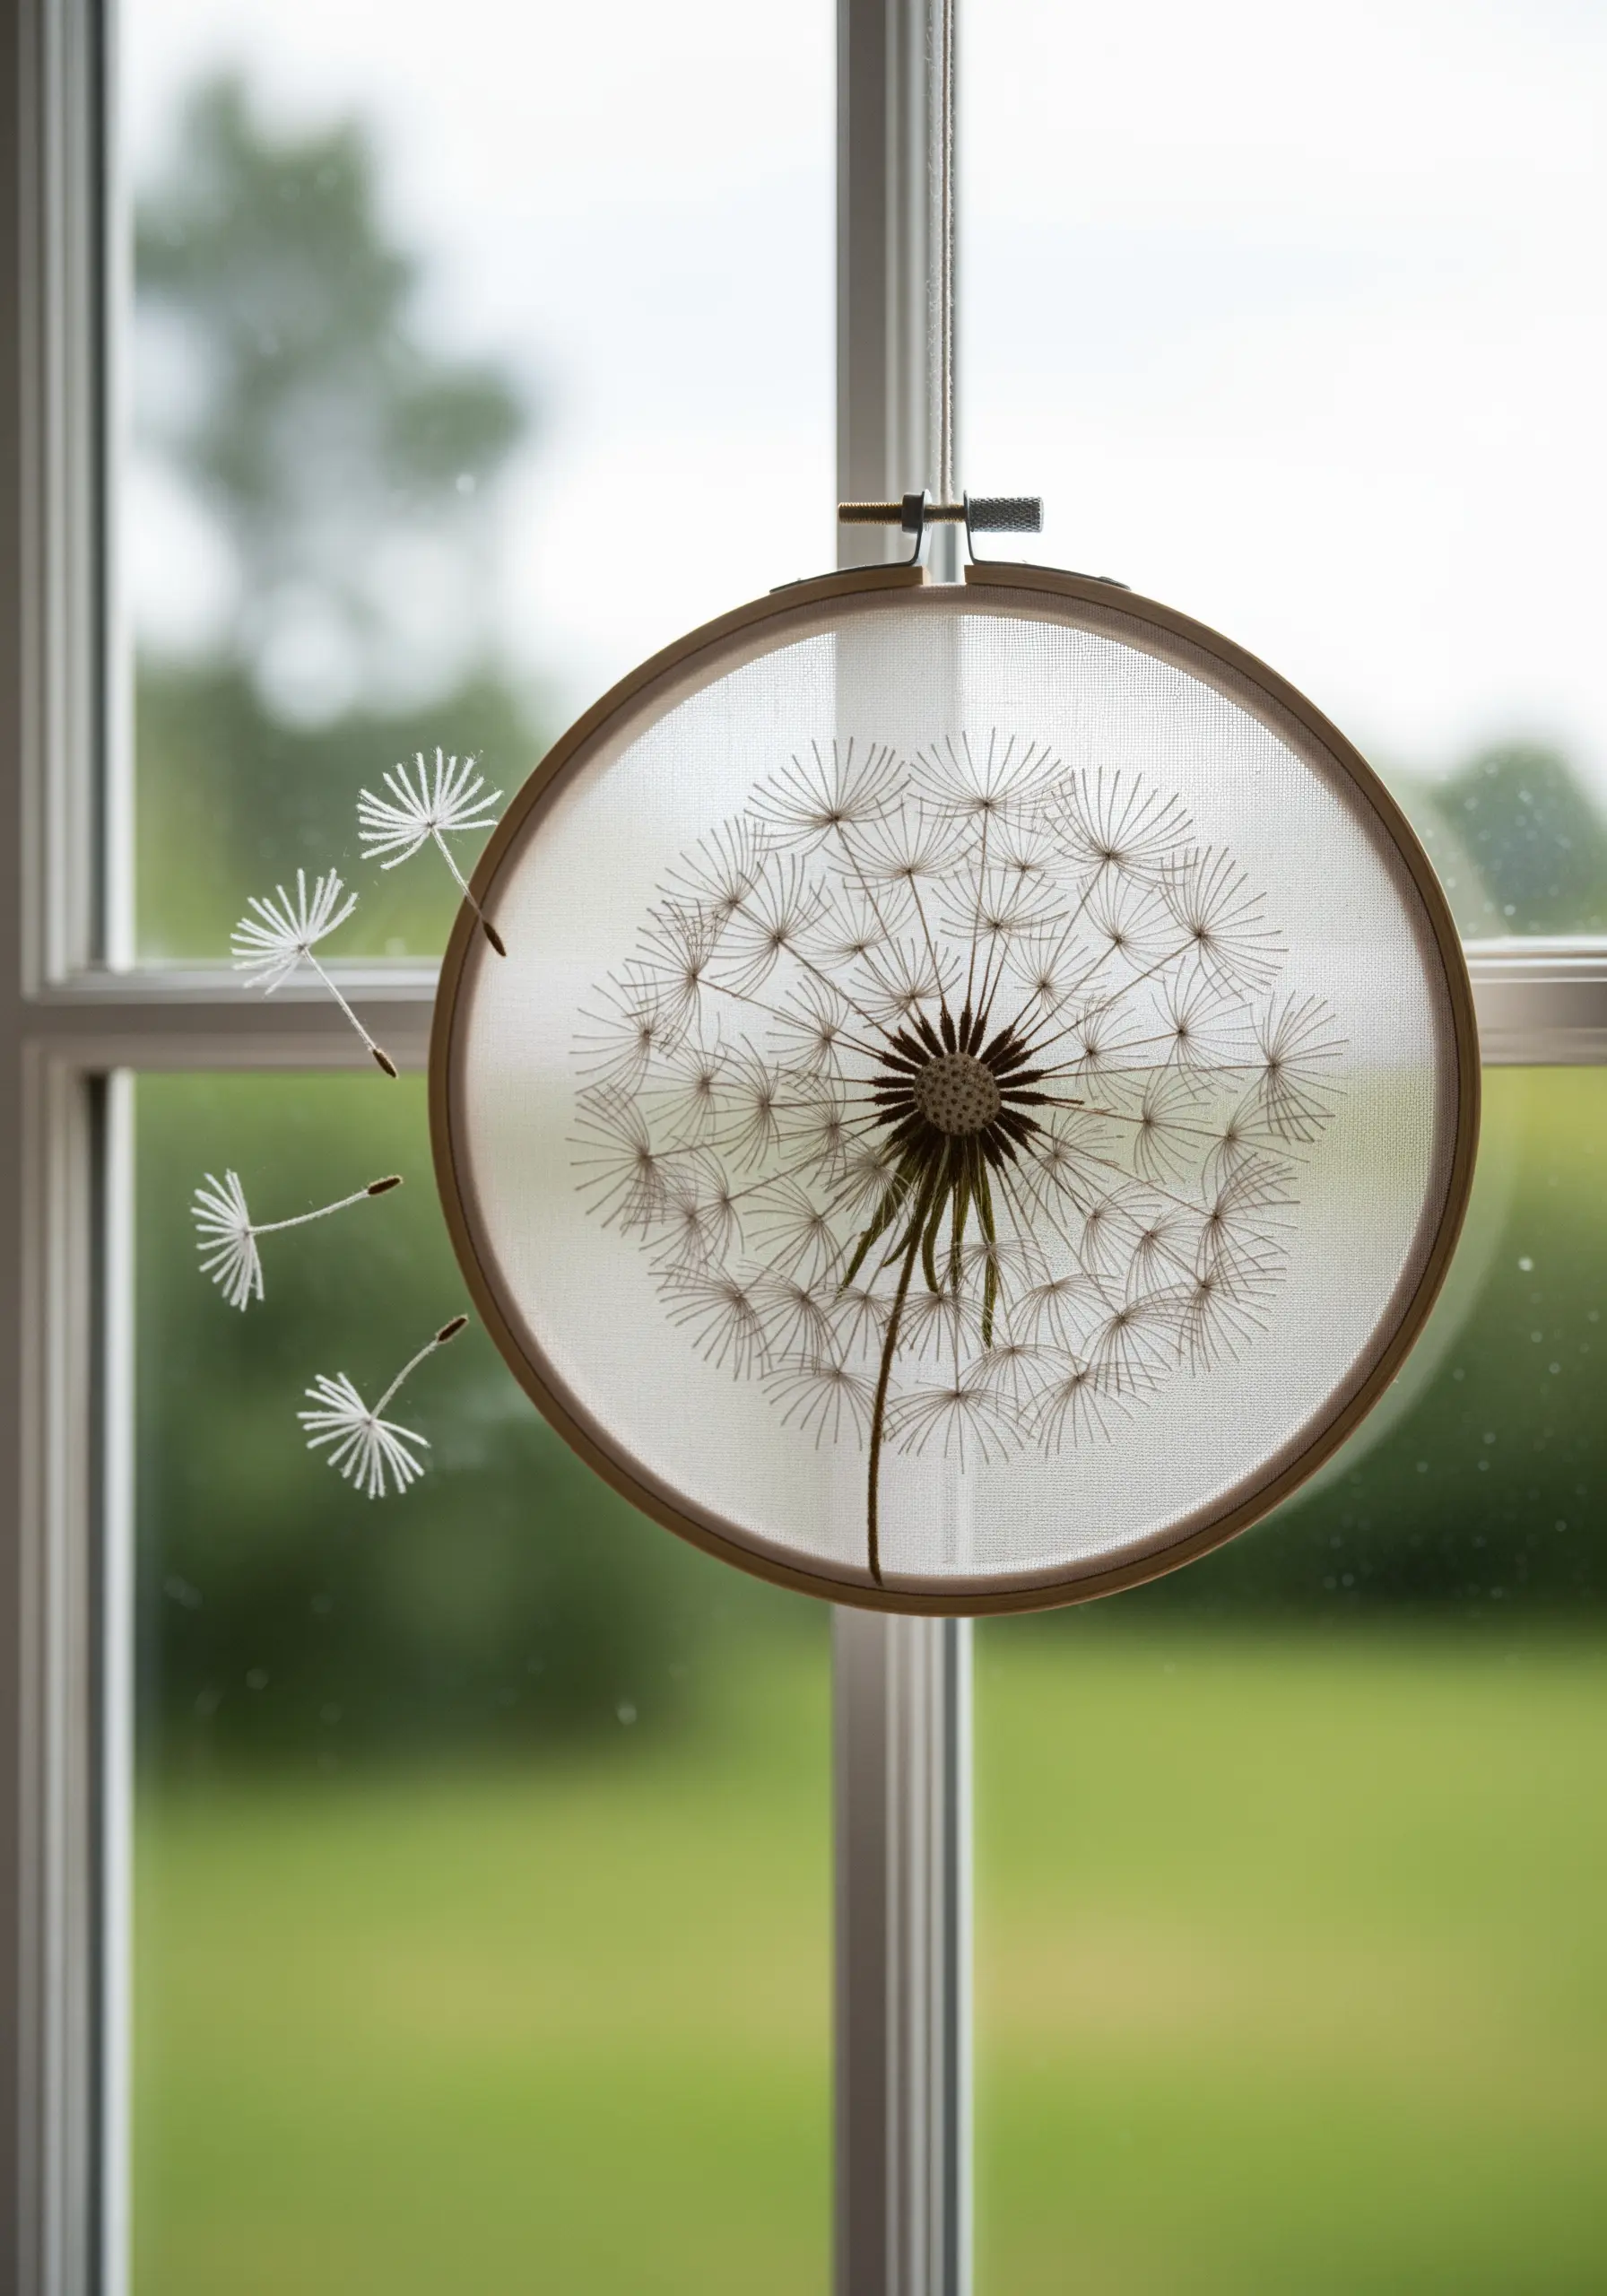
To make elements like dandelion seeds appear to float in mid-air, you need to work with a water-soluble stabilizer.
Stretch the stabilizer in your hoop and stitch the seed designs directly onto it.
Once finished, trim the excess stabilizer and dissolve the rest in water, leaving you with freestanding, thread-only shapes.
You can then attach these delicate pieces to your main artwork (stitched on sheer fabric) or to wires to make them appear to be blowing away from the main flower head.
30. Suggest Reflections with Thread Choice
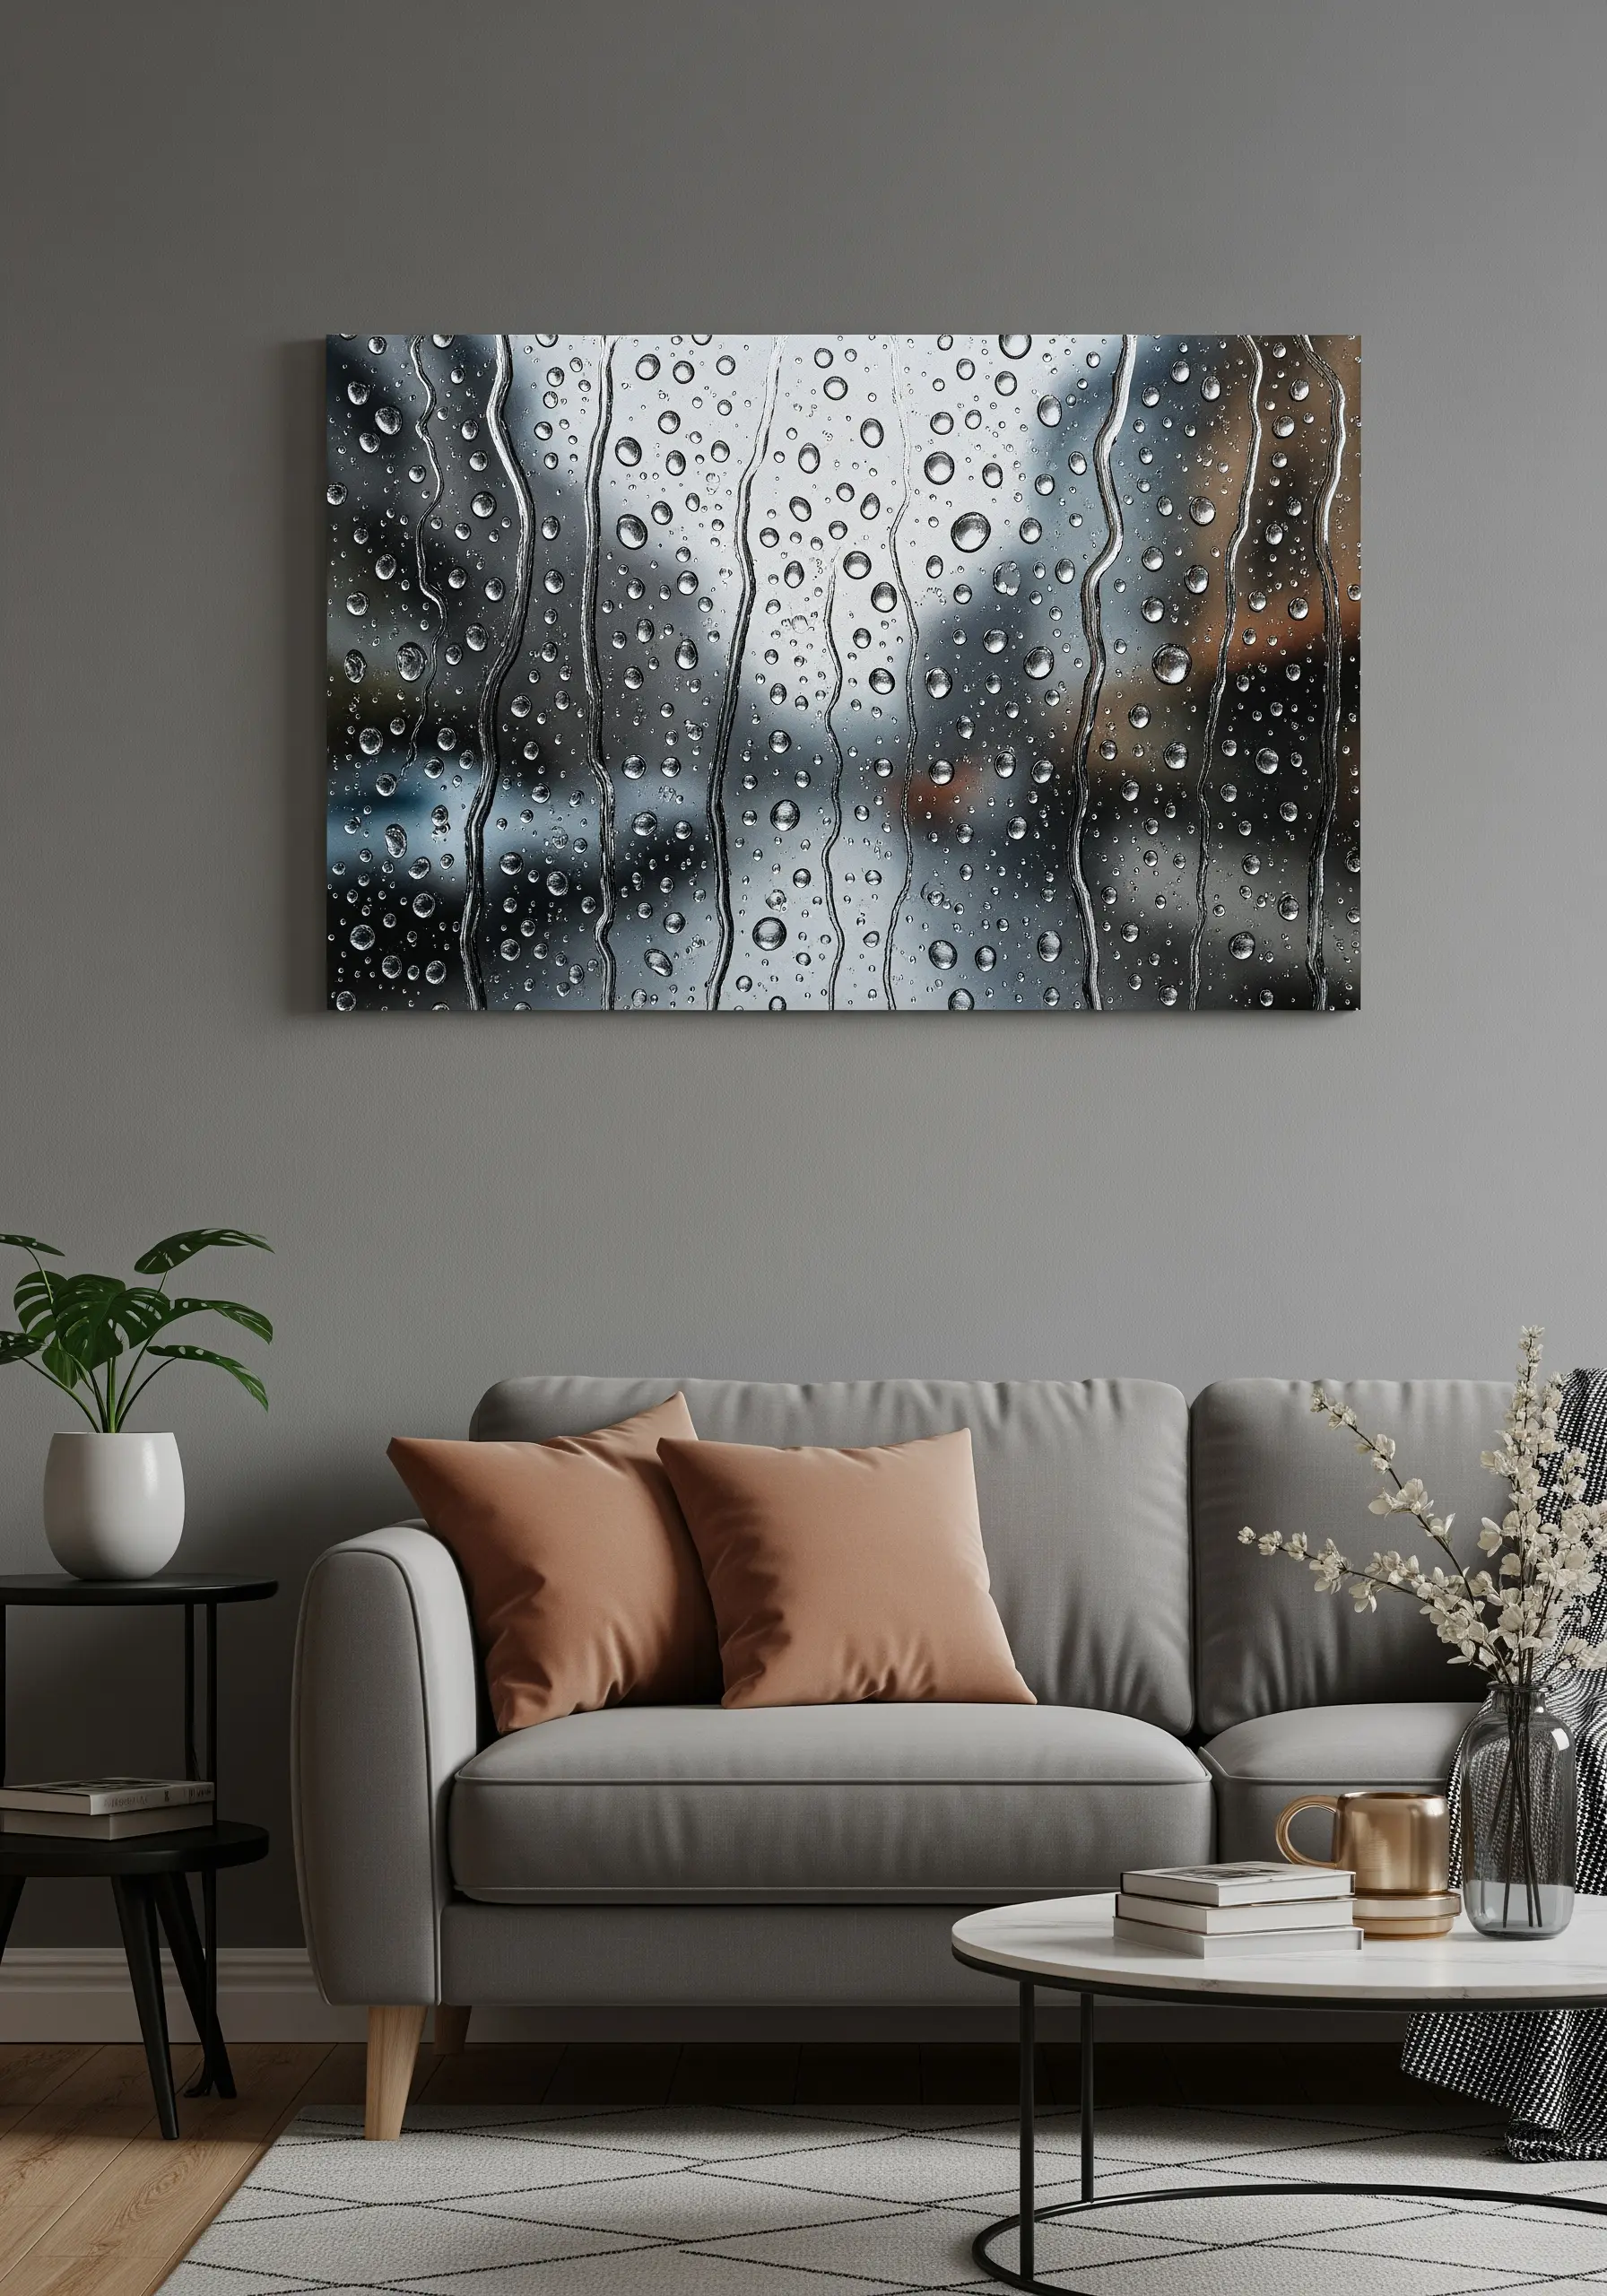
To create the illusion of wetness or reflection, your choice of thread is just as important as your stitch.
For raindrops on a window, use a high-sheen rayon or silk floss for the highlights and outlines.
These threads catch the light differently than standard matte cotton, creating a subtle glimmer that the eye interprets as reflection.
Stitch the drops with a padded satin stitch to give them a slight volume, and keep the background deliberately soft and out of focus using blended, muted colors.
The contrast in sheen and focus is what sells the effect.
31. Stitch Light with Vertical Satin Stitch
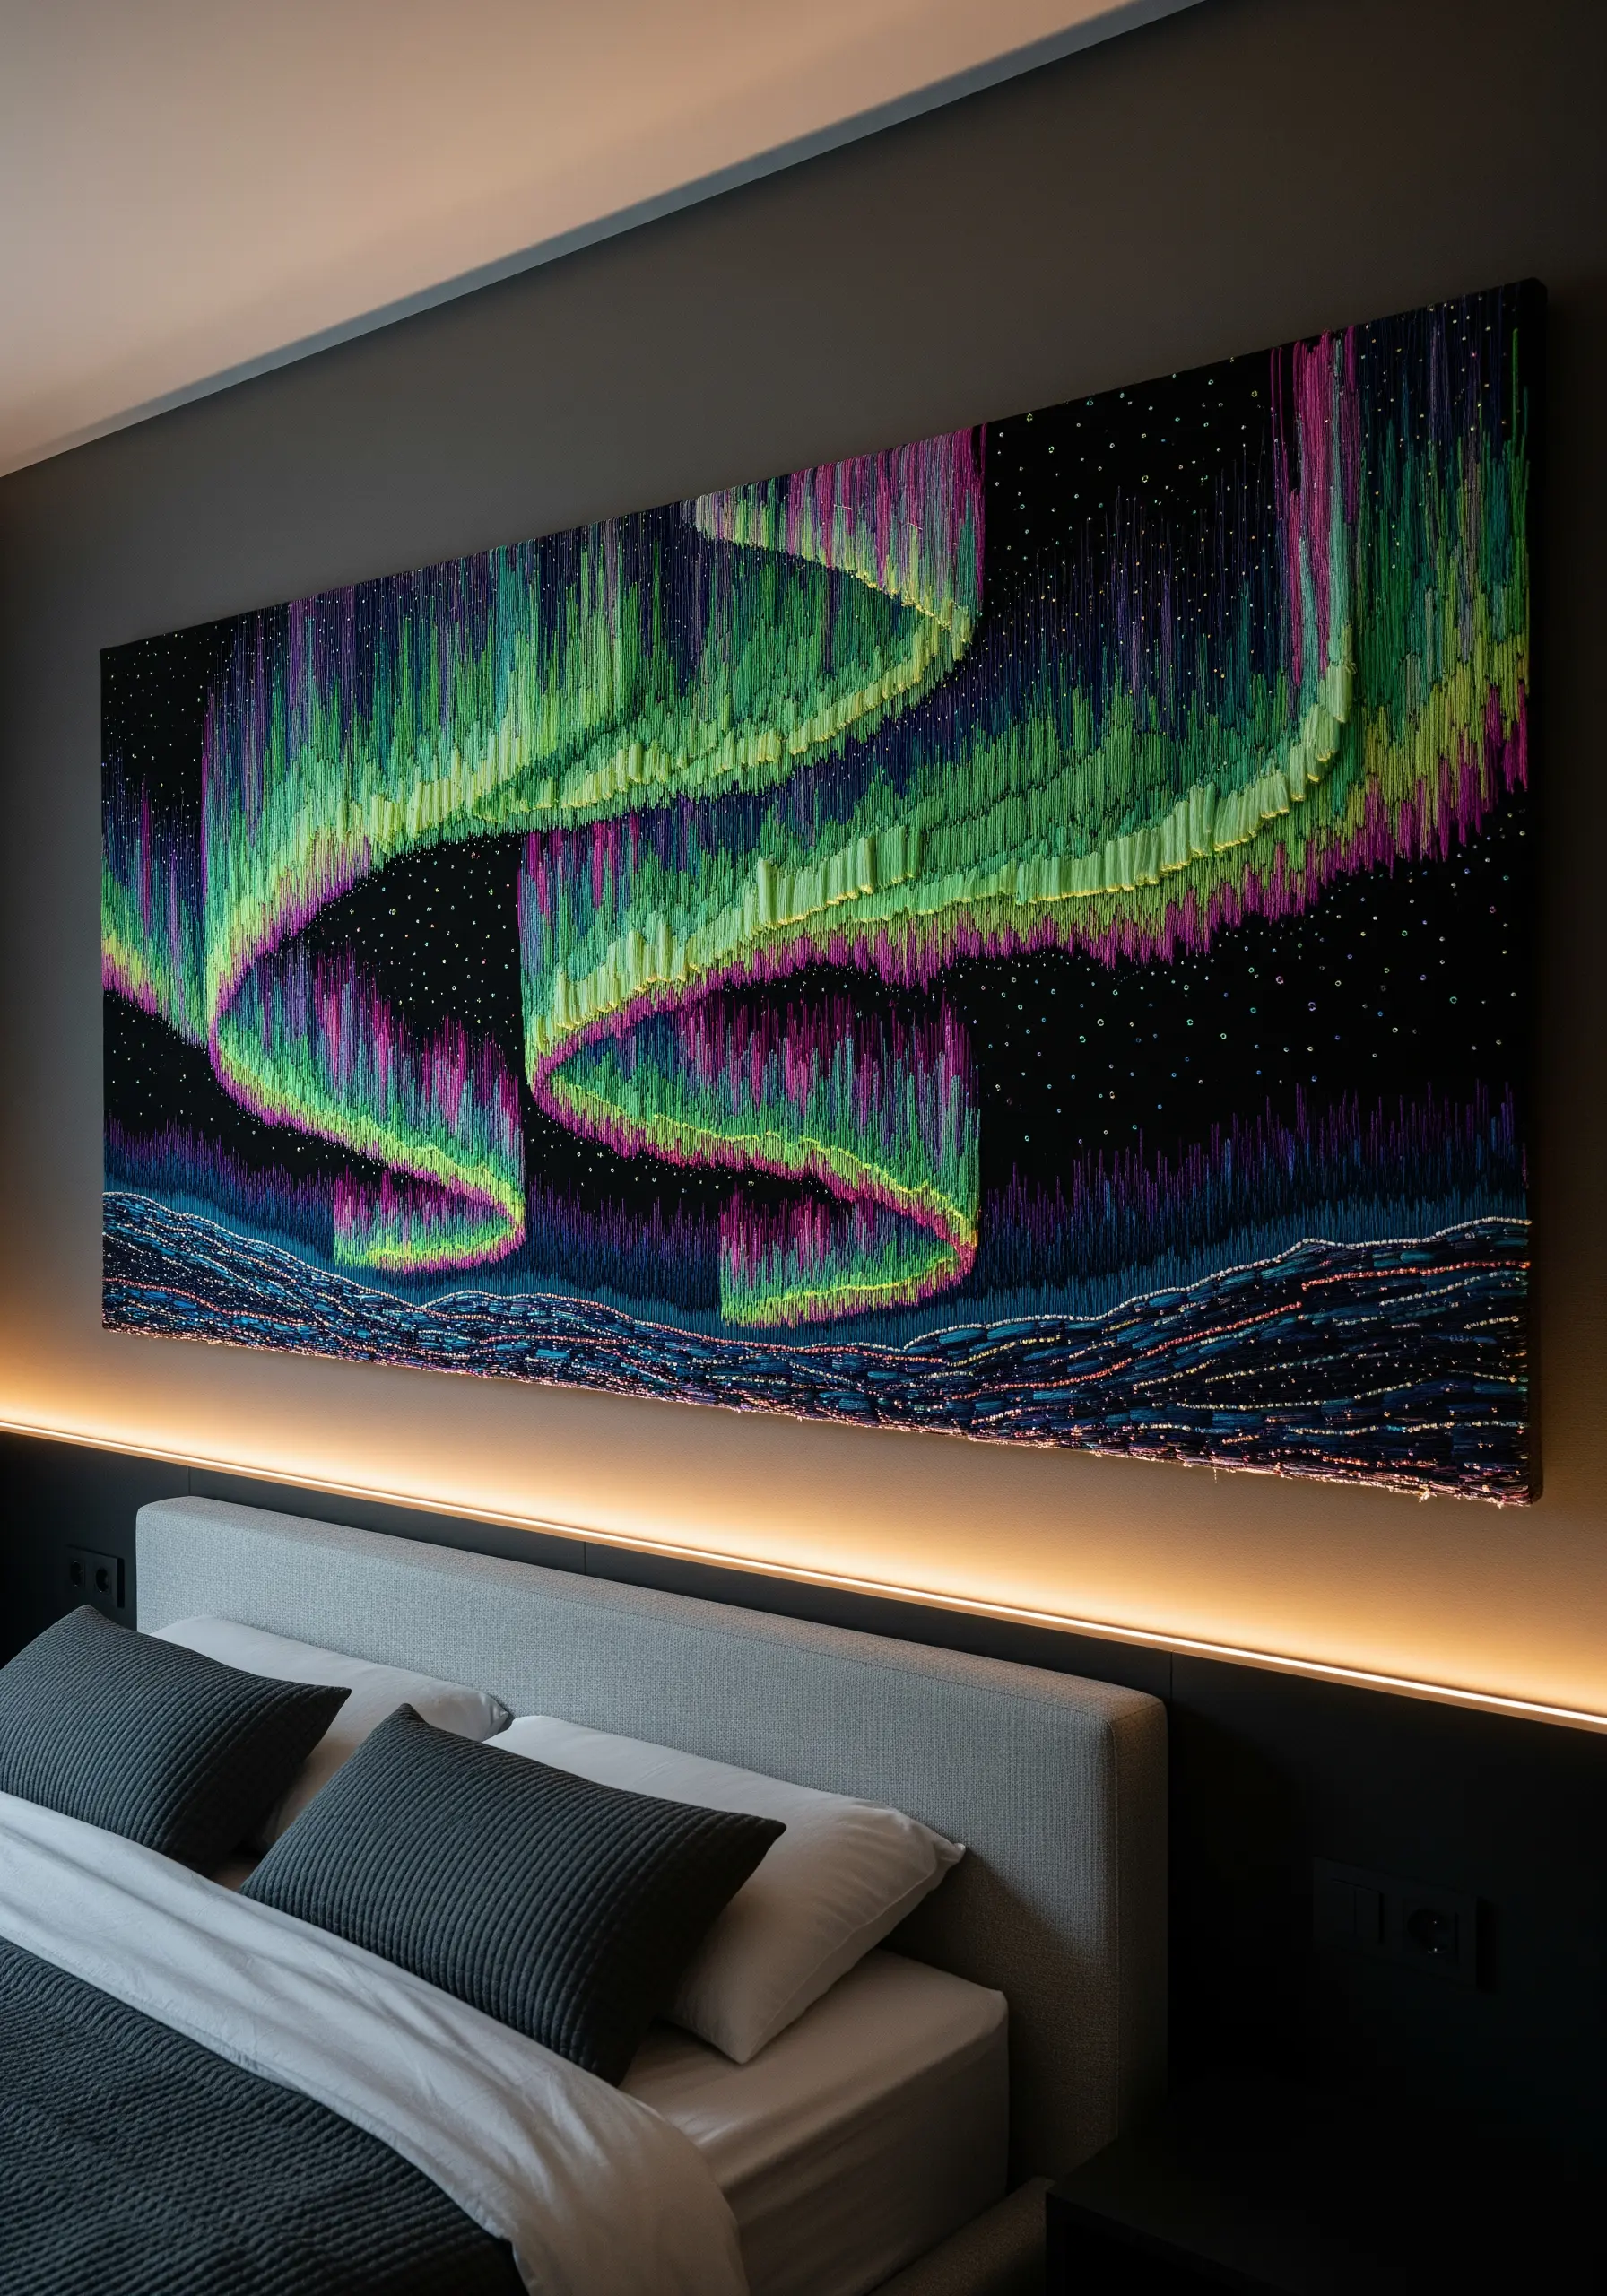
To capture the ethereal glow of the aurora borealis, think of your needle as a paintbrush loaded with light.
Use long, vertical satin stitches on a black or dark navy fabric, allowing the ends to be slightly uneven to create a soft, curtain-like effect.
The key is color blending: use fluorescent and brightly colored threads, laying stitches of different colors next to each other to create a smooth gradient.
Don’t be afraid to leave some threads slightly loose to enhance the sense of shimmering, moving light.
32. Sculpt Craters with Padded Stitching
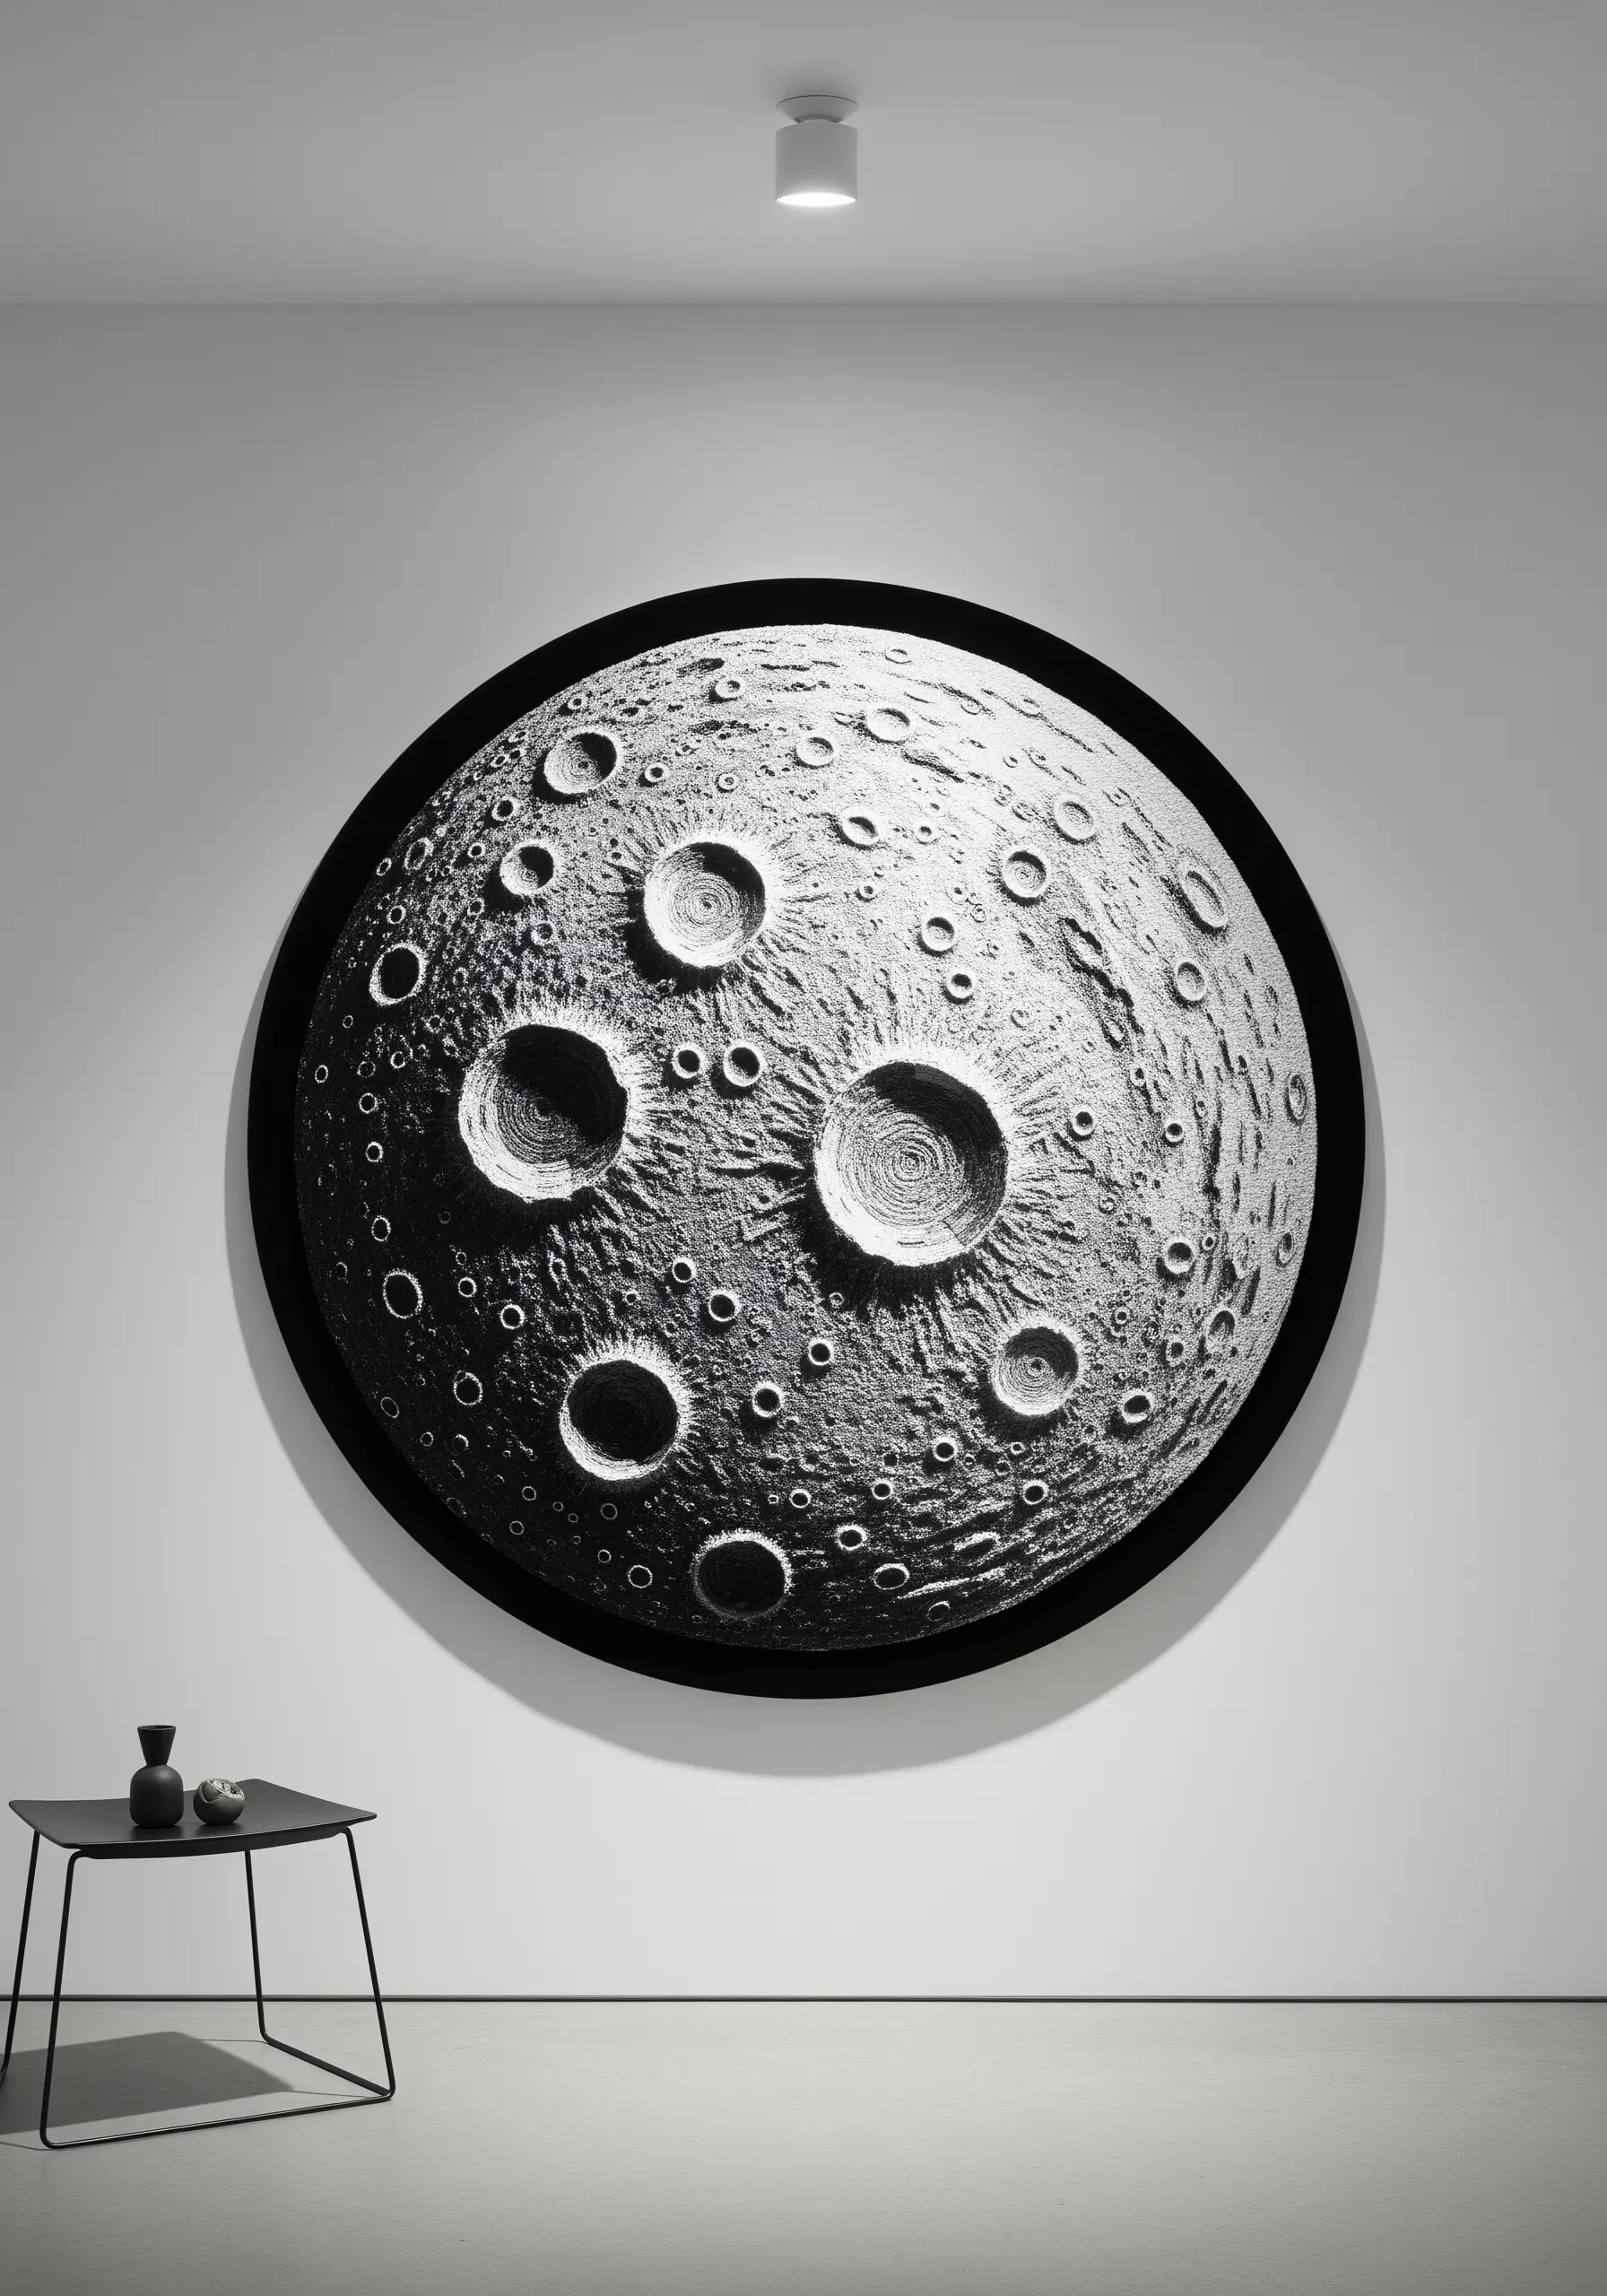
To create the iconic craters of the moon, you need to manipulate the surface of your fabric before you even stitch.
Create rings of padding by layering concentric circles of felt, or by using tightly coiled yarn couched into a circle.
Then, cover the entire surface with dense, smooth satin stitches or tiny seed stitches, allowing the underlying padding to create the deep shadows of the craters.
Using several shades of grey and off-white will enhance the shadows and highlights, giving the surface a convincingly rugged and three-dimensional appearance.
33. Blend 2D Illustration with 3D Objects

Create a playful and surprising piece by combining flat embroidery with a fully three-dimensional crocheted or knitted object.
Embroider the main illustration onto your fabric using simple line work or flat satin stitch—think of this as the 2D backdrop.
Then, create a small, sculptural element like the perfume atomizer using amigurumi crochet techniques.
Securely stitch this 3D object onto the canvas. The unexpected jump from two dimensions to three makes the artwork interactive and full of charm.
34. Define Form with Layered Appliqué

For complex, layered objects like an artichoke, build the form with individual fabric pieces.
Cut each leaf from felt or sturdy fabric, stitch the central vein and shading details onto it first.
Then, starting from the bottom layer, stitch each leaf onto your background fabric, allowing the tips to remain free.
Overlap the leaves as you work your way to the center, creating natural depth and shadow.
This methodical appliqué technique is perfect for any botanical subject with a distinct, layered structure, and is one of the best ways to embroider natural textures that wow your friends.
35. Capture Soft Fur with Thread Painting
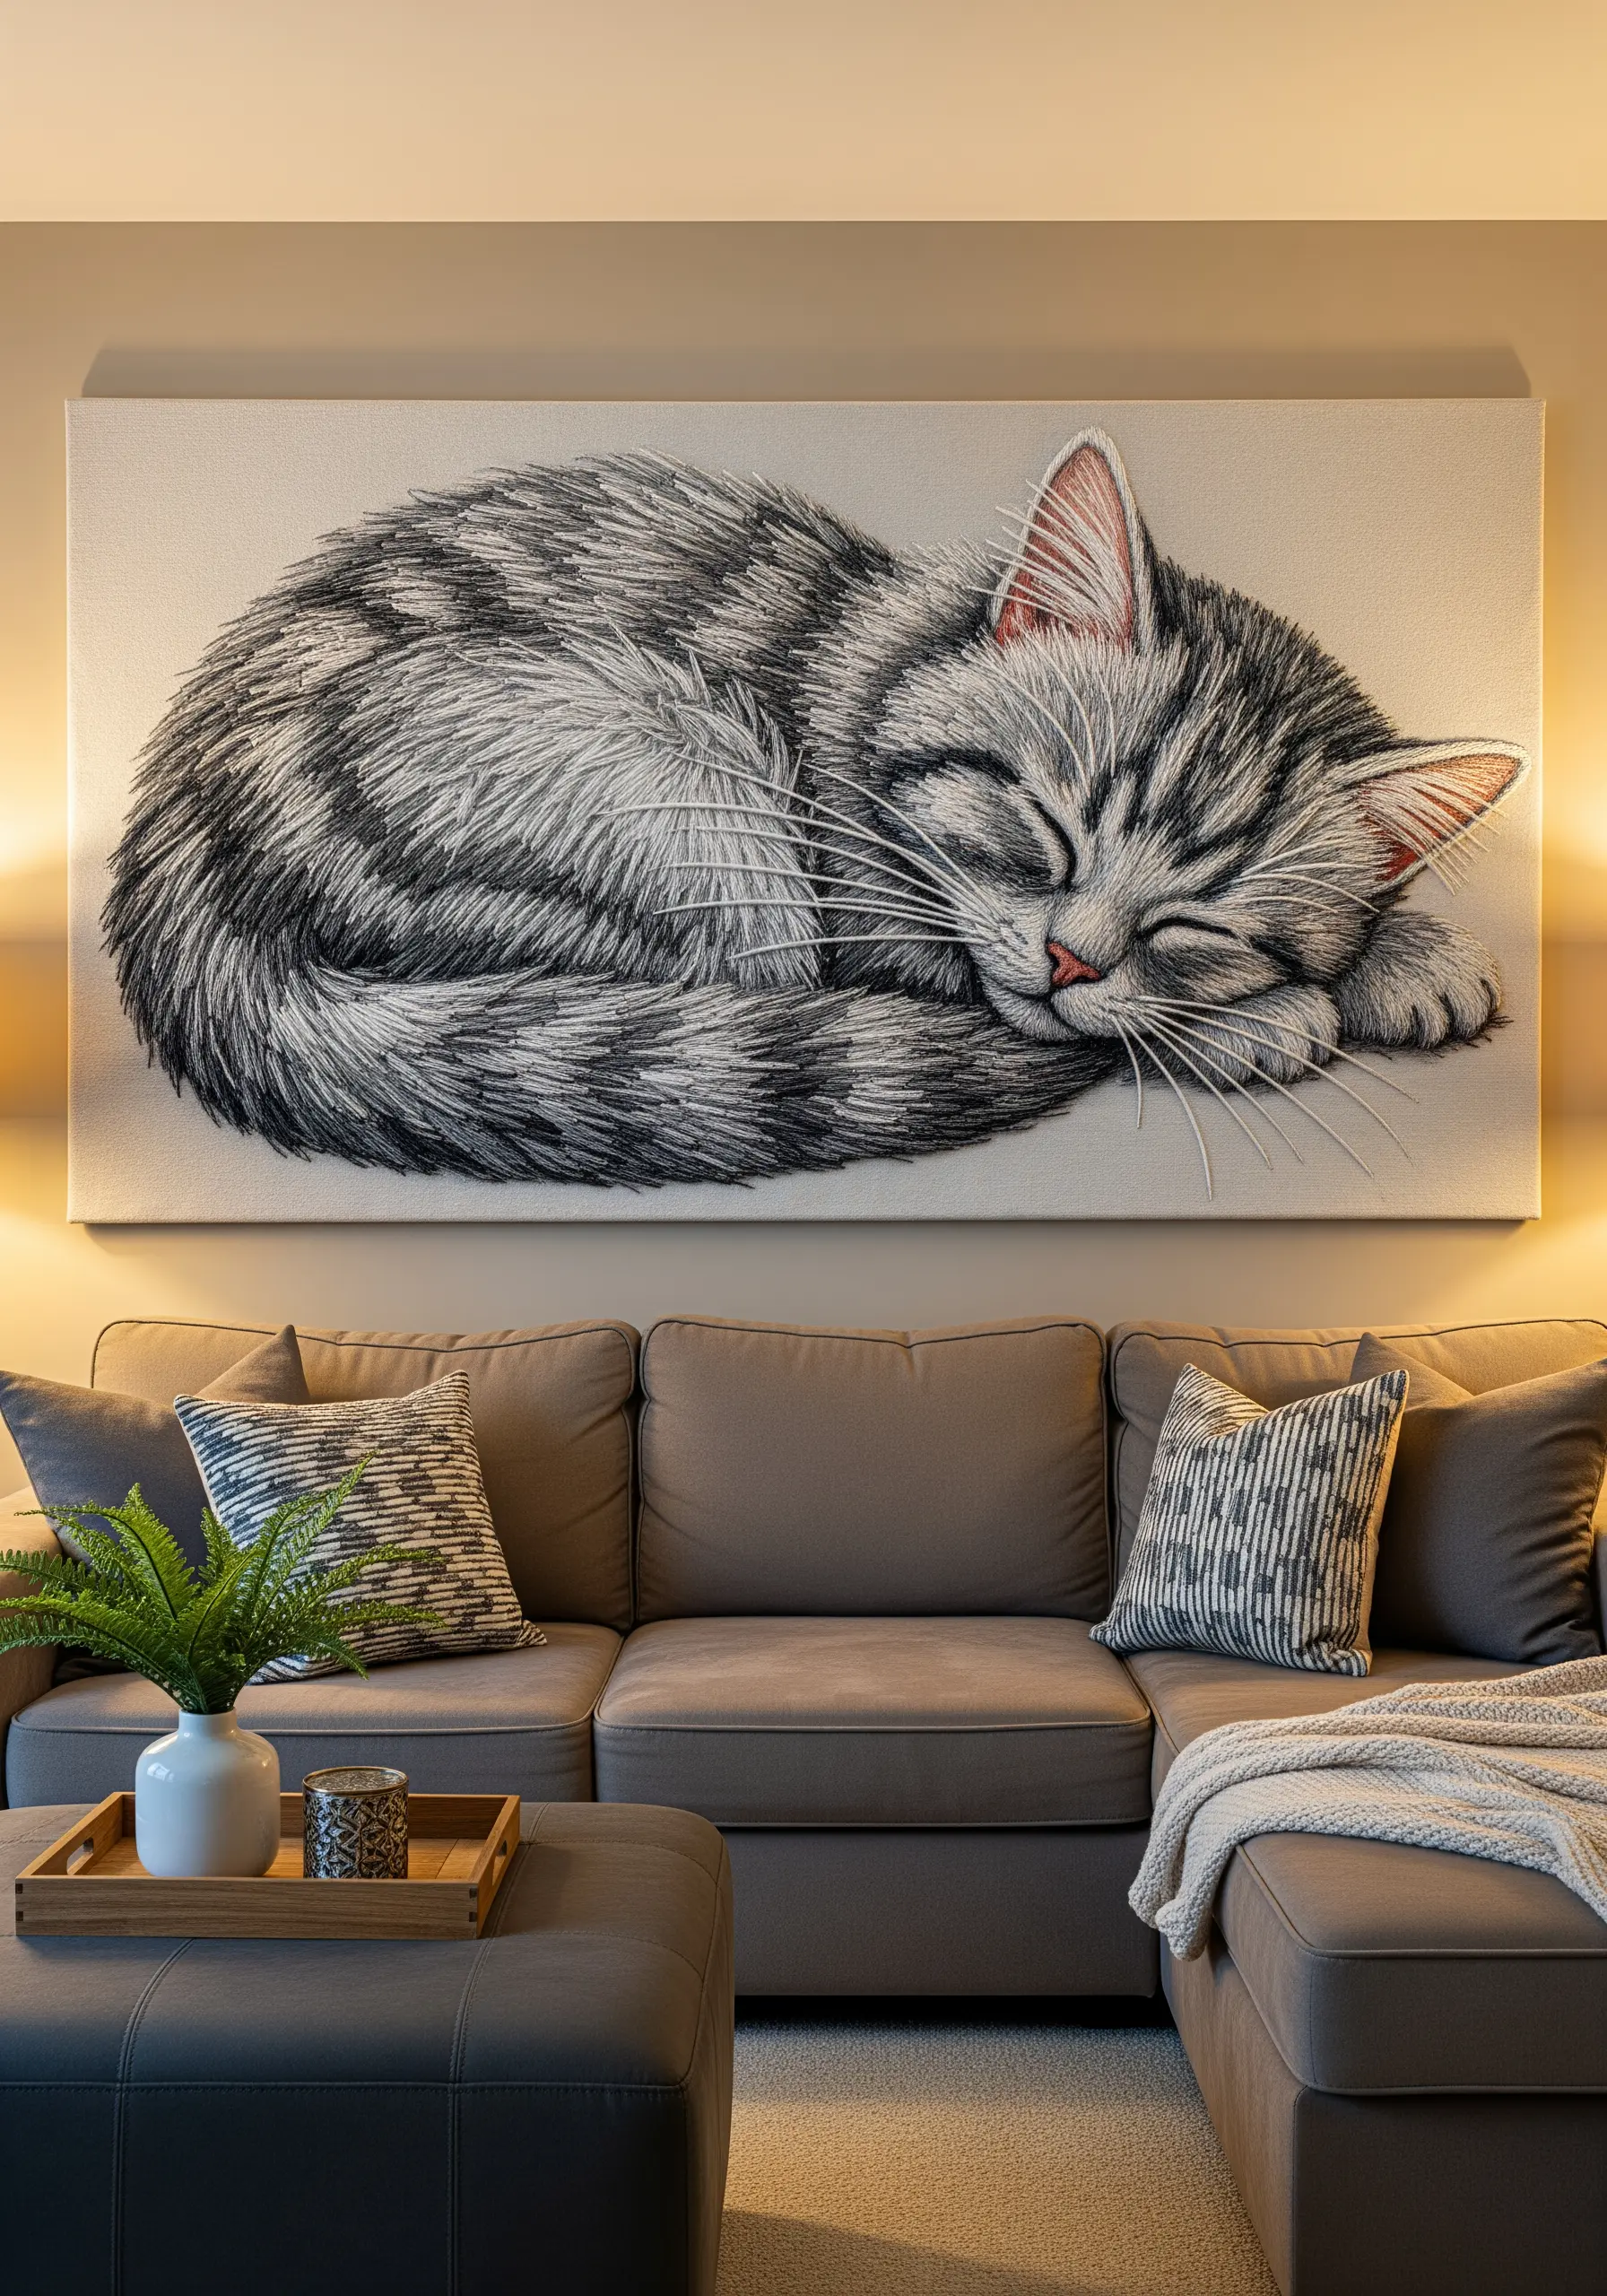
The key to soft, believable fur is using a single strand of embroidery floss and treating it like a pencil line.
With the thread painting technique (also known as needle painting or long-and-short stitch), you blend colors seamlessly to create highlights and shadows.
Always follow the direction of fur growth with your stitches; this is non-negotiable for realism.
For a sleeping cat, the fur curves around the body, so your stitches should echo that form.
This patient, layered process results in a portrait with incredible softness and depth, making cat & kitten embroidery designs that capture emotion and feel real enough to pet.


