

If you’re anything like me, you sometimes look at a blank piece of fabric and feel a mix of excitement and pressure. You want to create something beautiful, something that brings a sense of calm to your space, but the path from a simple idea to a finished piece can feel unclear.
Let’s change that. Think of your needle and thread not just as tools for decoration, but as instruments for focus. Each stitch can be a quiet anchor in a busy day, a way to build a small sanctuary right on your desk. The goal isn’t perfection; it’s intention.
These patterns are more than just designs—they are invitations to slow down. I’ll guide you through the specific choices in texture, color, and composition that transform a simple motif into a piece of art that genuinely soothes the eye and centers the mind. Together, we’ll make your workspace feel like an extension of your creativity.
1. Create Texture with Pointillism

Instead of filling your leaf shape with a dense satin stitch, use a combination of outline and textural fill.
Use a stem stitch for the outline to create a defined, raised edge.
Fill one half with tightly packed French knots in a slightly darker shade of green to create a stippled, shaded effect that adds depth and visual interest.
This contrast between the clean outline and the textured fill gives the piece a modern, graphic quality while still feeling organic.
This is one of the best nature texture embroidery projects for adding a tactile dimension to a simple botanical motif.
2. Paint Rolling Hills with Thread

To capture the soft, flowing nature of a landscape, rely on directional long and short stitches.
Work in horizontal bands, stitching each row of hills to follow its unique curve. This ensures the light reflects off the threads in a way that mimics natural contours.
Blend colors subtly by choosing three or four adjacent shades from a floss card, like sage green, dusty teal, and slate blue.
Overlap your stitches just enough to create a seamless gradient, transforming simple lines into abstract thread landscapes with a painterly feel.
3. Elevate Leaves with a 3D Effect
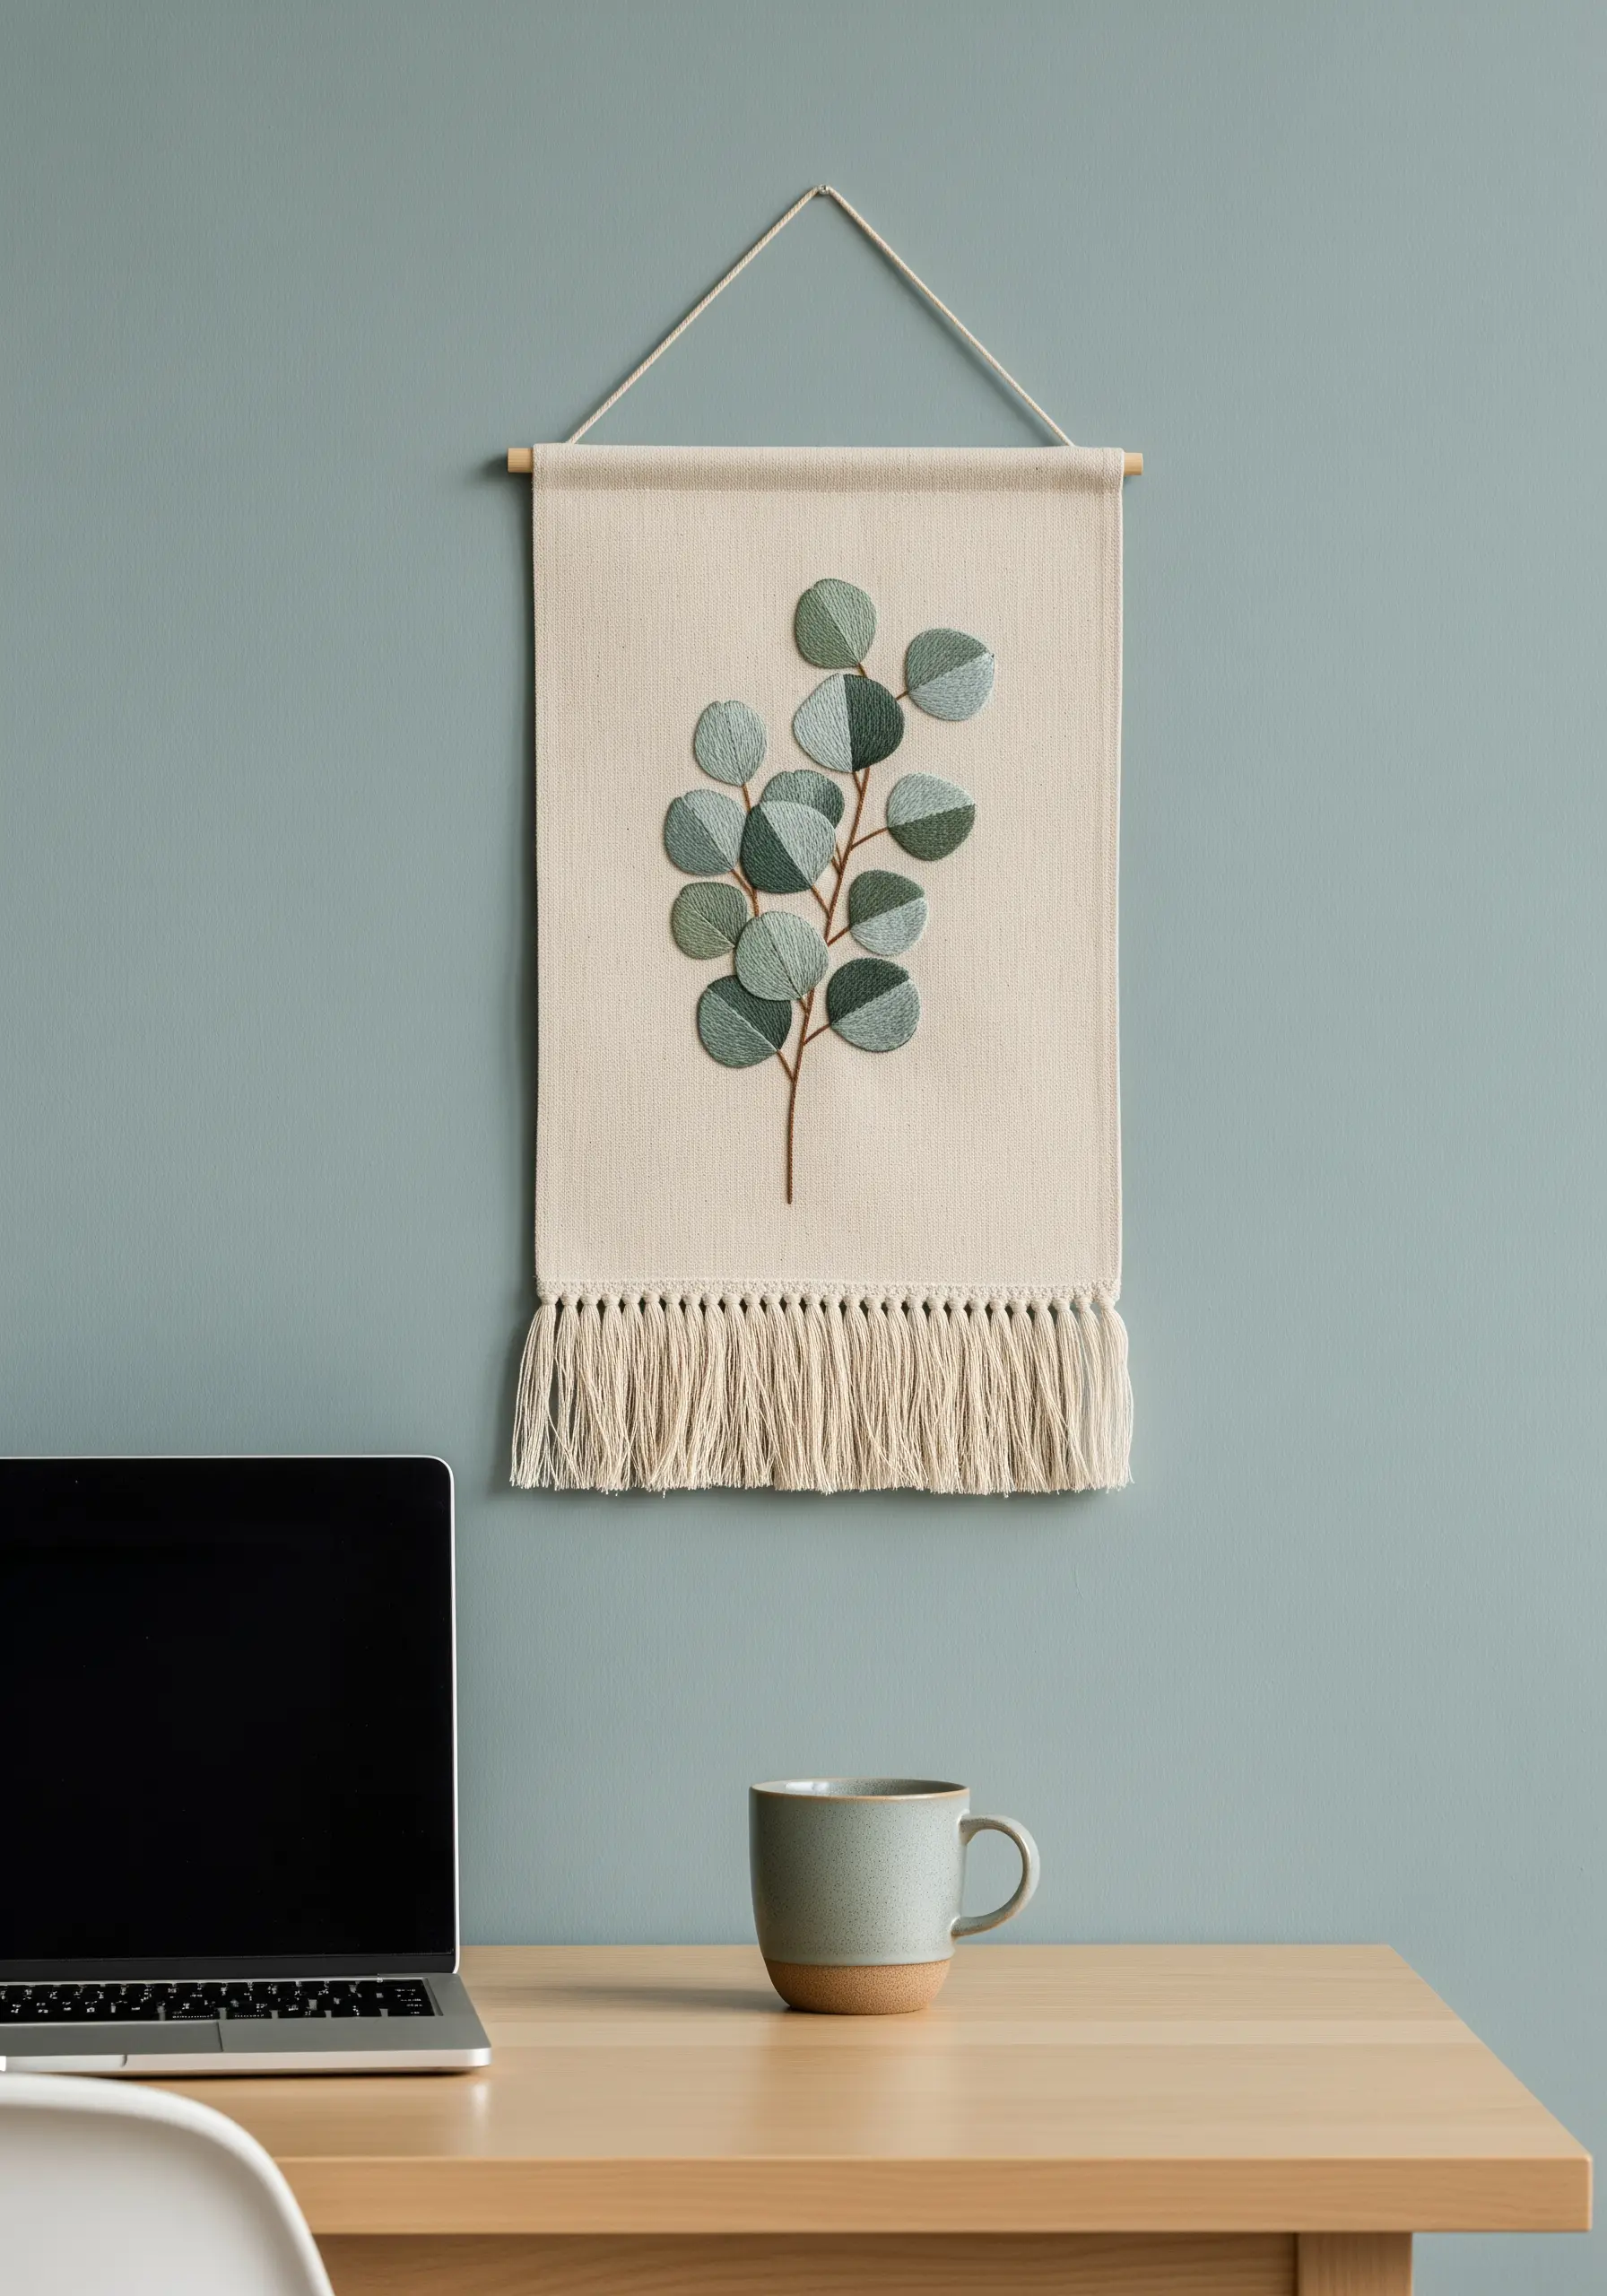
Give your botanicals a sculptural quality by using a padded satin stitch.
First, create a small underlayer of straight stitches within the leaf shape. Then, cover this padding with satin stitches angled outwards from the center vein.
This simple preparation lifts the threads off the fabric, making the leaves look plump and realistic.
Finish your piece as a wall hanging instead of in a hoop for a more integrated decor element. These embroidered textile wall hangings add softness and texture to any workspace wall.
4. Stitch a Meditative Fern Spiral

A spiral composition naturally draws the eye inward, creating a calming focal point.
Use a single strand of thread and a delicate fishbone stitch to create the fern fronds. This stitch creates a central spine and angled leaves in one fluid motion, perfectly mimicking nature.
Vary the size of the fronds, making them smaller as they approach the center of the spiral to enhance the sense of depth and movement.
Explore different fern foliage stitch variations to find the one that feels most rhythmic and relaxing to you.
5. Abstract Nature with Woven Textures
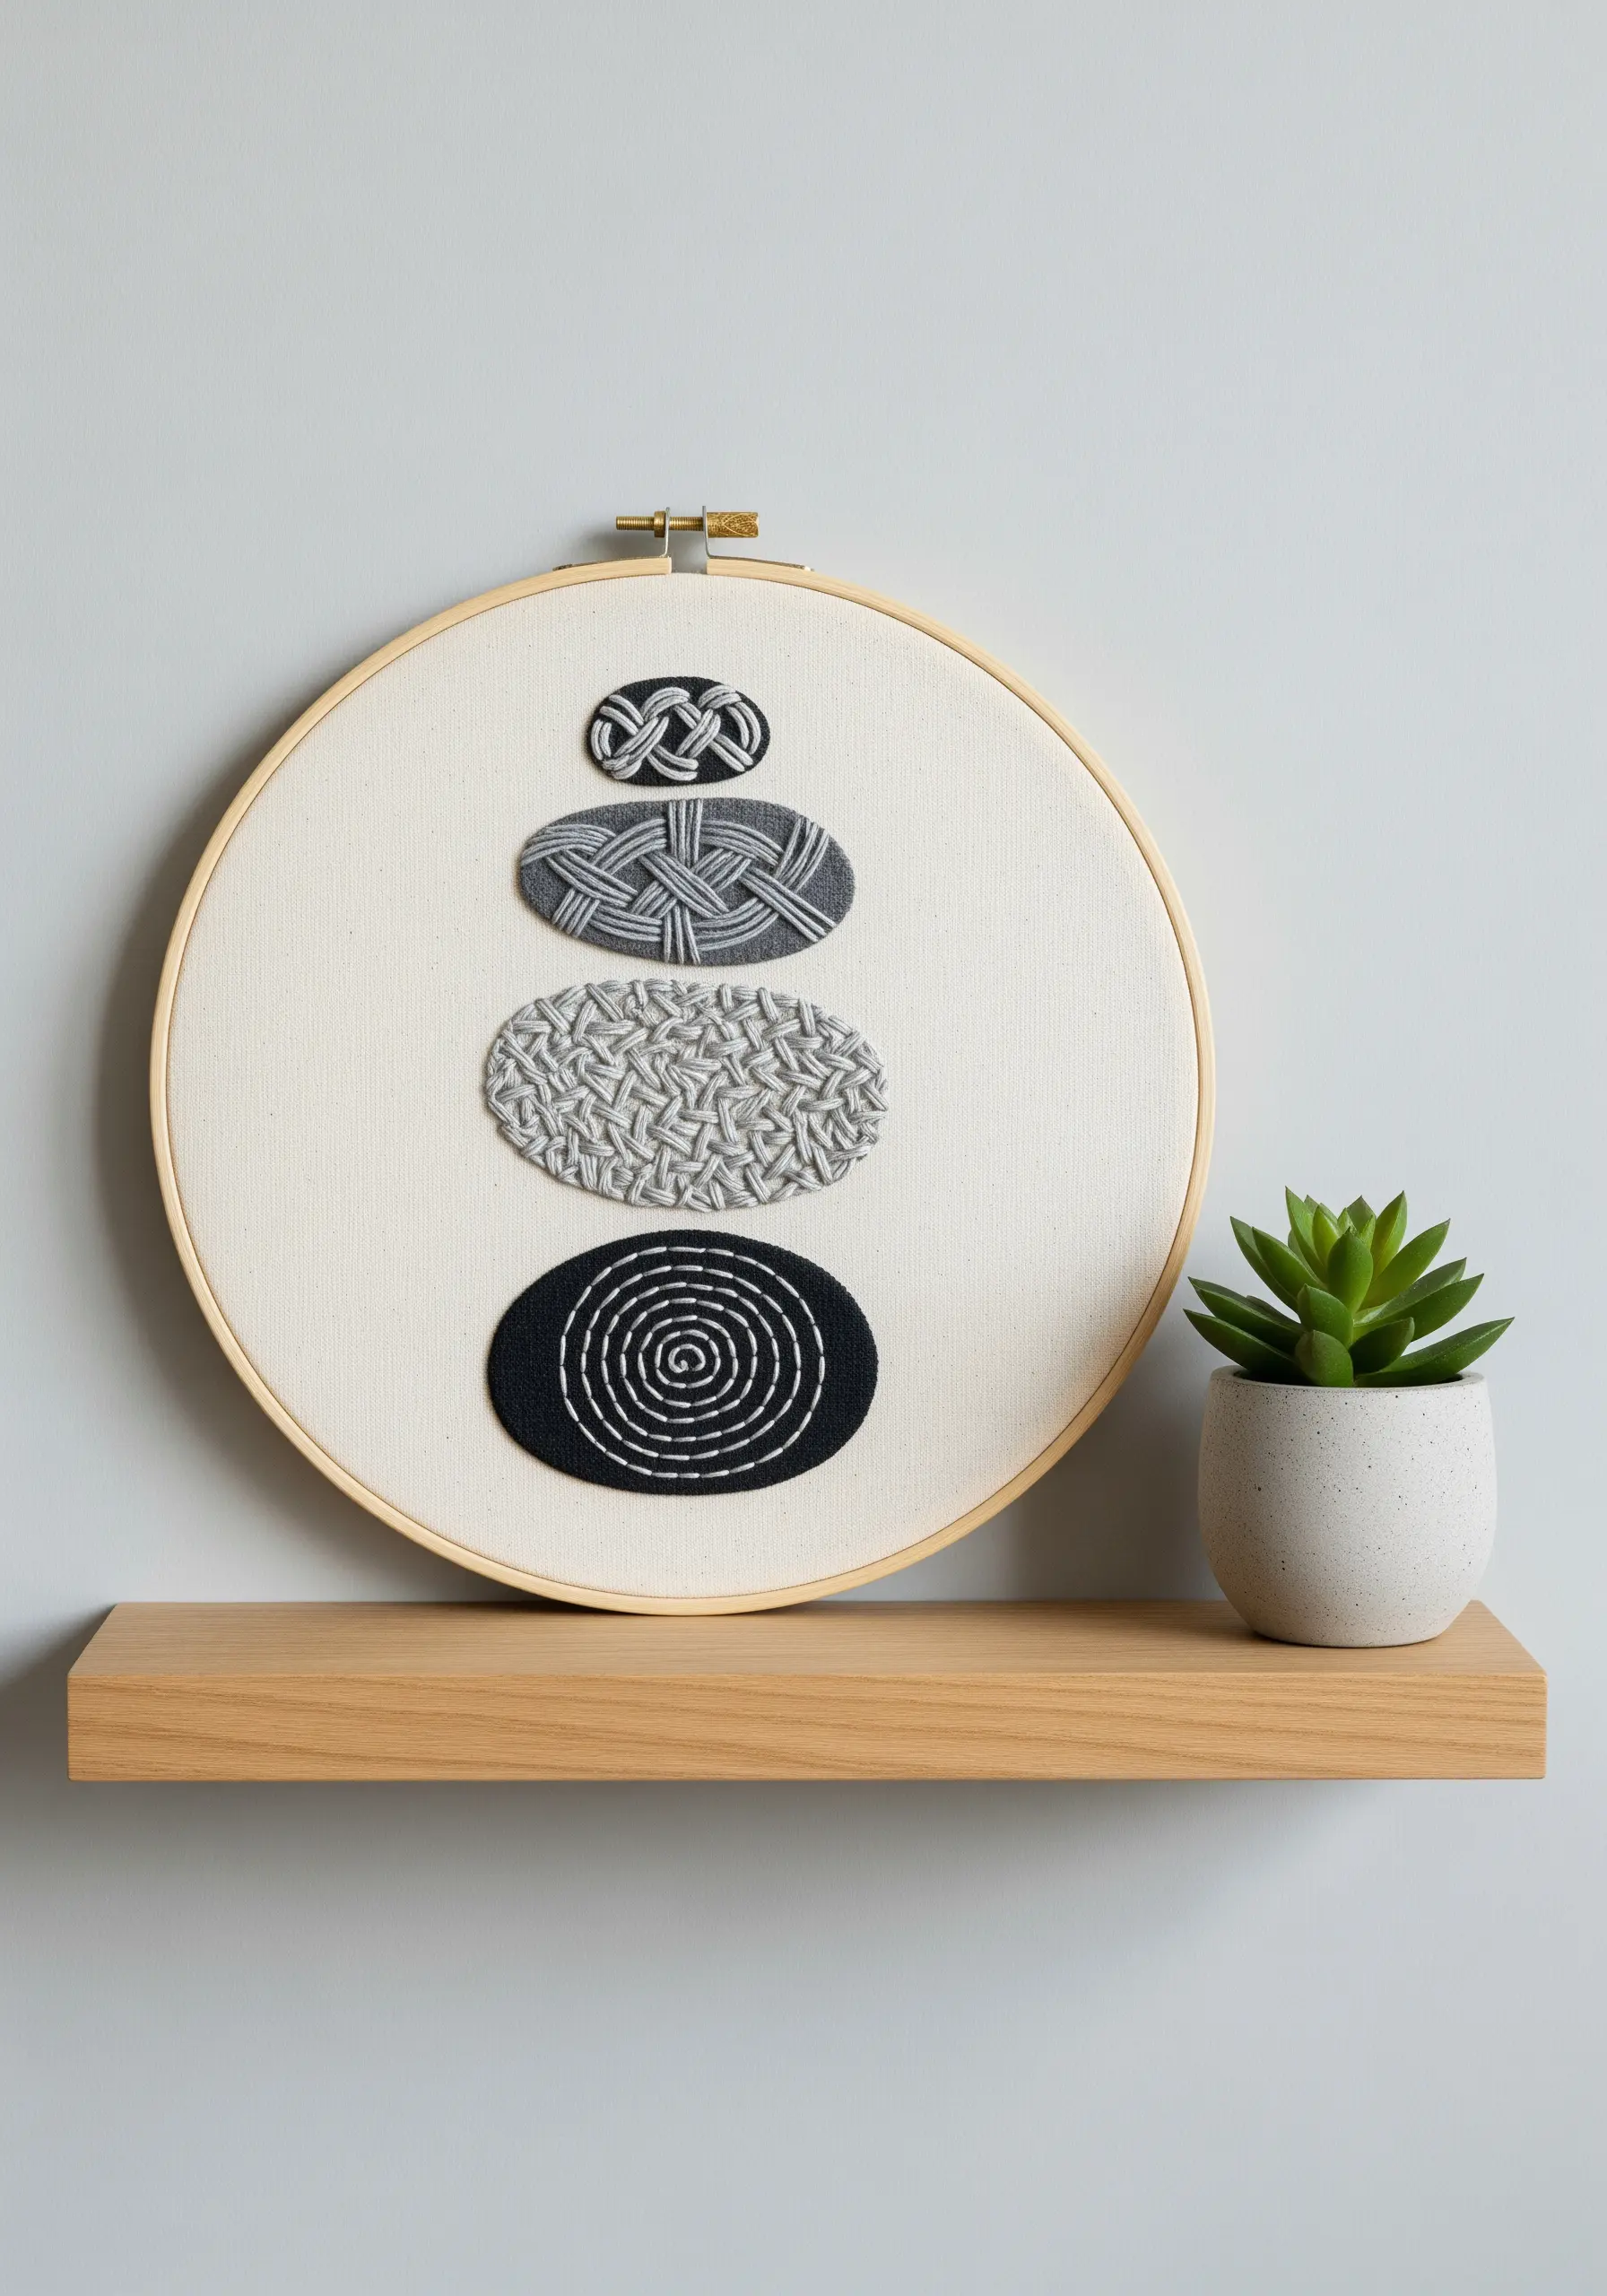
Capture the essence of stacked Zen stones by focusing on texture rather than realism.
Outline each stone shape, then fill it with a distinct, meditative pattern. Try a woven wheel stitch for a basket-like texture, or couched threads for a spiral effect.
Limit your palette to monochrome shades like black, white, and grey to emphasize the interplay of light and shadow across the different patterns.
This approach transforms simple ovals into tactile studies, perfect for those who love embroidery patterns inspired by stones, wood, and leaves.
6. Master the Elegance of Line Art
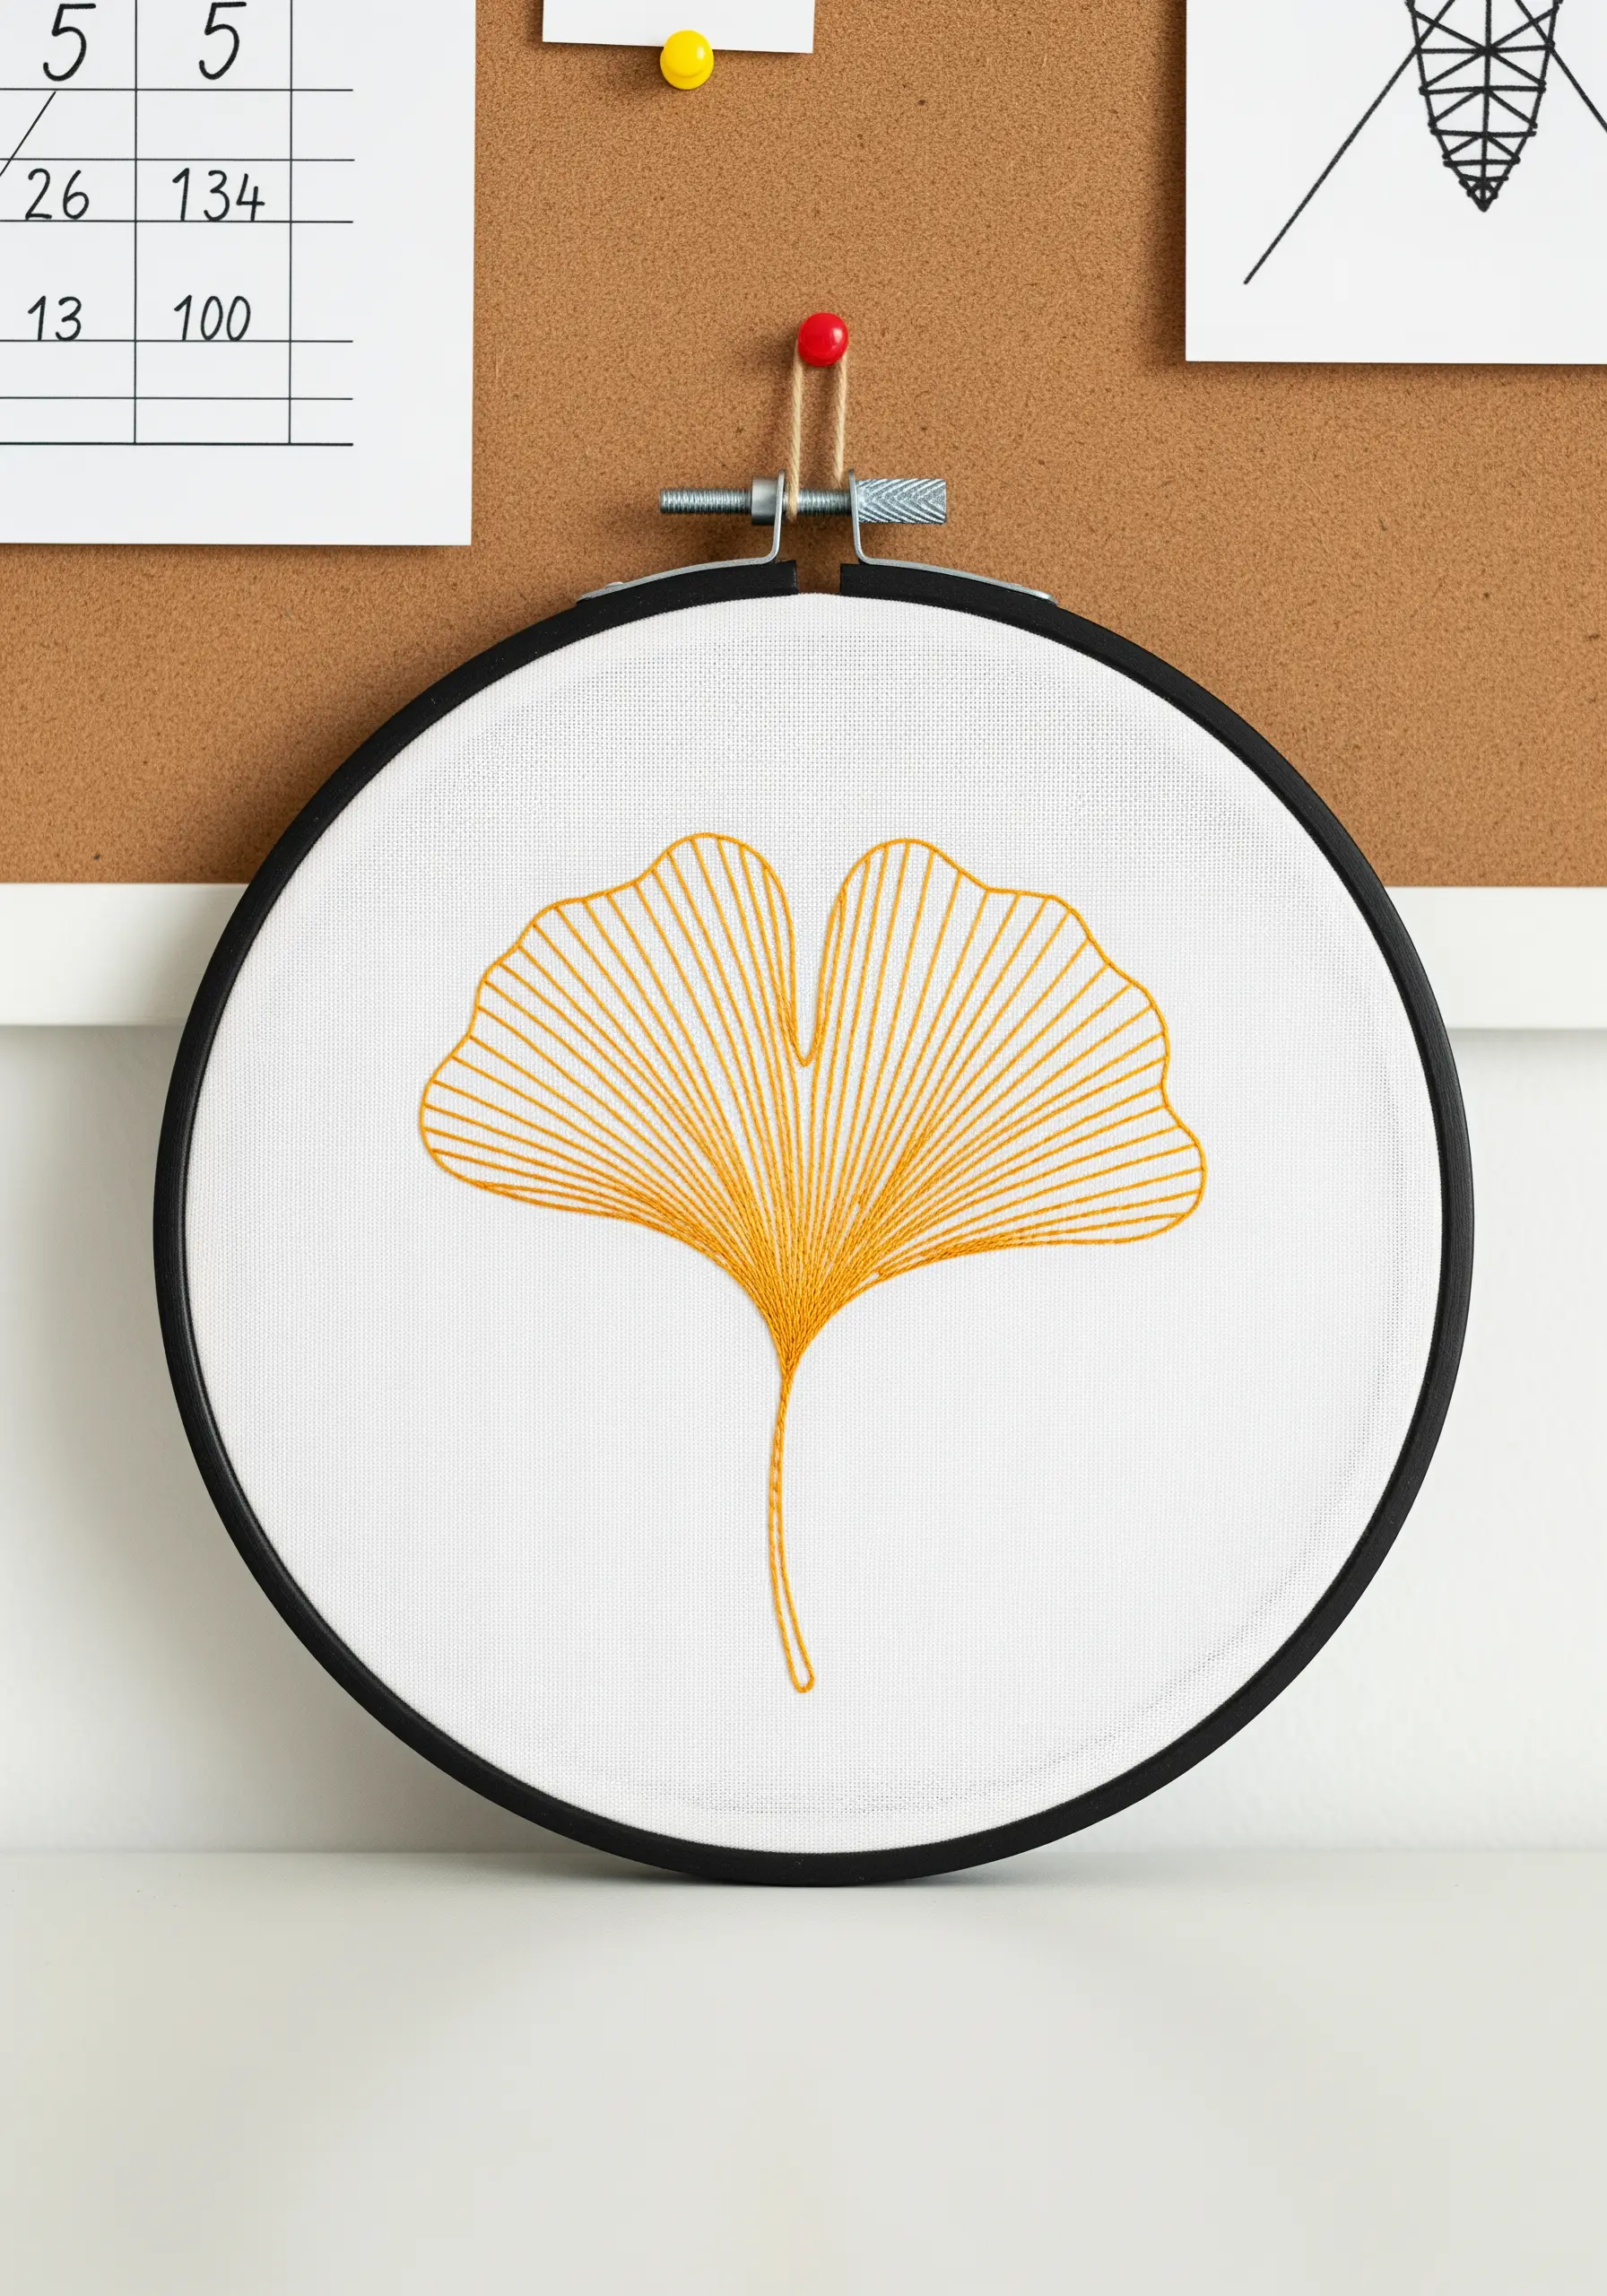
A single, continuous line can have more impact than a fully colored design.
For a delicate ginkgo leaf, choose a vibrant, contrasting thread color like marigold yellow against a stark white fabric.
Use a two-strand backstitch or stem stitch, focusing on keeping your stitch length perfectly consistent. This uniformity is what gives the final piece its clean, graphic, and professional look.
This is a perfect example of minimalist line art nature embroidery that feels both simple and incredibly sophisticated.
7. Add a Touch of Lunar Glow

Working with metallic thread can be challenging, but the result is worth it. To tame it, use shorter lengths of thread (no more than 12 inches) to prevent tangling and fraying.
A thread conditioner or beeswax can also make the metallic floss glide more smoothly through the fabric.
Stitch your crescent moon on a dark navy or black fabric; the high contrast makes the metallic shimmer pop, creating a luminous effect.
These metallic thread wall art designs catch the light beautifully, adding a subtle magic to your desk area.
8. Evoke Landscapes with Negative Space

You don’t need to fill the entire hoop to suggest a vast mountain range. A simple, clean outline allows the viewer’s imagination to fill in the details.
Use a dark thread on a lighter, textured fabric like linen or Aida to create a sense of grounding and contrast.
A simple backstitch is all you need. The key to this design’s success is its use of negative space—the unstitched fabric becomes the sky and the foreground, making the small motif feel expansive.
These minimal embroidery wall pieces prove that less is truly more.
9. Capture Motion with Layered Stitches
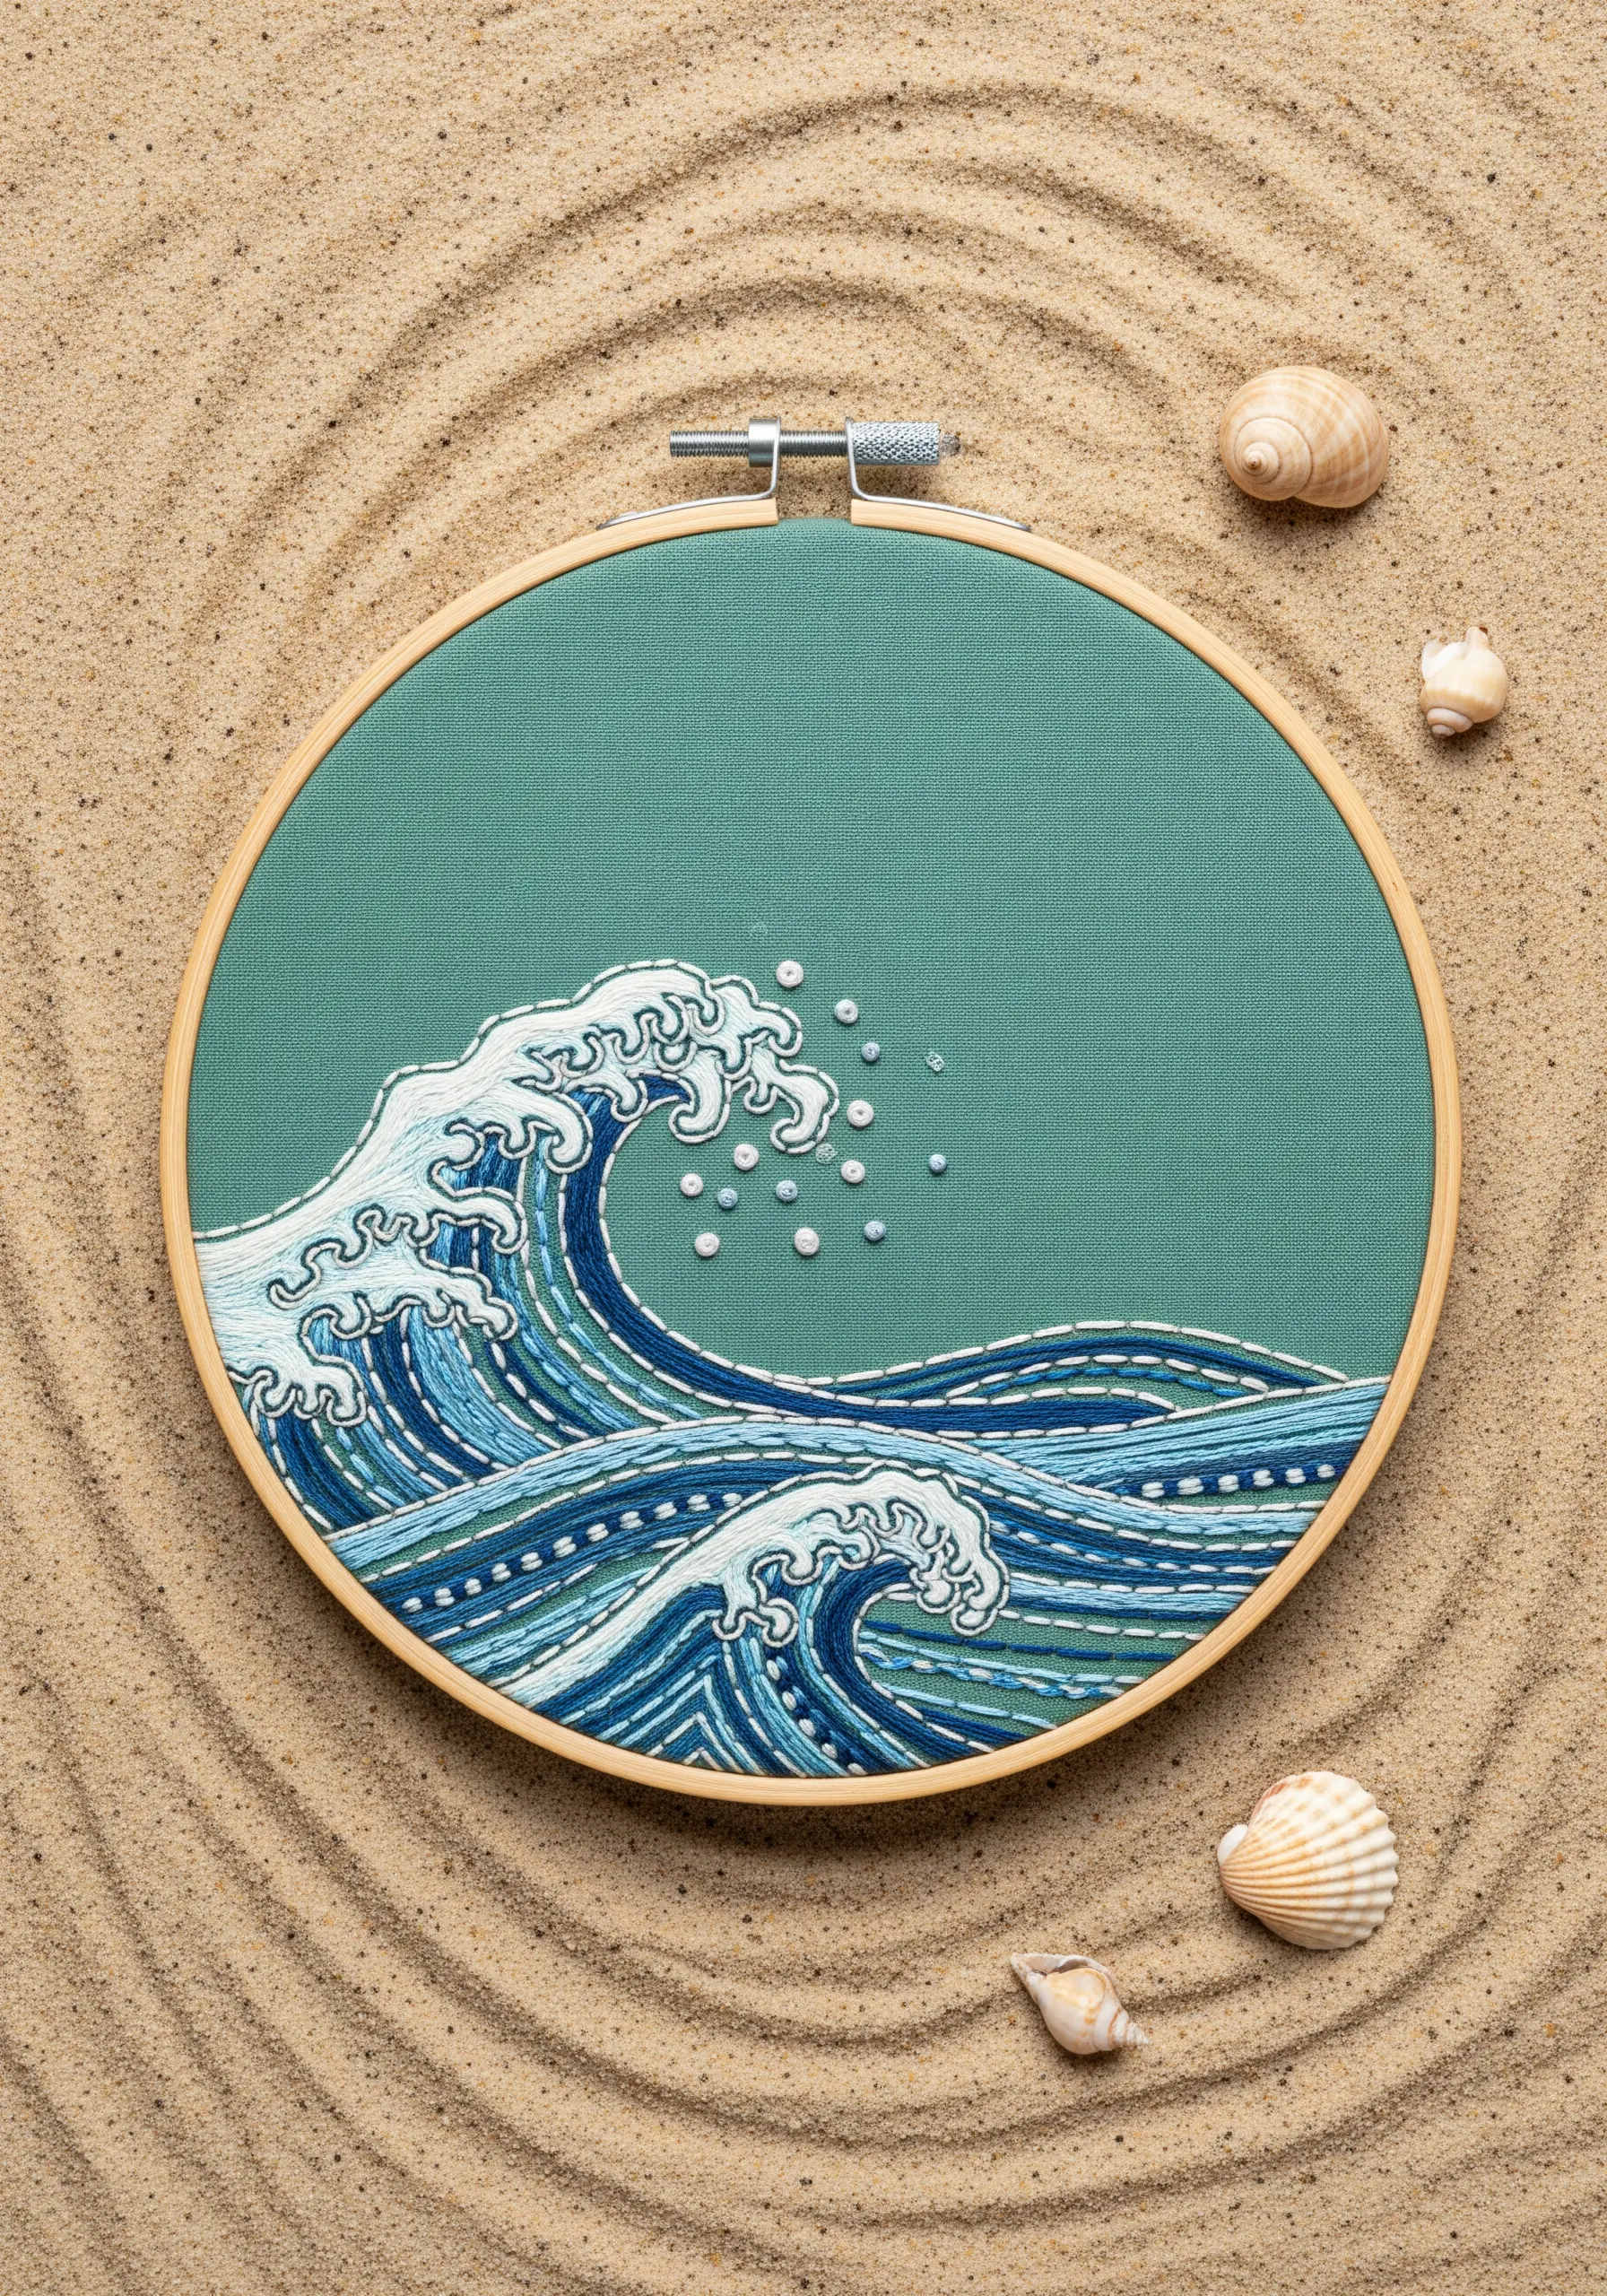
To create the dynamic energy of an ocean wave, layer different stitches and textures.
Use long and short stitches in varying shades of blue for the body of the wave, ensuring your stitches follow the direction of the water’s flow.
Overlay this with whipped backstitch or stem stitch in white to define the crests and foam. Finally, add tiny seed beads or French knots to represent sea spray.
This multi-layered approach adds depth and movement, perfect for coastal ocean-inspired string art ideas that feel alive.
10. Create Playful 3D Dandelion Seeds
Bring your embroidery off the fabric with detached stitches for a whimsical, three-dimensional effect.
For the dandelion seeds, stitch a single straight stitch for the stem and finish with a detached woven picot stitch at the top. This creates a tiny, raised ‘parachute’ that looks like it could float away.
You can even stitch a few seeds directly onto the wall beside your hoop to create the illusion of them blowing in the wind.
These 3D floral embroidery techniques add an interactive, playful quality to your art.
11. Sculpt Foliage with Varied Knots

To create a lush, leafy canopy, use French knots but avoid making them uniform.
Vary the number of times you wrap the thread around the needle (once for small, tight buds; twice or three times for fuller blossoms) to create clusters of different sizes.
Also, vary the tension slightly as you pull the knot tight. A looser knot will sit higher and appear larger, adding to the organic, textured feel of the foliage.
This is one of the most effective ways to layer leaf stitching for three-dimensional botanical texture that pops.
12. Define Shapes with a Clean Outline
When working with simple shapes and solid fills, a crisp outline can elevate the design from flat to finished.
First, fill the mushroom caps and stems with a smooth satin stitch, ensuring all your stitches lie in the same direction for a uniform sheen.
Then, go back with a single strand of contrasting thread (like white or black) and trace the entire shape with a delicate backstitch. This acts like an ink line in an illustration, adding definition and a clean, graphic pop.
This technique works beautifully for all kinds of adorable forest animal embroidery ideas too.
13. Achieve Clarity with Geometric Fills

For a clean, modern honeycomb pattern, precision is key. Your best tool here is the satin stitch.
To make the shapes pop, alternate between filled and empty hexagons. For the filled shapes, use a consistent stitch direction—either horizontal or vertical—within each one.
This uniformity ensures that the light hits each filled cell in the same way, creating a smooth, reflective surface that contrasts beautifully with the open outlines.
This is a perfect project for lovers of modern geometric thread art ideas who appreciate clean lines.
14. Build Botanicals with a Stitch Medley

A plant is made of many textures, so your stitching should be, too. Don’t rely on one stitch for an entire floral design.
For a lavender bouquet, use French knots or small lazy daisy stitches for the tiny purple blossoms, clustering them tightly at the top of the stalk.
Use a simple stem stitch for the green stems and long, straight stitches for the slender leaves.
Combining these textures makes the lavender instantly recognizable and visually interesting, just like these delicate lavender stitch ideas.
15. Create a Floating Effect on Tulle
Stitching on a sheer fabric like tulle or organza creates a magical, ethereal effect, making your motif appear to float in mid-air.
Use a stabilizer behind the fabric while you stitch to prevent puckering, which you can carefully tear or wash away later.
A simple line-art design, like a crane in flight, works beautifully as the transparent background emphasizes the clean lines of the stitching.
This technique is perfect for delicate bird & butterfly embroidery patterns that make fabric come alive.
16. Map Organic Textures with Running Stitch
You can create a complex, organic pattern like tree rings using the simplest stitch of all: the running stitch.
Start from the center and work your way outwards in concentric circles. The key is to intentionally vary the length of your stitches and the gaps between them.
Introduce a few different shades of a color—like browns, tans, and creams—to mimic the natural variations in wood grain. This creates a design that feels both abstract and deeply rooted in nature.
It’s one of the most meditative creative embroidery ideas inspired by tree bark and leaves.
17. Radiate Energy with Simple Sunbursts

This minimalist sun design is a powerful lesson in color theory and composition. It’s made entirely of simple straight stitches, also known as satin stitch bars.
Arrange the stitches in a radial pattern, leaving a circle of negative space in the center. Alternate between two or three warm, energetic colors like yellow and orange.
Vary the length of the stitches randomly to create a dynamic, pulsating effect rather than a perfect, static star shape.
You can use this technique to make incredible abstract thread burst techniques for all sorts of motifs.
18. Adapt Designs for Functional Art
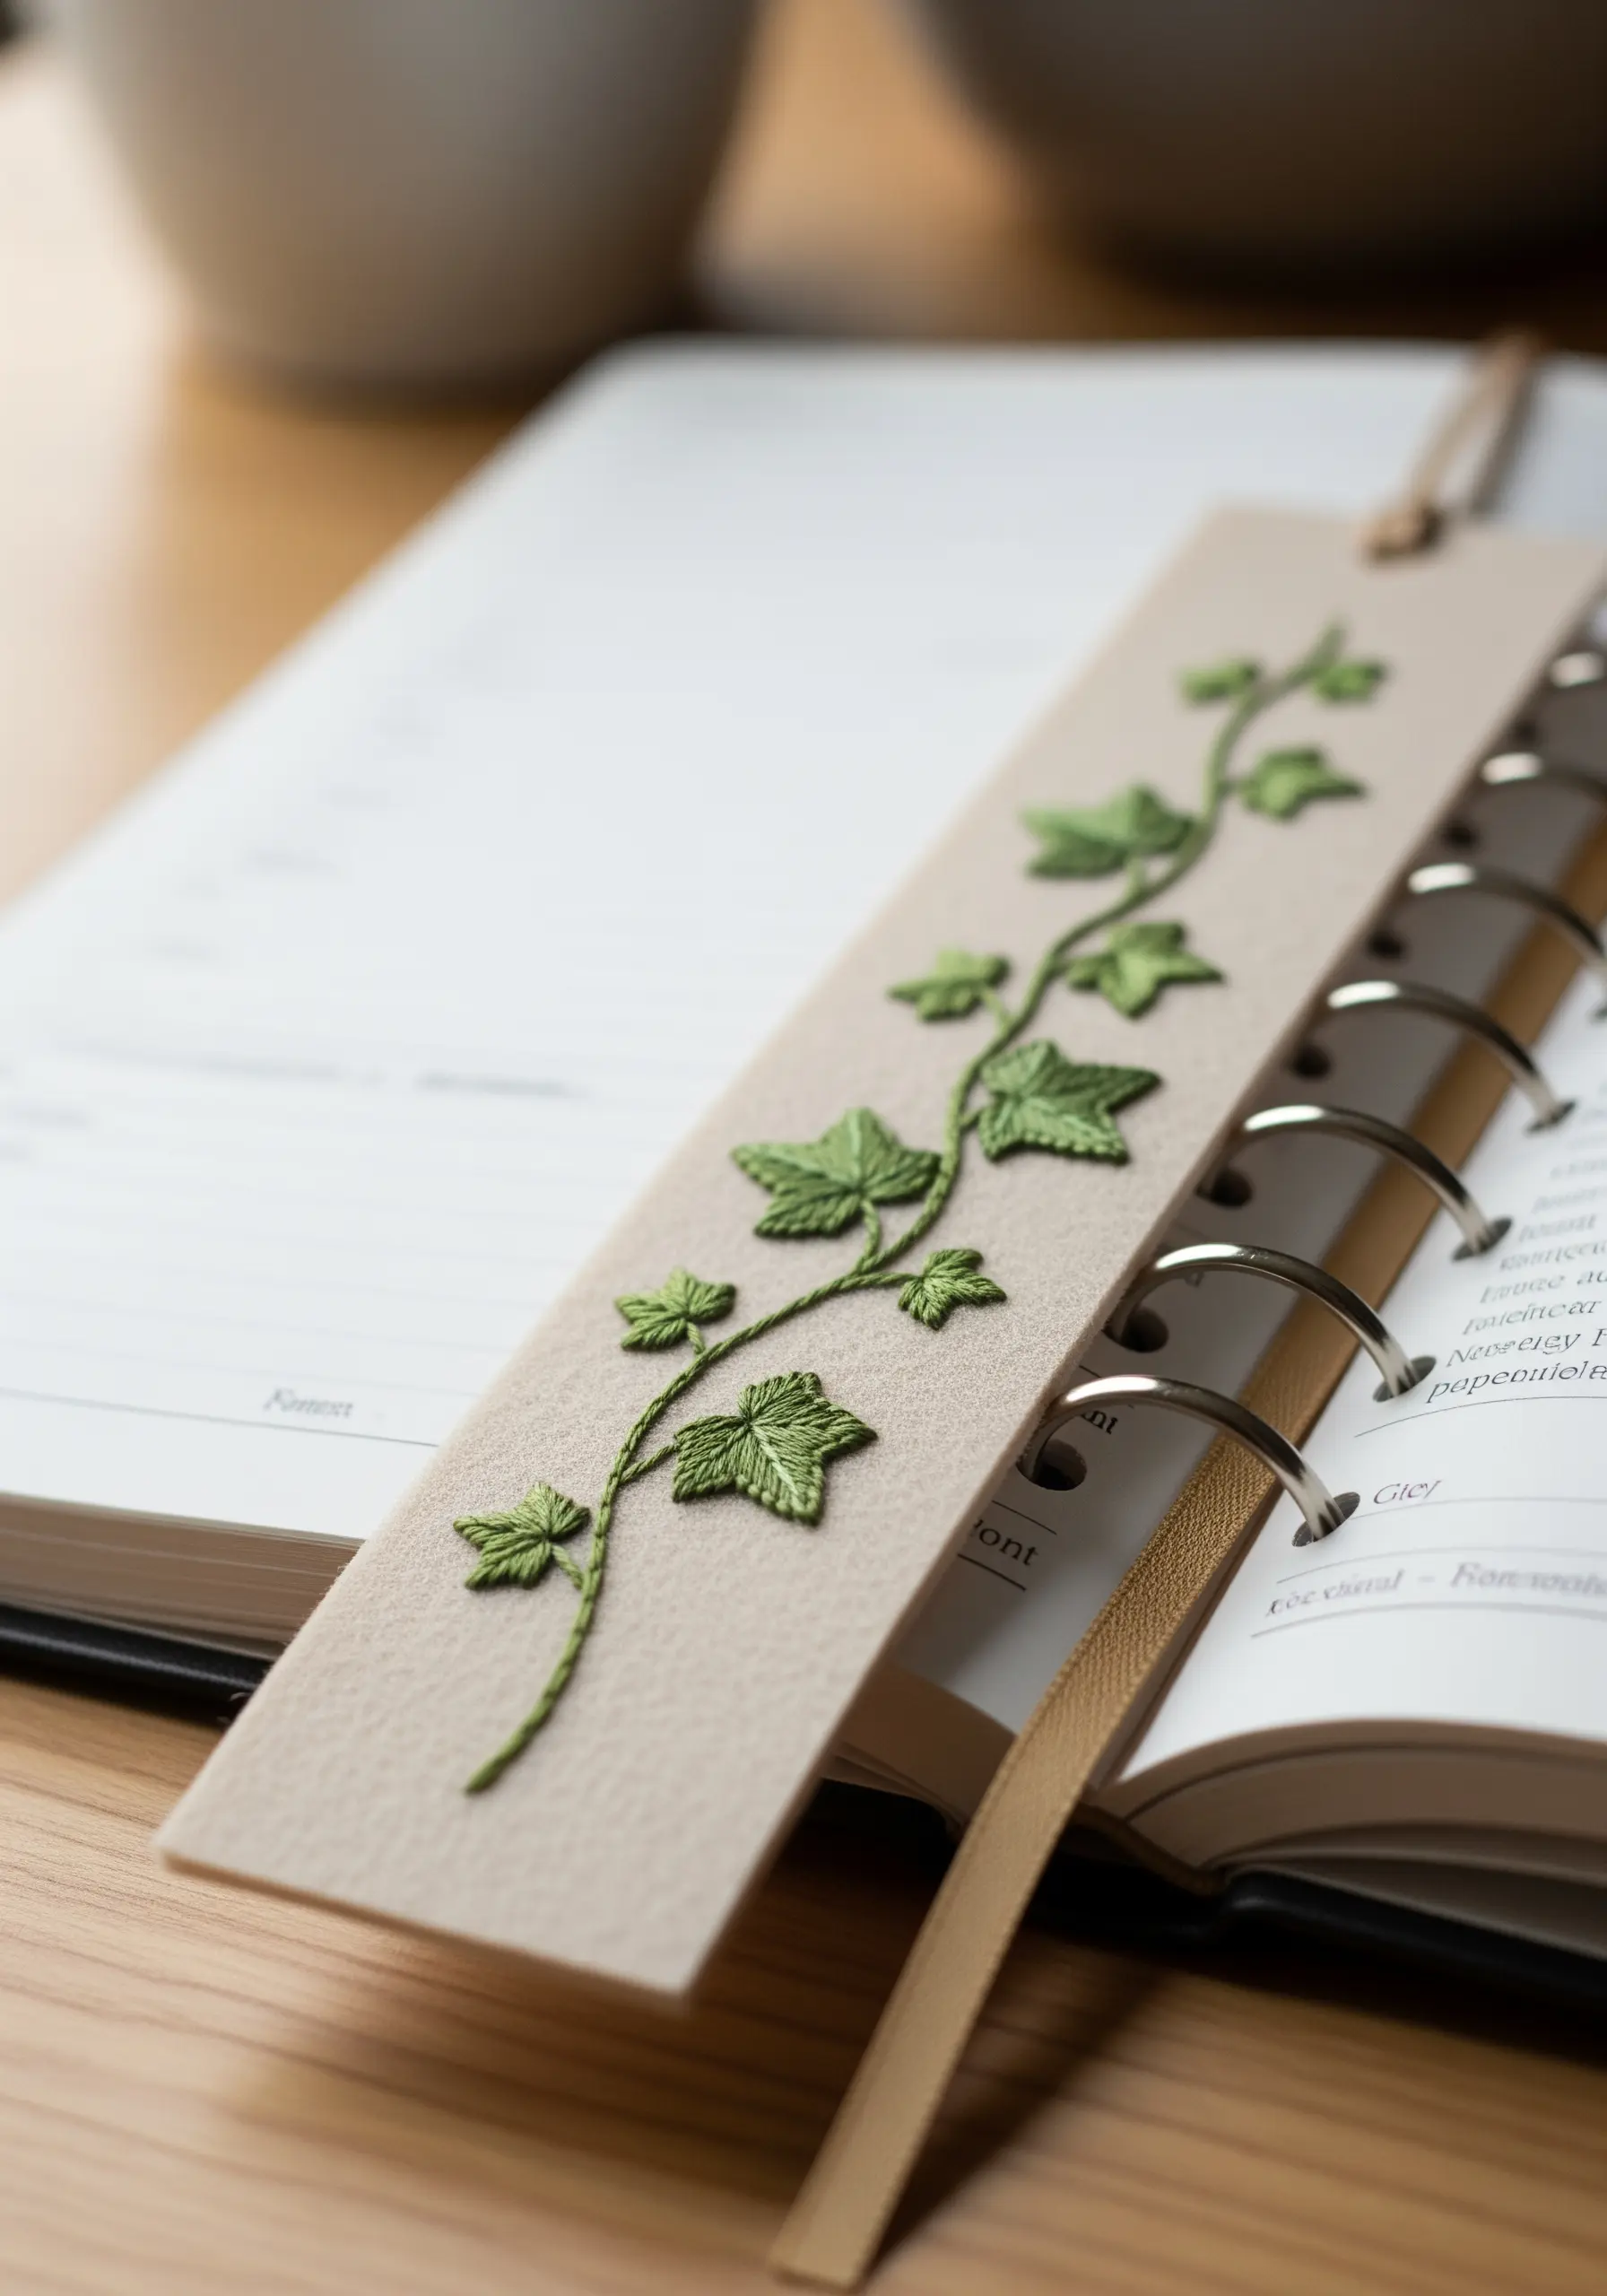
Your embroidery doesn’t have to live in a hoop. A beautiful ivy vine is perfect for a functional object like a bookmark.
Choose a sturdy, non-fraying base material like felt or bonded canvas. Use a combination of stem stitch for the winding vine and a small satin stitch for the leaves.
This not only creates a beautiful piece but also reinforces the fabric, making it durable for everyday use.
You can turn almost any small motif into DIY cozy embroidery bookmarks that bring a touch of handmade calm to your reading.
19. Make a Statement with Scale
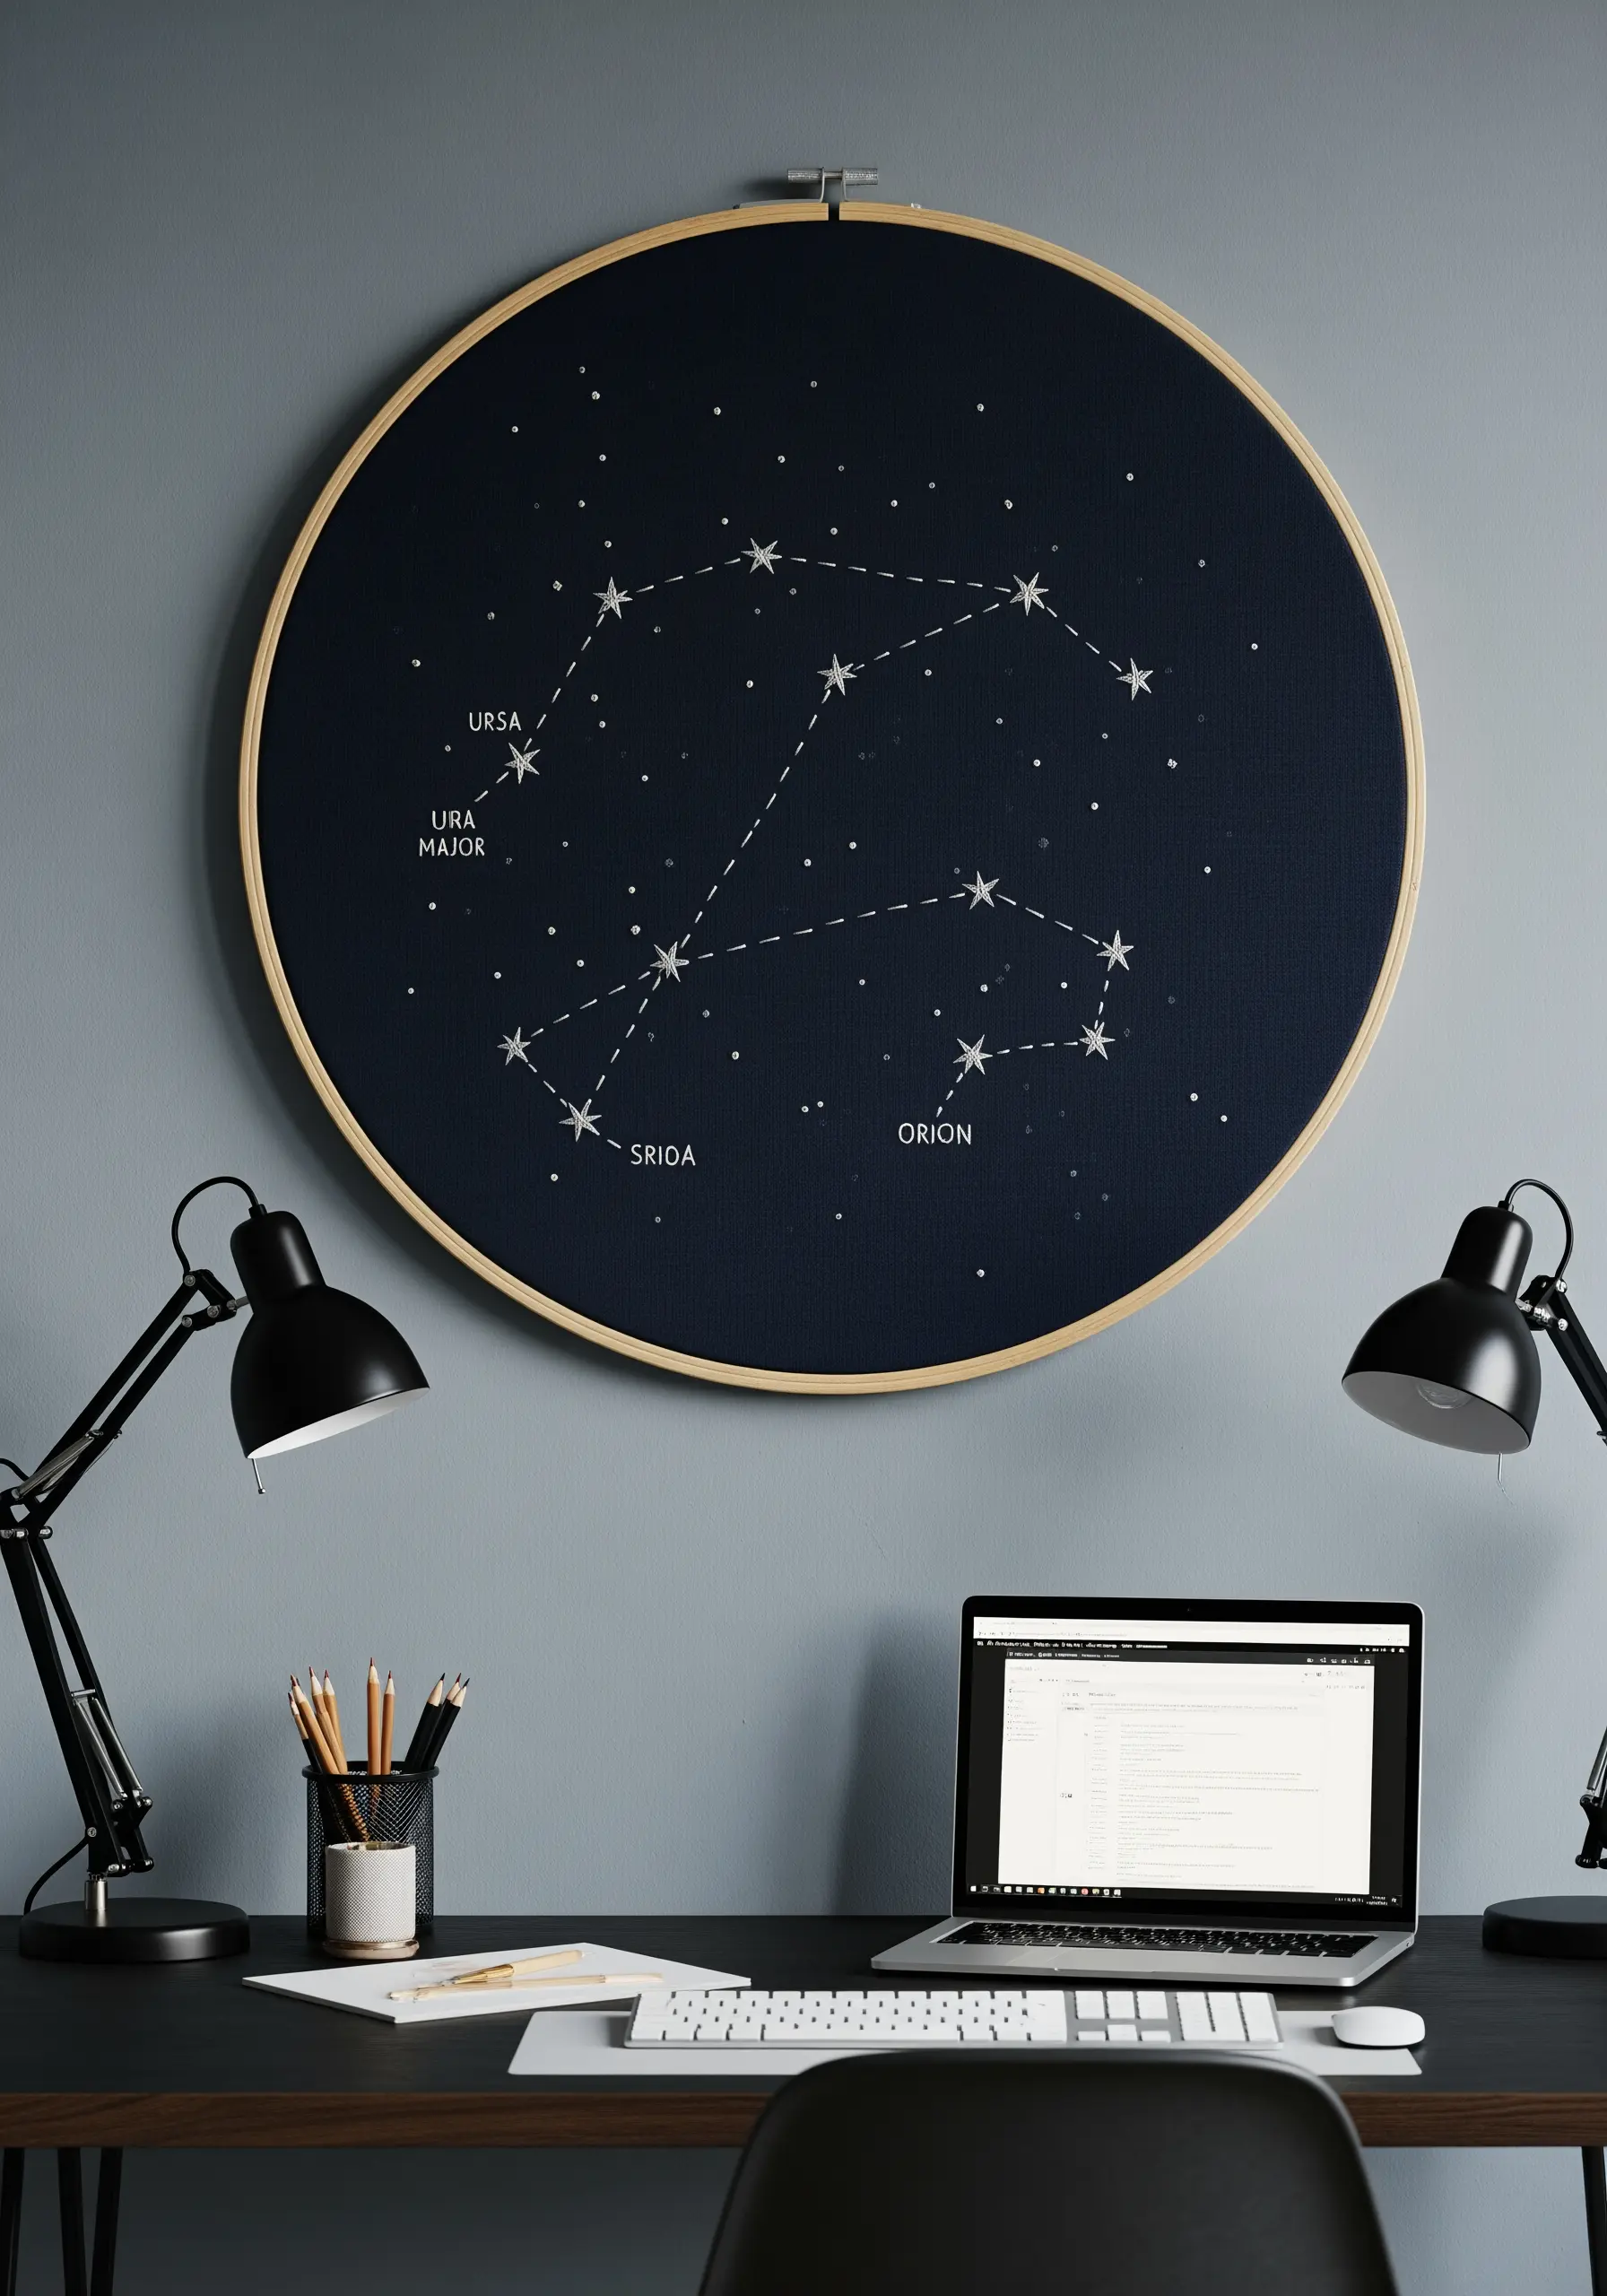
Transform a simple design into a breathtaking focal point by dramatically increasing its scale.
A constellation map, which is just a series of French knots and straight lines, becomes an impressive piece of wall art when stitched on a very large hoop.
Use a high-contrast palette like white thread on navy fabric to ensure the design is legible and striking from across the room.
This approach works well for any minimalist design, turning it into one of those large-scale embroidery tapestries that anchor a space.
20. Give Petals Dimension with Padding
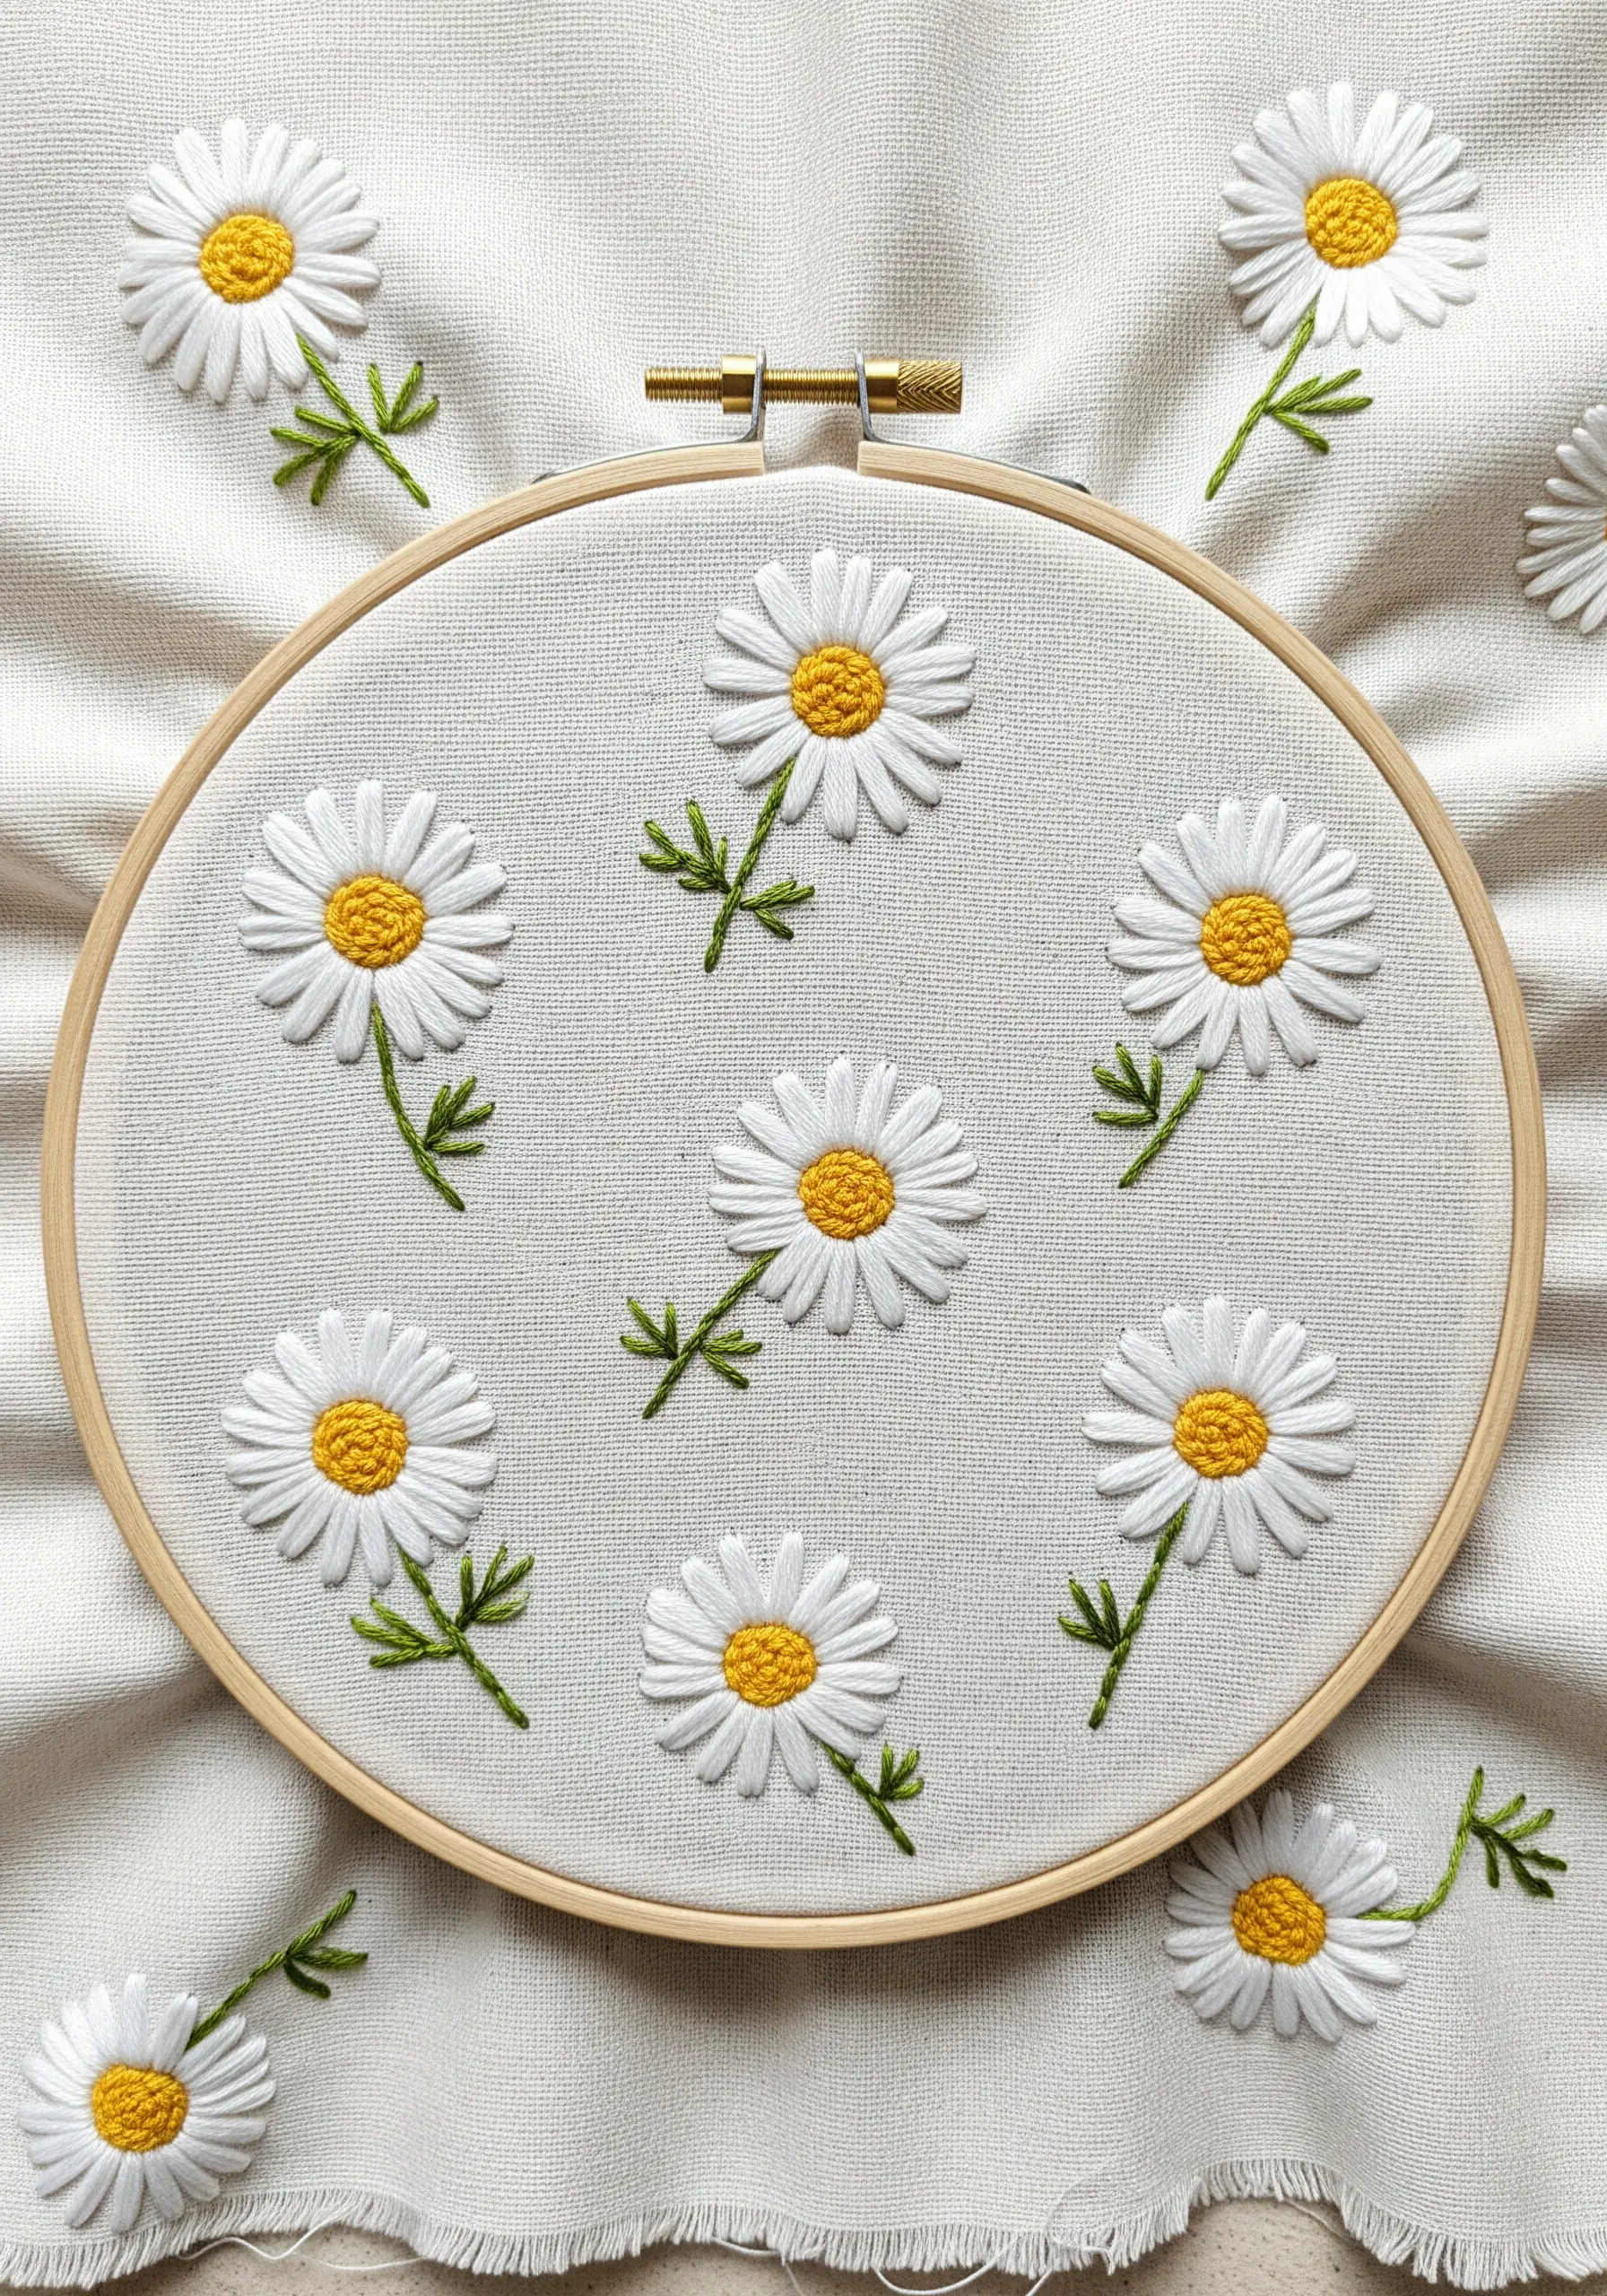
To prevent your satin-stitched petals from looking flat, give them a subtle lift with padding.
Before you stitch the white petals, lay down a foundation of small straight stitches within the petal shape. This underlayer will create a raised surface.
When you stitch your final satin stitches over the padding, the petals will have a gentle, rounded dimension that makes them look fuller and more realistic.
It’s a simple trick that elevates beginner daisy and buttercup projects to a professional level.
21. Frame Your Workspace with a Botanical Border

Integrate your embroidery directly into your workspace by creating a functional piece like a memo board.
Stretch linen or canvas over a cork board or foam core, securing it tightly at the back. Embroider a delicate vine or leaf pattern around the edges to create a natural frame.
This not only adds a touch of handmade beauty but also defines the usable space for notes and inspiration.
These are the kind of subtle embroidery touches that make your desk look Pinterest-ready and personalized.
22. Stitch Crystal Facets with Color Blocking
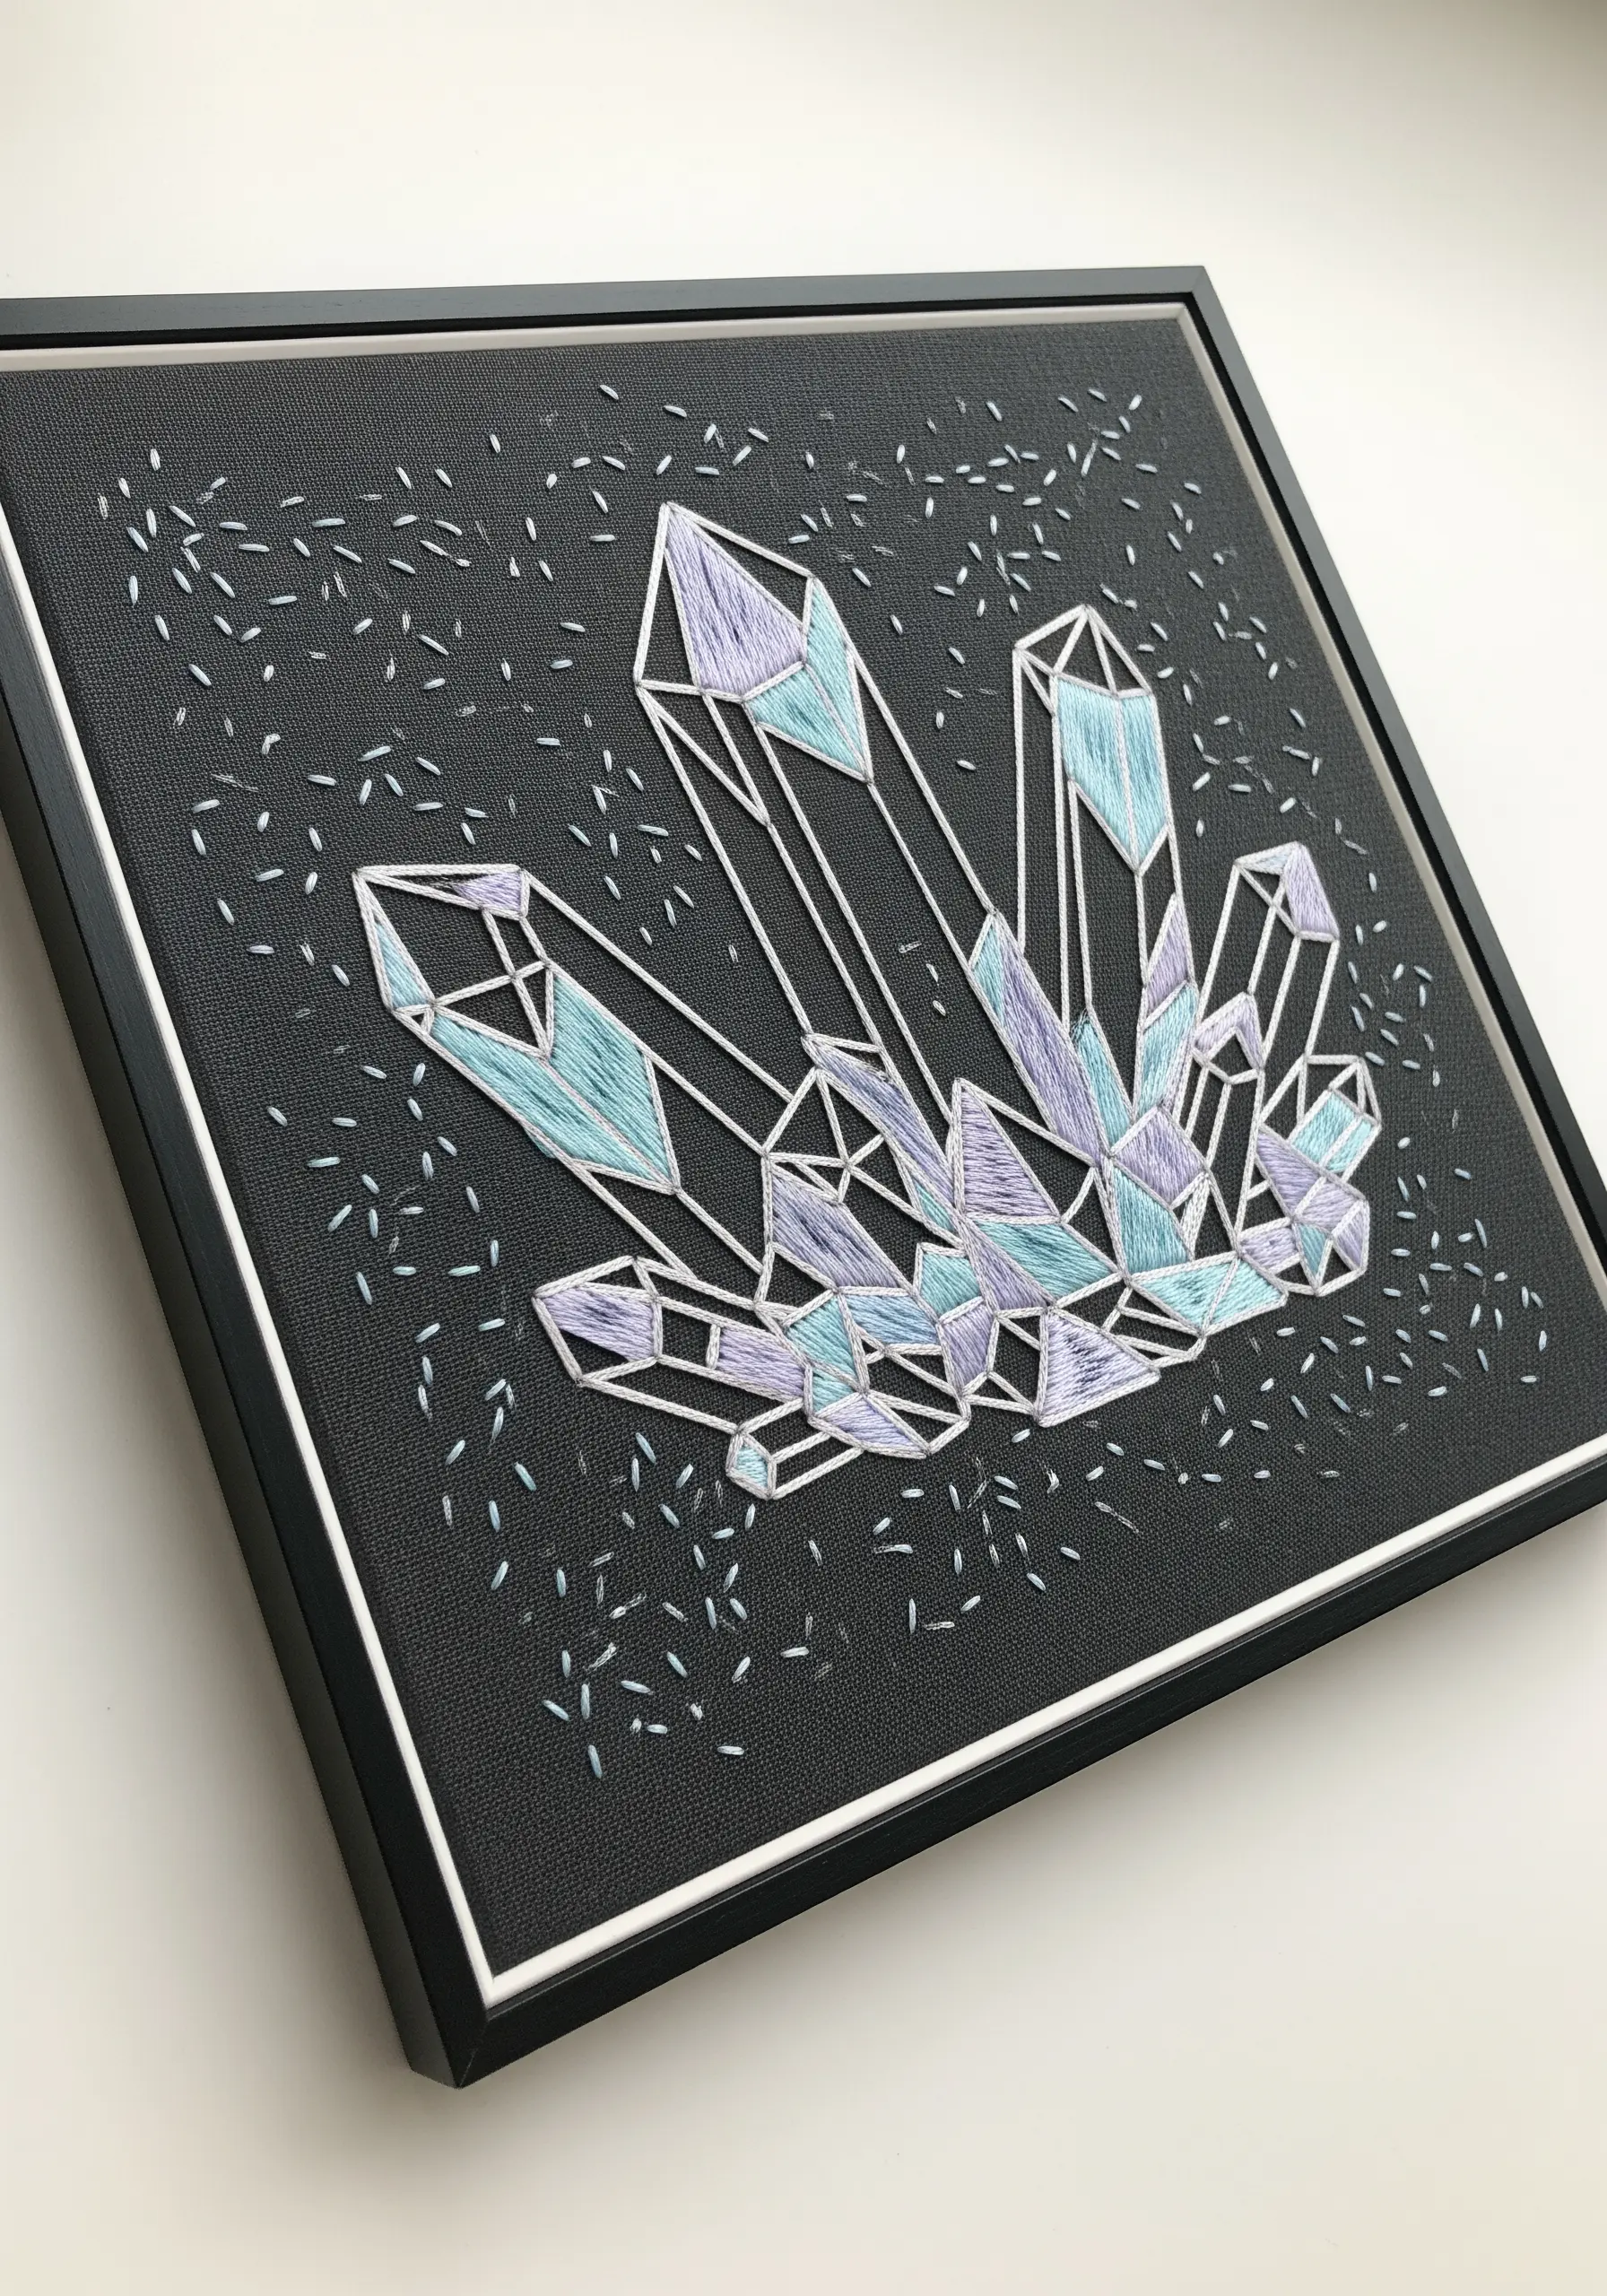
To create the illusion of light hitting crystal facets, you don’t need complex shading. Instead, use strategic color blocking with satin stitch.
Divide each crystal shape into smaller geometric sections. Fill adjacent sections with slightly different shades of the same color family (e.g., lilac, lavender, and periwinkle).
Varying the direction of your satin stitch in each section will also change how light reflects off the thread, enhancing the illusion of sharp, angled planes.
This technique turns simple shapes into abstract optical illusion stitches that trick the eye.
23. Use a Single Motif as a Tiny Accent

Sometimes, all a space needs is a tiny, unexpected touch of art.
Embroider a single, vibrant motif like a hummingbird in a small hoop. The beauty of this approach is its versatility—you don’t need a dedicated wall space for it.
Hang it from a drawer knob, a lamp switch, or the corner of a bookshelf. It becomes a small, personal detail that brings a pop of color and life to an often-overlooked corner of your workspace.
These tiny stitched details that add a luxe touch to your shelves are quick to make but have lasting charm.
24. Create Rhythmic Flow with Textured Lines
To create organic, flowing lines with beautiful texture, move beyond a simple backstitch.
Try a whipped chain stitch or a heavy chain stitch using a thicker thread or multiple strands of floss. These stitches create a raised, rope-like line that has a satisfying tactile quality.
Arrange these textured lines in gentle, sweeping curves to evoke the feeling of flowing water or wind patterns. The repetition of the stitch creates a calming, rhythmic effect.
Explore these abstract thread waves & swirls to capture motion and flow in your embroidery.
25. Go Bold with Yarn and Fiber

For a true statement piece, scale up your materials. Swap embroidery floss for thick yarn, cord, or even soft rope.
Use a sturdy canvas or felted wool as your base and a large, blunt tapestry needle. You can couch the thick fibers onto the surface with a matching thin thread, allowing you to create complex curves easily.
This technique creates a highly textural, sculptural piece of art that bridges the gap between embroidery and fiber art.
These statement-size wall art ideas are perfect for making a big impact in a minimalist space.
26. Find Calm in Simple Repetition
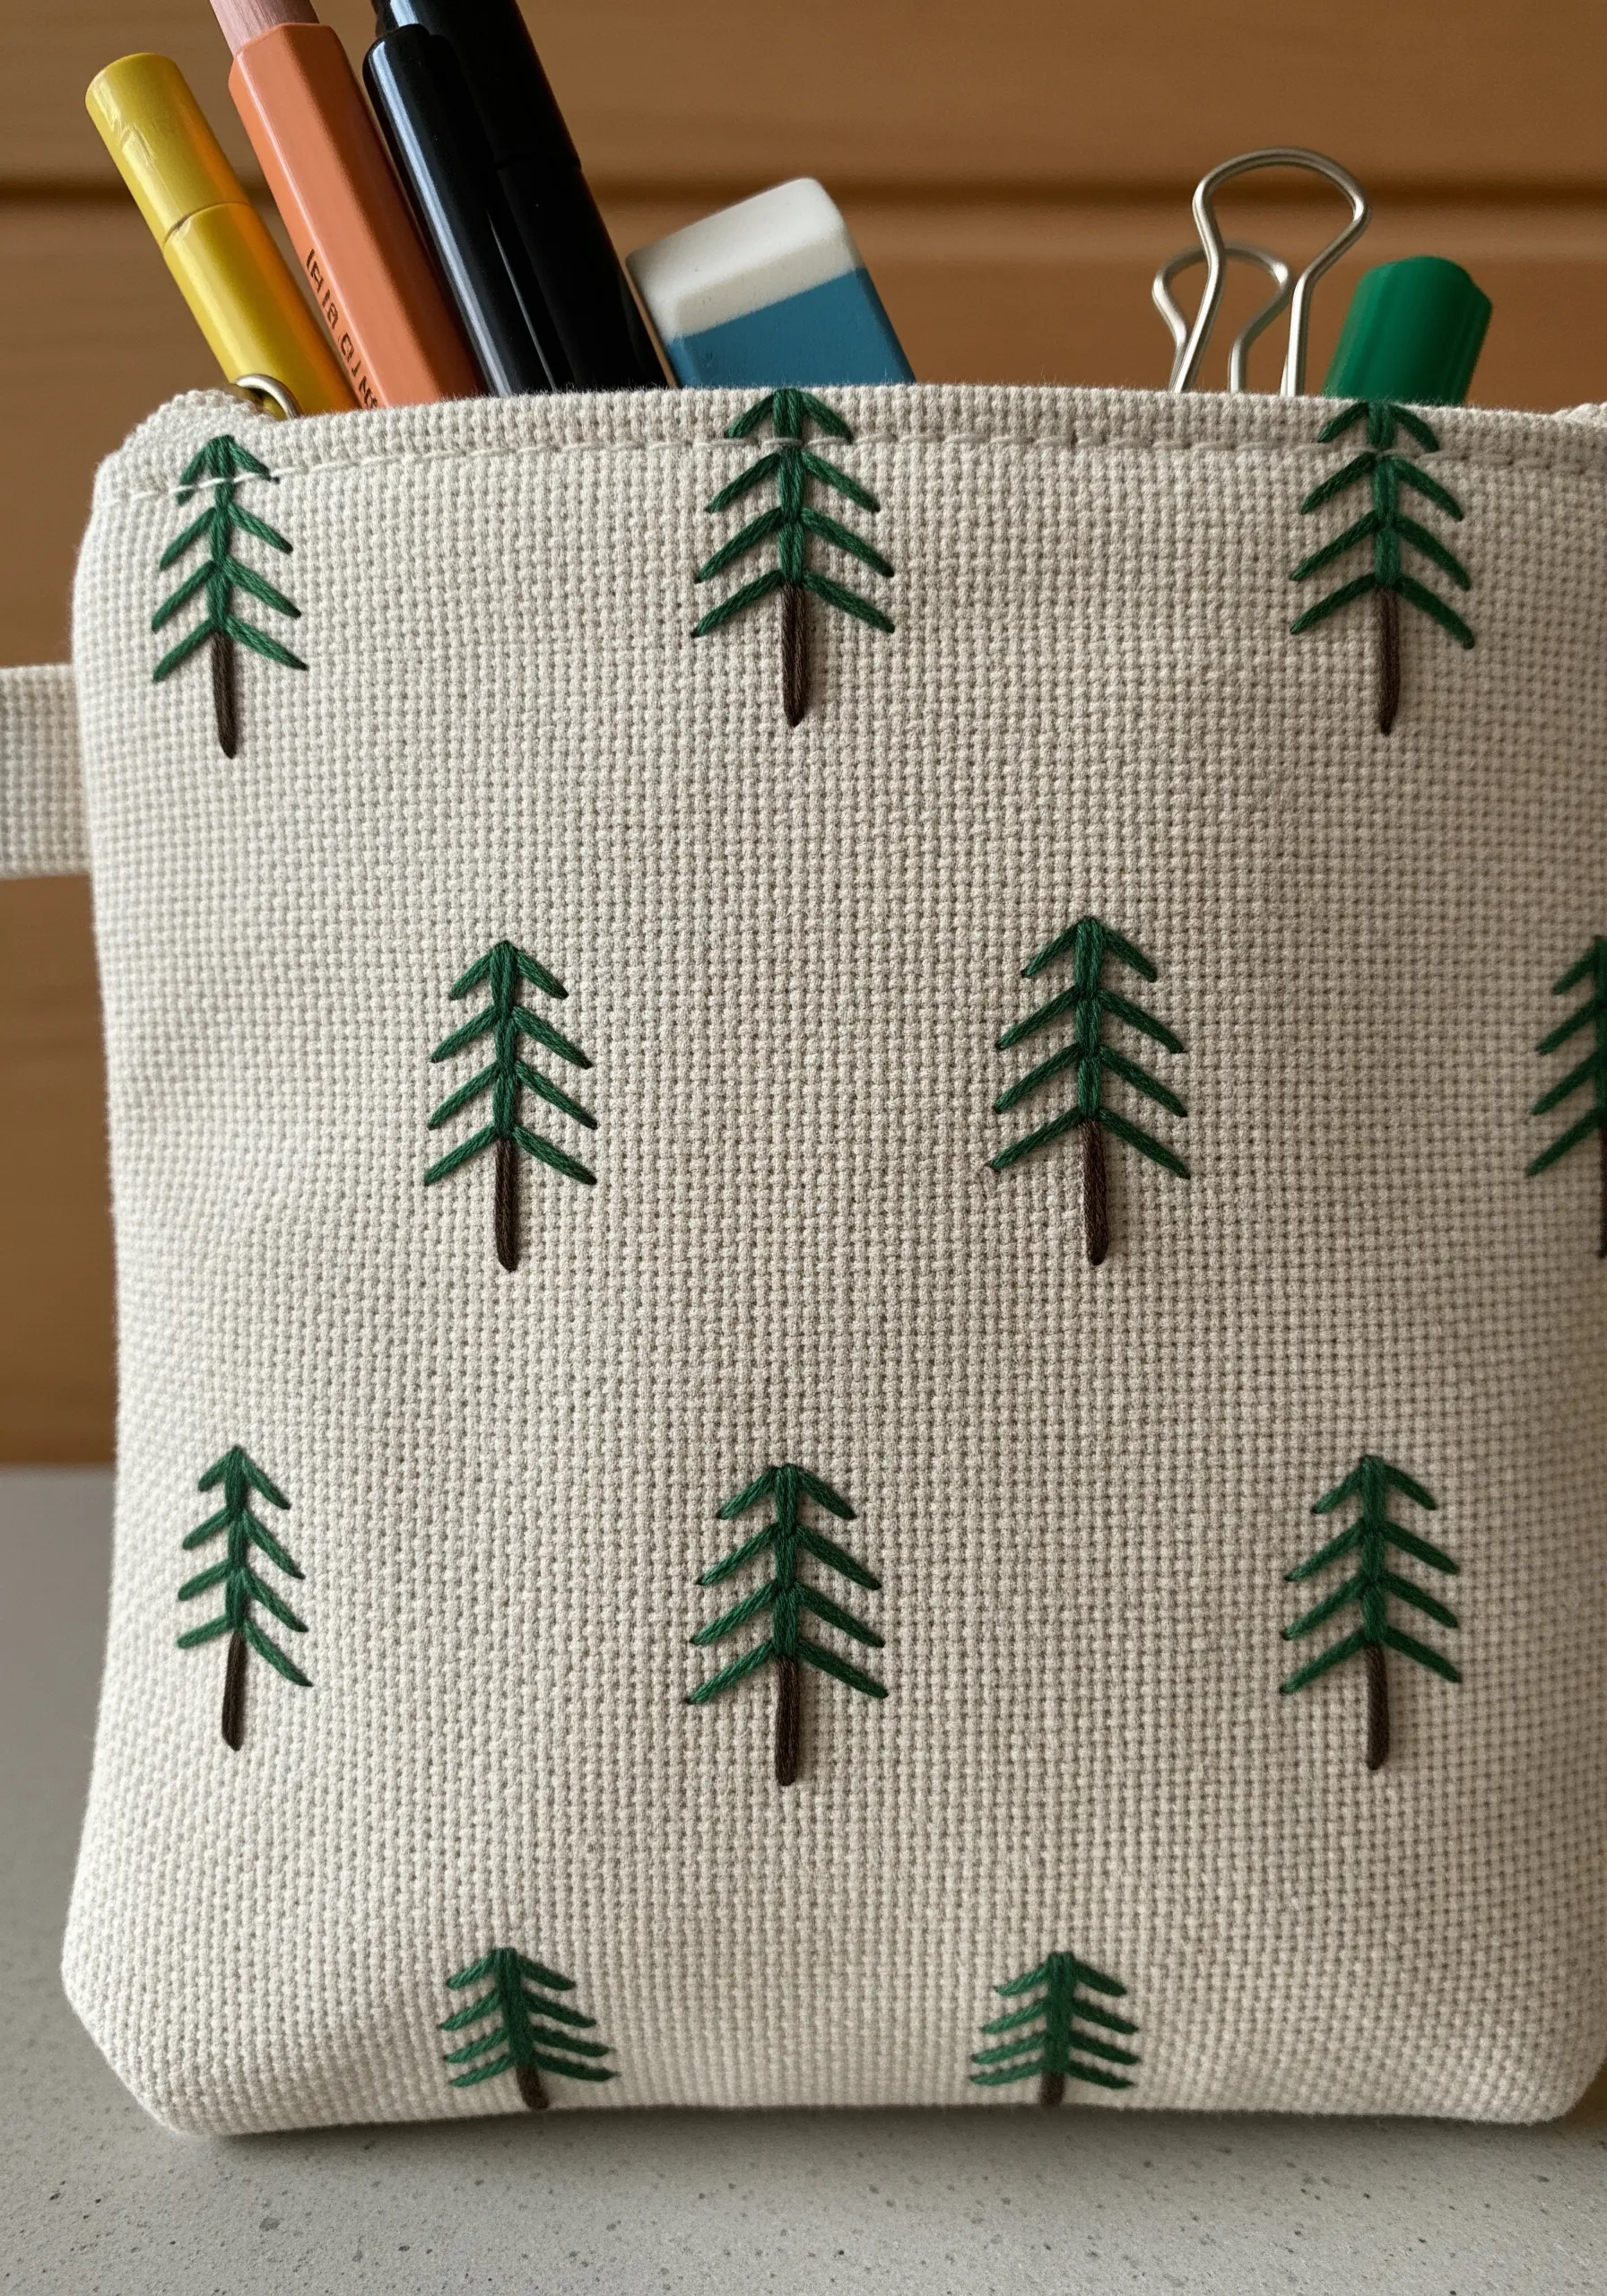
Creating a repeating pattern of a simple motif can be a wonderfully meditative process.
For these tiny pine trees, each one is just a few straight stitches—a vertical trunk and angled branches. By stitching them in a neat, orderly grid, you create a design that feels balanced and serene.
This is a perfect technique for embellishing functional items like pencil cases, tote bags, or notebook covers.
These quick simple embroidery accents can transform everyday objects into something special.
27. Add Softness with Fabric Appliqué

Combine embroidery with other materials for a rich, multi-textured piece.
For a soft, fluffy cloud, cut the shape from a piece of white felt or fleece. Use a simple running stitch or a decorative blanket stitch around the edge to attach it to your background fabric.
You can then add embroidered details, like silver teardrops for rain, stitched directly onto the background fabric beneath the cloud.
This layered, mixed-media fabric collage approach adds tactile depth and charm.
28. Capture Delicacy with Single-Strand Thread
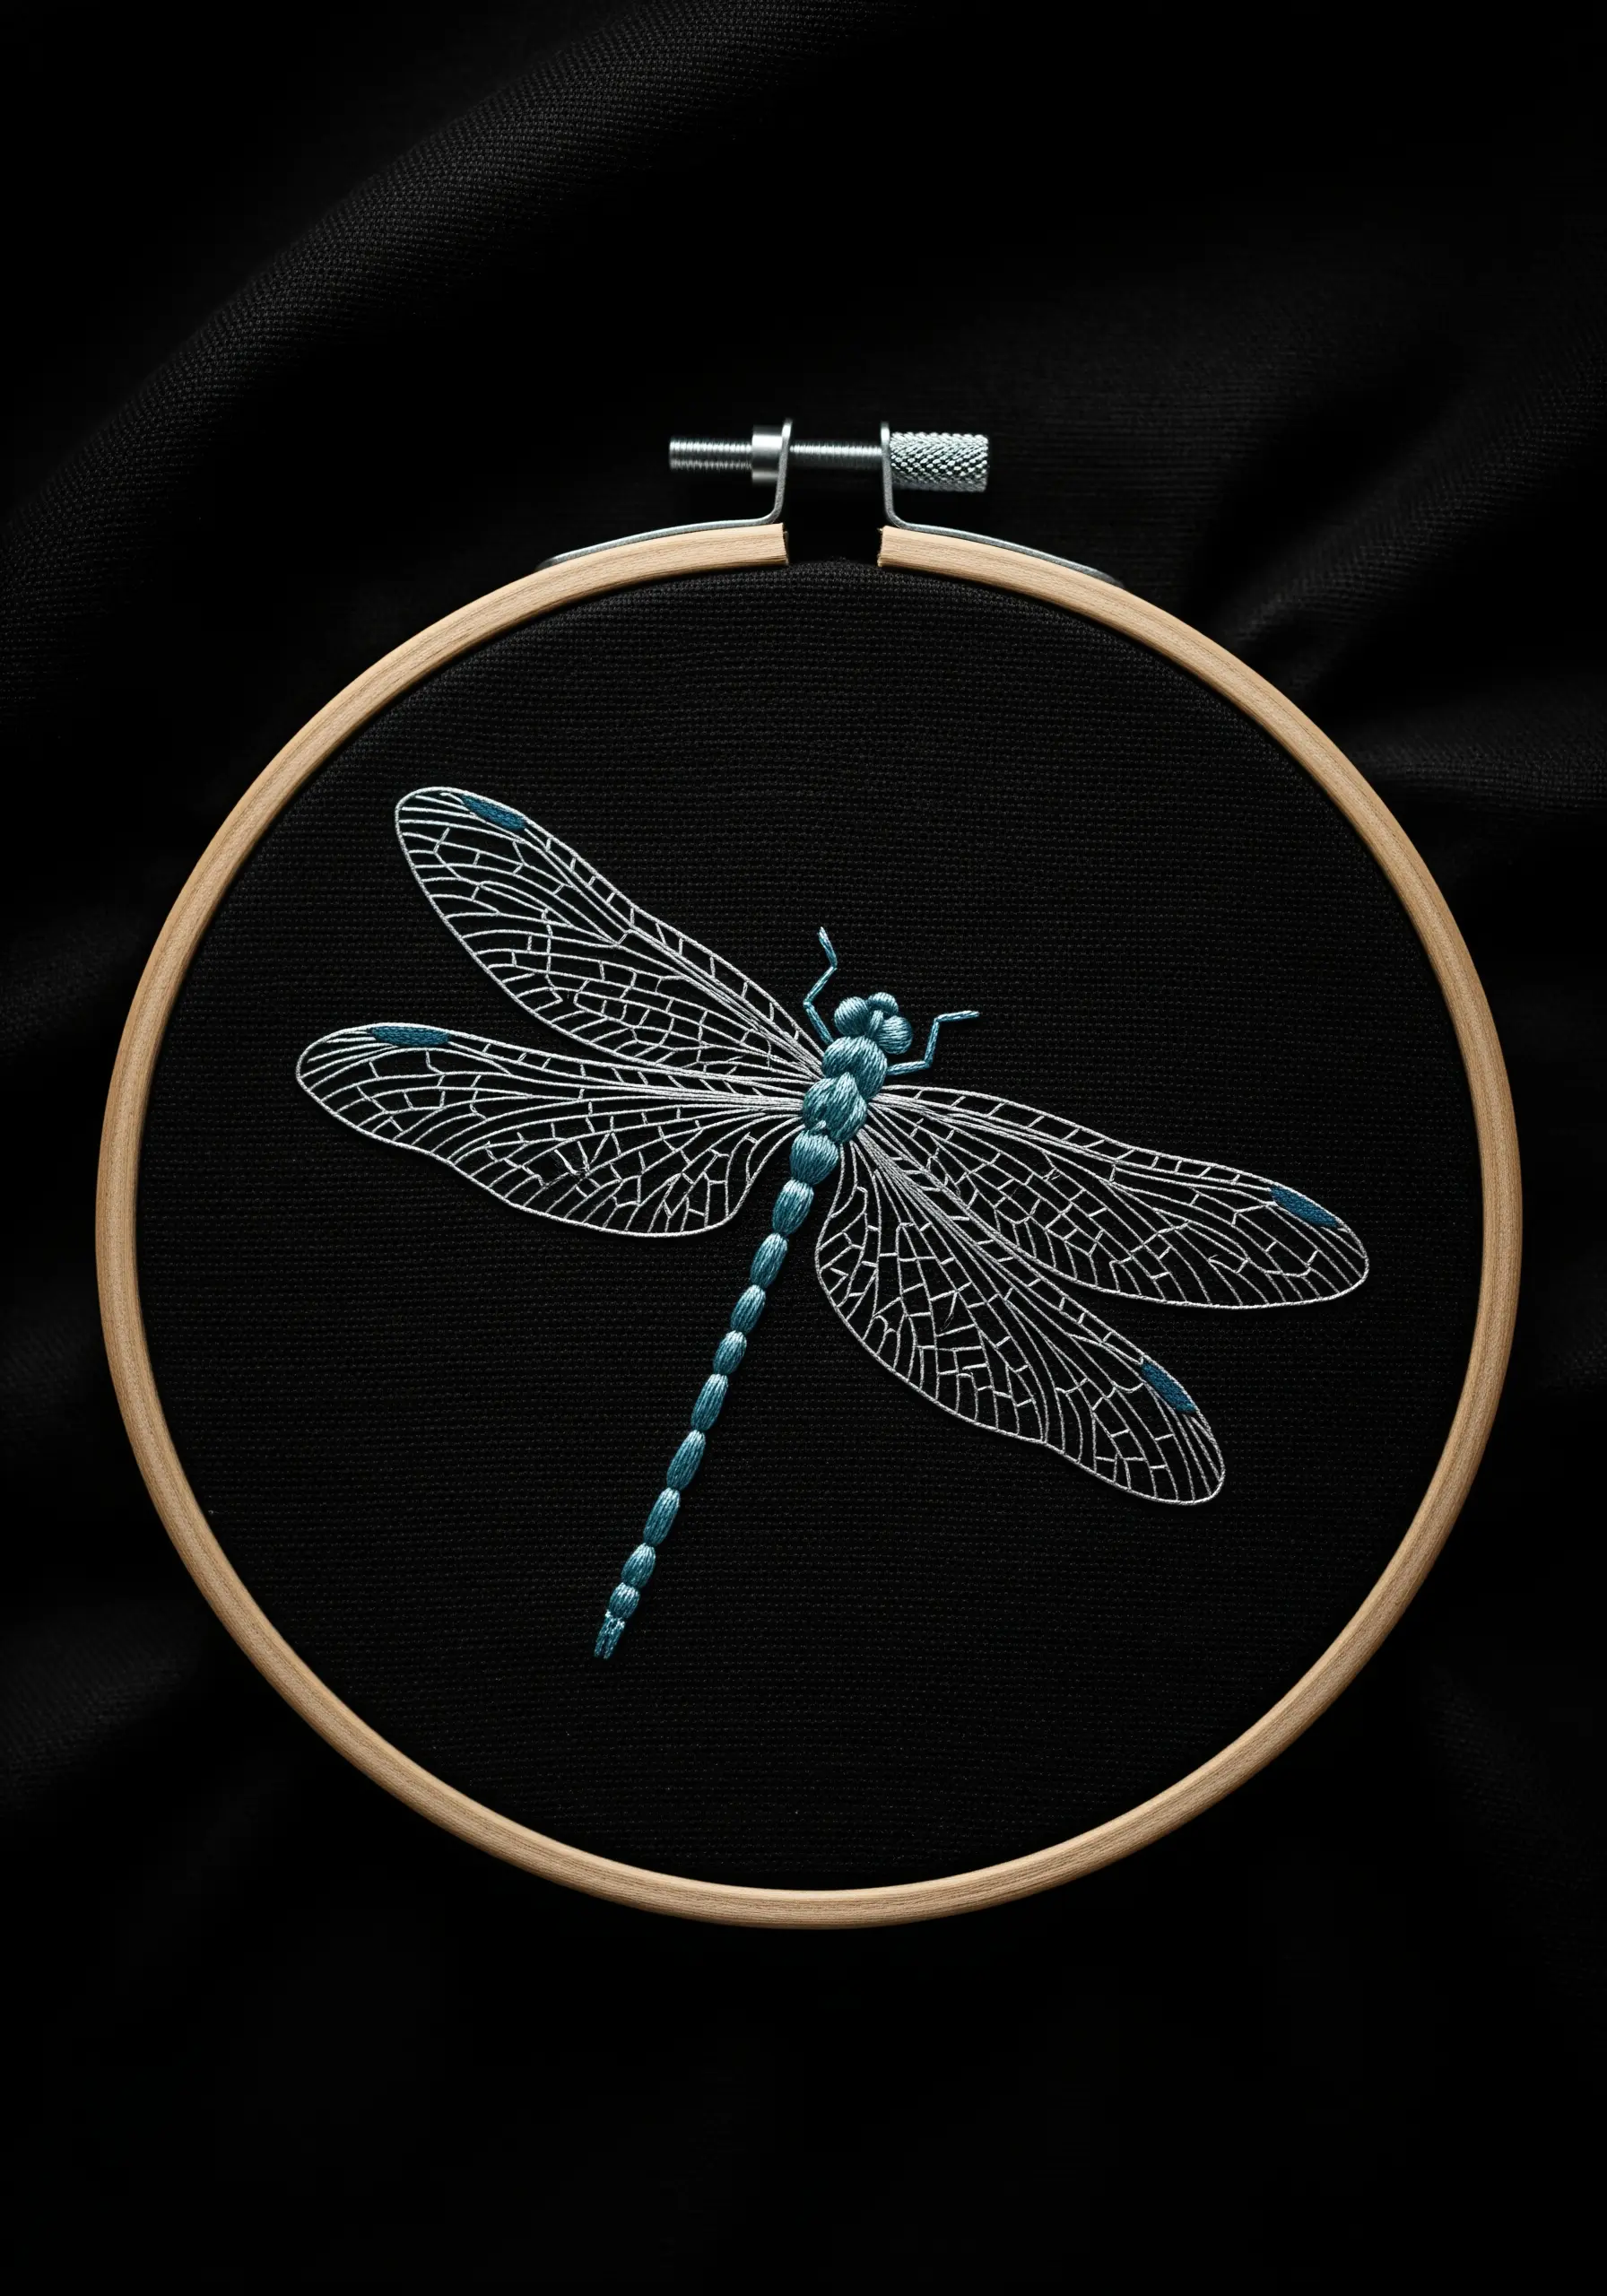
When your subject is as delicate as a dragonfly’s wings, your thread choice matters immensely.
Use only a single strand of embroidery floss. While it requires more patience, the result is an incredibly fine, crisp line that mimics the intricate veining of the wings perfectly.
Stitching with a light, iridescent, or metallic thread on a black background creates a dramatic, high-contrast effect, making the delicate details the undisputed star of the piece.
This technique is essential for minimalist stitch designs that fit in the palm of your hand.
29. Create Depth with Overlapping Shapes

To build a convincing scene like a pond of water lilies, you need to create a sense of perspective.
The key is layering. Stitch the elements that are furthest away first (like the dark blue water). Then, add the lily pads, allowing some to slightly overlap others.
Finally, stitch the flowers on top of the pads. This simple sequence of overlapping satin-stitched shapes instantly creates depth, making the scene feel lush and immersive.
These floral stitch wall art patterns can transform a room’s atmosphere.
30. Achieve Smoother Outlines with Split Stitch
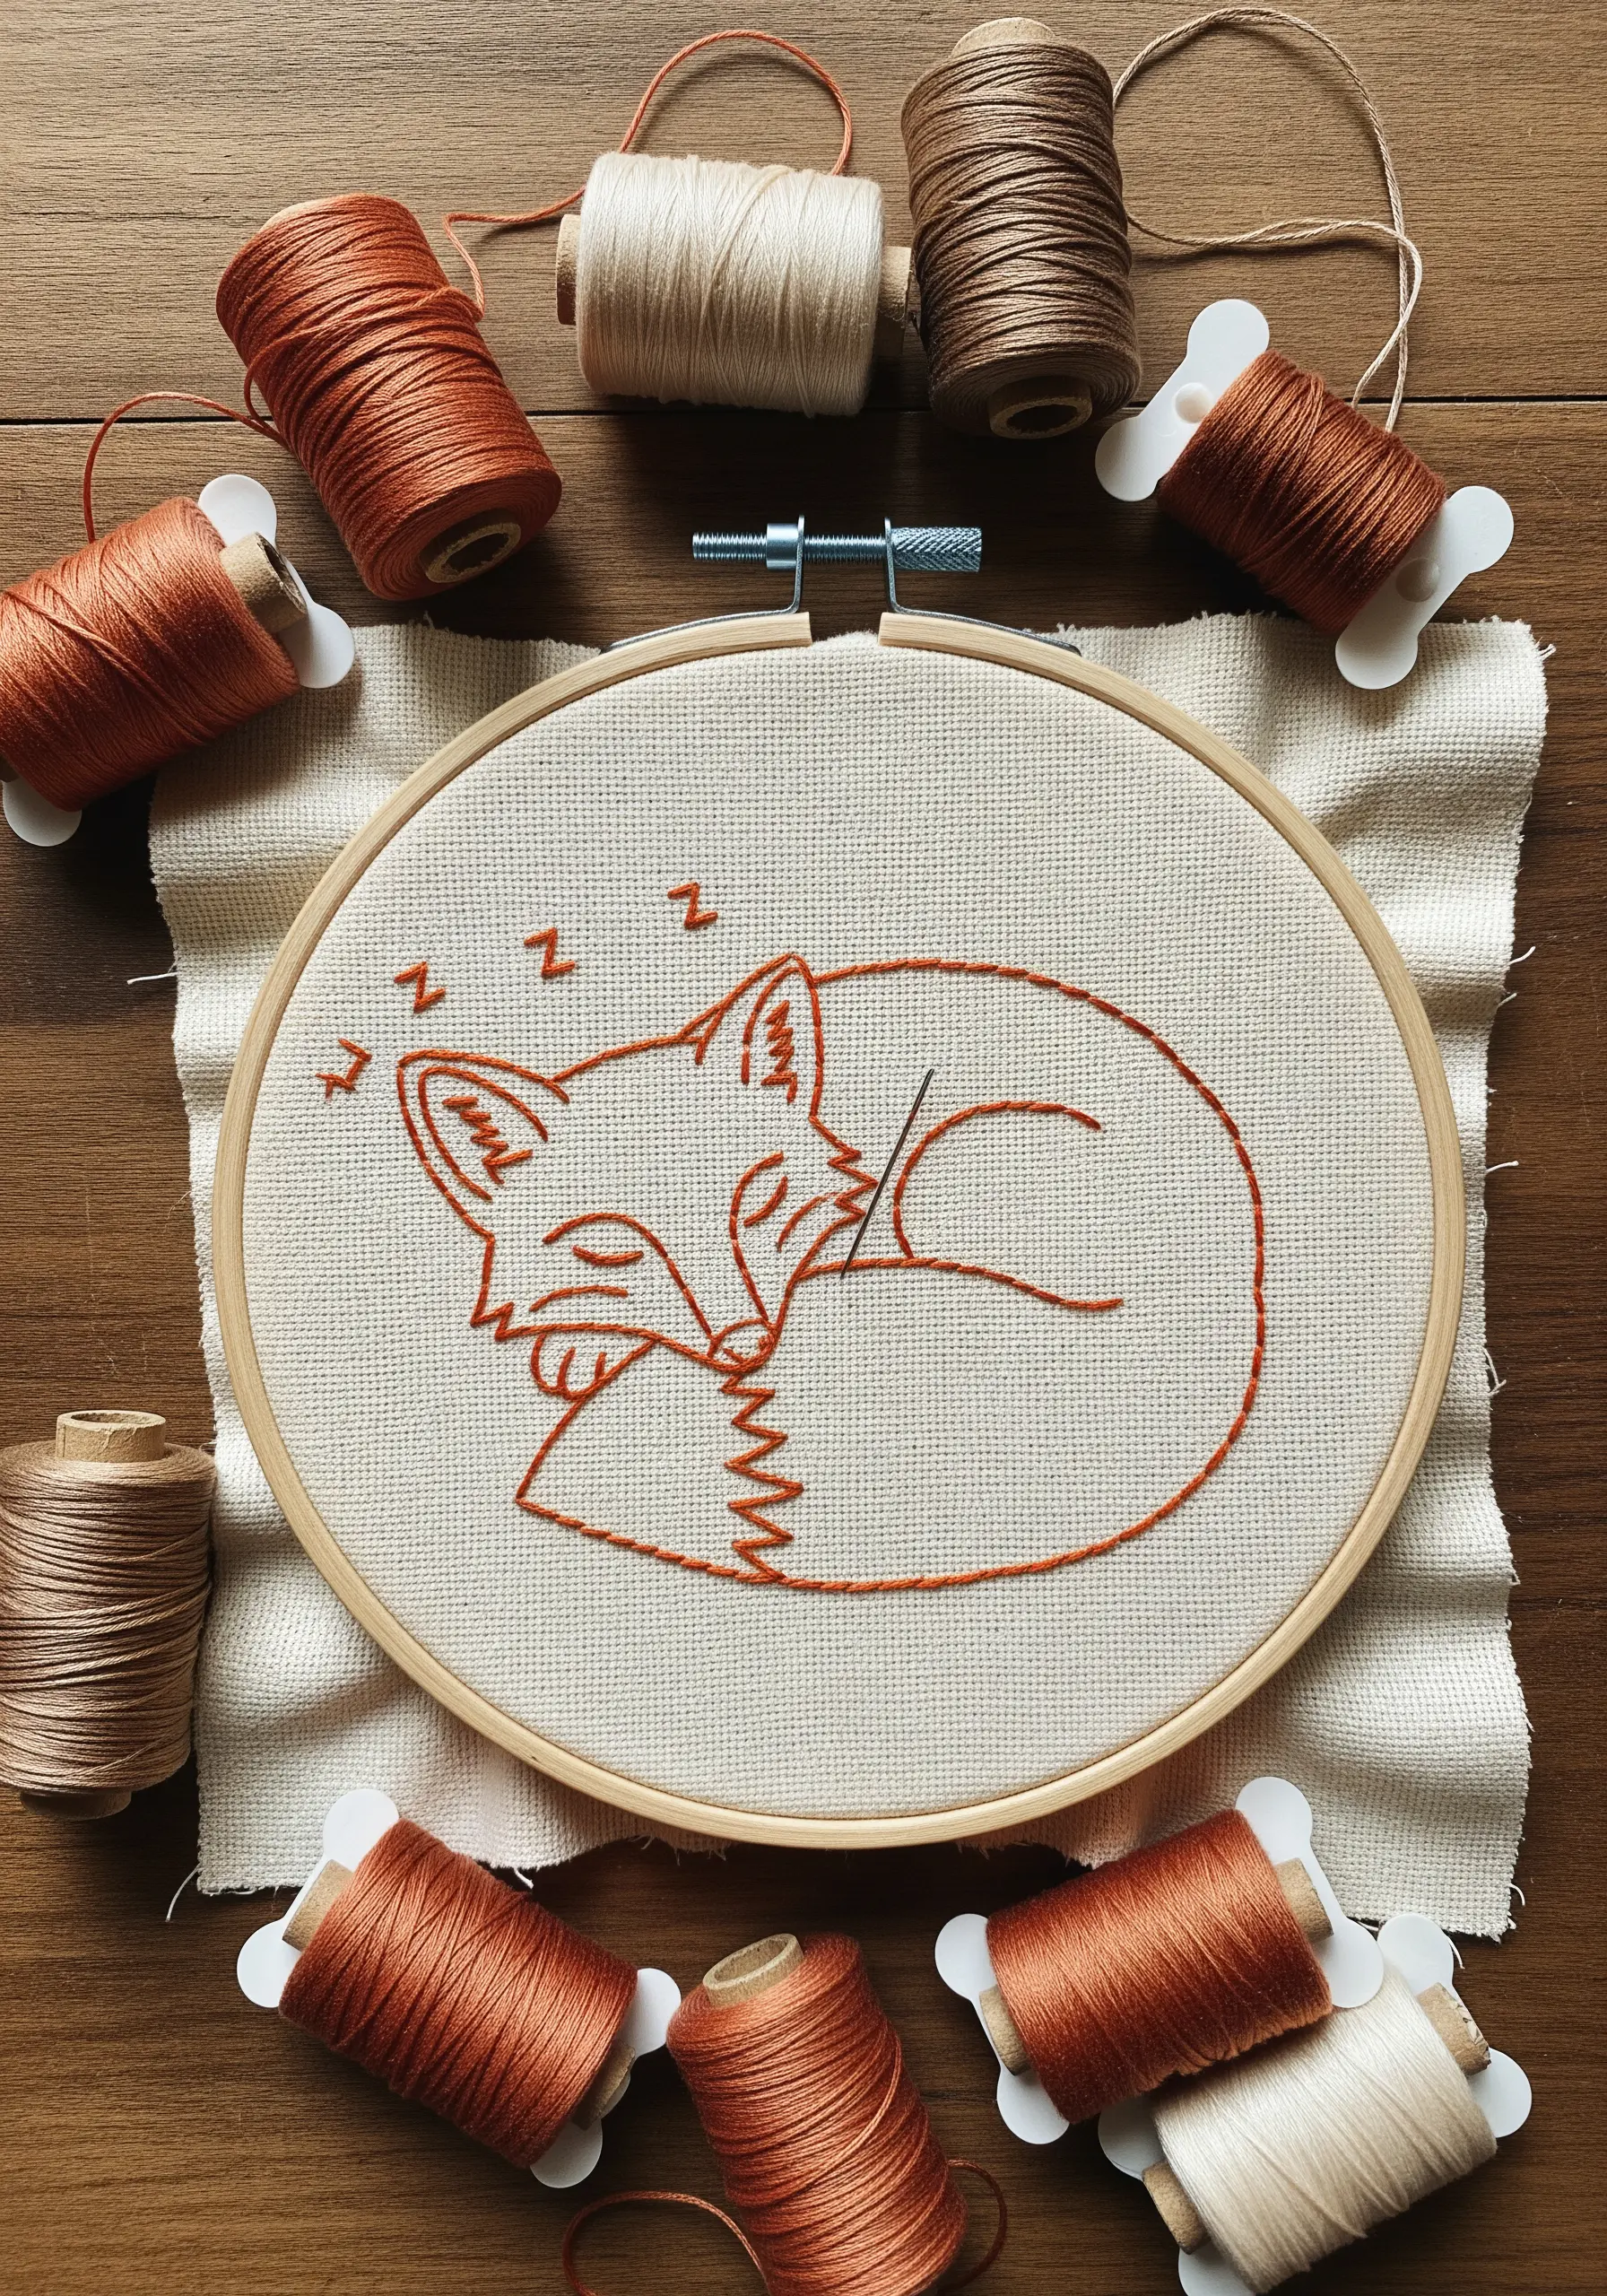
If you find your backstitch outlines look a bit disjointed or ‘dotted,’ switch to the split stitch for a smoother, more fluid line.
With a split stitch, your needle comes up through the middle of the previous stitch, effectively creating a continuous, solid line that looks more like a stroke of ink.
It’s the perfect choice for minimalist line art, like this sleeping fox, where the quality and flow of the outline is the entire focus of the piece.
This is a great technique for fox & deer embroidery patterns where a clean silhouette is key.
31. Stitch Natural Grass with Varied Angles

To embroider realistic grass, avoid making all your stitches perfectly upright and uniform.
Use simple straight stitches, but vary their height, angle, and spacing. Some blades should be short, others tall; some should lean left, others right.
Overlap a few stitches to create a sense of density. This intentional randomness is what makes the final result look like a natural, wild patch of grass rather than a neat row of lines.
It’s a foundational skill for anyone interested in leaf embroidery stitches that turn ordinary tote bags into botanical art.
32. Tell a Story with a Hoop Series
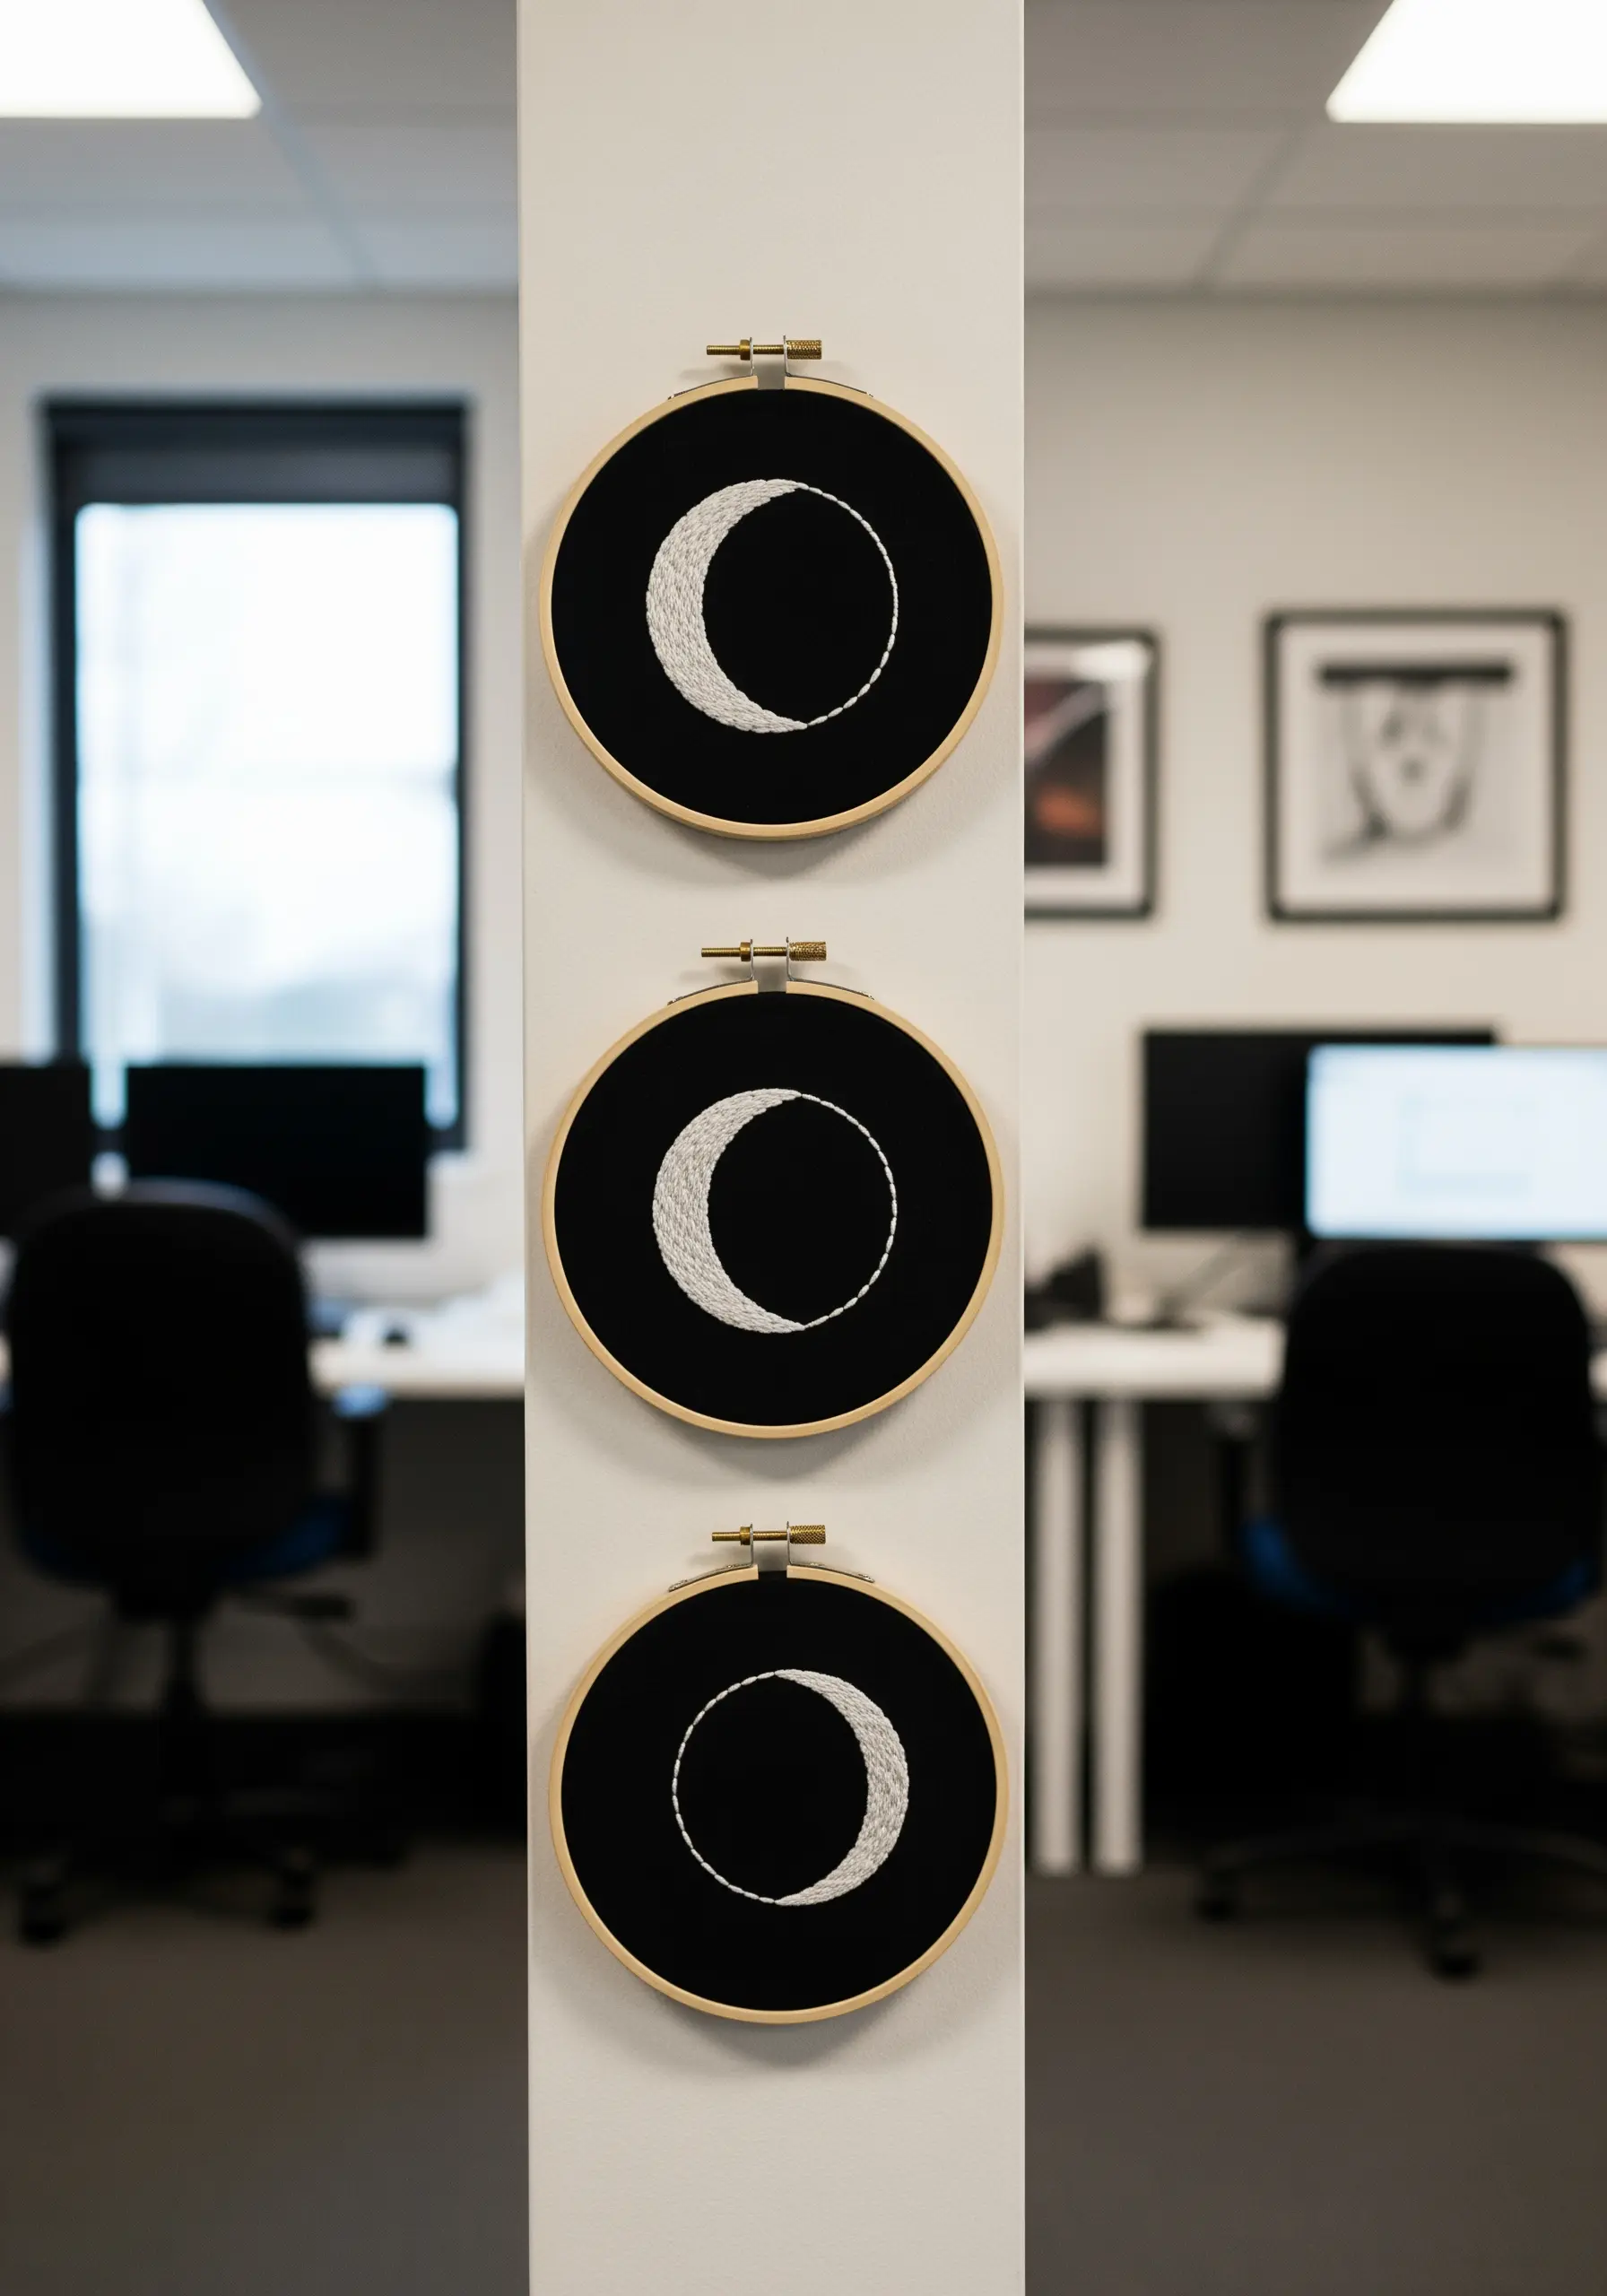
Three hoops are more powerful than one. Grouping your embroidery creates a cohesive art installation with a stronger narrative impact.
For a moon phase series, stitch each phase in a separate, identical hoop. Use the same fabric and thread for all pieces to ensure they feel connected.
When you display them together in a vertical or horizontal line, they represent a cycle and a sense of progression, which is inherently calming and visually satisfying.
It’s a great way to build a circle frame minimal embroidery composition without overwhelming a wall.
33. Play with Light, Shadow, and Sheer Fabric

When you embroider on semi-transparent fabric, the piece itself is only half of the art. The other half is the light that passes through it.
A cherry blossom branch stitched on organza becomes a beautiful suncatcher when hung in a window. The design will cast a delicate, artistic shadow that changes throughout the day.
This transforms your embroidery from a static object into a dynamic piece that interacts with its environment, especially effective in night garden embroidery ideas where light is key.
34. Perfect the Smoothness of Satin Stitch
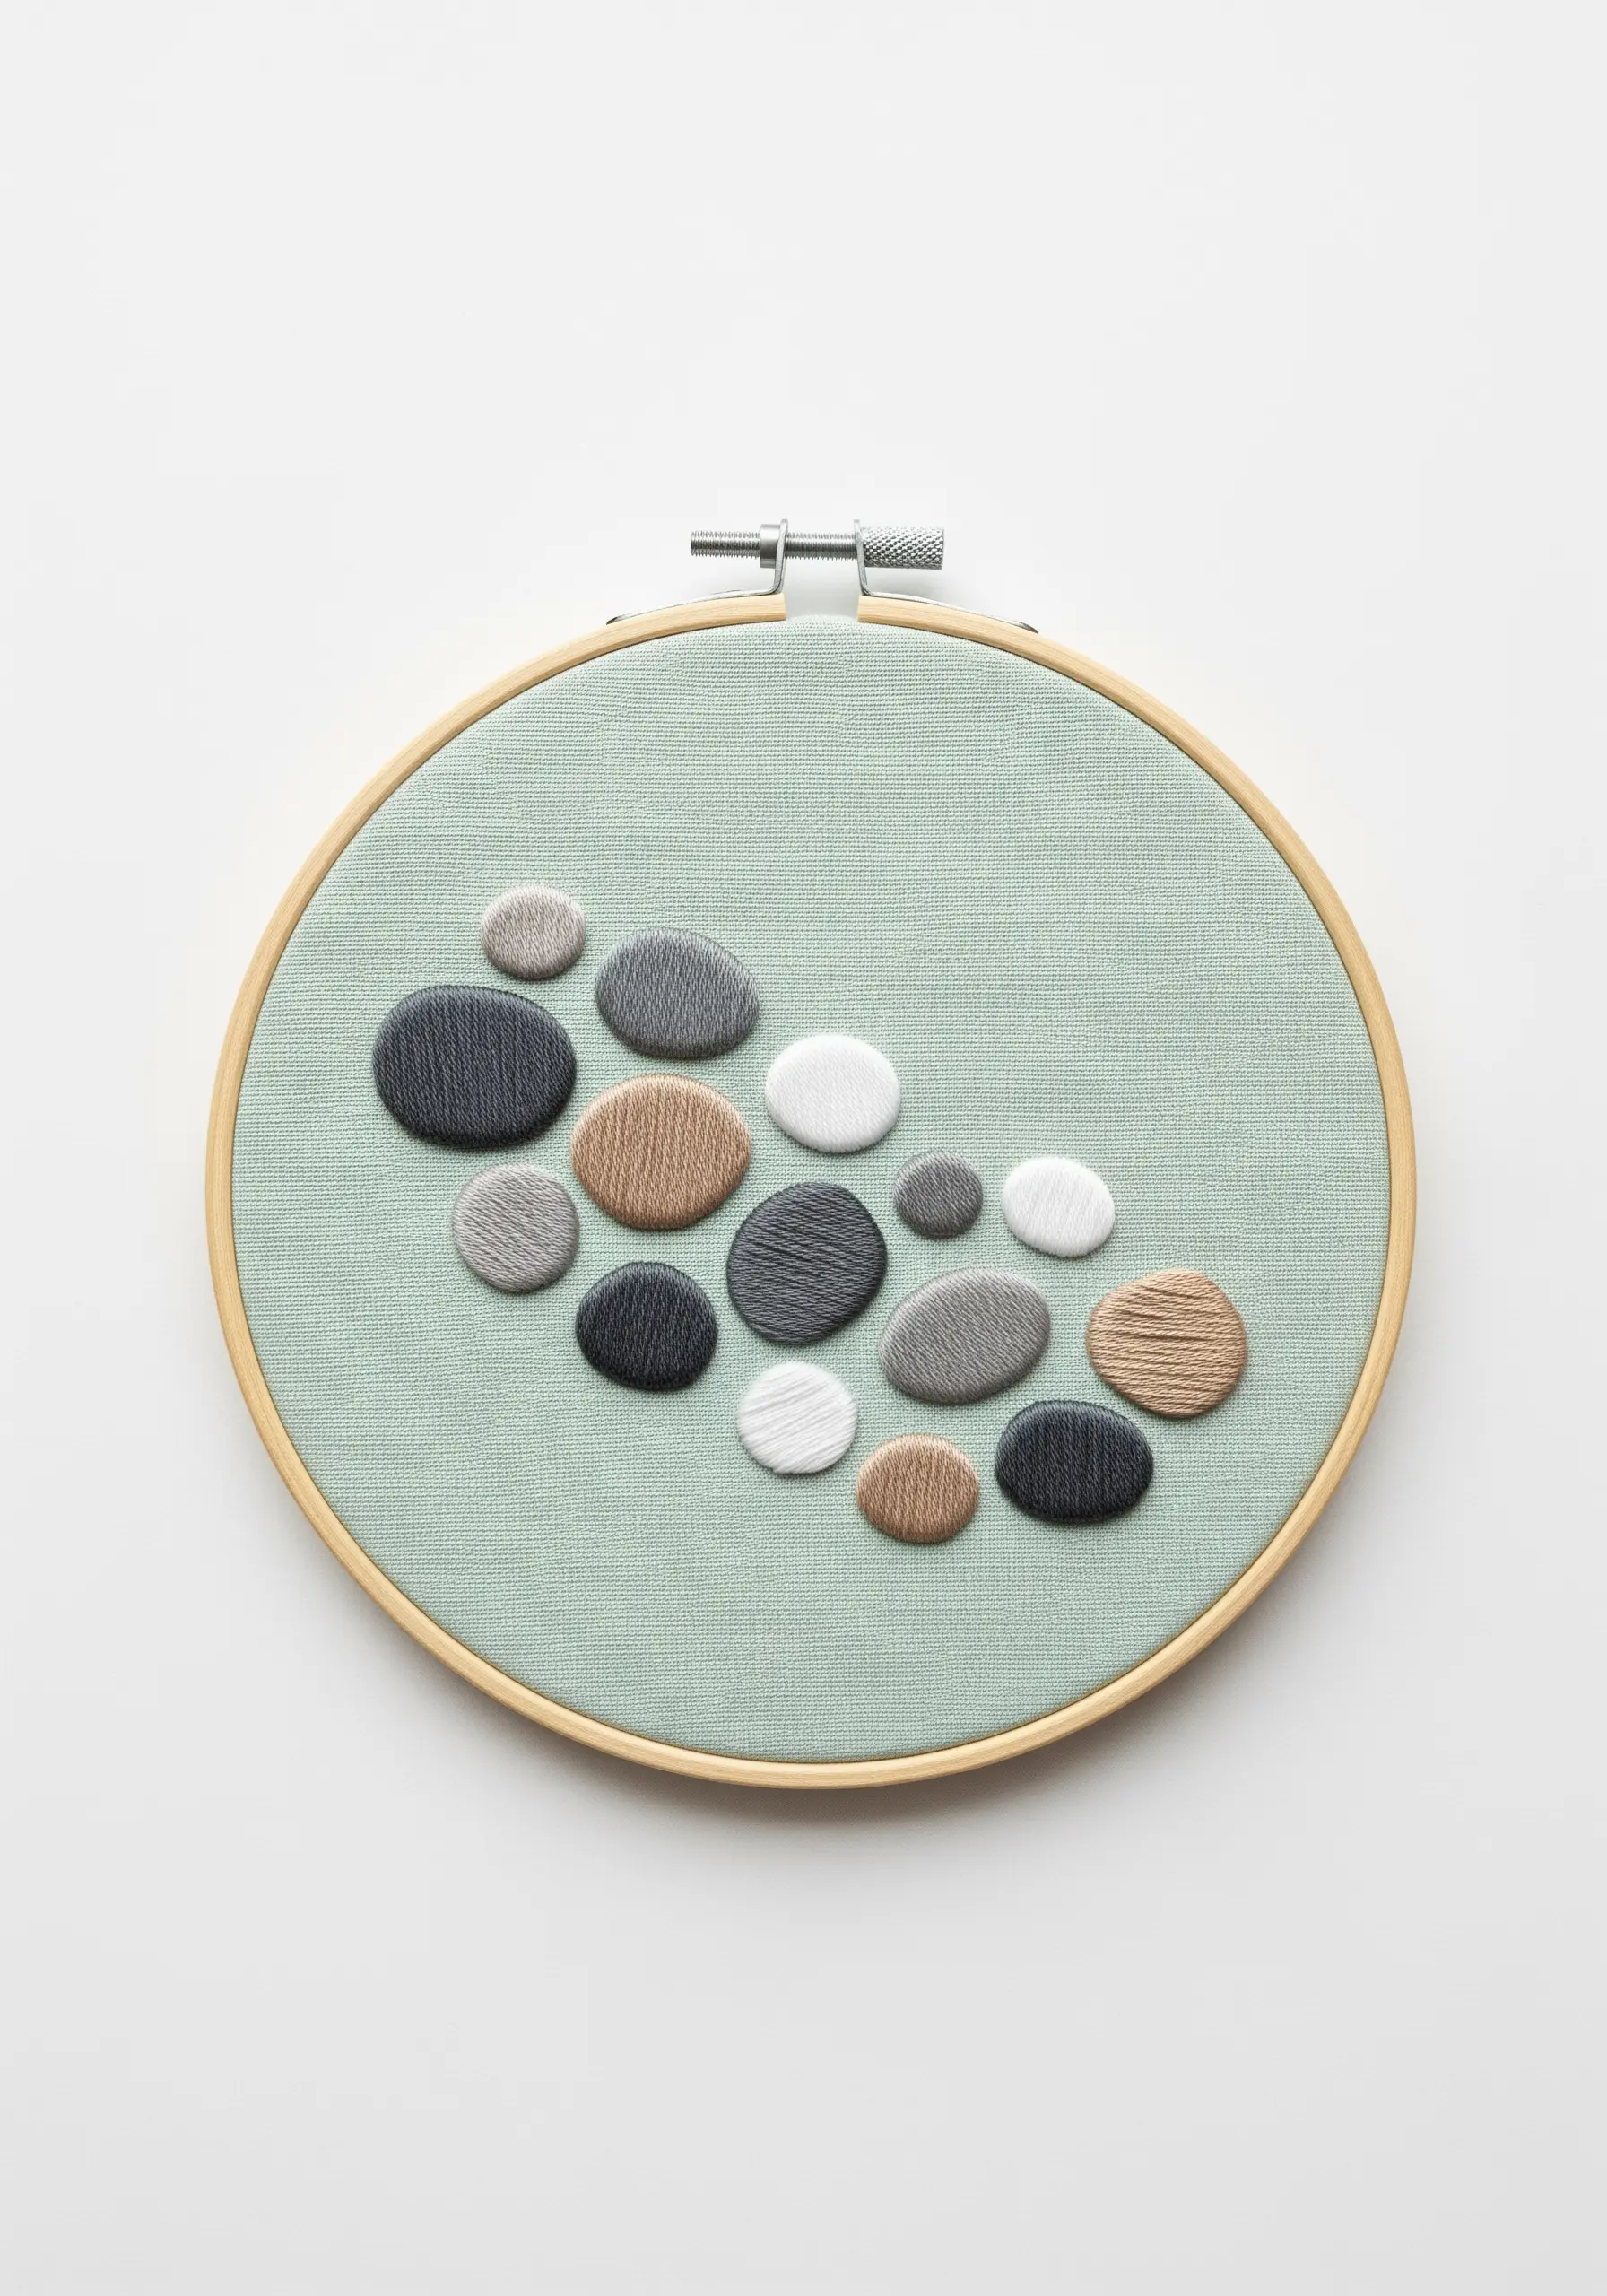
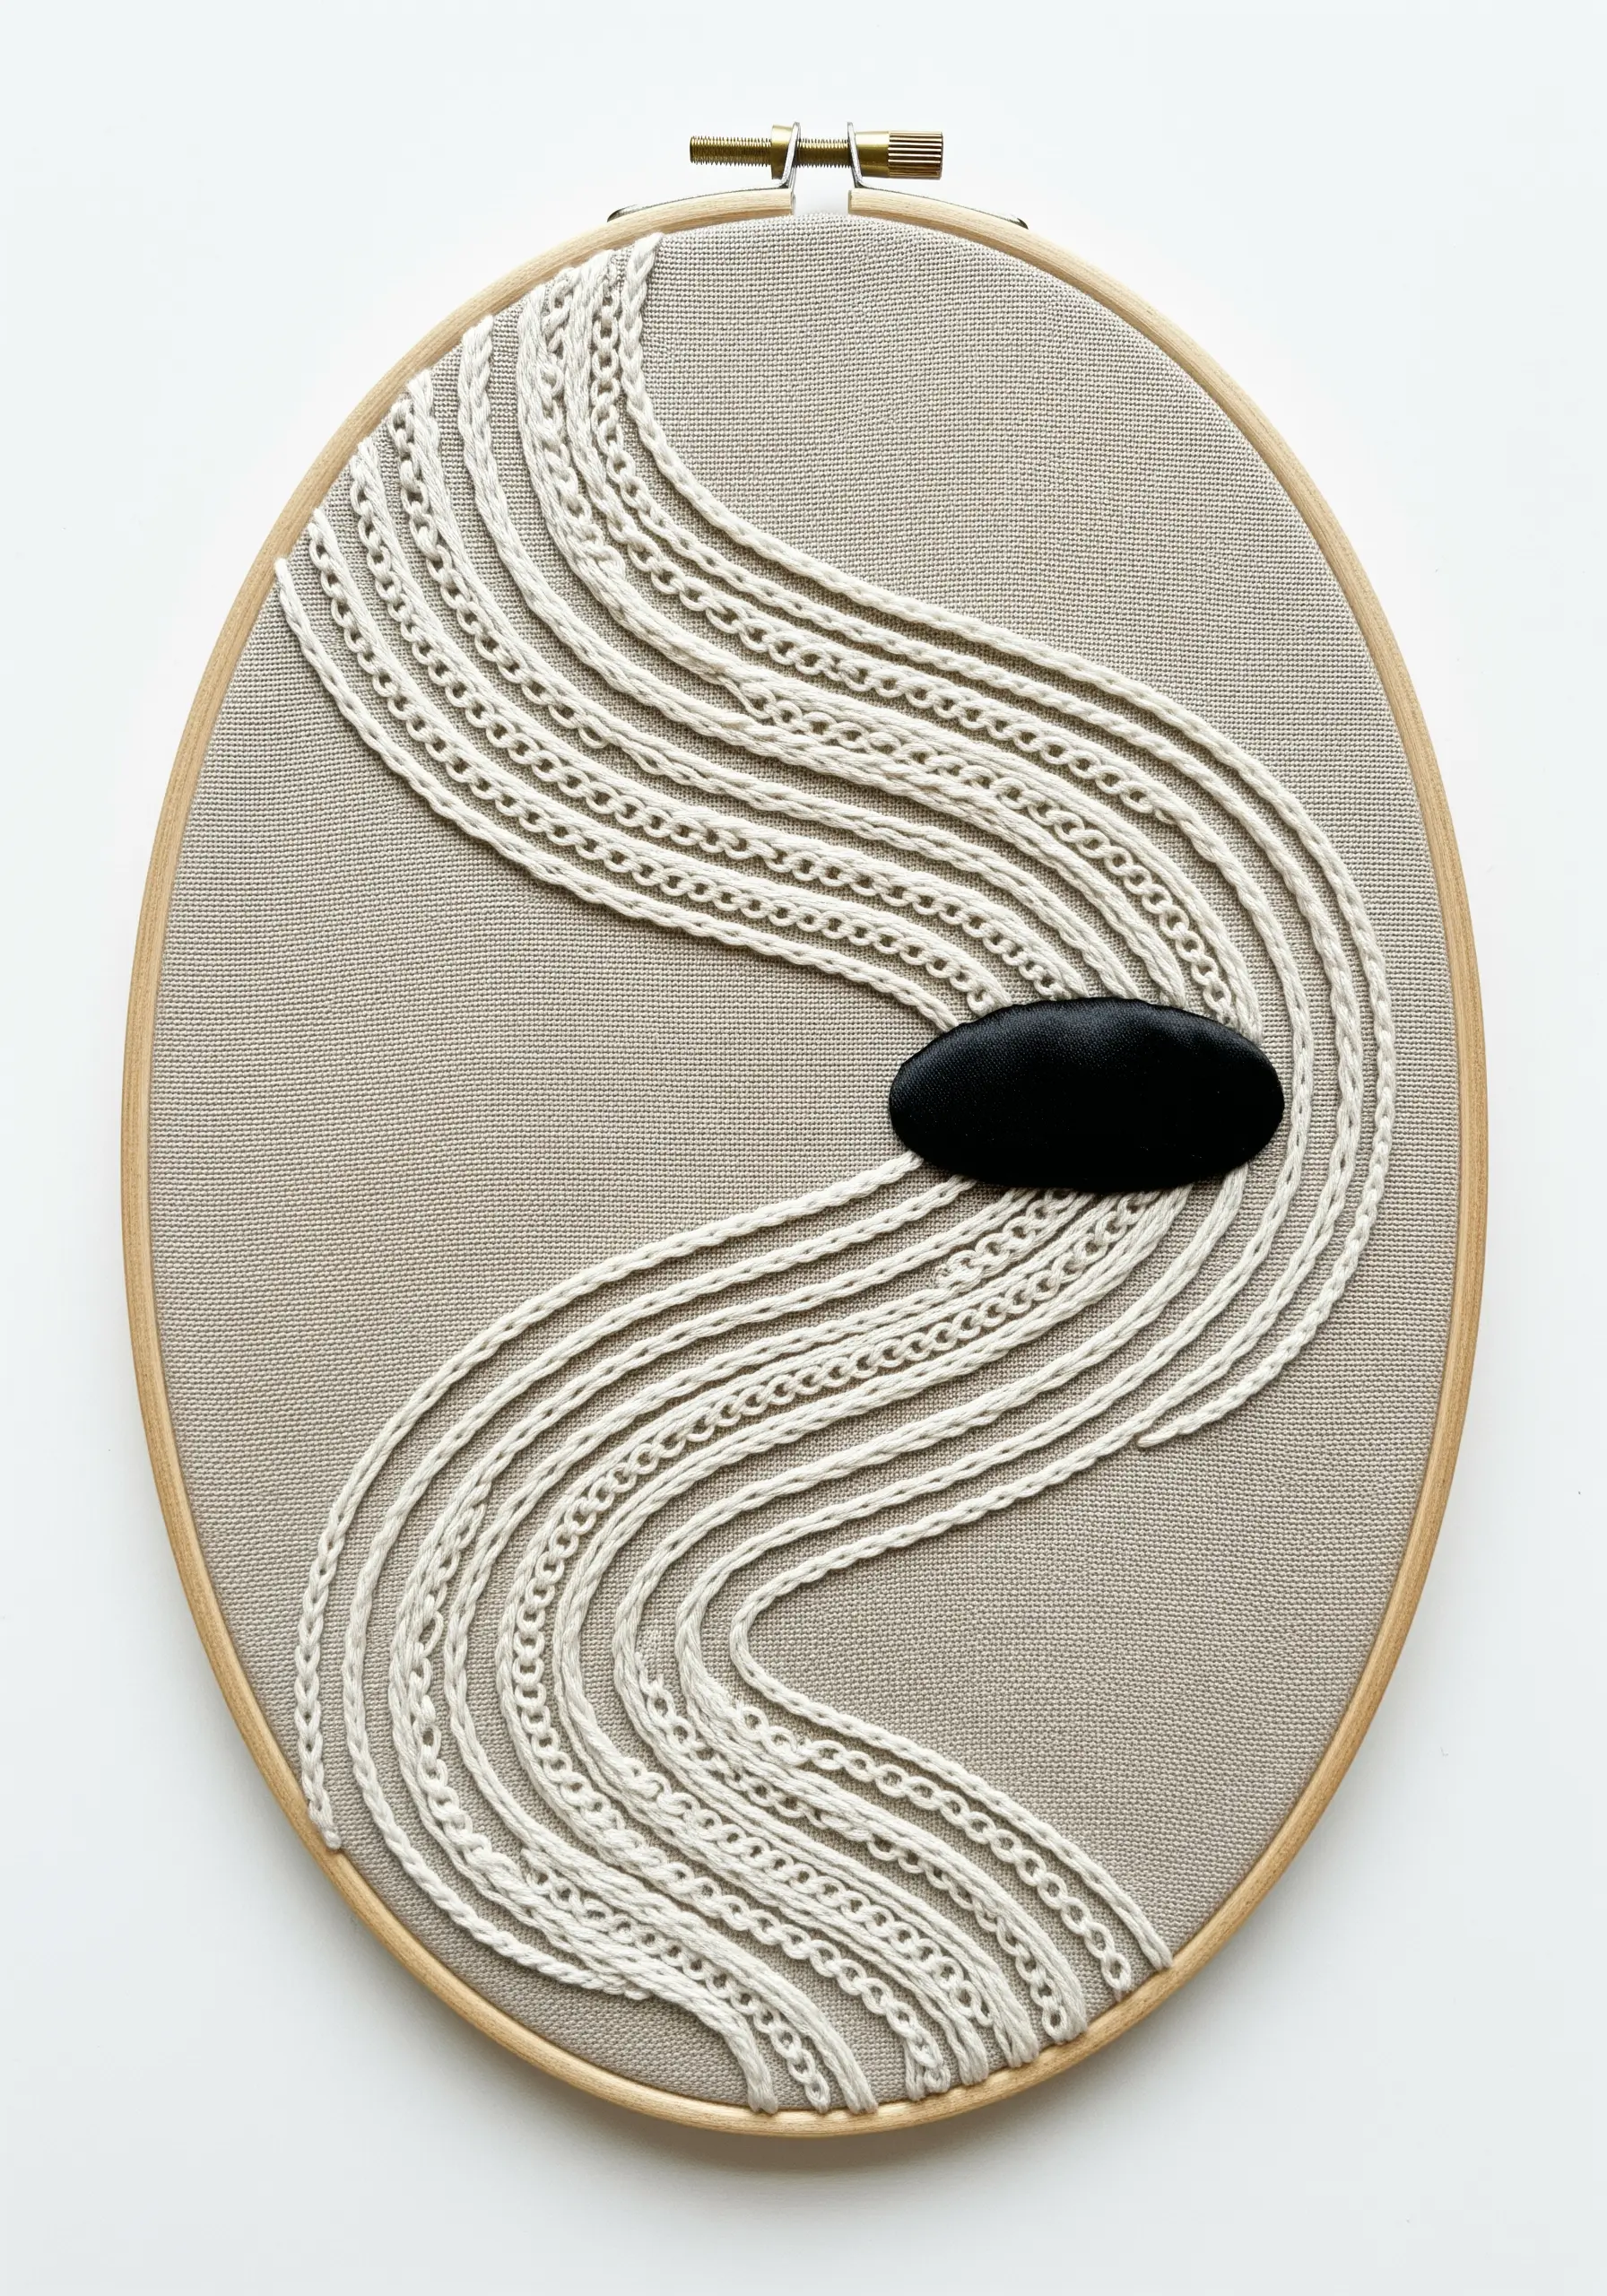
The satin stitch is the key to creating these smooth, serene pebbles. The goal is a surface so flat and even that it shines.
To achieve this, ensure your stitches lie perfectly parallel to each other, with no gaps or overlap. A laying tool or even a larger tapestry needle can help you guide each strand of floss into its precise place.
Use a single, consistent direction for all the stitches within one pebble shape. The smooth, tactile quality is incredibly satisfying and perfect for meditative stitching.
This tone-on-tone embroidery technique is exceptionally beautiful with neutral colors.


