

There is a quiet satisfaction in creating something beautiful and useful with your own hands, especially when it’s a gift meant to be held and cherished.
But often, the gap between the project in your mind and the one in your hands feels vast. It’s not about learning a hundred new stitches, but about mastering a few key details: the weight of a thread, the tension of a stitch, the subtle texture that elevates a simple piece of fabric into a work of art.
These projects are your invitation to focus on that refinement. Each one is a quick, thoughtful gift, but more importantly, a chance to practice the techniques that create a polished, intentional finish. Let’s make something that feels as good to give as it does to create.
1. Embroider a Delicate Botanical Bookmark
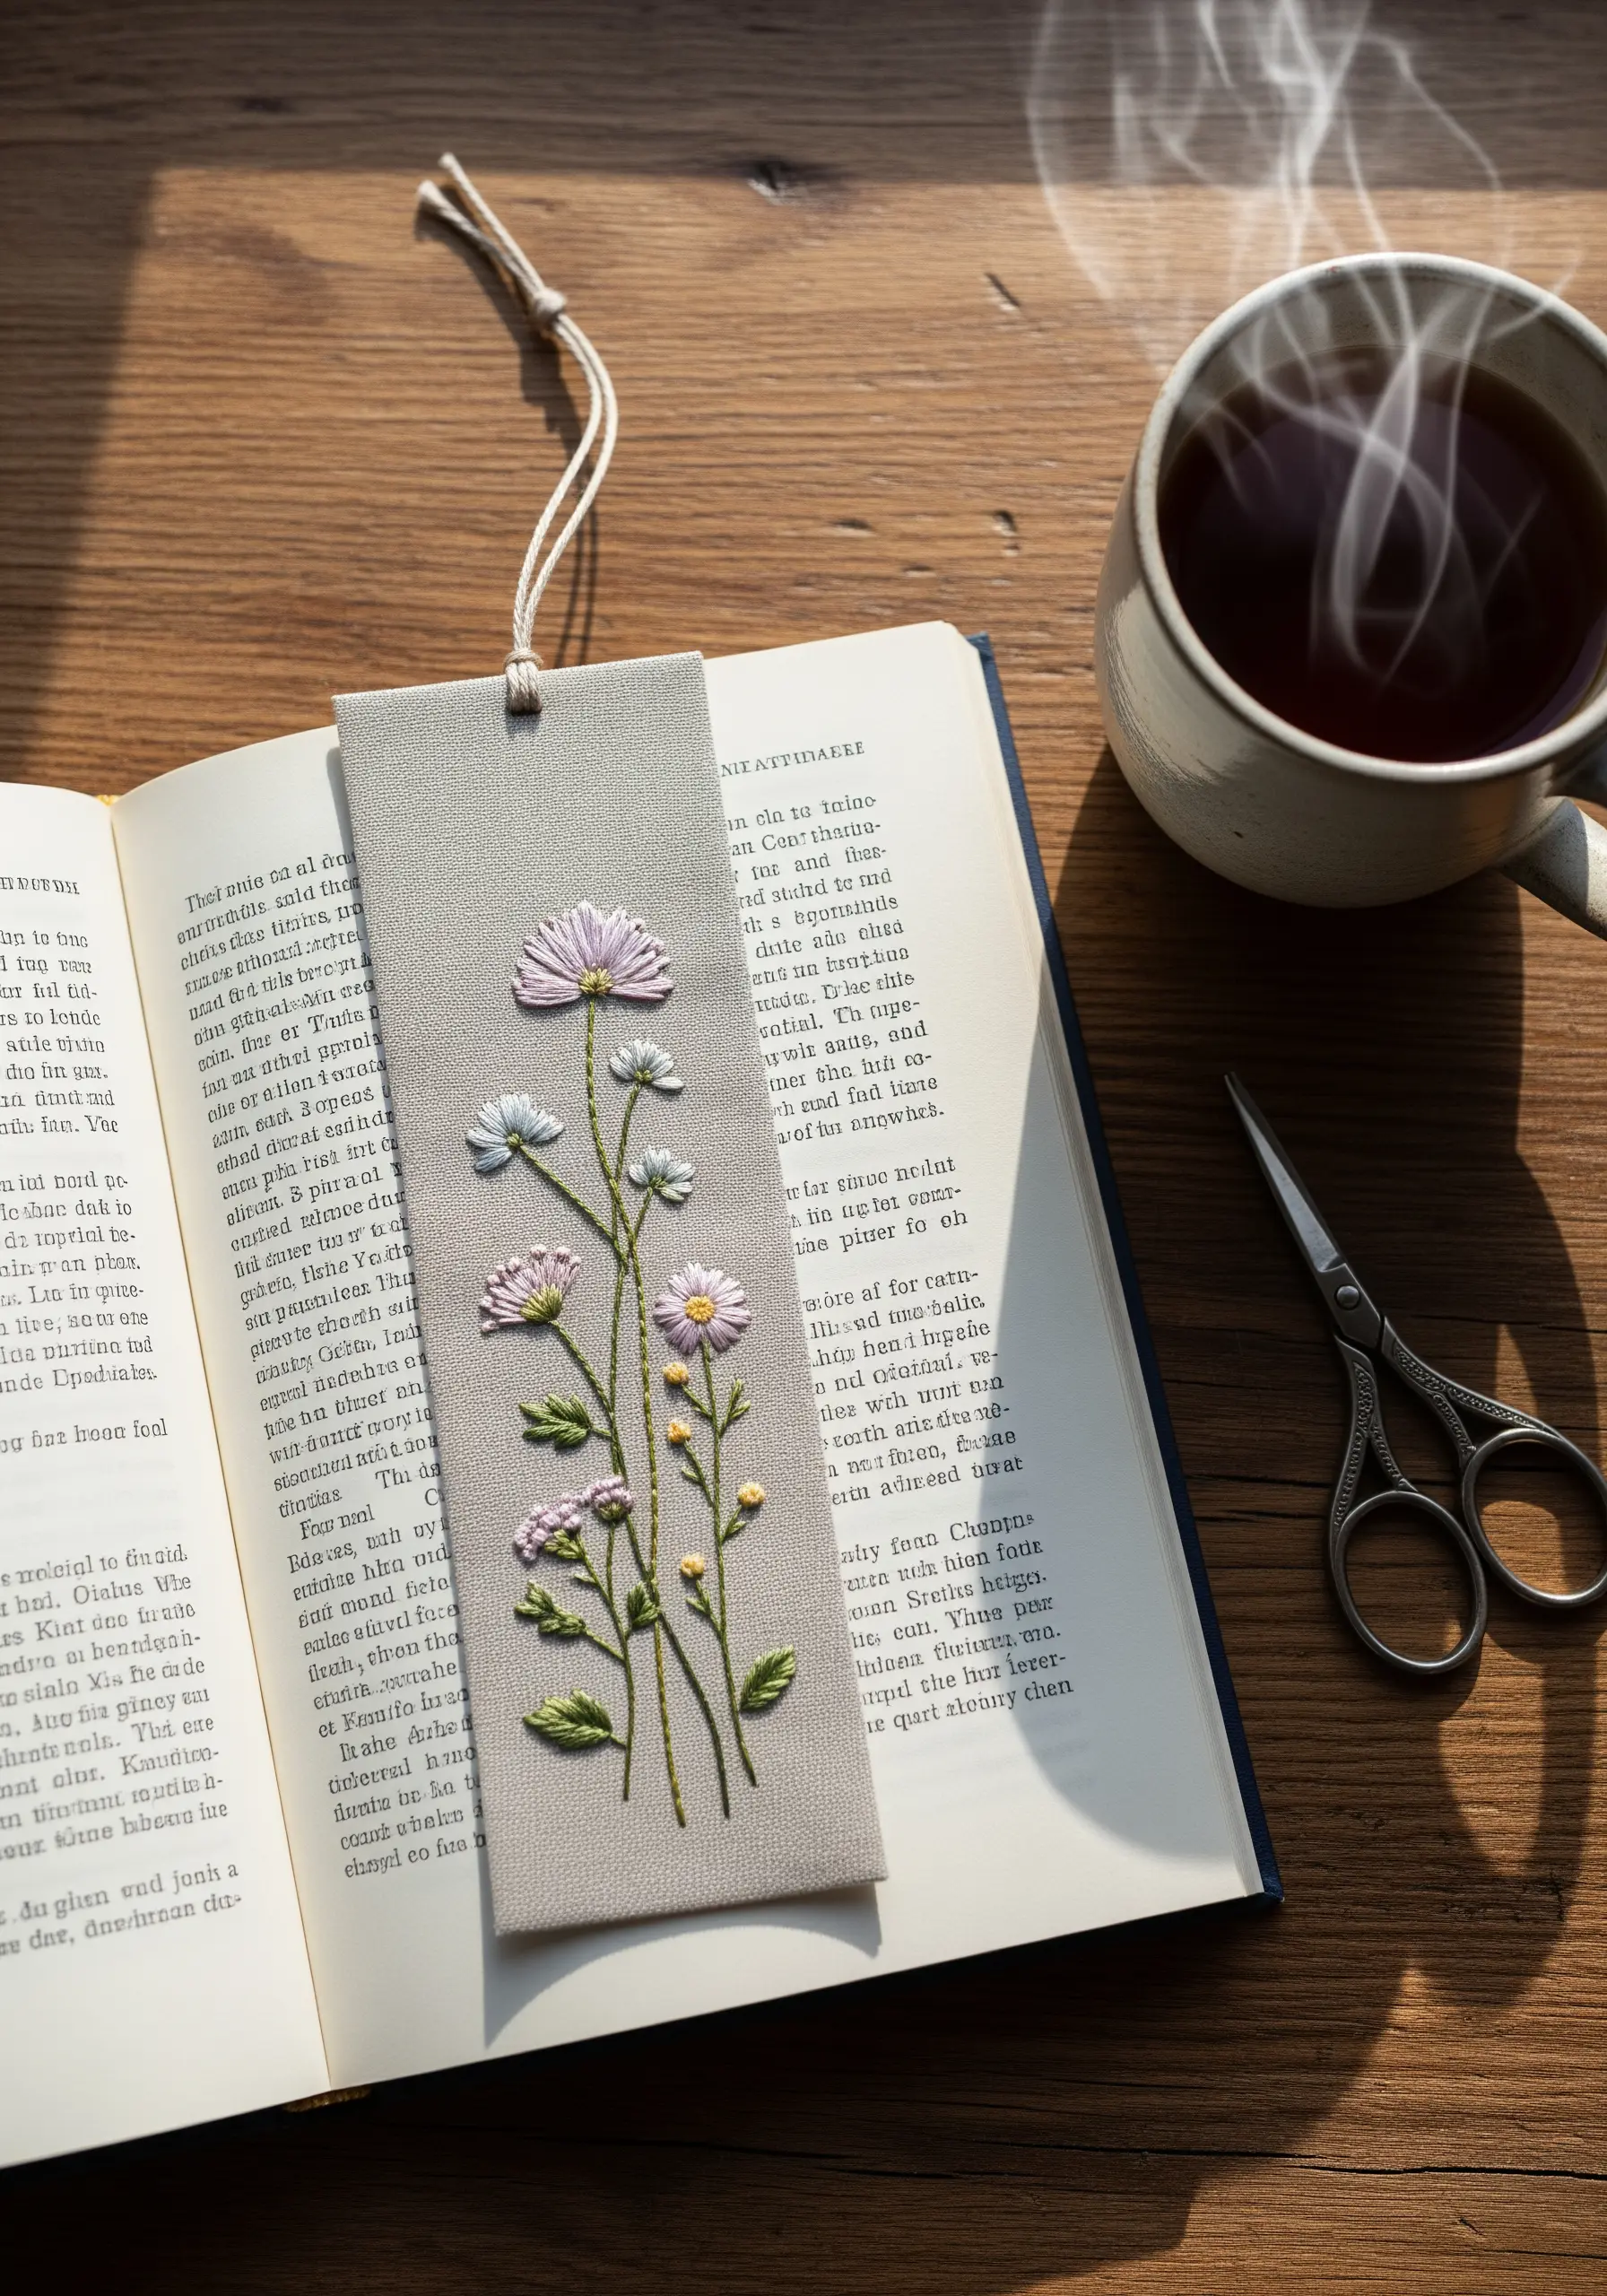
For a project this small and detailed, choose a single strand of six-strand embroidery floss.
This simple adjustment is the key to achieving fine, elegant lines that don’t overwhelm the delicate composition.
Use a stem stitch for the stalks and lazy daisy stitches for the petals, keeping your tension even but not tight.
Stitching on a non-woven material like felt or faux leather provides stability without needing a hoop, making it a perfect quick-finish gift.
2. Add Hand-Stitched Details to Quilted Coasters
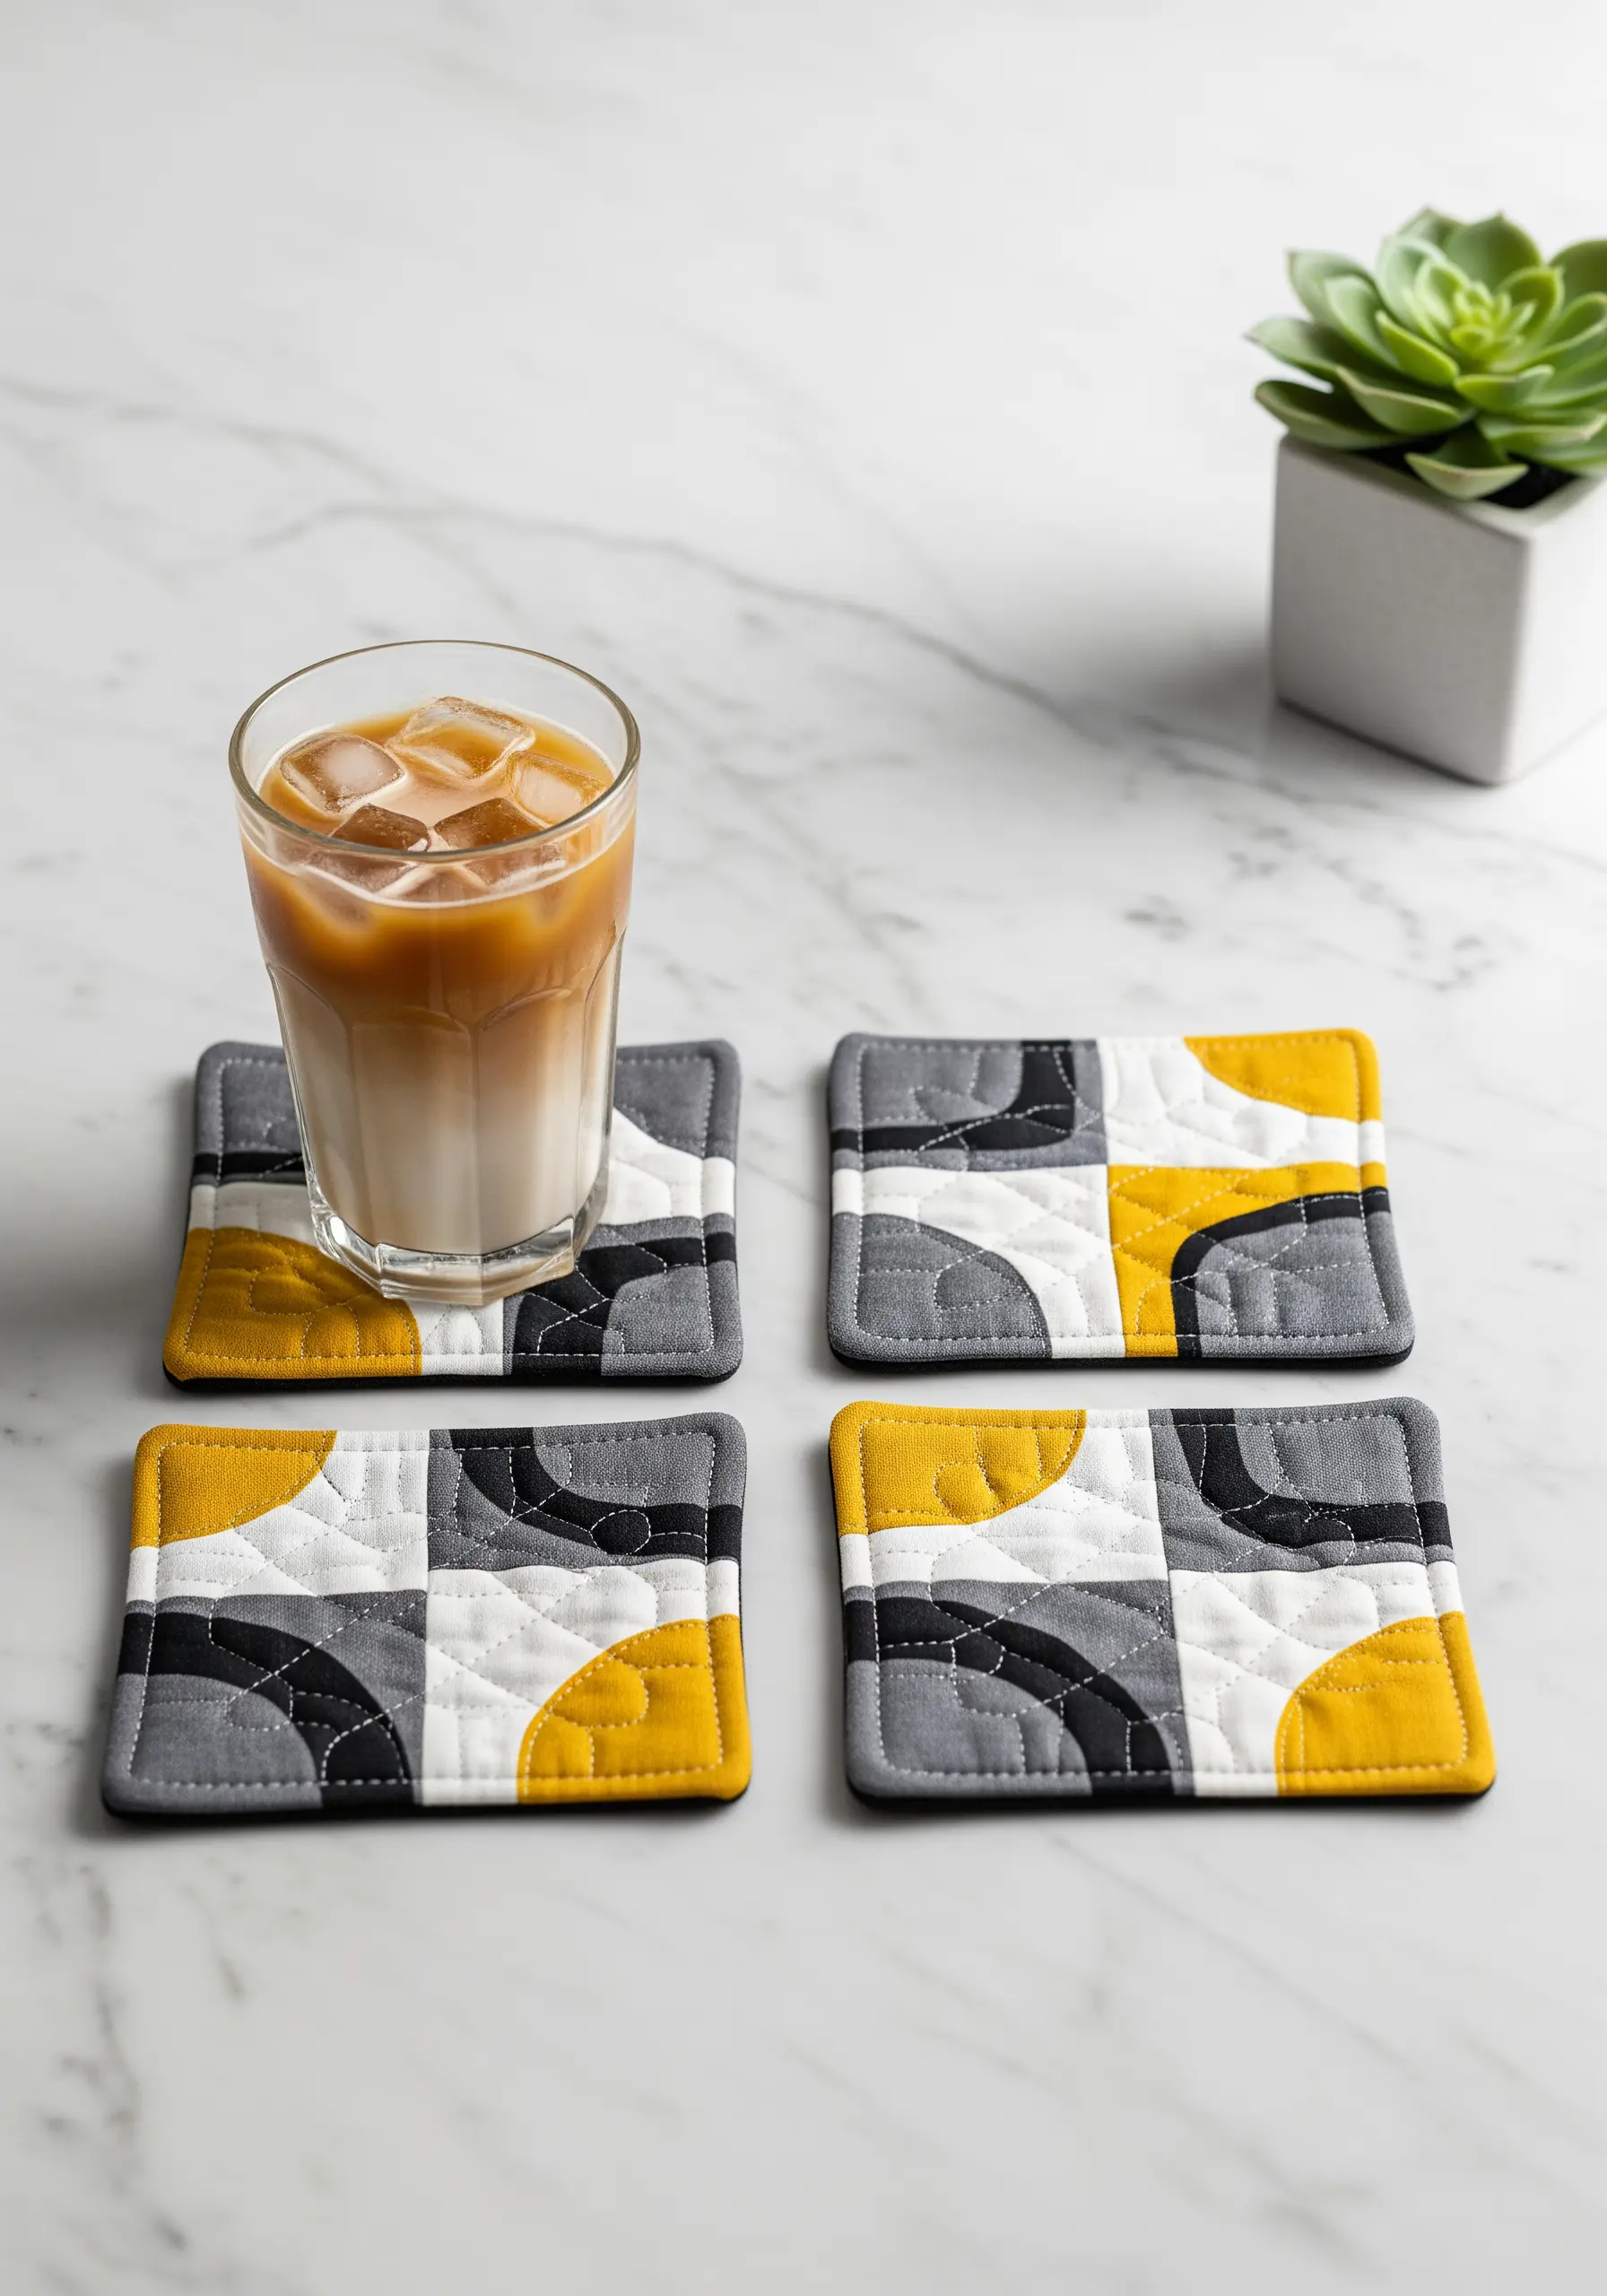
Even if a project is primarily machine-sewn, a final hand-stitched detail adds a layer of artistry and care.
After quilting your coasters, use a contrasting pearl cotton thread to add a decorative running stitch just inside the binding.
This technique, borrowed from Japanese Sashiko, not only adds visual interest but also emphasizes the handmade quality of the gift.
It frames the geometric pattern and introduces a soft, tactile element that contrasts beautifully with the crisp patchwork.
3. Create Celestial Patterns with Metallic Thread
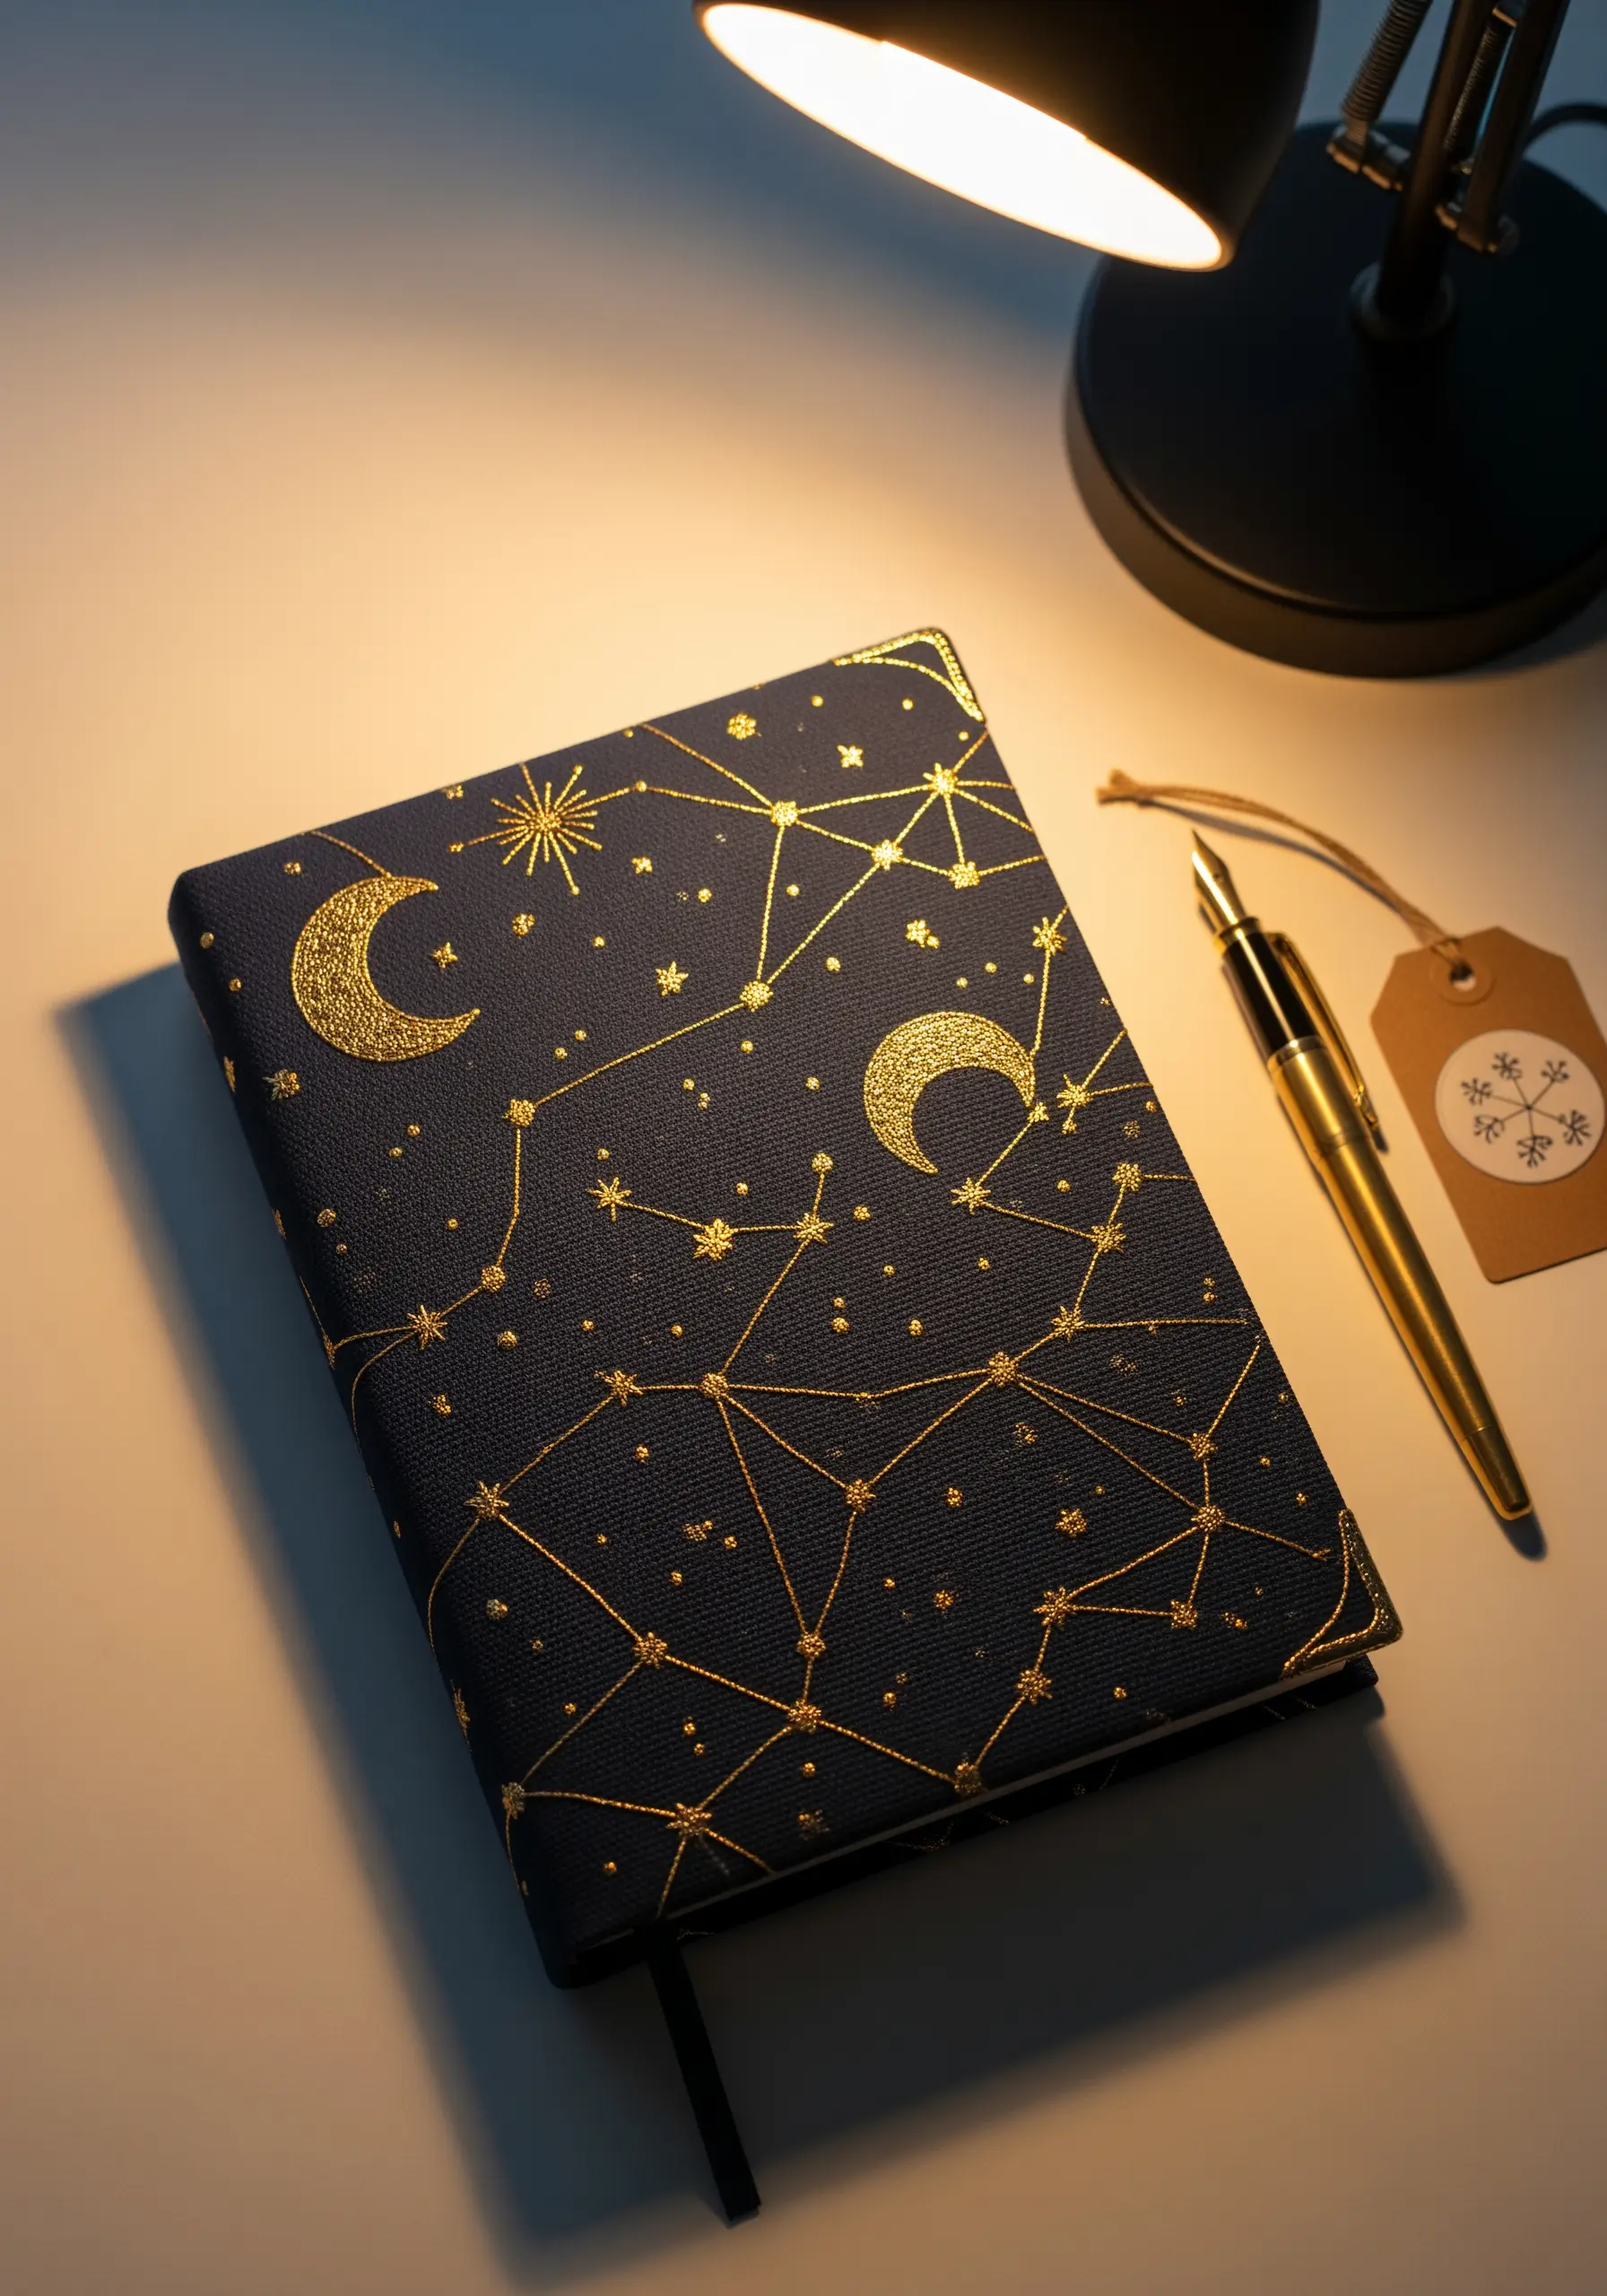
Working with metallic thread can be challenging, but the result is unmatched for adding a touch of magic to dark fabrics.
To prevent fraying and tangling, cut your thread into shorter lengths—no more than 12-14 inches.
Use a thread conditioner or beeswax to help it glide through the fabric smoothly.
For a journal cover, a simple backstitch or tiny seed stitches are all you need to map out constellations that shimmer under the light, turning a simple notebook into a personal treasure.
4. Elevate Felt Appliqué with Outline Stitching
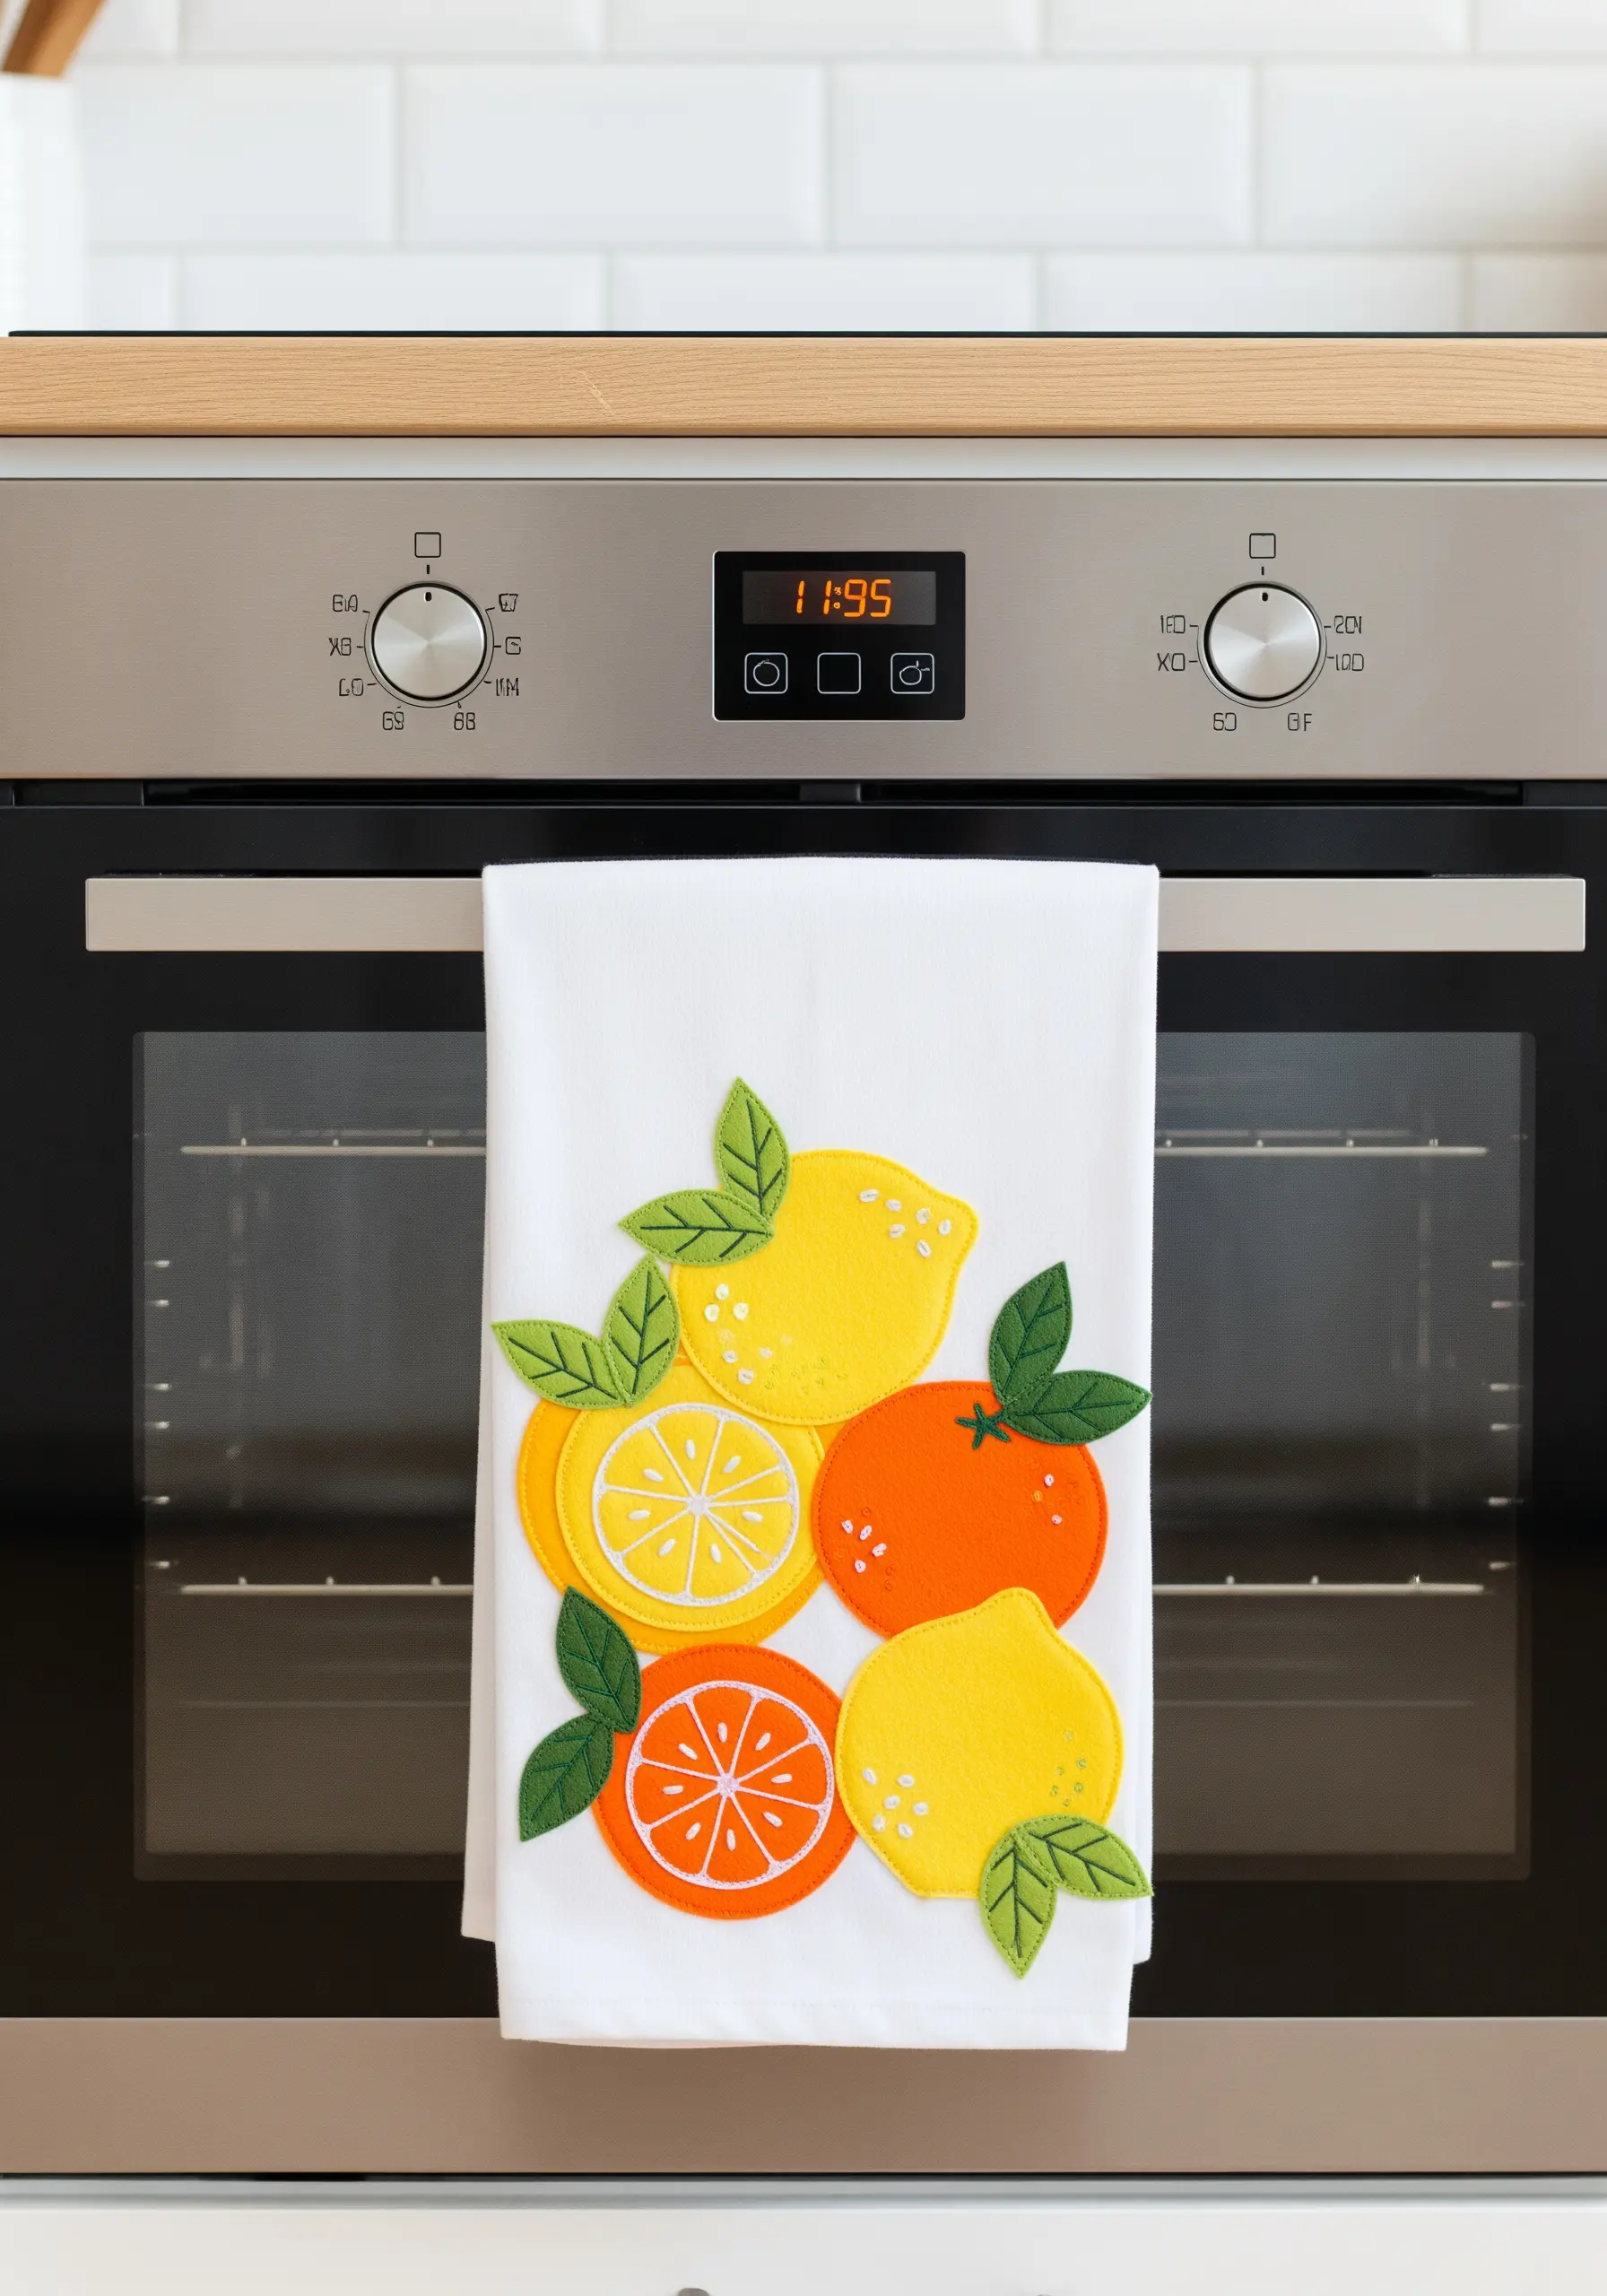
Give your felt appliqué pieces a clean, graphic finish by outlining them with simple embroidery stitches.
Instead of relying on fabric glue alone, secure your felt shapes with a backstitch or chain stitch in a contrasting color.
This not only makes the piece more durable but also turns the stitching into a deliberate design element.
On a kitchen towel, this technique adds a playful, illustrative quality that looks both charming and professional.
5. Master Gradient Shading for Realistic Motifs
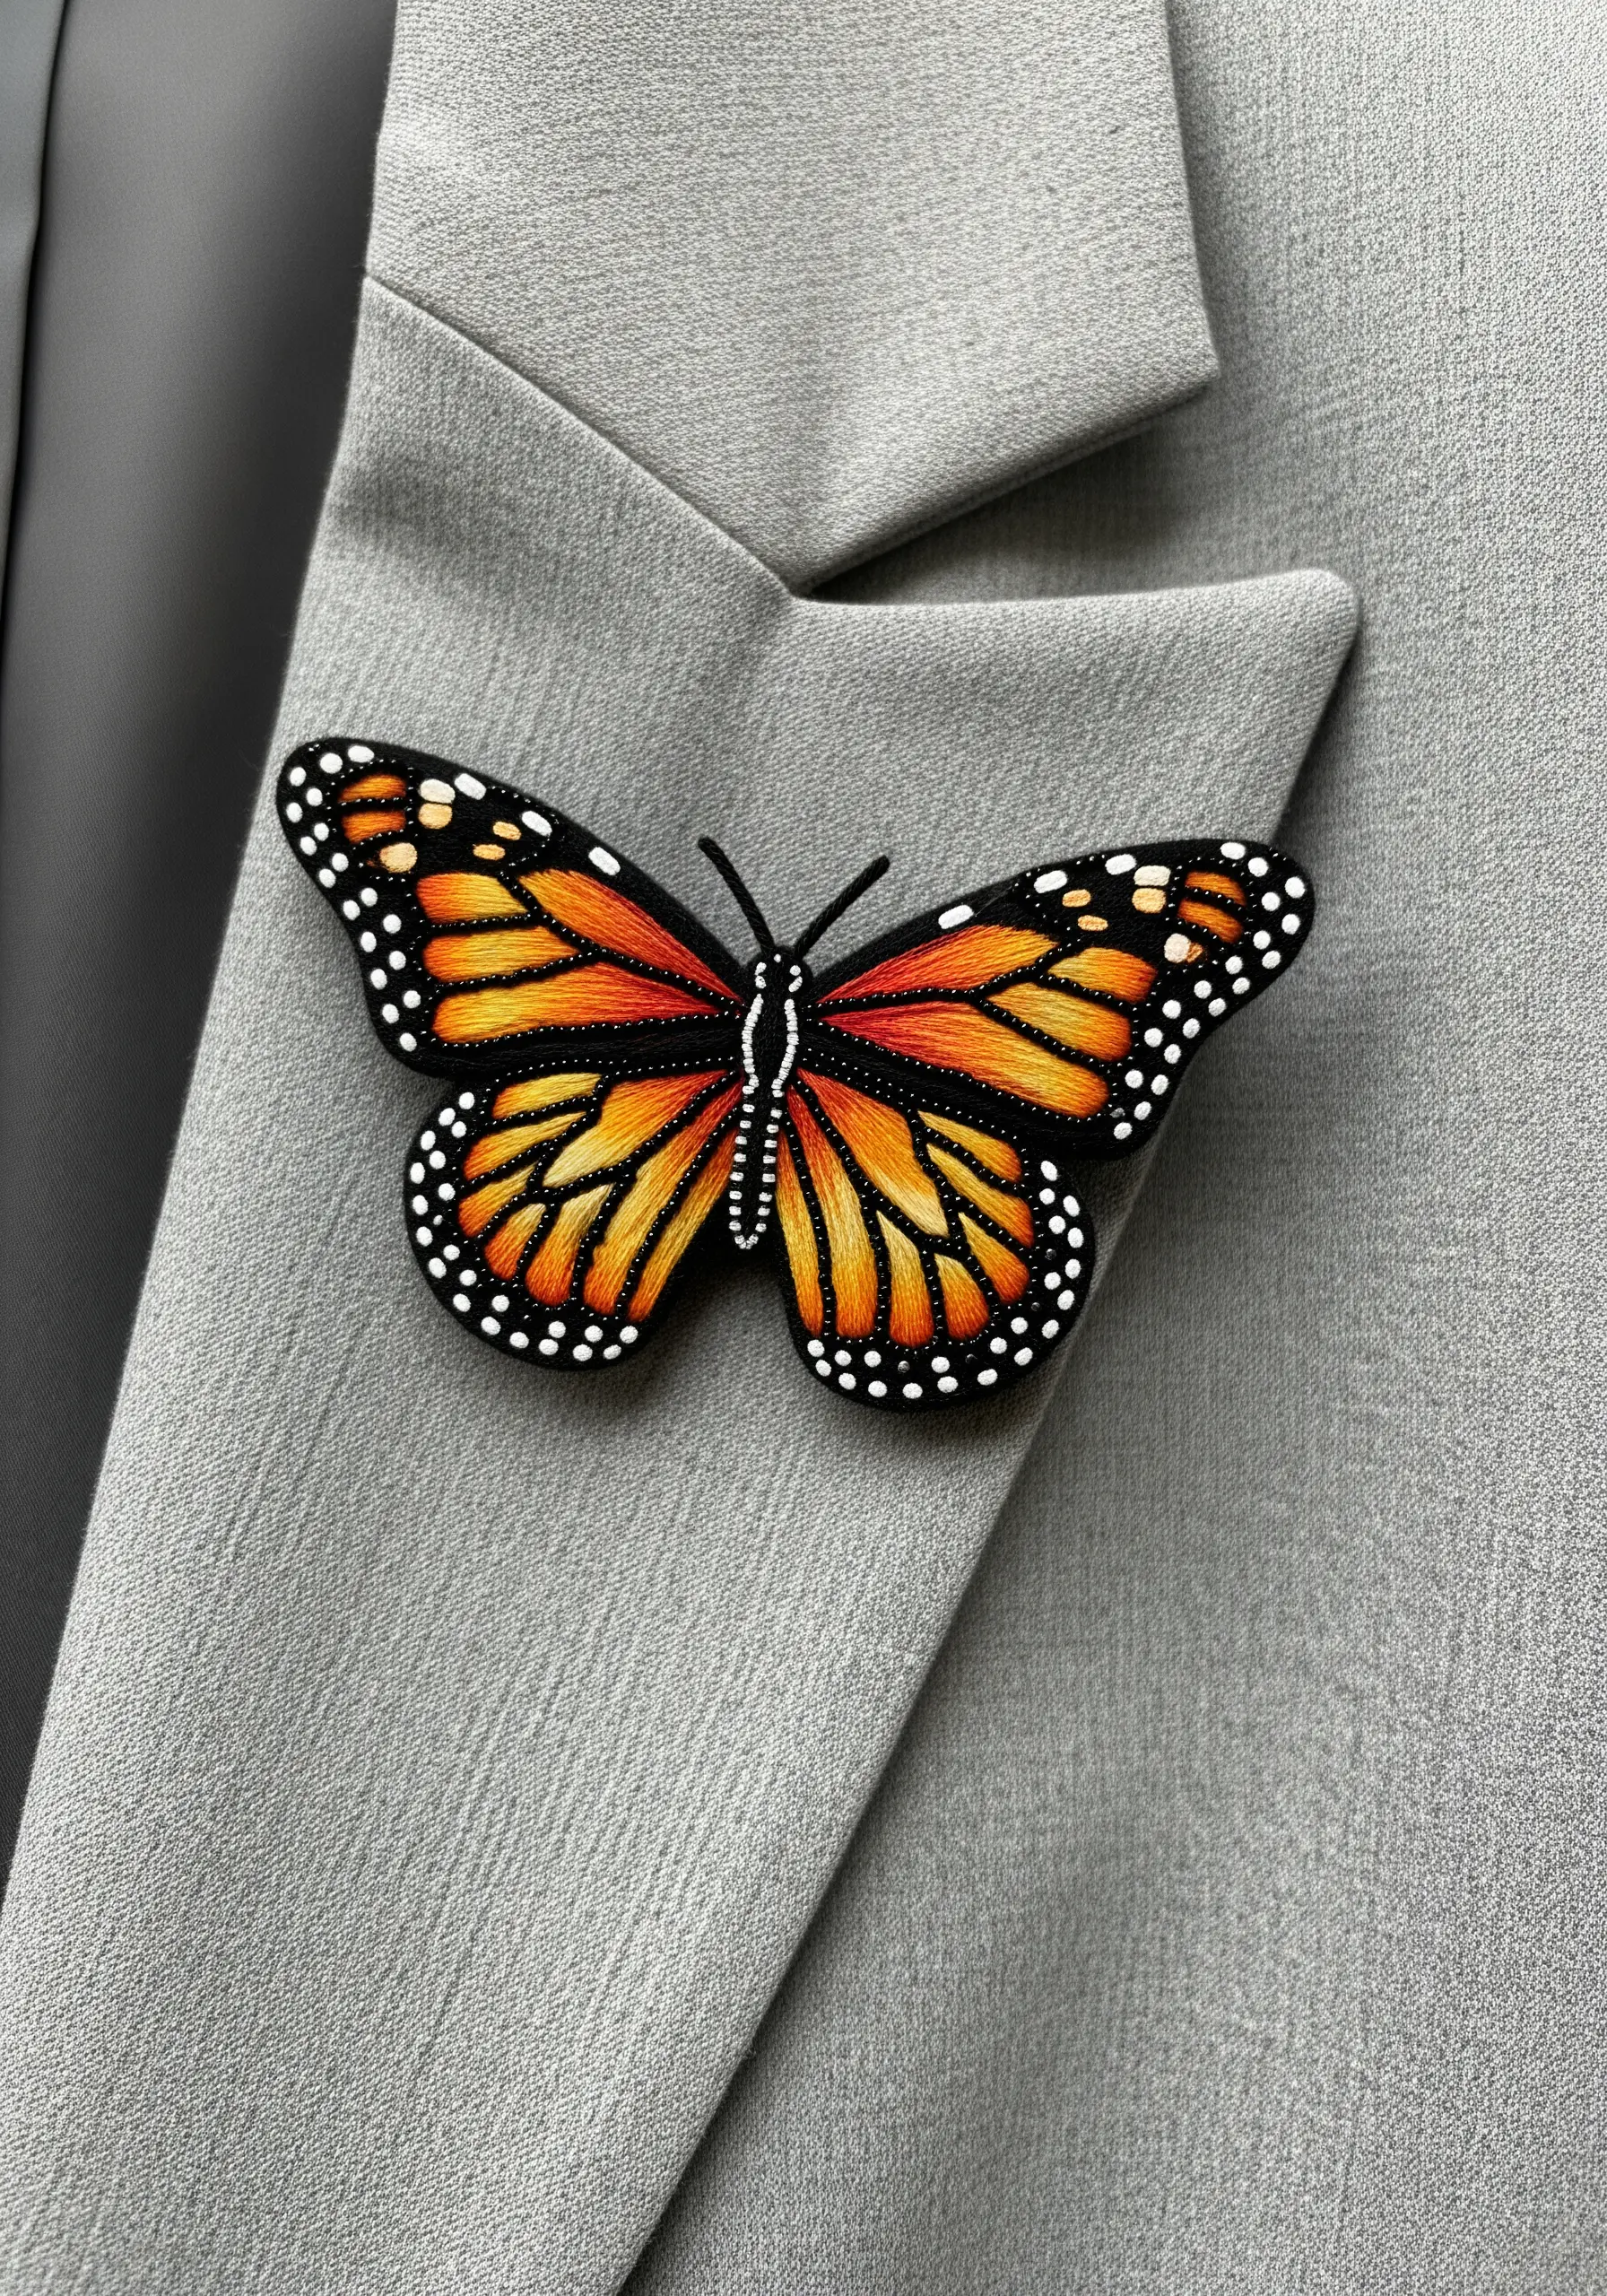
To create the stunning realism of a butterfly wing, move beyond satin stitch and embrace the long-and-short stitch technique.
This method, often called thread painting, allows you to blend colors seamlessly, creating soft, natural gradients.
Work with a single strand of floss and place your stitches like brushstrokes, staggering their lengths and overlapping shades to mimic the subtle color shifts found in nature.
This transforms a flat shape into a dynamic, lifelike object, perfect for a statement brooch or patch.
Explore realistic animal & insect embroidery patterns to practice this depth-enhancing skill.
6. Build Texture with French Knots and Wrapped Stems
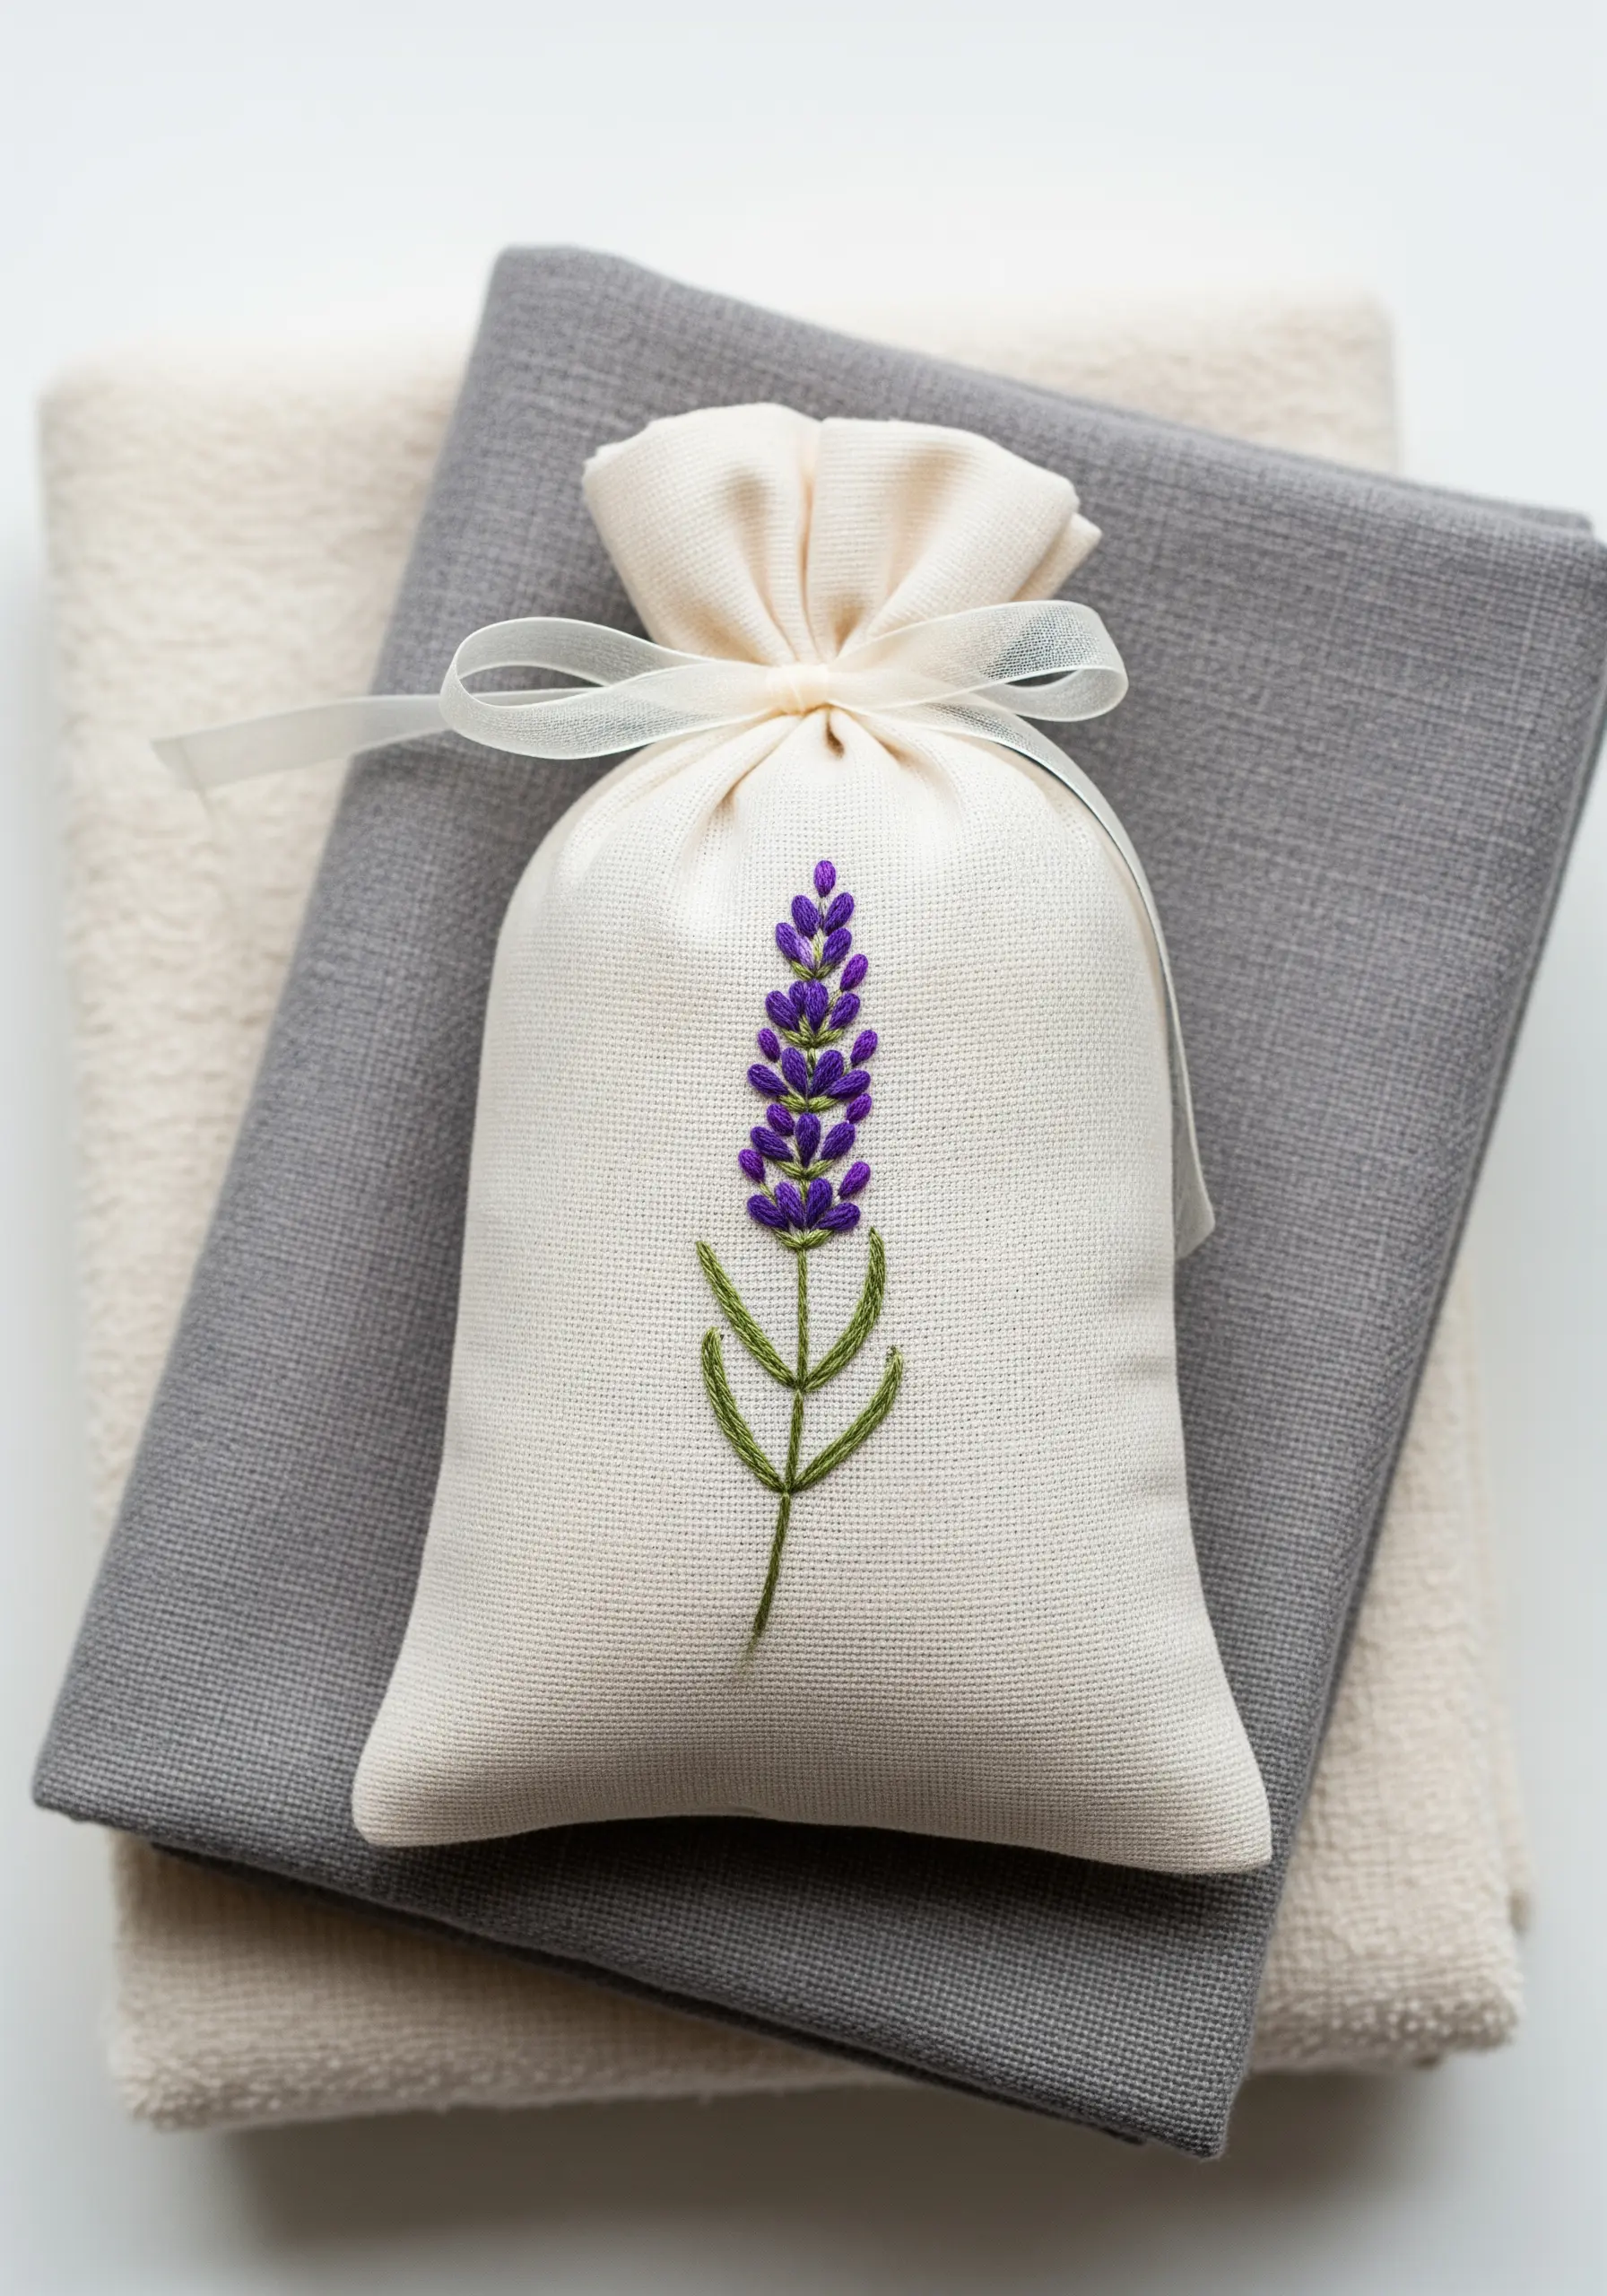
Transform a simple lavender sprig from a flat design into a richly textured motif.
Use French knots for the lavender buds, varying the number of wraps around your needle (once or twice) to create subtle differences in size and texture.
For the stem, first lay down a simple backstitch, then wrap it with the same color thread—a technique called whipped backstitch.
This gives the stem a raised, corded effect that adds dimension and a tactile quality to a simple sachet.
7. Stabilize Stitches on Luxe Fabrics like Velvet
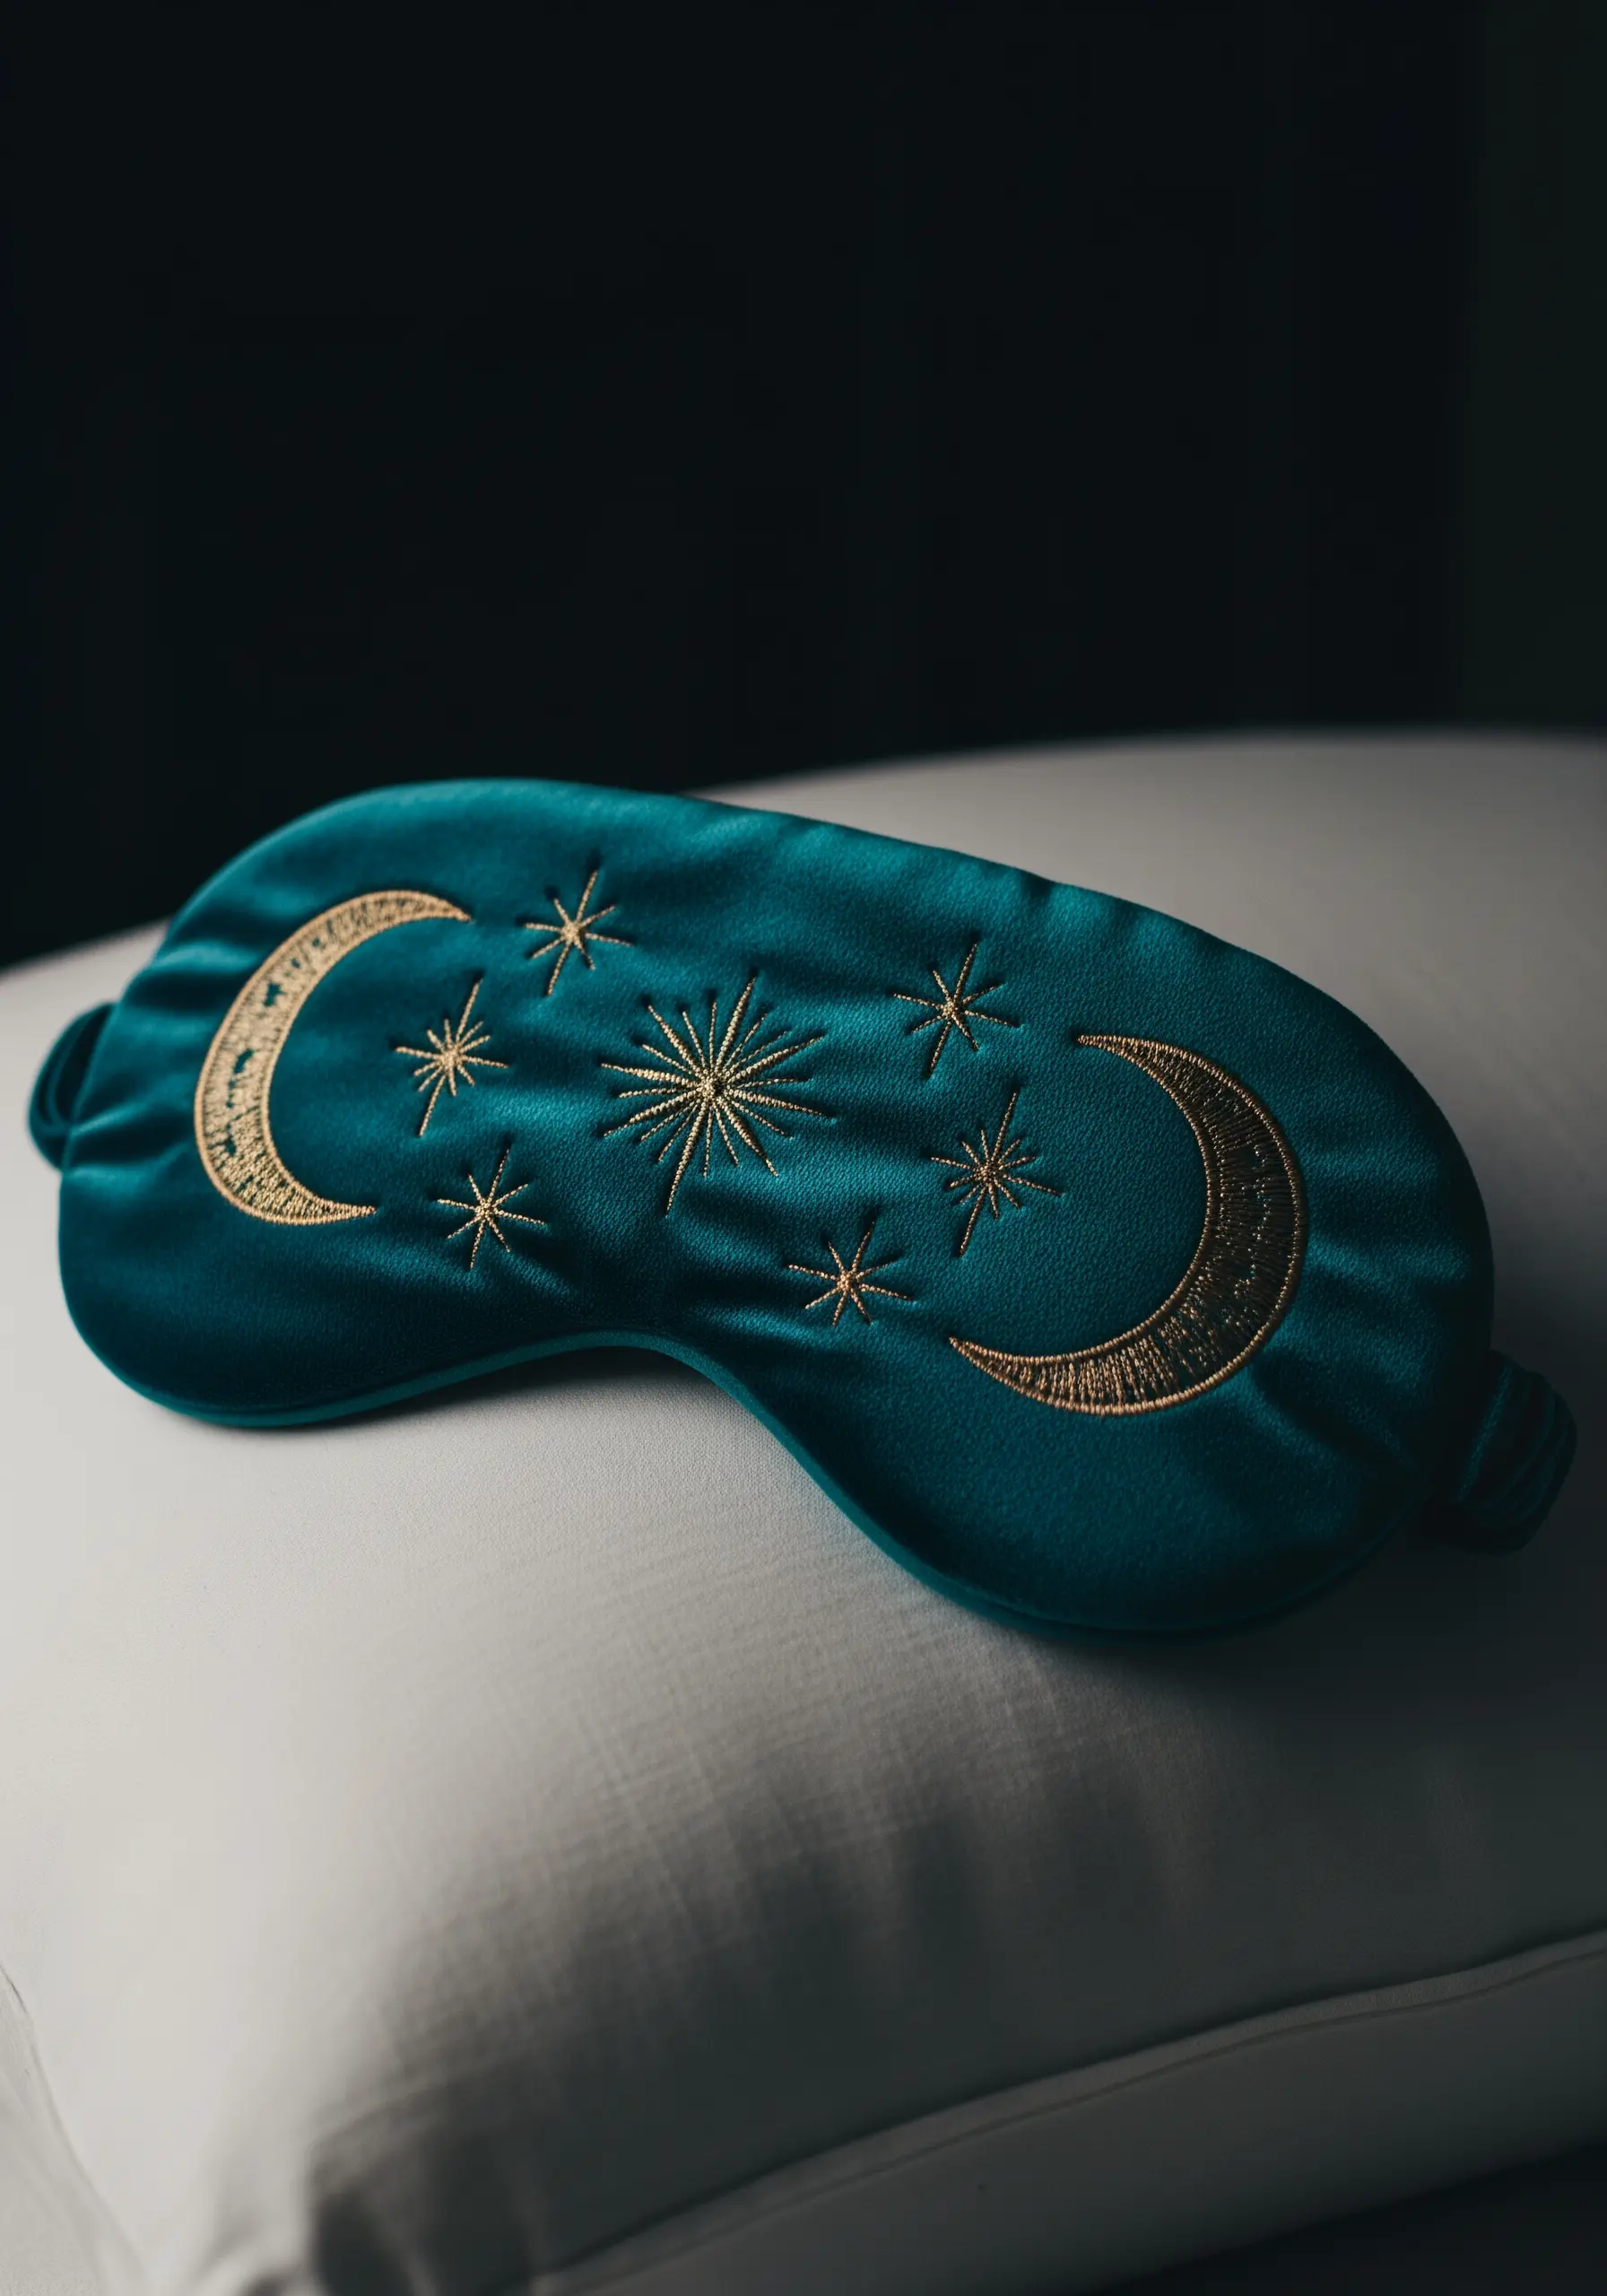
Embroidering on plush fabrics like velvet requires one crucial step: stabilization.
To prevent your stitches from sinking into the fabric’s pile, use a water-soluble or tear-away stabilizer on top of your velvet before you begin stitching.
This provides a smooth surface, ensuring your metallic threads lie flat and your lines remain crisp and clean.
Once you’re finished, the stabilizer dissolves or tears away, leaving behind a flawless design on a luxurious background.
8. Personalize a Simple Key Fob with a Tiny Motif
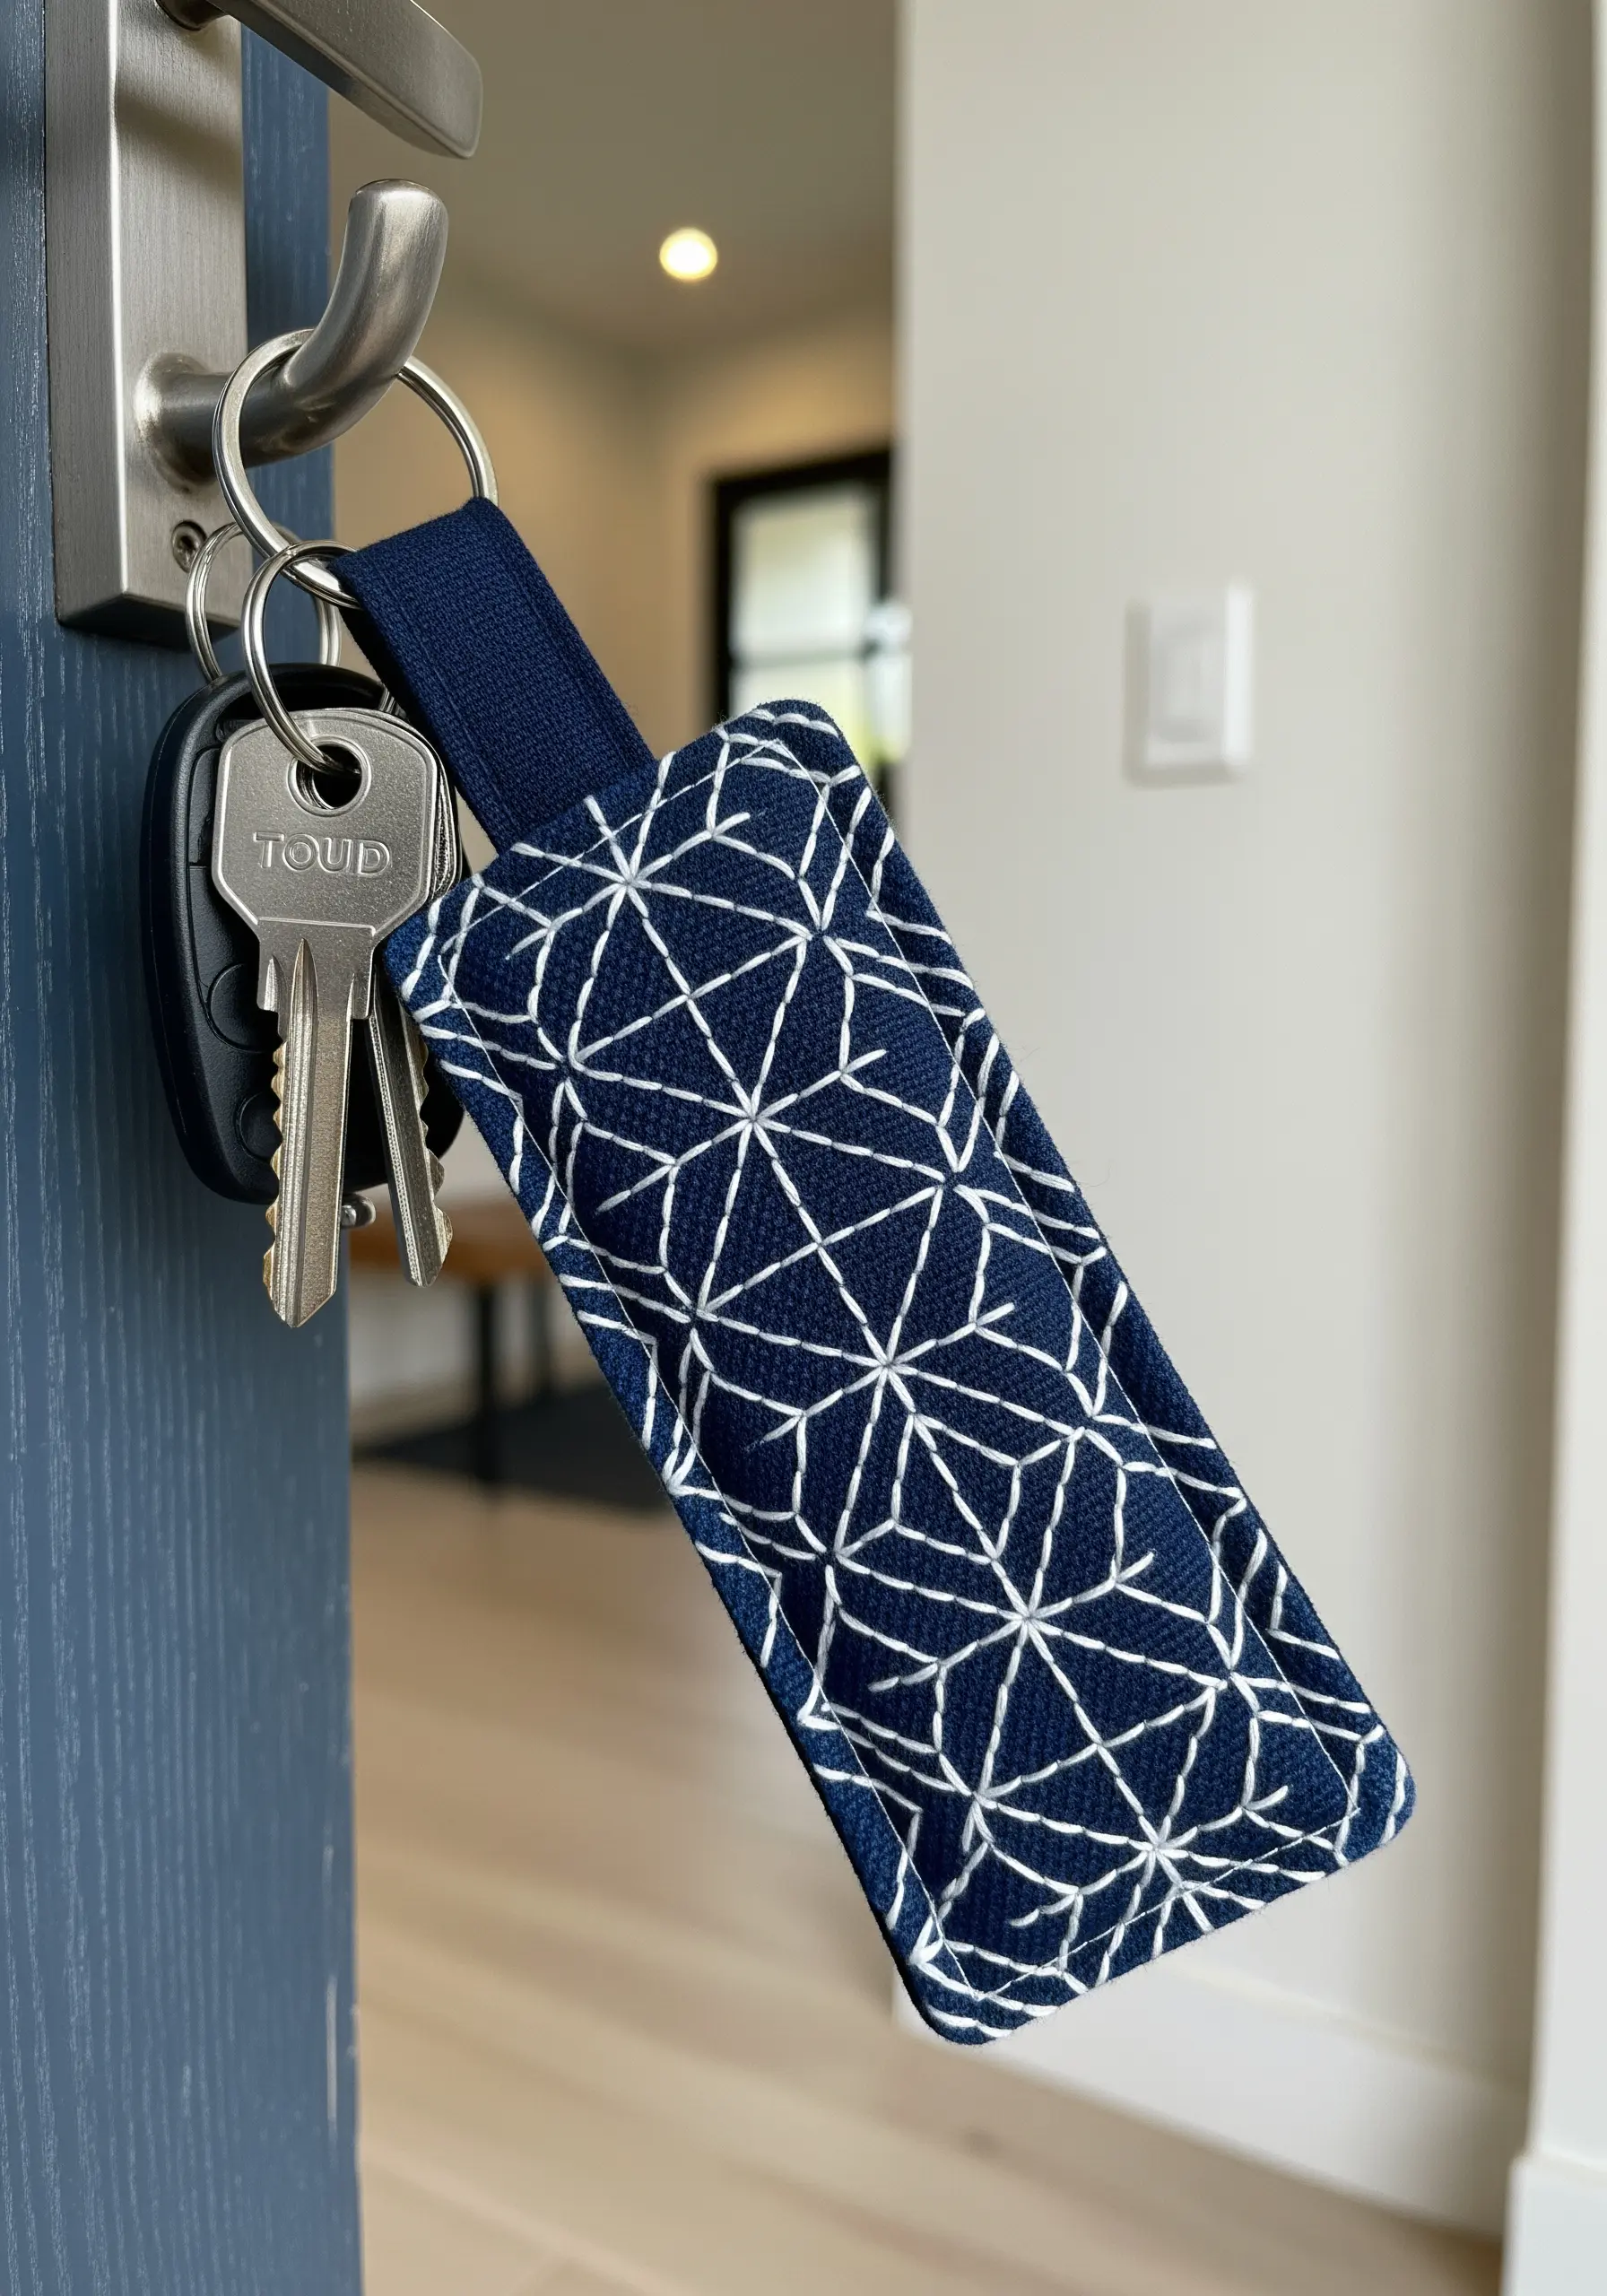
The most thoughtful gifts often feature a small, personal touch.
Elevate a simple fabric key fob by adding a tiny embroidered detail—a single initial, a small star, or a geometric symbol.
Choose a durable fabric like canvas or denim and stitch your motif before sewing the fob together.
This quick addition takes just minutes but transforms a practical item into a meaningful, custom-made keepsake.
9. Accentuate Fabric Prints with Selective Embroidery
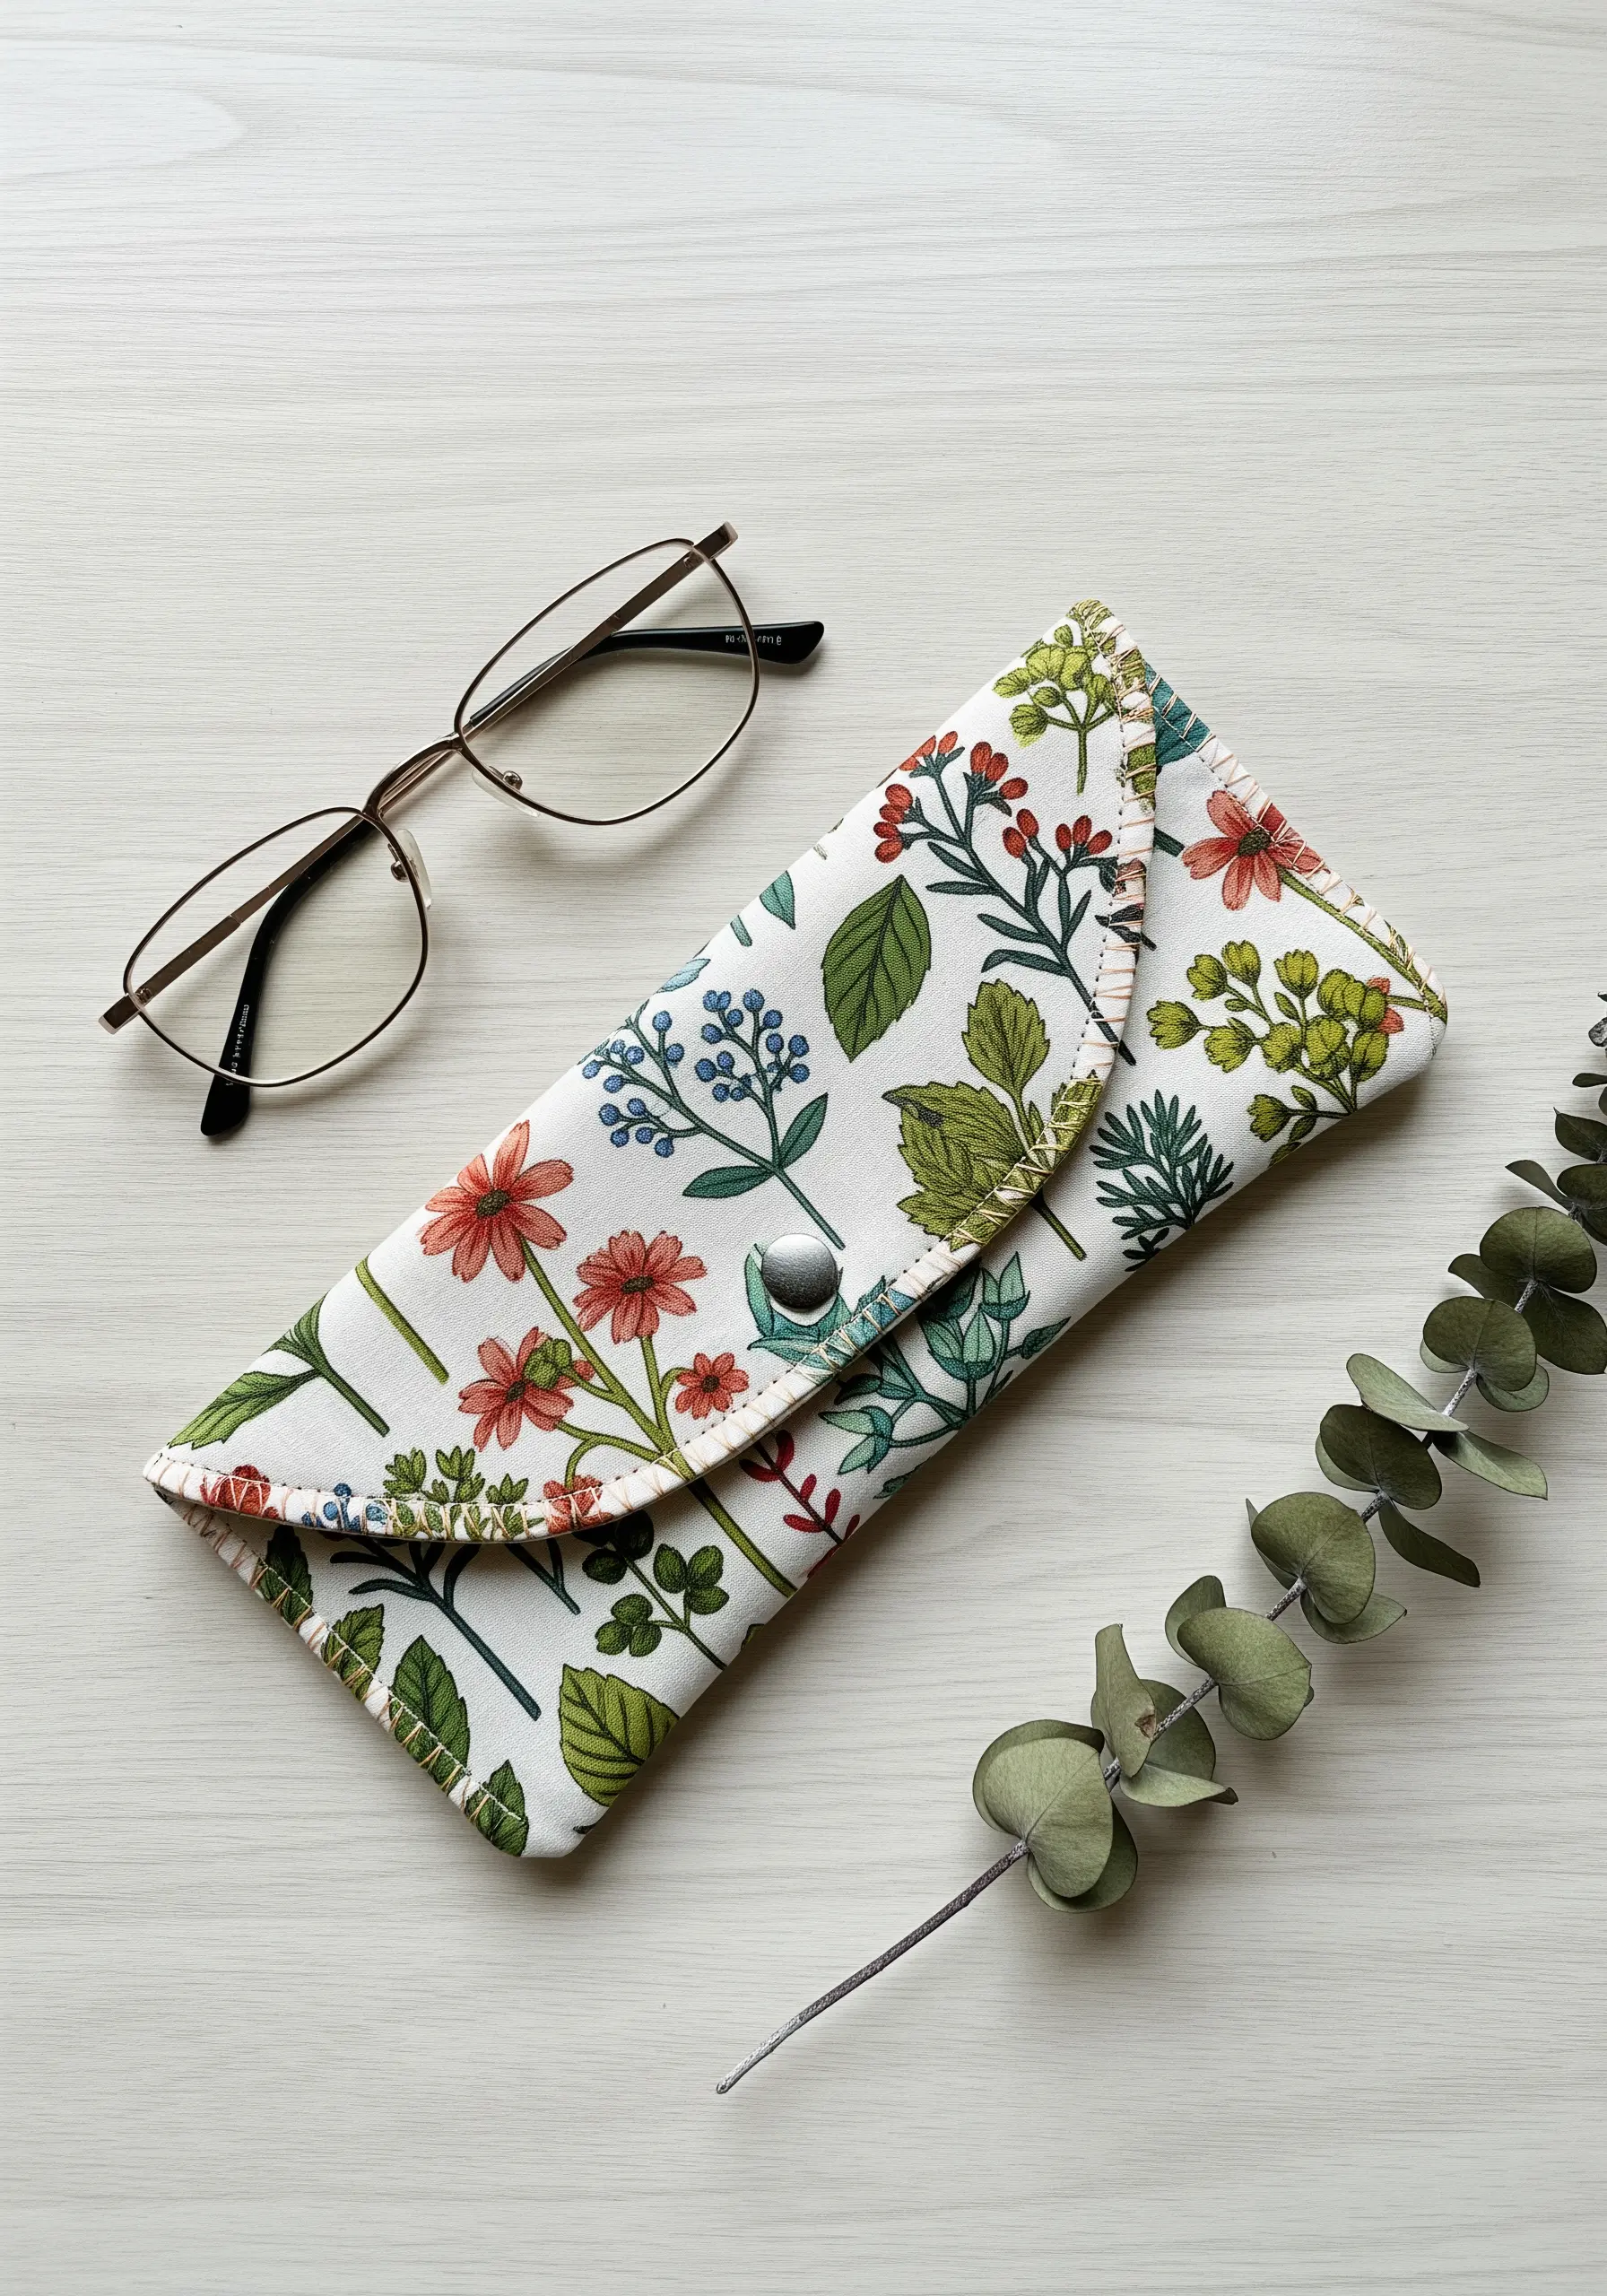
Instead of starting with a blank canvas, use a patterned fabric as your guide.
Choose a botanical print and use embroidery to highlight specific elements within the design.
You can outline a single flower with a backstitch, add French knots to the center of another, or fill in a leaf with seed stitch for texture.
This technique adds depth and a unique handmade touch, turning a simple patterned glasses case into a piece of mixed-media art.
10. Craft a Raised Monogram with Padded Satin Stitch
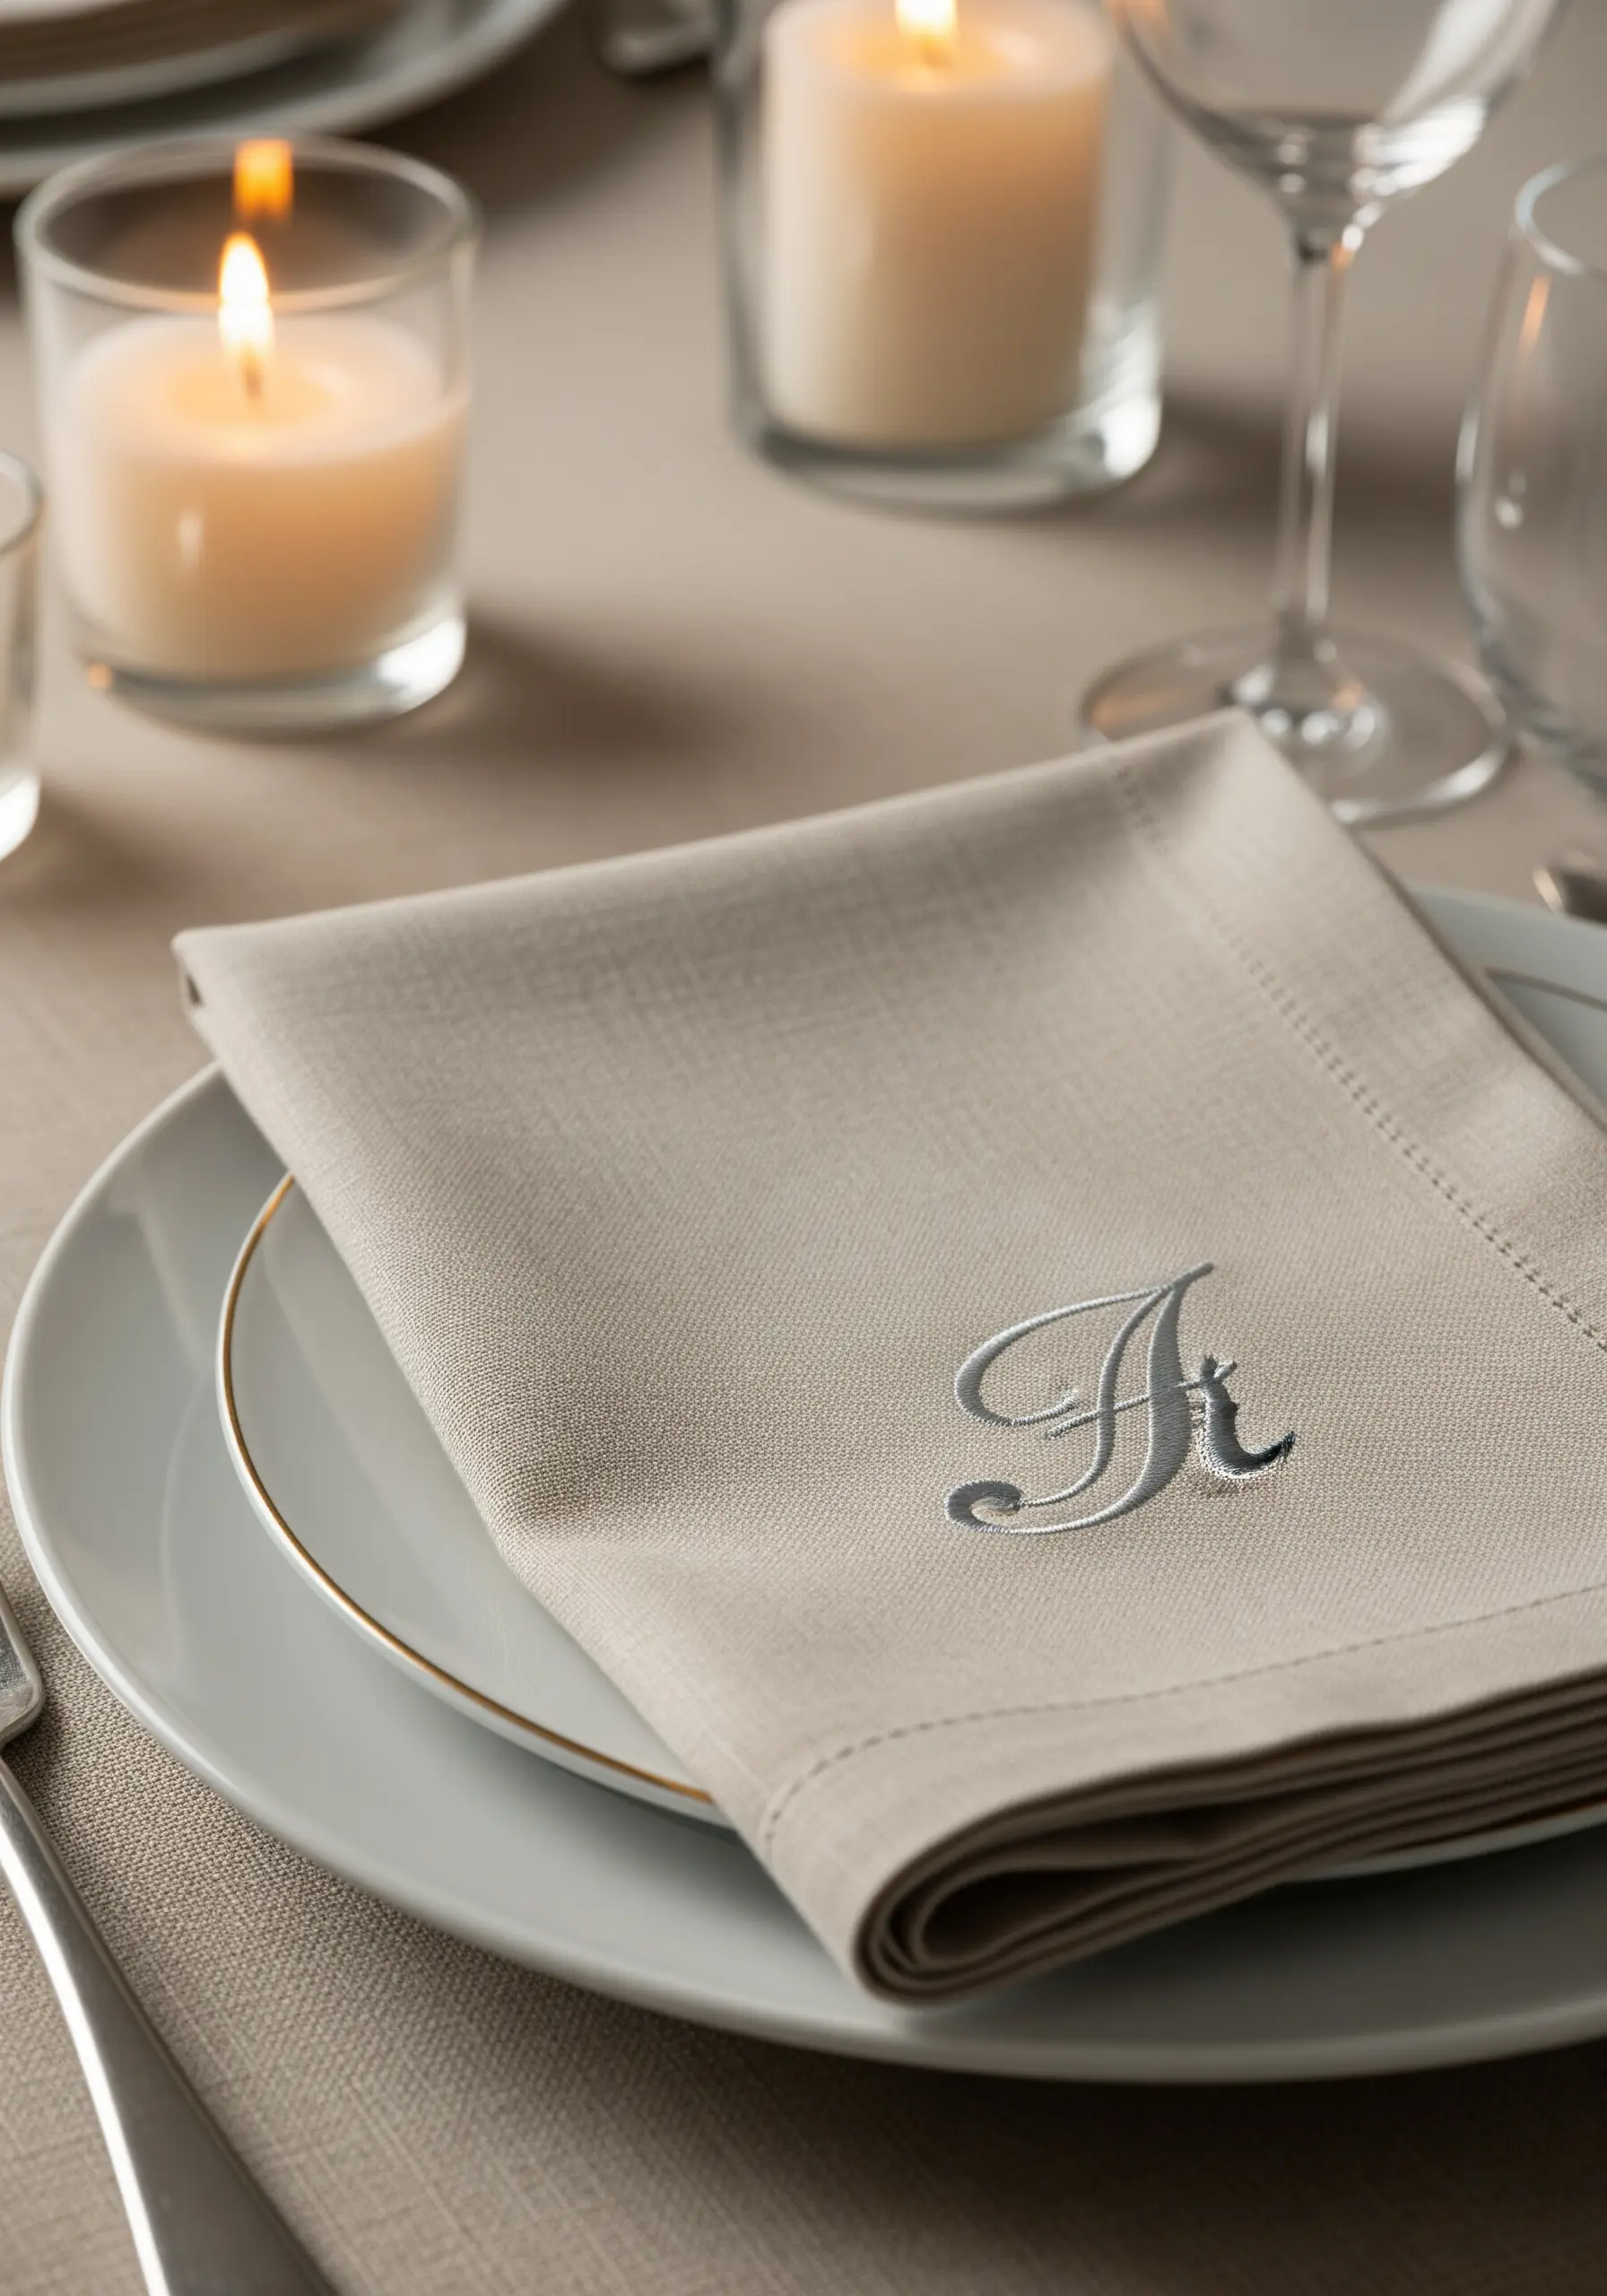
For a truly luxurious monogram, use a padded satin stitch to give the letter a raised, three-dimensional effect.
First, create a foundation for your letter using small, tight split stitches to fill the entire shape.
Then, work your satin stitches over this padded base, ensuring each stitch lies perfectly smooth and close to the next.
The underlying stitches push the top layer up, creating a professional, embossed look that makes a simple linen napkin feel exceptionally elegant.
These are perfect small embroidery patterns to customize your home decor.
11. Add Soft Texture with Hand-Quilted Stippling
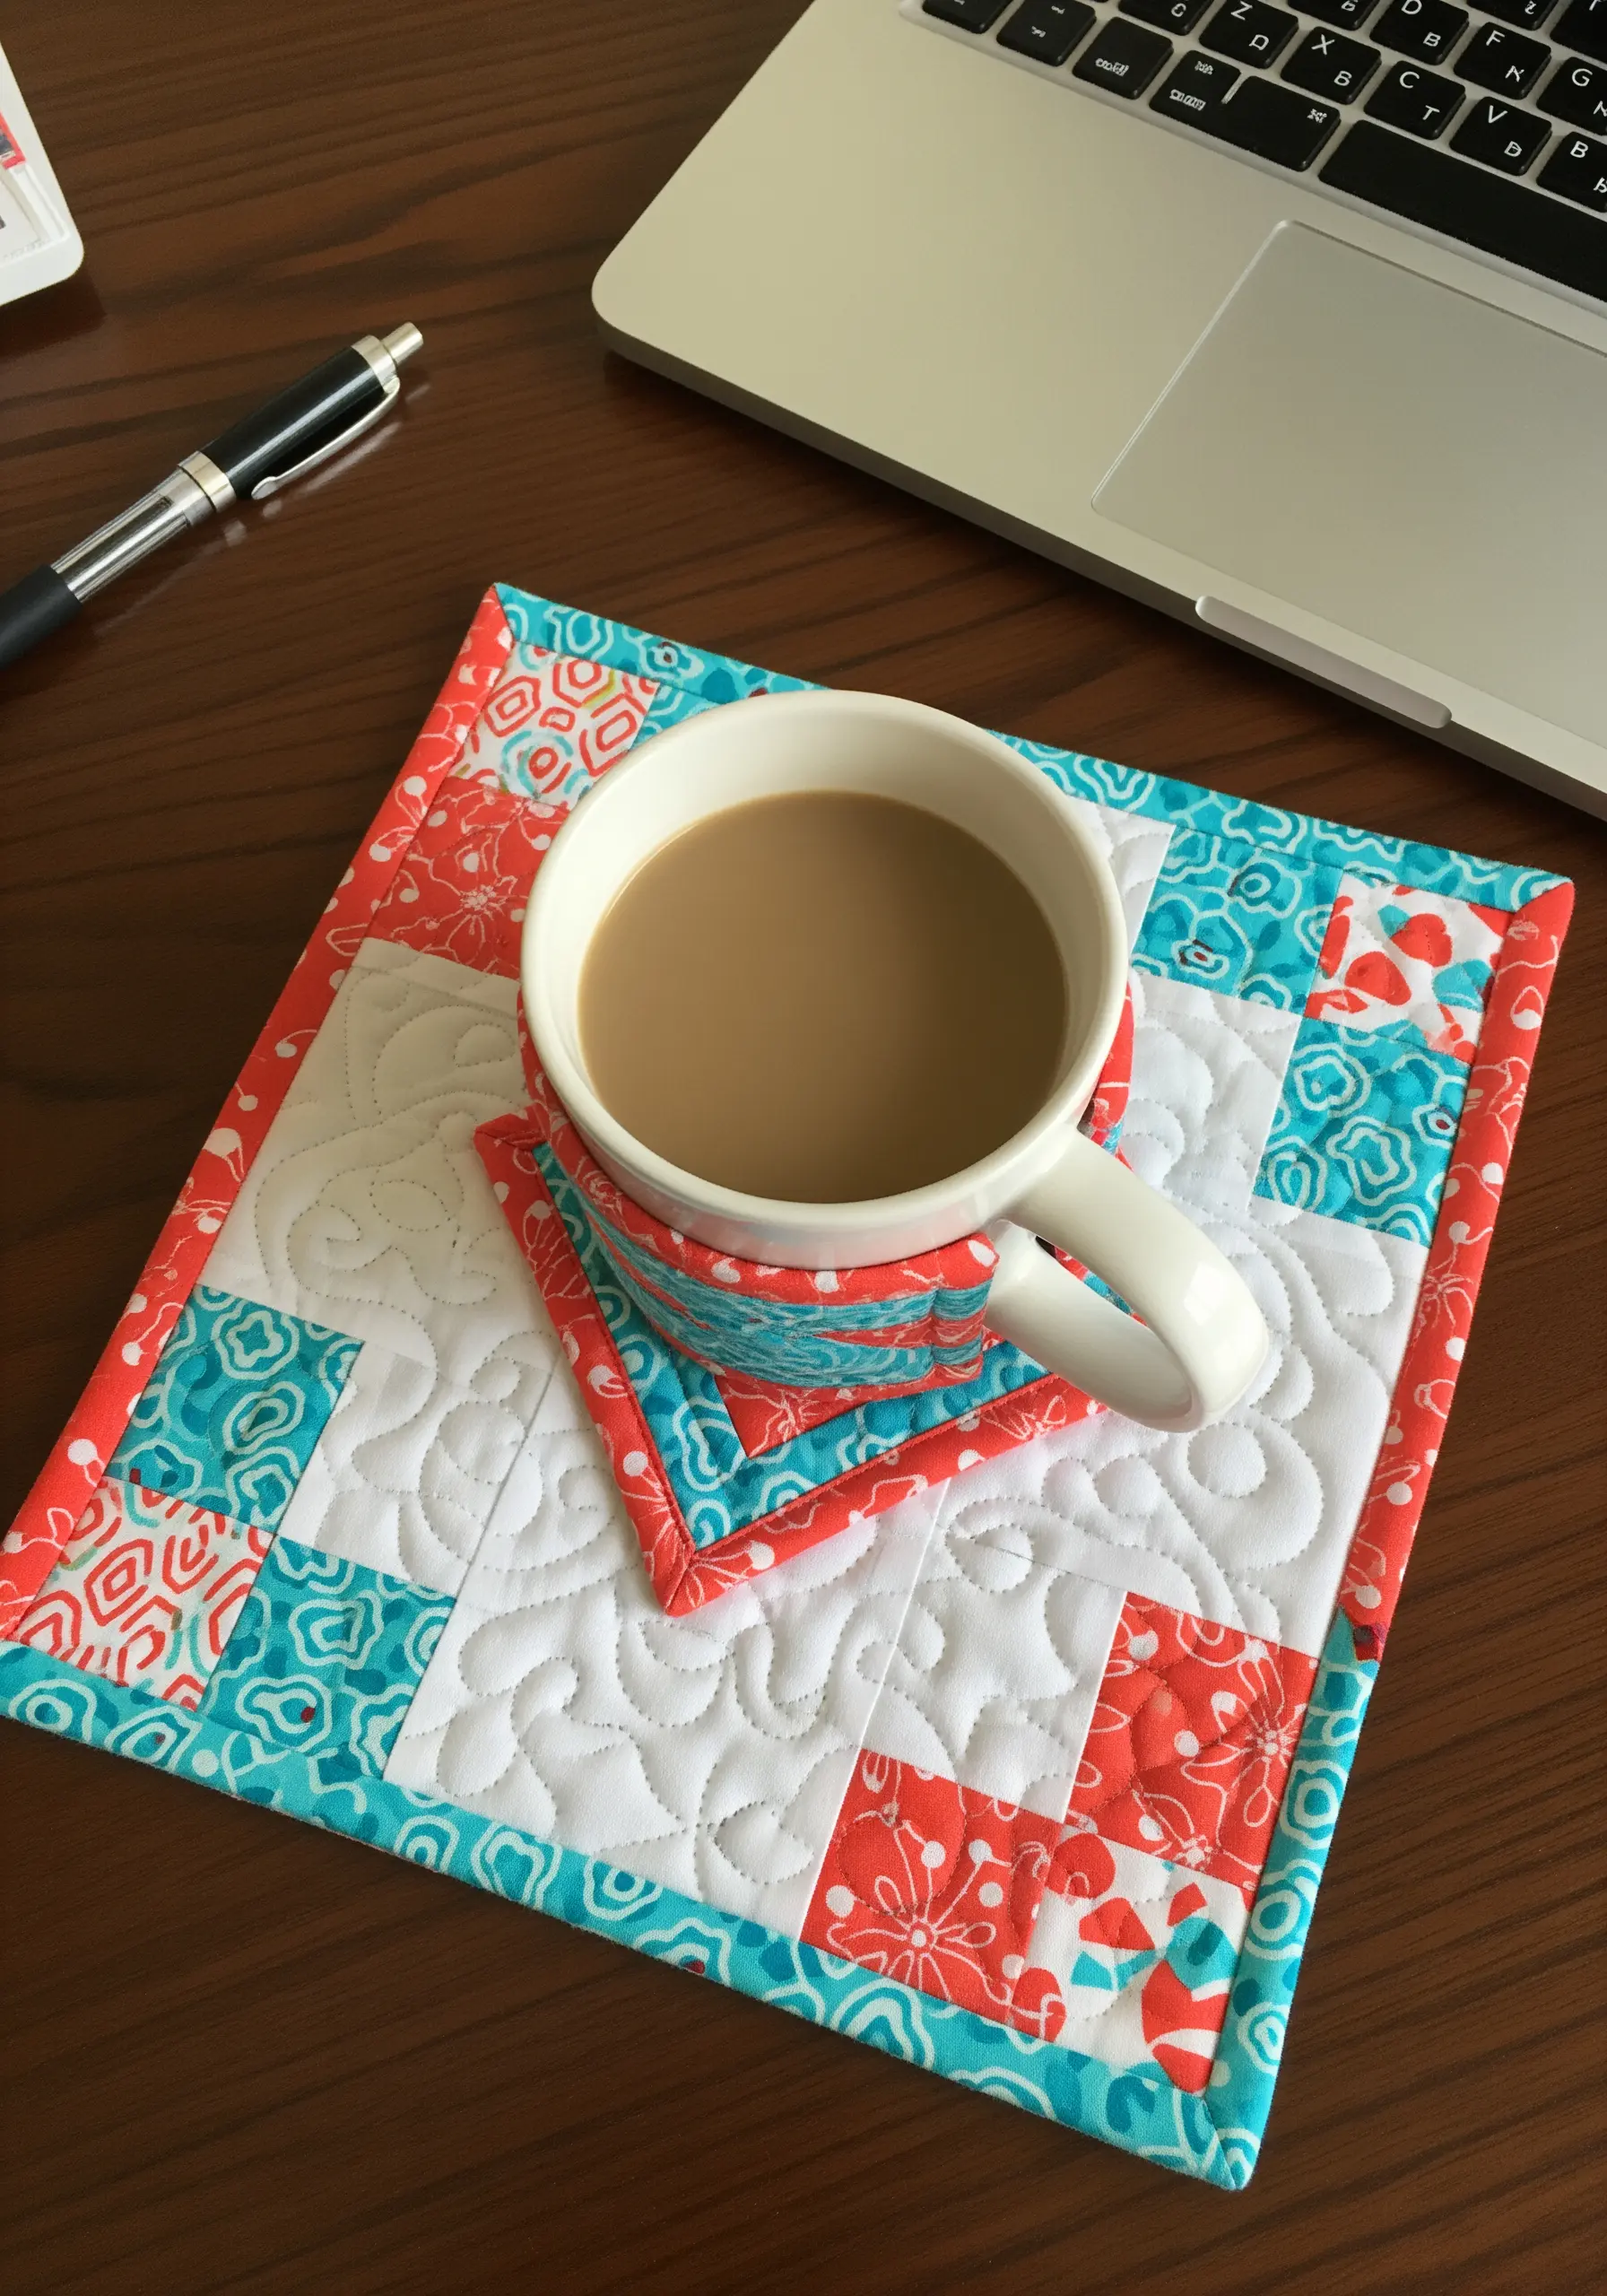
A simple mug rug becomes a tactile piece of art with the addition of hand quilting.
On the solid white areas of your patchwork, use a simple running stitch to create a meandering, stippled pattern.
This not only holds the fabric layers together but also creates a soft, puckered texture that adds visual depth and a cozy, handmade feel.
Use a contrasting thread to make your stitching stand out or a matching one for a more subtle effect.
12. Create Dense Landscapes with Textured Filler Stitches
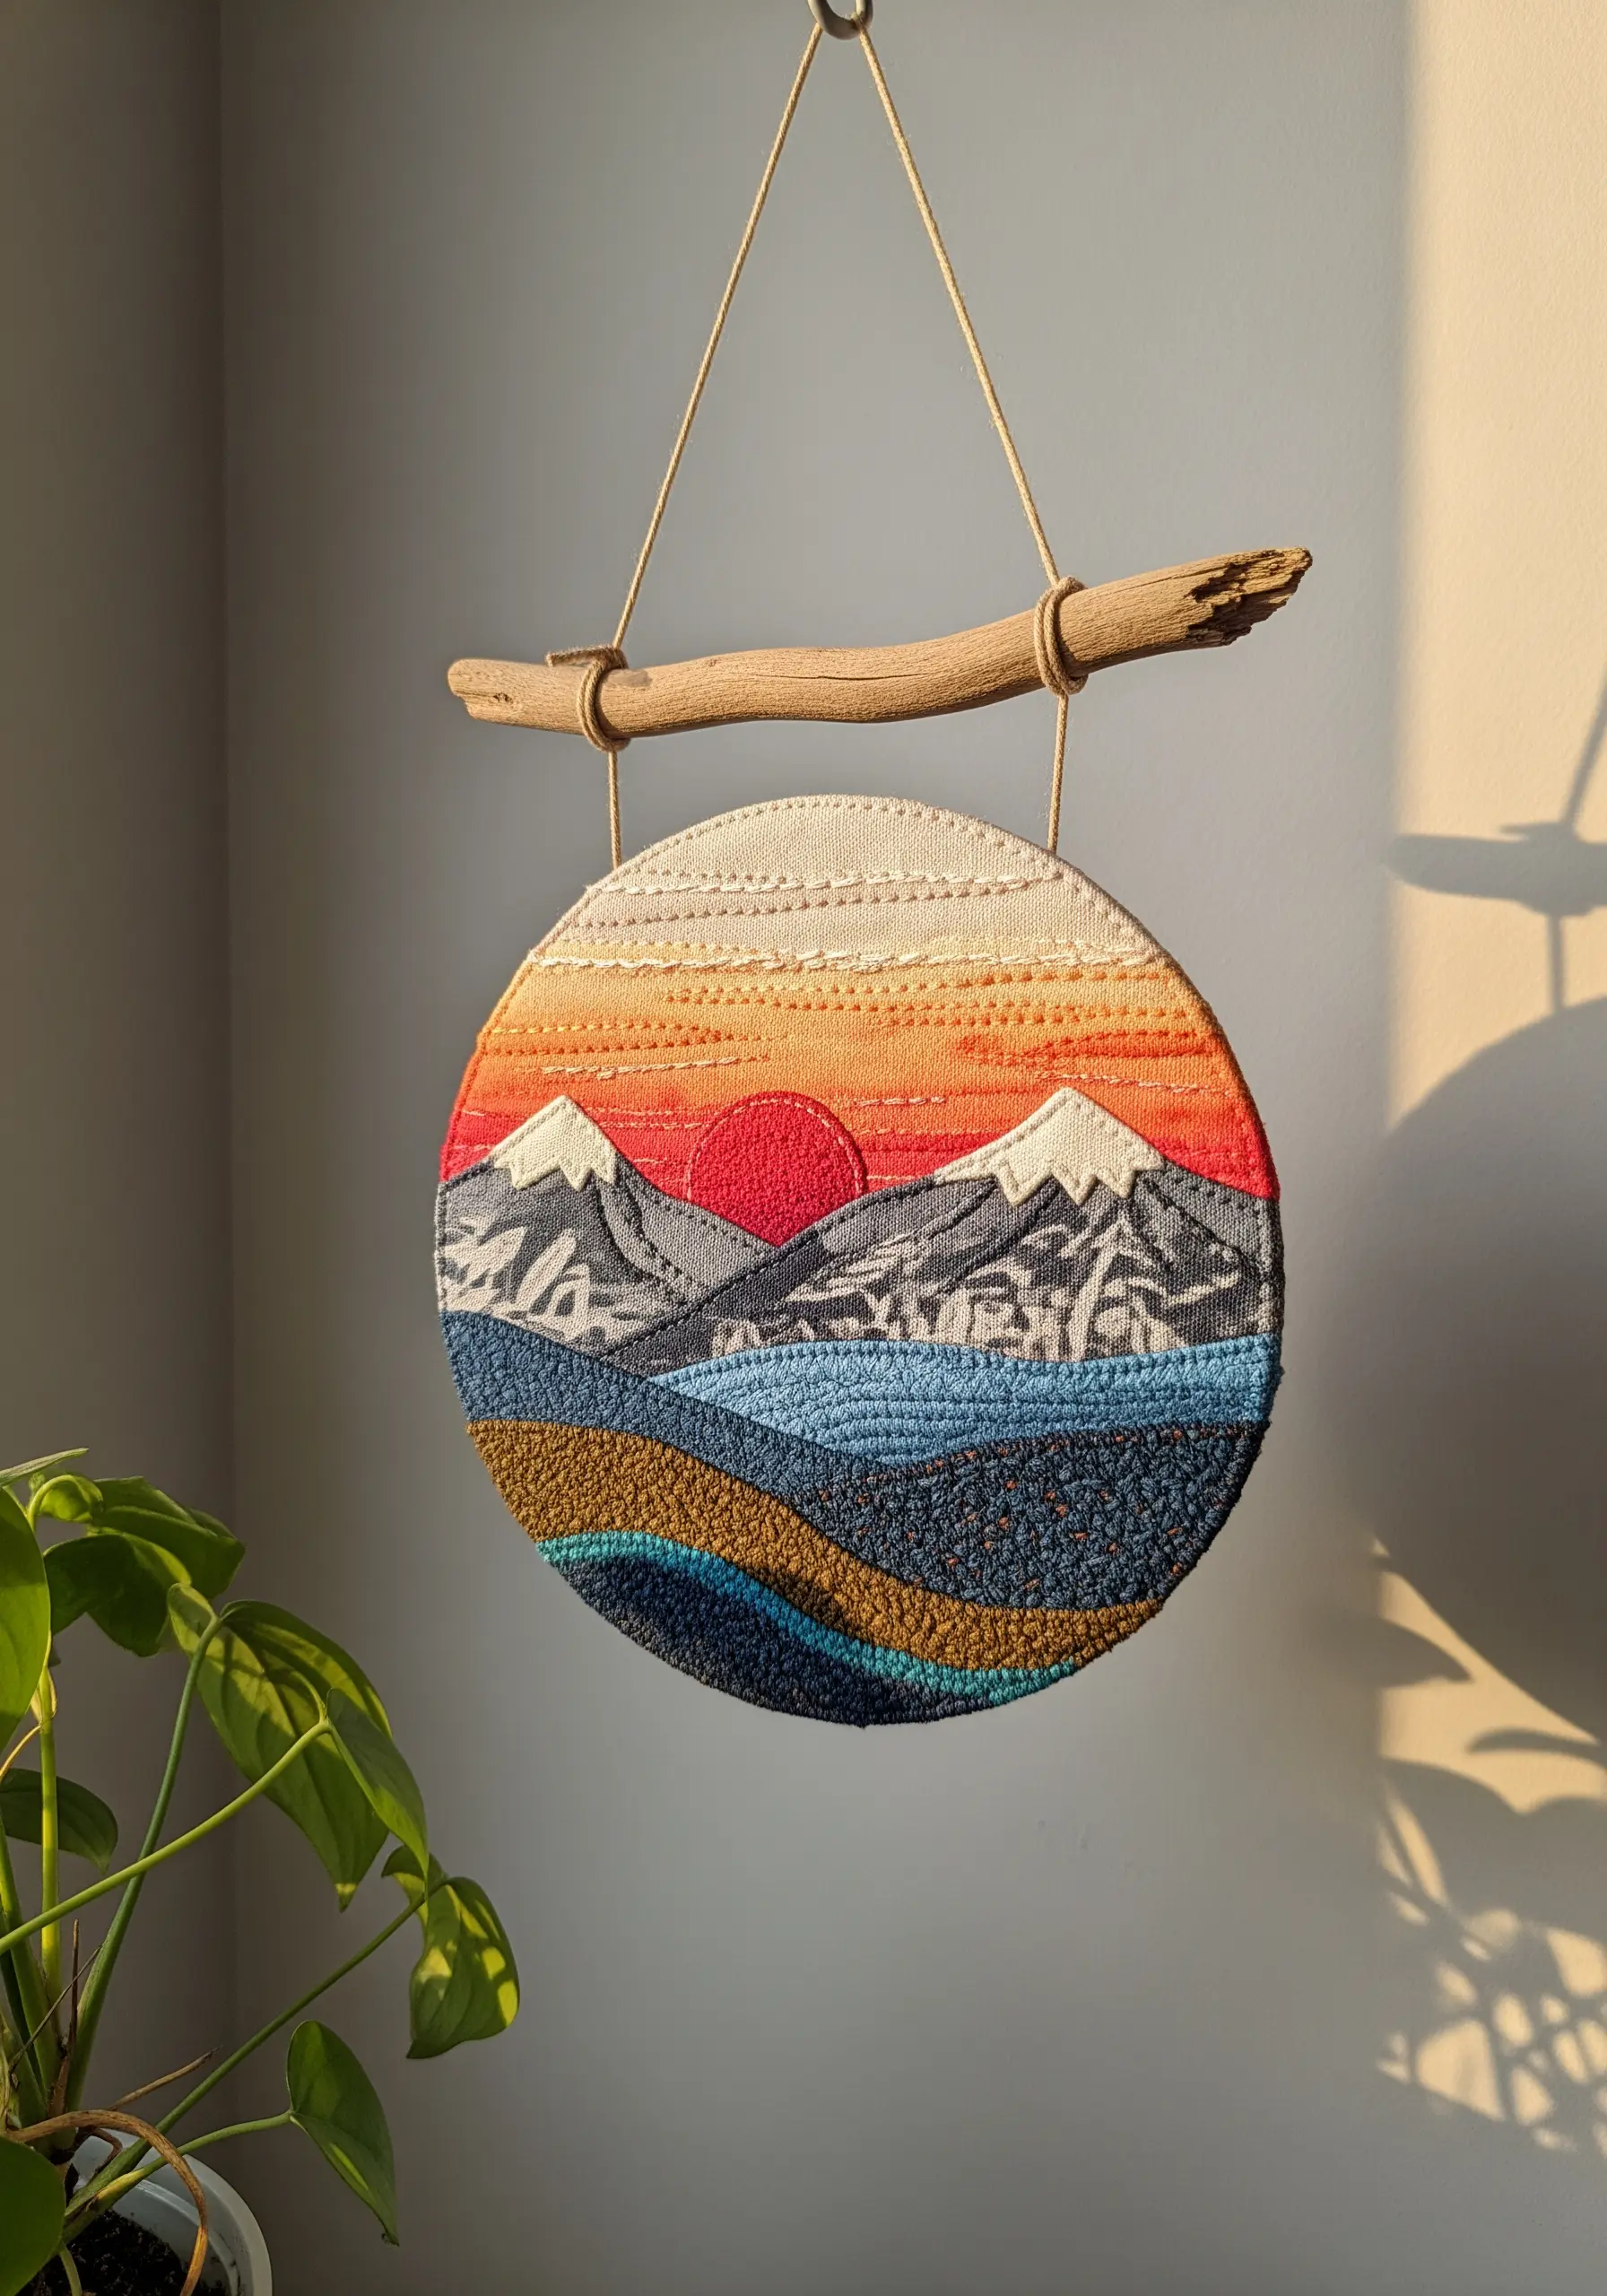
To achieve a rich, textural landscape, fill large areas with dense, looped, or knotted stitches.
Use a punch needle or traditional embroidery stitches like French knots, colonial knots, and the turkey stitch to build up color and dimension.
Vary the density of your knots and the height of your loops to create the illusion of depth—tighter knots for the foreground, looser ones for the distant sky.
This technique turns a simple circular hoop into a captivating, tactile scene you’ll find in many string art landscape scenes.
13. Stitch on Leather for a Modern, Rustic Finish
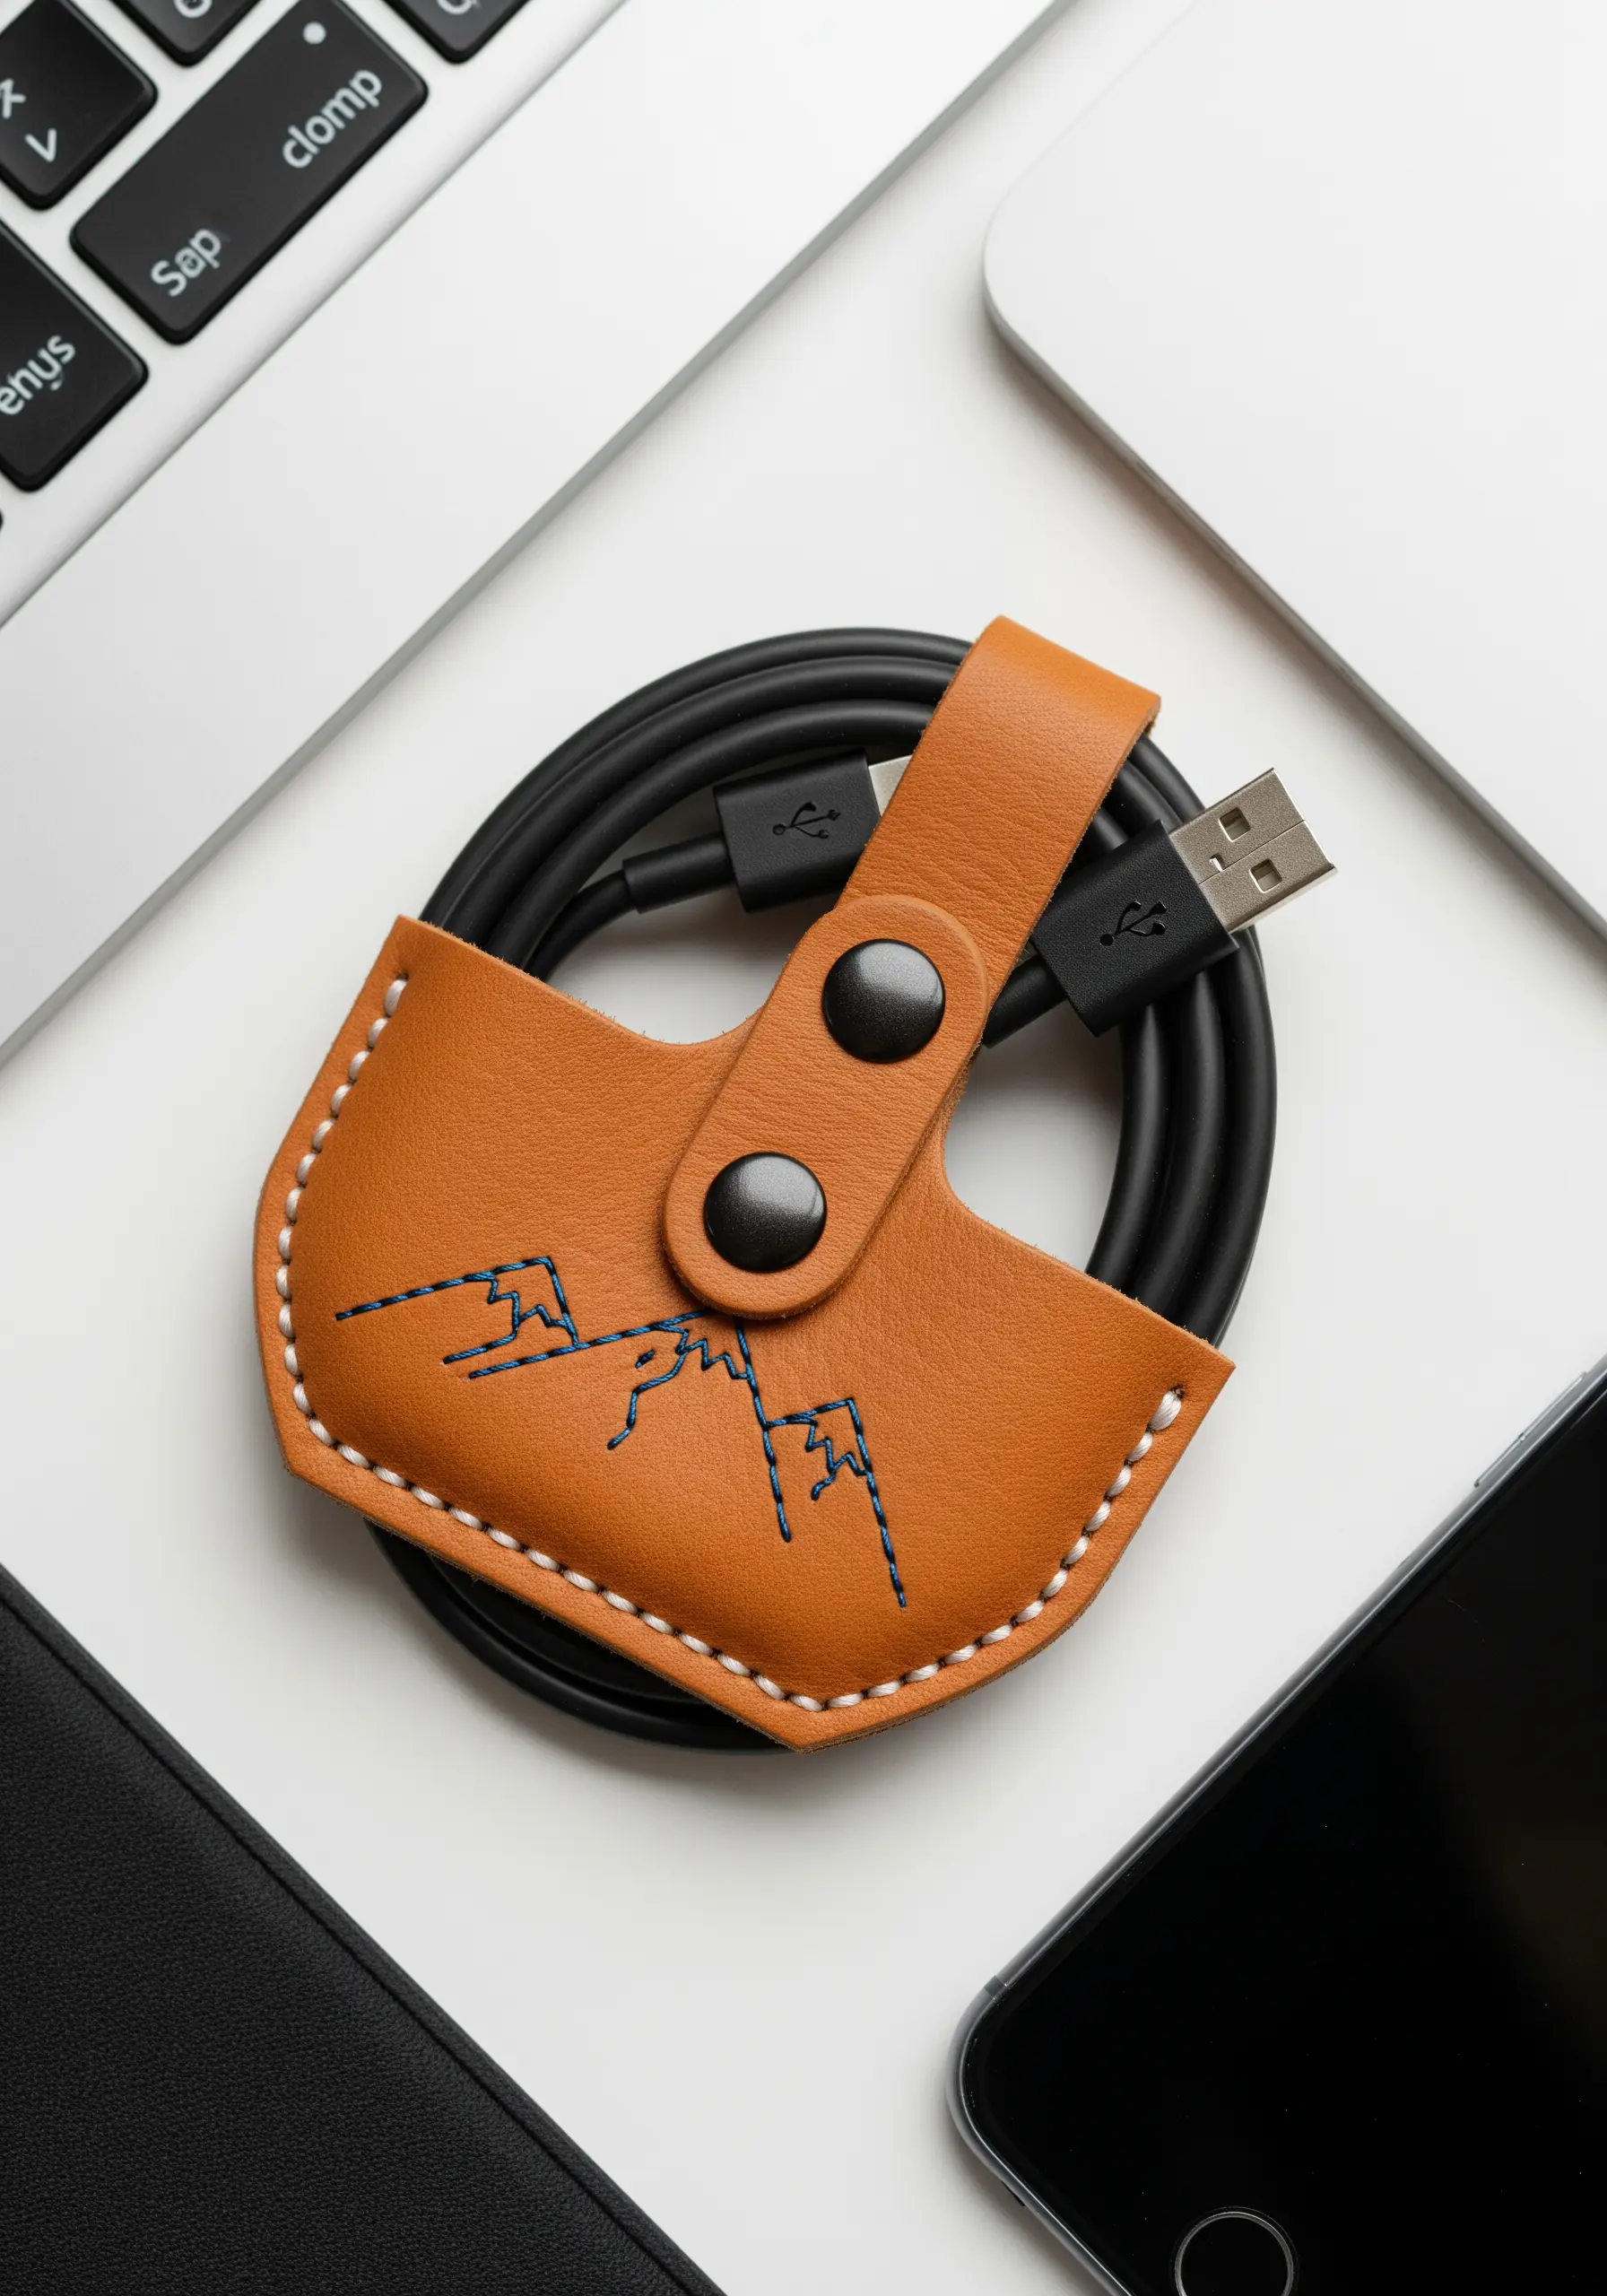
The contrast between soft thread and sturdy leather creates a uniquely modern and sophisticated look.
When embroidering on leather or vegan leather, always use a specialized leather needle, which has a triangular point designed to pierce the material cleanly.
For thicker leather, you can pre-punch the holes along your design line with an awl to make stitching easier.
A simple backstitch is all you need to create a crisp, graphic design on a cable organizer or wallet.
14. Personalize Printed Fabric with Simple Stitched Accents
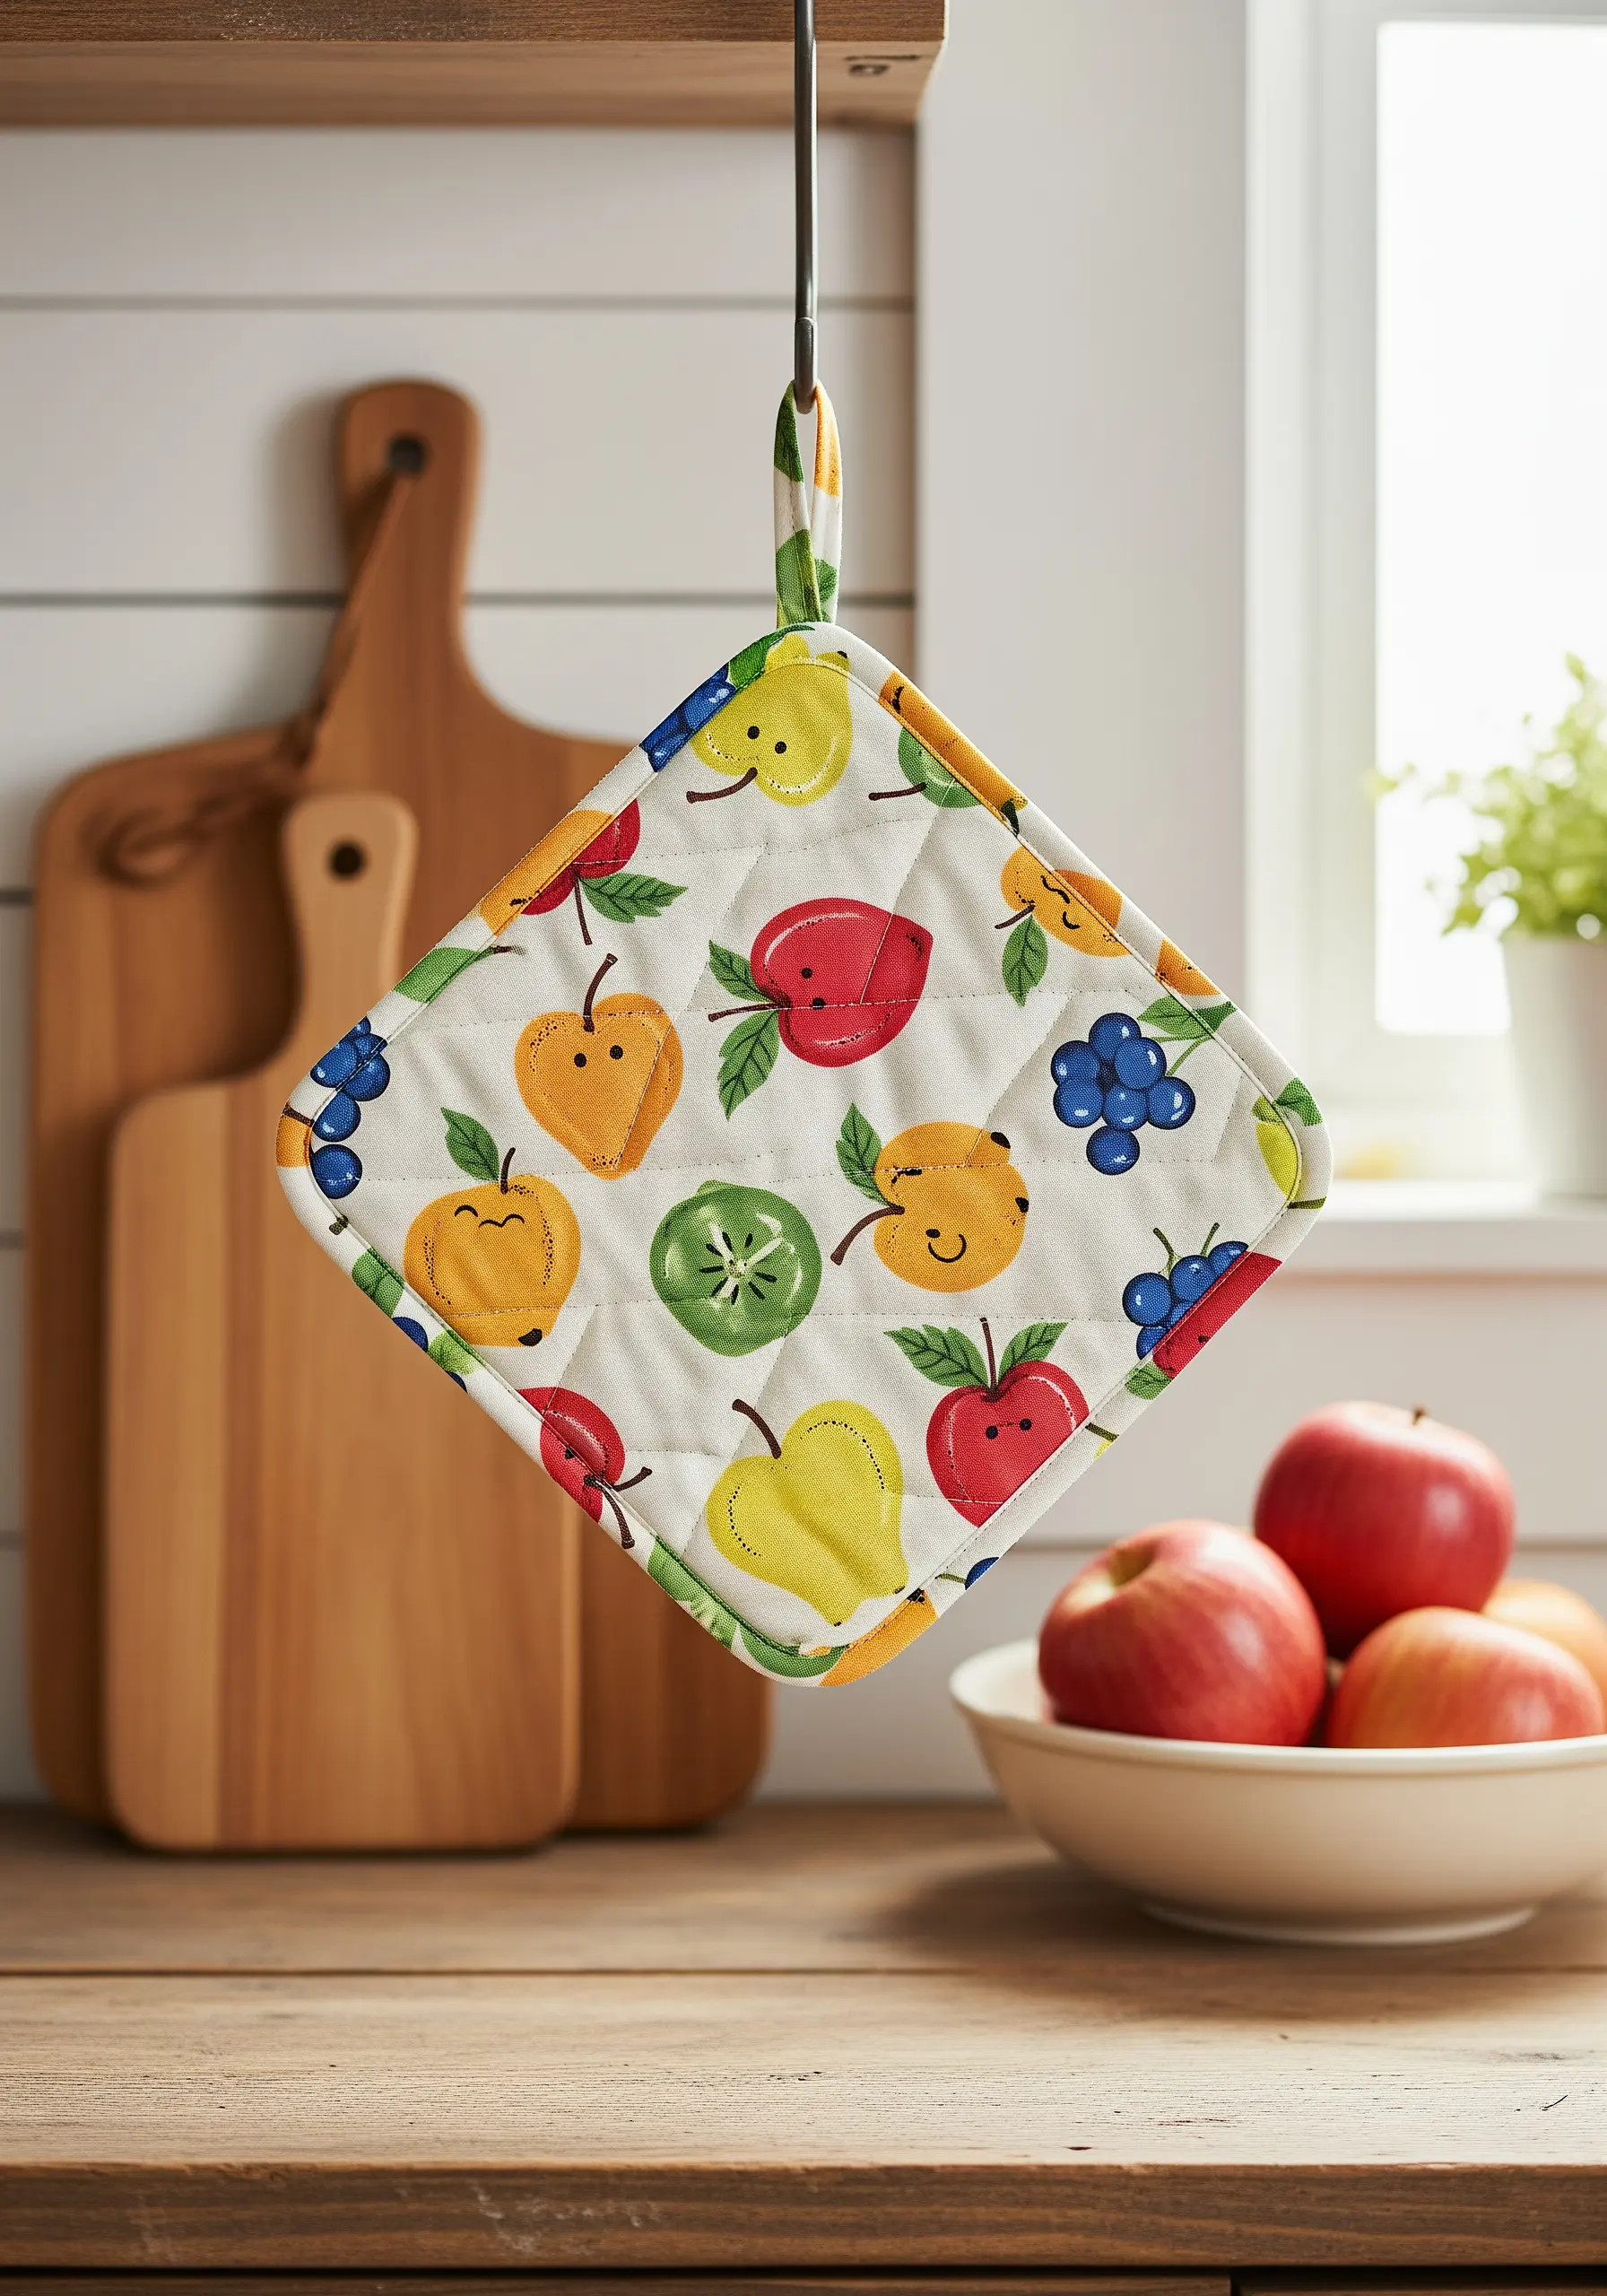
Give a charming printed pot holder an extra dose of personality with a few thoughtfully placed stitches.
Use a dark thread to add simple backstitched smiles or eyes to the cartoon fruit characters.
You can also add texture by filling in a small area with seed stitches or outlining a single fruit with a running stitch.
These tiny additions take only a few minutes but make a store-bought pattern feel uniquely handmade.
15. Compose a Delicate Corner Handkerchief Motif
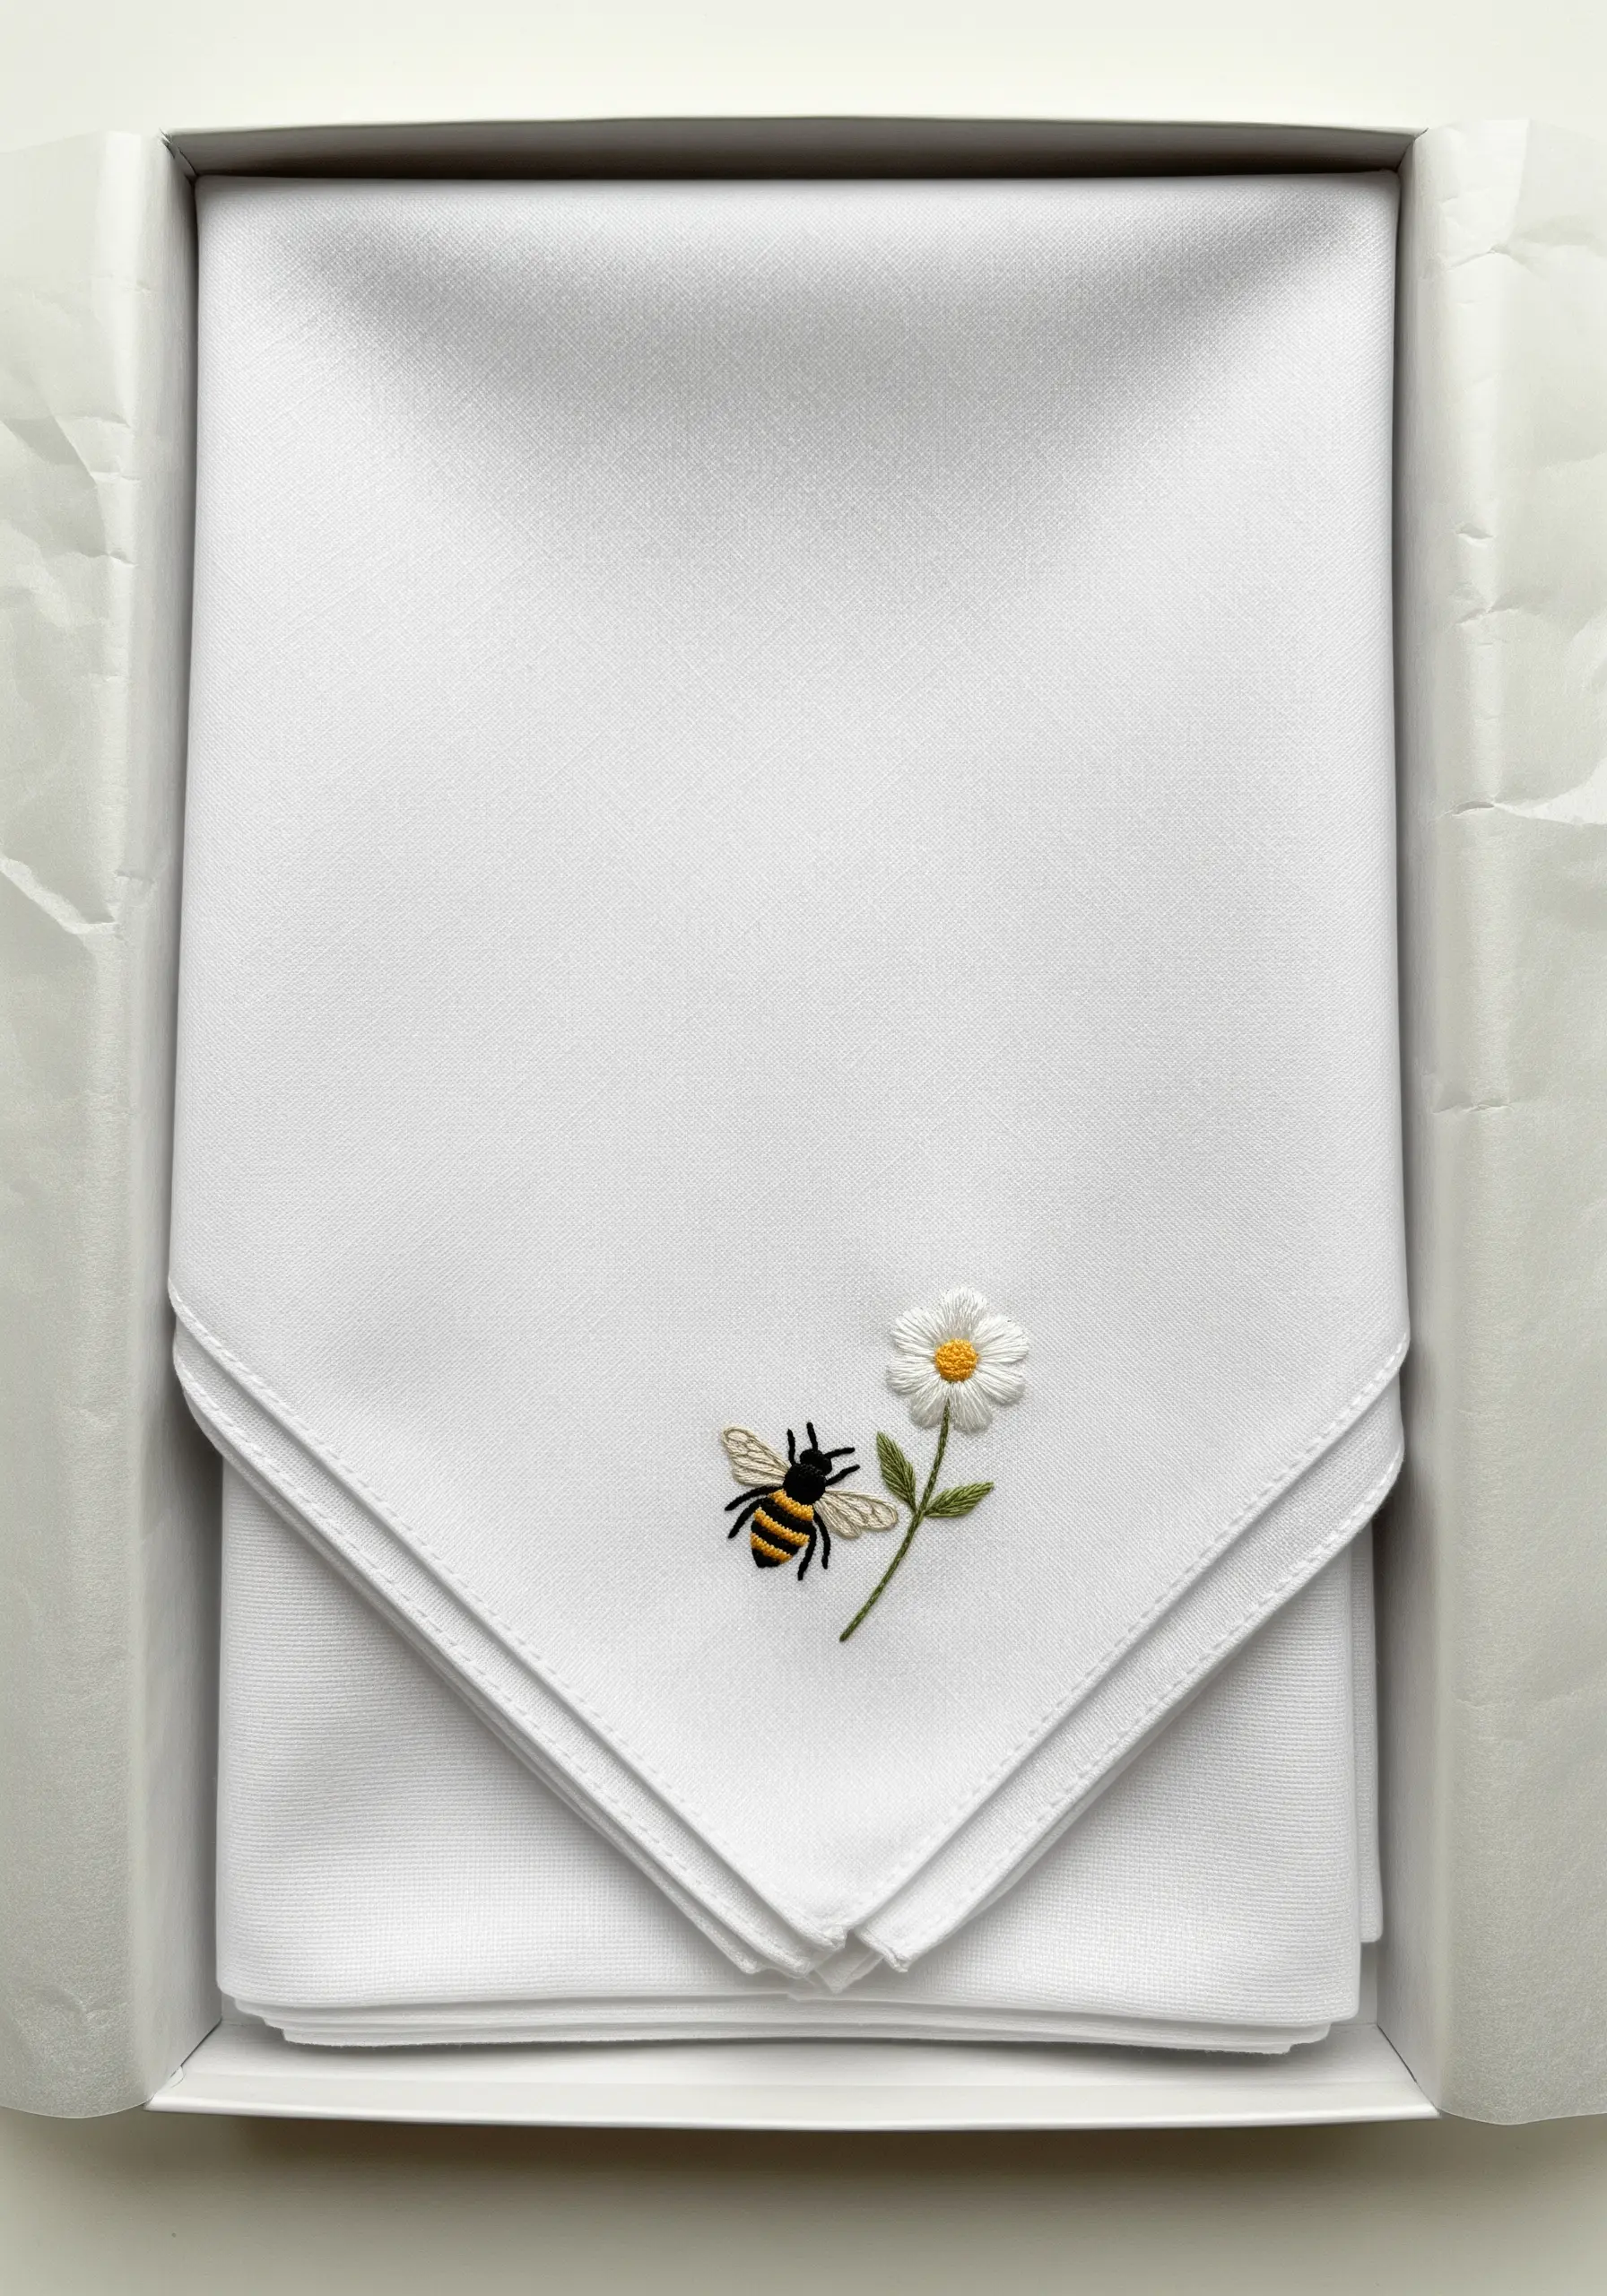
When embellishing a fine linen handkerchief, less is more.
Create a small, asymmetrical design in one corner that feels light and balanced.
Combine a single lazy daisy flower with a bee motif created using satin stitch for the body and delicate straight stitches for the wings.
Using only two or three strands of floss will ensure the embroidery remains delicate and doesn’t pucker the fine fabric.
16. Frame Appliqué with a Bold Blanket Stitch
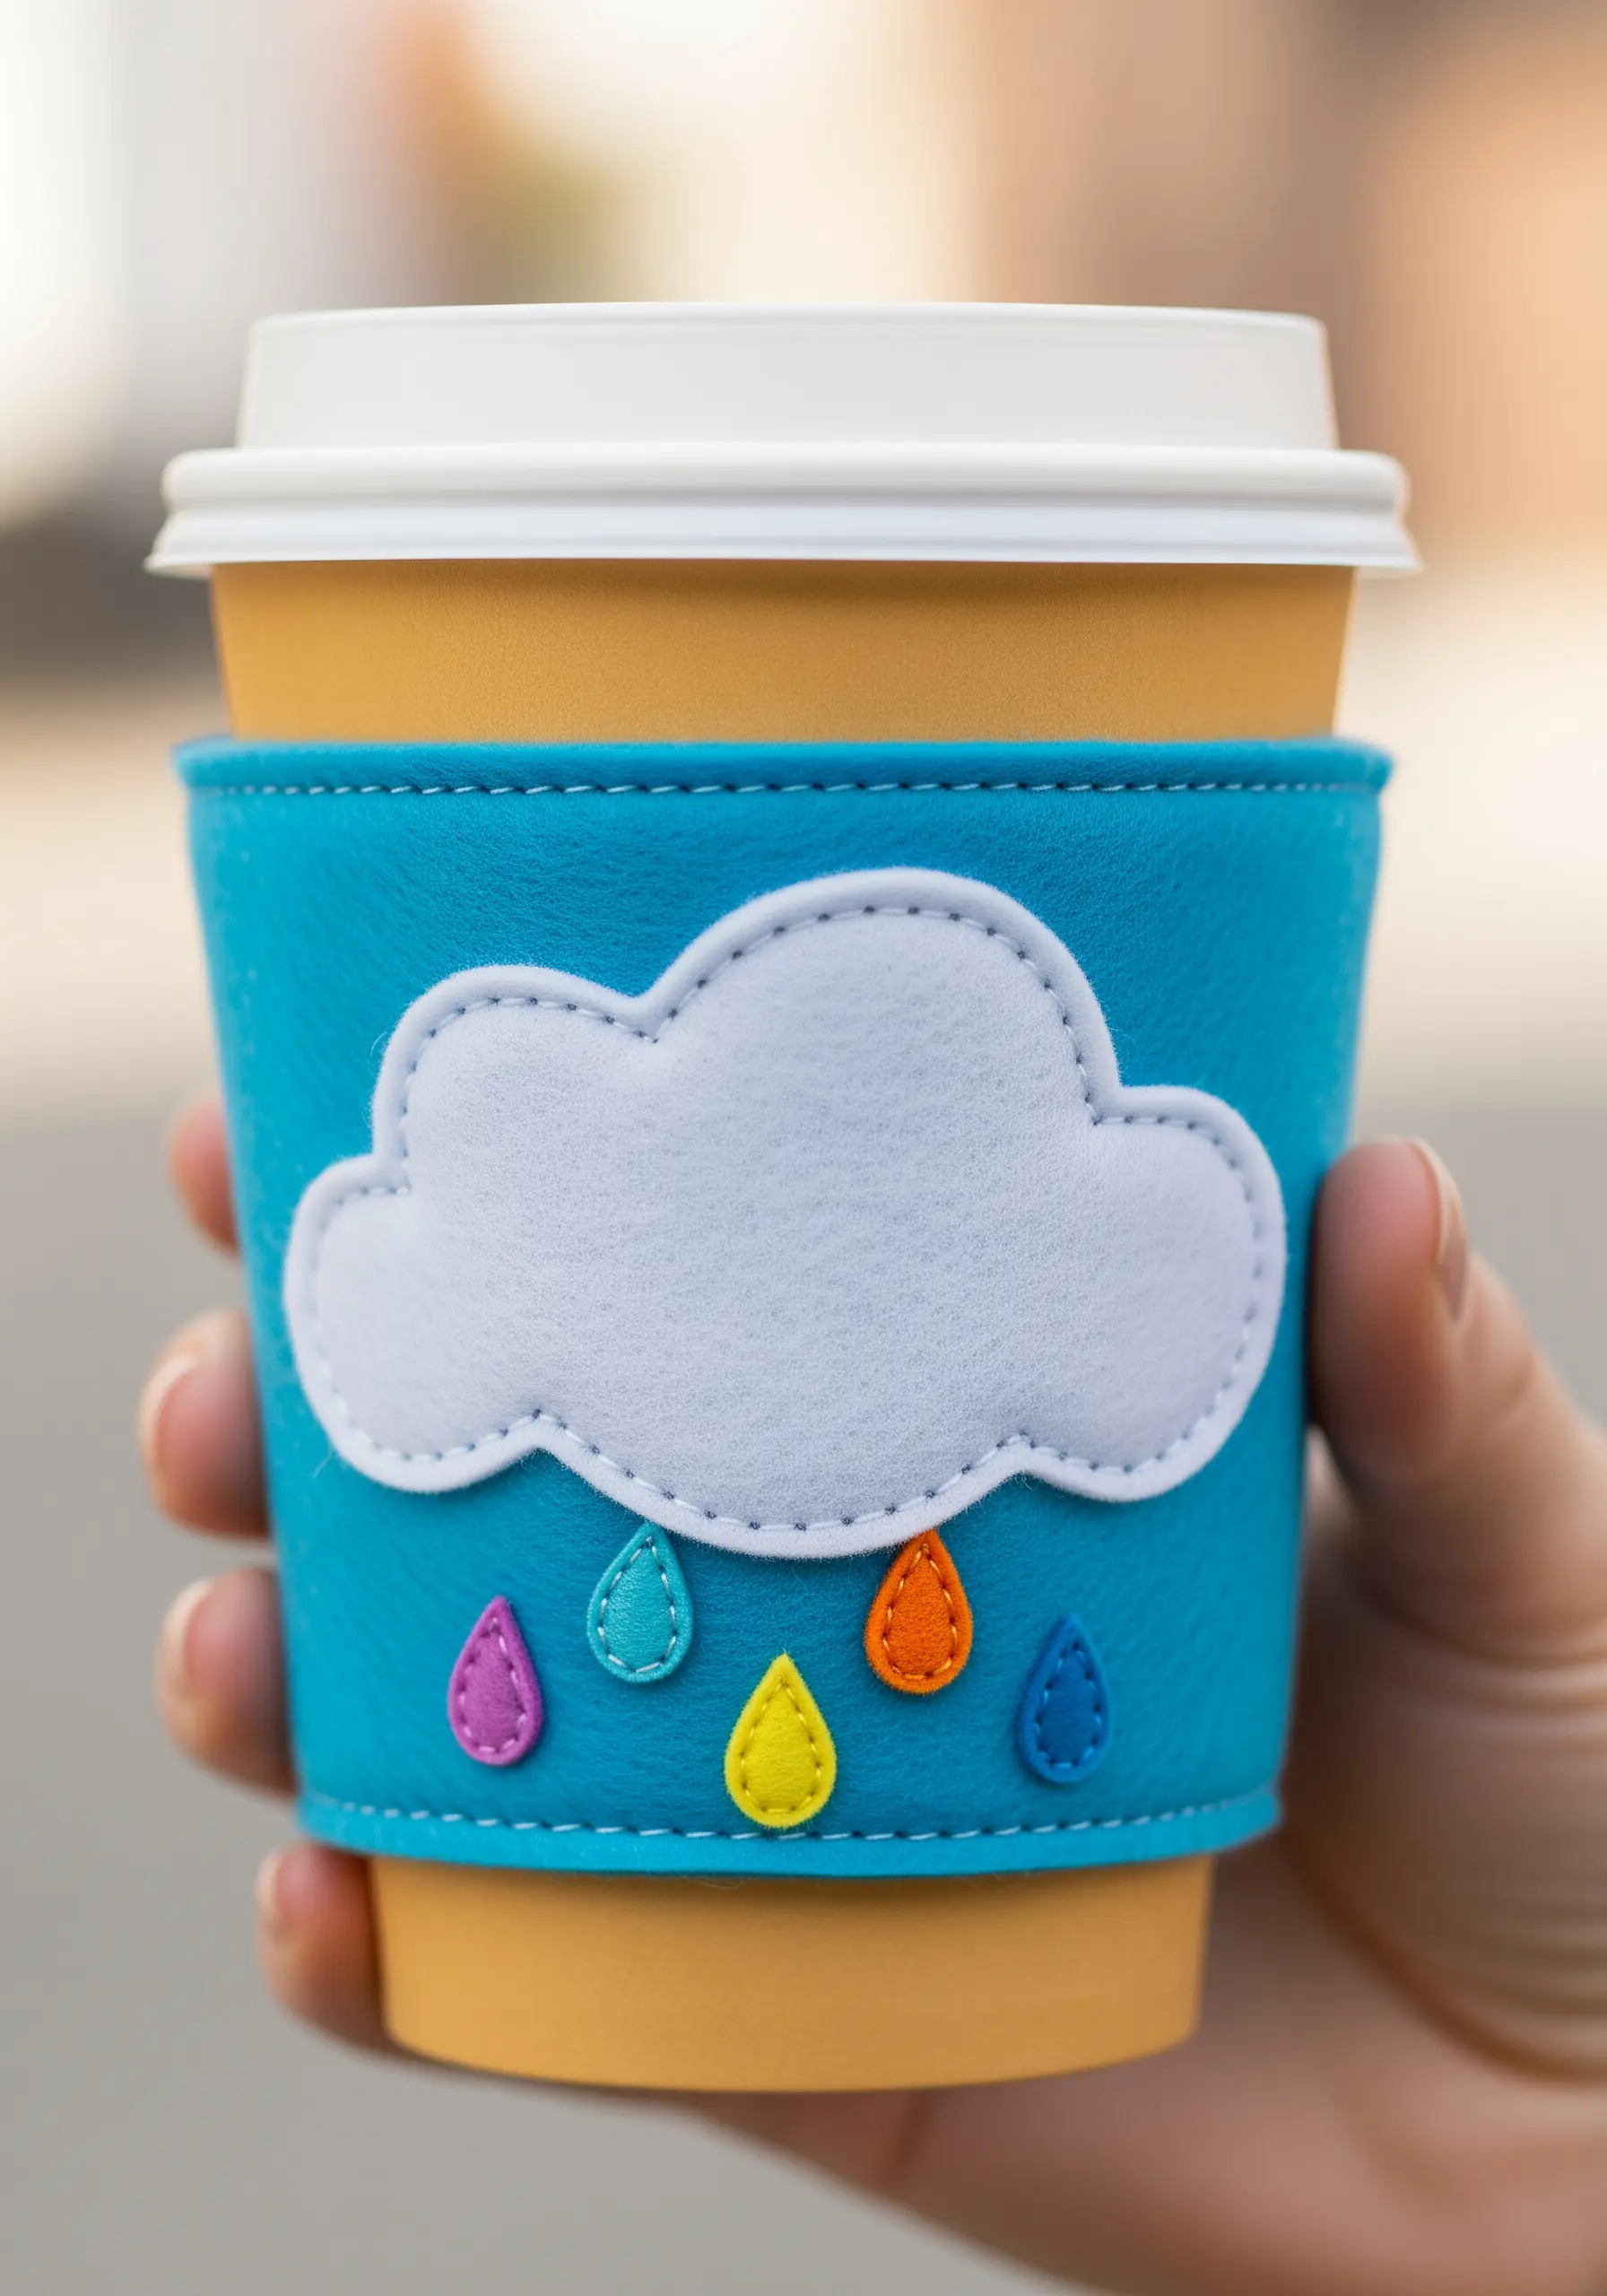
Turn your functional stitches into a primary design feature on a felt coffee sleeve.
Instead of a discreet running stitch, use a thick, contrasting thread to apply your felt shapes with a bold blanket stitch.
Space your stitches evenly to create a decorative border that frames the cloud and raindrops.
This technique adds a playful, handcrafted charm and makes the entire piece feel more substantial and finished.
17. Combine Beading and Embroidery for Luxe Detail
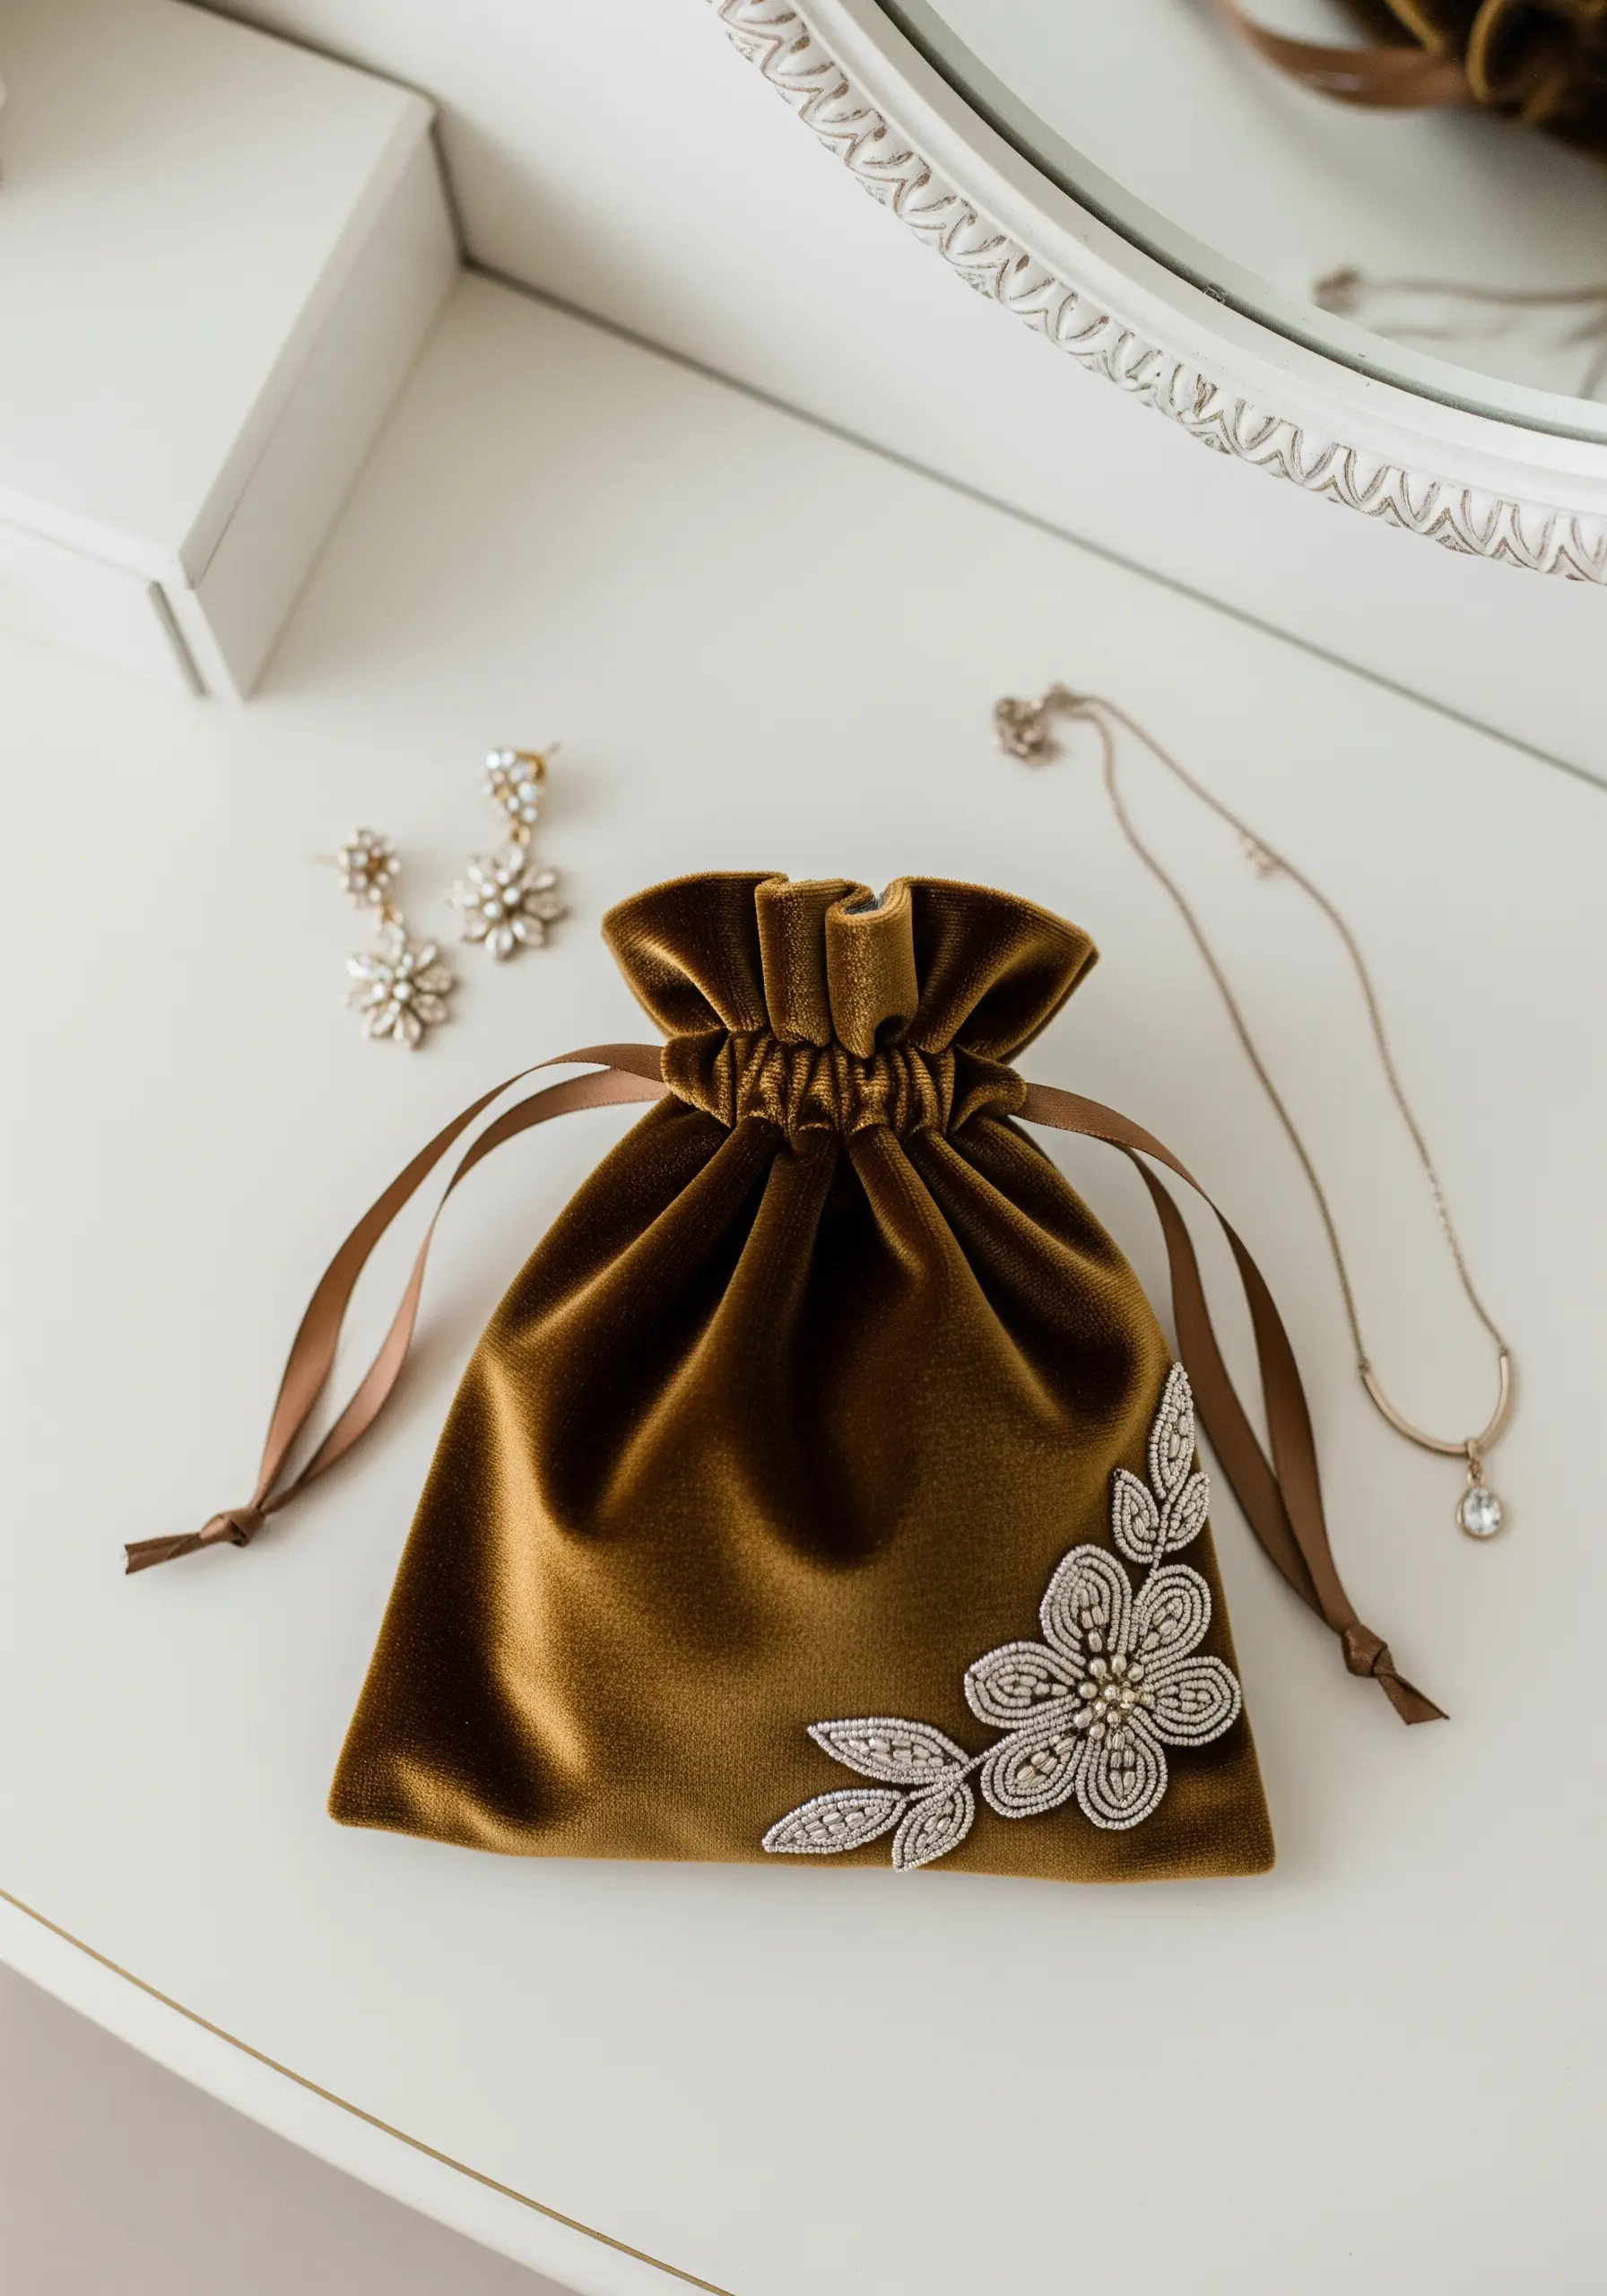
For an exceptionally luxurious gift, combine the softness of embroidery with the sparkle of beads.
On a velvet jewelry pouch, first create the structure of your floral design using a simple split stitch or stem stitch for the outlines.
Then, come back and fill the petals and leaves with tiny seed beads, securing each one with a small stitch.
This mixed-media approach adds texture, light, and a sense of opulence that feels incredibly special.
18. Add a Personal Touch to Fabric Corner Bookmarks
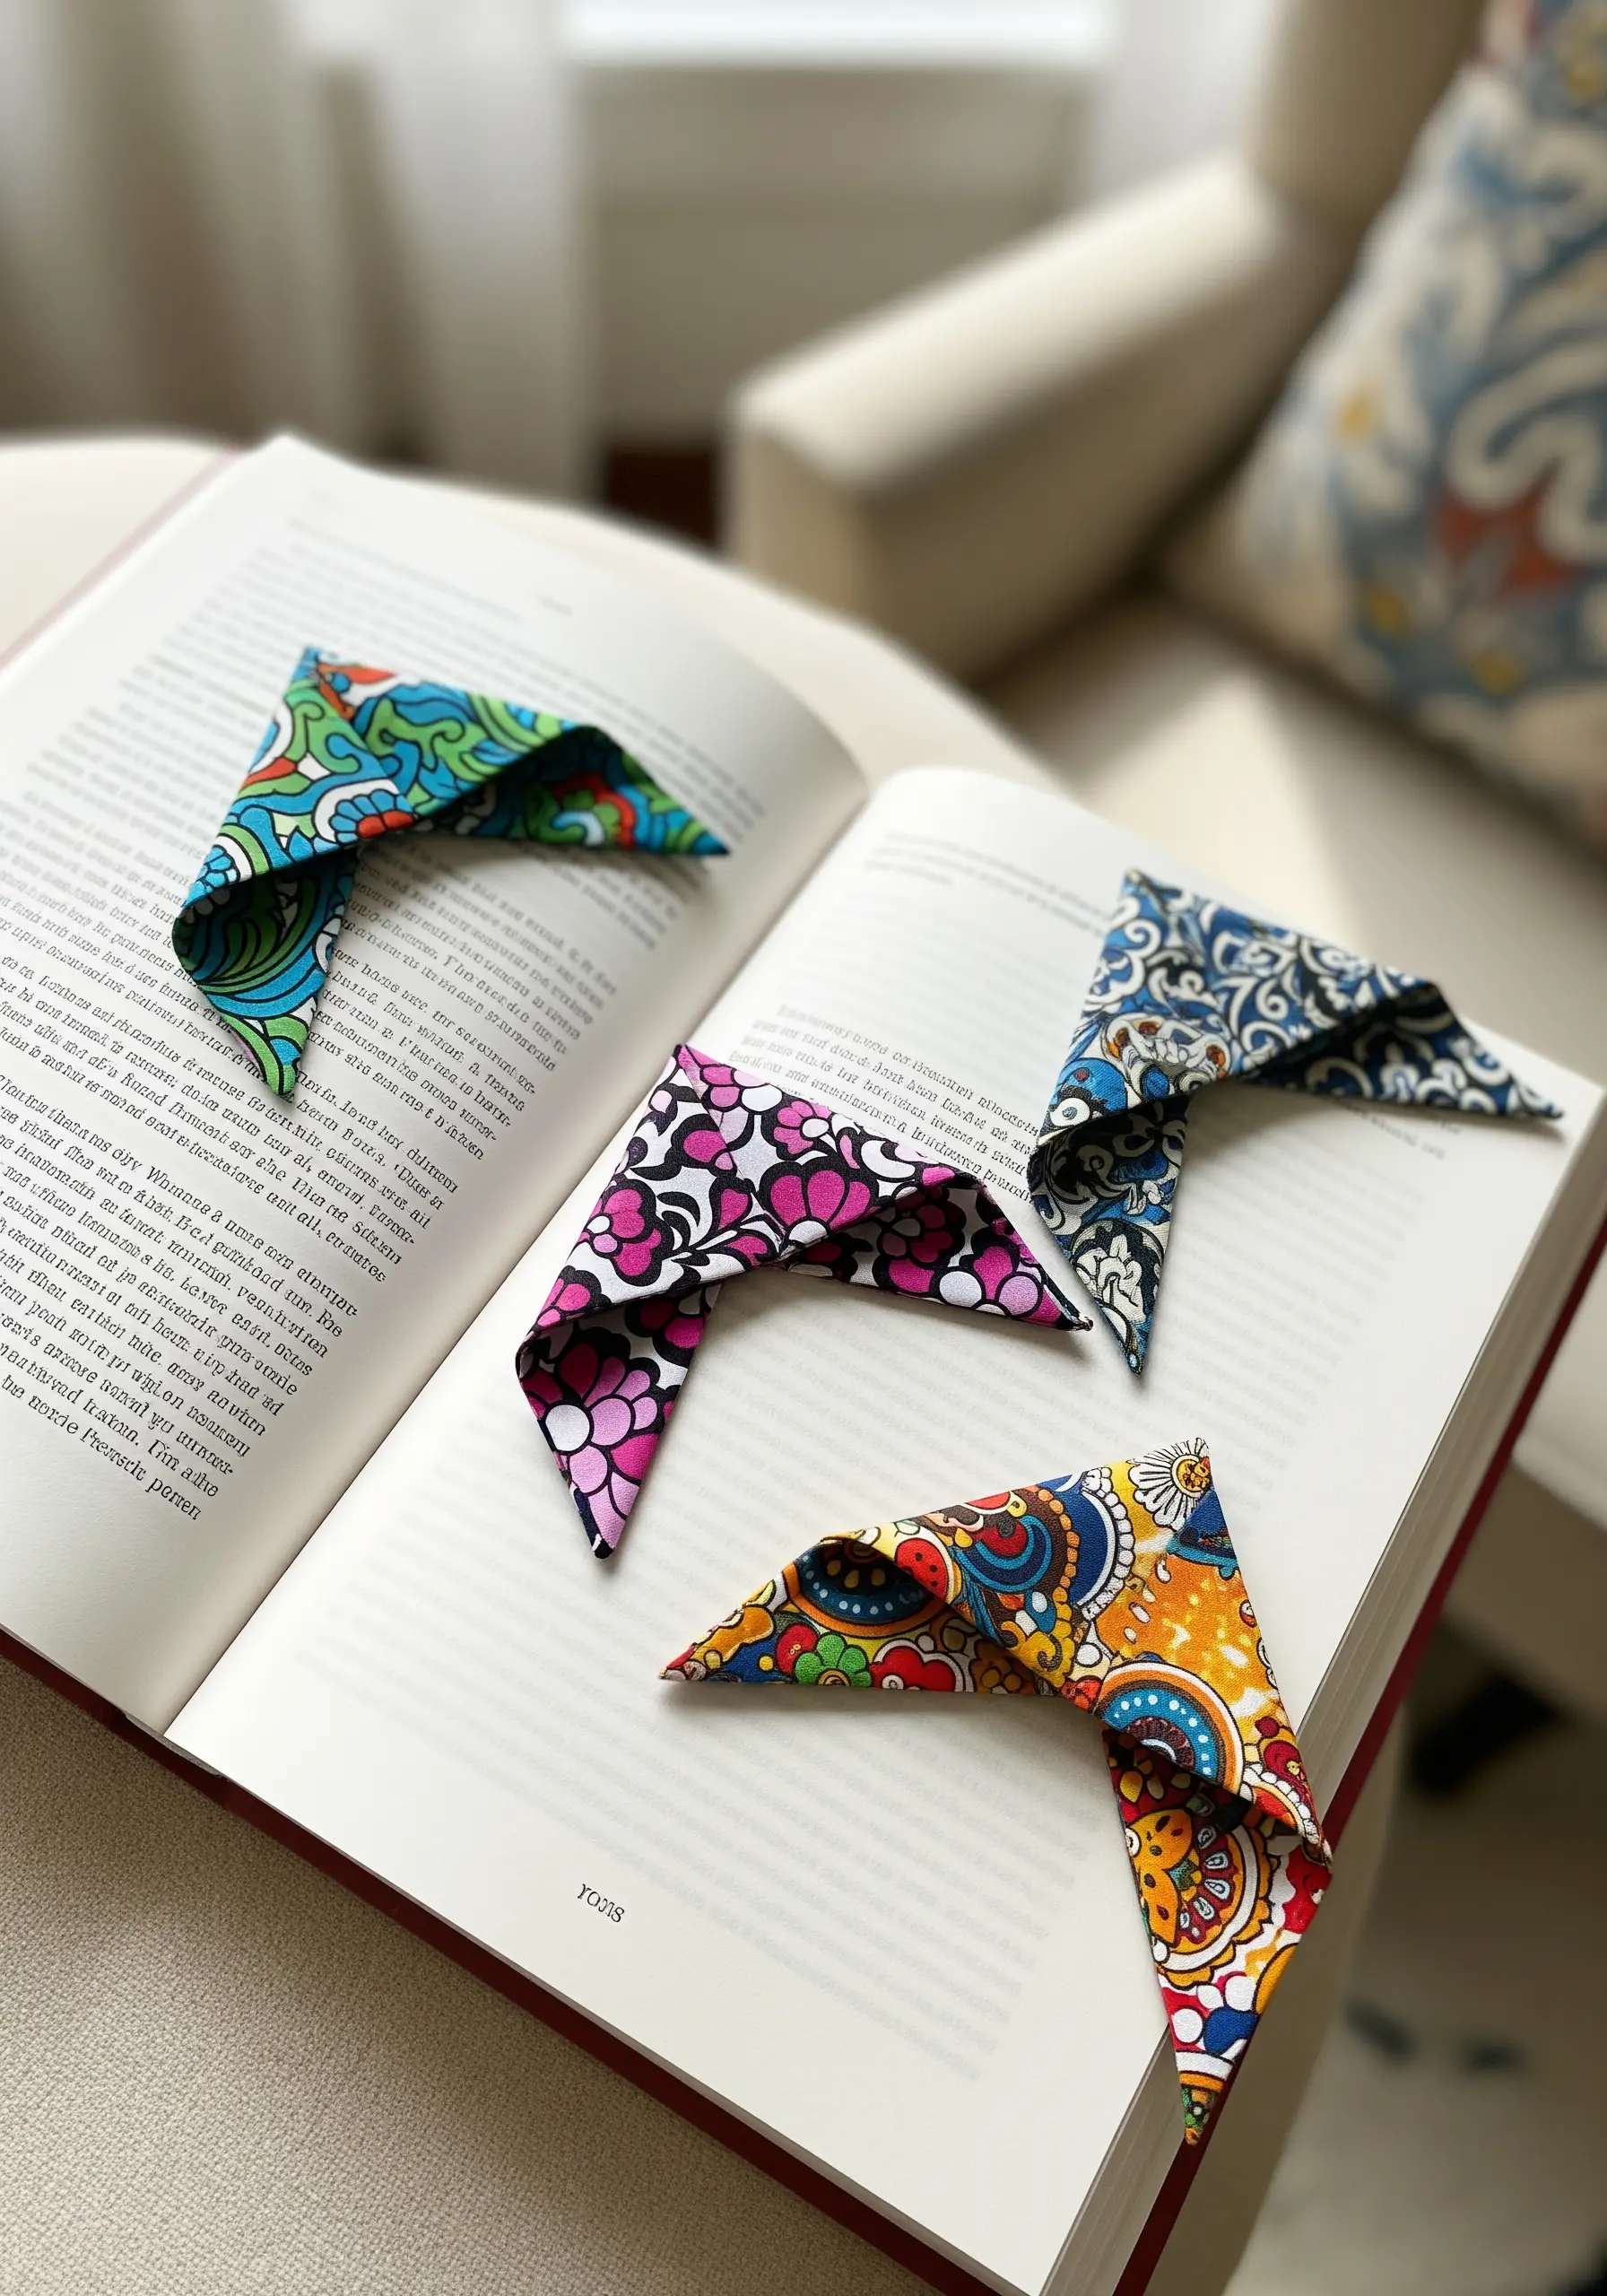
A set of simple, folded-fabric bookmarks is a wonderfully quick gift, but a touch of embroidery makes it personal.
Before you do the final fold and stitch, add a tiny embroidered initial or a simple starburst stitch in a contrasting color on the front corner.
It’s a discreet detail that transforms a simple scrap-busting project into a thoughtful, customized present for a book lover.
19. Create Miniature Texture in an Embroidery Pendant
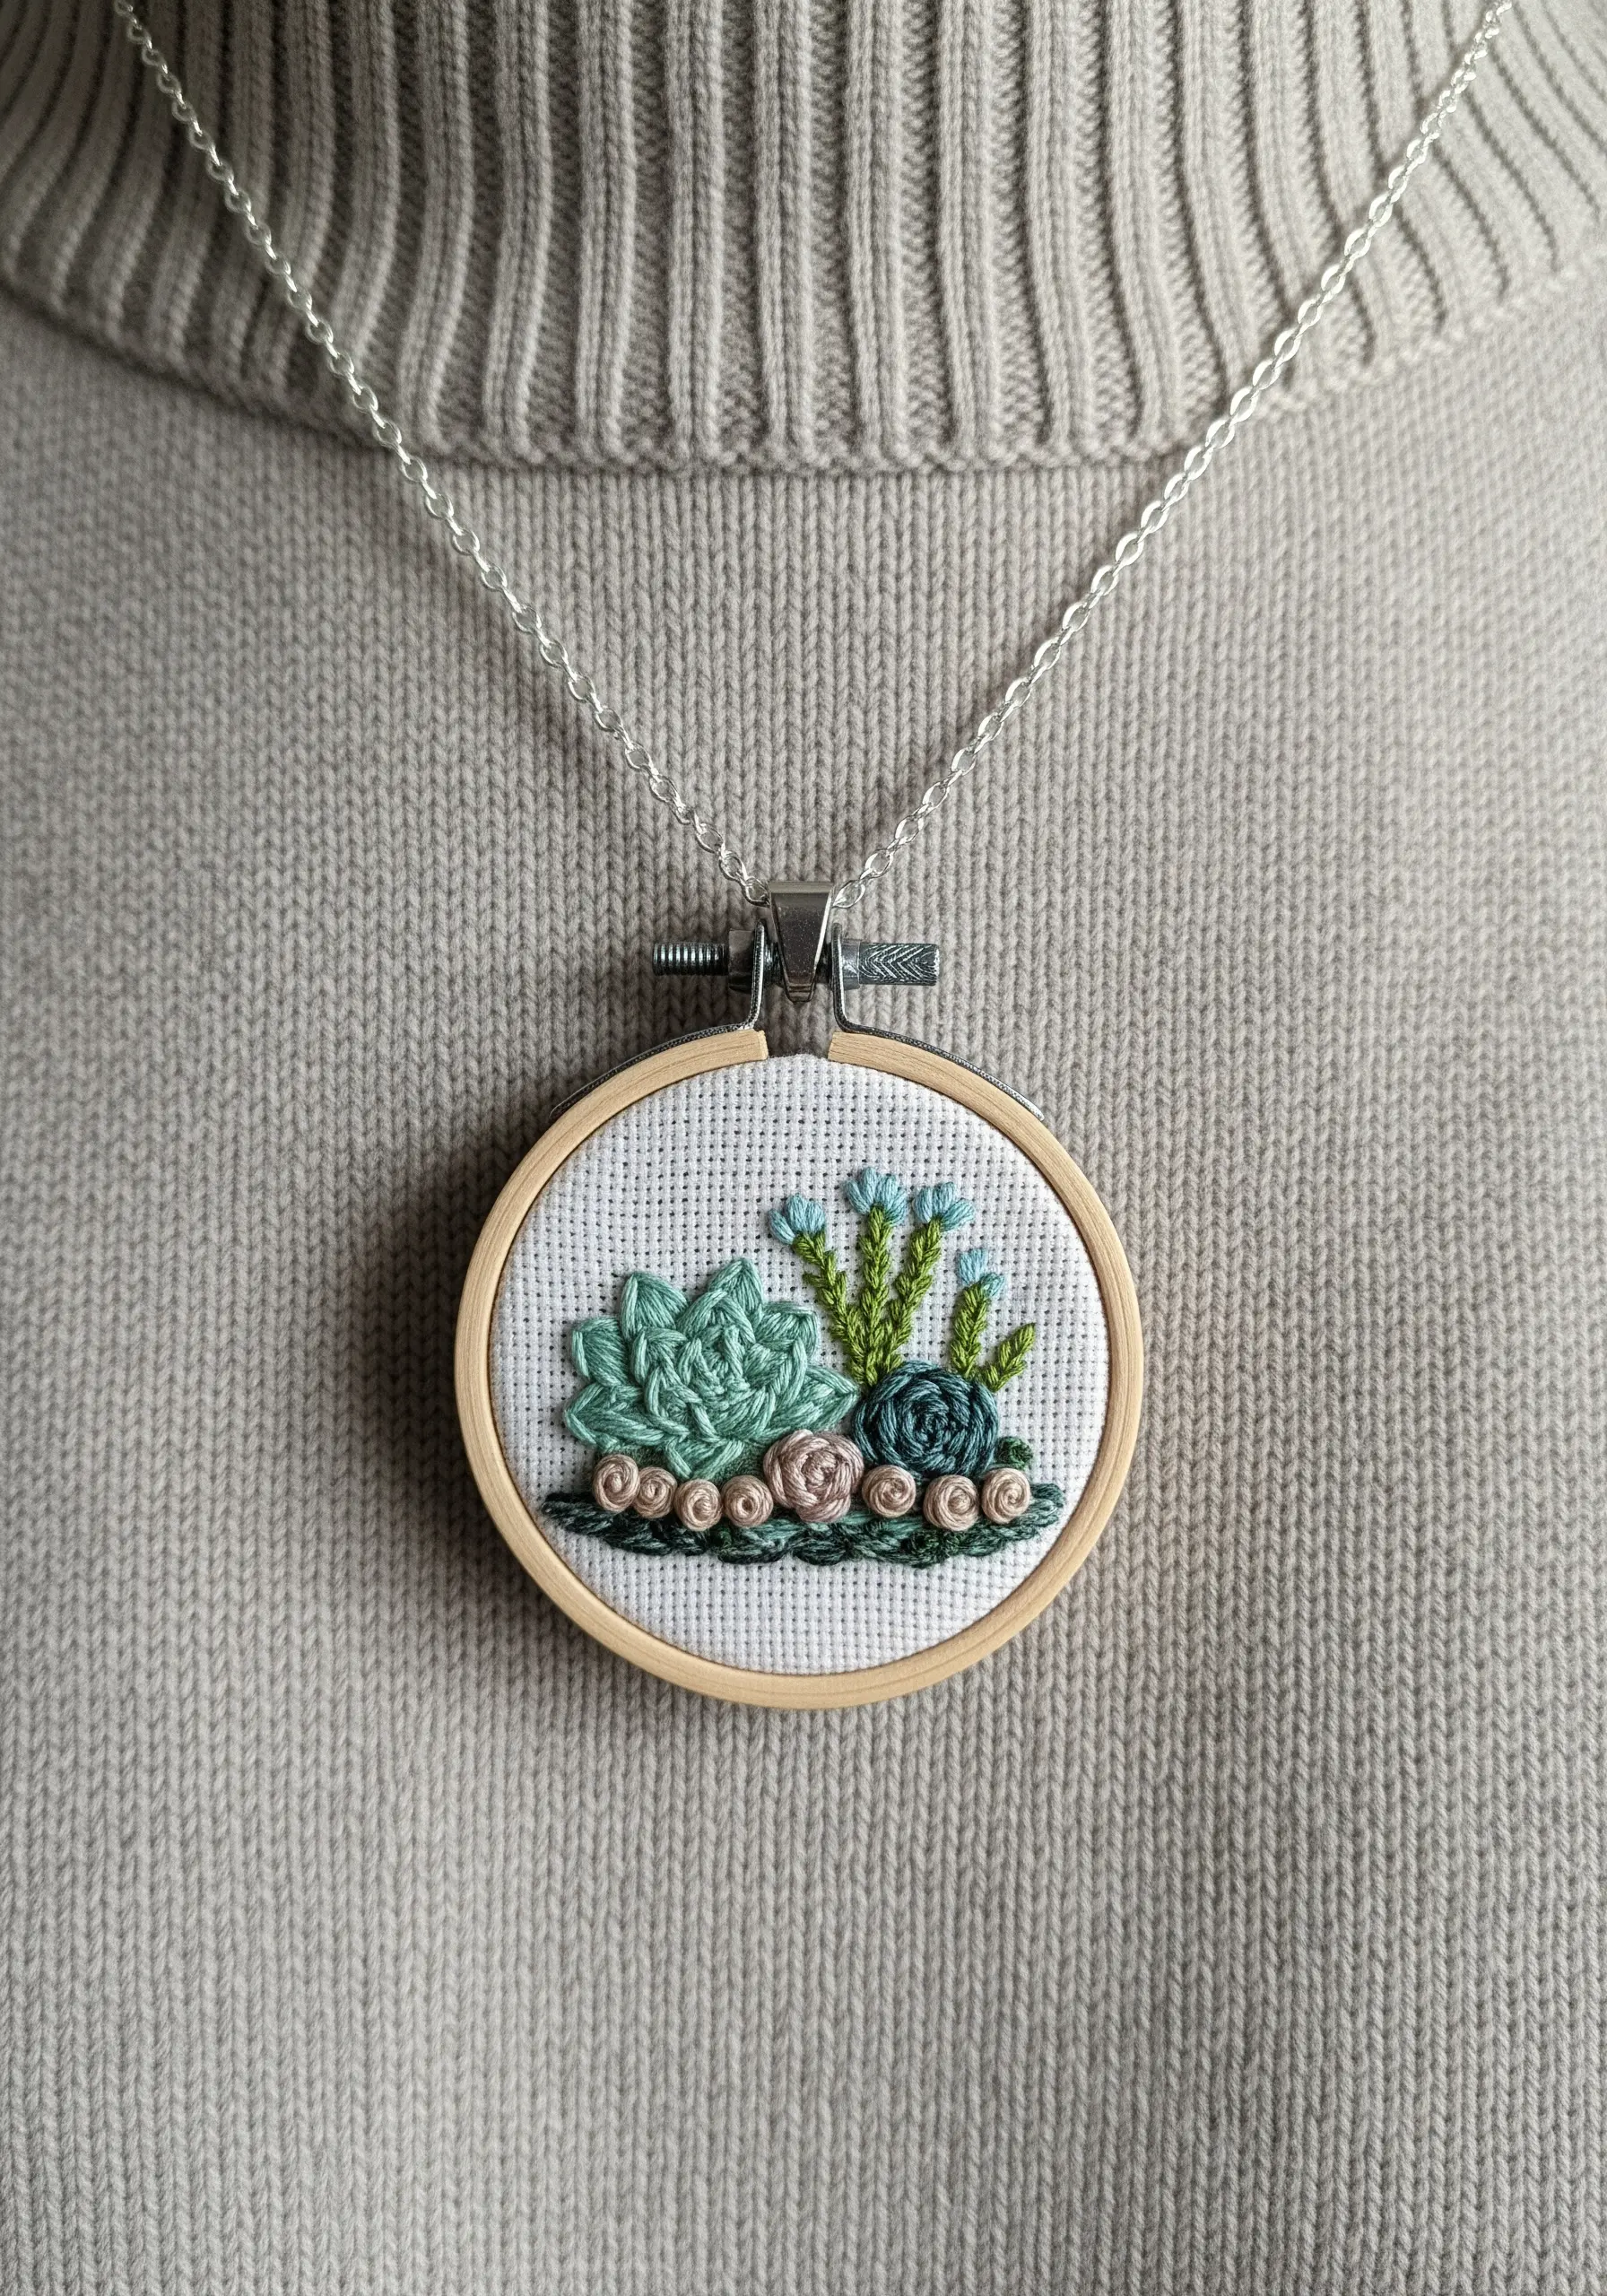
When working on a miniature scale, texture is everything.
For a tiny pendant, use stitches that create dimension, like woven wheel roses and French knots.
Always work with a single strand of floss to keep the details from looking bulky or crowded.
Even though the stitches are small, their raised surfaces catch the light and create shadows, making the tiny succulent garden feel intricate and alive. Explore other minimalist stitch designs that fit in the palm of your hand.
20. Stitch on Cardstock for Unique Gift Tags
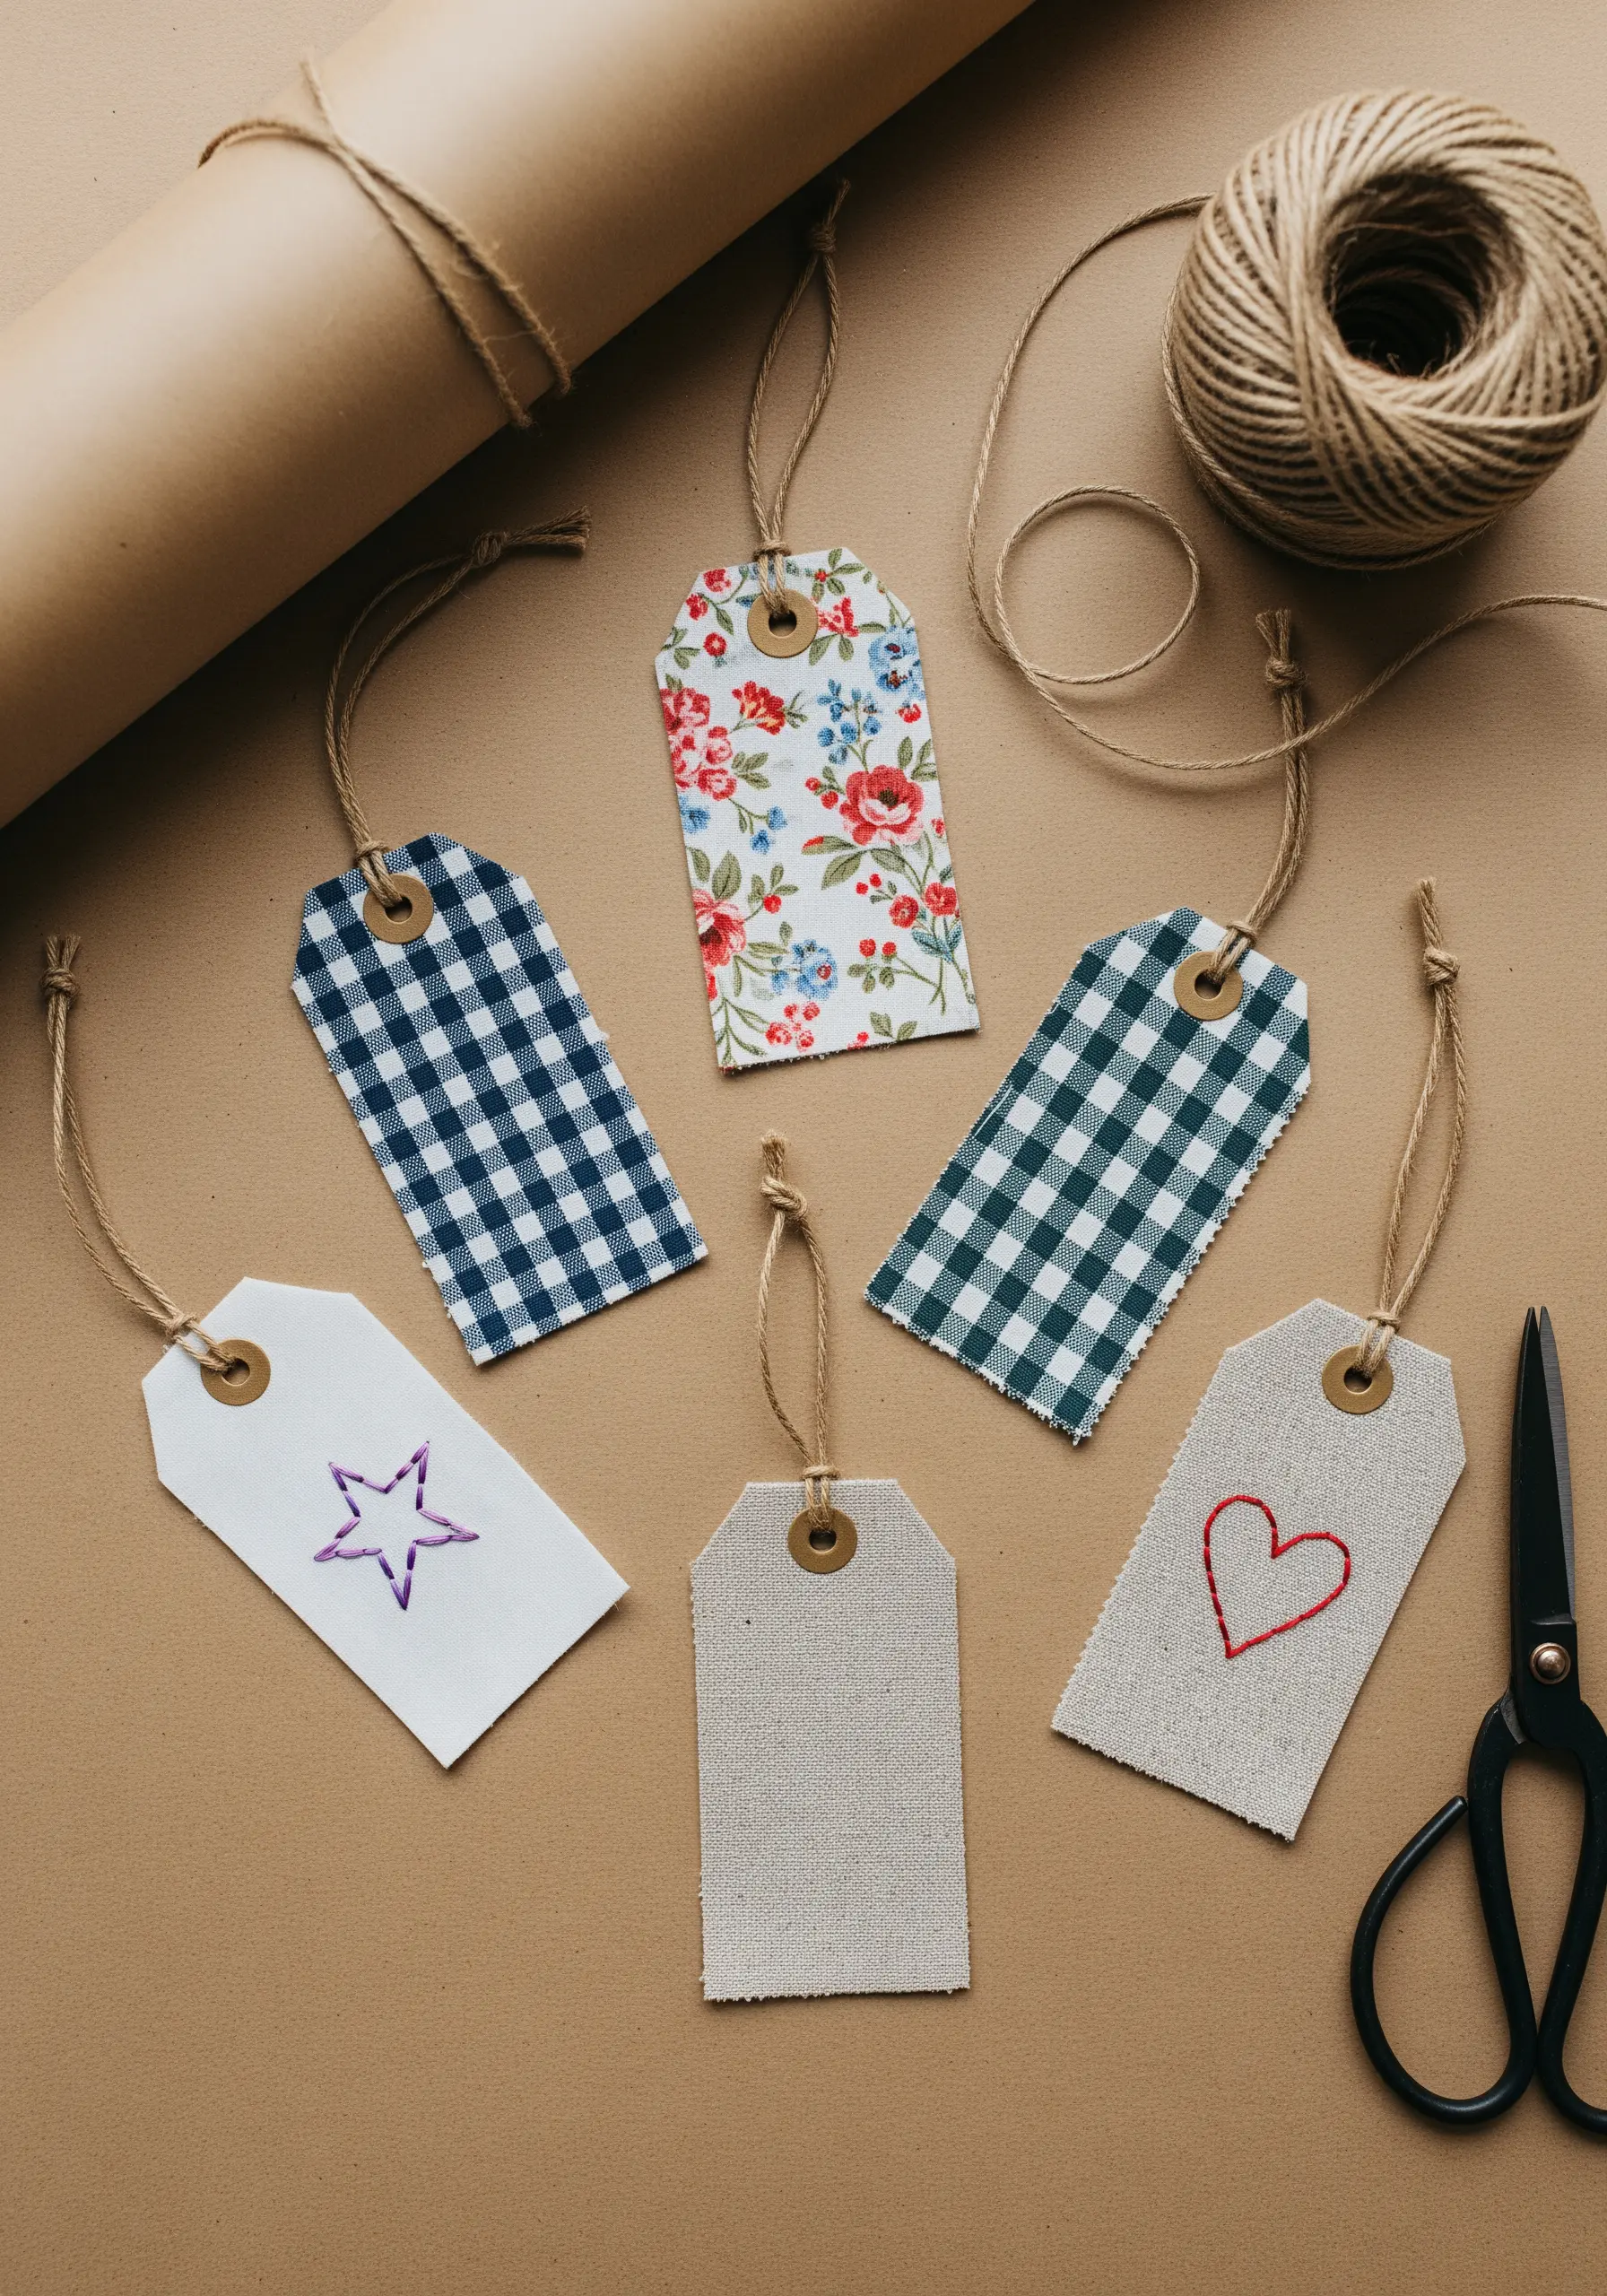
Embroidering on paper or cardstock is a fast and delightful way to create gift tags that double as keepsakes.
First, lightly sketch your design, then use a pin or awl to pre-punch holes along the lines before you begin stitching.
This prevents the paper from tearing and ensures your stitches are even.
A simple backstitch is perfect for creating clean, graphic shapes that turn a humble gift tag into a tiny piece of art. These small handmade projects that double as thoughtful gifts are always a wonderful surprise.
21. Add a Decorative Finish with Contrasting Topstitching
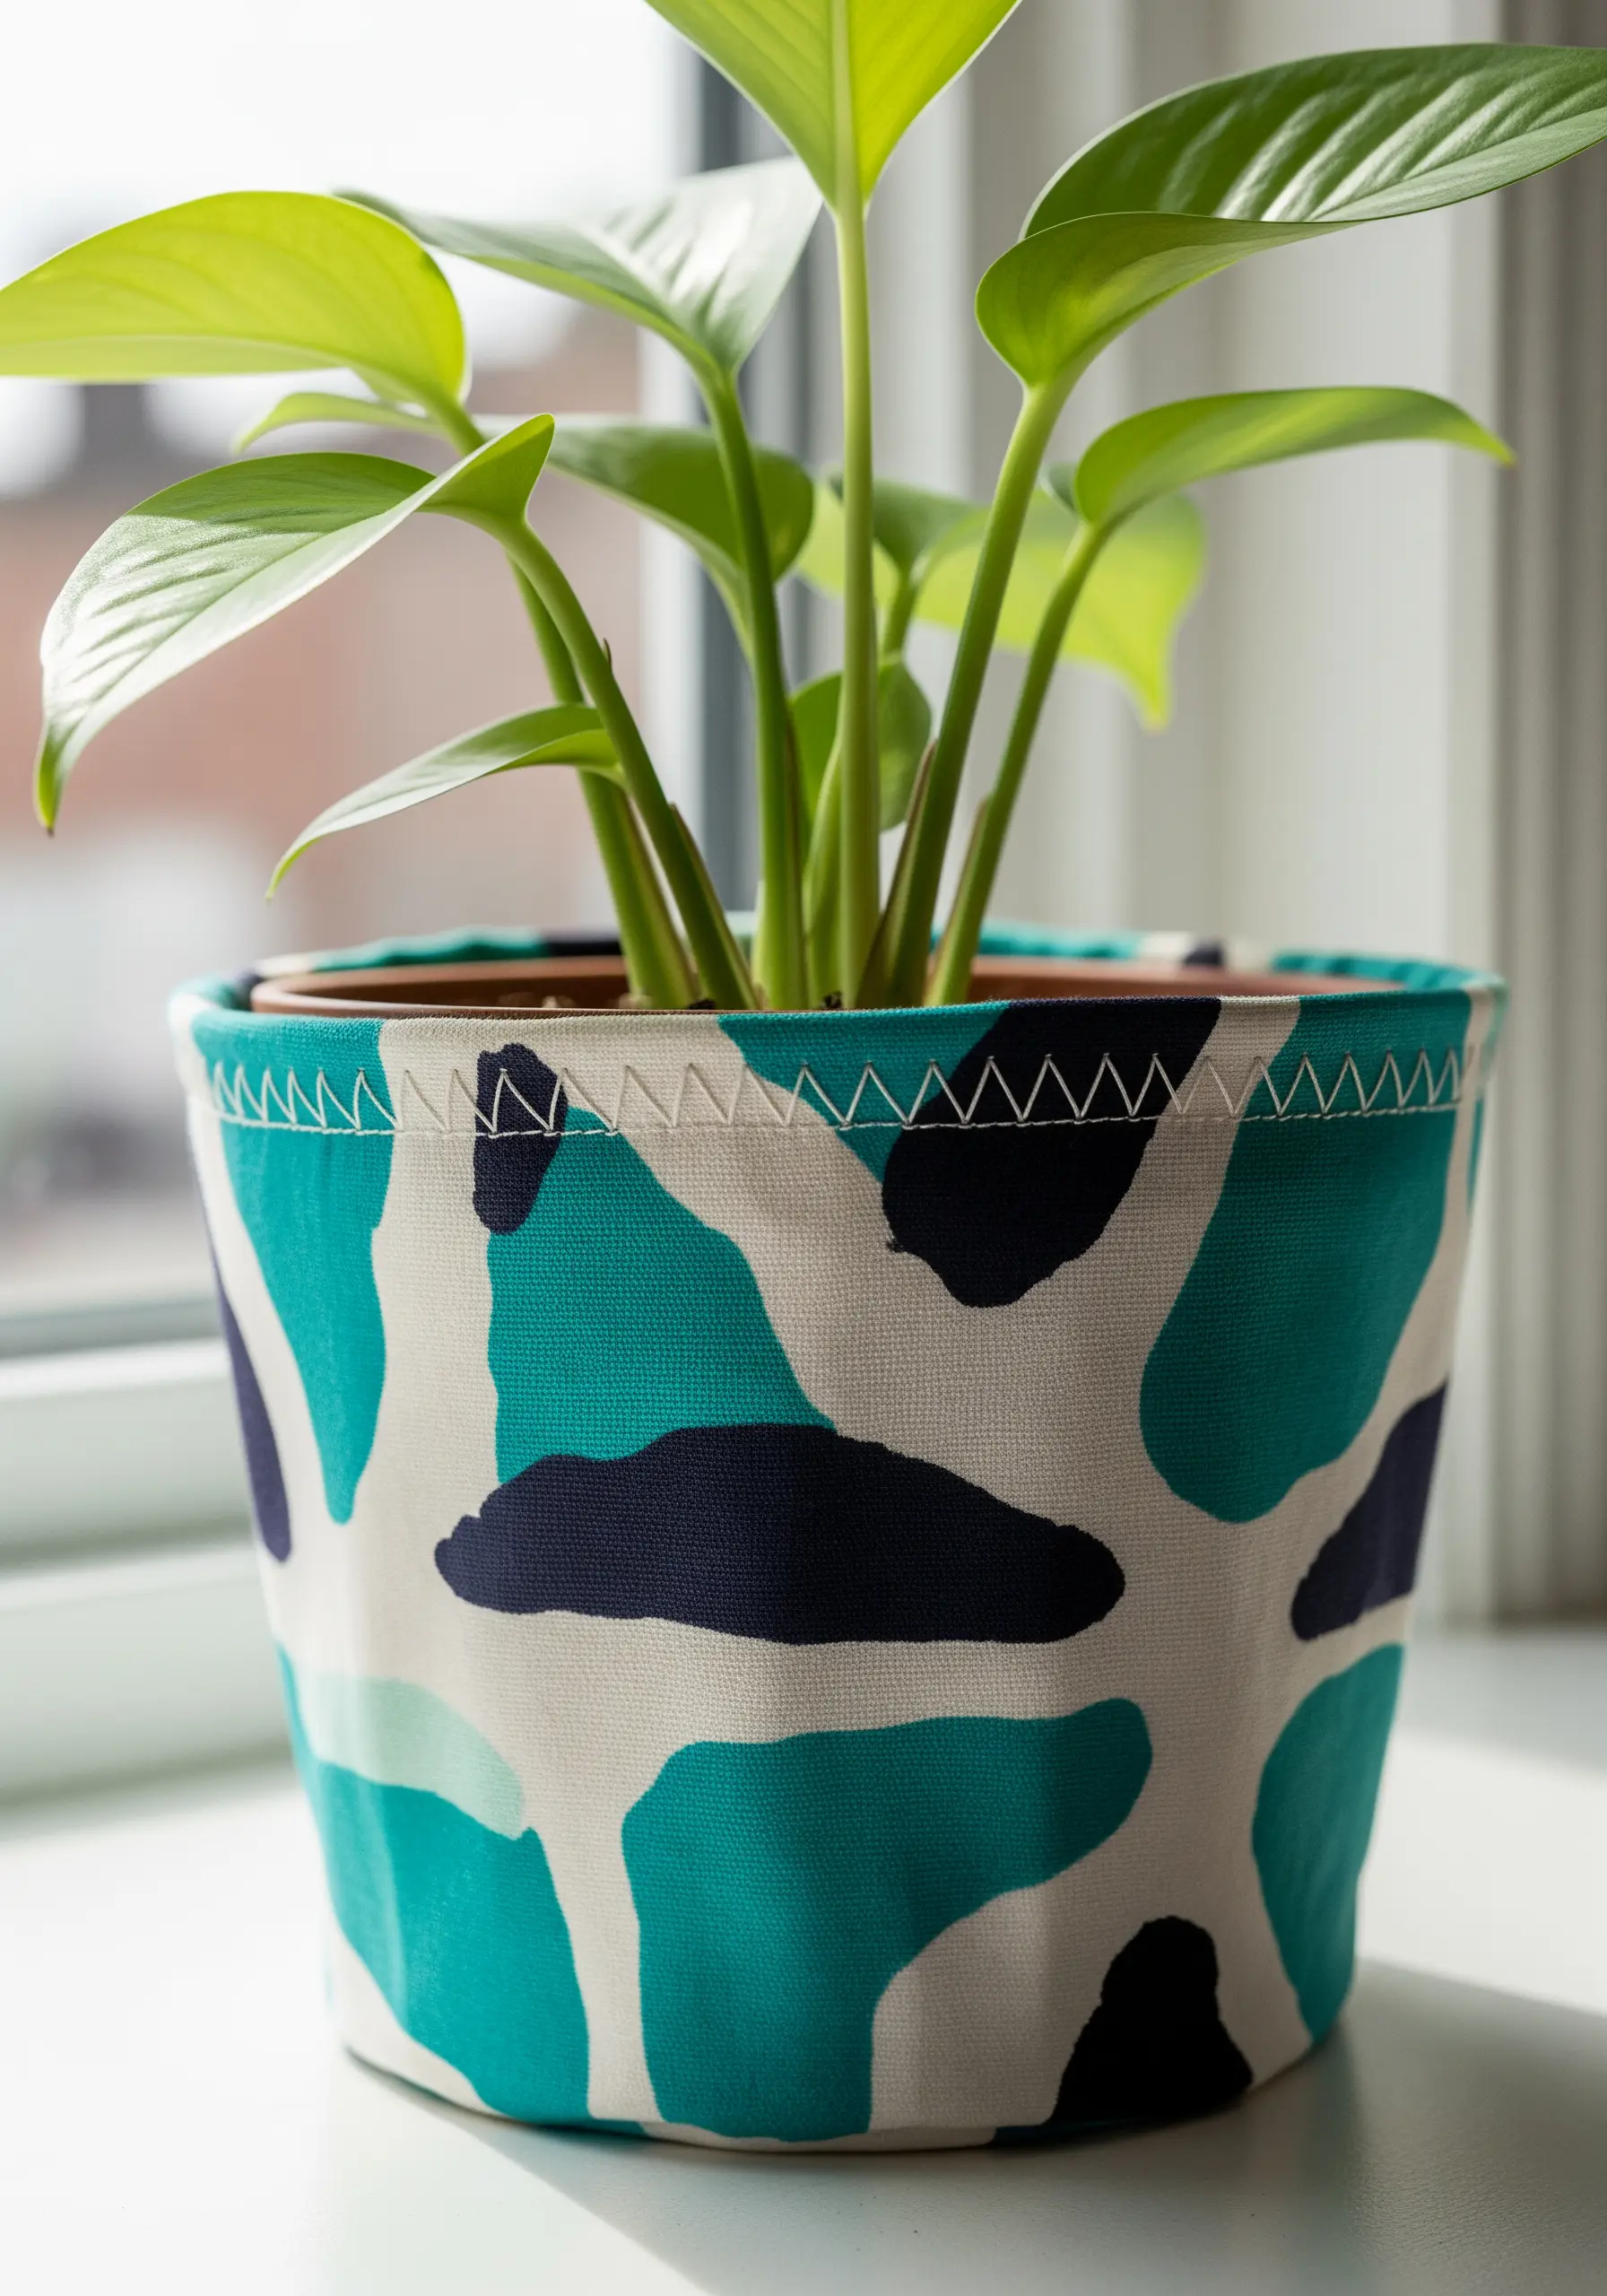
Elevate a simple fabric plant pot cover with a decorative topstitch that is both functional and beautiful.
Using a thick thread like #5 pearl cotton or sashiko thread in a contrasting color, add a bold zigzag or blanket stitch around the top rim.
This not only reinforces the edge but also adds a polished, graphic detail that draws the eye and makes the project look professionally finished.
22. Use Printed Lines as a Guide for Sashiko Stitching
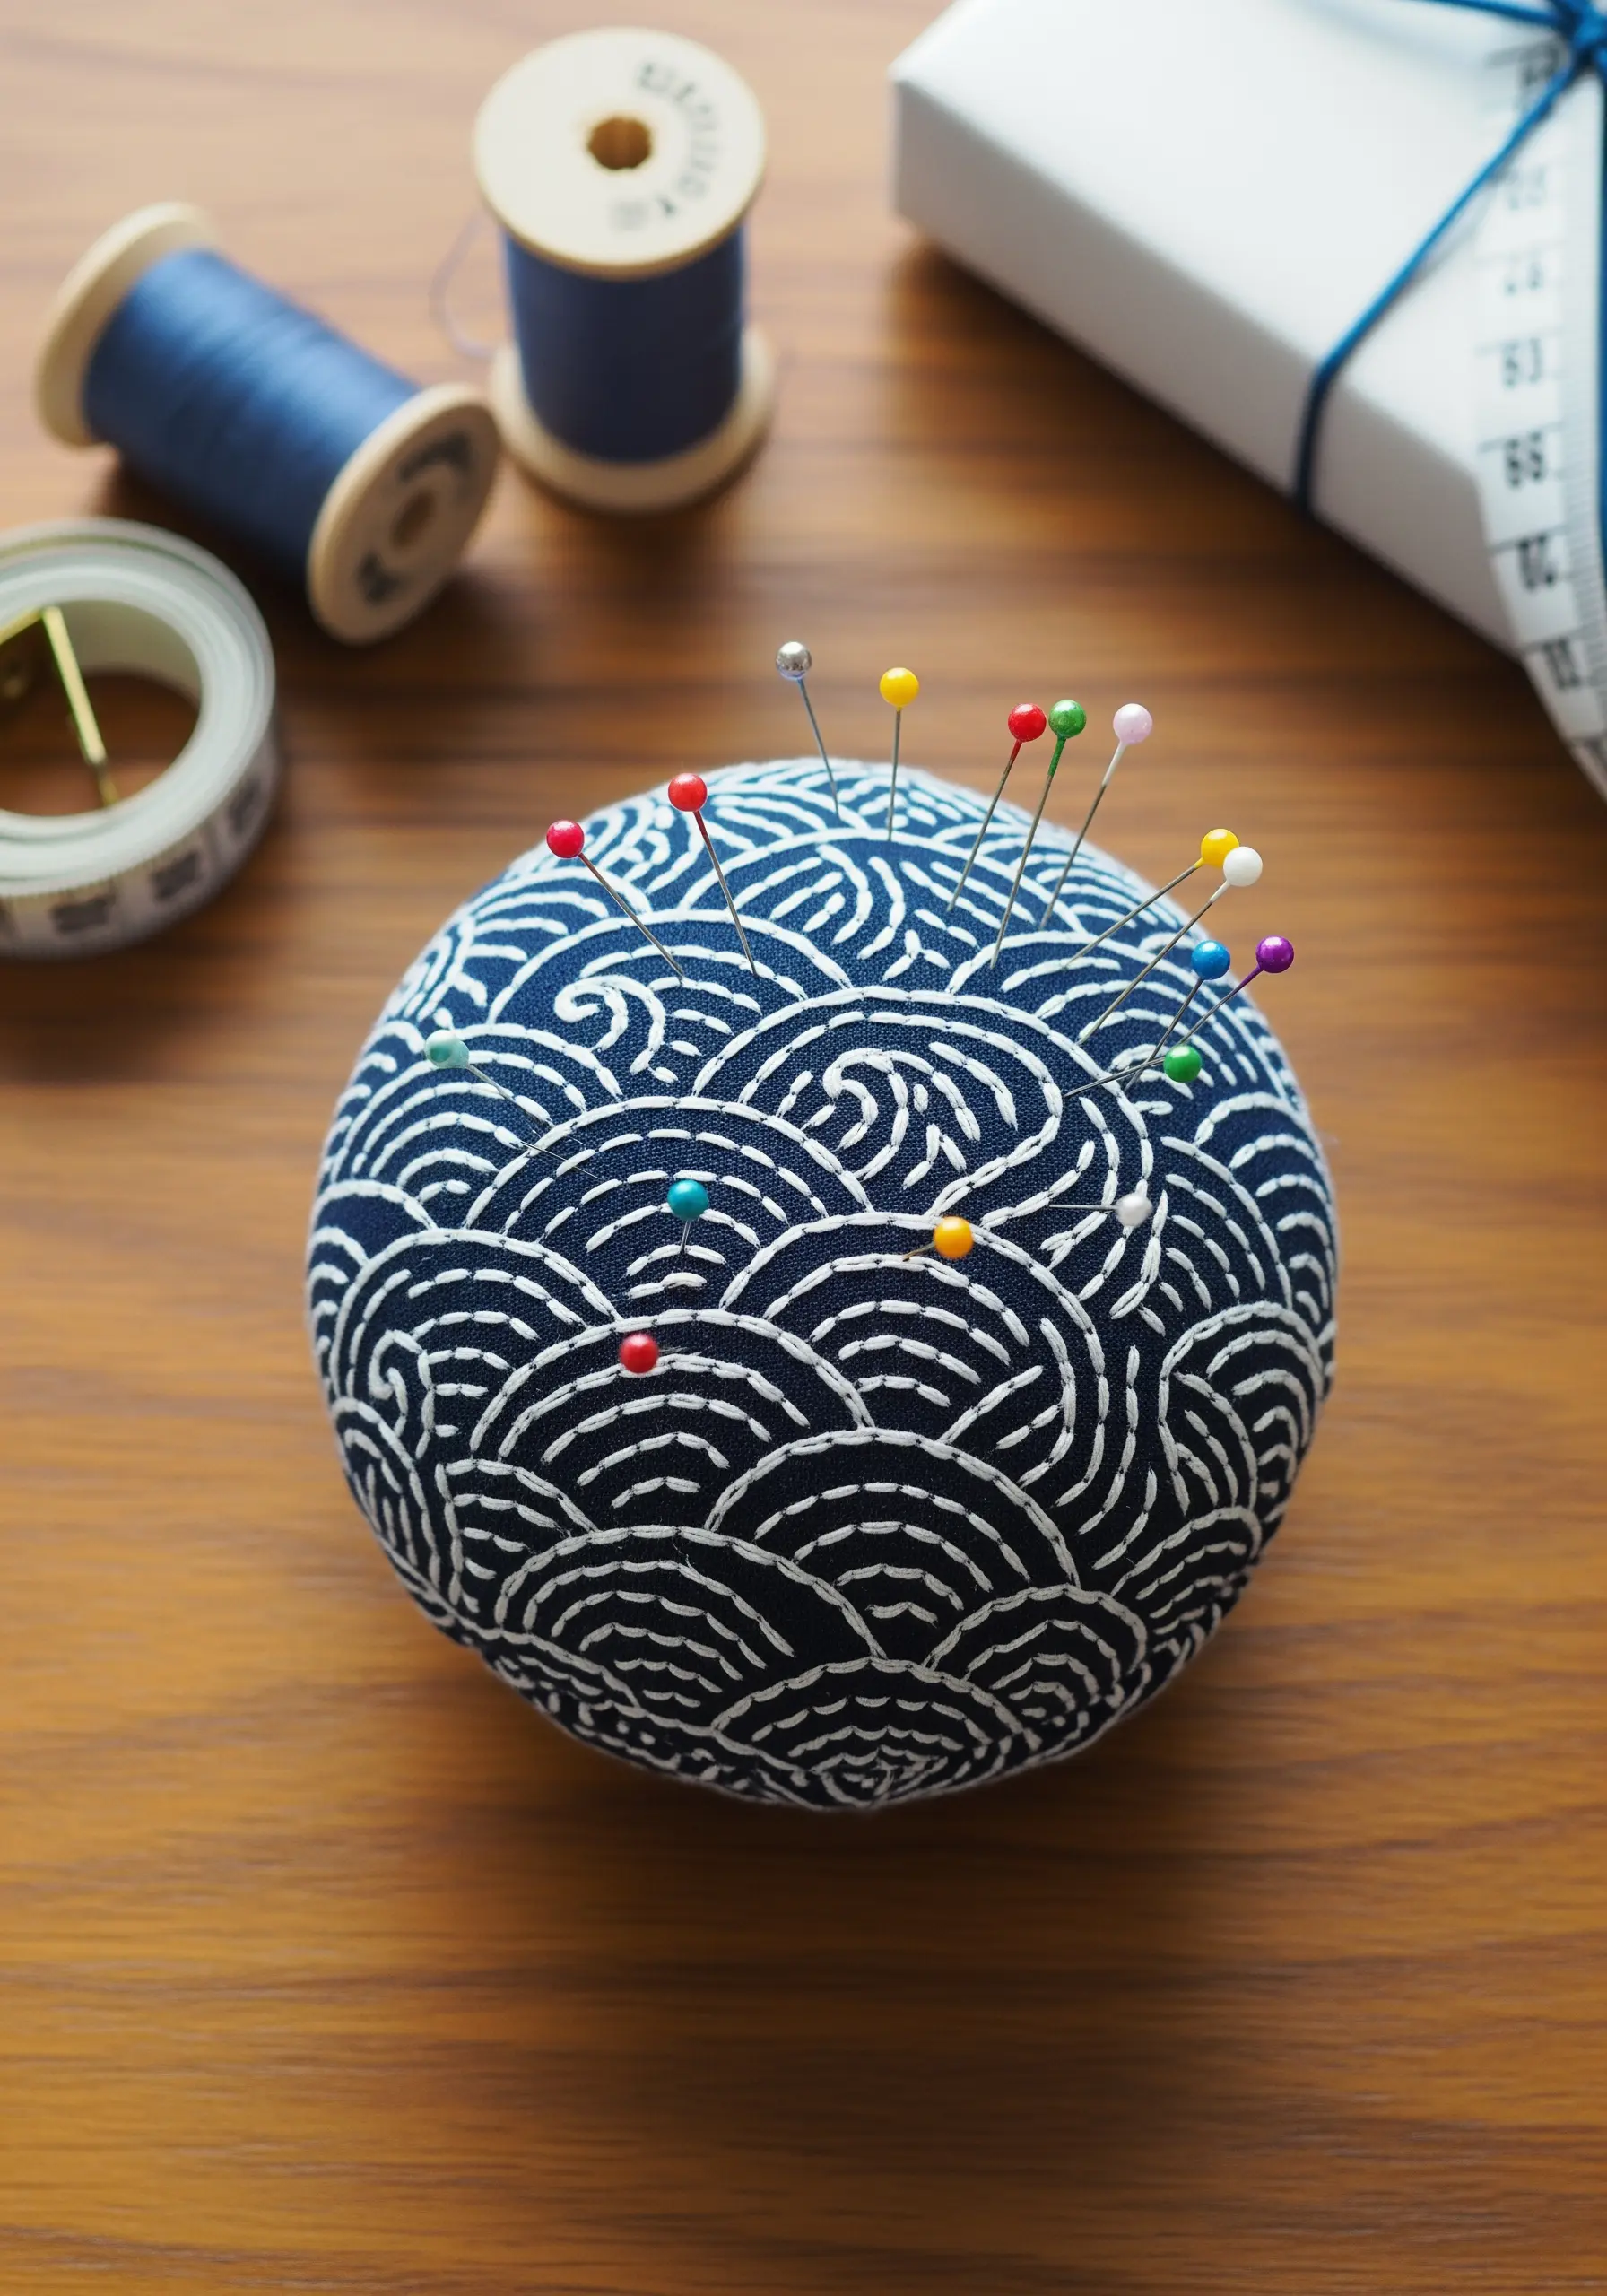
Transform a printed fabric into a meditative stitching project.
On a Japanese-inspired wave print, use the graphic lines as a guide for sashiko-style stitching.
With a simple running stitch in a contrasting white thread, trace the curves of the pattern to add texture and emphasize the design.
This technique turns a simple pincushion into a beautiful object that highlights both the print and the handiwork.
23. Turn Your Stitches into a Graphic Outline
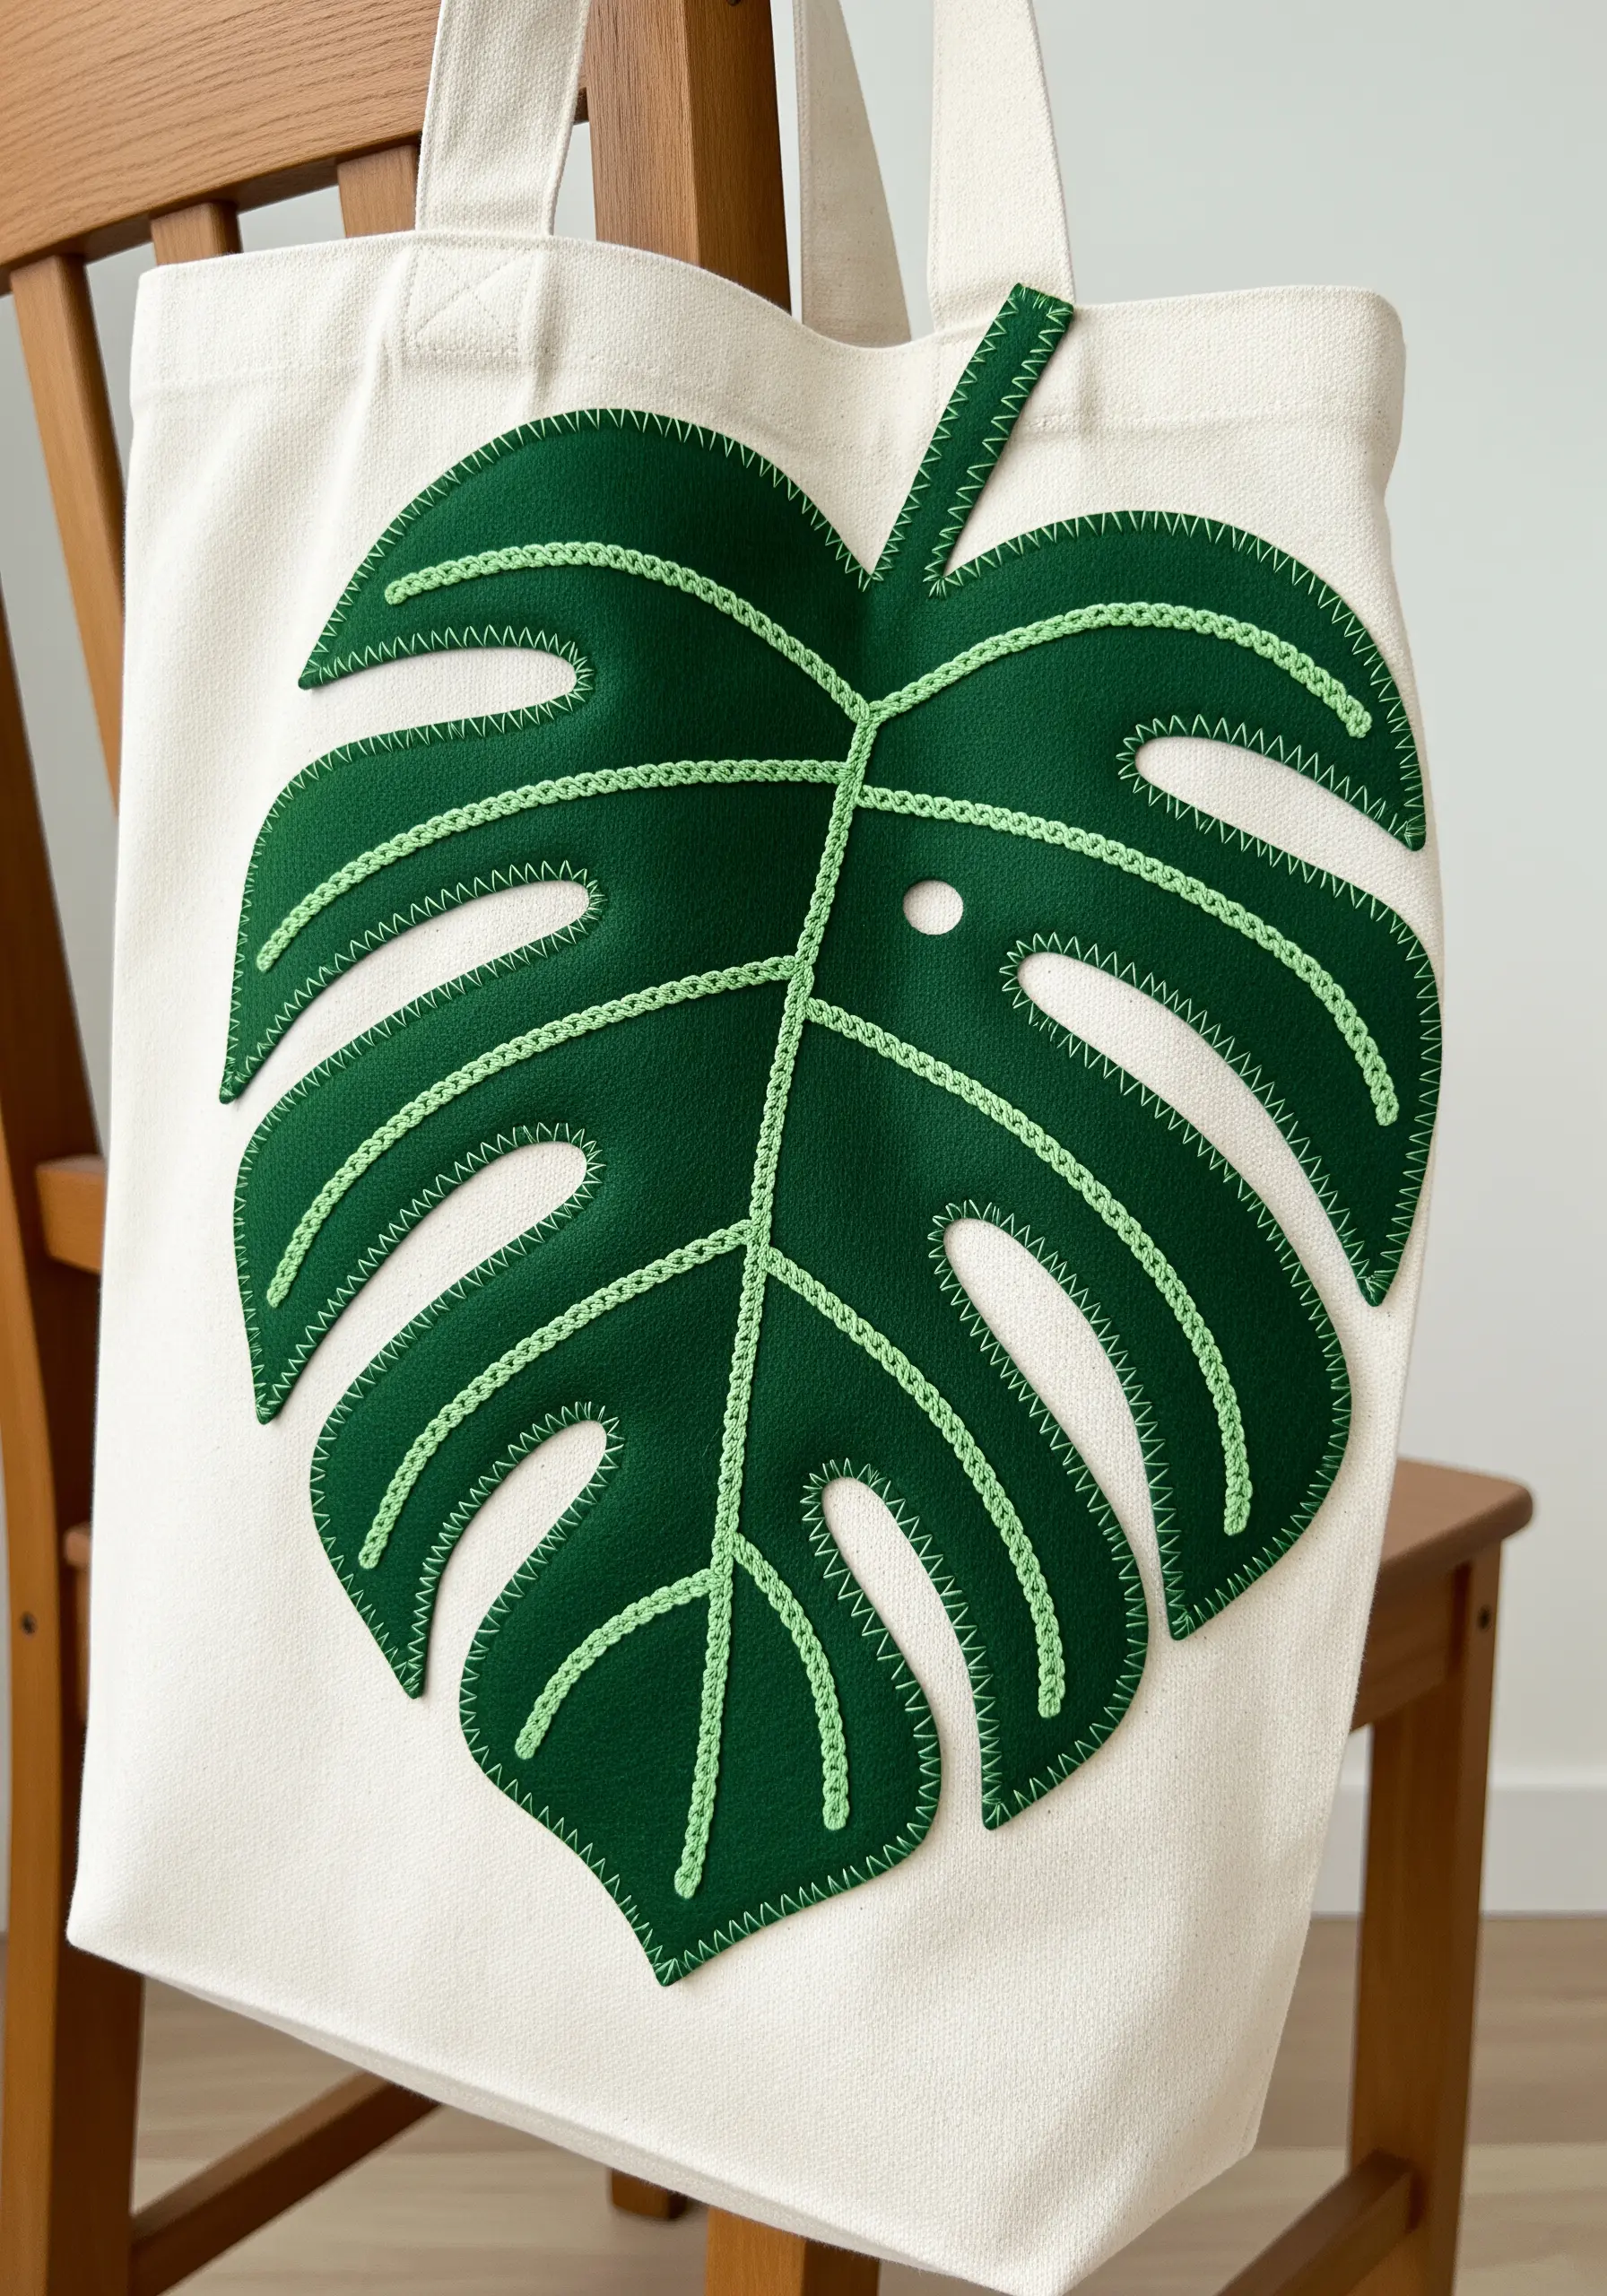
When adding a large appliqué to a tote bag, make the stitch work a star of the show.
Use a bold, textural stitch like a chain stitch or a thick blanket stitch to secure the appliqué’s edges.
Choose a contrasting thread color that stands out against both the appliqué and the base fabric.
This technique transforms the functional purpose of the stitch into a prominent graphic element, adding energy and a handcrafted aesthetic to your botanical stitch ideas to turn plain tote bags into mini nature gardens.


