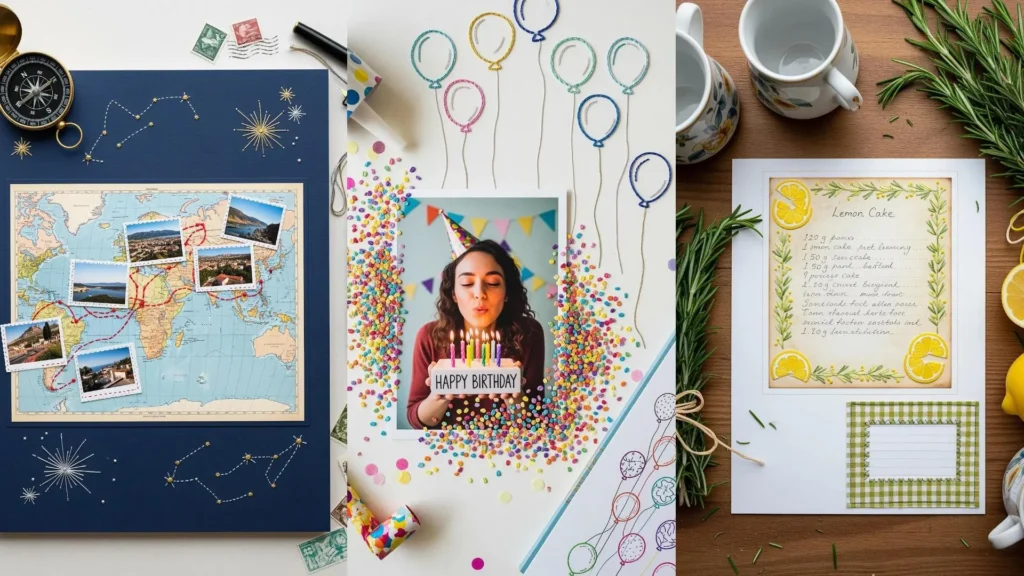
When you combine the delicate, crisp nature of paper with the soft texture of thread, something truly special happens. It’s a partnership of materials that invites you to slow down, to be more intentional with each pierce of the needle and each choice of color.
This isn’t about simply stitching on a new surface. It’s about rethinking composition and texture. You can use thread to add subtle dimension to a paper collage, create bold graphic lines that pop against a matte surface, or even build sculptural forms you never thought possible with embroidery.
Here, you’ll find techniques that honor both paper and thread. Forget the fear of tearing or warping; with the right approach, paper becomes a stable and wonderfully rewarding canvas. Let’s explore how to make your stitches feel both grounded and gracefully light.
1. Create a Stitched Botanical Mandala
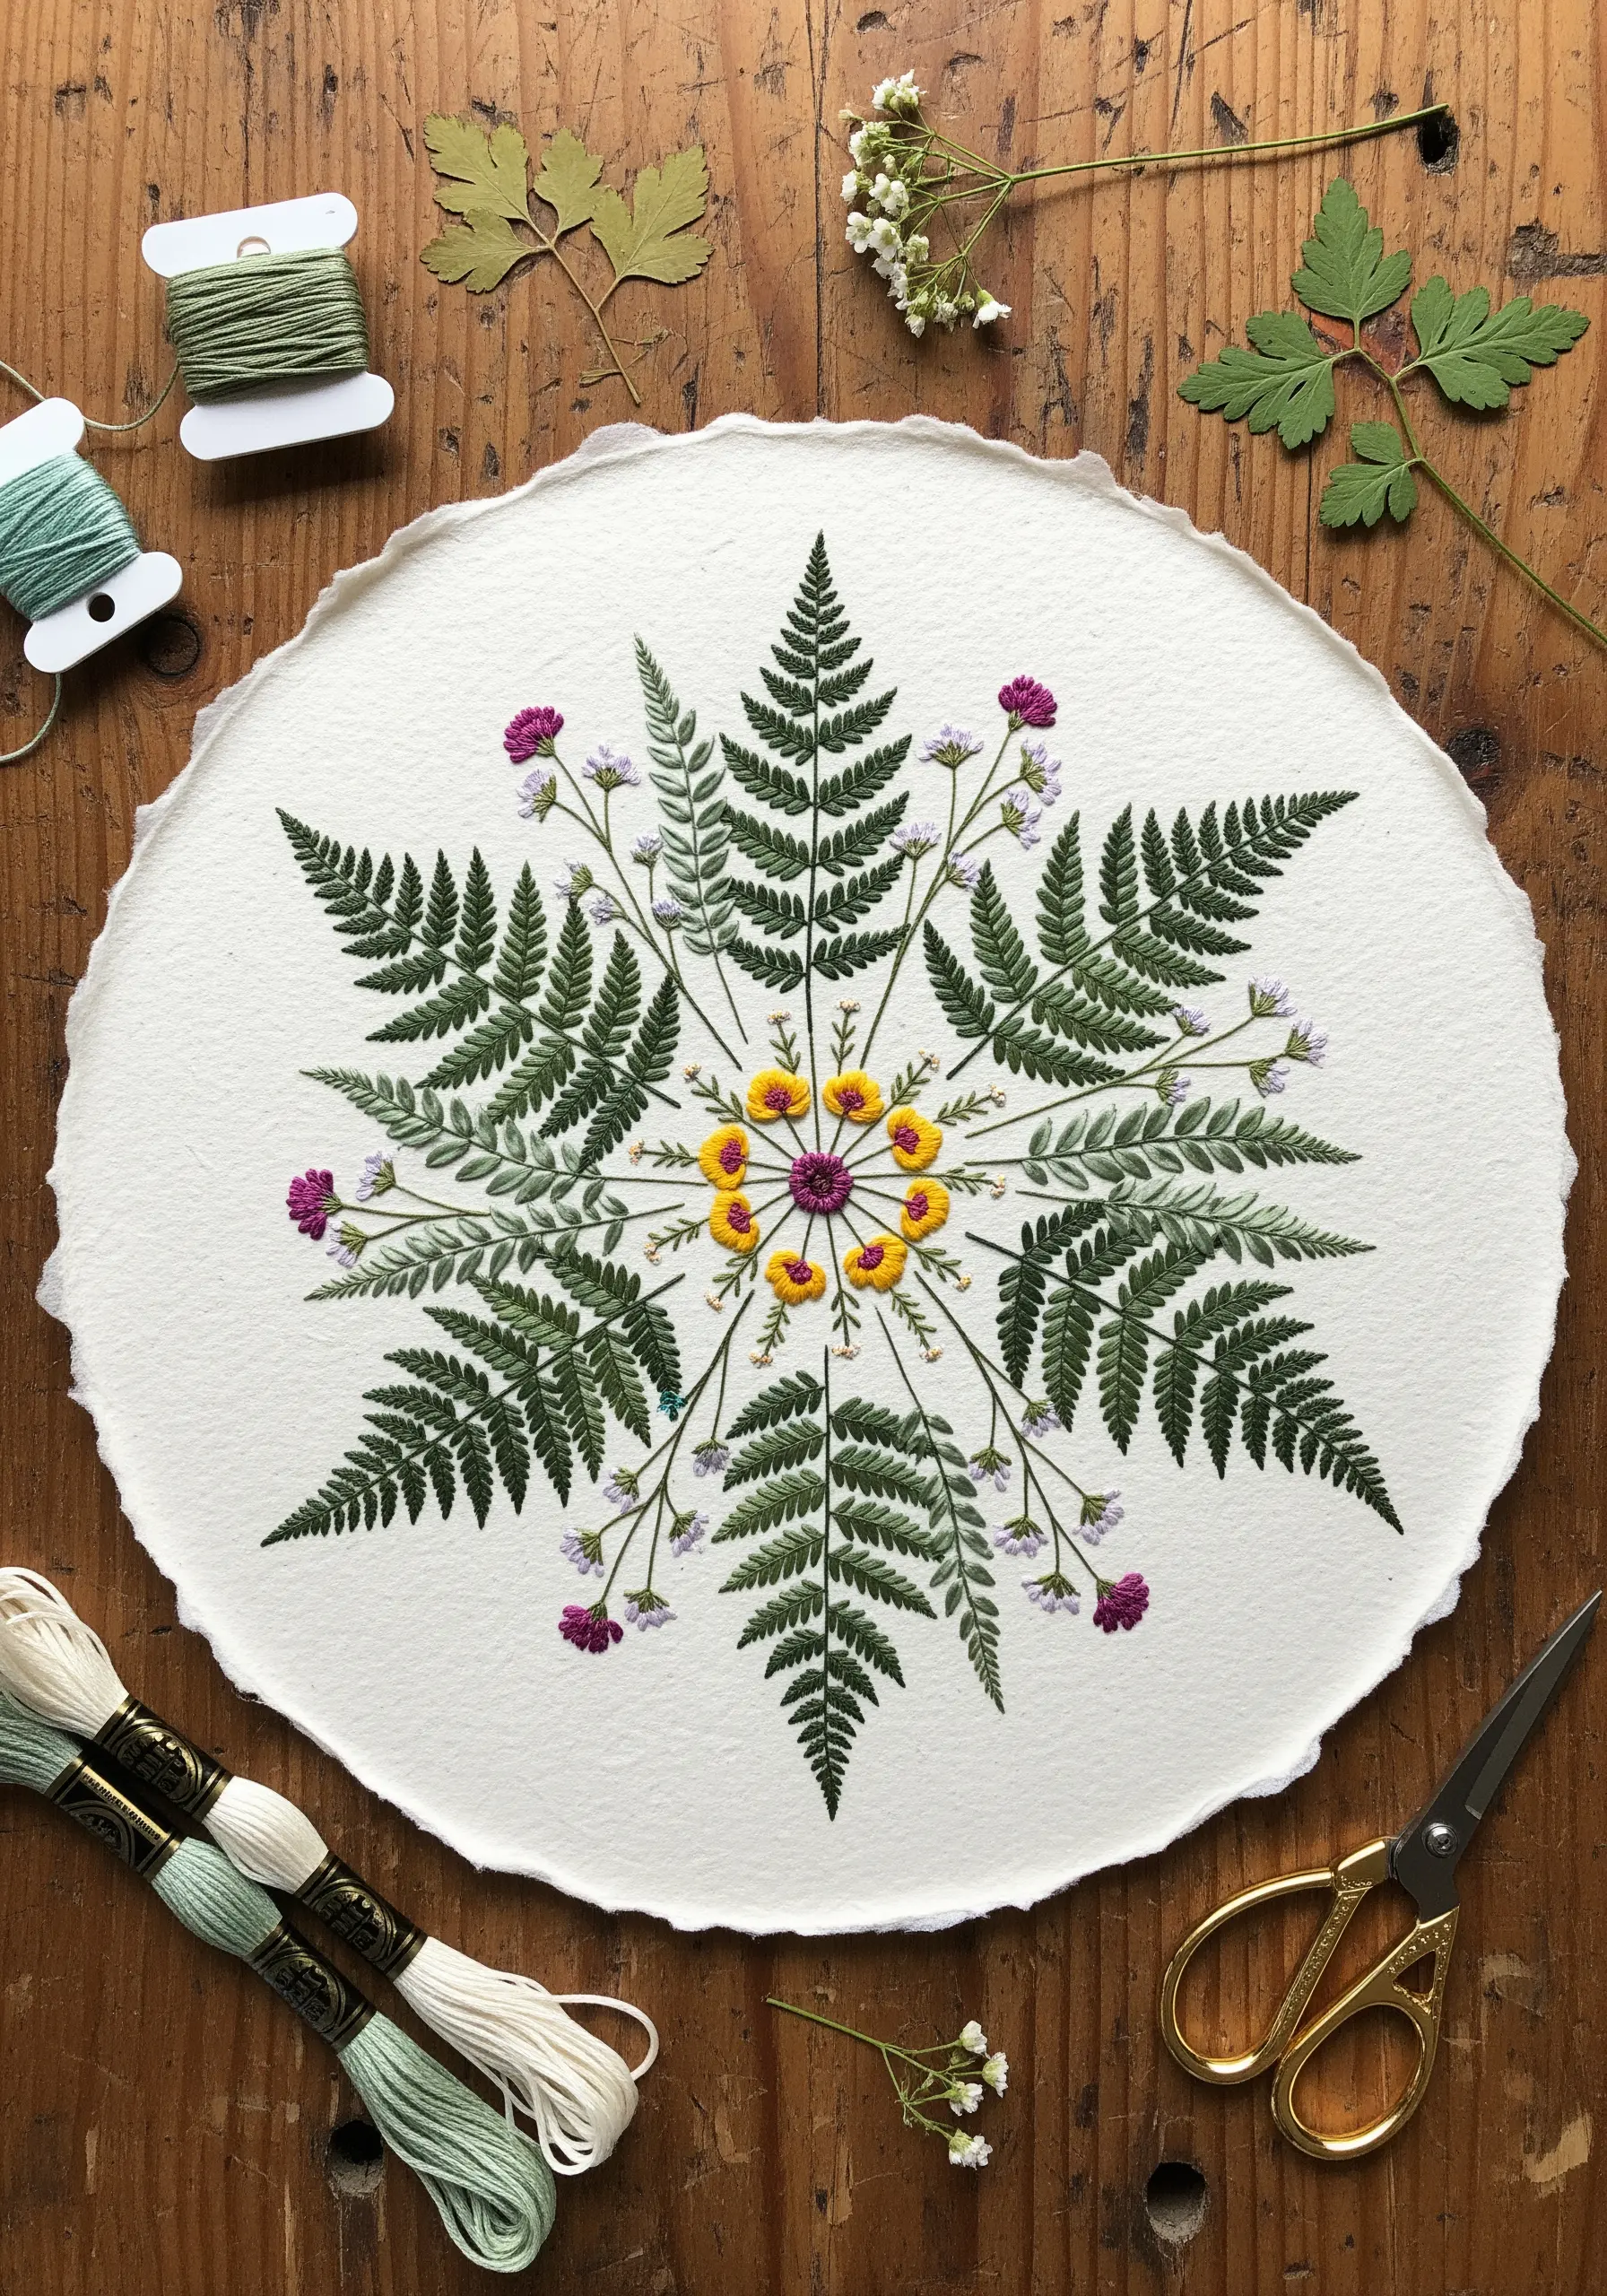
Combine pressed botanicals with delicate stitch work for a truly harmonious piece.
First, arrange and secure your pressed ferns and flowers onto heavy watercolor paper with a clear, acid-free adhesive.
Instead of stitching through the fragile leaves, use embroidery to add accent details around them—like tiny French knot flower centers or couched stems that extend from the real foliage.
This method preserves the natural elements while creating one of the most beautiful floral mandala embroidery ideas, blending texture and reality.
2. Construct a 3D Paper & Thread Mobile
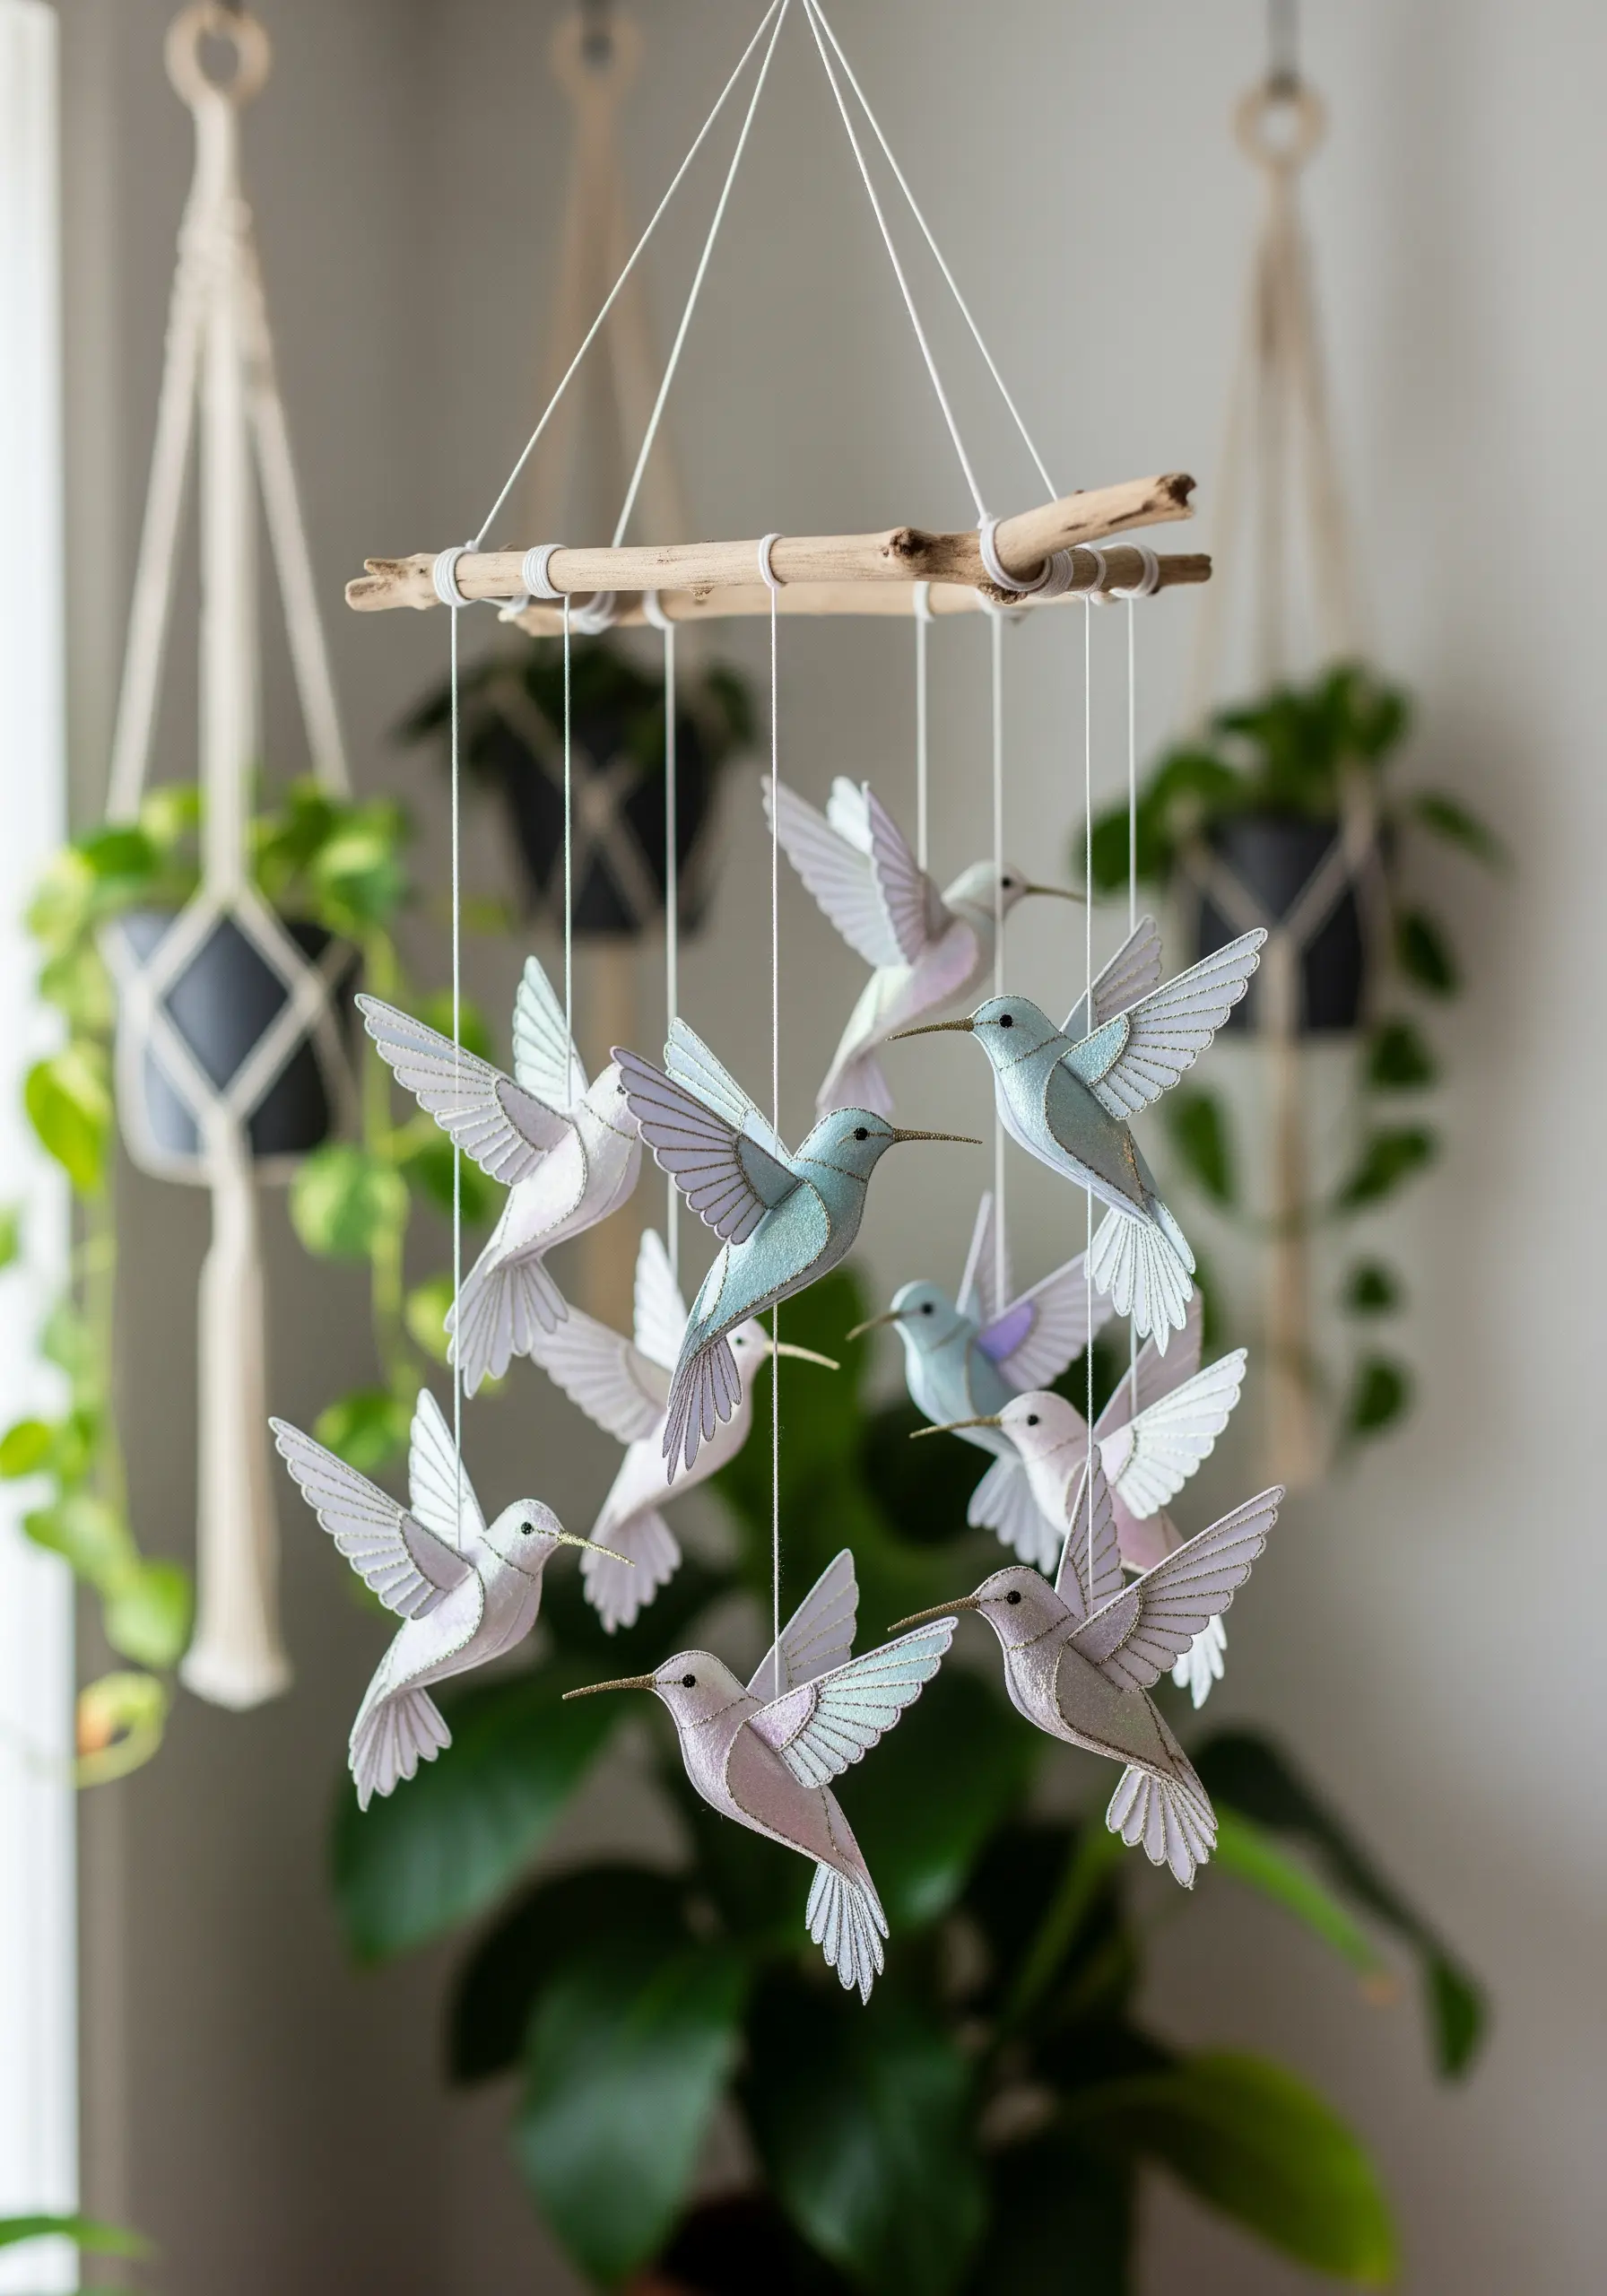
Transform flat paper into a kinetic sculpture by embroidering components before assembly.
Choose a heavy cardstock and stitch your design—like these hummingbirds—using a simple backstitch for outlines and satin stitch for color blocks.
Use a single strand of metallic or iridescent thread to add a subtle shimmer that catches the light as the mobile turns.
After stitching, carefully cut out the shapes and stiffen the back with a thin layer of fabric glue to prevent curling over time.
3. Build Lunar Textures with Couching
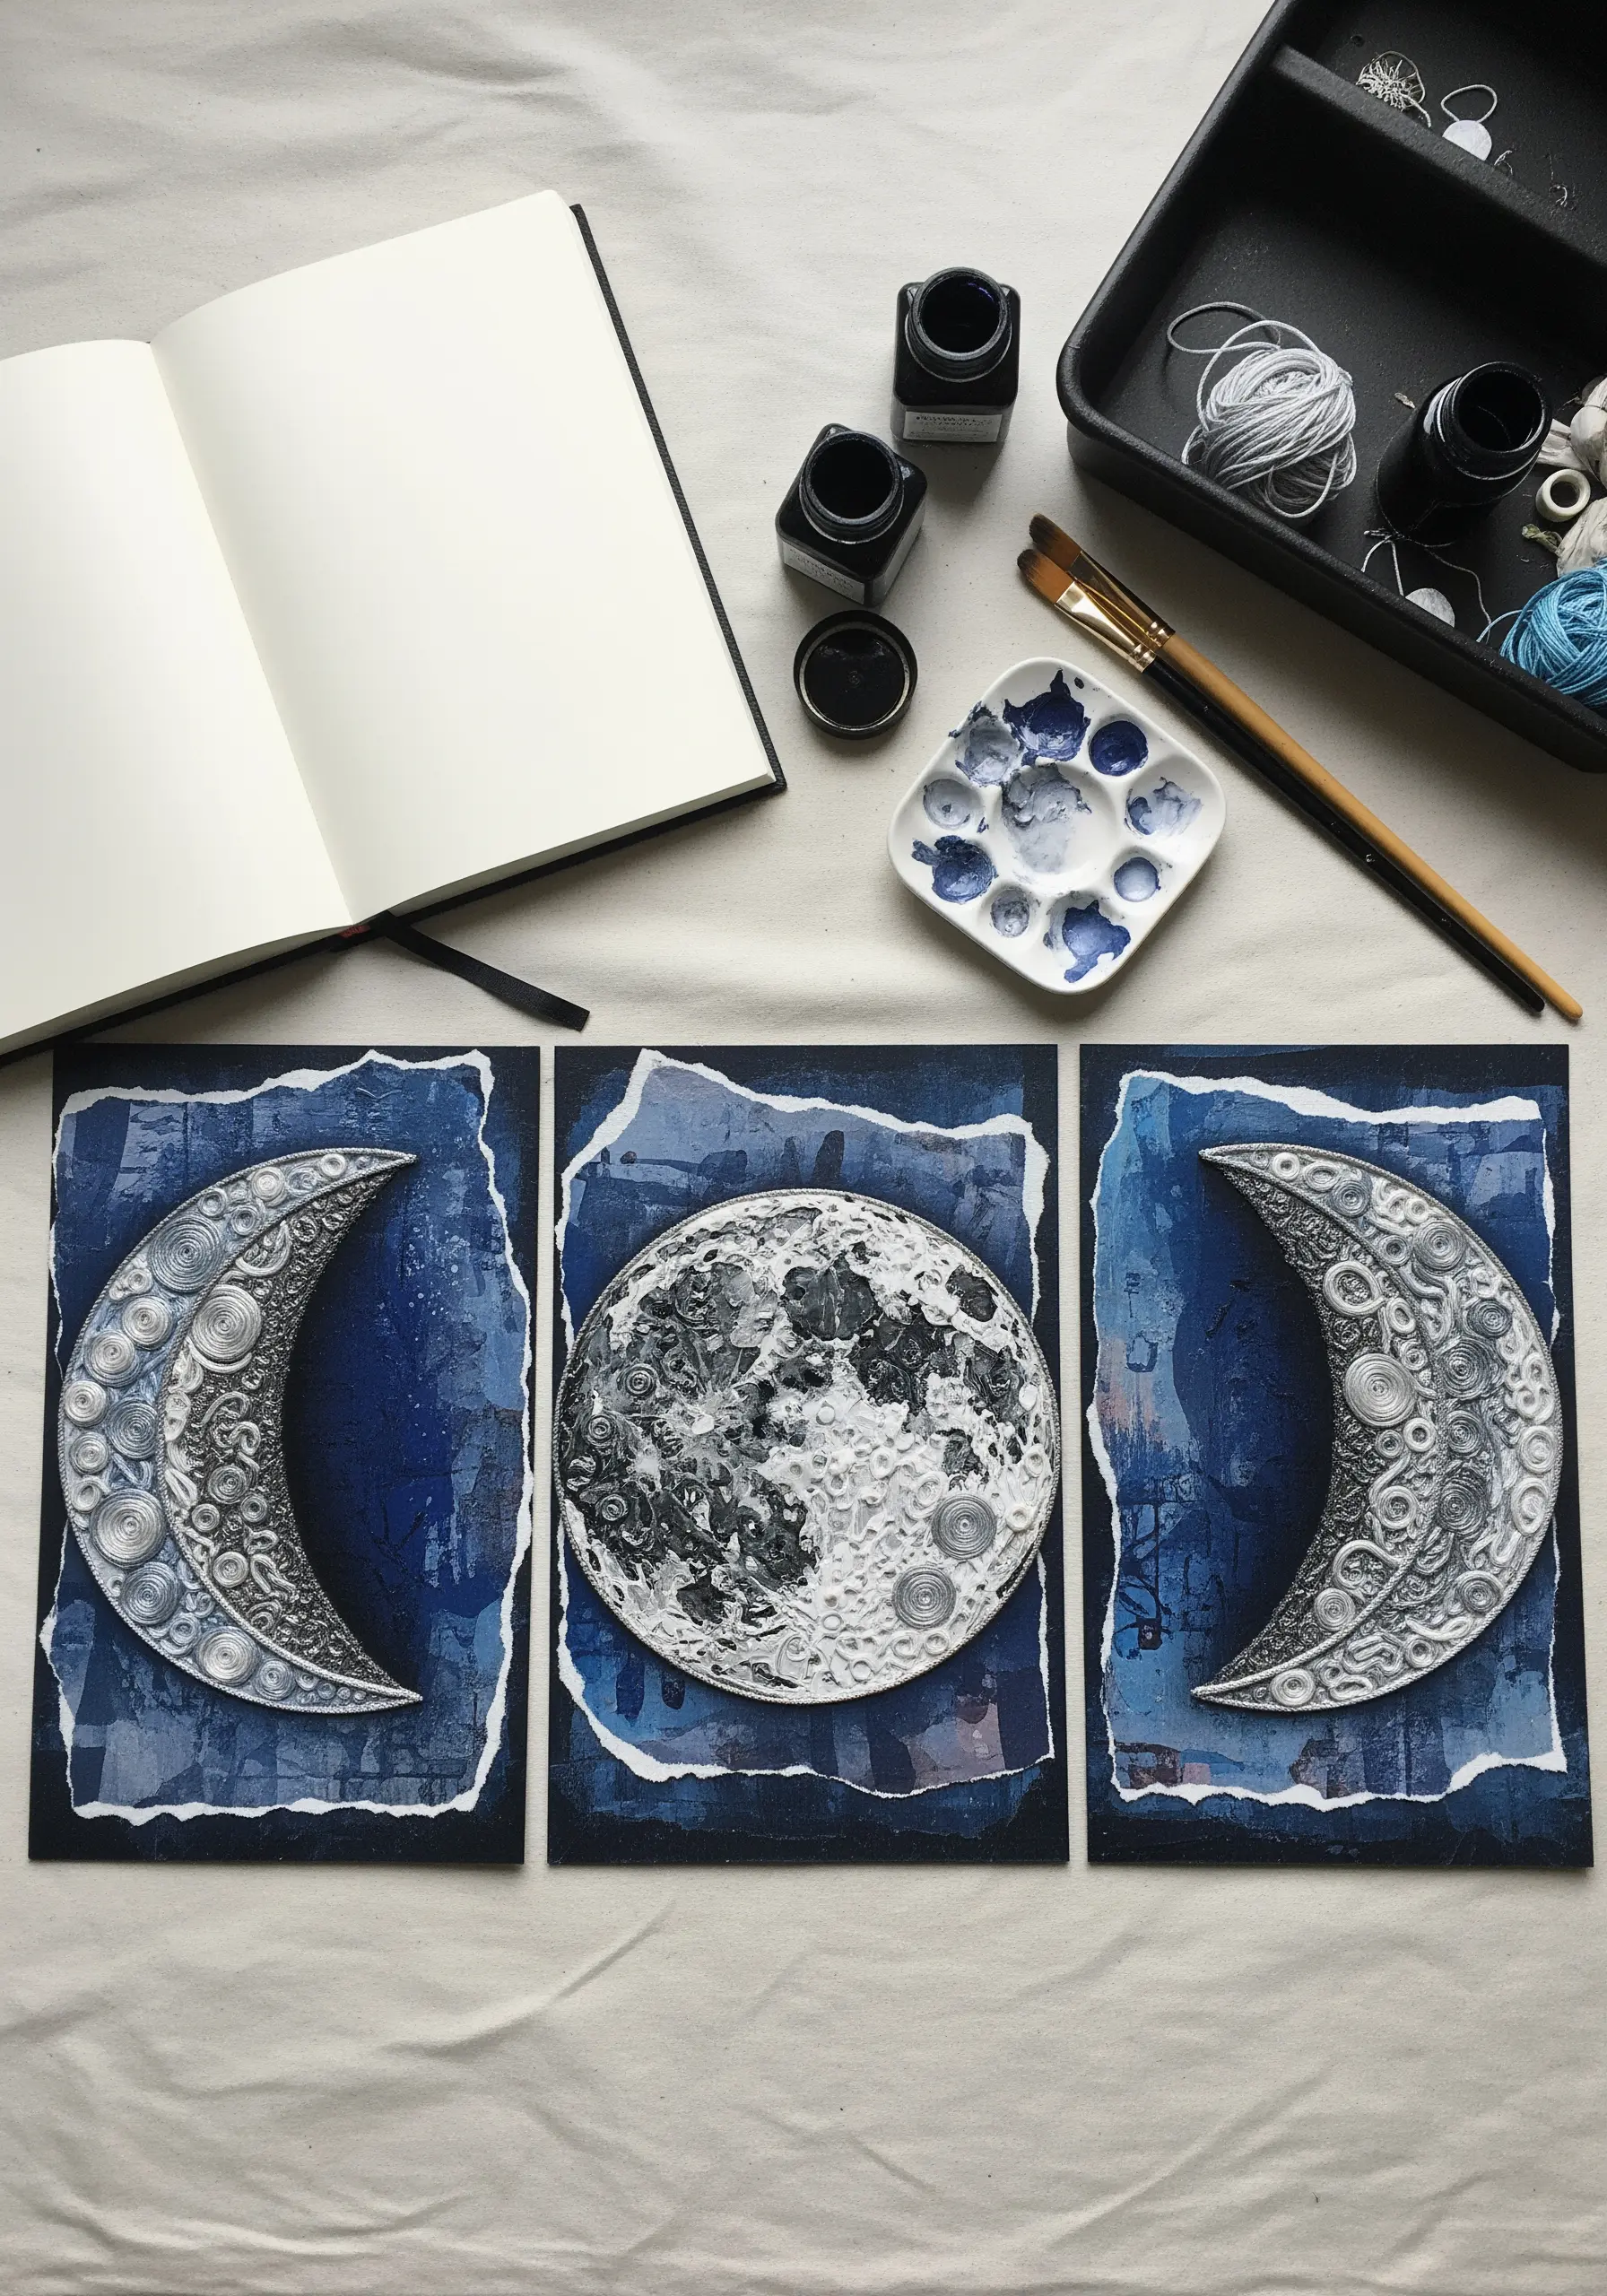
Instead of trying to fill a large area with satin stitch, create bold, sculptural lines using the couching technique.
First, paint your paper background with deep, celestial colors and let it dry completely.
Lay down thick yarn, twisted floss, or even soft cotton piping to form the moon’s craters and outlines, then tack it in place with a thinner, contrasting thread.
This approach is faster than traditional fill stitches and results in dramatic, high-relief textures perfect for abstract mixed-media embroidery ideas.
4. Integrate Stitches into a Paper Collage
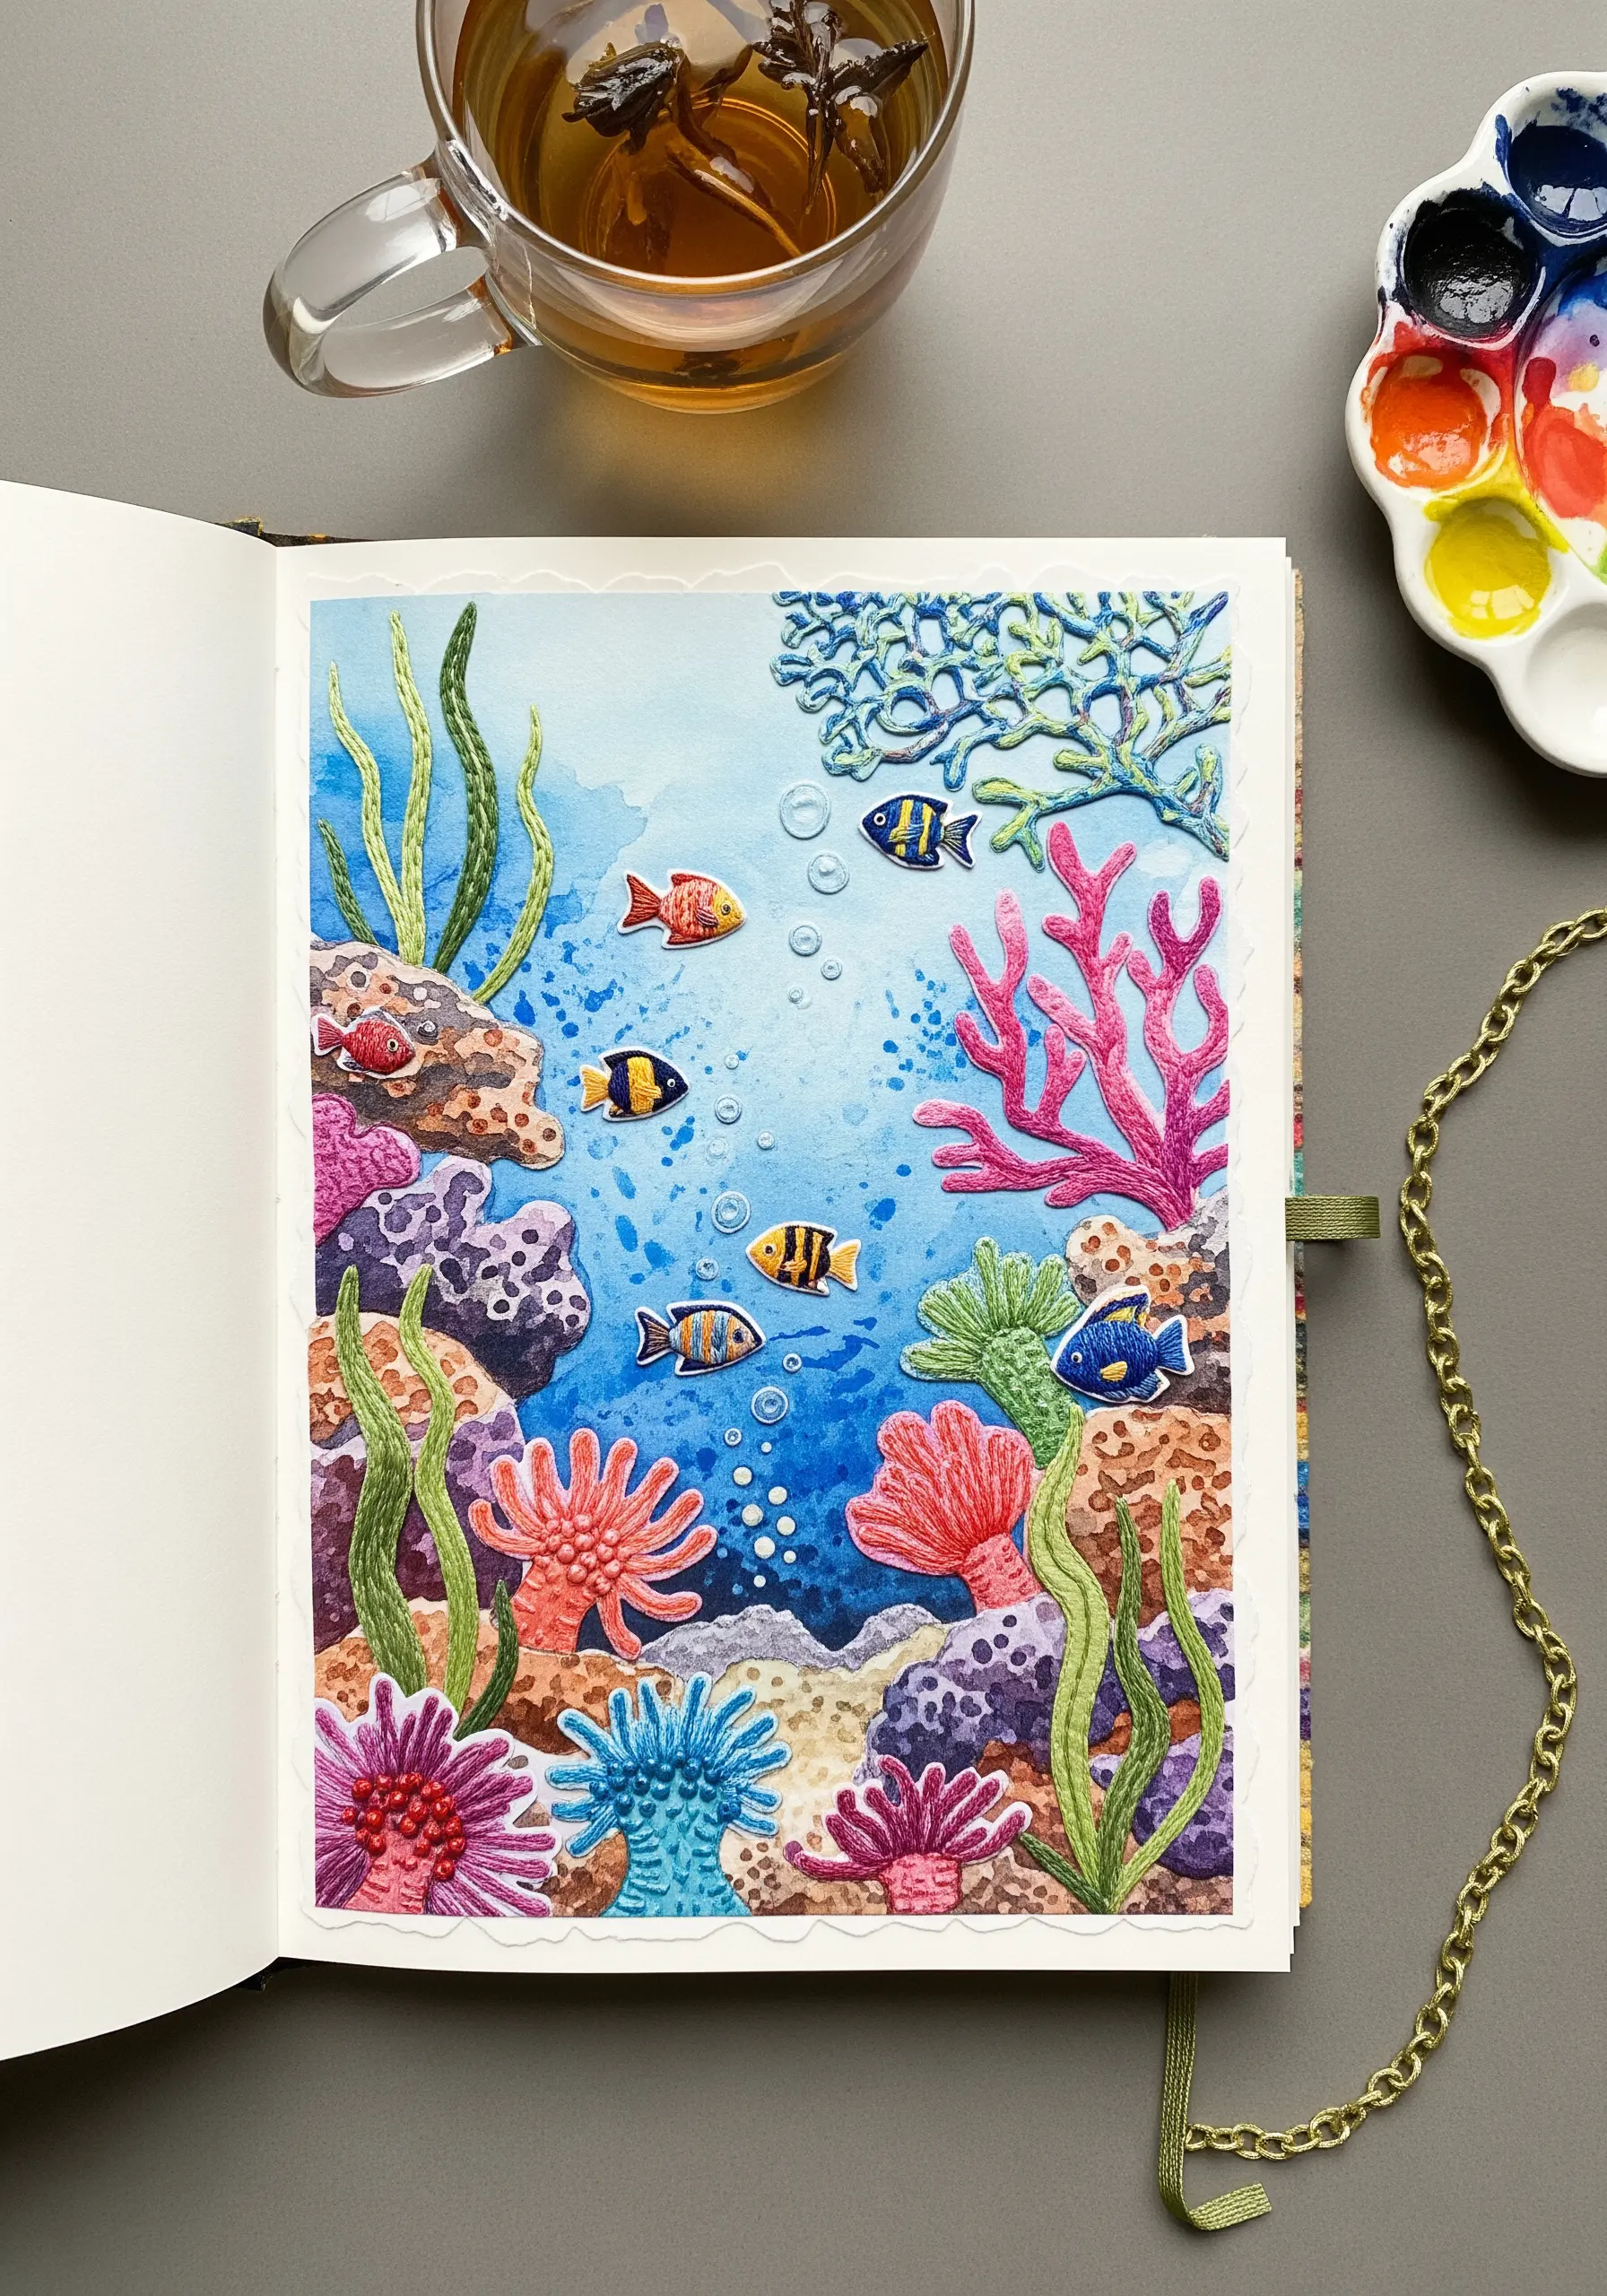
Let embroidery be the final, unifying detail in a layered paper scene.
Assemble your painted and cut-paper elements first, creating a vibrant underwater world with depth and color.
Then, add stitched accents directly through the layers—a line of French knots for coral texture, a stem stitch for seaweed, or a few straight stitches for air bubbles.
This technique of combining paper layers with subtle embroidery makes the thread a thoughtful textural highlight rather than the primary medium.
5. Master Clean Lines with String Art on Cardstock
Achieve sharp, graphic results by using string art techniques on cardstock.
Lightly sketch your design, then use a pin or awl to pre-punch holes along the lines at even intervals. This prevents the paper from tearing and ensures your stitches are perfectly placed.
Maintain a firm, consistent tension as you stitch to keep the lines taut and the paper from buckling.
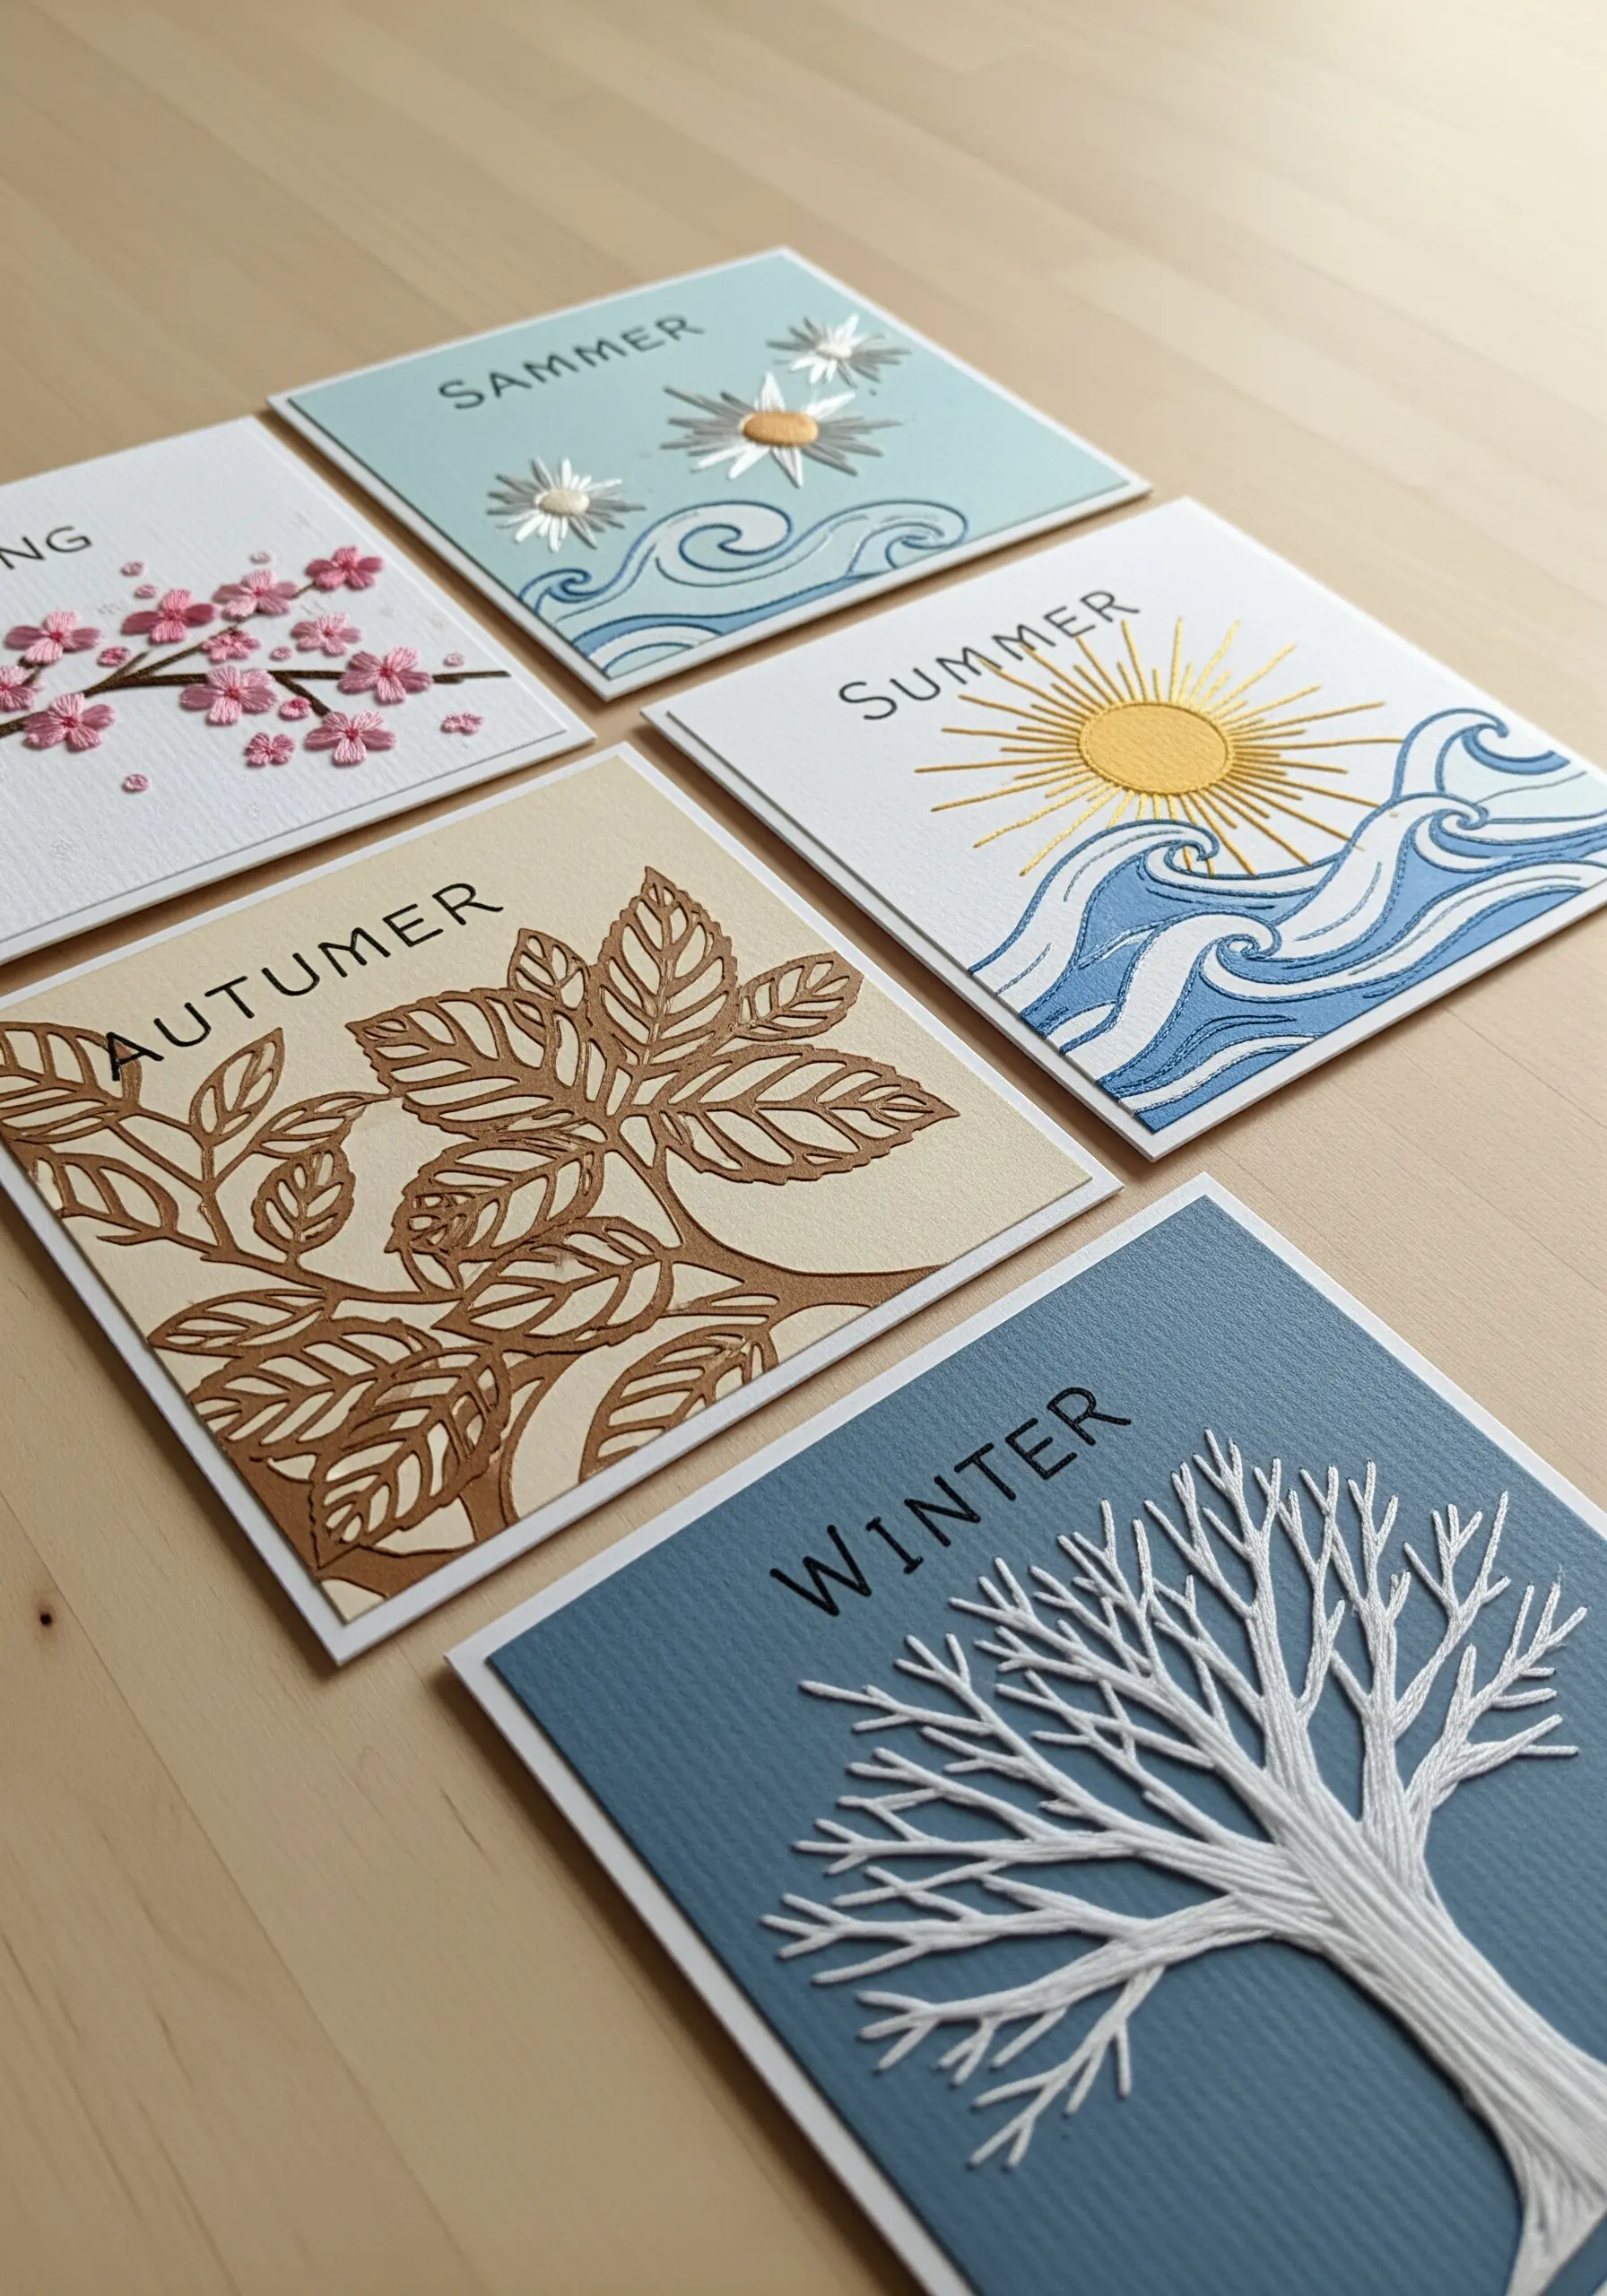
This method is ideal for creating graphic seasonal cards and other holiday-themed string art patterns with a clean, modern aesthetic.
6. Embroider a Translucent Paper Lantern
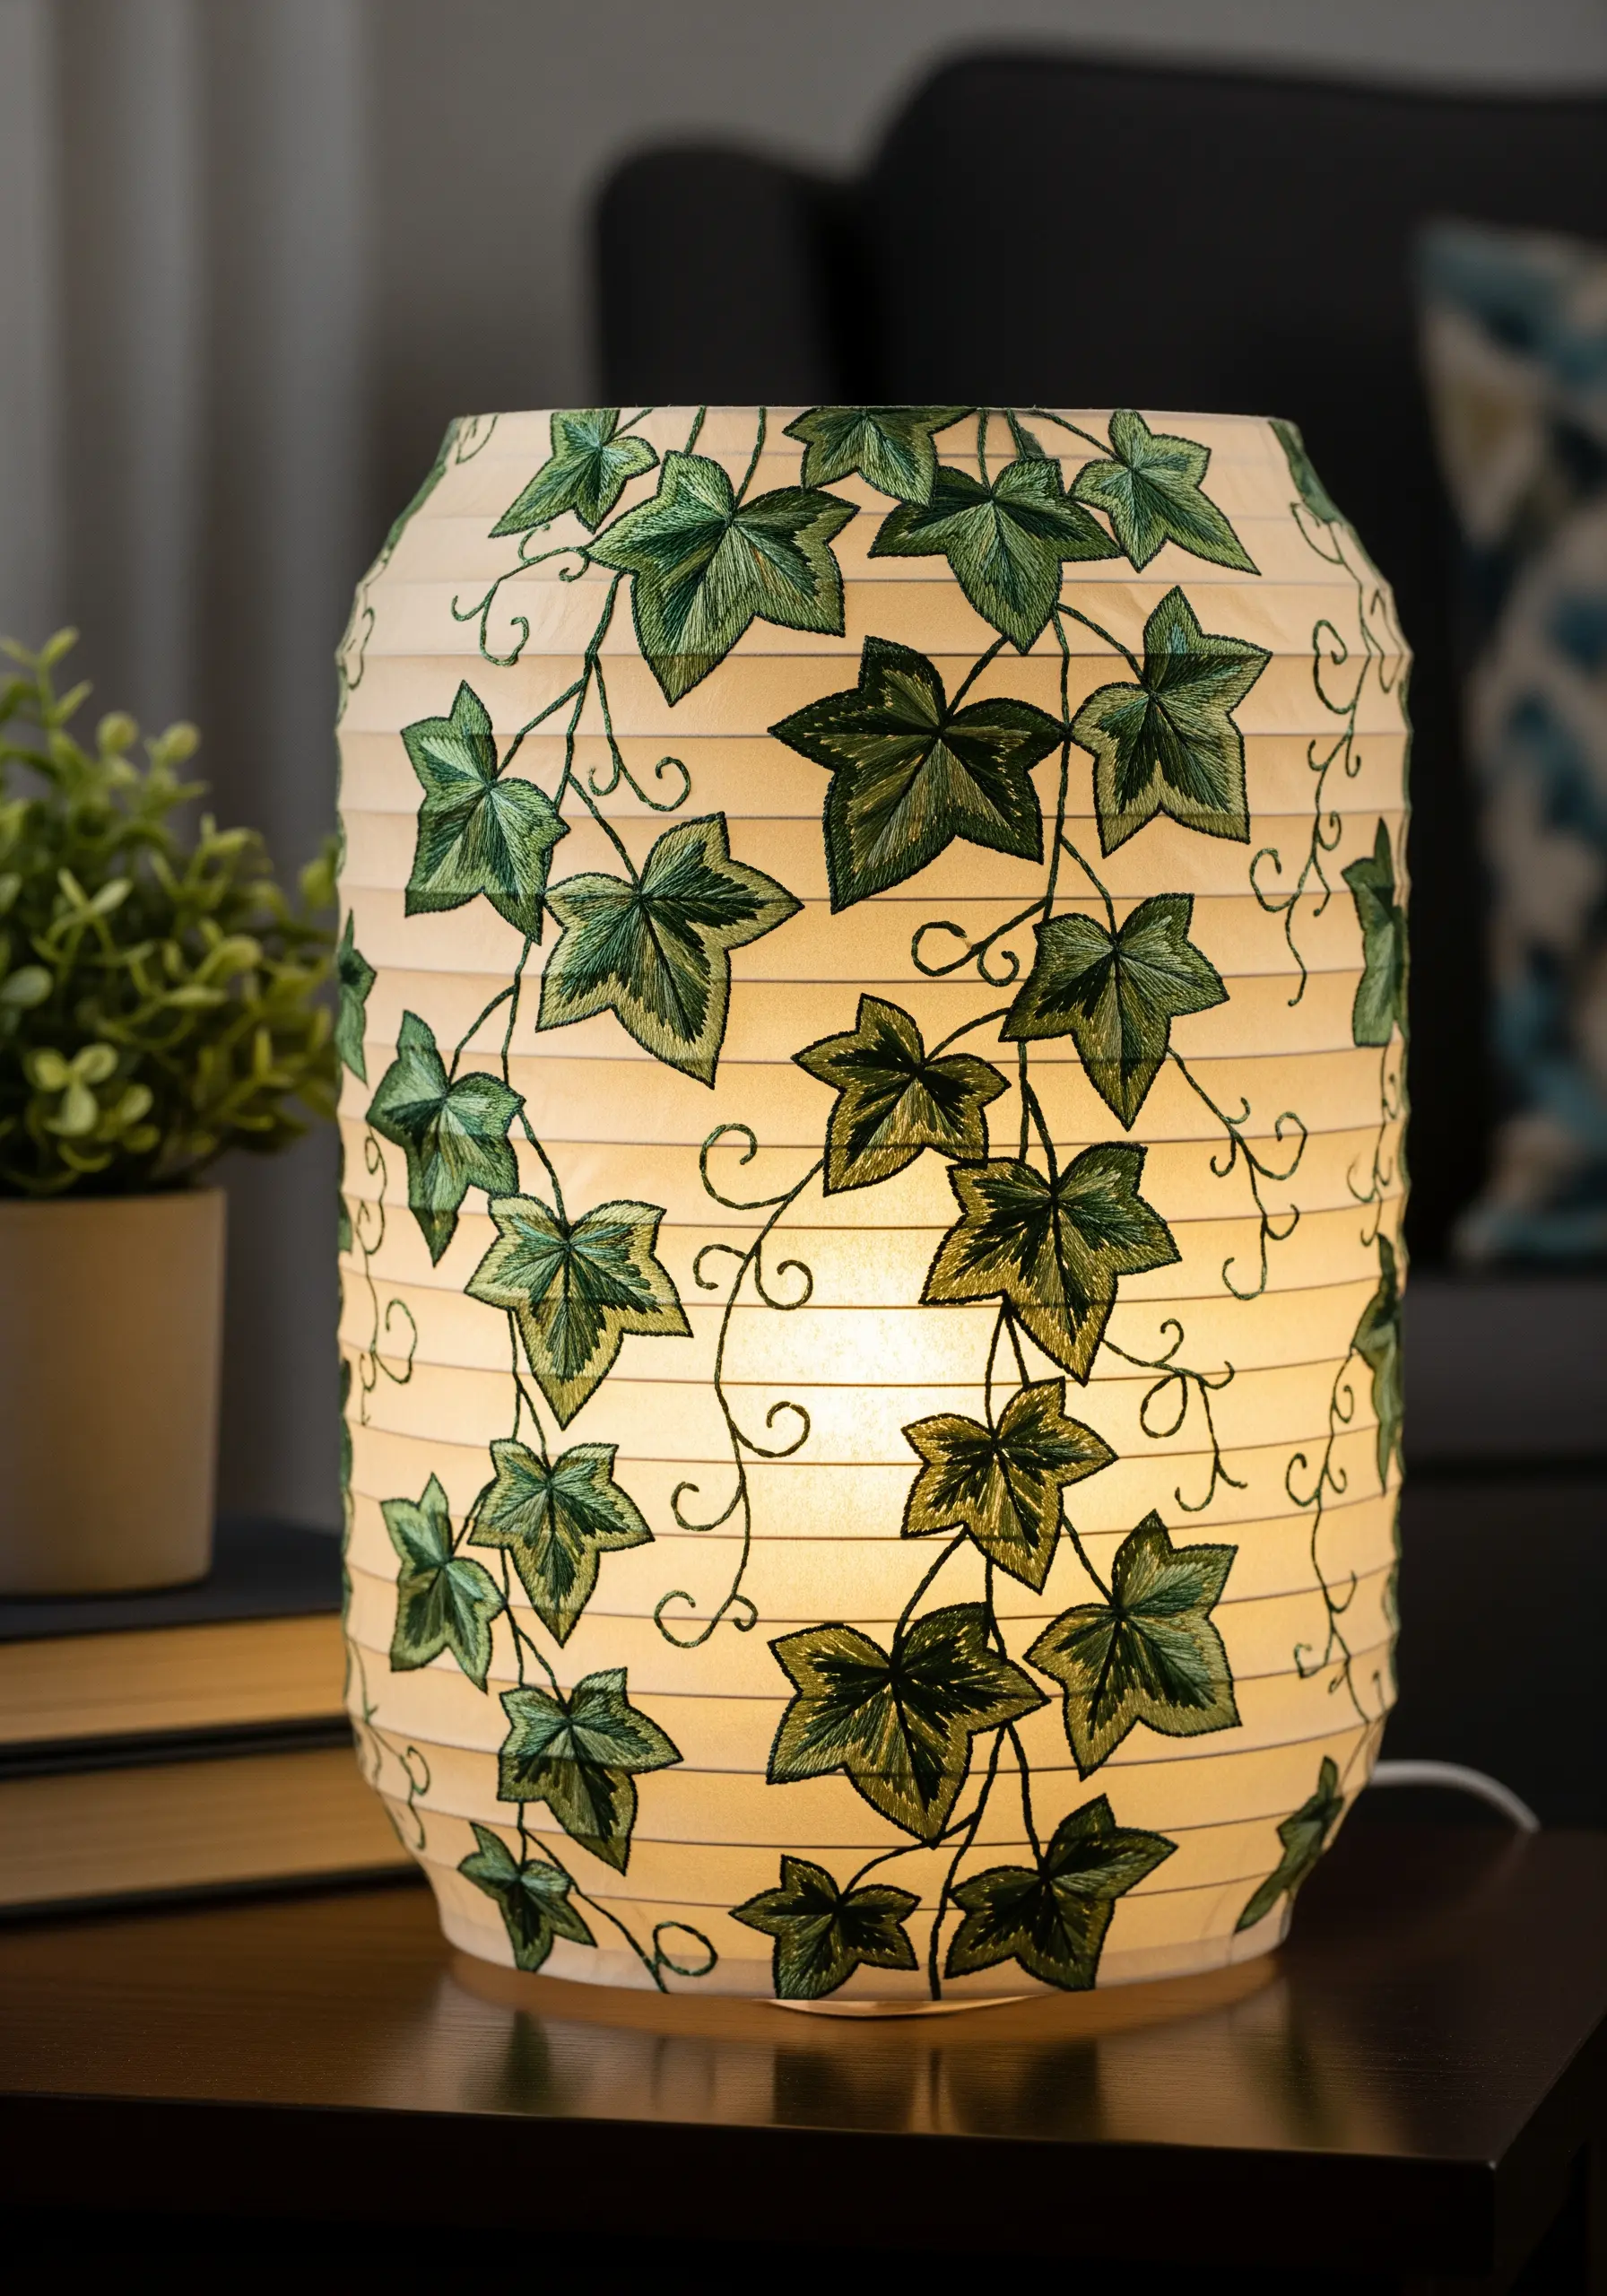
Stitching on delicate paper requires support, especially for an object that will be handled or curved.
Before you begin, iron a lightweight, fusible interfacing onto the back of the paper. This stabilizes the surface without sacrificing its translucency.
Use a long and short stitch to fill the leaves, varying the shades of green to mimic how light passes through them.
This technique allows you to embroider realistic shadows under leaves, creating a beautiful effect when the lantern is lit.
7. Add Stitched Fur to Paper Dioramas
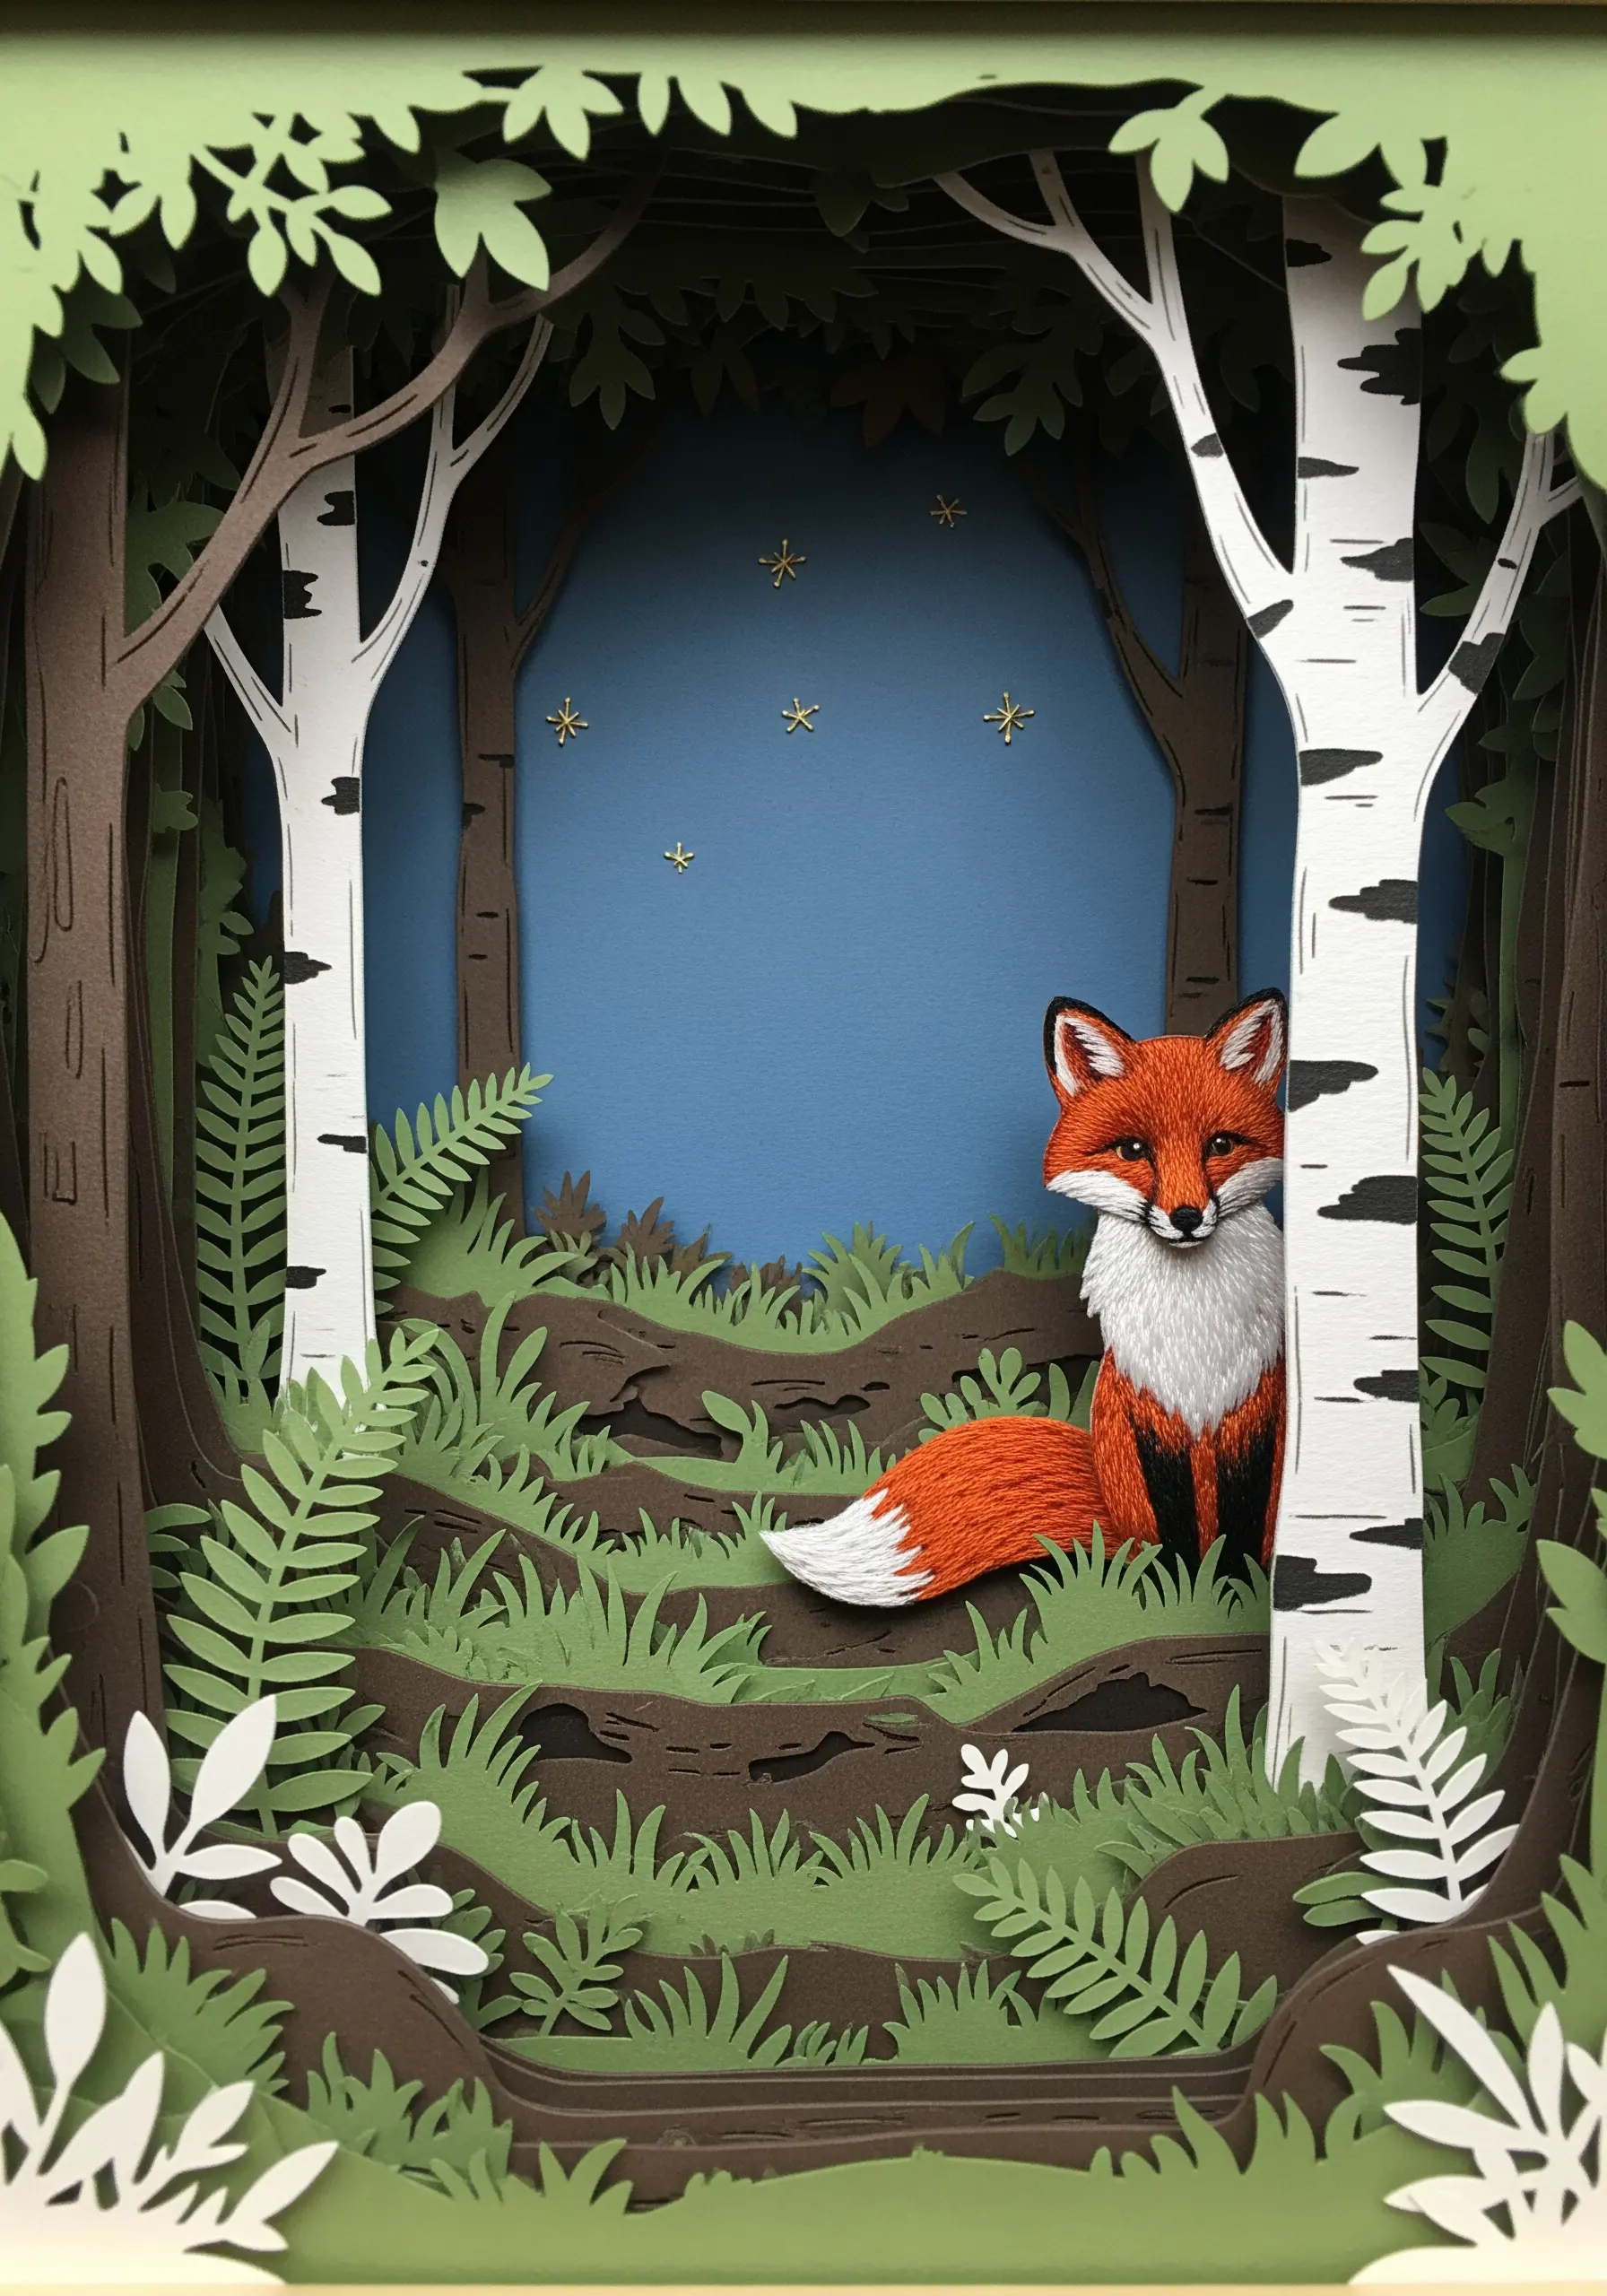
Elevate a layered papercraft scene by adding embroidered texture to a single focal point.
Before assembling your diorama, isolate the key element—like this fox—and stitch directly onto the paper cutout.
Use a combination of long and short stitch with just two or three shades of thread to create the illusion of soft fur.
This selective use of embroidery draws the eye and adds a surprising, tactile warmth to the crisp paper layers.
8. Create Topographic Art with Couched Yarn
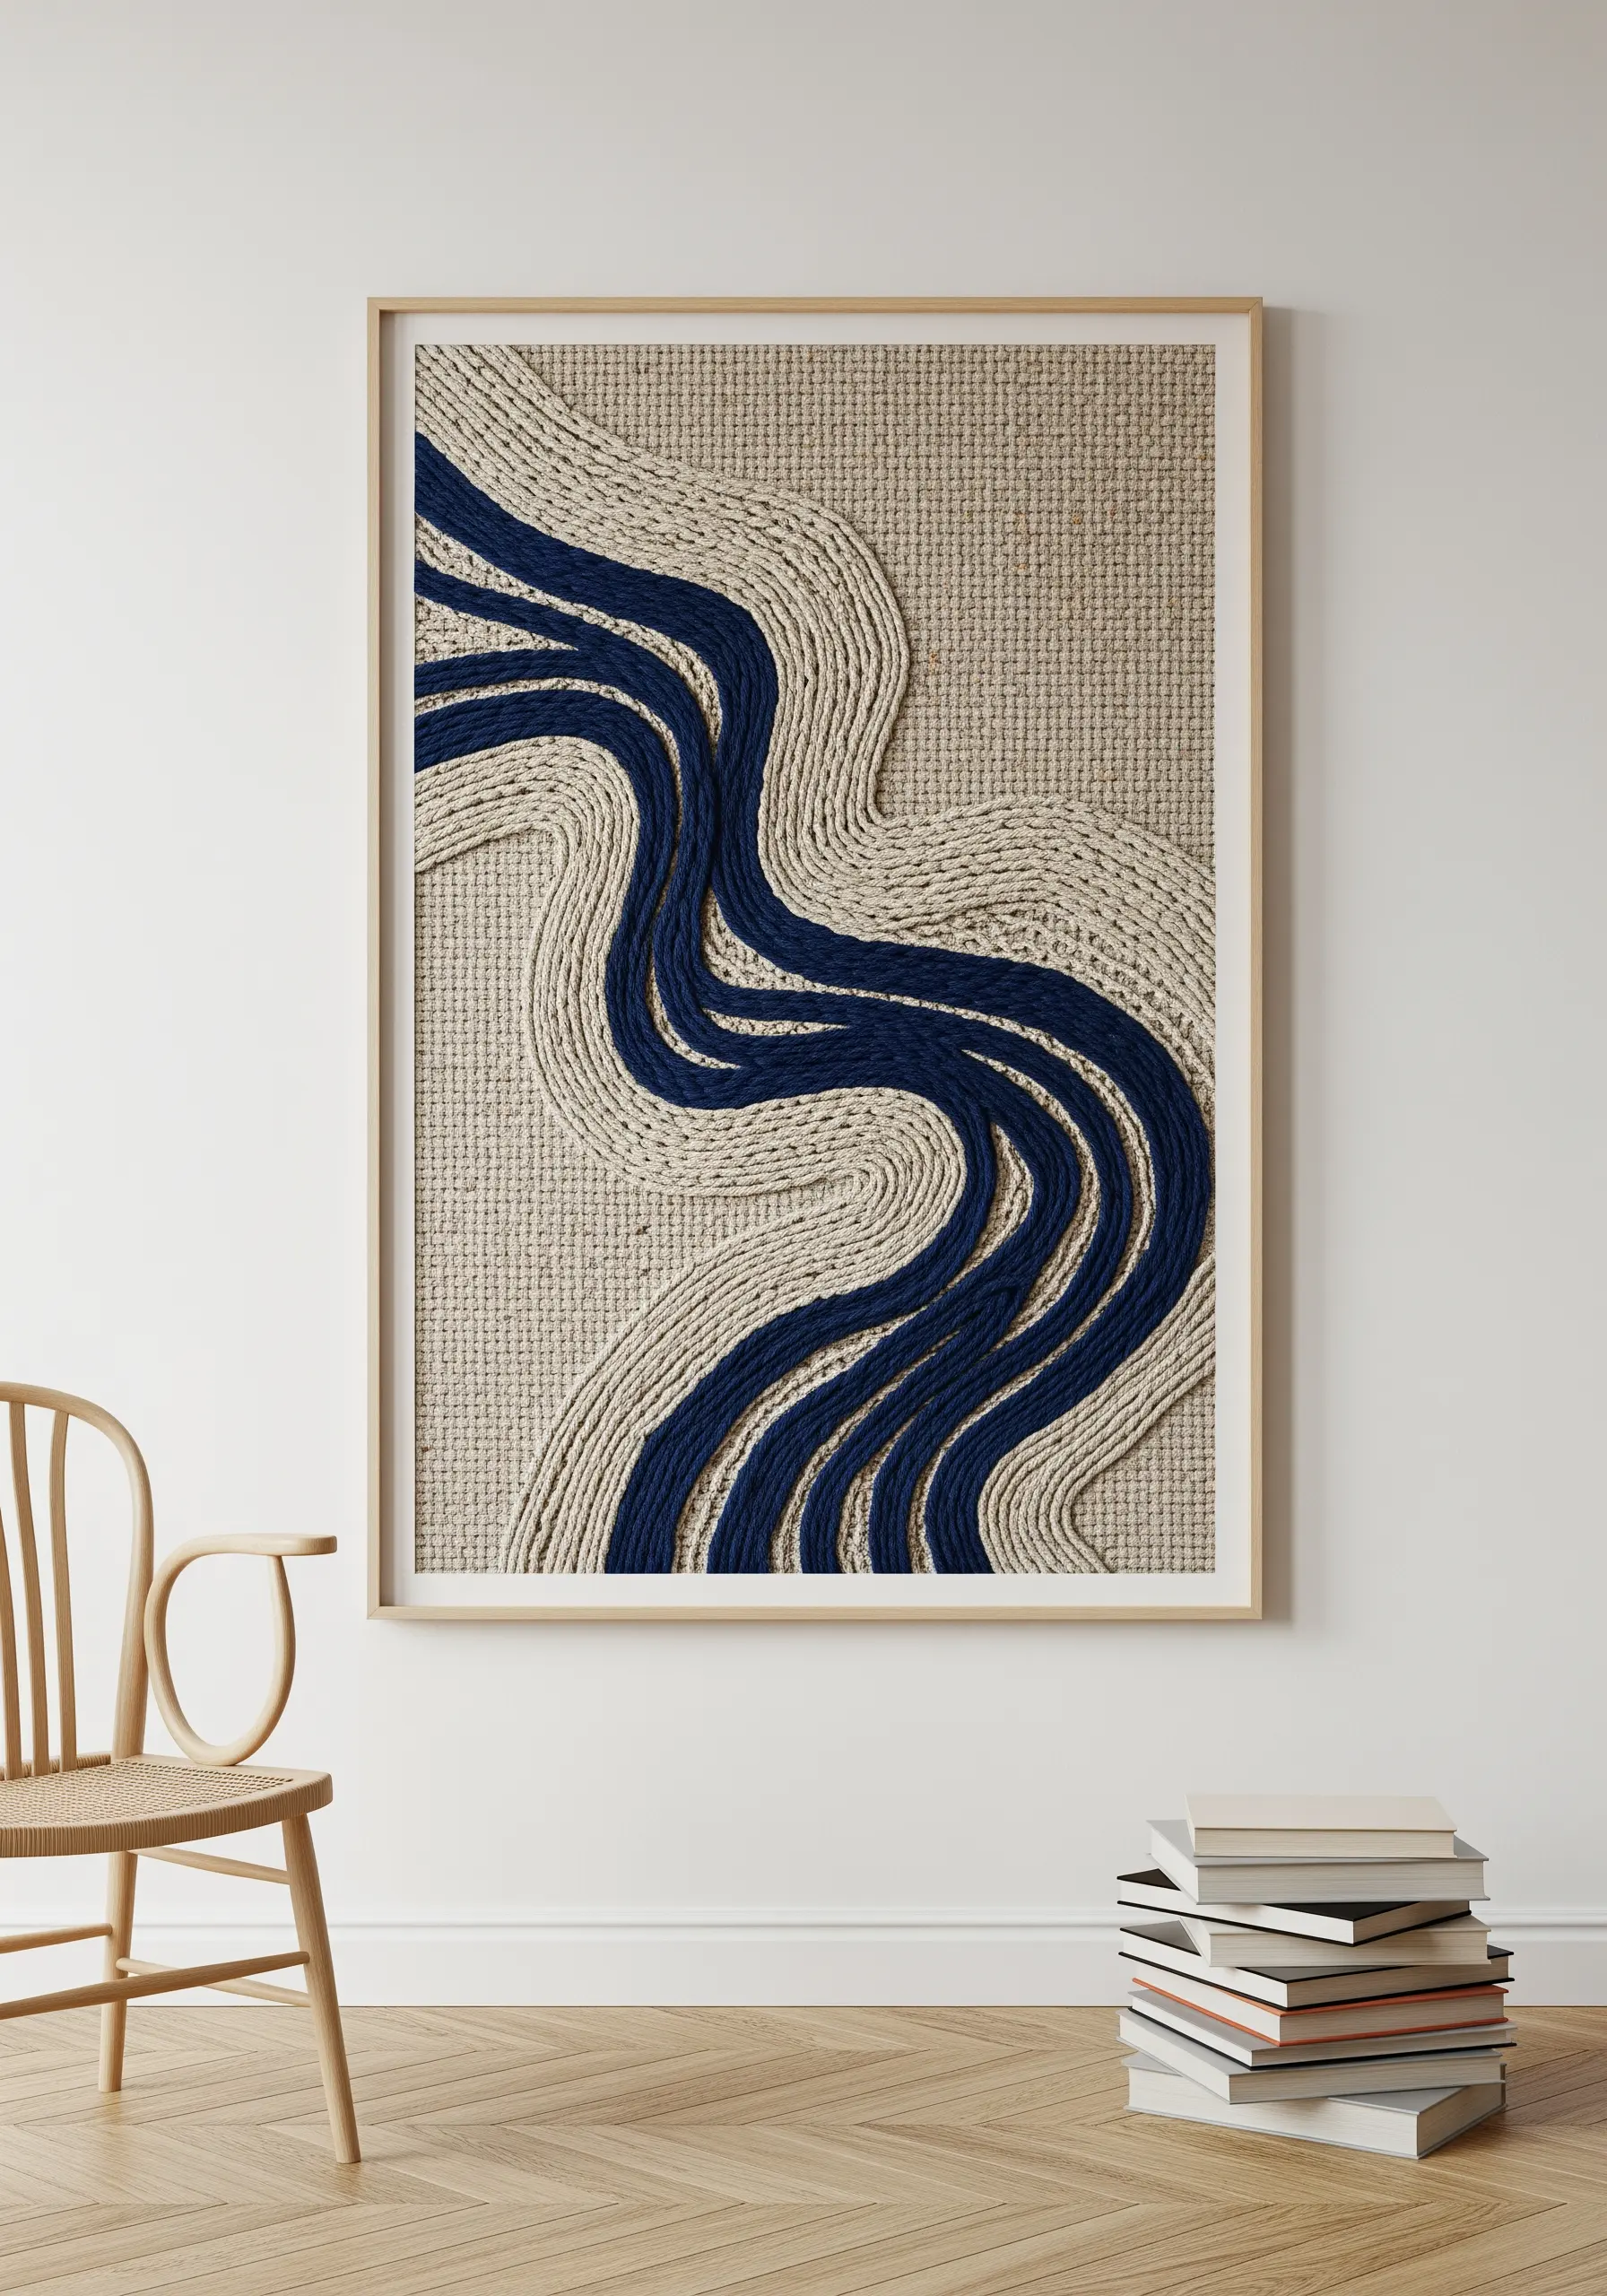
Design large-scale, minimalist wall art by couching thick yarn onto a neutral background.
Draw your abstract river or landscape contours directly onto aida cloth or heavy paper mounted on a board.
Lay down thick, textural yarn along your lines and use a single strand of matching floss to stitch it down with small, evenly spaced tacking stitches.
This is one of the simplest Yarn wall art projects, offering immense graphic impact with a meditative, repetitive process.
9. Stitch Delicate Botanical Bookmarks
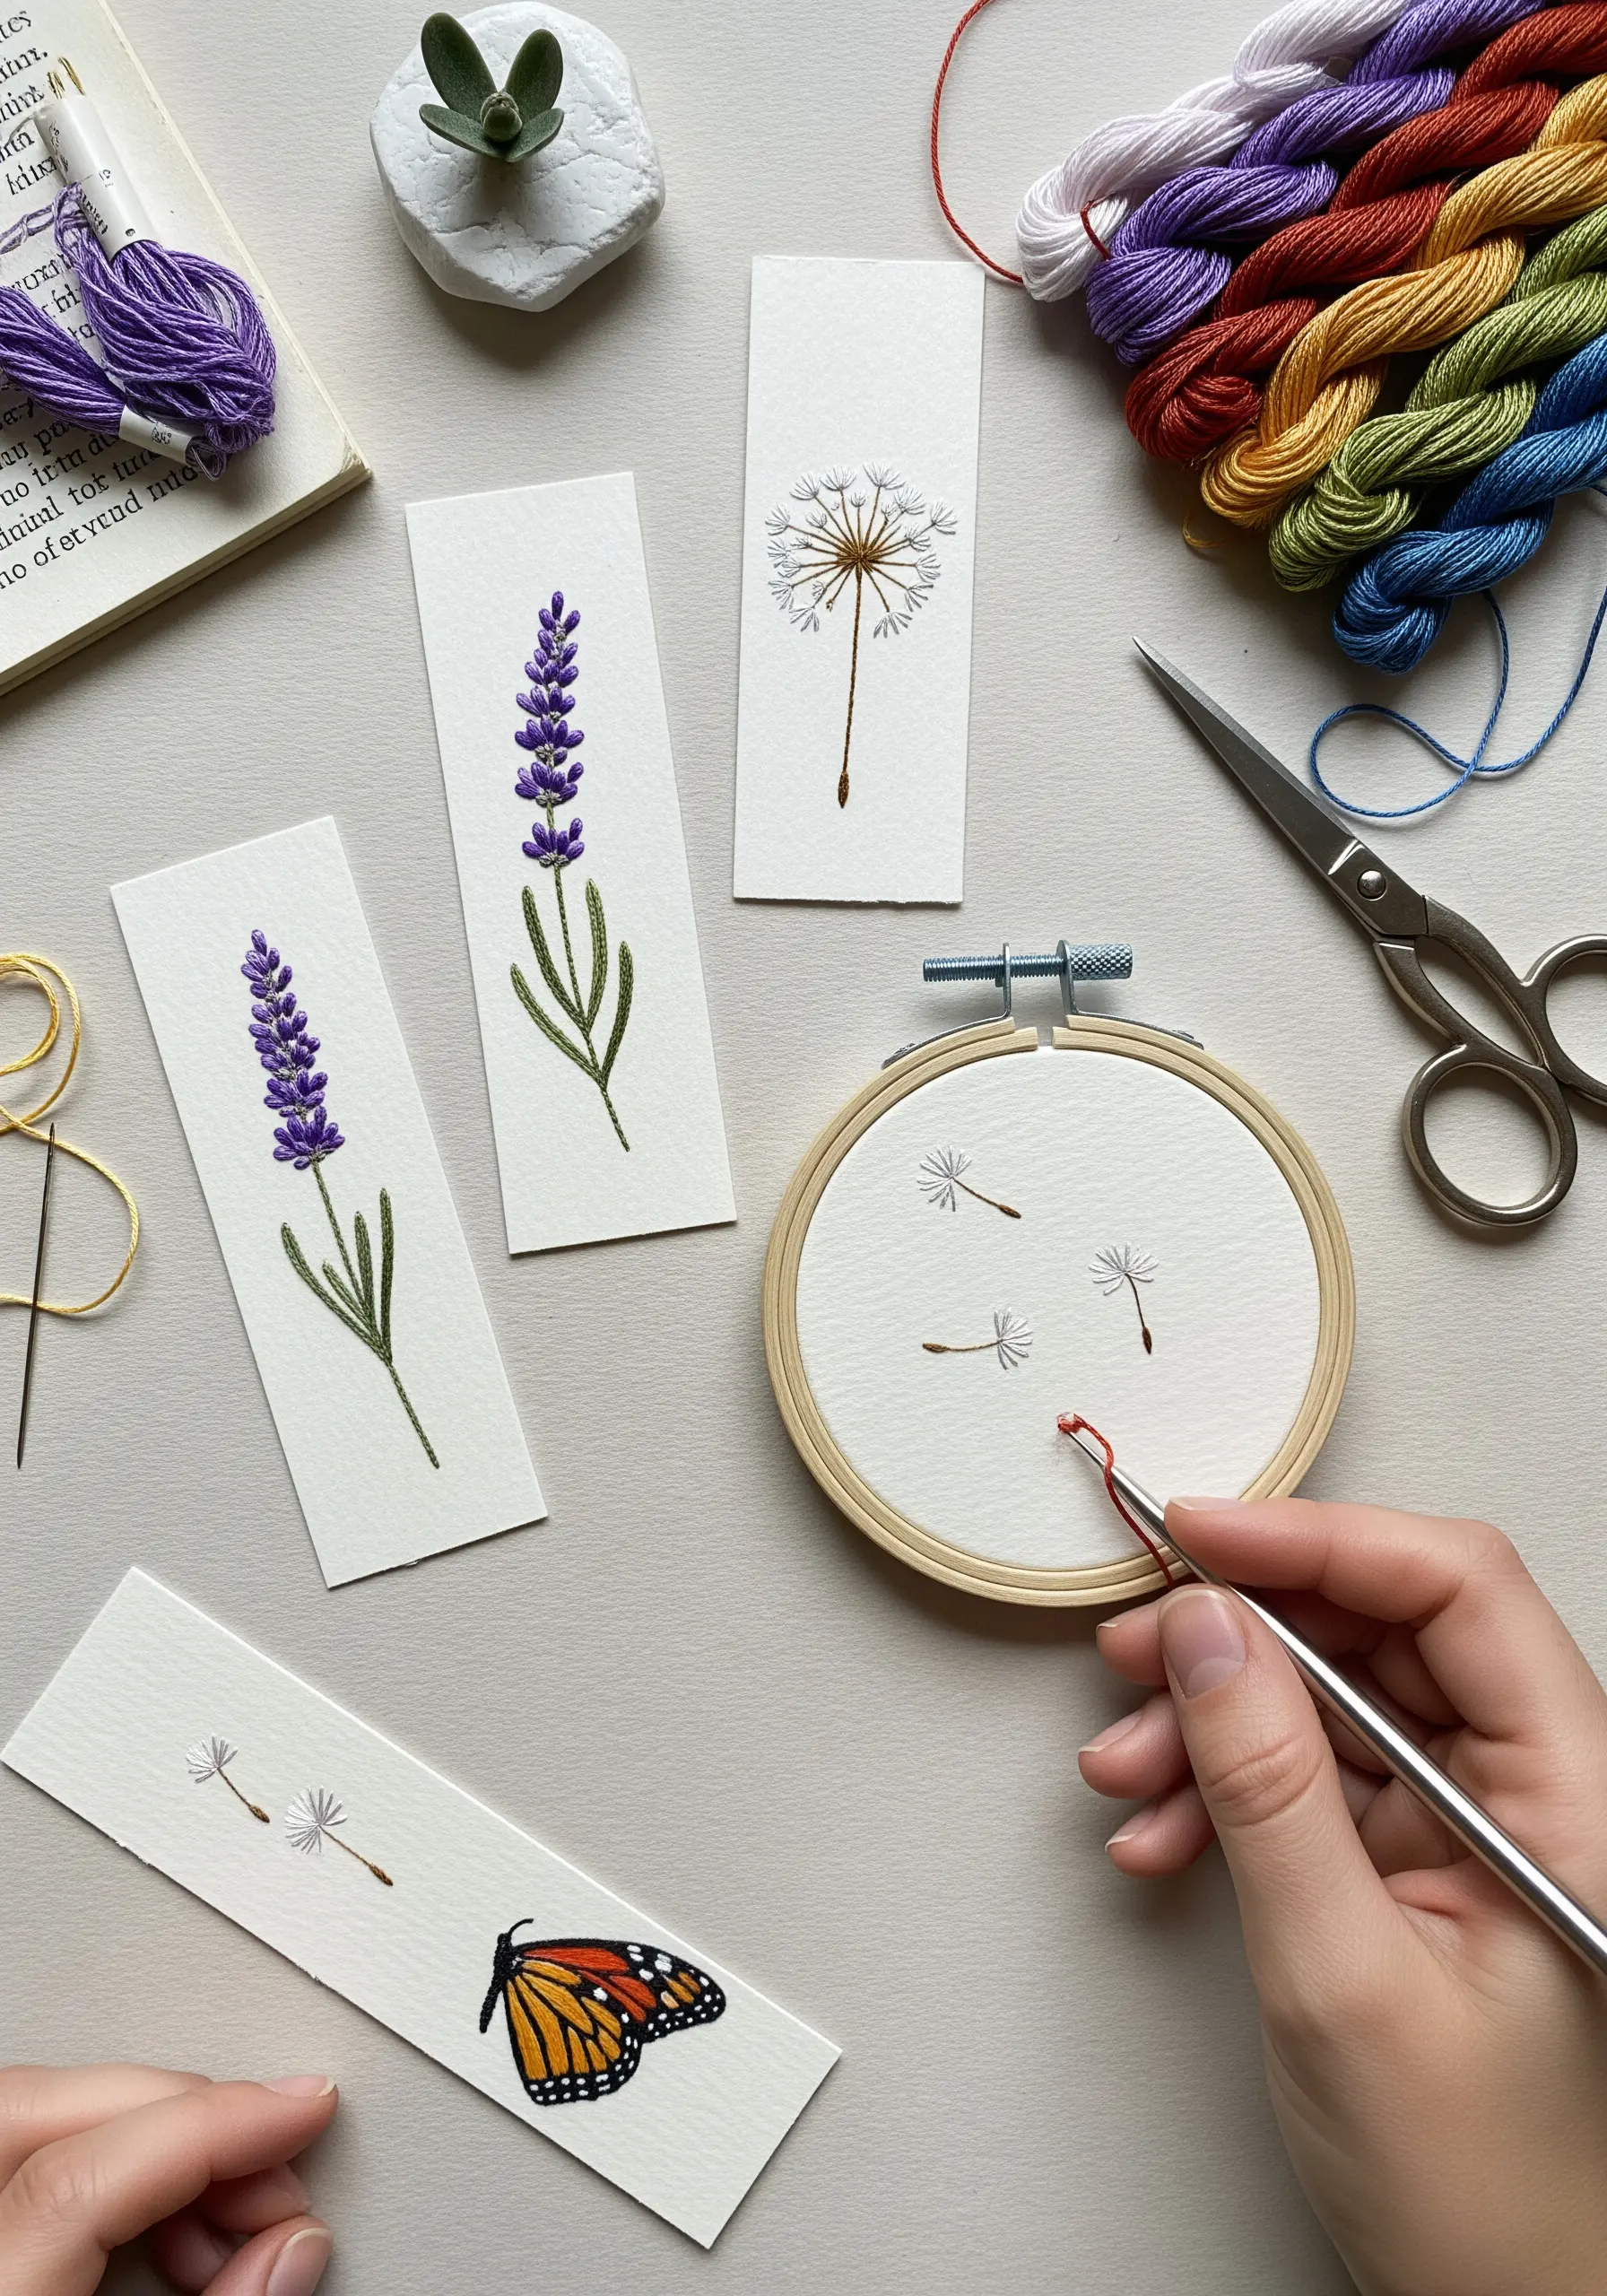
When working on a small scale, precision is everything. Choose heavyweight watercolor paper that can handle needle perforations without fraying.
Use only one or two strands of floss to keep the details fine and prevent the stitches from overwhelming the design.
For motifs like dandelion seeds, a single straight stitch is all you need for the filament, topped with a tiny v-shape or fly stitch.
These easy small embroidery patterns make thoughtful, personalized gifts you can complete in an afternoon.
10. Engineer Sculptural Embroidered Forms
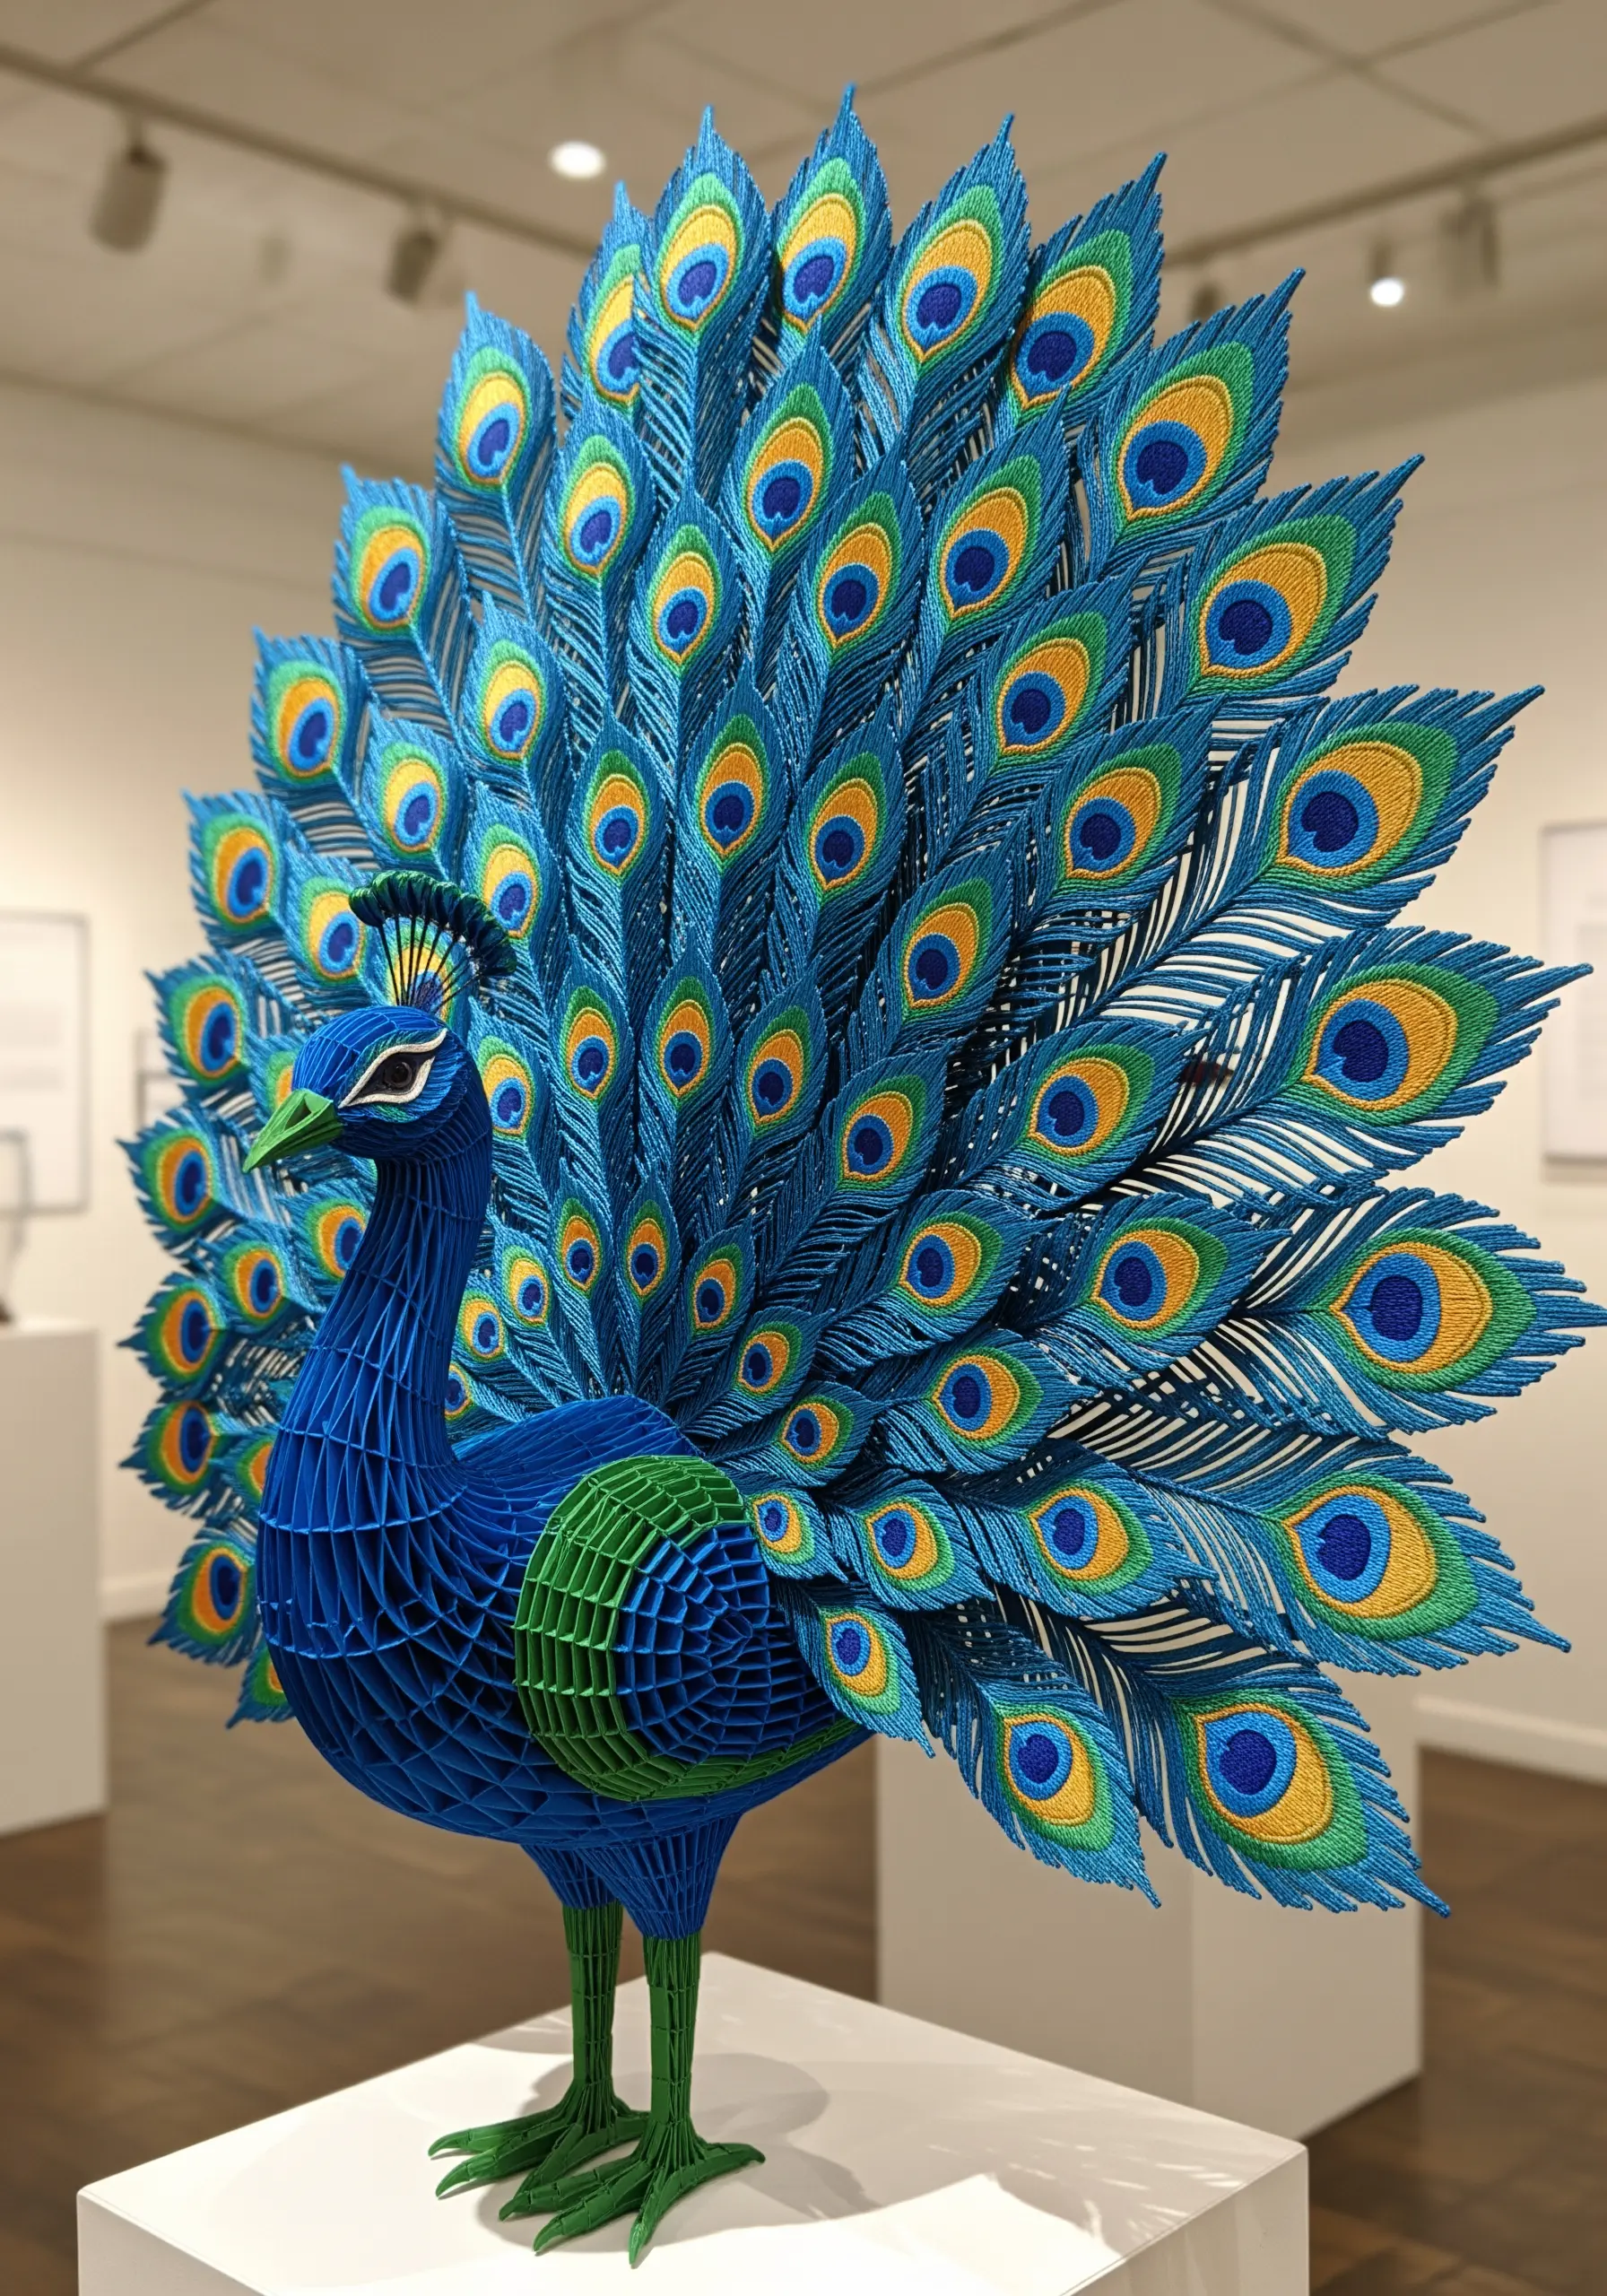
To create freestanding embroidered objects, you need to build a stable structure.
This peacock effect is achievable by embroidering individual feather components onto heavy-duty, water-soluble stabilizer.
Use dense satin stitching to create a solid ‘thread fabric’. After dissolving the stabilizer, the embroidered pieces will hold their shape.
Assemble the pieces with a hot glue gun or by stitching them together, creating complex Fiber art installations that defy gravity.
11. Design Minimalist Embroidered Gift Tags

Elevate simple gift wrapping with a touch of handmade elegance.
On thick, textured paper tags, a small, well-executed motif has more impact than a complex design.
Combine a clean backstitch outline with a small pop of color from a fill stitch, like the fishbone stitch used for the oak leaf.
These refined, minimal festive motifs show that thoughtful detail doesn’t require hours of stitching.
12. Accent Paper Cutouts with Metallic Thread
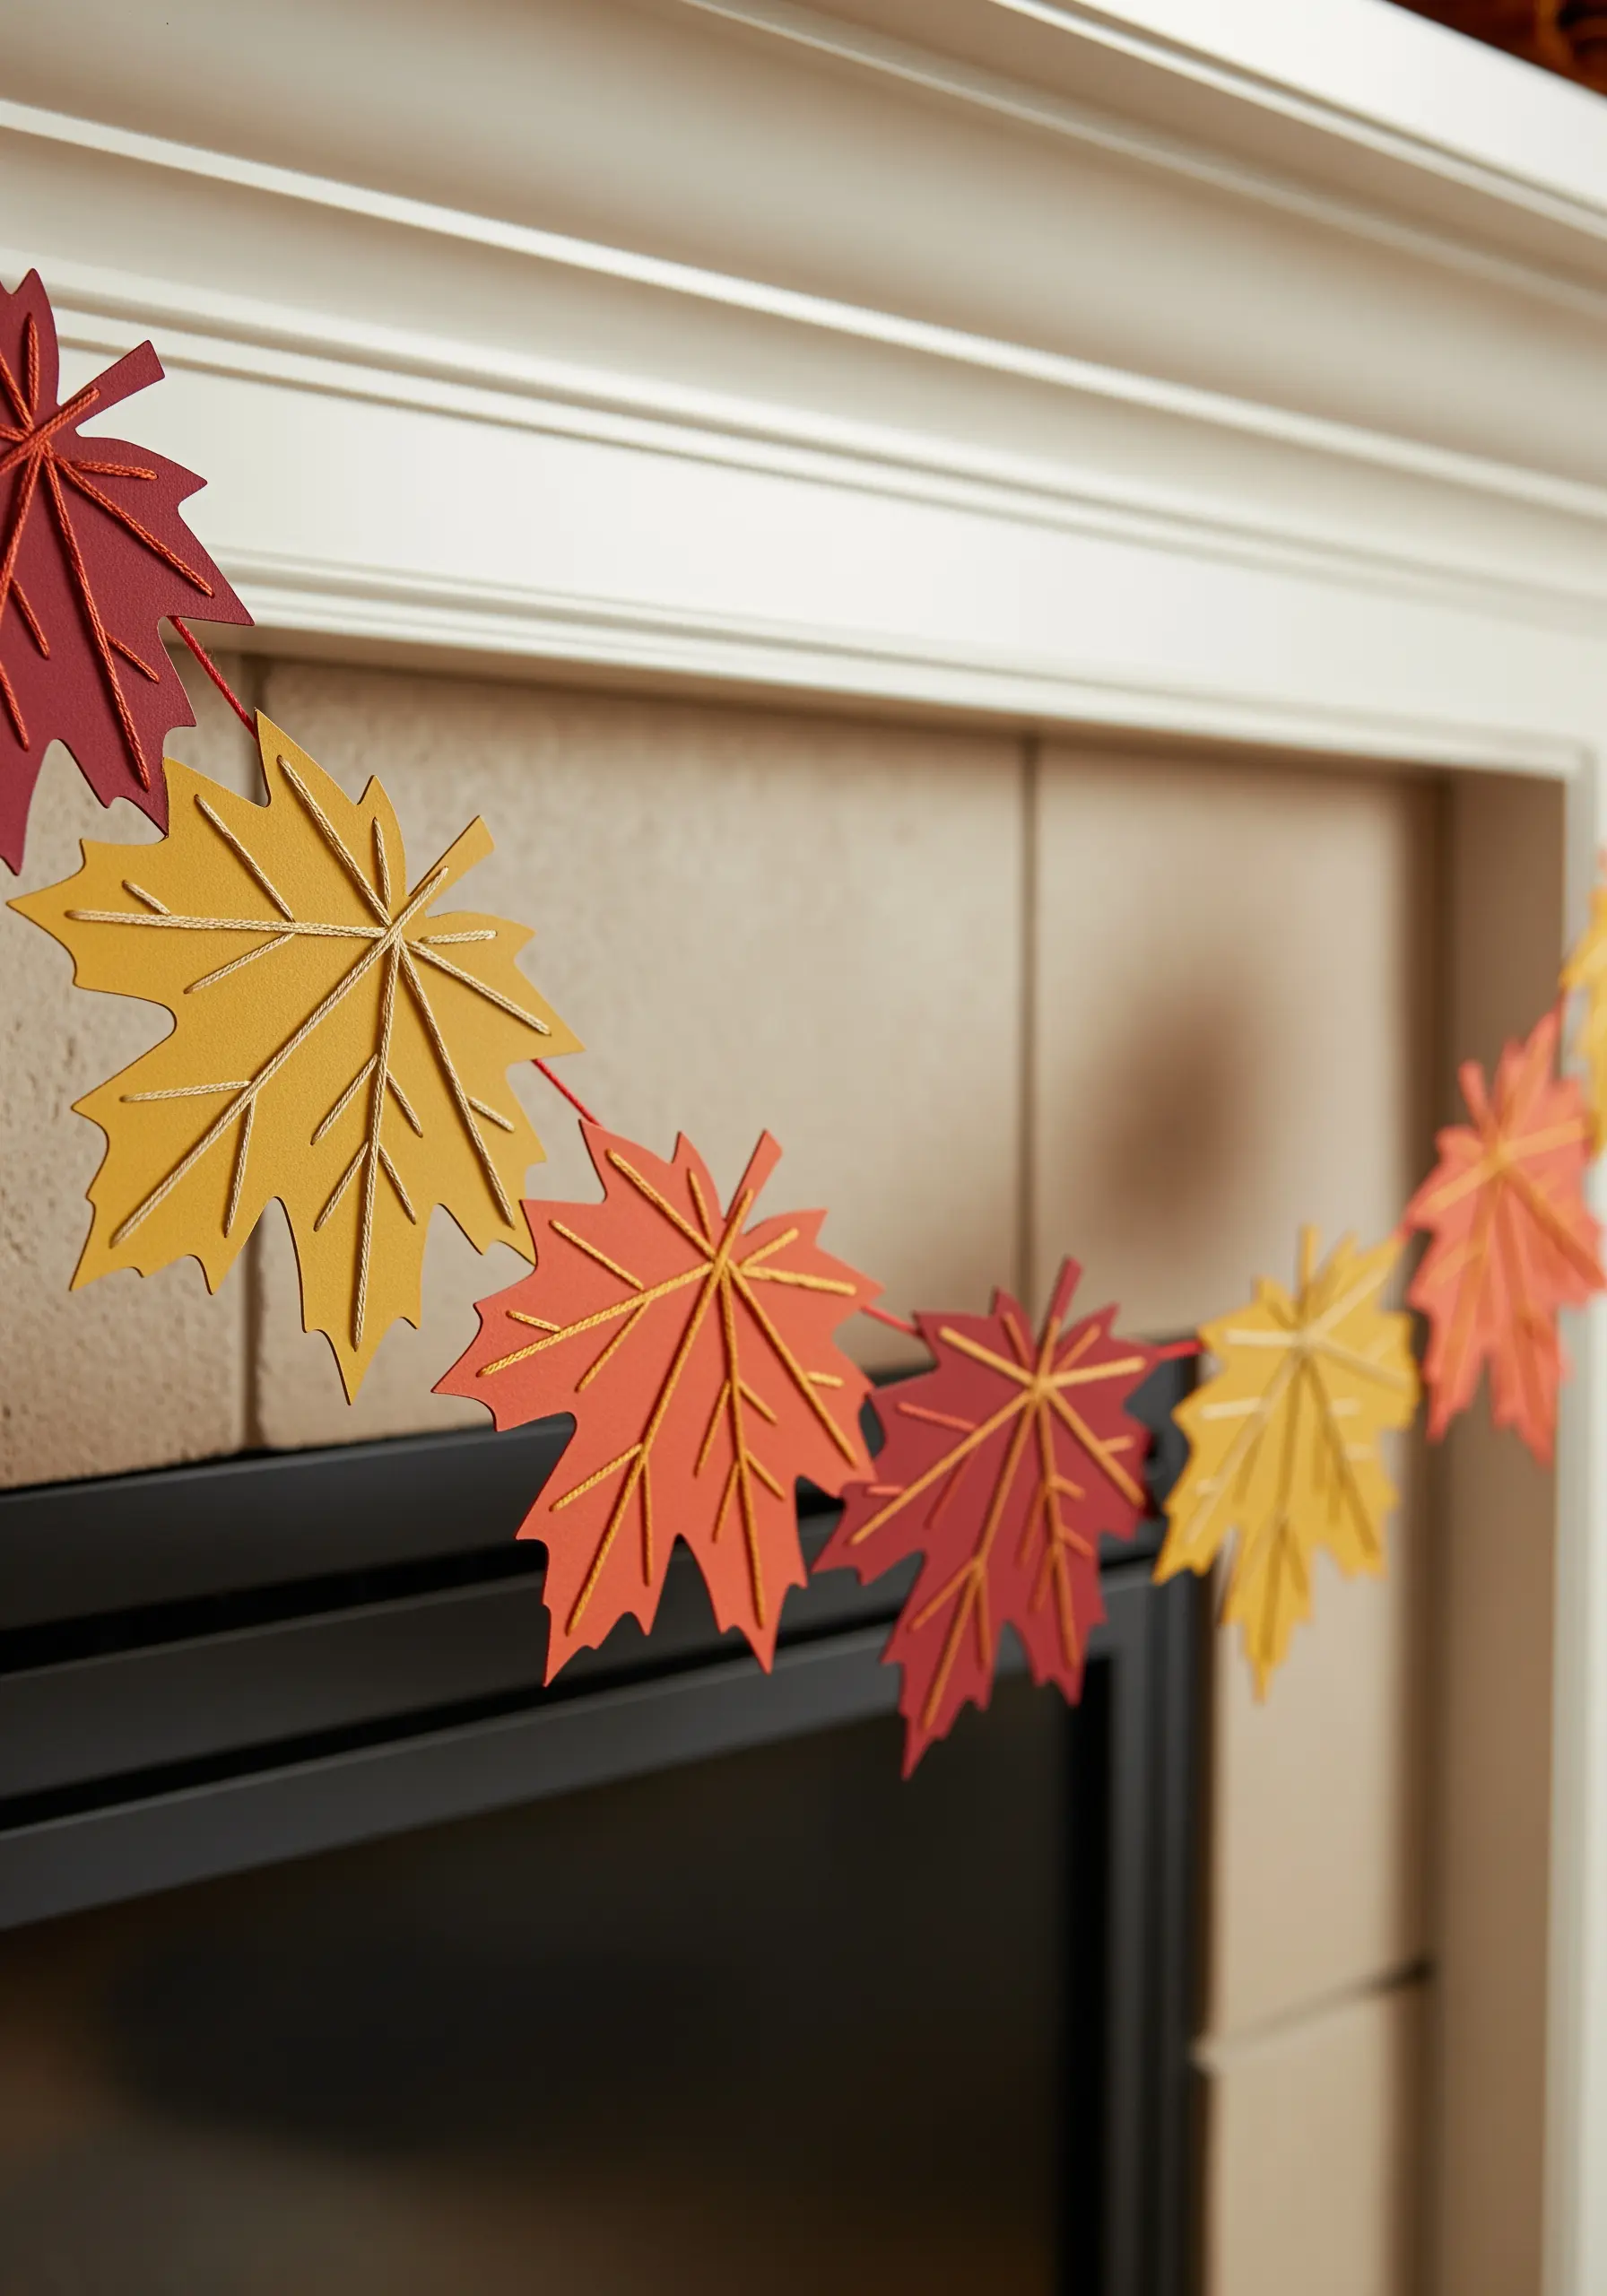
Add a touch of subtle glamour to a paper garland by stitching details with metallic thread.
Use a simple backstitch or stem stitch to trace the veins on paper leaf cutouts.
To make working with metallic floss easier, use a slightly larger needle eye and work with shorter lengths of thread (no more than 12 inches) to prevent tangling and fraying.
This project is one of many embroidery projects inspired by textures you’d find in nature, but with a festive twist.
13. Mimic Wood Grain with Thread Painting
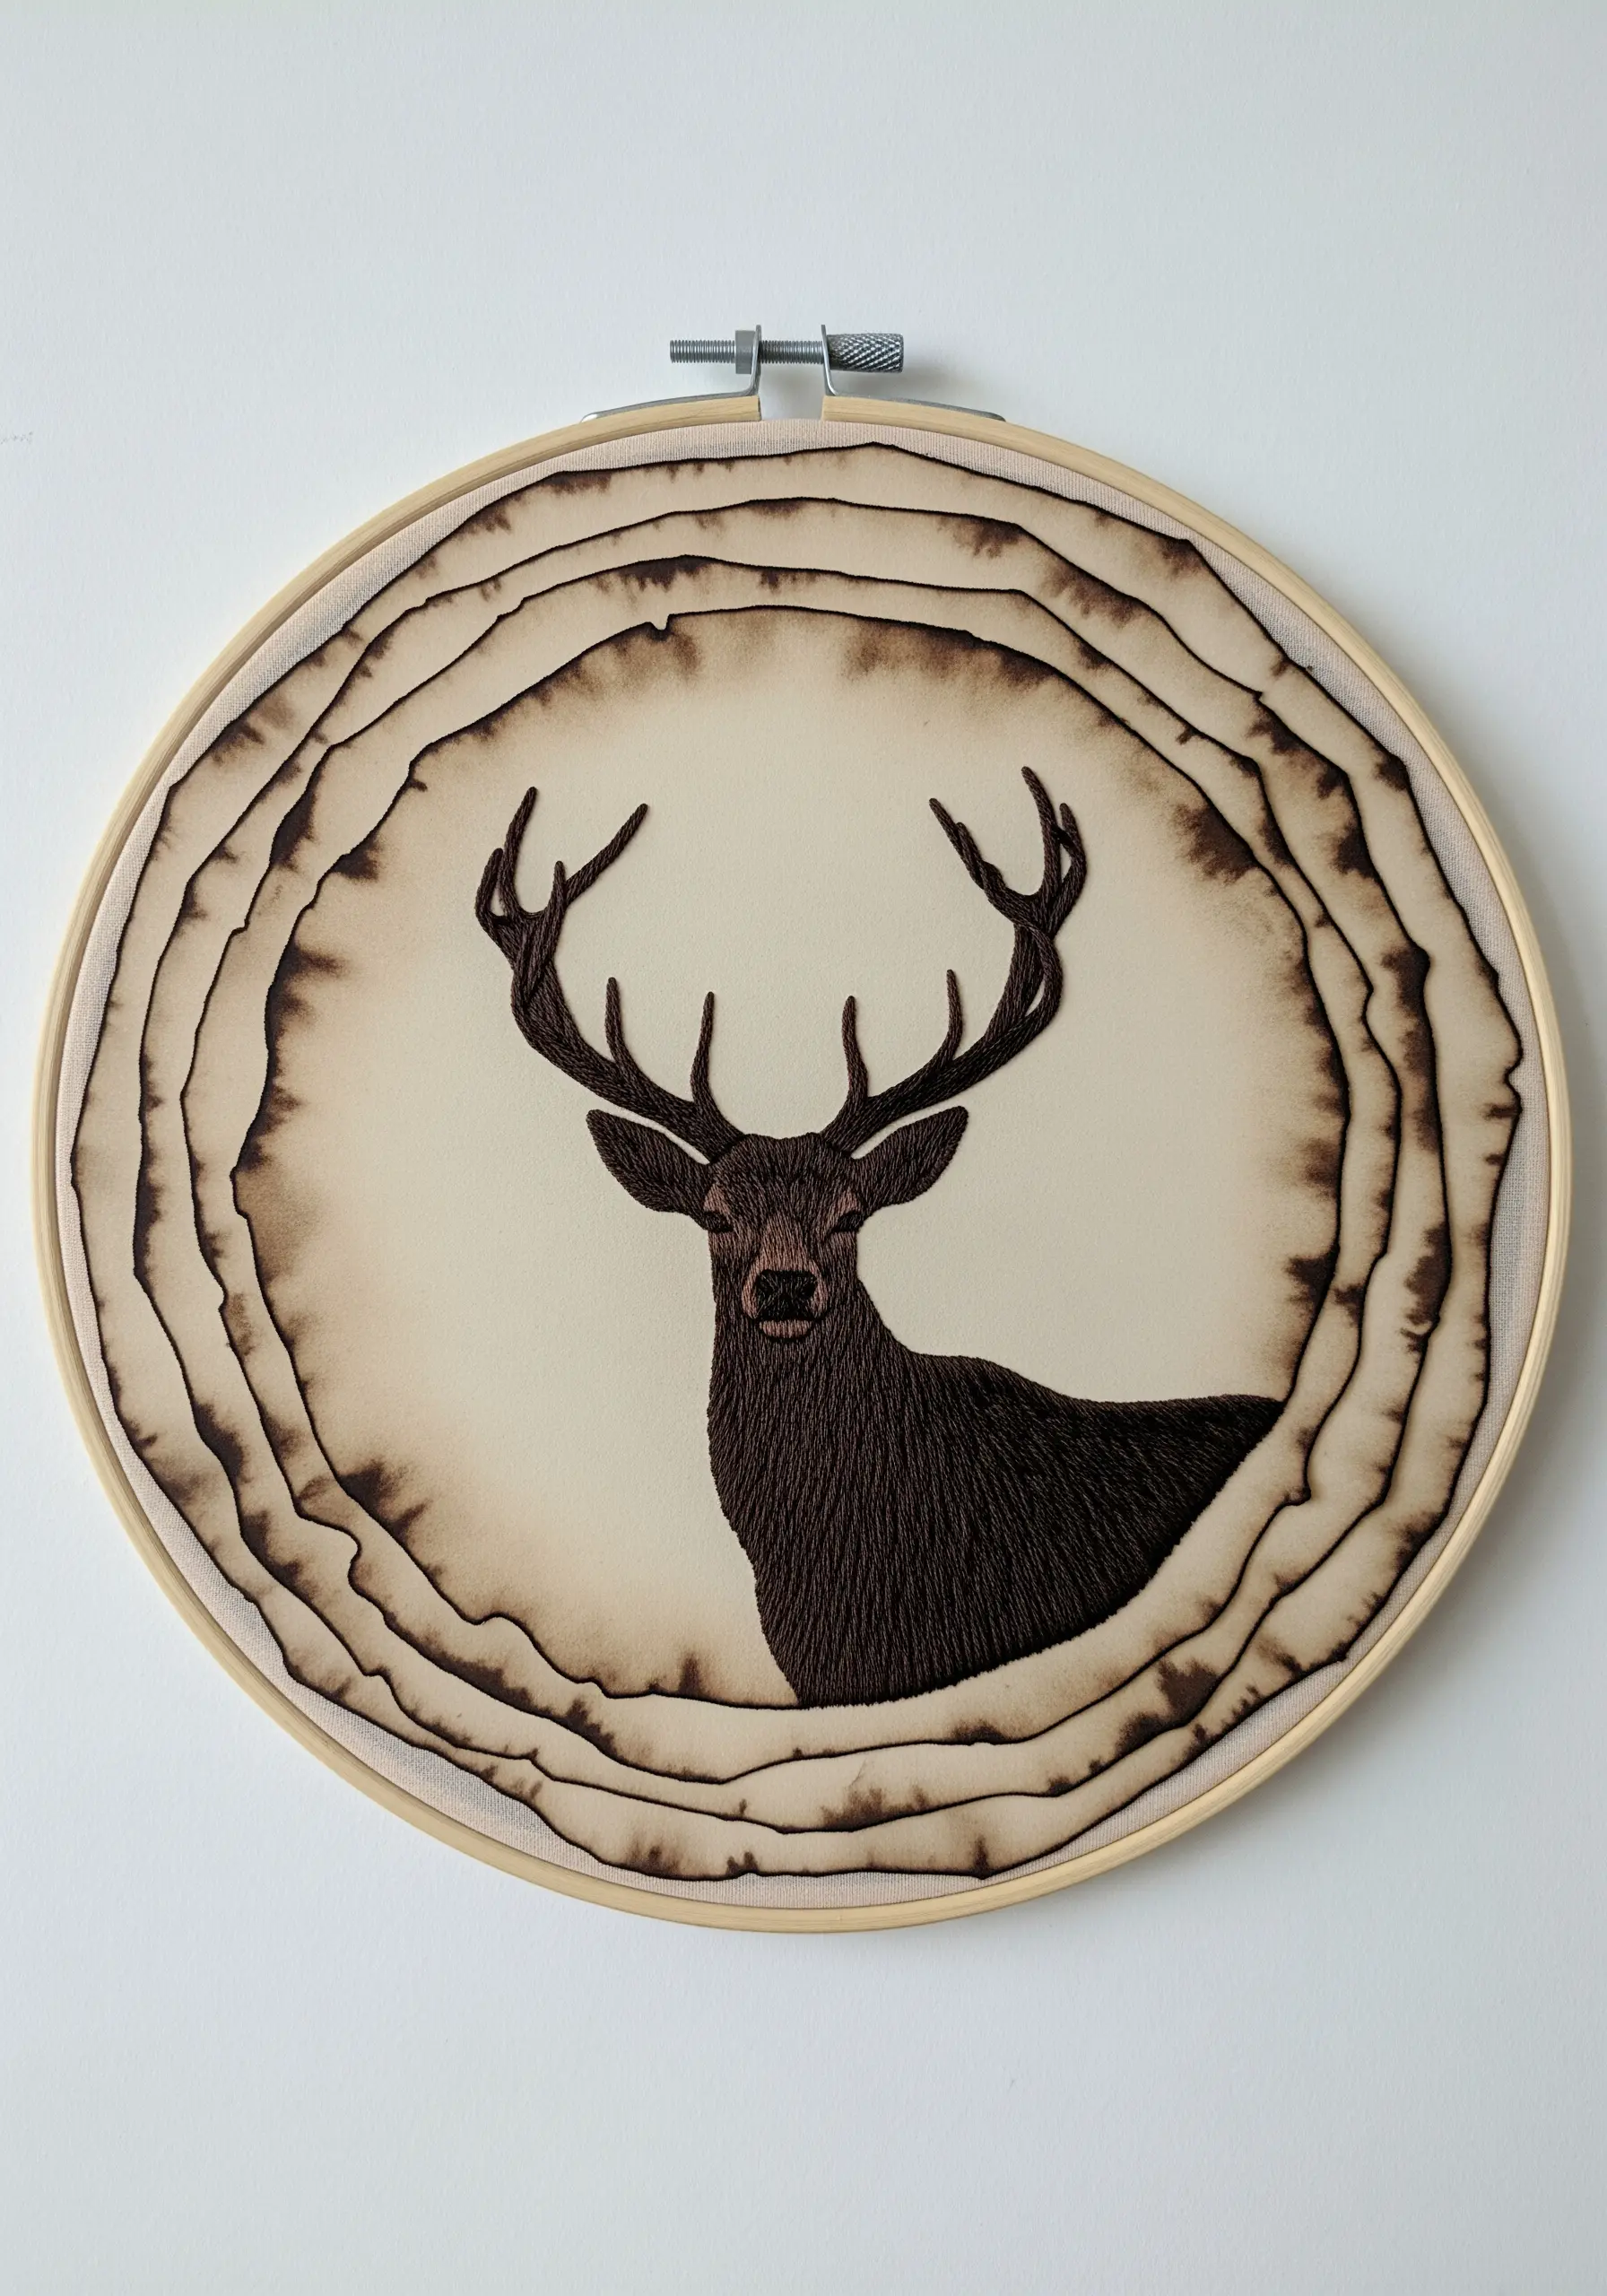
Create the organic, layered effect of wood rings or pyrography using only thread and fabric.
Instead of stitching on paper, use brown ink or watercolor paint to stain the edges of your fabric in concentric circles.
For the central stag motif, use dense seed stitch in dark brown and black floss. The random, overlapping stitches create a rich texture that absorbs light, making the silhouette feel solid and deep.
14. Unify a Paper Patchwork with Stitches

Use embroidery to connect and unify disparate pieces of patterned paper.
Arrange your paper triangles into a quilt-like block on a sturdy cardstock base, securing them with a glue stick.
Stitch a bold, symmetrical design—like this fern—over the top. The stitches will physically and visually quilt the layers together, creating a cohesive piece.
This is one of the most accessible high-texture fabric collage embroidery projects, perfect for using up beautiful paper scraps.
15. Scale Up Line Art for a Wall Tapestry
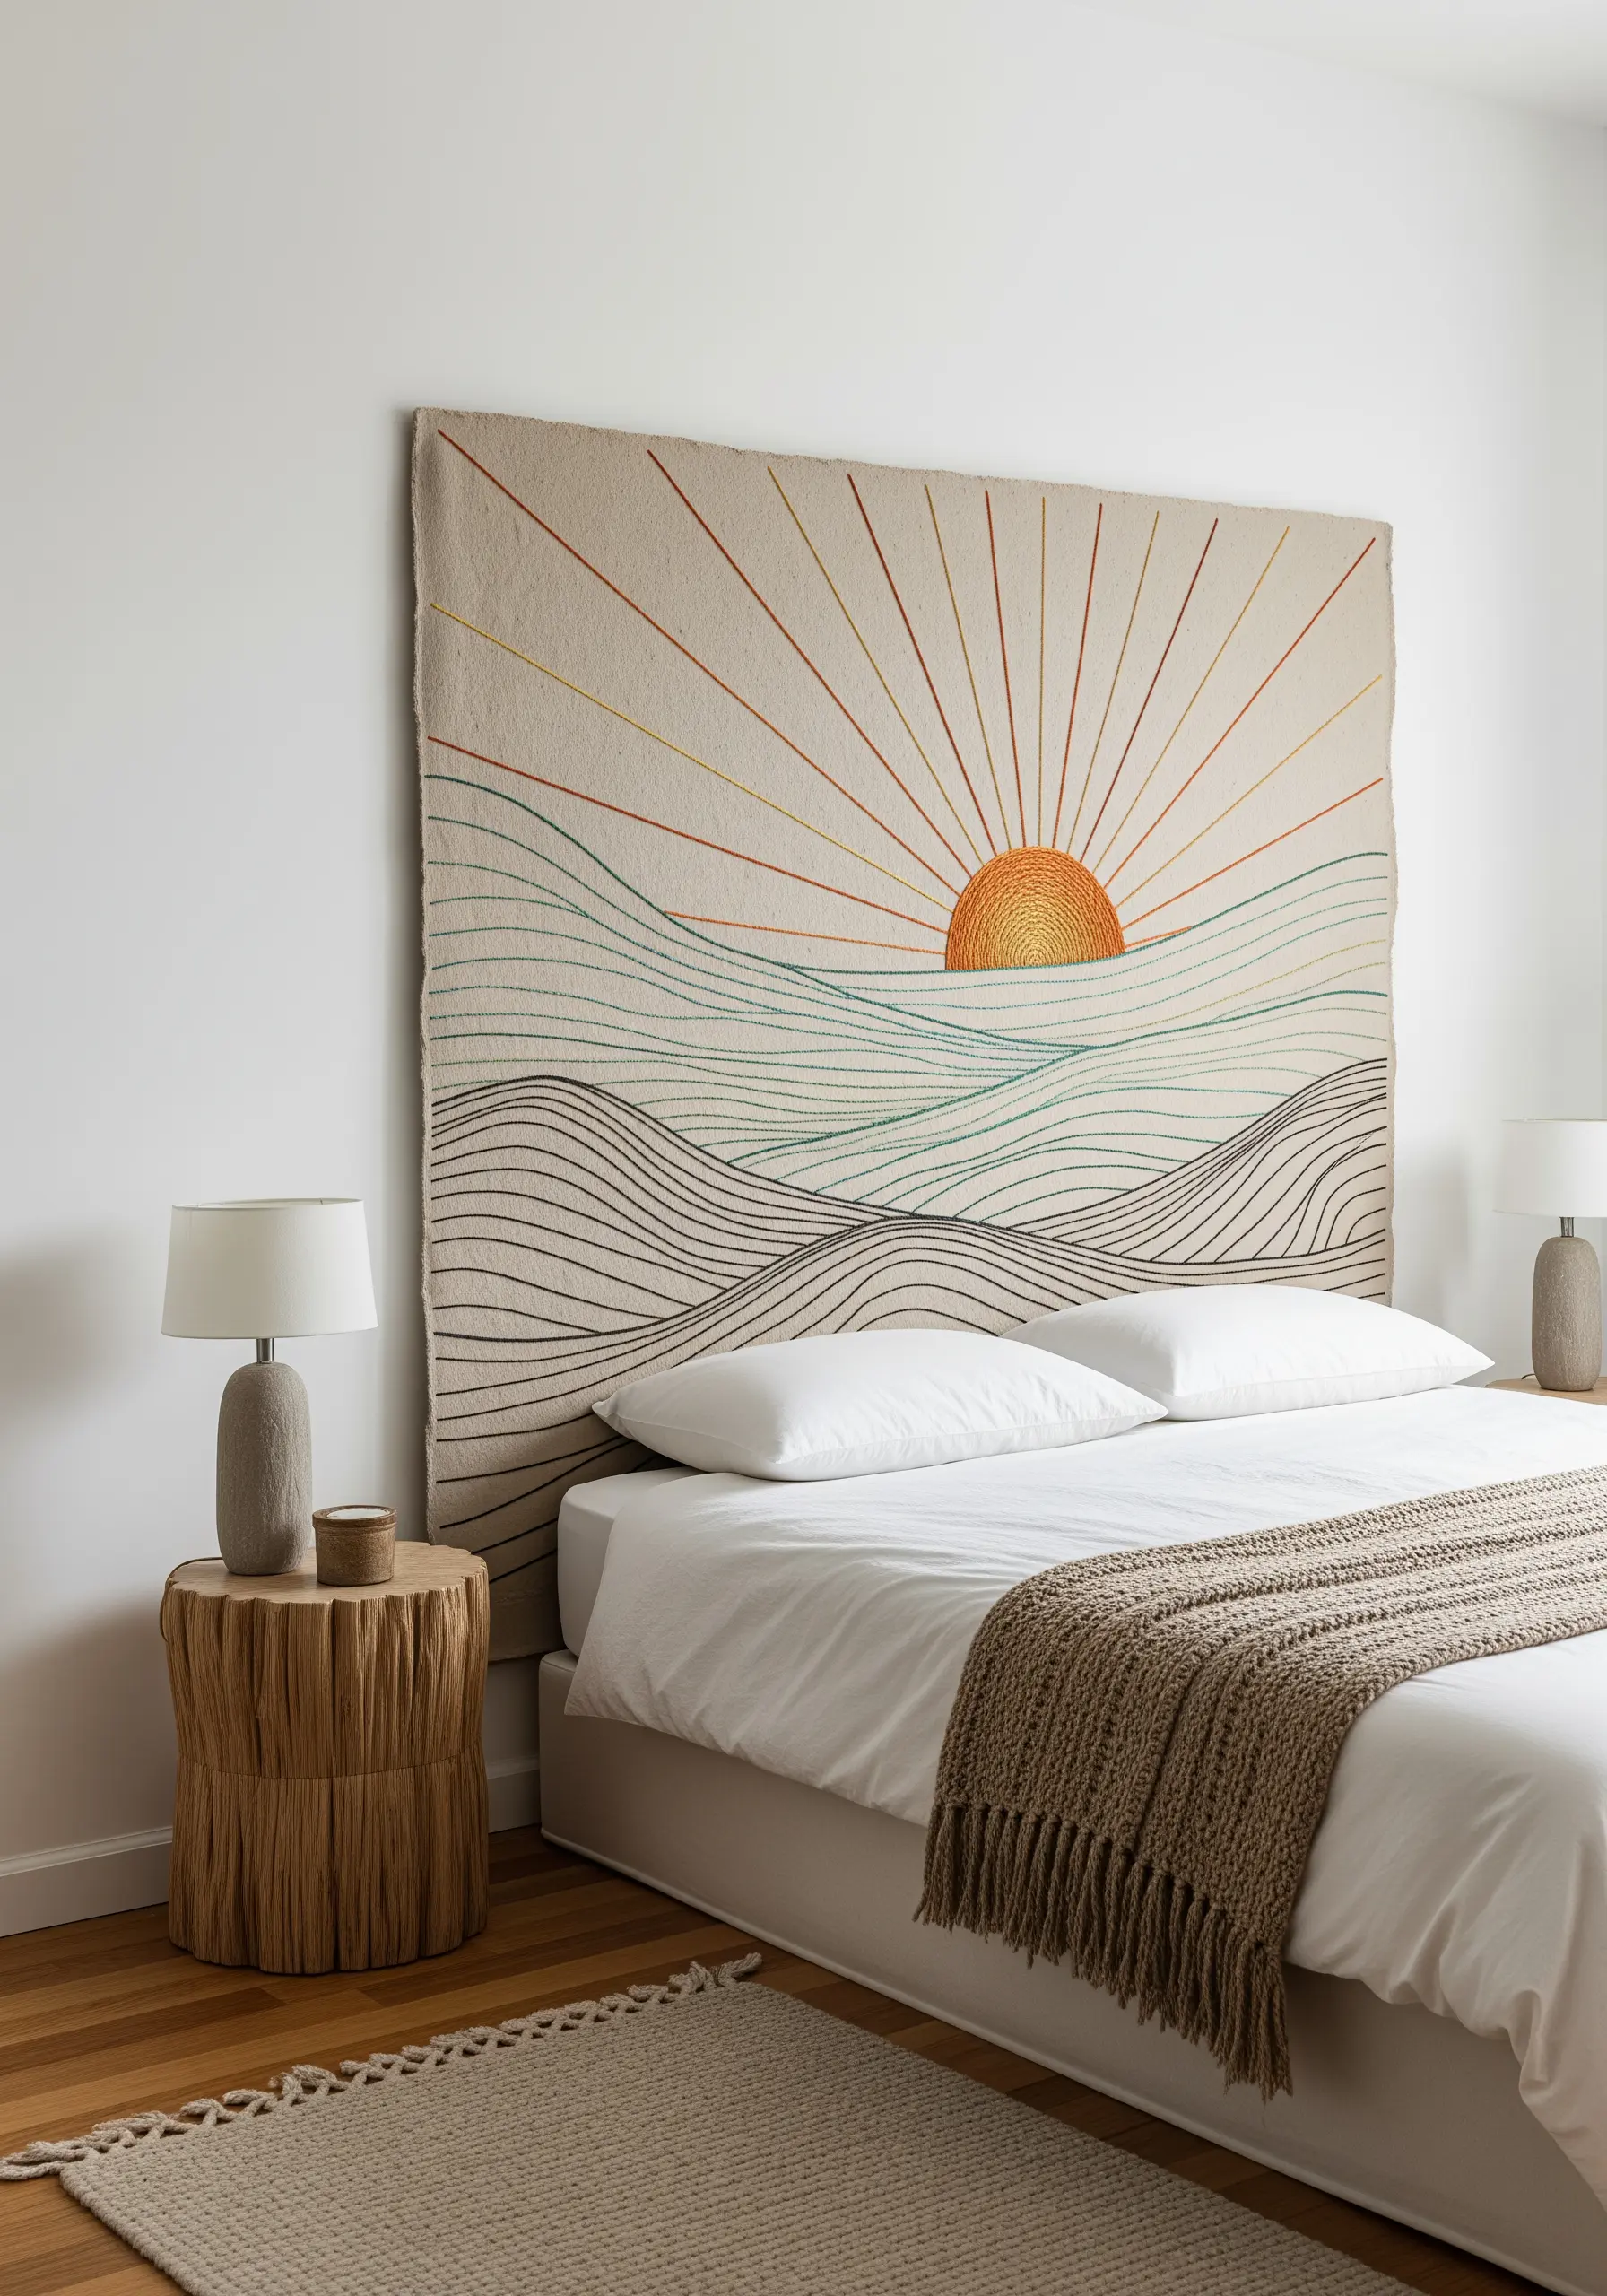
Translate a small line drawing into a large-scale, impactful piece of decor.
Project your design onto a large piece of heavy canvas or very sturdy paper to accurately trace the lines.
Instead of standard floss, use thicker materials like perle cotton, tapestry wool, or fine yarn to ensure the lines are bold enough for the scale.
These minimalist boho embroidery patterns transform a simple line into a statement piece.
16. Create Cosmic Swirls with Knotted Cords
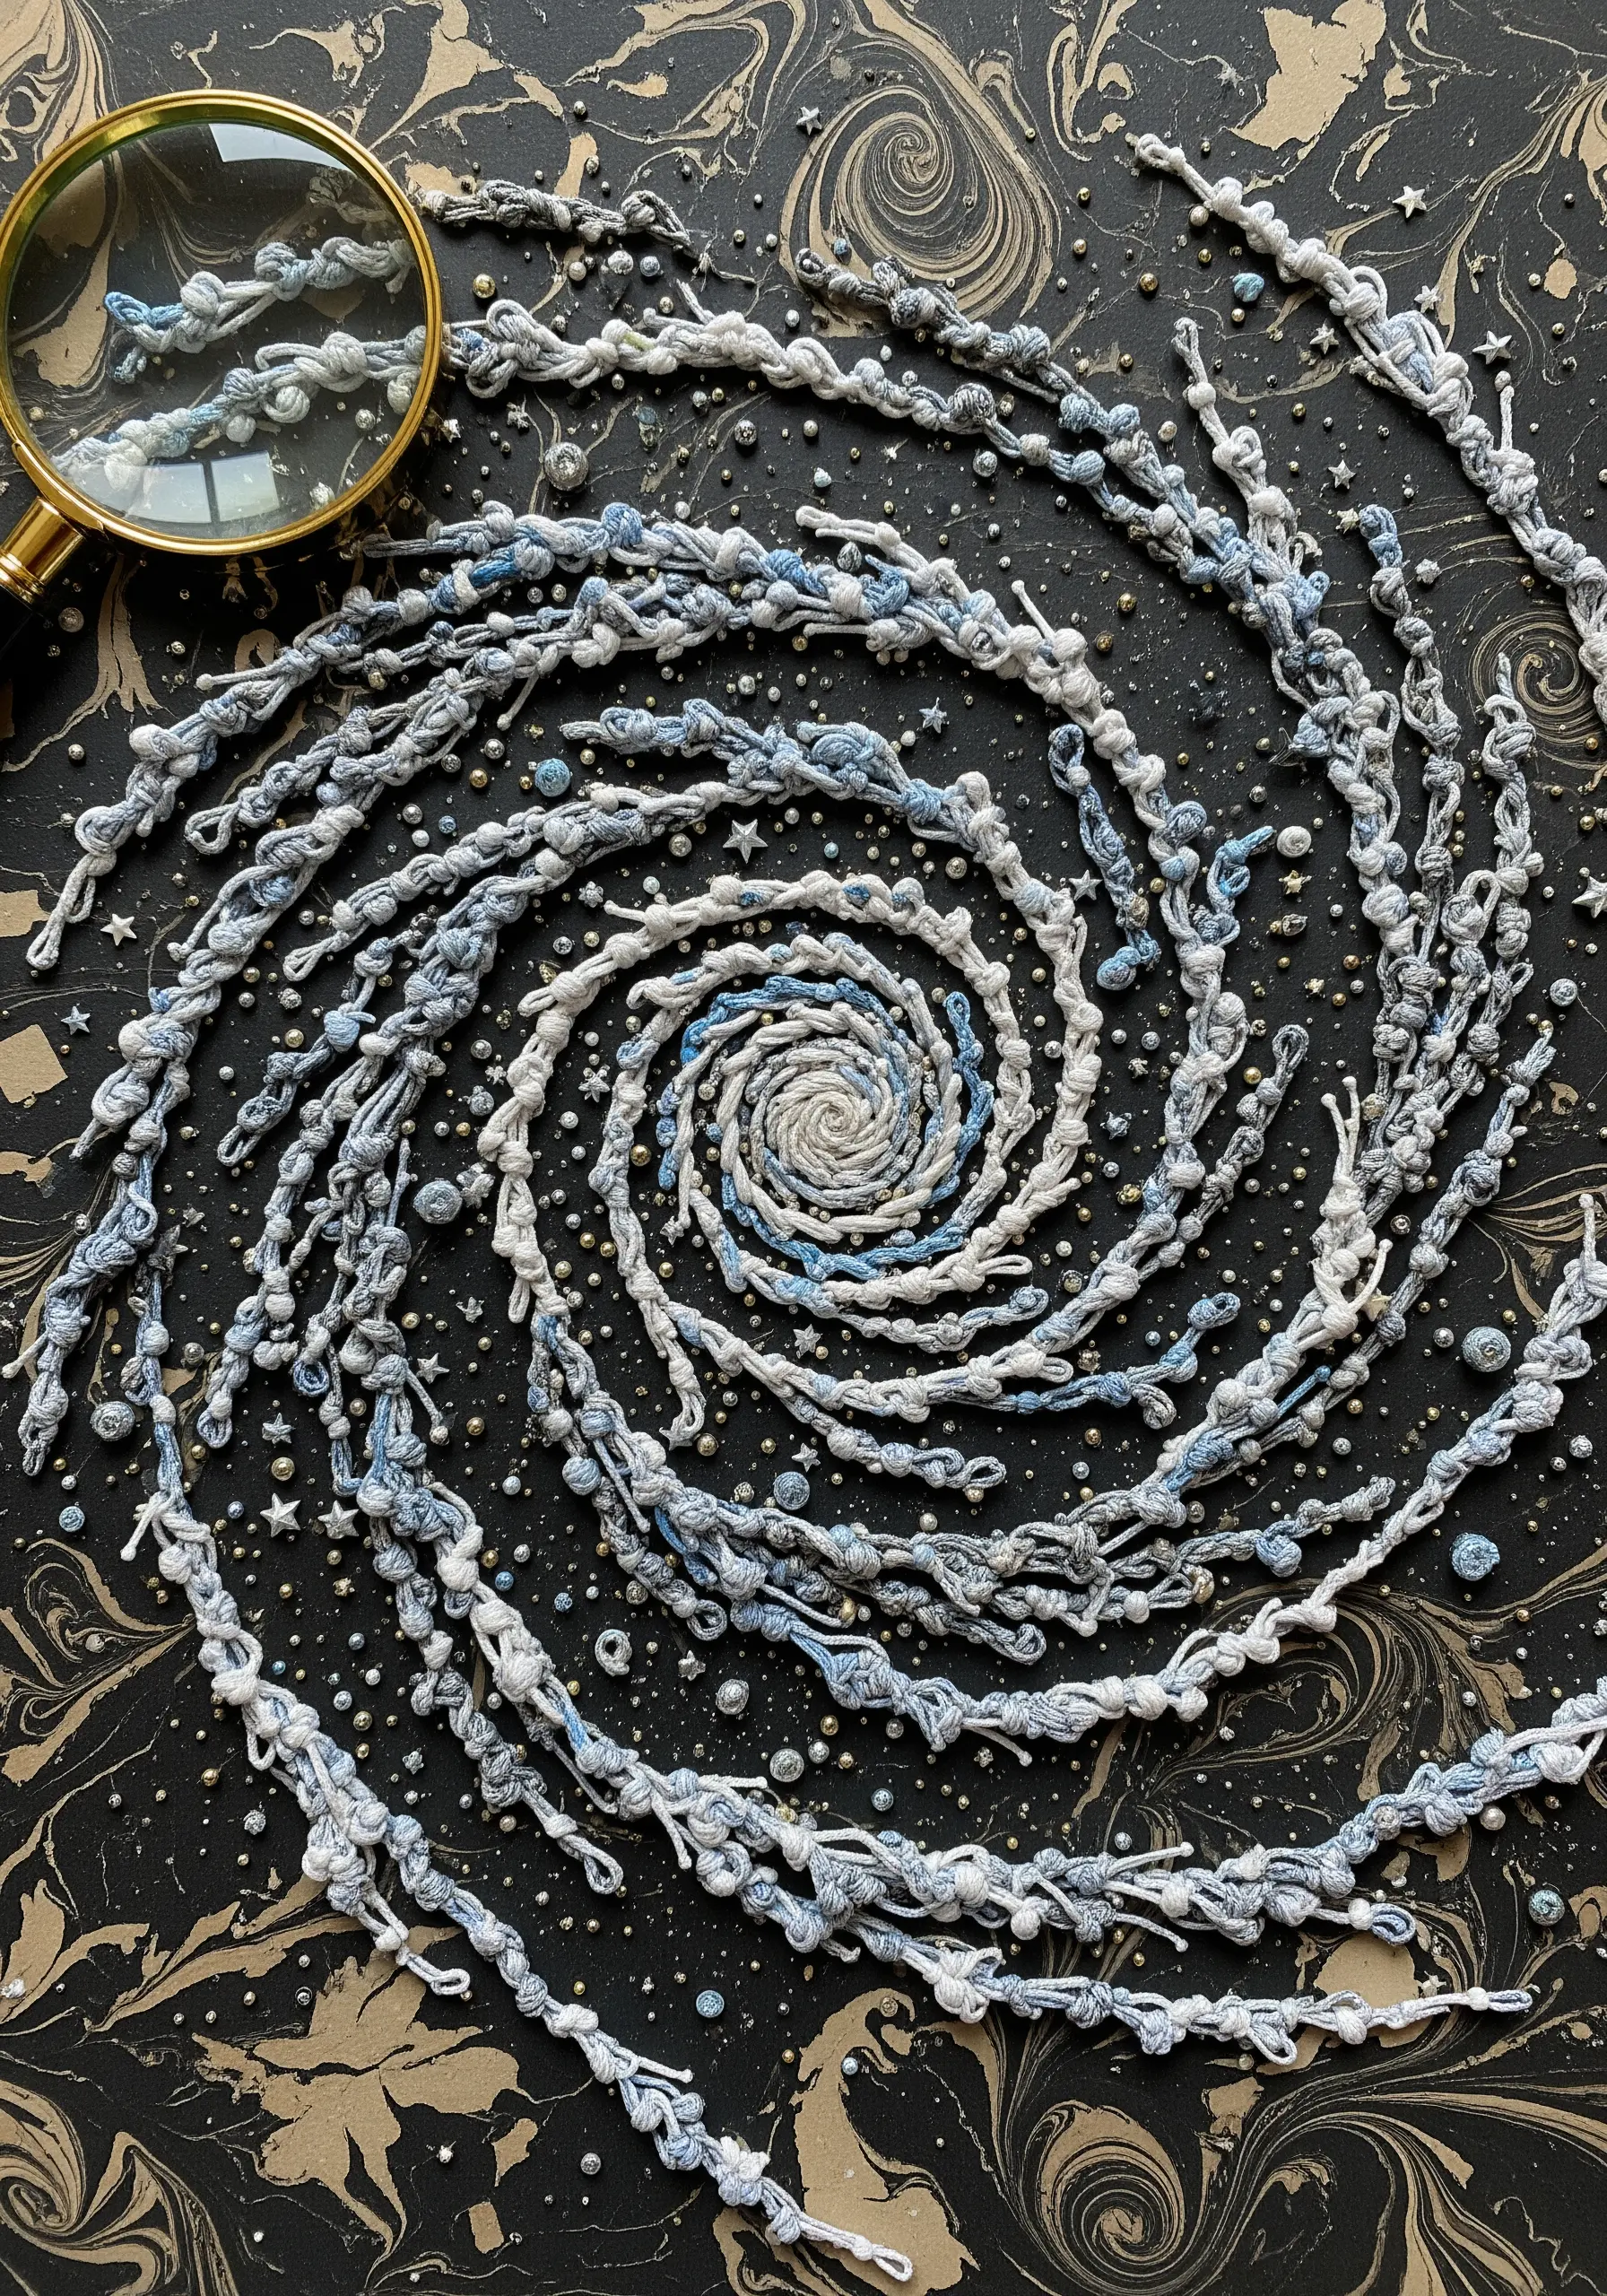
Build extraordinary texture by creating your own knotted and twisted cords before attaching them to your surface.
Take multiple strands of floss in variegated colors and twist them together tightly. Secure the texture by tying simple knots along the length of your new cord.
Arrange the cord in a spiral on a painted paper background and couch it down with a fine, invisible thread.
The result mimics the dynamic energy of a galaxy, especially when paired with contemporary rainbow-blend stitches and beaded ‘stars’.
17. Add Stitched Appliqué to Paper Mache
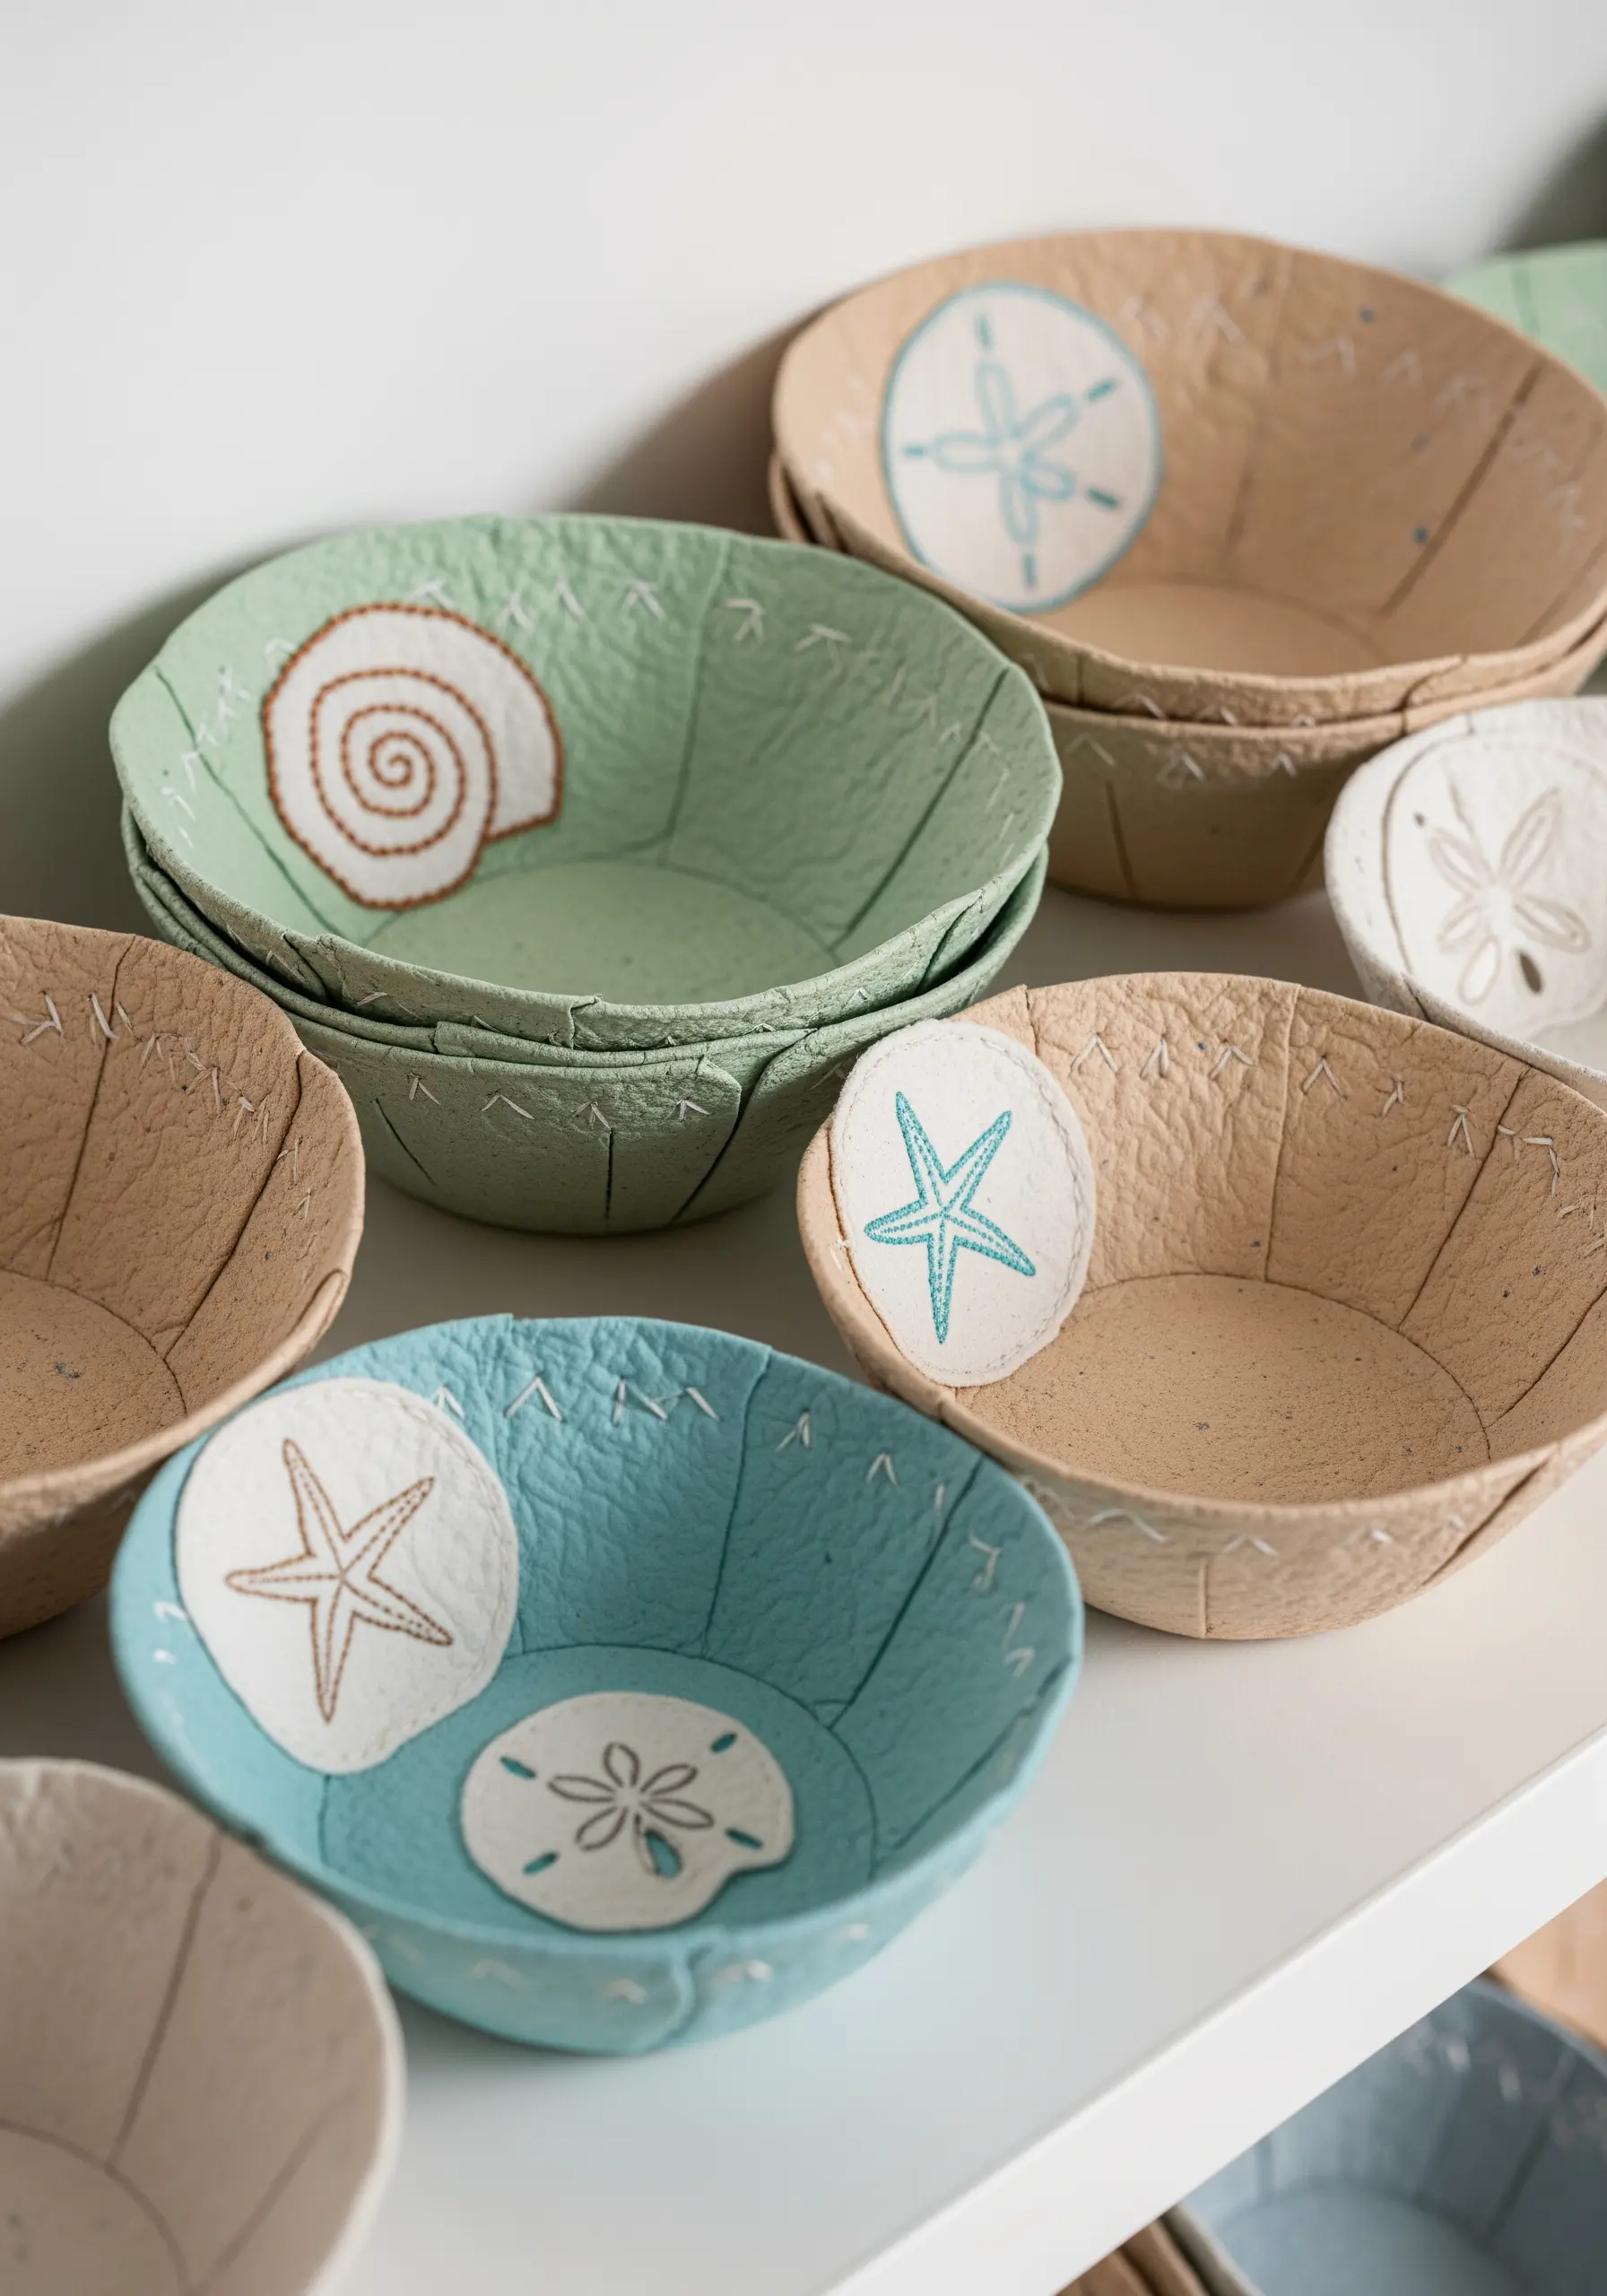
Stitching directly onto a curved, hardened paper mache surface can be difficult. An appliqué approach offers a simple solution.
Embroider your small coastal motifs—like shells and sand dollars—onto separate scraps of felt or canvas.
Cut them out, leaving a small border, and use a strong craft glue to adhere them to your paper mache bowls.
These simple handmade embroidery touches add charm without compromising the structure of your piece.
18. Sculpt Dimensional Mushrooms with Stumpwork
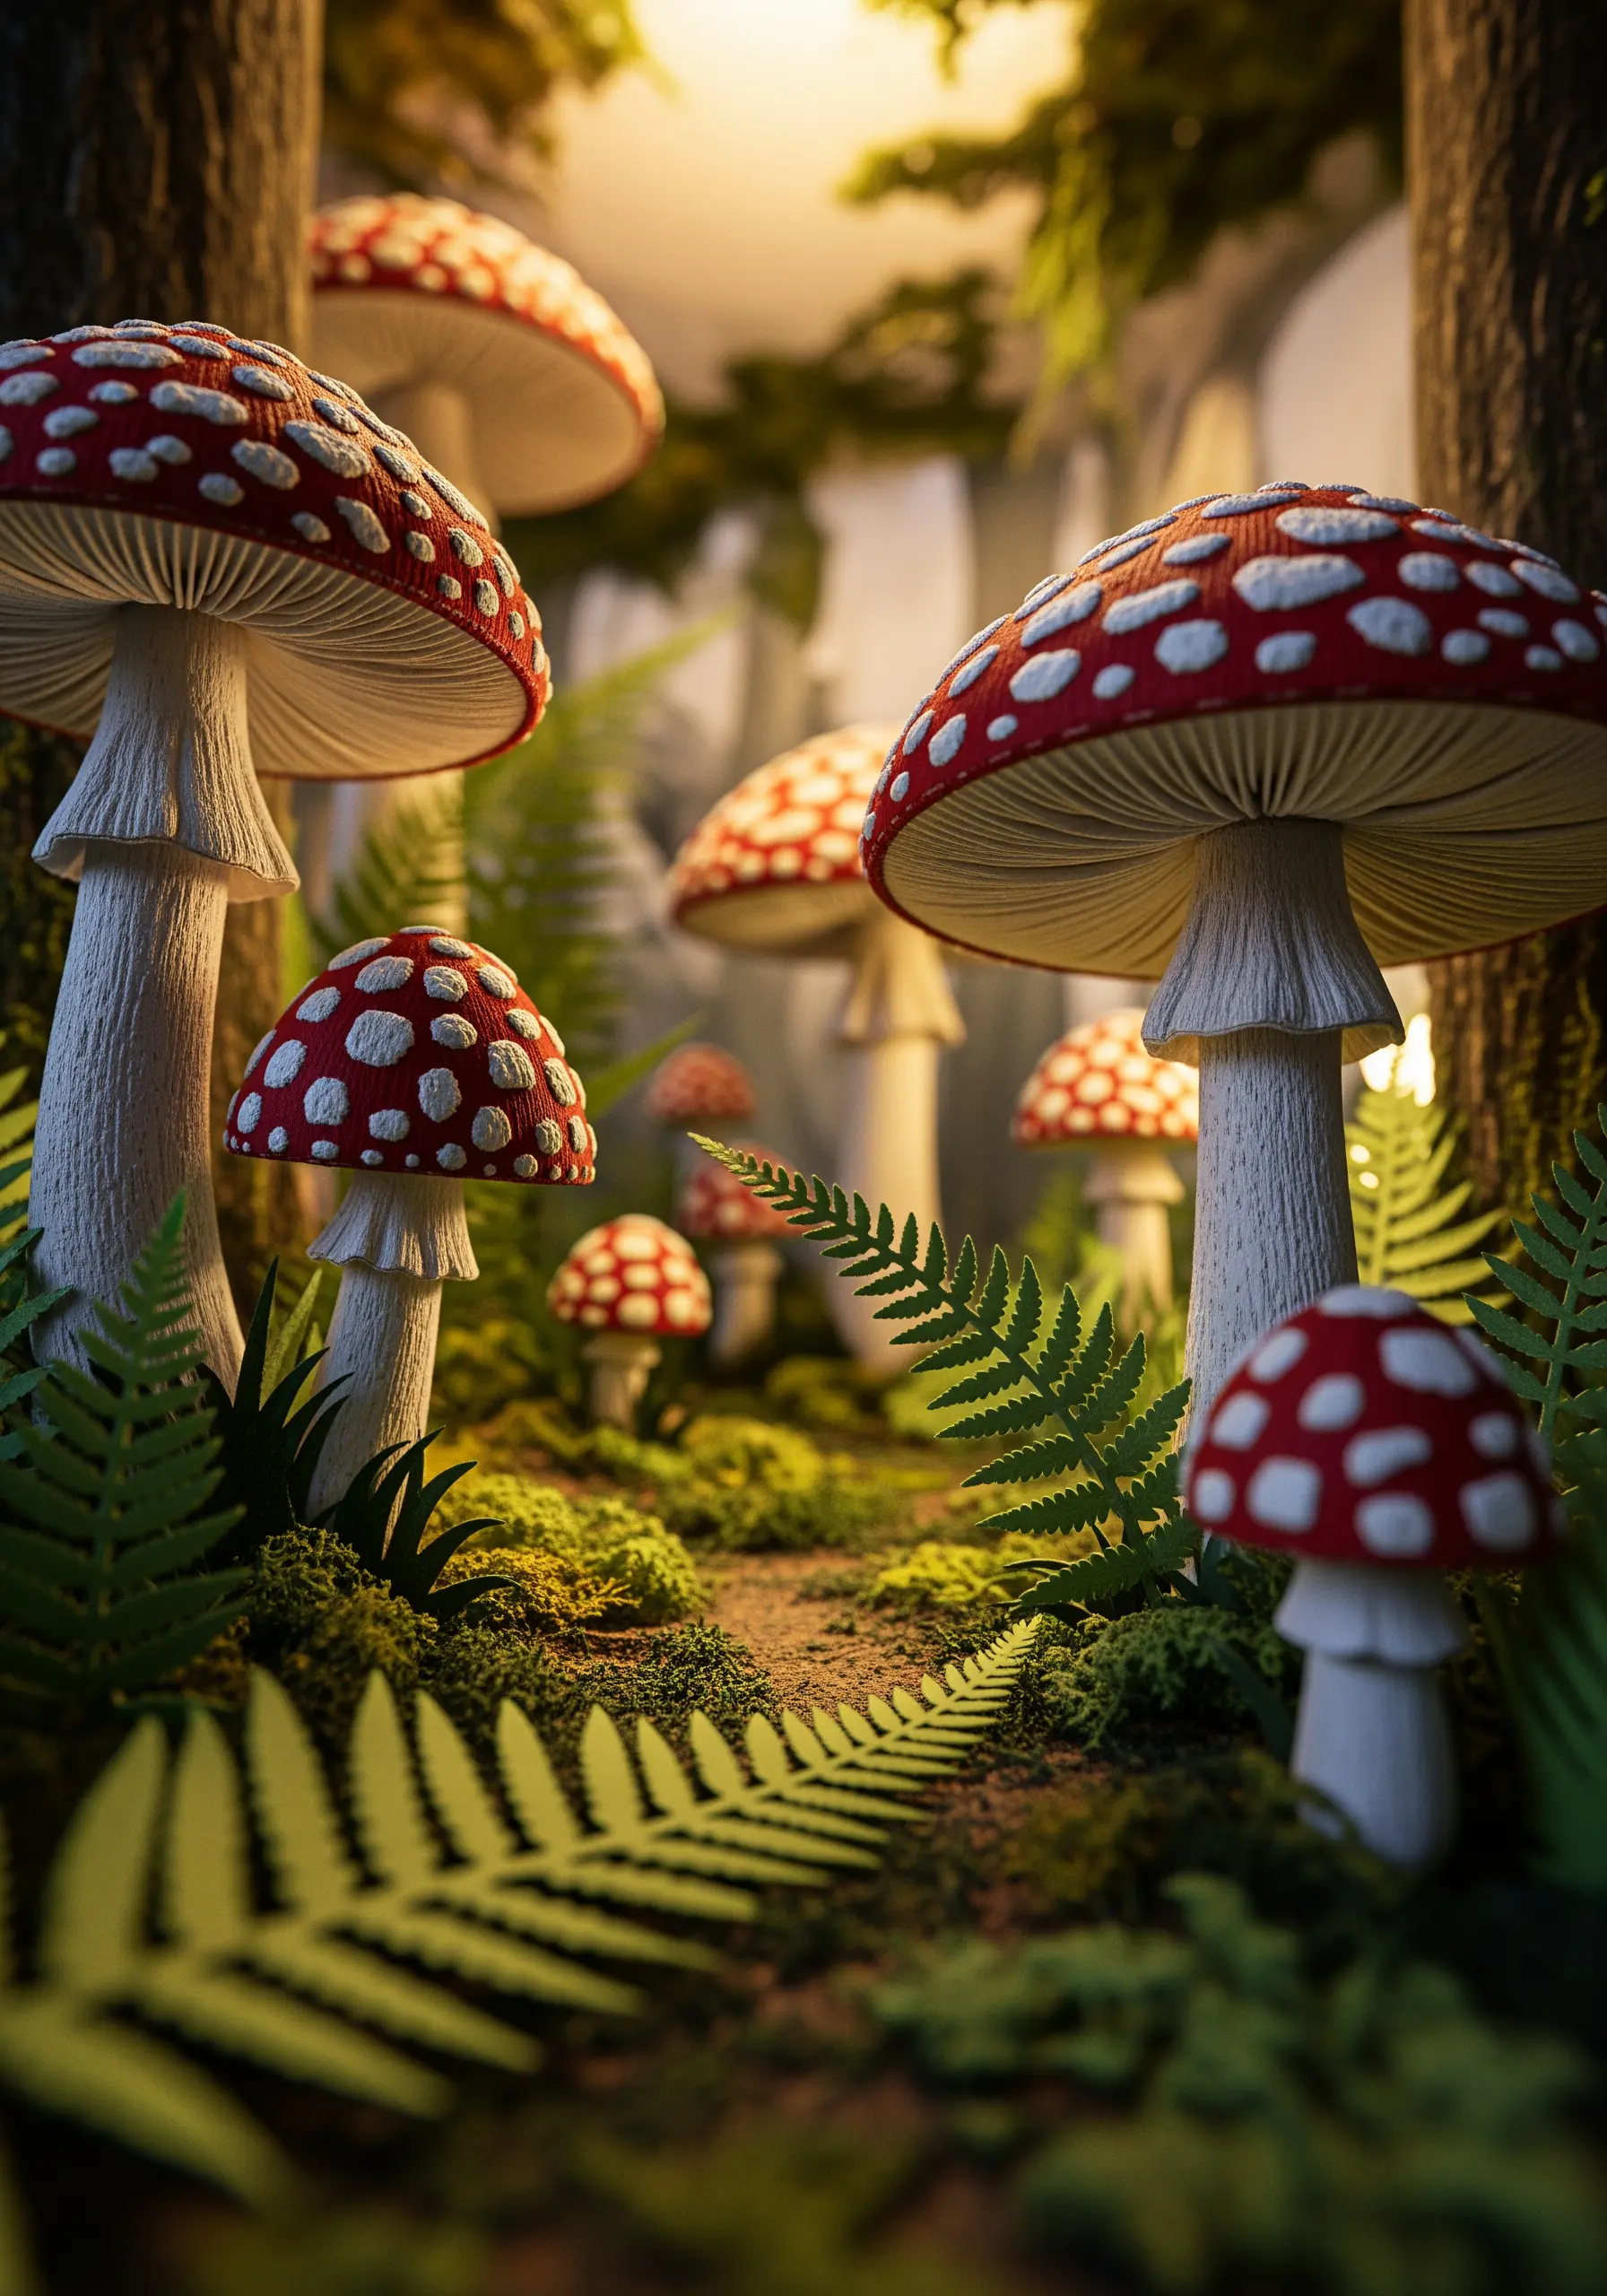
Give your woodland scenes lifelike dimension using stumpwork, or raised embroidery, techniques.
Create the mushroom caps by stitching over a felt padding or creating a wire frame and covering it with buttonhole stitches.
For the iconic red and white spots, use tightly packed French knots or colonial knots for a perfectly rounded shape.
This method transforms a flat embroidery into a tactile, three-dimensional sculpture.
19. Embroider Elegant Stationery with Precision
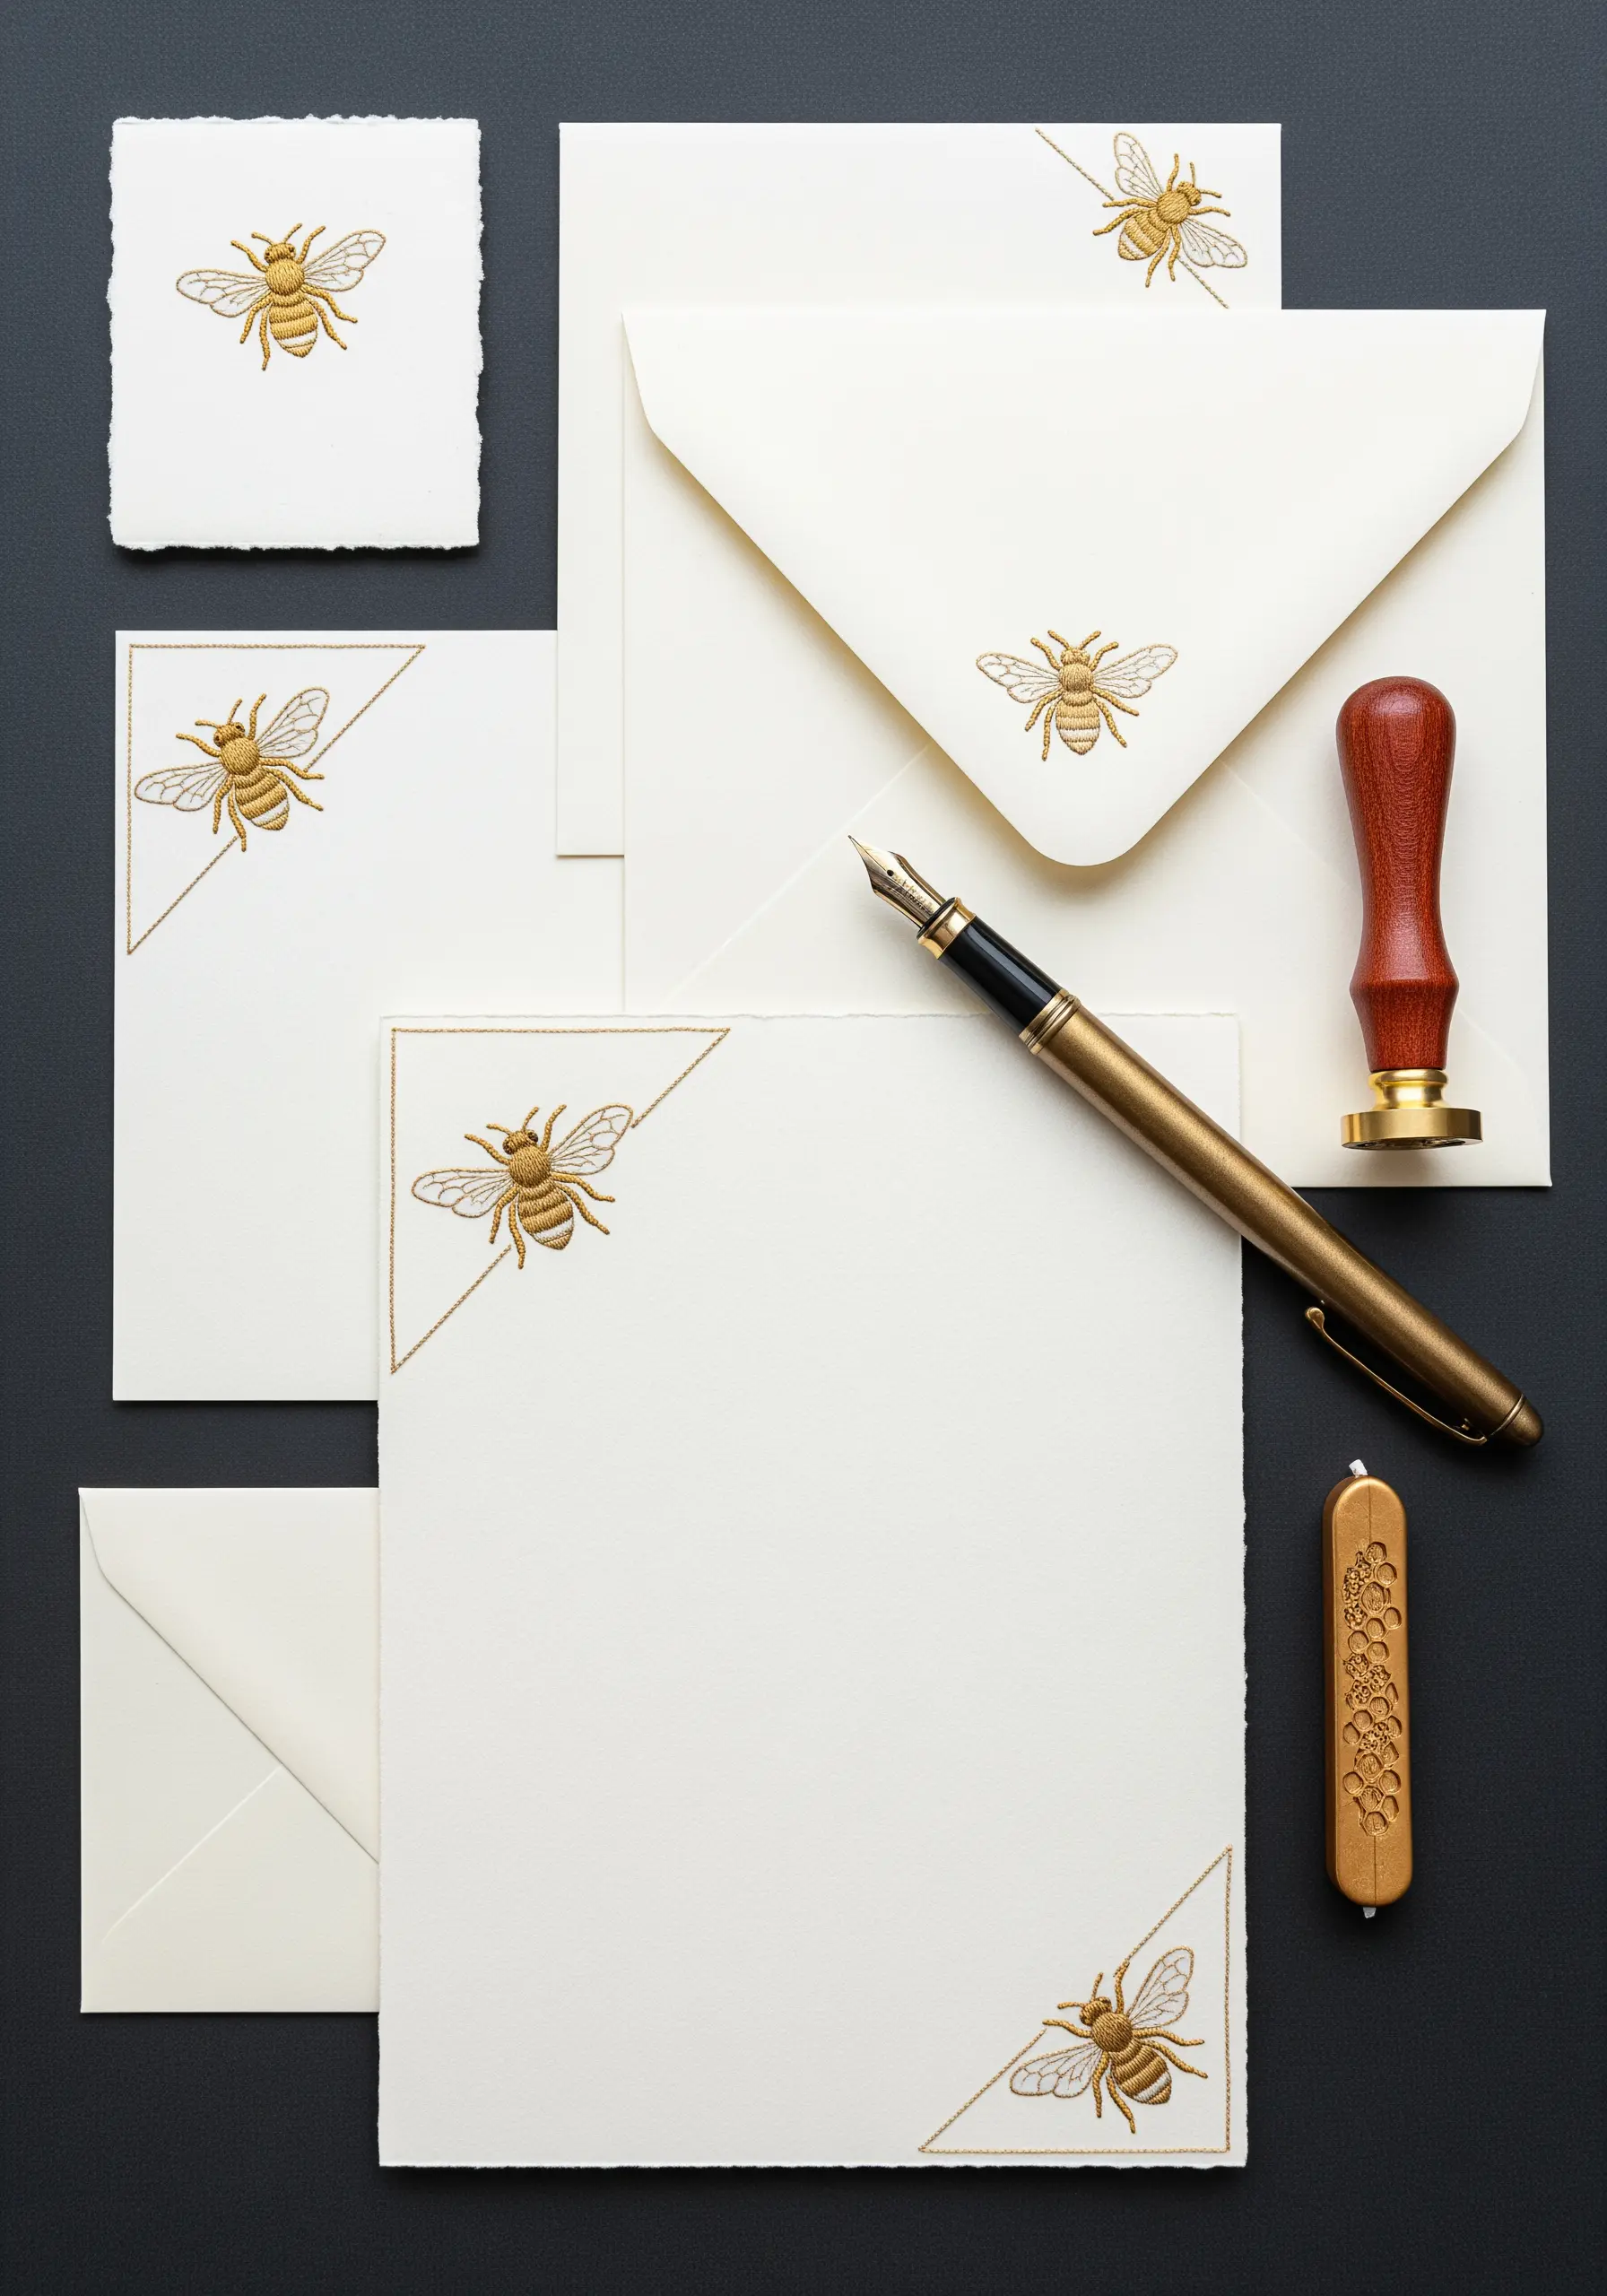
When adding embroidery to fine stationery, the quality of the stitch is paramount.
Use a sharp, fine needle (like a crewel size 10) and a single strand of high-quality cotton floss.
To create the bee’s body, use short, tight satin stitches laid closely together. For the delicate wings, an open Cretan stitch or a simple backstitch outline maintains an airy feel.
These classic, tiny embroidery designs lend a timeless, bespoke quality to paper goods.
20. Design a Multi-Panel Embroidered Screen
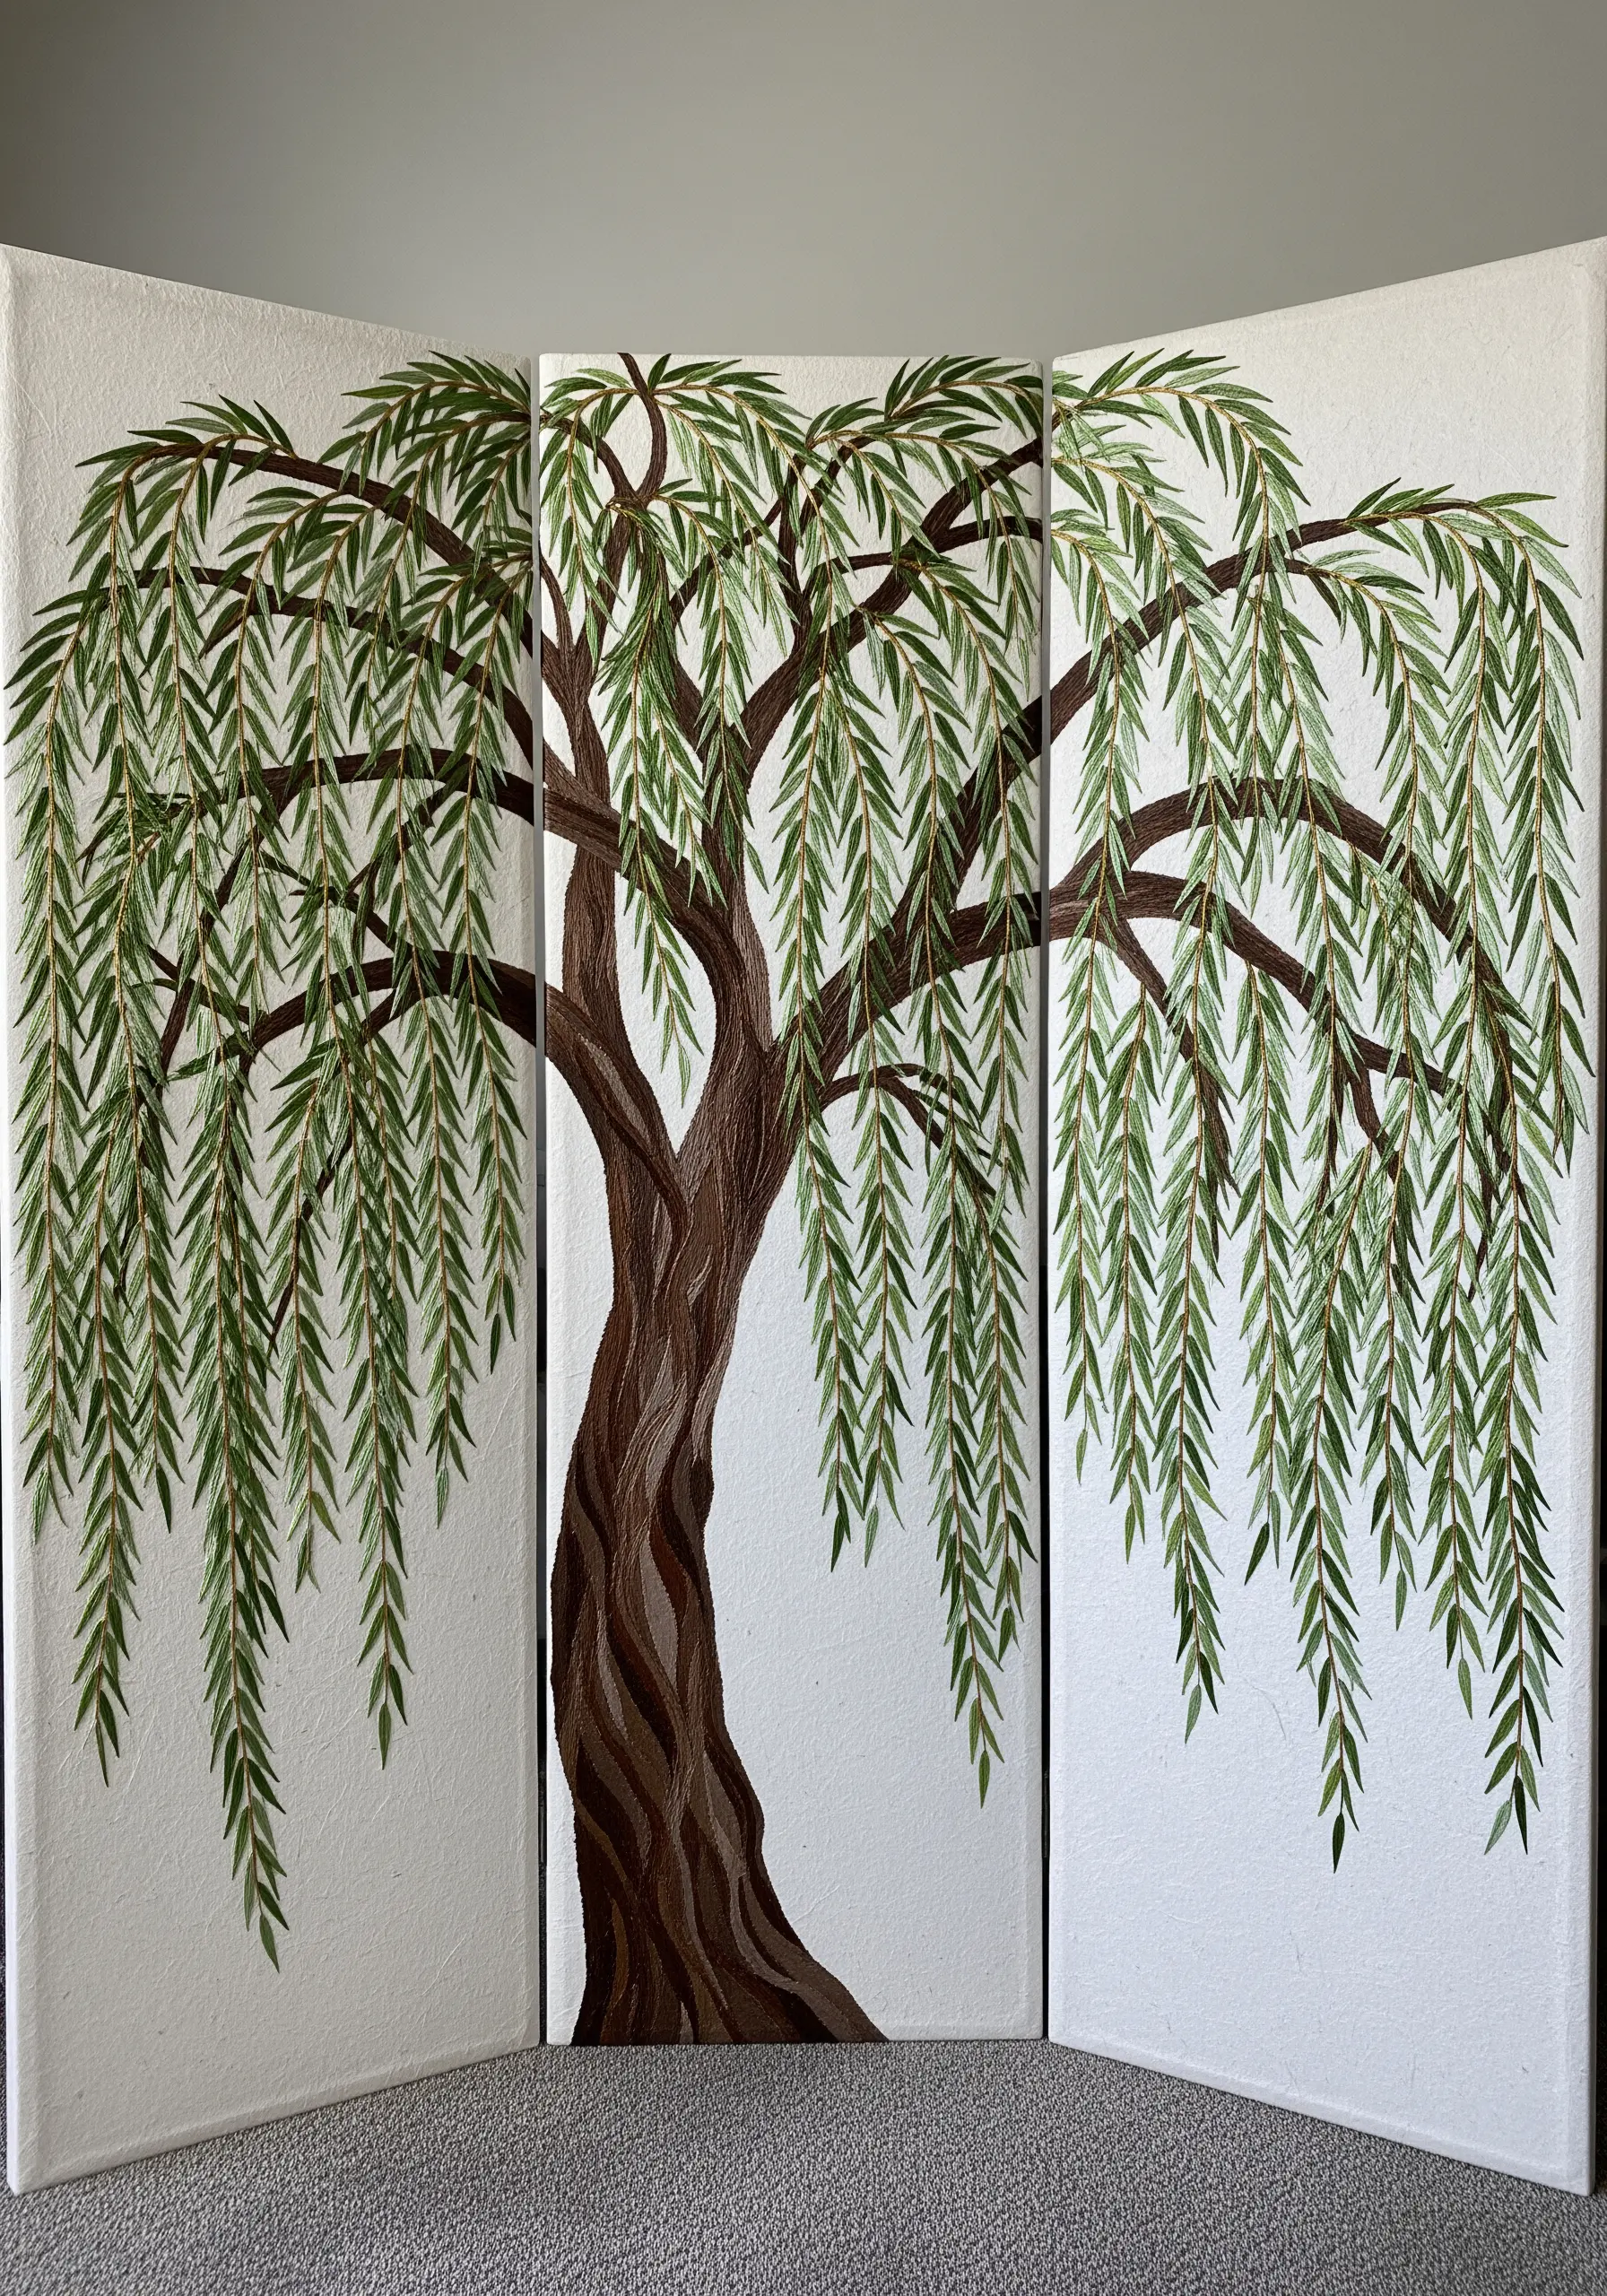
Break a large design across multiple panels to create a commanding piece of art.
Stretch canvas or heavy paper over three separate wooden frames. Ensure your design flows seamlessly from one panel to the next by tracing it before you begin stitching.
For the weeping willow leaves, use a combination of detached chain stitches and long straight stitches in various green shades to create a sense of movement and depth.
This method turns your work into one of those stunning framed embroidery pieces that can define a room.
21. Weave a Foundation, Then Add Details
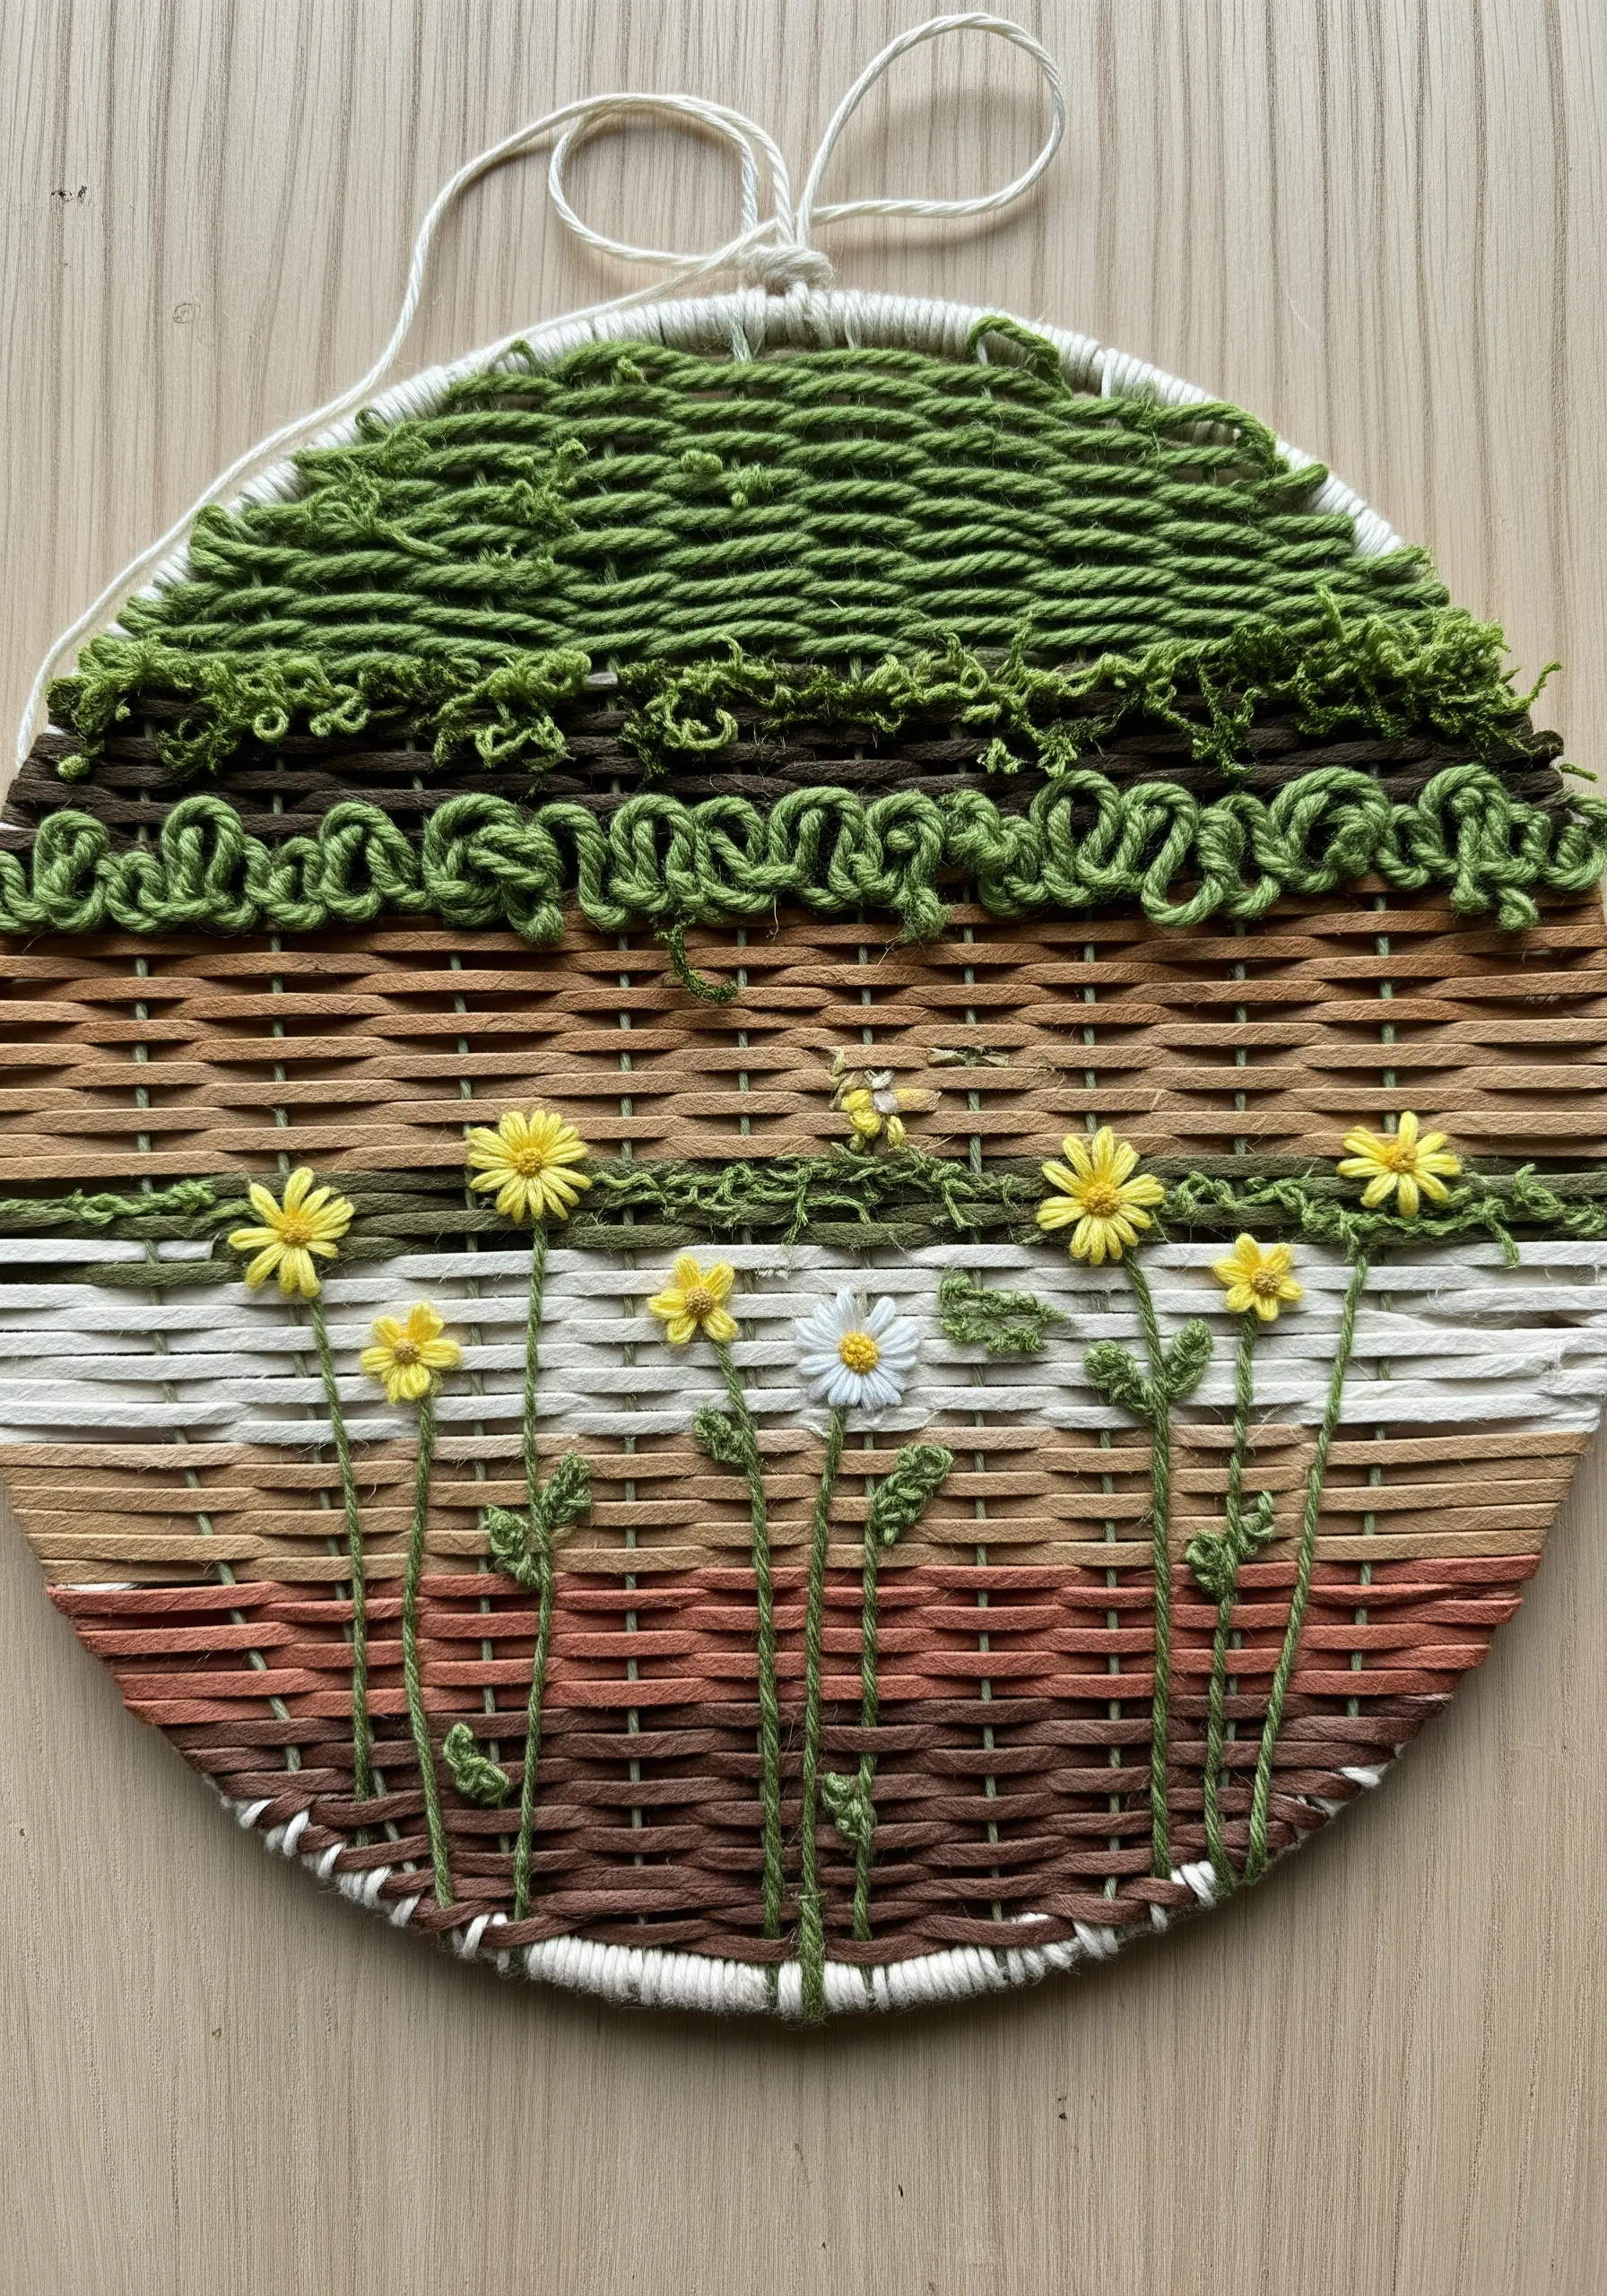
Combine weaving and embroidery in a single piece for a rich, layered effect.
Create a simple loom using a sturdy paper plate or a circle of cardboard with notches cut around the edge. Weave your background landscape with various colors and textures of yarn.
Once the weaving is complete, use the surface as your canvas. Embroider delicate flowers and stems directly into the woven yarns using lazy daisy and straight stitches.
This process results in truly unique mixed-fiber creations inspired by nature.
22. Feature an Embroidered Medallion

Incorporate a stitched element into a larger papercraft project, like a decoupage box.
Stitch your compass rose or other motif onto a small piece of canvas or perforated paper. This allows for precise, detailed work without struggling with the rigid box surface.
Cut out the finished medallion and glue it into a designated space in your design, sealing the entire project with a clear varnish to protect both paper and thread.
This is a perfect way to use line art travel adventure symbols for a keepsake box.
23. Layer Stitches Over Line Art
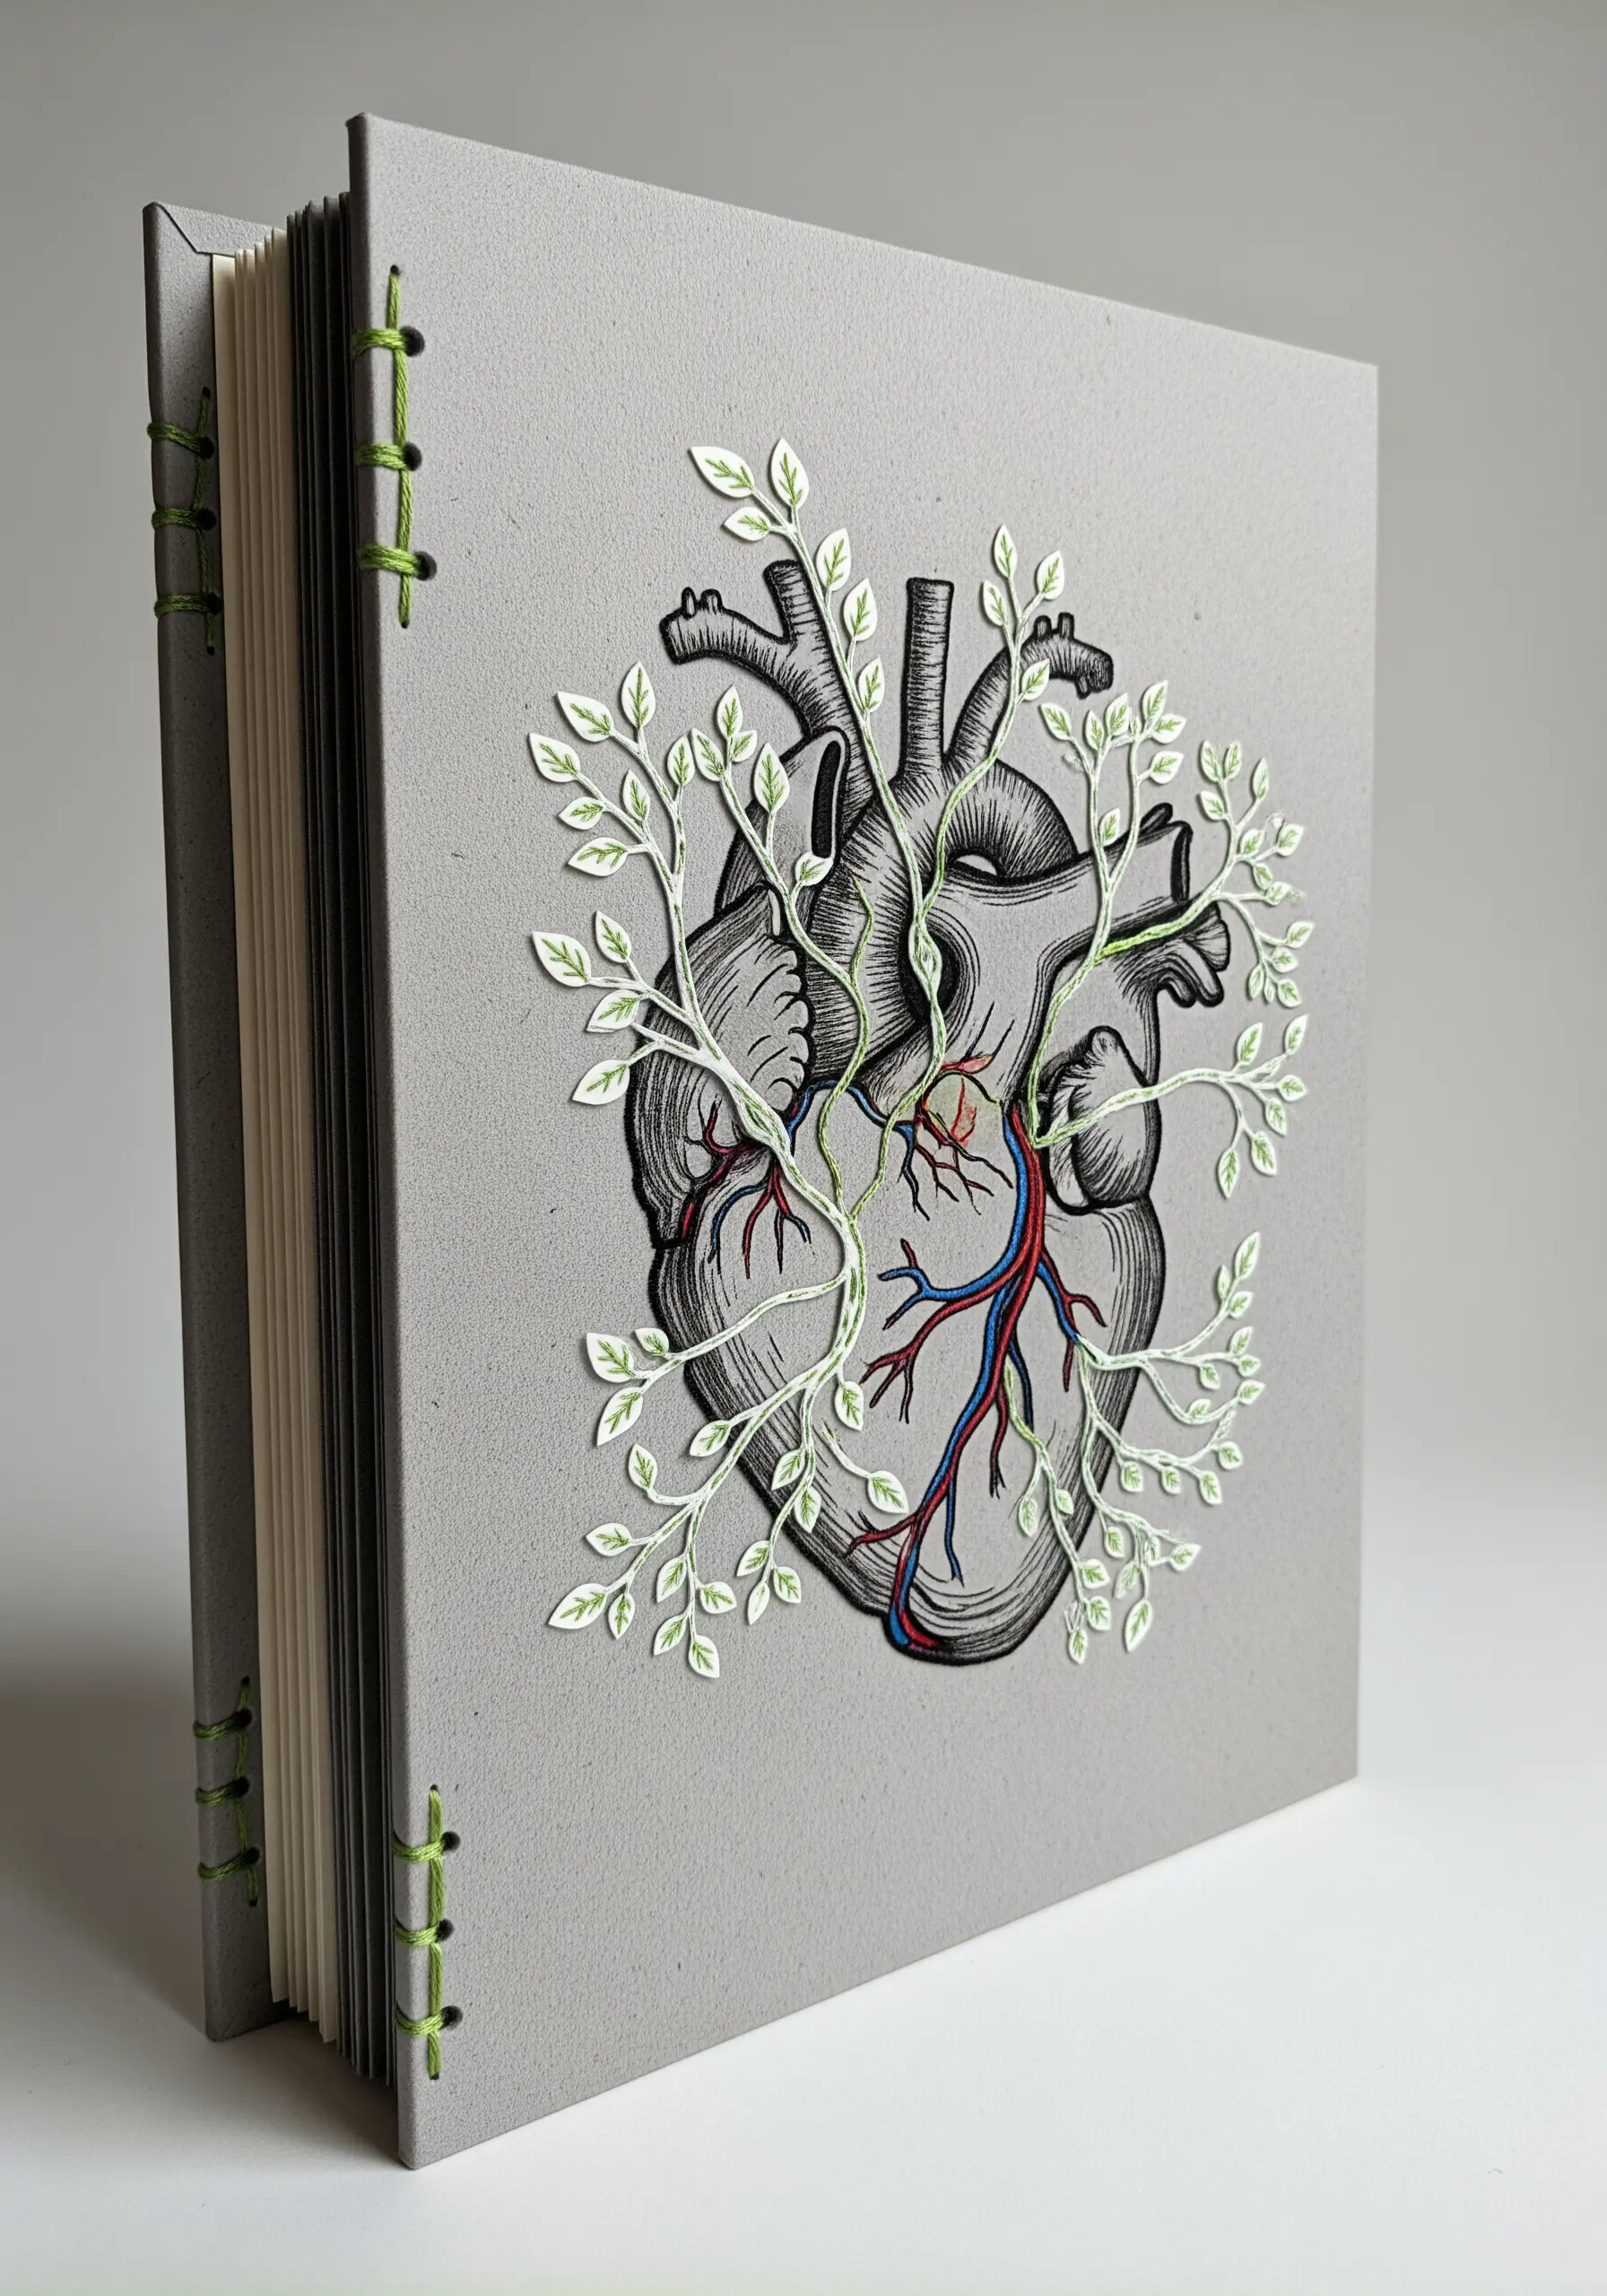
Create a dynamic, mixed-media effect by selectively embroidering parts of a printed or drawn illustration.
Start with a clean line drawing on heavy cardstock, like this anatomical heart. Instead of coloring it in, use thread to highlight specific areas.
Here, the veins and arteries are stitched in red and blue, adding color and texture that makes them pop. The layered paper leaves, stitched with green veins, add a final dimensional touch.
24. Stitch Constellations on Dark Cardstock
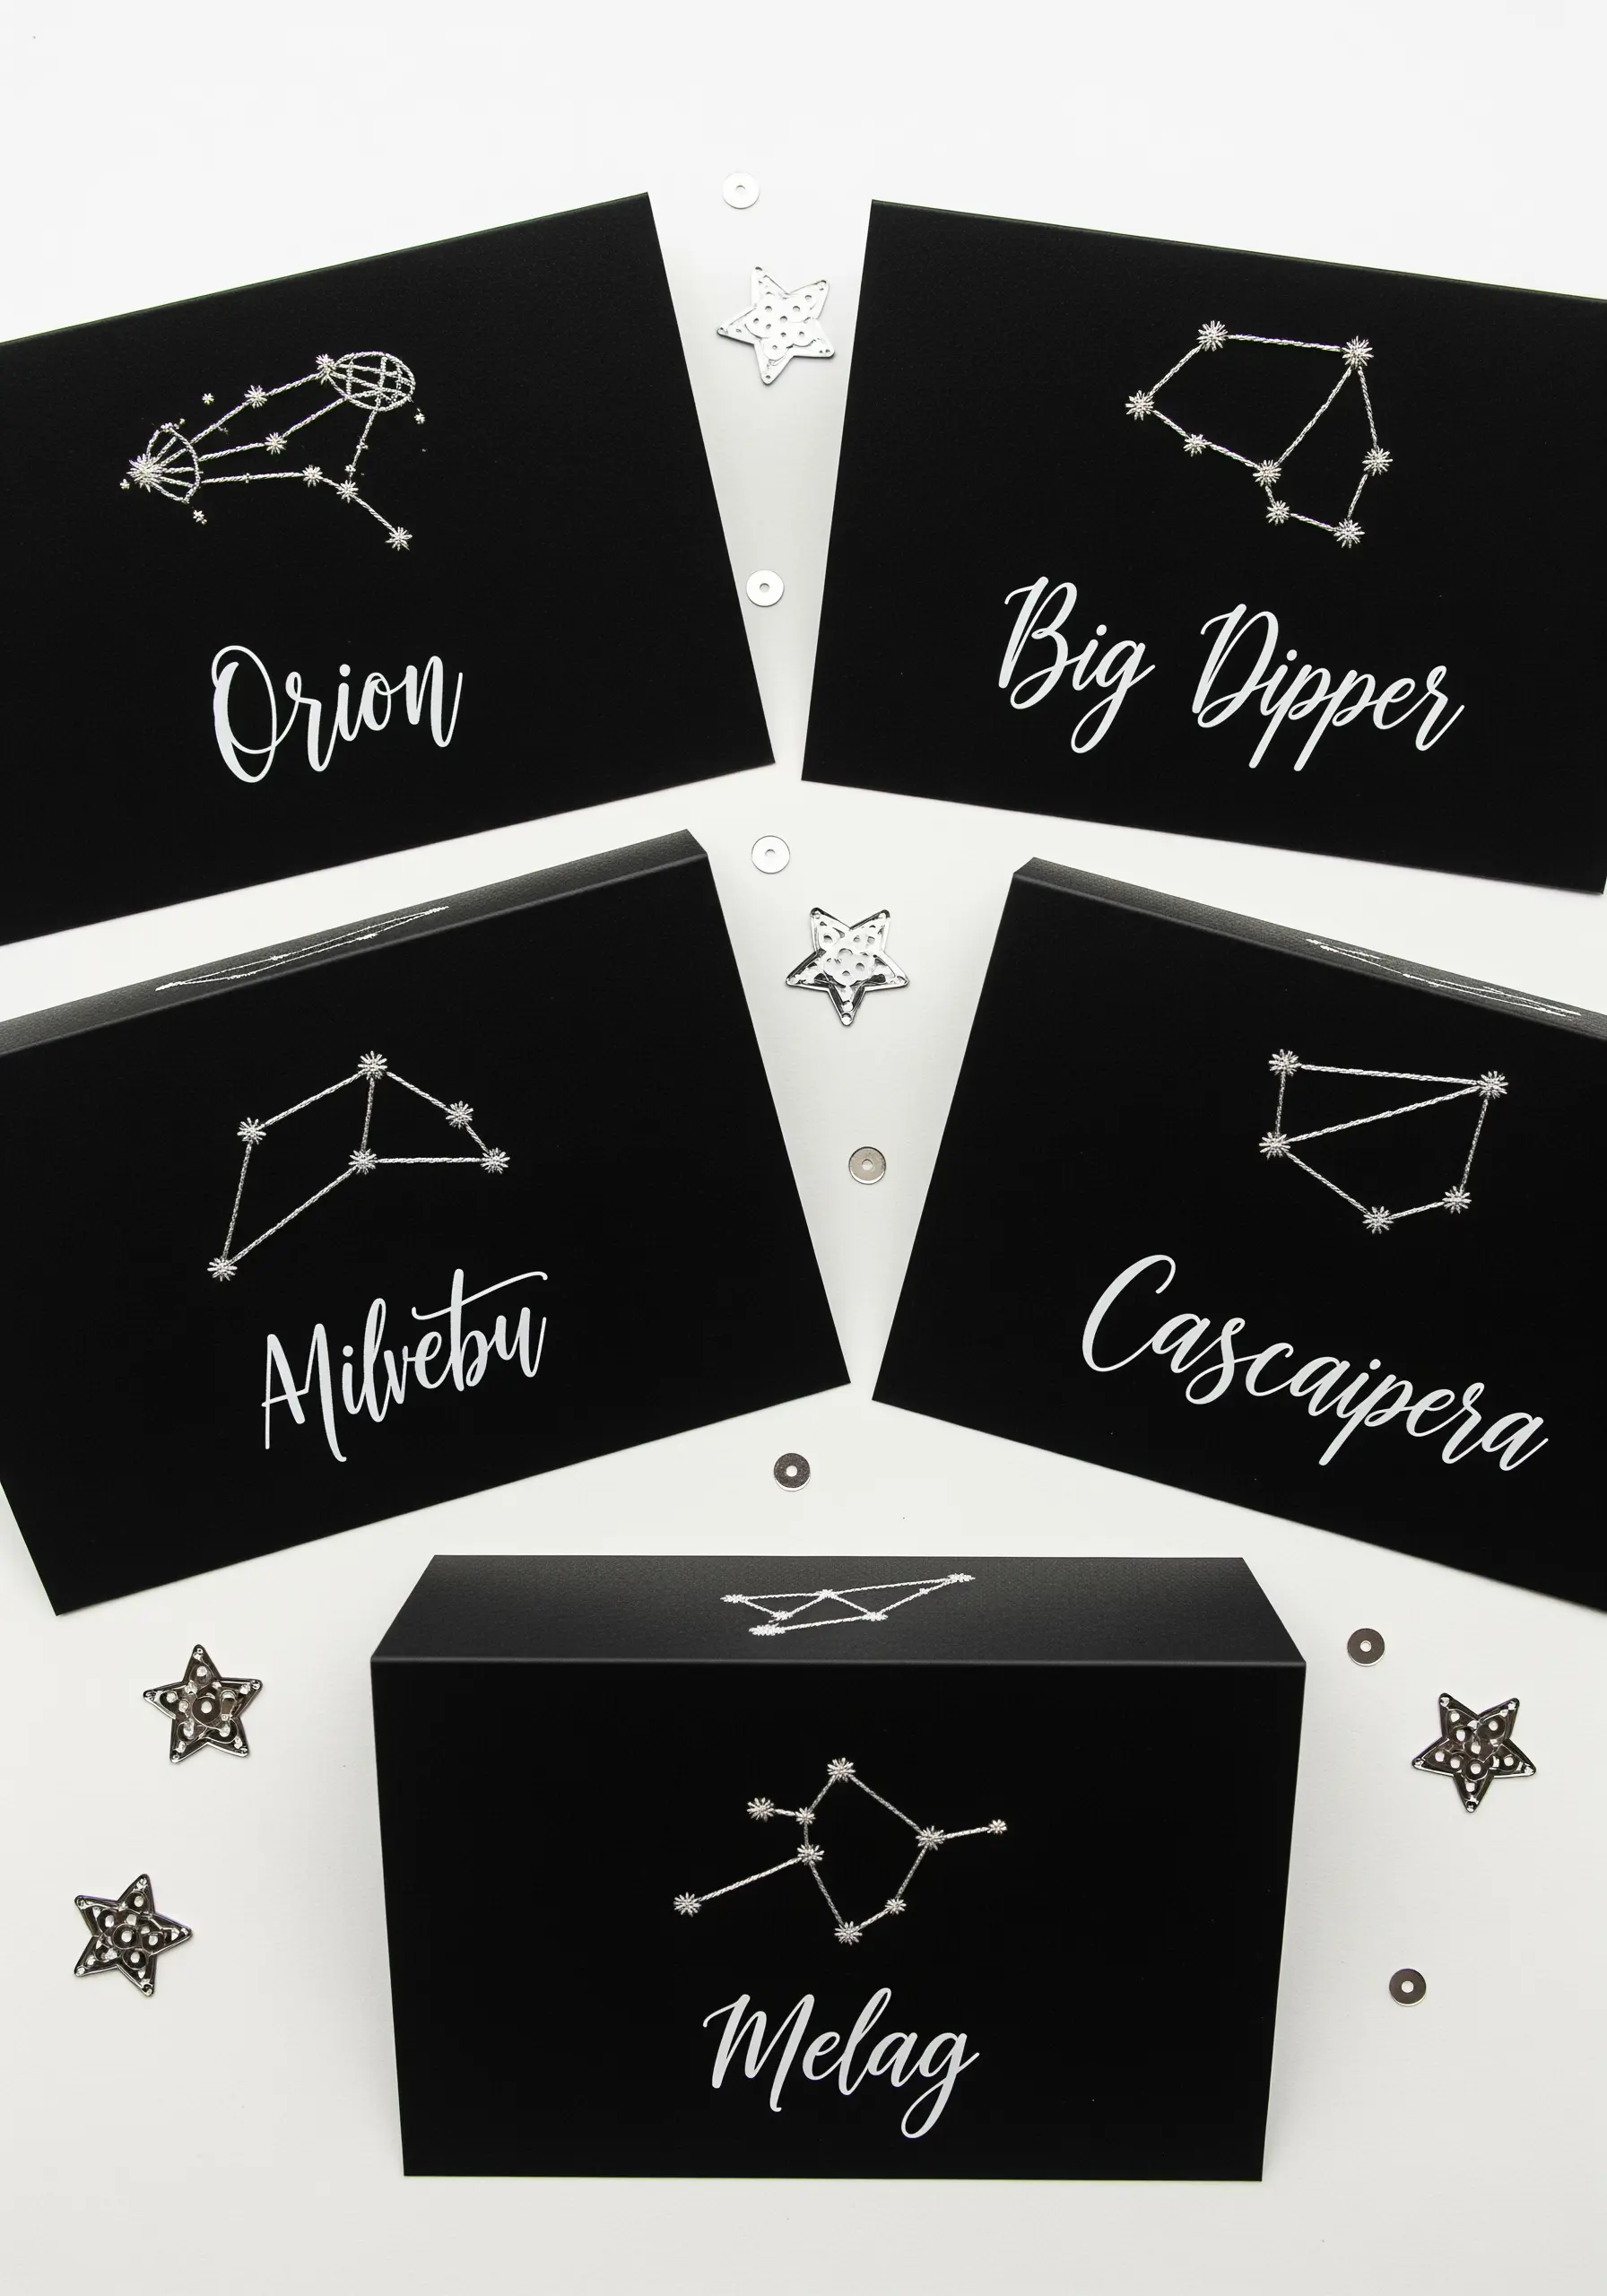
Capture the magic of the night sky with thread and paper.
Choose a high-contrast combination like metallic silver thread on matte black cardstock for maximum impact.
Use small, neat French knots for the main stars and connect them with a crisp backstitch. Pre-piercing your holes will ensure your lines are straight and the paper doesn’t warp.
These stellar motifs are a modern alternative to inspirational quote string art designs for elegant wall decor.
25. Create a Pressed Flower & Stumpwork Clock
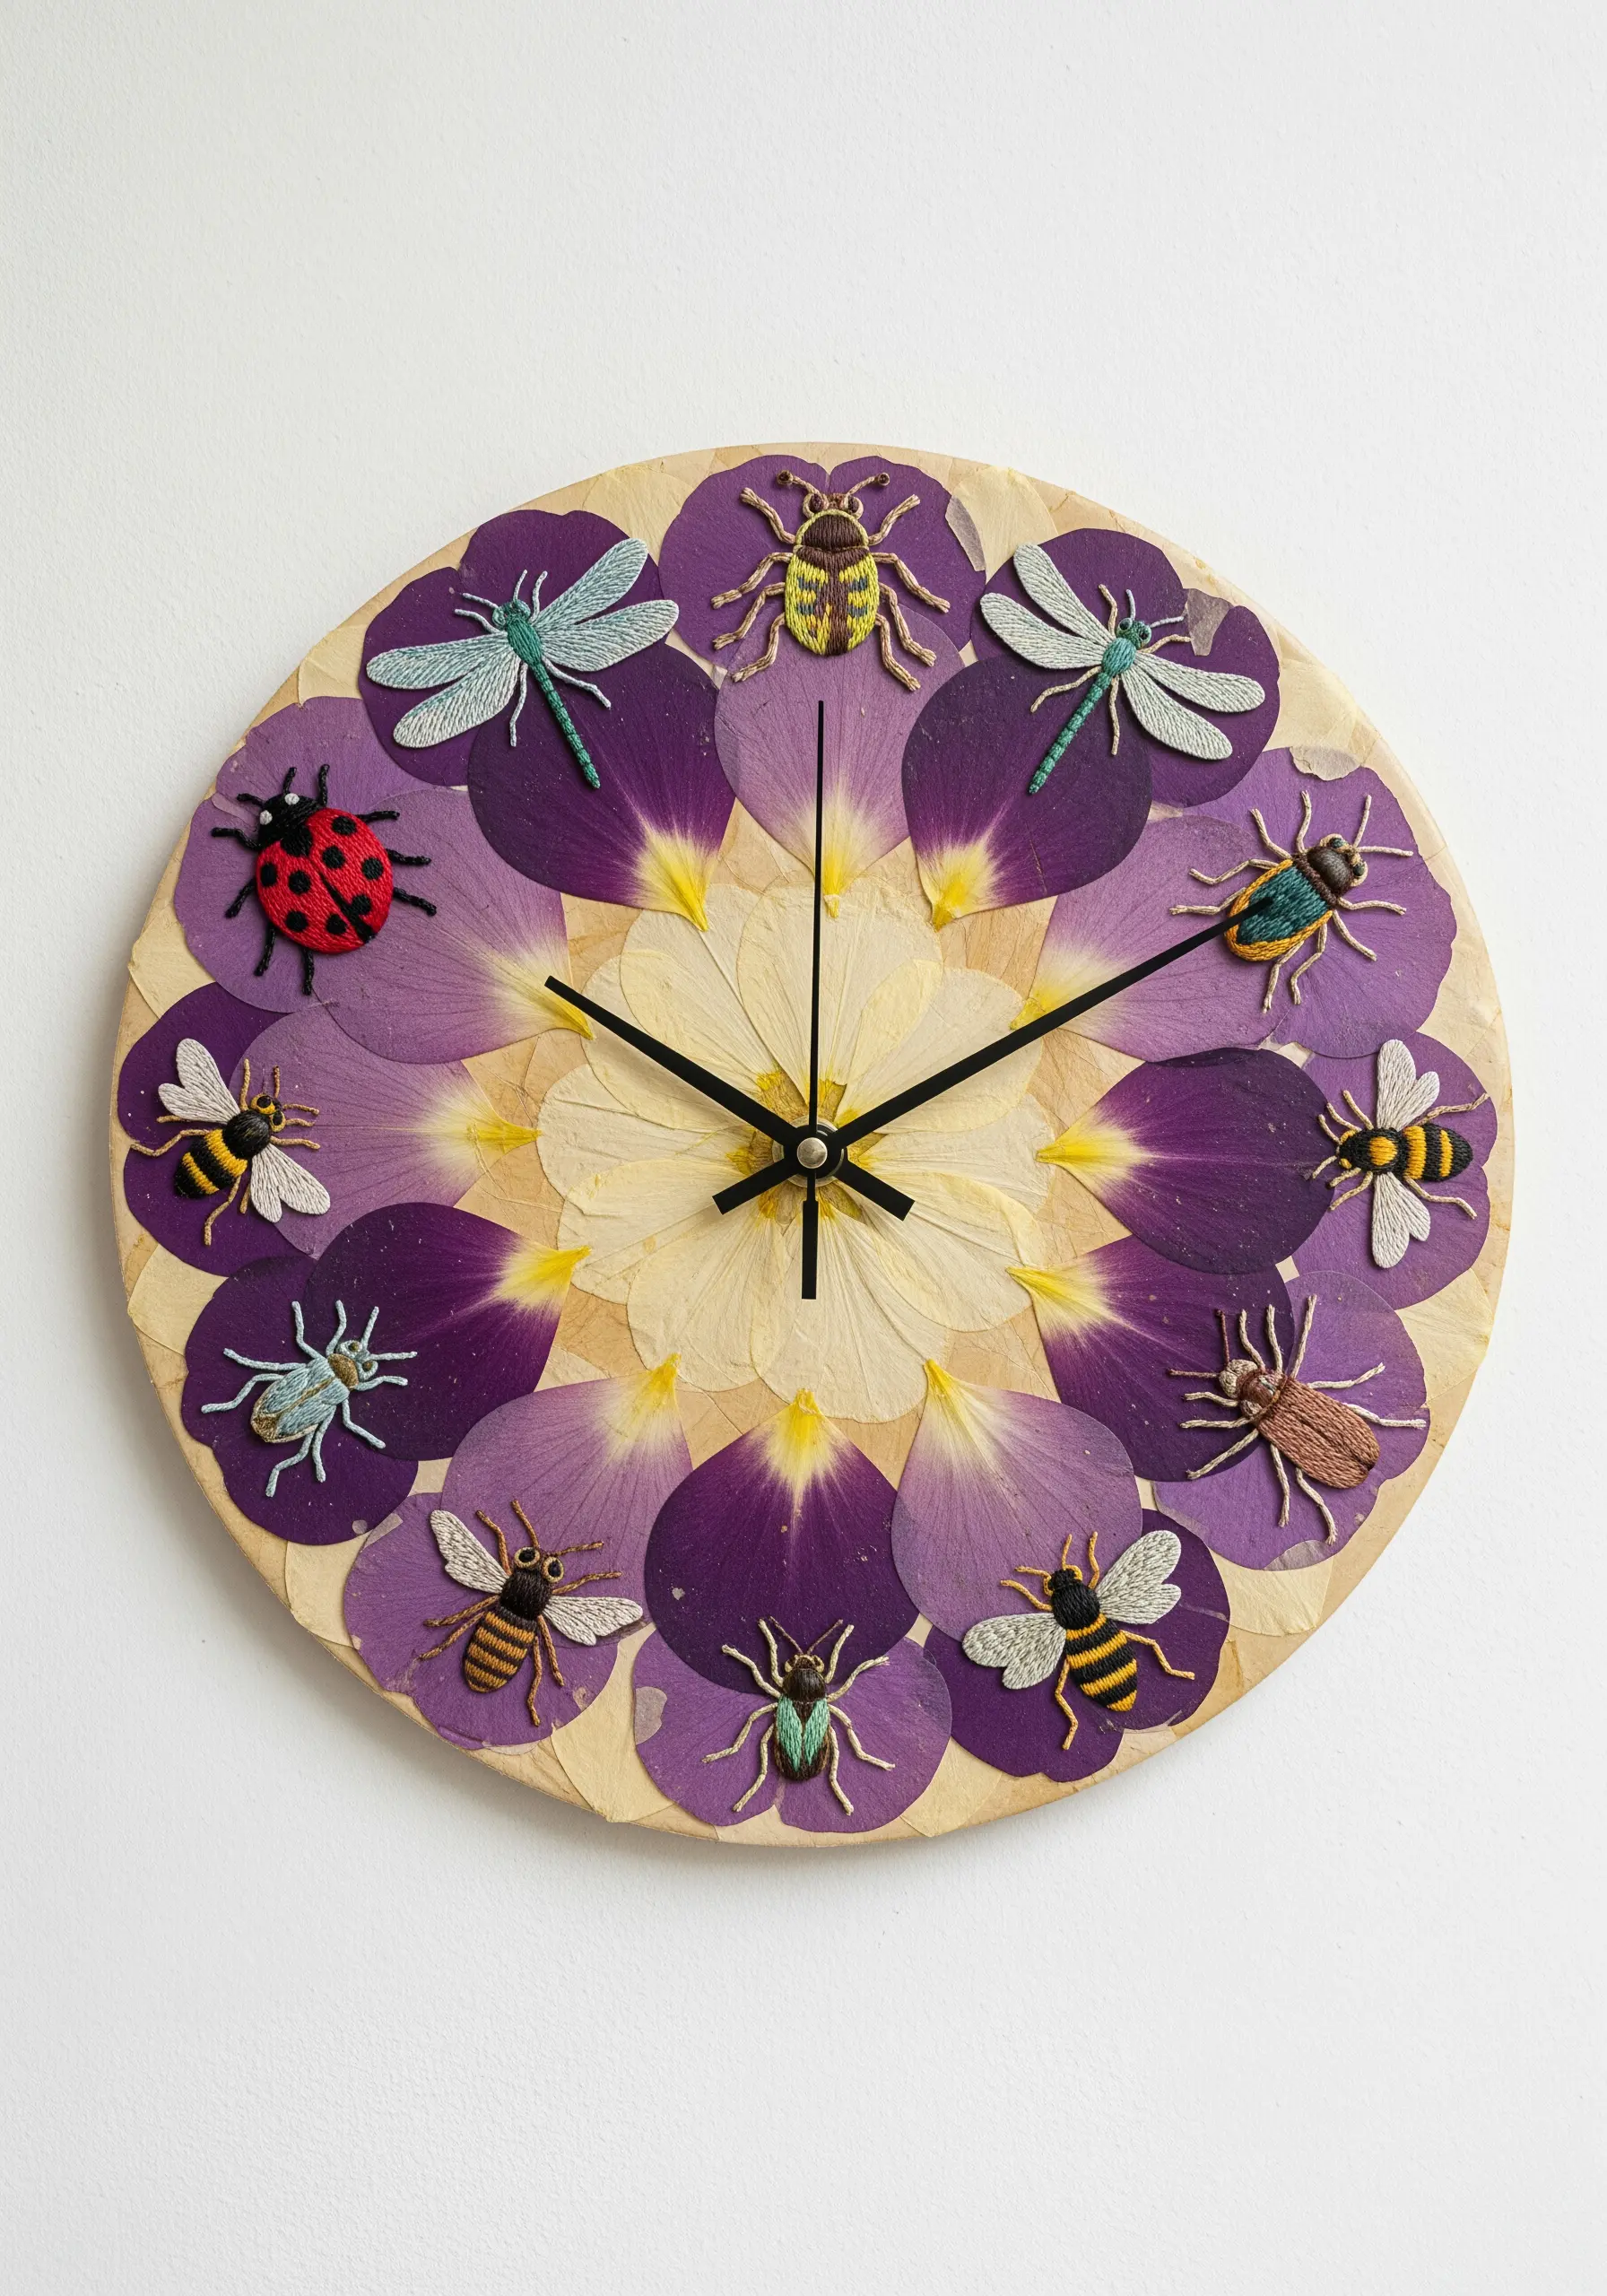
Combine the delicacy of pressed flowers with the detail of stumpwork embroidery.
Arrange and seal pressed petals onto a wooden clock face to form a colorful background.
Create your tiny insect motifs separately using stumpwork techniques on felt or scrap fabric. This allows you to achieve fine detail without risking damage to the flowers.
Once complete, carefully cut out the insects and glue them in place. This project is a wonderful way to use skills from nature-themed embroidery samplers.
26. Curate a Wall of Stitch Samples
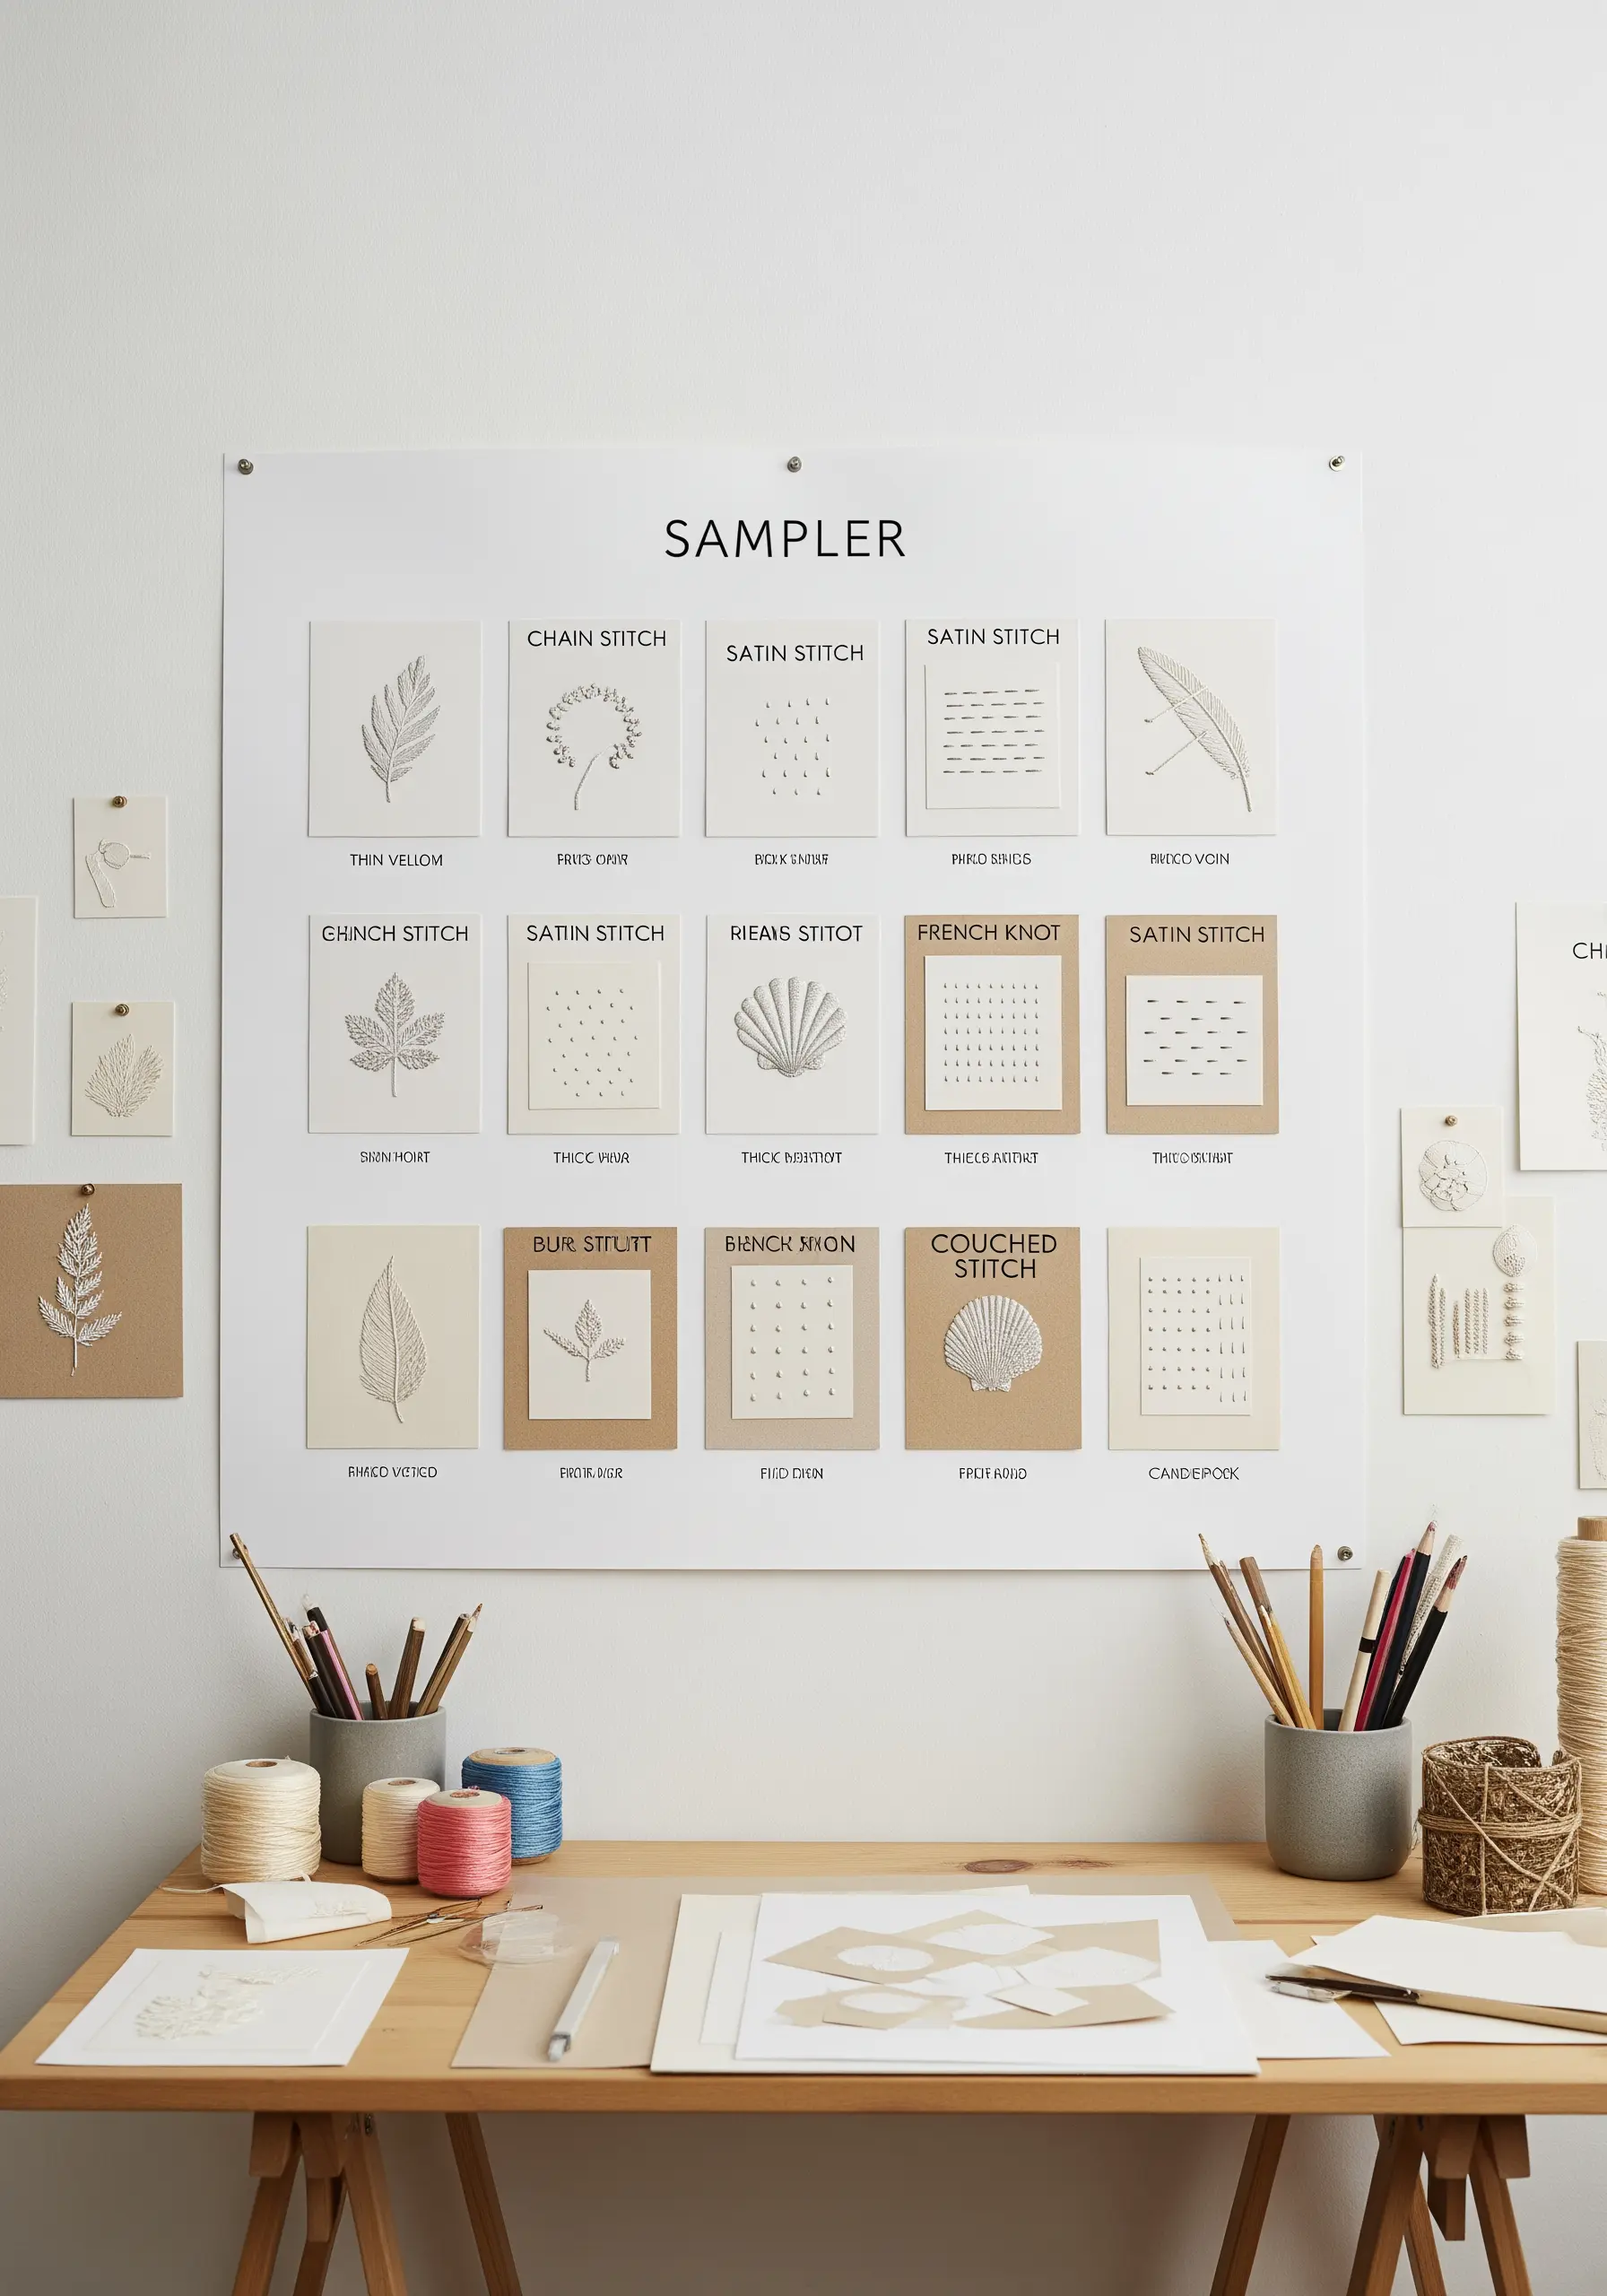
Turn your practice swatches into a beautiful and educational piece of wall art.
Dedicate a small square of high-quality cardstock to each stitch in your repertoire. Stitch a small sample and neatly label it.
Arranging them in a grid creates a clean, modern display that not only looks stunning but also serves as a physical reference guide for future projects.
This collection of stitched details that make plain walls pop is both art and a tool for your craft.
27. Emulate Mosaic with Color-Blocked Stitches
Achieve a mosaic or quilled-paper effect using thread by focusing on dense, directional color blocking.
Draw your design and map out each small color segment, as you would for a paint-by-number.
Fill each segment with satin stitch, paying close attention to the direction of your stitches. By changing the stitch angle in adjacent blocks, you create texture and light-play that mimics individual tiles.
28. Display Thread Sculptures in a Cloche
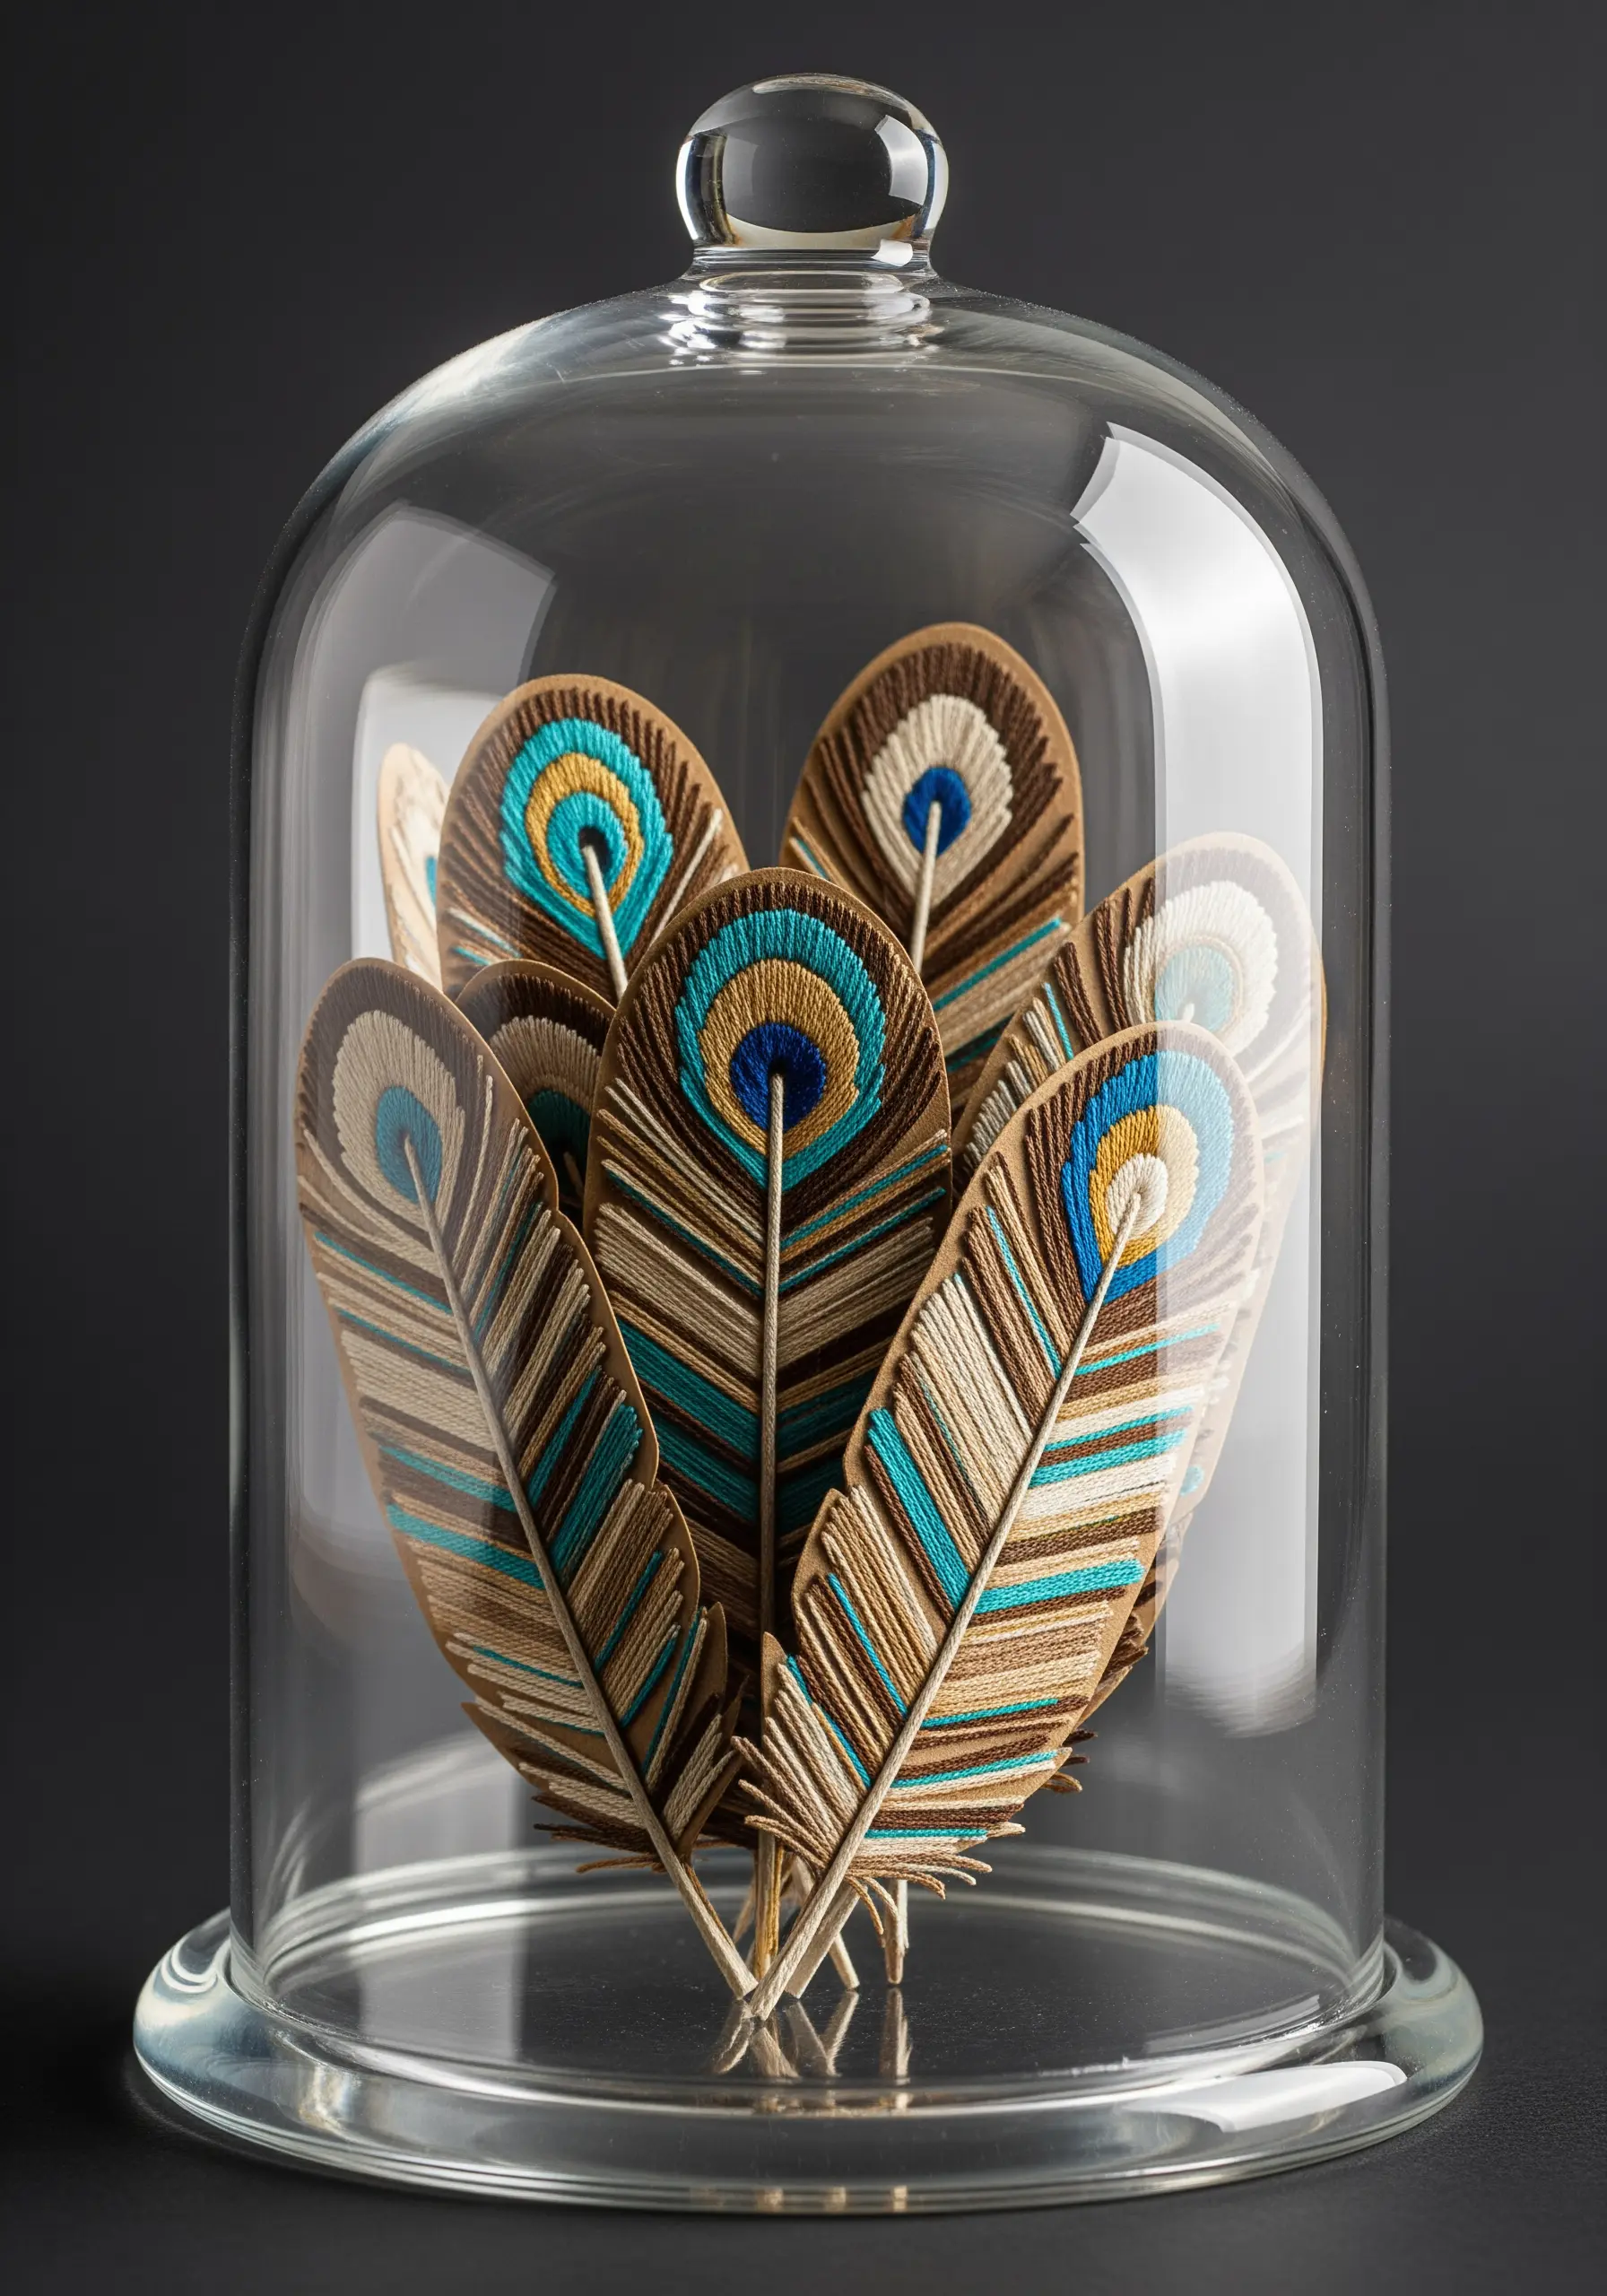
Create freestanding embroidered objects and display them as precious specimens under glass.
To make these feathers, stitch your design onto two layers of water-soluble stabilizer for extra rigidity.
After dissolving the stabilizer, gently shape the thread sculpture while it’s still damp and allow it to air dry completely. The thread will harden into a permanent, lightweight form perfect for display.
29. Enhance Paper Flowers with Stitched Centers
Add a final touch of realism and texture to crepe paper flowers with a bit of simple embroidery.
Before you fully assemble your paper peony or rose, create its center by stitching a dense cluster of yellow and brown French knots onto a small felt circle.
Glue this stitched center into the heart of the flower. This small detail provides a soft, pollen-like texture that contrasts beautifully with the crisp paper petals.
30. Layer Paper and Thread for a Mountainscape
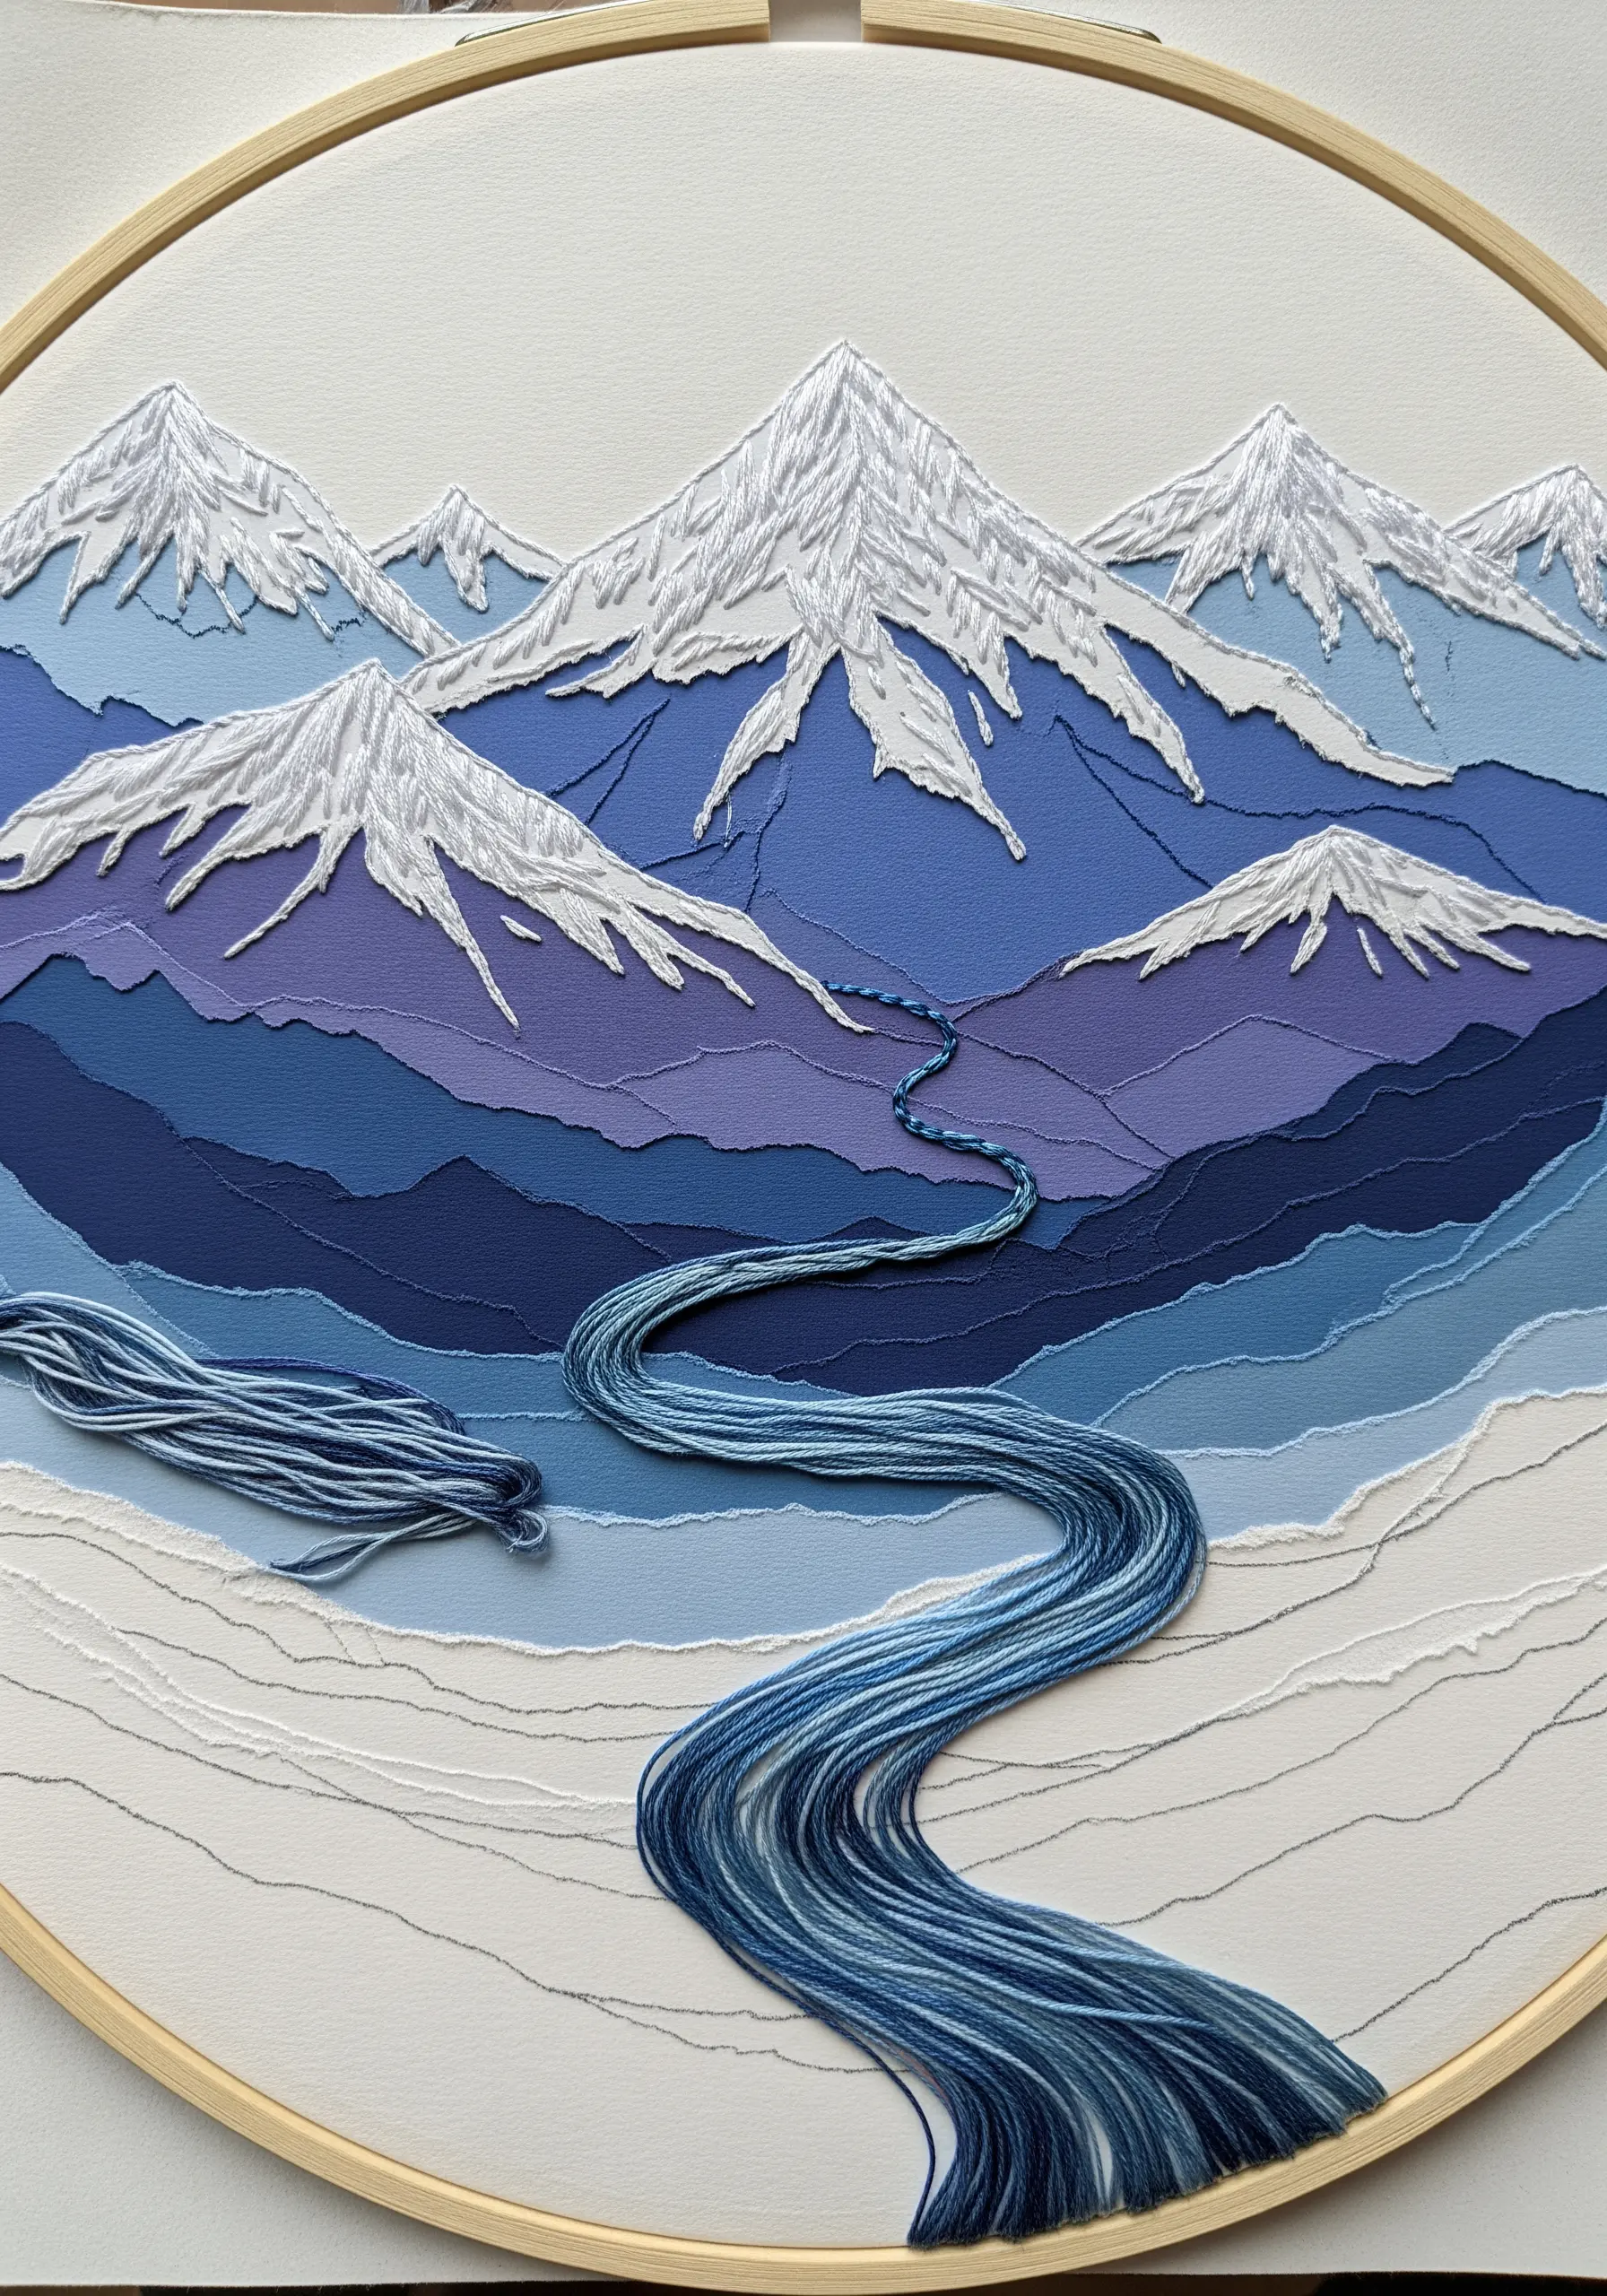
Build a landscape with physical depth by layering cut paper and adding embroidered textures.
Cut hills and mountains from different shades of cardstock and arrange them to create perspective.
Use thread to add the finishing details: long, vertical satin stitches in white and silver for snow-capped peaks, and couched variegated blue floss for a flowing river in the foreground.
These beautiful scenes are great framed embroidery ideas that pair perfectly with rustic interiors.