

You’ve spent patient hours pressing flowers, saving the delicate memory of a garden or a walk in the woods. You hold a fragile petal in your hand, a perfect, paper-thin whisper of what it once was. But how do you give it a new life, a permanence that honors its beauty?
This is where thread becomes your partner. Think of embroidery not as decoration, but as a way to anchor these fleeting moments. A line of stitches can become a stem, a French knot the center of a daisy, a metallic thread the glint of sun on a leaf. It adds structure, story, and a tactile depth that glue alone can never achieve.
Here, you won’t find complicated rules. Instead, you’ll discover how to combine your love for nature with the mindful practice of stitching. Let’s explore how a simple needle and thread can transform your pressed flowers from delicate keepsakes into enduring works of art.
1. Unify Your Composition with a Threaded Outline
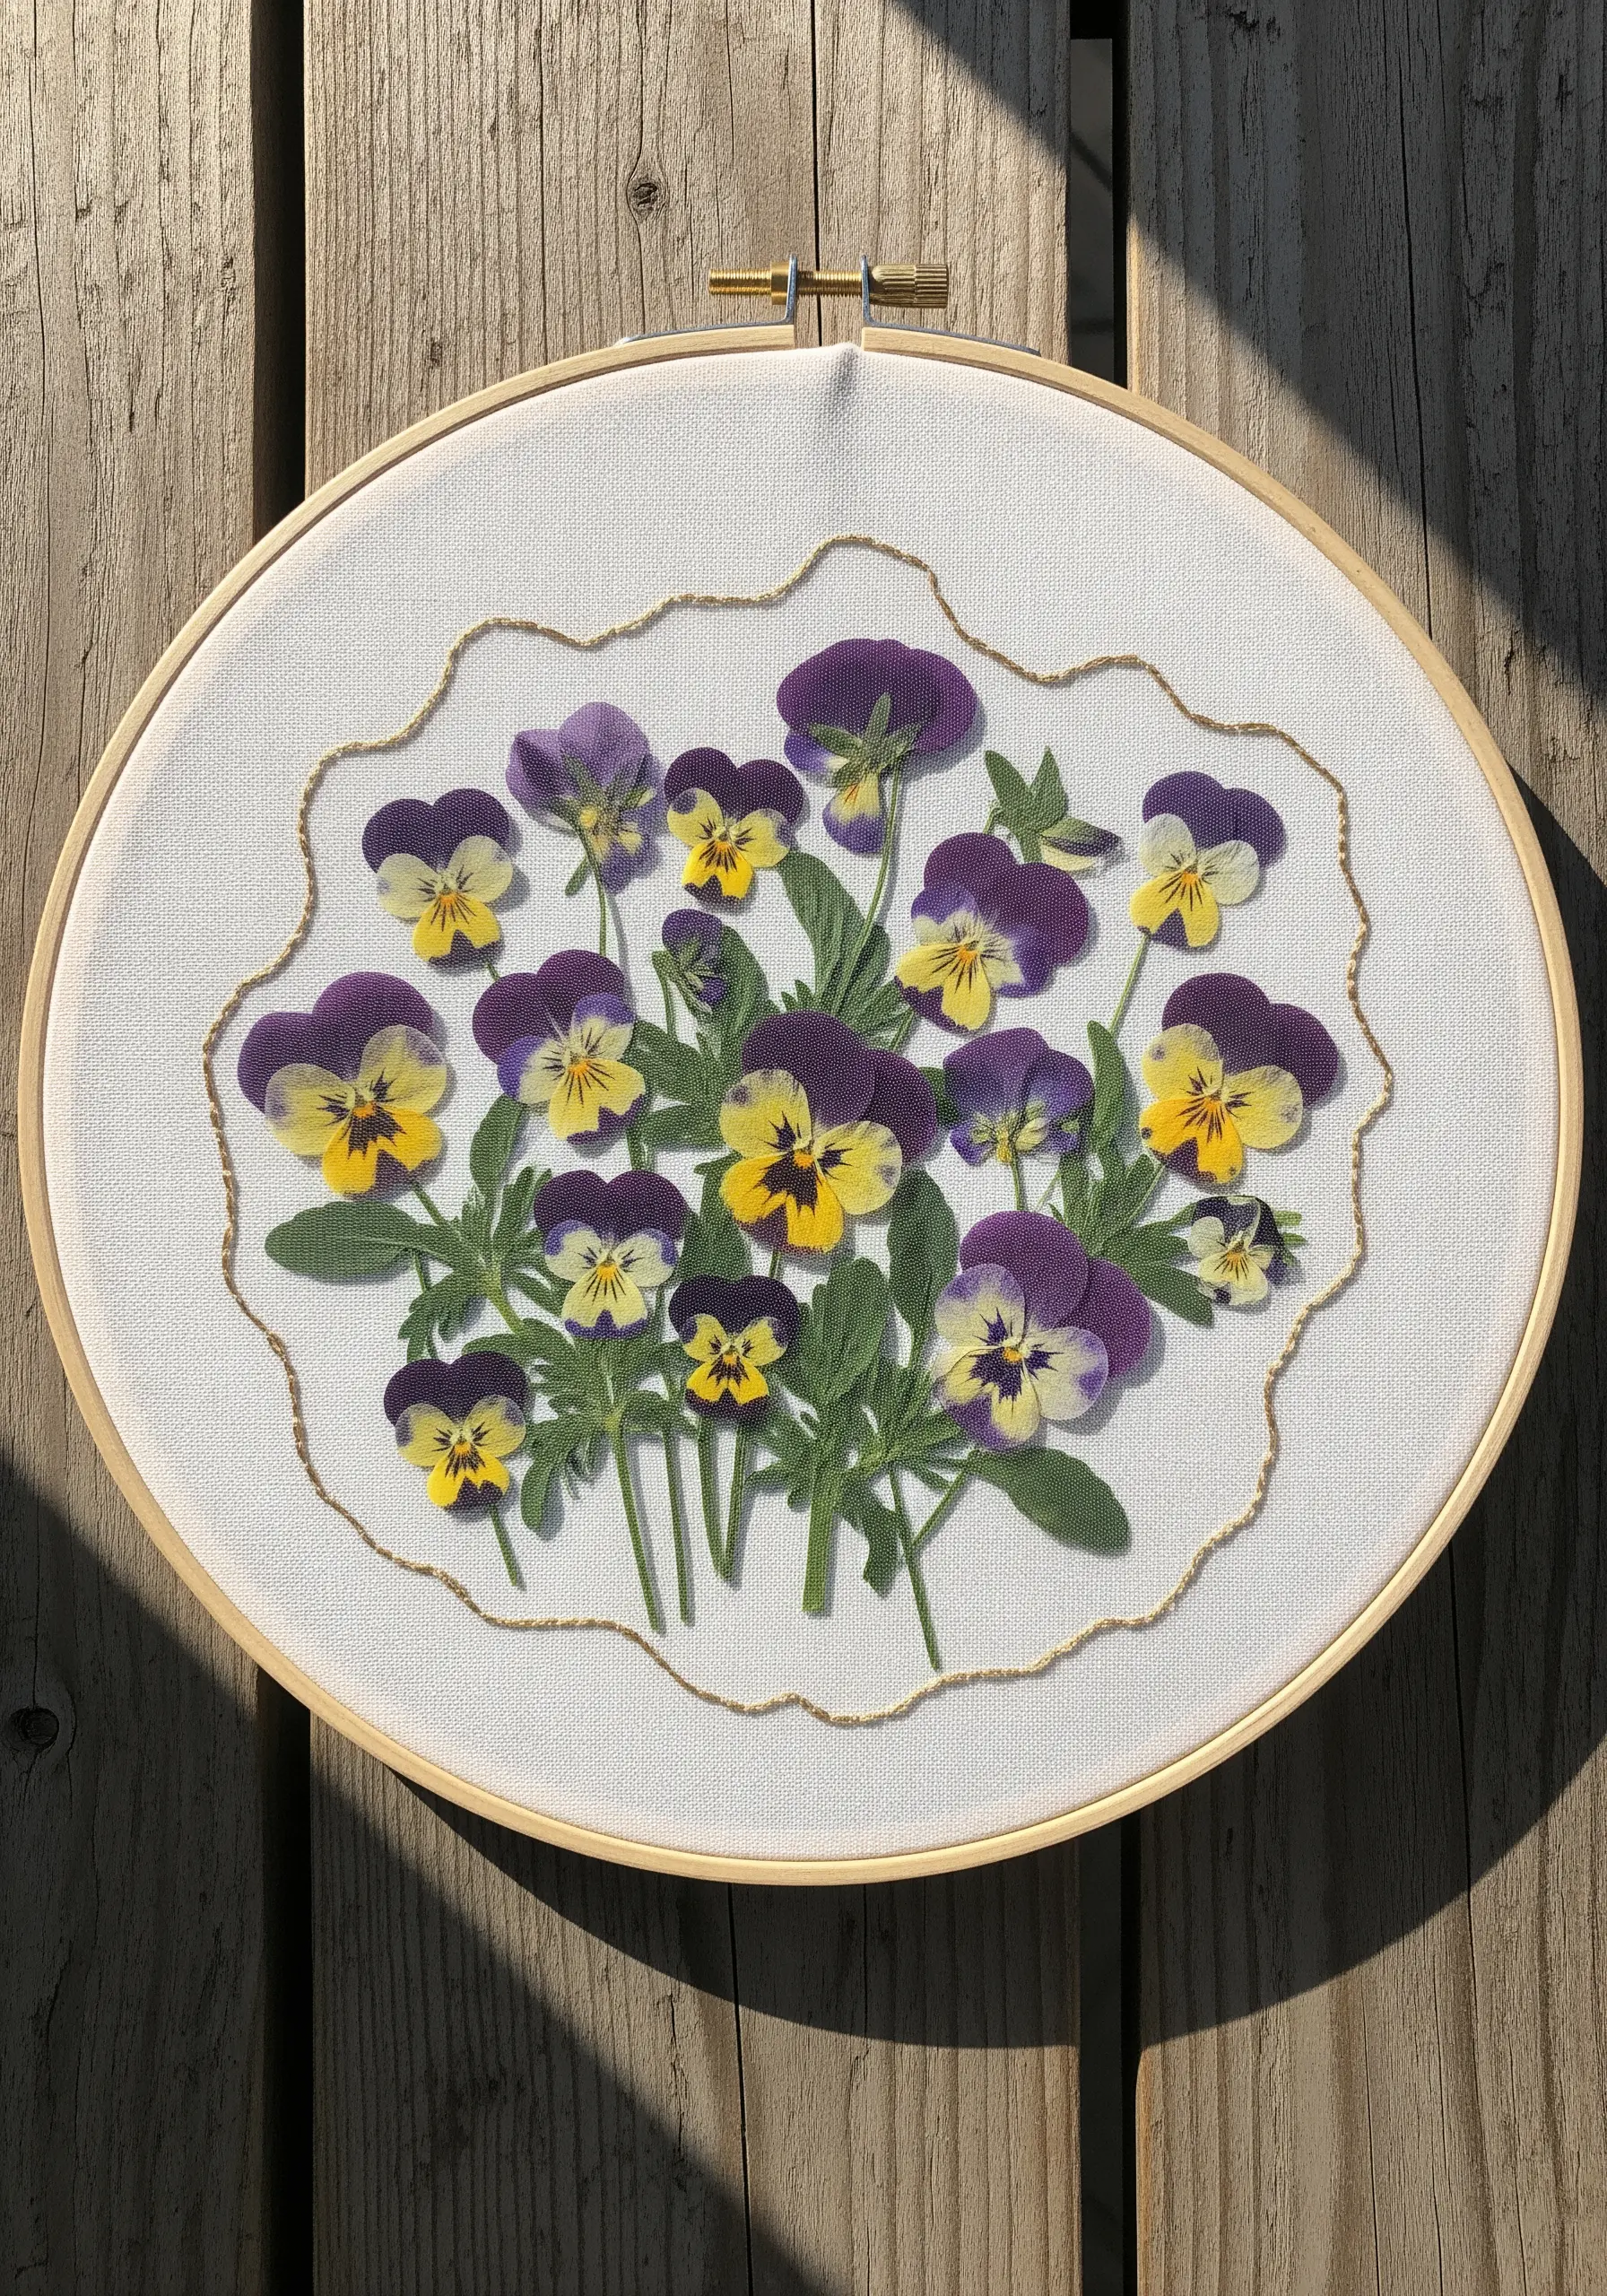
Define the space for your pressed botanicals by creating a delicate, organic border with a single strand of thread.
Use a simple backstitch or stem stitch to create a fluid shape that contains your arrangement, making it feel cohesive and complete.
For an elegant finish, choose a gold metallic thread; its subtle shimmer elevates the natural colors of the pansies without overpowering them.
Secure the flowers using tiny, almost invisible couching stitches over the stems and stronger petals to hold them in place without damage.
2. Integrate Botanicals onto Functional Textiles
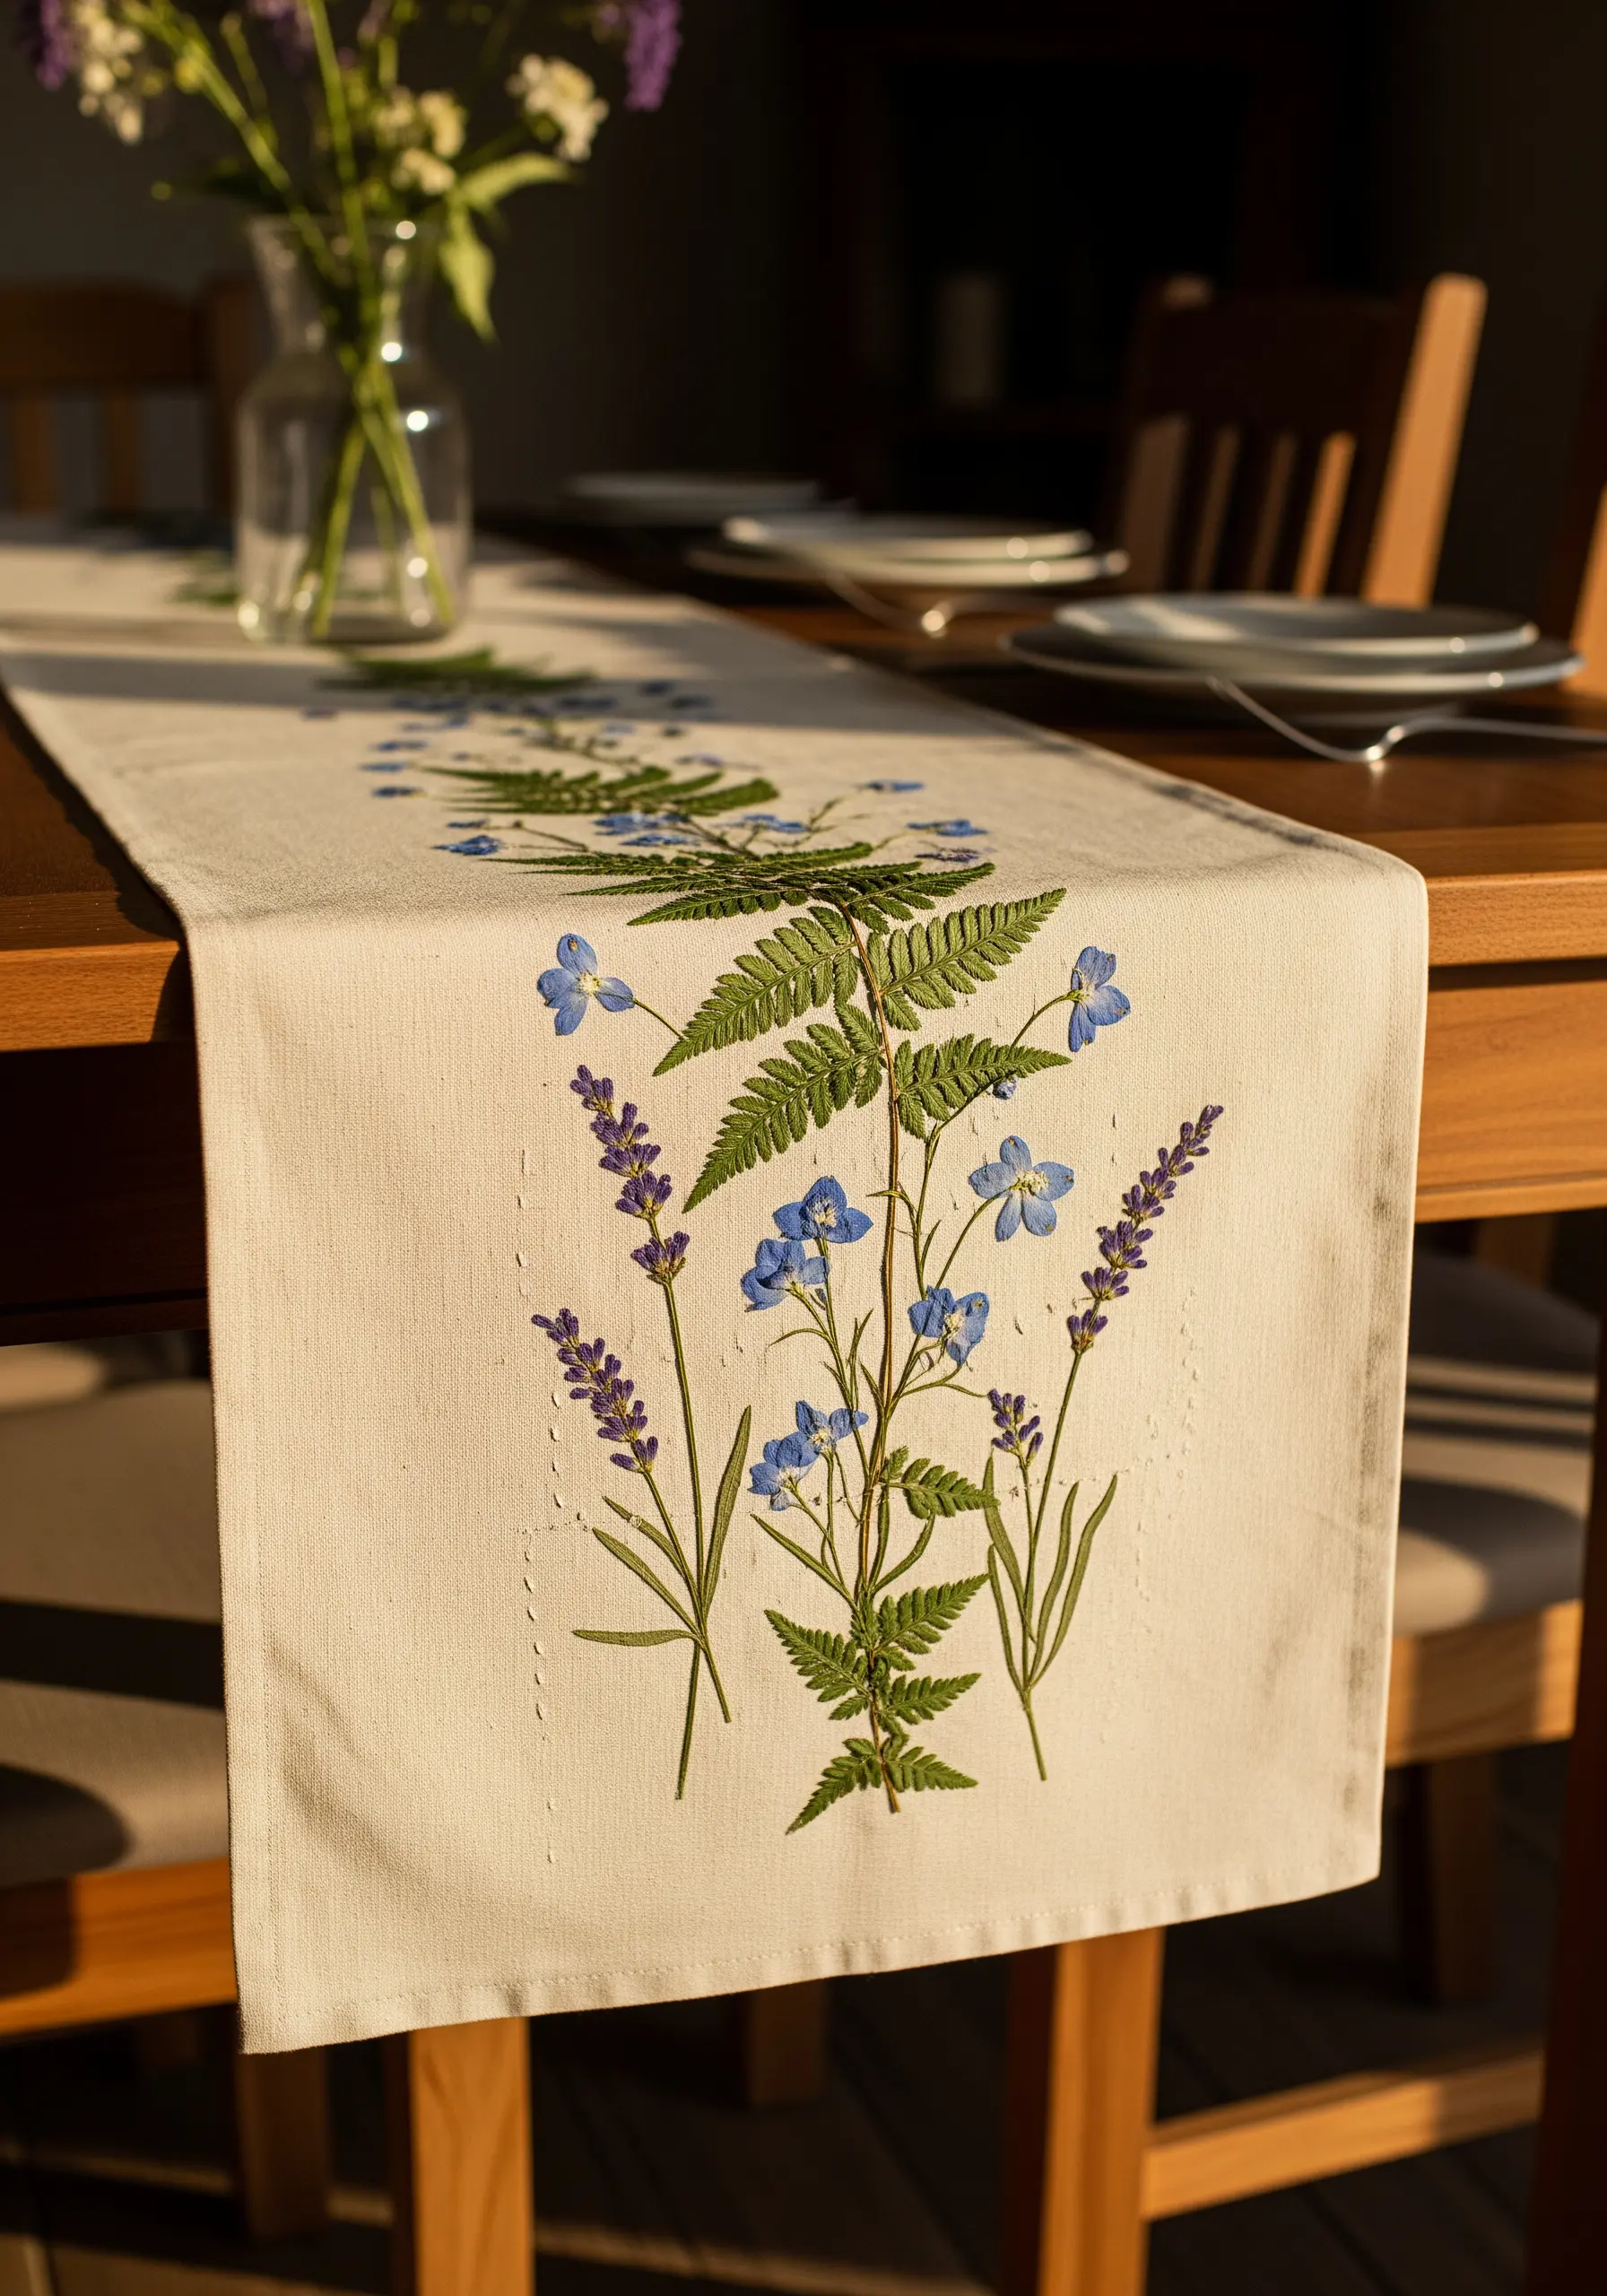
Transform everyday items by incorporating pressed flowers into functional decor like this table runner.
Choose sturdy, hardy botanicals like ferns, lavender, and flax that can withstand gentle handling.
Secure each element with a thin layer of clear, flexible fabric adhesive before adding embroidered details like stems or leaves to create a seamless blend of real and stitched nature.
This technique turns a simple table linen into a piece of botanical art that feels both personal and refined.
3. Create a Meadow with a Statement-Size Wall Hanging
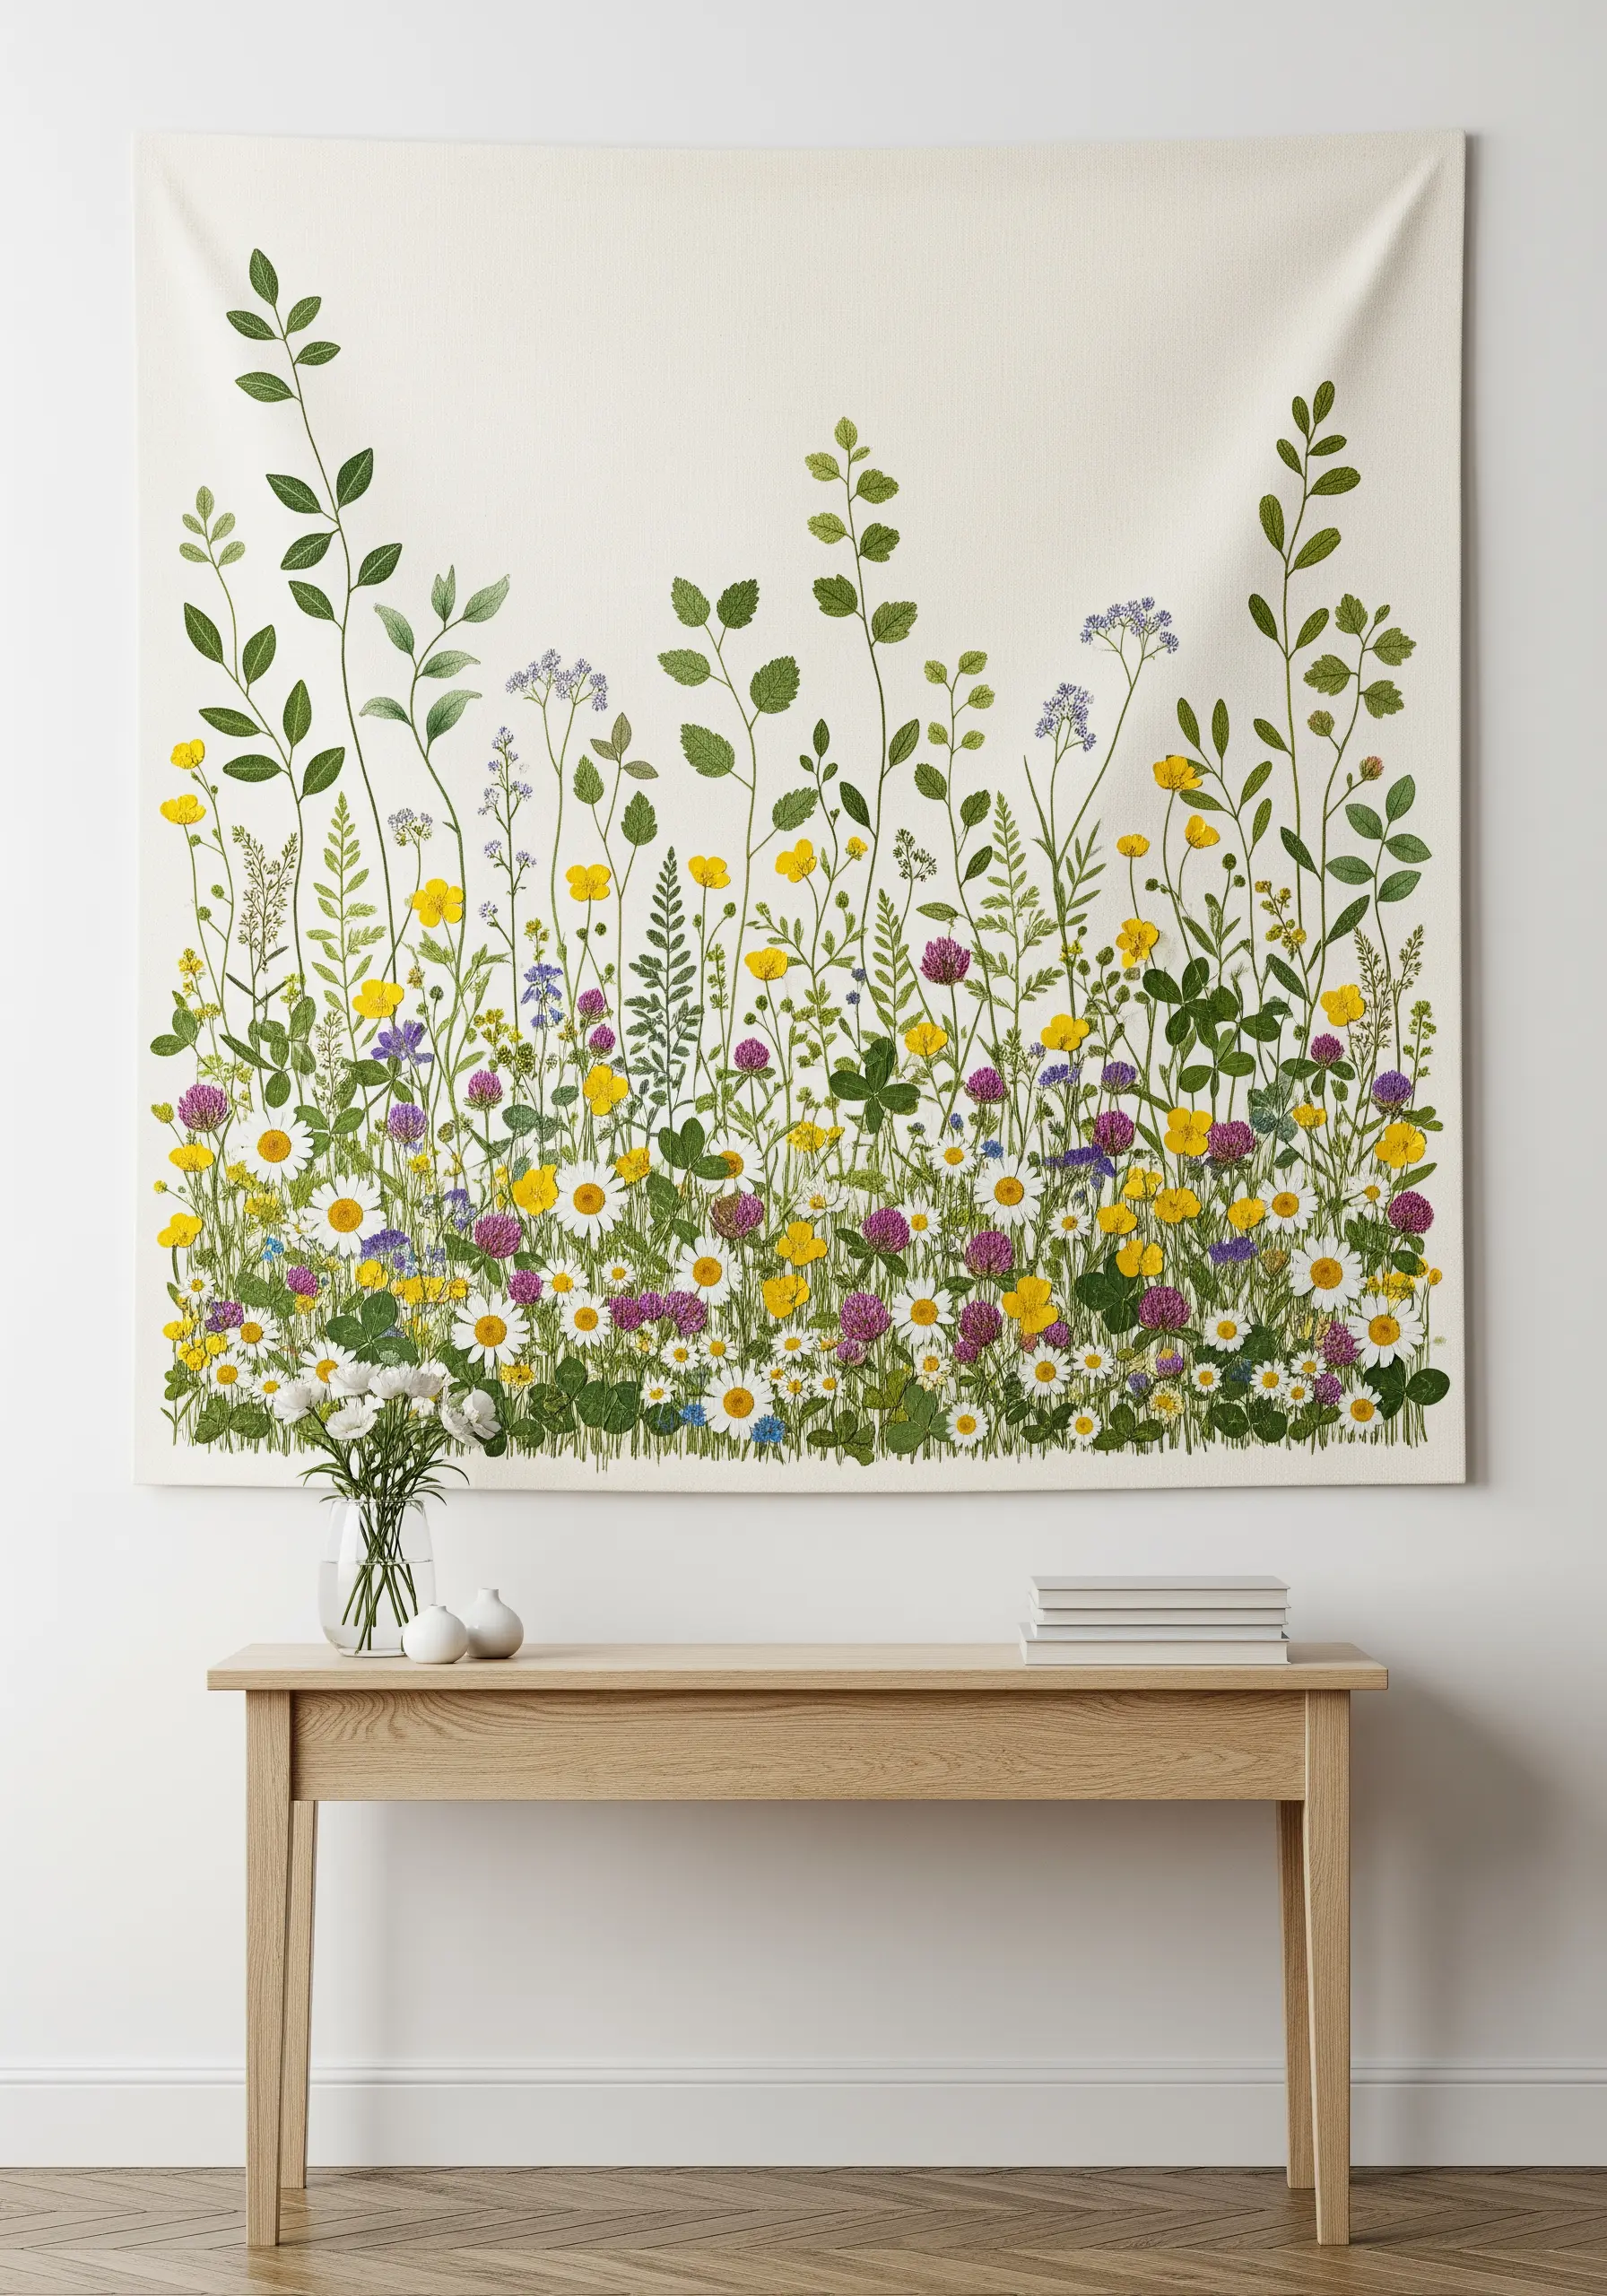
Think beyond the hoop and design a large-scale botanical tapestry that mimics a wildflower meadow.
To avoid a cluttered look, arrange taller stems and leaves near the top to draw the eye upward, and create denser clusters of flowers at the base.
Vary the shapes, colors, and textures of your chosen botanicals to build realistic depth, just as you would find in nature.
This approach allows you to create statement-size embroidered textile hangings that feel immersive and alive.
4. Harness the Power of Negative Space

Elevate a single, intricate botanical by making it the sole focus of your composition.
Choose a flower with a striking silhouette, like Queen Anne’s Lace, and place it centrally on a clean, neutral fabric background.
The surrounding empty space acts as a natural frame, drawing the viewer’s eye to the delicate details of the specimen.
This minimalist approach is perfect for framed embroidery art pieces that celebrate simplicity and form.
5. Translate Natural Textures into Thread

Study the structure of a real leaf and replicate its form and texture using embroidery stitches alone.
Use a satin stitch for the smooth, broad surface of a maple or ginkgo leaf, ensuring your stitches lie flat and parallel for a clean sheen.
Define the veins with a contrasting color or a single strand of darker thread using a simple backstitch or stem stitch.
This exercise sharpens your observation skills and is one of the best leaf stitching techniques for creating realistic botanical wearables.
6. Design with Three-Dimensional, Replaceable Florals
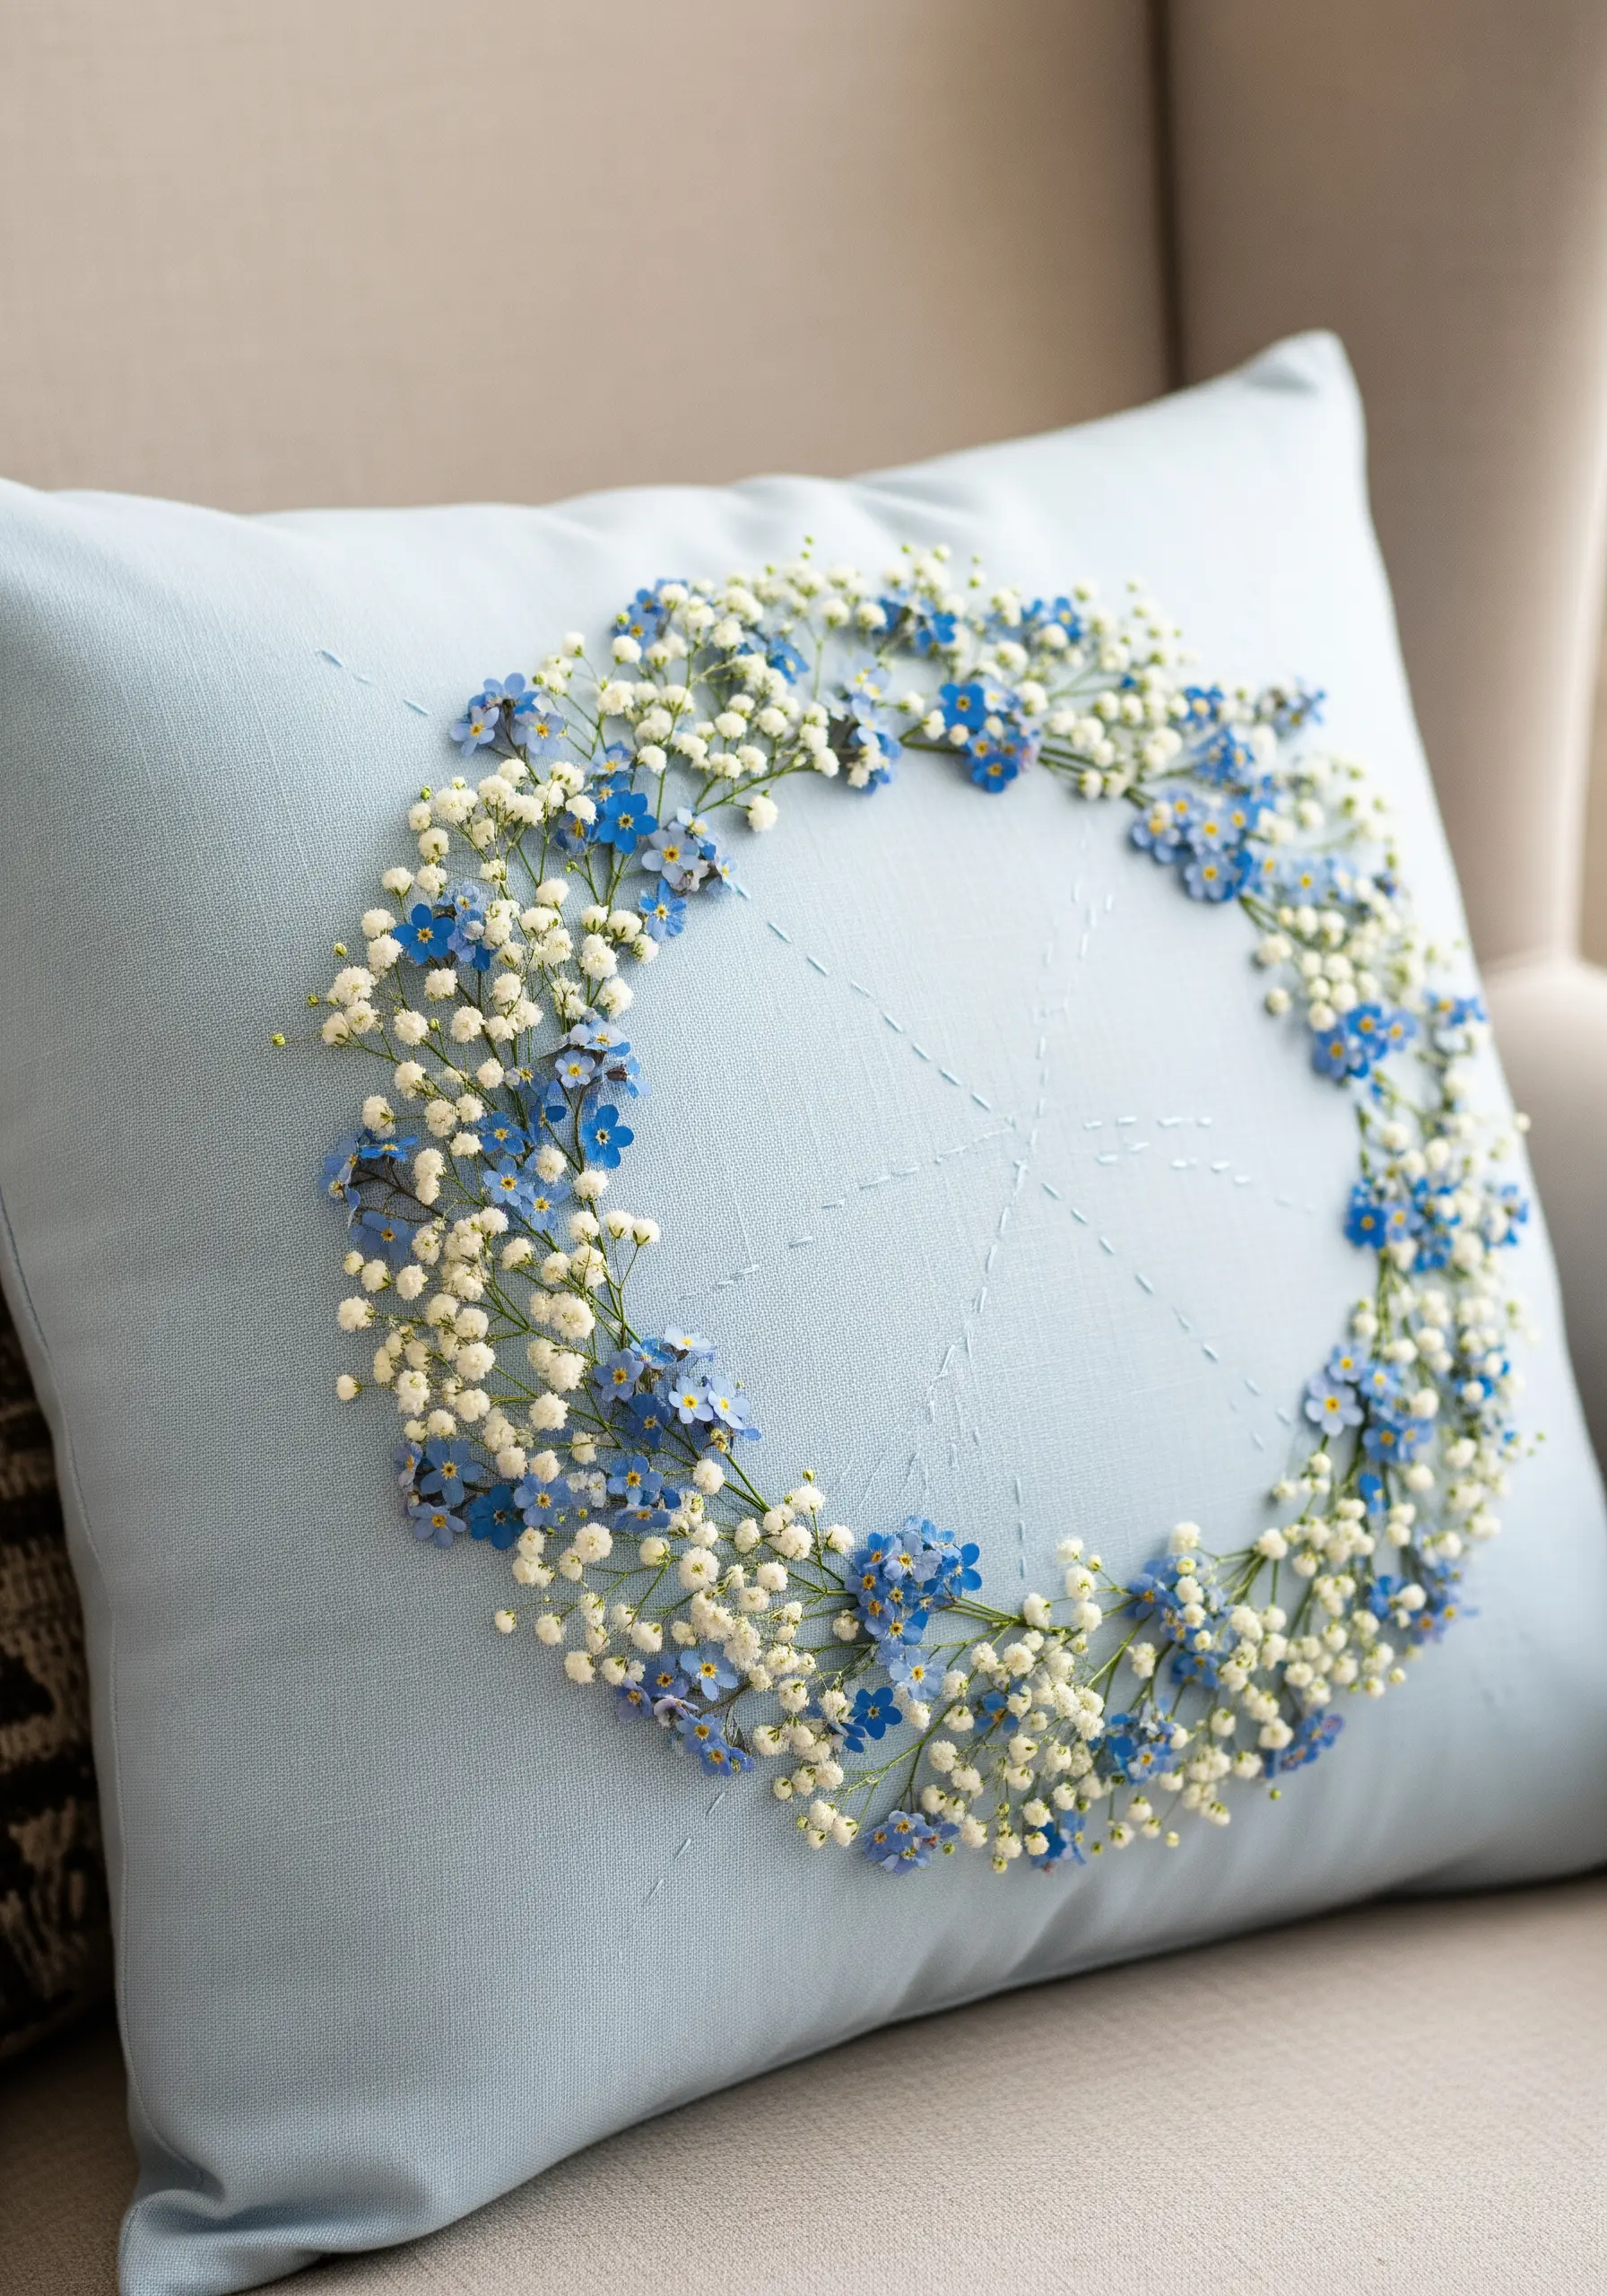
Create interactive art by combining a stitched base with fresh or dried dimensional flowers.
Embroider a subtle geometric or radiating line pattern on your fabric base, like a pillow cover, to serve as a guide for your floral arrangement.
Gently tack a wreath of delicate flowers like baby’s breath and forget-me-nots onto the fabric, allowing them to be removed or replaced over time.
This method gives you a dynamic piece that can change with the seasons.
7. Add Refined Lettering to Botanical Studies

Turn a simple collection of pressed herbs into an elegant botanical chart by adding embroidered labels.
Choose a cursive or script font that complements the organic shapes of the rosemary, thyme, and sage.
Use a single strand of floss in a contrasting color and a simple whipped backstitch to create smooth, readable lettering that doesn’t compete with the natural specimens.
This pairing of scientific observation and artistic flair creates a timeless piece of wall decor.
8. Trap Petals in Tulle for a Stained-Glass Effect
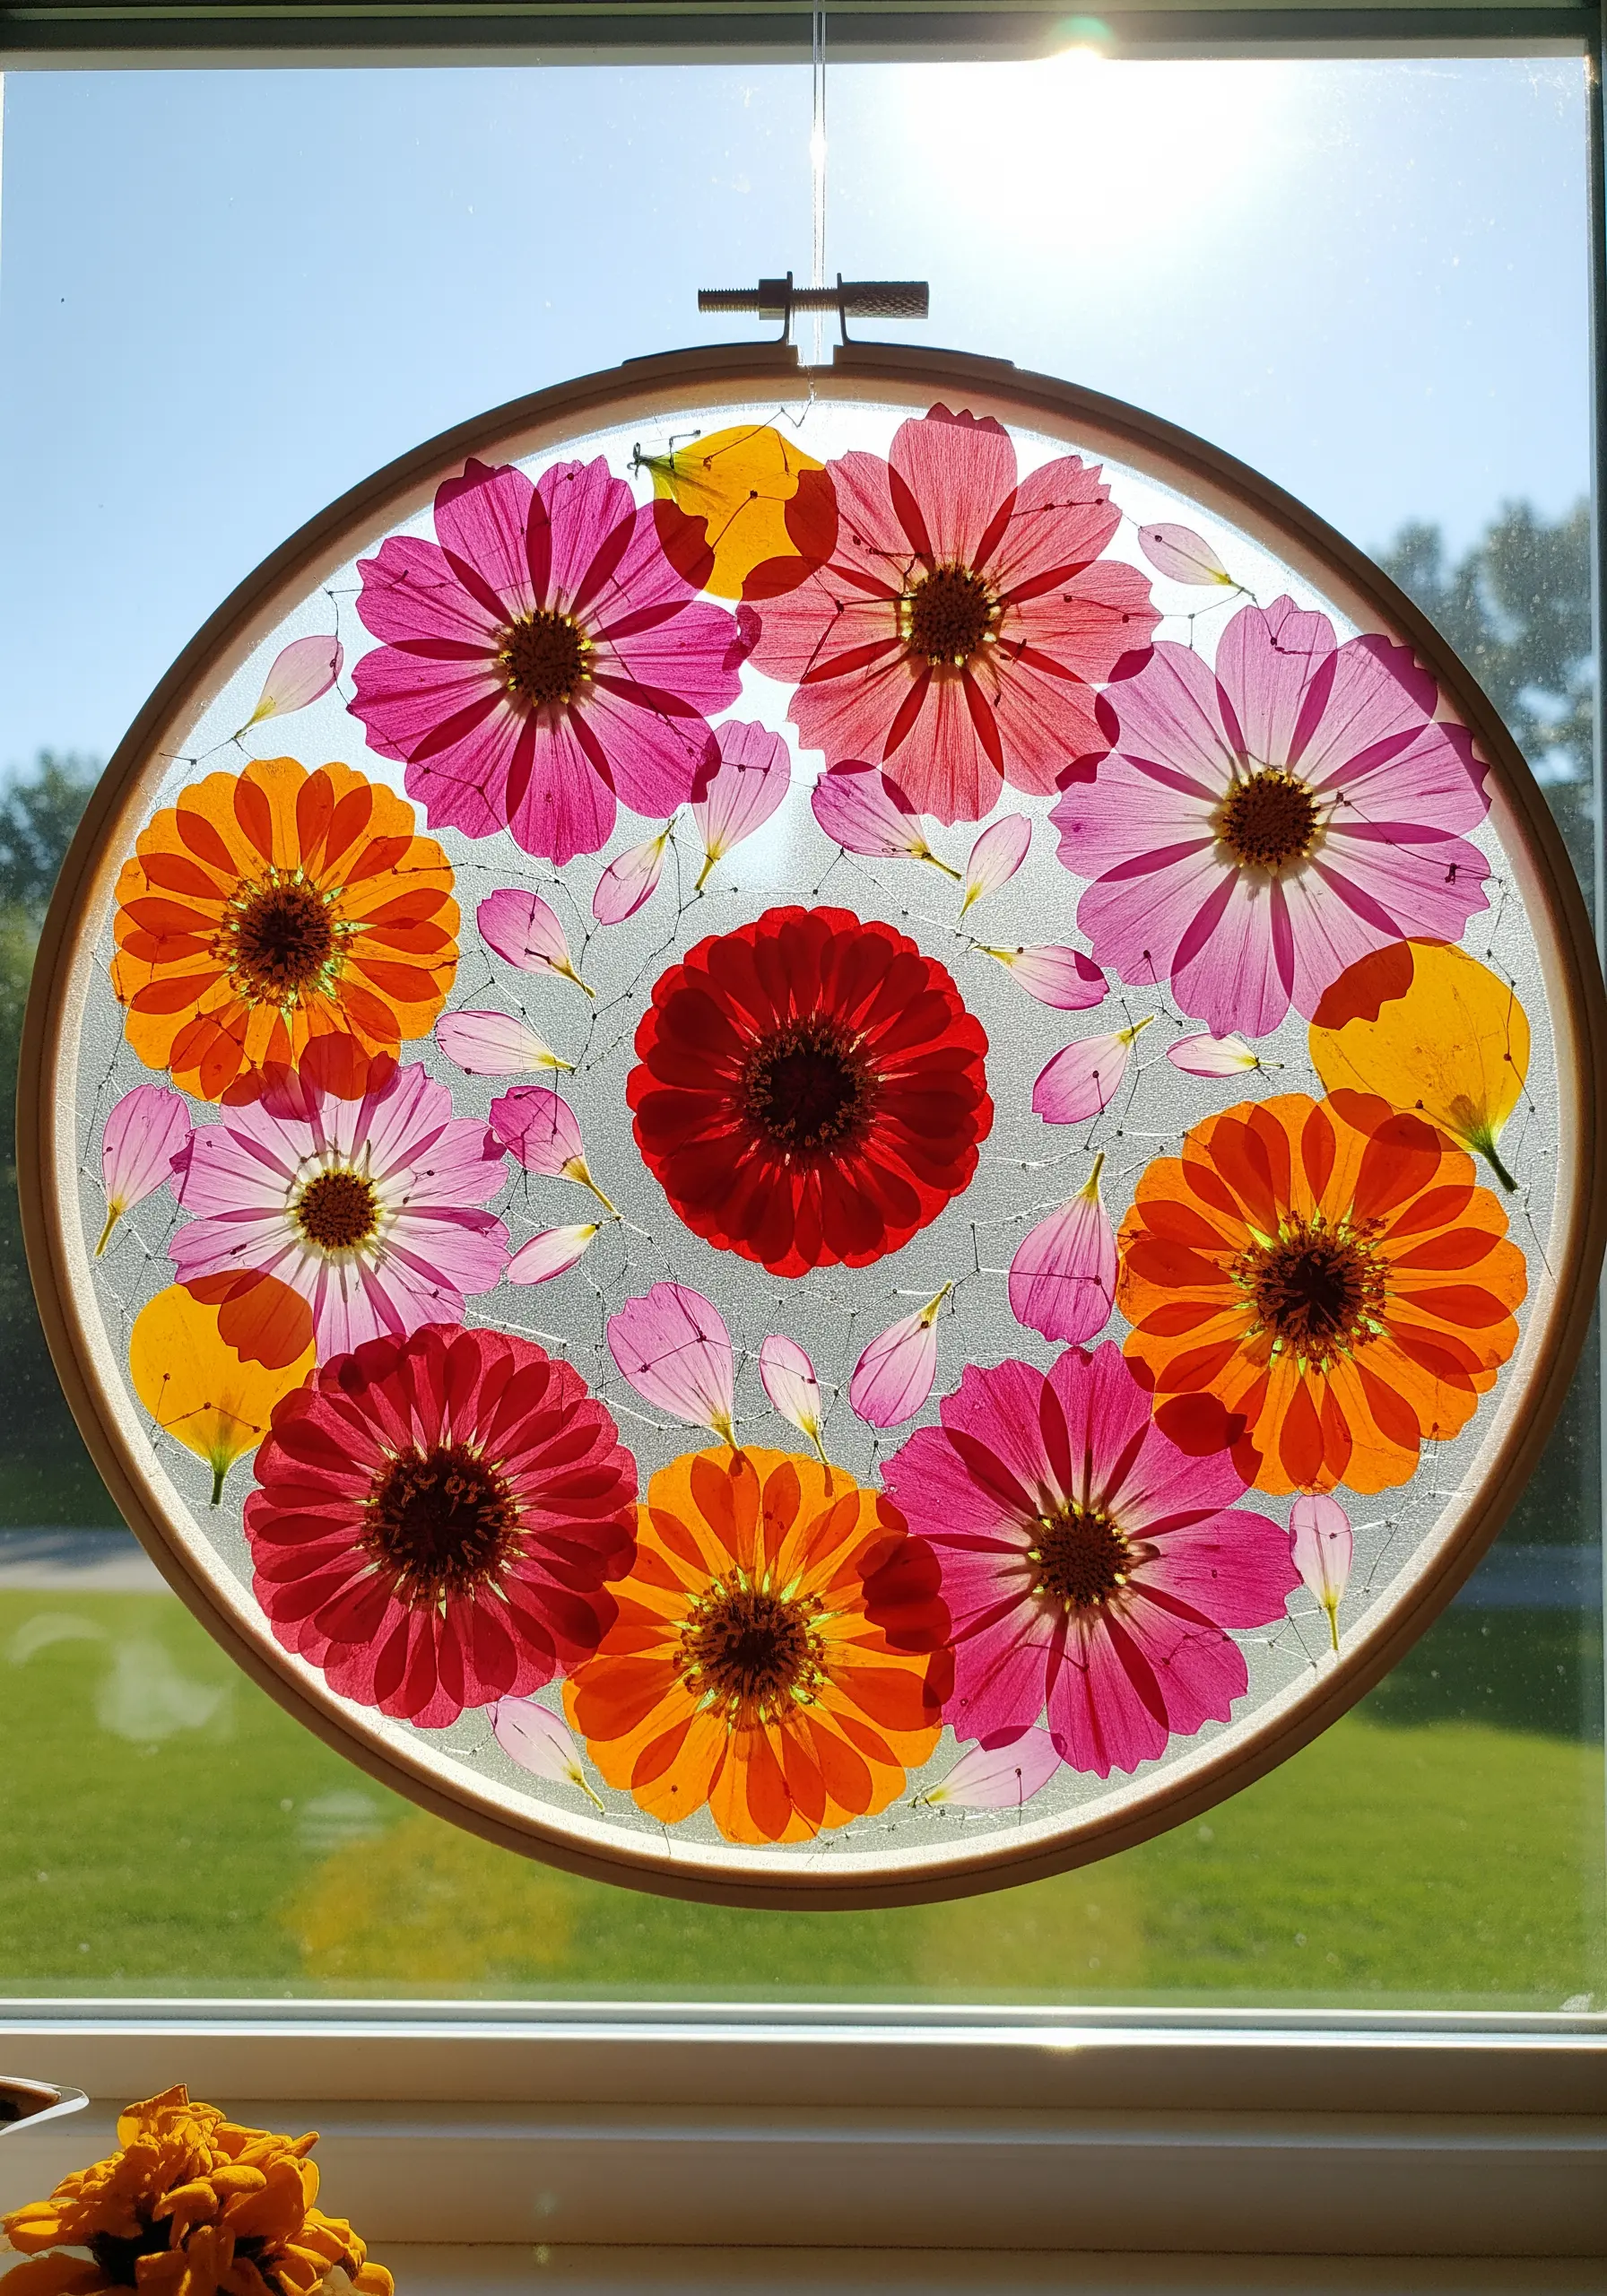
Create a stunning suncatcher by layering pressed flowers between two sheets of sheer tulle or organza within an embroidery hoop.
Arrange vibrant, translucent petals in a circular or mandala-like pattern to maximize the effect of light passing through them.
Pull the tulle taut in the hoop to secure the flowers in place without any glue, preserving their natural color and form.
When hung in a window, this piece illuminates the delicate structures of each petal.
9. Create Celestial Art with Petals and Metallic Leaf
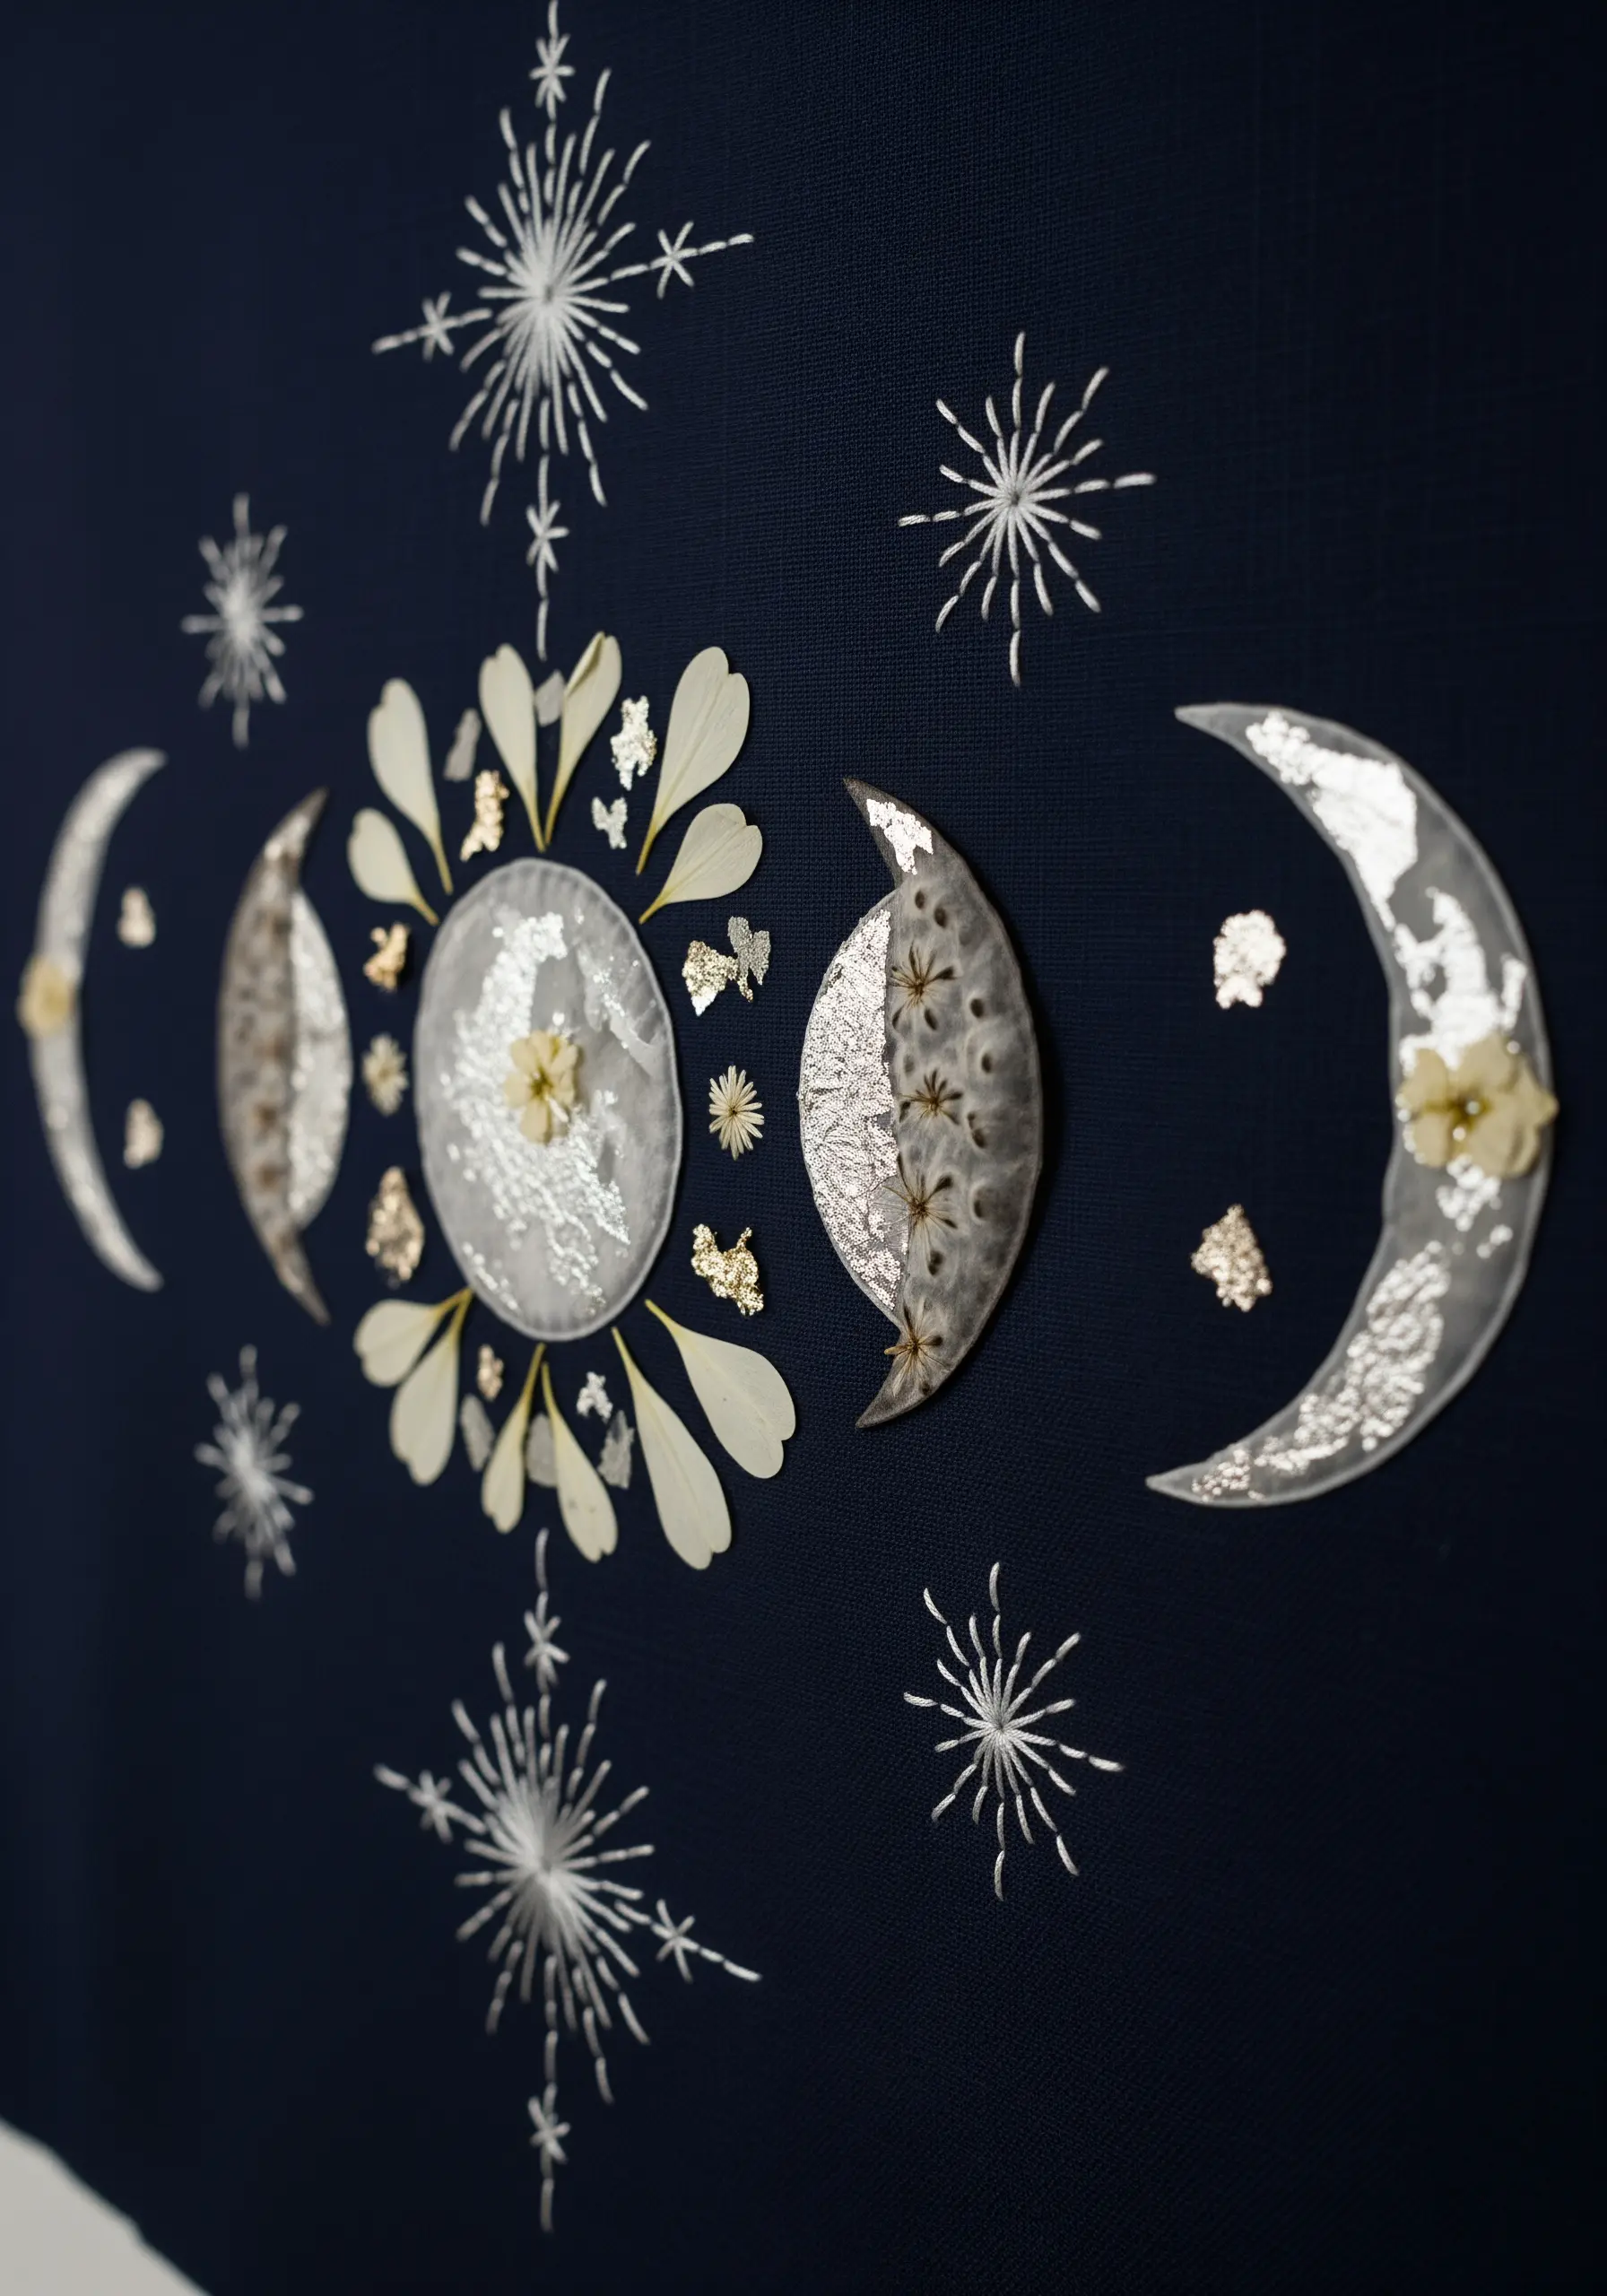
Combine pressed botanicals with other materials to build otherworldly textures and themes.
Use white petals or skeleton leaves to form the shapes of moon phases, then apply silver or gold leaf to add celestial shimmer and contrast against a dark fabric background.
Accent the composition with unexpected ways to use metallic thread, stitching starbursts with straight stitches to complete the cosmic scene.
This mixed-media approach transforms simple flowers into a magical narrative piece.
10. Tell a Tiny Story with a Single Stitched Detail
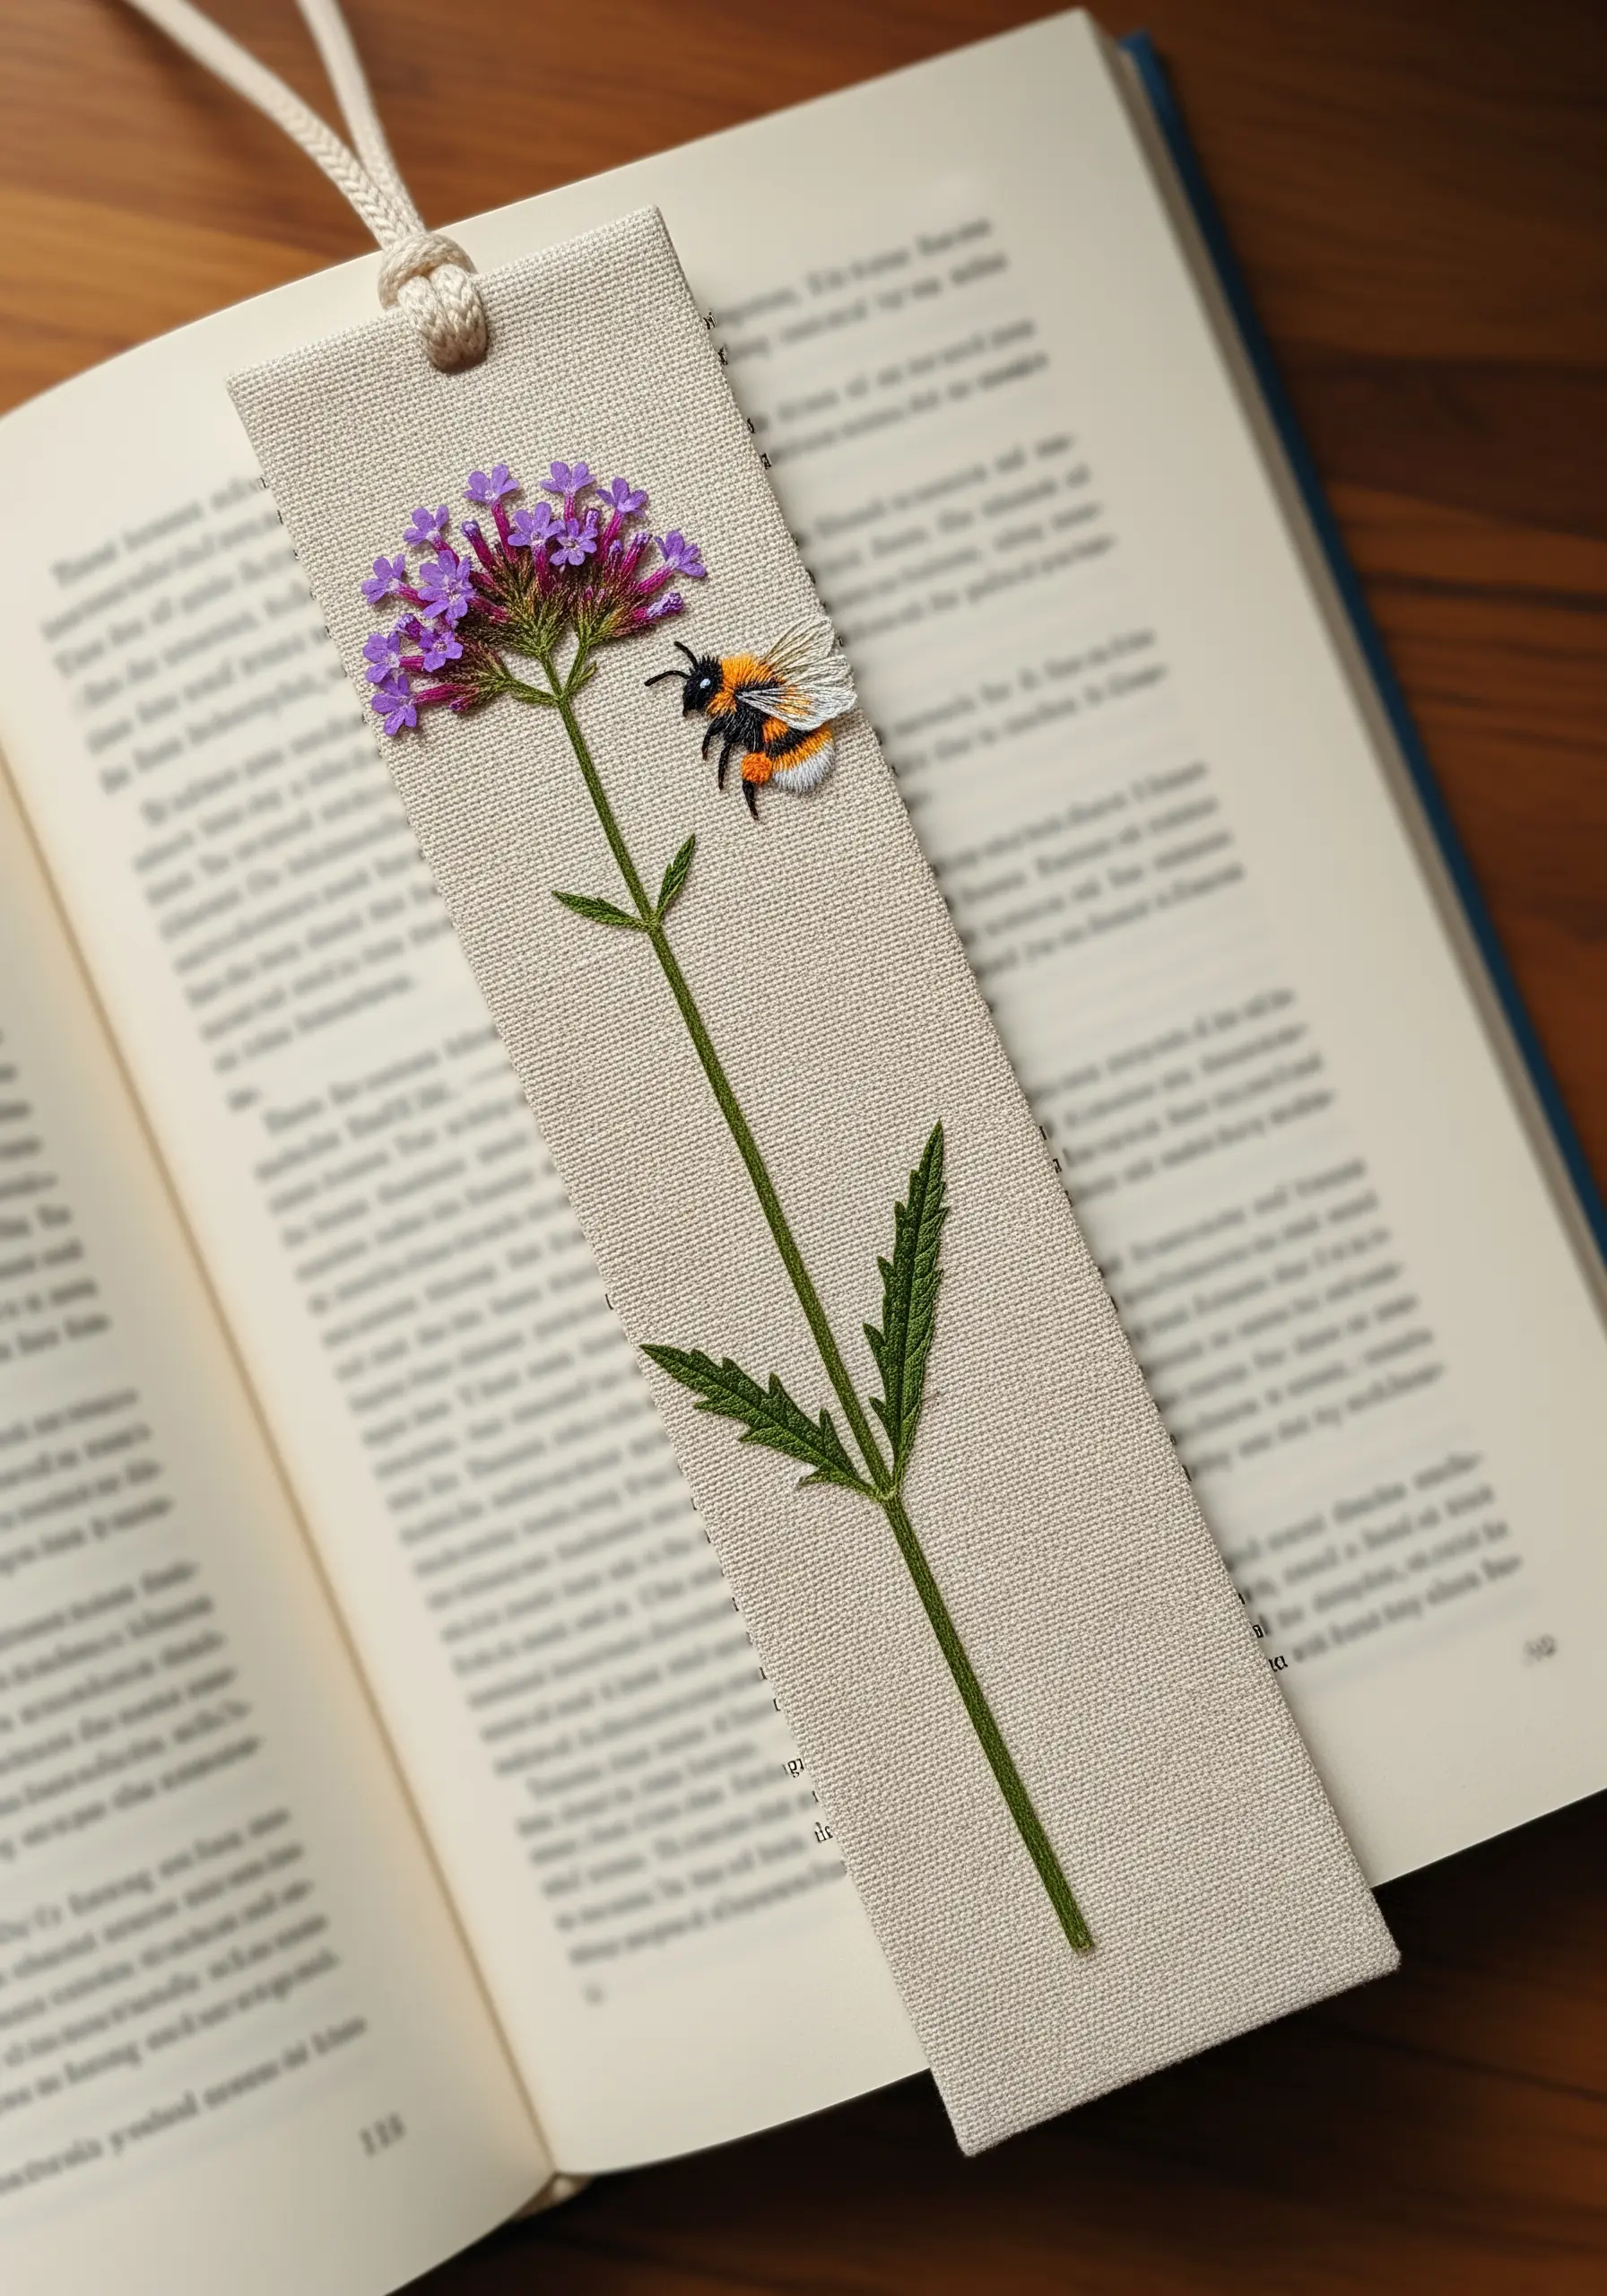
Elevate a pressed flower by adding a small, embroidered element that creates a miniature scene.
Secure a single pressed verbena stem to a bookmark, then stitch a tiny, fuzzy bumblebee with French knots and satin stitch, appearing to fly towards the blossom.
This simple addition transforms the piece from a botanical sample into a moment captured in time.
It’s a perfect technique for DIY cozy embroidery bookmarks and other small, precious objects.
11. Contrast Soft Petals with Sharp Geometric Lines

Create a striking visual dialogue between the organic and the man-made by encasing soft, colorful petals within a rigid geometric structure.
First, create a geometric frame using string art techniques or by stitching straight lines directly onto a dark canvas.
Then, carefully arrange a dense cluster of tiny, vibrant pressed flowers within the shape.
The contrast between the soft, chaotic florals and the clean, precise lines makes both elements stand out more dramatically.
12. Capture a Feeling of Movement with Thread
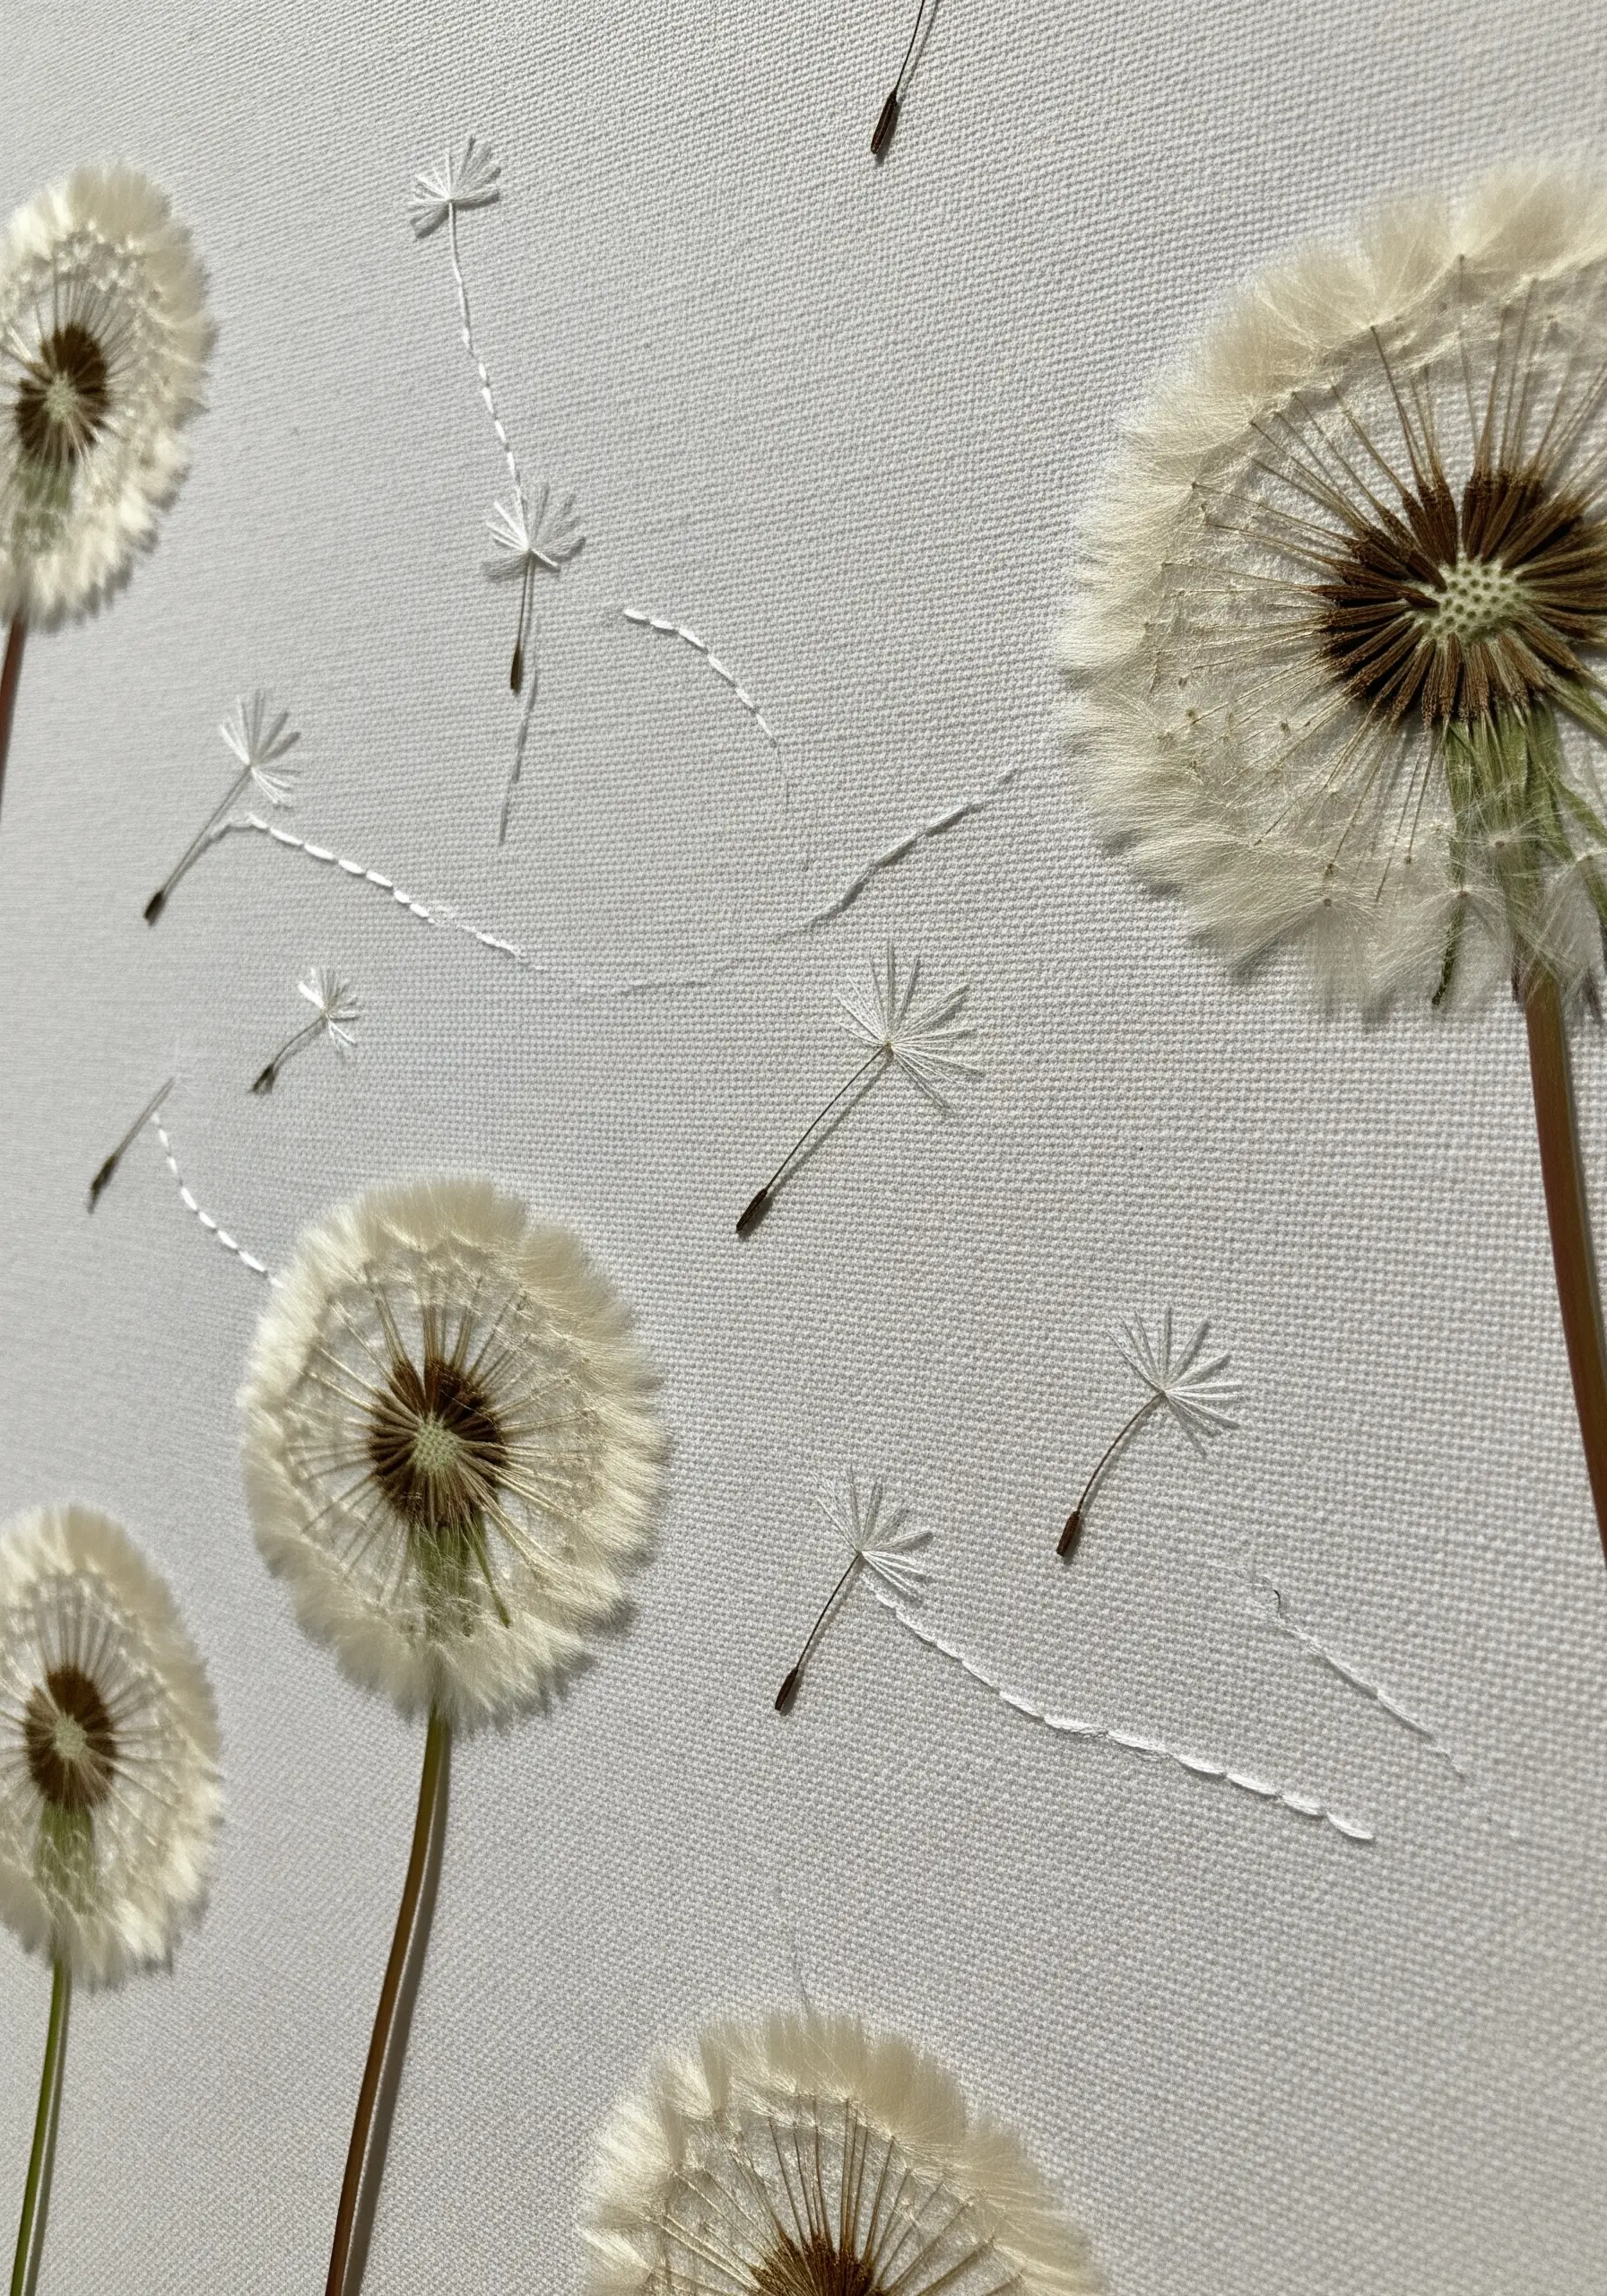
Use embroidery to extend the story of your pressed botanicals and create a sense of motion.
After securing real dandelion seed heads to your fabric, use a single strand of white thread to stitch their seeds scattering across the canvas.
A simple running stitch creates the perfect flight path, giving the piece a feeling of lightness and whimsy.
This is a beautiful way to use your skills to turn everyday nature into stunning art.
13. Construct a Larger Image from Individual Leaves
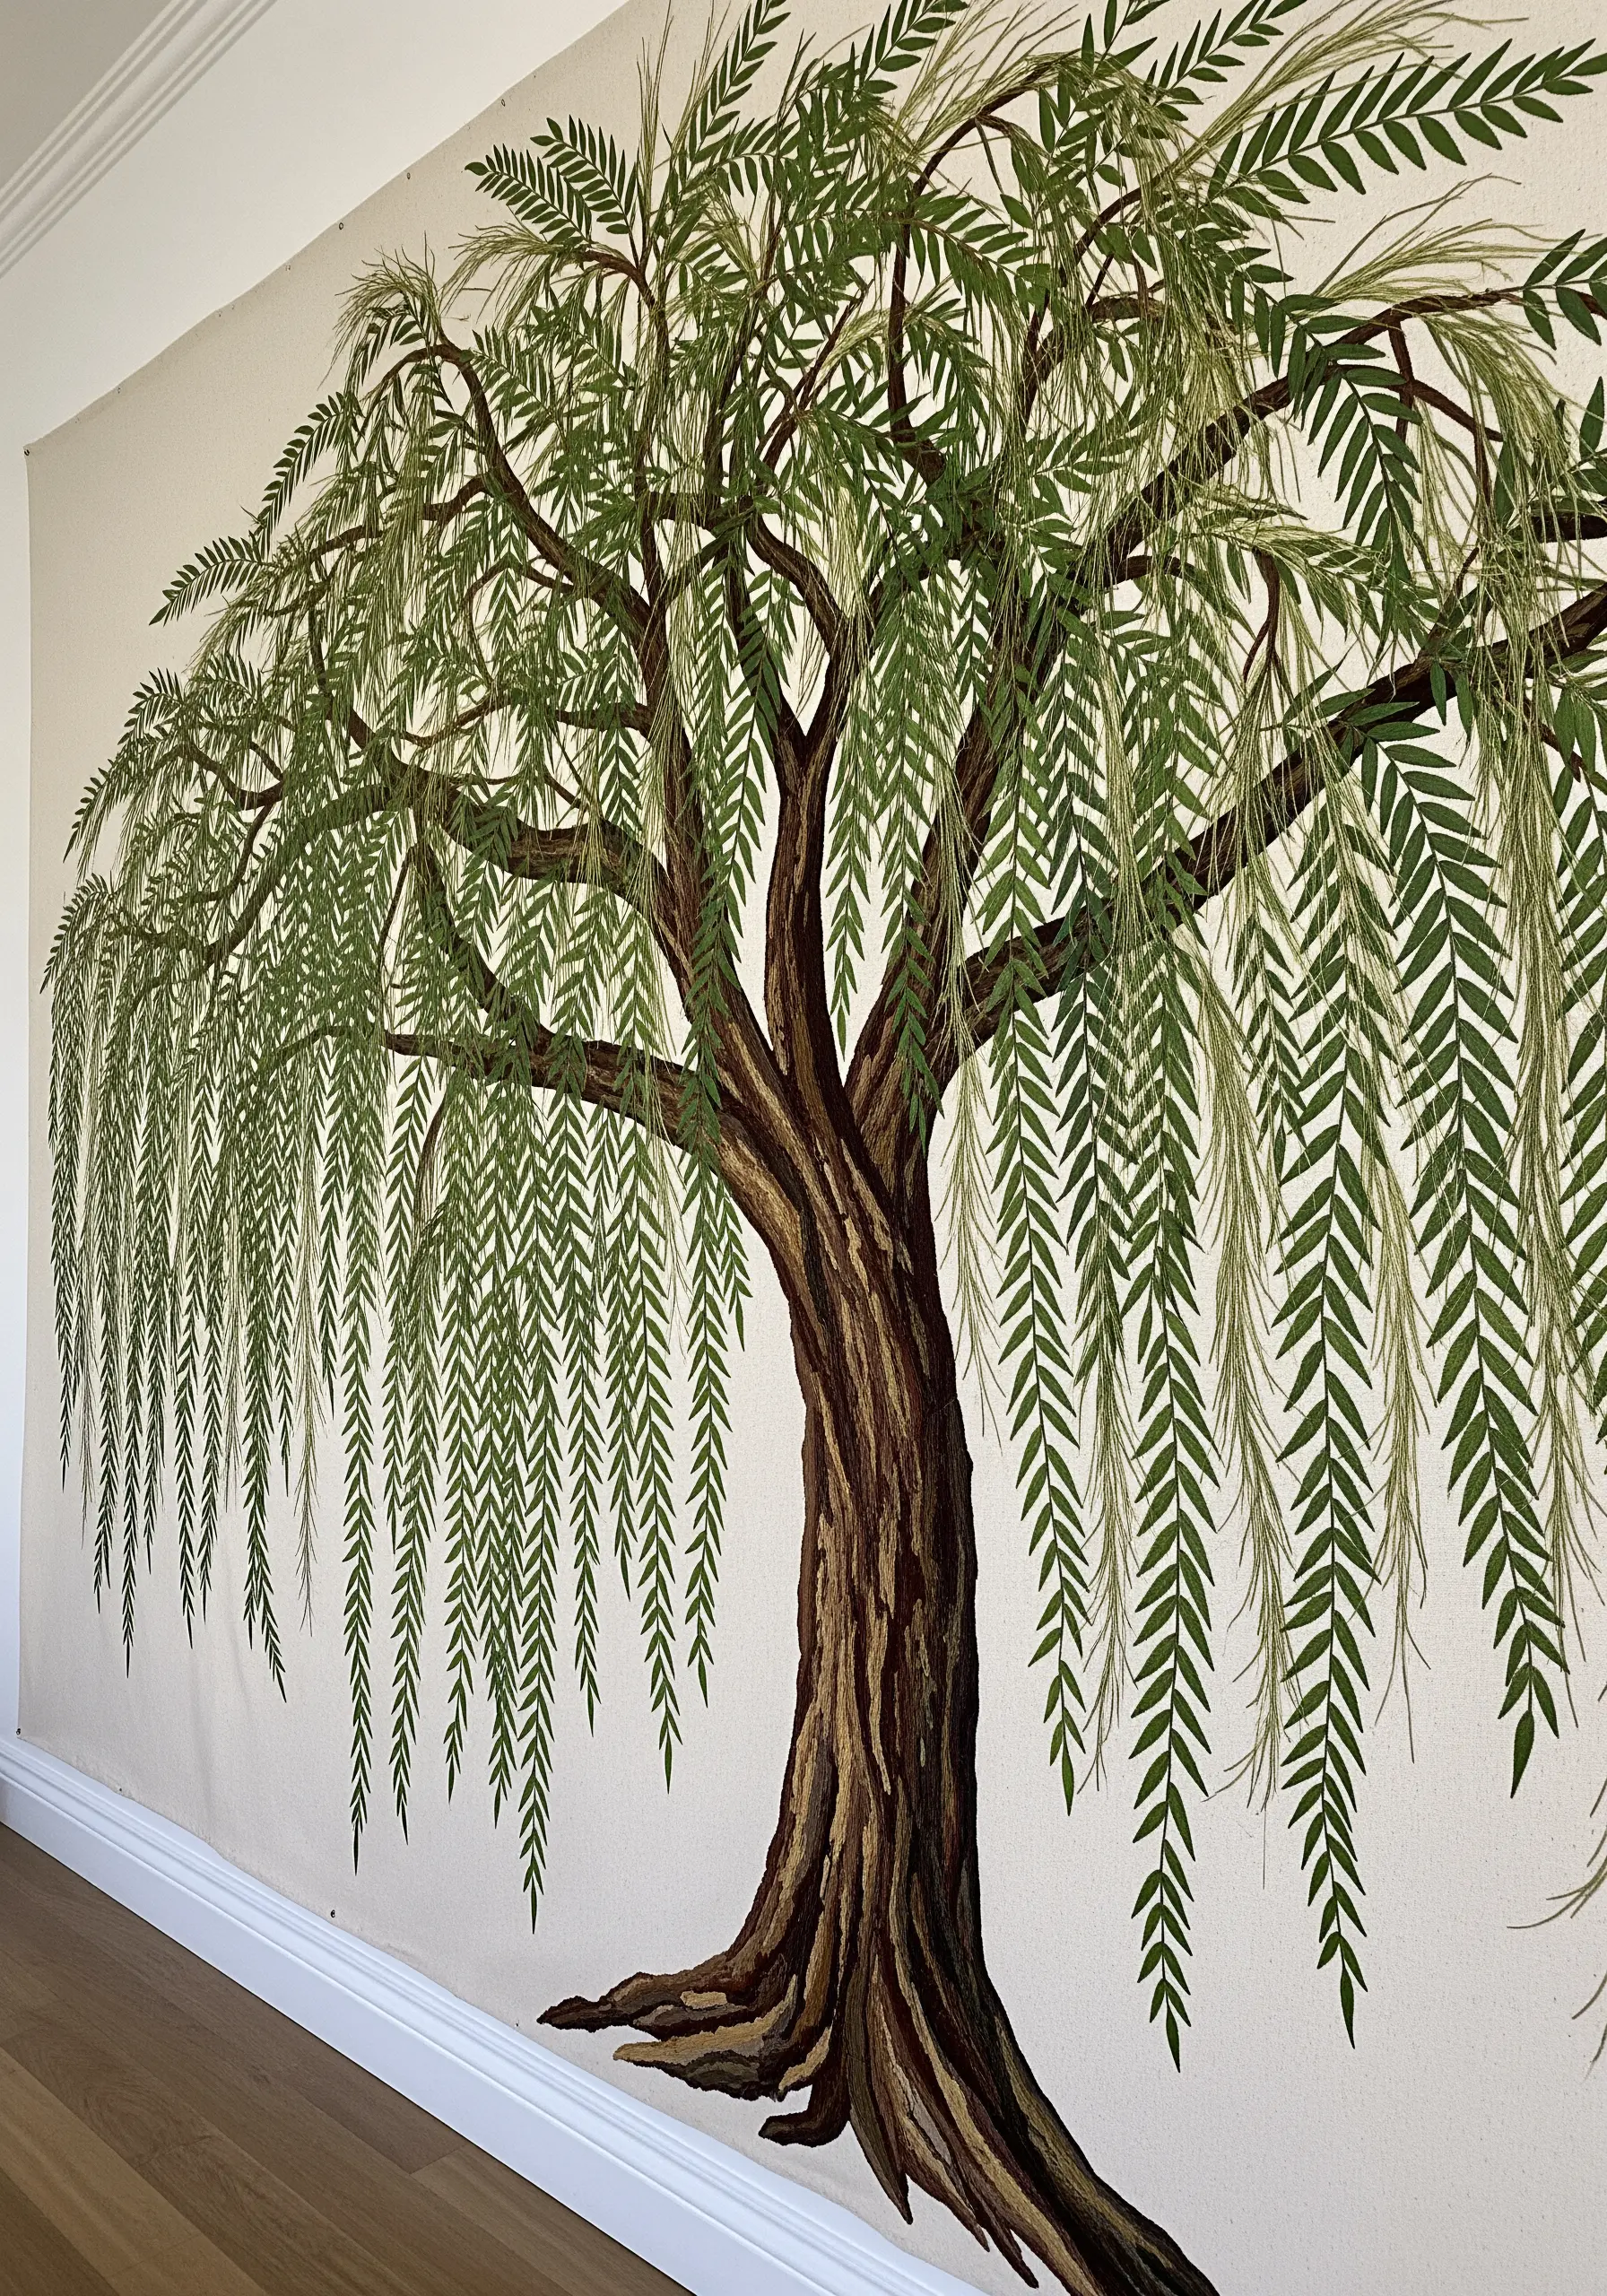
Build a complex, large-scale image, like a weeping willow, by using hundreds of individual pressed leaves.
Paint or stain the trunk and main branches onto your canvas first to create a structural base.
Then, painstakingly layer and glue individual pressed leaves—like those from a pepper tree or fern—to form the weeping foliage.
This mosaic-like technique allows you to achieve incredible texture and scale, deconstructing nature to rebuild it as art.
14. Finish Functional Art with a Decorative Edge

When creating functional items like coasters, finishing is key to both durability and aesthetics.
Seal your pressed flower under a layer of heat-resistant laminate or clear vinyl before sandwiching it with a felt backing.
Then, use a colorful six-strand floss to stitch a clean, decorative blanket stitch around the entire edge.
This not only secures the layers but also adds a handcrafted frame that makes the piece feel complete and professionally made.
15. Amplify Color with a High-Contrast Background
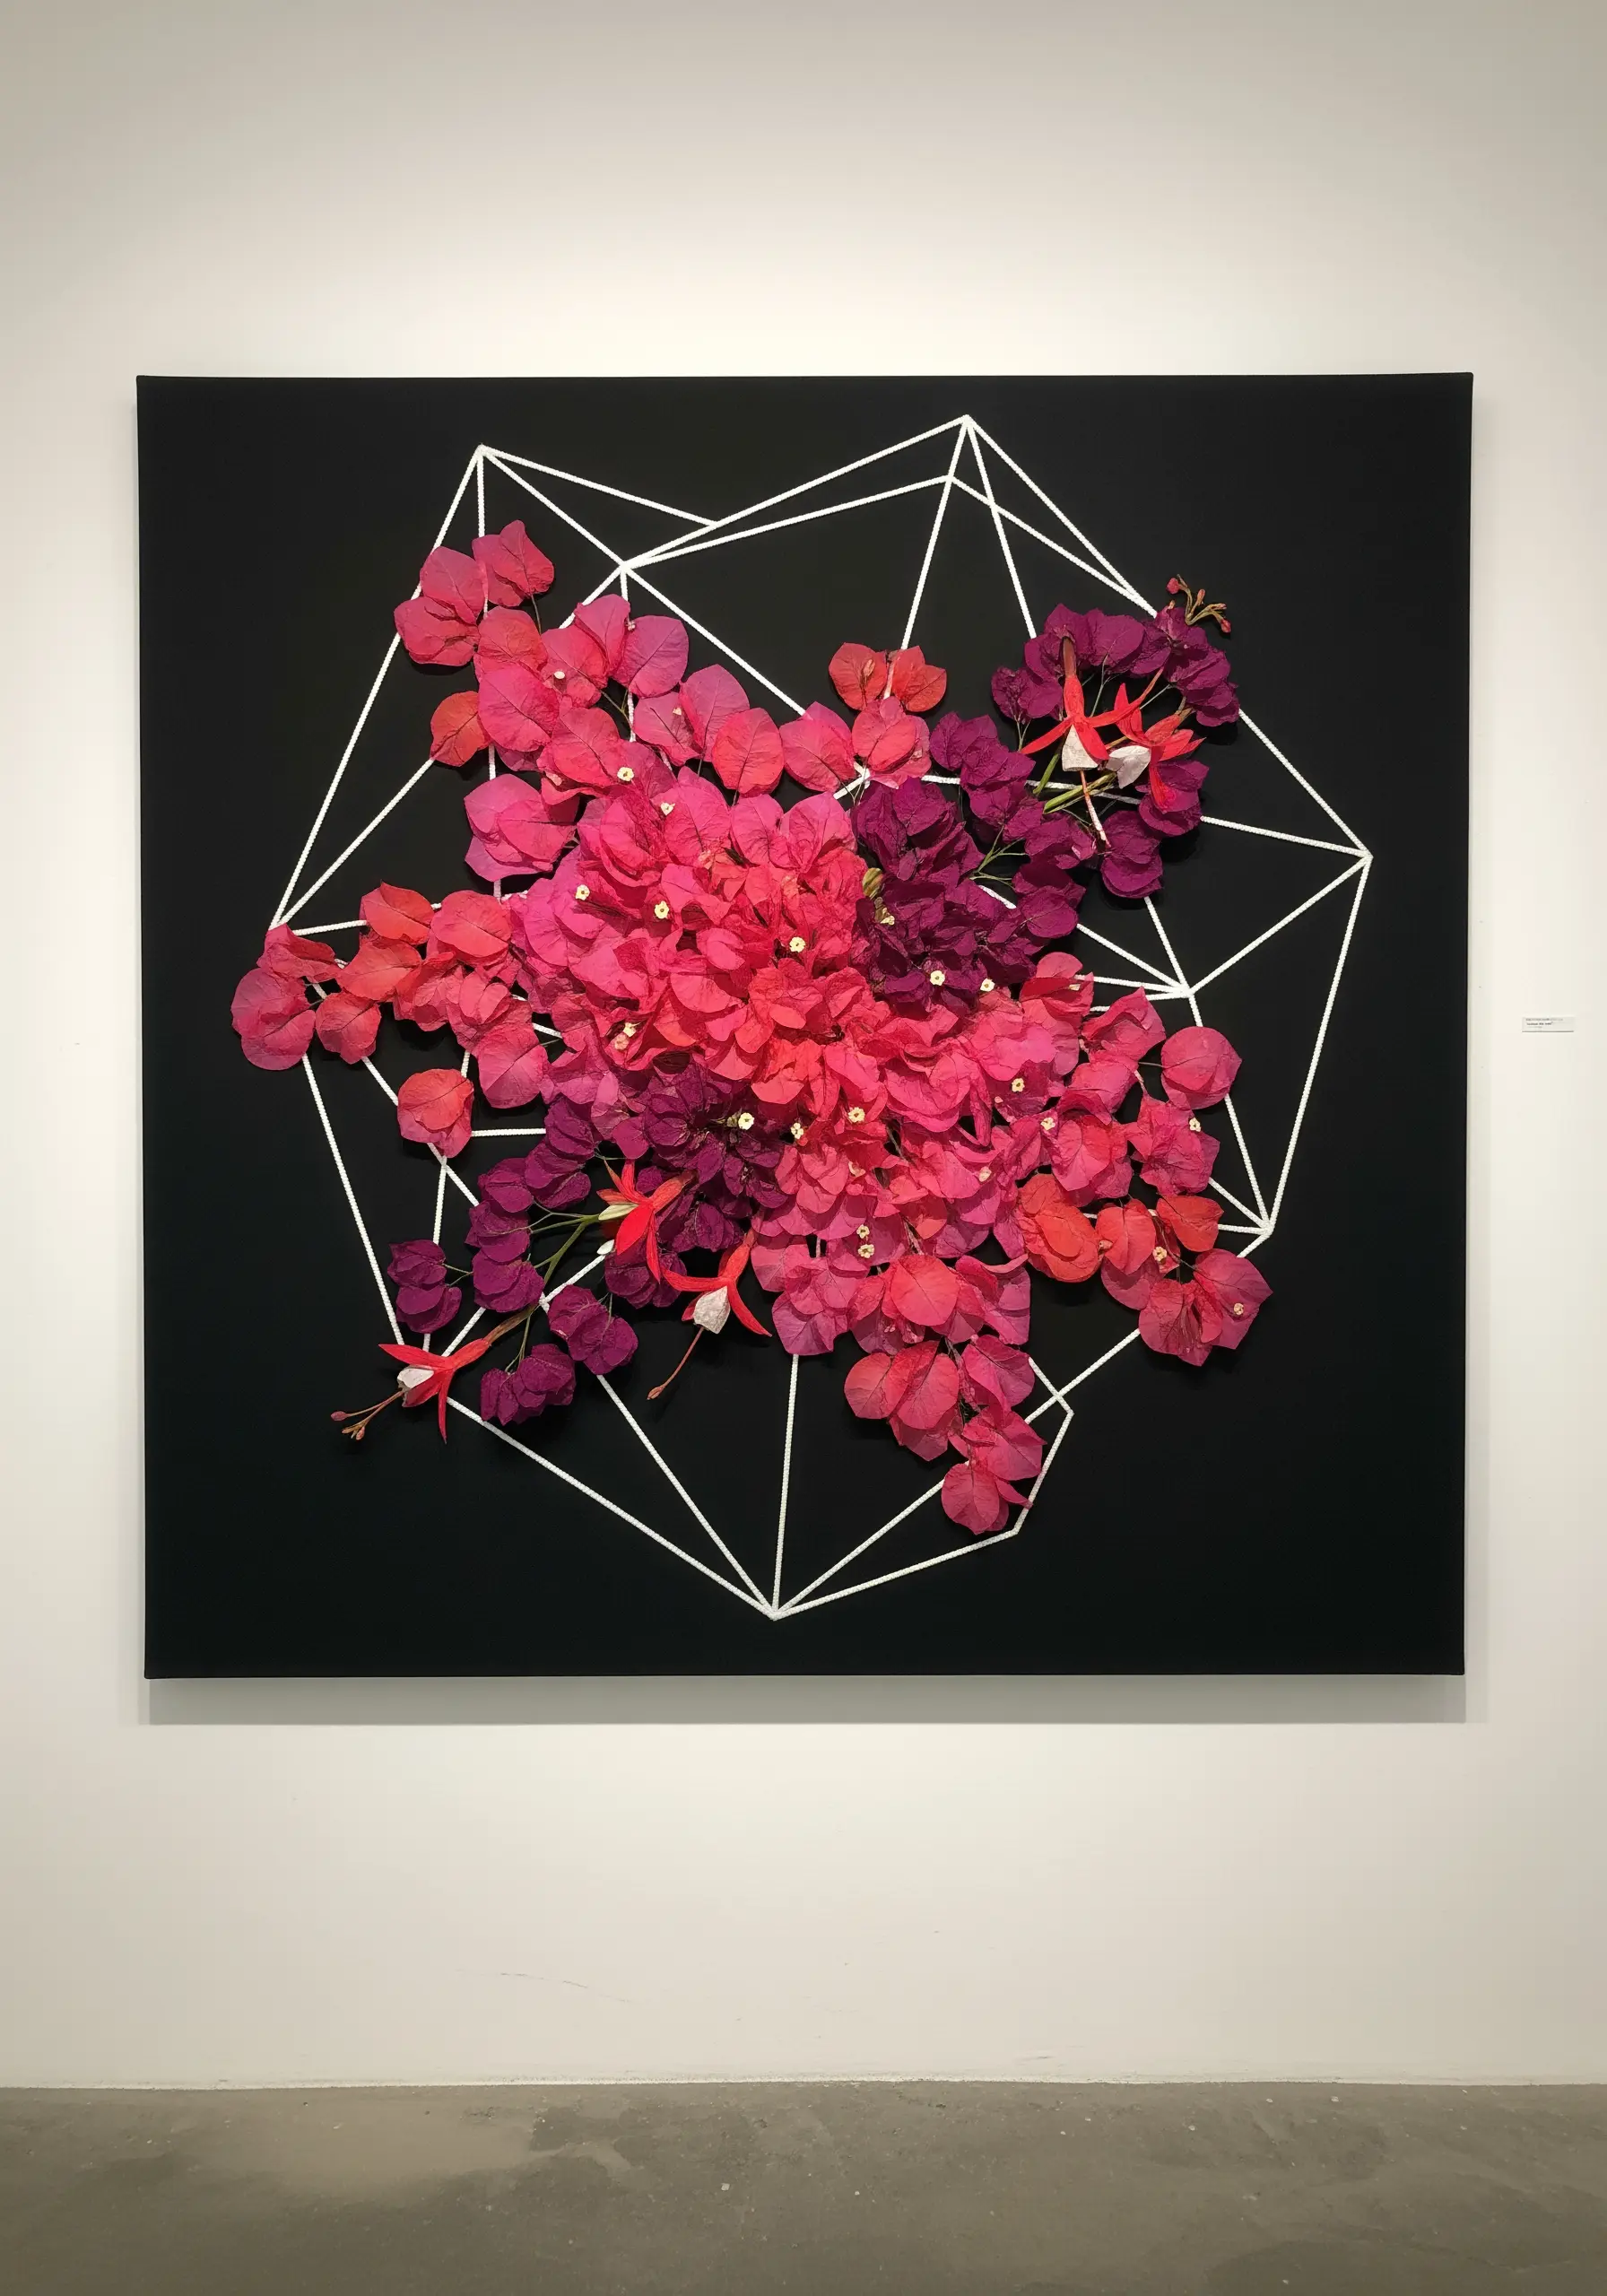
Make the vibrant colors of your botanicals feel even more intense by placing them against a stark, black background.
The deep, dark canvas absorbs light, causing the bright pinks, magentas, and reds of flowers like bougainvillea to appear almost luminous.
Add a clean, white geometric outline to frame the floral cluster; this sharp contrast contains the energy of the colors and gives the composition a modern, graphic edge.
It’s a powerful way to use color theory in bold color-pop embroidery wall frames.
16. Frame Botanicals with Meaningful, Hand-Stitched Text
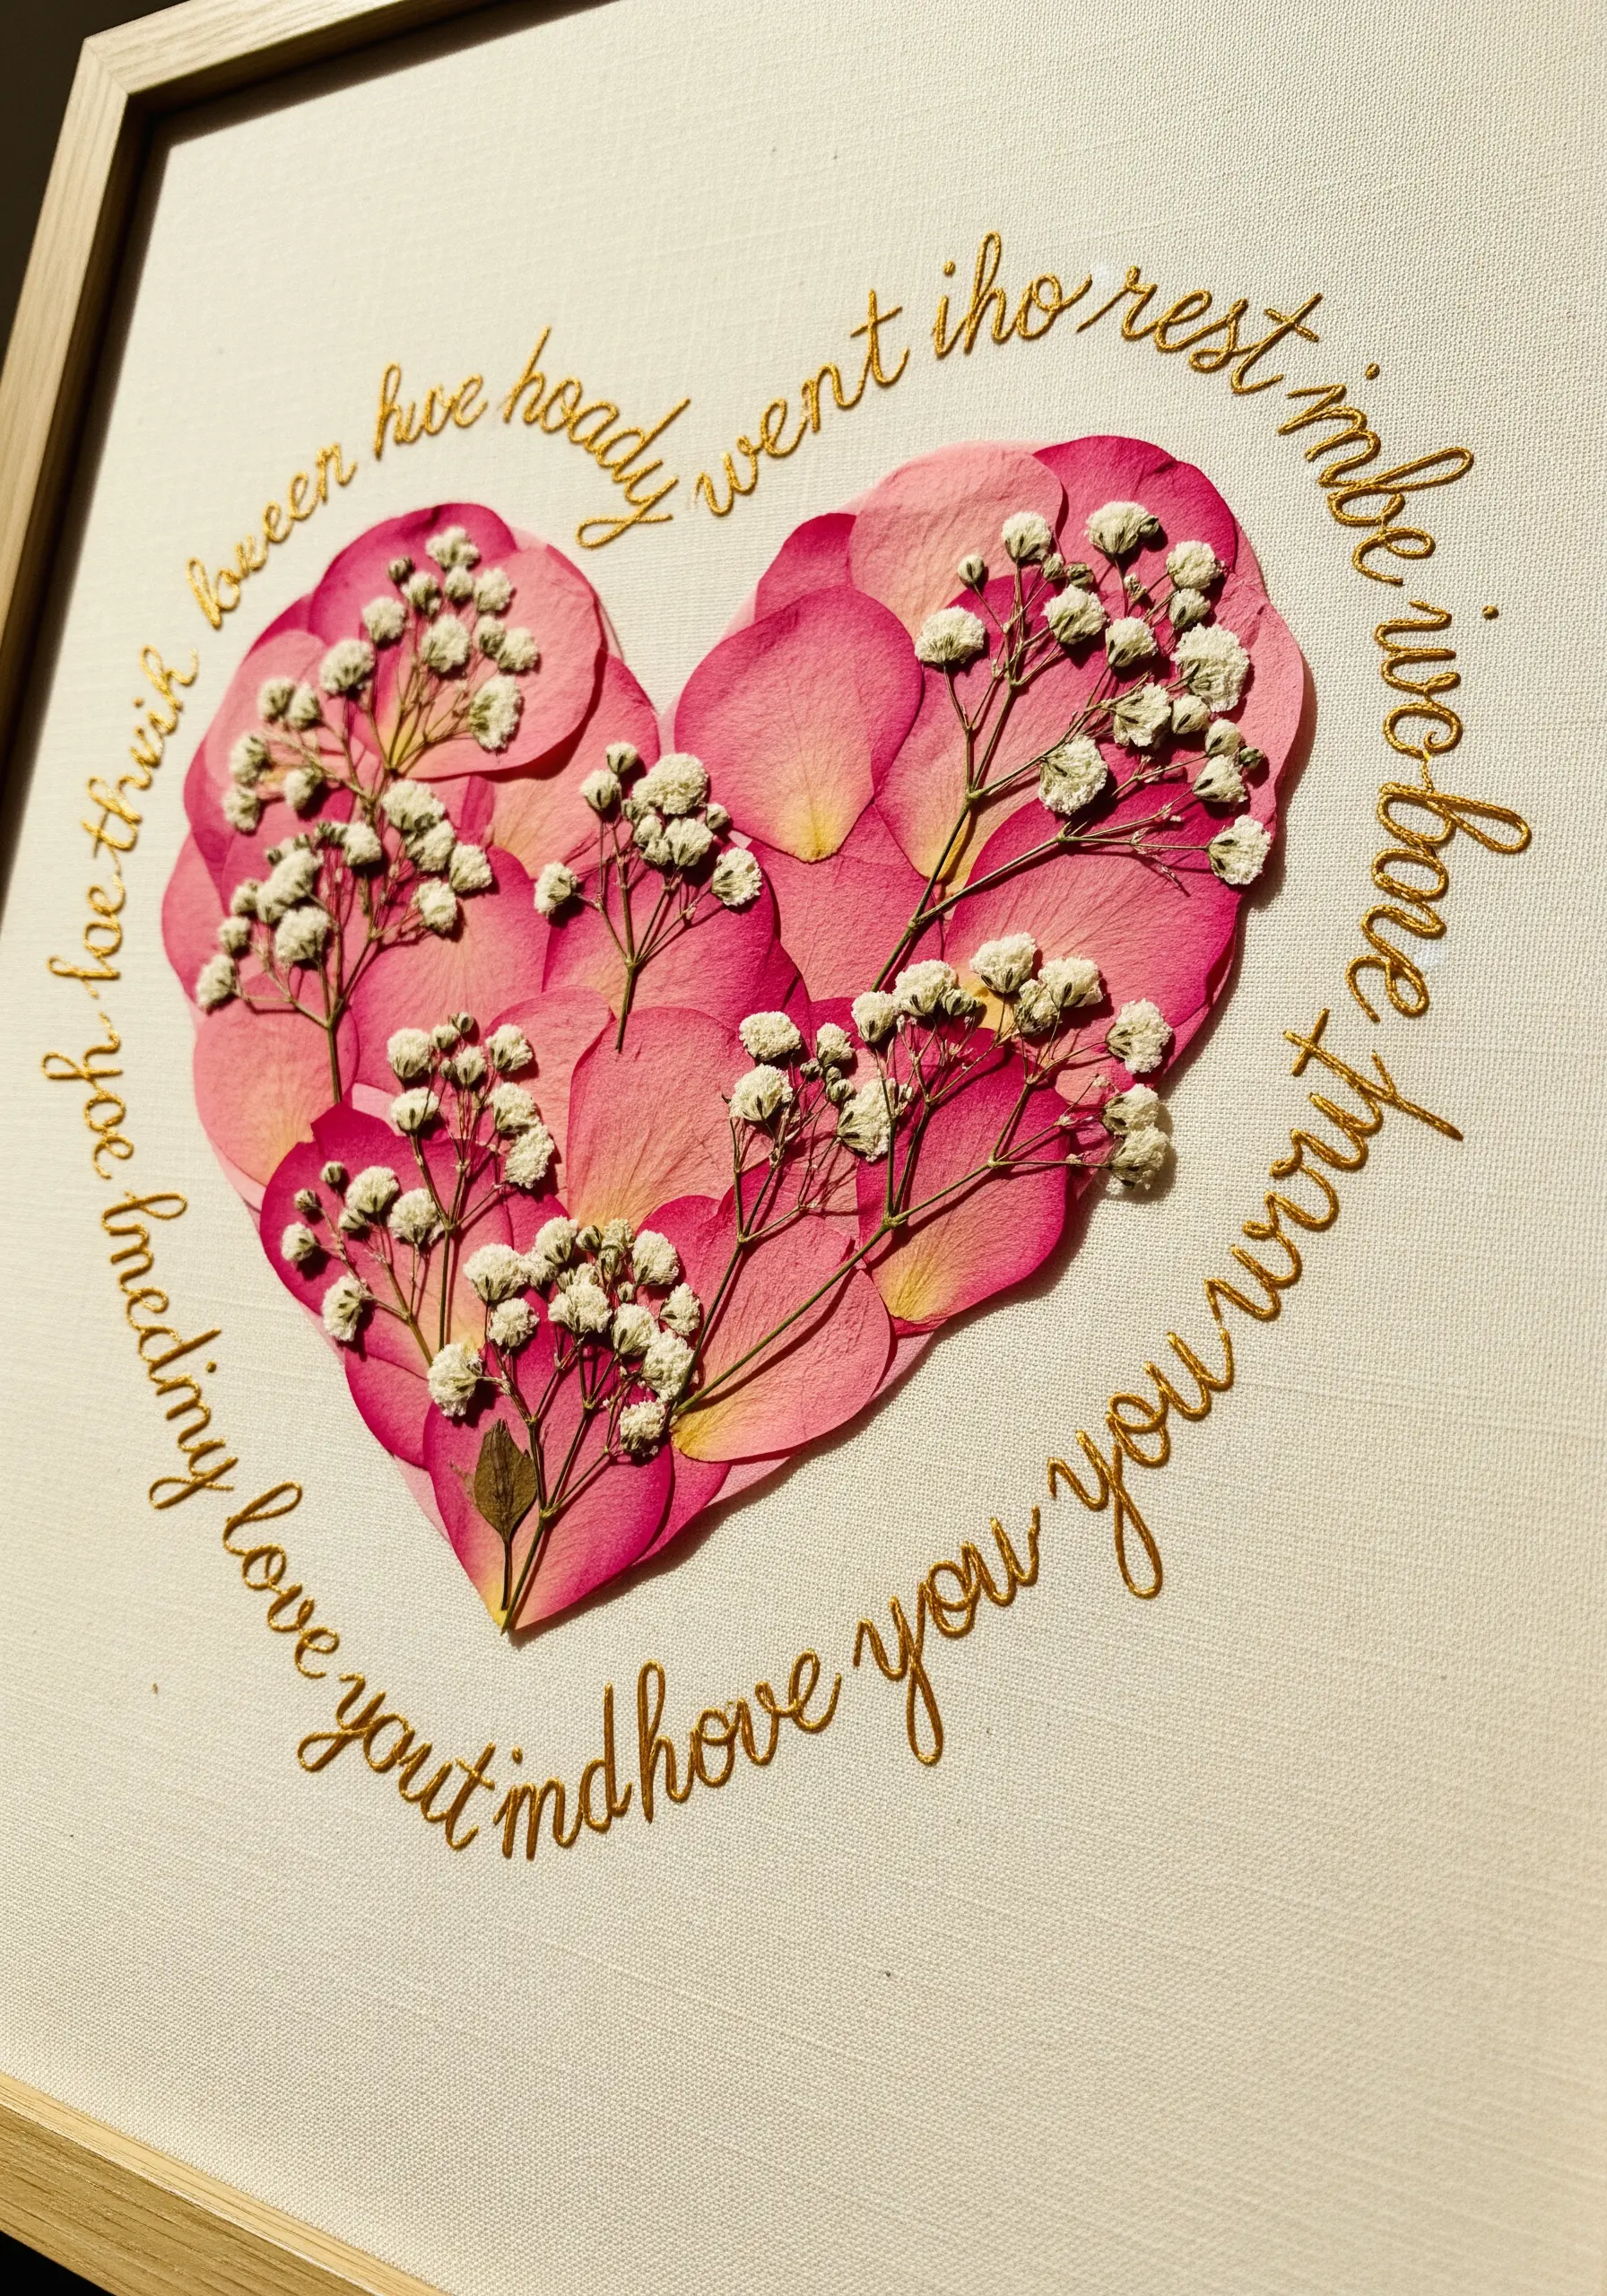
Surround a floral motif with a favorite quote, name, or date to transform it into a deeply personal keepsake.
First, arrange pressed rose petals and baby’s breath into a heart shape at the center of your fabric.
Then, using a fine metallic thread and a simple stem stitch, hand-letter your text in a circle around the heart.
The combination of delicate botanicals and personalized script makes for unforgettable personalized framed embroidery designs.
17. Illuminate Pressed Leaves on a Lampshade
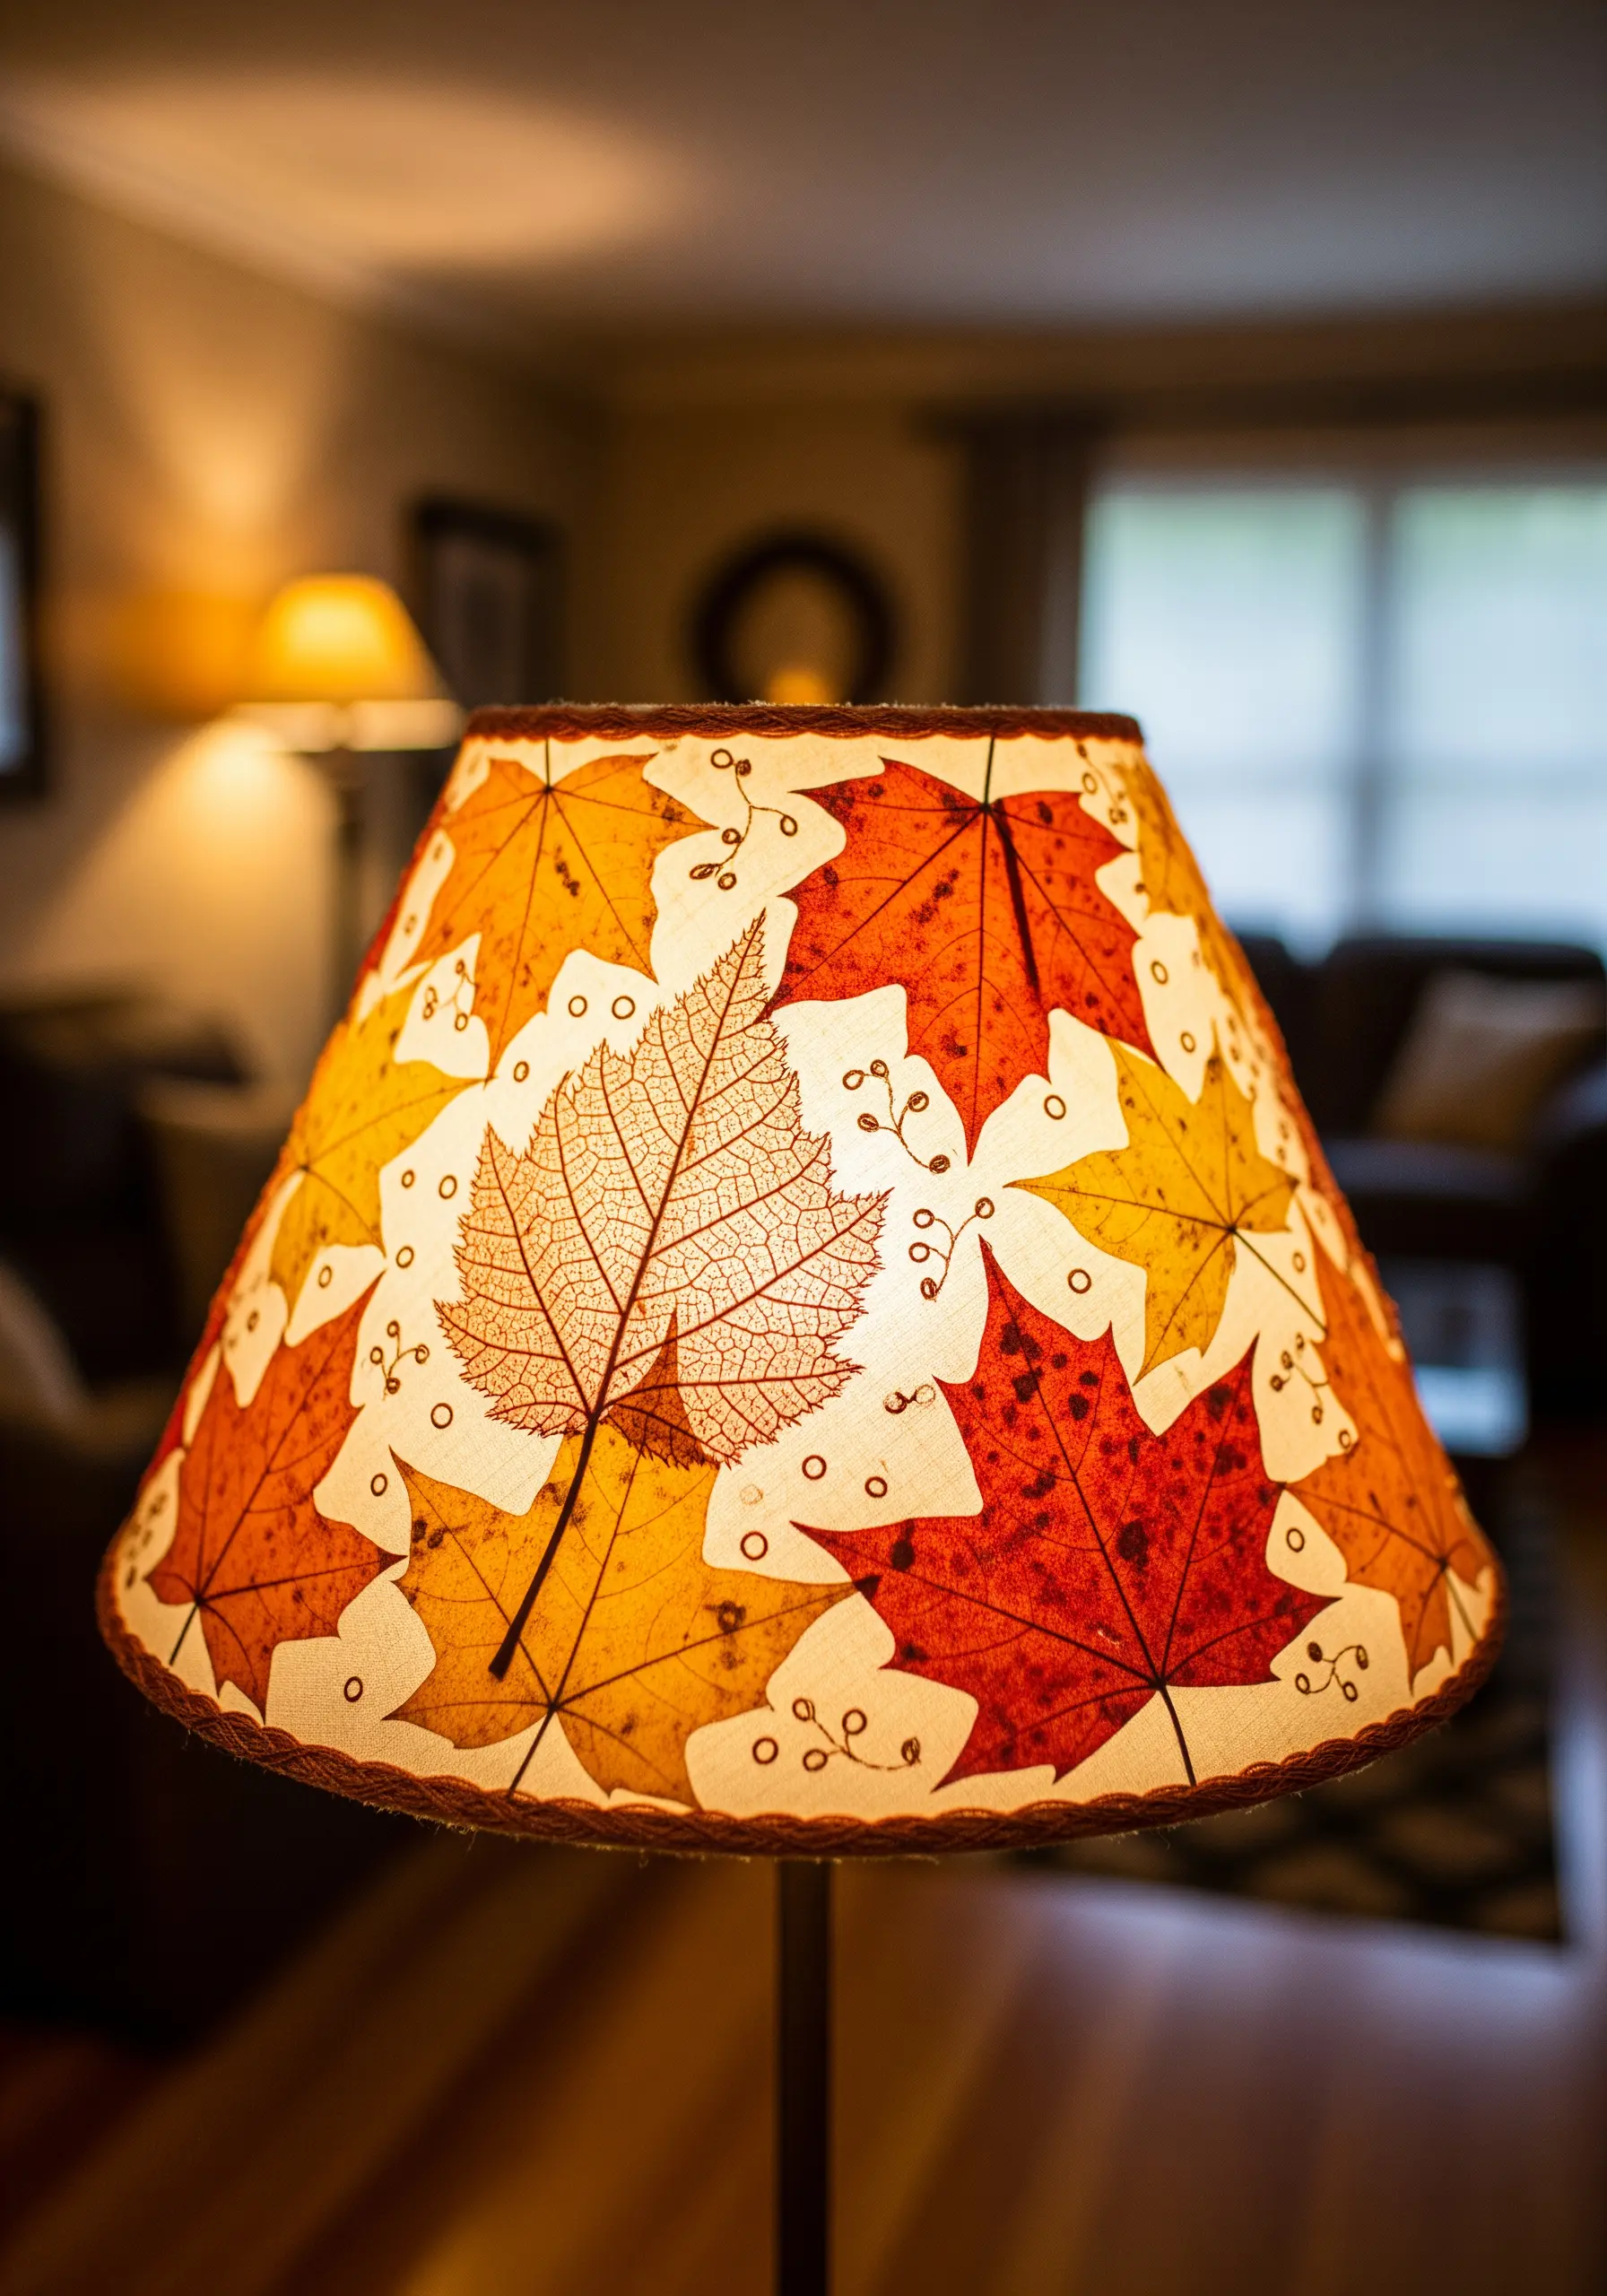
Explore unconventional surfaces by applying pressed botanicals to a plain lampshade.
Choose leaves with interesting vein structures and translucent qualities, as these details will be beautifully highlighted when the lamp is on.
Use a heat-resistant, acid-free adhesive to secure the leaves, and consider adding tiny stitched details or borders with embroidery floss to further integrate them into the shade.
This project turns a simple light source into a glowing work of natural art.
18. Build a 3D Scene with Mixed-Media Layers

Create a diorama effect by combining three-dimensional objects, pressed flowers, and embroidery in a single shadowbox frame.
Use a real twig for the branch, a preserved cocoon for texture, and a bed of pressed wildflowers for the foreground.
Add a beautifully embroidered butterfly as the focal point, using long-and-short stitches to create realistic color gradients on the wings.
This layering of embroidery and mixed media creates a rich, narrative scene with palpable depth.
19. Paint with Petals: Abstract Botanical Landscapes

Move beyond literal representations and use the color and shape of petals to create abstract art.
Arrange hundreds of blue hydrangea petals in undulating lines to evoke the movement of an ocean wave.
Use white baby’s breath or statice for the seafoam, and stitch blades of grass with straight stitches in the foreground for textural contrast.
This technique allows you to use nature as your palette, ‘painting’ scenes and emotions with botanical elements.
20. Construct an Intricate Botanical Mandala
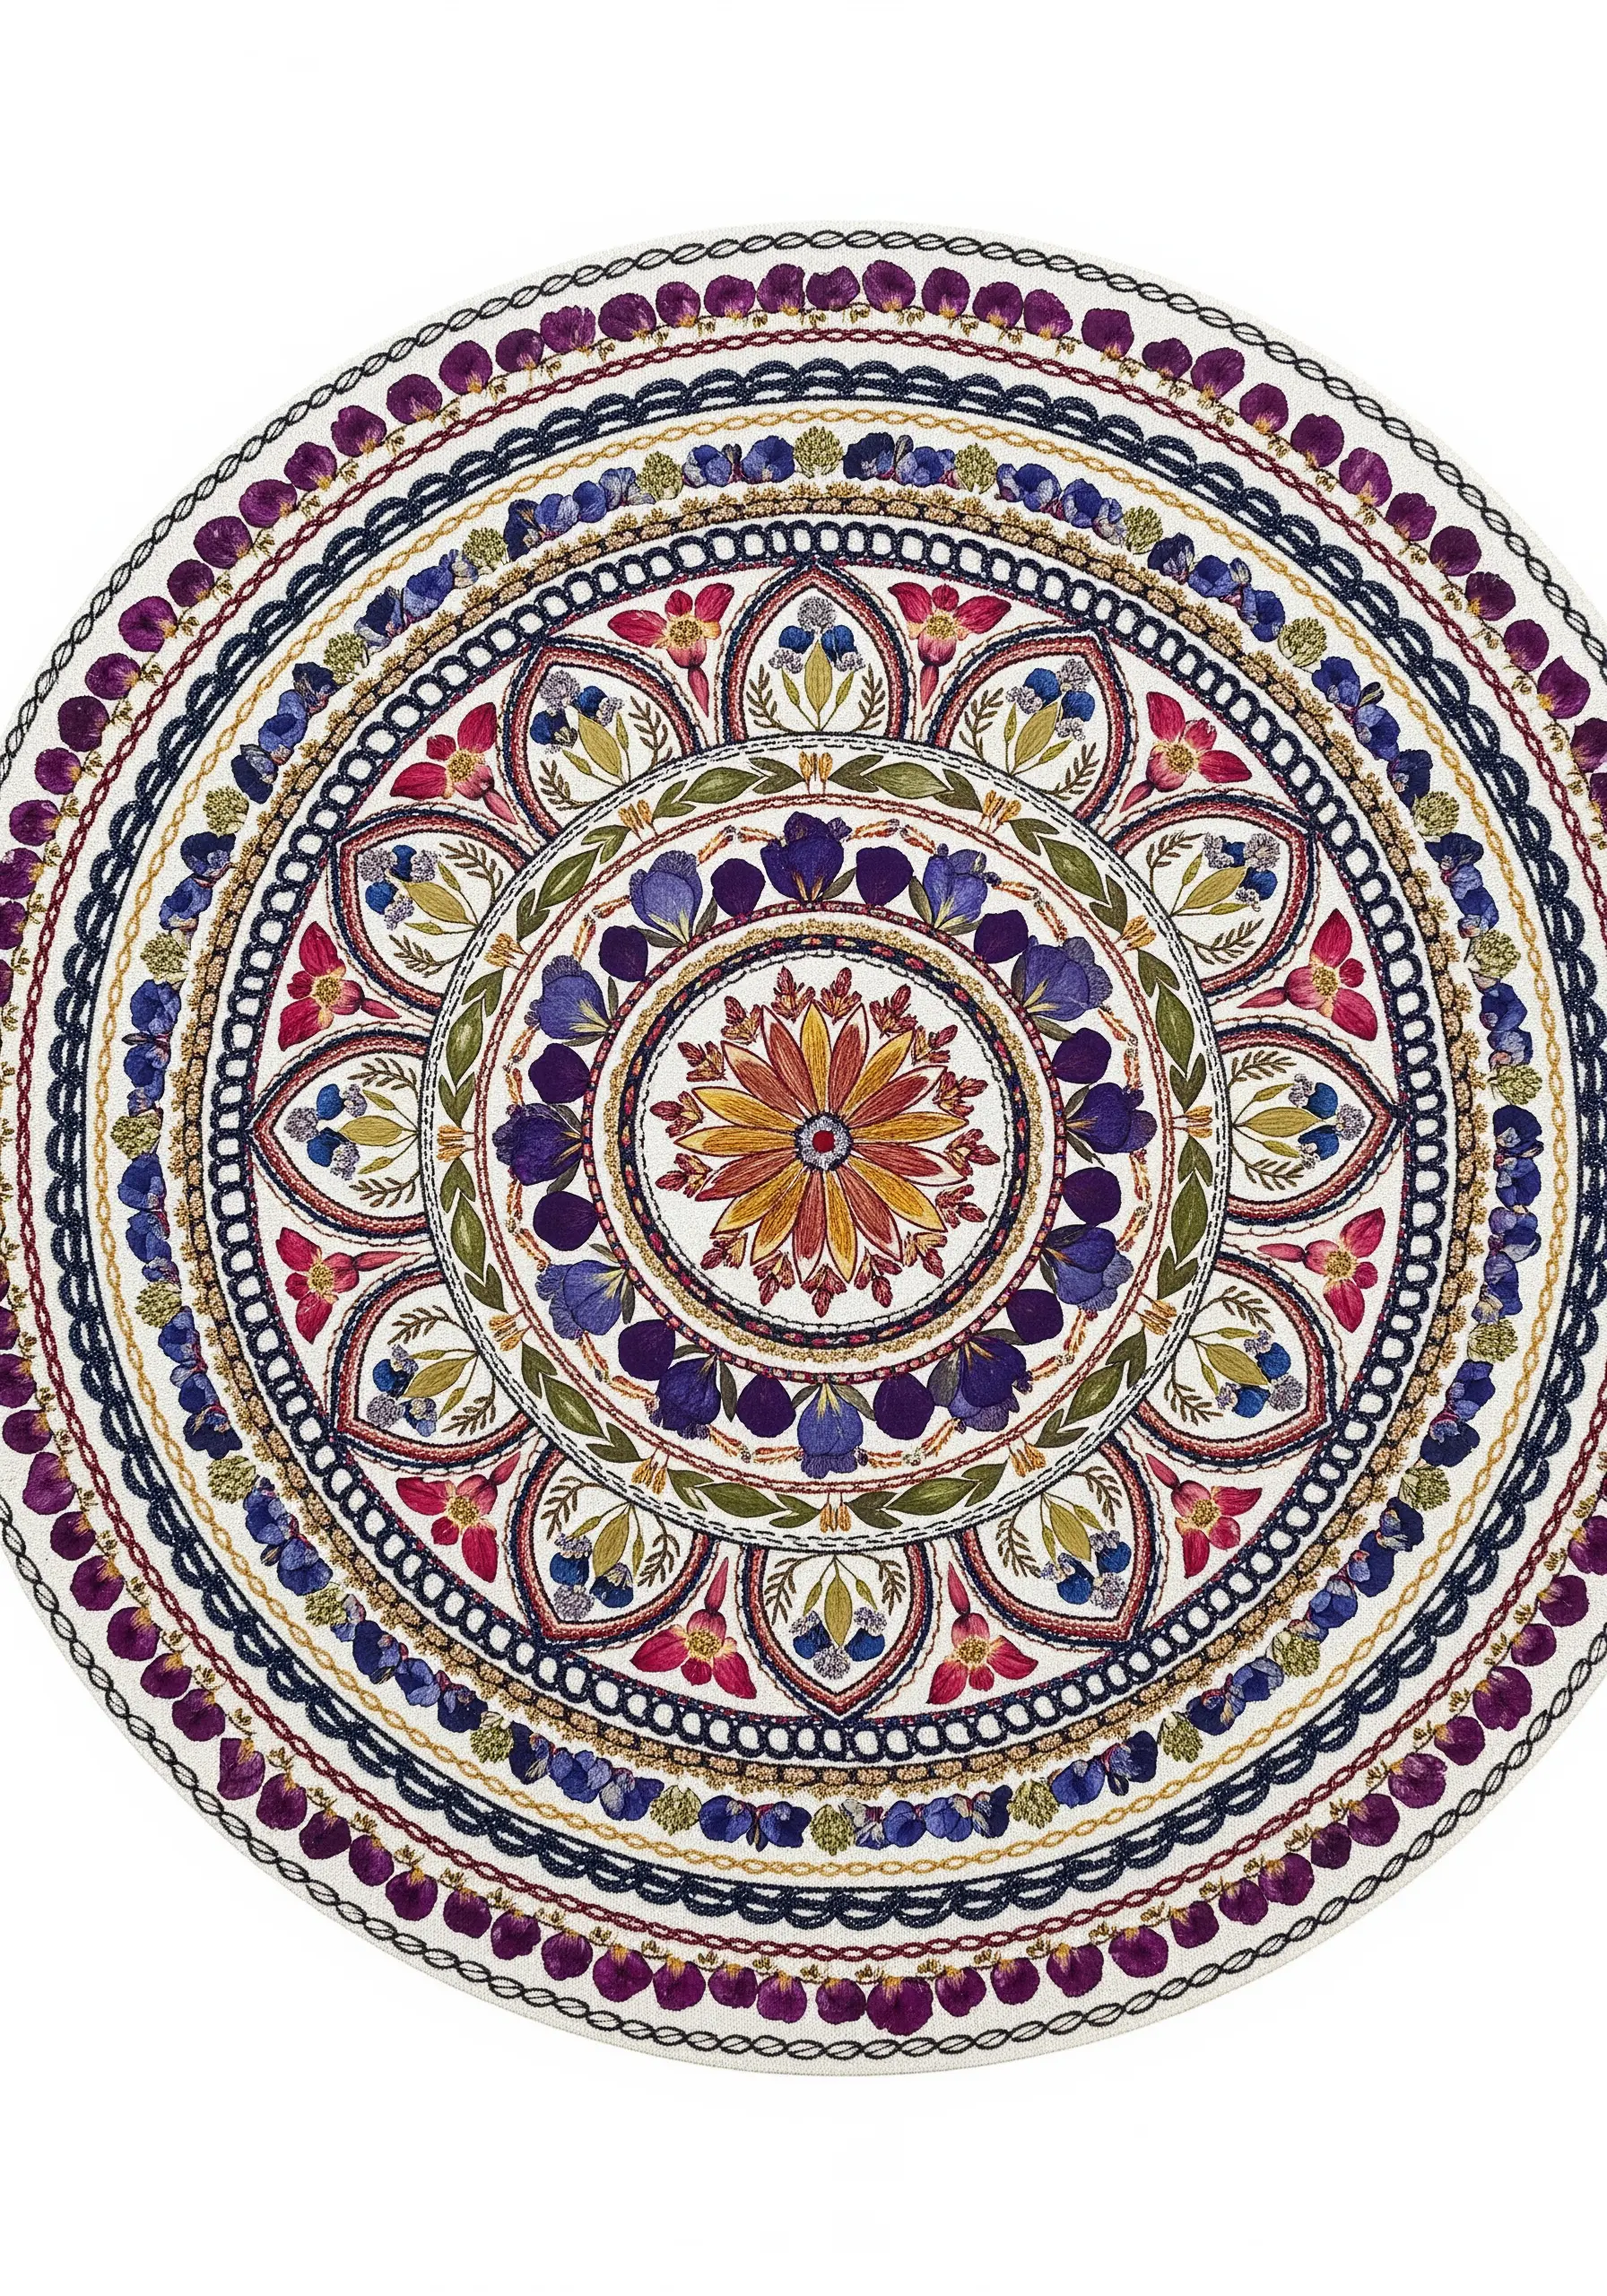
Combine the precision of embroidery with the natural beauty of pressed flowers to create a detailed, symmetrical mandala.
Plan your design on paper first, marking out concentric circles and repeating patterns.
Alternate sections of intricate stitching—like French knot clusters or woven picots—with carefully placed, identical pressed flowers or petals.
This meditative process results in stunningly complex tiny mandala embroidery wall art ideas that reward close inspection.
21. Embellish a Journal Cover with Flat, Durable Stitches

When decorating a high-contact item like a journal, choose techniques that prioritize durability.
Use flat stitches like the fishbone stitch for leaves and satin stitch for monograms, as they are less likely to snag.
Secure hardy pressed elements like ferns and heather with a strong, flexible glue, ensuring all edges are firmly attached.
This thoughtful application of technique ensures your DIY embroidered mixed media journals are both beautiful and built to last.
22. Suspend Botanicals in a Modern Acrylic Frame

For a clean, contemporary display, float your pressed flowers between sheer fabric layers inside a transparent acrylic frame.
This method allows light to pass through from all sides, highlighting the delicate structures of the petals and leaves.
Arrange the botanicals in a sparse, floating composition to emphasize the sense of airiness and space.
It’s a minimalist alternative to traditional framing that feels light, modern, and museum-quality.
23. Combine Paper Crafts with Simple Stitched Borders
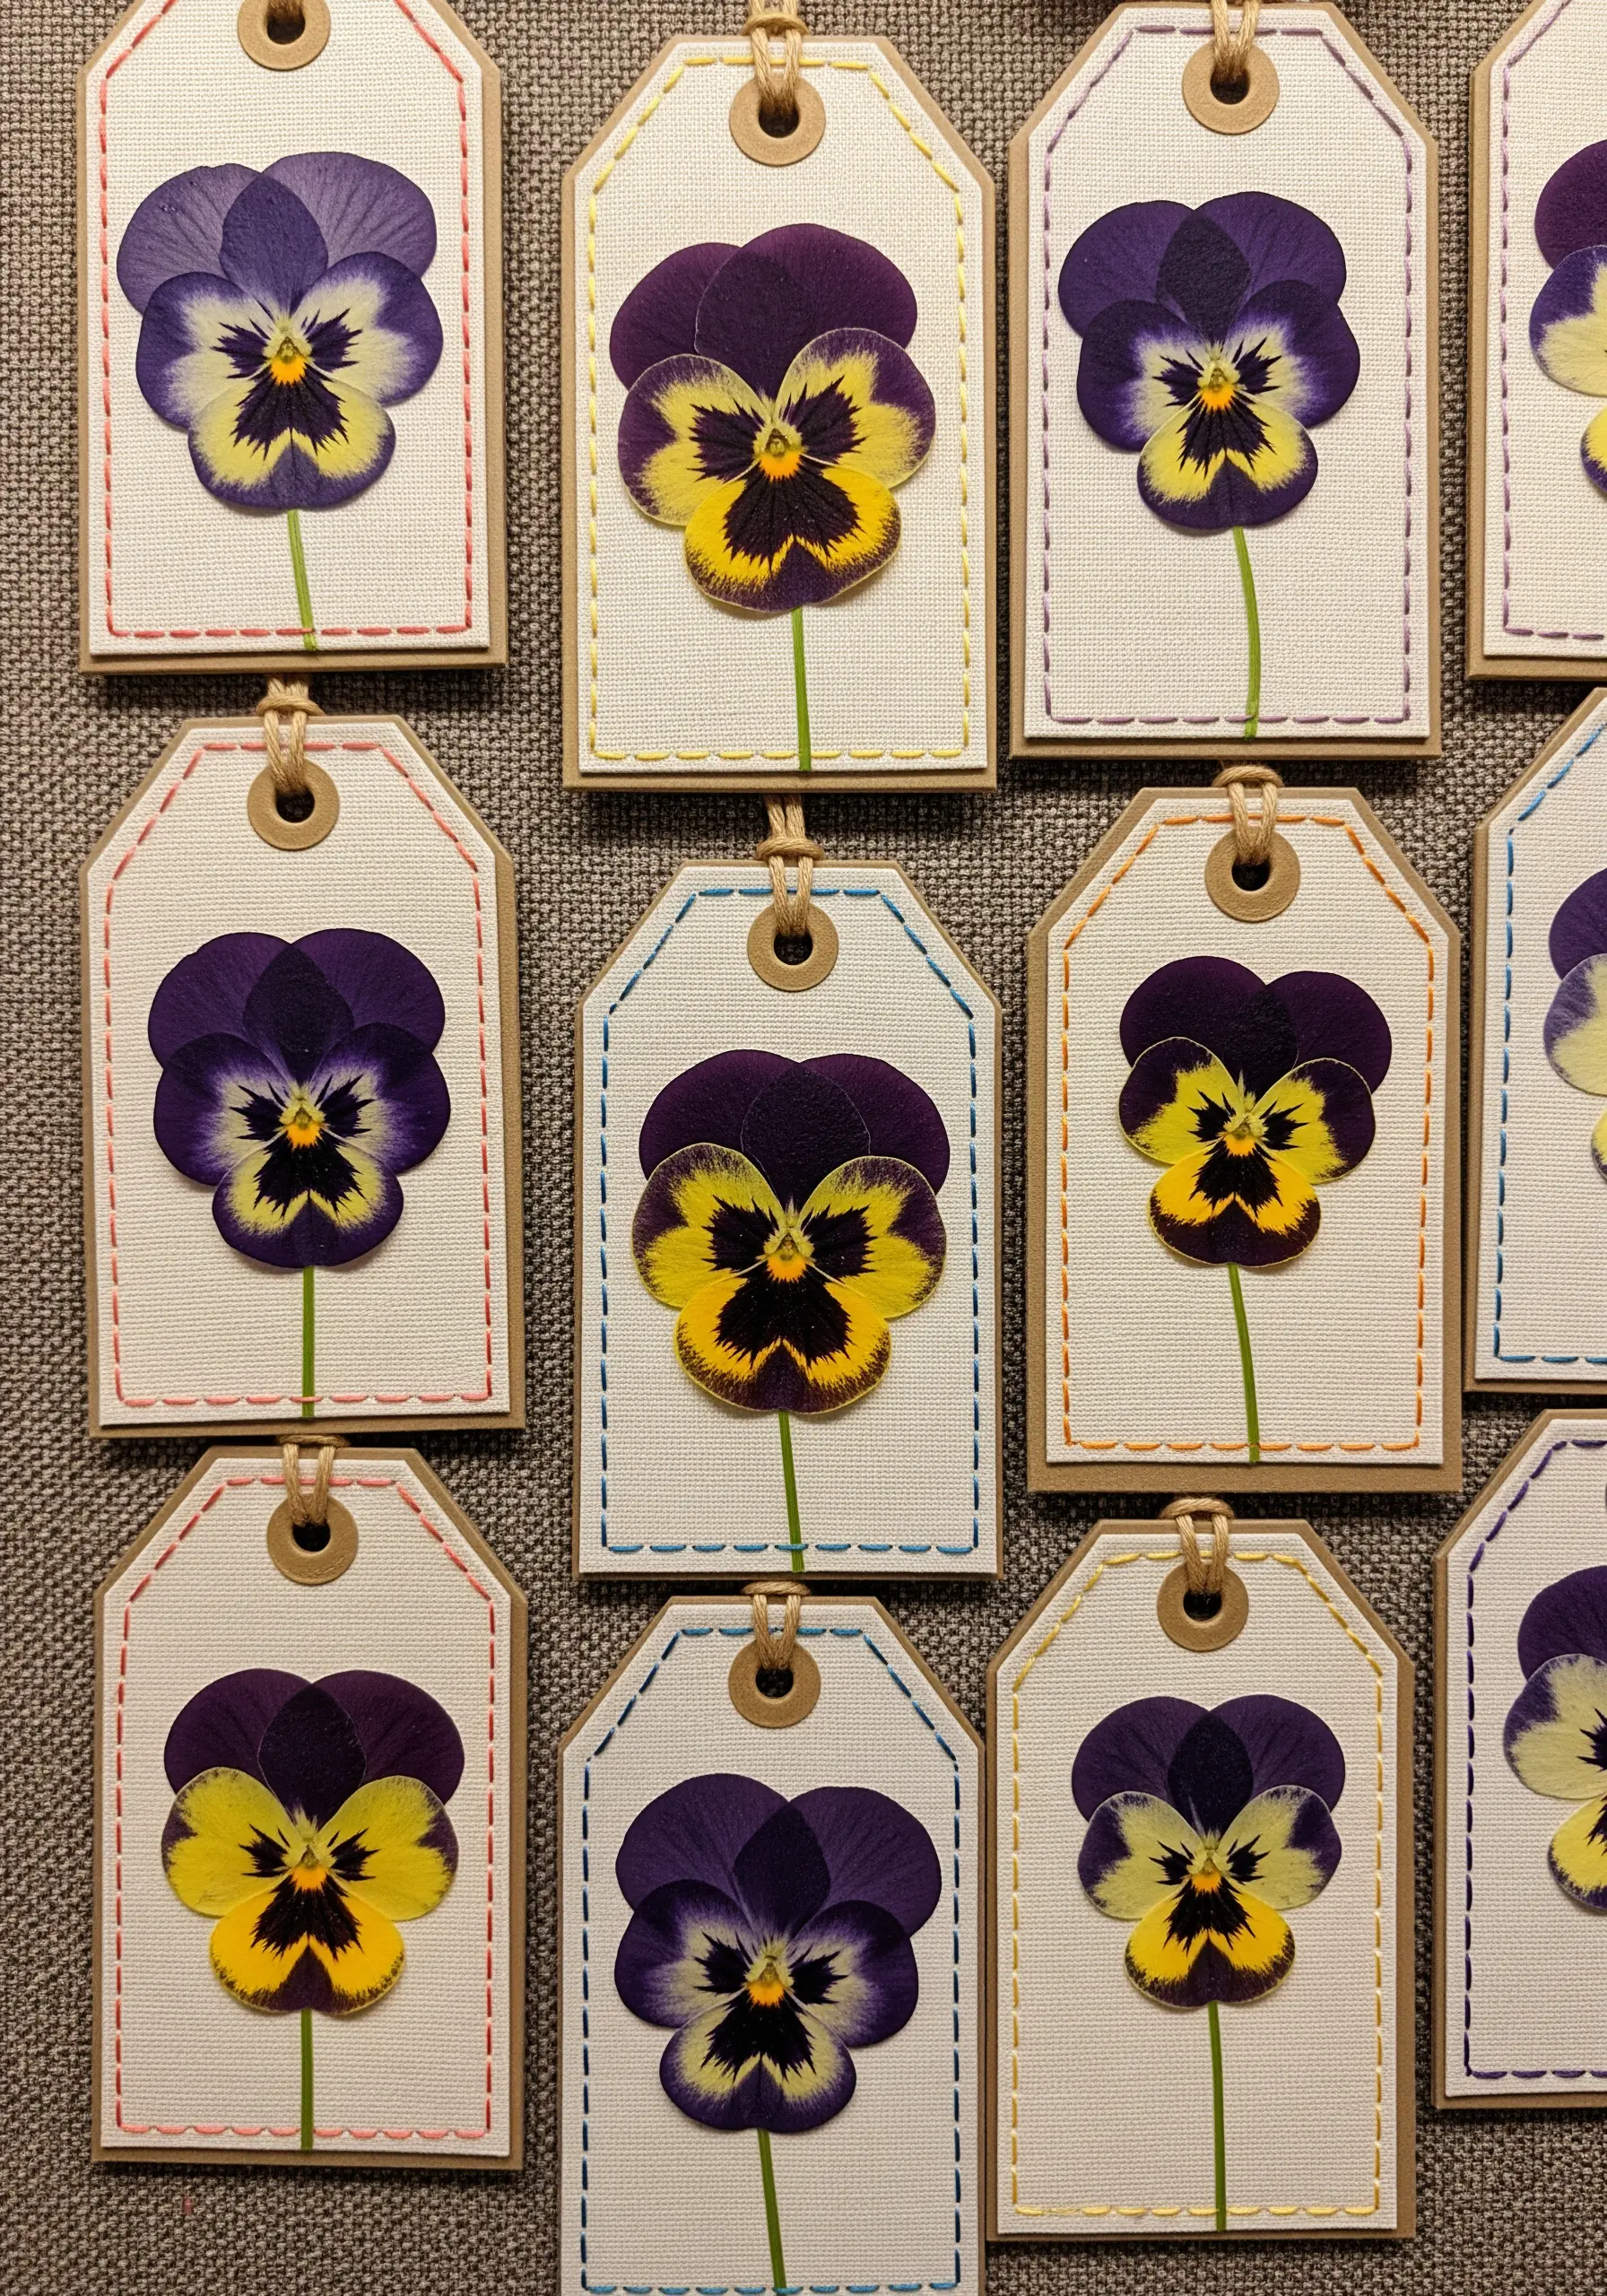
Elevate simple paper gift tags by adding both a pressed flower and a hand-stitched detail.
Use a needle to pre-punch holes along the border of the tag before stitching to prevent the paper from tearing.
A simple running stitch in a coordinating color adds a touch of texture and a thoughtful, handmade feel that complements the central pressed pansy.
This is one of the easiest paper embroidery projects you can start with.
24. Create a Festive Burst with Holiday Greenery
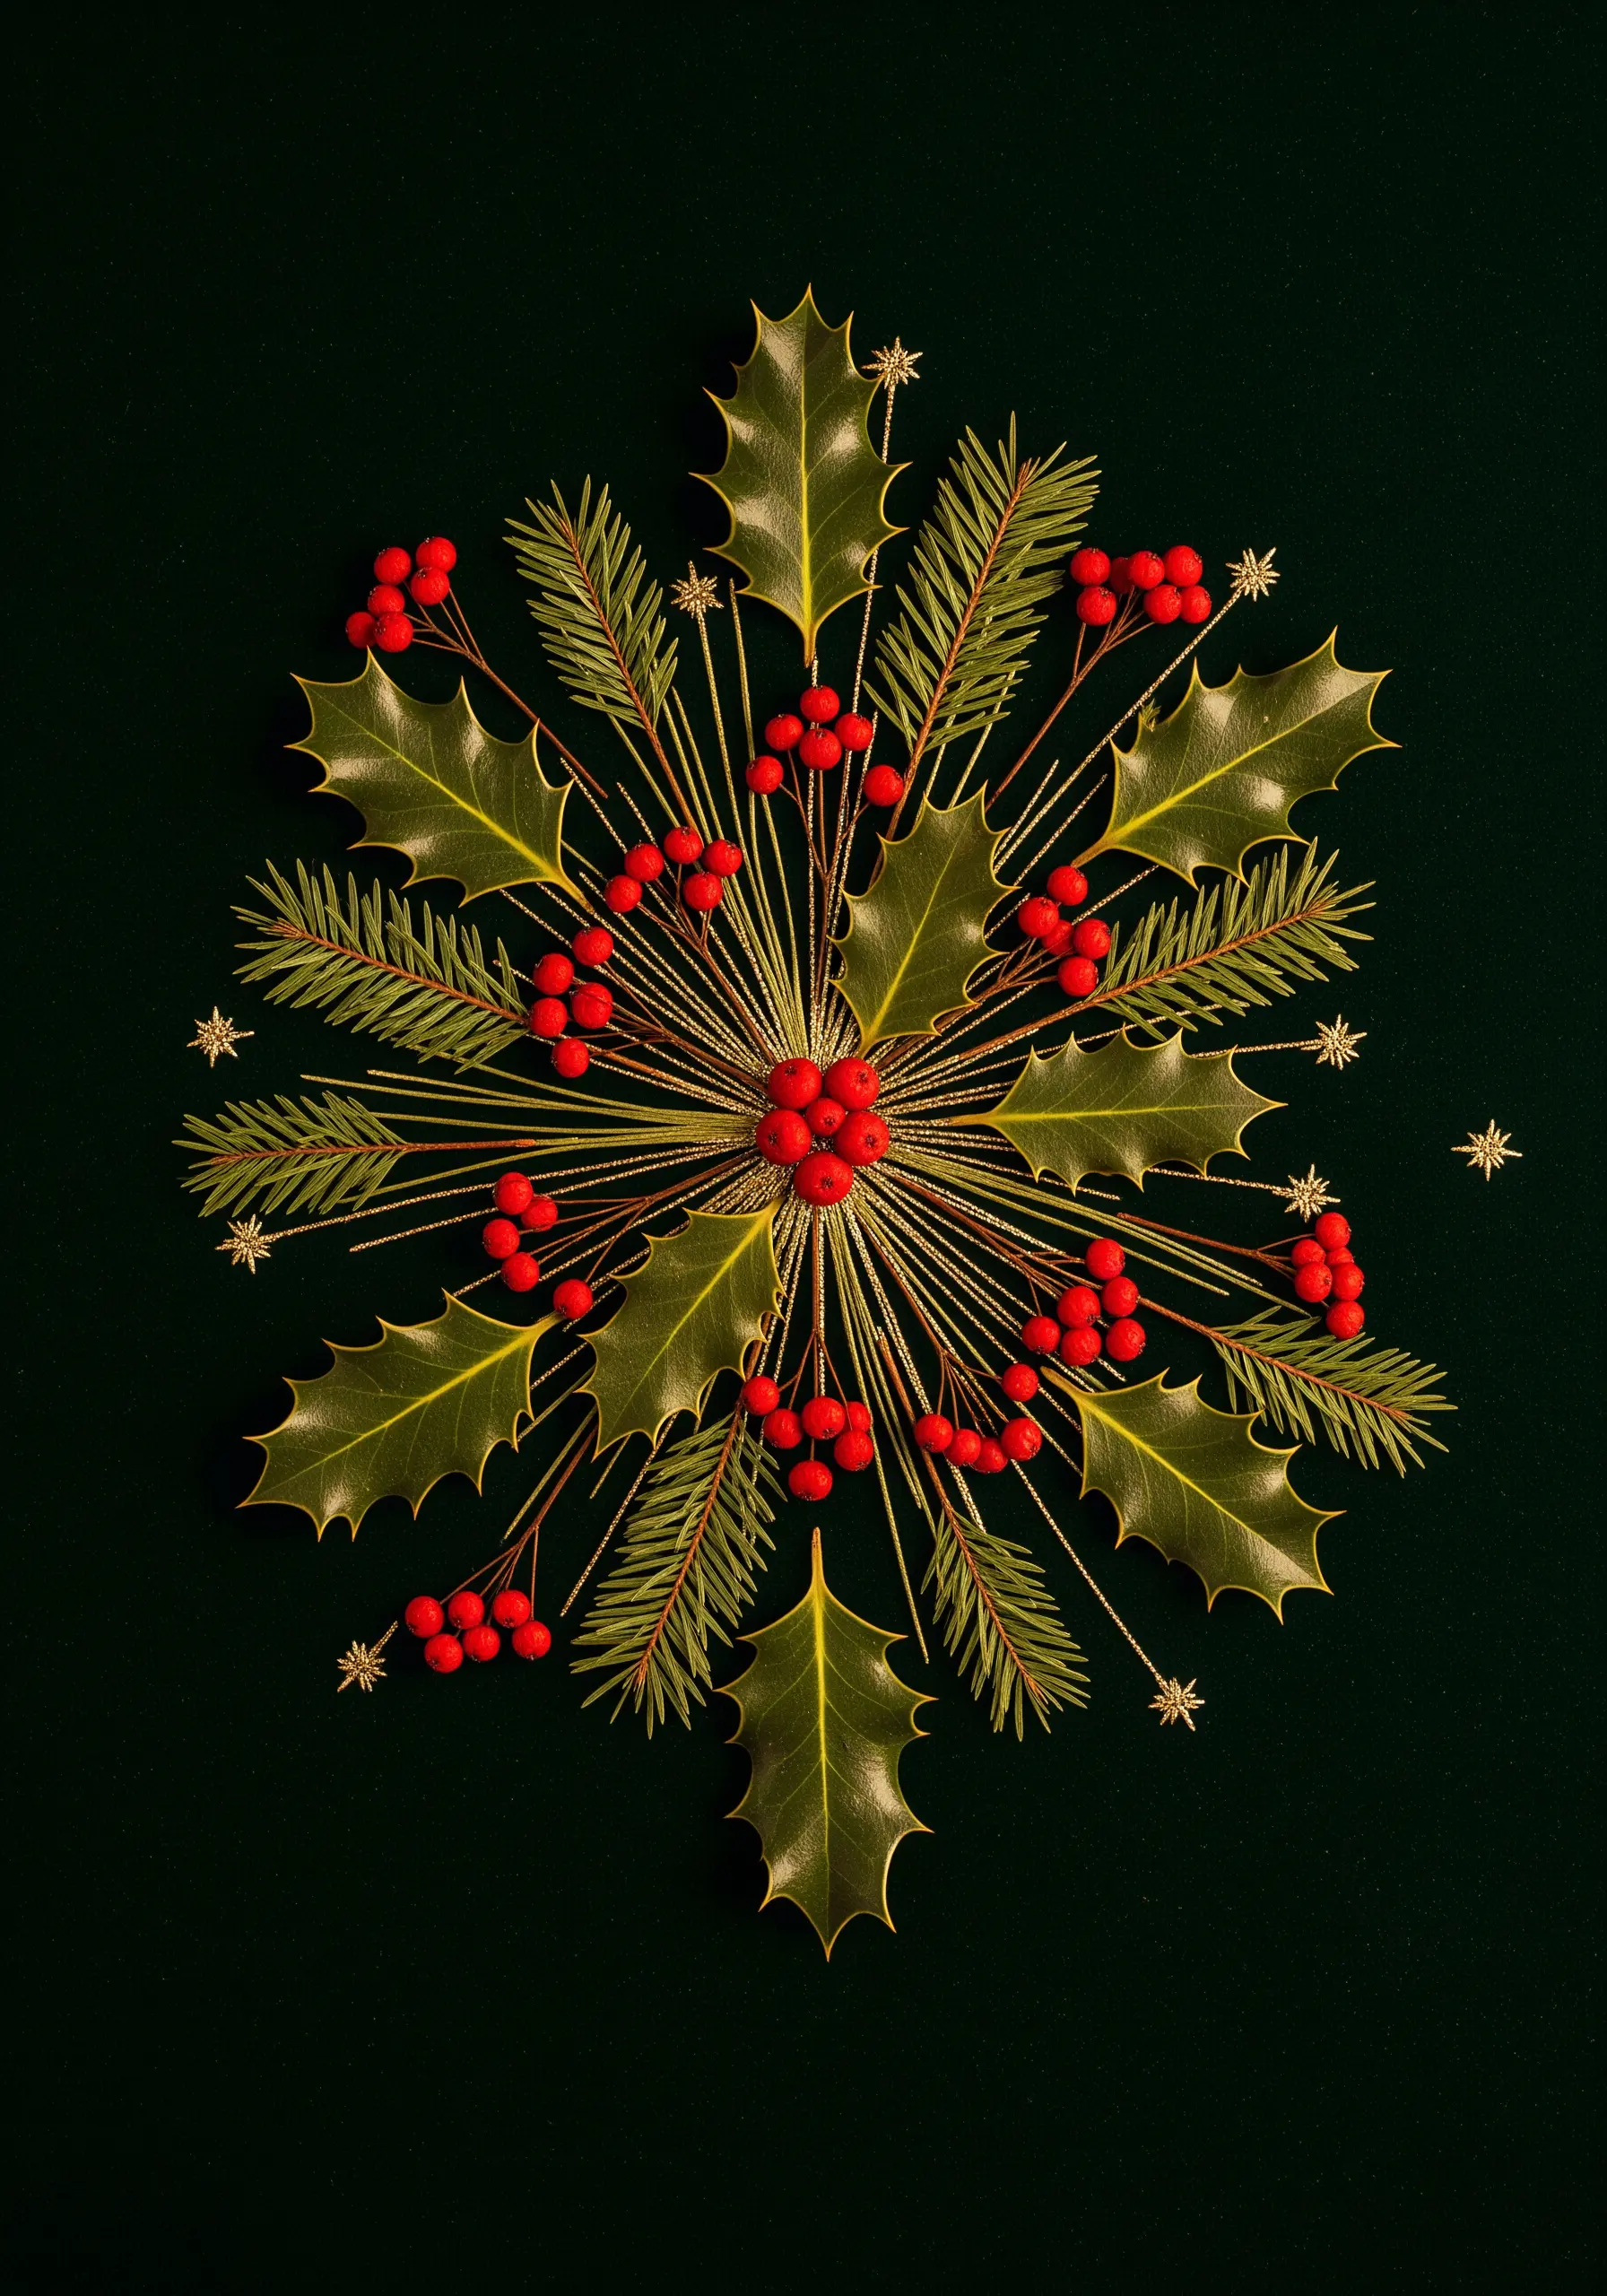
Assemble a striking holiday composition by arranging traditional winter botanicals in a radiating starburst pattern.
Use glossy holly leaves, fir needles, and bright red berries to create layers of texture and color against a dark, moody background like velvet or felt.
Add tiny embroidered stars with gold metallic thread for a subtle, festive sparkle.
This approach to seasonal embroidery wall decor feels both classic and dynamic.
25. Weave Cosmic Textures with Beads and French Knots
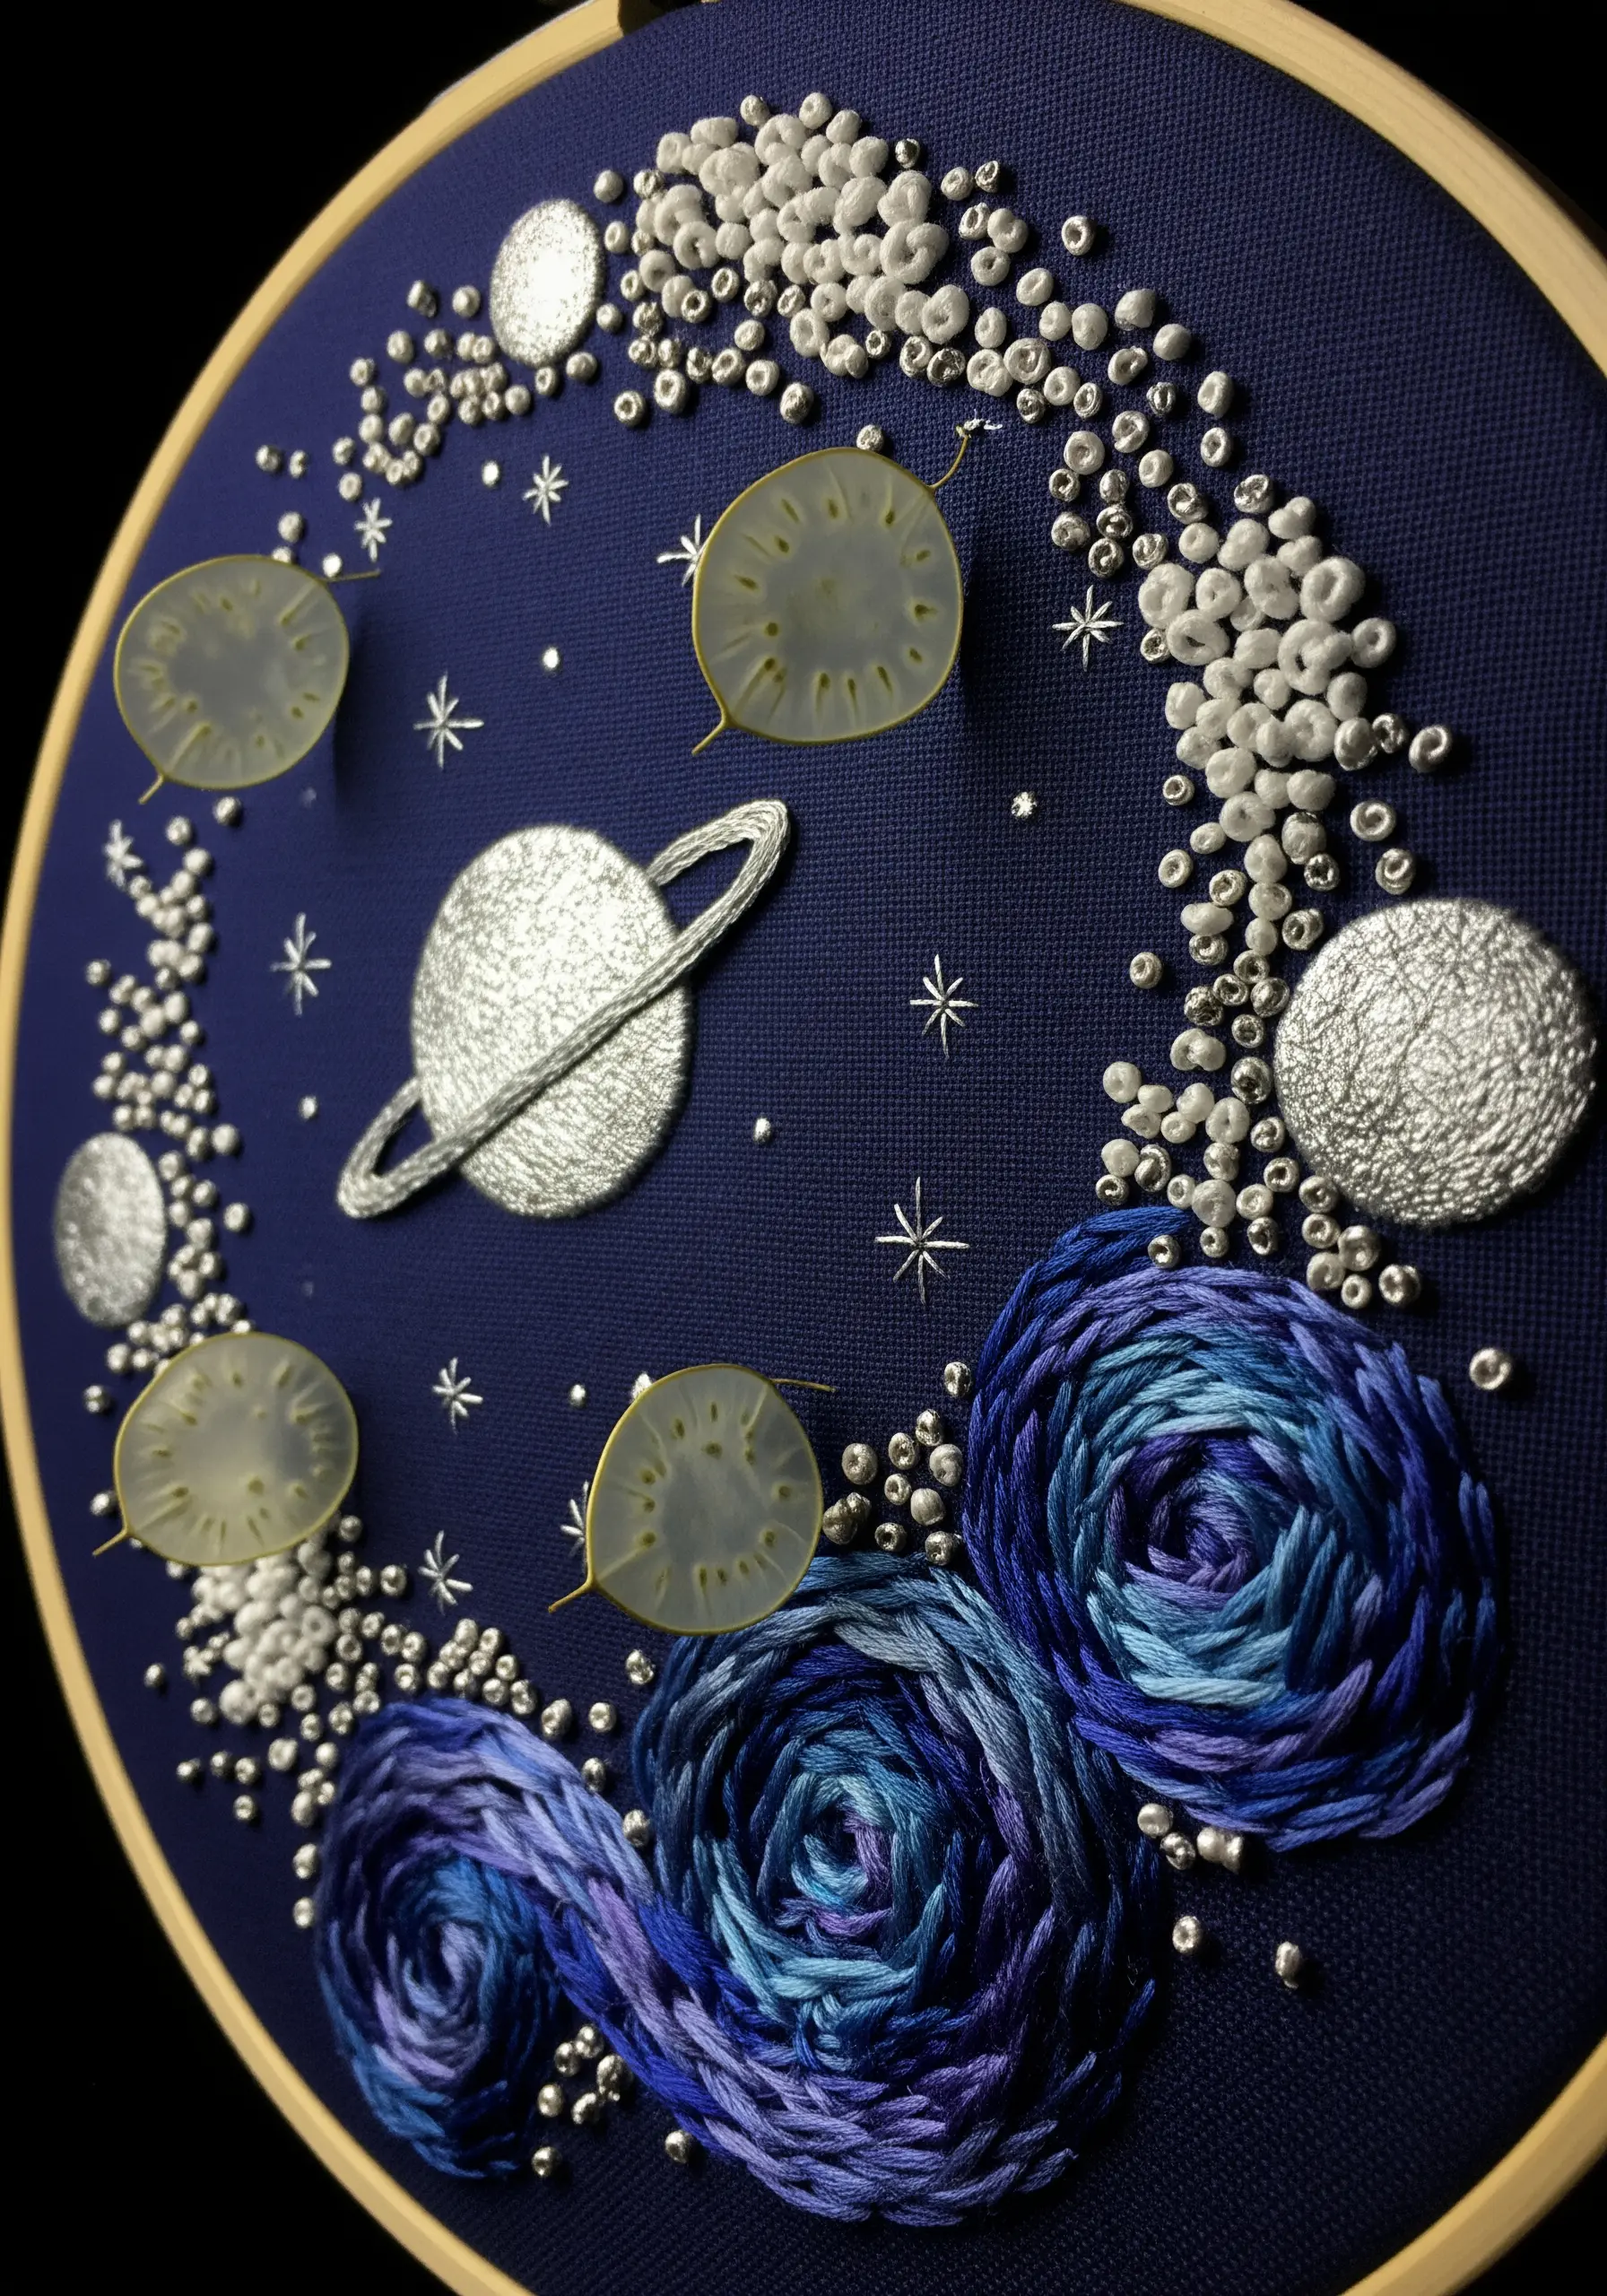
Evoke the magic of the cosmos by combining embroidery, beading, and sliced natural elements.
Create dense, textured planets using metallic satin stitch, and stitch swirling galaxies with variegated floss in a woven wheel stitch.
Fill the empty space with a field of stars made from a mix of silver French knots and tiny seed beads for varied shimmer.
Incorporate thinly sliced seed pods or other natural discs to add an unexpected, organic element to your celestial scene.


