

Sometimes the most beautiful creations come from combining two different worlds. Think of the delicate, fleeting beauty of a pressed flower and the steady, enduring nature of thread. Bringing them together on fabric isn’t just a craft—it’s a way to give a moment permanence, to capture a piece of the garden and hold it in your hands forever.
But how do you move beyond simple stitches to create something that feels truly polished, professional, and full of life? It’s not about learning hundreds of complex stitches. It’s about small, intentional adjustments: choosing the right thread for a specific texture, understanding how to blend colors to create realism, or knowing how to frame your finished piece to give it the presence it deserves.
In these hacks, you’ll find the techniques that make all the difference. They are the secrets to smoother satin stitches, more dynamic compositions, and finishes that transform your work from something you made into a piece of art you’ll treasure. Let’s begin.
1. Render Delicate Textures with Precision
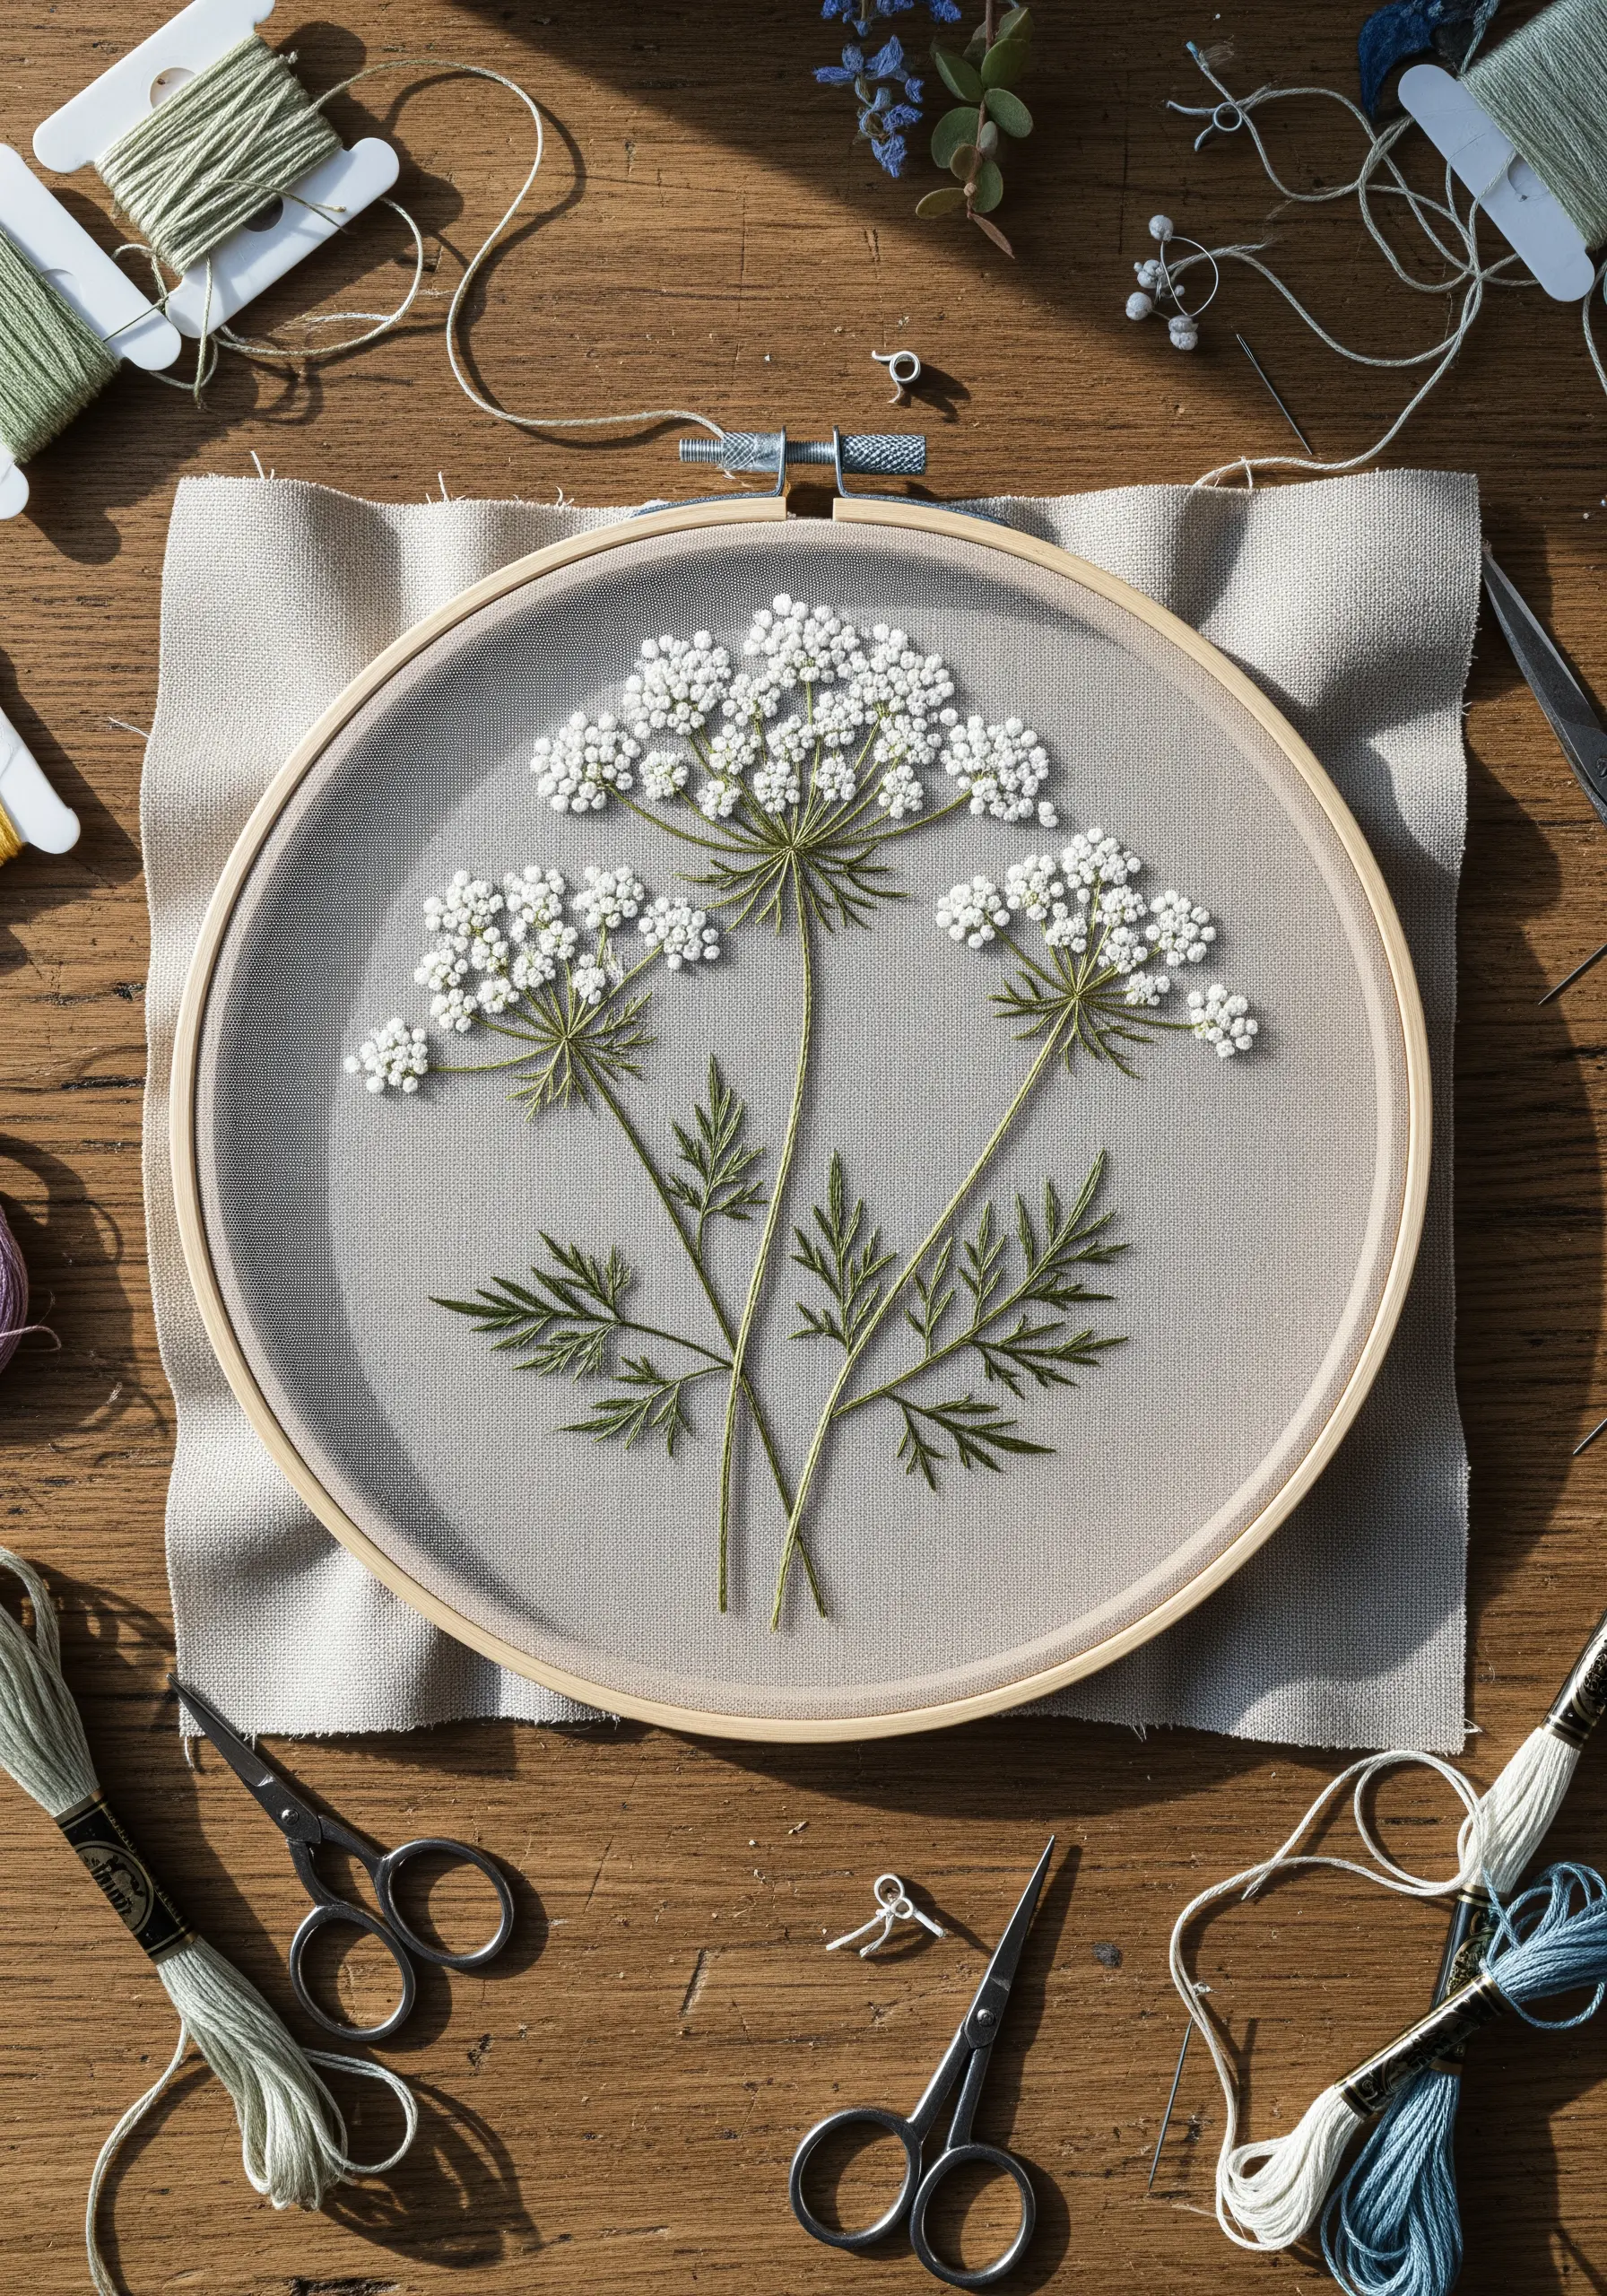
For flowers like Queen Anne’s Lace or Gypsophila, achieve that airy, clustered look by using single-strand floss for hundreds of tiny French knots.
This technique avoids the bulkiness of thicker threads, ensuring each tiny blossom is defined yet part of a cohesive whole.
Use a neutral, high-count linen as your base; its tight weave provides the perfect tension for small, secure knots and makes the delicate white thread pop.
For the stems, a whipped backstitch offers a smooth, rounded line that mimics natural growth without appearing rigid.
2. Master Realistic Color Blending in Leaves
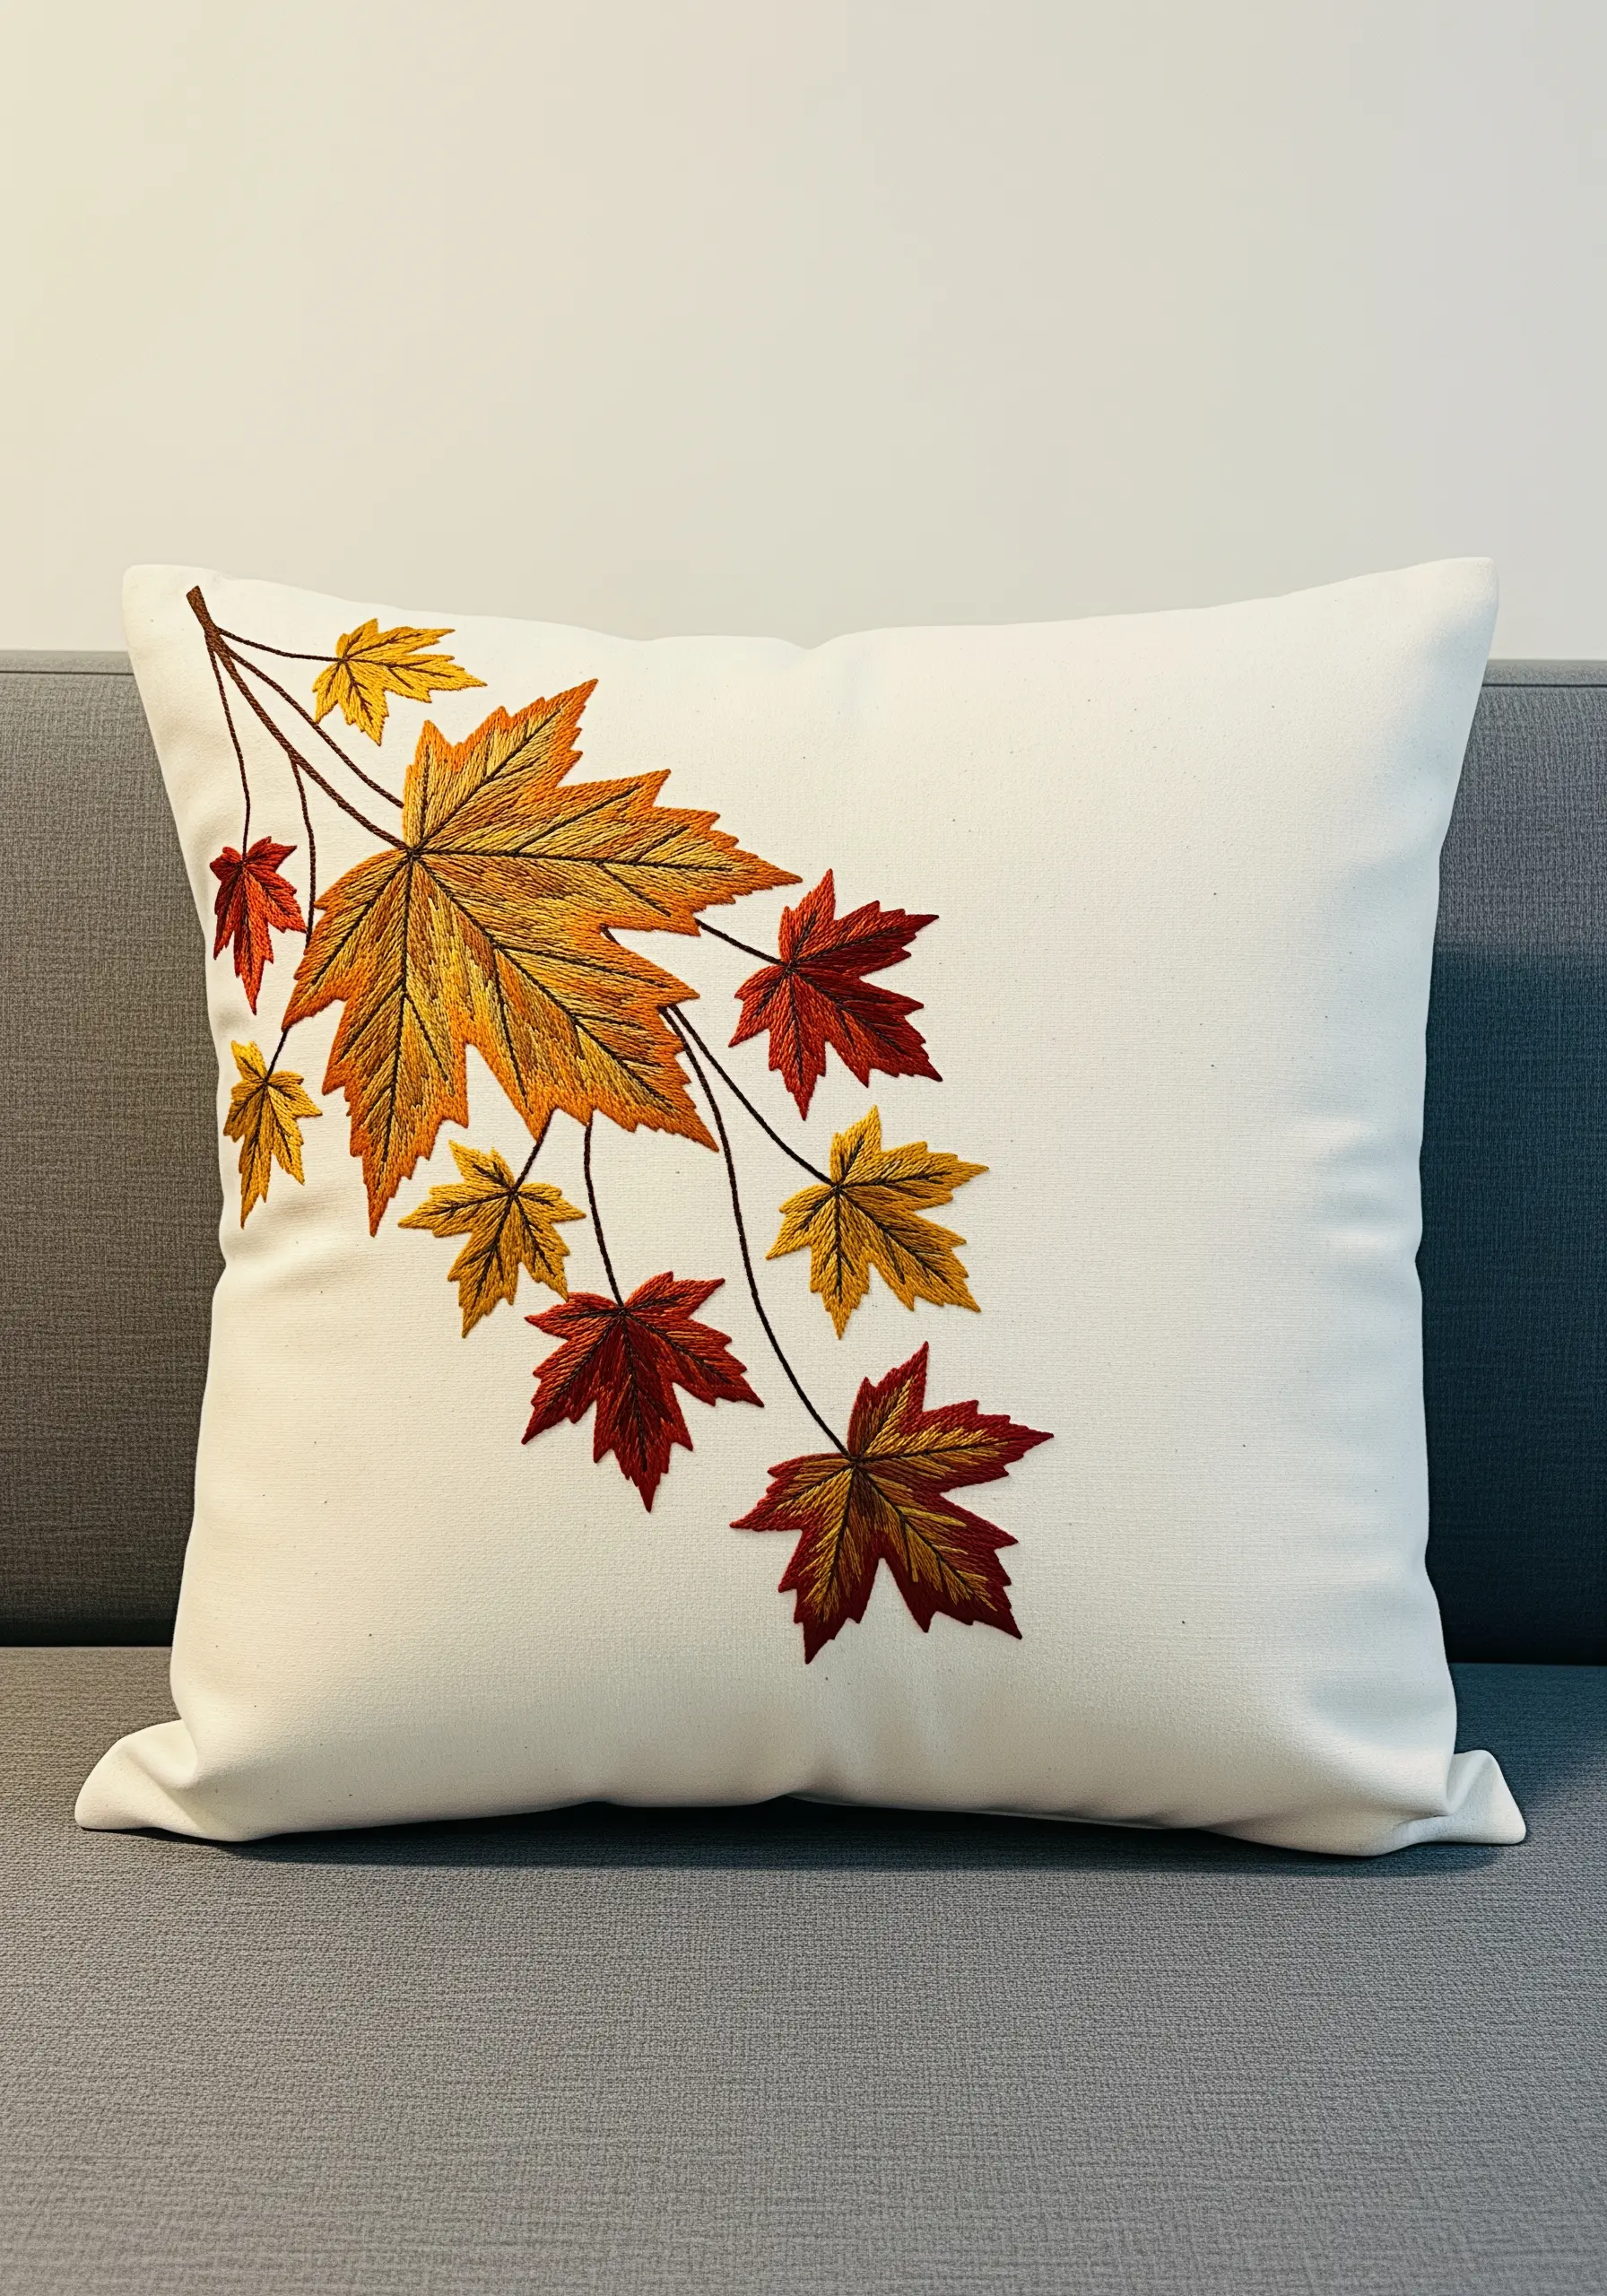
To capture the authentic color shift in autumn leaves, abandon solid satin stitch in favor of long-and-short stitch.
This method, also known as thread painting, allows you to blend shades of gold, rust, and deep red seamlessly, creating a natural gradient that feels painterly and intentional.
Work in sections, angling your stitches to follow the natural direction of the leaf’s veins. This small adjustment adds movement and realism to your work.
Choose a smooth cotton fabric for your pillowcase; it provides a stable, even surface that won’t distort your careful stitches.
3. Elevate Your Work with Professional Framing
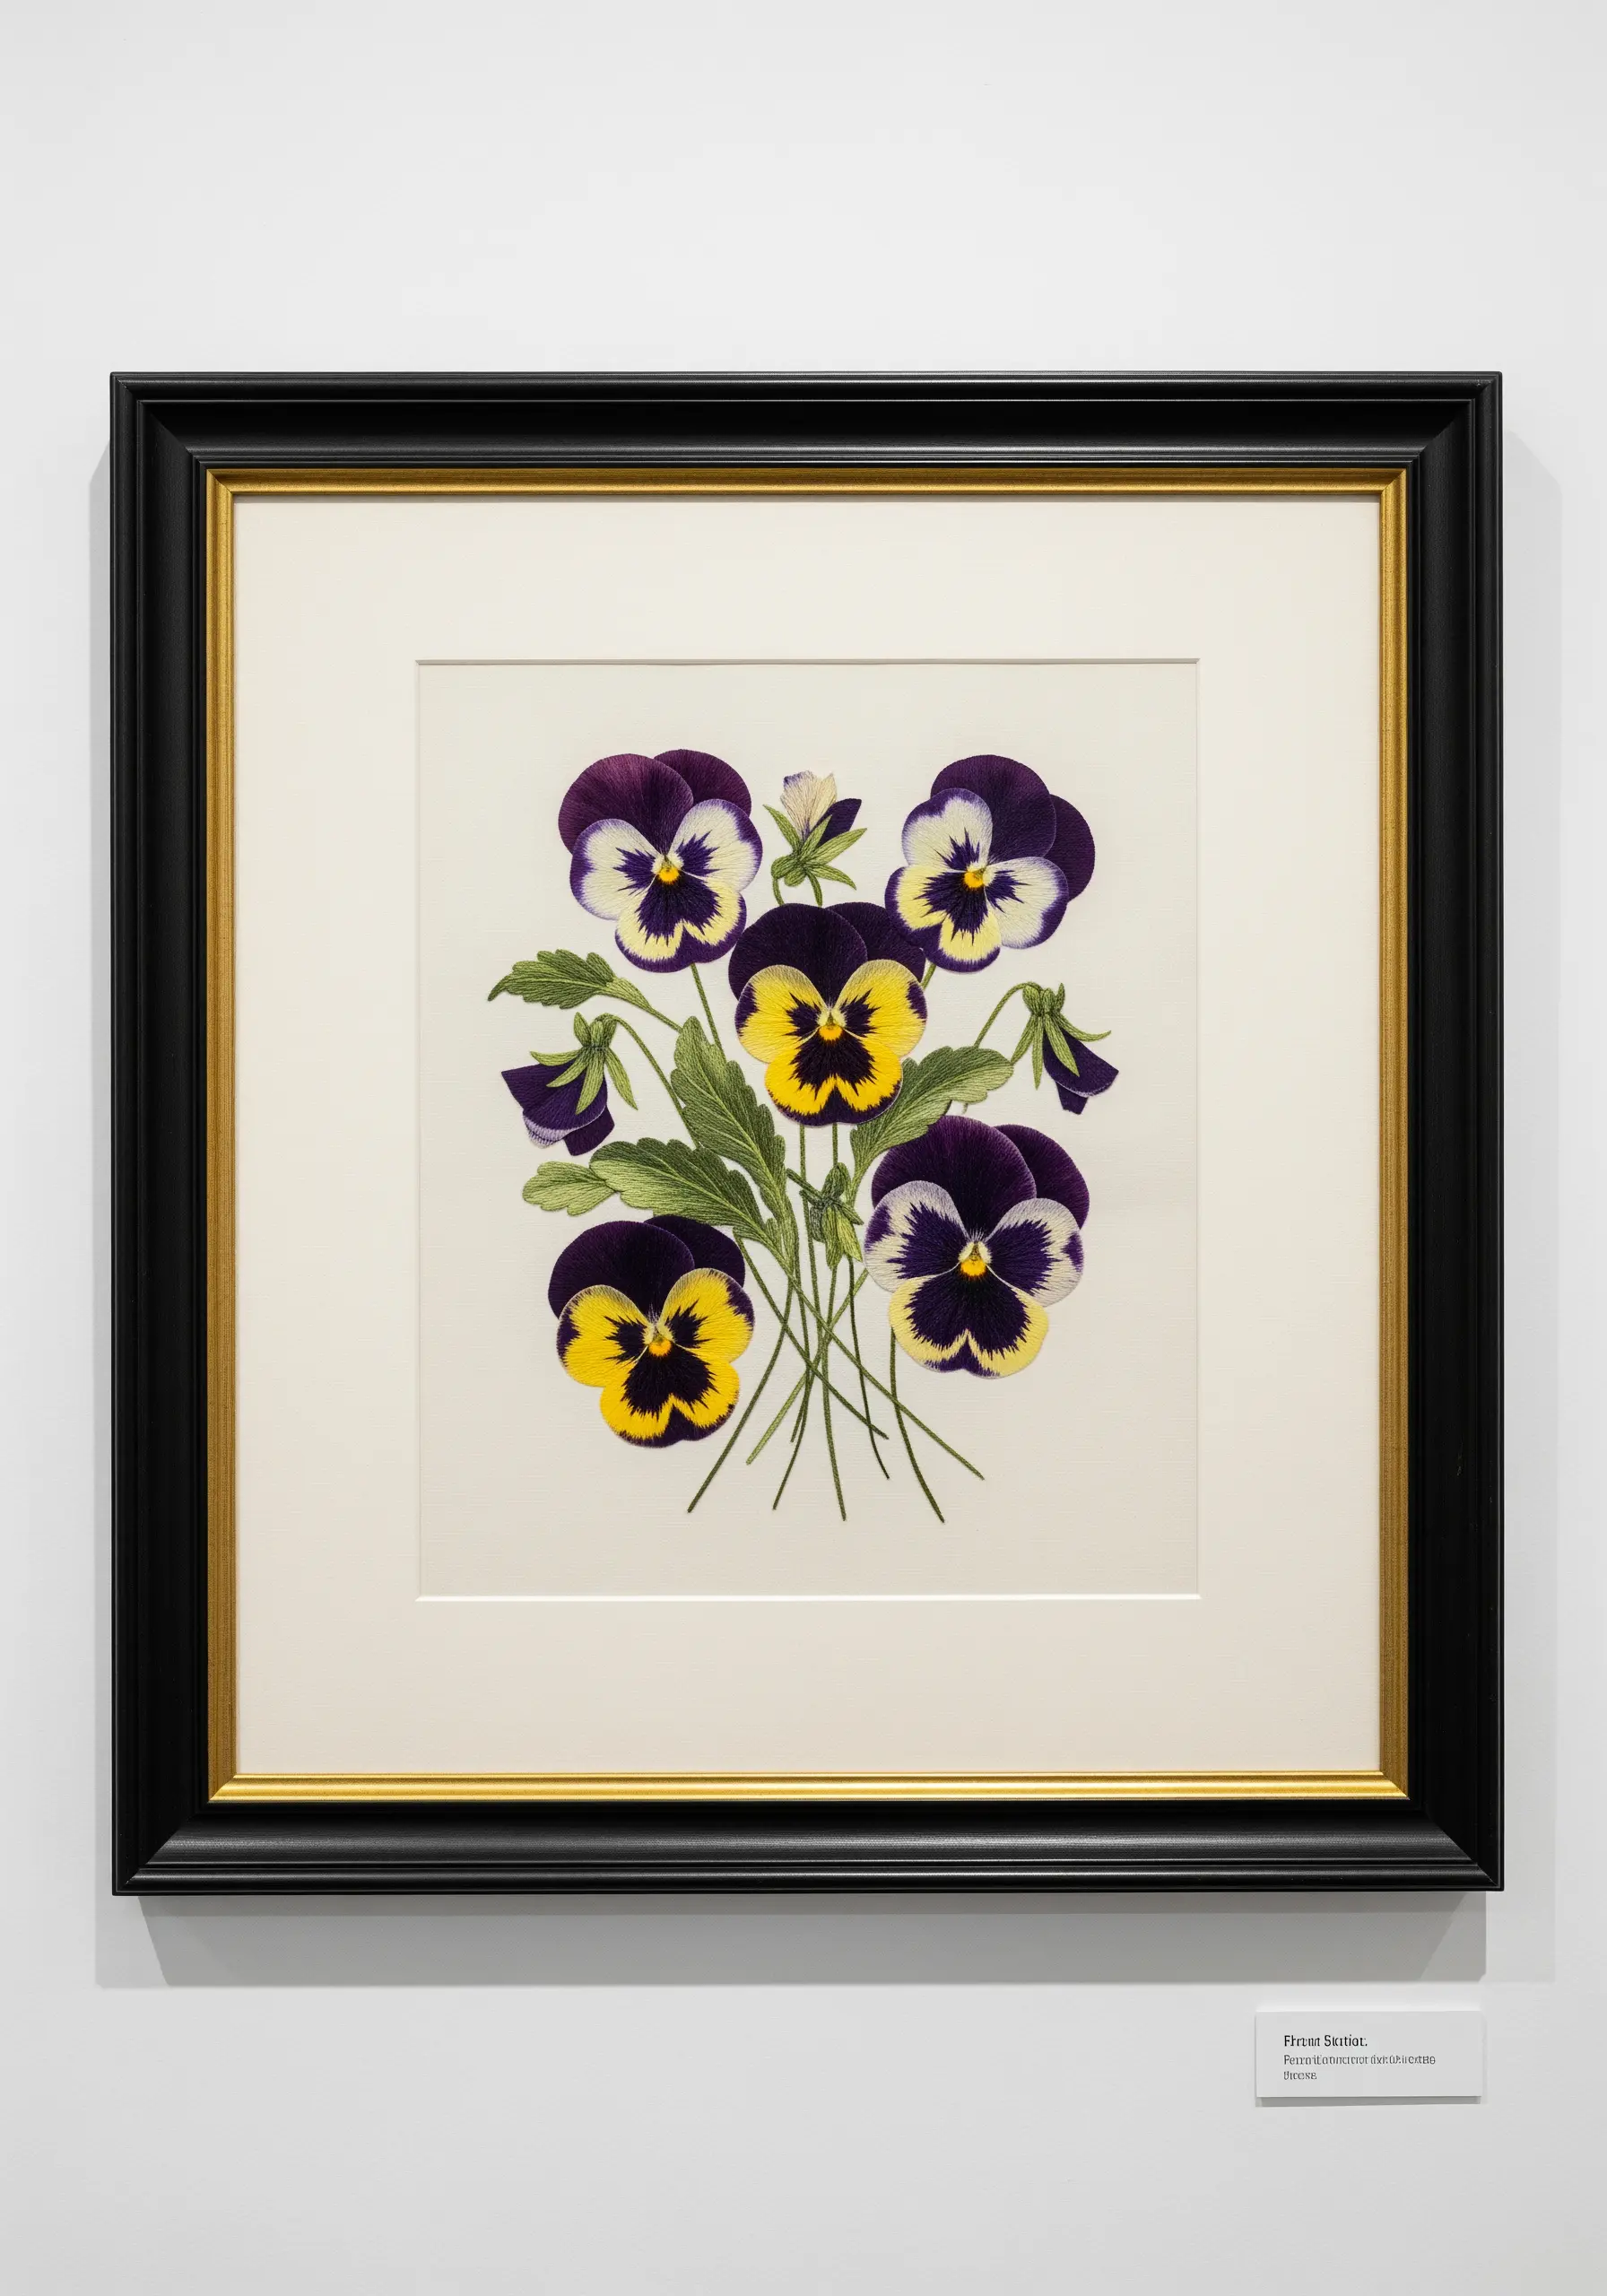
Transform your embroidery from a craft project into a piece of fine art by giving it the right presentation.
Instead of framing the hoop itself, mount your finished piece on acid-free board and use a mat.
The mat creates negative space, drawing the viewer’s eye inward and highlighting the intricate detail of your stitching.
This simple step protects the embroidery from pressing against the glass and gives it a sense of importance and permanence, just like a botanical illustration in a gallery.
4. Compose Balanced Wreaths for Functional Art
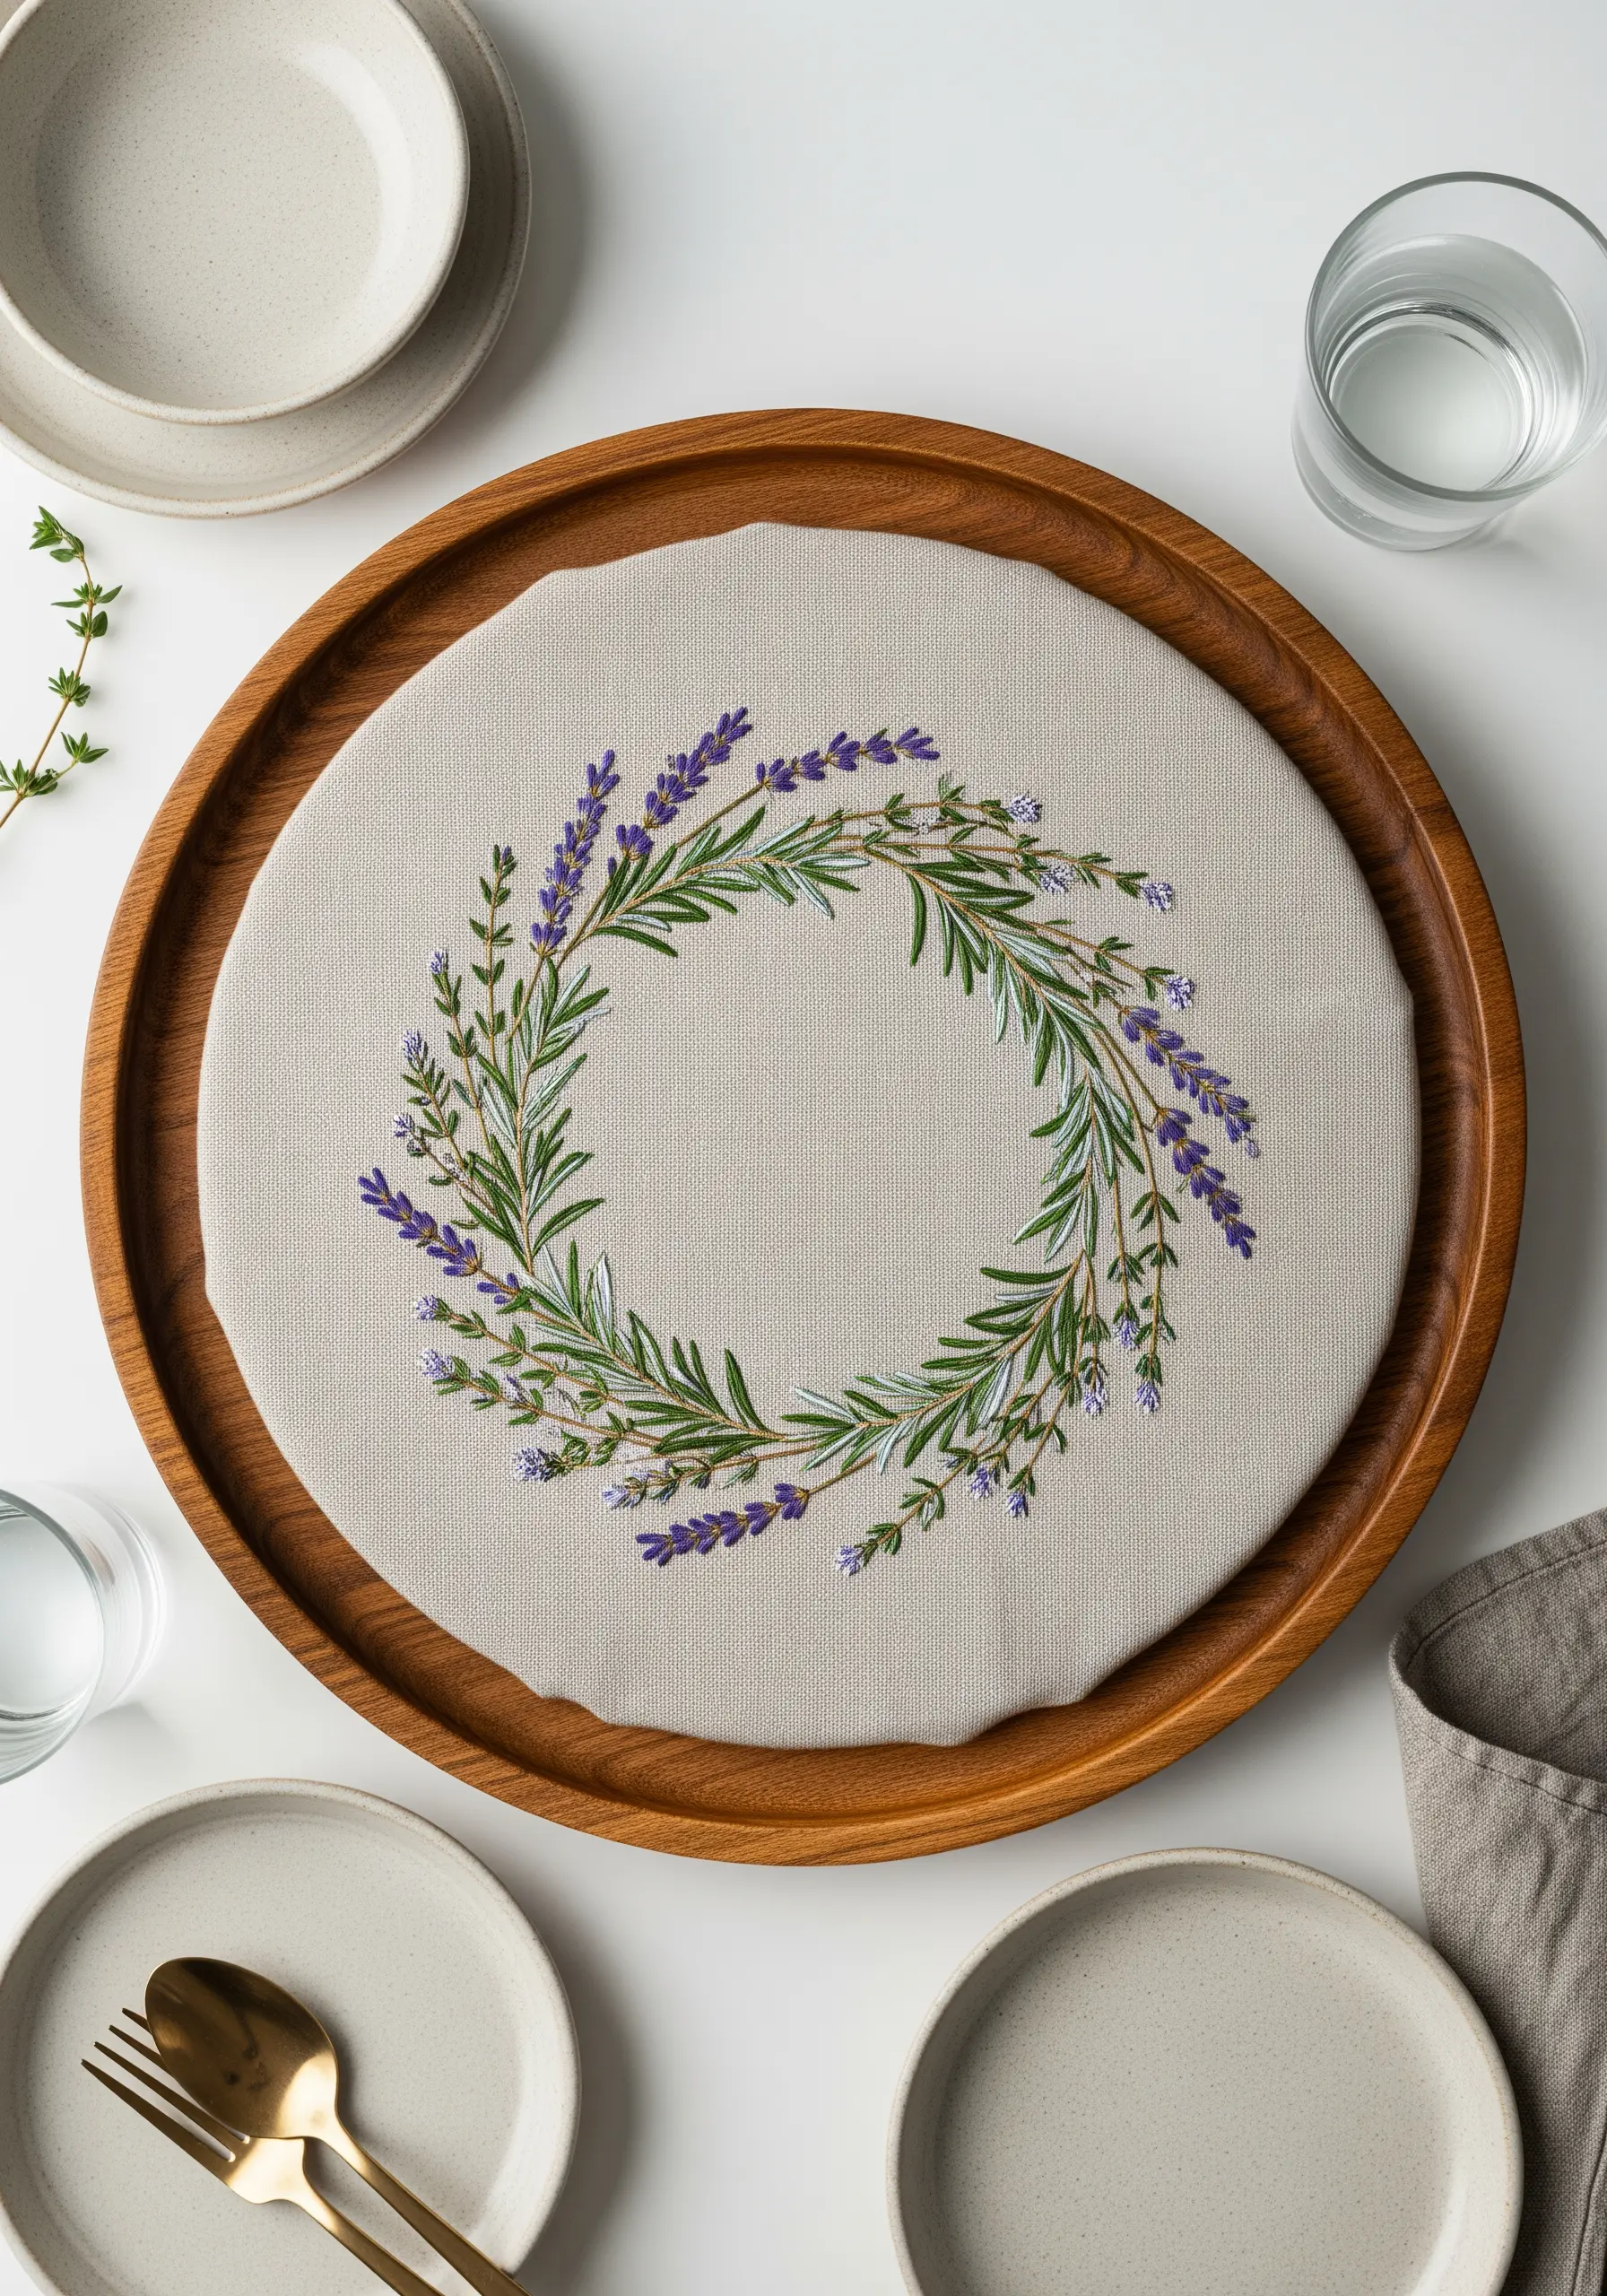
When embroidering a wreath on a functional item like a tray liner or placemat, composition is everything.
Vary the density of your stitches—place fuller lavender blossoms next to delicate, single-stitch rosemary sprigs to create visual rhythm.
Stitch the leaves at slightly different angles to mimic the organic, untamed nature of a real hand-stitched flower wreath.
This thoughtful placement prevents the design from looking static and ensures it feels balanced and alive, even within a perfect circle.
5. Use Appliqué for Bold Statements on Denim
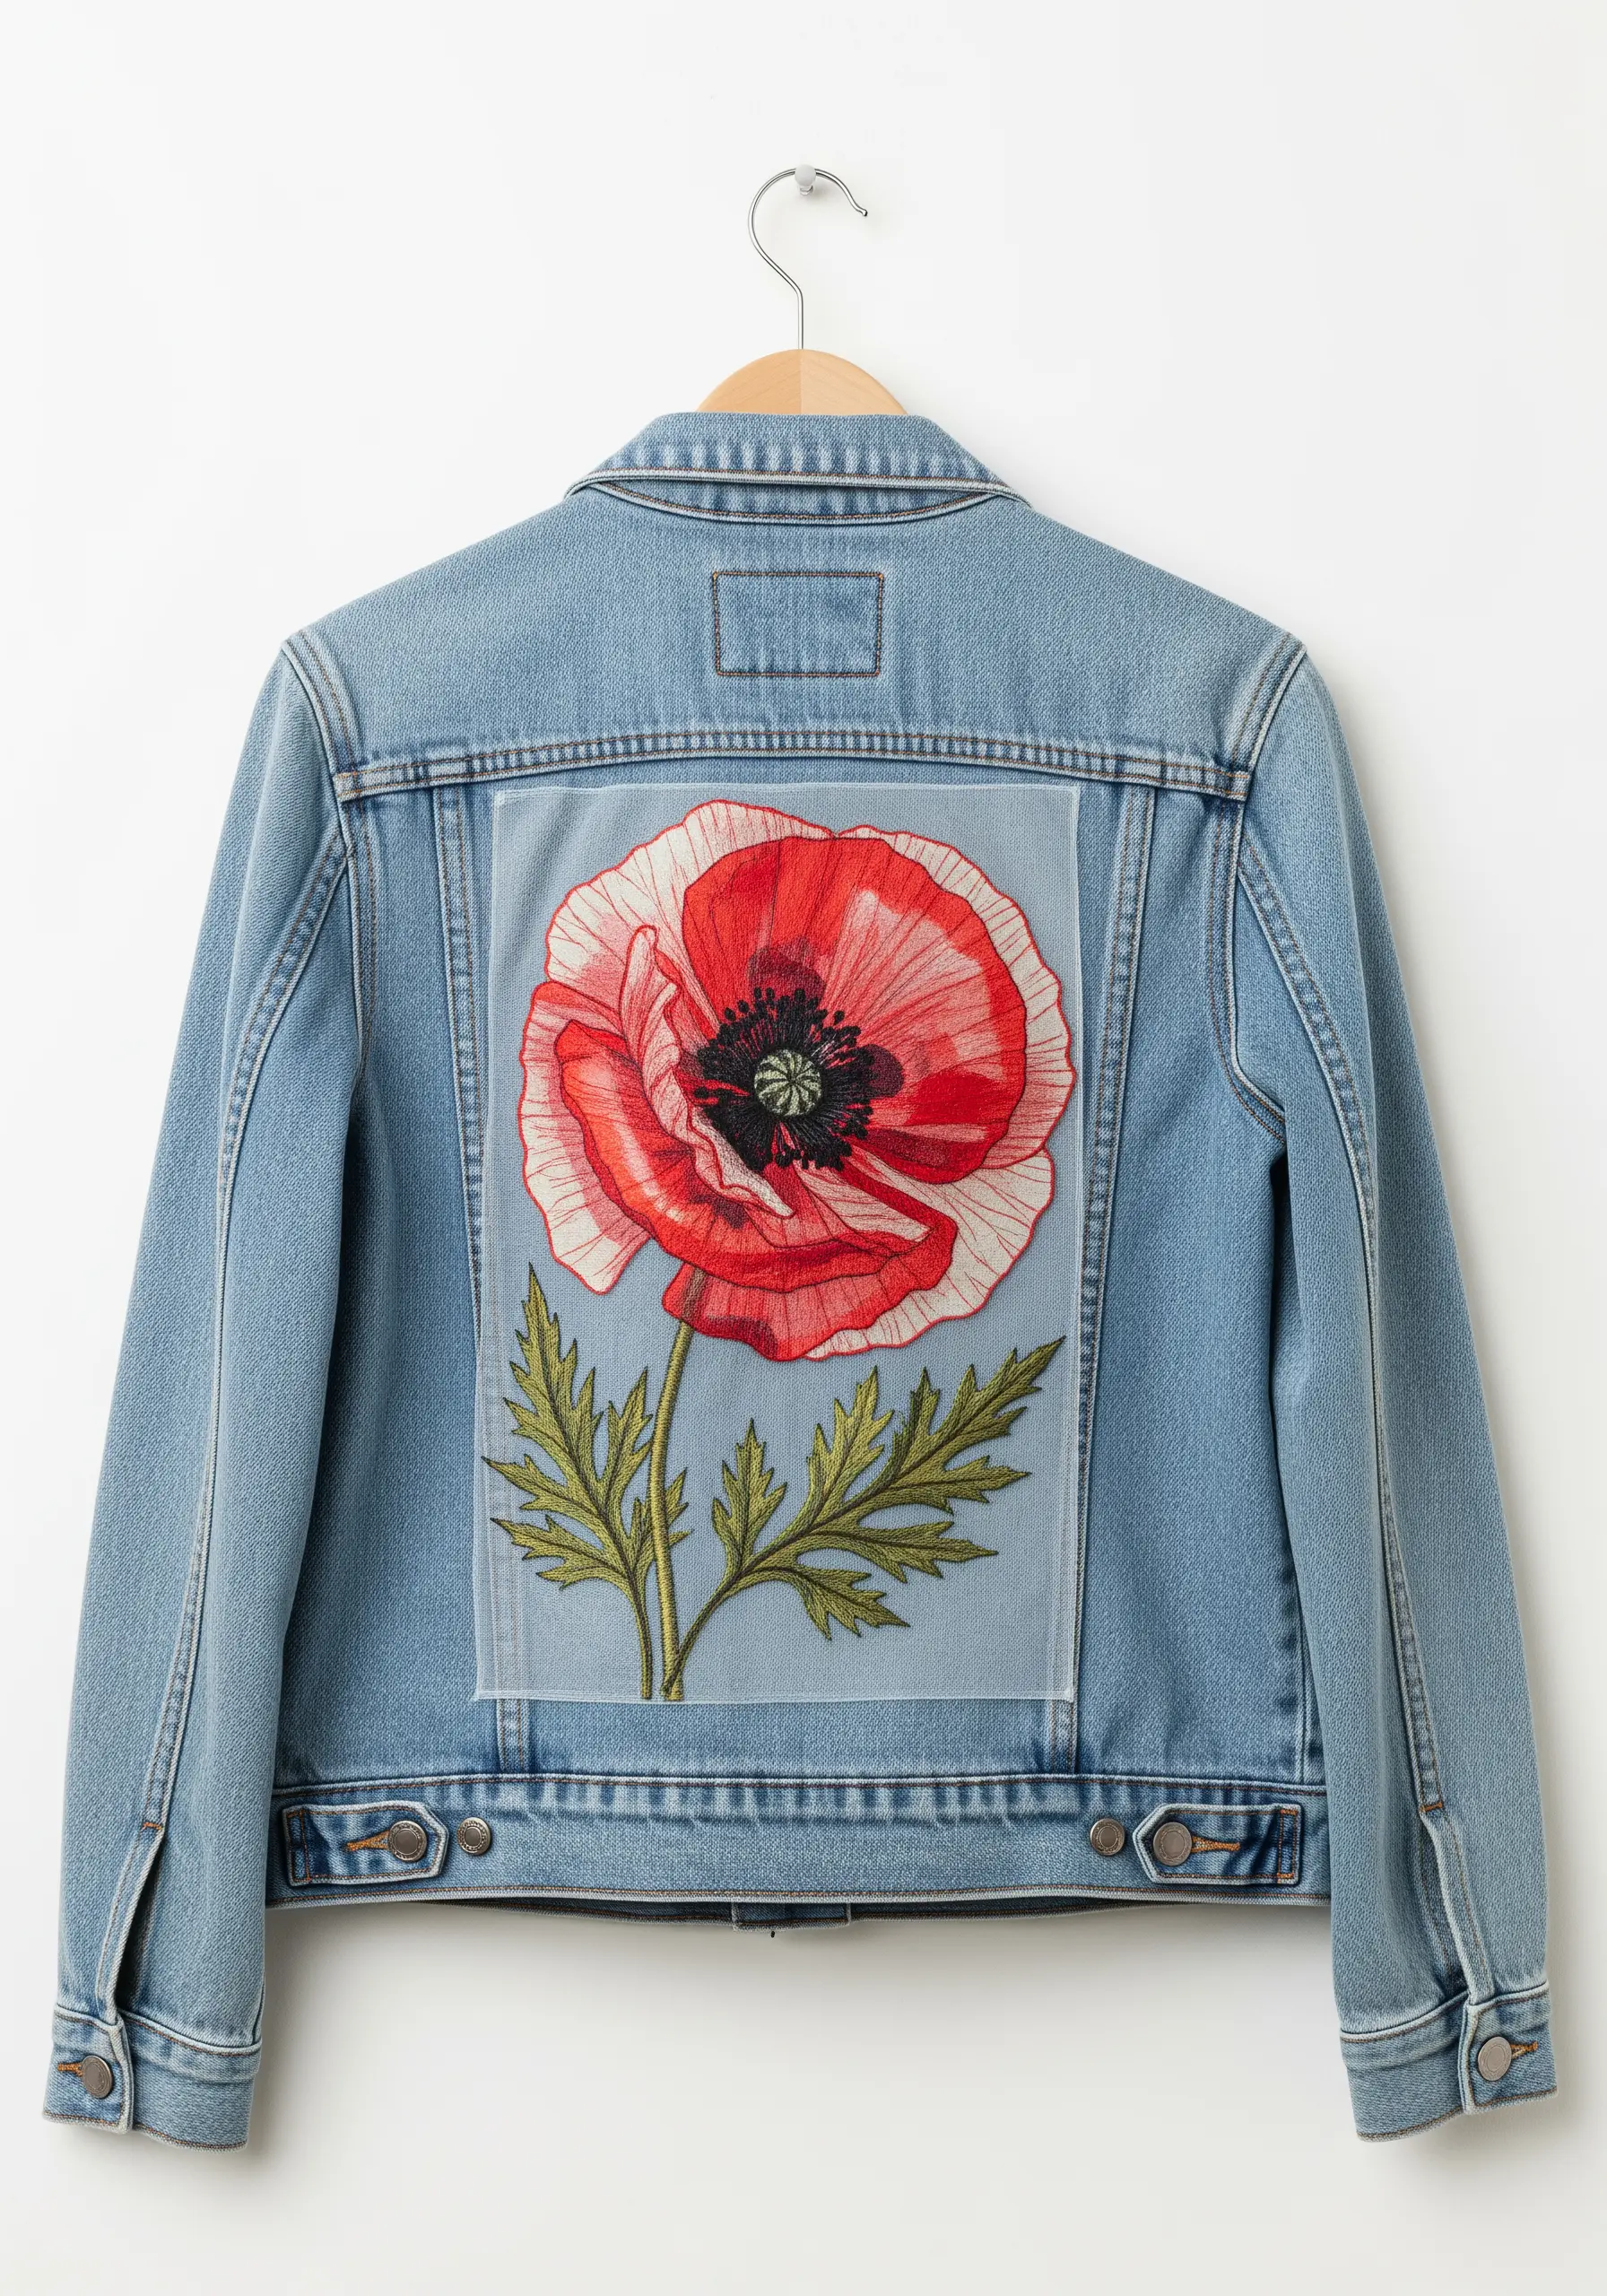
Embroidering directly onto heavy denim can be challenging and may cause puckering.
Instead, stitch your large-scale floral motif onto a separate piece of sheer organza or lightweight linen first.
Once complete, carefully trim the appliqué, leaving a small border. Pin it onto the jacket and secure it with a tiny, neat running stitch around the edge.
This technique ensures your stitches lie flat and remain pristine, creating a clean, patch-like effect that stands up to wear.
6. Create Sophistication with Tone-on-Tone Texture
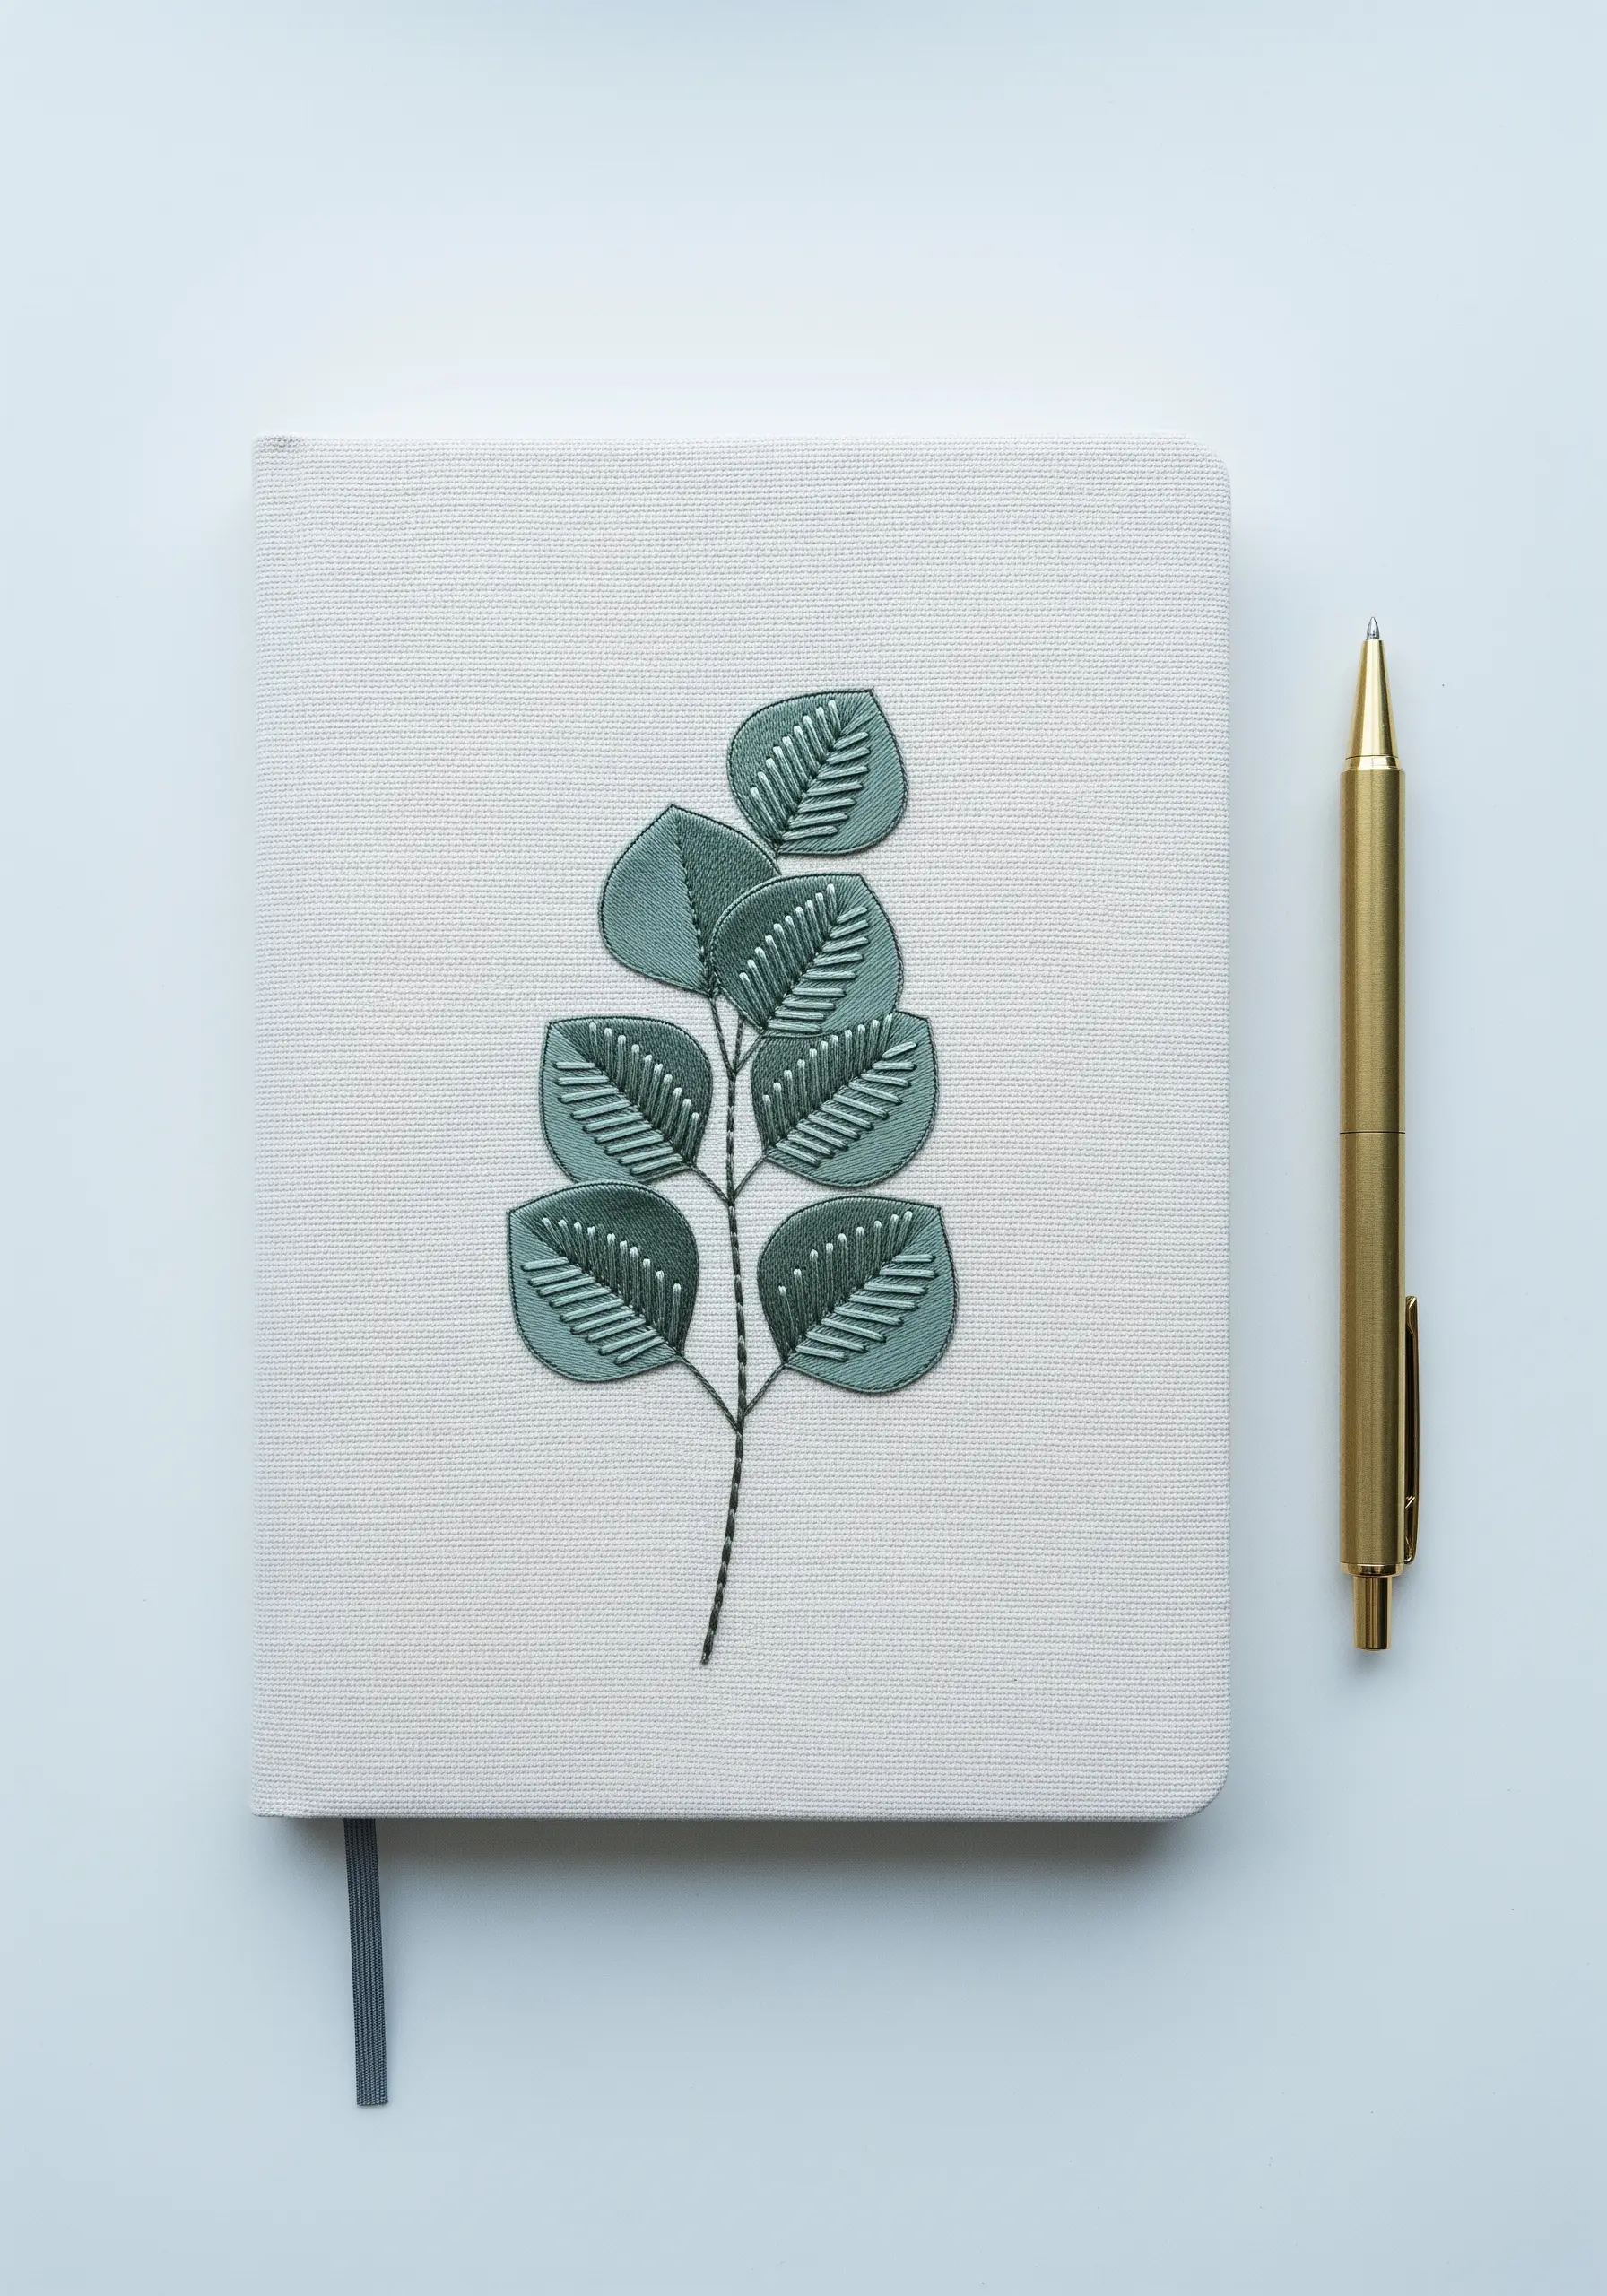
For an understated and modern botanical, explore a monochromatic color palette.
Select several shades of the same color—in this case, muted greens—to create depth without overwhelming the design.
Use a split stitch to outline each leaf shape, then fill it with a perfectly smooth satin stitch. The raised outline adds a subtle, graphic definition that elevates the entire piece.
This tone-on-tone embroidery technique proves that texture can be just as powerful as a full spectrum of color.
7. Perfect Small Motifs on Table Linens

When embellishing functional items like napkins, less is more. A single, exquisitely stitched pansy offers a touch of bespoke luxury.
To prevent puckering on fine linen, always use a peel-and-stick or iron-on stabilizer on the back of the fabric before you begin stitching.
Once finished, gently tear or wash away the stabilizer. This ensures your motif remains crisp and flat, even after laundering.
Position the motif in a corner so it remains visible when the napkin is folded, adding a thoughtful detail to your table setting.
8. Emulate Botanical Illustrations with Fine Stitches

Capture the delicate, scientific beauty of a fern collection by focusing on line work over color.
Use a single strand of dark green or black thread to trace the intricate fronds, treating your needle like an illustrator’s pen.
A simple backstitch or stem stitch is all you need. The goal is precision, not dense filling.
Add delicate script to identify each specimen, transforming your textile into a timeless piece of botanical art. You can even try real garden leaf tracing ideas to achieve authentic shapes.
9. Combine Real Pressed Flowers with Thread

For a truly unique piece, merge the worlds of pressed botanicals and embroidery. This is one of the most direct ways to combine pressed flowers with embroidery.
First, carefully press your chosen wildflowers until they are completely dry and flat. Adhere them to your fabric base—a sturdy felt or wool-blend is ideal—with a tiny amount of acid-free fabric glue.
Then, use embroidery to add the elements that don’t press well, like stems and delicate leaves. The thread adds permanence and texture, anchoring the fragile blossom to the textile.
10. Imply Movement with Scattered Stitches

To make your embroidered cherry blossoms feel like they’re caught in a gentle breeze, don’t contain them all within the main branch.
Add a few detached, single blossoms and scattered petals falling away from the central design.
Use detached chain stitches for the individual blossoms and single, angled straight stitches for loose petals.
This simple trick creates a sense of movement and narrative, turning a static image into a fleeting moment captured in thread.
11. Master Embroidery on Sheer Fabrics

Stitching on sheer curtains requires a different approach, as both the front and back of your work will be visible.
Always use a water-soluble stabilizer; it provides the necessary support during stitching and dissolves completely, leaving no trace.
Plan your stitch path to minimize travel stitches on the back. Use lightweight threads and secure your ends by weaving them under existing stitches rather than making knots.
The result is a delicate design that appears to float on the fabric, catching the light beautifully.
12. Integrate Unexpected Hardware for a Modern Edge

Elevate a simple embroidered book cover or journal by incorporating non-traditional materials.
A piece of metal chain, carefully couched down with matching thread, can serve as a surprisingly elegant spine or border detail.
This technique adds a touch of industrial chic that contrasts beautifully with the softness of the thread and fabric.
It’s an excellent example of mixed-media fabric collage embroidery projects that push creative boundaries and create a truly custom piece.
13. Design for Light with Lampshade Embroidery

When embroidering a lampshade, remember that your design will be backlit. Simple, graphic silhouettes work best.
Use a dark, high-contrast thread on a light-colored linen shade. The light will shine through the fabric, turning your stitches into a striking outline.
A simple running stitch or backstitch is all you need to create an effective pattern. This minimalist approach ensures the design is elegant both when the lamp is off and when it’s illuminated.
14. Finish Small Works as Professional Bookmarks

Give your small botanical studies a purpose by turning them into elegant bookmarks.
Stitch your tiny wildflower or pressed clover onto a small piece of evenweave fabric, then mount it inside a pre-made bookmark frame or tag.
This method provides a clean, polished finish and protects the delicate stitching from wear and tear.
These make thoughtful and impressive DIY embroidered cards and mini gifts, perfect for any book lover.
15. Create Playful Dimension with Stumpwork
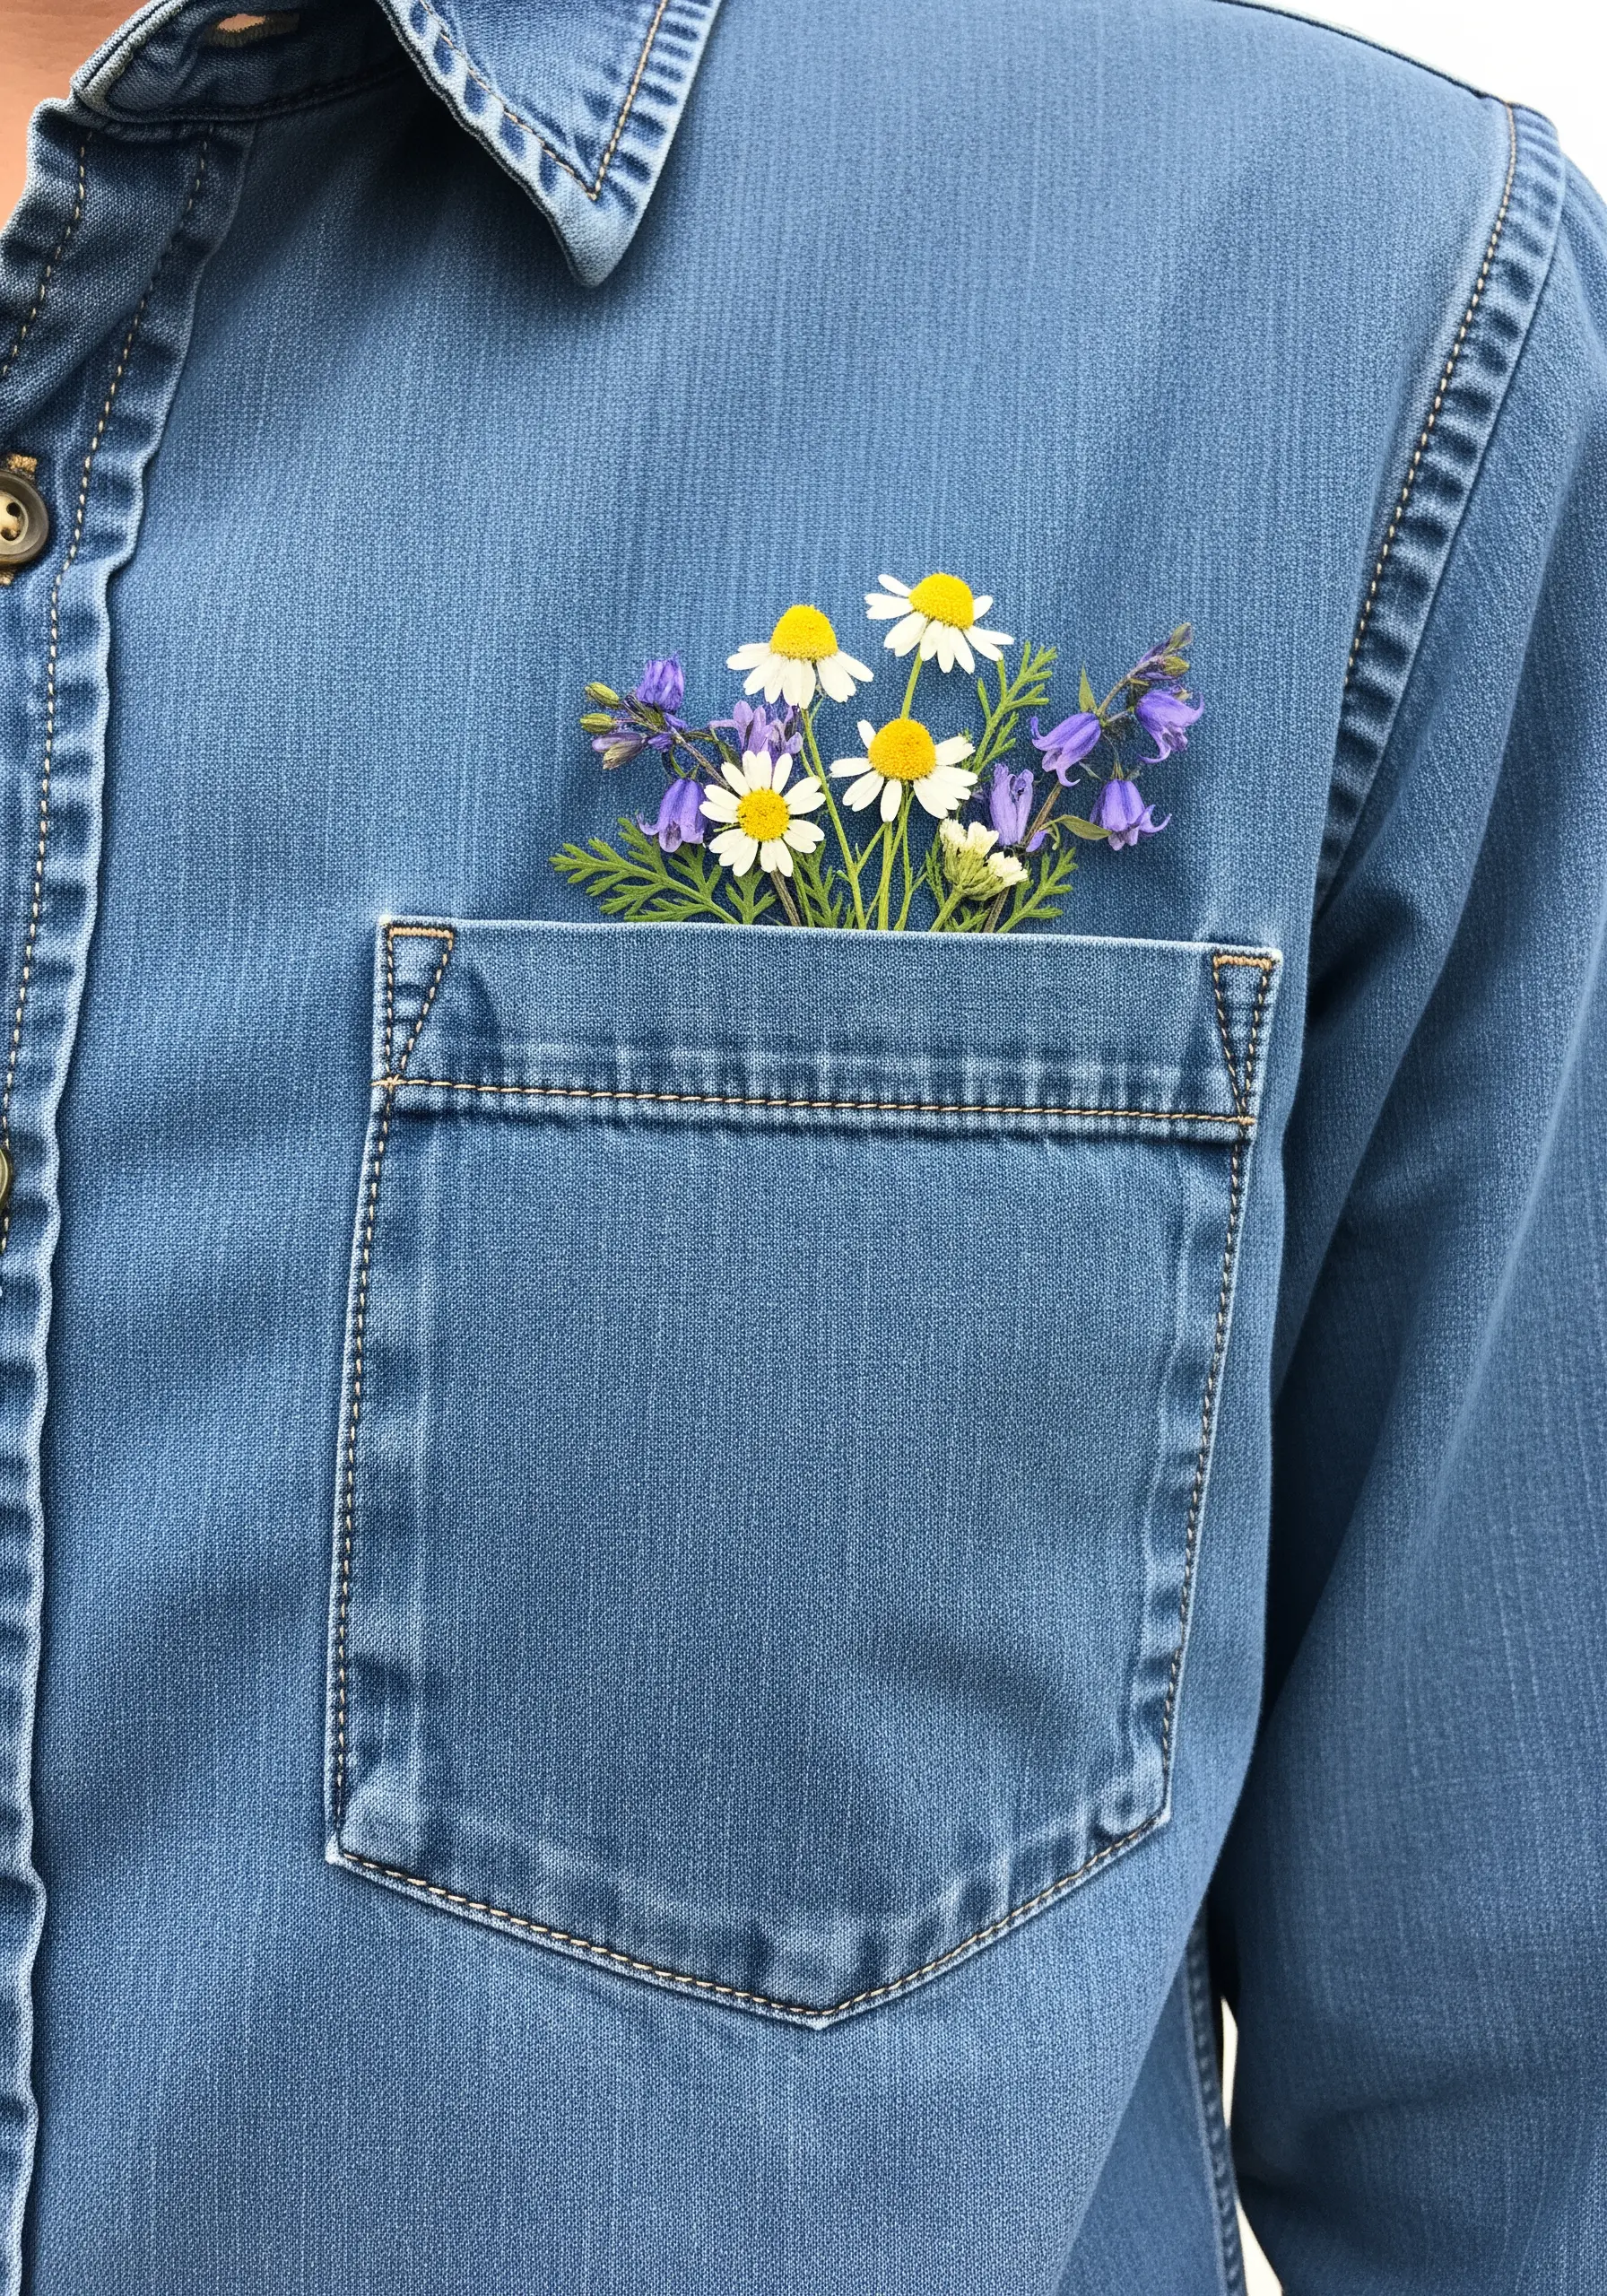
Make your embroidery interactive by using stumpwork techniques to create three-dimensional flowers that literally pop out of the fabric.
Craft petals separately by stitching over a wire framework with buttonhole stitch. Once complete, you can cut them out and shape them.
Attach these dimensional elements to the garment, allowing them to sit above the surface. A bouquet peeking from a pocket is a whimsical touch that showcases advanced skill.
16. Tell a Story with a Thematic Triptych

Amplify the impact of a simple motif by presenting it as a series.
Stitch the same design—like a ginkgo leaf—three times, but alter the color palette in each to represent the changing seasons.
This transforms a single image into a narrative about growth, time, and transition.
Mounting and framing each piece identically creates a cohesive, gallery-worthy collection that feels both modern and deeply meaningful. It’s one of the best small embroidery ideas that double as cute wall art.
17. Design Flowing Compositions for Table Runners
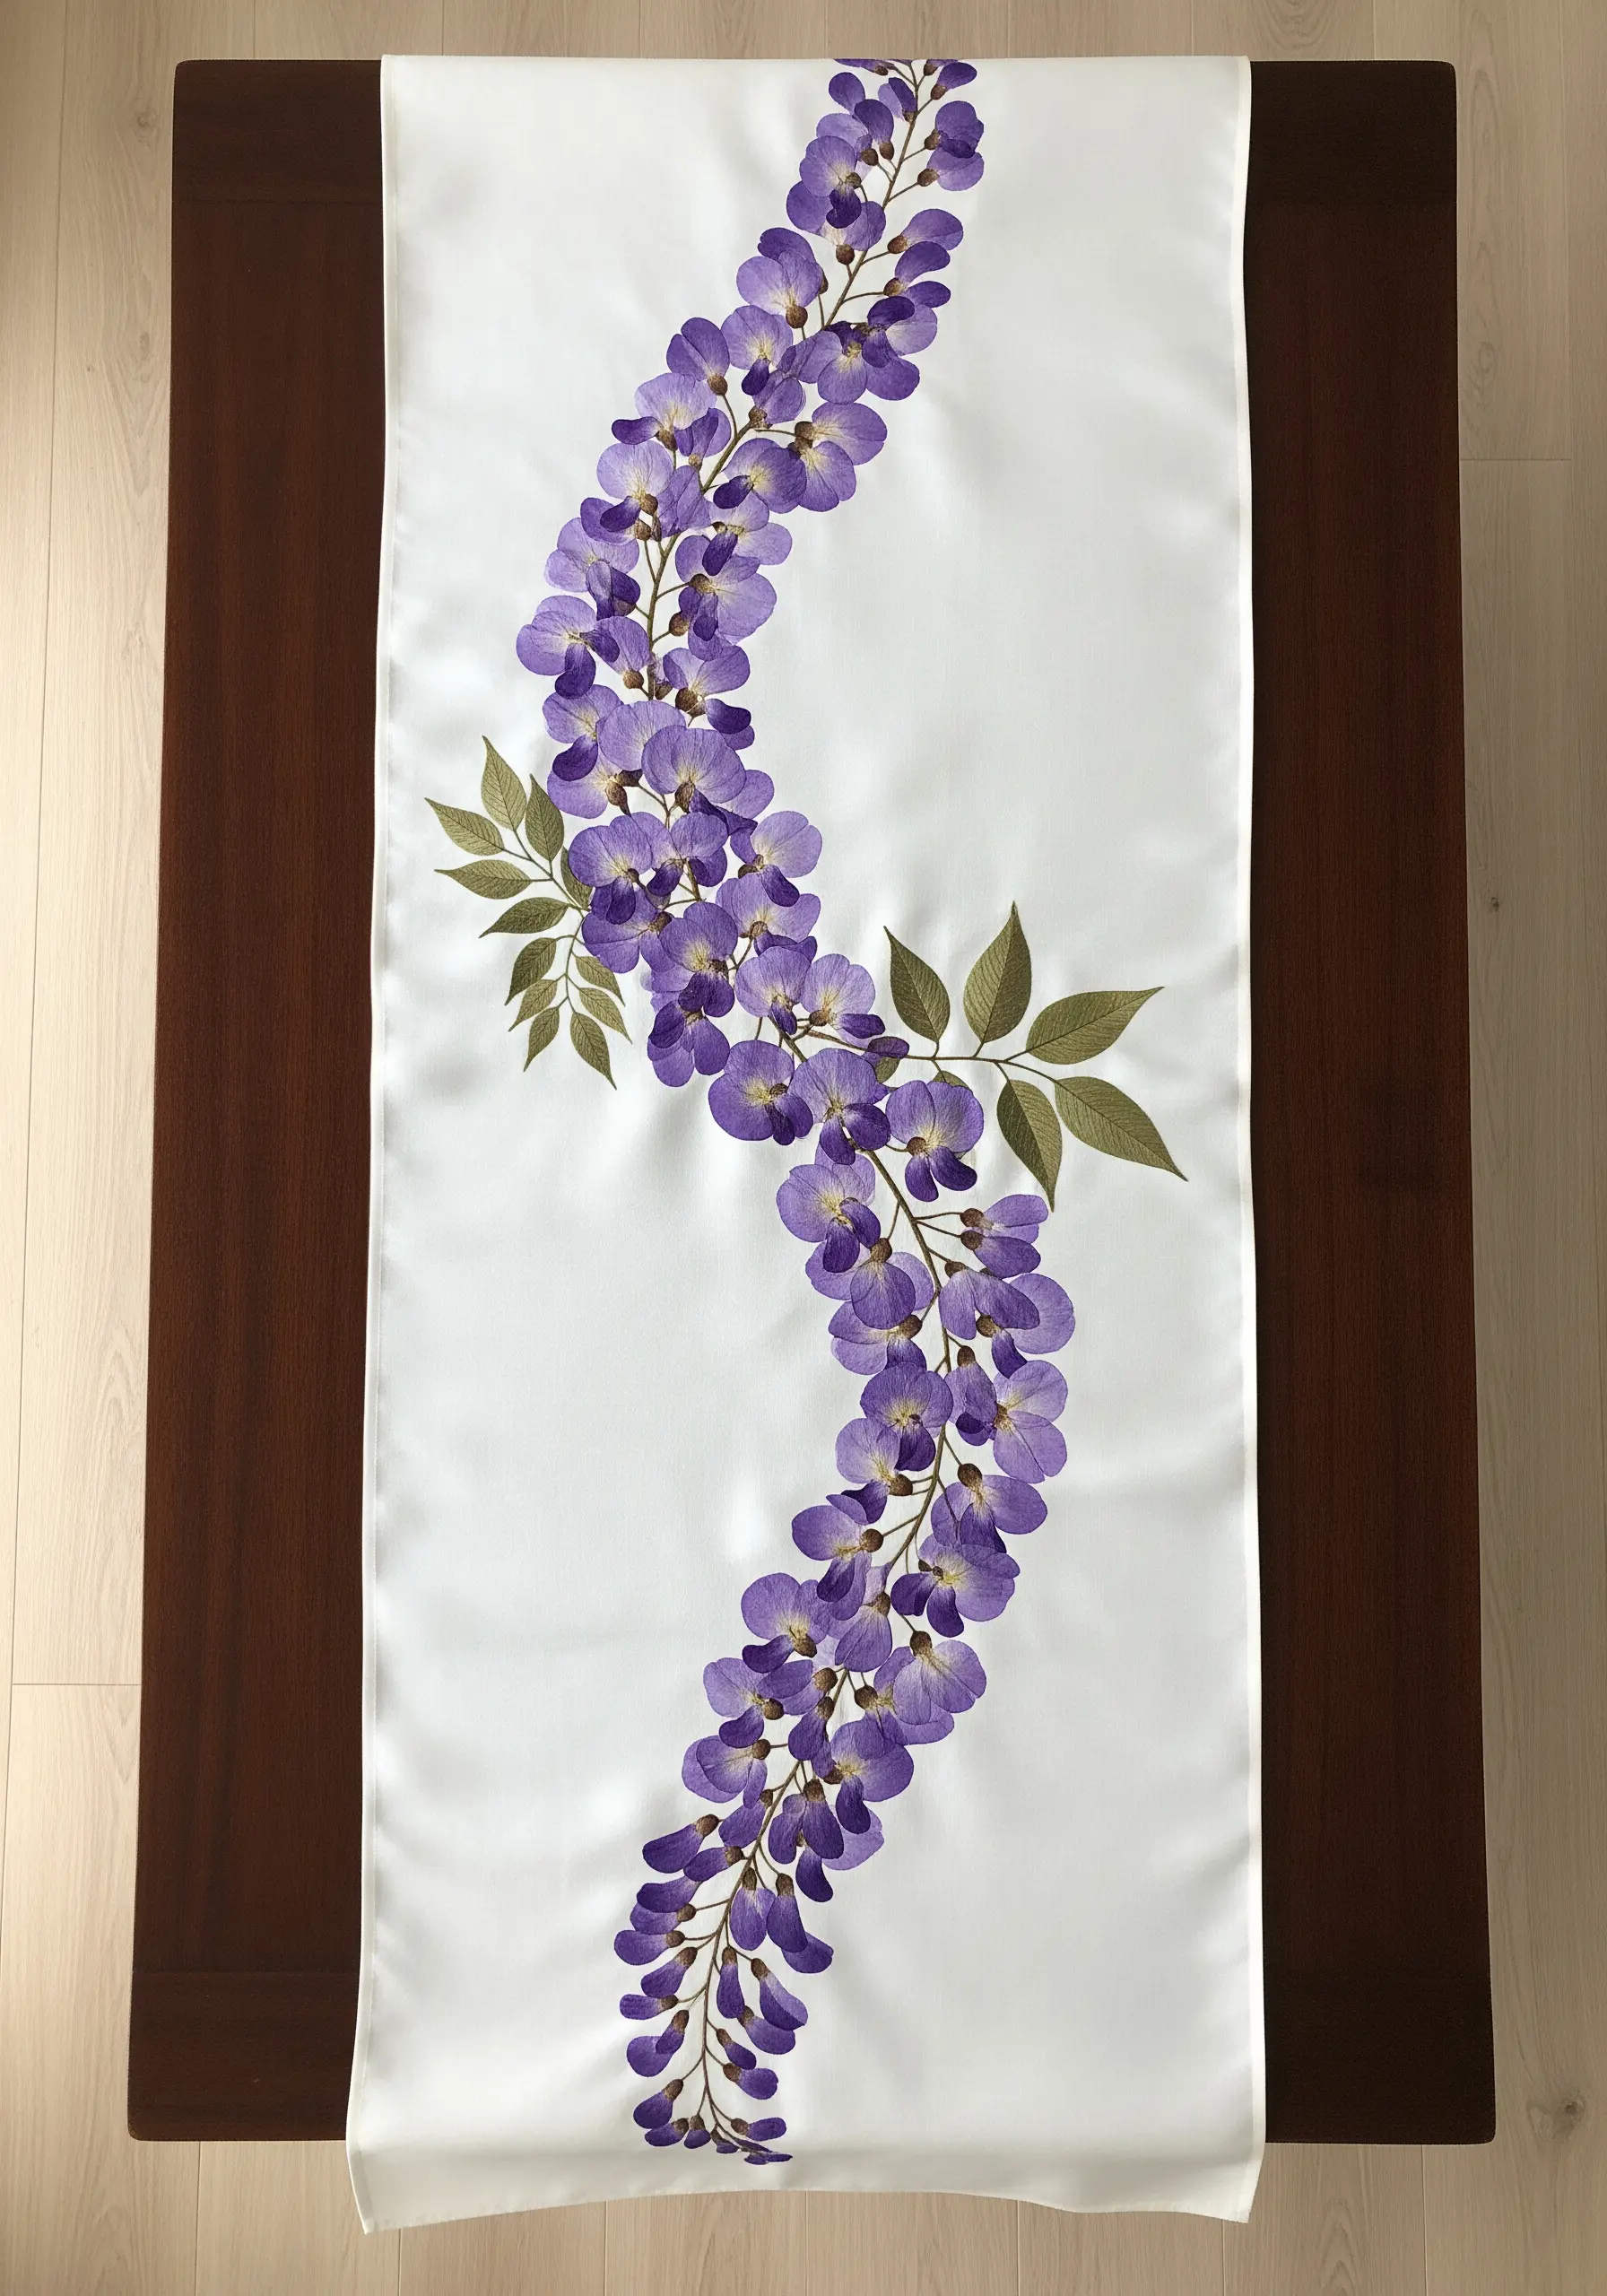
A table runner is a long, narrow canvas. Avoid static, centered designs and instead create a composition that flows and moves.
An S-curve, like this wisteria vine, guides the eye gracefully along the length of the table.
Use subtle color variations within the petals to create depth and a sense of cascading weight. Stitching the blossoms at slightly different angles will enhance this effect.
This thoughtful design approach makes the embroidery a dynamic part of your tablescape, not just a static decoration.
18. Use Thread Sheen for Strategic Contrast

Make your floral motif the undeniable focal point by playing with thread finishes.
On a matte, textured fabric like linen, use a thread with a high sheen, such as silk or rayon floss. This contrast will catch the light and draw immediate attention to your stitching.
The subtle glow of the white and pink petals against the flat purple of the lavender sachet creates a luxurious, tactile quality.
Add a cluster of French knots in a contrasting color and texture for a center that provides even more visual interest.
19. Build Realistic Texture with Layered Knots
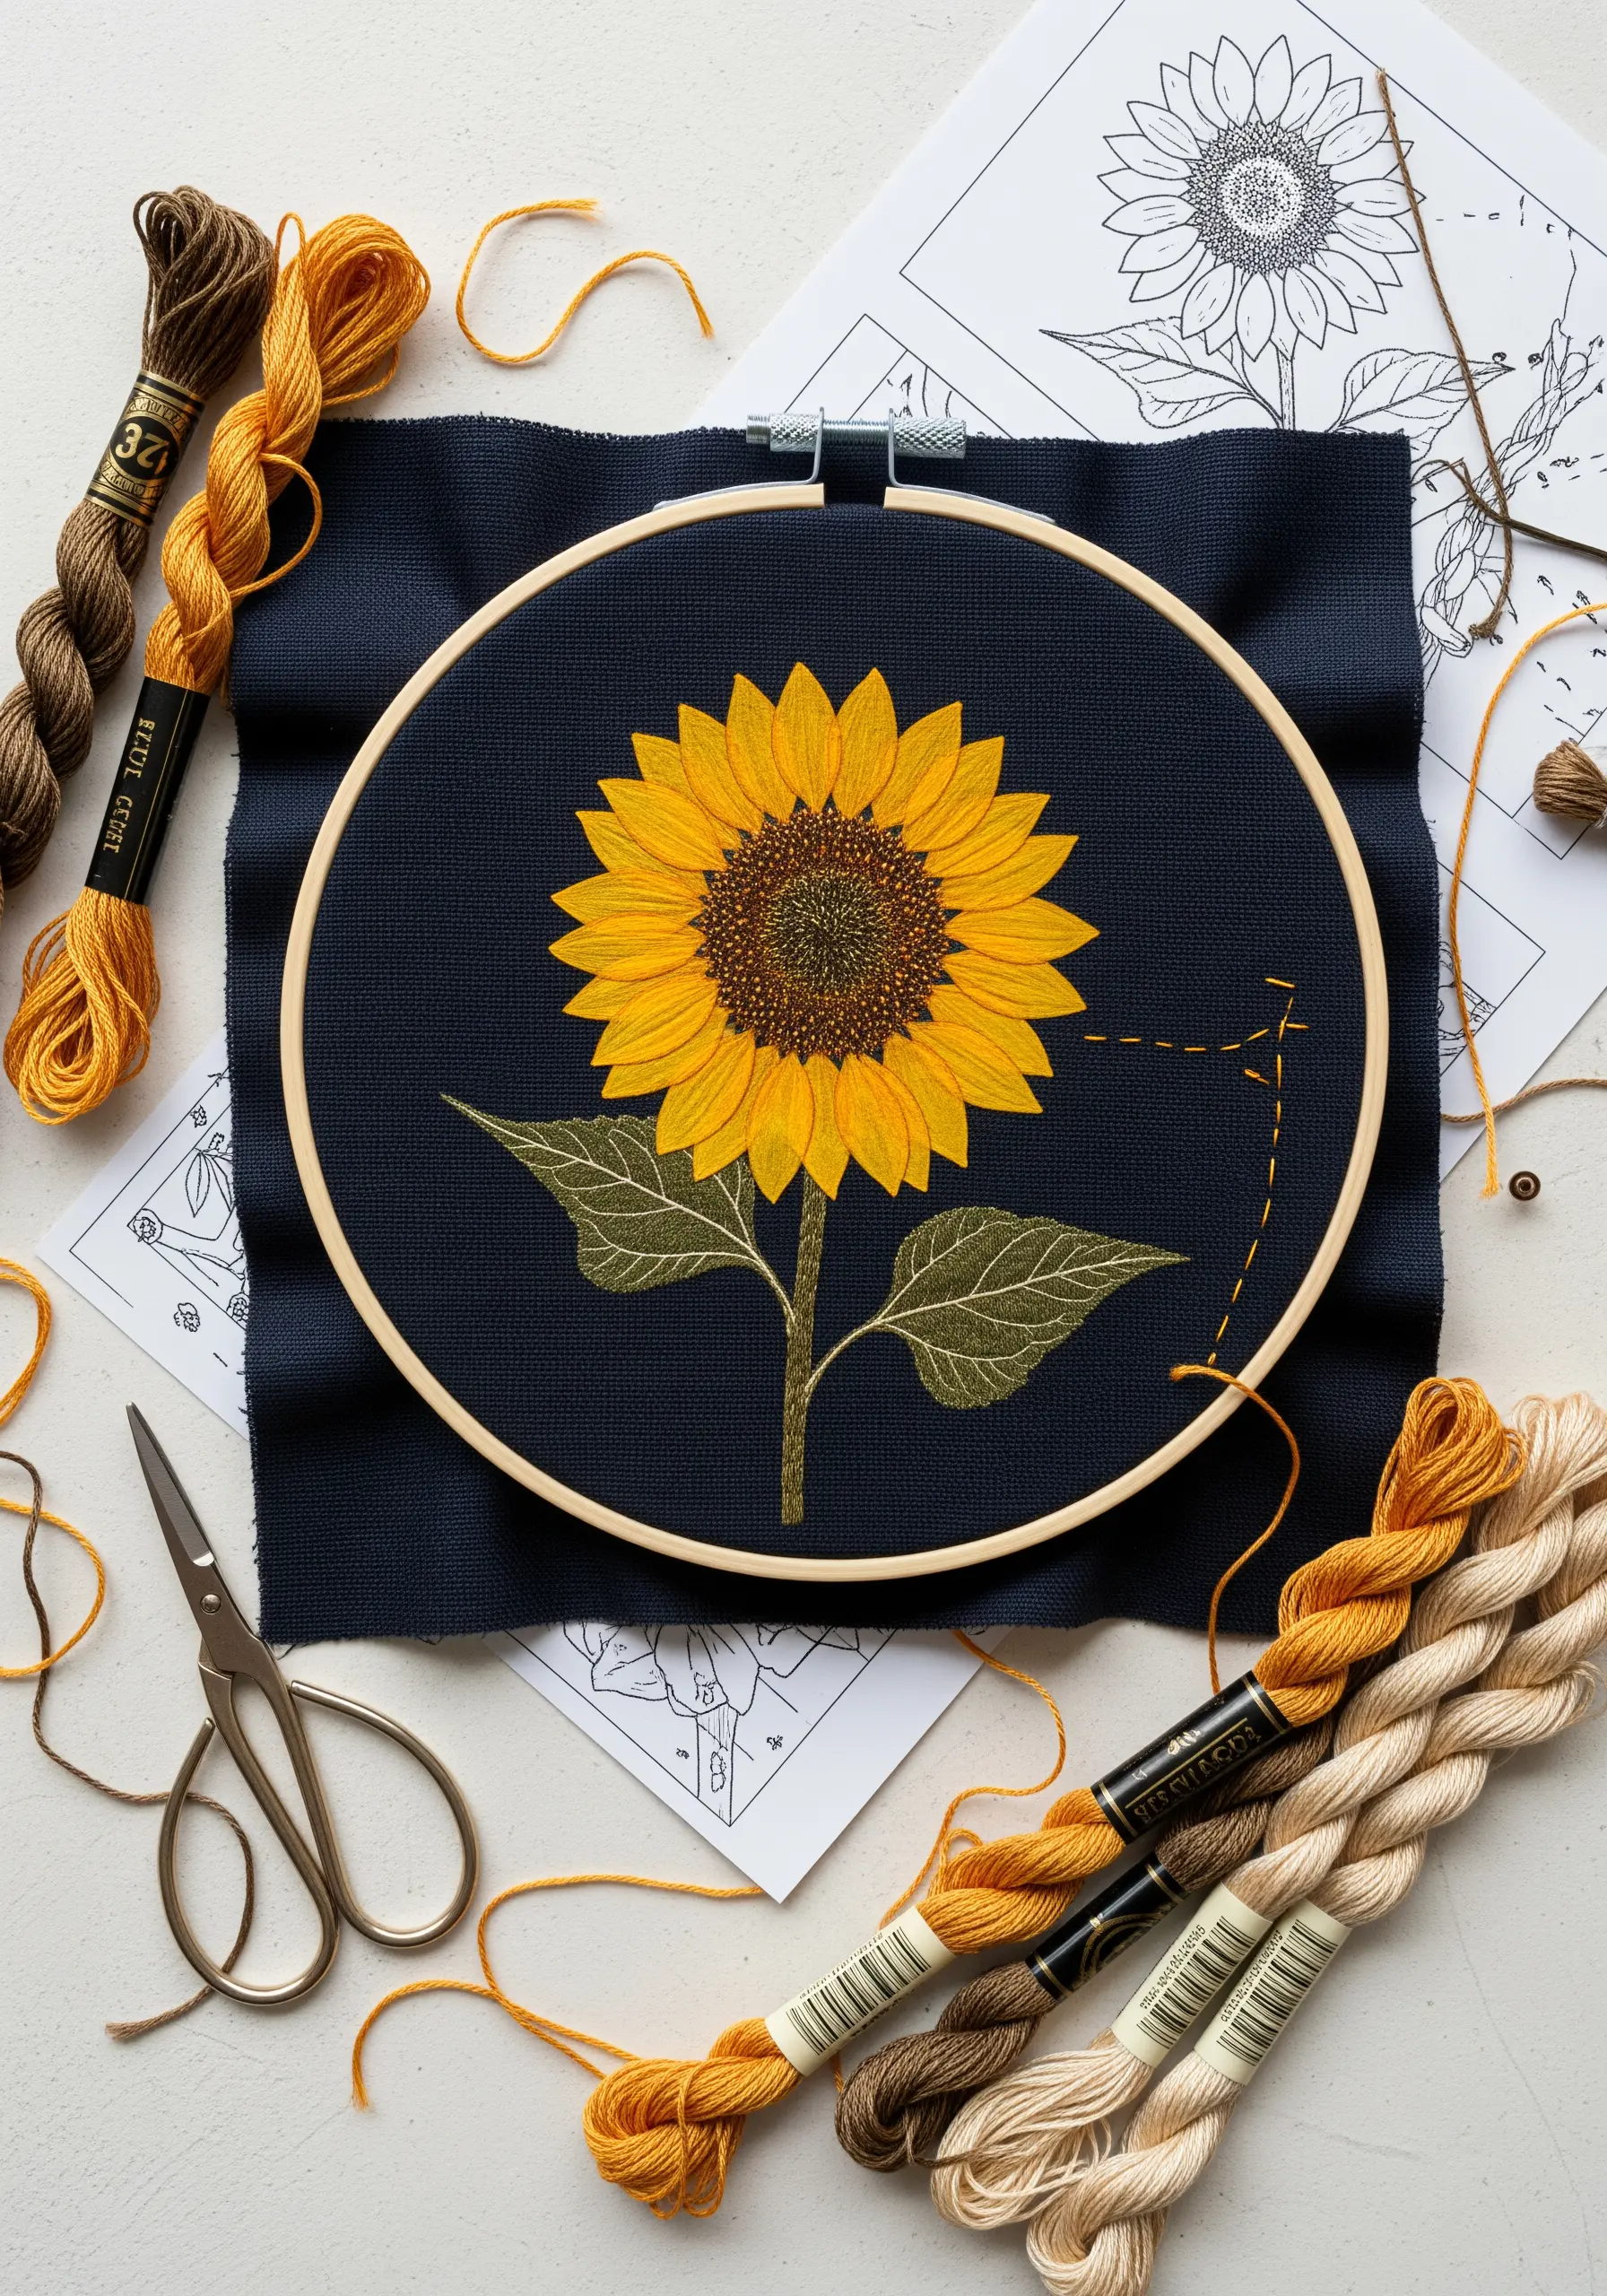
To replicate the dense, complex center of a sunflower, move beyond a single layer of stitches.
Use a blend of three or four shades of brown and gold thread. Start by filling the center with scattered seed stitches.
Then, layer French and colonial knots on top, varying the colors and how tightly you pack them together. This layering builds a rich, three-dimensional organic texture that begs to be touched.
For the petals, long-and-short stitch provides the perfect smooth contrast to the heavily textured center.
20. Scale Up Your Designs for Statement Décor
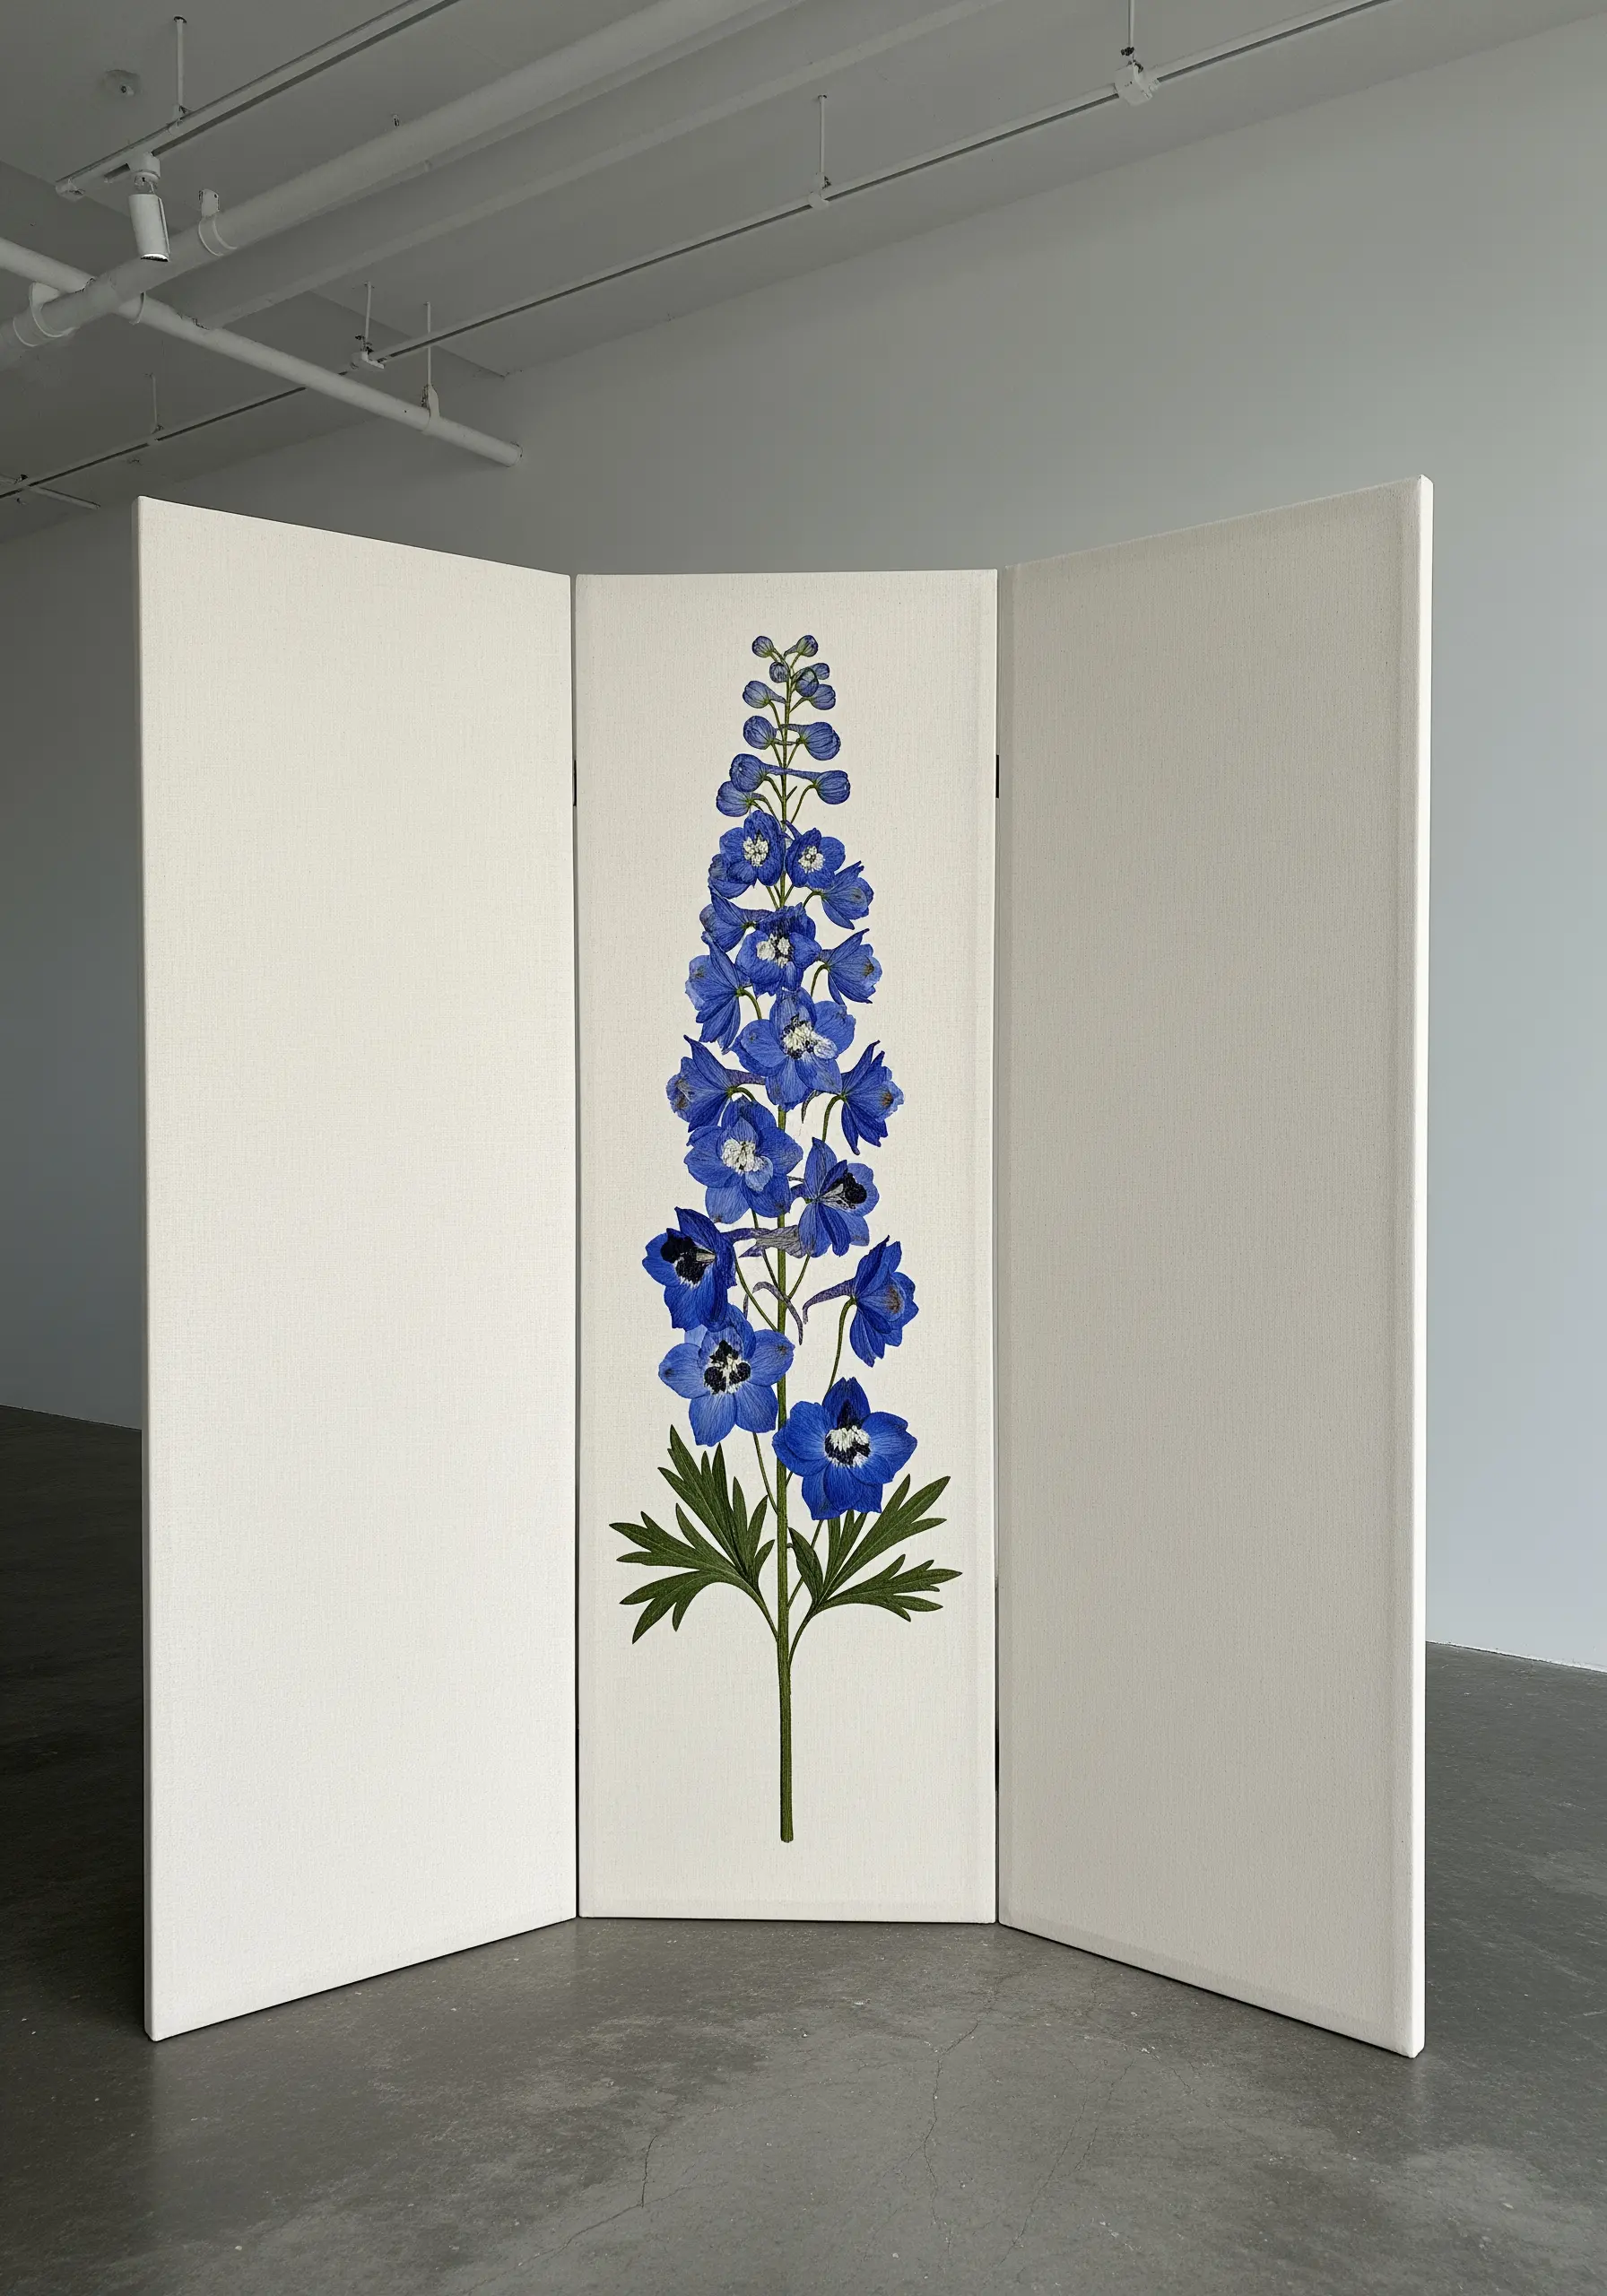
Don’t be afraid to take embroidery beyond the hoop. A large-scale floral on a room divider or canvas panel can become a stunning piece of art.
For projects of this size, simplify your stitch vocabulary. Use thicker threads, like pearl cotton No. 5 or No. 8, to fill large areas more effectively.
Break the design into manageable sections and focus on creating a strong silhouette. The goal is visual impact from a distance, with the intricate details rewarding closer inspection.
21. Add Durable 3D Flowers with Ribbon Stitch
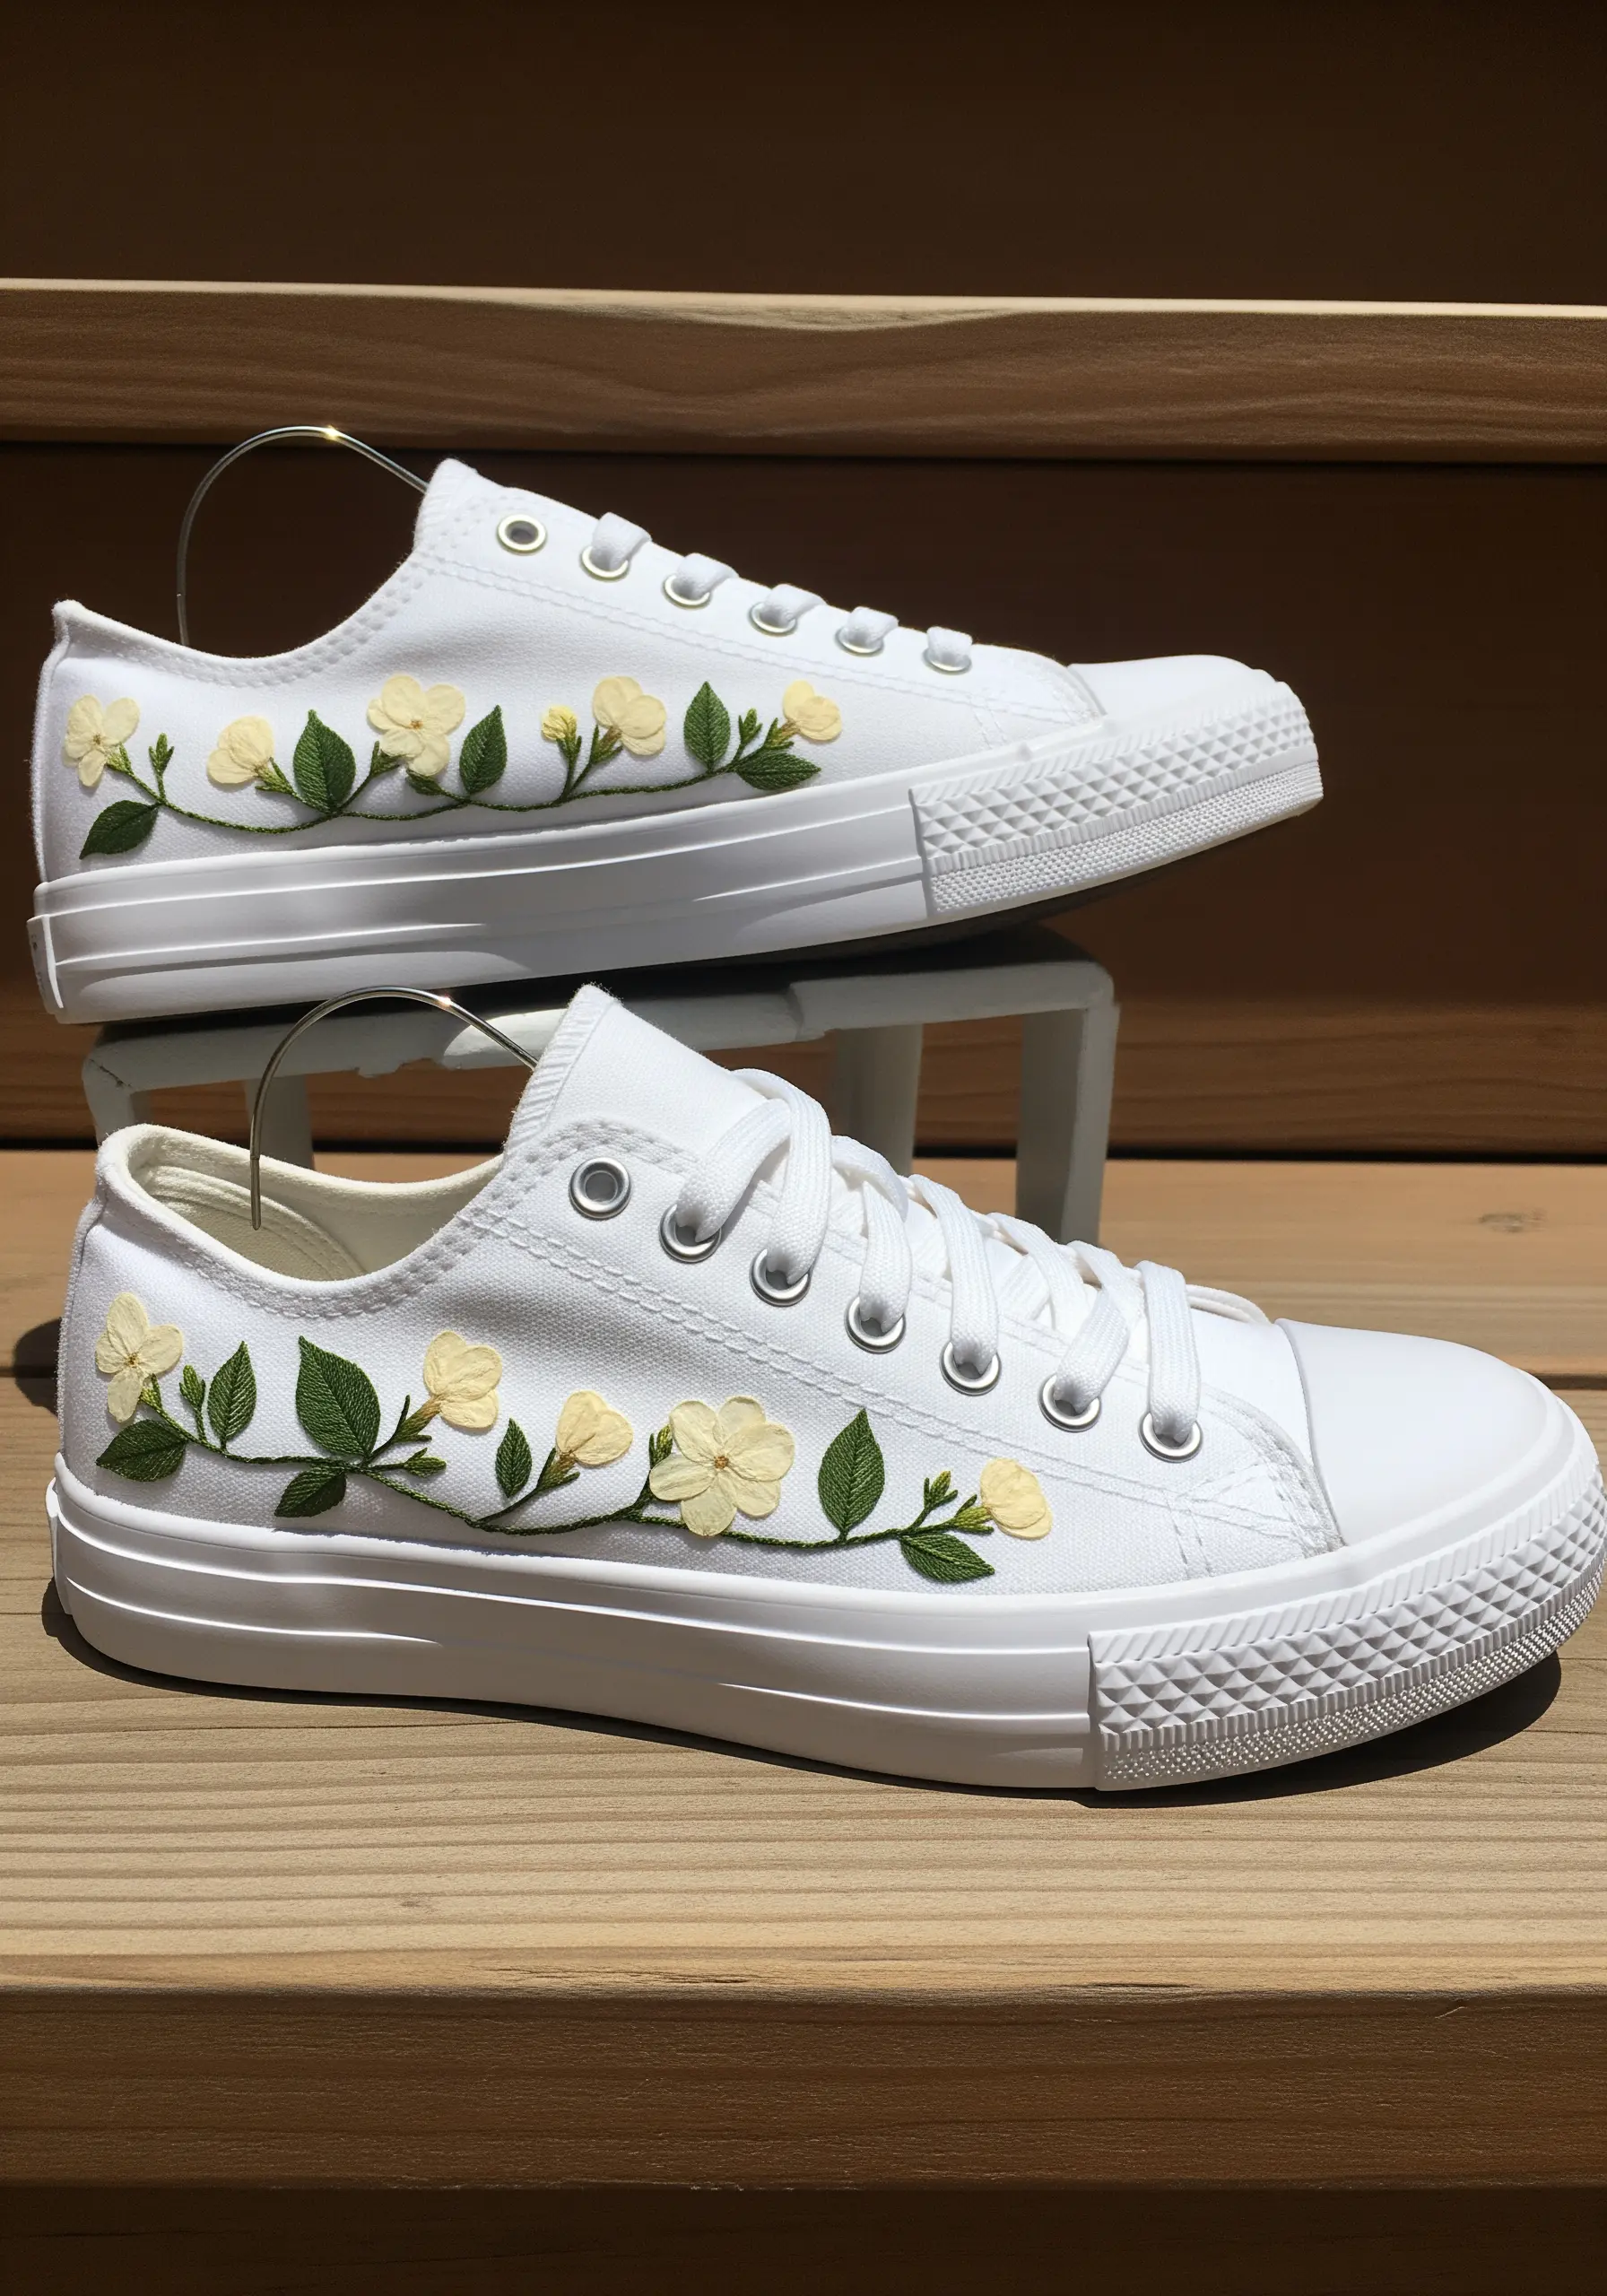
For items that will see a lot of wear, like shoes, traditional thread loops can snag and break.
Instead, use silk ribbon embroidery to create soft, durable, three-dimensional flowers. The ‘spider web rose’ stitch is perfect for this.
Create a star of straight stitches with thread, then weave the ribbon over and under the spokes until you have a full blossom.
These floral-inspired ribbon embroidery ideas create petals that are securely attached to the canvas, combining beauty with resilience.
22. Fuse Pressed Leaves with Quilting Techniques
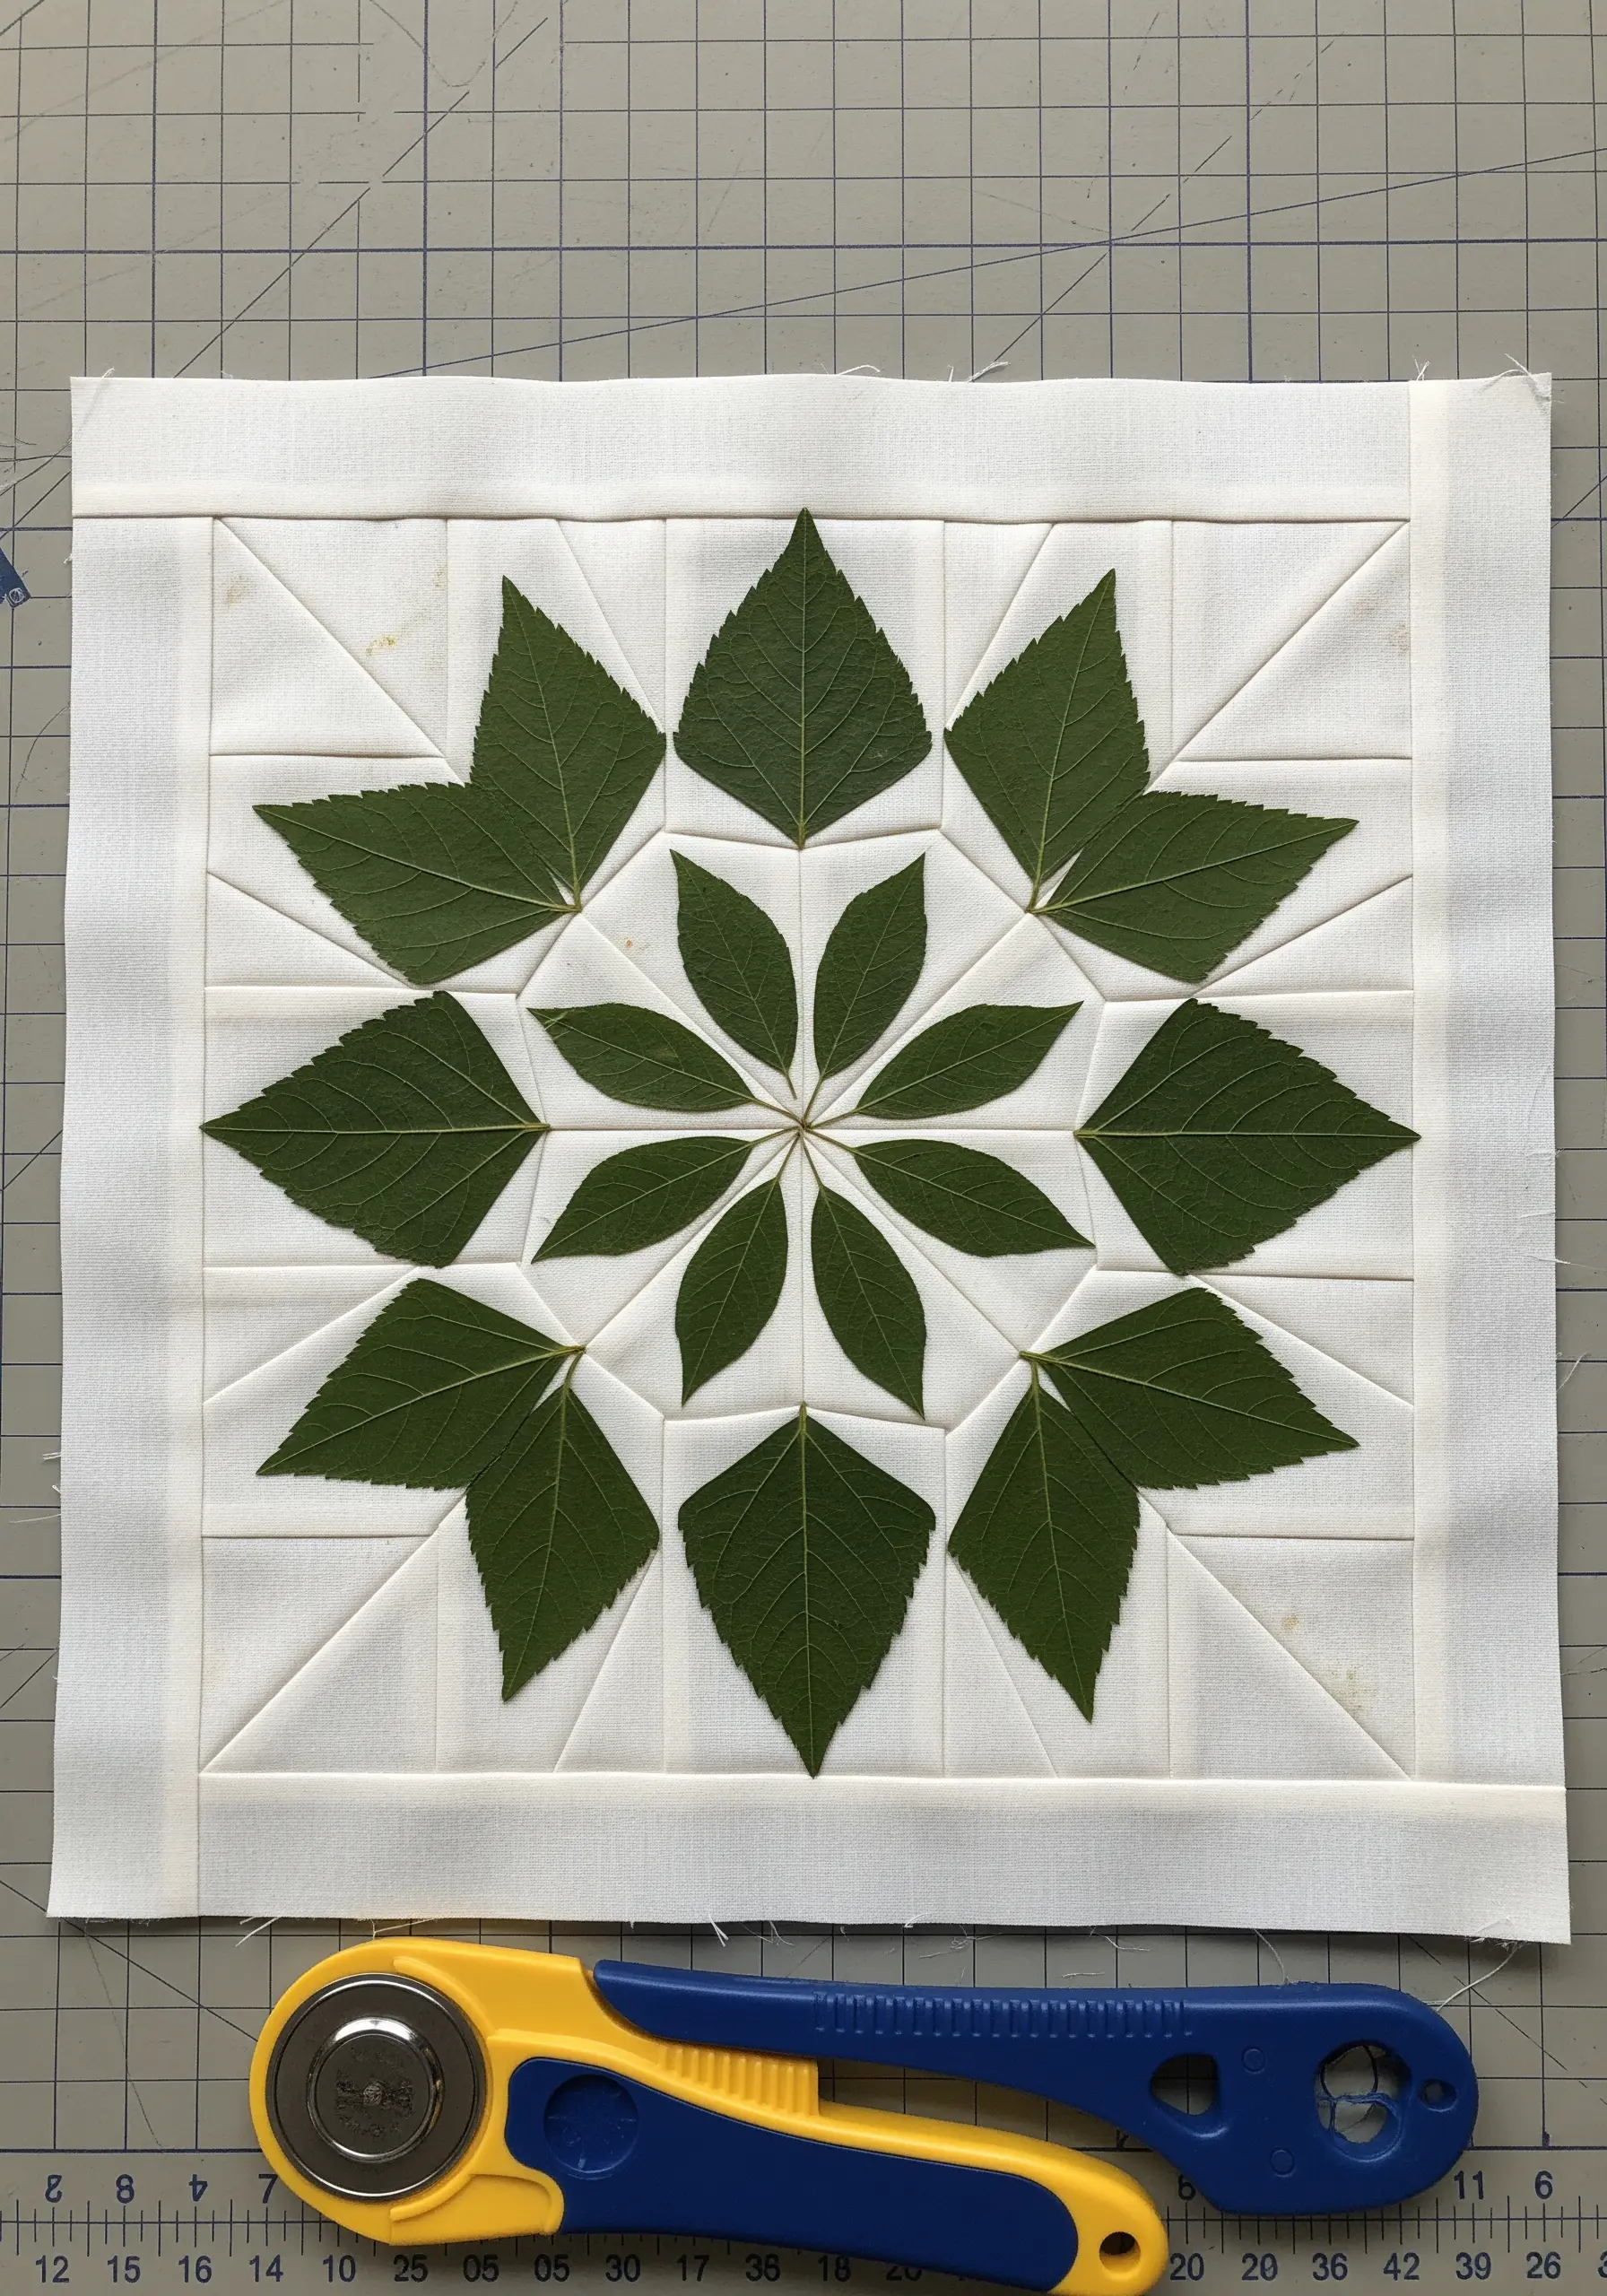
Translate the precise geometry of pressed botanicals into your textile work by combining them with quilting.
Arrange real, pressed leaves into a geometric pattern on a quilt block as your guide.
You can either appliqué fabric leaf shapes or use the real leaves as a template for a foundation paper piecing pattern.
Finish by stitching the central veins of each leaf. This unexpected fusion of disciplines creates a sophisticated, graphic design with an organic heart.
23. Craft Delicate Jewelry with Micro-Stitches

When working on a miniature scale for jewelry, your technique must be flawless.
Use a tiny hoop and a high-count fabric like evenweave linen. The tight weave allows for incredible detail.
Work with a single strand of embroidery floss to keep your stitches from looking bulky.
Consider combining a tiny, perfectly preserved rosebud with a few delicately stitched leaves. These micro-hoop embroidery collections transform your skills into wearable art.
24. Adapt Your Stitches for Textured Fabrics
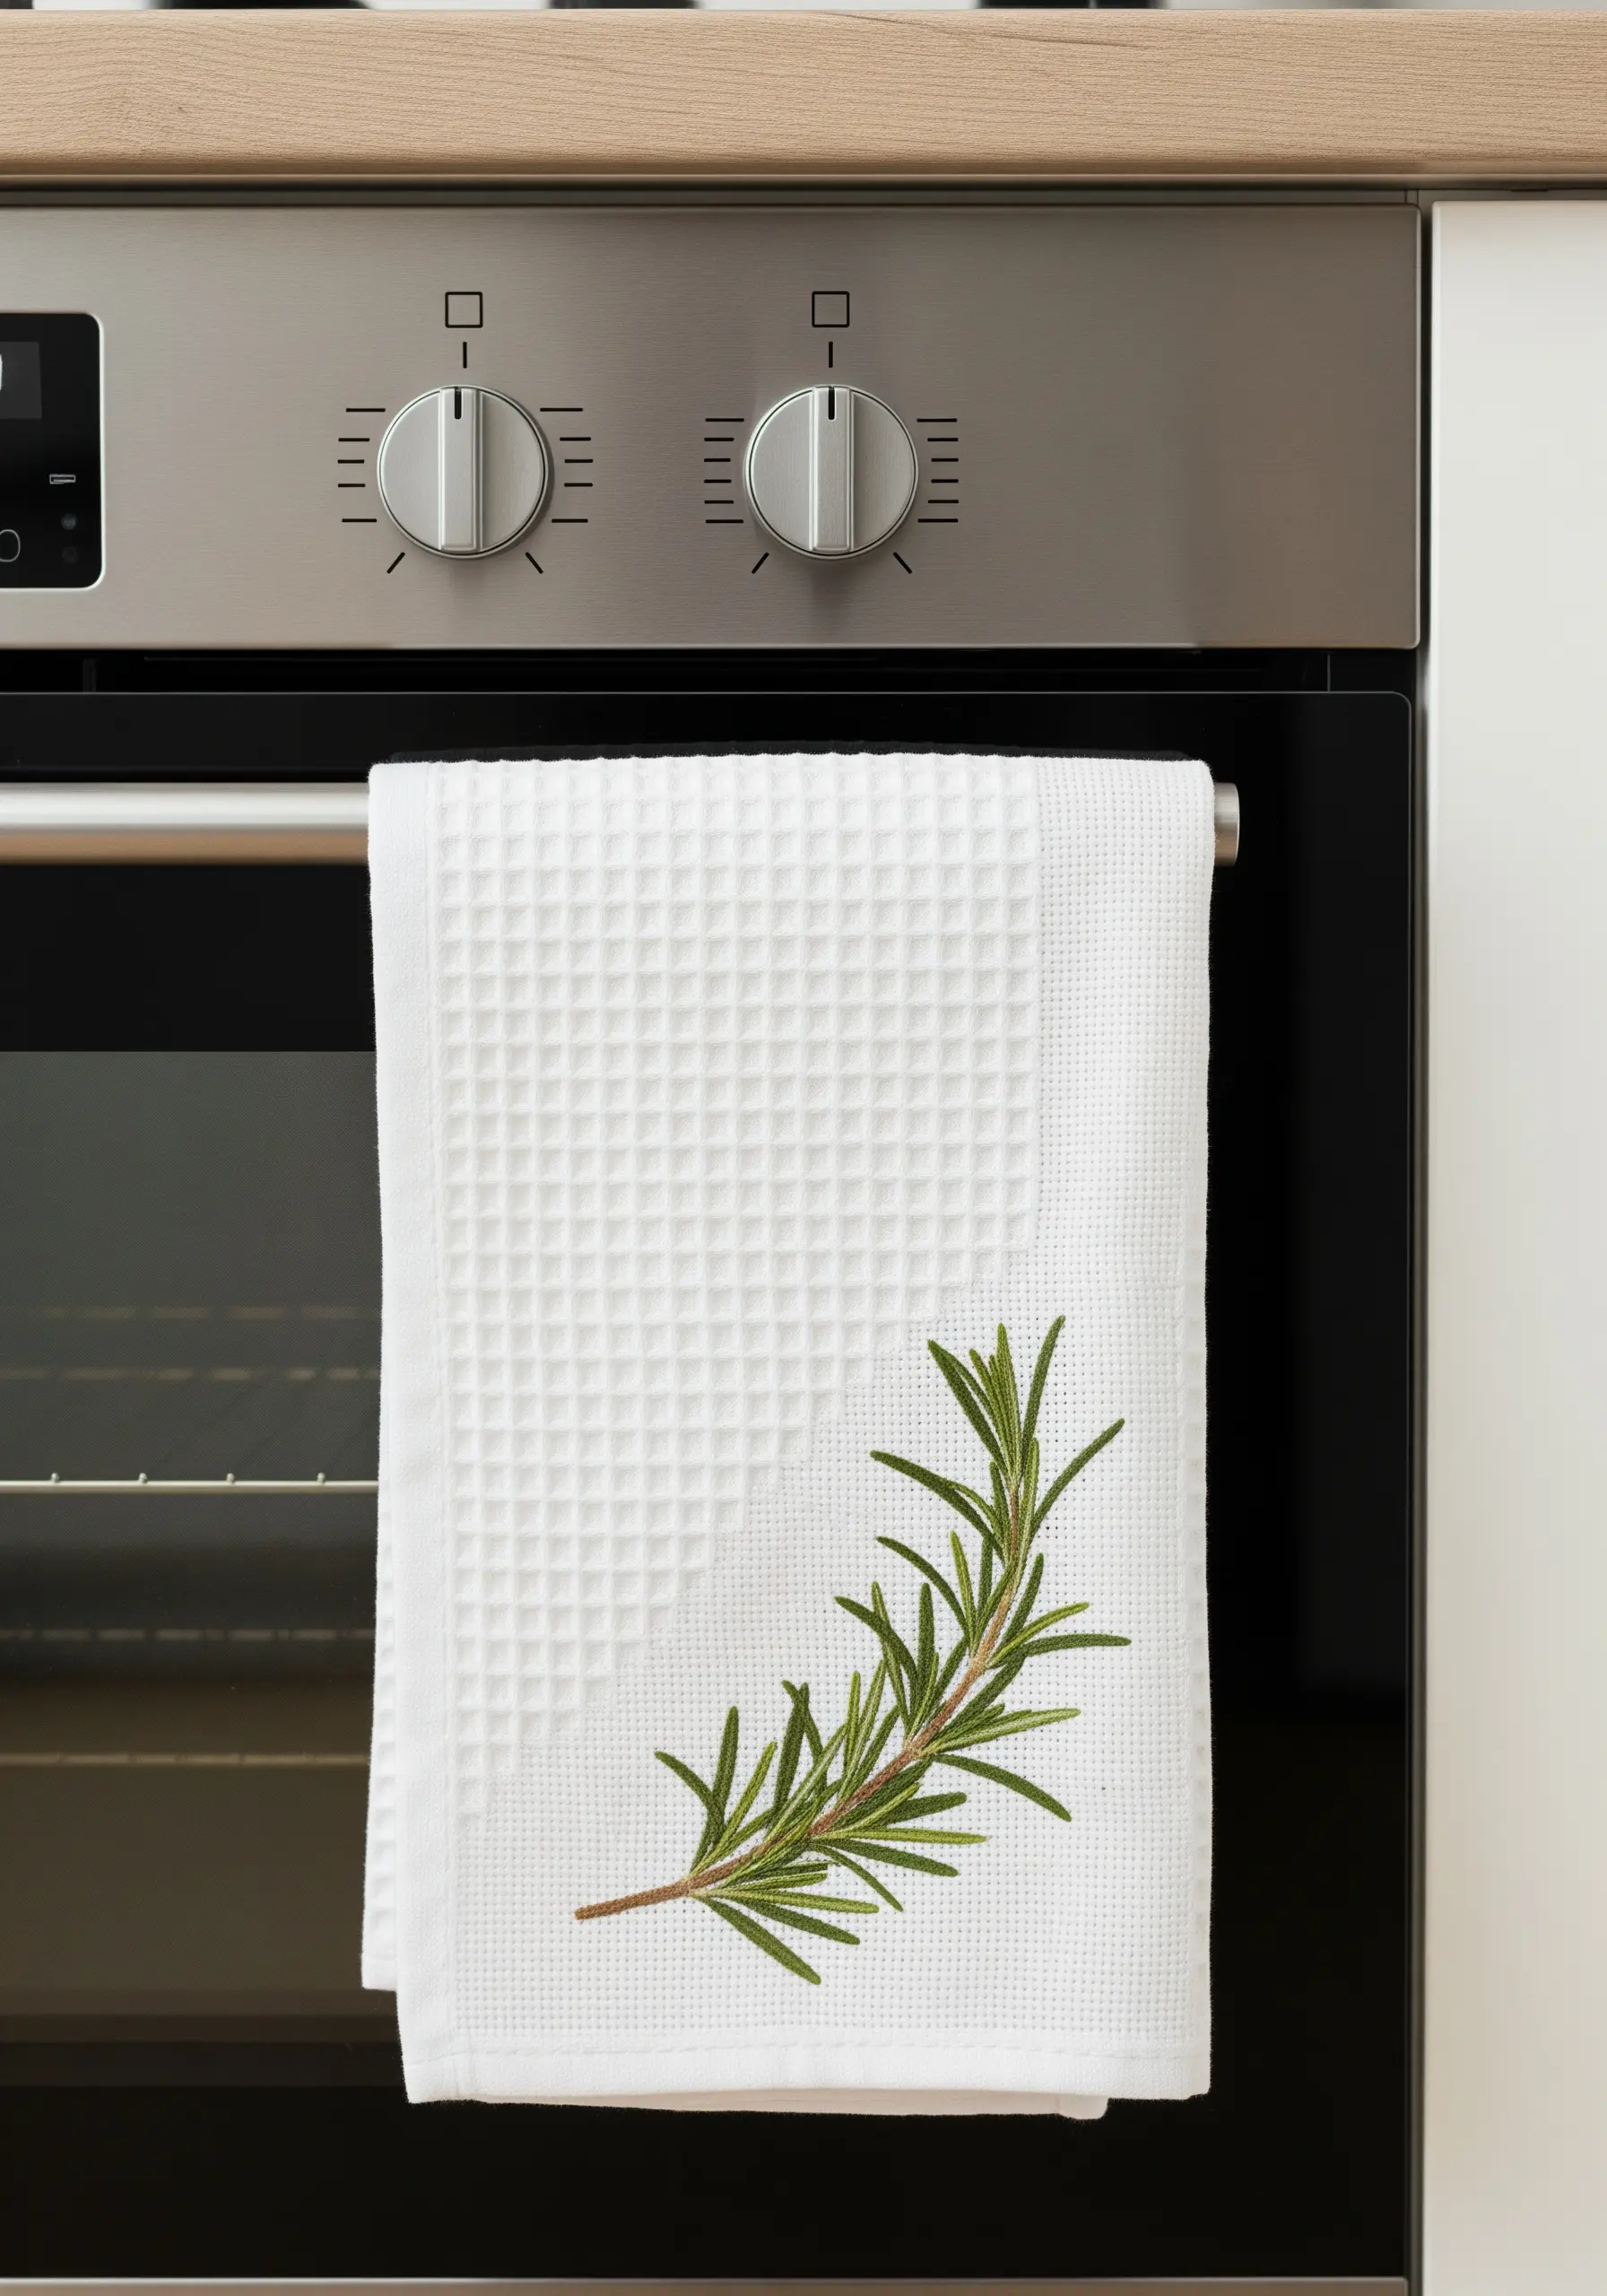
When embroidering on a textured surface like a waffle-weave kitchen towel, some stitches will get lost in the fabric’s grid.
Choose stitches that sit prominently on top of the weave. Stem stitch, chain stitch, and French knots are excellent choices.
Avoid satin stitch for large areas, as it will sink into the indentations and look uneven. By selecting the right stitches, your design remains crisp and defined, complementing the fabric’s texture instead of competing with it.
25. Stitch Directly on Paper for Elegant Tags

For a refined finish on gift tags or cards, embroider directly onto high-quality, heavy cardstock.
First, pierce your design’s stitch holes with a needle to prevent tearing the paper. Use a simple backstitch or straight stitches with one or two strands of floss.
The tension should be gentle to avoid bending the cardstock. This technique combines the crispness of paper goods with the warmth of hand-stitching, and is a perfect way to use paper art projects to elevate your gifts.
26. Frame Your Motif with Luxurious Fabric

The fabric you choose is just as important as your stitching. A bold, luxurious fabric can act as a natural frame for a single, elegant motif.
Here, a deep emerald satin makes the soft, creamy white of the magnolia appear even more luminous.
When your fabric is this rich, keep the embroidery focused. A single, perfectly executed flower using subtle shading is far more impactful than a busy, cluttered design.
Add a simple piped border to complete the high-end, bespoke look.
27. Master Metallics for a Touch of Glamour

Working with metallic thread can be frustrating, but the results are worth it. The key is to reduce friction.
Use a needle with a slightly larger eye, and work with shorter lengths of thread (no more than 12 inches) to prevent tangling and fraying.
For the smoothest lines, try couching: lay the metallic thread on the surface and tack it down with a second, finer thread in a matching color.
This technique gives you complete control, resulting in flawless, shimmering accents that elevate any design, especially on formal table linens.


