

Let’s rethink the boundary between paper and thread. For so long, they have felt like separate worlds—one of crisp folds and sharp edges, the other of soft textures and flowing lines. But what happens when you invite them to collaborate?
You discover a new language for your embroidery. Suddenly, you can create dimension without dense stitching, achieve perfectly clean lines with ease, and build sculptural forms that would be impossible with thread alone. Paper isn’t just a surface to stitch on; it’s a partner in your design.
In these ideas, you won’t find complicated instructions. Instead, you’ll find simple, elegant ways to use paper to add depth, structure, and a distinctly modern feel to your work. This is your invitation to experiment, to cut, to layer, and to see what new stories your needle and thread can tell when they have a new friend to play with.
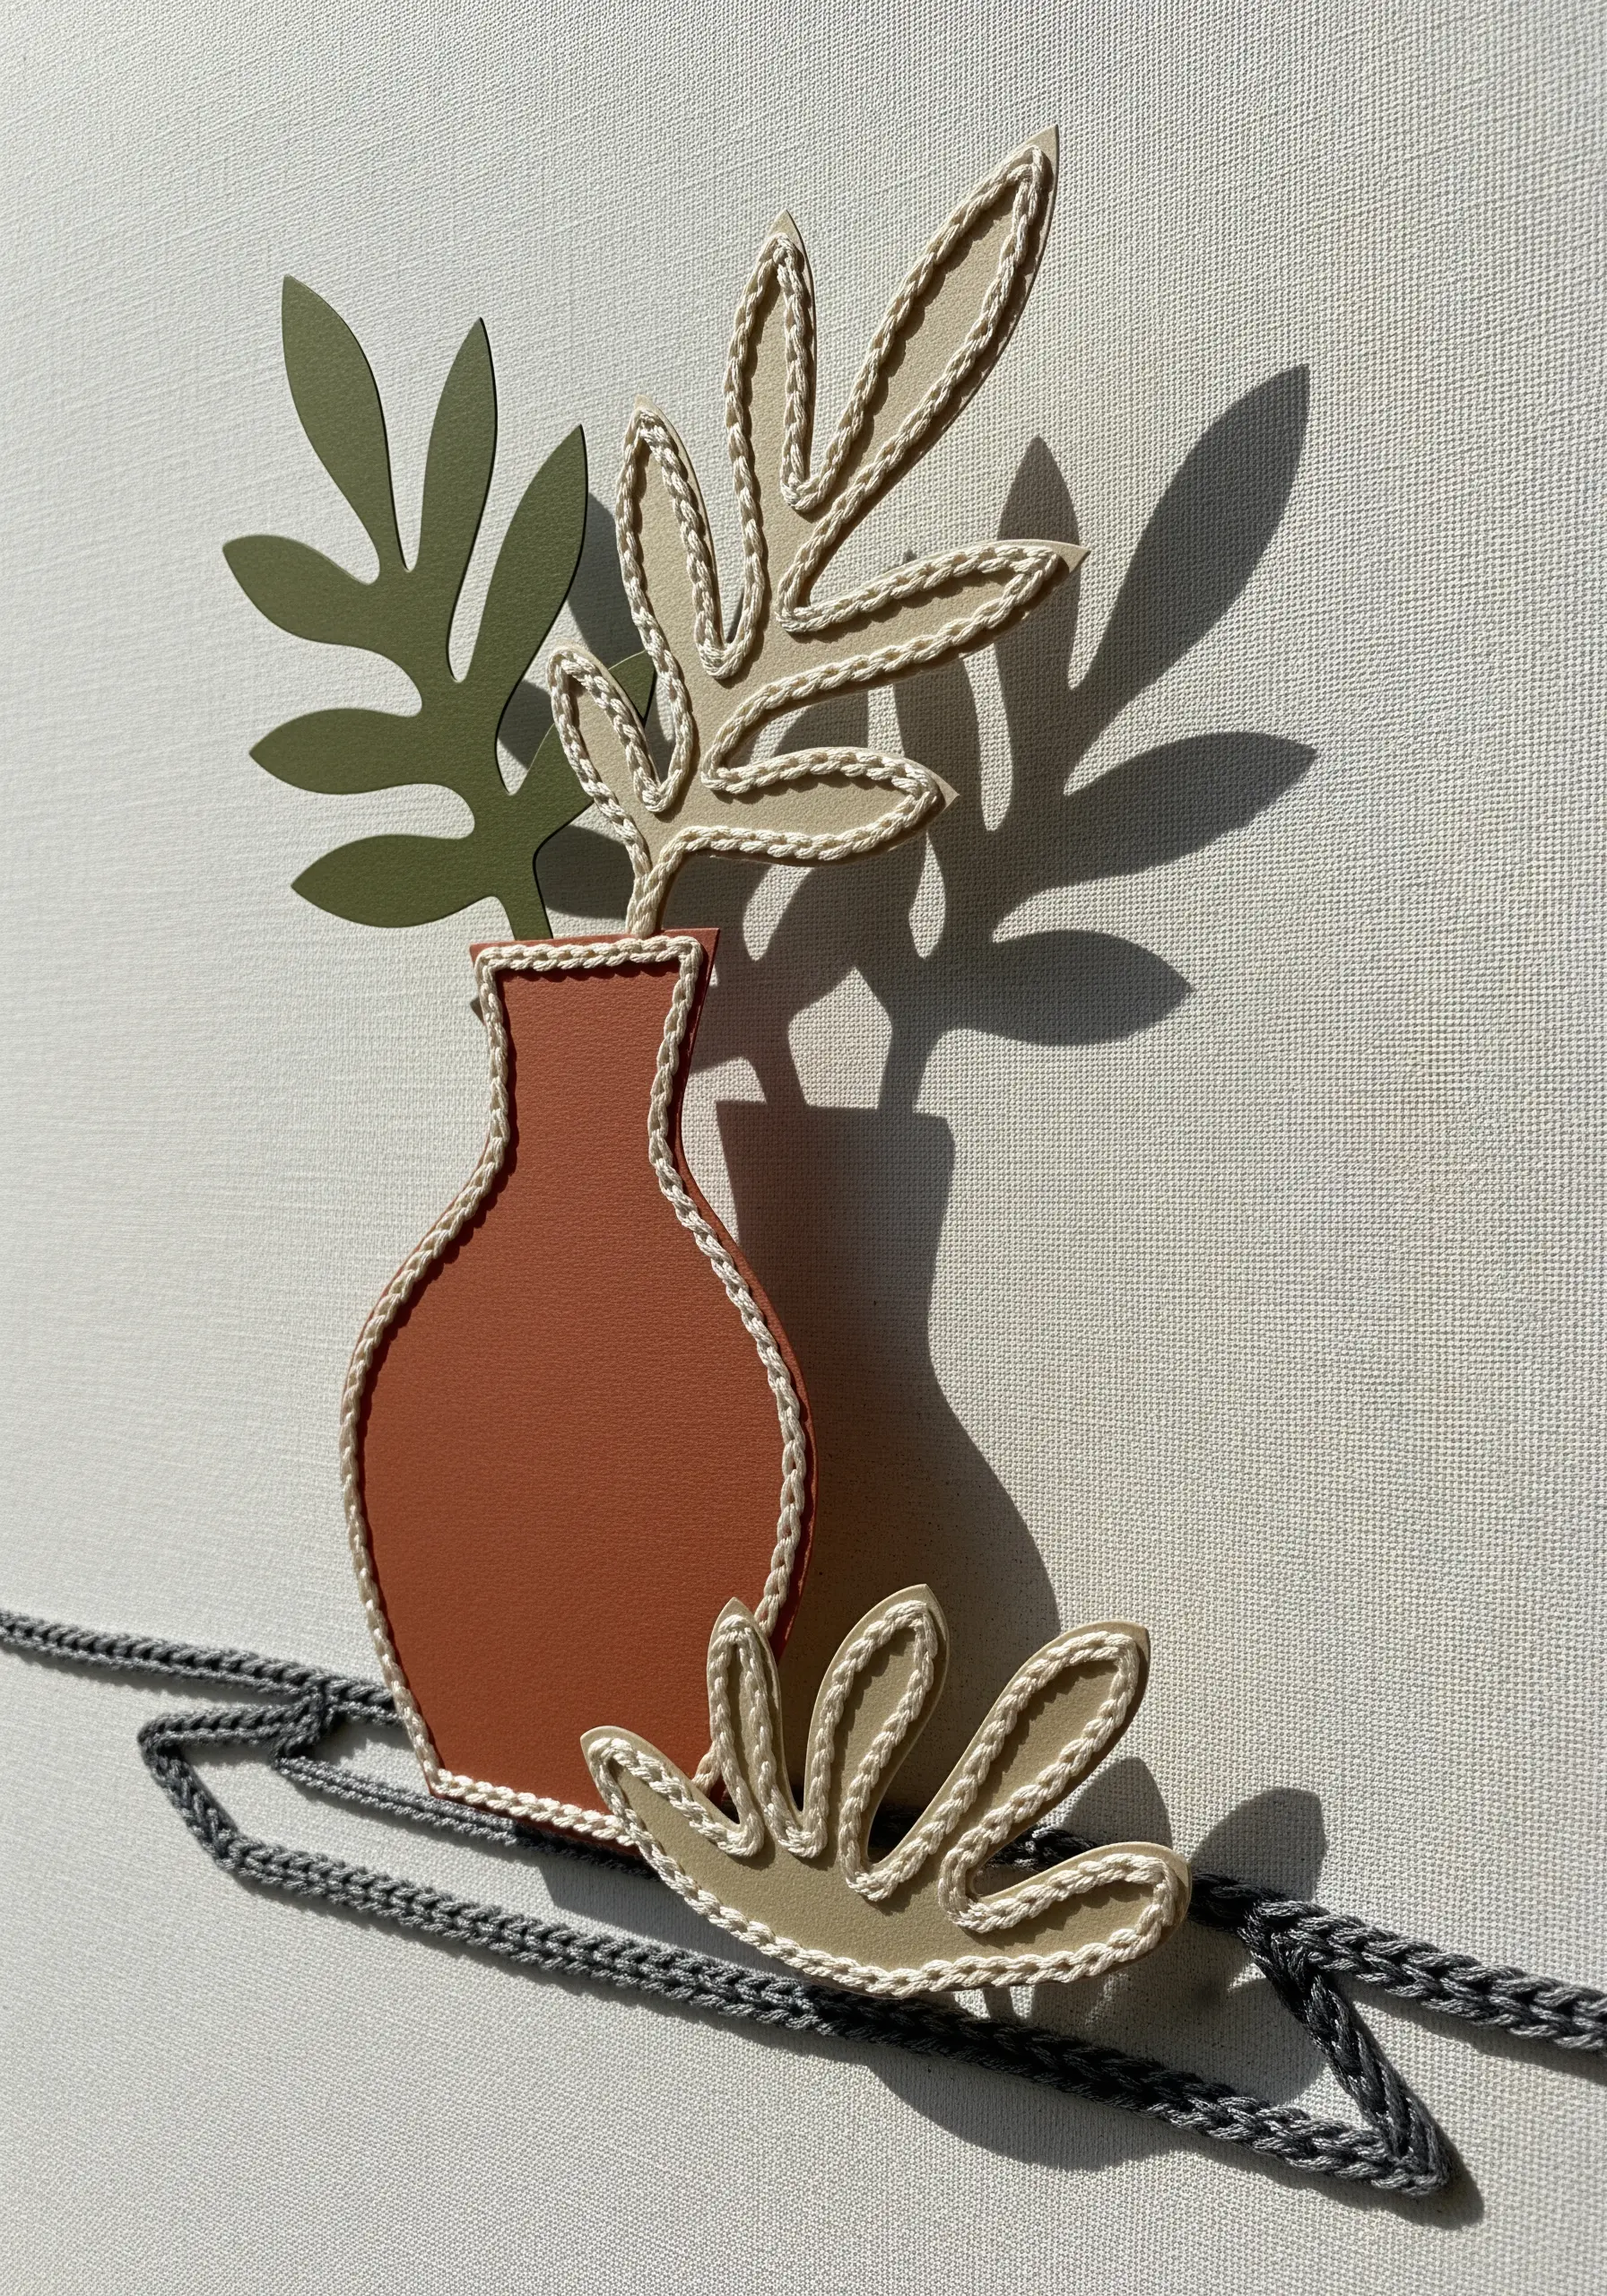
1. Layer Paper Cutouts for Botanical Depth
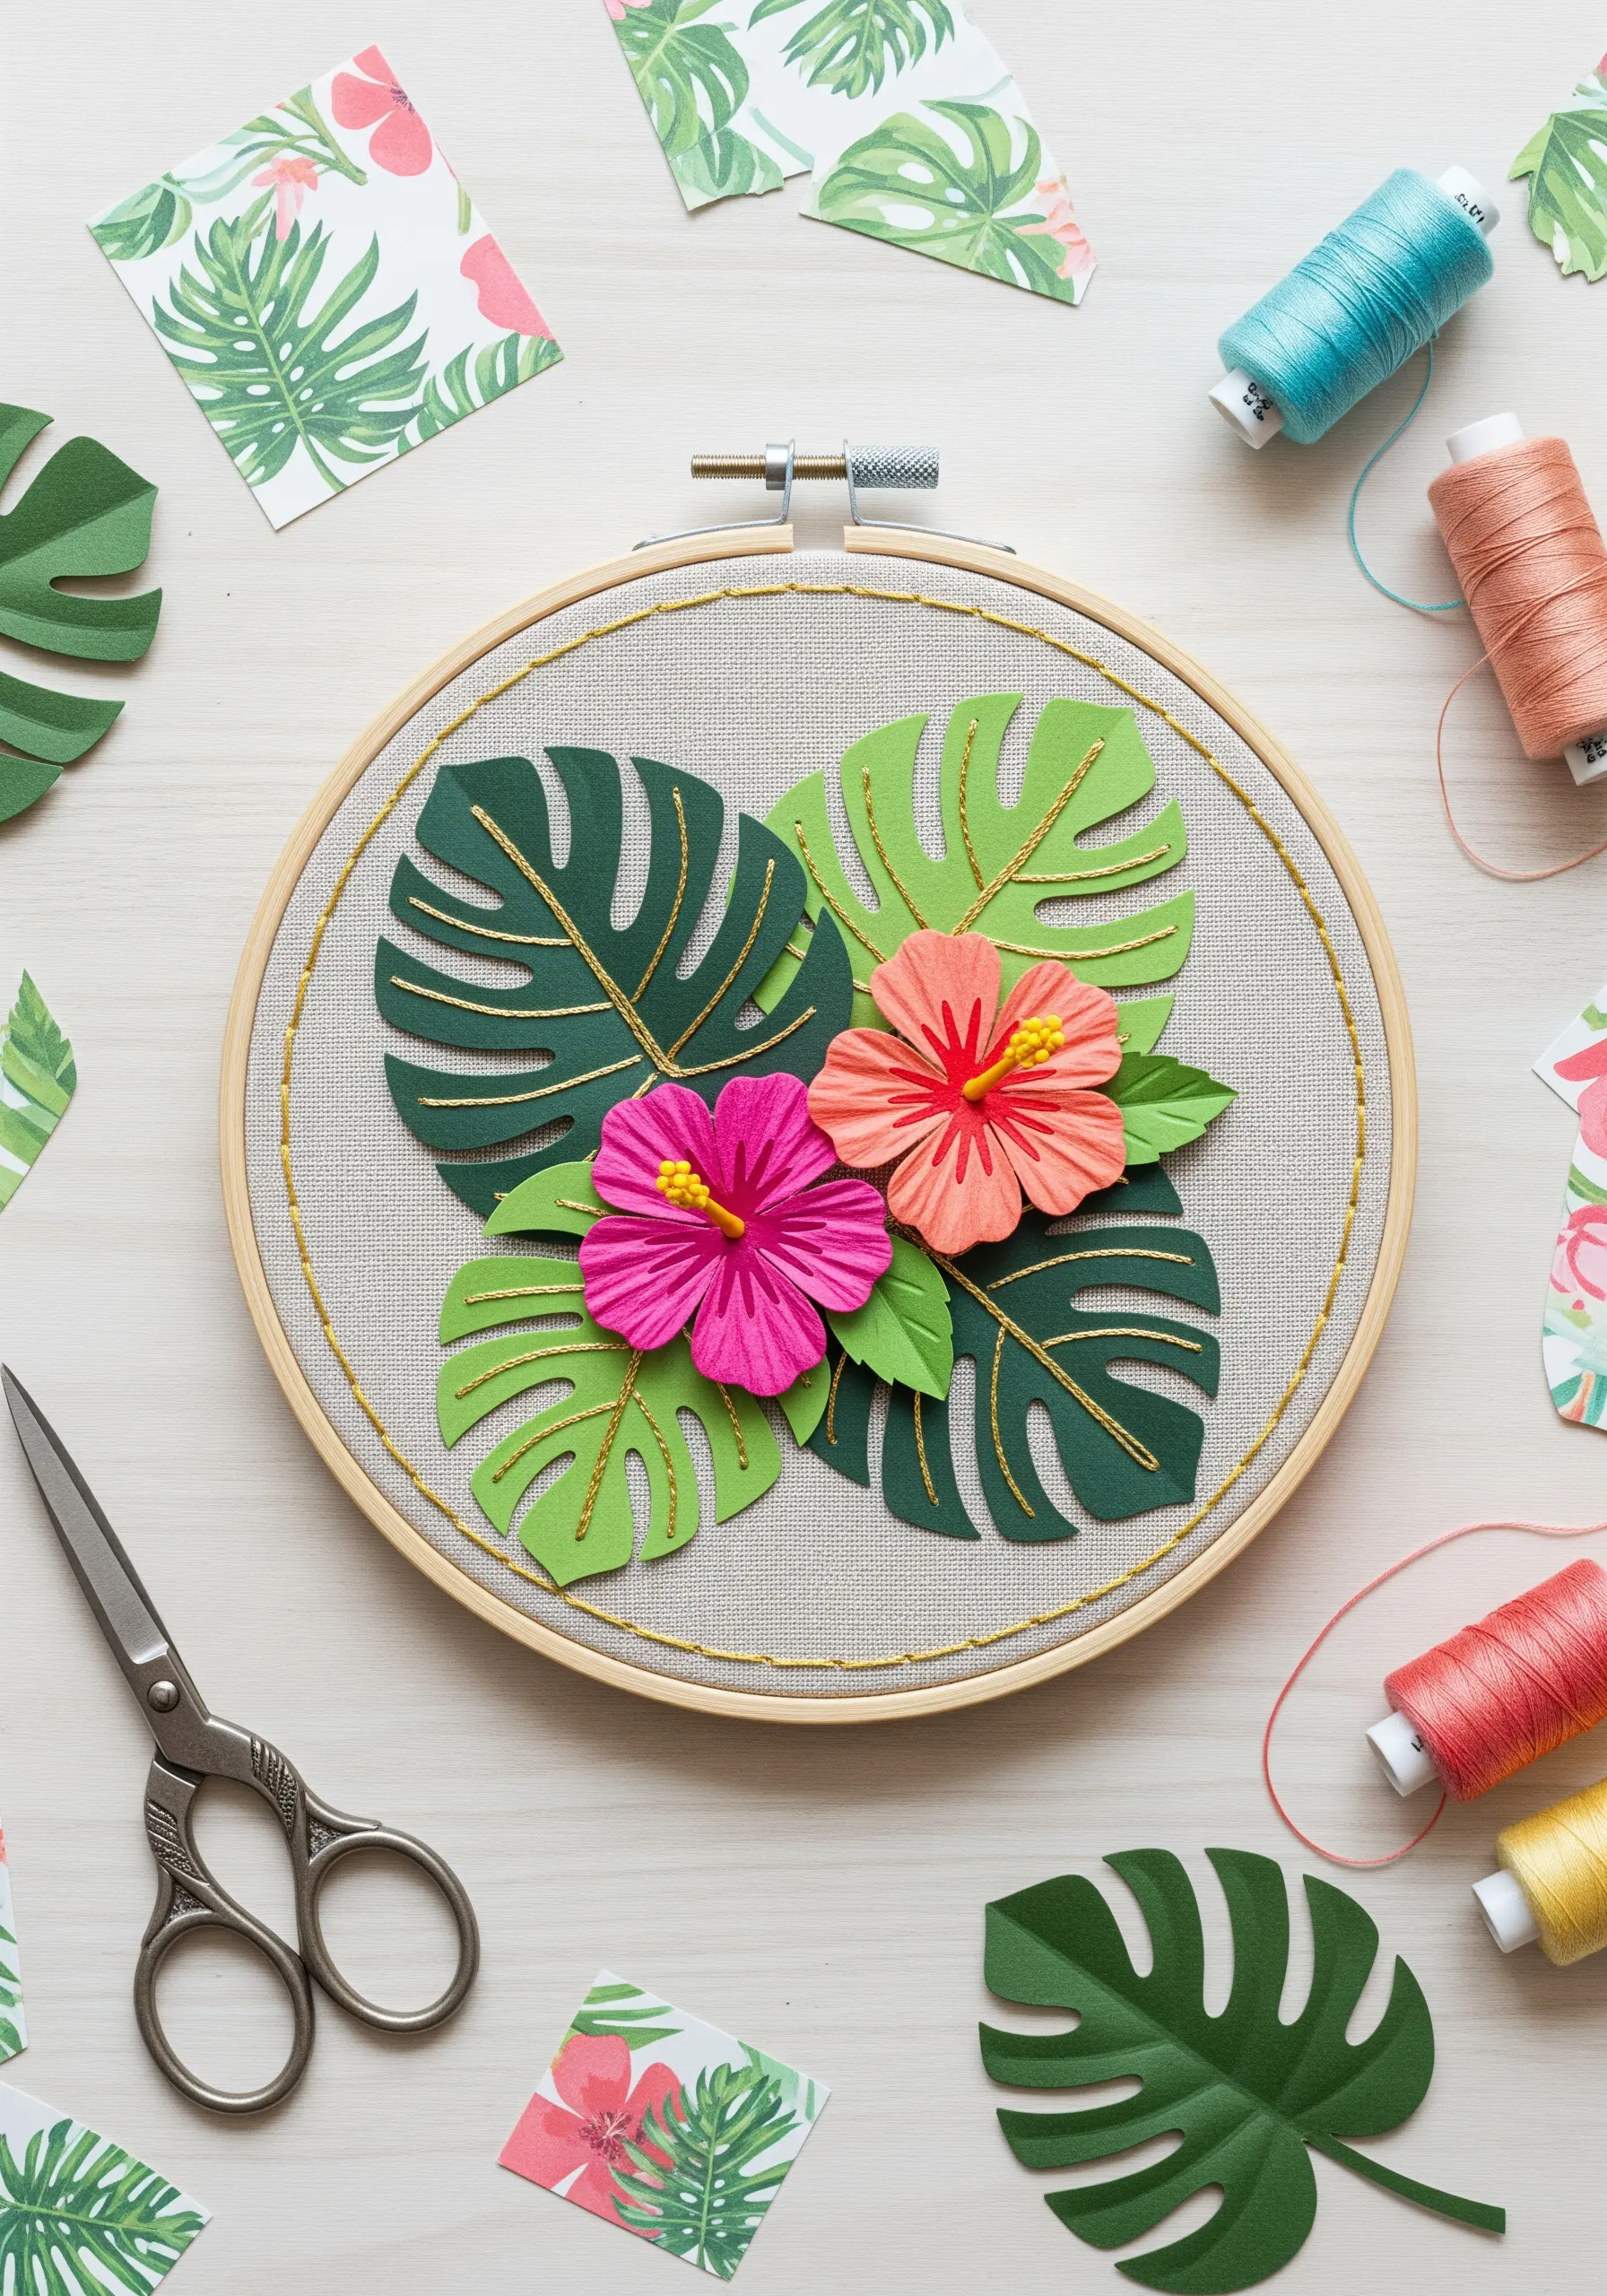
Create a lush, dimensional scene by layering precise paper cutouts onto your fabric base.
Use high-quality cardstock in varying shades of green for the leaves to suggest light and shadow.
Secure each paper piece with a tiny dot of fabric glue, then outline the edges using a couching stitch with metallic gold thread for a clean, graphic finish.
This technique combines the crisp edges of paper with the soft texture of thread, making your tropical leaf embroidery designs feel both modern and handcrafted.
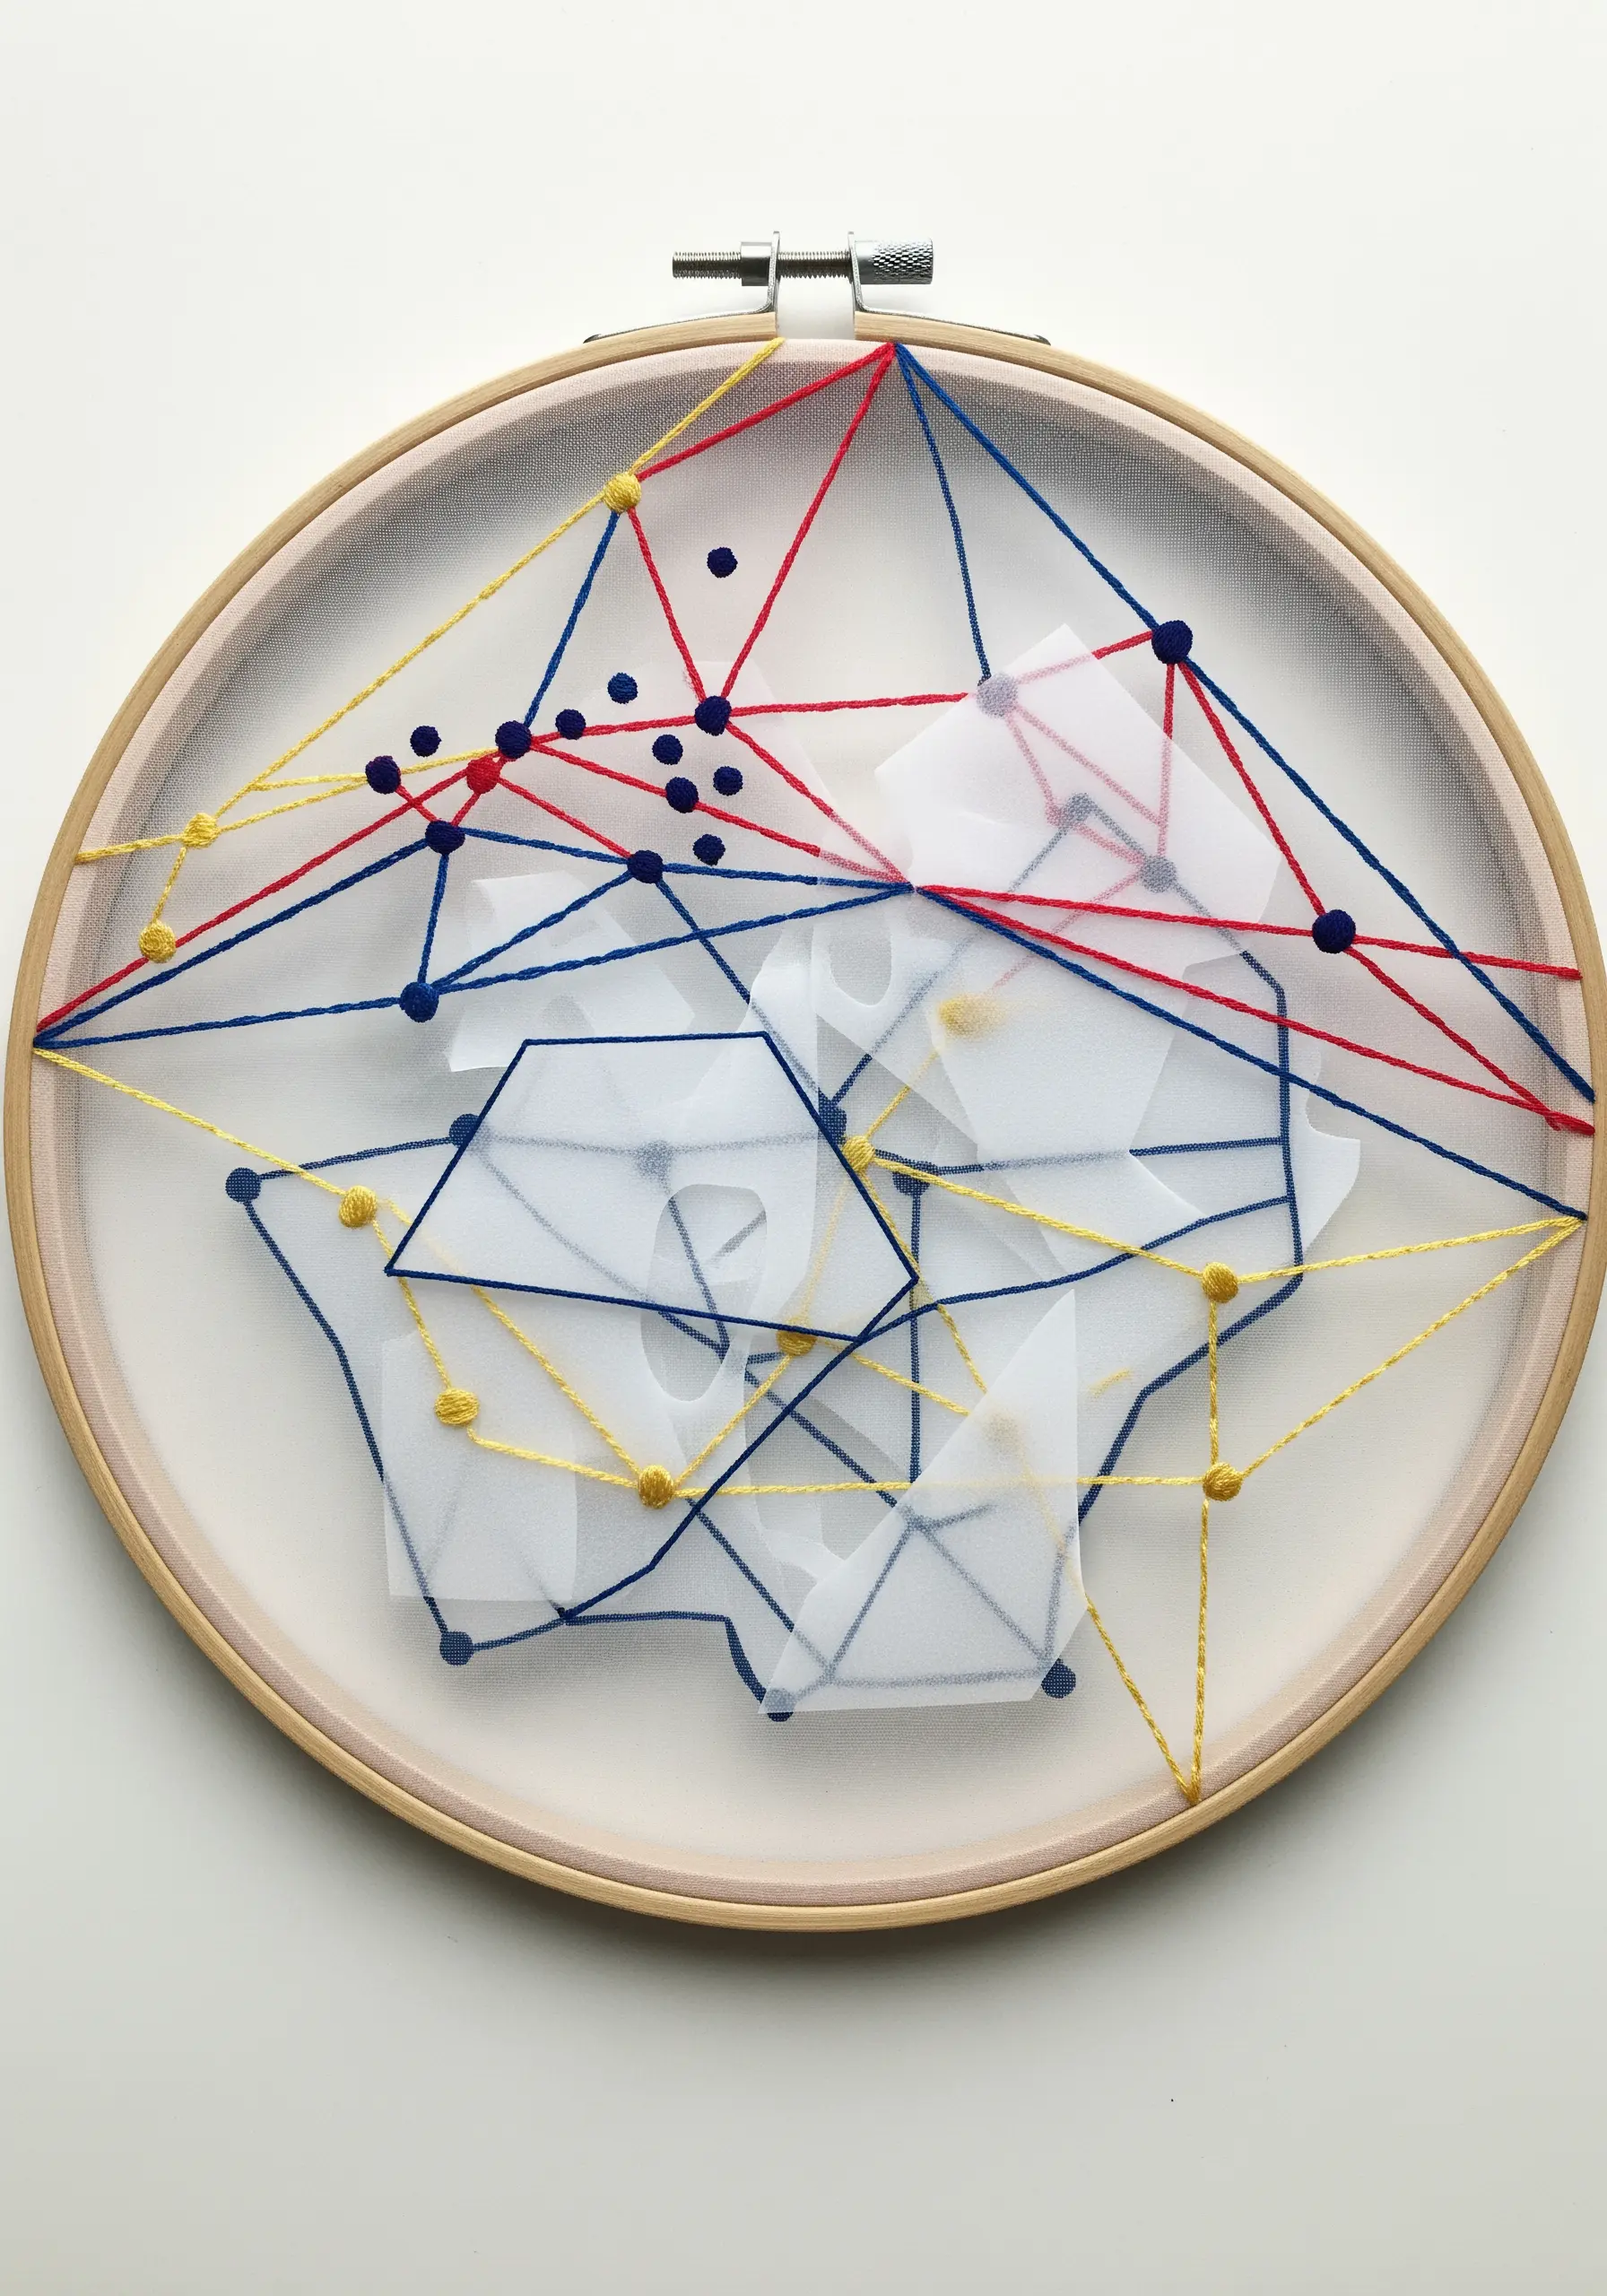
2. Construct with Geometric String Art
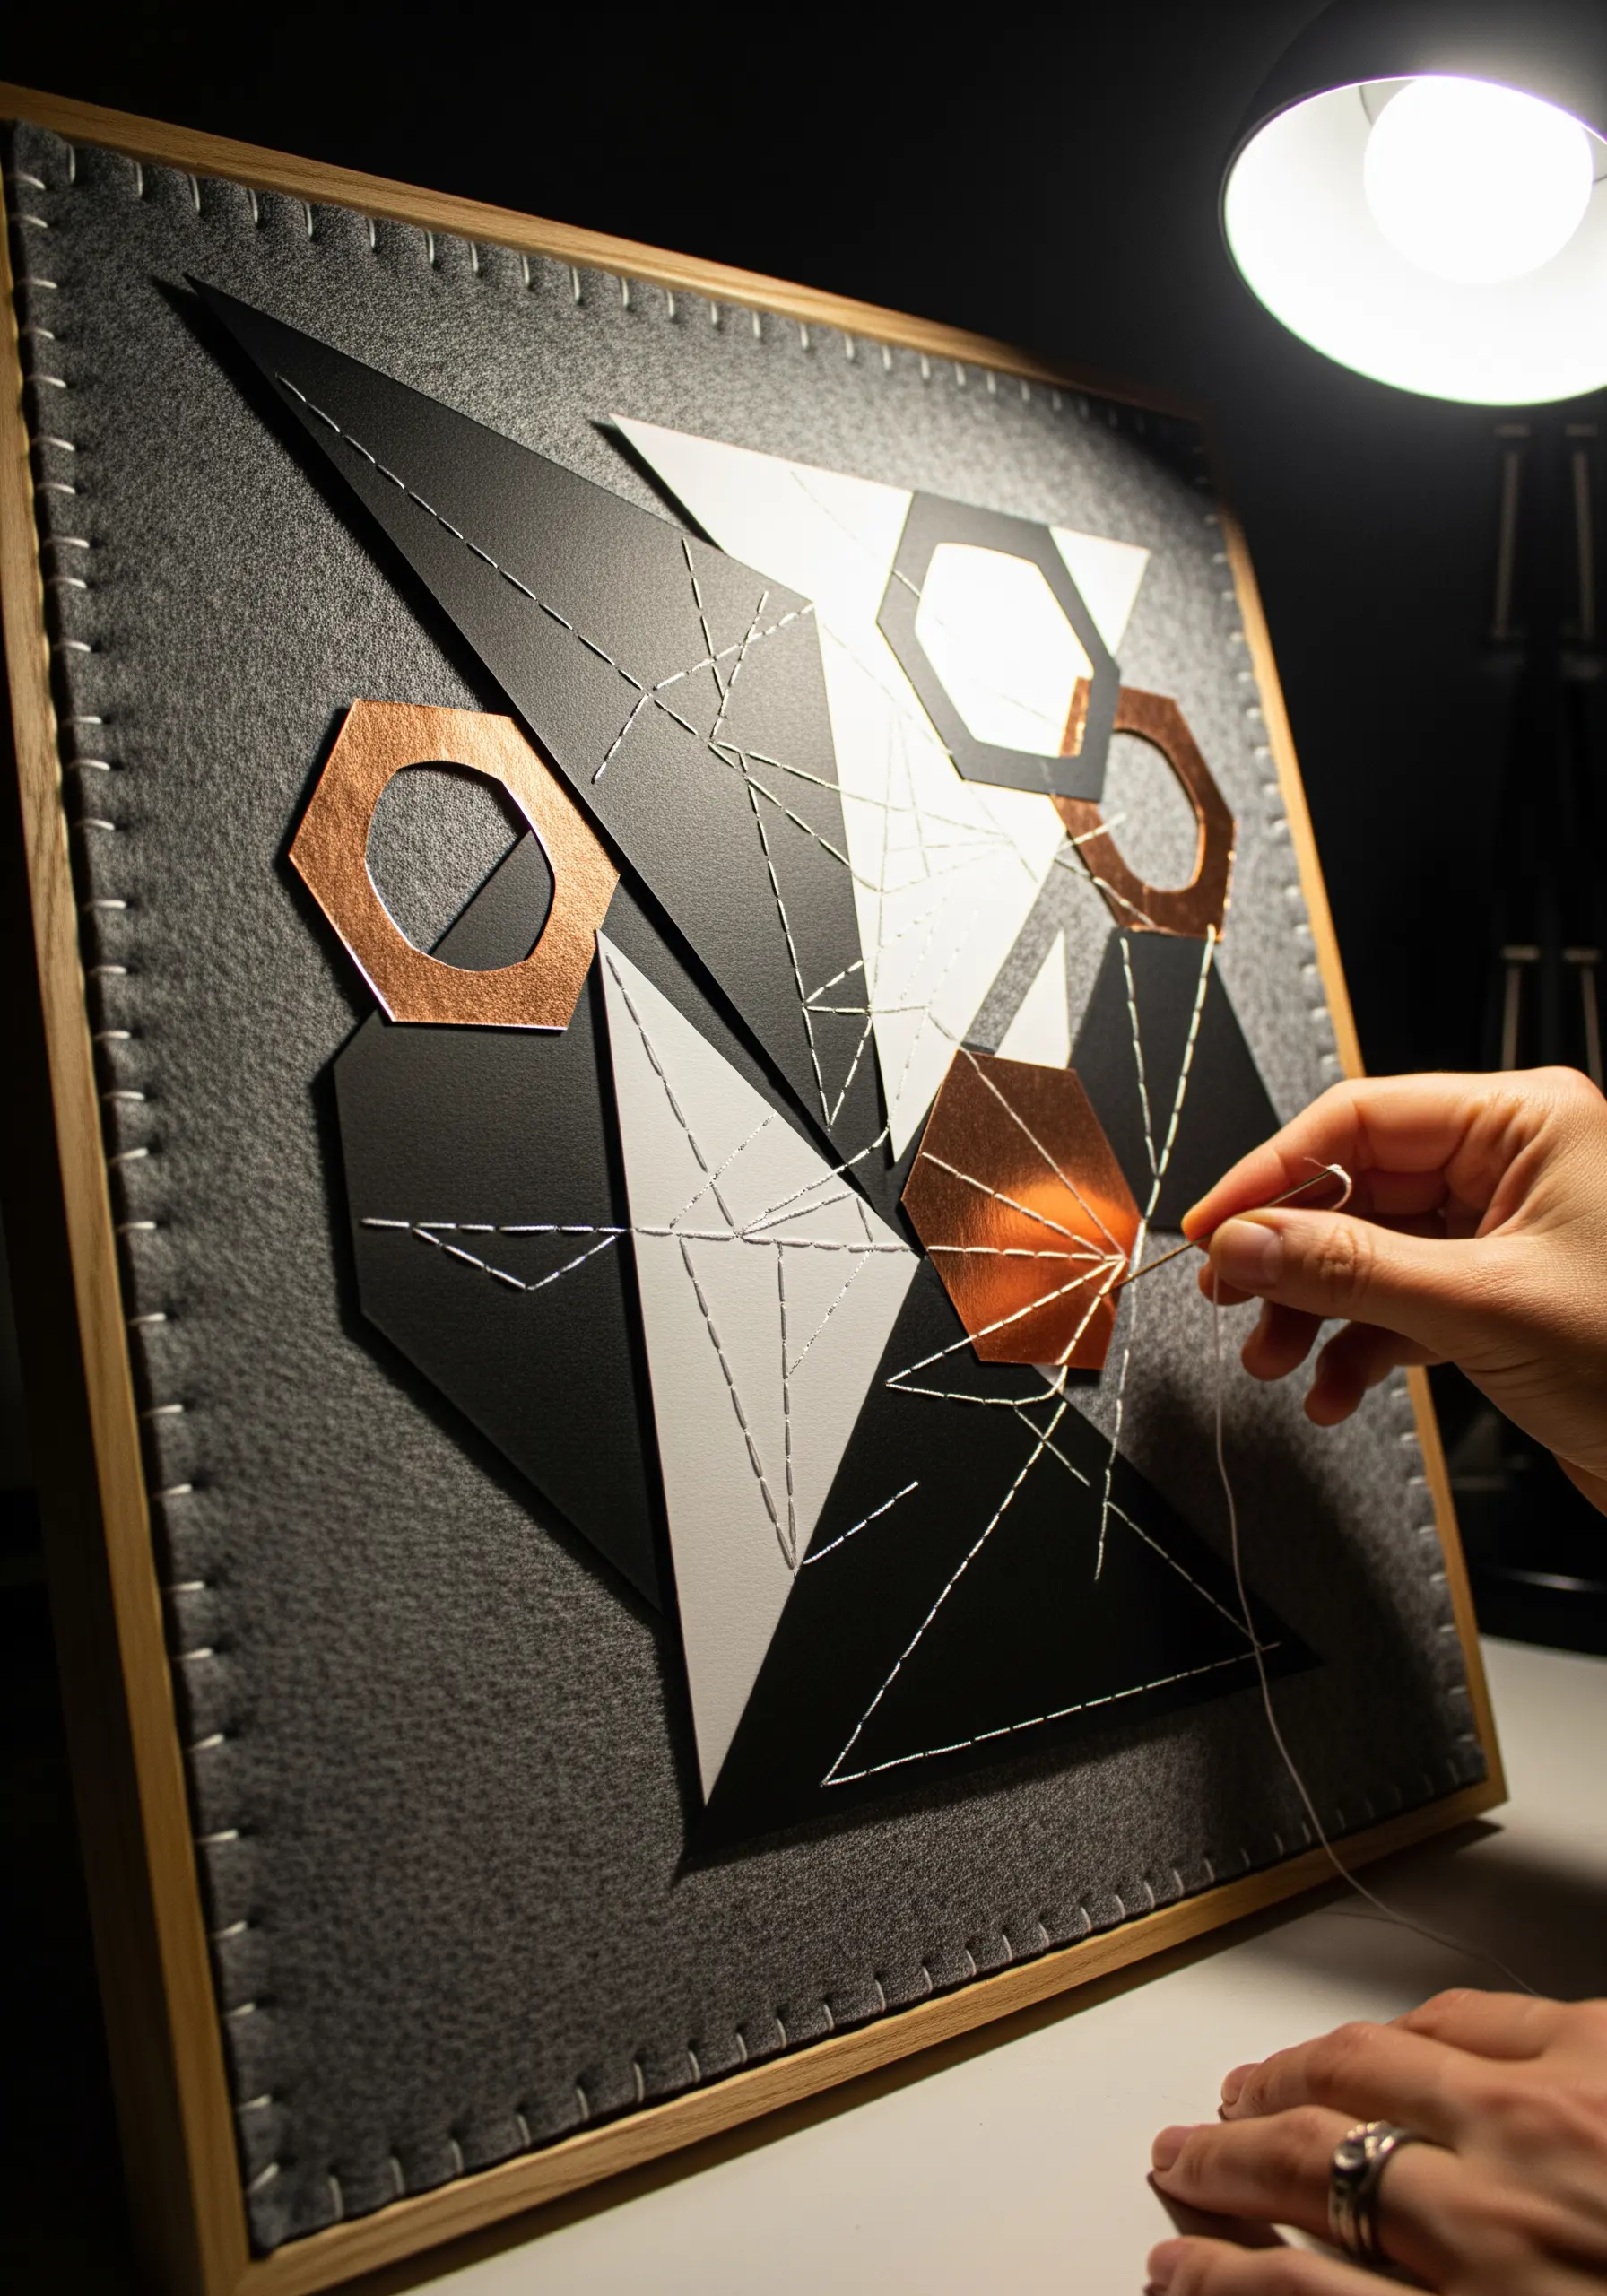
Transform a simple felt-covered board into a piece of architectural art by combining paper shapes and thread.
Arrange geometric cutouts—triangles, hexagons, and sharp angles—to create a dynamic composition.
Use a strong, fine thread like a pearl cotton to stretch between points, piercing the paper and felt to create lines of tension.
This method allows you to explore structure and form, turning simple materials into striking geometric hoop art designs that feel both engineered and artistic.
3. Illuminate Celestial Scenes with Paper Appliqué

Give your celestial embroidery a focal point by using a paper cutout for the moon or central planet.
Choose a textured watercolor paper or a pearlescent vellum for the moon to give it a subtle, ethereal glow against a dark navy cotton or linen.
Stitch the constellations around it with a fine metallic silver thread, using tiny sequins or seed beads for the stars to catch the light.
This mix of matte paper and shimmering thread elevates your moon and stars embroidery ideas, creating a sophisticated cosmic narrative.
4. Build 3D Architectural Vignettes
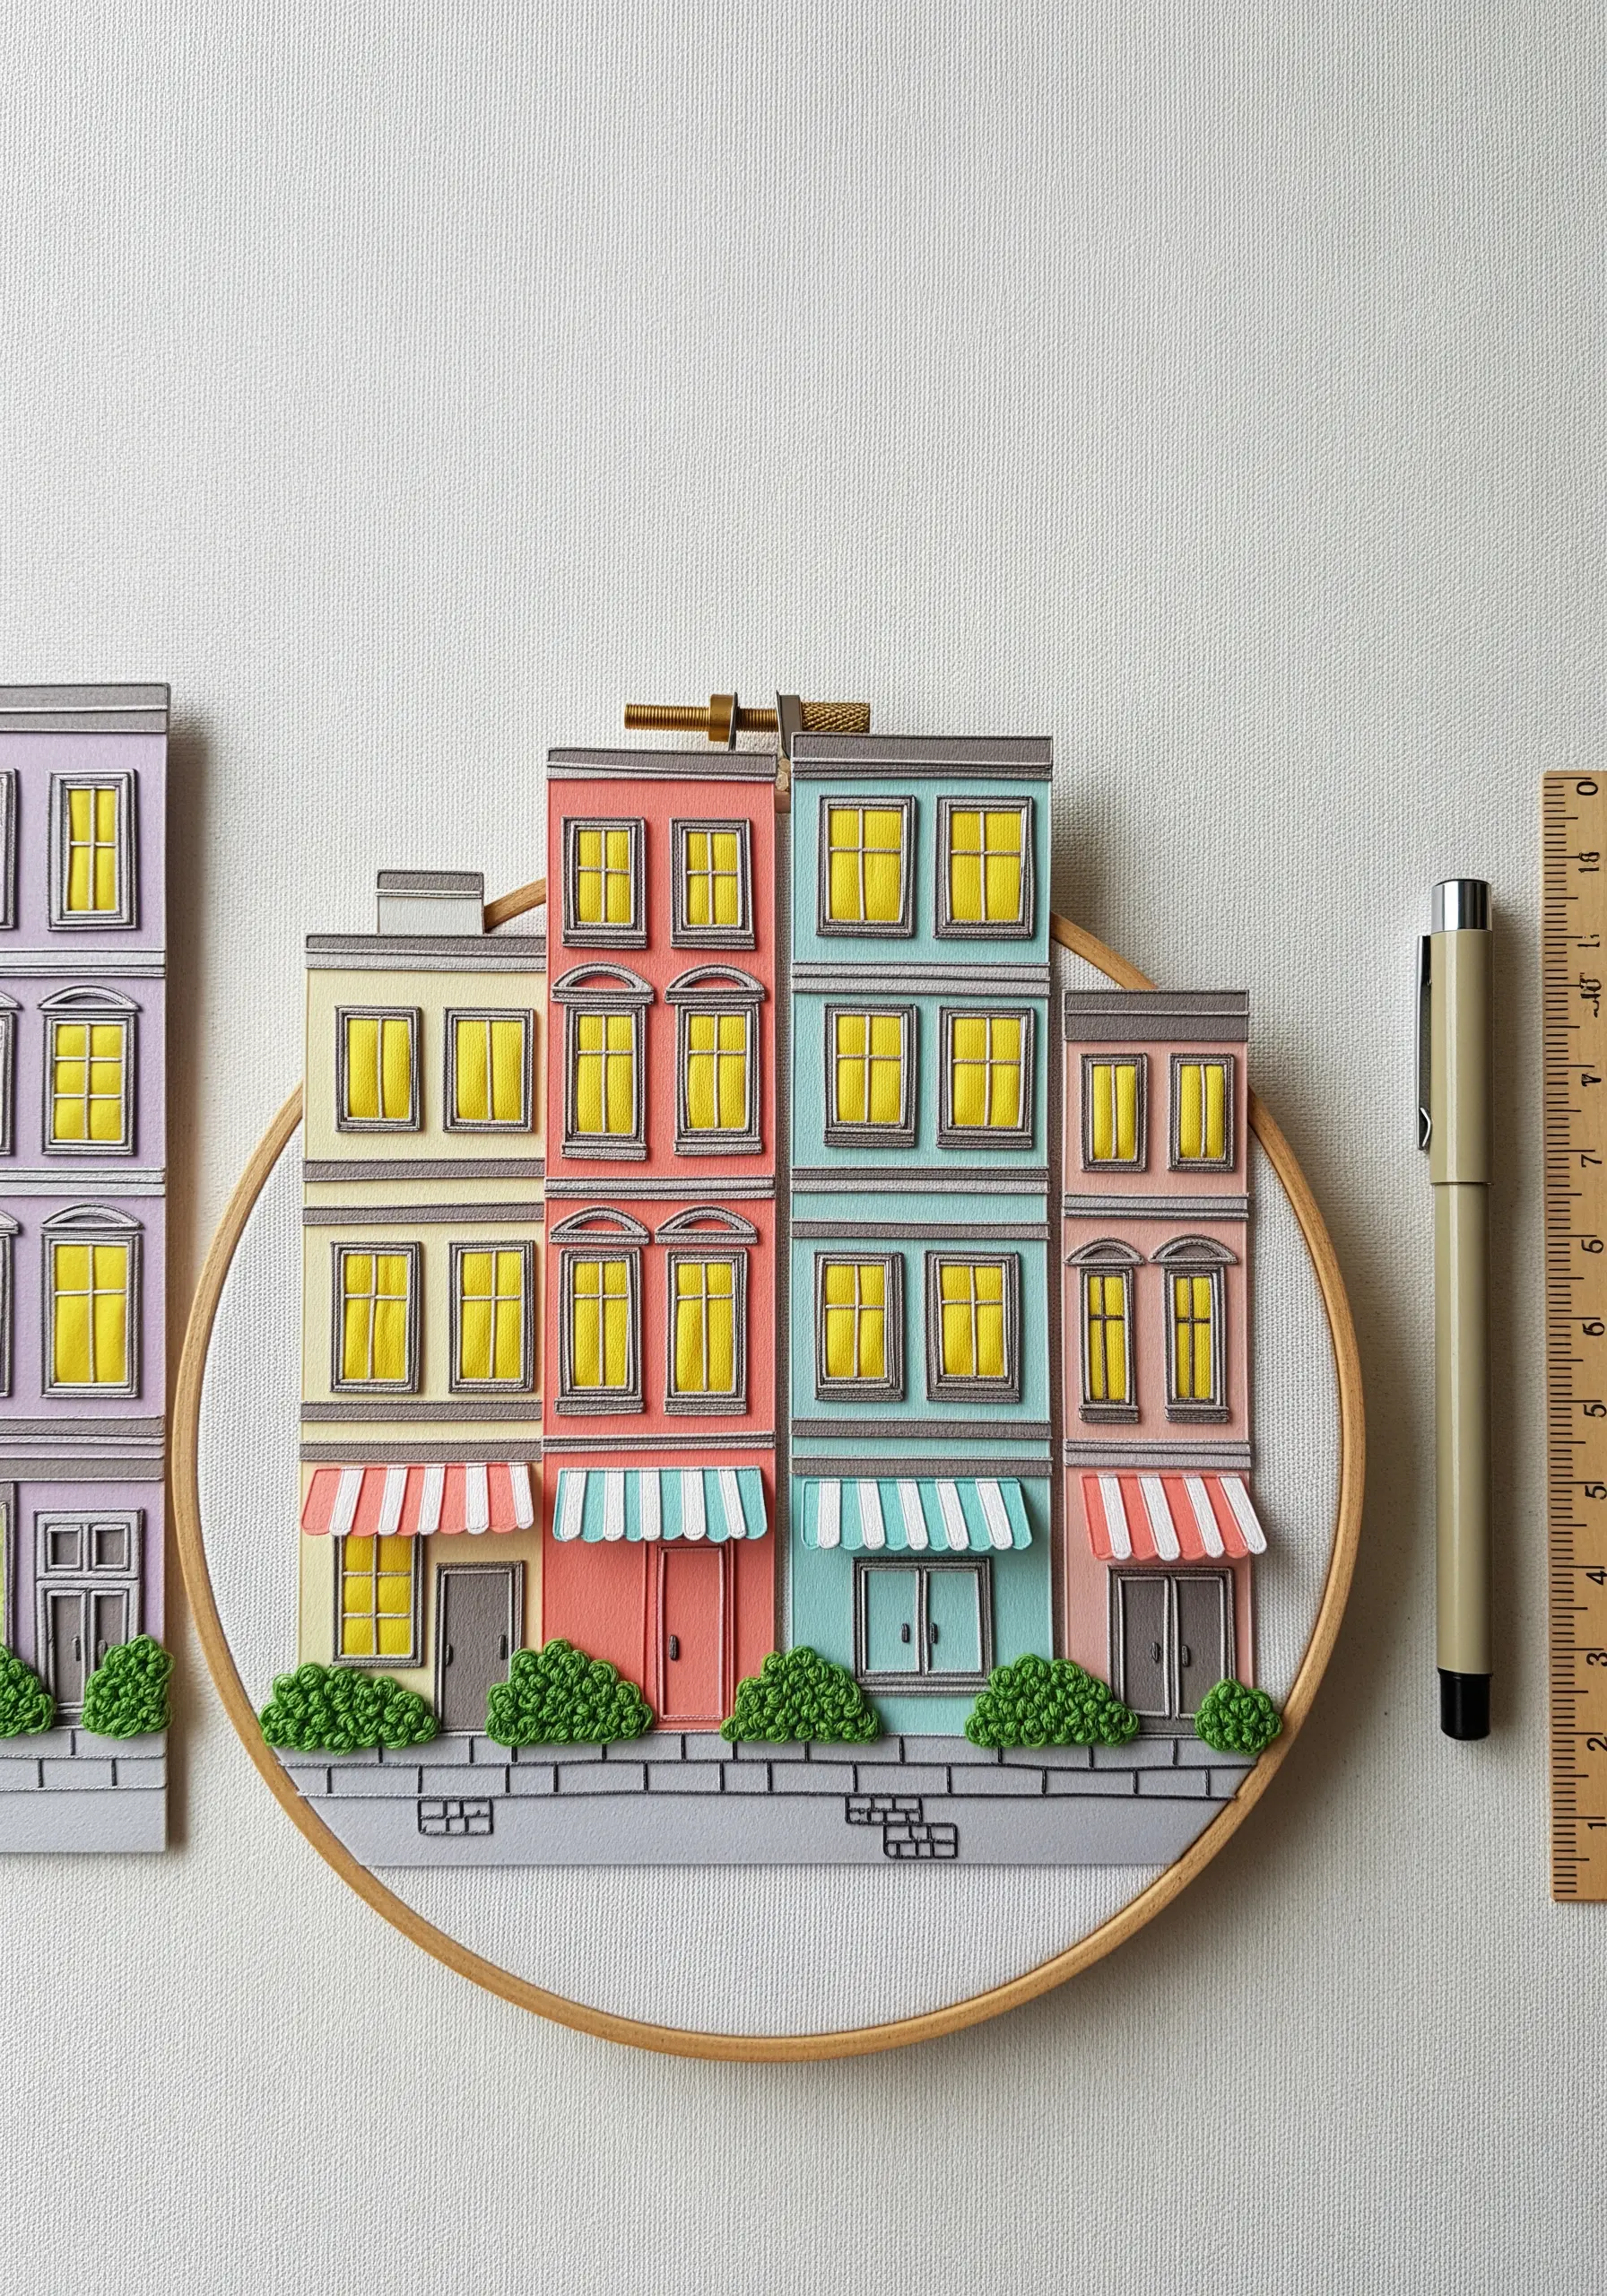
Create charming cityscapes by layering folded and cut paper to build dimensional facades.
Use a heavy cardstock for stability and score the fold lines cleanly for crisp, architectural edges.
Instead of stitching the whole building, use thread selectively. Fill the windows with a vibrant yellow satin stitch to create the illusion of glowing light from within.
This focused use of embroidery draws the eye and adds a touch of warmth to your miniature world, perfect for tiny apartment office decor.
5. Sculpt with Paper Quilling and Thread

Combine the sculptural forms of paper quilling with delicate embroidery to create an explosion of texture.
First, secure a simple paper silhouette to your fabric.
Then, build up the design by adding quilled paper coils, flowers, and leaves, securing them with small, discreet stitches or glue.
Integrate embroidered elements like French knots and leaf stitches among the paper shapes to soften the look and seamlessly blend the two mediums, creating dynamic modern thread portraits.
6. Weave Paper for a Textured Canvas
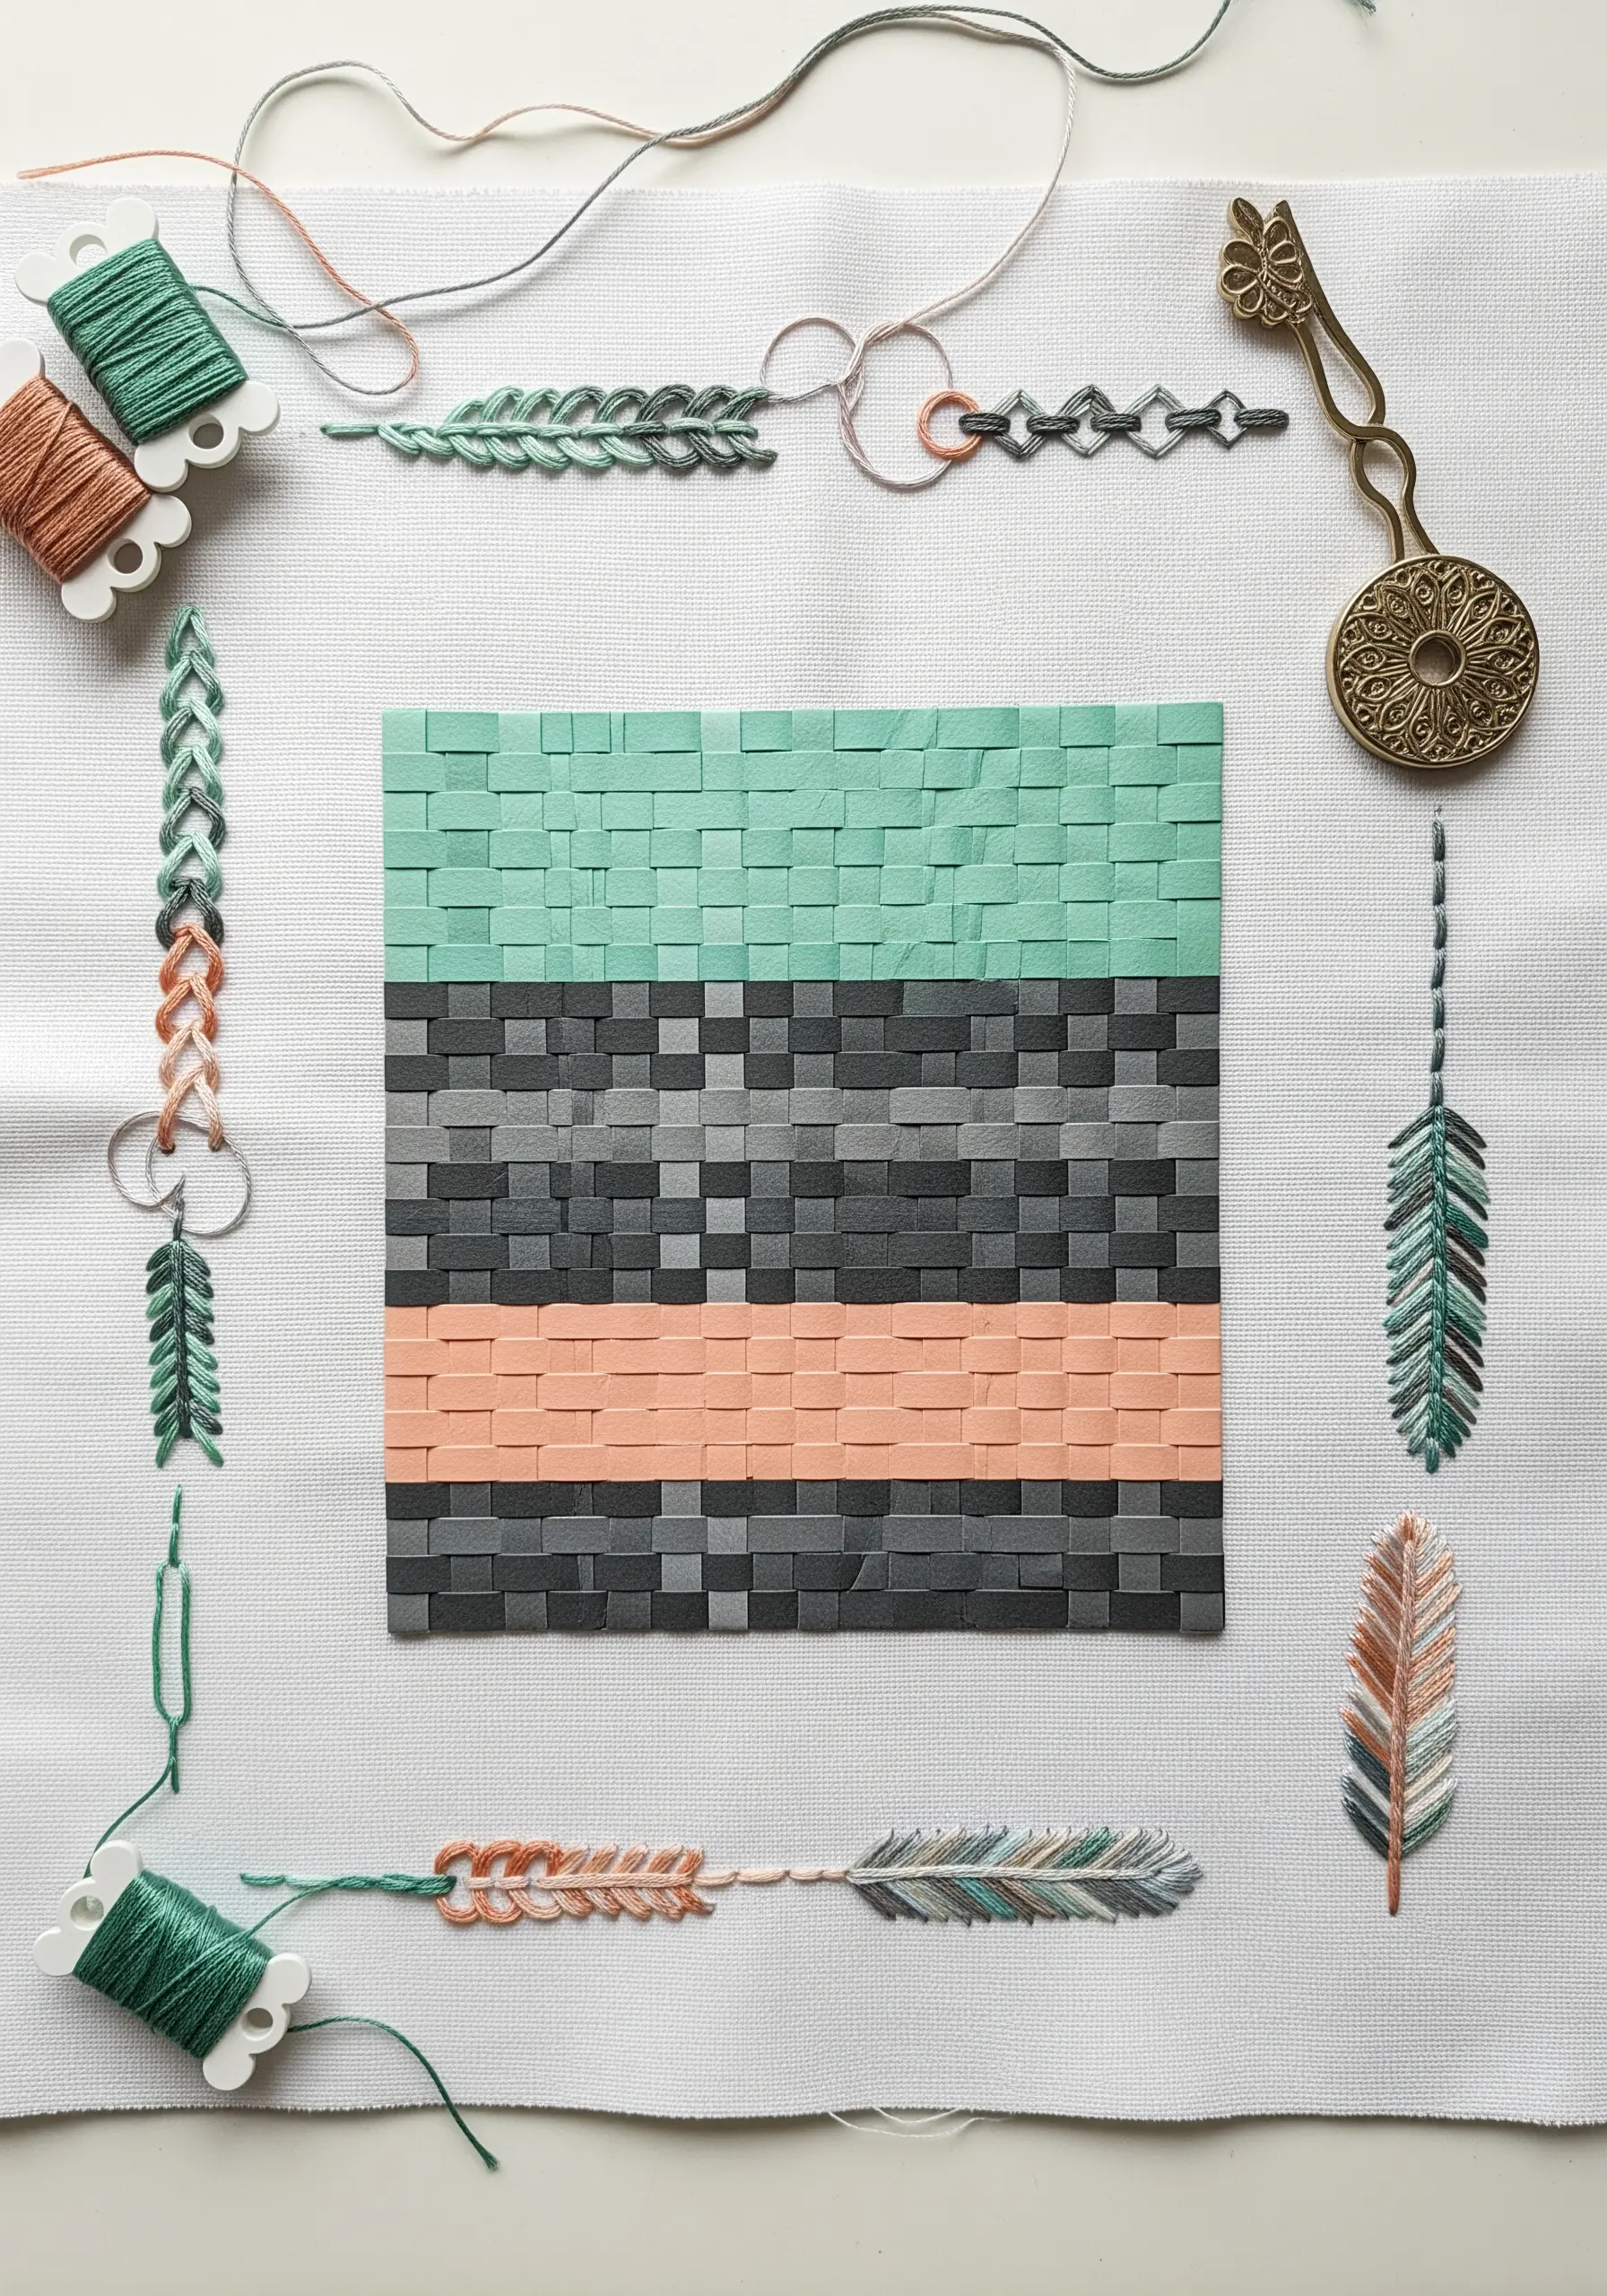
Create a central block of texture by weaving thin strips of colored paper directly onto your fabric.
Secure the edges of your woven square with a simple running stitch to hold it in place.
Frame this central element by stitching complementary motifs around it, like delicate feathers or braided bands.
This approach treats paper as a textile itself, offering a modern, graphic alternative to a fully stitched background and creating unique, textured neutral embroidery samplers.
7. Define Paper Feathers with a Stitched Spine

Craft delicate, realistic feathers by using paper for the vane and thread for the central rachis, or spine.
Cut your feather shapes from sturdy paper; for a softer look, add a watercolor wash before cutting.
Use a single line of stem stitch or couched gold cord down the center to provide structure and a touch of elegance.
This simple combination gives the feathers a clean, defined look that elevates even the most delicate leaf stitch techniques in surrounding work.
8. Compose with Torn Paper and Wrapped Yarn

Create an abstract composition by layering torn pieces of textured paper for an organic, collage-like base.
The torn edges provide a soft, unpredictable quality that contrasts beautifully with the controlled lines of thread.
Instead of traditional stitches, wrap yarn or thick thread across the hoop, creating a grid that holds the paper in place and adds another layer of texture.
This technique allows you to explore composition and tension, resulting in beautifully tactile organic texture embroidery ideas.
9. Integrate Origami into Painted Scenes
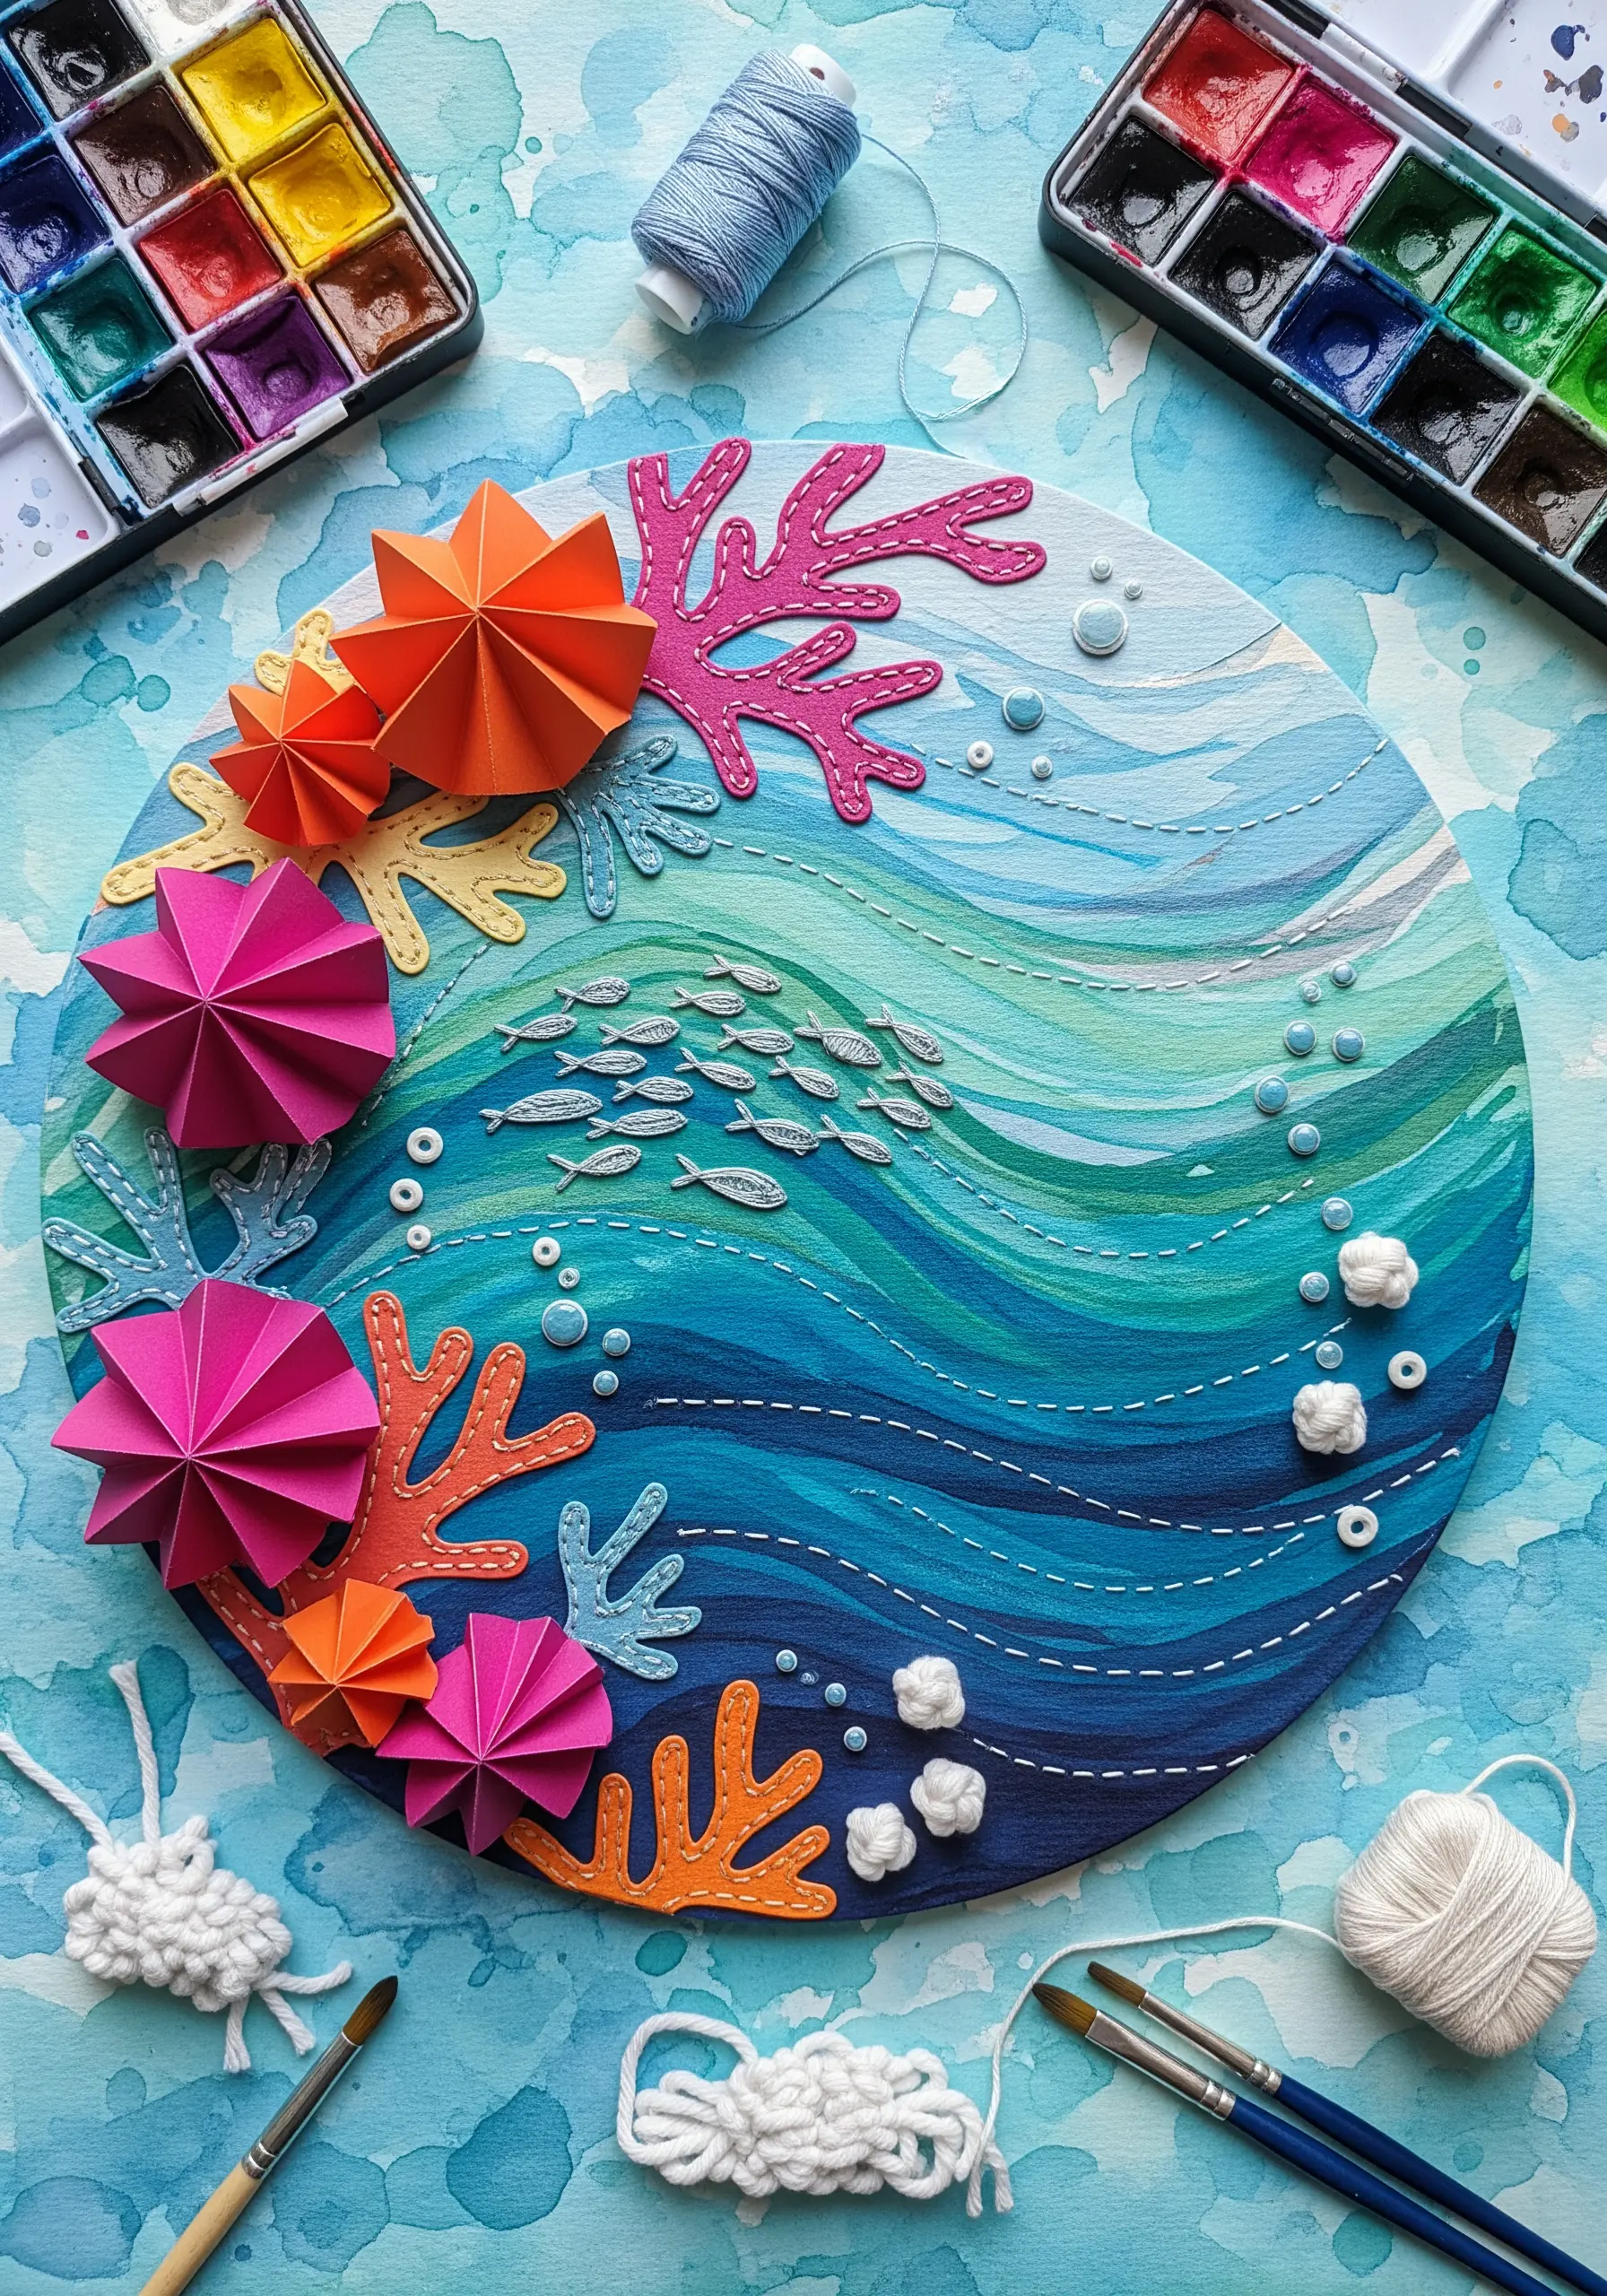
Add unexpected dimension to a painted canvas by incorporating folded paper elements.
First, paint your background scene—like ocean waves—directly onto the fabric or canvas.
Then, introduce 3D origami shapes, like the geometric corals seen here, securing them with a few anchor stitches.
Use simple running stitches to echo the painted lines, seamlessly blending the painted, folded, and stitched elements into one cohesive, minimal ocean-inspired embroidery pieces.
10. Use Paper as a Minimalist Anchor
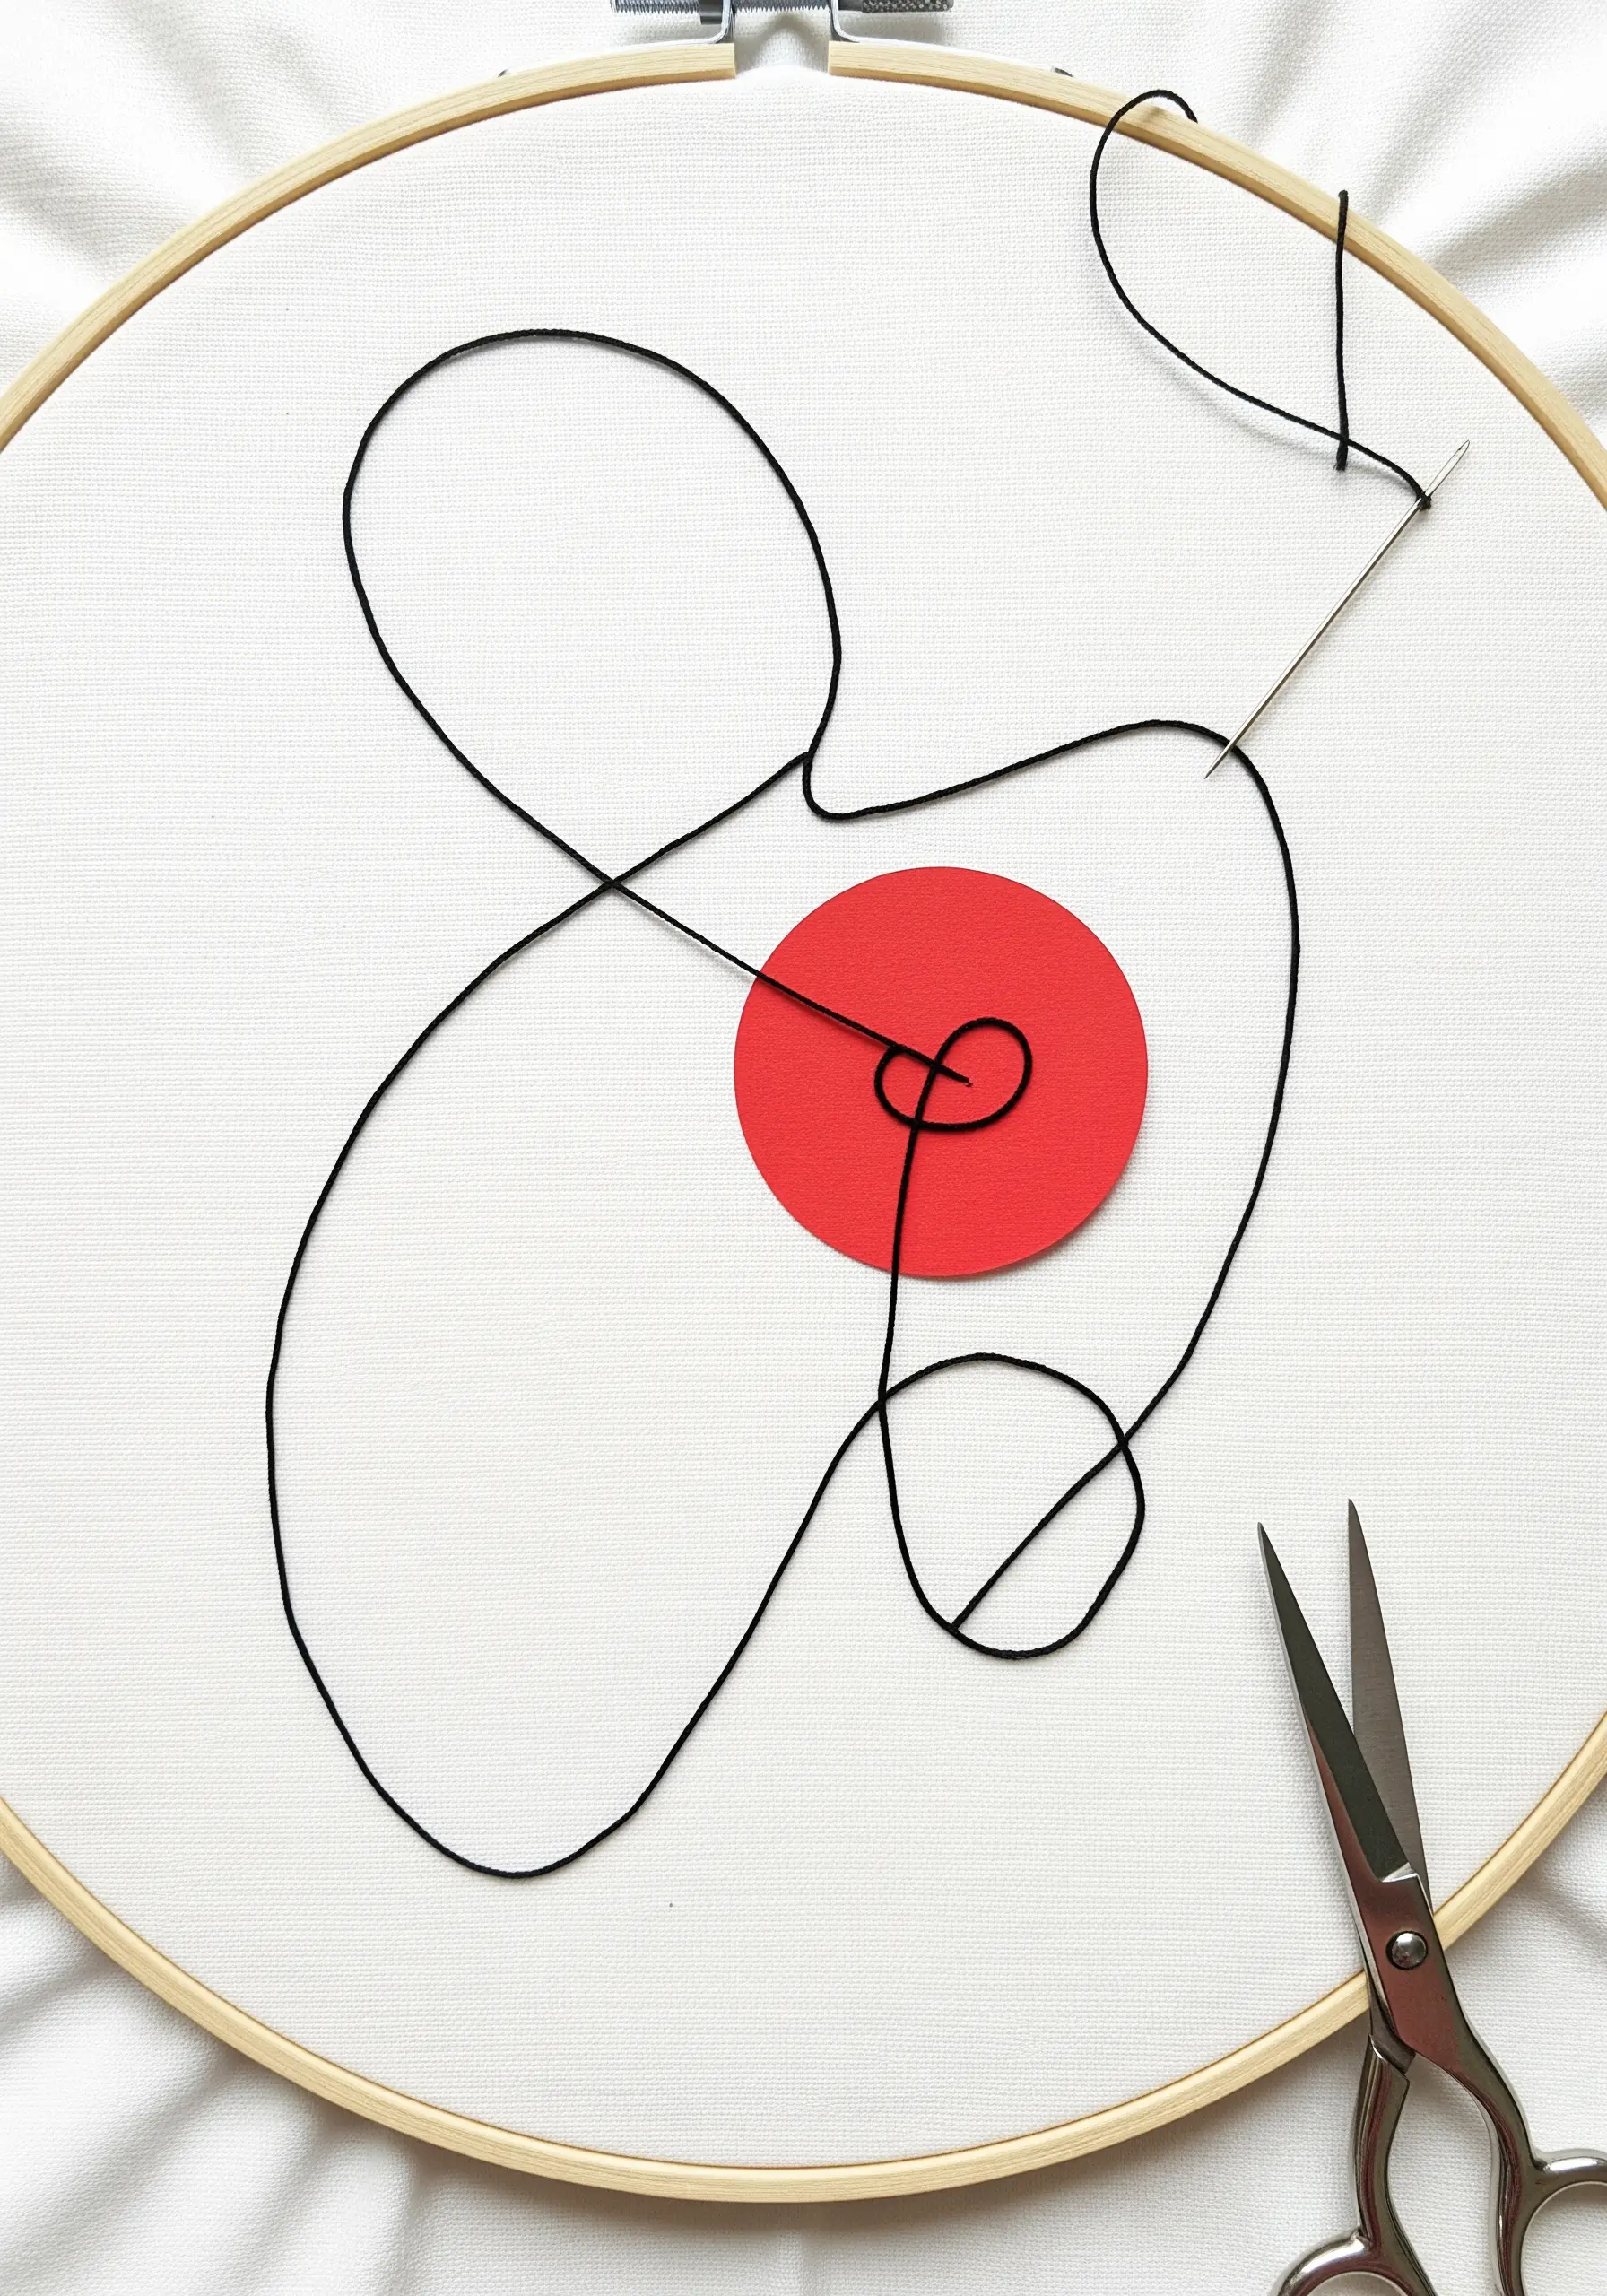
For a truly modern and minimalist piece, use a single, bold paper shape as the anchor for your entire design.
A simple, clean-cut circle in a primary color provides a powerful focal point on a stark white canvas.
Allow a single, contrasting thread to loop and travel across the space, interacting with the paper shape at only one or two points.
This exercise in restraint creates powerful abstract thread embroidery ideas where every element has maximum impact.
11. Embellish Filigree Paper with Micro-Florals

Use an intricately laser-cut paper monogram or shape as a delicate framework for your stitches.
Secure the paper form onto a rich, contrasting fabric like velvet or heavy linen.
Instead of filling the whole shape, add tiny, targeted embellishments. Weave delicate vines with leaf stitch and add French or bullion knots for flower buds along the paper’s filigree edges.
This turns a simple cutout into a treasured, personalized name monogram wall embroidery piece.
12. Layer Vellum for Ghostly Dimensions
Create an ethereal, layered effect by stitching over and under translucent vellum paper.
Cut abstract shapes from the vellum and lightly tack them onto sheer fabric.
Stretch threads across the hoop, connecting points on the hoop’s edge to create a web-like structure. Some threads should go over the vellum, while others pass underneath.
This interplay of transparent layers and taught threads produces mind-bending abstract thread layering techniques that feel both complex and delicate.
13. Combine Paper Rinds and Satin Stitch Pulp
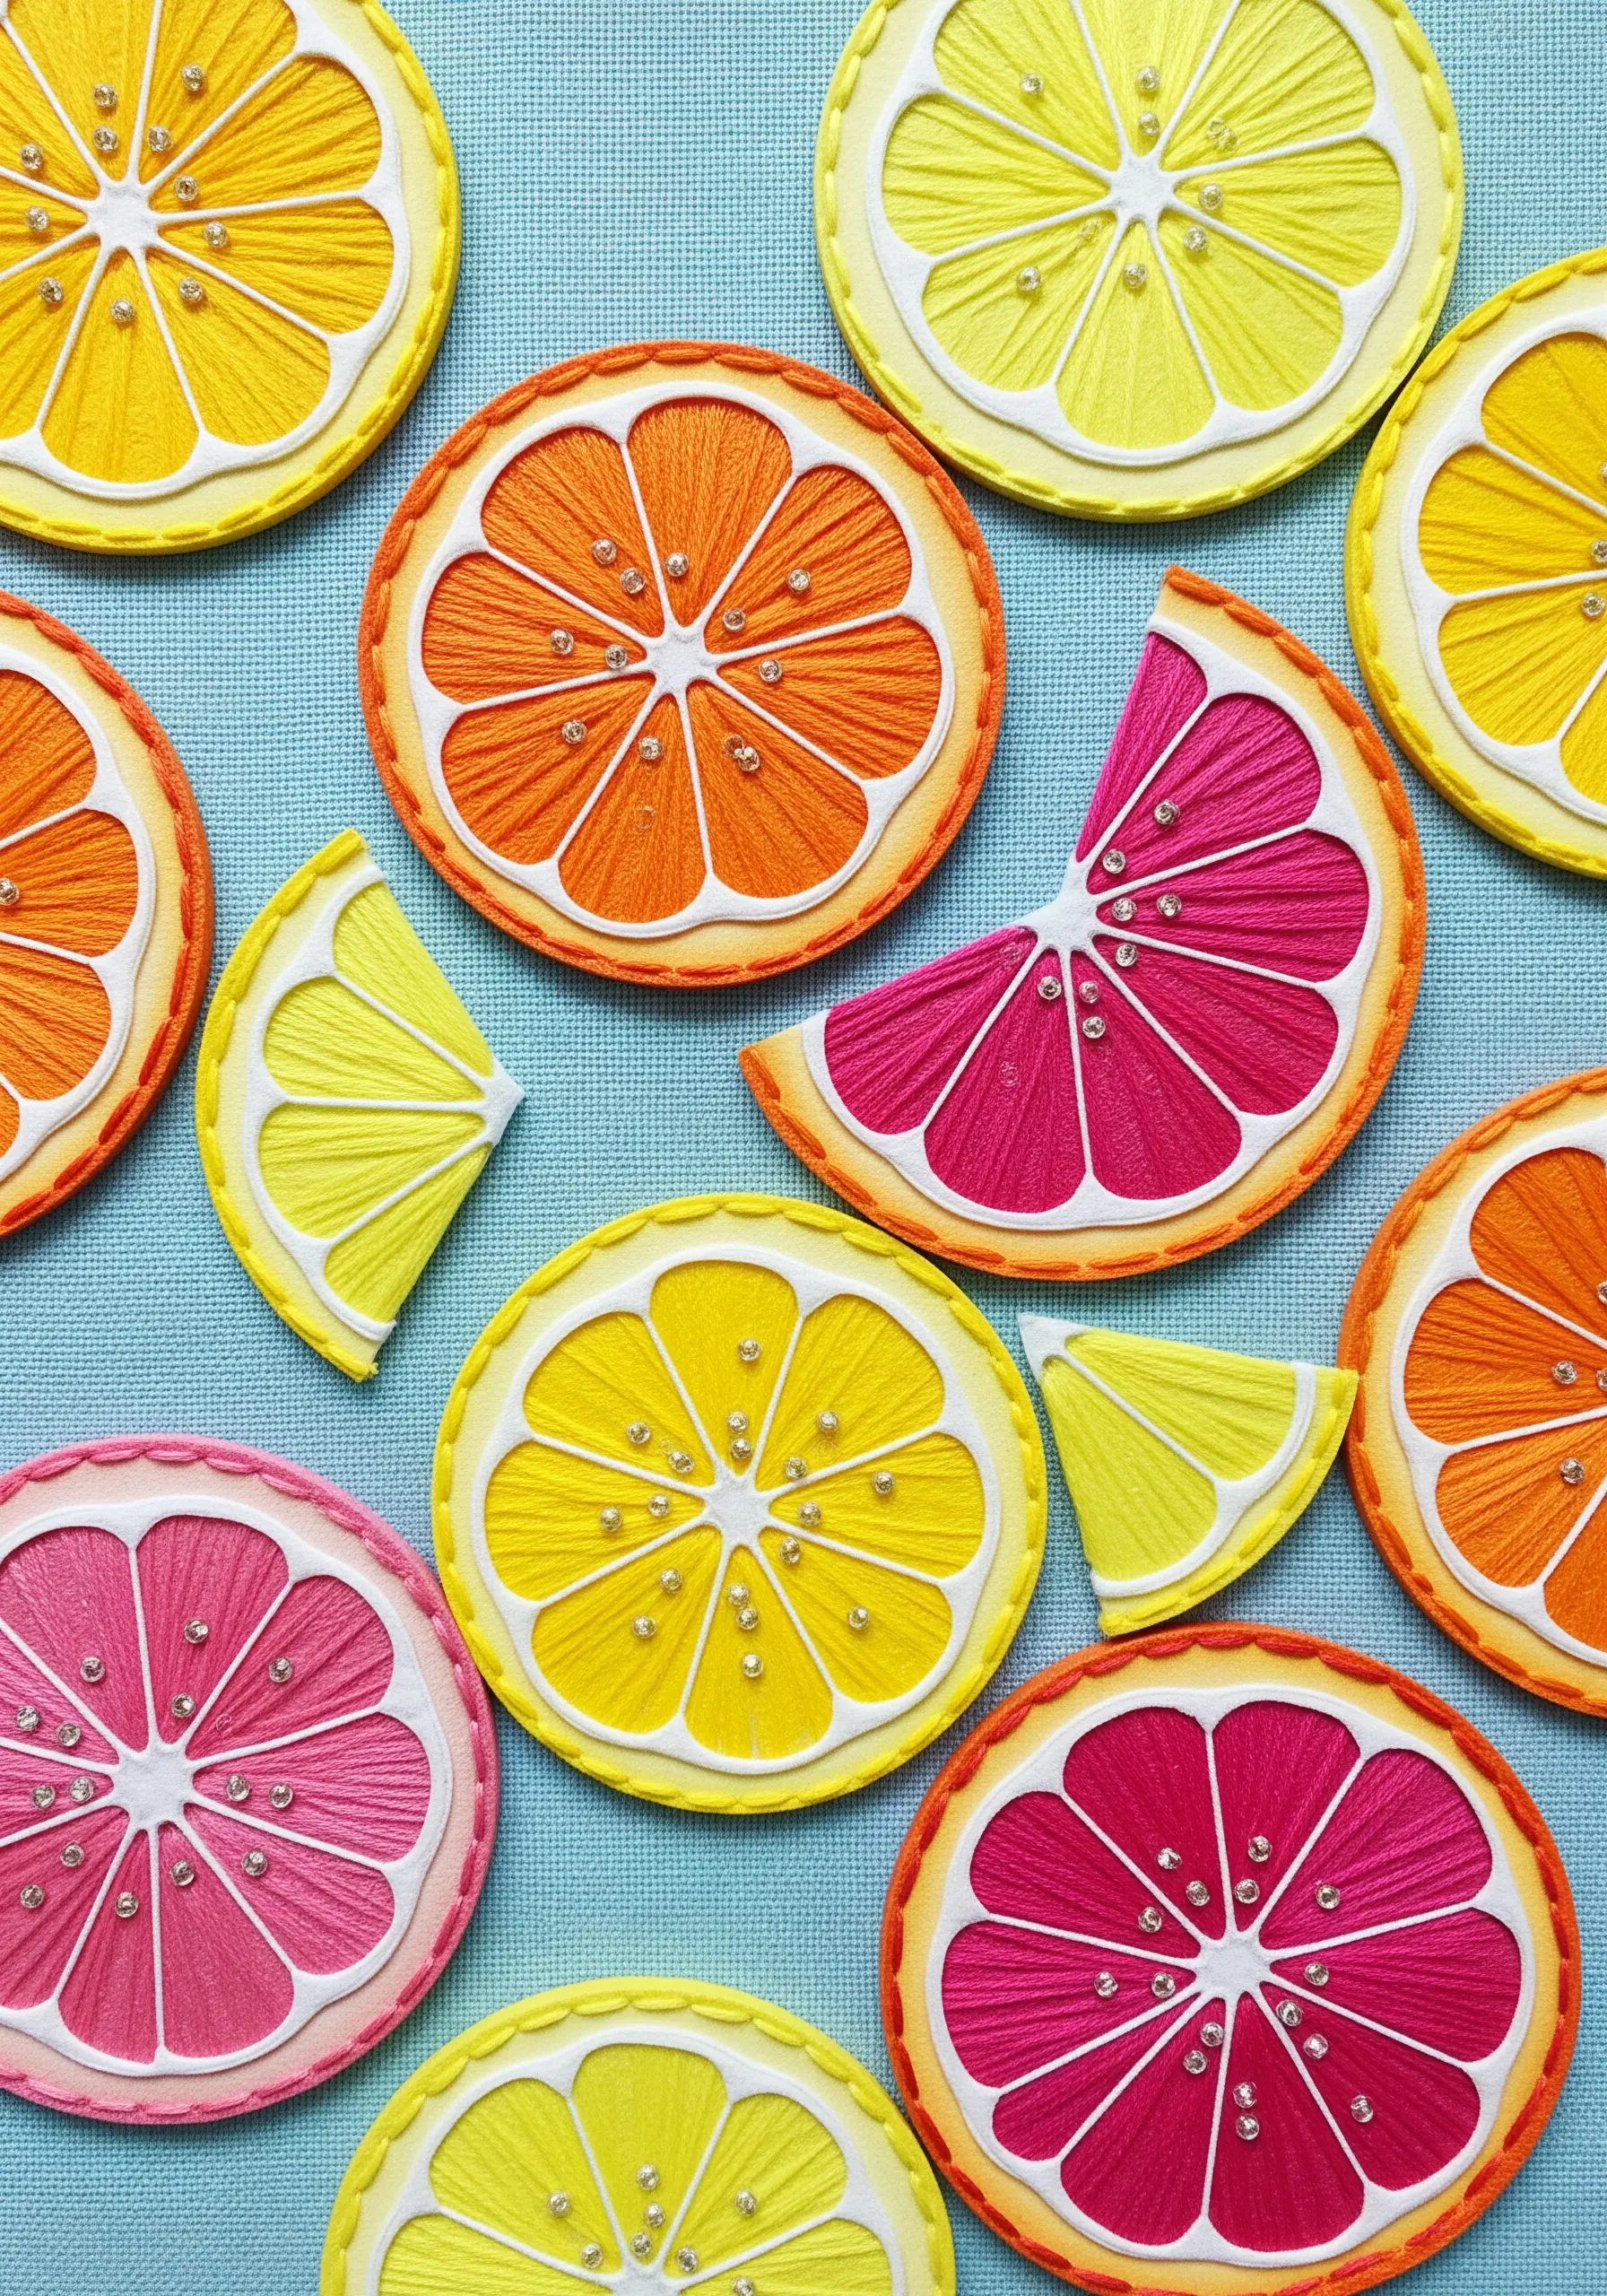
Achieve a clean, graphic look for fruit slices by using paper for the rind and thread for the flesh.
Cut the outer circle (rind) and inner segment dividers (pith) from paper and secure them to your fabric.
Fill the segments with perfectly smooth satin stitches, running your thread right up to the paper’s edge for a crisp boundary.
This technique gives you the best of both worlds: the sharp precision of paper and the vibrant, tactile texture of thread, perfect for minimal fruit botanical embroidery patterns.
14. Anchor Radiating Stitches with Origami
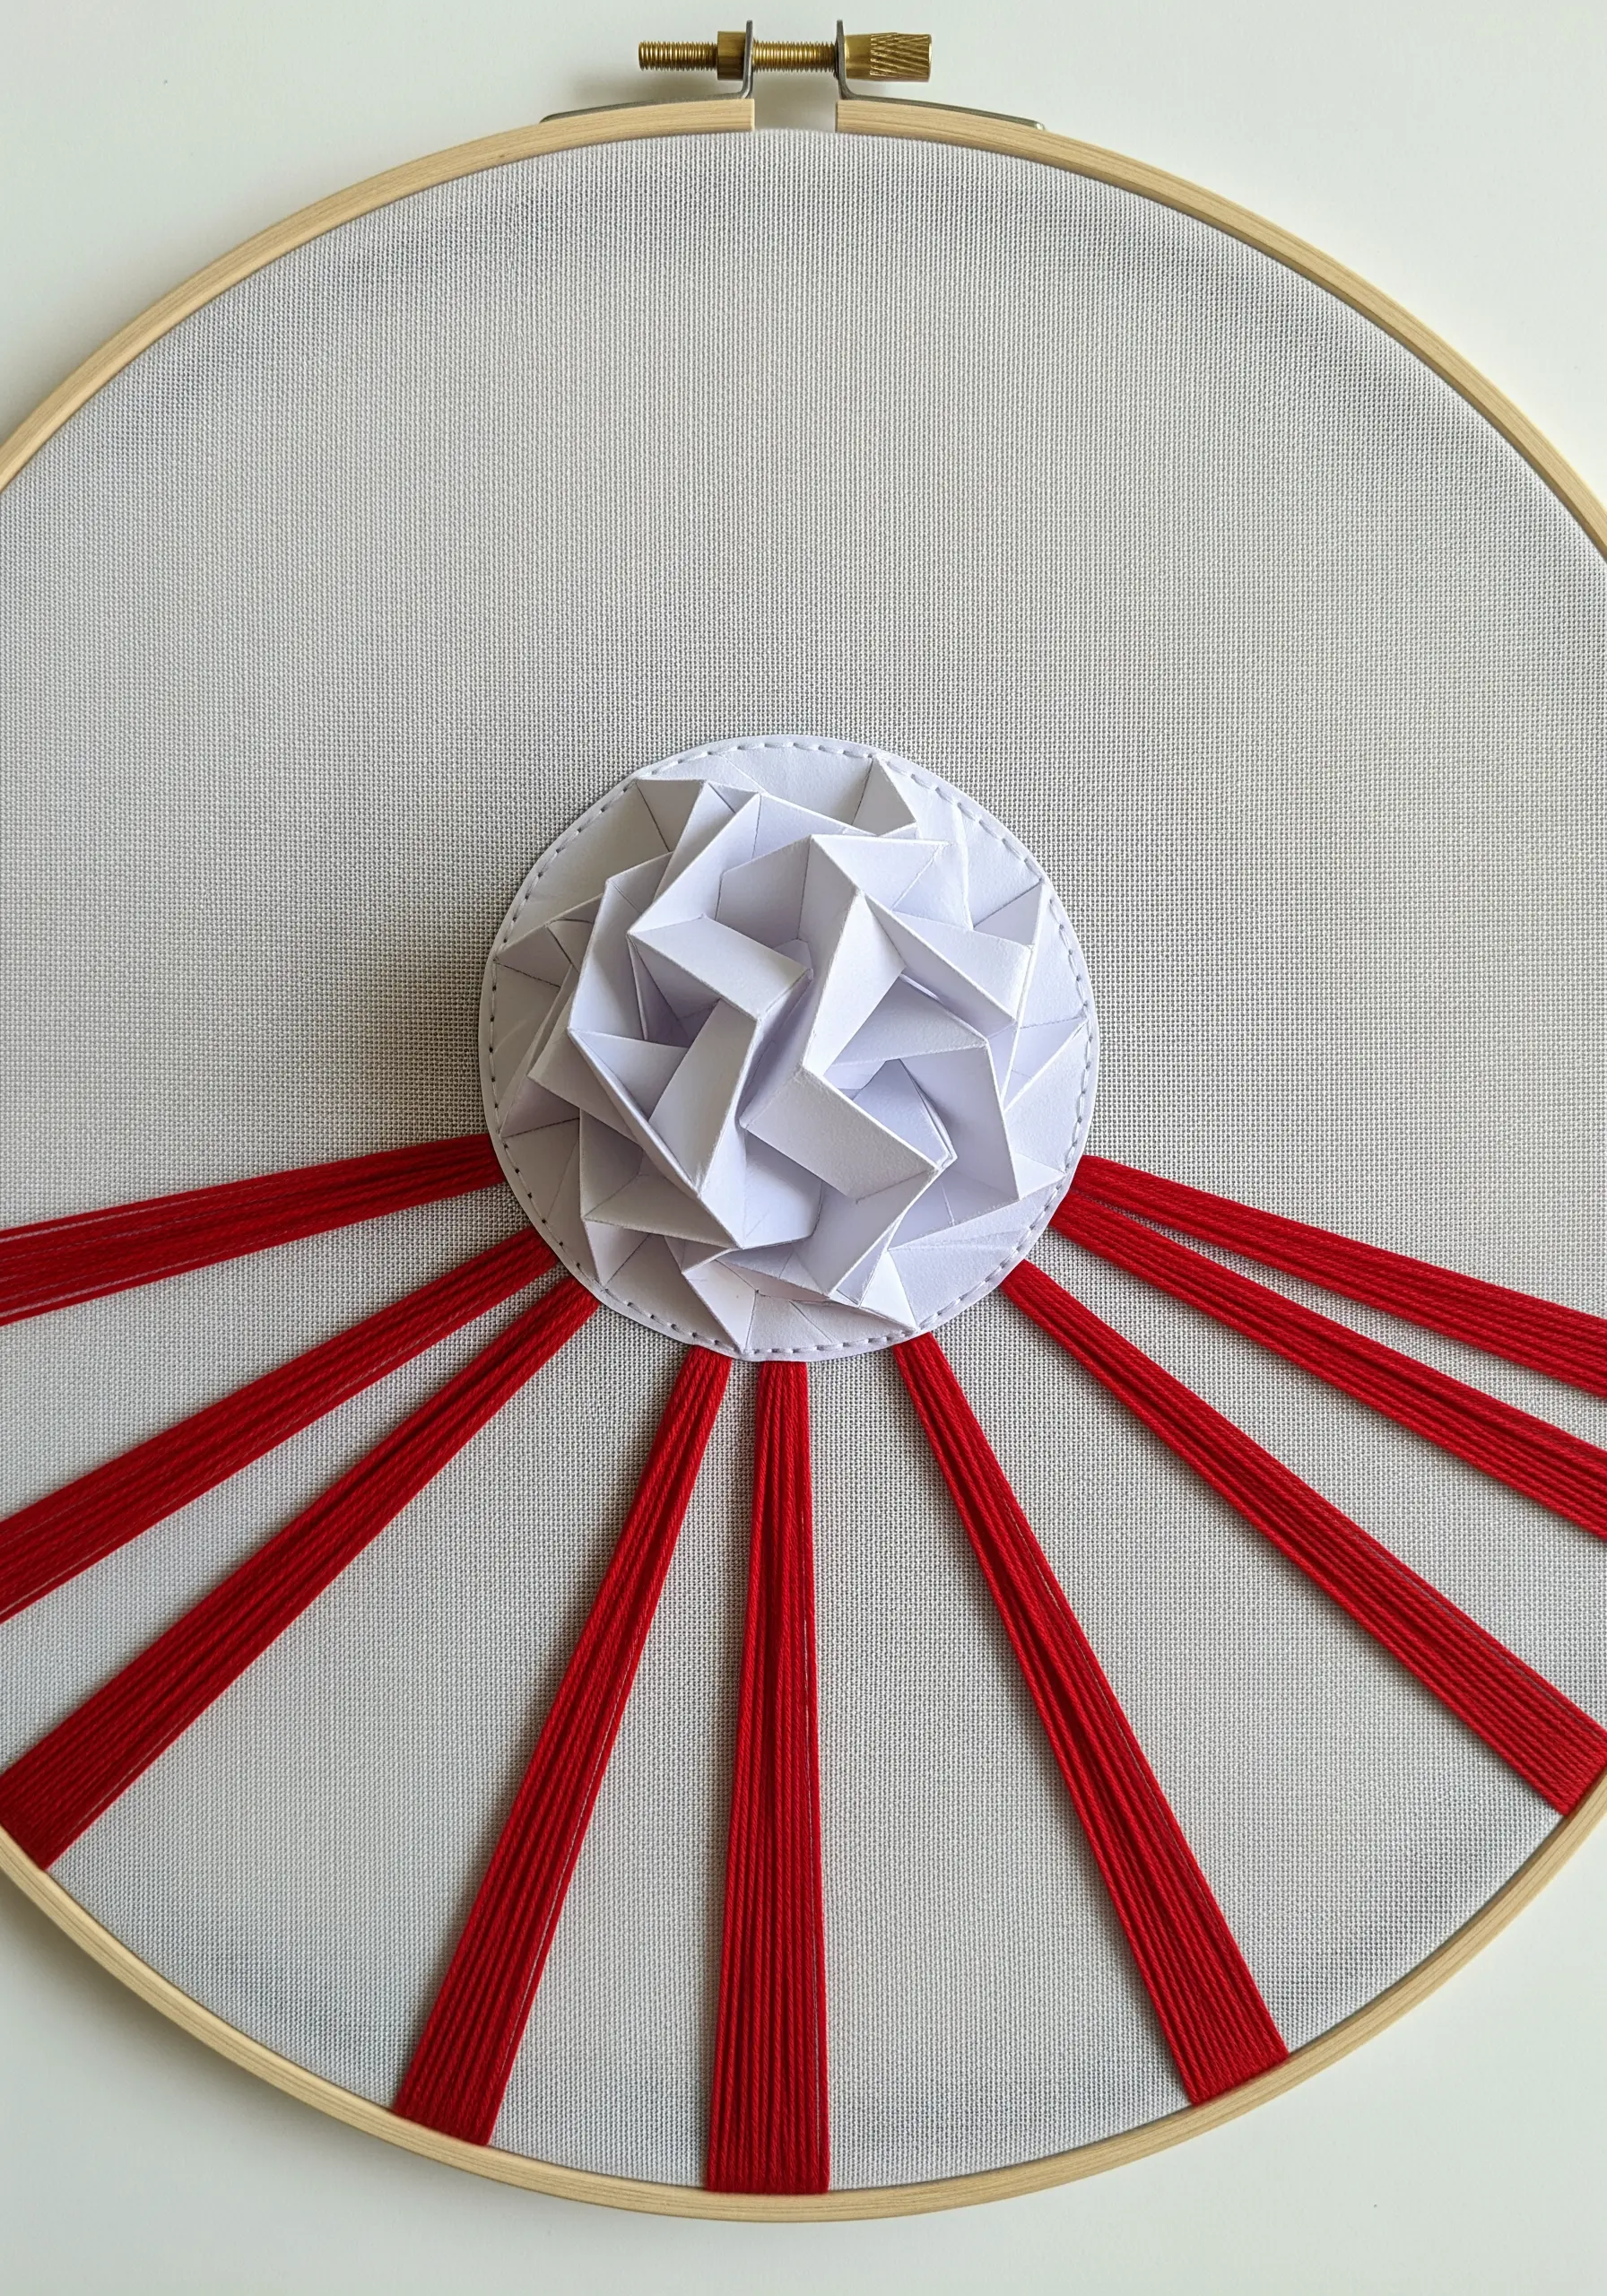
Create a powerful focal point by using a complex origami model as the centerpiece of your hoop.
Choose a geometric or tessellated origami fold and stitch it securely to the center of your fabric.
Use the folds and points of the paper model as anchors for threads radiating out to the edges of the hoop.
This creates a stunning sunburst effect that transforms the static paper fold into a source of dynamic energy, much like in modern mandala stitch patterns.
15. Create a Diorama with 3D Paper Models
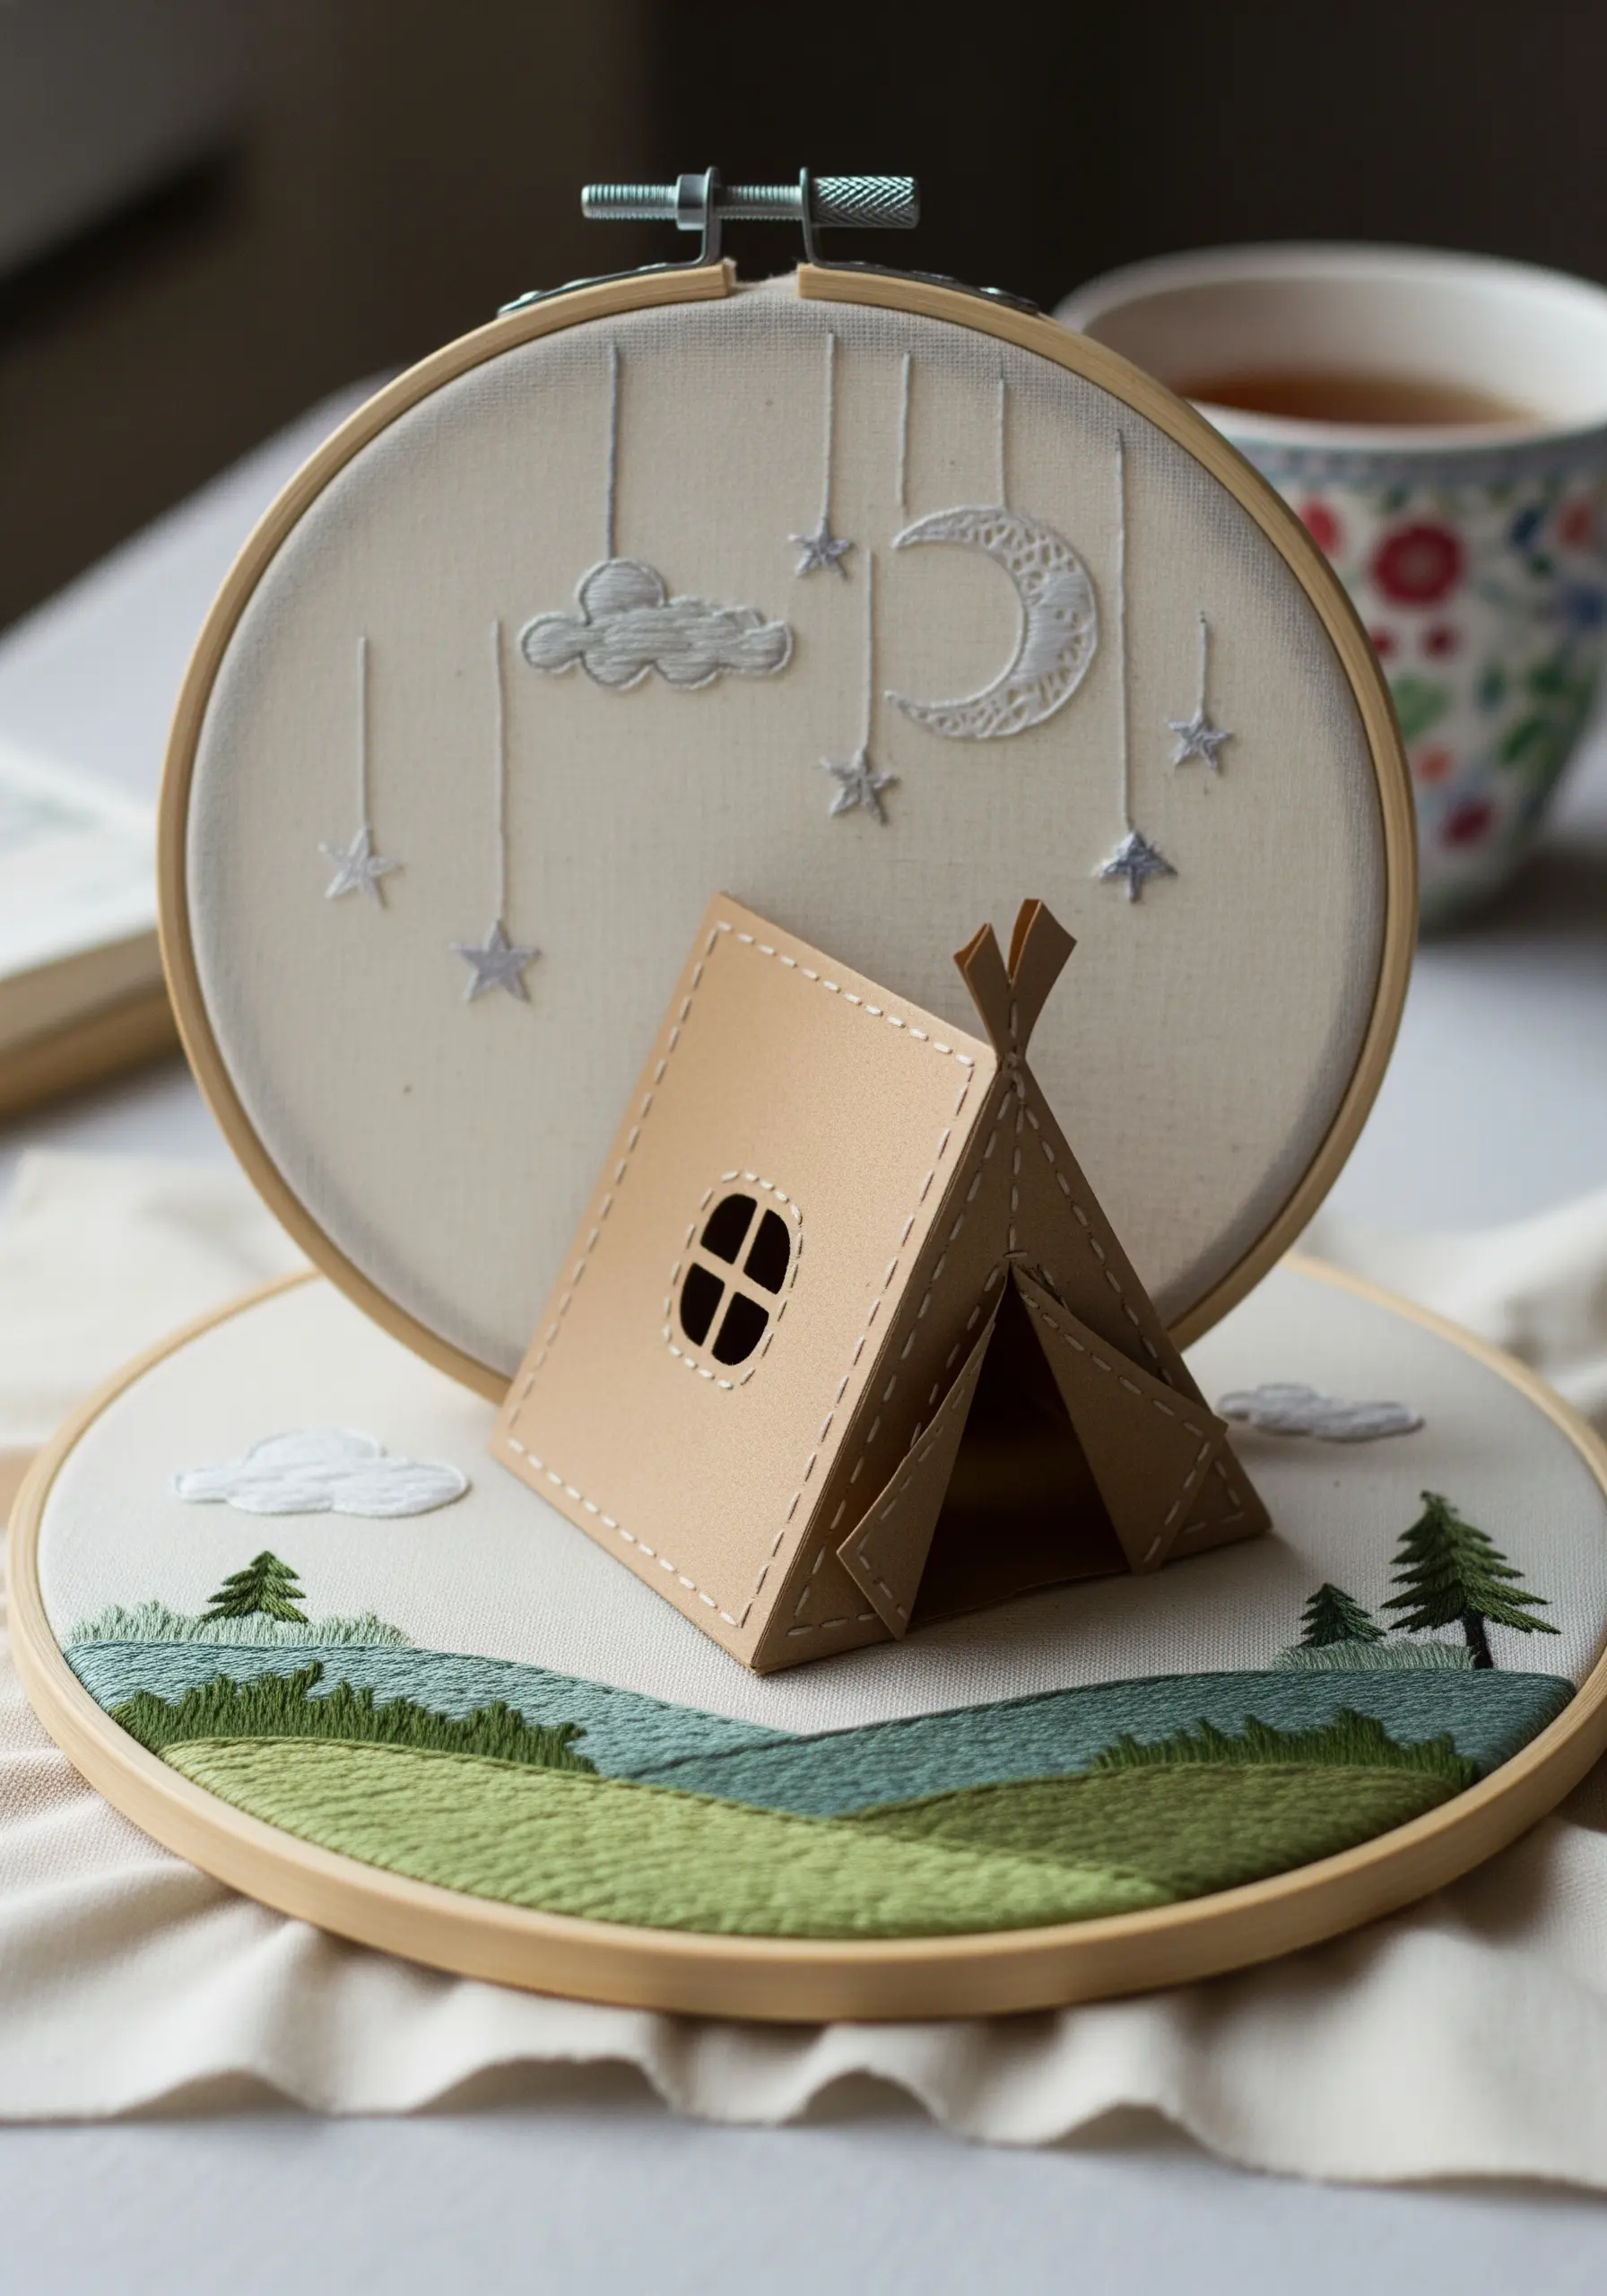
Tell a story by building a miniature scene that combines a 3D paper object with a 2D embroidered background.
Construct your paper model—like a tent or a house—separately and then place it onto a finished embroidery piece.
Embroider a landscape on one hoop and a celestial sky on another to create a layered environment.
This diorama-style approach adds a playful, narrative quality, transforming your hoop into a window onto a tiny, stitched world, perfect for a relaxing nature scene.
16. Stitch Color onto Monochrome Photographs

Transform a printed photograph by using embroidery to selectively add color and texture.
Choose a high-quality print on matte photo paper, which is easier to pierce with a needle.
Identify elements you want to bring to life. Here, thread adds vibrant color to the flowers in the foreground and texture to the clouds and sun, while the rest of the landscape remains monochrome.
This technique creates a stunning contrast and allows you to reinterpret a memory or scene, making the wildflower thread palettes pop with surreal beauty.
17. Sculpt Topographical Maps with Layered Paper

Create the illusion of depth by layering cutouts of paper or felt in graduating shades.
Stack each layer, from largest to smallest, to build a three-dimensional topographical map effect.
Use a simple, subtle running stitch along the edge of each layer to secure it and add a delicate, hand-finished texture.
This method is perfect for depicting landscapes, water, or abstract forms, offering a much faster way to achieve depth than dense thread painting, similar to the visuals in mountain landscape thread painting.
18. Trace Journeys onto Paper Maps
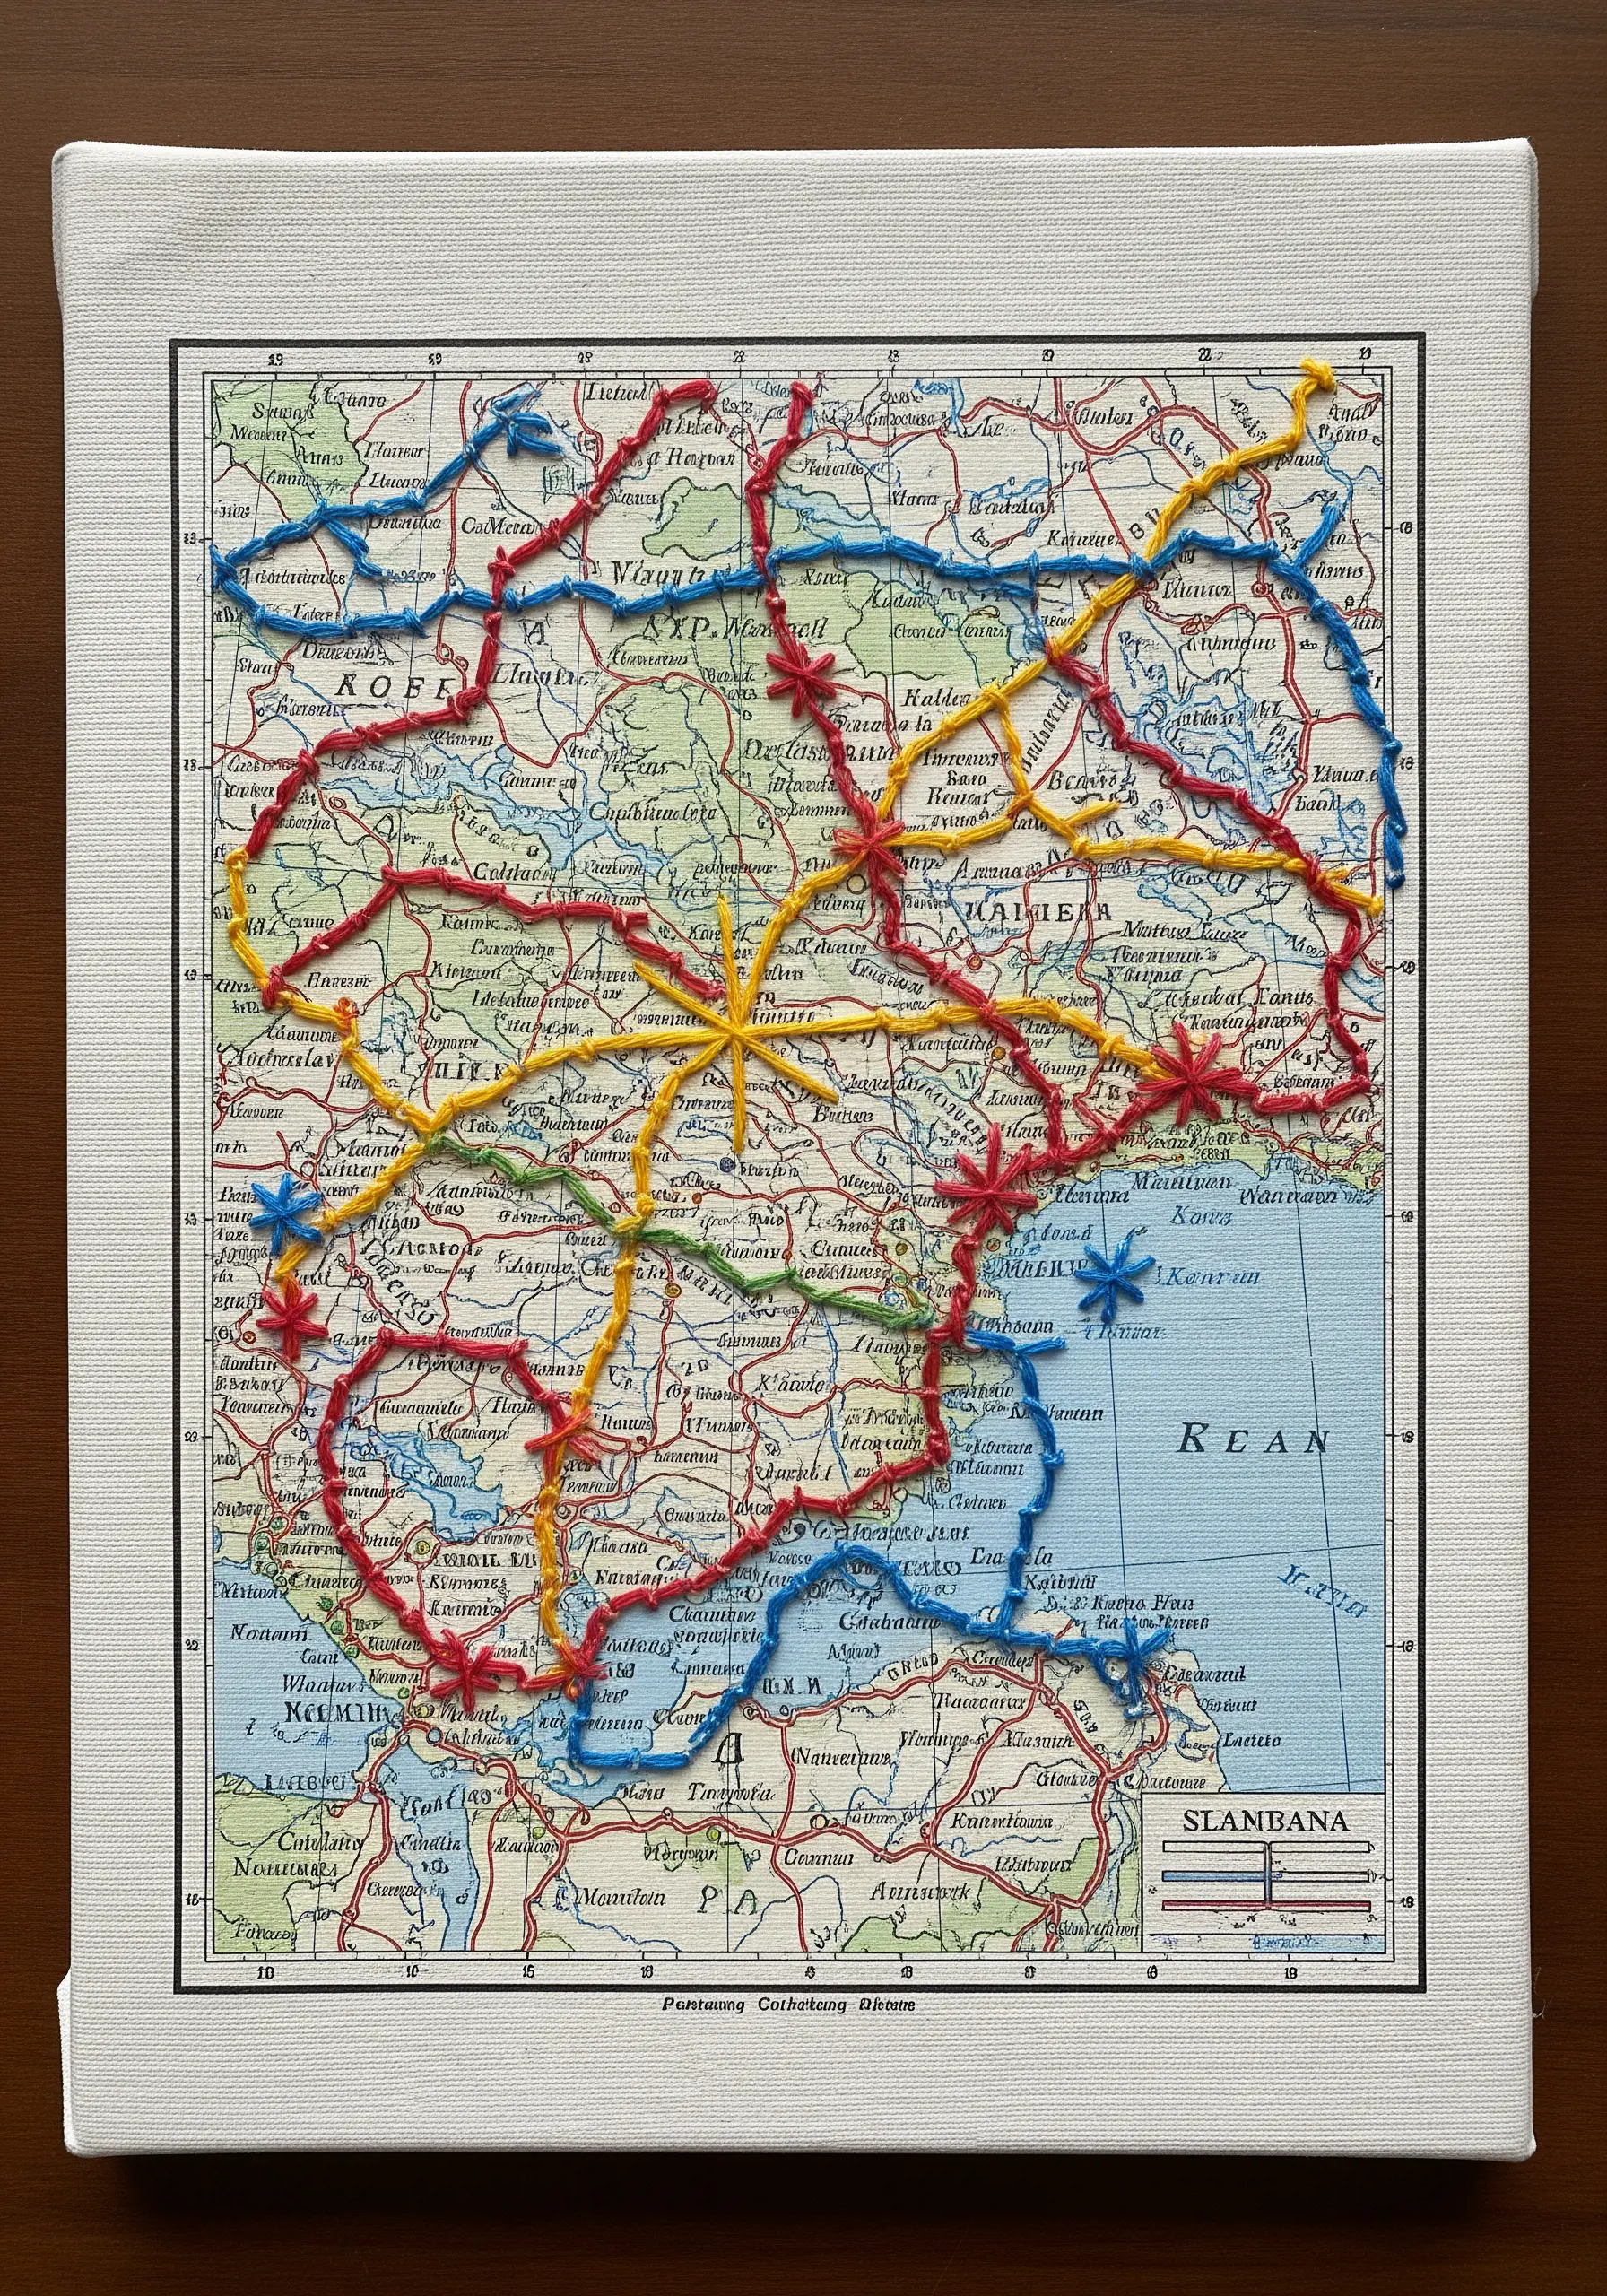
Turn a map into a personal story by using thread to chart a path or connect meaningful locations.
Choose a vintage or decorative map and mount it onto a sturdy backing like foam core or canvas.
Use a simple backstitch or running stitch to trace a journey, a relationship, or a network of friends.
Vary the thread colors for different routes or people to create a rich, visual narrative. This is one of the most personal minimal travel-themed embroidery ideas you can create.
19. Craft a Honeycomb from Paper and Fabric

Build a stunning honeycomb mosaic by combining patterned paper and dimensional fabric hexagons.
Cut hexagon shapes from various gold and yellow papers and fabrics.
For added texture, create a few padded hexagons by wrapping fabric around a small piece of batting before stitching it down.
Arrange the pieces in a tight cluster and add tiny embroidered bees with sheer fabric wings to bring the scene to life, reminiscent of delicate fabric collage animals.
20. Obscure and Reveal with Geometric Overlays

Create a compelling sense of mystery by partially covering a traditional floral embroidery with stark, geometric paper shapes.
First, complete your floral stitching or use a piece of vintage embroidered fabric as your base.
Arrange sharp, black paper triangles over the top, allowing them to obscure parts of the design while revealing others.
Connect the paper pieces with fine, white thread to create a secondary geometric pattern. This contrast between old and new, soft and sharp, turns your hoop into a piece of contemporary art, using the cloth as a creative fabric collage bases.
21. Visualize Sound with Stitched Paper

Translate an abstract concept like a soundwave into a physical art piece.
Use a craft knife to precisely cut the shape of a soundwave from a piece of sturdy white or metallic paper.
Mount the paper cutout onto a high-contrast background, like black fabric.
Instead of stitching the entire shape, use a bright, contrasting thread to create a secondary outline with a simple backstitch. This technique allows you to literally stitch sound, adding a layer of color and texture that makes the static shape feel dynamic.
22. Construct Hyperrealistic Paper Insects
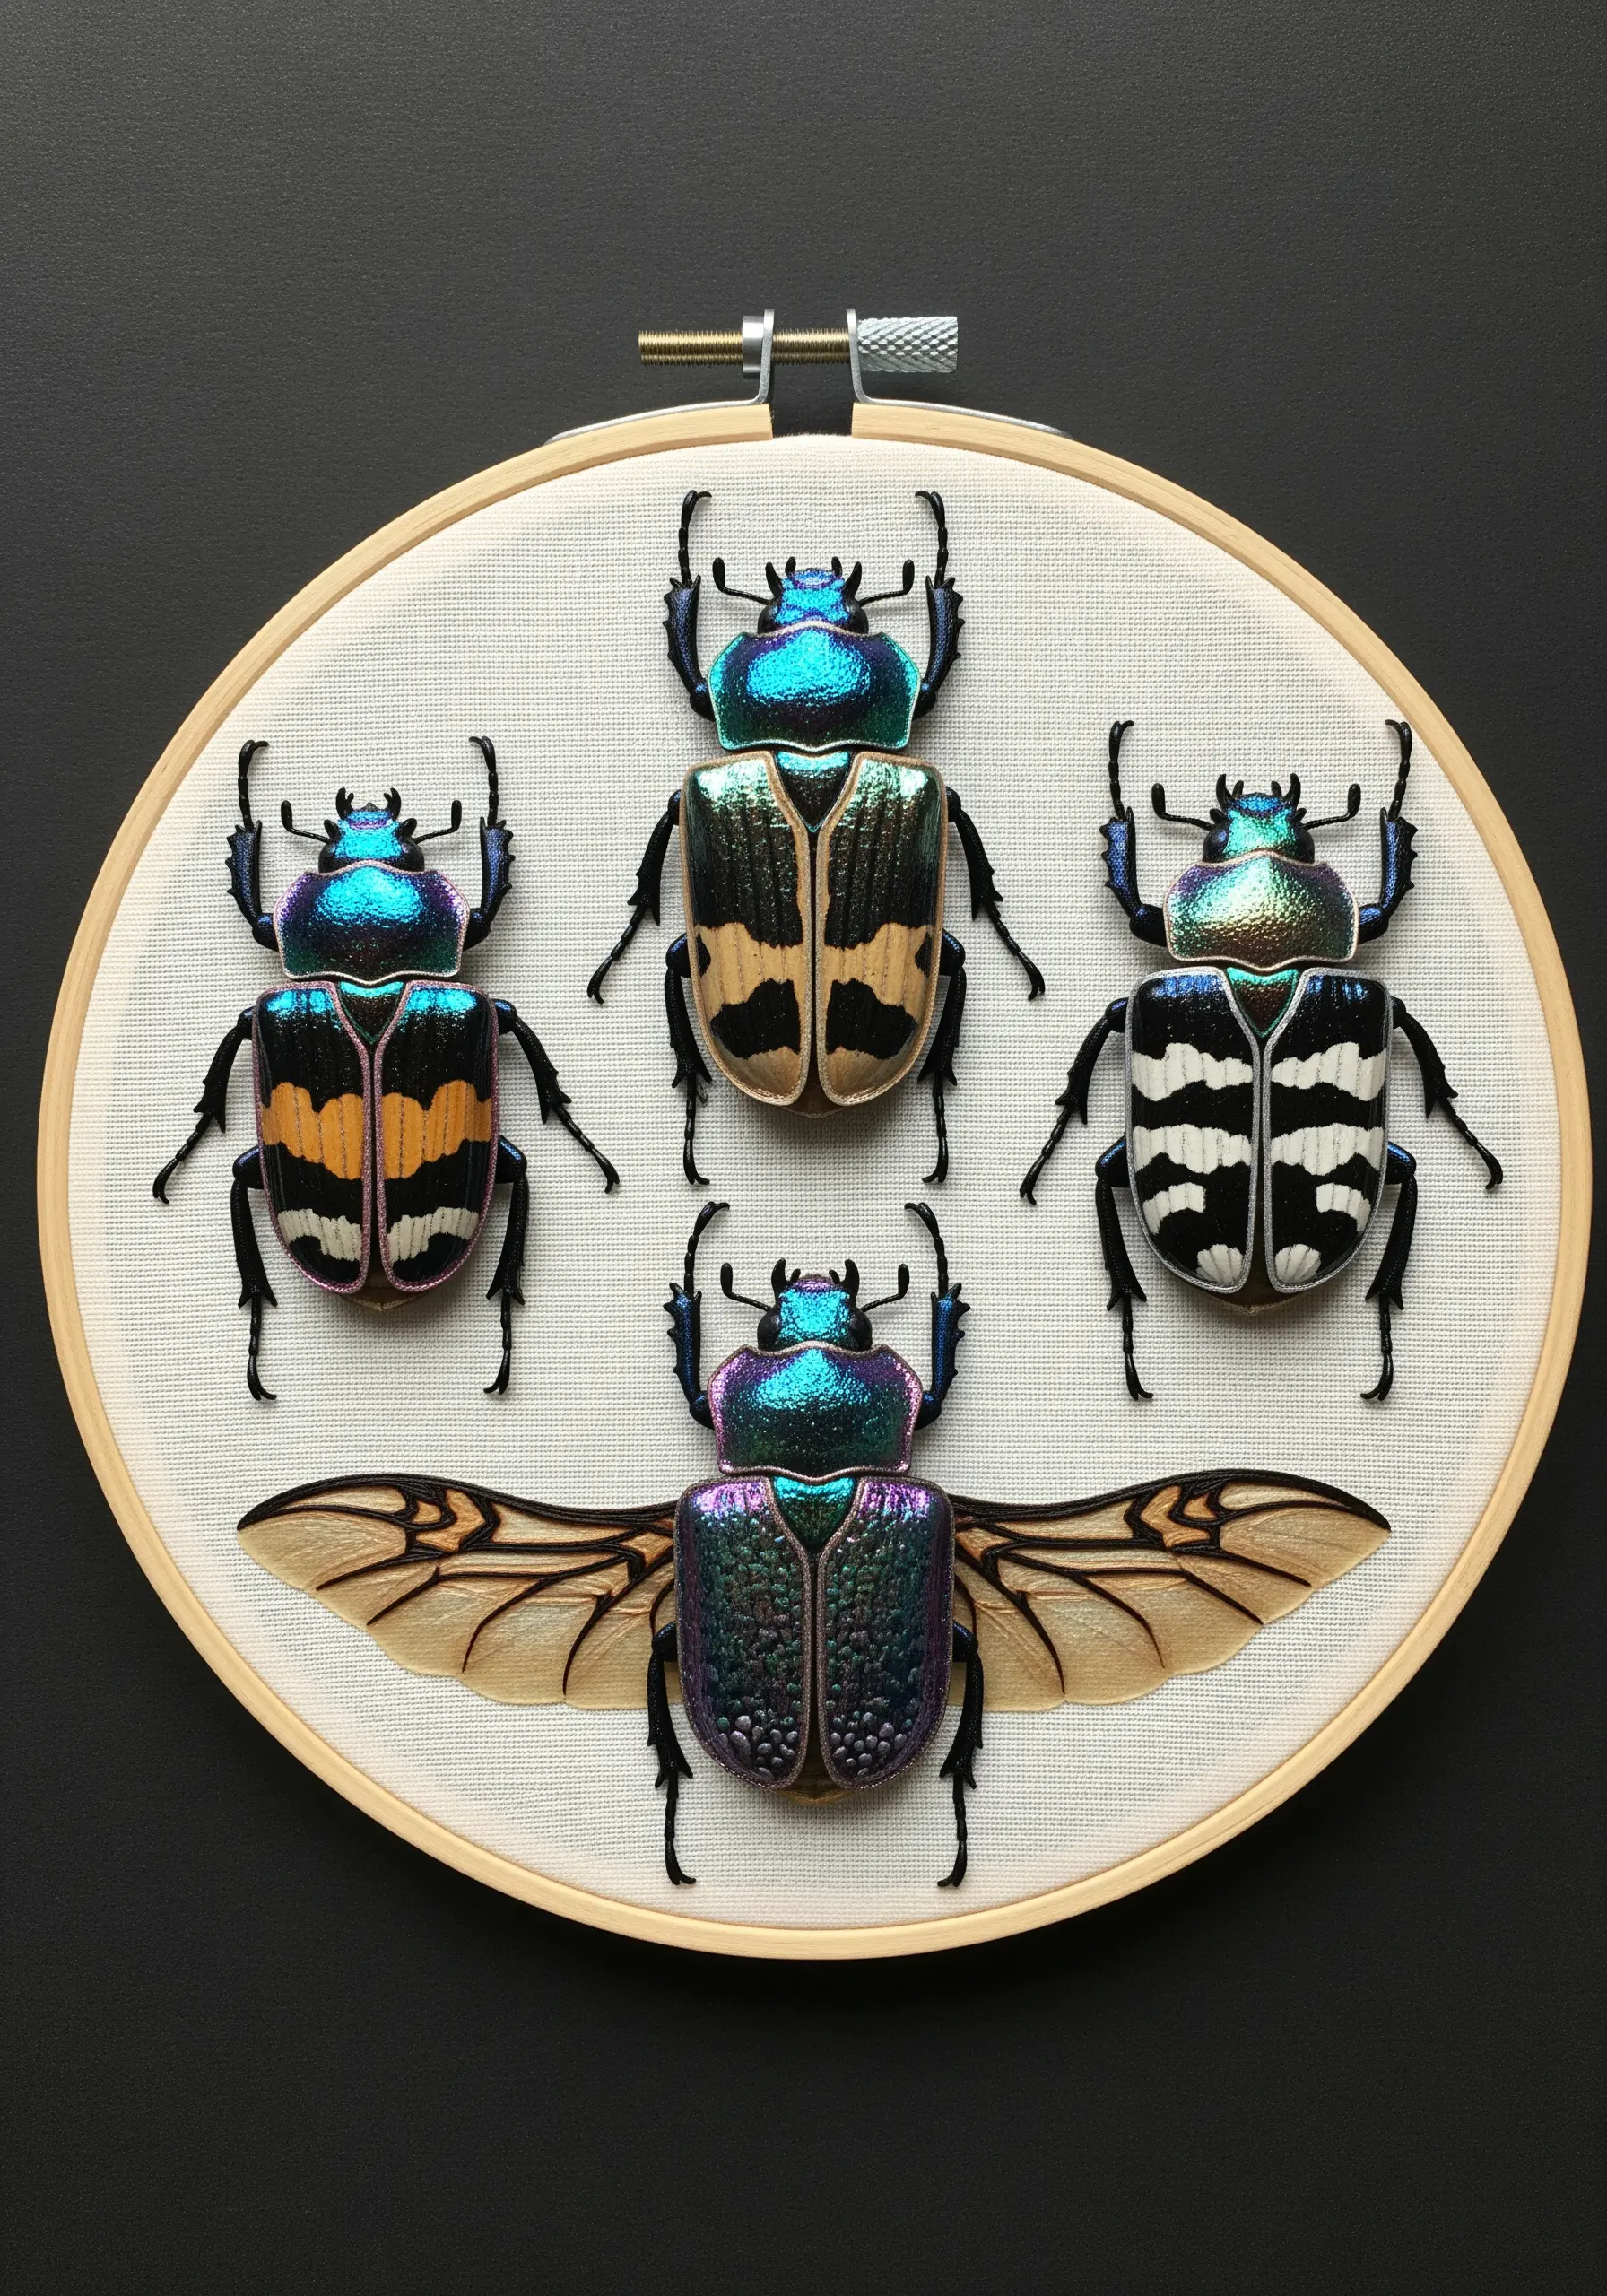
Achieve stunning realism by building the bodies of insects from paper and using thread for the fine details.
Print high-resolution images of beetles onto iridescent or glossy photo paper, then carefully cut them out.
Create dimension by gently curving the paper and layering pieces for the wings and thorax.
Use a fine black thread and a sharp needle to stitch the delicate legs and antennae directly into the fabric, making your creations look like real specimens and feel as if the fabric come alive.
23. Frame Paper Shapes with Braided Thread
Give simple paper cutouts a bold, textural outline using a heavy, decorative stitch.
Cut minimalist botanical shapes from cardstock in earthy, muted tones.
Instead of a fine backstitch, use a braided chain stitch or a heavy couched cord to outline the paper.
This technique adds substantial weight and dimension, transforming basic shapes into a sophisticated, graphic composition. It’s a perfect way to execute modern line art thread designs with a tactile twist.
24. Use Paper Doilies as Stitching Guides
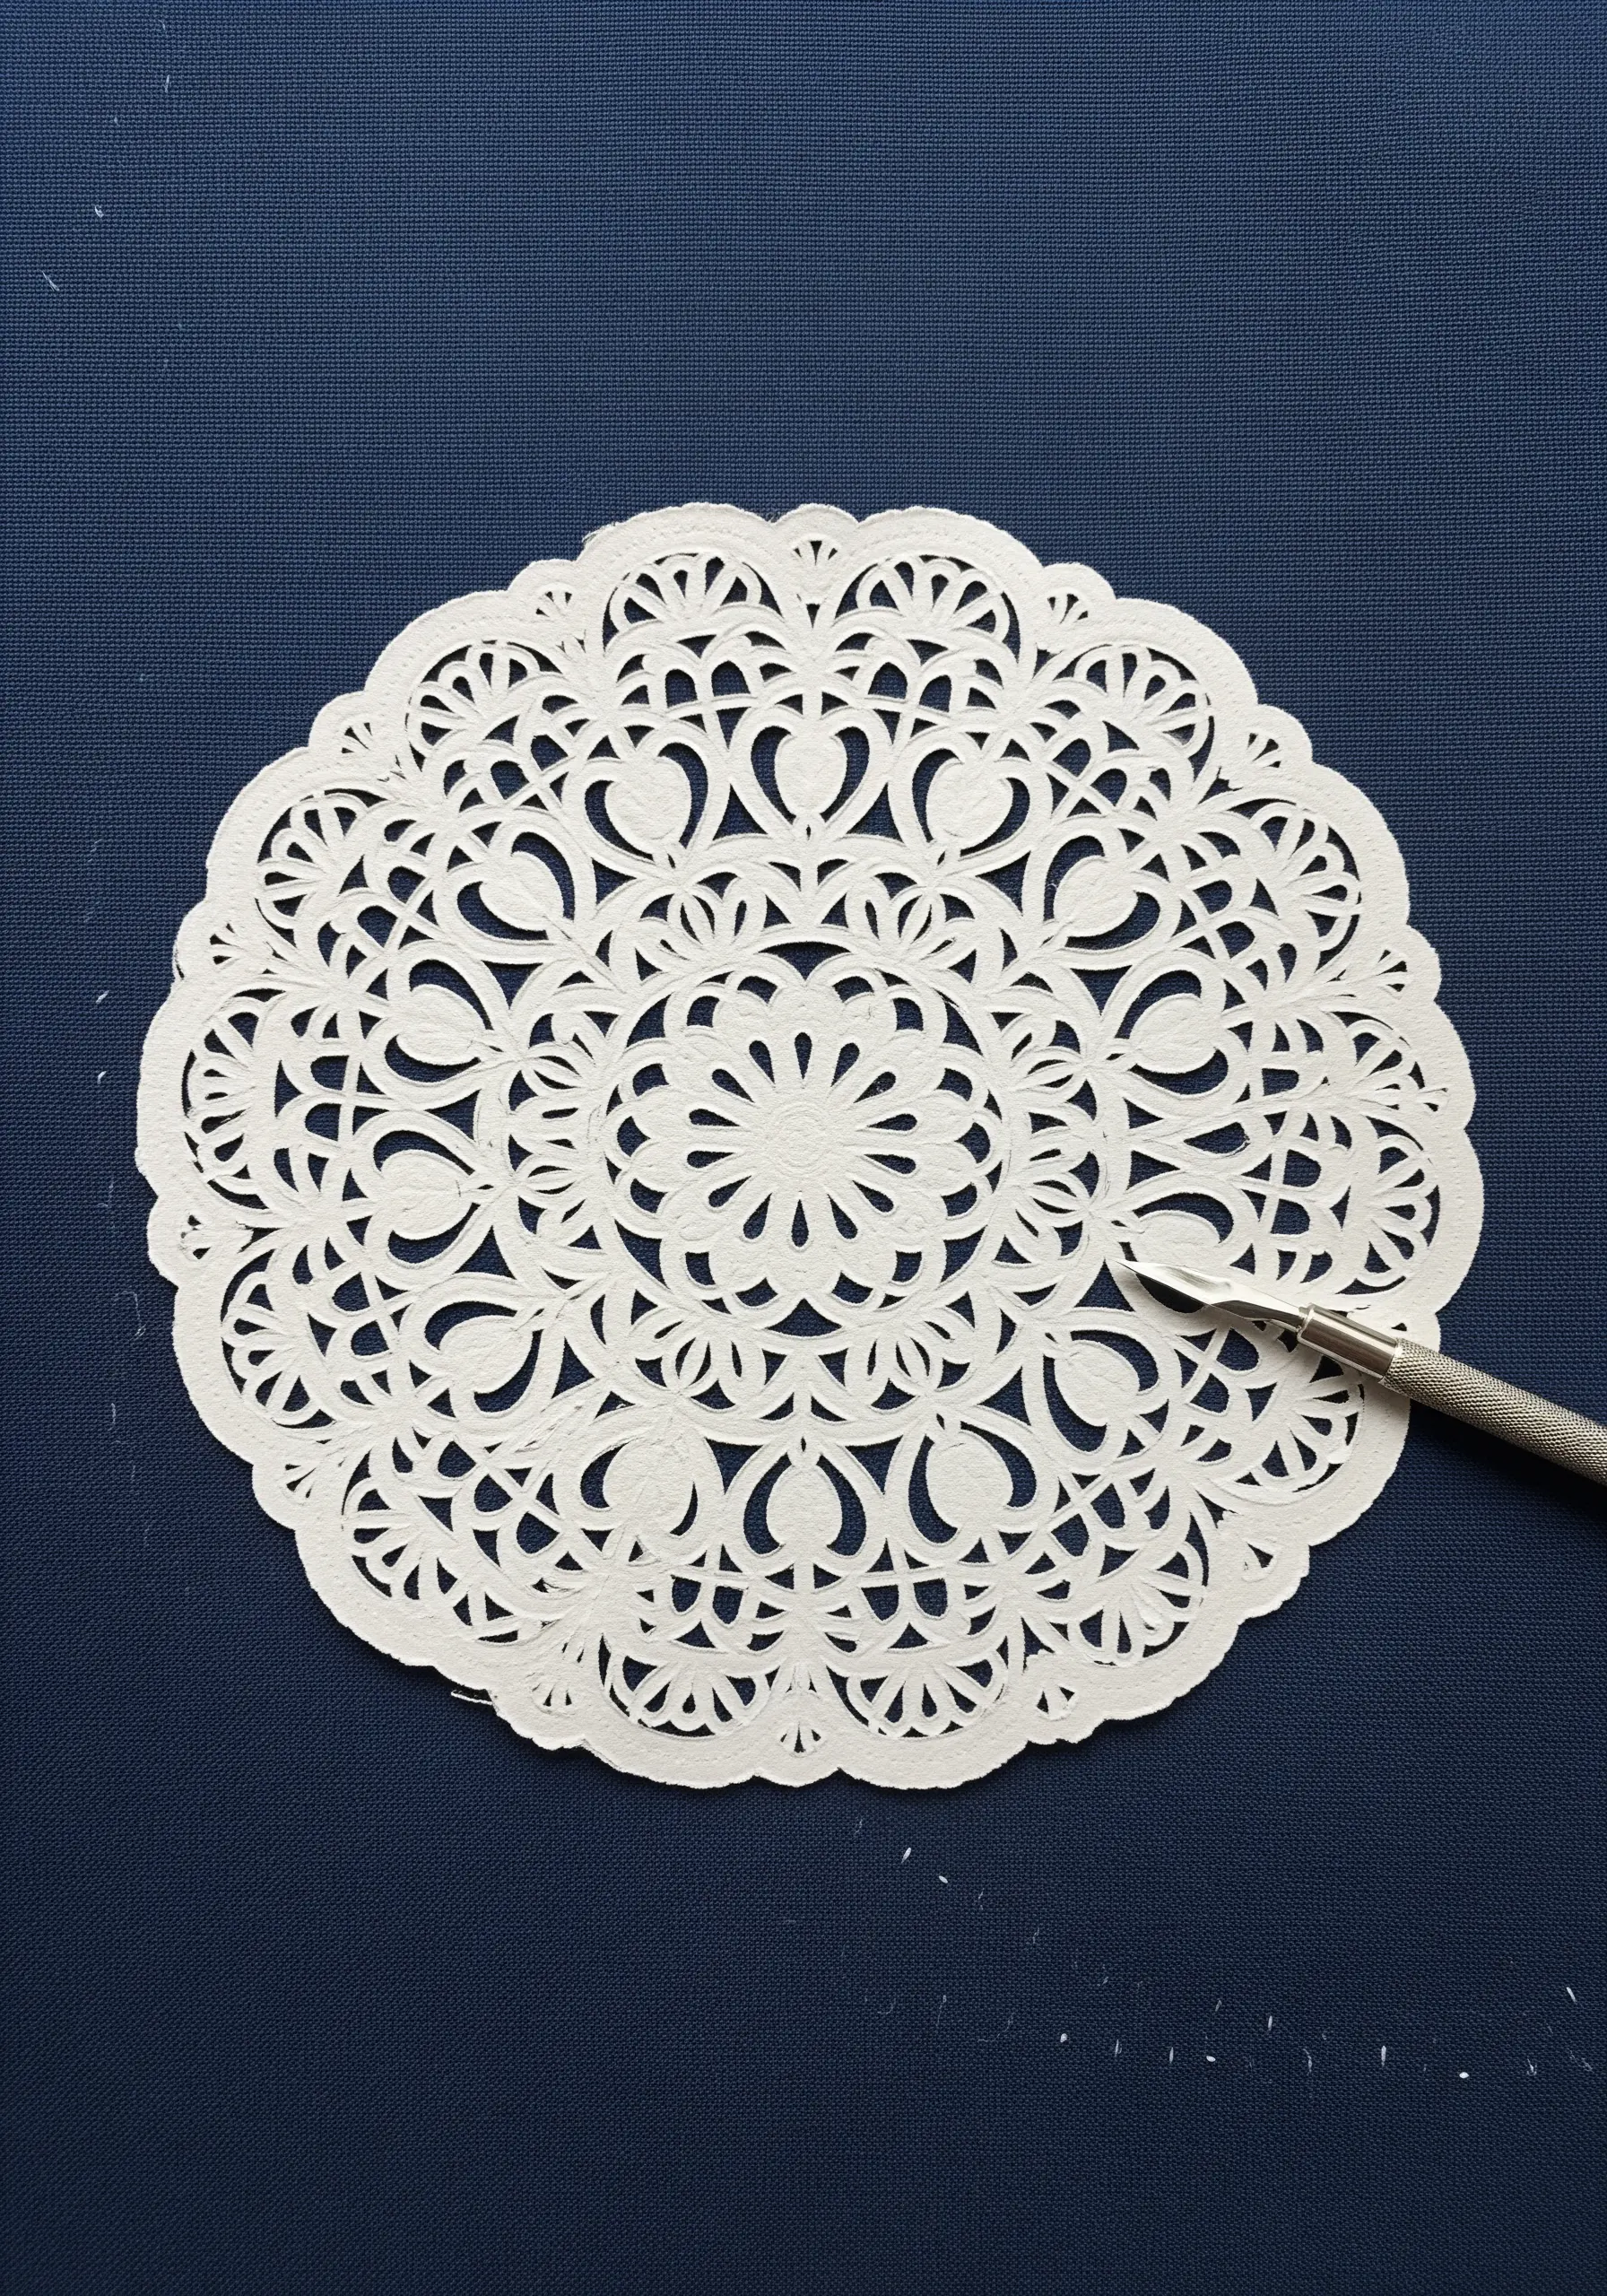
Create perfectly symmetrical, intricate patterns by using a paper doily as a template.
Temporarily affix a lace paper doily to the center of your fabric.
Use the holes and patterns of the doily as a guide for your stitches. You can stitch small crosses, French knots, or connect the dots to create a complex mandala-like design.
Once finished, carefully tear the paper away, revealing a flawless pattern that looks incredibly complex but was beautifully simple to execute, adding instant elegance.
25. Stitch Through Translucent Color Blocks
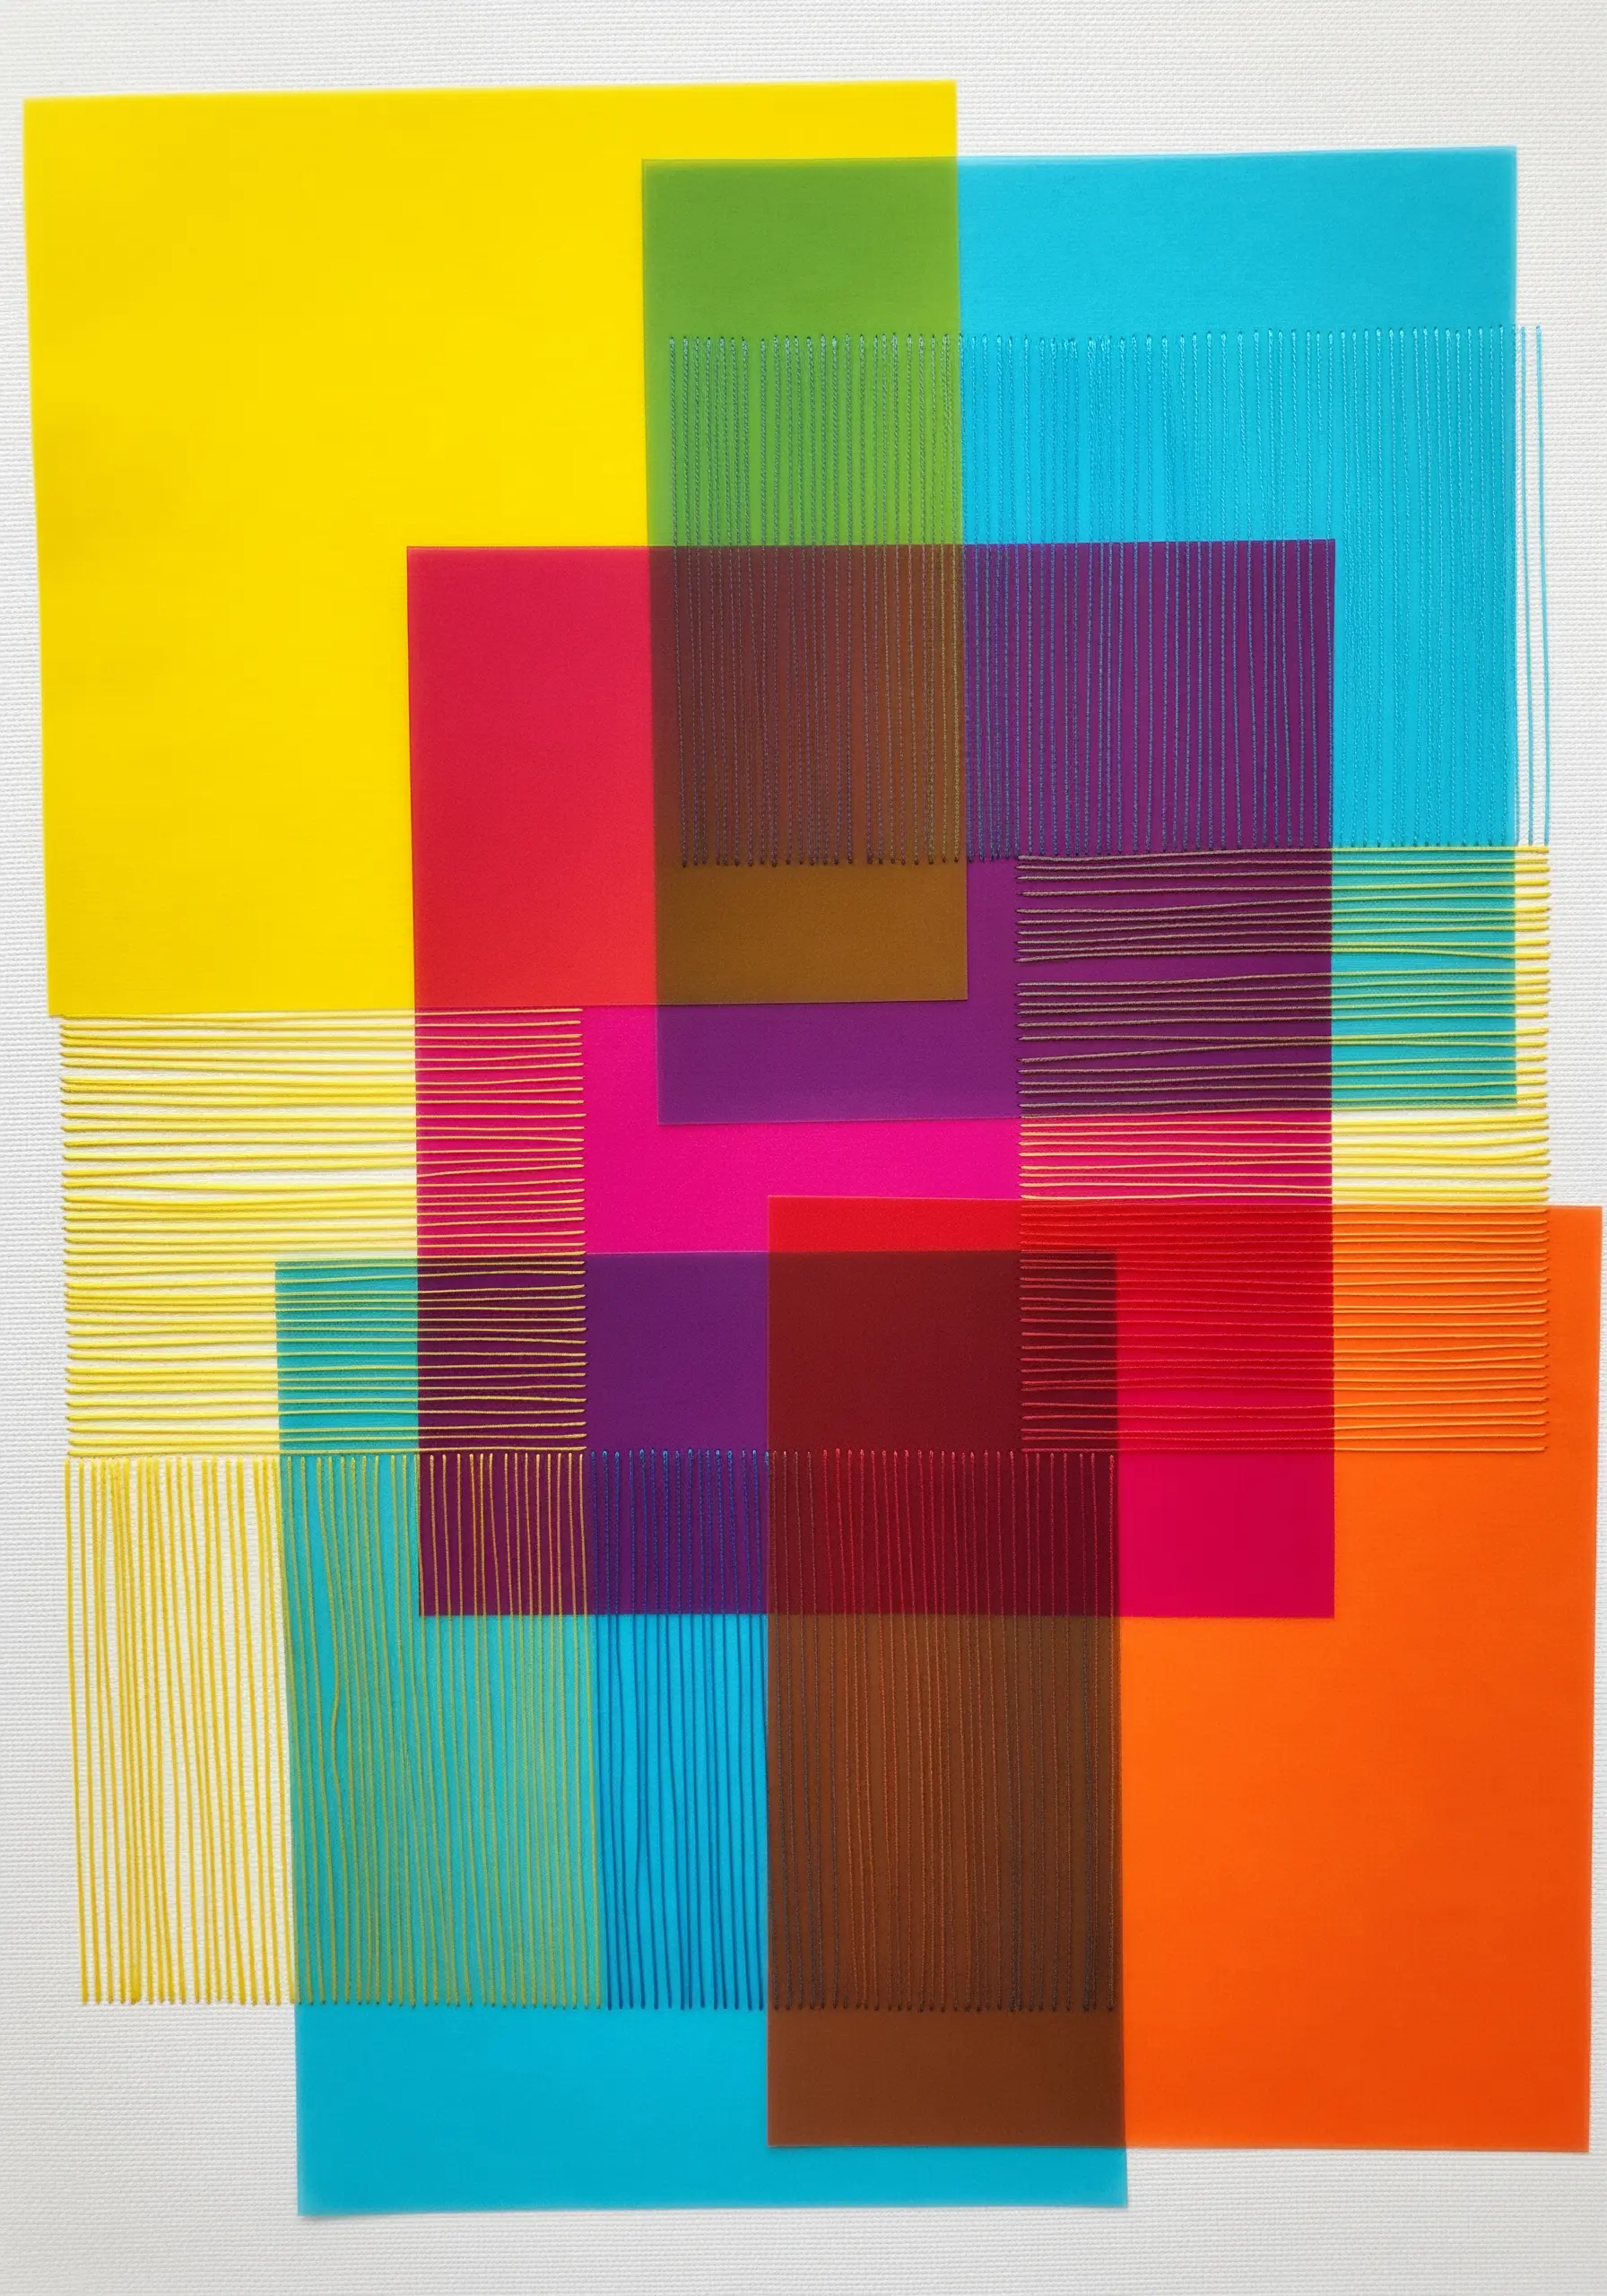
Explore the interplay of color and light by stitching through layers of translucent paper or acetate sheets.
Arrange overlapping squares of bold, transparent colors to create secondary and tertiary hues where they intersect.
Use simple, parallel running stitches to secure the sheets and add a linear, textural element.
The thread will appear differently depending on the color it passes over, creating a dynamic visual effect that showcases sophisticated thread color blending tricks.
26. Embroider on Crumpled Metallic Paper

Embrace imperfection and texture by stitching directly onto crumpled metallic paper.
Gently crumple a piece of gold or silver foil paper, then smooth it out partially to retain the crinkled texture.
Mount the paper onto a backing fabric for stability before hooping.
Use simple stitches, like the stars and running stitches seen here, which allow the paper’s shimmering, uneven surface to be the main feature. The light will catch on every fold, enhancing the sparkle of your gold thread luxury wall art.
27. Construct a Lush Paper Wreath
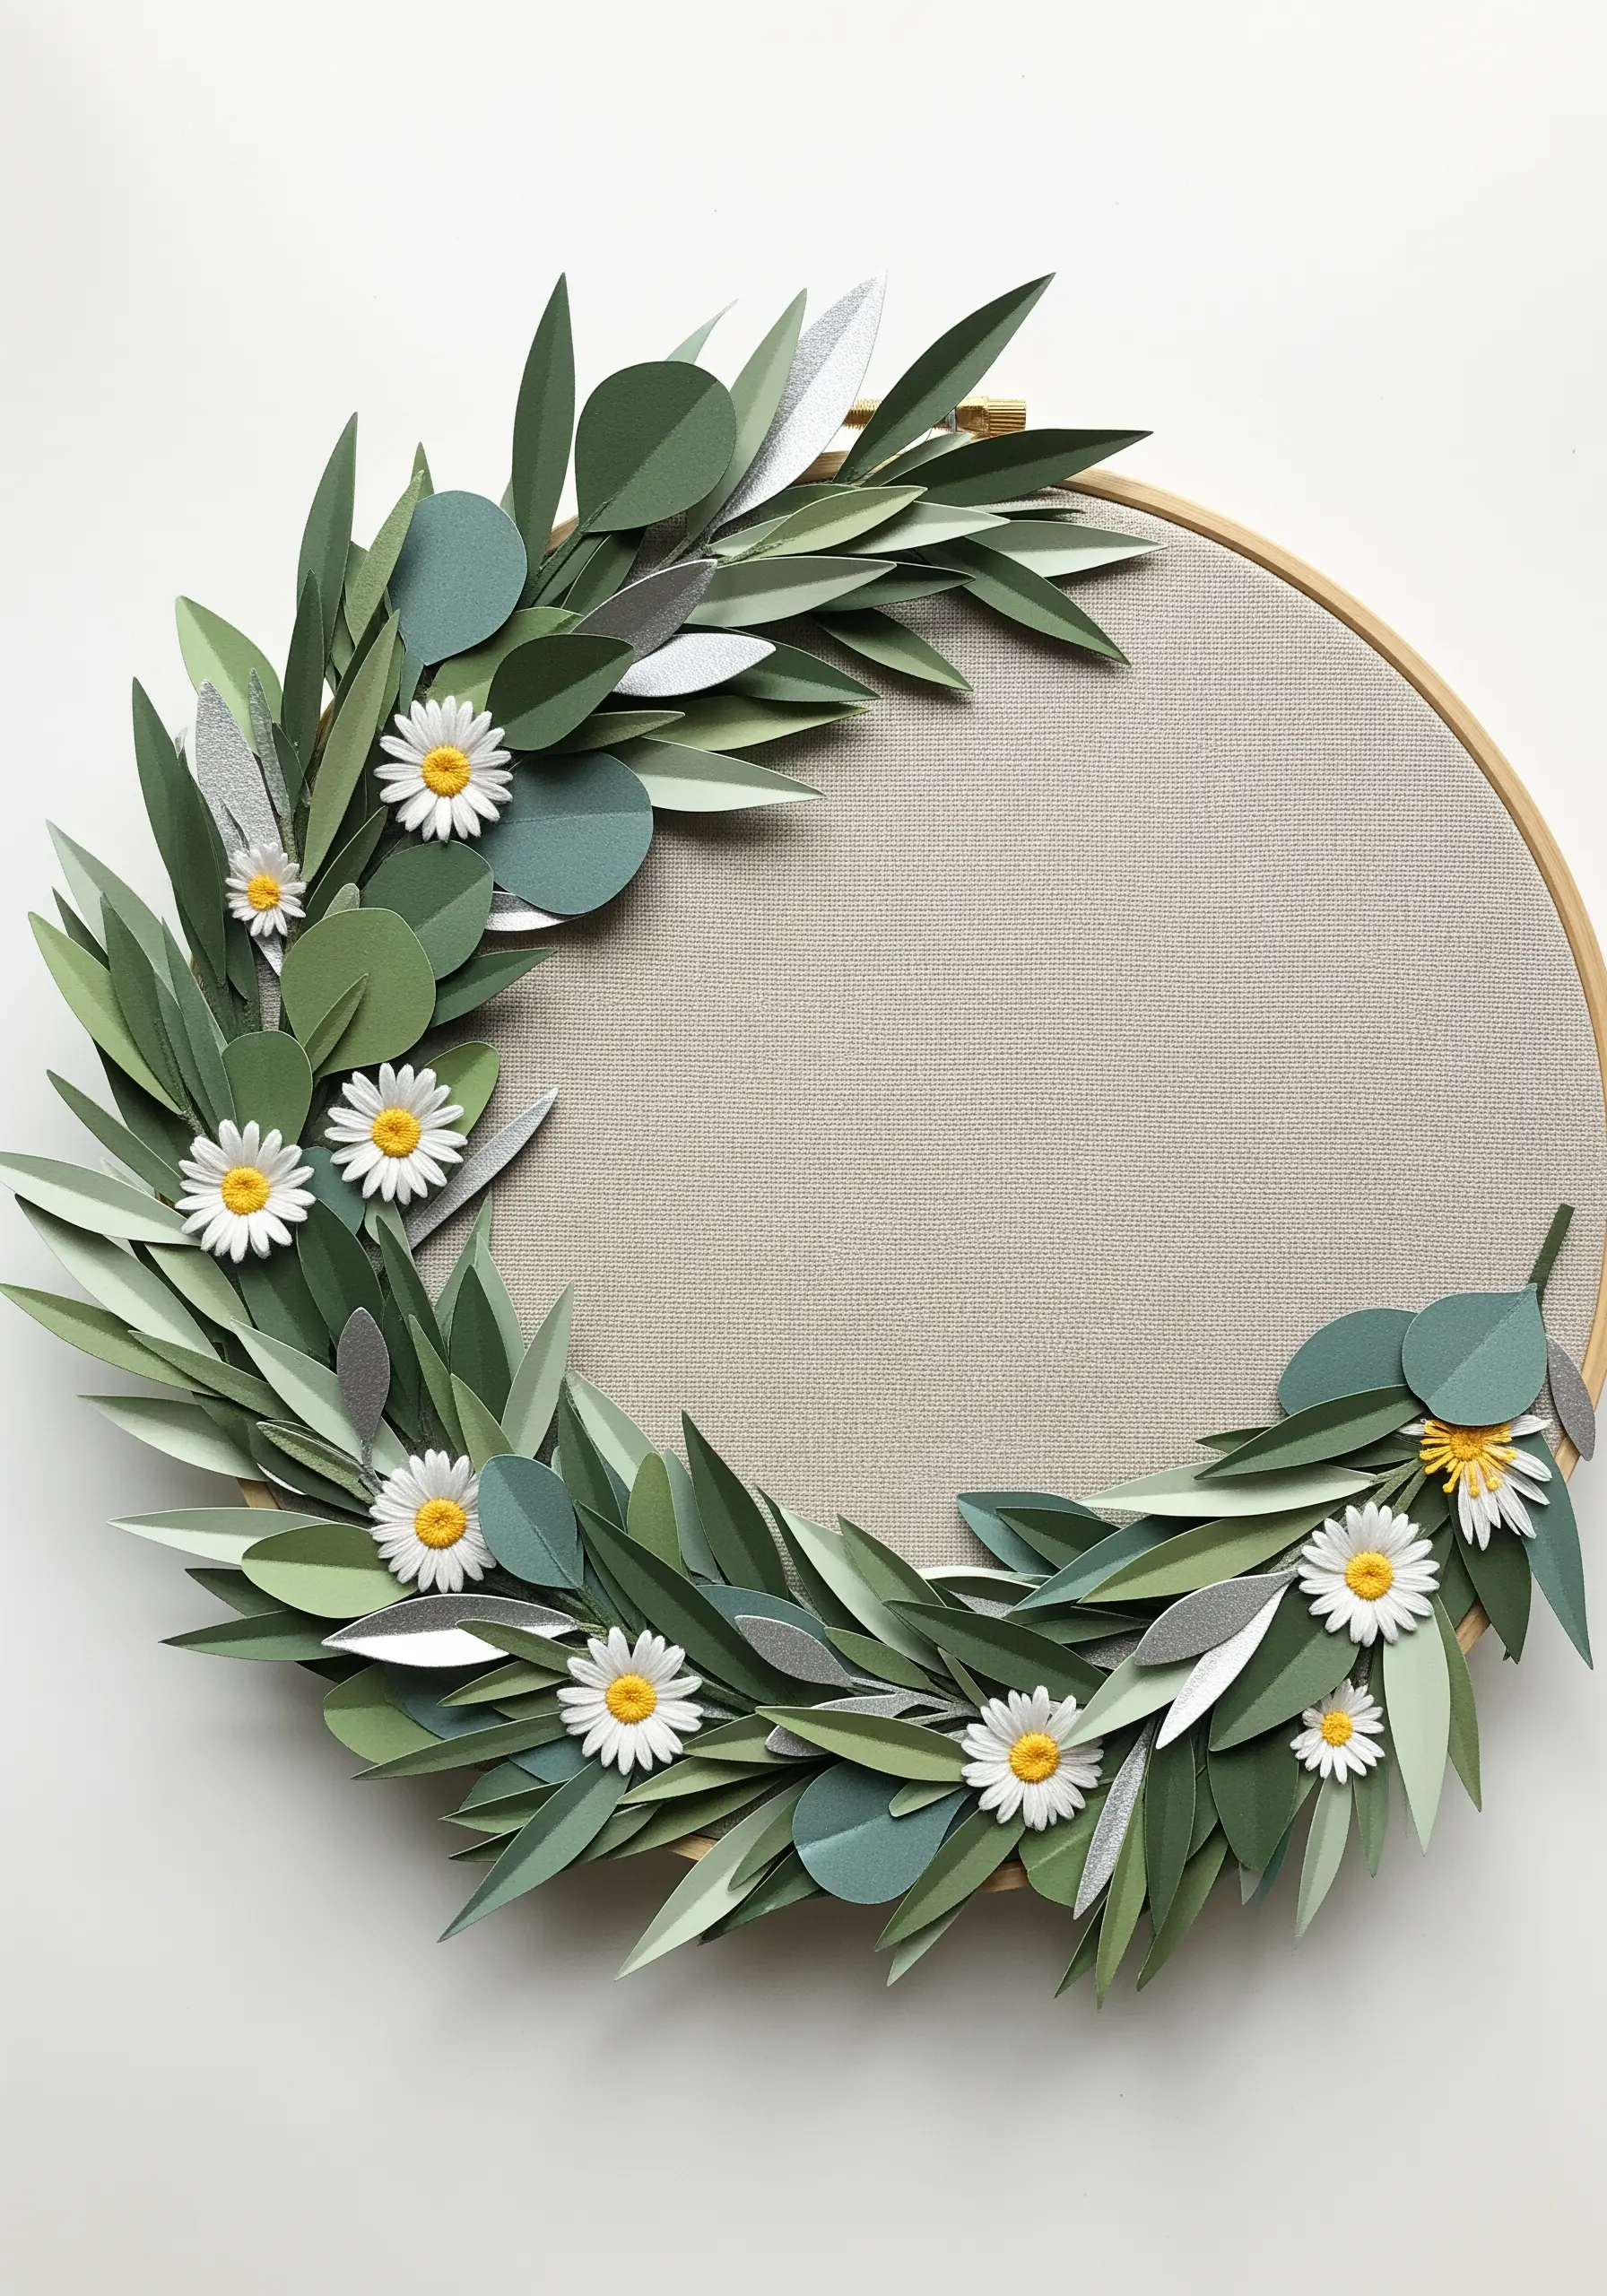
Build a full, three-dimensional wreath by layering paper leaves directly inside your embroidery hoop.
Cut various leaf shapes from cardstock in different shades of green and silver for a realistic, varied look.
Arrange and layer the leaves to create a sense of fullness and movement. Secure them with small stitches or glue.
Add tiny embroidered details, like the French knot centers of the paper daisies, to seamlessly merge the two crafts into a beautiful hand-stitched flower wreath.
28. Create a Sampler on Paper and Fabric Tiles

Design a modern quilt-style piece by working your stitches on small, individual squares of paper and fabric.
Cut uniform squares from various materials—patterned paper, textured cardstock, felt, and linen.
Practice different stitches on each square, allowing the background material to influence your thread color and stitch choice.
Arrange the finished tiles in a grid on your base fabric for a visually rich composition. This is a wonderful way to create inspirational small hoop samplers with modern flair.
29. Add Stitched Veins to Watercolor Leaves

Combine the softness of watercolor with the definition of thread for beautifully artistic leaves.
Paint loose washes of autumnal color onto watercolor paper and let it dry completely.
Cut out your leaf shapes, then use a simple backstitch in a contrasting dark thread to add the central vein and delicate side veins.
This method perfectly captures the organic beauty of changing leaves, with the paint providing the color and the thread providing the structure, perfect for ways to layer leaf stitching.
30. Contrast Torn Paper Mountains with a Stitched Sun

Create a powerful landscape by juxtaposing the rough, organic texture of torn paper with the smooth perfection of a satin-stitched sun.
Layer strips of torn, heavy-weight paper in shades of grey to build a mountain range with soft, natural edges.
Embroider a perfect circle with dense, smooth satin stitch for the sun. The crisp edge and uniform texture of the stitching will stand in striking contrast to the paper.
This composition creates beautiful abstract thread landscapes that play on texture and form.
31. Map Origami Flight Paths with Thread

Bring a sense of movement and grace to your work by adding small origami figures to your fabric.
Fold several small cranes from patterned origami paper.
Arrange them across your fabric as if in flight, then secure each one with a few tiny, hidden stitches.
Use a delicate, shimmering thread—like a silver metallic or a silky rayon—to stitch swirling flight paths with a simple running stitch, capturing a moment of Japanese-inspired elegance.
32. Add Stitched Accents to Layered Mandalas
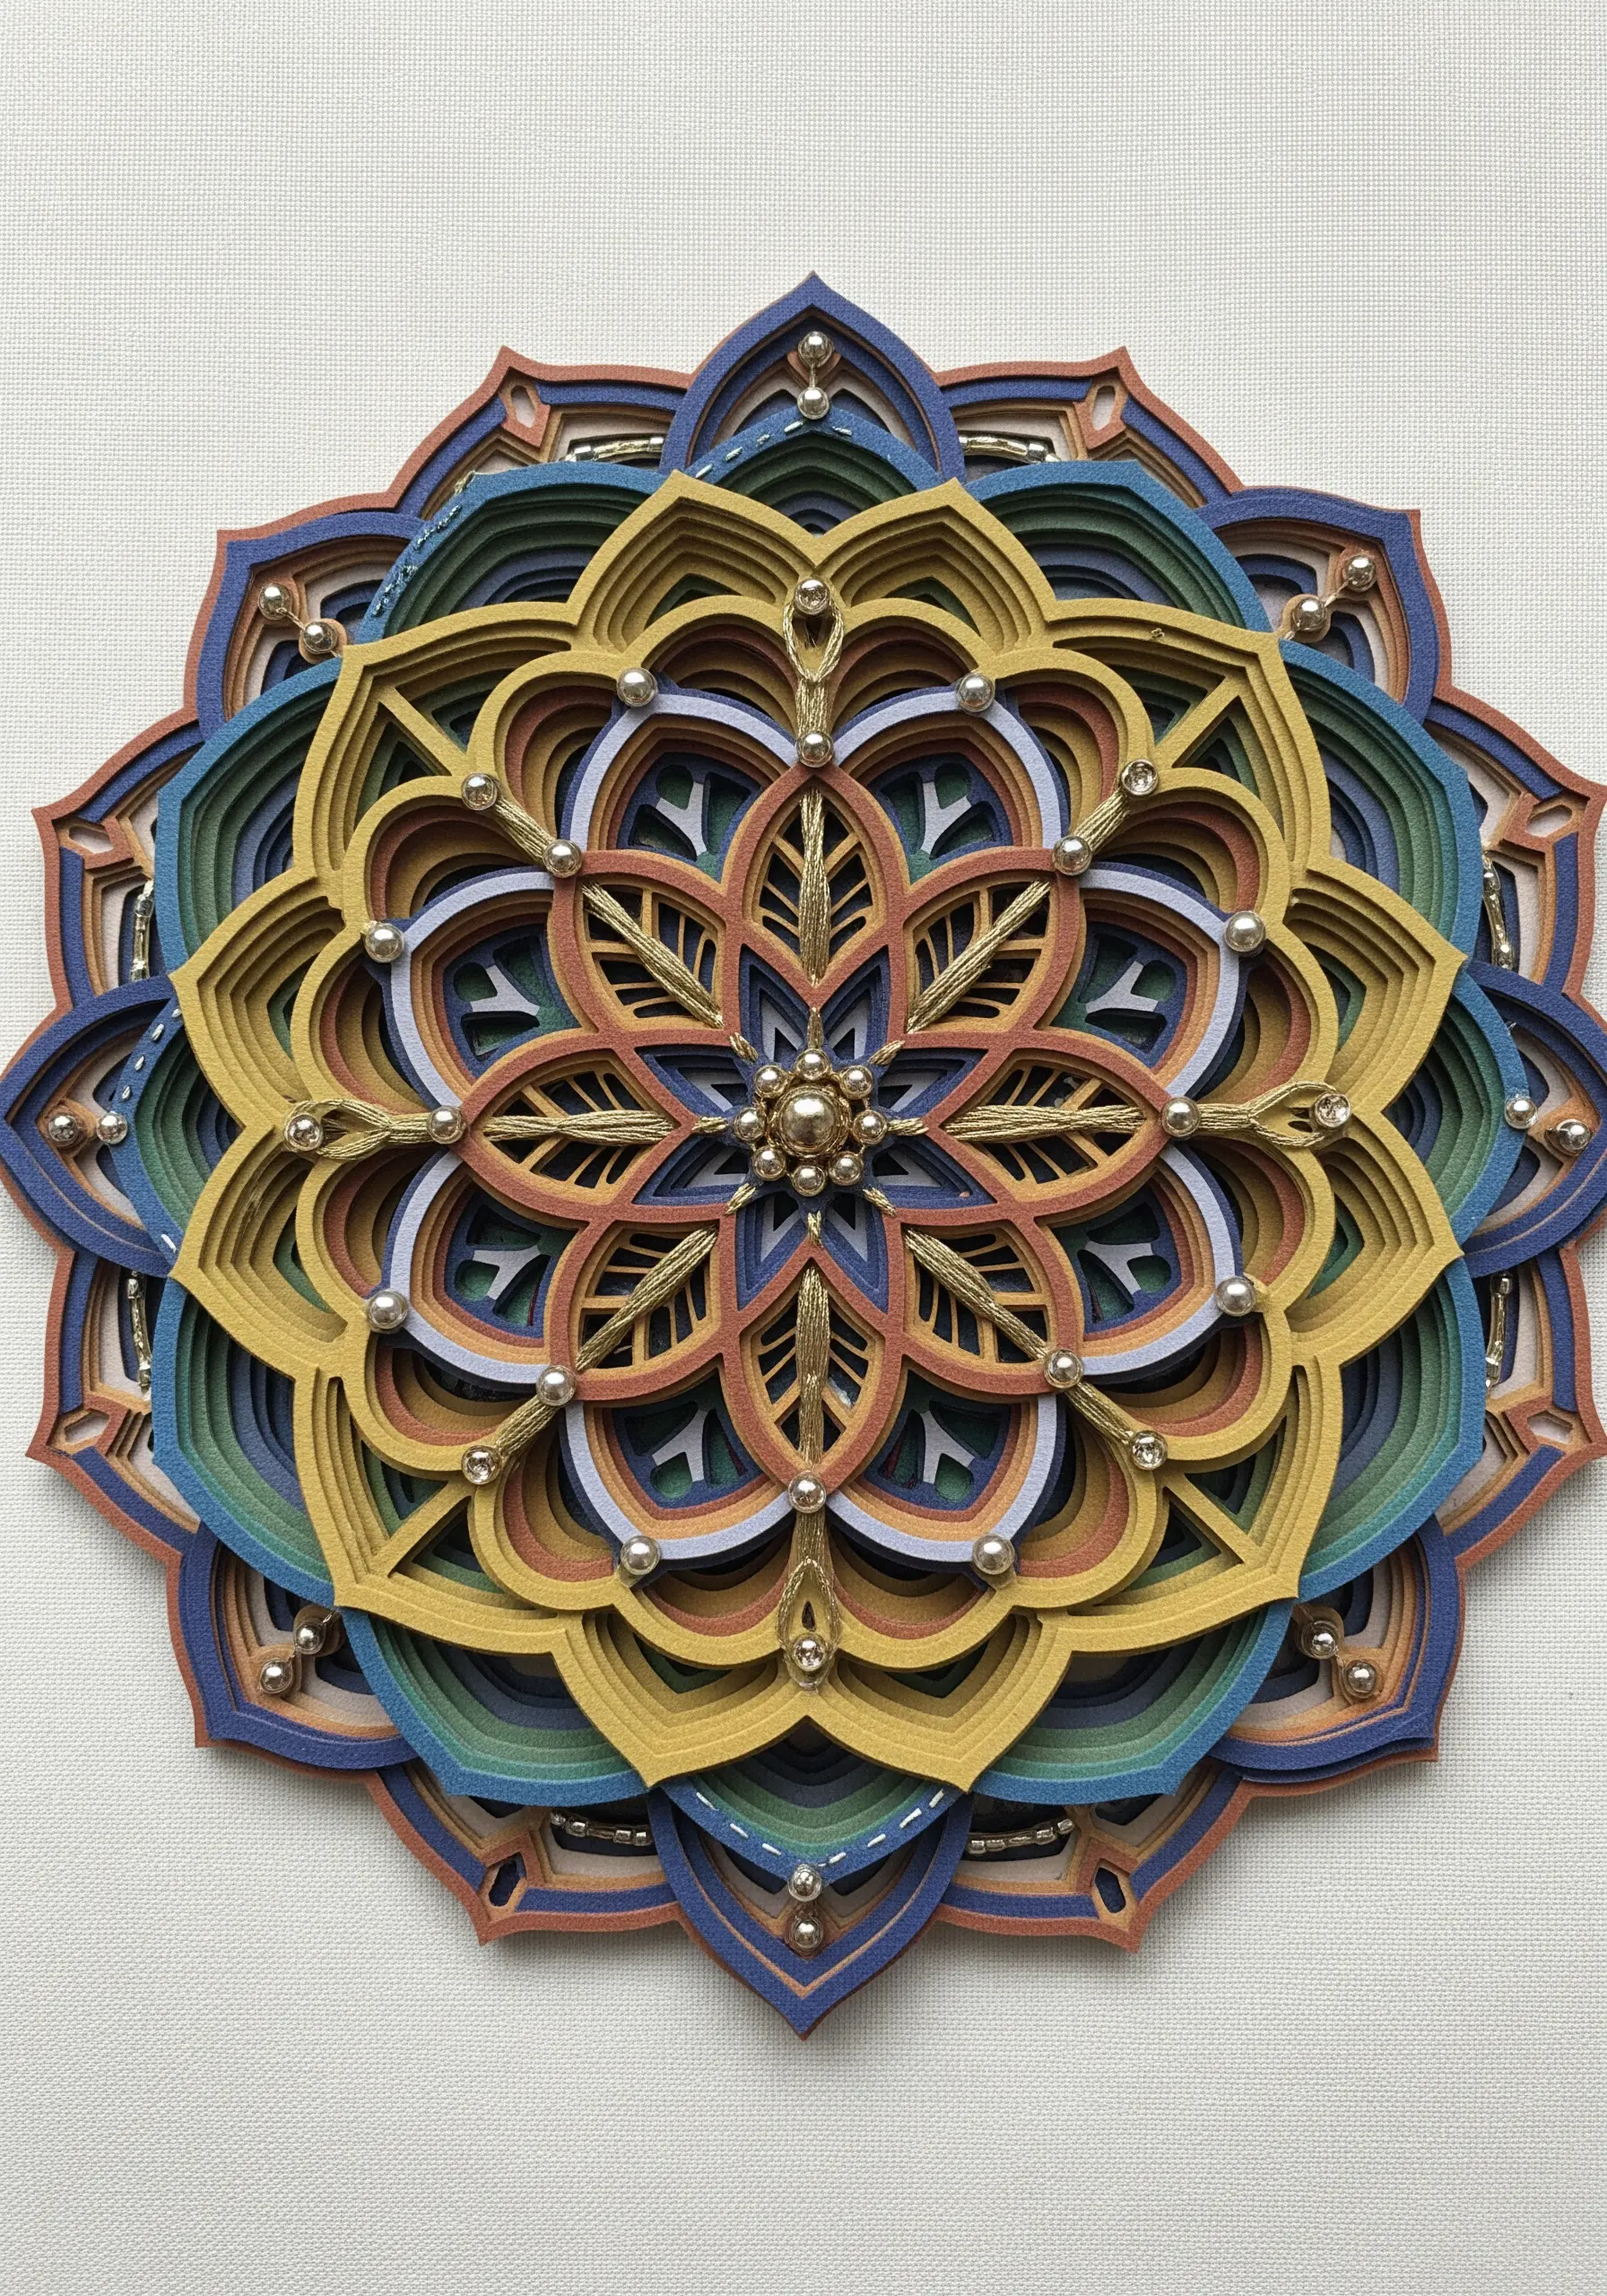
Enhance a complex, layered paper mandala with carefully placed stitches and beads.
After assembling your laser-cut paper layers, identify areas that would benefit from a textural accent.
Use metallic gold thread to add small, decorative stitches along certain edges, catching the light and adding definition.
Secure tiny pearl beads or French knots at key intersections to provide focal points within the intricate design, elevating it beyond paper into a true mixed-media thread mandala.
33. Fill Paper Typography with Textural Stitches
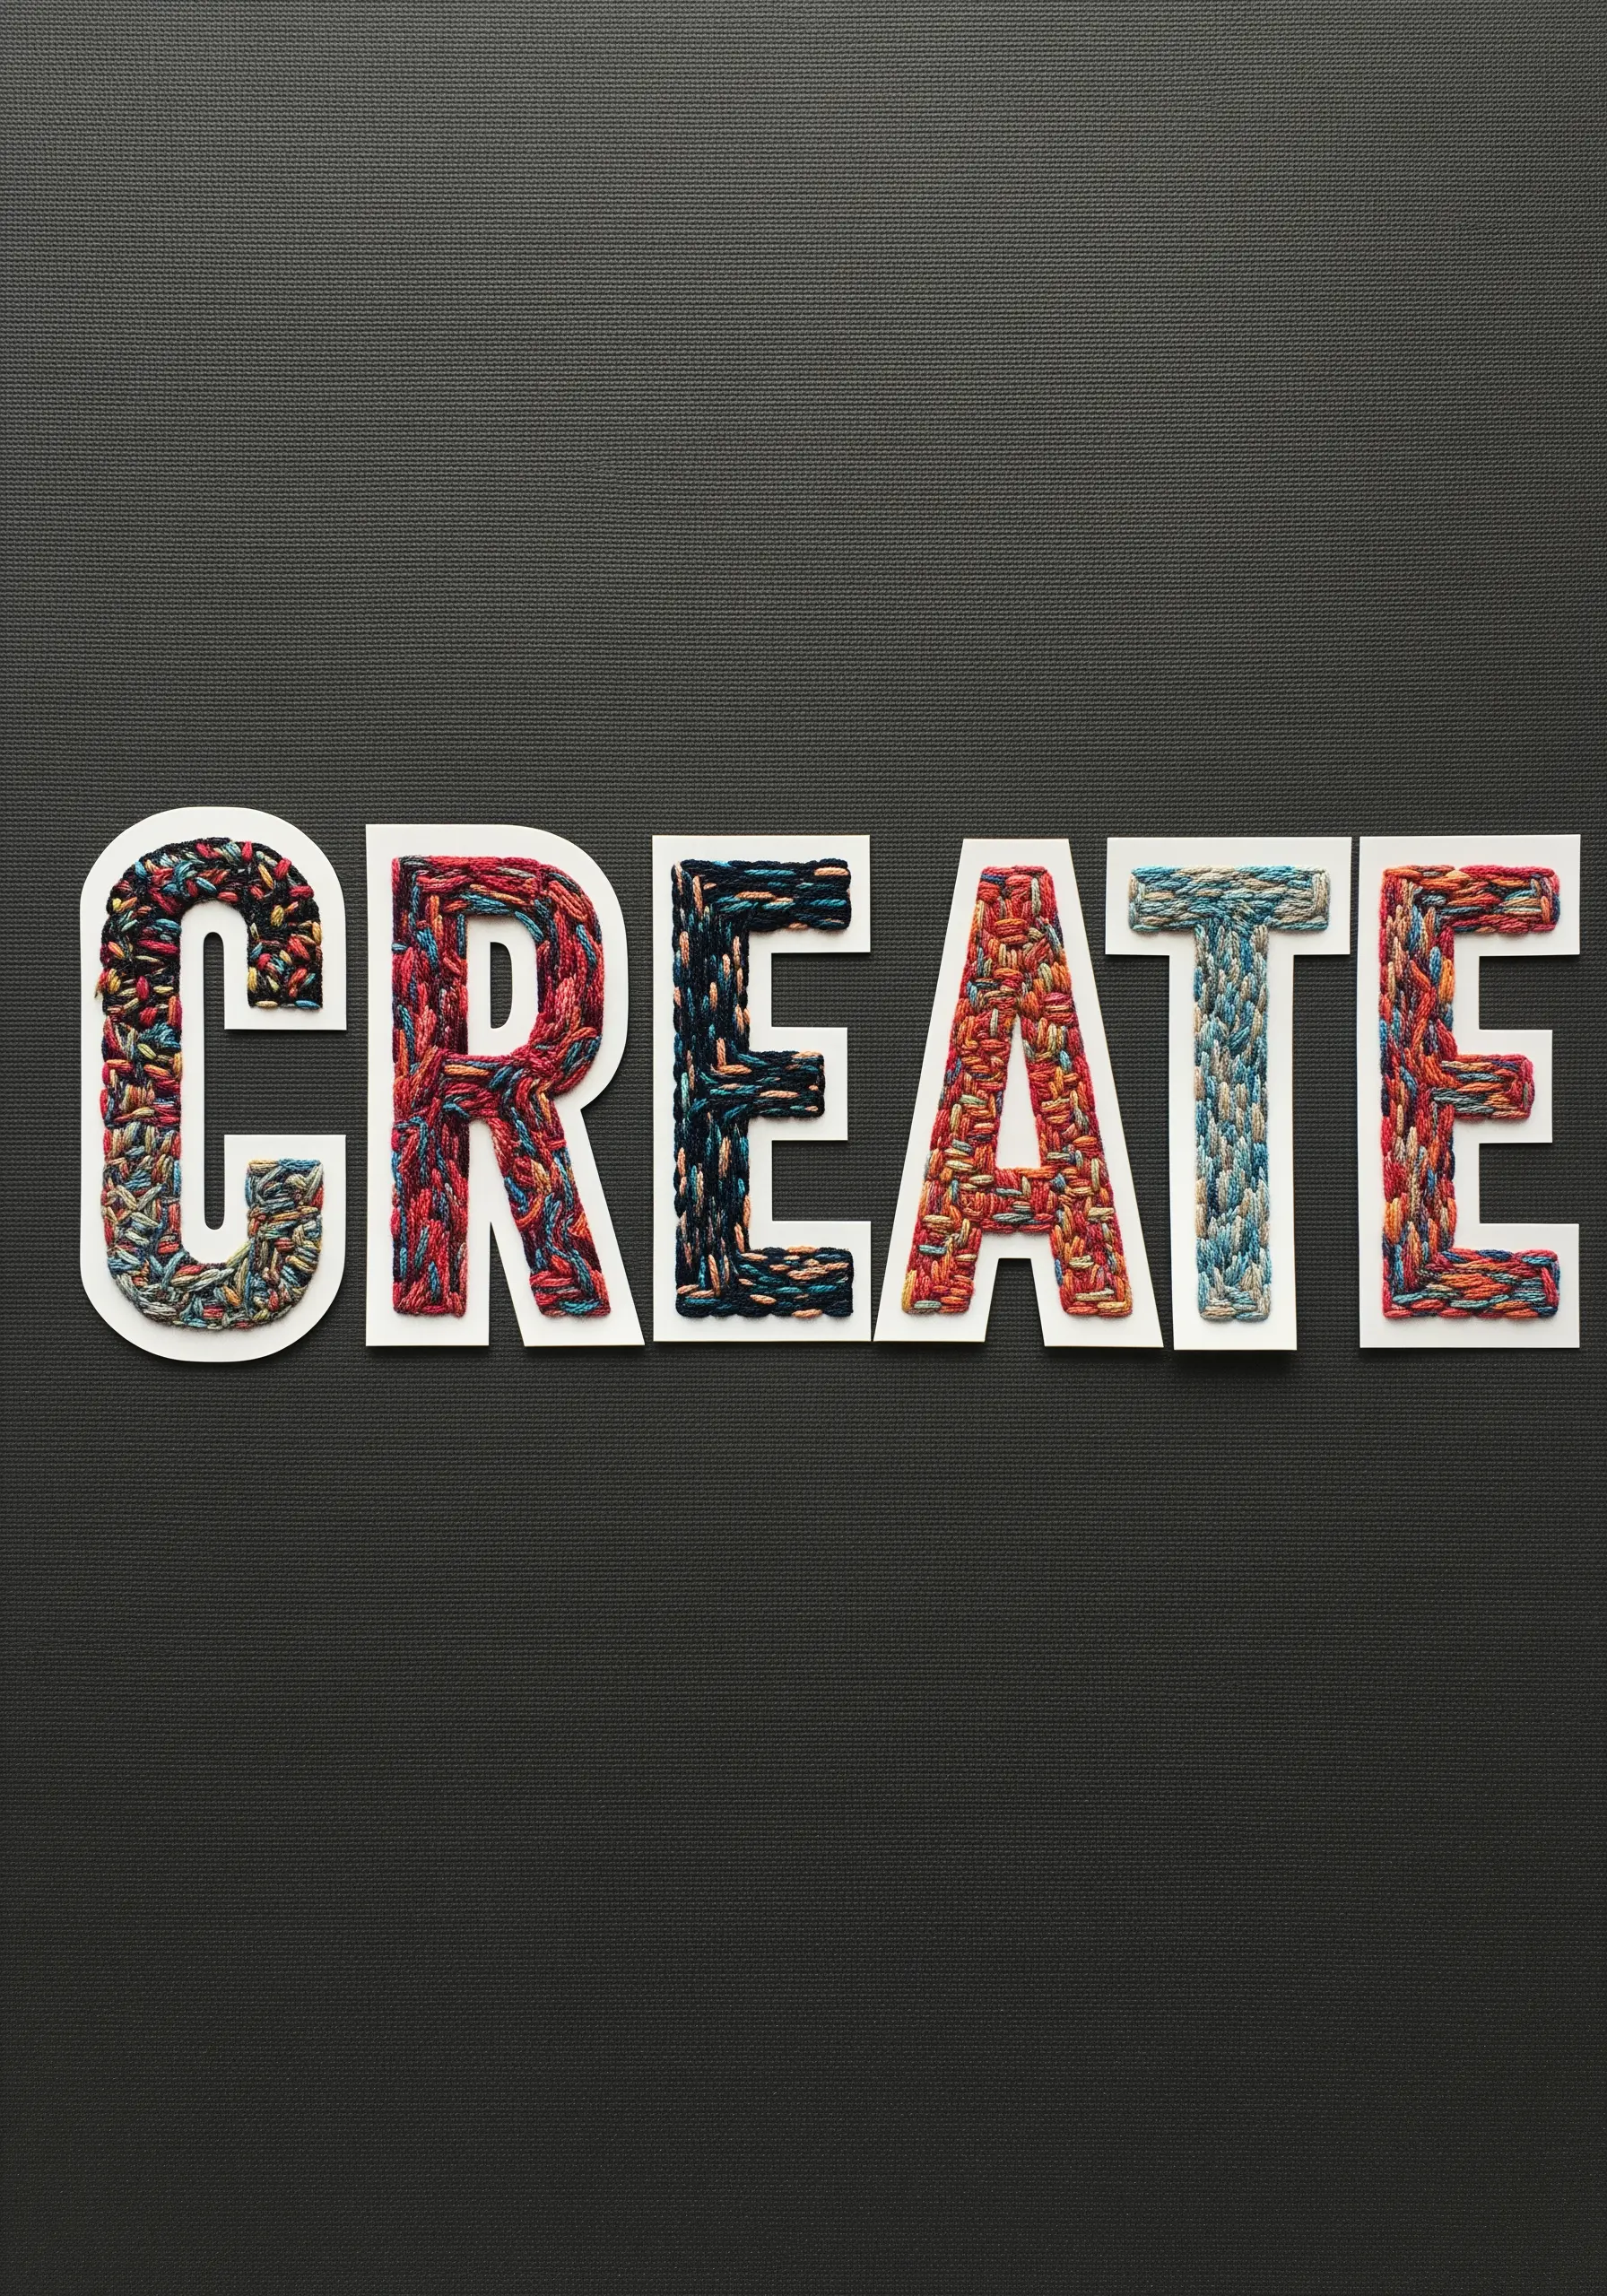
Use paper letters as a clean container for an explosion of textural, freeform stitching.
Cut bold, block letters from a stiff white cardstock and affix them to a dark, textured background.
Fill the inside of each letter with a dense mix of stitches—try seed stitch, French knots, and short straight stitches using variegated thread.
The crisp paper edge contains the chaotic texture of the stitches, creating a powerful and visually satisfying typographic artwork. It’s a fantastic way to approach modern typography stitch designs.
34. Pierce Paper for Minimalist Line Art

For clean, graphic botanicals, use your needle to pre-pierce your pattern into the paper before you even thread it.
Lightly draw your design onto heavy-weight paper or smooth cardstock.
Use a pin or your needle to punch holes at regular intervals along your drawn lines.
Stitch through the pre-punched holes using a simple backstitch or running stitch. This method prevents the paper from tearing and results in exceptionally clean, precise lines, perfect for minimalist botanical stitch designs.


