

When you place an embroidery hoop in a window, it becomes more than just a piece of fabric and thread. It transforms into a canvas for light, where every stitch is illuminated and the spaces between them tell a story. This is your opportunity to move beyond simply filling in a pattern and begin crafting with light itself.
Think of your fabric not as a solid ground, but as a filter. A sheer linen can create a soft, diffused glow, while a dark, opaque cotton can turn your stitches into brilliant points of color against shadow. The light reveals the texture of a French knot, the smooth sheen of a satin stitch, and the delicate line of a stem stitch in a way that a solid wall never could.
In these projects, you’ll discover how to use stitch direction, thread texture, and negative space to create botanical art that feels alive. You’ll learn to build dimension not just with padding, but with contrast and transparency. Let this be an invitation to slow down, observe the way light falls in your home, and stitch something that changes with the day.
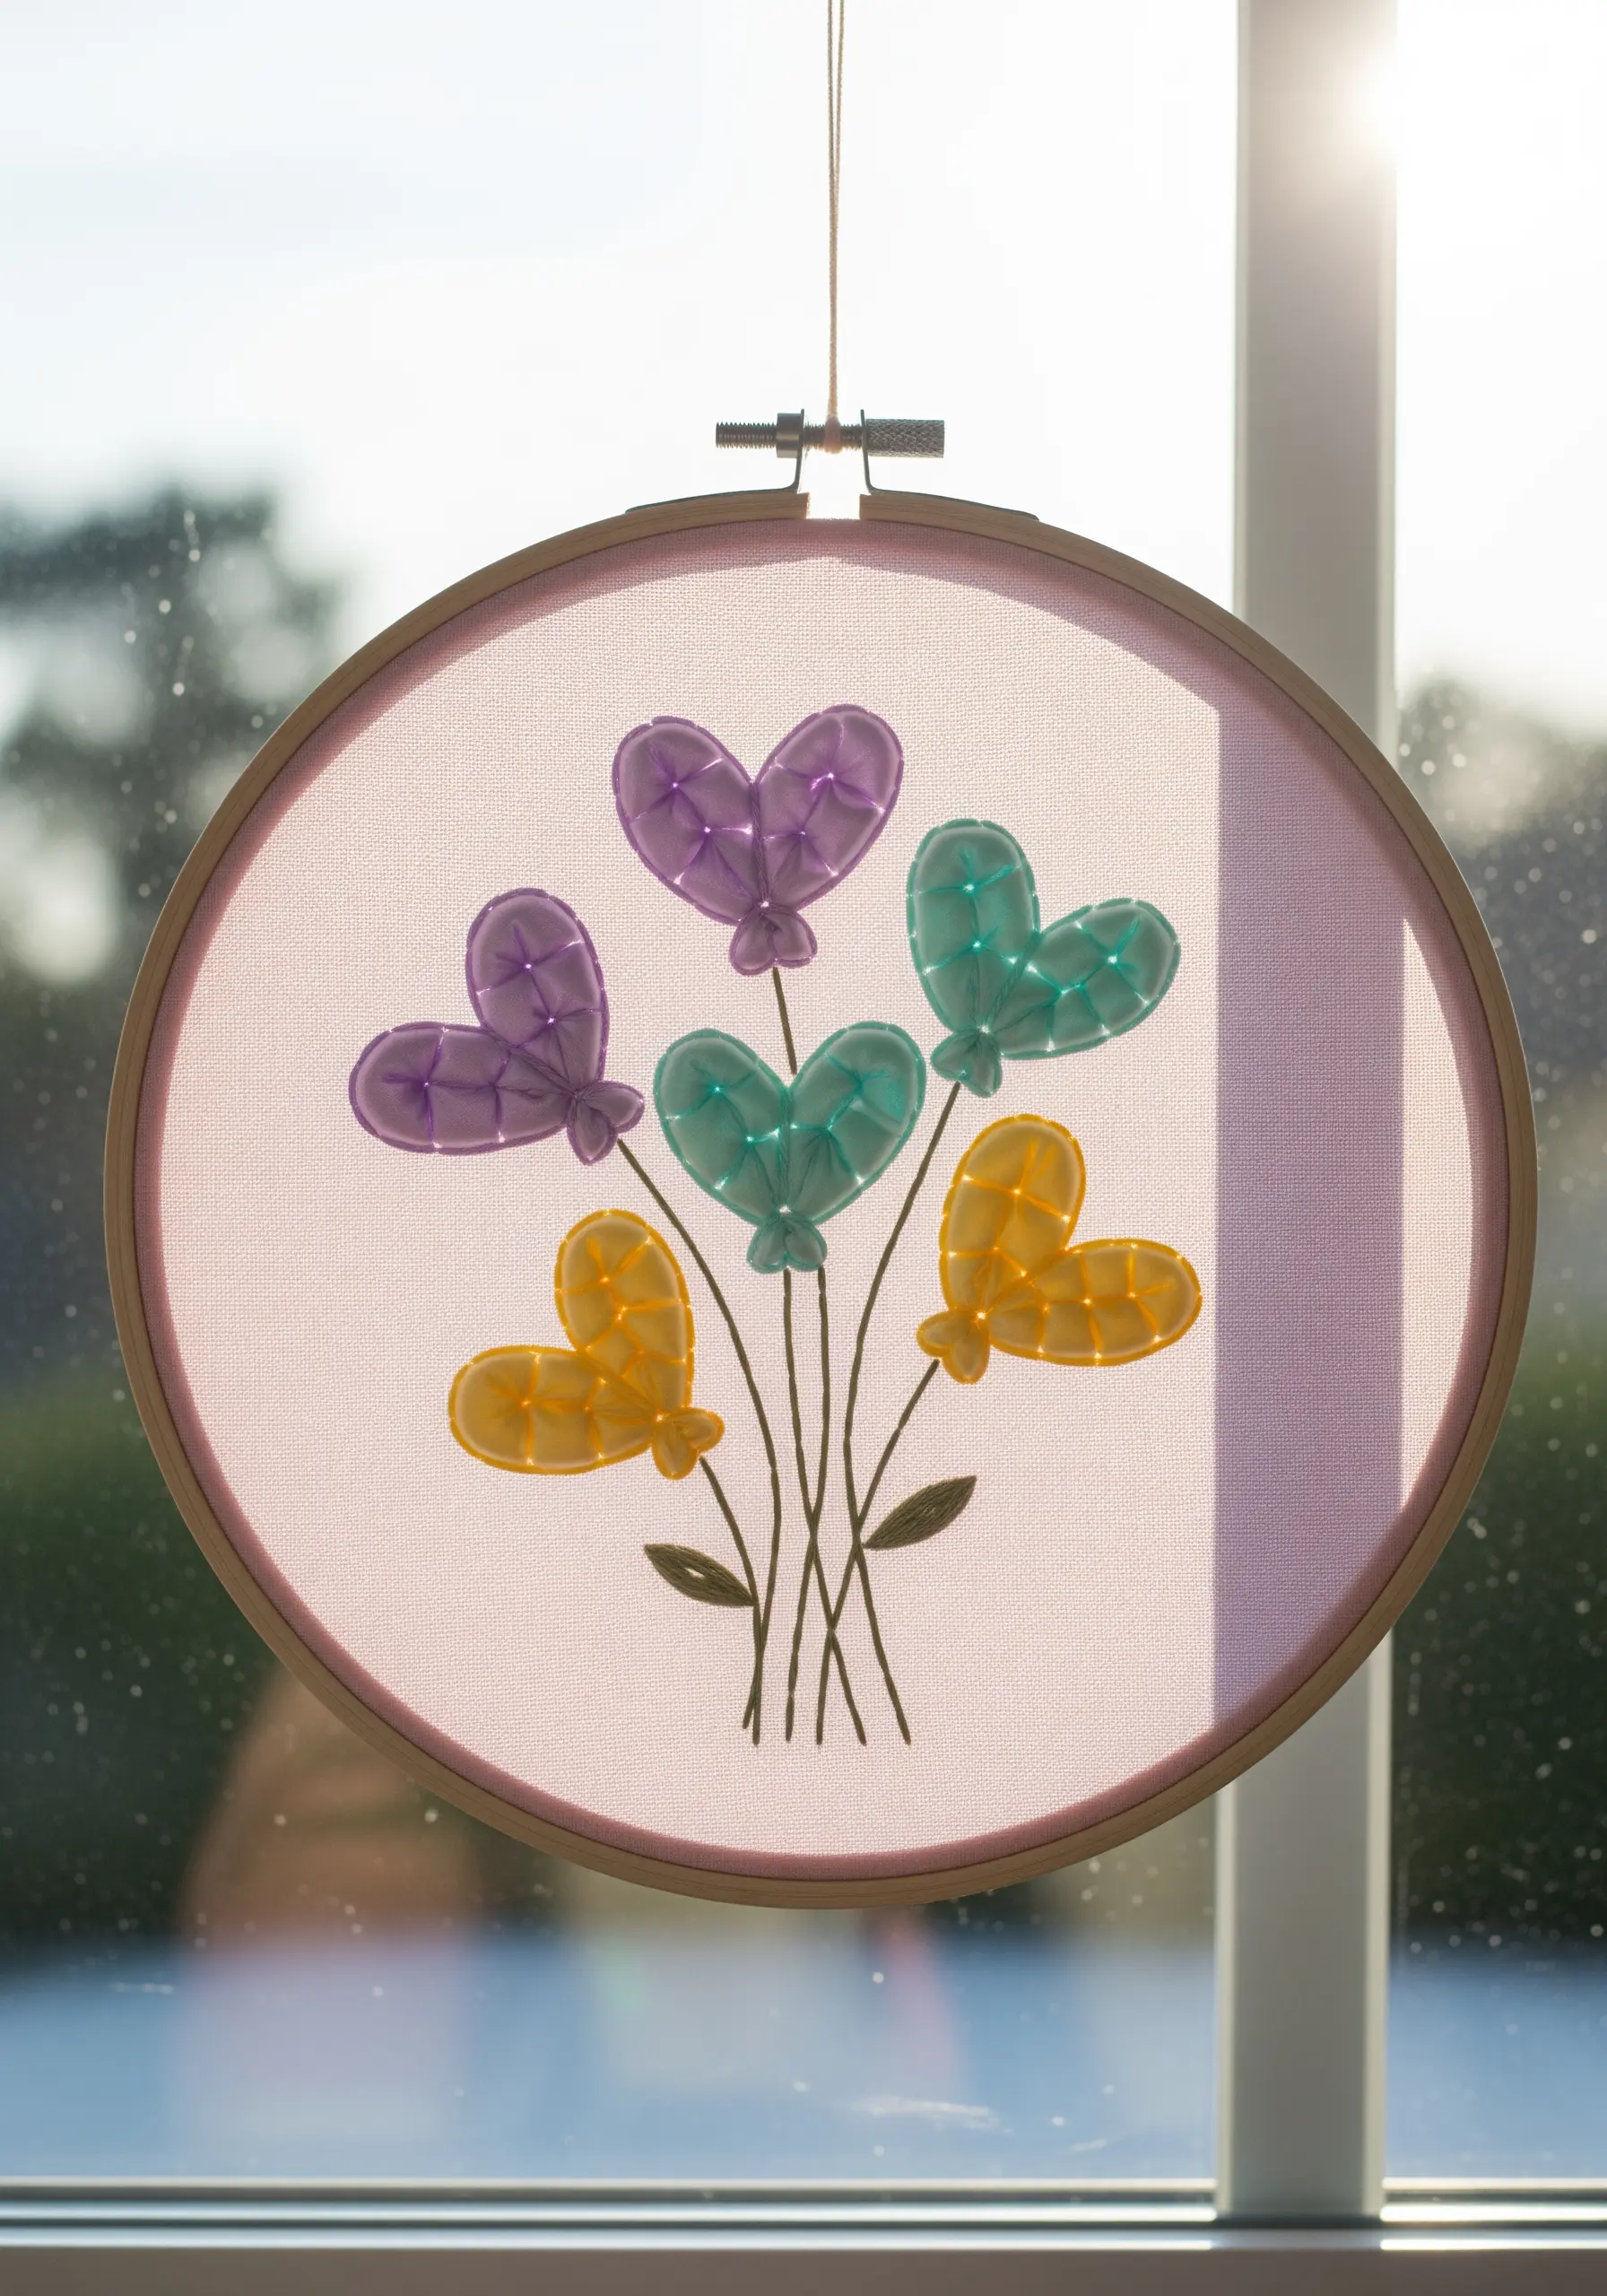
1. Create a Backlit Lavender Silhouette
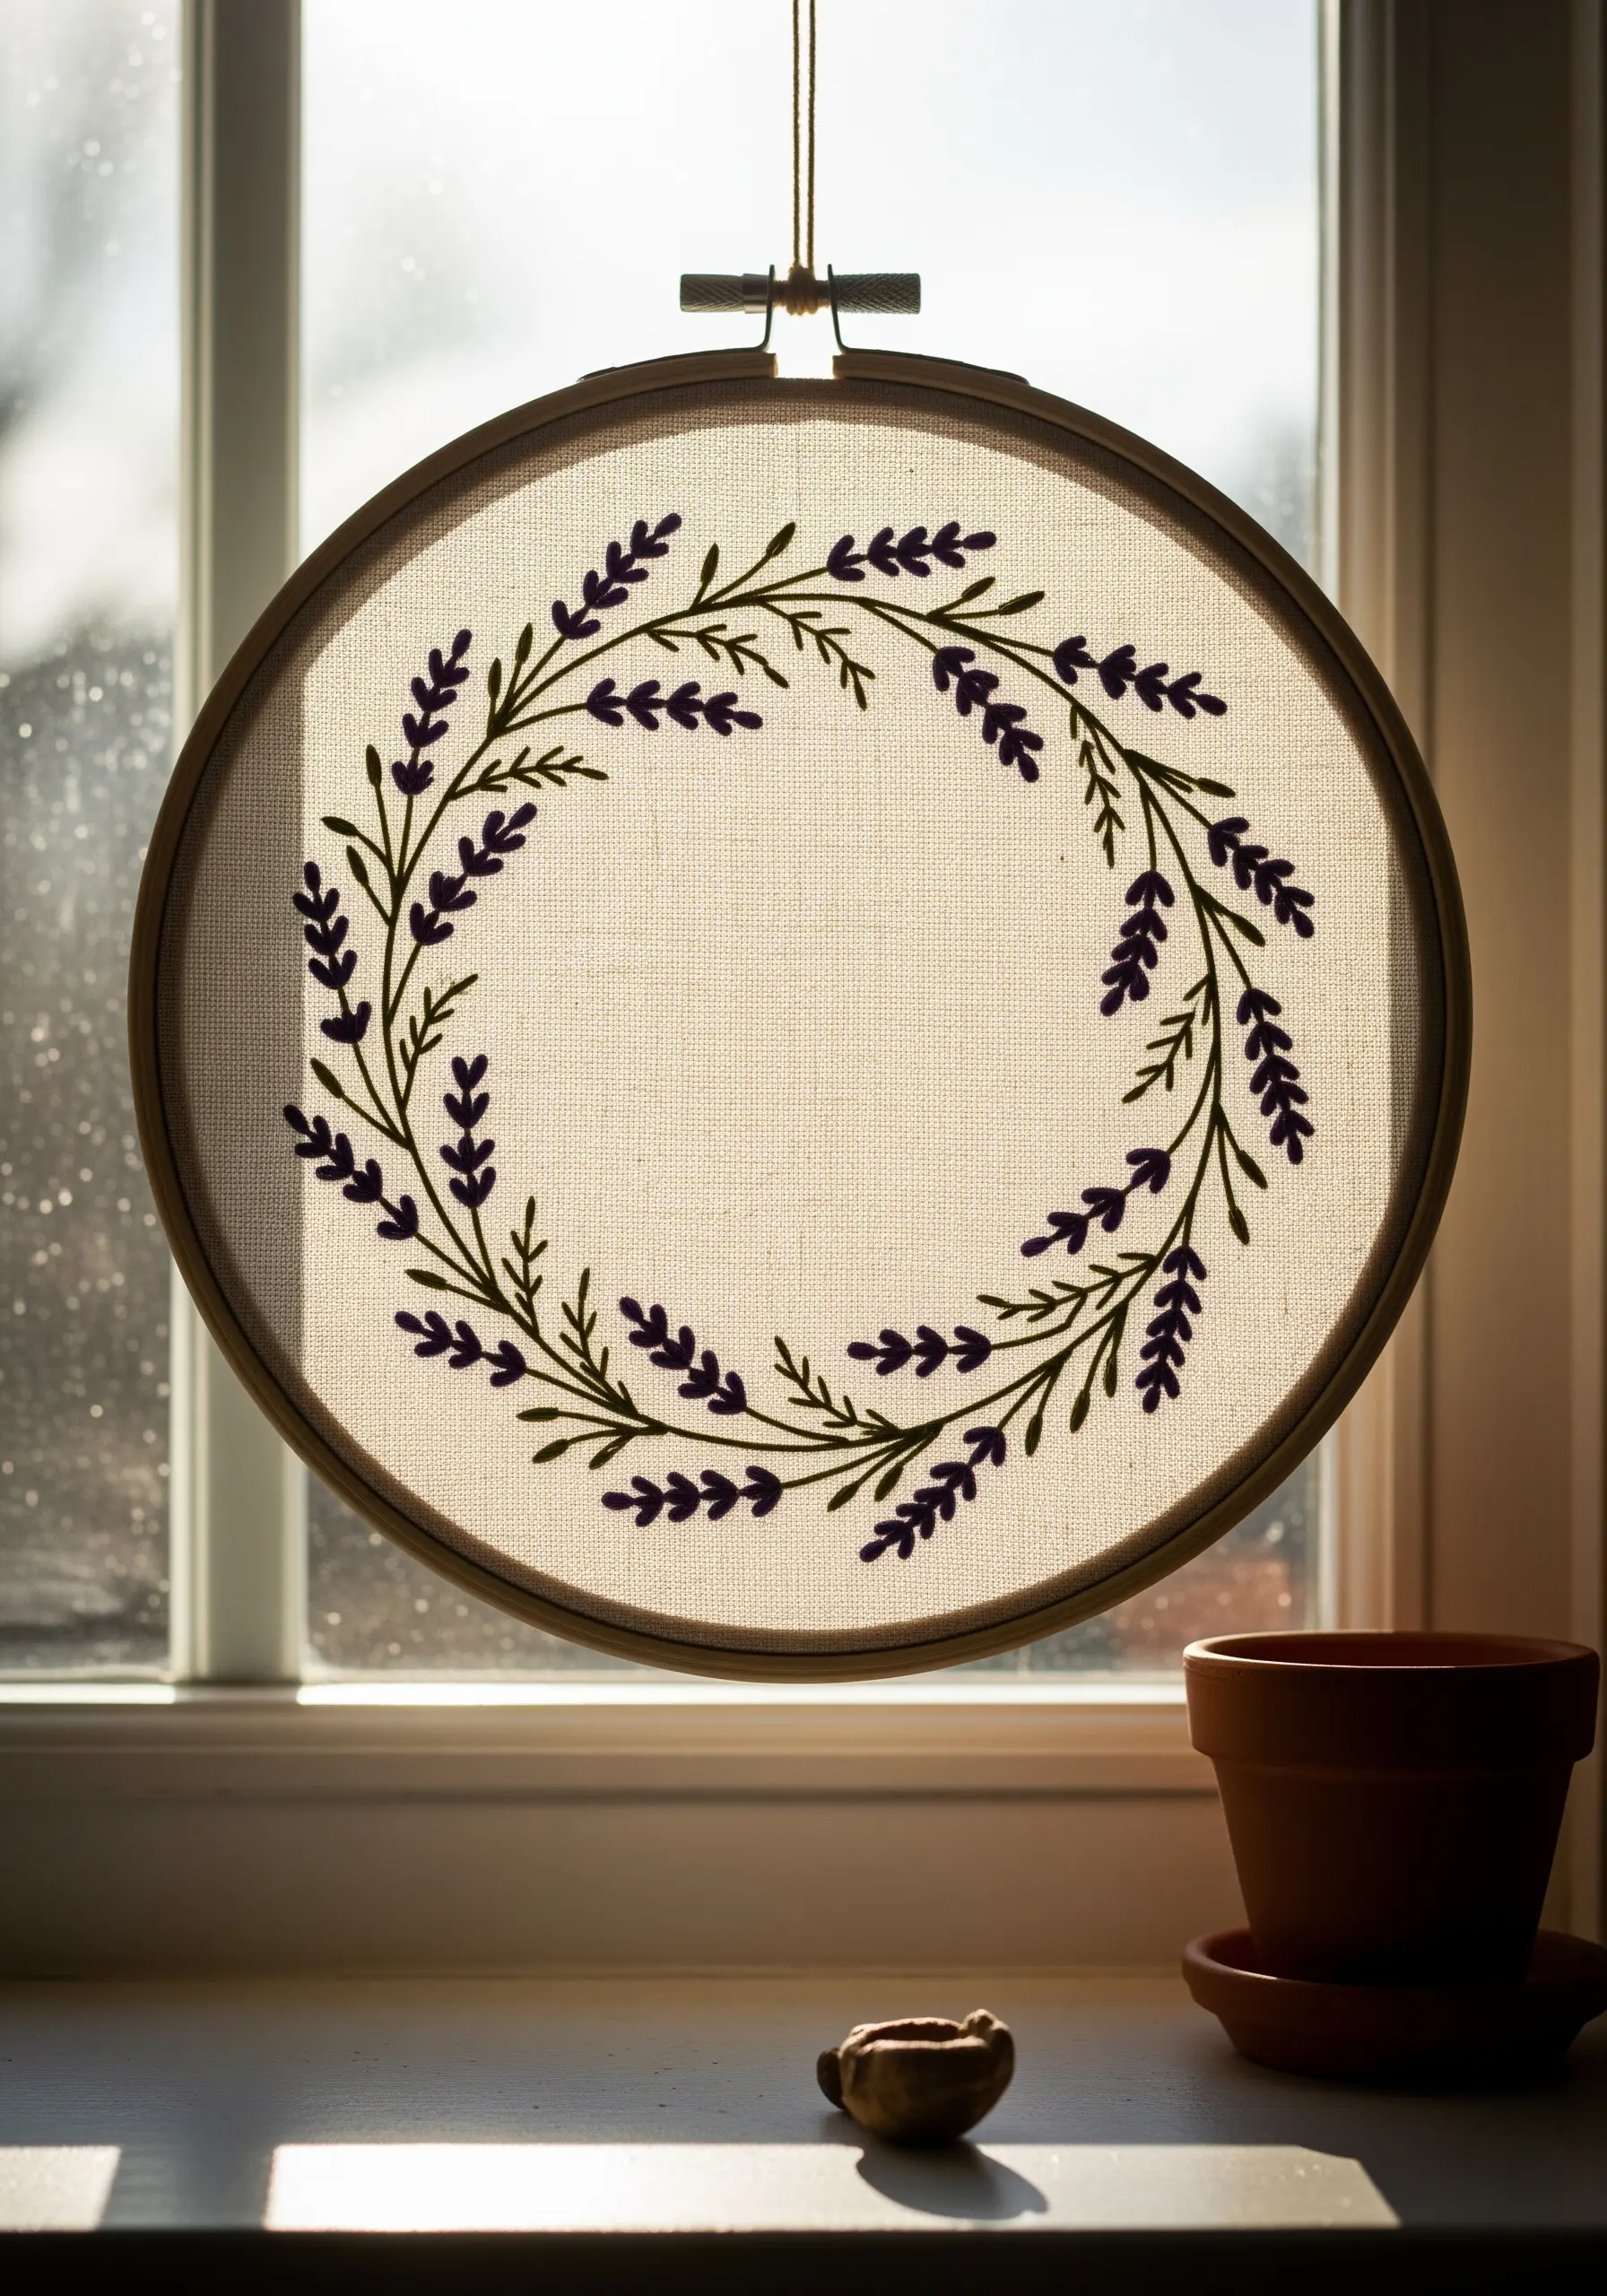
Choose a lightweight, semi-sheer fabric like linen or cotton evenweave to allow sunlight to filter through, transforming your stitches into a delicate silhouette.
Use a crisp backstitch for the stems and small lazy daisy stitches for the lavender buds.
This technique relies on clean lines, so ensure your tension is even and the back of your work is neat, as it will be partially visible against the light.
The goal is to create a design that looks like a pen-and-ink drawing suspended in the air.
2. Master the Variegated Monstera Leaf
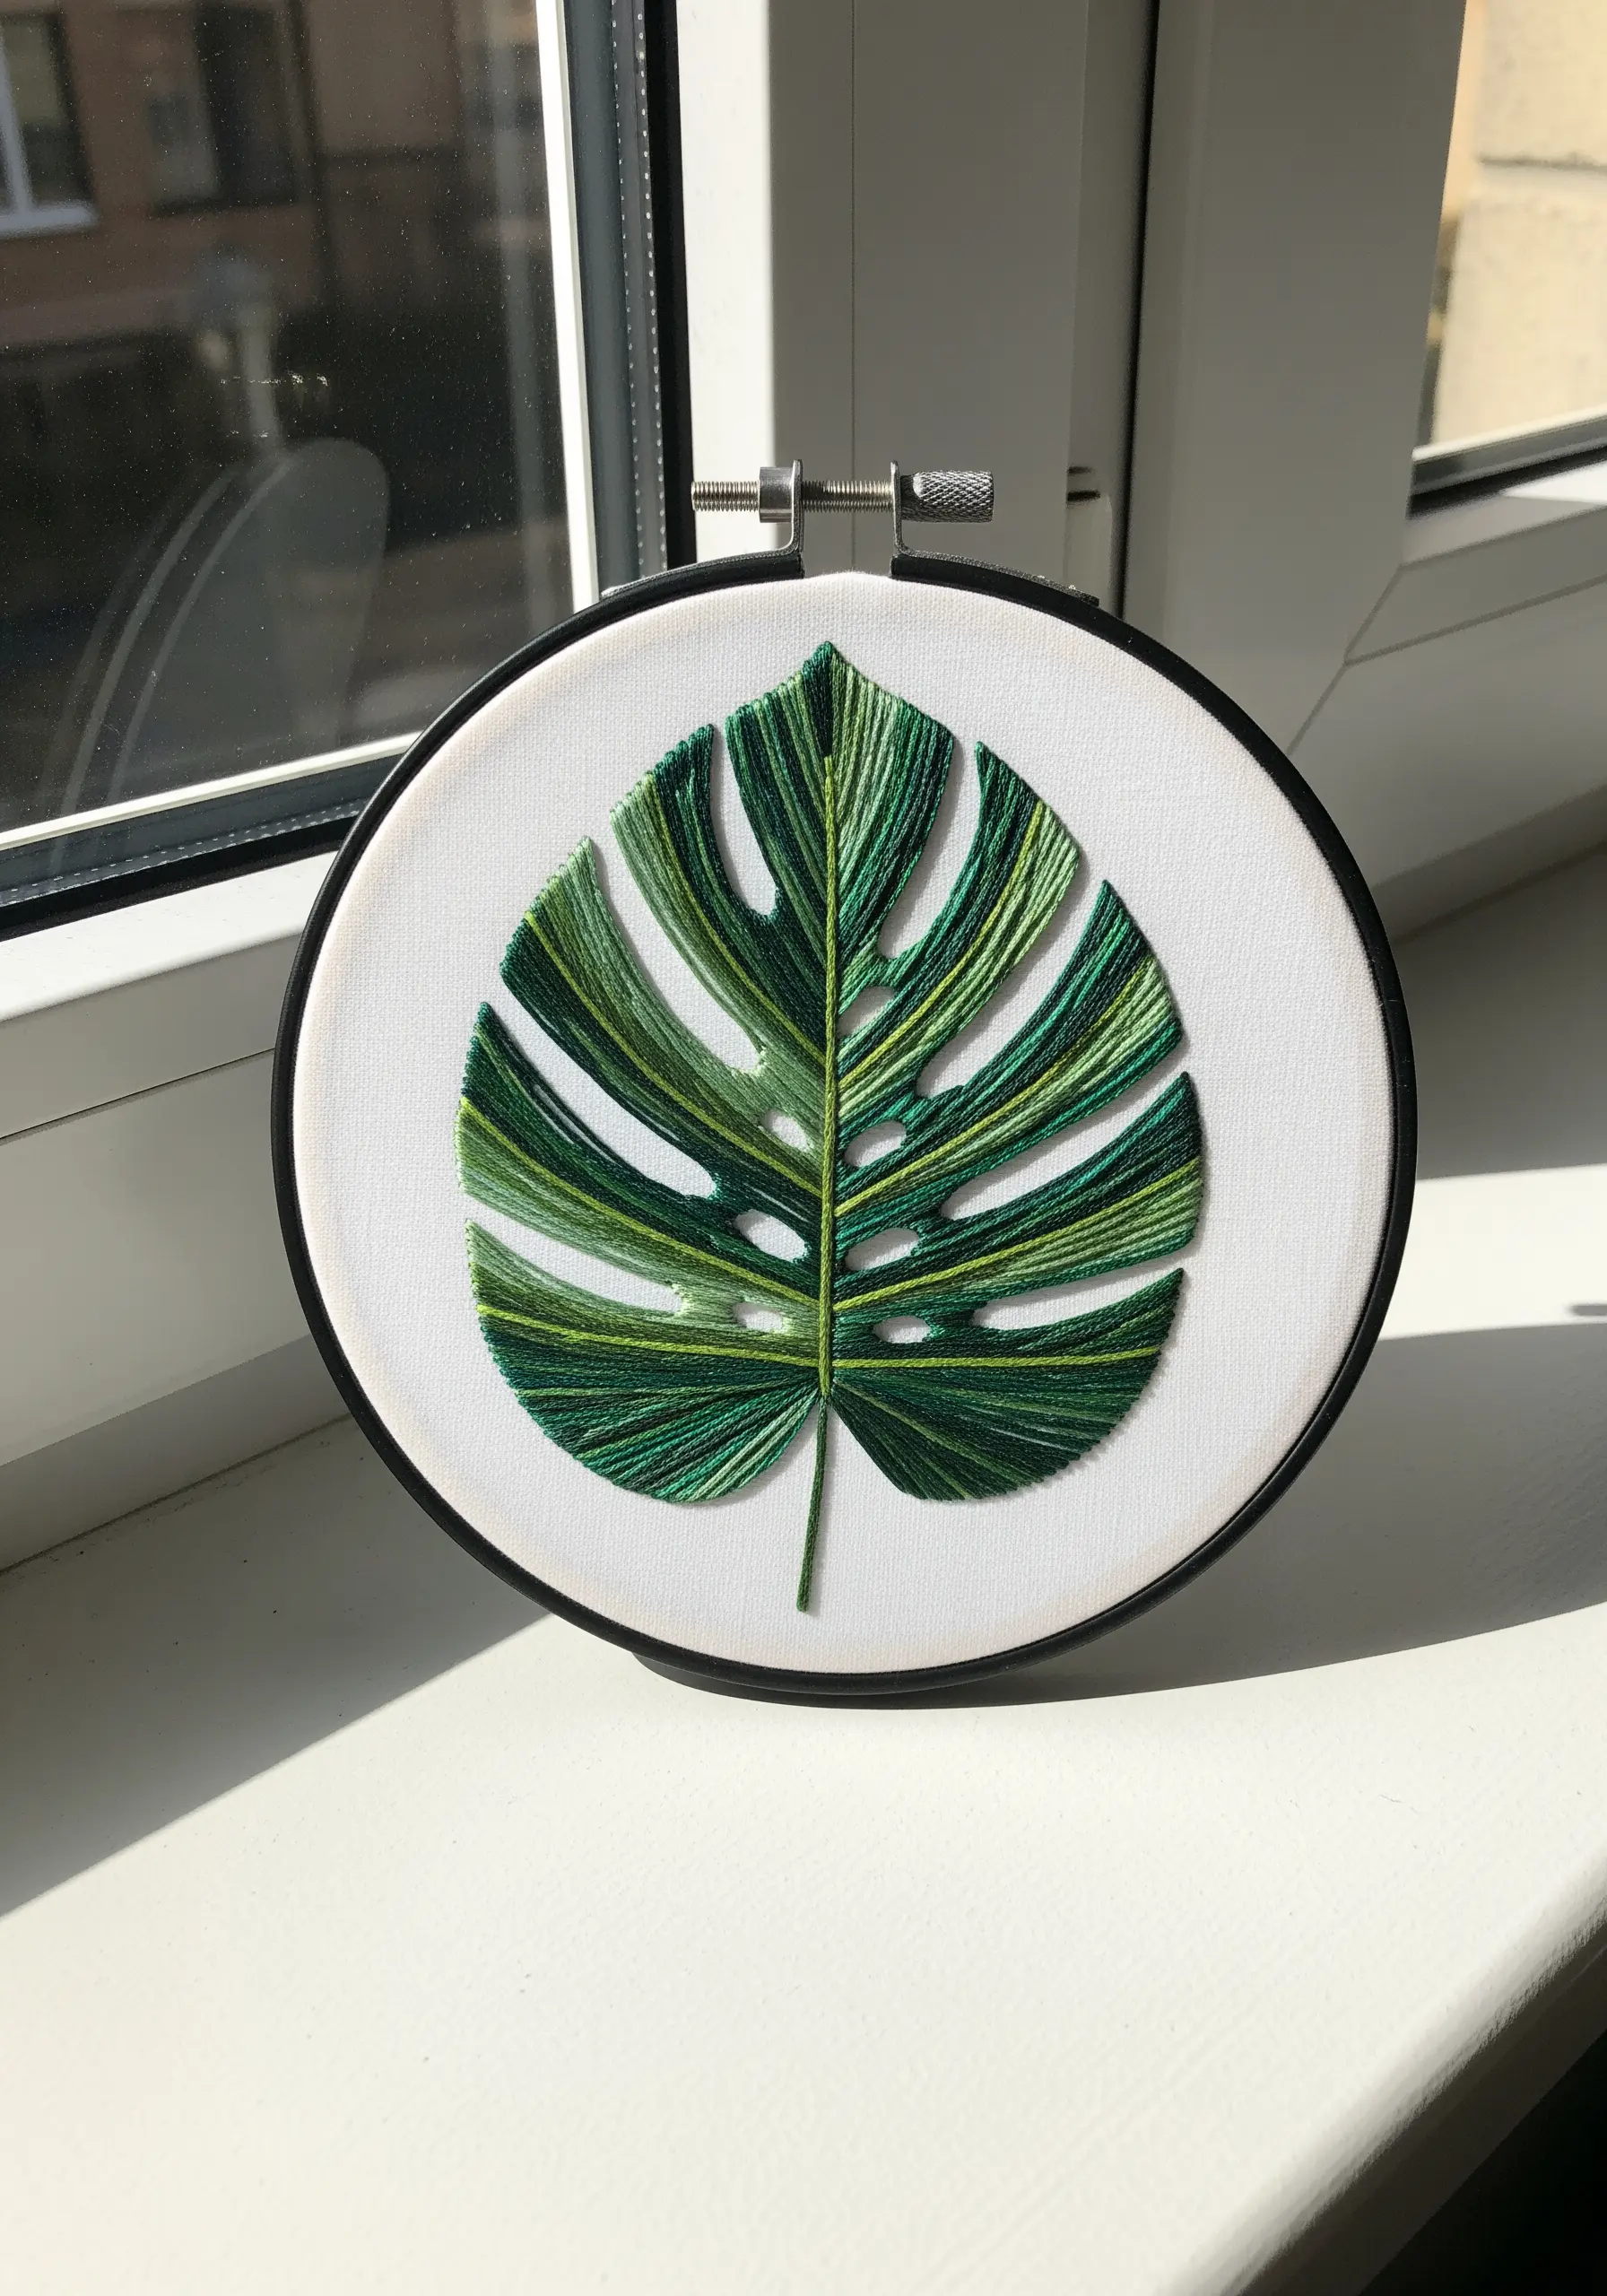
Achieve a natural, painterly effect by using long, parallel straight stitches that follow the direction of the leaf’s veins.
Instead of a single color, use a variegated green thread or hold two different shades of green together in your needle.
This blending technique eliminates the need for complex thread painting while still creating incredible depth and realism.
Pay close attention to stitch tension to prevent the white canvas from puckering under the dense stitching.
3. Build a Meadow with Stitch Variation
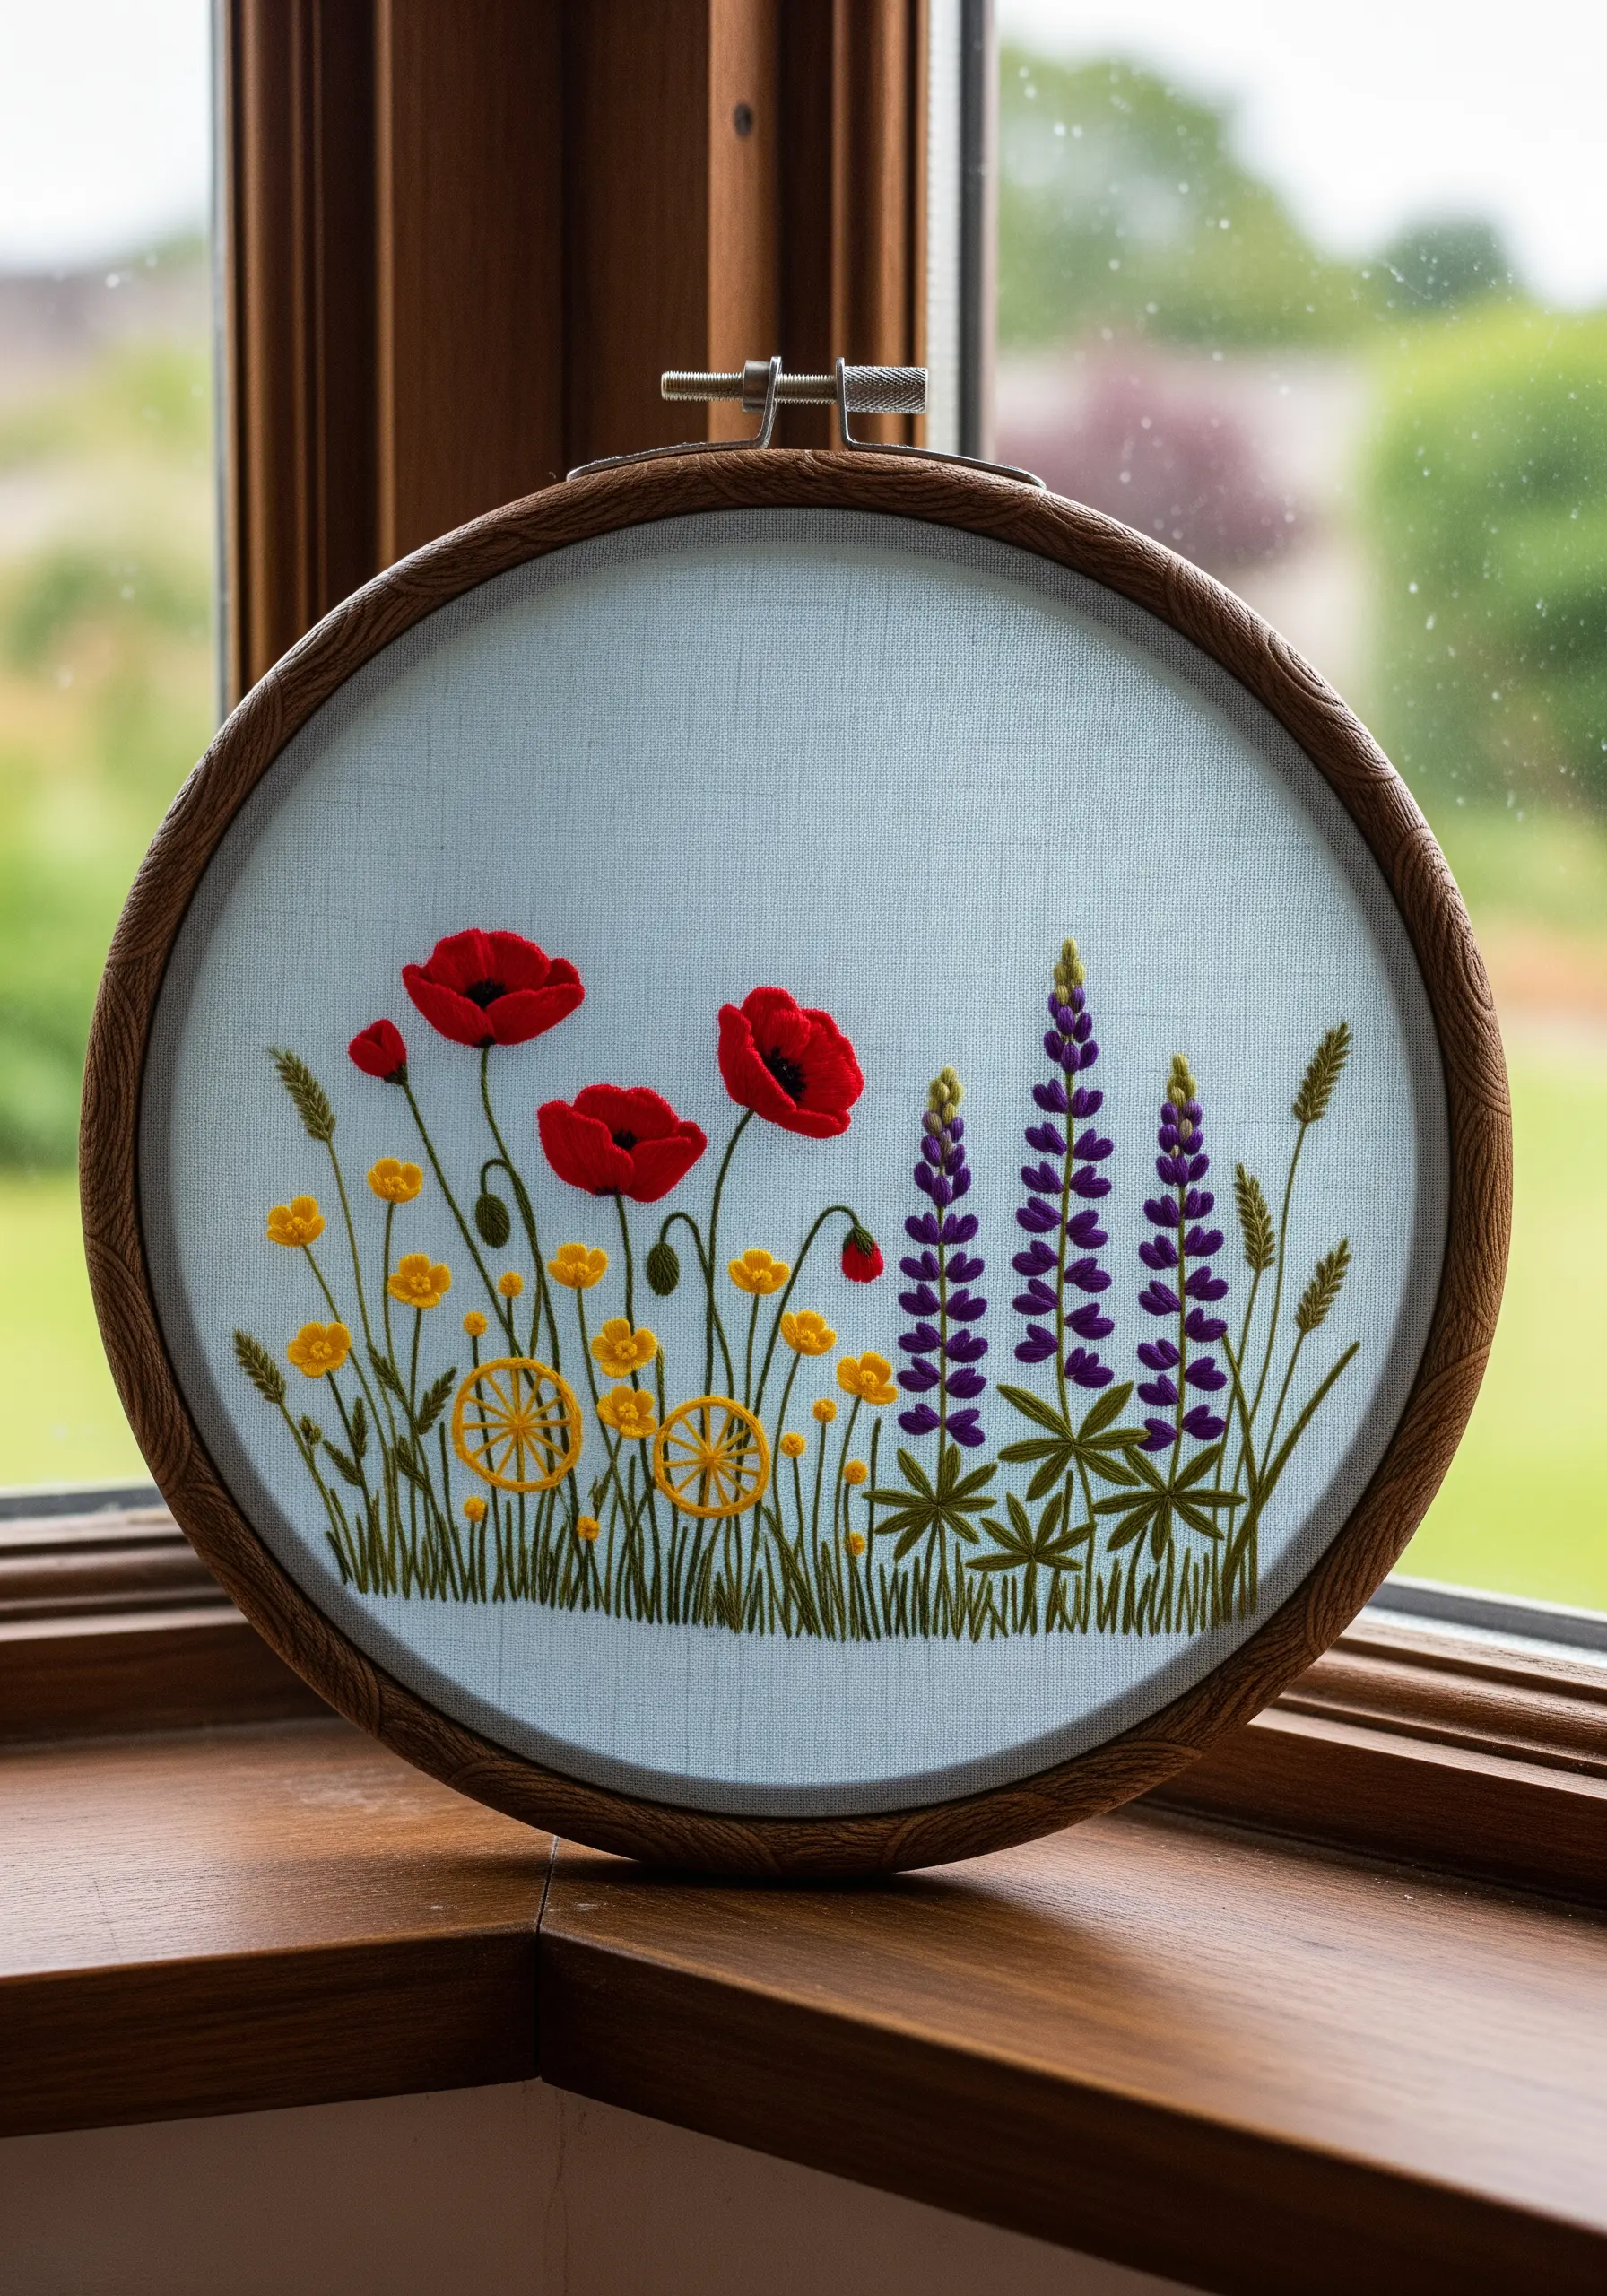
Combine multiple stitches in one scene to create a rich, tactile wildflower meadow.
Use woven wheel stitches for round, dimensional flowers like buttercups, and rely on satin stitch for the flat, bold petals of poppies.
For the lupines, build up texture with tightly packed French knots or colonial knots, arranging them in vertical clusters.
This multi-stitch approach makes the composition dynamic and invites the eye to explore each distinct floral element.
4. Stitch a Luminous Crescent Moon
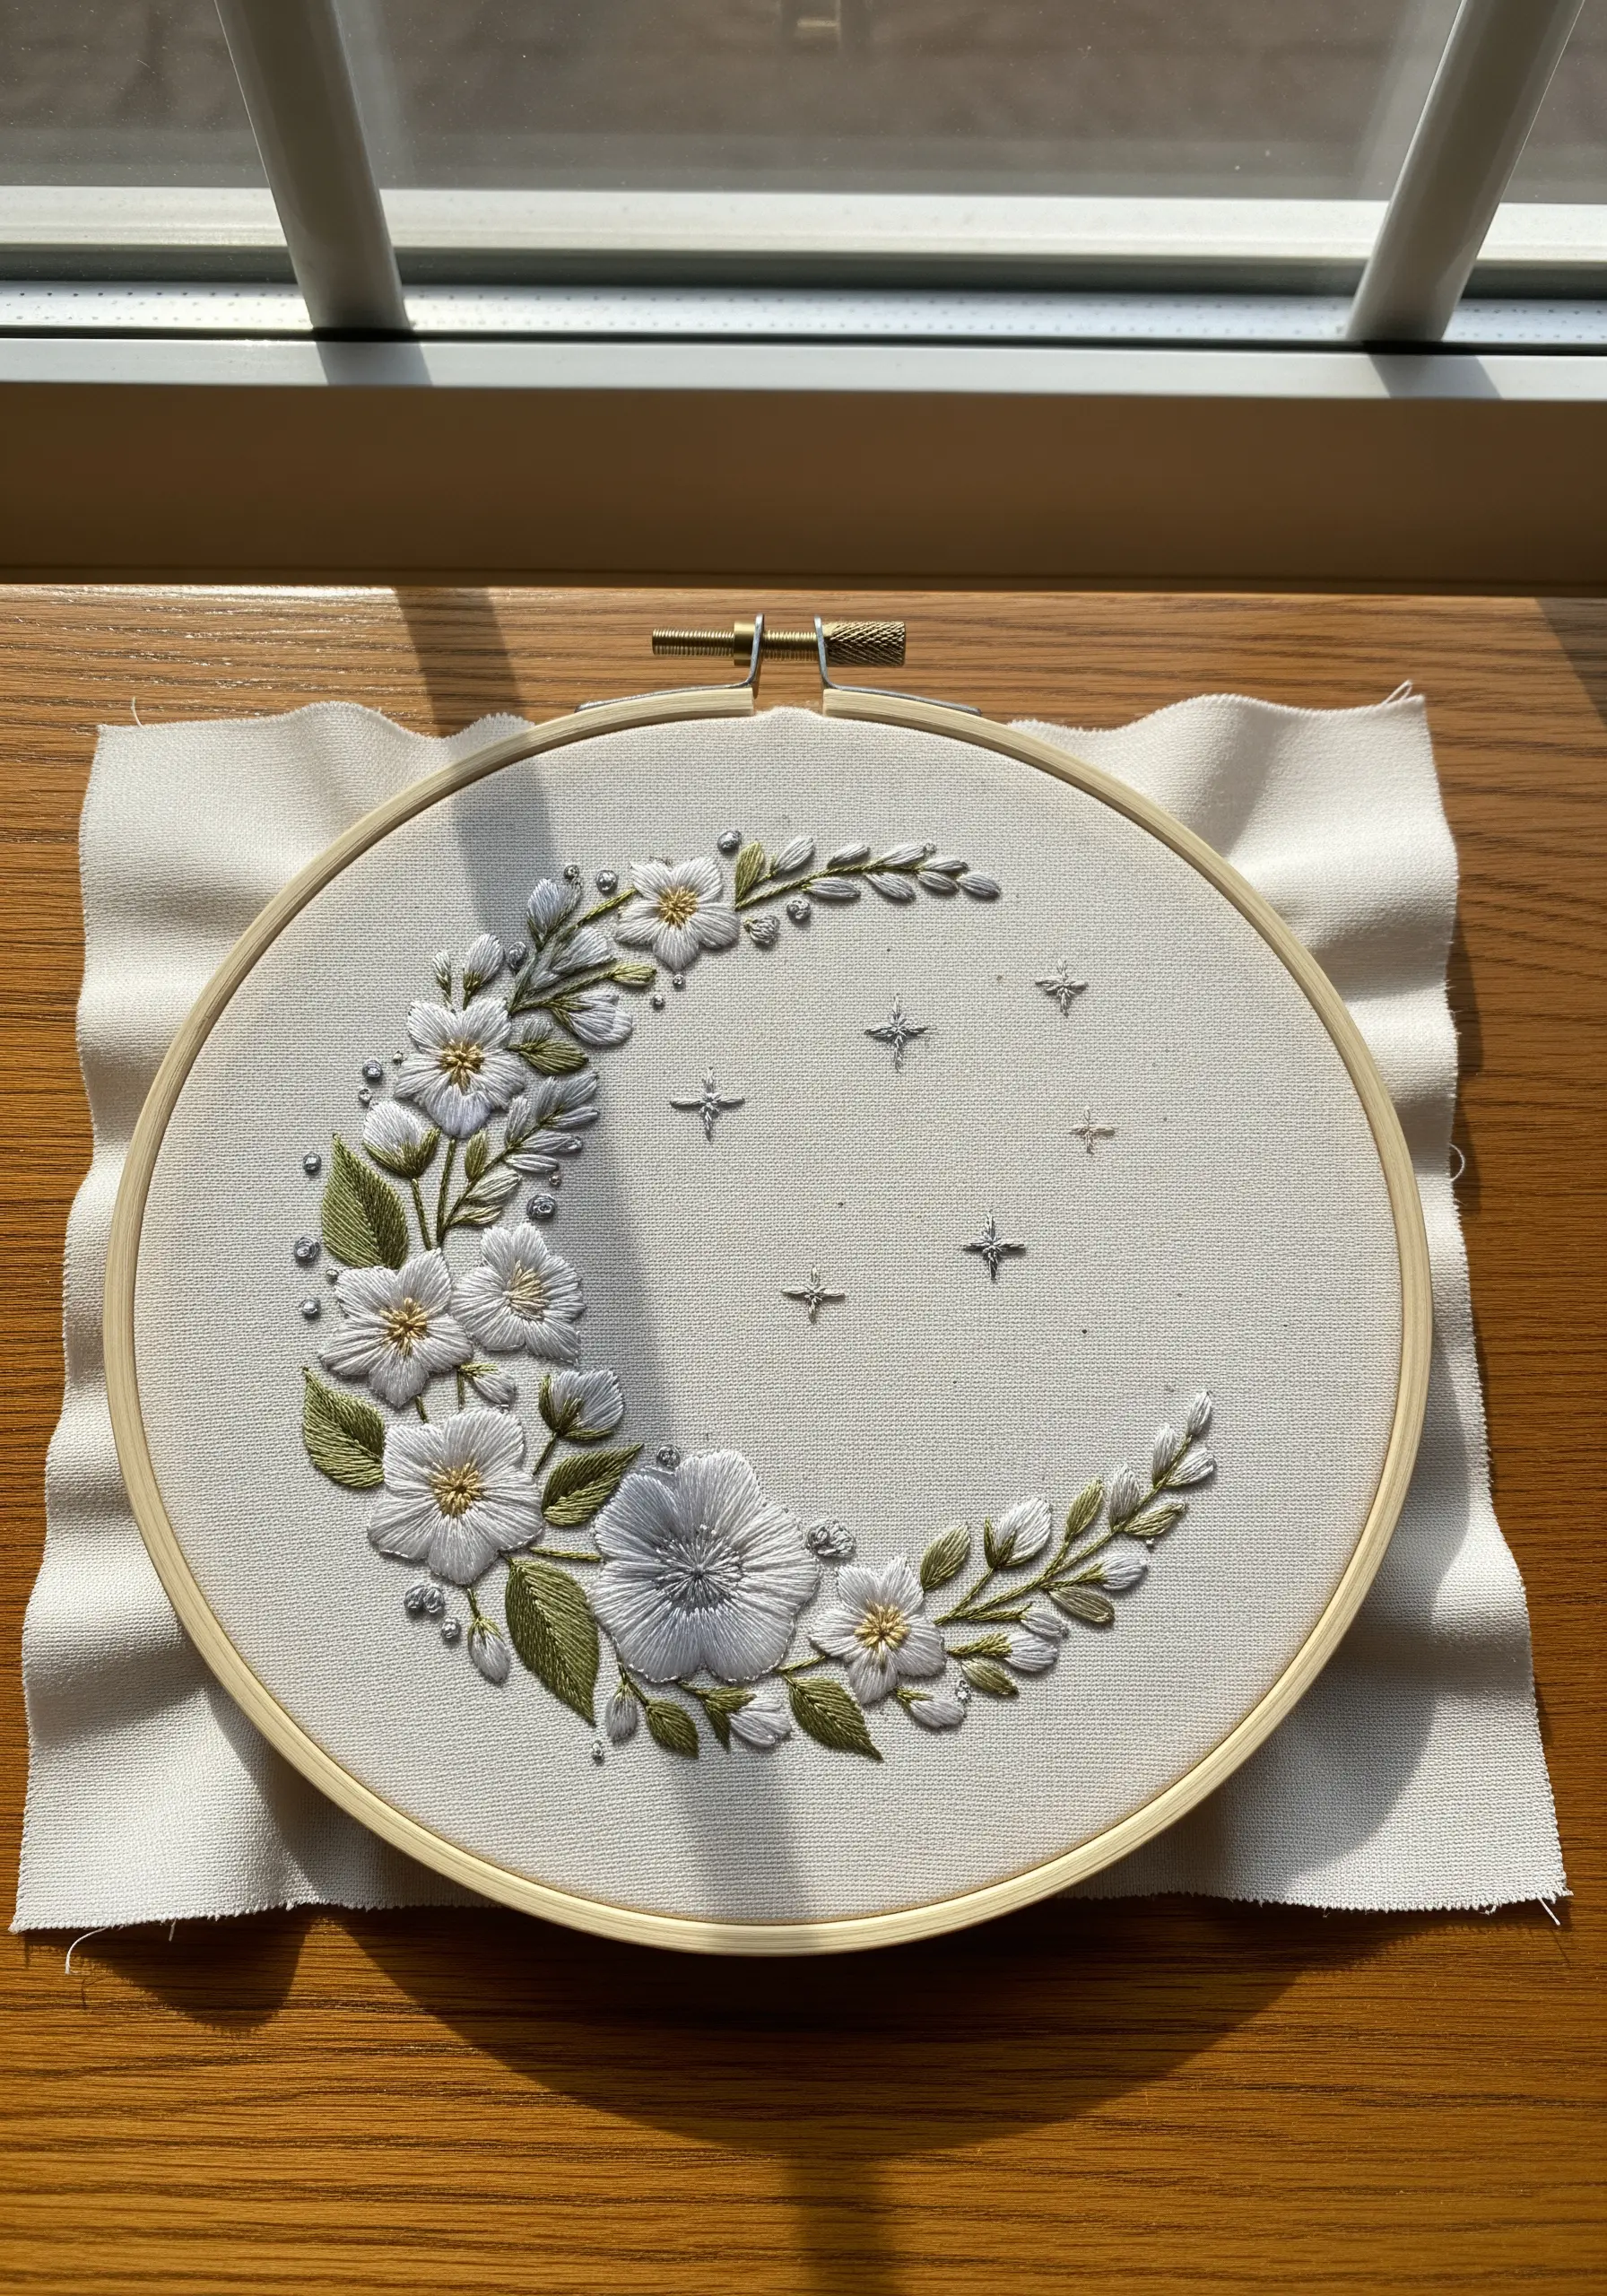
Elevate simple floral shapes by using padded satin stitch for the petals; create a base of small straight stitches first, then cover them with your satin stitch.
This raises the surface, causing the petals to catch more light and create soft shadows.
Work with a limited, serene palette of whites, creams, and sage greens to maintain a sophisticated and cohesive feel.
For the stars, use a single strand of metallic silver thread to add a subtle, elegant sparkle that activates in the sunlight.
5. Give Citrus Fruits a Textured Sheen
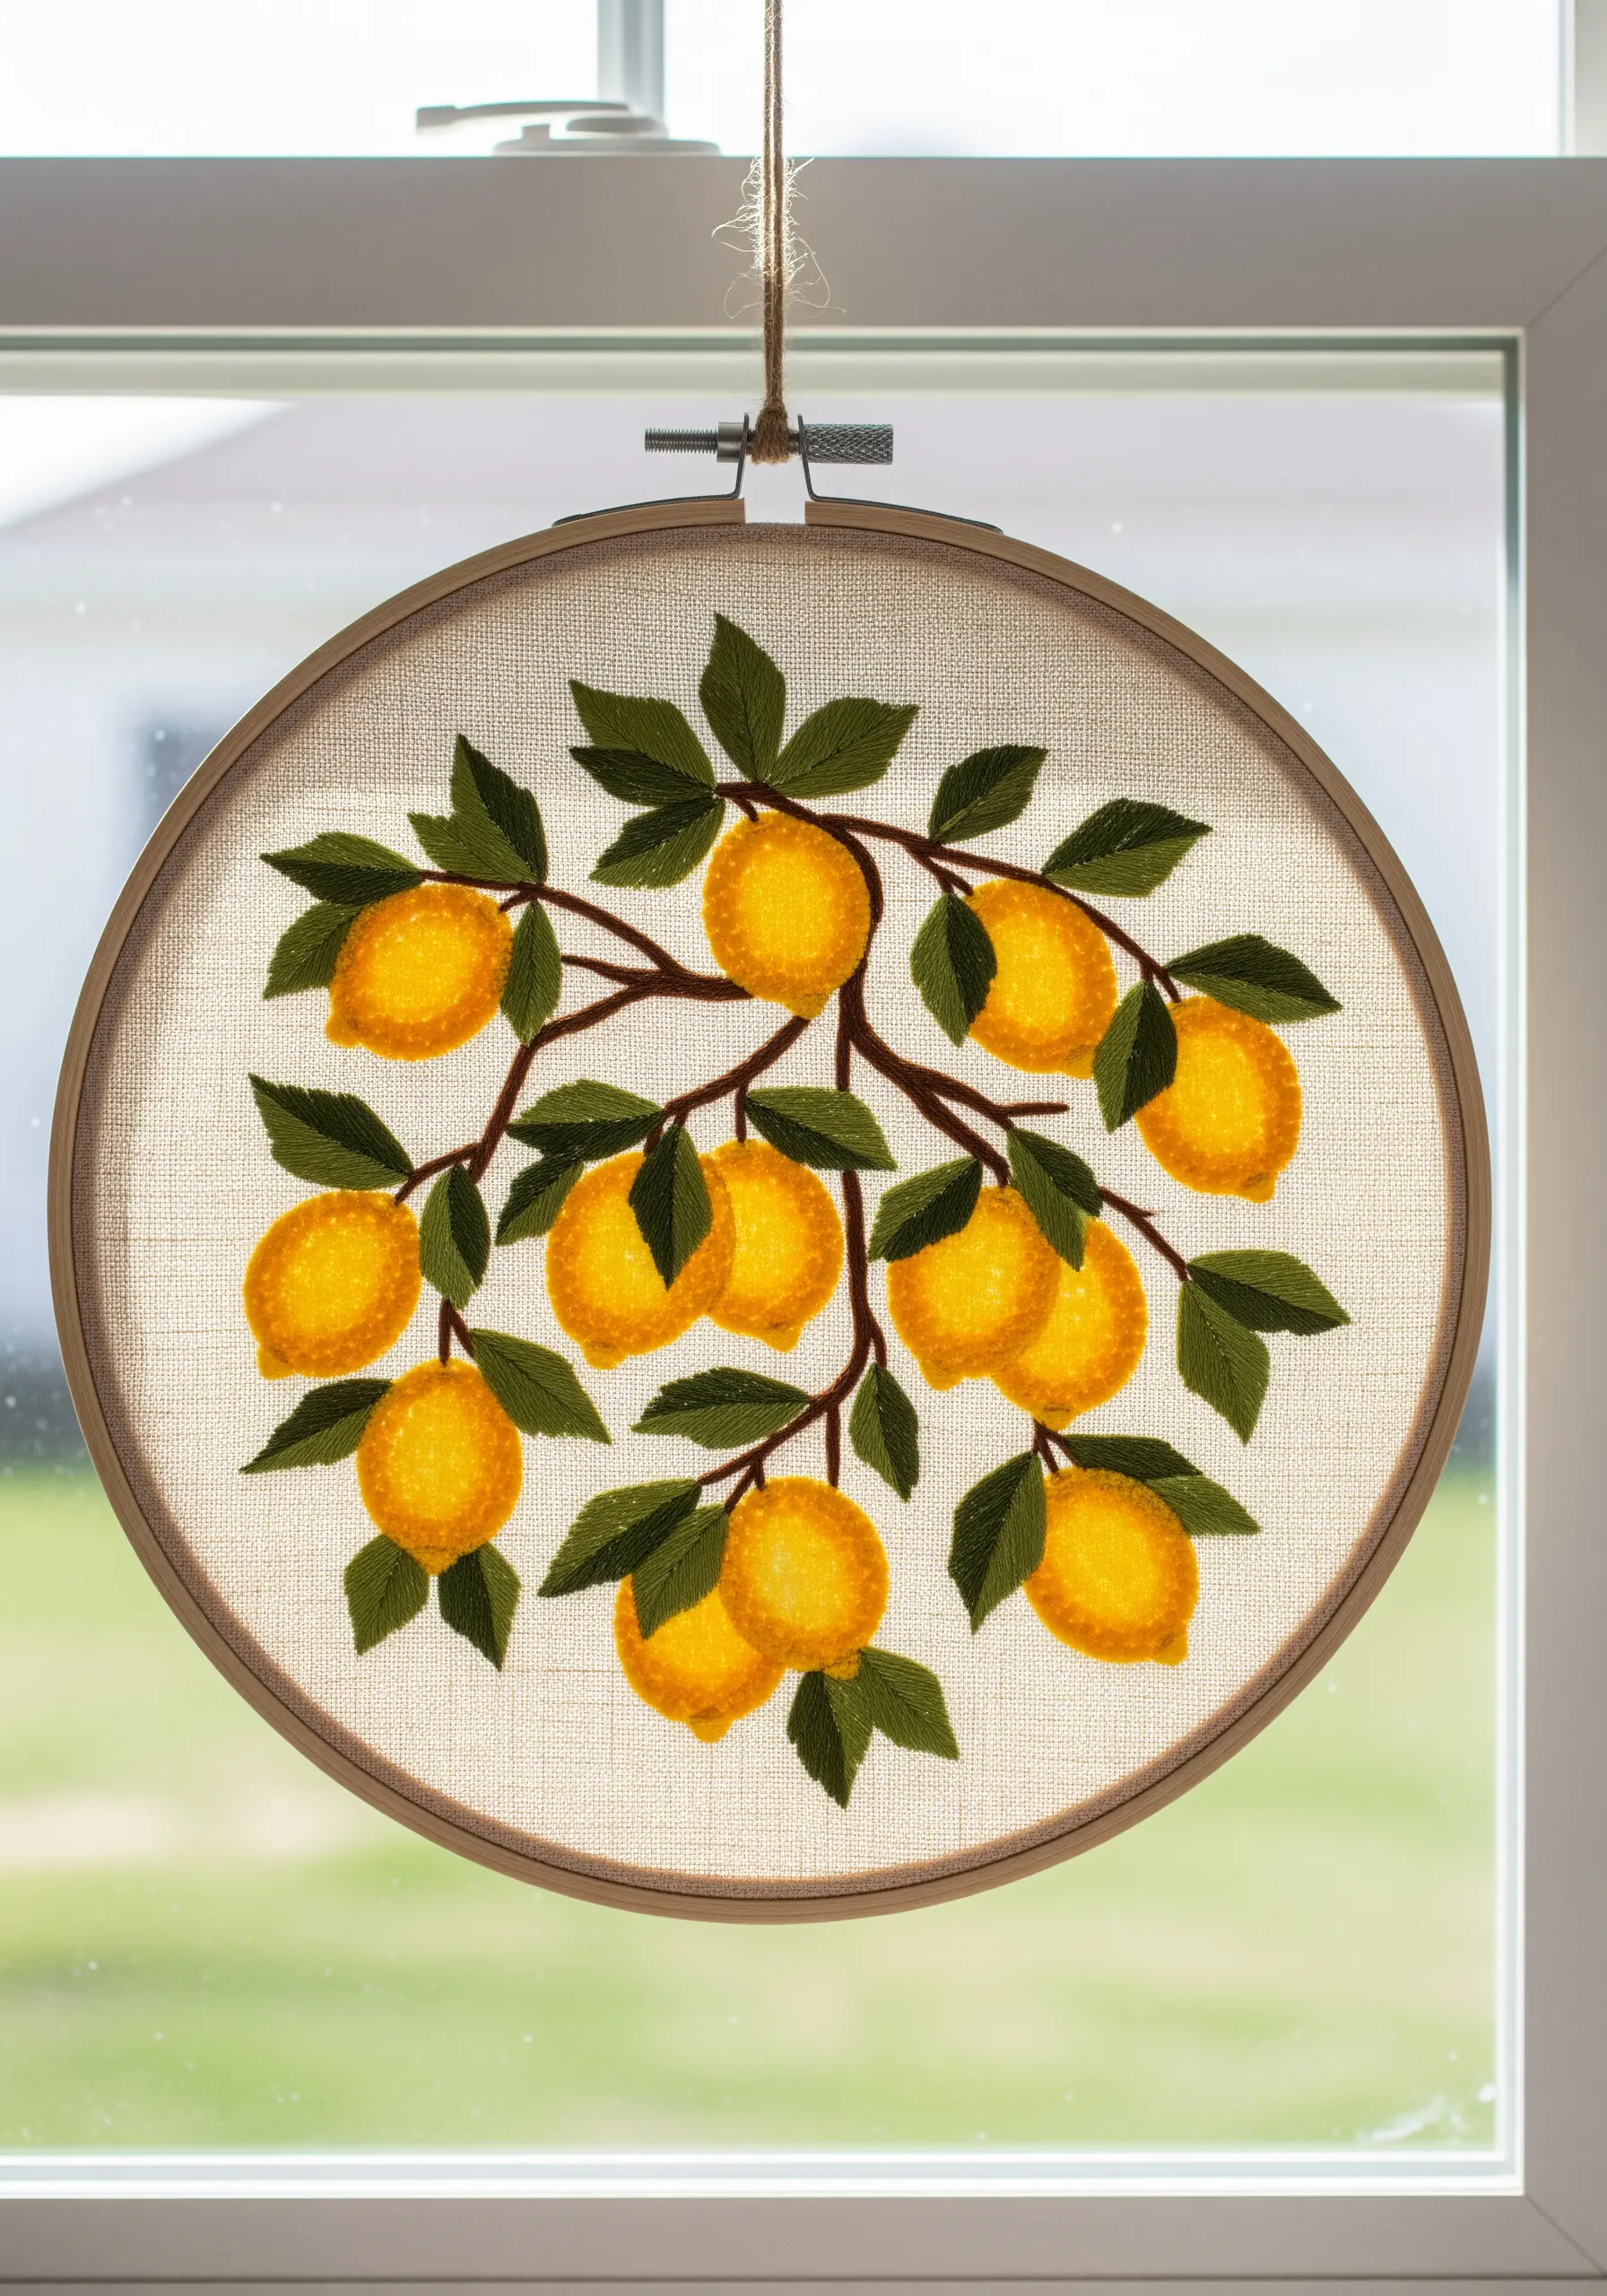
Instead of a flat satin stitch, fill your lemons with French knots or seed stitches using a slightly lighter shade of yellow on top of a darker base.
This mimics the dimpled texture of citrus peel and adds a layer of complexity that feels more realistic.
For the leaves, use a fishbone stitch to create a prominent central vein, enhancing their structure.
Hanging this piece in a window allows the light to highlight these subtle textural differences.
6. Contrast Delicate Knots with Dark Fabric
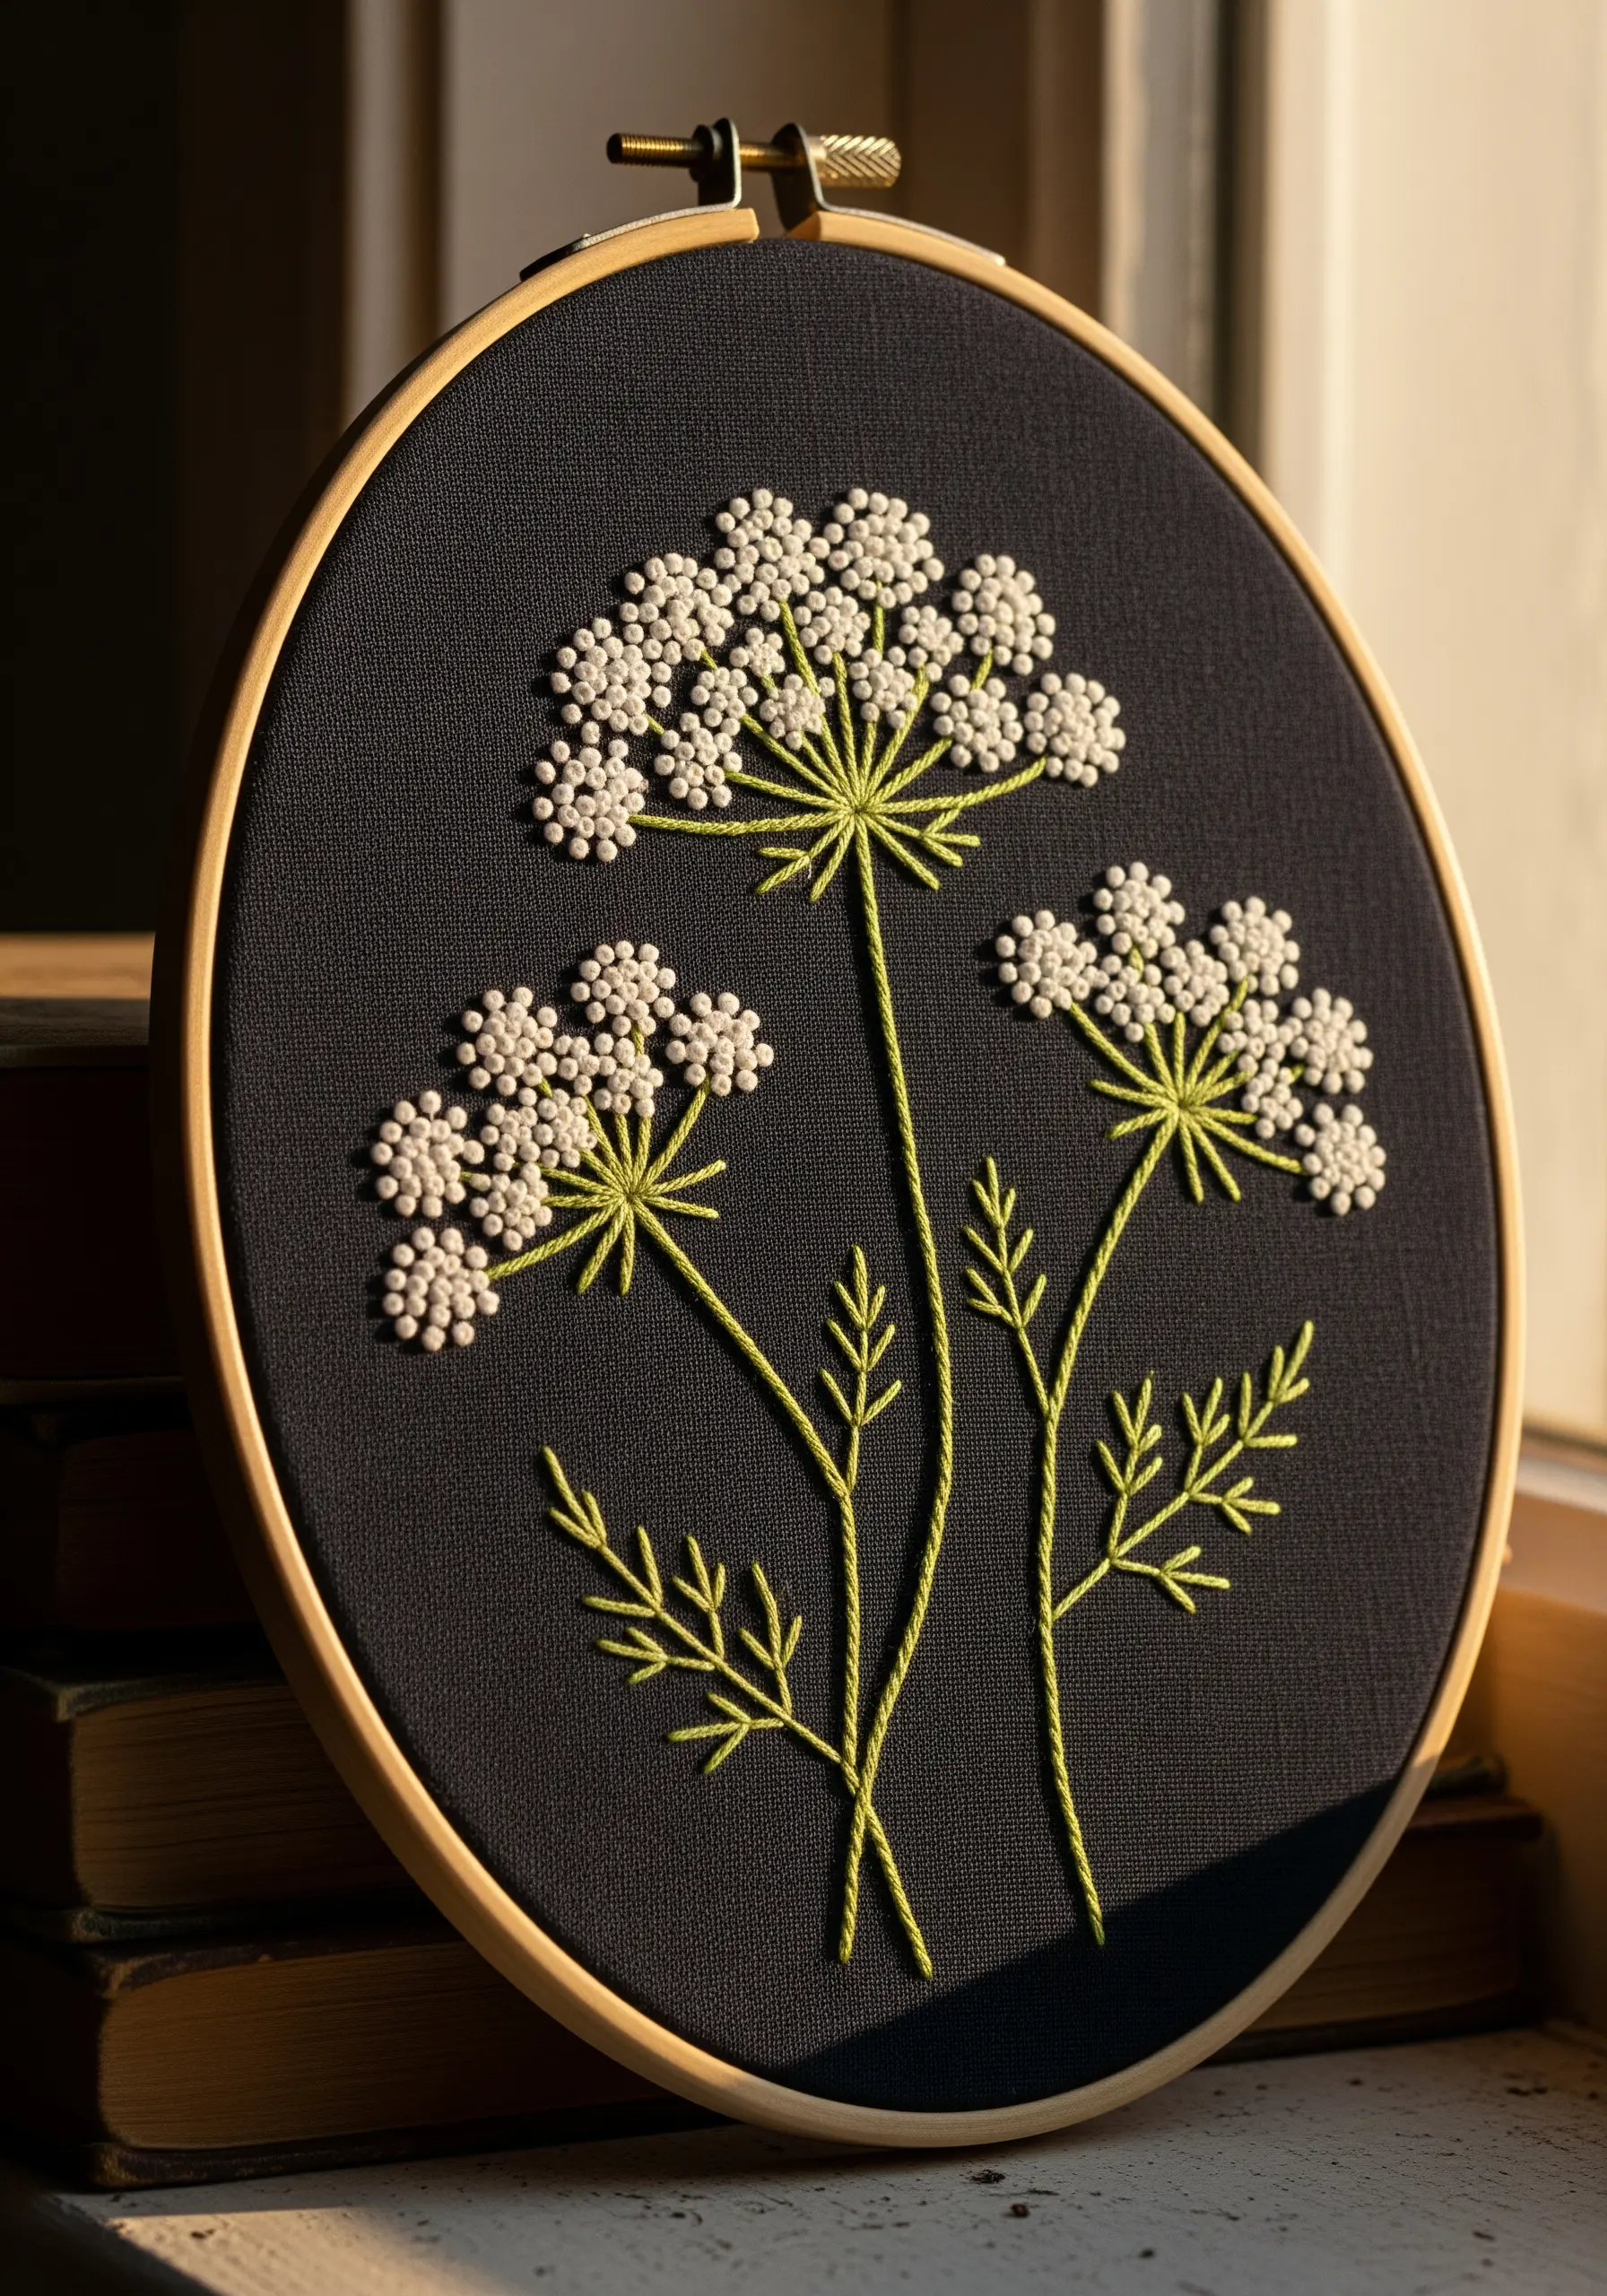
Make Queen Anne’s lace pop by using a high-contrast palette of crisp white thread on black or navy fabric.
Form the tiny flower heads with delicate, uniform French knots, which stand out sharply against the dark background.
Use a fine, sharp needle to ensure your stitches are precise and don’t create large holes in the tightly woven fabric.
The chartreuse green stems, stitched with a simple split stitch, add a vibrant, modern energy to the classic botanical subject.
7. Create a Forest Floor with Layered Textures
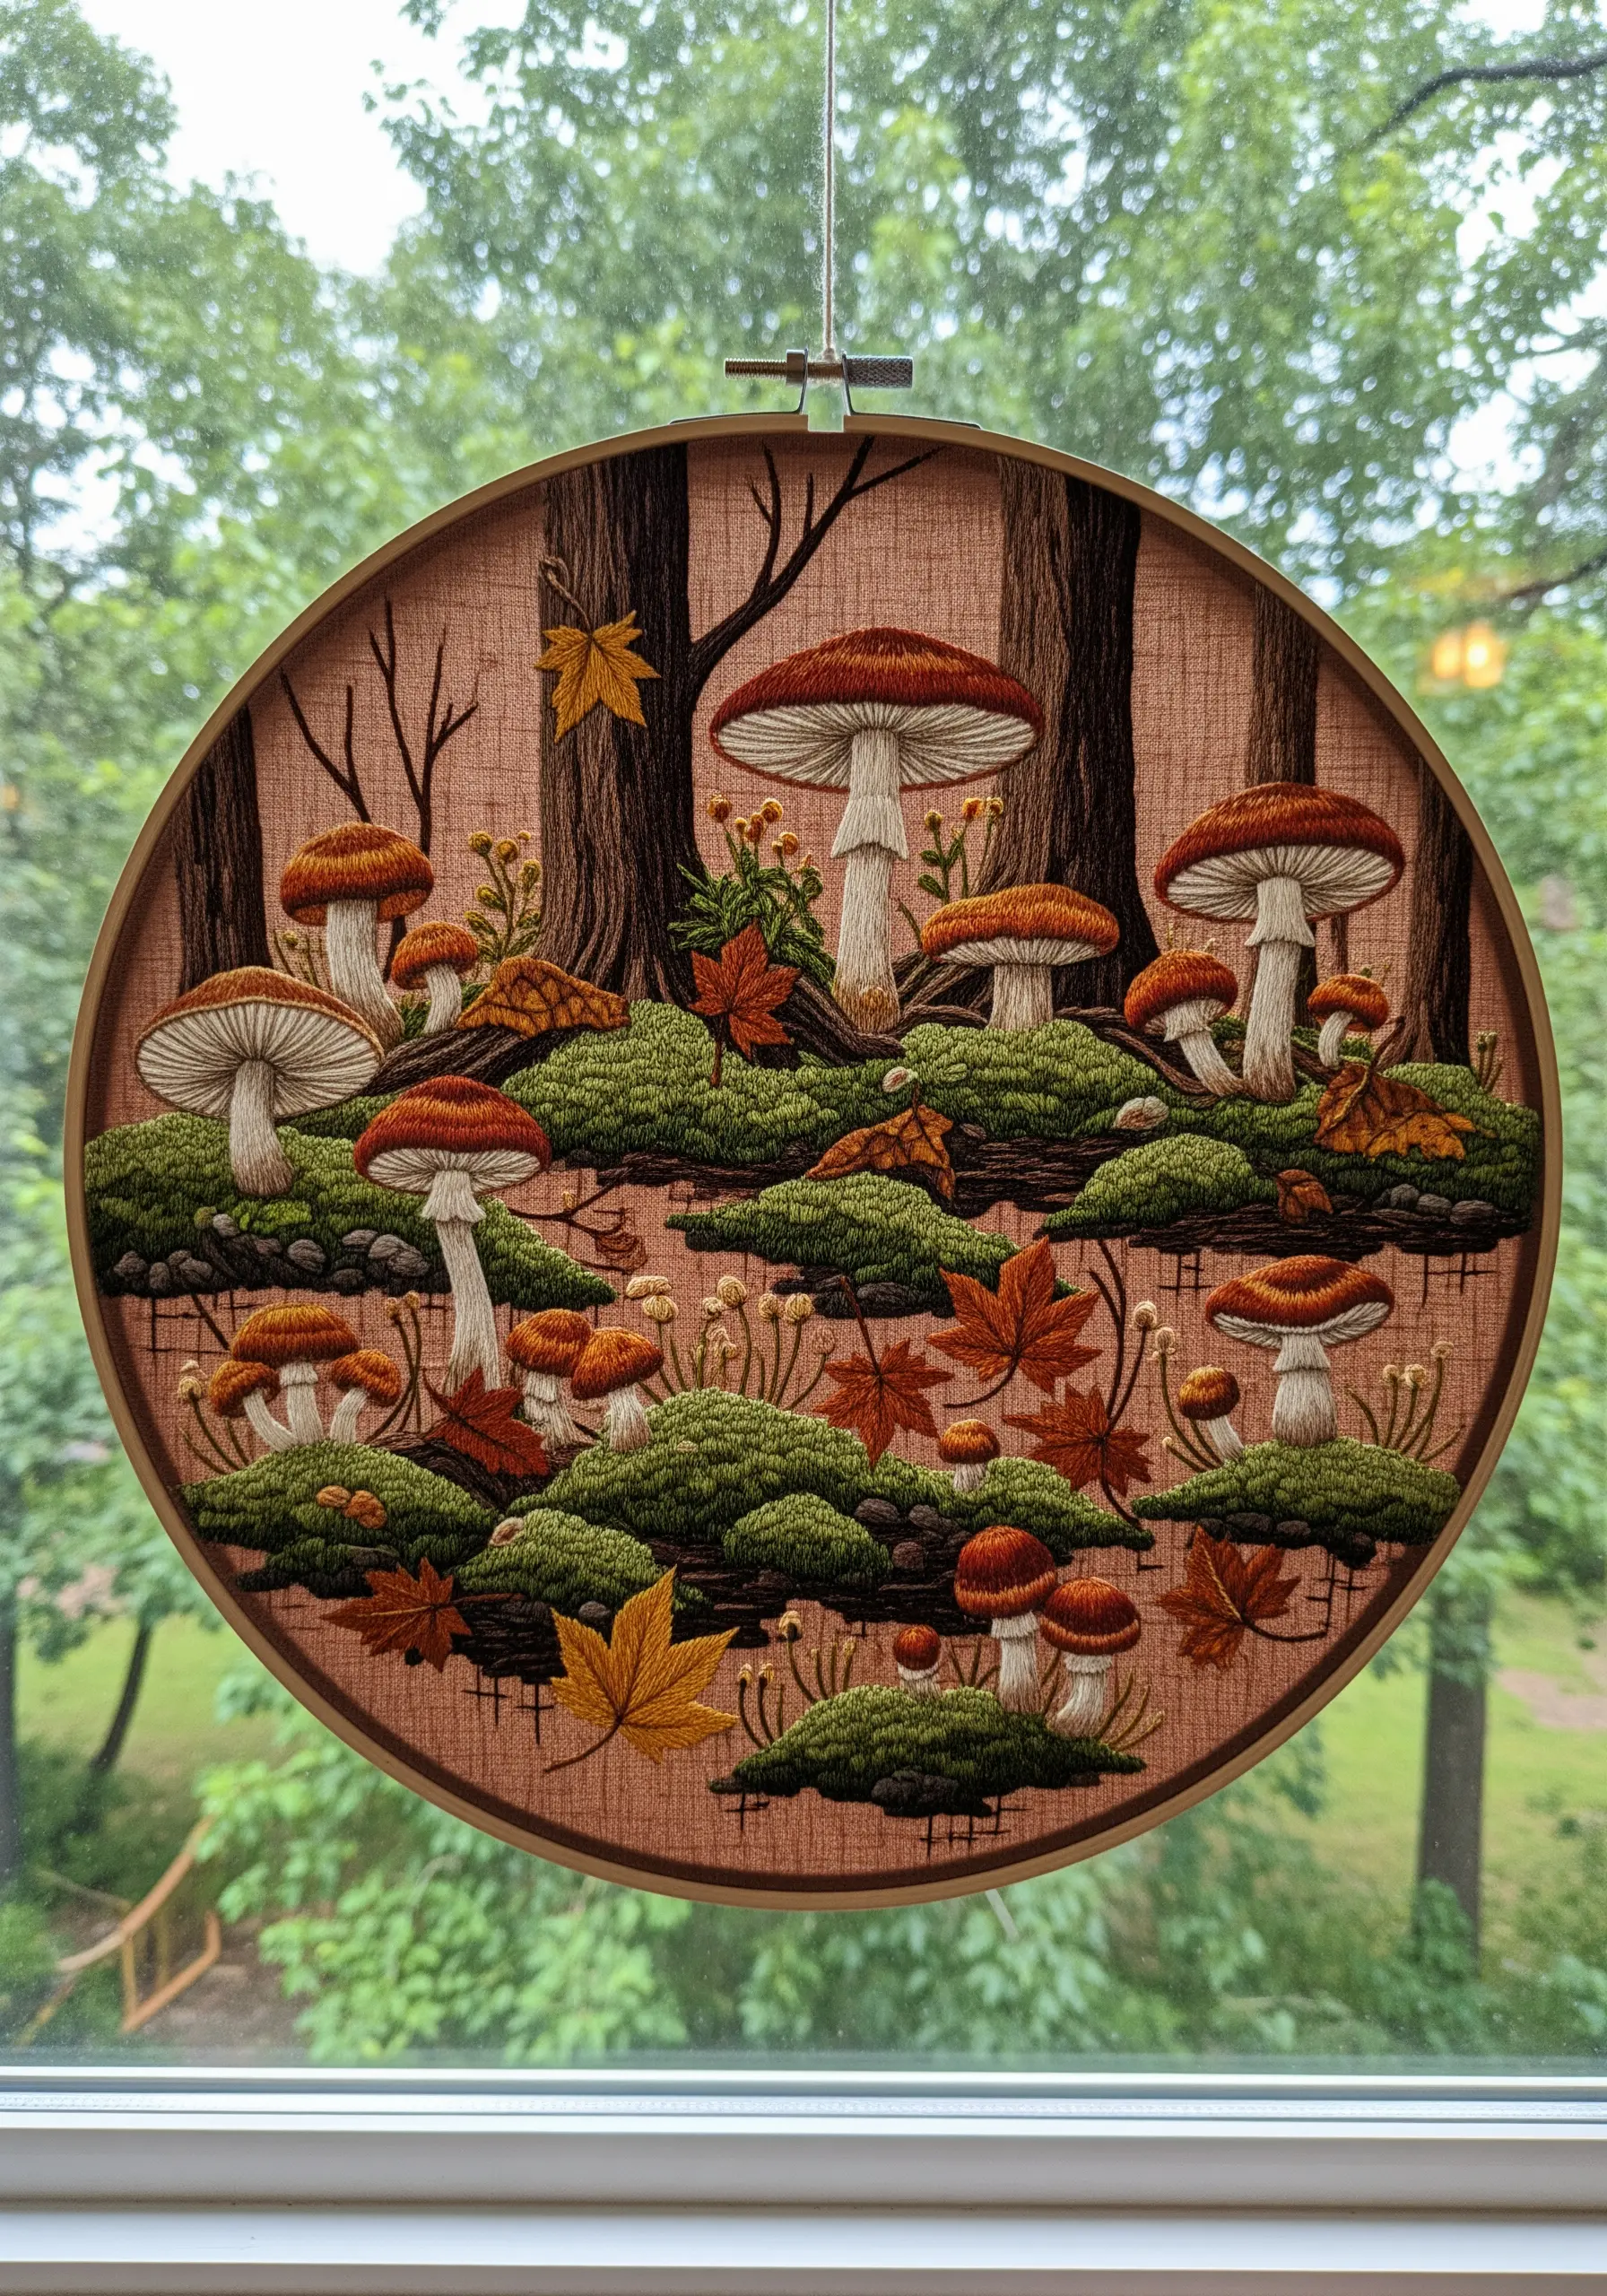
Build a sense of depth in your woodland scene by layering different textures.
Create mossy ground using dense clusters of French knots in several shades of green and brown.
For the mushroom caps, use a smooth, directional satin stitch, and for the gills underneath, use vertical straight stitches in a contrasting cream color.
The background trees, stitched with a simple backstitch, recede into the distance, making the foreground elements feel closer and more tangible.
8. Embroider a Dandelion on Sheer Tulle
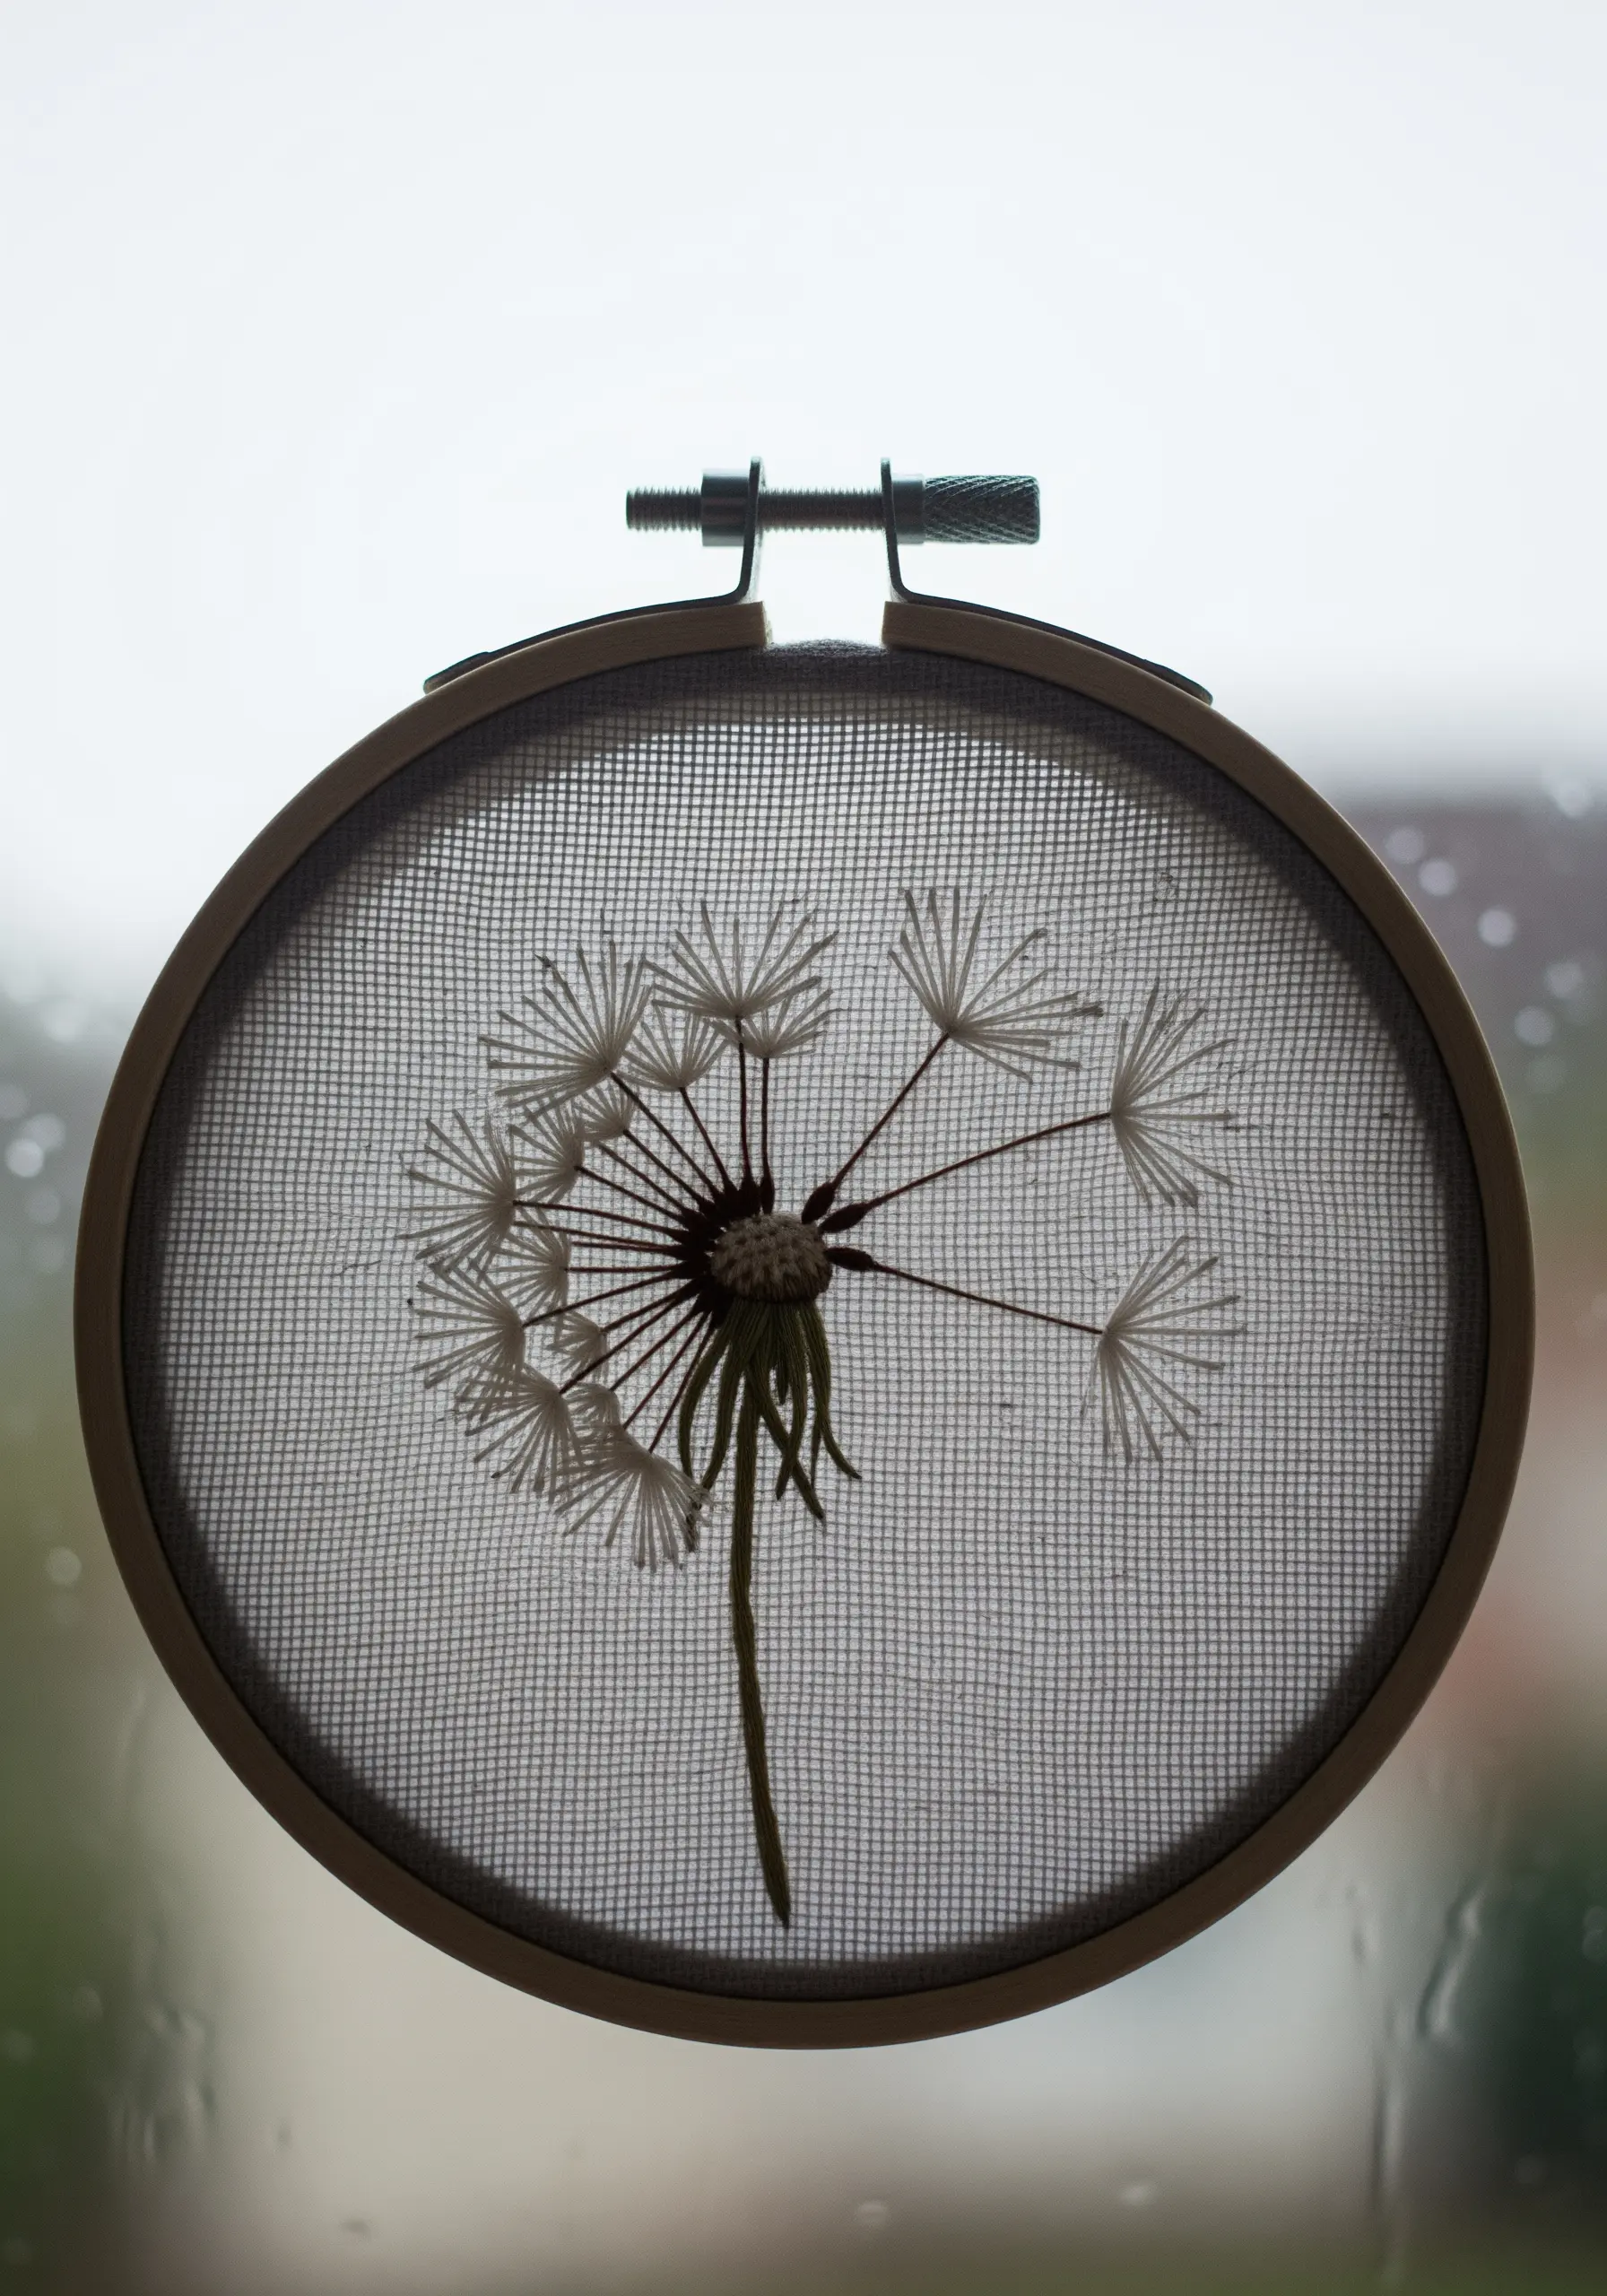
Create the illusion of floating seeds by stitching your design on a sheer fabric like tulle or organza.
Use detached chain stitches (lazy daisies) combined with straight stitches to form the delicate pappus of the dandelion head.
Securing your threads is key on a transparent base; instead of knots, weave the thread tails back through the reverse side of your stitches.
This use of negative space embroidery techniques makes the hoop feel like a captured moment in time.
9. Weave a Geometric Sunrise

Combine botanical and geometric elements for a modern landscape.
Create the sun’s rays with long, taut straight stitches in a metallic gold thread, ensuring they radiate from a single point for a clean, graphic look.
Fill the mountain shapes with long-and-short stitch in cool blues and grays, varying the stitch direction in each segment to suggest rocky facets.
This juxtaposition of soft, blended mountains and sharp, metallic lines creates a stunning visual contrast.
10. Craft Translucent Balloon Flowers
Mimic the look of sea glass or translucent petals by combining appliqué with simple embroidery.
Cut heart shapes from colored organza or vellum, place them on your base fabric, and secure the edges with a neat backstitch outline in a matching thread color.
The layering of the sheer fabric creates a subtle color-shifting effect when light passes through it.
Keep the stems simple with a basic stem stitch to ensure the balloon flowers remain the focal point.
11. Arrange a Cascade of Autumn Leaves
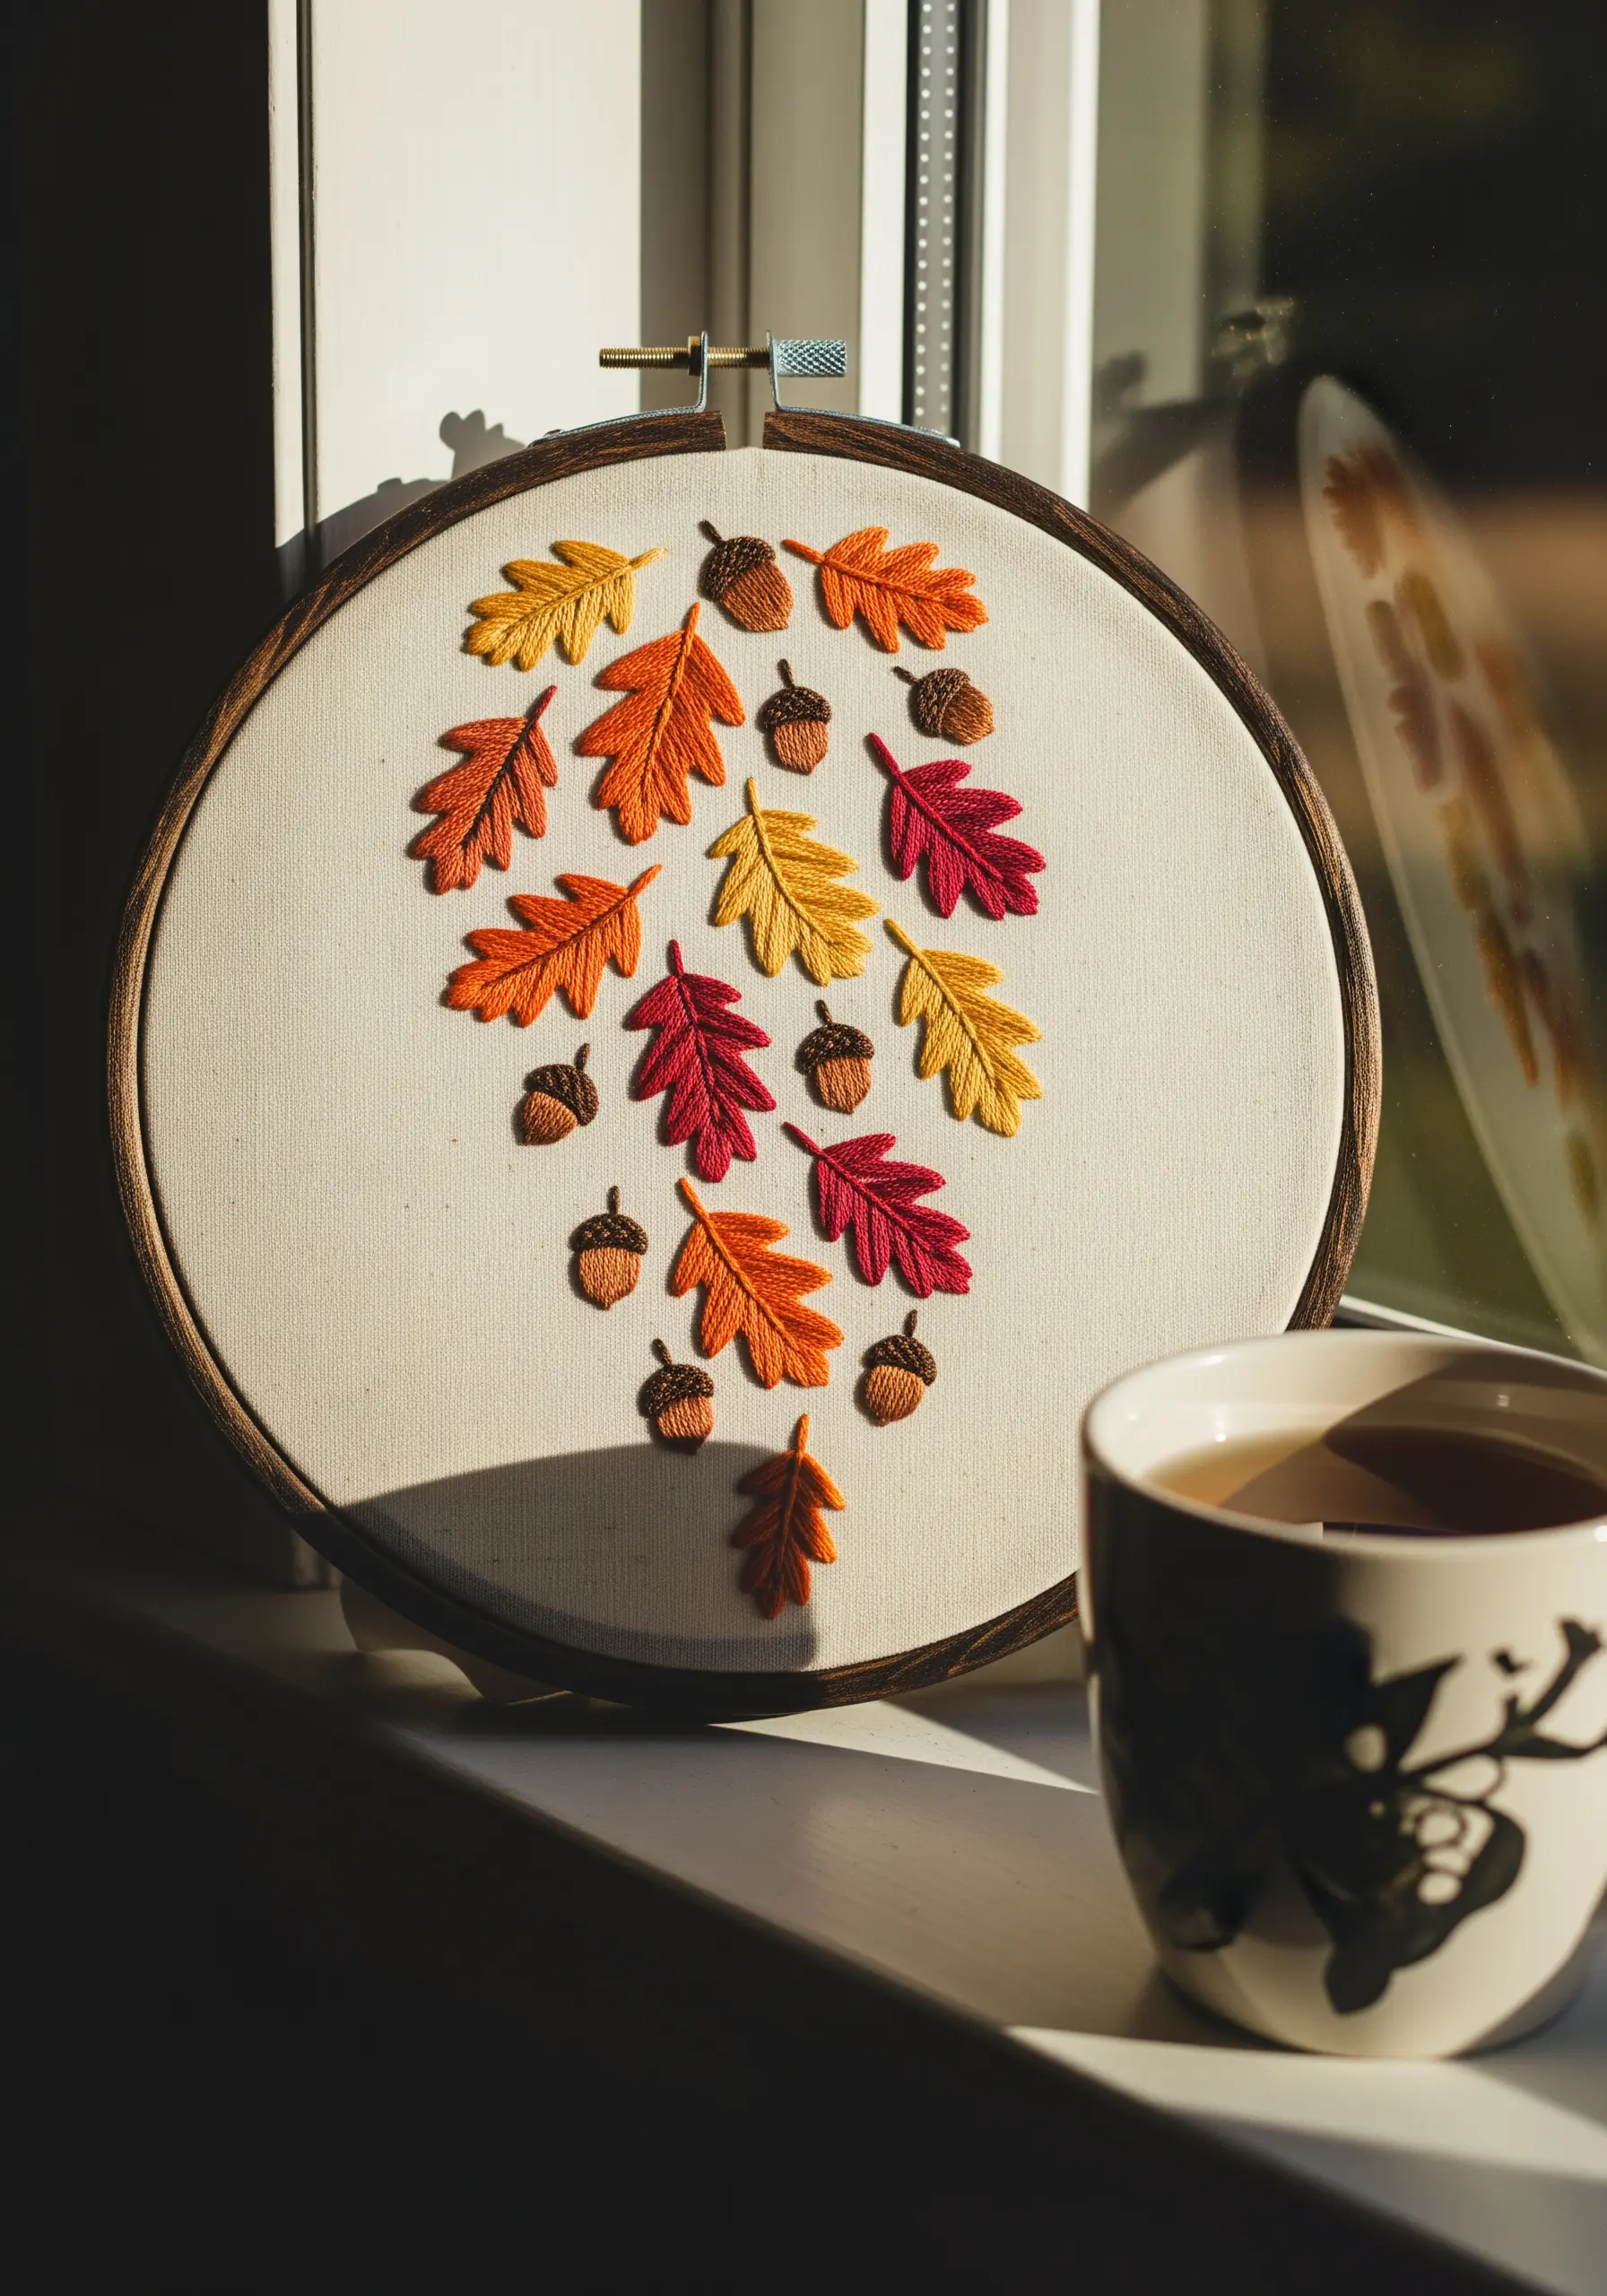
Create a sense of movement by arranging your embroidered leaves in a dynamic, falling pattern rather than a static wreath.
Use fishbone stitch for the oak leaves, as it naturally forms the central vein and angled lobes in one fluid process.
Work with a rich, autumnal color palette—mustard, rust, and deep crimson—to evoke a cozy, seasonal feeling.
Adding tiny acorns stitched with satin stitch and French knots provides a charming textural contrast to the flatter leaves.
12. Achieve Lifelike Dimension with Thread Painting
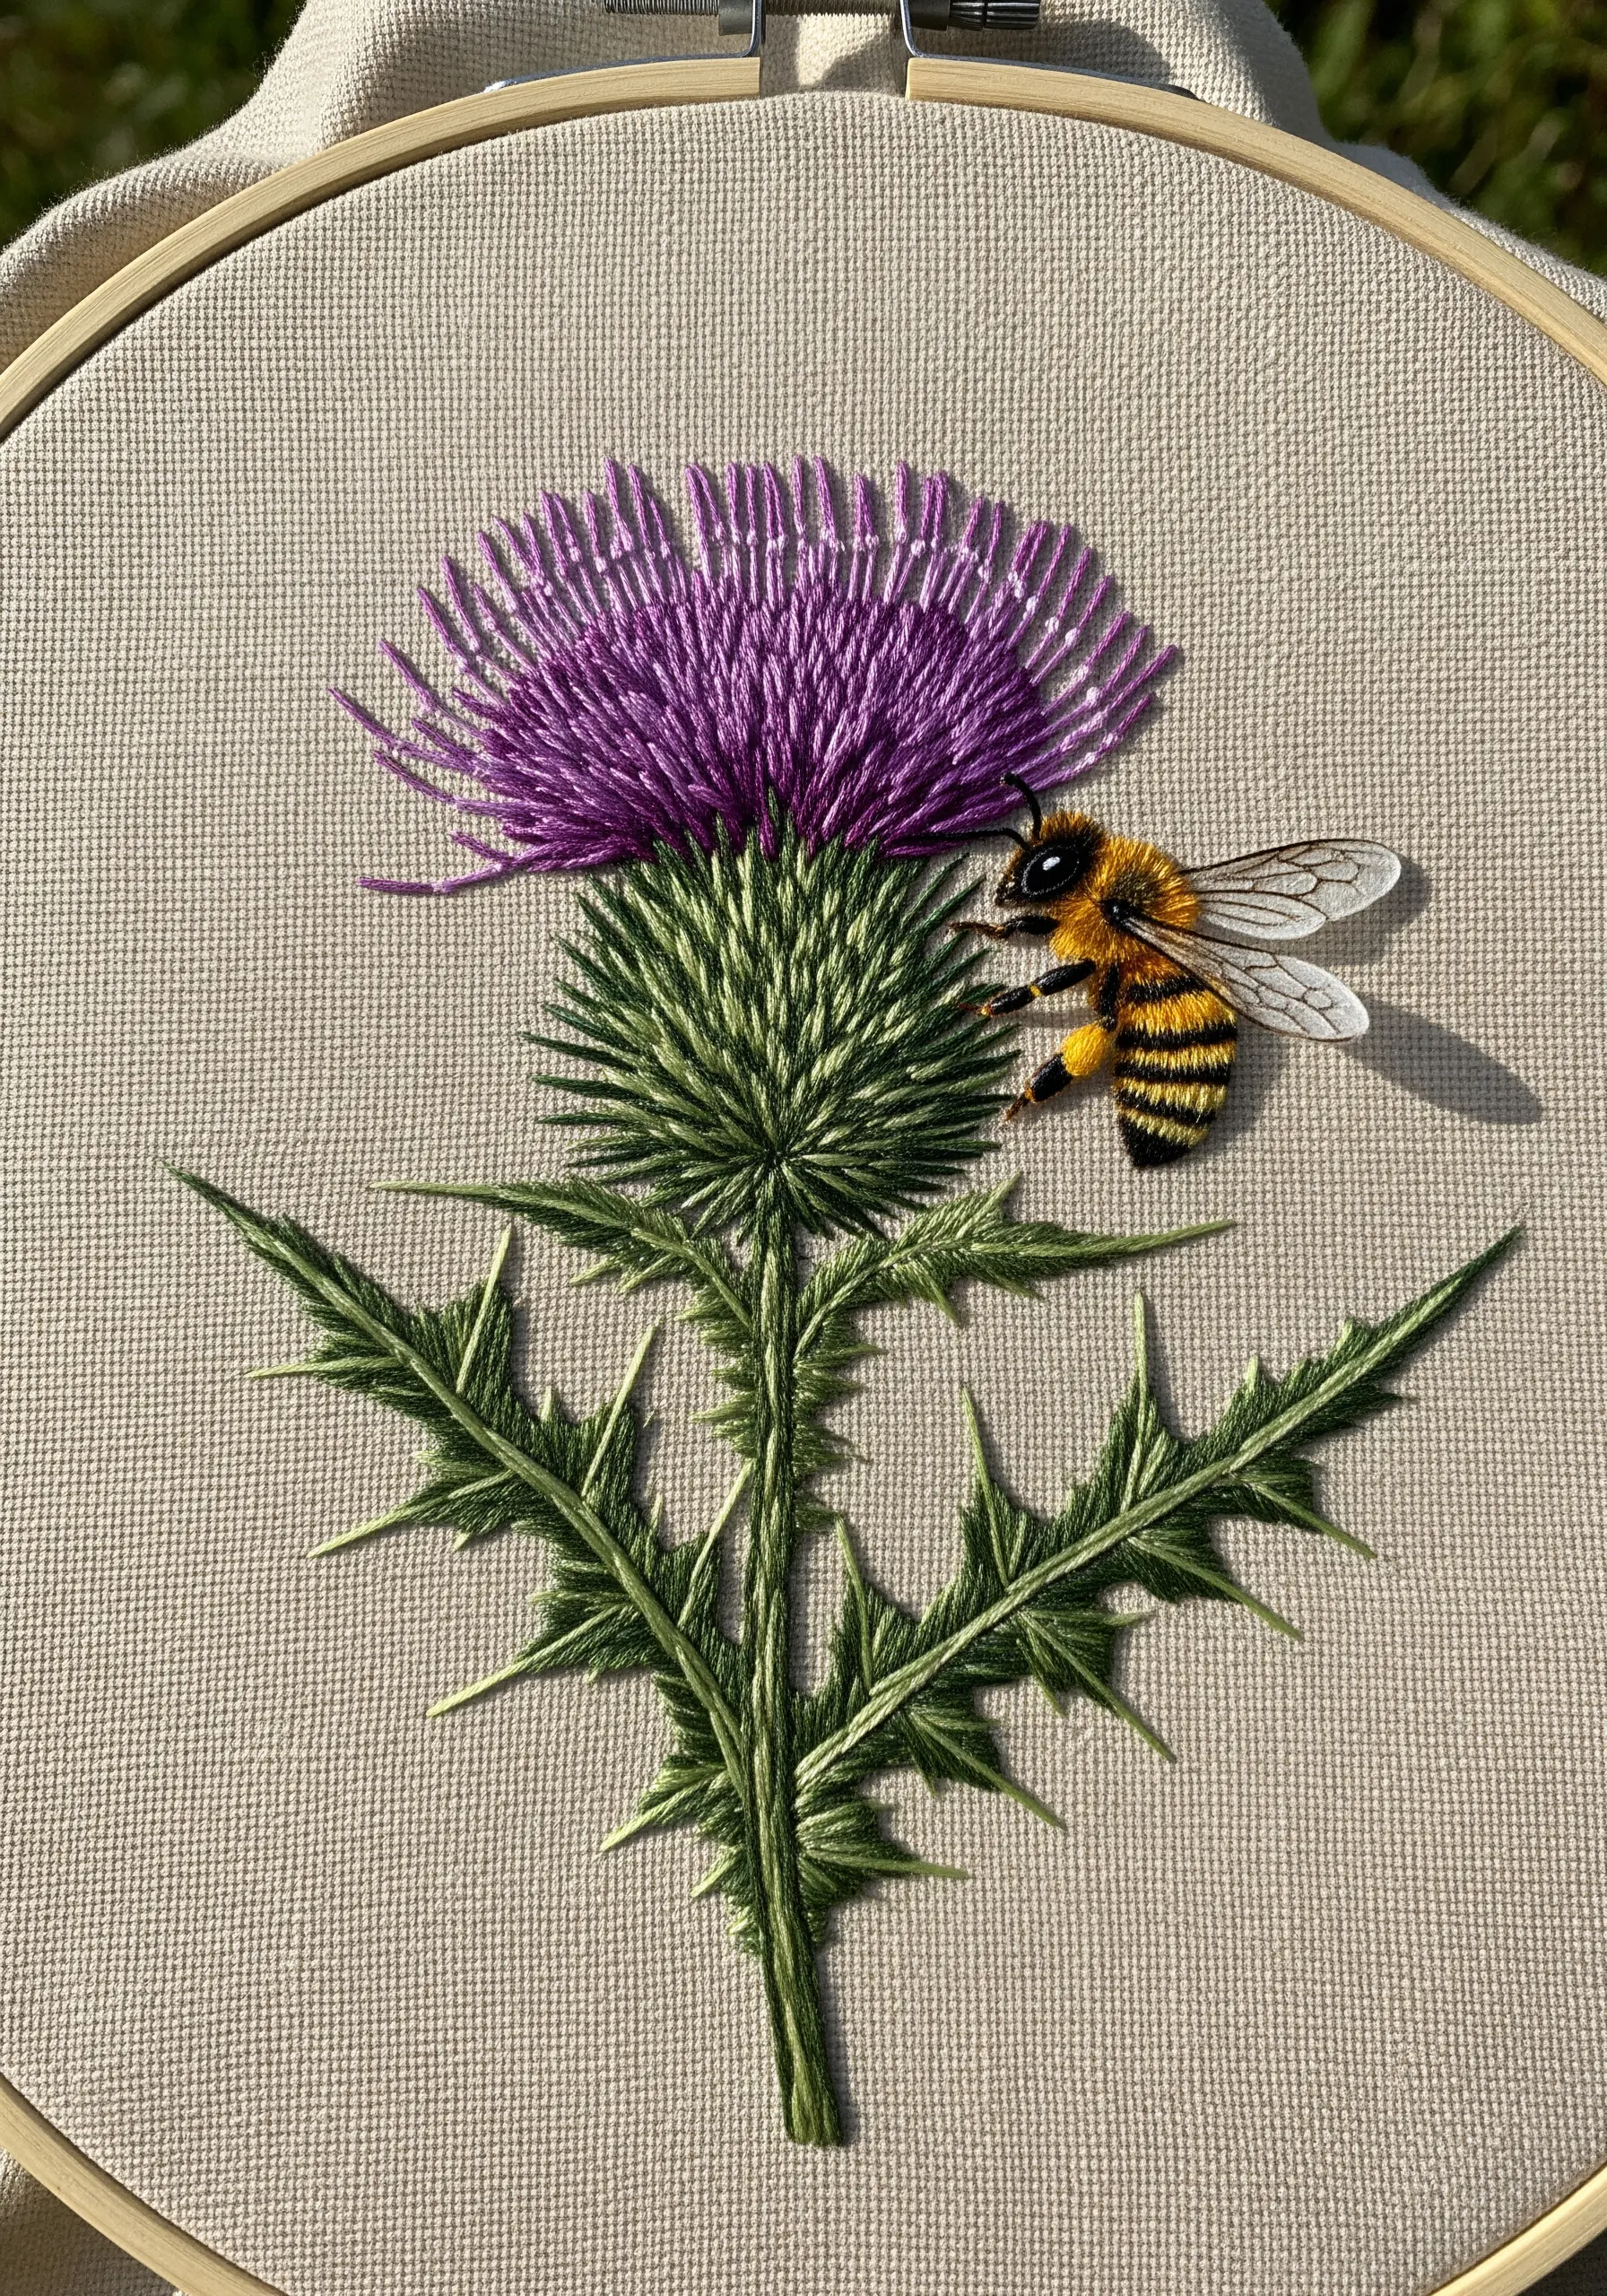
For a realistic bee, use long-and-short stitch to blend yellows, blacks, and browns on its body, mimicking its fuzzy texture.
The thistle requires a different approach: create the spiky green base with sharp, angled straight stitches, and form the purple flower head with long, vertical stitches fanning out from the center (a technique known as Turkey work can also create this fringe effect).
To make the bee’s wings, stitch them separately on organza with a fine grey thread, cut them out carefully, and attach them to the main fabric for a 3D effect.
13. Sculpt Snowy Branches with Textured Stitches
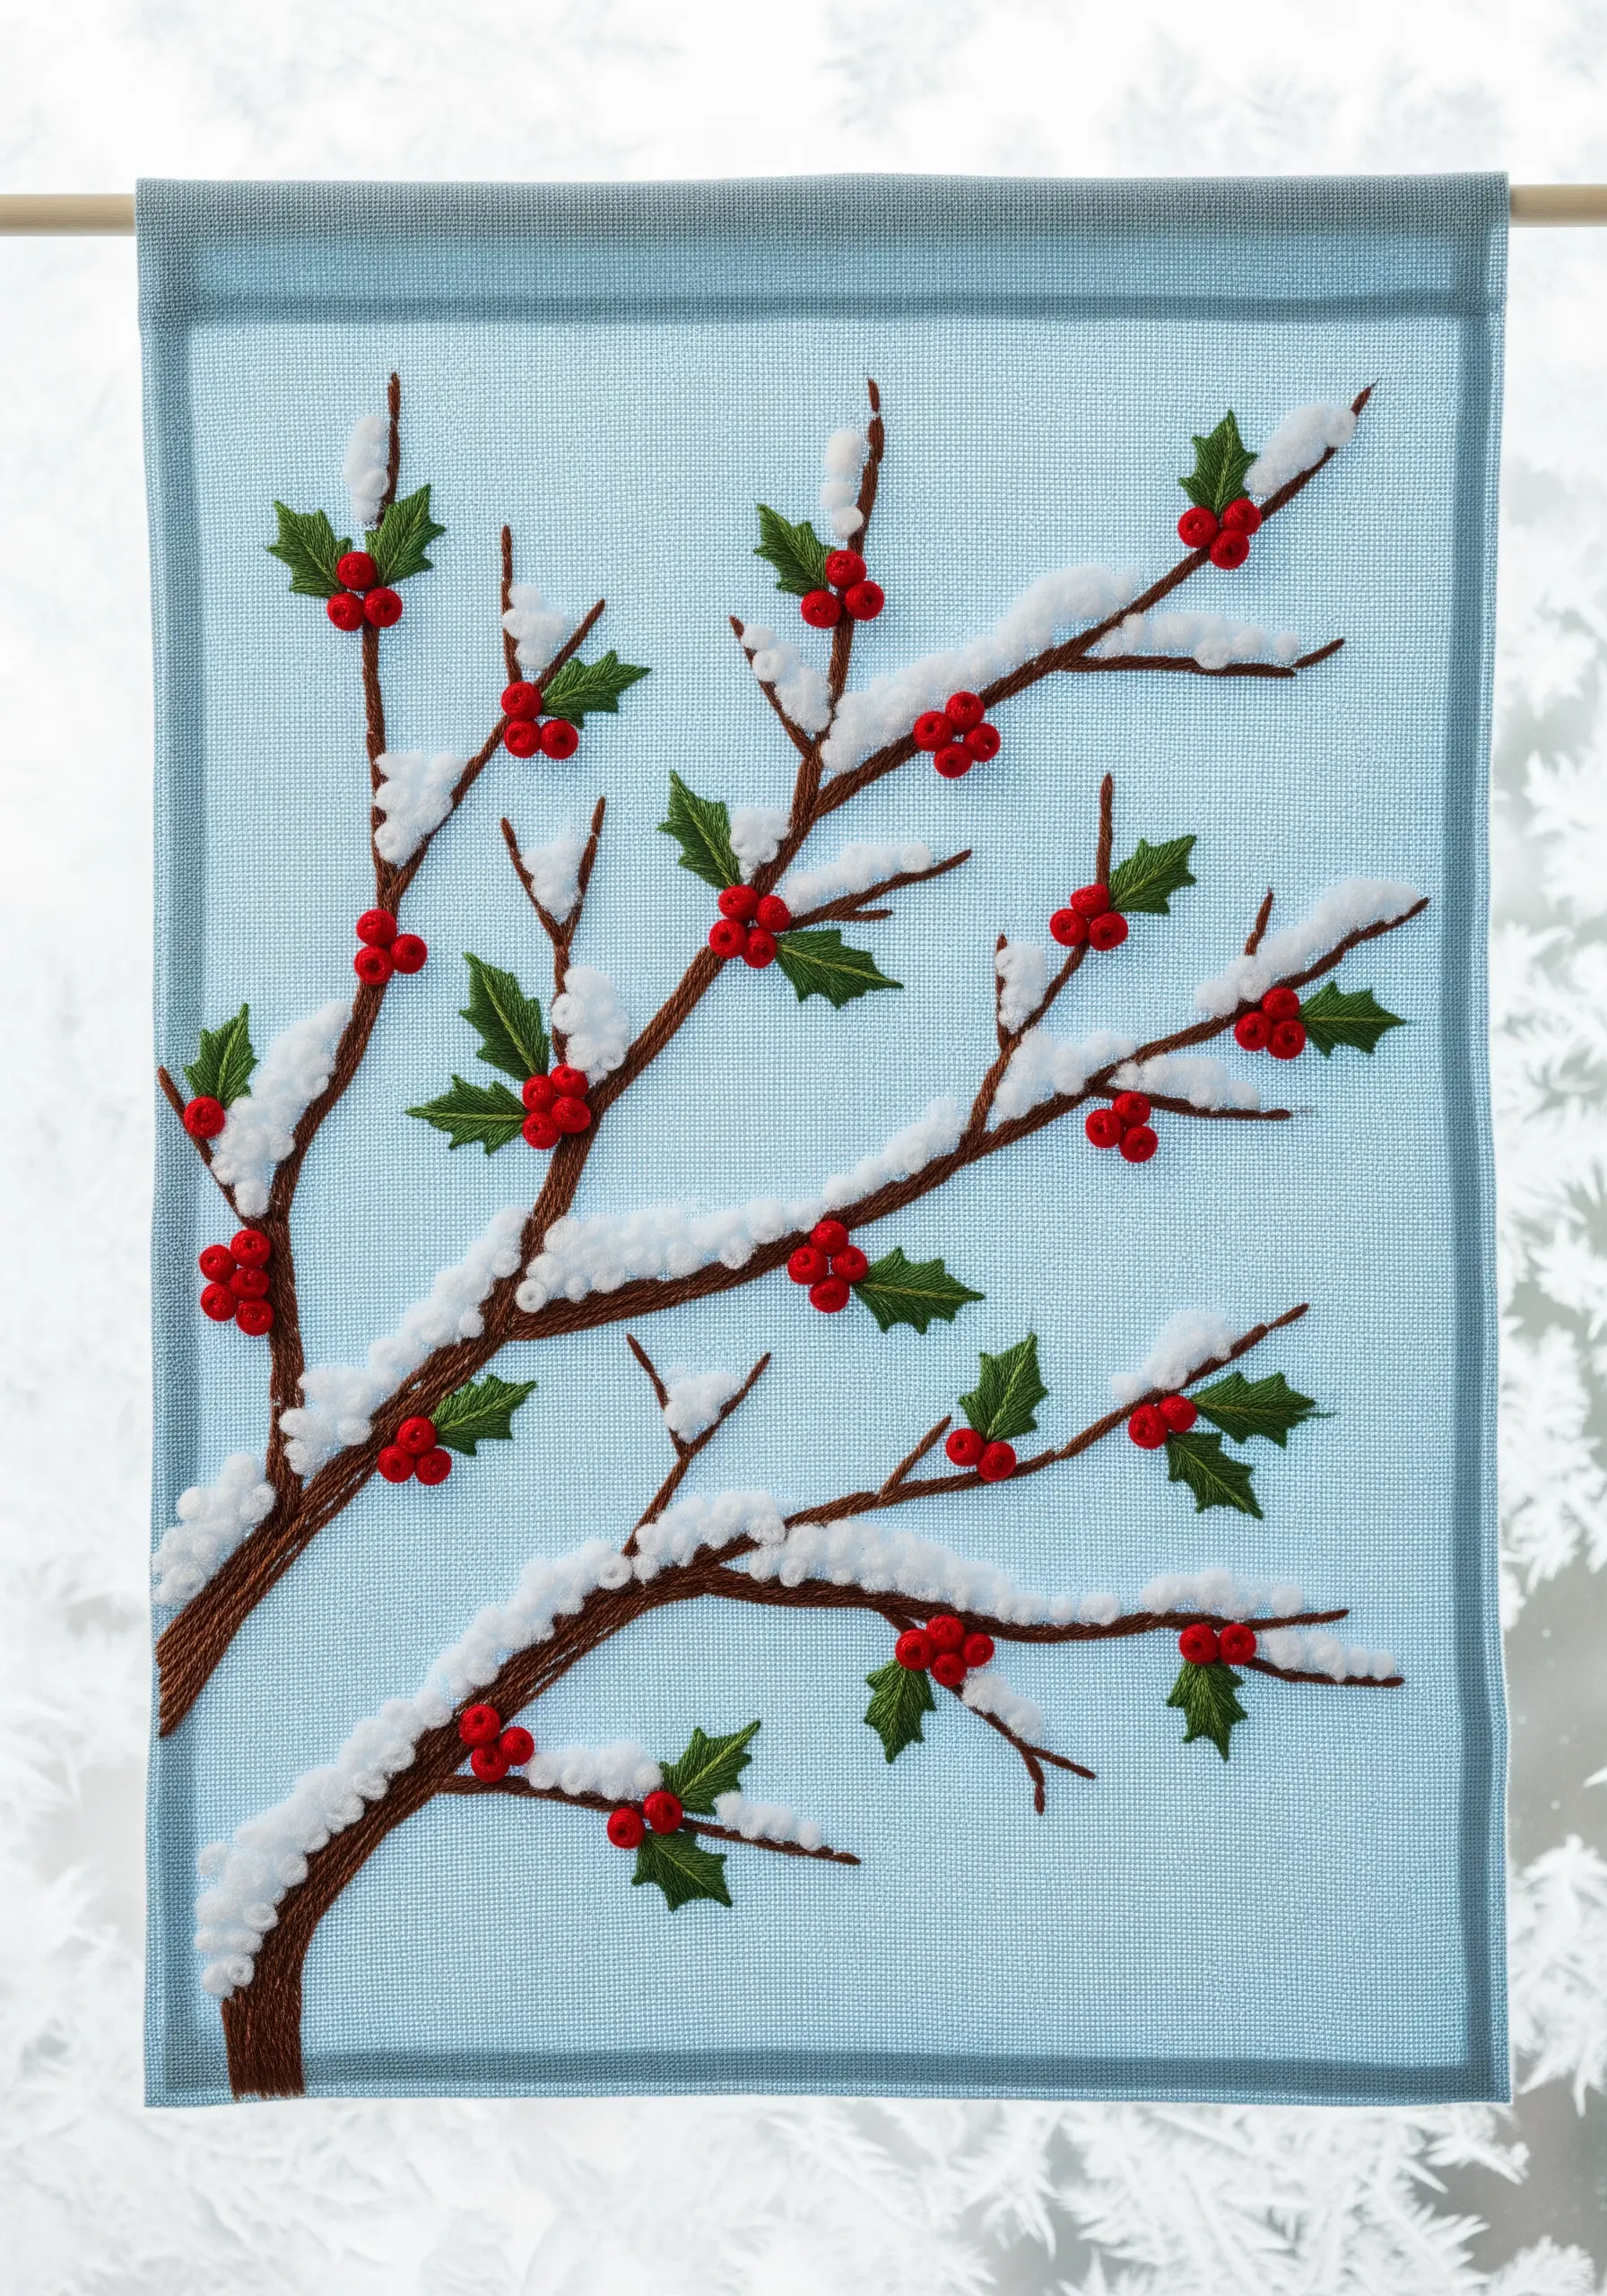
Create the effect of freshly fallen snow by using a plush, textured stitch like the chenille stitch or simply by couching a thick, fluffy yarn onto the branches.
Use a classic stem stitch for the brown branches to give them a rounded, woody appearance.
The holly leaves are best formed with satin stitch, while the bright red berries are perfect for raised French knots or small beads.
This project is all about contrasting textures: the smooth leaves, rough branches, and soft snow.
14. Design a Trailing String of Pearls
Recreate the unique shape of a string of pearls succulent by combining padded satin stitch and French knots.
For the trailing ‘pearls,’ use a padded satin stitch worked in the round to create puffy, dimensional spheres.
The rosette-shaped succulents can be built with layered detached chain stitches or bullion knots arranged in a circle.
Allowing the embroidered vines to hang below the hoop breaks the frame and adds a playful, dynamic quality to the piece.
15. Paint a Sunset with Horizontal Satin Stitch

Fill your entire hoop with horizontal satin stitches to create a smooth, painterly effect for a sunset over water.
Blend the sky colors—pinks, oranges, and purples—by using a single strand of thread and the long-and-short stitch technique where colors meet.
Create the sun’s reflection on the water with a few shimmering stitches of metallic or silk thread.
The dark, silhouetted reeds in the foreground, stitched in a simple backstitch, provide a sharp contrast that makes the colorful sky appear even more vibrant.
16. Build a Sunflower with Dimensional Knots
The center of a sunflower is its most iconic feature; replicate its complex texture by filling it with hundreds of French knots.
Work in concentric circles, starting with dark brown or black in the middle and gradually transitioning to lighter browns and golds toward the edge.
For the petals, use long-and-short stitch to blend shades of yellow and orange, giving them a realistic, sun-kissed gradient.
Stitching on black fabric makes the vibrant yellows and golds of the sunflower appear intensely saturated and radiant.
17. Capture the Sheen of Eucalyptus Leaves
Recreate the silvery-green hue of eucalyptus by blending a grey-green thread with a single strand of silver or light blue silk floss.
The satin stitches should follow the natural curve of the leaves, all slanting in the same direction to create a smooth, light-reflecting surface.
This technique gives the leaves a subtle iridescence that changes as the light from the window hits it from different angles.
A simple, thin backstitched stem in brown keeps the focus entirely on the luminous leaves.
18. Stitch Delicate Herbs on Patterned Fabric
Elevate simple line-work embroidery by choosing a patterned fabric, like this subtle gingham, as your canvas.
The pattern adds visual interest and a cozy, kitchen-like feel without overwhelming the delicate stitches.
Use fine, precise stitches like split stitch or stem stitch to render the herbs’ leaves and stems.
This approach transforms simple herbal plant embroidery motifs into a piece of charming, rustic decor perfect for a kitchen window.
19. Create a Dense Canopy of Tropical Leaves
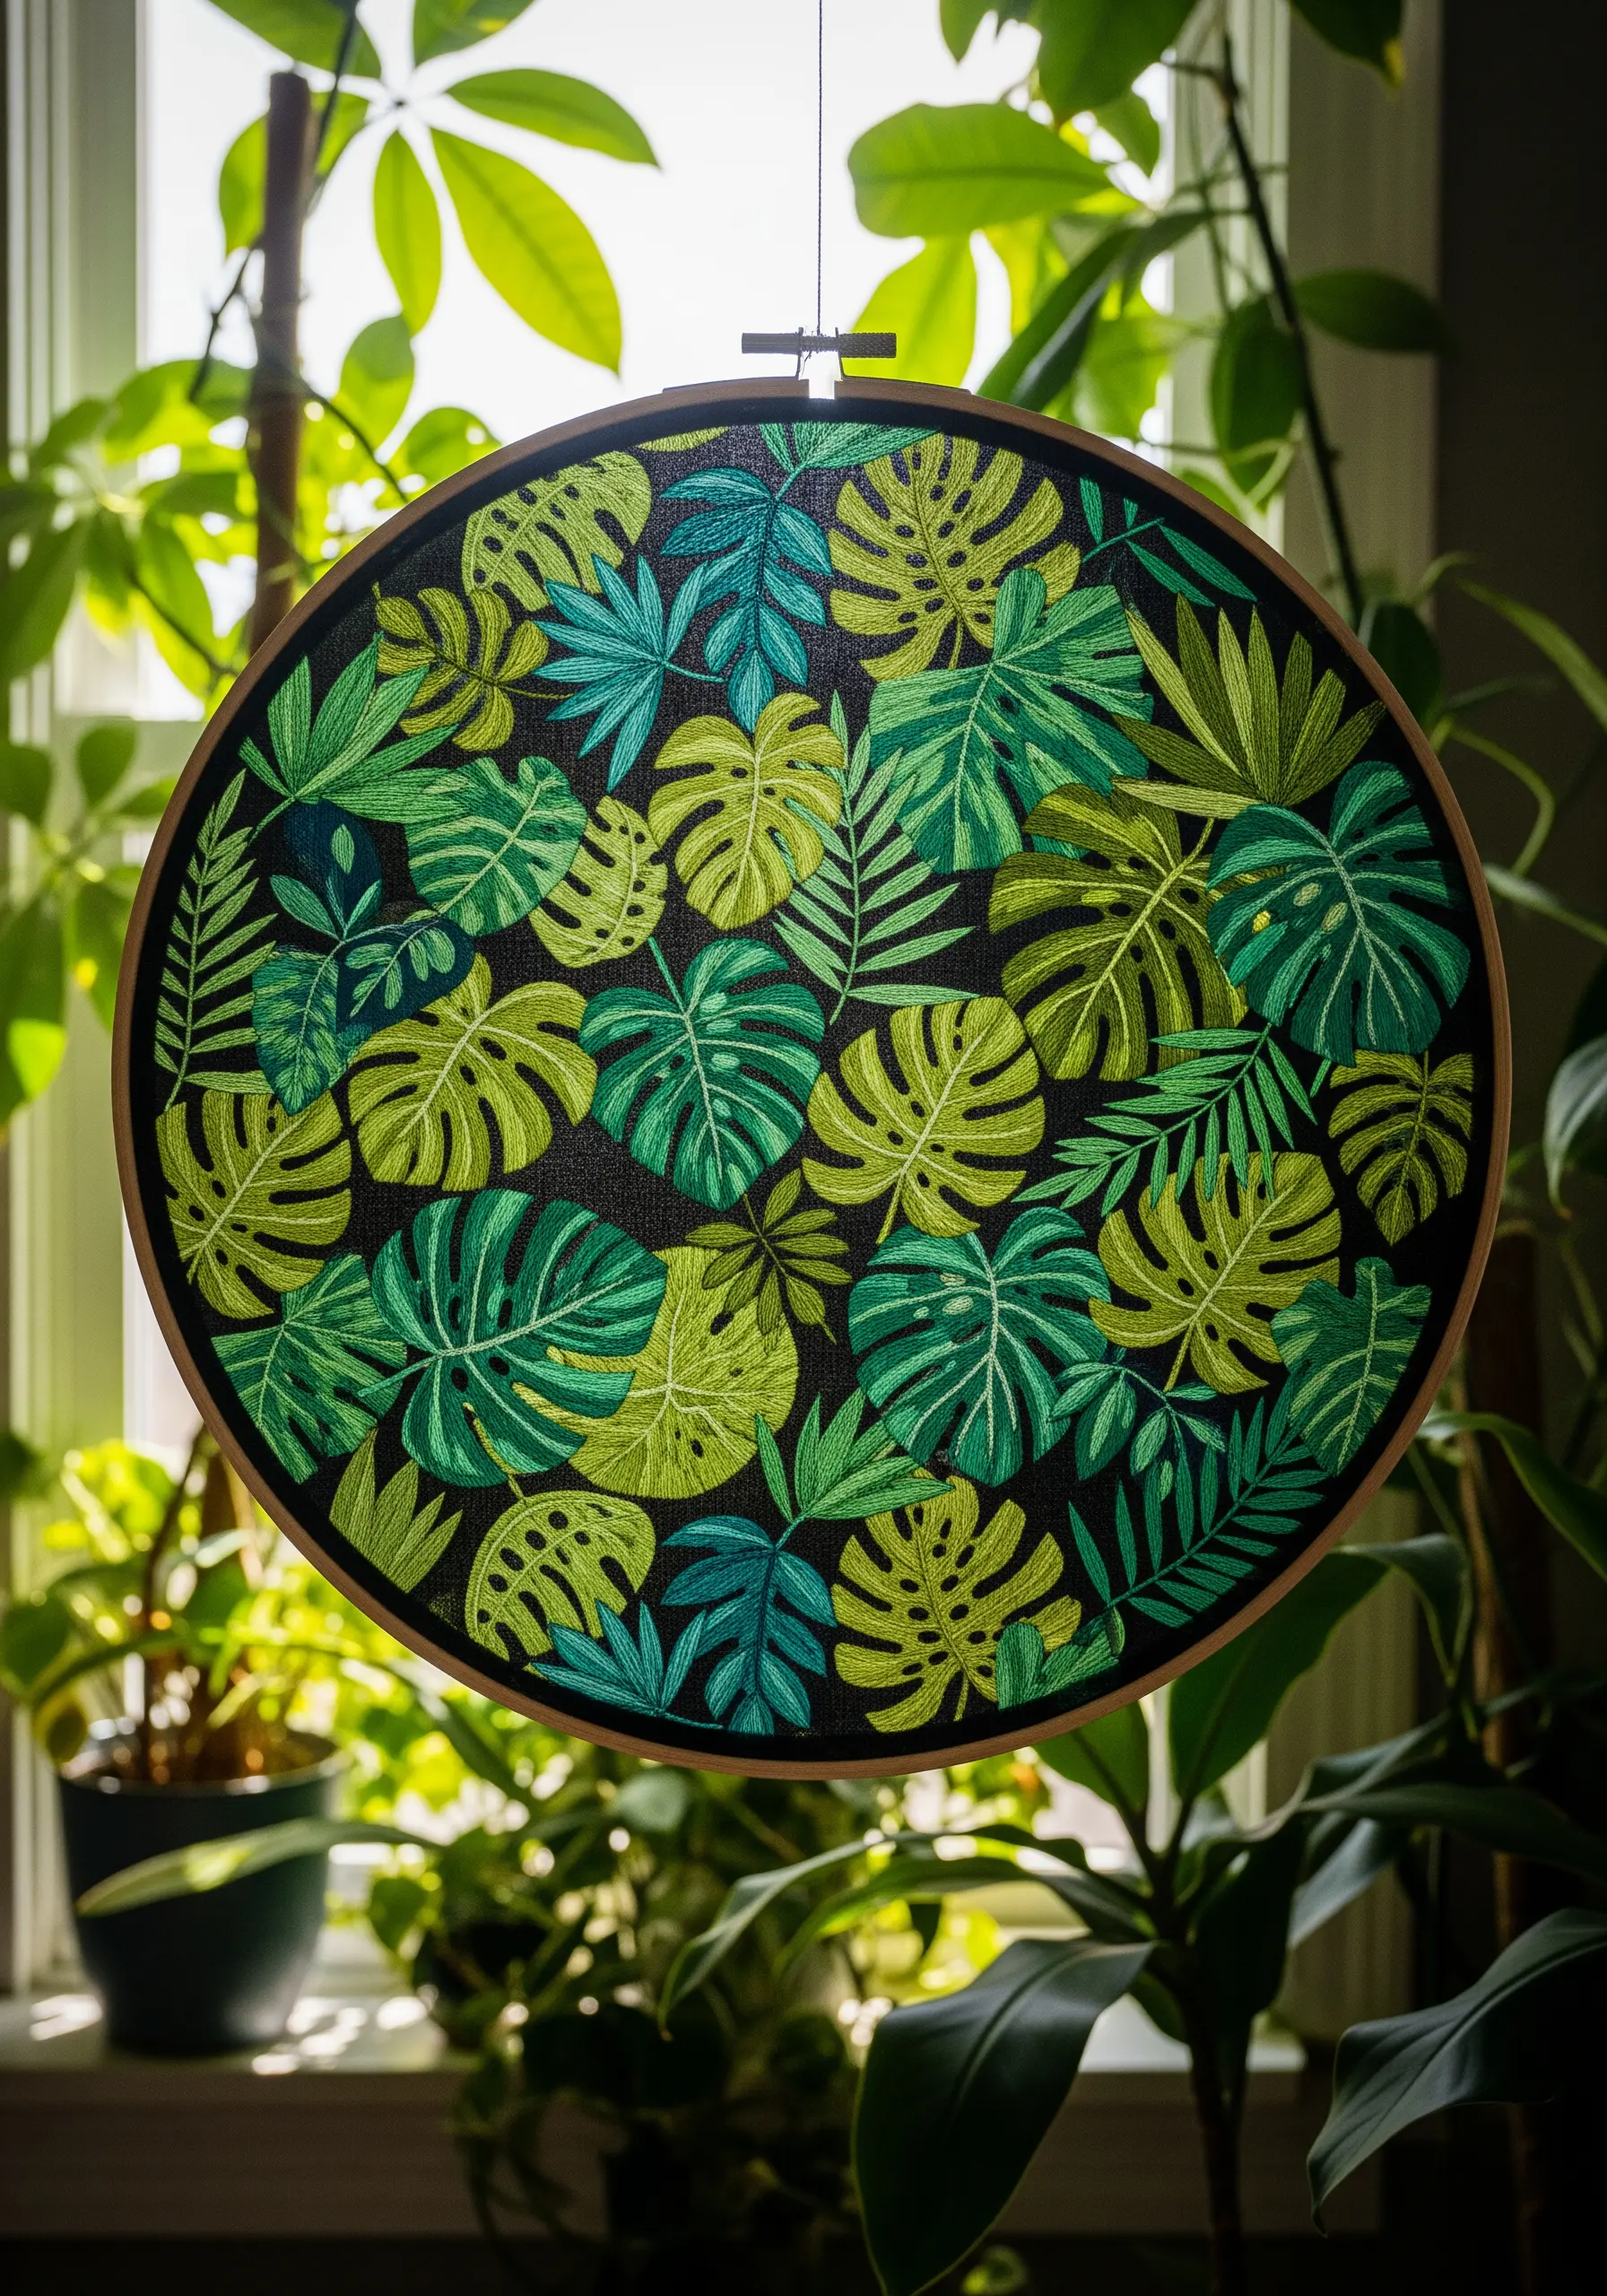
Achieve a lush, overlapping effect by carefully planning your layers.
Stitch the leaves in the background first, then stitch the foreground leaves directly on top of them.
Use a variety of greens and leaf shapes to create a composition that feels rich and diverse, like a real jungle canopy.
Employ fishbone stitch for pointed leaves and satin stitch for broader ones to add subtle textural variation throughout the piece.
20. Embellish Cherry Blossoms with Hanging Chains
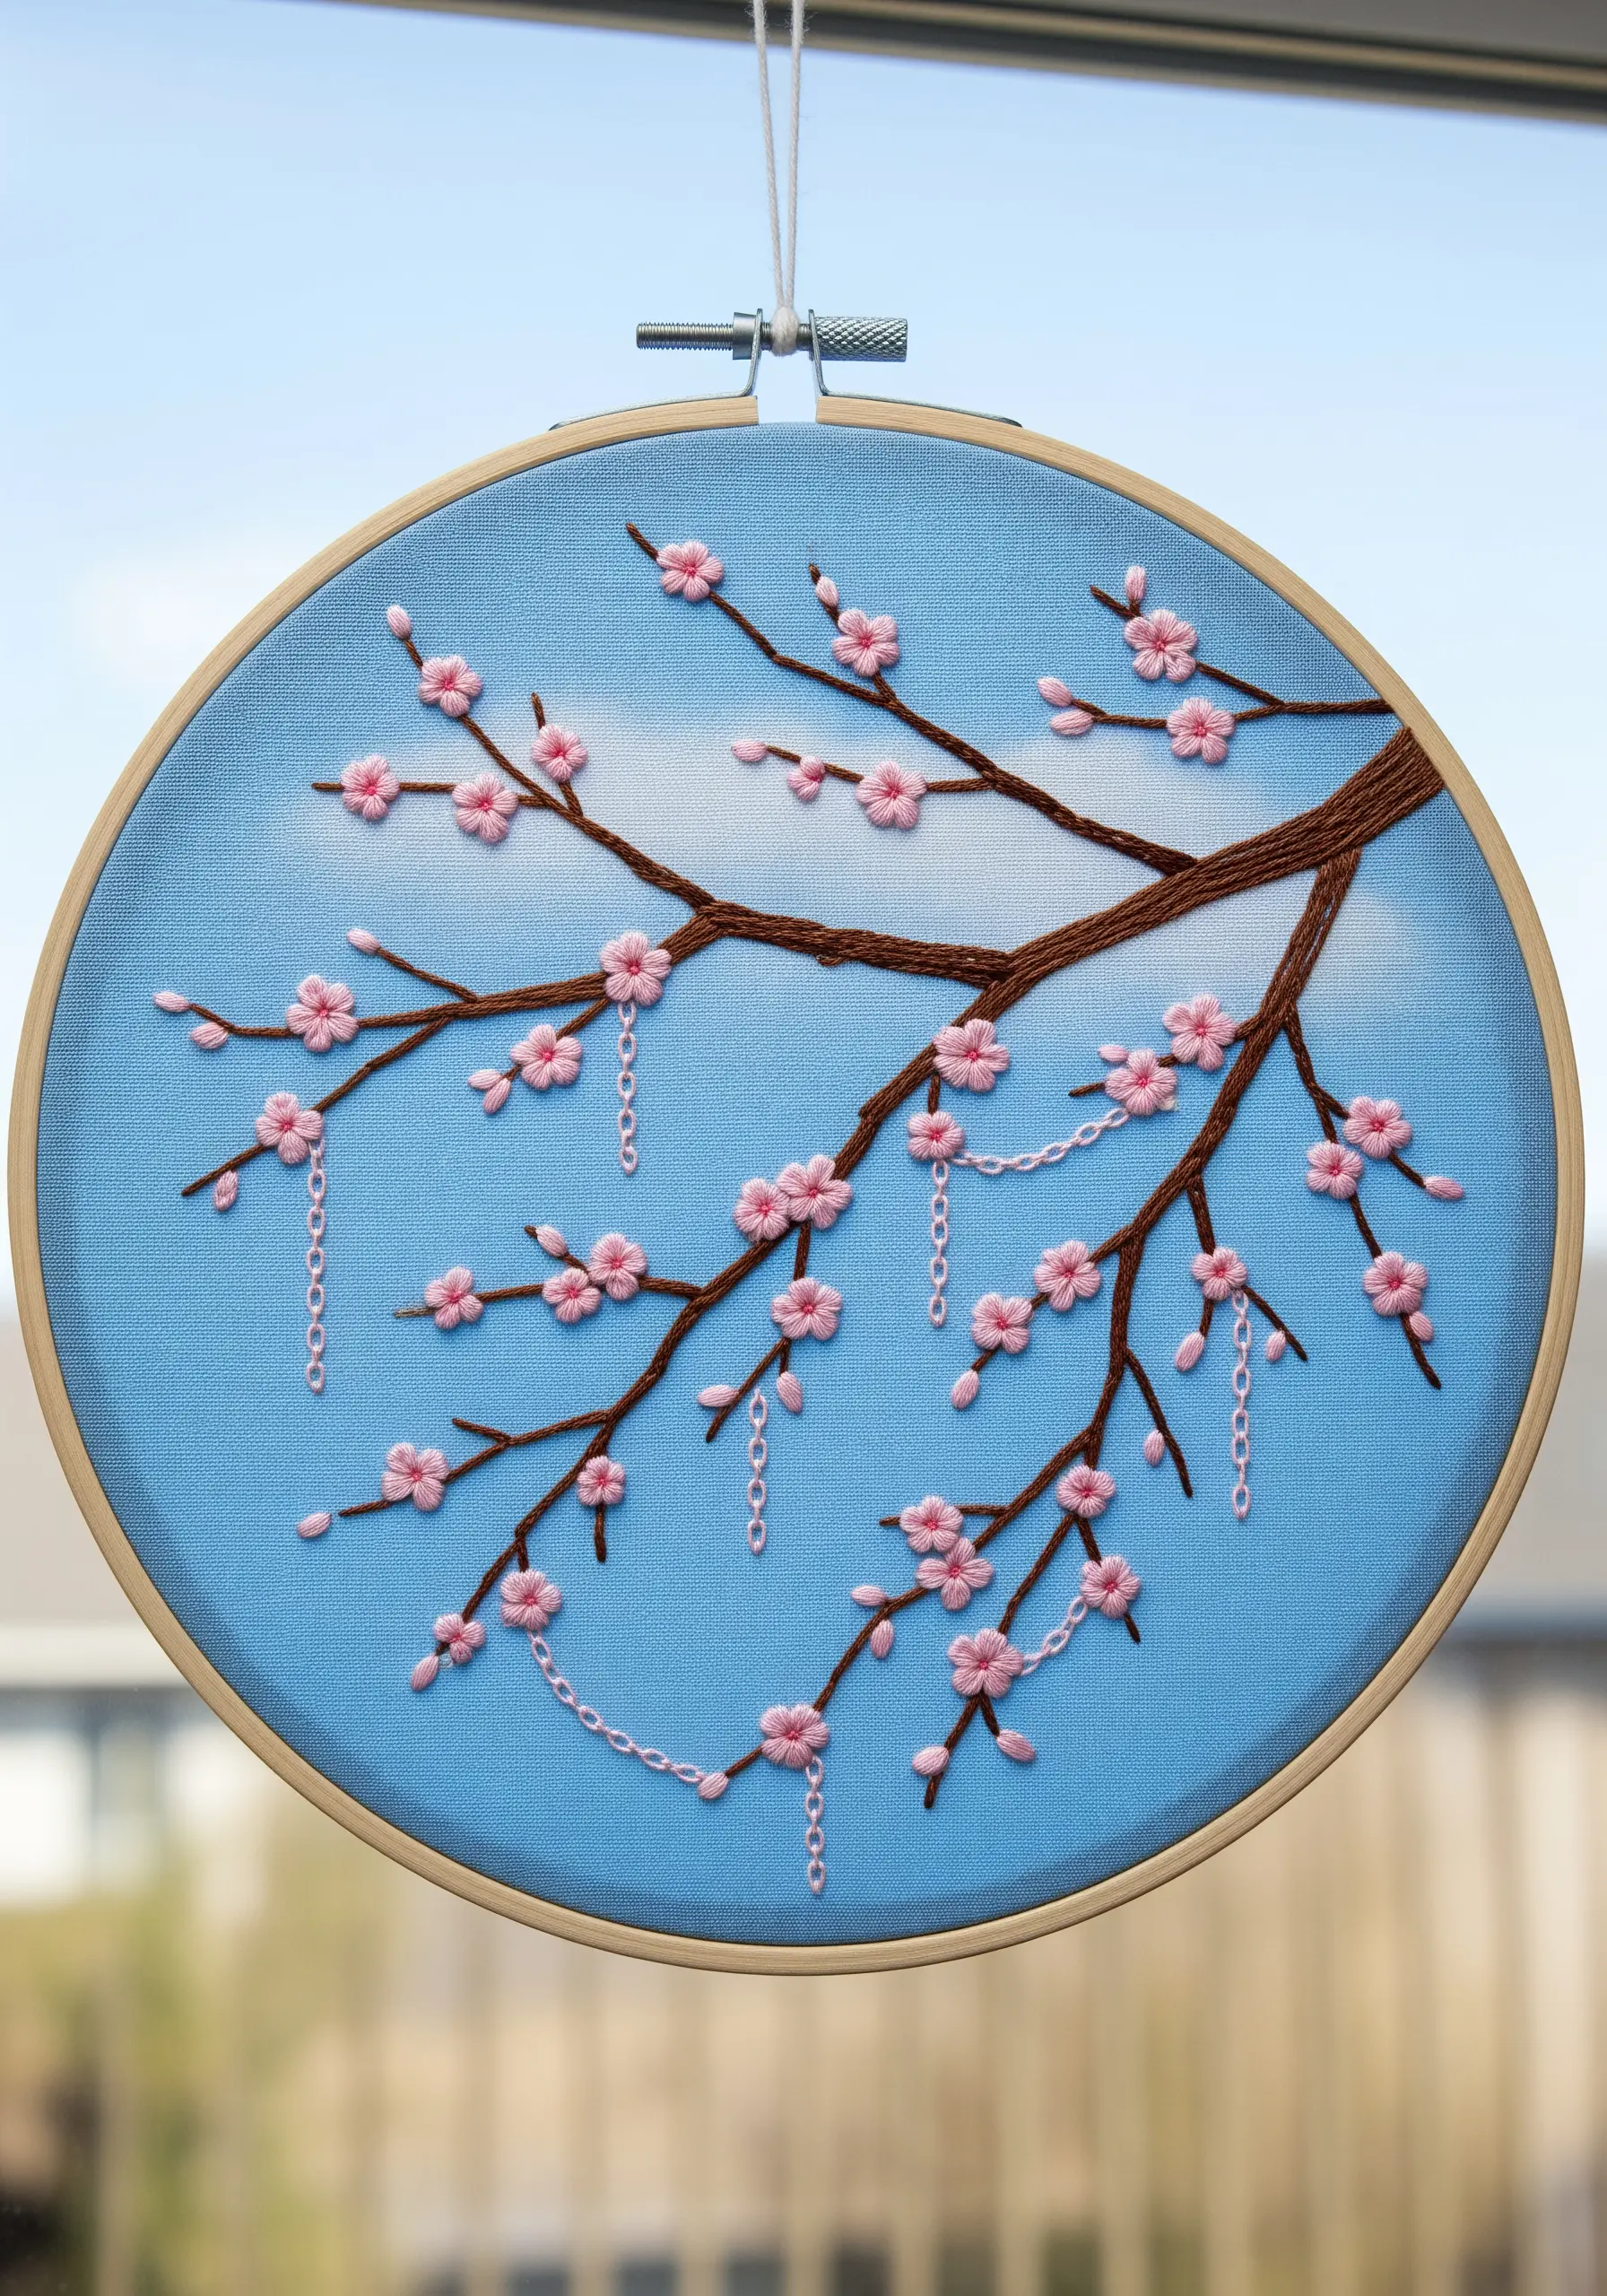
Add a touch of delicate whimsy by incorporating hanging chain stitches that look like weeping branches or jewelry.
Create the tiny blossoms with satin-stitched petals and a single French knot in the center.
The branches can be stitched with a whipped backstitch to give them a thicker, more textured appearance than a simple outline.
The light blue fabric provides a perfect ‘sky’ background that makes the pink and brown tones stand out beautifully.
21. Sculpt a Realistic Rose with Layered Stitches
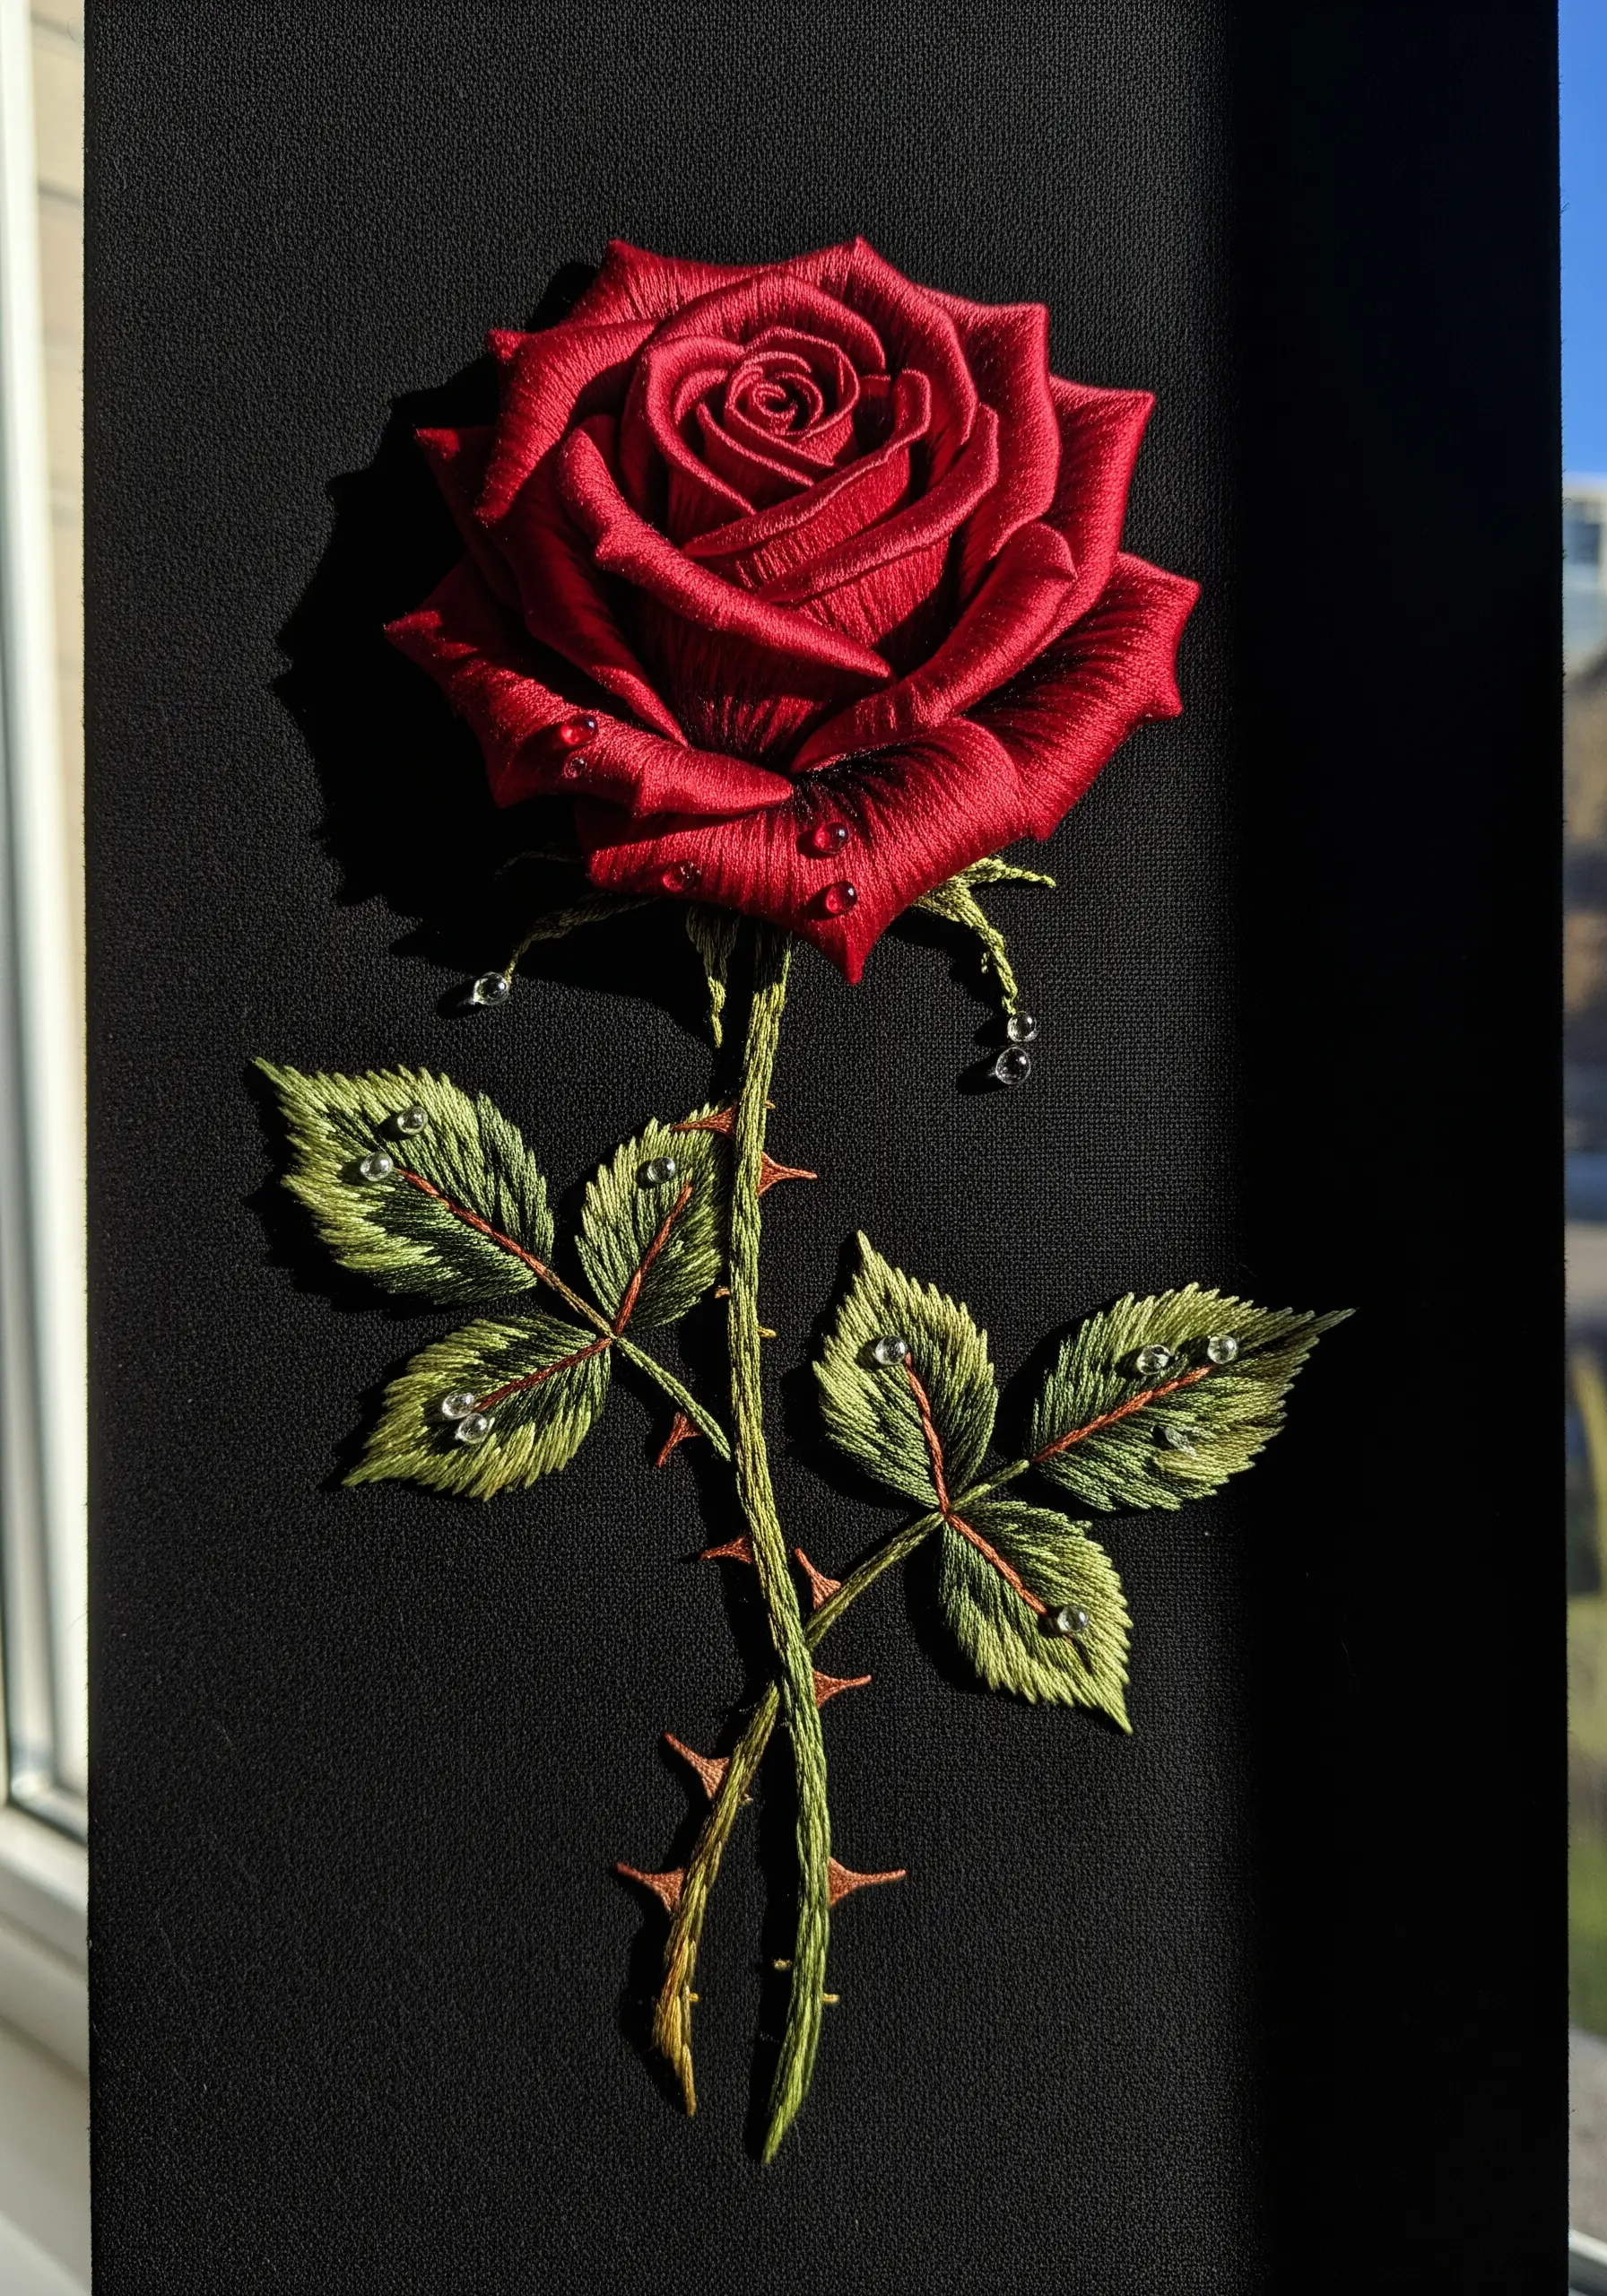
Build the rose from the inside out, starting with the tight swirl of petals at the center.
Use long-and-short stitch, angling your stitches to follow the curve of each individual petal.
Achieve realism by using at least three or four shades of red, with the darkest shade used for the shadowed areas deep within the flower.
For a final touch of magic, add tiny, clear seed beads to the leaves to simulate morning dew drops that will sparkle in the sunlight.
22. Explore Geometry with Ginkgo Leaves
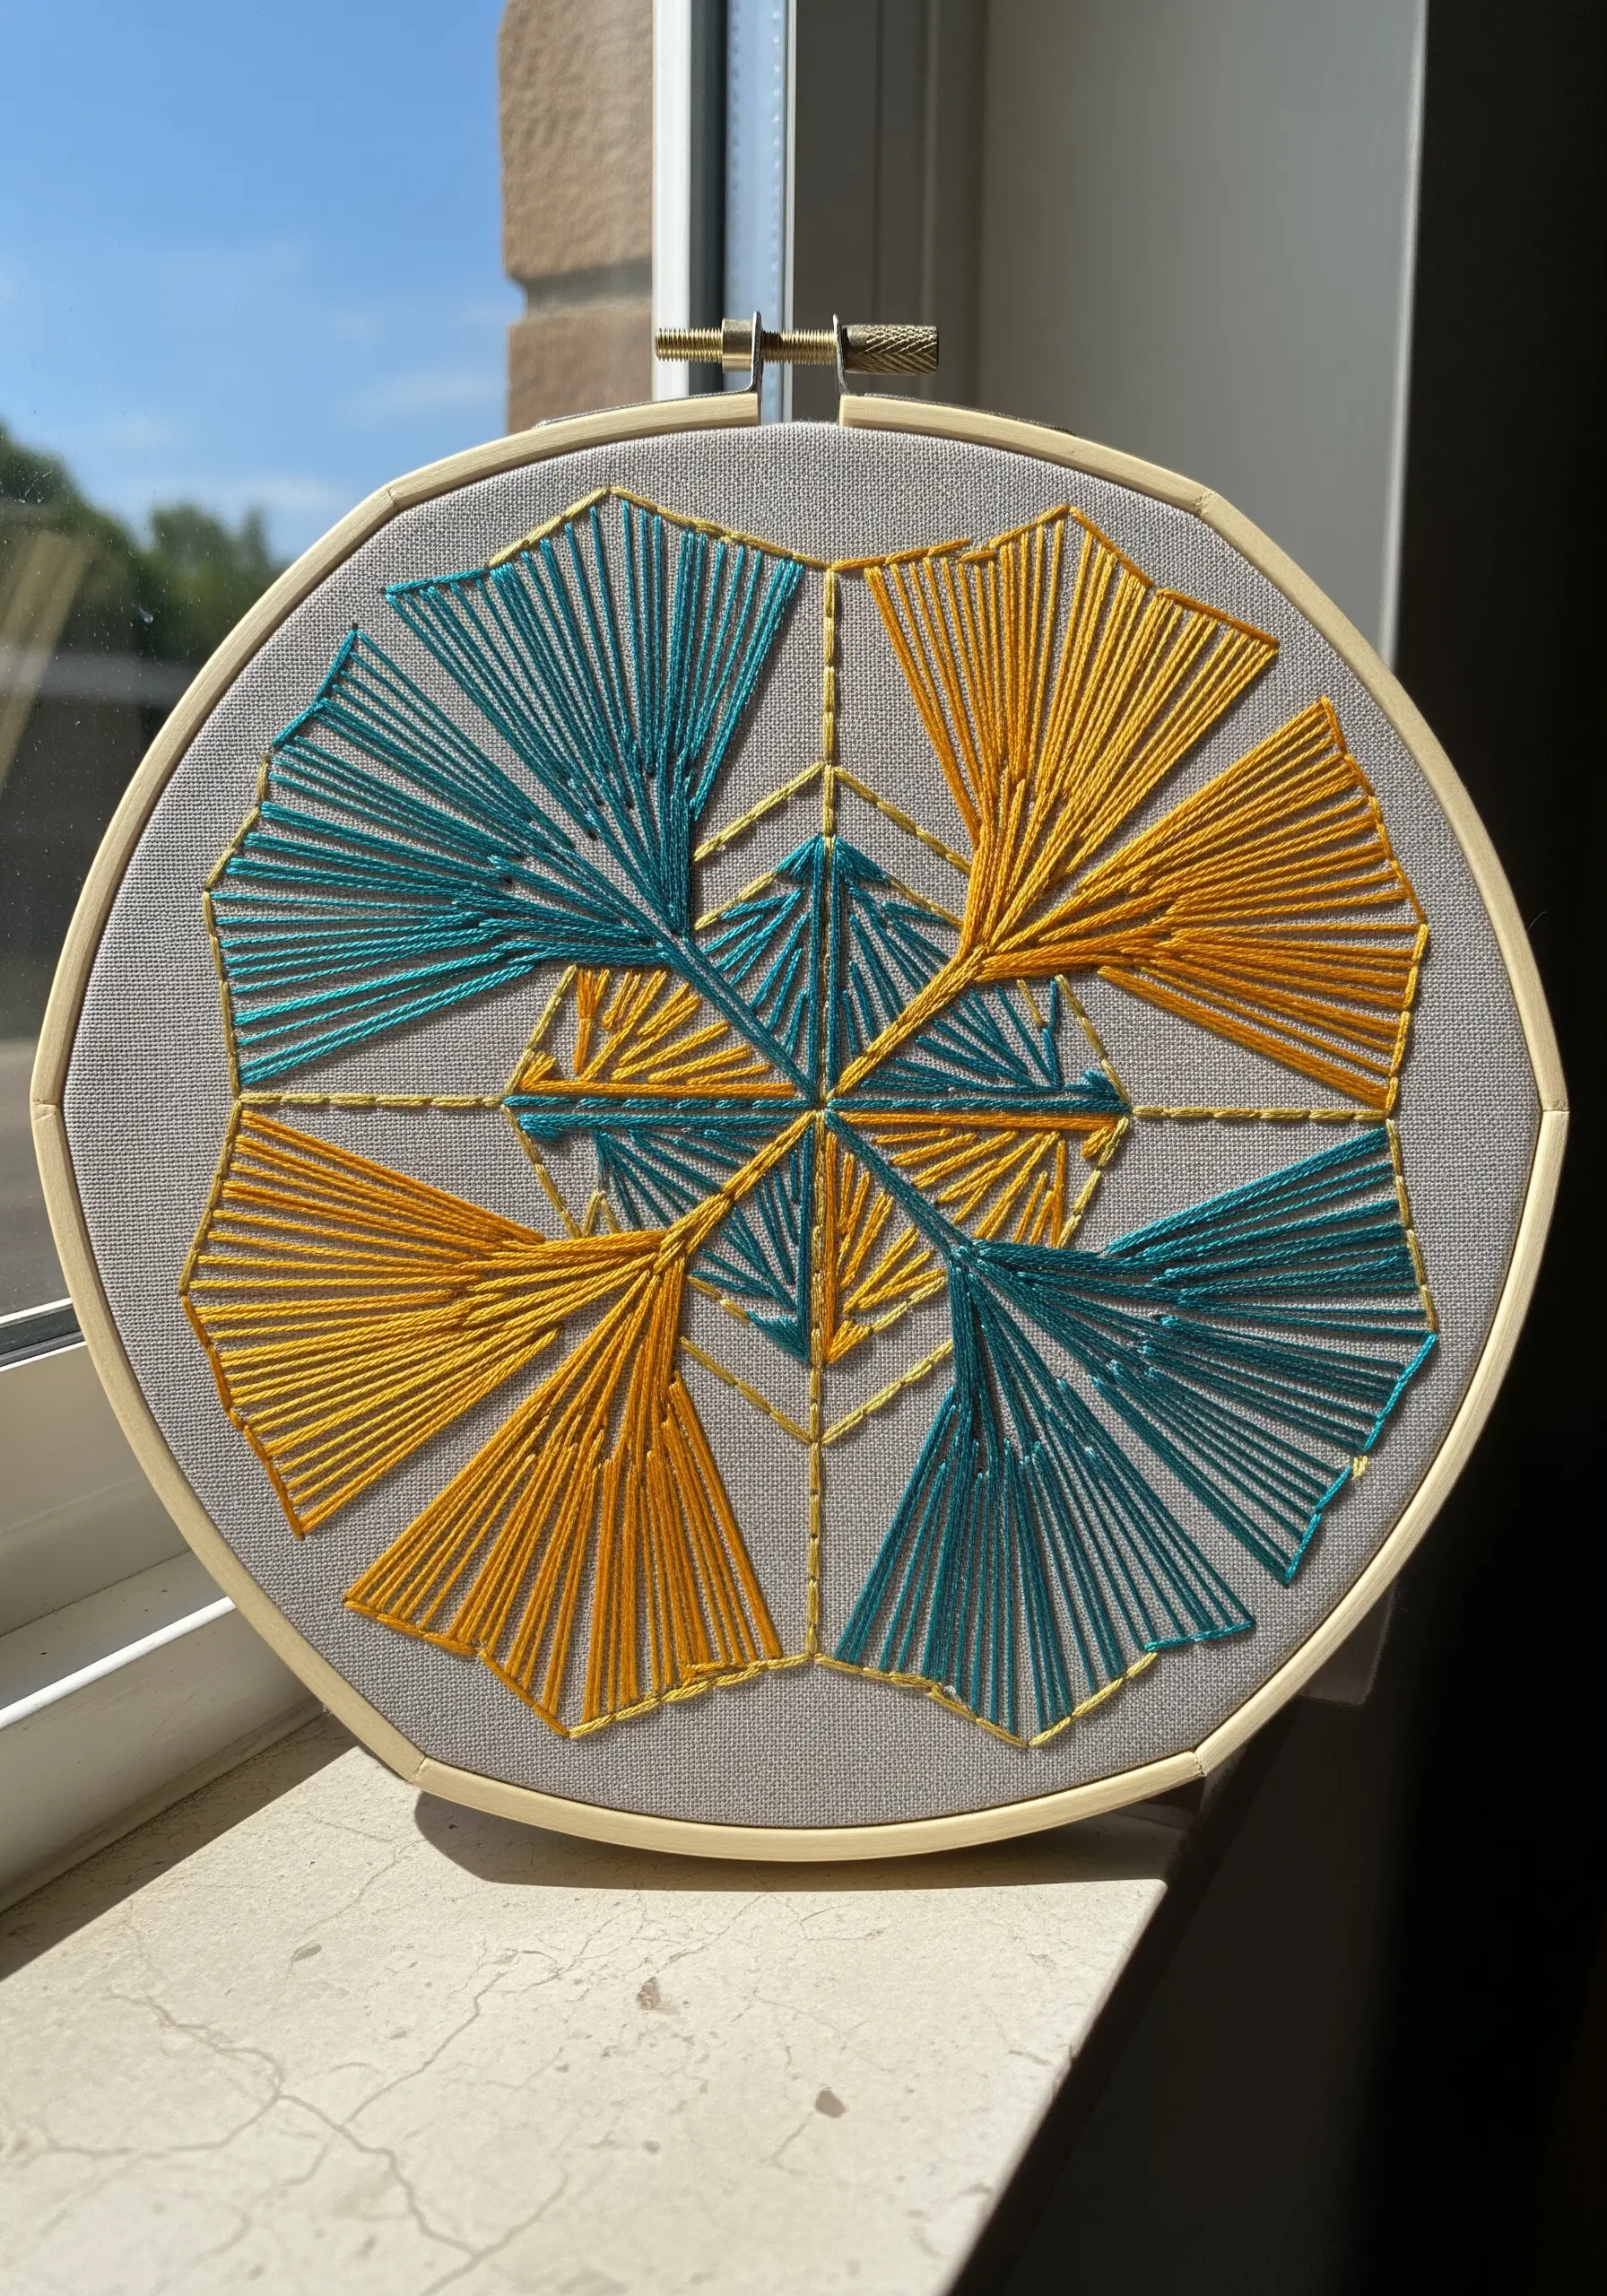
Transform a simple botanical shape into a striking geometric pattern by arranging it symmetrically.
Outline the fan shape of the ginkgo leaves first, then fill them with long straight stitches that radiate from the base, creating a beautiful ‘sunburst’ effect within each leaf.
The complementary color scheme of teal and marigold creates a vibrant, energetic contrast that is both modern and harmonious.
This is a perfect project for practicing stitch direction and tension, as the neatness of the long stitches is key to the design’s success.
23. Spotlight Ferns with Dramatic Lighting
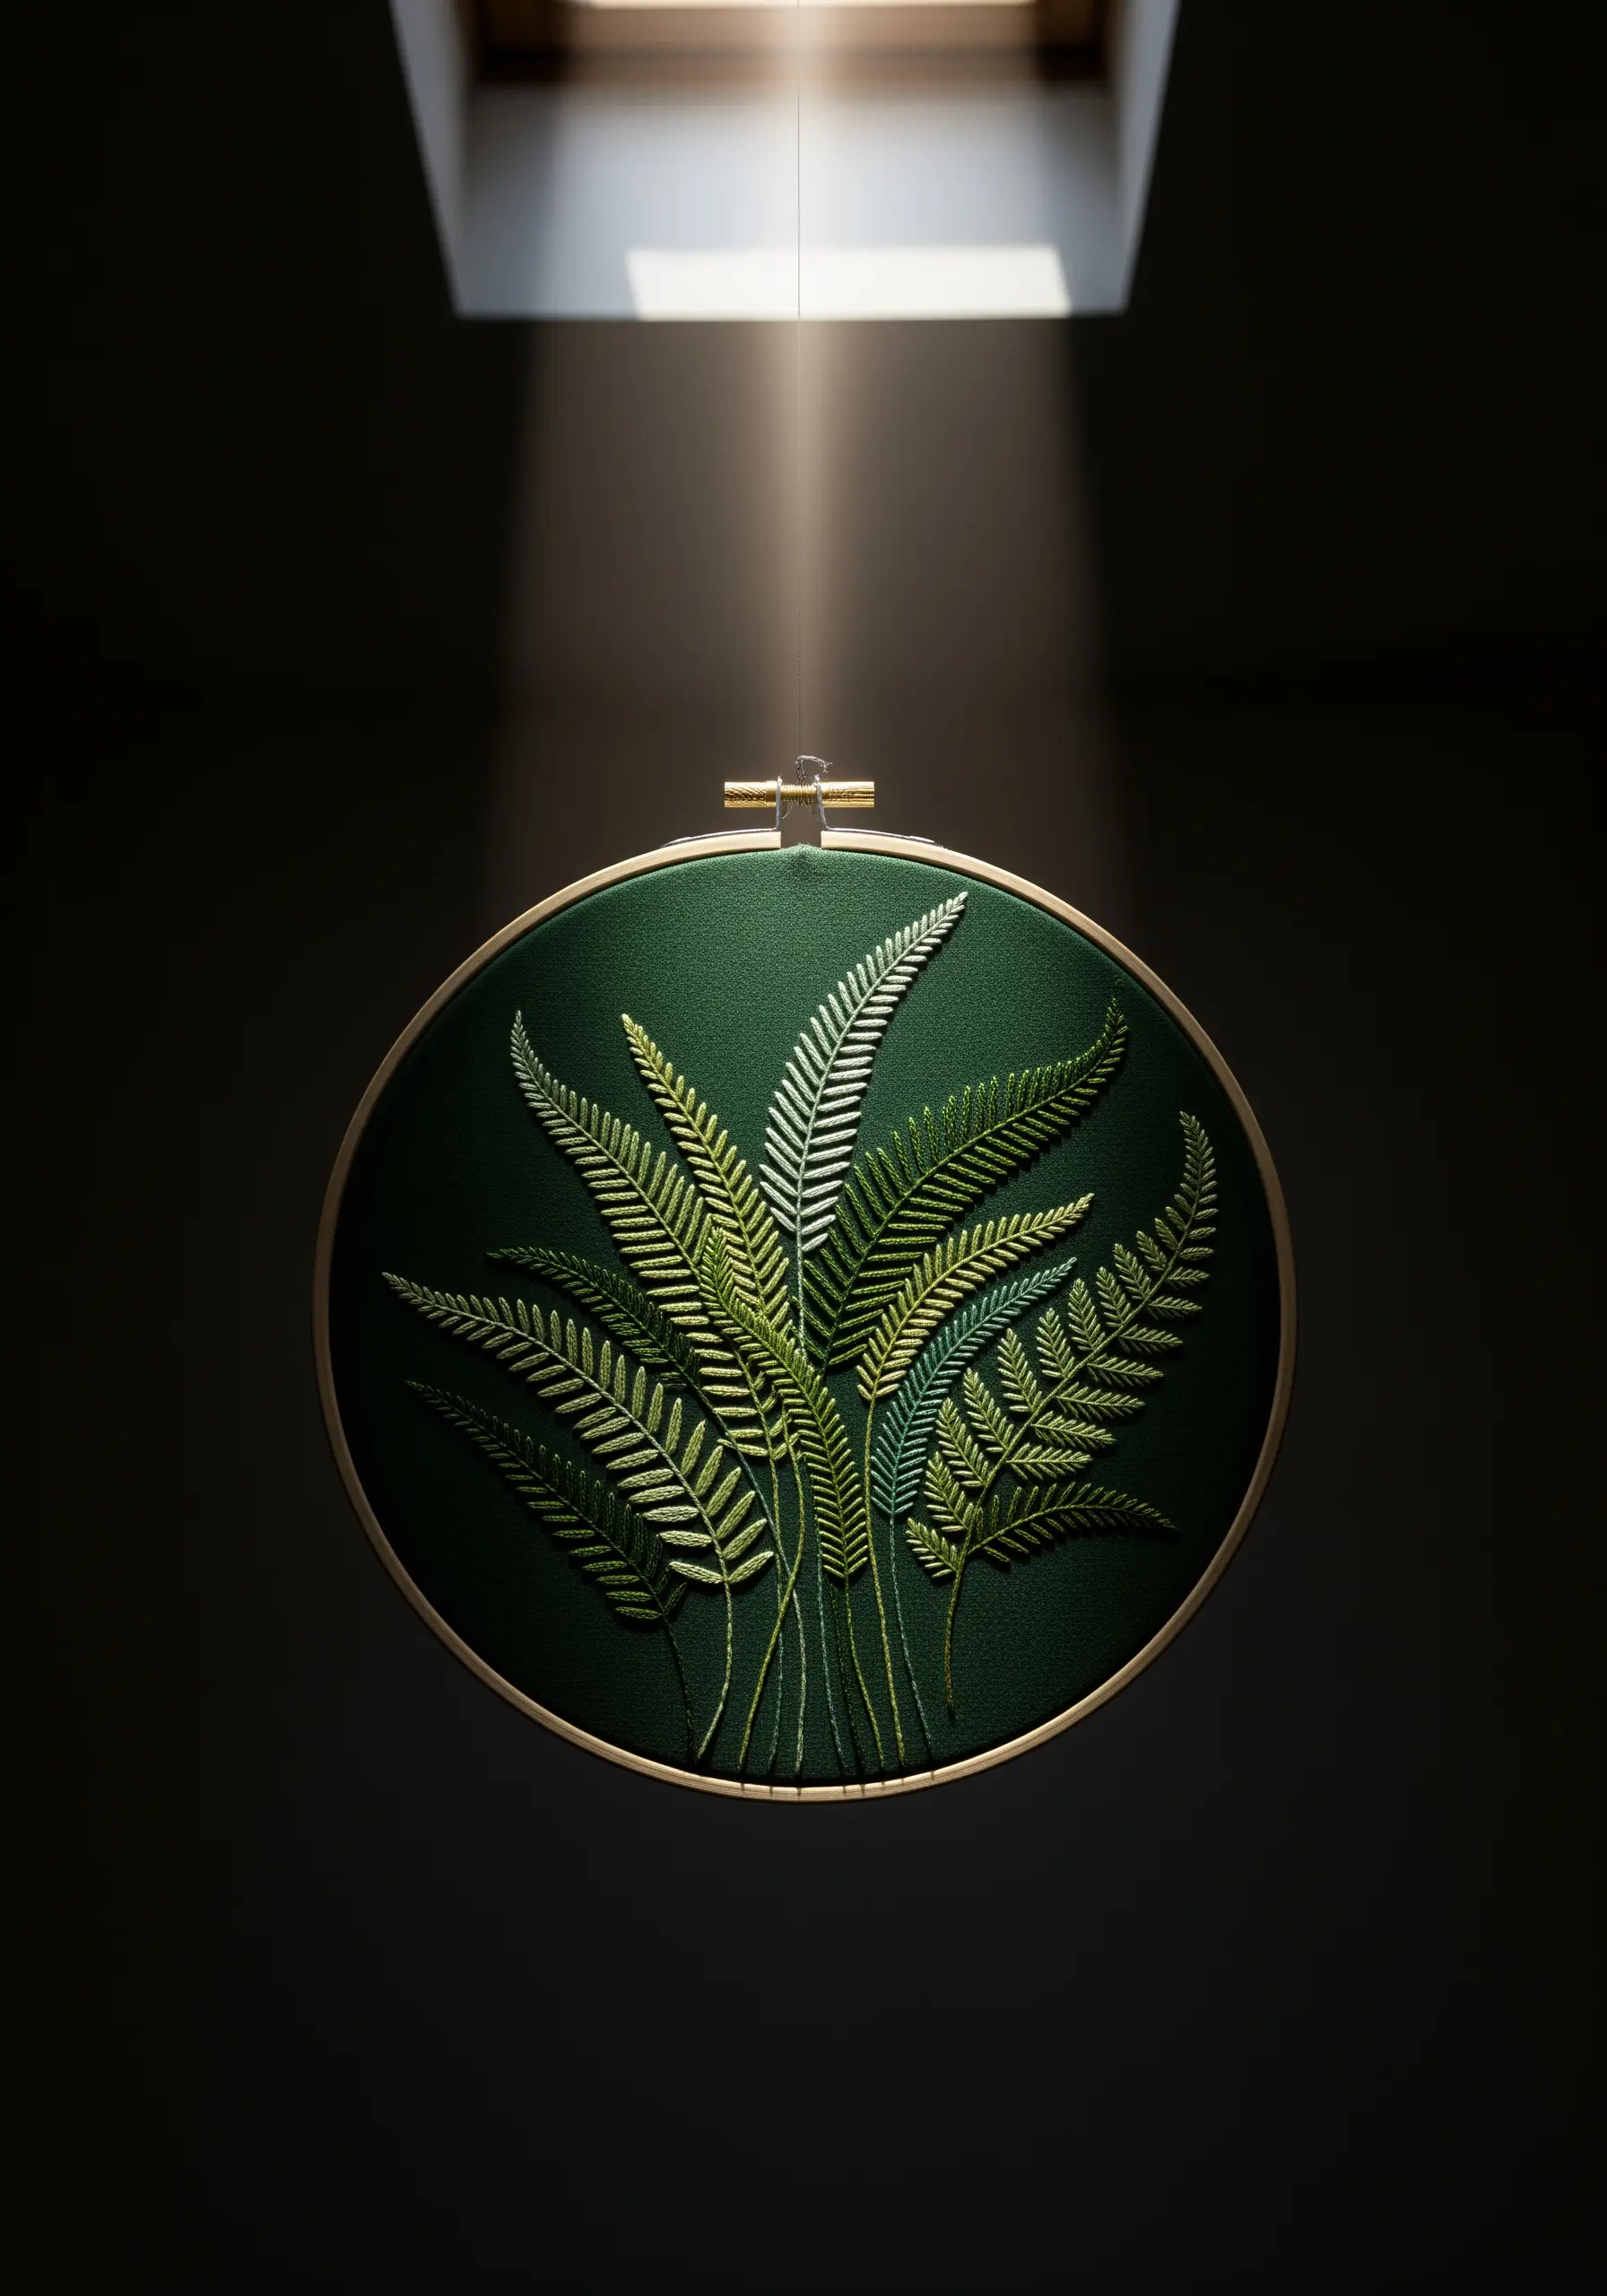
Create a high-impact piece by choosing a deep, saturated background fabric like this forest green.
When stitching the ferns, use a gradient of greens—from pale lime to deep olive—to give the fronds depth and dimension.
A simple fishbone stitch works perfectly for each leaflet, creating the central stem and leafy portion simultaneously.
Displaying this piece under a single light source or in a beam of sunlight will make the lighter threads glow against the dark canvas, creating a dramatic, spotlighted effect.
24. Blend Vibrant Colors for an Iridescent Hummingbird
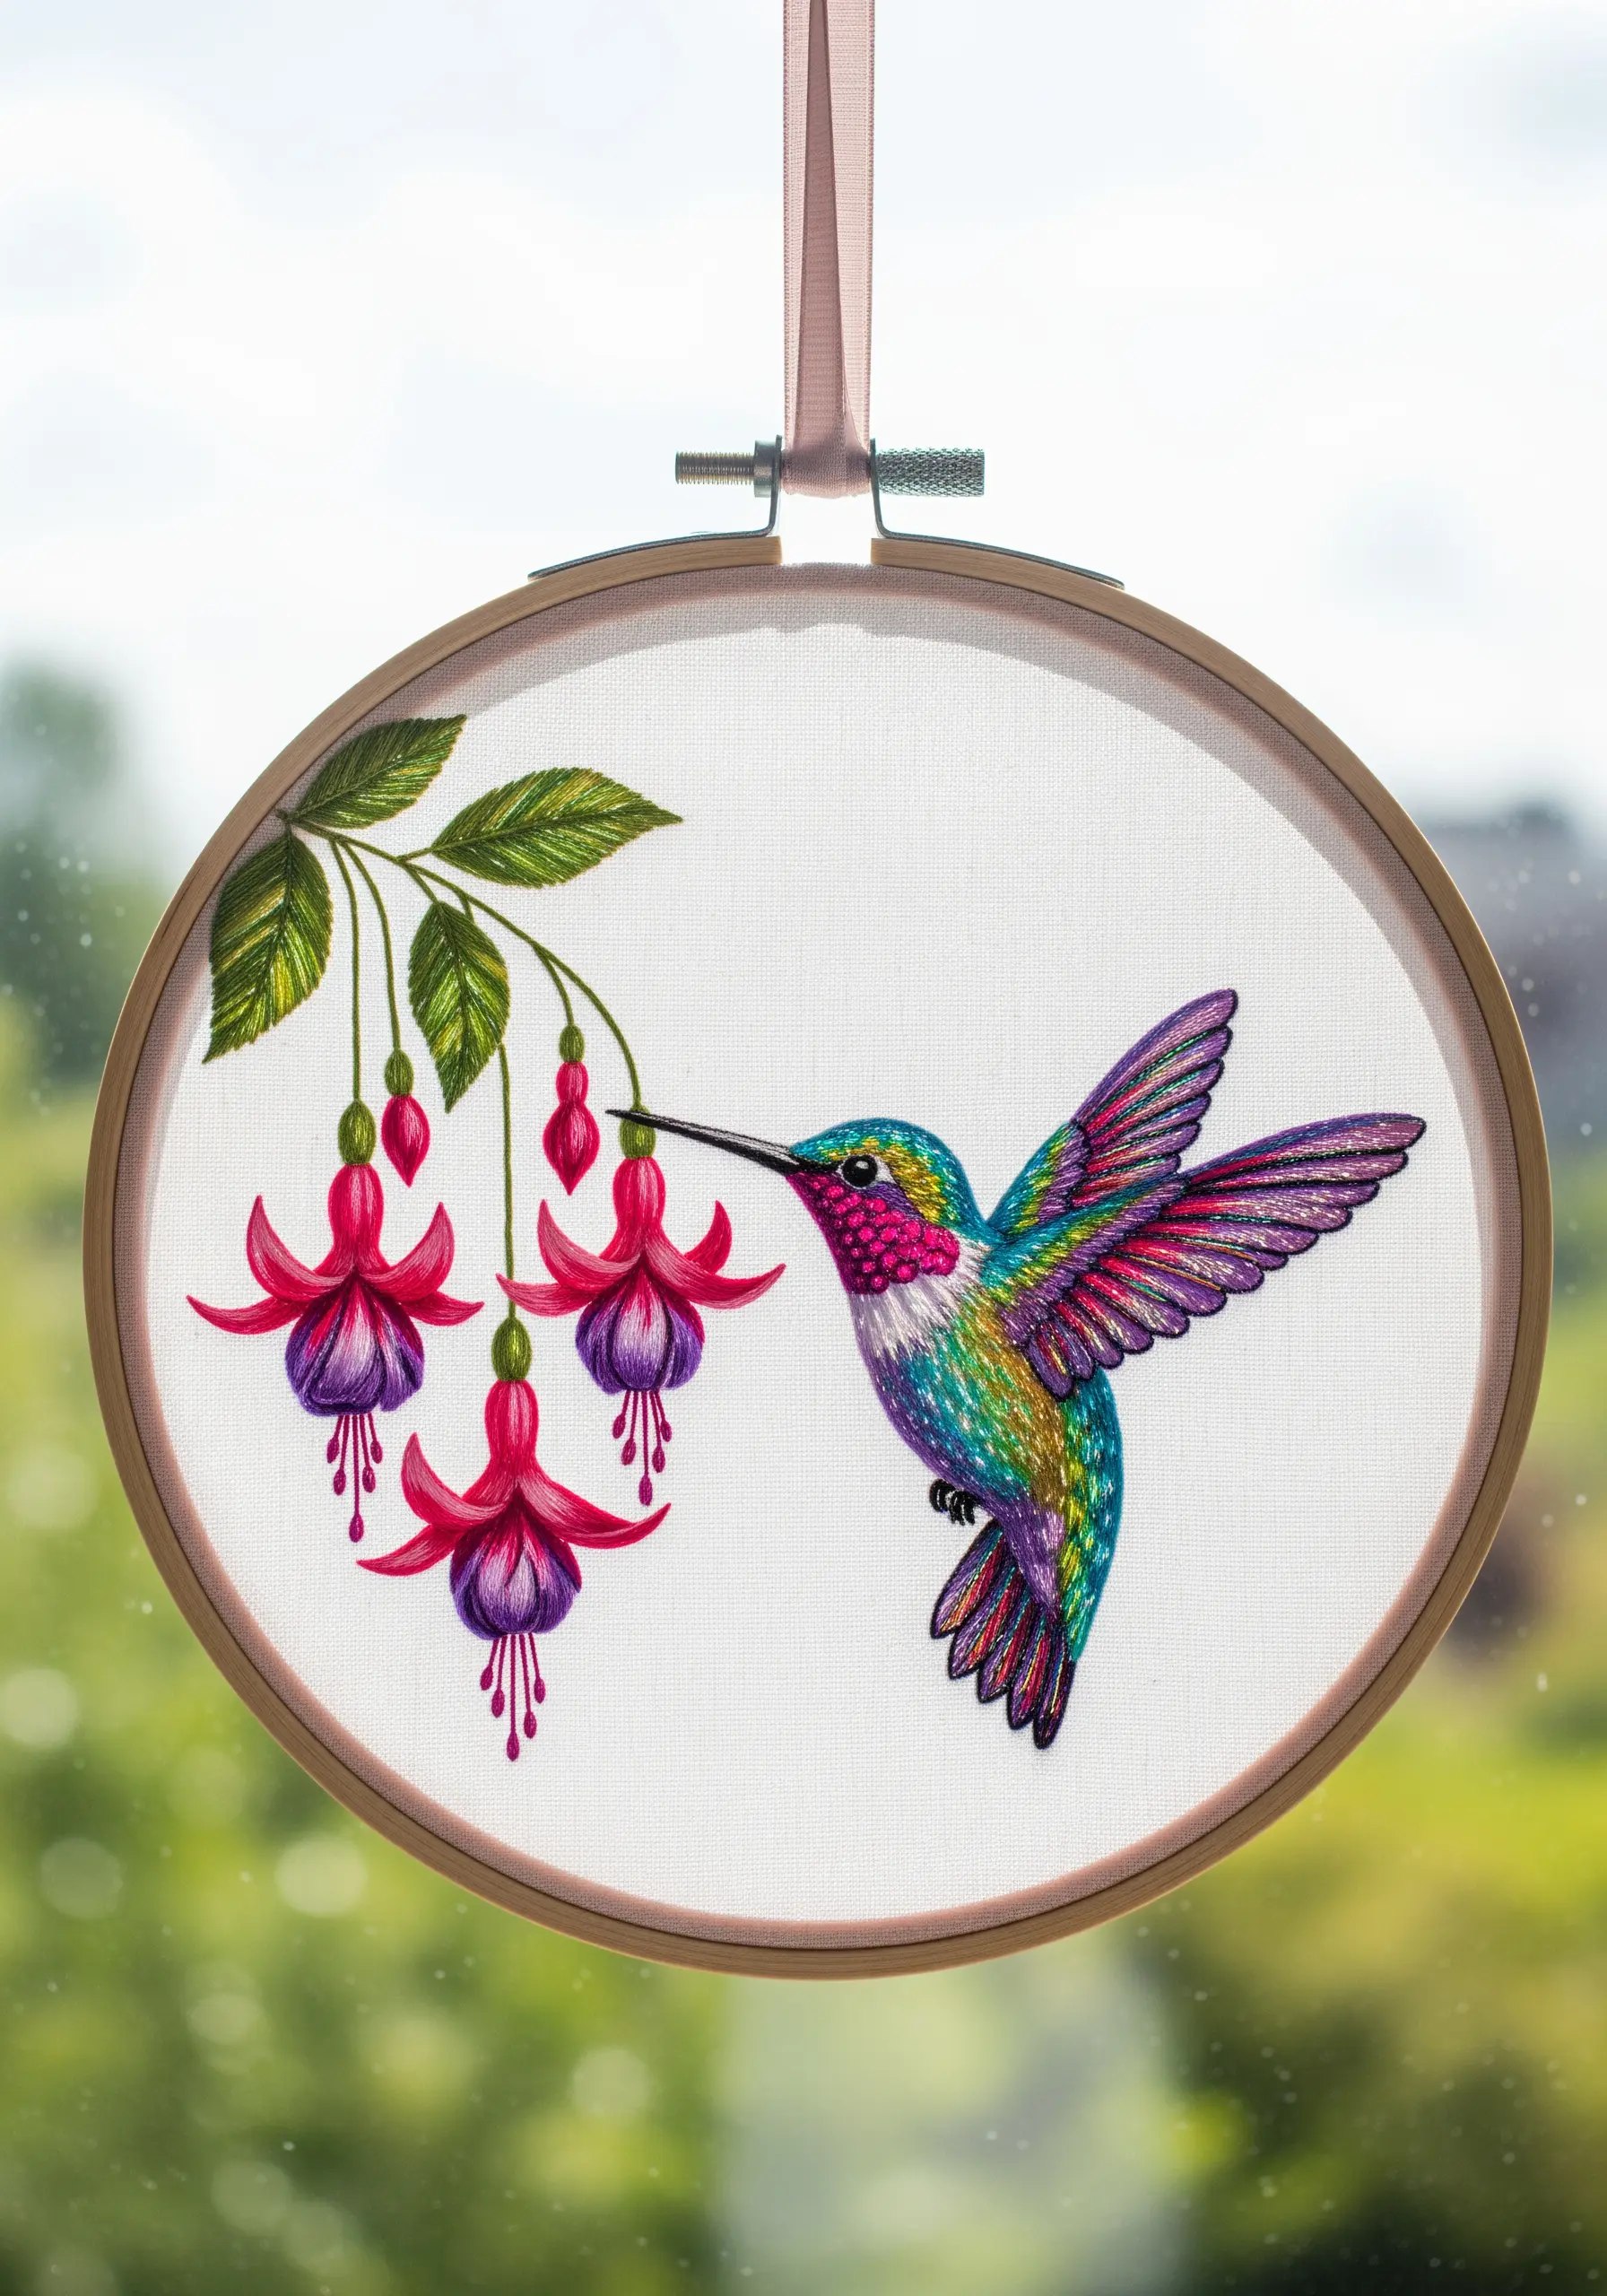
Capture the shimmering quality of a hummingbird’s feathers by using the long-and-short stitch to seamlessly blend multiple bright colors.
Use single strands of thread for the finest detail, laying stitches side-by-side like brushstrokes.
For the fuchsia flowers, use a satin stitch for the petals, changing the stitch direction to differentiate each one.
This wildflower thread painting technique brings an incredible sense of life and movement to your work.
25. Sculpt Desert Plants with Directional Stitches
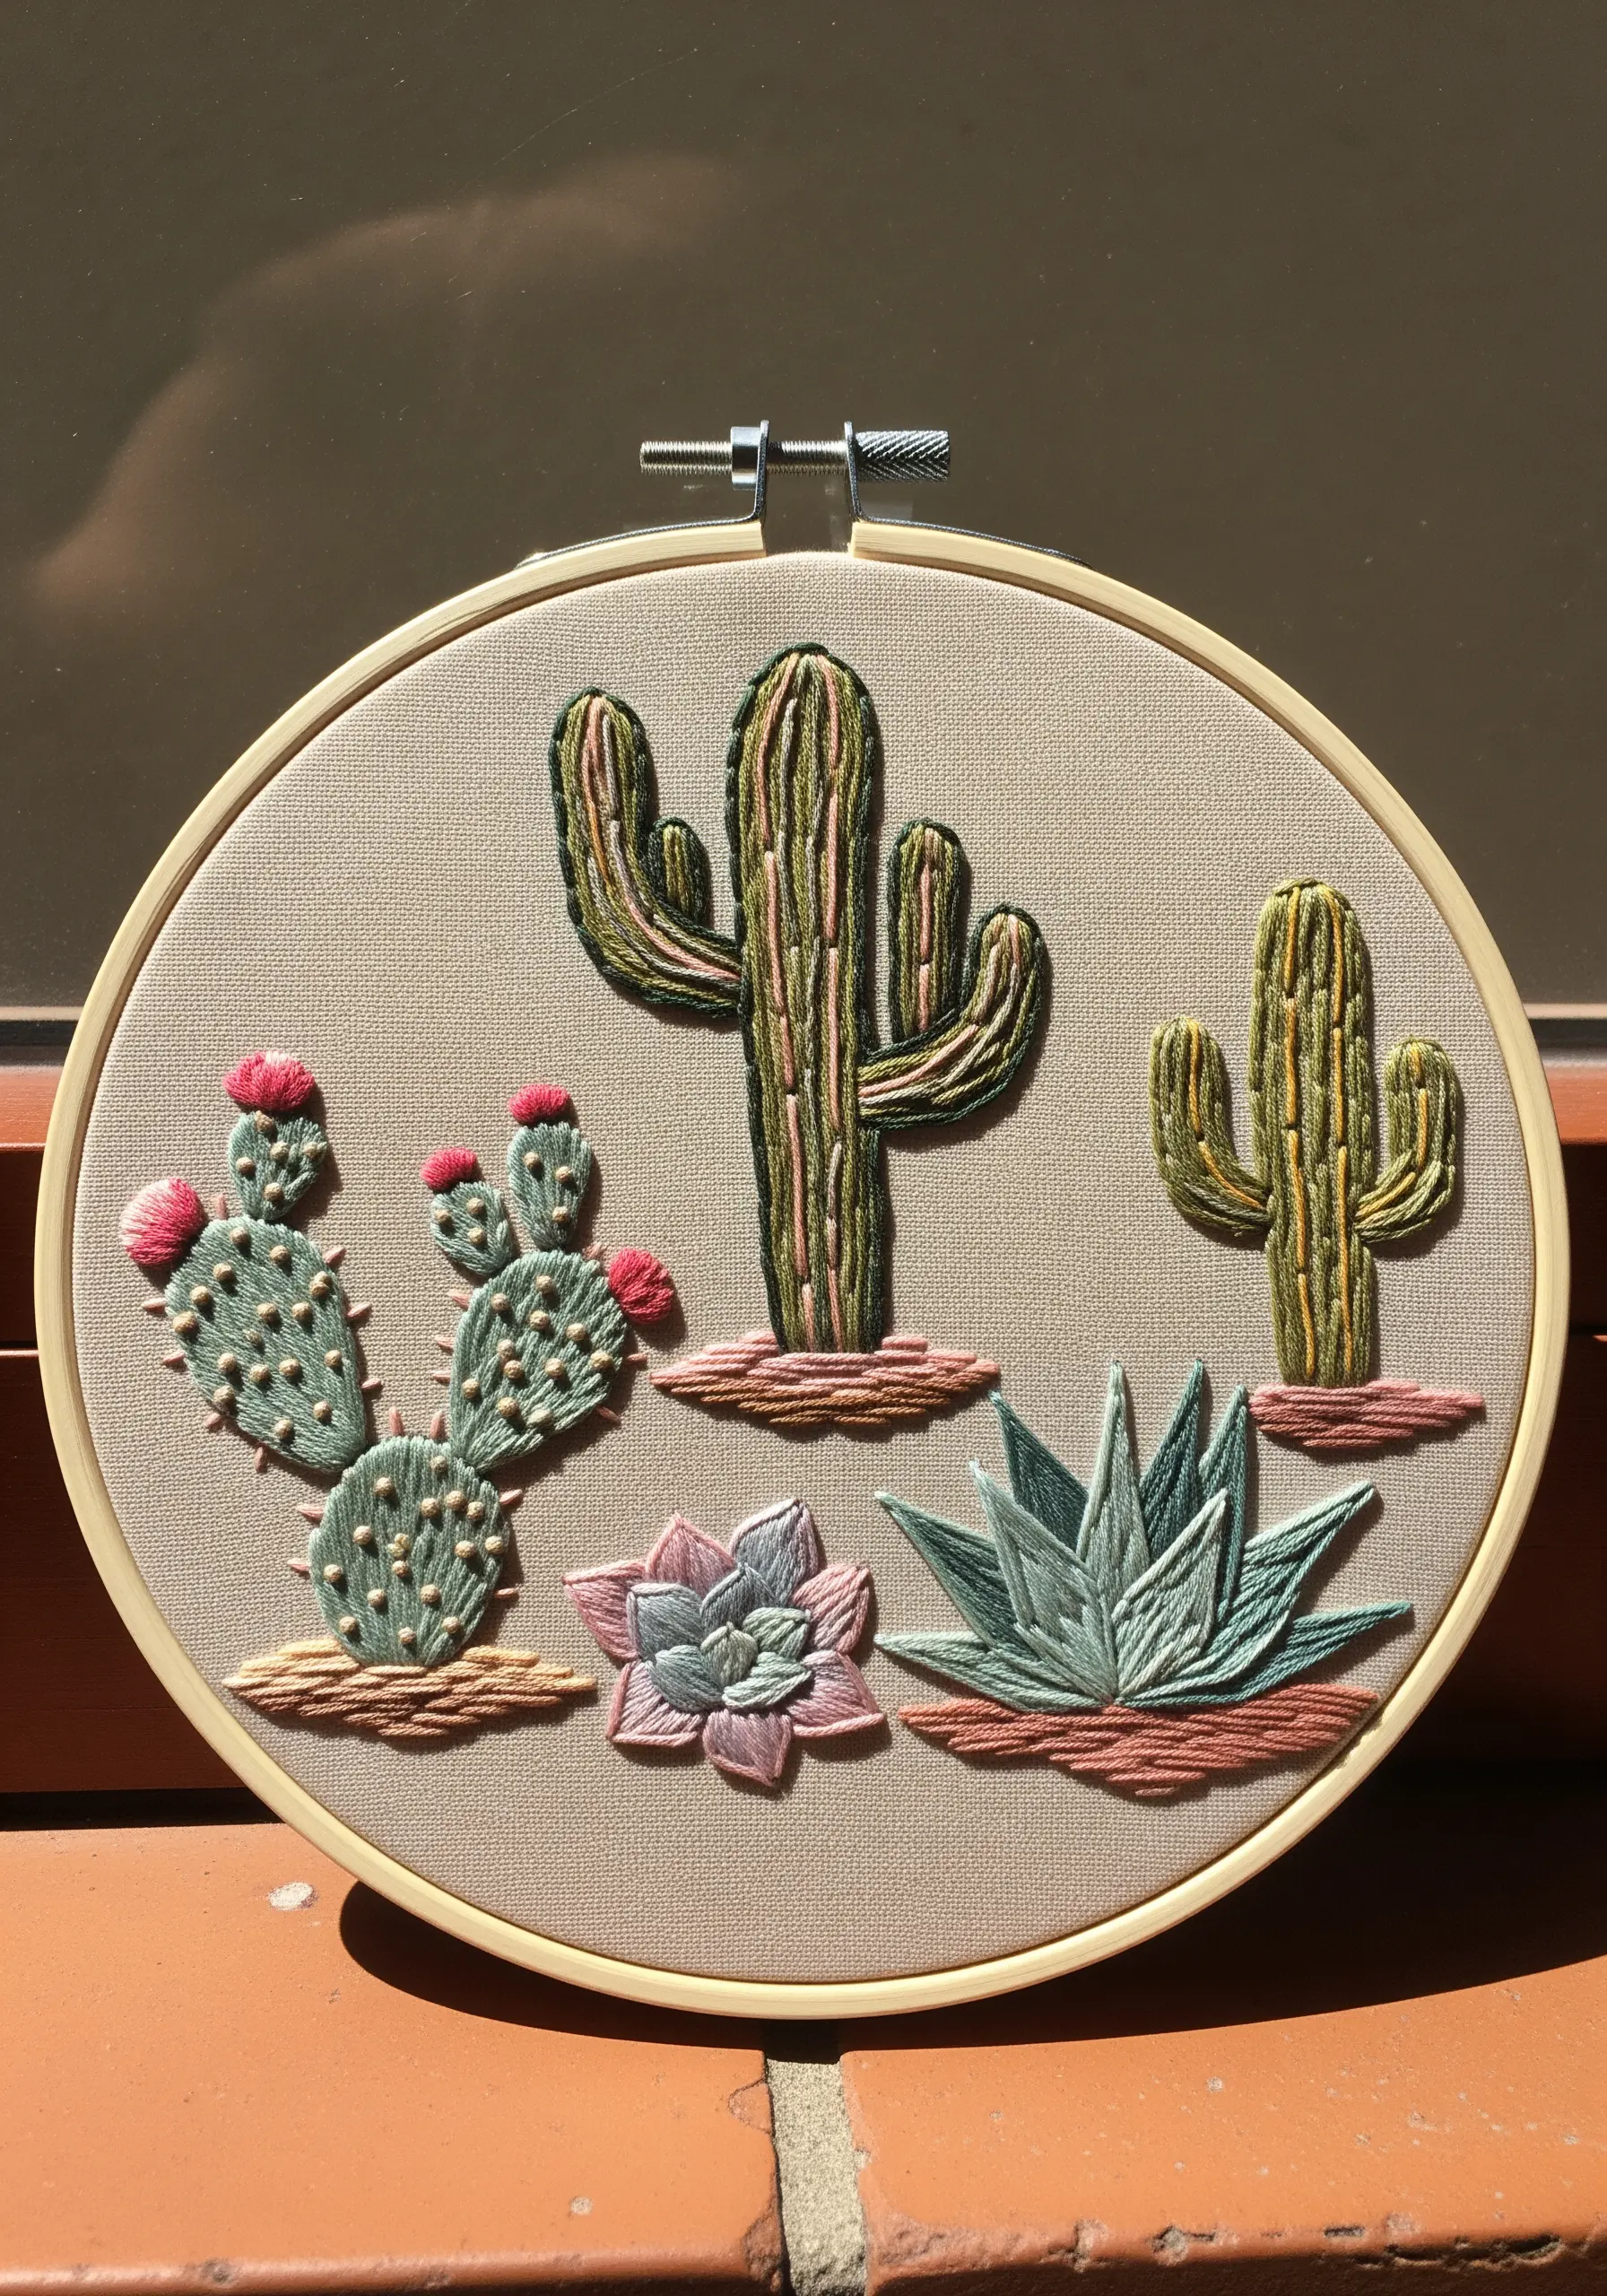
Give your cacti a rounded, 3D appearance by using stitches that follow their contours.
For the prickly pear, use short, padded satin stitches. For the tall saguaro, use long vertical satin stitches, adding definition with a darker green backstitch for the ribs.
The tiny pink flowers can be made with bullion knots, which have a wonderful, caterpillar-like texture that mimics cactus blossoms perfectly.
This project demonstrates how changing stitch direction and type can create a variety of sculptural forms.
26. Scatter Delicate Baby’s Breath on Organza
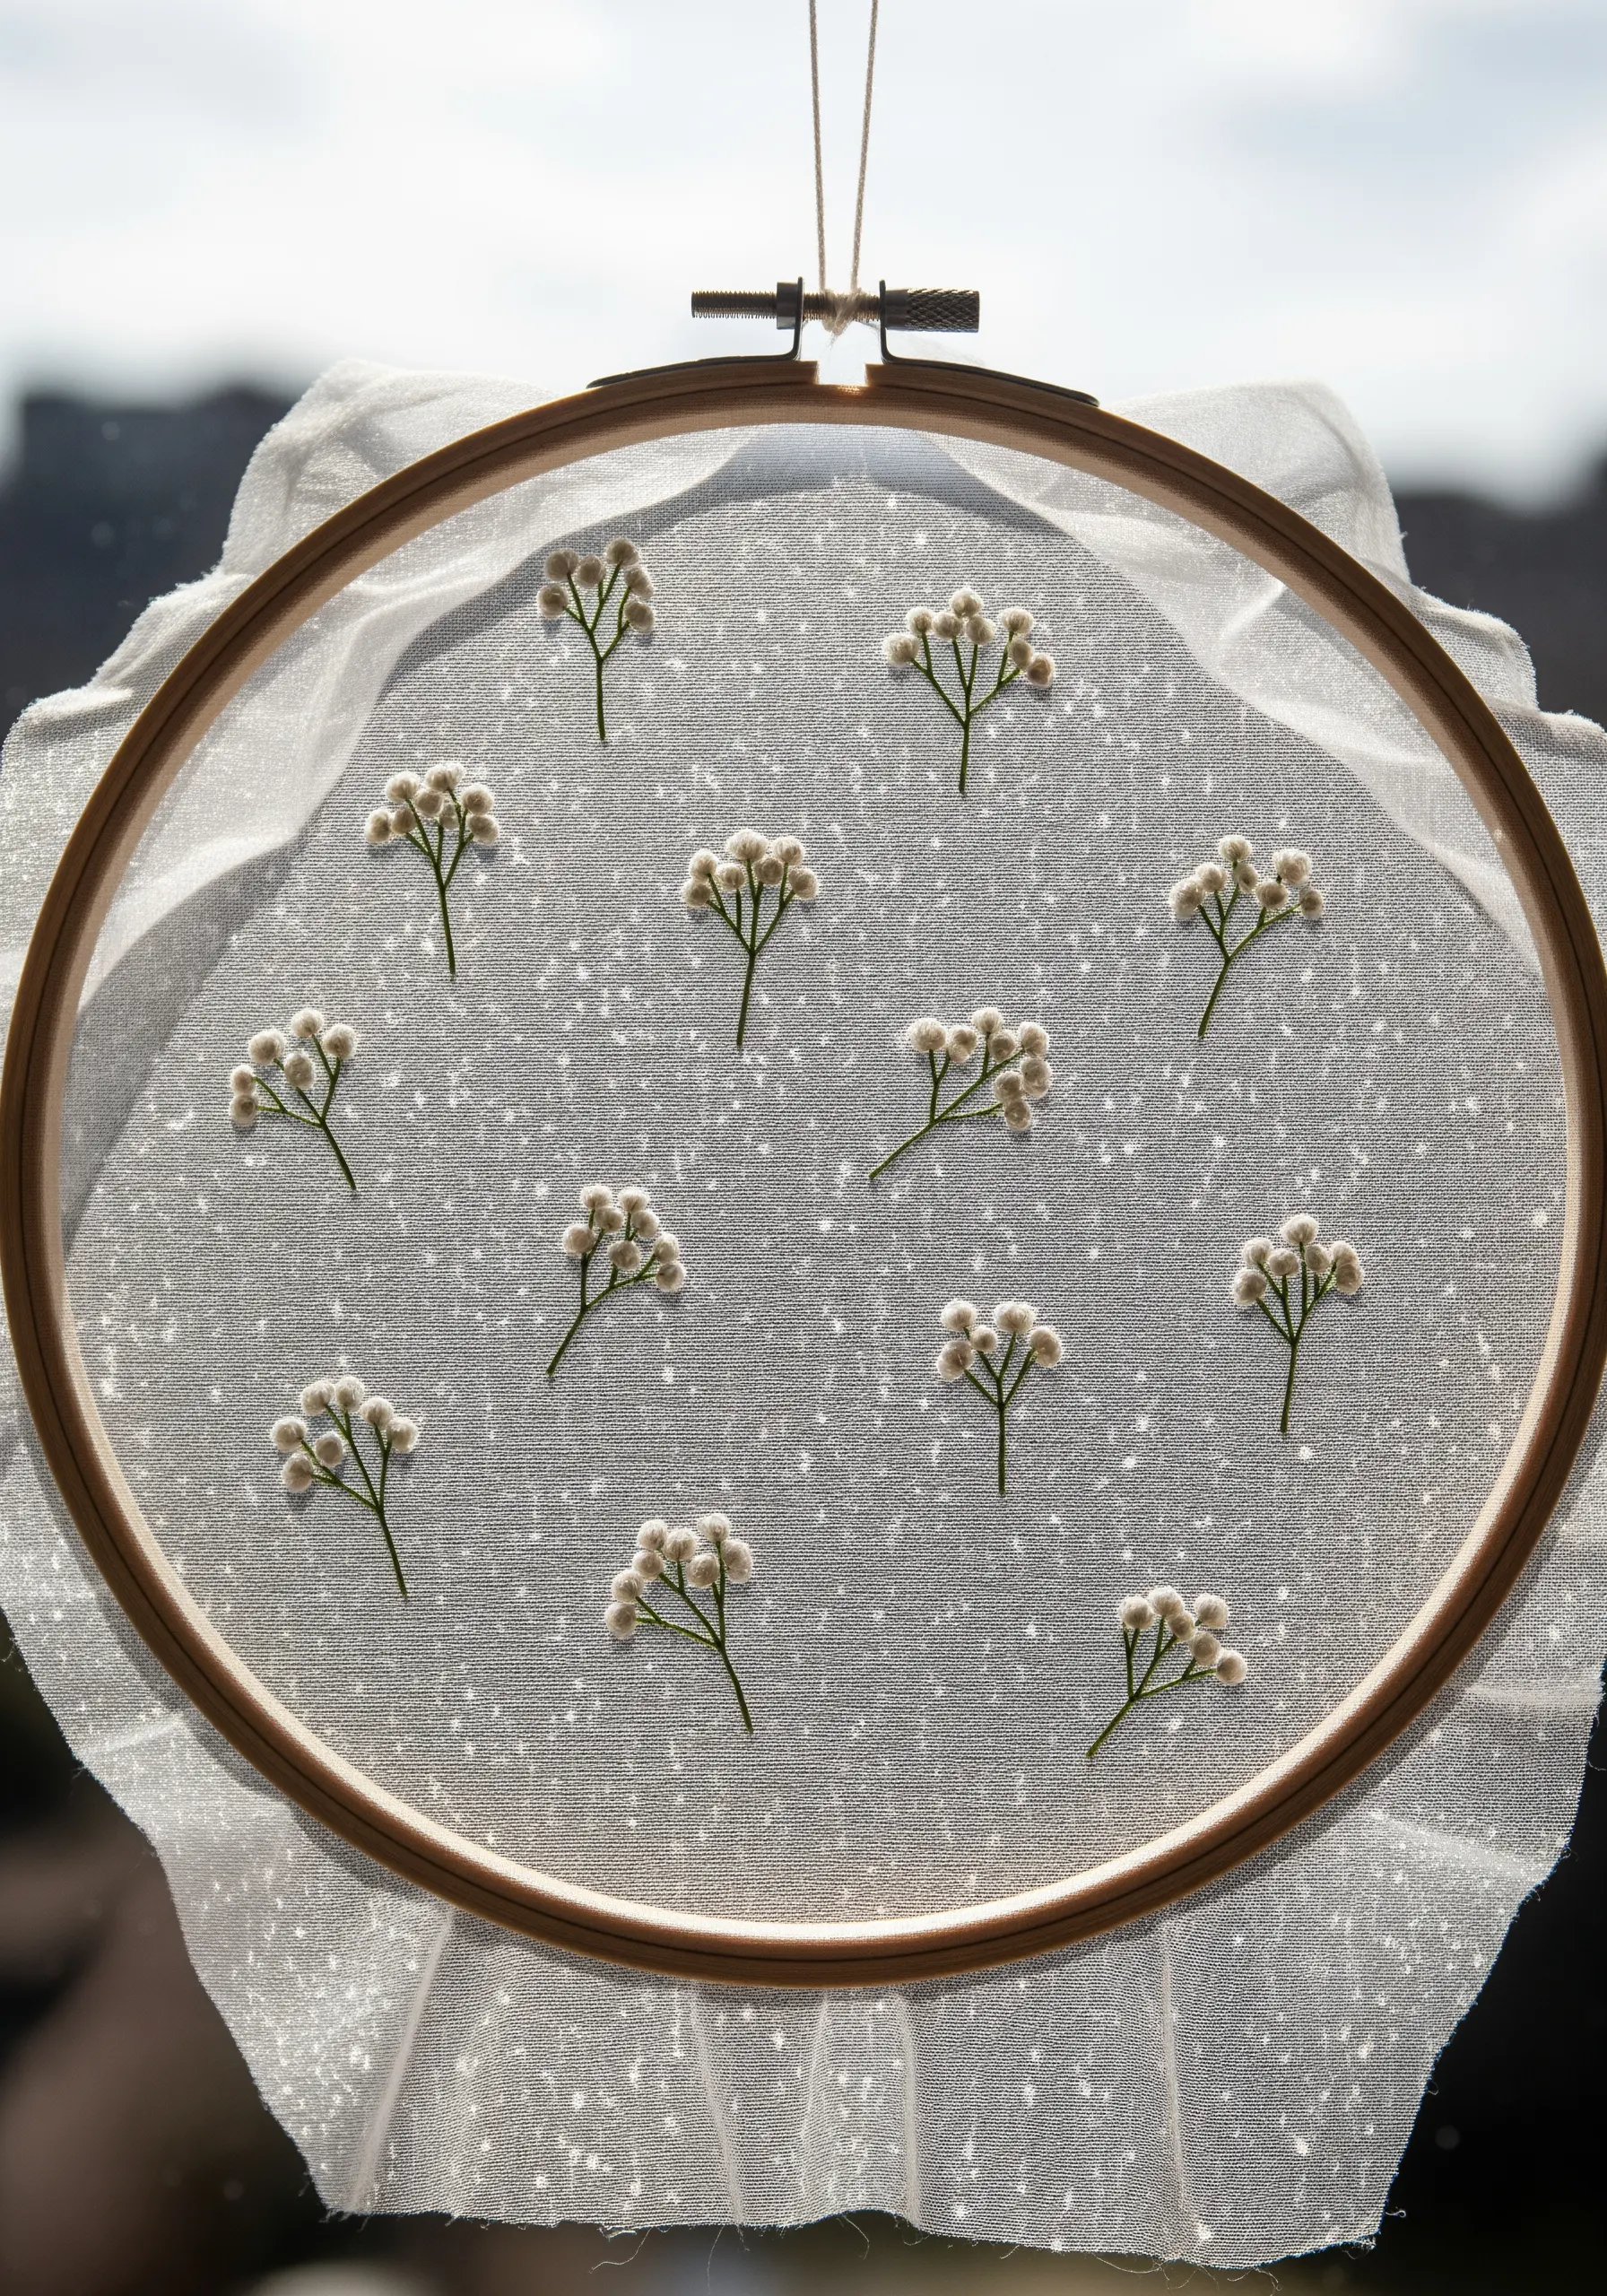
Create an ethereal, floating effect by stitching tiny sprigs of baby’s breath on a sheer, sparkly organza fabric.
Each blossom is a single, perfectly placed French knot in a creamy white thread.
Use a very fine needle (size 9 or 10) to avoid leaving visible holes in the delicate organza.
When hung in a window, the fabric itself becomes almost invisible, leaving only the tiny, suspended flowers to catch the light.
27. Construct a Botanical Monogram
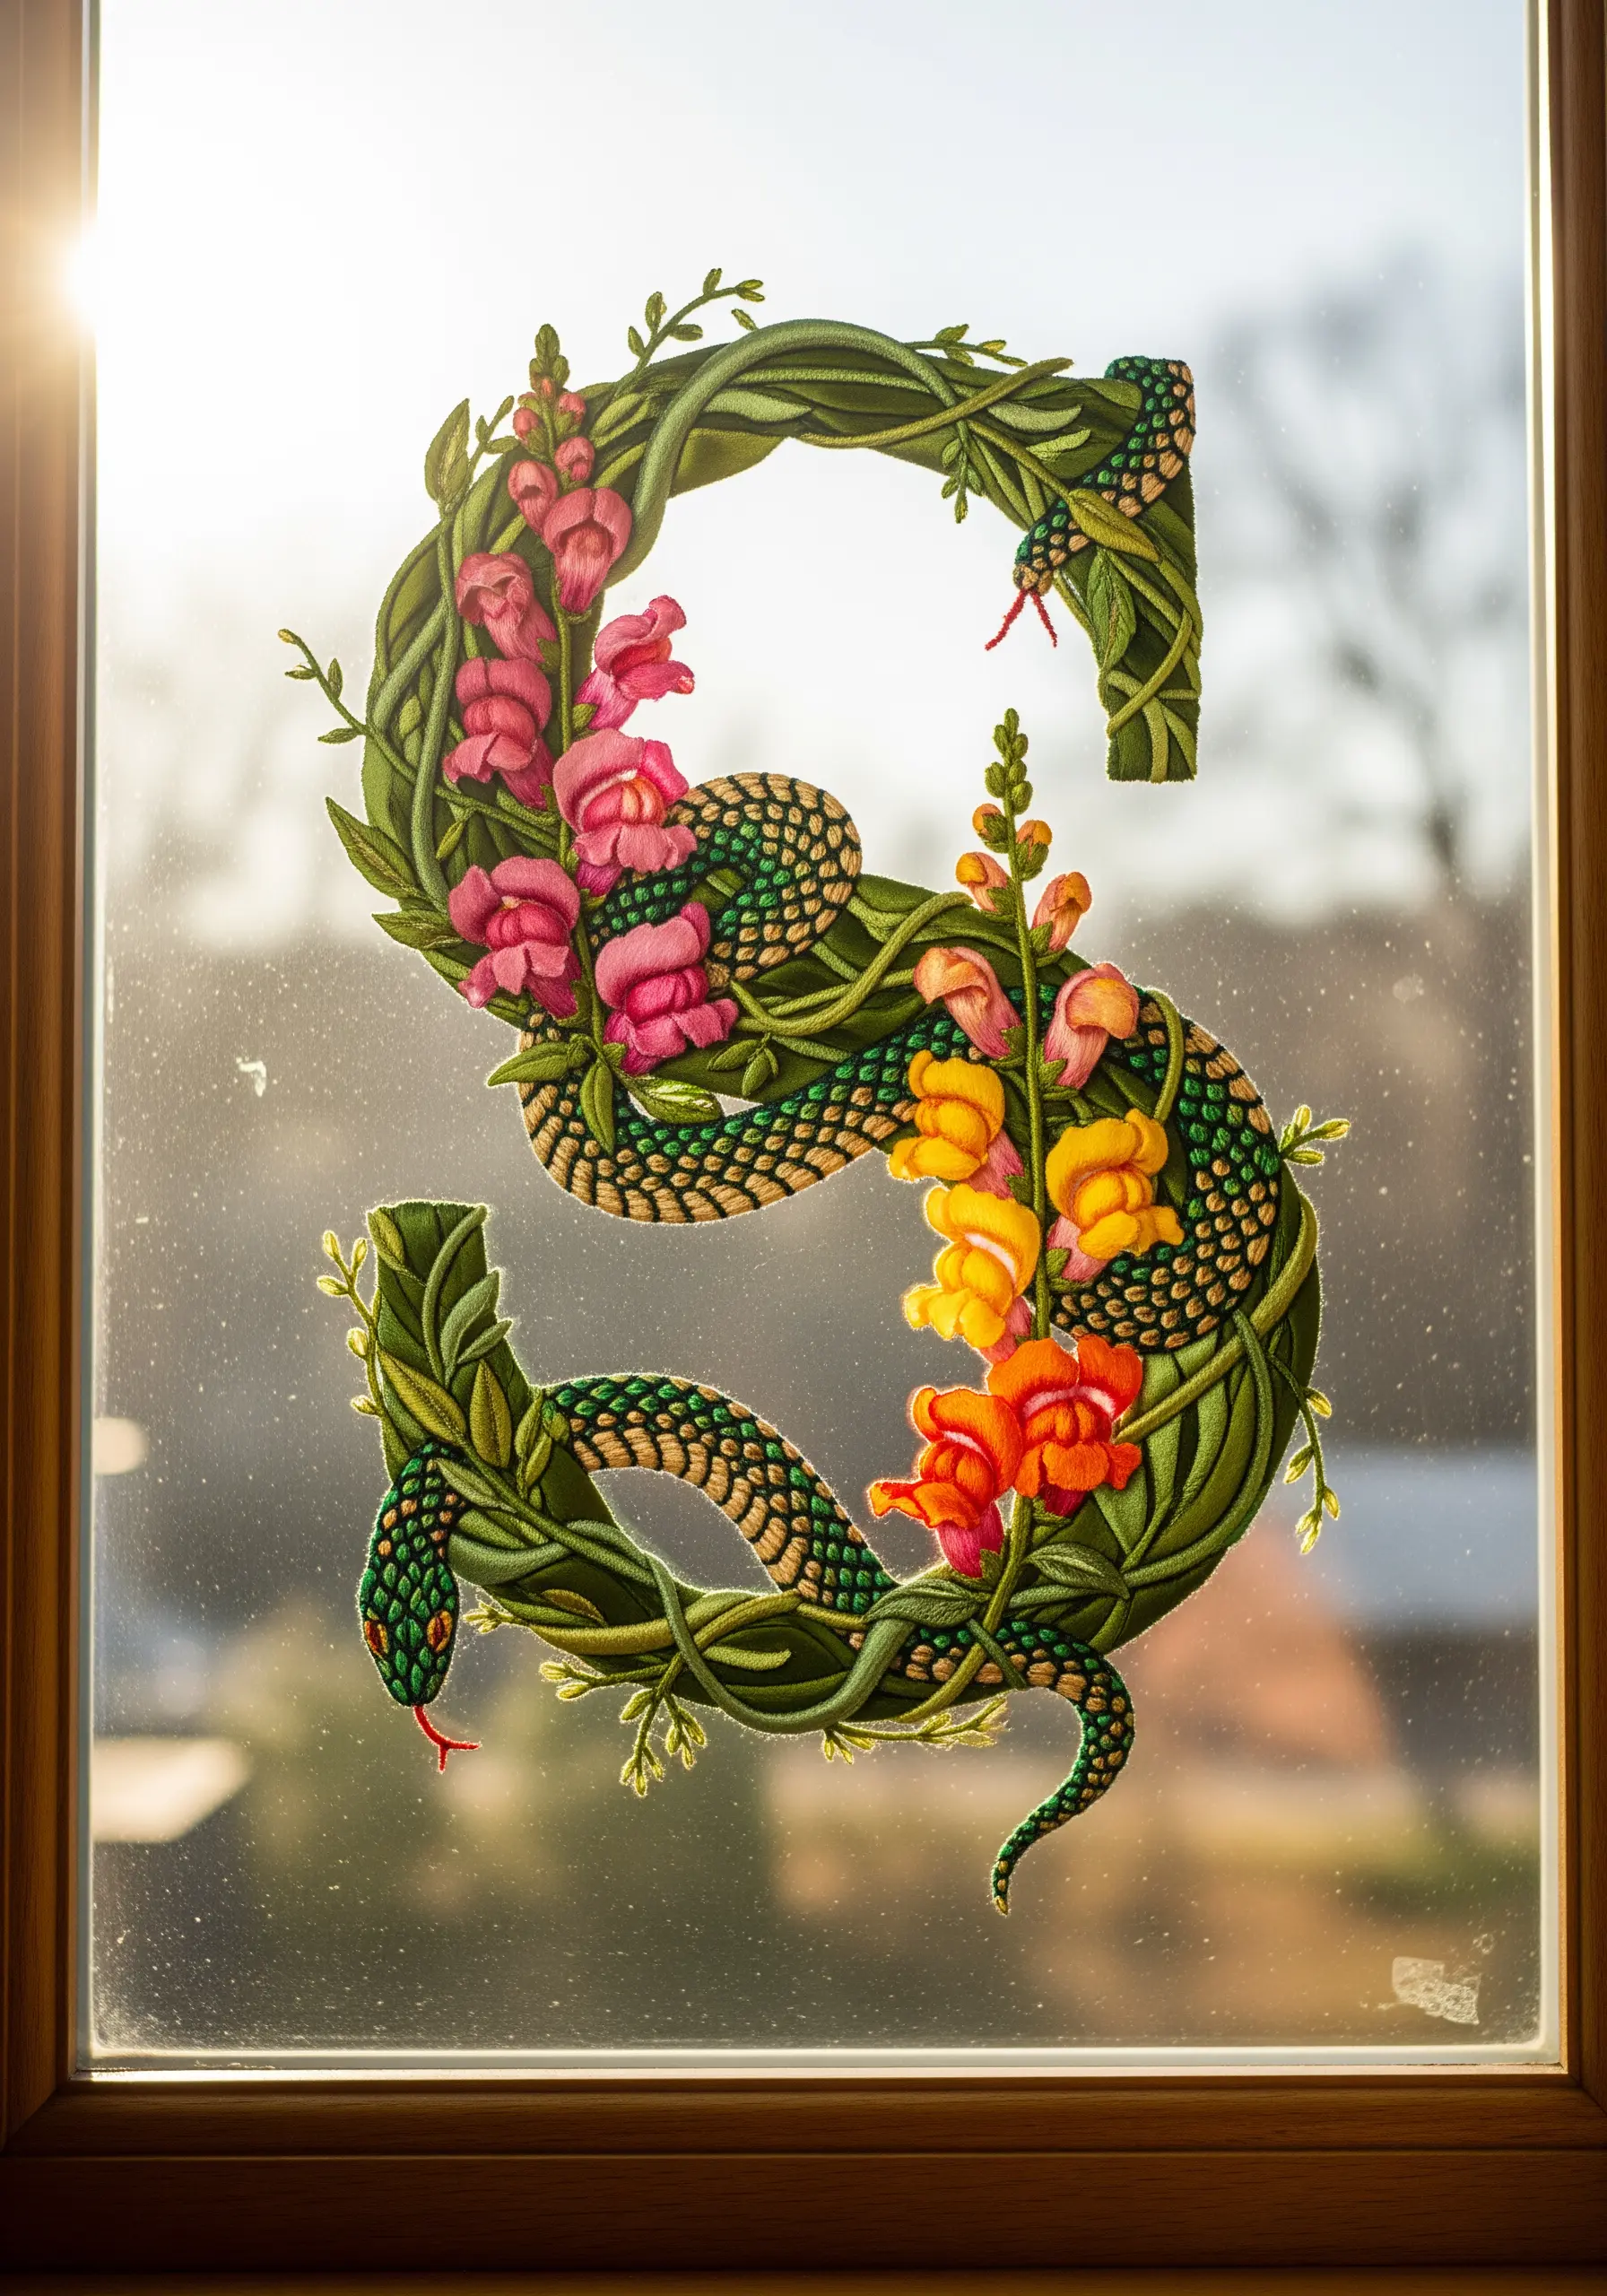
Create a stunning, personalized piece by forming the shape of a letter with intricately stitched botanicals.
Use a variety of stitches to build up the texture: satin stitch for the flower petals, couching for the snake’s body, and detached chain stitches for the leaves.
This is a ‘maximalist’ approach where more is more; overlap elements and fill the entire letterform to create a dense, tapestry-like effect.
Stitching this on soluble stabilizer and then washing it away will result in a free-standing lace-like piece that looks incredible against glass.
28. Capture an Underwater Kelp Forest
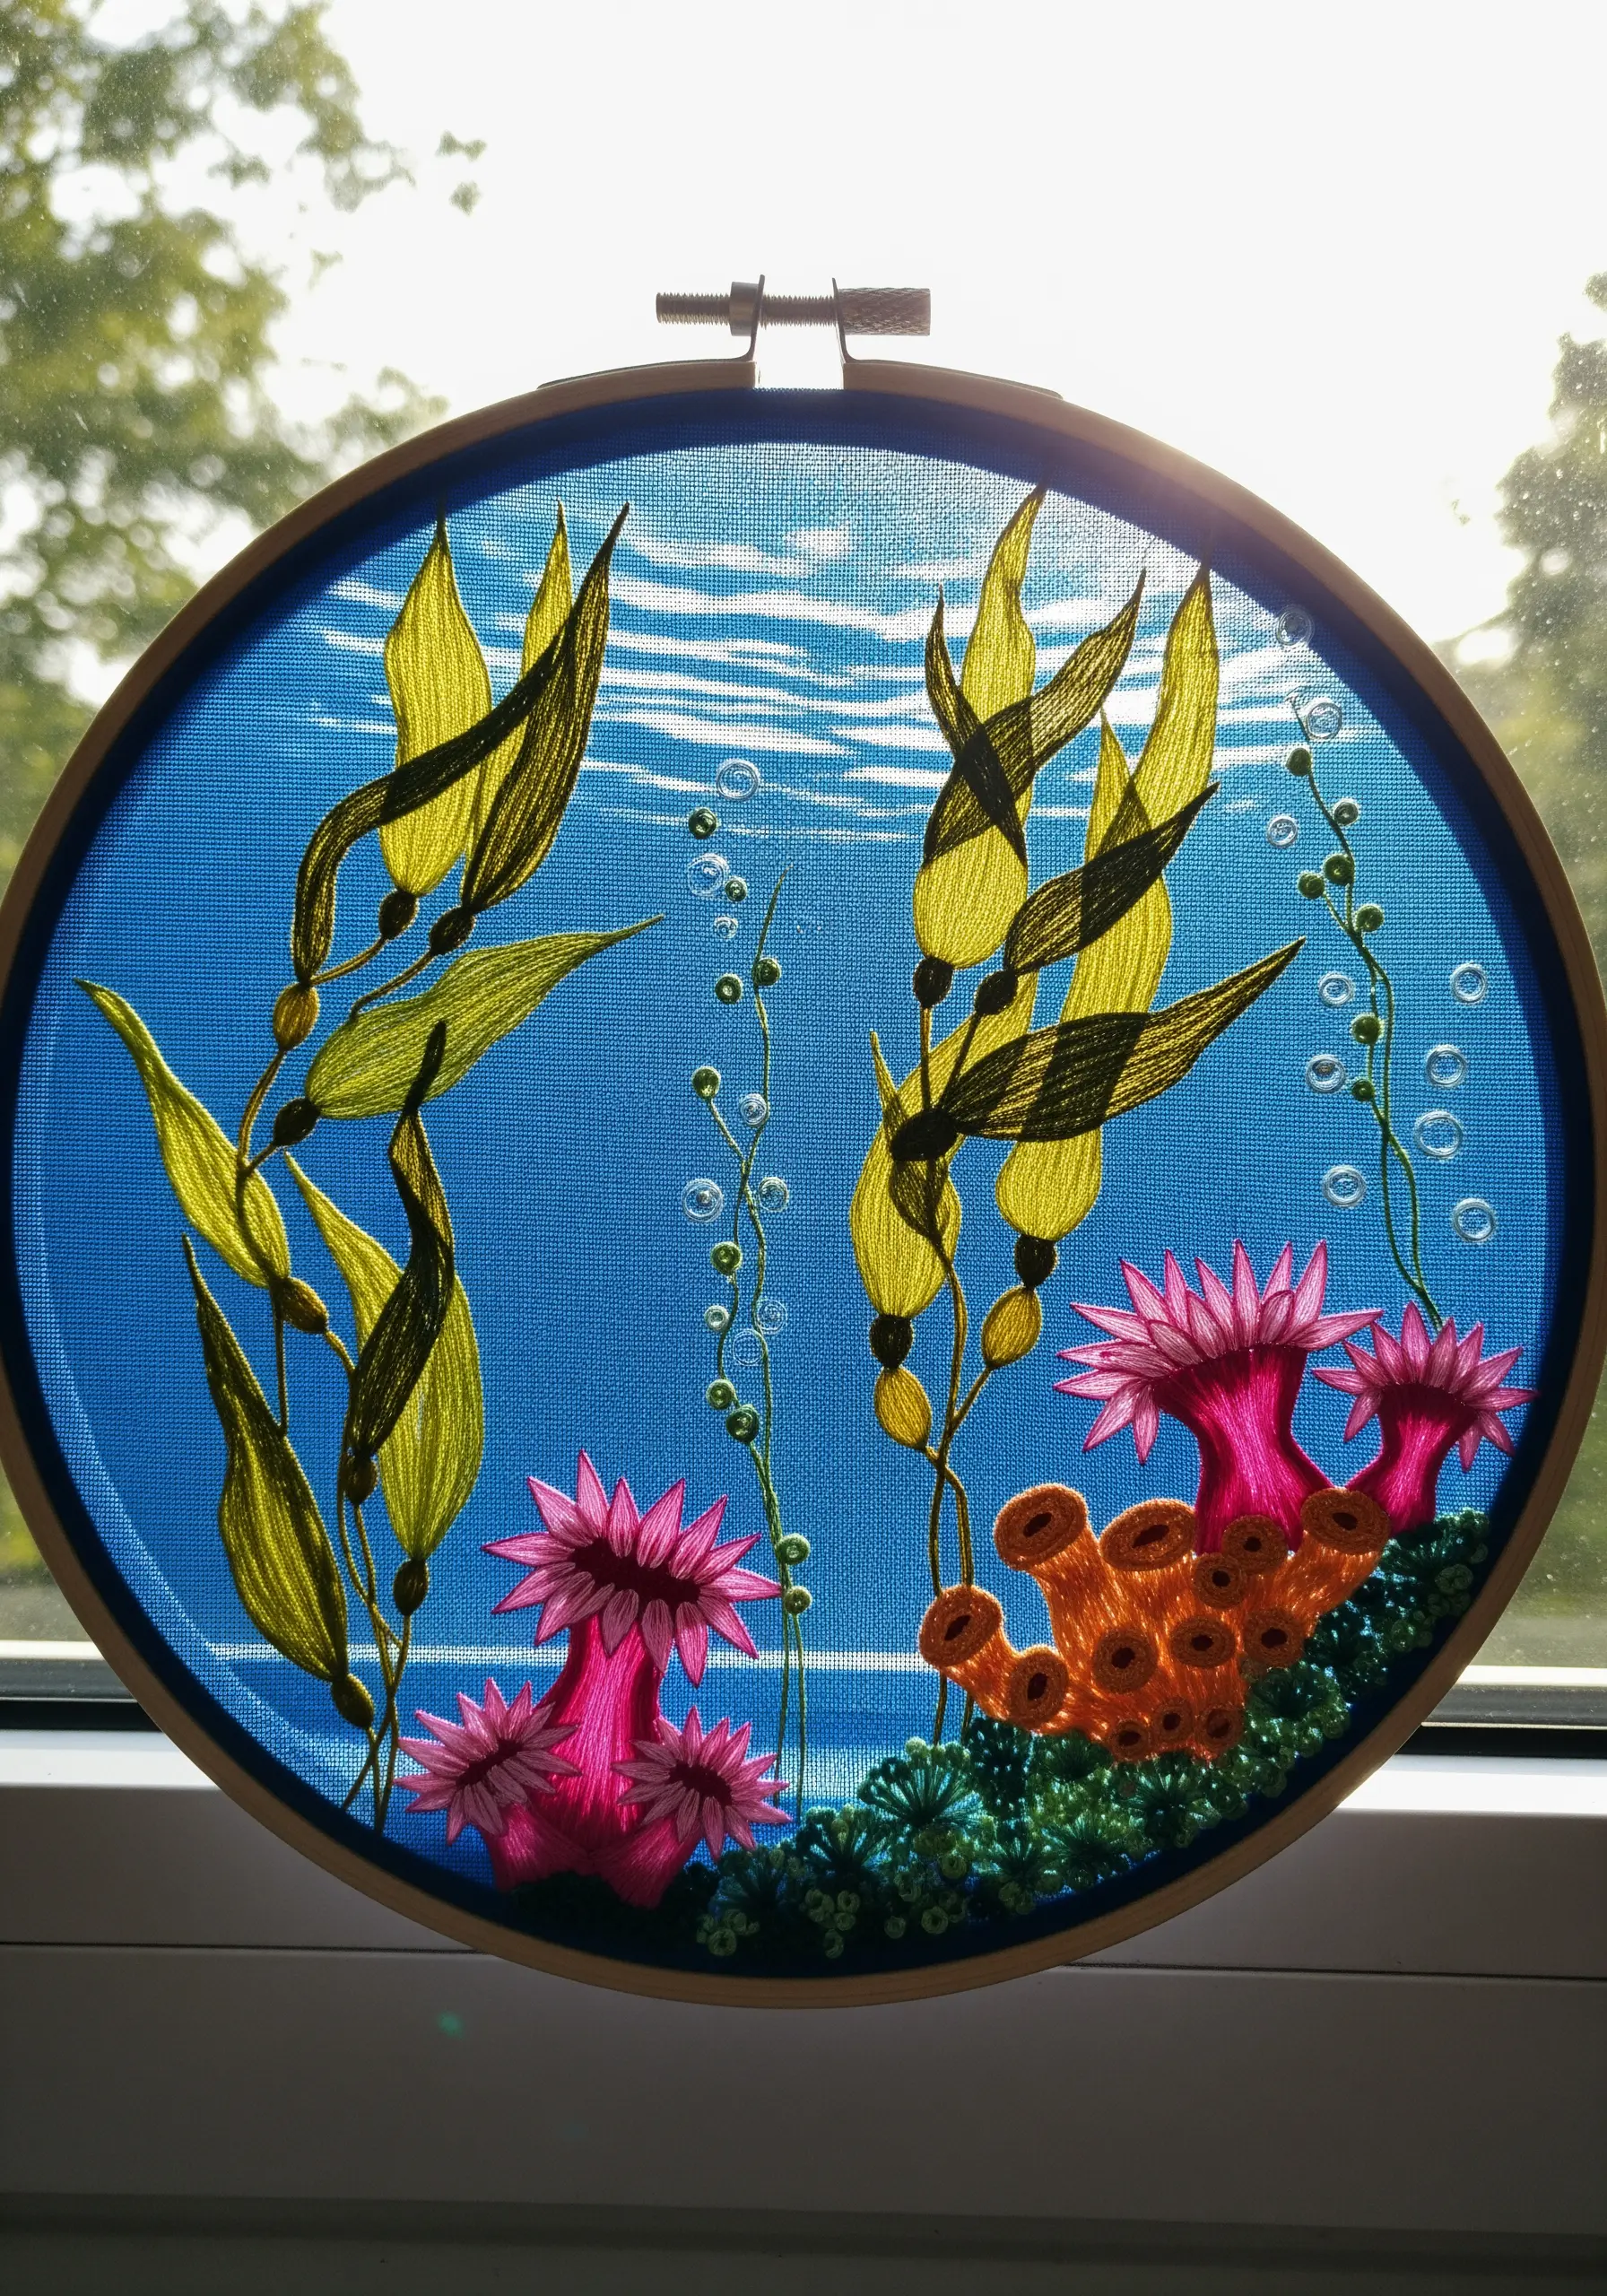
Recreate the effect of light filtering through water by using long-and-short stitch to blend light and dark shades on the kelp leaves.
Use a fine, single strand of white thread to stitch thin, wavering lines for the water’s surface reflection.
Tiny air bubbles can be made with single, isolated French knots or small seed beads, adding a sense of movement.
The bright blue fabric serves as a perfect ocean backdrop, making the vibrant pinks and greens of the marine life stand out.
29. Stitch Minimalist Cotton on Tulle
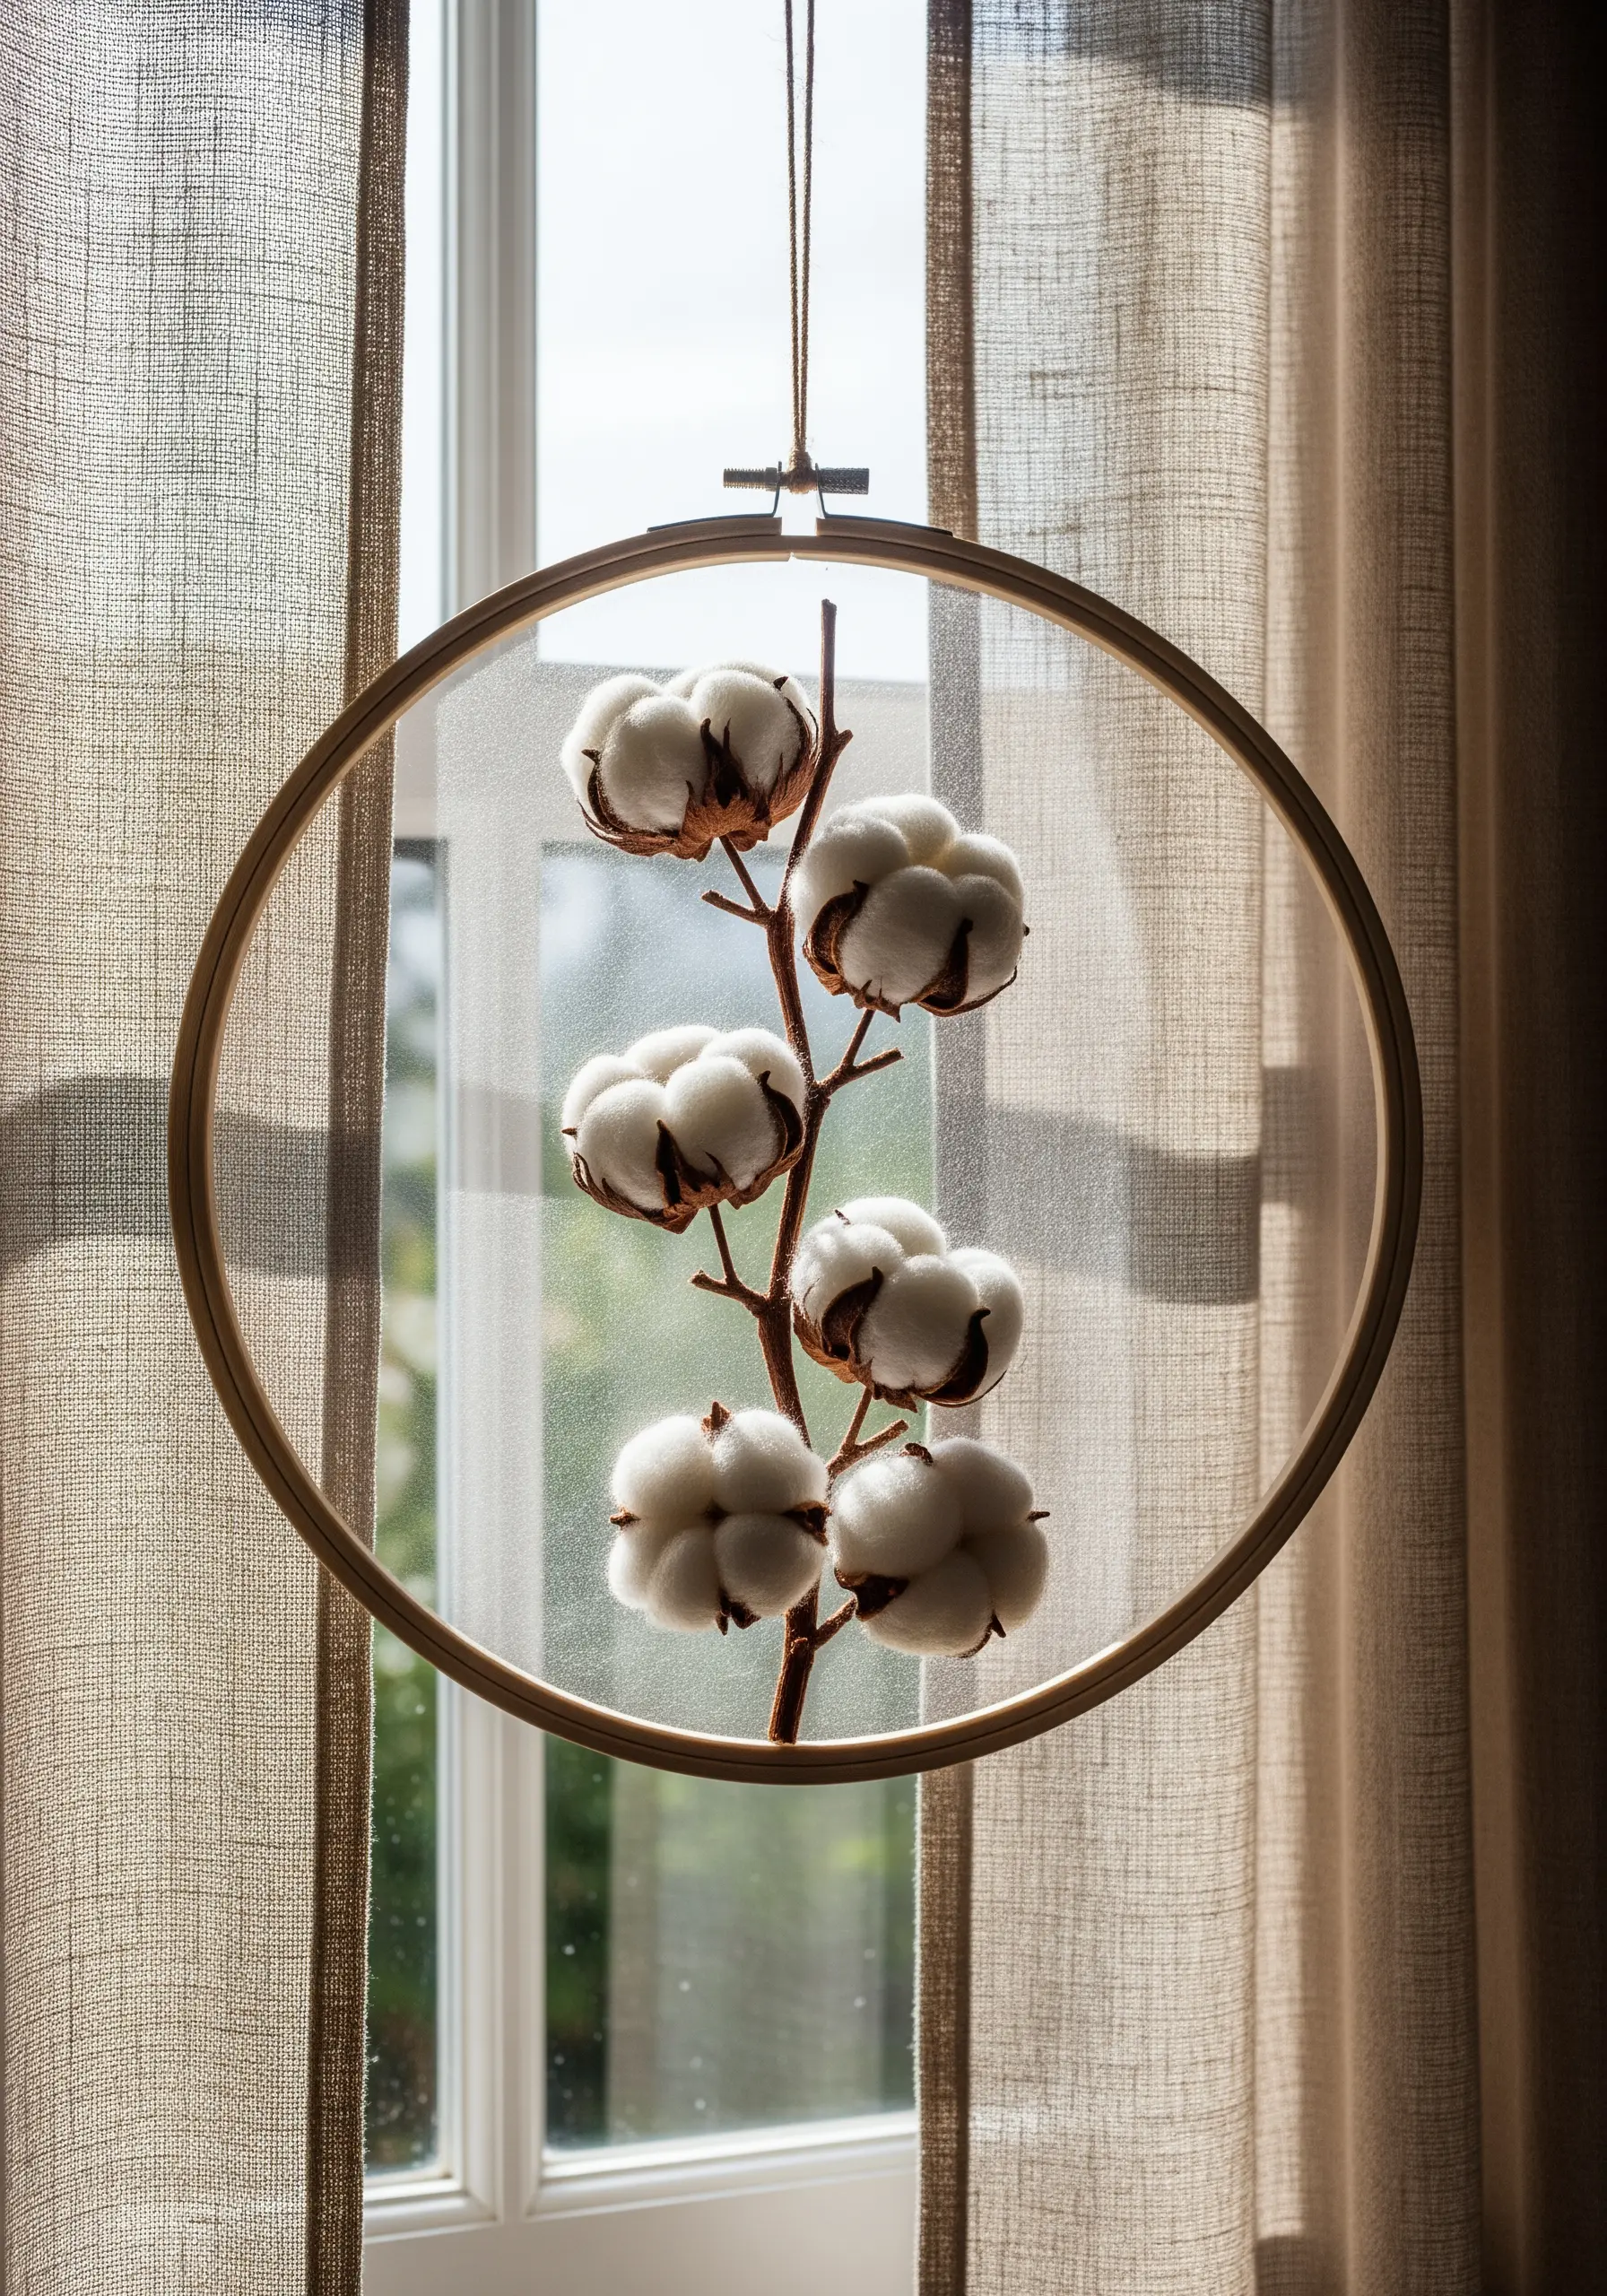
This design masterfully combines texture and negative space for a modern, airy feel.
Create the fluffy cotton bolls using a turkey work stitch and trimming the loops, or by applying small tufts of needle felting wool directly onto the fabric.
The delicate brown branches are rendered with a simple split stitch, providing structure without adding weight.
By stitching on tulle, the cotton branch appears to float in the hoop, making it a piece of modern thread art that interacts beautifully with the light and space around it.


