

There comes a moment when you realize that stitches alone might not be enough to say everything you want to with your art. You have a vision—for more texture, more depth, more story—but the path from a simple line of thread to a fully realized world can feel unclear.
This is where fabric collage comes in. It’s not about abandoning your stitching skills; it’s about giving them a richer ground to play on. By layering scraps of velvet, torn strips of linen, or sheer pieces of organza, you can build landscapes, create atmosphere, and convey emotion before you even make the first stitch.
Think of your fabric scraps not as leftovers, but as a palette of textures waiting to be composed. These techniques invite you to paint with fabric, to sculpt with wool, and to see your embroidery hoop as a canvas for more than just thread. It’s an intuitive, freeing way to make your work feel deeply and uniquely yours.
1. Layer Raw-Edge Fabrics for Celestial Depth
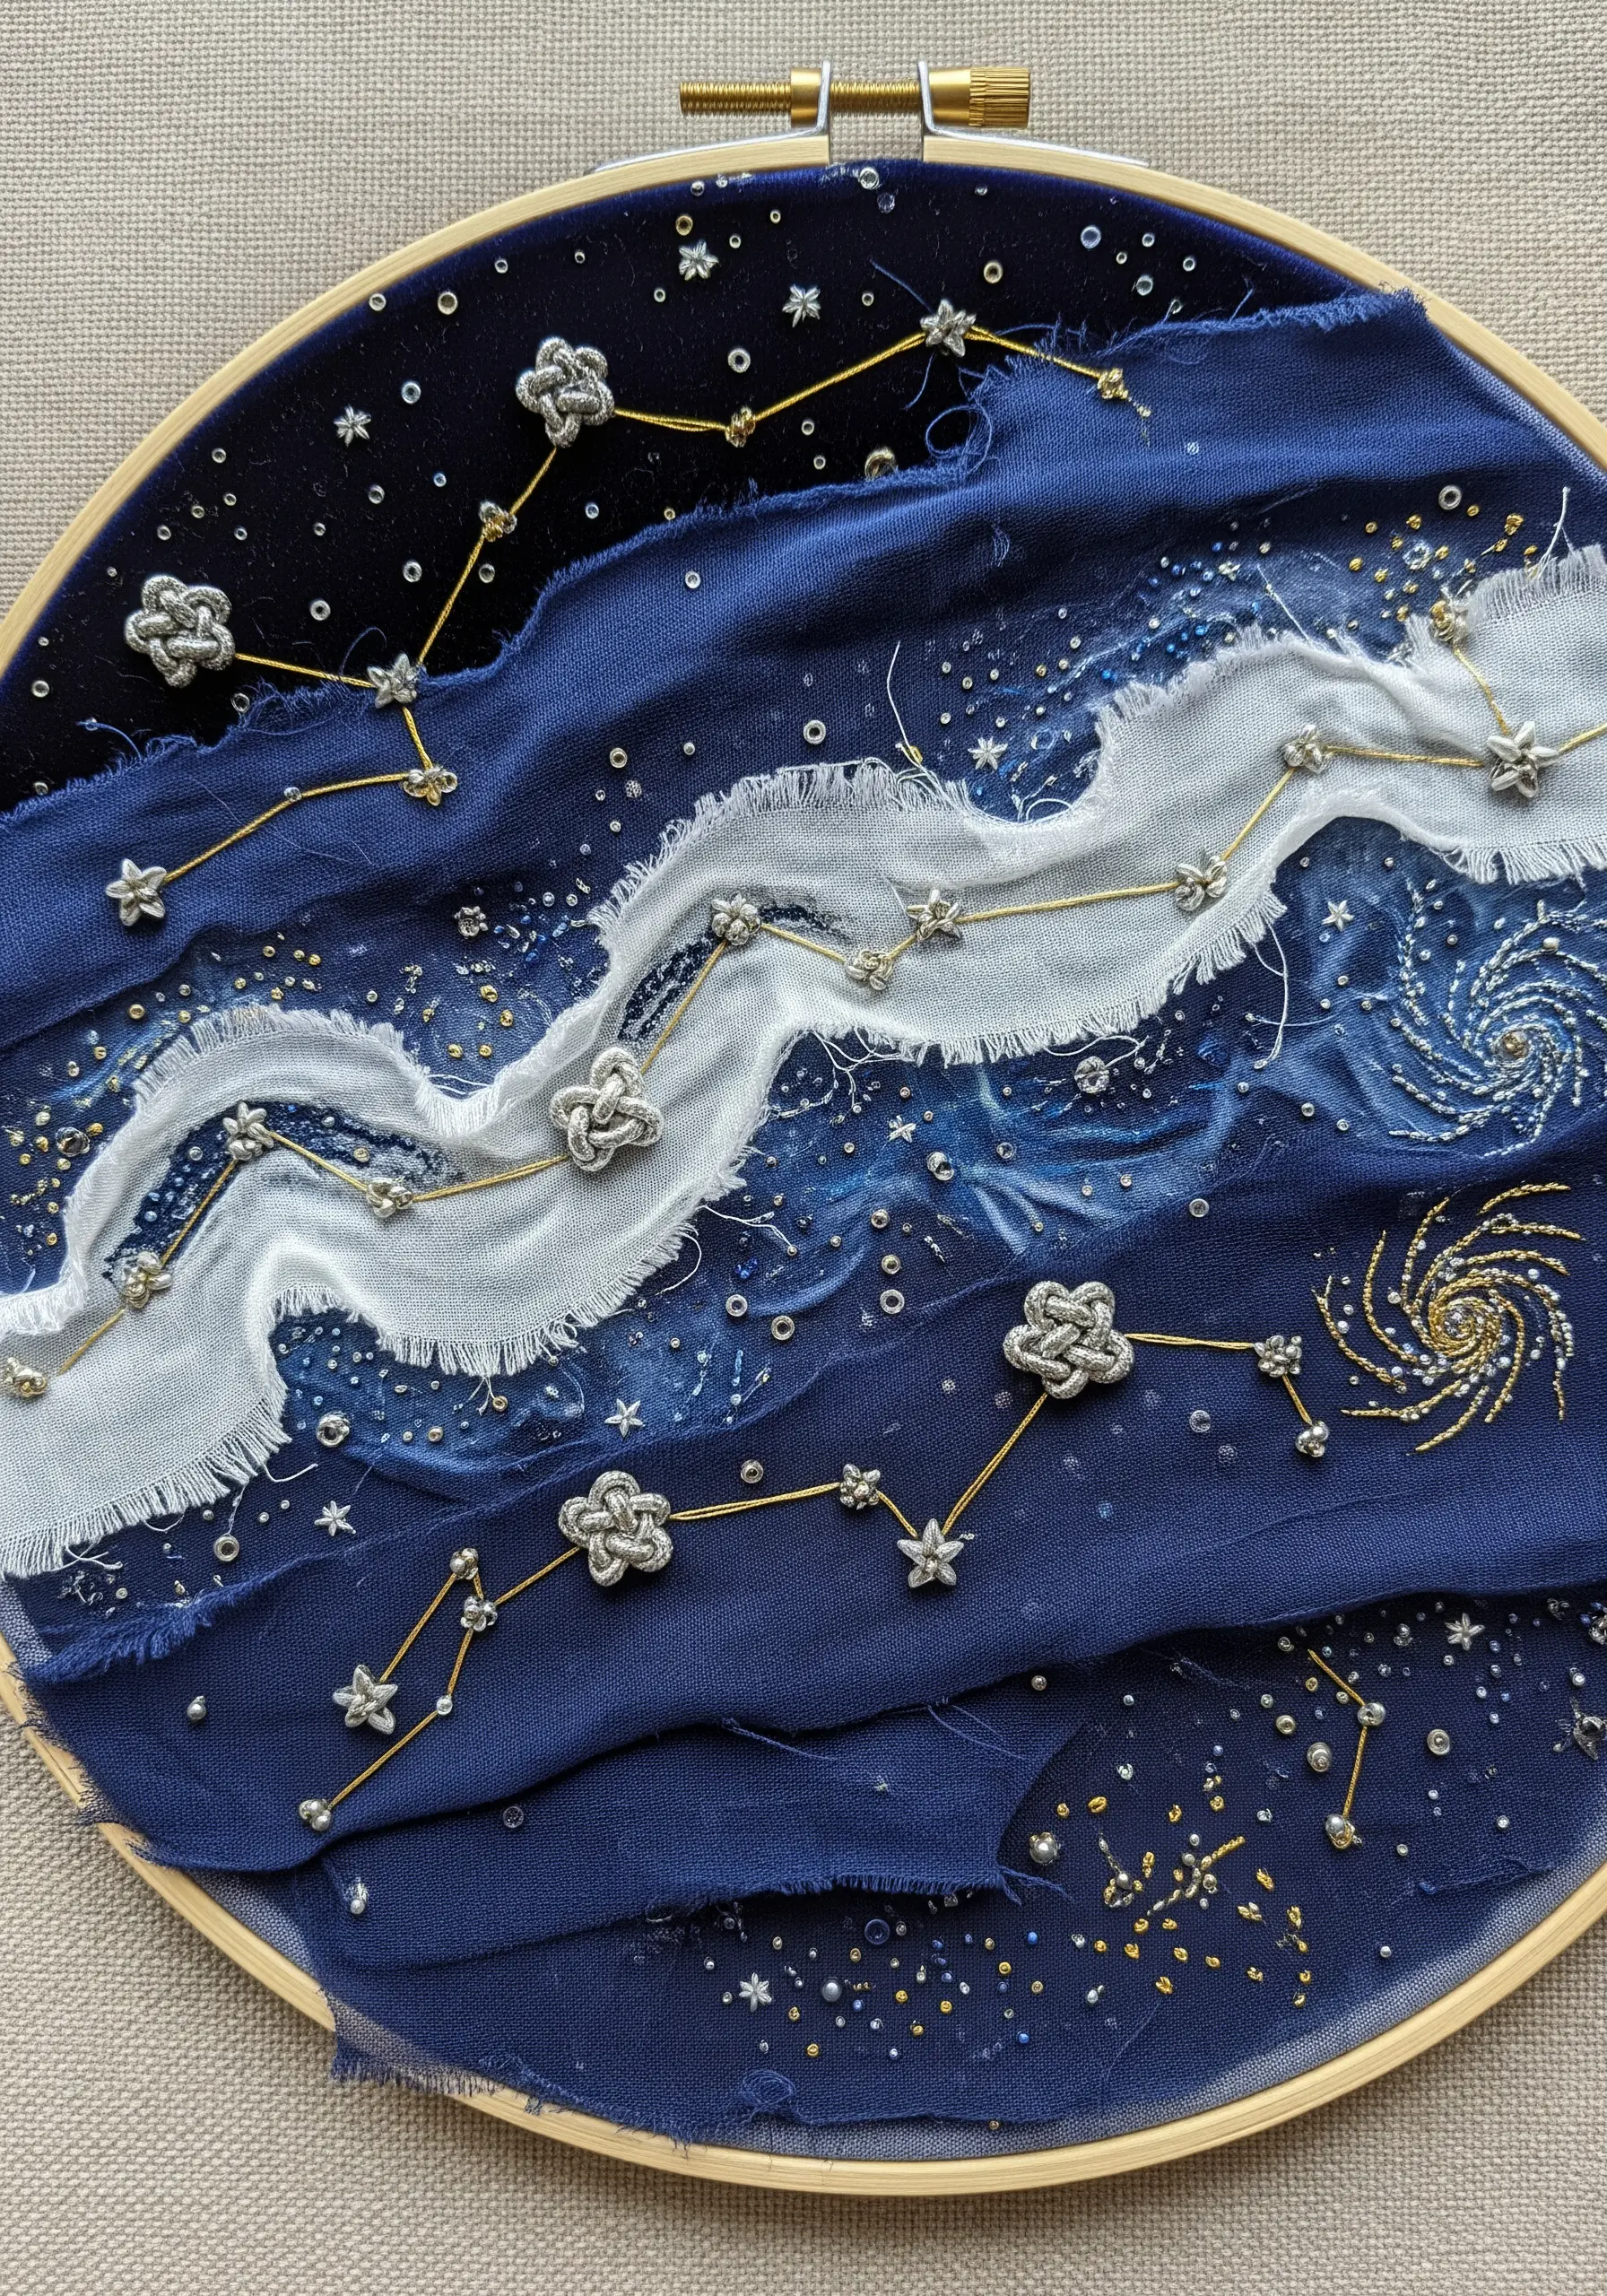
Build a dimensional galaxy by layering strips of ripped fabric, allowing the frayed edges to create soft, nebula-like clouds.
Use a combination of opaque cottons and sheer organza in shades of deep blue and black to suggest cosmic depth.
Secure the layers with scattered seed beads, then connect them with lines of gold thread to form constellations.
For larger stars, use Chinese button knots or small woven wheels with a metallic thread to make them catch the light.
This technique turns simple fabric scraps into a dynamic, textured skyscape that feels both vast and detailed.
2. Create Atmospheric Fog with Distressed Cheesecloth
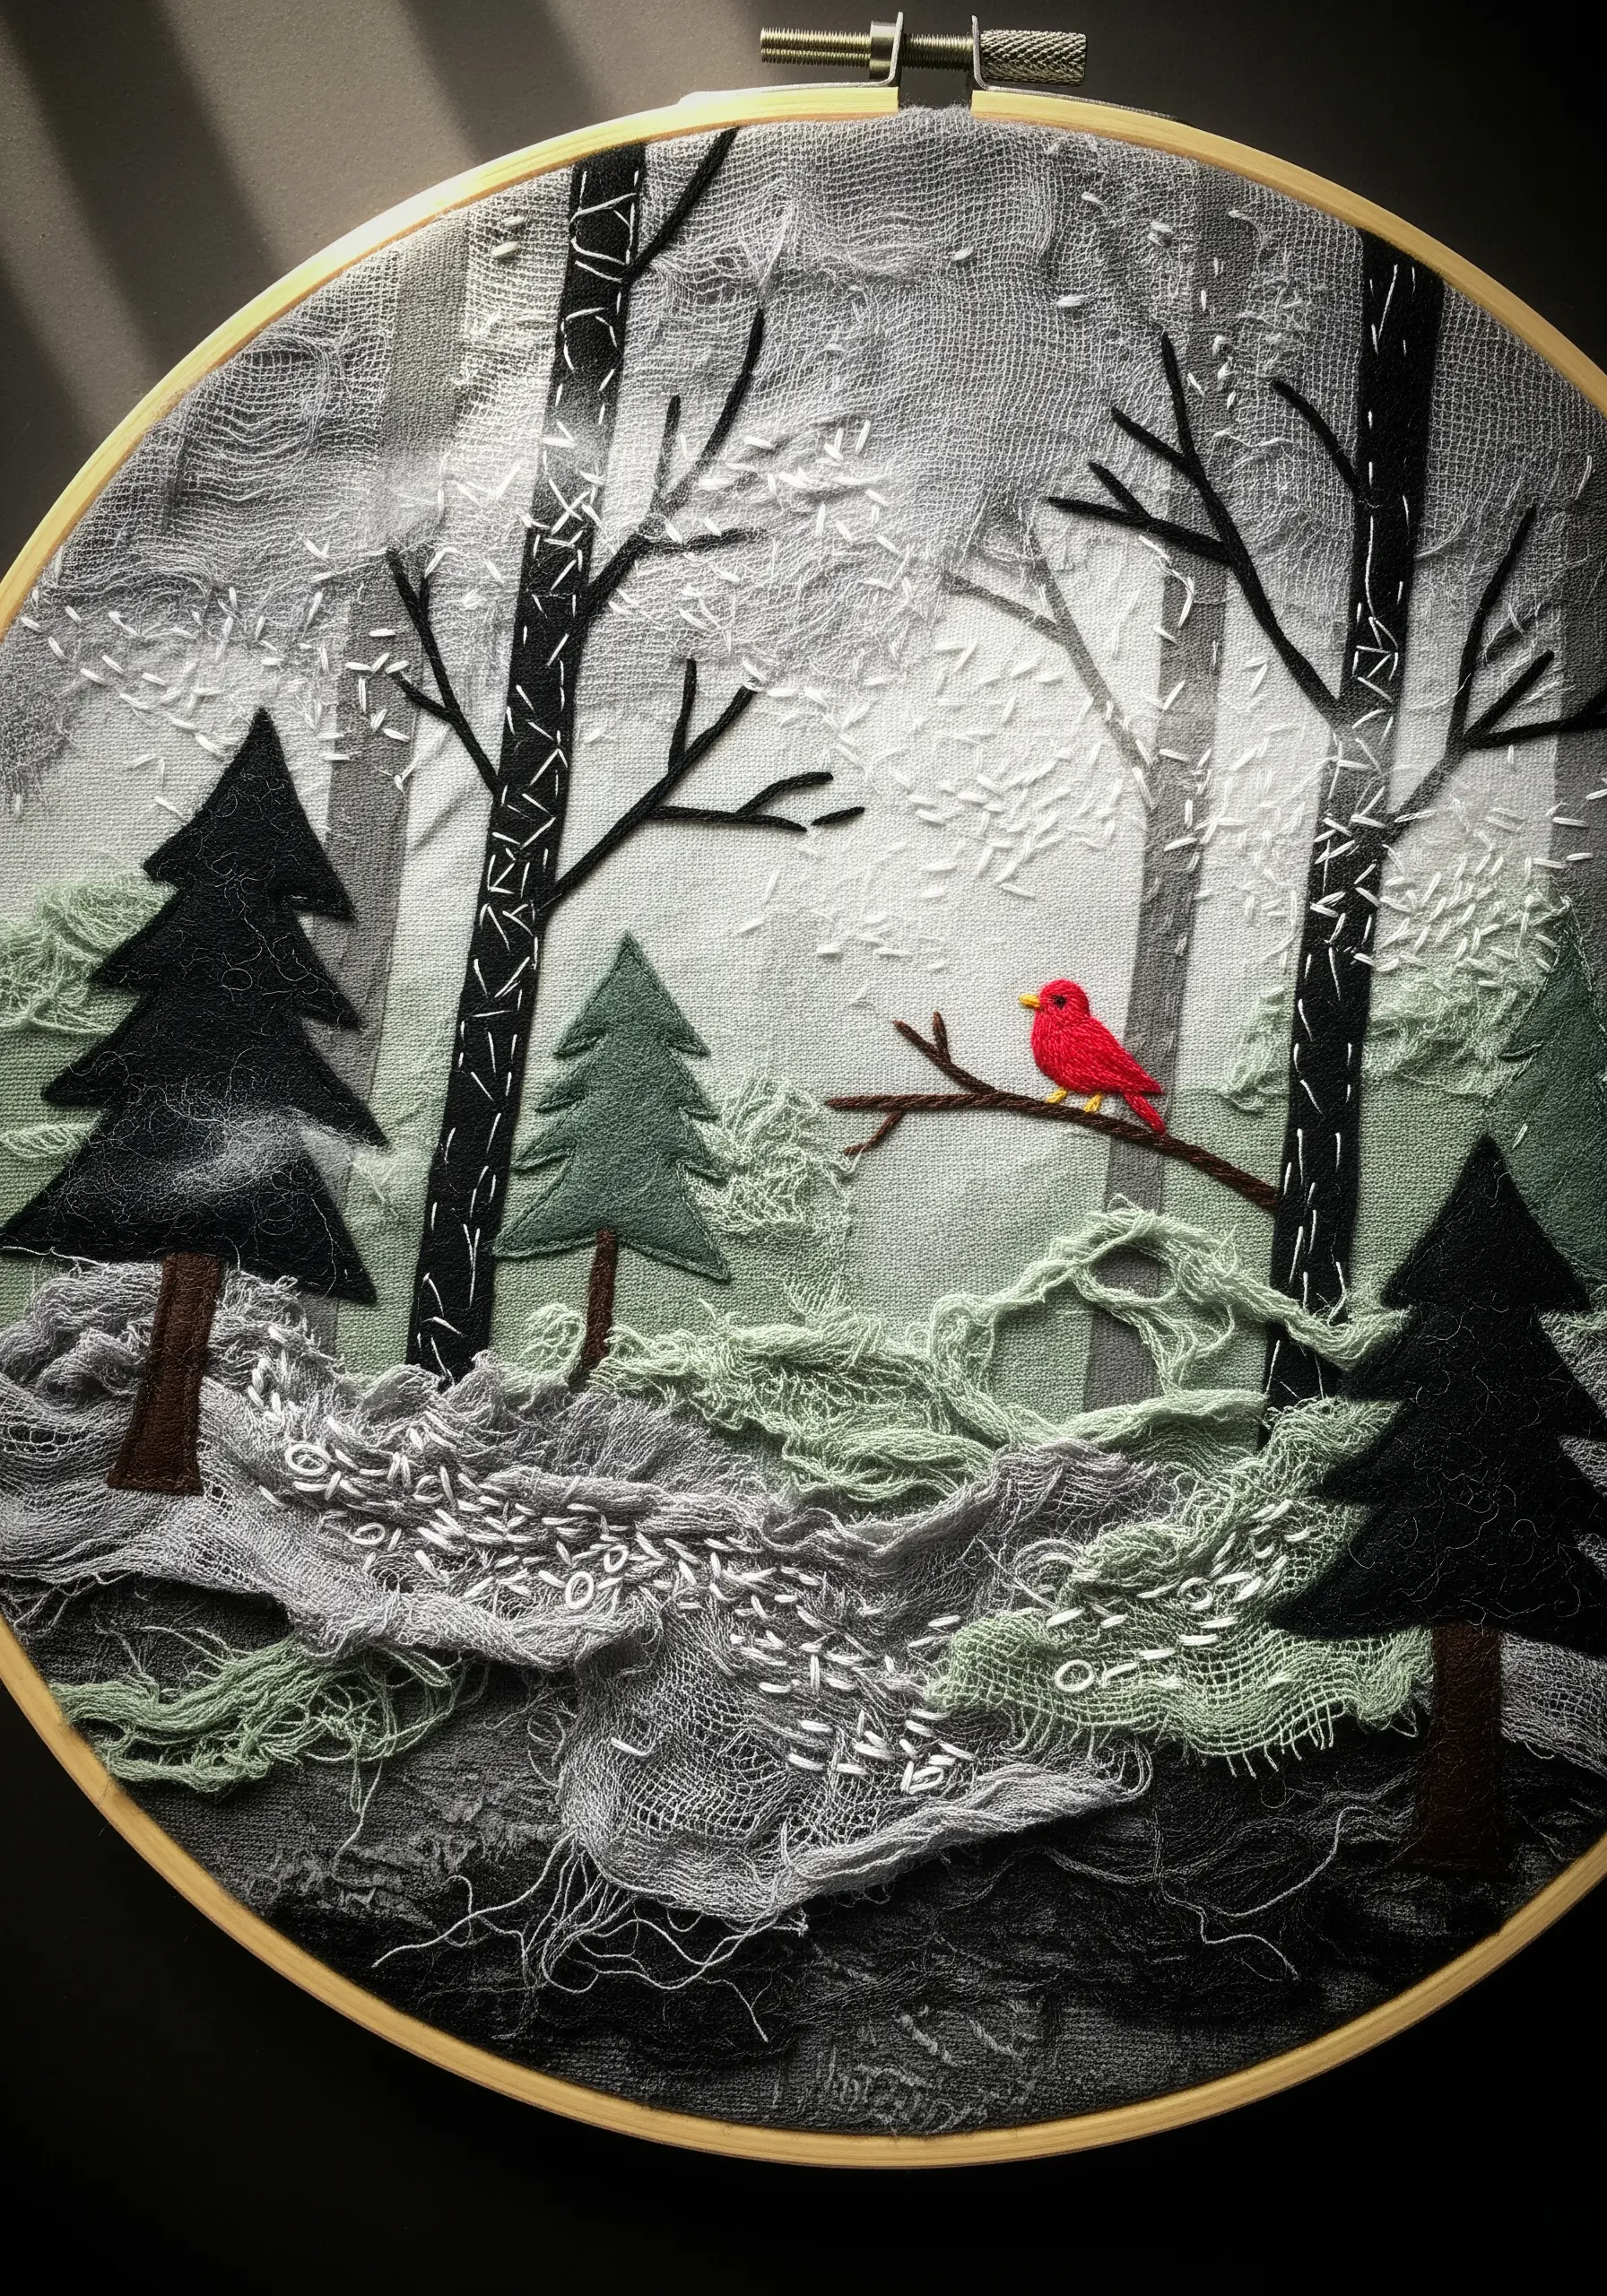
To give your landscapes a sense of mood and atmosphere, incorporate distressed cheesecloth to represent fog or mist.
Gently pull and stretch the cheesecloth until the weave opens up, then drape and layer it over your background elements.
Contrast this soft, ethereal texture with the solid, defined shapes of appliqué felt trees.
Use sparse, simple stitches like seed stitch in white or grey to suggest falling snow or light filtering through the haze, integrating the collage elements seamlessly.
3. Build a Tactile Coral Reef with Velvet and Satin
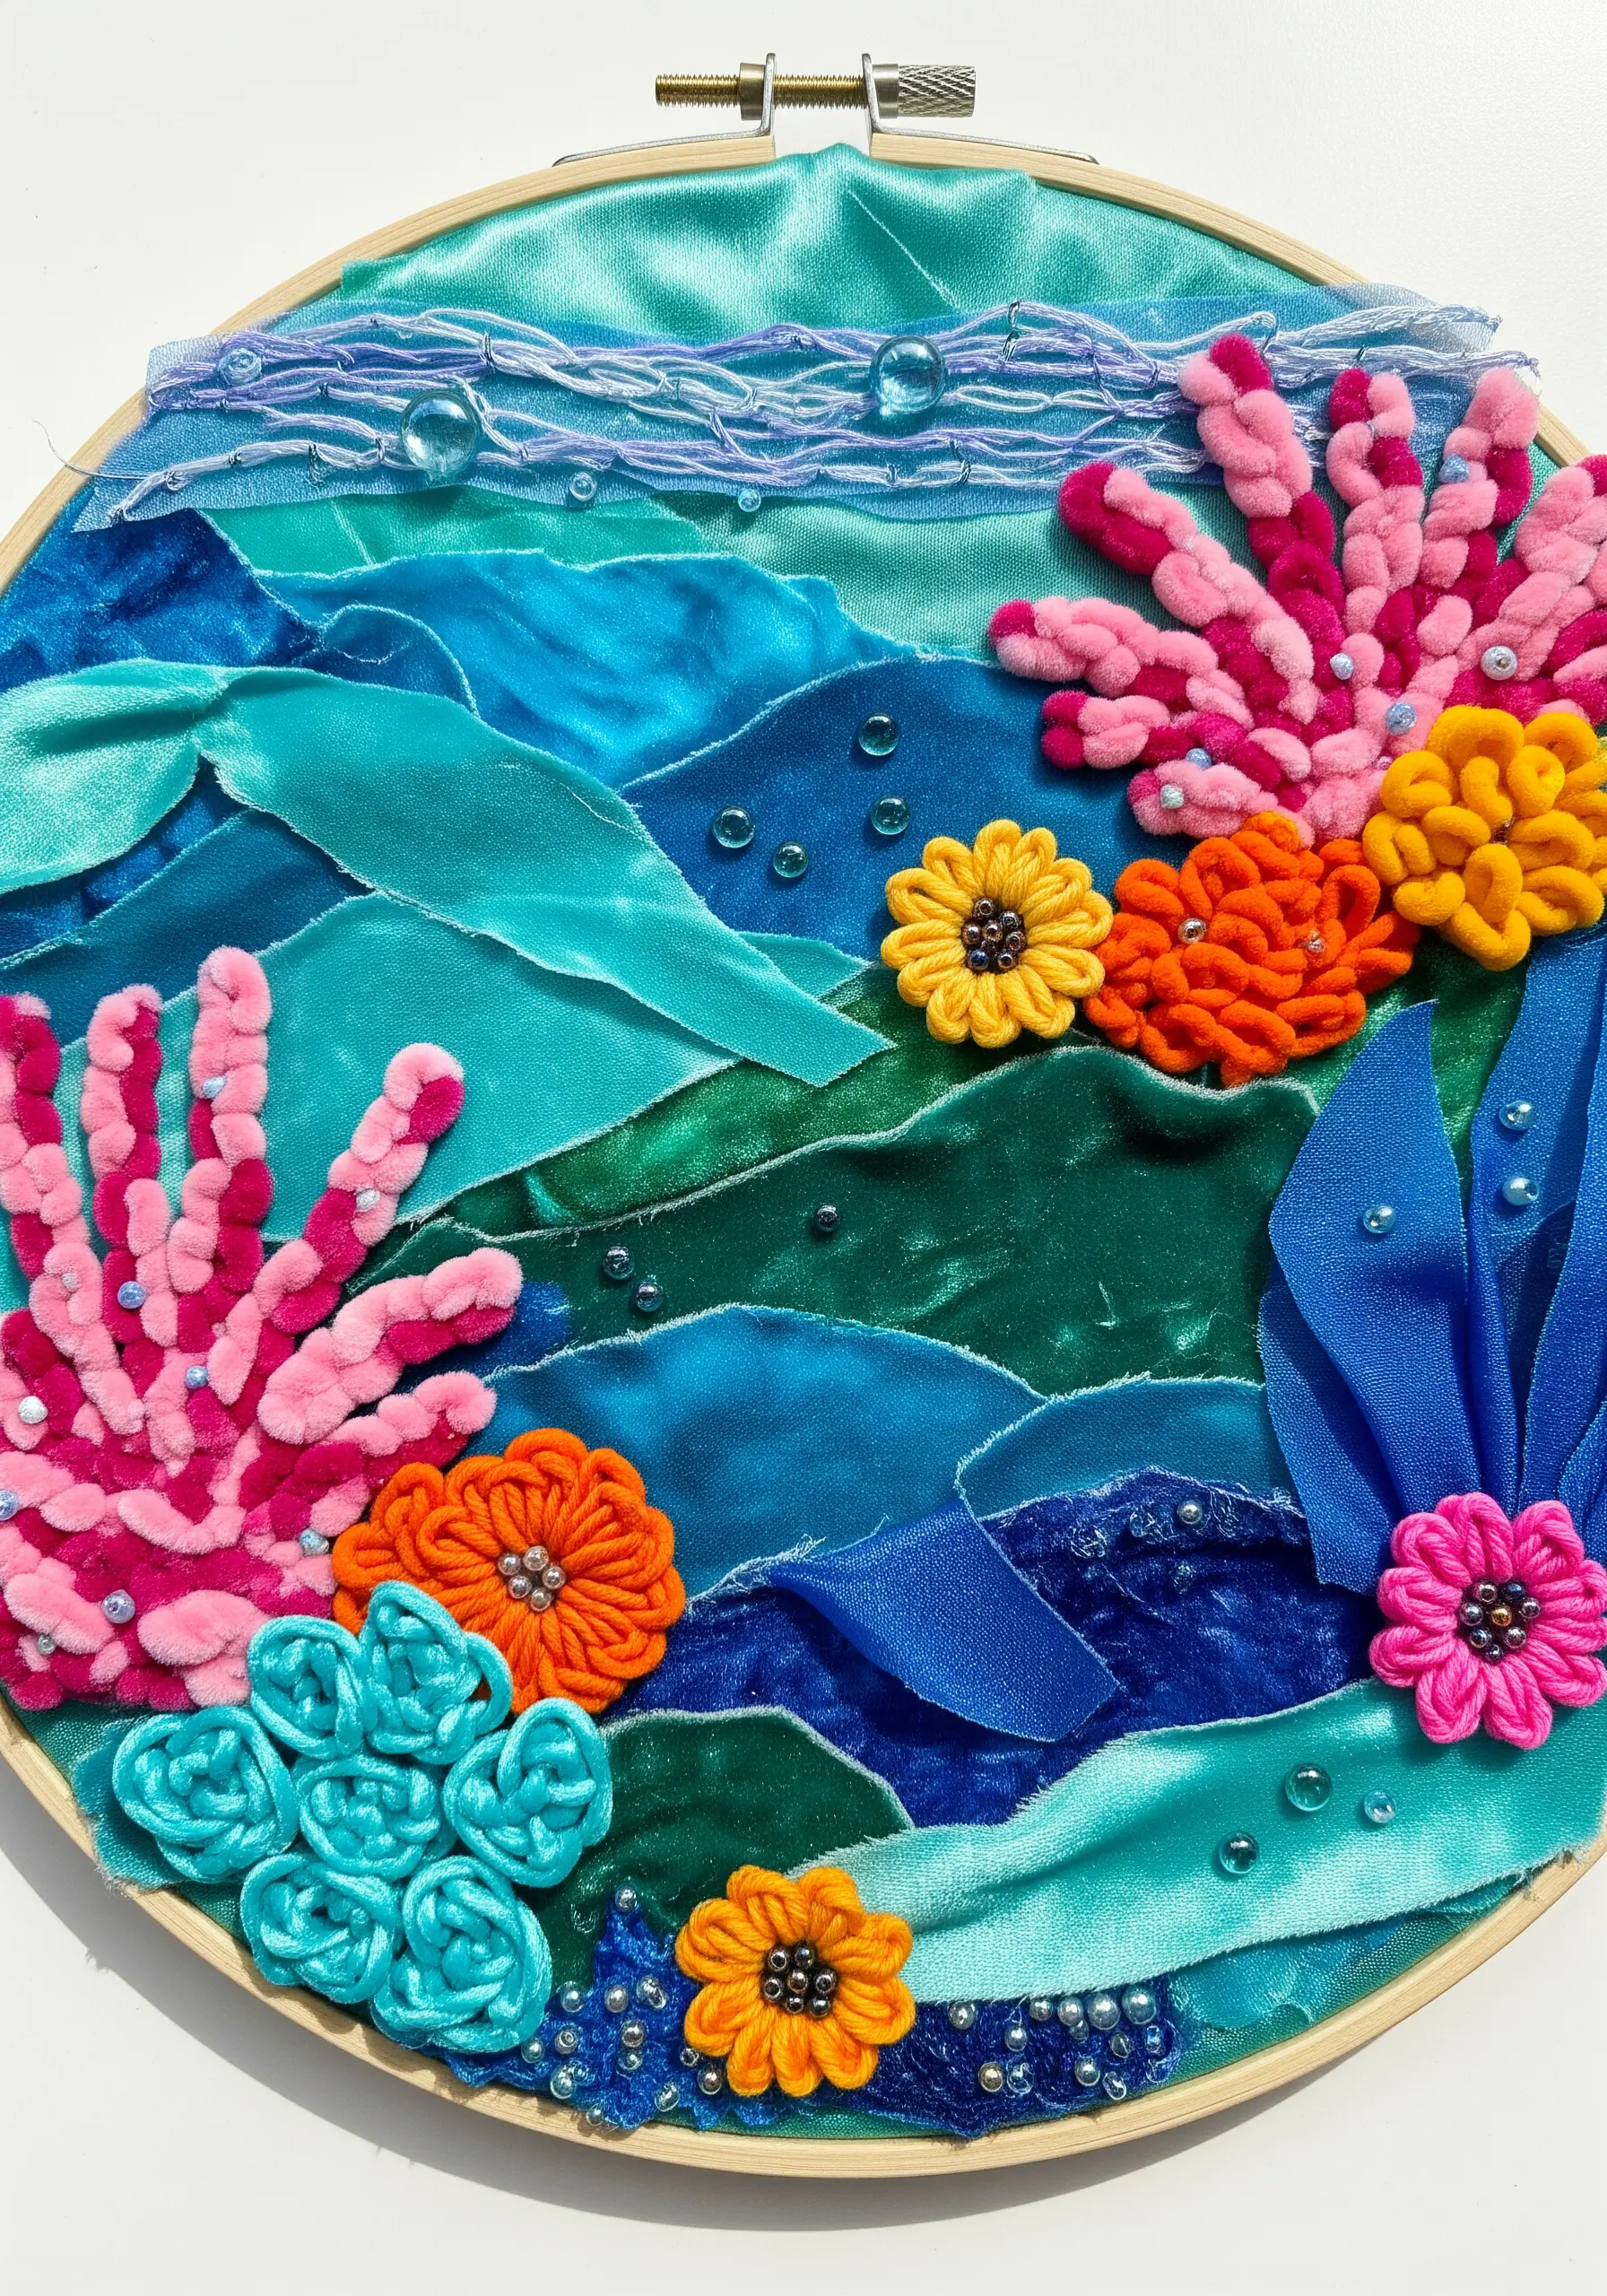
Mimic the rich, varied textures of an underwater world by choosing fabrics that evoke natural forms.
Use plush velvet for soft corals and anemones, folding and securing it to create organic, rounded shapes.
Layer scraps of satin, silk, or other shimmering fabrics for the background to suggest the movement and reflection of water.
Enhance the scene with dimensional stitches like bullion knots or woven wheel flowers, and add clear seed beads to look like air bubbles.
This material-first approach makes your embroidery a truly sensory experience.
4. Weave Metallic Ribbon Through a Fabric Gradient
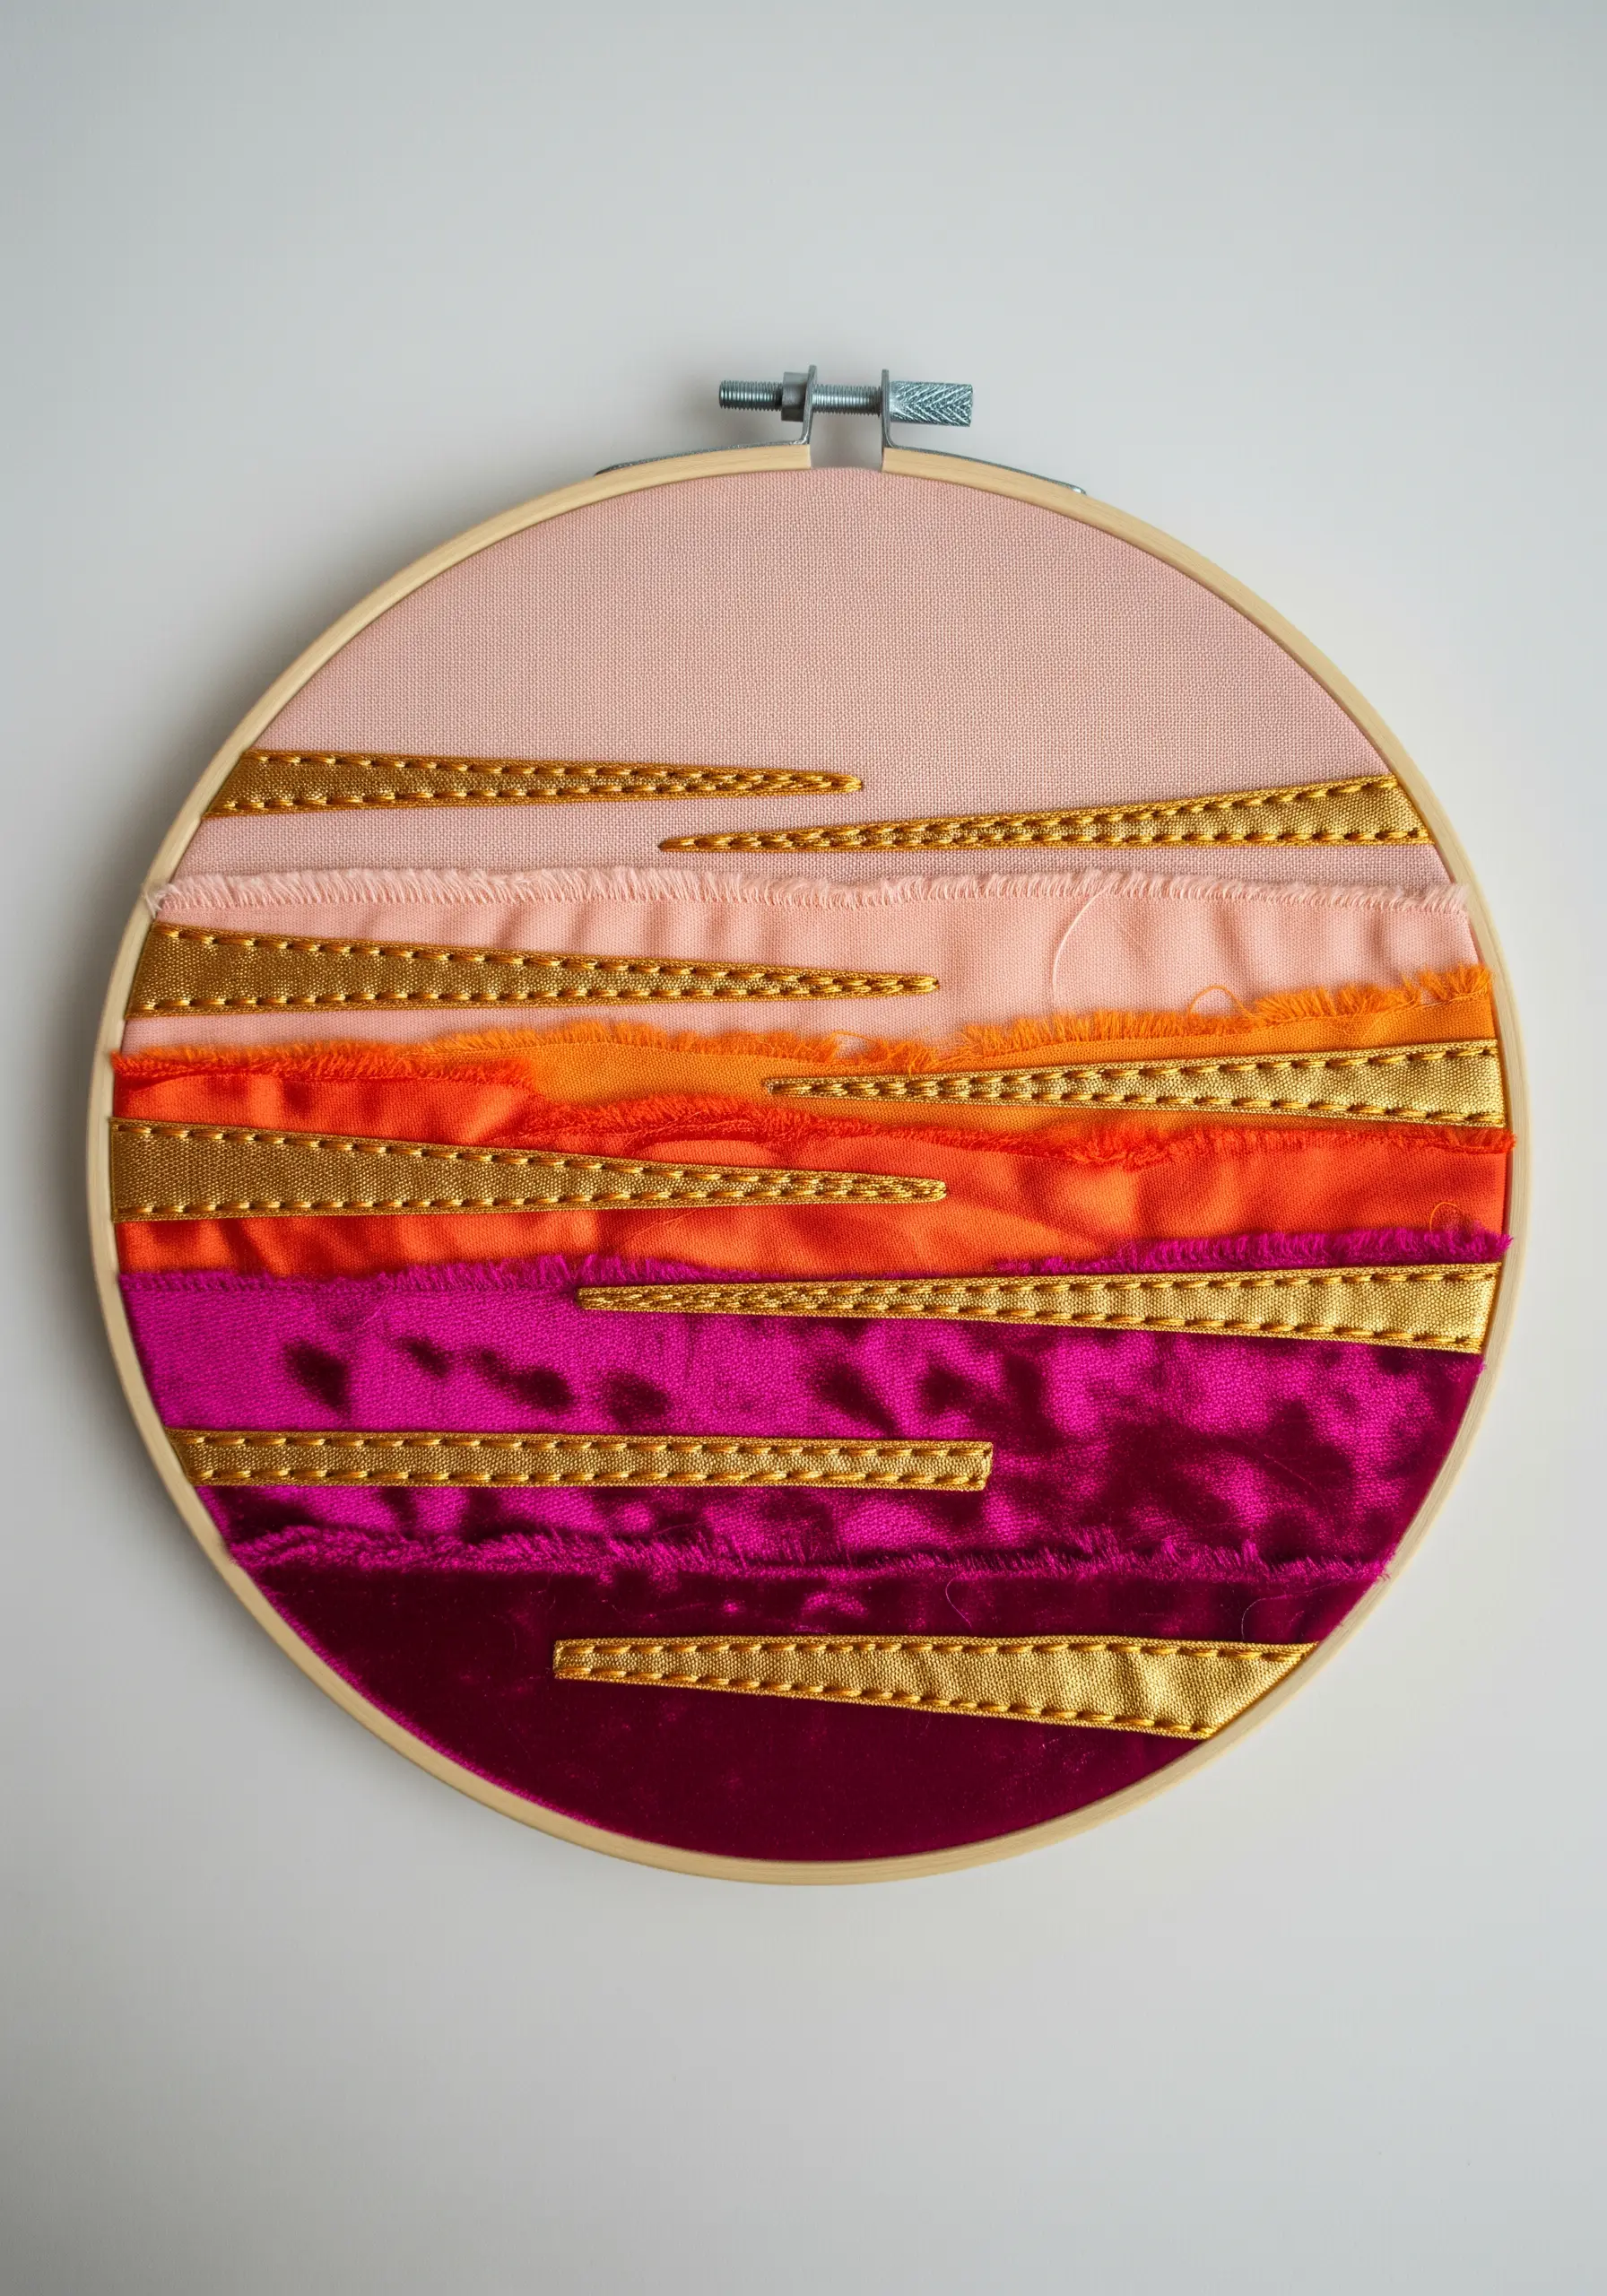
For a bold, modern abstract, arrange strips of fabric in a color gradient to create a foundation.
Instead of stitching over them, carefully cut small, parallel slits in the fabric layers and weave a flat metallic ribbon or trim through them.
This technique adds a clean, graphic element that contrasts beautifully with the soft texture of the fabrics.
It provides structure, catches the light, and unites the disparate fabric strips into a cohesive, polished composition.
5. Soften a Floral Collage with a Tulle Overlay
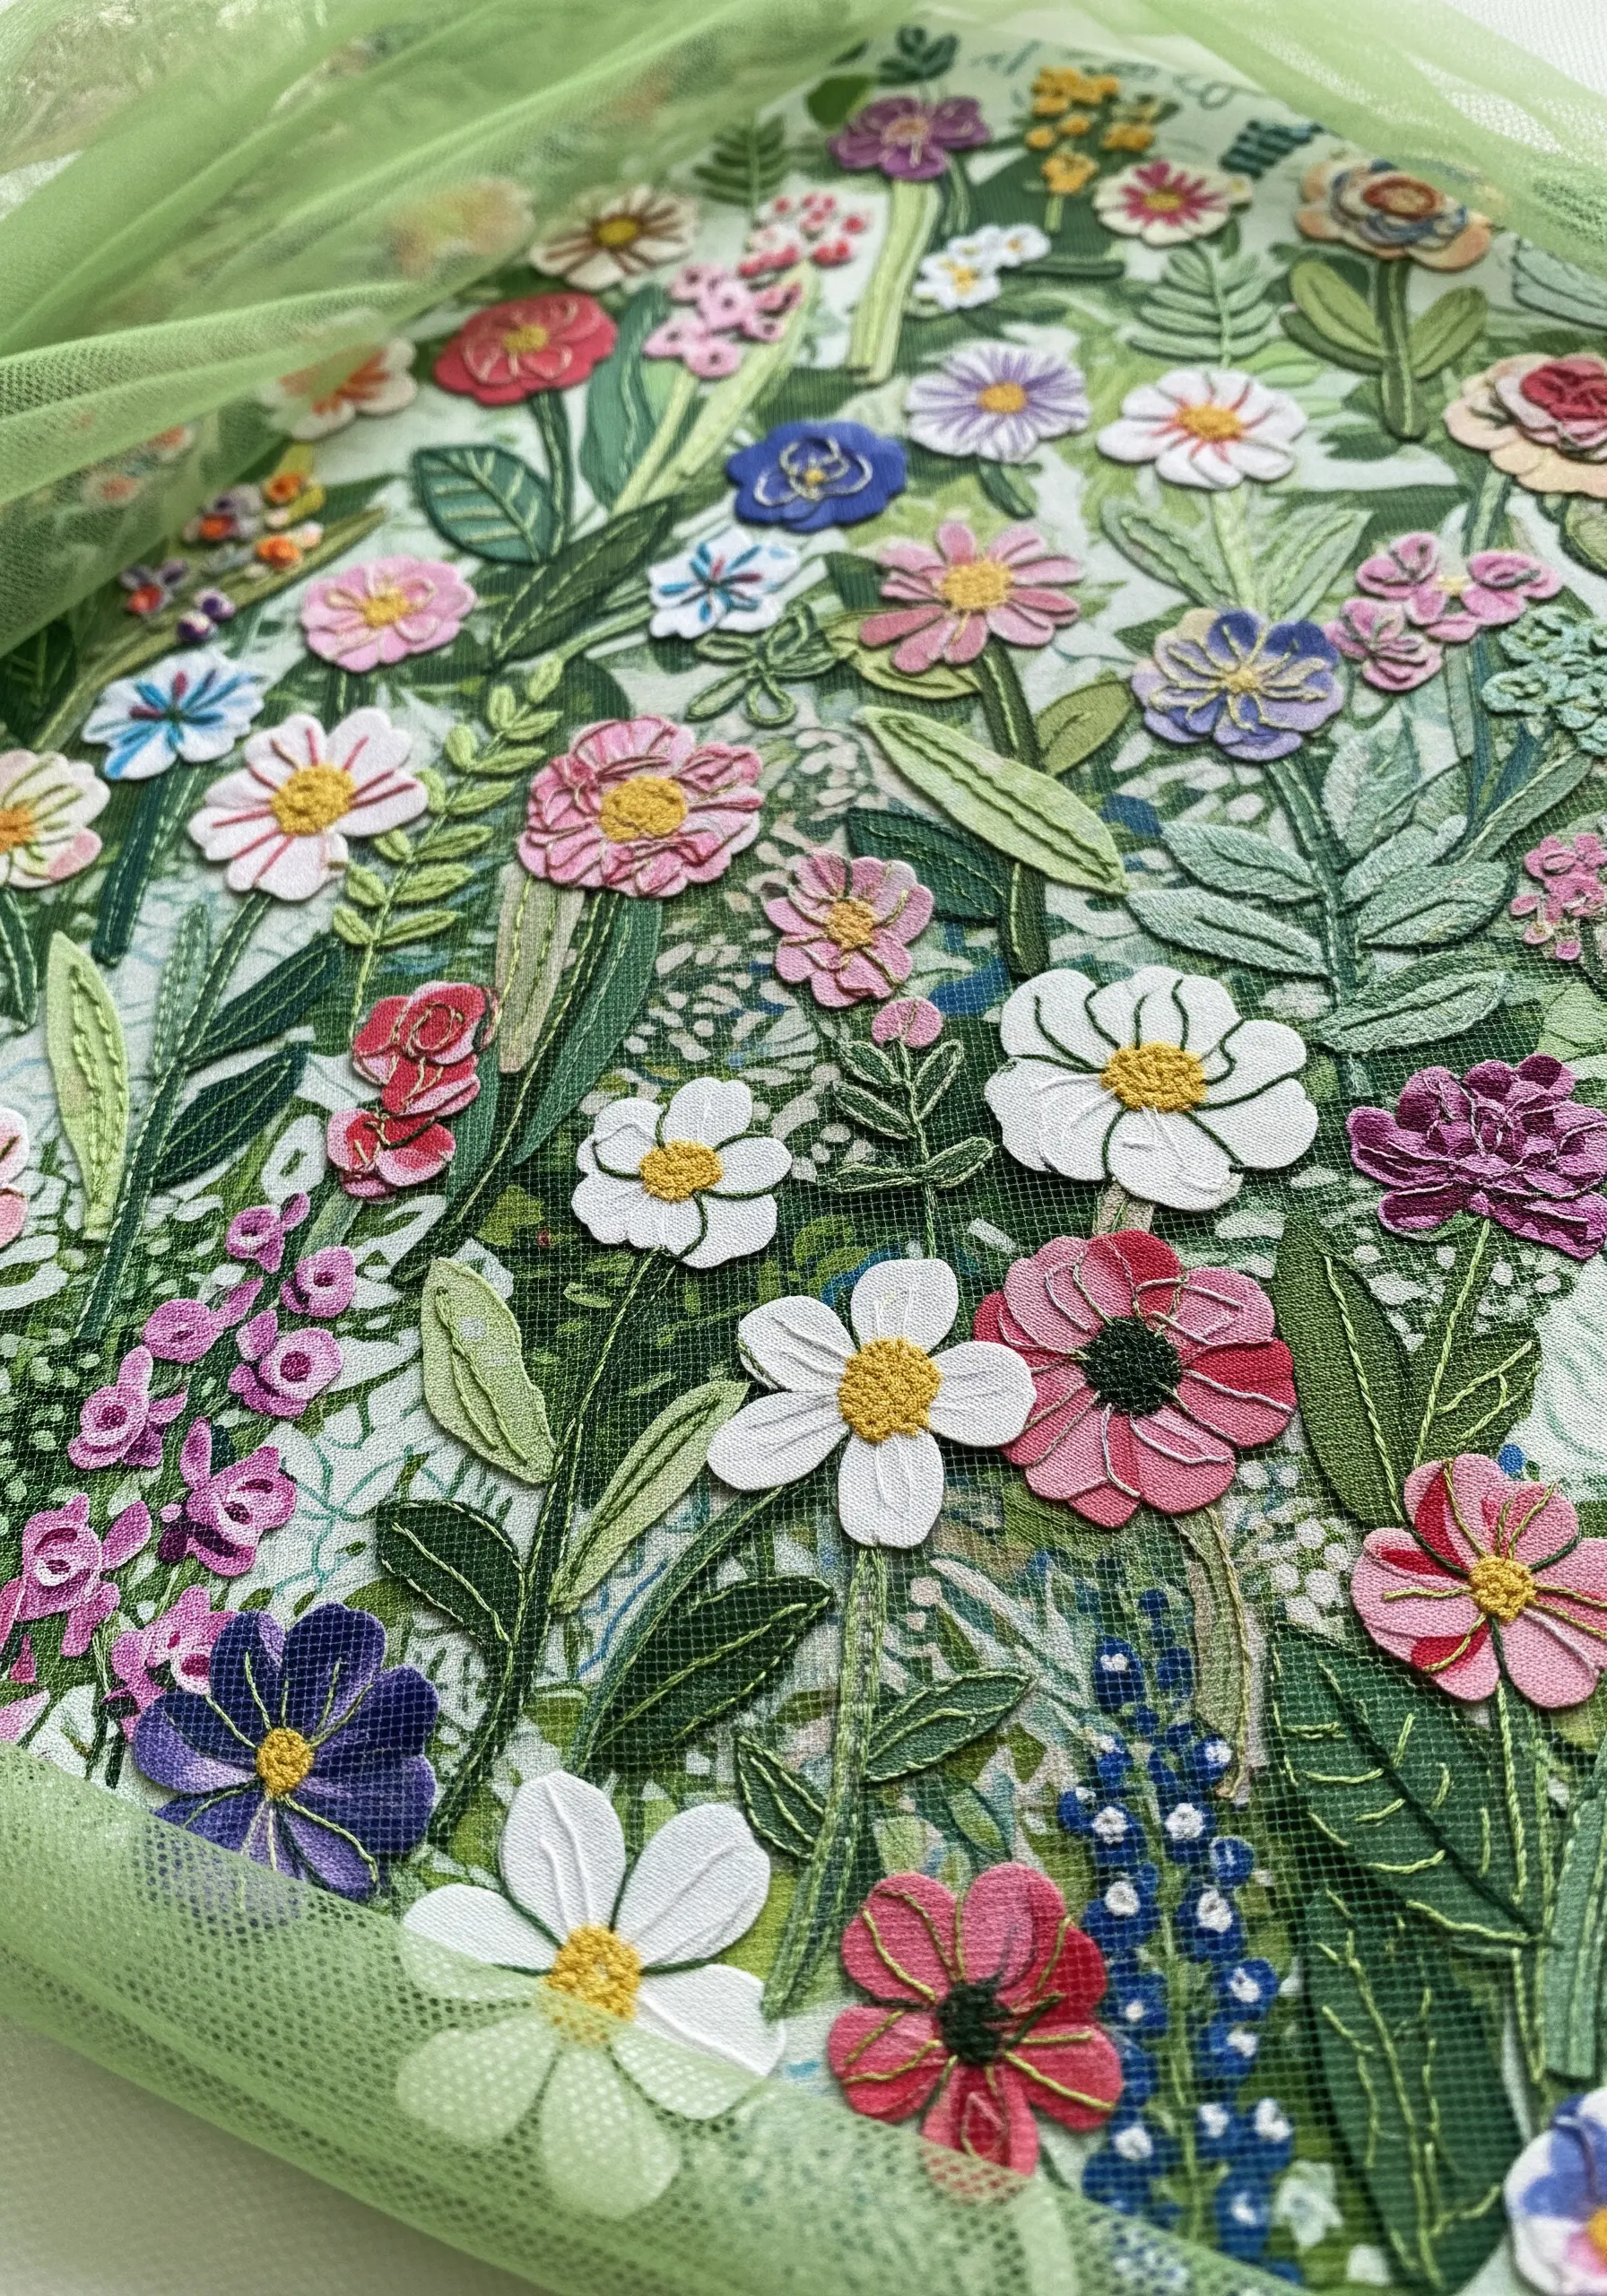
Create the impression of a dense, dreamy meadow by first collaging cut-out floral motifs from various printed fabrics.
Arrange the flowers and leaves directly onto your base fabric, overlapping them to build depth.
Once your composition is set, lay a single piece of fine tulle over the entire scene and hoop everything together.
Add your embroidery details by stitching directly through the tulle, which secures the collage pieces and gives the finished work a beautiful, dreamy, filtered effect.
6. Use Patterned Fabrics for Graphic Mountainscapes
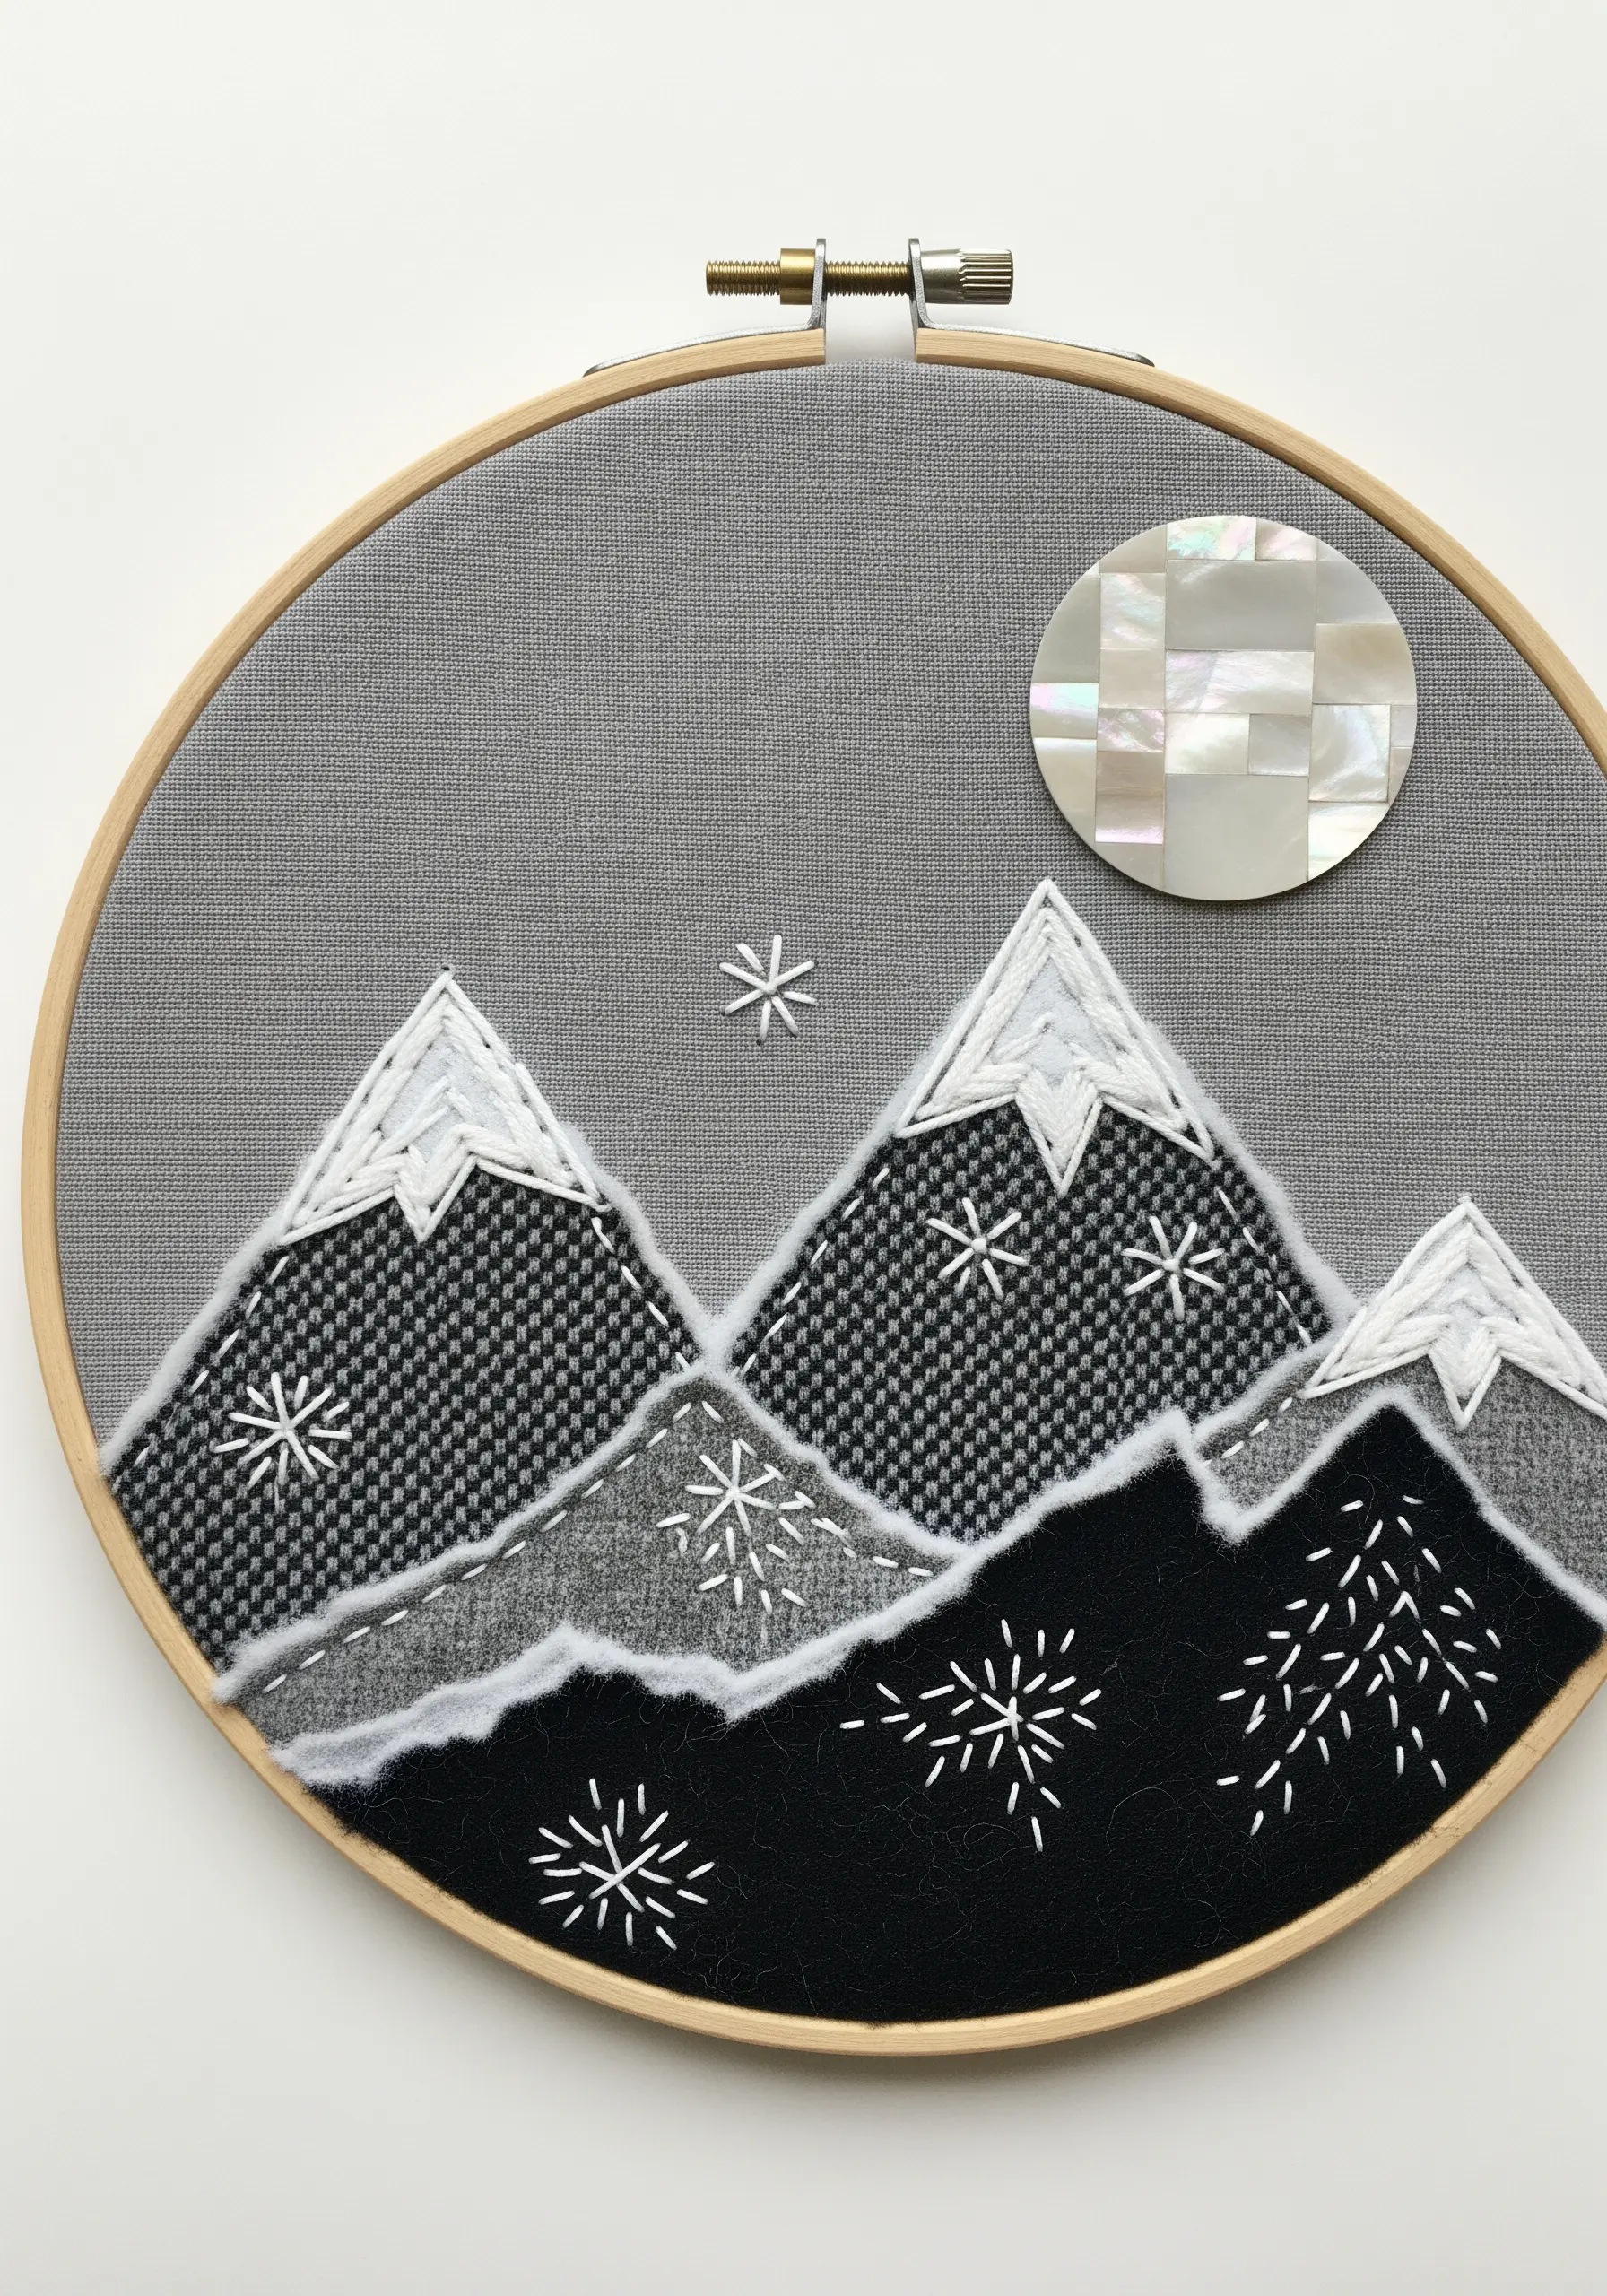
Let the fabric do the textural work for you by choosing materials with built-in patterns, such as wool suiting with herringbone or houndstooth weaves.
Cut sharp, geometric mountain shapes and arrange them in overlapping layers to create a sense of distance.
Secure the raw-edged appliqué pieces with a simple running stitch in a contrasting color for a clean, modern finish.
Incorporate other materials, like a mother-of-pearl button for a moon, to add a surprising and elegant focal point.
7. Integrate Patterned Fabric to Add a Narrative Layer
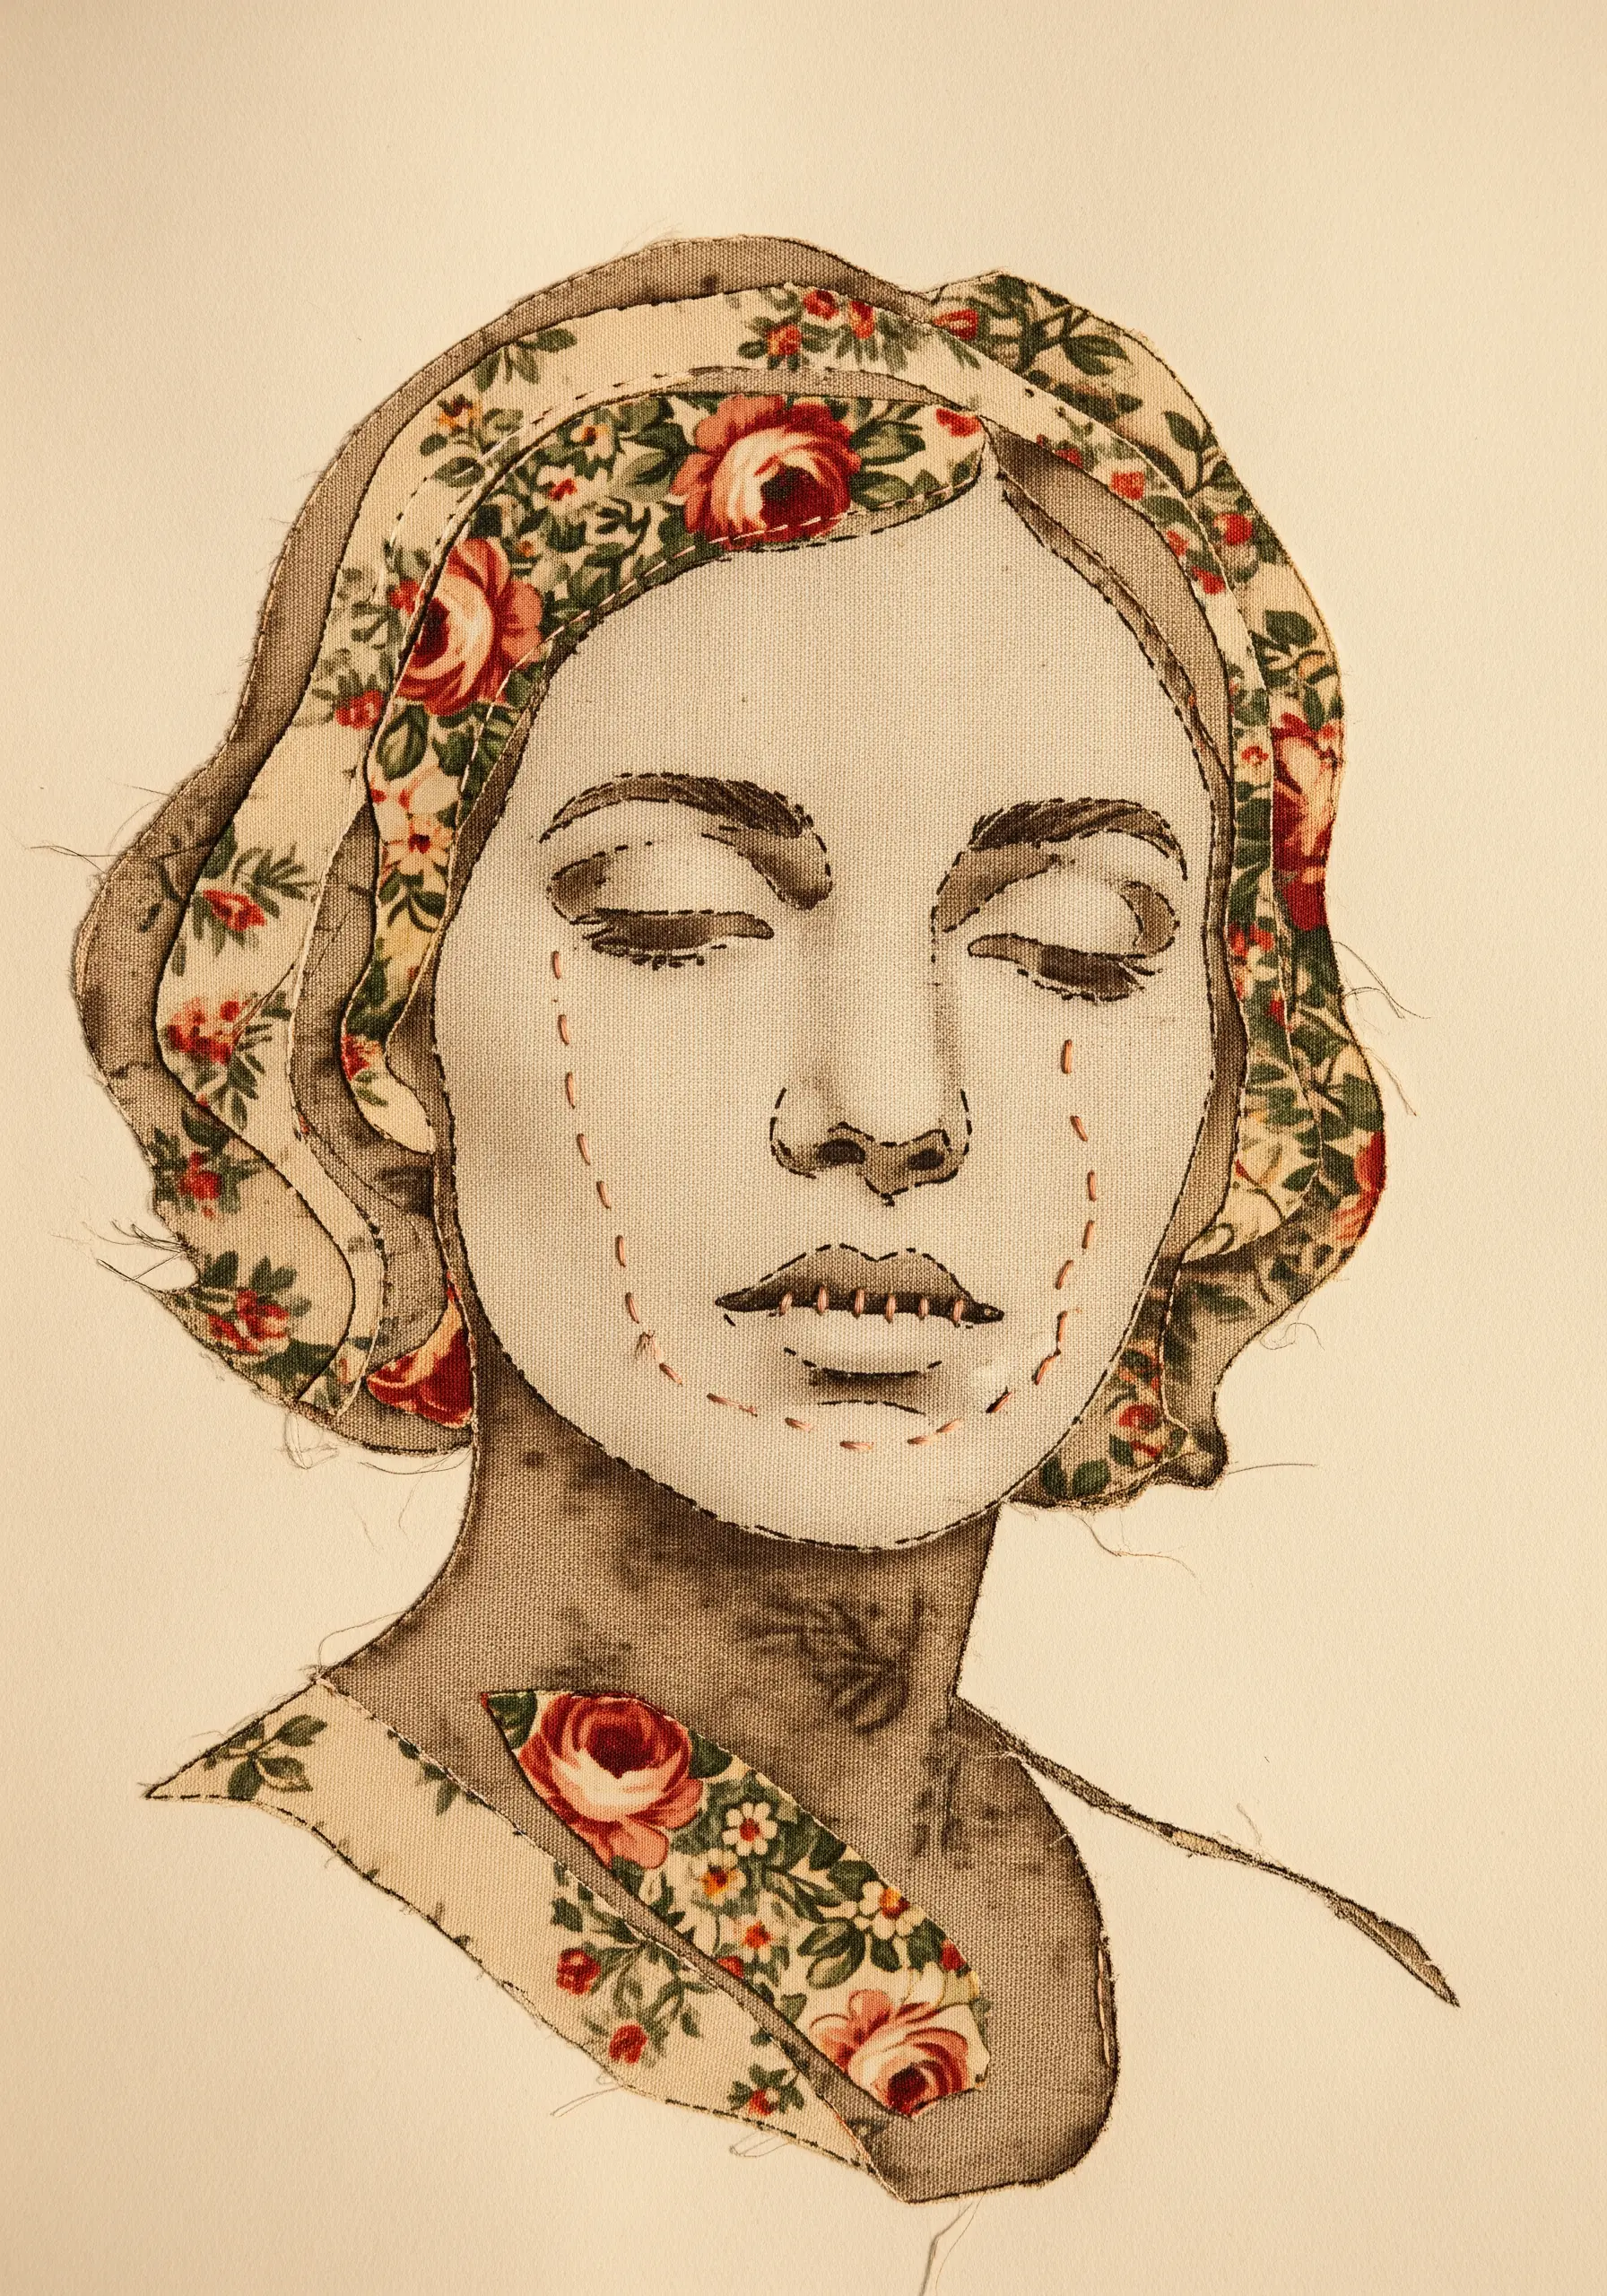
Elevate a simple portrait by using fabric collage as a narrative tool.
Start with a line drawing or print on your base fabric, then selectively cover areas like hair, clothing, or background elements with a meaningful patterned fabric.
This act of replacement adds a symbolic dimension, telling a story about memory, identity, or emotion.
Tack the fabric down with minimal, almost invisible stitches to keep the focus on the powerful interplay between line and pattern.
8. Compose with Geometric Shapes for a Minimalist Aesthetic
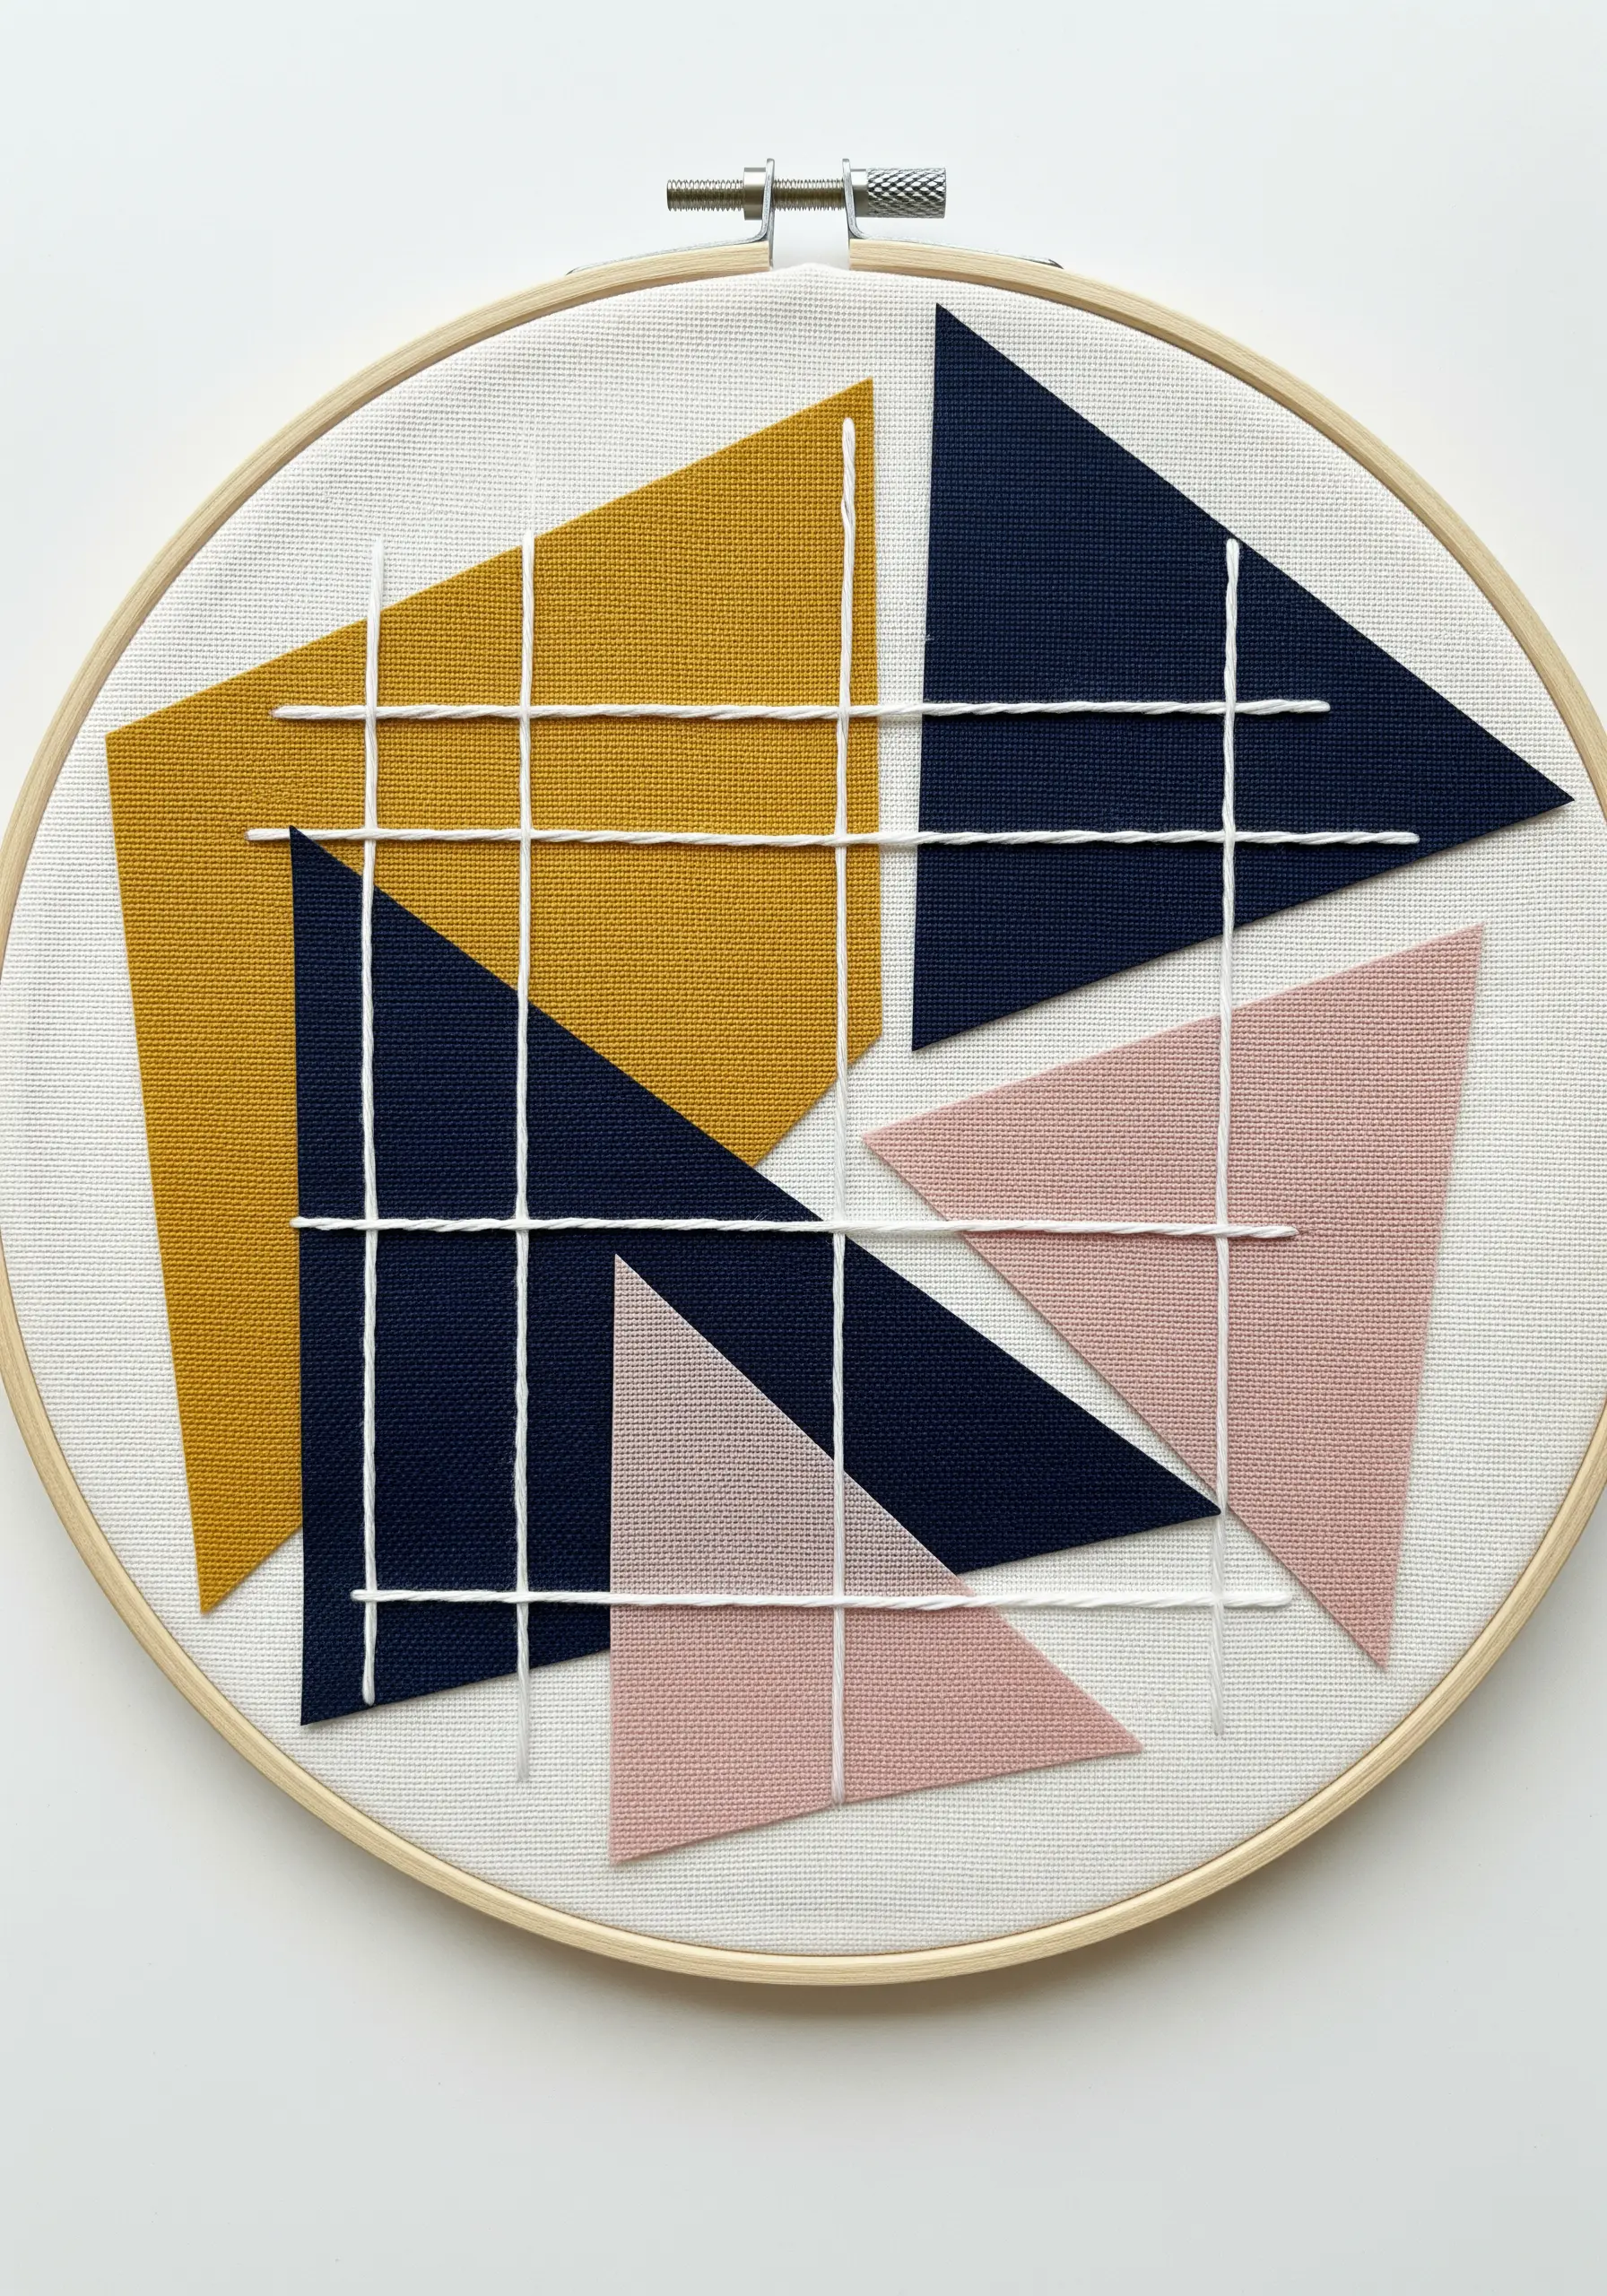
Explore the principles of balance, tension, and negative space by collaging with clean, hard-edged geometric shapes.
Cut triangles, squares, or other polygons from solid-colored fabrics and arrange them in a dynamic composition.
Once your shapes are in place, use a thick, contrasting thread to stitch a simple grid over the entire piece.
This final linear layer unifies the disparate elements and adds a sense of architectural structure, resulting in a sophisticated, minimalist aesthetic.
9. Blend Lace and Fabric Petals for a Romantic Meadow

Create a composition rich with nostalgia and delicate texture by combining different types of collage materials.
Use a piece of vintage lace to form a soft, cloud-like horizon line or a patch of textured ground.
After stitching your primary flowers, add another layer of depth by tucking in and securing loose, artificial petals.
This mix of flat embroidery, structured lace, and three-dimensional petals gives the scene a romantic, ephemeral quality.
10. Sculpt 3D Waves with Yarn and Fabric Scraps
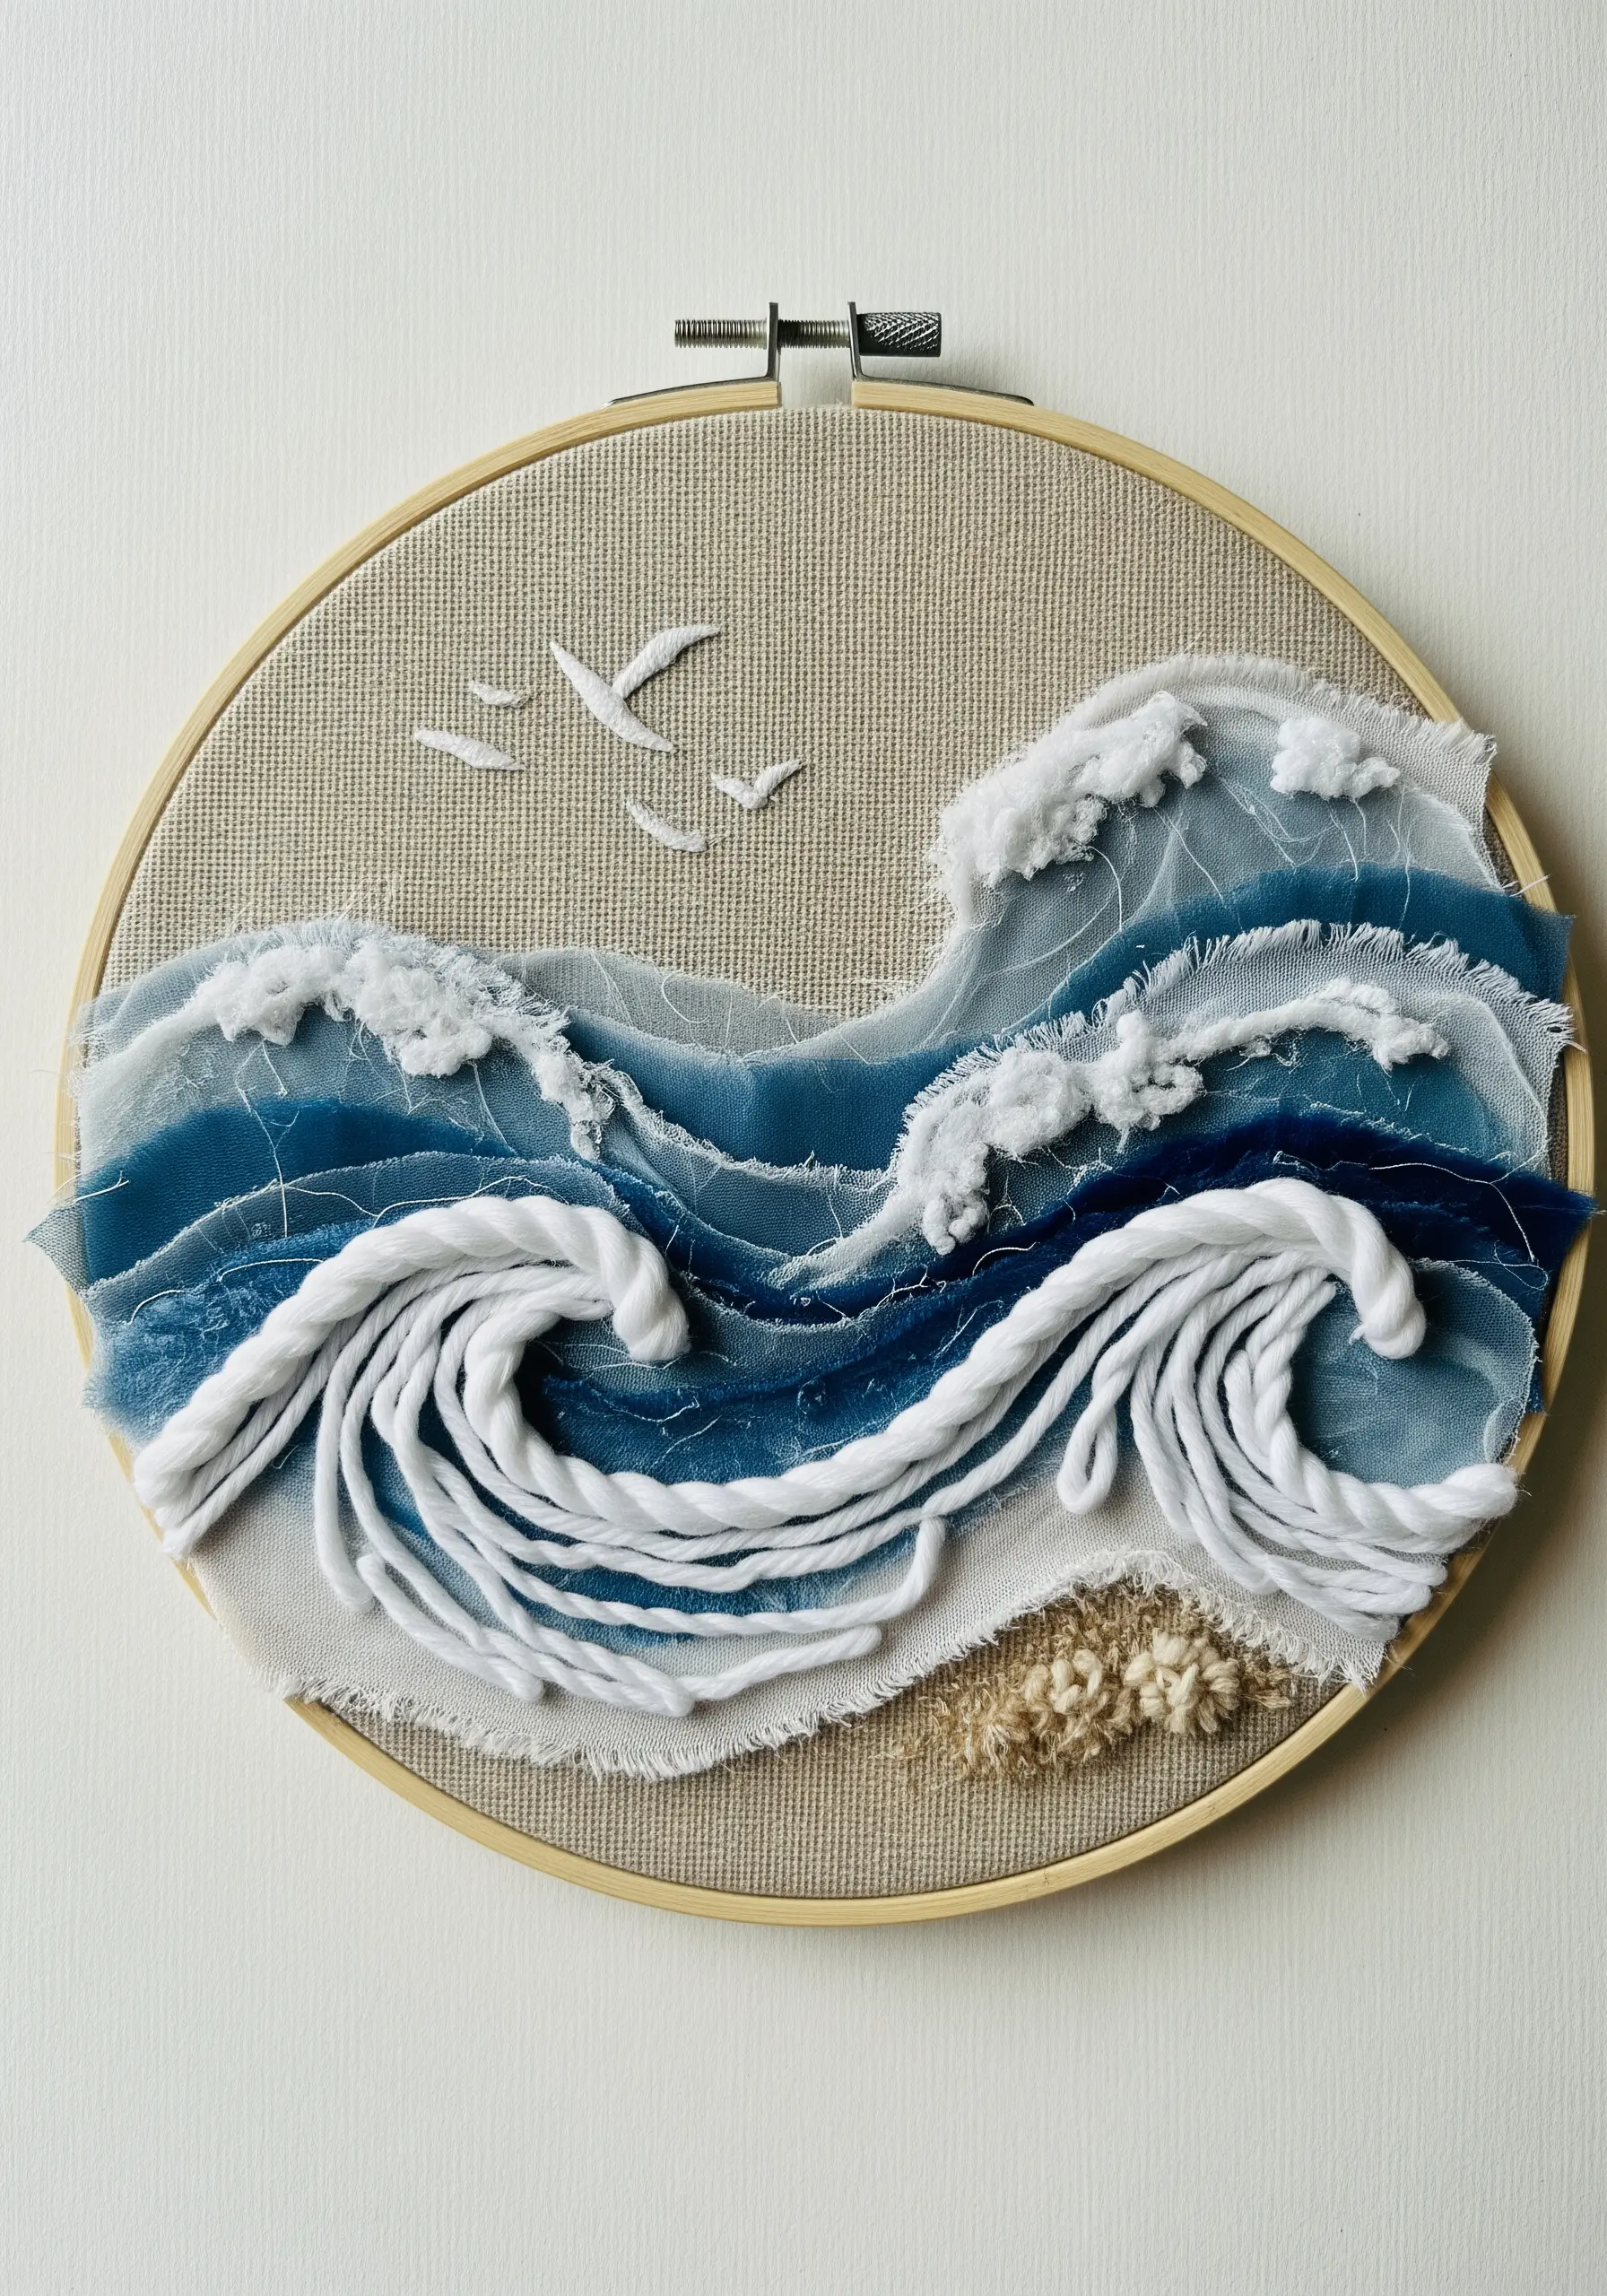
Capture the powerful movement of the ocean by building texture in three dimensions.
First, create an underpainting of color by layering torn strips of blue and white fabrics.
Then, couch thick, twisted white yarn or rope onto the surface to define the crests of the crashing waves.
For the finishing touch, tease apart cotton batting or wool roving to create seafoam, securing the wisps with tiny, anchoring stitches.
11. Layer Skeleton Leaves for Ethereal Delicacy
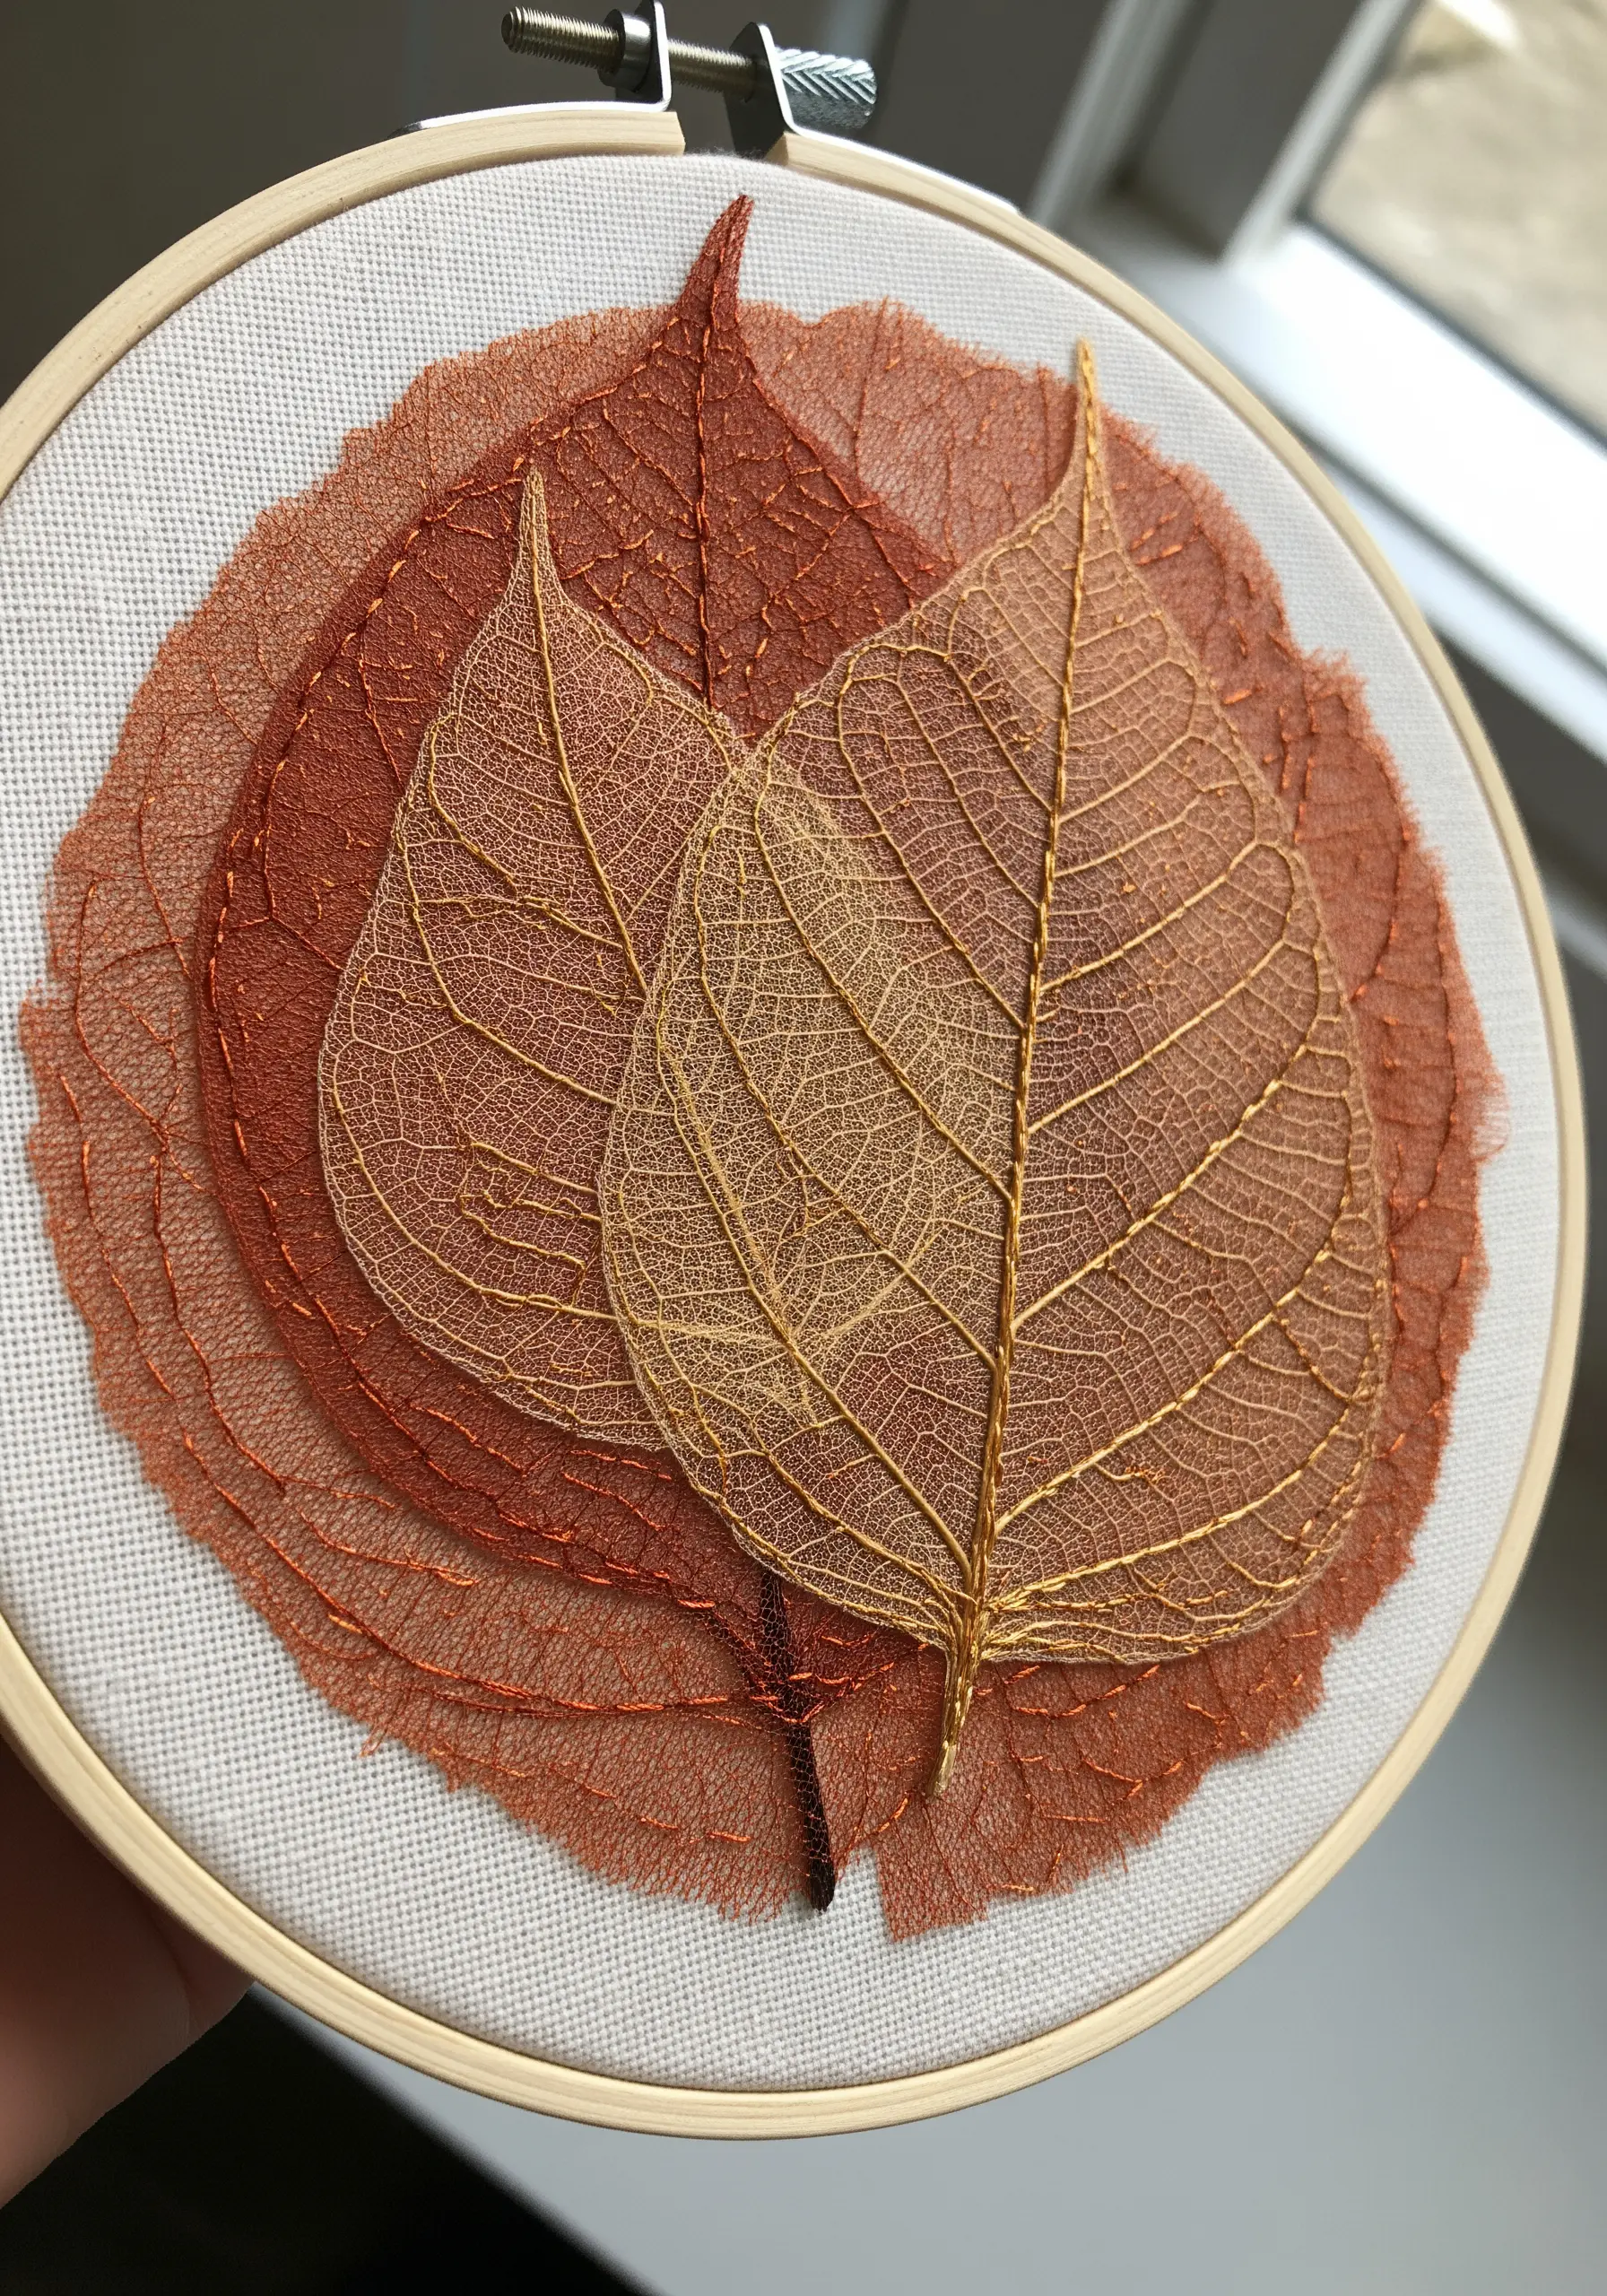
Incorporate natural elements for an effect that is impossible to achieve with thread alone.
Skeleton leaves, available at craft stores, offer a beautiful and delicate transparency.
Arrange them in overlapping layers to create subtle shifts in color and tone.
Use a single, fine thread to stitch them down along the central vein, leaving the intricate, web-like edges free to add a fragile, natural texture to your work.
12. Coil Fabric Strips into a Galactic Spiral

Generate a strong sense of motion by coiling thin strips of fabric into a tight spiral.
Start from the center of your hoop and twist the fabric as you stitch it down, creating a dense, textural base.
Work your way outwards, alternating colors to mimic the bands of a swirling galaxy.
Once the fabric base is complete, embellish it heavily with a dense mix of beads, sequins, and metallic knots to represent stars and cosmic dust.
13. Sculpt Fluffy Clouds from Wool Roving
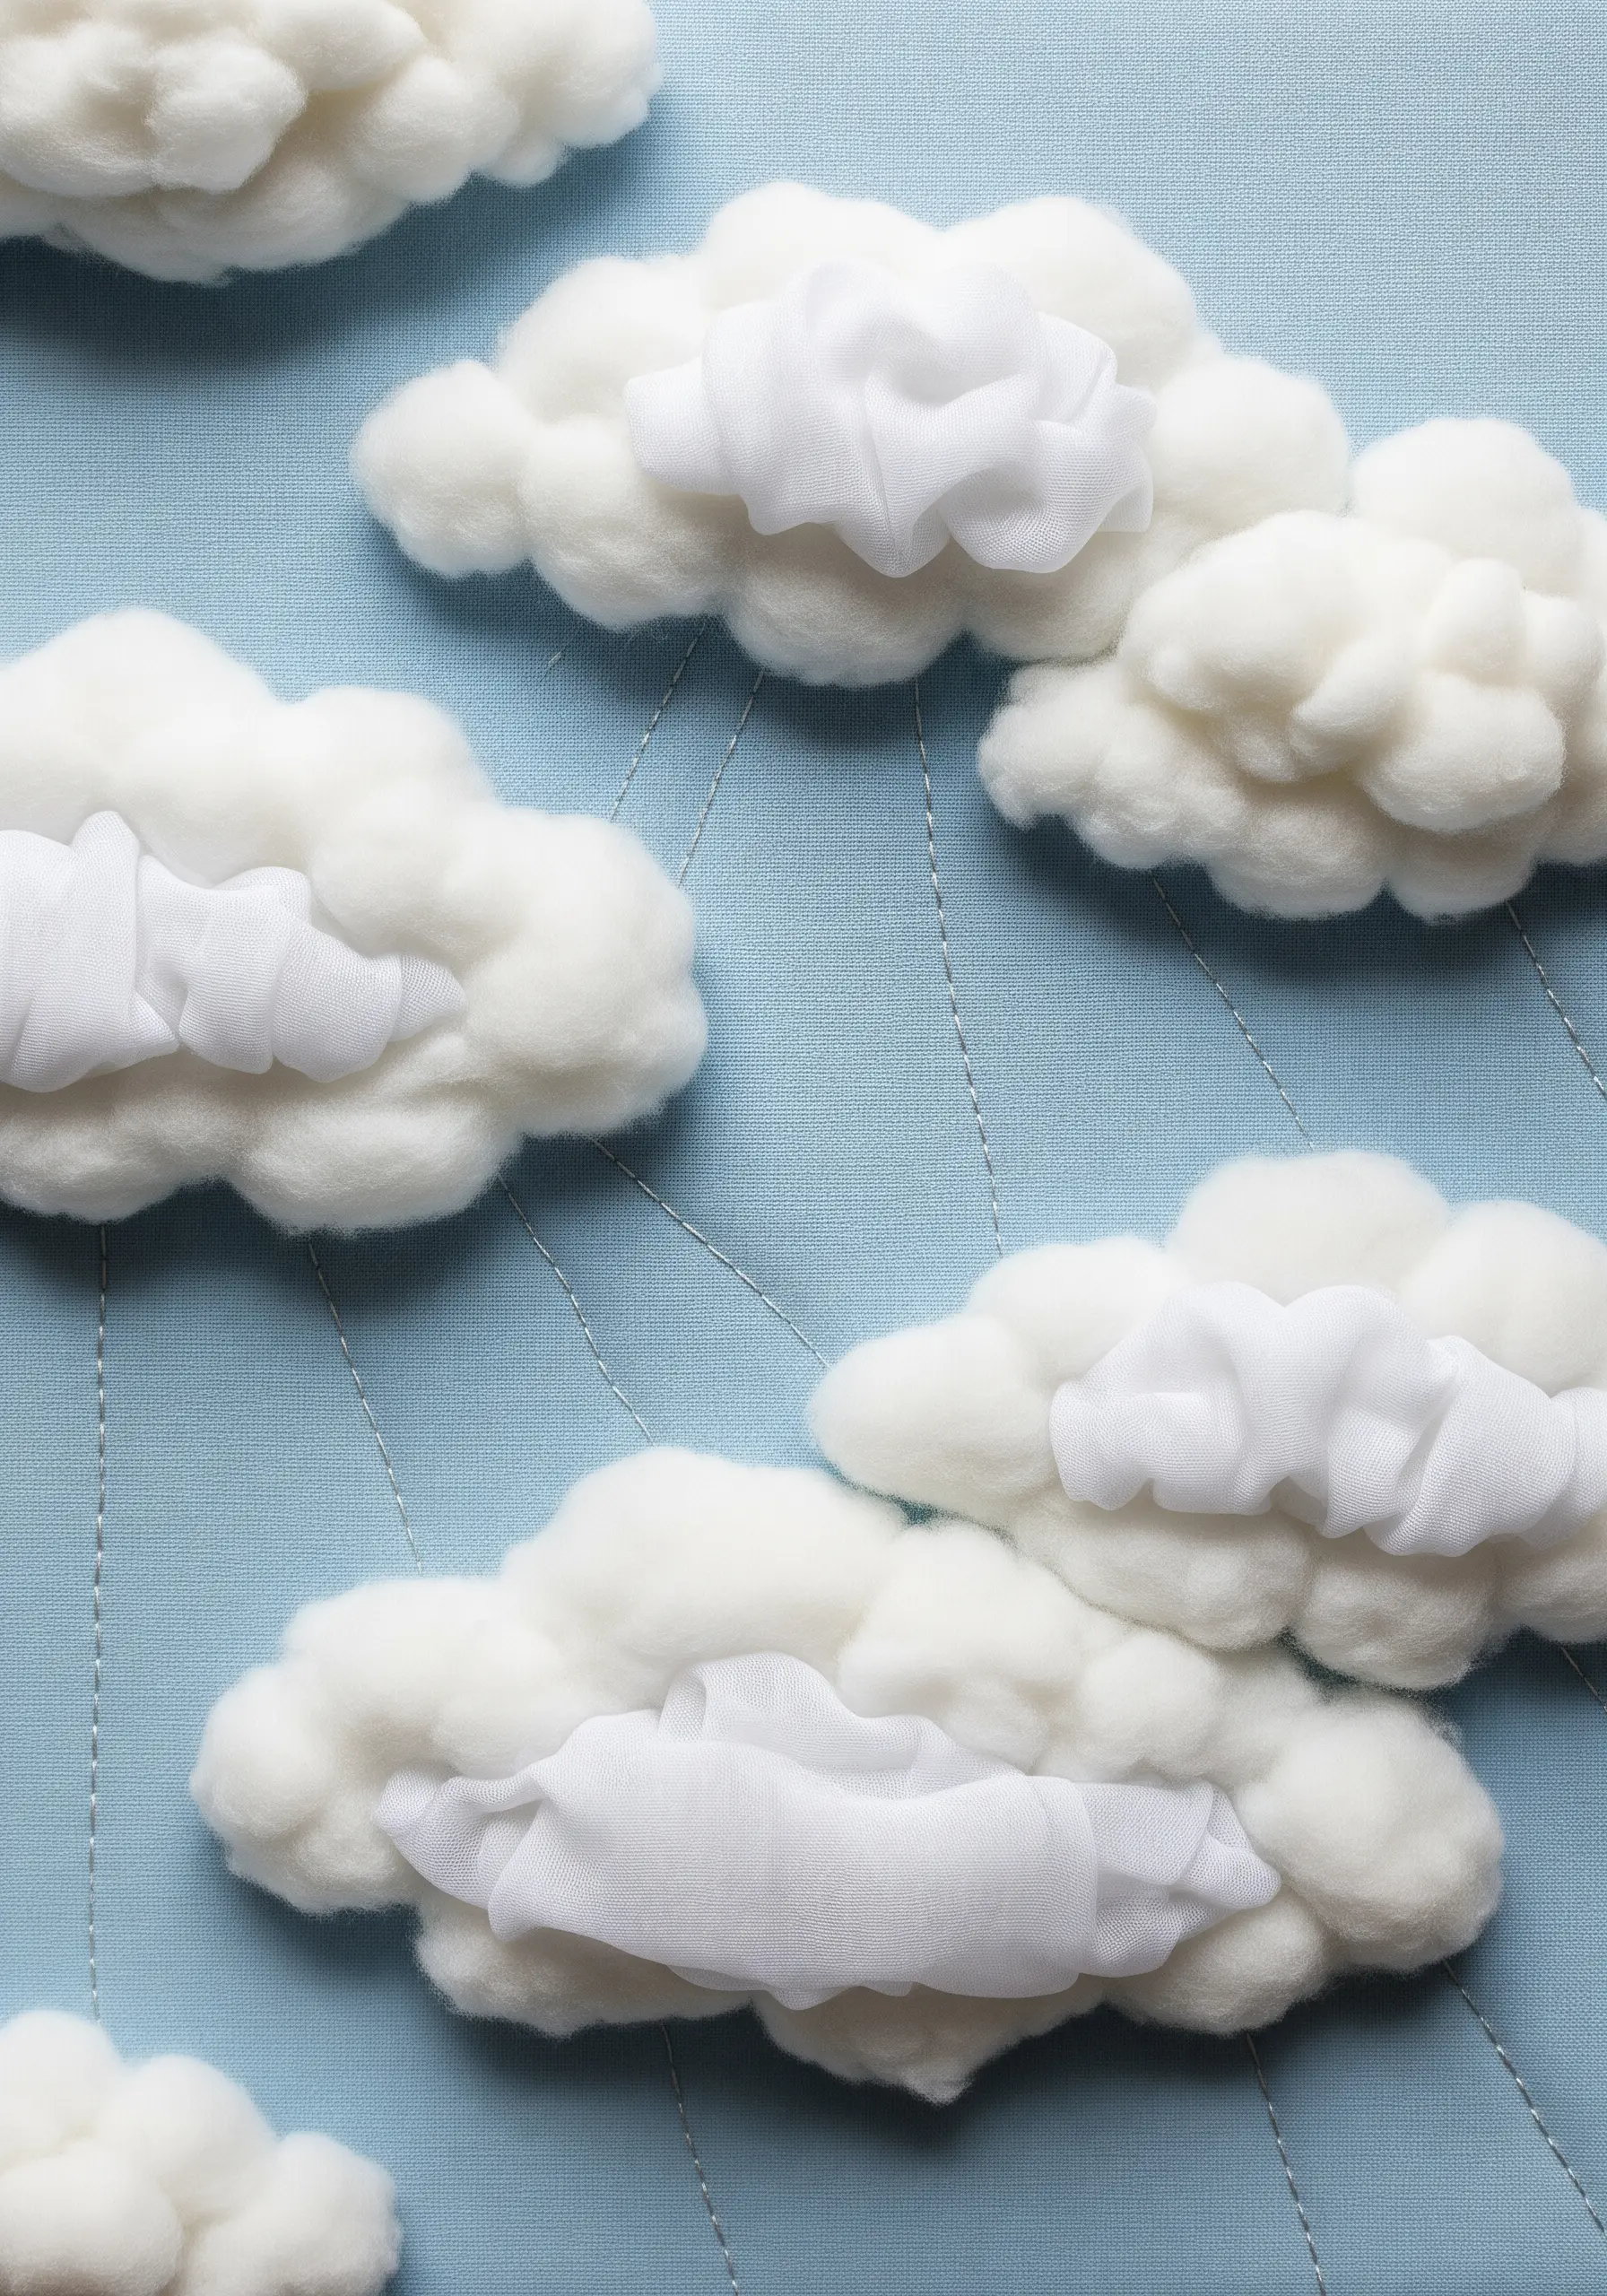
For truly three-dimensional clouds, move beyond thread and embrace the texture of wool roving or stuffing.
Pull apart and shape the wool into cloud forms directly on your fabric, then secure them with a few hidden tacking stitches.
To add highlights and another layer of texture, gently gather a small piece of sheer white fabric, like organza or chiffon, and stitch it to the surface of your wool cloud.
Simple running stitches in a matching thread can represent rain, anchoring the floating clouds to the composition.
14. Frame a Scene with Reverse Appliqué Windows

Instead of adding fabric on top of your background, cut into it to reveal a pattern beneath.
Layer a solid fabric over a patterned one. Stitch the outlines of your windowpanes, then carefully trim away the top layer of fabric from inside your stitched lines.
This reverse appliqué technique creates a crisp, clean frame and a wonderful sense of looking into another world.
Finish the raw edges of the ‘windows’ with a tight blanket stitch or a thin line of satin stitch for a polished look.
15. Explore Texture in a Monochromatic Collage
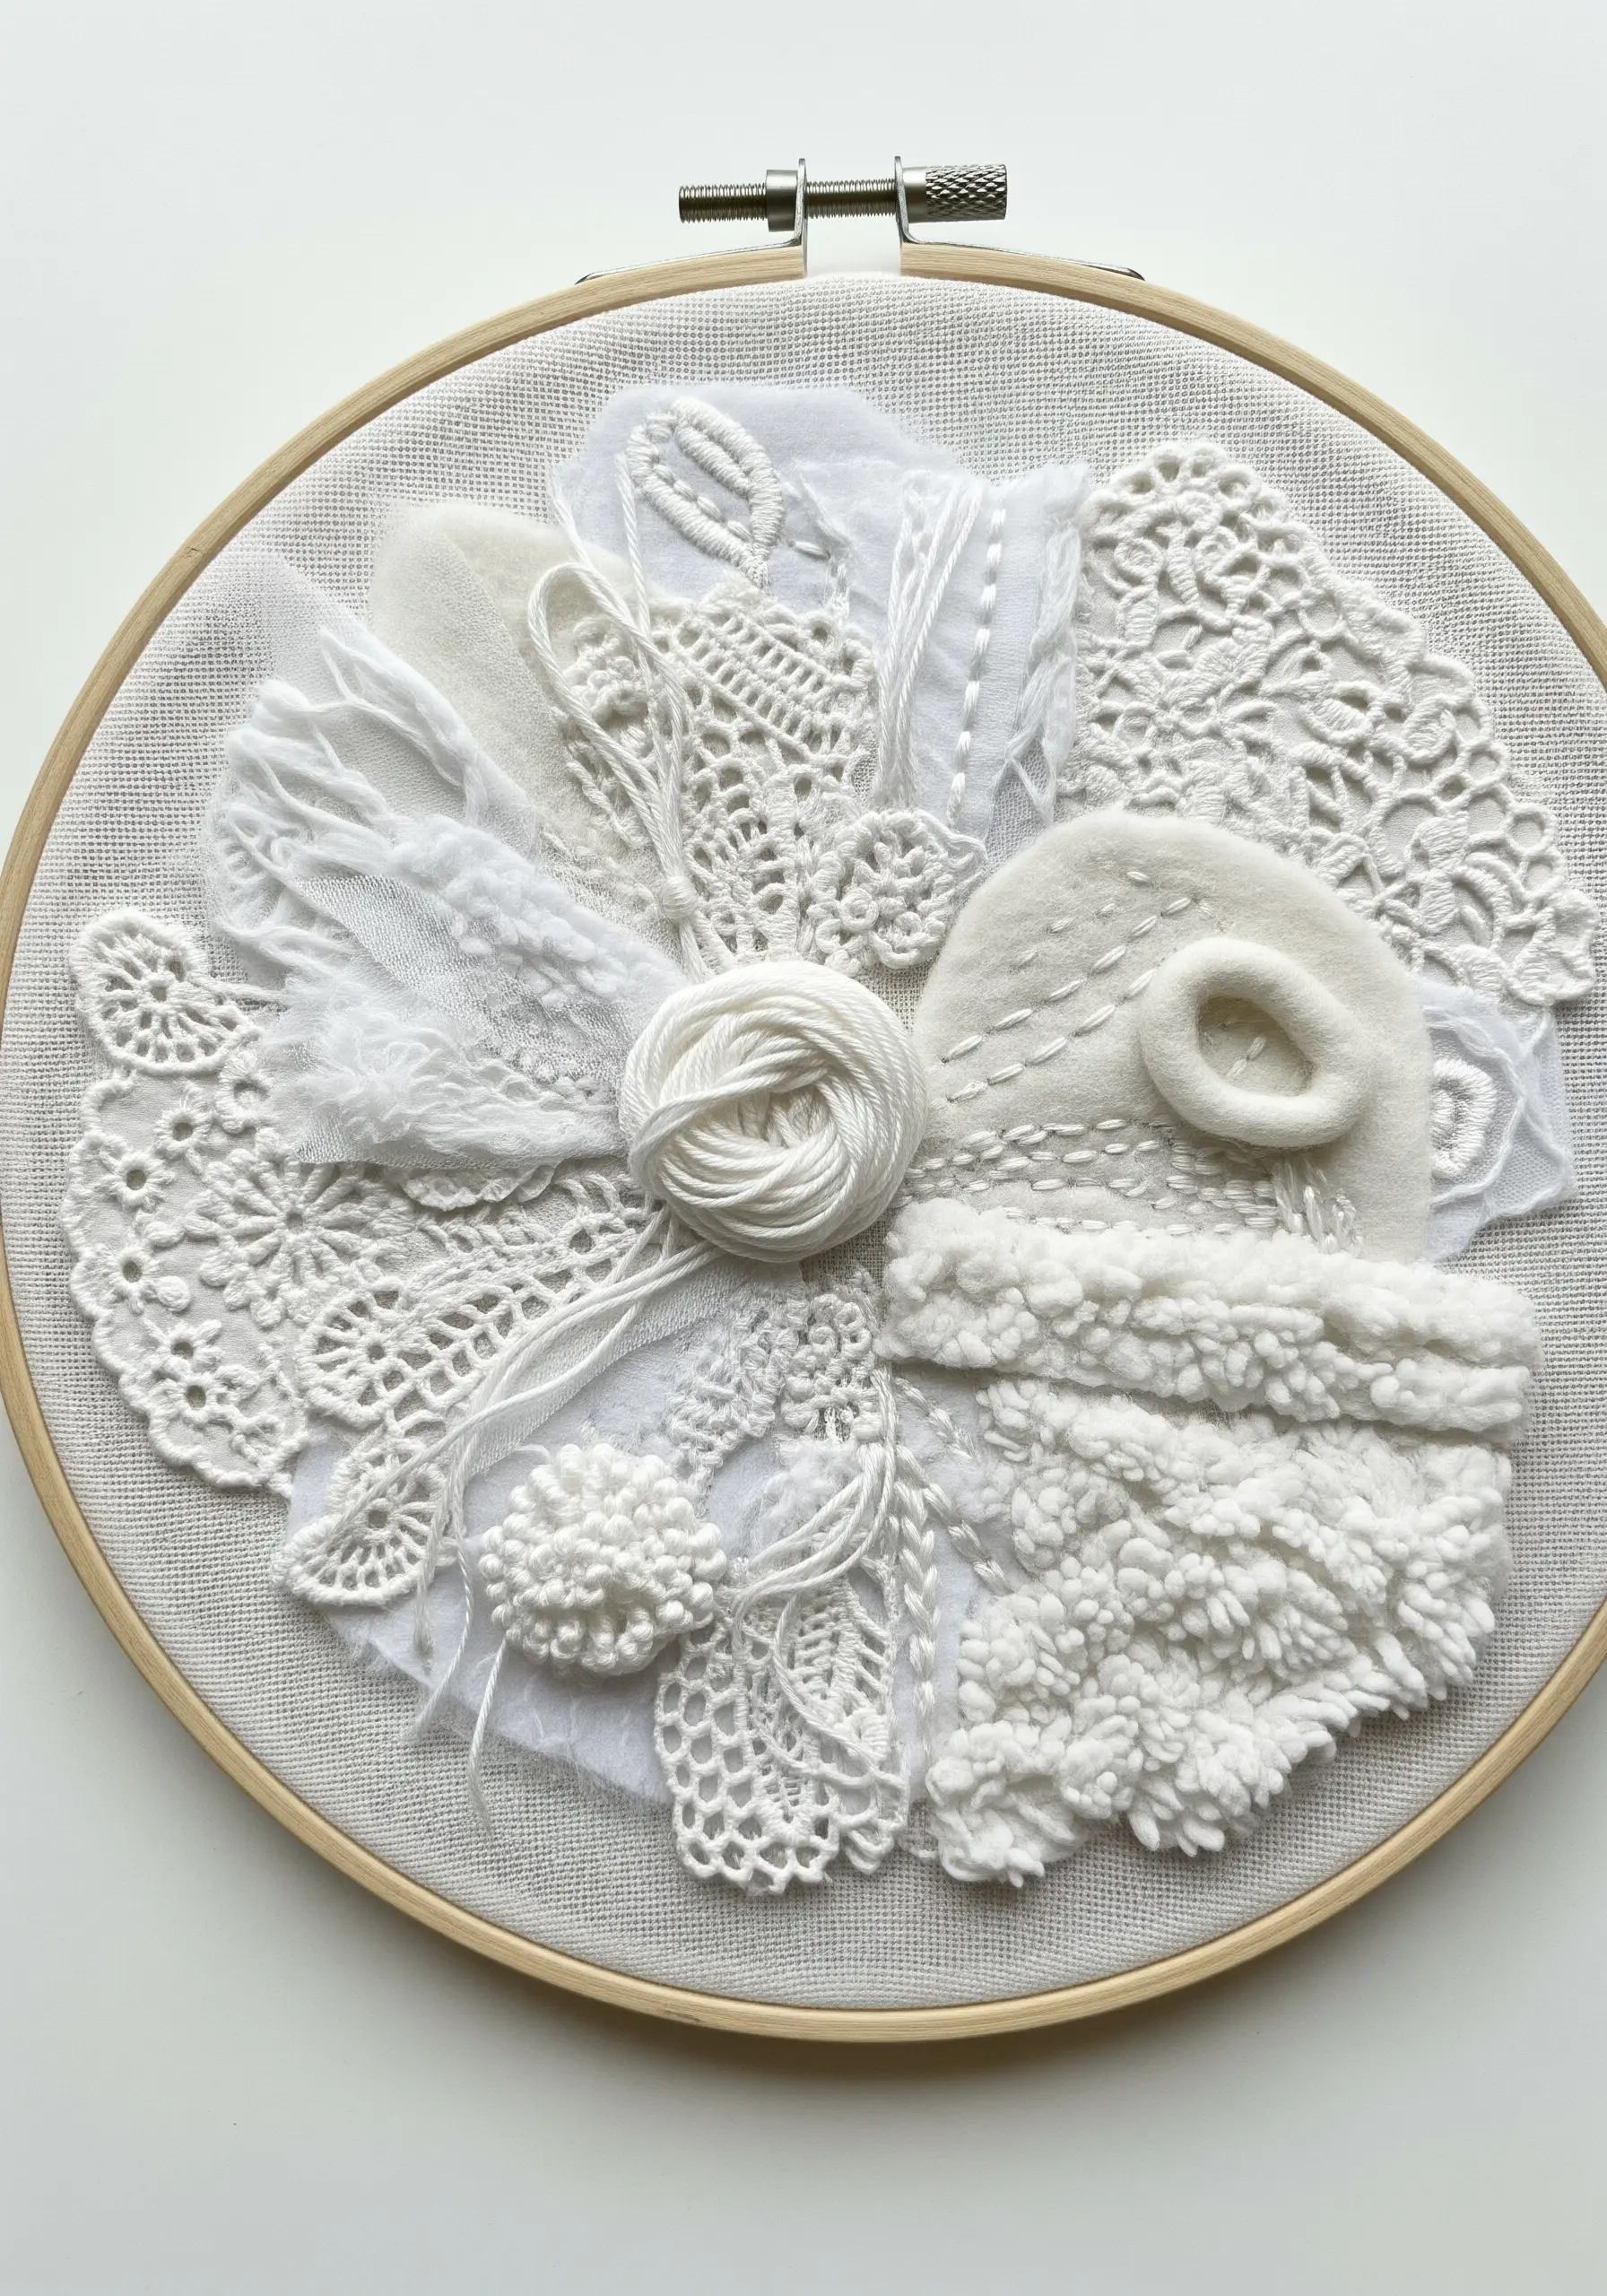
Discover how powerful texture can be by limiting your palette to a single color.
Gather a wide variety of materials in shades of white, cream, or grey—lace, wool, tulle, canvas, felt, and thick yarn.
Arrange these materials in a composition that relies solely on the interplay of light and shadow across different surfaces.
Without color to distract the eye, the unique characteristics of each material become the star of the piece.
16. Build a Whimsical Street with Fussy-Cut Fabrics
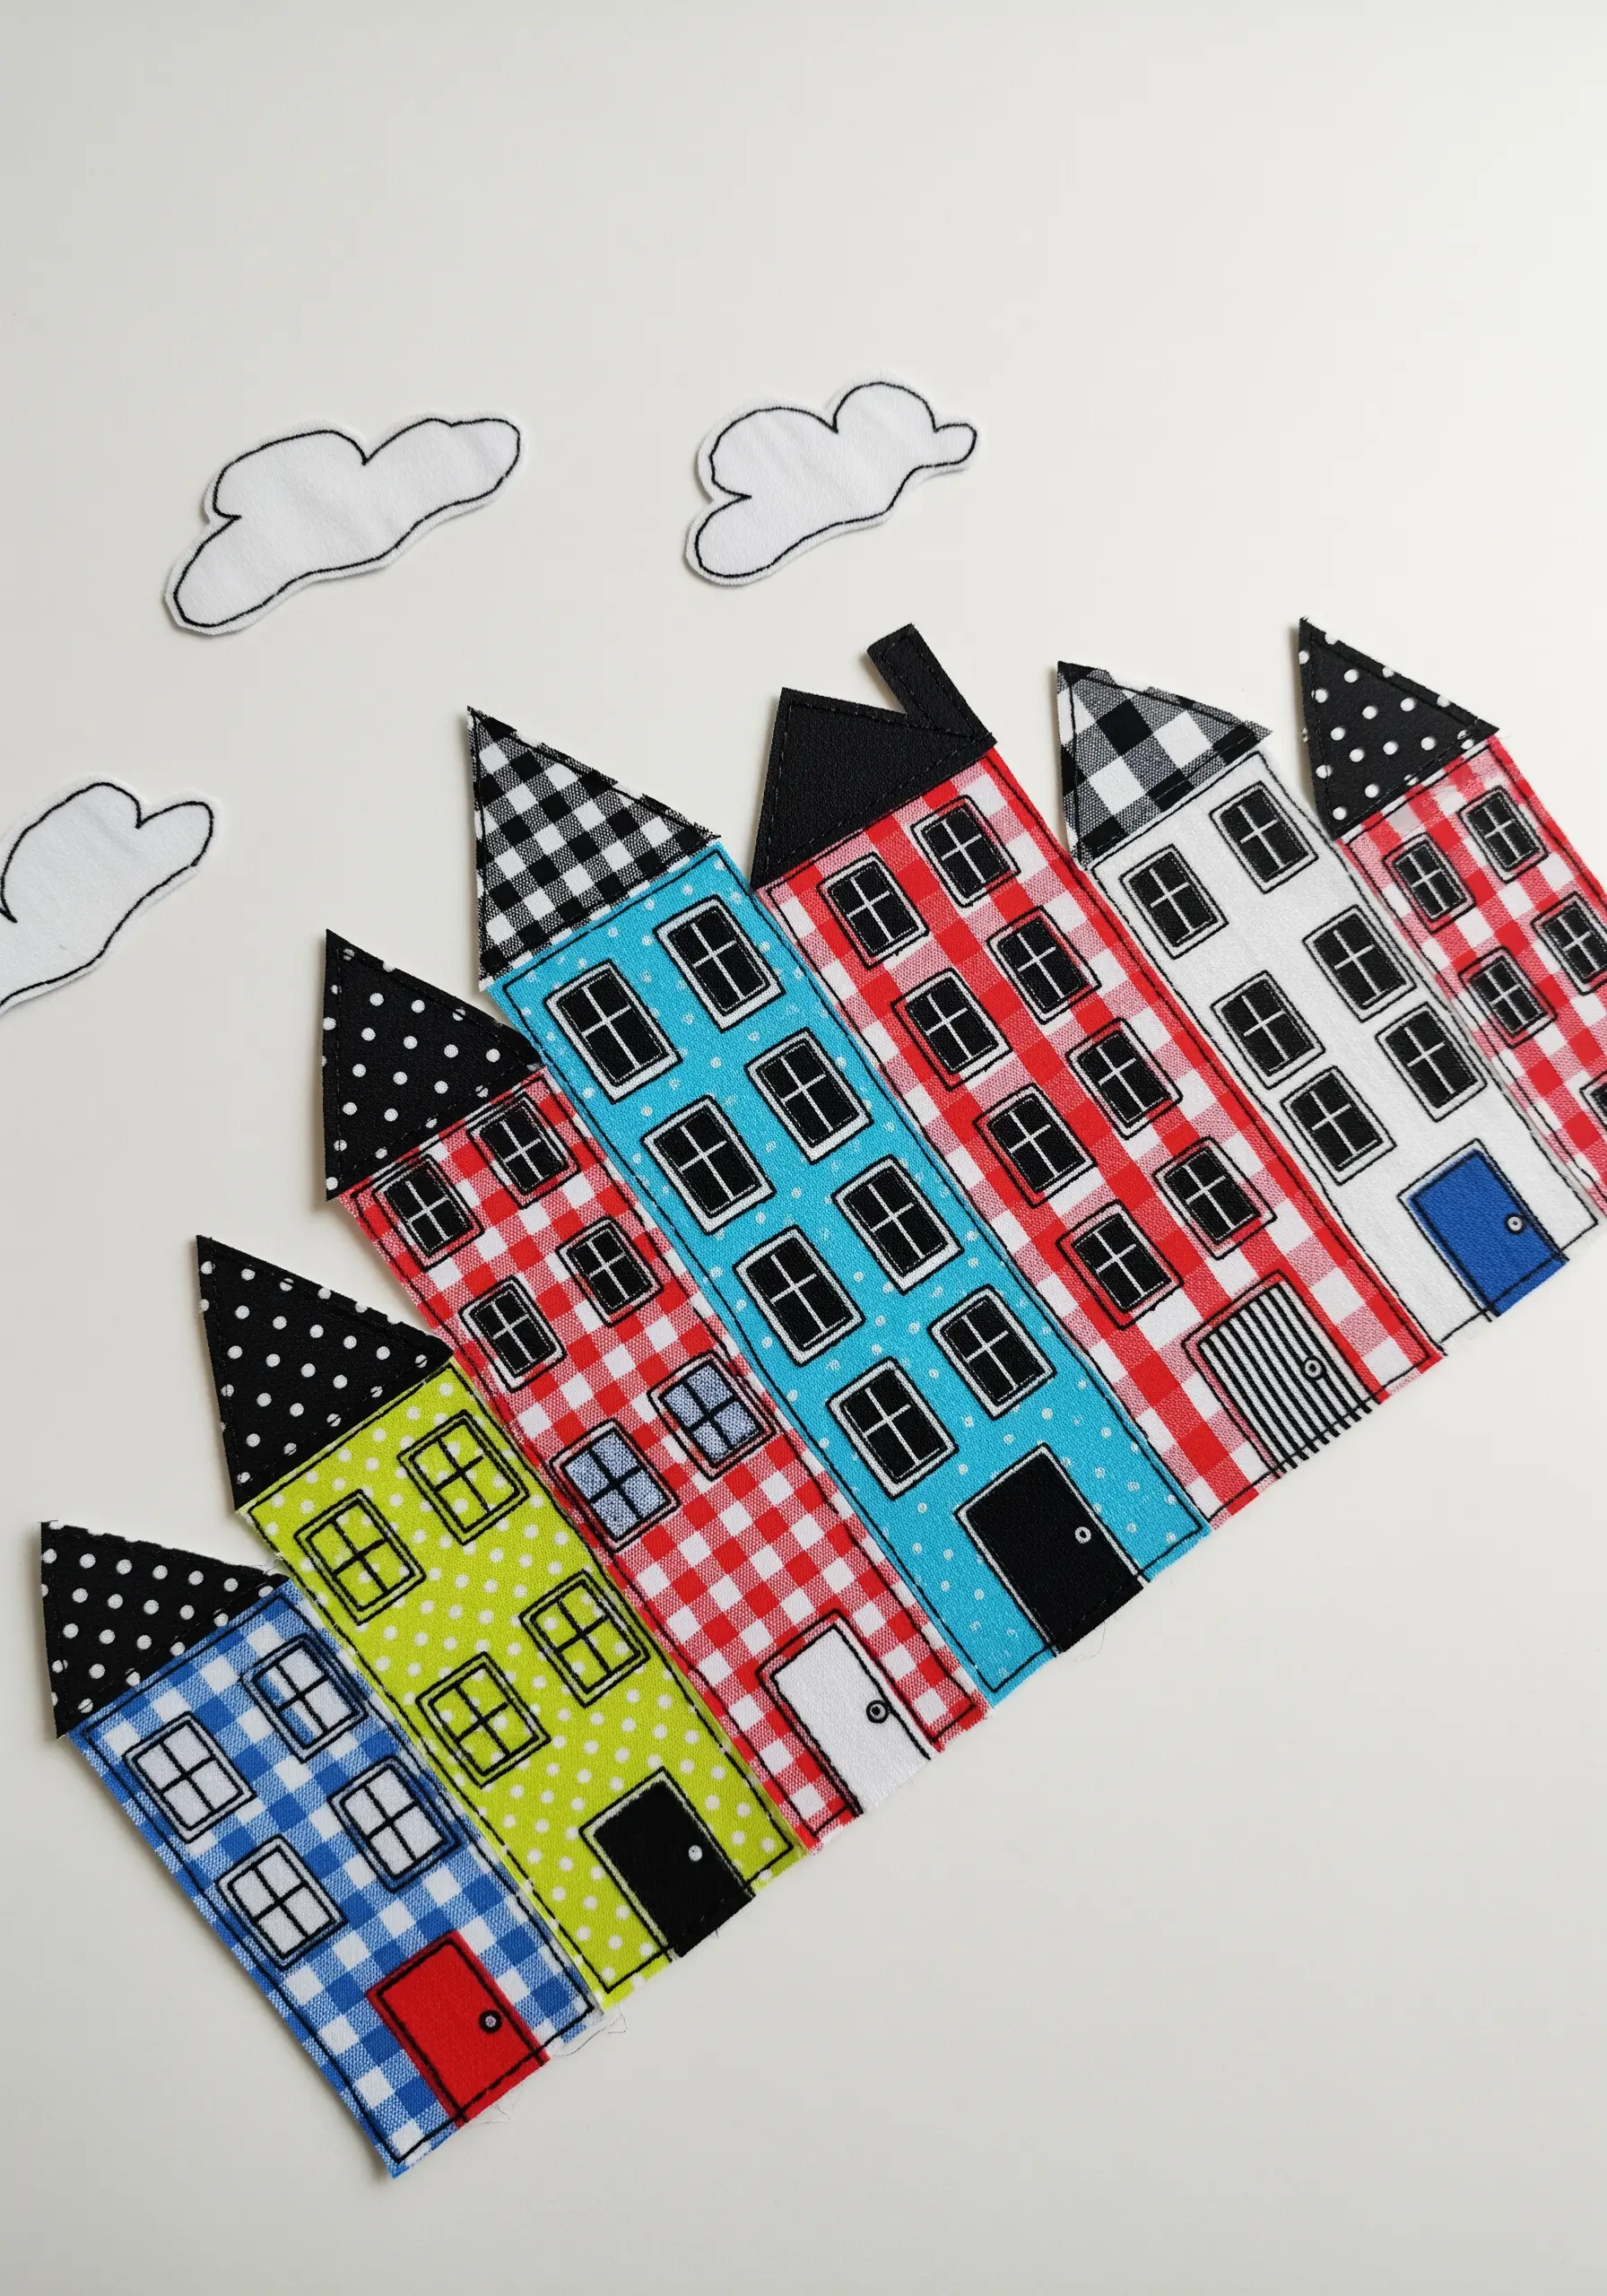
Let your fabric scraps tell a story by using their patterns to build a playful scene.
Select a variety of prints—gingham, polka dots, florals—and cut them into simple house shapes.
Use the technique of ‘fussy cutting’ to strategically place a specific part of a pattern, like a flower or a geometric motif, exactly where you want it to be.
Secure the pieces with a simple running stitch, and allow the joyful mix of patterns to create a vibrant and charming cityscape.
17. Craft Iridescent Wings from Cellophane and Tulle
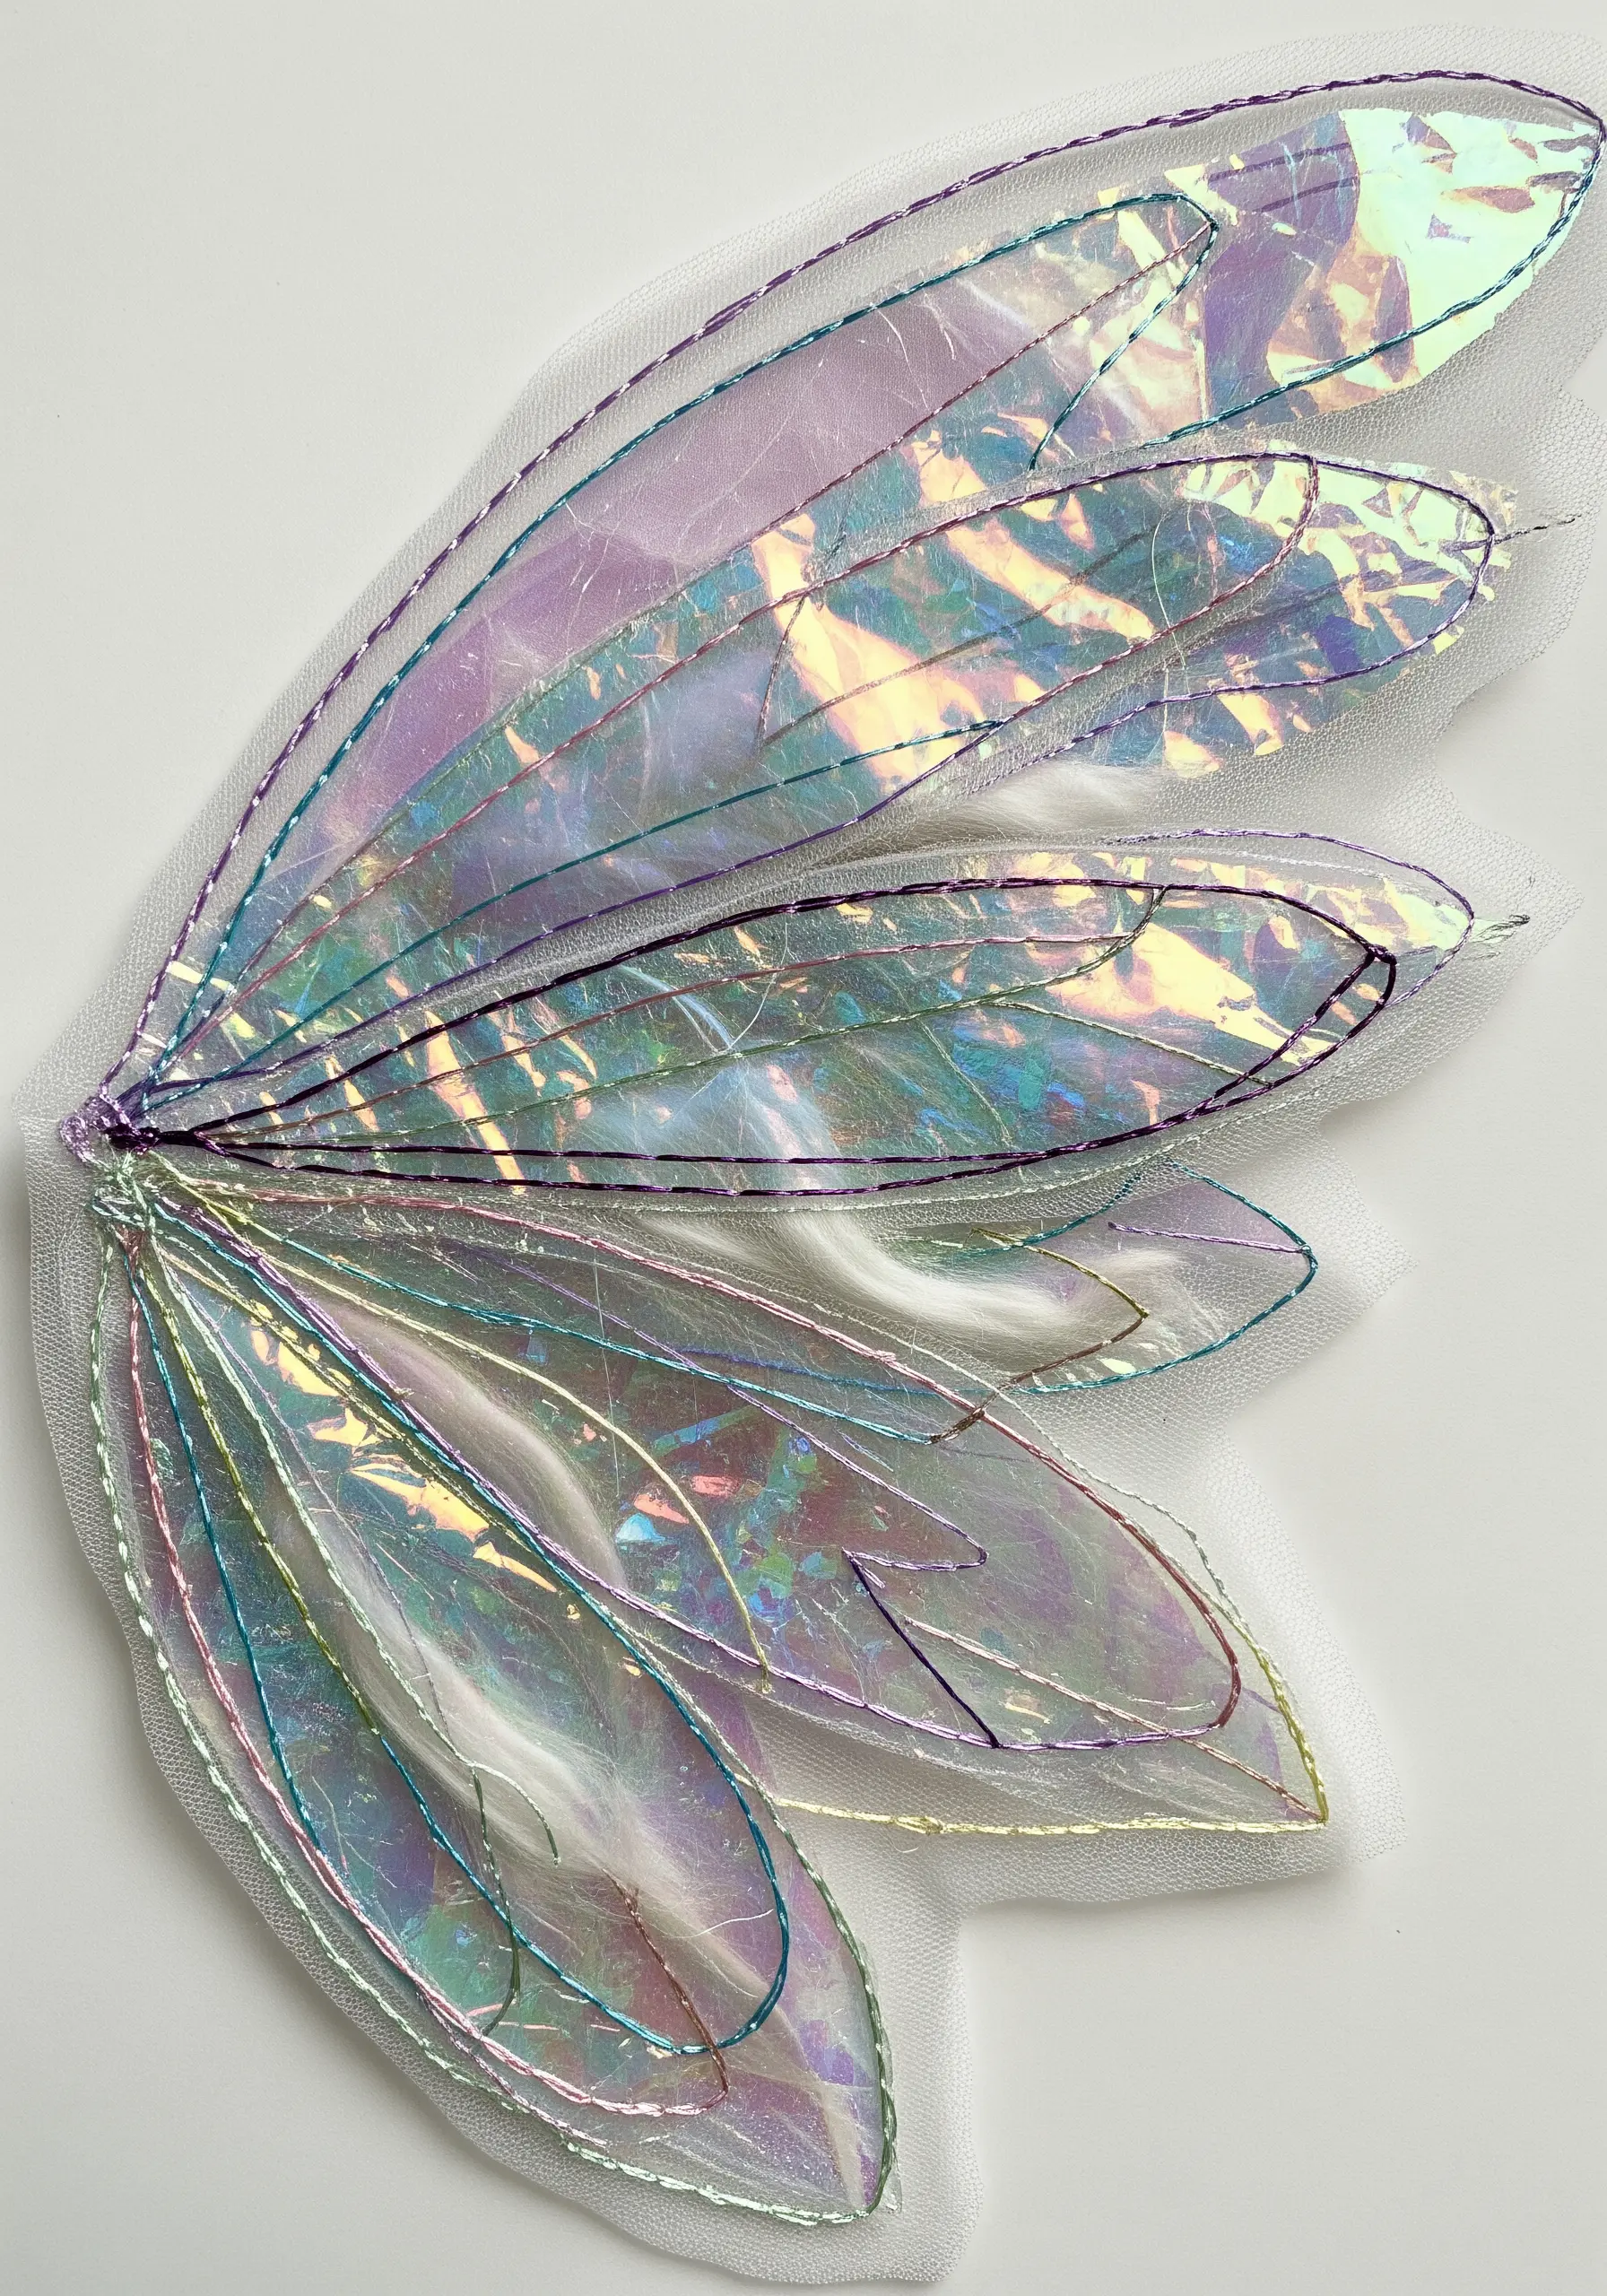
Capture an ethereal, magical quality by using unconventional materials like iridescent cellophane.
To create delicate fairy wings, sandwich a layer of crinkled cellophane between two layers of fine, sheer tulle.
Stitch the wing veins with a simple backstitch, which will trap the cellophane and secure all the layers together.
Once the stitching is complete, carefully trim away the excess material close to your outlines to reveal the shimmering, translucent wings.
18. Add Narrative with Raw-Edge Strips and Script

Create a composition that feels like a treasured manuscript or a worn piece of a journal.
Horizontally layer strips of ripped canvas and linen, embracing the rustic, frayed edges as a key design element.
Over this textured, rugged background, add delicate, free-form script using a single strand of dark thread.
The strong contrast between the raw, heavy fabric and the fine, flowing lines of the stitching creates a beautiful and poetic, journal-like effect.
19. Construct a Bejeweled Geode with Fabric and Beads
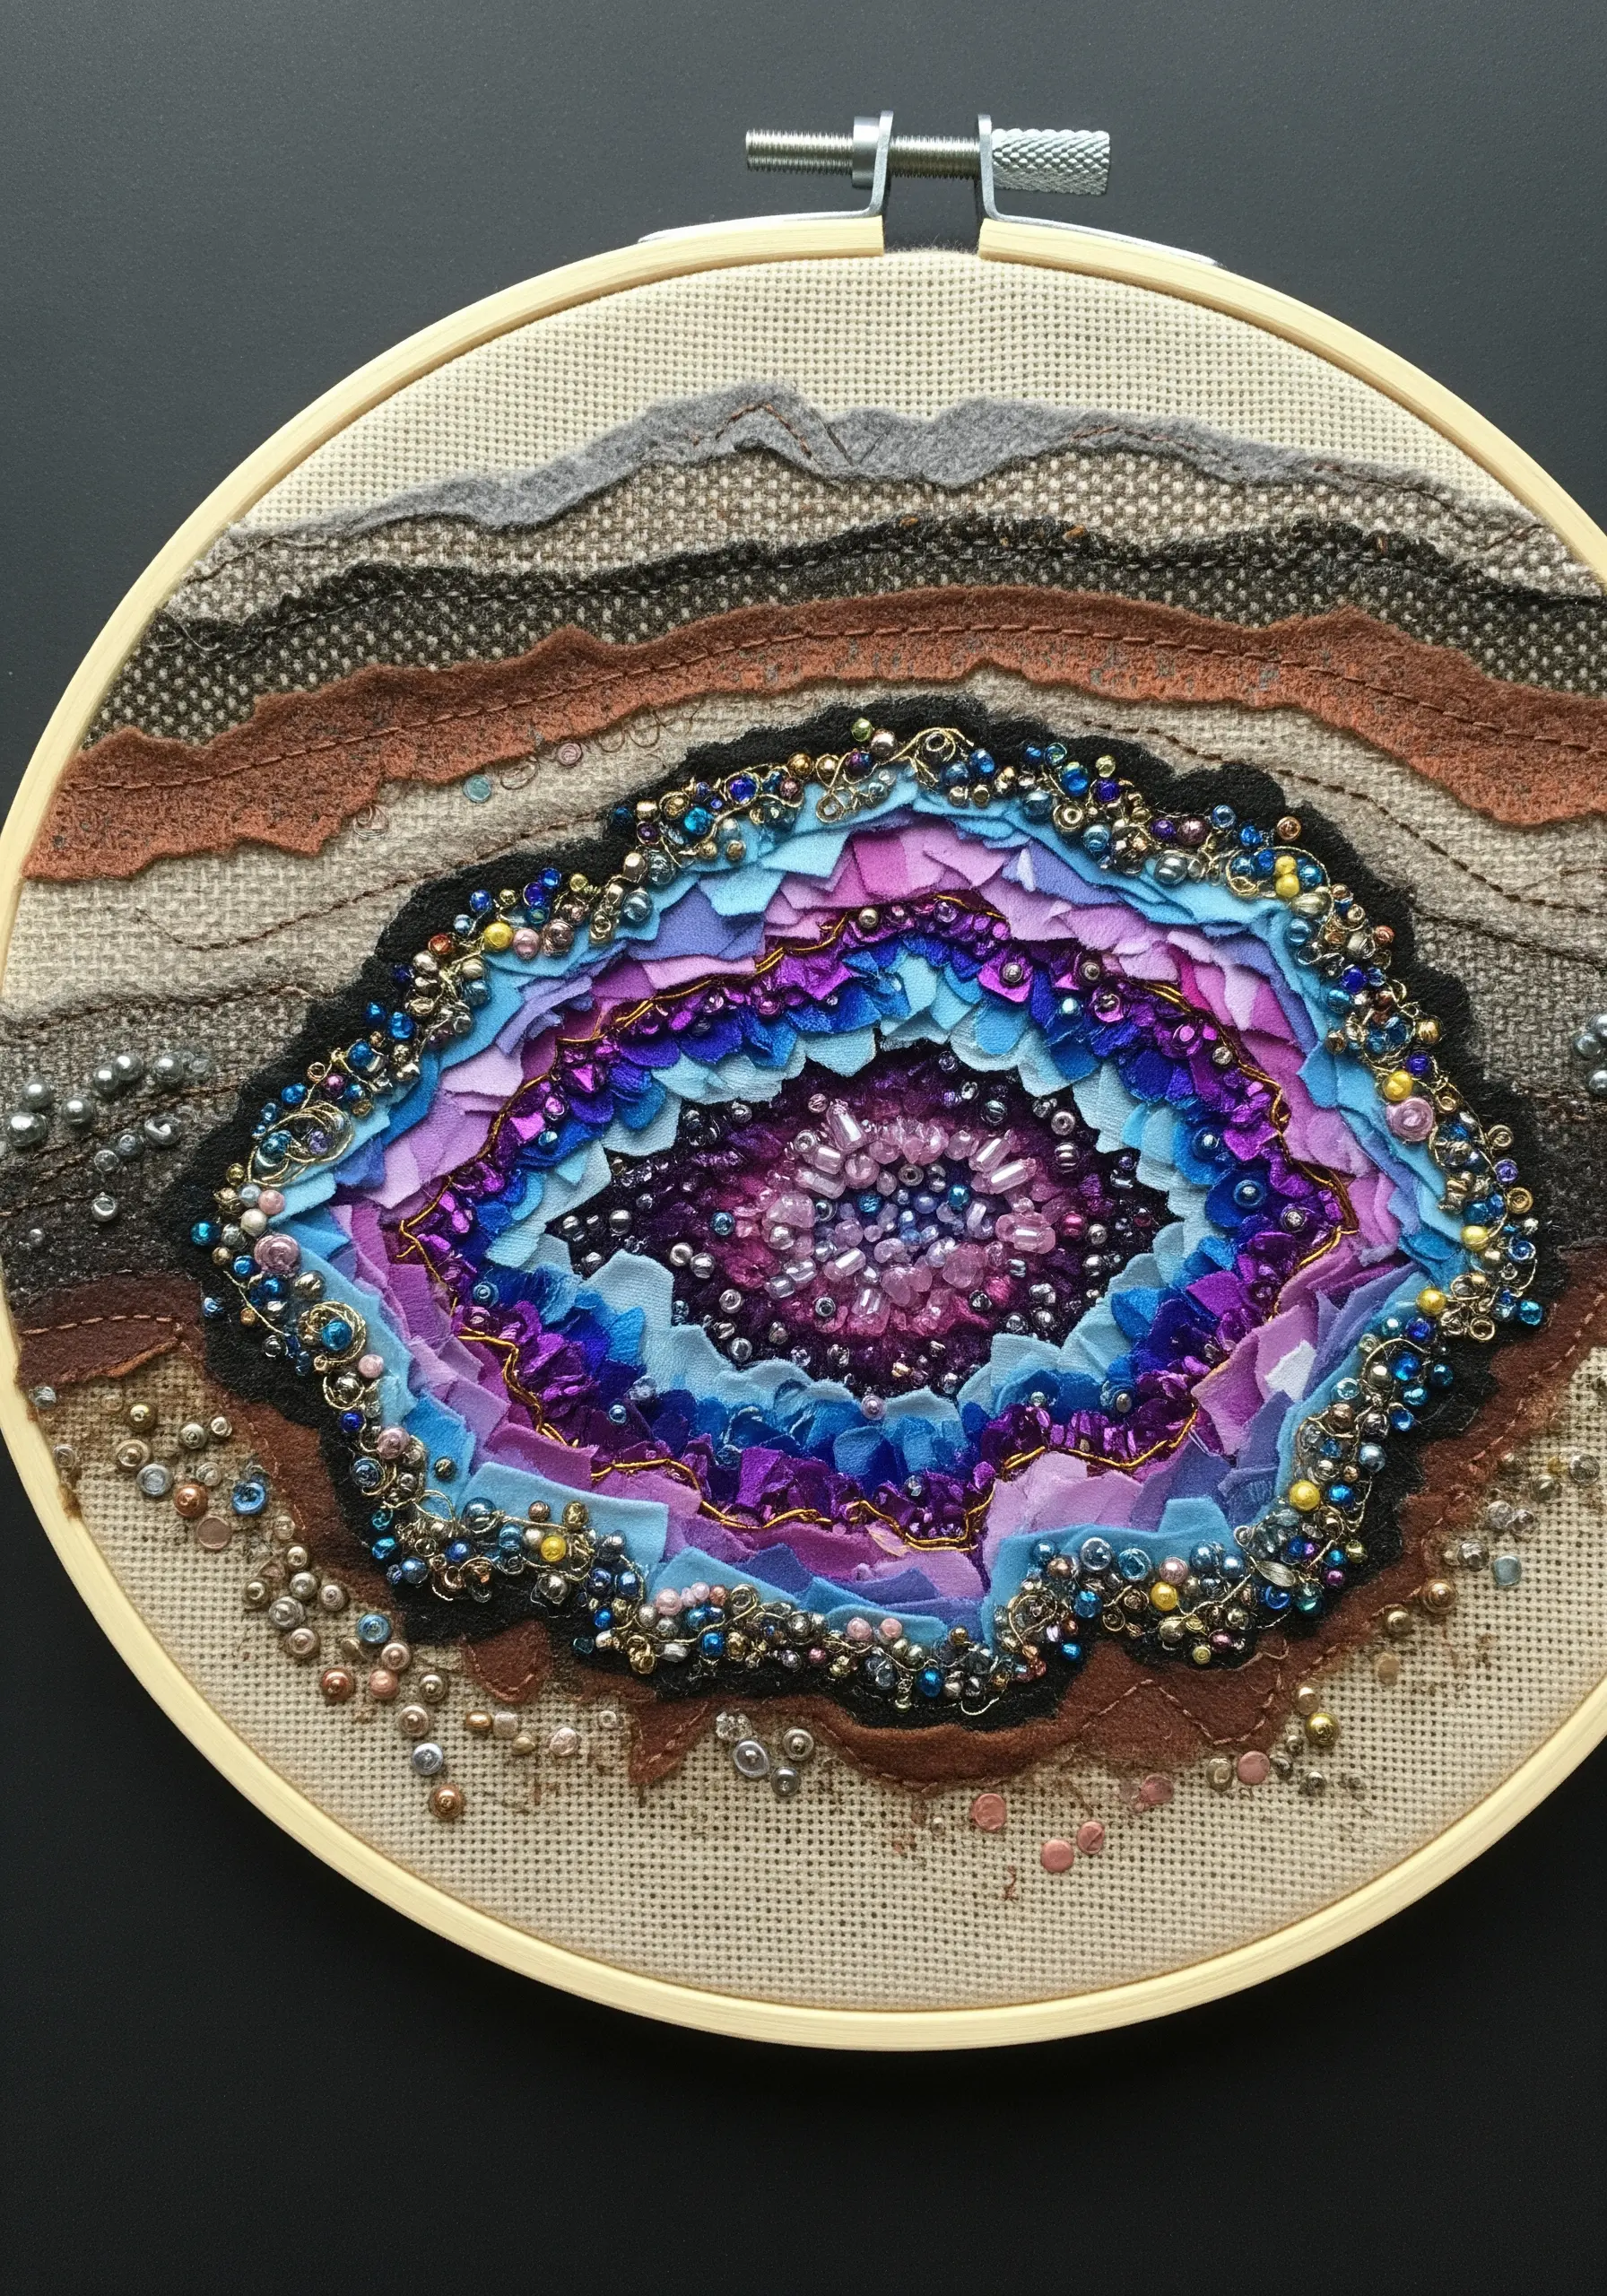
Build a stunning, crystal-like formation using concentric layers of fabric and beadwork.
Start by creating rings of ruched or folded fabric strips, working from earthy, darker tones on the outer edges toward bright, jewel-toned fabrics in the center.
Fill the very center with a dense cluster of seed beads to create a crystalline core.
Embellish the surrounding fabric rings with more scattered beads and French knots to mimic the sparkling, mineral-like texture found in a real geode.


