

You’ve mastered the basic stitches, and you follow patterns with a steady hand. But perhaps you’re feeling that quiet pull to move beyond imitation and into true artistry—to make work that feels not just crafted, but expressive and intentional.
The secret to elevating your embroidery isn’t about learning dozens of complex new stitches. It’s about refining your approach. It’s in choosing the right stitch for the right texture, understanding how stitch direction can mimic light, and seeing how a simple change in thread type can transform an entire design.
These nature-inspired pieces are more than just project ideas; they are invitations to explore these subtle yet powerful techniques. Use them as a starting point to see how you can translate the textures, colors, and forms of the natural world into thread, creating hoop art that is uniquely, beautifully, and confidently yours.
1. Elevate Florals with Textured French Knots
Create the delicate, clustered look of Queen Anne’s Lace by mastering the French knot.
Instead of keeping them uniform, vary the number of times you wrap the thread (once or twice) to build subtle dimension.
For the stems, use a whipped backstitch with a fine, single strand of thread to achieve a smooth, uninterrupted line that contrasts beautifully with the textured blossoms.
Stitching on a high-quality linen or cotton-linen blend provides a soft, organic backdrop that enhances the botanical theme.
2. Master Smooth Fills with a Satin Stitch Foundation
To achieve a flawlessly smooth satin stitch on motifs like these mushroom caps, you must first create a foundation.
Outline the shape with a split stitch before you begin filling it in.
This simple step creates a slightly raised edge that acts as a guide, preventing your satin stitches from pulling unevenly and keeping the shape crisp.
For the grass, use detached chain stitches (lazy daisies) or loop stitches of varying heights to create a wonderfully uneven, organic texture that grounds the main subject.
3. Create a Botanical Tapestry with Stitch Layering

Build a dense, luxurious texture by layering your stitches within a defined shape, like this crescent moon.
Begin with the largest elements—the main leaves stitched in fishbone or satin stitch.
Next, fill the medium-sized gaps with smaller flowers using lazy daisy stitches.
Finally, pack the remaining tiny spaces with French knots and seed stitches.
This methodical layering creates a rich visual depth, and stitching on dark navy fabric makes the pastel and metallic threads appear to glow.
4. Achieve Lifelike Fur with Needle Painting
Bring a creature like this bee to life by using the long-and-short stitch, also known as needle painting.
Use a single strand of floss and blend shades of yellow, black, and ochre to mimic the texture of fur.
Always angle your stitches in the direction of natural growth to create realistic movement and form.
For the wings, use a single strand of light gray or silver thread to outline them, then add a few sparse straight stitches inside to suggest transparency without adding bulk.
5. Paint a Sky with Directional Stitching
The incredible energy in this sunset comes not just from color, but from stitch direction.
To create that radiating glow, use long straight stitches or a split stitch, all emanating from a central point behind the mountains.
By layering concentric rings of color, you build a gradient that feels luminous.
For the mountains, angle your satin stitches to follow their natural slopes and shadows, turning a flat design into a dynamic landscape with palpable depth.
6. Capture Underwater Motion with Varied Textures

To create a dynamic underwater scene, assign different textures to each element.
Use a whipped backstitch for some seaweed stalks to make them smooth and flowing, then use a chunkier chain stitch for others to add a bubbly, linked texture.
Create the sandy ocean floor with a dense field of French knots in several shades of beige and off-white.
The contrast between the linear seaweed and the knotted seabed makes the entire piece feel alive with gentle motion.
7. Achieve Botanical Precision with the Fishbone Stitch
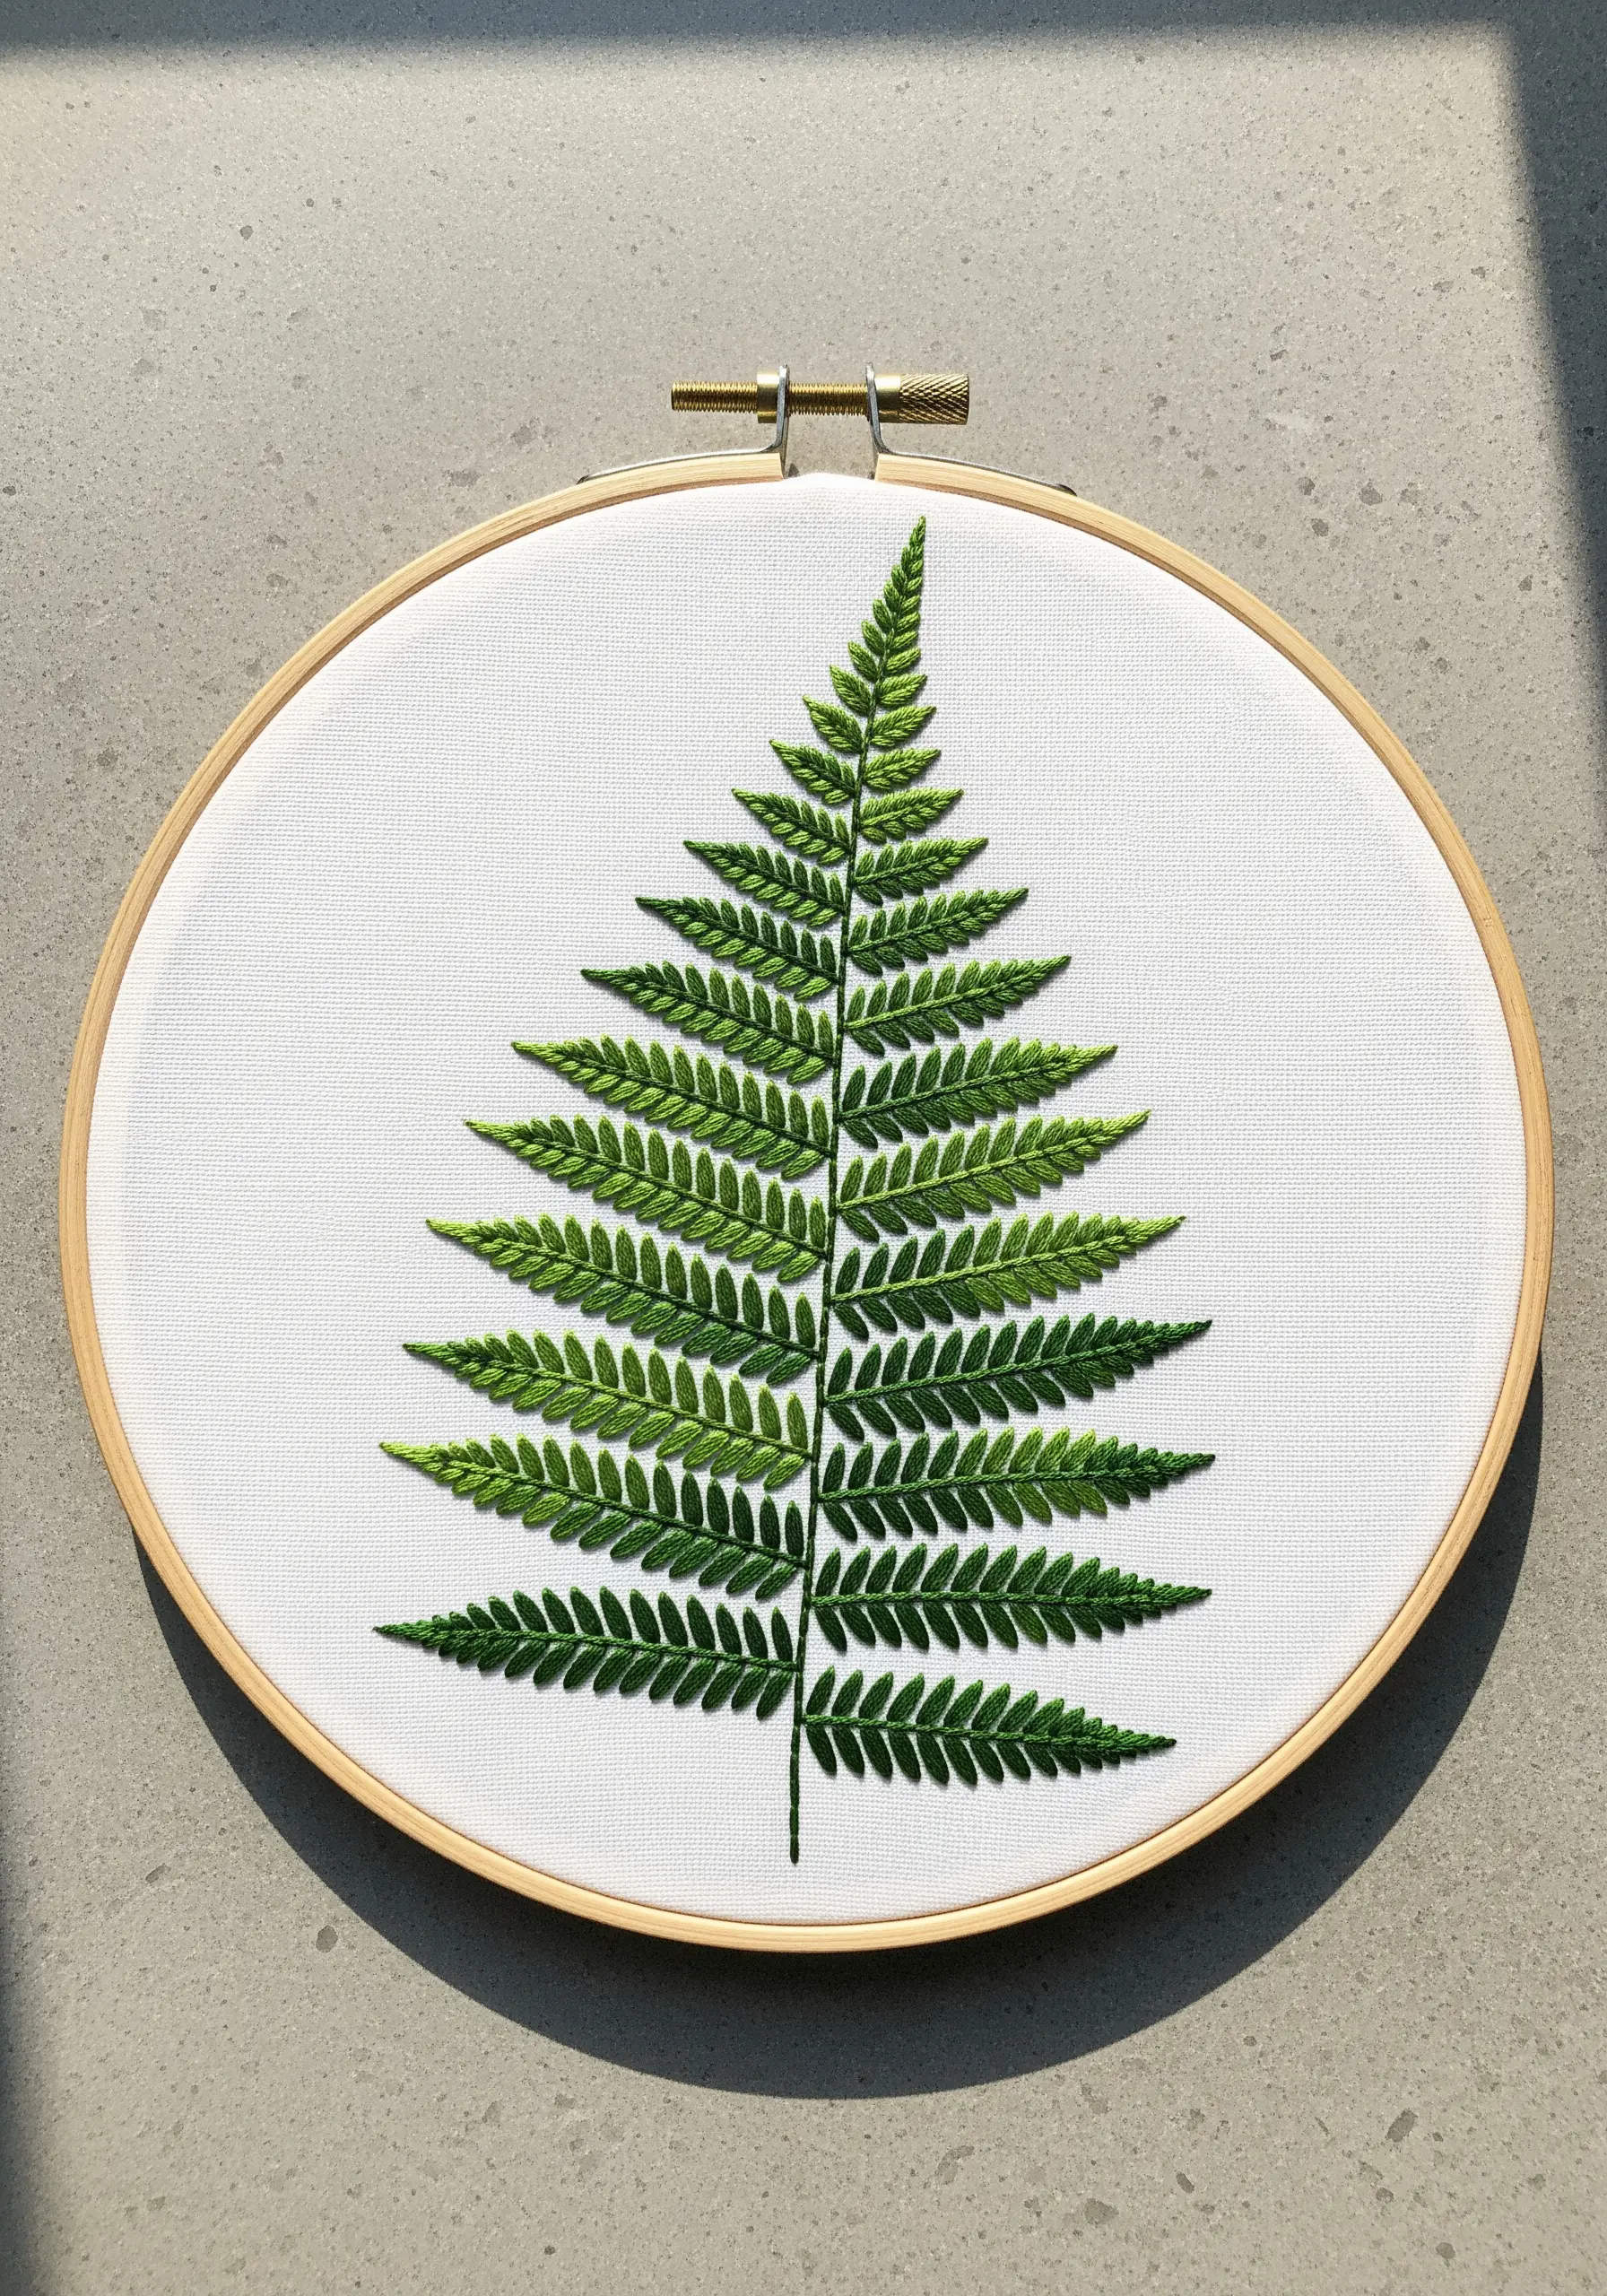
The structural elegance of a fern frond is perfectly captured using the fishbone stitch.
The key to a polished result is consistency: maintain the same stitch angle and length for each leaflet to create a clean, symmetrical pattern.
To add subtle realism, use two or three closely related shades of green, changing your thread color as you move up the stem.
This creates a natural-looking color gradient that mimics how light hits the plant.
8. Illustrate a Life Cycle Through Stitch Variation

Tell a compelling visual story by assigning a unique stitch to each stage of a natural cycle.
Use tiny, raised French knots for the butterfly eggs to give them a three-dimensional quality.
For the caterpillar, clean satin stitch bands create its iconic stripes, while a padded satin stitch gives the chrysalis a smooth, sculptural form.
Finally, the butterfly wings require detailed long-and-short stitch blending, completing the tactile narrative.
9. Add a Hidden Layer with Glow-in-the-Dark Thread
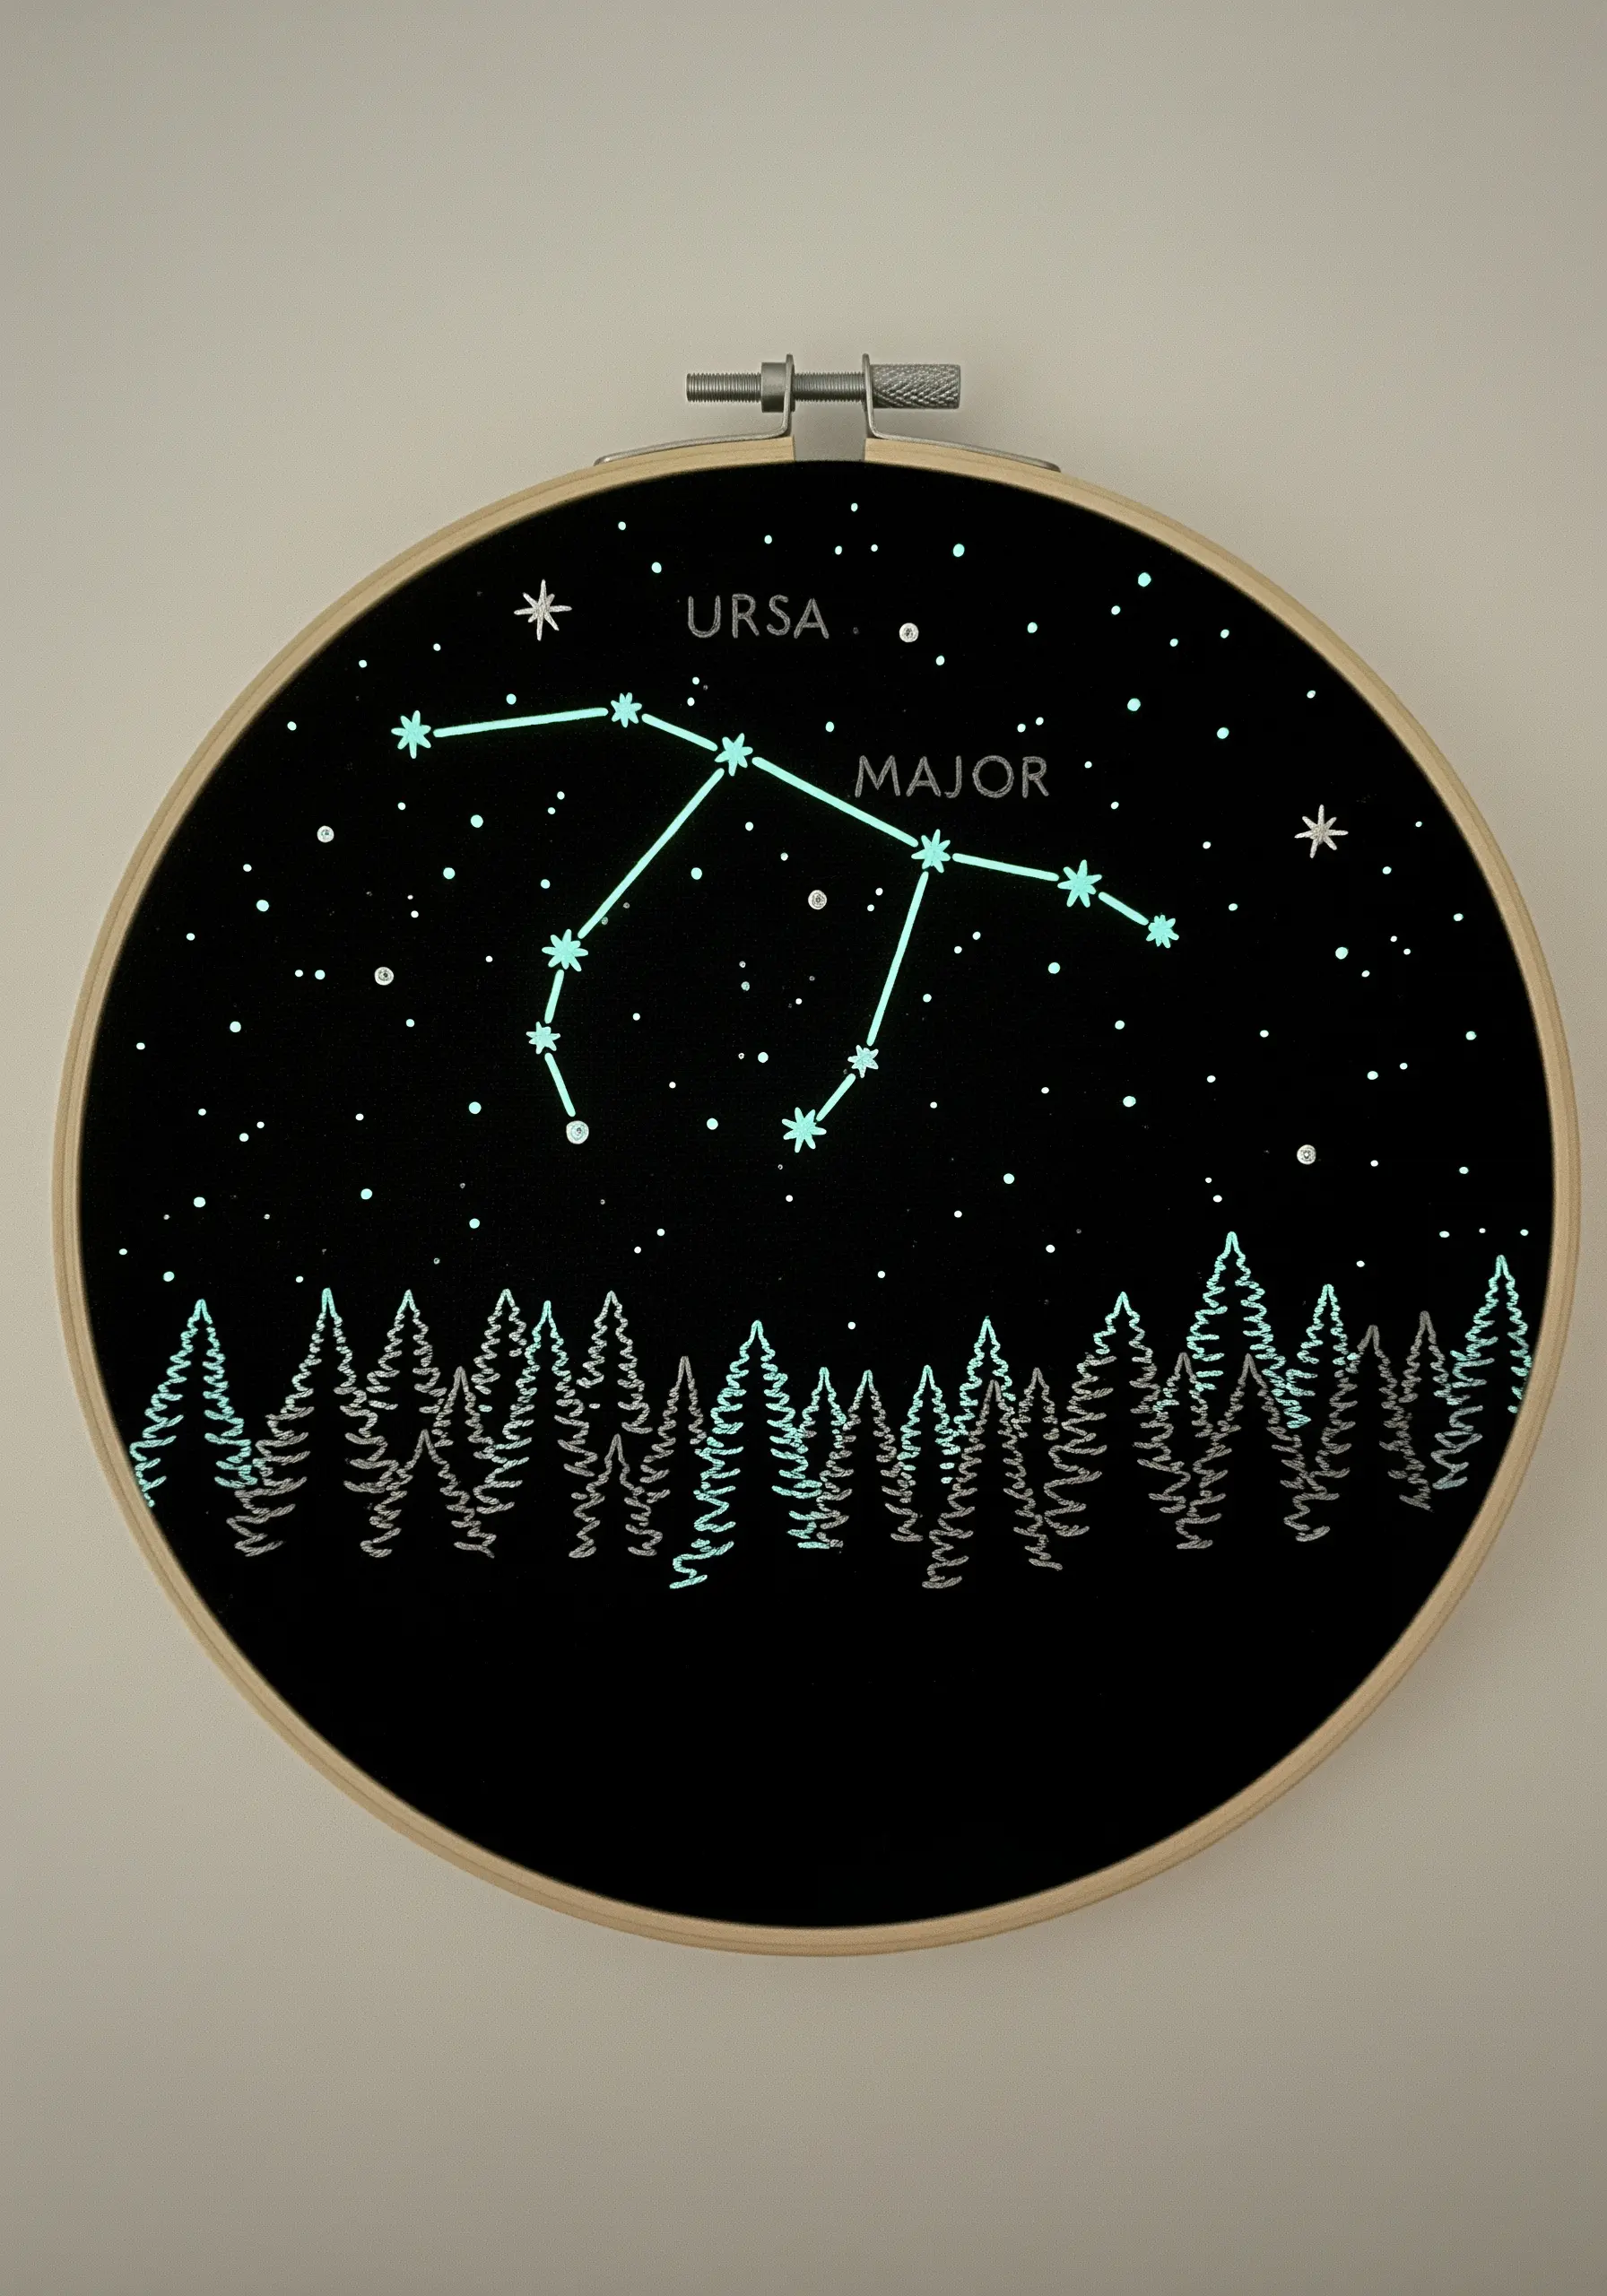
Elevate a simple night sky design into something truly magical by incorporating glow-in-the-dark thread.
Stitch the forest silhouette and background stars with standard white or silver floss.
Then, use the specialty thread for the main constellation lines and the brightest stars.
The piece will look elegant by day, but reveals a secret celestial map when the lights go out, making it one of those minimal celestial embroidery wall designs that bring quiet magic to bedrooms and nursery walls.
10. Define Foliage with Contrasting Herbal Textures

When your design features several types of foliage, using distinct stitches is essential for clarity.
For the lavender, use lazy daisy stitches to form the individual buds, giving them shape and volume.
Recreate rosemary needles with short, angled straight stitches branching off a central stem line.
Finally, suggest thyme with tiny, scattered French knots and seed stitches.
This textural variety ensures each herb is distinct, preventing the greenery from becoming a flat, indistinguishable mass.
11. Create Geode-Inspired Art with Fabric and Wool

Move beyond thread and explore the stunning textures of other materials.
Create the lustrous inner rings by wrapping thin strips of silk ribbon or fabric around a cord, then couching the coil into place.
For the soft, matte outer ring, braid thick wool roving and stitch it down along the edge.
This is one of the best mixed media techniques for embroidery lovers who crave unique art, creating a dramatic contrast that perfectly mimics a natural geode.
12. Stitch an Energetic Seascape with Dynamic Lines

Capture the powerful movement of water with dense, layered linework.
Use a mix of split stitch and straight stitch, varying the thread count from one to six strands to create highlights and shadows within the wave.
For the crashing seafoam, switch to a bright white thread and use dense clusters of French knots and bullion knots.
This contrast between the linear motion of the water and the chaotic texture of the foam is what gives the piece its incredible energy.
13. Build an Organic Bird’s Nest with Free-Form Stitches
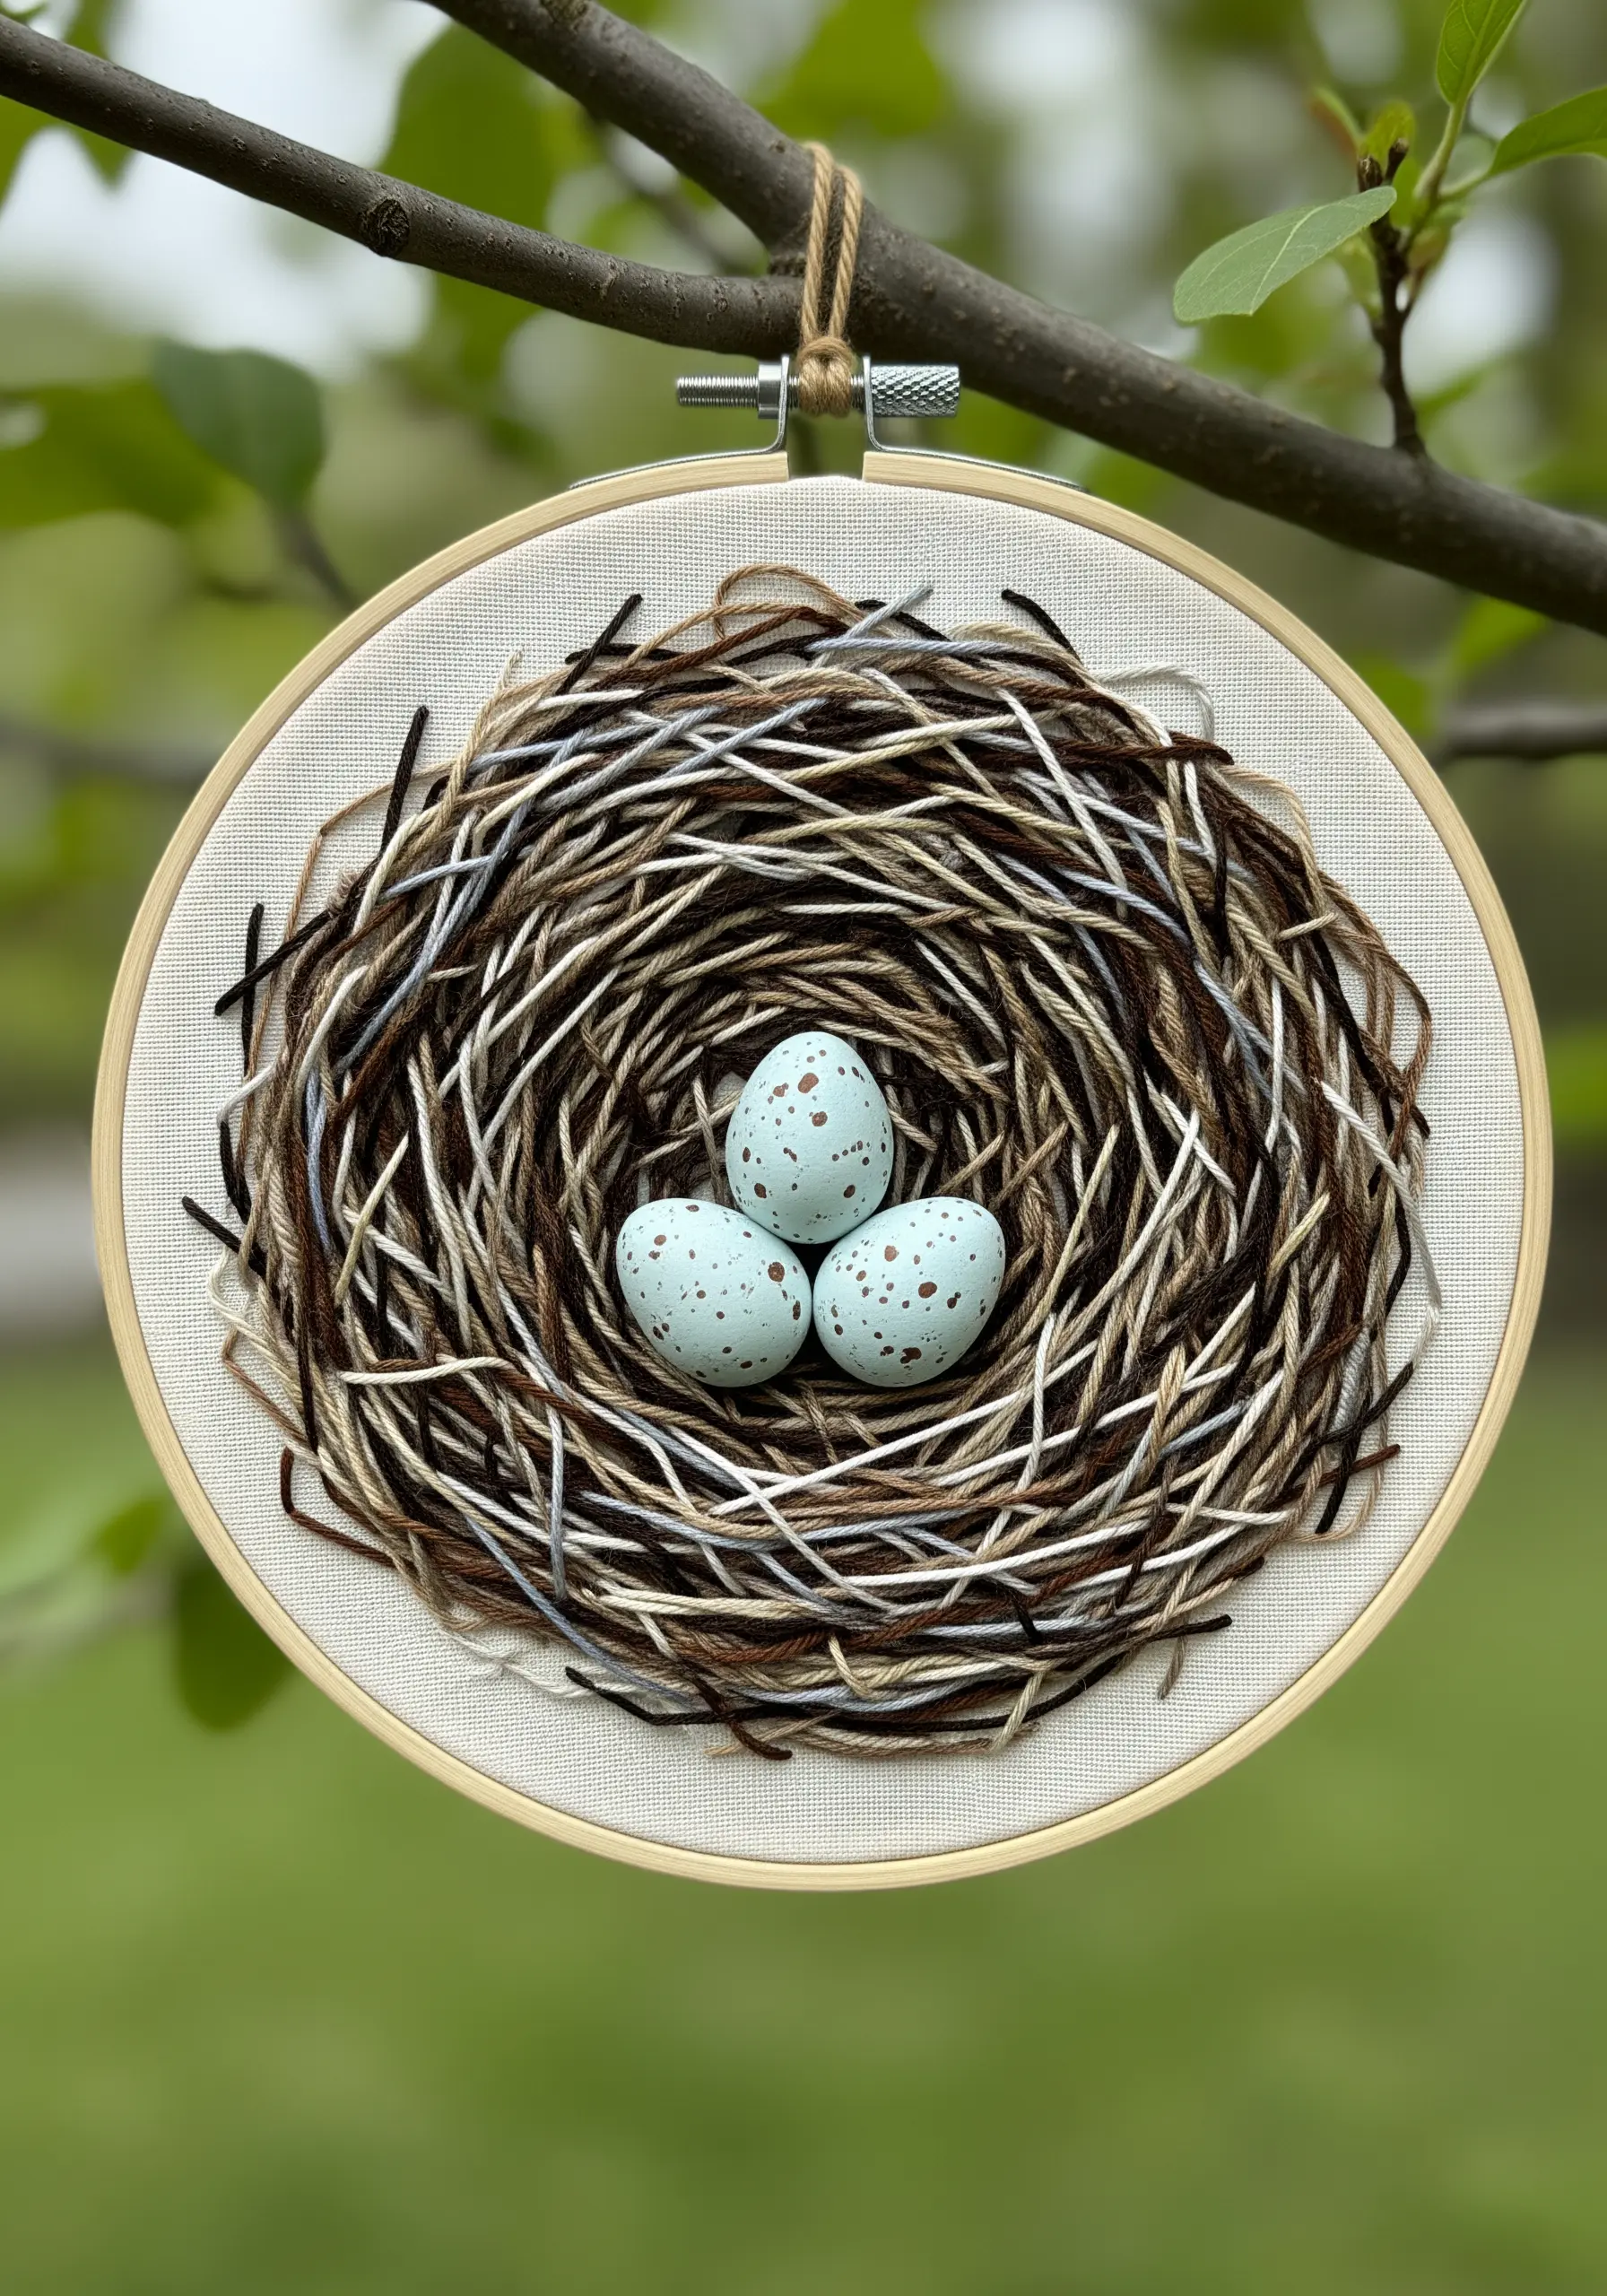
To create a realistic nest, you must embrace a bit of chaos.
Use a mix of variegated threads in browns, grays, and creams.
Lay down long, overlapping straight stitches in a circular fashion, allowing them to crisscross and loop imperfectly.
The goal is not neatness, but to build up a layered, twig-like texture.
Finish by nestling three small eggs made from padded satin stitch into the center.
14. Sculpt Plump Berries with Colonial Knots
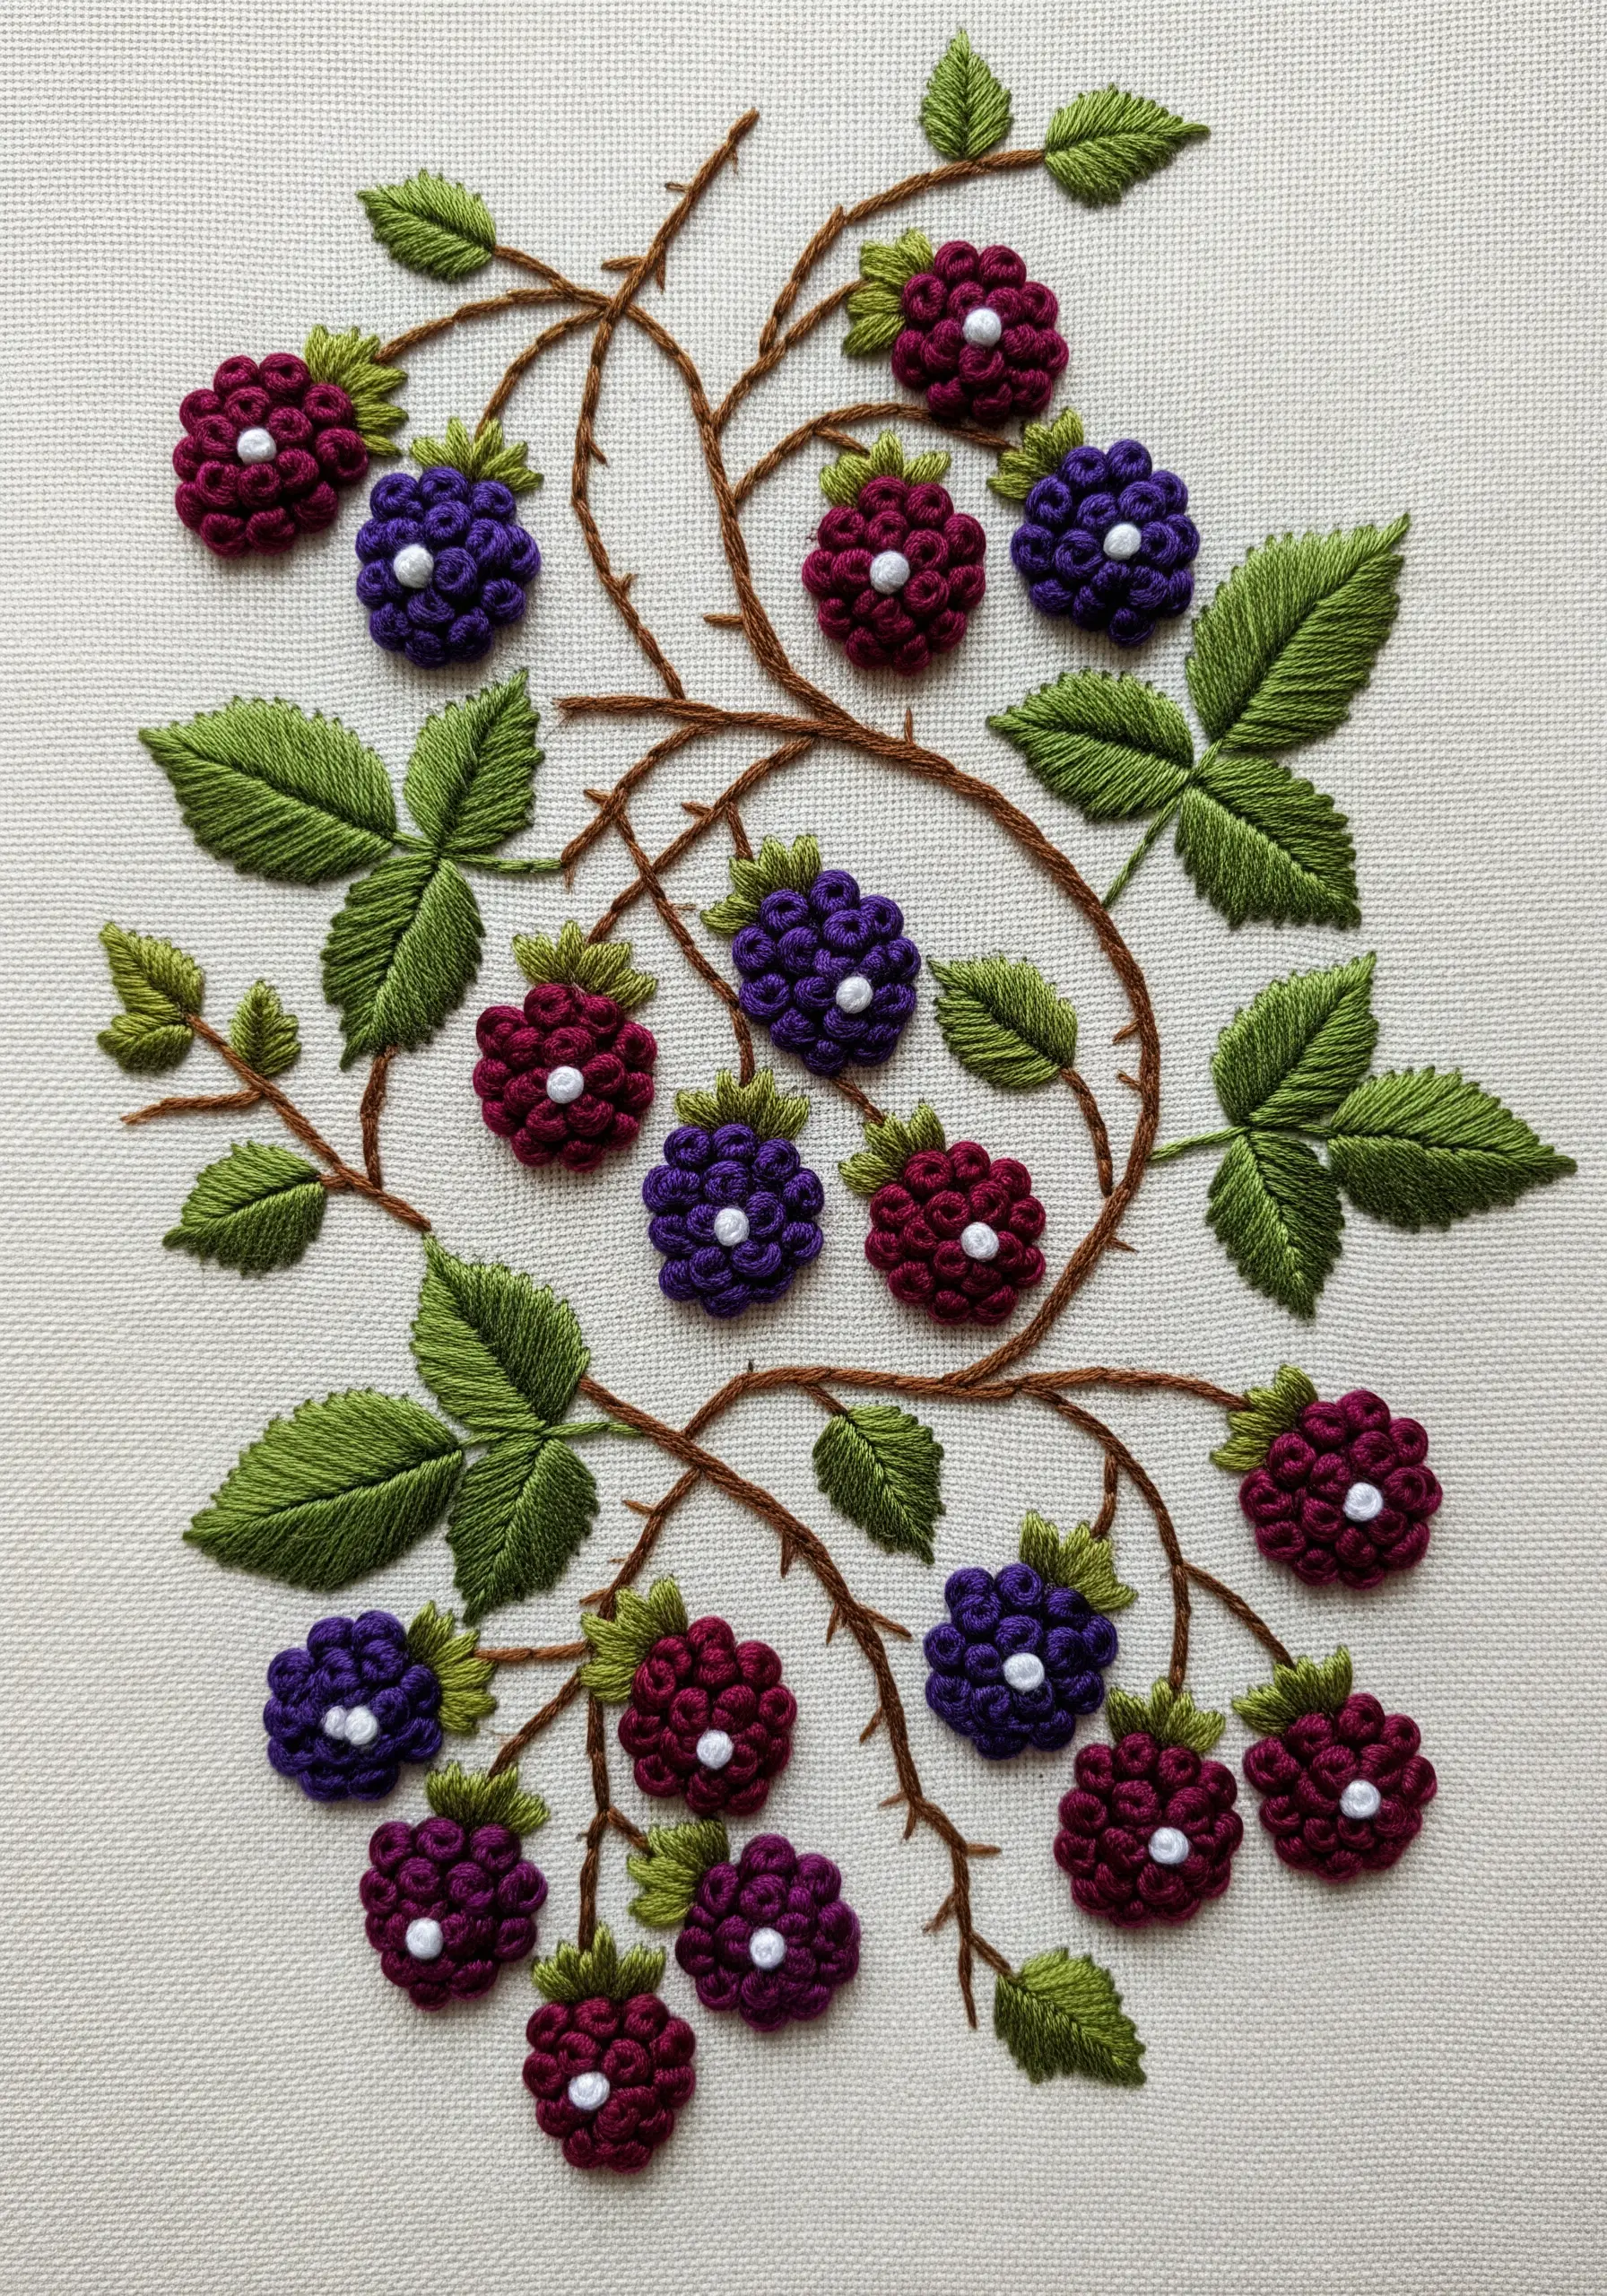
For berries that look juicy enough to pick, the Colonial knot is your best friend.
It creates a slightly rounder, more robust nub of texture than a French knot.
Stitch them in tight clusters to form each blackberry, using a mix of deep purple and magenta threads for realism.
Add a final touch of polish with a single tiny white French knot or a seed bead at the center of each berry to act as a light-catching highlight.
15. Master Realistic Feathers with Directional Thread Painting
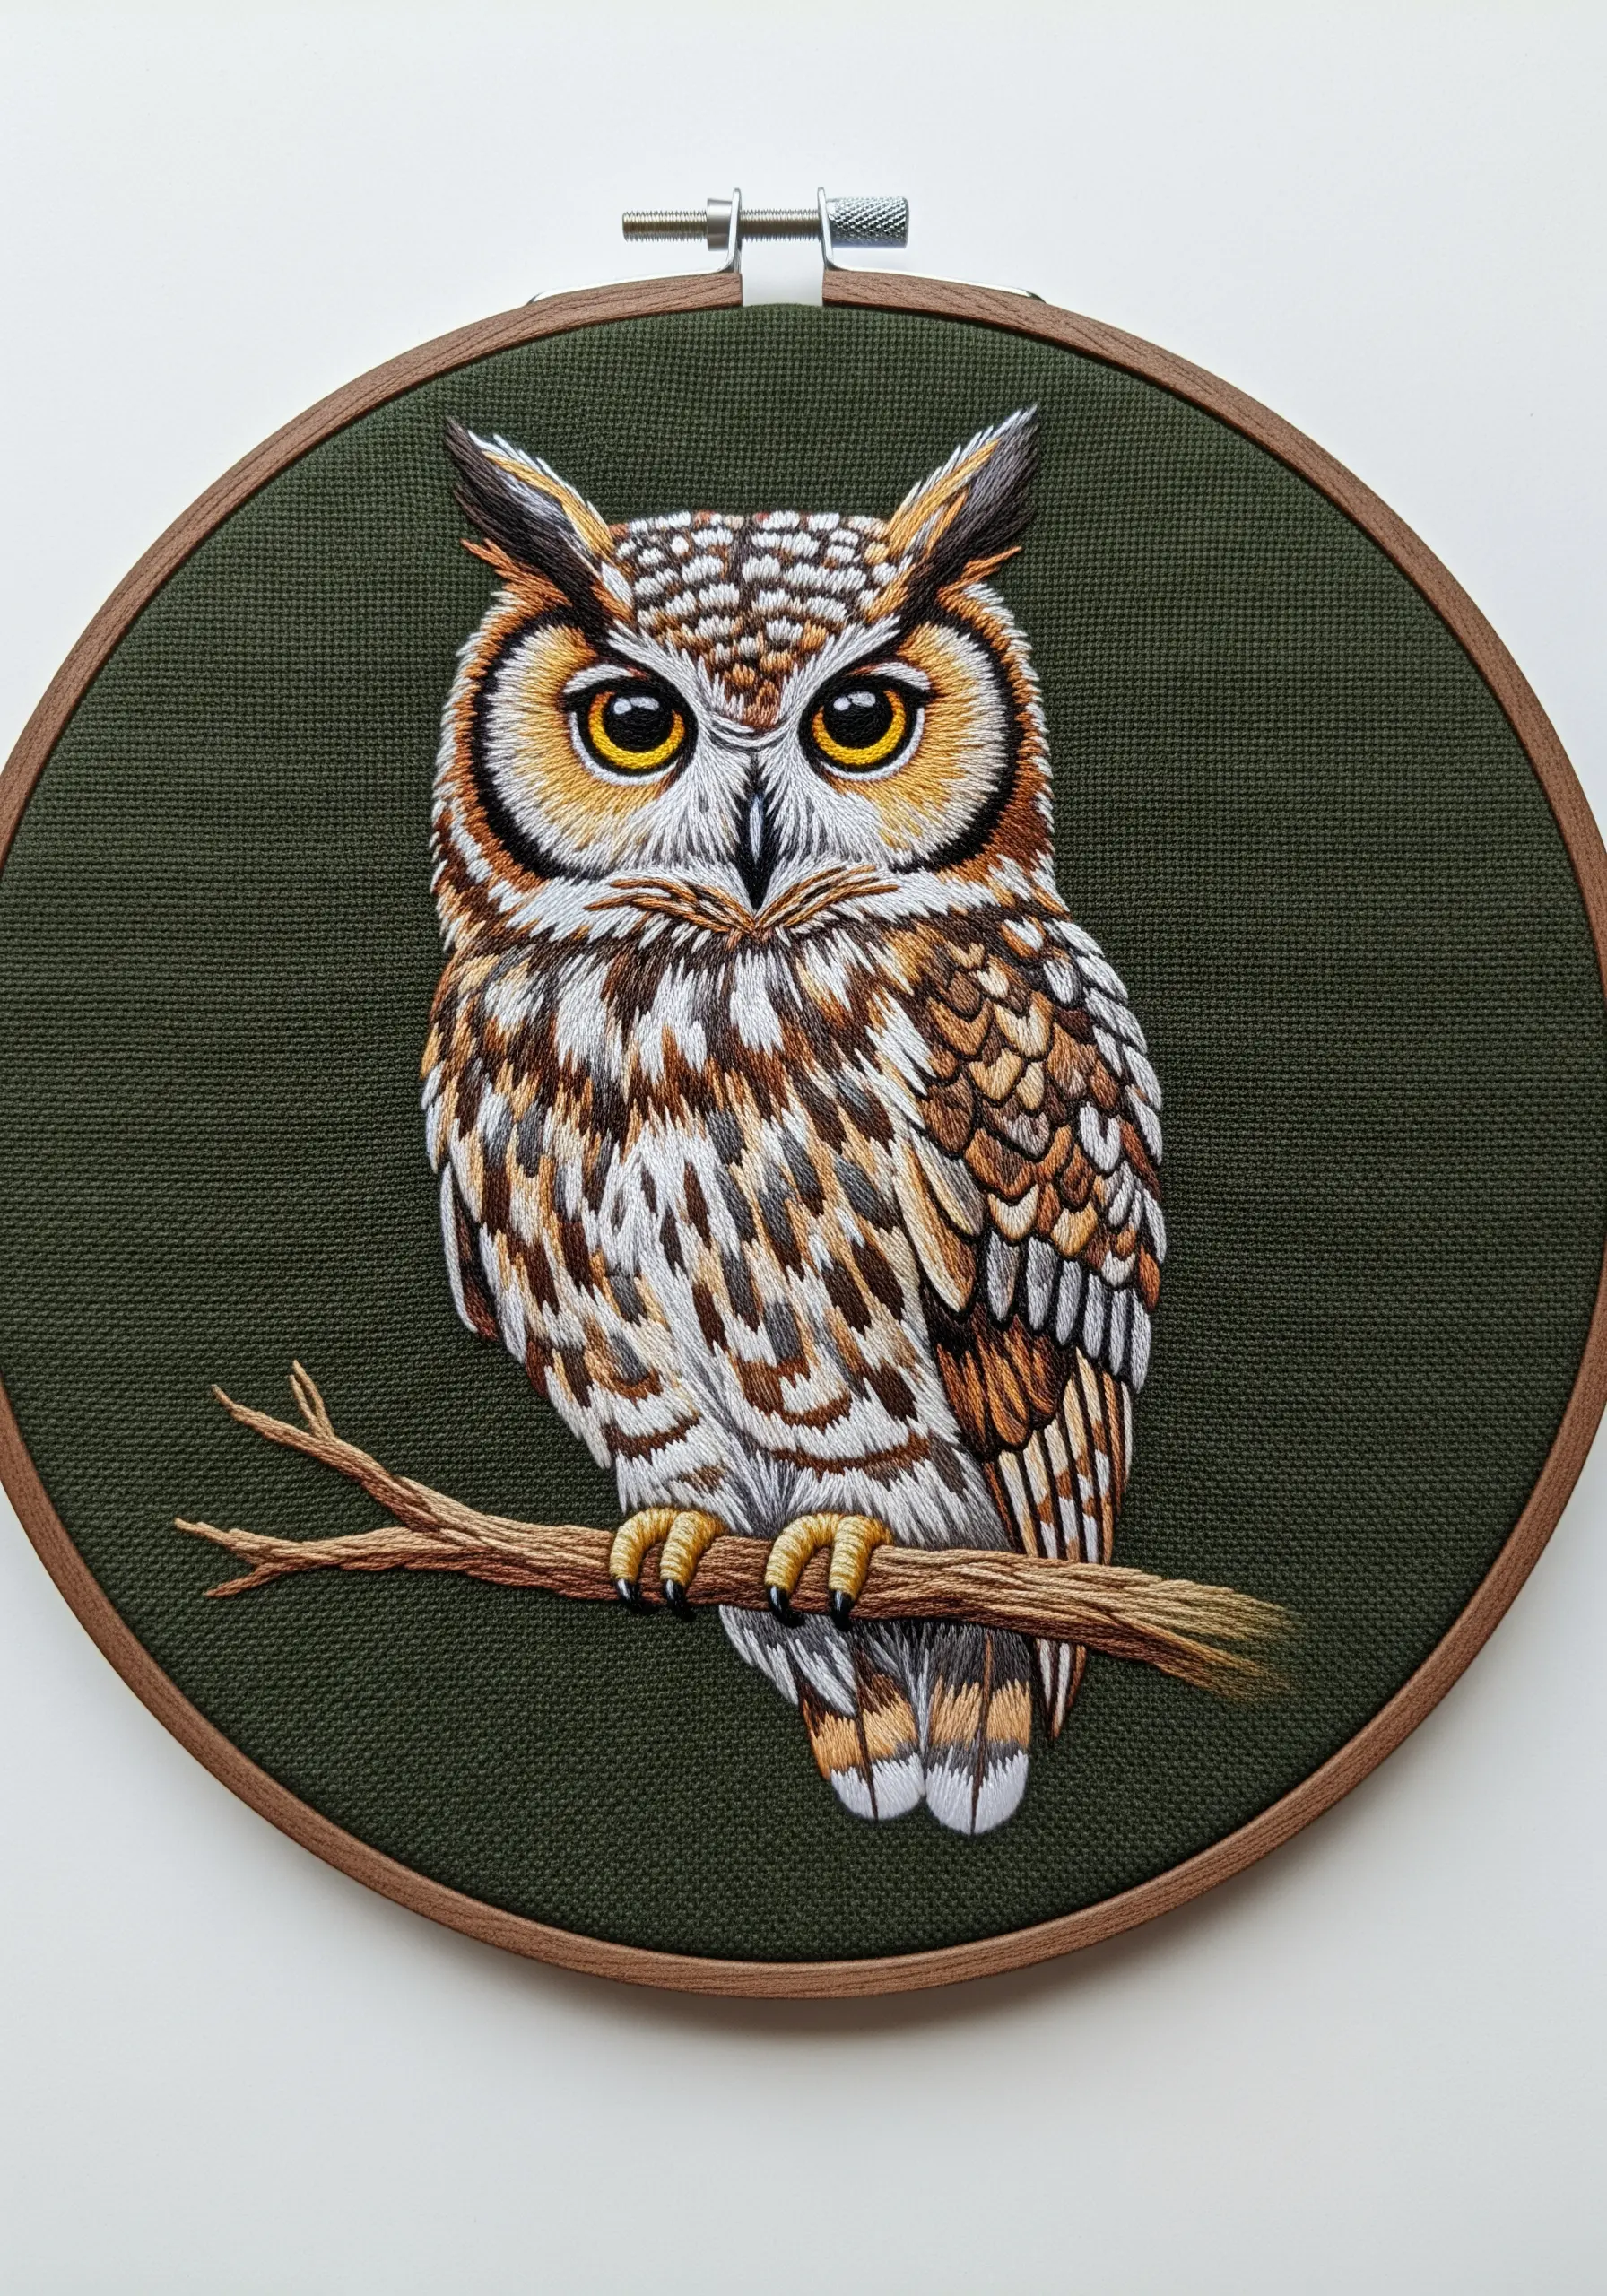
The secret to this owl’s lifelike appearance lies in meticulous stitch direction.
Using a single strand of floss for fine detail, apply long-and-short stitches that follow the natural, overlapping pattern of the feathers.
Use short, tight stitches radiating around the eyes to draw focus, and longer, softer stitches on the chest to suggest downy softness.
This attention to the direction of your needlework is what separates a good piece from a breathtaking one.
16. Craft a 3D Succulent Garden with a Stitch Sampler

This design is a perfect playground for practicing dimensional stitches that lift off the fabric.
Use the cast-on stitch or woven picot stitch to create plump succulent petals that you can physically lift.
The ground is an excellent place to practice dense French knots with variegated thread to mimic pebbles.
This combination of techniques turns your hoop into a miniature, tactile botanical garden sampler you can’t help but touch.
17. Embroider a Dandelion’s Journey with Delicate Stitches
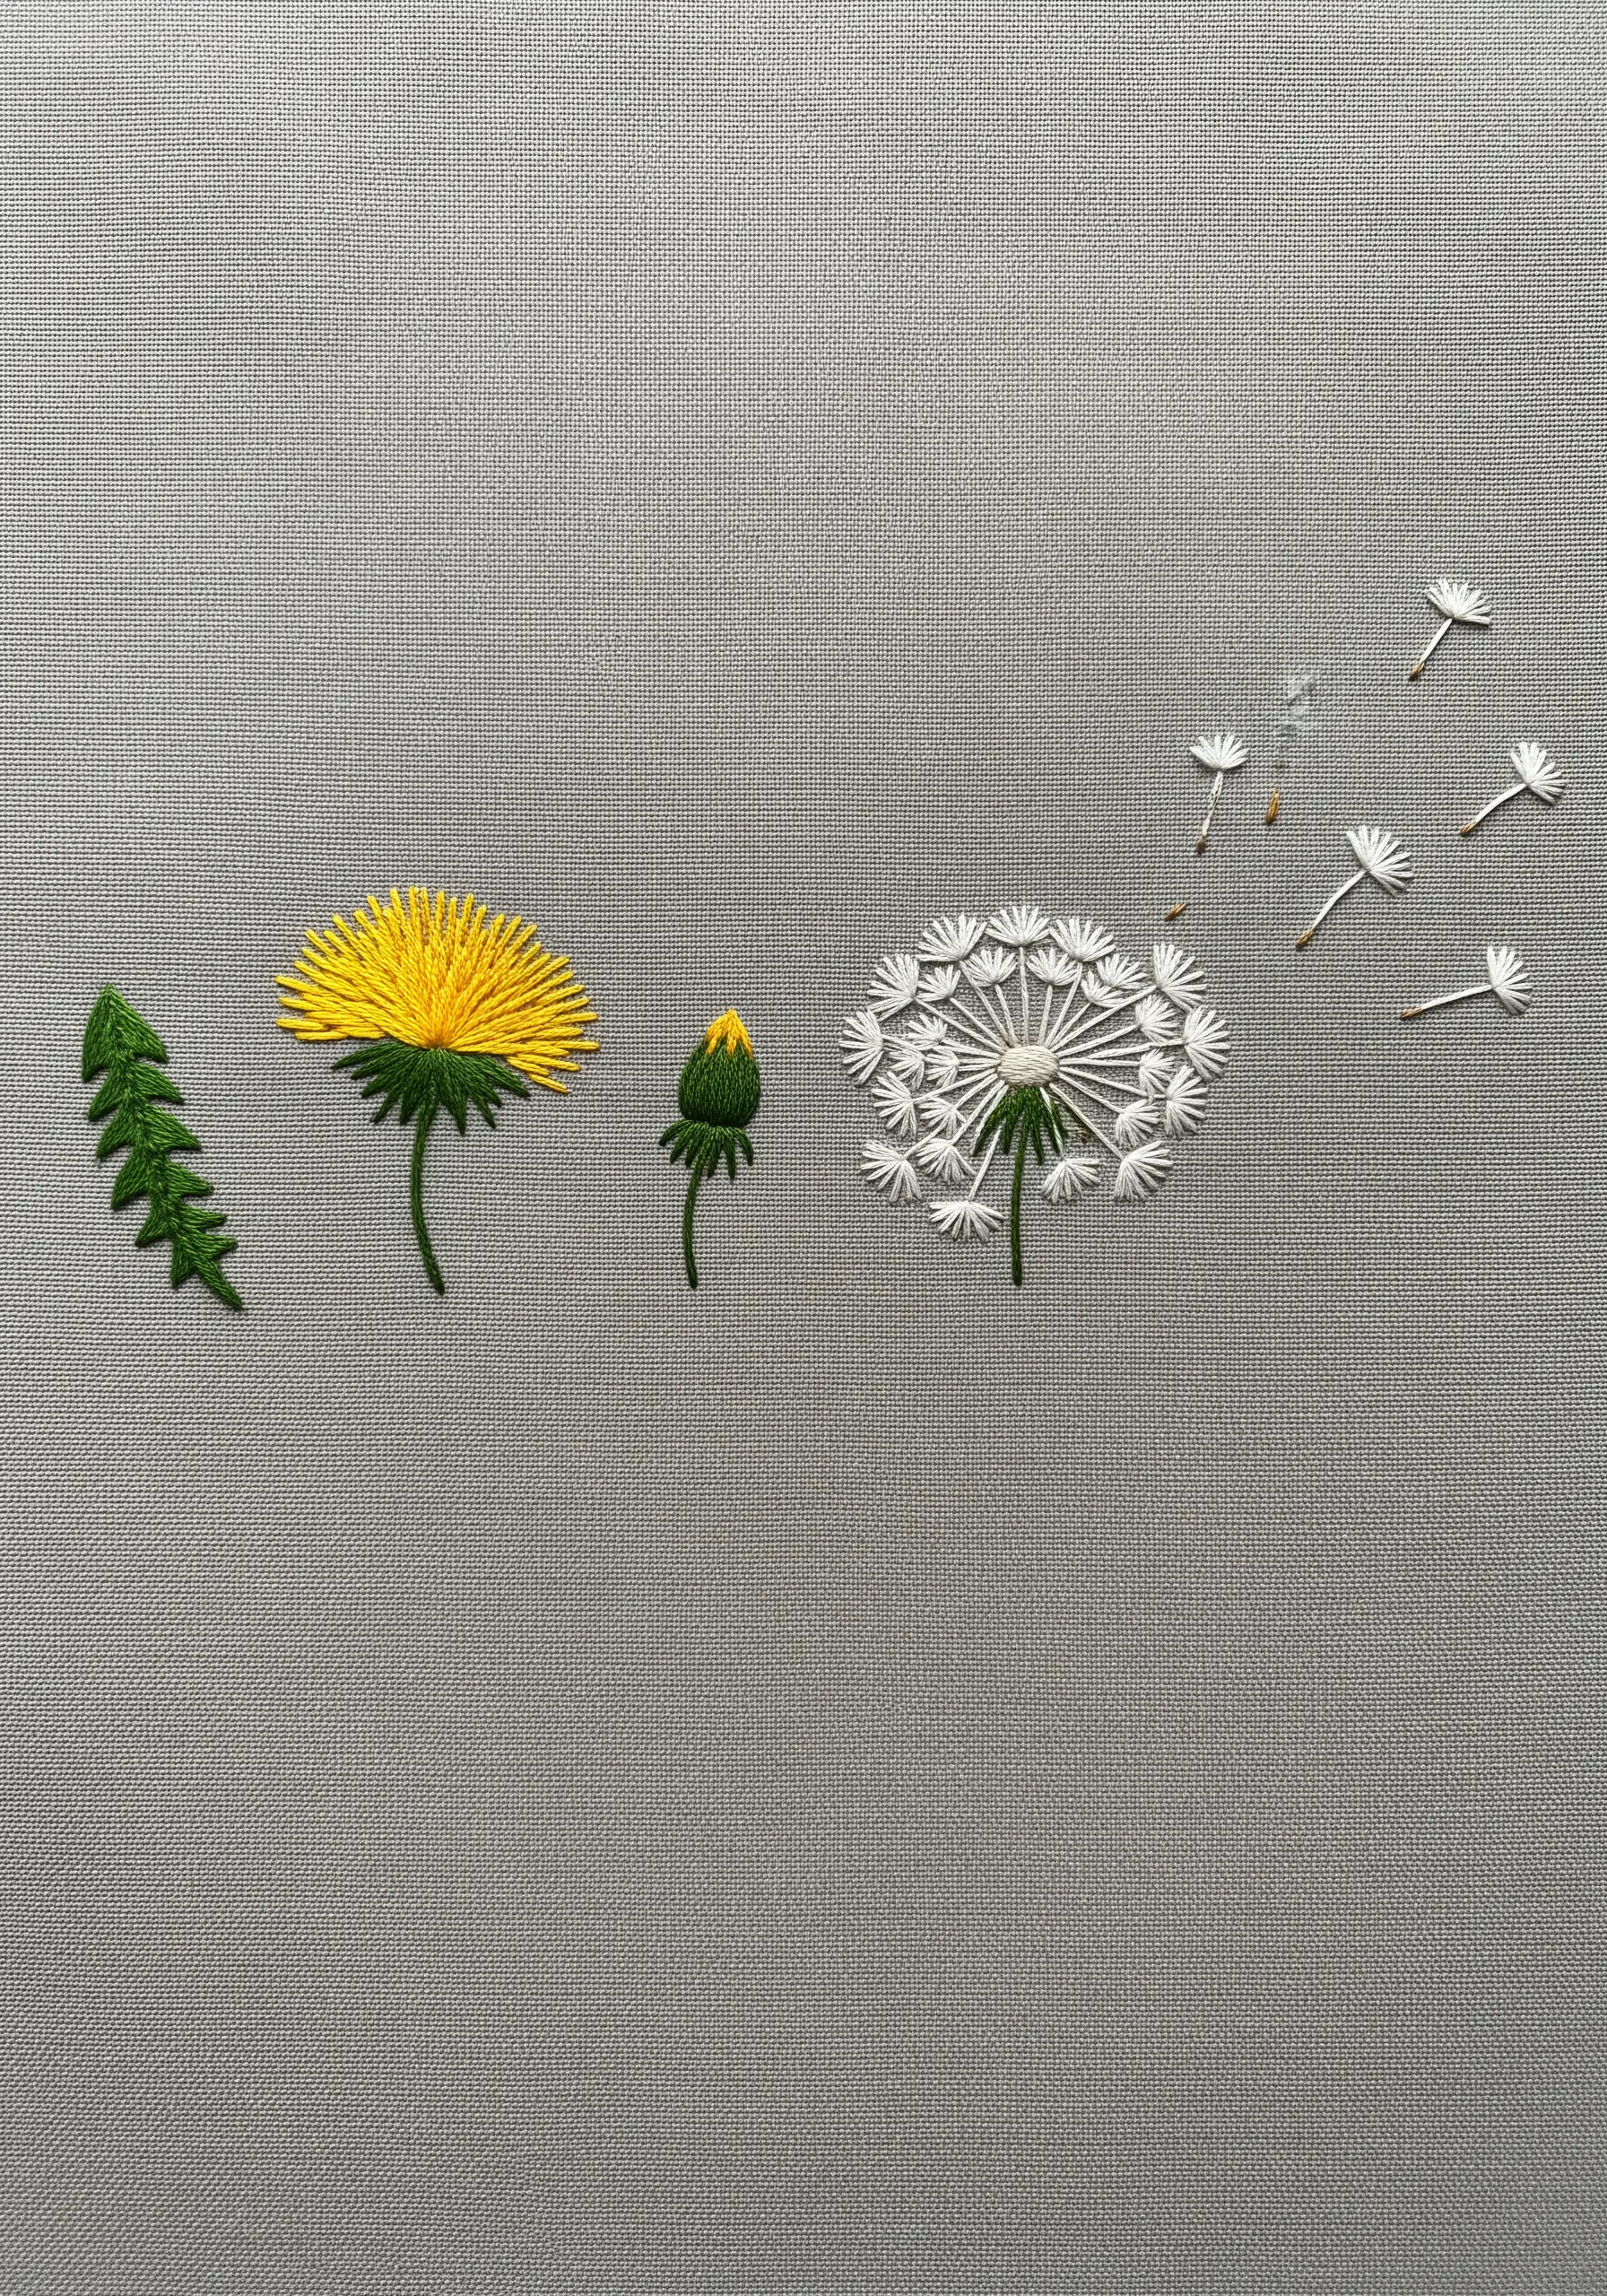
Capture the ethereal quality of a dandelion by using a light touch and intentional spacing.
For the seed head, create a central hub with straight stitches, then add individual seeds using a detached chain stitch (for the parachute) attached to a single straight stitch (for the stem).
The real magic happens with the floating seeds.
By stitching them sparsely and allowing plenty of negative space, you create a powerful sense of wind and movement across the fabric.
18. Create Duality with Contrasting Thread and Texture
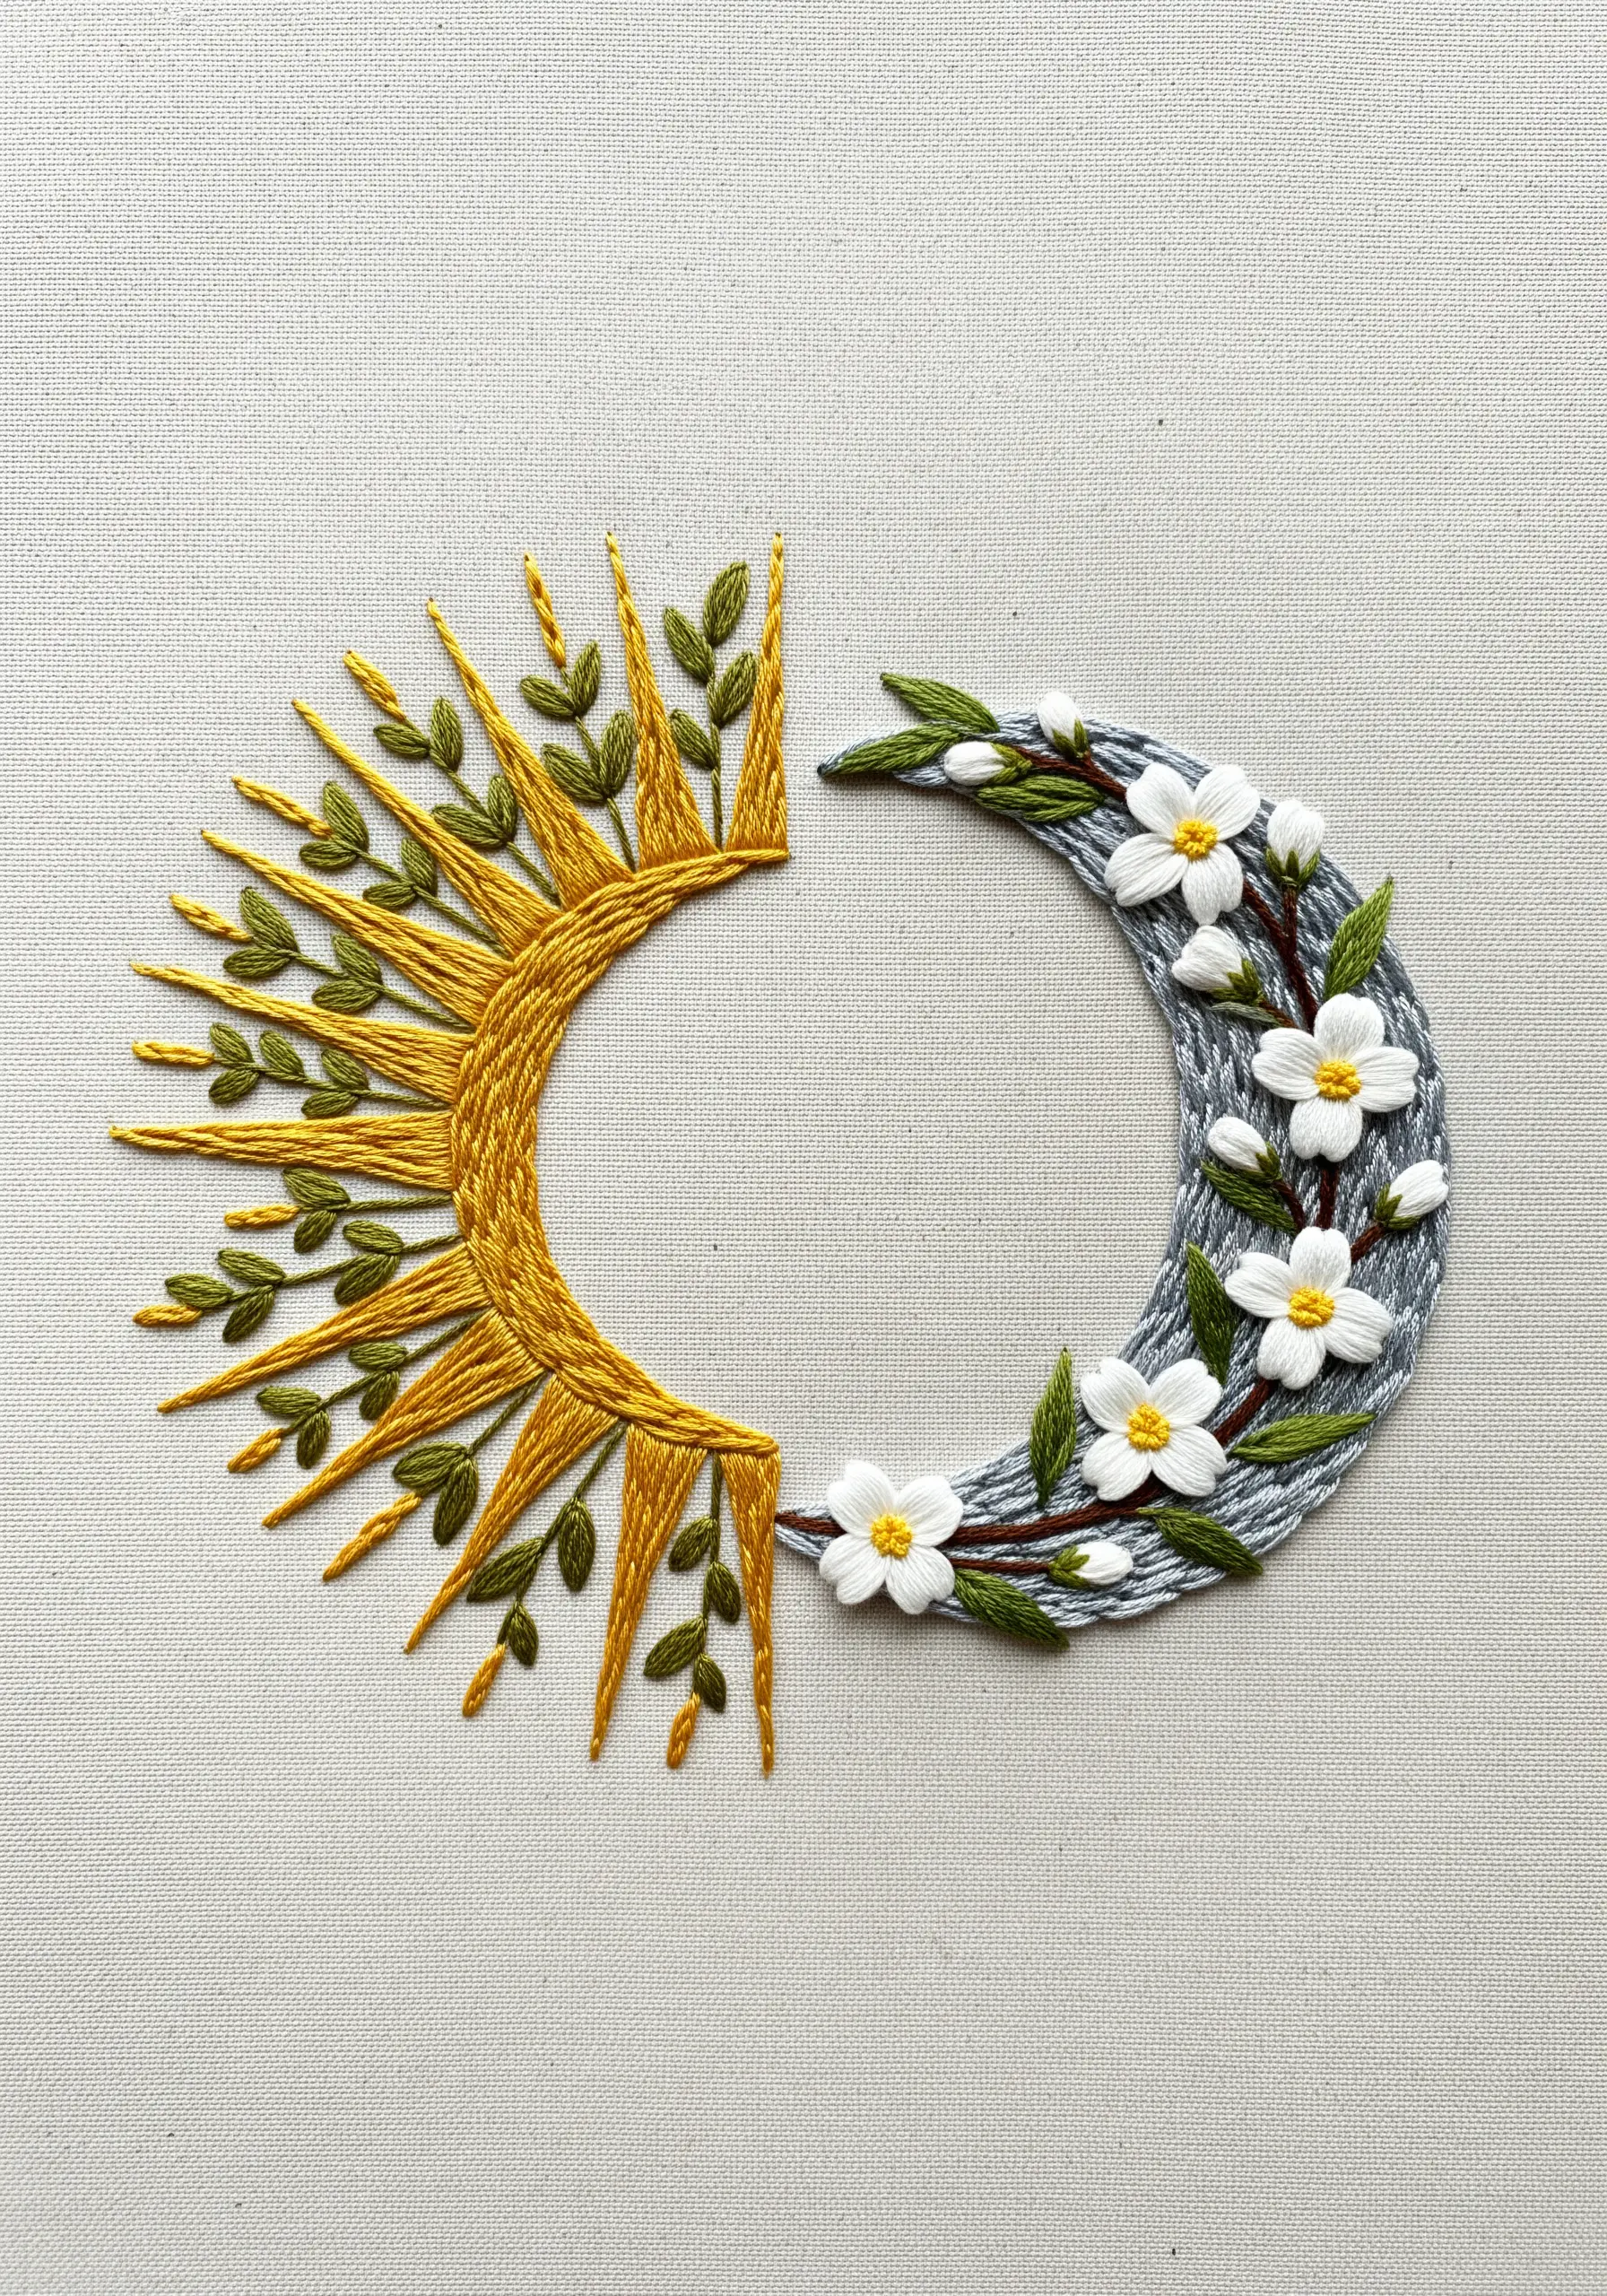
Amplify the theme of sun and moon by using contrasting materials and techniques.
For the sun, stitch with shiny, fine-stranded floss, using sharp satin stitches and radiating straight stitches to convey bright energy.
For the moon, switch to a thicker, matte thread like perle cotton or a single ply of wool.
Use a wrapping technique or a soft padded satin stitch to create a gentle, textured surface.
This textural difference makes the design’s duality both visible and tactile.
19. Build a Sculptural Coral Reef with Advanced Stitches
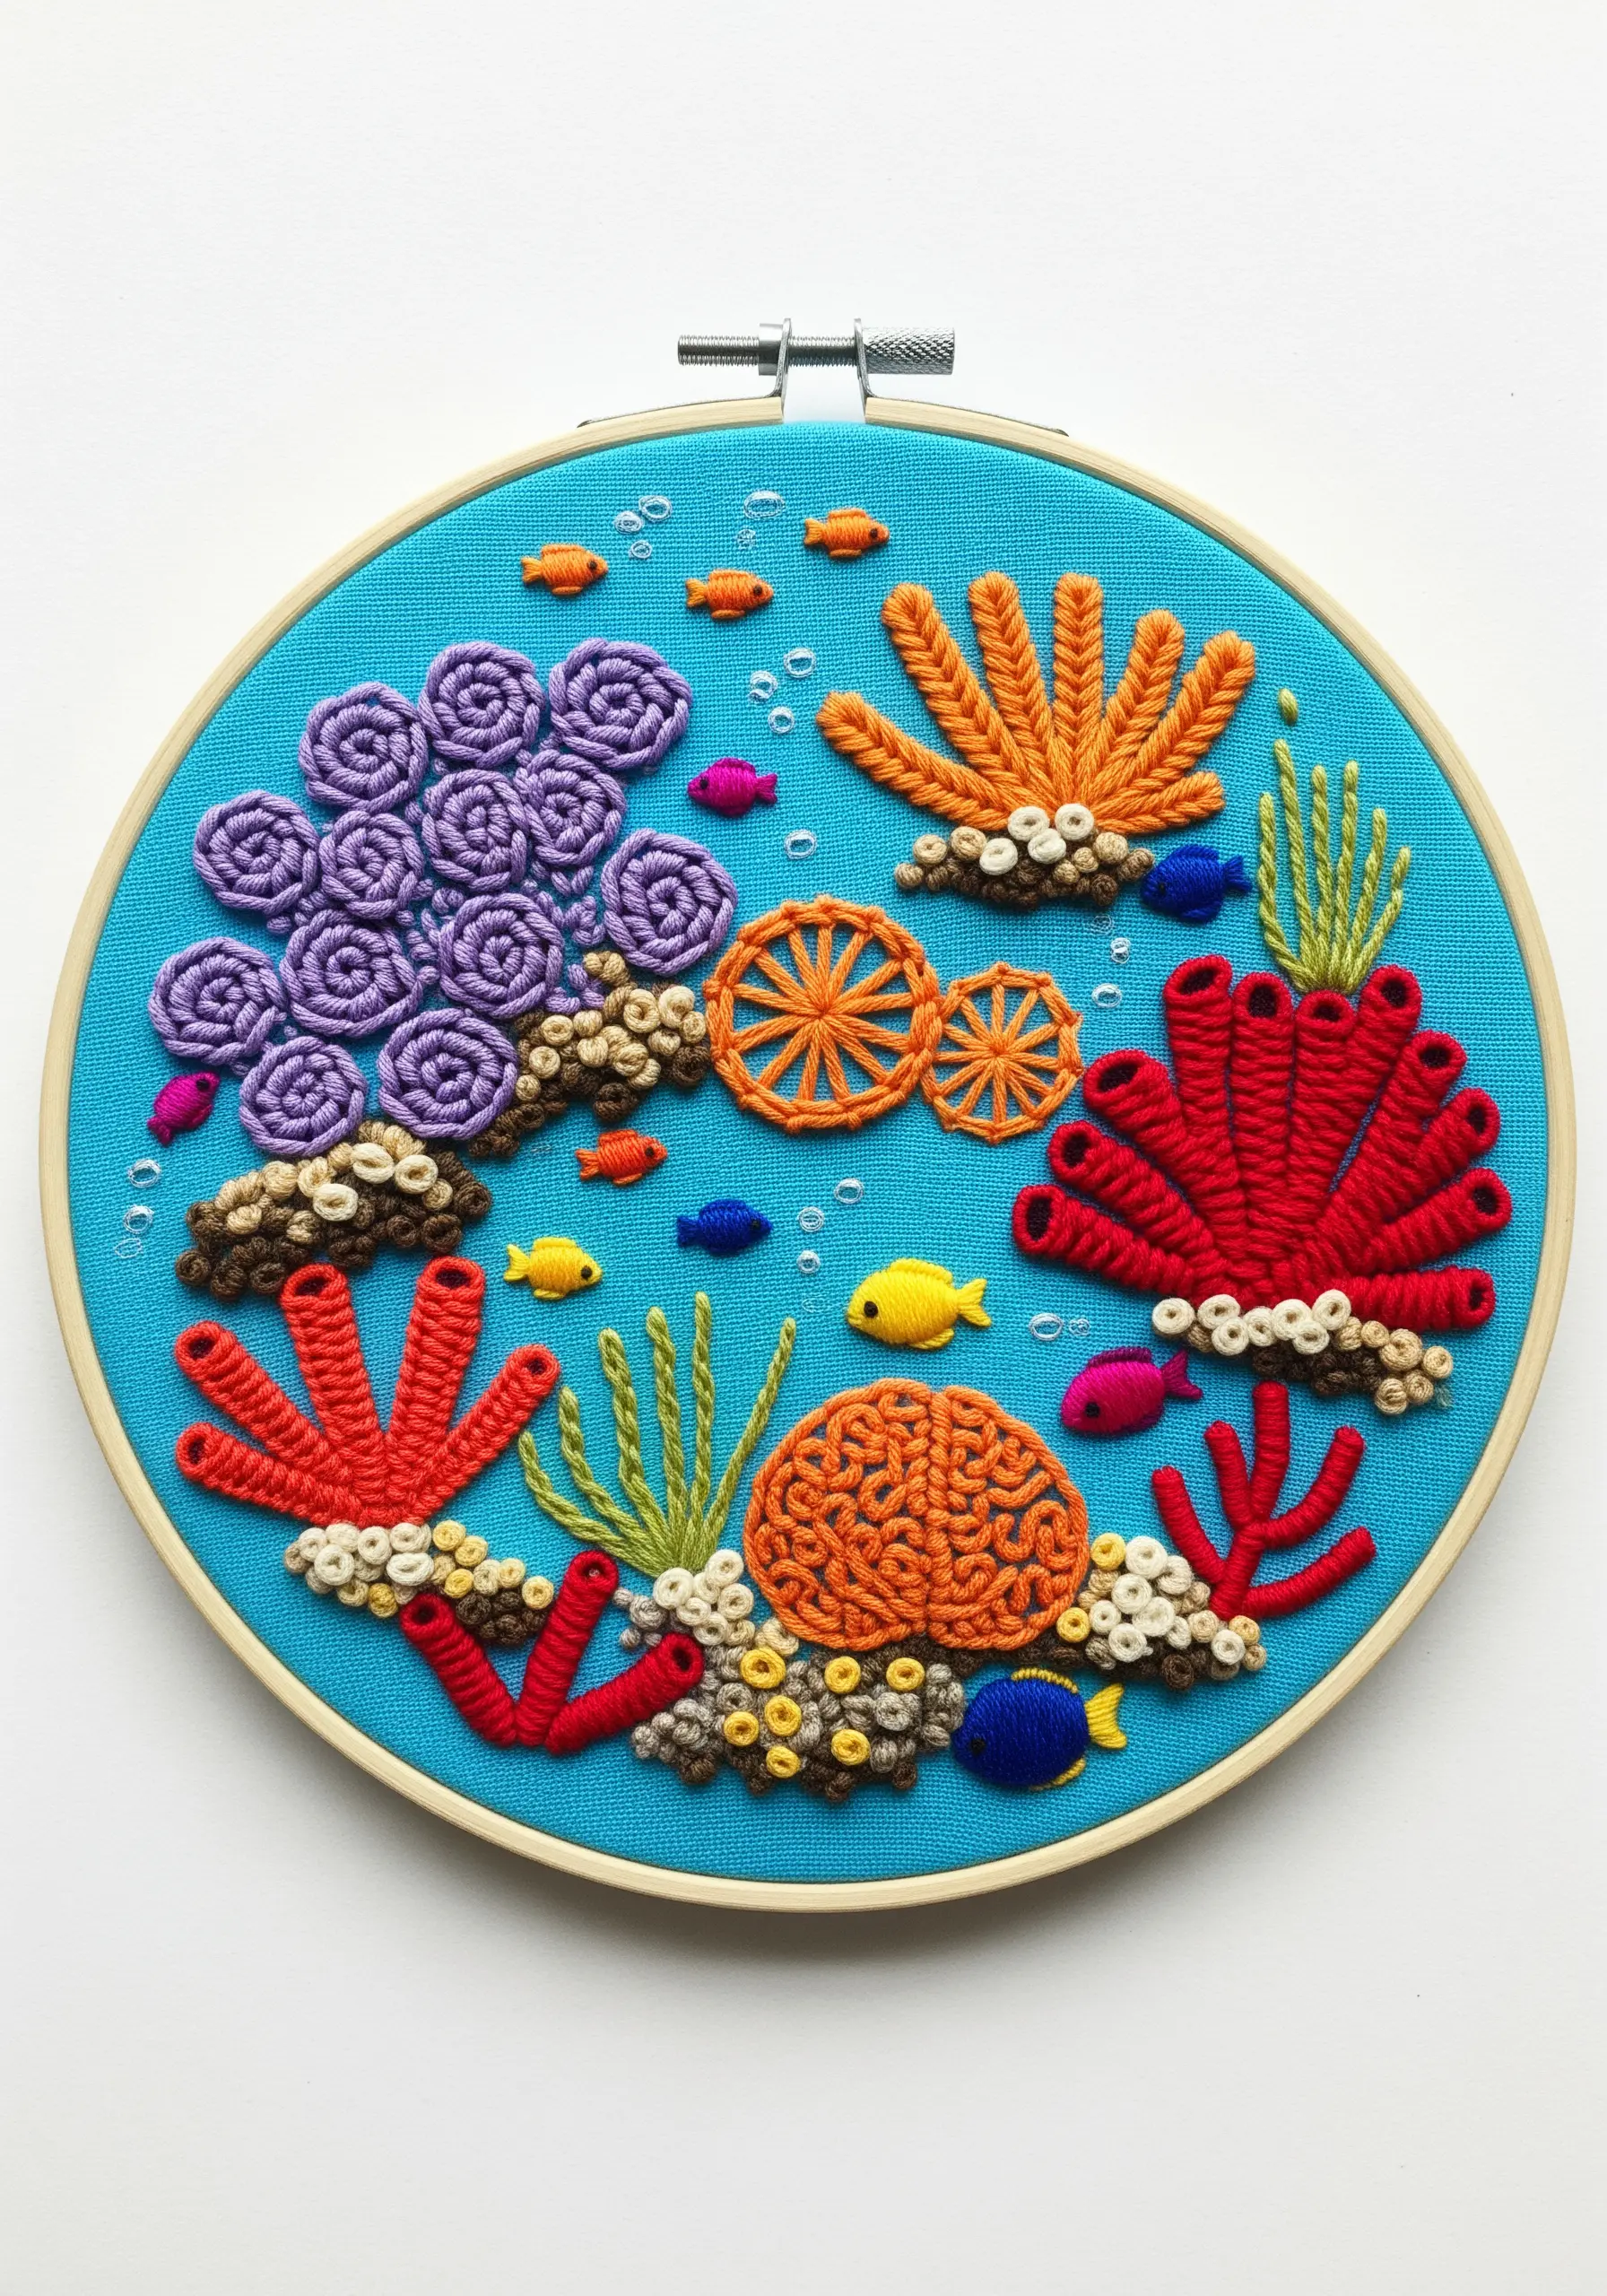
A vibrant coral reef is the perfect subject for exploring sculptural, three-dimensional stitches.
Use bullion knots of varying lengths for tube coral, and create brain coral with the winding path of a Pekinese stitch worked in a spiral.
The fan-like coral can be formed with layered woven wheel stitches.
This project challenges you to think beyond the flat surface of the fabric and build a rich, tactile ecosystem that makes for stunning sea animal embroidery ideas.
20. Capture Autumn’s Glow with Thread Blending

Achieve a soft, painterly color gradient without complex needle painting by blending your threads.
To create the transition from red to orange, thread your needle with one strand of red and one strand of orange floss at the same time.
Stitch a section, then swap the red strand for a yellow one to blend from orange to yellow.
This simple technique creates beautiful, subtle color shifts that perfectly capture the essence of an autumn leaf.
21. Stitch a Dried Bouquet with Muted Tones
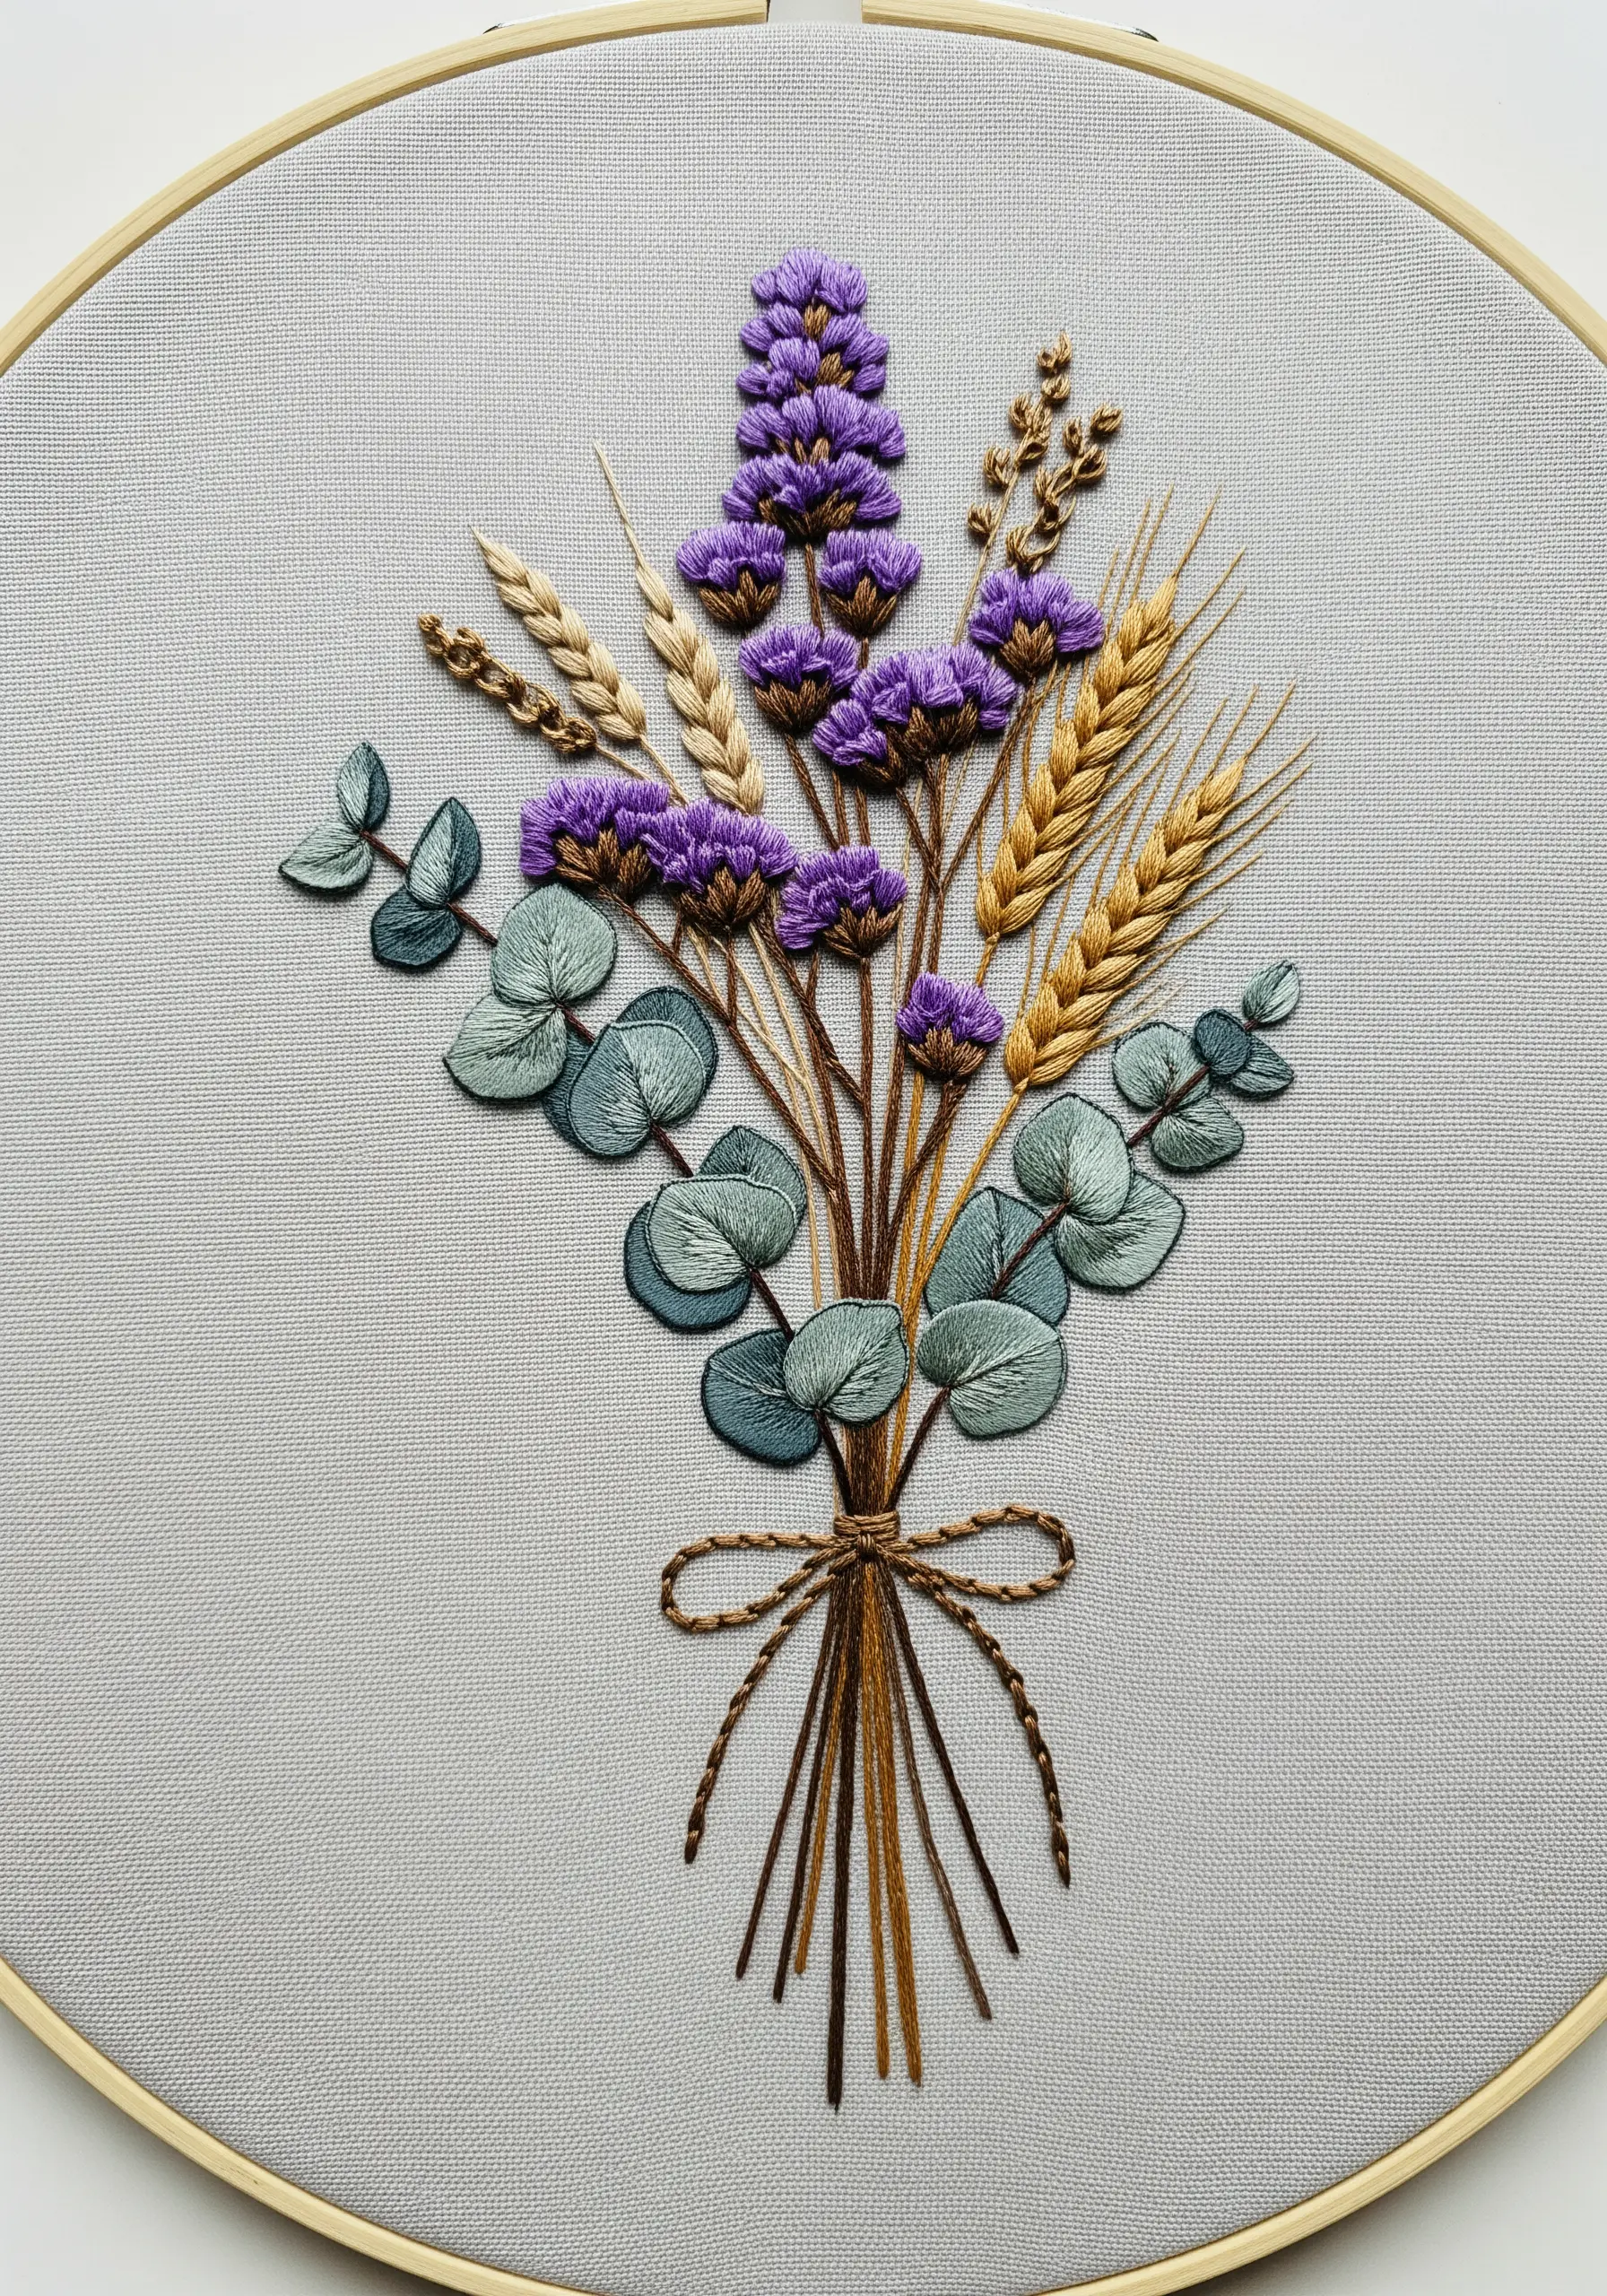
The key to embroidering dried botanicals is a restrained and thoughtful color palette.
Instead of bright greens and vibrant purples, choose their dusty, muted counterparts.
Select several shades of gray-green for eucalyptus leaves, deep mauve for lavender, and warm ochre for wheat stalks.
Use simple satin stitches, French knots, and straight stitches—the sophisticated color choices will do all the aesthetic work, resulting in a beautifully calm and elegant piece.
22. Fill a Silhouette with a Wildflower Meadow

This striking design uses the power of contrast between a crisp outline and a chaotic fill.
First, establish a strong deer silhouette using a thick, dark stem stitch or chain stitch.
Then, fill the interior with a dense meadow of tiny flowers, using lazy daisies, French knots, and straight stitches in a riot of color.
Allow a few stems and petals to break the boundary of the outline—this small detail makes the composition feel more organic and alive.
23. Create a Magical Glow with Paint and Thread

This beautifully atmospheric piece is a simple yet effective mixed-media project.
Begin by painting the tree silhouettes directly onto the dark fabric using black acrylic paint mixed with a fabric medium for flexibility.
After the paint dries completely, use a bright yellow or glow-in-the-dark thread to add the fireflies.
A single, well-placed French knot for each light is all it takes to create a stunning, magical scene with incredible depth.
24. Recreate Moss and Lichen with Dense Textural Knots

This is a masterclass in building texture through repetition.
To create the lush, deep green moss, densely pack areas with French knots using a slightly thicker thread, like cotton perle or a few strands of floss.
For the flatter, plate-like lichen, use satin stitches in a dusty gray-green, outlining the shapes first with a split stitch for a clean edge.
The contrast between the high-pile knots and the smooth satin stitch creates a stunningly realistic effect.
25. Stitch a Swirling Galaxy with Variegated Thread

Let your thread do the color work for you when stitching cosmic scenes.
Choose a variegated floss in shades of blue, purple, and pink, and use a simple chain stitch or whipped backstitch to form the swirling arms of the galaxy.
The thread’s automatic color changes will create a beautiful, effortless gradient.
Enhance the design by adding scattered silver beads and tiny white French knots for stars, turning it into a beautiful piece of abstract negative space art.
26. Embroider a Personal Journey with a Topographic Map

This elegantly minimal design is a tribute to a special place.
Use a simple backstitch and two strands of floss for the contour lines, ensuring they remain clean and precise.
Choose several shades of green and brown to represent the changing elevation.
To highlight a beloved trail or specific route, stitch it in a contrasting color like red and use a whipped backstitch.
This makes the line slightly thicker and smoother, drawing the eye and telling a personal story.
27. Construct a Botanical Monogram with Woven Stitches
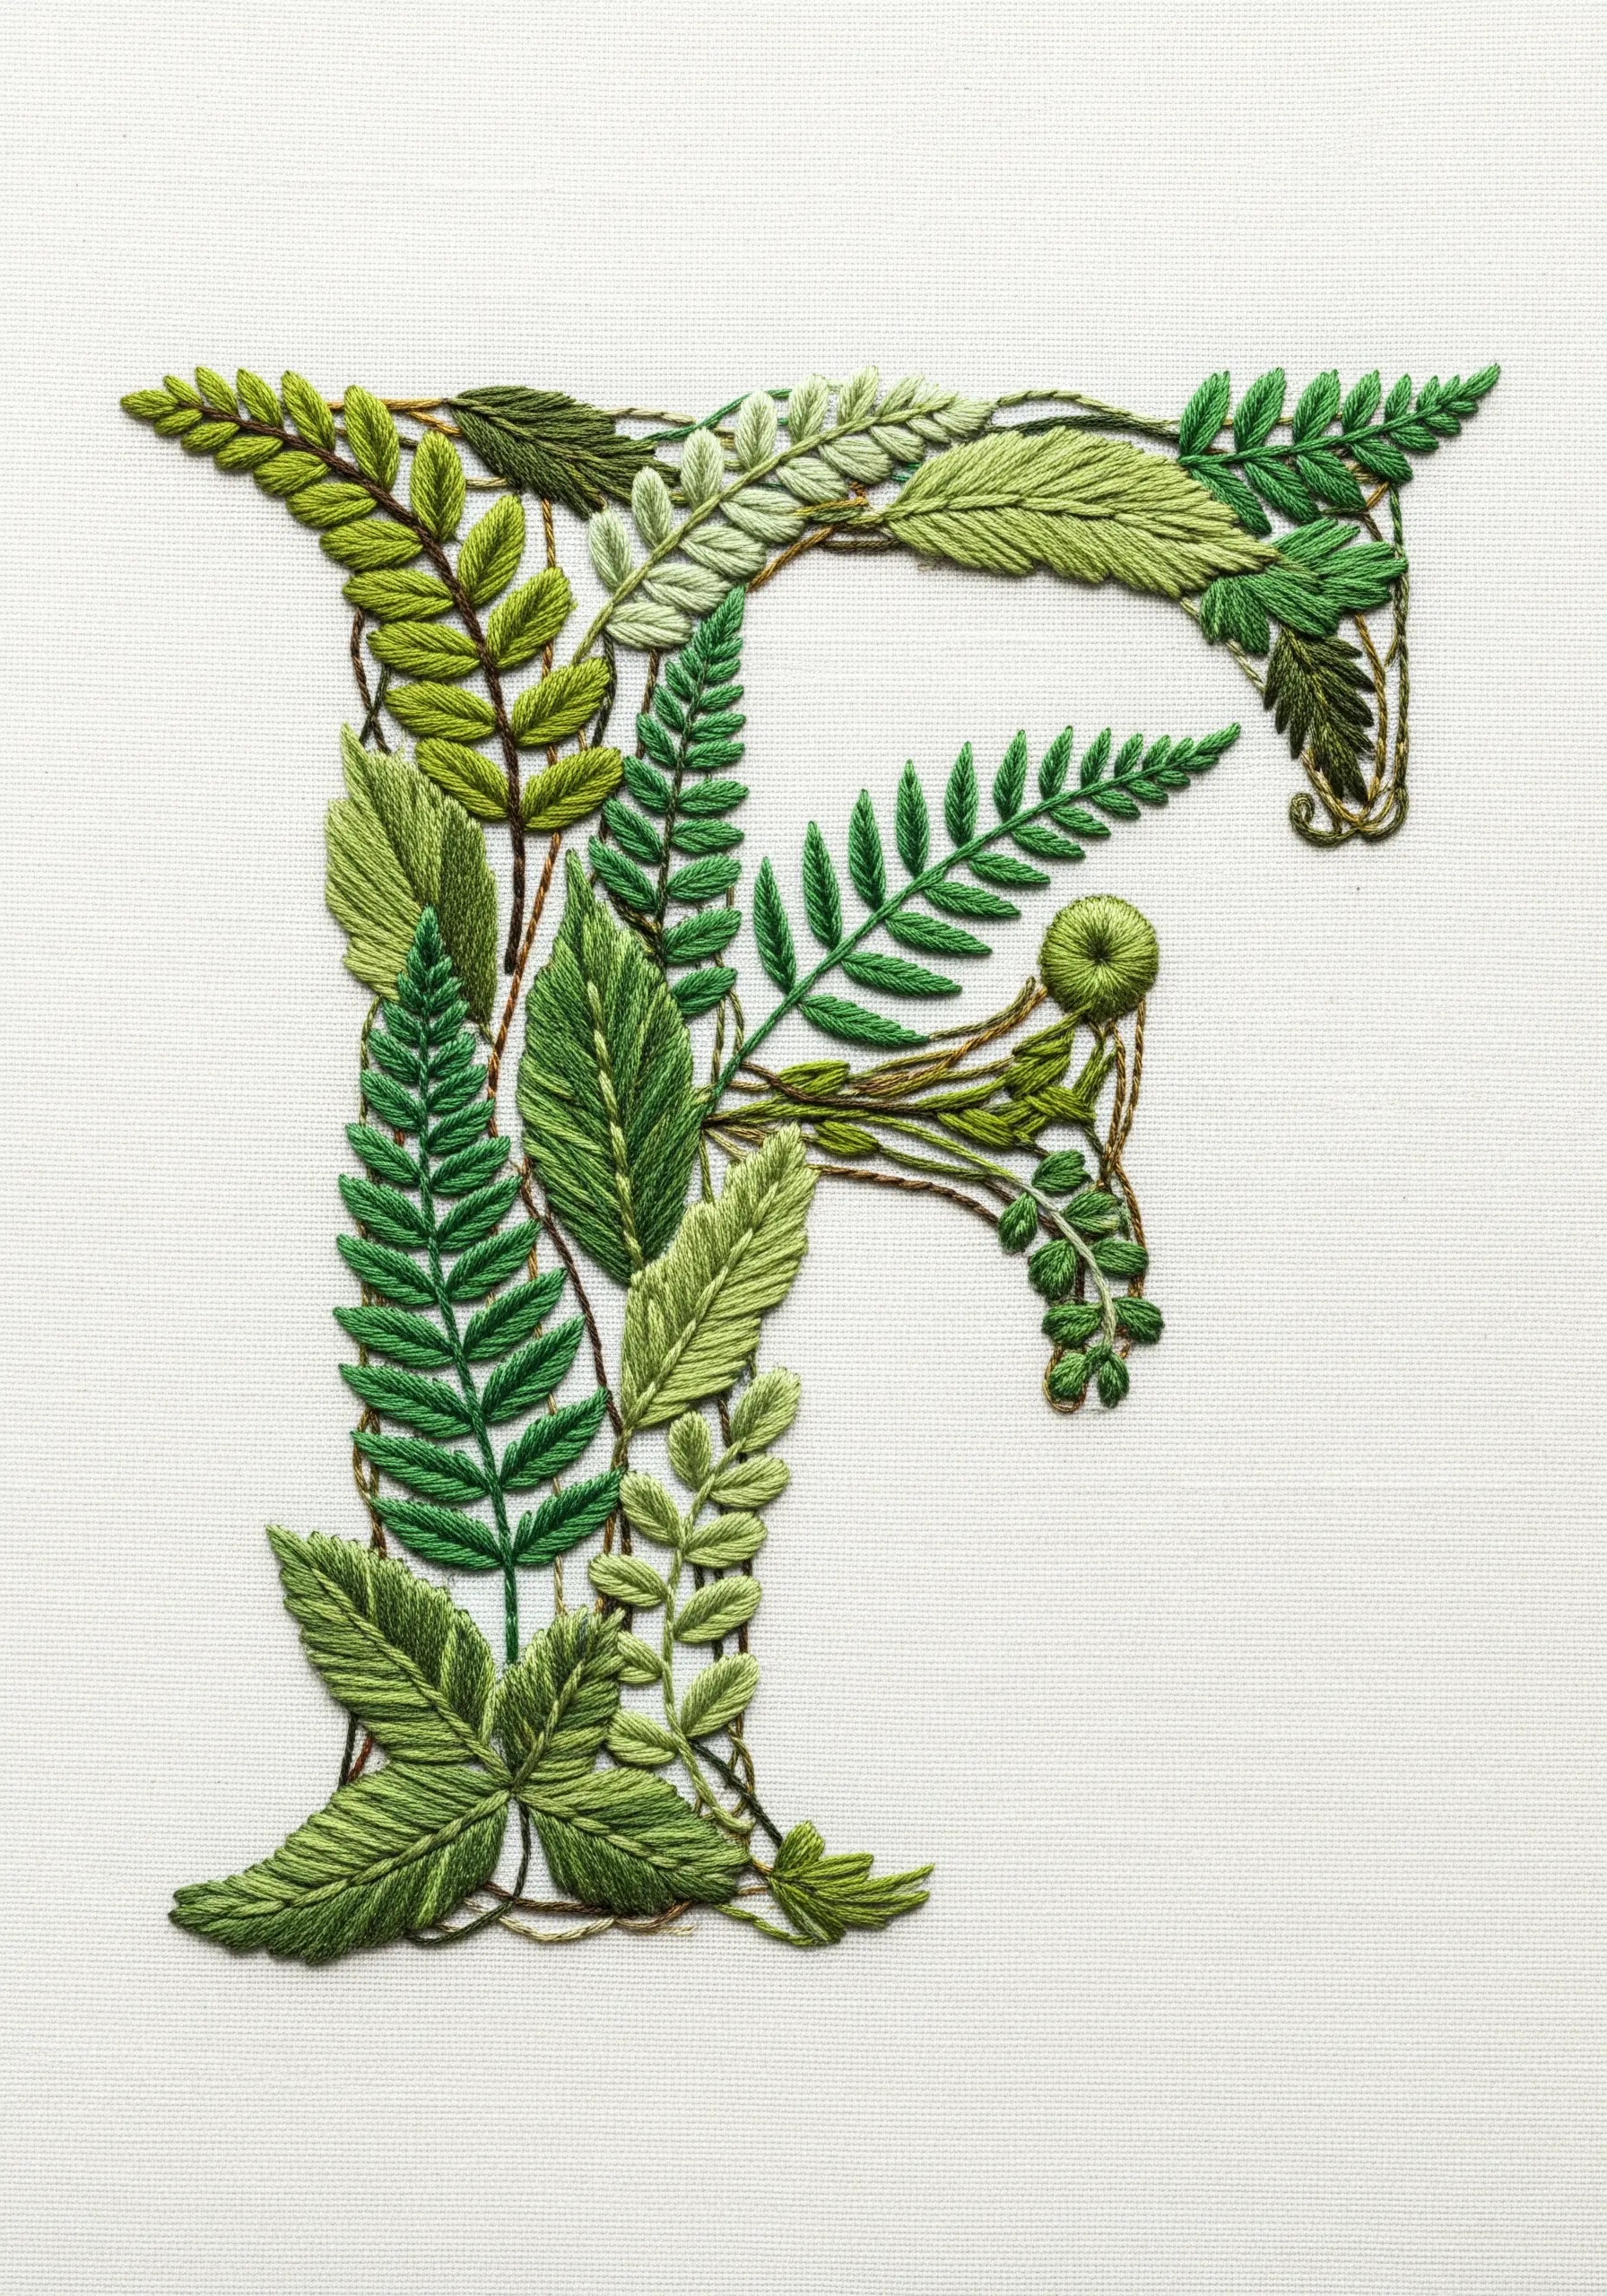
Elevate a simple monogram by transforming it into a lush botanical study.
Outline your chosen letter, then fill it with a variety of leaf stitches: fishbone stitch for broad leaves, fly stitch for fern-like fronds, and detached chain stitches for small buds.
Intentionally overlap the elements and allow their stems (made with stem stitch) to weave over and under one another.
These personalized embroidery ideas create a sense of depth and turn a simple initial into a complex, beautiful piece of art.


