
A handmade gift is a conversation. It says, ‘I thought of you, I spent time for you, I created this only for you.’ With needle and thread, you have a unique power to craft something that carries deep personal meaning, turning a simple object into a treasured keepsake.
But how do you ensure your heartfelt effort translates into a beautiful, polished piece? The secret isn’t in complex patterns or expensive tools. It lies in the small, intentional choices—the way you blend colors to create softness, the stitch you select to add just the right texture, or the way you frame a design to make it feel complete.
Think of these ideas not as rules, but as techniques to add to your creative vocabulary. Each one is a way to elevate your work, giving you the confidence to transform your vision into a gift that will be truly unforgettable. Let’s begin.
1. Capture Soulful Expression with Thread Painting
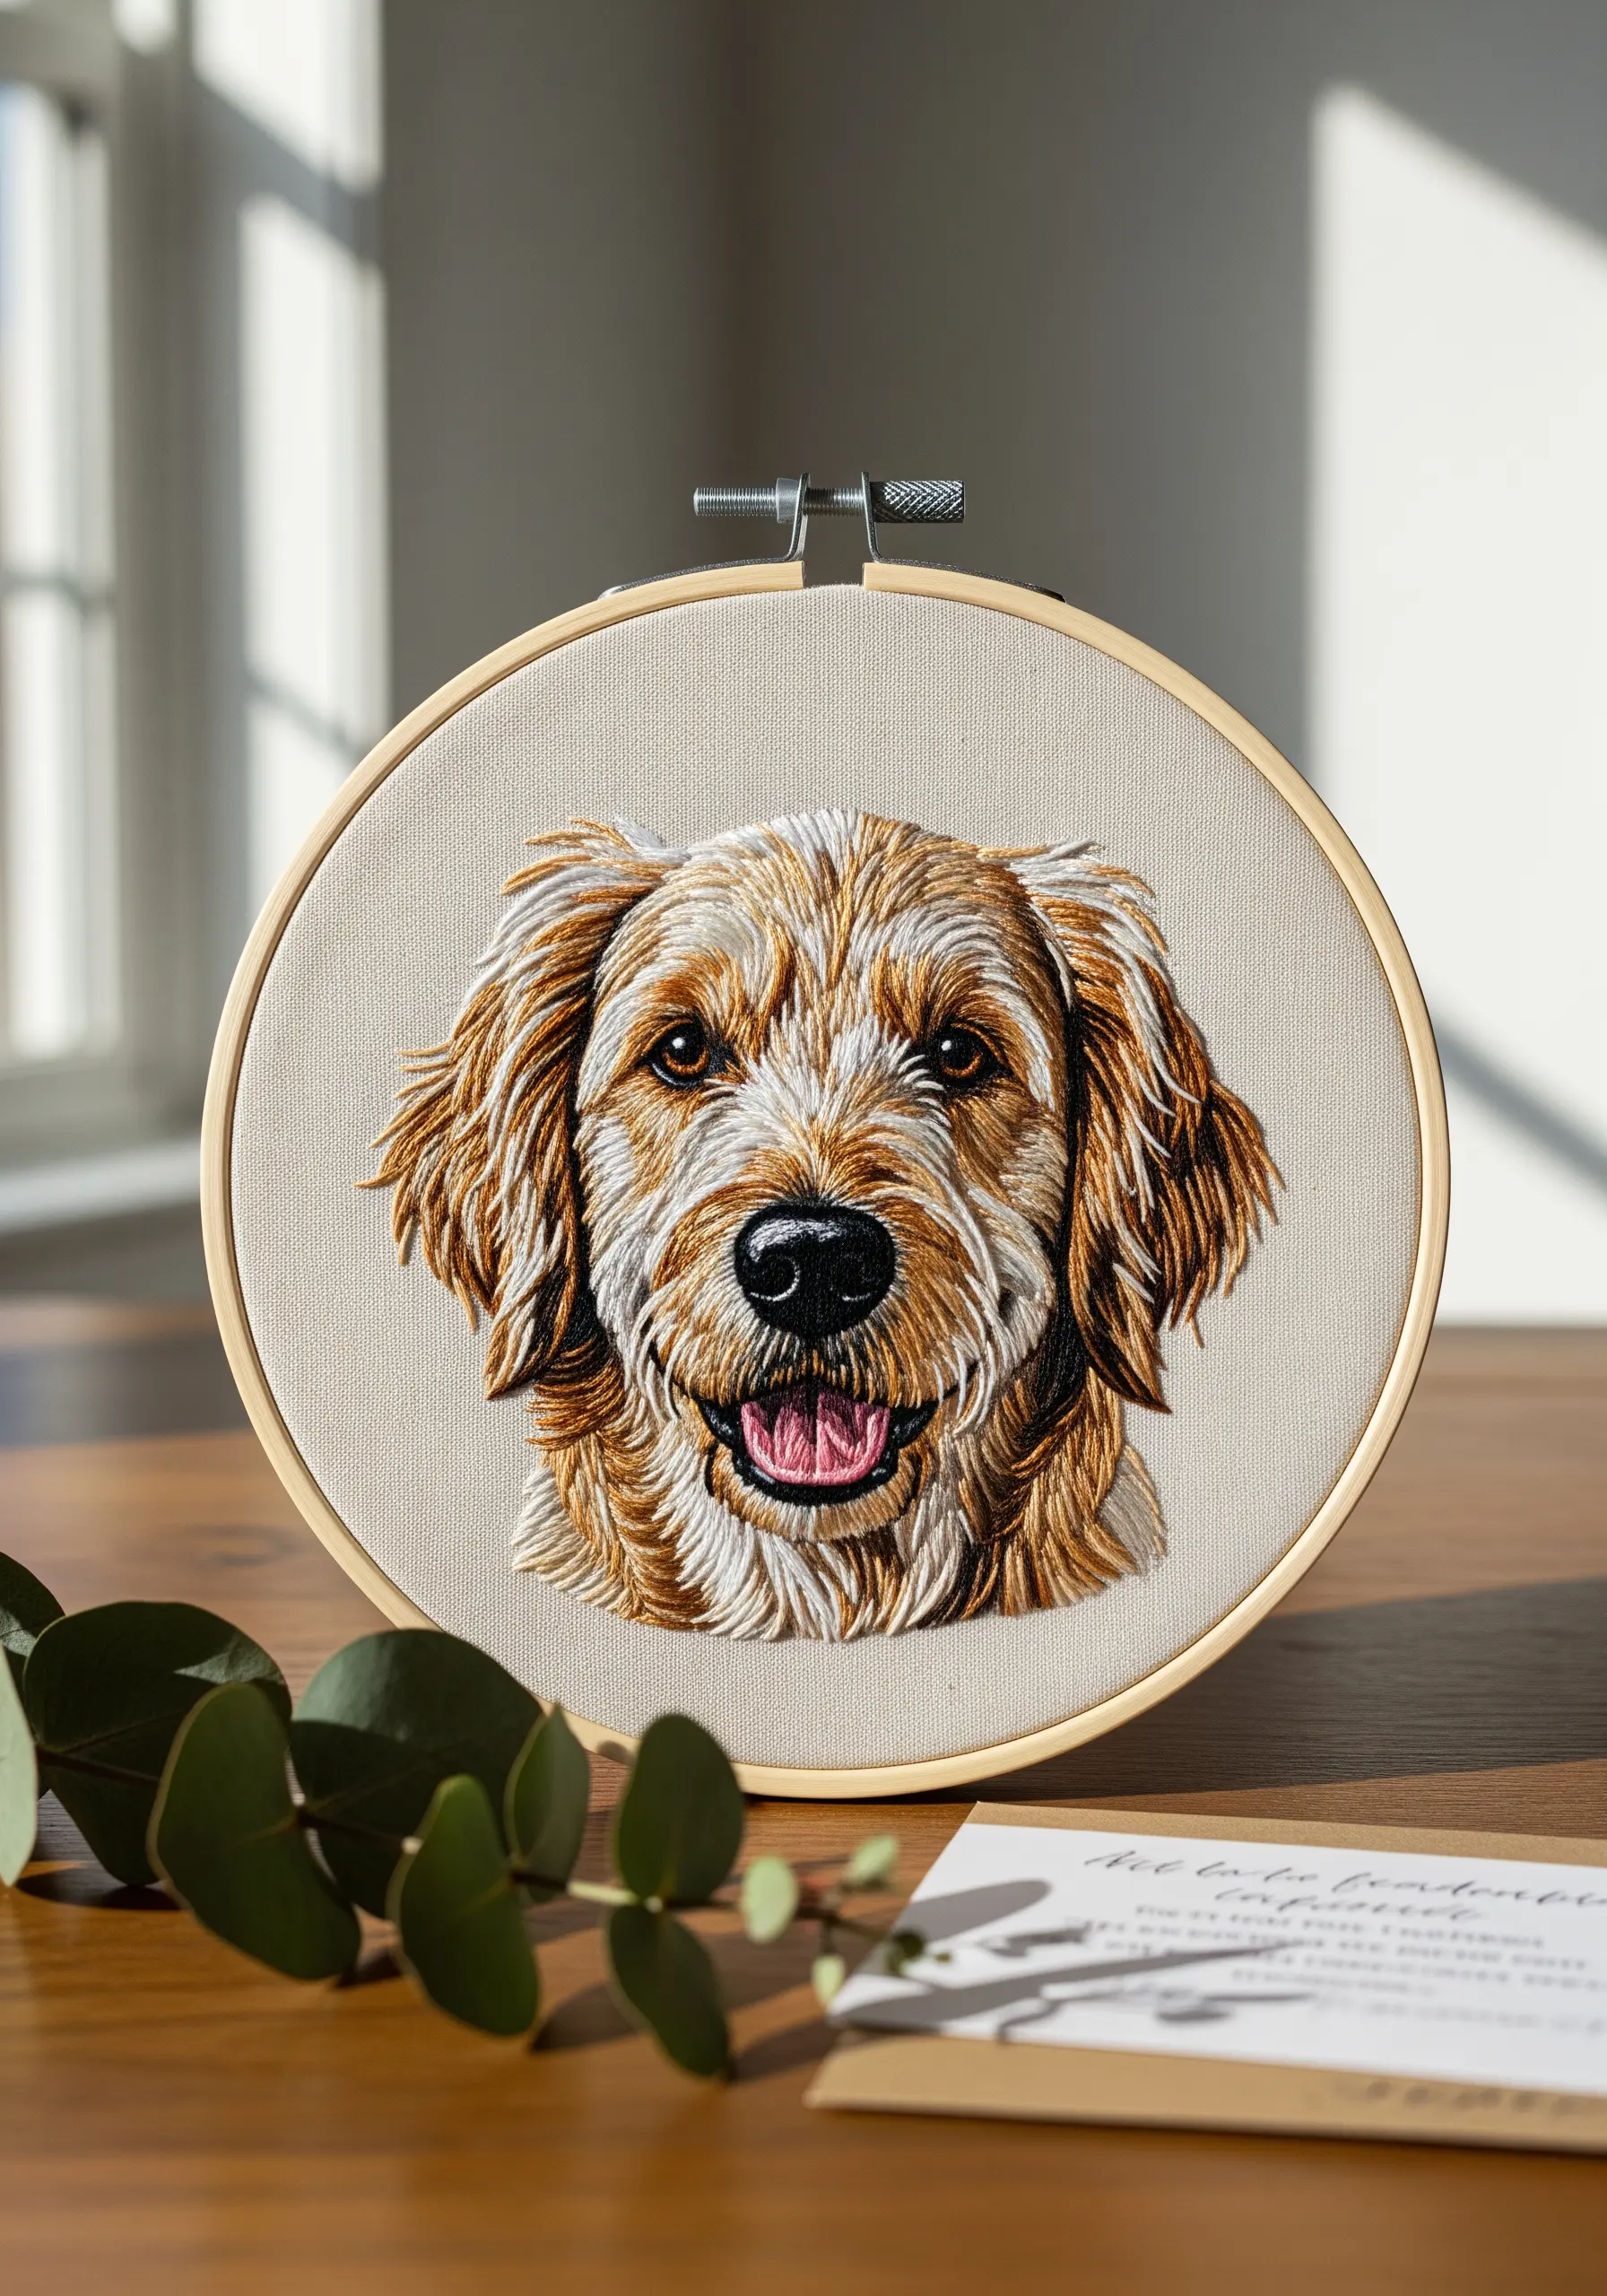
To create a realistic pet portrait, think like a painter, using thread to build layers of color and light.
Use single strands of floss and the long-and-short stitch, directing your stitches to follow the natural flow of the fur.
This technique avoids solid blocks of color, creating depth and softness that brings the portrait to life.
For the eyes, use a tiny satin stitch with a single white French knot to create a reflective glint—this is the detail that conveys emotion.
2. Chart the Stars with Metallic Thread
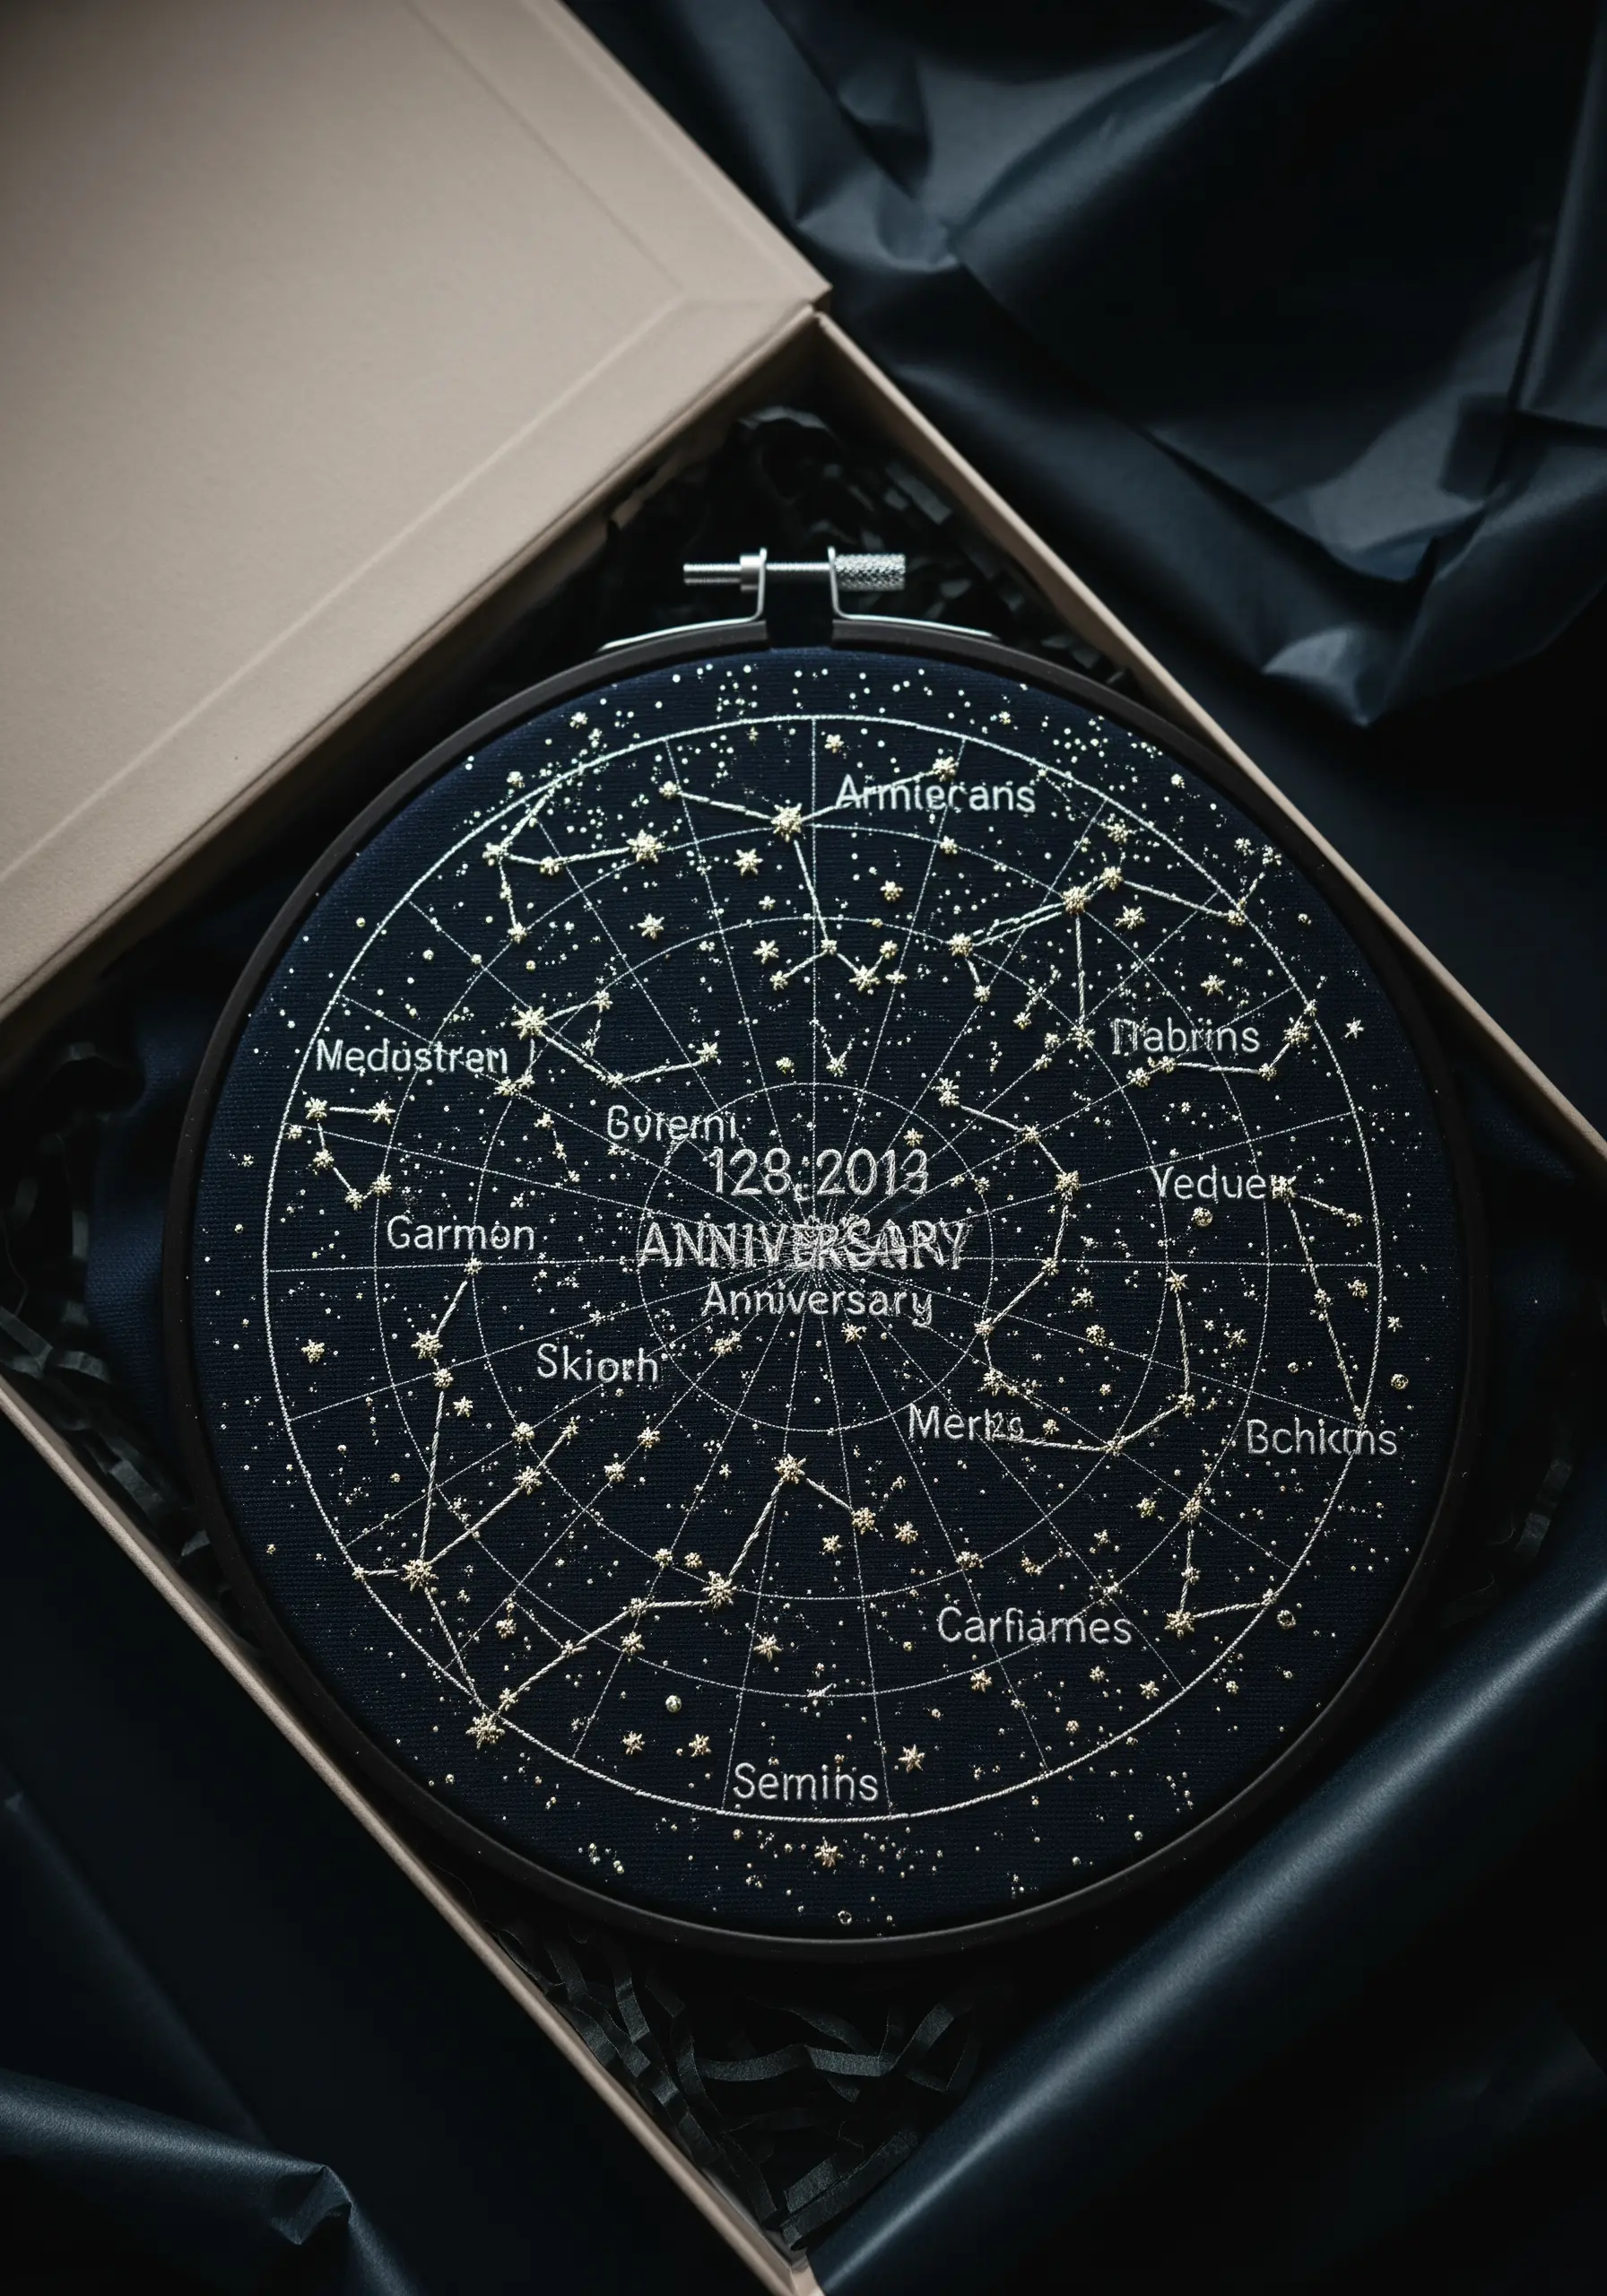
Recreate a significant night sky—a birthday, an anniversary—on dark navy or black cotton fabric for dramatic contrast.
Use a single strand of fine gold or silver metallic thread for the constellation lines, stitched with a precise backstitch for clarity.
Vary the size of your stars by using French knots with one, two, or three wraps of thread; this creates a sense of cosmic depth.
Always use a stabilizer with dark fabrics to prevent puckering, ensuring your celestial map remains flat and elegant.
3. Elevate Lettering with Textured Fills
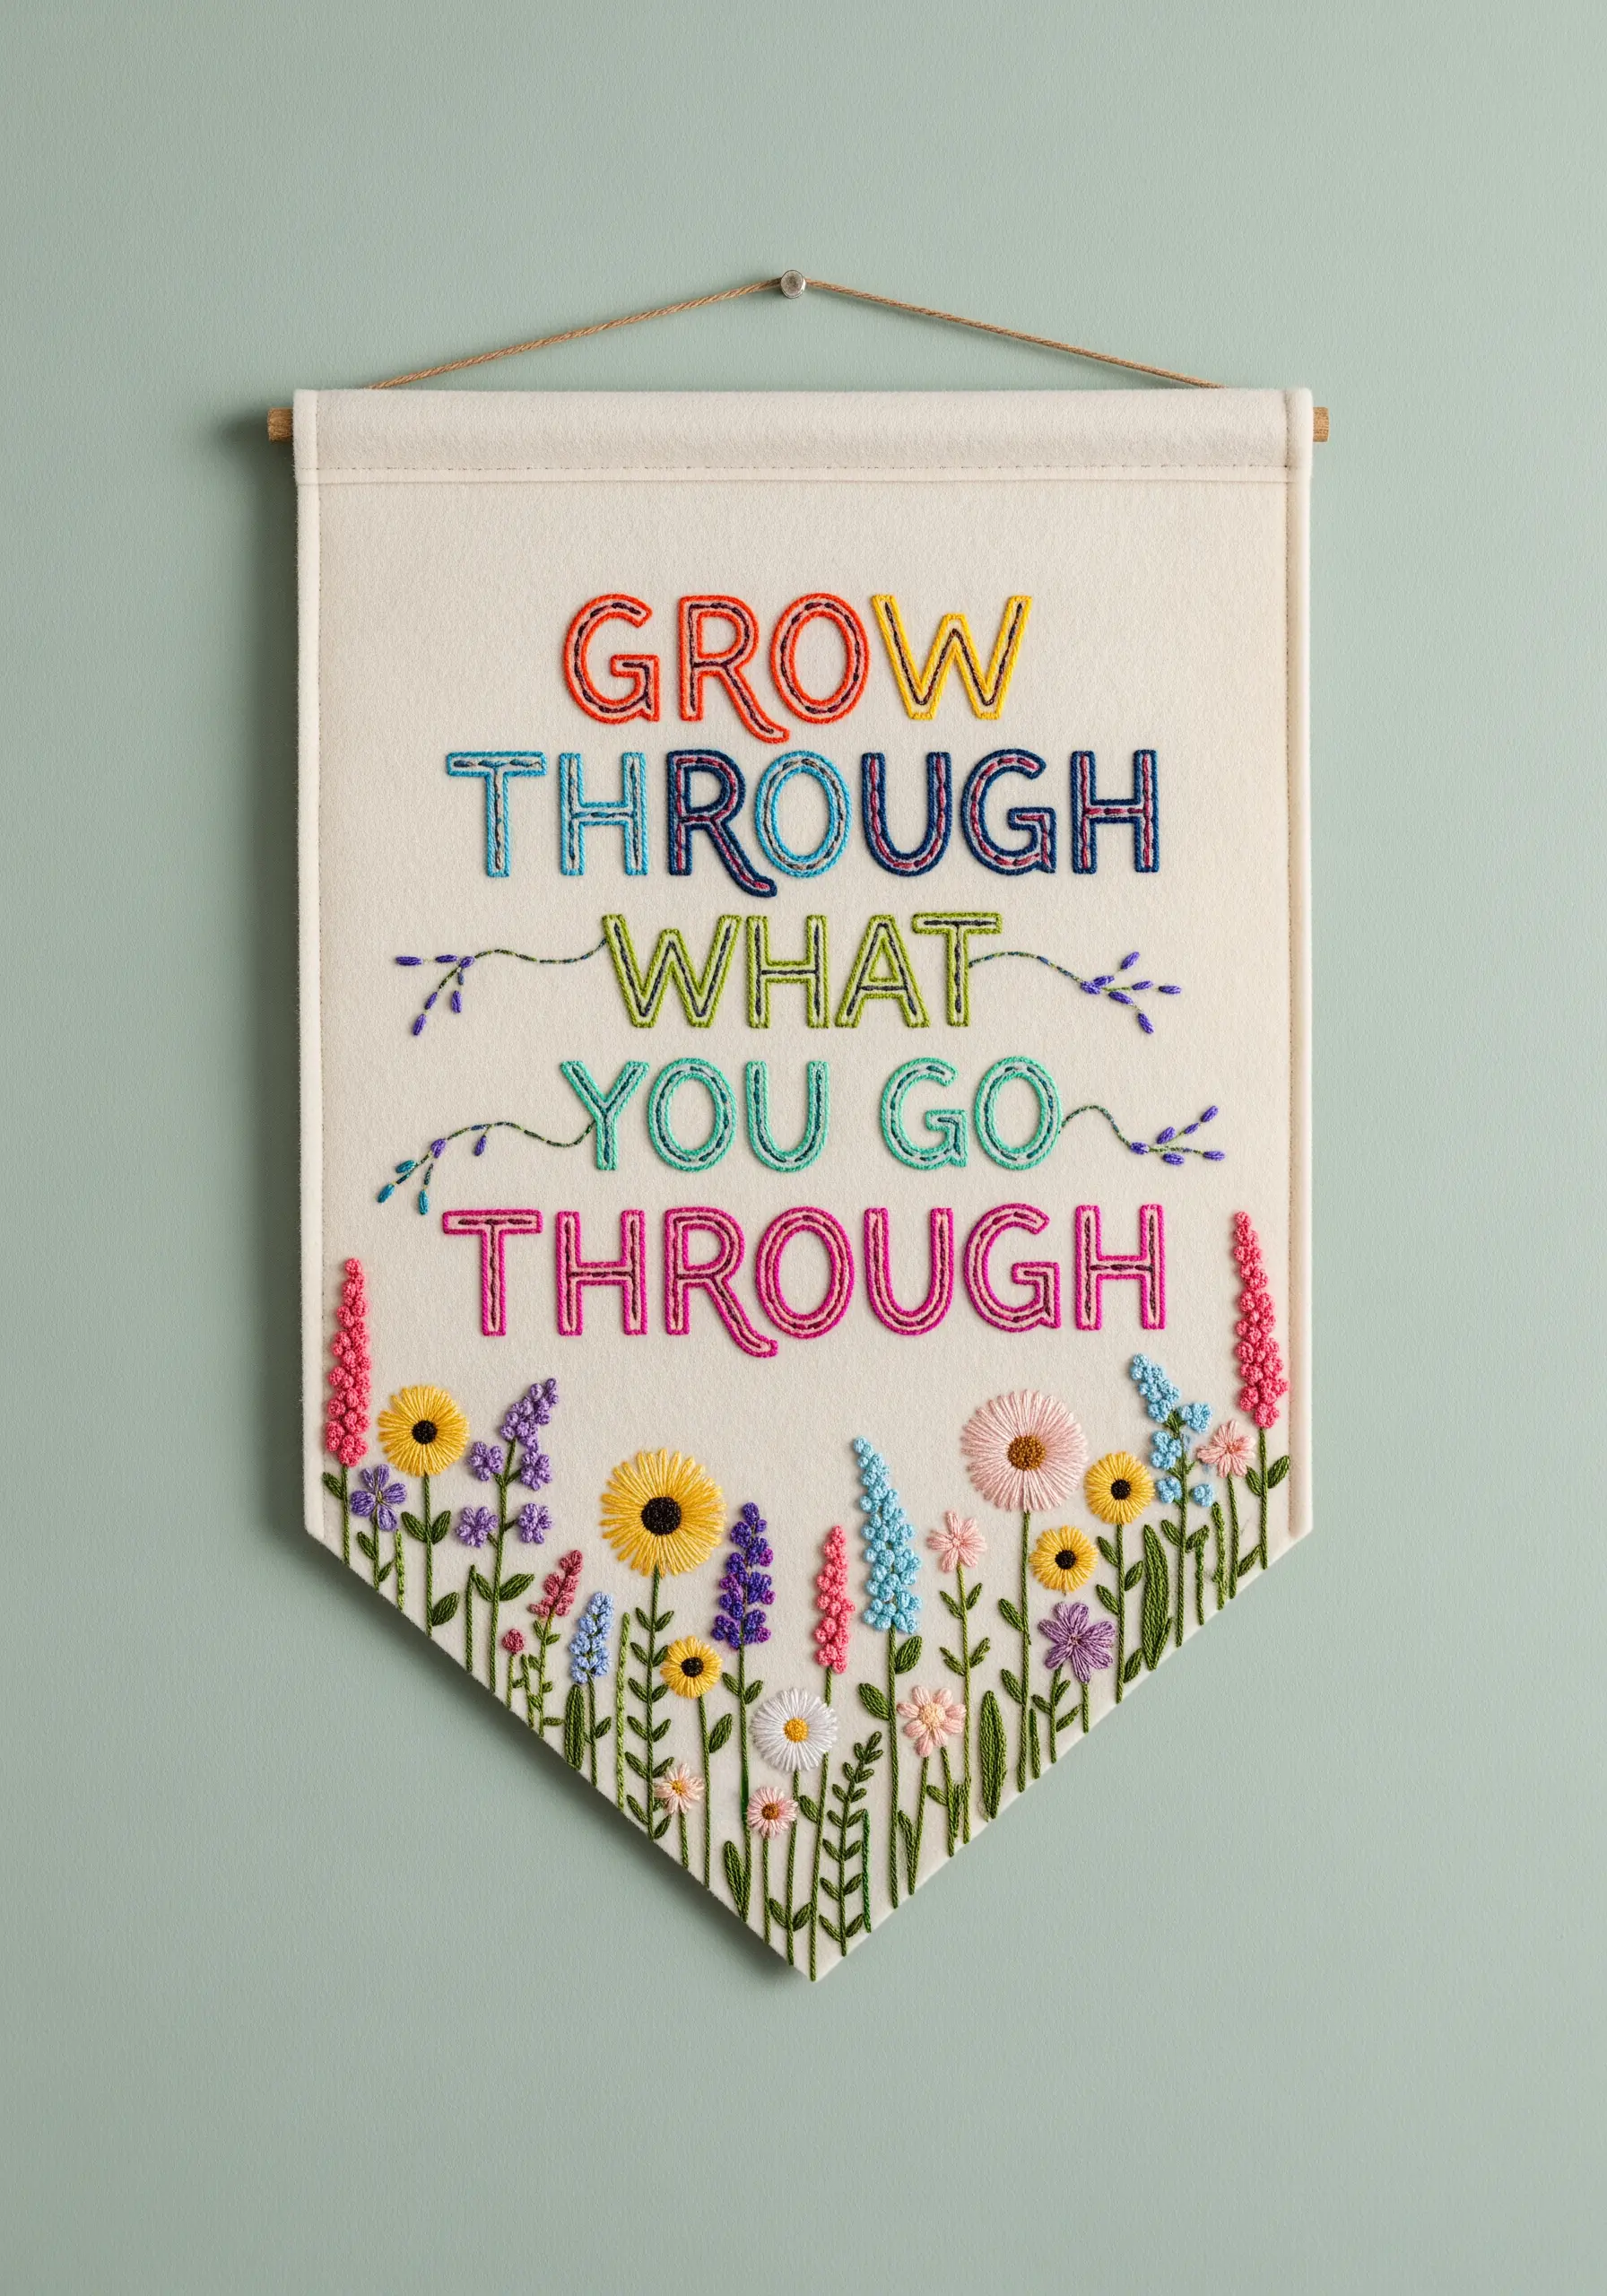
Instead of a simple satin stitch, fill your letters with a chain stitch for a bold, braided texture that makes words pop.
Work the chain stitch in neat rows, following the curves of each letter to maintain legibility and create a cohesive look.
For the floral elements, combine different textural stitches: lazy daisy for petals, French knots for flower centers, and stem stitch for delicate greenery.
This mix of textures turns a simple quote into a tactile piece of art.
4. Master Monograms on Plush Velvet
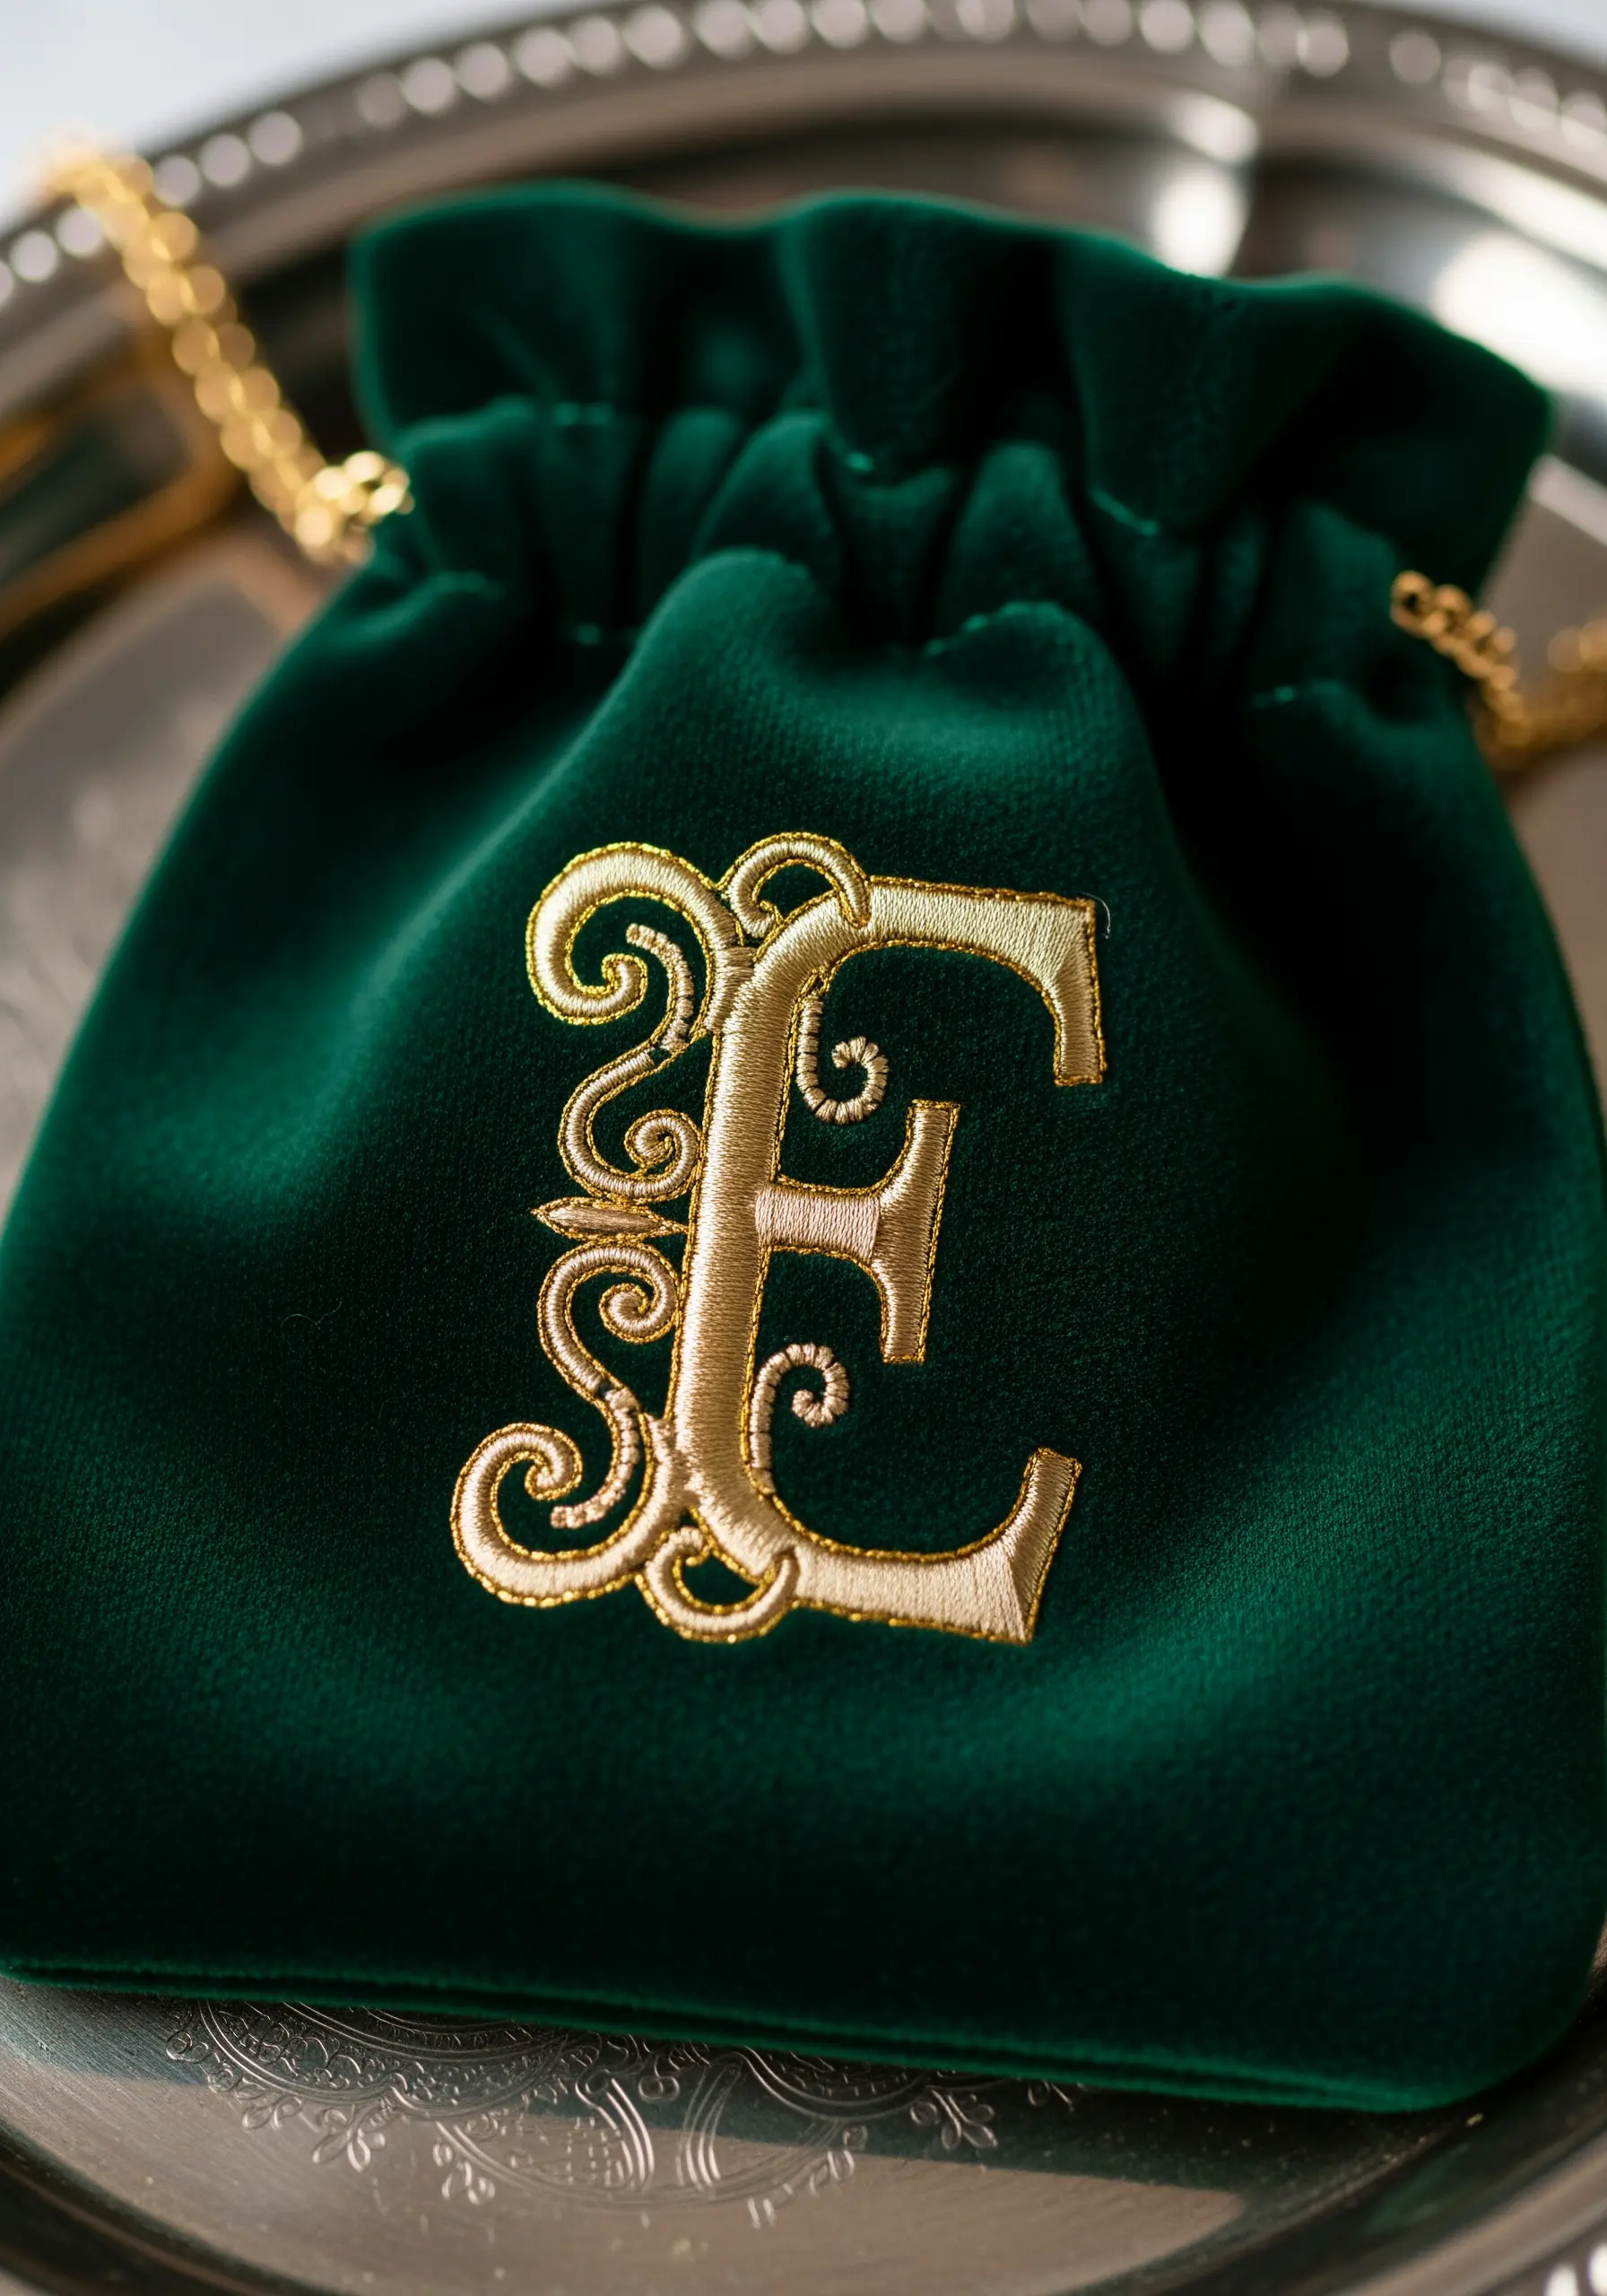
Embroidering on a high-pile fabric like velvet requires preparation to prevent the stitches from sinking and disappearing.
First, apply a water-soluble topper stabilizer over the fabric surface; this provides a smooth foundation for your stitches to sit on.
Use a dense satin stitch for the monogram, ensuring your stitches are tight and even to create a solid, lustrous surface that contrasts beautifully with the velvet’s sheen.
A sharp, fine needle will part the velvet fibers rather than piercing them, preserving the fabric’s luxurious finish.
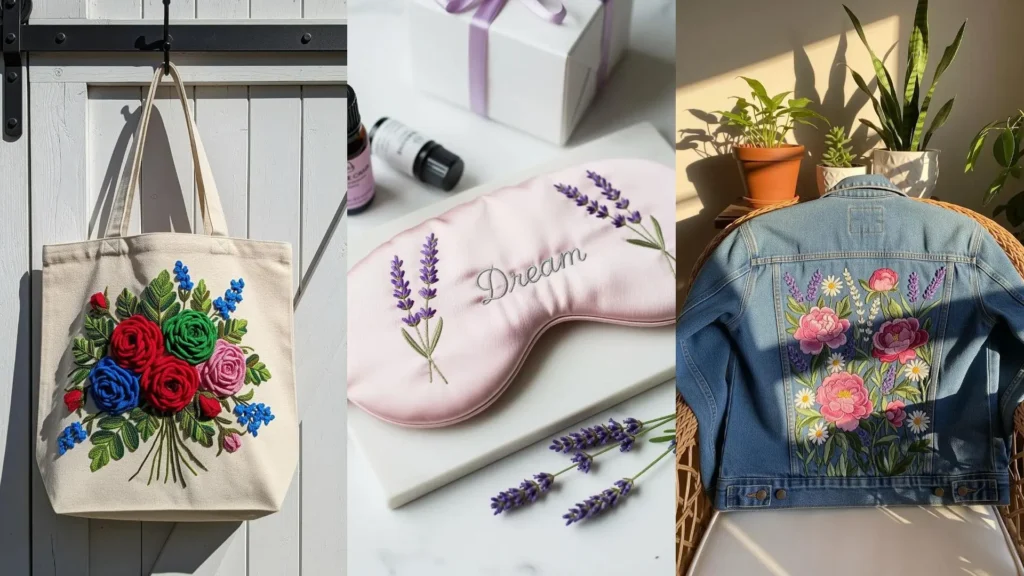
5. Design a Statement Piece on Denim
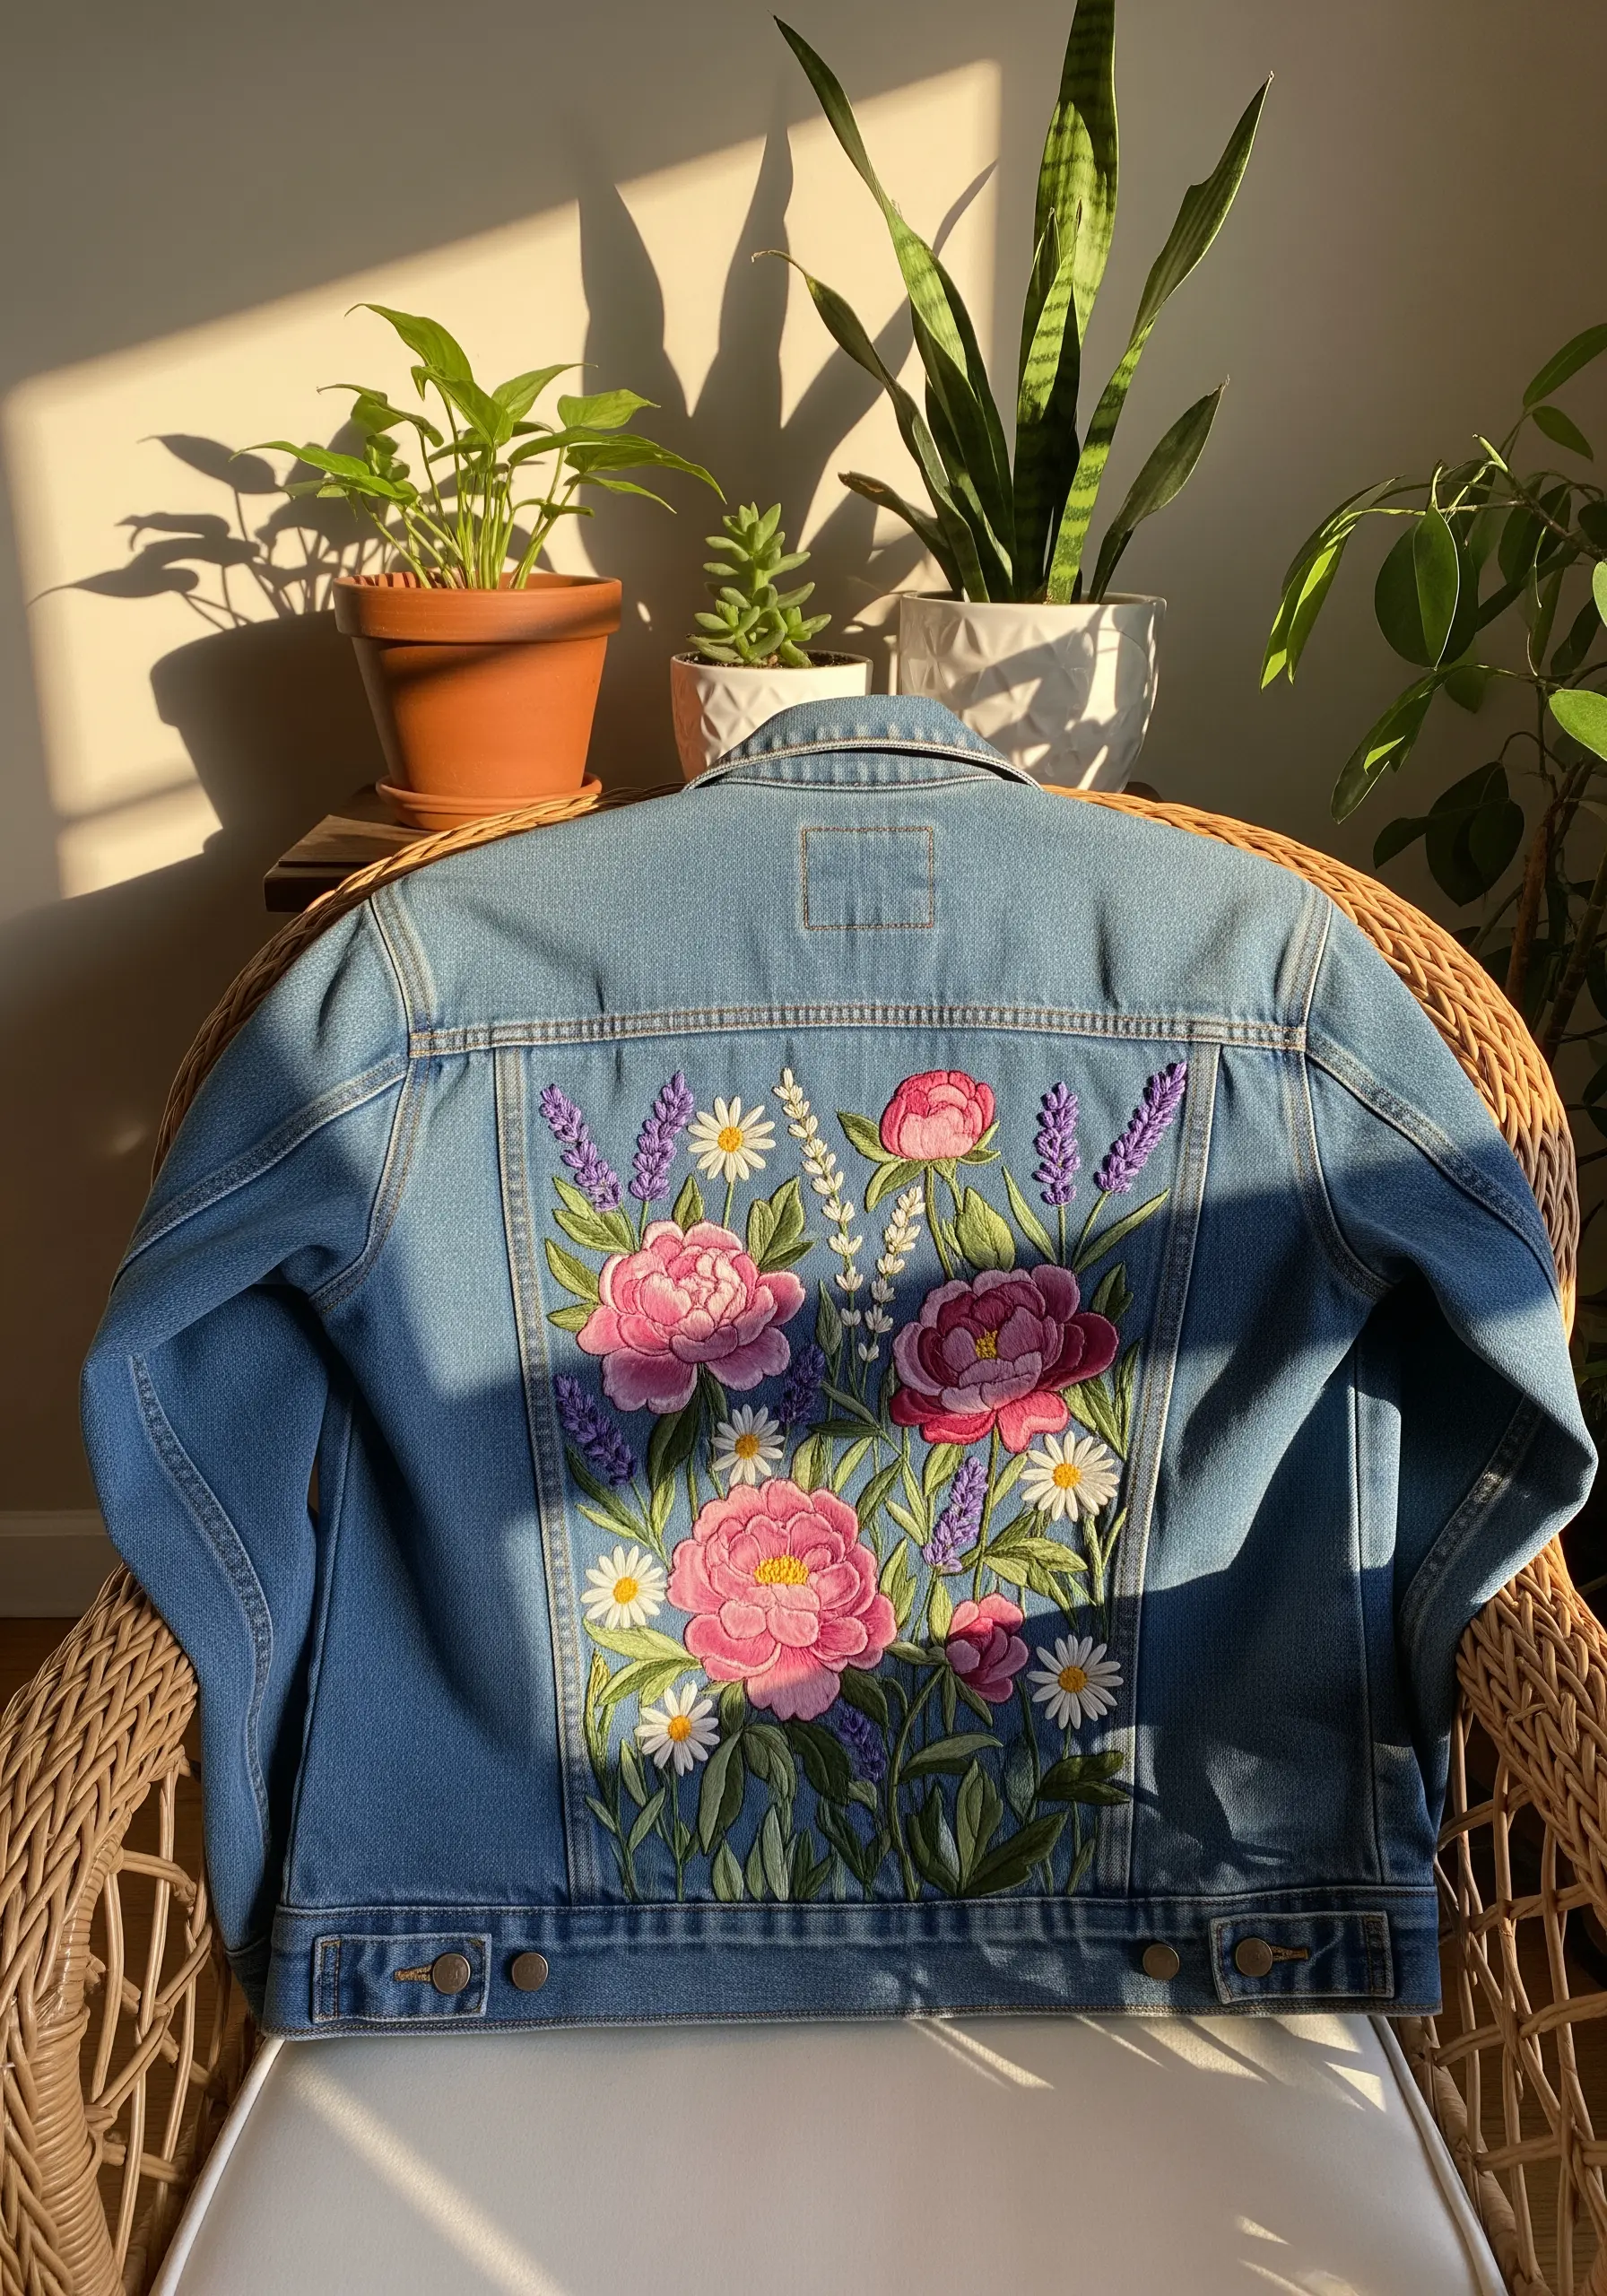
Transform a denim jacket with a large-scale floral design that feels like a wearable mural.
For smooth gradients in the petals, use the long-and-short stitch, blending two or three shades of a color to create realistic dimension.
You must use a heavy-duty cut-away stabilizer on the inside of the jacket to support the weight of the stitches and prevent the denim from puckering.
This thoughtful approach turns a simple garment into one of your signature botanical embroidery ideas.
6. Add Delicate Stitches to Faux Leather
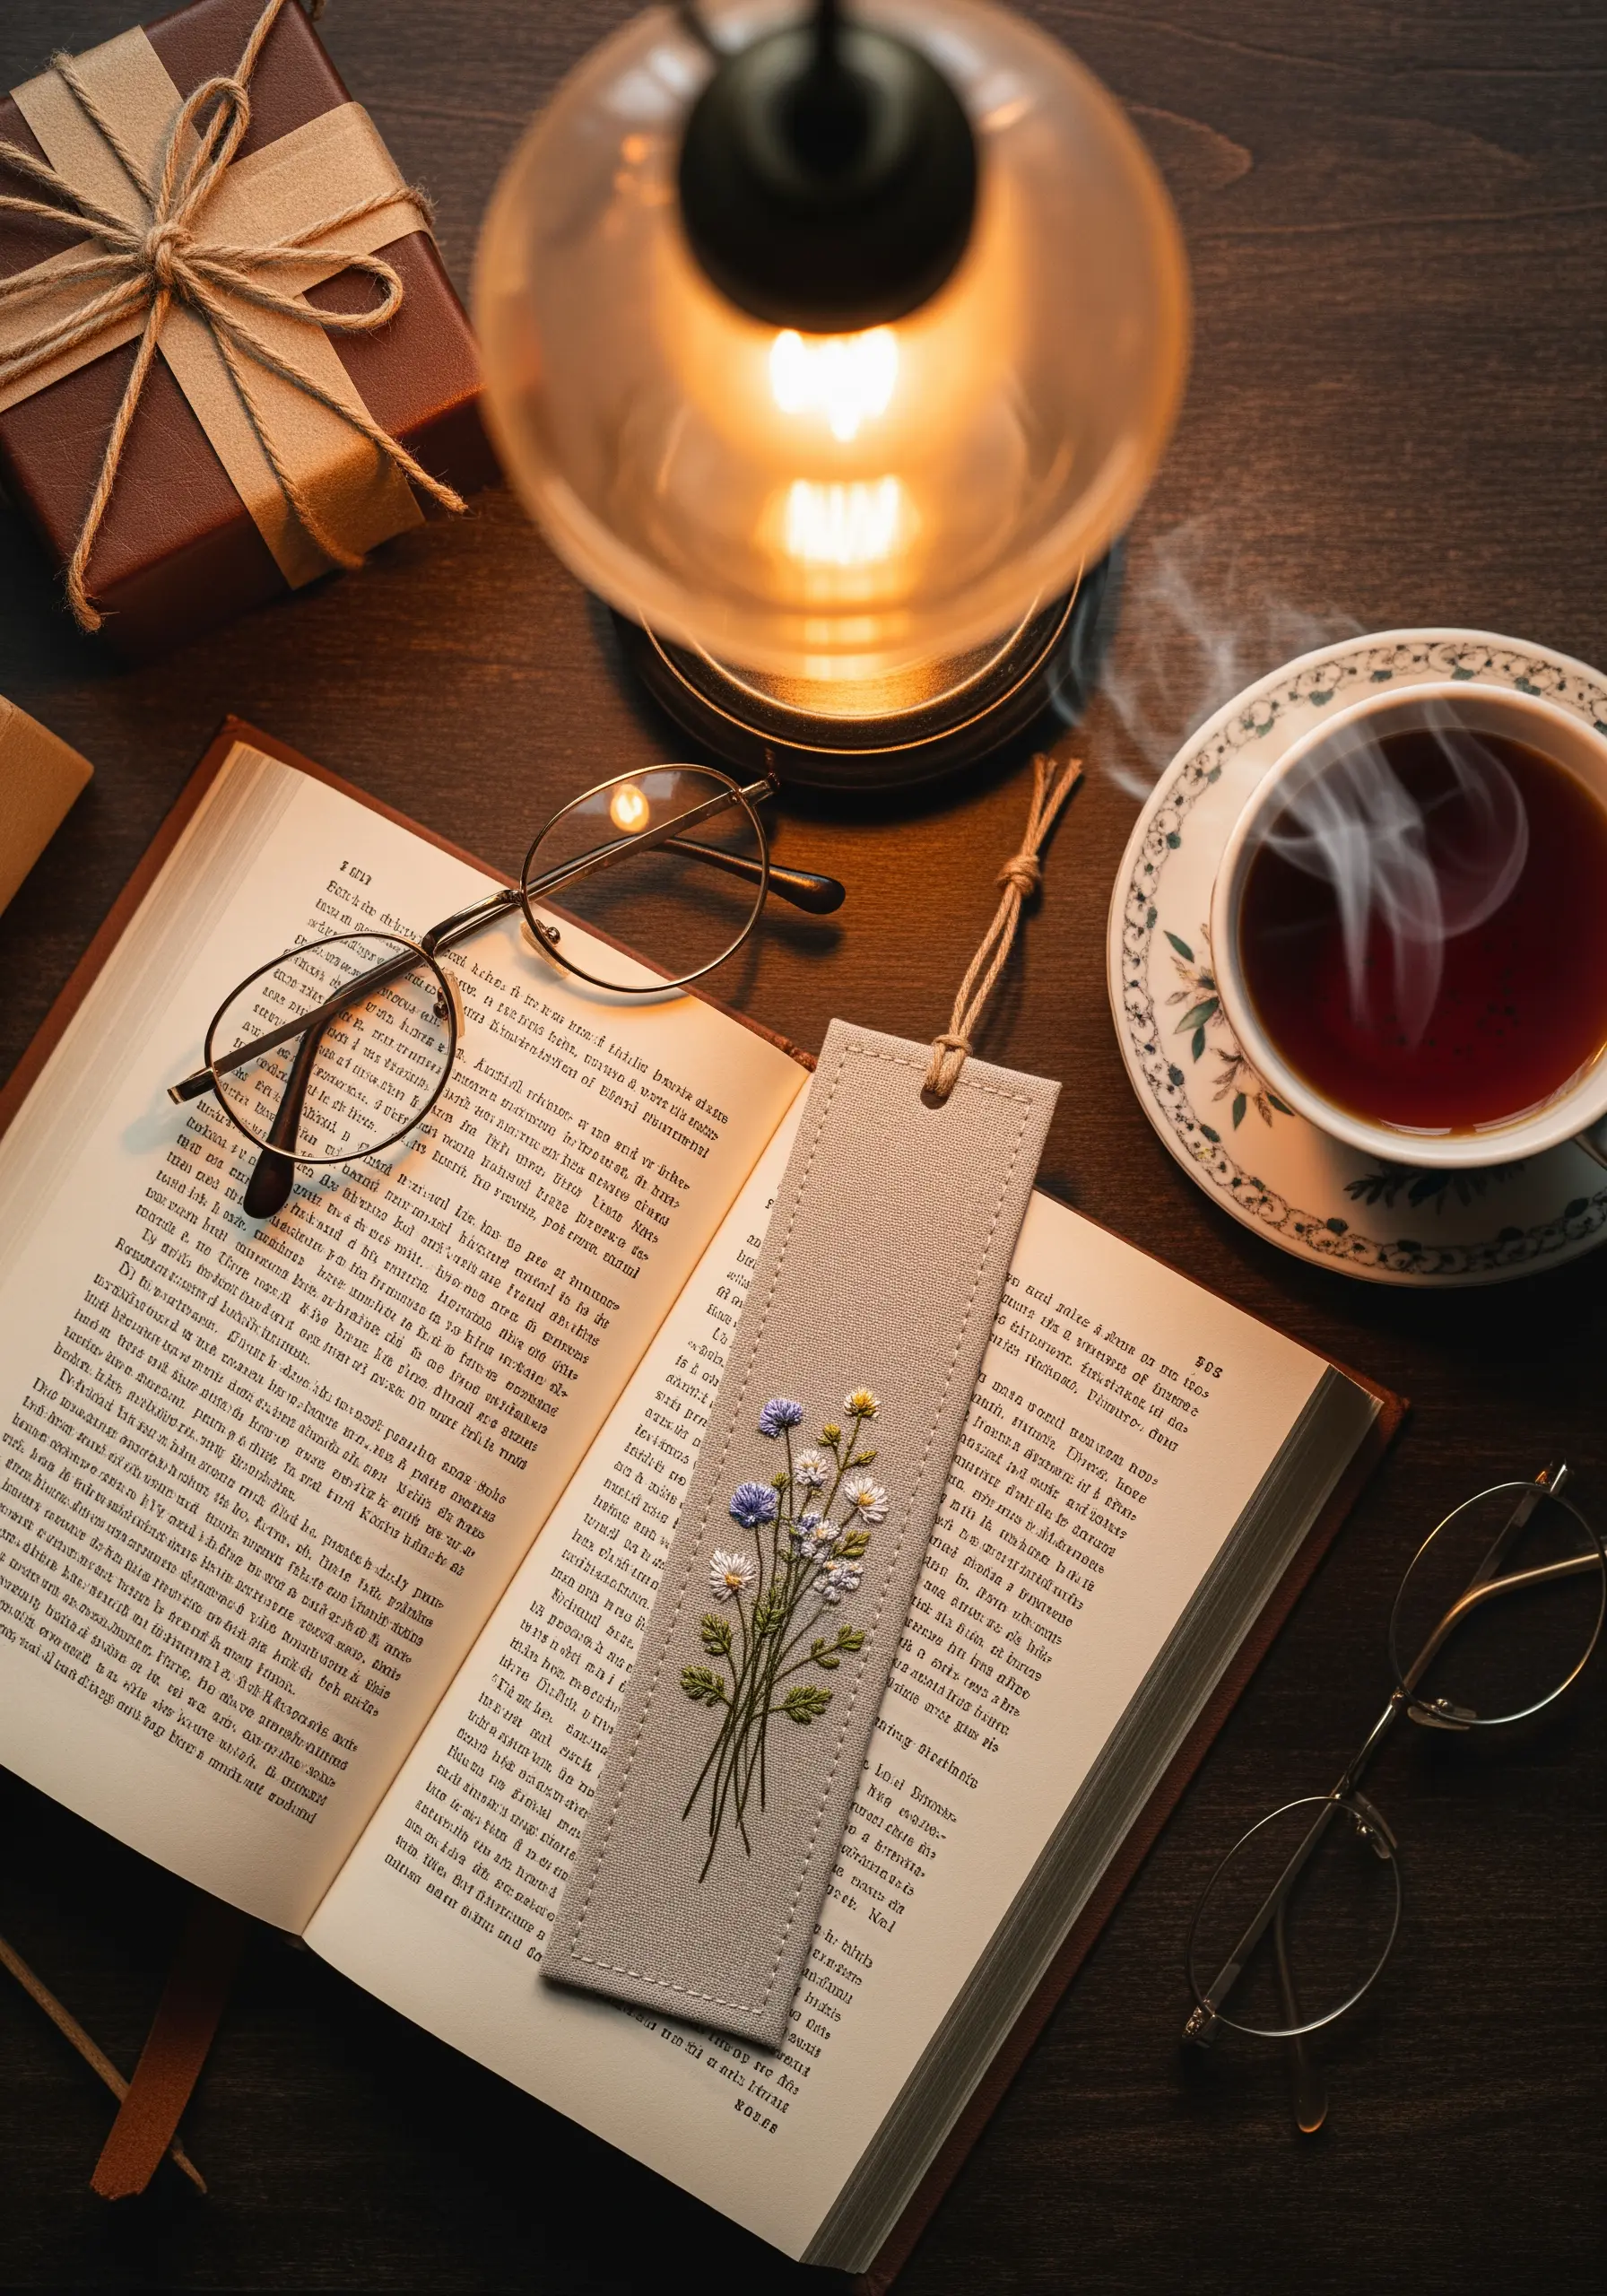
To create an elegant embroidered bookmark, choose a high-quality faux leather that won’t tear easily.
Instead of forcing a needle through, pre-punch your stitching holes with a fine awl or the smallest leather punch you have.
This method prevents misshapen stitches and makes the sewing process smooth and enjoyable.
Use simple, classic stitches like stem stitch for the stems and lazy daisy for the petals, as they are graphic and hold their shape well on a sturdy surface.
7. Preserve a Family Recipe in Thread

Turn a cherished handwritten recipe into a functional kitchen heirloom by having it digitized for machine embroidery.
This process captures the unique quirks of a loved one’s handwriting, making the gift profoundly personal.
If you’re stitching by hand, trace the recipe onto the fabric and use a single strand of floss with a meticulous backstitch to replicate the script as closely as possible.
Frame the text with simple motifs, like apples and cinnamon sticks, to add a touch of color without distracting from the main story.
8. Stitch an Architectural House Portrait

Capture the essence of a home by focusing on its key architectural details rather than trying to replicate every single brick.
Use a fine, single-strand backstitch to outline windows, doors, and rooflines for a clean, illustrative effect.
Create texture for landscaping and building materials with simple fill stitches: French knots for bushes, seed stitch for grass, and straight stitches laid in a pattern for brickwork.
This approach transforms a photograph into a stylized, heartfelt work of art.
9. Create a Miniature Landscape Pendant
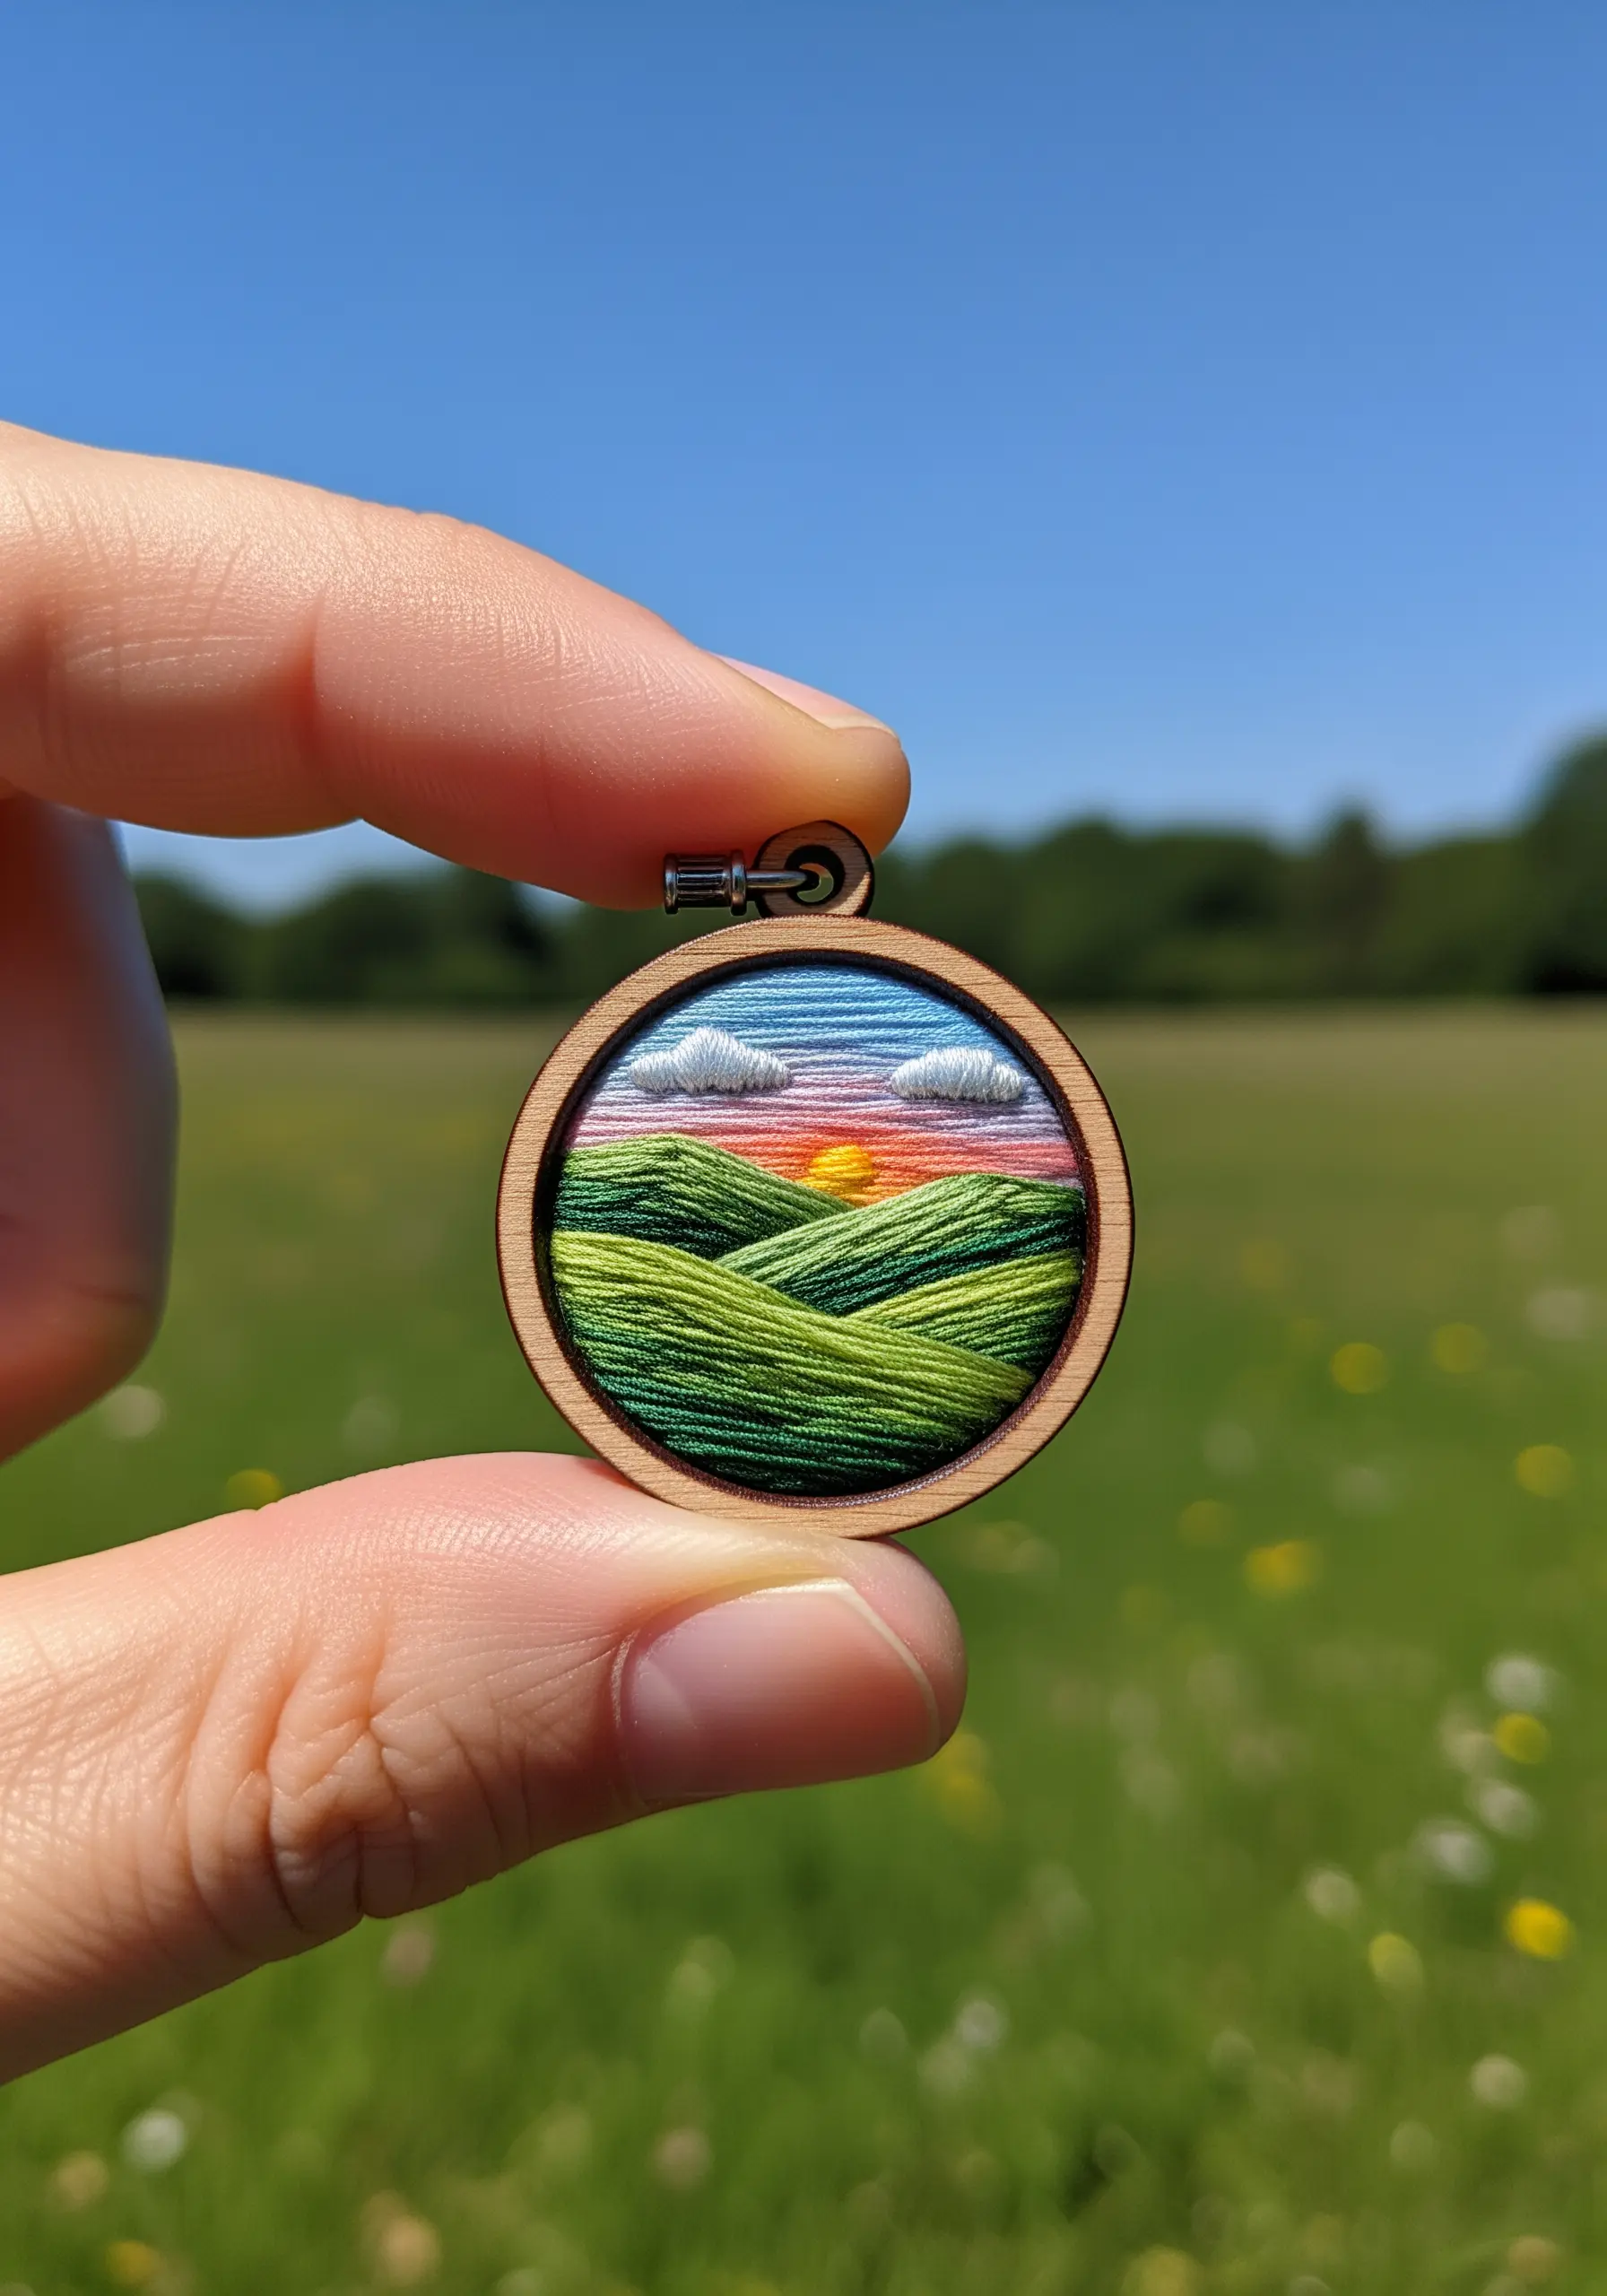
The key to successful miniature embroidery is simplifying the scene into blocks of color and texture.
Use a single strand of cotton floss to allow for fine detail and smooth blending, especially in the sunset sky.
Fill the rolling hills with tightly packed straight stitches or seed stitches, slightly overlapping your rows of color to create a gentle gradient.
This is one of those tiny embroidery projects where thread direction is everything—it creates the illusion of contours and light.
10. Personalize a Soft Baby Blanket
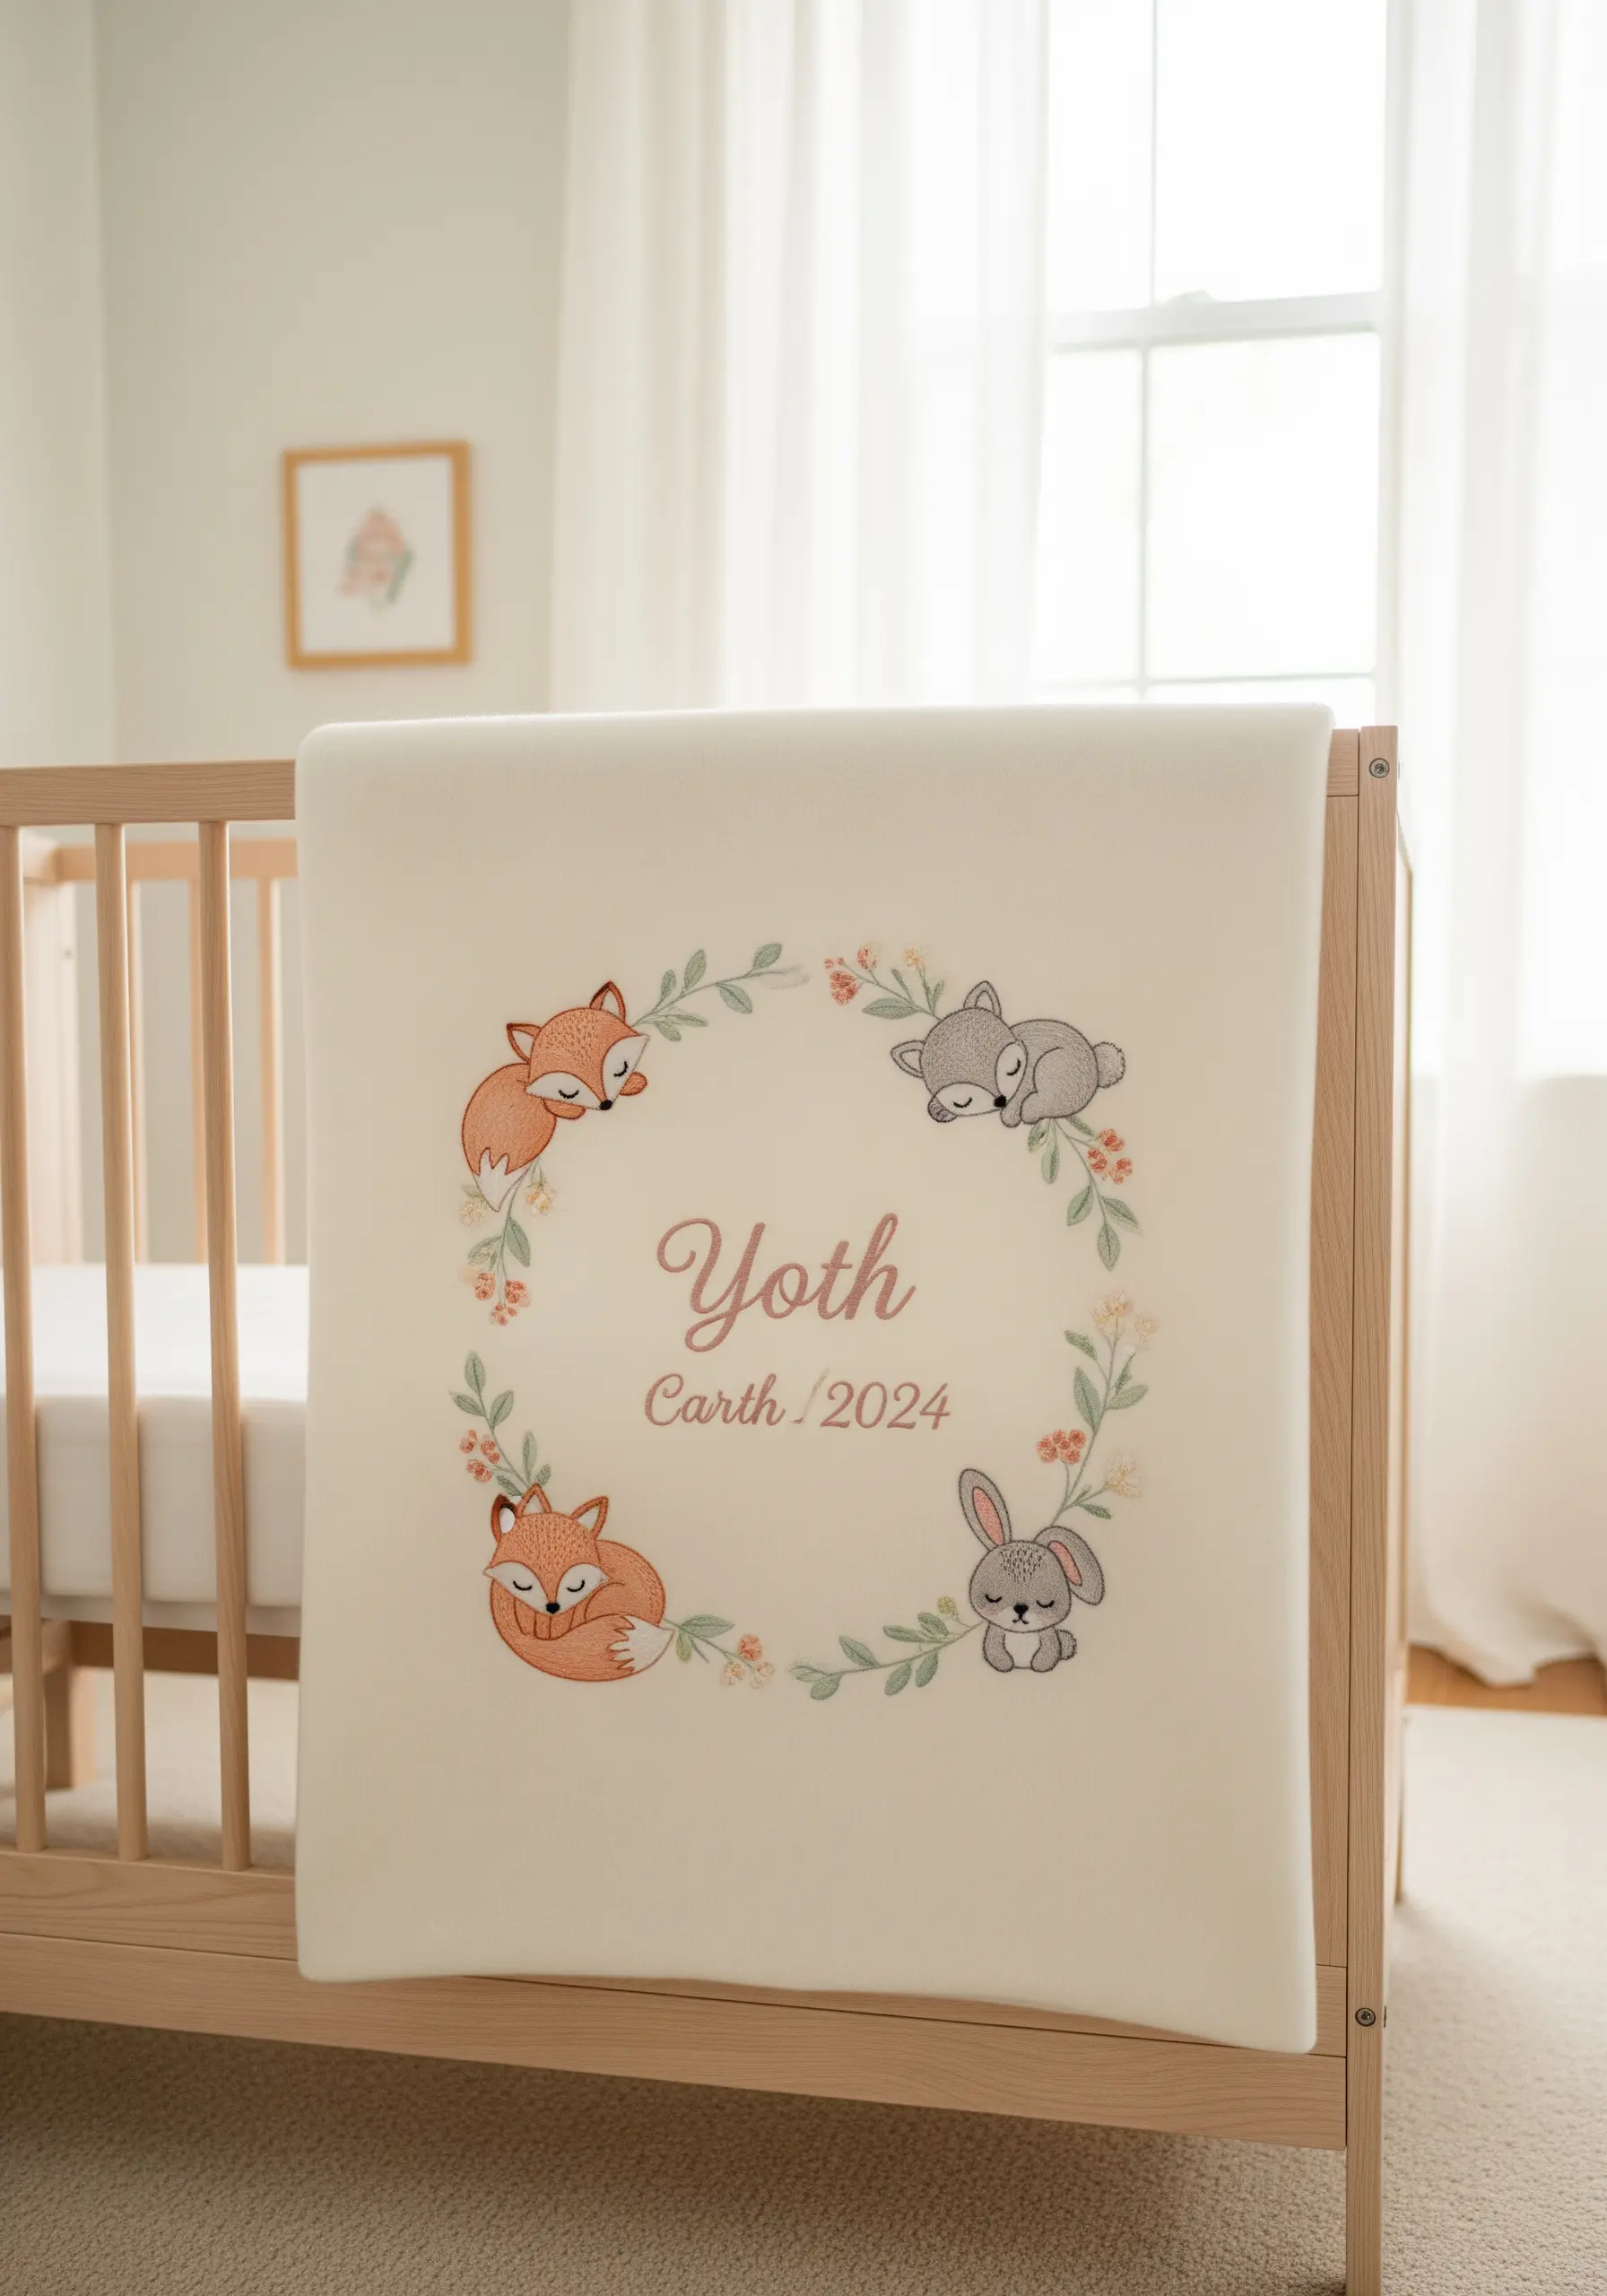
When embroidering on soft or stretchy material like fleece, a stabilizer is non-negotiable.
Place a wash-away stabilizer on top of the fabric to prevent stitches from sinking, and a permanent cut-away stabilizer on the back for durability through washes.
Choose a design with simple fills and clean outlines, as intricate details can get lost in the plush texture of the blanket.
For a soft finish on the back, you can iron on a tender-touch covering after you’ve trimmed the stabilizer, protecting delicate skin from scratchy threads.
11. Embellish Canvas Sneakers with Bold Motifs

Give a pair of plain canvas sneakers a custom look with vibrant, durable embroidery.
Use a sharp, heavy-duty needle, a thimble, and pliers to help you pull the needle through the tough canvas, especially near the seams.
Trace your design with a water-soluble pen and use bold stitches like a chain stitch or a thick stem stitch for the outlines to ensure they stand out.
Fill in the shapes with a dense satin stitch, using high-quality, colorfast thread that can withstand wear and tear.
12. Craft a Timeless Linen Wall Calendar

A hand-stitched calendar is a gift that offers beauty and function all year long.
For the grid and lettering, use a heat-erasable pen for precise guidelines that will vanish without a trace.
A tiny, one or two-strand backstitch is essential for keeping the numbers and letters crisp and legible.
Add a small, seasonal motif to each month—like a leaf for autumn or a flower for spring—to give the calendar a charming, narrative quality.
13. Design Elegant, Minimalist Table Linens
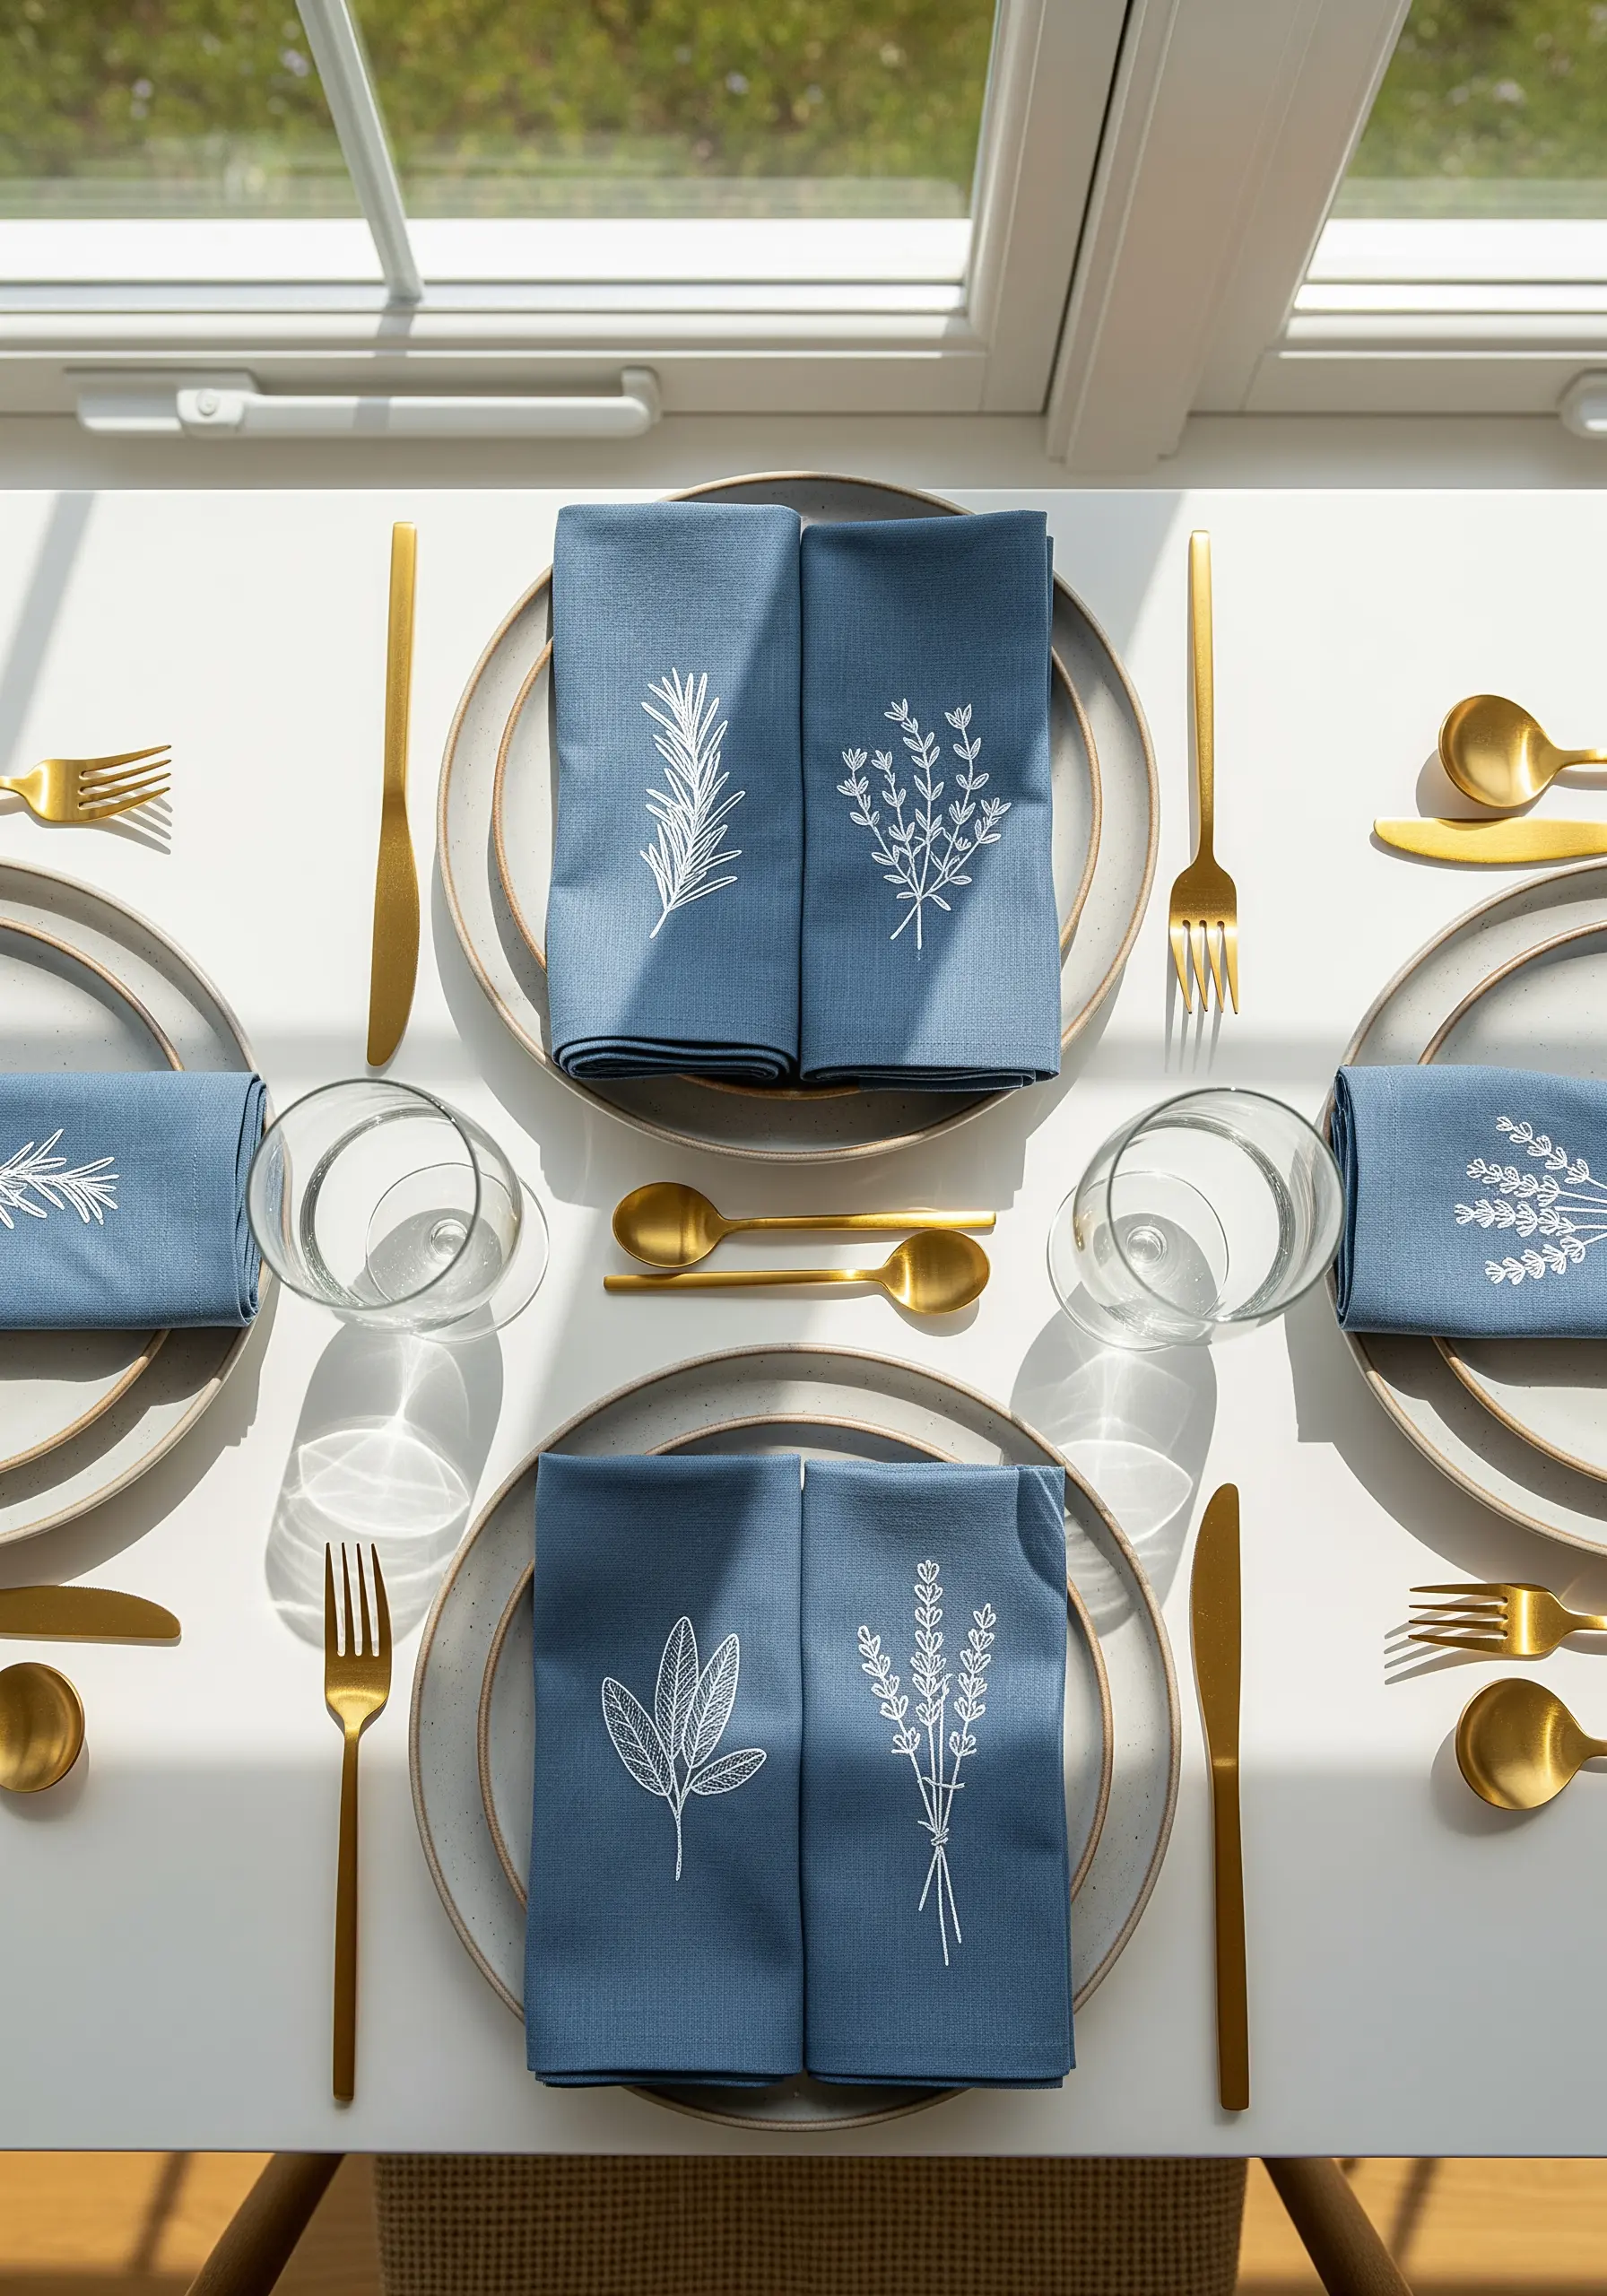
Elevate a simple set of napkins into a sophisticated gift with clean, single-line botanical designs.
Choose high-quality linen or cotton napkins, as their natural texture provides a beautiful backdrop for simple stitchwork.
Use a stem stitch or a split stitch with three strands of floss to create a raised, cord-like line that gives the motif substance.
The beauty of these herbal plant embroidery motifs lies in their restraint; a single, well-placed sprig feels more luxurious than an overly dense design.
14. Build Dimension with Woven Wheel Roses
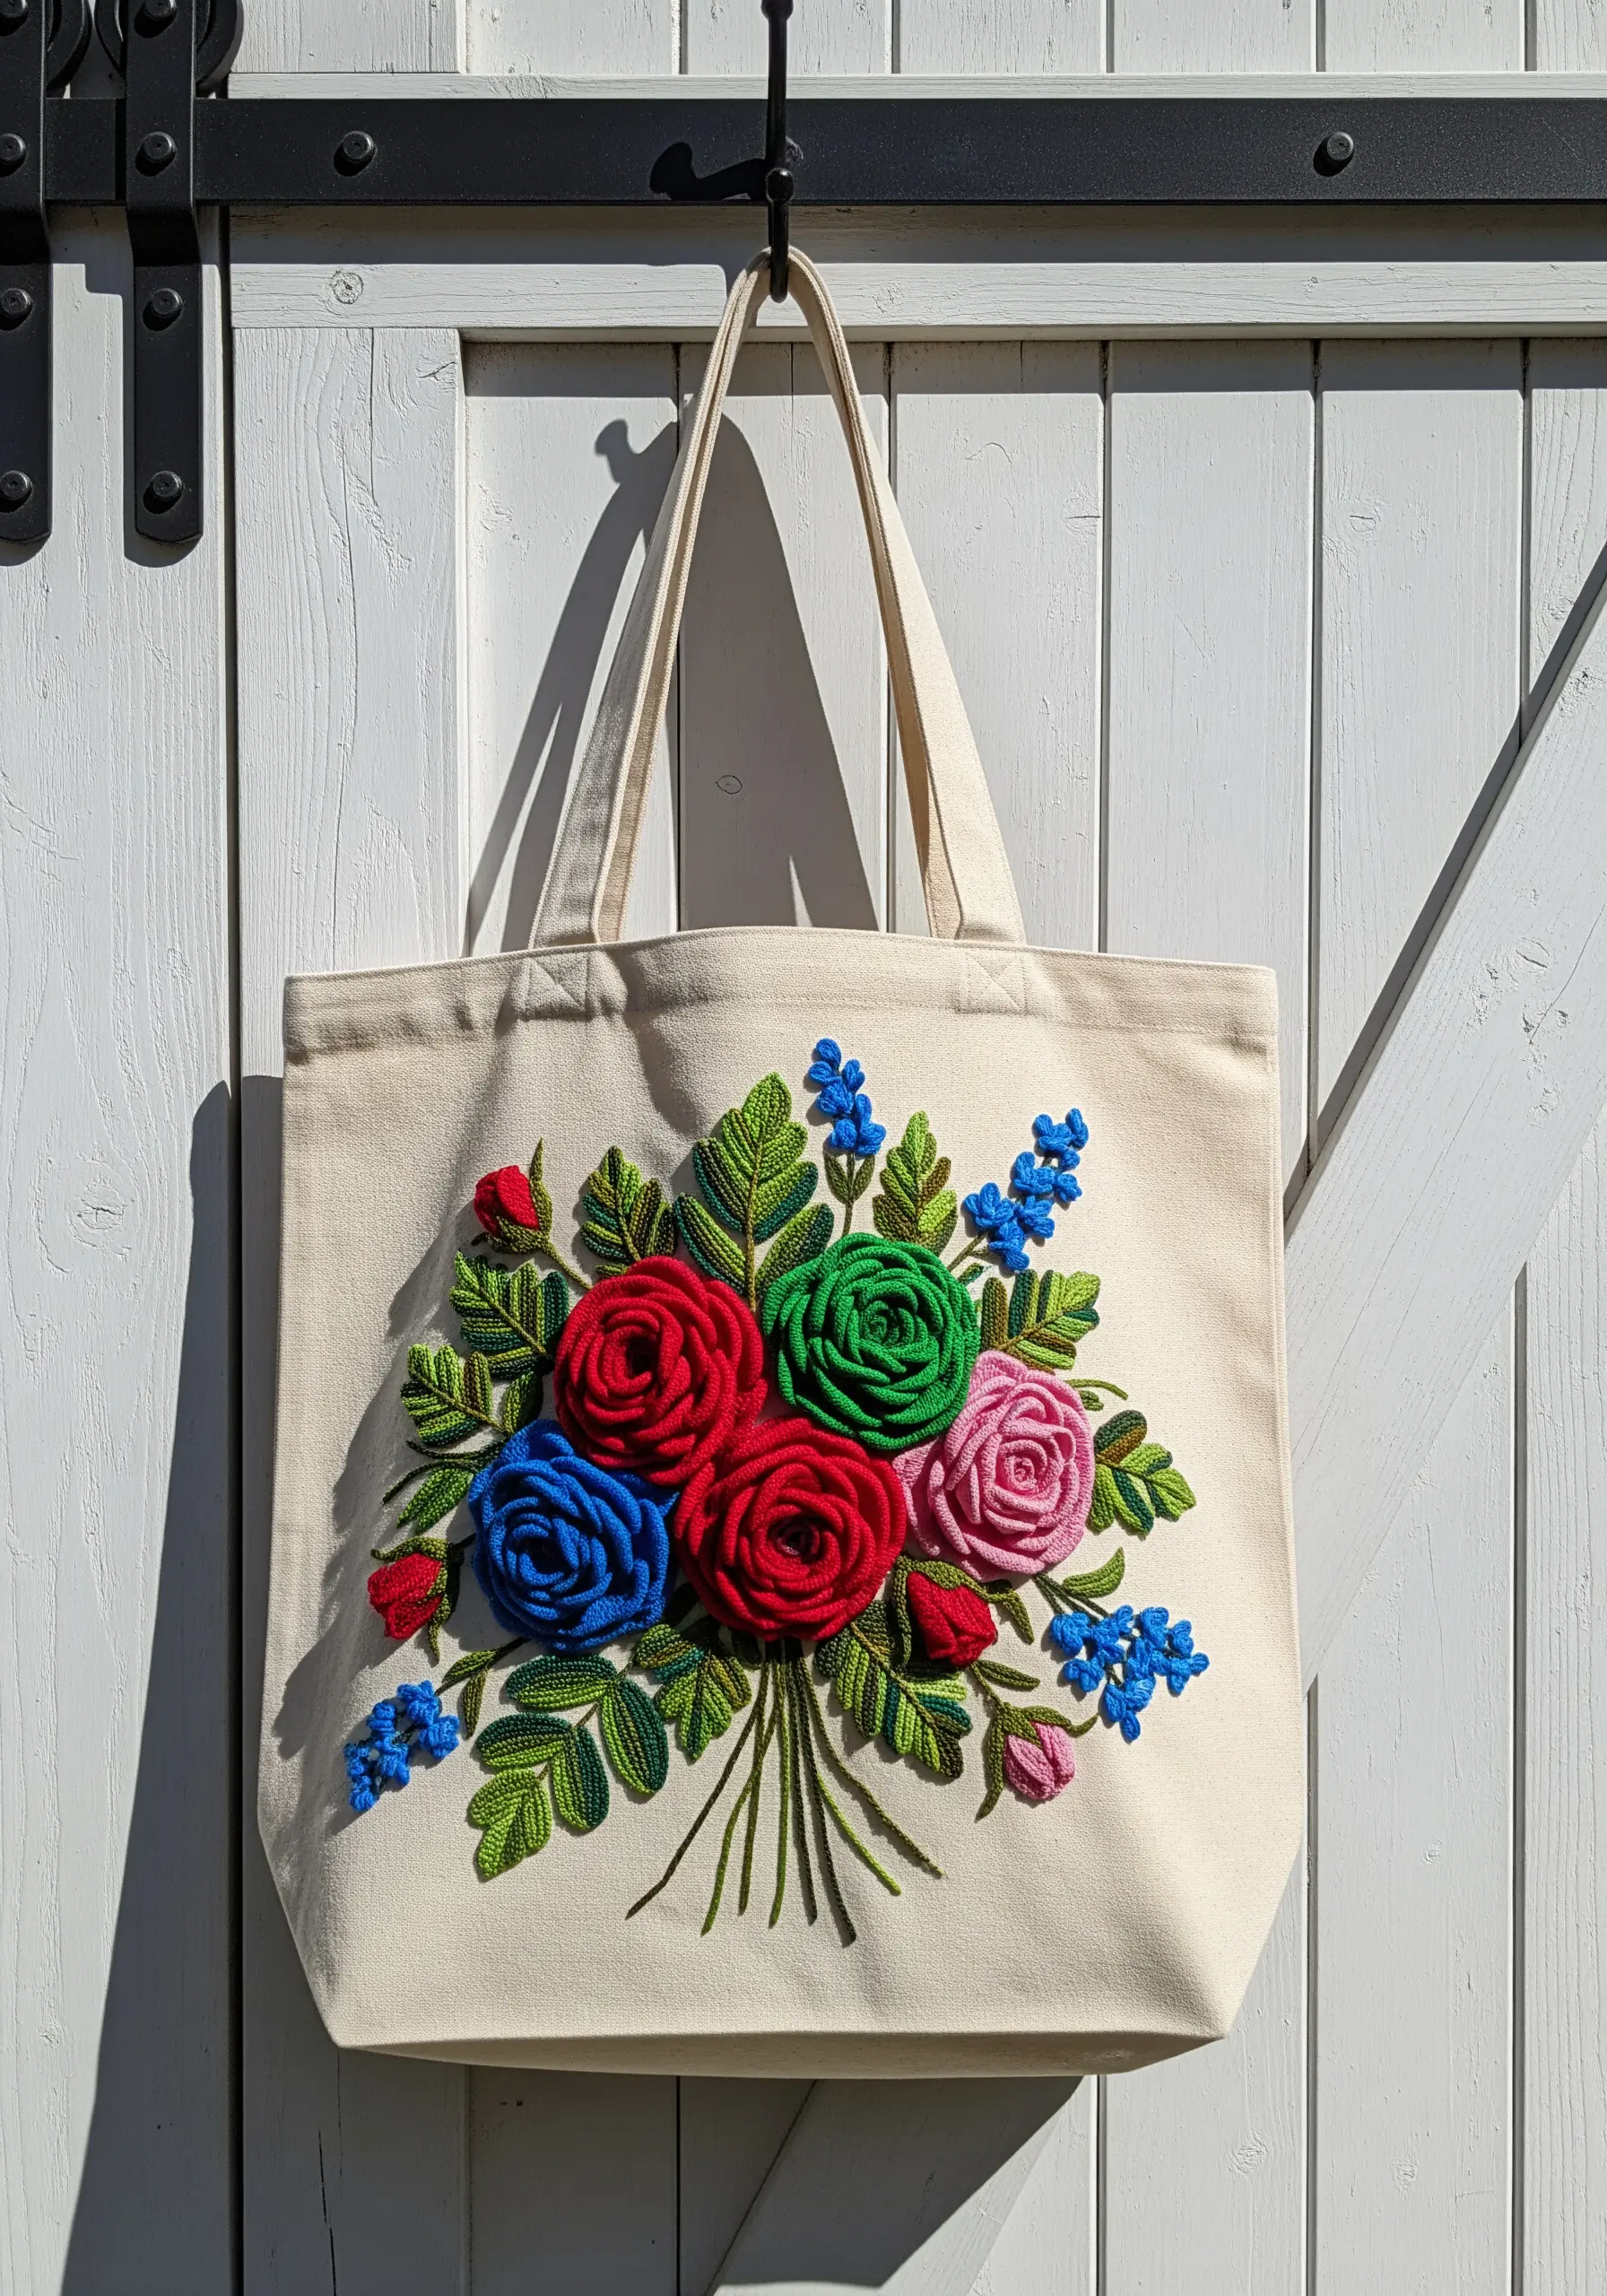
To create stunning 3D roses, master the woven wheel stitch—it’s much easier than it looks and delivers incredible texture.
Create a foundation of five or seven straight stitches, like spokes on a wheel, then weave your thread over and under each spoke until the shape is filled.
The more you weave, the fuller and more dimensional your rose will be. Use a thicker thread, like all six strands of floss, for a plush, raised effect.
This technique transforms a simple tote bag into a lush, touchable garden.
15. Create an Interactive Embroidered Travel Map
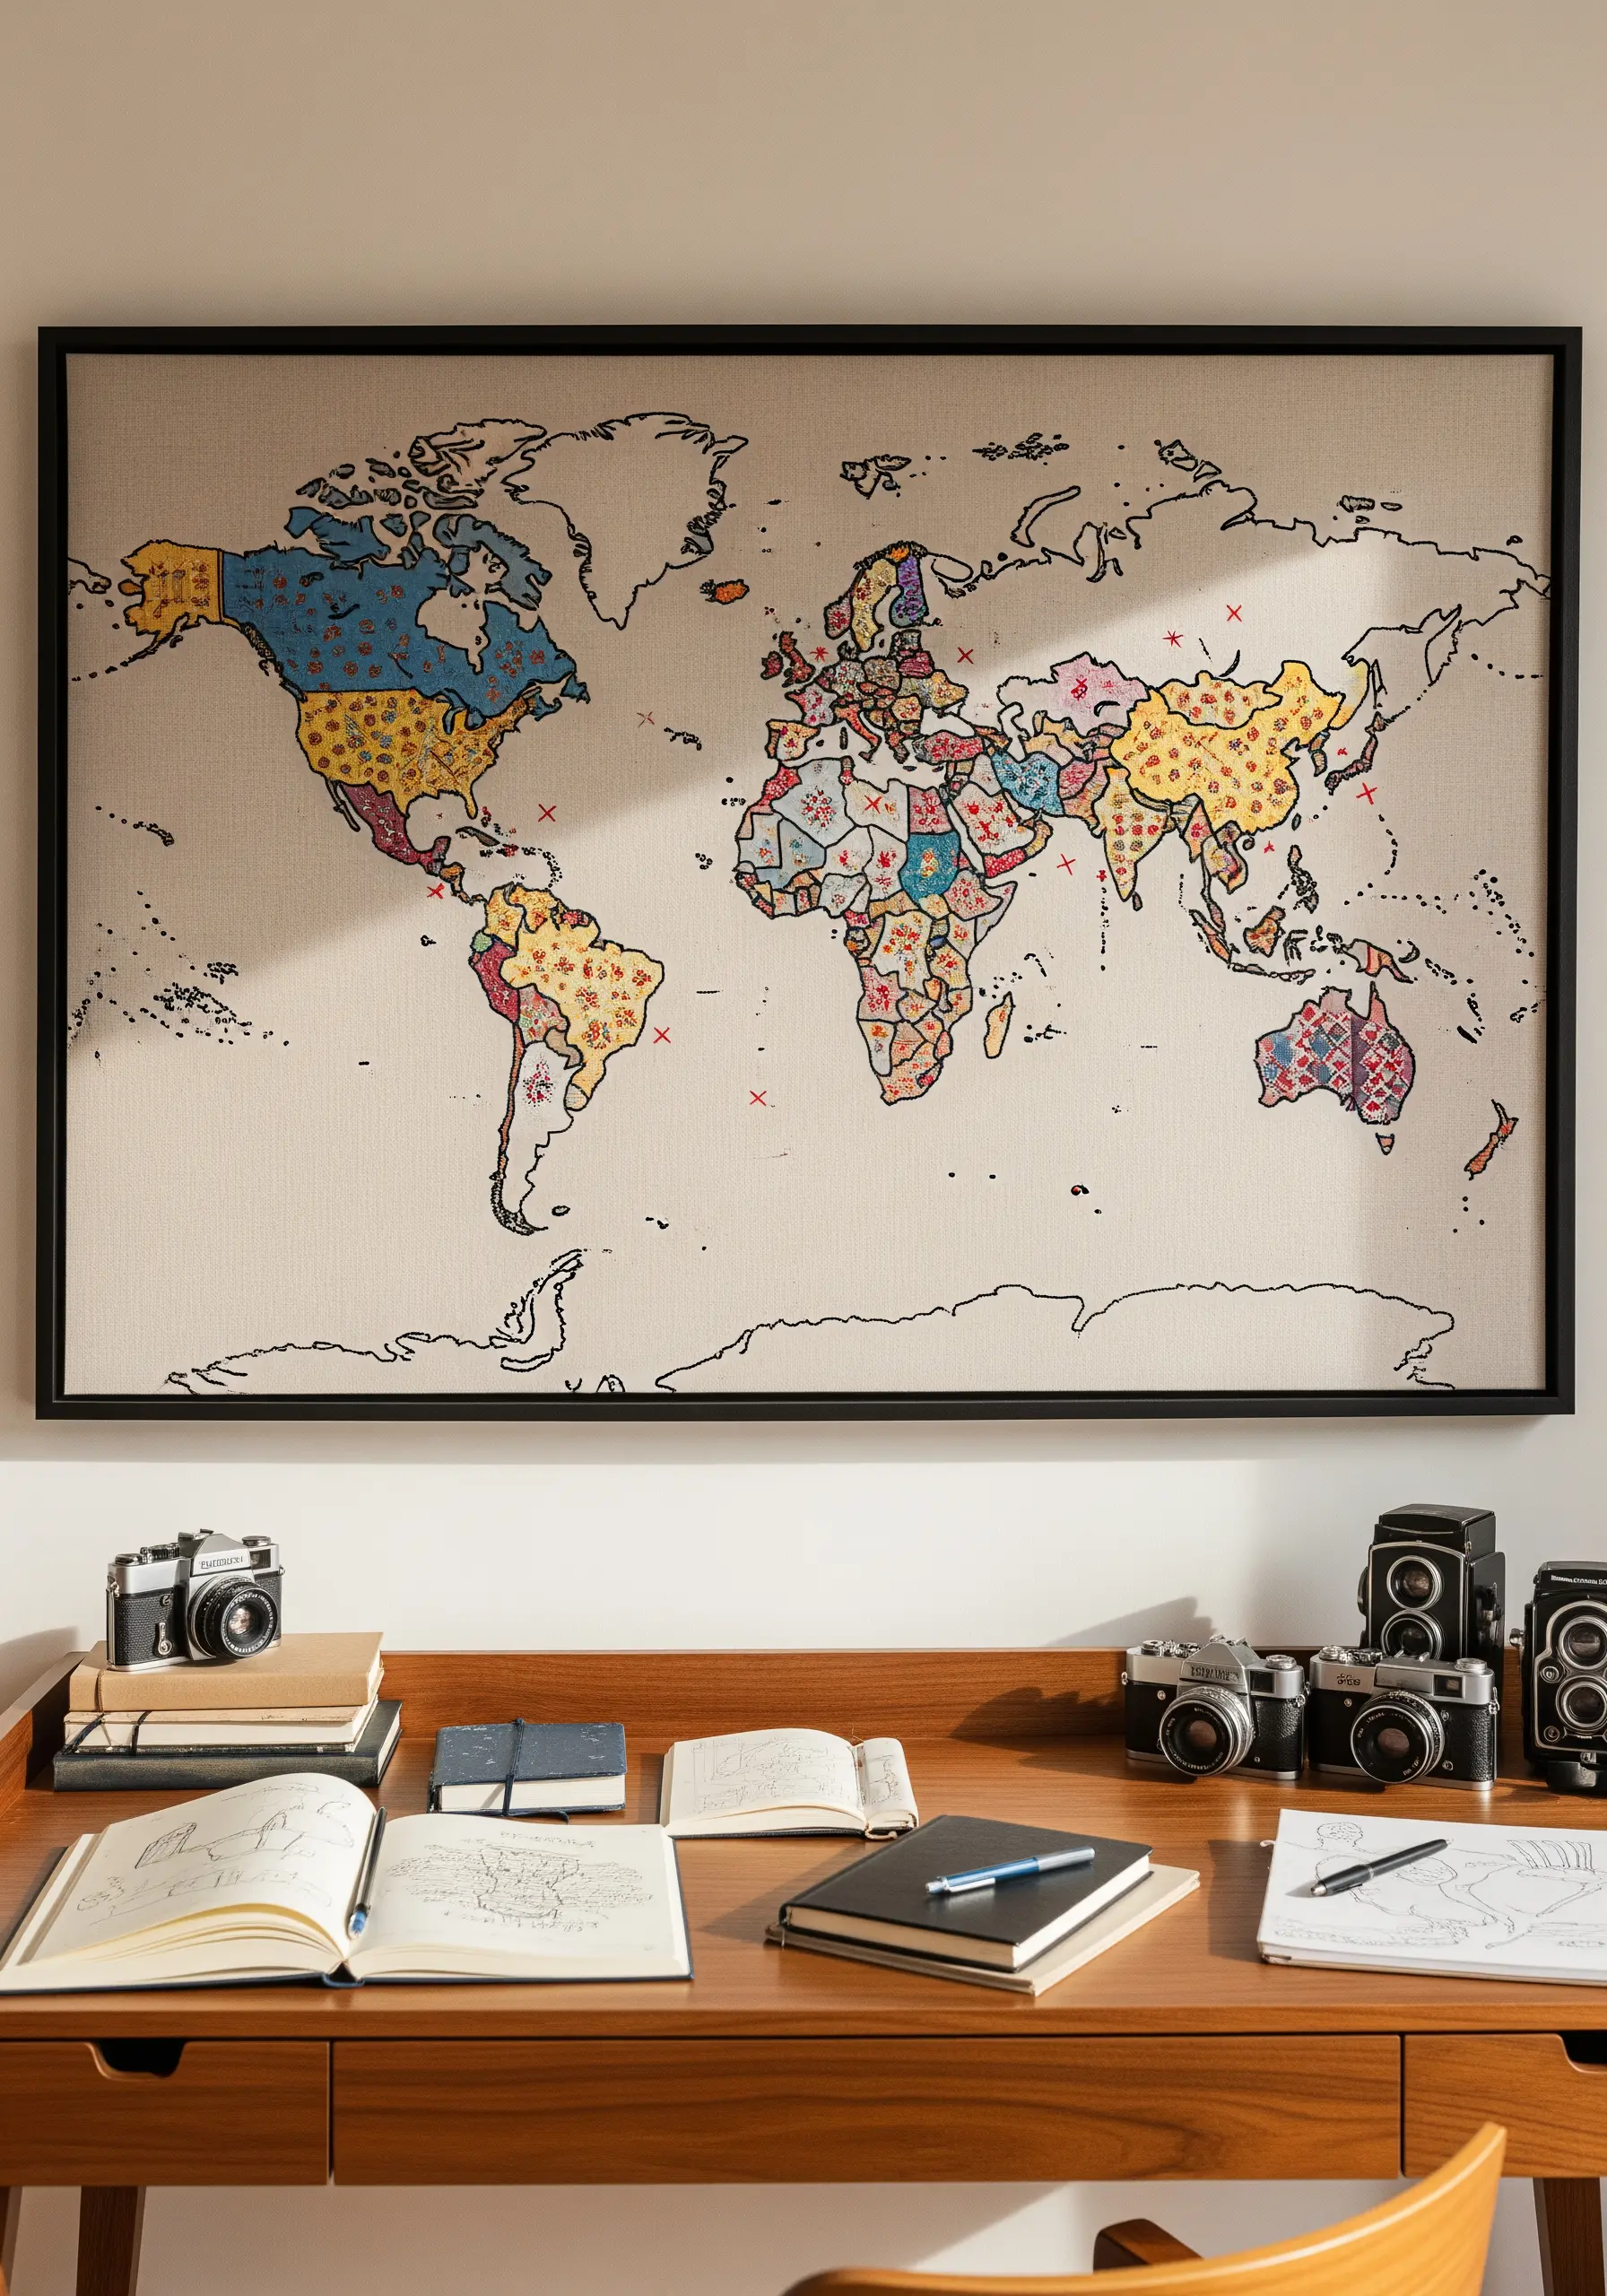
This is a gift that evolves over time, documenting a story of adventure.
Start with a printed fabric map, which serves as the perfect canvas. The gift recipient then adds their own stitches to mark places they’ve visited.
Include a small starter kit with a few needles and threads in different colors so they can begin their journey right away.
Simple ‘X’ stitches, French knots, or tiny heart stitches are all they need to create a beautiful, collaborative, and deeply personal record of their travels.
16. Transform a Photograph with Thread
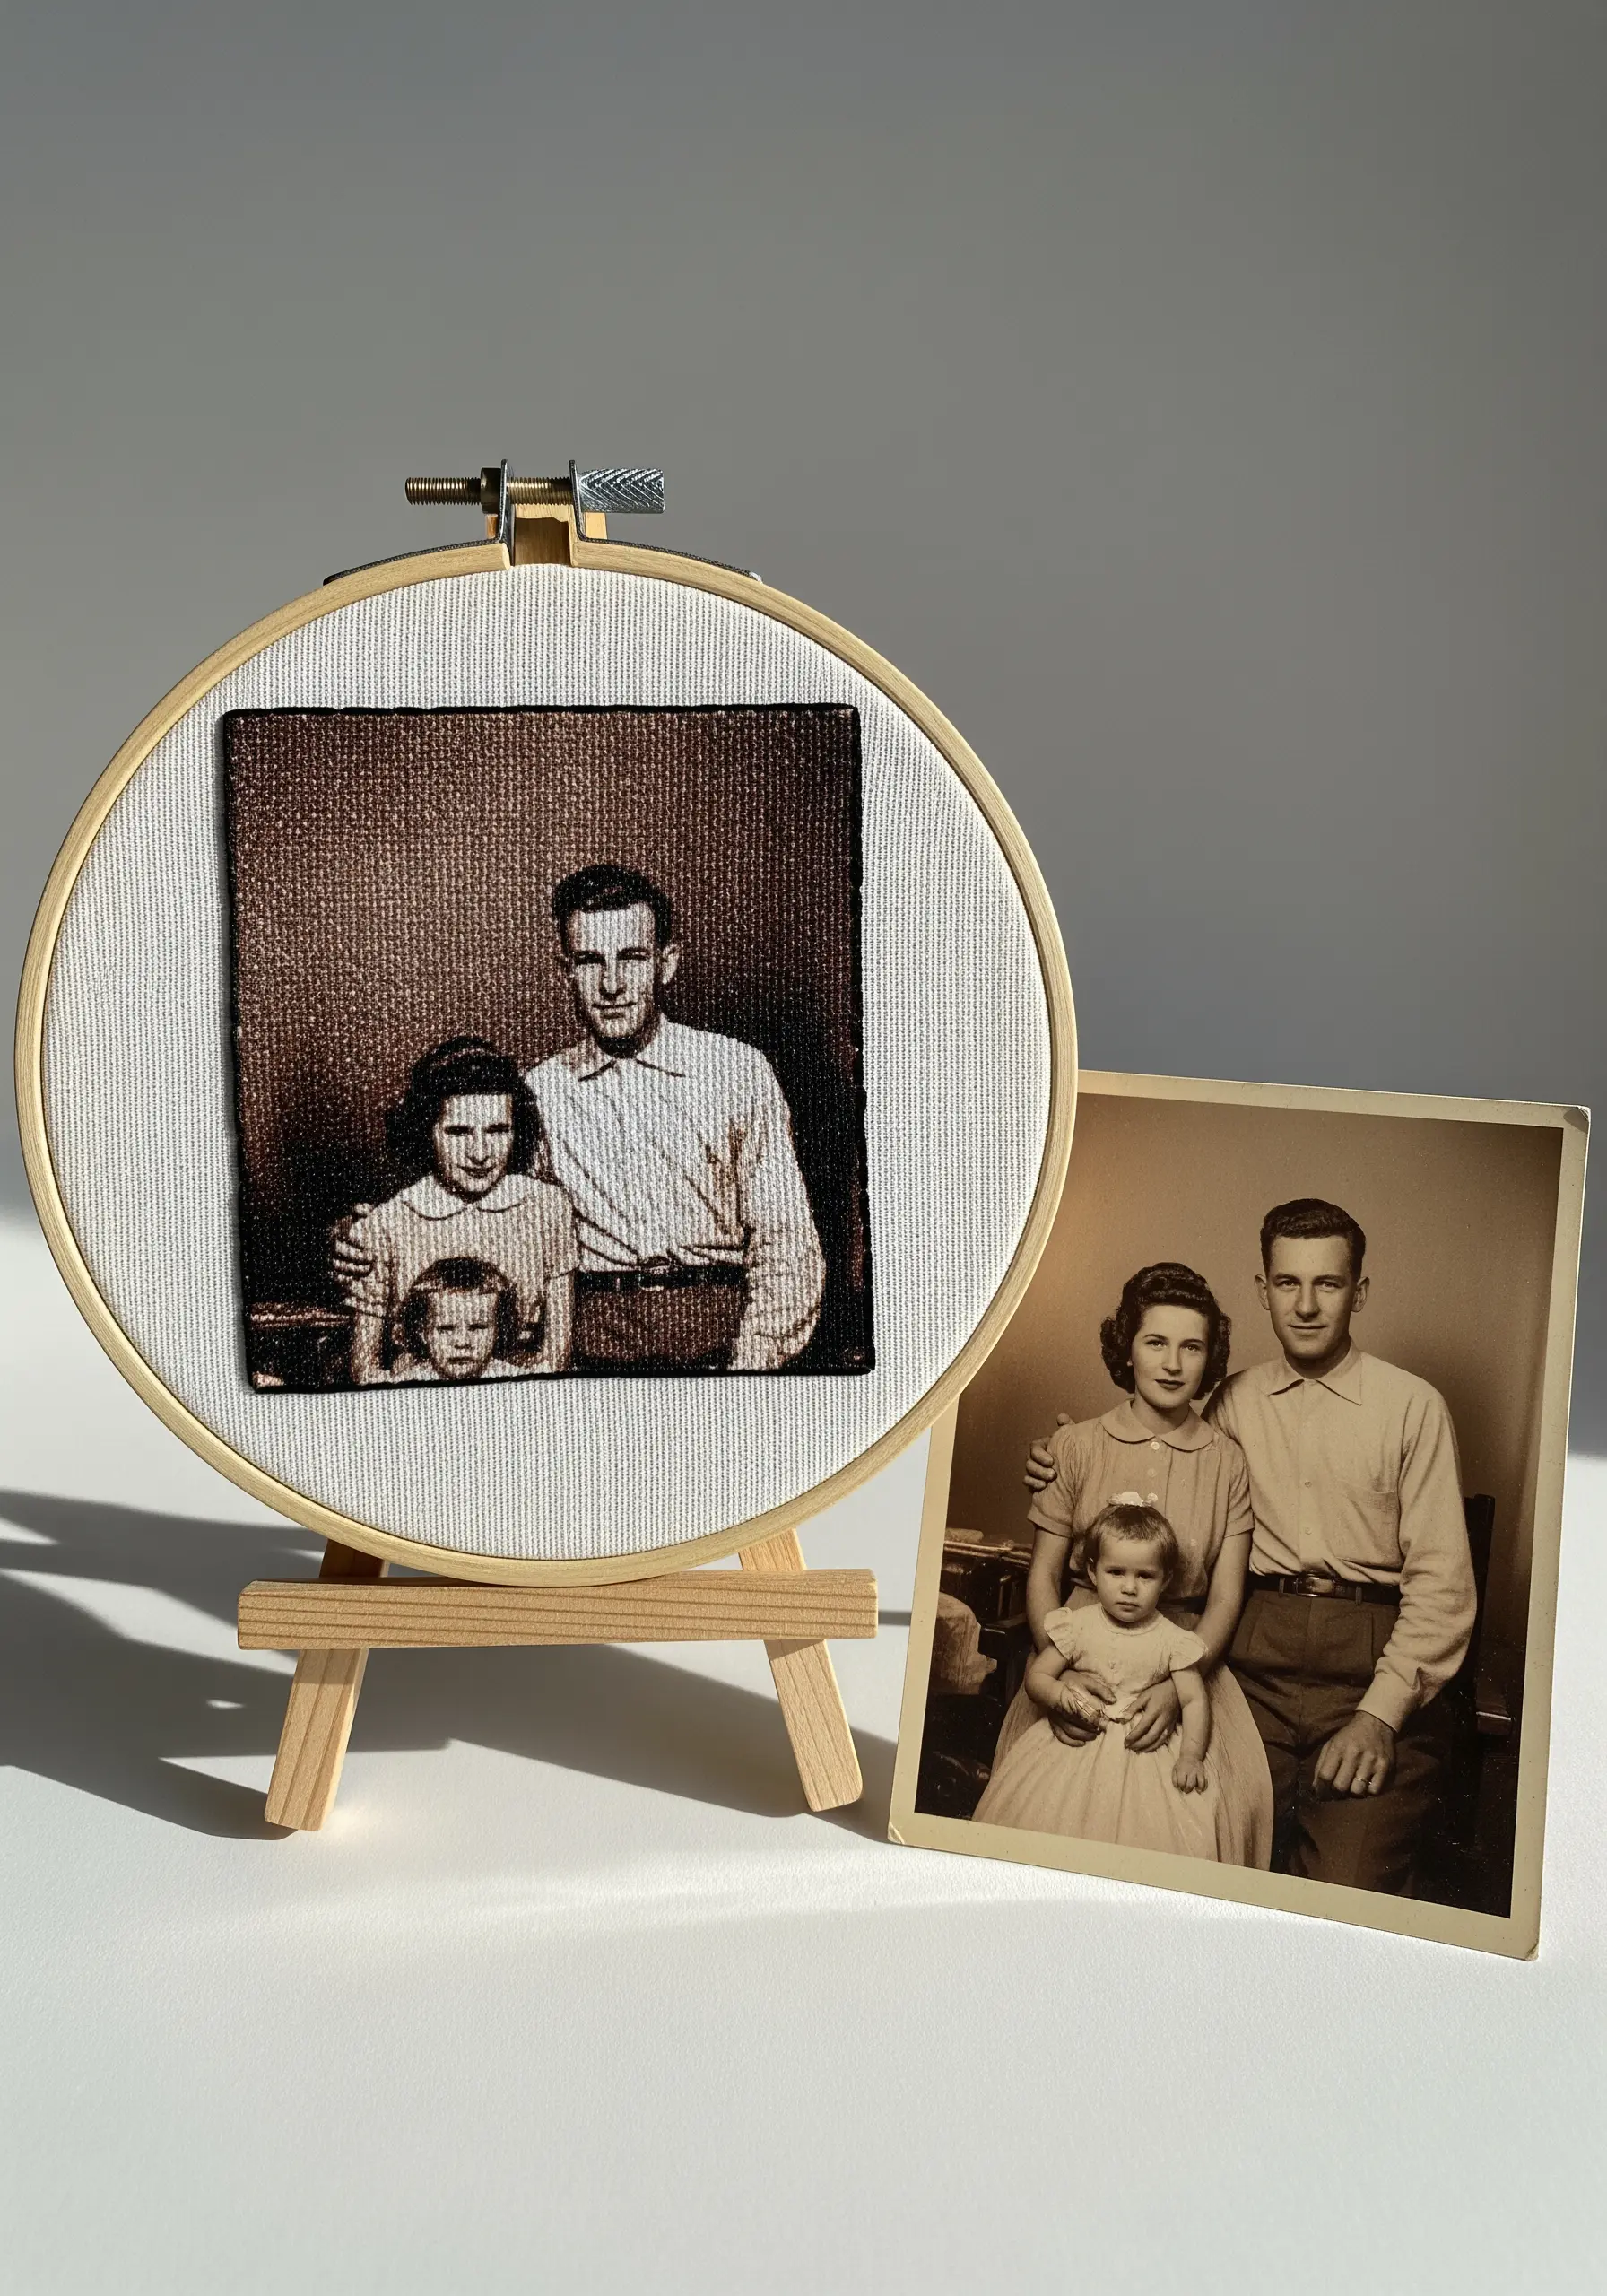
Bring a new layer of warmth and texture to an old family photo by printing it onto fabric and adding embroidered details.
Choose a high-contrast black and white or sepia photo, as it provides a striking base for colored thread.
You don’t need to stitch the entire image; instead, use a dense grid of seed stitches or single straight stitches to create a textural, almost pixelated effect that honors the original.
This mixed-media technique turns a memory into a tangible, touchable piece of art.
17. Add a Touch of Luxury to a Silk Sleep Mask
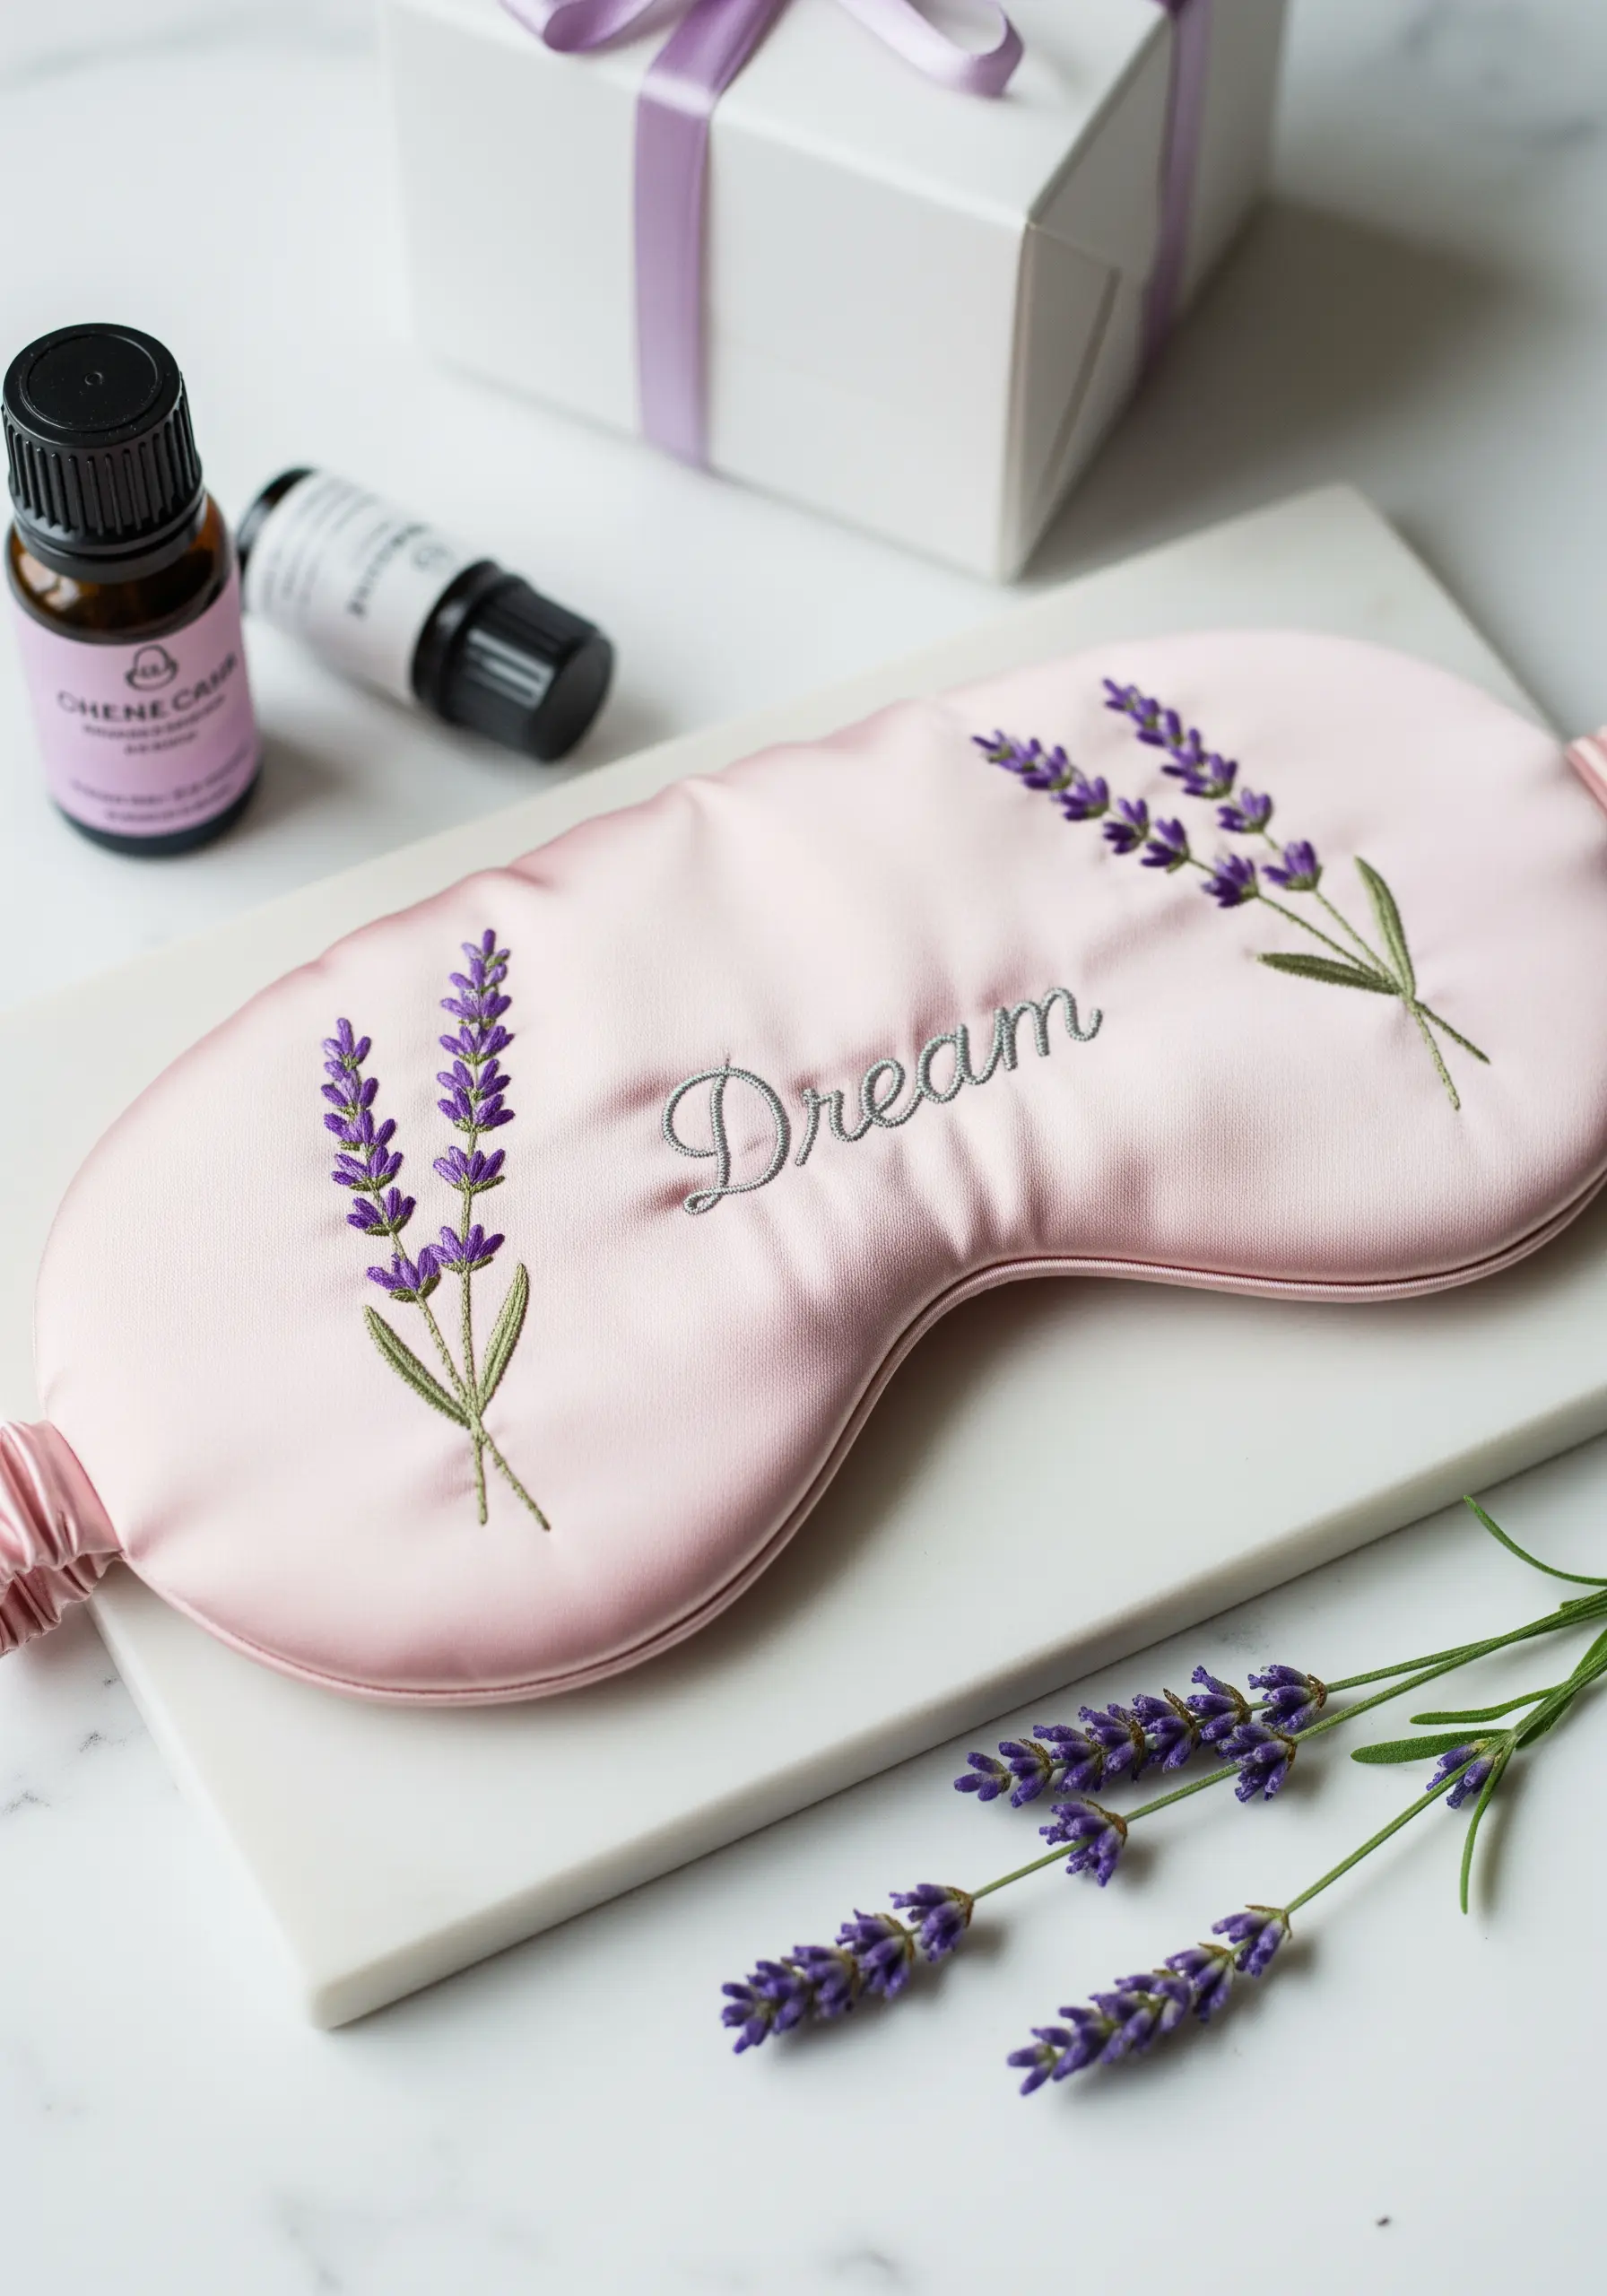
Stitching on silk or satin requires a delicate touch to avoid snagging the fine fabric.
Always use a brand new, very fine needle (like a size 10 sharps) and a lightweight, tear-away stabilizer on the back.
For elegant lettering, a whipped backstitch creates a smooth, continuous line that mimics cursive handwriting beautifully.
Choose simple botanical motifs like lavender sprigs, as their open structure complements the delicate nature of the silk without overwhelming it.
18. Craft an Heirloom Wedding Ring Pillow
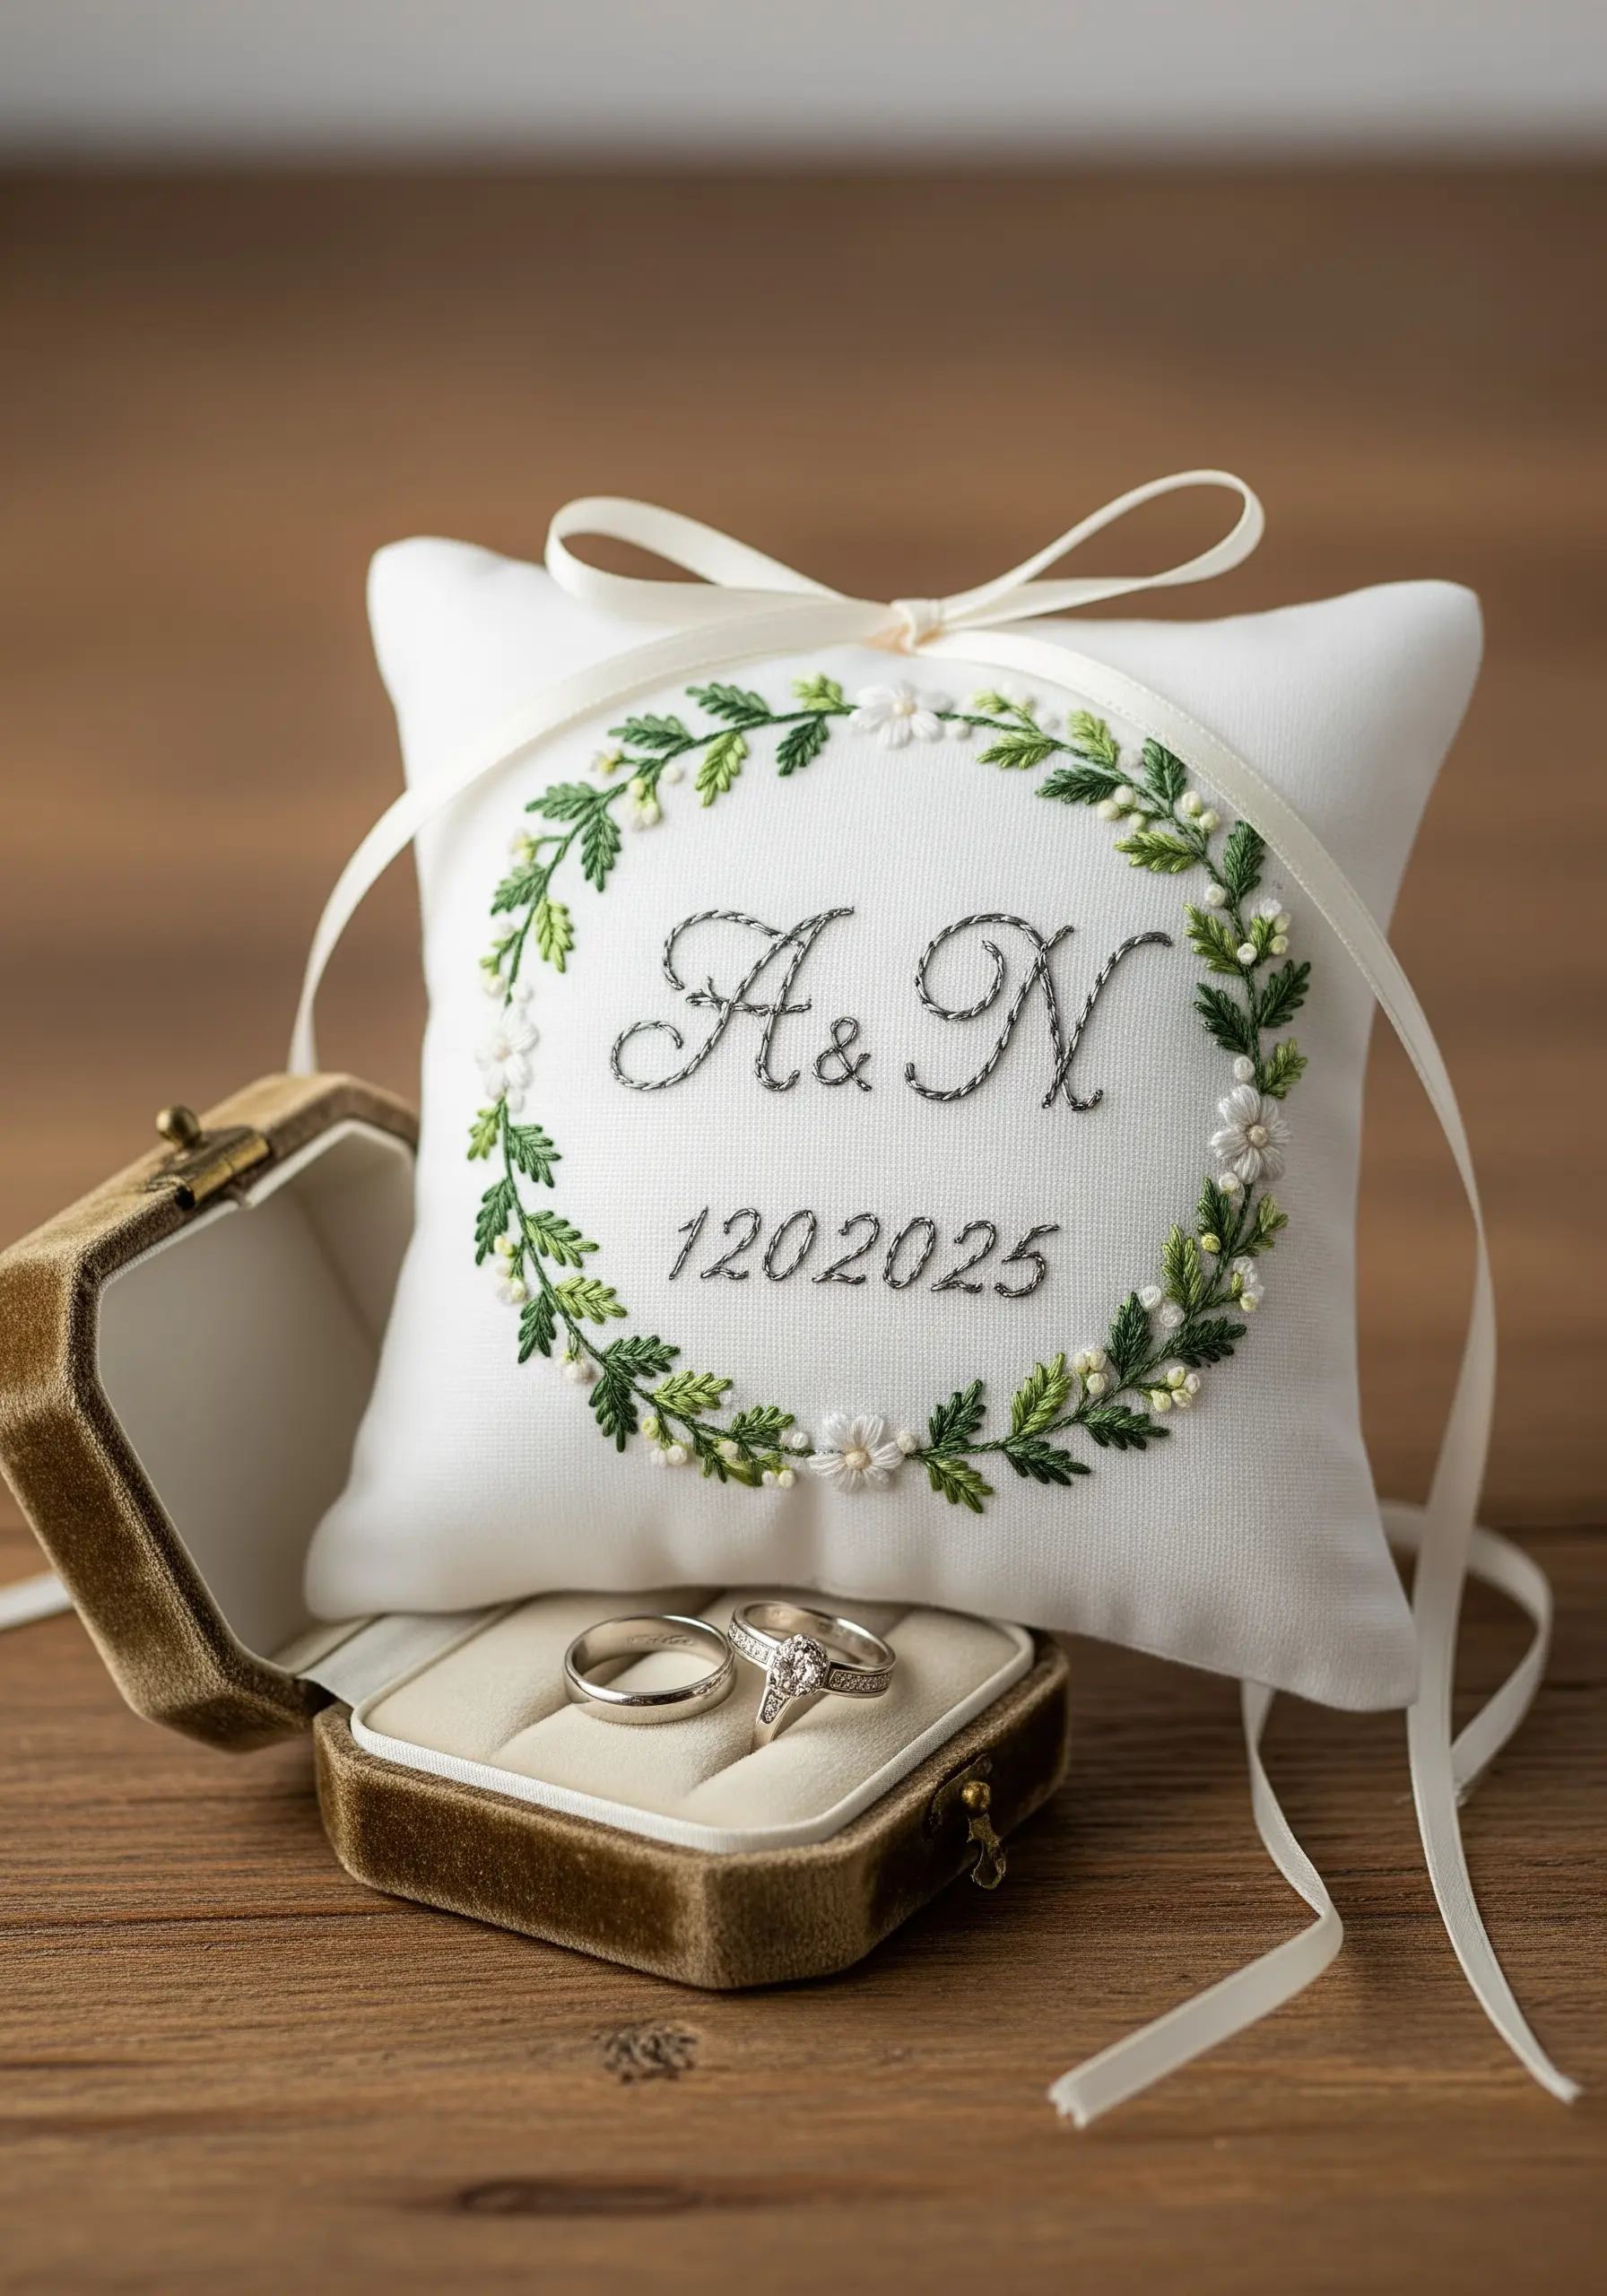
Create a timeless keepsake by personalizing a ring bearer pillow with monograms and a significant date.
For the delicate leaf border, use a fishbone stitch to give each leaf a defined central vein and a natural, organic shape.
Tiny white flowers can be made with single French knots or detached chain stitches (lazy daisies), adding a subtle, elegant texture.
Use a crisp, fine backstitch for the initials and date, ensuring this sentimental detail is perfectly clear and beautifully rendered.
19. Master Minimalist Designs on Knitwear

Embroidering on a stretchy, ribbed beanie presents a unique challenge: the stitches can get lost or distort the fabric.
The solution is to use a water-soluble stabilizer on top of the knit. It provides a stable surface for stitching and ensures your design sits neatly on the ribs.
Choose a simple, graphic outline, as complex details will be obscured by the texture of the knit.
A clean backstitch or stem stitch is ideal for creating sharp, modern mountain ranges or other minimalist motifs that hold their shape perfectly after the stabilizer is washed away.
20. Create High-Impact Texture with Chunky Yarn
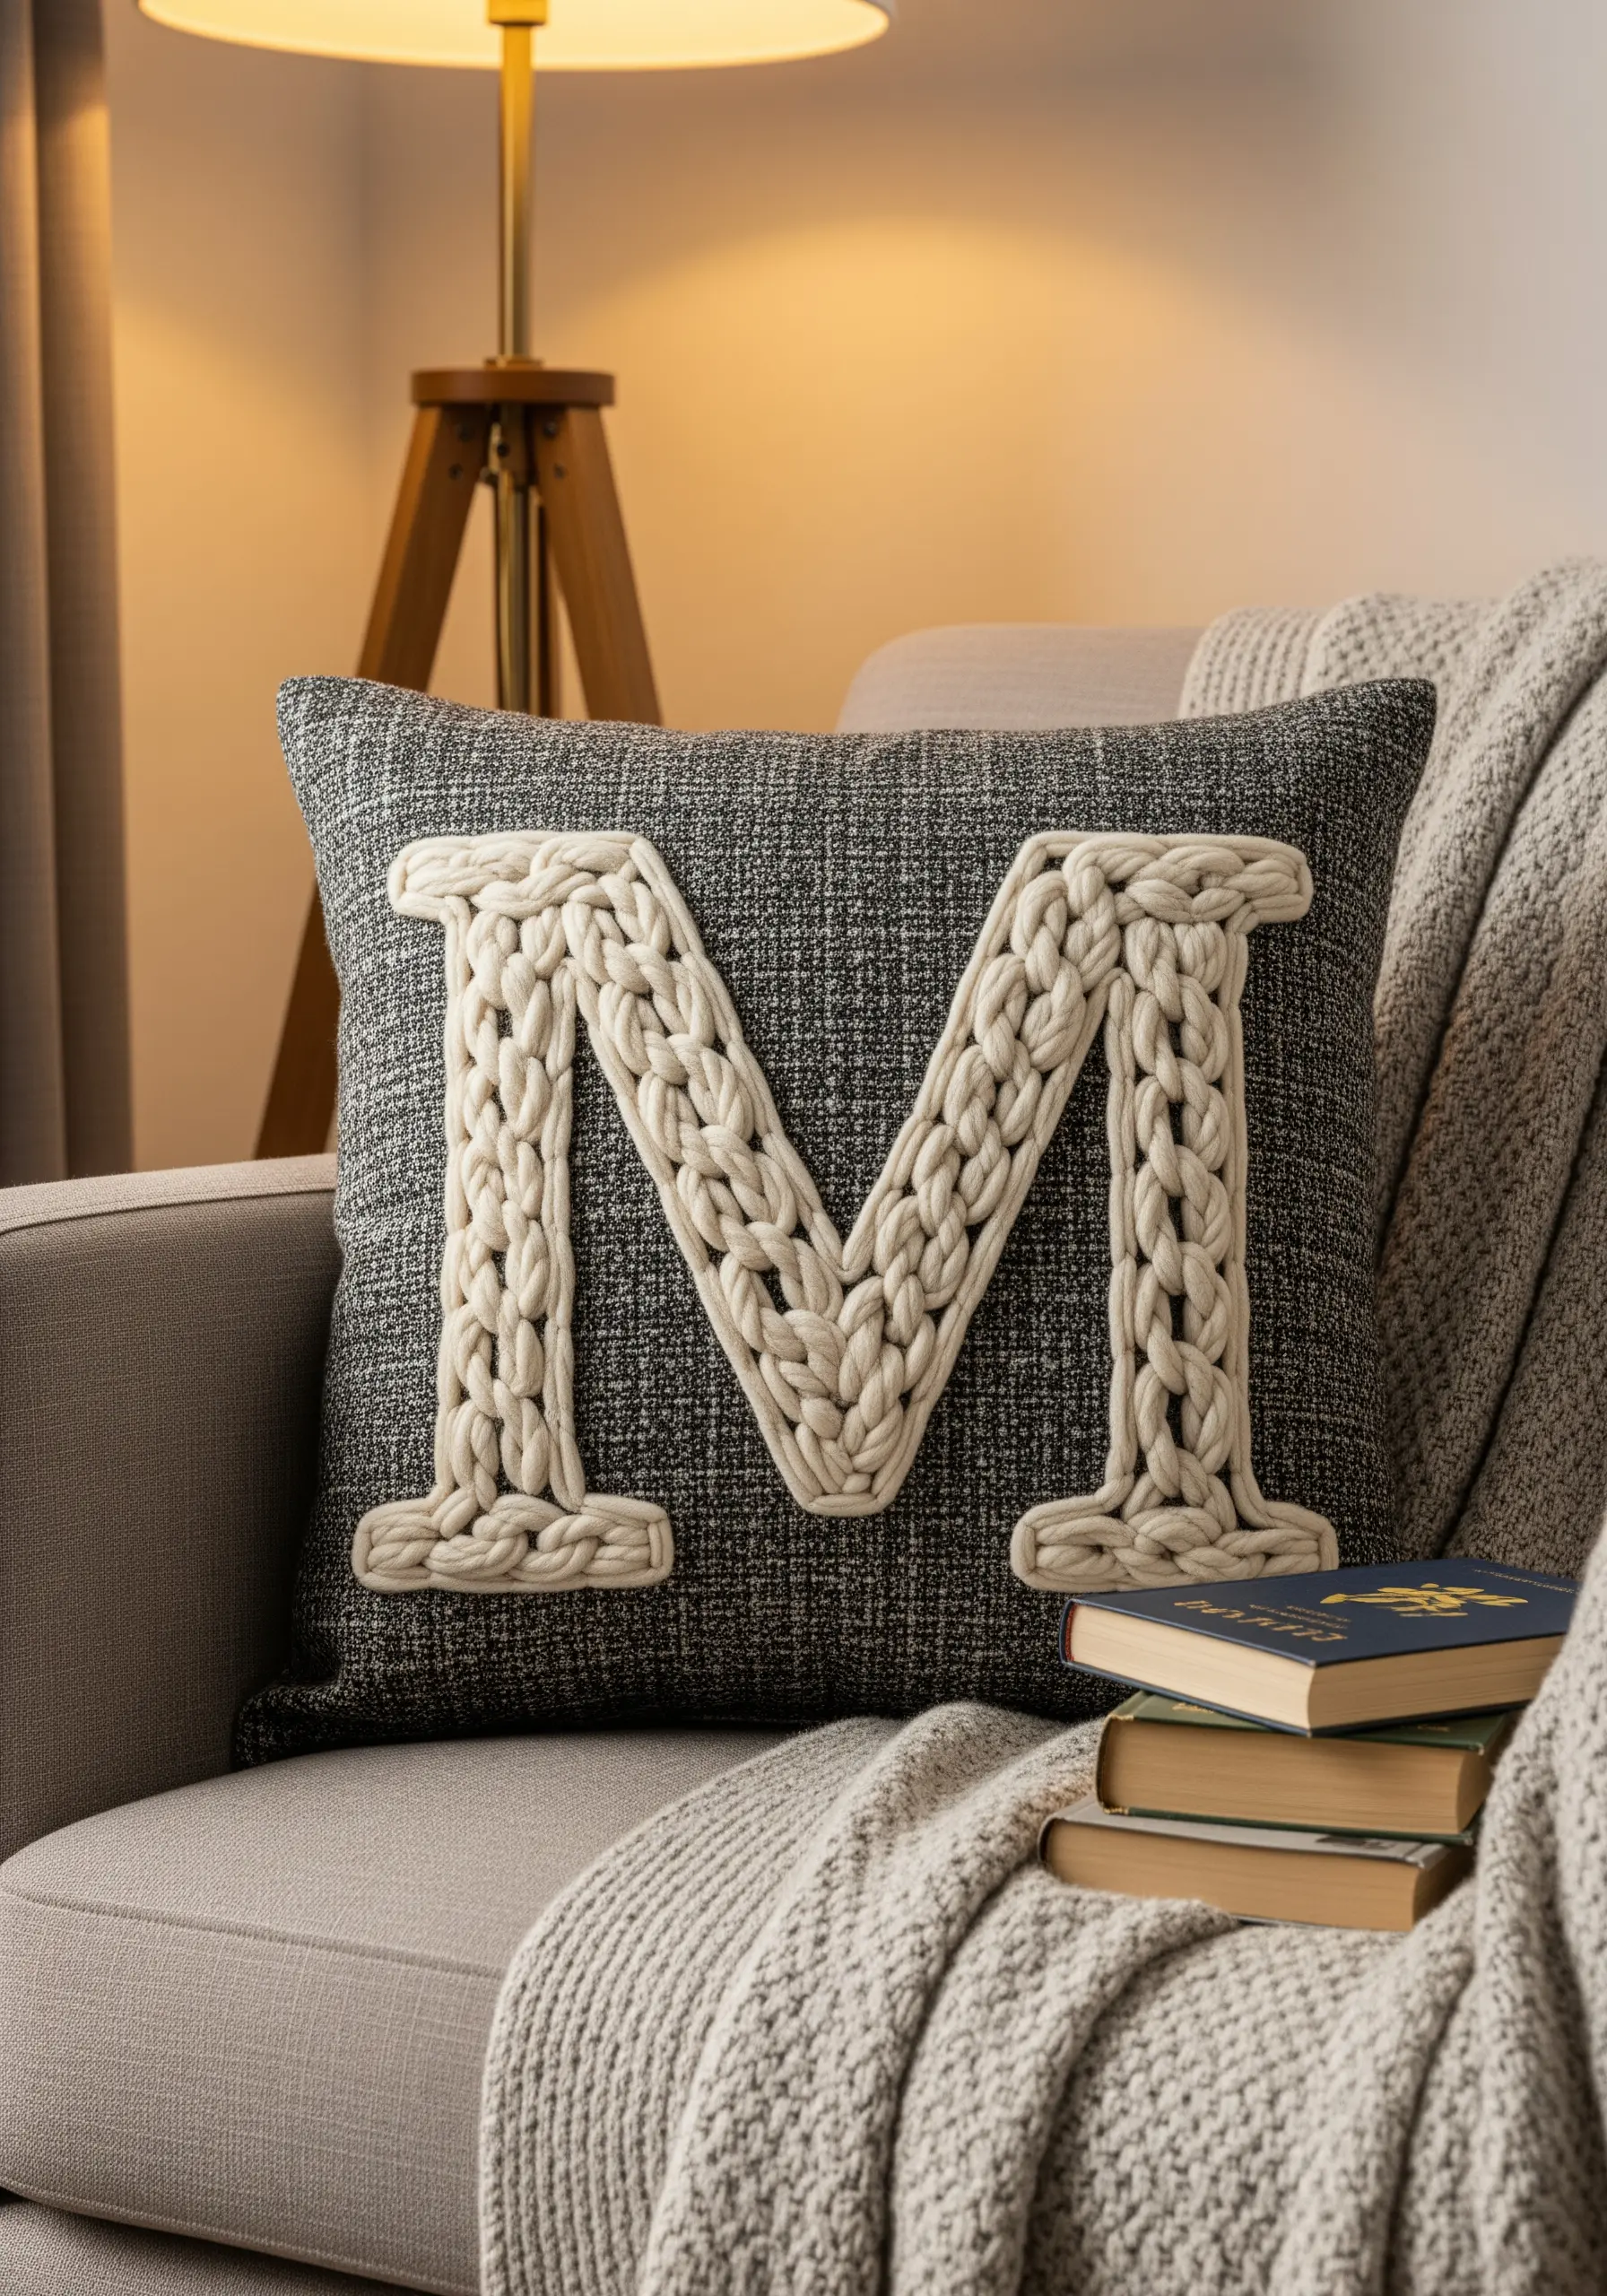
For a gift that makes a bold statement, move beyond traditional floss and stitch with chunky yarn or wool roving.
Use a large tapestry needle to weave the yarn through a heavy-duty, open-weave fabric like hessian or a thick tweed.
You can create this braided monogram effect with an oversized chain stitch or by couching the yarn onto the surface with a matching, thinner thread.
This technique adds dramatic, sculptural texture that transforms a simple pillow into a piece of modern fiber art.
21. Stitch Geometric Patterns for a Modern Look
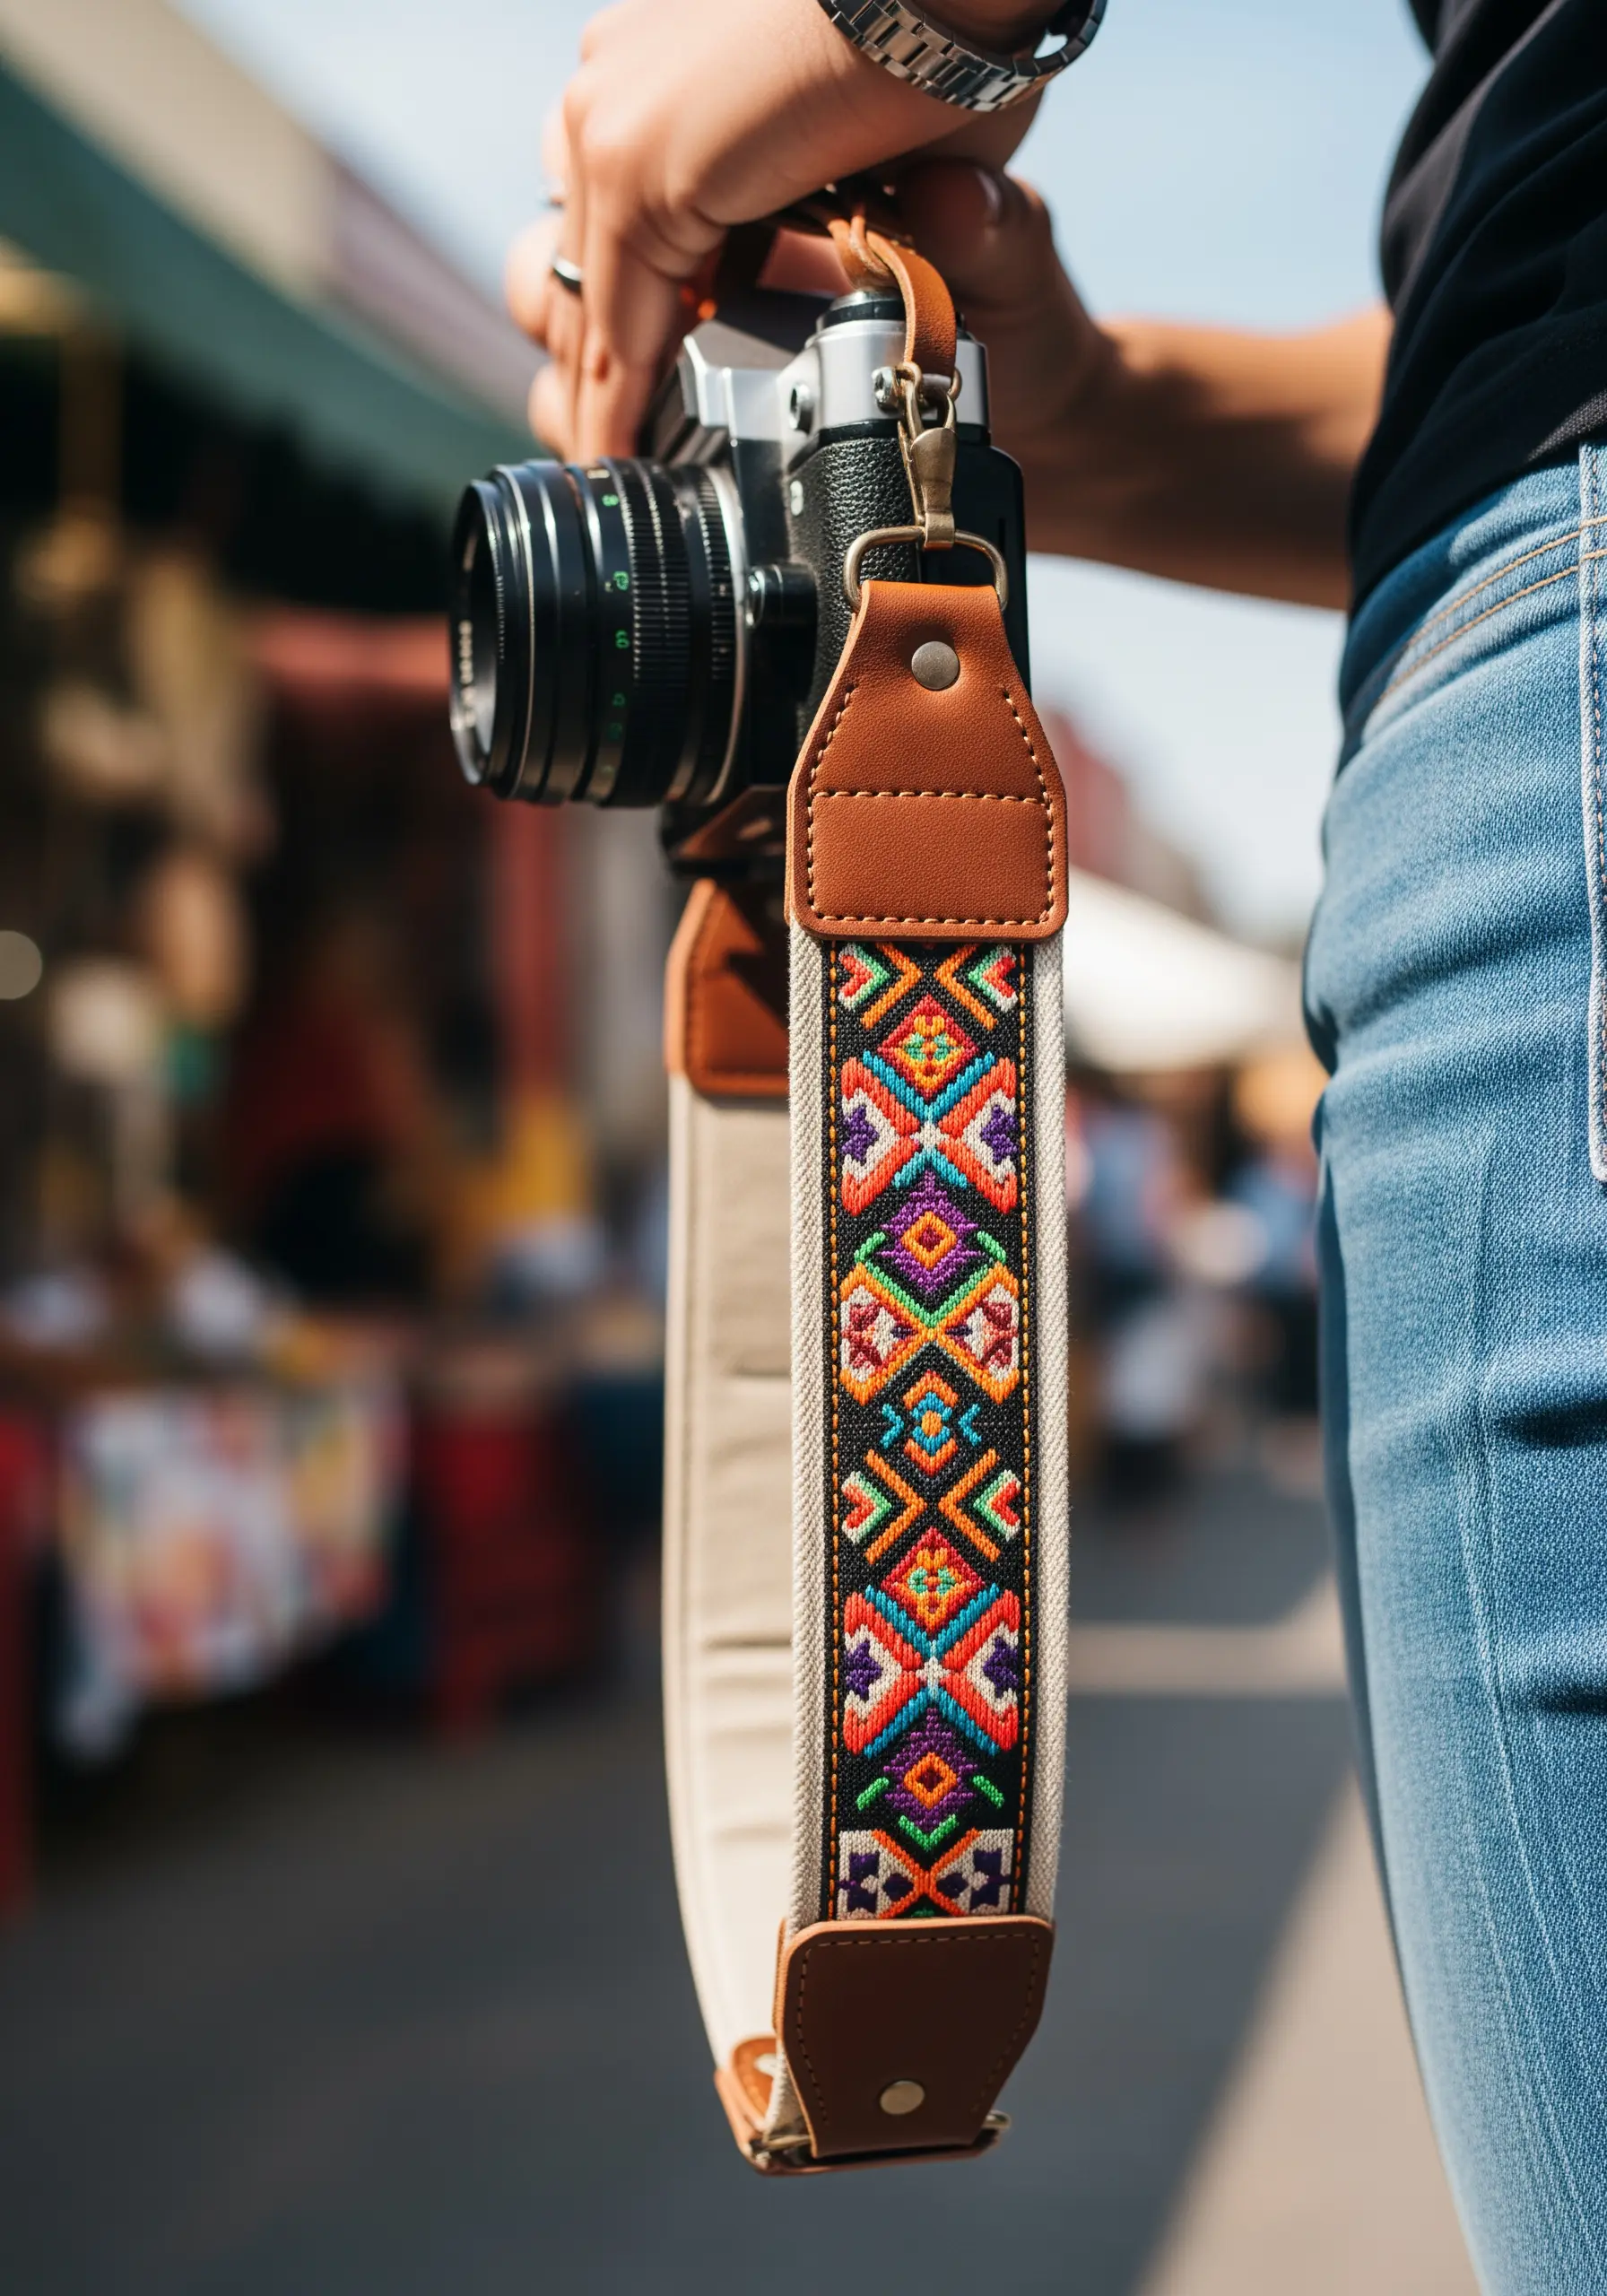
Give a practical gift, like a camera strap, a vibrant, personalized touch with a geometric embroidery pattern.
This style relies on precision. You can achieve this by using waste canvas—a grid you temporarily baste onto your fabric, stitch over, and then pull out, thread by thread, leaving a perfect cross-stitch design behind.
Alternatively, use a sturdy webbing material and stitch a pattern inspired by traditional weaving, using straight stitches and satin stitch blocks.
The result is a durable, functional piece of art that looks incredibly complex but is based on simple, repetitive stitches.
22. Embroider a Soundwave for a Hidden Message

Capture a personal message—a snippet of a song, a spoken “I love you”—by stitching its soundwave pattern.
Use a screenshot from a soundwave generator app as your template and transfer it to your fabric.
Fill the shape with a dense satin stitch or vertical straight stitches, using a single color for a clean, graphic look.
You can even add a scannable QR code linking to the audio file, creating an interactive gift that bridges the gap between traditional craft and modern technology.
23. Personalize a Pet Collar with Dainty Florals
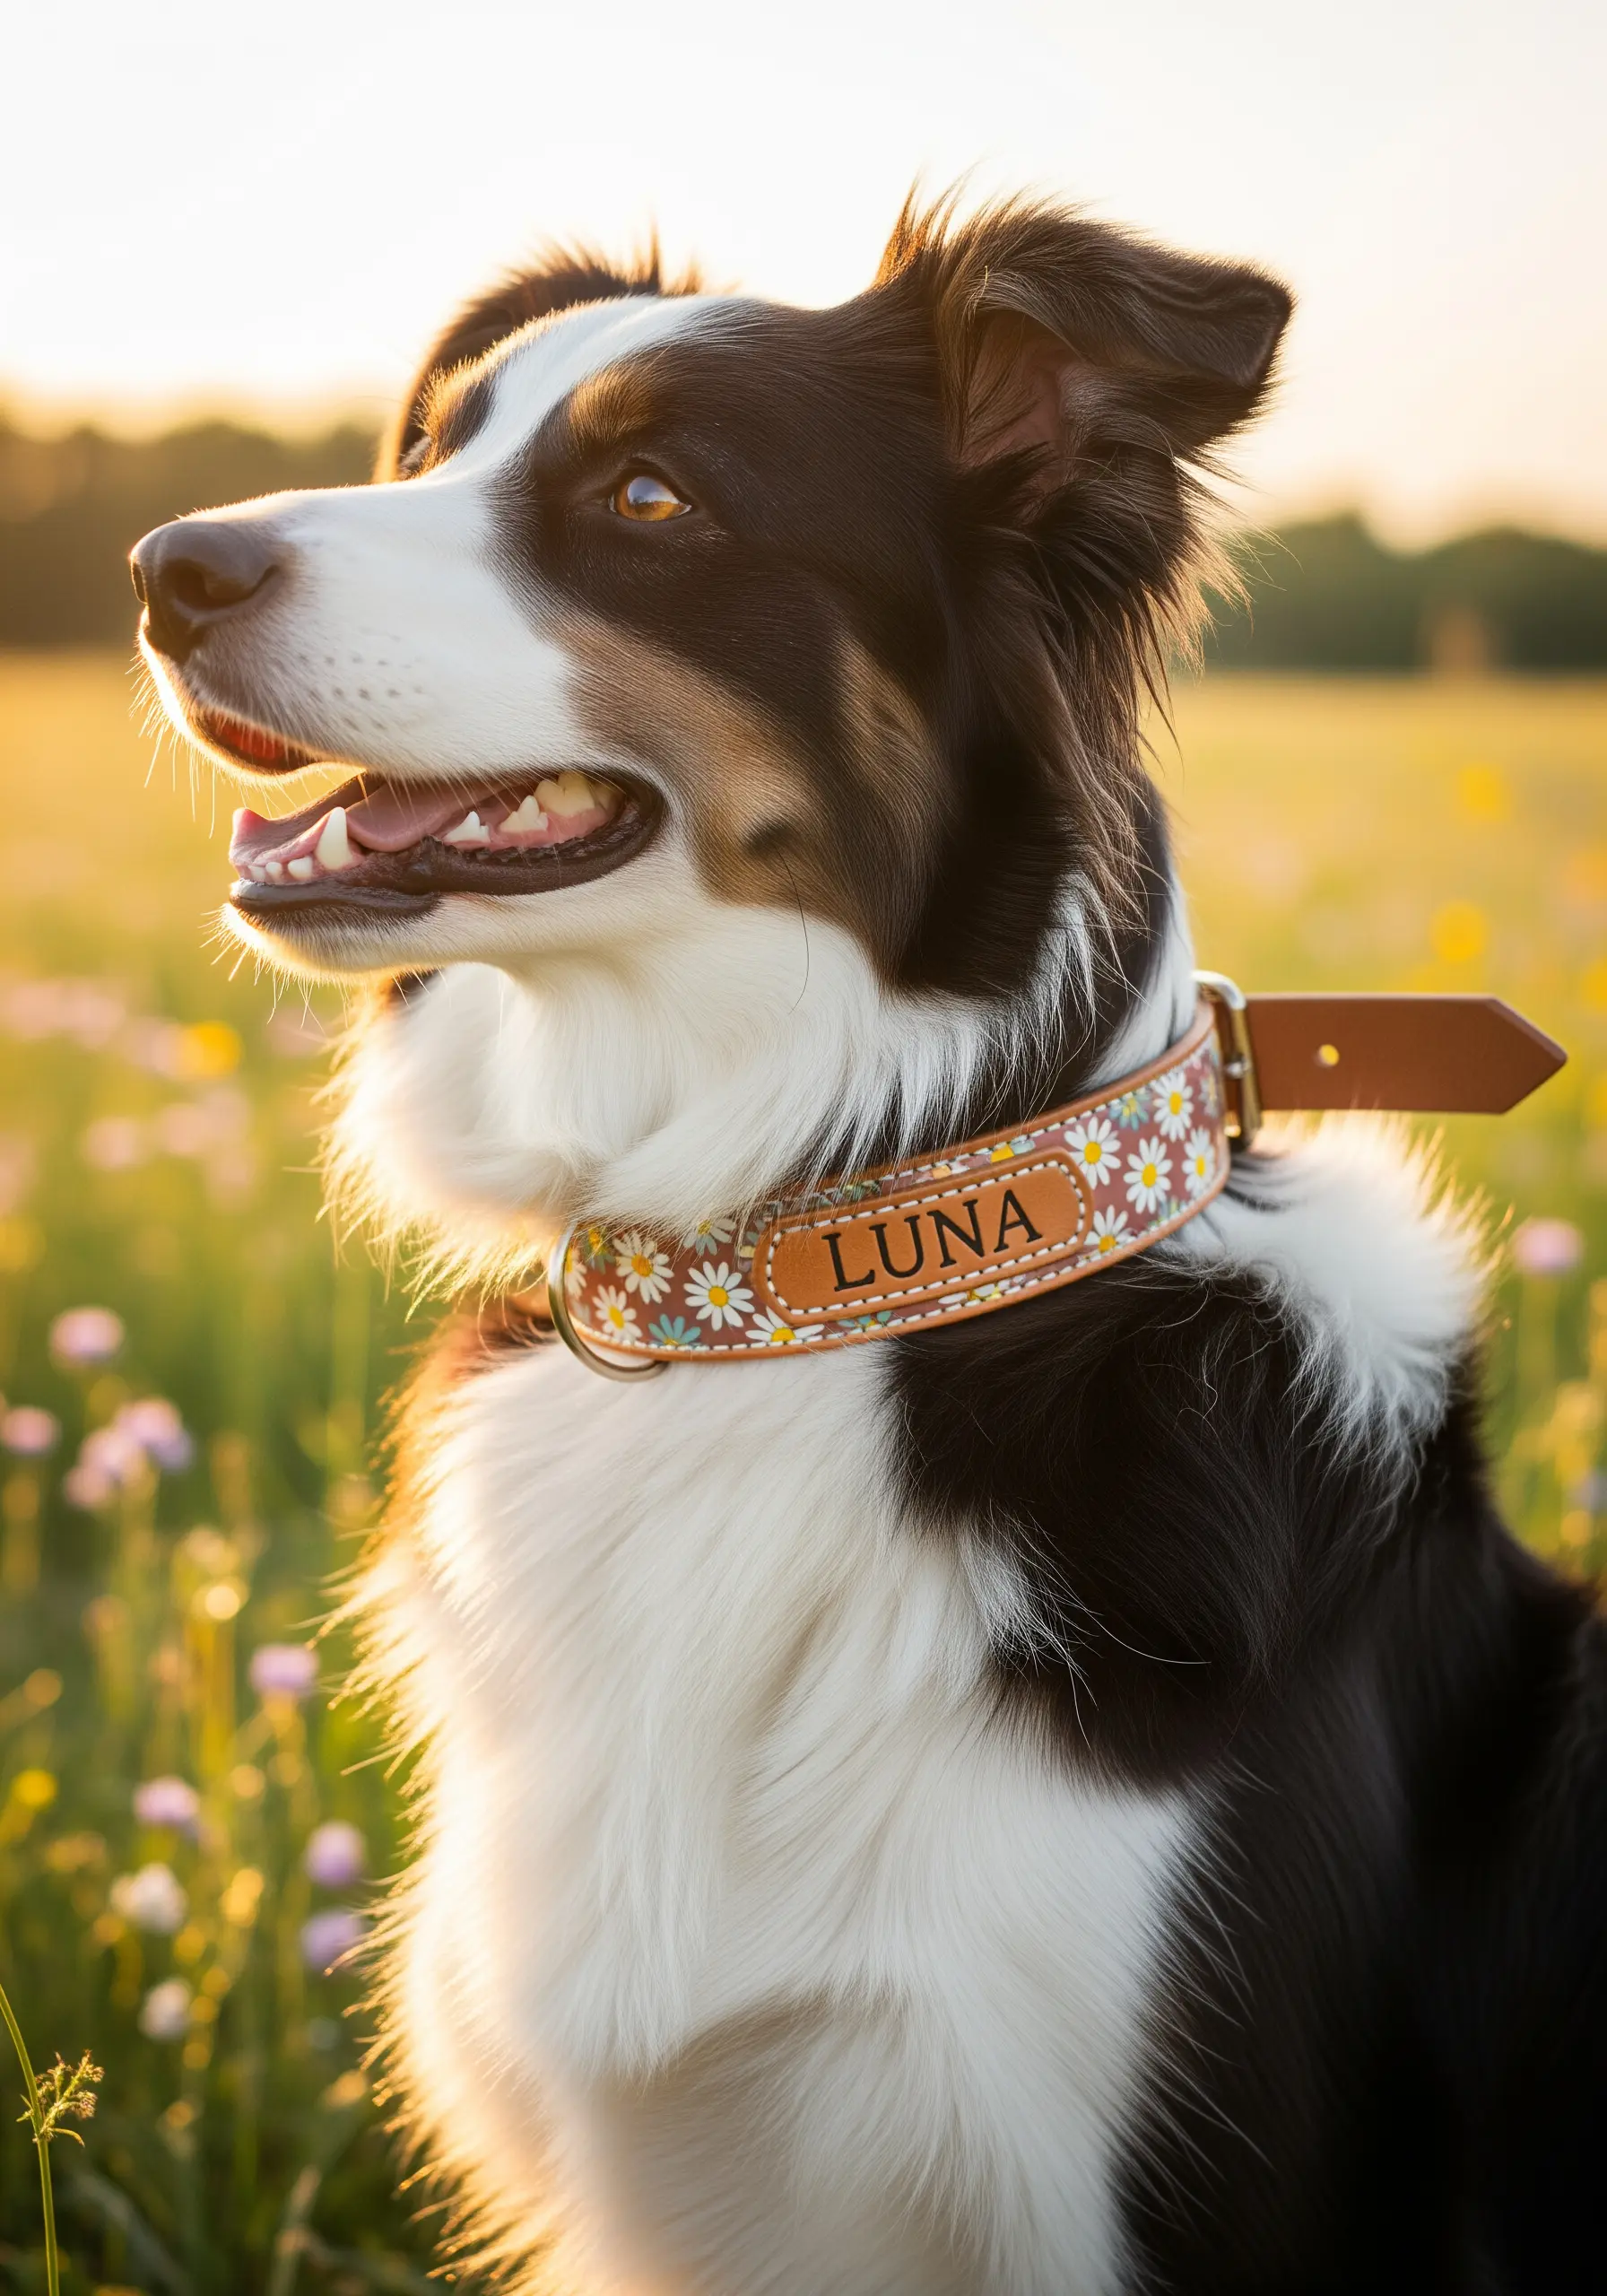
A custom collar is a beautiful and practical gift for any pet lover.
For a durable leather or nylon webbing collar, use a sharp, strong needle and a protective thimble.
Simple, robust stitches work best: lazy daisy stitches create charming flower petals, and French knots make sturdy, textured centers.
Use a contrasting thread color for the pet’s name, stitched in a clean backstitch, to ensure it stands out and is easy to read.


