

Sometimes, the secret to richer, more expressive embroidery isn’t adding more color—it’s taking it away. When you limit your palette to just two colors, something remarkable happens. Every stitch, every texture, and every decision you make becomes more intentional and impactful.
This isn’t about restriction; it’s about focus. A two-color framework quiets the noise and allows the elegance of the thread itself to take center stage. You’ll start to see the subtle power in the way a shadow falls on a French knot, the clean grace of a single backstitched line, or the smooth sheen of a perfectly laid satin stitch.
Think of this as a way to refine your eye and your hand. In these examples, you won’t just find ideas—you’ll discover techniques that elevate your work from simple craft to thoughtful art. Let’s explore how texture, line, and composition can make minimalism feel incredibly rich.
1. Build Sculptural Lines with Yarn
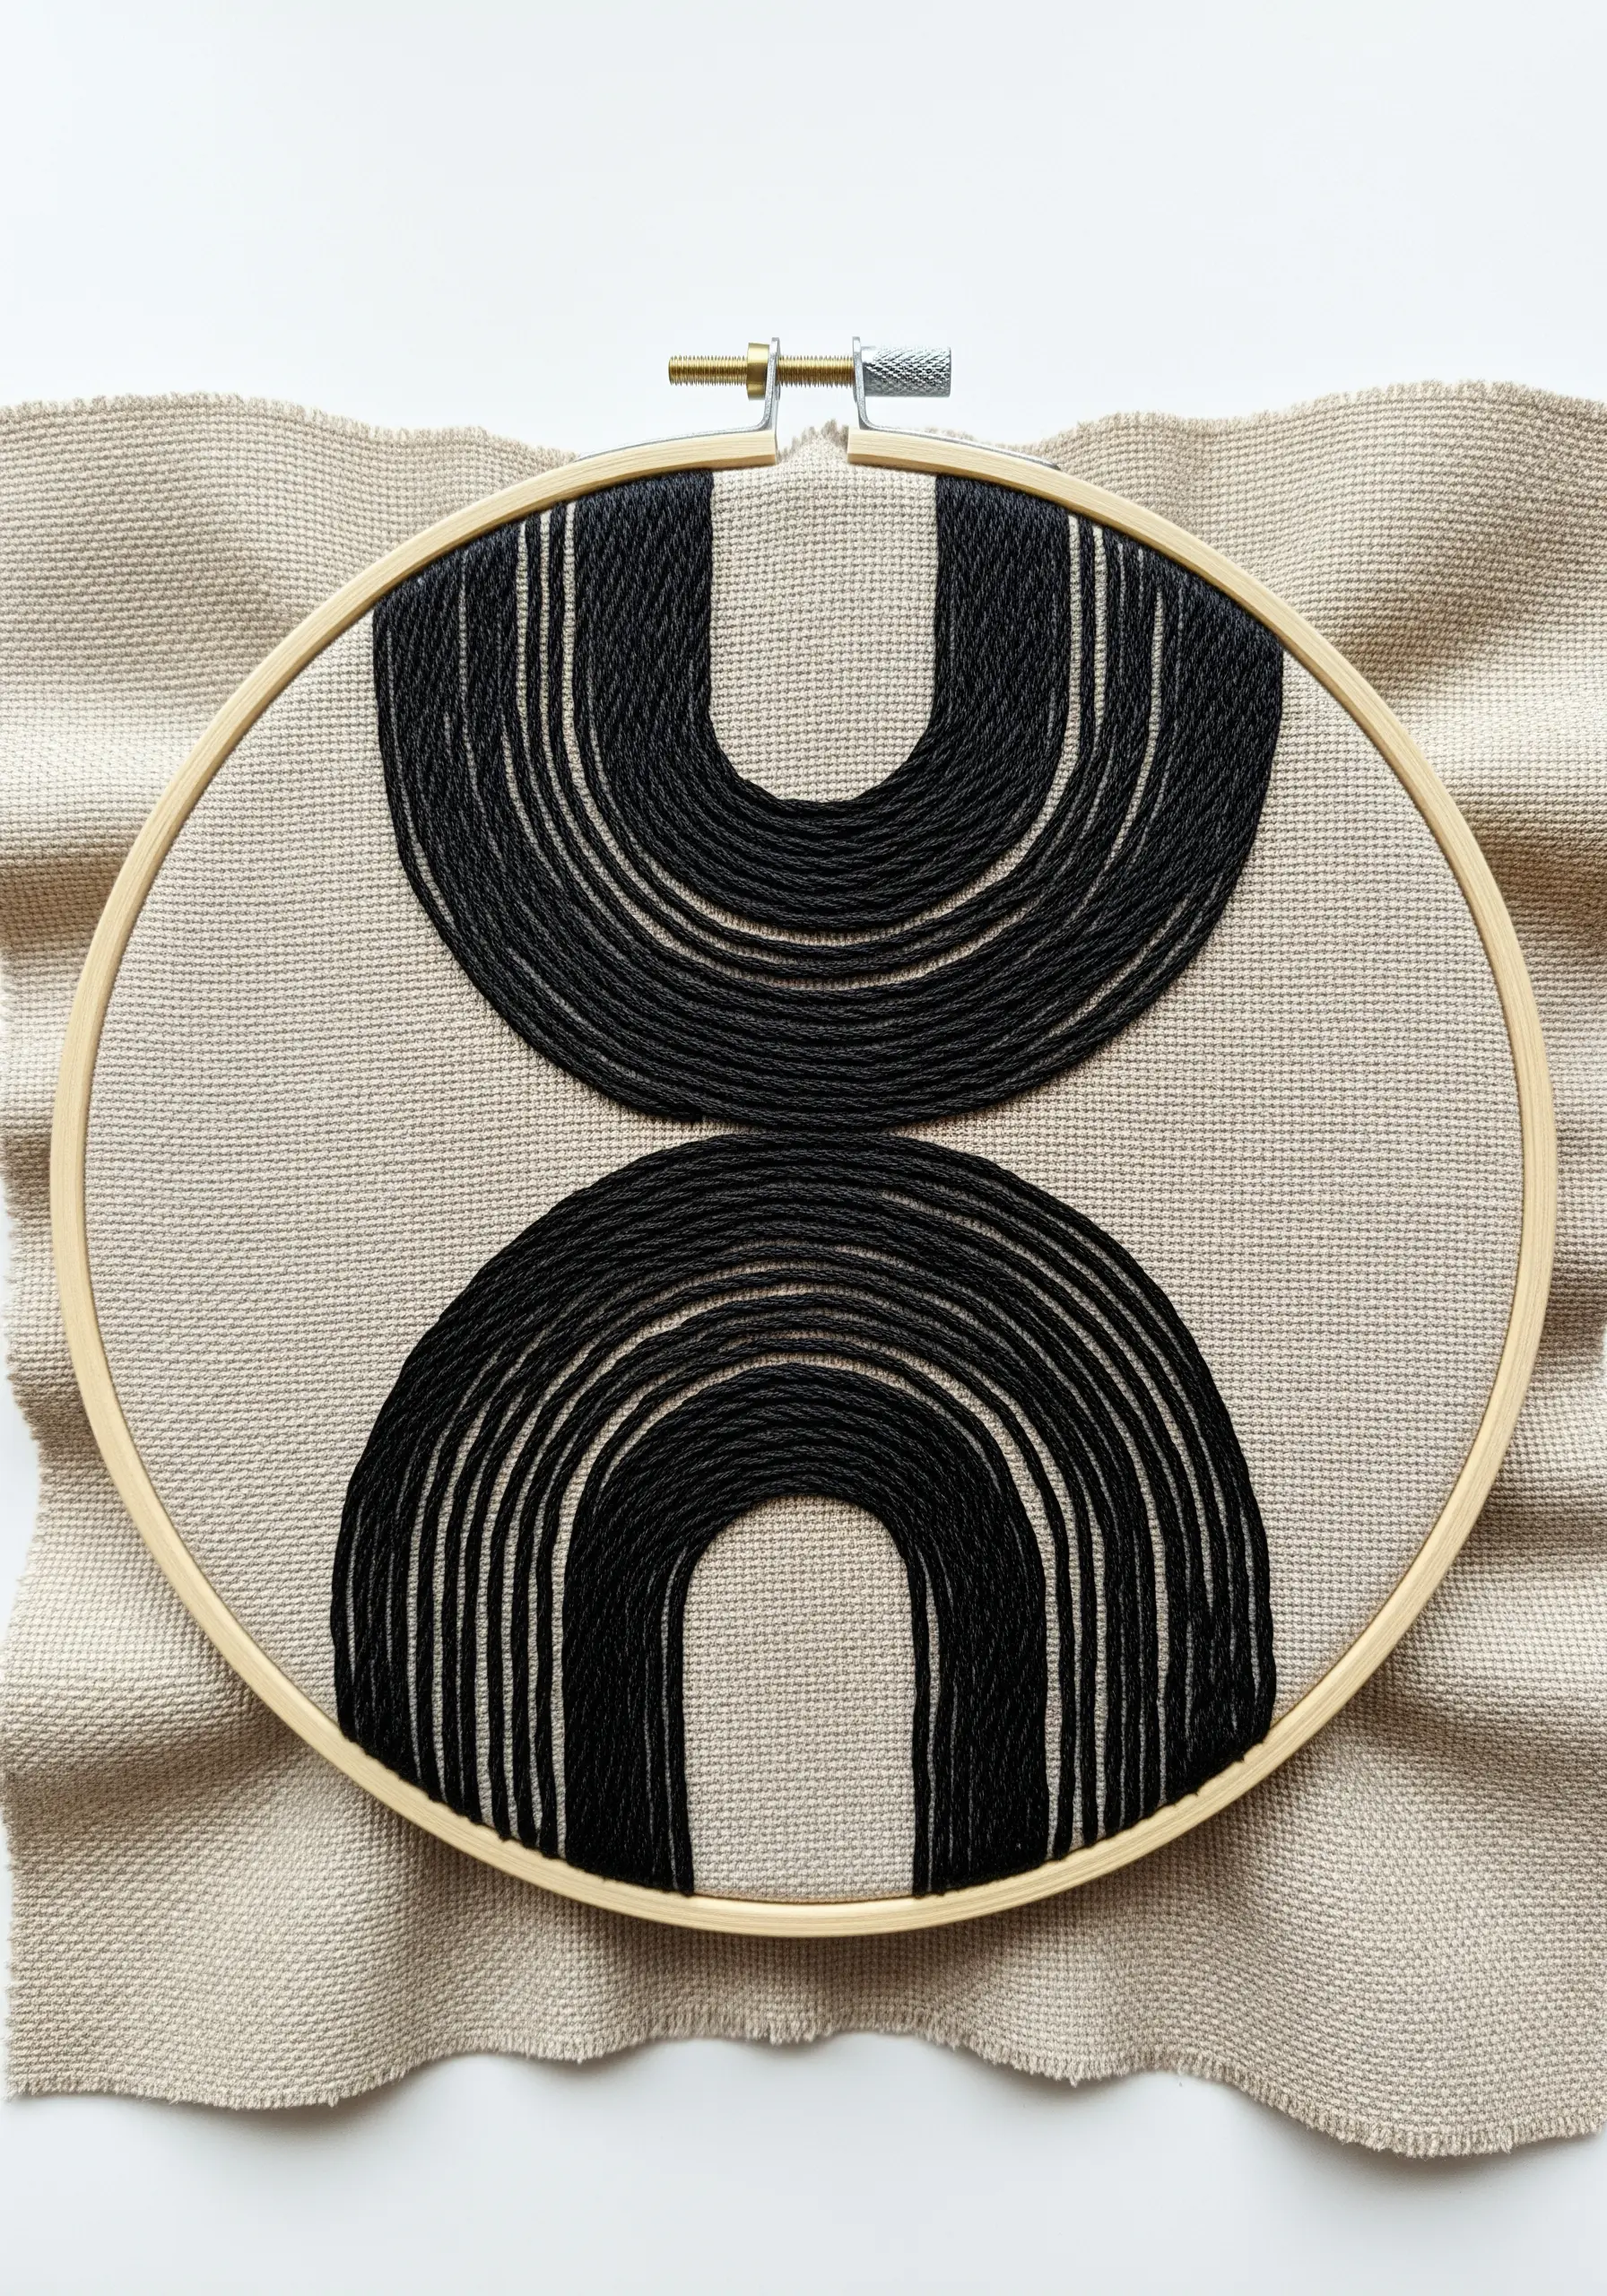
Move beyond standard floss and embrace the bold texture of yarn or multiple strands of pearl cotton to create graphic, high-impact designs.
Use a long-and-short stitch, but lay the strands side-by-side rather than blending them, creating what is known as laid work or Roumanian couching.
This technique turns your thread into a sculptural element, where the tension and placement of each strand define the form.
The key is consistent tension—not too tight to pucker the fabric, but firm enough to hold the curves without sagging.
Select a sturdy, even-weave fabric like cotton canvas or linen that can support the weight of the yarn and prevent distortion.
This approach transforms a simple two-color design into dramatic, yarn wall art creations that feel both modern and tactile.
2. Achieve Botanical Realism with Precise Stitches
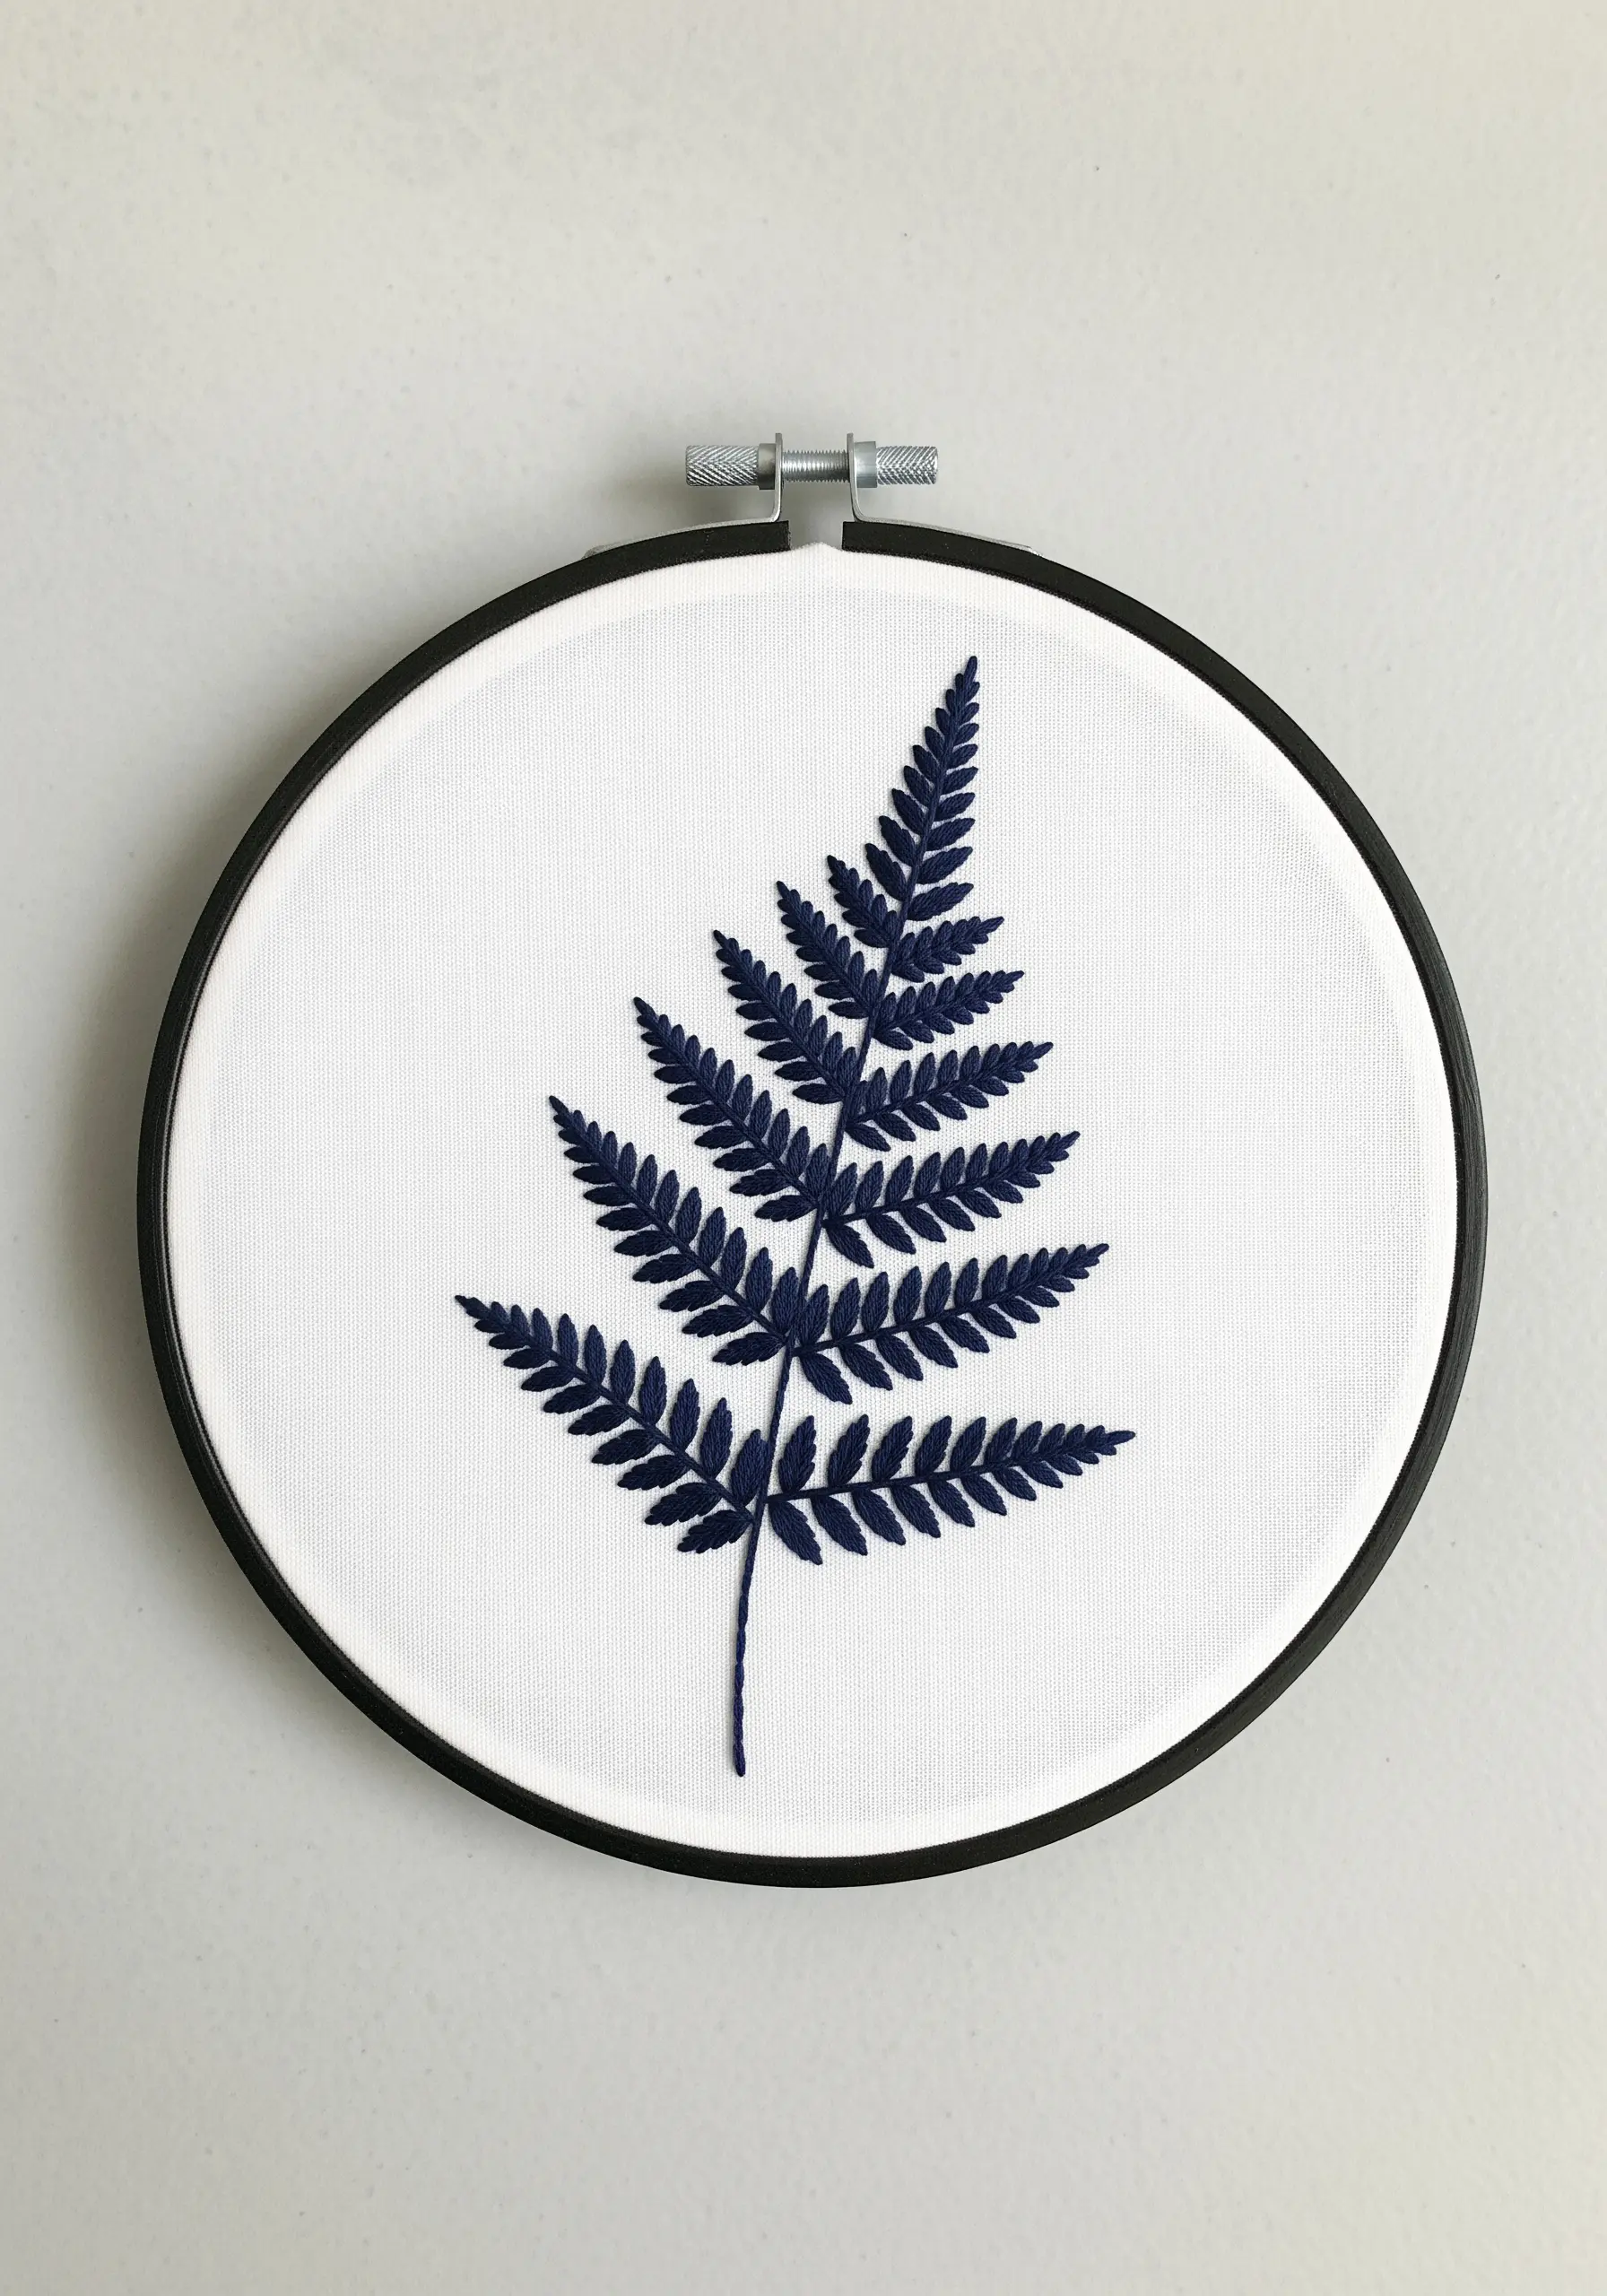
To capture the delicate structure of a fern, assign a different stitch to each part of the plant for lifelike texture.
Use a fishbone stitch for the individual leaves (fronds) to create the subtle center line that a real leaf possesses.
For the main stem, a simple stem stitch or whipped backstitch will give you a solid, raised line that grounds the design.
Work with fewer strands of floss—two or three at most—to keep the details crisp and avoid a bulky finish.
The contrast between the filled leaves and the clean lines of the stem elevates simple leaf & plant embroidery ideas into elegant botanical studies.
3. Create 3D Texture with Sculptural Knots
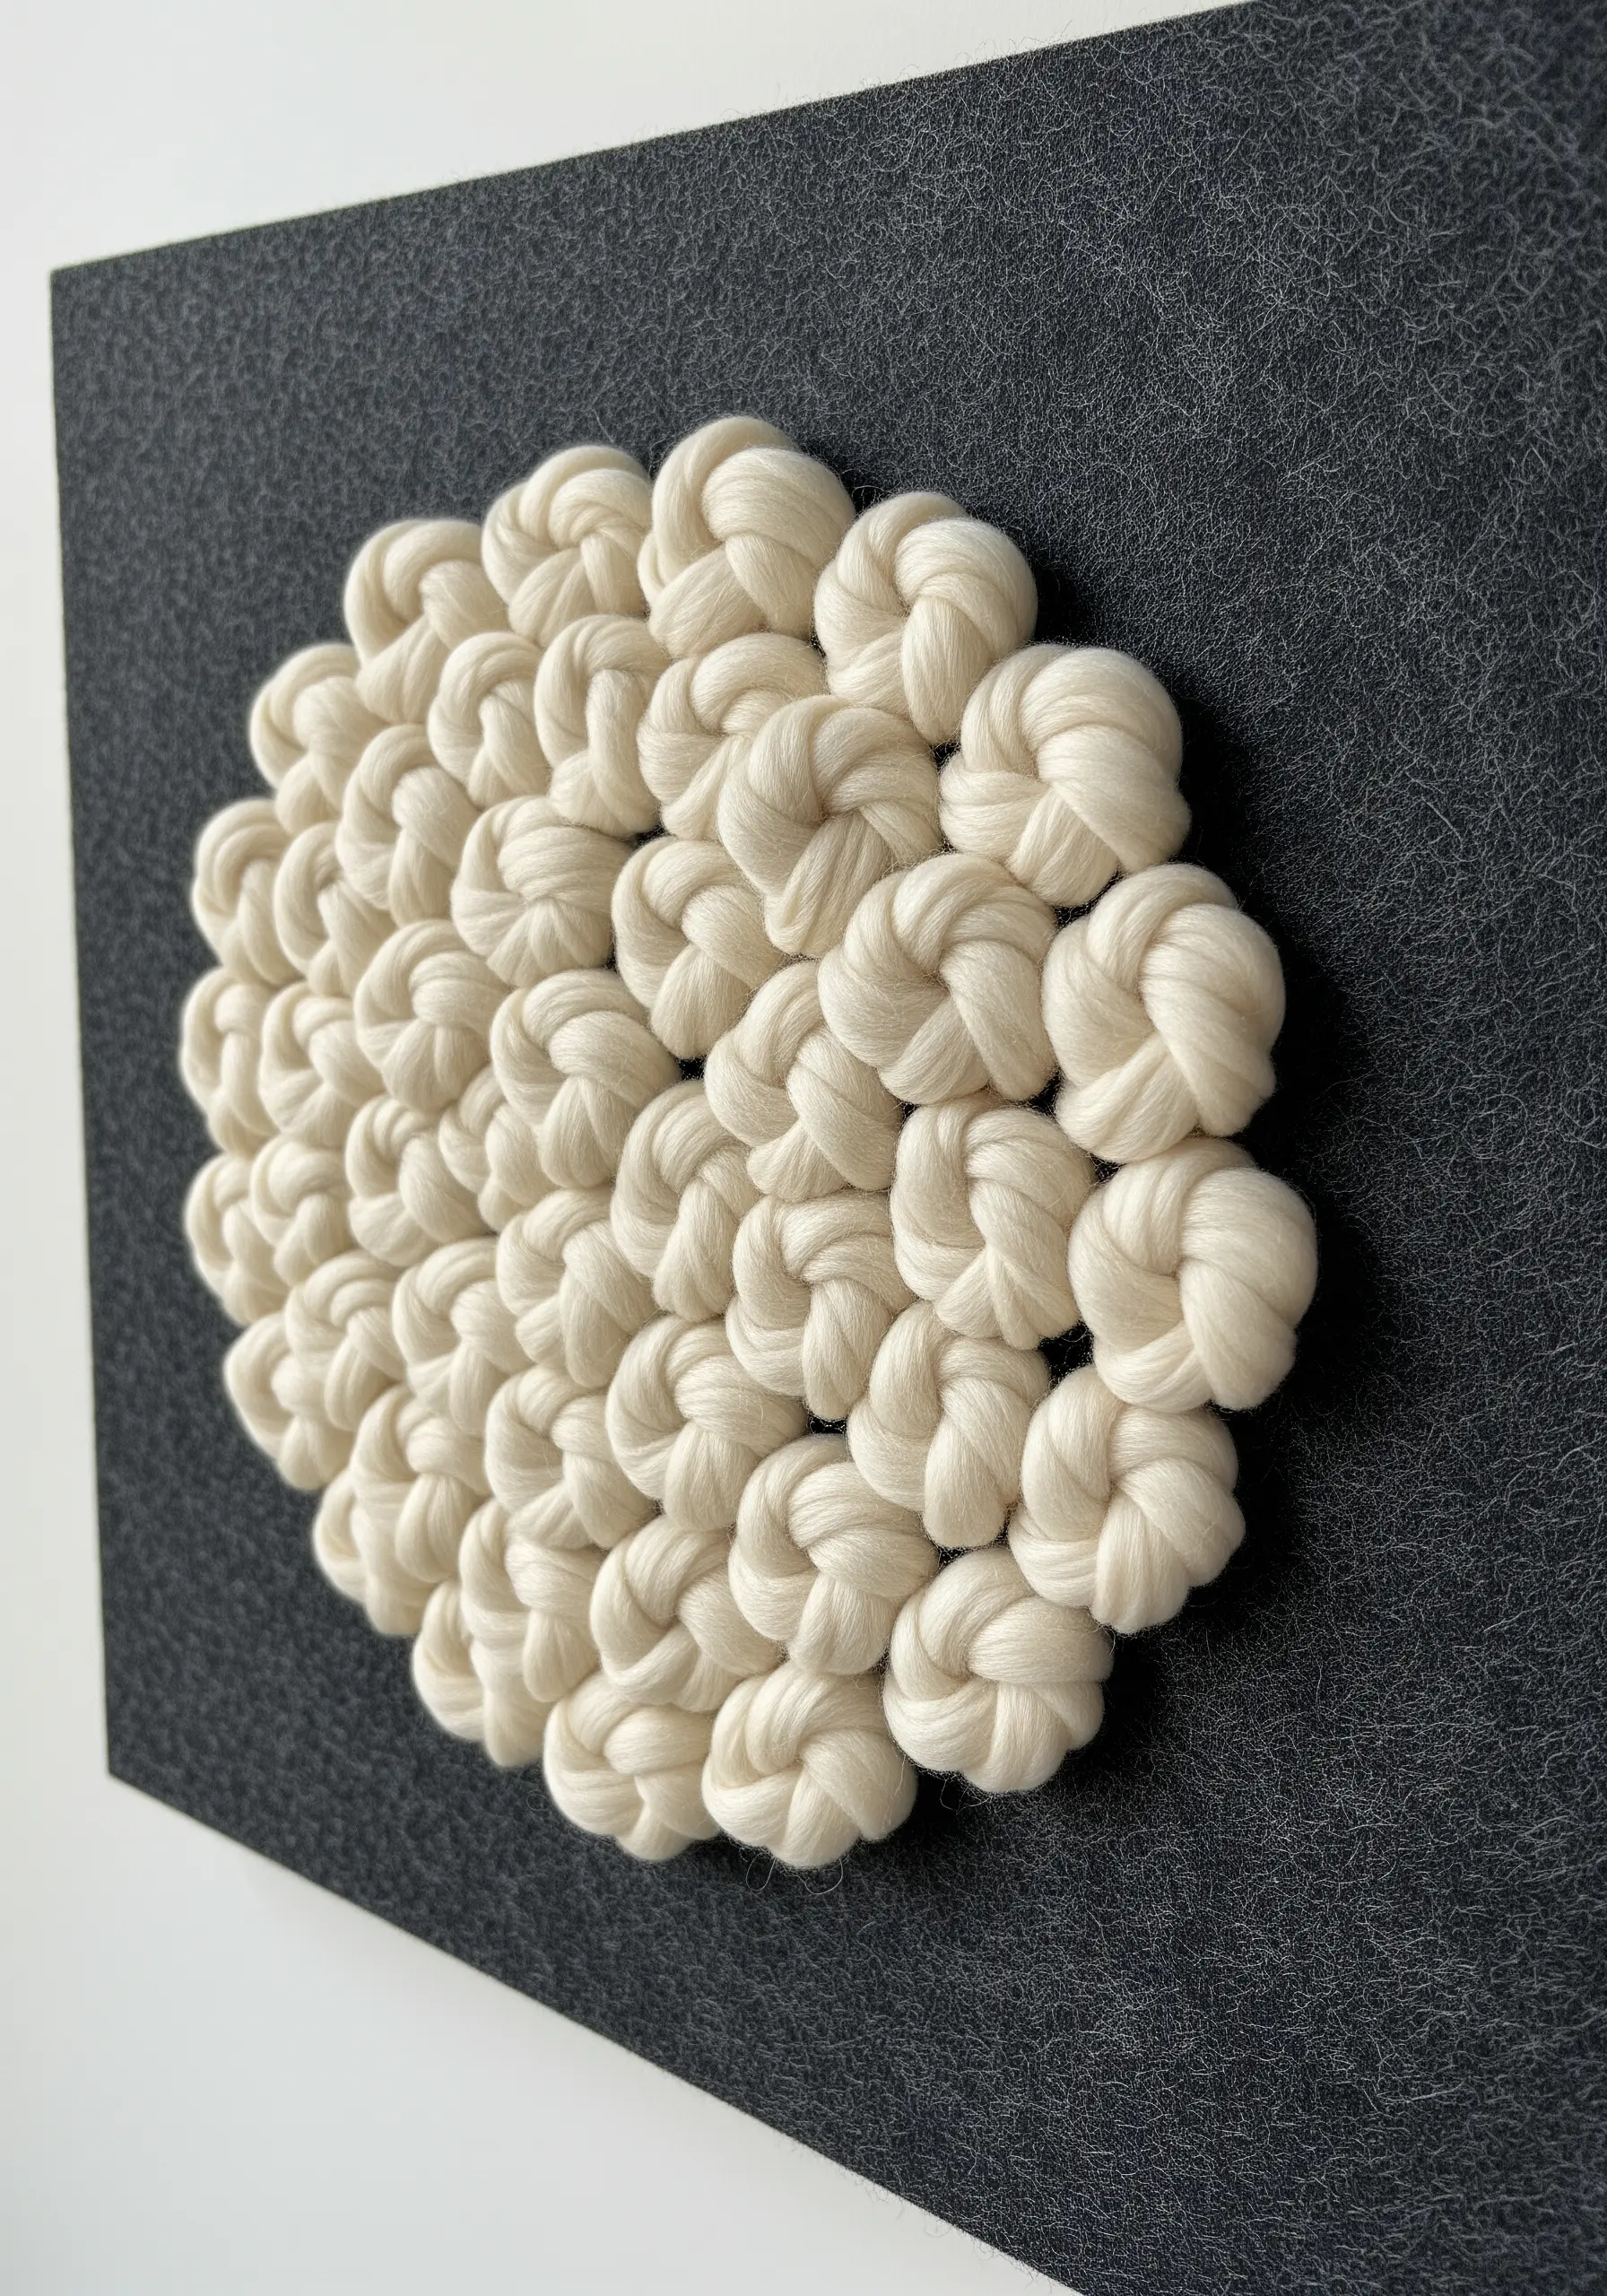
Build a dense, touchable surface by packing French knots or colonial knots tightly together inside a defined shape.
Use a thicker thread, such as pearl cotton or even soft wool yarn, to give each knot more volume and dimension.
To ensure your knots are uniform, wrap the thread consistently and pull each stitch with even pressure.
This technique is perfect for creating abstract art on a non-traditional background, like thick felt or wool, which provides a stable base for the heavy stitching.
It’s an immediate way to capture nature’s textures, like pebbles or petals, using just a single stitch and color.
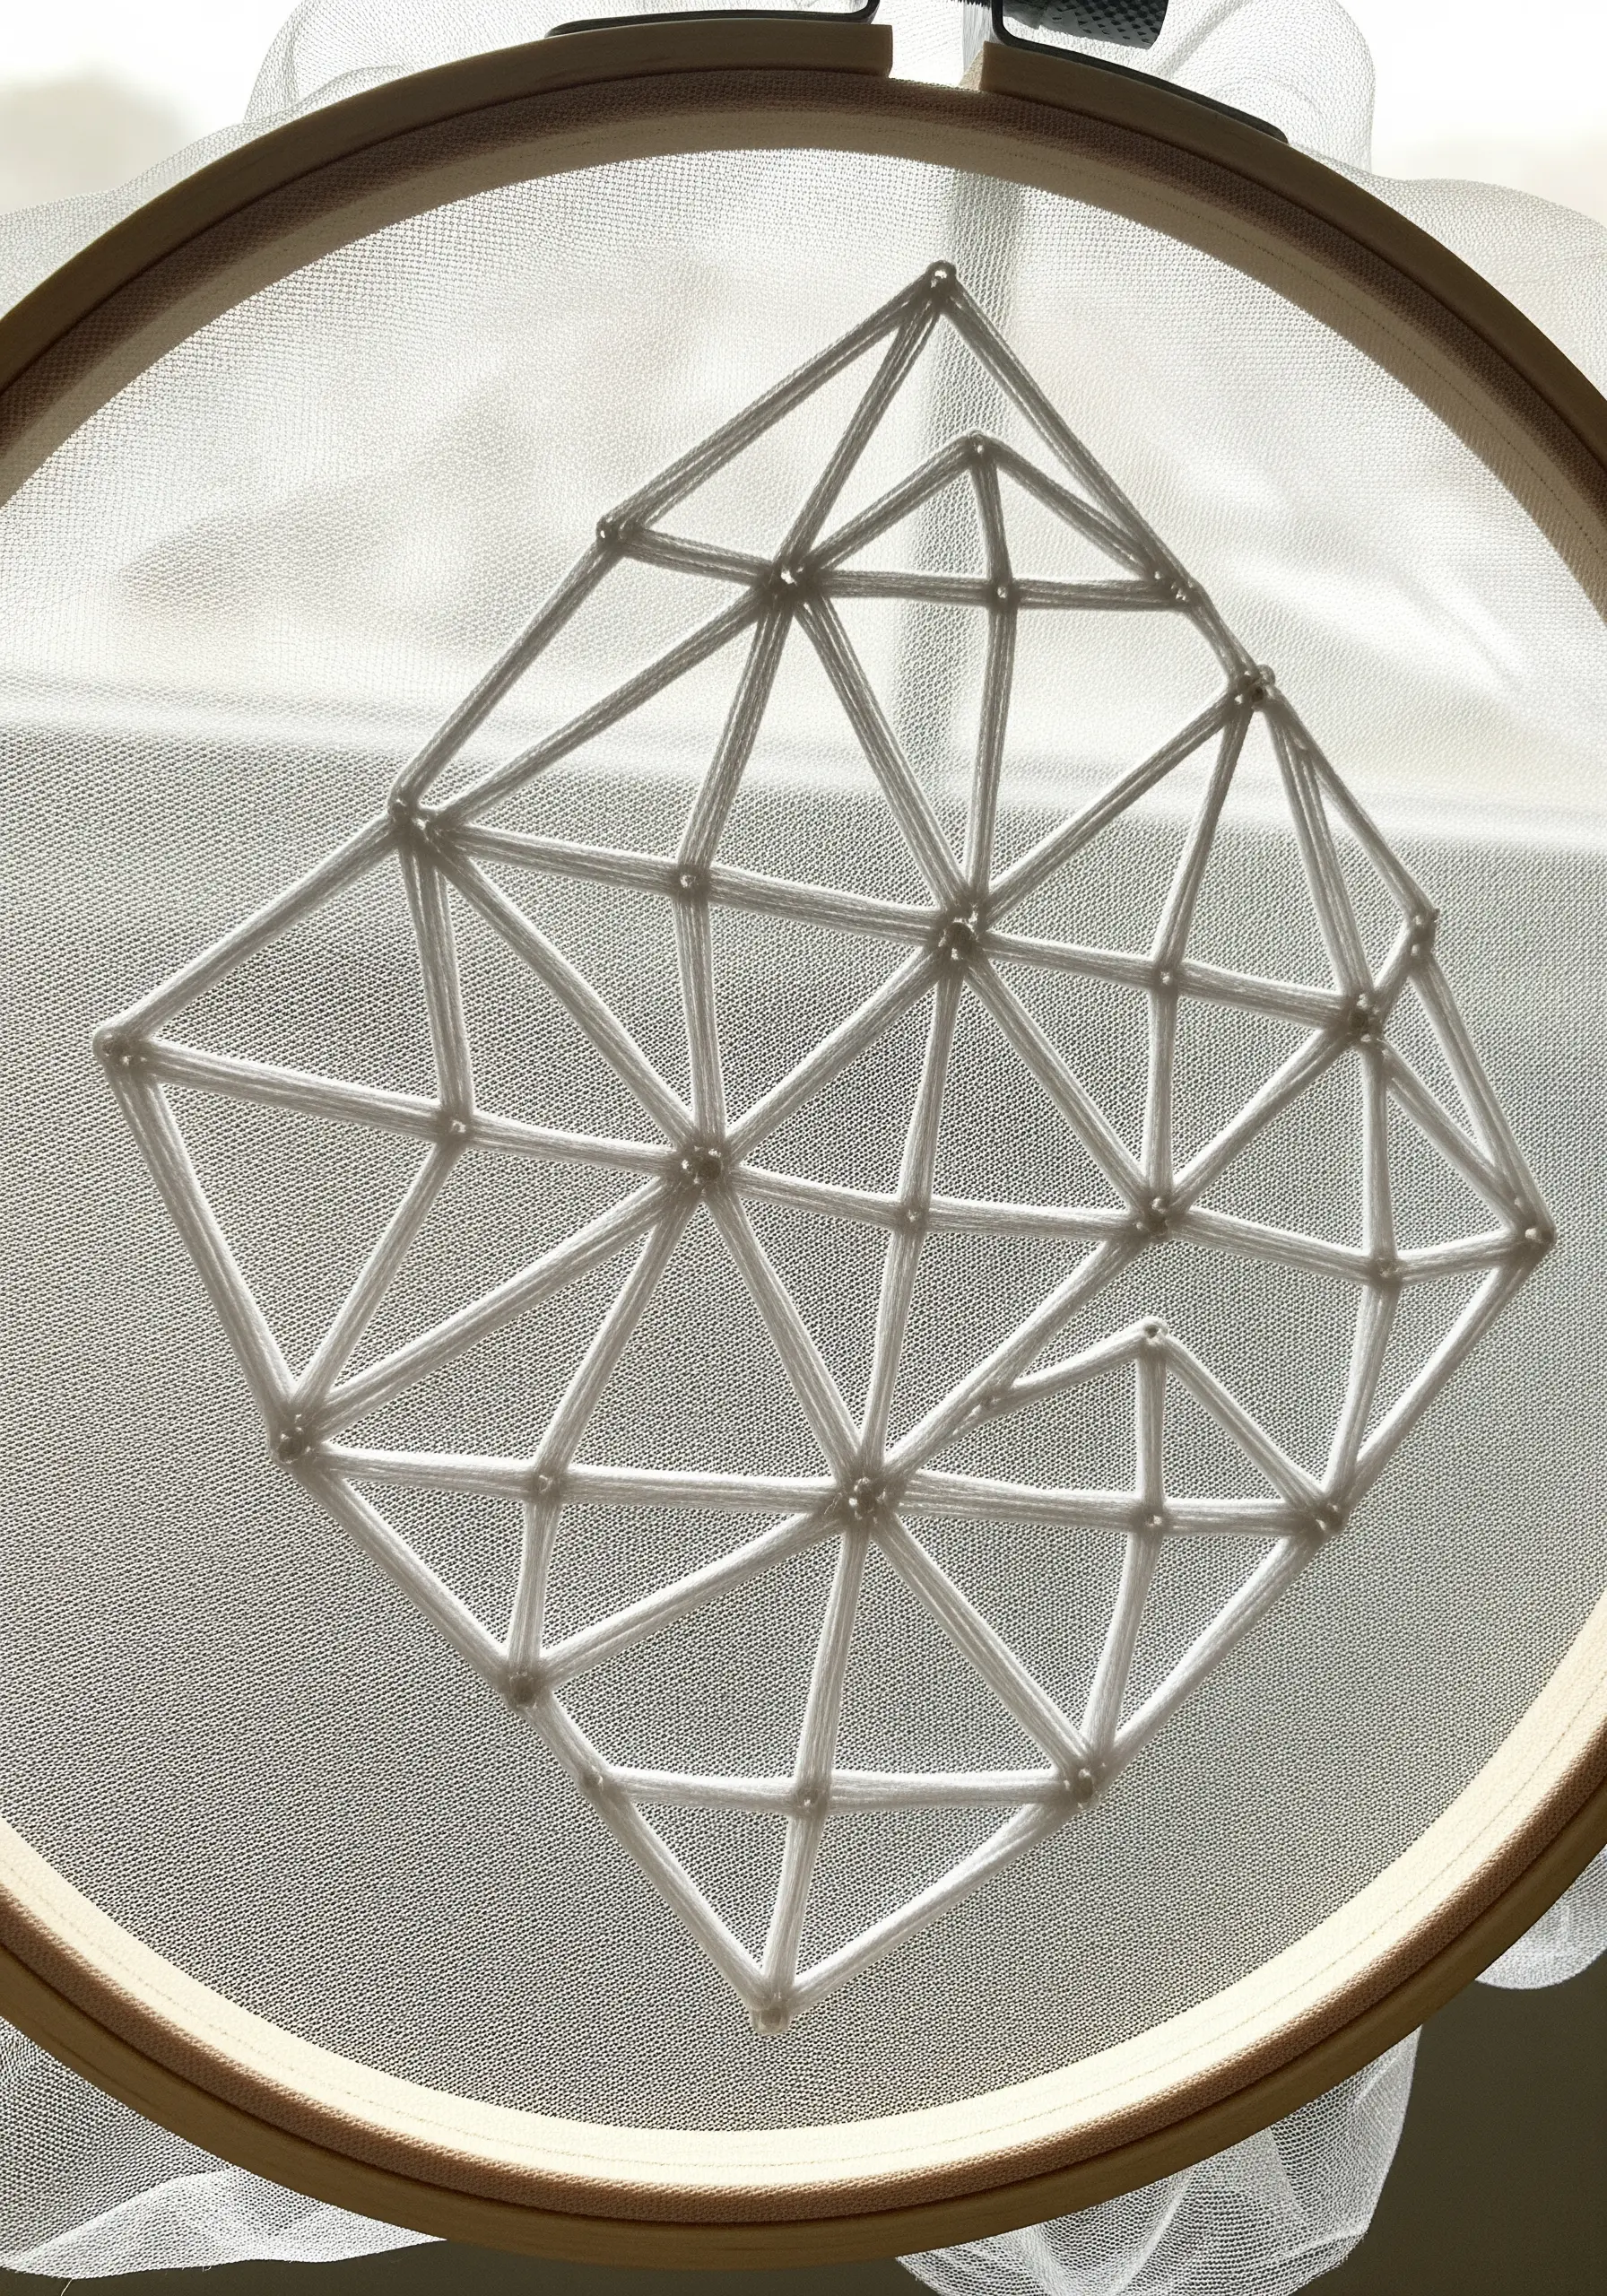
4. Map Out Architectural Forms with Line Work
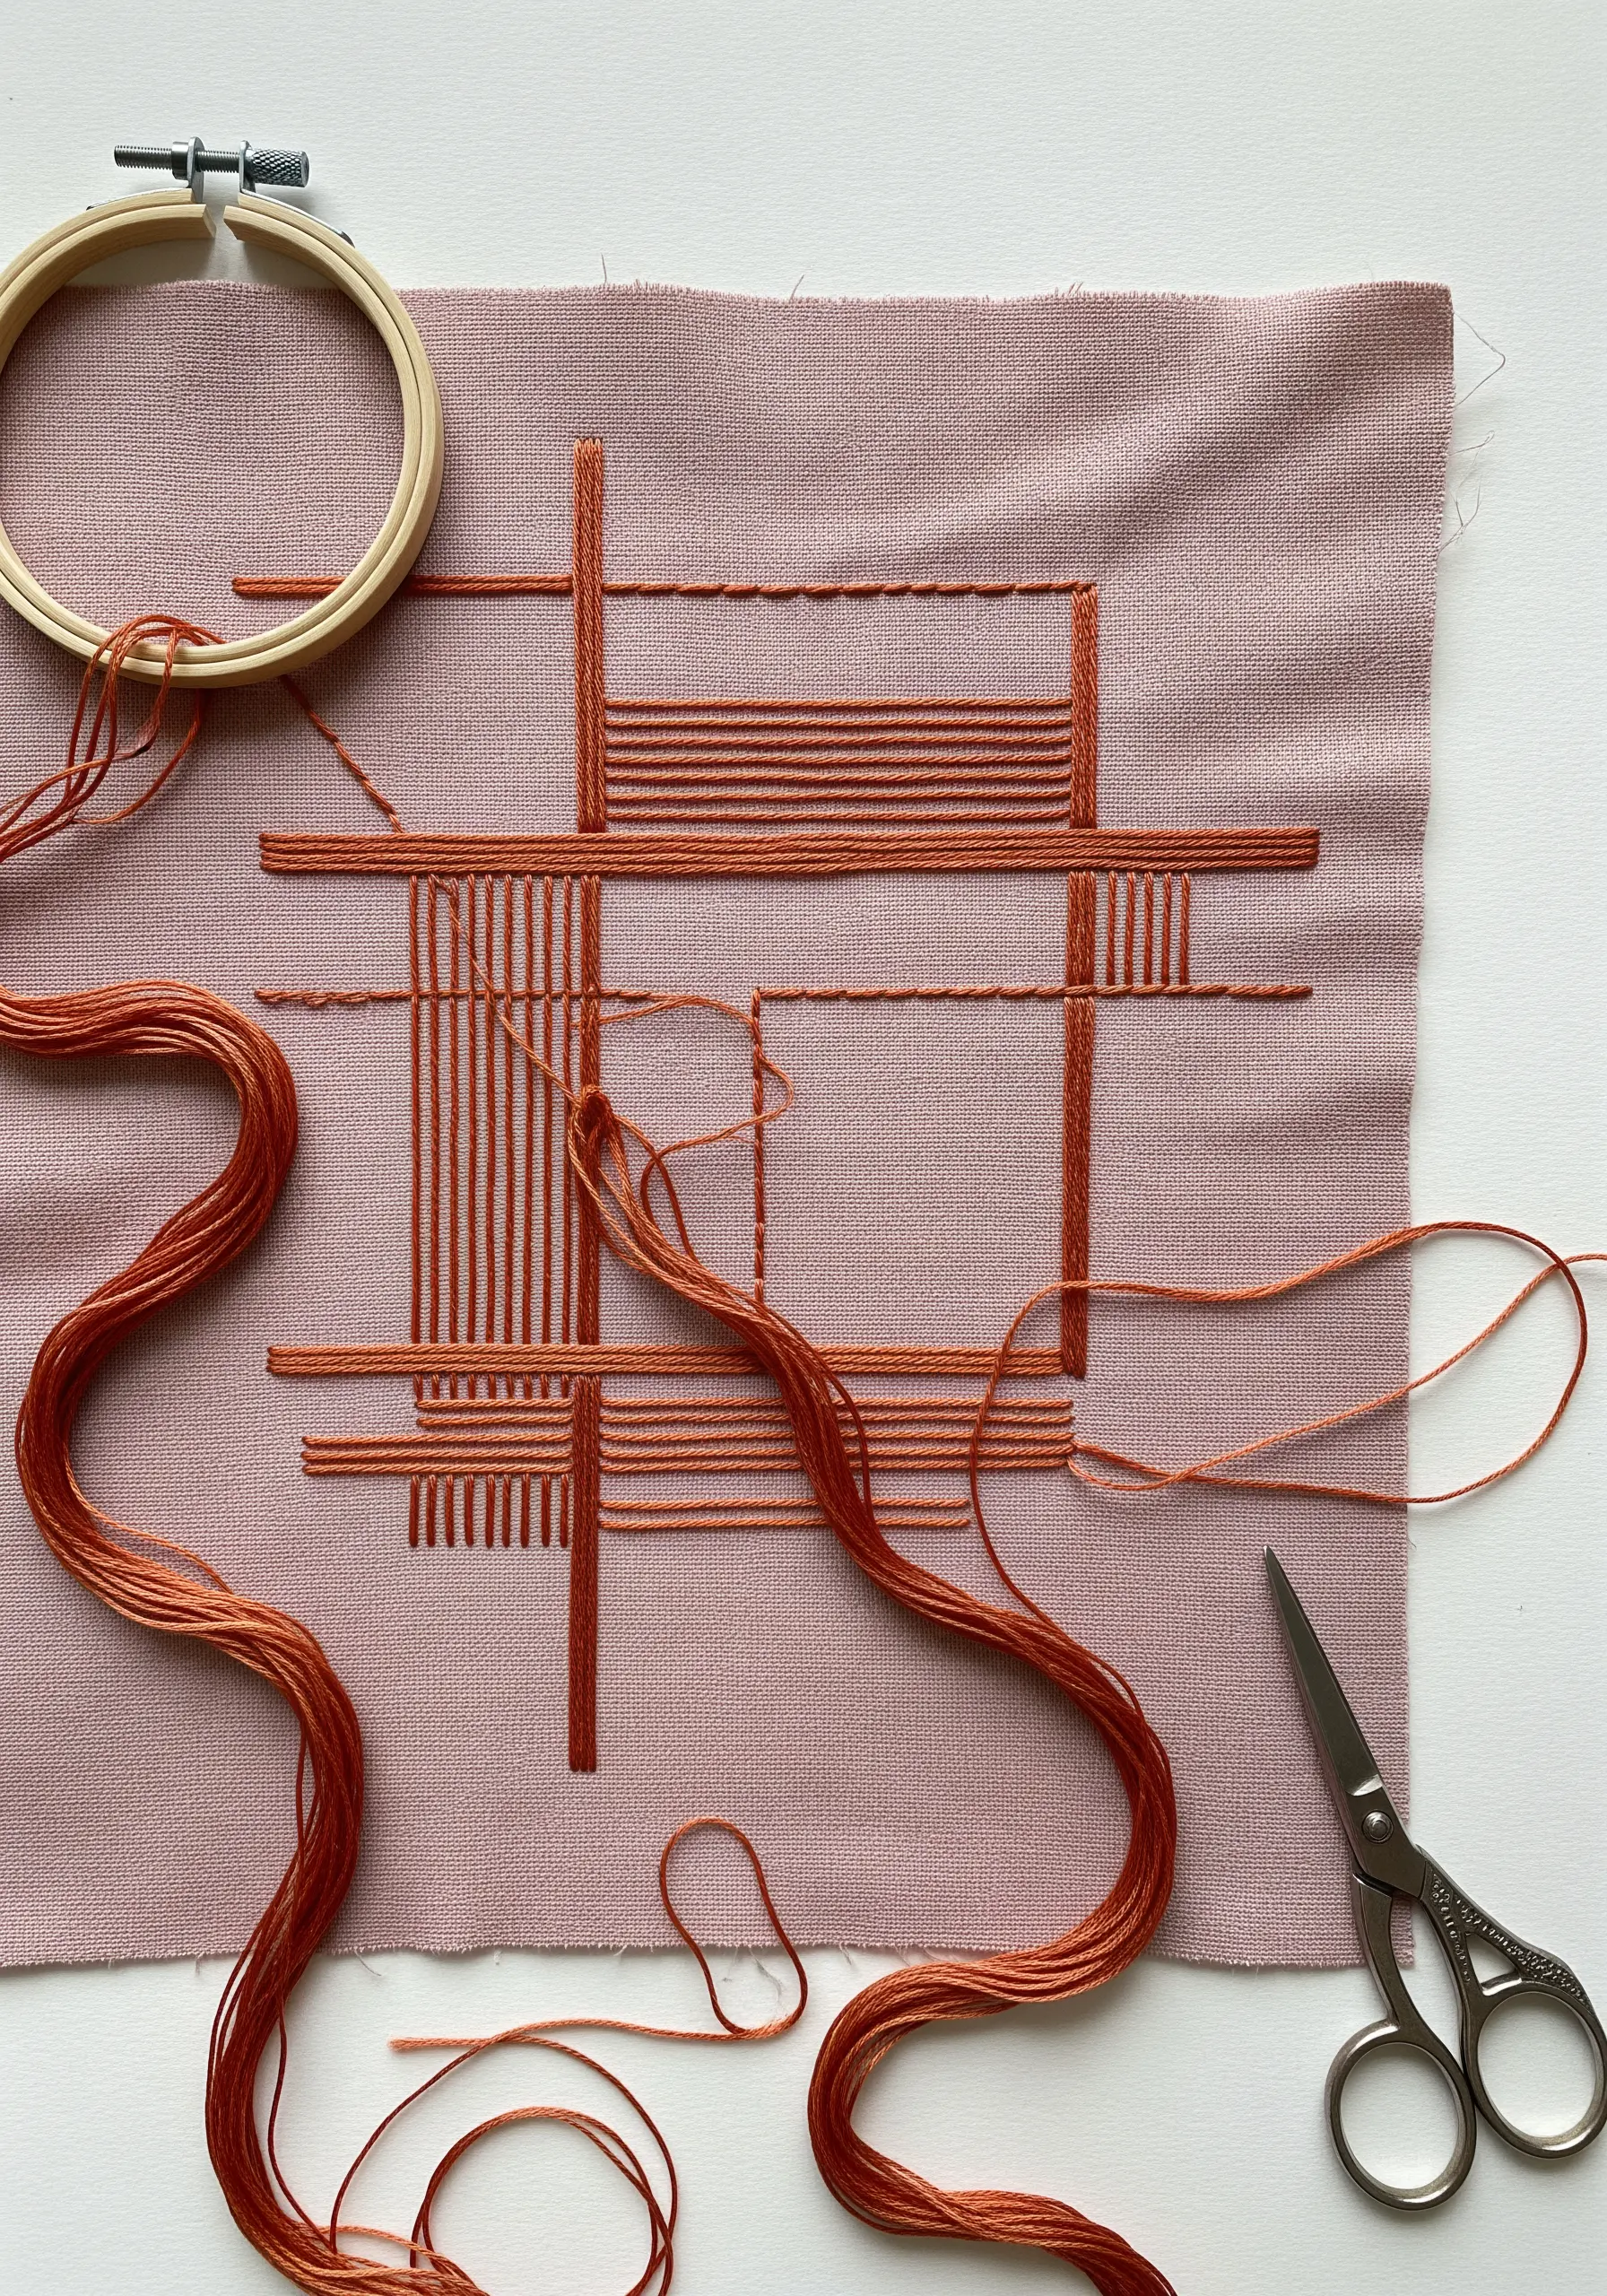
Use satin stitch not as a fill, but as a precise line to build clean, geometric, and architectural forms.
Lay long, parallel stitches to create grids and blocks of texture, allowing the thread direction to define the planes of your design.
This method, often seen in architectural string art designs, relies on perfect tension to keep the long stitches from sagging.
Choose a thread with a slight sheen, like satin floss or silk, to catch the light and emphasize the clean lines against a matte fabric.
The beauty of this technique is its simplicity—it’s just straight stitches, but their careful placement creates a sophisticated, structured effect.
5. Embellish Home Décor with Raised Contours
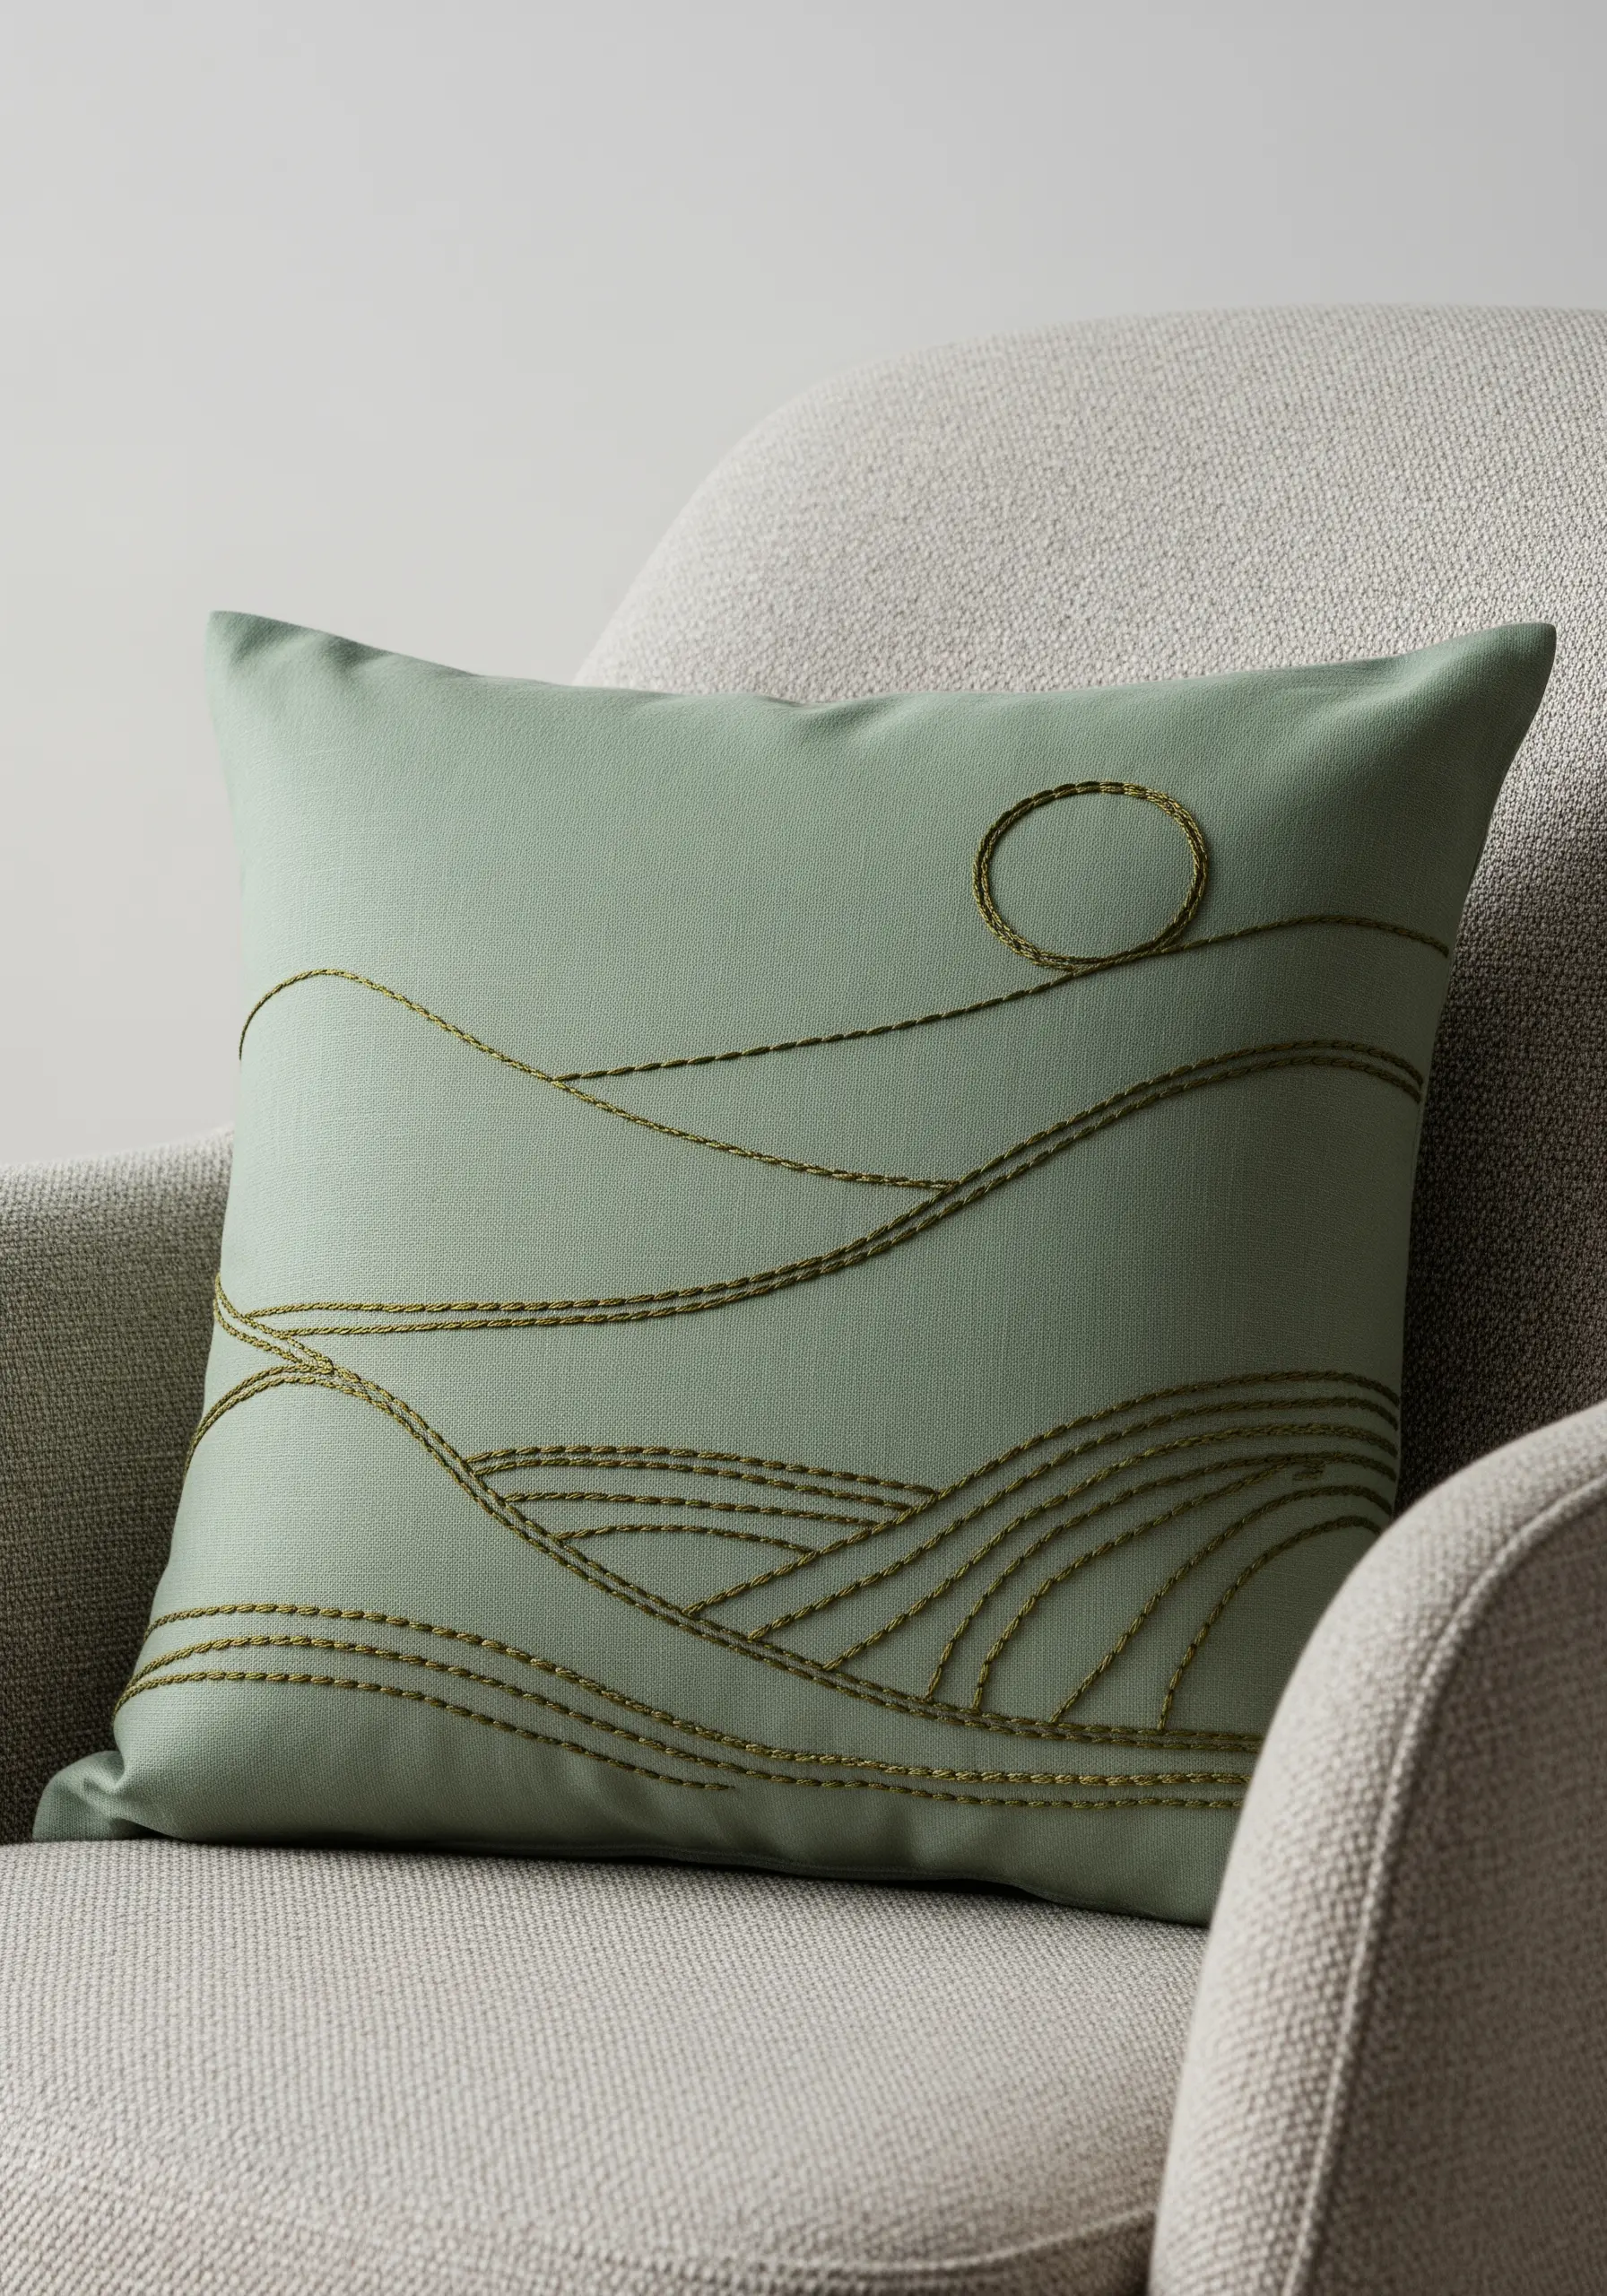
Transform a simple cushion cover by adding a tactile, flowing landscape using a whipped running stitch or a heavy chain stitch.
These stitches create a raised, cord-like line that stands out from the fabric, making the design both visible and touchable.
Choose a thread color that is just a few shades darker or lighter than your fabric for a subtle, tonal effect that feels integrated and high-end.
This is one of the most effective minimal stitch patterns that turn boring pillowcases into boutique home decor, adding texture without overwhelming the piece.
It proves that a single continuous line can carry an entire design, turning an everyday object into a piece of art.
6. Illuminate Dark Fabric with Metallics
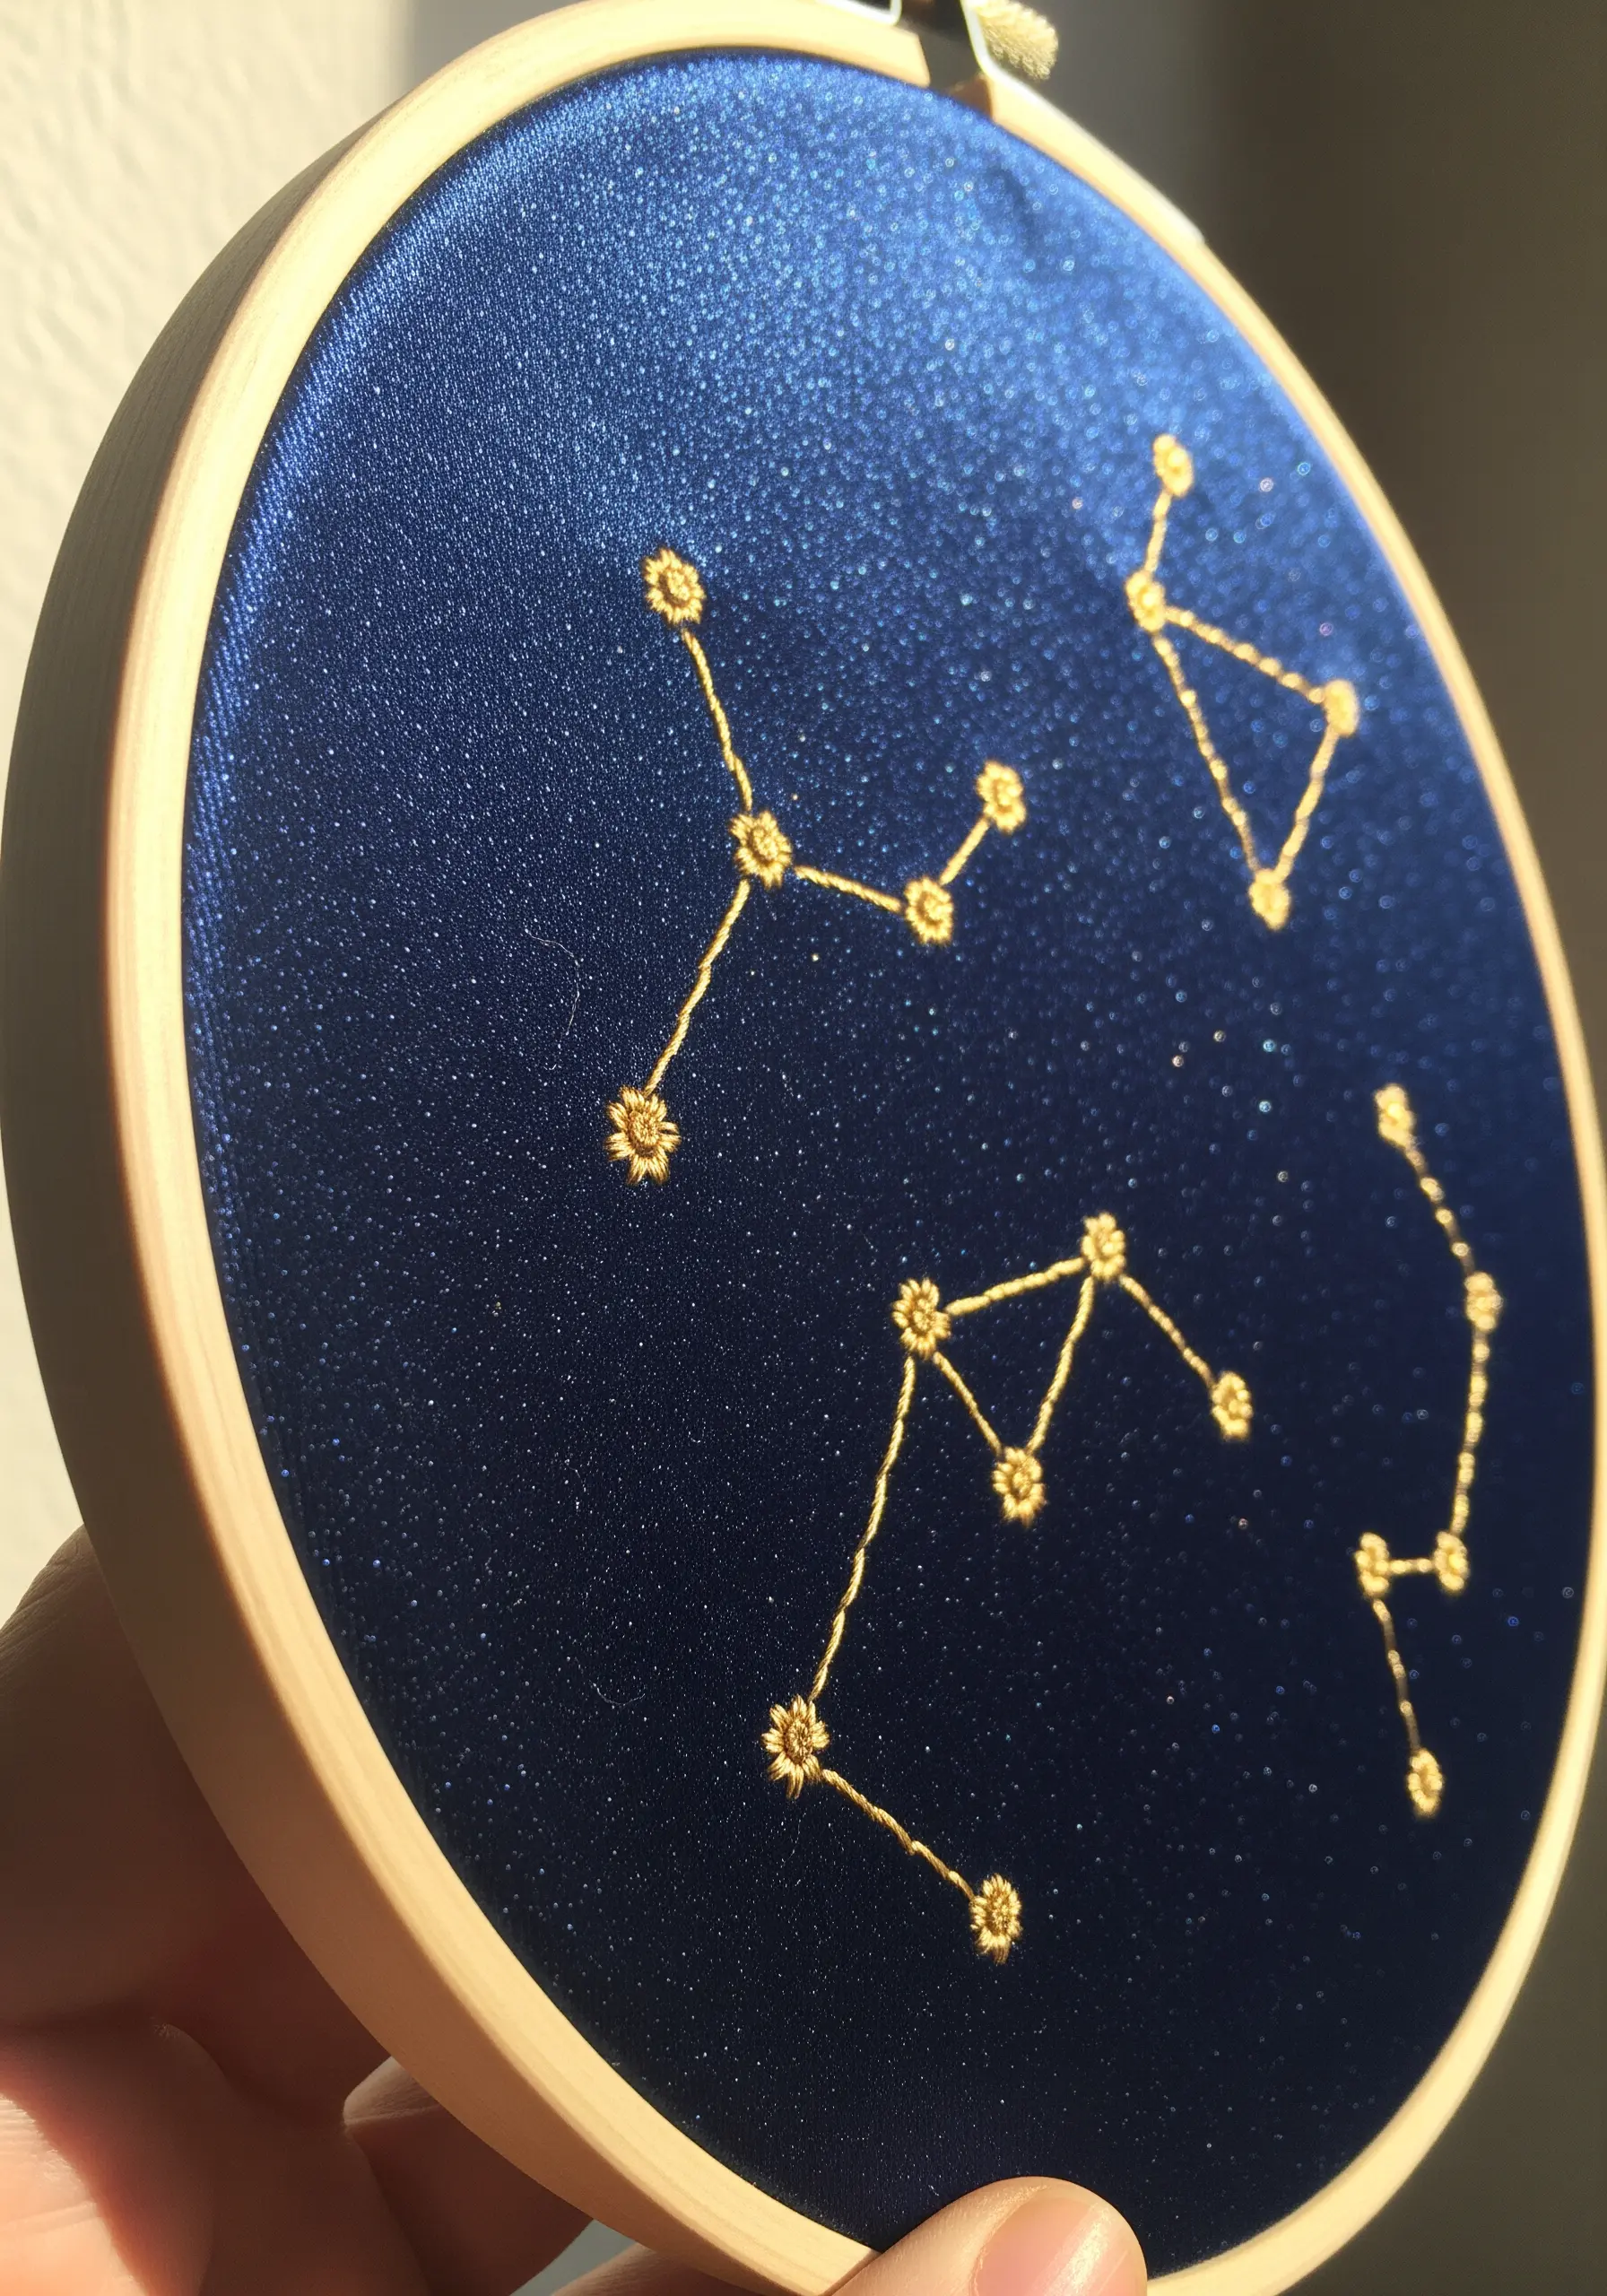
Create a striking celestial scene by pairing metallic gold thread with a deep blue or black fabric.
To make the stars pop, use a combination of tiny star stitches and French knots of varying sizes.
When working with metallic floss, use short lengths of thread (no more than 12 inches) and a thread conditioner to prevent tangling and fraying.
The glittery satin fabric enhances the effect, but this technique works just as well on plain cotton or linen for a more subdued look.
These are perfect for minimal sky & moon designs, where the contrast between thread and fabric does all the work.
7. Master the Unbroken Line for Fluid Portraits
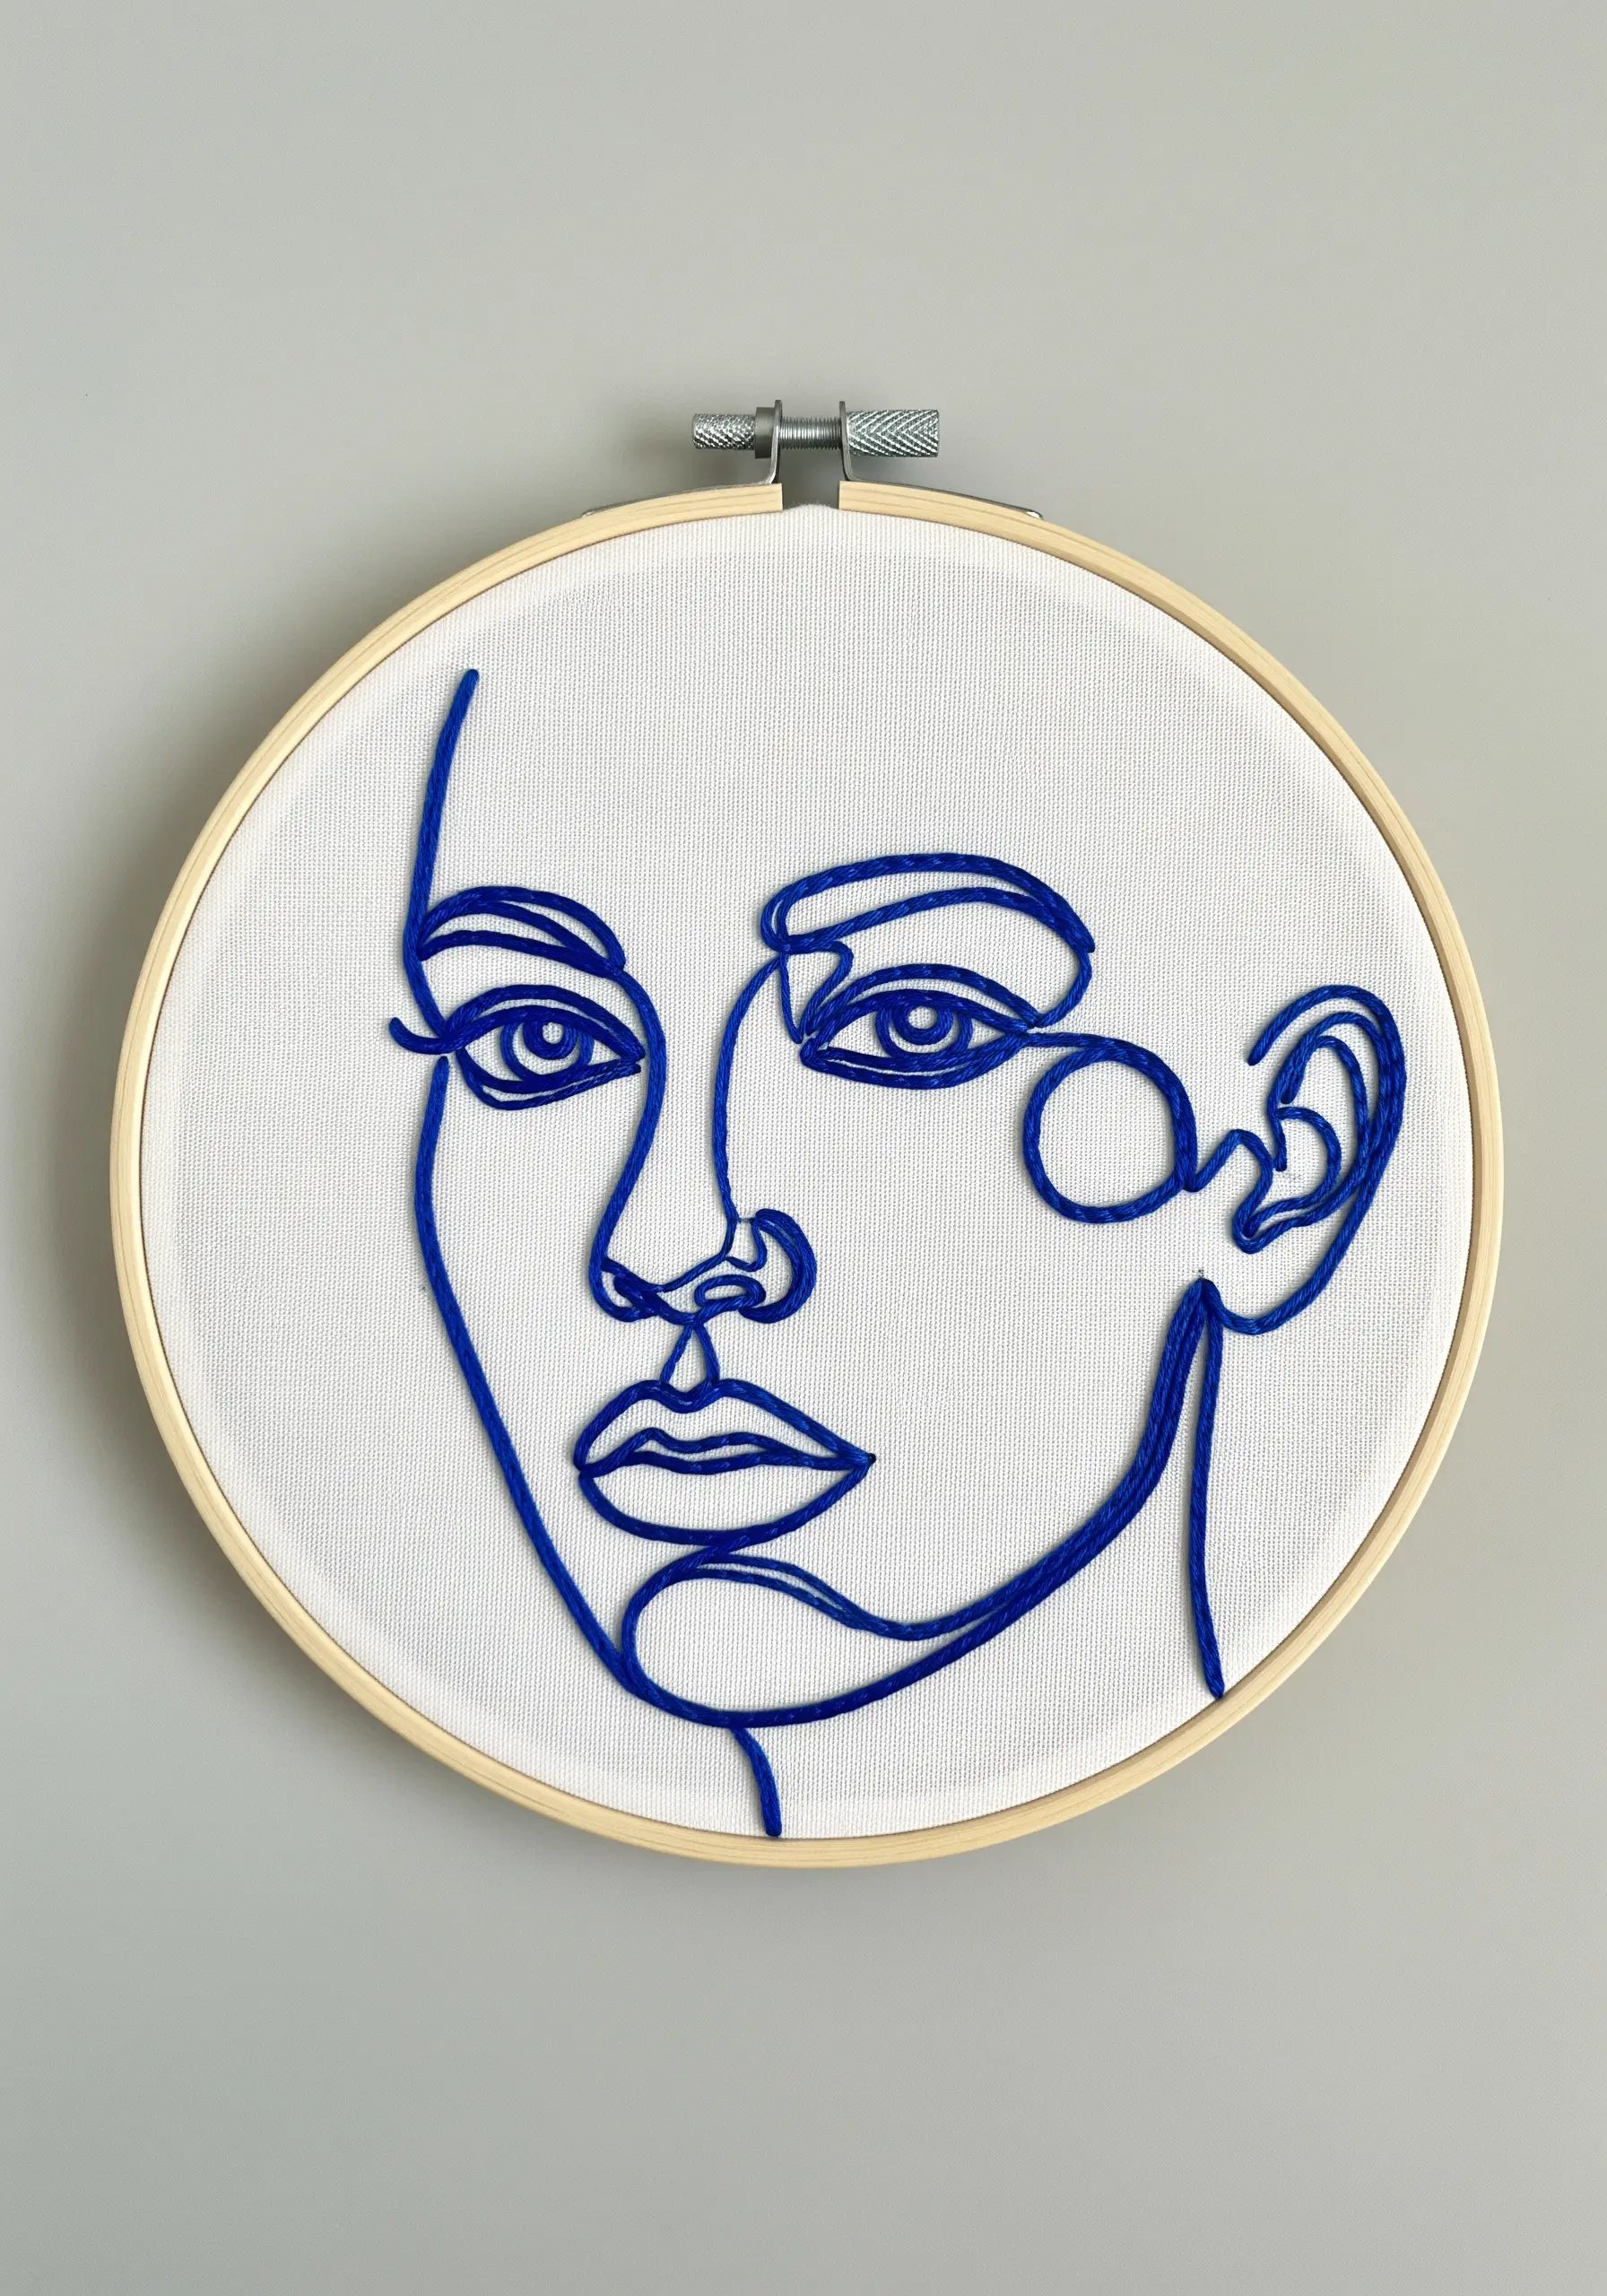
For continuous line art, the goal is a perfectly smooth, uninterrupted curve that mimics a single stroke of an ink pen.
Use a whipped backstitch or a stem stitch with 4-6 strands of floss to achieve a raised, consistent line without any visible breaks.
Alternatively, couching a thicker thread like pearl cotton allows you to lay down the perfect curve first and then tack it into place with a finer thread.
This approach transforms simple drawings into sophisticated single-line face profiles that feel both graphic and deeply expressive.
8. Fill Space with Intricate Wheels and Circles
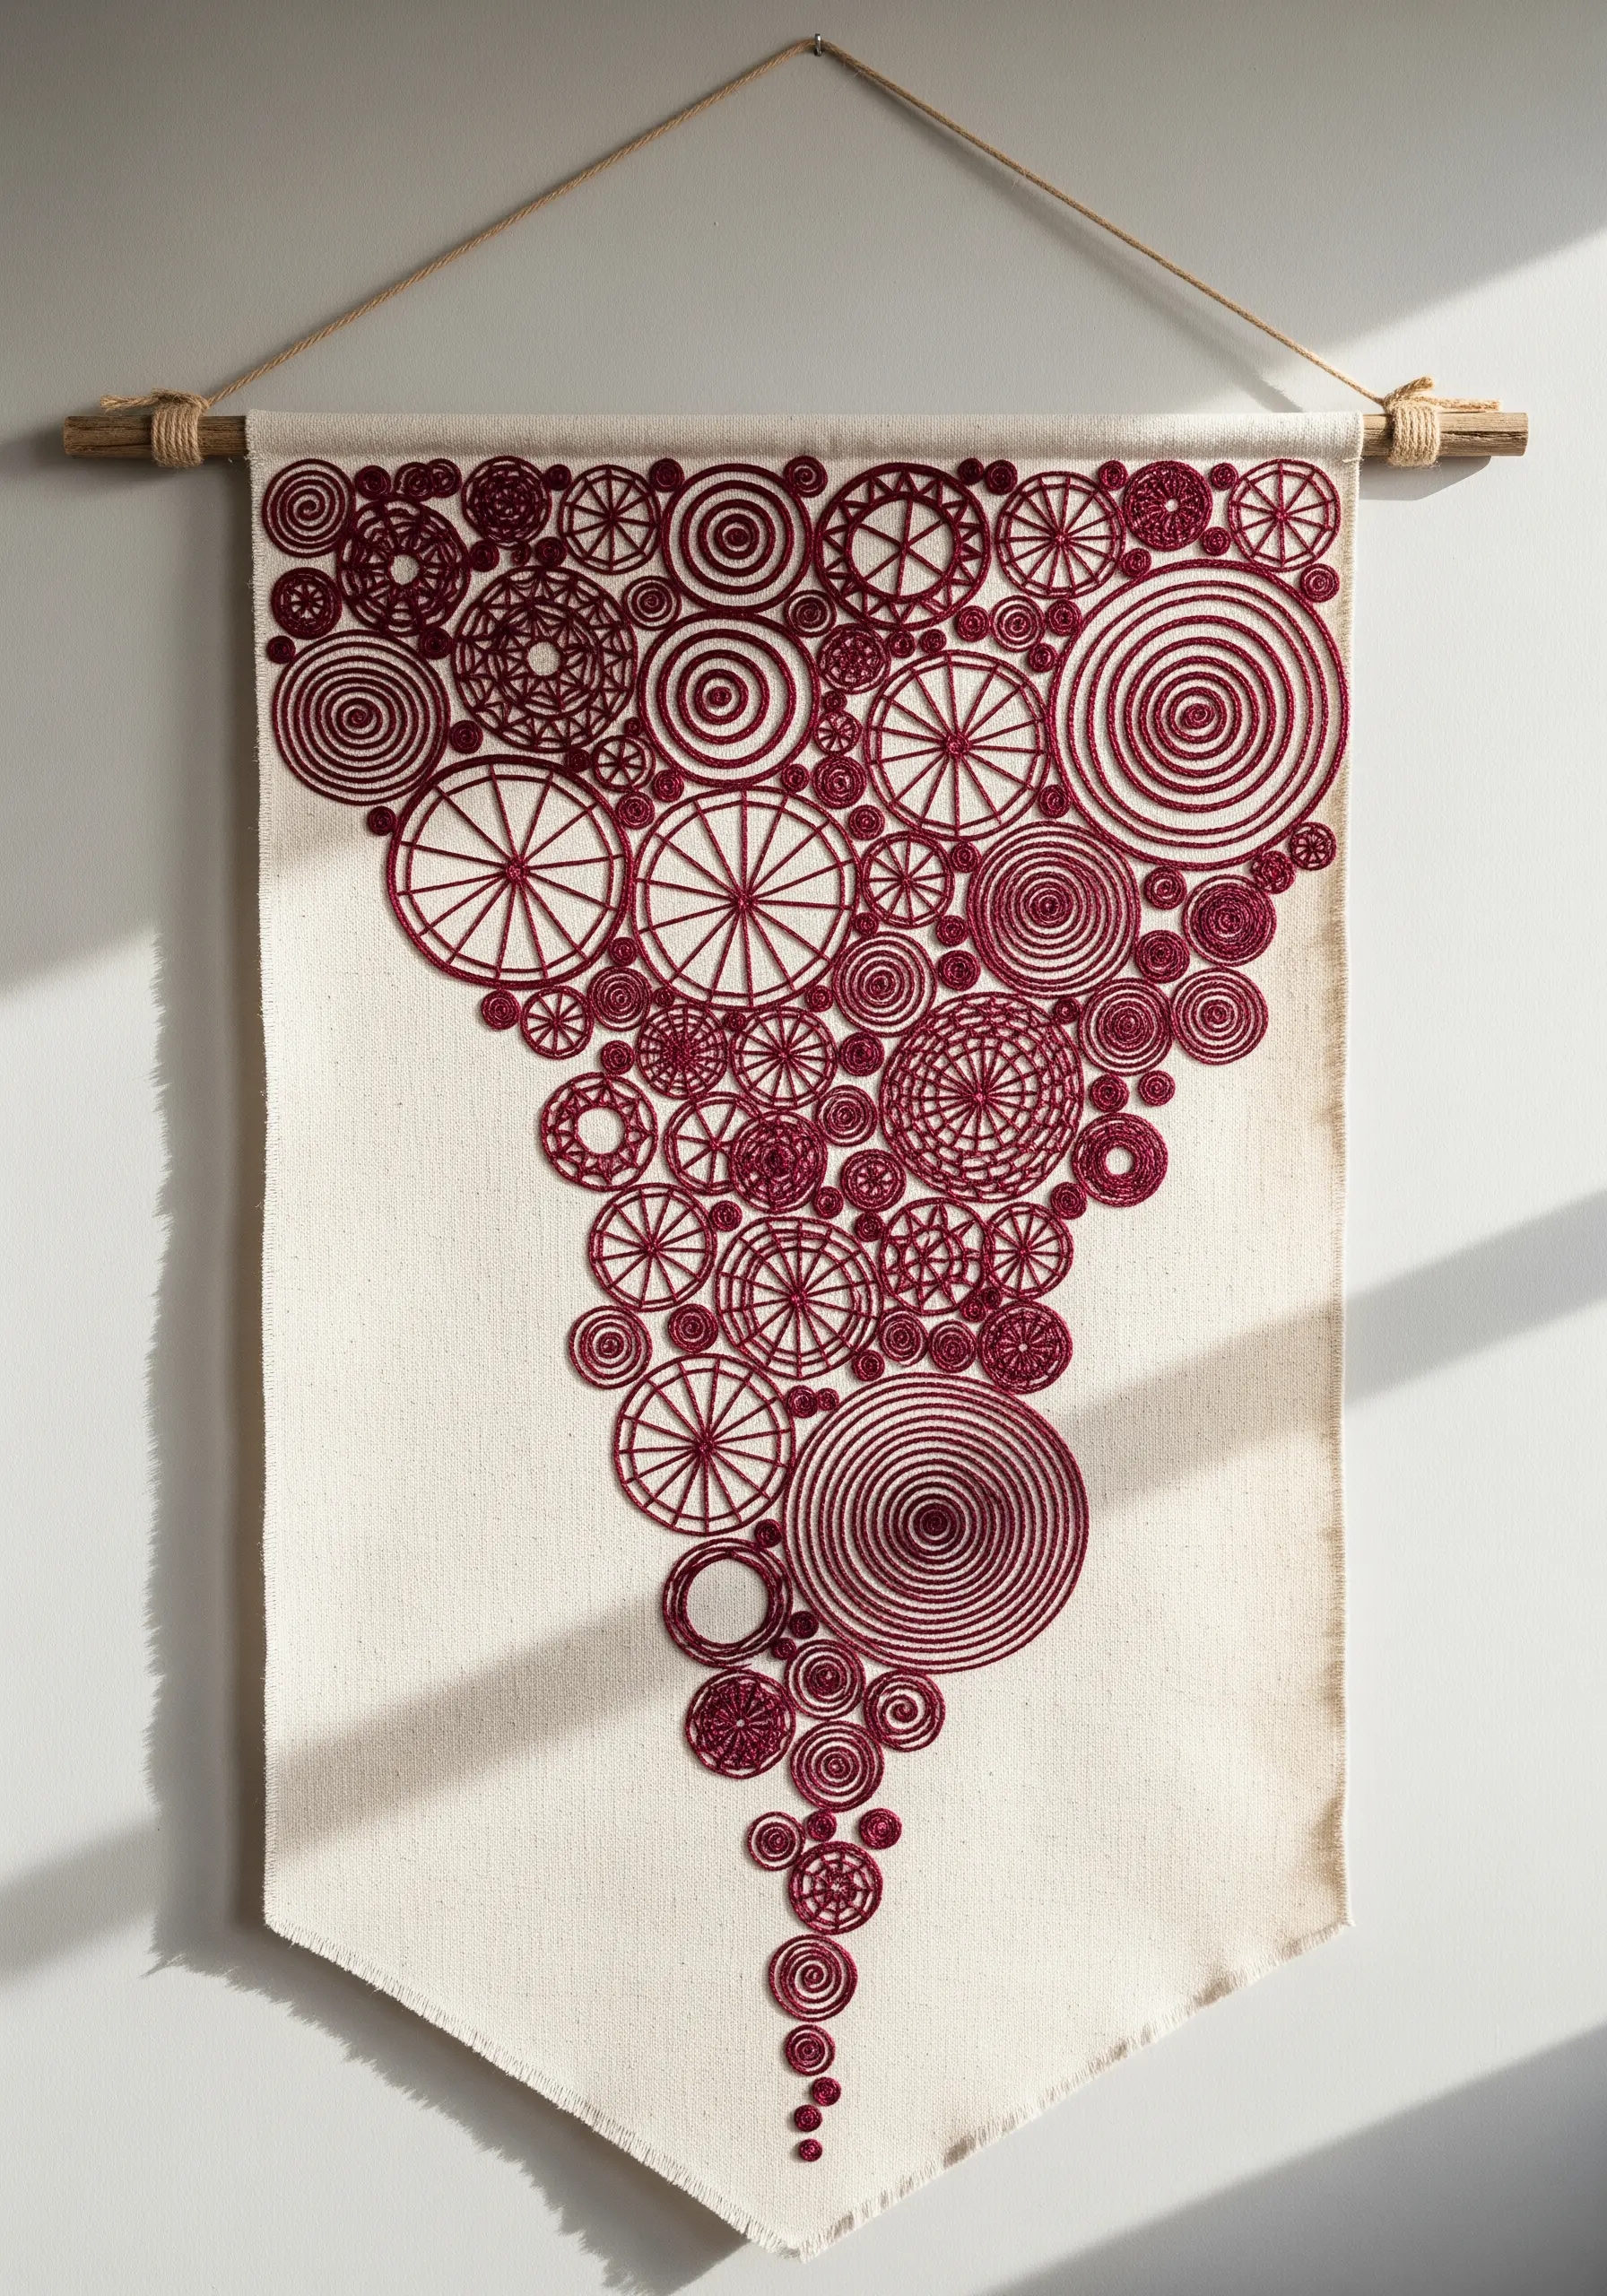
Create a dynamic, cascading composition by filling circular shapes with a variety of stitches.
Use woven spider wheels, radial satin stitches, or eyelet stitches to give each circle a unique internal pattern.
By varying the size and fill style of each circle, you can build a visually complex design that still feels cohesive due to the single color choice.
This technique is ideal for large-scale embroidered textile wall hangings, where the repetition of a simple shape creates a powerful visual rhythm.
9. Add Bold, Graphic Edges to Apparel
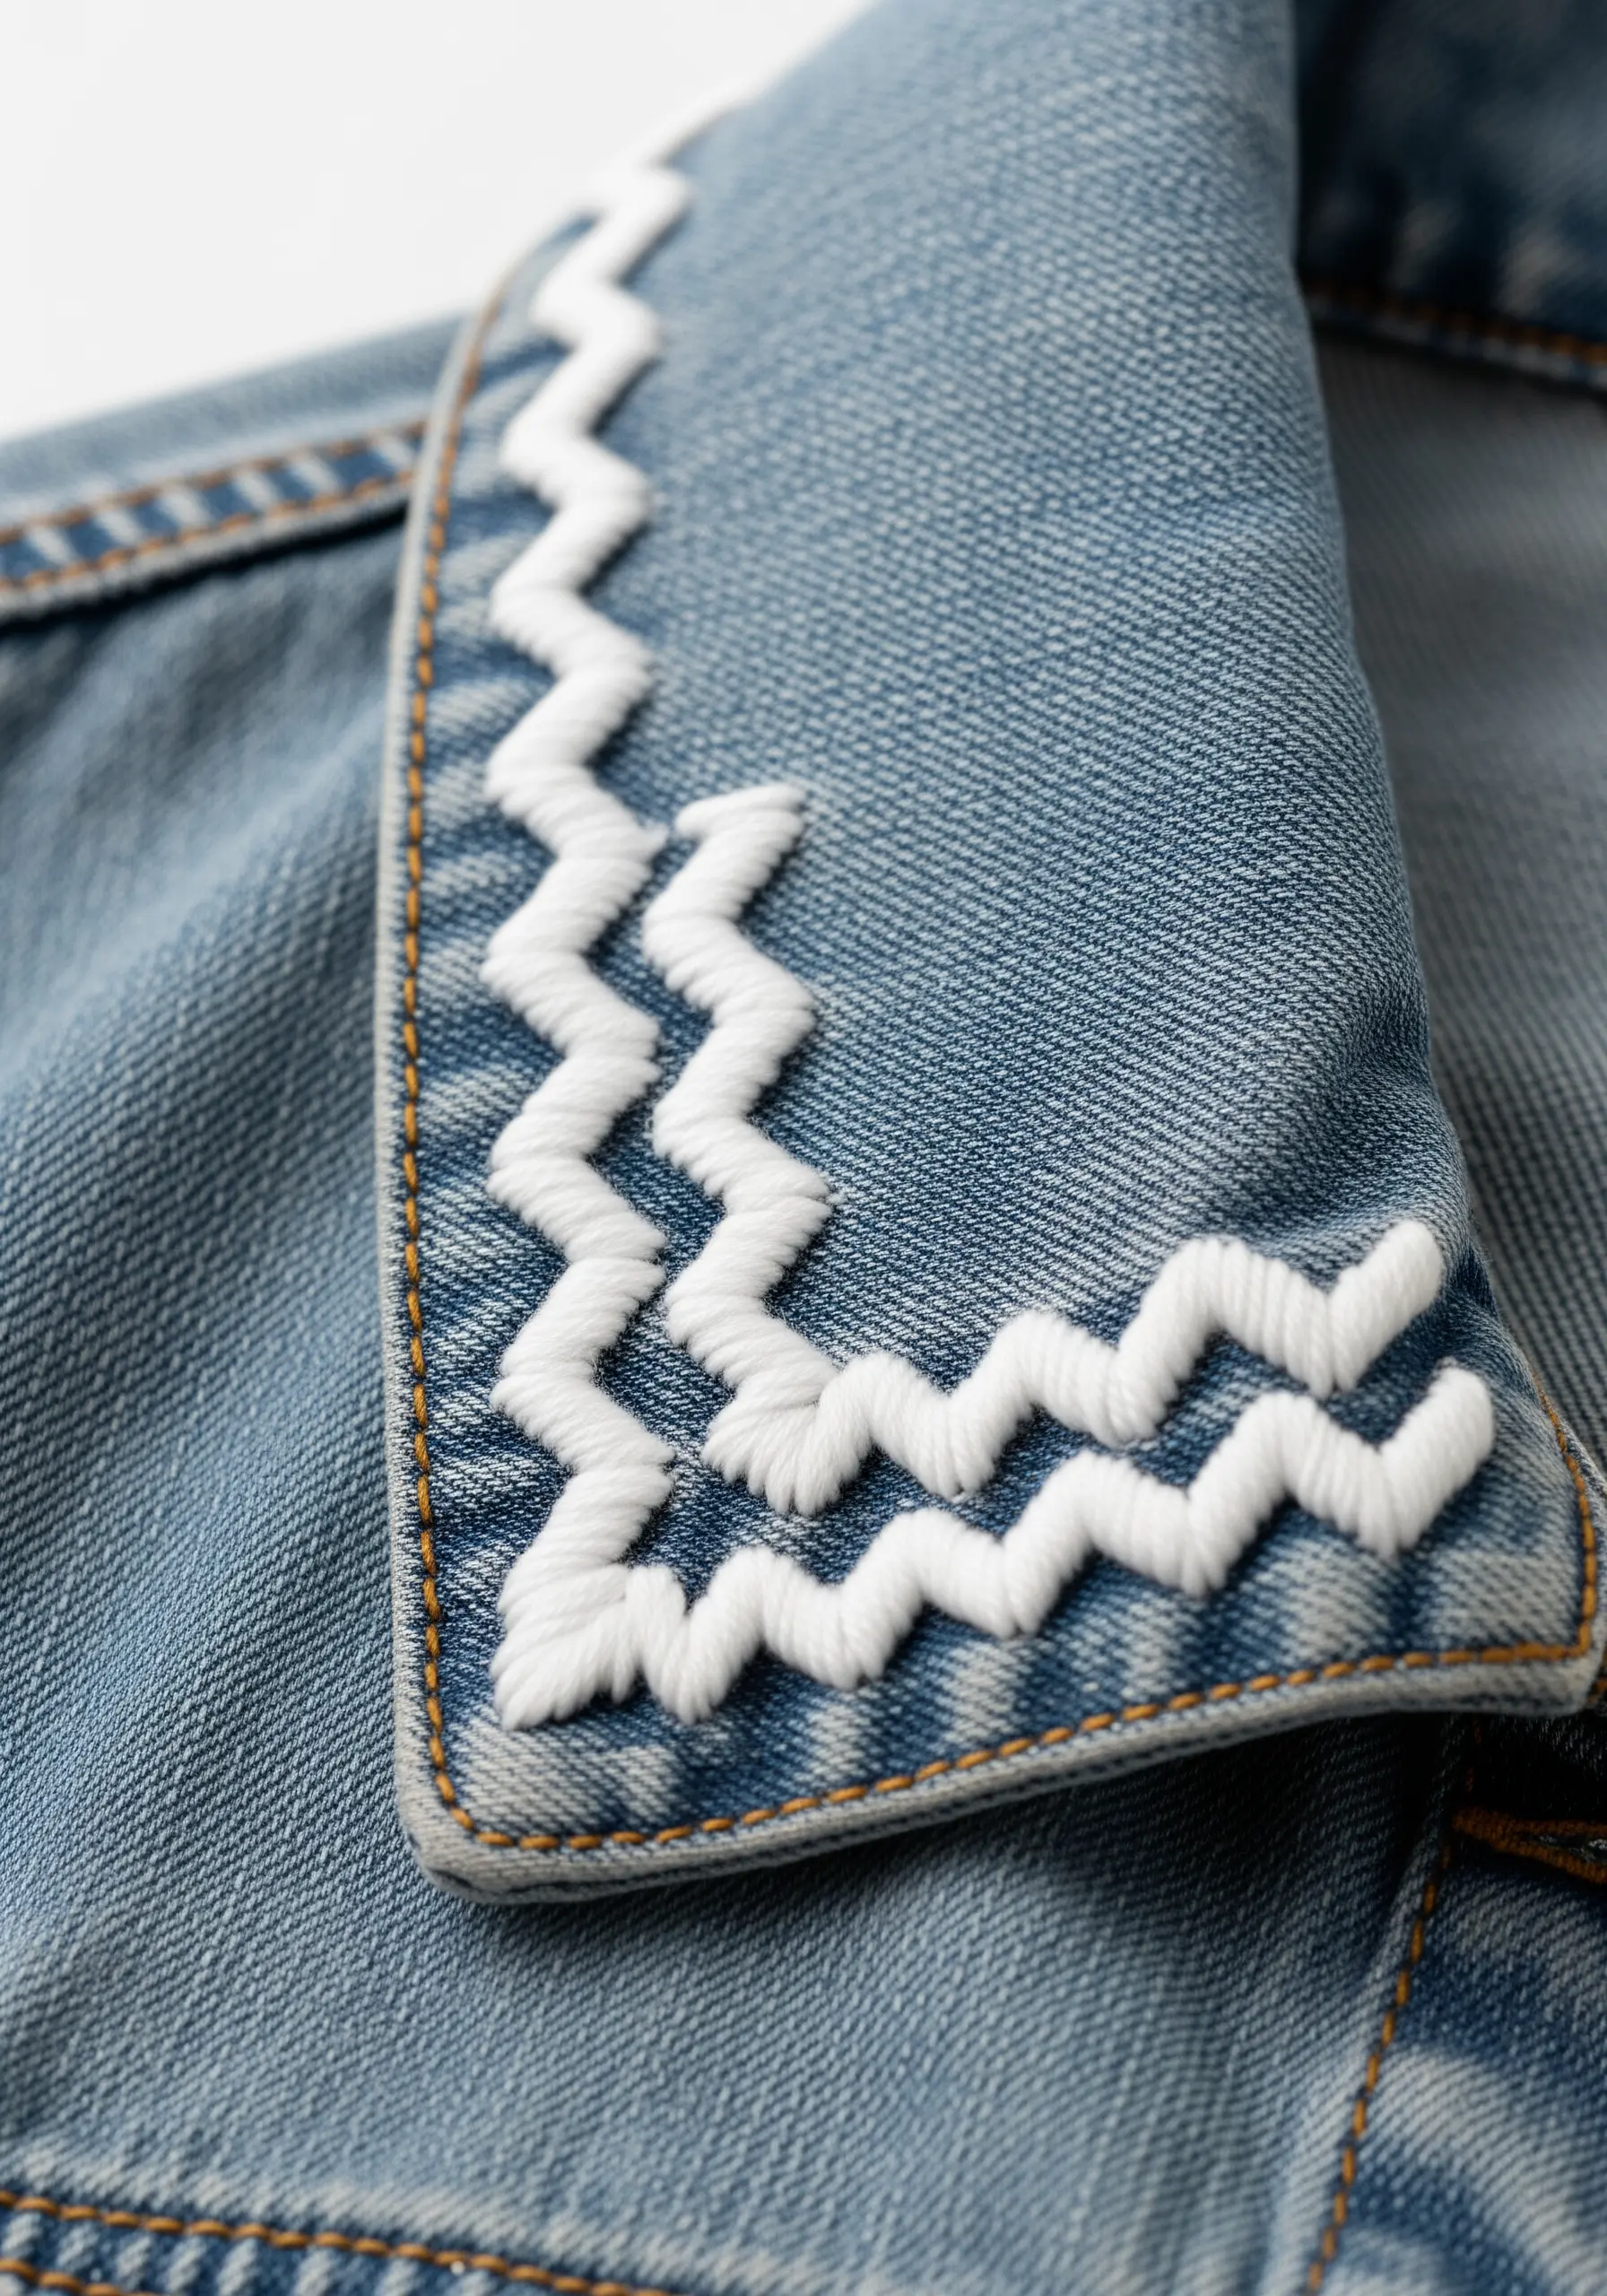
Elevate a plain denim collar with a bold, graphic border using a wide satin stitch or a Hungarian braided chain stitch.
Use all six strands of embroidery floss, or even pearl cotton, to create a chunky, raised texture that stands out against the sturdy fabric.
Mark your pattern clearly with a water-soluble pen to ensure your zigzags are sharp and evenly spaced.
This simple addition can transform ready-to-wear clothing, making these vintage-inspired denim jacket embroidery motifs feel custom and personal.
10. Create Subtle Movement with Variegated Thread
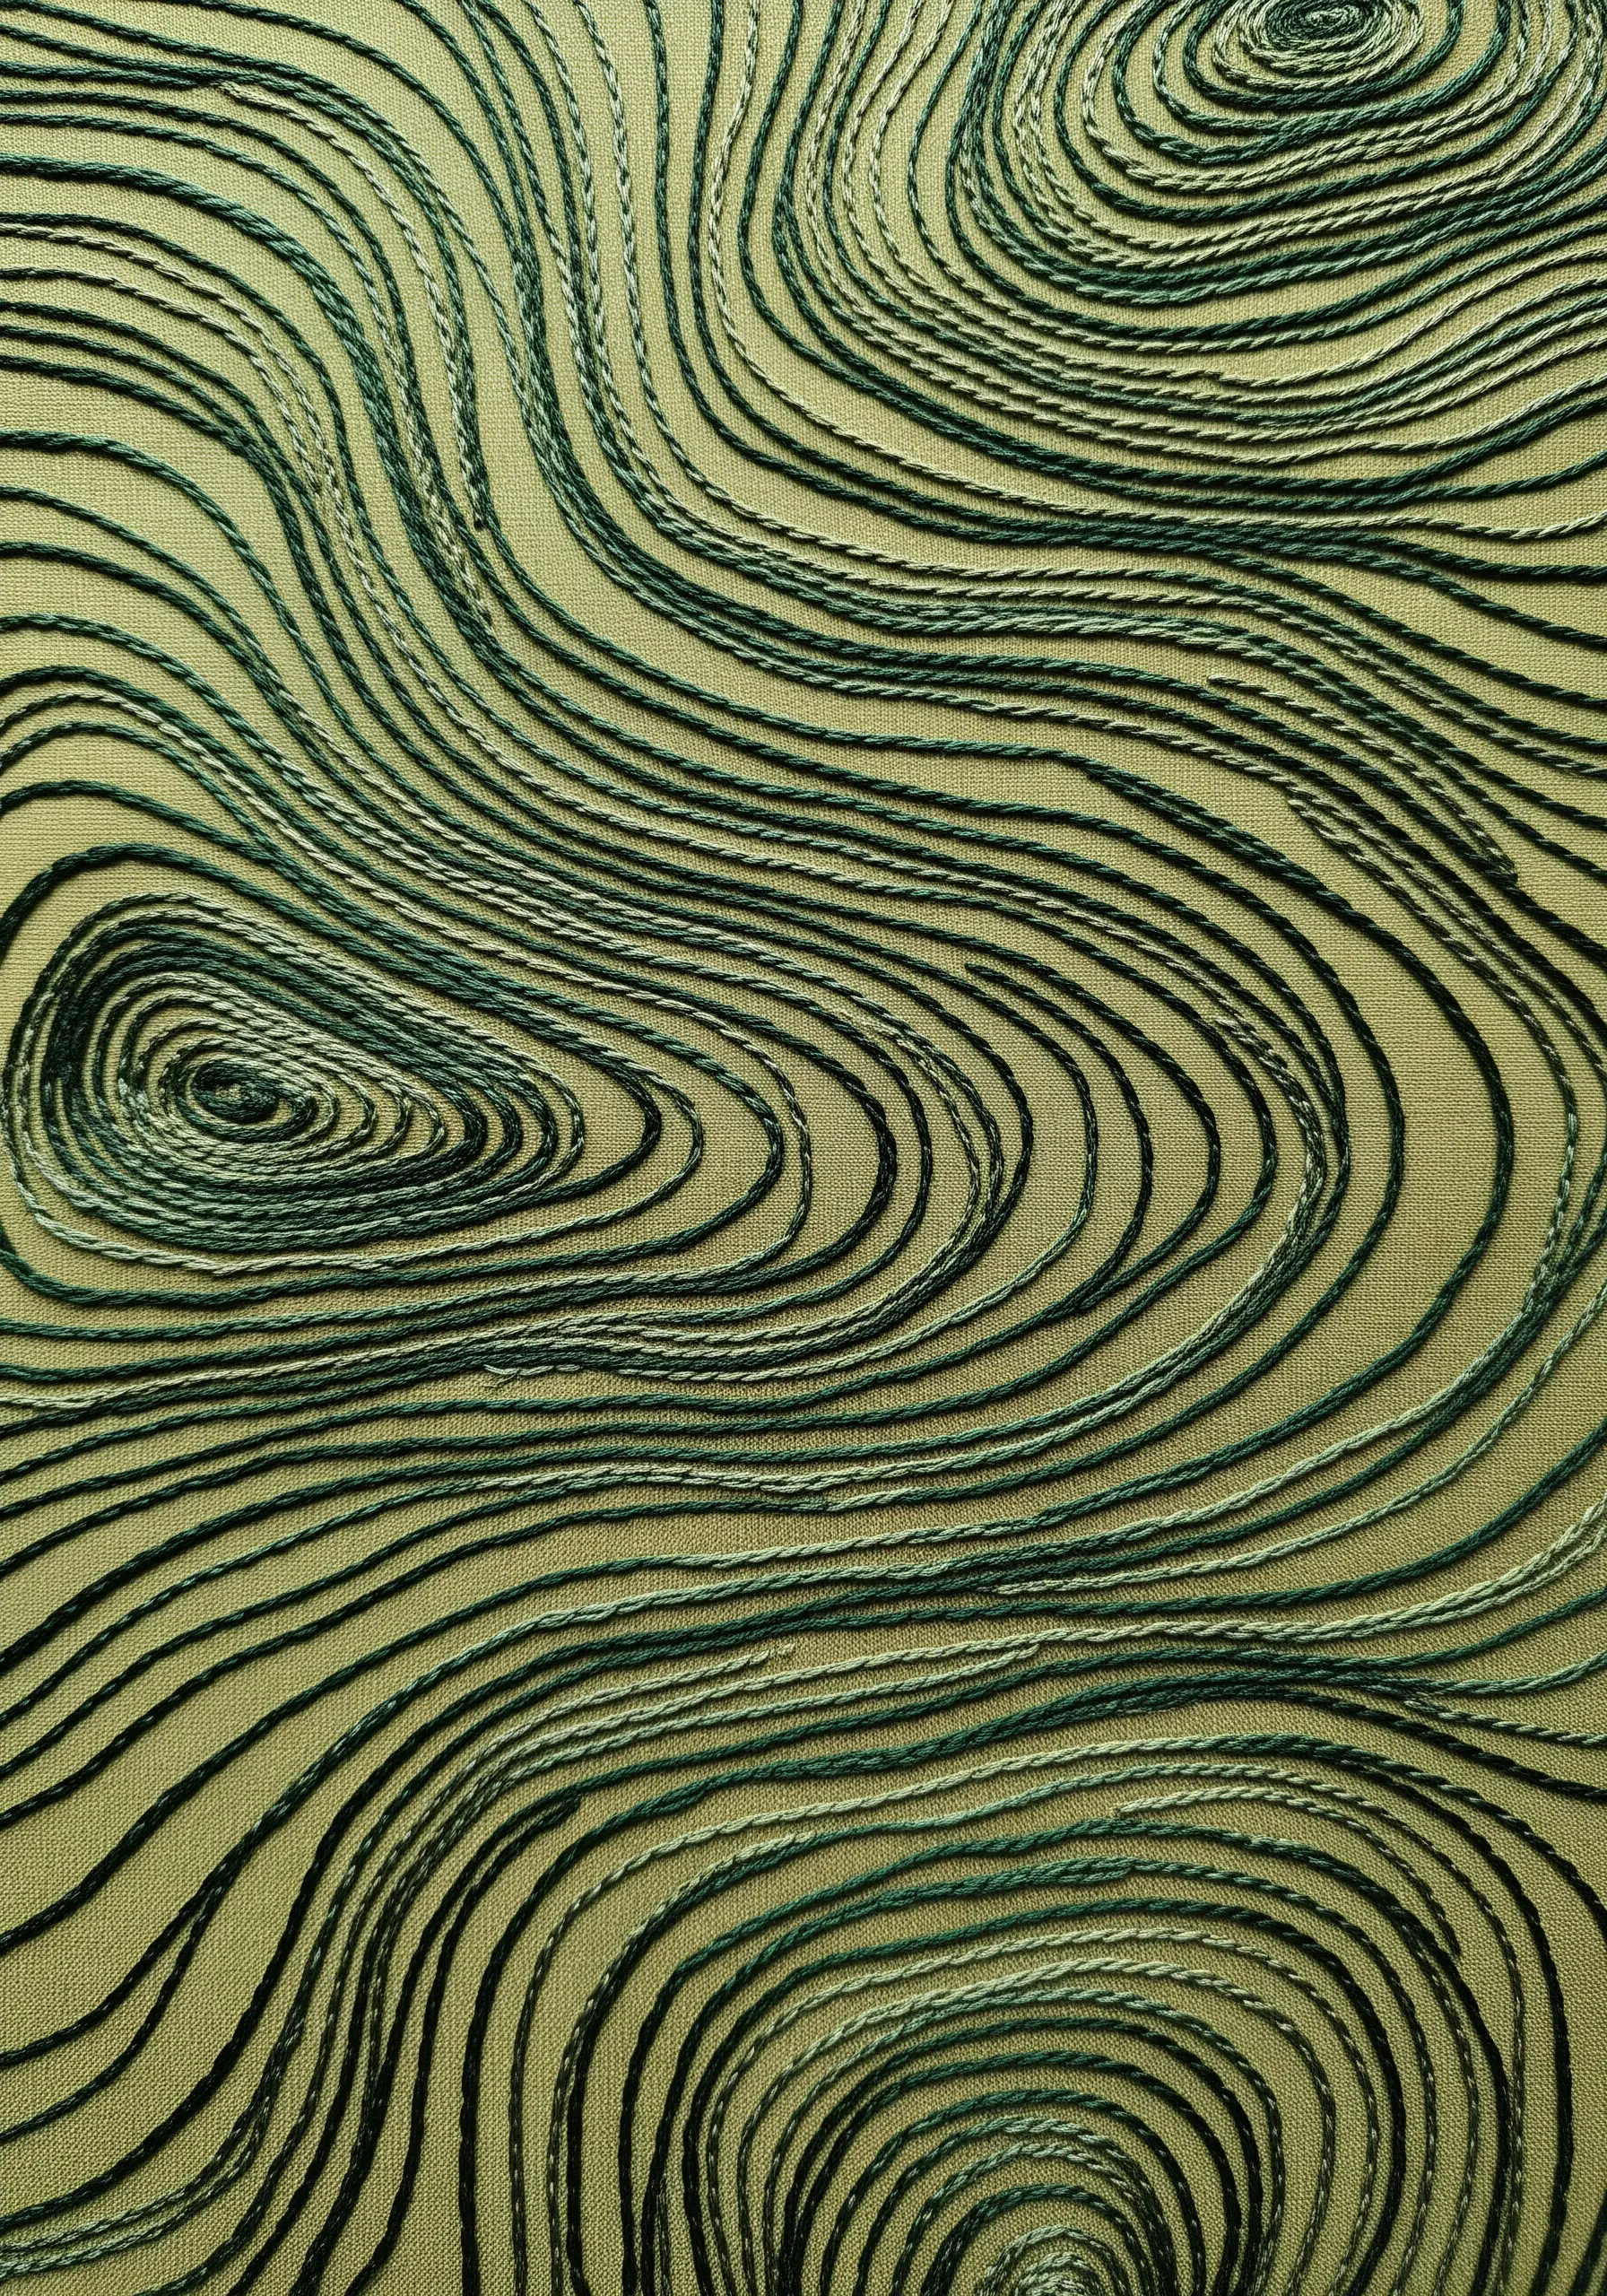
Instead of switching colors, use a single variegated thread to create organic, flowing lines with built-in color shifts.
Lay down long, curved lines using a simple backstitch or stem stitch, and let the thread’s natural color changes create depth and movement.
This is a simple way to add complexity to abstract thread embroidery ideas inspired by nature, mimicking topographic maps or wood grain.
The key is to not control the color changes but to embrace their random placement, which gives the final piece a natural, painterly quality.
11. Mimic Architectural Drawings with Fine Lines
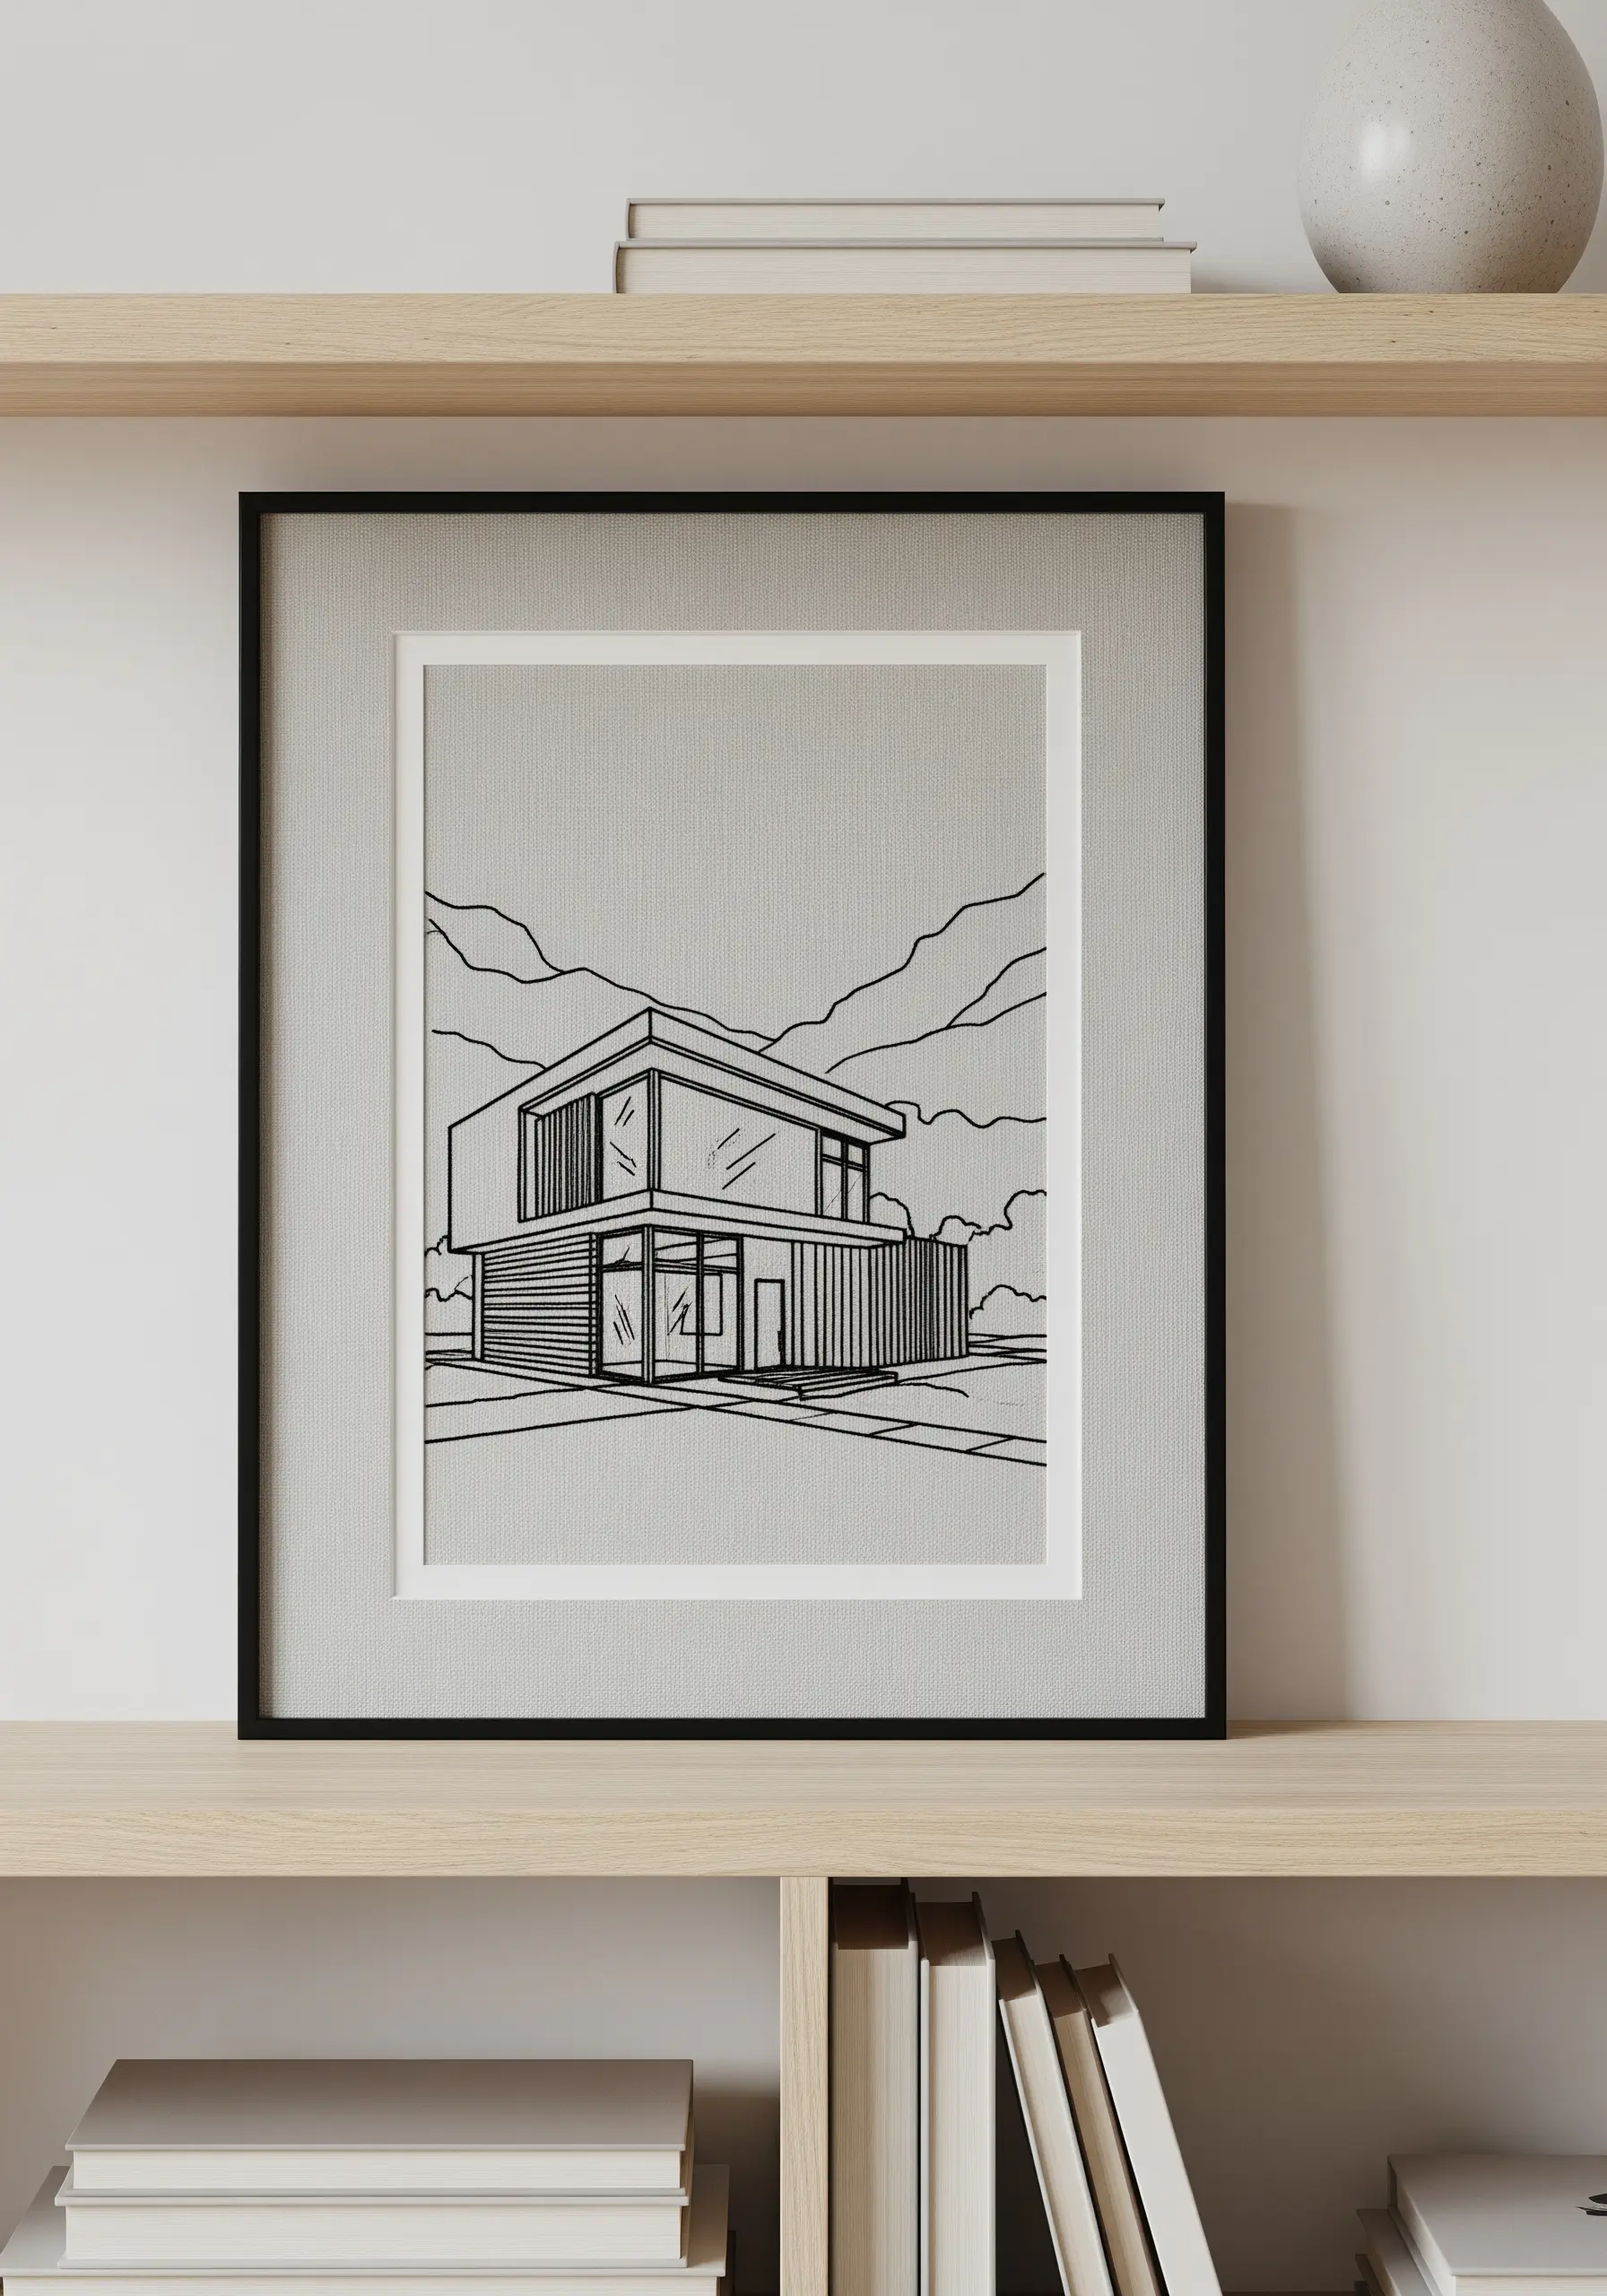
Capture the precision of an architectural sketch by using a minimal number of threads and a simple backstitch.
Work with just one or two strands of black floss on a light, even-weave fabric like linen or Aida cloth to achieve crisp, clean lines.
Focus on maintaining consistent stitch length to ensure your lines look uniform and deliberate, just like an ink drawing.
This technique is perfect for creating sophisticated, DIY framed embroidery art projects that look expensive but are based on the simplest of stitches.
12. Divide Your Hoop with Texture and Space
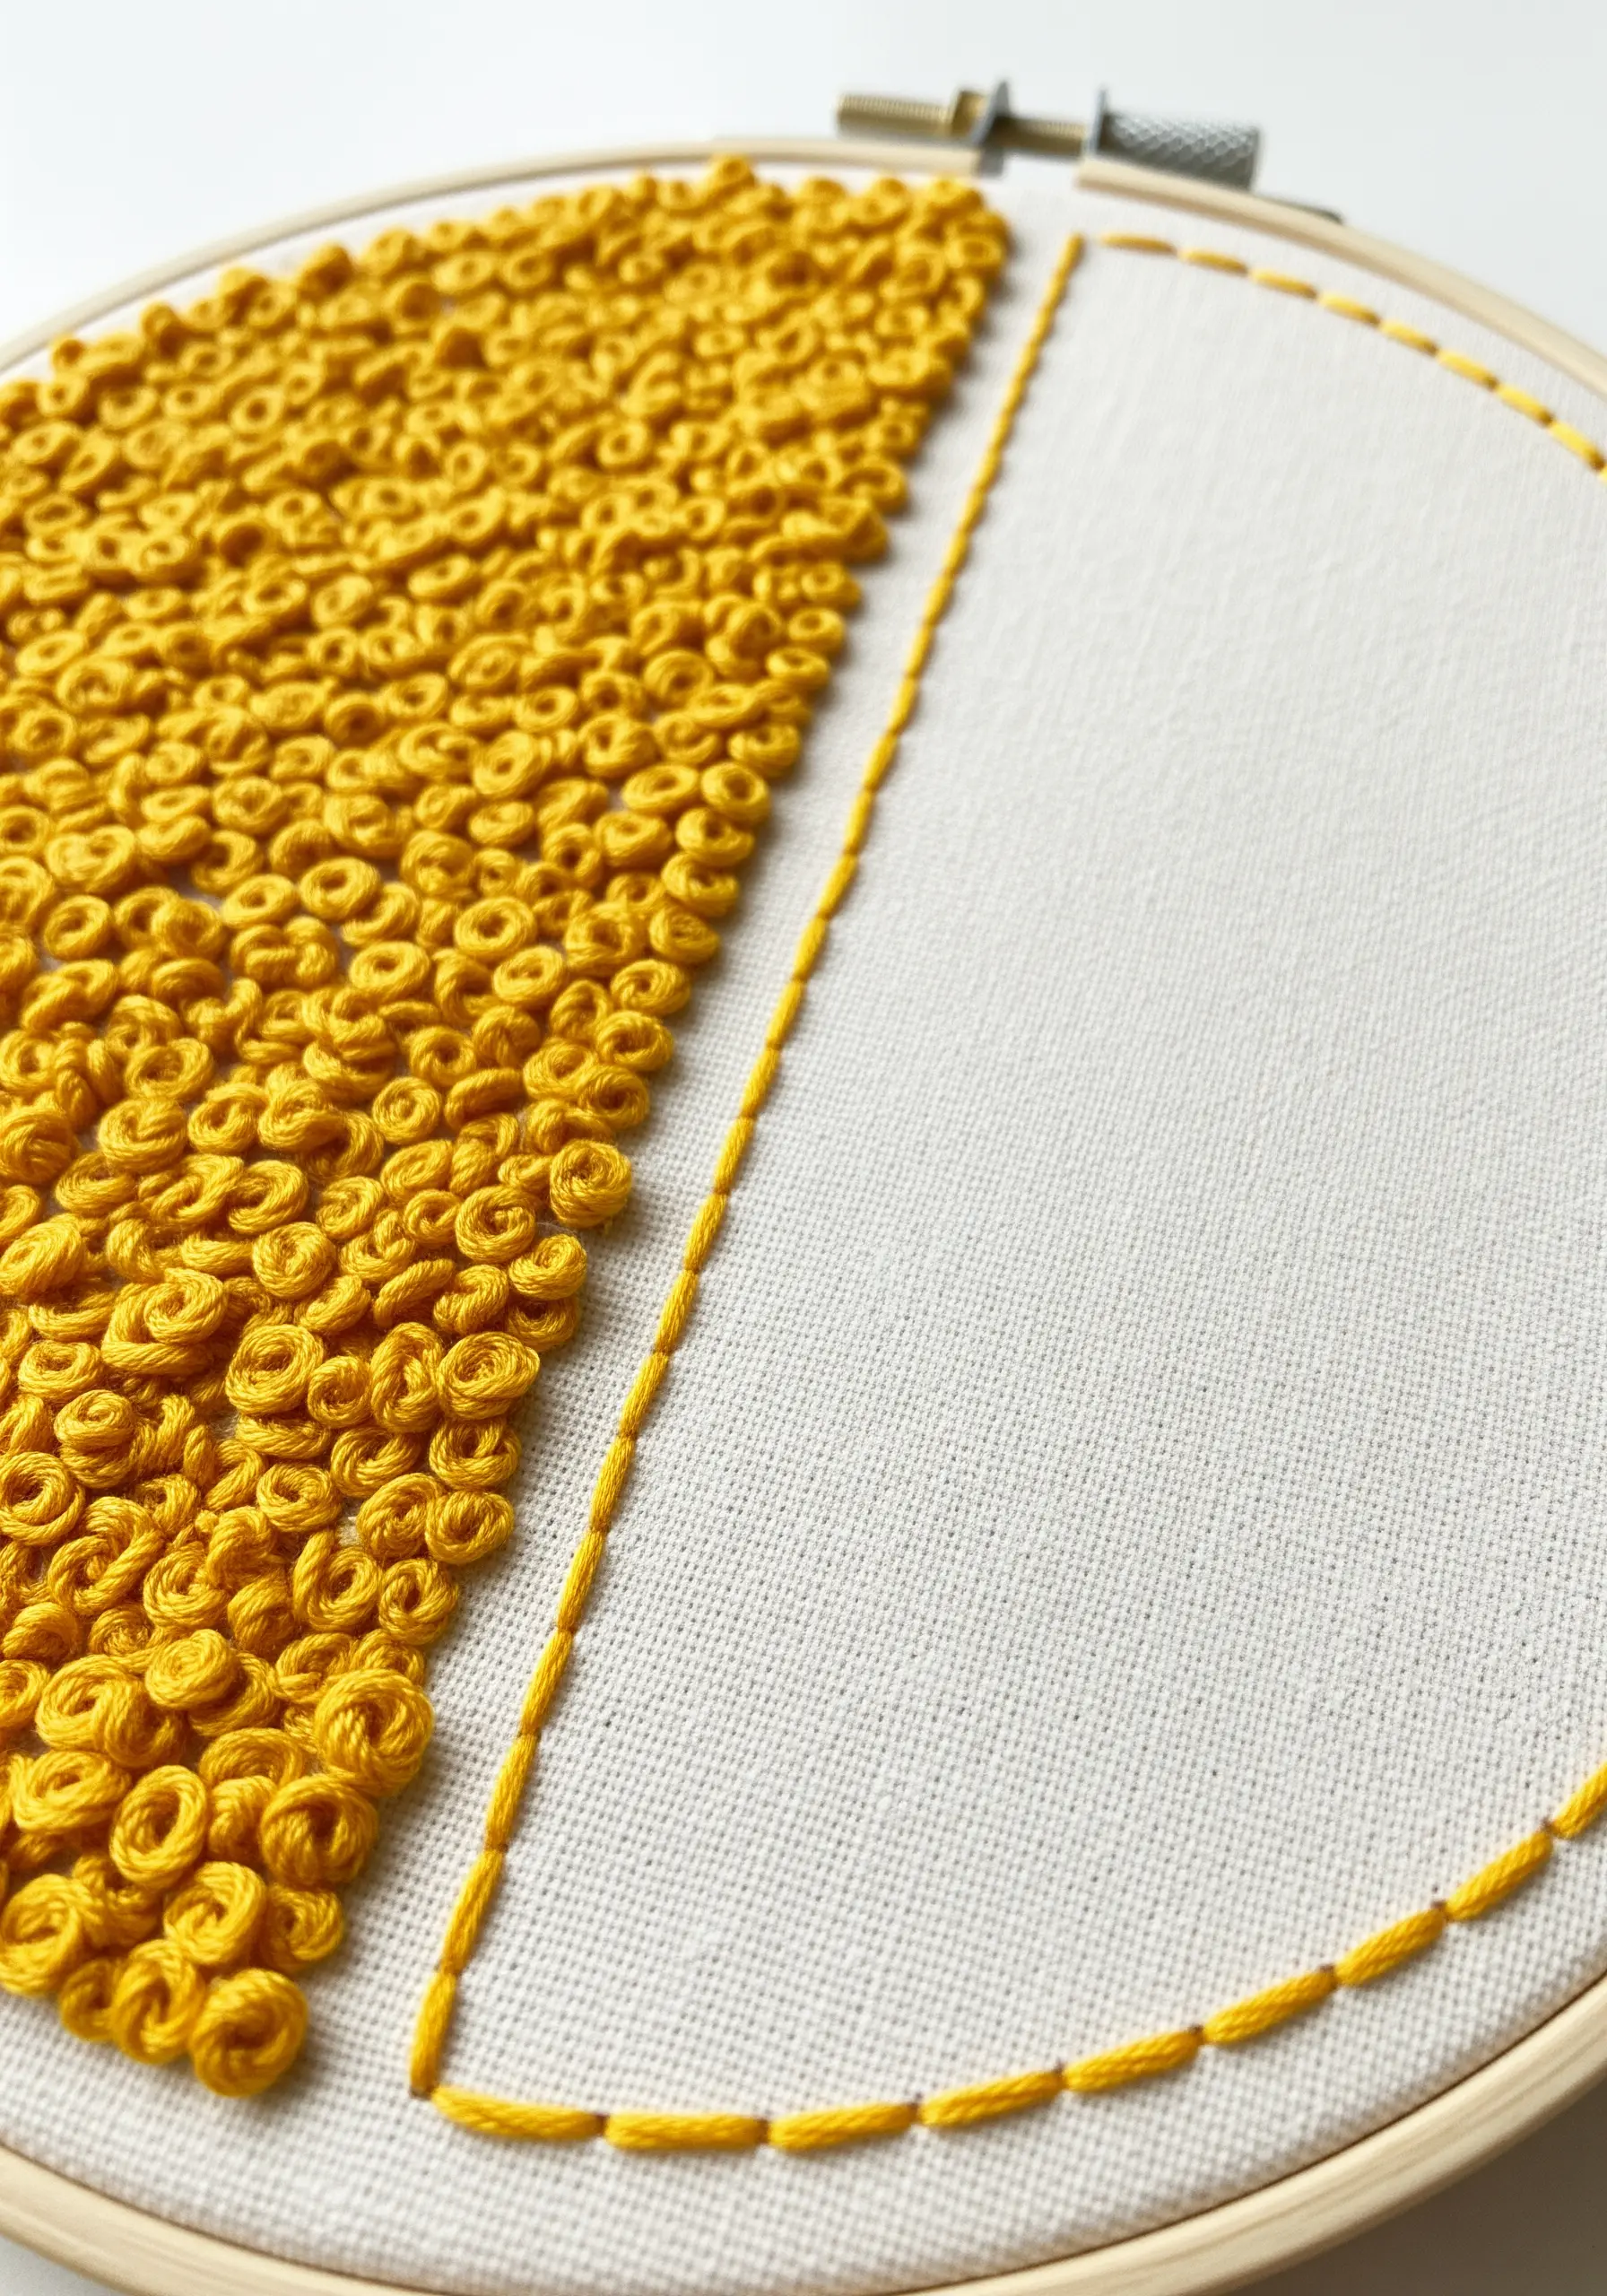
Create a powerful composition by filling one half of your design with dense texture while leaving the other half almost empty.
Use a single stitch, like the French knot or colonial knot, packed tightly to create a tactile, visually heavy area.
Contrast this with a simple backstitched outline on the other side, using the negative space of the fabric as a key design element.
This play on density transforms simple natural texture embroidery patterns into compelling abstract art.
13. Convey Motion with Strategic Running Stitches

Use the simple running stitch, characteristic of Japanese Sashiko, to create the illusion of movement and flow.
Vary the length and spacing of your stitches: longer, sparser stitches can represent flowing water, while dense, shorter stitches can form the foam of a crashing wave.
Outline the main shapes with a heavier, solid stitch like a stem stitch to contain the energy of the running stitches.
This shows how even the most basic minimal embroidery patterns that look harder than they are can create incredibly dynamic scenes.
14. Build Up Texture to Represent Light and Shadow

Illustrate the phases of the moon by varying your stitch density, from sparse to completely filled.
Use a dense collection of seed stitches or French knots to create the heavily cratered, bright surface of the full moon.
For the crescent moons, use fewer stitches, letting the dark fabric show through to represent shadow.
This is a brilliant technique for creating gradients and texture in stunning embroidered wall hangings without changing your thread color.
15. Direct Your Stitches for Dynamic Fills
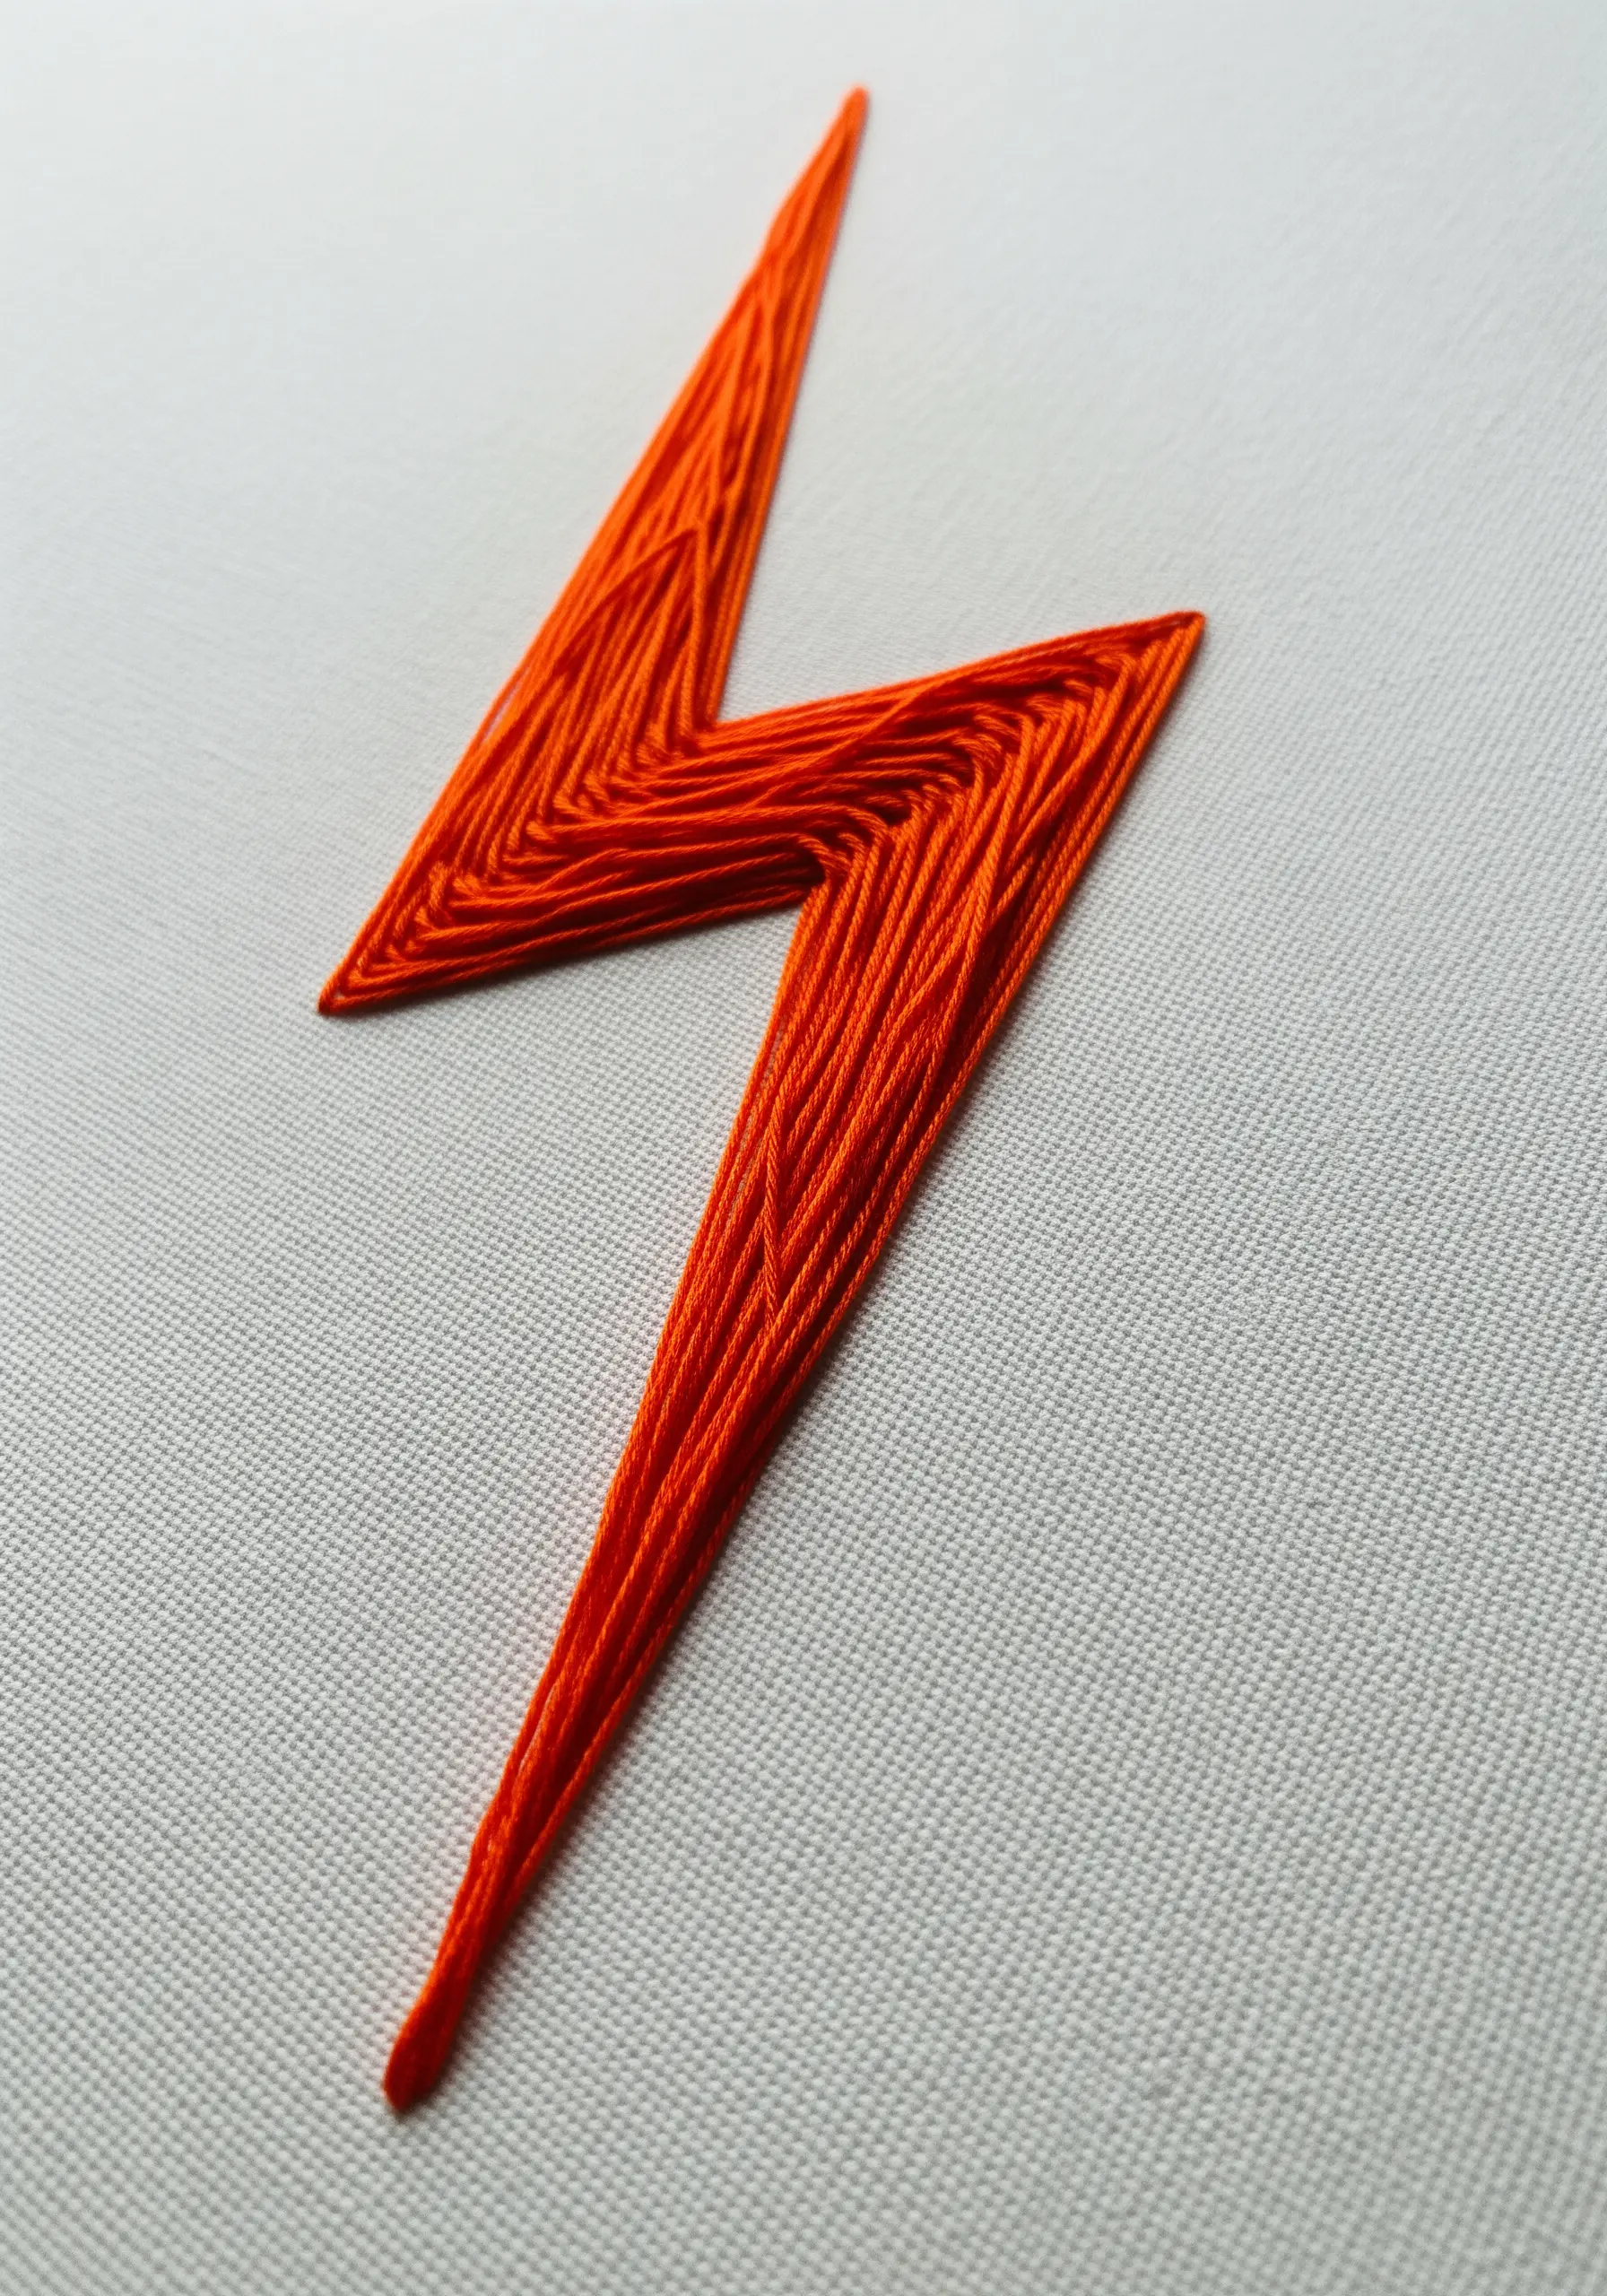
Instead of a standard parallel satin stitch, fill a shape by changing the direction of your stitches to create movement and energy.
For a shape like a lightning bolt, angle your stitches to follow the form’s sharp turns, making the object feel dynamic rather than static.
This directional filling technique adds a layer of complexity and visual interest, turning a simple fill into a narrative element.
It works especially well for abstract concept art embroidery ideas where you want to convey a feeling like speed or power.
16. Explore a Visual Dictionary of Stitches

Dedicate a hoop to creating a sampler with a single color to see how different stitches manipulate thread and create texture.
Combine linear stitches (running stitch), knotted stitches (French knots), woven stitches (weaving bars), and looped stitches (chain stitch) in a simple grid.
This is more than practice; it’s a way to build your visual library and understand how each stitch interacts with light and shadow.
Use your finished piece as a reference, just like nature-themed embroidery samplers, to inform future design choices.
17. Combine Fill and Outline for Detailed Motifs
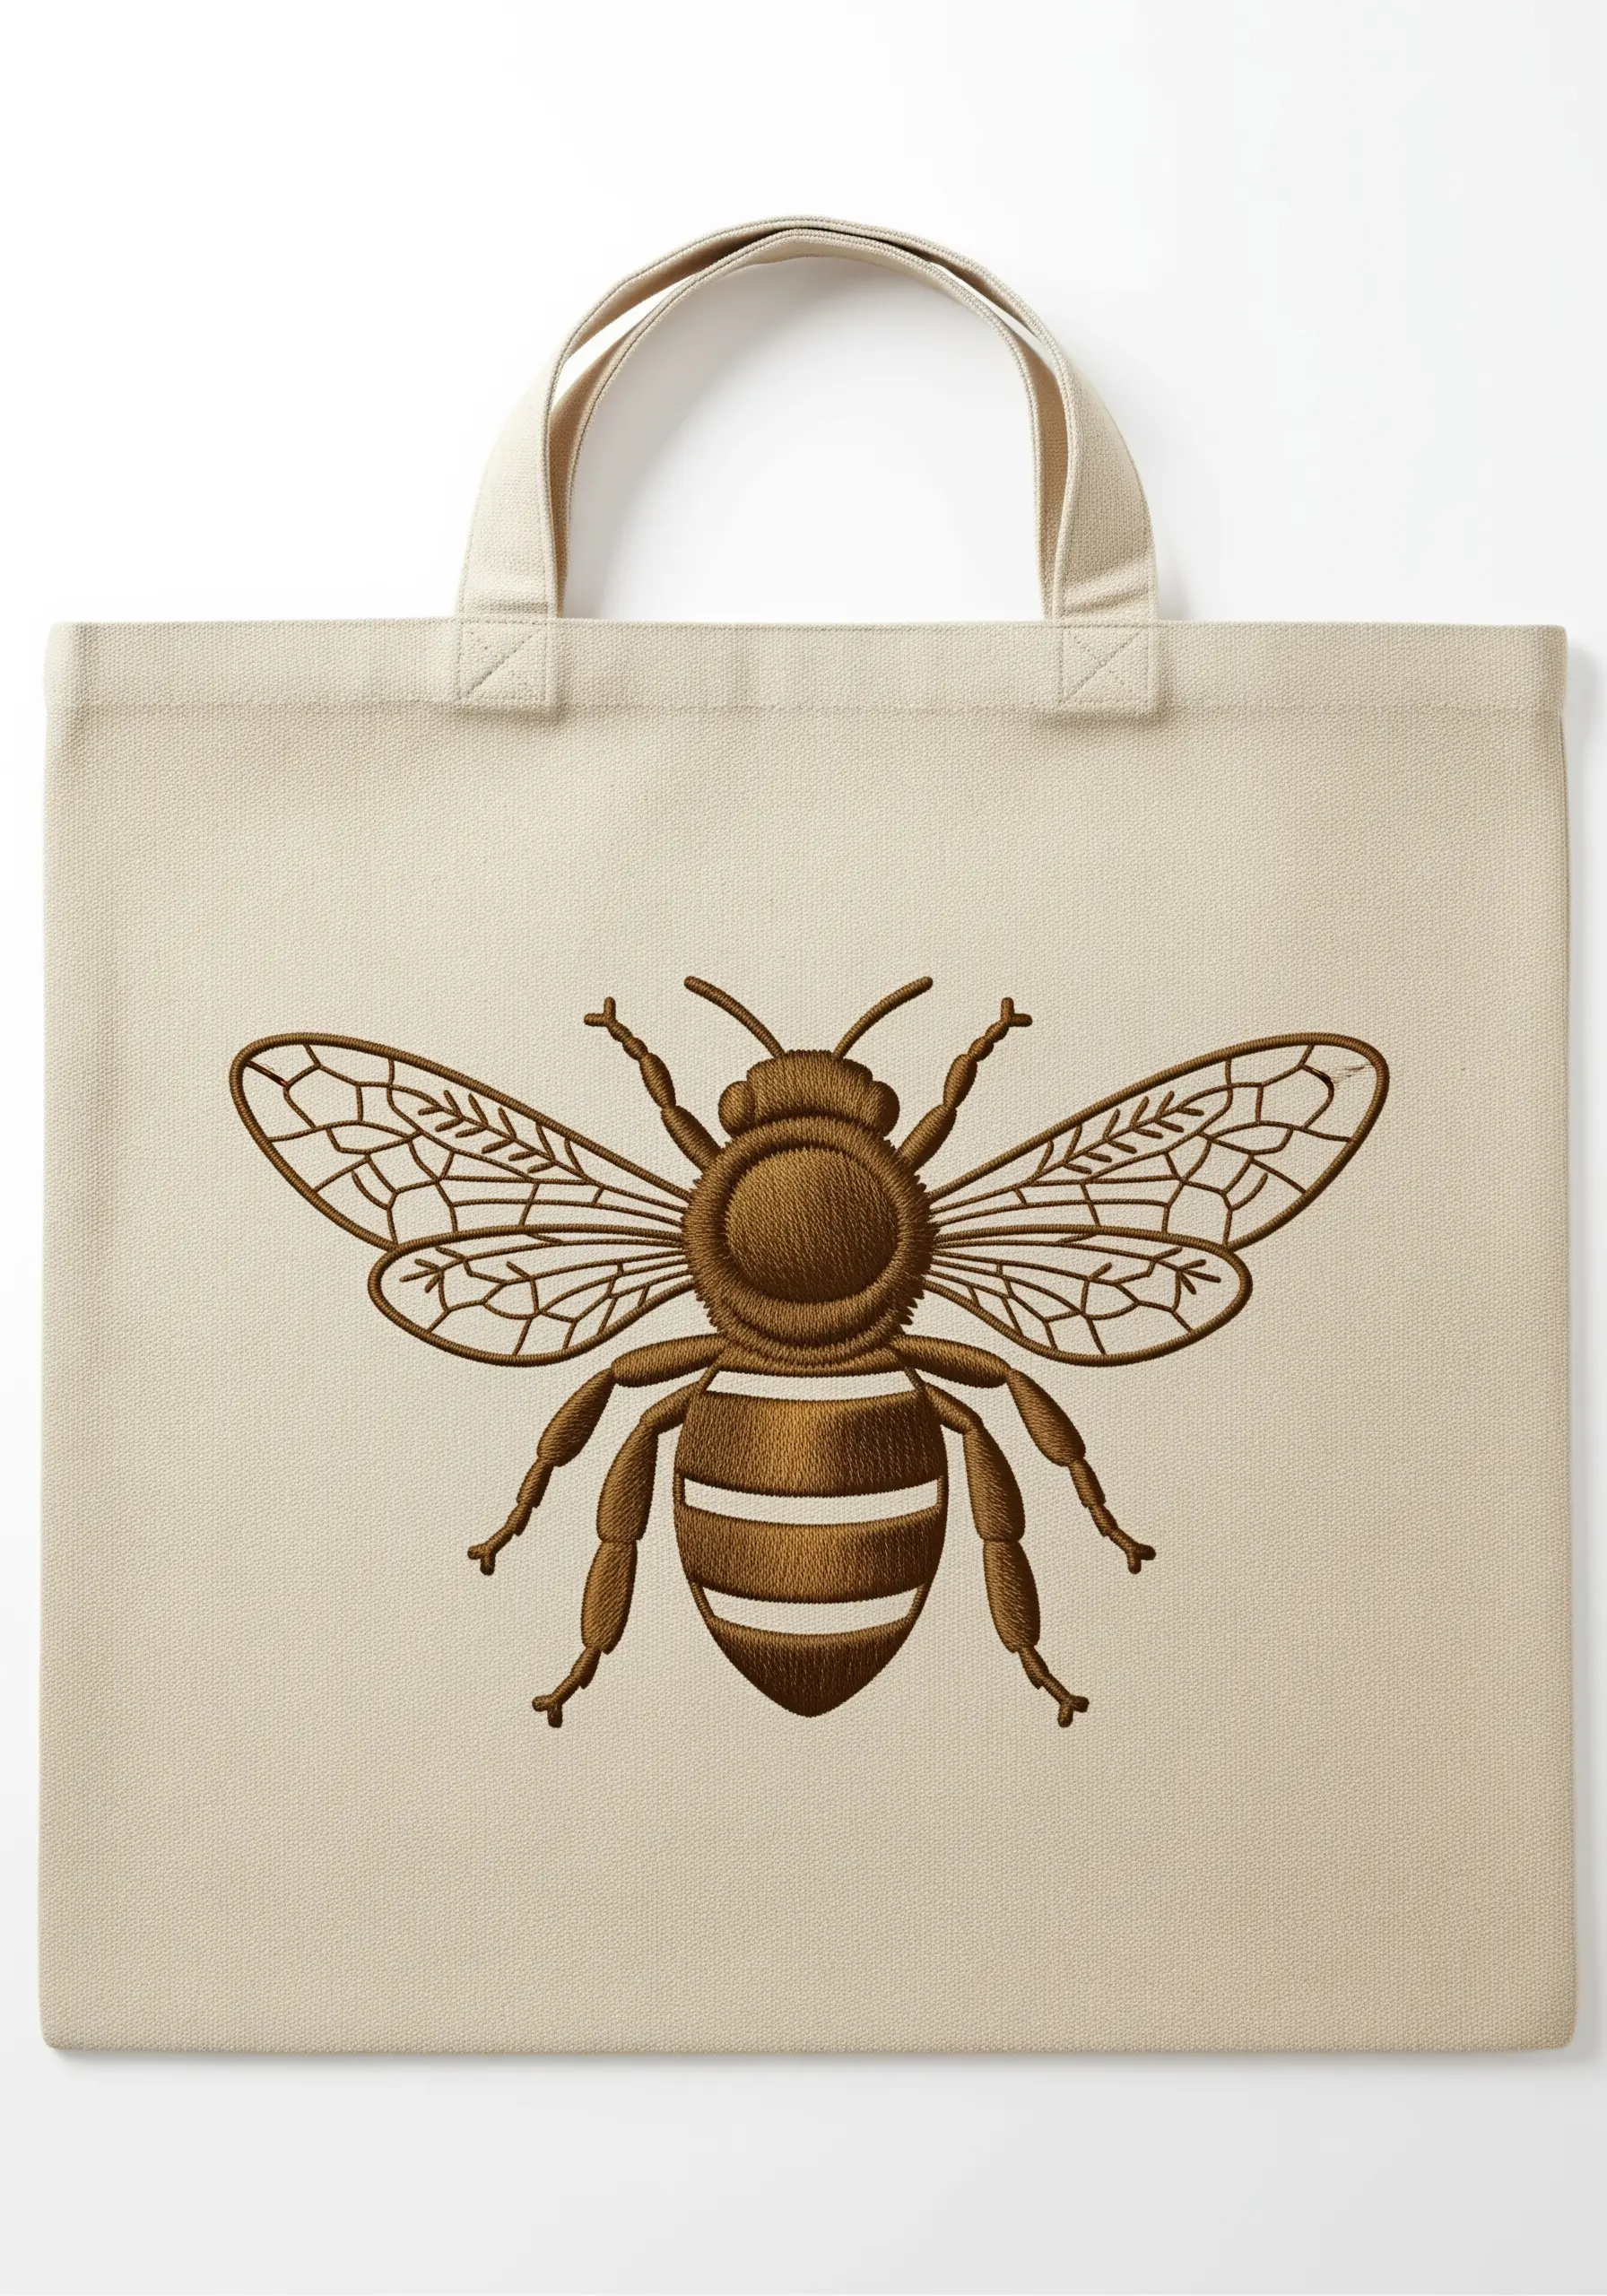
For realistic depictions of insects or animals, use a combination of satin stitch for solid body parts and a fine backstitch for delicate details.
Fill the body with a smooth, dense satin stitch to give it weight and form.
Then, use a single strand of the same color for the wings and legs, creating a texture that feels lighter and more translucent.
This technique is perfect for elevating botanical stitch ideas to turn plain tote bags into detailed, nature-inspired art.
18. Define Geometry with a Whipped Backstitch
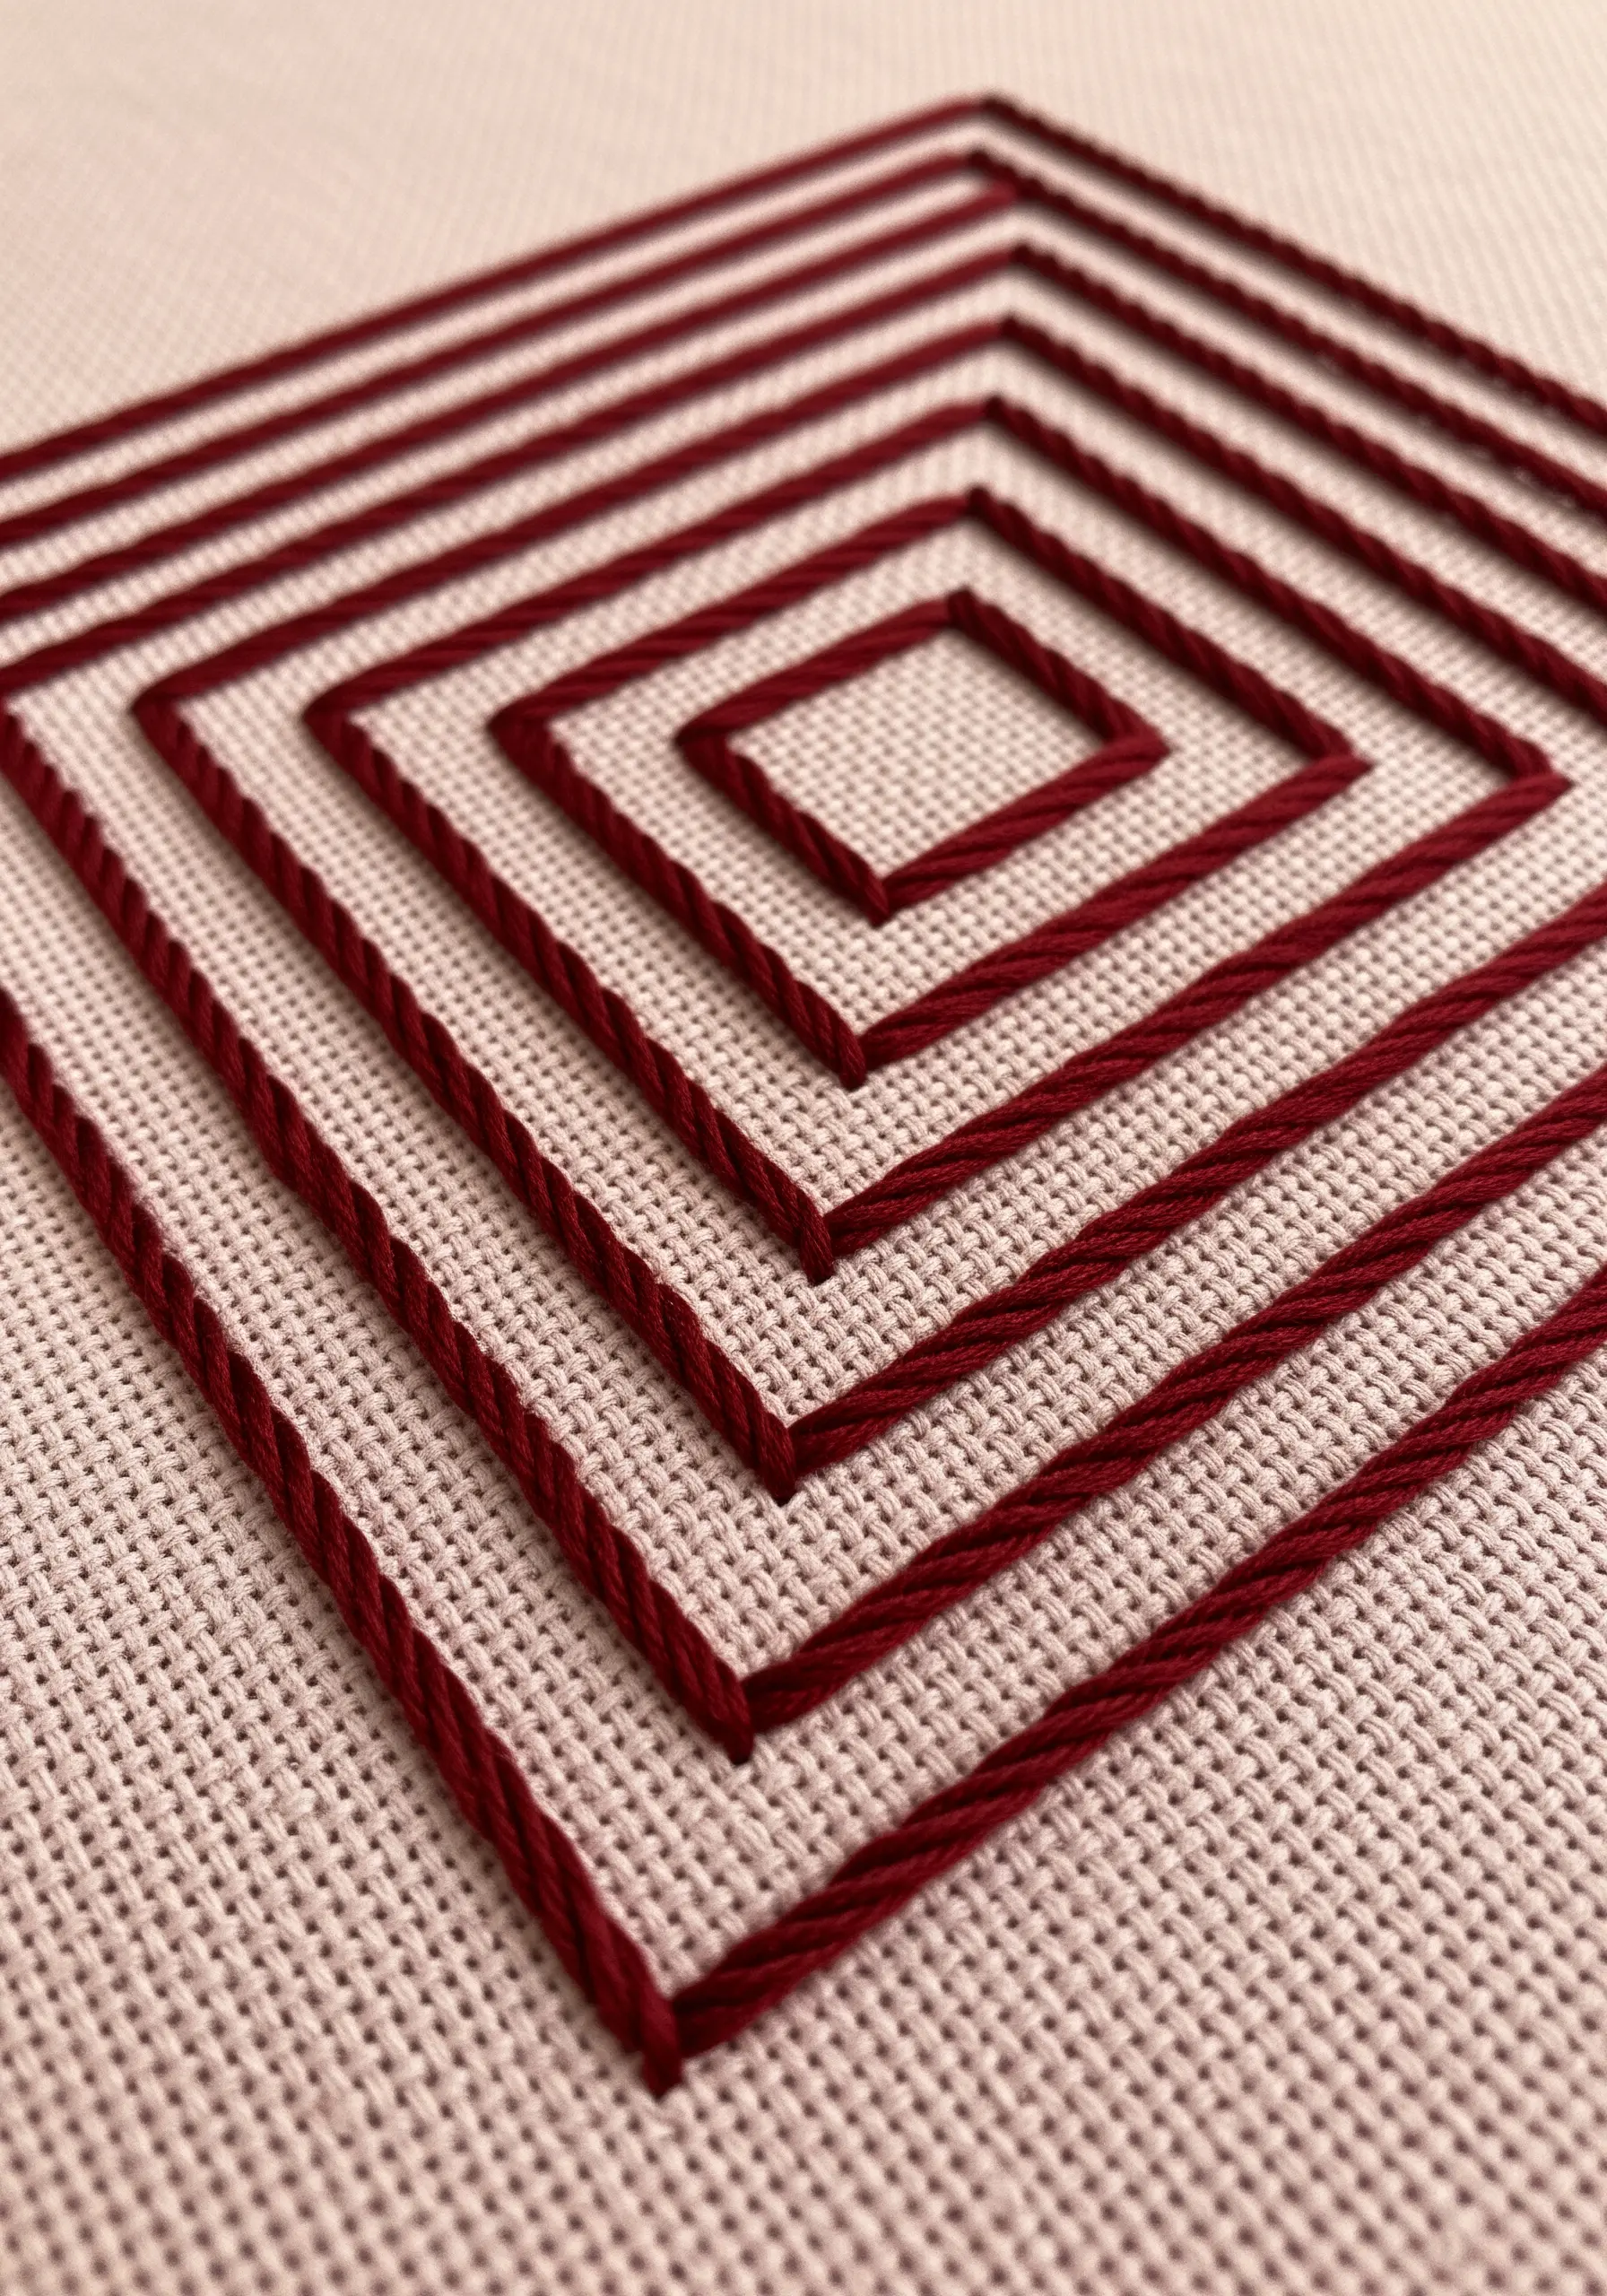
Create clean, sharp geometric shapes by first outlining them with a backstitch, then wrapping, or ‘whipping,’ that outline with the same thread.
This technique produces a raised, solid line that has the smoothness of a satin stitch but with more control around sharp corners.
It’s an ideal method for creating hypnotic, repeating patterns and is often used in yarn wall art projects inspired by geometric patterns for its precision.
The slightly rounded, cord-like finish gives your geometry a polished, dimensional quality.
19. Capture Botanicals with Minimalist Stitching
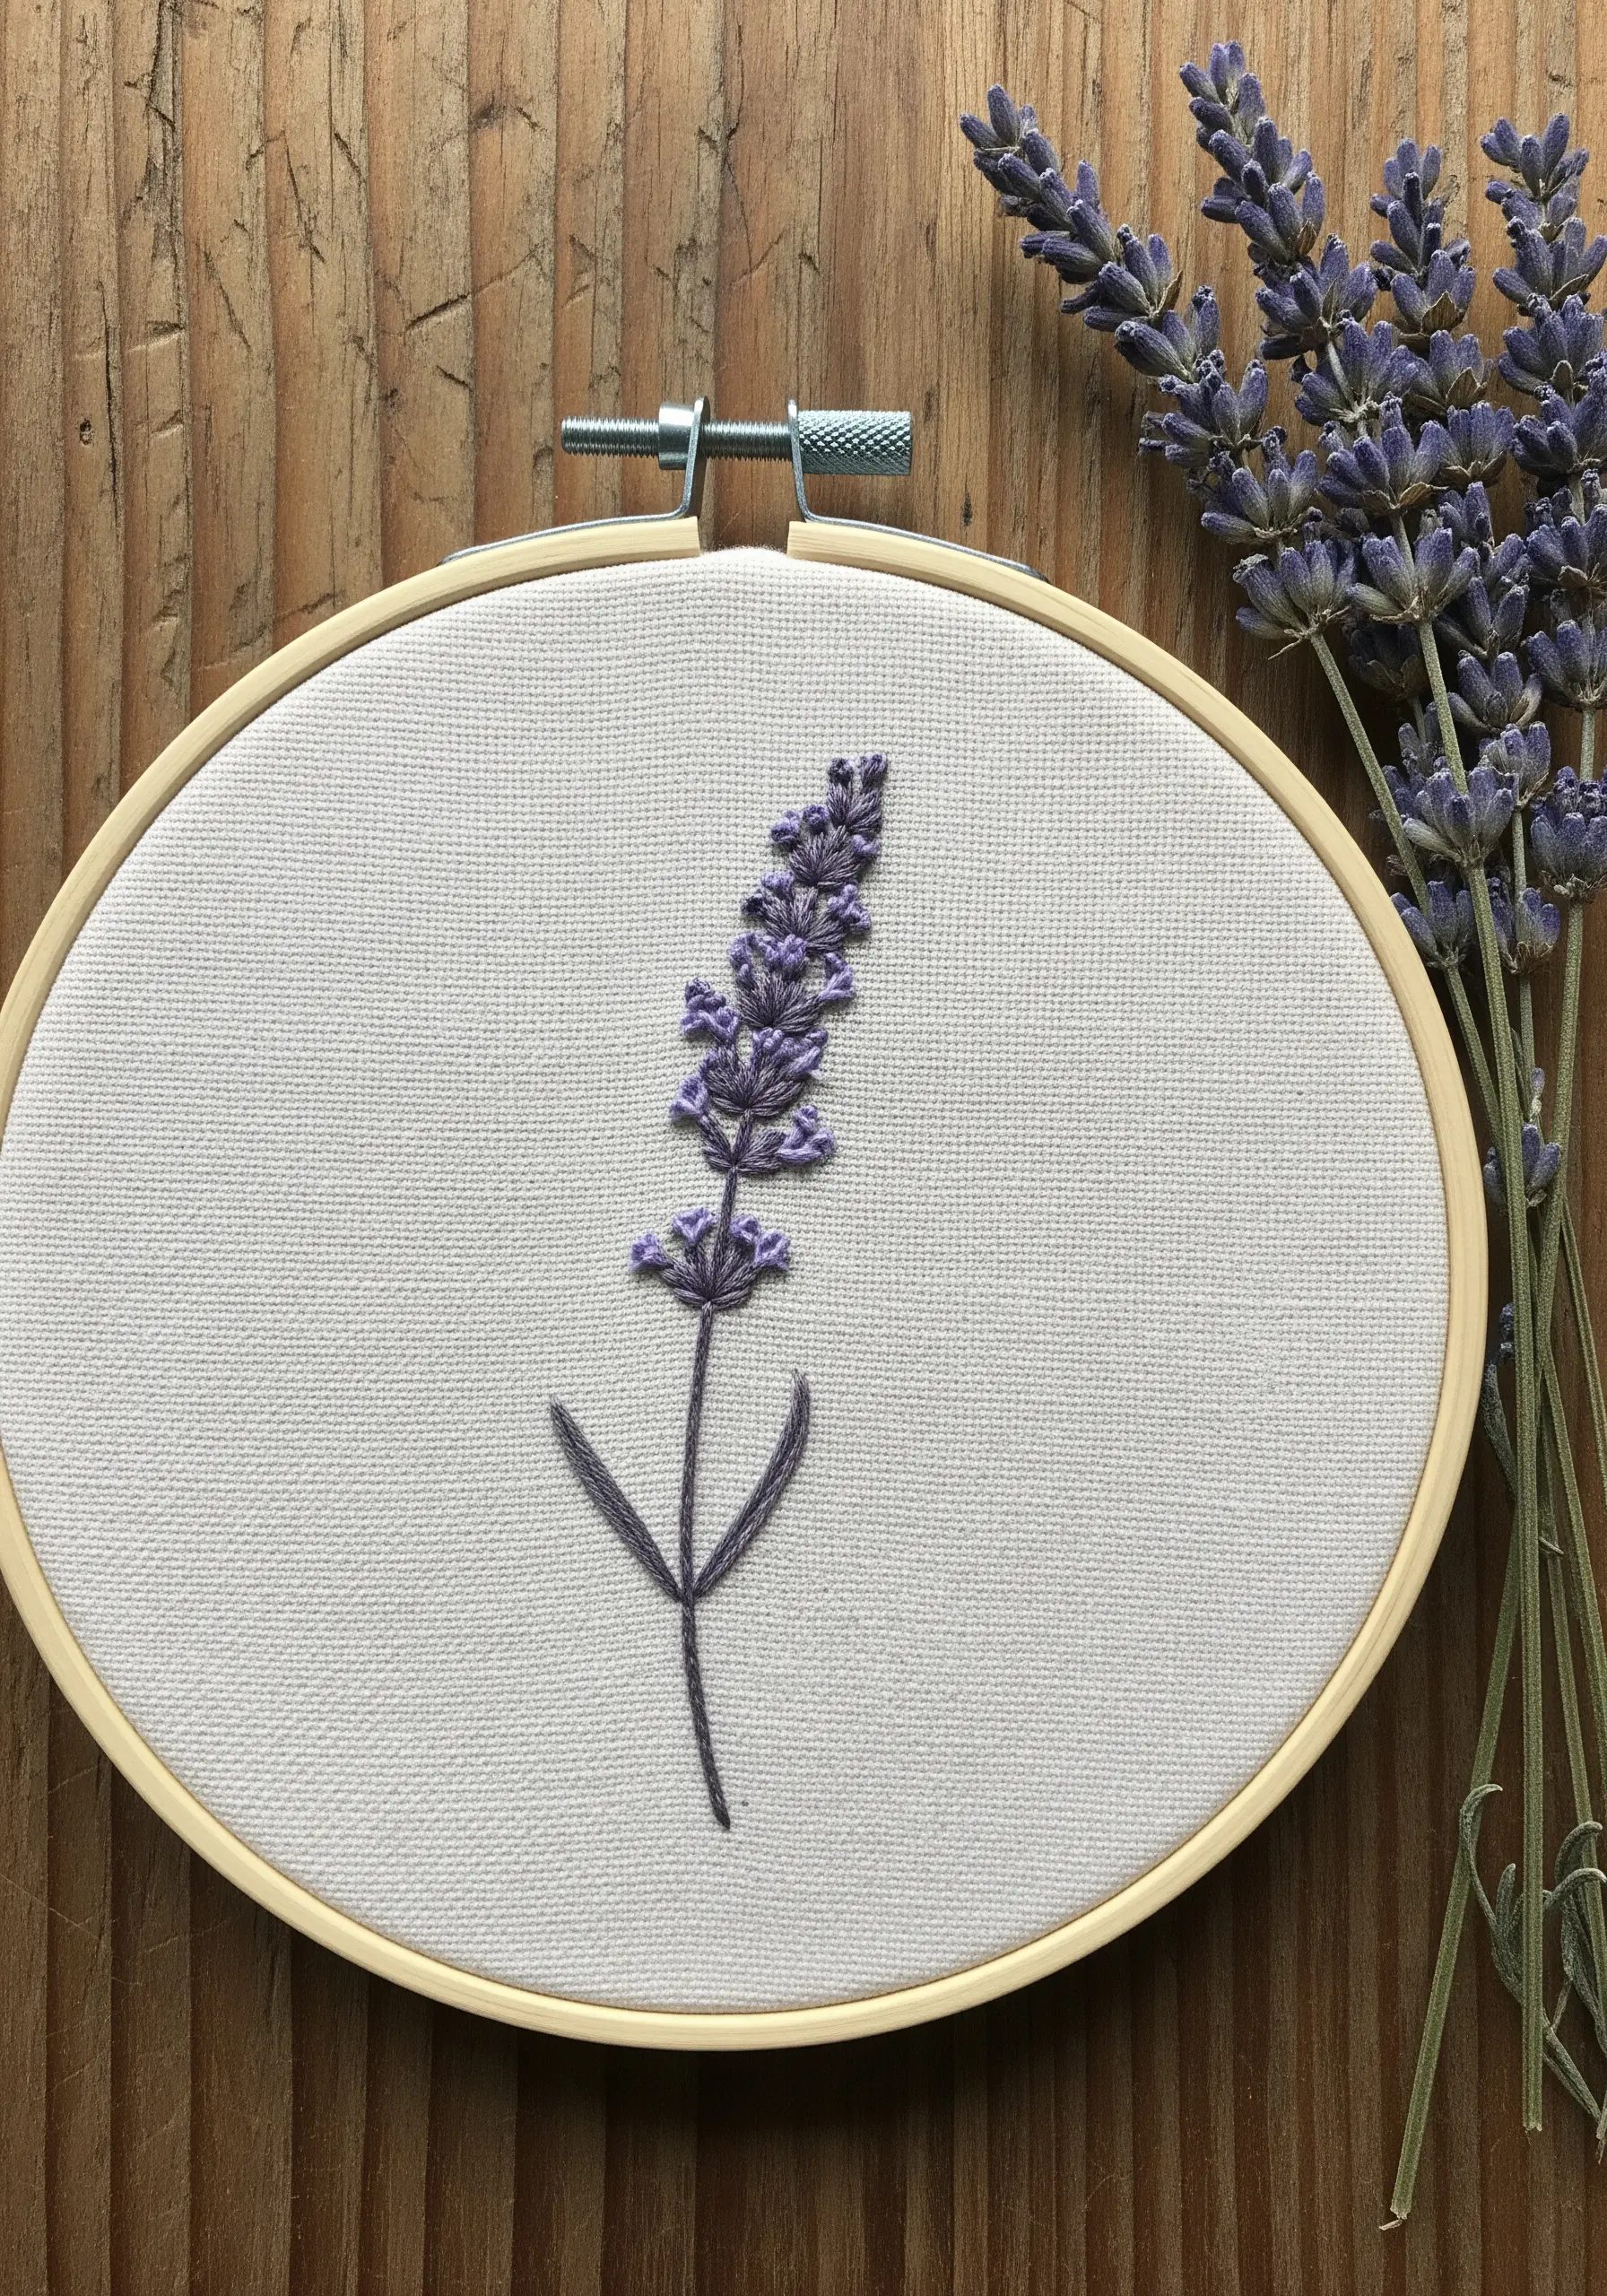
Suggest the form of a flower rather than rendering it in full detail for an elegant, modern take on botanical embroidery.
Use small French knots or lazy daisy stitches for the lavender buds and a simple stem stitch for the stalk and leaves.
By using only two complementary shades of one color, you create a soft, tonal effect that feels calm and sophisticated.
This restrained approach is central to delicate lavender stitch ideas and proves that a few well-placed stitches are often more powerful than a fully saturated design.
20. Achieve Flawless Lettering with an Under-Stitch
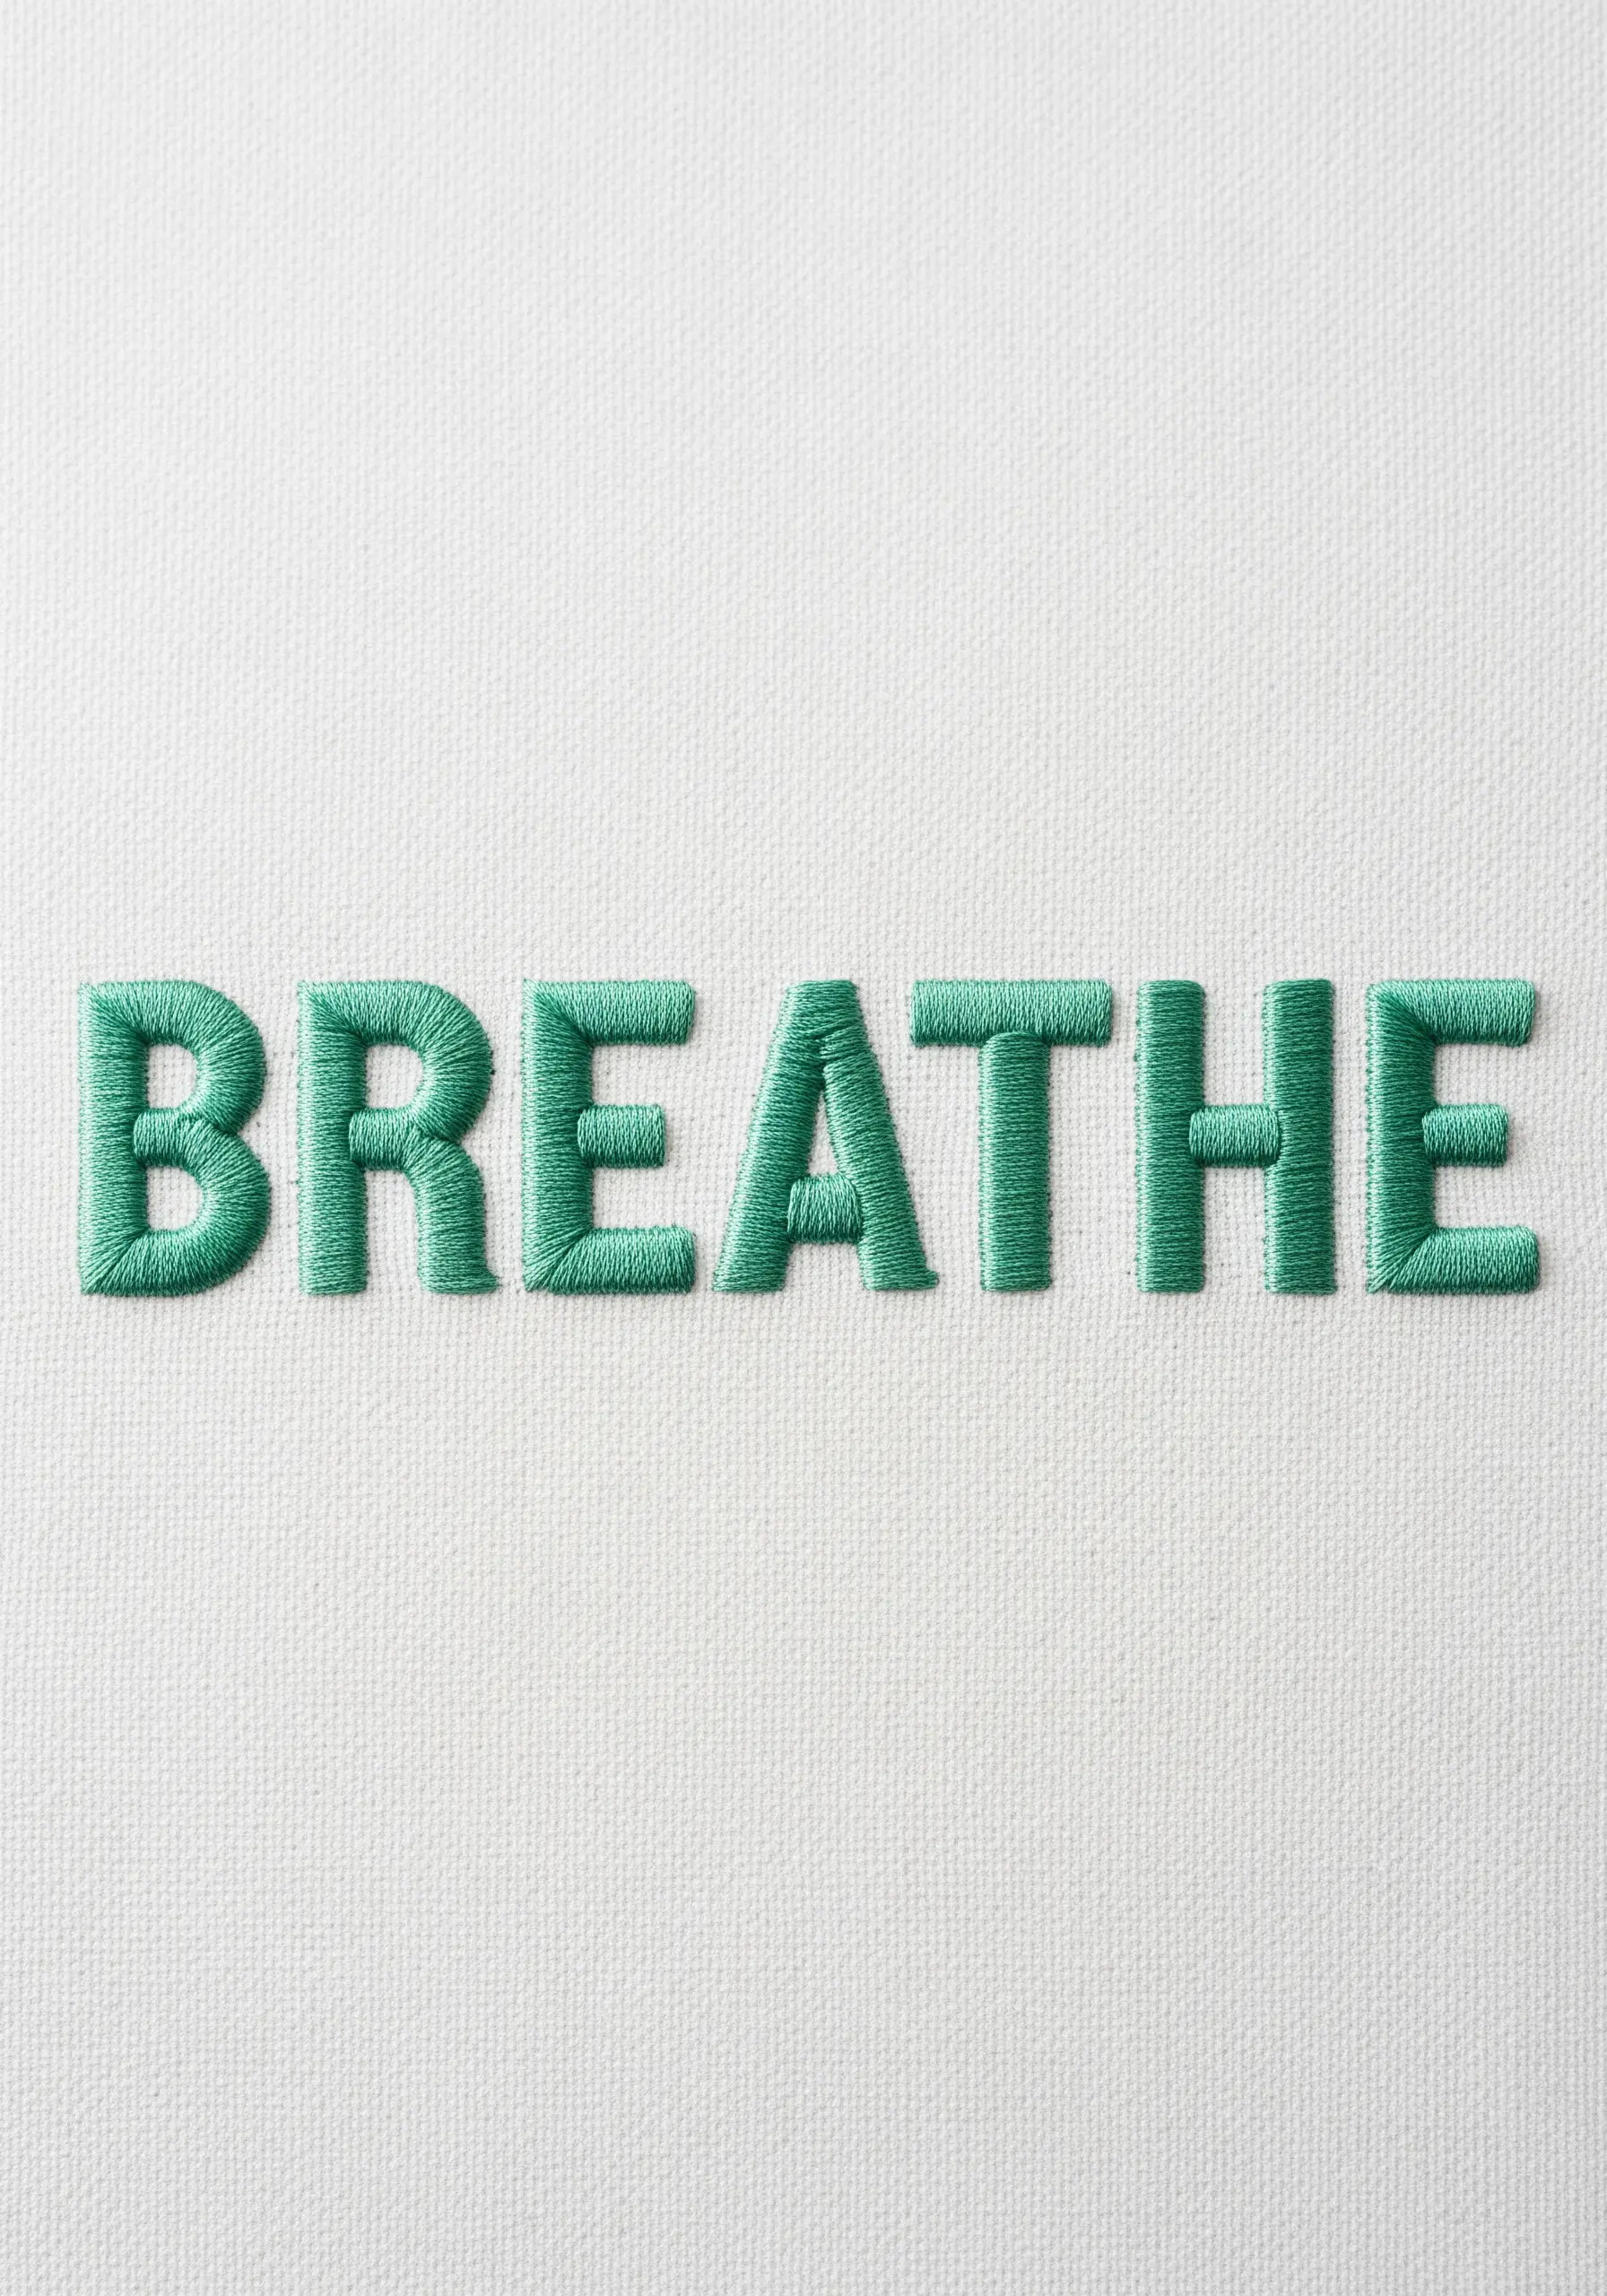
For perfectly smooth, raised satin-stitched letters, first create a foundation with a split stitch just inside your outline.
Stitch your satin stitches over this raised base, going just beyond the split stitch on either side.
This under-stitching, or padding, gives the letters a subtle three-dimensional quality and helps keep the edges incredibly sharp and clean.
This professional technique is essential for creating peaceful, poetic quote embroidery hoops that look flawless and refined.
21. Weave with Chunky Yarn for Maximum Texture
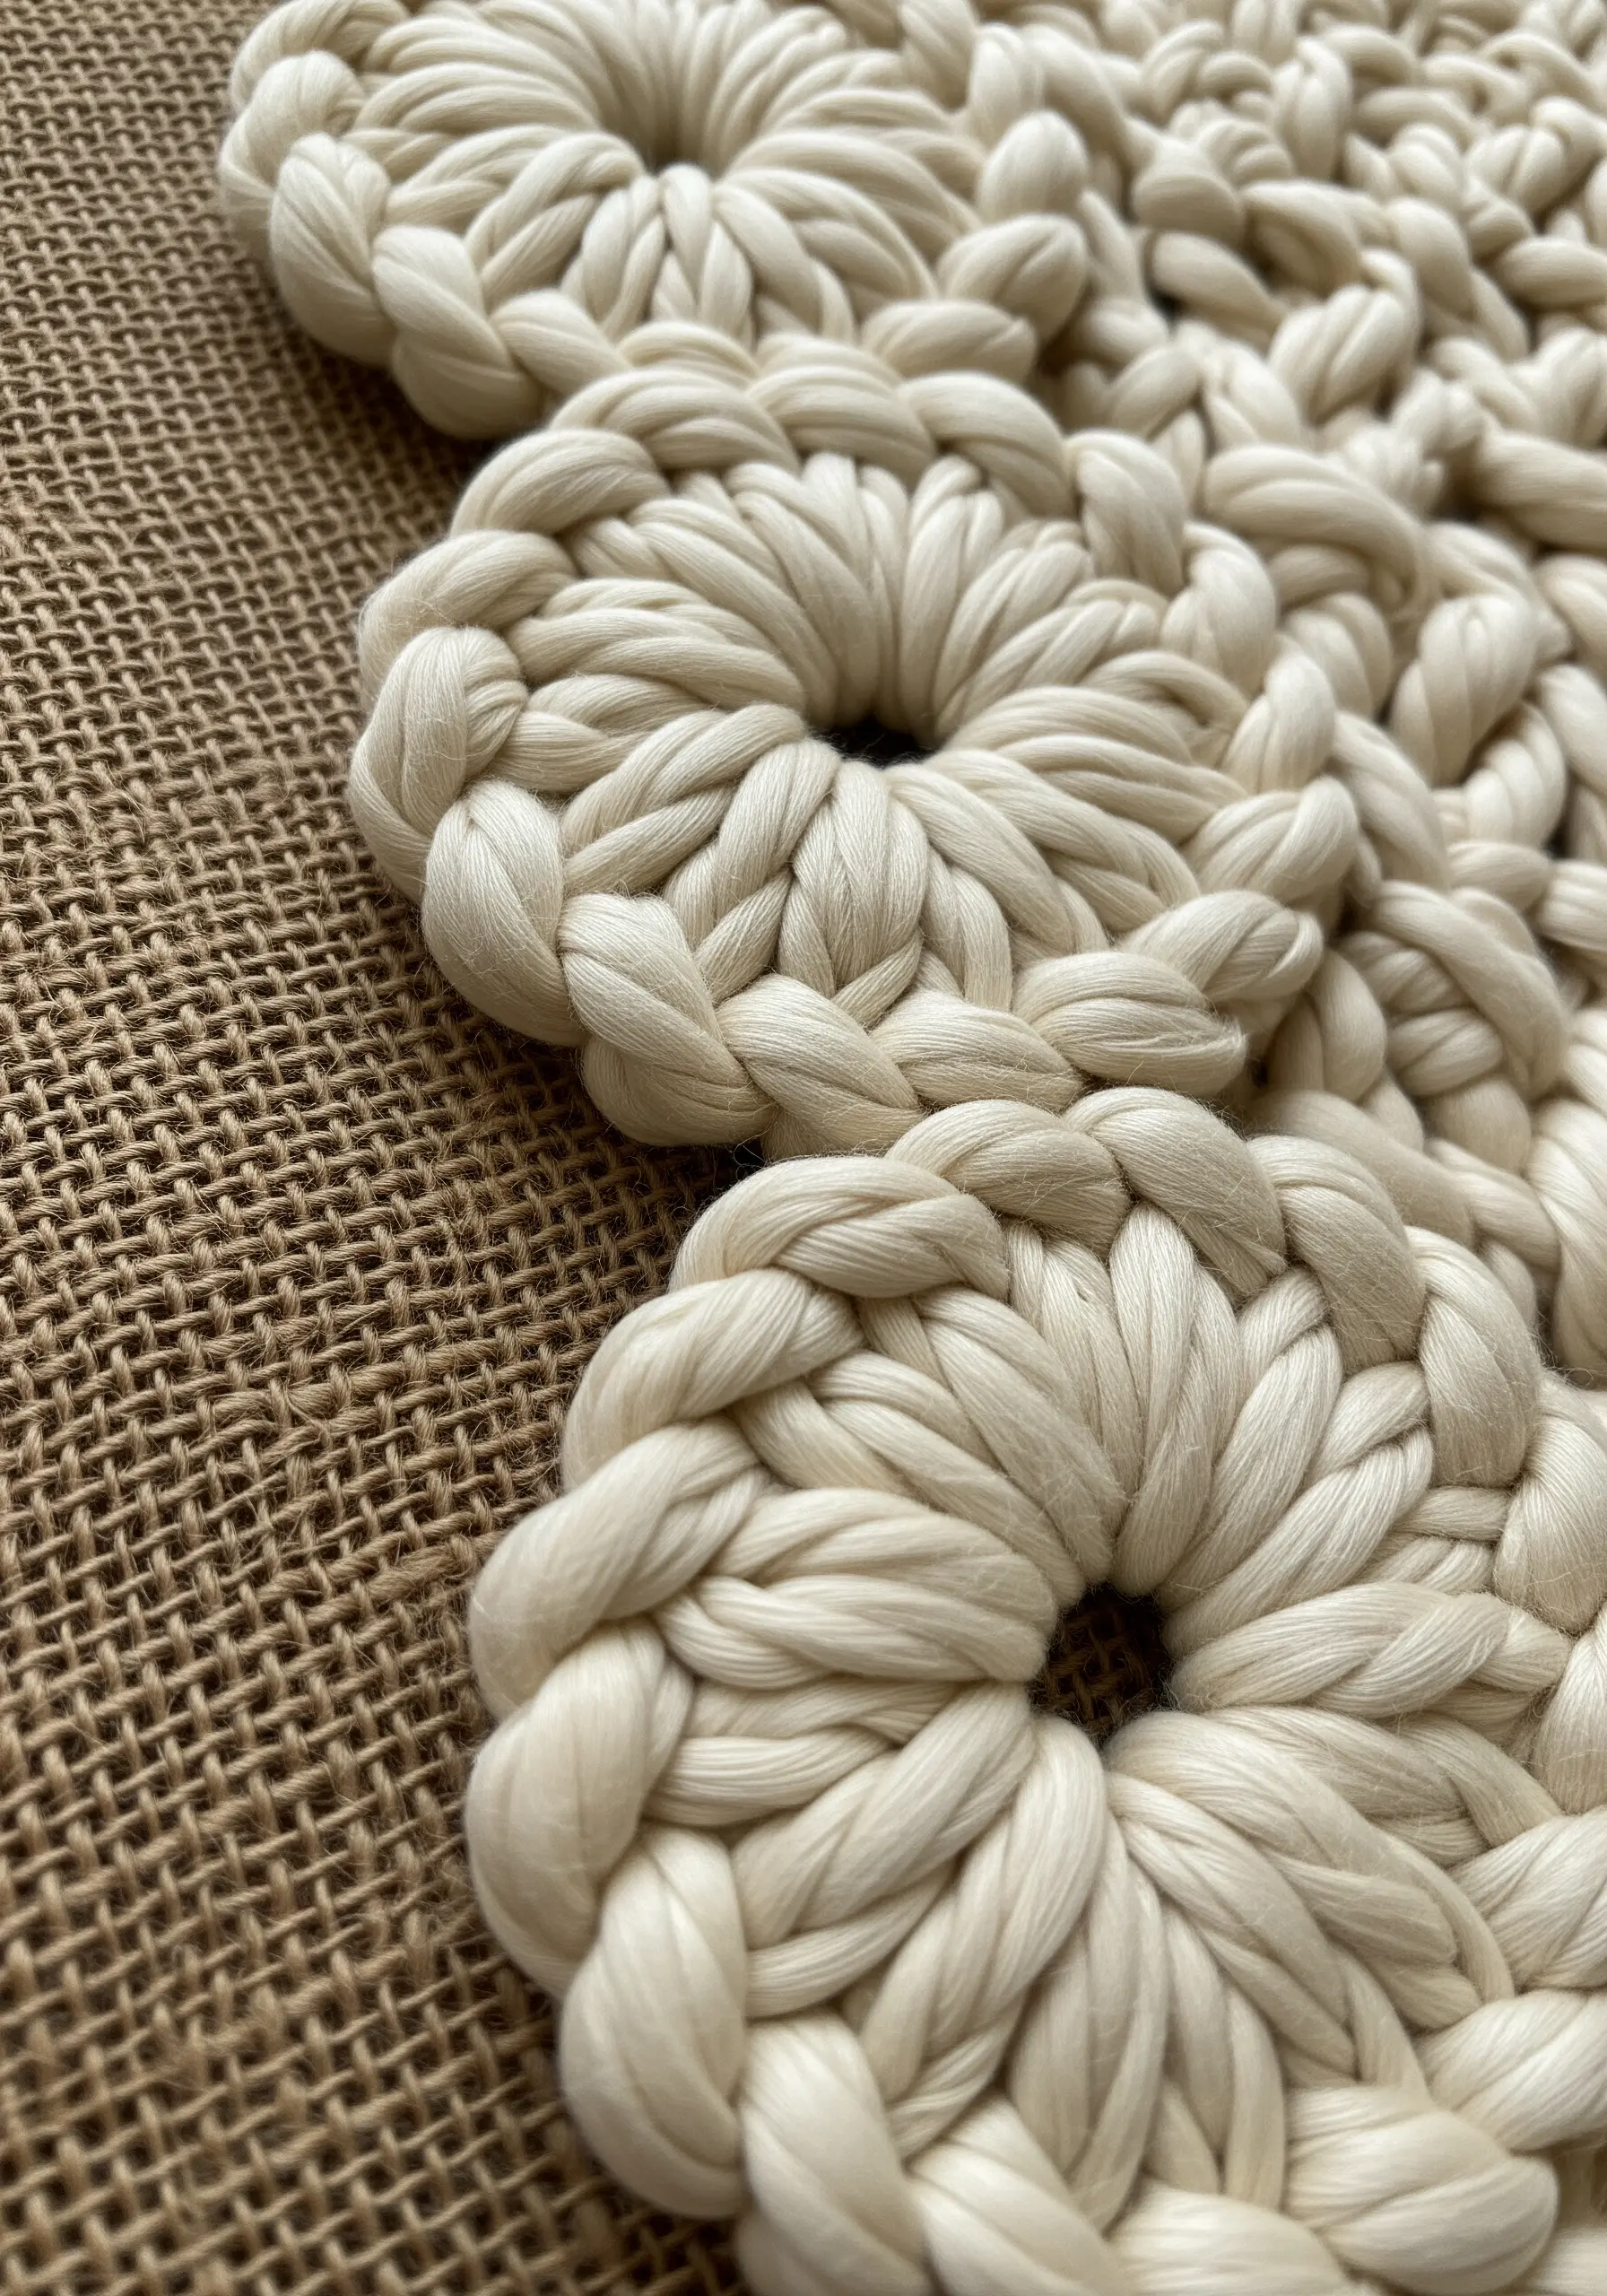
Incorporate thick, chunky yarn into your embroidery by couching it onto a sturdy fabric base like burlap.
Lay the thick yarn in your desired shape—like these looped floral motifs—and use a matching, standard-weight embroidery floss to tack it down at regular intervals.
This technique allows you to work with fibers that are too thick to pass through the fabric, opening up a world of textural possibilities.
It’s a fantastic way to create cozy mixed-fiber projects that bridge the gap between embroidery and weaving.
22. Embroider on Paper for a Delicate Finish
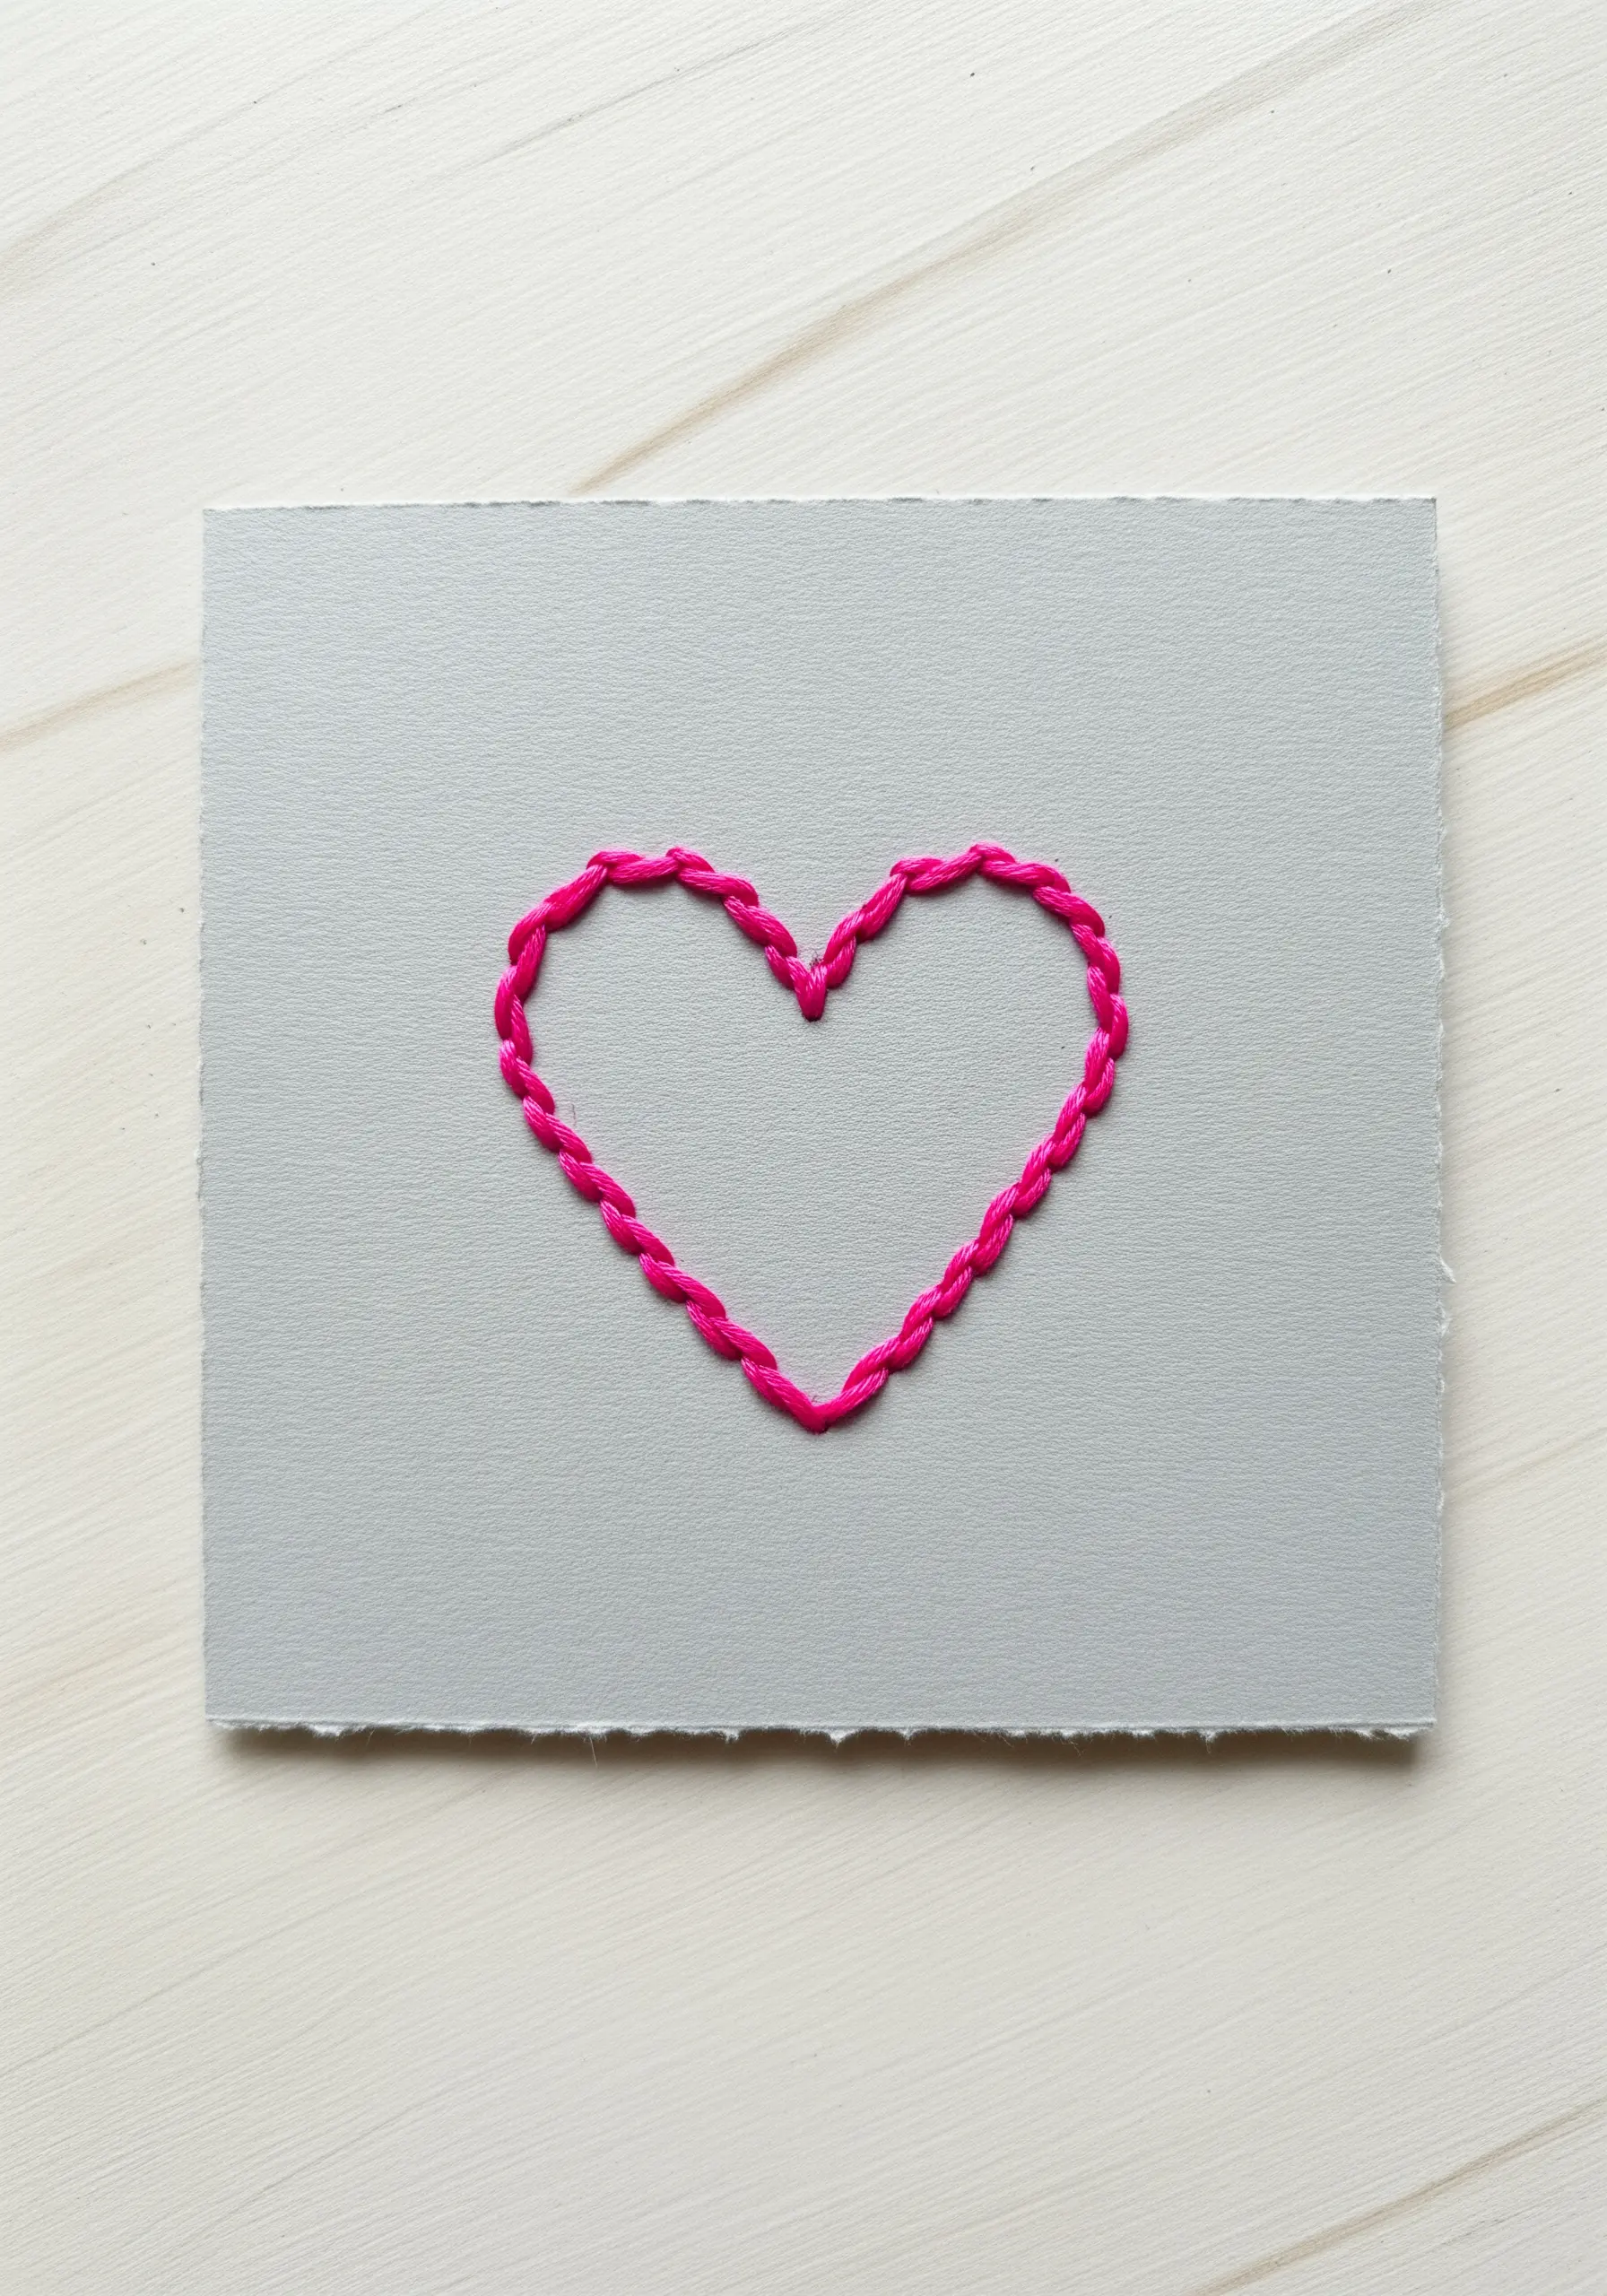
Stitching on paper creates a unique piece that blends fiber art with illustration.
Choose a heavyweight, textured paper or cardstock that can withstand piercing without tearing.
Use a needle to gently pre-pierce the holes for your design before you begin stitching, which will prevent buckling and create cleaner entry points.
A simple, open stitch like a chain stitch or backstitch works best, as dense stitches can perforate the paper too much.
These easy paper art hacks result in beautiful, giftable cards or small framed art.
23. Visualize the Abstract with Repetitive Stitches
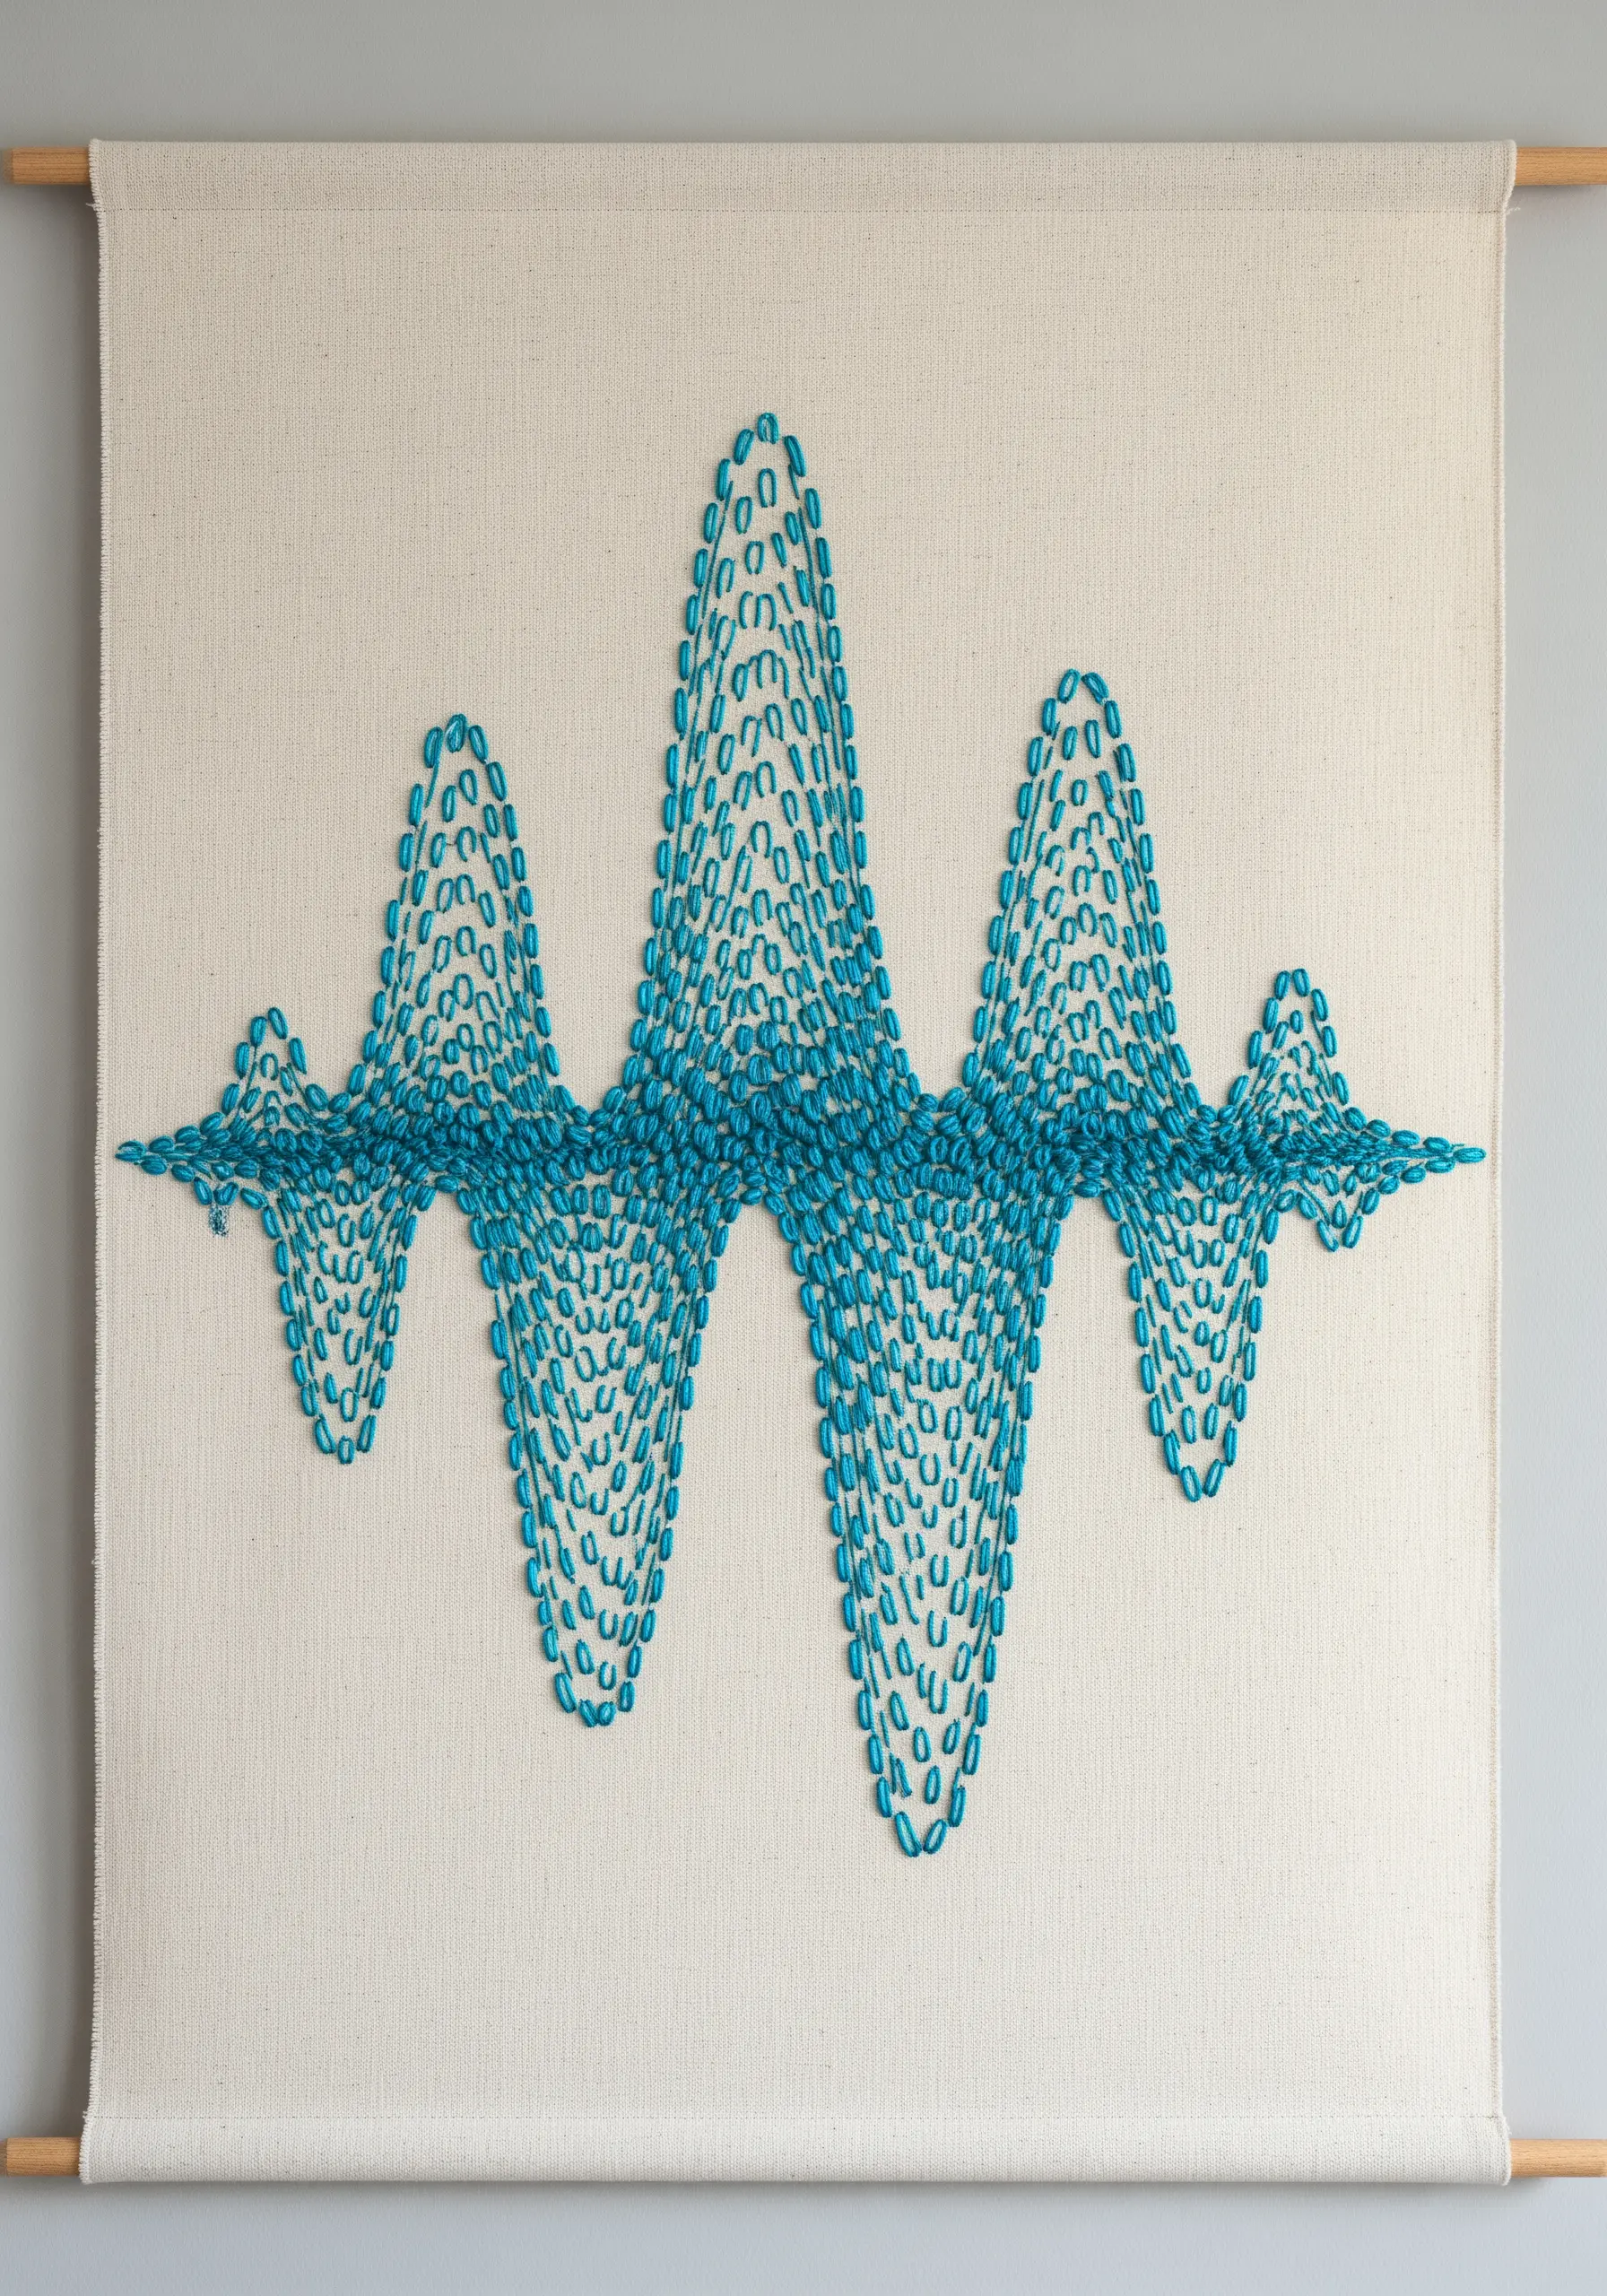
Represent abstract concepts like sound waves or data by filling a shape with hundreds of tiny, repetitive stitches.
Use a simple detached chain stitch or a single straight seed stitch, varying the angle slightly with each one to create a sense of movement and vibration.
The overall shape is defined not by an outline, but by the collective mass of the small stitches.
This technique is perfect for creating textured abstract thread waves & swirls that feel both organic and graphically precise.
24. Create Floating Designs on Sheer Fabric
Use tulle or organza as your base to create geometric designs that appear to float in mid-air.
Stabilize the sheer fabric in your hoop, ensuring it’s taut but not stretched, to prevent puckering.
Work with a thicker thread, like pearl cotton, and use simple straight stitches to form your geometric grid.
Anchor the intersections with tiny seed beads or French knots to add stability and a subtle point of interest.
This is a core technique for ethereal, minimalist embroidery projects that play with light and transparency.
25. Tell a Story with Texture and Negative Space
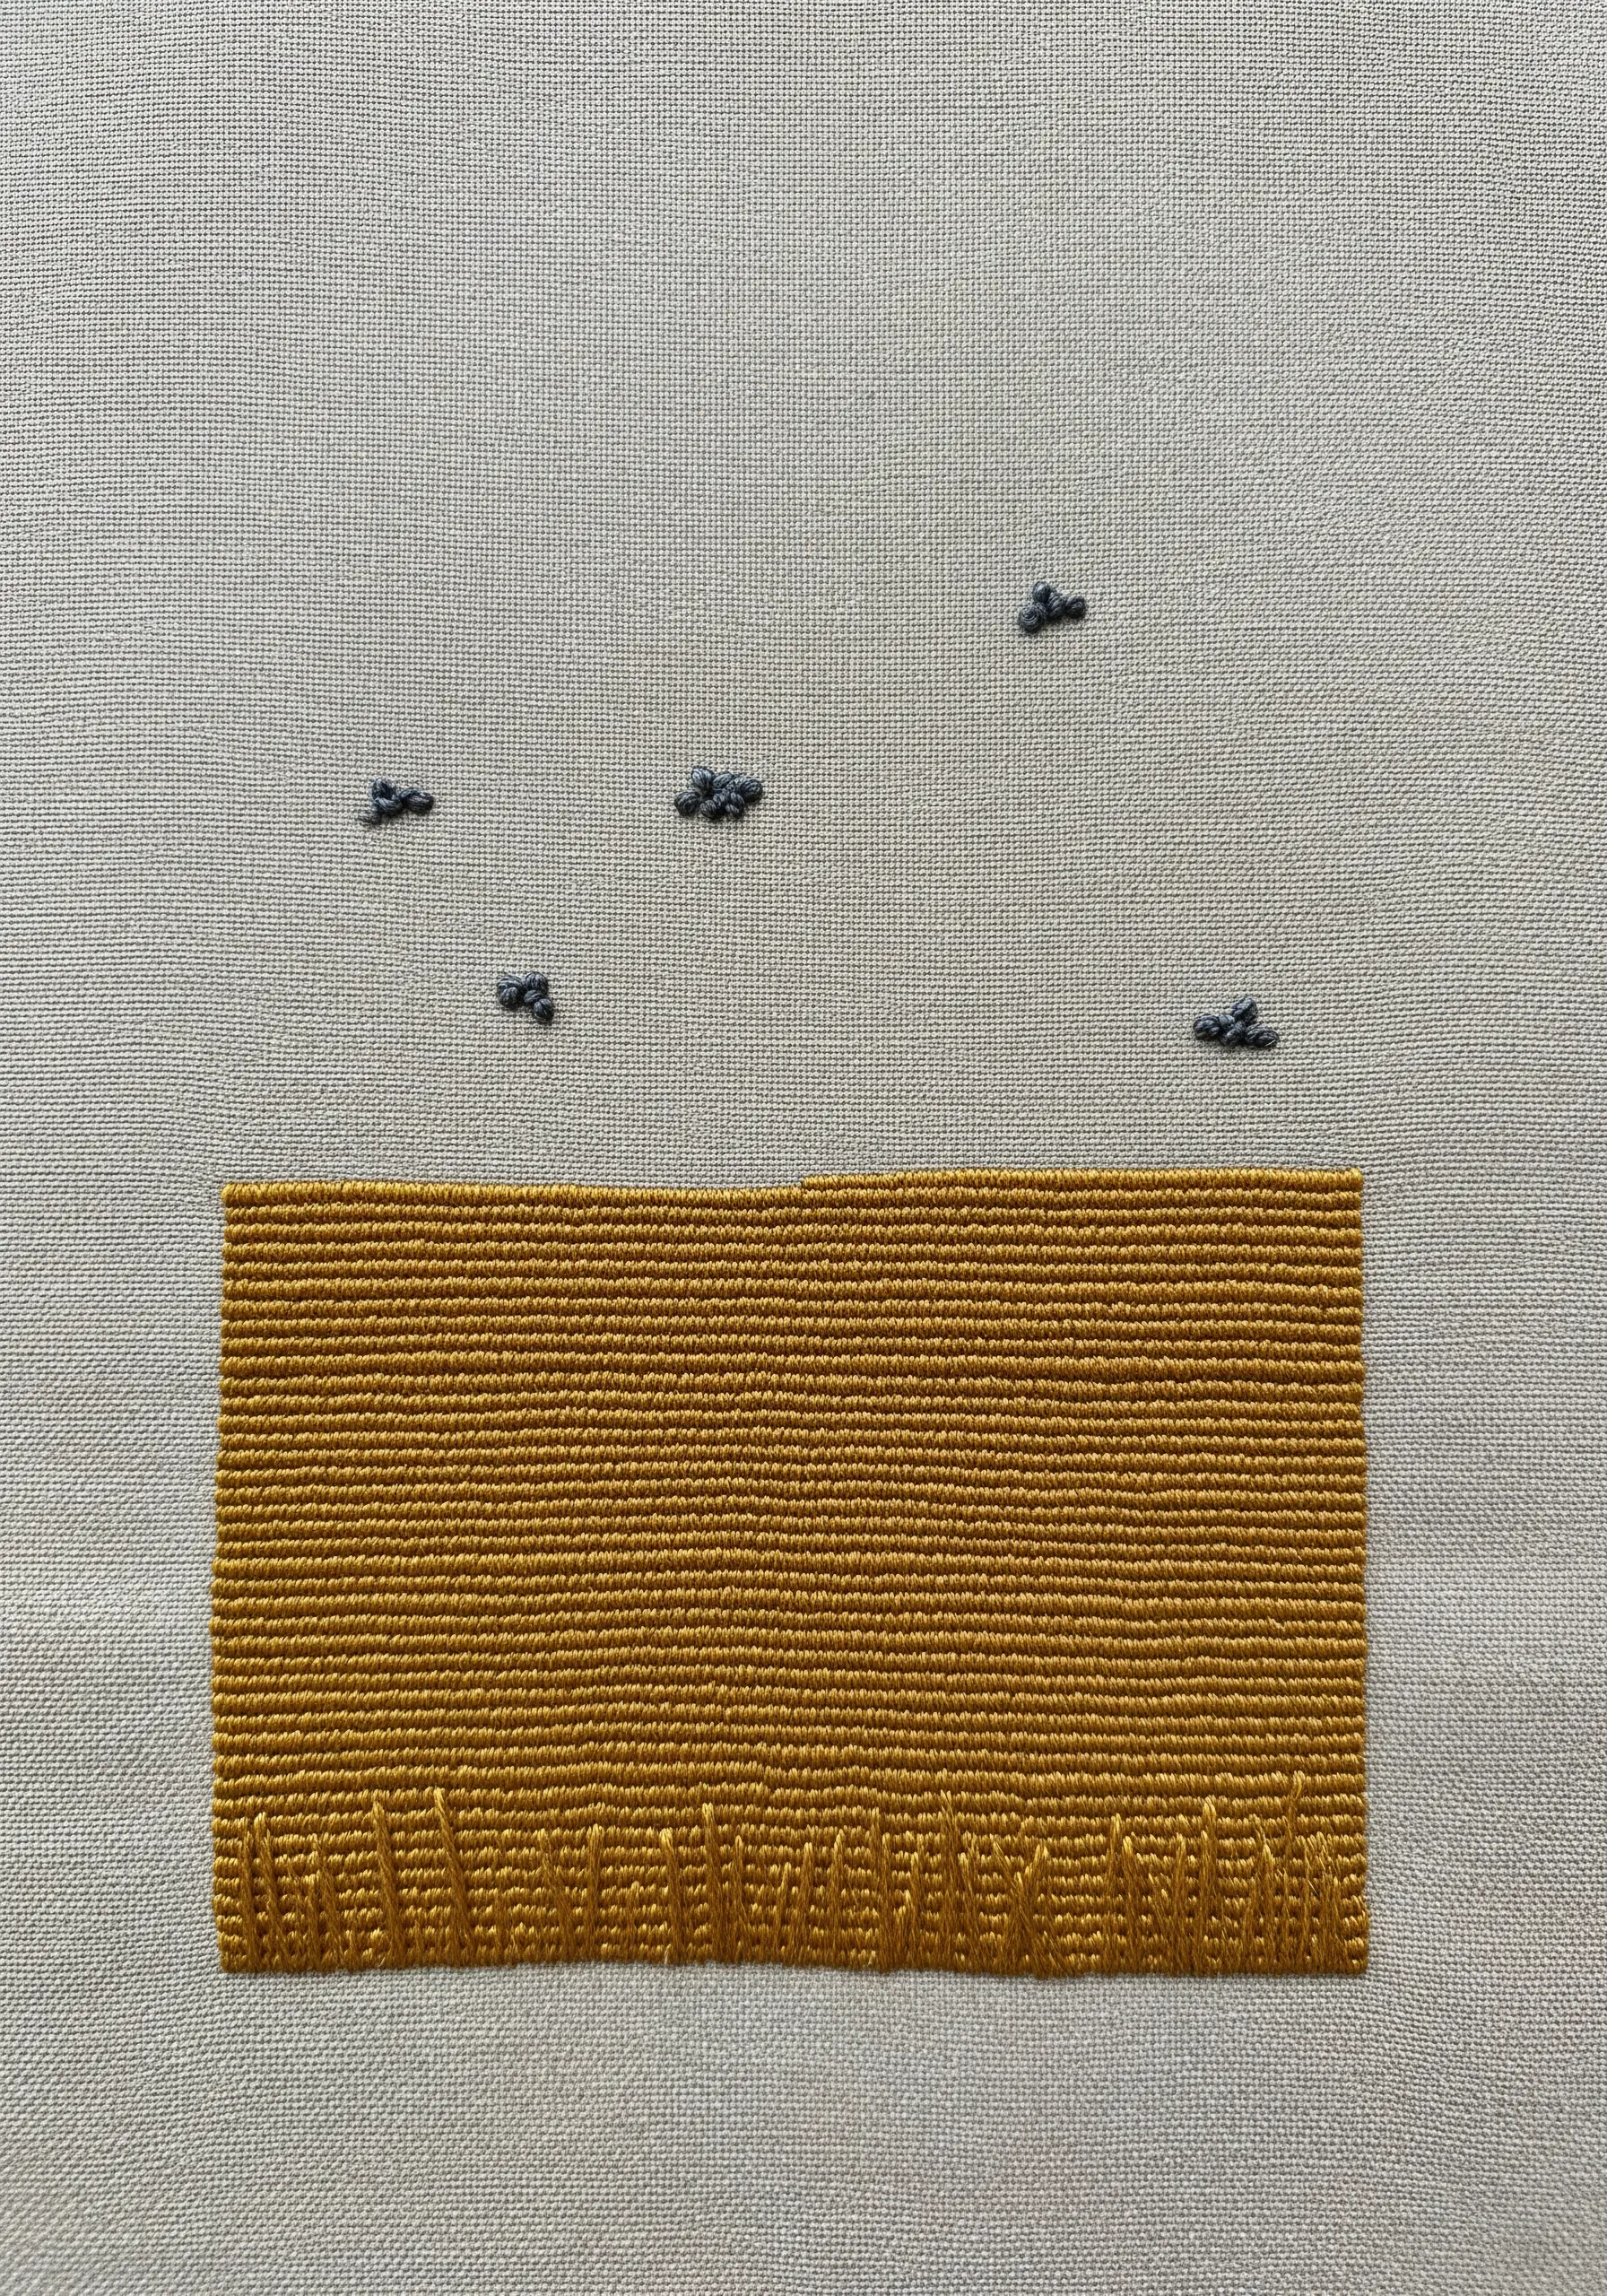
Create a minimalist landscape by pairing a block of dense, flat texture with tiny, suggestive details in the negative space.
Use a perfectly flat fill, like brick stitch or long-and-short stitch, to represent a field of wheat or grass.
For the birds, use just two or three tiny straight stitches, allowing their simplicity and distance to create a sense of scale and atmosphere.
This is one of the most effective embroidery projects inspired by textures you’d find on a nature walk, capturing a feeling rather than a literal scene.
26. Radiate Energy with Graphic Starbursts
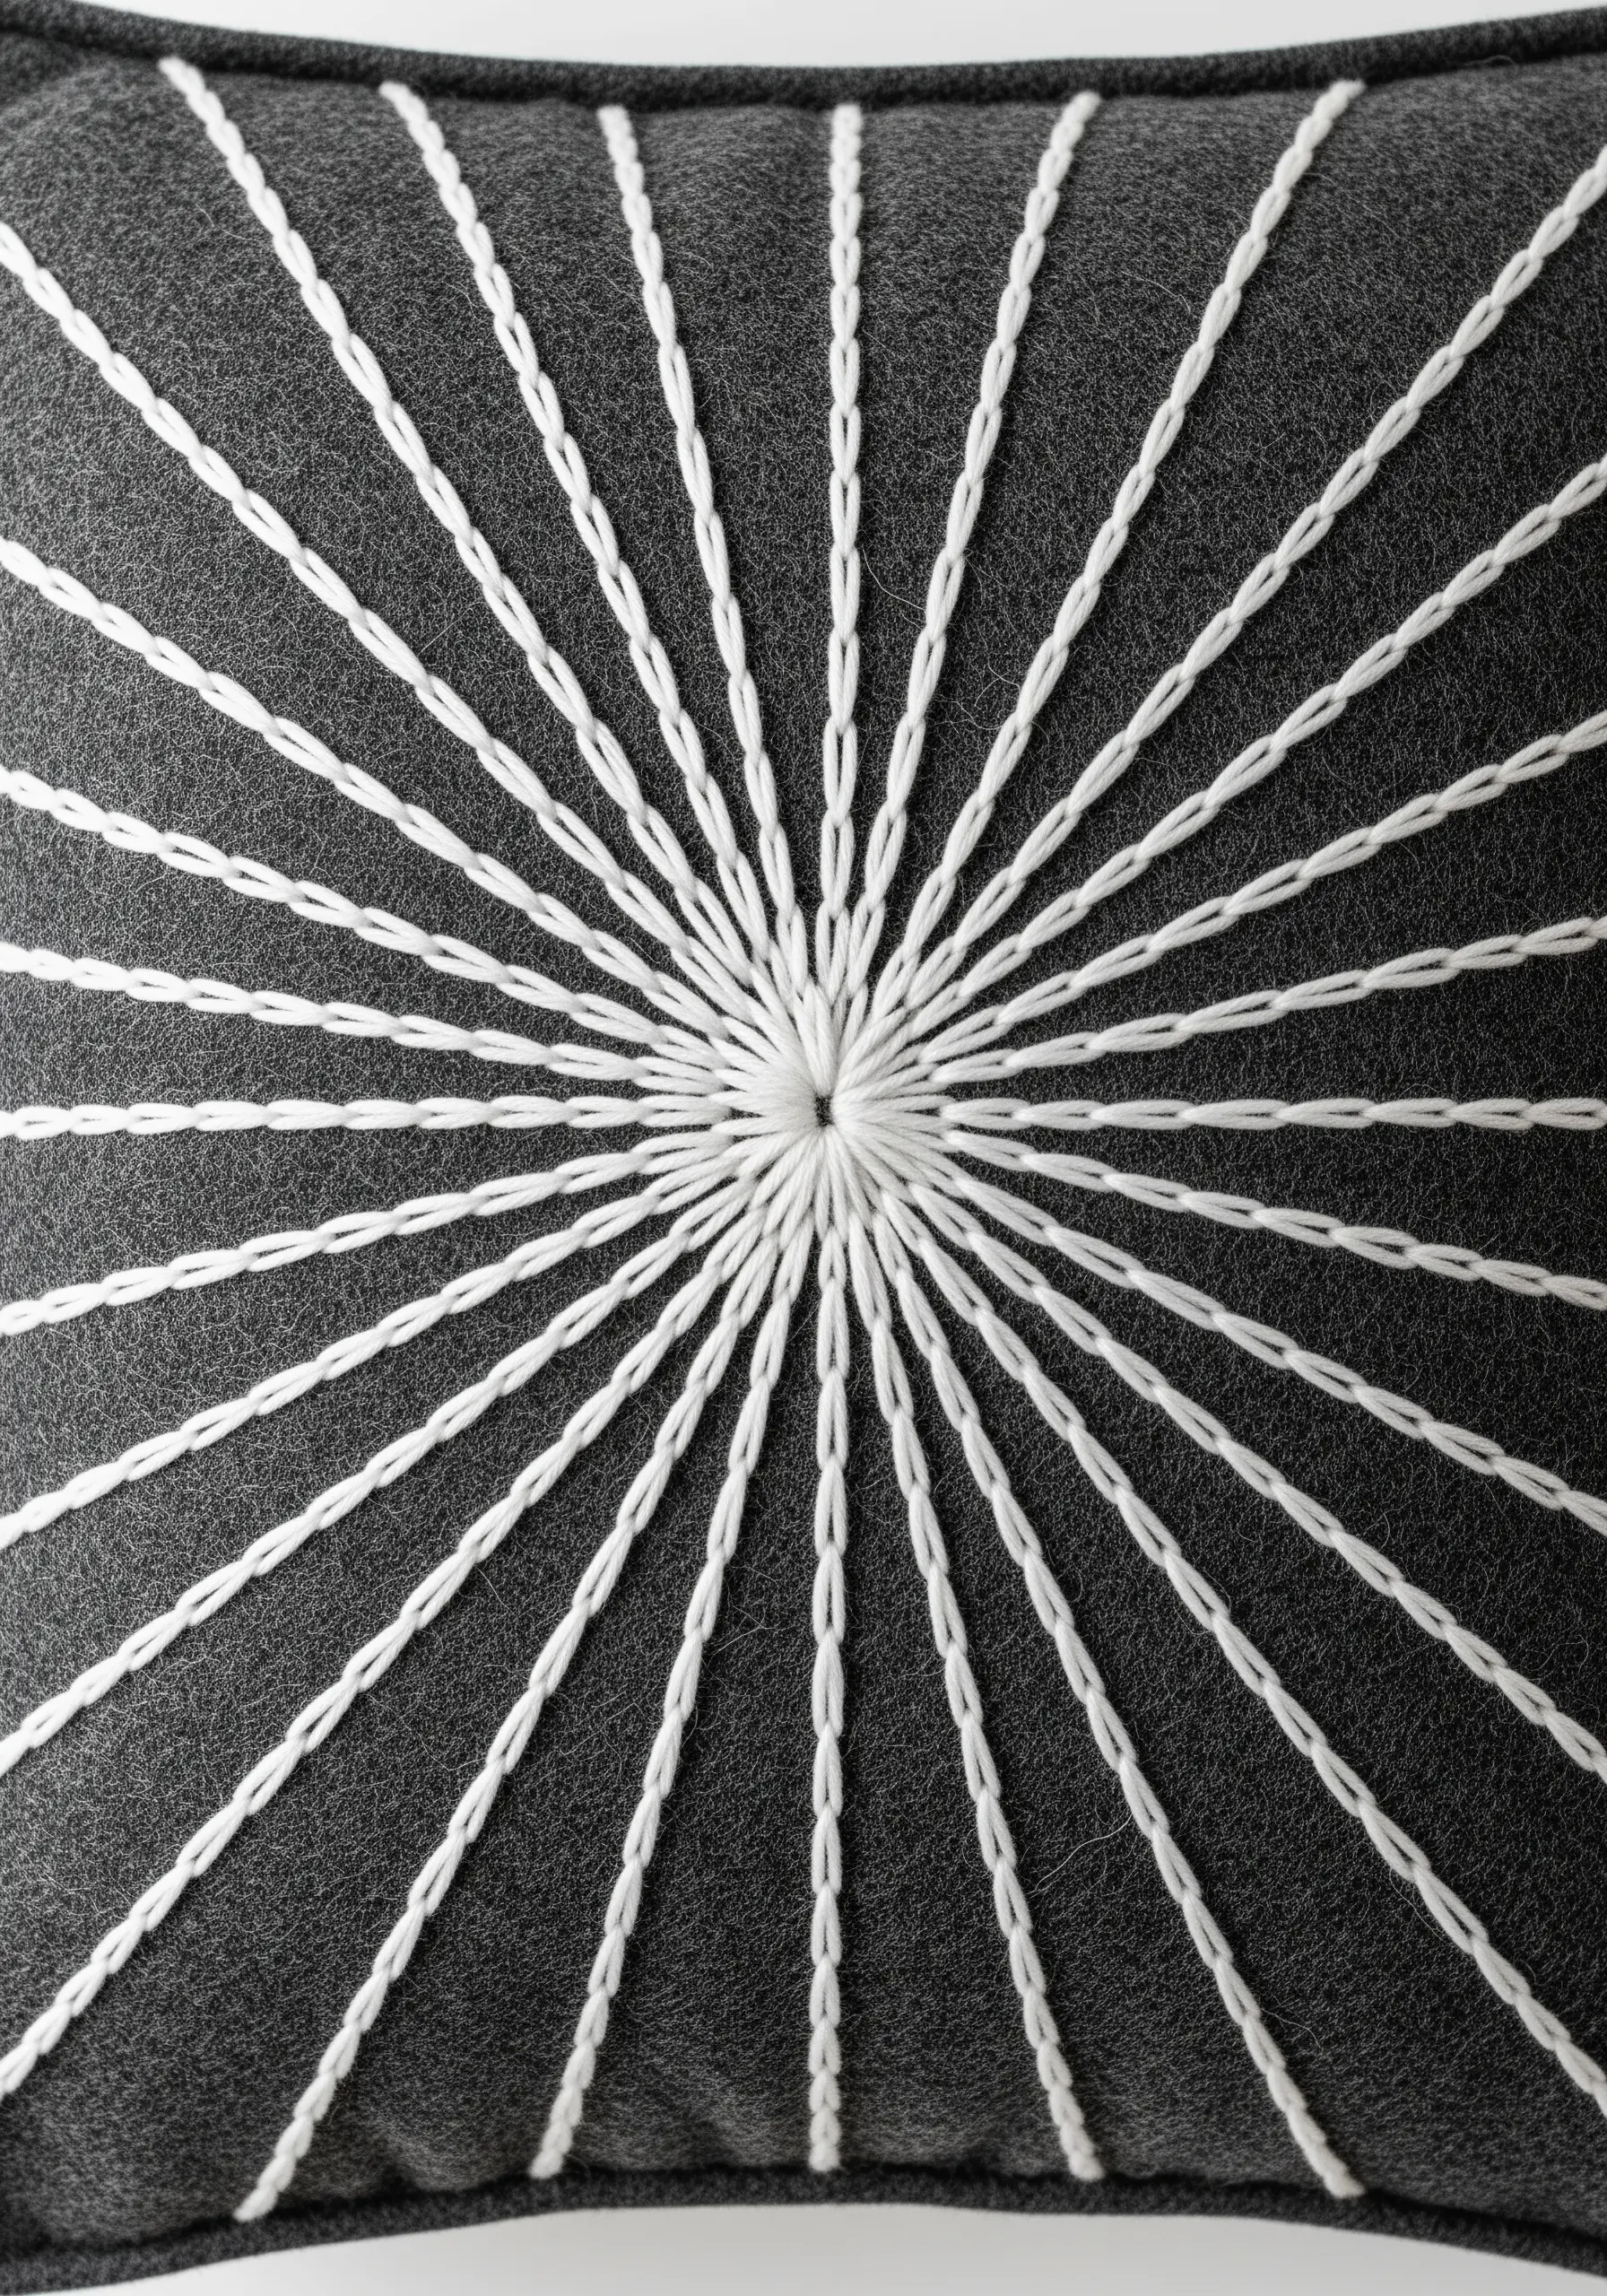
Create a dynamic focal point on a cushion or wall hanging with a radial starburst pattern.
Start with a small circle of satin stitch in the center, then work long, straight stitches or whipped backstitches radiating outwards.
Ensure your lines are perfectly straight and evenly spaced for a clean, graphic effect.
This technique is perfect for modern home decor, transforming minimal stitch designs into high-impact statement pieces.
The high contrast between the white thread and dark wool felt makes the design pop.
27. Introduce Mixed Media for Textural Contrast
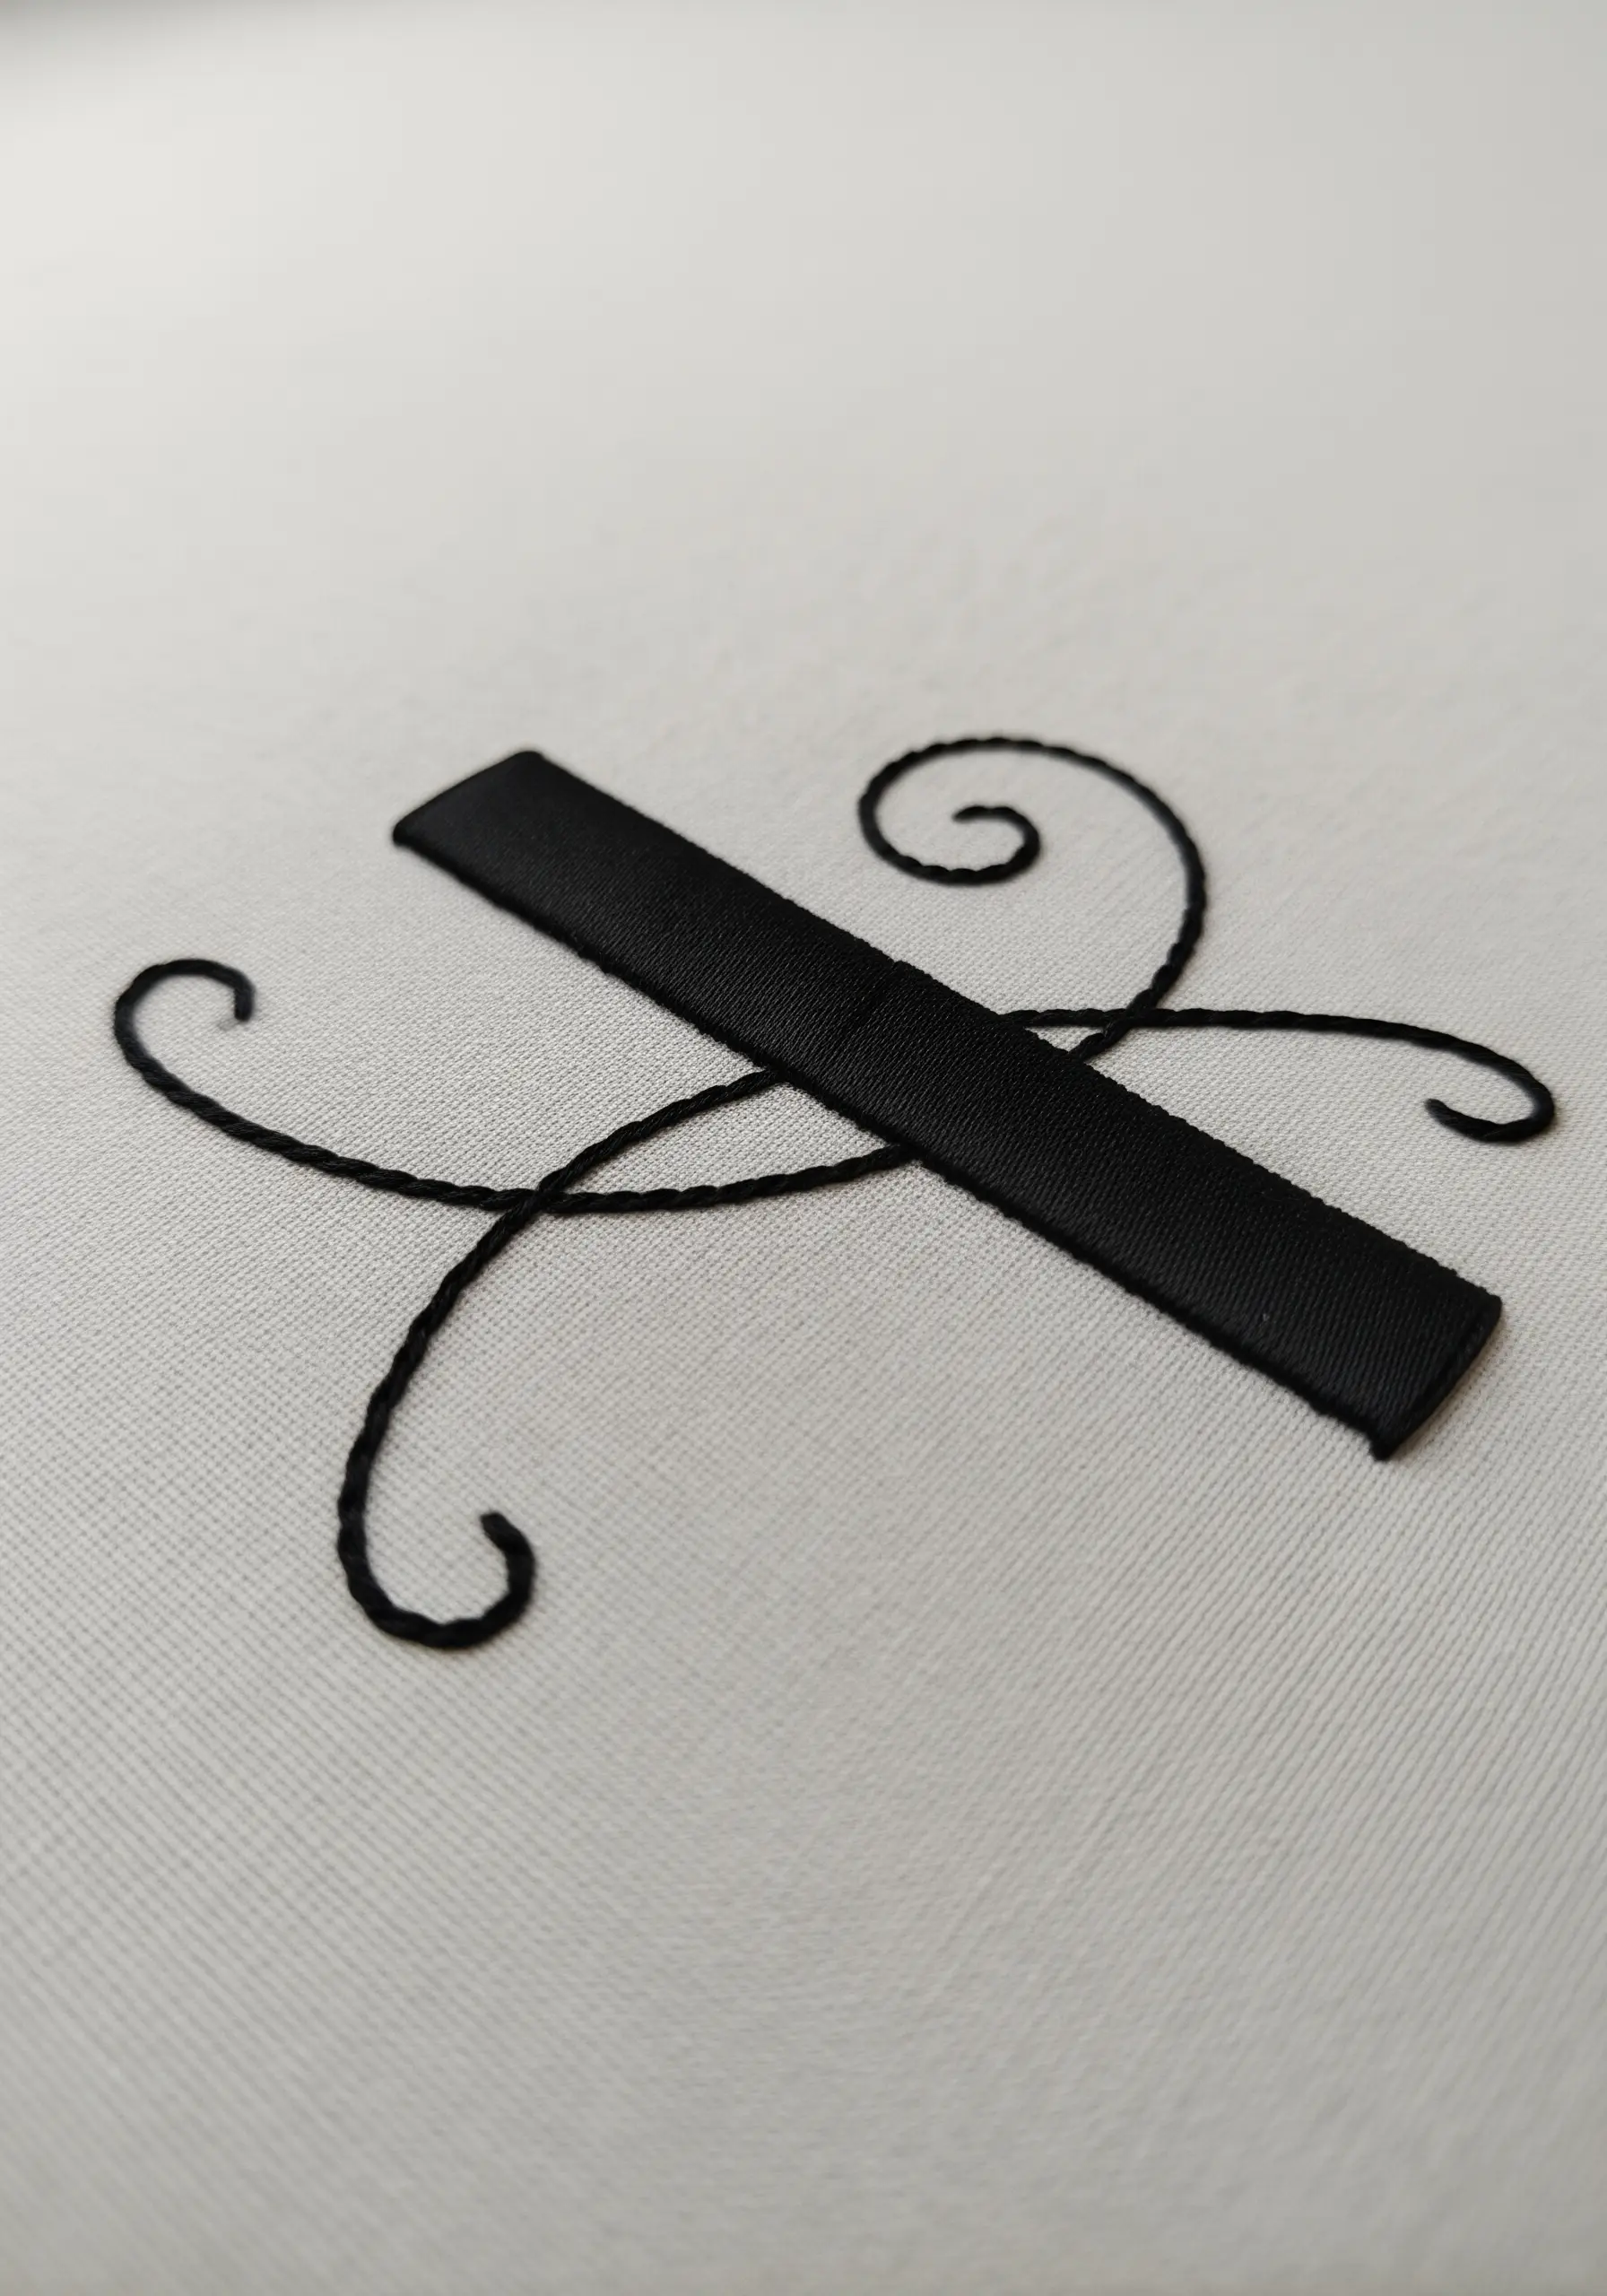
Combine standard embroidery floss with an unexpected material, like satin ribbon, to create a striking interplay of textures.
Use the ribbon for a bold, smooth shape with a high sheen, couching it down or using wide satin stitches.
Then, add delicate, swirling details with a fine, matte cotton floss to create contrast in both weight and finish.
This is an excellent entry point into DIY mixed-media embroidery projects, as it requires no special tools but delivers a dramatic, sophisticated result.


