

The clean lines and mesmerizing patterns of string art offer a beautiful starting point for your next embroidery project, especially for a calm and modern nursery.
Think of these designs not as something to copy literally, but as maps for texture, color, and form. The ‘pins’ become anchor points for your stitches—perhaps a tiny French knot or a seed bead. The ‘strings’ become your floss, laid down with intention to create flow, shadow, and dimension.
Here, you’ll discover how to translate these graphic animal silhouettes into sophisticated textile art. We’ll explore how changing your stitch direction, playing with thread density, and introducing unexpected textures can transform a simple outline into a piece filled with personality and polish.
1. Translate Radiating Lines with Directional Satin Stitch
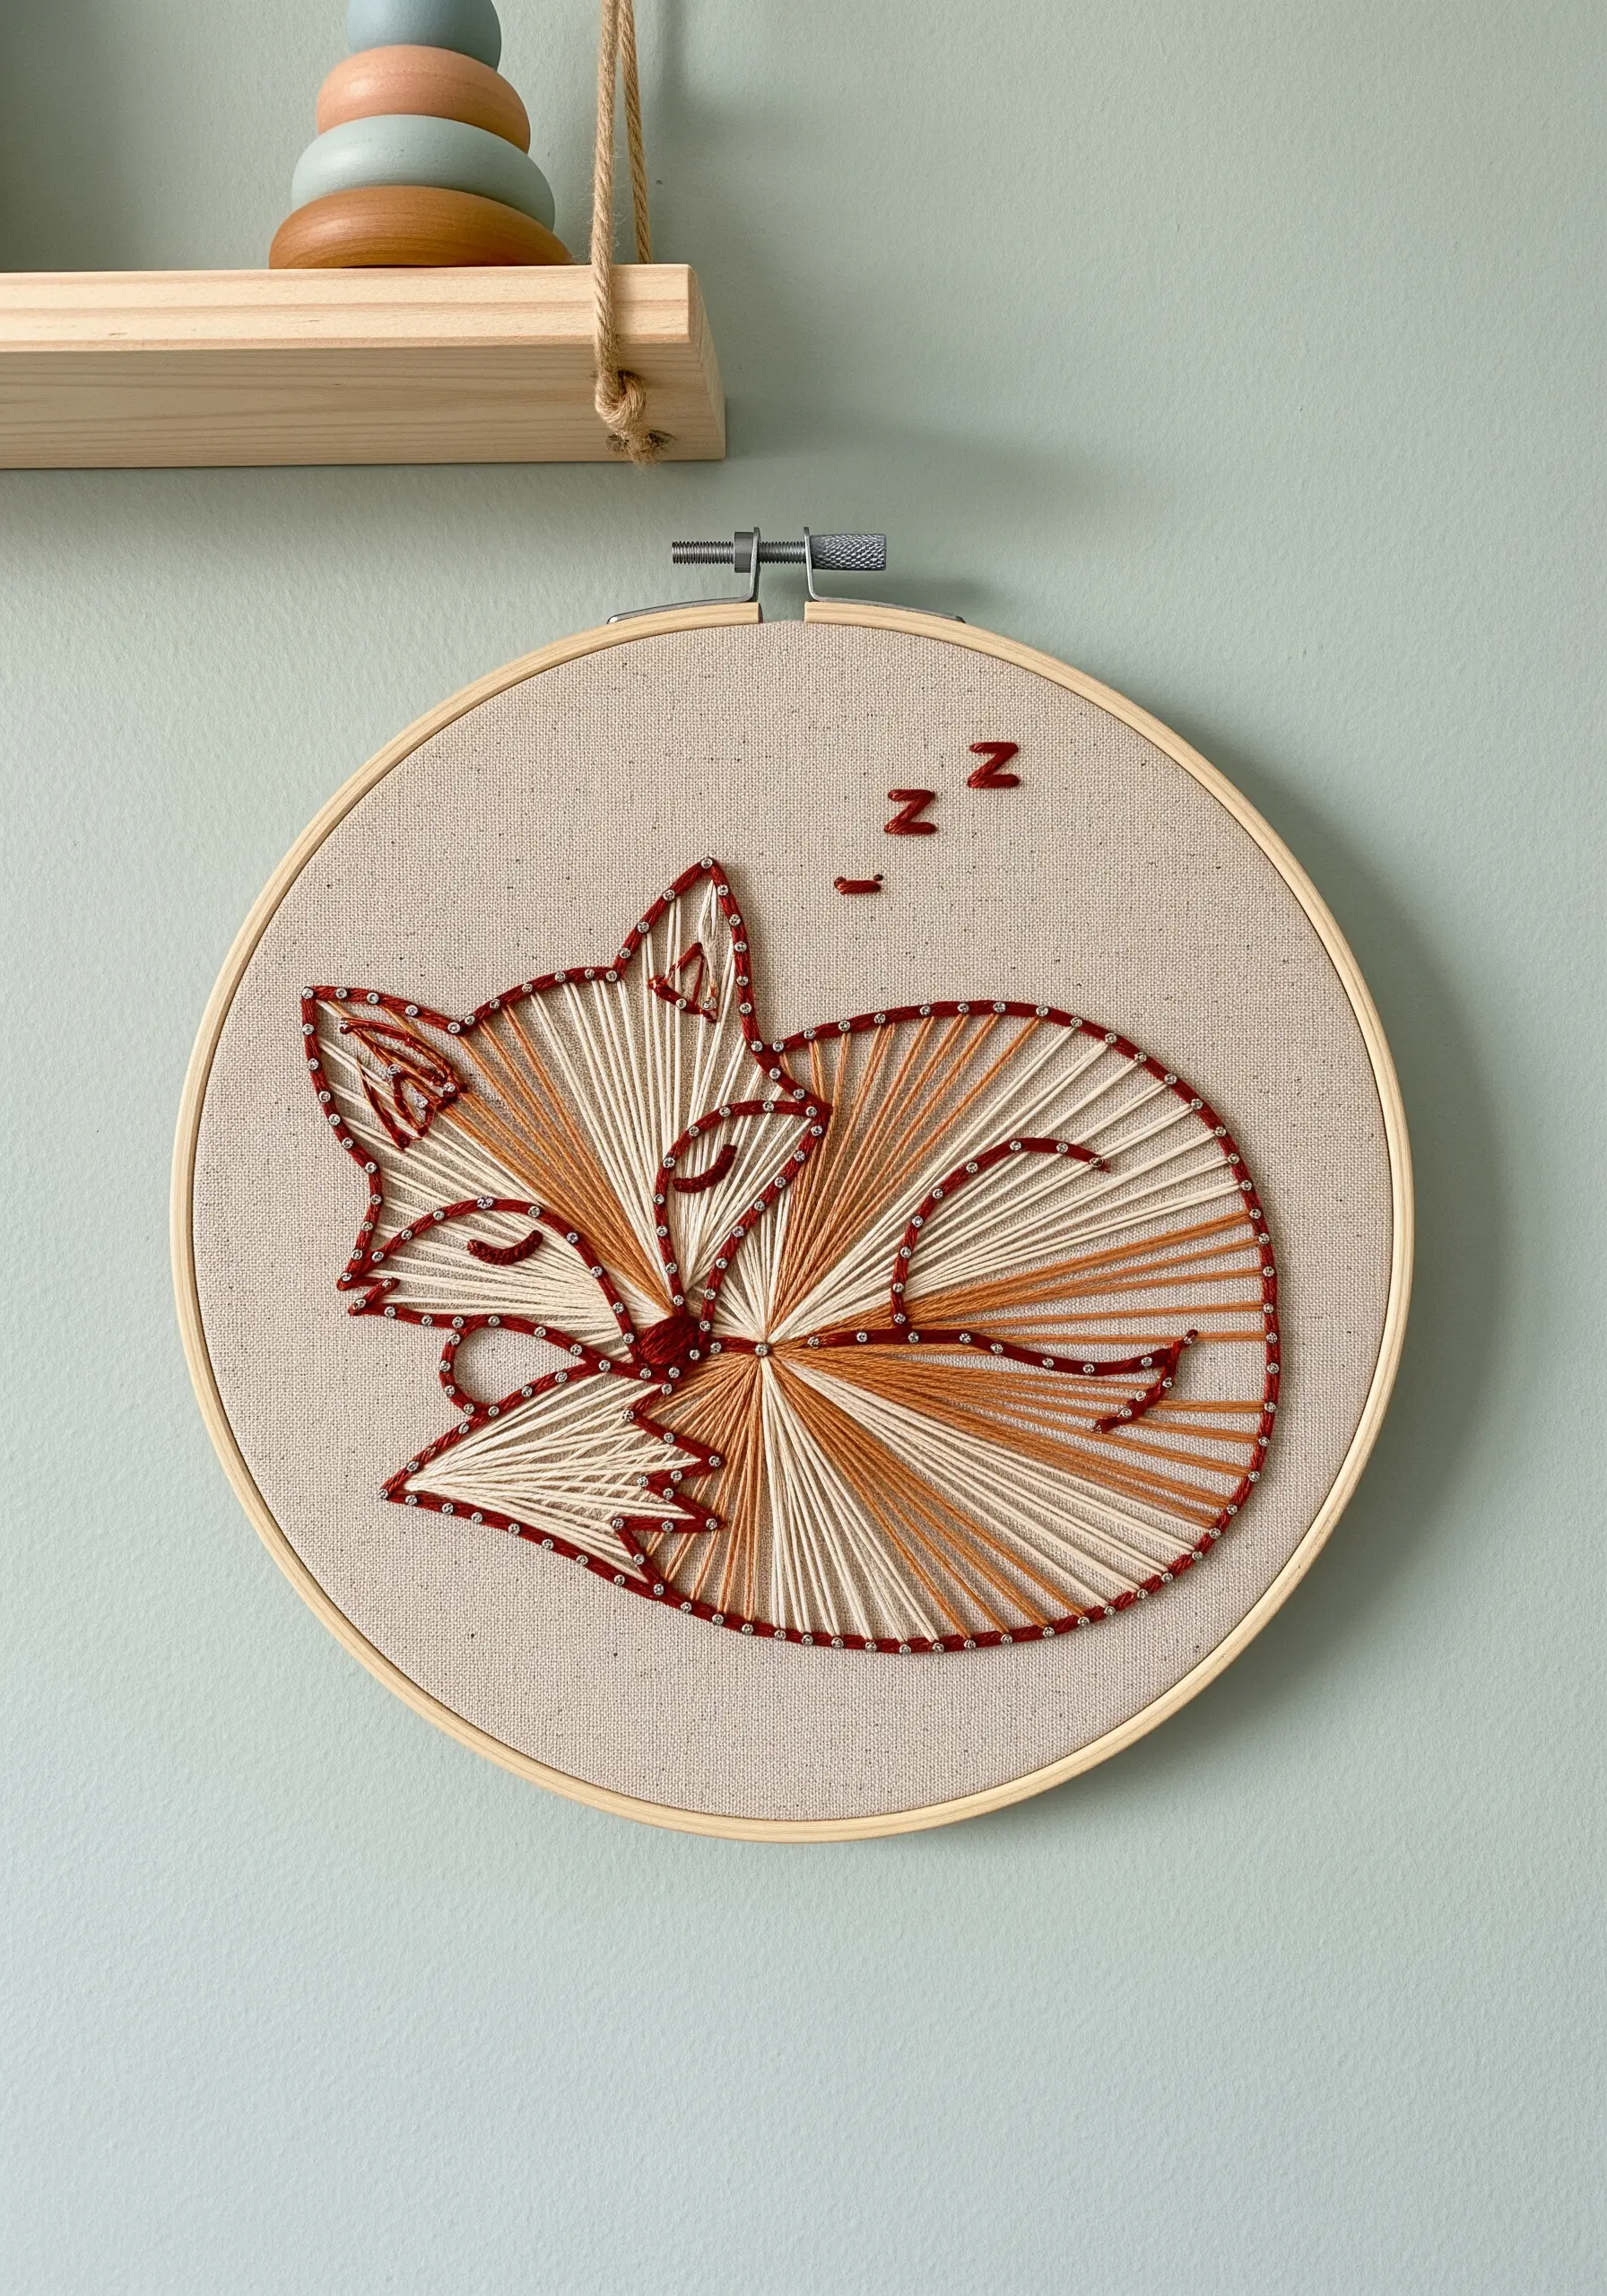
Instead of crisscrossing threads randomly, adapt this string art look by filling sections of your silhouette with directional satin stitches.
Create anchor points along the outline with tiny seed stitches or beads, then work your satin stitch from these points toward a central focus within each shape—like the fox’s nose or the curve of its back.
This method organizes the ‘strings’ into neat, flowing segments that give the animal a sense of form and softness.
For the outline, use a contrasting, darker thread in a backstitch or stem stitch to create a crisp edge that contains the fill and makes the silhouette pop.
2. Create Sophisticated Drama with Metallic Thread on Dark Fabric
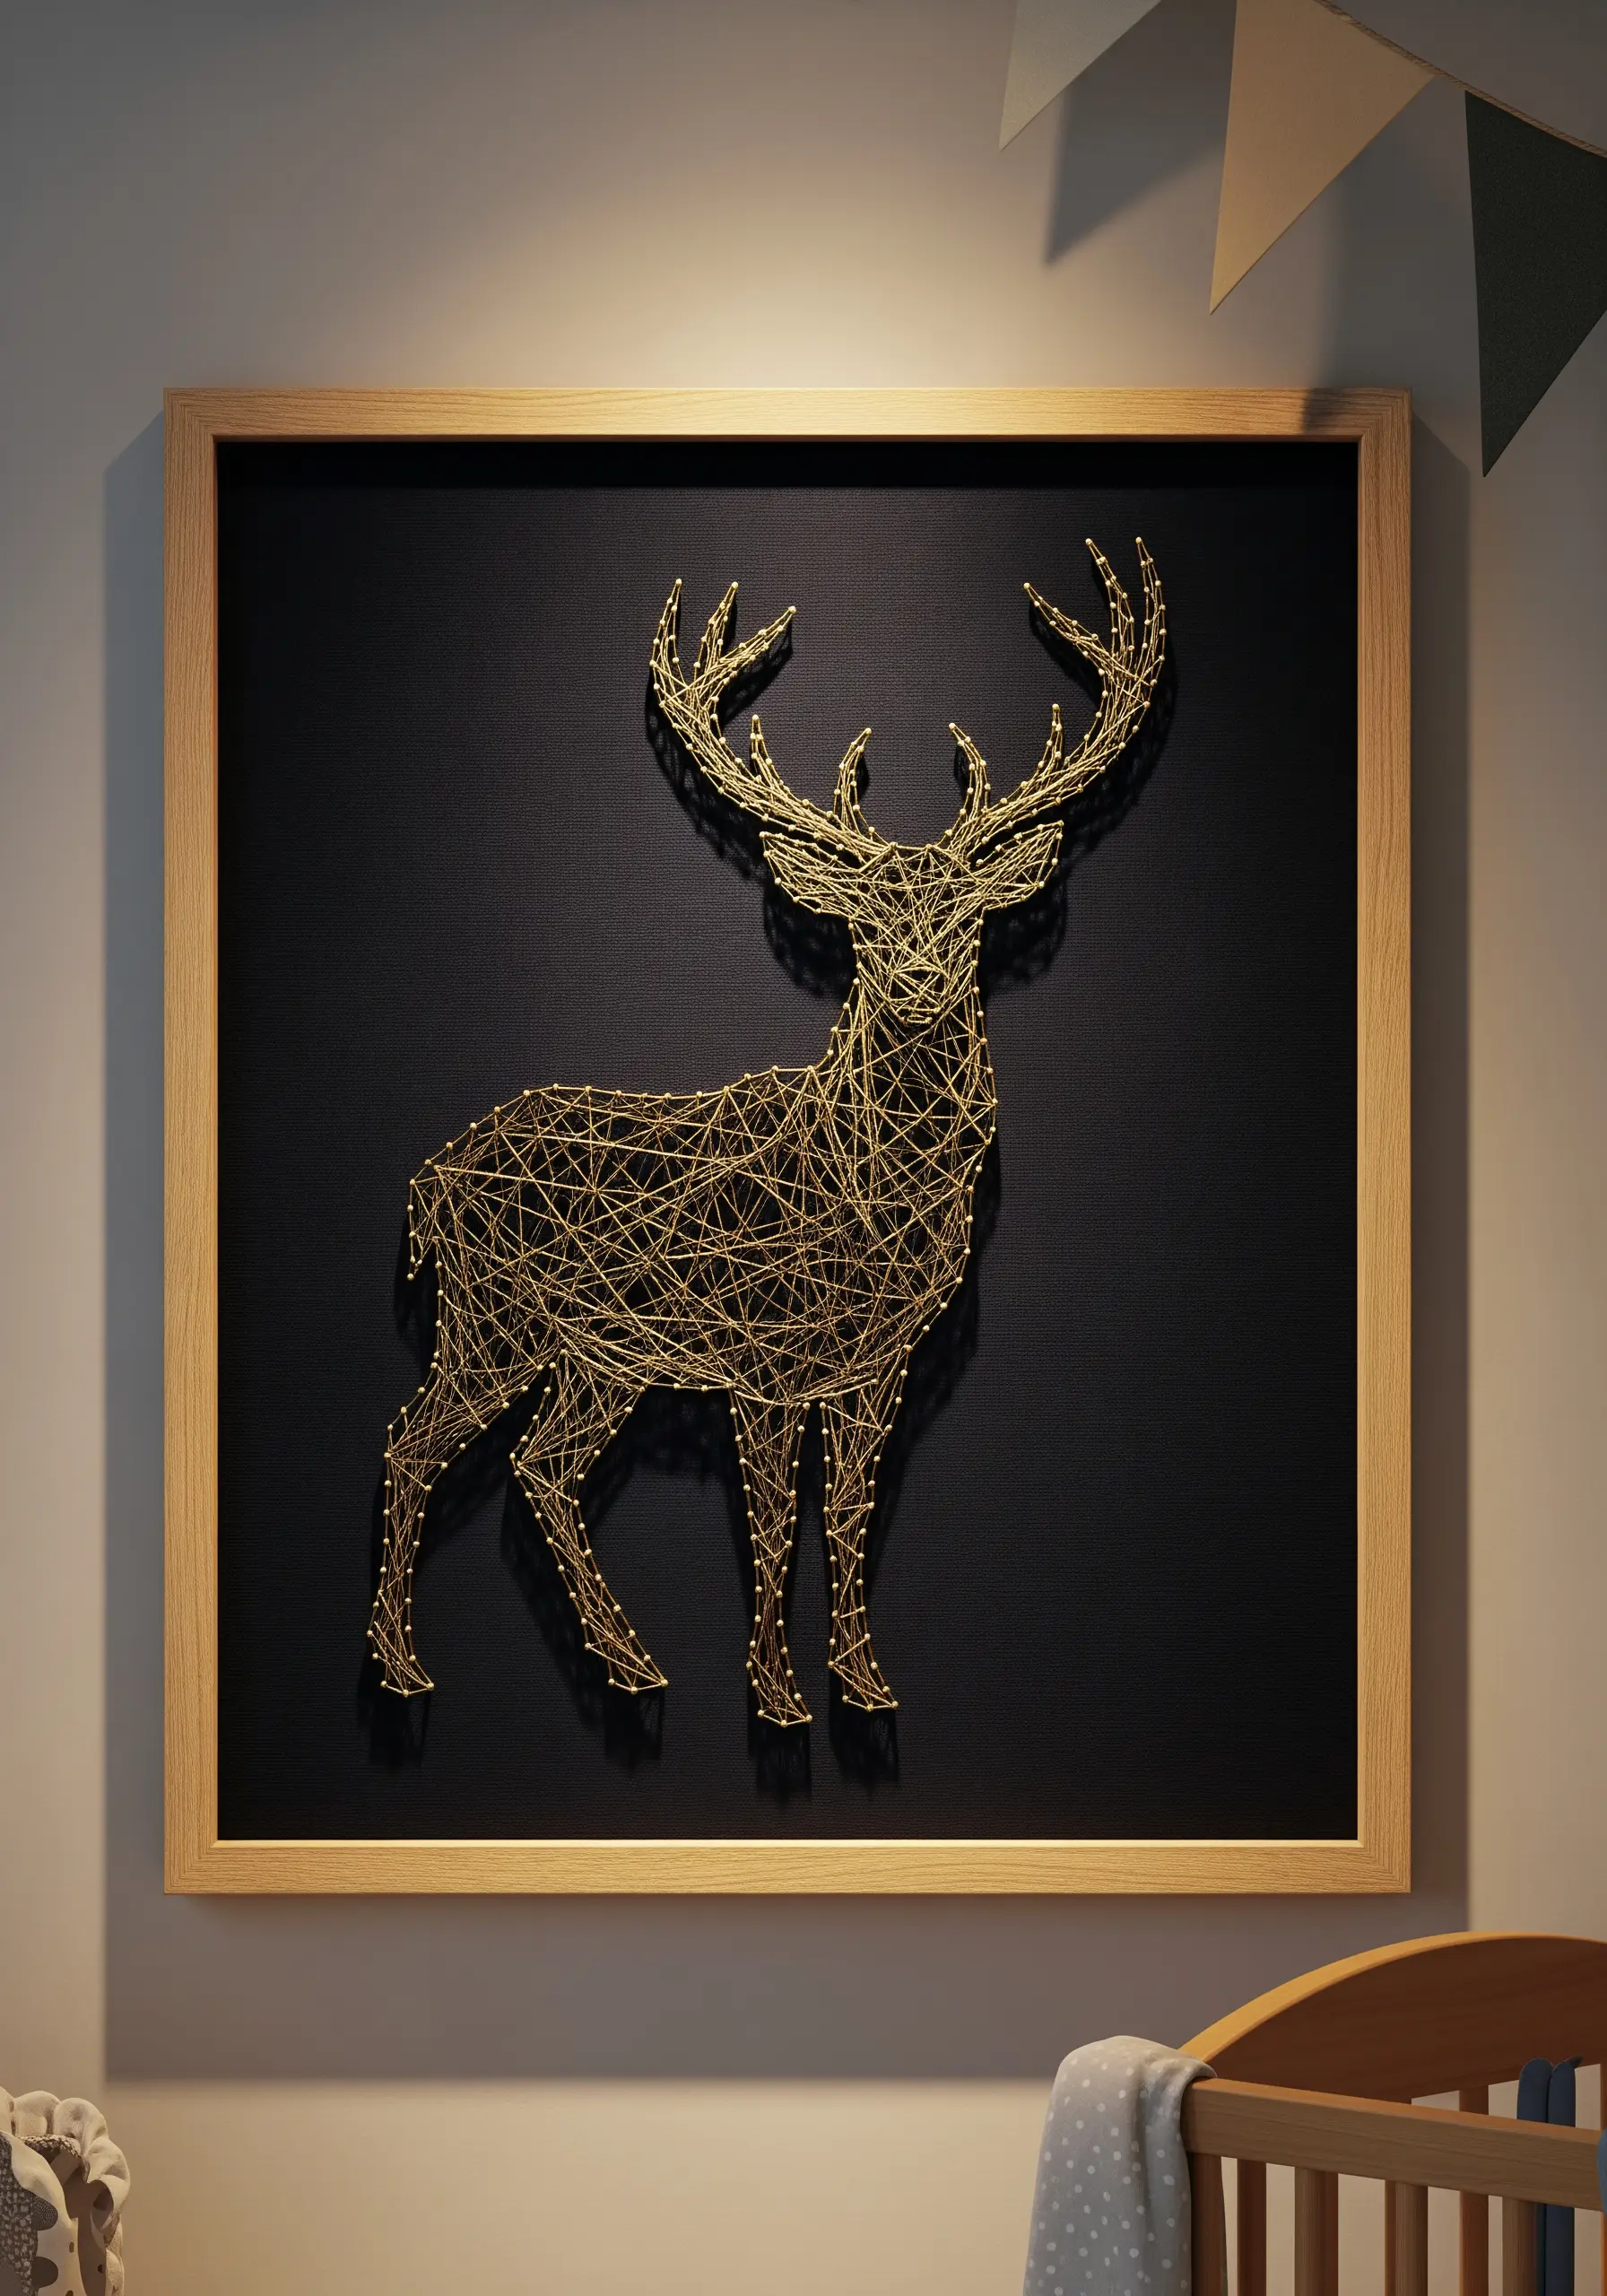
Elevate a simple silhouette by choosing a high-contrast palette.
Work with a single strand of fine metallic thread on black or navy linen to replicate the delicate, web-like quality of this deer.
Instead of pins, use tiny, evenly spaced backstitches along the outline to act as your anchor points.
Keep your straight stitches long and taut, layering them to build density in areas like the antlers and chest, creating a design that feels both powerful and ethereal—perfect for modern nursery stitch art.
3. Map Color-Blocking with Long-and-Short Stitch

Use the geometric sections of a string art pattern as a guide for color-blocking with thread.
Fill each segment of the bear with a soft long-and-short stitch, using a different shade of blue, grey, or white for each section.
This technique eliminates the need for harsh outlines between colors, allowing the tones to blend softly at the edges while still looking defined.
Stitching on felt, as shown here, provides a stable, non-fraying base that adds to the cozy, plush feel of the final piece.
4. Achieve a Seamless Gradient with Thread Blending

To translate the smooth color transition of this whale, use the principles of thread painting.
Select four to five shades of a single color, from light to dark.
Fill the silhouette with long, straight stitches, starting with the lightest color and gradually introducing the darker shades, overlapping your stitches to create a seamless blend.
Ensure all your stitches follow the natural curves of the animal’s body to enhance the illusion of depth and movement.
5. Combine Graphic Outlines with Geometric Fill Stitches
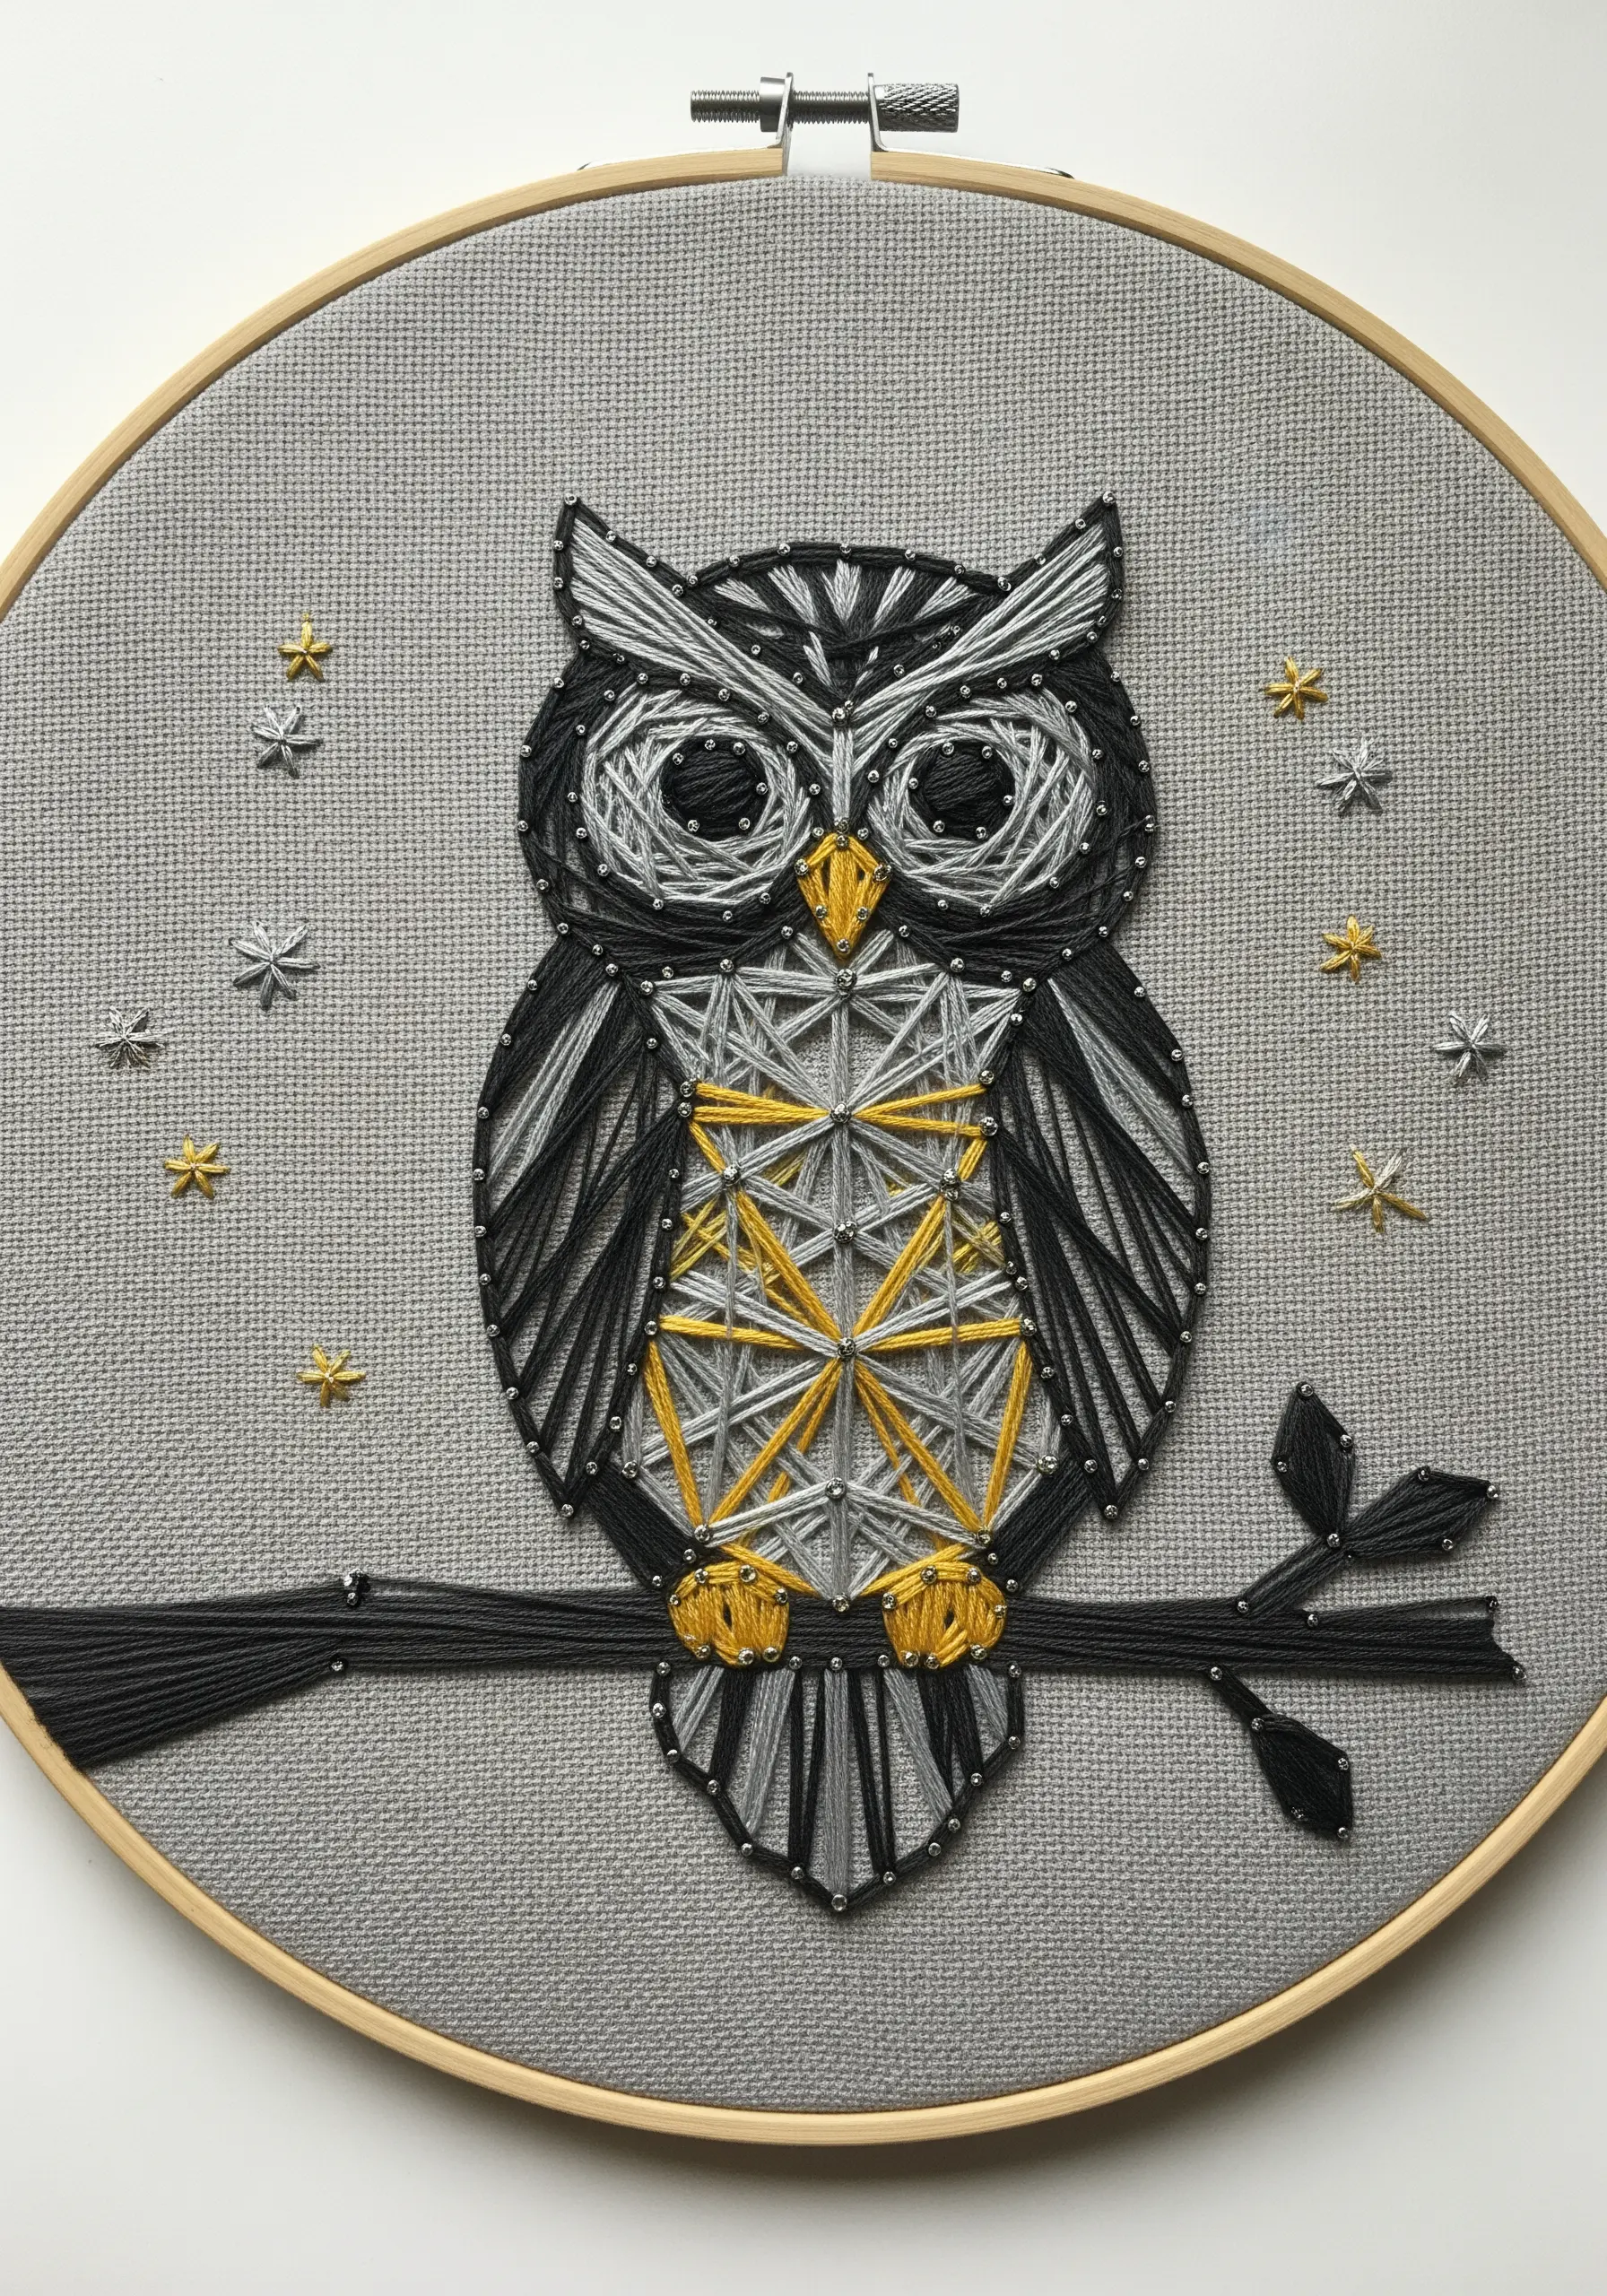
Create visual interest by contrasting bold outlines with delicate interior patterns.
Use a thick, 6-strand floss or pearl cotton for the owl’s main outline with a stem stitch for a rope-like finish.
For the geometric fills on the wings and body, switch to a finer, single strand of thread.
Introduce a pop of metallic gold for the central starburst pattern to draw the eye and add a touch of magic, scattering tiny metallic star stitches in the background to complete the scene.
6. Incorporate Playful 3D Texture with a Yarn Pom-Pom
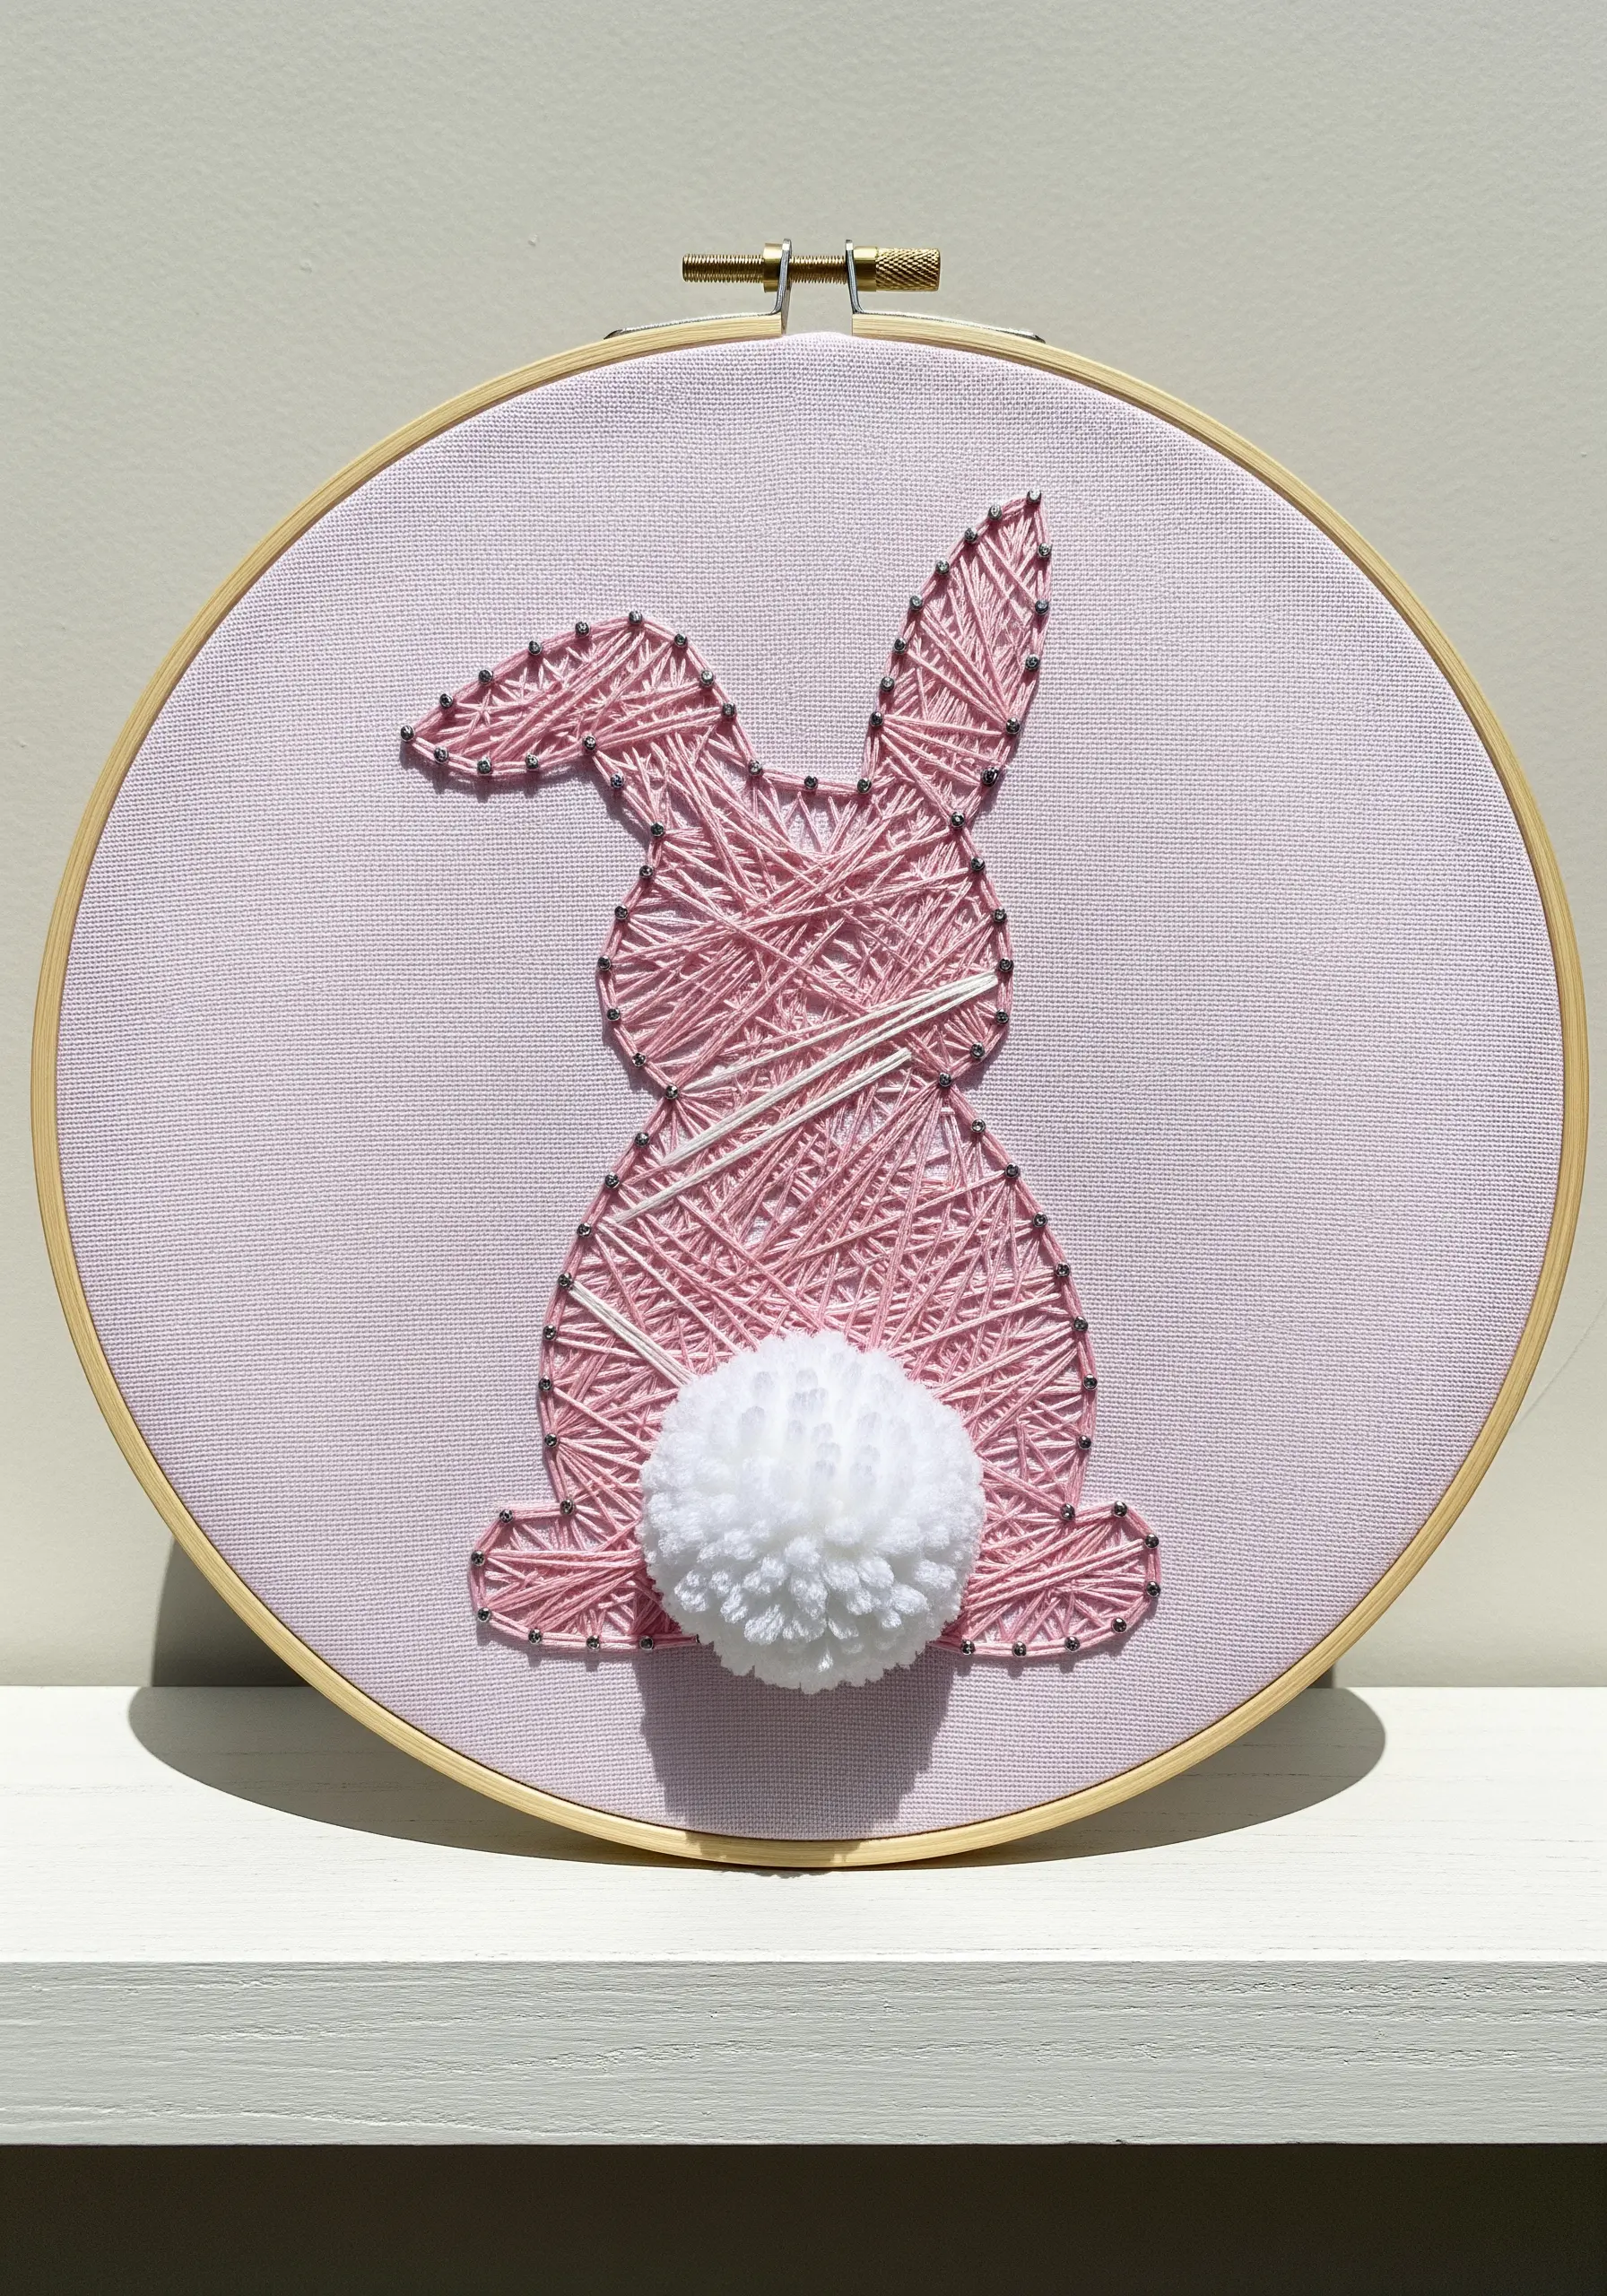
Add a delightful, tactile element to your embroidery by mixing mediums.
Stitch the rabbit’s body with simple, crisscrossing straight stitches in a soft pink floss to mimic the string art effect.
For the tail, create a small, fluffy pom-pom using white yarn and securely stitch it onto the fabric.
This simple addition transforms a flat design into an interactive piece, making it one of those creative embroidery gift projects that’s especially charming for a nursery.
7. Create a Patchwork Effect with Directional Fill
Mimic the faceted look of this giraffe by treating each geometric shape as a tiny canvas.
Fill each triangle or polygon with satin stitches, but change the direction of your stitches for every adjacent shape.
Use a palette of warm yellows, oranges, and golds to create a cohesive yet varied pattern.
This technique catches the light differently across the surface, giving the animal a subtle shimmer and a beautiful, mosaic-like quality.
8. Use Stitch Density to Define Form in a Monochromatic Palette
When working with a single color, you can create definition by varying your stitch density.
Outline the elephant and moon with a tight, close-set backstitch.
Then, fill the interior with long straight stitches, placing them closer together in areas that need shading (like the elephant’s belly) and farther apart in highlighted areas.
This allows the dark background fabric to show through, creating depth and tone without changing your thread color. Sprinkle French knots in silver thread for a starry night sky.
9. Capture a Sense of Motion with Scattered Stitches
Bring your animal silhouette to life by stitching elements that suggest movement.
Embroider the dolphin’s body with smooth, dense straight stitches.
For the water splashes, use detached chain stitches and single straight stitches scattered outward from the tail.
By varying the length, direction, and color of these splash stitches, you create a dynamic effect that makes the dolphin appear to be leaping right off the fabric.
10. Define Shapes with Clean, Bold Color Blocking
This squirrel design is a perfect study in using color to define form.
Divide the silhouette into distinct sections—tail, body, and leg—and fill each with a dense satin stitch in a solid, contrasting color.
This approach gives your work a clean, graphic, and modern feel.
To maintain perfectly crisp edges between colors, outline each section with a split stitch *before* filling it with satin stitch. This creates a raised barrier that keeps your fill stitches neat.
11. Let Variegated Thread Create Effortless Color Shifts
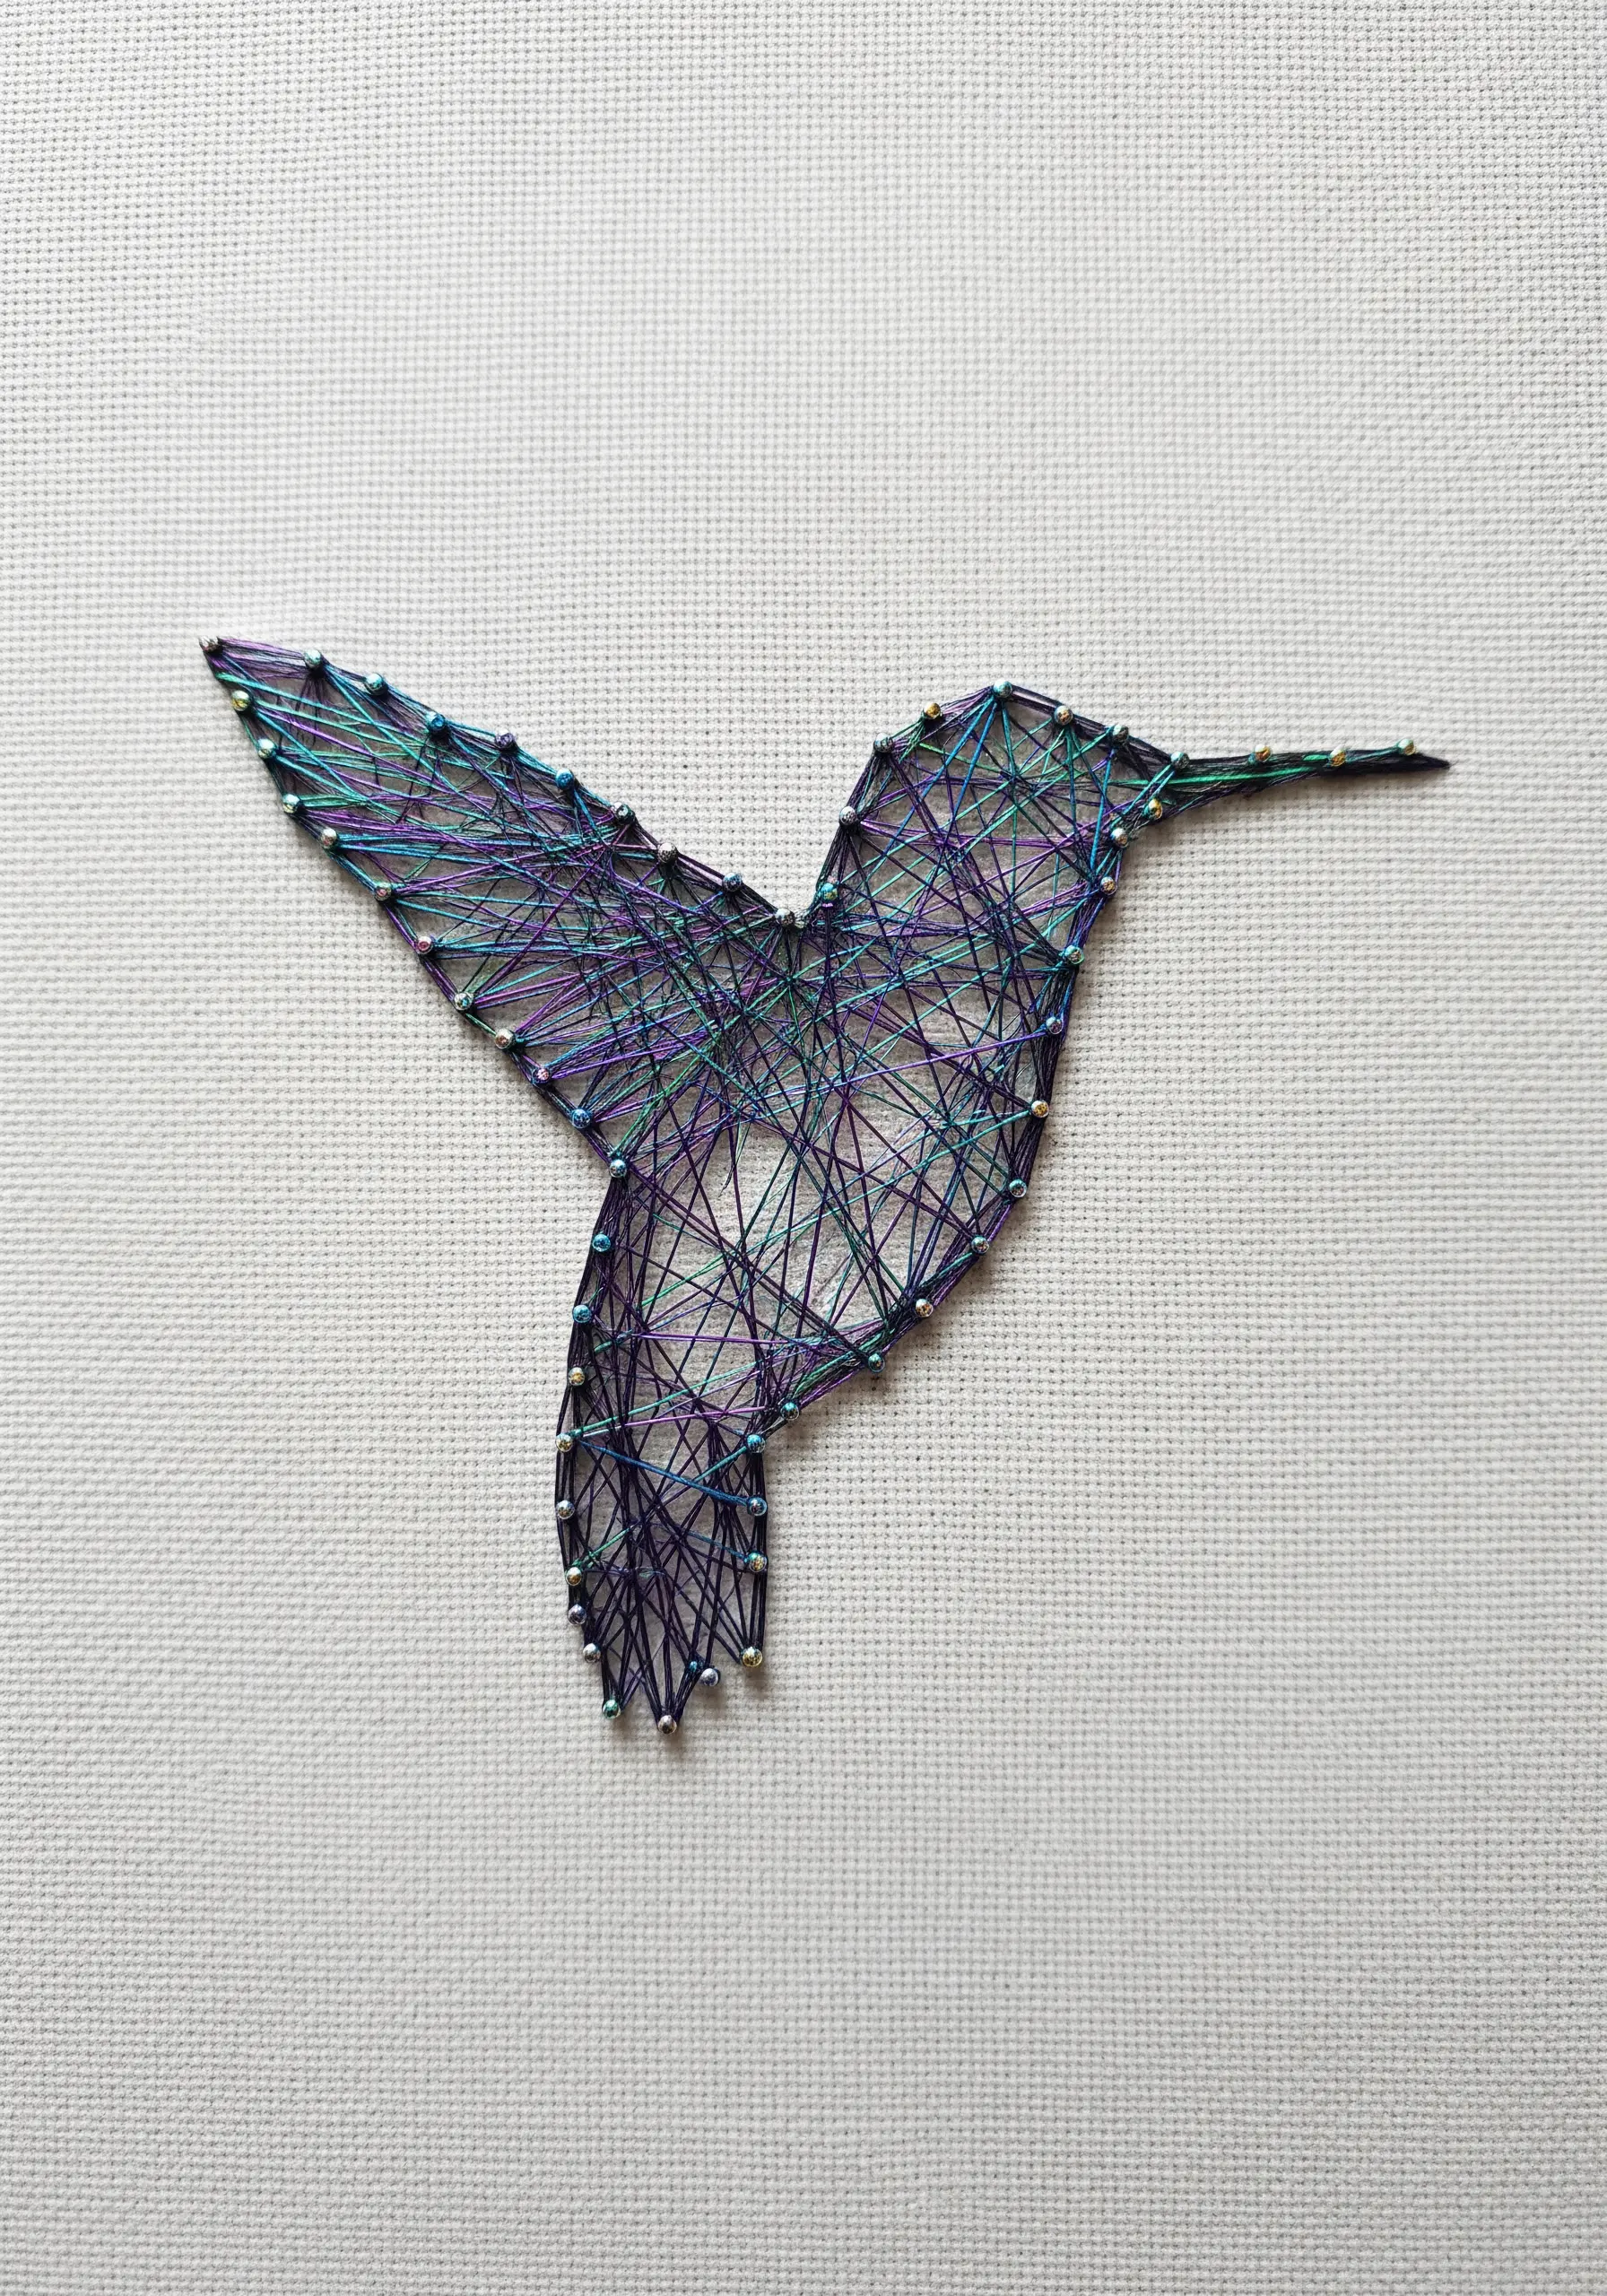
Achieve a complex, iridescent look with minimal effort by choosing a variegated thread.
A single strand of floss that shifts between blues, purples, and greens will naturally create the shimmering effect of a hummingbird’s feathers as you fill the shape with long straight stitches.
The random nature of the color changes adds an organic, painterly quality to the piece, proving that sometimes the simplest stitch is the most effective when paired with the right material.
12. Build Tactile Spines with Turkey Work Stitch
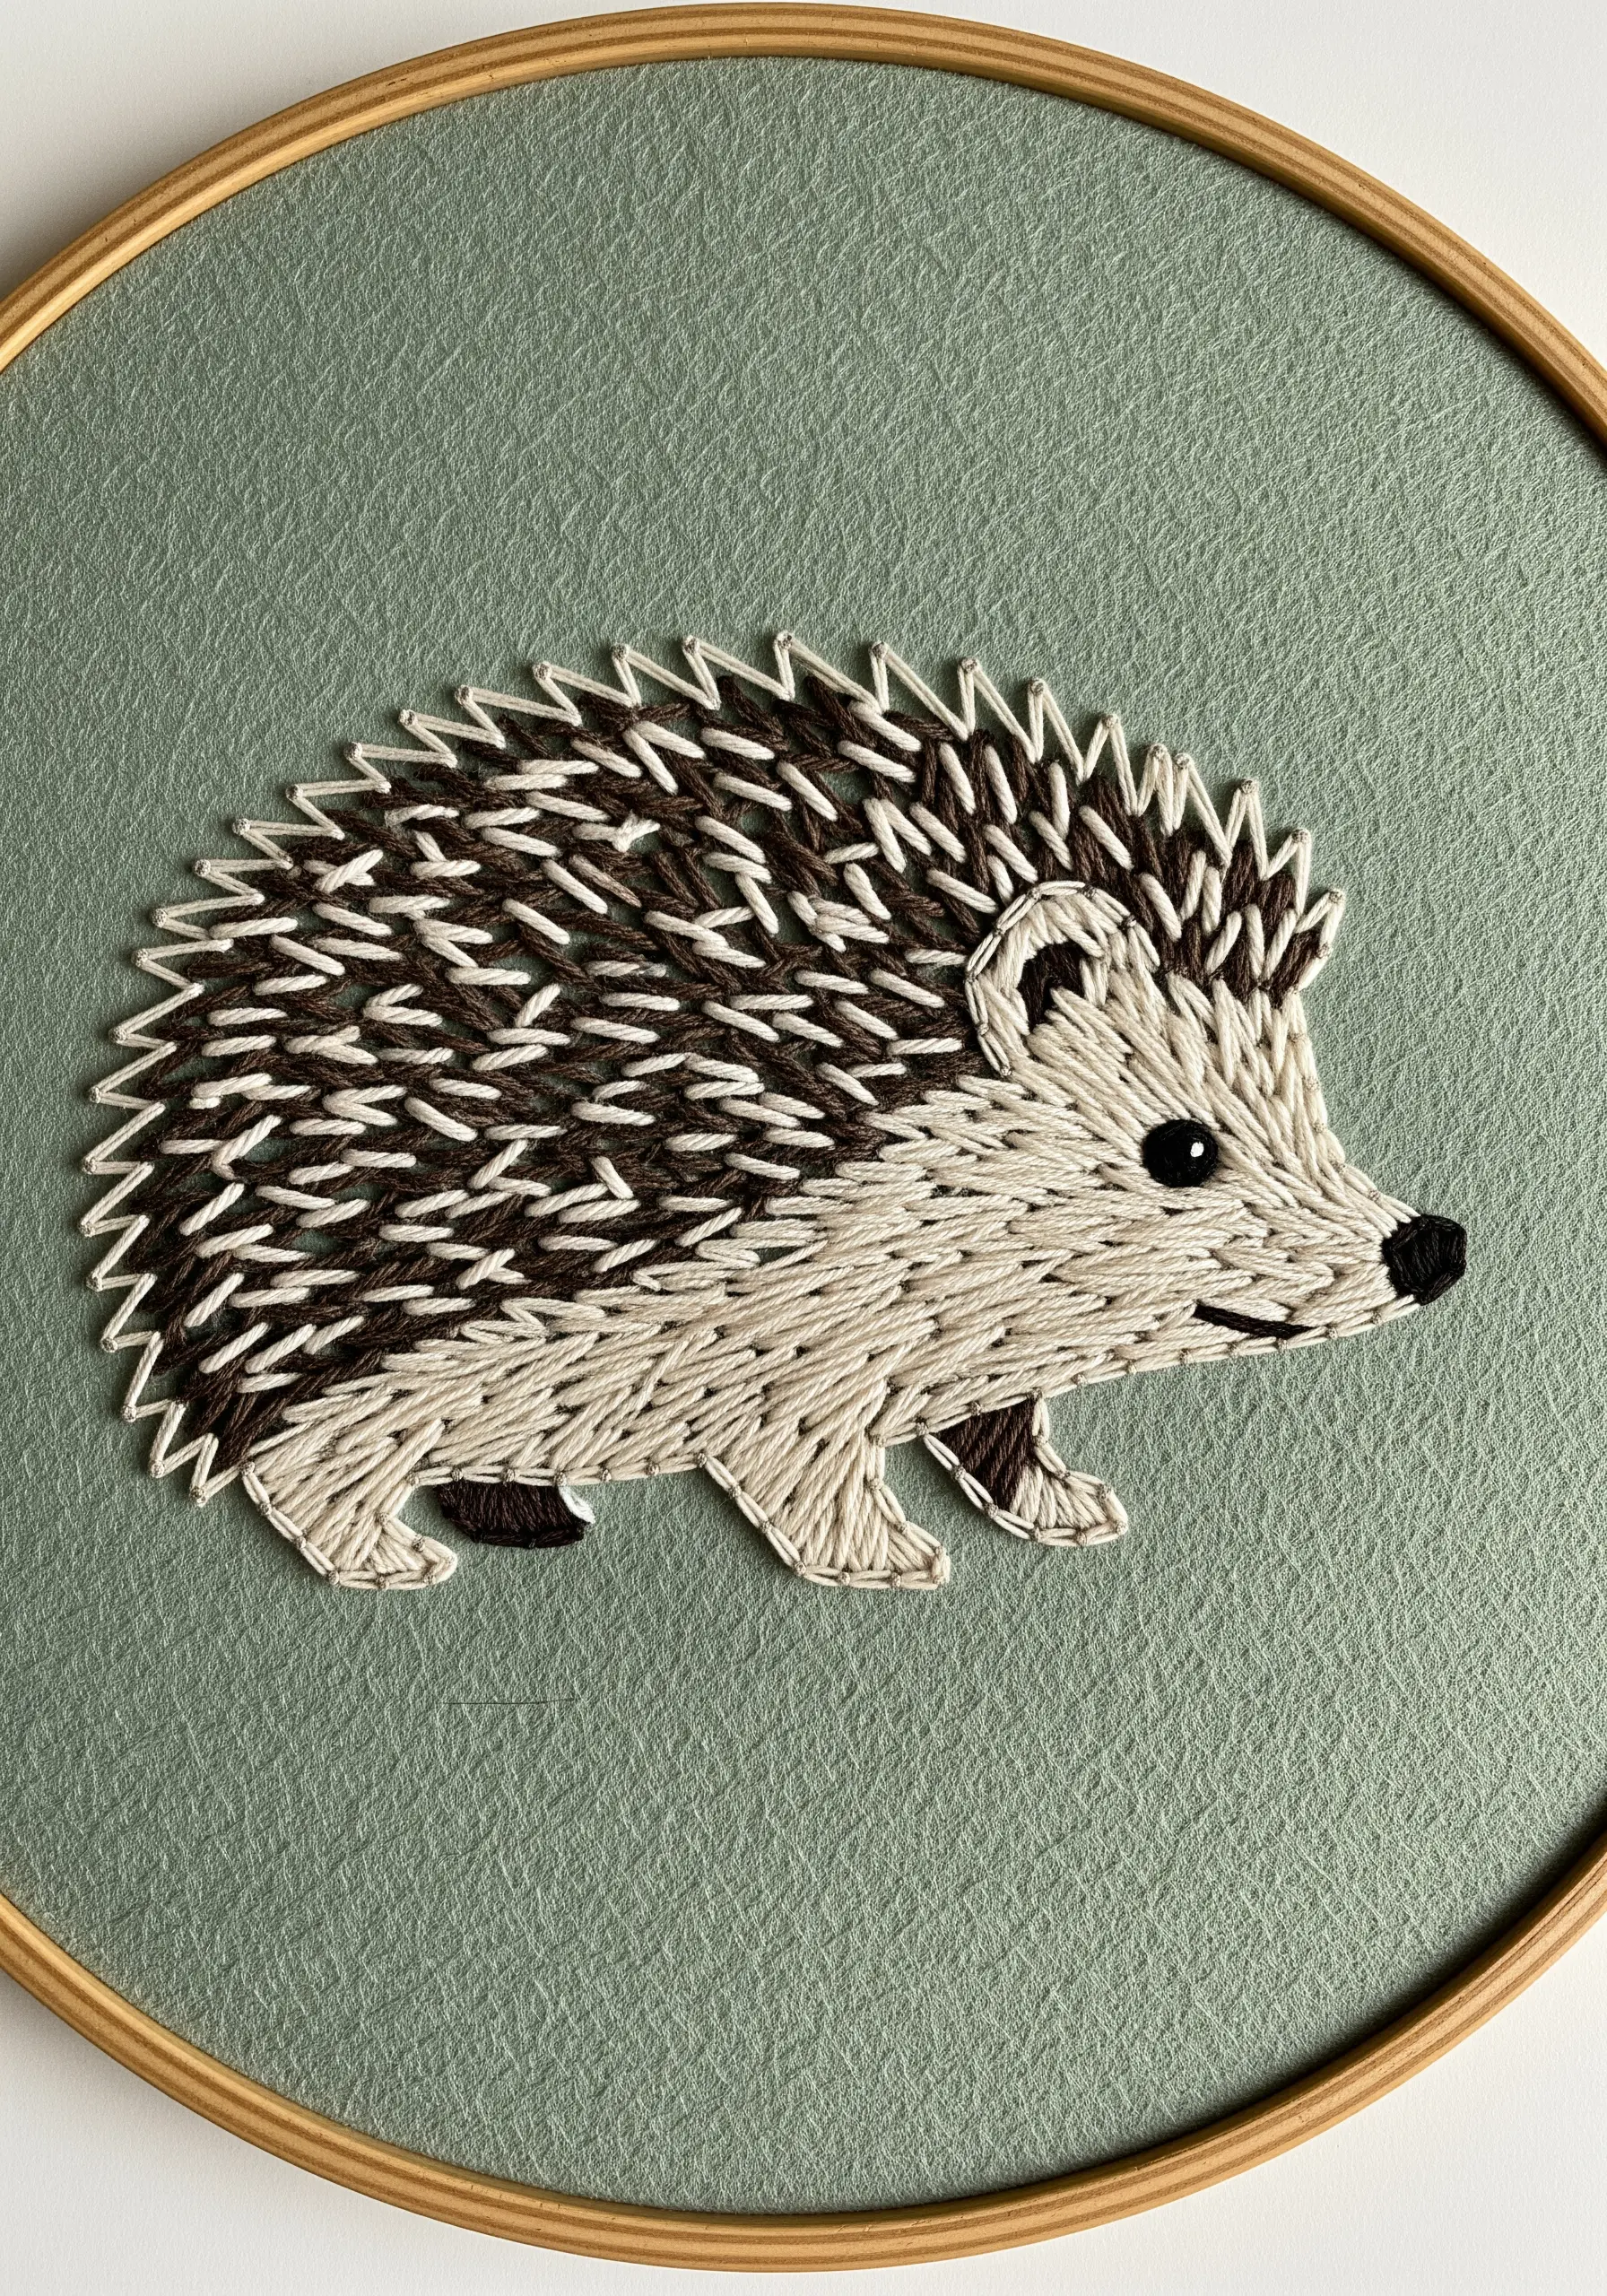
Move beyond flat stitches and give this hedgehog a truly prickly texture.
Work rows of turkey stitch (also known as the Ghiordes knot) across the hedgehog’s back, using a blend of brown and cream threads.
Once the loops are complete, trim them to create a dense, brush-like pile.
Contrast this high-texture area with a smooth satin stitch for the face and underbelly, creating a piece that invites touch.
13. Sculpt a 3D Mane with Looped Stitches
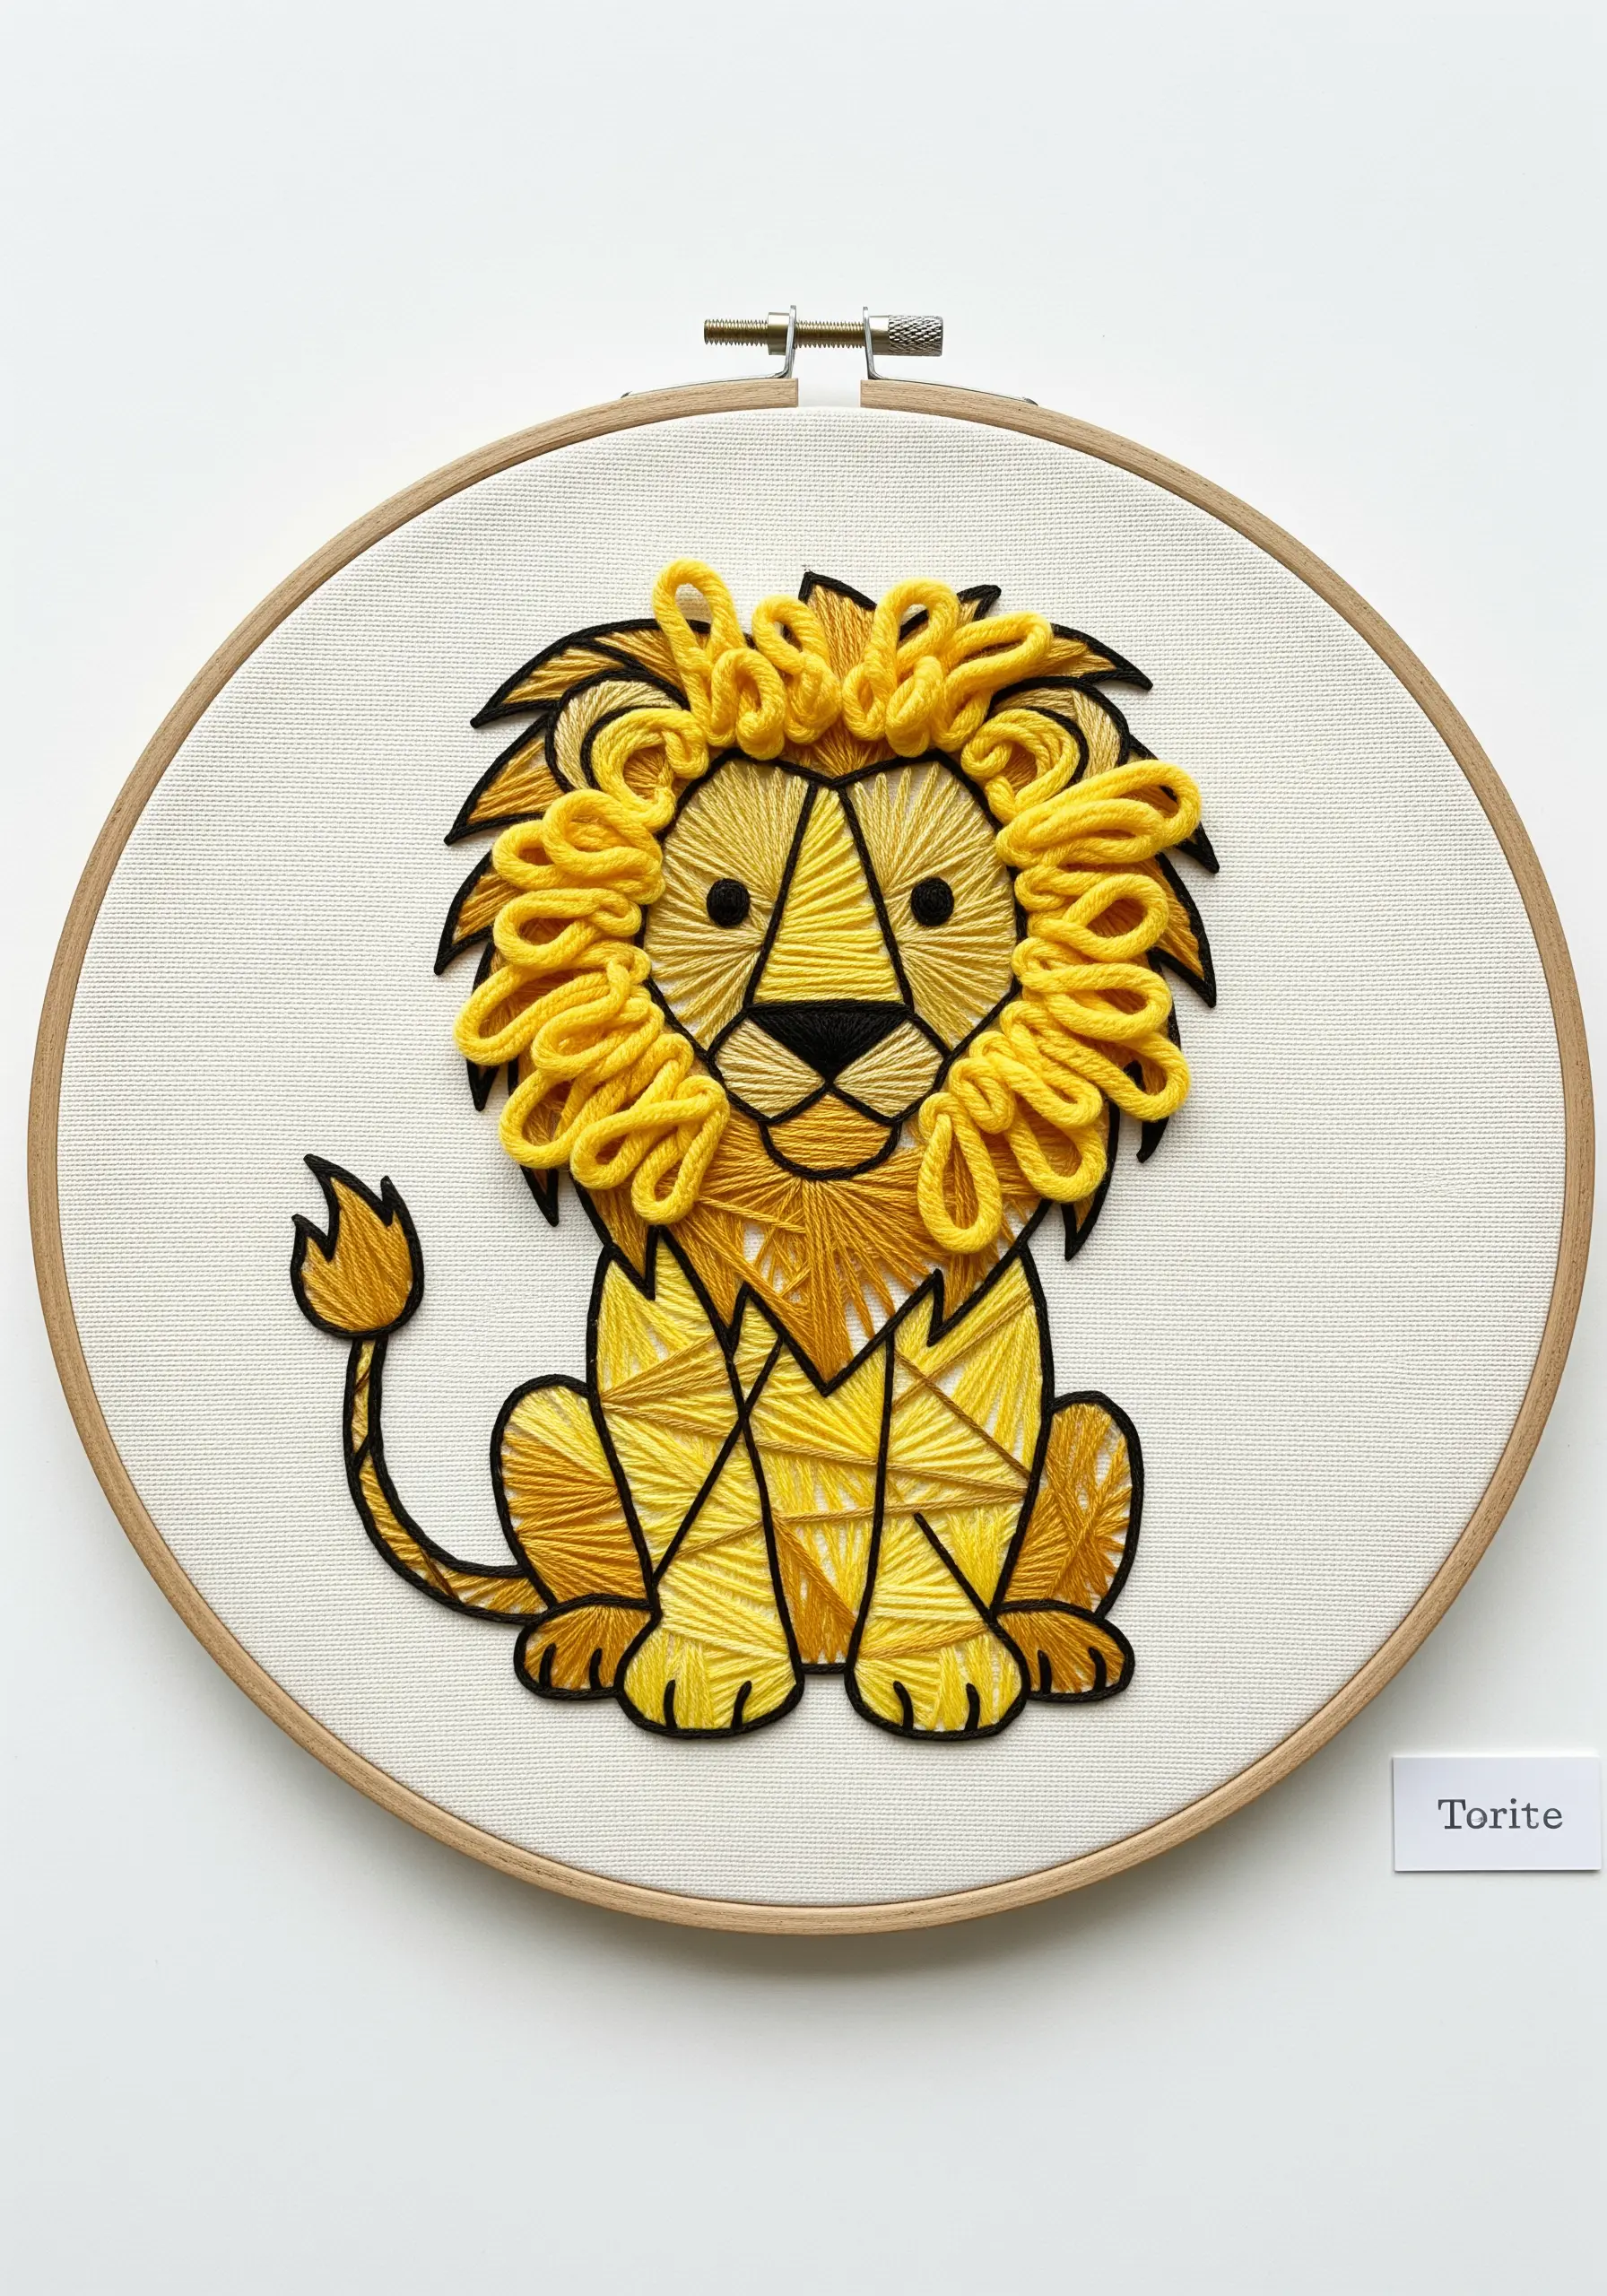
Give your lion a magnificent mane that stands out from the fabric.
Use a thick, soft yarn or multiple strands of floss to create raised, looped stitches like the cast-on stitch or bullion knots around the face.
Don’t pull them completely tight; allow them to remain voluminous and coil naturally.
This statement textured embroidery technique instantly adds personality and a sculptural quality to your work.
14. Combine Textures for a Lifelike Composition
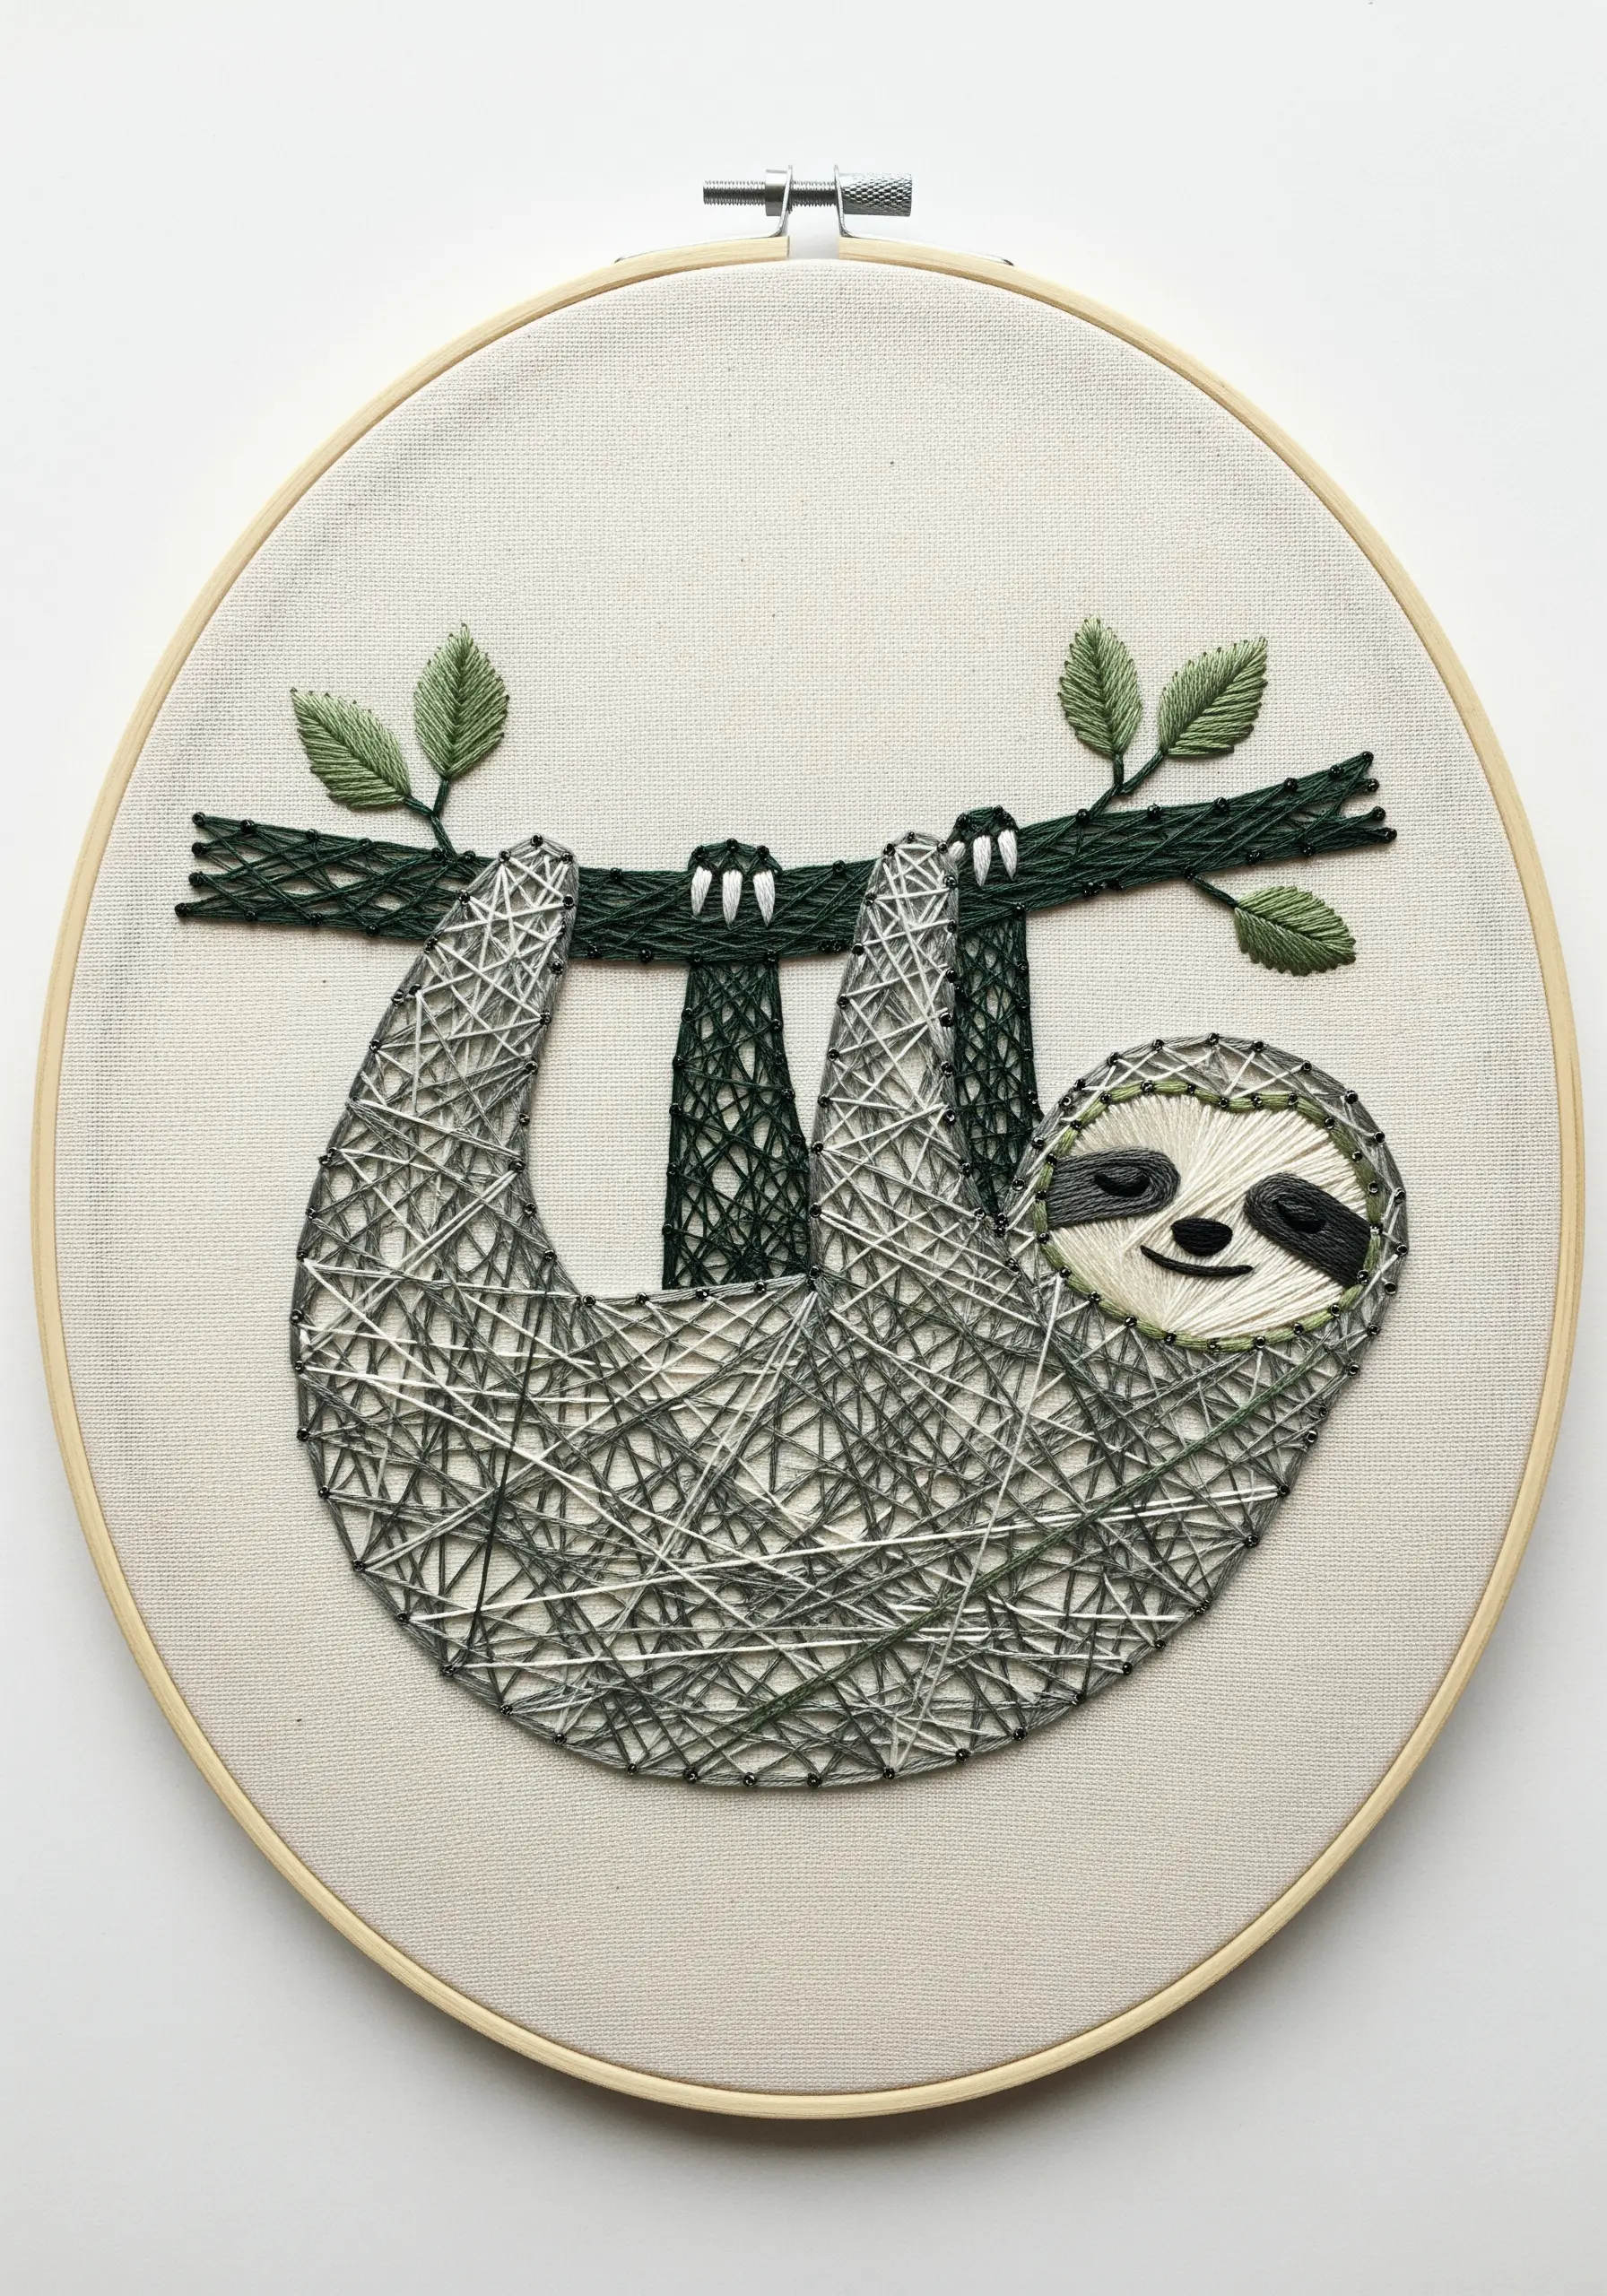
Create a more dynamic scene by assigning a different texture to each element.
Use a mix of grey and green straight stitches for the sloth’s fur to give it a slightly shaggy look.
For the branch, wrap a foundation of long stitches with a darker brown thread—a technique called couching—to mimic the texture of bark.
Finish with simple lazy daisy stitches for the leaves, giving each part of the design its own distinct and realistic character.
15. Master Crisp Edges with High-Contrast Satin Stitch
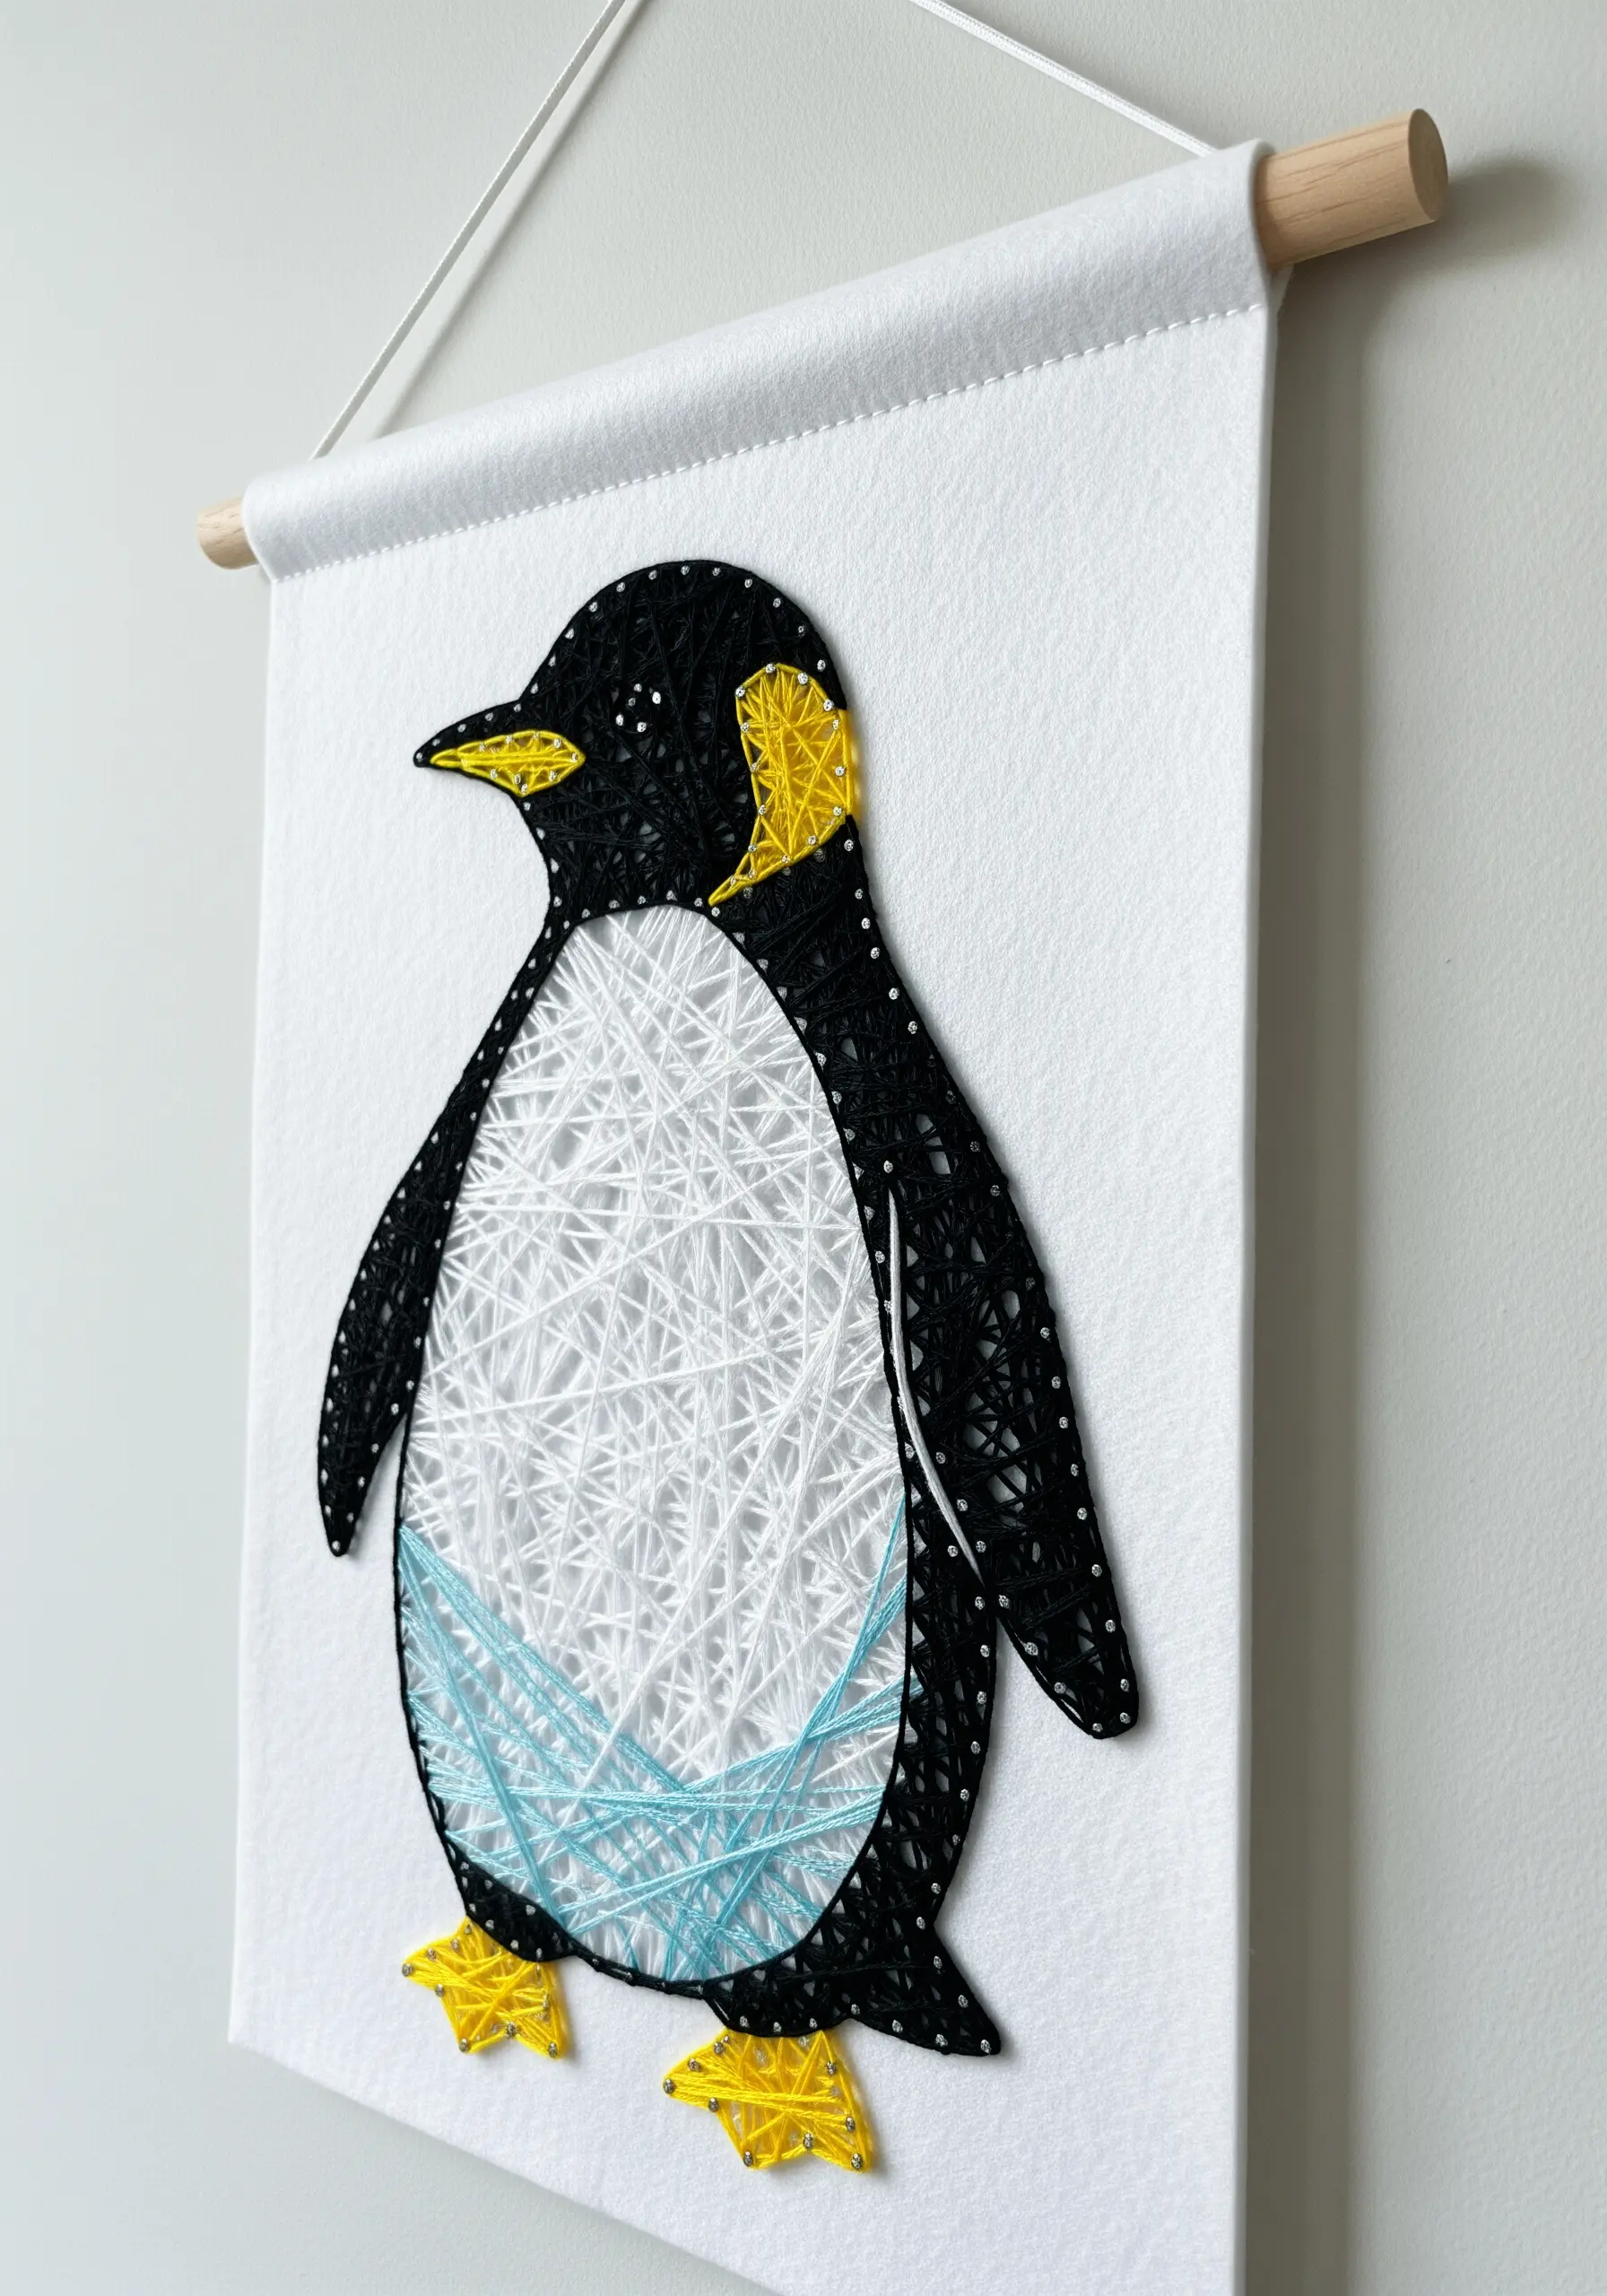
The key to a striking graphic animal like this penguin is the clean definition between colors.
Use a dense, smooth satin stitch to fill the black, white, and yellow areas.
To prevent colors from bleeding into one another and to achieve razor-sharp lines, always outline each section first with a split stitch in the matching color.
This raised edge acts as a perfect boundary for your satin stitches, ensuring a polished, professional finish.
16. Design a Cohesive Trio with a Shared Palette

When creating a set of embroideries, unity is key.
Stitch the same simple bird silhouette in three different hoops, but assign each one a distinct color from a coordinated pastel palette—like dusty rose, seafoam green, and cornflower blue.
Use the same neutral thread for details like the eye and outline on all three birds.
This repetition of form and restrained use of color results in a harmonious gallery wall that feels intentional and serene, making it perfect for hooped wall collage layouts.
17. Achieve an Ethereal Look with a Single Delicate Thread

Capture a sense of magic by simplifying your materials.
Use just a single strand of white or silver thread on a rich, colored fabric like this dusty rose cotton.
Fill the unicorn silhouette with random, layered straight stitches, allowing the background color to peek through.
This creates a delicate, sketch-like effect that feels light and airy, transforming the animal into something truly enchanting.
18. Embrace Maximalist Texture with Chunky Yarn and Weaving
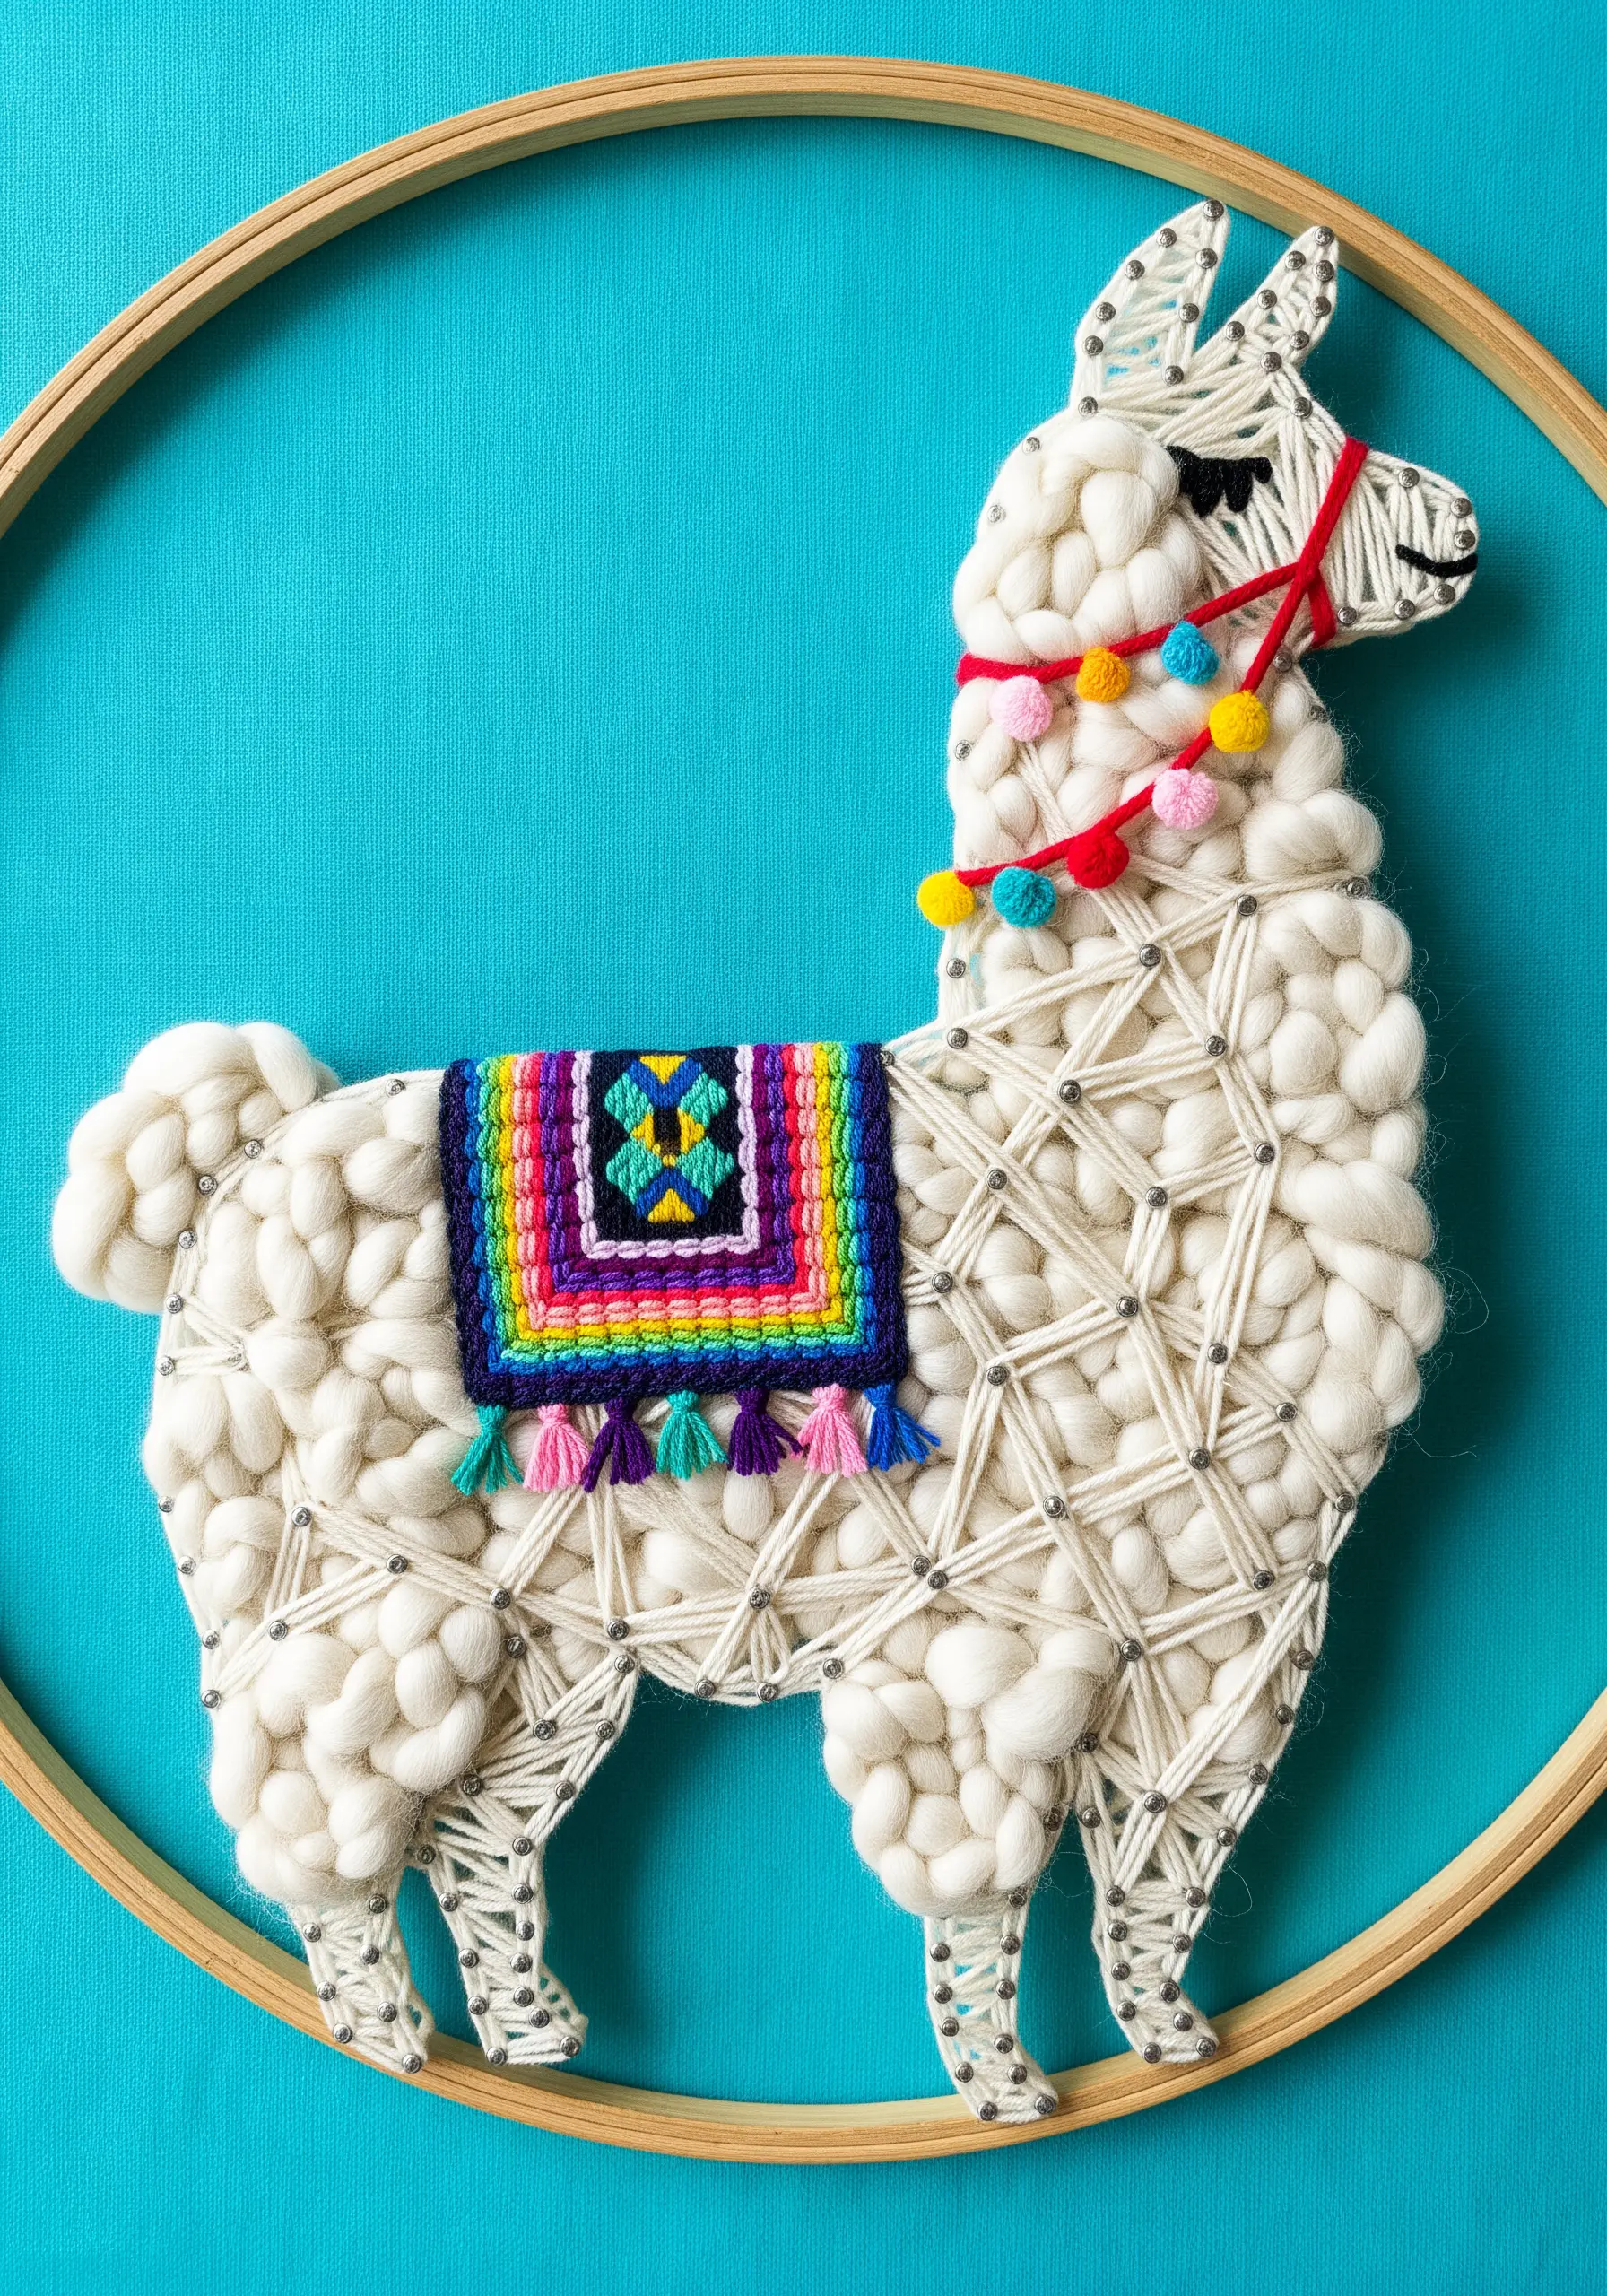
Push the boundaries of embroidery by incorporating chunky fibers.
Instead of floss, use a thick, unspun wool roving to fill the llama’s body with chunky French knots or by weaving it through a grid of foundation stitches.
This technique creates an incredibly plush, high-relief texture.
Accessorize with mini pom-poms and tassels for a playful, bohemian design that celebrates mixed-fiber creations.
19. Define Geometric Patterns with Contrasting Outlines
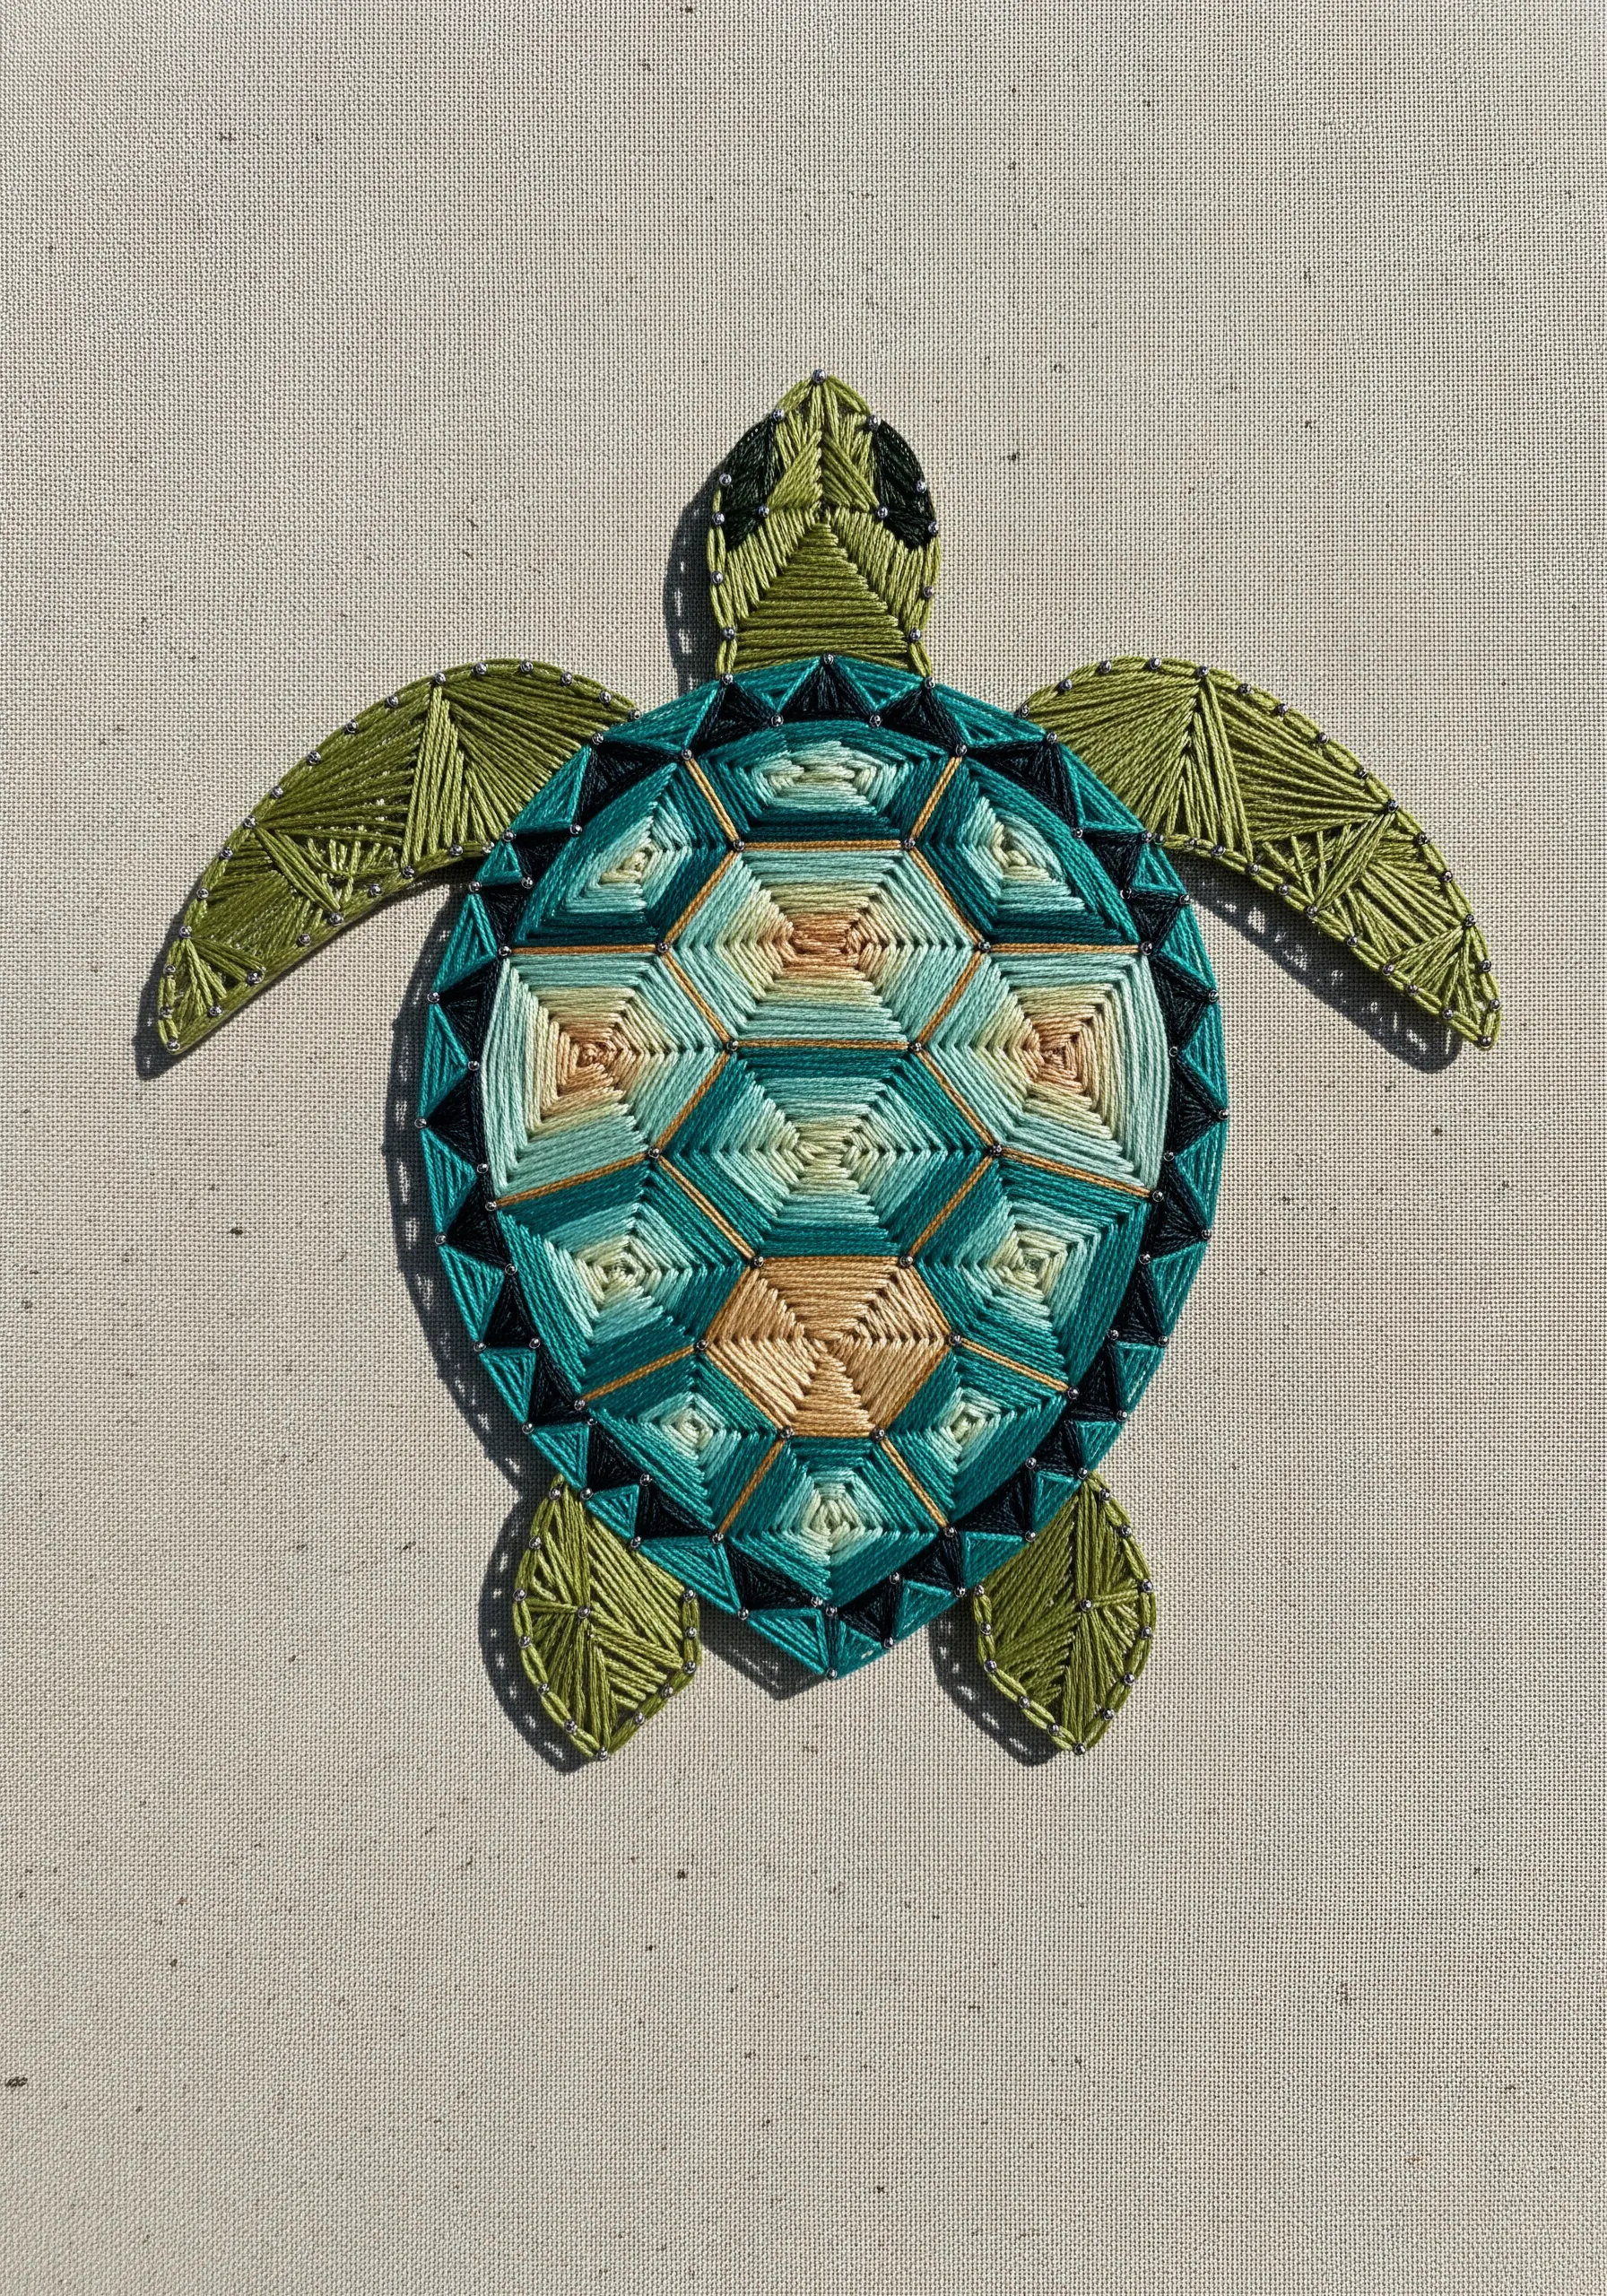
Recreate this turtle’s intricate shell by focusing on its geometric structure.
Fill each small shape on the shell with satin stitches in a palette of sea greens, teals, and sandy beiges.
The crucial step is to then outline every single segment with a bold backstitch in a dark, contrasting color like black or navy.
This technique defines the pattern and gives the design a sharp, stained-glass appearance that looks incredibly detailed and polished.
20. Create Translucence with Ribbon and Organza
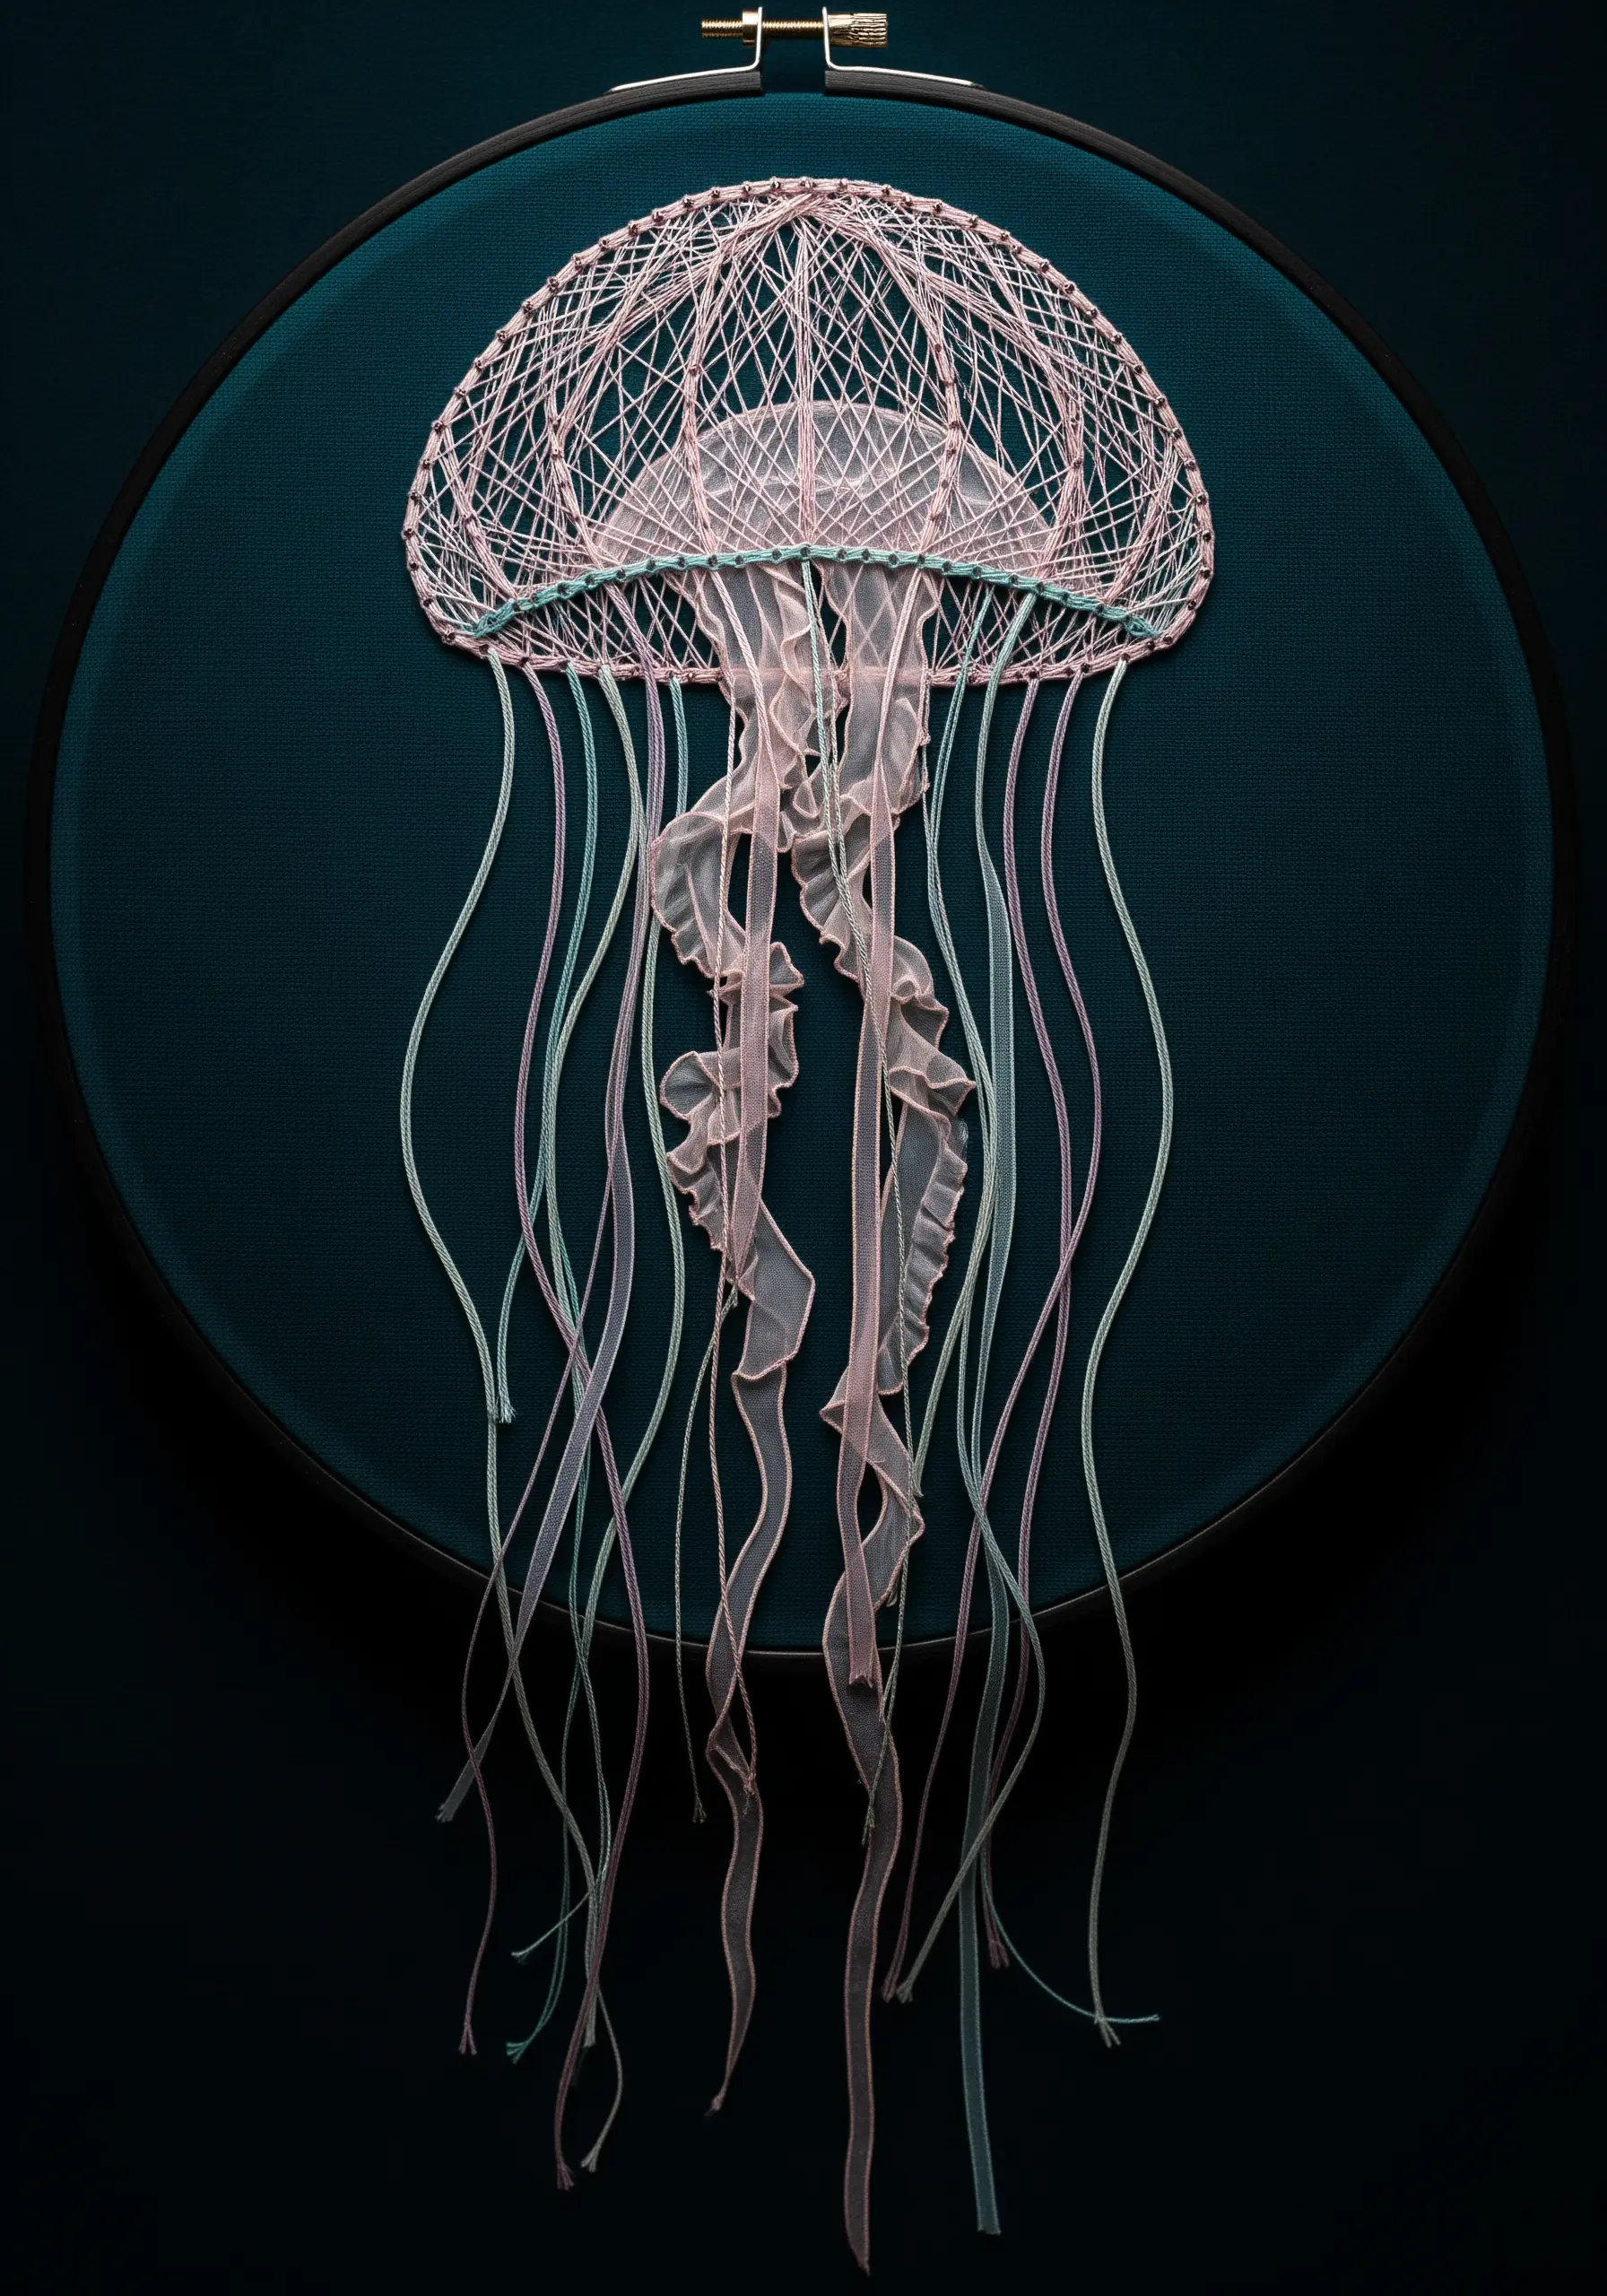
Capture the delicate, ethereal quality of a jellyfish by incorporating sheer materials.
Stitch the bell using a fine, light-colored thread in an open cross-hatch pattern to suggest translucency.
For the flowing tentacles, couch down thin strips of organza or chiffon ribbon, allowing them to twist and curl naturally.
This mixed-media embroidery technique adds a layer of depth and realism that thread alone cannot achieve, creating a truly mesmerizing piece.


