

Creating a quilt is an act of love, and each block is a chance to stitch a memory that will last for generations. But how do you ensure your embroidered animals feel truly special, infused with a life and softness that begs to be touched? The secret isn’t in complex patterns; it’s in the thoughtful details.
It’s about choosing the right stitch to mimic the texture of fur, blending colors to create depth, and using contrast to make a tiny creature pop from the fabric. It’s about understanding how a single strand of thread can capture a delicate whisker, while dense knots can build a woolly coat you can almost feel.
These ideas are more than just designs—they are small lessons in texture, light, and composition. Let them guide you in transforming simple squares of fabric into a collection of cherished moments, creating not just a blanket, but a true family heirloom.
1. Render Delicate Fur with Thread Painting
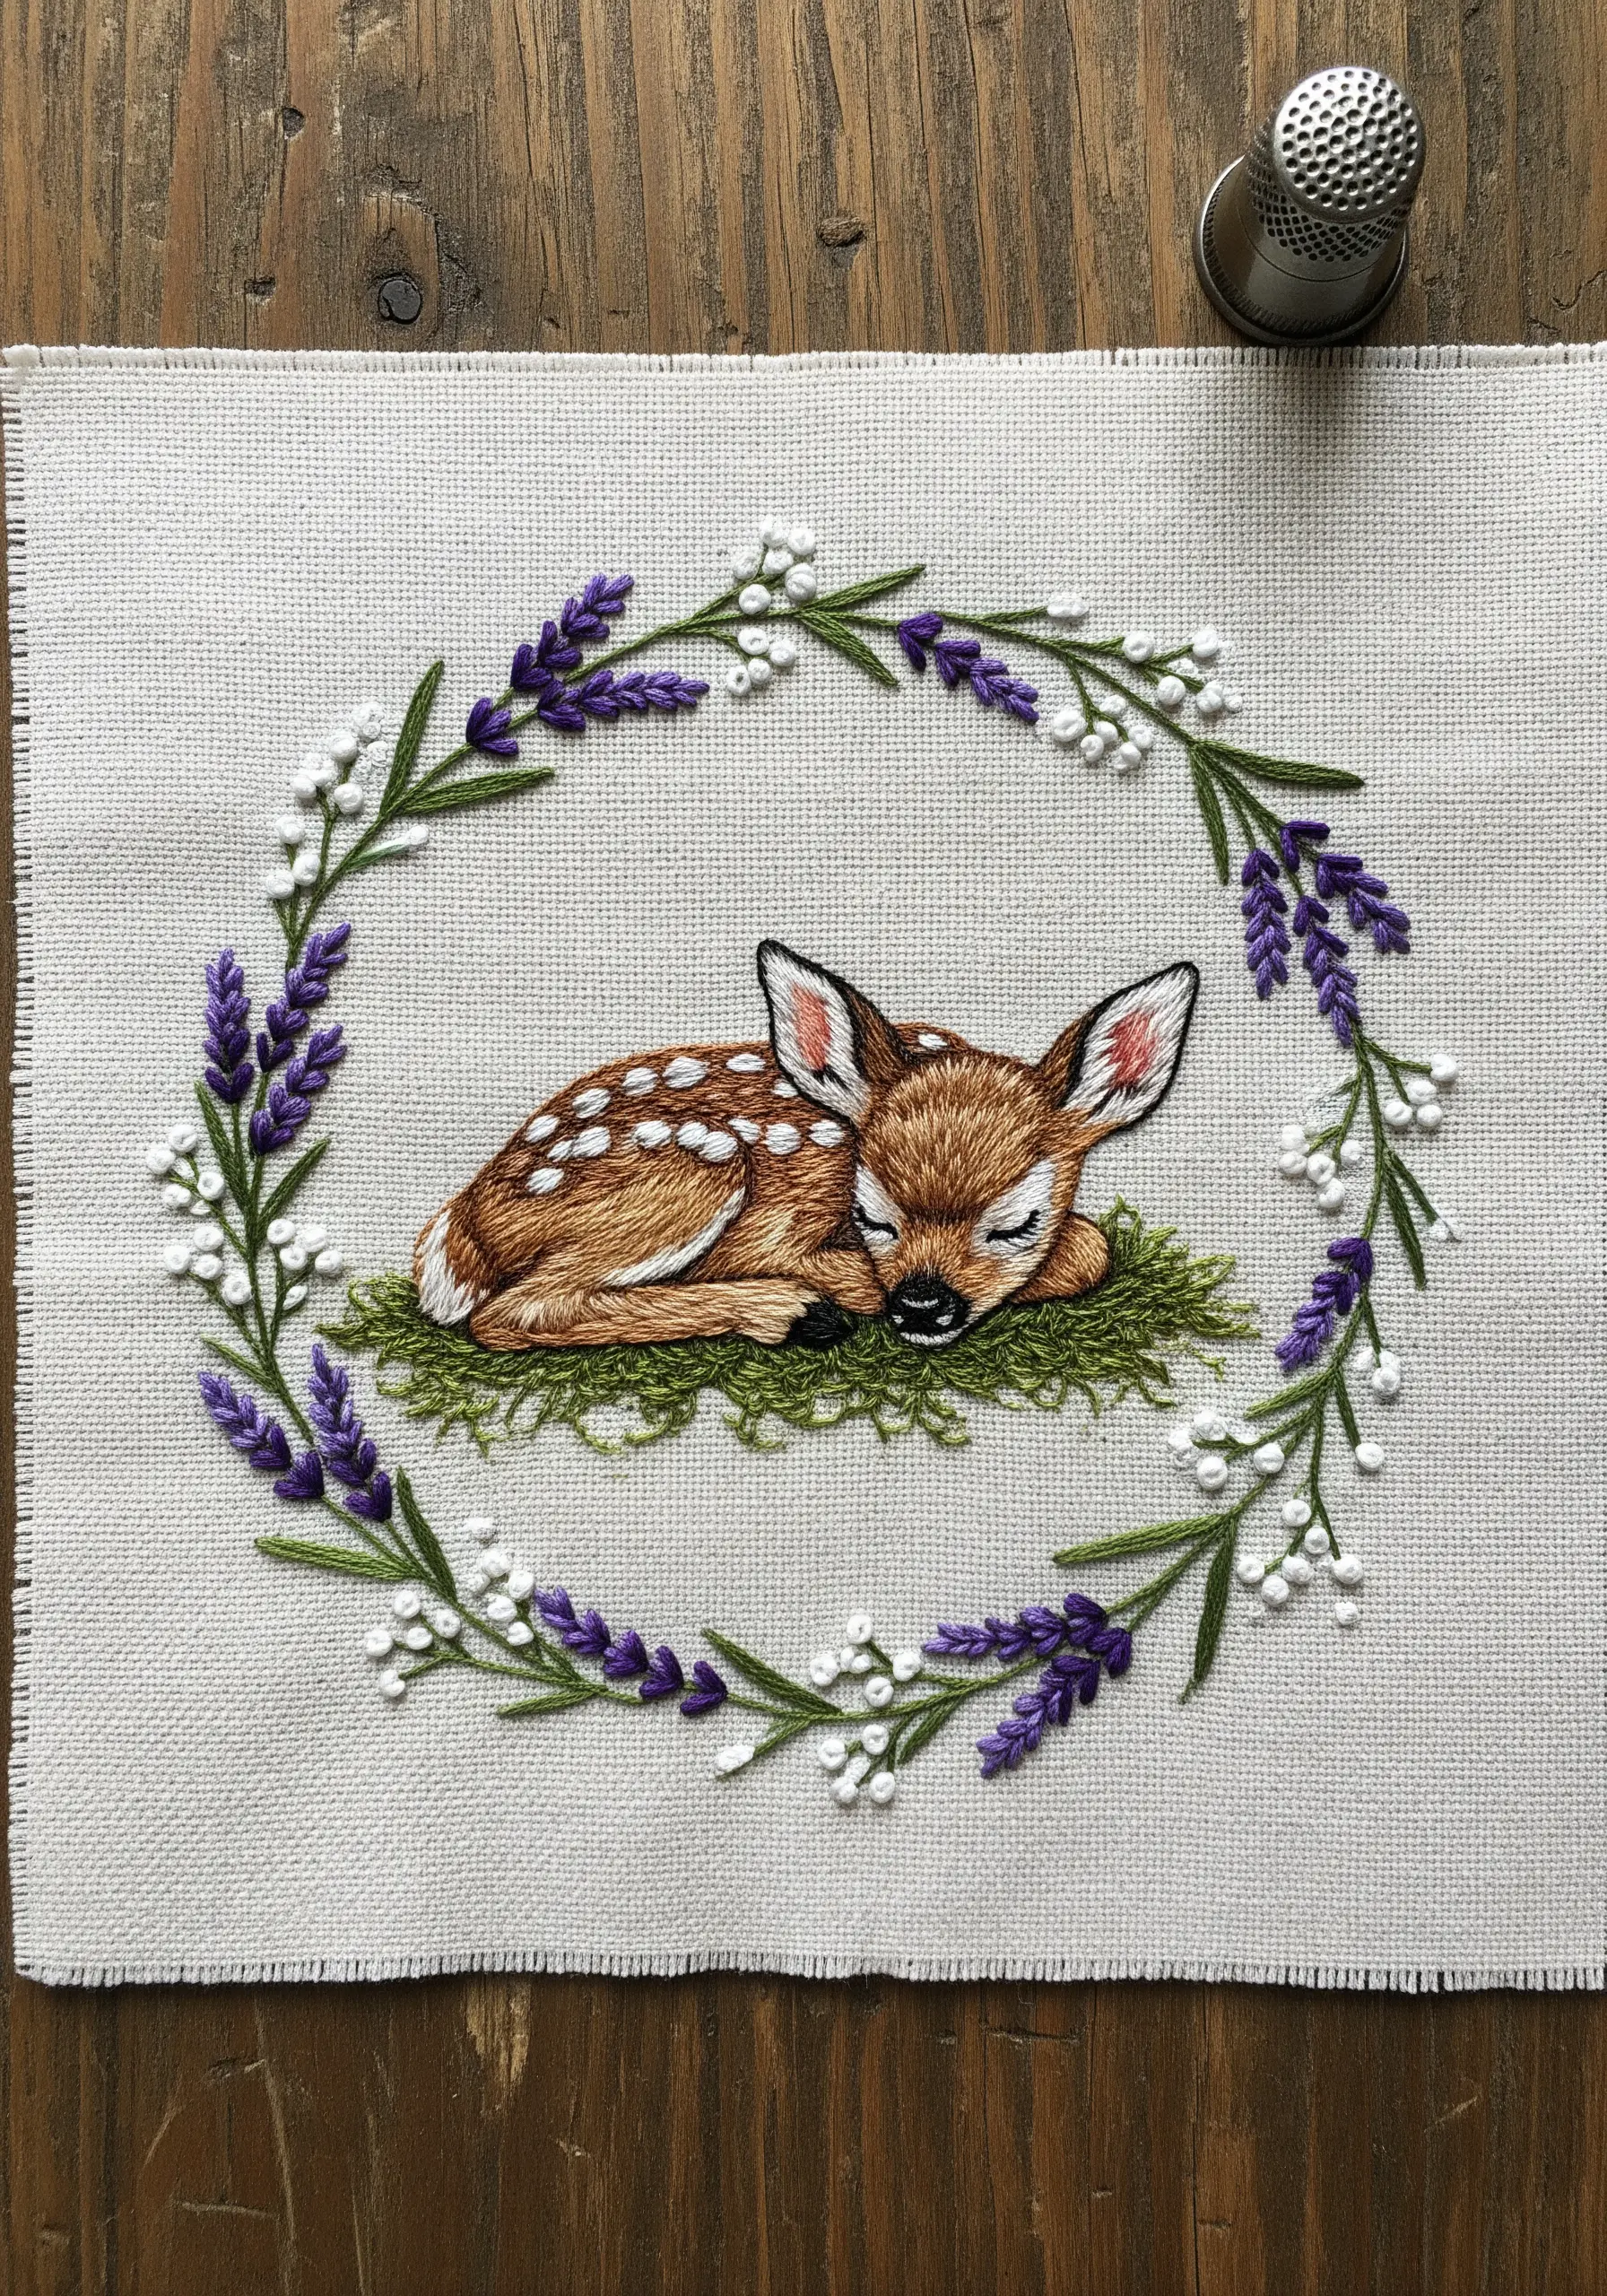
To achieve the soft, realistic fur of a fawn, use the long-and-short stitch technique, often called thread painting.
Work with a single strand of floss and choose three to four closely related shades of brown—a light, two mid-tones, and a shadow color.
Fill the body with directional stitches that follow the natural curve of the animal, allowing the colors to blend seamlessly into one another for a subtle gradient.
This method avoids hard outlines and gives the animal a gentle, lifelike quality perfect for a treasured keepsake.
2. Create Depth with Layered Stitches
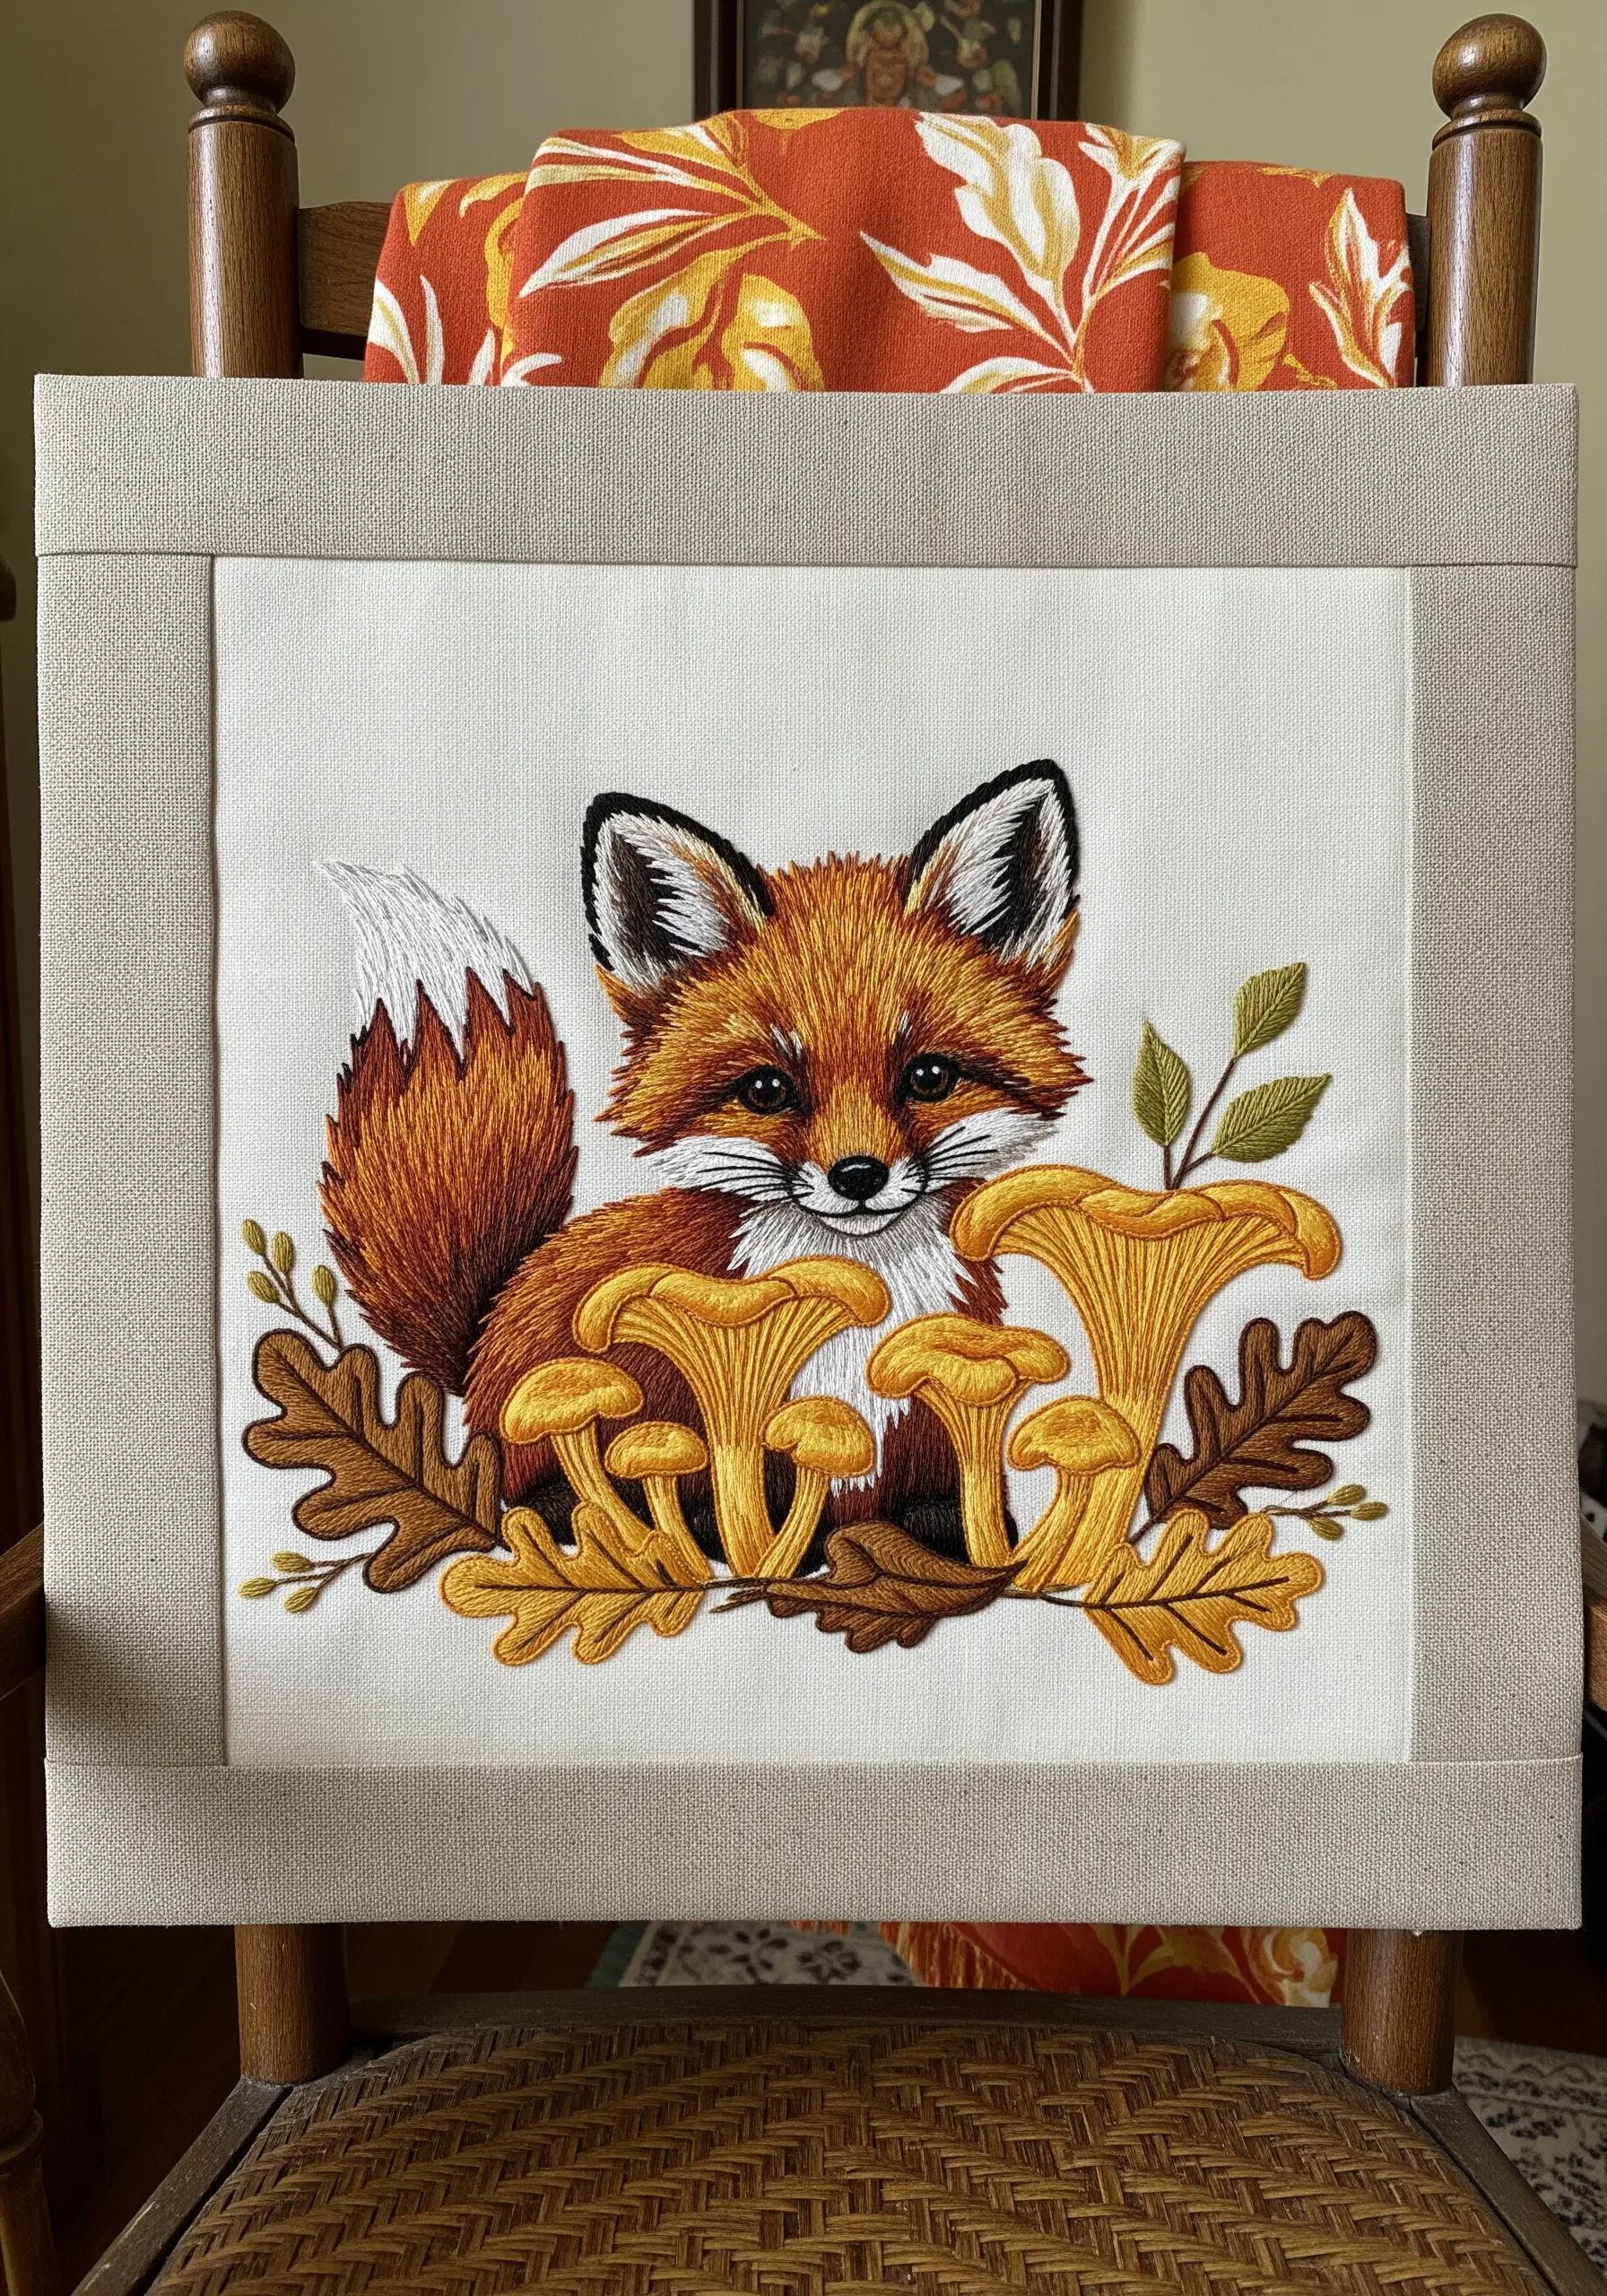
Give your woodland scenes a three-dimensional feel by physically layering your embroidered elements.
Stitch the oak leaves in the background first, using a fishbone stitch to create a central vein.
Next, add the mushrooms using a padded satin stitch to make them pop. Finally, stitch the fox’s fur so it slightly overlaps the elements behind it.
This simple sequencing trick constructs a foreground, mid-ground, and background, making your composition far more dynamic than a flat design.
3. Use Dark Fabric for High-Contrast Drama
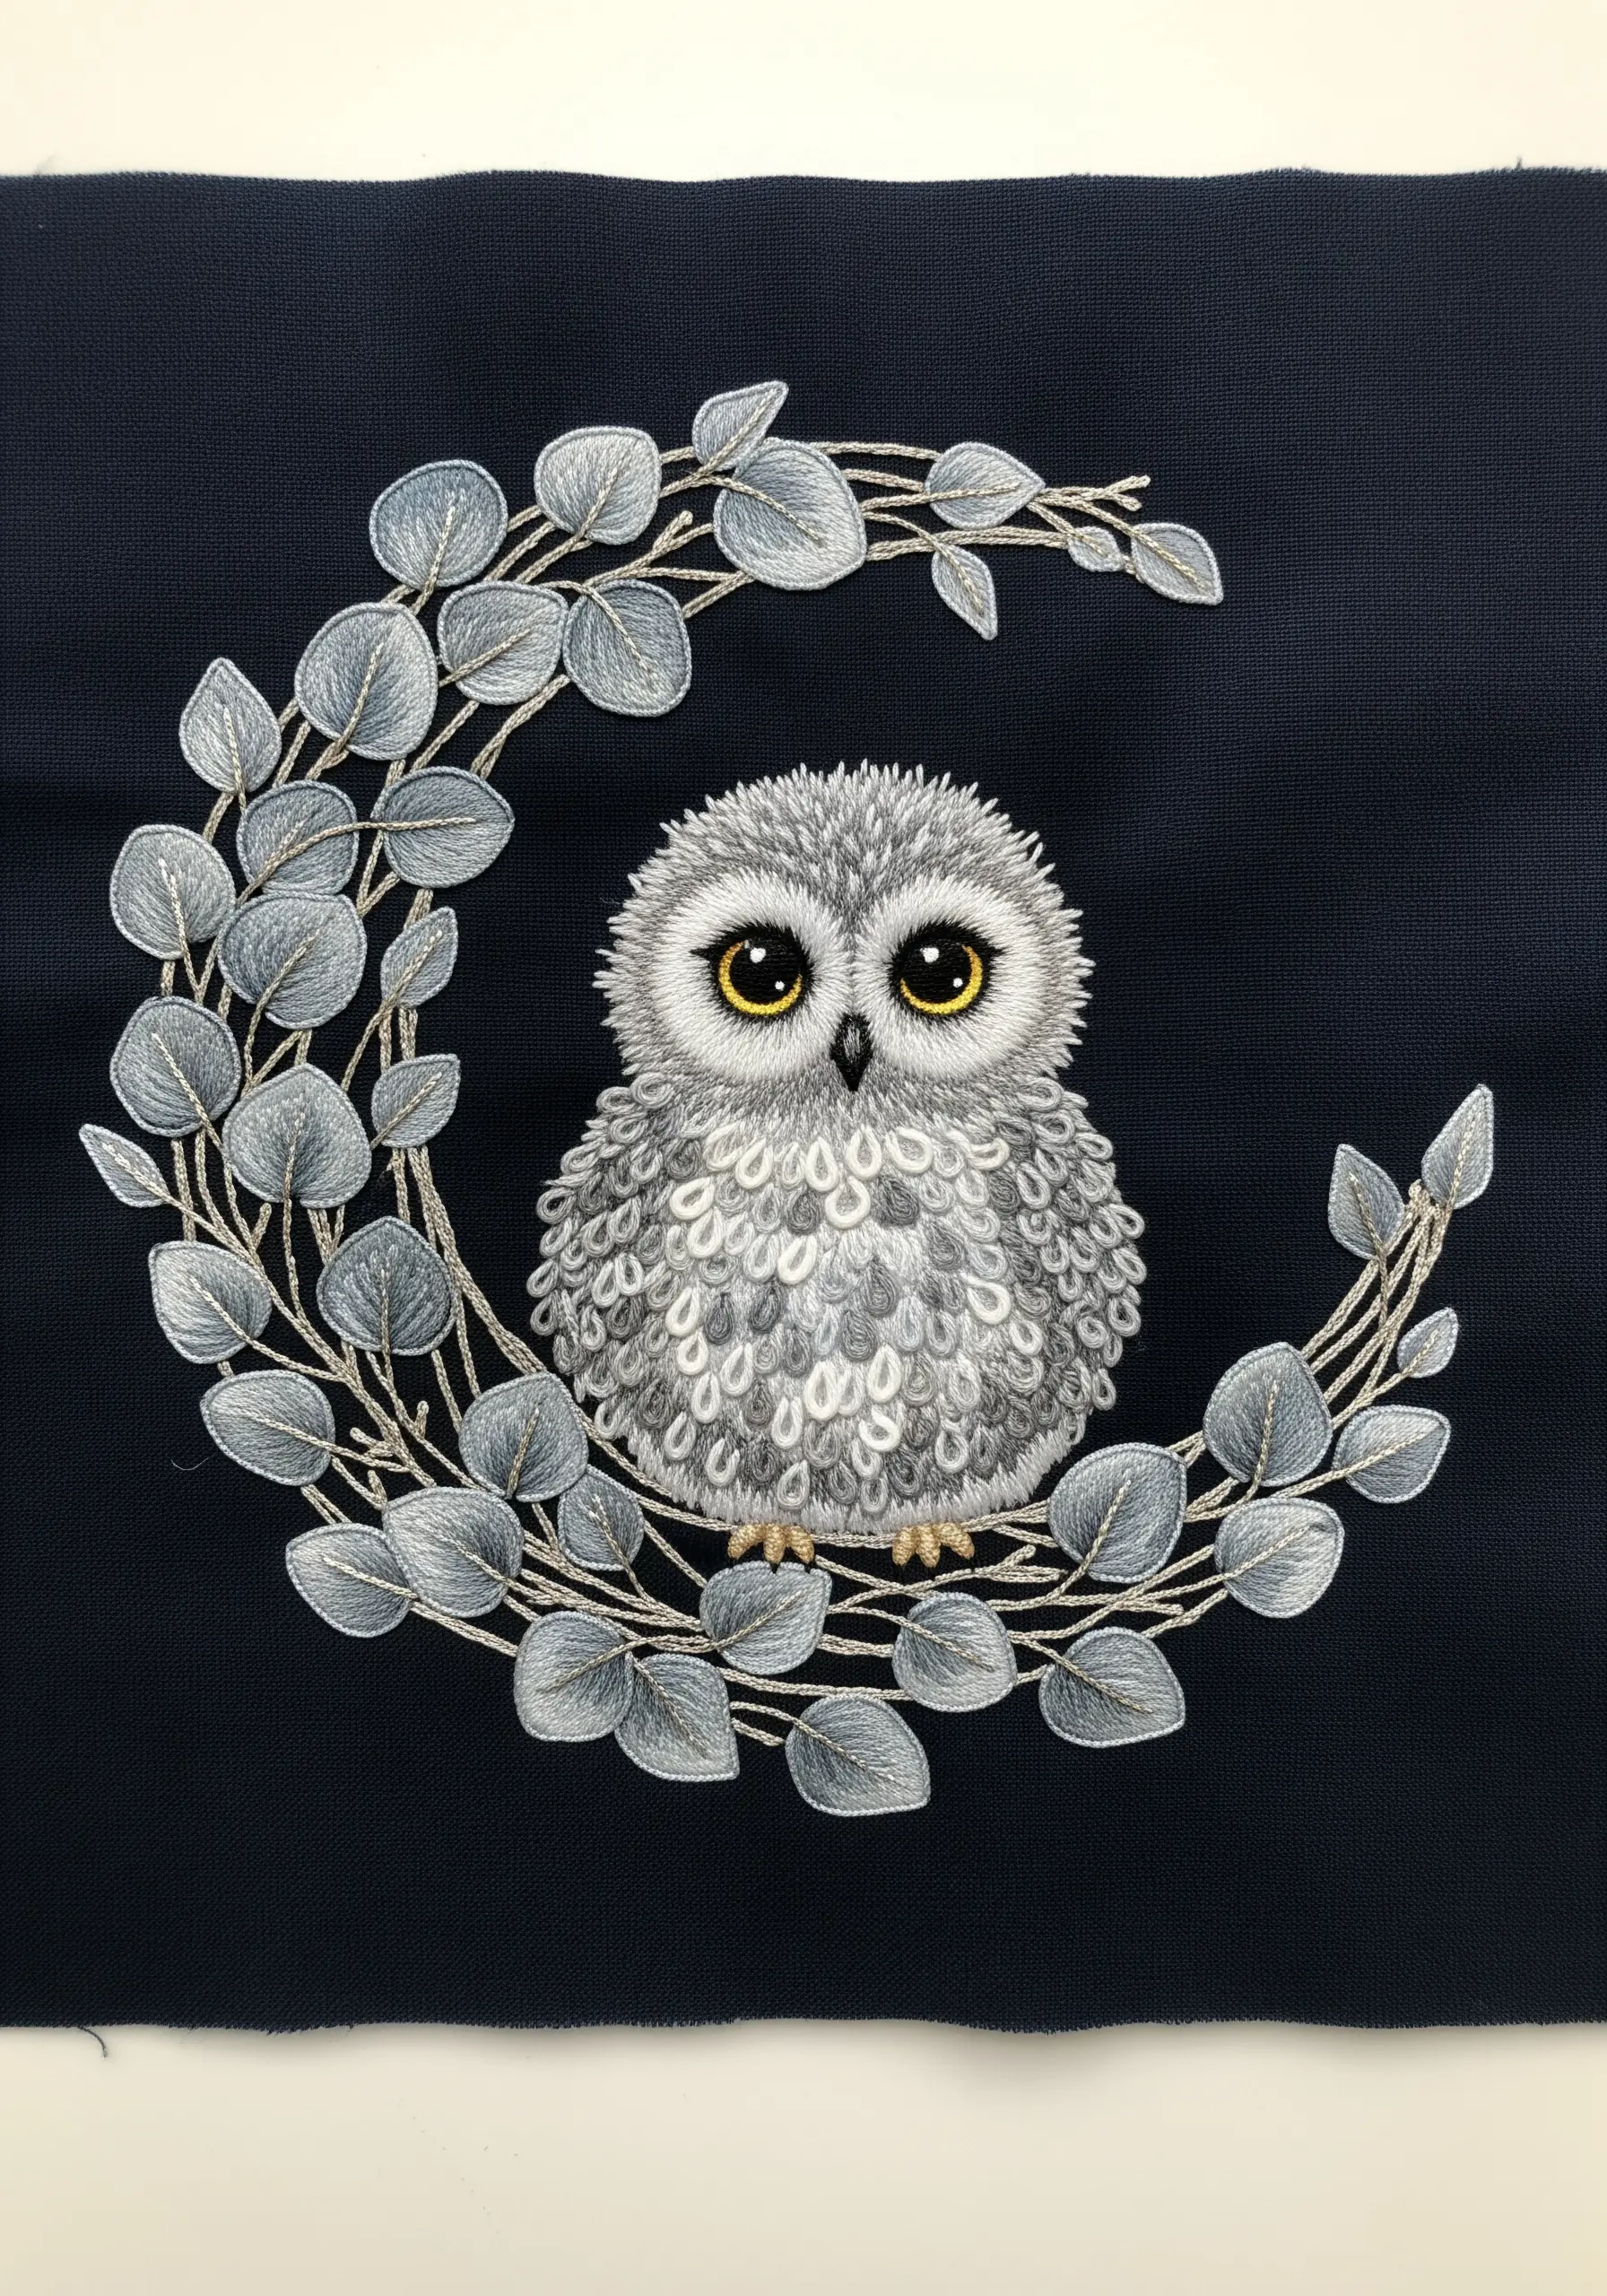
Make your stitches radiate by choosing a dark fabric base like navy or black.
The contrast immediately makes lighter threads appear more vibrant and detailed.
For the owl’s fluffy texture, use a series of small, overlapping detached chain stitches (lazy daisies) in white and gray.
This technique creates a soft, feathery effect that stands out powerfully against the deep background, while the smoother satin stitch of the eucalyptus leaves provides a beautiful textural contrast.
4. Blend Threads for a Softer Fur Texture

For a soft, plush fur perfect for a bear cub, move beyond solid colors by blending threads in your needle.
Use one strand of a mid-tone brown and one strand of a lighter tan together to stitch the main body with a dense split stitch.
This instantly creates subtle color variation and a softer look than a single, flat color.
Reserve the darkest brown for shaded areas like under the chin and on the paws to add realistic dimension.
5. Play with Negative Space and Scattered Fills
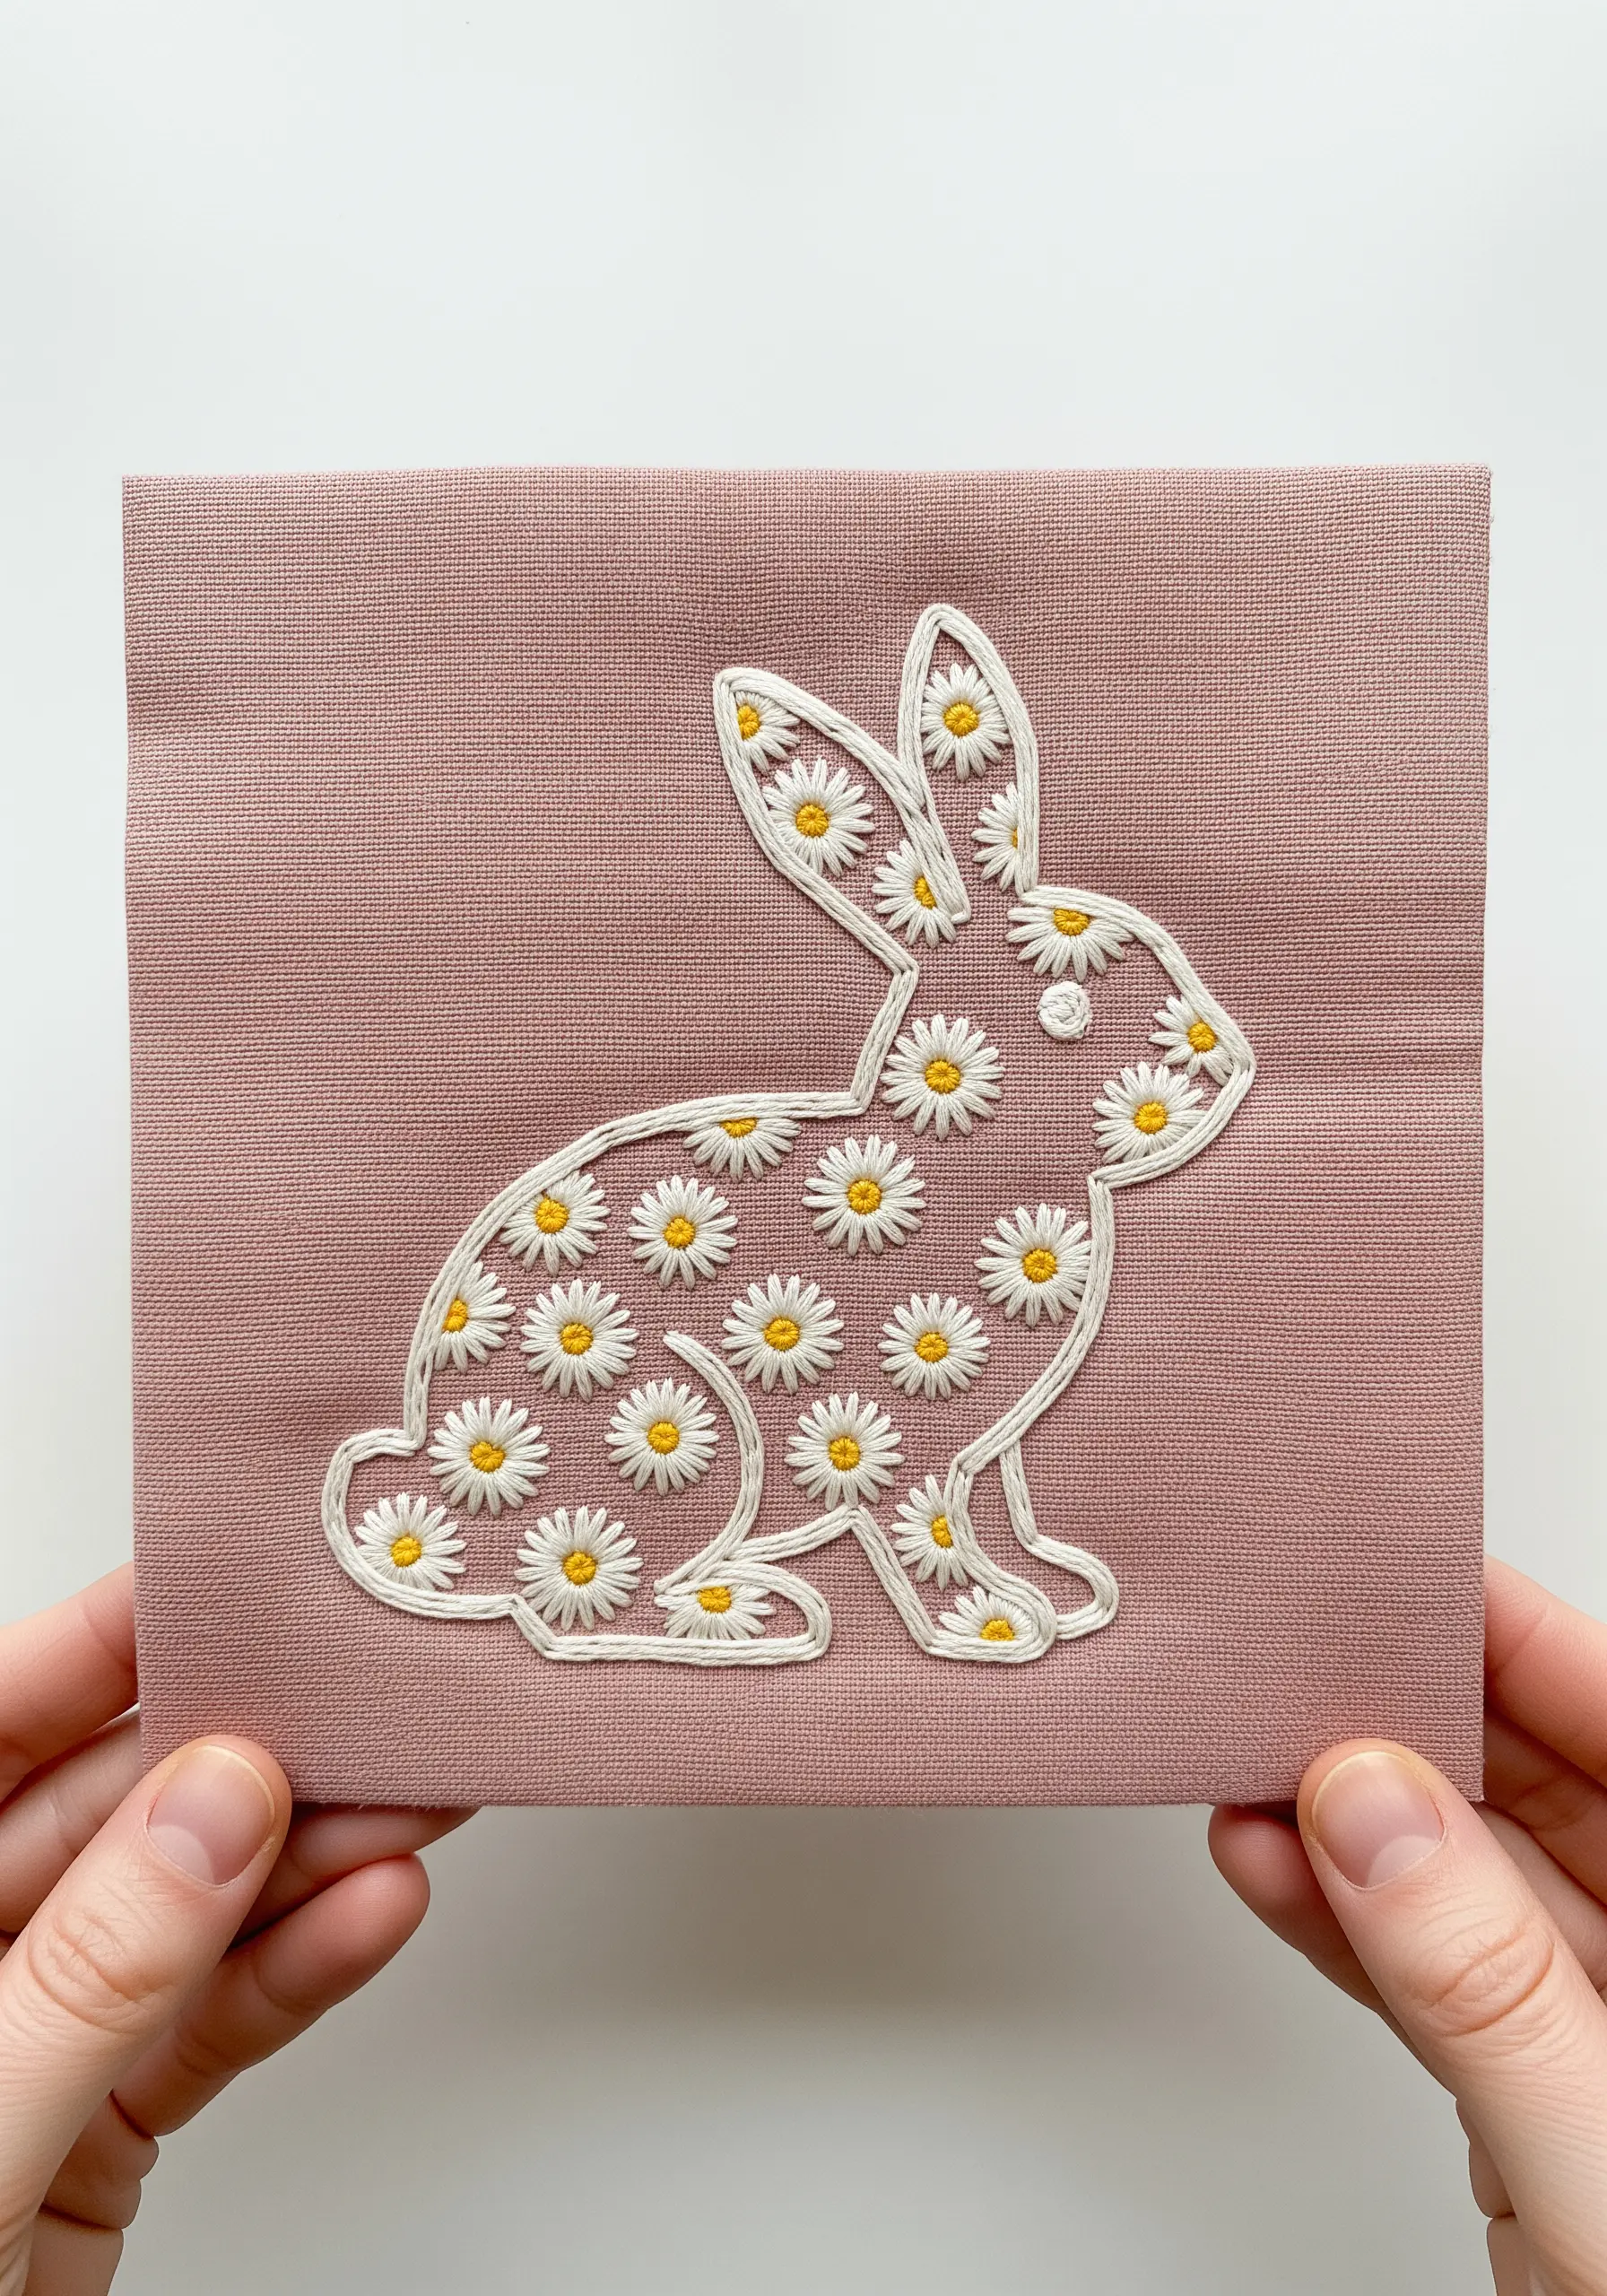
Create a modern, airy design by outlining a shape and filling it with a pattern instead of dense stitches.
Use a whipped backstitch for the rabbit’s outline; this creates a raised, cord-like edge that is clean and defined.
Instead of a traditional satin fill, scatter tiny floral motifs inside the silhouette using lazy daisy stitches for petals and a French knot for the center.
This technique is visually light and allows the color of your fabric to become an integral part of the design.
6. Stitch Water Ripples and Reflections
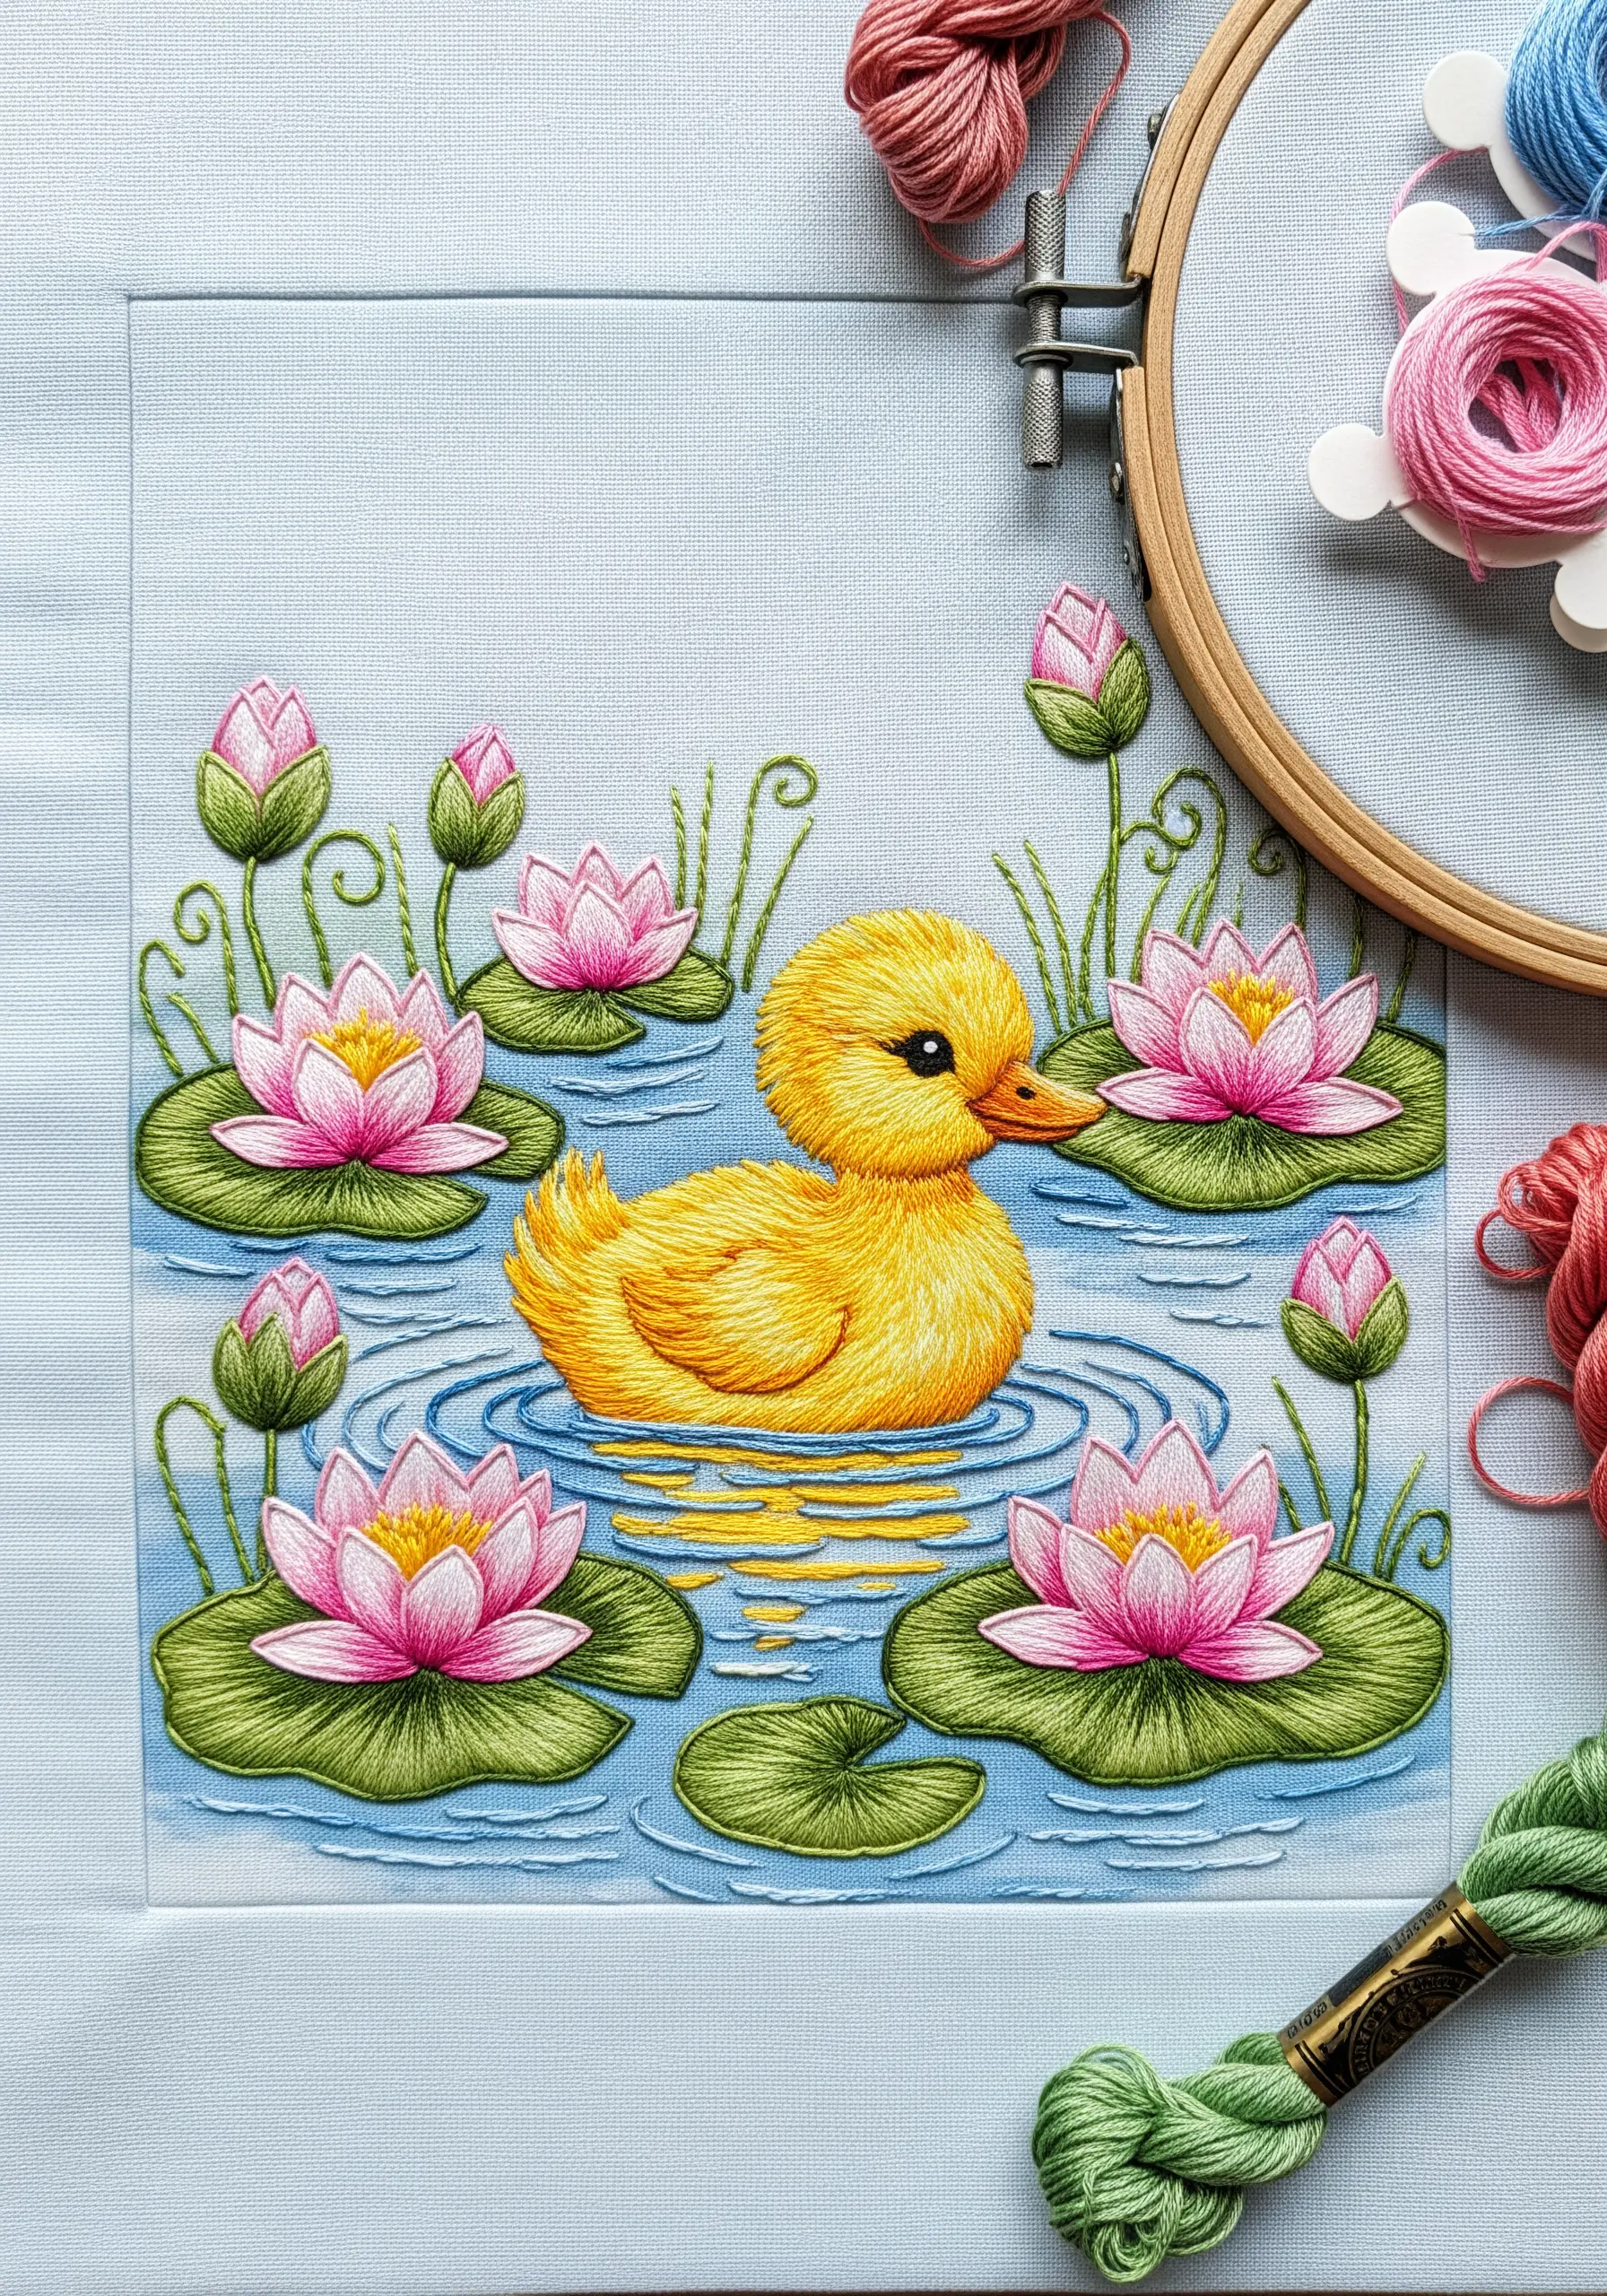
Suggest the movement of water without stitching an entire pond.
Use concentric ovals of split stitch around the duckling to create the effect of ripples spreading outward.
For the reflection, use the same yellow as the duckling but with long, horizontal satin stitches that are slightly wavy and broken up by shades of blue from the water.
This creates a convincing illusion of a reflection shimmering on the water’s surface, adding life to the scene.
7. Build Touchable Texture with Dense Knots
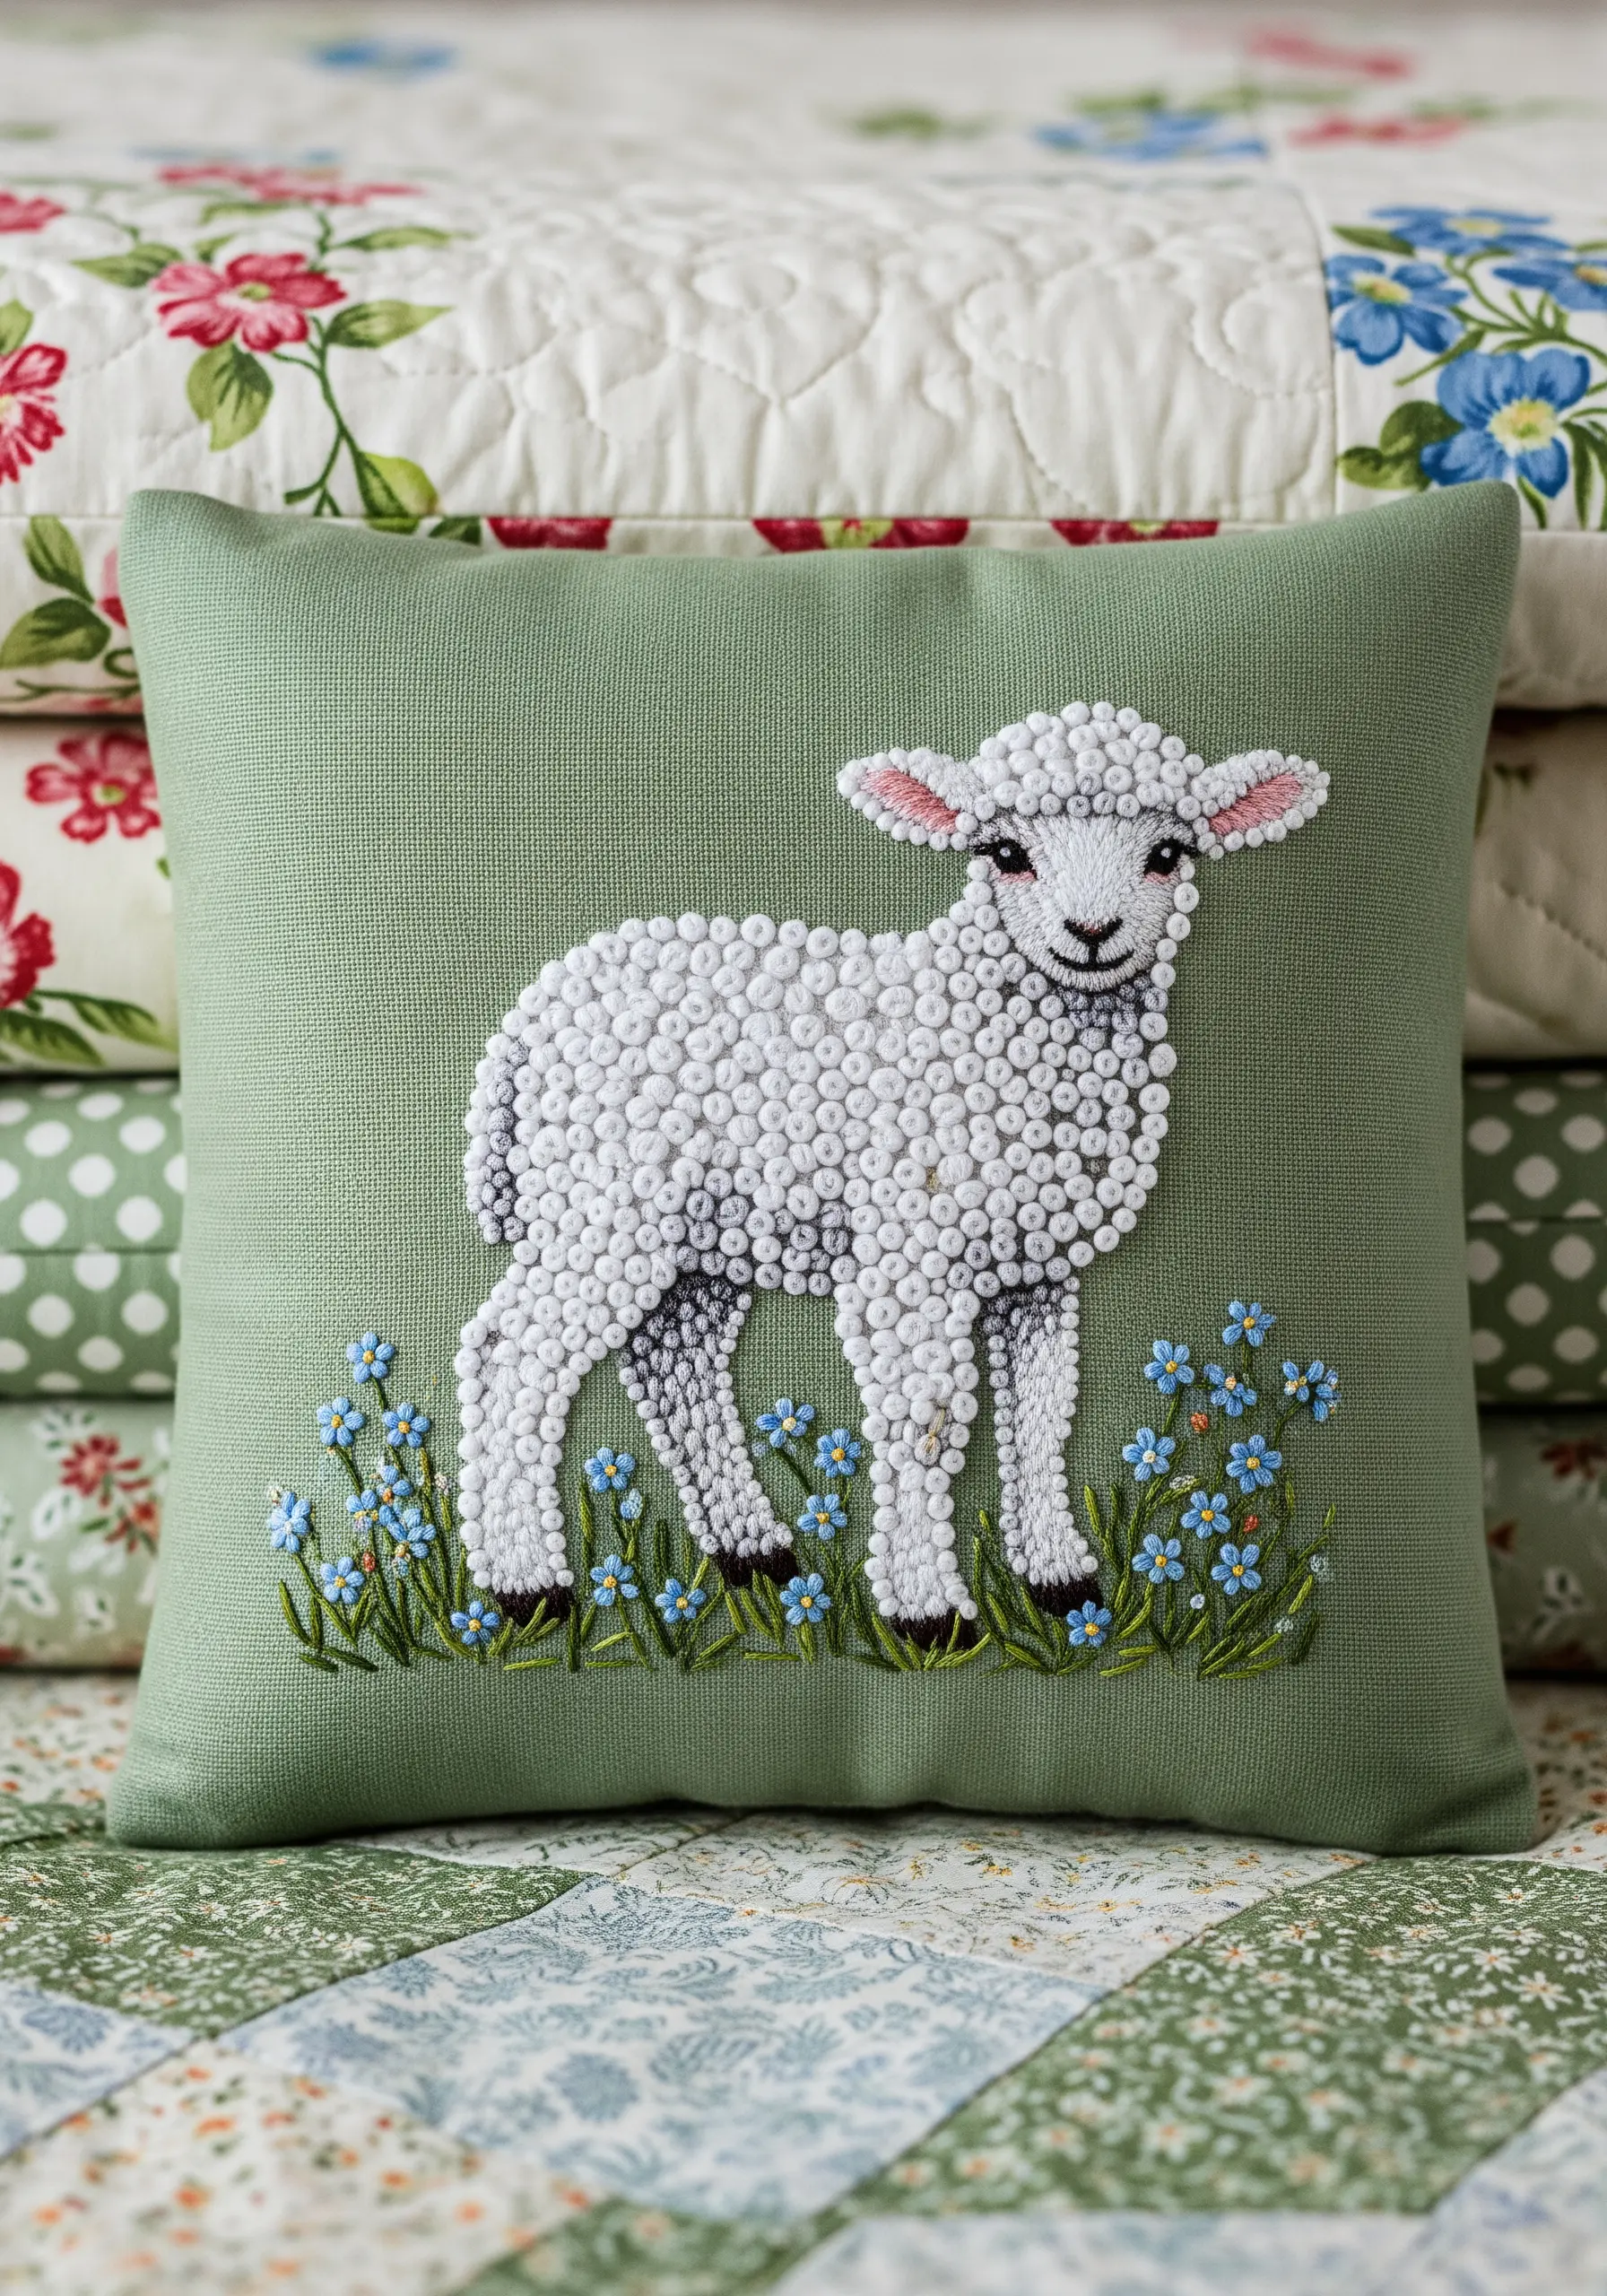
For a wonderfully tactile quilt block, fill the lamb’s body entirely with French or Colonial knots.
Pack the knots tightly together, using a slightly thicker thread (like all six strands of floss) to create a plush, woolly effect.
Introduce subtle shading by using a light gray thread for the knots along the belly and inner legs.
This high-texture finish invites touch and makes the simple animal shape incredibly engaging and memorable.
8. Use Directional Stitches for Realistic Quills
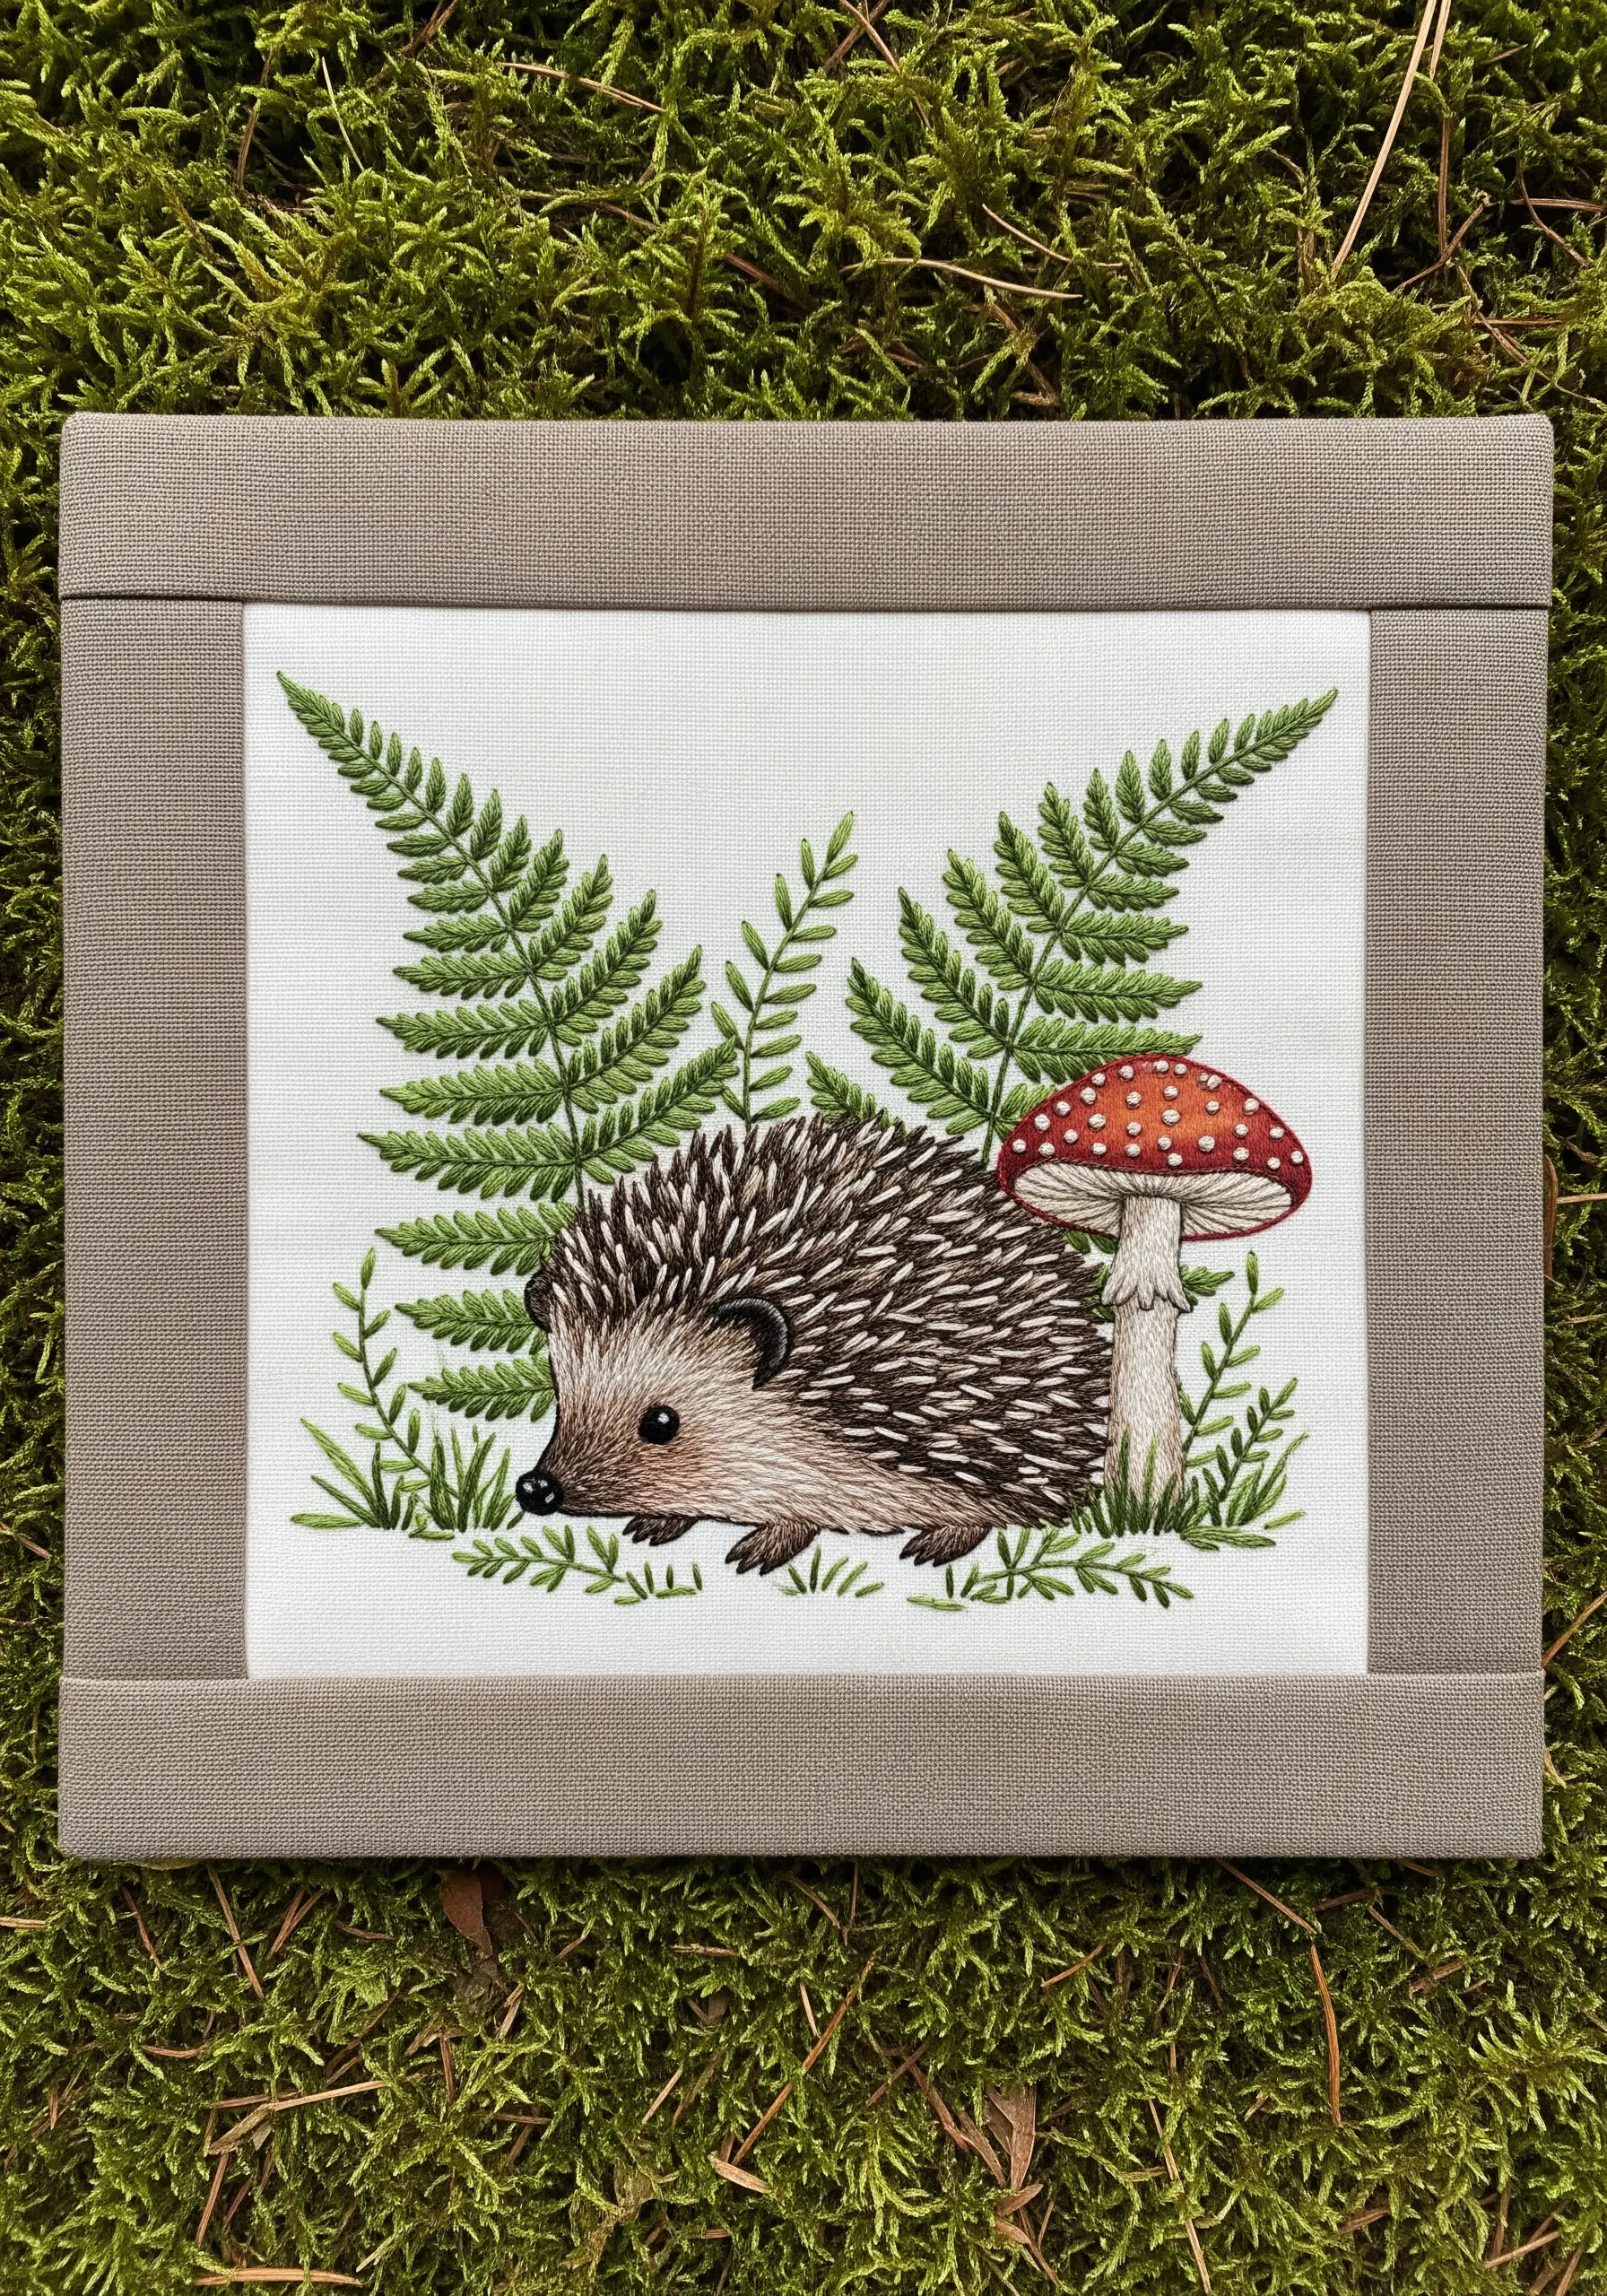
Capture the essence of a hedgehog’s spines by paying close attention to the direction of your stitches.
Use a combination of long straight stitches and split stitches, all radiating outward from the animal’s face.
Layer multiple shades—dark brown, black, and cream—to mimic the natural variegation of quills.
Ensuring your stitches follow this natural growth pattern is what elevates the design from a simple shape to a recognizable, lifelike creature.
9. Master the Multi-Toned Squirrel Tail
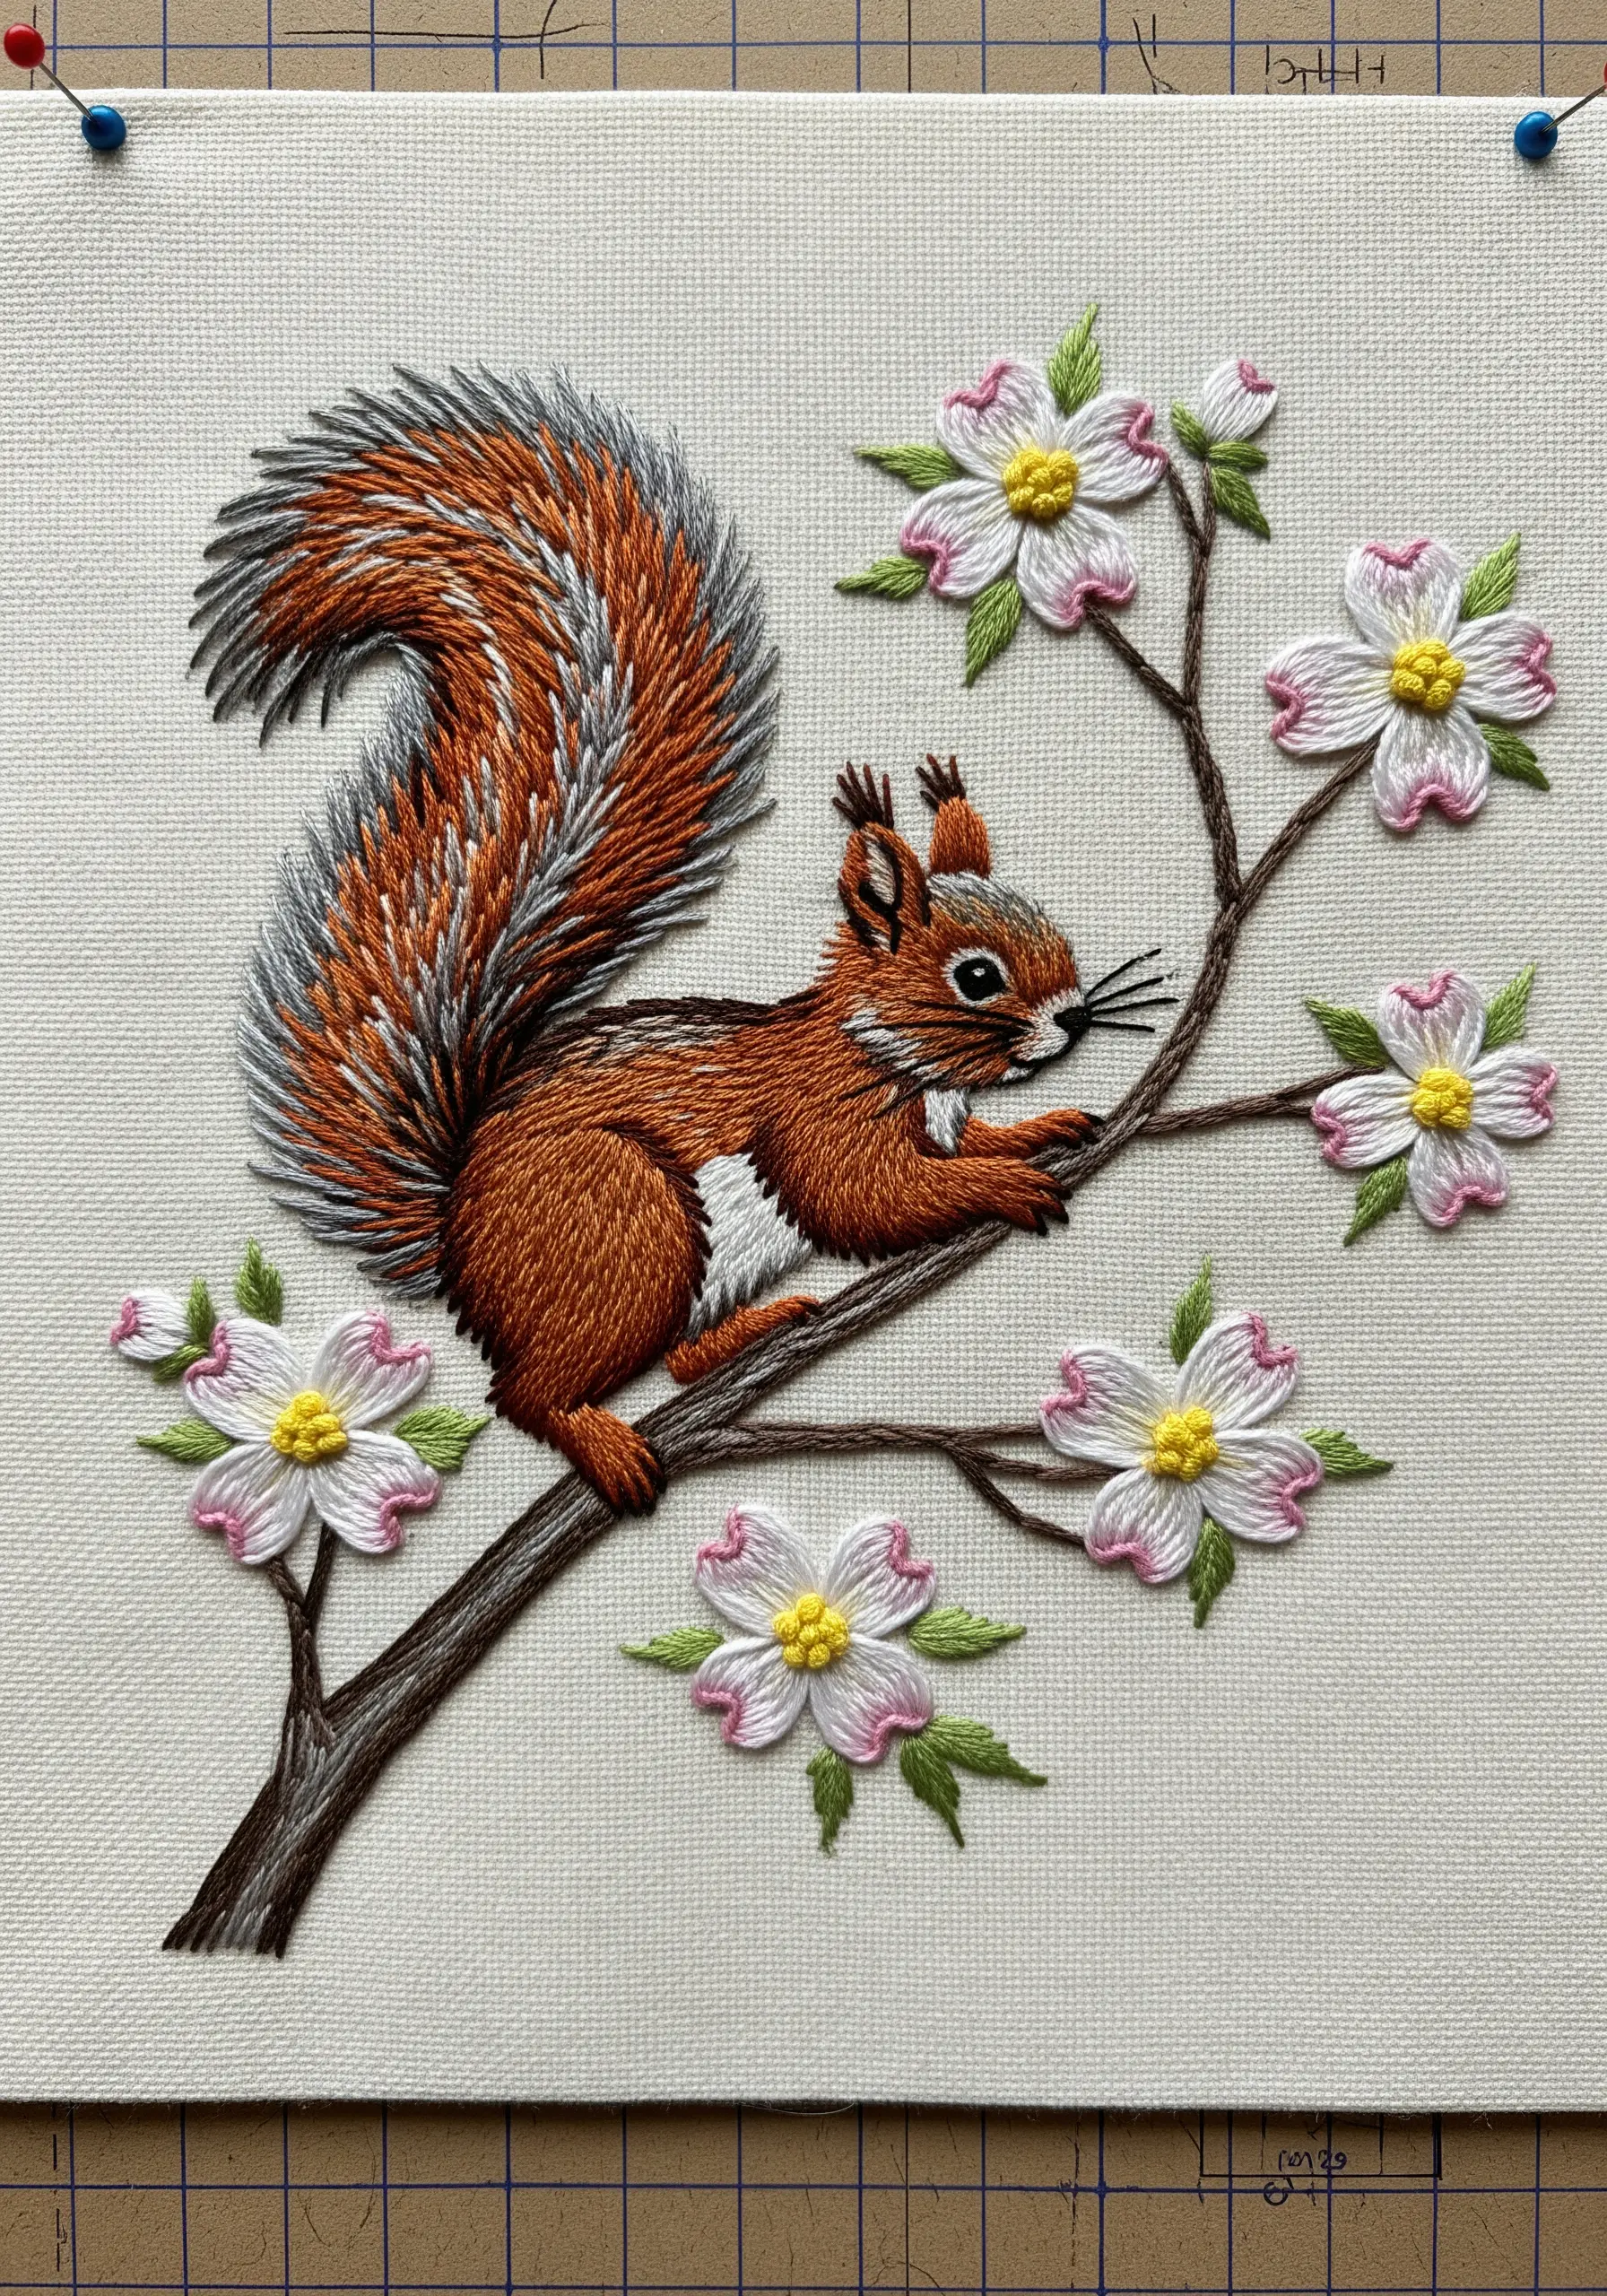
The key to a magnificent, bushy tail is color blending with a long-and-short stitch.
Using a single strand of thread, work in small patches of color—russet, gray, white, and dark brown.
Instead of creating hard stops between colors, allow the stitches to interlock and blend into one another.
This creates a fluid, painterly effect that perfectly captures the fluffy, multi-tonal quality of a squirrel’s tail.
10. Suggest Water with Minimalist Seed Stitching
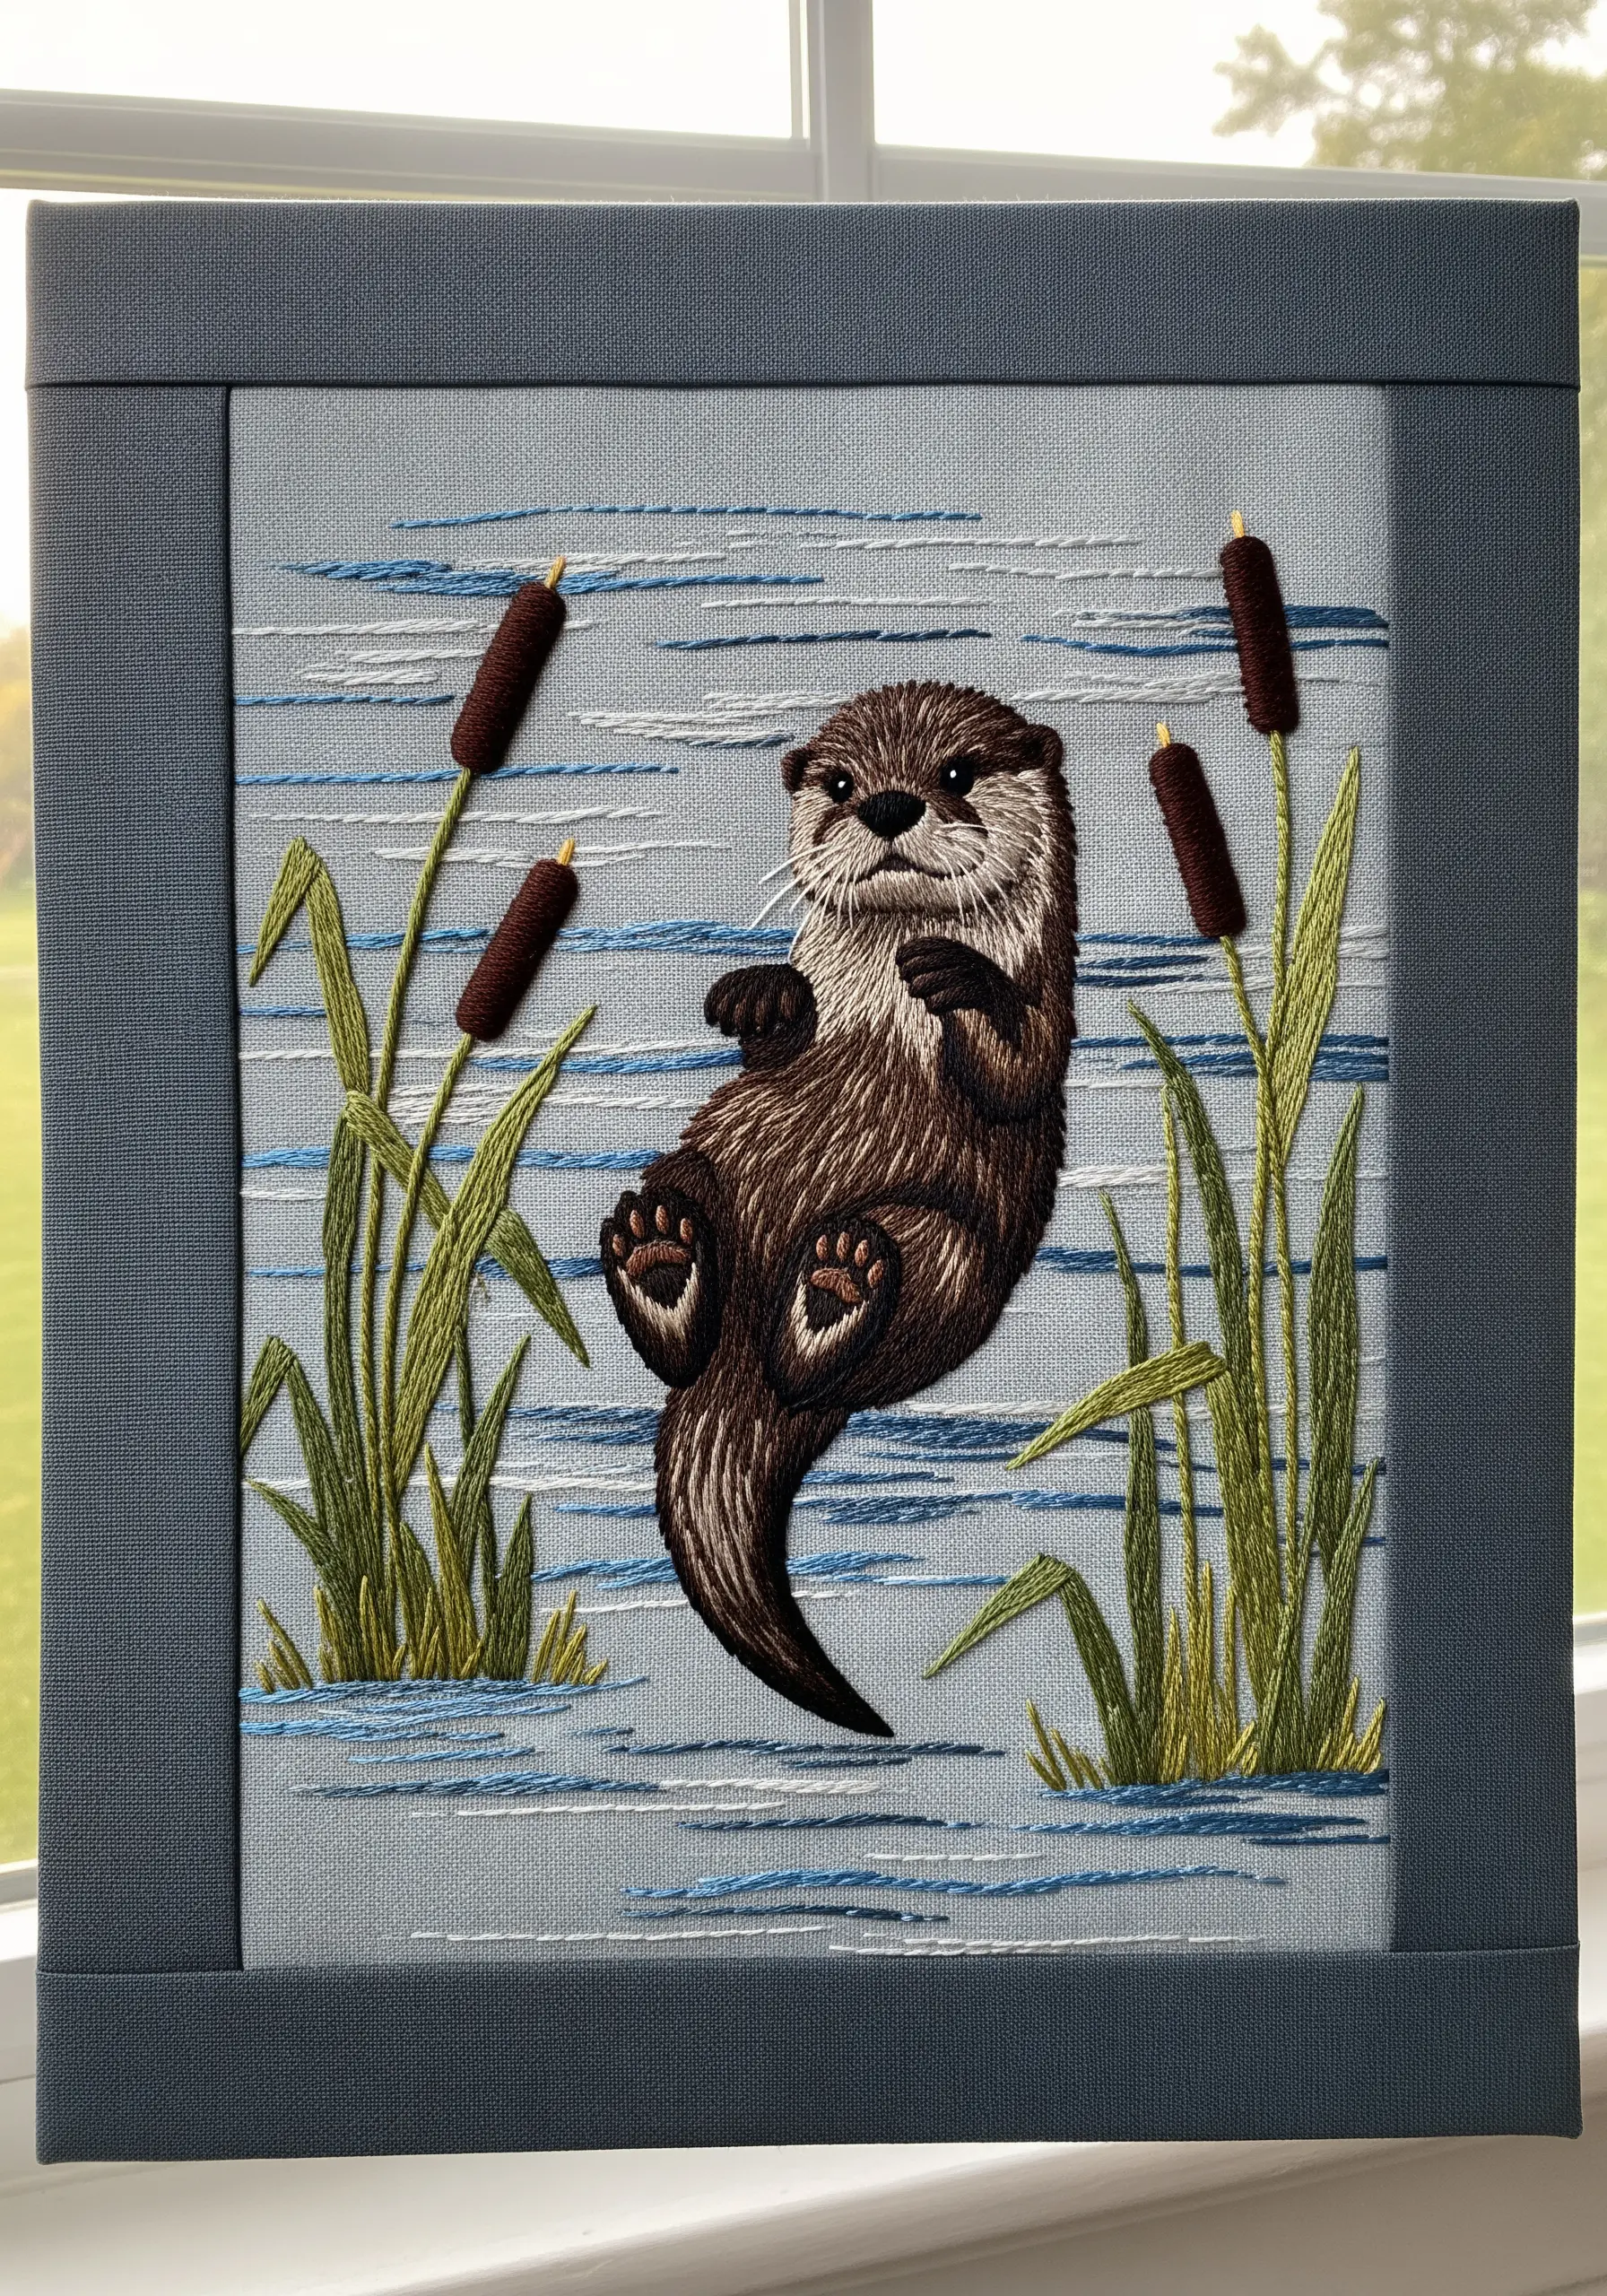
You don’t need to fill an entire area to create an environment. Suggest the texture of water with a scattering of tiny seed stitches.
Use single, short straight stitches in varying directions and shades of blue, aqua, and white.
This minimalist approach creates a sense of light and movement on the water’s surface without overwhelming the central figure of the otter.
It’s a sophisticated technique that keeps your design feeling modern and uncluttered.
11. Create Tactile Snow with Colonial Knots
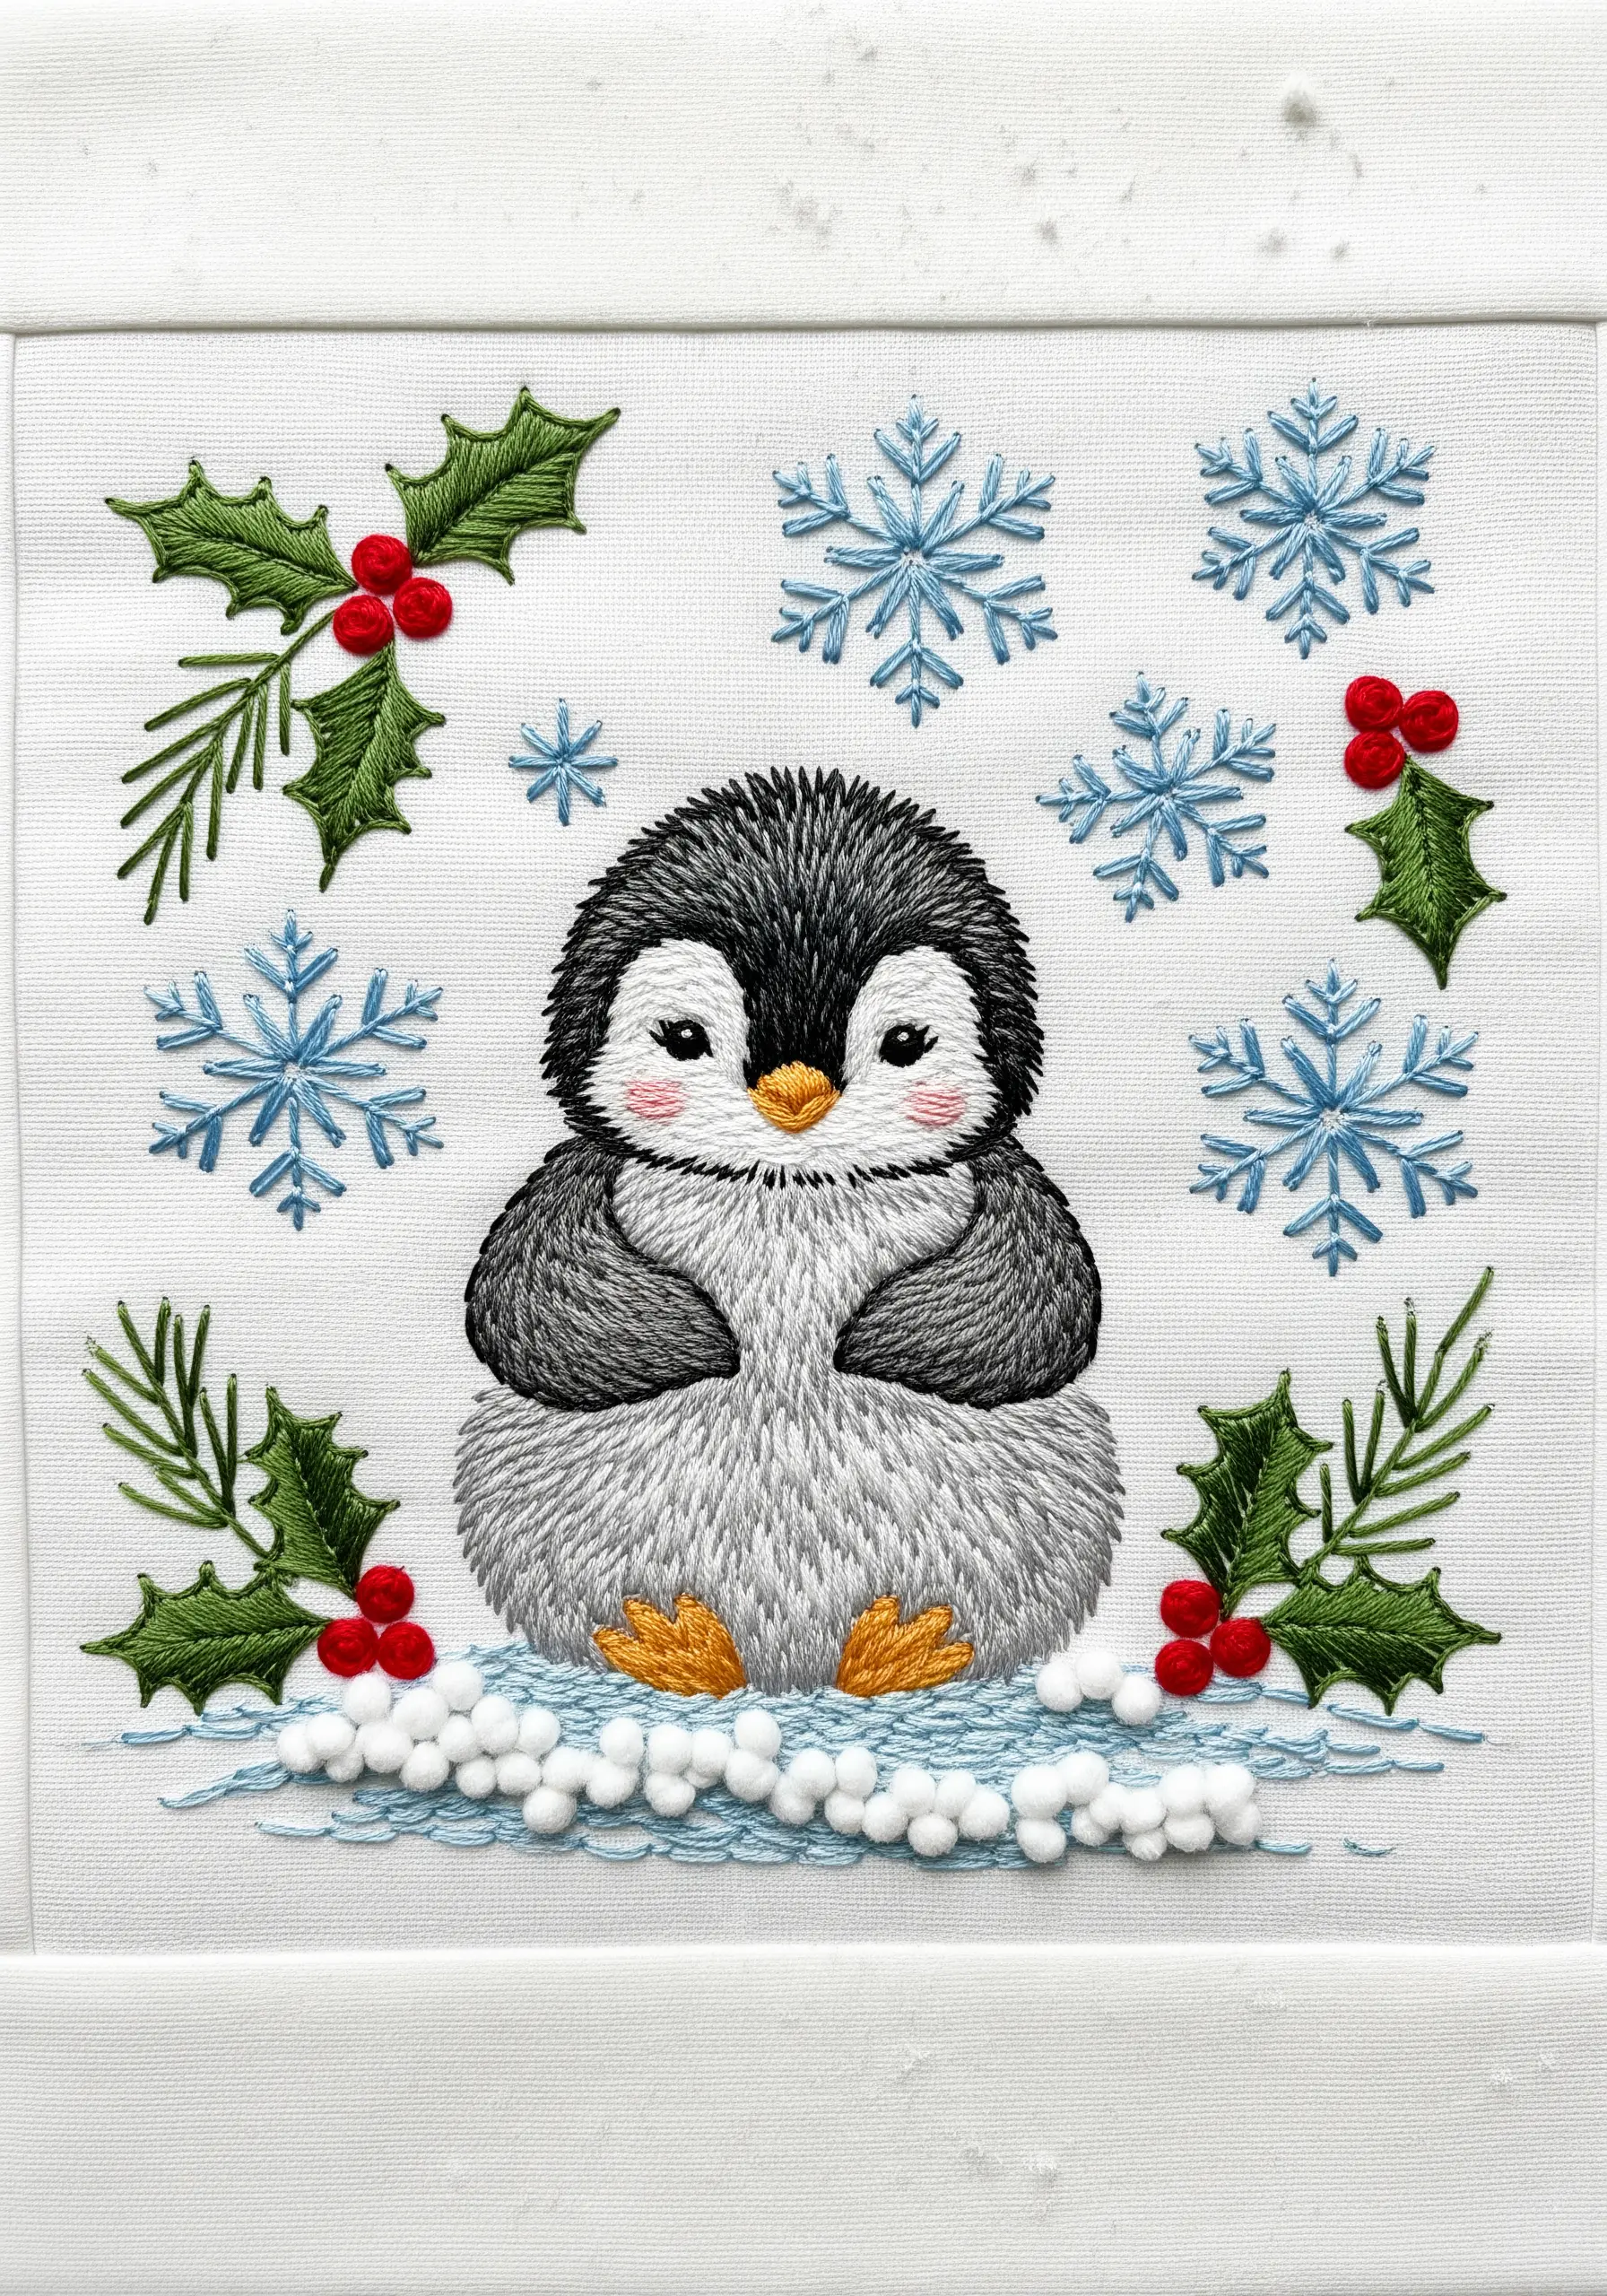
For a quilt block that will be handled and loved, Colonial knots are a sturdier alternative to French knots for creating a snowy ground.
Cluster them densely at the penguin’s feet to create a pile of fluffy snow.
Contrast this bumpy, three-dimensional texture with the sharp, clean lines of the backstitched snowflakes and the smooth, dense split stitch of the penguin’s belly.
This mix of textures makes the entire seasonal wall art piece more engaging.
12. Define Form with Moonlight Highlights
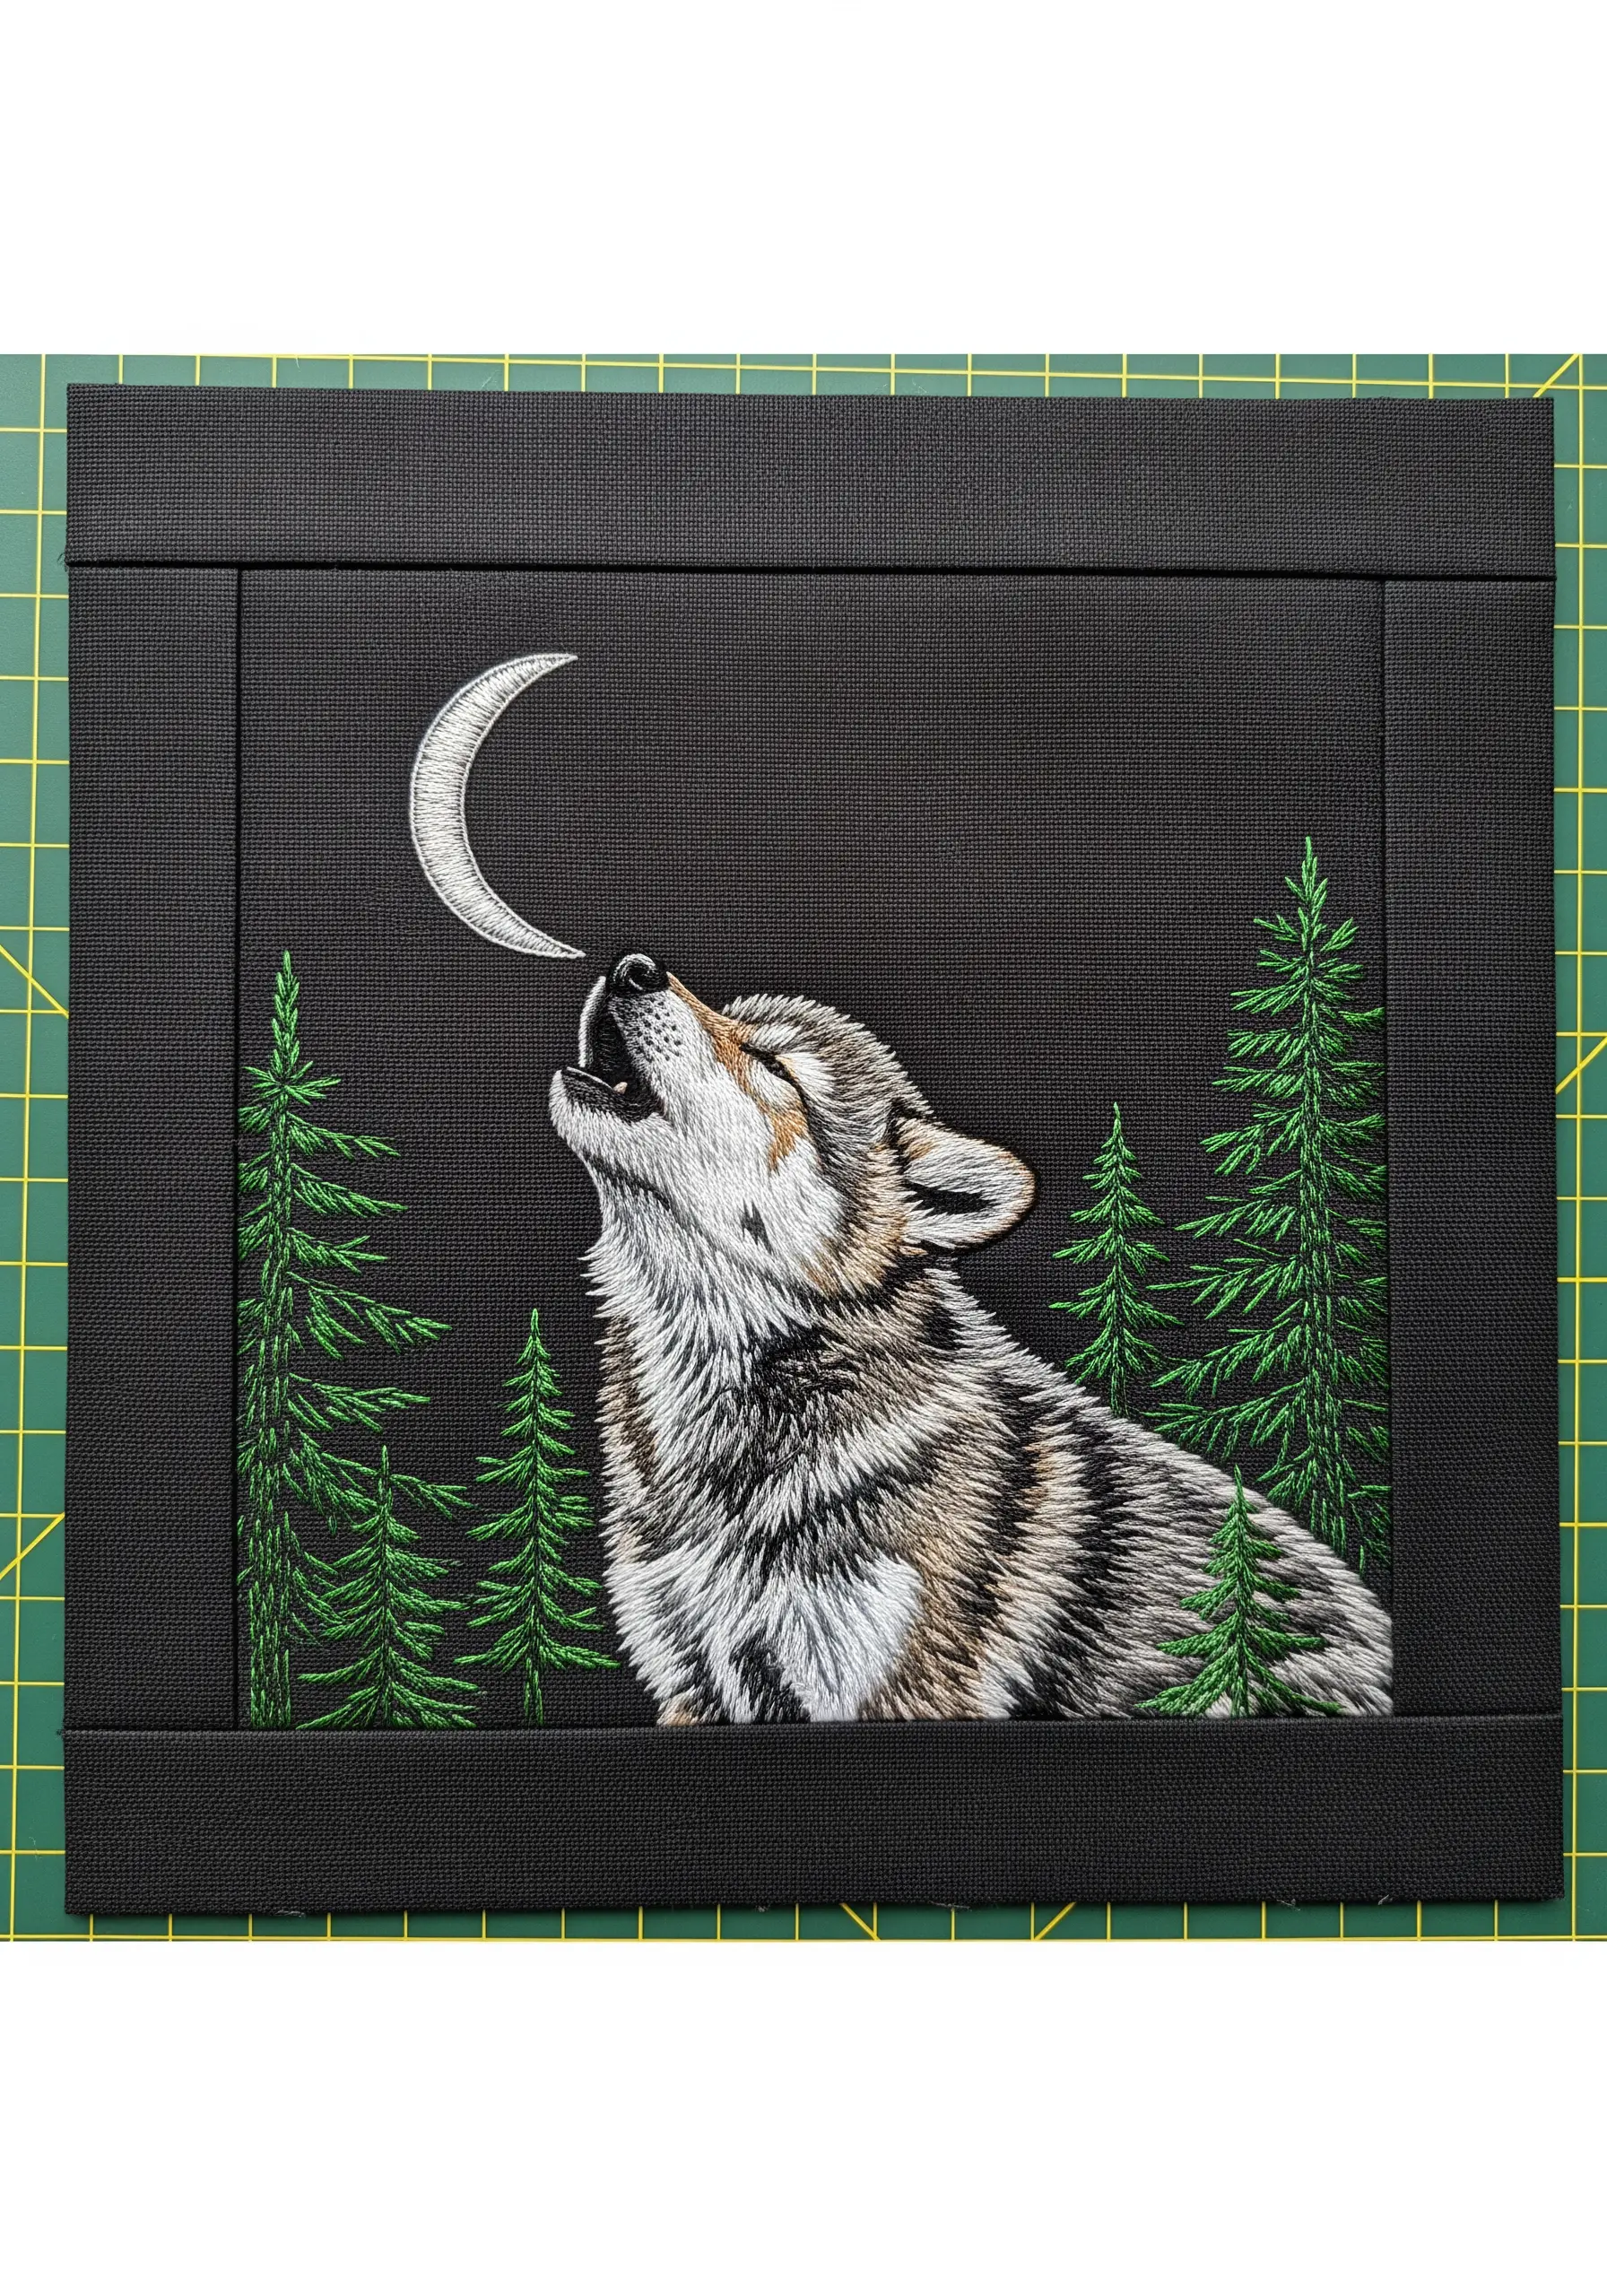
When working on dark fabric, use light to create shape instead of dark outlines.
For this howling wolf, the form is defined almost entirely by where the moonlight hits.
Use a bright white or silver thread to stitch the fur only on the top-facing planes—the bridge of the nose, the edge of the ear, the ruff of the neck, and the arch of the back.
This selective highlighting creates a dramatic, sculptural effect that is both realistic and artistic.
13. Capture Fine Detail with a Single Thread
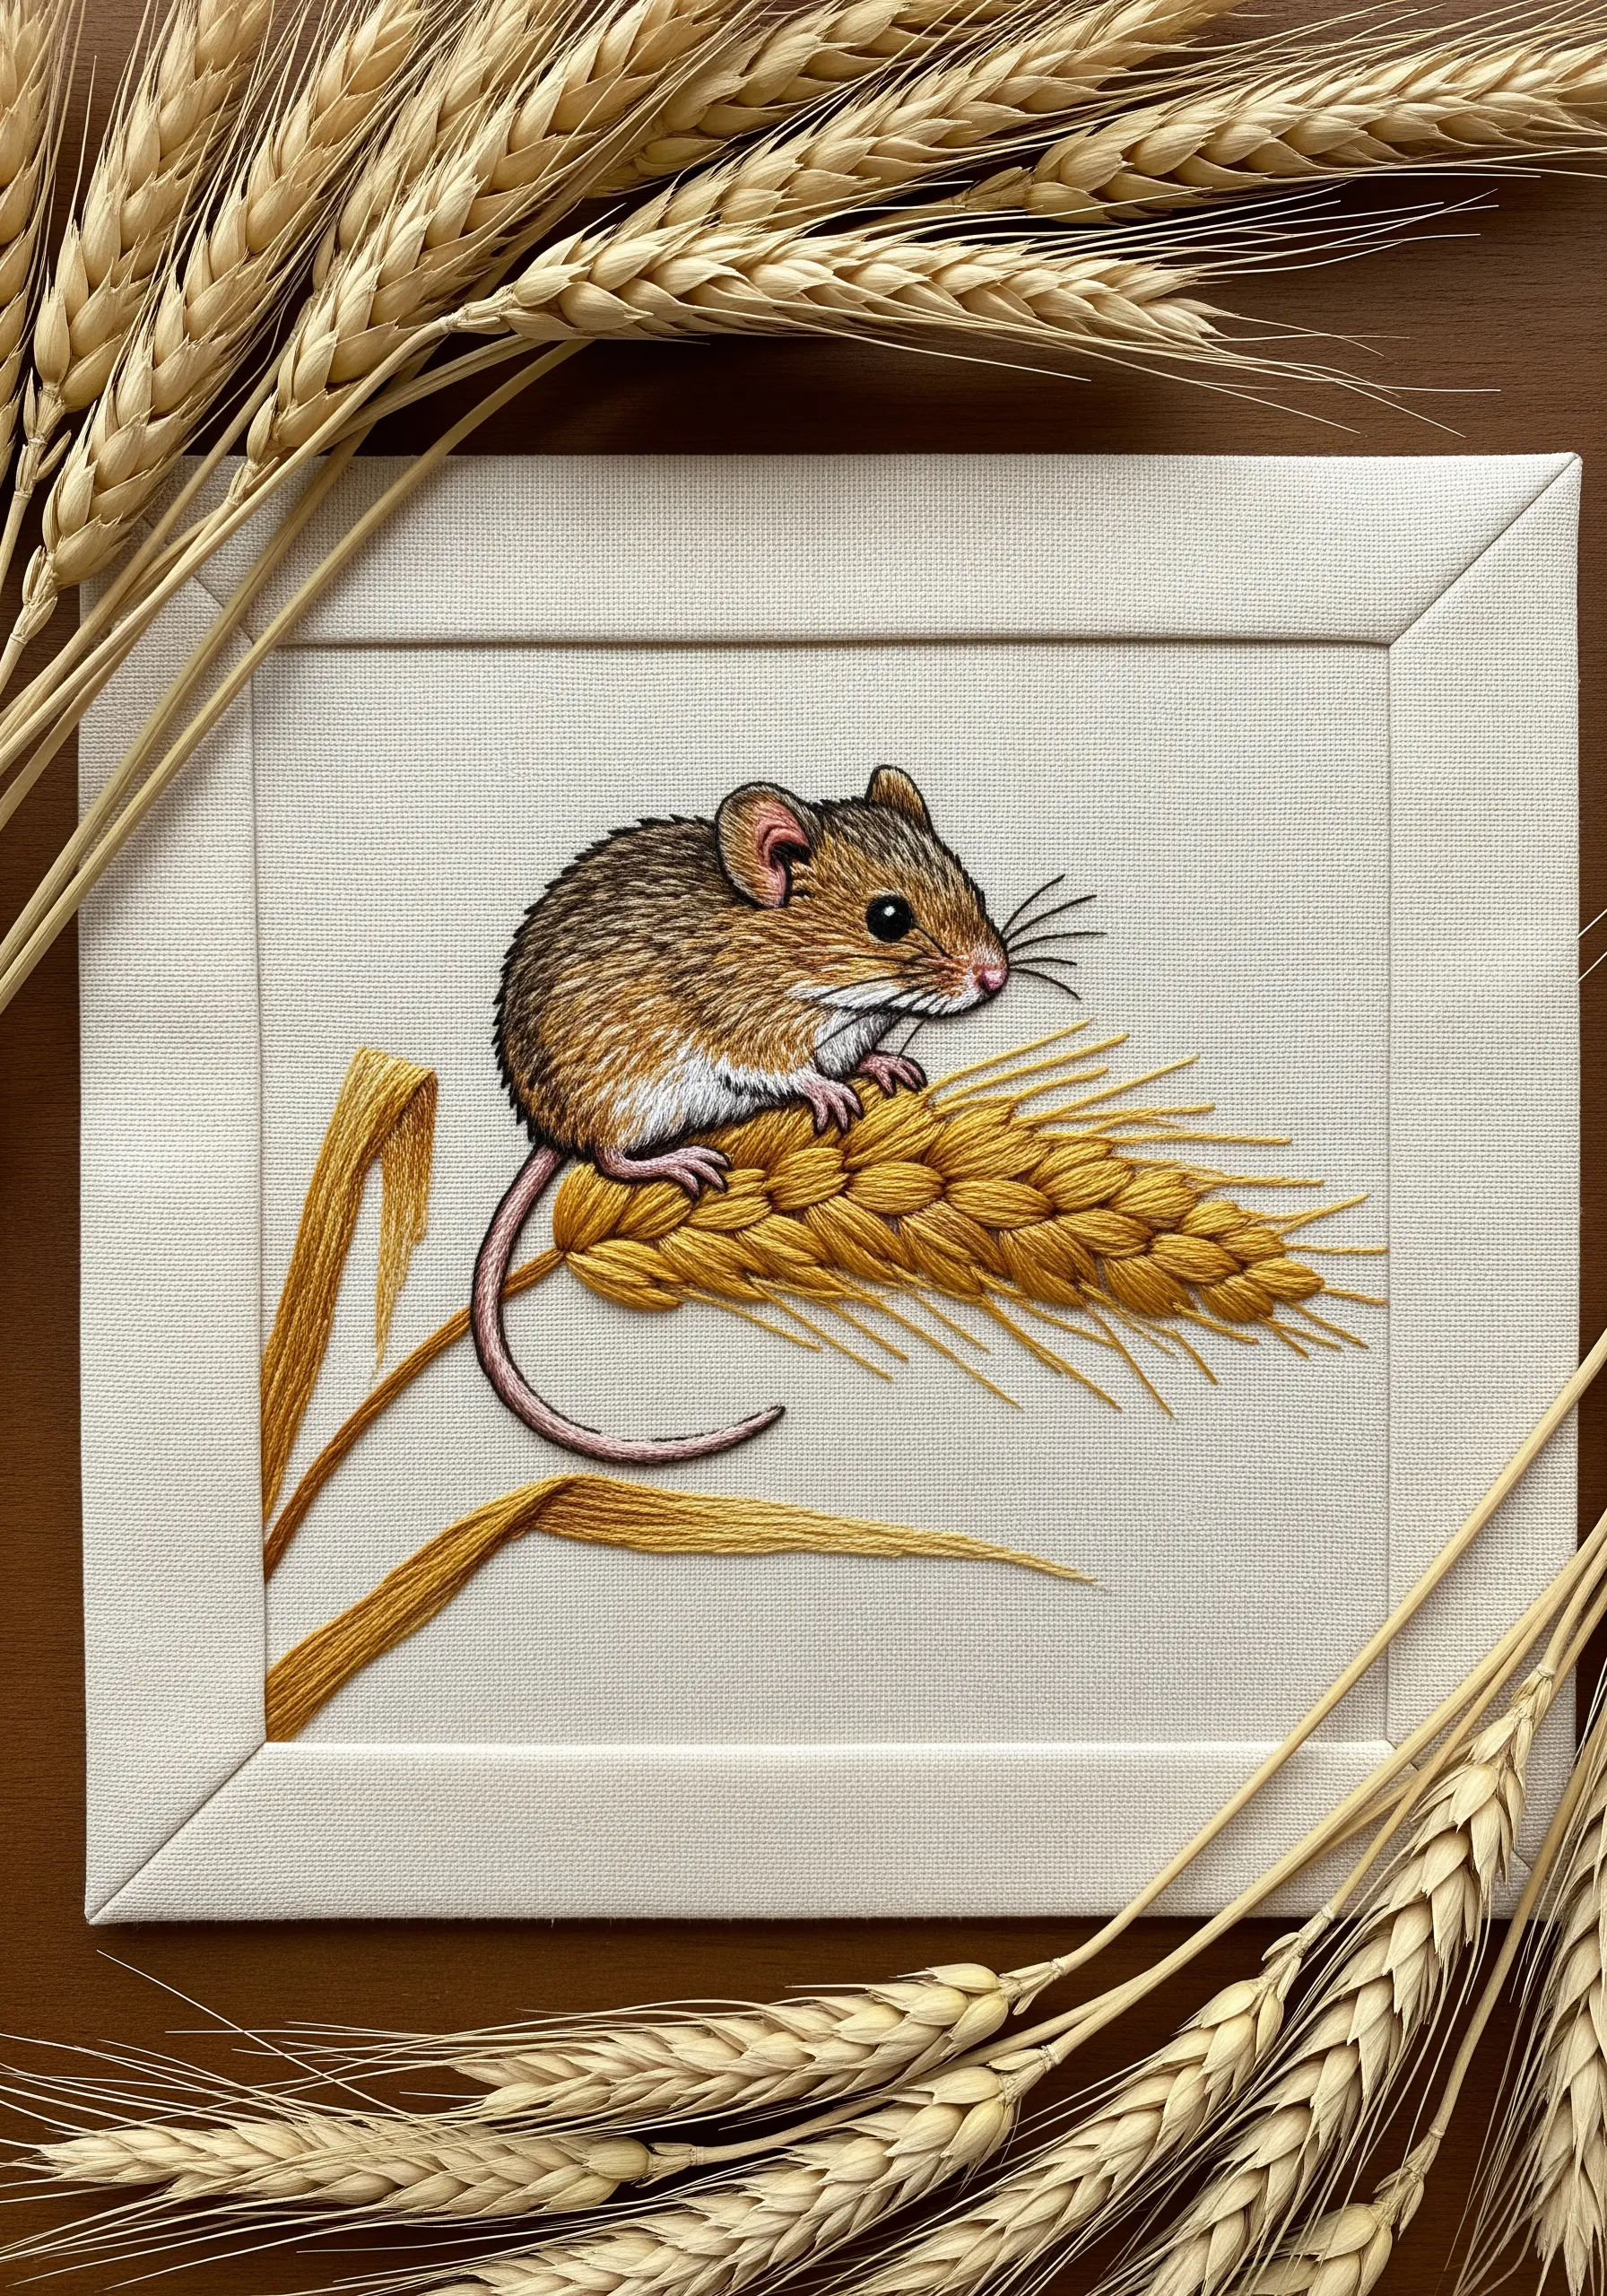
When stitching a subject as tiny as a field mouse, reduce your thread to a single strand of floss.
This simple adjustment allows you to execute incredibly fine details, from the delicate whiskers and tiny pink ears to the individual kernels of wheat.
Using a single thread for your long-and-short stitch will also create a smoother, more refined fur texture appropriate for such a small creature, making your tiny animal embroidery designs look polished.
14. Frame the Face with Botanical Elements
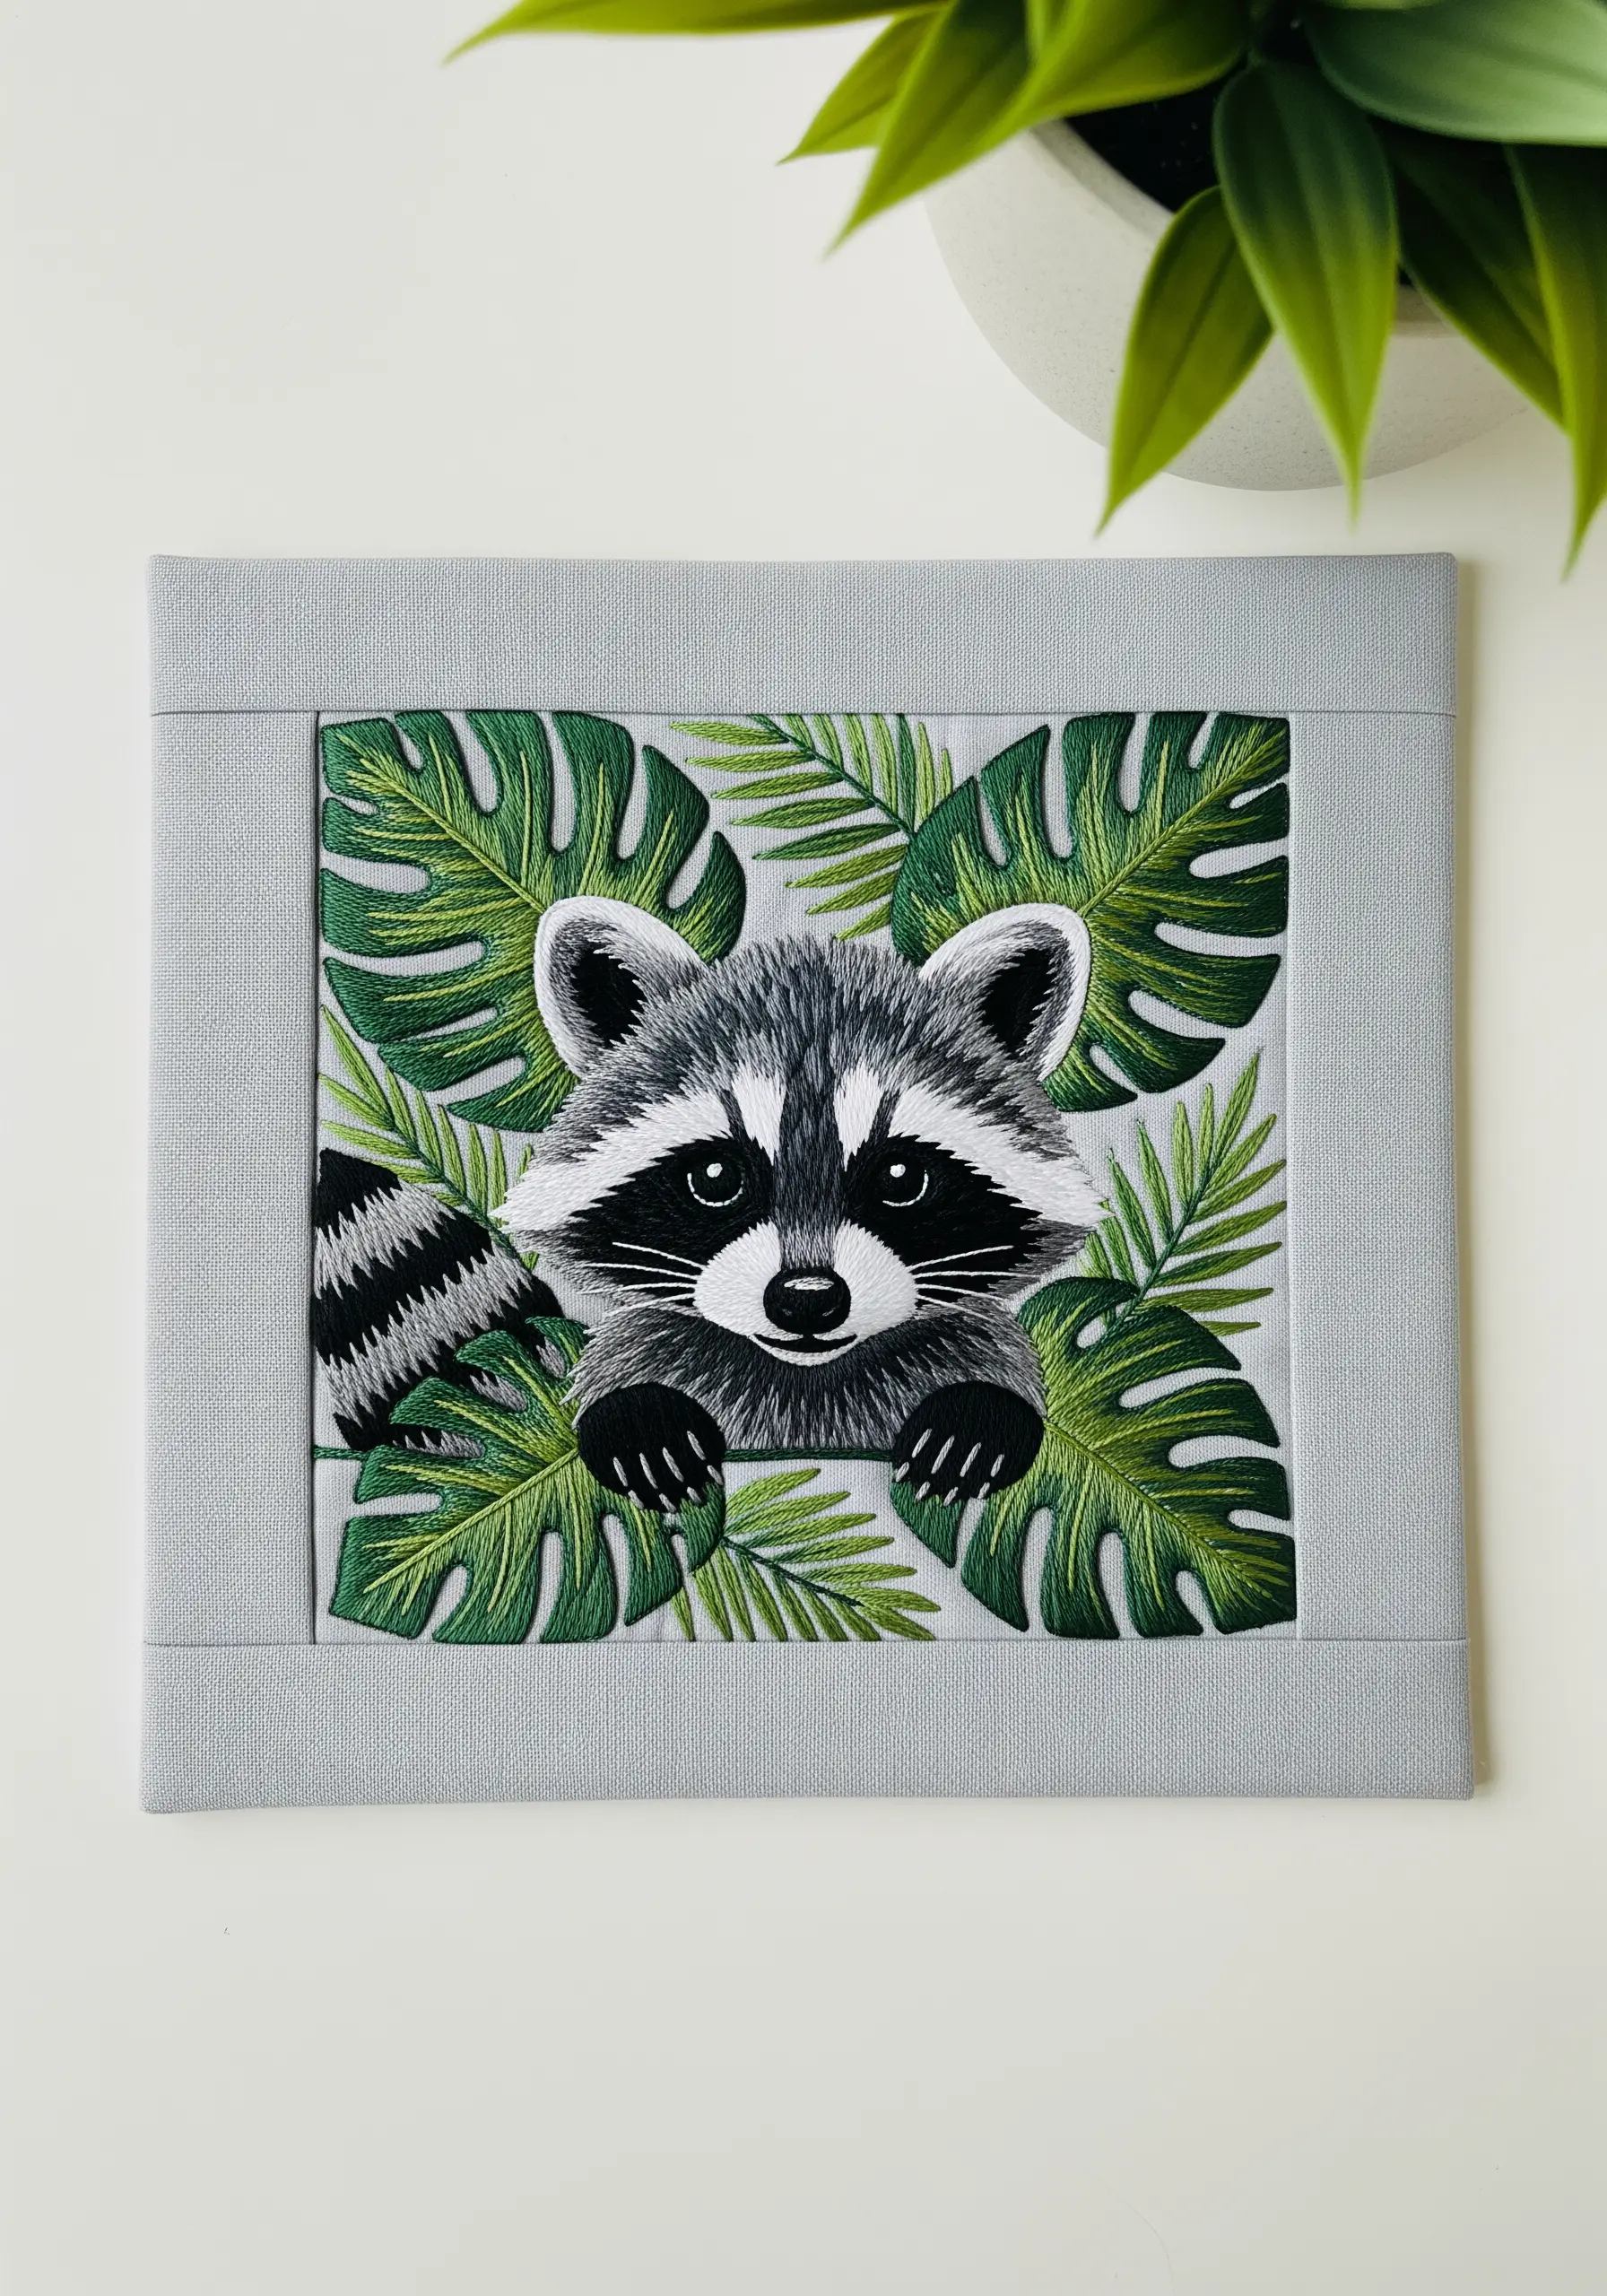
Draw the viewer’s eye directly to your animal’s expressive face by framing it with leaves.
Layer different leaf shapes and sizes around the raccoon, stitching the ones in the back with slightly darker, less detailed stitches.
This creates a sense of depth and makes it feel as though the animal is genuinely peeking out from the foliage.
It’s a classic compositional tool that adds narrative and focus to your quilt block.
15. Build an Authentic Nest with Mixed Fibers
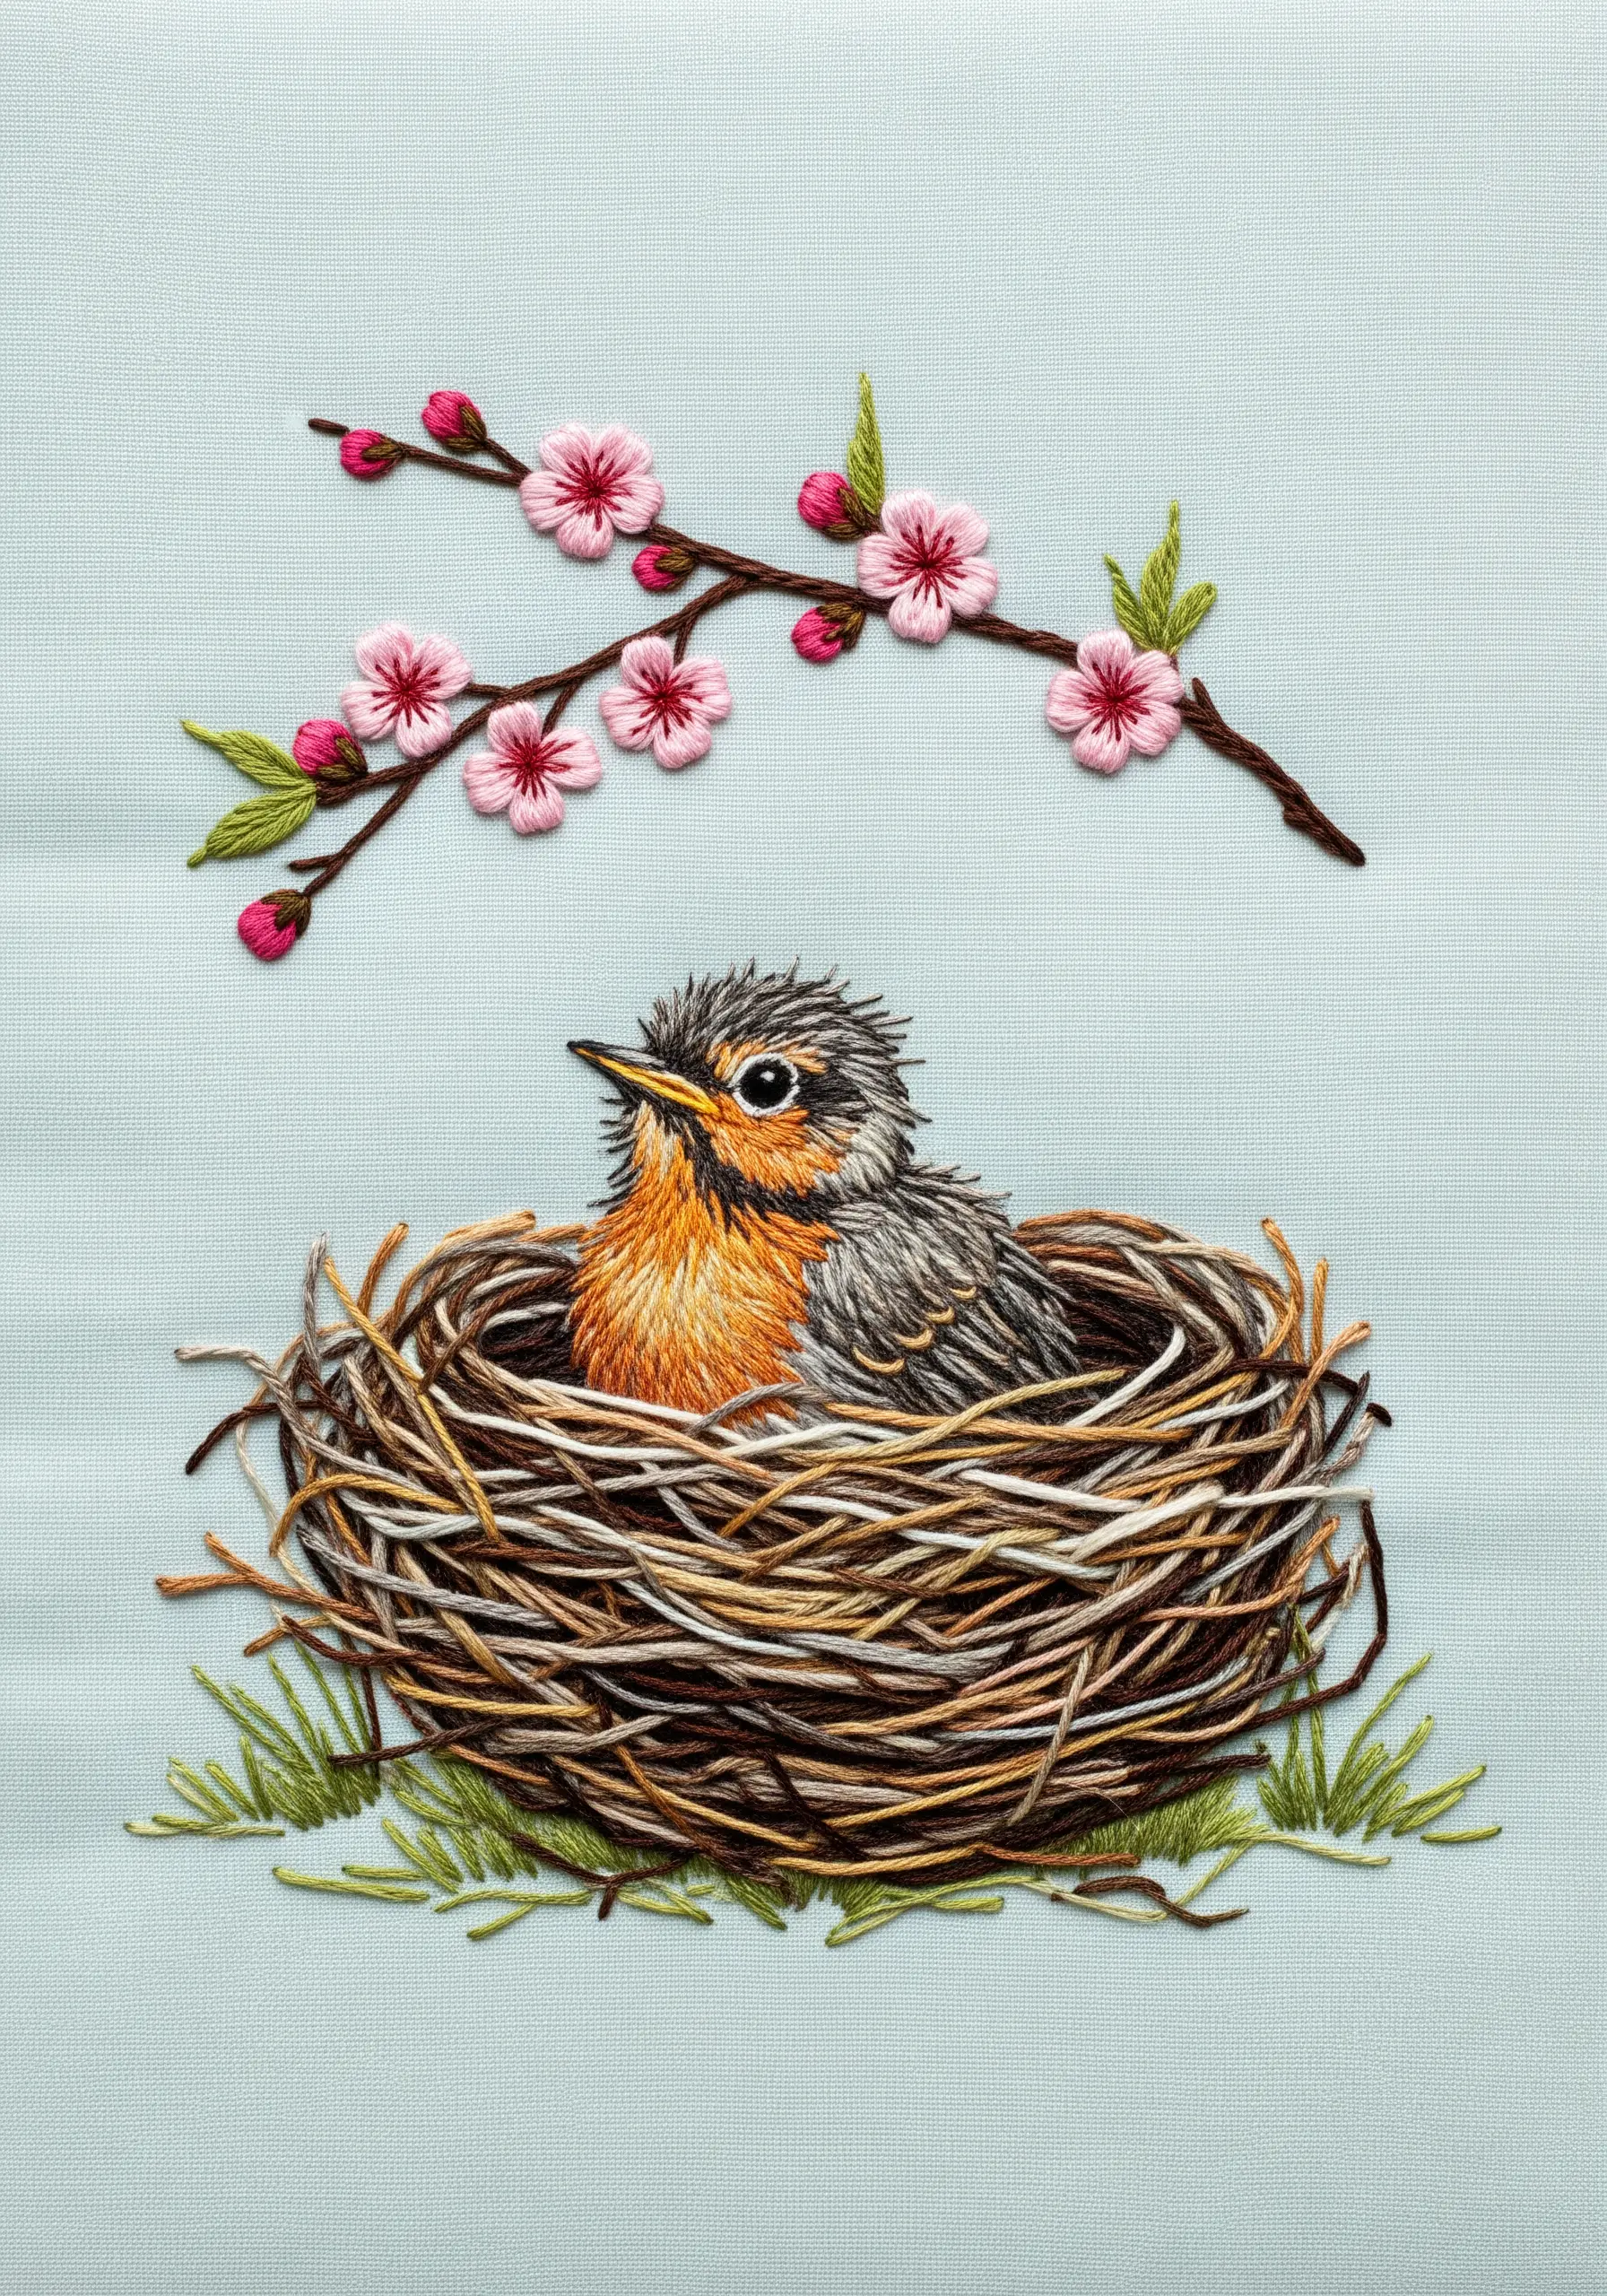
A bird’s nest is a masterwork of chaotic construction, so mimic that by using a variety of threads.
Combine standard six-strand floss with thinner sewing thread, thicker pearl cotton, and even some textured wool or linen threads.
Use a palette of browns, tans, grays, and creams, laid down in long, overlapping straight stitches.
This mix of colors, textures, and weights is the secret to creating nature-inspired texture patterns that look truly authentic.
16. Combine a Bold Silhouette with Folk Art Florals
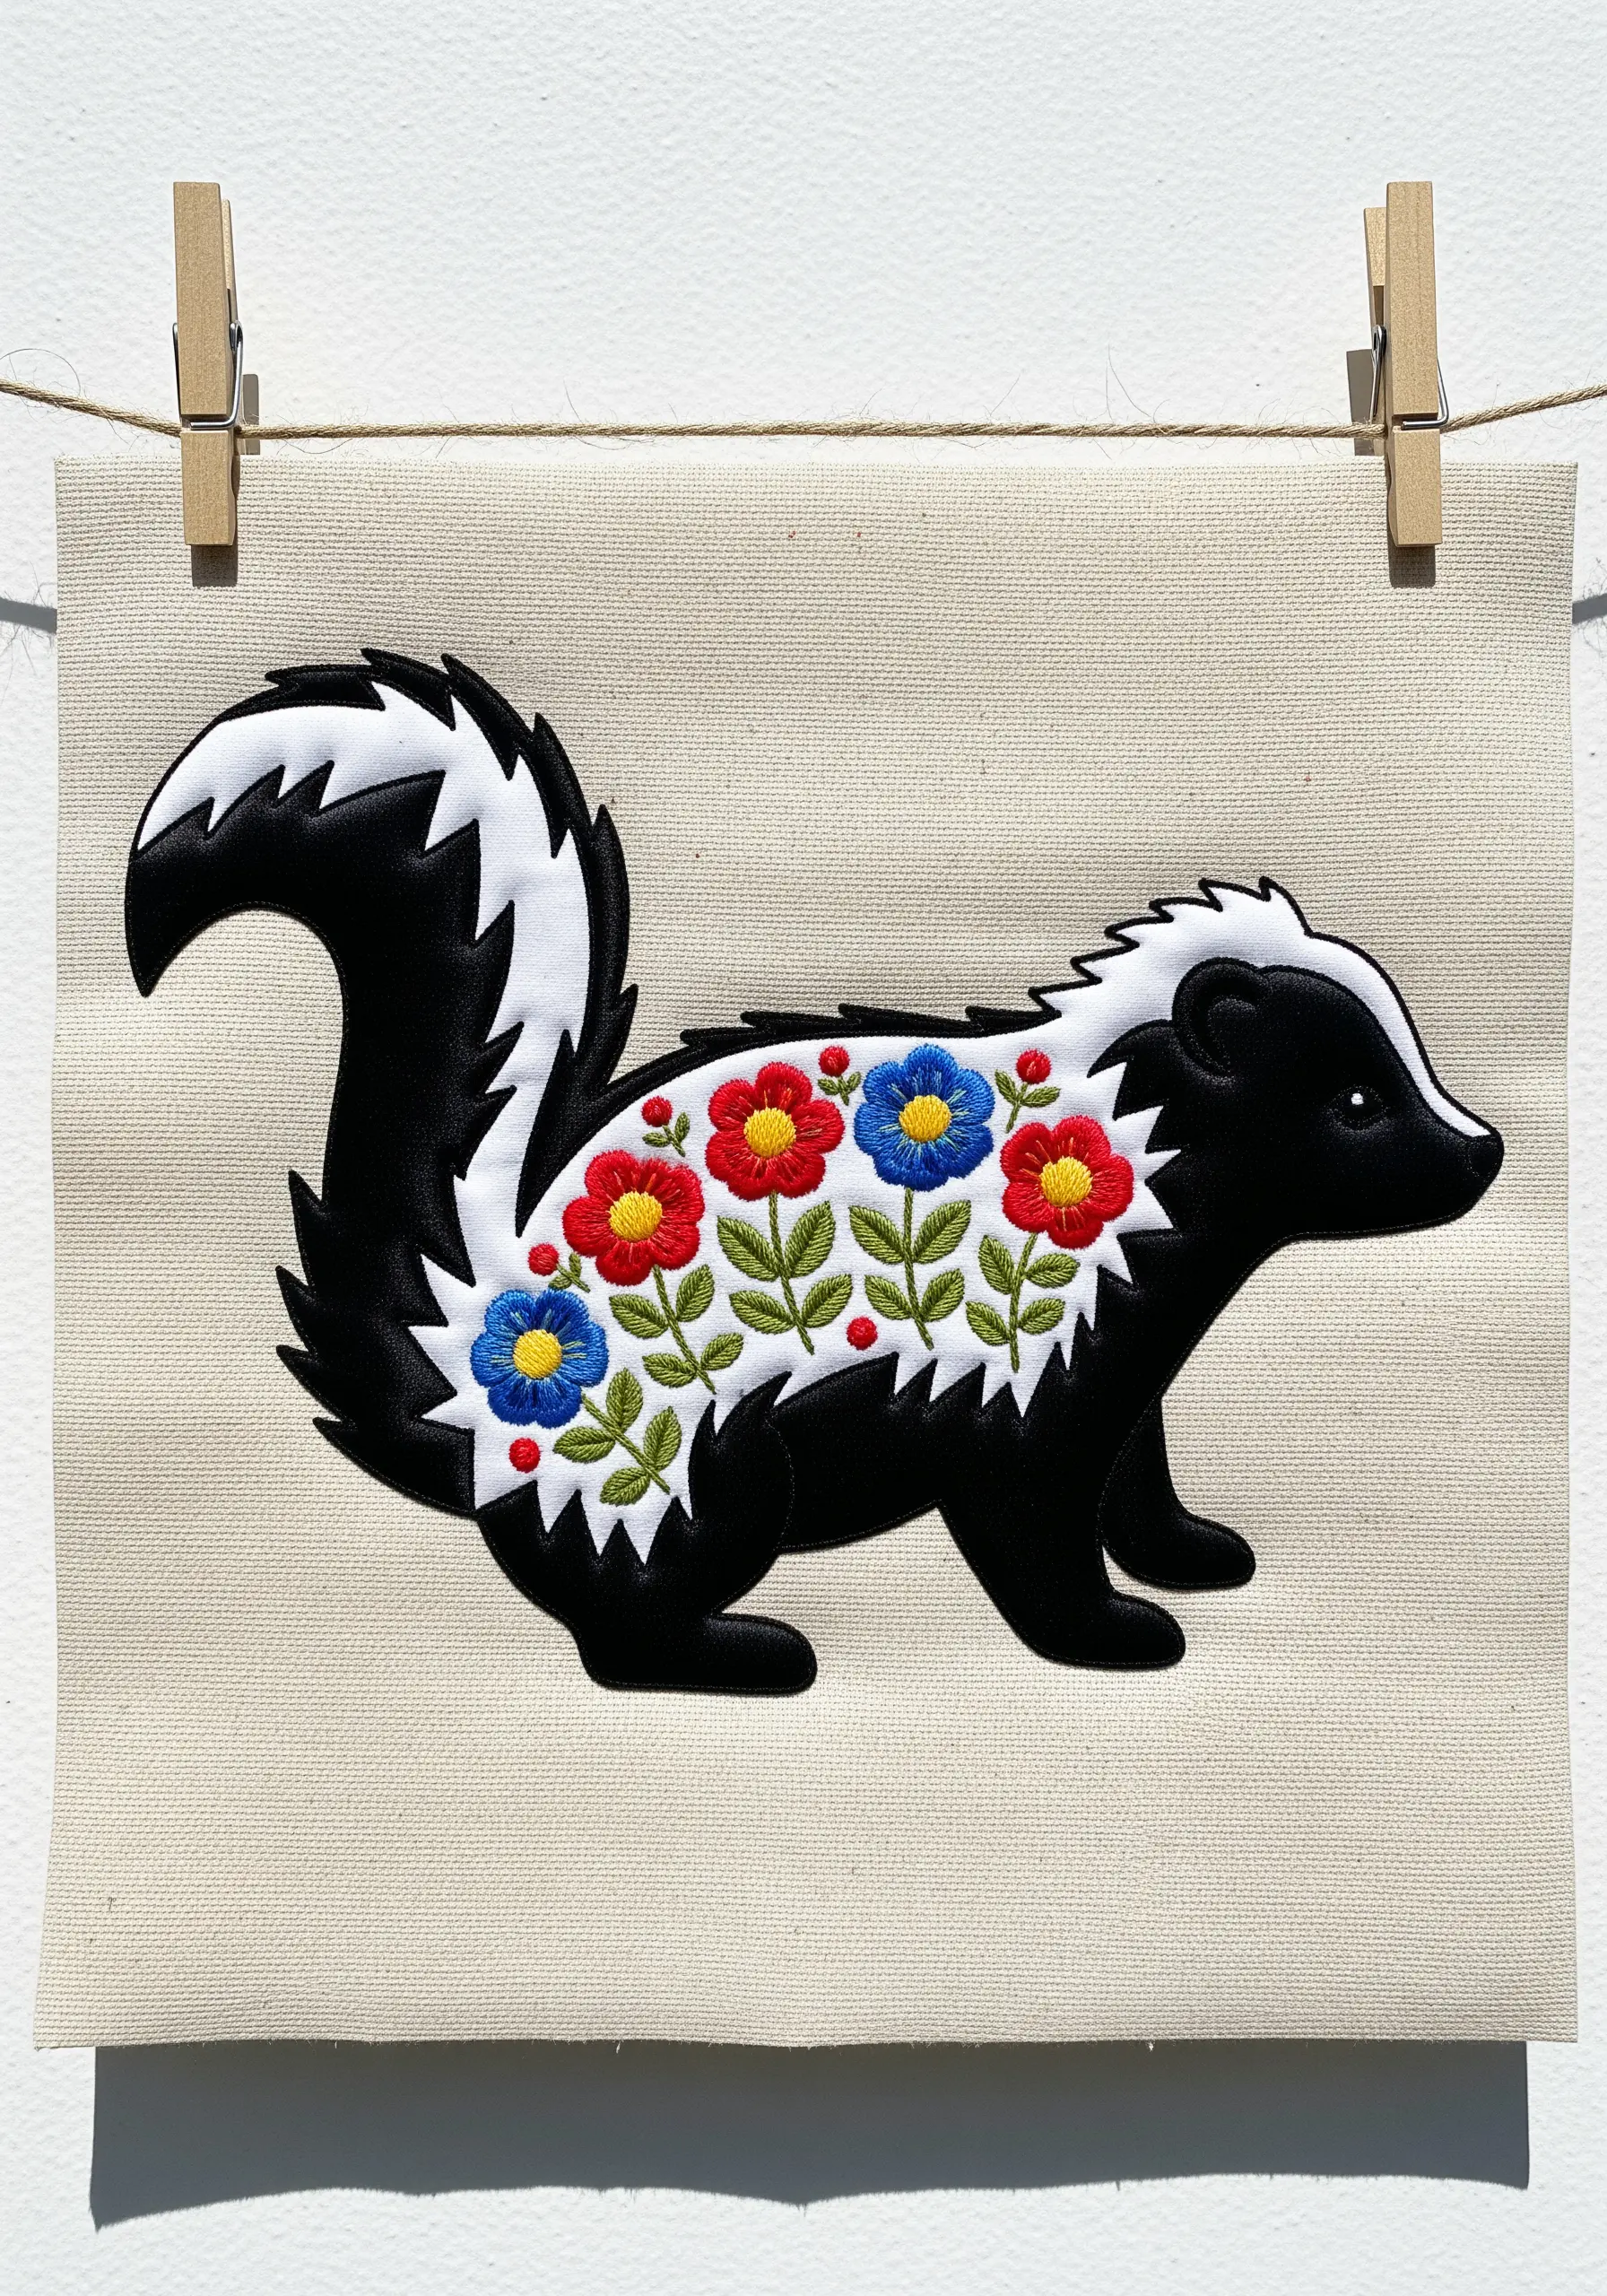
Create a striking, modern heirloom by blending two distinct styles: realism and folk art.
First, establish the skunk’s form with a clean, solid satin stitch in black and a whipped backstitch for the white outline.
Then, treat the white stripe as a canvas, filling it with brightly colored, stylized flowers.
The contrast between the graphic animal shape and the decorative, colorful interior creates a captivating and unique design.
17. Add Whimsy by Playing with Scale

Create a sweet and playful narrative by exaggerating the scale of an element in your composition.
By making the sunflower nearly as large as the chipmunk, the scene instantly feels more charming and storybook-like.
Emphasize the sunflower’s texture with a dense collection of French knots for the center, making it a tactile focal point that beautifully balances the sleek fur of the chipmunk.
This thoughtful choice elevates a simple portrait into a memorable moment.


