
Have you ever finished a piece of embroidery, held it in your hands, and felt that it deserved more than to be tucked away in a box? Your stitching is more than just a craft; it’s a form of art, and it deserves to be seen. The transition from a loose piece of fabric to a polished, framed artwork is where your skill truly gets to shine.
Framing your work is not just about preservation—it’s about presentation. It’s the final, decisive step that tells the world, and reminds you, that what you have created is valuable. The right frame, the right placement, and the right techniques can transform a simple hoop into a breathtaking focal point that will have guests stopping to admire your skill and creativity.
Here, you’ll discover how to think like a curator of your own work. We’ll explore how material choices, stitch textures, and thoughtful compositions can be elevated by their final presentation, turning your passion into stunning framed embroidery pieces that will not only impress your guests but, more importantly, fill you with a deep sense of accomplishment.
1. Master Art Deco Drama with Metallic Thread

Create a statement piece by stitching a symmetrical, geometric pattern on black linen or cotton velvet.
Use a high-sheen gold or silver metallic thread for maximum contrast and light reflection, which gives the artwork a dynamic, luxurious quality.
To ensure your lines are perfectly straight and crisp, use a couching stitch for thicker outlines and a precise backstitch for finer details.
This technique turns simple straight lines into a radiant, graphic composition that feels both timeless and modern, creating DIY framed embroidery art projects that look expensive but aren’t.
2. Embrace Serenity with a Botanical Triptych

Tell a quiet story by displaying three related motifs in separate, identical frames.
Choose a single, elegant botanical element for each—like a ginkgo leaf, bamboo stalk, or cherry blossom—and stitch it on a neutral, textured fabric like raw linen.
Use a minimal palette of soft, muted greens and pinks with only two or three strands of floss to maintain a delicate feel.
The negative space around each motif is just as important as the stitching itself; this intentional simplicity results in minimalist embroidery wall art ideas that turn plain white walls into calming luxury spaces.
3. Weave a Maximalist Tapestry with Thread Painting

For a rich, tapestry-like effect, fill the entire fabric surface with dense, layered stitches.
Use the long-and-short stitch to blend colors seamlessly, creating painterly depth in florals and foliage.
Incorporate a wide range of vibrant, saturated colors against a dark background, like navy or forest green, to make every hue pop.
Varying your stitch direction and adding textural details like French knots and bullion knots will give the piece a lifelike, dynamic quality that invites closer inspection. Mastering these floral thread painting techniques is key to achieving this opulent style.
4. Capture Motion with Abstract Satin Stitch

Explore abstract art by using blocks of satin stitch to create a sense of movement and energy.
Instead of filling shapes randomly, make sure every stitch is laid parallel in the same direction to create a smooth, reflective surface.
Choose a confident, limited color palette—like navy, orange, and grey—to give the design a sophisticated, graphic feel.
The interplay of curved and straight lines creates a dynamic rhythm, perfect for modern interiors. This approach helps you capture motion and flow in your embroidery with striking simplicity.
5. Curate a Gallery of Geometric Line Art

Elevate simple line work by presenting it as a cohesive series.
Stitch several related geometric or abstract designs using a single color of thread—black is classic—on a neutral linen background.
Framing them identically and hanging them in a grid formation transforms individual pieces into a single, impactful installation.
This method highlights the purity of line and form, proving that even the most minimalist designs can create gallery-style hoop art when displayed with intention.
6. Build Lush Texture with Yarn and Punch Needle

Move beyond floss to explore the bold textures of yarn. A punch needle or a simple couching stitch allows you to create high-relief designs with incredible speed and visual impact.
Work in concentric circles to build a vibrant mandala, using contrasting colors like turquoise, magenta, and yellow to create energy and focus.
Stretching your finished piece over a large, artist-grade circular canvas instead of a hoop gives it the presence of a contemporary painting. This is a perfect way to explore embroidered mandala wall art designs for mindful stitching.
7. Stitch a Landscape with a Painter’s Eye

Translate the beauty of a landscape painting into thread by focusing on color, light, and perspective.
Use aida cloth and cross-stitch or tent stitch to create a gridded, almost pixelated effect that feels both traditional and charming.
Select a palette that captures atmospheric depth—cooler, muted tones for distant mountains and warmer, saturated colors for the foreground.
A classic, ornate frame adds a touch of gravitas, turning your stitched piece into a timeless heirloom. These are the kinds of landscape scenes that embroidery lovers will want to hang in every room.
8. Evoke Coastal Calm with Delicate Textures

Capture the gentle essence of the sea by using subtle textures and a soft color palette.
Use French knots and seed stitches to render coral and seahorses, giving them a tactile, dimensional quality.
A variegated blue floss can mimic the natural color variations of water, adding depth without requiring constant color changes.
Displaying these pieces as a triptych in simple, light-colored frames enhances the airy, serene feeling, perfect for creating a coastal-themed accent for bathroom or bedroom walls.
9. Channel Mid-Century Style with Bold Graphics

Recreate the iconic optimism of mid-century modern design with sharp, graphic motifs and a distinct color palette.
Use boomerang shapes and starbursts, filling them with perfectly smooth satin stitch. The key is impeccable stitch direction and tension to achieve that clean, manufactured look.
Stick to classic retro colors like teal, orange, and black on a neutral linen background.
A wide panoramic frame complements the long lines of a credenza and solidifies the vintage aesthetic, creating striking retro patterns for vintage-loving makers.
10. Design a Charming Farmhouse Gallery Wall

Create a warm, inviting focal point by clustering several small hoops together.
Combine simple botanical line drawings, a central quote in a bold font, and even a few hoops wrapped in coordinating gingham fabric.
This mix-and-match approach adds visual interest and personality. Keep the color palette consistent—here, greens, reds, and neutrals—to ensure the collection feels curated, not cluttered.
Arranging them in an organic, slightly asymmetrical cluster makes for a dynamic gallery wall without visual clutter.
11. Highlight a Single Motif with an Ornate Frame

Give a single, exquisitely stitched element the attention it deserves.
Stitch a peacock feather on a dark, solid background like navy or black silk to make the colors appear iridescent.
Use a combination of fine straight stitches for the feather barbs and satin stitch for the eye, blending greens, blues, and golds.
Placing this delicate subject in a dramatic, oversized, and ornate frame creates a powerful contrast that feels both luxurious and unexpected. This is a perfect project for experimenting with metallic thread to add glam without overdoing it.
12. Go Large-Scale with Expressive Line Work

Think beyond the hoop and treat your fabric like a canvas for a large-scale abstract drawing.
Use thick black yarn or multiple strands of floss and long, energetic running stitches that cross and intersect.
Embrace imperfection—variations in stitch length and tension will add to the piece’s raw, expressive character.
Hanging the unstretched canvas directly on the wall gives it a modern, industrial feel, turning your stitches into abstract art that feels like a modern painting.
13. Find Beauty in Imperfection with Stitched Kintsugi

Apply the Japanese philosophy of Kintsugi—mending broken pottery with gold—to fabric.
Start with a piece of distressed or tie-dyed denim with frayed edges. Then, stitch radiating cracks using a shimmering gold metallic thread.
Use a whipped backstitch or a heavy chain stitch to create a thick, raised line that mimics the golden lacquer.
This technique transforms a simple piece of fabric into a meaningful work of art about resilience and beauty, much like the details on vintage-inspired denim jacket motifs.
14. Achieve Dutch Master Drama on Black Velvet

Create the dramatic chiaroscuro effect of an Old Master painting by stitching a vibrant floral bouquet on black velvet.
The plush, non-reflective surface of the velvet absorbs light, making your thread colors appear exceptionally rich and saturated.
Focus on realistic shading and highlights using the long-and-short stitch to give each petal and leaf a three-dimensional form.
This combination of subject, technique, and background material results in abstract floral hoops that look like fine art, worthy of a grand, traditional frame.
15. Curate an Eclectic and Personal Gallery Wall

Your gallery wall doesn’t need to be perfectly uniform. In fact, mixing it up creates more personality.
Combine embroidery in traditional frames with pieces finished in their hoops. Vary the frame styles, colors, and sizes to create a collected, organic feel.
Unify the diverse collection with a loose color palette that connects back to your room’s decor, like the warm tones in the sofa cushions.
This approach allows you to showcase different styles—from abstracts to botanicals—and create tiny handmade decor ideas that instantly transform any room.
16. Create a Meditative Centerpiece with Radial Stitches

For a truly monumental piece, think in terms of texture and scale rather than intricate motifs.
Create a massive radial design by stitching thousands of straight lines outward from a central point. Use a single, bold color like magenta for maximum impact.
The overlapping threads will create a dense, vibrant texture that changes with the light.
This technique is meditative in its repetition and results in a powerful, contemporary artwork perfect for large, minimalist spaces. You can even use oversized hoop wall displays to achieve a similar effect on a smaller scale.
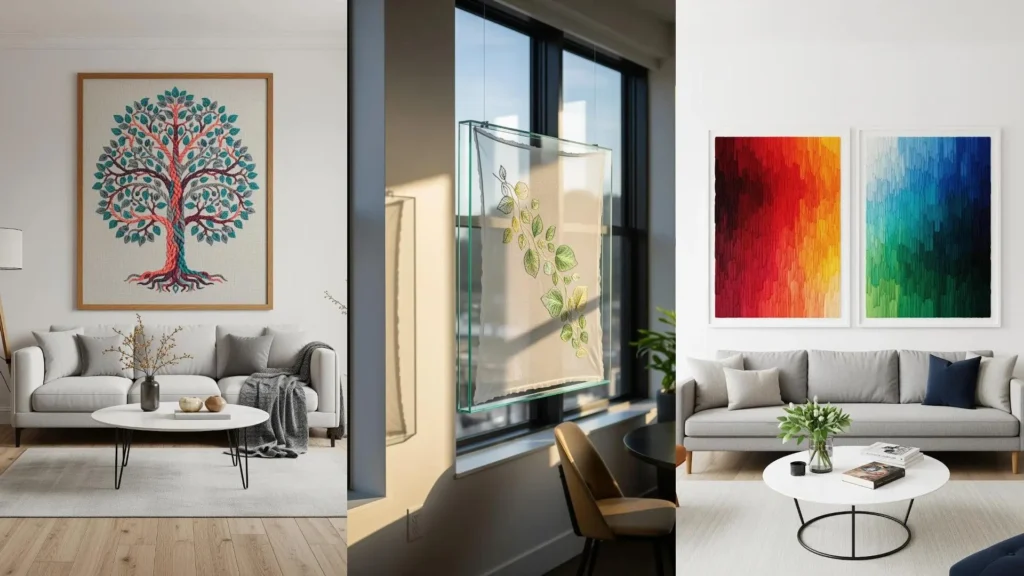
17. Tell a Story Across a Triptych

Expand your composition beyond a single frame by using a triptych—three individual panels that form one cohesive image.
This format is perfect for a subject like a tree, allowing you to emphasize its height and the connection between roots and branches.
Use textural stitches to differentiate elements: a heavy chain stitch or padded satin stitch for the bark, and delicate fishbone or satin stitches for the leaves.
The negative space of the dark background fabric becomes an active part of the design, isolating the tree’s form. This focus on detail is what turns ordinary projects into botanical art you’ll want to show off.
18. Render Architecture with Precision Backstitch

Capture the complex beauty of architecture by treating your needle and thread like a fine-tipped ink pen.
Use a single strand of black floss and a meticulous backstitch or split stitch to create sharp, clean lines.
Focus on perspective, shading through hatching and cross-hatching, and maintaining consistent stitch length for a polished, drafted appearance.
This technique requires patience, but it transforms your embroidery into a sophisticated illustration. It’s a great way to create stunning wall panels inspired by your favorite buildings.
19. Chart the Cosmos on Deep Blue Fabric

Create a celestial masterpiece by using a deep navy or black fabric as your night sky.
Use a single strand of metallic gold or silver thread to stitch constellations, spirals, and zodiac signs with a delicate backstitch.
Incorporate tiny seed stitches or French knots in a bright white or silver to represent distant stars, adding layers of depth and sparkle.
Finishing the piece in a large, simple wooden hoop enhances the circular, cosmic theme, making it one of those peaceful embroidery hoops for bedrooms filled with quiet intentions.
20. Layer Colors to Create an Atmospheric Landscape

Stitch a mountain range that conveys a sense of depth and misty atmosphere.
Create this effect by dividing the landscape into distinct, overlapping layers. Use darker, more saturated colors and denser stitches for the foreground elements, like the trees.
For the distant mountains, switch to progressively lighter, cooler shades of blue, lavender, and pink, and use less dense fill stitches.
This deliberate use of color and density mimics atmospheric perspective, resulting in watercolor-style embroidery patterns with beautiful visual flow.
21. Build a 3D Insect Specimen Box

Move your embroidery into the third dimension with stumpwork techniques to create lifelike insects.
Use padded satin stitch to give bodies a rounded, realistic shape. For elements like wings, stitch onto a separate piece of fabric with a wire outline, then cut it out and attach it to the main piece.
Mount each insect in its own small box frame and arrange them in a grid, mimicking a traditional entomology display.
This elevates your work from a 2D picture to a collection of intricate sculptures, perfect for realistic animal and insect embroidery patterns for nature lovers.
22. Paint with Thread Using Color Gradients

Explore pure color by creating an abstract piece focused entirely on smooth transitions.
Fill your entire canvas with dense, vertical straight stitches or long-and-short stitches. Plan your color progression meticulously, blending shades from dark to light to create a seamless gradient.
Presenting two complementary gradients—like warm reds to yellows and cool greens to blues—as a diptych creates a powerful visual dialogue.
This technique is a meditative exercise in color theory and results in stunning abstract art that can express mood, calm, or drama.
23. Juxtapose Modern Lines with Classic Frames

Create an intriguing visual tension by pairing a modern, minimalist design with a traditional, ornate frame.
Stitch a simple, continuous-line portrait using a bold backstitch or stem stitch in black thread on a soft, solid-colored background like blush pink linen.
The simplicity of the artwork allows the gilded, detailed frame to shine without competing, and vice-versa.
This unexpected pairing feels fresh, sophisticated, and intentional, elevating your delicate line art into a statement piece.
24. Explore Intricacy with Monochrome Pattern Work

Challenge yourself by creating a complex design using only a single color of thread.
Without color to create contrast, your design must rely on the interplay of line, shape, and negative space.
Use precise backstitches for outlines and carefully placed seed stitches or small satin stitches for texture and shading.
This disciplined approach is perfect for geometric patterns, mandalas, and knotwork, resulting in intricate cultural motifs that feel both ancient and modern.
25. Weave Texture into a Stylized Tree of Life

Give a classic motif a contemporary twist by focusing on texture and stylized color.
Use a thick, braided chain stitch or raised stem stitch band for the tree trunk, giving it a tangible, rope-like quality.
For the leaves, choose a non-traditional color palette like teal and grey, and stitch them with a simple fishbone or detached chain stitch for a uniform look.
This blend of bold textures and modern colors reimagines a timeless symbol, making for beautiful high-texture projects for people who love tactile art.
26. Create Rhythmic Waves with Pattern Fills

Capture the movement of the ocean by stitching a classic Japanese wave pattern.
Use a consistent fill stitch, like satin stitch or even darning stitch, to create solid blocks of color that define the wave shapes.
A simple, two-color palette of deep blue and white on a neutral background is all you need for a crisp, graphic effect.
The repetition of the pattern creates a mesmerizing rhythm, making it a perfect subject for a long, panoramic frame in a minimalist space. This is a great example of minimal embroidery that uses only a few colors for a striking effect.
27. Stitch Moody Florals on Jewel-Toned Velvet

For a rich, dramatic effect, choose a dark, luxurious fabric like emerald green or burgundy velvet as your canvas.
The deep, saturated background makes floral colors like crimson, magenta, and deep purple appear luminous and intense.
Use thread painting techniques (long-and-short stitch) to blend your shades smoothly, giving petals a realistic, velvety texture that complements the background fabric.
This combination creates a sense of depth and opulence, perfect for romantic designs that feel timeless and elegant.
28. Capture Iridescence with Silk Thread

When stitching subjects known for their shimmer, like hummingbirds, your thread choice is critical.
Switch from standard cotton floss to silk or rayon threads. Their natural high sheen will catch the light and mimic the iridescent quality of feathers.
Use tiny, carefully directed straight stitches to follow the direction of feather growth, enhancing the play of light across the surface.
This small material adjustment makes a significant visual difference, and is perfect for tiny hummingbird embroidery ideas where detail is everything.
29. Define Shapes with Bold Yarn Couching

Create a bold, graphic artwork with the texture of thick yarn.
Instead of trying to pull heavy yarn through the fabric, use the couching technique: lay the yarn on the surface and tack it down with a thinner, matching thread.
This allows you to create clean, continuous lines and fluid curves that would otherwise be impossible.
A retro-inspired color palette of rust, olive, and navy gives the piece a warm, nostalgic feel, resulting in playful yarn wall art crafts to refresh your living space.
30. Assemble a Botanical Collection in Hoops

Create the look of a vintage botanical chart by stitching individual plant specimens and displaying them as a collection.
Choose a variety of forms—ferns, flowers, mushrooms—to create visual interest. Focus on realistic details and accurate colors.
Finishing each piece in a simple wooden hoop and arranging them in a tight, organic cluster on the wall gives the display a cohesive, scholarly feel.
This is an excellent way to build on your skills and create beautiful nature-themed embroidery samplers to practice real plant shapes.
31. Experiment with Embroidery on Sheer Fabric

Create an ethereal, floating effect by stitching your design on a transparent fabric like organza or tulle.
Because both the front and back of your work will be visible, you’ll need to keep your stitches exceptionally neat. This is a great challenge for refining your technique.
Suspending the finished piece within a glass box frame or between two panes of glass enhances the illusion of weightlessness.
The way light passes through the fabric adds a magical dimension to your work, turning simple stitches into stunning decor that plays with light and shadow.
32. Illuminate Your Art with Strategic Lighting

The way you display your embroidery is as important as the stitching itself. Consider how lighting can enhance your work.
For a piece with high-contrast metallic threads on a dark background, a dedicated spotlight from above will make the threads gleam, emphasizing the texture and intricate linework.
This dramatic, gallery-style presentation transforms your embroidery from a simple craft into a serious work of art.
It proves that thoughtful display is the final step in creating fiber art installations that combine modern art and classic techniques.


