

A blank wall in a small apartment doesn’t have to feel empty—it’s an opportunity. It’s a canvas waiting for the warmth and texture that only handmade art can provide. Forget expensive prints or generic decor; your needle and thread are all you need to transform a space and make it truly yours.
These ideas are more than just patterns; they are techniques designed to elevate your work. You’ll learn how to use stitch direction to create light, how to layer textures for depth, and how to choose a color palette that brings a sense of calm and intention to your home.
Whether you’re working on a large-scale tapestry or a small, delicate hoop, the goal is the same: to create something with your own hands that adds beauty, personality, and a quiet sense of comfort to the place you live.
1. Build Landscapes with Chunky Yarn

Move beyond floss to create dramatic, tactile wall art using chunky yarn and a punch needle or by couching the yarn onto a heavy canvas backing.
This technique allows you to fill large areas quickly, building up color-blocked shapes with satisfying texture.
Vary the loop height or stitch direction to create subtle shifts in light and shadow, giving your landscape depth without complicating the color palette.
Hanging the finished piece from a natural element like a birch branch reinforces the organic, handmade feel.
2. Master Celestial Motifs on Dark Fabric

Make your celestial designs pop by stitching with metallic or bright white thread on a dark navy or black cotton fabric.
For the moon’s texture, instead of a flat satin stitch, fill the shapes with a dense scattering of French knots and seed stitches using a slightly off-white or silver thread.
This technique mimics the cratered surface beautifully and creates a focal point that draws the eye.
Keep the stars simple—isolated cross stitches or single straight stitches—to let the detailed moons shine.
3. Achieve Lush Foliage with Satin Stitch

When embroidering large leaves like monstera, the direction of your satin stitch is everything.
Angle your stitches to follow the natural direction of the leaf’s veins, starting from the center and moving outwards.
This simple adjustment creates a subtle, light-catching sheen that gives the flat shape a sense of life and movement.
Use several shades of green—even just one or two tones apart—to create highlights and shadows, adding a layer of realism to your houseplant embroidery motifs.
4. Create Depth with Thread Painting and Couching
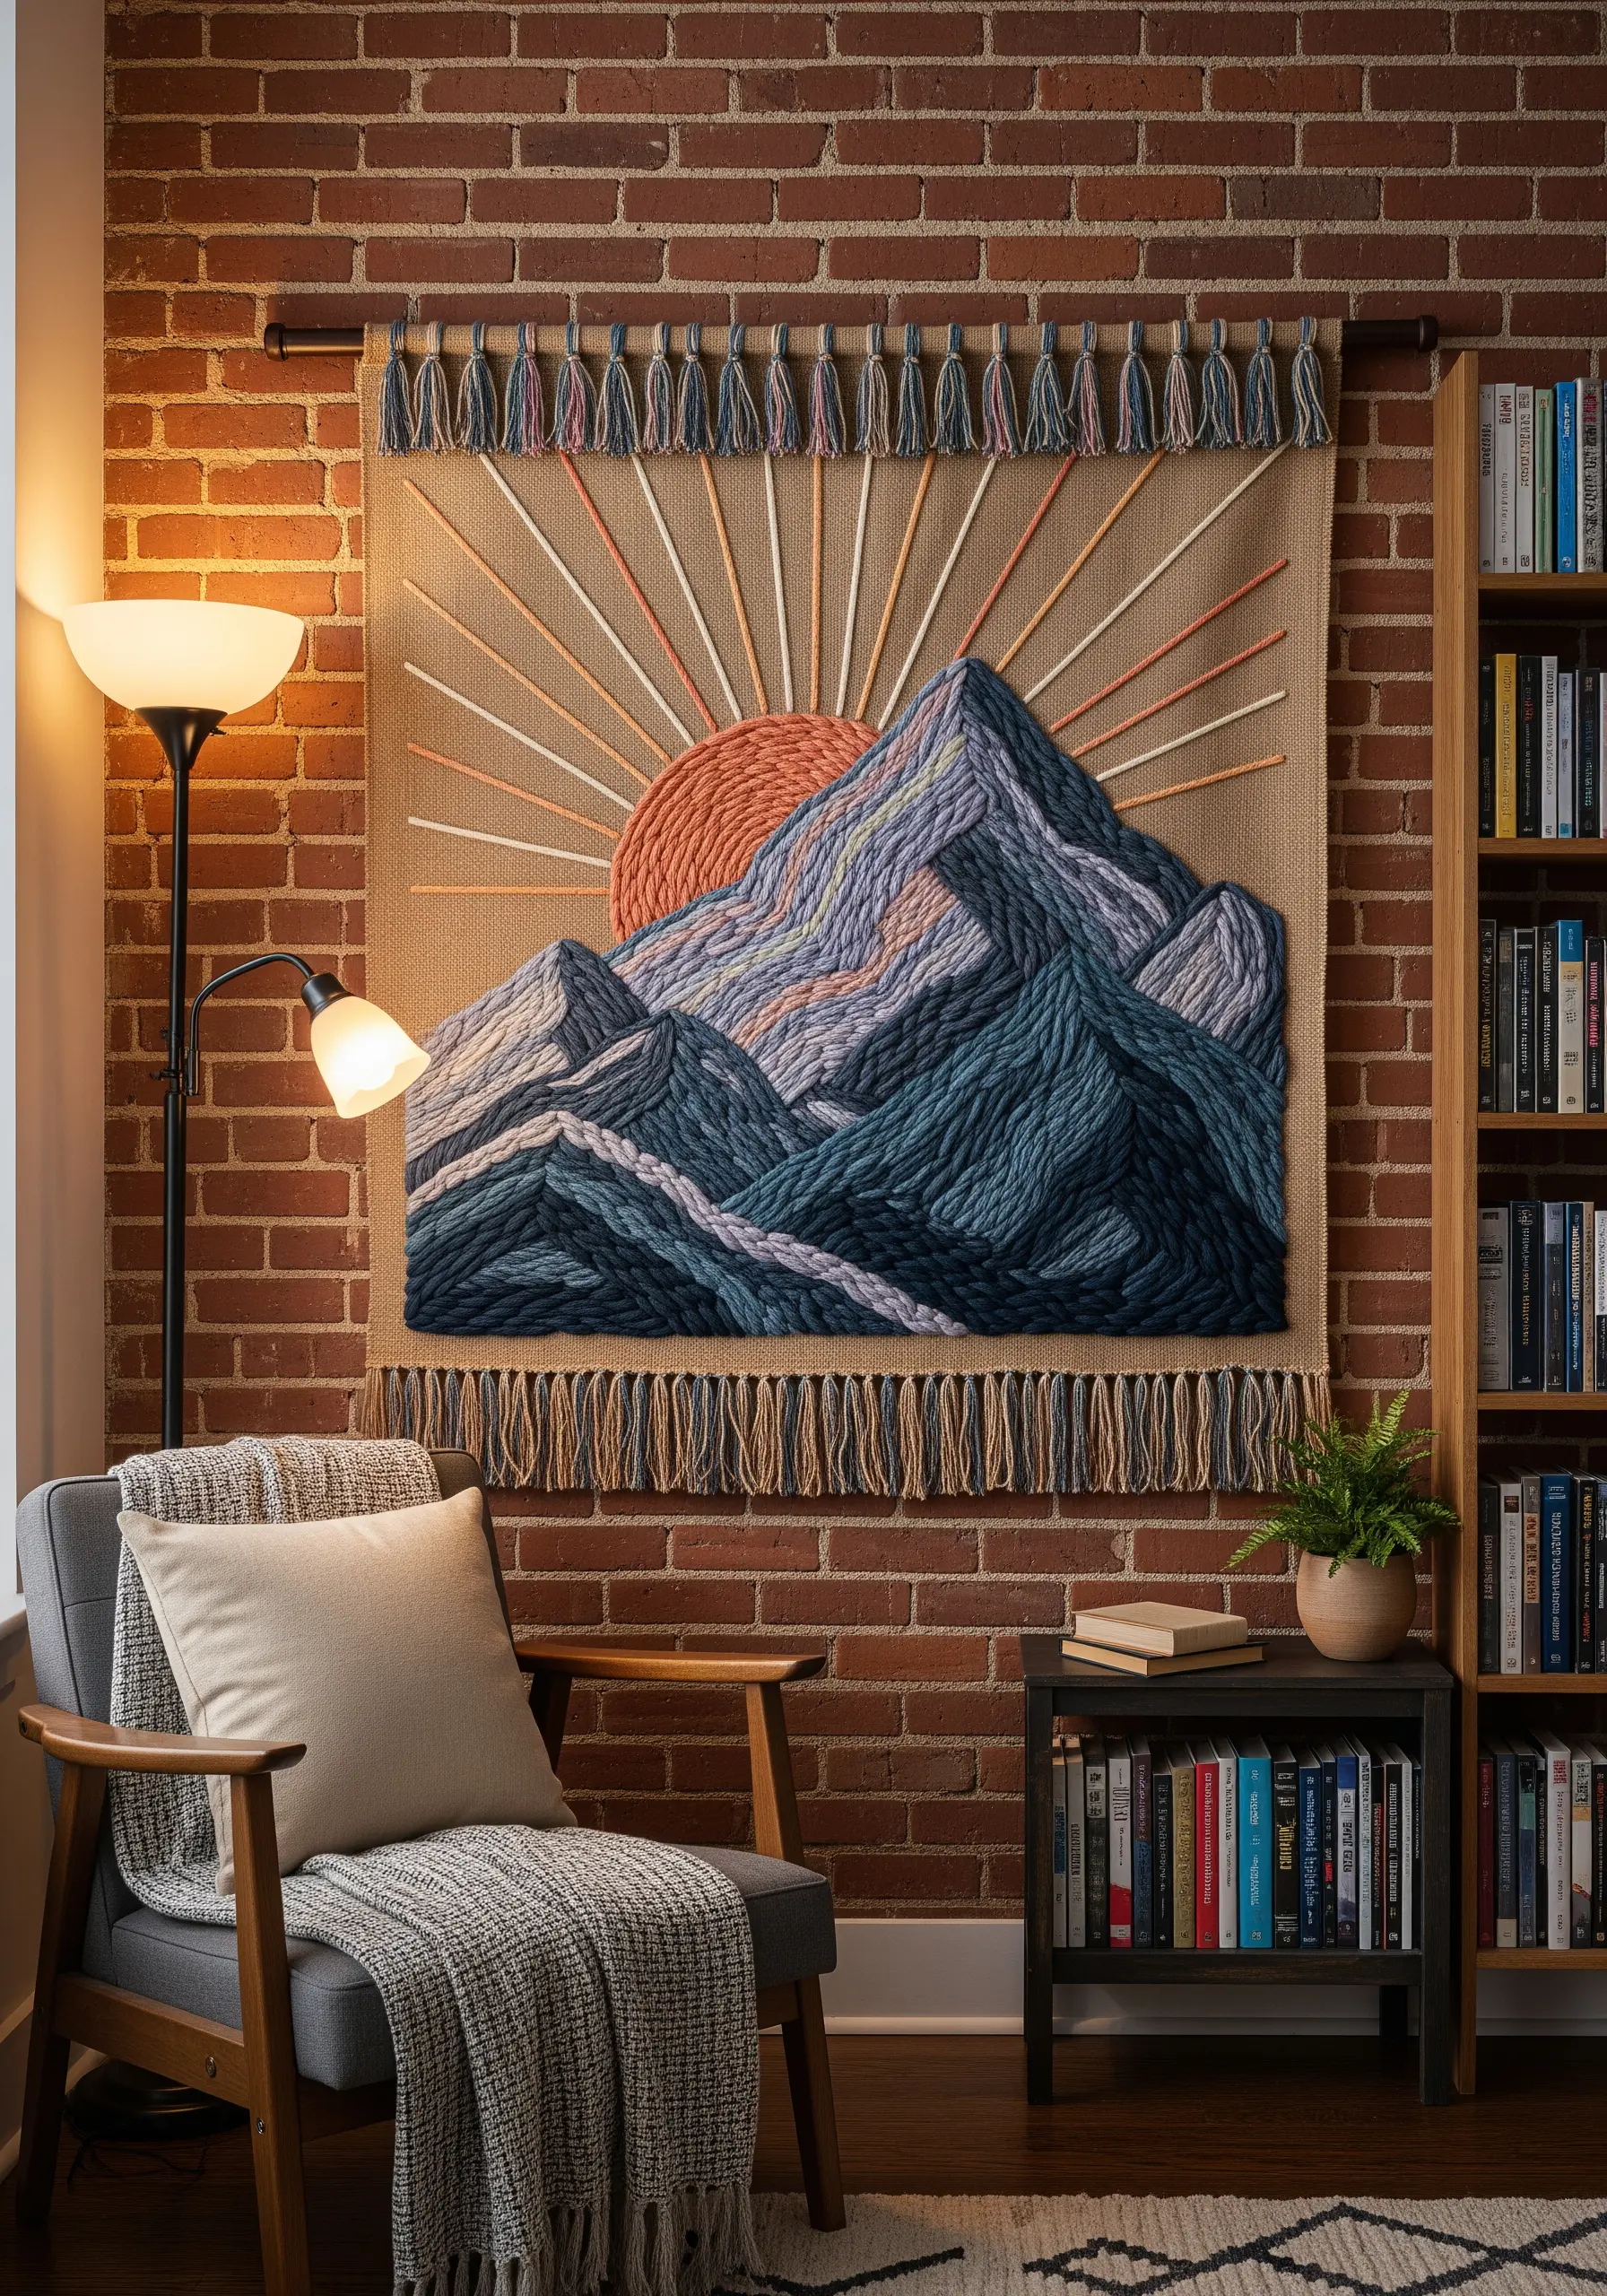
For complex landscapes, combine thread painting for color blending with couching for sharp definition.
Use long and short stitches to fill the mountain faces, blending shades of blue, gray, and lavender to create natural-looking shadows and highlights.
Then, lay down thicker yarn along the mountain ridges and stitch over it with a matching floss color (couching) to create bold, clean outlines that define the shapes.
This mix of techniques results in a piece with both soft, painted areas and crisp, graphic lines.
5. Energize Your Space with Geometric Color Blocking

Transform a plain wall with a bold, abstract tapestry that plays with shape and color.
Use a dense satin stitch or long-and-short fill stitch to create solid blocks of color, ensuring your stitches are tight and even for a smooth, woven appearance.
Pay close attention to the direction of your stitches within each shape; alternating directions (horizontal, vertical, diagonal) adds another layer of subtle texture and visual interest.
A limited but high-contrast palette—like cobalt, coral, and teal—gives the piece a modern, graphic impact.
6. Embrace Folk Art with Symmetrical Cross-Stitch
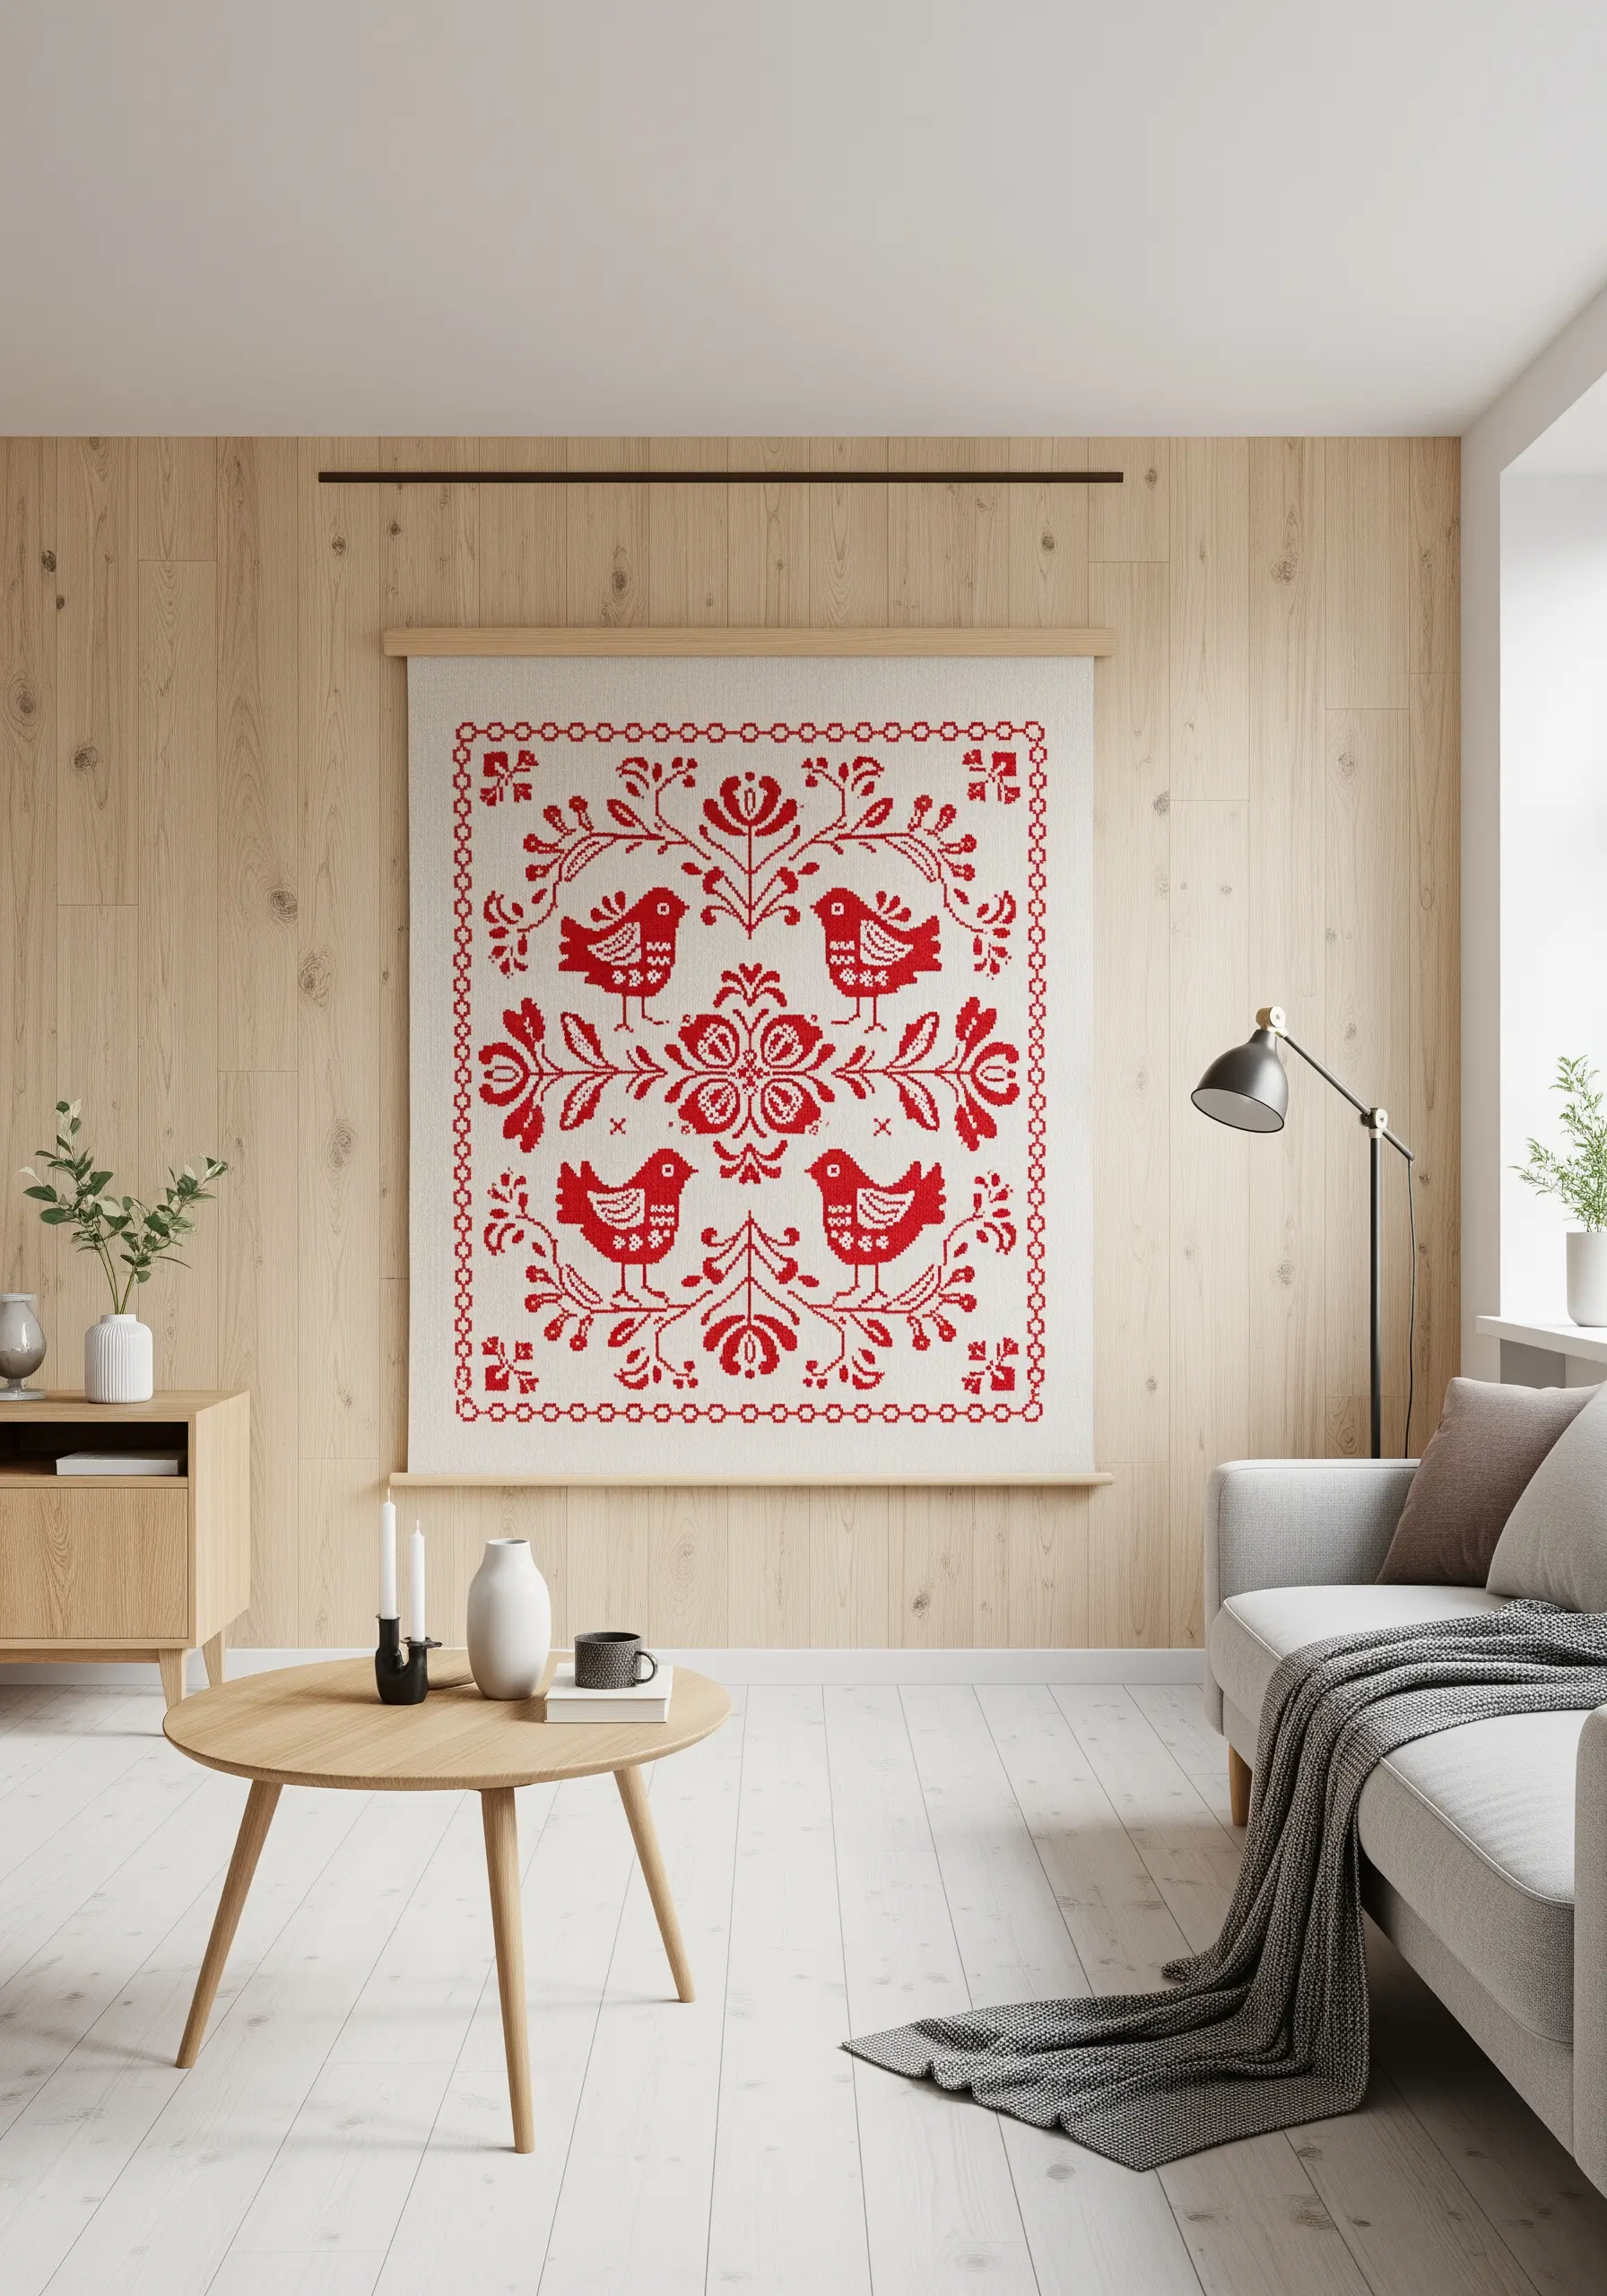
Channel traditional folk art by creating a symmetrical design with cross-stitch on a heavy, even-weave fabric like linen.
The beauty of this style lies in its simplicity and repetition; using a single bold color, like red on a neutral background, creates a timeless, graphic statement.
To ensure your motifs are perfectly mirrored, map out one quadrant of your design on graph paper first, then replicate it across the other sections.
This methodical approach is meditative and yields stunningly balanced results.
7. Sculpt with Fiber and Mixed Textures
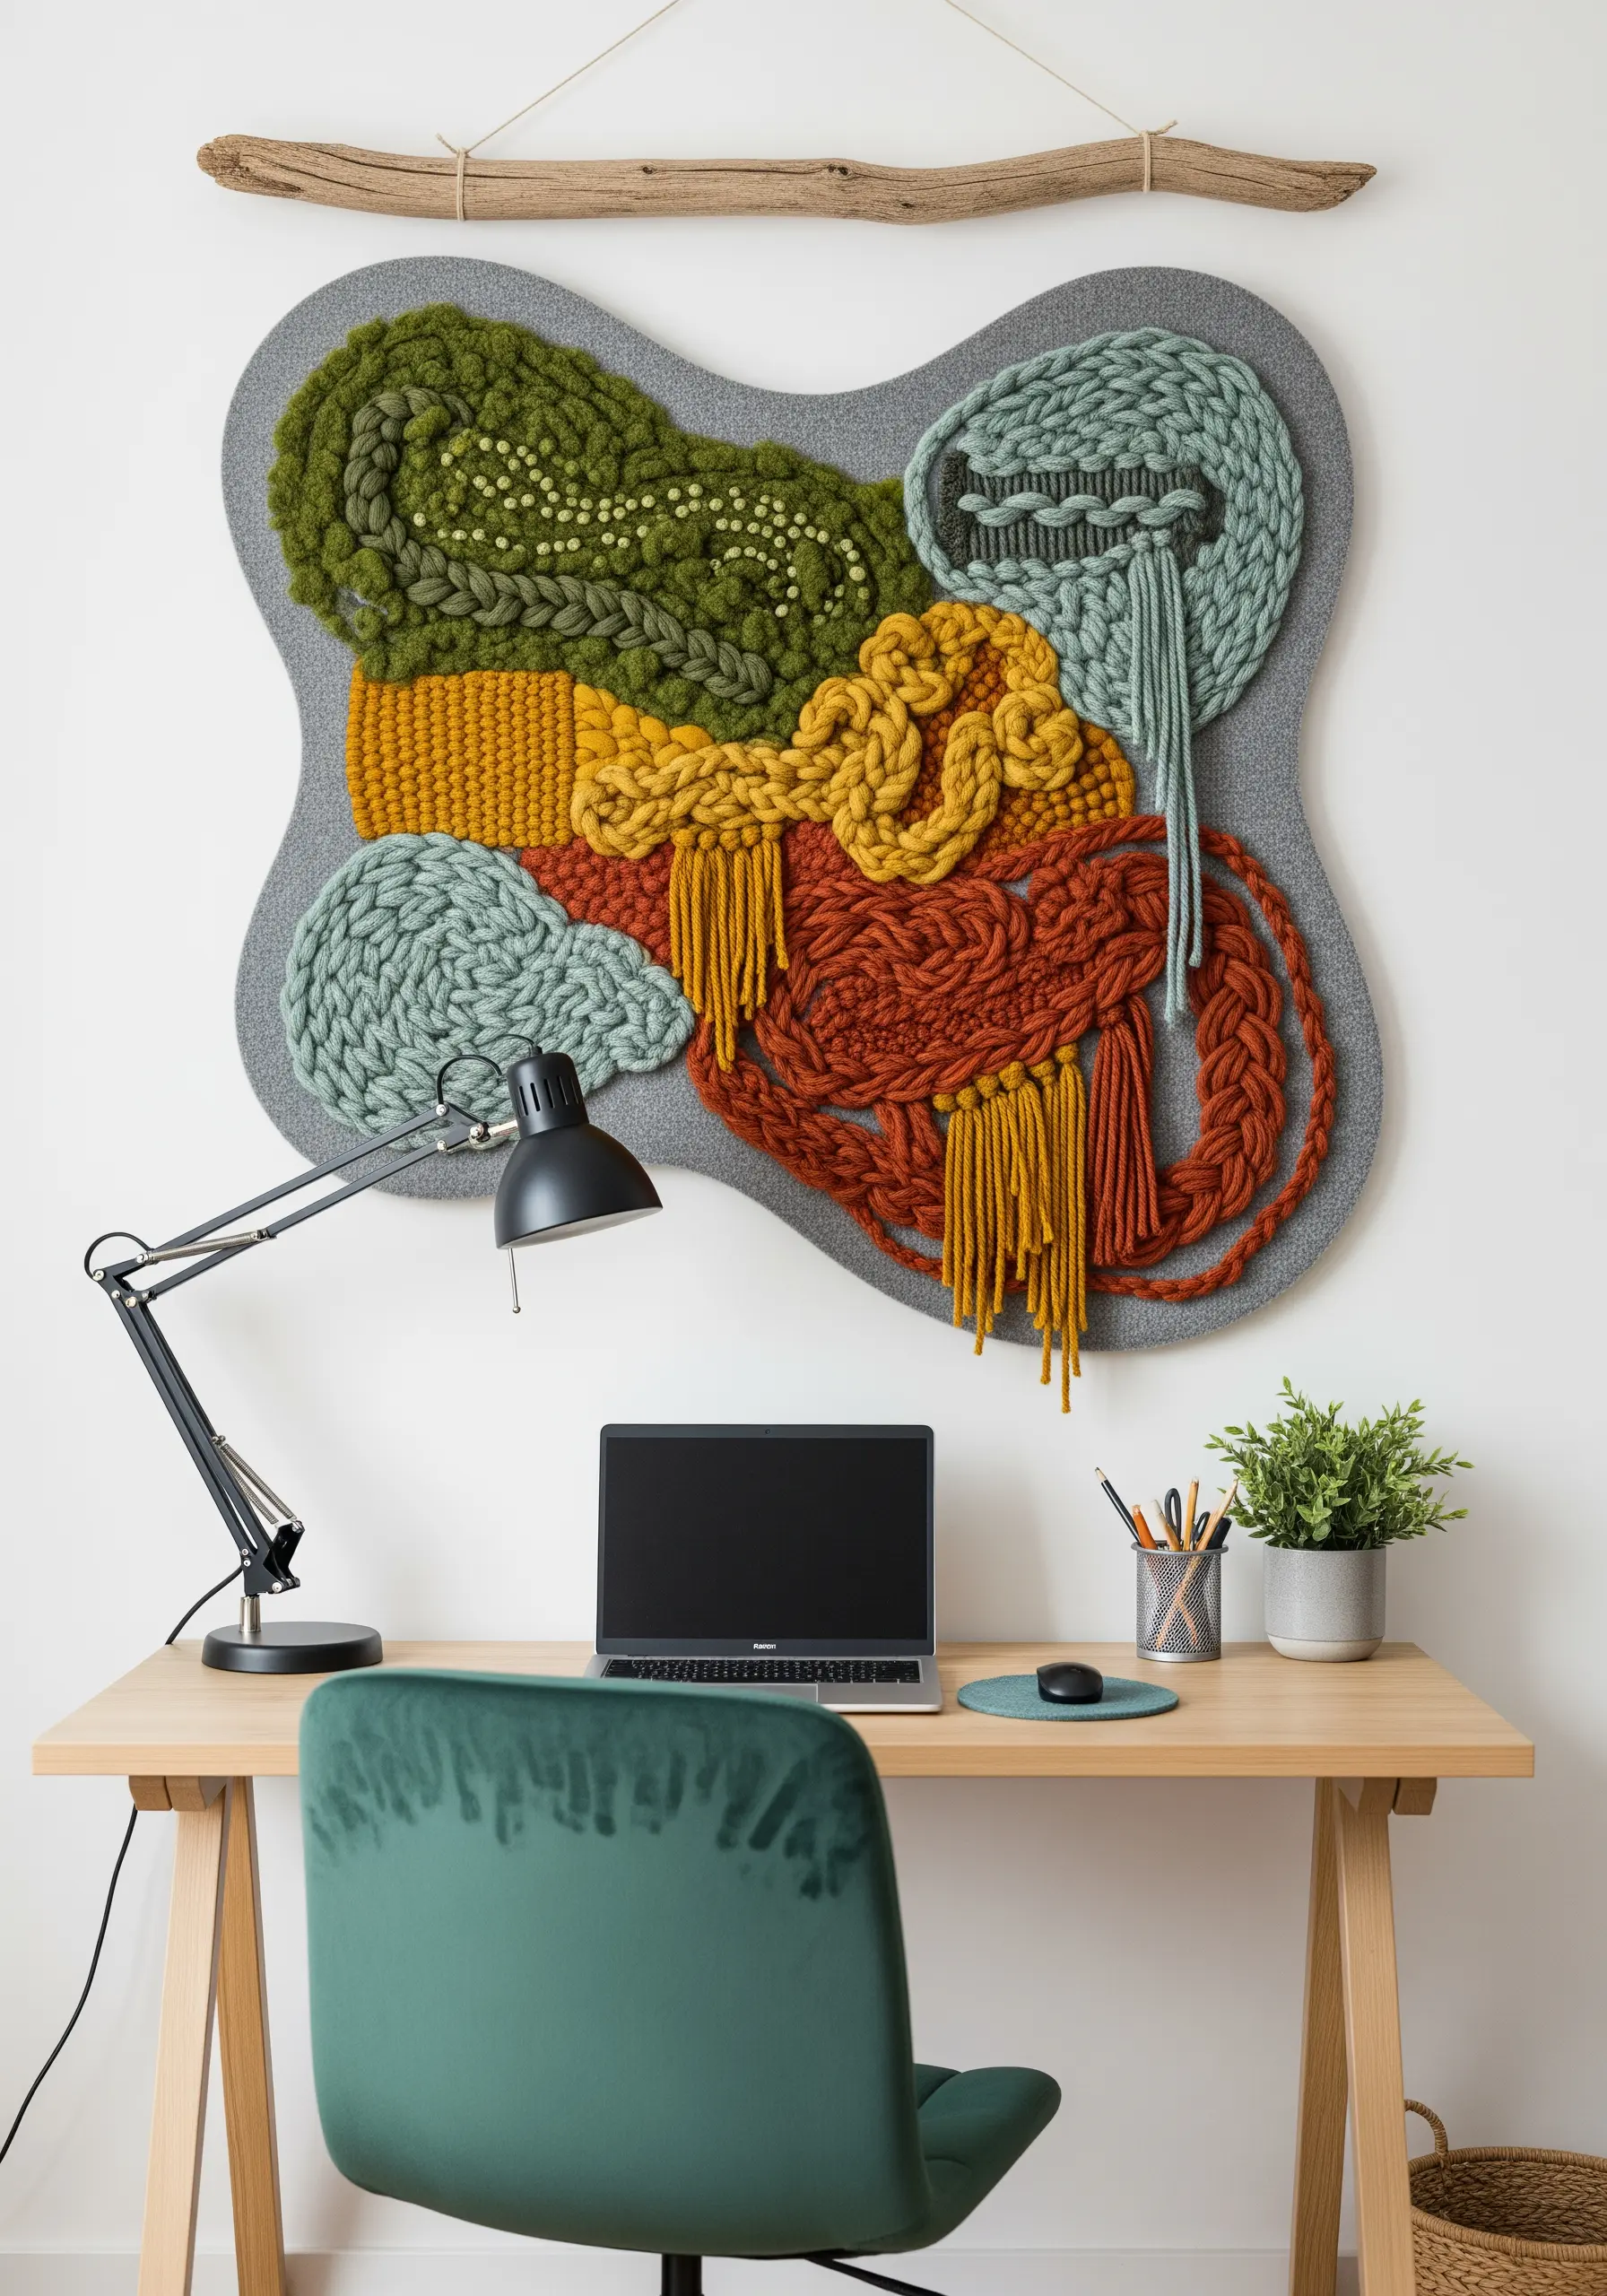
Elevate your embroidery by thinking like a sculptor and incorporating a variety of fiber types and dimensional stitches.
Combine thick, couched yarn, tightly packed French knots, woven sections, and traditional floss embroidery on a felt or wool base.
This mixed fiber embroidery technique turns the fabric surface into a three-dimensional landscape.
Mounting the finished piece on a custom-cut board and hanging it from a piece of driftwood adds an organic, gallery-worthy finish.
8. Stitch a Wildflower Meadow as a Headboard

Create an immersive botanical scene by embroidering a wide, landscape-oriented tapestry to hang above a bed.
To create a sense of depth, use smaller, less-defined stitches and lighter thread colors for the flowers in the distance.
Bring the foreground into focus with larger, more detailed stitches like woven wheels for daisies and bullion knots for lavender, using bolder, more saturated colors.
This layering technique transforms a simple floral pattern into a dynamic, realistic wildflower thread palette.
9. Capture Art Deco Glamour with Metallic Threads

Achieve a luxurious Art Deco aesthetic by pairing metallic threads with a black fabric backdrop.
To prevent the frustration of working with metallic floss, use a thread conditioner like beeswax and work with shorter lengths (no more than 12 inches) to minimize tangling and fraying.
Alternate between gold, silver, and pewter threads to create visual rhythm and depth within the repeating fan motifs.
The high contrast and reflective quality of the thread make this piece incredibly dramatic, especially in low light.
10. Make a Statement with Minimalist Line Art
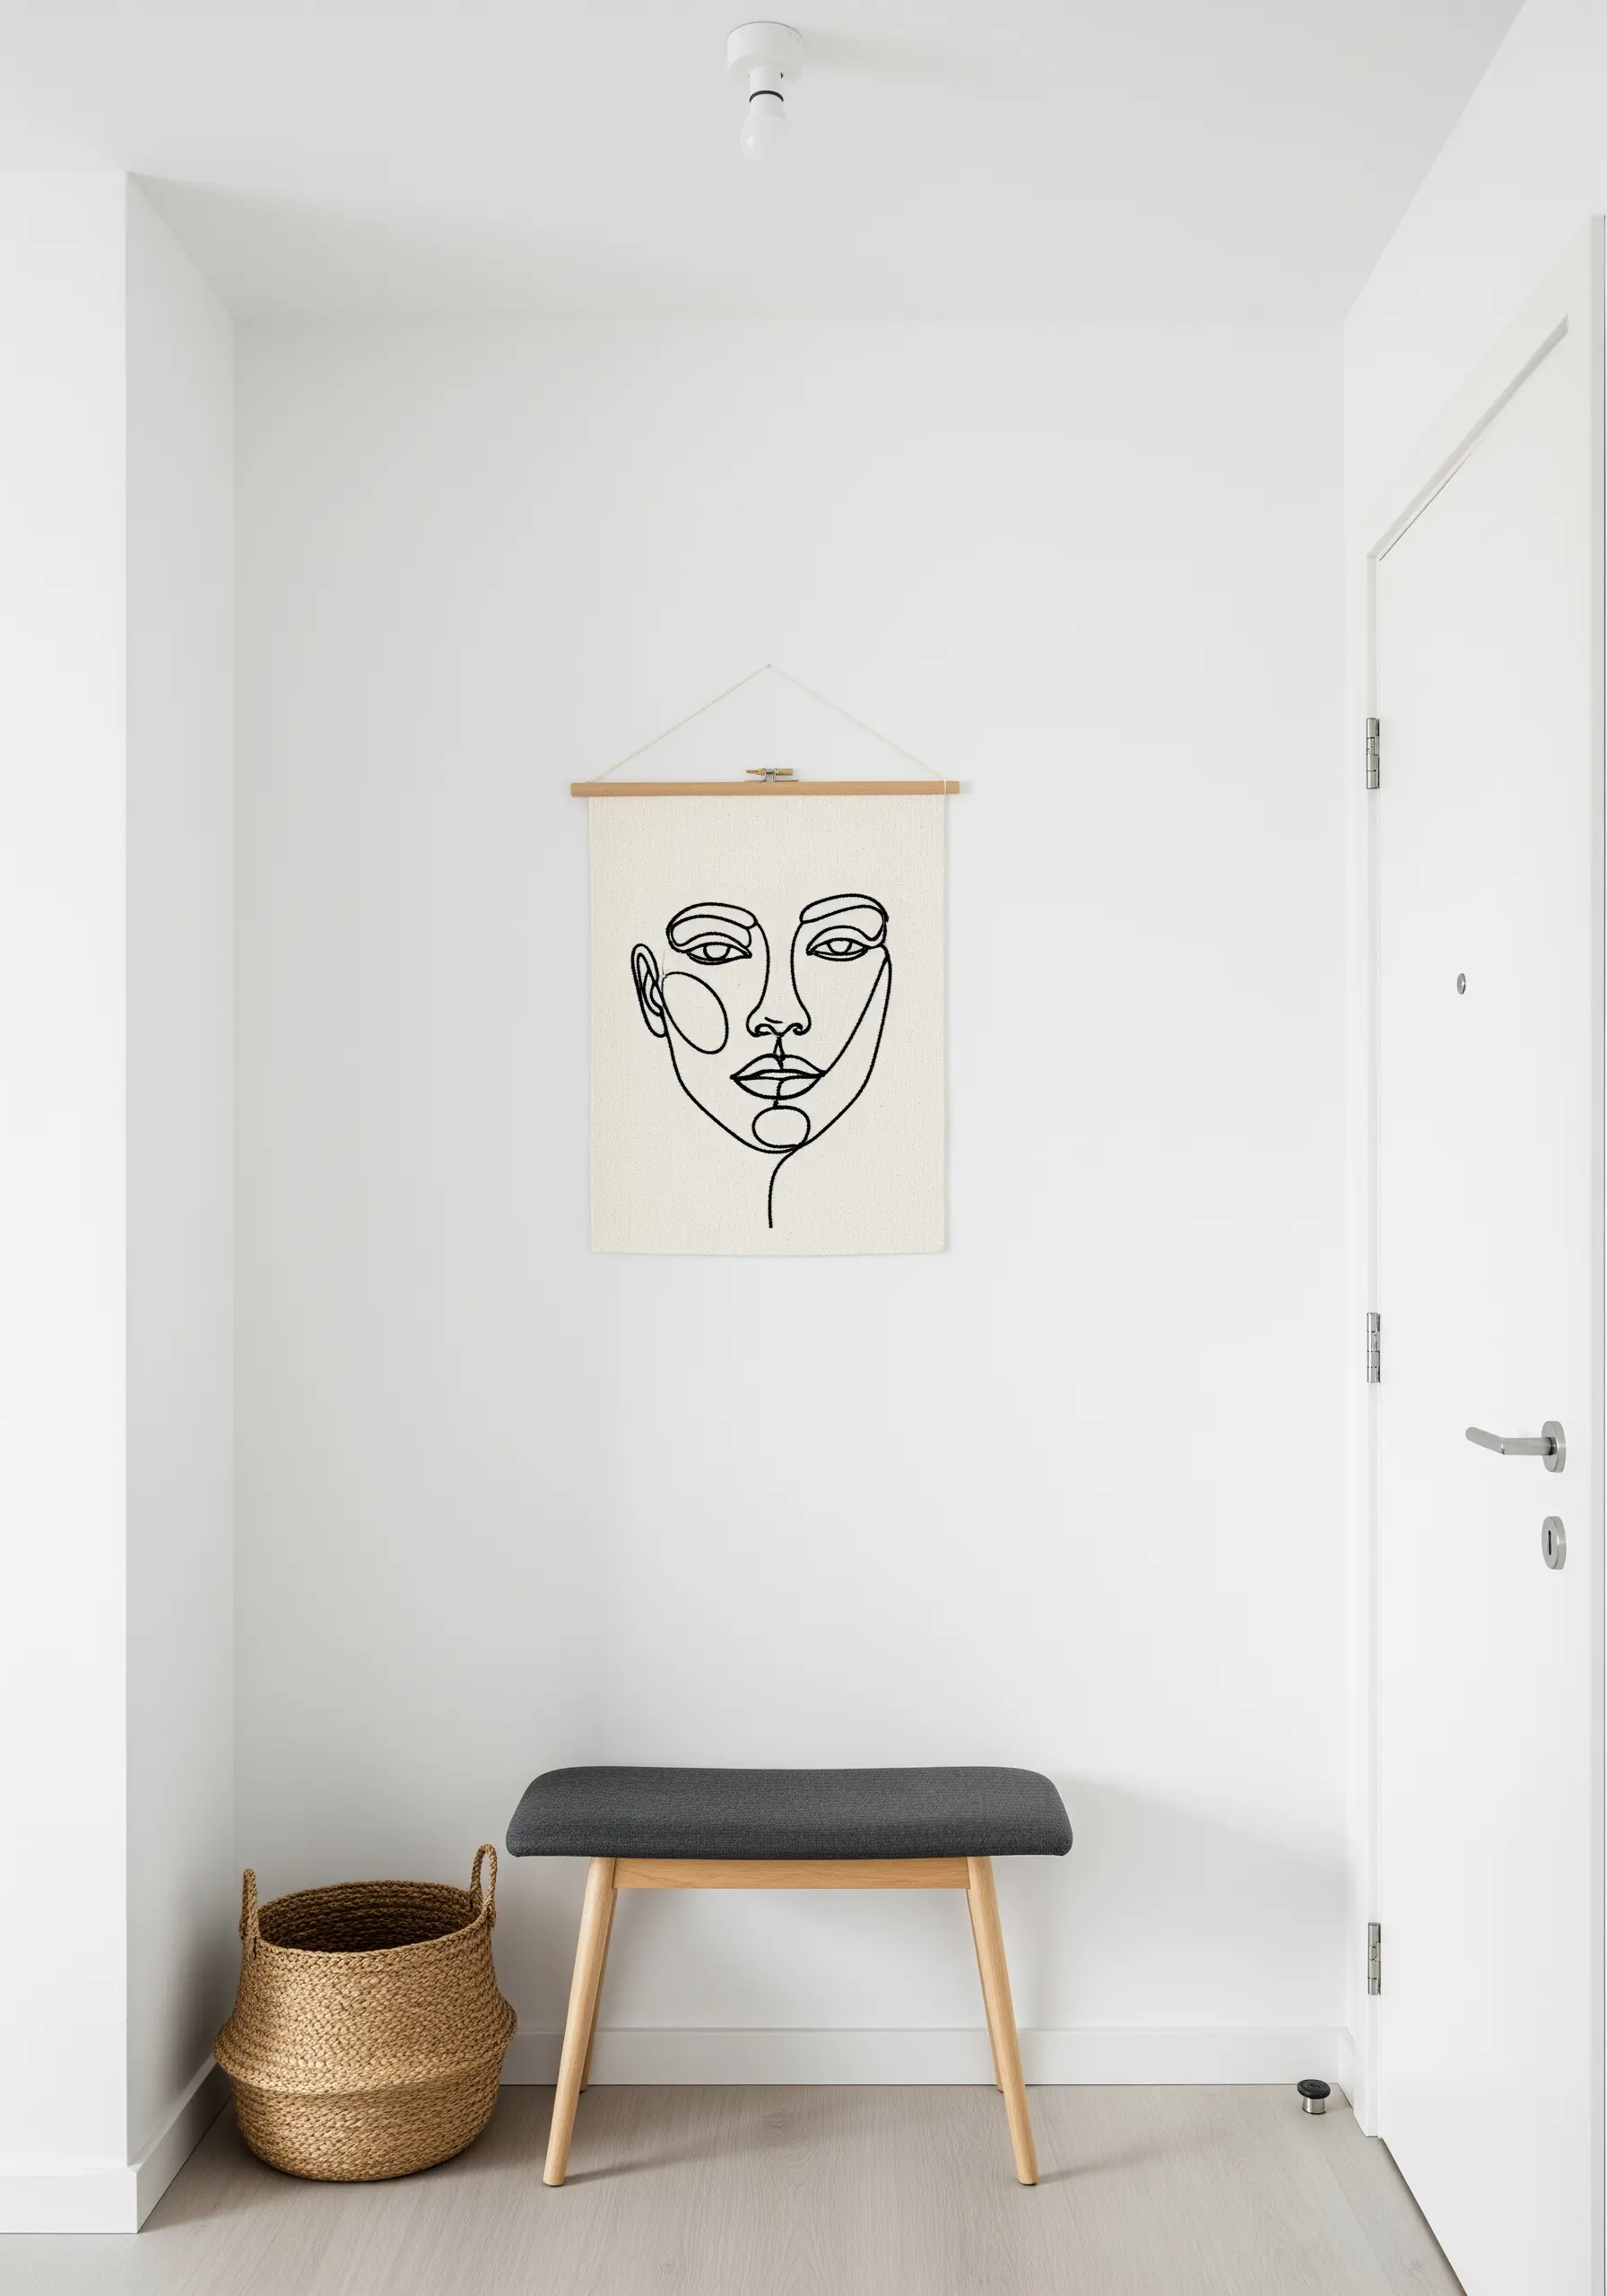
Explore the power of a single line to create an elegant, modern piece of art.
Use a whipped backstitch or a stem stitch with a thicker cotton perle thread to achieve a smooth, continuous line with a slightly raised profile.
The key to this style is confidence in your line and embracing the negative space—the unstitched areas are just as important as the embroidered line itself.
This minimalist line art approach is perfect for adding a touch of sophistication to an entryway or gallery wall.
11. Create an Underwater World with Dimensional Stitches

Bring a coral reef to life using a rich vocabulary of textural stitches.
Use bullion knots and cast-on stitches to form the branching shapes of coral, and fill larger areas with dense French knots to create a bubbly, organic texture.
For the water, use a gradient of blue threads in a simple long and short stitch to suggest depth and light filtering from the surface.
This project is a fantastic sampler for practicing and mastering a variety of dimensional stitches in a single, vibrant piece.
12. Find Calm in a Large-Scale Mandala
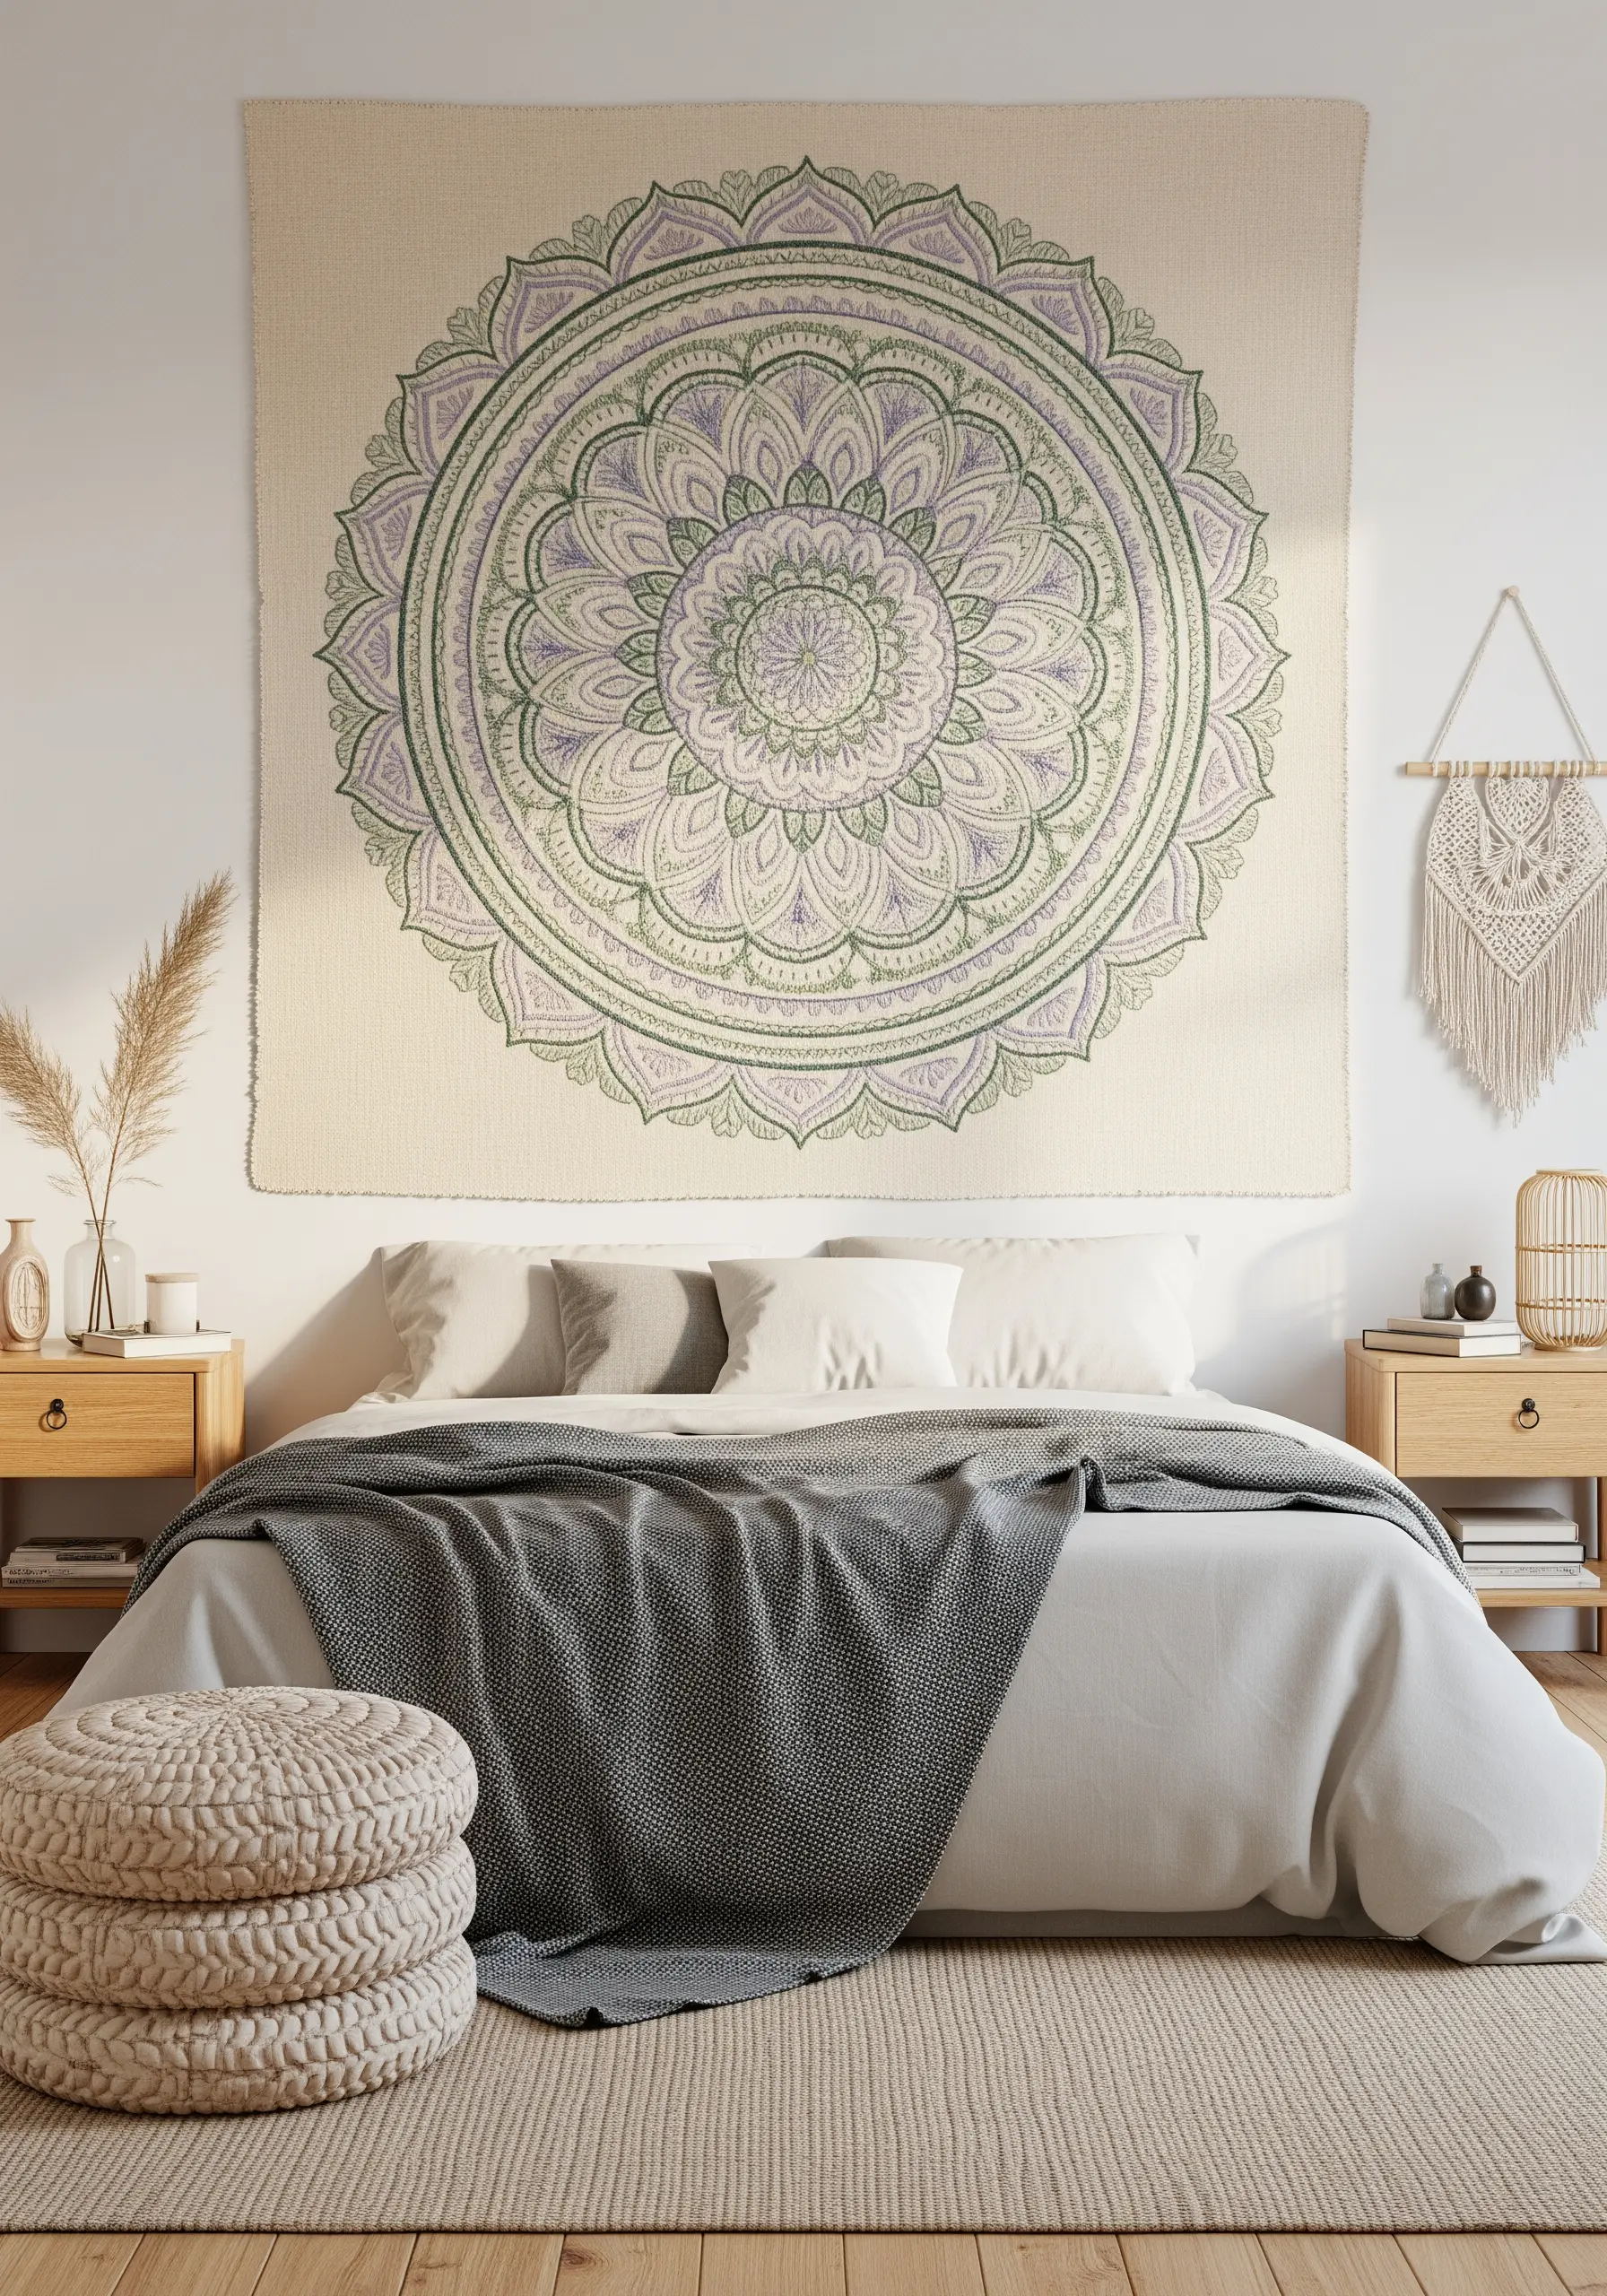
Stitching a large mandala offers a meditative experience that results in a stunning, serene focal point for a room.
Break the complex design into smaller, manageable sections, focusing on one ring of patterns at a time to maintain consistency.
A soft, analogous color scheme—like lavender and sage green—enhances the calming effect of the symmetrical design.
Using a lightweight but durable fabric like a cotton-linen blend will ensure the tapestry hangs beautifully without sagging under the weight of the stitches.
13. Explore Abstract Forms with Directional Fills
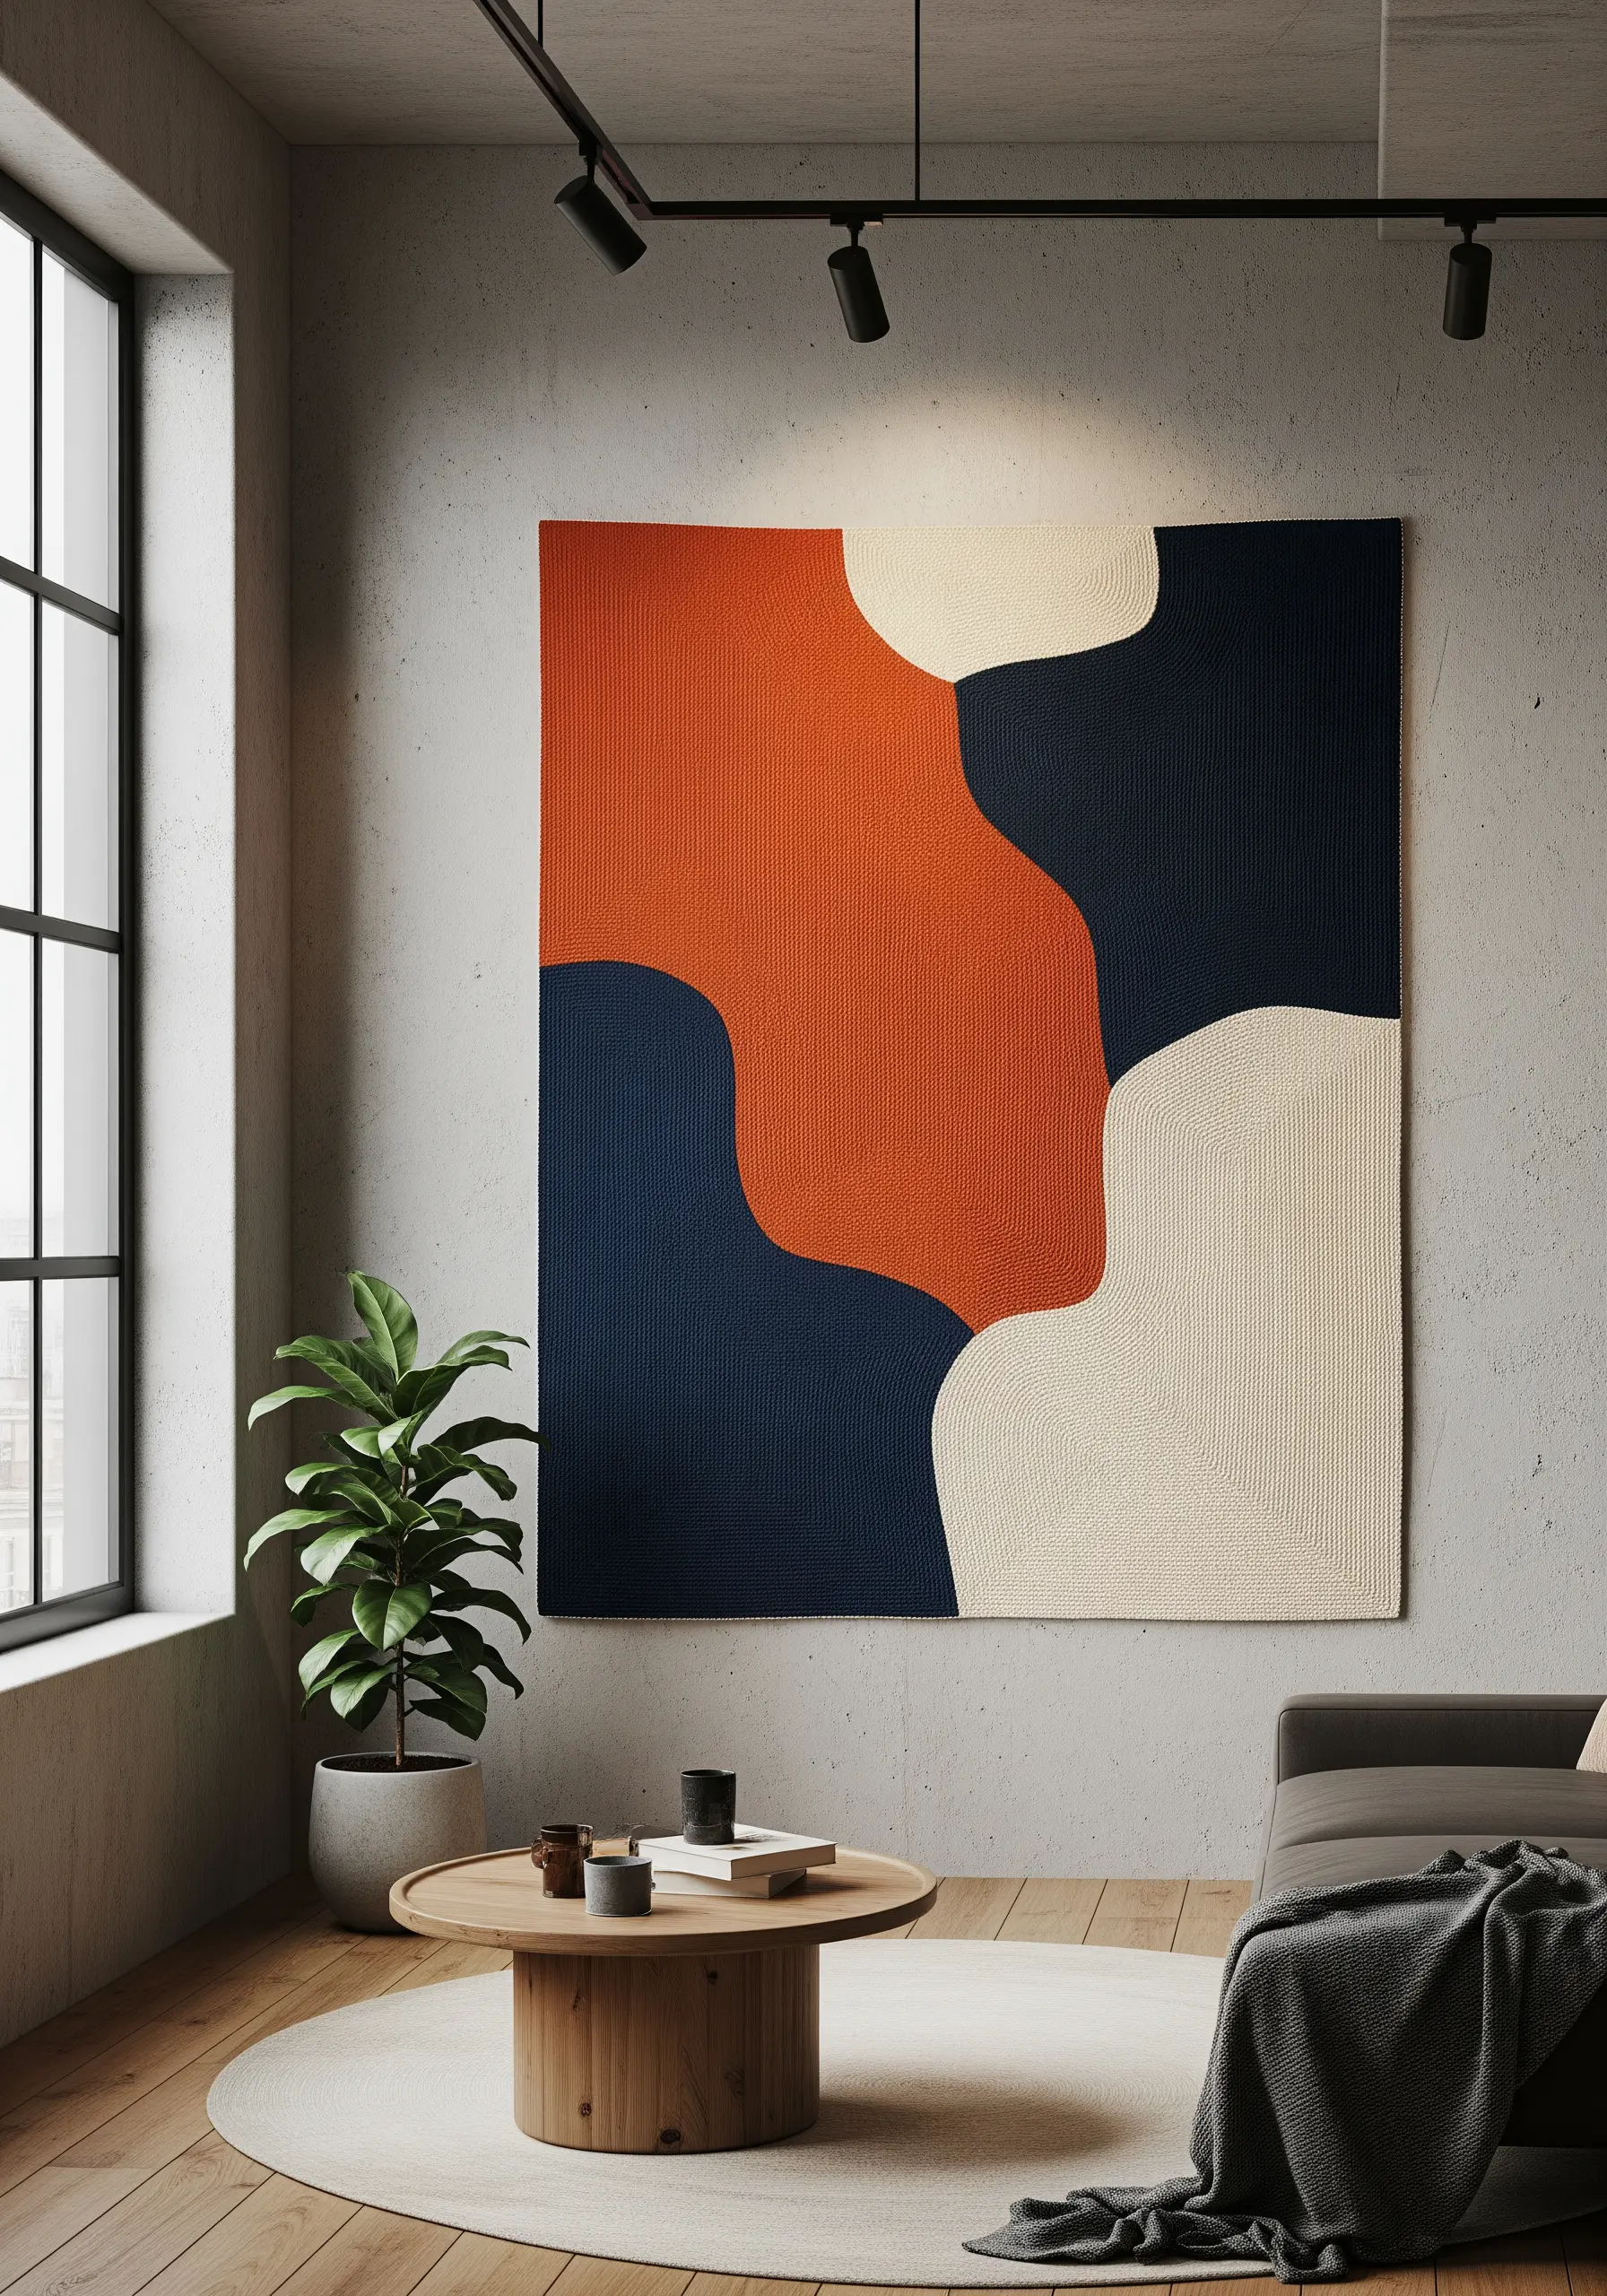
Recreate the feel of a modern painting with thread by filling large, organic shapes with dense, directional stitches.
Instead of a standard satin stitch, use a brick stitch or long-and-short stitch, tightly packed, to create a texture that resembles woven fabric.
The magic is in the direction: have all the stitches in one color block run vertically, and those in the adjacent block run horizontally.
This subtle shift in stitch direction defines the edges of the shapes and creates a dynamic interplay of light and texture.
14. Capture a Cozy Moment in Illustrative Stitches

Tell a story with your embroidery by adopting a charming, illustrative style.
Use a simple backstitch for all the outlines, like a pen-and-ink drawing, to keep the scene clean and readable.
Fill in small areas of color with a simple satin stitch, but don’t obsess over perfection; slight irregularities add to the hand-drawn character.
This approach is less about technical precision and more about capturing the feeling of a scene, making it perfect for creating calm, cozy embroidery projects.
15. Embroider a Topographical Map with 3D Texture
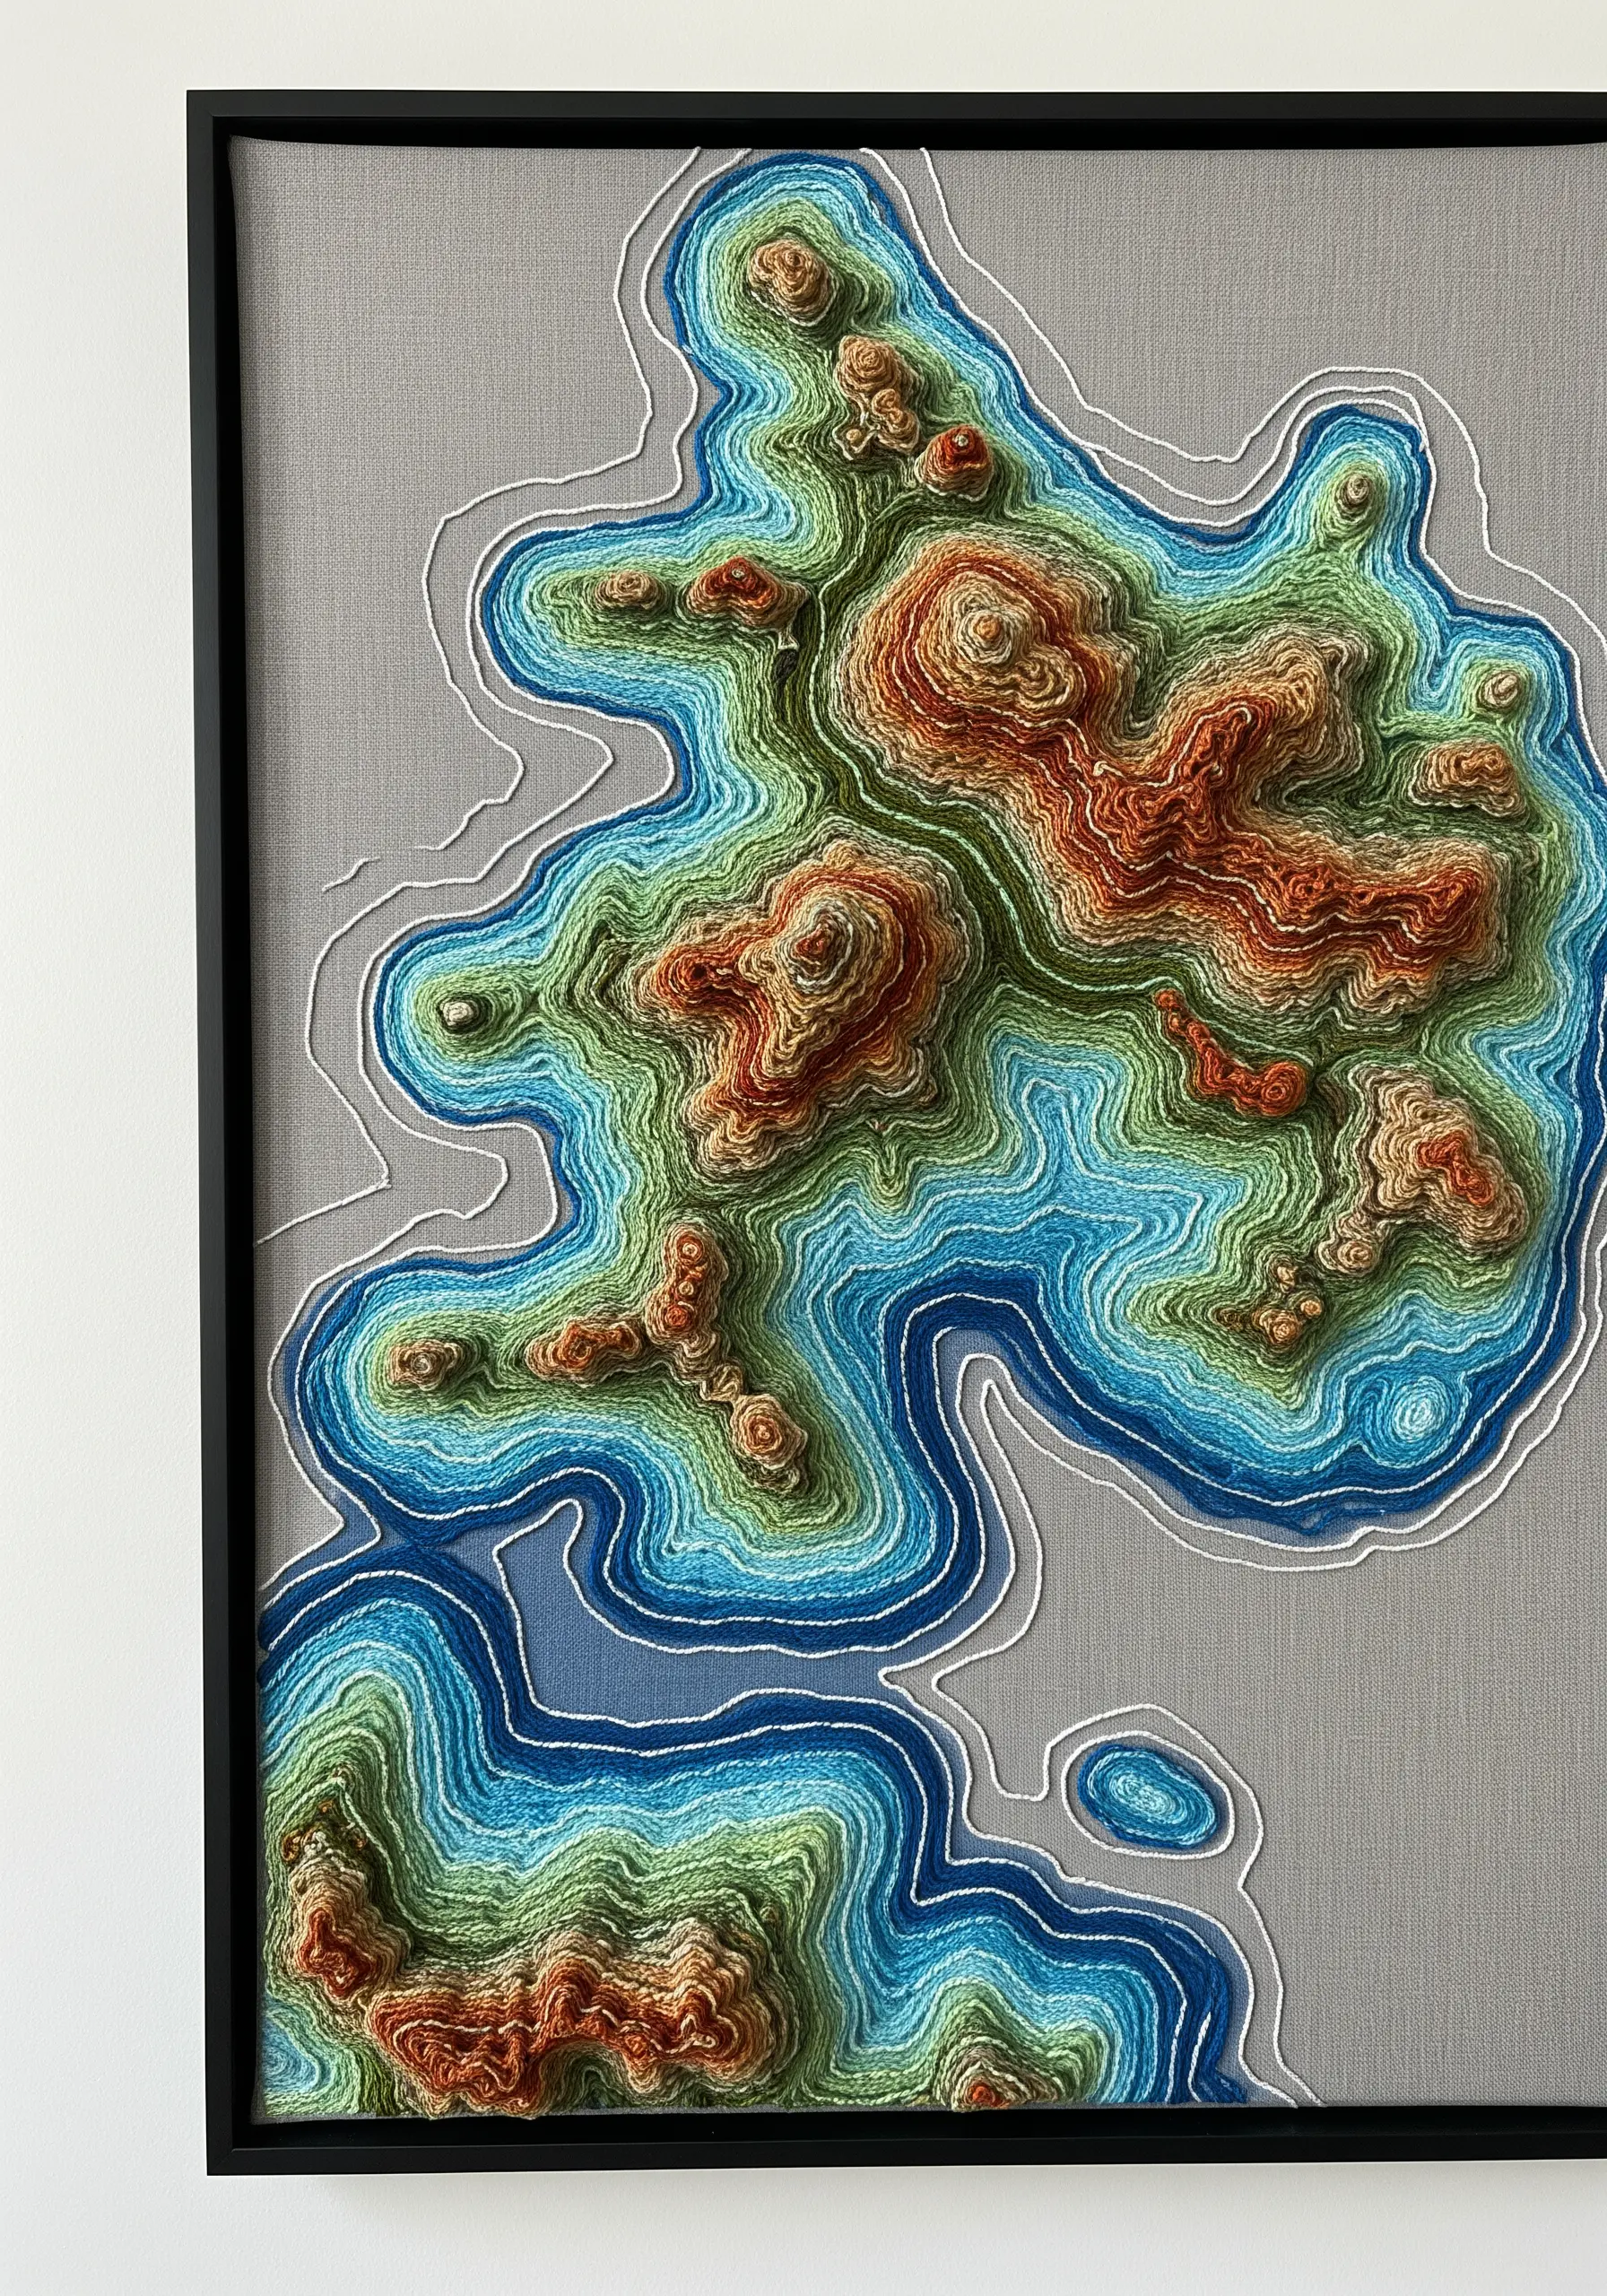
Translate a topographical map into a stunning piece of dimensional art by using thread to represent elevation.
Use layers of dense French knots, Turkey work, or raised stem stitch bands, changing thread colors from blues and greens to oranges and browns to signify rising terrain.
Trace the contour lines first with a single strand of white or black thread to provide a clear guide.
The resulting piece is a tactile, data-driven work of art that invites viewers to touch and explore.
16. Design a Functional and Fresh Herb Chart

Combine beauty and function by stitching a botanical chart of your favorite kitchen herbs.
For each plant, use a distinct stitch to capture its essence: feathery straight stitches for rosemary, detached chain stitches for thyme leaves, and smooth satin stitch for basil.
For the lettering, use a tiny, neat backstitch to ensure readability.
Framing the piece with a classic gingham border adds a touch of rustic charm, making it a perfect addition to a sunny kitchen wall.
17. Paint a Desert Scene with Warm Hues
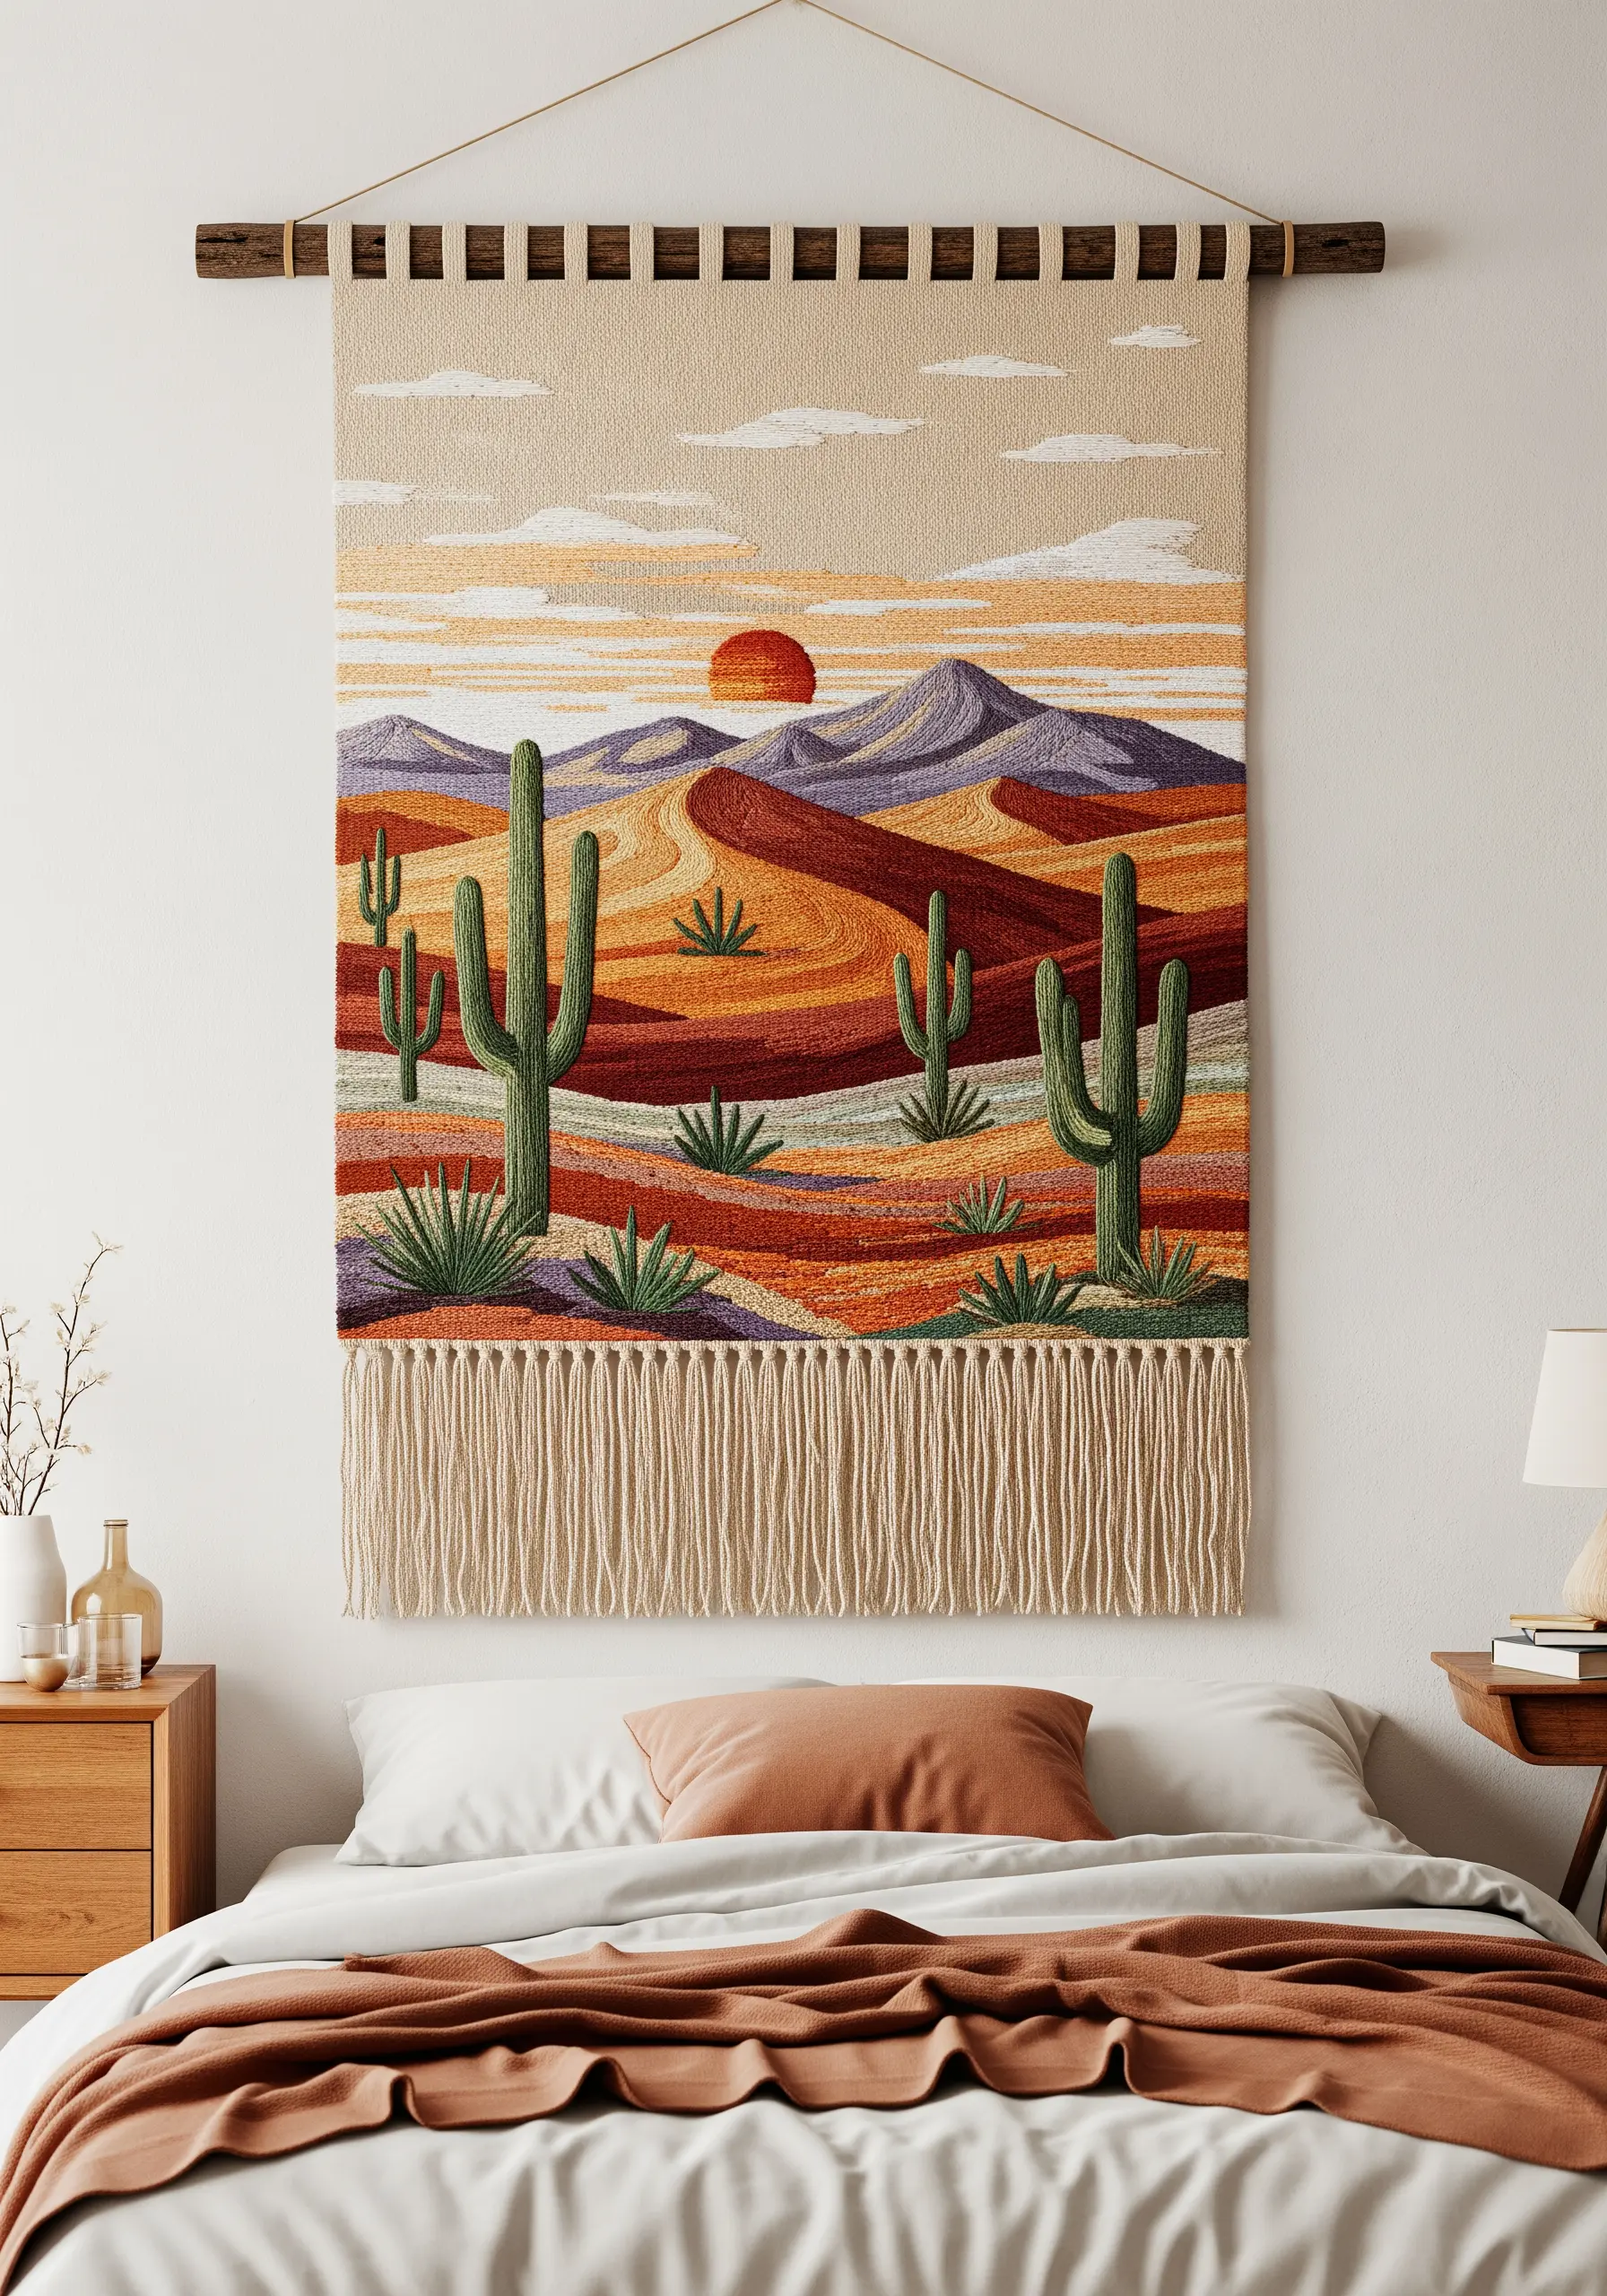
Capture the warm, dusty glow of a desert landscape using thread painting techniques.
Use long and short stitches to seamlessly blend shades of terracotta, sand, and mauve for the rolling dunes and distant mountains.
Keep the cacti and other botanicals more graphic with satin stitch and backstitch outlines to make them stand out against the soft, blended background.
Finishing the tapestry with a long, straight fringe enhances the bohemian, sun-drenched aesthetic.
18. Find Beauty in Repetition with Sashiko Stitching

Explore the Japanese art of Sashiko by creating a bold, geometric pattern with a simple running stitch.
The power of this technique comes from precision and consistency—each stitch should be the same length, and the gaps between them should be uniform.
Use a thick, contrasting thread (like white on indigo fabric) and a long Sashiko needle to help you load multiple stitches at once for straighter lines.
This meditative practice creates a strikingly modern and graphic result from the most basic of stitches.
19. Create Impact with Raised Satin Stitch Lettering
Give your embroidered words a three-dimensional effect by using a raised satin stitch.
First, create a foundation for your letters using several layers of padding stitches (like split stitches or running stitches) within the outline of each letter.
Then, work your final satin stitch over this padding, pulling the thread taut for a smooth, raised finish.
For an even subtler touch, add tone-on-tone embroidery details, like the delicate leaves stitched in white on a white background.
20. Curate a Cohesive Hoop Art Gallery

Elevate simple floral hoops by displaying them as a curated collection.
To create a cohesive look, use the same background fabric and a consistent color palette across all the hoops, even if the specific floral designs vary.
Stitching each flower with the long and short stitch technique will give them a soft, realistic shading that feels more like a painting than a simple stitch-out.
Arranging them vertically in a narrow space like an entryway draws the eye upward and makes a thoughtful, intentional statement.
21. Stitch a Glowing Cityscape with Strategic Color
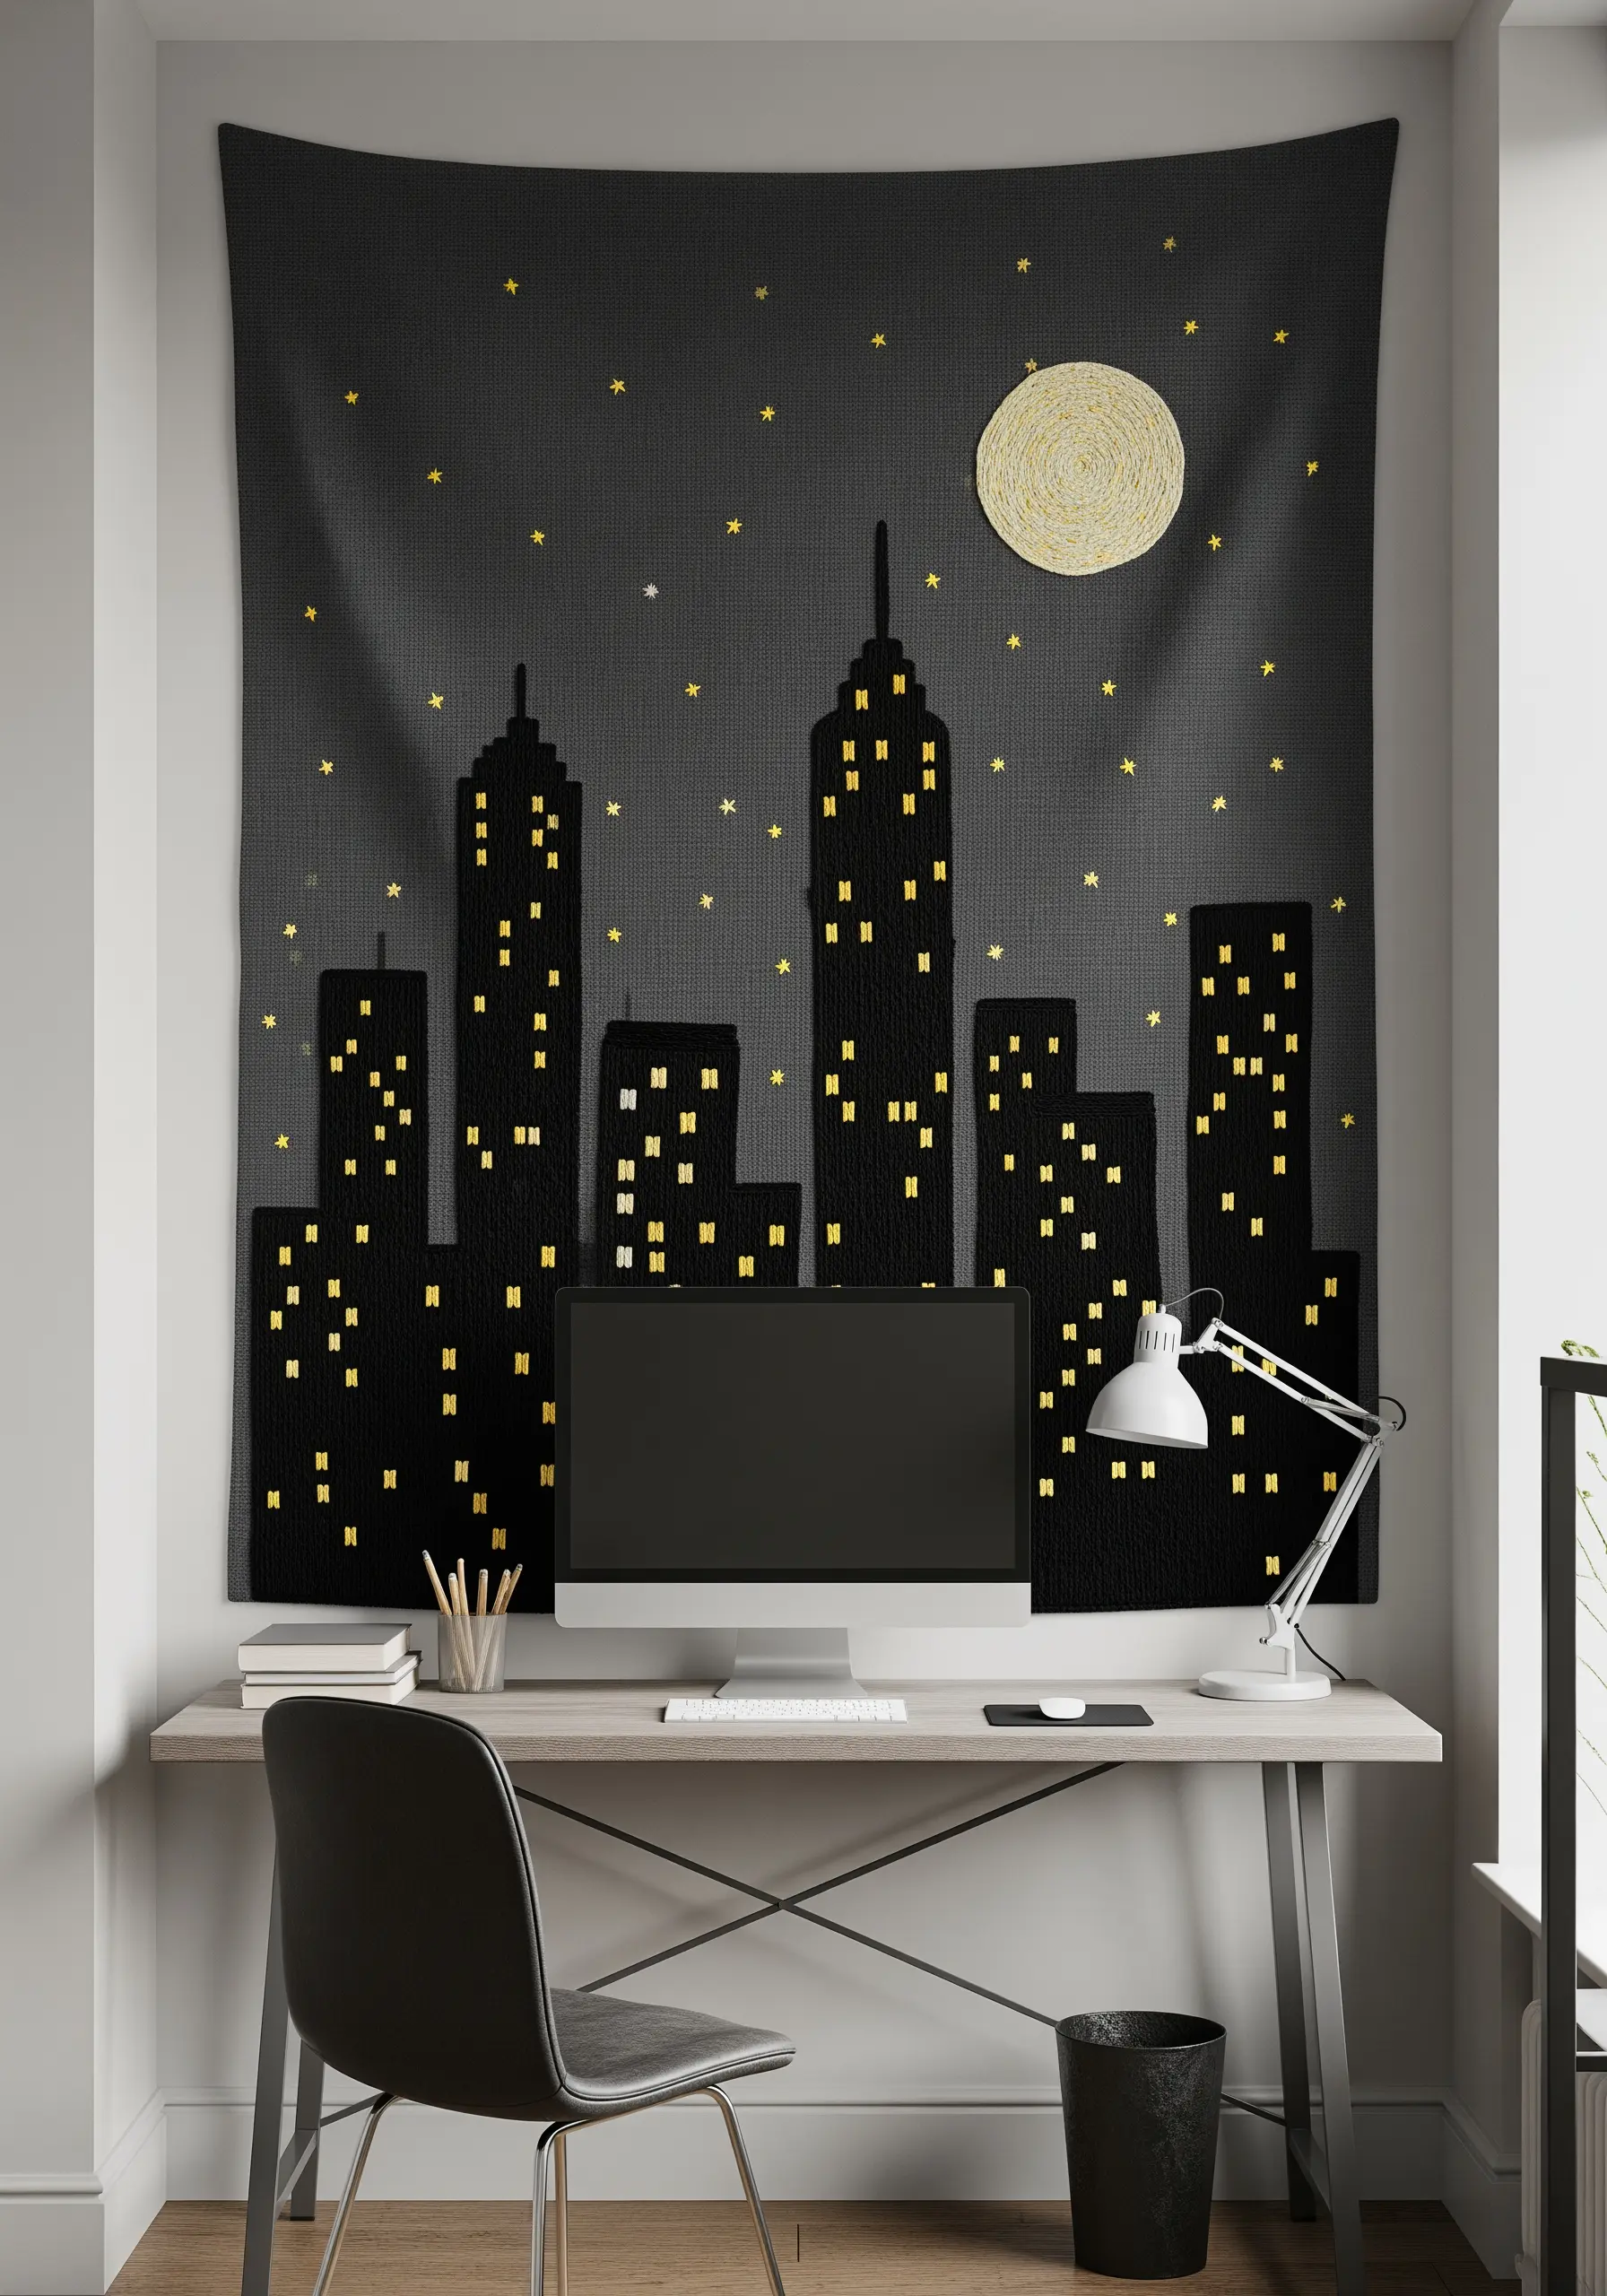
Create a dramatic nighttime cityscape using negative space and pops of bright color.
Let the dark fabric serve as the silhouette of the buildings, and use a bright yellow or gold thread to stitch small, rectangular satin stitch windows.
This simple technique instantly creates the illusion of a city glowing at night.
For the moon, a tightly coiled woven wheel stitch in a contrasting color and texture provides a perfect focal point against the dark sky.
22. Achieve Graphic Impact with Pop Art Embroidery

Capture the bold energy of pop art with clean lines and flat, saturated color fills.
Use a thick, heavy outline stitch—like a stem stitch worked with all six strands of floss—to mimic the strong black lines of comic book art.
Fill the shapes with a dense, perfectly flat satin stitch. To keep your satin stitches even over large areas, lay down a single straight stitch across the middle of the shape first as a guide.
This ensures your stitches remain parallel and your fill looks flawless.
23. Build a Woodland Scene with Layered Textures
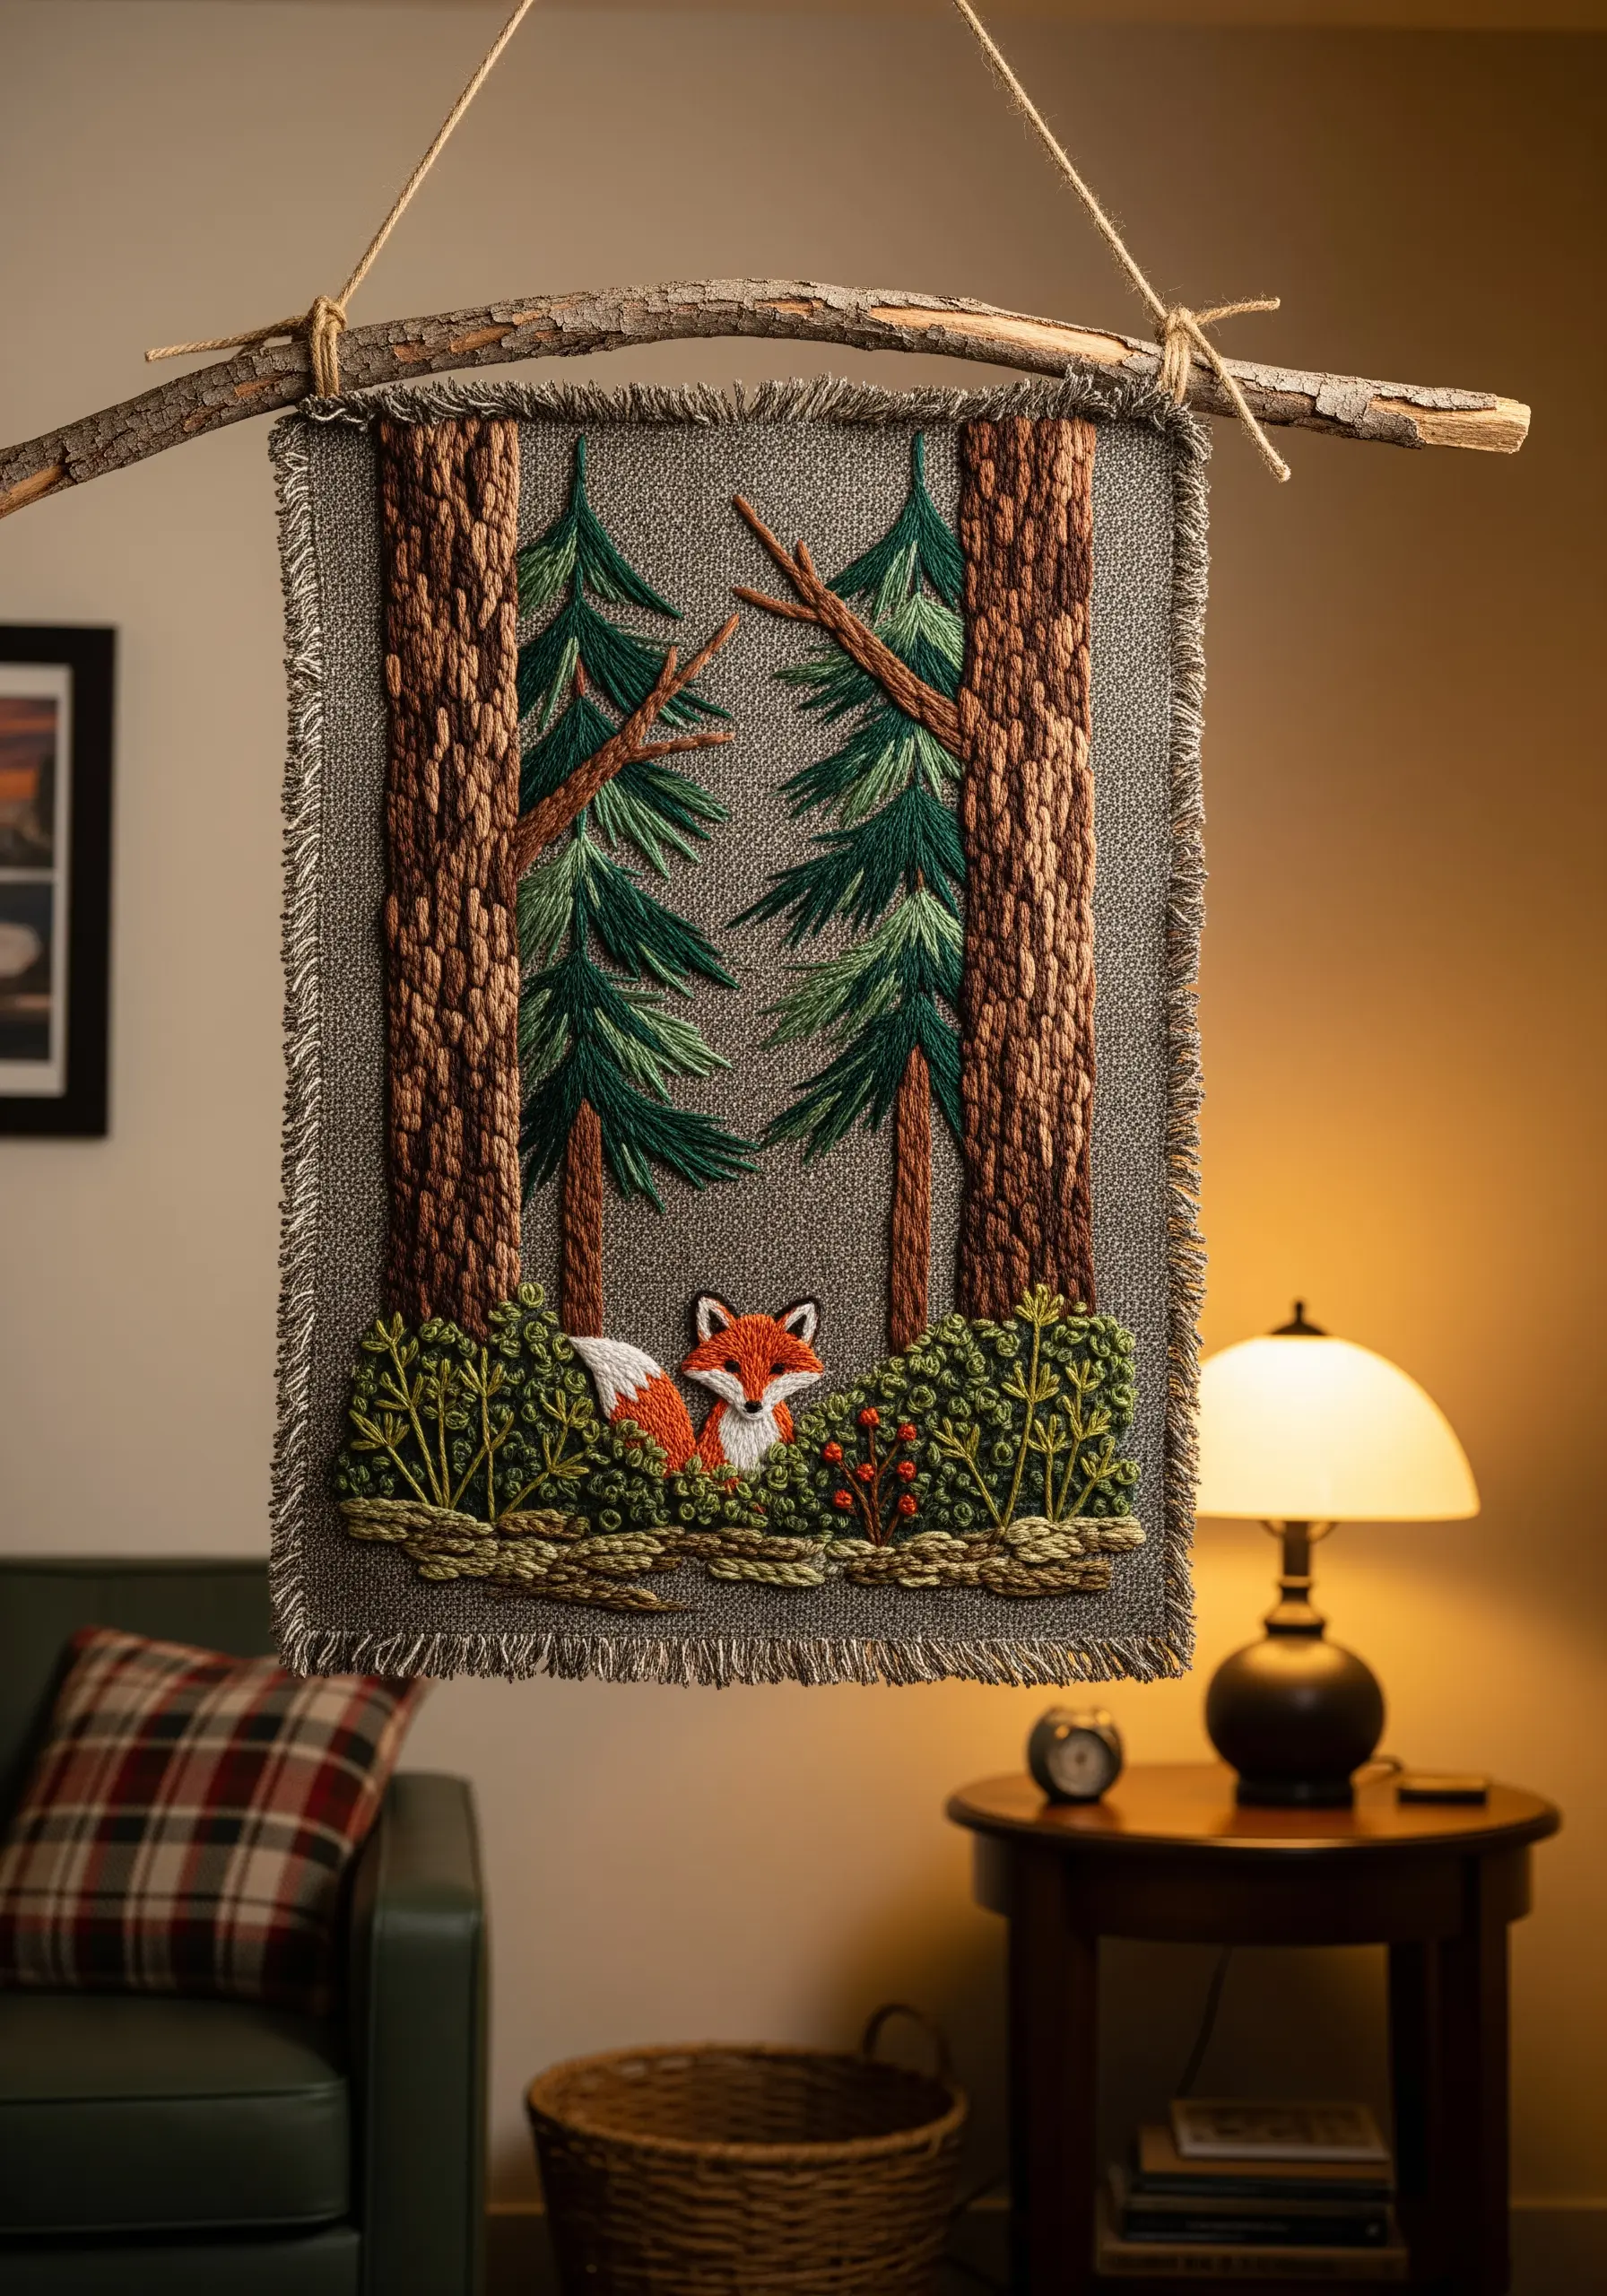
Create a charming woodland vignette by layering different textures to suggest depth.
For the tree bark, use vertical satin stitches in varying shades of brown. For the dense forest floor and bushes, use a combination of French knots and Turkey work to build up a plush, three-dimensional texture.
Placing the fox, stitched with a smoother long and short stitch, behind the textured bushes instantly creates a sense of foreground and background.
Finishing the piece with a frayed edge and hanging it from a rustic branch completes the naturalistic feel.
24. Combine Weaving and Embroidery for a Bohemian Look
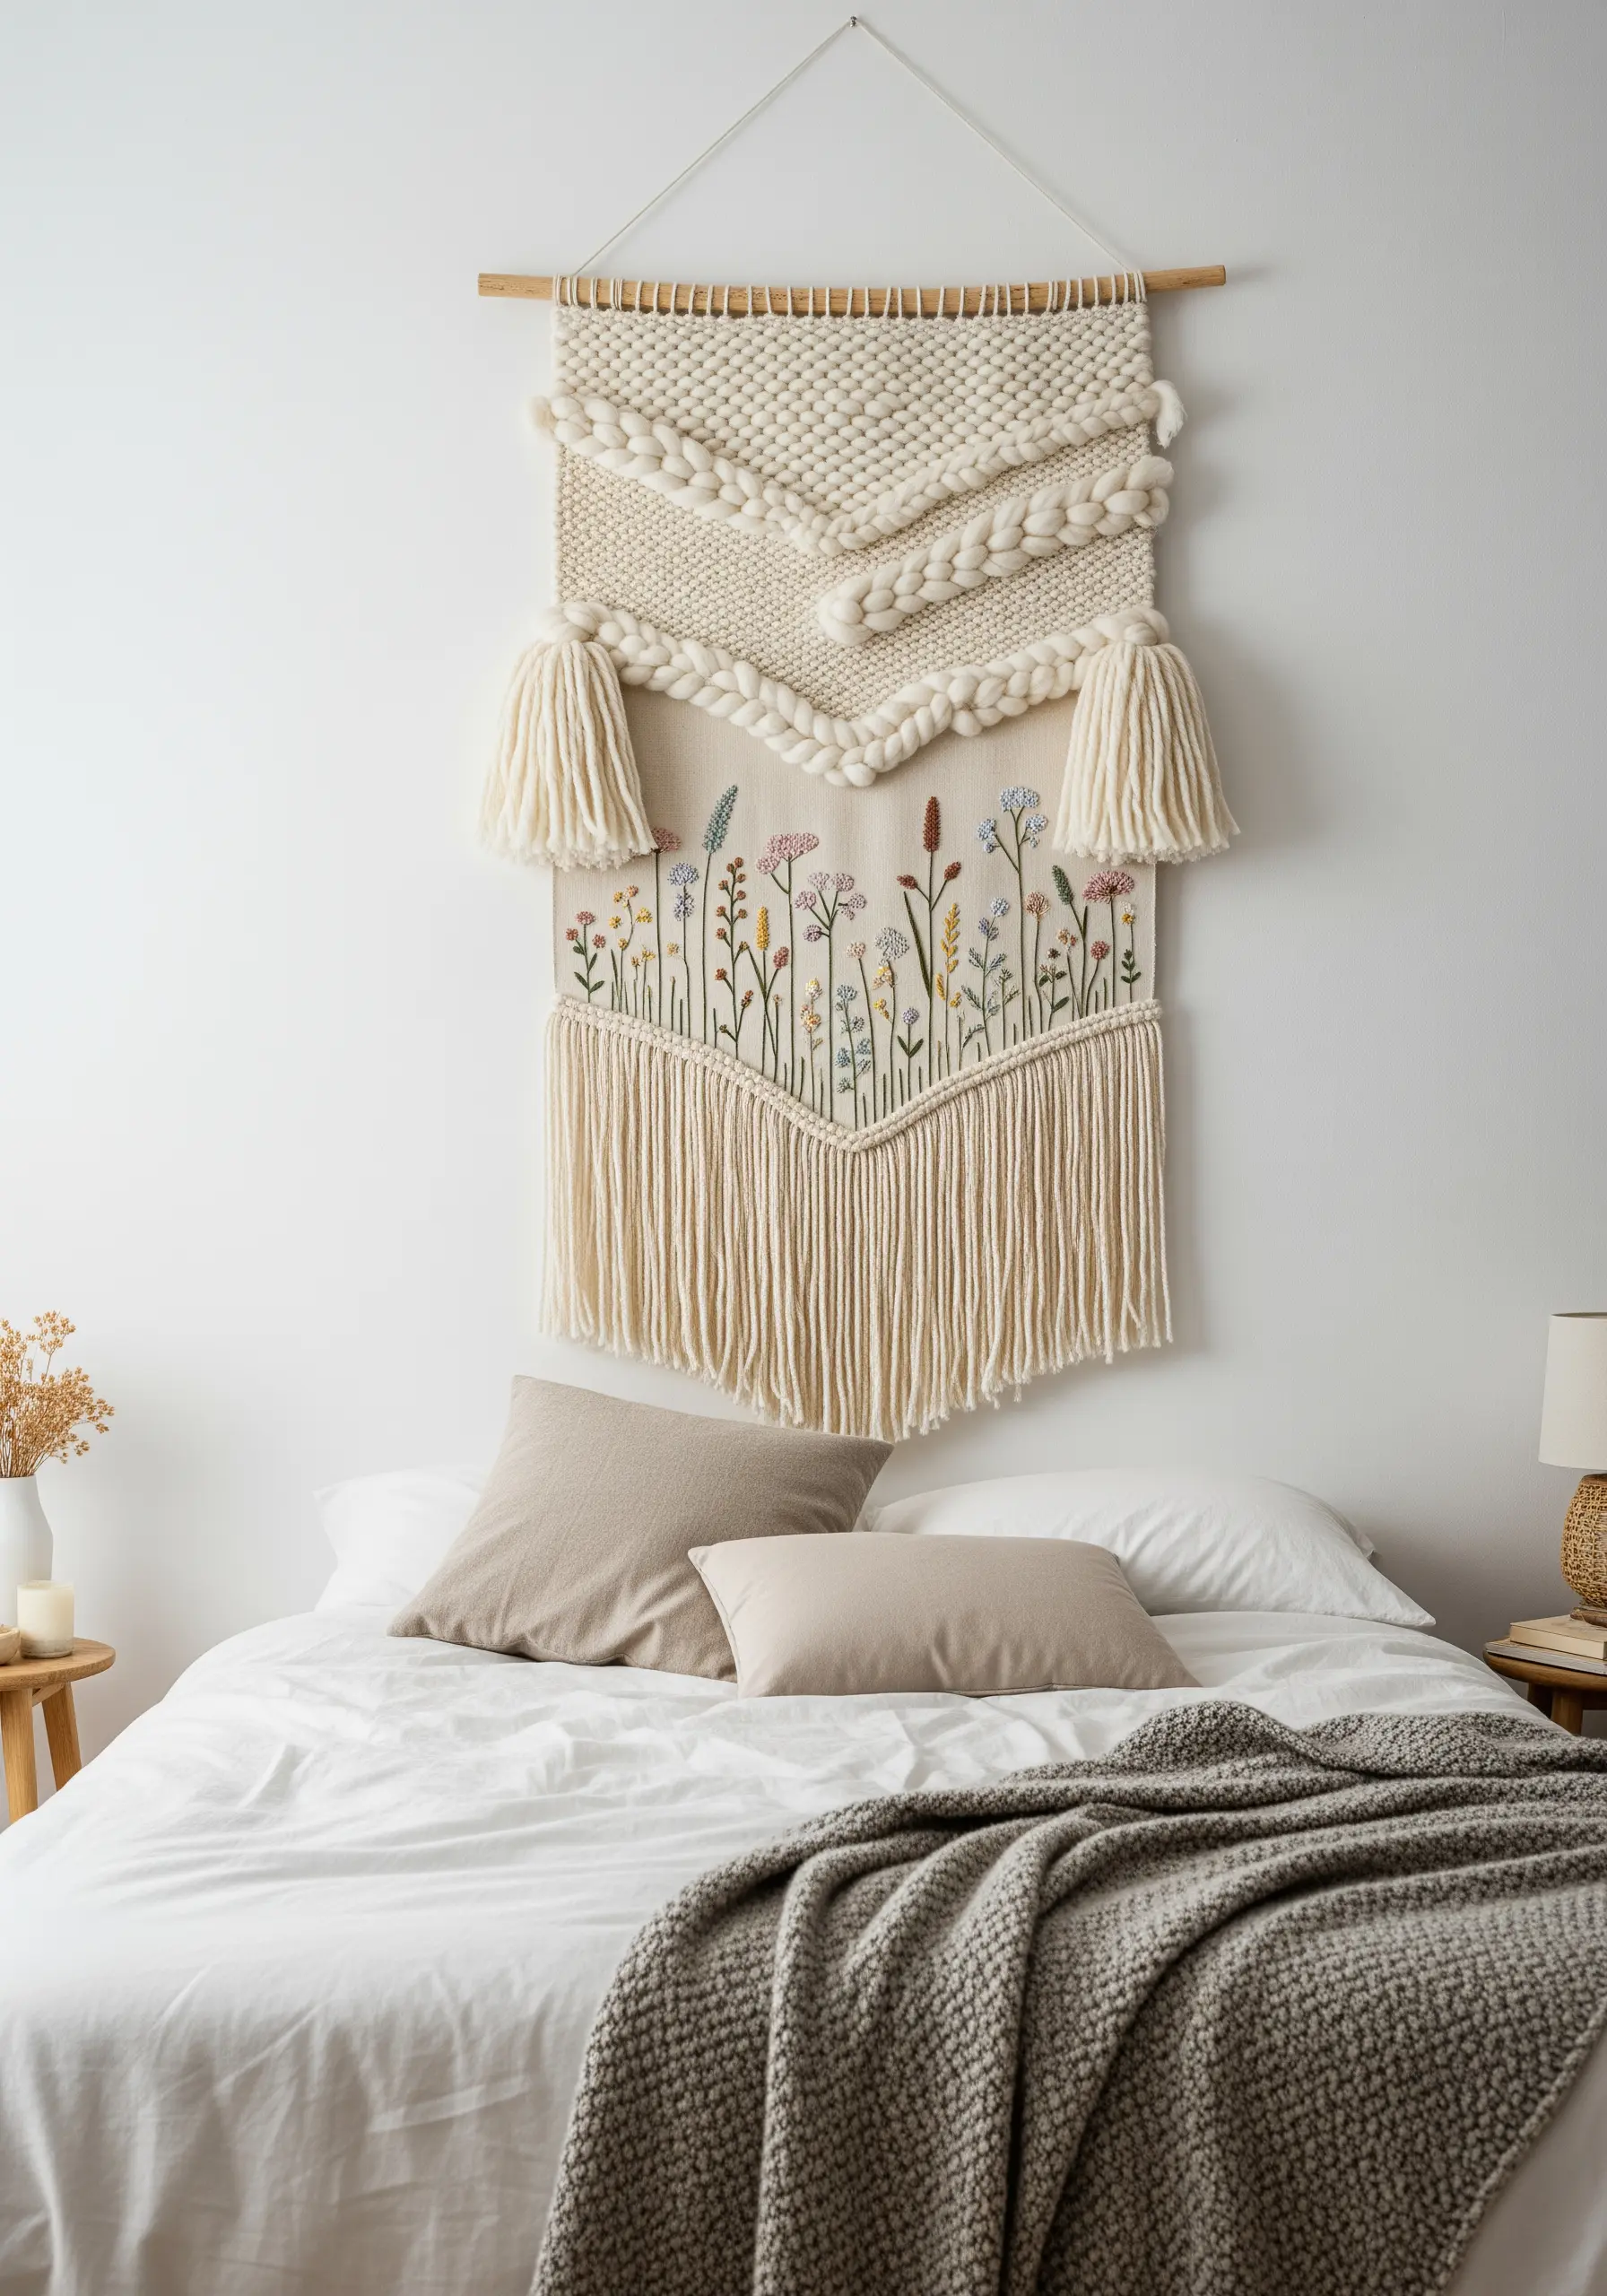
Create a stunning, multi-textured wall hanging by combining simple weaving or macrame techniques with delicate embroidery.
Weave the top portion of the hanging with chunky, neutral-colored yarn to create bold, dimensional shapes and tassels.
Leave the bottom portion as flat canvas, and use it as your space for stitching delicate, colorful wildflowers.
This juxtaposition of bold texture and fine detail creates a balanced and sophisticated boho-inspired textile wall art piece.
25. Emulate Stained Glass with Fabric and Cord

Recreate the luminous effect of stained glass using fabric appliqué and thick cord.
Cut pieces of shiny, satin-like fabric for the colored glass sections and appliqué them onto your base fabric.
Then, couch a thick black cord or braided thread along the seams between the fabric pieces to mimic the lead lines.
The slight puffiness of the appliqué combined with the defined lines creates a convincing and highly textural stained-glass effect.
26. Create a Whimsical Scene with Appliqué Details

For large-scale, illustrative designs, save time and thread by using fabric appliqué for the main shapes.
Cut the shapes for the hot air balloons and clouds from felt or cotton fabric, iron them onto your background with a fusible webbing, and then secure the edges with a neat blanket stitch.
Once the large shapes are in place, add the finer details—like the balloon baskets and decorative patterns—with traditional embroidery stitches.
This combination of techniques allows you to create a large, playful mural without the daunting task of filling every inch with stitches.
27. Greet Guests with a Botanical Banner

Turn a narrow entryway into a welcoming space with a tall, slim banner filled with cheerful motifs.
Stitching a collection of small, individual houseplants is a fantastic way to create a lush, detailed piece without tackling a single, complex image.
It also serves as a perfect project for using up leftover thread from other projects, giving each pot and plant its own unique personality.
Finishing the banner with wooden dowels at the top and bottom ensures it hangs straight and flat, giving it a polished, professional look.


